

Portable DVD Player
Before connecting, operating or adjusting this
product, please read this instruction booklet carefully
and completely.
Owner’s Manual
Model: DP271
DP271-P_AA5ILLW_ENG
This lightning flash with arrowhead symbol within an equilateral
triangle is intended to alert the user to the presence of uninsulated dangerous voltage within the product’s enclosure that may be
of sufficient magnitude to constitute a risk of electric shock to persons.
The exclamation point within an equilateral triangle is intended to
alert the user to the presence of important operating and maintenance (servicing) instructions in the literature accompanying the
product.
WARNING : Do not install this equipment in a confined space such a
bookcase or similar unit.
CAUTION: Do not block any ventilation openings. Install in accordance
with the manufacturer's instructions.
Slots and openings in the cabinet are provided for ventilation and to
ensure reliable operation of the product and to protect it from over heating.
The openings should be never be blocked by placing the product on a bed,
sofa, rug or other similar surface. This product should not be placed in a
built-in installation such as a bookcase or rack unless proper ventilation is
provided or the manufacturer's instruction have been adhered to.
CAUTION:
This product employs a Laser System.
To ensure proper use of this product, please read this owner’s manual
carefully and retain it for future reference. Should the unit require maintenance, contact an authorized service center.
Use of controls, adjustments or the performance of procedures other than
those specified herein may result in hazardous radiation exposure.
To prevent direct exposure to laser beam, do not try to open the enclosure.
Visible laser radiation when open. DO NOT STARE INTO BEAM.
CAUTION: The apparatus should not be exposed to water (dripping or
splashing) and no objects filled with liquids, such as vases, should be
placed on the apparatus.
NOTES ON COPYRIGHTS:
It is forbidden by law to copy
, broadcast, show, broadcast via cable, play in
public, or rent copyrighted material without permission.
This product features the copy protection function developed by
Macrovision. Copy protection signals are recorded on some discs. When
recording and playing the pictures of these discs on a VCR, picture noise
will appear.
This product incorporates copyright protection technology that is protected
by method claims of certain U.S. patents and other intellectual property
rights owned by Macrovision Corporation and other rights owners. Use of
this copyright protection technology must be authorized by Macrovision
Corporation, and is intended for home and other limited viewing uses only
unless otherwise authorized by Macrovision Corporation. Reverse engineering or disassembly is prohibited.
Safety Precautions
2
CAUTION: TO REDUCE THE RISK OF ELECTRIC SHOCK
DO NOT REMOVE COVER (OR BACK)
NO USER-SERVICEABLE PARTS INSIDE
REFER SERVICING TO QUALIFIED SERVICE PERSONNEL.
CAUTION
RISK OF ELECTRIC SHOCK
DO NOT OPEN
WARNING: TO PREVENT FIRE OR ELECTRIC SHOCK HAZARD, DO
NOT EXPOSE THIS PRODUCT TO RAIN OR MOISTURE.
3
CAUTION concerning the Power Cord
Most appliances recommend they be placed upon a dedicated
circuit;
That is, a single outlet circuit which powers only that appliance and
has no additional outlets or branch circuits. Check the specification
page of this owner's manual to be certain.
Do not overload wall outlets. Overloaded wall outlets, loose or damaged wall outlets, extension cords, frayed power cords, or damaged
or cracked wire insulation are dangerous. Any of these conditions
could result in electric shock or fire. Periodically examine the cord of
your appliance, and if its appearance indicates damage or deterioration, unplug it, discontinue use of the appliance, and have the cord
replaced with an exact replacement part by an authorized servicer.
Protect the power cord from physical or mechanical abuse, such as
being twisted, kinked, pinched, closed in a door, or walked upon.
Pay particular attention to plugs, wall outlets, and the point where the
cord exits the appliance.
To disconnect power from the mains, pull out the mains cord plug.
When installing the product, ensure that the plug is easily accessible.
This product is manufactured to comply with the
EEC DIRECTIVE 89/336/EEC, 93/68/EEC and
2006/95/EC.
Disposal of your old appliance
1. When this crossed-out wheeled bin symbol is attached to a
product it means the product is covered by the European
Directive 2002/96/EC.
2. All electrical and electronic products should be disposed
of separately from the municipal waste stream via designated collection facilities appointed by the government or
the local authorities.
3. The correct disposal of your old appliance will help prevent potential negative consequences for the environment
and human health.
4. For more detailed information about disposal of your old
appliance, please contact your city office, waste disposal
service or the shop where you purchased the product.
Safety Precautions (Continued)
Introduction

4
Contents
Introduction
Safety Precautions . . . . . . . . . . . . . . . . . . . . . . . . . . . . . . . . . . . . . . 2-3
Contents . . . . . . . . . . . . . . . . . . . . . . . . . . . . . . . . . . . . . . . . . . . . . . . 4
Before Use. . . . . . . . . . . . . . . . . . . . . . . . . . . . . . . . . . . . . . . . . . . . 5-7
About the Symbol Display. . . . . . . . . . . . . . . . . . . . . . . . . . . . 5
Symbol used in this Manual. . . . . . . . . . . . . . . . . . . . . . . . . . . . . . 5
Notes on Discs . . . . . . . . . . . . . . . . . . . . . . . . . . . . . . . . . . . . . . . 5
Maintenance and Service . . . . . . . . . . . . . . . . . . . . . . . . . . . . . . . 6
Types of Playable Discs . . . . . . . . . . . . . . . . . . . . . . . . . . . . . . . . 7
Regional Code . . . . . . . . . . . . . . . . . . . . . . . . . . . . . . . . . . . . . . . 7
Identification of Controls . . . . . . . . . . . . . . . . . . . . . . . . . . . . . . . . .8-11
Main Unit . . . . . . . . . . . . . . . . . . . . . . . . . . . . . . . . . . . . . . . . . . .8-9
Remote Control . . . . . . . . . . . . . . . . . . . . . . . . . . . . . . . . . . . .10-11
Power Connections . . . . . . . . . . . . . . . . . . . . . . . . . . . . . . . . . . .12-15
Connect the AC adapter . . . . . . . . . . . . . . . . . . . . . . . . . . . . . . . .12
Connect the Automotive adapter. . . . . . . . . . . . . . . . . . . . . . . . . .13
Battery Pack . . . . . . . . . . . . . . . . . . . . . . . . . . . . . . . . . . . . . .14-15
Rotating the LCD . . . . . . . . . . . . . . . . . . . . . . . . . . . . . . . . . . . . . . . .16
Playing a Disc . . . . . . . . . . . . . . . . . . . . . . . . . . . . . . . . . . . . . . . . . . 17
Advanced Operations
Displaying Disc Information on-screen. . . . . . . . . . . . . . . . . . . . . . . . . 18
Initial Settings . . . . . . . . . . . . . . . . . . . . . . . . . . . . . . . . . . . . . . . 18-23
General Operation. . . . . . . . . . . . . . . . . . . . . . . . . . . . . . . . . . . . 18
LANGUAGE . . . . . . . . . . . . . . . . . . . . . . . . . . . . . . . . . . . . . . . . 19
DISPLAY. . . . . . . . . . . . . . . . . . . . . . . . . . . . . . . . . . . . . . . . . . . 19
AUDIO . . . . . . . . . . . . . . . . . . . . . . . . . . . . . . . . . . . . . . . . . . . . 20
LOCK (Parental Control). . . . . . . . . . . . . . . . . . . . . . . . . . . . . 21-22
OTHERS. . . . . . . . . . . . . . . . . . . . . . . . . . . . . . . . . . . . . . . . . . . 23
General Features . . . . . . . . . . . . . . . . . . . . . . . . . . . . . . . . . . . . . 24-26
Additional Features . . . . . . . . . . . . . . . . . . . . . . . . . . . . . . . . . . . . . . 27
Playing an Audio CD or MP3/WMA file . . . . . . . . . . . . . . . . . . . . . . . 28
Programmed Playback . . . . . . . . . . . . . . . . . . . . . . . . . . . . . . . . . . . 29
Repeat Programmed Tracks . . . . . . . . . . . . . . . . . . . . . . . . . . . . . 29
Erasing a Track from Program List . . . . . . . . . . . . . . . . . . . . . . . . 29
Erasing the Complete Program List. . . . . . . . . . . . . . . . . . . . . . . . 29
Viewing a JPEG file . . . . . . . . . . . . . . . . . . . . . . . . . . . . . . . . . . . 30-31
Slide Show . . . . . . . . . . . . . . . . . . . . . . . . . . . . . . . . . . . . . . . . . . 30
Still Picture . . . . . . . . . . . . . . . . . . . . . . . . . . . . . . . . . . . . . . . . . . 30
Moving to another File . . . . . . . . . . . . . . . . . . . . . . . . . . . . . . . . . 31
Zoom . . . . . . . . . . . . . . . . . . . . . . . . . . . . . . . . . . . . . . . . . . . . . . 31
To rotate picture . . . . . . . . . . . . . . . . . . . . . . . . . . . . . . . . . . . . . . 31
To listen to MP3/WMA music while watching picture . . . . . . . . . . . 31
JPEG disc compatibility with this unit is limited as follows . . . . . . . 31
Playing a DVD VR format Disc . . . . . . . . . . . . . . . . . . . . . . . . . . . . . 32
Playing a DivX Movie file . . . . . . . . . . . . . . . . . . . . . . . . . . . . . . . 33-34
DivX disc compatibility with this unit is limited as follows . . . . . . . . 34
Playing an USB Flash Drive . . . . . . . . . . . . . . . . . . . . . . . . . . . . . . 35
Connections
Setting up the Player . . . . . . . . . . . . . . . . . . . . . . . . . . . . . . . . . . 36-38
AV output Connections . . . . . . . . . . . . . . . . . . . . . . . . . . . . . . . . . 36
AV input Connections . . . . . . . . . . . . . . . . . . . . . . . . . . . . . . . . . . 37
Audio Connection to Optional Equipment . . . . . . . . . . . . . . . . . . . 38
Reference
Troubleshooting. . . . . . . . . . . . . . . . . . . . . . . . . . . . . . . . . . . . . . . . . 39
Language Code. . . . . . . . . . . . . . . . . . . . . . . . . . . . . . . . . . . . . . . . . 40
Area Codes . . . . . . . . . . . . . . . . . . . . . . . . . . . . . . . . . . . . . . . . . . . . 41
Specifications . . . . . . . . . . . . . . . . . . . . . . . . . . . . . . . . . . . . . . . . . . 42
5
Introduction
Before Use
To ensure proper use of this product, please read this owner’s
manual carefully and retain for future reference.
This manual provides information on the operation and maintenance of your unit. Should the unit require service, contact an
authorized service location.
About the Symbol Display
“ ” may appear on your LCD display during operation and
indicates that the function explained in this owner’s manual is not
available on that specific DVD video disc.
Symbol Used in this Manual
NOTE
Indicates special notes and operating features.
TIP
Indicates tips and hints for making the task easier.
A section whose title has one of the following symbols is
applicable only to the disc represented by the symbol.
All discs and files listed below
DVD and finalized DVD±R/RW
Video CDs.
Audio CDs. MP3 files.
WMA files.
DivX files.
Notes on Discs
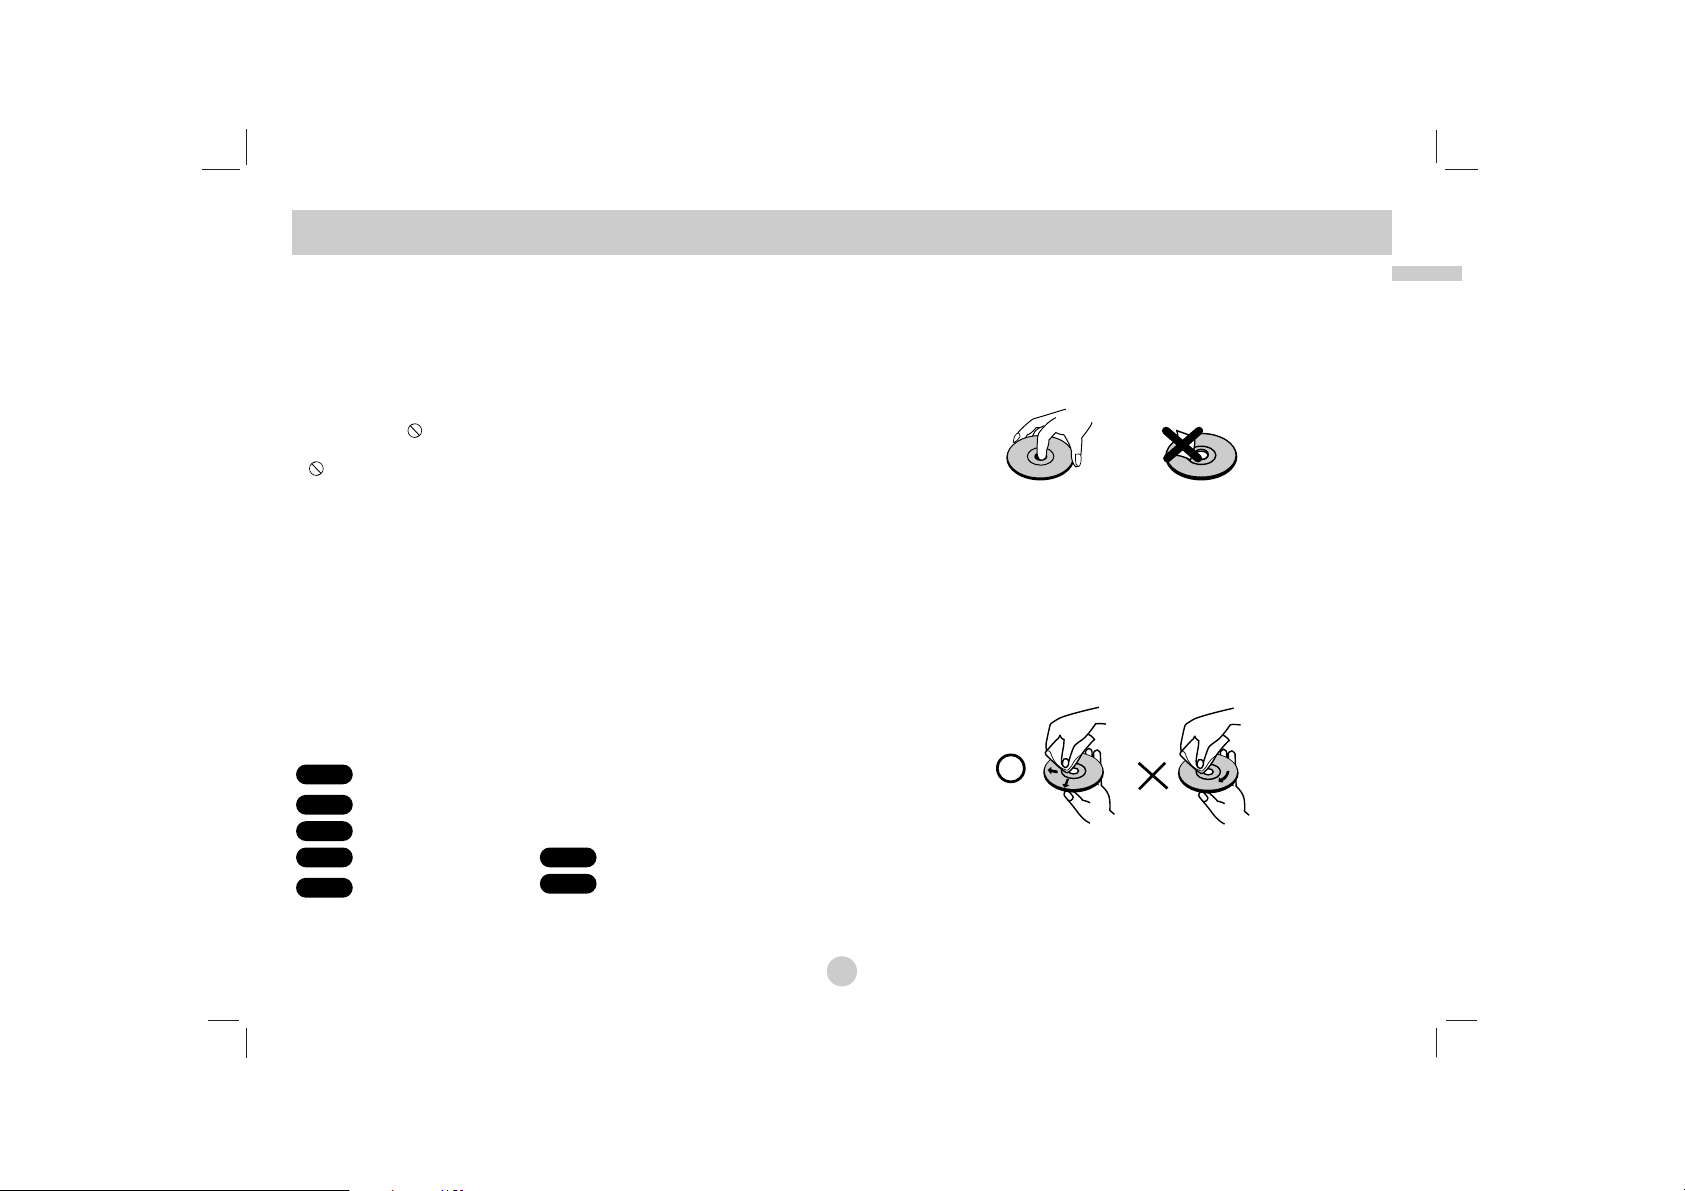
Handling Discs
Do not touch the playback side of the disc. Hold the disc by the
edges so that fingerprints do not get on the surface. Never stick
paper or tape on the disc.
Storing Discs
After playing, store the disc in its case. Do not expose the disc to
direct sunlight or sources of heat and never leave it in a parked
car exposed to direct sunlight.
Cleaning Discs
Fingerprints and dust on the disc can cause poor picture quality
and sound distortion. Before playing, clean the disc with a clean
cloth. Wipe the disc from the center out.
Do not use strong solvents such as alcohol, benzine, thinner, commercially available cleaners, or anti-static spray intended for older
vinyl records.
DivX
WMA
MP3ACD
VCD
DVD
ALL

6
Before Use (Continued)
Maintenance and Service
Refer to the information in this chapter before contacting a service
technician.
Handling the Unit
When shipping the unit
Please save the original shipping carton and packing materials. If
you need to ship the unit, for maximum protection, re-pack the unit
as it was originally packed at the factory.
Keeping the exterior surfaces clean
• Do not use volatile liquids such as insecticide spray near the
unit.
• Do not leave rubber or plastic products in contact with the unit
for a long period of time. since they leave marks on the
surface.
Cleaning the unit
To clean the player, use a soft, dry cloth. If the surfaces are
extremely dirty, use a soft cloth lightly moistened with a mild detergent solution.
Do not use strong solvents such as alcohol, benzine, or thinner, as
these might damage the surface of the unit.
Maintaining the Unit
The DVD player is a high-tech, precision device. If the optical
pick-up lens and disc drive parts are dirty or worn, the picture
quality could be diminished.
Depending on the operating environment, regular inspection and
maintenance are recommended after every 1,000 hours of use.
For details, please contact your nearest authorized service center.
7
Introduction
Before Use (Continued)
Types of Playable Discs
DVD
(8 cm / 12 cm disc)
Video CD(VCD)
(8 cm / 12 cm disc)
Audio CD
(8 cm / 12 cm disc)
In addition, this unit plays DVD±R/RW and CD-R/RW, SVCD, USB
that contains audio titles, DivX, MP3, WMA, and/or JPEG files.
This indicates a product feature that is capable of
playing DVD-RW discs recorded with Video Recording
format.
NOTES
• Depending on the conditions of the recording equipment or the
CD-R/RW (or DVD±R/RW) disc itself, some CD-R/RW
(or DVD
±
R/RW) discs cannot be played on the unit.
• Do not attach any seal or label to either side (the labeled side or
the recorded side) of a disc.
•
Do not use irregularly shaped CDs (e.g., heart-shaped
or octagonal). It may result in malfunctions.
Customers should note that permission is required in order to
download MP3 / WMA files and music from the Internet. Our
company has no right to grant such permission. Permission
should always be sought from the copyright owner.
Regional Code
This unit has a regional code printed on the rear of the unit. This
unit can play only DVD discs labelled same as the rear of the unit
or “ALL”.
Notes on Regional Codes
• Most DVD discs have a globe with one or more numbers in it
clearly visible on the cover. This number must match your unit’s
regional code or the disc cannot play.
• If you try to play a DVD with a different regional code from your
player, the message “Check Regional Code” appears on the TV
screen.
Manufactured under license from Dolby
Laboratories. “Dolby”, “Pro Logic” and the double-D
symbol are trademarks of Dolby Laboratories.
DTS and DTS Digital Out are trademarks of Digital
Theater Systems, Inc.
8
Identification of Controls
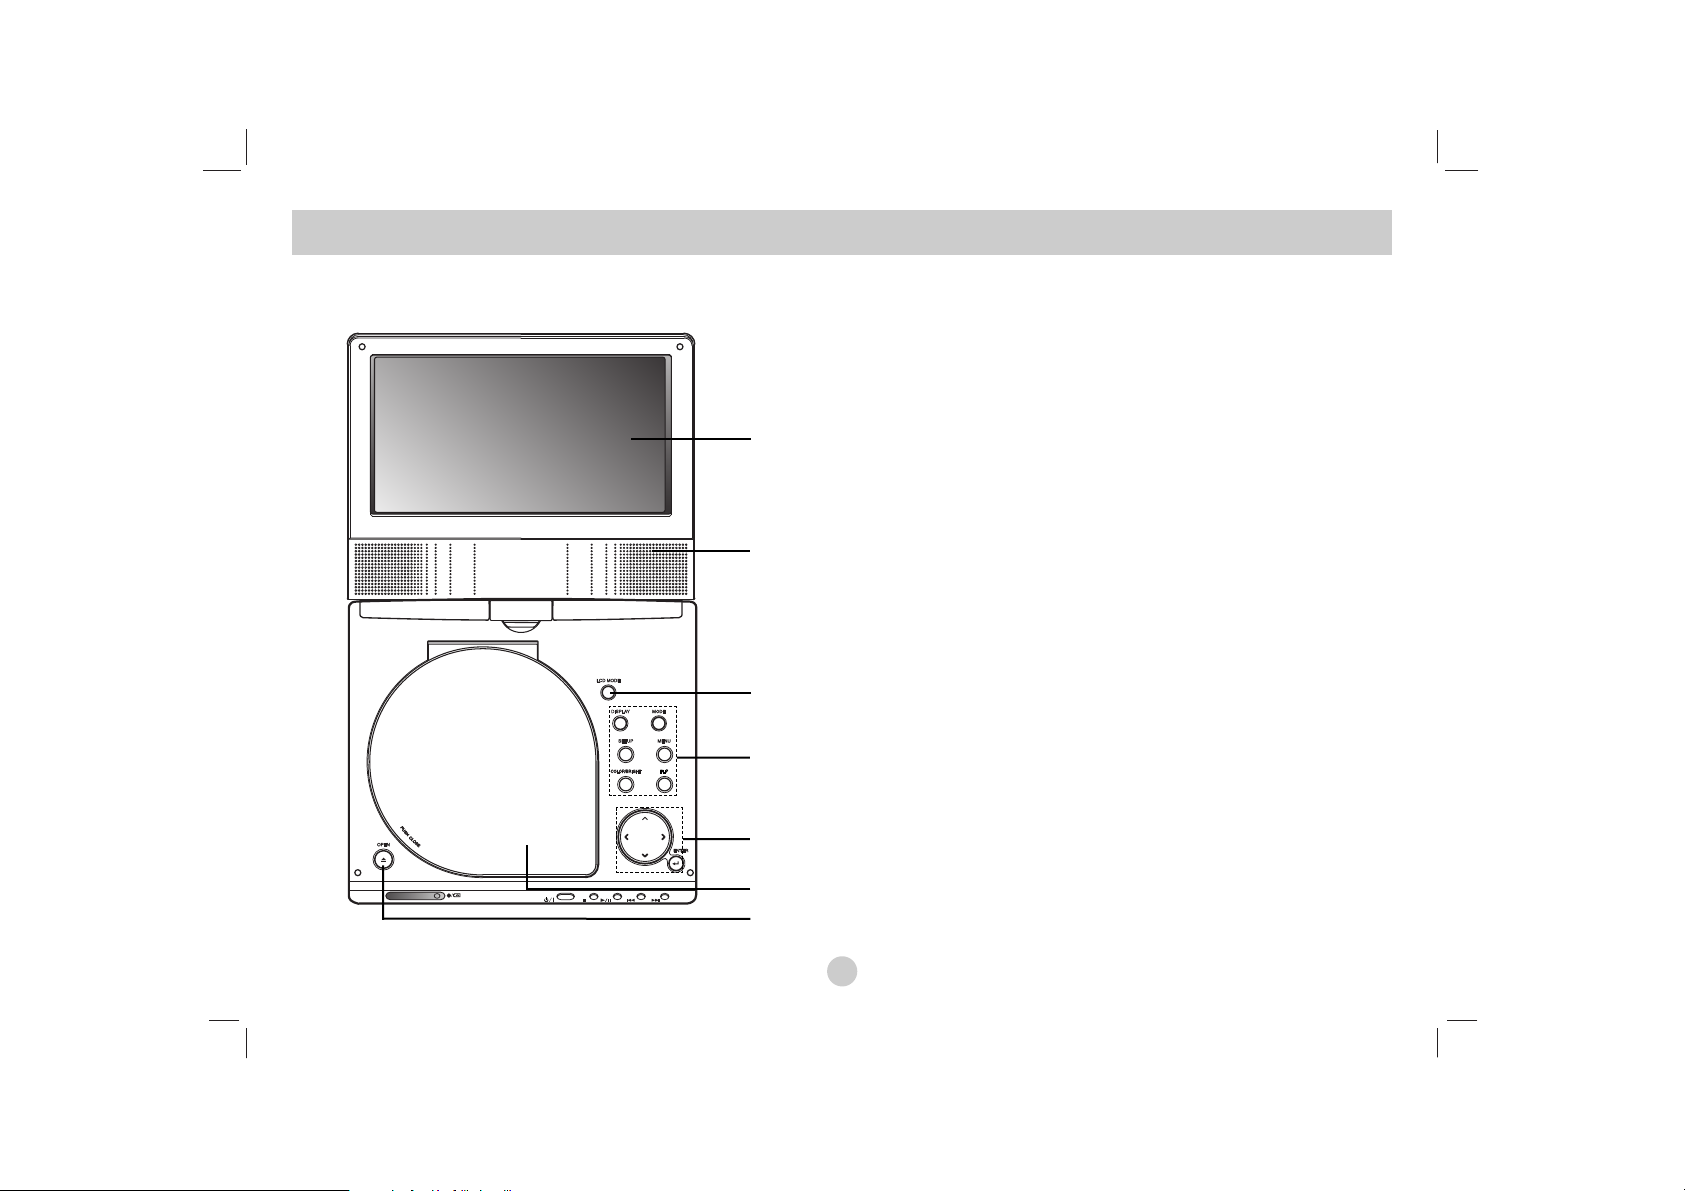
Main Unit
a LCD screen
b Speaker
c LCD MODE: NORMAL → 4:3 Mode → OFF
d Function Buttons
• DISPLAY: Accesses On-Screen display.
• MODE: Selects a mode among DISC, AV IN or USB.
• SETUP: Accesses or removes setup menu.
• MENU: Accesses menu on a DVD disc.
• COLOR/BRIGHT: Selects the mode of LCD adjustment
Brightness → Color → OFF
• FLIP: Rotates the screen.
e Menu Control Buttons
• bBvV(left/right/up/down)
Selects an item in the menu.
• bB: Adjusts the COLOR/BRIGHT.
• ENTER: Confirms menu selection.
f Disc Lid
g OPEN button: Push this button to open the Disc lid.
a
b
c
d
e
f
g
9
Introduction
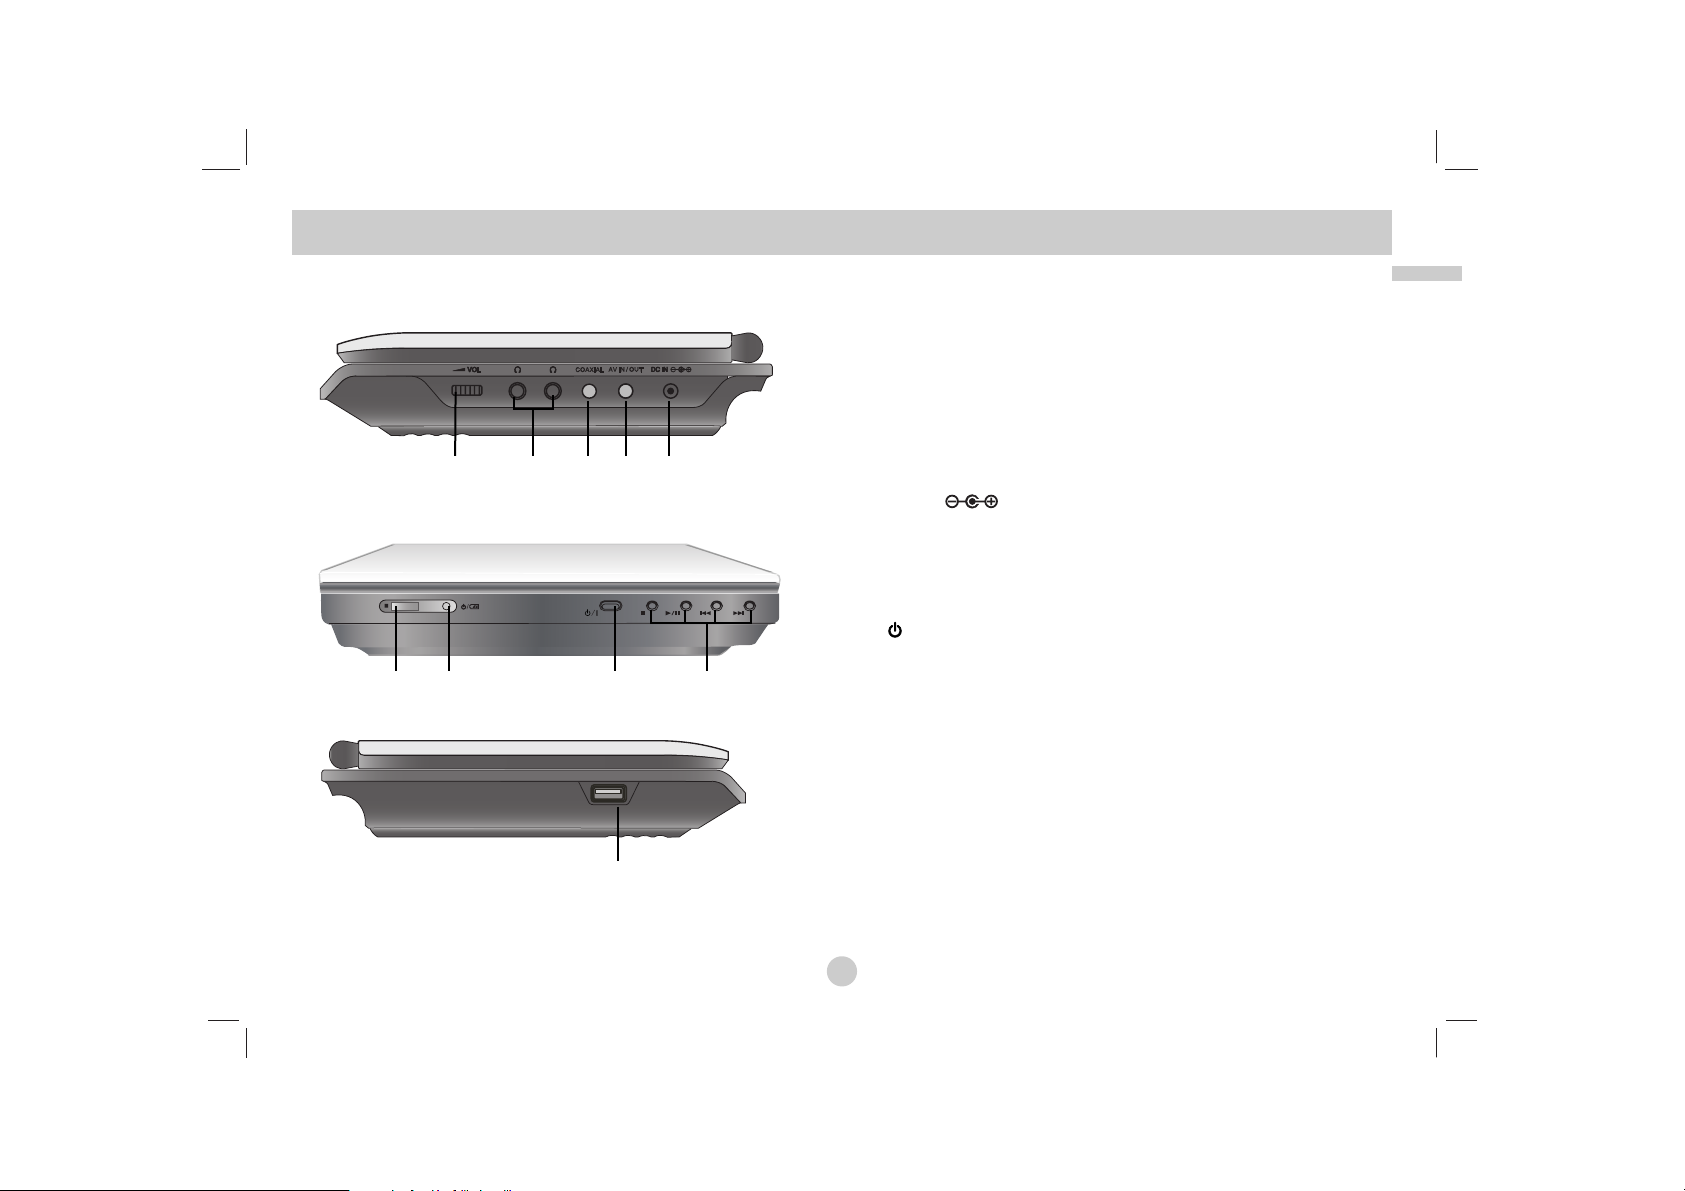
Main Unit
a Volume Control
b Earphones jacks
c COAXIAL jack
d AV IN/OUT jack
NOTE
If the VIDEO IN signal is not connected in AV IN mode, this unit
will automatically power off in 10 minutes to prevent battery discharge.
e DC IN
Connect the AC adapter or Automotive adapter.
f Remote sensor
Receive the signal from the Remote Control for operation.
g Battery charge indicator
h (POWER): Switches the player ON or OFF.
i Playback buttons
• x ( STOP ): Stops playback.
• B/X ( PLAY/PAUSE ):
Starts playback/ Pauses playback temporarily.
• . (Reverse SKIP/SEARCH )
Search backward*/ go to beginning of current chapter or
track or go to previous chapter or track.
• > (Forward SKIP/SEARCH)
Search forward*/ go to next chapter or track.
* Press and hold button for about two seconds.
j USB: Connect an USB Flash Drive.
Identification of Controls (continued)
abcde
fg h i
j
10
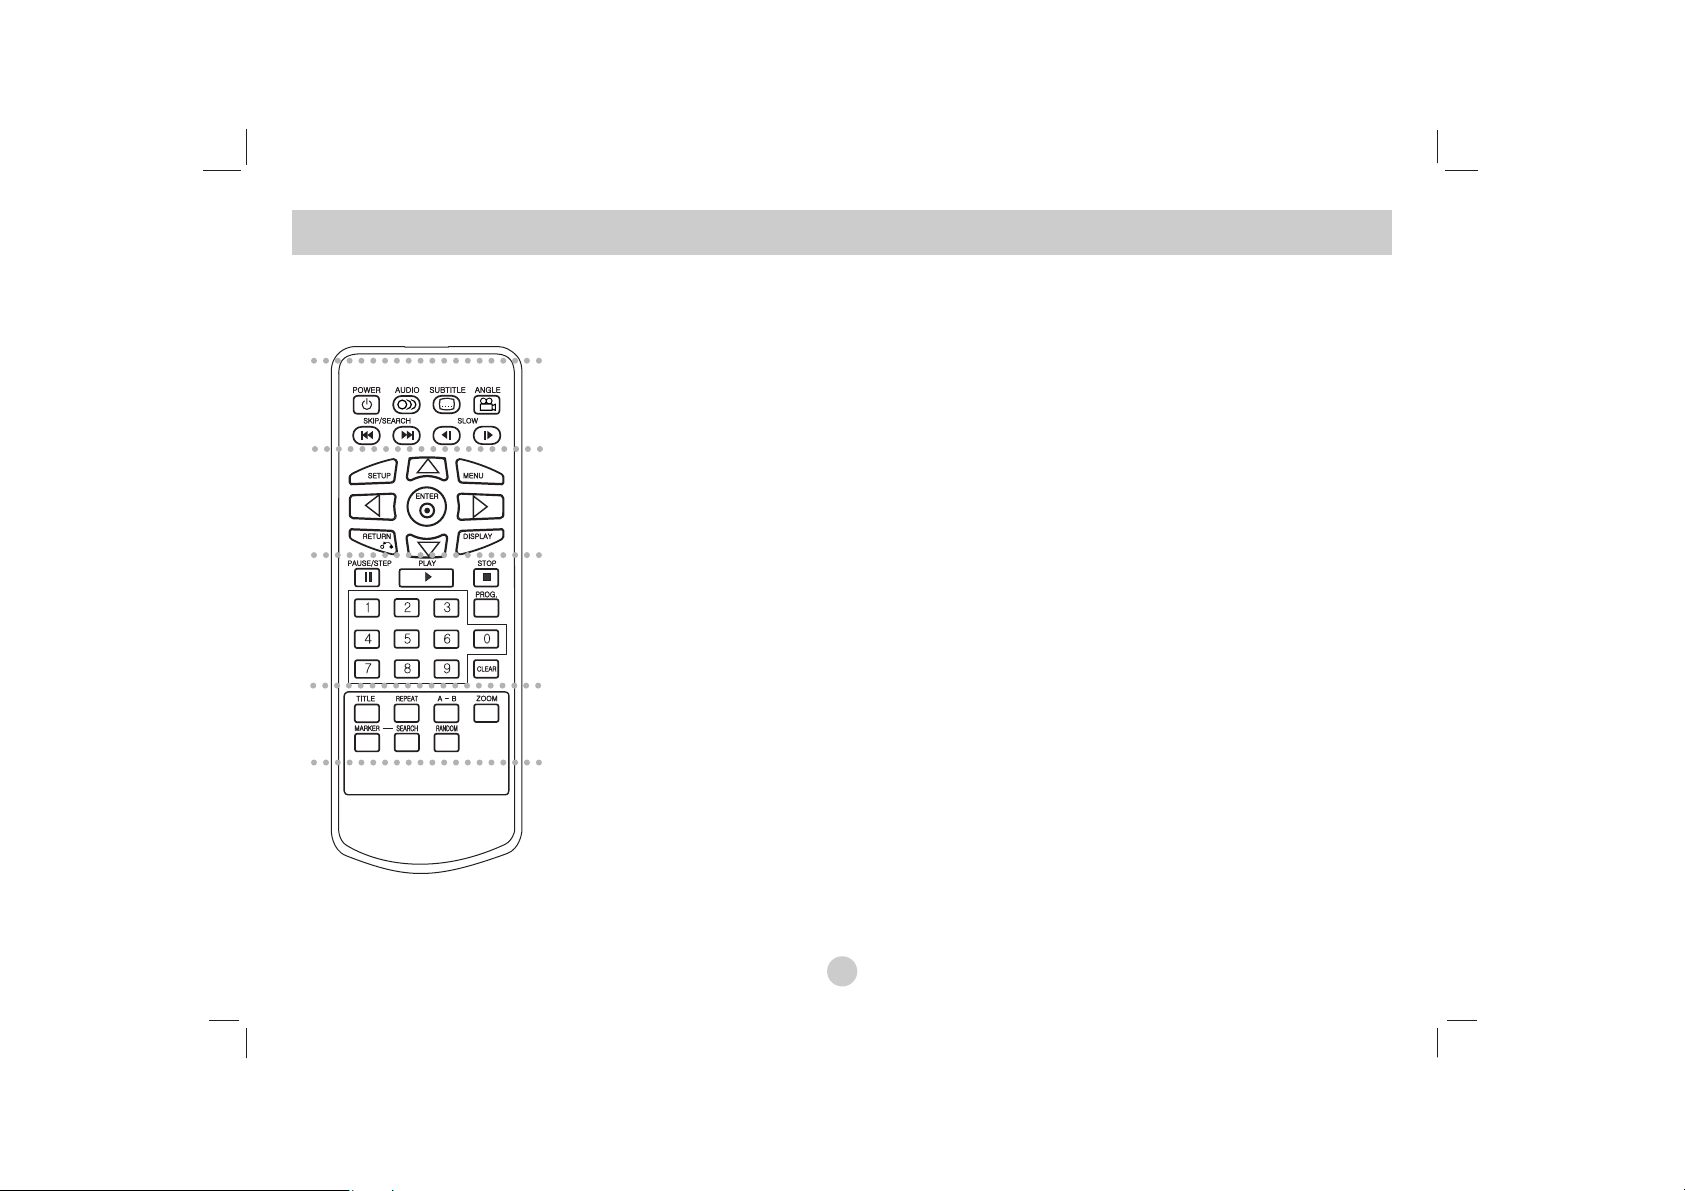
a
POWER: Switches DVD Player ON or OFF.
AUDIO: Selects an audio language.
SUBTITLE: Selects a subtitle language.
ANGLE:
Selects a DVD camera angle, if available.
Reverse SKIP/SEARCH ( . ):
Search backward*/ go to beginning of current
chapter or track or go to previous chapter or
track.
Forward SKIP/SEARCH ( > ):
Search forward*/ go to next chapter or track.
* Press and hold button for about two
seconds.
SLOW ( t / T ):
Reverse/ Forward slow playback.
b
SETUP: Accesses or removes setup menu.
MENU: Accesses menu on a DVD disc.
RETURN (O): Removes the menu.
DISPLAY: Accesses On-Screen display.
bBvV(left/right/up/down):
Selects an item in the menu.
ENTER: Confirms menu selection.
c
PAUSE/STEP ( X ):
Pauses playback temporarily/ press
repeatedly for frame-by-frame playback.
PLAY (N): Starts playback.
STOP ( x ): Stops playback.
0-9 number buttons:
Selects numbered items in a menu.
PROG.: Places a track on the program list.
CLEAR:
Removes a track number on the program list
or a mark on the MARKER SEARCH menu.
d
TITLE: Displays title menu, if available.
REPEAT: Repeat chapter, track, title all.
A-B: Repeat sequence.
ZOOM: Enlarges video image.
MARKER: Marks any point during playback.
SEARCH: Displays MARKER SEARCH menu.
RANDOM: Plays tracks in random order.
Identification of Controls (continued)
Remote Control
a
b
c
d
11
Introduction
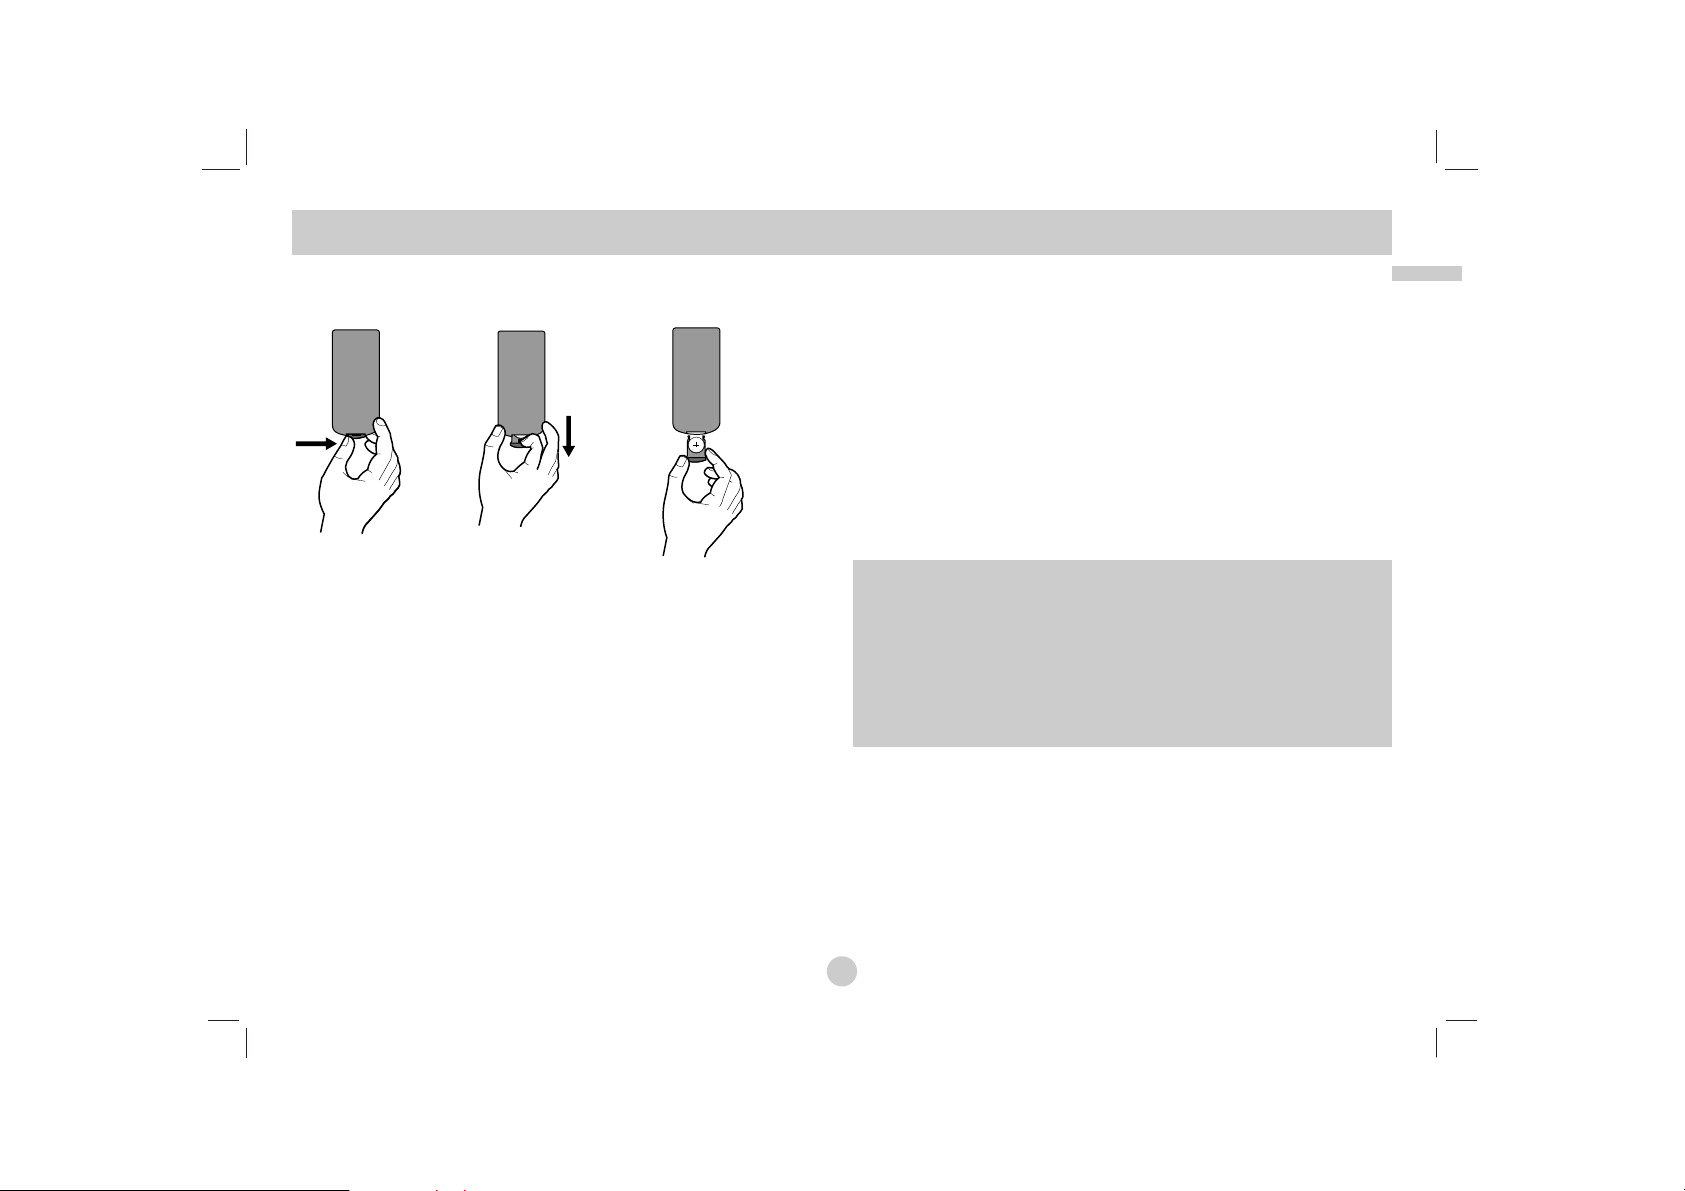
Insert the battery (Lithium battery)
NOTES
• Do not expose the Remote Control sensor to bright light.
• Do not place obstacles between the Remote Control sensor and
the Remote Control.
V Replacing the button-type battery
The battery normally lasts for about a year. Replace the battery if
the Remote Control fails to operate the unit when used within the
operation range.
Button-type battery (Lithium battery)
1. Pinch the battery holder clip together then pull the tab to
remove the battery holder.
2. Insert the battery with the + facing in the same direction as the
+ on the battery holder.
3. Replace the battery holder with battery into the Remote Control
unit making sure that it is fully inserted.
NOTES
• Replace Remote Control unit battery with 3V micro lithium cells
such as CR. 2025 or its equivalent.
• Dispose of battery safety in accordance with local laws. Do not
dispose of in fire.
Identification of Controls
(Continued)
Warning :
The battery used in this device may present a fire or
chemical burn hazard if mistreated. Do not recharge, disassemble, incinerate, or heat above 100 °C (212 °F).
Replace the battery with Matsushita Elec. Ind. Co., Ltd.
(Panasonic), part no. CR. 2025 only.
Use of another battery may present a risk of fire or explosion. Dispose of used batteries. Keep batteries away
from children. Do not disassemble or dispose of in fire.

12
Connect the AC adapter.
a Connect the AC Adapter to the DC IN jack on the unit.
b Connect the AC adapter to the wall outlet.
Caution
• Do not connect the power plug to a power outlet other than that
indicated on the label, as this can result in a risk of fire or
electric shock.
• Do not connect or disconnect the power plug with wet hands.
Doing so may cause electric shock.
• Do not use an AC adapter other than one specified, as it can
cause a fire or damage to the player.
AC adapter
• This AC adapter operates on 100-240V~ 50/60Hz 1.5A.
• Contact an electrical parts distributor for assistance in selecting
a suitable AC plug adapter or AC cord set.
• Manufactured by WANLIDA Digital Technology Co., Ltd.
Power Connections
a
b
13
Introduction
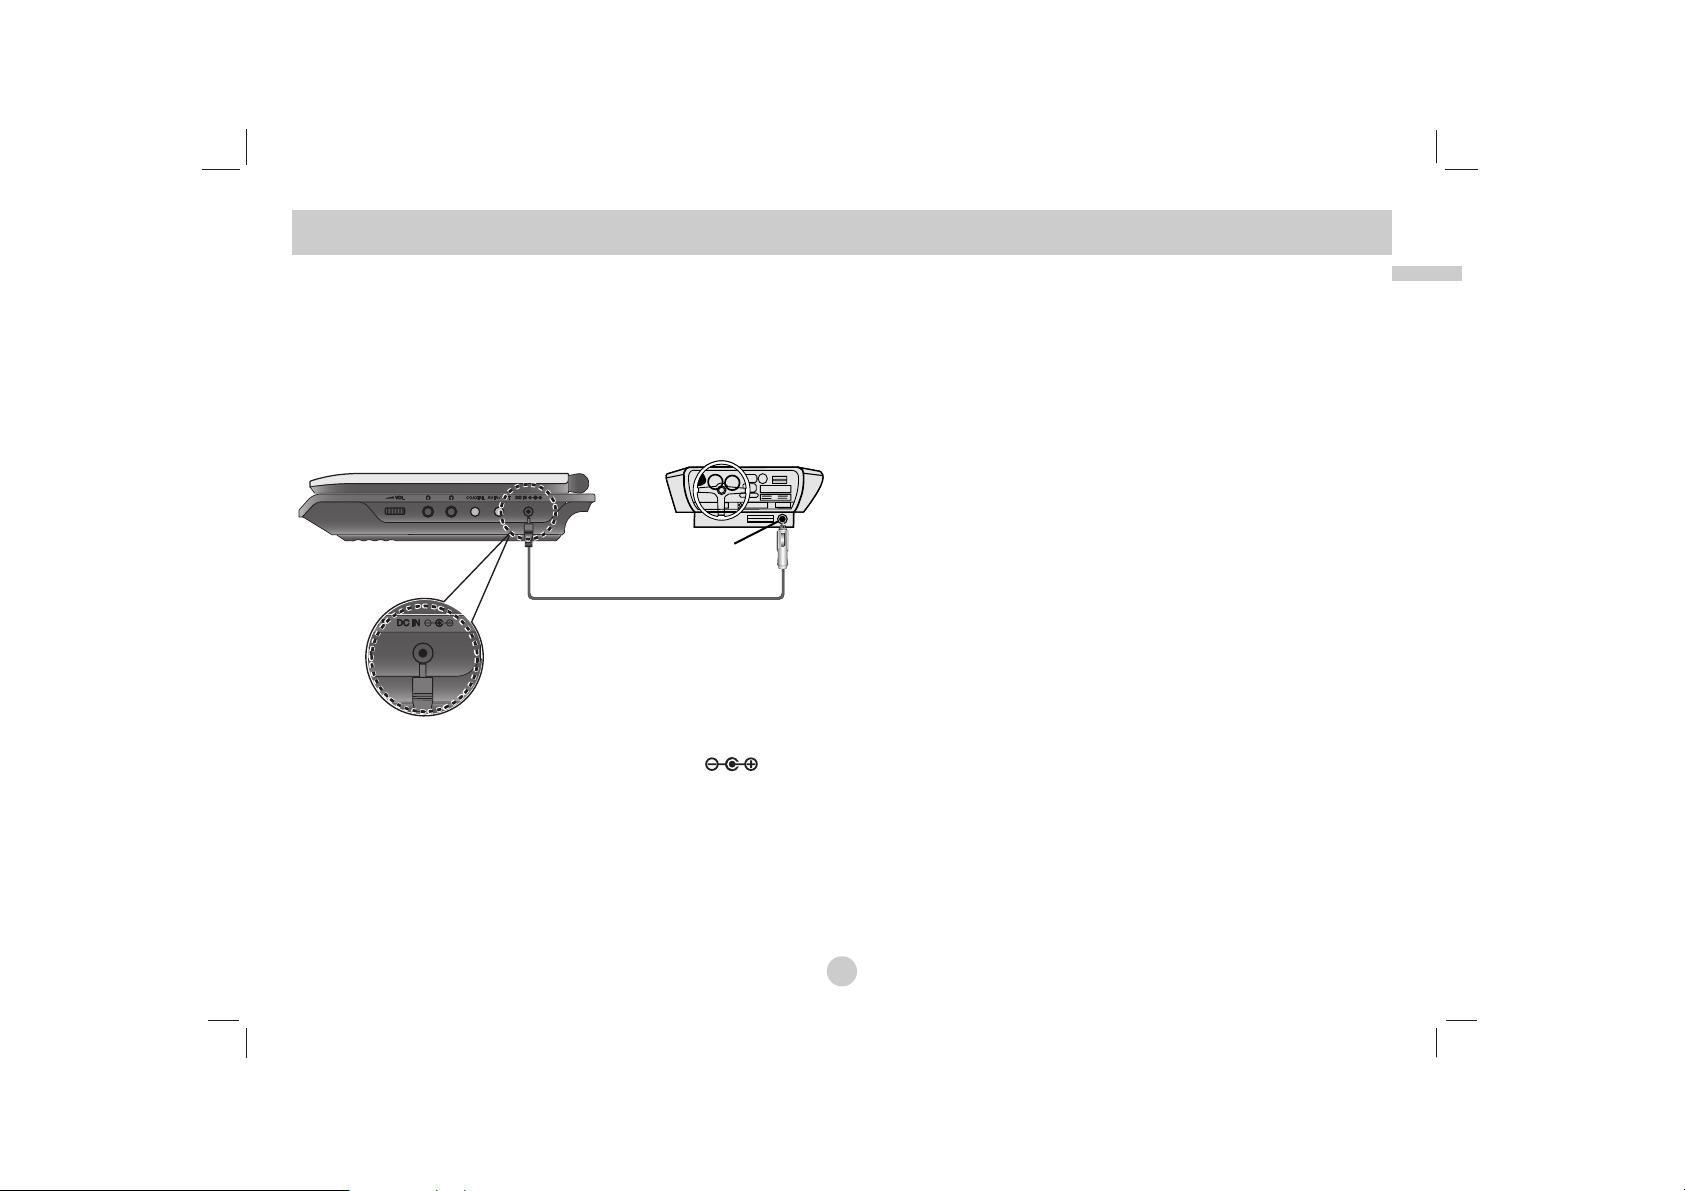
Connect the Automotive adapter
This unit and its automotive adapter are designed for use in vehicles that have 8.5-16 volt, negative ground electrical systems.
(This is standard for most vehicles.) If your vehicle has a different
type of electrical system, the DC power system cannot be used.
a Connect the automotive adapter to the DC IN jack on
the unit.
b Connect the automotive adapter to the car’s cigarette lighter
socket.
Caution
• To prevent electrical shock and possible damage to your unit or
vehicle, always unplug the automotive adapter from the cigarette
lighter socket before you remove the plug from your unit.
• A 3 amp. 250V fuse for protection is installed in the automotive
adapter.
• While the engine is being started, disconnect the automotive
adapter from the car’s cigarette lighter socket.
•
Do not operate your unit when the car battery is discharged.
Peak current from the car generator may cause the DC fuse to
blow.
• If the vehicle’s supply voltage drops below approximately 10
volts, your unit may not work properly.
• Do not leave your unit in a place where the temperature
exceeds 70°C (158°F), or the pick-up device may be damaged.
Examples include:
- Inside a car with the windows closed and in direct sunshine.
- Near a heating appliance.
Automotive adapter
• This automotive adapter operates on DC 8.5-16V.
• Contact an electrical parts distributor for assistance in selecting
a suitable automotive adapter.
• Manufactured by WANLIDA Digital Technology Co., Ltd.
Power Connections
(continued)
Cigarette lighter socket
a
b
14
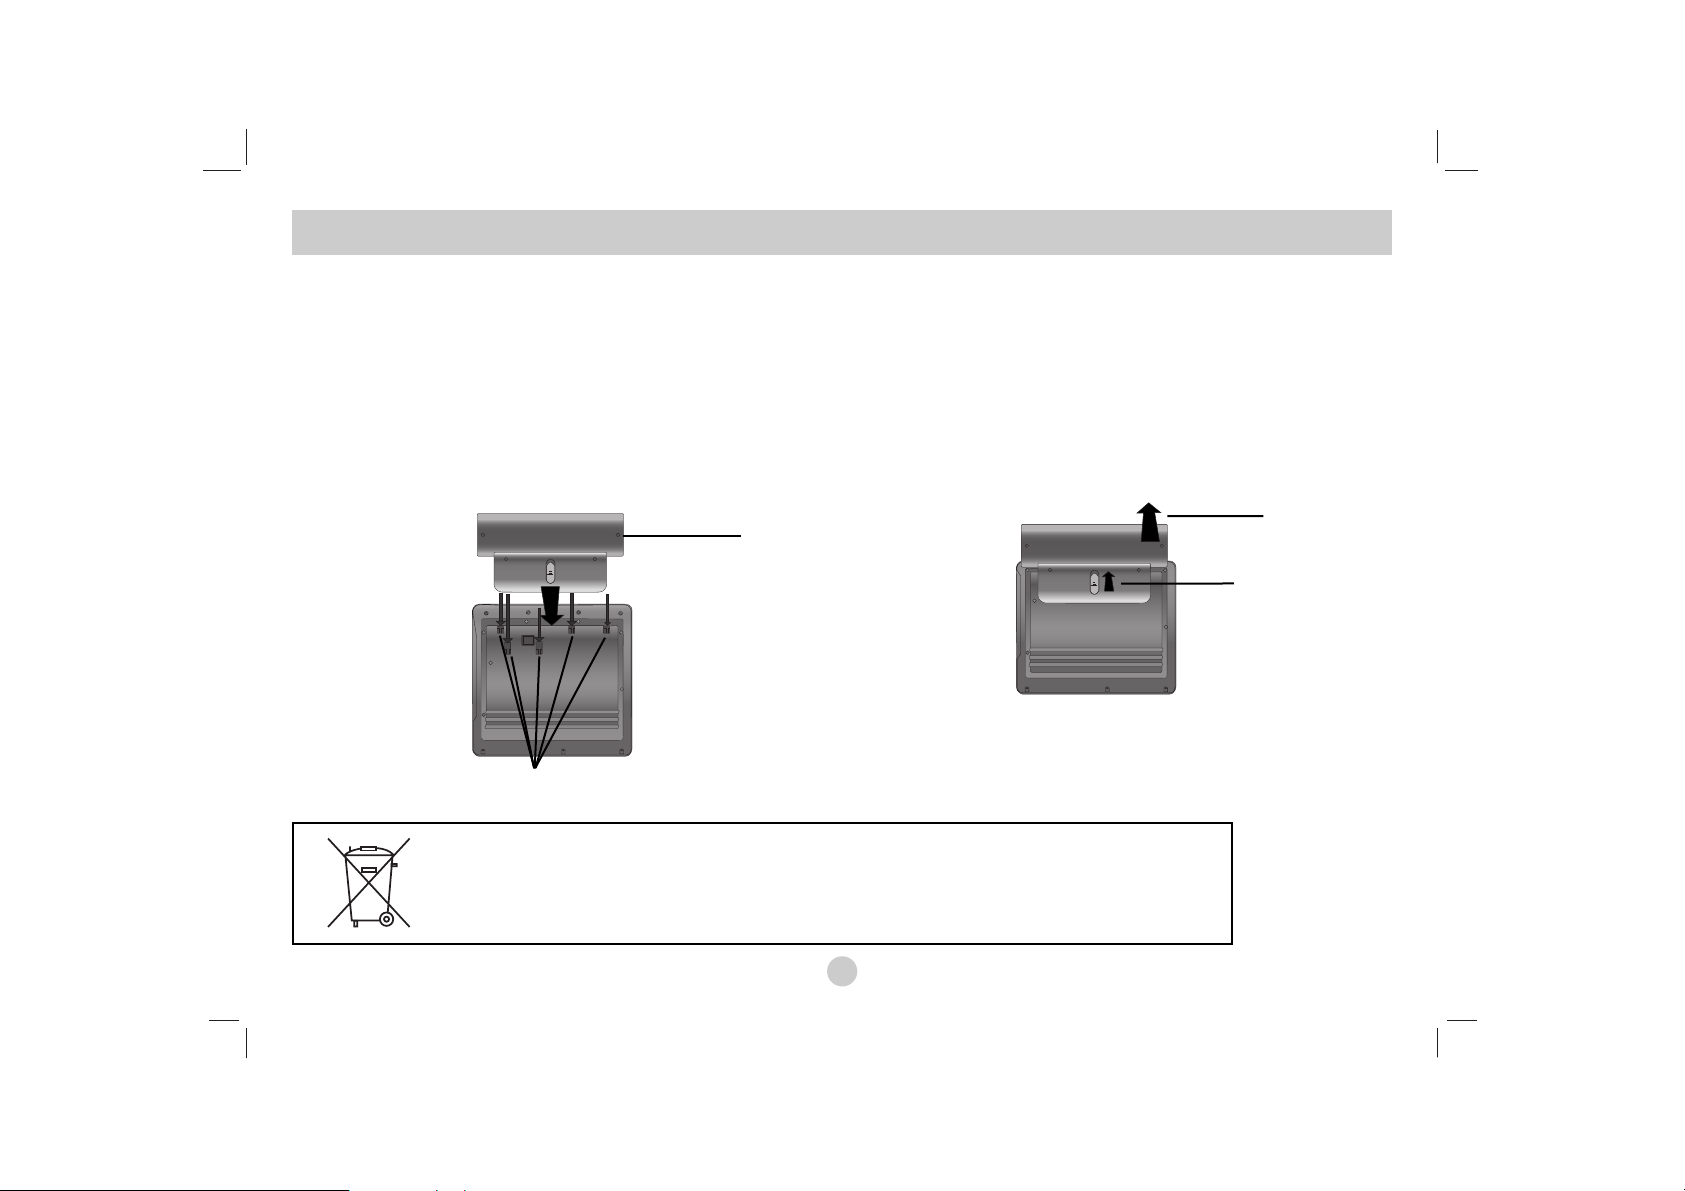
Battery Pack
Charge the battery pack before using it for the first time.
A
Attaching the battery pack
a Match the hooks of the battery pack into the holes on the
bottom of the player.
b Press and slide the battery pack until the hooks click.
NOTES
• Do not detach the battery pack during playback.
• Be careful not to drop the battery pack.
A
Detaching the battery pack
a Press the PUSH knob.
b Pull the battery pack until the hooks click.
Power Connections (continued)
ATTENTION
The product that you have purchased contains a rechargeable battery. The battery is recyclable. At
the end of it’s useful life, under various state and local laws, it may be illegal to dispose of this battery into the municipal waste stream. Check with your local solid waste/officials for details in your
area for recycling options or proper disposal.
a
b
Hooks
a
b
15
Introduction
A
Charging the battery pack
1. Attach the battery pack to the player.
2. Connect the AC power adapter to the player and
the plug into an AC outlet.
3. During recharging, charge indicator is red. If recharging is
complete, charge indicator changes to green color.
CAUTION
Take the following precautions to avoid liquid leakage,
overheating, etc.
• Do not use any unauthorized parts.
• Use the authorized AC adapter when recharging battery.
• Do not expose to high temperature above 60°C (140°F).
• Do not attempt to dismantle or modify the unit.
• Excessive impact may cause the unit to malfunction.
• Do not incinerate.
• Do not disassemble; dispose of properly.
• Do not short-circuit.
NOTE
Charging a battery only happens when the power is off.
The battery will not be charged when it is naturally or purposely
discharged. Because the unit cannot perceive battery voltage,
even if you attached the battery.
When you are in this situation, power on the unit and then power
off again. Then battery charge will proceed.
A
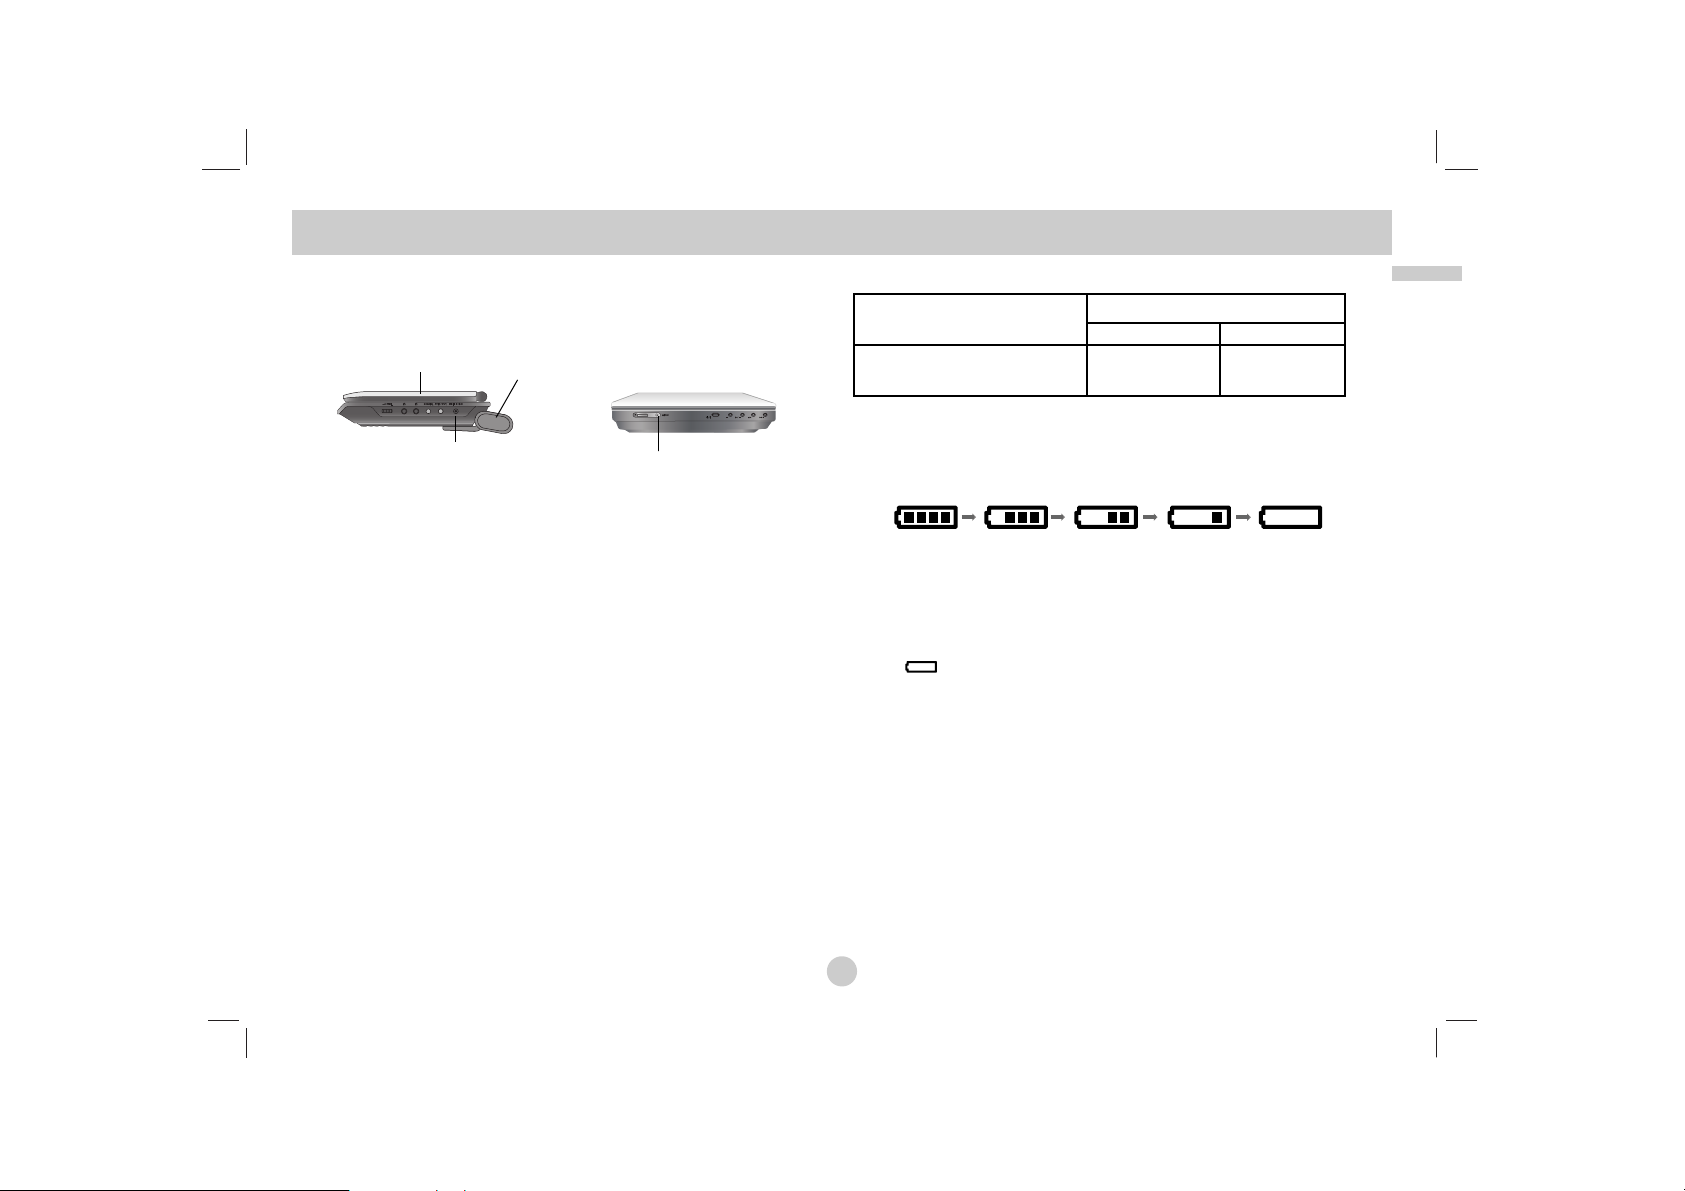
Recharging and play times
* When Brightness control is set to initial mode.
- using the headphones and volume center.
A
Press “Display” to display the battery status on the screen.
If using the AC adapter, battery display does not appear.
If the battery capacity is not enough, “Check Battery Status”
or “ ” is displayed on the screen and then the power is
automatically turned off after a few minute.
A
If play time dramatically reduces after recharging
The battery pack has reached the end of its service life (it can be
recharged about 300 times).
A
If the unit is not used for a long time
• Detach the battery pack. (Even if the unit is off, it still uses some power.
This can lead to over discharging of the battery and malfunction.)
• Recharge the battery pack when you are ready to use it again.
Power Connections (Continued)
Battery Pack
Player
Connect the AC
adapter cord
Charge indicator
Recharging Play time
without Playback LCD On LCD Off
Approx. Approx. Approx.
3 hour 3.5 hours* 4 hours
Full
Low
Recharge
16
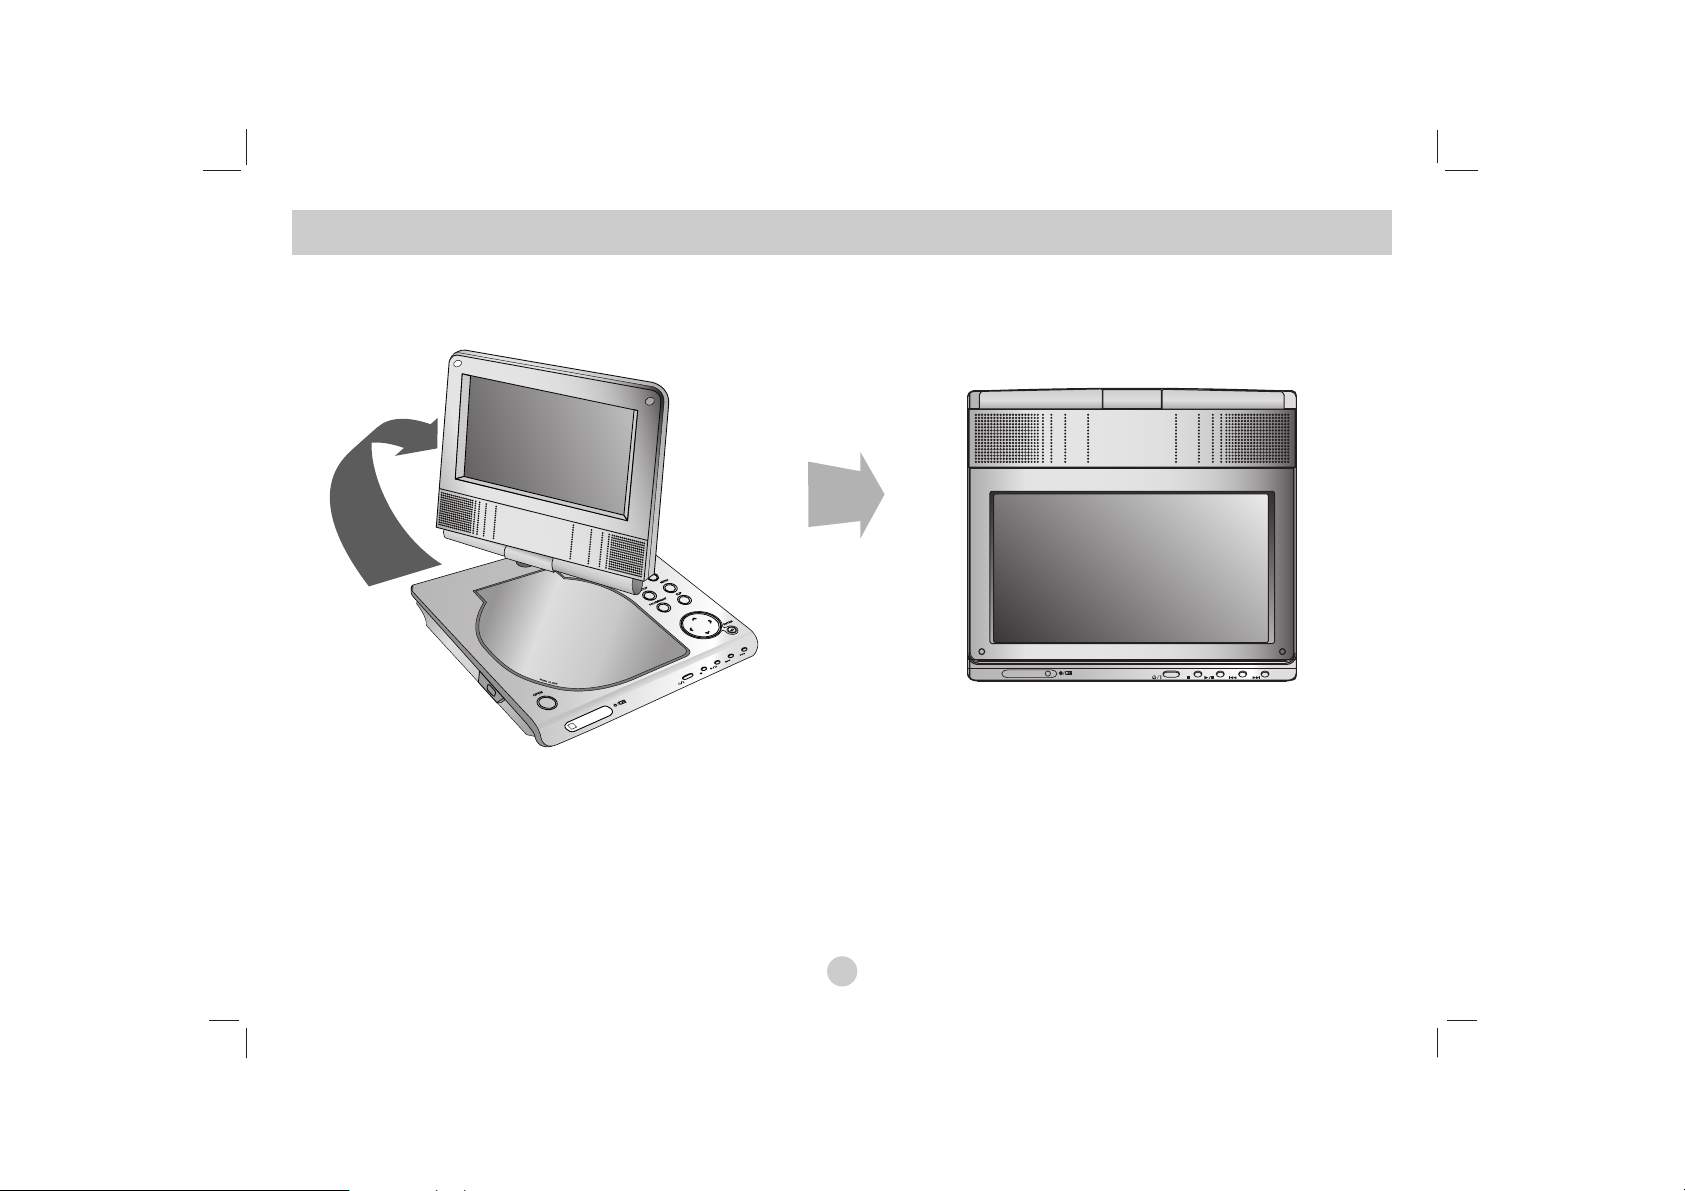
You can rotate LCD clockwise an angle of 180 degrees. However,
if you turn it by force, it can cause serious damage.
After rotating LCD completely, you can fold the LCD screen as
shown above.
Rotating the LCD
17
Introduction
1. Prepare the power supply.
2. Open the outer cover and press POWER button.
3.
Press OPEN to open the disc lid and insert a disc with the side
you want to play label up. Close the disc lid by hand.
• If the disc is placed in upside down (and it is a single-sided disc),
“CHECK DISC” or “DISC ERROR” appears on the screen.
• After playing back all of the chapters in the title, the unit automatically
stops and returns to the menu screen.
4. Press PLAY(N) to playback.
5. Adjust the volume.
NOTES
• Place a disc with the playback side down on the spindle, and
push gently on the center of the disc so it goes into position.
• If you are not using the LCD on this unit, select OFF to conserve
power.
• The LCD is turned off if you close the unit.
• The picture shown on the LCD depends on the display mode
and the size recorded on the disc.
A
Changing the size of the picture
Use the LCD MODE button to change the picture mode.
The mode is shown on the unit’s display as follows.
NORMAL → 4:3 mode → OFF
NOTE
May appear to differ according to kind of disc.
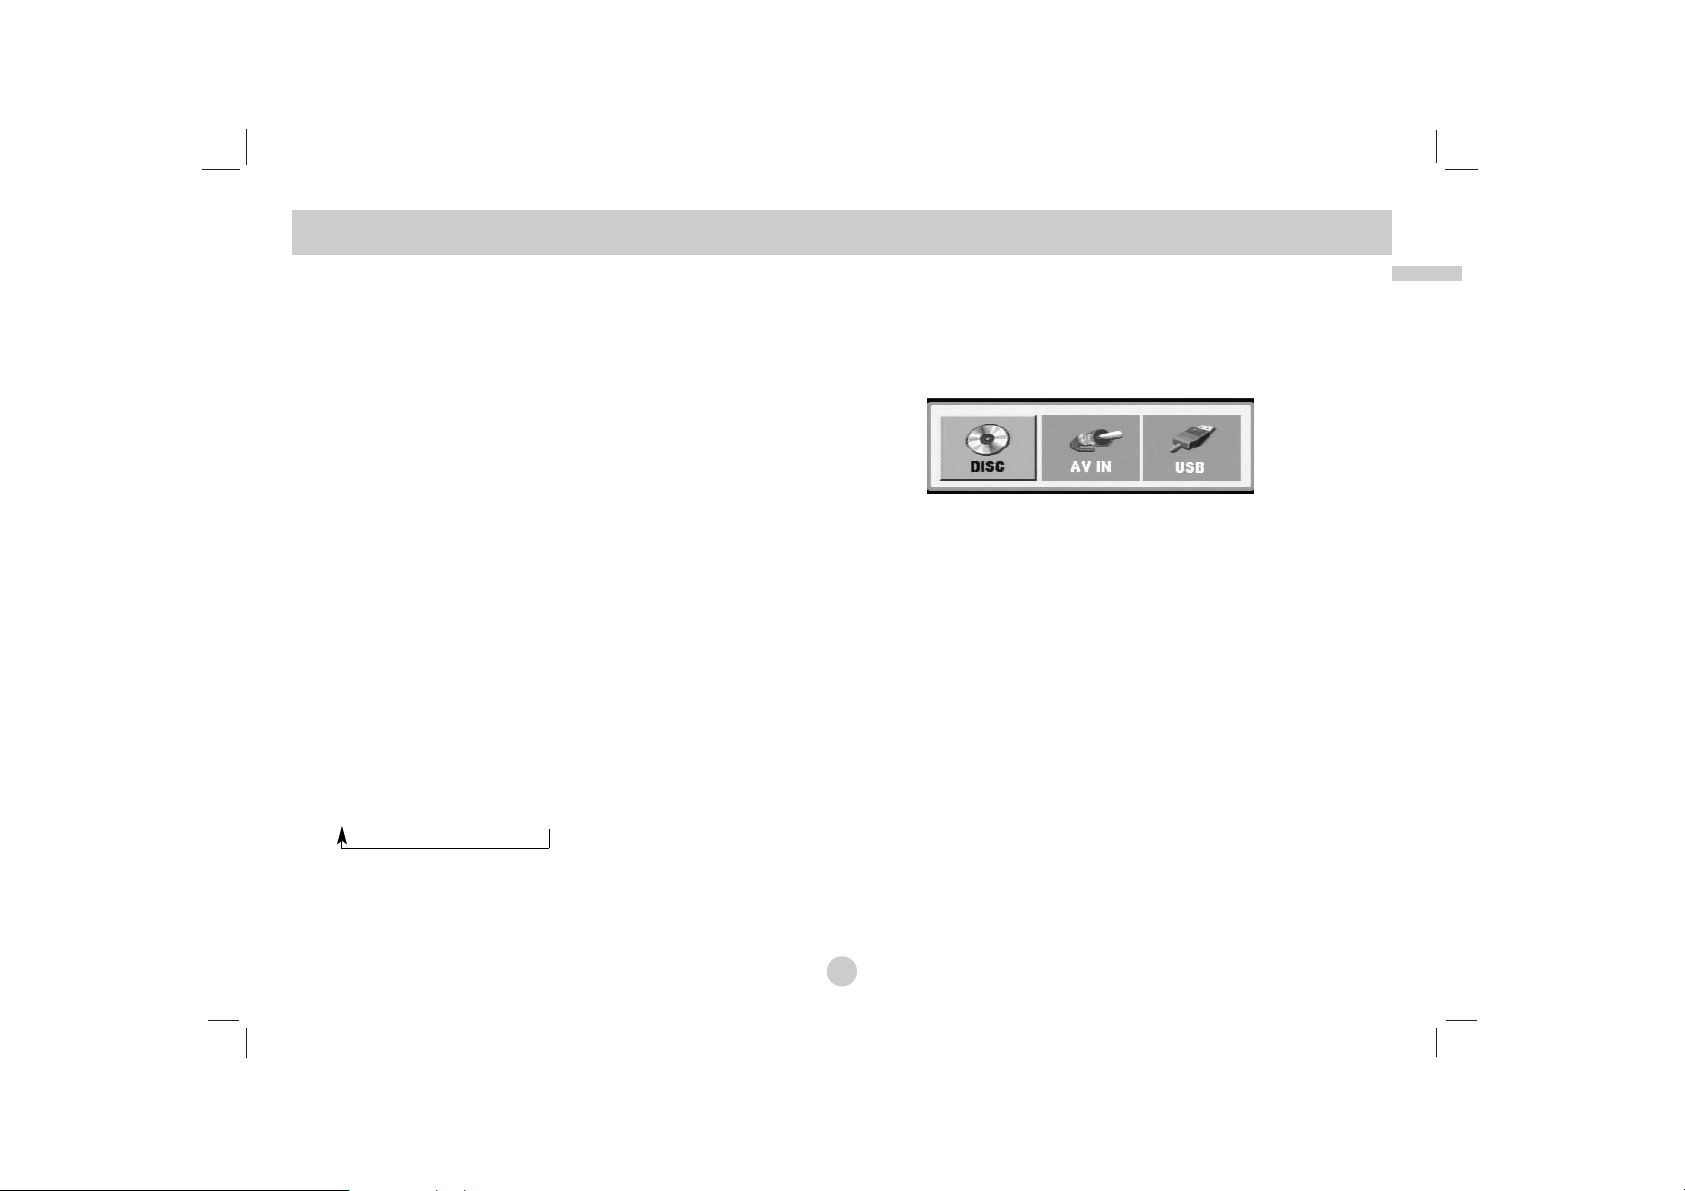
Select a MODE
Selects a mode among DISC, AV IN or USB.
1. Press MODE button on the unit.
The mode selection menu appears on the screen.
2. Use b / B to select the mode then press ENTER.
•
DISC:
The disc menu or playback picture for the disc appears
on the screen .
• AV IN: A picture from external device appears on the screen.
• USB: A file or folder list in USB Flash Drive appears on the
screen.
Playing a Disc
18
On-Screen Display
Displaying Disc Information on-screen
You can display various information about the disc loaded
on-screen.
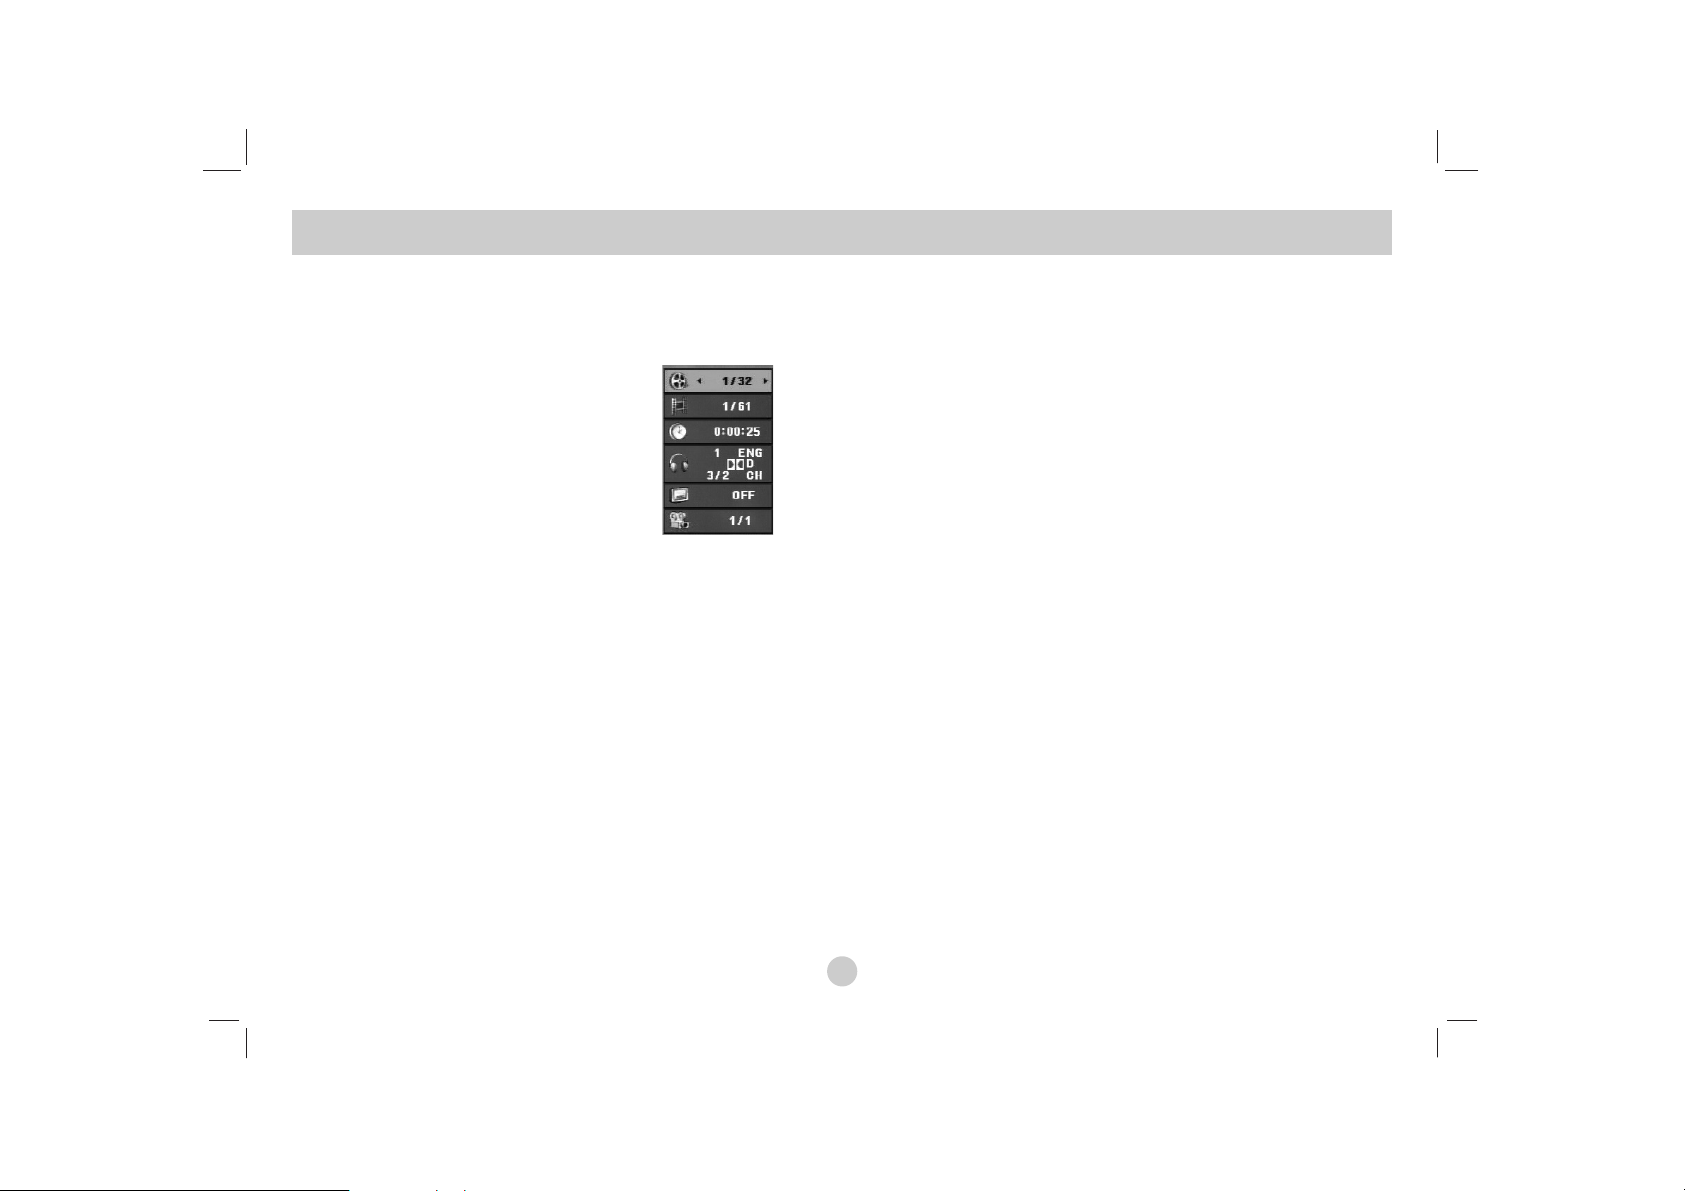
1. Press DISPLAY to show various
playback information. The items
displayed differ depending on the
disc type or playing status.
2. You can select an item by pressing v / V and change or select
the setting by pressing b / B.
Title (Track) – Current title (or track). number/total number of
titles (or tracks).
Chapter – Current chapter number/total number of chapters.
Time – Elapsed playing time.
Audio – Selected audio language or channel.
Subtitle – Selected subtitle.
Angle – Selected angle/total number of angles.
NOTE
If no button is pressed for a few seconds, the on-screen display
disappears.
Initial Settings
By using the Setup menu, you can make various adjustments to
items such as picture and sound. You can also set a language for
the subtitles and the Setup menu, among other things. For details
on each Setup menu item, see pages 19 to 23.
To display and exit the Menu:
Press SETUP to display the menu. A second press of SETUP will
take you back to initial screen.
To go to the next level:
Press B on the Remote Control.
To go back to the previous level:
Press b on the Remote Control.
General Operation
1. Press SETUP. The Setup menu appears.
2. Use v / V to select the desired option then press B to move to
the second level. The screen shows the current setting for the
selected item, as well as alternate setting(s).
3. Use v / V to select the second desired option then press B to
move to the third level.
4.
Use v / V to select the desired setting then press ENTER to
confirm your selection. Some items require additional steps.
5. Press SETUP or PLAY(N) to exit the Setup menu.
Advanced Operations
19
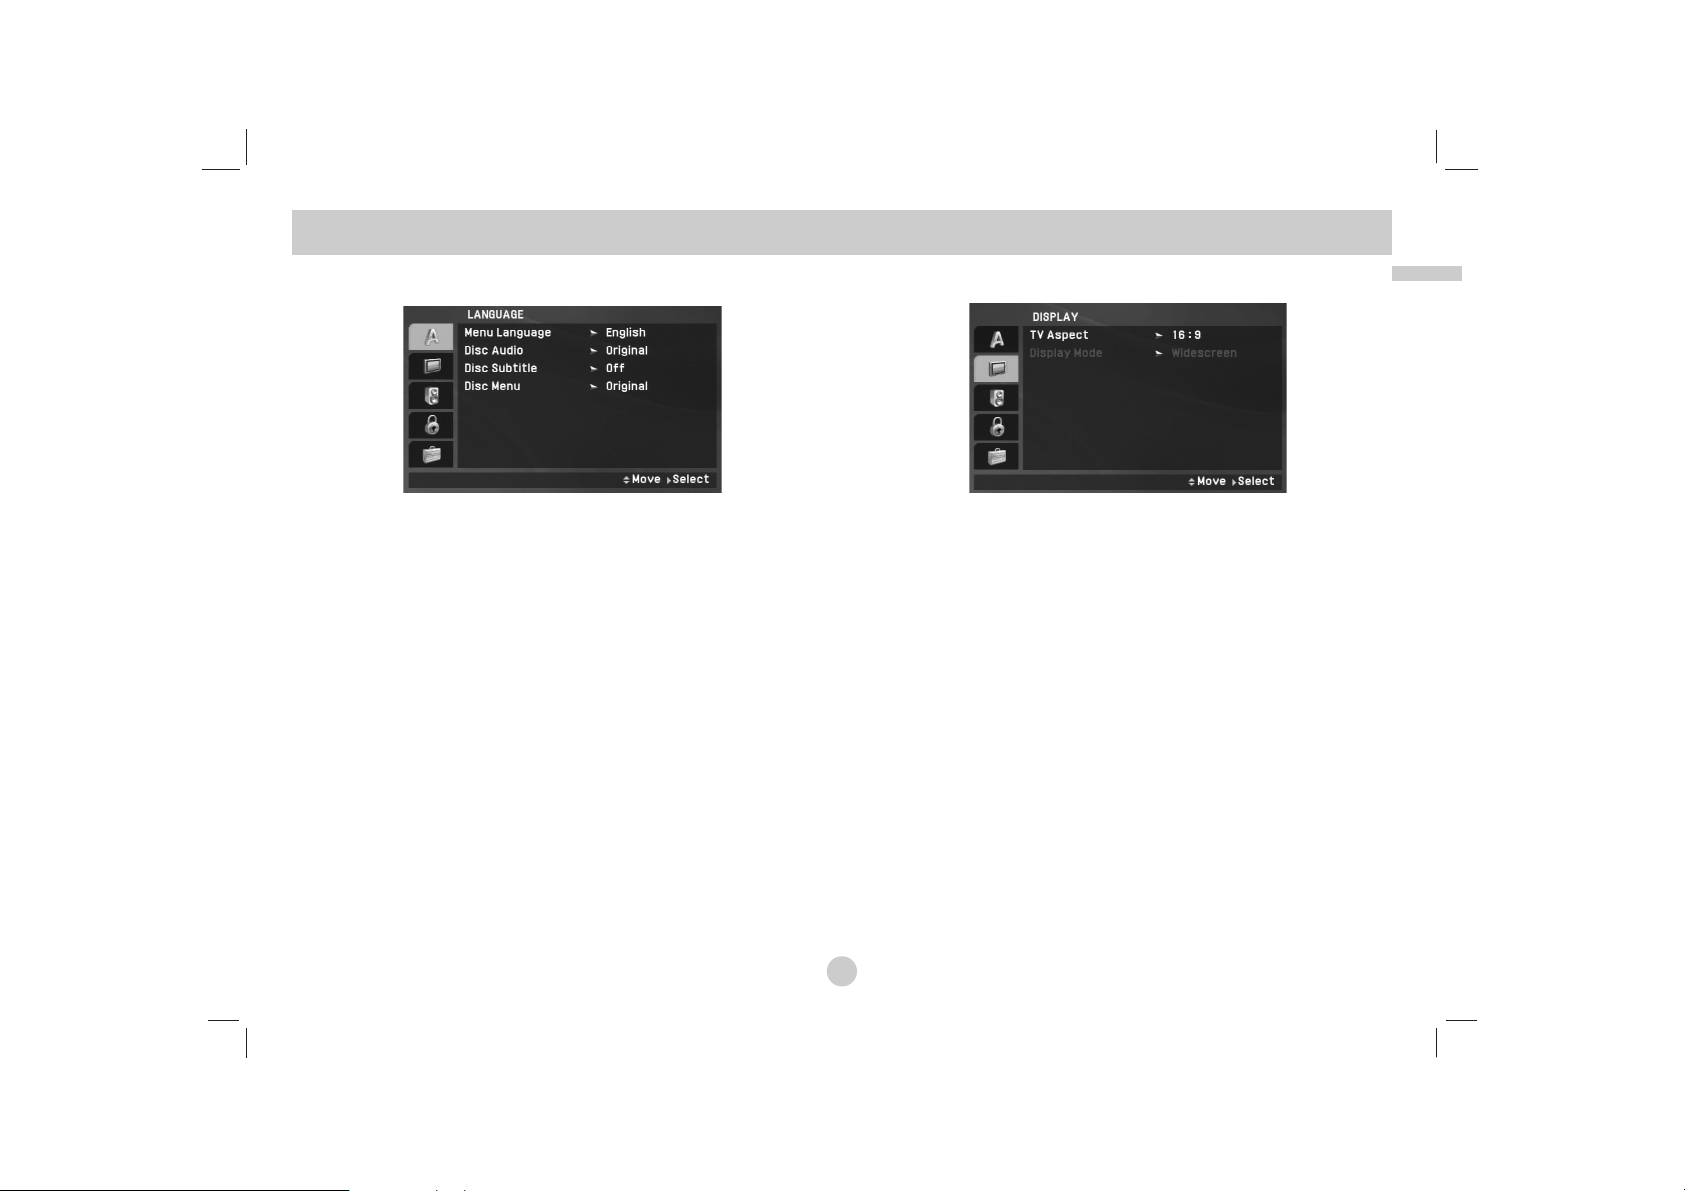
LANGUAGE
Menu Language
Select a language for the Setup menu and on-screen display.
Disc Audio / Subtitle / Menu
Select the language you prefer for the audio track (disc audio),
subtitles and the disc menu.
Original: Refers to the original language in which the disc was
recorded.
Other: To select another language, press numeric buttons and
then ENTER to enter the corresponding 4-digit number according to the language code list on the page 40. If you enter the
wrong language code, press CLEAR.
Off (for Disc Subtitle) – Turn off Subtitle.
DISPLAY
TV Aspect
4:3:
Select when a standard 4:3 TV is connected.
16:9: Select when a 16:9 TV is connected.
NOTE
If the TV Aspect option is set to 16:9, the Display Mode setting is
automatically set to Widescreen.
Display Mode
Display Mode setting works only when the TV Aspect mode is set
to “4:3”.
LetterBox: Displays a wide picture with bands on the upper
and lower portions of the screen.
Panscan:
Automatically displays the wide picture on the entire
screen and cuts off the portions that do not fit.
Initial Settings
20
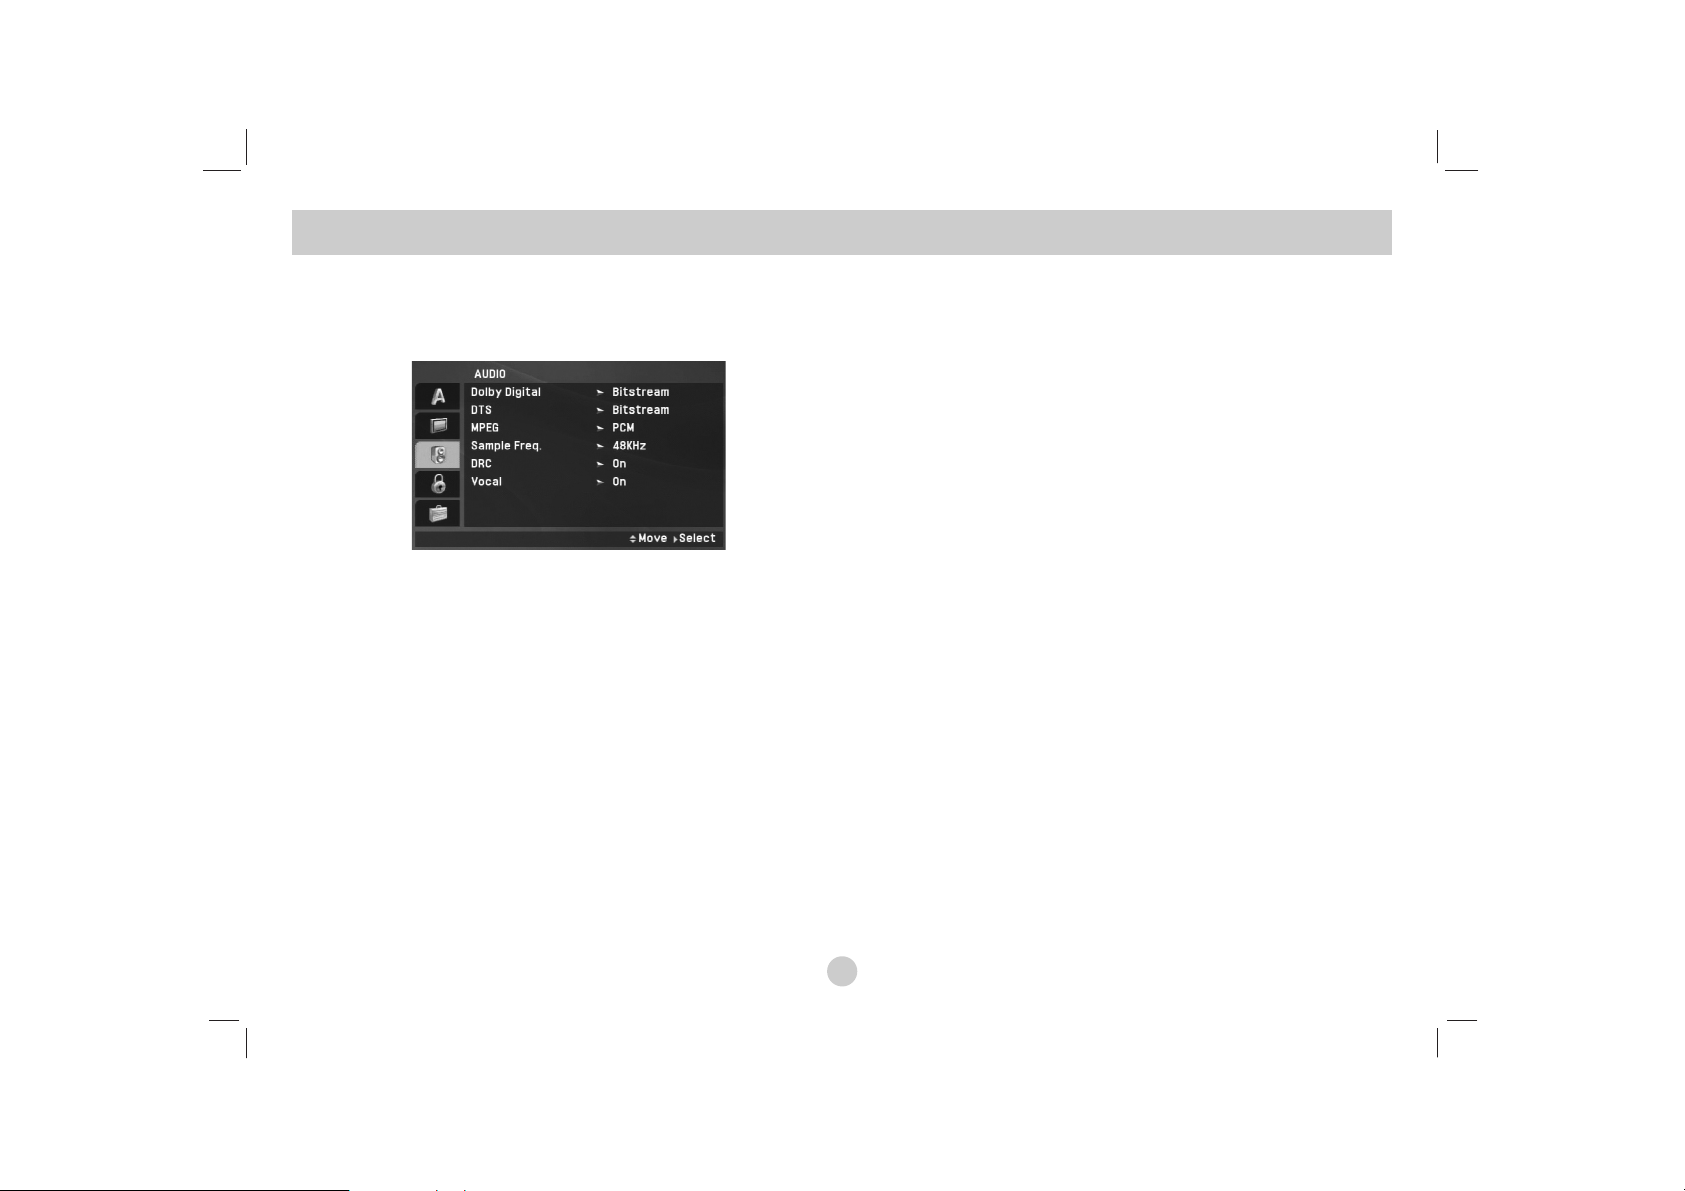
AUDIO
Each DVD disc has a variety of audio output options. Set the player’s AUDIO options according to the type of audio system you use.
Dolby Digital / DTS / MPEG
Bitstream: Select “Bitstream” if you connect the unit’s DIGITAL
OUT jack to an amplifier or other equipment with a Dolby
Digital, DTS or MPEG decoder.
PCM (for Dolby Digital / MPEG): Select when connected to a
two-channel digital stereo amplifier. DVDs encoded in Dolby
Digital or MPEG will be automatically downmixed to two-channel PCM audio.
Off (for DTS): If you select “Off”, the DTS signal is not output
through the DIGITAL OUT jack.
Sample Freq. (Frequency)
If your receiver or amplifier is NOT capable of handling 96 kHz
signals, select 48 kHz. When this choice is made, this unit automatically converts any 96 kHz signals to 48 kHz so your system
can decode them.
If your receiver or amplifier is capable of handling 96 kHz signals,
select 96 kHz. When this choice is made, this unit passes each
type of signal through without any further processing.
Check the documentation for your amplifier to verify its
capabilities.
DRC (Dynamic Range Control)
With the DVD format, you can hear a program’s soundtrack in the
most accurate and realistic presentation possible, thanks to digital
audio technology. However, you may wish to compress the
dynamic range of the audio output (the difference between the
loudest sounds and the quietest ones). This allows you to listen to
a movie at a lower volume without losing clarity of sound. Set
DRC to On for this effect.
Vocal
Set to On only when a multi-channel karaoke DVD is playing.
The karaoke channels on the disc mix into normal stereo sound.
Initial Settings
(continued)
21
Advanced Operations
Initial Settings
(continued)
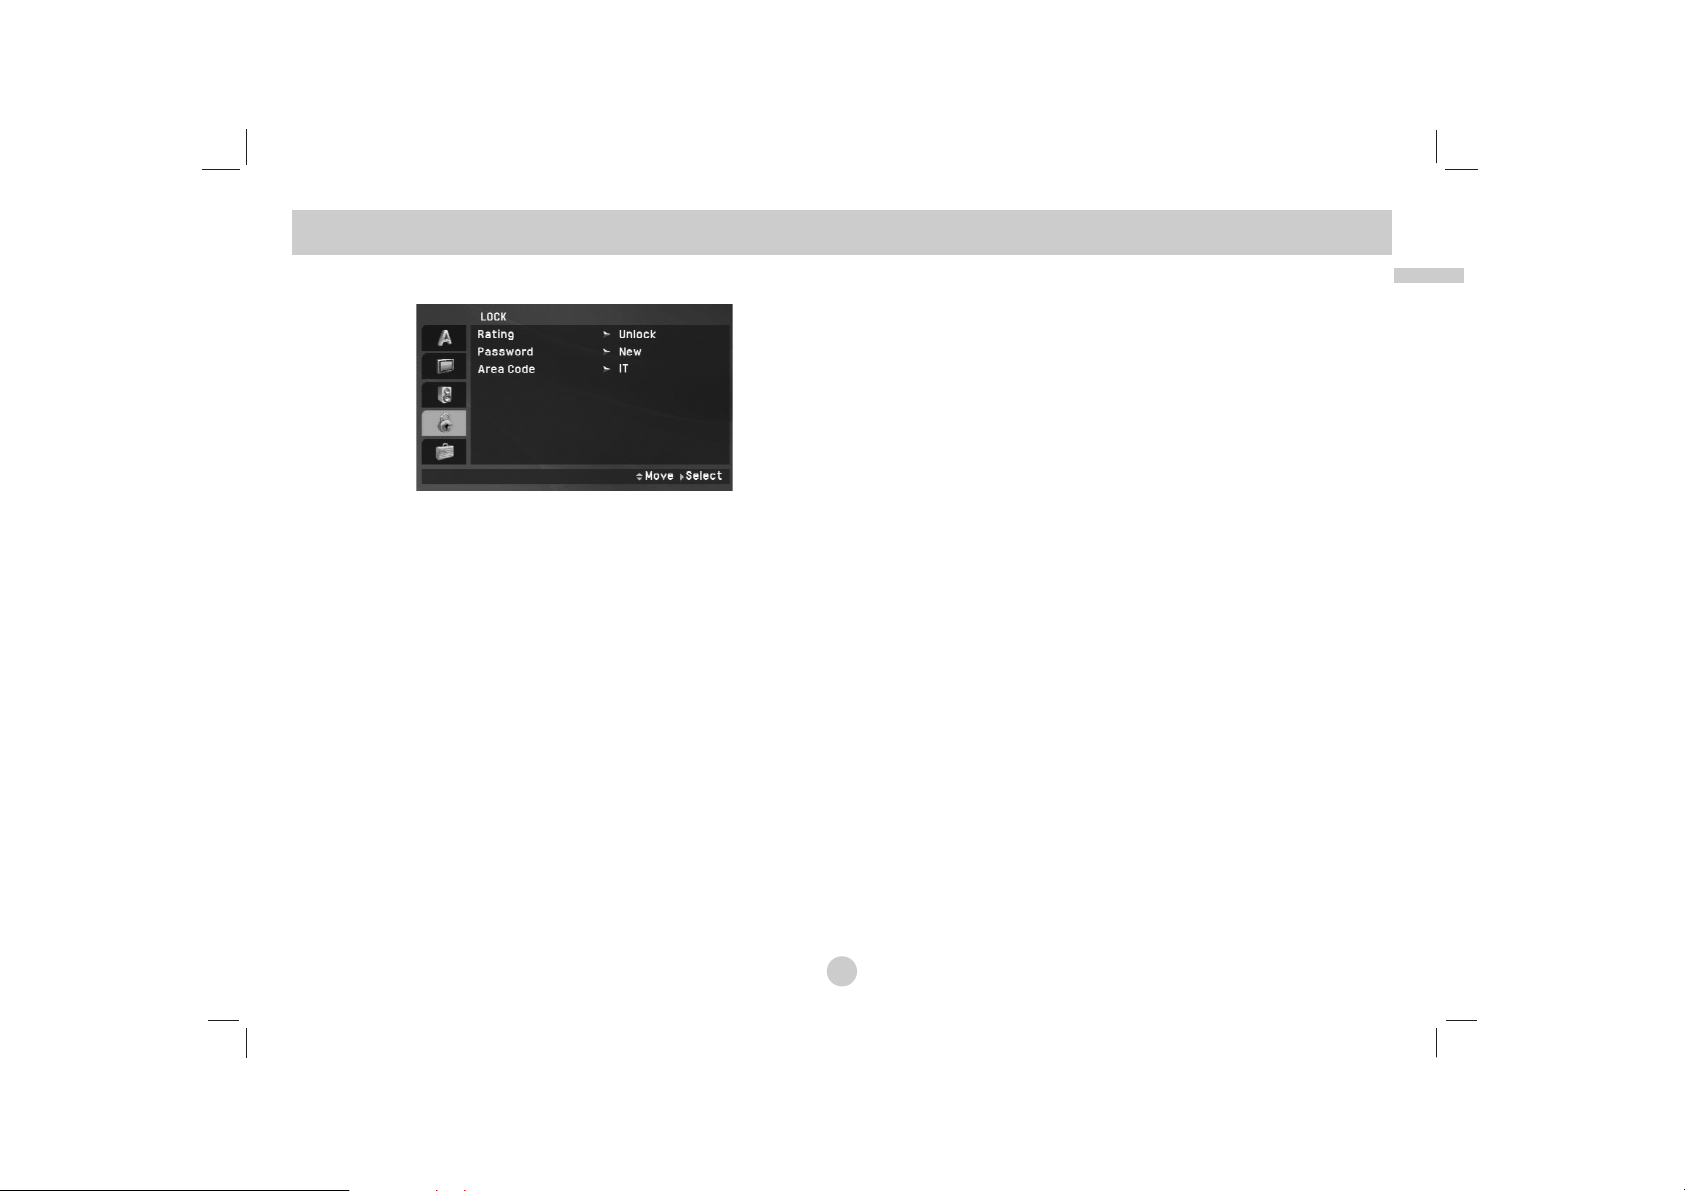
LOCK (Parental Control)
Rating
Blocks playback of rated DVDs based on their content. Not all
discs are rated.
1. Select “Rating” on the LOCK menu then press B.
2. To access the Rating, Password and Area Code features, you
must input the 4-digit password you created. If you have not yet
entered a password you are prompted to do so.
Input a 4-digit code and press ENTER. Enter it again and press
ENTER to verify. If you make a mistake before pressing
ENTER, press CLEAR.
3. Select a rating from 1 to 8 using the v / V buttons.
Rating 1-8: Rating one (1) has the most restrictions and rating
eight (8) is the least restrictive.
Unlock: If you select unlock, parental control is not active and
the disc plays in full.
NOTE
If you set a rating for the unit, all disc scenes with the same
rating or lower are played. Higher rated scenes are not played
unless an alternate scene is available on the disc. The alternative must have the same rating or a lower one. If no suitable
alternative is found, playback stops. You must enter the 4-digit
password or change the rating level in order to play the disc.
4. Press ENTER to confirm your rating selection, then press
SETUP to exit the menu.

22
Initial Settings
(continued)
Password
You can enter or change password.
1. Select Password on the LOCK menu then press B.
2. To make a new password:
Press ENTER when the “New” option is highlighted. Enter a
new password using the numbered buttons then press ENTER.
Enter the password again to verify.
To change the password:
Press ENTER when the “Change” option is highlighted. Enter a
current password using the numbered buttons then press
ENTER. Enter a new password using the numbered buttons
then press ENTER. Enter the password again to verify.
3. Press SETUP to exit the menu.
If you forget your password
If you forget your password, you can clear it using the following
steps:
1. Press SETUP to display the Setup menu.
2. Input the 6-digit number “210499” and the password is cleared.
Area Code
Enter the code of the area whose standards were used to rate the
DVD video disc, based on the list on page 41.
1. Select “Area Code” on the LOCK menu then press B.
2. Follow step 2 as shown previous page (Rating).
3. Select the first character using v / V buttons.
4. Press ENTER and select the second character using v / V
buttons.
5. Press ENTER to confirm your area code selection.
23
Advanced Operations
Initial Settings(Continued)
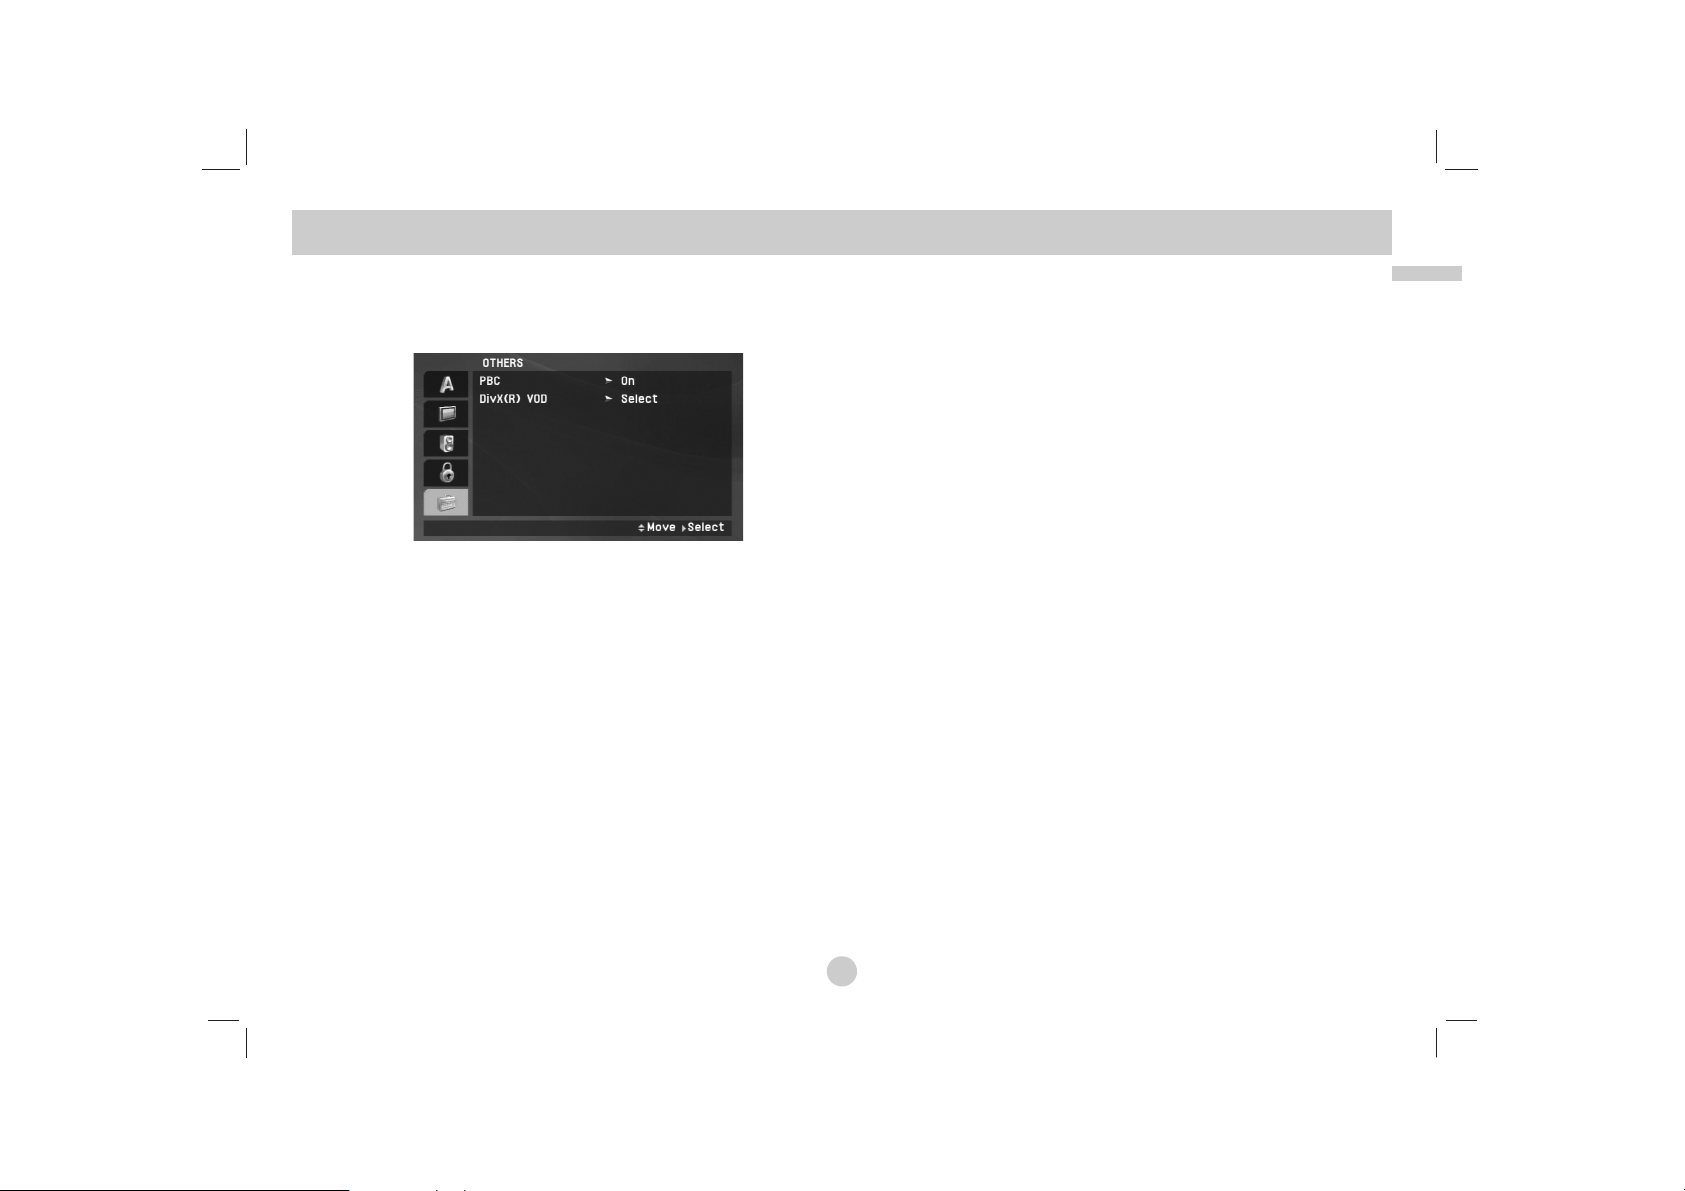
OTHERS
The PBC, DivX(R) VOD settings can be changed.
PBC
Set Playback Control (PBC) to On or Off.
On: Video CDs with PBC are played according to the PBC.
Off: Video CDs with PBC are played in the same way as Audio
CDs.
DivX(R) VOD
We provide you the DivX®VOD (Video On Demand) registration
code that allows you to rent and purchase videos using the DivX
®
VOD service. For more information, visit www.divx.com/vod.
1. Select “DivX(R) VOD” option then press B.
2. Press ENTER while “Select” is selected and the registration
code will appear.
Use the registration code to purchase or rent the videos from
DivX
®
VOD service at www.divx.com/vod. Follow the instructions
and download the video onto a disc for playback on this unit.
3. Press ENTER to exit.
NOTE
All the downloaded videos from DivX®VOD can only be played
back on this unit.

24
If a menu screen is displayed
Use the bB v Vbuttons to select the title/chapter you want to view,
then press ENTER to start. Press TITLE or MENU to return to the
menu screen.
Use the number buttons to select the track you want to view and
press RETURN to return to the menu screen. Menu settings and
operating procedures may differ. Follow the instructions on the each
menu screen. You also may set PBC to Off (See “PBC” on page 23).
NOTES
• If parental control is set and the disc is not within the rating settings
you must input the password.
(See “LOCK Menu” on page 21-22.)
• DVDs may have a region code. Your unit does not play discs that
have a region code different from your unit.
Unless stated otherwise, all operations described use the
Remote Control. Some features may also be available on the
Setup menu.
Resume Play
When play is stopped, the unit records the point where STOP was
pressed (RESUME function).
Press PLAY(N) and play will resume from this point.
Moving to another TITLE
When a disc has more than one title, you can move to another title.
Press DISPLAY during playback or resume play then the appropriate
number (0-9) or use b / B to move to another title.
Moving to another CHAPTER/TRACK
During playback, press SKIP/SEARCH (. or >) to go to the
next chapter/track or to return to the beginning of the current
chapter/track.
Press SKIP . twice briefly to step back to the previous
chapter/track.
Search
1. Press and hold SKIP/SEARCH (. or >) for about two
seconds during playback.
The player will now go into SEARCH mode.
2. Press and hold SKIP/SEARCH (. or >) repeatedly to select
the required speed.
DVD, DivX disc: 4 steps
Video CD, MP3, WMA, Audio CD: 3 steps
3. To exit SEARCH mode, press PLAY(N).
Slow Motion
1. Press SLOW (t or T) during playback.
The player will enter Slow mod
e.
DVD disc: 4 steps
Video CD, DivX: 4 steps
(forward only)
2. To exit slow motion mode, press PLAY(N).
DivXVCDDVD
ALL
ALL
DVD
ALL
VCD
DVD
General Features

25
Advanced Operations
Still Picture and Frame-by-Frame Playback
During playback, press PAUSE/STEP(X) to pause playback.
Press PAUSE/STEP(X) repeatedly to play Frame-by-Frame.
( Remote Control Only )
To exit still motion mode, press PLAY(N).
Time Search
To start playing at any chosen time on the disc:
1. Press DISPLAY during playback. The time search box shows
the elapsed playing time.
2. Use v / V to select the time search box and “-:--:--” appears.
3. Input the required start time in hours, minutes, and seconds
from left to right. If you enter the wrong numbers, press
CLEAR to remove the numbers you entered. Then input the
correct numbers.
4. Press ENTER to confirm. Playback starts from the selected
time.
Repeat A-B
During playback, each press of A-B button to select point A and
point B and repeats a sequence from point A (Starting point) to
point B (End point).
Press A-B again to cancel.
Repeat
During playback, press REPEAT repeatedly to select a desired
repeat mode.
DVD Video Discs: Chapter/Title/Off
Video CDs, Audio CD, DivX/MP3/WMA discs: Track/All/Off
NOTES
• On a Video CD with PBC, you must set PBC to Off on the setup menu
to use the repeat function (See “PBC” on page 23).
• If you press SKIP (>) once during Repeat Chapter (Track) playback,
the repeat playback cancels.
Zoom
During watching pictures, press ZOOM to enlarge the video image
(3 steps).
You can move through the zoomed picture using bBvVbuttons.
Press CLEAR to exit.
NOTES
Zoom may not work on some DVDs.
DivXVCDDVD
ALL
ACDDivXVCDDVD
DivXVCDDVD
DivXVCDDVD
ALL
General Features (Continued)

26
General Features (Continued)
Title Menu
If the current DVD title has a menu, the title menu appears on the
screen. Otherwise, the disc menu may appears.
Disc Menu
Press MENU and the disc menu is displayed. Press MENU again
to exit.
Changing the Audio Language
Press AUDIO repeatedly during playback to hear a different audio
language or encoding method.
With DVD-RW discs recorded in VR mode that have both a main
and a Bilingual audio channel, you can switch between Main (L),
Bilingual (R), or a mix of both (Main + Bilingual) by pressing
AUDIO.
Press AUDIO repeatedly during playback to hear a different audio
channel (STEREO, LEFT, or RIGHT).
Camera Angle
During playback of DVD disc contains scenes recorded different
camera angles, press ANGLE repeatedly to select a desired angle.
TIP
The angle indicator will blink on the screen during scenes recorded at
different angles as an indication that angle switching is possible.
Subtitles
Press SUBTITLE repeatedly during playback to see the different
subtitle languages.
NOTE
If there is no information or there is a code that can not read in the
DivX file, “ 1 ” etc are displayed.
DivXDVD
DVD
VCD
DivXDVD
DVD
DVD

27
Advanced Operations
Additional features
Marker Search
To enter a Marker
You can start playback from up to nine memorized points. To enter
a marker, press MARKER at the desired point on the disc. The
Marker icon appears on the TV screen briefly. Repeat to enter up
to nine markers.
To Recall or Clear a Marked Scene
1. During disc playback, press SEARCH. The marker search
menu appears on the screen.
2. Within 9 seconds, press b / B to select a marker number that
you want to recall or clear.
3. Press ENTER and playback starts from the marked scene. Or,
Press CLEAR and the marker number is erased from the list.
4. You can play any marker by inputting its number on the marker
search menu.
NOTES
• Some subtitles recorded around the marker may fail to appear
(DVD).
• All the markers are cleared when the power is turned off or the
disc is removed.
• The marker is not stored when the DVD or title menu is dis-
played on the screen.
Last Scene Memory
This unit memorizes last scene from the last disc that is viewed.
The last scene remains in memory even if you remove the disc
from the unit or switch off the unit. If you load a disc that has the
scene memorized, the scene is automatically recalled.
NOTES
This unit does not memorize the scene of a disc if you switch off
the unit before commencing to play the disc.
Screen Saver/Auto Power Off
The screen saver appears when you leave the unit in Stop mode
for about five minutes. If the Screen Saver is displayed for five
minutes, the unit automatically turns itself off.
VCD1.1
ACDDVDDivXVCDDVD

28
This unit can play Audio CDs or MP3/WMA files.
MP3/ WMA/ Audio CD
Once you insert an MP3/WMA files recorded media or Audio CD, a
menu appears on the TV screen.
Press v / V to select a track/file then press PLAY(N) or ENTER
and playback starts. You can use variable playback functions.
Refer to page 24-25.
ID3 TAG
• When playing a file containing information such as track titles,
you can see the information by pressing DISPLAY.
[ Title, Artist, Album, Year, Comment ]
• If there is no information, “NO ID3 TAG” appears on the display.
TIPS
• If you are in a file list on the MUSIC menu and want to return to
the Folder list, use the v / V to highlight and press ENTER.
• Press MENU to move to the next page.
• On a CD with MP3/WMA, JPEG and MOVIE file, you can switch
MUSIC, PHOTO and MOVIE menu. Press TITLE and MUSIC,
PHOTO and MOVIE word on top of the menu is highlighted.
MP3 / WMA file compatibility with this unit is limited as
follows:
• Sampling frequency: within 8 - 48 kHz (MP3),
within 32 - 48kHz (WMA)
• Bit rate: within 8 - 320kbps (MP3),
32 - 192kbps (WMA)
• The unit cannot read an MP3/WMA file that has a file extension
other than “.mp3” / “.wma”.
• CD-R physical format should be ISO 9660
• If you record MP3 / WMA files using software that cannot create
a file system (eg. Direct-CD) it is impossible to playback MP3 /
WMA files. We recommend that you use Easy-CD Creator, which
creates an ISO 9660 file system.
• File names should have a maximum of 16 letters and must incorporate an .mp3 or .wma extension.
• They should not contain special letters such as / ? * : “ < > l etc.
• The total number of files on the disc should be less than 650.
• This unit requires discs and recordings to meet certain technical
standards in order to achieve optimal playback quality. Prerecorded DVDs are automatically set to these standards. There
are many different types of recordable disc formats (including
CD-R containing MP3 or WMA files) and these require certain
pre-existing conditions (see above) to ensure compatible playback.
Playing an Audio CD or MP3/WMA file

29
Advanced Operations
The program function enables you to store your favorite tracks
from any disc in the player memory.
A program can contain 30 tracks.
1. Insert an Audio CD or MP3/WMA files recorded media. AUDIO
CD or MUSIC menu appears.
2. Press PROG. The mark will appear
NOTE
Press PROG. again, then the mark will disappear to exit the
Program Edit mode.
Audio CD Menu MP3/WMA Menu
3. Select a track on the “List”, then press ENTER to place the
selected track on the “Program” list. Repeat to place additional
tracks on the list.
4. Press B.
Select the track you want to start playing on the “Program” list.
5. Press PLAY(N) or ENTER to start. Playback begins in the
order in which you programmed the tracks. Playback stops
after all of the tracks on the “Program” list have played once.
6.
To resume normal playback from programmed playback, select
a track of AUDIO CD (or MUSIC) list and then press PLAY(N
).
Repeat Programmed Tracks
Press REPEAT to select a desired repeat mode.
• Track: repeats the current track
• All: repeats all the tracks on programmed list.
• Off(No display): does not play repeatedly.
NOTE
If you press > once during Repeat Track playback, the repeat
playback cancels.
Erasing a Track from Program List
1. Press PROG. and the mark will appear
2. Use vVb Bto select the track that you wish to erase from
the Program list.
3. Press CLEAR. Repeat step 1-3 to erase additional tracks on
the list.
Erasing the Complete Program List
1. Press PROG. and the mark will appear
2. Use vVb Bto select “Clear All”, then press ENTER.
NOTE
The programs are also cleared when the power is off or the disc is
removed.
Programmed Playback
E
E
E
E

30
This unit can play JPEG files.
1. Insert a JPEG files recorded media. The PHOTO menu
appears on the TV screen.
2. Press v / V to select a folder, and press ENTER. A list of files
in the folder appears. If you are in a file list and want to return
to the previous Folder list, use the v / V buttons on the remote
to highlight and press ENTER.
3. If you want to view a particular file, press v / V to highlight a
file and press ENTER or PLAY(N).
4. While viewing a file, you can press STOP(x) to move to the
previous menu (PHOTO menu).
TIPS
• Press MENU to move to the next page.
• There are three Slide Speed options :
>>> (Fast), >> (Normal) and > (Slow).
Use vVbBto highlight the . Then, use b / B to select the
option you want to use.
• On a CD with MP3/WMA, JPEG and MOVIE file, you can switch
MUSIC, PHOTO and MOVIE menu. Press TITLE and MUSIC,
PHOTO and MOVIE word on top of the menu is highlighted.
• While watching a picture, press RETURN (O) to hide the help
menu.
Slide Show
Use vVbBto highlight the (Slide Show) then press
ENTER.
Still Picture
1. Press PAUSE/STEP(X) during slide show.
The unit will now go into pause mode.
2. To return to the slide show, press PLAY(N) or press
PAUSE/STEP(X) again.
Viewing a JPEG file

31
Advanced Operations
Moving to another file
Press SKIP/SEARCH (. or >) or cursor (b or B) once while
viewing a picture to advance to the next or previous file.
Zoom
During watching pictures, press ZOOM to enlarge the video image
(3 steps).
You can move through the zoomed picture using bBvVbuttons.
Press CLEAR to exit.
To rotate picture
Press v / V during showing a picture to rotate the picture clockwise or counter clockwise.
To listen to MP3/WMA music while watching picture
1. Insert the disc containing the two types of file in the unit.
2. Press TITLE to display PHOTO menu.
3. Press v / V to select a photo file.
4. Use B to select icon then press ENTER.
Playback starts.
5. While viewing a file, you can press STOP(x) to move to the
previous menu (PHOTO menu).
TIP
To listen to only the desired music while watching picture, programmed the desired files from the “MUSIC” menu and then proceed as above
.
JPEG disc compatibility with this unit is limited as
follows:
• Depending upon the size and number of JPEG files, it could take a
long time for the unit to read the disc’s contents. If you don’t see an
on-screen display after several minutes, some of the files may be too
large — reduce the resolution of the JPEG files to less than 2M pixels
as 2760 x 2048 pixels and burn another disc.
• The total number of files and folders on the disc should be less than
650.
• Some discs may be incompatible due to a different recording format or
the condition of disc.
• Ensure that all the selected files have the “.jpg” extensions when
copying into the CD layout.
• If the files have “.jpe” or “.jpeg” extensions, please rename them as
“.jpg” file.
• File names without “.jpg” extension will not be able to be read by this
unit. Even though the files are shown as JPEG image files in Windows
Explorer.
Viewing a JPEG file (Continued)

32
This unit will play DVD-RW discs recorded using the Video
Recording (VR) format.
1. Insert a disc and close the tray. The DVD-VR menu appears
on the screen.
2. Press v / V to select a track then press PLAY(N) or ENTER
and playback starts.
3. Press MENU to move to the list menu.
NOTES
• This unit will play DVD-R/RW disc that is recorded using the DVD-Video
format that have been finalized using a DVD-recorder. Unfinalized DVDR/RW discs cannot be played in this unit.
• Some DVD-VR disc are made with CPRM data by DVD RECORDER.
Player does not support these kinds of discs.
What is ‘CPRM’?
CPRM is a copy protection system (with scramble system) only allowing
the recording of ‘copy once’ broadcast programs. CPRM stands for
Content Protection for Recordable Media.
Playing a DVD VR format Disc

33
Advanced Operations
This unit can play DivX files.
1. Insert a DivX file recorded media. The MOVIE menu appears
on the screen.
2. Press v / V to select a folder, and press ENTER. A list of files
in the folder appears. If you are in a file list and want to return
to the Folder list, use the v / V buttons on the remote to highlight and press ENTER.
3. If you want to view a particular file, press v / V to highlight a
file and press ENTER or PLAY(N). You can use variable play-
back functions. Refer to page 24-27.
4. Press STOP(x) to stop the playback. The Movie menu
appears.
Notice for displaying the DivX subtitle
If the subtitle does not display properly during playback, press and
hold SUBTITLE about 3 seconds then press b / B to select anoth-
er language code until the subtitle is displayed properly.
TIPS
• Press MENU to move to the next page.
• On a CD with MP3/WMA, JPEG and MOVIE file, you can switch
MUSIC, PHOTO and MOVIE menu. Press TITLE and MUSIC,
PHOTO and MOVIE word on top of the menu is highlighted.
• The disc subtitle may not be displayed properly, if a DivX subtitle
is downloaded through the internet.
• If the disc subtitle setup menu does not have the DivX subtitle
language you are going to play, the subtitle language may not
be displayed properly.
• The DivX subtitle file name has to be identified with the DivX file
name to display by this unit.
Playing a DivX Movie file

34
DivX disc compatibility with this unit is limited as follows:
• Available resolution size of the DivX file is under 720x576 (W x H)
pixel.
• The file name of the DivX subtitle is limited to 56 characters.
• If there is impossible code to express in the DivX file, it may be displayed as " _ " mark on the display.
• If the frame rate is over 30 frames per second, this unit may not
operate normally.
• If the video and audio structure of recorded file is not interleaved,
either video or audio is outputted.
• If the file is recorded with GMC, the unit supports only 1-point of
the record level.
*
GMC?
GMC is the acronym for Global Motion Compensation. It is an encoding tool specified in MPEG4 standard. Some MPEG4 encoder, like
DivX , have this option.
There are different levels of GMC encoding, usually called 1-point, 2point, or 3-point GMC.
Playable DivX file
".avi ", ".mpg ", ".mpeg "
Playable Subtitle format
SubRip(*.srt/*.txt)
SAMI(*.smi)
SubStation Alpha(*.ssa/*.txt)
MicroDVD(*.sub/*.txt)
SubViewer 2.0(*.sub/*.txt)
TMPlayer(*.txt)
Dvd Subtitle System(*.txt)
VobSub (*.sub) → Sub/idx, stream based format.
Playable Codec format
"DIVX3.xx ", "DIVX4.xx ", "DIVX5.xx ",
"MP43 ", "3IVX ".
Playable Audio format
"Dolby Digital ", "DTS ", "PCM ", "MP3 ", "WMA ".
• Sampling frequency: within 8 - 48 kHz (MP3),
within 32 - 48kHz (WMA)
• Bit rate: within 8 - 320kbps (MP3),
32 - 192kbps (WMA)
Playing a DivX Movie file (Continued)

35
Advanced Operations
This unit can play DivX or MP3/WMA files.
1. Connect the USB Flash Drive to the USB port on the unit after
power is on.
2. Press MODE on the unit.
The mode selection menu appears on the screen.
3. Select the USB using b / B buttons and press ENTER.
The file or folder list in USB Flash Drive appears on the
screen.
4. If you want to change the other mode, select the other mode in
mode selection menu.
To Remove the USB Flash Drive from the unit
1. Follow step 4 as shown above, to exit the menu.
2. Remove the USB Flash Drive from the unit.
NOTES
• Do not extract the USB Flash Drive in operating.
• Music files (MP3/WMA), image files (JPEG) and DivX files can
be played.
• The total number of files in a USB Flash Drive should be less
than 650 files.
• Some USB Flash Drive is not supported on this unit.
• This unit supports only USB Flash Drive.
• This unit can support USB1.1.
For details on each operations item,
refer to relevant page. (See pages 24-34)
Playing an USB Flash Drive

36
The picture and sound of a nearby TV, VCR, or radio may be
distorted during playback. If this occurs, position the player away
from the TV, VCR, or radio, or turn off the unit after removing the
disc.
AV output Connections
Depending on your TV and other equipment there are various
ways you can connect the unit. Please refer to the manuals of
your TV, stereo system or other devices as necessary for
additional connection information.
AV output Connections to Your TV
1. Set the Mode selection menu to “USB” or “ DISC” mode.
2. Connect the black end of supplied AV cable to the AV IN/OUT
jack on the unit.
3. Connect the yellow end of supplied AV cable to the VIDEO
Input jack on your TV.
4. Connect the red and white ends of supplied AV cable to the
AUDIO Input jacks on your TV.
NOTE
Make sure the DVD player is connected directly to the TV and not
to a VCR, otherwise the DVD image could be distorted by the
copy protection system.
Setting up the Player
Audio/Video cable
(Supplied)
Rear of TV
Right side of unit

37
Connections
AV input Connections
Connect the input jacks (Audio/Video) on the unit to the
audio/video out jacks on your external device, using audio/video
cables.
AV input Connections to Your unit
1. Set the Mode selection menu to “AV IN” mode.
2. Connect the black end of supplied AV cable to the AV IN/OUT
jack on the unit.
3. Connect the yellow end of supplied AV cable to the VIDEO
Output jack on your external device.
4. Connect the red and white ends of supplied AV cable to the
AUDIO Output jacks on your external device.
Setting up the Player (Continued)
Audio/ Video cable
(Supplied)
External Device
Right side of unit

38
Audio Connection to Optional Equipment
Connect the unit to your optional equipment for audio output.
You must set the Mode selection menu to “USB” or “ DISC” mode.
Amplifier equipped with 2-channel analog stereo or Dolby Pro
Logic ll / Pro Logic: Connect the AV IN/OUT jacks on the unit to
the audio left and right IN jacks on your amplifier, receiver, or
stereo system, using the audio cables.
Amplifier equipped with 2-channel digital stereo (PCM) or
audio / video receiver equipped with a multi-channel decoder
(Dolby Digital™, MPEG 2, or DTS): Connect one of the unit
Coaxial jack to the corresponding in jack on your amplifier. Use an
optional digital audio cable.
Digital Multi-channel sound
A digital multi-channel connection provides the best sound quality.
For this you need a multi-channel audio / video receiver that supports one or more of the audio formats supported by your unit
such as MPEG 2, Dolby Digital and DTS. Check the receiver manual and the logos on the front of the receiver.
NOTES
•
If the audio format of the digital output does not match the capabilities of your receiver, the receiver produces a strong, distorted
sound or no sound at all.
• Six Channel Digital Surround Sound via a digital connection can
only be obtained if your receiver is equipped with a Digital Multichannel decoder.
• To see the audio format of the current DVD in the on-screen dis-
play, press AUDIO.
Setting up the Player (Continued)
Coaxial cable
(Not supplied)
Audio/ Video
cable (Supplied)
and/or
Amplifier(Receiver)
Right side of unit
L
COAXIAL
DIGITAL INPUT
R
AUDIO INPUT

39
Reference
Troubleshooting
Symptom
No power.
No picture on the LCD
or TV (including video
from another unit).
No sound.
The unit does not start
playback.
No response when buttons are pressed.
The Remote Control
does not work properly.
Correction
• Plug the power cord into the wall outlet securely.
• Recharge the battery.
• Connect the video cable into the jacks securely.
• Set the MODE correctly.
While you are viewing video from other equipment,
set the MODE to A/V IN mode.
• Select a LCD mode other than OFF.
• Select the appropriate video input mode on the TV
so the picture from the unit appears on the screen.
• Select the correct input mode of the audio receiver
so you can listen to the sound from the unit.
• Connect the audio cable into the jacks securely.
• Insert a playable disc. (Check the disc type and
Regional code.)
• Cancel the Rating function or change the rating level.
• “ ” may appear on the screen during operation.
• Operate the Remote Control within about 23 ft
(7 m).
Cause
• The power cord is disconnected.
• The battery is discharged.
• The video cable is not connected securely.
• The MODE selection is not set correctly.
• LCD mode is set to OFF.
• The TV is not set to receive DVD signal
output.
•
The equipment connected with the audio cable
is not set to receive DVD signal output.
• The audio cables are not connected
securely.
• An unplayable disc is inserted.
• The Rating level is set.
• Some discs prohibit certain operations.
• The Remote Control is too far from the
unit.

40
Use this list to input your desired language for the following initial settings:
Disc Audio, Disc Subtitle, Disc Menu.
Language Codes
Language Code
Abkhazian 6566
Afar 6565
Afrikaans 6570
Albanian 8381
Ameharic 6577
Arabic 6582
Armenian 7289
Assamese 6583
Aymara 6588
Azerbaijani 6590
Bashkir 6665
Basque 6985
Bengali; Bangla 6678
Bhutani 6890
Bihari 6672
Breton 6682
Bulgarian 6671
Burmese 7789
Byelorussian 6669
Cambodian 7577
Catalan 6765
Chinese 9072
Corsican 6779
Croatian 7282
Czech 6783
Danish 6865
Dutch 7876
English 6978
Esperanto 6979
Estonian 6984
Faroese 7079
Language Code
Fiji 7074
Finnish 7073
French 7082
Frisian 7089
Galician 7176
Georgian 7565
German 6869
Greek 6976
Greenlandic 7576
Guarani 7178
Gujarati 7185
Hausa 7265
Hebrew 7387
Hindi 7273
Hungarian 7285
Icelandic 7383
Indonesian 7378
Interlingua 7365
Irish 7165
Italian 7384
Japanese 7465
Javanese 7487
Kannada 7578
Kashmiri 7583
Kazakh 7575
Kirghiz 7589
Korean 7579
Kurdish 7585
Laothian 7679
Latin 7665
Latvian, Lettish 7686
Language Code
Lingala 7678
Lithuanian 7684
Macedonian 7775
Malagasy 7771
Malay 7783
Malayalam 7776
Maltese 7784
Maori 7773
Marathi 7782
Moldavian 7779
Mongolian 7778
Nauru 7865
Nepali 7869
Norwegian 7879
Oriya 7982
Panjabi 8065
Pashto, Pushto 8083
Persian 7065
Polish 8076
Portuguese 8084
Quechua 8185
Rhaeto-Romance 8277
Rumanian 8279
Russian 8285
Samoan 8377
Sanskrit 8365
Scots Gaelic 7168
Serbian 8382
Serbo-Croatian 8372
Shona 8378
Sindhi 8368
Language Code
Singhalese 8373
Slovak 8375
Slovenian 8376
Somali 8379
Spanish 6983
Sudanese 8385
Swahili 8387
Swedish 8386
Tagalog 8476
Tajik 8471
Tamil 8465
Tatar 8484
Telugu 8469
Thai 8472
Tibetan 6679
Tigrinya 8473
Tonga 8479
Turkish 8482
Turkmen 8475
Twi 8487
Ukrainian 8575
Urdu 8582
Uzbek 8590
Vietnamese 8673
Volapük 8679
Welsh 6789
Wolof 8779
Xhosa 8872
Yiddish 7473
Yoruba 8979
Zulu 9085

41
Reference
Choose an area code from this list.
Area Codes
Area Code
Afghanistan AF
Argentina AR
Australia AU
Austria AT
Belgium BE
Bhutan BT
Bolivia BO
Brazil BR
Cambodia KH
Canada CA
Chile CL
China CN
Colombia CO
Congo CG
Costa Rica CR
Croatia HR
Czech Republic CZ
Denmark DK
Ecuador EC
Egypt EG
El Salvador SV
Area Code
Ethiopia ET
Fiji FJ
Finland FI
France FR
Germany DE
Great Britain GB
Greece GR
Greenland GL
Herd and Mcdonald Islands
HM
Hungary HU
India IN
Indonesia ID
Israel IL
Italy IT
Jamaica JM
Japan JP
Kenya KE
Kuwait KW
Libya LY
Luxembourg LU
Area Code
Malaysia MY
Maldives MV
Mexico MX
Monaco MC
Mongolia MN
Morocco MA
Nepal NP
Netherlands NL
Netherlands Antilles AN
New Zealand NZ
Nigeria NG
Norway NO
Oman OM
Pakistan PK
Panama PA
Paraguay PY
Philippines PH
Poland PL
Portugal PT
Romania RO
Russian Federation RU
Area Code
Saudi Arabia SA
Senegal SN
Singapore SG
Slovak Republic SK
Slovenia SI
South Africa ZA
South Korea KR
Spain ES
Sri Lanka LK
Sweden SE
Switzerland CH
Thailand TH
Turkey TR
Uganda UG
Ukraine UA
United States US
Uruguay UY
Uzbekistan UZ
Vietnam VN
Zimbabwe ZW

42
General
Power supply:
DC 9.5V (AC adapter terminal), DC 7.4V (Battery)
Power consumption: 12W with battery
Net Weight: 1.60 lbs (0.73 kg) (without battery pack)
External dimensions (W x H x D):
7.6 x 1.5 x 6.7 inches (195 x 38.5 x 172.6 mm)
Signal system: PAL
Laser:
DVD Laser wavelength 662+25 / 662-15 nm
CD Laser wavelength 785+25 / 785-15 nm
Frequency range (audio):
DVD linear sound: 48kHz sampling 8 Hz to 20 kHz
96kHz sampling 8 Hz to 44 kHz
Signal-to-noise ratio (audio): More than 80 dB
Dynamic range (audio): More than 80 dB
Harmonic distortion (audio): 0.02 %
Operating conditions:
Temperature: 5°C to 35°C, Operation status: Horizontal
Connectors
Video input/output (VIDEO In/Out):
1.0 V (p-p), 75 Ω, negative sync., ø3.5mm mini jack x 1
Audio input/output (AUDIO In/Out, analog audio):
2.0 Vrms(1 KHz, 0 dB), ø3.5mm mini jack x 1
Earphone terminal: ø3.5mm stereo mini jack x 2
Liquid Crystal Display
Panel size: 7 inches wide (diagonal)
Projection system: R.G.B. stripe
Driving system: TFT active matrix
Resolution: 234 x 480 x 3 (effective pixel rate: more than
99.99%)
Accessories
• RCA Audio/Video cable...........................................................1
• AC Adapter (DPAC1T) ............................................................1
• Automotive Adapter (DPDC1) .................................................1
• Battery Pack (DPB27).............................................................1
• Remote control........................................................................1
• Battery for Remote control (Lithium Battery) ..........................1
Design and specifications are subject to change without notice.
Specifications
P/NO. : MFL37883923

LETTORE DVD PORTABILE
Leggere con attenzione e completamente queste
istruzioni prima di effettuare le connessioni e
registrazioni o utilizzare questo prodotto.
MANUALE DELL’UTENTE
Modello: DP271

Il fulmine con la punta a freccia all’interno di un triangolo equilatero avverte l’utente della presenza di tensioni pericolose
sprovviste di isolamento all’interno del prodotto, sufficientemente potenti da causare il rischio di folgorazione alle persone.
Il punto esclamativo all’interno di un triangolo equilatero avverte
l’utente della presenza di istruzioni importanti relative alla
manutenzione (assistenza) fornite con la documentazione in
dotazione.
ATTENZIONE: Non installare questo apparecchio in spazi ristretti quali
scaffali o unità simili.
AVVERTENZA : non ostruire le aperture di ventilazione. Installare secondo
le istruzioni del fabbricante.
Le feritoie e le aperture sono previste per la ventilazione e per garantire il
corretto funzionamento del prodotto, proteggendolo dal surriscaldamento.
Non ostruire le aperture collocando il prodotto su divani, letto, tappeti o
altre superfici simili. Non collocare il prodotto incassato in mobili come
librerie o scaffali, a meno che non sia prevista una ventilazione sufficiente
e siano state seguite le istruzioni del fabbricante.
ATTENZIONE:
questo prodotto impiega un sistema laser.
Per garantire l'uso corretto del prodotto, leggere il presente manuale di
istruzioni a fondo e conservarlo per consultazione futura. In caso di necessità
di manutenzione dell'unità, contattare un centro di assistenza autorizzato.
L'uso di comandi di impostazione o l'esecuzione di procedure diverse da
quelle specificate nel presente manuale possono determinare l'eventuale
esposizione a radiazioni pericolose.
Per evitare l'esposizione diretta al fascio laser non aprire il dispositivo. In caso
di apertura sussiste il pericolo di radiazioni laser visibili. NON FISSARE LO
SGUARDO SUL FASCIO LASER.
ATTENZIONE: l'apparecchio non deve essere esposto all'acqua (gocce o
spruzzi) e quindi sopra al dispositivo non devono essere posti oggetti contenenti liquidi, come ad esempio i vasi.
Note sul Copyright:
La legge vieta la copia, la trasmissione, la riproduzione, la trasmissione
via cavo, la riproduzione in pubblico e la vendita di materiale protetto da
Copyright senza autorizzazione. Questo prodotto integra la funzione di
protezione dalla copia sviluppata da Macrovision. I segnali di protezione
dalla copia sono registrati sui dischi stessi. Quando si registrano e poi si
riproducono le immagini di questi dischi, le immagini appaiono
disturbate. Questo prodotto integra la tecnologia per la protezione del
copyright tutelata da rivendicazioni di metodo di specifici brevetti U.S. e
altri diritti di proprietà intellettuale di Macrovision Corporation e altri
proprietari di diritti. L'utilizzo di tale tecnologia per la protezione del
copyright deve essere autorizzata da Macrovision Corporation, ed è
intesa per il solo uso domestico e in altre situazioni di visione limitata,
salvo diversa autorizzazione di Macrovision Corporation. È vietata la
decodifica, la decompilazione o il disassemblaggio.
Precauzioni di sicurezza
2
ATTENZIONE
PERICOLO DI FOLGO-
RAZIONE - NON APRIRE
ATTENZIONE:
PER RIDURRE IL RISCHIO DI FOLGO-
RAZIONENON RIMUOVERE IL PANNELLO - NON CONTIENE
PARTI UTILIZZABILI DALL'UTENTE.PER LE RIPARAZIONI
CONSULTARE PERSONALESPECIALIZZATO.
AVVERTENZA: PER RIDURRE IL RISCHIO DI INCENDI O
FOLGORAZIONE, NON ESPORRE QUESTA
APPARECCHIATURA ALLA PIOGGIA O ALL'UMIDITÀ.

3
AVVERTENZA Cavo di alimentazione
Per la maggior parte degli elettrodomestici si consiglia di
collegarli a un circuito dedicato.
In altre parole, a un circuito a singola presa che alimenti solo
quell’elettrodomestico e che non abbia altre uscite o circuiti di
diramazione. In caso di dubbi, consultare la pagina delle specifiche
del manuale dell’utente.
Non sovraccaricare le prese a muro. Prese sovraccariche,
allentate o danneggiate, prolunghe, cavi sfilacciati o isolamenti
spaccati sono pericolosi. Ognuna delle situazioni elencate può
provocare scosse elettriche o incendi. Periodicamente, controllare
il cavo dell’elettrodomestico e se si notano danni o deterioramento, scollegarlo, interromperne l’uso e far sostituire il cavo con uno
dello stesso tipo presso un centro di assistenza autorizzato.
Proteggere il cavo di alimentazione da schiacciamento,
calpestamento o attorcigliamento. Porre particolare attenzione alle
spine, alle prese a muro e ai punti di uscita del cavo
dall’elettrodomestico.
Per scollegare l’alimentazione di rete, staccare il cavo. Durante
l’installazione del prodotto, assicurarsi che la spina sia facilmente
accessibile.
Dichiarazione di conformità La società LG ELECTRONICS ITALIA S.p.A.
dichiara che il prodotto DP271 è costruito in conformità alle prescrizioni del
D.M.n°548 del 28/8/95, pubblicato sulla G.U.n°301 del 28/12/95 ed in
particolare è conforme a quanto indicato nell’art.2, comma 1 dello stesso
descreto.
Questo prodotto è fabbricato in conformità alla direttiva
CEE 89/336/CEE, 93/68/CEE e 2006/95/CE.
Smaltimento delle apparecchiature obsolete
1. Quando su un prodotto è riportato il simbolo di un bidone della
spazzatura barrato da una croce significa che il prodotto è
coperto dalla direttiva europea 2002/96/EC.
2. Tutti i prodotti elettrici ed elettronici dovrebbero essere smaltiti
separatamente rispetto alla raccolta differenziata municipale,
mediante impianti di raccolta specifici designati dal governo o
dalle autorità locali.
3. Il corretto smaltimento delle apparecchiature obsolete
contribuisce a prevenire possibili conseguenze negative sulla
salute umana e sull'ambiente.
4. Per informazioni più dettagliate sullo smaltimento delle
apparecchiature obsolete, contattare il comune, il servizio di
smaltimento rifiuti o il negozio in cui è stato acquistato il prodotto.
Precauzioni di sicurezza (Continua)
Introduzione

4
Indice
Introduzione
Precauzioni di sicurezza. . . . . . . . . . . . . . . . . . . . . . . . . . . . . . . . . . 2-3
Indice . . . . . . . . . . . . . . . . . . . . . . . . . . . . . . . . . . . . . . . . . . . . . . . . . 4
Prima dell’uso . . . . . . . . . . . . . . . . . . . . . . . . . . . . . . . . . . . . . . . . . 5-7
Informazioni sul simbolo . . . . . . . . . . . . . . . . . . . . . . . . . . . . . 5
Simboli utilizzati nel manuale. . . . . . . . . . . . . . . . . . . . . . . . . . . . . 5
Note sui Dischi . . . . . . . . . . . . . . . . . . . . . . . . . . . . . . . . . . . . . . . 5
Manutenzione e assistenza . . . . . . . . . . . . . . . . . . . . . . . . . . . . . . 6
Tipi di dischi riproducibili . . . . . . . . . . . . . . . . . . . . . . . . . . . . . . . . 7
Codice regionale . . . . . . . . . . . . . . . . . . . . . . . . . . . . . . . . . . . . . . 7
Identificazione dei controlli . . . . . . . . . . . . . . . . . . . . . . . . . . . . . . .8-11
Unità principale . . . . . . . . . . . . . . . . . . . . . . . . . . . . . . . . . . . . . .8-9
Telecomando . . . . . . . . . . . . . . . . . . . . . . . . . . . . . . . . . . . . . .10-11
Connessioni per l’alimentazione . . . . . . . . . . . . . . . . . . . . . . . . . .12-15
Connettere l'adattatore CA . . . . . . . . . . . . . . . . . . . . . . . . . . . . . .12
Connettere l'adattatore per automobile . . . . . . . . . . . . . . . . . . . . .13
Pacco batterie . . . . . . . . . . . . . . . . . . . . . . . . . . . . . . . . . . . . .14-15
Rotazione dello schermo LCD . . . . . . . . . . . . . . . . . . . . . . . . . . . . . .16
Riproduzione di un disco . . . . . . . . . . . . . . . . . . . . . . . . . . . . . . . . . . 17
Funzionamento avanzato
Visualizzazione a schermo delle informazioni relativ0e al disco . . . . . 18
Impostazioni iniziali . . . . . . . . . . . . . . . . . . . . . . . . . . . . . . . . . . . 18-23
Funzionamento generale . . . . . . . . . . . . . . . . . . . . . . . . . . . . . . . 18
LINGUA . . . . . . . . . . . . . . . . . . . . . . . . . . . . . . . . . . . . . . . . . . . 19
ESPOSIZIONE . . . . . . . . . . . . . . . . . . . . . . . . . . . . . . . . . . . . . . 19
AUDIO . . . . . . . . . . . . . . . . . . . . . . . . . . . . . . . . . . . . . . . . . . . . 20
BLOCCO . . . . . . . . . . . . . . . . . . . . . . . . . . . . . . . . . . . . . . . . 21-22
ALTRI . . . . . . . . . . . . . . . . . . . . . . . . . . . . . . . . . . . . . . . . . . . . . 23
Funzioni generali . . . . . . . . . . . . . . . . . . . . . . . . . . . . . . . . . . . . . 24-26
Funzionalità aggiuntive . . . . . . . . . . . . . . . . . . . . . . . . . . . . . . . . . . . 27
Riproduzione di un CD audio o di un file MP3/WMA. . . . . . . . . . . . . . 28
Riproduzione programmata . . . . . . . . . . . . . . . . . . . . . . . . . . . . . . . . 29
Ripetizione delle tracce programmate . . . . . . . . . . . . . . . . . . . . . 29
Cancellazione di una traccia dall'Elenco Programma . . . . . . . . . . 29
Cancellazione di tutto l’Elenco Programma . . . . . . . . . . . . . . . . . 29
Visualizzazione di file JPEG . . . . . . . . . . . . . . . . . . . . . . . . . . . . . 30-31
Mostra (Presentazione) . . . . . . . . . . . . . . . . . . . . . . . . . . . . . . . . 30
Immagine statica . . . . . . . . . . . . . . . . . . . . . . . . . . . . . . . . . . . . . 30
Passare a un altro file . . . . . . . . . . . . . . . . . . . . . . . . . . . . . . . . . 31
Zoom . . . . . . . . . . . . . . . . . . . . . . . . . . . . . . . . . . . . . . . . . . . . . 31
Per ruotare l’immagine . . . . . . . . . . . . . . . . . . . . . . . . . . . . . . . . 31
Per ascoltare MP3/WMA musica guardando l’immagine. . . . . . . . 31
La compatibilità dei dischi JPEG con il lettore è limitata alle
seguenti caratteristiche . . . . . . . . . . . . . . . . . . . . . . . . . . . . . . . . 31
Riproduzione di un disco con formato DVD VR . . . . . . . . . . . . . . . . . 32
Riproduzione di un file di filmato DivX. . . . . . . . . . . . . . . . . . . . . . 33-34
La compatibilità con il lettore di dischi contenenti file DivX è
limitata secondo le seguenti modalità. . . . . . . . . . . . . . . . . . . . . . 34
Riproduzione da un'unità Flash USB . . . . . . . . . . . . . . . . . . . . . . . . . 35
Connessioni
Installazione del lettore . . . . . . . . . . . . . . . . . . . . . . . . . . . . . . . . . 36-38
Uscita AV connessioni . . . . . . . . . . . . . . . . . . . . . . . . . . . . . . . . . 36
Ingresso AV connessioni . . . . . . . . . . . . . . . . . . . . . . . . . . . . . . . 37
Collegamento audio ad apparecchi opzionali . . . . . . . . . . . . . . . . 38
Riferimento
Risoluzione dei problemi . . . . . . . . . . . . . . . . . . . . . . . . . . . . . . . . . . 39
Codici di lingua . . . . . . . . . . . . . . . . . . . . . . . . . . . . . . . . . . . . . . . . . 40
Codici dei paesi . . . . . . . . . . . . . . . . . . . . . . . . . . . . . . . . . . . . . . . . 41
Specifiche . . . . . . . . . . . . . . . . . . . . . . . . . . . . . . . . . . . . . . . . . . . . . 42

Per garantire l'utilizzo corretto del prodotto, leggere attentamente il
presente manuale dell'utente e conservarlo per futuro riferimento.
Il presente manuale fornisce informazioni relative al funzionamento e alla manutenzione del Lettore DVD.
Se l'unità necessita di assistenza, rivolgersi al servizio di assistenza autorizzato più vicino.
Informazioni sul simbolo
Durante il funzionamento, sullo schermo della propria TV può
apparire il simbolo “ ”, il quale indica che la funzione spiegata
nel presente manuale dell'utente non è disponibile su quel particolare disco video DVD.
Simboli utilizzati nel manuale
NOTA:
Indica note speciali e funzionalità operative.
SUGGERIMENTO:
Indica suggerimenti e consigli per rendere un'attività più semplice.
Se nel titolo di una sezione è presente uno dei seguenti simboli, le
istruzioni di tale sezione sono riferite solo ai dischi rappresentati
dal simbolo.
Tutti i dischi e File elencati in basso.
DVD e finalizzato DVD±R/RW
Video CD
CD audio File MP3
File WMA File DivX
Note sui Dischi
Manipolazione dei Dischi
Non toccare la faccia di lettura dei dischi. Tenere i dischi dai bordi
in modo da non lasciare impronte sulla superficie. Non incollare in
alcun caso carta o nastro adesivo sul disco.
Conservazione dei Dischi
Dopo la riproduzione, conservare i dischi nella loro custodia. Non
esporre i dischi alla luce diretta del sole, a fonti di calore o in
un'auto parcheggiata esposta alla luce diretta del sole.
Pulizia dei Dischi
Impronte digitali e polvere sul disco possono causare una qualità
scadente dell'immagine e dell'audio. Prima di riprodurre un disco,
pulirlo con un panno pulito. Strofinare il disco partendo dal centro
e scorrendo verso l'esterno.
Non utilizzare solventi aggressivi come ad esempio alcol, benzene, diluenti, detersivi disponibili in commercio o spray antistatici
dedicati a vecchie registrazioni in vinile.
DivX
WMA
MP3ACD
VCD
DVD
ALL
Prima dell’uso
5
Introduzione

Manutenzione e assistenza
Consultare le informazioni fornite in questo capitolo prima di
contattare un tecnico dell'assistenza.
Maneggiare l'unità
Durante il trasporto dell'unità
Conservare il cartone di trasporto originale e il materiale
dell'imballo. Se occorre trasportare l'unità, per ottenere la massima
protezione è possibile reimballare il prodotto nell'imballo originale
fornito dalla fabbrica.
Tenere pulite le superfici esterne
• Non utilizzare liquidi volatili in prossimità dell'unità, come ad
esempio spray insetticida.
• Non lasciare nastri o prodotti di plastica a contatto con l'unità
per un lungo periodo di tempo, dato che possono lasciare
segni permanenti sulla superficie.
Pulizia dell'unità
Per pulire l'unità, utilizzare un panno morbido e asciutto. Se le
superfici sono estremamente sporche, utilizzare un panno morbido
leggermente imbevuto con una soluzione detergente non
aggressiva.
Non utilizzare solventi aggressivi come ad esempio alcol,
benzene o diluenti, dato che questi prodotti possono danneggiare
la superficie dell'unità.
Manutenzione dell'unità
Il lettore DVD è un dispositivo di precisione ad alta tecnologia.
Se le lenti della testina ottica e le parti della guida dei dischi sono
sporche o logorate, la qualità dell'immagine potrebbe diminuire.
A seconda dell'ambiente di funzionamento, sono consigliate
ispezioni e manutenzioni regolari dopo ogni 1.000 ore di utilizzo.
Per i dettagli, contattare il rivenditore più vicino.
6
Prima dell’uso (Continua)

Prima dell’uso (Continua)
7
Introduzione
Tipi di dischi riproducibili
DVD
(disco da 8 cm / 12 cm)
Video CD (VCD)
(disco da 8 cm / 12 cm)
CD audio
(disco da 8 cm / 12 cm)
Inoltre, questa unità può riprodurre DVD+/-R/RW e CD-R/RW,
SVCD, USB contenenti titoli audio, DivX, MP3, WMA e/o file JPEG.
Questa indicazione denota la capacità del prodotto di
poter riprodurre dischi DVD-RW registrati con formato
Video Recording
NOTE
• Dipendendo dalle condizioni dell'apparecchiatura di
registrazione o il disco CD-R/RW (o DVD±R/RW) stesso, alcuni
dischi CD-R/RW (o DVD±R/RW) non possono essere riprodotti
su questa unità.
• Non attaccare adesivi o etichette su nessuna delle due facce
(faccia etichettata e faccia registrata) dei dischi.
•
Non utilizzare CD dalla forma non regolare, ad esempio a forma
di cuore o ottagonali, dato che ciò potrebbe causarne il
malfunzionamento.
È opportuno considerare che occorrono autorizzazioni per
scaricare file MP3/WMA e musica da Internet.
La nostra società non ha diritti per fornire tali autorizzazioni.
Le autorizzazioni devono essere sempre concesse da chi
detiene il Copyright.
Codice regionale
Questa unità ha un codice regionale stampato sul retro. Questa
unità può riprodurre solo dischi DVD etichettati come sul retro
dell'unità o ALL (TUTTI).
Note relative ai codici regionali
• La maggior parte dei dischi DVD hanno sulla copertina
chiaramente visibile il simbolo di un piccolo globo su cui sono
presenti uno o più numeri. Questo numero deve corrispondere
con il codice regionale del lettore DVD, altrimenti il disco non
potrà essere riprodotto.
• Se si tenta di riprodurre un DVD con un codice regionale
differente da quello del lettore, sullo schermo TV appare il
messaggio "Controllare Codice Regionale".
Prodotto con concessione di licenza da parte di
Dolby Laboratories. “Dolby”, “Pro Logic”, e il simbolo della doppia D sono marchi registrati di Dolby
Laboratories.
DTS e DTS Digital Out sono marchi registrati di
Digital Theater Systems, Inc.

8
Identificazione dei controlli
Unità principale
a Schermo LCD
b Altoparlante
c LCD MODE: NORMAL → MODO 4:3 → SPENTO
d Pulsanti di funzione
• DISPLAY: Apre il menu a schermo (OSD).
• MODE: Seleziona una modalità tra DISC, AV IN o USB.
• SETUP: Richiama o abbandona il menu di Setup.
• MENU: Apre il menu di un disco DVD.
• COLOR/BRIGHT: Seleziona la modalità di regolazione LCD.
Luminosità → Colore → OFF
• FLIP: Ruota lo schermo.
e Pulsanti di controllo menu
• bBvV(sinistra/destra/su/giù)
Seleziona una voce del menu.
• bB: Regola il COLORE/LUMINOSITA.
• ENTER: Conferma la selezione del menu.
f Sportellino del disco
g Pulsante OPEN :Premere il pulsante per aprire il vassoio
disco.
a
b
c
d
e
f
g

9
Introduzione
Identificazione dei controlli (continua)
Unità principale
a Controllo Volume
b Presa per Cuffie
c Jack COAXIAL
d Jack AV IN/OUT
NOTA
Se il segnale VIDEO IN non è collegato in modalità AV IN, l'unità
si spegne automaticamente dopo 10 minuti per impedire che le
batterie si scarichino.
e DC IN
Collega l'adattatore AC o l'adattatore per auto.
f Remote sensor
Riceve il segnale dal telecomando per il funzionamento.
g Indicatore di carica della batteria
h (POWER): Accende e spegne il lettore.
i Pulsanti di riproduzione
• x ( STOP ): Interrompe la riproduzione.
• B/X ( PLAY/PAUSE ):
Avvia la riproduzione./ Pone temporaneamente in pausa
la riproduzione.
• . (Skip/Search indietro)
Ricerca all’indietro* / torna all’inizio del capitolo/traccia
corrente o torna al capitolo o traccia precedente.
• > (Skip/Search in avanti)
Ricerca in avanti* / passa al prossimo capitolo o traccia.
* Ricerca in avanti* / passa al prossimo capitolo o traccia.
j USB: Connettere un'unità Flash USB.
abcde
fg h i
j

Identificazione dei controlli (continua)
10
a
POWER: Accende e spegne il lettore DVD.
AUDIO:
Consente di selezionare una lingua
per l'audio.
SUBTITLE:
Seleziona una lingua per i
sottotitoli.
ANGLE:
Se disponibili, seleziona le inquadrature della
cinepresa presenti sul DVD.
SKIP/SEARCH all’indietro
( . ):
Ricerca all’indietro* / torna all’inizio del
capitolo/traccia corrente o torna al capitolo o
traccia precedente.
SKIP/SEARCH in avanti
( > ):
Ricerca in avanti* / passa al prossimo
capitolo o traccia.
*
Tenere premuto il pulsante per circa due
secondi.
SLOW ( t / T ):
Riproduzione al rallentatore Indietro/Avanti.
b
SETUP:
Richiama o abbandona il menù di
Setup.
MENU:
Apre il menu di un disco DVD.
RETURN (O): Rimuove il menu.
DISPLAY:
Apre il menu a schermo (OSD).
bBvV
(sinistra/destra/su/giù)
:
Seleziona una voce del menu.
ENTER:
Conferma la selezione del menu.
c
PAUSE/STEP ( X ):
Pone temporaneamente in pausa la
riproduzione / Premere ripetutamente per la
riproduzione fotogramma per fotogramma.
PLAY (N):
Avvia la riproduzione.
STOP ( x ):
Interrompe la riproduzione.
Pulsanti numerici 0 - 9:
Consentono di selezionare voci numerate in
un menu.
PROG.: Apre/chiude le modalità di modifica
programmi.
CLEAR:
Rimuove un numero di traccia dall'elenco dei
programmi o un marcatore dal menu
MARKER SEARCH.
d
TITLE:
Visualizza i menu dei titoli, se
disponibili.
REPEAT:
Ripete un capitolo, una traccia, un
titolo, tutto.
A-B:
Sequenza di ripetizione.
ZOOM:
Allarga l'immagine del video.
MARKER:
Consente di marcare un punto
qualsiasi durante la riproduzione.
SEARCH:
Visualizza il menu MARKER
SEARCH.
RANDOM:
Riproduce le tracce con un ordine
casuale.
Telecomando
a
b
c
d

11
Introduzione
Inserire la batteria (batteria a litio)
NOTE
• Non esporre il sensore del telecomando alla luce molto luminosa
• Non mettere ostacoli tra sensore del telecomando ed il telecomando stesso.
VV
Sostituzione della batteria del tipo a bottone.
Questo tipo di batteria dura solitamente per circa un anno.
Sostituire la batteria se il telecomando non funziona quando usato
entro il raggio del campo di azione.
Inserire la batteria di tipo a bottone (batteria a litio)
1. Strizzare il supporto della batteria e tirare la linguetta per rimuovere il supporto della batteria.
2. Inserire la batteria con il segno del positivo (+) nella stessa
direzione del segno positivo sul supporto della batteria.
3. Sostituire il supporto della batteria con la batteria nell’unità del
telecomando assicurandosi che sia completamente inserita.
NOTE
• Sostituire la batteria dell’unità del telecomando con celle micro
3V al litio quali la CR. 2025 o equivalente.
• Smaltire le batterie rispettando le norme di sicurezza in
conformità alle leggi locali. Non gettare nel fuoco.
Identificazione dei controlli (continua)
Avvertenza : La batteria utilizzata in questo dispositivo,
se utilizzato in modo non regolamentare, può
causare pericolo di incendio o bruciature chimiche.
Non ricaricare, smontare, buttare negli inceneritori
o riscaldare a temperature superiori ai
100° C (212 °F)
Sostituire la batteria solamente con una Matsushita
Elec. Ind. (Panasonic), n° di pezzo CR. 2025.
L’uso di una batteria di tipo diverso può comportare
il rischio di incendio o esplosione. Smaltire in modo
idoneo le batterie usate. Conservare le batterie
lontane dai bambini. Non smontare o gettare nel
fuoco.

Connessioni per l’alimentazione
12
Connettere l'adattatore CA
a Connettere l'adattatore CA al jack DC IN sull'unità.
b Connettere l'adattatore CA alla presa alla parete.
Attenzione
• Non connettere la spina di alimentazione ad una presa della
corrente diversa da quella indicata sull’etichetta, poiché vi può
essere il rischio di incendio o esplosione.
• Non connettere o staccare la presa spina della corrente con le
mani bagnate. potrebbe provocare il rischio di scossa elettrica.
• Non usare un alimentatore CA diverso da quello specificato,
poiché potrebbe essere causa di incendio o danni al lettore.
Alimentatore CA
• Questo alimentatore CA funziona 100-240V~ 50/60Hz 1.5A.
• Rivolgersi ad un rivenditore di componenti elettrici per
selezionare un adattatore adatto alla spina CA o al set cavo CA.
• Prodotto da WANLIDA Digital Technology Co., Ltd.
a
b

13
Introduzione
Connessioni per l’alimentazione
(continua)
Connettere l'adattatore automobile
Questo lettore DVD e il suo adattatore per automobile sono
progettati per essere usati in veicoli che hanno un sistema
elettrico con massa negativa di 8,5-16 volt (Questo è standard per
la maggior parte dei veicoli.) Se il vostro veicolo ha un differente
tipo di sistema elettrico, il sistema di alimentazione CD non può
essere usato.
a Connettere l'adattatore per automobile al jack DC IN
sull'unità.
b Connettere l'adattatore per automobile alla presa
dell'accendisigari dell'auto.
Precauzioni
• Per prevenire folgorazioni o danni al lettore DVD e al veicolo,
scollegare sempre l'adattatore dall'accendisigari prima di
scollegare il cavo dal lettore DVD.
• Nell'adattatore è installato un fusibile tipo A3 amp. 250V per
protezione.
• Durante l'avviamento del motore, scollegare l'adattatore
dall'accendisigari dell'auto.
• Non usare il lettore DVD quando la batteria è scarica. Picchi di
corrente dal generatore dell'automobile possono causare il salto
del fusibile.
• Se vi è una caduta di tensione fornita dal veicolo al di sotto di
circa 10 volts, il lettore DVD potrebbe non funzionare
adeguatamente.
• Non lasciare il lettore DVD in un luogo dove la temperatura sia
oltre i 70°C (158°F), o l'unità pick-up potrebbe subire danni.
Esempi:
- Dentro un veicolo esposto al solo e con I finestrini chiusi.
- Vicino a una fonte di calore.
Adattatore per automobile
• Questo adattatore funziona con DC fra 8.5-16V.
• Contattare un distributore di prodotti elettrici per l'assistenza
nella scelta di un adattatore adeguato.
• Prodotto da WANLIDA Digital Technology Co., Ltd.
Presa accendisigari
a
b

Connessioni per l’alimentazione
(continua)
14
Pacco batterie
Mettere la batteria ricaricabile sotto carica prima di usarla per la
prima volta.
A
Collegamento del pacco batterie
a Inserire i ganci del pacco batterie nei fori che si trovano sul
retro del lettore.
b Premere e far scorrere il pacco batterie fino a far scattare il
gancio.
NOTE
• Non staccare il pacco batterie durante la riproduzione.
• Fare attenzione a non far cadere il pacco batterie.
A
Smontaggio del pacco batterie
a Premere la manopola.
b Tirare il pacco batterie fino a far scattare il gancio.
ATTENZIONE
Il prodotto che avete acquistato contiene una batteria ricaricabile La batteria è riciclabile Quando la
batteria è esaurita e non può più essere ricaricata, secondo alcune leggi locali e statali, è illegale
smaltire questa batteria con i rifiuti solidi urbani.
Controllare con le proprie autorità locali/funzionari aziende di rimozione rifiuti per le opzioni disponibili nella propria zona per il riciclaggio o il corretto smaltimento.
a
b
Hooks
a
b

15
Introduzione
A
Ricarica del pacco batterie.
1. Attaccare il pacco di batterie sul lettore.
2. Collegare l’adattatore AC al lettore e la spina a una presa AC.
3.
Durante il periodo di ricarica l’indicatore di carica è rosso. Quando
la ricarica è completa, l’indicatore di carica cambia colore e
diventa verde.
PERICOLO
Per evitare versamenti di liquido, surriscaldamento ecc. seguire le
seguenti procedure:
• Non usare componenti non autorizzati.
• Per la ricarica della batteria usare sempre l’alimentatore CA autorizzato.
• Non esporre a temperature superiori a 60° C (140° F)
• Non tentare di modificare o smontare l’unità.
• Un impatto eccessivo potrebbe provocare un cattivo funzionamento
dell’unità.
• Non mettere in un inceneritore.
• Non smontare, smaltire secondo le indicazioni.
• Non cortocircuitare.
NOTA
La ricarica della batteria si avvia solo quando l’unità è spenta.
Se la batteria viene scaricata di proposito o si scarica in modo naturale, non sarà ricaricata. Questo perché l’unità non percepisce la
tensione della batteria anche se quest’ultima è montata.
In questo caso, accendere l’unità e spegnerla nuovamente. A
questo punto la ricarica si avvierà.
A
Ricarica e tempi di riproduzione.
* Quando Luminosità è impostato alla modalità iniziale.
- Uso delle cuffie e centro del volume.
A
A Verificare la ricarica della batteria sul display dell’unità
Quando si usa l’alimentatore CA il display della batteria no
viene mostrato.
Se la capacità della batteria non è sufficiente, sullo schermo
viene visualizzato “Controlla stato della batteria” o “ ”
sullo schermo e l'alimentazione viene automaticamente
disinserita dopo un minuto.
A
Se i tempi di riproduzione diminuiscono in modo
considerevole dopo la ricarica.
Il pacco batterie ha raggiunto la fine della sua vita utile (può essere
ricaricato circa 300 volte)
A
Se l'unità non è utilizzata per lunghi periodi
• Staccare il pacco batterie ( Anche se l’unità è spenta c’è un certo
consumo di batteria) Questo può portare ad uno scaricamento eccessivo
della batteria ed a un cattivo funzionamento della stessa.
• Ricaricare il pacco batterie solo quando si è pronti ad utilizzare
nuovamente l’unità.
Connessioni per l’alimentazione
(continua)
Pacco batterie
Lettore
Connettere il cavo
dell'adattatore CA
Indicatore di carica
Ricarica Tempo di riproduzione
senza Riproduttore
LCD On LCD Off
Circa. Circa. Circa.
3 ora 3.5 ora* 4 ora
Carica massima
Carica scarsa
Ricaricare

16
L'LCD può essere rotato in senso orario di 180 gradi. Non
forzarlo onde evitare di danneggiarlo.
Dopo aver ruotato completamente l'LCD, è possibile piegarlo
come mostrato sopra.
Rotazione dello schermo LCD

17
1.Preparare l’alimentazione.
2.Aprire il coperchio e premere il pulsante POWER.
3.
Premere OPEN (Apri) per aprire lo sportello del disco ed inserire
un disco con il lato che si desidera etichetta verso l’alto. Chiudere
manualmente il coperchio del disco.
• Se il disco è messo al contrario (e si tratta di un disco a lato singolo),
sullo schermo verrà visualizzato il messaggio “CHECK DISC” o
“DISC ERROR”.
• Dopo avere eseguito tutti i capitoli nel titolo, il lettore DVD si ferma
automaticamente e torna alla schermata del menu.
4.Premere PLAY(N) per avviare la riproduzione.
5.Regolare il volume.
NOTE
• Posizionare il disco con il lato di riproduzione volto verso il
basso sul perno, e premere gentilmente sul centro del disco in
modo da inserirlo in posizione.
• Se non usate lo schermo LCD su questa unità, selezionare OFF
per risparmiare energia.
• Lo schermo LCD viene spento se si chiude l’unità.
• L’immagine visualizzata sullo schermo LCD dipende dalla
modalità di visualizzazione e le dimensioni registrate sul disco.
A
Modifica delle dimensioni dell’immagine
Utilizzare il pulsante LCD MODE per cambiare la modalità dell’immagine. La modalità è visualizzata sul display dell’unità come
segue.
NORMALE → MODO 4:3 → SPENTO
NOTA
La visualizzazione potrebbe essere diversa a seconda del disco.
Selezionare un MODO
Seleziona una modalità tra DISC, AV IN o USB.
1. Premere il pulsante MODO sull'unità.
Il menu di selezione della modalità viene visualizzato sullo
schermo.
2. Usare b / B per selezionare il modo e poi premere ENTER.
•
DISC: Il menu disco o l'immagine di riproduzione del disco viene
visualizzato sullo schermo.
• AV IN: Un immagine da un dispositivo esterno appare sullo schermo.
• USB: Un elenco di file o cartelle dell'unità Flash USB viene
visualizzato sullo schermo.
Riproduzione di un disco
Introduzione

18
Menu a schermo (OSD)
Visualizzazione a schermo delle
informazioni relative al disco
Sullo schermo è possibile visualizzare una serie di informazioni
relative al disco inserito nell'unità.
1. Premere DISPLAY per visualizzare una serie di
dati relativi alla riproduzione.
Le voci visualizzate dipendono dal tipo di disco
e dallo stato di riproduzione.
2. È possibile selezionare una voce premendo b / B e modificare
o selezionare l'impostazione premendo v / V.
Titolo (traccia) - Indica il numero del titolo corrente (o della
traccia)/il numero totale di titoli (o tracce)
Capitolo - Indica il numero del capitolo corrente/il numero
totale di capitoli
Tempo - Tempo di riproduzione trascorso
Audio - Scelta della lingua o del canale audio
Sottotitolo - Sottotitolo selezionato
Angolazione - Angolazione selezionata/numero totale di
angolazioni
NOTA
Se non si preme alcun tasto entro alcuni secondi, la visualizzazione a schermo viene chiusa.
Impostazioni iniziali
Mediante il menu di configurazione è possibile effettuare varie
regolazioni a impostazioni quali l'immagine e l'audio. È anche possibile impostare una lingua per i sottotitoli e per il menu di configurazione, oltre ad altre configurazioni. Per ulteriori dettagli su ciascuna voce del menu di configurazione, vedere le pagine da 19 a 23.
Per aprire e chiudere il menu:
Premere SETUP per visualizzare il menu. Una seconda pressione
del pulsante SETUP consente di tornare alla schermata iniziale.
Passare al livello successivo:
Premere B sul telecomando.
Tornare al livello precedente:
Premere b sul telecomando.
Funzionamento generale
1. Premere SETUP. Viene visualizzato il menu di configurazione.
2. Utilizzare i pulsanti v / V per selezionare l'opzione desiderata,
quindi premere il pulsante B per spostarsi al secondo livello.
Lo schermo mostra l'impostazione corrente della voce
selezionata, insieme ad impostazioni alternative.
3. Utilizzare i pulsanti v / V per selezionare la seconda opzione
desiderata, quindi premere il pulsante B per spostarsi al terzo
livello.
4. Utilizzare i pulsanti v / V per selezionare l'impostazione
desiderata, quindi premere ENTER per confermare la
selezione. Alcune voci potrebbero richiedere ulteriori passi.
5. Premere SETUP o
PLAY(N)
per chiudere il menu di
configurazione.

LINGUA
Linguaggio Menu
Consente di selezionare una lingua per il menu di configurazione
e le voci OSD.
Disco Audio / Sottotitoli / Menu
Selezionare una lingua per la traccia audio (disco audio),
per i sottotitoli e per il menu del disco.
Default :
Fa riferimento alla lingua originale in cui è stato registra-
to il disco.
Altri: Per selezionare un'altra lingua, premere i pulsanti
numerici e poi ENTER per inserire il numero a 4 cifre
corrispondente all'elenco dei codici lingua a pagina 40.
Se inserite un codice lingua sbagliato, premere CLEAR.
Off (per Sottotitoli Disco) – disattiva la visualizzazione dei
sottotitoli.
ESPOSIZIONE
Rapporto D’aspetto
4:3:
impostazione da selezionare quando è collegata una TV di
formato standard 4:3.
16:9: impostazione da selezionare quando è collegata una TV
di formato esteso 16:9.
NOTA
Se l'opzione di formato TV è impostata su 16:9, la modalità di
display viene automaticamente impostata su Widescreen.
Modalità display
L'impostazione Display Mode funziona solo quando è selezionato
il formato "4:3" nell'impostazione TV Aspect.
LetterBox: visualizza un'immagine estesa con una banda
superiore e una inferiore sullo schermo.
Panscan:
visualizza automaticamente l'immagine estesa a
schermo intero, tagliando le porzioni di immagine che non vi
rientrano.
19
Funzionamento avanzato
Impostazioni iniziali

20
AUDIO
Ogni disco DVD ha una varietà di opzioni di uscita audio.
Impostare la configurazione AUDIO del lettore sulla base del tipo
di sistema audio utilizzato.
Dolby Digital / DTS / MPEG
Bitstream: selezionare “Bitstream” se si è collegato il jack di
uscita audio DIGITAL OUT del lettore DVD a un amplificatore o
altro apparecchio dotato di decoder Dolby Digital, DTS o
MPEG.
PCM (per Dolby Digital / MPEG): impostazione da
selezionare quando il lettore è collegato a un amplificatore
stereo digitale a due canali. Verrà eseguito automaticamente il
downmix in audio PCM a due canali dei DVD codificati in
Dolby Digital o MPEG.
Off (per DTS): se si seleziona “Off”, dal jack di uscita audio
DIGITAL OUT non verrà emesso il segnale DTS.
Campion. PCM
Se il proprio ricevitore o amplificatore NON è in grado di gestire
segnali a 96 kHz, selezionare 48 kHz. Selezionando questa
opzione, l'unità converte automaticamente qualsiasi segnale a 96
kHz in segnali a 48 kHz, in modo che il sistema possa decodificarli.
Se il proprio ricevitore o amplificatore è in grado di gestire segnali
a 96 kHz, selezionare 96 kHz. Selezionando questa opzione,
l'unità consente il passaggio di qualsiasi tipo di segnale senza
ulteriori elaborazioni.
Consultare la documentazione dell'amplificatore per verificarne le
capacità.
DRC (controllo della gamma dinamica)
Con il formato DVD, è possibile ascoltare la colonna sonora di un
programma nella presentazione più accurata e realistica possibile,
grazie alla tecnologia audio digitale. Tuttavia, l'utente potrebbe
voler comprimere la gamma dinamica dell'uscita audio (la differenza tra i suoni più vivaci e quelli più tenui). In questo modo è possibile ascoltare un film a un volume più basso senza perdere la
chiarezza sonora. Impostare su On la funzione DRC per ottenere
questo effetto.
Vocal
Impostare su On questa opzione solo quando si riproduce un DVD
karaoke multicanale. I canali karaoke del disco vengono mixati nell'audio stereo normale.
Impostazioni iniziali
(continua)

21
Funzionamento avanzato
BLOCCO
Restrizione
Blocca la riproduzione di DVD classificati sulla base del loro
contenuto. Non tutti i dischi sono classificati.
1. Selezionare “Restrizione” nel menu BLOCCO, quindi premere
B.
2. Per accedere al Rating, Password e Codice area, è necessario
inserire la password a 4 cifre che avete creato.
Se non avete ancora inserito una password vi verrà chiesto di
farlo.
Inserire il codice a 4 cifre e premere ENTER. Per verificarlo,
inserirlo nuovamente e premere ENTER. Se si è fatto un errore
prima di premere ENTER, premere CLEAR.
3. Selezionare una classificazione da 1 a 8 utilizzando i pulsanti
v / V.
Restrizione 1-8: il Rating 1 presenta le maggiori restrizioni,
mentre il Rating 8 presenta restrizioni minime.
Sbloccato: Selezionando l'impostazione Sbloccato,
il filtro dei contenuti viene disattivato e il disco viene riprodotto
interamente.
NOTA
se si imposta una classificazione per il lettore, vengono
riprodotte tutte le scene del disco che presentano una classificazione uguale o inferiore. Le scene con classificazione più
alta non vengono riprodotte, a meno che sul disco non sia
disponibile una scena alternativa. L'alternativa deve presentare
una classificazione uguale o inferiore. Se non viene trovata
alcuna alternativa adatta, la riproduzione si interrompe. Per
poter riprodurre il disco è necessario inserire la password da 4
cifre o cambiare il livello di Rating.
4. Premere ENTER per confermare la classificazione selezionata,
quindi premere SETUP per chiudere il menu.
DVD
Impostazioni iniziali
(continua)

22
Password (codice di sicurezza)
Qui è possibile immettere o modificare la password.
1. Selezionare Password nel menu BLOCCO, quindi premere B.
2. Per creare una nuova password:
Premere ENTER dopo aver selezionato l'opzione “New”
(nuovo). Digitare una nuova password mediante i tasti numerici,
quindi premere ENTER. Digitare nuovamente la password a per
verifica.
Per modificare la password:
Premere ENTER dopo aver selezionato l'opzione “Change”
(modifica). Digitare una password attuale mediante i tasti
numerici, quindi premere ENTER. Digitare una nuova password
mediante i tasti numerici, quindi premere ENTER.
Digitare nuovamente la password a per verifica.
4. Premere SETUP per chiudere il menu.
Se si dimentica la password
In caso non si ricordi la password, è possibile annullarla come
segue:
1. Premere SETUP per visualizzare il menu di configurazione.
2. Inserire il numero di 6 cifre “210499” e il codice di sicurezza
verrà cancellato.
Codice Area
Immettere il codice dell'area i cui standard sono stati utilizzati per
classificare il disco video DVD, facendo riferimento all'elenco a
pagina 41.
1. Selezionare "Codice Area" nel menu BLOCCO,
quindi premere B.
2. Seguire la fase 2 della pagina precedente (Classificazione).
3. Selezionare il primo carattere utilizzando i pulsanti v / V.
4. Premere ENTER e selezionare il secondo carattere utilizzando
i pulsanti v / V.
5. Premere ENTER per confermare il codice del paese
selezionato.
Impostazioni iniziali
(continua)

23
Funzionamento avanzato
ALTRI
Le impostazioni PBC, DivX(R) VOD possono essere
modificate.
PBC
Attiva (On) o disattiva (Off) il controllo della riproduzione PBC.
On:
Video CD dotati di PBC vengono riprodotti seguendo i controlli PBC.
Off: i Video CD dotati di PBC vengono riprodotti allo stesso
modo dei CD audio.
DivX(R) VOD
All'utente viene fornito il codice di registrazione DivX®VOD (Video
On Demand) che consente di noleggiare e acquistare video utilizzando il servizio DivX
®
VOD. Per maggiori informazioni, visitare il
sito www.divx.com/vod.
1. Selezionare l'opzione DivX(R) VOD, quindi premere B.
2. Per visualizzare il codice di registrazione, mentre [Seleziona] è
selezionato premere ENTER.
Utilizzare il codice di registrazione per acquistare o noleggiare
video tramite il servizio Divx
®
VOD all'indirizzo
www.divx.com/vod. Seguire le istruzioni per eseguire il download del video su un disco e riprodurlo su questa unità.
3. Per chiudere il menu, premere ENTER.
NOTA
I video scaricati da DivX
®
VOD possono essere riprodotti solo su
questa unità.
Impostazioni iniziali
(continua)

24
Quando viene visualizzato una schermata di menu
Utilizzare i pulsanti bB v Vper selezionare il titolo/capitolo che si
desidera vedere, quindi premere ENTER per avviarlo. Premere
TITLE o MENU per tornare alla schermata del menu.
Utilizzare i pulsanti numerici per selezionare la traccia che si
desidera vedere, quindi premere RETURN per tornare alla schermata del menu. Le impostazioni del menu e le procedure operative potrebbero essere diverse. Seguire le istruzioni visualizzate in
ogni schermata di menu. È anche possibile impostare la funzione
PBC a Off (vedere "PBC" a pagina 23).
NOTE
• Se è stato impostato il filtro contenuti e il disco non presenta
una classificazione compresa nell'ambito scelto dall'utente, è
necessario immettere la password (vedere "BLOCCO" a pagina
21-22).
•
I DVD possono avere un codice regionale. L'unità non è in grado di
riprodurre dischi con un codice regionale diverso da quello dell'unità.
Se non diversamente specificato, tutte le operazioni descritte
fanno riferimento all'uso del telecomando. Alcune funzioni
potrebbero anche essere disponibili nel menu di
configurazione.
Riprendere la riproduzione
Quando la riproduzione è stata interrotta, l’unità memorizza il punto
in cui il pulsante di STOP è stato attivato (Funziona RIPRISTINA).
Premere PLAY(N) e la riproduzione riprende da questo punto.
Passaggio a un altro TITOLO
Quando un disco ha più di un titolo, è possibile passare a un altro
titolo. Premere DISPLAY durante la riproduzione o riprendi
riproduzione, quindi premere il numero appropriato (0-9) o usare
b / B per passare a un altro titolo.
Passaggio a un altro CAPITOLO/TRACCIA
Durante la riproduzione, premere SKIP/SEARCH (. o >) per
passare alla traccia/capitolo successivo o per tornare all'inizio
della traccia/capitolo corrente.
Premere due volte brevemente SKIP . per passare alla traccia/capitolo precedente.
Ricerca
1. Tenere premuto SKIP/SEARCH (. o >) per circa due
secondi durante la riproduzione.
Il lettore entra in modalità SEARCH.
2. Tenere premuto SKIP/SEARCH (. o >) ripetutamente per
selezionare la velocità desiderata.
Disco DVD, DivX; 4 fasi
Video CD, MP3, Audio CD ; 3 fasi
3. Per uscire dalla modalità SEARCH, premere PLAY(N).
Rallentatore
1. Premere SLOW (t o T) durante la riproduzione.
Il lettore entra in modalità SLOW.
DVD disc: 4 fasi
VCD, DivX disc : 4 fasi
(
solo avanti
)
3. Per uscire dalla modalità Rallentatore, premere PLAY(N).
DivXVCDDVD
ALL
ALL
DVD
ALL
VCD
DVD
Funzioni generali

25
Funzionamento avanzato
Fermo immagine e riproduzione fotogramma per fotogramma
Durante la riproduzione, premere PAUSE/STEP(X) per mettere in
pausa la riproduzione.
Premere ripetutamente PAUSE/STEP(X) per riprodurre fotogram-
ma per fotogramma. (Solo telecomando)
Per uscire dalla modalità di riproduzione fotogramma per
fotogramma, premere PLAY(N).
Ricerca a tempo
Per avviare la riproduzione a un qualsiasi tempo predefinito sul
disco:
1. Premere DISPLAY durante la riproduzione La finestra di
dialogo della ricerca a tempo visualizza il tempo trascorso.
2. Usare v / V per selezionare di ricerca orario e “-:--:--” appare.
3. Inserire il tempo richiesto di avvio in ore, minuti e secondi
partendo da sinistra a destra. Se vengono inseriti i numeri
sbagliati, premere ANNULLA e rimuovere i numeri inseriti.
Dopodiché inserire i numeri corretti.
4. Premere ENTER per confermare. La riproduzione viene avviata all’ora indicata.
Ripetizione A-B
Durante la riproduzione, ciascuna pressione dei pulsanti A-B per
selezionare il punto A e B e ripete una sequenza dal punto A
(iniziale) al punto B (finale).
Premere nuovamente A-B per annullare.
Ripetizione
Durante la riproduzione, premere ripetutamente REPEAT per
selezionare la modalità di ripetizione desiderata.
Dischi DVD video: Capitolo/Titolo/Off
Dischi Video CD, Audio CD, Dischi DivX/MP3/WMA :
TRACK/All/Off (Traccia/Tutto/Off)
NOTE
• Su un Video CD con PBC, è necessario impostare la funzione PBC a
Off nel menu di configurazione per utilizzare questa funzione (vedere
"PBC" a pagina 23).
• Se si preme una volta SKIP (>) durante la riproduzione ripetuta
Chapter (o Track), la riproduzione ripetuta viene annullata.
Zoom
Durante la riproduzione o in pausa, premere ZOOM per ingrandire
l'immagine a video (3 fasi).
È possibile spostarsi nell'immagine ingrandita usando i pulsanti
bBvV. Per chiudere il menu, premere CLEAR.
NOTA
la funzione Zoom potrebbe non funzionare per alcuni DVD.
DivXVCDDVD
ALL
ACDDivXVCDDVD
DivXVCDDVD
DivXVCDDVD
ALL
Funzioni generali
(continua)

26
Menu del titolo
Se il titolo del DVD ha un menu, questo viene visualizzato sullo
schermo. In caso contrario, potrebbe apparire il menu del disco.
Menu del disco
Premere MENU per visualizzare il menu del disco. Premere nuovamente MENU per uscire.
Cambiamento della lingua dell'audio
Premere AUDIO ripetutamente durante la riproduzione per sentire
una lingua audio diversa o metodo di codifica.
Con i dischi DVD registrati nella modalità VR forniti sia di un
canale audio principale che di un canale bilingue, è possibile passare da Principale (S) a Bilingue (D) o una combinazione di
ambedue (Principale + Bilingue) premendo AUDIO.
Premere ripetutamente AUDIO durante la riproduzione per
ascoltare un differente canale audio (Stereo, Sinistra o Destra).
Angolazione della telecamera
Durante la riproduzione di un disco contenente scene registrate da
angolazioni diverse, premere ripetutamente ANGLE per
selezionare l'angolo desiderato.
SUGGERIMENTO
Per indicare che è possibile cambiare angolazione, sullo schermo della TV
appare l'indicatore lampeggiante dell'angolazione durante le scene registrate da diverse angolazioni.
Sottotitoli
Premere SUBTITLE ripetutamente durante la riproduzione per
visualizzare le diverse lingue dei sottotitoli.
NOTA
Se non vi sono informazioni o se vi è un codice che non è possibile leggere nel file DivX, viene visualizzato “1” ecc.
DivXDVD
DVD
VCD
DivXDVD
DVD
DVD
Funzioni generali
(continua)

27
Funzionamento avanzato
Funzionalità aggiuntive
Ricerca marcatore
Per inserire un marcatore
È possibile memorizzare fino a nove punti da cui avviare la riproduzione. Per inserire un marcatore, premere MARKER al punto
desiderato del disco. Sullo schermo della TV appare brevemente
l'icona del marcatore. Ripetere la procedura per inserire fino a
nove marcatori.
Per richiamare una scena marcata o cancellare un marcatore
1. Durante la riproduzione, premere SEARCH. Sullo schermo
appare il menu di ricerca marcatore.
2. Entro 9 secondi, premere b / B per selezionare un marcatore
che si desidera richiamare o cancellare.
3. Premere ENTER e la riproduzione si avvierà dalla scena
marcata. Oppure, premere CLEAR e il numero del marcatore
sarà eliminato dall'elenco.
4. È possibile riprodurre un marcatore qualsiasi inserendo il
numero corrispondente nel menu di ricerca marcatore.
NOTE
• È possibile che alcuni sottotitoli registrati in prossimità del
segnalibro non vengano visualizzati (DVD).
• I segnalibro vengono cancellati quando viene spento
l’apparecchio o viene rimosso il disco.
• Il segnalibro non viene archiviato quando il DVD o il menu dei
titoli viene visualizzato sullo schermo della TV.
Memorizzazione dell'ultima scena
Il lettore memorizza l'ultima scena dell'ultimo disco visualizzato.
La scena resta in memoria anche se si rimuove il disco dal lettore
o si spegne il lettore. Se si carica il disco che ha la scena
memorizzata, la scena viene automaticamente richiamata.
NOTA
Questo lettore non memorizza le impostazioni di un disco se il
lettore viene spento prima di iniziare la riproduzione.
Salvaschermo/Spegnimento automatico
Se si lascia il lettore DVD in modalità interrotto per circa cinque
minuti, viene visualizzato uno screen saver (salvaschermo).
Trascorsi cinque minuti dall'avvio dello screen saver, il lettore DVD
si spegne automaticamente.
VCD1.1
ACDDVDDivXVCDDVD

28
Questa unità è in grado di riprodurre CD Audio o file MP3/WMA.
MP3/ WMA/ Audio CD
Una volta inserito un supporto registrato con file MP3/WMA o un
CD audio, sulla TV appare un menu.
Premere v / V per selezionare un file/traccia, quindi premere
PLAY(N) o ENTER per avviare la riproduzione. È possibile
utilizzare funzioni variabili di riproduzione. Vedere pag. 24-25.
ID3 TAG
• Durante la riproduzione di file che contengono informazioni
come ad esempio traccia titoli è possibile visualizzare le informazioni premendo TITLE. [ Title, Artist, Album, Year, Comment ]
• Se non vi sono informazioni viene visualizzato “NO ID3 TAG”.
SUGGERIMENTI
• Se ci si trova in un elenco di file di un menu MUSIC e si
desidera tornare all'elenco delle cartelle, utilizzare i pulsanti
v / V per selezionare l'icona , quindi premere ENTER.
• Premere MENU per spostarsi alla pagina successiva.
• Su un disco su cui sono contenuti file MP3/WMA, JPEG e
MOVIE, è possibile cambiare tra i menu MUSIC, PHOTO e
MOVIE. Premere TITLE, e la parola MUSIC, PHOTO o MOVIE
nella sezione superiore del menu viene evidenziata.
La compatibilità dei dischi MP3/WMA con il lettore è limitata
alle seguenti caratteristiche:
• Frequenza di campionamento: entro a 8 - 48 kHz (MP3),
tra 32 - 48 kHz (WMA)
• Velocità bit: entro 8 e 320 kbps (MP3),
entro 32 - 192 kbps (WMA)
• Il lettore non può leggere un file MP3/WMA salvato con
estensione diversa da ".mp3" / ".wma".
• Il formato fisico dei dischi CD-R deve essere ISO 9660.
• Se si sono registrati file MP3/WMA utilizzando software che
non possono creare un file system (ad esempio, Direct-CD),
è impossibile riprodurre file MP3/WMA. È consigliato l'uso di
Easy-CD Creator, che crea un file system ISO 9660.
• I nomi dei file devono avere massimo 16 lettere e incorporare
un'estensione .mp3 o .wma.
• Essi non devono contenere lettere speciali quali ad esempio /
? * : “ < > , ecc.
• Il numero totale dei file presenti in una cartella deve essere
inferiore a 650.
• Il lettore DVD richiede dischi e registrazioni che rispettano
determinati standard tecnici al fine di ottenere la qualità di
riproduzione ottimale. I DVD preregistrati sono
automaticamente impostati su questi standard.
Esistono molte tipologie differenti di formati di dischi registrabili
(inclusi i CD-R contenenti file MP3 o WMA) e sono necessari
determinati prerequisiti (vedere sopra) per assicurarne la
compatibilità di riproduzione.
Riproduzione di un CD audio o di un file MP3/WMA

29
Funzionamento avanzato
La funzione Programma consente di memorizzare nella memoria
del lettore le tracce preferite da qualsiasi disco.
Un programma può contenere 30 tracce (CD Audio, MP3/WMA).
1. Inserire un CD audio o supporti registrati con file MP3/WMA.
Viene visualizzato il menu AUDIO CD o MUSIC.
2. Premere PROG. per visualizzare il simbolo .
NOTA
Premere nuovamente PROG., e il segno scompare per uscire
dalla modalità di Modifica programma.
Menu audio CD Menu MP3/WMA
3. Selezionare una traccia sulla “Lista” e poi premere ENTER per
inserire la traccia selezionata sulla lista di “Programma”.
Ripetere per inserire ulteriori tracce all'elenco.
4.
Premere
B.
Selezionare la traccia che si desidera riprodurre dall'Elenco
Programma.
5.
Premere PLAY
(N)
o ENTER per iniziare. Inizia la riproduzione
nell'ordine in cui sono state programmate le tracce. La riproduzione si interrompe una volta completata la singola riproduzione
di tutte le tracce programmate nell'elenco.
6. Per riprendere la riproduzione normale dalla riproduzione
programmata, selezionare una traccia nell'elenco quindi
premere PLAY (N).
Ripetizione delle tracce programmate
Premere REPEAT per selezionare la modalità di ripetizione
desiderata.
• Traccia : Ripete la traccia corrente
• Tutto : Ripete tutte le tracce presenti nell'elenco programmati.
• Off (nessuna visualizzazione): Non esegue alcuna ripetizione.
NOTA
Se si preme SKIP (>) una volta durante la ripetizione traccia, la
funzione viene annullata.
Cancellazione di una traccia dall'Elenco Programma
1. Premere PROG. per visualizzare il simbolo .
2. Utilizzare b / B / v / V per selezionare la traccia che si
desidera cancellare dall'Elenco Programma.
3. Premere CLEAR. Ripetere i passi 1-3 per cancellare ulteriori
tracce all'elenco.
Cancellazione di tutto l’Elenco Programma
1. Premere PROG. per visualizzare il simbolo .
2. Utilizzare b / B / v / V per selezionare “Cancella Tutto”, quindi premere ENTER.
NOTA
Quando l'unità viene spenta e il disco viene rimosso anche la programmazione viene cancellata.
Riproduzione programmata
E
E
E
E

30
Questa unità è in grado di riprodurre file JPEG.
1. Inserire un disco e chiudere il vassoio. Sullo schermo della
LCD appare il menu PHOTO.
2. Premere v / V per selezionare una cartella, quindi premere
ENTER. Viene visualizzato l'elenco dei file presenti nella
cartella. Se ci si trova in un elenco di file e si desidera tornare
all'elenco precedente di cartelle, utilizzare i pulsanti v / V del
telecomando per selezionare l'icona , premere ENTER.
3. Se si desidera visualizzare un file particolare, premere v / V
per selezionare il file, quindi premere ENTER o PLAY(N).
4. Mentre si visualizza un file è possibile premere STOP(x) per
passare al menu precedente (menu PHOTO).
SUGGERIMENTI
• Premere MENU per spostarsi alla pagina successiva.
• Vi sono quattro opzioni per la velocità della presentazione
(impostazione Slide Speed) :
>>> (Basso), >> (Normale) e > (Alto).
Usare vVbBper evidenziare il . Poi, usare b / B per
selezionare l'opzione che desiderate usare.
• Su un disco su cui sono contenuti file MP3/WMA, JPEG e
MOVIE, è possibile cambiare tra i menu MUSIC, PHOTO e
MOVIE. Premere TITLE, e la parola MUSIC, PHOTO o MOVIE
nella sezione superiore del menu viene evidenziata.
• Per nascondere il menu di guida durante la visualizzazione delle
immagini, premere RETURN (O).
Mostra (Presentazione)
Utilizzare i pulsanti
b / B / v / V
per selezionare la presentazione
(Slide Show), quindi premere ENTER.
Immagine statica
1. Premere PAUSE/STEP(X) durante la presentazione.
Il lettore passa nella modalità PAUSE.
2. Per tornare alla presentazione, premere PLAY(N) oppure
premere nuovamente PAUSE/STEP(X).
Visualizzazione di file JPEG

31
Funzionamento avanzato
Passare a un altro file
Premere SKIP/SEARCH (. o >) o il cursore (b o B) durante
la visualizzazione dell’immagine per passare al file precedente o
successivo.
Zoom
Durante la riproduzione o in pausa, premere ZOOM per ingrandire
l'immagine a video (3 fasi).
È possibile spostarsi nell'immagine ingrandita usando i pulsanti
bBvV. Per chiudere il menu, premere CLEAR.
Rotazione dell'immagine
Premere v / V durante la visualizzazione dell’immagine per ruotare
l’immagine in senso orario o antiorario.
Per ascoltare MP3/WMA musica guardando l’immagine
1. Inserire nel lettore il disco contenente i due tipi di file.
2. Premere TITLE per visualizzare il menu PHOTO.
3. Premere v / V per selezionare il file immagine.
4. Usare B per selezionare l’icona poi premere ENTER.
Viene avviata la riproduzione.
5. Mentre si visualizza un file è possibile premere STOP(x) per
passare al menu precedente (menu PHOTO).
SUGGERIMENTO
Per ascoltare solamente la musica desiderata durante la visione di
immagini, programmate i file desiderati dal menu “MUSICA” e poi
procedere come riportato sopra.
La compatibilità dei dischi JPEG con il lettore è limitata alle
seguenti caratteristiche:
• A seconda delle dimensioni e numero di file JPEG, il lettore DVD può
impiegare un tempo relativamente lungo per leggere la visualizzazione
dello schermo. Se non si vede visualizzazione sullo schermo dopo
alcuni minuti, alcuni dei file possono essere troppo grandi – ridurre la
risoluzione dei file JEPG a meno di 2M pixel come 2760X2048 pixel e
masterizzare un altro disco.
•
Il numero totale dei file presenti in una cartella deve essere
inferiore a 650.
• Alcuni dischi possono essere incompatibili a causa di un differente formato di registrazione o delle condizioni del disco.
• Accertarsi che tutti i file selezionati abbiano l'estensione ".jpg" quando
vengono copiati sul CD.
• Se i file hanno estensione ".jpe" o ".jpeg", rinominarli utilizzando
l'estensione ".jpg".
• I file denominati senza estensione ".jpg" non potranno essere letti dal
lettore DVD, anche se i file vengono visualizzati come file immagine
JPEG in Esplora risorse.
Visualizzazione di file JPEG
(continua)

32
L’unità riproduce i dischi DVD-RW registrati utilizzando il formato
Video Recording (VR).
1. Inserire un disco e chiudere il vassoio. Sullo schermo appare il
menu DVD-VR.
2. Premere v / V per selezionare una traccia poi premere
PLAY(N) o ENTER per avviare la riproduzione.
3. Premere MENU per passare al menu elenco.
NOTE
• Questa unità riproduce dischi DVD-R/RW registrati usando il formato
DVD-Video e che sono stati finalizzati usando un masterizzatore DVD.
I dischi DVD-R/RW che non sono stati finalizzati non possono essere
riprodotti su questo lettore.
• Alcuni dischi DVD-VR sono realizzati con dati CPRM della DVD
RECORDER Il lettore non è compatibile con questo tipo di disco.
Cosa è ‘CPRM’?
CPRM è un sistema di protezione da copia (con sistema di crittografia
dei dati) che permette solo la registrazione di programmi trasmessi per
una copia. Il significato di CPRM è "Content Protection for Recordable
Media" (protezione del contenuto per supporti registrabili)
Riproduzione di un disco con formato DVD VR

33
Funzionamento avanzato
Con questo lettore DVD è possibile riprodurre file DivX.
1. Inserire un supporto con file DivX. Sulla appare il menu
MOVIE.
2. Premere v / V per selezionare una cartella,
quindi premere ENTER. Nella cartella appare l’elenco
dei file. Se ci si trova in un elenco di file e si desidera
tornare all'elenco di cartelle, utilizzare i pulsanti v / V V
del telecomando per selezionare e premere ENTER.
3.
Se si desidera visualizzare un particolare file, premere
v / V
per
selezionare un file, quindi premere ENTER oppure
PLAY(N)
.
È possibile utilizzare funzioni variabili di riproduzione.
Vedere pag. 24-27.
4. Premere STOP(x) per interrompere la riproduzione.
Viene visualizzato il menu Film.
Informazioni per la visualizzazione dei sottotitoli del DivX
Se il sottotitolo non viene visualizzato correttamente durante la
riproduzione, tenere premuto
SUBTITLE
per circa 3 secondi,
quindi premere b / B per selezionare un altro codice lingua fino a
visualizzare correttamente i sottotitoli.
SUGGERIMENTO
• Premere MENU per spostarsi alla pagina successiva.
• Su un disco su cui sono contenuti file MP3/WMA, JPEG e
MOVIE, è possibile cambiare tra i menu MUSIC, PHOTO e
MOVIE. Premere TITLE, e la parola MUSIC, PHOTO o MOVIE
nella sezione superiore del menu viene evidenziata.
• Se il titolo di un DivX è stato scaricato da Internet, il sottotitolo
del disco potrebbe non essere visualizzato correttamente.
• Se il menu di configurazione dei sottotitoli del disco non
supporta la lingua dei sottotitoli DivX che si desidera riprodurre,
la lingua potrebbe non essere visualizzata correttamente.
• Per essere visualizzato su questa unità il nome del file di
sottotitoli DivX deve essere identificato con il nome del file DivX.
Riproduzione di un file di filmato DivX

La compatibilità con il lettore di dischi contenenti file DivX è
limitata secondo le seguenti modalità:
• Risoluzione del file DivX inferiore a 720x576 (W x H) pixel.
• Nome file del sottotitolo DivX entro 56 caratteri.
• Se nel file DivX è presente codice che non è possibile esprimere, sul
display viene visualizzato " _ ".
• Se il numero di fotogrammi è superiore a 30 per 1 secondo, l’unità
potrebbe non funzionare correttamente.
• Se la struttura audio e video del file registrato è priva di interfoliazione,
l’output sarà o video o audio.
• Se il file è registrato con GMC, l’unità supporta solo livelli di registrazione a 1 punto.
*
GMC?
GMC è l’acronimo di Global Motion Compensation. Si tratta di uno
strumento di codifica dello standard MPEG4. Alcuni encoder MPEG4,
come DivX, hanno questa opzione.
Esistono vari lielli di codifica GMC, solitamente chiamati GMC a 1
punto, a 2 punti o a 3 punti.
File DivX supportati
".avi ", ".mpg ", ".mpeg "
Formati dei sottotitoli supportati
SubRip(*.srt/*.txt)
SAMI(*.smi)
SubStation Alpha(*.ssa/*.txt)
MicroDVD(*.sub/*.txt)
SubViewer 2.0(*.sub/*.txt)
TMPlayer(*.txt)
Dvd Subtitle System(*.txt)
VobSub (*.sub) → formato basato su stream Sub/idx
Formati Codec supportati
"DIVX3.xx ", "DIVX4.xx ", "DIVX5.xx ",
"MP43 ", "3IVX ".
Formati audio supportati
"Dolby Digital ", "DTS ", "PCM ", "MP3 ", "WMA ".
• Frequenza di campionamento: entro 8 - 48 kHz (MP3),
entro 32 - 48kHz (WMA)
• Bit rate: entro 8 - 320kbps (MP3),
32 - 192kbps (WMA)
Riproduzione di un file di filmato DivX (
continua
)
34

35
Funzionamento avanzato
Questa unità è in grado di riprodurre DivX o file MP3/WMA.
1. Connettere l'unità Flash USB alla porta USB dell'unità dopo
l'accensione.
2. Premere MODE sull'unità.
Il menu di selezione della modalità viene visualizzato sullo
schermo.
3. Selezionare USB utilizzando i pulsanti b / B , quindi premere
ENTER. L'elenco di file o cartelle dell'unità Flash USB viene
visualizzato sullo schermo.
4. Se volete cambiare all'altra modalità, selezionare l'altra
modalità nel menu di selezione della modalità.
Per rimuovere l'unità flash USB dall'unità.
1. Seguire i 4 passi sopra per chiudere il menu.
2. Rimuovere l'unità flash USB dall'unità.
NOTE
• Non levare l'unità Flash USB quando è in funzione.
• È possibile riprodurre file musicali (MP3/WMA), immagini
(JPEG) e DivX.
• Il numero totale di file contenuto su un'unità Flash USB
dovrebbe essere inferiore a 650 file.
• Alcune unità Flash USB non è sono supportate da questa unità-.
• Questa unità supporta solo l'unità USB Flash.
• Questa unità è in grado di supportare soltanto
USB 1.1
Per dettagli su ogni operazione, vedere la pagina
relativa. (Vedere pag. 24-34)
Riproduzione da un'unità Flash USB

36
Installazione del lettore
L'immagine e l'audio di una TV, un videoregistratore o una radio
vicini potrebbero risentire di disturbi durante la riproduzione.
Se ciò si verifica, spostare il lettore lontano dalla TV,
dal videoregistratore o dalla radio, oppure spegnere l'unità dopo
aver rimosso il disco.
Uscita AV connessioni
A seconda della TV e di altri apparecchi, esistono varie modalità
per collegare il lettore. Fare riferimento ai manuali di TV, sistema
stereo o altri apparecchi quando necessario per consultare
ulteriori informazioni sui collegamenti.
Uscita AV connessioni verso al TV
1. Impostare il menu di selezione del modo sulla modalità
“USB” o “ DISC”.
2. Connettere l'estremità del cavo AV fornito al jack AV IN/OUT
dell'unità.
3. Connettere l'estremità gialla del cavo AV fornito al jack VIDEO
di ingresso alla propria TV.
4. Connettere le estremità rosse e bianche del cavo AV fornito al
jack AUDIO di ingresso alla propria TV.
NOTA
Accertarsi che il lettore DVD sia collegato direttamente alla TV e
non a un videoregistratore, altrimenti l'immagine del DVD potrebbe
essere distorta dal sistema di protezione dalla copia.
Cavo Audio/Video
(Fornito)
Dietro la TV
Lato destro dell'unità

Ingresso AV connessioni
Connettere i jack di ingresso (Audio/Video) sull'unità ai jack di
uscita audio/video del dispositivo, usando cavi audio/video.
Ingresso AV connessioni verso la TV
1. Impostare il menu di selezione del modo sulla modalità
“AV IN”.
2. Connettere l'estremità del cavo AV fornito al jack
AV IN/OUT dell'unità.
3. Connettere l'estremità gialla del cavo AV fornito al jack VIDEO
di uscita sul proprio dispositivo esterno.
4. Connettere le estremità rosse e bianche del cavo AV fornito al
jack AUDIO di uscita sul dispositivo esterno.
Installazione del lettore
(continua)
37
Connessioni
Cavo Audio/Video
(Fornito)
Dispositivo esterno
Lato destro dell'unità

Collegamento audio ad apparecchi opzionali
Collegare il lettore DVD all'apparecchio opzionale per l'uscita
audio.
Impostare il menu di selezione della modalità a USB o DISC.
Amplificatore dotato di stereo analogico a 2 canali o Dolby
Pro Logic ll / Pro Logic: Collegare i jack AV IN/OUT sul lettore
DVD ai jack d’ingresso destro e sinistro dell’amplificatore,
ricevitore o impianto stereo mediante i cavi appositi.
Amplificatore dotato di stereo digitale a 2 canali (PCM) o
ricevitore audio/video dotato di decoder multicanale (Dolby
Digital™, MPEG 2 o DTS): Connettere uno dei jack coassiali
dell'unità, al jack corrispondente del vostro amplificatore. Usare un
cavo audio digitale ottico opzionale.
Audio multicanale digitale
Un collegamento multicanale digitale consente di ottenere la
migliore qualità sonora. Per questo scopo occorre disporre di un
ricevitore audio/video multicanale che supporta uno o più dei formati audio supportati dal lettore DVD, quali MPEG 2, Dolby Digital
e DTS. Controllare il contenuto del manuale del ricevitore e i loghi
stampigliati sul pannello frontale del ricevitore.
NOTE
•
Se il formato audio dell'uscita digitale non corrisponde con le
capacità del proprio ricevitore, quest'ultimo produrrà suoni forti e
distorti, oppure nessun audio.
•
L'audio digitale Surround a sei canali mediante collegamento digitale potrà essere ottenuto solo se il ricevitore è equipaggiato con
un decoder digitale multicanale.
•
Per visualizzare nell'OSD il formato audio del DVD corrente, premere AUDIO.
Installazione del lettore
(continua)
38
Cavo coassiale
(non fornito)
Cavo Audio/Video
(Fornito)
e/o
Amplificatore (ricevitore)
Lato destro dell'unità
L
COAXIAL
DIGITAL INPUT
R
AUDIO I NPUT

39
Riferimento
Risoluzione dei problemi
Sintomo
L'apparecchio non si
accende.
Assenza di immagine
sul pannello LCD o TV
(Incluso il video da latra
unità)
Assenza di audio
Il lettore DVD non avvia
la riproduzione.
Nessuna risposta quando
vengono premuti i tasti.
Il telecomando non
funziona in modo corretto
Correzione
•
Inserire il cavo di alimentazione nella presa di rete.
• Ricaricare la batteria.
• Connettere bene il cavo video nei jack.
• Impostare la MODALITÀ correttamente.
-
Quando si visualizzano video da altri apparecchi, impostare la MODALITÀ su A/V IN.
• Selezionare una modalità LCD diversa da OFF.
• Selezionare il modo corretto di ingresso segnale
video in modo da poter visualizzare sullo schermo
TV l’immagine DVD
• Selezionare il modo ingresso corretto per il ricevitore audio in modo da poter ascoltare l’audio
proveniente dal lettore DVD
• Connettere bene il cavo audio nei jack.
• Inserire un disco riproducibile (verificare il tipo di
disco e il codice regionale).
• Eliminare la funzione di classificazione o modificare il livello di classificazione.
• Il simbolo “ ” può essere visualizzato sullo
schermo della TV durante la riproduzione.
• Usare il telecomando da una distanza entro 23ft
(7m).
Causa
• Il cavo di alimentazione non è collegato.
• La batteria è scarica.
•
Il cavo del segnale video non è collegato bene.
• La selezione della modalità non è impostata
correttamente.
• La modalità LCD è impostata su OFF
• L’apparecchio TV non è stato impostato per
ricevere un segnale di uscita DVD.
• Le apparecchiature collegate tramite il cavo
audio non sono state impostate per ricevere
il segnale in uscita DVD.
• I cavi del segnale audio non sono collegati
bene.
• È stato inserito un disco che non può essere
riprodotto
• È stato impostato il livello di classificazione
• Alcuni dischi no permettono alcune
operazioni.
• Il telecomando è troppo lontano dal lettore
DVD.

Utilizzare questo elenco per inserire la lingua desiderata per le seguenti impostazioni iniziali:
Linguaggio Audio, Sottotitoli Disco, Menu Disco.
Codici di lingua
Lingua Codice
Abkhazian 6566
Afar 6565
Africano 6570
Albanese 8381
Amharico 6577
Arabo 6582
Armeno 7289
Assamese 6583
Aymara 6588
Azerbaijani 6590
Bashkir 6665
Basco 6985
Bengalese 6678
Bhutan 6890
Bihari 6672
Bretone 6682
Bulgaro 6671
Birmano 7789
Bielorusso 6669
Cambogiano 7577
Catalano 6765
Cinese 9072
Corsico 6779
Croato 7282
Ceco 6783
Danese 6865
Olandese 7876
Inglese 6978
Esperanto 6979
Estone 6984
Faroese 7079
Lingua Codice
Figiano 7074
Finlandese 7073
Francese 7082
Frisone 7089
Gallego 7176
Georgiano 7565
Tedesco 6869
Greco 6976
Groenlandese 7576
Guarani 7178
Gujarati 7185
Hausa 7265
Ebreo 7387
Hindi 7273
Ungaro 7285
Islandese 7383
Indonesiano 7378
Interlingua 7365
Irlandese 7165
Italiano 7384
Giapponese 7465
Giavanese 7487
Kannada 7578
Kashmiri 7583
Kazako 7575
Kirghiso 7589
Coreano 7579
Curdo 7585
Laothiano 7679
Latino 7665
Lettone 7686
Lingua Codice
Lingala 7678
Lituano 7684
Macedone 7775
Malgascio 7771
Malese 7783
Malayalam 7776
Maltese 7784
Maori 7773
Marathi 7782
Moldavo 7779
Mongolo 7778
Nauruano 7865
Nepali 7869
Norvegese 7879
Oriya 7982
Punjabi 8065
Pashtu 8083
Persiano 7065
Polacco 8076
Portoghese 8084
Quechua 8185
Retoromanzo 8277
Rumeno 8279
Russo 8285
Samoano 8377
Sanscrito 8365
Scots Gaelic 7168
Serbo 8382
Serbo-Croato 8372
Shona 8378
Sindhi 8368
Lingua Codice
Singalese 8373
Slovacco 8375
Sloveno 8376
Somalo 8379
Spagnolo 6983
Sudanese 8385
Swahili 8387
Svedese 8386
Tagal 8476
Tajiko 8471
Tamil 8465
Tatar 8484
Telugu 8469
Thailandese 8472
Tibetano 6679
Tigrinya 8473
Tongano 8479
Turco 8482
Turkmeno 8475
Twi 8487
Ucraino 8575
Urdu 8582
Uzbeco 8590
Vietnamita 8673
Volapük 8679
Gallese 6789
Wolof 8779
Xhosa 8872
Yiddish 7473
Yoruba 8979
Zulu 9085
40

41
Riferimento
Utilizzare questo elenco per inserire il proprio paese.
Codici dei paesi
Paese Codice
Afghanistan AF
Argentina AR
Australia AU
Austria AT
Belgio BE
Bhutan BT
Bolivia BO
Brasile BR
Cambogia KH
Canada CA
Cile CL
Cina CN
Colombia CO
Congo CG
Costa Rica CR
Croazia HR
Repubblica Ceca CZ
Danimarca DK
Ecuador EC
Egitto EG
El Salvador SV
Paese Codice
Etiopia ET
Fiji FJ
Finlandia FI
Francia FR
Germania DE
Gran Bretagna GB
Grecia GR
Groenlandia GL
Isole HM
Ungheria HU
India IN
Indonesia ID
Israele IL
Italia IT
Giamaica JM
Giappone JP
Kenya KE
Kuwait KW
Libia LY
Lussemburgo LU
Paese Codice
Malaysia MY
Maldive MV
Messico MX
Monaco MC
Mongolia MN
Marocco MA
Nepal NP
Paesi Bassi NL
Antille Paesi Bassi AN
Nuova Zelanda NZ
Nigeria NG
Norvegia NO
Oman OM
Pakistan PK
Panama PA
Paraguay PY
Filippine PH
Polonia PL
Portogallo PT
Romania RO
Federazione Russa RU
Paese Codice
Arabia Saudita SA
Senegal SN
Singapore SG
Repubblica Slovacca SK
Slovenia SI
Sud Africa ZA
Corea del Sud KR
Spagna ES
Sri Lanka LK
Svezia SE
Svizzera CH
Thailandia TH
Turchia TR
Uganda UG
Ucraina UA
Stati Uniti US
Uruguay UY
Uzbekistan UZ
Vietnam VN
Zimbabwe ZW

Generale
Alimentazione:
DC 9,5 V (terminale alimentatore AC), DC 7,4 V (Batteria)
Consumo di energia: 12W con batteria
Peso netto: 1,60 lbs (0,73 kg) (senza pacco batterie)
Dimensioni esterne (L x P x A):
7,6 x 1,5 x 6,7 pollici (195 x 38.5 x 172,6 mm)
Sistema segnale: PAL
Laser:
Lunghezza d’onda laser DVD 662+25 / 662-15 nm
Lunghezza d’onda laser CD 785+25 / 785-15 nm
Gamma frequenza (Audio):
DVD audio lineare: 48kHz campionamento 8 Hz a 20 kHz
96kHz campionamento 8 Hz a 44 kHz
Rapporto segnale-rumore (audio): Oltre 80 dB
Range dinamico (Audio): Oltre 80 dB
Distorsione armonica (audio): 0,02 %
Condizioni di esercizio:
Temperatura: da 5°C a 35°C, Stato operativo: Orizzontale
connettori
ingresso/uscita video (VIDEO In/Out):
1,0 V (p-p), 75 Ω, sinc. negativo, ø3,5mm mini jack x 1
ingresso/uscita audio (AUDIO In/Out, audio analogico):
2,0 Vrms(1 KHz, 0 dB), ø3,5mm mini jack x 1
Terminale cuffie: ø3,5mm stereo mini jack x 2
Display a cristalli liquid
Dimensioni pannello: 7 pollici (diagonale)
Sistema proiezione: Striscia R.G.B.
Sistema guida: TFT matrice attiva
Risoluzione: 234 x 480 x 3 (gamma effettiva pixel: oltre 99,99%)
Accessori
• Cavo RCA audio/video............................................................1
• Alimentatore CA (DPAC1T).....................................................1
• Adattatore per automobile (DPDC1).......................................1
• Pacco batterie (DPB27) ..........................................................1
• Telecomando...........................................................................1
• Batteria per il telecomando (batteria a litio)............................1
Il design e le specifiche tecniche sono soggette a cambiamento senza preavviso.
Specifiche
42
 Loading...