

Page 1
Portable DVD Player
Before connecting, operating or adjusting this
product, please read this instruction booklet carefully
and completely.
Owner’s Manual
Model: DP271
DP271B-P_AA6SLLW_ENG
Page 2

This lightning flash with arrowhead symbol within an equilateral
triangle is intended to alert the user to the presence of uninsulated dangerous voltage within the product’s enclosure that may be
of sufficient magnitude to constitute a risk of electric shock to persons.
The exclamation point within an equilateral triangle is intended to
alert the user to the presence of important operating and maintenance (servicing) instructions in the literature accompanying the
product.
WARNING : Do not install this equipment in a confined space such a
bookcase or similar unit.
CAUTION: Do not block any ventilation openings. Install in accordance
with the manufacturer's instructions.
Slots and openings in the cabinet are provided for ventilation and to
ensure reliable operation of the product and to protect it from over heating.
The openings should be never be blocked by placing the product on a bed,
sofa, rug or other similar surface. This product should not be placed in a
built-in installation such as a bookcase or rack unless proper ventilation is
provided or the manufacturer's instruction have been adhered to.
CAUTION:
This product employs a Laser System.
To ensure proper use of this product, please read this owner’s manual
carefully and retain it for future reference. Should the unit require maintenance, contact an authorized service center.
Use of controls, adjustments or the performance of procedures other than
those specified herein may result in hazardous radiation exposure.
To prevent direct exposure to laser beam, do not try to open the enclosure.
Visible laser radiation when open. DO NOT STARE INTO BEAM.
CAUTION: The apparatus should not be exposed to water (dripping or
splashing) and no objects filled with liquids, such as vases, should be
placed on the apparatus.
NOTES ON COPYRIGHTS:
It is forbidden by law to copy
, broadcast, show, broadcast via cable, play in
public, or rent copyrighted material without permission.
This product features the copy protection function developed by
Macrovision. Copy protection signals are recorded on some discs. When
recording and playing the pictures of these discs on a VCR, picture noise
will appear.
This product incorporates copyright protection technology that is protected
by method claims of certain U.S. patents and other intellectual property
rights owned by Macrovision Corporation and other rights owners. Use of
this copyright protection technology must be authorized by Macrovision
Corporation, and is intended for home and other limited viewing uses only
unless otherwise authorized by Macrovision Corporation. Reverse engineering or disassembly is prohibited.
Safety Precautions
2
CAUTION: TO REDUCE THE RISK OF ELECTRIC SHOCK
DO NOT REMOVE COVER (OR BACK)
NO USER-SERVICEABLE PARTS INSIDE
REFER SERVICING TO QUALIFIED SERVICE PERSONNEL.
CAUTION
RISK OF ELECTRIC SHOCK
DO NOT OPEN
WARNING: TO PREVENT FIRE OR ELECTRIC SHOCK HAZARD, DO
NOT EXPOSE THIS PRODUCT TO RAIN OR MOISTURE.
Page 3
3
CAUTION concerning the Power Cord
Most appliances recommend they be placed upon a dedicated
circuit;
That is, a single outlet circuit which powers only that appliance and
has no additional outlets or branch circuits. Check the specification
page of this owner's manual to be certain.
Do not overload wall outlets. Overloaded wall outlets, loose or damaged wall outlets, extension cords, frayed power cords, or damaged
or cracked wire insulation are dangerous. Any of these conditions
could result in electric shock or fire. Periodically examine the cord of
your appliance, and if its appearance indicates damage or deterioration, unplug it, discontinue use of the appliance, and have the cord
replaced with an exact replacement part by an authorized servicer.
Protect the power cord from physical or mechanical abuse, such as
being twisted, kinked, pinched, closed in a door, or walked upon.
Pay particular attention to plugs, wall outlets, and the point where the
cord exits the appliance.
To disconnect power from the mains, pull out the mains cord plug.
When installing the product, ensure that the plug is easily accessible.
This product is manufactured to comply with the
EEC DIRECTIVE 89/336/EEC, 93/68/EEC and
2006/95/EC.
Disposal of your old appliance
1. When this crossed-out wheeled bin symbol is attached to a
product it means the product is covered by the European
Directive 2002/96/EC.
2. All electrical and electronic products should be disposed
of separately from the municipal waste stream via designated collection facilities appointed by the government or
the local authorities.
3. The correct disposal of your old appliance will help prevent potential negative consequences for the environment
and human health.
4. For more detailed information about disposal of your old
appliance, please contact your city office, waste disposal
service or the shop where you purchased the product.
Safety Precautions (continued)
Introduction
Page 4

4
Contents
Introduction
Safety Precautions . . . . . . . . . . . . . . . . . . . . . . . . . . . . . . . . . . . . . . 2-3
Contents . . . . . . . . . . . . . . . . . . . . . . . . . . . . . . . . . . . . . . . . . . . . . . . 4
Before Use. . . . . . . . . . . . . . . . . . . . . . . . . . . . . . . . . . . . . . . . . . . . 5-7
About the Symbol Display. . . . . . . . . . . . . . . . . . . . . . . . . . . . 5
Symbol used in this Manual. . . . . . . . . . . . . . . . . . . . . . . . . . . . . . 5
Notes on Discs . . . . . . . . . . . . . . . . . . . . . . . . . . . . . . . . . . . . . . . 5
Maintenance and Service . . . . . . . . . . . . . . . . . . . . . . . . . . . . . . . 6
Types of Playable Discs . . . . . . . . . . . . . . . . . . . . . . . . . . . . . . . . 7
Regional Code . . . . . . . . . . . . . . . . . . . . . . . . . . . . . . . . . . . . . . . 7
Identification of Controls . . . . . . . . . . . . . . . . . . . . . . . . . . . . . . . . .8-11
Main Unit . . . . . . . . . . . . . . . . . . . . . . . . . . . . . . . . . . . . . . . . . . .8-9
Remote Control . . . . . . . . . . . . . . . . . . . . . . . . . . . . . . . . . . . .10-11
Power Connections . . . . . . . . . . . . . . . . . . . . . . . . . . . . . . . . . . .12-15
Connect the AC adapter . . . . . . . . . . . . . . . . . . . . . . . . . . . . . . . .12
Connect the Automotive adapter. . . . . . . . . . . . . . . . . . . . . . . . . .13
Battery Pack . . . . . . . . . . . . . . . . . . . . . . . . . . . . . . . . . . . . . .14-15
Rotating the LCD . . . . . . . . . . . . . . . . . . . . . . . . . . . . . . . . . . . . . . . .16
Playing a Disc . . . . . . . . . . . . . . . . . . . . . . . . . . . . . . . . . . . . . . . . . . 17
Advanced Operations
Displaying Disc Information on-screen. . . . . . . . . . . . . . . . . . . . . . . . . 18
Initial Settings . . . . . . . . . . . . . . . . . . . . . . . . . . . . . . . . . . . . . . . 18-23
General Operation. . . . . . . . . . . . . . . . . . . . . . . . . . . . . . . . . . . . 18
LANGUAGE . . . . . . . . . . . . . . . . . . . . . . . . . . . . . . . . . . . . . . . . 19
DISPLAY. . . . . . . . . . . . . . . . . . . . . . . . . . . . . . . . . . . . . . . . . . . 19
AUDIO . . . . . . . . . . . . . . . . . . . . . . . . . . . . . . . . . . . . . . . . . . . . 20
LOCK (Parental Control). . . . . . . . . . . . . . . . . . . . . . . . . . . . . 21-22
OTHERS. . . . . . . . . . . . . . . . . . . . . . . . . . . . . . . . . . . . . . . . . . . 23
General Features . . . . . . . . . . . . . . . . . . . . . . . . . . . . . . . . . . . . . 24-26
Additional Features . . . . . . . . . . . . . . . . . . . . . . . . . . . . . . . . . . . . . . 27
Playing an Audio CD or MP3/WMA file . . . . . . . . . . . . . . . . . . . . . . . 28
Programmed Playback . . . . . . . . . . . . . . . . . . . . . . . . . . . . . . . . . . . 29
Repeat Programmed Tracks . . . . . . . . . . . . . . . . . . . . . . . . . . . . . 29
Erasing a Track from Program List . . . . . . . . . . . . . . . . . . . . . . . . 29
Erasing the Complete Program List. . . . . . . . . . . . . . . . . . . . . . . . 29
Viewing a JPEG file . . . . . . . . . . . . . . . . . . . . . . . . . . . . . . . . . . . 30-31
Slide Show . . . . . . . . . . . . . . . . . . . . . . . . . . . . . . . . . . . . . . . . . . 30
Still Picture . . . . . . . . . . . . . . . . . . . . . . . . . . . . . . . . . . . . . . . . . . 30
Moving to another File . . . . . . . . . . . . . . . . . . . . . . . . . . . . . . . . . 31
Zoom . . . . . . . . . . . . . . . . . . . . . . . . . . . . . . . . . . . . . . . . . . . . . . 31
To rotate picture . . . . . . . . . . . . . . . . . . . . . . . . . . . . . . . . . . . . . . 31
To listen to MP3/WMA music while watching picture . . . . . . . . . . . 31
JPEG disc compatibility with this unit is limited as follows . . . . . . . 31
Playing a DVD VR format Disc . . . . . . . . . . . . . . . . . . . . . . . . . . . . . 32
Playing a DivX Movie file . . . . . . . . . . . . . . . . . . . . . . . . . . . . . . . 33-34
DivX disc compatibility with this unit is limited as follows . . . . . . . . 34
Playing an USB Flash Drive . . . . . . . . . . . . . . . . . . . . . . . . . . . . . . 35
Connections
Setting up the Player . . . . . . . . . . . . . . . . . . . . . . . . . . . . . . . . . . 36-38
AV output Connections . . . . . . . . . . . . . . . . . . . . . . . . . . . . . . . . . 36
AV input Connections . . . . . . . . . . . . . . . . . . . . . . . . . . . . . . . . . . 37
Audio Connection to Optional Equipment . . . . . . . . . . . . . . . . . . . 38
Reference
Troubleshooting. . . . . . . . . . . . . . . . . . . . . . . . . . . . . . . . . . . . . . . . . 39
Language Code. . . . . . . . . . . . . . . . . . . . . . . . . . . . . . . . . . . . . . . . . 40
Area Codes . . . . . . . . . . . . . . . . . . . . . . . . . . . . . . . . . . . . . . . . . . . . 41
Specifications . . . . . . . . . . . . . . . . . . . . . . . . . . . . . . . . . . . . . . . . . . 42
Page 5
5
Introduction
Before Use
To ensure proper use of this product, please read this owner’s
manual carefully and retain for future reference.
This manual provides information on the operation and maintenance of your unit. Should the unit require service, contact an
authorized service location.
About the Symbol Display
“ ” may appear on your LCD display during operation and
indicates that the function explained in this owner’s manual is not
available on that specific DVD video disc.
Symbol Used in this Manual
NOTE
Indicates special notes and operating features.
TIP
Indicates tips and hints for making the task easier.
A section whose title has one of the following symbols is
applicable only to the disc represented by the symbol.
All discs and files listed below
DVD and finalized DVD±R/RW
Video CDs.
Audio CDs. MP3 files.
WMA files.
DivX files.
Notes on Discs
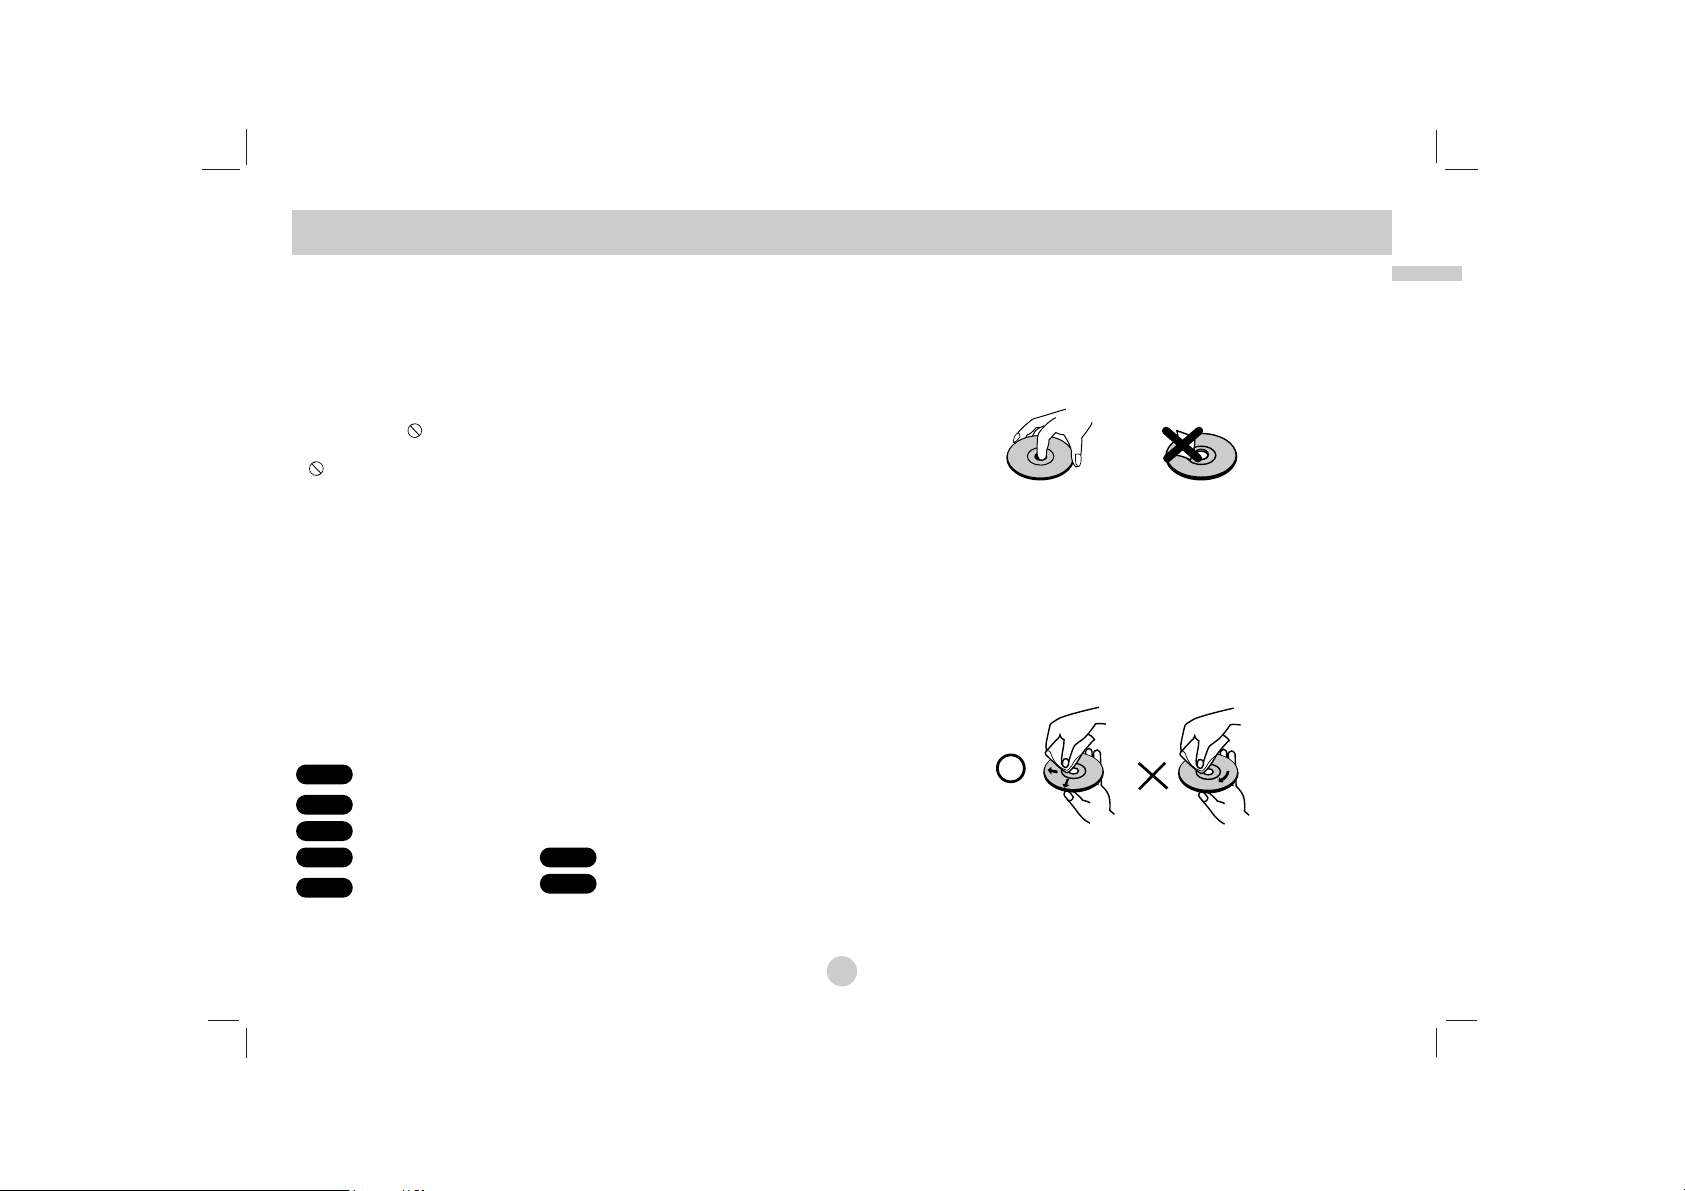
Handling Discs
Do not touch the playback side of the disc. Hold the disc by the
edges so that fingerprints do not get on the surface. Never stick
paper or tape on the disc.
Storing Discs
After playing, store the disc in its case. Do not expose the disc to
direct sunlight or sources of heat and never leave it in a parked
car exposed to direct sunlight.
Cleaning Discs
Fingerprints and dust on the disc can cause poor picture quality
and sound distortion. Before playing, clean the disc with a clean
cloth. Wipe the disc from the center out.
Do not use strong solvents such as alcohol, benzine, thinner, commercially available cleaners, or anti-static spray intended for older
vinyl records.
DivX
WMA
MP3ACD
VCD
DVD
ALL
Page 6

6
Before Use (continued)
Maintenance and Service
Refer to the information in this chapter before contacting a service
technician.
Handling the Unit
When shipping the unit
Please save the original shipping carton and packing materials. If
you need to ship the unit, for maximum protection, re-pack the unit
as it was originally packed at the factory.
Keeping the exterior surfaces clean
• Do not use volatile liquids such as insecticide spray near the
unit.
• Do not leave rubber or plastic products in contact with the unit
for a long period of time. since they leave marks on the
surface.
Cleaning the unit
To clean the player, use a soft, dry cloth. If the surfaces are
extremely dirty, use a soft cloth lightly moistened with a mild detergent solution.
Do not use strong solvents such as alcohol, benzine, or thinner, as
these might damage the surface of the unit.
Maintaining the Unit
The DVD player is a high-tech, precision device. If the optical
pick-up lens and disc drive parts are dirty or worn, the picture
quality could be diminished.
Depending on the operating environment, regular inspection and
maintenance are recommended after every 1,000 hours of use.
For details, please contact your nearest authorized service center.
Page 7
7
Introduction
Before Use (continued)
Types of Playable Discs
DVD
(8 cm / 12 cm disc)
Video CD(VCD)
(8 cm / 12 cm disc)
Audio CD
(8 cm / 12 cm disc)
In addition, this unit plays DVD±R/RW and CD-R/RW, SVCD, USB
that contains audio titles, DivX, MP3, WMA, and/or JPEG files.
This indicates a product feature that is capable of
playing DVD-RW discs recorded with Video Recording
format.
NOTES
• Depending on the conditions of the recording equipment or the
CD-R/RW (or DVD±R/RW) disc itself, some CD-R/RW
(or DVD±R/RW) discs cannot be played on the unit.
• Do not attach any seal or label to either side (the labeled side or
the recorded side) of a disc.
•
Do not use irregularly shaped CDs (e.g., heart-shaped
or octagonal). It may result in malfunctions.
Customers should note that permission is required in order to
download MP3 / WMA files and music from the Internet. Our
company has no right to grant such permission. Permission
should always be sought from the copyright owner.
Regional Code
This unit has a regional code printed on the rear of the unit. This
unit can play only DVD discs labelled same as the rear of the unit
or “ALL”.
Notes on Regional Codes
• Most DVD discs have a globe with one or more numbers in it
clearly visible on the cover. This number must match your unit’s
regional code or the disc cannot play.
• If you try to play a DVD with a different regional code from your
player, the message “Check Regional Code” appears on the TV
screen.
Manufactured under license from Dolby
Laboratories. “Dolby”, “Pro Logic” and the double-D
symbol are trademarks of Dolby Laboratories.
DTS and DTS Digital Out are trademarks of Digital
Theater Systems, Inc.
Page 8
8
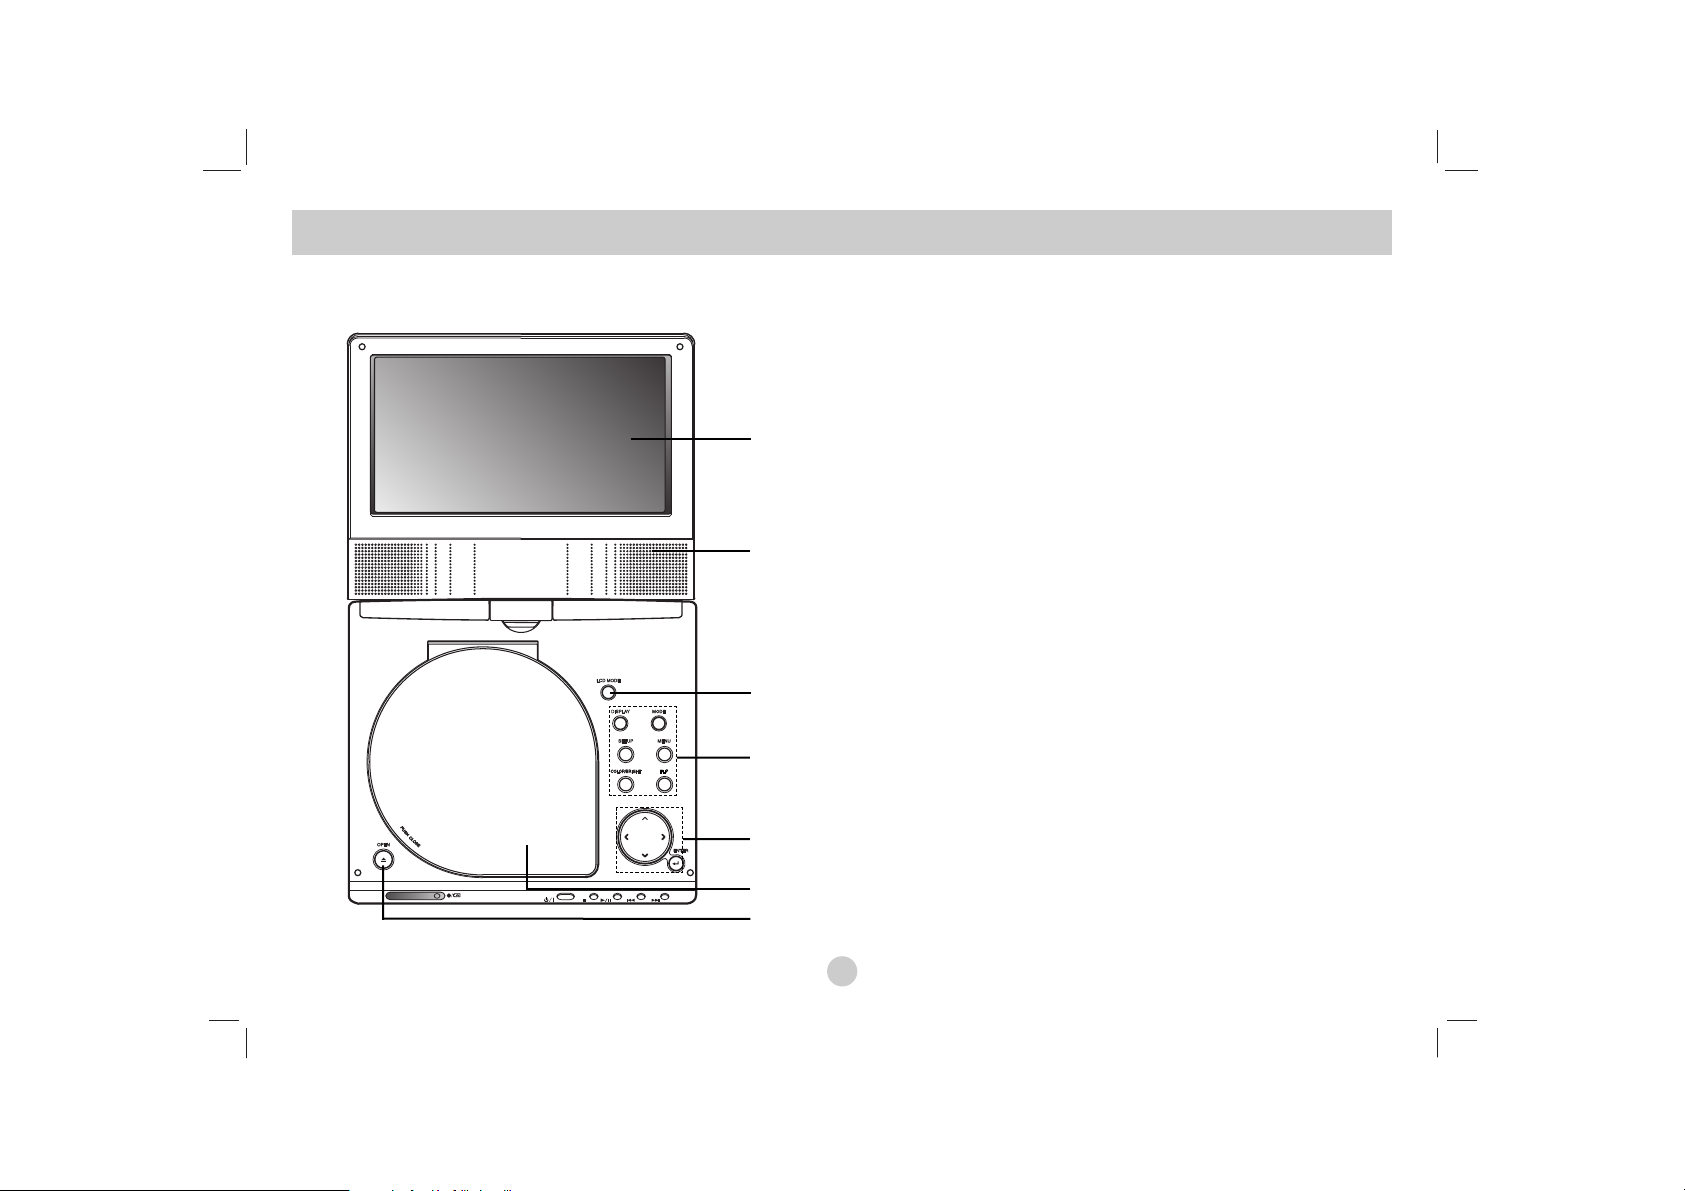
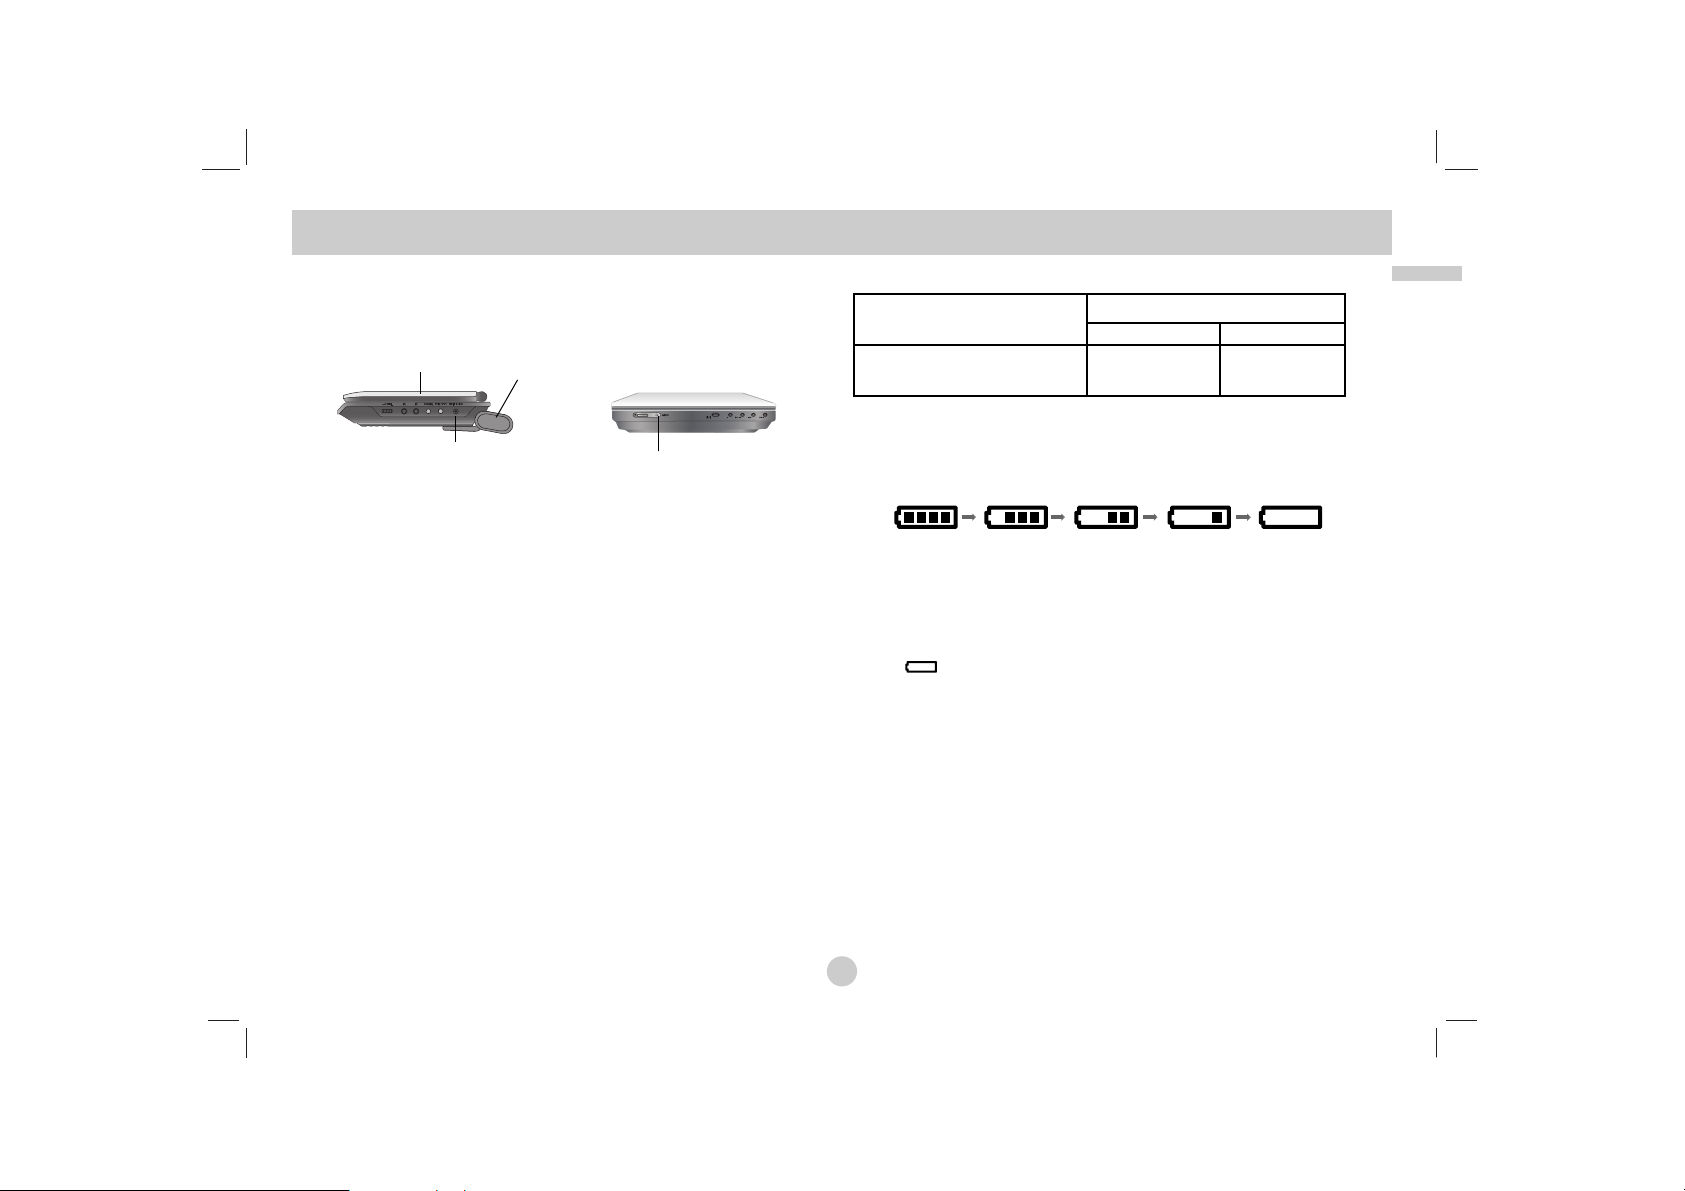
Identification of Controls
Main Unit
a LCD screen
b Speaker
c LCD MODE: NORMAL → 4:3 Mode → OFF
d Function Buttons
• DISPLAY: Accesses On-Screen display.
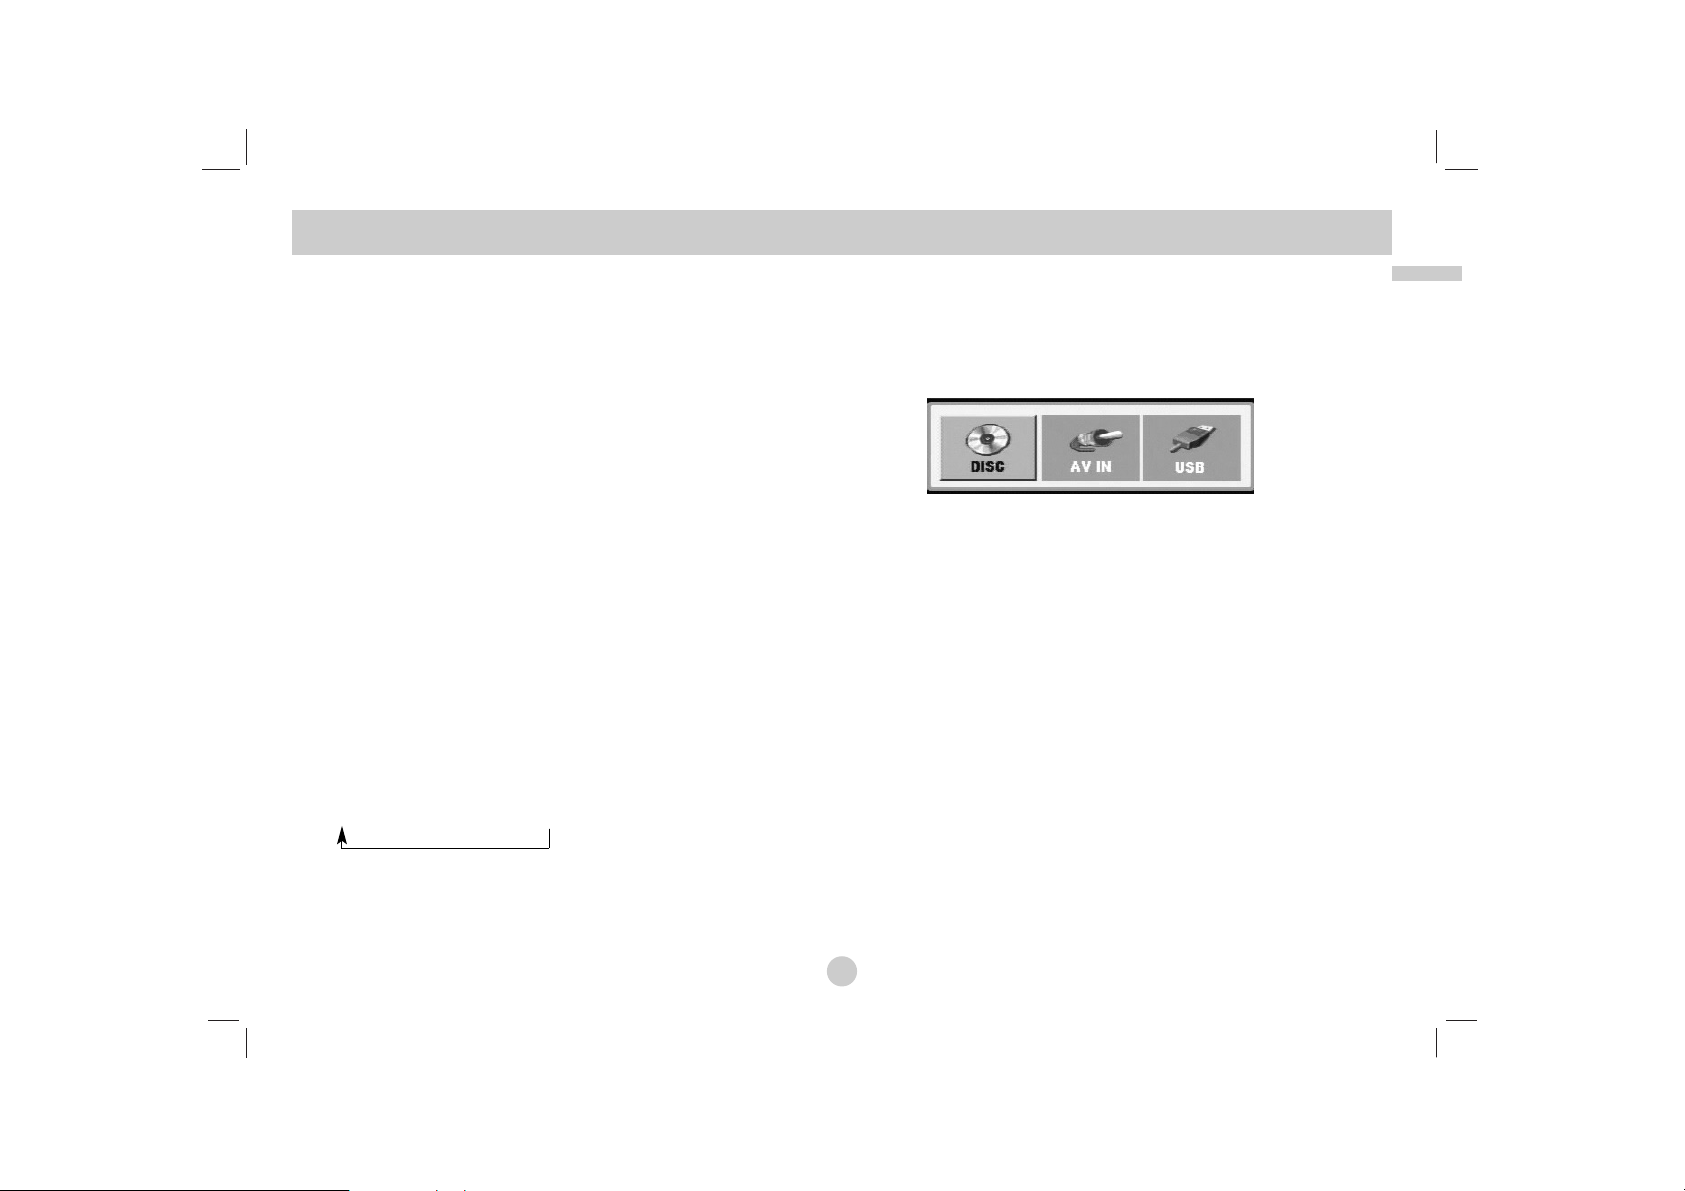
• MODE: Selects a mode among DISC, AV IN or USB.
• SETUP: Accesses or removes setup menu.
• MENU: Accesses menu on a DVD disc.
• COLOR/BRIGHT: Selects the mode of LCD adjustment
Brightness → Color → OFF
• FLIP: Rotates the screen.
e Menu Control Buttons
• bBvV(left/right/up/down)
Selects an item in the menu.
• bB: Adjusts the COLOR/BRIGHT.
• ENTER: Confirms menu selection.
f Disc Lid
g OPEN button: Push this button to open the Disc lid.
a
b
c
d
e
f
g
Page 9
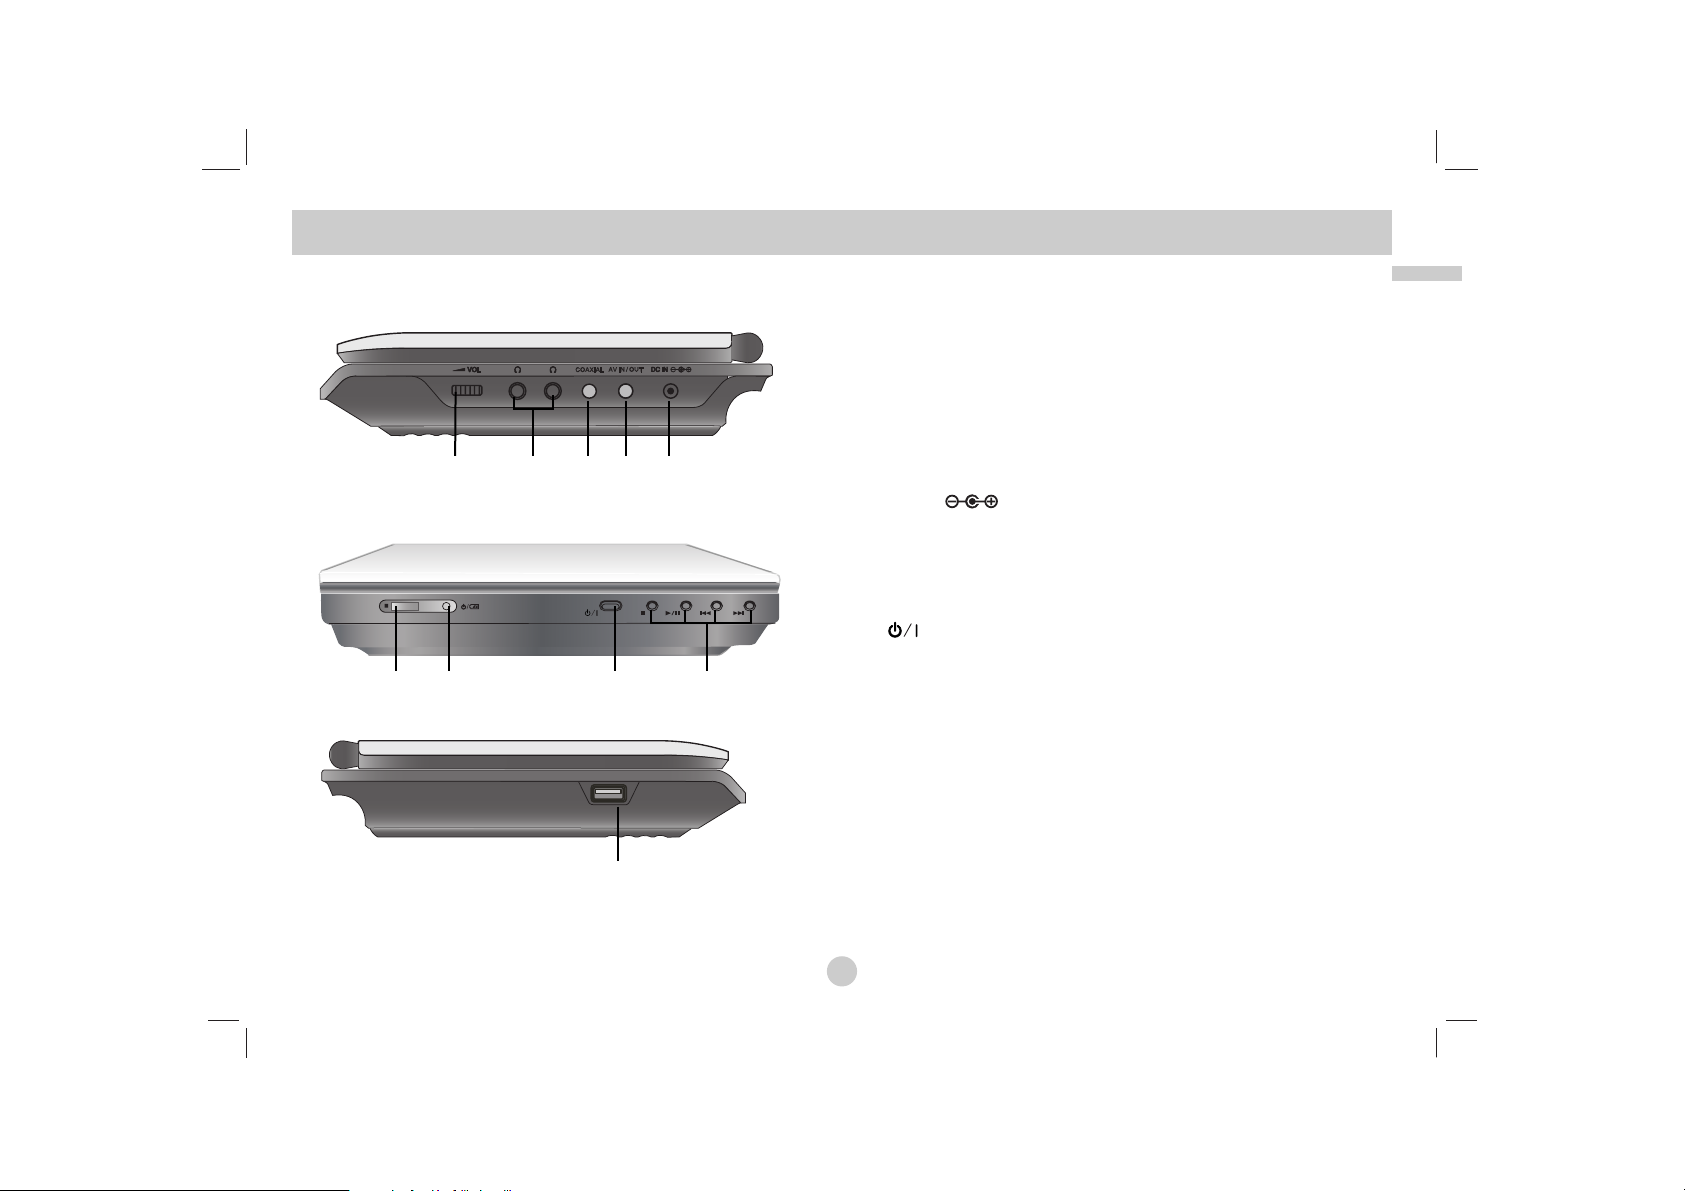
9
Introduction
Main Unit
a Volume Control
b Earphones jacks
c COAXIAL jack
d AV IN/OUT jack
NOTE
If the VIDEO IN signal is not connected in AV IN mode, this unit
will automatically power off in 10 minutes to prevent battery discharge.
e DC IN
Connect the AC adapter or Automotive adapter.
f Remote sensor
Receive the signal from the Remote Control for operation.
g Battery charge indicator
h (POWER): Switches the player ON or OFF.
i Playback buttons
• x ( STOP ): Stops playback.
• B/X ( PLAY/PAUSE ):
Starts playback/ Pauses playback temporarily.
• . (Reverse SKIP/SEARCH )
Search backward*/ go to beginning of current chapter or
track or go to previous chapter or track.
• > (Forward SKIP/SEARCH)
Search forward*/ go to next chapter or track.
* Press and hold button for about two seconds.
j USB: Connect an USB Flash Drive.
Identification of Controls (continued)
abcde
fg h i
j
Page 10
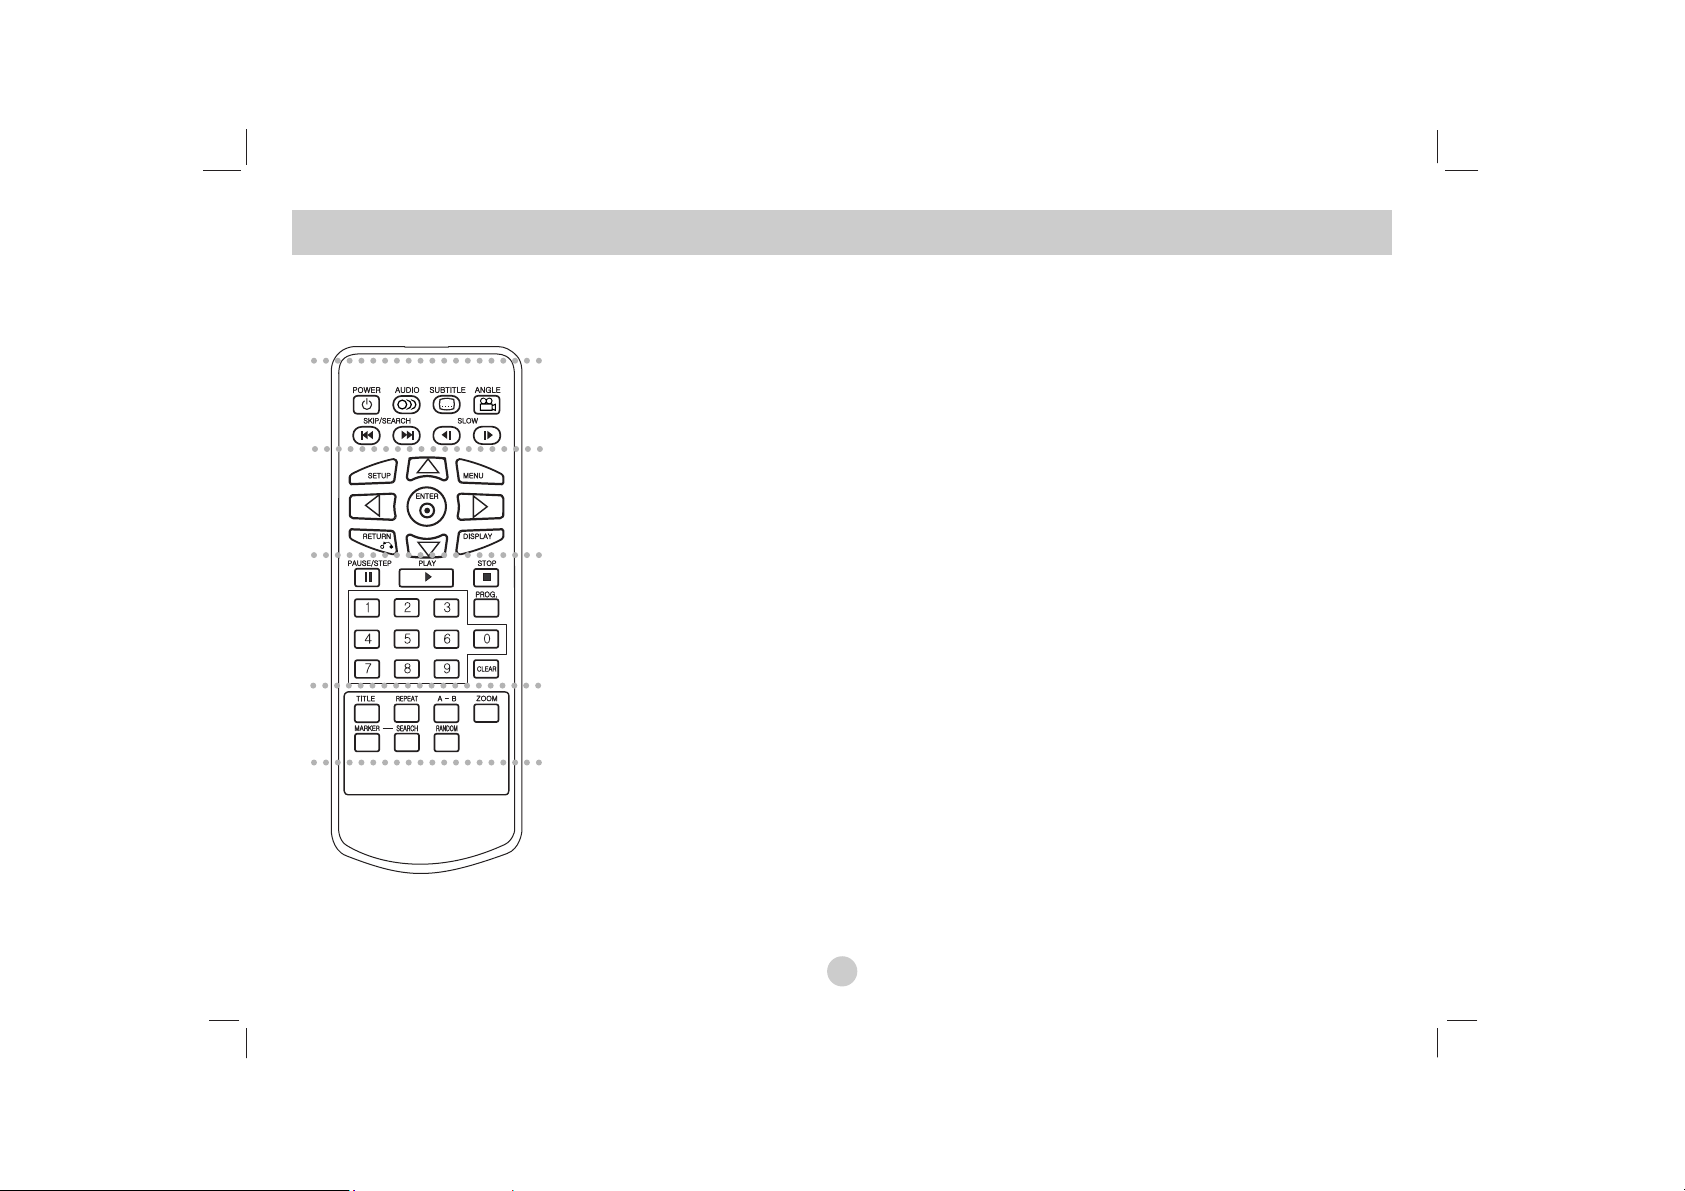
10
a
POWER: Switches DVD Player ON or OFF.
AUDIO: Selects an audio language.
SUBTITLE: Selects a subtitle language.
ANGLE: Selects a DVD camera angle, if
available.
Reverse SKIP/SEARCH ( . ):
Search backward*/ go to beginning of current
chapter or track or go to previous chapter or
track.
Forward SKIP/SEARCH ( > ):
Search forward*/ go to next chapter or track.
* Press and hold button for about two
seconds.
SLOW ( t / T ): Reverse/ Forward slow
playback.
b
SETUP: Accesses or removes setup menu.
MENU: Accesses menu on a DVD disc.
RETURN (O): Removes the menu.
DISPLAY: Accesses On-Screen display.
bBvV(left/right/up/down):
Selects an item in the menu.
ENTER: Confirms menu selection.
c
PAUSE/STEP ( X ): Pauses playback
temporarily/ press repeatedly for
frame-by-frame playback.
PLAY (N): Starts playback.
STOP ( x ): Stops playback.
0-9 number buttons:
Selects numbered items in a menu.
PROG.: Places a track on the program list.
CLEAR: Removes a track number on the
program list or a mark on the MARKER
SEARCH menu.
d
TITLE: Displays title menu, if available.
REPEAT: Repeat chapter, track, title all.
A-B: Repeat sequence.
ZOOM: Enlarges video image.
MARKER: Marks any point during playback.
SEARCH: Displays MARKER SEARCH menu.
RANDOM: Plays tracks in random order.
Identification of Controls (continued)
Remote Control
a
b
c
d
Page 11
11
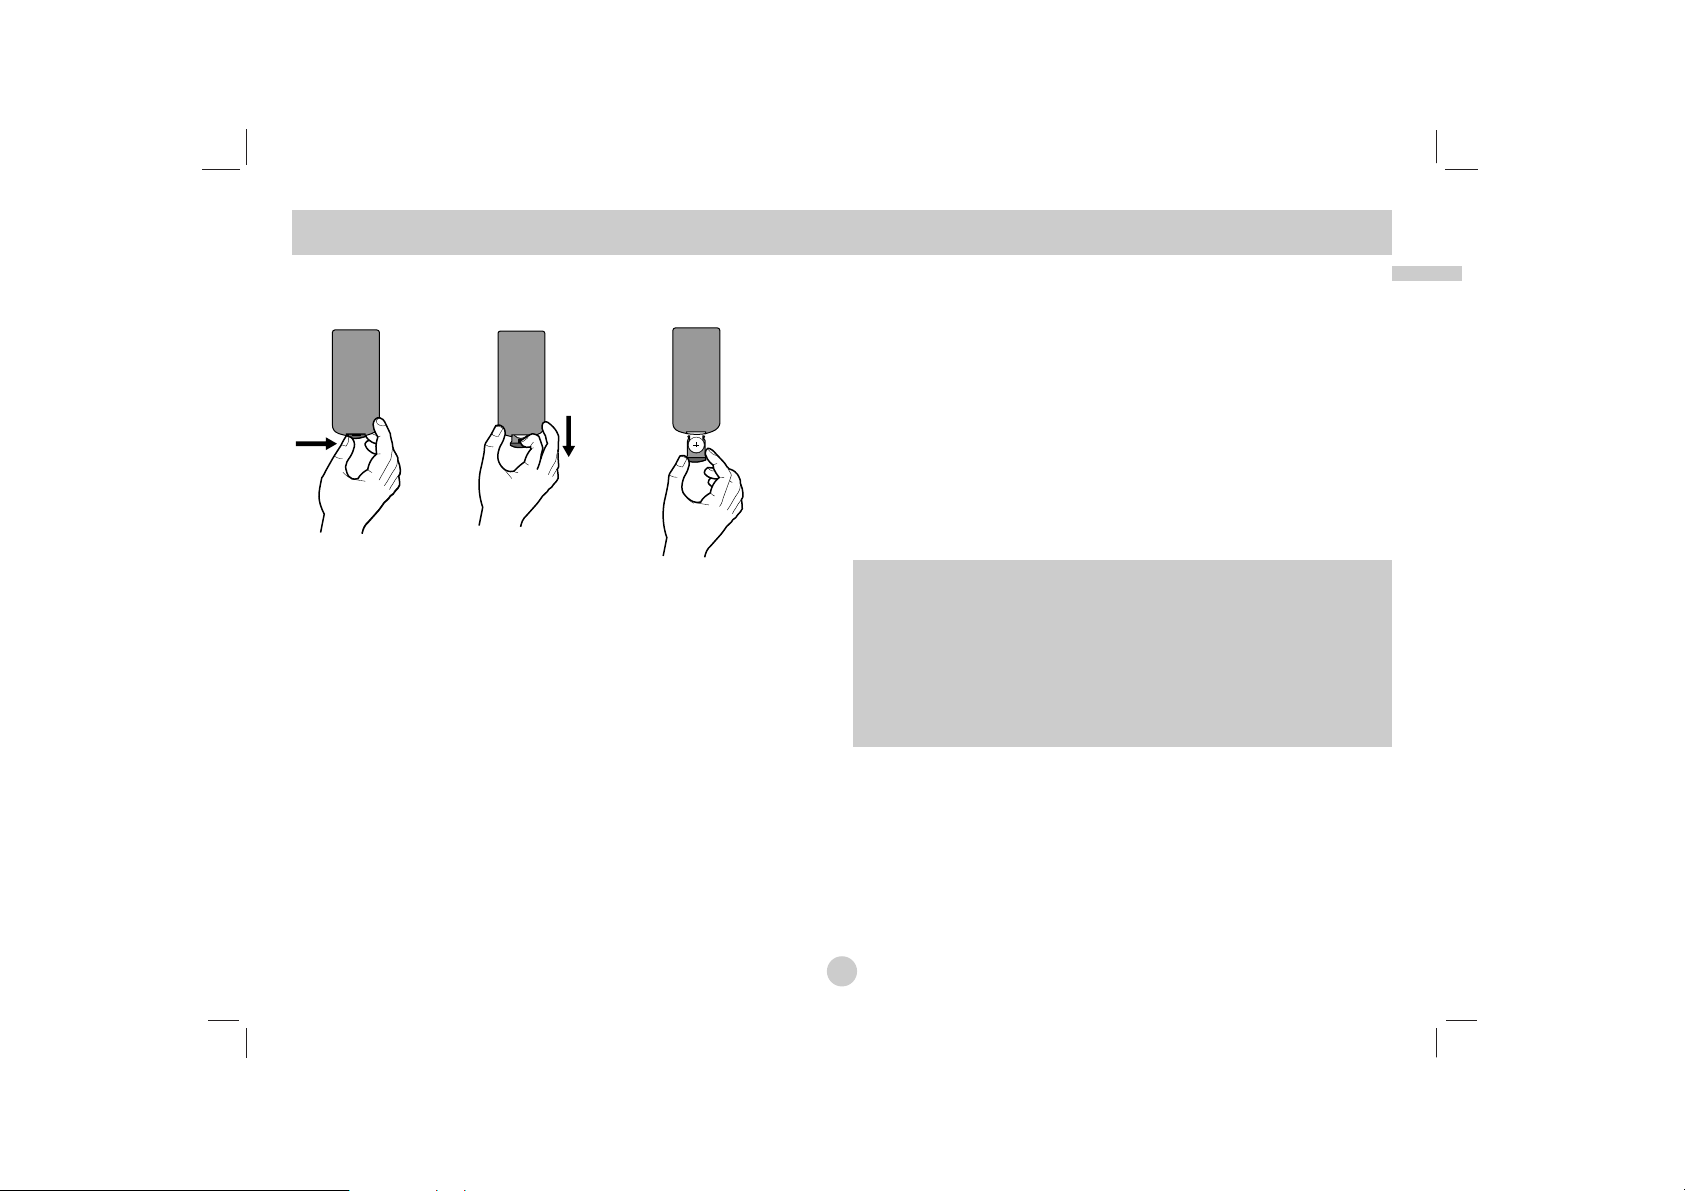
Introduction
Insert the battery (Lithium battery)
NOTES
• Do not expose the Remote Control sensor to bright light.
• Do not place obstacles between the Remote Control sensor and
the Remote Control.
V Replacing the button-type battery
The battery normally lasts for about a year. Replace the battery if
the Remote Control fails to operate the unit when used within the
operation range.
Button-type battery (Lithium battery)
1. Pinch the battery holder clip together then pull the tab to
remove the battery holder.
2. Insert the battery with the + facing in the same direction as the
+ on the battery holder.
3. Replace the battery holder with battery into the Remote Control
unit making sure that it is fully inserted.
NOTES
• Replace Remote Control unit battery with 3V micro lithium cells
such as CR. 2025 or its equivalent.
• Dispose of battery safety in accordance with local laws. Do not
dispose of in fire.
Identification of Controls
(continued)
Warning :
The battery used in this device may present a fire or
chemical burn hazard if mistreated. Do not recharge, disassemble, incinerate, or heat above 100 °C (212 °F).
Replace the battery with Matsushita Elec. Ind. Co., Ltd.
(Panasonic), part no. CR. 2025 only.
Use of another battery may present a risk of fire or explosion. Dispose of used batteries. Keep batteries away
from children. Do not disassemble or dispose of in fire.
Page 12
12
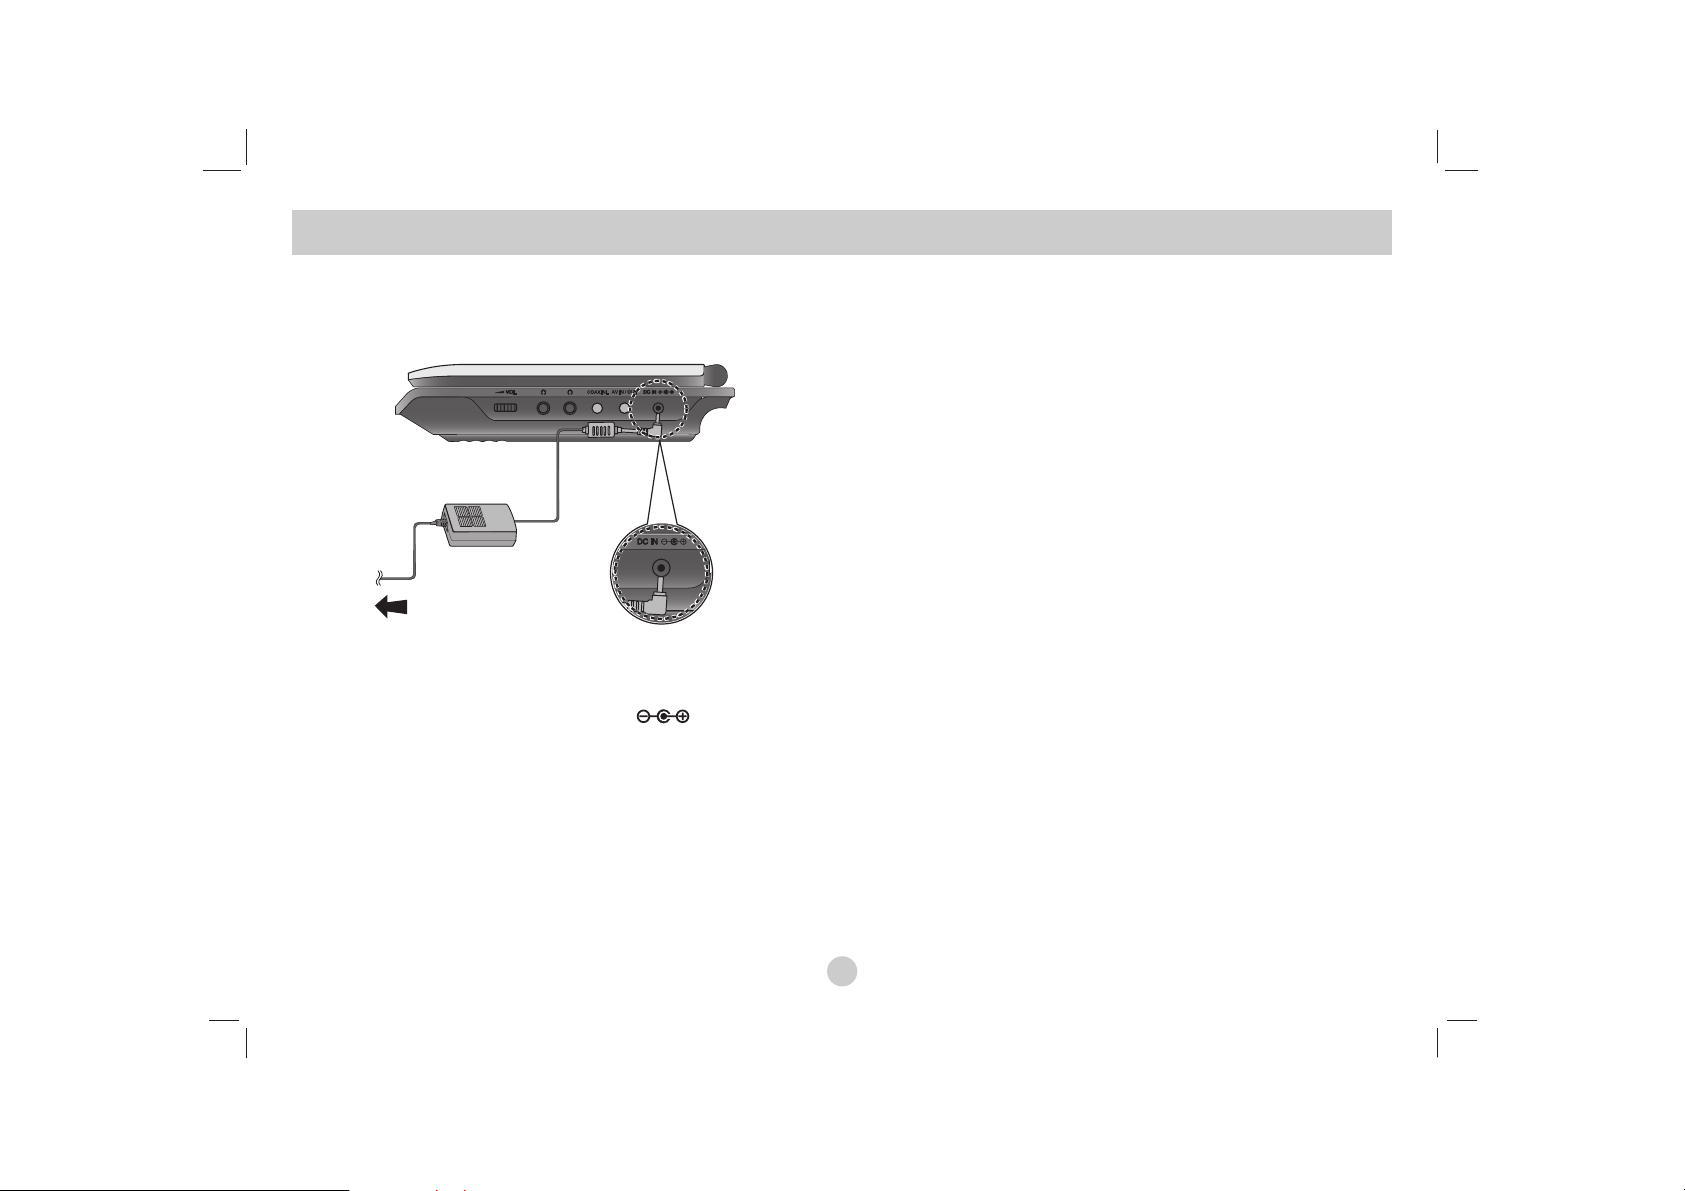
Connect the AC adapter.
a Connect the AC Adapter to the DC IN jack on the unit.
b Connect the AC adapter to the wall outlet.
Caution
• Do not connect the power plug to a power outlet other than that
indicated on the label, as this can result in a risk of fire or
electric shock.
• Do not connect or disconnect the power plug with wet hands.
Doing so may cause electric shock.
• Do not use an AC adapter other than one specified, as it can
cause a fire or damage to the player.
AC adapter
• This AC adapter operates on 100-240V~ 50/60Hz 1.5A.
• Contact an electrical parts distributor for assistance in selecting
a suitable AC plug adapter or AC cord set.
• Manufactured by WANLIDA Digital Technology Co., Ltd.
Power Connections
a
b
Page 13
13
Introduction
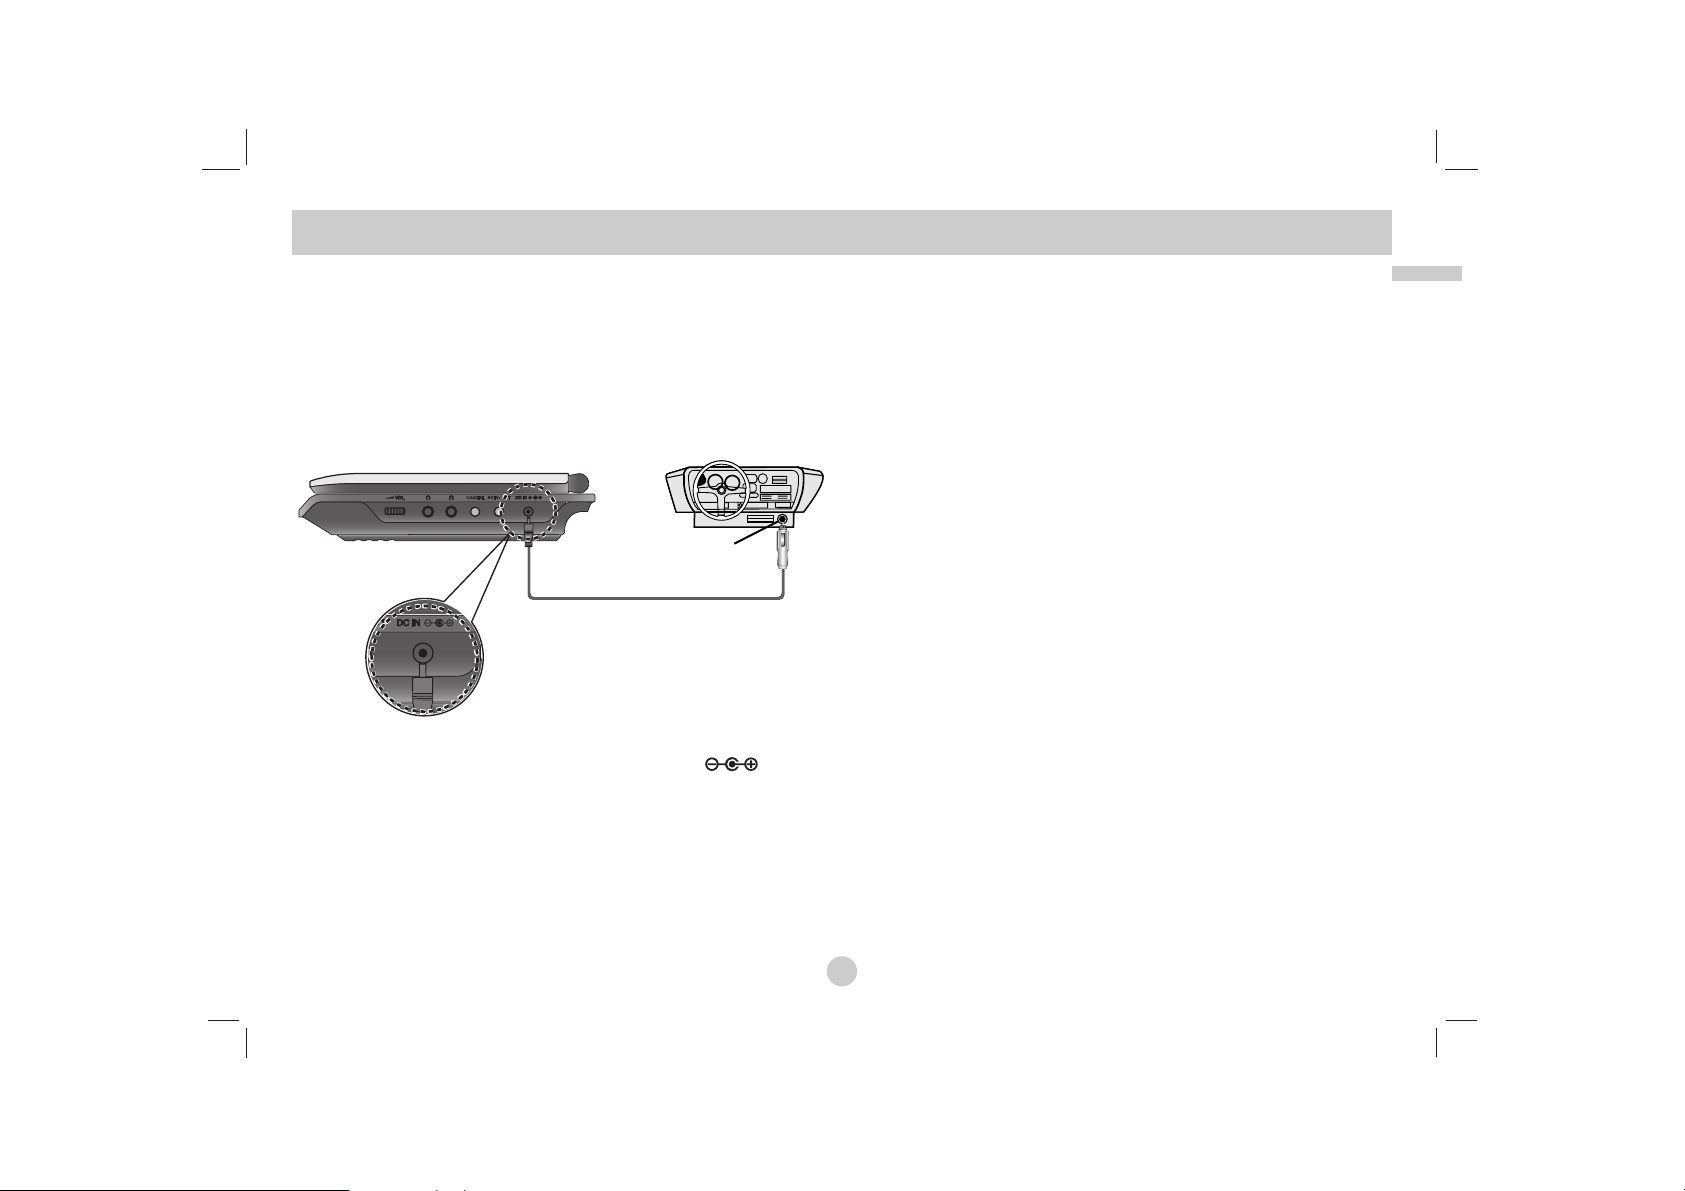
Connect the Automotive adapter
This unit and its automotive adapter are designed for use in vehicles that have 8.5-16 volt, negative ground electrical systems.
(This is standard for most vehicles.) If your vehicle has a different
type of electrical system, the DC power system cannot be used.
a Connect the automotive adapter to the DC IN jack on
the unit.
b Connect the automotive adapter to the car’s cigarette lighter
socket.
Caution
• To prevent electrical shock and possible damage to your unit or
vehicle, always unplug the automotive adapter from the cigarette
lighter socket before you remove the plug from your unit.
• A 3 amp. 250V fuse for protection is installed in the automotive
adapter.
• While the engine is being started, disconnect the automotive
adapter from the car’s cigarette lighter socket.
•
Do not operate your unit when the car battery is discharged.
Peak current from the car generator may cause the DC fuse to
blow.
• If the vehicle’s supply voltage drops below approximately 10
volts, your unit may not work properly.
• Do not leave your unit in a place where the temperature
exceeds 70°C (158°F), or the pick-up device may be damaged.
Examples include:
- Inside a car with the windows closed and in direct sunshine.
- Near a heating appliance.
Automotive adapter
• This automotive adapter operates on DC 8.5-16V.
• Contact an electrical parts distributor for assistance in selecting
a suitable automotive adapter.
• Manufactured by WANLIDA Digital Technology Co., Ltd.
Power Connections
(continued)
Cigarette lighter socket
a
b
Page 14

14
Battery Pack
Charge the battery pack before using it for the first time.
A
Attaching the battery pack
a Match the hooks of the battery pack into the holes on the
bottom of the player.
b Press and slide the battery pack until the hooks click.
NOTES
• Do not detach the battery pack during playback.
• Be careful not to drop the battery pack.
A
Detaching the battery pack
a Press the PUSH knob.
b Pull the battery pack until the hooks click.
Power Connections (continued)
ATTENTION
The product that you have purchased contains a rechargeable battery. The battery is recyclable. At
the end of it’s useful life, under various state and local laws, it may be illegal to dispose of this battery into the municipal waste stream. Check with your local solid waste/officials for details in your
area for recycling options or proper disposal.
a
b
Hooks
a
b
Page 15
15
Introduction
A
Charging the battery pack
1. Attach the battery pack to the player.
2. Connect the AC power adapter to the player and
the plug into an AC outlet.
3. During recharging, charge indicator is red. If recharging is
complete, charge indicator changes to green color.
CAUTION
Take the following precautions to avoid liquid leakage,
overheating, etc.
• Do not use any unauthorized parts.
• Use the authorized AC adapter when recharging battery.
• Do not expose to high temperature above 60°C (140°F).
• Do not attempt to dismantle or modify the unit.
• Excessive impact may cause the unit to malfunction.
• Do not incinerate.
• Do not disassemble; dispose of properly.
• Do not short-circuit.
NOTE
Charging a battery only happens when the power is off.
The battery will not be charged when it is naturally or purposely
discharged. Because the unit cannot perceive battery voltage,
even if you attached the battery.
When you are in this situation, power on the unit and then power
off again. Then battery charge will proceed.
A
Recharging and play times
* When Brightness control is set to initial mode.
- using the headphones and volume center.
A
Press “Display” to display the battery status on the screen.
If using the AC adapter, battery display does not appear.
If the battery capacity is not enough, “Check Battery Status”
or “ ” is displayed on the screen and then the power is
automatically turned off after a few minute.
A
If play time dramatically reduces after recharging
The battery pack has reached the end of its service life (it can be
recharged about 300 times).
A
If the unit is not used for a long time
• Detach the battery pack. (Even if the unit is off, it still uses some power.
This can lead to over discharging of the battery and malfunction.)
• Recharge the battery pack when you are ready to use it again.
Power Connections (continued)
Battery Pack
Player
Connect the AC
adapter cord
Charge indicator
Recharging Play time
without Playback LCD On LCD Off
Approx. Approx. Approx.
3 hour 3.5 hours* 4 hours
Full
Low
Recharge
Page 16
16
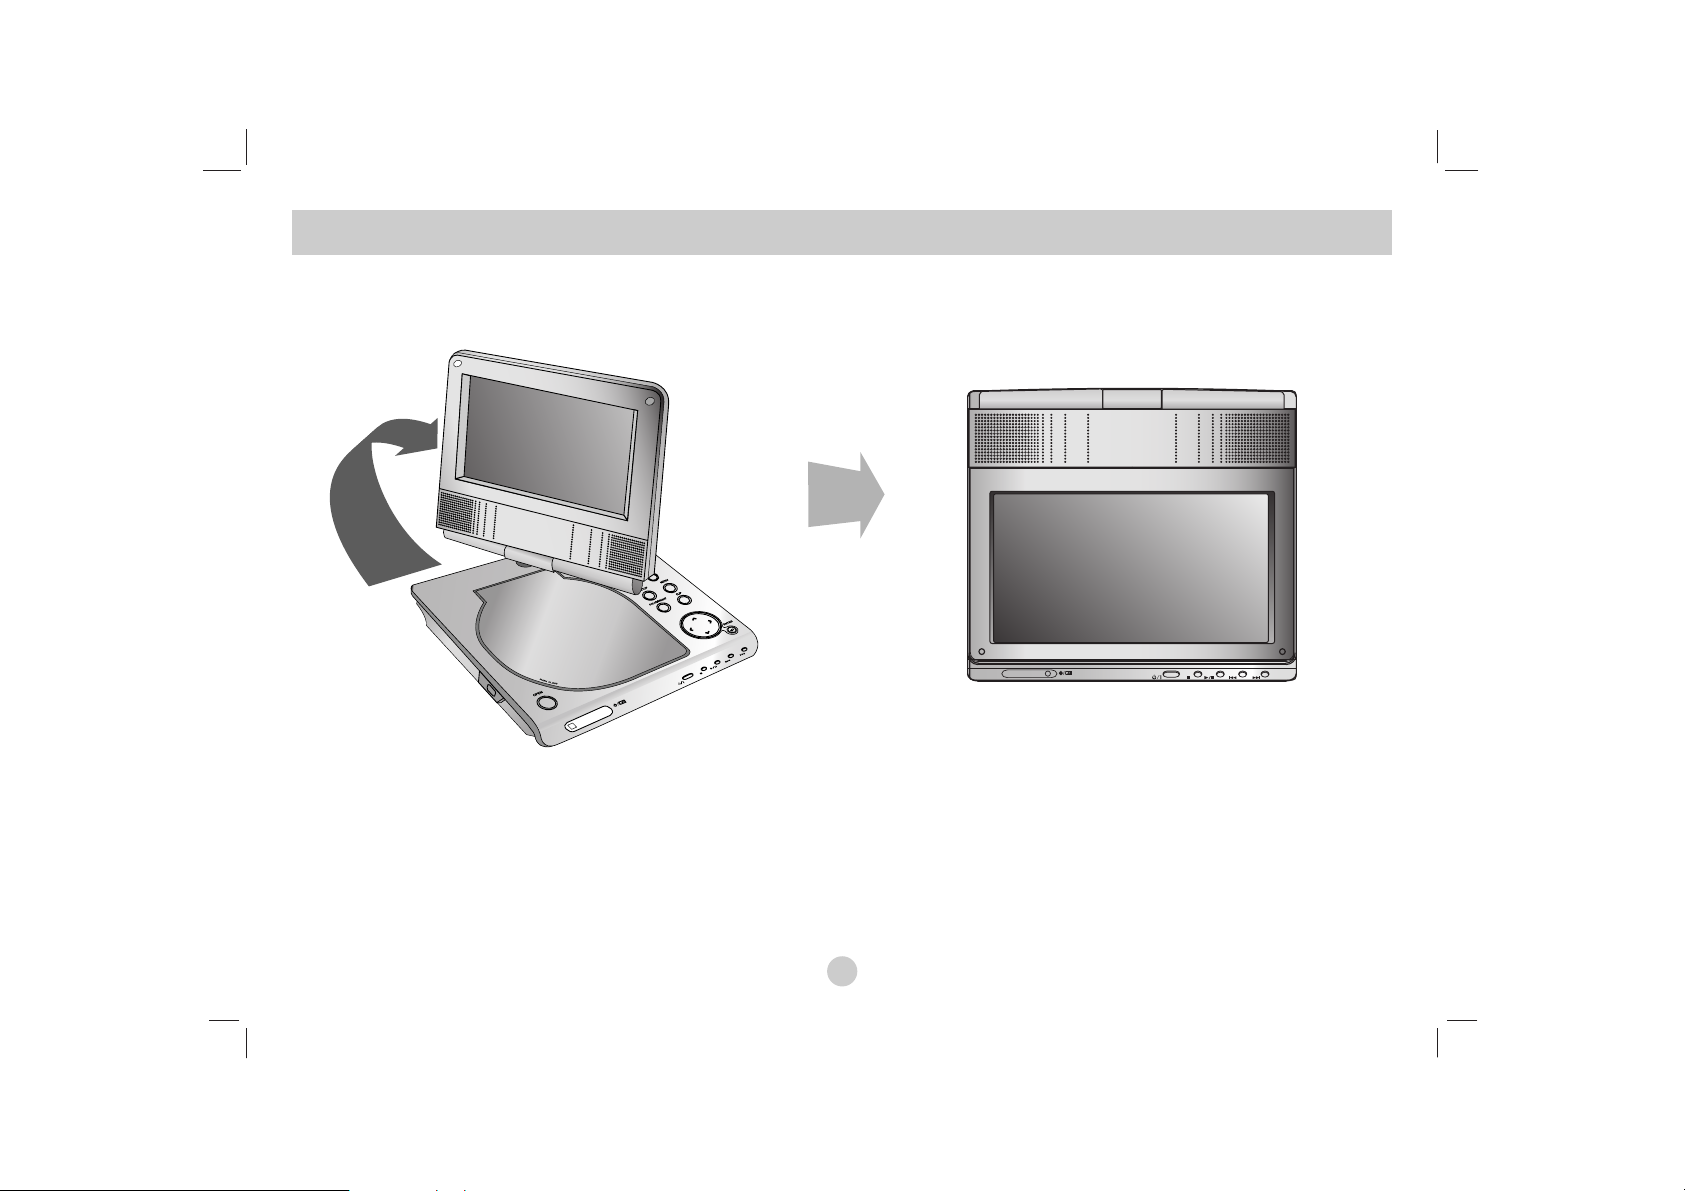
You can rotate LCD clockwise an angle of 180 degrees. However,
if you turn it by force, it can cause serious damage.
After rotating LCD completely, you can fold the LCD screen as
shown above.
Rotating the LCD
Page 17
17
Introduction
1. Prepare the power supply.
2. Open the outer cover and press POWER button.
3.
Press OPEN to open the disc lid and insert a disc with the side
you want to play label up. Close the disc lid by hand.
• If the disc is placed in upside down (and it is a single-sided disc),
“CHECK DISC” or “DISC ERROR” appears on the screen.
• After playing back all of the chapters in the title, the unit automatically
stops and returns to the menu screen.
4. Press PLAY(N) to playback.
5. Adjust the volume.
NOTES
• Place a disc with the playback side down on the spindle, and
push gently on the center of the disc so it goes into position.
• If you are not using the LCD on this unit, select OFF to conserve
power.
• The LCD is turned off if you close the unit.
• The picture shown on the LCD depends on the display mode
and the size recorded on the disc.
A
Changing the size of the picture
Use the LCD MODE button to change the picture mode.
The mode is shown on the unit’s display as follows.
NORMAL → 4:3 mode → OFF
NOTE
May appear to differ according to kind of disc.
Select a MODE
Selects a mode among DISC, AV IN or USB.
1. Press MODE button on the unit.
The mode selection menu appears on the screen.
2. Use b / B to select the mode then press ENTER.
•
DISC: The disc menu or playback picture for the disc appears
on the screen .
• AV IN: A picture from external device appears on the screen.
• USB: A file or folder list in USB Flash Drive appears on the
screen.
Playing a Disc
Page 18
18
On-Screen Display
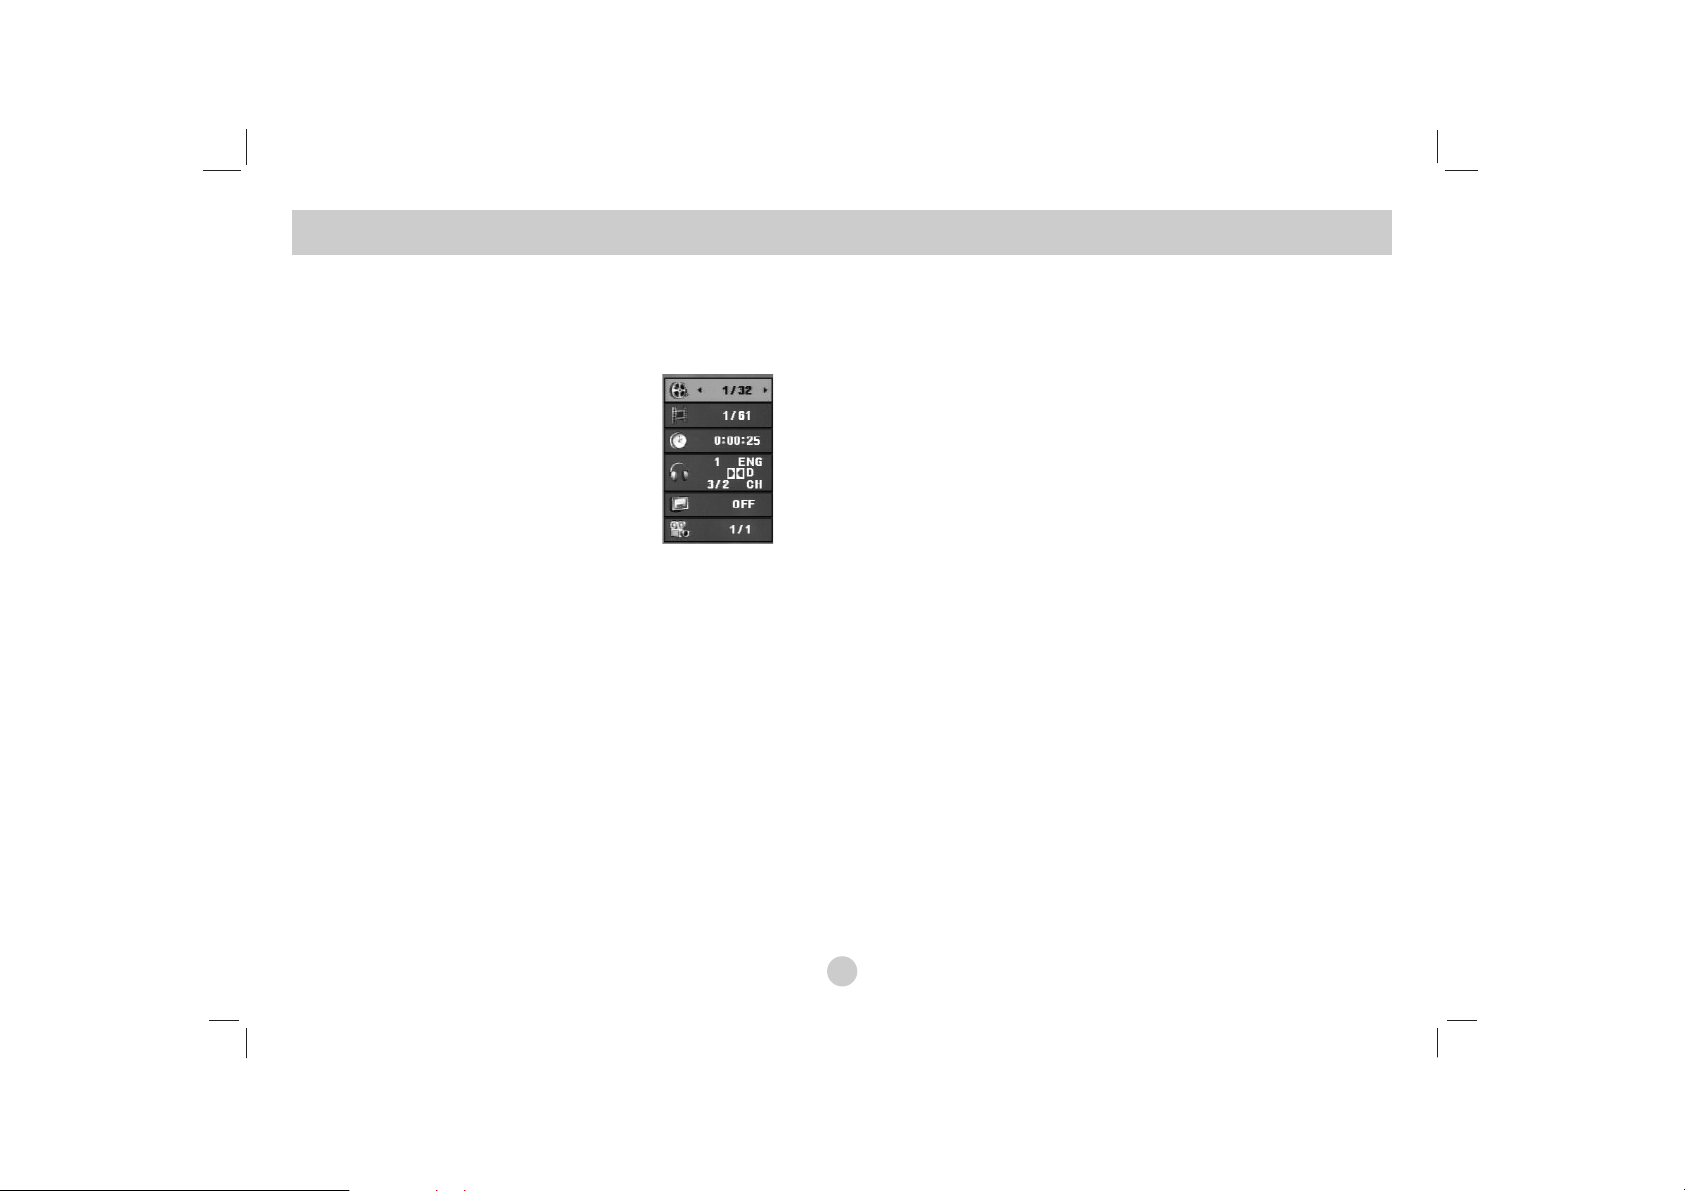
Displaying Disc Information on-screen
You can display various information about the disc loaded
on-screen.
1. Press DISPLAY to show various
playback information. The items
displayed differ depending on the
disc type or playing status.
2. You can select an item by pressing v / V and change or select
the setting by pressing b / B.
Title (Track) – Current title (or track). number/total number of
titles (or tracks).
Chapter – Current chapter number/total number of chapters.
Time – Elapsed playing time.
Audio – Selected audio language or channel.
Subtitle – Selected subtitle.
Angle – Selected angle/total number of angles.
NOTE
If no button is pressed for a few seconds, the on-screen display
disappears.
Initial Settings
By using the Setup menu, you can make various adjustments to
items such as picture and sound. You can also set a language for
the subtitles and the Setup menu, among other things. For details
on each Setup menu item, see pages 19 to 23.
To display and exit the Menu:
Press SETUP to display the menu. A second press of SETUP will
take you back to initial screen.
To go to the next level:
Press B on the Remote Control.
To go back to the previous level:
Press b on the Remote Control.
General Operation
1. Press SETUP. The Setup menu appears.
2. Use v / V to select the desired option then press B to move to
the second level. The screen shows the current setting for the
selected item, as well as alternate setting(s).
3. Use v / V to select the second desired option then press B to
move to the third level.
4.
Use v / V to select the desired setting then press ENTER to
confirm your selection. Some items require additional steps.
5. Press SETUP or PLAY(N) to exit the Setup menu.
Page 19
Advanced Operations
19
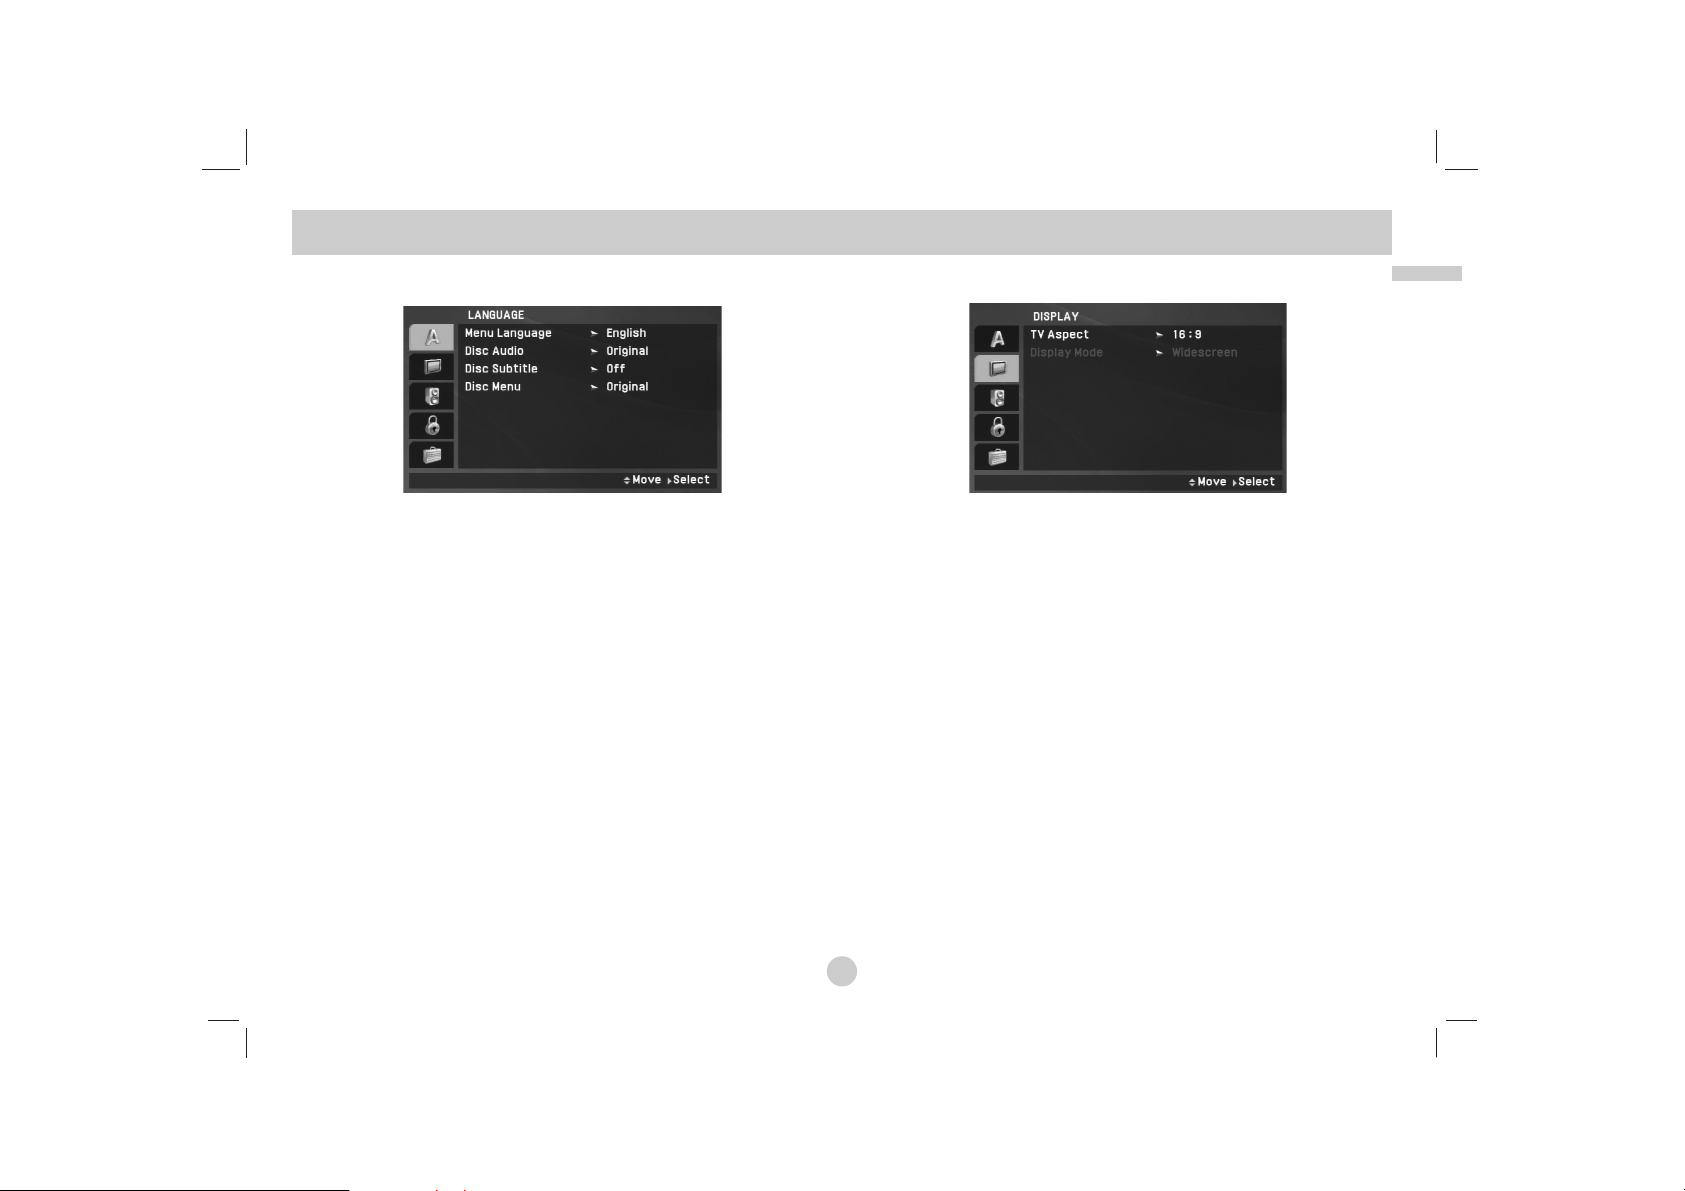
LANGUAGE
Menu Language
Select a language for the Setup menu and on-screen display.
Disc Audio / Subtitle / Menu
Select the language you prefer for the audio track (disc audio),
subtitles and the disc menu.
Original: Refers to the original language in which the disc was
recorded.
Other: To select another language, press numeric buttons and
then ENTER to enter the corresponding 4-digit number according to the language code list on the page 40. If you enter the
wrong language code, press CLEAR.
Off (for Disc Subtitle) – Turn off Subtitle.
DISPLAY
TV Aspect
4:3:
Select when a standard 4:3 TV is connected.
16:9: Select when a 16:9 TV is connected.
NOTE
If the TV Aspect option is set to 16:9, the Display Mode setting is
automatically set to Widescreen.
Display Mode
Display Mode setting works only when the TV Aspect mode is set
to “4:3”.
LetterBox: Displays a wide picture with bands on the upper
and lower portions of the screen.
Panscan:
Automatically displays the wide picture on the entire
screen and cuts off the portions that do not fit.
Initial Settings
Page 20
20
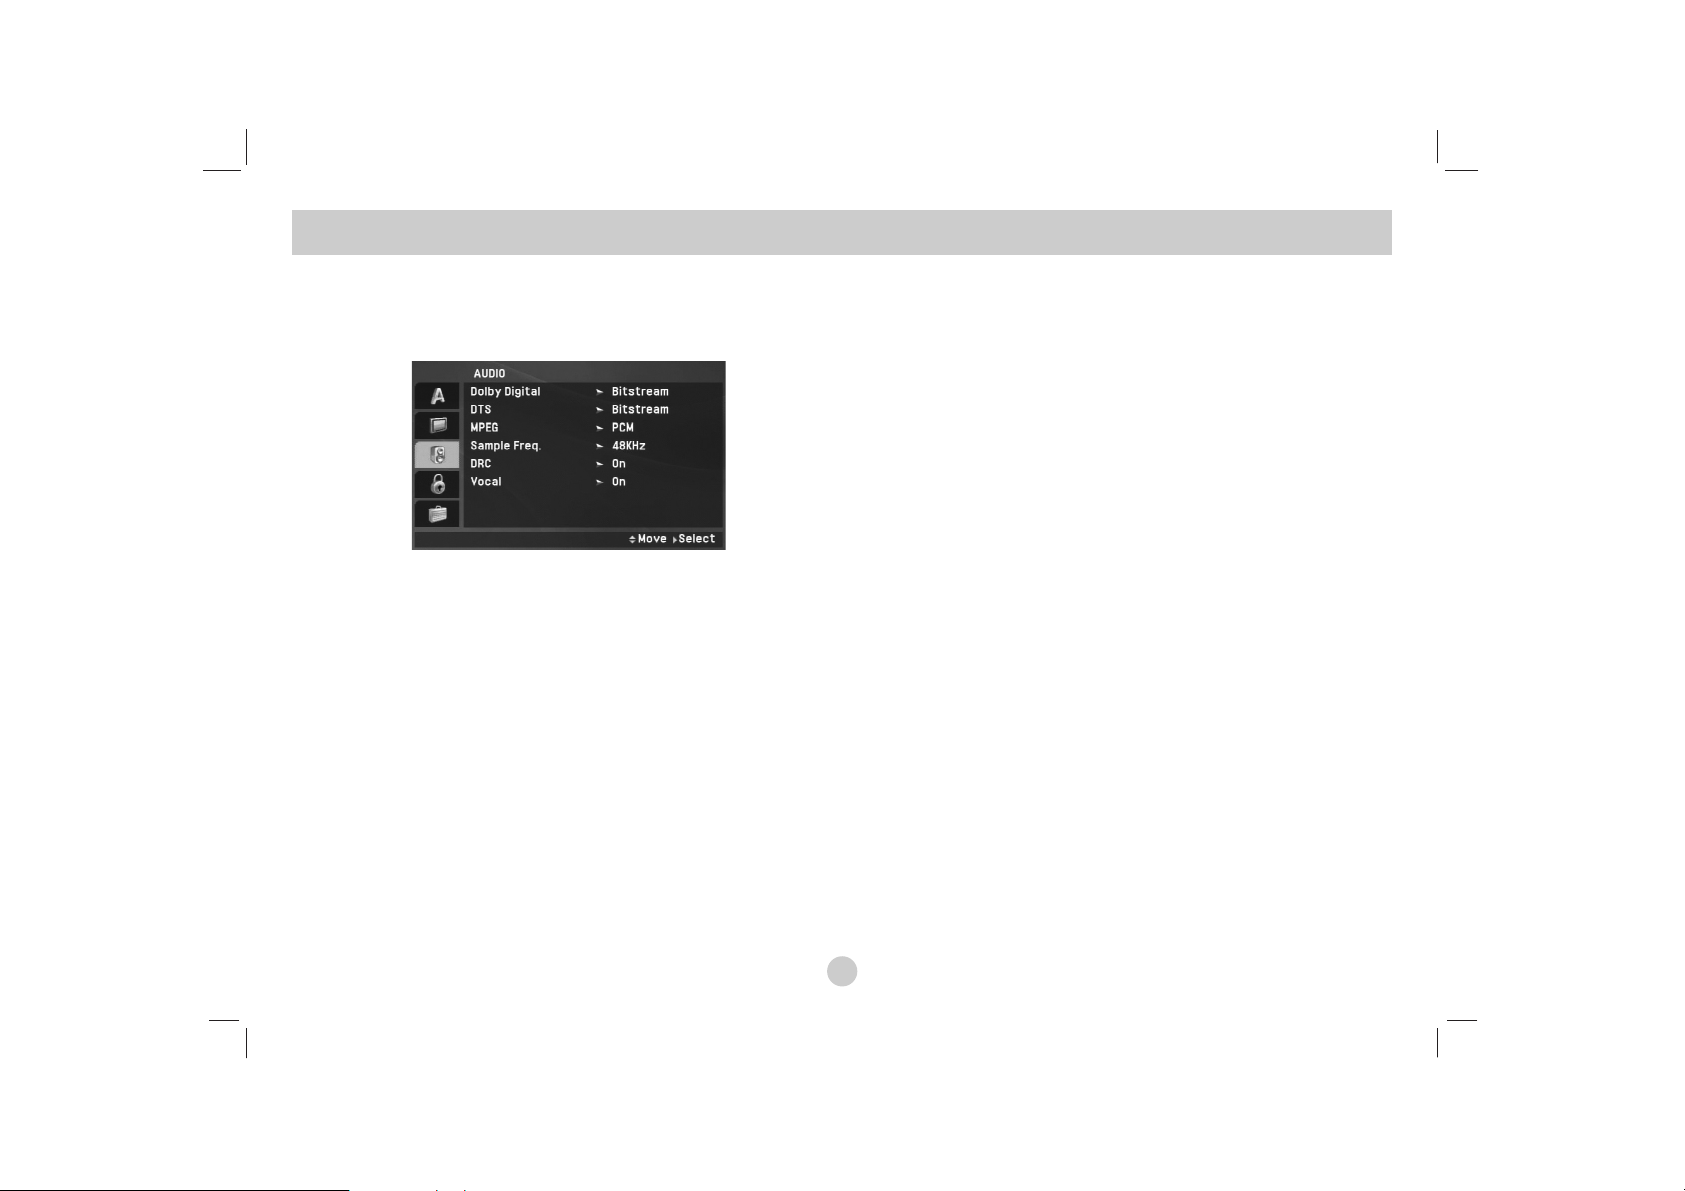
AUDIO
Each DVD disc has a variety of audio output options. Set the player’s AUDIO options according to the type of audio system you use.
Dolby Digital / DTS / MPEG
Bitstream: Select “Bitstream” if you connect the unit’s DIGITAL
OUT jack to an amplifier or other equipment with a Dolby
Digital, DTS or MPEG decoder.
PCM (for Dolby Digital / MPEG): Select when connected to a
two-channel digital stereo amplifier. DVDs encoded in Dolby
Digital or MPEG will be automatically downmixed to two-channel PCM audio.
Off (for DTS): If you select “Off”, the DTS signal is not output
through the DIGITAL OUT jack.
Sample Freq. (Frequency)
If your receiver or amplifier is NOT capable of handling 96 kHz
signals, select 48 kHz. When this choice is made, this unit automatically converts any 96 kHz signals to 48 kHz so your system
can decode them.
If your receiver or amplifier is capable of handling 96 kHz signals,
select 96 kHz. When this choice is made, this unit passes each
type of signal through without any further processing.
Check the documentation for your amplifier to verify its
capabilities.
DRC (Dynamic Range Control)
With the DVD format, you can hear a program’s soundtrack in the
most accurate and realistic presentation possible, thanks to digital
audio technology. However, you may wish to compress the
dynamic range of the audio output (the difference between the
loudest sounds and the quietest ones). This allows you to listen to
a movie at a lower volume without losing clarity of sound. Set
DRC to On for this effect.
Vocal
Set to On only when a multi-channel karaoke DVD is playing.
The karaoke channels on the disc mix into normal stereo sound.
Initial Settings
(continued)
Page 21
21
Advanced Operations
Initial Settings
(continued)
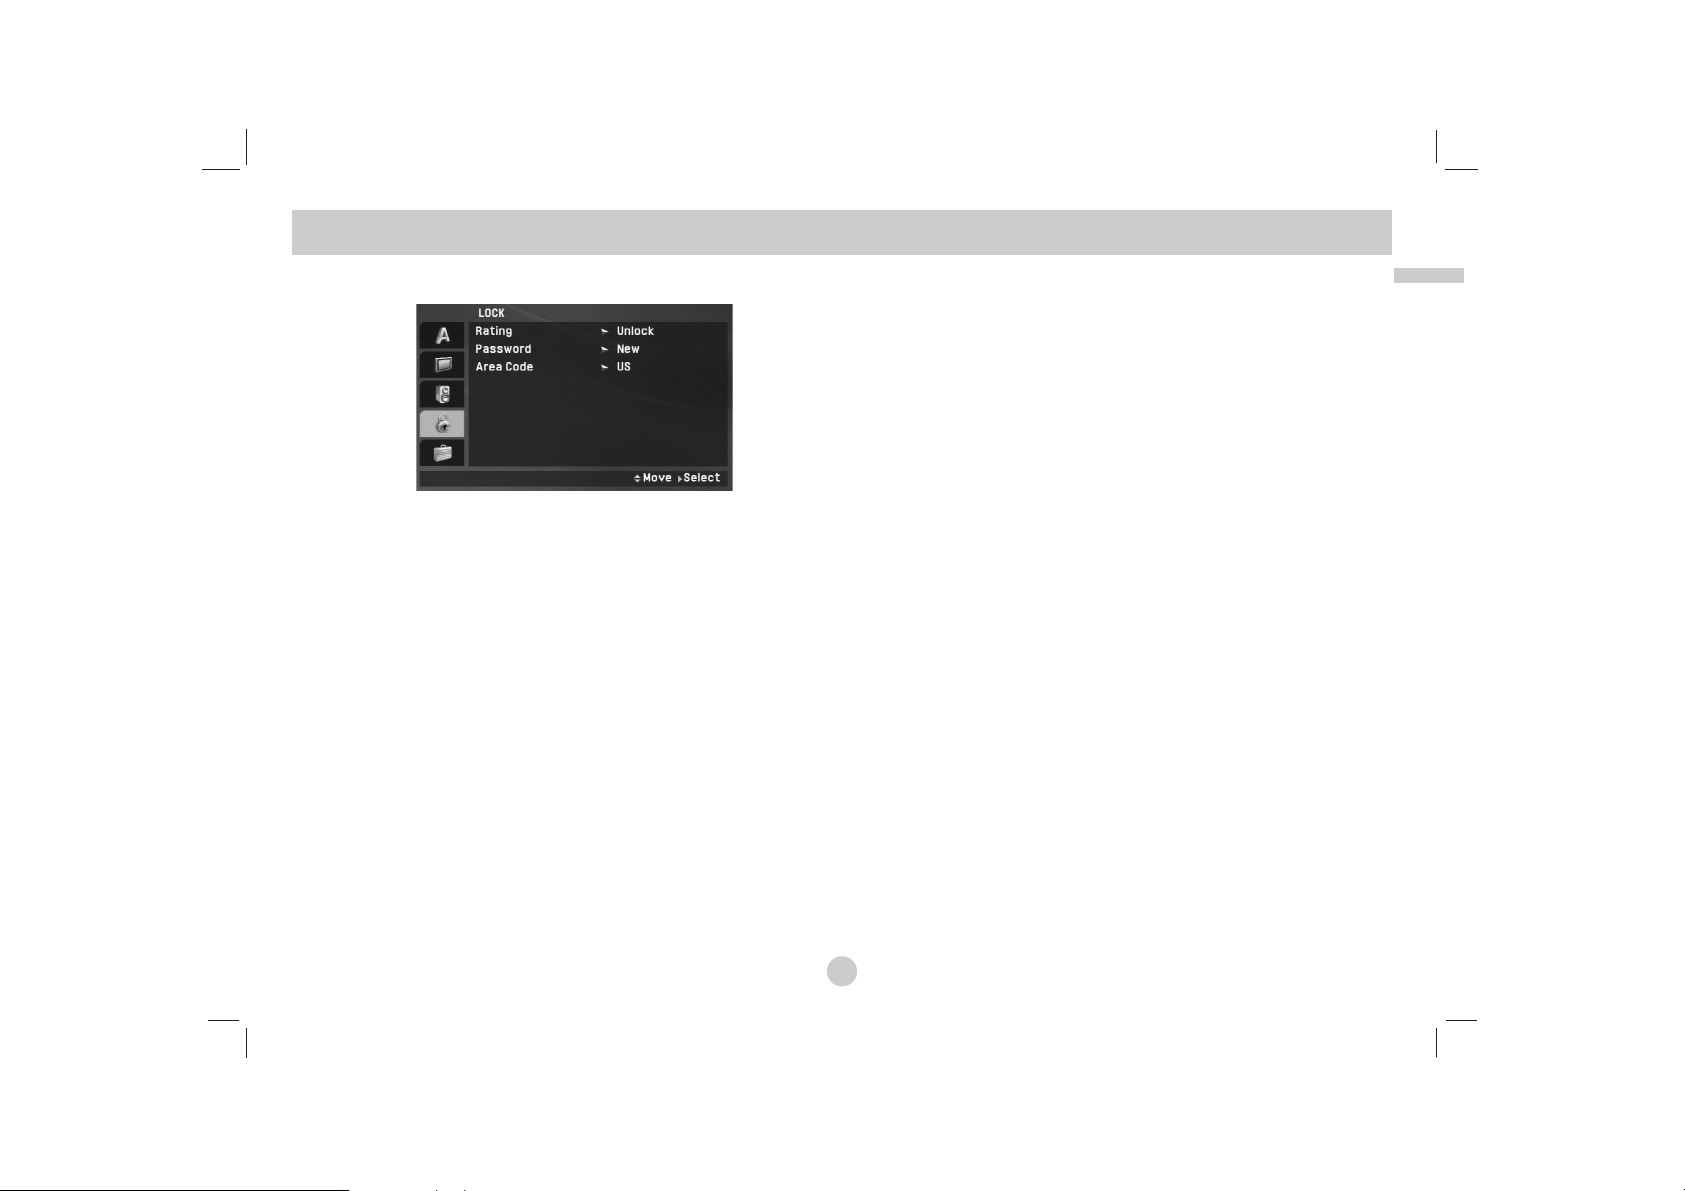
LOCK (Parental Control)
Rating
Blocks playback of rated DVDs based on their content. Not all
discs are rated.
1. Select “Rating” on the LOCK menu then press B.
2. To access the Rating, Password and Area Code features, you
must input the 4-digit password you created. If you have not yet
entered a password you are prompted to do so.
Input a 4-digit code and press ENTER. Enter it again and press
ENTER to verify. If you make a mistake before pressing
ENTER, press CLEAR.
3. Select a rating from 1 to 8 using the v / V buttons.
Rating 1-8: Rating one (1) has the most restrictions and rating
eight (8) is the least restrictive.
Unlock: If you select unlock, parental control is not active and
the disc plays in full.
NOTE
If you set a rating for the unit, all disc scenes with the same
rating or lower are played. Higher rated scenes are not played
unless an alternate scene is available on the disc. The alternative must have the same rating or a lower one. If no suitable
alternative is found, playback stops. You must enter the 4-digit
password or change the rating level in order to play the disc.
4. Press ENTER to confirm your rating selection, then press
SETUP to exit the menu.
Page 22

22
Initial Settings
(continued)
Password
You can enter or change password.
1. Select Password on the LOCK menu then press B.
2. To make a new password:
Press ENTER when the “New” option is highlighted. Enter a
new password using the numbered buttons then press ENTER.
Enter the password again to verify.
To change the password:
Press ENTER when the “Change” option is highlighted. Enter a
current password using the numbered buttons then press
ENTER. Enter a new password using the numbered buttons
then press ENTER. Enter the password again to verify.
3. Press SETUP to exit the menu.
If you forget your password
If you forget your password, you can clear it using the following
steps:
1. Press SETUP to display the Setup menu.
2. Input the 6-digit number “210499” and the password is cleared.
Area Code
Enter the code of the area whose standards were used to rate the
DVD video disc, based on the list on page 41.
1. Select “Area Code” on the LOCK menu then press B.
2. Follow step 2 as shown previous page (Rating).
3. Select the first character using v / V buttons.
4. Press ENTER and select the second character using v / V
buttons.
5. Press ENTER to confirm your area code selection.
Page 23
23
Advanced Operations
Initial Settings (continued)
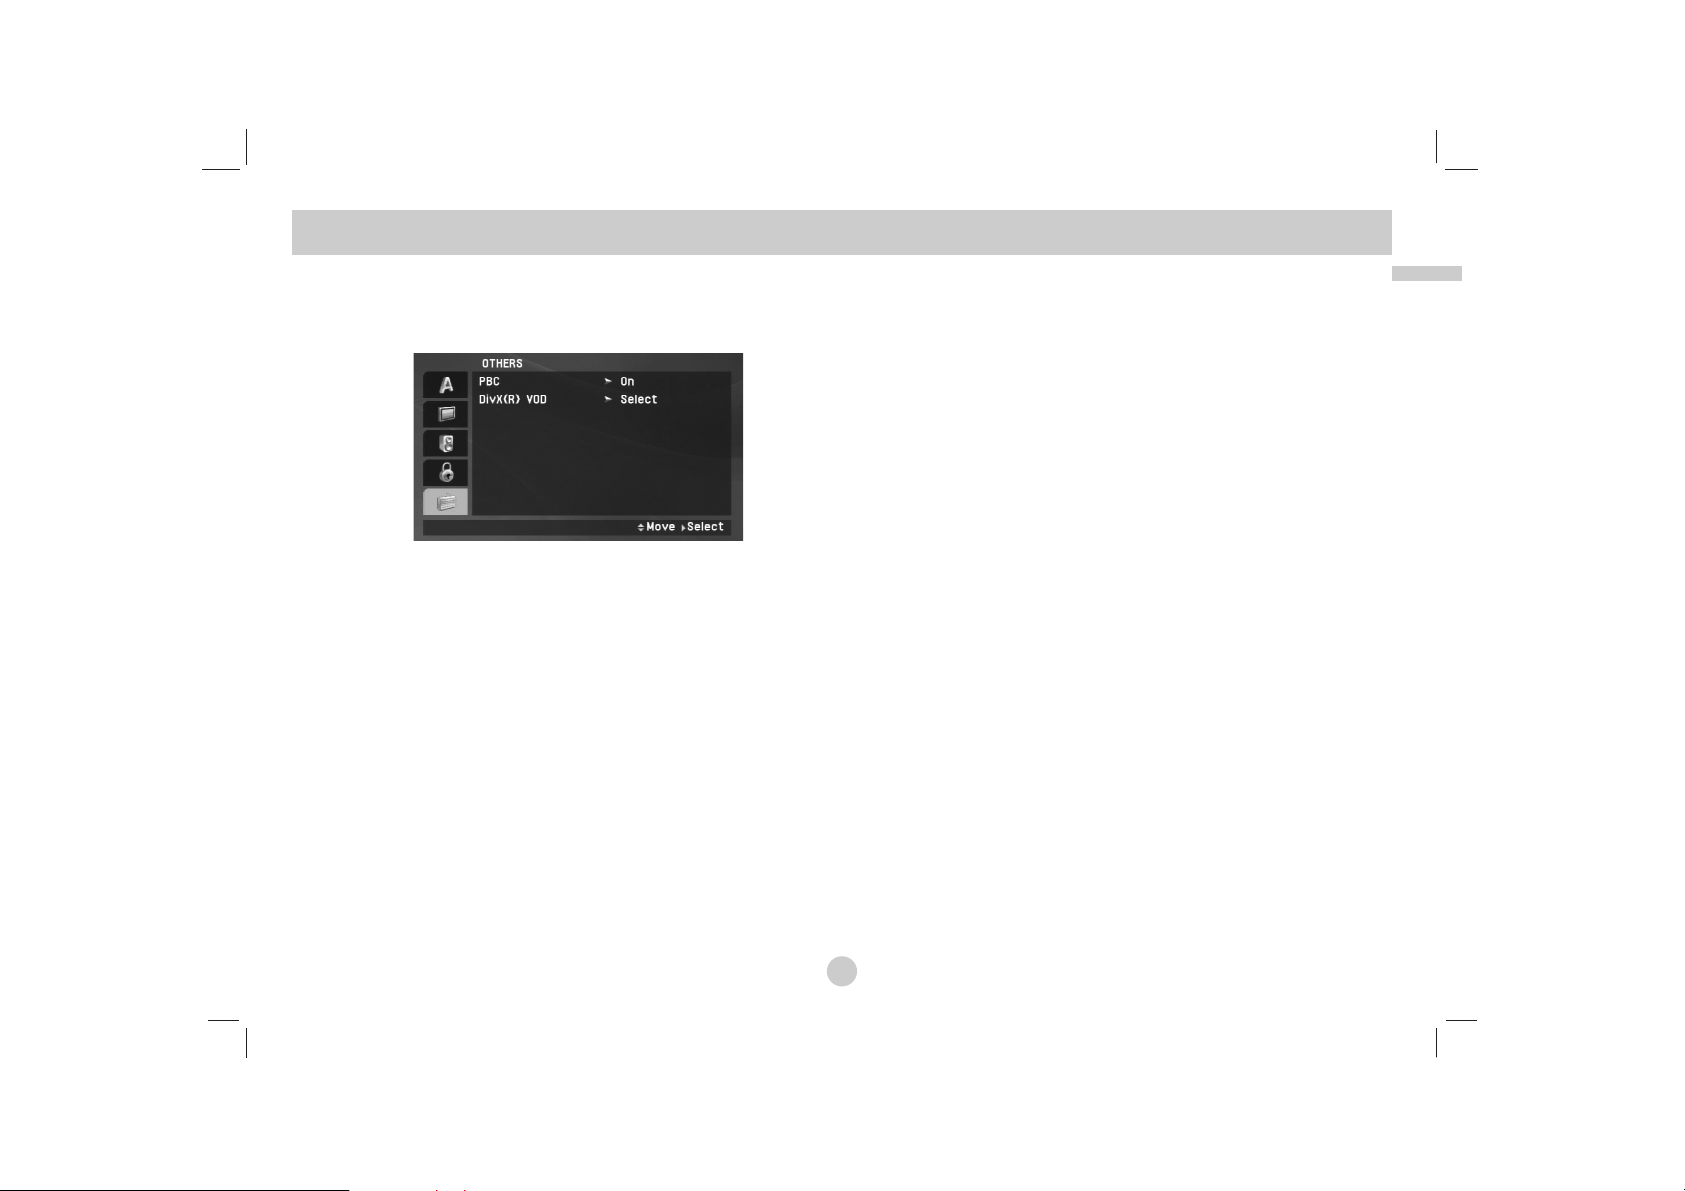
OTHERS
The PBC, DivX(R) VOD settings can be changed.
PBC
Set Playback Control (PBC) to On or Off.
On: Video CDs with PBC are played according to the PBC.
Off: Video CDs with PBC are played in the same way as Audio
CDs.
DivX(R) VOD
We provide you the DivX®VOD (Video On Demand) registration
code that allows you to rent and purchase videos using the DivX
®
VOD service. For more information, visit www.divx.com/vod.
1. Select “DivX(R) VOD” option then press B.
2. Press ENTER while “Select” is selected and the registration
code will appear.
Use the registration code to purchase or rent the videos from
DivX
®
VOD service at www.divx.com/vod. Follow the instructions
and download the video onto a disc for playback on this unit.
3. Press ENTER to exit.
NOTE
All the downloaded videos from DivX®VOD can only be played
back on this unit.
Page 24

24
If a menu screen is displayed
Use the bB v Vbuttons to select the title/chapter you want to view,
then press ENTER to start. Press TITLE or MENU to return to the
menu screen.
Use the number buttons to select the track you want to view and
press RETURN to return to the menu screen. Menu settings and
operating procedures may differ. Follow the instructions on the each
menu screen. You also may set PBC to Off (See “PBC” on page 23).
NOTES
• If parental control is set and the disc is not within the rating settings
you must input the password.
(See “LOCK Menu” on page 21-22.)
• DVDs may have a region code. Your unit does not play discs that
have a region code different from your unit.
Unless stated otherwise, all operations described use the
Remote Control. Some features may also be available on the
Setup menu.
Resume Play
When play is stopped, the unit records the point where STOP was
pressed (RESUME function).
Press PLAY(N) and play will resume from this point.
Moving to another TITLE
When a disc has more than one title, you can move to another title.
Press DISPLAY during playback or resume play then the appropriate
number (0-9) or use b / B to move to another title.
Moving to another CHAPTER/TRACK
During playback, press SKIP/SEARCH (. or >) to go to the
next chapter/track or to return to the beginning of the current
chapter/track.
Press SKIP . twice briefly to step back to the previous
chapter/track.
Search
1. Press and hold SKIP/SEARCH (. or >) for about two
seconds during playback.
The player will now go into SEARCH mode.
2. Press and hold SKIP/SEARCH (. or >) repeatedly to select
the required speed.
DVD, DivX disc: 4 steps
Video CD, MP3, WMA, Audio CD: 3 steps
3. To exit SEARCH mode, press PLAY(N).
Slow Motion
1. Press SLOW (t or T) during playback.
The player will enter Slow mod
e.
DVD disc: 4 steps
Video CD, DivX: 4 steps
(forward only)
2. To exit slow motion mode, press PLAY(N).
DivXVCDDVD
ALL
ALL
DVD
ALL
VCD
DVD
General Features
Page 25

25
Advanced Operations
Still Picture and Frame-by-Frame Playback
During playback, press PAUSE/STEP(X) to pause playback.
Press PAUSE/STEP(X) repeatedly to play Frame-by-Frame.
( Remote Control Only )
To exit still motion mode, press PLAY(N).
Time Search
To start playing at any chosen time on the disc:
1. Press DISPLAY during playback. The time search box shows
the elapsed playing time.
2. Use v / V to select the time search box and “-:--:--” appears.
3. Input the required start time in hours, minutes, and seconds
from left to right. If you enter the wrong numbers, press
CLEAR to remove the numbers you entered. Then input the
correct numbers.
4. Press ENTER to confirm. Playback starts from the selected
time.
Repeat A-B
During playback, each press of A-B button to select point A and
point B and repeats a sequence from point A (Starting point) to
point B (End point).
Press A-B again to cancel.
Repeat
During playback, press REPEAT repeatedly to select a desired
repeat mode.
DVD Video Discs: Chapter/Title/Off
Video CDs, Audio CD, DivX/MP3/WMA discs: Track/All/Off
NOTES
• On a Video CD with PBC, you must set PBC to Off on the setup menu
to use the repeat function (See “PBC” on page 23).
• If you press SKIP (>) once during Repeat Chapter (Track) playback,
the repeat playback cancels.
Zoom
During watching pictures, press ZOOM to enlarge the video image
(3 steps).
You can move through the zoomed picture using bBvVbuttons.
Press CLEAR to exit.
NOTES
Zoom may not work on some DVDs.
DivXVCDDVD
ALL
ACDDivXVCDDVD
DivXVCDDVD
DivXVCDDVD
ALL
General Features (continued)
Page 26

26
General Features (continued)
Title Menu
If the current DVD title has a menu, the title menu appears on the
screen. Otherwise, the disc menu may appears.
Disc Menu
Press MENU and the disc menu is displayed. Press MENU again
to exit.
Changing the Audio Language
Press AUDIO repeatedly during playback to hear a different audio
language or encoding method.
With DVD-RW discs recorded in VR mode that have both a main
and a Bilingual audio channel, you can switch between Main (L),
Bilingual (R), or a mix of both (Main + Bilingual) by pressing
AUDIO.
Press AUDIO repeatedly during playback to hear a different audio
channel (STEREO, LEFT, or RIGHT).
Camera Angle
During playback of DVD disc contains scenes recorded different
camera angles, press ANGLE repeatedly to select a desired angle.
TIP
The angle indicator will blink on the screen during scenes recorded at
different angles as an indication that angle switching is possible.
Subtitles
Press SUBTITLE repeatedly during playback to see the different
subtitle languages.
NOTE
If there is no information or there is a code that can not read in the
DivX file, “ 1 ” etc are displayed.
DivXDVD
DVD
VCD
DivXDVD
DVD
DVD
Page 27

27
Advanced Operations
Additional features
Marker Search
To enter a Marker
You can start playback from up to nine memorized points. To enter
a marker, press MARKER at the desired point on the disc. The
Marker icon appears on the TV screen briefly. Repeat to enter up
to nine markers.
To Recall or Clear a Marked Scene
1. During disc playback, press SEARCH. The marker search
menu appears on the screen.
2. Within 9 seconds, press b / B to select a marker number that
you want to recall or clear.
3. Press ENTER and playback starts from the marked scene. Or,
Press CLEAR and the marker number is erased from the list.
4. You can play any marker by inputting its number on the marker
search menu.
NOTES
• Some subtitles recorded around the marker may fail to appear
(DVD).
• All the markers are cleared when the power is turned off or the
disc is removed.
• The marker is not stored when the DVD or title menu is dis-
played on the screen.
Last Scene Memory
This unit memorizes last scene from the last disc that is viewed.
The last scene remains in memory even if you remove the disc
from the unit or switch off the unit. If you load a disc that has the
scene memorized, the scene is automatically recalled.
NOTES
This unit does not memorize the scene of a disc if you switch off
the unit before commencing to play the disc.
Screen Saver/Auto Power Off
The screen saver appears when you leave the unit in Stop mode
for about five minutes. If the Screen Saver is displayed for five
minutes, the unit automatically turns itself off.
VCD1.1
ACDDVDDivXVCDDVD
Page 28

28
This unit can play Audio CDs or MP3/WMA files.
MP3/ WMA/ Audio CD
Once you insert an MP3/WMA files recorded media or Audio CD, a
menu appears on the TV screen.
Press v / V to select a track/file then press PLAY(N) or ENTER
and playback starts. You can use variable playback functions.
Refer to page 24-25.
ID3 TAG
• When playing a file containing information such as track titles,
you can see the information by pressing DISPLAY.
[ Title, Artist, Album, Year, Comment ]
• If there is no information, “NO ID3 TAG” appears on the display.
TIPS
• If you are in a file list on the MUSIC menu and want to return to
the Folder list, use the v / V to highlight and press ENTER.
• Press MENU to move to the next page.
• On a CD with MP3/WMA, JPEG,and MOVIE file, you can switch
MUSIC, PHOTO and MOVIE menu. Press TITLE and MUSIC,
PHOTO and MOVIE word on top of the menu is highlighted.
MP3 / WMA file compatibility with this unit is limited as
follows:
• Sampling frequency: within 8 - 48 kHz (MP3),
within 32 - 48kHz (WMA)
• Bit rate: within 8 - 320kbps (MP3),
32 - 192kbps (WMA)
• The unit cannot read an MP3/WMA file that has a file extension
other than “.mp3” / “.wma”.
• CD-R physical format should be ISO 9660
• If you record MP3 / WMA files using software that cannot create
a file system (eg. Direct-CD) it is impossible to playback MP3 /
WMA files. We recommend that you use Easy-CD Creator, which
creates an ISO 9660 file system.
• File names should have a maximum of 16 letters and must incorporate an .mp3 or .wma extension.
• They should not contain special letters such as / ? * : “ < > l etc.
• The total number of files on the disc should be less than 650.
• This unit requires discs and recordings to meet certain technical
standards in order to achieve optimal playback quality. Prerecorded DVDs are automatically set to these standards. There
are many different types of recordable disc formats (including
CD-R containing MP3 or WMA files) and these require certain
pre-existing conditions (see above) to ensure compatible playback.
Playing an Audio CD or MP3/WMA file
Page 29

29
Advanced Operations
The program function enables you to store your favorite tracks
from any disc in the player memory.
A program can contain 30 tracks.
1. Insert an Audio CD or MP3/WMA files recorded media. AUDIO
CD or MUSIC menu appears.
2. Press PROG. The mark will appear
NOTE
Press PROG. again, then the mark will disappear to exit the
Program Edit mode.
Audio CD Menu MP3/WMA Menu
3. Select a track on the “List”, then press ENTER to place the
selected track on the “Program” list. Repeat to place additional
tracks on the list.
4. Press B.
Select the track you want to start playing on the “Program” list.
5. Press PLAY(N) or ENTER to start. Playback begins in the
order in which you programmed the tracks. Playback stops
after all of the tracks on the “Program” list have played once.
6.
To resume normal playback from programmed playback, select
a track of AUDIO CD (or MUSIC) list and then press PLAY(N
).
Repeat Programmed Tracks
Press REPEAT to select a desired repeat mode.
• Track: repeats the current track
• All: repeats all the tracks on programmed list.
• Off(No display): does not play repeatedly.
NOTE
If you press > once during Repeat Track playback, the repeat
playback cancels.
Erasing a Track from Program List
1. Press PROG. and the mark will appear
2. Use vVb Bto select the track that you wish to erase from
the Program list.
3. Press CLEAR. Repeat step 1-3 to erase additional tracks on
the list.
Erasing the Complete Program List
1. Press PROG. and the mark will appear
2. Use vVb Bto select “Clear All”, then press ENTER.
NOTE
The programs are also cleared when the power is off or the disc is
removed.
Programmed Playback
E
E
E
E
Page 30

30
This unit can play JPEG files.
1. Insert a JPEG files recorded media. The PHOTO menu
appears on the TV screen.
2. Press v / V to select a folder, and press ENTER. A list of files
in the folder appears. If you are in a file list and want to return
to the previous Folder list, use the v / V buttons on the remote
to highlight and press ENTER.
3. If you want to view a particular file, press v / V to highlight a
file and press ENTER or PLAY(N).
4. While viewing a file, you can press STOP(x) to move to the
previous menu (PHOTO menu).
TIPS
• Press MENU to move to the next page.
• There are three Slide Speed options :
>>> (Fast), >> (Normal) and > (Slow).
Use vVbBto highlight the . Then, use b / B to select the
option you want to use.
• On a CD with MP3/WMA, JPEG and MOVIE file, you can switch
MUSIC, PHOTO and MOVIE menu. Press TITLE and MUSIC,
PHOTO and MOVIE word on top of the menu is highlighted.
• While watching a picture, press RETURN (O) to hide the help
menu.
Slide Show
Use vVbBto highlight the (Slide Show) then press
ENTER.
Still Picture
1. Press PAUSE/STEP(X) during slide show.
The unit will now go into pause mode.
2. To return to the slide show, press PLAY(N) or press
PAUSE/STEP(X) again.
Viewing a JPEG file
Page 31

31
Advanced Operations
Moving to another file
Press SKIP/SEARCH (. or >) or cursor (b or B) once while
viewing a picture to advance to the next or previous file.
Zoom
During watching pictures, press ZOOM to enlarge the video image
(3 steps).
You can move through the zoomed picture using bBvVbuttons.
Press CLEAR to exit.
To rotate picture
Press v / V during showing a picture to rotate the picture clockwise or counter clockwise.
To listen to MP3/WMA music while watching picture
1. Insert the disc containing the two types of file in the unit.
2. Press TITLE to display PHOTO menu.
3. Press v / V to select a photo file.
4. Use B to select icon then press ENTER.
Playback starts.
5. While viewing a file, you can press STOP(x) to move to the
previous menu (PHOTO menu).
TIP
To listen to only the desired music while watching picture, programmed the desired files from the “MUSIC” menu and then proceed as above
.
JPEG disc compatibility with this unit is limited as
follows:
• Depending upon the size and number of JPEG files, it could take a
long time for the unit to read the disc’s contents. If you don’t see an
on-screen display after several minutes, some of the files may be too
large — reduce the resolution of the JPEG files to less than 2M pixels
as 2760 x 2048 pixels and burn another disc.
• The total number of files and folders on the disc should be less than
650.
• Some discs may be incompatible due to a different recording format or
the condition of disc.
• Ensure that all the selected files have the “.jpg” extensions when
copying into the CD layout.
• If the files have “.jpe” or “.jpeg” extensions, please rename them as
“.jpg” file.
• File names without “.jpg” extension will not be able to be read by this
unit. Even though the files are shown as JPEG image files in Windows
Explorer.
Viewing a JPEG file (continued)
Page 32

32
This unit will play DVD-RW discs recorded using the Video
Recording (VR) format.
1. Insert a disc and close the tray. The DVD-VR menu appears
on the screen.
2. Press v / V to select a track then press PLAY(N) or ENTER
and playback starts.
3. Press MENU to move to the list menu.
NOTES
• This unit will play DVD-R/RW disc that is recorded using the DVD-Video
format that have been finalized using a DVD-recorder. Unfinalized DVDR/RW discs cannot be played in this unit.
• Some DVD-VR disc are made with CPRM data by DVD RECORDER.
Player does not support these kinds of discs.
What is ‘CPRM’?
CPRM is a copy protection system (with scramble system) only allowing
the recording of ‘copy once’ broadcast programs. CPRM stands for
Content Protection for Recordable Media.
Playing a DVD VR format Disc
Page 33

33
Advanced Operations
This unit can play DivX files.
1. Insert a DivX file recorded media. The MOVIE menu appears
on the screen.
2. Press v / V to select a folder, and press ENTER. A list of files
in the folder appears. If you are in a file list and want to return
to the Folder list, use the v / V buttons on the remote to highlight and press ENTER.
3. If you want to view a particular file, press v / V to highlight a
file and press ENTER or PLAY(N). You can use variable play-
back functions. Refer to page 24-27.
4. Press STOP(x) to stop the playback. The Movie menu
appears.
Notice for displaying the DivX subtitle
If the subtitle does not display properly during playback, press and
hold SUBTITLE about 3 seconds then press b / B to select anoth-
er language code until the subtitle is displayed properly.
TIPS
• Press MENU to move to the next page.
• On a CD with MP3/WMA, JPEG and MOVIE file, you can switch
MUSIC, PHOTO and MOVIE menu. Press TITLE and MUSIC,
PHOTO and MOVIE word on top of the menu is highlighted.
• The disc subtitle may not be displayed properly, if a DivX subtitle
is downloaded through the internet.
• If the disc subtitle setup menu does not have the DivX subtitle
language you are going to play, the subtitle language may not
be displayed properly.
• The DivX subtitle file name has to be identified with the DivX file
name to display by this unit.
Playing a DivX Movie file (continued)
Page 34

34
DivX disc compatibility with this unit is limited as follows:
• Available resolution size of the DivX file is under 720x576 (W x H)
pixel.
• The file name of the DivX subtitle is limited to 56 characters.
• If there is impossible code to express in the DivX file, it may be displayed as " _ " mark on the display.
• If the frame rate is over 30 frames per second, this unit may not
operate normally.
• If the video and audio structure of recorded file is not interleaved,
either video or audio is outputted.
• If the file is recorded with GMC, the unit supports only 1-point of
the record level.
*
GMC?
GMC is the acronym for Global Motion Compensation. It is an encoding tool specified in MPEG4 standard. Some MPEG4 encoder, like
DivX , have this option.
There are different levels of GMC encoding, usually called 1-point, 2point, or 3-point GMC.
Playable DivX file
".avi ", ".mpg ", ".mpeg "
Playable Subtitle format
SubRip(*.srt/*.txt)
SAMI(*.smi)
SubStation Alpha(*.ssa/*.txt)
MicroDVD(*.sub/*.txt)
SubViewer 2.0(*.sub/*.txt)
TMPlayer(*.txt)
Dvd Subtitle System(*.txt)
VobSub (*.sub) → Sub/idx, stream based format.
Playable Codec format
"DIVX3.xx ", "DIVX4.xx ", "DIVX5.xx ",
"MP43 ", "3IVX ".
Playable Audio format
"Dolby Digital ", "DTS ", "PCM ", "MP3 ", "WMA ".
• Sampling frequency: within 8 - 48 kHz (MP3),
within 32 - 48kHz (WMA)
• Bit rate: within 8 - 320kbps (MP3),
32 - 192kbps (WMA)
Playing a DivX Movie file (continued)
Page 35

35
Advanced Operations
This unit can play DivX or MP3/WMA files.
1. Connect the USB Flash Drive to the USB port on the unit after
power is on.
2. Press MODE on the unit.
The mode selection menu appears on the screen.
3. Select the USB using b / B buttons and press ENTER.
The file or folder list in USB Flash Drive appears on the
screen.
4. If you want to change the other mode, select the other mode in
mode selection menu.
To Remove the USB Flash Drive from the unit
1. Follow step 4 as shown above, to exit the menu.
2. Remove the USB Flash Drive from the unit.
NOTES
• Do not extract the USB Flash Drive in operating.
• Music files (MP3/WMA), image files (JPEG) and DivX files can
be played.
• The total number of files in a USB Flash Drive should be less
than 650 files.
• Some USB Flash Drive is not supported on this unit.
• This unit supports only USB Flash Drive.
• This unit can support USB1.1.
For details on each operations item,
refer to relevant page. (See pages 24-34)
Playing an USB Flash Drive
Page 36

36
The picture and sound of a nearby TV, VCR, or radio may be
distorted during playback. If this occurs, position the player away
from the TV, VCR, or radio, or turn off the unit after removing the
disc.
AV output Connections
Depending on your TV and other equipment there are various
ways you can connect the unit. Please refer to the manuals of
your TV, stereo system or other devices as necessary for
additional connection information.
AV output Connections to Your TV
1. Set the Mode selection menu to “USB” or “ DISC” mode.
2. Connect the black end of supplied AV cable to the AV IN/OUT
jack on the unit.
3. Connect the yellow end of supplied AV cable to the VIDEO
Input jack on your TV.
4. Connect the red and white ends of supplied AV cable to the
AUDIO Input jacks on your TV.
NOTE
Make sure the DVD player is connected directly to the TV and not
to a VCR, otherwise the DVD image could be distorted by the
copy protection system.
Setting up the Player
Audio/Video cable
(Supplied)
Rear of TV
Right side of unit
Page 37

37
Connections
AV input Connections
Connect the input jacks (Audio/Video) on the unit to the
audio/video out jacks on your external device, using audio/video
cables.
AV input Connections to Your unit
1. Set the Mode selection menu to “AV IN” mode.
2. Connect the black end of supplied AV cable to the AV IN/OUT
jack on the unit.
3. Connect the yellow end of supplied AV cable to the VIDEO
Output jack on your external device.
4. Connect the red and white ends of supplied AV cable to the
AUDIO Output jacks on your external device.
Setting up the Player (continued)
Audio/ Video cable
(Supplied)
External Device
Right side of unit
Page 38

38
Audio Connection to Optional Equipment
Connect the unit to your optional equipment for audio output.
You must set the Mode selection menu to “USB” or “ DISC” mode.
Amplifier equipped with 2-channel analog stereo or Dolby Pro
Logic ll / Pro Logic: Connect the AV IN/OUT jacks on the unit to
the audio left and right IN jacks on your amplifier, receiver, or
stereo system, using the audio cables.
Amplifier equipped with 2-channel digital stereo (PCM) or
audio / video receiver equipped with a multi-channel decoder
(Dolby Digital™, MPEG 2, or DTS): Connect one of the unit
Coaxial jack to the corresponding in jack on your amplifier. Use an
optional digital audio cable.
Digital Multi-channel sound
A digital multi-channel connection provides the best sound quality.
For this you need a multi-channel audio / video receiver that supports one or more of the audio formats supported by your unit
such as MPEG 2, Dolby Digital and DTS. Check the receiver manual and the logos on the front of the receiver.
NOTES
•
If the audio format of the digital output does not match the capabilities of your receiver, the receiver produces a strong, distorted
sound or no sound at all.
• Six Channel Digital Surround Sound via a digital connection can
only be obtained if your receiver is equipped with a Digital Multichannel decoder.
• To see the audio format of the current DVD in the on-screen dis-
play, press AUDIO.
Setting up the Player (continued)
Coaxial cable
(Not supplied)
Audio/ Video
cable (Supplied)
and/or
Amplifier(Receiver)
Right side of unit
L
COAXIAL
DIGITAL INPUT
R
AUDIO INPUT
Page 39

39
Reference
Troubleshooting
Symptom
No power.
No picture on the LCD
or TV (including video
from another unit).
No sound.
The unit does not start
playback.
No response when buttons are pressed.
The Remote Control
does not work properly.
Correction
• Plug the power cord into the wall outlet securely.
• Recharge the battery.
• Connect the video cable into the jacks securely.
• Set the MODE correctly.
While you are viewing video from other equipment,
set the MODE to A/V IN mode.
• Select a LCD mode other than OFF.
• Select the appropriate video input mode on the TV
so the picture from the unit appears on the screen.
• Select the correct input mode of the audio receiver
so you can listen to the sound from the unit.
• Connect the audio cable into the jacks securely.
• Insert a playable disc. (Check the disc type and
Regional code.)
• Cancel the Rating function or change the rating level.
• “ ” may appear on the screen during operation.
• Operate the Remote Control within about 23 ft
(7 m).
Cause
• The power cord is disconnected.
• The battery is discharged.
• The video cable is not connected securely.
• The MODE selection is not set correctly.
• LCD mode is set to OFF.
• The TV is not set to receive DVD signal
output.
•
The equipment connected with the audio cable
is not set to receive DVD signal output.
• The audio cables are not connected
securely.
• An unplayable disc is inserted.
• The Rating level is set.
• Some discs prohibit certain operations.
• The Remote Control is too far from the
unit.
Page 40

40
Use this list to input your desired language for the following initial settings:
Disc Audio, Disc Subtitle, Disc Menu.
Language Codes
Language Code
Abkhazian 6566
Afar 6565
Afrikaans 6570
Albanian 8381
Ameharic 6577
Arabic 6582
Armenian 7289
Assamese 6583
Aymara 6588
Azerbaijani 6590
Bashkir 6665
Basque 6985
Bengali; Bangla 6678
Bhutani 6890
Bihari 6672
Breton 6682
Bulgarian 6671
Burmese 7789
Byelorussian 6669
Cambodian 7577
Catalan 6765
Chinese 9072
Corsican 6779
Croatian 7282
Czech 6783
Danish 6865
Dutch 7876
English 6978
Esperanto 6979
Estonian 6984
Faroese 7079
Language Code
Fiji 7074
Finnish 7073
French 7082
Frisian 7089
Galician 7176
Georgian 7565
German 6869
Greek 6976
Greenlandic 7576
Guarani 7178
Gujarati 7185
Hausa 7265
Hebrew 7387
Hindi 7273
Hungarian 7285
Icelandic 7383
Indonesian 7378
Interlingua 7365
Irish 7165
Italian 7384
Japanese 7465
Javanese 7487
Kannada 7578
Kashmiri 7583
Kazakh 7575
Kirghiz 7589
Korean 7579
Kurdish 7585
Laothian 7679
Latin 7665
Latvian, Lettish 7686
Language Code
Lingala 7678
Lithuanian 7684
Macedonian 7775
Malagasy 7771
Malay 7783
Malayalam 7776
Maltese 7784
Maori 7773
Marathi 7782
Moldavian 7779
Mongolian 7778
Nauru 7865
Nepali 7869
Norwegian 7879
Oriya 7982
Panjabi 8065
Pashto, Pushto 8083
Persian 7065
Polish 8076
Portuguese 8084
Quechua 8185
Rhaeto-Romance 8277
Rumanian 8279
Russian 8285
Samoan 8377
Sanskrit 8365
Scots Gaelic 7168
Serbian 8382
Serbo-Croatian 8372
Shona 8378
Sindhi 8368
Language Code
Singhalese 8373
Slovak 8375
Slovenian 8376
Somali 8379
Spanish 6983
Sudanese 8385
Swahili 8387
Swedish 8386
Tagalog 8476
Tajik 8471
Tamil 8465
Tatar 8484
Telugu 8469
Thai 8472
Tibetan 6679
Tigrinya 8473
Tonga 8479
Turkish 8482
Turkmen 8475
Twi 8487
Ukrainian 8575
Urdu 8582
Uzbek 8590
Vietnamese 8673
Volapük 8679
Welsh 6789
Wolof 8779
Xhosa 8872
Yiddish 7473
Yoruba 8979
Zulu 9085
Page 41

41
Reference
Choose an area code from this list.
Area Codes
Area Code
Afghanistan AF
Argentina AR
Australia AU
Austria AT
Belgium BE
Bhutan BT
Bolivia BO
Brazil BR
Cambodia KH
Canada CA
Chile CL
China CN
Colombia CO
Congo CG
Costa Rica CR
Croatia HR
Czech Republic CZ
Denmark DK
Ecuador EC
Egypt EG
El Salvador SV
Area Code
Ethiopia ET
Fiji FJ
Finland FI
France FR
Germany DE
Great Britain GB
Greece GR
Greenland GL
Herd and Mcdonald Islands
HM
Hungary HU
India IN
Indonesia ID
Israel IL
Italy IT
Jamaica JM
Japan JP
Kenya KE
Kuwait KW
Libya LY
Luxembourg LU
Area Code
Malaysia MY
Maldives MV
Mexico MX
Monaco MC
Mongolia MN
Morocco MA
Nepal NP
Netherlands NL
Netherlands Antilles AN
New Zealand NZ
Nigeria NG
Norway NO
Oman OM
Pakistan PK
Panama PA
Paraguay PY
Philippines PH
Poland PL
Portugal PT
Romania RO
Russian Federation RU
Area Code
Saudi Arabia SA
Senegal SN
Singapore SG
Slovak Republic SK
Slovenia SI
South Africa ZA
South Korea KR
Spain ES
Sri Lanka LK
Sweden SE
Switzerland CH
Thailand TH
Turkey TR
Uganda UG
Ukraine UA
United States US
Uruguay UY
Uzbekistan UZ
Vietnam VN
Zimbabwe ZW
Page 42

42
General
Power supply:
DC 9.5V (AC adapter terminal), DC 7.4V (Battery)
Power consumption: 12W with battery
Net Weight: 1.60 lbs (0.73 kg) (without battery pack)
External dimensions (W x H x D):
7.6 x 1.5 x 6.7 inches (195 x 38.5 x 172.6 mm)
Signal system: PAL
Laser:
DVD Laser wavelength 662+25 / 662-15 nm
CD Laser wavelength 785+25 / 785-15 nm
Frequency range (audio):
DVD linear sound: 48kHz sampling 8 Hz to 20 kHz
96kHz sampling 8 Hz to 44 kHz
Signal-to-noise ratio (audio): More than 80 dB
Dynamic range (audio): More than 80 dB
Harmonic distortion (audio): 0.02 %
Operating conditions:
Temperature: 5°C to 35°C, Operation status: Horizontal
Connectors
Video input/output (VIDEO In/Out):
1.0 V (p-p), 75 Ω, negative sync., ø3.5mm mini jack x 1
Audio input/output (AUDIO In/Out, analog audio):
2.0 Vrms(1 KHz, 0 dB), ø3.5mm mini jack x 1
Earphone terminal: ø3.5mm stereo mini jack x 2
Liquid Crystal Display
Panel size: 7 inches wide (diagonal)
Projection system: R.G.B. stripe
Driving system: TFT active matrix
Resolution: 234 x 480 x 3 (effective pixel rate: more than
99.99%)
Accessories
• RCA Audio/Video cable...........................................................1
• AC Adapter (DPAC1T) ............................................................1
• Automotive Adapter (DPDC1) .................................................1
• Battery Pack (DPB27).............................................................1
• Remote control........................................................................1
• Battery for Remote control (Lithium Battery) ..........................1
Design and specifications are subject to change without notice.
Specifications
P/NO : MFL37883906
Page 43

REPRODUCTOR DE DVD
PORTÁTIL
Antes de conectar, utilizar o ajustar este producto,
lea detenida y completamente este libro de
instrucciones.
MANUAL DEL USUARIO
MODELO: DP271
DP271B-P_AA6SLLW_SPA
Lea detenidamente el contenido de esta tarjeta
de Garantía.
Page 44

Este símbolo de un relámpago con cabeza de flecha dentro de
un triángulo equilátero tiene como finalidad alertar al usuario de
la presencia de una potencia no aislada peligrosa dentro del producto que puede ser de la magnitud suficiente como para constituir un riesgo de choque eléctrico a las personas.
El signo de exclamación dentro de un triángulo equilátero tiene
como finalidad alertar al usuario de la presencia de instrucciones
de mantenimiento y funcionamiento en la documentación que
acompaña al producto.
ADVERTENCIA: No instale el equipo en un espacio cerrado, como en una
estantería o mueble similar.
PRECAUCIÓN: No obstruya ninguno de los orificios de ventilación.
Instalar conforme a las instrucciones del fabricante.
Las ranuras y orificios de la carcasa cumplen un propósito de ventilación y
aseguran el correcto funcionamiento del producto, y a fin de protegerlo de
un posible sobrecalentamiento.
Los orificios no deben obstruirse en ningún caso colocando el producto
sobre una cama, sofá, alfombra o superficie similar. Este producto no debe
colocarse en una instalación empotrada, como una librería o estante, a
menos que se proporcione una correcta ventilación del mismo y se respeten todas las instrucciones del fabricante.
PRECAUCIÓN:
Este producto emplea un sistema láser.
Para asegurar un uso apropiado de este producto por favor, lea detenidamente este manual del propietario y consérvelo para futuras consultas. Si
la unidad necesitara de mantenimiento, póngase en contacto con un centro de servicio autorizado.
El uso de controles, ajustes, o la ejecución de procedimientos, a excepción de los aquí especificados, puede dar lugar a una exposición peligrosa
a la radiación.
Para prevenir la exposición directa al rayo láser, no intente abrir el cerramiento. Radiación visible del láser al abrirlo. NO FIJE LA VISTA EN EL
LÁSER O HAZ DE LUZ.
PRECAUCIÓN: El aparato no debe exponerse al agua (goteo o salpicaduras) y no debe colocar sobre el aparato objetos que contengan líquidos,,
como floreros.
Notas sobre el copyright:
La ley prohíbe copiar
, retransmitir, proyectar, retransmitir por cable, repro-
ducir en público o alquilar material registrado sin autorización.
Este producto cuenta con la protección contra copias creada por
Macrovision. Las señales de protección contra copias están registradas en
algunos discos. Cuando se graban o reproducen las imágenes de estos
discos, éstas tendrán interferencias.
Este producto utiliza la tecnología de protección del copyright que se
encuentra amparada por el registro de ciertas patentes estadounidenses y
otros derechos de propiedad intelectual de Macrovision Corporation y
otros titulares. El uso de esta tecnología de protección del copyright debe
ser autorizado por Macrovision Corporation y queda limitado al uso
doméstico y otros usos limitados, a menos que Macrovision Corporation
autorice lo contrario. Queda prohibida la técnica retroactiva y el desmontaje del producto.
Precauciones de seguridad
2
ADVERTENCIA: PARA REDUCIR EL RIESGO DE CHOQUE
ELÉCTRICO NO EXTRAIGA LA CUBIERTA (O PARTE POSTERIOR).
NO HAY EN EL INTERIOR NINGUNA PARTE QUE PUEDA REEM-
PLAZAR EL USUARIO REFIERA EL MANTENIMIENTO A PERSONAL
DE MANTENIMIENTO CUALIFICADO.
ADVERTENCIA
RIESGO DE CHOQUE
ELÉCTRICO. NO ABRIR
ADVERTENCIA: PARA REDUCIR EL RIESGO DE INCENDIO O
CHOQUE ELÉCTRICO, NO EXPONGA ESTE PRODUCTO A LA
LLUVIA NI A LA HUMEDAD.
Page 45

3
PRECAUCIÓN referente al cable de alimentación
La mayoría de los electrodomésticos recomiendan ser
emplazados sobre un circuito dedicado;
Es decir, un circuito de un sólo enchufe que acciona solamente
este electrodoméstico y no tiene enchufes o circuitos derivados
adicionales. Revise la página de especificaciones de este manual
del propietario para asegurarse.
No sobrecargue los enchufes de pared. Los enchufes de pared
sobrecargados, flojos o dañados, cables de extensión, cables de
alimentación pelados, o el aislamiento dañado o agrietado del
cable son elementos peligrosos. Cualquiera de estas condiciones
podría dar lugar a descargas eléctricas o fuego. Examine
periódicamente el cable de su electrodoméstico, ya que su
aspecto indica daños o deterioro, desenchúfelo, cese el uso del
electrodoméstico, y haga cambiar el cable por una pieza de
recambio exacta por un distribuidor de servicio autorizado.
Proteja el cable de alimentación contra abusos físicos o
mecánicos, como el ser torcido, doblado, pinzado, atrapado bajo
una puerta cerrada, o ser pisado continuamente. Preste especial
atención a los enchufes, tomas de pared, y al punto donde el
cable sale del electrodoméstico.
Para desconectar la alimentación principal, retire el cable principal
de alimentación. Durante la instalación del producto, asegúrese
de que el enchufe sea fácilmente accesible.
Este producto está fabricado para cumplir con la
DIRECTIVA CEE 89/336/CEE, 93/68/CEE y 2006/95/CE.
Cómo deshacerse de aparatos eléctricos y
electrónicos viejos
1. Si en un producto aparece el símbolo de un contenedor
de basura tachado, significa que éste se acoge a la
Directiva 2002/96/EC.
2. Todos los aparatos eléctricos o electrónicos se deben
desechar de forma distinta del servicio municipal de
recogida de basura, a través de puntos de recogida designados por el gobierno o las autoridades locales.
3. La correcta recogida y tratamiento de los dispositivos
inservibles contribuye a evitar riesgos potenciales para el
medio ambiente y la salud pública.
4. Para obtener más información sobre cómo deshacerse de
sus aparatos eléctricos y electrónicos viejos, póngase en
contacto con su ayuntamiento, el servicio de recogida de
basuras o el establecimiento donde adquirió el producto.
Precauciones de seguridad (Continuación)
Introducción
Page 46

Índice
Introducción
Precauciones de seguridad . . . . . . . . . . . . . . . . . . . . . . . . . . . . . . . 2-3
Índice . . . . . . . . . . . . . . . . . . . . . . . . . . . . . . . . . . . . . . . . . . . . . . . . . 4
Antes de usar. . . . . . . . . . . . . . . . . . . . . . . . . . . . . . . . . . . . . . . . . . 5-7
El visualizador de símbolos . . . . . . . . . . . . . . . . . . . . . . . . . . . 5
Símbolo utilizados en este manual . . . . . . . . . . . . . . . . . . . . . . . . 5
Notas sobre los discos . . . . . . . . . . . . . . . . . . . . . . . . . . . . . . . . . 5
Mantenimiento y reparaciones. . . . . . . . . . . . . . . . . . . . . . . . . . . . 6
Tipos de discos reproducibles . . . . . . . . . . . . . . . . . . . . . . . . . . . . 7
Código de región. . . . . . . . . . . . . . . . . . . . . . . . . . . . . . . . . . . . . . 7
Identificación de controles . . . . . . . . . . . . . . . . . . . . . . . . . . . . . . . .8-11
Unidad principal . . . . . . . . . . . . . . . . . . . . . . . . . . . . . . . . . . . . .8-9
Mando a distancia . . . . . . . . . . . . . . . . . . . . . . . . . . . . . . . . . .10-11
Conexiones de energía eléctrica . . . . . . . . . . . . . . . . . . . . . . . . . .12-15
Conectar el adaptador de CA . . . . . . . . . . . . . . . . . . . . . . . . . . .12
Conectar el adaptador del coche . . . . . . . . . . . . . . . . . . . . . . . . .13
Compartimiento de las Baterías . . . . . . . . . . . . . . . . . . . . . . .14-15
Girar la LCD . . . . . . . . . . . . . . . . . . . . . . . . . . . . . . . . . . . . . . . . . . .16
Reproducci de un disco . . . . . . . . . . . . . . . . . . . . . . . . . . . . . . . . . . . 17
Opciones avanzadas
Visualización en pantalla de la información del disco . . . . . . . . . . . . . 18
Parámetros iniciales . . . . . . . . . . . . . . . . . . . . . . . . . . . . . . . . . . . 18-23
Funcionamiento general . . . . . . . . . . . . . . . . . . . . . . . . . . . . . . . 18
IDIOMA. . . . . . . . . . . . . . . . . . . . . . . . . . . . . . . . . . . . . . . . . . . . 19
PANTALLA . . . . . . . . . . . . . . . . . . . . . . . . . . . . . . . . . . . . . . . . . 19
AUDIO . . . . . . . . . . . . . . . . . . . . . . . . . . . . . . . . . . . . . . . . . . . . 20
BLOQUEO . . . . . . . . . . . . . . . . . . . . . . . . . . . . . . . . . . . . . . . 21-22
OTROS. . . . . . . . . . . . . . . . . . . . . . . . . . . . . . . . . . . . . . . . . . . . 23
Características generales . . . . . . . . . . . . . . . . . . . . . . . . . . . . . . . 24-26
Características adicionales . . . . . . . . . . . . . . . . . . . . . . . . . . . . . . . . 27
Reproducción de un CD de audio o un archivo MP3/WMA
. . . . . . . . . . 28
Reproducción programada. . . . . . . . . . . . . . . . . . . . . . . . . . . . . . . . . 29
Repetición de las pistas programadas . . . . . . . . . . . . . . . . . . . . . 29
Eliminación de una pista de la lista “Programa” . . . . . . . . . . . . . . 29
Eliminación de toda la lista de programas . . . . . . . . . . . . . . . . . . 29
Visualización de un archivo JPEG
. . . . . . . . . . . . . . . . . . . . . . . . . 30-31
Mostrar (Proyección de diapositivas) . . . . . . . . . . . . . . . . . . . . . . 30
Imagen congelada. . . . . . . . . . . . . . . . . . . . . . . . . . . . . . . . . . . . 30
Mover a otro fichero . . . . . . . . . . . . . . . . . . . . . . . . . . . . . . . . . . 31
Zoom . . . . . . . . . . . . . . . . . . . . . . . . . . . . . . . . . . . . . . . . . . . . . 31
Para rota la imagen. . . . . . . . . . . . . . . . . . . . . . . . . . . . . . . . . . . 31
Para escuchar música MP3/WMA mientras se mira una imagen . 31
La compatibilidad del disco JPEG con este reproductor queda
limitada como sigue. . . . . . . . . . . . . . . . . . . . . . . . . . . . . . . . . . . 31
Reproducción de un disco en formato DVD VR . . . . . . . . . . . . . . . . . 32
Reproducción de un archivo de película DivX
. . . . . . . . . . . . . . . . 33-34
La compatibilidad de los discos DivX con este reproductor
está limitada del siguiente modo . . . . . . . . . . . . . . . . . . . . . . . . . 34
Reproducción de una unidad Flash USB . . . . . . . . . . . . . . . . . . . . . 35
Conexiones
Configuración del reproductor. . . . . . . . . . . . . . . . . . . . . . . . . . . . 36-38
Conexiones de salida AV . . . . . . . . . . . . . . . . . . . . . . . . . . . . . . . 36
Conexiones de entrada de AV . . . . . . . . . . . . . . . . . . . . . . . . . . . 37
Conexión de audio con equipos opcionales . . . . . . . . . . . . . . . . . 38
Referencia
Localización de fallos . . . . . . . . . . . . . . . . . . . . . . . . . . . . . . . . . . . . 39
Códigos del idioma . . . . . . . . . . . . . . . . . . . . . . . . . . . . . . . . . . . . . . 40
Códigos de área . . . . . . . . . . . . . . . . . . . . . . . . . . . . . . . . . . . . . . . . 41
Especificaciones . . . . . . . . . . . . . . . . . . . . . . . . . . . . . . . . . . . . . . . . 42
4
Page 47

5
Introducción
Antes de usar
Para garantizar el uso adecuado de este producto, lea detenidamente
este manual del usuario y consérvelo para futuras consultas.
Este manual ofrece información sobre el manejo y el mantenimiento
de su reproductor de DVD. En caso de que la unidad necesite alguna
reparación, póngase en contacto con un servicio de reparaciones
autorizado.
El visualizador de símbolos
El símbolo “ ” puede aparecer en la pantalla de su televisor
durante el funcionamiento e indica que la función explicada en
este manual del usuario no está disponible para ese disco de
vídeo DVD específico.
Símbolo utilizados en este manual
NOTA
Indica la existencia de notas y características de funcionamiento
particulares.
CONSEJO
Señala consejos y trucos para facilitar la tarea.
Un apartado cuyo título tenga uno de los símbolos siguientes,
indica que éste es aplicable exclusivamente al disco representado
con el símbolo.
Todos los discos que aparecen a continuación
DVD y DVD±R/RW finalizados
CDs de vídeo
CDs de audio Archivos MP3
Archivos WMA
Archivos DivX
Notas sobre los Discos
Manejo de los Discos
No toque la cara grabada del disco. Sostenga el disco por los
extremos para no dejar huellas en la superficie. Nunca pegue
papel o cinta adhesiva en el disco.
Colocación de los Discos
Tras la reproducción, guarde el disco en su caja. No exponga el
disco a la luz solar directa o a fuentes de calor, ni lo deje dentro
de un coche aparcado y expuesto a la luz solar directa.
Limpieza de los Discos
La existencia de huellas y polvo en el disco puede disminuir la calidad de la imagen y distorsionar el sonido. Antes de utilizarlo,
limpie el disco con un paño limpio. Pase el paño desde el centro
del disco hacia fuera.
No utilice disolventes fuertes como alcohol, bencina, disolvente,
productos de limpieza o pulverizadores antiestáticos pensados
para los antiguos discos de vinilo.
DivX
WMA
MP3ACD
VCD
DVD
ALL
Page 48

6
Antes de usar (Continuación)
Mantenimiento y reparaciones
Consulte la información facilitada en este capítulo antes de contactar con el servicio técnico.
Manejo de la unidad
Durante el transporte de la unidad
Conserve la caja y los materiales de embalaje originales. Si necesita enviar de nuevo la unidad, para una máxima protección de la
misma, empaquétela como venía de fábrica.
Conservación de las superficies externas limpias
• No utilice líquidos volátiles, como insecticidas, cerca de la
unidad.
• No deje productos de caucho o plástico en contacto con la
unidad durante un tiempo prolongado, podrían dejar marcas
en la superficie.
Limpieza de la unidad
Para limpiar el reproductor, utilice un paño suave y seco. Si las
superficies están extremadamente sucias, utilice un paño suave
ligeramente humedecido con una solución de detergente suave.
No utilice disolventes fuertes, como alcohol, bencina o disolvente,
podría dañar la superficie de la unidad.
Mantenimiento de la unidad
El reproductor de DVD es un aparato de precisión de alta
tecnología. Si las lentes ópticas y las piezas de la unidad del
disco están sucias o deterioradas, la calidad de la imagen podría
disminuir.
Dependiendo del medio de uso, se recomienda la inspección y el
mantenimiento regulares tras 1.000 horas de utilización.
Para obtener más detalles, póngase en contacto con su
distribuidor más cercano.
Page 49

7
Introducción
Antes de usar (Continuación)
Tipos de discos reproducibles
DVD
(disco de 8 cm / 12 cm)
CD de vídeo (VCD)
(disco de 8 cm / 12 cm)
CD de audio
(disco de 8 cm / 12 cm)
Además, esta unidad reproduce DVD±R/RW y CD-R/RW, discos
de doble capa, USB que contenga pistas de audio, archivos DivX,
MP3, WMA y/o JPEG.
Esto indica una característica del producto que es
capaz de reproducir discos DVD-RW grabados en formato de grabación de vídeo.
NOTAS
• Dependiendo de las condiciones del equipo de grabación o del
propio disco CD-R/RW (o DVD±R/RW), ciertos discos CD-R/RW
(o DVD±R/RW) pueden no reproducirse en la unidad.
• No pegue etiquetas ni sellos en ninguno de los dos lados del
disco (el lado etiquetado o el lado grabado).
•
No utilice CDs con forma irregular (por ejemplo, con forma de
corazón u octogonal) pues podrían provocar el funcionamiento incorrecto de la unidad.
Los clientes no deberán olvidar que es necesaria una autorización para descargarse archivos MP3 / WMA y música
desde Internet. Nuestra empresa no goza del derecho para
garantizar dicha autorización. La autorización deberá solicitarse siempre al propietario del copyright.
Código de región
Esta unidad tiene un código de región impreso en su parte posterior. La unidad sólo puede reproducir DVDs con la misma etiqueta
que la existente en la parte posterior de la unidad, o “ALL (Todo)”.
Notas sobre los códigos regionales
• La mayoría de los discos DVD tiene un globo con uno o más
números en su interior claramente visible en la cubierta. Este
número debe coincidir con el código regional de su reproductor
de DVD o el disco no podrá ser reproducido.
• Si intenta reproducir un DVD con un código de zona distinto al
de su reproductor, aparecerá en la pantalla del televisor el mensaje "Chequee Código Regional".
Fabricado con la autorización de Dolby Laboratories.
“Dolby”, y “Pro Logic”, el símbolo de doble D son
marcas comerciales de Dolby Laboratories.
DTS y DTS Digital Out son marcas comerciales de
Digital Theater Systems, Inc.
Page 50

8
Identificación de controles
Unidad principal
a Pantalla LCD
b Bocina
c LCD MODE : NORMAL →4:3 modo → OFF
d Botones de función
• DISPLAY (PANTALLA) : Acceso a la pantalla de visualización.
• MODE: Seleccione un modo mediante DISC, AV IN o USB.
• SETUP (CONFIGURACIÓN) : Accede o sale del menú de
configuración.
• MENU (MENÚ) : Accede al menú de un disco DVD.
• COLOR/BRIGHT : Selecciona el modo de ajuste de la LCD
en el nivel de Brillo → Color → DESCONEXIÓN
• FLIP: Rotar la pantalla.
e Botones de control del menú
• bBvV(izda/dcha/arriba/abajo)
Selecciona una opción en el menú.
• bB: Ajuste del COLOR/BRILLO.
• ENTER : Confirma la selección del menú.
f Tapa del disco
g Botón OPEN : Presione este botón para abrir la bandeja de
disco.
a
b
c
d
e
f
g
Page 51

9
Introducción
Unidad principal
a Control de volumen
b Conector de audífonos
c Conector de COAXIAL
d Conector de AV IN/OUT
NOTA
Si la señal de ENTRADA DE VÍDEO no está conectada en modo
ENTRADA AV, esta unidad se desconectará automáticamente en
10 minutos, a fin de evitar la descarga de la batería.
e DC IN
Conecte el adaptador de CA o el adaptador automotriz.
f Sensor remoto
Recepción de la señal procedente del mando a distancia para
el funcionamiento.
g Indicador de carga de la batería
h (POWER): Enciende (ON) o apaga (OFF) la unidad.
i Botones de reproducción
• x ( STOP ) : Para la reproducción.
• B/X ( PLAY/PAUSE ):
I
nicia la reproducción / Detiene la reproducción
• . (SKIP/SEARCH hacia atrás)
Buscar hacia atrás* / ir al principio del capítulo o pista actuales o
ir al capítulo o pista anteriores.
• > (SKIP/SEARCH hacia delante)
Buscar hacia delante* / ir al siguiente capítulo.
* Oprimir y mantener apretado el botón durante
aproximadamente dos segundos.
j USB: Conectar una unidad Flash USB.
Identificación de controles (Continuación)
abcde
fg h i
j
Page 52

10
a
POWER: Enciende (ON) o apaga (OFF) la
unidad.
AUDIO:
Selecciona un idioma de audio (DVD).
SUBTITLE (SUBTITULADO):
Selecciona un idioma de subtitulado.
ANGLE: Selecciona el ángulo de la cámara
si está disponible.
SKIP/SEARCH hacia atrás ( . ):
Buscar hacia atrás* / ir al principio del capítulo o pista
actuales o ir al capítulo o pista anteriores.
Forward SKIP/SEARCH ( > ):
Buscar hacia delante* / ir al siguiente
capítulo.
*
Oprimir y mantener apretado el botón
durante aproximadamente dos segundos.
SLOW (t / T): Reproducción en retroce-
so/avance en modo lento.
b
SETUP (CONFIGURACIÓN):
Accede o sale del menú de configuración.
MENU (MENÚ): Accede al menú de un disco
DVD.
RETURN (O): Despliega el menú.
DISPLAY (PANTALLA): Acceso a la pantalla
de visualización.
bBvV(izda/dcha/arriba/abajo):
Selecciona una opción en el menú.
ENTER: Confirma la selección del menú.
c
PAUSE/STEP ( X ): Detiene la reproducción.
Pulse repetidamente para la reproducción
fotograma a fotograma.
PLAY (N): Inicia la reproducción.
STOP (PARAR) ( x ):
Detiene la reproducción.
Botones numéricos 0-9
Selecciona opciones numeradas en un
menú.
PROG.: Pone una pista en la lista de programas.
CLEAR (ELIMINAR): Elimina una pista de la
lista del programa o la marca en el menú de
BÚSQUEDA DE MARCADOR.
d
TITLE (TÍTULO): Despliega el menú de títulos del disco, si está disponible.
REPEAT (REPETIR): Repetir capítulo, pista,
título, todos.
A-B: Repetir la secuencia.
ZOOM: Aumenta la imagen de vídeo.
MARKER (MARCADOR):
Marca cualquier
punto durante la reproducción.
SEARCH (BÚSQUEDA): Muestra el menú
BÚSQUEDA DE MARCADOR.
RANDOM (ALEATORIO): Reproduce las
pistas en orden aleatorio.
Identificación de controles (Continuación)
Mando a distancia
a
b
c
d
Page 53

11
Introducción
Inserte la pila (Pila de Litio)
NOTAS
• No exponga el sensor del mando a distancia a la luz brillante.
• No deje objetos entre el sensor del mando a distancia y el
mando a distancia.
V Reemplazo de la pila tipo botón.
La duración normal de la pila es de aproximadamente un año.
Cámbiela si el mando a distancia empieza a fallar al utilizar el
aparato mientras esta funcionando.
Pila tipo botón (Pila de Litio)
1. Apriete el clip de sujeción de la pila y presione sobre la pestaña
para retirar el soporte de la pila.
2. Inserte la pila con el polo positivo “+” orientado en la misma
dirección que el “+” indicado en el soporte de la pila.
3. Reemplace el soporte de la pila por una pila nueva en la
unidad del mando a distancia, asegurándose de que se ha
insertado correctamente.
NOTAS
• Reemplace la pila de la unidad de mando a distancia con micro
celdas de lítio de 3V tales como CR. 2025 o su equivalente.
• Deseche la pila conforme a las disposiciones de seguridad de
las leyes locales. No la tire al fuego.
Identificación de controles (Continuación)
Advertencia: La pila que se usa en este aparato puede provocar
un incendio o quemaduras químicas peligrosas si
se maltrata.
No la recargue, desensamble, incinere, o caliente
arriba de 100 grados centígrados (212 grados F).
Reemplace la pila con Matsushita Elec. Ind. Co.,
Ltd. (Panasonic), parte no. CR. 2025. Únicamente.
El uso de cualquier otra pila puede provocar riesgos de incendio o explosión. Deseche las pilas
usadas. Mantenga las pilas fuera del alcance de
los niños. No desensamble o tire al fuego.
Page 54

12
Conectar el adaptador de CA.
a Conectar el adaptador de CA a la toma de DC IN de
la unidad.
b Conectar el transformador de CA a la toma de pared.
Precaución
• No conecte la clavija a una toma de corriente diferente a la que
se indica en la etiqueta, ya que esto puede desencadenar de
incendio o descarga eléctrica.
• No conecte o desconecte la clavija con las manos mojadas. Al
hacerlo puede recibir una descarga eléctrica.
• No utilice un adaptador de corriente alterna diferente al que se
especifica, ya que esto puede ocasionar un incendio o dañar el
aparato.
Adaptador de corriente alterna
• Este adaptador de corriente alterna opera con Corriente Alterna
entre 100-240V~ 50-60Hz 1,5A.
• Contacte a un distribuidor de partes eléctricas para que lo asista
en la elección de una clavija para el adaptador de corriente
alterna o un juego de cables de CA.
• Fabricado por WANLIDA Digital Technology Co., Ltd.
Conexiones de energía eléctrica
a
b
Page 55

13
Introducción
Conectar el adaptador del coche
Este reproductor de DVD y su adaptador para automóvil han sido
diseñados para utilizarlos en vehículos que tengan sistemas eléctricos conectados a una masa negativa de 8,5-16 voltios. (Este es
el valor estándar para la mayoría de vehículos). Si su vehículo
dispone de un sistema eléctrico diferente, no se podrá utilizar el
sistema de alimentación de CC.
a Conectar el adaptador del coche a la toma de DC IN
de la unidad.
b Conectar el adaptador del coche al mechero de éste.
Atención
• Desconecte siempre el adaptador para automóviles del enchufe del
encendedor antes de desconectarlo del reproductor de DVD para evitar
así sacudidas eléctricas o posibles daños.
• Hay instalado un fusible de 250 V y 3 amperios en el adaptador para
automóvil
• Si va a arrancar el motor, desconecte el adaptador para automóvil del
enchufe del encendedor del vehículo.
• No utilice este reproductor de DVD si la batería del automóvil está
descargada. Es posible que el fusible de CC se funda si el generador del
vehículo produce un máximo de corriente.
• Si el voltaje de alimentación del vehículo cae por debajo de los 10
voltios, el reproductor de DVD no funcionará correctamente.
• No deje el reproductor de DVD donde la temperatura sobrepase los
70ºC, ya que el dispositivo de lectura de datos puede resultar dañado.
Por ejemplo:
- En el interior de un vehículo con las ventanas cerradas expuesto a la
luz directa del sol.
- Cerca de un aparato de calefacción.
Adaptador para el automóvil
• Este adaptador para automóvil funciona con CC de DC 8,5-16V.
• Contacte con un distribuidor de piezas eléctrica si desea obtener
ayuda para elegir el adaptador para automóvil adecuado.
• Fabricado por WANLIDA Digital Technology Co., Ltd.
Conexiones de energía eléctrica
(Continuación)
a
b
Enchufe del encendedor
Page 56

14
Compartimiento de las baterías
Cargue el compartimiento de las baterías cuando lo use por
primera vez.
A
Colocación del compartimiento de las baterías
a Haga coincidir los ganchos del compartimiento de las baterías
con los orificios en la parte posterior del aparato.
b Presione y deslice el paquete de baterías hasta que los
ganchos hagan clic.
NOTAS
• No retire el paquete de baterías durante la reproducción.
• Tenga cuidado de no dejar caer el paquete de baterías.
A
Desmontaje del paquete de baterías
a Presione el pulsador.
b Extraiga el paquete de baterías hasta que los ganchos hagan
clic.
Conexiones de energía eléctrica
(Continuación)
ATENCIÓN
El aparato que acaba de adquirir contiene una batería recargable. La batería es reciclable. Al final
de su vida útil, ante las leyes locales de varios estados, podría ser ilegal depositar esta batería en
el flujo normal del basurero municipal. Verifique con las autoridades del basurero municipal de su
localidad para detalles sobre opciones de reciclaje o eliminación adecuada.
Ganchos
a
b
a
b
Page 57

15
Introducción
A
Para cargar el compartimiento de las baterías
1. Acople el compartimiento de la batería en el reproductor.
2. Conecte el adaptador de CA al reproductor y el enchufe en un
enchufe de CA.
3. Mientras se está cargando el indicador permanecerá rojo. Al
terminar la recarga el indicador cambiará a color verde.
PRECAUCION
Tome las siguientes precauciones para evitar fugas de líquido,
sobrecalentamiento, etc.
• No utilice partes no autorizadas.
• Utilice el adaptador de CA autorizado al recargar la batería.
•
No se exponga a altas temperaturas, superiores a 60 grados centígrados.
• No intente desarmar o modificar la unidad.
• Un fuerte impacto puede provocar un malfuncionamiento de la unidad.
• No lo incinere.
• No desensamble, deséchele en forma apropiada.
• No lo cortocircuite.
NOTA
Proceda a cargarla sólo cuando la unidad está apagada. La
batería no se cargará cuando esté descargada naturalmente o a
propósito. La unidad no puede percibir el voltaje de la batería,
incluso si la conecta. Cuando se encuentre en esta situación,
encienda la unidad y después vuelva a apagarla. Entonces la
batería comenzará a cargarse.
A
Tiempos de recargado y de duración
* Cuando el control de brillo está configurado en modo inicial.
- Utilice los auriculares y el centro de volumen.
A
Confirme la carga de la batería en la pantalla de la unidad.
Si se usa el adaptador de corriente, el indicador de batería no
aparecerá.
Si el nivel de batería no es suficiente, en pantalla se mostrará
“Check Battery Status” (Comprobar estado de la batería) o
“ ”, y después la unidad se desconectará automáticamente tras unos minutos.
A
Si el tiempo de duración de la batería se reduce en forma
dramática después del recargado, significa que
la vida útil del compartimiento de las baterías ha llegado a su fin (esta
puede ser recargada alrededor de 300 veces.)
A
Si no va a utilizar la unidad por un largo periodo de tiempo
• Retire el compartimiento de las baterías. (Aún si la unidad esta apagada, ésta utiliza algo de carga. Esto puede ocasionar una descarga en la
batería y un malfuncionamiento del aparato).
• Reponga el compartimiento de las baterías cuando esté listo para usarla nuevamente.
Conexiones de energía eléctrica
(Continuación)
Recargando Tiempo de Reproducción
sin reproducción Pantalla Encendida Pantalla Apagada
Aprox. Aprox. Aprox.
3 horas 3,5 horas* 4 horas
Completa
Bajo
Recarga
Compartimiento de baterías
Reproductor
Conectar el cable del
adaptador de CA.
Indicador de carga
Page 58

16
Usted podrá rotar la LCD en sentido horario en un ángulo de 180
grados.
Sin embargo, si fuerza el giro, podría causar daños serios.
Después de rotar completamente la LCD, podrá doblar la
pantalla LCD como se muestra.
Girar la LCD
Page 59

Introducción
1. Prepare el suministro de energía eléctrica.
2. Abra la cubierta exterior y presione el botón POWER.
3.
Presione OPEN (ABRIR) para levantar la tapa del disco e inserte
el disco a reproducir dejando la etiqueta de lo que desea reproducir hacia arriba. Cierre la cubierta con la mano.
• Si coloca el disco al revés (y se trata de un disco con una sola cara
grabada), "Check Disc" o "Disc Error" aparece en pantalla.
• Después de haber reproducido todos los capítulos en el título, el DVD
se detiene automáticamente y regresa a la pantalla del menú.
4. Presione PLAY (N) (reproducir) para iniciar la
reproducción.
5. Ajuste de volumen.
NOTAS
•
Coloque un disco con la parte a reproducir hacia abajo, y presione
suavemente sobre el centro del disco para alinearlo con el eje.
• Si usted no esta utilizando la pantalla de esta unidad,
seleccione OFF (APAGAR) para guardar energía.
• La pantalla se apaga si usted cierra la unidad.
• La película que se muestra en la pantalla depende de la
modalidad de reproducción y tamaño grabados en el disco.
A
Cambio del tamaño de la película
Utilice el botón MODO LCD para cambiar el modo de imagen.
El modo se muestra en la pantalla de la unidad como a
continuación.
NORMAL → 4:3 modo → OFF
NOTA
La disposición puede variar según la clase de disco.
Seleccione un MODO
Seleccione un modo mediante DISC, AV IN o USB.
1. Presione el botón MODE de la unidad.
El menú de selección de modo aparecerá en pantalla.
2. Utilice b / B para seleccionar el modo y, a continuación,
presione ENTER.
•
DISC: el menú del disco o la imagen de reproducción del disco
aparecerá en pantalla.
• AV IN: una imagen del dispositivo externo aparecerá en
pantalla.
• USB: una lista de archivos o carpetas existentes en la unidad
Flash USB aparecerá en pantalla.
Reproducción de un disco
17
Page 60

18
Visualizador en pantalla
Visualización en pantalla de la información del
disco
Podrá visualizar en pantalla información variada acerca del disco
cargado.
1.
Presione DISPLAY para mostrar
información variada sobre la reproducción.
Los elementos en pantalla difieren
dependiendo del tipo de disco o del estado de
reproducción.
2. Puede seleccionar un elemento presionando v / V y cambiar o
seleccionar la configuración presionando b / B.
Título (pista) – Número del título actual (o pista) /número
total de títulos (o pistas)
Capítulo – Número del capítulo actual/número total de capítulos
Tiempo – Tiempo de reproducción transcurrido
Audio – Idioma seleccionado de audio o canal
Subtítulos – Subtítulos seleccionados
Ángulo – Ángulo seleccionado/número total de ángulos
NOTA
Si no se presiona ningún botón durante algunos segundos, la
visualización en pantalla desaparecerá.
Parámetros iniciales
Con el menú de configuración, puede efectuar varios ajustes en
opciones tales como la imagen y el sonido. Asimismo, puede configurar, entre otras cosas, un idioma para los subtítulos y el menú
de configuración. Para conocer más detalles sobre cada opción
del menú de configuración, véanse las páginas 19 a 23.
Para entrar y salir del menú:
Pulse SETUP para entrar en el menú. Pulsando de nuevo SETUP
volverá a la pantalla inicial.
Para pasar a la categoría siguiente:
Pulse B en el mando a distancia.
Para volver a la categoría anterior:
Pulse b en el mando a distancia.
Funcionamiento general
1. Pulse SETUP. Aparecerá el menú de configuración.
2. Utilice los botones
v / V
para seleccionar la opción deseada y
pulse B para pasar a la segunda categoría. La pantalla muestra
la configuración actual de la opción elegida, así como los
parámetros alternativos.
3. Utilice los botones
v / V
para seleccionar la segunda opción
deseada y pulse B para pasar a la tercera categoría.
4. Utilice los botones
v / V para seleccionar la configuración
deseada y pulse ENTER para confirmar su elección. Algunas
opciones requieren pasos adicionales.
5. Pulse SETUP o PLAY
(N)
para salir del menú de configuración.
Page 61

19
Opciones avanzadas
IDIOMA
Idioma del Menú
Elija un idioma para el menú de configuración y el visualizador en
pantalla.
Audio / Subtítulo / Menú Del Disco
Seleccione el idioma que prefiera para la pista de audio (audio del
disco), subtítulos y menú del disco.
Original: Hace referencia al idioma original en el que se grabó
el disco.
Otros: Para seleccionar otro idioma pulse los botones numéricos y, a continuación, ENTER para introducir el número de 4
dígitos correspondiente según la lista de códigos de idiomas
incluida en la página 40. Si introdujera el código erróneo, pulse
CLEAR.
Apagado (para Subtítulo Del Disco) – Apagar subtítulos.
PANTALLA
Aspecto TV
4:3:
Opción para la conexión de un televisor 4:3 estándar.
16:9: Opción para la conexión de un televisor ancho 16:9.
NOTA
Si la opción Relación de TV está configurada en 16:9, el ajuste
del Modo de visualización se establecerá automáticamente en
Pantalla completa.
Modo visualización
La configuración del modo de visualización sólo funciona cuando
el modo de aspecto del televisor se encuentra en "4:3".
LetterBox: Muestra una imagen alargada con bandas en la
parte superior e inferior de la pantalla.
Panscan:
Muestra de forma automática la imagen en la pantalla
completa y corta las partes de la imagen que no se ajusten a la
misma.
Visualizador en pantalla (Continuación)
Page 62

20
AUDIO
Cada disco DVD cuenta con varias opciones de salida de audio.
Configure las opciones de AUDIO del reproductor según el tipo de
sistema de audio que utilice.
Dolby Digital / DTS / MPEG
Bitstream: Seleccione "Bitstream" si conectó el conector de
SALIDA DIGITAL del reproductor de DVD a un amplificador o a
otro equipo con decodificador de Dolby Digital, DTS o MPEG.
PCM (para Dolby Digital / MPEG): Seleccione esta opción
cuando haya conectado el equipo a un amplificador de sonido
estéreo digital de dos canales. Los DVDs codificados con
Dolby Digital o MPEG se mezclarán automáticamente en audio
PCM de dos canales.
Off (para DTS): Si selecciona "Off (Apagado)", no habrá salida
de señal DTS a través del conector jack de SALIDA DIGITAL.
Muestreo PCM (Frecuencia)
Si su receptor o amplificador NO acepta señales de 96 kHz, seleccione 48 kHz. Al efectuar esta elección, la unidad convierte
automáticamente las señales de 96 kHz a 48 kHz para que su sistema pueda descodificarlas.
Si su receptor o amplificador acepta señales de 96 kHz, seleccione 96 kHz. Al efectuar esta elección, la unidad admite cada tipo
de señal sin necesidad de ningún otro proceso.
Compruebe la documentación de su amplificador para verificar su
capacidad.
Control de rango dinámico (DRC)
Con el formato DVD, puede escuchar la banda sonora de un programa con la presentación más precisa y realista posible, gracias
a la tecnología de audio digital. No obstante, tal vez desee comprimir el rango dinámico de la salida de audio (diferencia entre los
sonidos más altos y los más bajos). Esta opción le permite
escuchar una película a un volumen más bajo sin perder la claridad del sonido. Para ello, active el DRC.
Vocal
Active esta opción sólo cuando reproduzca un DVD con karaoke
multi-canal. Los canales de karaoke del disco se combinan para
crear un sonido estéreo normal.
Visualizador en pantalla (Continuación)
Page 63

21
Opciones avanzadas
Visualizador en pantalla (Continuación)
BLOQUEO
Índice
Al pulsar en Enter ajustará el reproductor en modo Barrido
progresivo.
1. Seleccione "Índice" en el menú de BLOQUEO y pulse B.
2. Para acceder a las características de clasificación, contraseña
y código de área, deberá introducir la contraseña de 4 dígitos
creada por usted. Si aún no ha introducido una contraseña, se
le solicitará que lo haga.
Introduzca un código de 4 dígitos y pulse ENTER. Introduzca
de nuevo el código y pulse ENTER para confirmar.
Si se equivoca antes de pulsar ENTER, pulse CLEAR.
3. Elija una clasificación del 1 al 8 utilizando los botones v / V.
Índice 1-8: La clasificación uno (1) es la que tiene más
restricciones y la ocho (8) la que menos.
Desbloqueo: Si selecciona la opción de desbloqueo, el control
parental no estará activado y el disco se reproducirá en su
totalidad.
NOTA
Si establece una clasificación para el reproductor, se reproducen todas las escenas del disco con una clasificación igual o
inferior. Las escenas con clasificación mayor no se reproducirán a menos que existan escenas alternativas en el disco.
Las escenas alternativas deberán tener una clasificación igual
o inferior.
Si no se encuentra una alternativa adecuada, la reproducción
se detiene. Debe introducir la clave de 4 dígitos o cambiar el
nivel de clasificación para poder reproducir el disco.
4. Pulse ENTER para confirmar la clasificación elegida,
a continuación, pulse SETUP para salir del menú.
Page 64

22
Visualizador en pantalla (Continuación)
Contraseña
Puede introducir o cambiar la contraseña.
1. Seleccione Contraseña en el menú BLOQUEO y, a continuación, presione B.
2. Para crear una nueva contraseña:
Presione ENTER cuando la opción “New” (nueva) esté destacada. Introduzca una nueva contraseña empleando los
botones numéricos y, a continuación, presione ENTER. Vuelva
a introducir la contraseña para verificarla.
Para cambiar la contraseña existente:
Presione ENTER cuando la opción “Change” (cambiar) esté
destacada. Introduzca la contraseña actual empleando los
botones numéricos y, a continuación, presione ENTER.
Introduzca una nueva contraseña empleando los botones numéricos y, a continuación, presione ENTER. Vuelva a introducir la
contraseña para verificarla.
3. Presione SETUP para salir del menú.
Si olvida su contraseña
Si olvida su contraseña, puede borrarla siguiendo estos pasos:
1. Pulse SETUP para acceder al menú de configuración.
2. Introduzca el número de 6 dígitos "210499" y el código de
seguridad se anulará.
Códigos de área
Introduzca el código de área cuyos estándares se utilizaran para
clasificar el disco de vídeo DVD, consultando la lista de la
página 41.
1. Seleccione "Códigos de área" en el menú de BLOQUEO y
pulse B.
2. Siga el paso 2 como se muestra en la página anterior (Índice).
3. Elija el primer carácter utilizando los botones v / V.
4. Pulse ENTER y seleccione el segundo carácter con los
botones v / V.
5. Pulse ENTER para confirmar el código de área que haya
elegido.
Page 65

23
Opciones avanzadas
Visualizador en pantalla (Continuación)
OTROS
Pueden cambiarse los ajustes PBC, DivX(R) VOD.
PBC
Ajuste el control de reproducción (PBC) en Activado o
Desactivado.
On (Activado): Los CDs de vídeo con PBC se reproducen
según los parámetros del PBC.
Off (Desactivado): Los CDs de vídeo con PBC se reproducen
igual que los CDs de audio.
DivX(R) VOD
Le proporcionamos el código de registro DivX
®
VOD (Video On
Demand) que le permitirá alquilar y comprar vídeos mediante el
servicio DivX
®
VOD. Para obtener más información, visite
www.divx.com/vod.
1. Seleccione la opción “DivX(R) VOD” y presione B.
2. Presione ENTER mientras “Select” está seleccionado y
aparecerá el código de registro.
Emplee el código de registro para adquirir o alquilar vídeos del
servicio VOD de DivX
®
VOD en www.divx.com/vod Siga las
instrucciones y descargue el vídeo a un disco para la
reproducción en esta unidad.
3. Presione ENTER para salir.
NOTA
Los vídeos descarados de DivX®VOD sólo podrán
reproducirse en ésta unidad.
Page 66

24
Si se muestra una pantalla de menú
Utilice los botones bB v Vpara elegir el título / capítulo que
desee ver, seguidamente, pulse ENTER para iniciar la reproducción. Pulse TITLE o MENU para volver a la pantalla del
menú.
Utilice los botones numéricos para seleccionar la pista que
desee ver y pulse RETURN para volver a la pantalla del menú.
Los parámetros del menú y los procedimientos de funcionamiento pueden diferir. Siga las instrucciones de cada pantalla de menú. También puede desactivar el PBC (véase el
apartado "PBC" en la página 23).
NOTAS
• Si ha configurado el control parental y el disco no se ajusta a los
parámetros de clasificación, deberá introducir la clave. (Véase el
apartado "BLOQUEO" en la página 21-22).
• Puede que los DVDs tengan un código de zona. Su reproductor
no reproduce discos que tengan un código de zona distinto al de
éste.
A menos que se establezca lo contrario, todas las operaciones
descritas utilizan el mando a distancia. Algunas características
pueden encontrarse también disponibles en el menú de
Configuración.
Reproducción RESUME (Reiniciada)
Cuando se detiene la reproducción, el aparato graba el punto en el
que se presionó el botón de STOP (es la función de RESUME
REINICIO). Presione PLAY(N) (REPRODUCIR) y empezará a
reproducir desde este punto.
Cambio a otro TÍTULO
Cuando un disco tiene más de un título, usted puede acceder a
otro título. Presione DISPLAY durante la reproducción o reanúdela,
a continuación presione el número adecuado (0-9) o utilice b / B
para desplazarse a otro título.
Cambio a otro CAPÍTULO / PISTA
Durante la reproducción, presione SKIP/SEARCH (. o >)
para dirigirse al siguiente capítulo/pista o para regresar al inicio del
capítulo/pista actual.
Presione SKIP . brevemente dos veces para regresar al
capítulo/pista anterior.
Búsqueda
1. Pulse y mantenga pulsado el botón SKIP/SEARCH (. o
>) durante unos dos segundos durante la reproducción.
El reproductor iniciará la función de BÚSQUEDA.
2. Pulse y mantenga el botón SKIP/SEARCH (. o >)
repetidamente para seleccionar la velocidad deseada.
DVD, disco DivX: 4 pasos
CD de vídeo, MP3, WMA, CD de audio: 3 pasos
3. Para salir de la función de SEARCH pulse PLAY(N).
Cámara lenta
1. Pulse SLOW (t o T) durante la reproducción.
El reproductor iniciará la función de Cámara lenta.
DVD; 4 pasos
CD de vídeo, DivX ; 4 pasos
(sólo hacia delante)
2. Para salir del modo a cámara lenta, pulse PLAY(N).
DivXVCDDVD
ALL
ALL
DVD
ALL
VCD
DVD
Características generales
Page 67

25
Opciones avanzadas
Imagen congelada y reproducción fotograma a fotograma
Durante la reproducción, presione PAUSE/STEP(X) a fin de
pausar la reproducción.
Presione repetidamente PAUSE/STEP(X) para lograr una reproducción fotograma a fotograma.
(
Sólo mediante el mando a distancia
)
Para salir del modo de congelación de la imagen en movimiento,
pulse
PLAY(N)
.
Búsqueda por tiempo
Para iniciar la reproducción en cualquier momento seleccionado del
disco:
1. Pulse DISPLAY durante la reproducción.
2. Pulse v / V para seleccionar el icono del tiempo y “-:--:--”
aparecerá.
3. Introduzca el tiempo de inicio requerido en horas, minutos y
segundos de izquierda a derecha. En caso de que introduzca
un número equivocado, pulse CLEAR y borre los números que
haya introducido. A continuación, introduzca los números correctos.
4. Pulse el botón ENTER para confirmar. La reproducción se ini-
ciará a partir del momento seleccionado.
Repetición A-B
Durante la reproducción, cada vez que presione el botón A-B para
seleccionar el punto A y el punto B se repetirá la secuencia desde
el punto A (punto de inicio) al punto B (punto final).
Pulse de nuevo A-B para anular.
Repetición
Durante la reproducción, presione repetidamente REPEAT para
seleccionar el modo de repetición deseado.
Discos de vídeo en DVD - Capítulo/Título/Desactivado
CD de vídeo, CD de audio, discos DivX/MP3/WMA -
Pista/Todo/Desactivado
NOTAS
• En un CD de vídeo con PBC, debe desactivar el PBC en el menú de
configuración para utilizar la función de repetición (véase el apartado
"PBC" en la página 23).
• Si pulsa SKIP (>) una vez durante la repetición del capítulo (pista), la
reproducción de repetición se anula.
Zoom
Durante la reproducción o el modo de pausa, presione ZOOM para
aumentar la imagen de vídeo. (3 pasos).
Podrá desplazarse a través de la imagen ampliada mediante los
botones bBvV. Presione CLEAR para salir.
NOTAS
Puede que la opción de zoom no funcione en algunos DVDs.
DivXVCDDVD
ALL
ACDDivXVCDDVD
DivXVCDDVD
DivXVCDDVD
ALL
Características generales
(Continuación)
Page 68

26
Características generales
(Continuación)
Menú de títulos
Si el título actual del DVD tiene un menú, el menú de títulos
aparecerá en pantalla. De lo contrario, el menú del disco puede
no aparecer.
Menú del disco
Pulse MENU y aparecerá el menú del disco. Para salir, pulse de
nuevo MENU.
Cambio del idioma de audio
Presione repetidamente AUDIO durante la reproducción para
escuchar un idioma de audio o un método de codificación diferente.
Con discos DVD-RW grabados en modo VR que tienen tanto un
canal de audio bilingüe como principal, podrá cambiar entre Main
(principal) (L), Bilingual (bilingüe) (R), o una mezcla de ambos
(Main + Bilingual) pulsando AUDIO.
Pulse AUDIO repetidas veces durante la reproducción para oír un
canal de audio diferente (Estéreo, Diestro o Derecho).
Ángulo de la cámara
Durante la reproducción del DVD, el disco contiene escenas
grabadas desde diferentes ángulos de la cámara; presione ANGLE
repetidamente para seleccionar el ángulo deseado.
CONSEJO
El indicador del ángulo parpadeará en la pantalla del televisor durante las
escenas grabadas en ángulos diferentes como indicación de que el
cambio de ángulo es posible.
Subtítulos
Pulse SUBTITLE repetidas veces durante la reproducción para
ver los distintos idiomas de subtitulado.
NOTA
Si no hay información o hay un código que no puede leer en el
archivo DivX, se visualizará “1”, etc.
DivXDVD
DVD
VCD
DivXDVD
DVD
DVD
Page 69

27
Opciones avanzadas
Características adicionales
Búsqueda de marcadores
Para introducir un marcador
Puede iniciar la reproducción desde un máximo de nueve puntos
memorizados. Para introducir un marcador, pulse MARKER en el
punto del disco que desee marcar. El icono de marcador aparece
brevemente en la pantalla del televisor. Repita esta operación
para introducir hasta nueve marcadores.
Para mostrar o anular una escena marcada
1. Durante la reproducción del disco, pulse SEARCH. El menú de
búsqueda de marcadores aparecerá en pantalla.
2. En los 9 segundos siguientes, pulse b / B para elegir un
número de marcador que desee mostrar o anular.
3. Pulse ENTER y la reproducción se inicia a partir de la escena
marcada. O, pulse CLEAR y el número del marcador se borrará de la lista.
4. Puede reproducir cualquier marcador introduciendo su número
en el menú de búsqueda de marcadores.
NOTAS
• Algunos subtítulos grabados alrededor del indicador pueden
fallar al aparecer (DVD).
• Todos los indicadores se borran cuando el aparato se apaga o
se quita el disco.
• El indicador no está almacenado cuando el DVD o el menú de
título aparece en la pantalla de TV.
Memoria de la última escena
Este reproductor memoriza la última escena del último disco que
vio. La escena permanece en la memoria incluso si retira el disco
o apaga el reproductor. Si introduce un disco que tiene la escena
memorizada, ésta reaparecerá de forma automática.
NOTA
Este reproductor no memoriza las configuraciones de un disco si
desconecta el reproductor antes de que comience a reproducir.
Salvapantallas / Apagado automático
El salvapantallas aparece cuando el reproductor de DVD se
encuentra en la posición de parada durante unos cinco minutos.
Transcurridos cinco minutos con el salvapantallas, el reproductor
de DVD se apaga de forma automática.
VCD1.1
ACDDVDDivXVCDDVD
Page 70

28
Esta unidad puede reproducir CDs de audio o archivos MP3/WMA.
MP3/ WMA/ CD de audio
Una vez insertado un archivo MP3/WMA o un CD de audio, aparecerá un menú en la pantalla de TV.
Presione v / V para seleccionar una pista/archivo y presione
PLAY(N) o ENTER para iniciar la reproducción. Puede utilizar
funciones variables de reproducción. Consulte las páginas 24-25.
ID3 TAG
• Si reproduce un archivo que contenga información, como los
títulos de las pistas, podrá verla pulsando DISPLAY.
[ Title, Artist, Album, Year, Comment ]
• Si no hay información, “NO ID3 TAG” aparecerá en la pantalla.
CONSEJOS
• Si se encuentra en una lista de archivos del menú de MUSIC y
desea regresar a la lista de carpetas, utilice los botones v / V
para seleccionar y pulse ENTER.
• Pulse MENU para ir a la página siguiente.
• En un CD con archivo MP3/WMA, JPEG y MOVIE, puede cam-
biar entre los menús MUSIC, PHOTO y MOVIE. Si pulsa TITLE,
se iluminarán las palabras MUSIC, PHOTO y MOVIE en la parte
superior del menú.
La compatibilidad del disco MP3 / WMA con este reproductor
queda limitada del siguiente modo:
• Frecuencia de muestra: entre 8 - 48kHz (MP3),
entre 32 -48 kHz (WMA)
• Régimen binario: entre 8 - 320kbps (MP3), 32 - 192 kbps (WMA)
• El reproductor no puede leer un archivo MP3/WMA que no tenga la
extensión ".mp3" / ".wma".
• El formato físico de CD-R será ISO 9660.
• Si graba archivos MP3 / WMA con un programa de software que no
cree un sistema de archivos (por ejemplo: Direct-CD), será imposible
la reproducción de archivos MP3 / WMA. Le recomendamos que utilice el programa Easy-CD Creator para crear un sistema de archivos
ISO 9660.
• El nombre de los archivos tendrá un máximo de 16 letras y llevará la
extensión .mp3 o .wma.
• No llevarán caracteres especiales como / ? * : " < > l etc.
• El número total de archivos en el disco deberá ser inferior a 650.
•
Este reproductor de DVD exige que los discos y las grabaciones cumplan ciertas normas técnicas estándar para poder
obtener una calidad de reproducción óptima. Los DVDs ya
grabados se adaptan automáticamente a estas normas.
Existen muchos tipos diferentes de formatos de discos
grabables (incluidos CD-R con archivos MP3 o WMA) y éstos
exigen ciertas condiciones previas (véanse las indicaciones
anteriores) para garantizar una reproducción compatible.
Reproducción de un CD de audio o un archivo MP3/WMA
Page 71

29
Opciones avanzadas
La función de programación le permite almacenar las pistas
favoritas de cualquier disco en la memoria del reproductor.
Un programa puede contener 30.
1. Inserte un CD de audio o un archivo MP3/WMA.
El menú de PHOTO aparecerá en la pantalla del televisor.
2. Presione PROG. y aparecerá la marca
.
NOTA
Pulse PROG., desaparecerá la marca para salir del modo de
edición de programas.
Menú del CD de audio Menú del MP3/WMA
3. Seleccione una pista en “Lista de usuario” y, a continuación,
pulse ENTER para añadir la pista seleccionada a la lista
“Programa”. Repita para añadir otras pistas a la lista.
4. Pulse B.
Seleccione la pista que desee empezar a reproducir en la lista
“Programa”.
5. Pulse PLAY (N) o ENTER para iniciar la reproducción. La
reproducción se inicia en el orden en que programó las pistas.
La reproducción se detiene después de que todas las pistas
de la lista “Programa” se hayan reproducido una vez.
6. Para volver a la reproducción normal desde la reproducción
programada, seleccione una pista de la lista AUDIO CD (o
MUSIC) y, a continuación, pulse PLAY (N).
Repetición de las pistas programadas
Pulse REPEAT para seleccionar el modo de repetición deseado.
• Track: repite la pista actual.
• Todo: repite todas las pistas de la lista programada.
•
Apagado (Sin pantalla): no reproduce repetidamente.
NOTA
Si pulsa una vez > durante la reproducción repetida de pistas,
se cancelará la reproducción repetida.
Eliminación de una pista de la lista “Programa”
1. Presione PROG. y aparecerá la marca
.
2. Utilice vVb Bpara seleccionar la pista que desea eliminar
de la Lista de programas.
3. Presione CLEAR. Repita los pasos 1-3 para eliminar pistas
adicionales de la lista.
Eliminación de toda la lista de programas
1. Presione PROG. y aparecerá la marca
.
2. Utilice vVb Bpara seleccionar “Borrar Todo” y, a contin-
uación, pulse ENTER.
NOTA
Los programas también serán eliminados al desconectar la unidad
o retirar el disco.
Reproducción programada
E
E
E
E
Page 72

30
Esta unidad puede reproducir archivos JPEG.
1. Inserte un archivo JPEG. El menú PHOTO
aparecerá en la pantalla LCD..
2. Pulse v / V para seleccionar una carpeta y ENTER. Aparecerá
una lista de archivos de la carpeta. Si se encuentra en una
lista de archivos y desea regresar a la lista de carpetas, utilice
los botones v / V del mando a distancia para seleccionar
y pulse ENTER.
3. Si desea ver un archivo particular, pulse v / V para marcarlo y
ENTER o PLAY(N).
4. Mientras ve un archivo, puede pulsar STOP(x) para ir al menú
anterior (menú PHOTO).
CONSEJOS
• Pulse MENU para ir a la página siguiente.
• Existen tres opciones de velocidad de proyección : >>>
(Bajo), >> (Normal) y > (Alto).
Utilice vVbBpara resaltar . A continuación, utilice b / B
para seleccionar la opción que desea utilizar.
• En un CD con archivo MP3/WMA, JPEG y MOVIE, puede cambiar entre los menús MUSIC, PHOTO y MOVIE. Si pulsa TITLE,
se iluminarán las palabras MUSIC, PHOTO y MOVIE en la parte
superior del menú.
• Pulse RETURN, y se ocultará la información acerca del fichero.
Mostrar (Proyección de diapositivas)
Utilice los botones vVbBpara marcar la opción de
proyección de diapositivas y pulse ENTER.
Imagen congelada
1. Pulse PAUSE/STEP(X) durante la proyección de diapositivas.
El reproductor pasará al modo de PAUSA.
2. Para volver a la proyección de diapositivas, pulse PLAY(N)o
pulse de nuevo PAUSE/STEP(X).
Visualización de un archivo JPEG
Page 73

31
Opciones avanzadas
Mover a otro fichero
Pulse SKIP/SEARCH (. o >) o el cursor (b o B) una vez
mientras visualiza una imagen para avanzar al fichero siguiente o
para retroceder al anterior.
Zoom
Durante la reproducción o el modo de pausa, presione ZOOM para
aumentar la imagen de vídeo. (3 pasos).
Podrá desplazarse a través de la imagen ampliada mediante los
botones bBvV. Presione CLEAR para salir.
Para girar la imagen
Pulse v / V mientras se muestra una imagen para hacerla girar
hacia la izquierda o hacia la derecha.
Para escuchar música MP3/WMA mientras se mira una
imagen
1. Inserte el disco que contiene los dos tipos de fichero en el
reproductor.
2. Pulse TITLE para que aparezca PHOTO en el menú.
3. Pulse v / V para seleccionar un fichero de fotos.
4. Use B para seleccionar el icono y, a continuación, pulse
ENTER. Se iniciará la reproducción.
5. Mientras ve un archivo, puede pulsar STOP(x) para ir al menú
anterior (menú PHOTO).
CONSEJO
Para escuchar sólo la música deseada durante la visualización de
una película, programe los archivos deseados del menú “MUSIC”
y proceda como se ha explicado.
La compatibilidad del disco JPEG con este reproductor
queda limitada como sigue:
• Dependiendo del tamaño y número de los ficheros JPEG, podría tardarse mucho tiempo en que el reproductor DVD lea todos los contenidos del disco. Si no ve un mensaje en pantalla transcurridos varios
minutos, algunos de los ficheros tal vez sean demasiado grandes.
Reduzca la resolución de los ficheros JPEG a menos de 2M píxeles,
como 2760 x 2048 píxeles y grabe otro disco.
• El número total de archivos y carpetas en el disco deberá ser inferior a
650.
• Algunos discos pueden ser incompatibles por haber sido grabados en
un formato diferente o por el estado del disco.
• Asegúrese de que todos los archivos seleccionados tengan la extensión ".jpg" cuando los copie en el CD.
• Si la extensión de los archivos es ".jpe" o ".jpeg", cámbiela por ".jpg".
• Este reproductor de DVD no podrá leer archivos cuyos nombres no
tengan la extensión ".jpg". No obstante, los archivos se muestran
como archivos de imagen JPEG en el explorador de Windows.
Visualización de un archivo JPEG
(Continuación)
Page 74

32
Esta unidad reproduce discos DVD-R/RW grabados usando el
formato Videograbación (VR).
1. Inserte un disco y cierre la bandeja. El menú DVD-VR aparece
en pantalla.
2. Pulse v / V para seleccionar una pista y, a continuación, pulse
PLAY o ENTER. Comenzará la reproducción.
3. Presione el MENU para desplazarse al menú de la lista.
NOTAS
• Esta unidad puede reproducir discos DVD-R/RW grabados utilizando el
formato de vídeo DVD y finalizados mediante una grabadora de DVD.
Este reproductor no puede reproducir discos DVD-R/RW no finalizados.
• Ciertos discos DVD-VR han sido creados con datos CPRM mediante
una GRABADORA DE DVD.
El reproductor no admitirá este tipo de discos.
Qué es ‘CPRM’?
CPRM es un sistema de protección contra copia (con un sistema de
condificación) que sólo permite la grabación de programas ‘de una sola
grabación’ CPRM significa Content Protection for Recordable Media
(Protección de contenidos para soportes grabables).
Reproducción de un disco en formato DVD VR
Page 75

33
Opciones avanzadas
Esta unidad puede reproducir archivos DivX.
1. Inserte un archivo DivX. El menú MOVIE aparece en la pantalla del televisor.
2. Pulse v / V para seleccionar una carpeta y, a continuación,
pulse ENTER. Aparece una lista con los archivos contenidos
en la carpeta. Si está en una lista de archivos y desea
regresar a la lista de carpetas, use los botones v / V del
mando a distancia para resaltar la opción y pulse
ENTER.
3. Si desea visualizar un archivo concreto, presione v / V para
resaltar un archivo y presione ENTER o PLAY(N). Puede uti-
lizar funciones variables de reproducción. Consulte las páginas
24-27.
4. Presione STOP (x) para cesar la reproducción. Aparecerá el
menú Película.
Aviso para la lectura de subtítulos en DivX
Si los subtítulos no aparecen correctamente durante la lectura del
disco, mantenga pulsado SUBTITLE durante 3 segundos y, a continuación, presione b / B para seleccionar otro código de idioma
hasta que los subtítulos puedan leerse correctamente.
CONSEJOS
• Pulse MENU para ir a la página siguiente.
• En un CD con archivo MP3/WMA, JPEG y MOVIE, puede cambiar entre los menús MUSIC, PHOTO y MOVIE. Si pulsa TITLE,
se iluminarán las palabras MUSIC, PHOTO y MOVIE en la parte
superior del menú.
• Los subtítulos del disco pueden no visualizarse correctamente si
descarga un título en DivX por Internet.
• Si el menú de configuración de subtítulos del disco no cuenta
con el idioma del DivX que usted va a reproducir, el idioma de
los subtítulos puede no visualizarse correctamente.
• El nombre del archivo de subtítulos del DivX debe ser identificado según nombre correspondiente mostrado por esta unidad.
Reproducción de un archivo de película DivX
Page 76

34
La compatibilidad de los discos DivX con este reproductor
está limitada del siguiente modo:
• El tamaño de resolución disponible del archivo DivX es inferior a
720x576 (W x H) píxeles.
• El nombre del archivo de los subtítulos DivX pueden tener hasta 56
caracteres.
• Si no se puede expresar el código en el archivo DivX, se visualizará
" _ " en la pantalla.
• Si el número de fotogramas en la pantalla es superior a 30 por
segundo, la unidad no funcionará con normalidad.
• Si la estructura de vídeo y audio del archivo grabado no está
intercalada, se emitirá vídeo o audio.
• Si el archivo está grabado con GMC, la unidad sólo admite 1
punto del nivel de grabación.
*
GMC?
GMC son las siglas de Global Motion Compensation. Es una herramienta de codificación especificada en el estándar MPEG4. Algunos
codificadores MPEG4, como DivX, disponen de esta opción.
Hay diferentes niveles de codificación GMC, normalmente denominados GMC de 1 punto, 2 puntos o 3 puntos.
Archivo DivX reproducible
".avi ", ".mpg ", ".mpeg "
Formatos de subtítulos reproducibles
SubRip (*.srt/*.txt)
SAMI (*.smi)
SubStation Alpha (*.ssa/*.txt)
MicroDVD (*.sub/*.txt)
SubViewer 2.0 (*.sub/*.txt)
TMPlayer (*.txt)
Dvd Subtitle System (*.txt)
VobSub (*.sub) b Sub/idx, formato con base secuencia.
Formato de codificación reproducible
"DIVX3.xx ", "DIVX4.xx ", "DIVX5.xx ",
"MP43 ", "3IVX ".
Formato de audio reproducible
"Dolby Digital ", "DTS ", "PCM ", "MP3 ", "WMA ".
• Frecuencia de muestreo: entre 8 - 48 kHz (MP3),
entre 32 - 48kHz (WMA)
• Tasa de bits: entre 8 - 320kbps (MP3), 32 - 192kbps (WMA)
Reproducción de un archivo de película DivX
(Continuación)
Page 77

35
Opciones avanzadas
Esta unidad puede reproducir DivX o archivos MP3/WMA.
1. Conecte la unidad Flash USB al puerto USB de la unidad, una
vez encendida ésta.
2. Pulse MODE en la unidad.
El menú de selección de modo aparecerá en pantalla.
3. Seleccione USB utilizando los botones b / B y pulse ENTER.
La lista de archivos o carpetas existentes en la unidad Flash
USB aparecerá en pantalla.
4. Si desea cambiar a otro modo, seleccione el modo deseado
en el menú de selección correspondiente.
Para retirar la unidad Flash USB de la unidad.
1. Siga el paso 4 como se muestra abajo para salir del menú.
2. Retire la unidad Flash USB de la unidad.
NOTES
• No extraiga la unidad Flash USB mientras esté en funcionamiento.
• Pueden reproducirse archivos de música (MP3/WMA), archivos
de imágenes (JPEG) y archivos DivX.
• El número total de archivos en una unidad Flash USB debe ser
inferior a 650.
• Esta unidad no es compatible con ciertas unidades Flash USB.
• Esta unidad sólo es compatible con unidades Flash USB.
• Esta unidad sólo puede admitir USB 1.1.
Para obtener detalles sobre cada artículo de la
operación, consulte la página relevante.
(Consulte las páginas 24 a 34).
Reproducción de una unidad Flash USB
Page 78

36
La imagen y el sonido de un televisor o aparato de vídeo cercano
puede distorsionarse durante la reproducción. Si esto ocurre,
coloque el reproductor lejos del televisor, vídeo o radio y apague
la unidad cuando haya sacado el disco.
Conexiones de salida AV
En función de su televisor y otros equipos, existen distintas
formas de conectar el reproductor. Consulte los manuales de su
televisor, sistema estéreo u otros aparatos para obtener la
información adicional necesaria para la conexión.
Conexiones de salida AV en su TV
1. Establezca el menú de selección de modo en “USB” o
“DISCO”.
2. Conecte el extremo negro del cable AV incluido en la unidad de
ENTRADA/SALIDA de AV de la unidad.
3. Conecte el extremo amarillo del cable AV incluido en la toma
de entrada de VÍDEO del TV.
4. Conecte los extremos rojo y blanco del cable AV incluido en las
tomas de entrada de AUDIO del TV.
NOTAS
Asegúrese de que el reproductor de DVD está conectado directamente al televisor y no a un aparato de vídeo, de lo contrario, la
imagen del DVD podría verse distorsionada por el sistema de protección contra copias.
Configuración del reproductor
Cable para Audio/Vídeo
(se incluye)
Lado derecho del aparato
Parte trasera del televisor
Page 79

37
Conexiones
Conexiones de entrada de AV
Conecte las clavijas de entrada (Audio/Vídeo) a las clavijas de
salida de audio/vídeo de la unidad, utilizando los cables de
audio/vídeo.
Conexiones de entrada de AV en su unidad
1. Establezca el menú de selección de modo en “ENTRADA DE
AV”.
2. Conecte el extremo negro del cable AV incluido en la unidad de
ENTRADA/SALIDA de AV de la unidad.
3. Conecte el extremo amarillo del cable AV incluido en la toma
de salida de VÍDEO del dispositivo externo.
4. Conecte los extremos rojo y blanco del cable AV incluido en las
tomas de salida de AUDIO del dispositivo externo.
Configuración del reproductor (Continuación)
Cable para Audio/Video
(se incluye)
Lado derecho del aparato
Dispositivo externo
Page 80

38
Conexión de audio con equipos opcionales
Conecte el reproductor de DVD a su equipo opcional para la
salida.
Debe poner el menú de selección de modo en el modo “USB” o
en modo “DISC”.
Amplificador equipado con 2 canales de sonido estéreo análogo o Dolby Pro Logic ll / Pro Logic: Conecte la AV IN/OUT del
reproductor de DVD a las entradas de audio izquierda y derecha
en su amplificador, receptor, o sistema estéreo, mediante los
cables de audio.
Amplificador equipado con 2 canales de sonido estéreo digital
(PCM) o receptor de audio / vídeo equipado con un decodificador multi-canal (Dolby Digital™, MPEG 2 o DTS): Conecte
una de las salidas de coaxial del reproductor de DVD a la entrada
correspondiente en su amplificador. Utilice un cable opcional de
audio digital.
Sonido digital multi-canal
Una conexión multi-canal digital ofrece una calidad de sonido óptima. Para ello necesita un receptor de audio/vídeo multi-canal que
soporte uno o más formatos de audio admitido por su reproductor
de DVD, como por ejemplo, MPEG 2, Dolby Digital y DTS.
Compruebe el manual del receptor y los logotipos de la parte
delantera del receptor.
NOTAS
•
Si el formato de audio de la salida digital no coincide con las
características de su receptor, éste emitirá un sonido fuerte y
distorsionado o no emitirá sonido alguno.
•
El sonido envolvente digital de seis canales a través de la
conexión digital, sólo se obtiene si su receptor cuenta con un
decodificador multi-canal digital.
•
Para ver el formato de audio del DVD actual en el visualizador en
pantalla, pulse AUDIO.
Configuración del reproductor
(Continuación)
Cable COAXIAL
(no se incluye)
Cable para
Audio/Vídeo
(se incluye)
o
Lado derecho del aparato
Amplificador (Receptor)
L
COAXIAL
DIGITAL INPUT
R
AUDIO INPUT
Page 81

39
Referencia
Localización de fallos
Síntoma
Ausencia de energía
eléctrica.
No hay imagen en la
pantalla ni en la TV
(incluyendo vídeo desde
otro equipo)
No hay sonido
El reproductor DVD no
inicia la reproducción.
No responde cuando se
presionan los botones.
El mando a distancia no
funciona apropiadamente.
Corrección
• Asegure la clavija del cordón de electricidad al
contacto en la pared.
• Recague la batería.
• Conecte el cable en la conexión de video
correctamente.
• Ajuste correctamente la selección MODE.
Mientras está visionando un vídeo desde otro
equipo, ajuste MODE a modo A/V IN.
• Seleccione un modo de pantalla que no sea
apagado (OFF).
• Seleccione el modo apropiado de entrada de vídeo
en la TV para que la imagen del reproductor de
DVD aparezca en la TV.
• Seleccione la modalidad de entrada correcta del
receptor de audio para que pueda escuchar el
sonido del reproductor DVD.
• Asegure la clavija del cable de audio en el contacto
en la pared.
• Inserte un disco reproducible. (Compruebe el tipo
de disco y el código de región.)
• Cancele la función de clasificación o cambie el
nivel de clasificación.
• “ ” puede aparecer mientras está operando.
• Utilice el mando a una distancia inferior a 7 metros.
Causa
• El cable de electricidad esta desconectado.
• La batería está descargada.
• El cable de vídeo no está bien correctado.
• La selección MODE no ha sido ajustada correctamente
• Pantalla Apagada.
• La TV no está configurada para recibir la
salida del DVD.
• El equipo conectado con el cable del audio
no esta colocado para recibir la señal de
salida del DVD.
• Los cables del audio no están bien
conectados.
• Se insertó un disco que no puede ser
reproducido.
• El nivel de clasificación esta configurado.
• Algunos discos no permiten ciertas
operaciones.
• El mando a distancia esta demasiado lejos
del DVD.
Page 82

40
Utilice esta lista para introducir el idioma deseado en los parámetros iniciales siguientes.
Audio Del disco, Subtítulos Del disco, Menú Del disco.
Códigos del idioma
Idioma Código
Abjaso 6566
Afaro 6565
Afrikáans 6570
Albanés 8381
Amárico 6577
Árabe 6582
Armenio 7289
Asamés 6583
Aymara 6588
Azerbaijano 6590
Basquiro 6665
Eusquera 6985
Bengalí; Bangla 6678
Bhután 6890
Bihari 6672
Bretón 6682
Búlgaro 6671
Burmese 7789
Bielorruso 6669
Camboyano 7577
Catalán 6765
Chino 9072
Corso 6779
Croata 7282
Checoslovaco 6783
Danés 6865
Holandés 7876
Inglés 6978
Esperanto 6979
Estonio 6984
Faroés 7079
Idioma Código
Fiji 7074
Finlandés 7073
Francés 7082
Frisio 7089
Gallego 7176
Georgiano 7565
Alemán 6869
Griego 6976
Groenlandés 7576
Guaraní 7178
Gujarati 7185
Hausa 7265
Hebreo 7387
Hindi 7273
Húngaro 7285
Islandés 7383
Indonesio 7378
Interlingua 7365
Irlandés 7165
Italiano 7384
Japonés 7465
Javanés 7487
Canarés 7578
Cachemiro 7583
Kazakh 7575
Kirguizo 7589
Coreano 7579
Kurdo 7585
Lao 7679
Latín 7665
Letón 7686
Idioma Código
Lingala 7678
Lituano 7684
Macedonio 7775
Malagasy 7771
Malayo 7783
Malayalam 7776
Maltés 7784
Maorí 7773
Marathi 7782
Moldavo 7779
Mongol 7778
Nauru 7865
Nepalí 7869
Noruego 7879
Oriya 7982
Punjabi 8065
Pashto, Pushto 8083
Persa 7065
Polaco 8076
Portugués 8084
Quechua 8185
Retorromano 8277
Rumano 8279
Ruso 8285
Samoano 8377
Sánscrito 8365
Gaélico escocés 7168
Serbio 8382
Serbo-croata 8372
Shona 8378
Sindhi 8368
Idioma Código
Singalés 8373
Eslovaco 8375
Esloveno 8376
Somalí 8379
Español 6983
Sudanés 8385
Suahili 8387
Sueco 8386
Tagalo 8476
Tajik 8471
Tamil 8465
Tártaro 8484
Telugu 8469
Tailandés 8472
Tibetano 6679
Tigrinya 8473
Tongo 8479
Turco 8482
Turkmenistán 8475
Twi 8487
Ucraniano 8575
Urdu 8582
Uzbeco 8590
Vietnamita 8673
Volapuk 8679
Galés 6789
Wolf 8779
Xhosa 8872
Yiddish 7473
Yoruba 8979
Zulú 9085
Page 83

41
Referencia
Utilice esta lista para introducir el código de área.
Códigos de área
Área Código
Afganistán AF
Argentina AR
Australia AU
Austria AT
Bélgica BE
Bhután BT
Bolivia BO
Brasil BR
Camboya KH
Canadá CA
Chile CL
China CN
Colombia CO
Congo CG
Costa Rica CR
Croacia HR
República Checa CZ
Dinamarca DK
Ecuador EC
Egipto EG
El Salvador SV
Área Código
Etiopía ET
Fiji FJ
Finlandia FI
Francia FR
Alemania DE
Gran Bretaña GB
Grecia GR
Groenlandia GL
Islas Heard y
McDonald HM
Hungría HU
India IN
Indonesia ID
Israel IL
Italia IT
Jamaica JM
Japón JP
Kenia KE
Kuwait KW
Libia LY
Luxemburgo LU
Área Código
Malasia MY
Maldivas MV
Méjico MX
Mónaco MC
Mongolia MN
Marruecos MA
Nepal NP
Países Bajos NL
Antillas Holandesas AN
Nueva Zelanda NZ
Nigeria NG
Noruega NO
Omán OM
Pakistán PK
Panamá PA
Paraguay PY
Filipinas PH
Polonia PL
Portugal PT
Rumanía RO
Federación Rusa RU
Área Código
Arabia Saudita SA
Senegal SN
Singapur SG
República de Eslovaquia
SK
Eslovenia SI
Sudáfrica ZA
Corea del Sur KR
España ES
Sri Lanka LK
Suecia SE
Suiza CH
Tailandia TH
Turquía TR
Uganda UG
Ucrania UA
Estados Unidos US
Uruguay UY
Uzbekistán UZ
Vietnam VN
Zimbabwe ZW
Page 84

42
General
Suministro de energía:
DC 9,5V(terminal de adaptador de CA), DC 7,4V (Baterías)
Consumo de energía: 12W con batería
Peso: 1,60 lbs (0,73 kg) (sin compartimiento de baterías)
Dimensiones externas (WxDxH):
7,6 x 1,5 x 6,7 pulgadas (195 x 38.5 x 172.6 mm)
Sistema de señal: PAL
Láser:
Longitud de onda del DVD 662+25 / 662-15 nm
Longitud de onda del CD 785+25 / 785-15 nm
Frecuencia de rango (audio):
Sonido lineal DVD: 48kHz muestreo de 8 Hz a 20 kHz
96kHz muestreo de 8 Hz a 44 kHz
Señal con ruido de fondo (audio): Más de 80 dB
Rango dinámico (audio): Más de 80 dB
Distorsión Armónica (audio) : 0,02 %
Condiciones de operación:
Temperatura: 5 a 35 grados C, Posición de Operación: Horizontal
Conectores
Entrada y Salida de Vídeo (VIDEO In/Out):
1,0 V (p’p) 75 ohms, zinc negativo, diam. 3,5 mini enchufes x 1
Entrada/Salida de Audio (AUDIO IN/OUT, audio análogo):
2.0 Vrms(1 KHz, 0 dB), diam 3,5mm mini conector x 1
Terminal de audífonos: diam 3,5mm mini conector de estéreo x 2
Pantalla de cristal líquido
Medida de Panel: 7 pulgadas de ancho (en diagonal)
Sistema de proyección : R.G.B. raya
Sistema Conductor: Matriz Activa TFT
Resolución: 234 x 480 x 3
(clasificación efectiva en pixeles: más de 99,99%)
Accesorios suministrados
• Cable RCA Video/Audio..........................................................1
• Adaptador de CA (Corriente Alterna) (DPAC1T).....................1
• Adaptador para el automóvil (DPDC1) ...................................1
• Compartimiento de baterías (DPB27).....................................1
• Mando a distancia...................................................................1
• Batería para Mando a distancia (Pila de Litio) .......................1
El diseño y las especificaciones están sujetos a cambios sin previo aviso.
Especificaciones
 Loading...