

LG DP-3510 YYDA, DP-2510 YYDA Service Manual

Delta Elec. Inc. DP-3510 YYDA & DP-2510 YYDA rev.00
DATA PROJECTOR
DP-3510 YYDA & DP-2510 YYDA
SERVICE MANUAL (rev.00)
Company Confidential LGE_______________________ Delta____________
1
2007/11/30

Delta Elec. Inc. DP-3510 YYDA & DP-2510 YYDA rev.00
DLP DIGITAL PROJECTOR
Model Name : DP-3510 YYDA & DP-2510 YYDA
Revision Description Date
rev.00 Preliminary 11/30/2007
Company Confidential LGE_______________________ Delta____________
2
2007/11/30

Delta Elec. Inc. DP-3510 YYDA & DP-2510 YYDA rev.00
CONTENTS
1.COMPLIANCE OF SAFE REPAIR.........................................................................................5
1-1.Caution During Disassembling And Assembling.............................................................5
1-2.Lamp.............................................................................................................................. 5
1-3.Lens................................................................................................................................5
2.SPECIFICATIONS.................................................................................................................6
2-1.Summary Specifications................................................................................................. 6
2-2.DMD Specifications........................................................................................................ 7
2-3.Color Wheel................................................................................................................... 7
2-4.Lamp.............................................................................................................................. 7
2-5.Input/output connectors……………………………………………………………………….7
2-6.I/O Ports Illustration........................................................................................................8
2-7.Remote Control Parts.....................................................................................................9
2-8.Key Pad-Top view-On-screen Display(OSD) buttons and LEDs……………………….. 11
2-9.Bottom view…………………………………………………………………………………...12
2-10.Remote and Keypad…………………………………………………………………….….13
2-11.Adjusting the Zoom, Focus and Keystone………………………………………………..14
2-12.Adjusting the Volume…………………………………………………………………….…15
2-13.BLOCK DIAGRAM..................................................................................................... 16
2-14. Wire diagram………………………………………………………………………………..17
3.TROUBLE SHOOTING....................................................................................................... 18
4.DISASSEMBLY AND ASSEMBLY....................................................................................... 26
5.Flash Upgrade Flow........................................................................................................... 40
5-1.Projector USB Drivers Installation Guide………………………………………………….40
Appendix-A How to clear the USB enumeration registry?...........................................49
Appendix-B Projector USB status on Windows Device Manager………………………51
5-2.DLP Projector Flash-Tool (firmware) User Guide…………………….……….…………..52
5-3.Start with Flash-Tool………………………………………………………………………....53
5-4.Starting and Shutting down the Projector……………………………………………….....58
5-5.Setting an Access Password (Security Lock)………………………………….…………..60
5-6.SETUP / Advanced………………………………………………………………………..…62
5-7.Security Timer………………………………………………………………………………...63
Company Confidential LGE_______________________ Delta____________
3
2007/11/30

Delta Elec. Inc. DP-3510 YYDA & DP-2510 YYDA rev.00
6. Color Wheel Index, DMD Contrast and Brightness Adjustment @ RGB source…….…….64
7. Color Border Adjustment………………………………………………………………………...65
8. Projection Lamp…………………………………………………………………………………..66
9. Cleaning………………………………………………………………..………………..………...70
10.SERVICE NOTE............................................................................................................... 71
10-1.Cleaning..................................................................................................................... 71
10-2.Inserting the Remote Control Batteries...................................................................... 72
10-3.Power & READY LED Blink Code Message.............................................................. 73
10-4.Factory Preset Display Modes................................................................................... 74
11.EDID data …..................................................................................................................... 76
12.Spare part list ................................................................................................................... 84
Company Confidential LGE_______________________ Delta____________
4
2007/11/30

Delta Elec. Inc. DP-3510 YYDA & DP-2510 YYDA rev.00
1. COMPLIANCE OF SAFE REPAIR
Be sure to read this Service Manual before providing services. In the projector, full
consideration is taken to ensure safety for fire, electric shock, injury, harmful radiation, and
substance. Therefore, observe the notice described in this Service Manual so that safety is
kept when providing services. Moreover, be sure to observe the notice described in the
Instruction Manual.
Pay attention to the following items during service inspection.
1.1 Cautions during disassembling and assembling
1. This equipment contains parts under high voltage. When making repairs, etc.
Be sure to pull out the power plug beforehand to insure safety.
2. Parts may be very hot immediately after use.
Make sure the equipment has cooled off sufficiently before carrying out repairs.
3. Make sure that parts and screws and wiring, etc. are returned to their original positions.
Tube, tape and other insulation materials have been used for safety reasons.
The internal wiring has been designed to avoid direct contact with hot parts or parts under
high voltage when using clamps or other tools.
4. The parts used in this device have special safety features such as flame-resistance and
anti-voltage properties. When replacing parts, always use parts supplied from the factory.
5. After finishing operations make sure that all parts and wires have been returned to their
original position and that there has been no deterioration of the area around the location that
was worked on.
6. Be sure to use a grounding strap (wrist band) during repair and inspection.
1.2 Lamp
During current conduction, the lamp is in the high-temperature state. In this case, pay
careful attention because a high voltage is used. When replacing a lamp, replace it after
confirming that the lamp has gotten cold sufficiently.
1.3 Lens
Do not look into a lens during projection. This damages your eyes.
Company Confidential LGE_______________________ Delta____________
5
2007/11/30

Delta Elec. Inc. DP-3510 YYDA & DP-2510 YYDA rev.00
2. SPECIFICATIONS
2-1. Summary Specifications
Model
DS325-JD DX325-JD
Display type
Resolution
Projection distance
Projection screen size
Projection lens
Zoom ratio
Vertical keystone
correction
Projection methods
Data compatibility
SDTV/EDTV/ HDTV
Video compatibility
H-Sync
V-Sync
Safety certification
TI DMD Type X, 0.55 inches, SVGA TI DMD Type X, 0.55 inches, XGA
SVGA 800x600 Native XGA 1024x768 Native
1.5 meters ~ 10 meters
0.86 to 6.6 meters (34 to 260 inches)
Manual focus / Manual zoom
1.15:1
+/- 30 degrees
Desktop front/rear
IBM PC or compatibles (VGA, SVGA, XGA, SXGA, UXGA), Mac
480i, 576i, 480p, 576p, 720p, 1080i
NTSC/NTSC 4.43, PAL (B/G/H/I/M/N 60), SECAM
15, 31 - 70 KHz 15, 31 - 90 KHz
50 - 85 Hz
FCC-B, UL, cUL, TUV, CB, CE, GOST SABS, IRAM, MIC, EK
Operation
temperature
Dimensions
AC Input
Power consumption
Stand By
Lamp
Audio speaker
PC
Video
Audio
Security
220 mm (W) x 71 mm (H) x 178 mm (D)
AC Universal 100 ~ 240, Typical @ 110 VAC (100~240)/±10%
Typical 260W (standard mode); Typical 210W (ECO mode)
Normal Mode: 200W; Eco Mode: 160W
1W / 4 ohm mono speaker
Composite video (RCA X 1)
5° ~ 35°C
< 5 watts
RGB
S-Video (Mini-DIN)
Mini-jack
Kensington lock
Company Confidential LGE_______________________ Delta____________
6
2007/11/30

Delta Elec. Inc. DP-3510 YYDA & DP-2510 YYDA rev.00
2-2.DMD Specifications
Unit Min. Max. Typical Notes
DMD type (DP-2510)
Number of Columns (DP-2510) Pixel 800
Number of Rows (DP-2510) Pixel 600
DMD type (DP-3510) TI 0.55" XGA 12 deg LVDS
Number of Columns (DP-3510) Pixel 1024
Number of Rows (DP-3510) Pixel 768
TI 0.55" SVGA 12 deg LVDS
Panel Operating Temp.
Ambient Temp
℃
℃
2-3.Color Wheel
Spec.
Color Segment
Unit Min. Max. Typical Notes
RYGWB 82/29/80/91/78 (44mm)
2-4. Lamp
Spec.
Lamp Type
Driver
Soft start Current
Maximum
Warm-UP Current
Reflector Type
Lamp Output
Power
Unit Min. Max. Typical Notes
A 2.4 2.8
A 4.0 4.6
W
10 65
25
MH-SA20D-SHP114
PWB Assy Power Ballast
Board DP-3510
2.6
4.3
FEX92
200W+/-5% (Normal)
160W+/-5% (ECO)
Delta p/n: 5600600579
@Vo from 50V to 120V
@Vo from 50V to 120V
2-5. Input/output connectors
PC
VGA
USB (Service Only)
Composite video (RCAx1)
Video
S-Video (Mini-DIN)
Audio Mini-jack
Security Kensington slot
Company Confidential LGE_______________________ Delta____________
7
2007/11/30

Delta Elec. Inc. DP-3510 YYDA & DP-2510 YYDA rev.00
2-6. I/O Ports Illustration about Projector
ITEM LABEL DESCRIPTION
1.
2.
3.
4.
5.
6.
7.
8.
Note:
AC IN Connect the power cord
Rear IR receiver
(Optional)
USB (Service Only) Connect the USB cable from a computer (service only)
AUDIO Connect the audio cable from the input device
S-VIDEO Connect the S-Video cable from a video device
VIDEO Connect a composite video cable from a video device
RGB Connect the computer cable from a computer
(Security Lock)
Receiver for IR signal from remote control
Secure to permanent object with a Kensington® Lock system
If your video equipment has both S-VIDEO and RCA jacks (composite video) connect to the
S-VIDEO connector. S-VIDEO provides a better quality signal
Company Confidential LGE_______________________ Delta____________
8
2007/11/30
Delta Elec. Inc. DP-3510 YYDA & DP-2510 YYDA rev.00
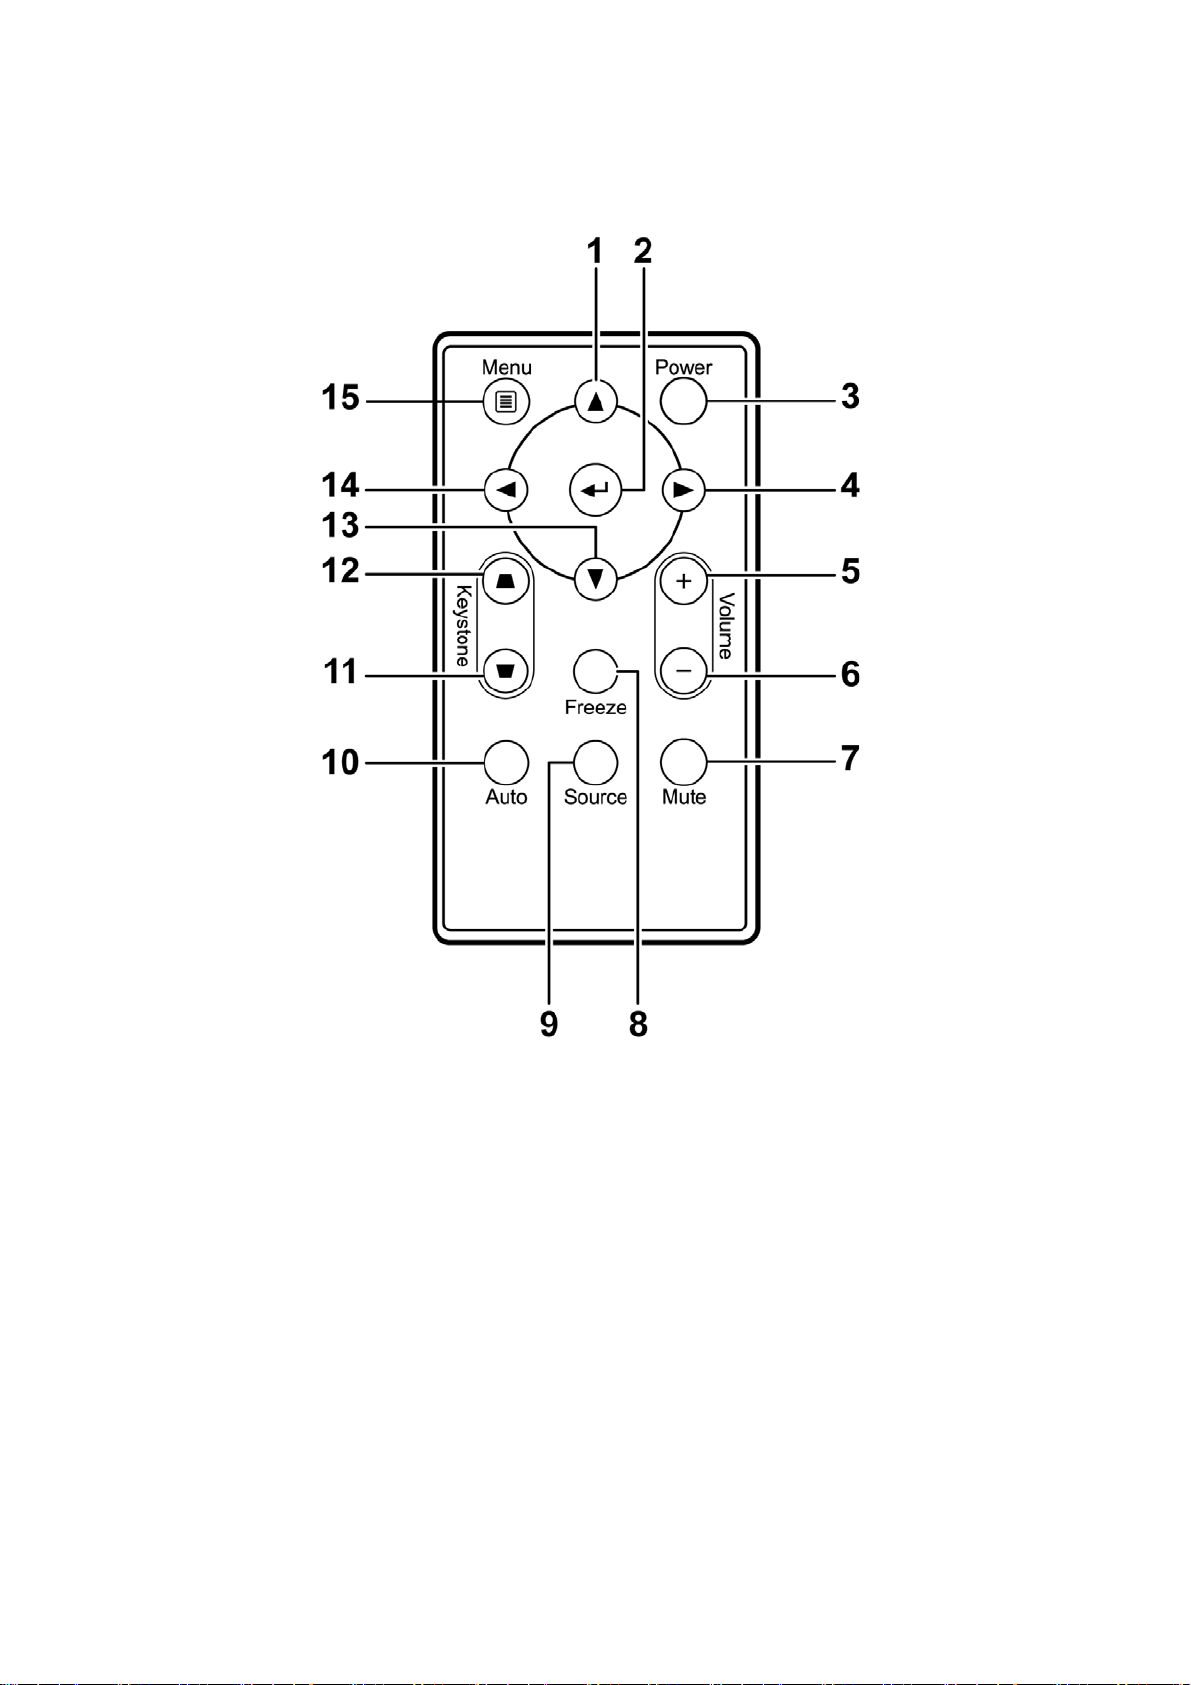
2-7. Remote Control Parts
Important:
1. Avoid using the projector with bright fluorescent lighting turned on. Certain high-frequency
fluorescent lights can disrupt remote control operation.
2. Be sure nothing obstructs the path between the remote control and the projector. If the path
between the remote control and the projector is obstructed, you can bounce the signal off
certain reflective surfaces such as projector screens.
3. The buttons and keys on the projector have the same functions as the corresponding
buttons on the remote control. This user’s manual describes the functions based on the remote
control.
Company Confidential LGE_______________________ Delta____________
9
2007/11/30

Delta Elec. Inc. DP-3510 YYDA & DP-2510 YYDA rev.00
ITEM LABEL DESCRIPTION
1.
2.
3.
4.
5.
6.
7.
8.
9.
10.
Up cursor Navigates and changes settings in the OSD
Enter Changes settings in the OSD
Power Turns the projector On or Off
Right cursor Navigates and changes settings in the OSD
Volume + Increase volume
Volume - Decrease volume
Mute Mutes the built-in speaker
Freeze Freeze/unfreezes the on-screen picture
Source Detects the input device
Auto adjustment for frequency, tracking, size,
Auto
position
11.
12.
13.
14.
15.
Keystone top Corrects image trapezoid (wider bottom) effect
Keystone bottom Corrects image-trapezoid (wider top) effect
Down cursor Navigates and changes settings in the OSD
Left cursor Navigates and changes settings in the OSD
Menu Opens the OSD
Remote Control Operating Range
The remote control uses infrared transmission to control the projector. It is not necessary to
point the remote directly at the projector. Provided you are not holding the remote
perpendicular to the sides or the rear of the projector, the remote will function well within a
radius of about 7 meters (23 feet) and 15 degrees above or below the projector level. If the
projector does not respond to the remote control, move a little closer.
Company Confidential LGE_______________________ Delta____________
10
2007/11/30
Delta Elec. Inc. DP-3510 YYDA & DP-2510 YYDA rev.00
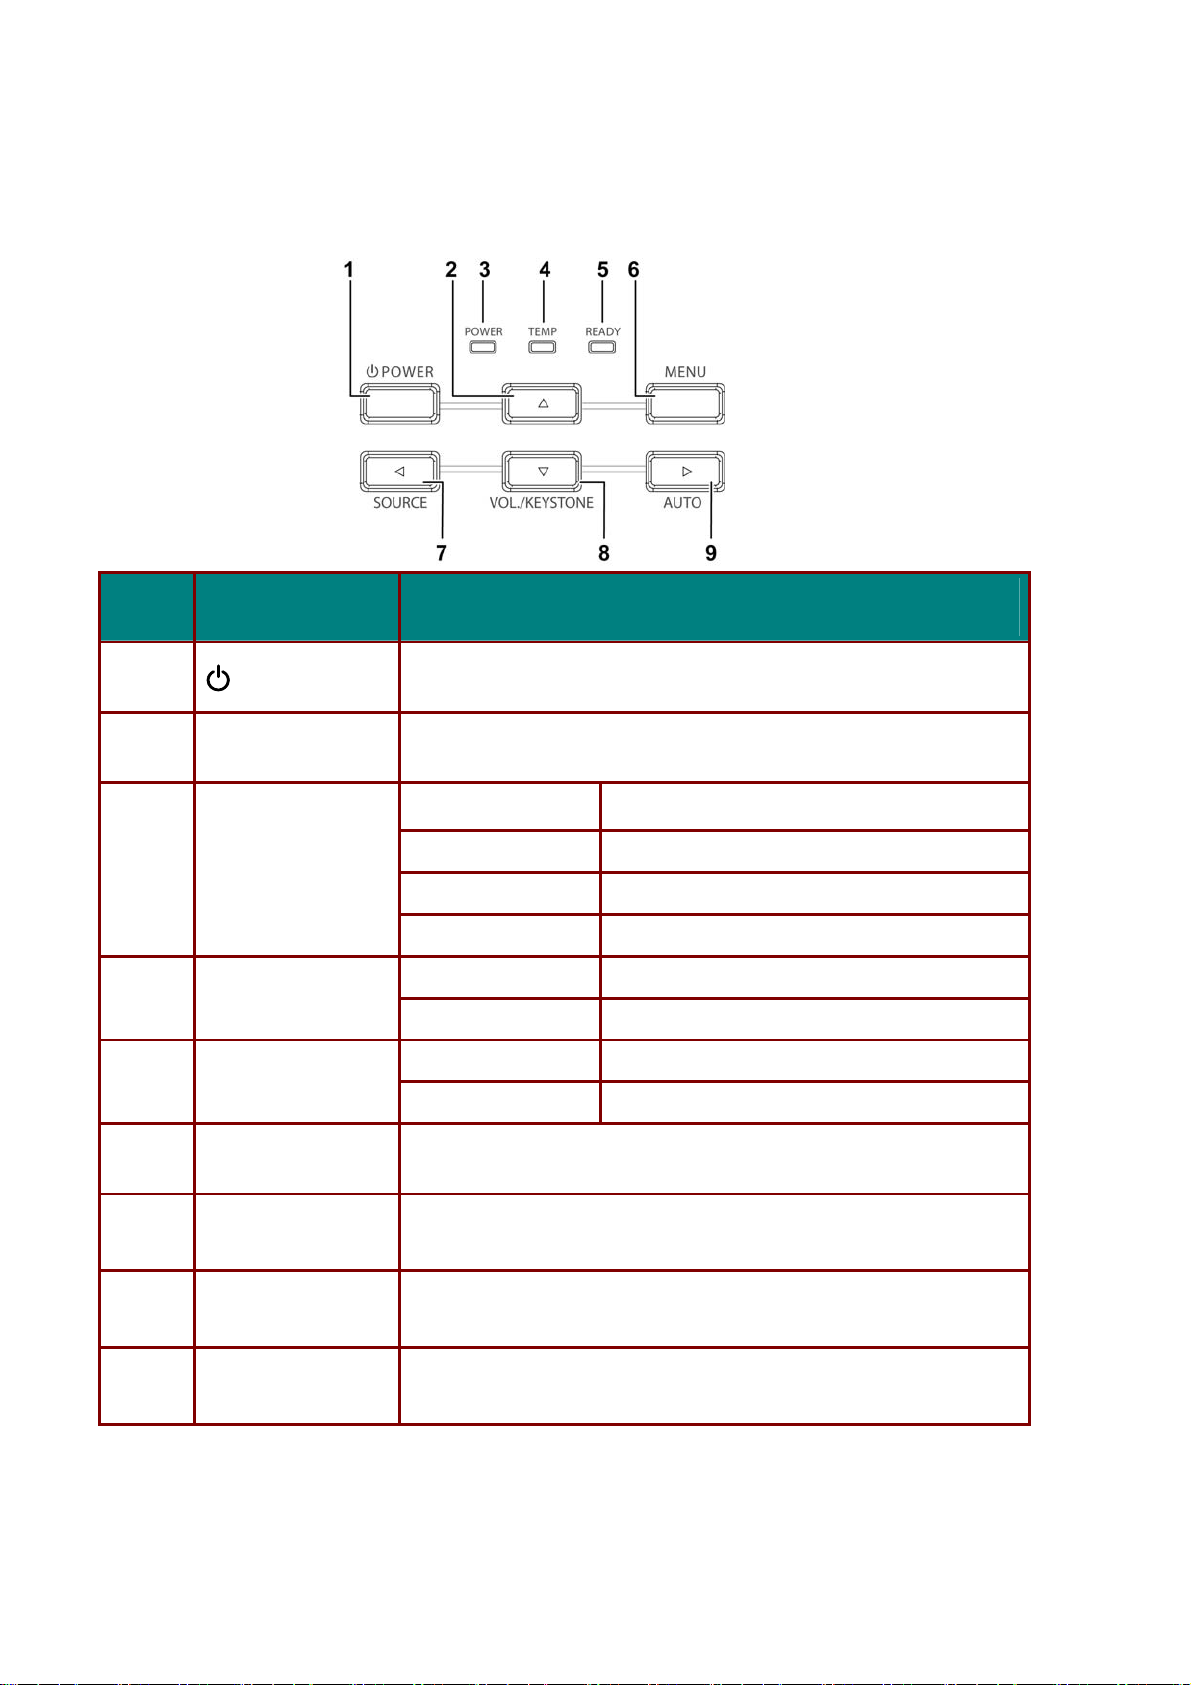
2-8. Key Pad
Top view—On-screen Display (OSD) buttons and LEDs
ITEM
1.
2.
3.
4.
5.
6.
LABEL DESCRIPTION
(POWER)
▲ (Up cursor) Navigates and changes settings in the OSD
POWER LED
TEMP LED
READY LED
MENU Open and exits the OSD buttons
Turns the projector On or Off
on LED Green still on
stand-by mode LED Flashing Green off 2.5s / on 1s
Warming up mode LED Flashing Green off 2.5s / on 1s
Off (cooling down) LED Flashing Green 10s => LED Green off
On System over temperature
Off Normal State
Orange Lamp is ready to be powered-on.
Flashing Lamp not ready
(Warm-up/shutting down/cooling)
◄ (Left cursor) /
Detects the input device
7.
SOURCE/
▼ (Down cursor) /
Navigates and changes settings in the OSD
Quick Menu – For Keystone, Audio Volume
8.
VOL./KEYSTONE
► (Right cursor) /
Navigates and changes settings in the OSD
Optimizes image size, position, and resolution
9.
AUTO/
Company Confidential LGE_______________________ Delta____________
11
Navigates and changes settings in the OSD
2007/11/30
Delta Elec. Inc. DP-3510 YYDA & DP-2510 YYDA rev.00
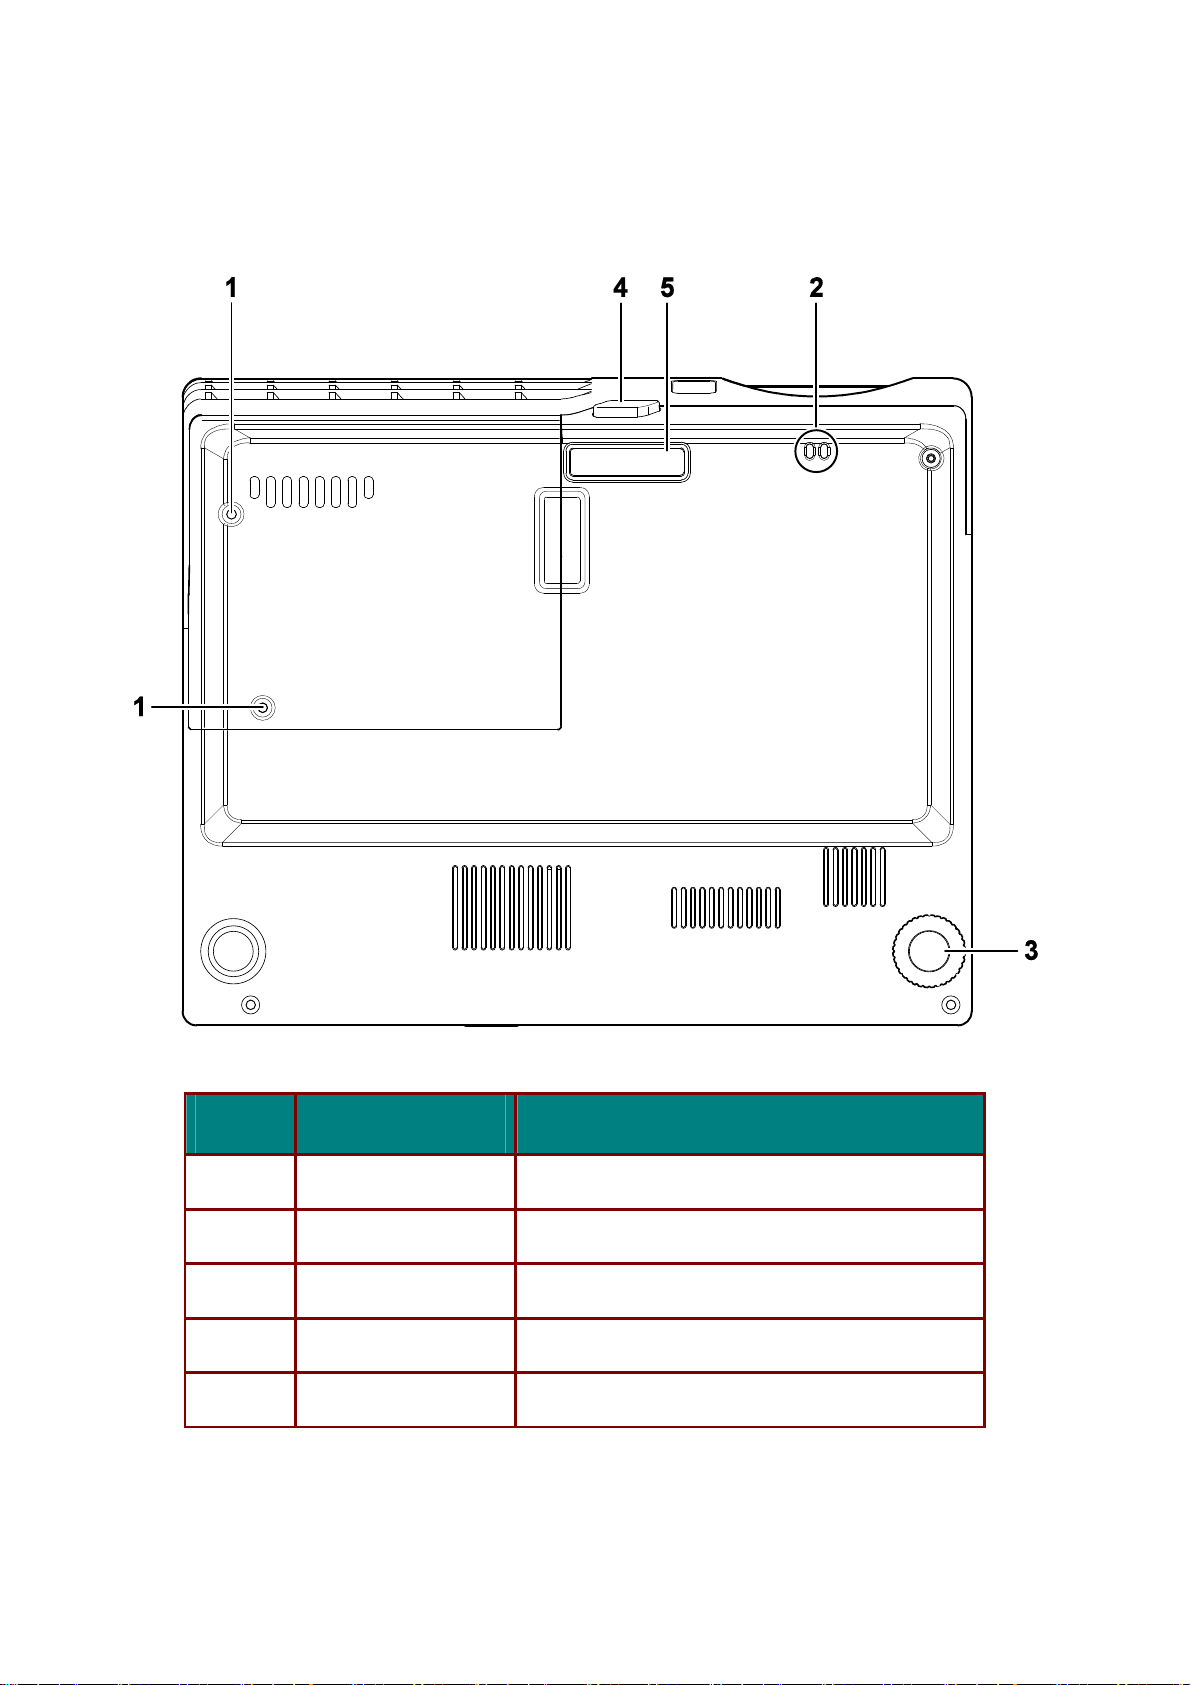
2-9. Bottom view
ITEM LABEL DESCRIPTION
1.
2.
3.
4.
5.
Company Confidential LGE_______________________ Delta____________
12
Lamp cover Remove when changing the lamp.
Lens cap hook To fasten the lens cap cover.
Tilt adjustor Rotate adjuster lever to adjust angle position.
Height adjustor button Push to release adjustor.
Height adjustor Adjuster drops down when adjuster button is pushed.
2007/11/30
Delta Elec. Inc. DP-3510 YYDA & DP-2510 YYDA rev.00
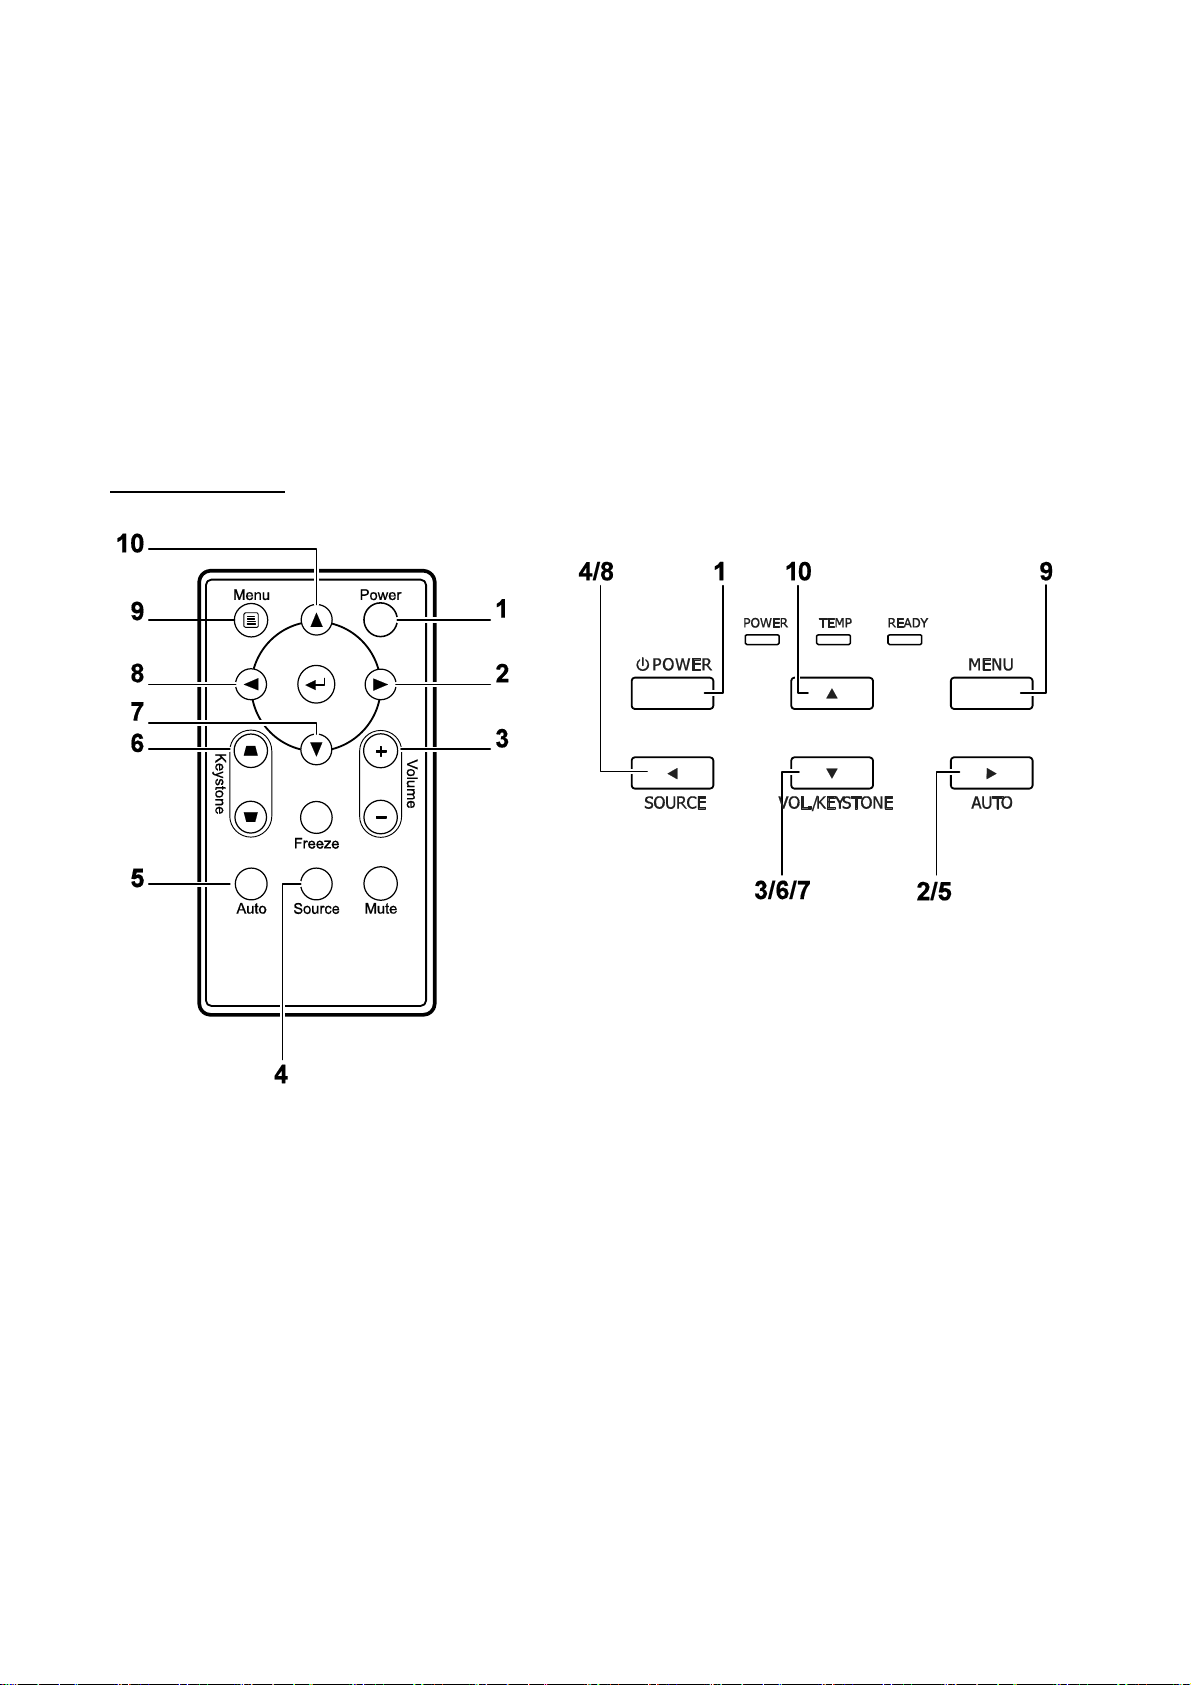
2.10 Projector and Remote Control Buttons
The projector can be operated using the remote control or the buttons on the top of the
projector. All operations can be carried out with the remote control; however, the buttons on the
projector are limited in use. The following illustration shows the corresponding buttons on the
remote control and on the projector.
Remote Control
Some buttons on the projector have multiple functions. For example, item 3/6/7 on the
projector functions as the keystone button, volume adjuster, and as the down cursor key.
Company Confidential LGE_______________________ Delta____________
13
2007/11/30
Delta Elec. Inc. DP-3510 YYDA & DP-2510 YYDA rev.00
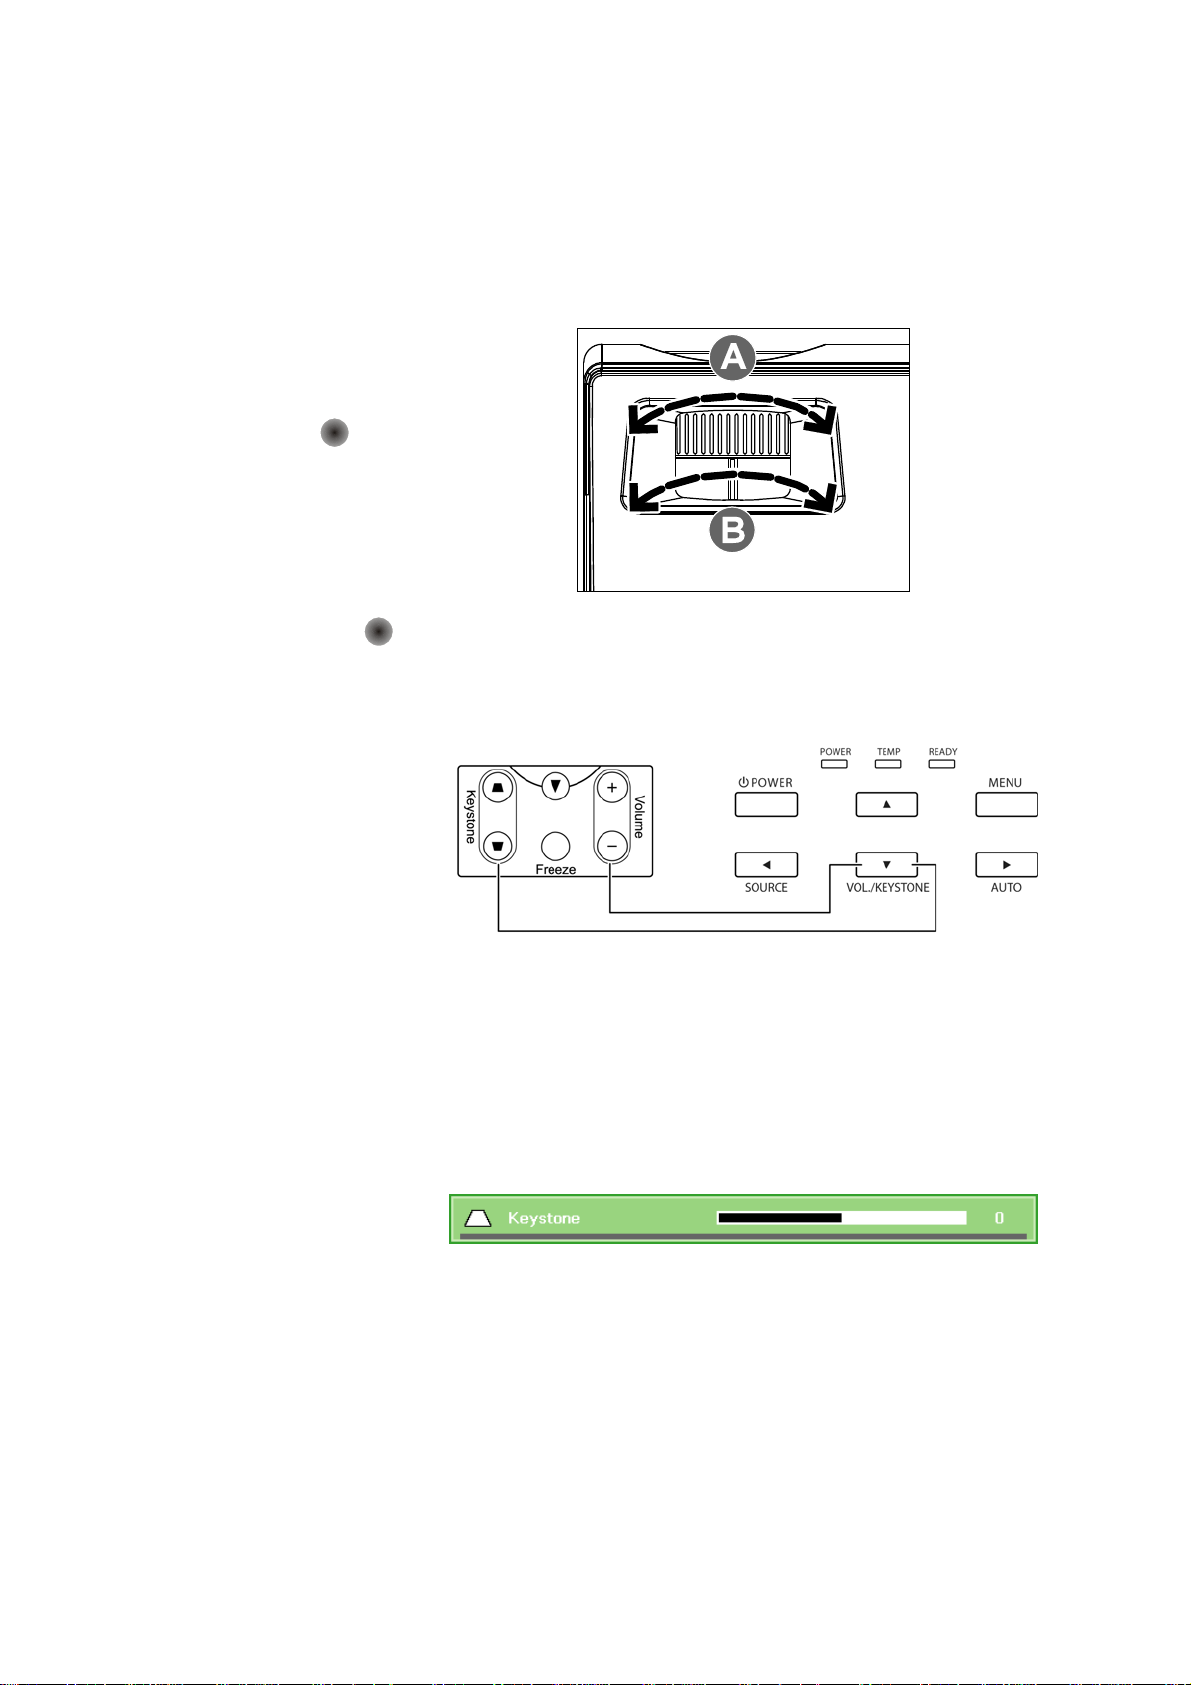
2.11 Adjusting the Zoom, Focus and Keystone
Use the Image-zoom
1.
control (on the projector
only) to resize the
projected image and
B
screen size
Use the Image-focus
2.
control (on the projector
only) to sharpen the
projected image
.
A
.
Use the KEYSTONE
3.
buttons (on the
projector or the remote
control) to correct
image-trapezoid (wider
top or bottom) effect.
The keystone control
4.
appears on the display.
Remote control and OSD panel
Company Confidential LGE_______________________ Delta____________
14
2007/11/30
Delta Elec. Inc. DP-3510 YYDA & DP-2510 YYDA rev.00
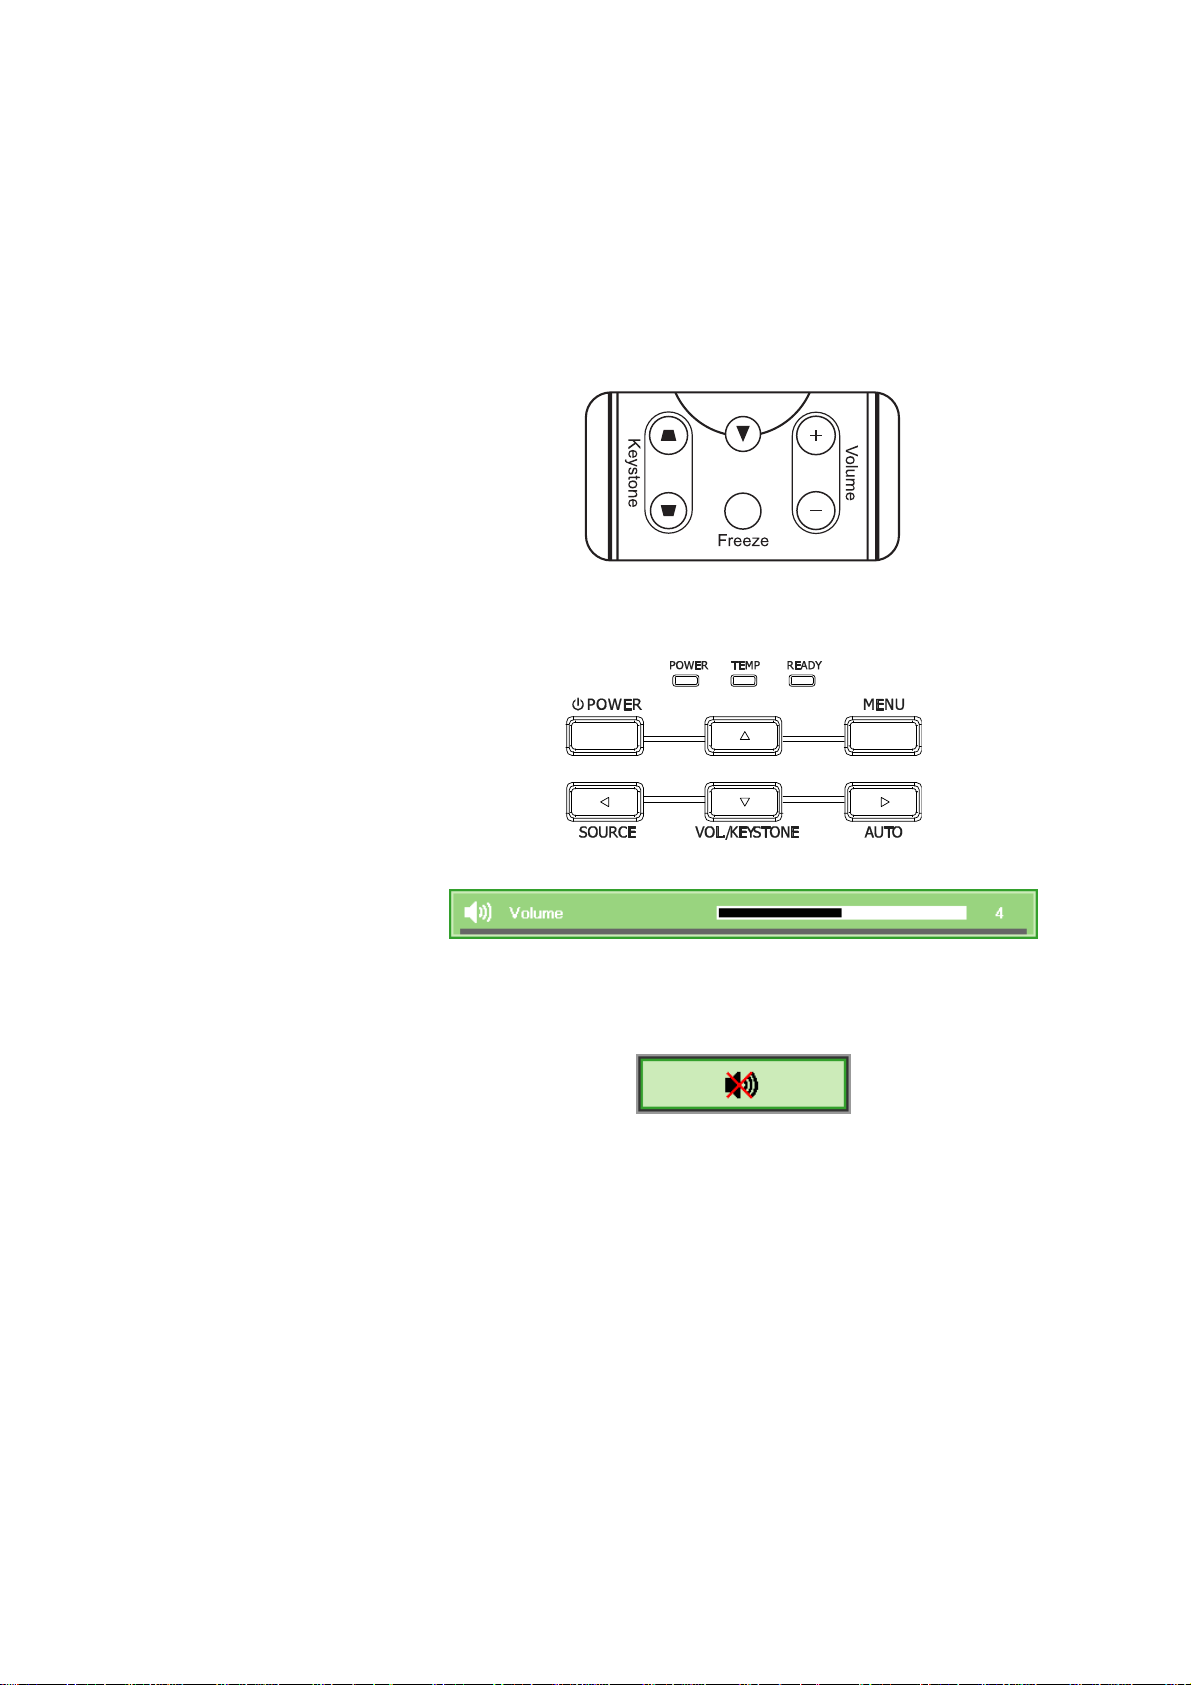
2.12 Adjusting the Volume
Press the VOLUME +/-
1.
buttons on the remote
control.
The volume control
appears on the display.
Press the Down Cursor
2.
button on the keypad to
adjust Volume +/-.
Press the MUTE button
3.
to turn off the volume
(This feature is
available only on the
remote).
Company Confidential LGE_______________________ Delta____________
15
2007/11/30

Delta Elec. Inc. DP-3510 YYDA & DP-2510 YYDA rev.00
2-13. Block Diagram
Company Confidential LGE_______________________ Delta____________
16
2007/11/30
Delta Elec. Inc. DP-3510 YYDA & DP-2510 YYDA rev.00
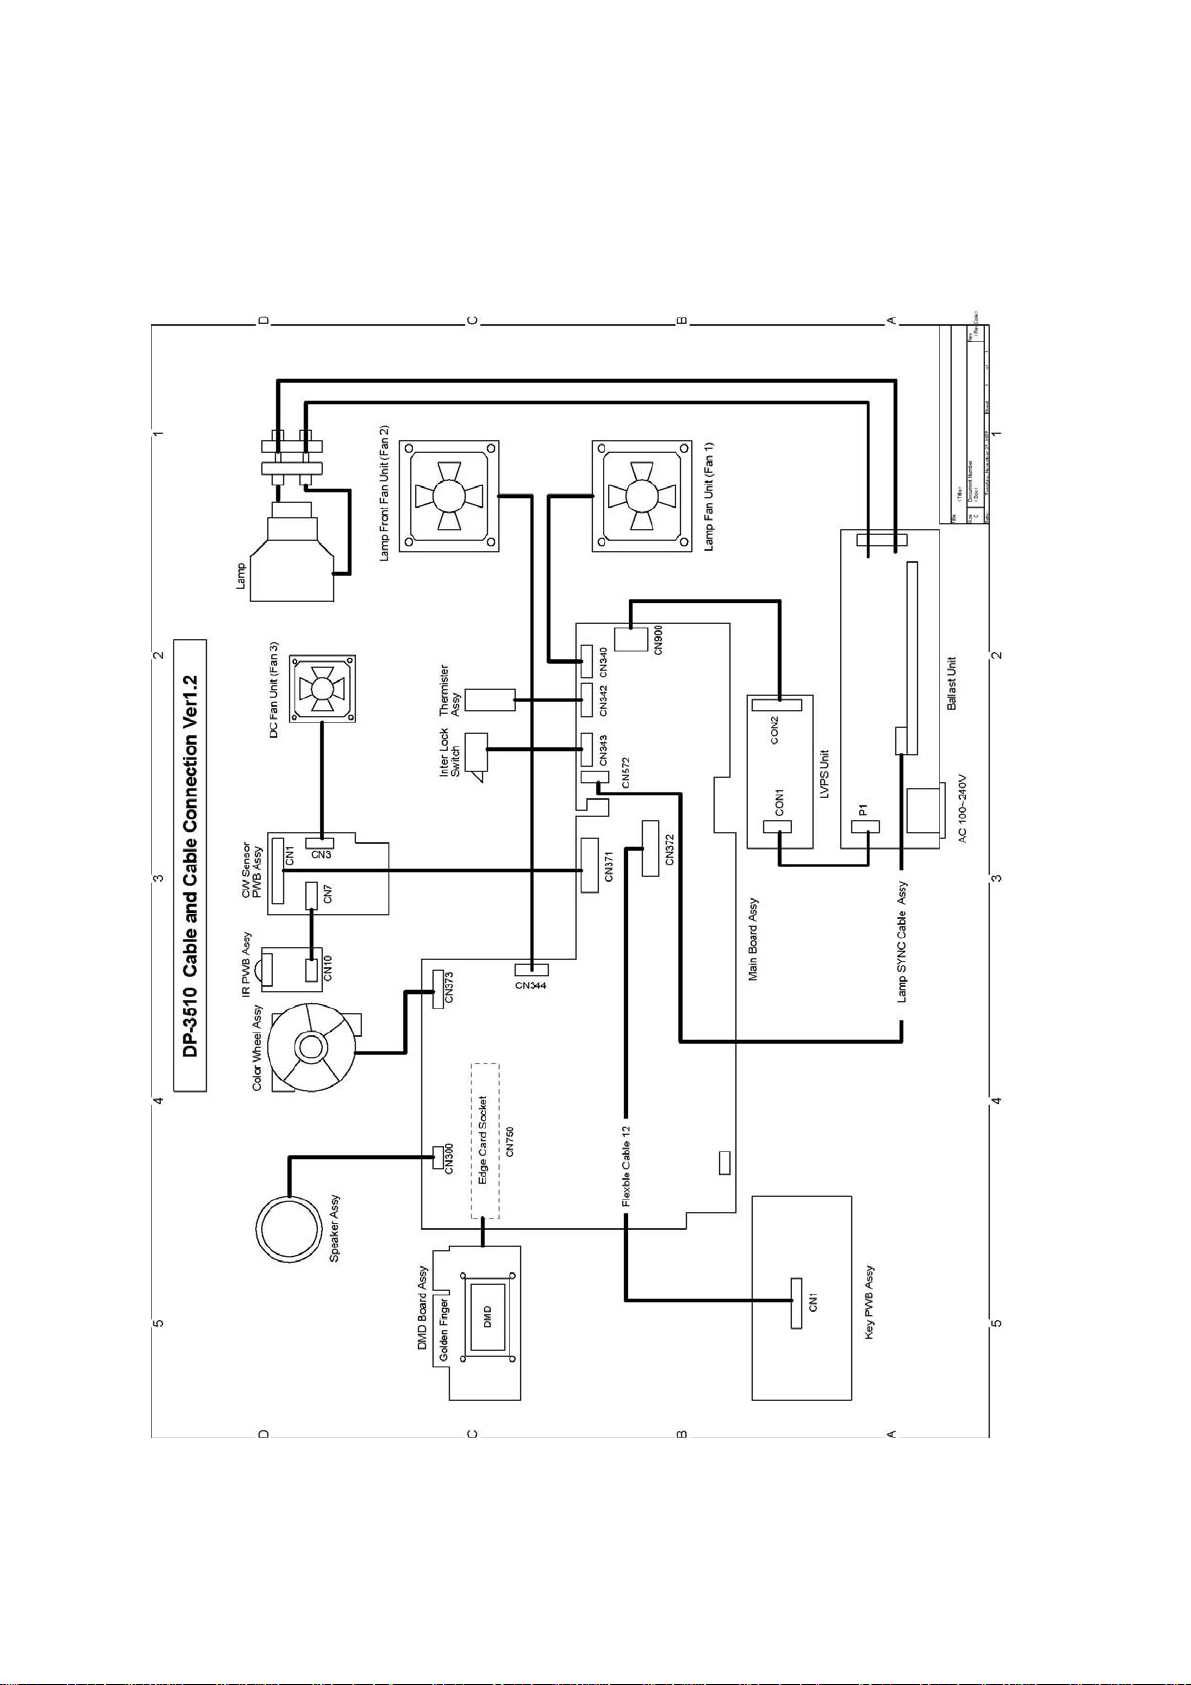
2.14 Wire diagram
Company Confidential LGE_______________________ Delta____________
17
2007/11/30
Delta Elec. Inc. DP-3510 YYDA & DP-2510 YYDA rev.00
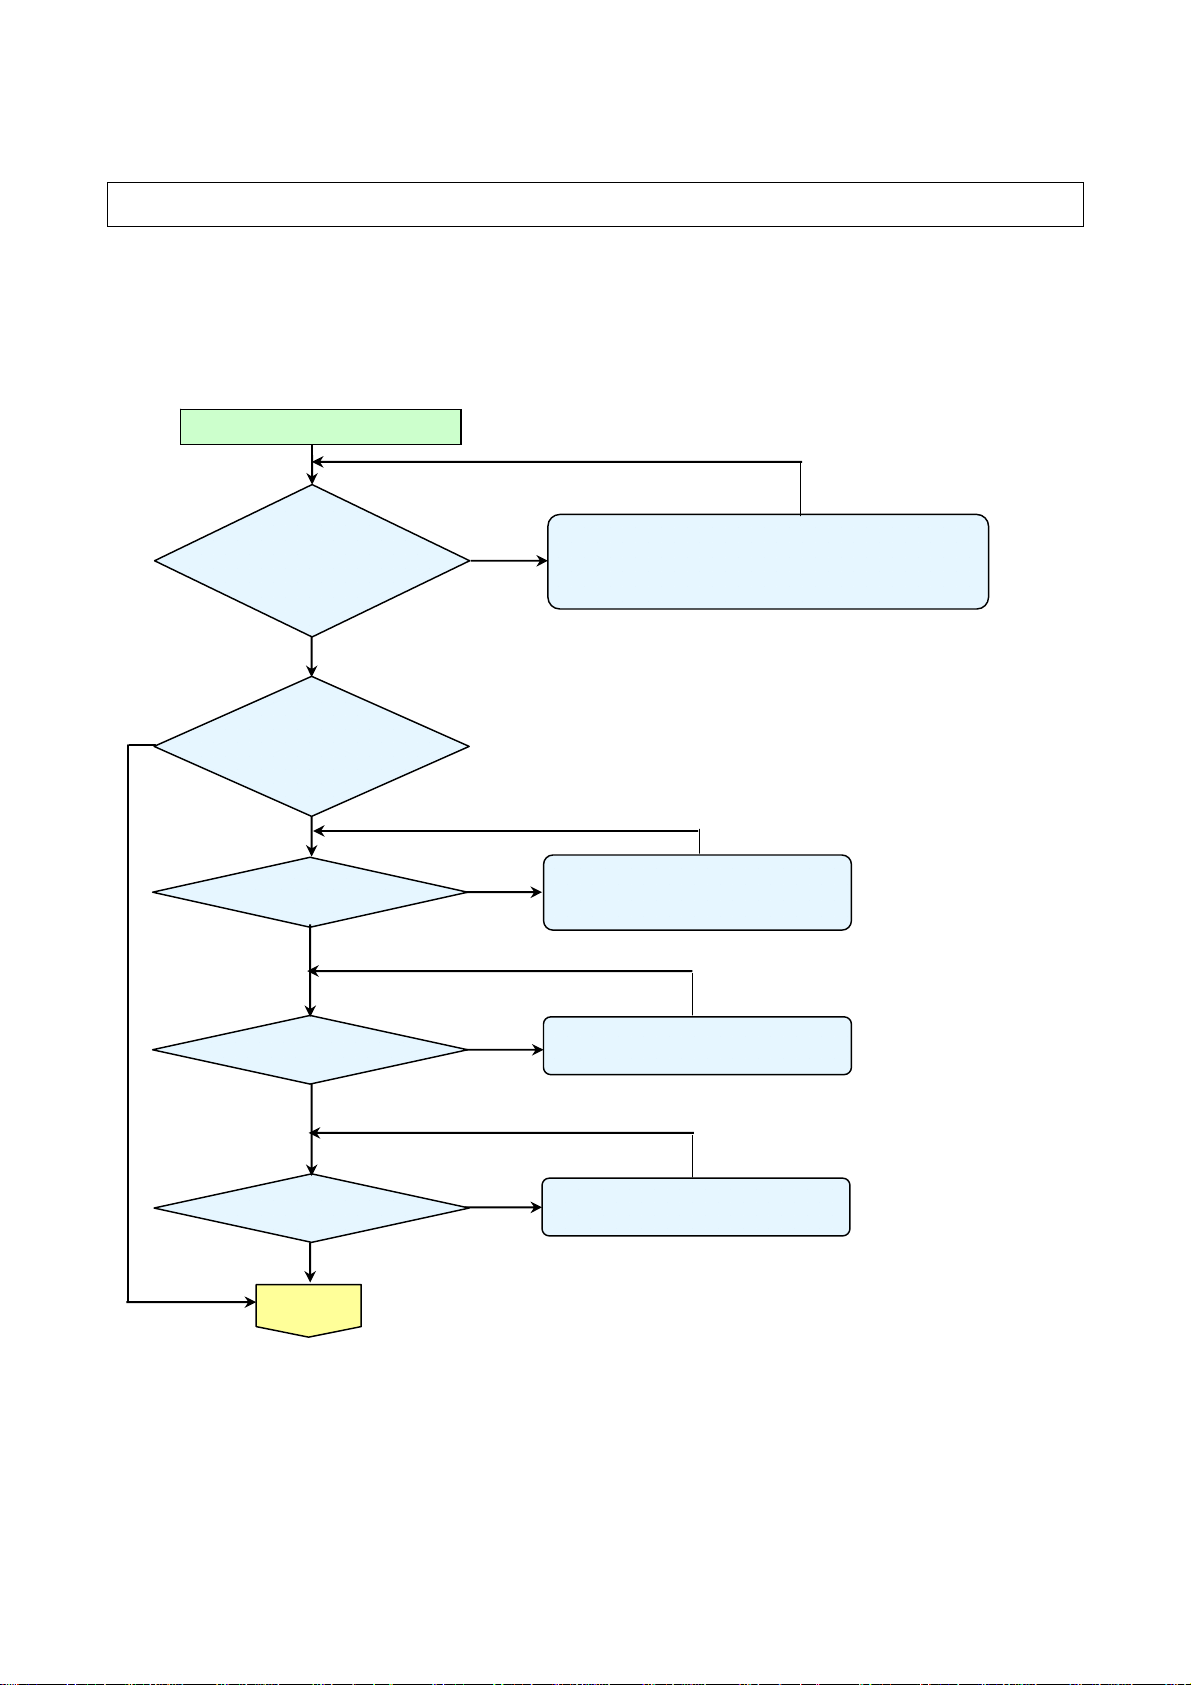
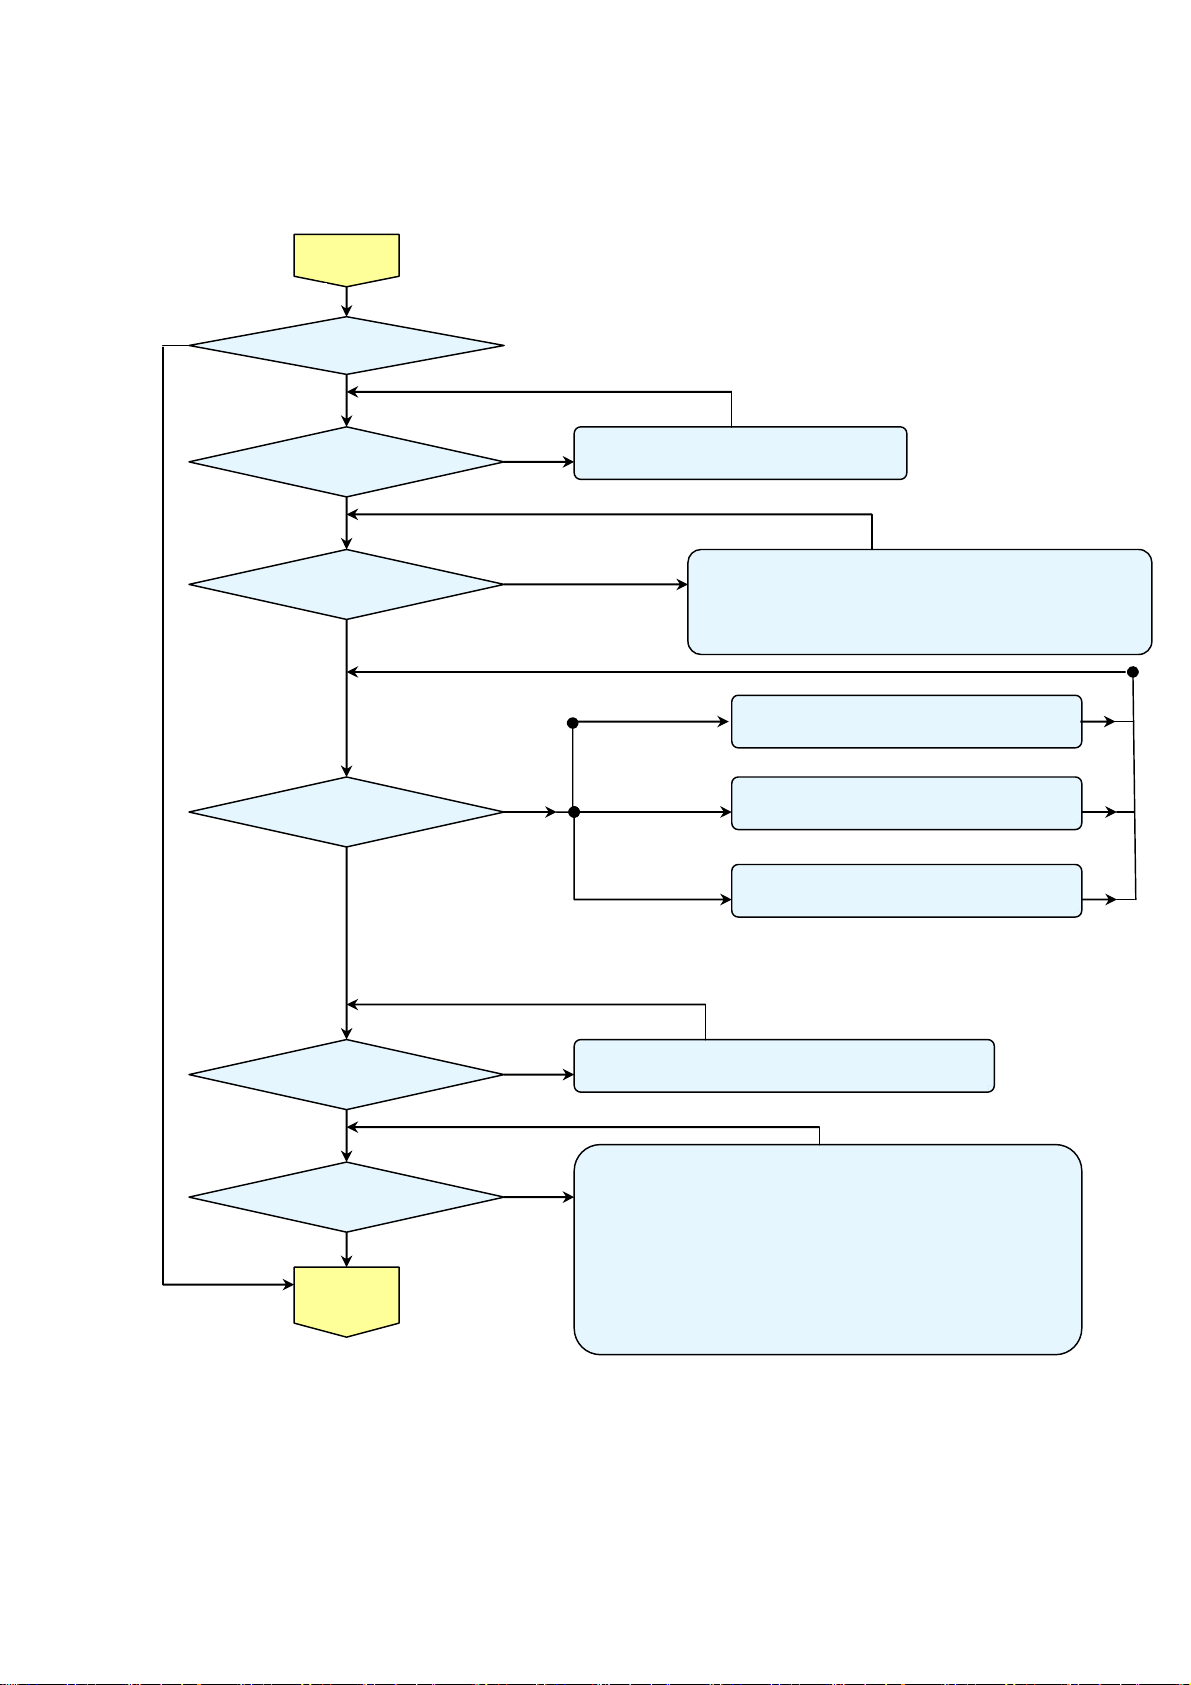
3. TROUBLE SHOOTING v1.1
By checking operations during normal usage time, it is possible to carry out judgments on malfunction
to a certain extent. Carry out the following checks before disassembling the equipment.
Yes
Connect the power cord
Yes
POWER: Light
READY : Light
Standy-by-ready
Yes
Press “power key”
POWER: Light
READY : OFF
Power ON
No
POWER: 7 Blinks
No
Over Temp LED:
ON
No
Yes
Yes
No
• Cable of Power Supply Unit and thermostat Ass’y.
• Check the connection of Power Supply (CON900 to CN2)
• Power Supply Unit malfunction
• Check keypad connection
No
•Lamp Cover A’ssy is not attached
•Switch (CN343) is open
•Thermostat is not attached.
No
•Connector (CN342) disconnected.
•Thermal sensor PWB Ass’y check.
Company Confidential LGE_______________________ Delta____________
18
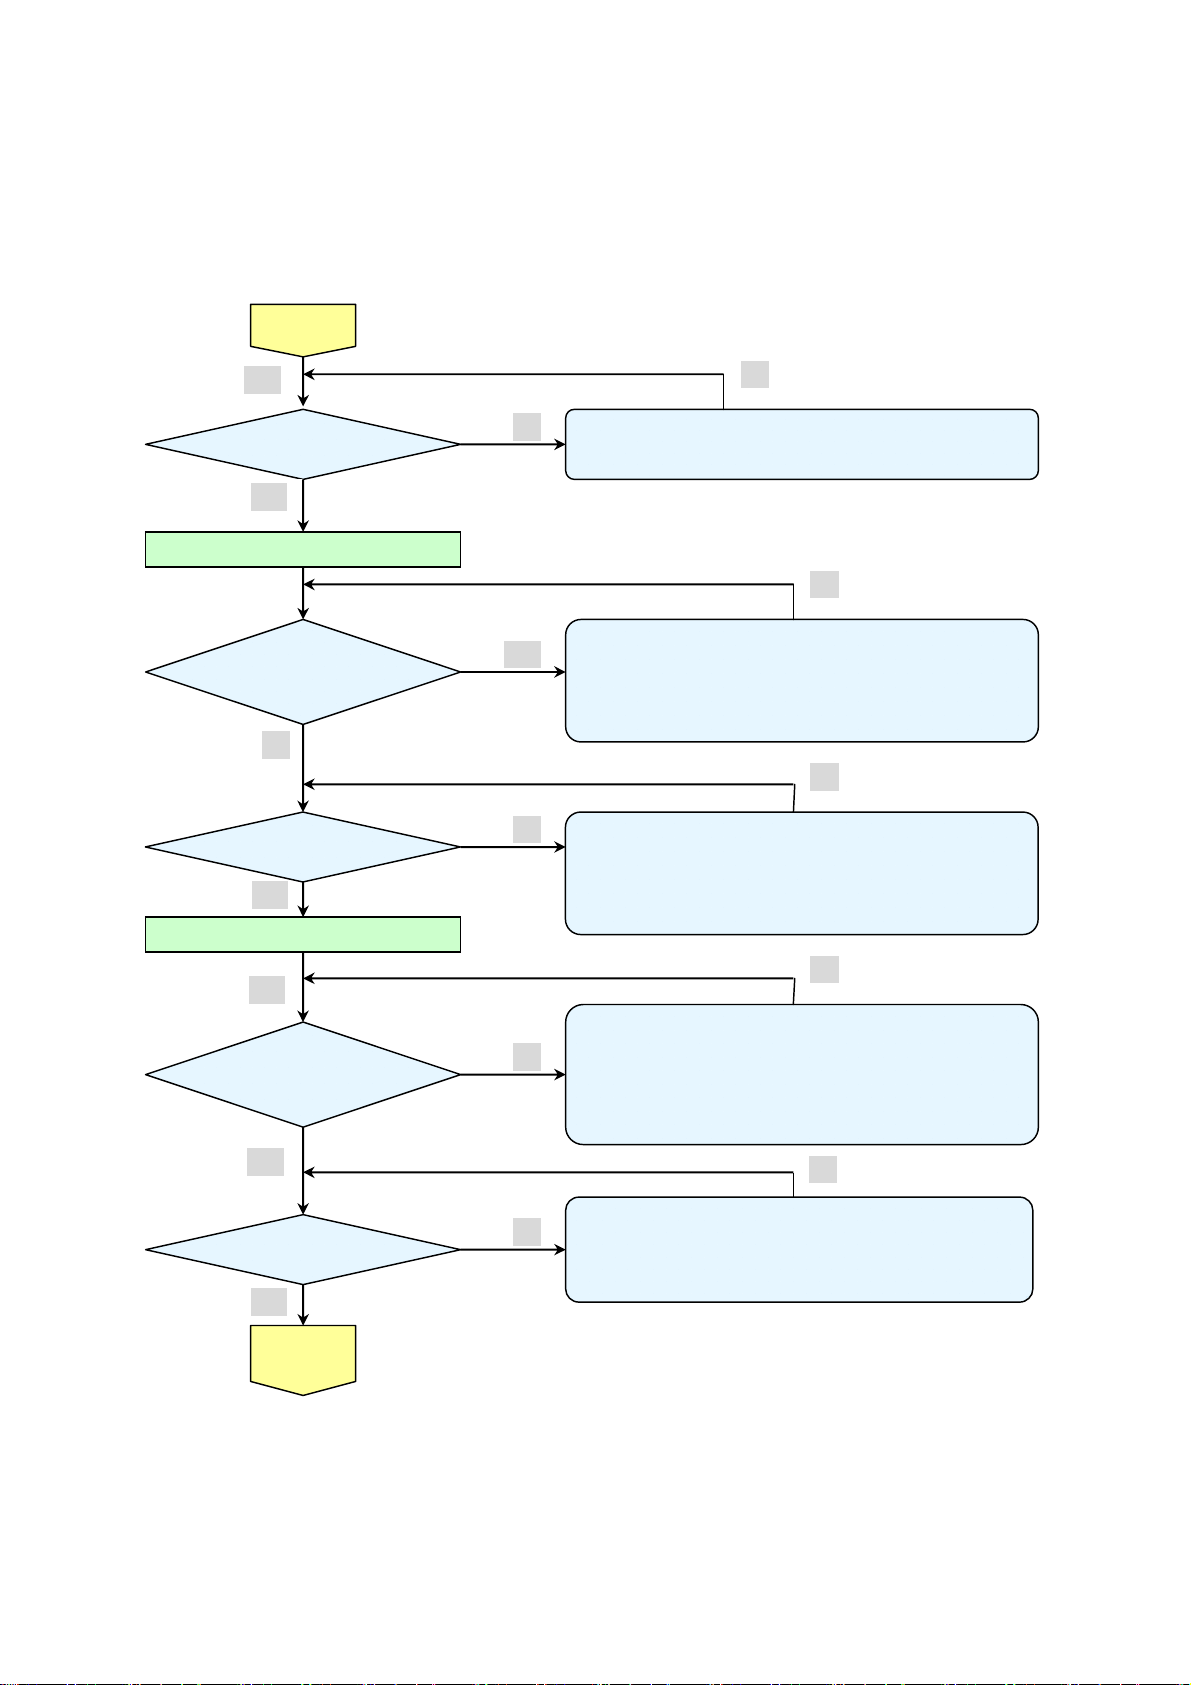
No
POWER: 9 Blinks
Yes
Waiting
Power On
Yes
No
•DMD chip error.
•DMD Board PWB Ass’y check.
2007/11/30
Delta Elec. Inc. DP-3510 YYDA & DP-2510 YYDA rev.00
r
Yes
Turn th e
power ON
Yes
The lamp is ON
No
POWER: 4 Blinks
•Thermal Break Sensor error
Yes
•Thermal Break Sensor disconnected.
No
No
POWER: 5 Blink
No
Yes
No
No
Lamp does not light:lighting operation sound (ignition sound)
exists.
• Main Board and Ballast Board Ass’y malfunction
• Ballast Connector (P1) or LVPS unit (con1) disconnected
• Lamp failure (Lamp is broken, damaged, or burst)
LAMP:1 Blinks
• Connector CN340 of Fan disconnected
• Lamp fan malfunction
POWER: 6 Blinks
No
Yes
LAMP:2 Blinks
LAMP:3 Blinks
• Connector CN344 of Fan disconnected
• Lamp Front fan malfunction
• Connector CN7 (MIS PWB) of Fan disconnected
• DC fan malfunction
POWER: 7 Blinks
Yes
•Lamp Cover or thermostat Ass’y is not attached.
•Switch (CN343) is open malfunction
No
No
Image
Display
POWER: 9 Blinks
Yes
Lamp does not light:No lighting operation sound (ignition sound) exists.
• Flexible cable of Color Wheel Ass’y is disconnected (CN373) o
broken.
• Color Wheel Ass’y malfunction (does not rotate).
• Main Board Ass’y malfunction (Color Wheel Ass’y does not rotate).
• Power Supply Unit malfunction.
• Index board malfunction (color wheel turns fast).
• C/W sensor PWB Ass’y (CN2) / MIS PWB (CN8) is disconnected
or broken.
No
No
Company Confidential LGE_______________________ Delta____________
19
2007/11/30
Delta Elec. Inc. DP-3510 YYDA & DP-2510 YYDA rev.00
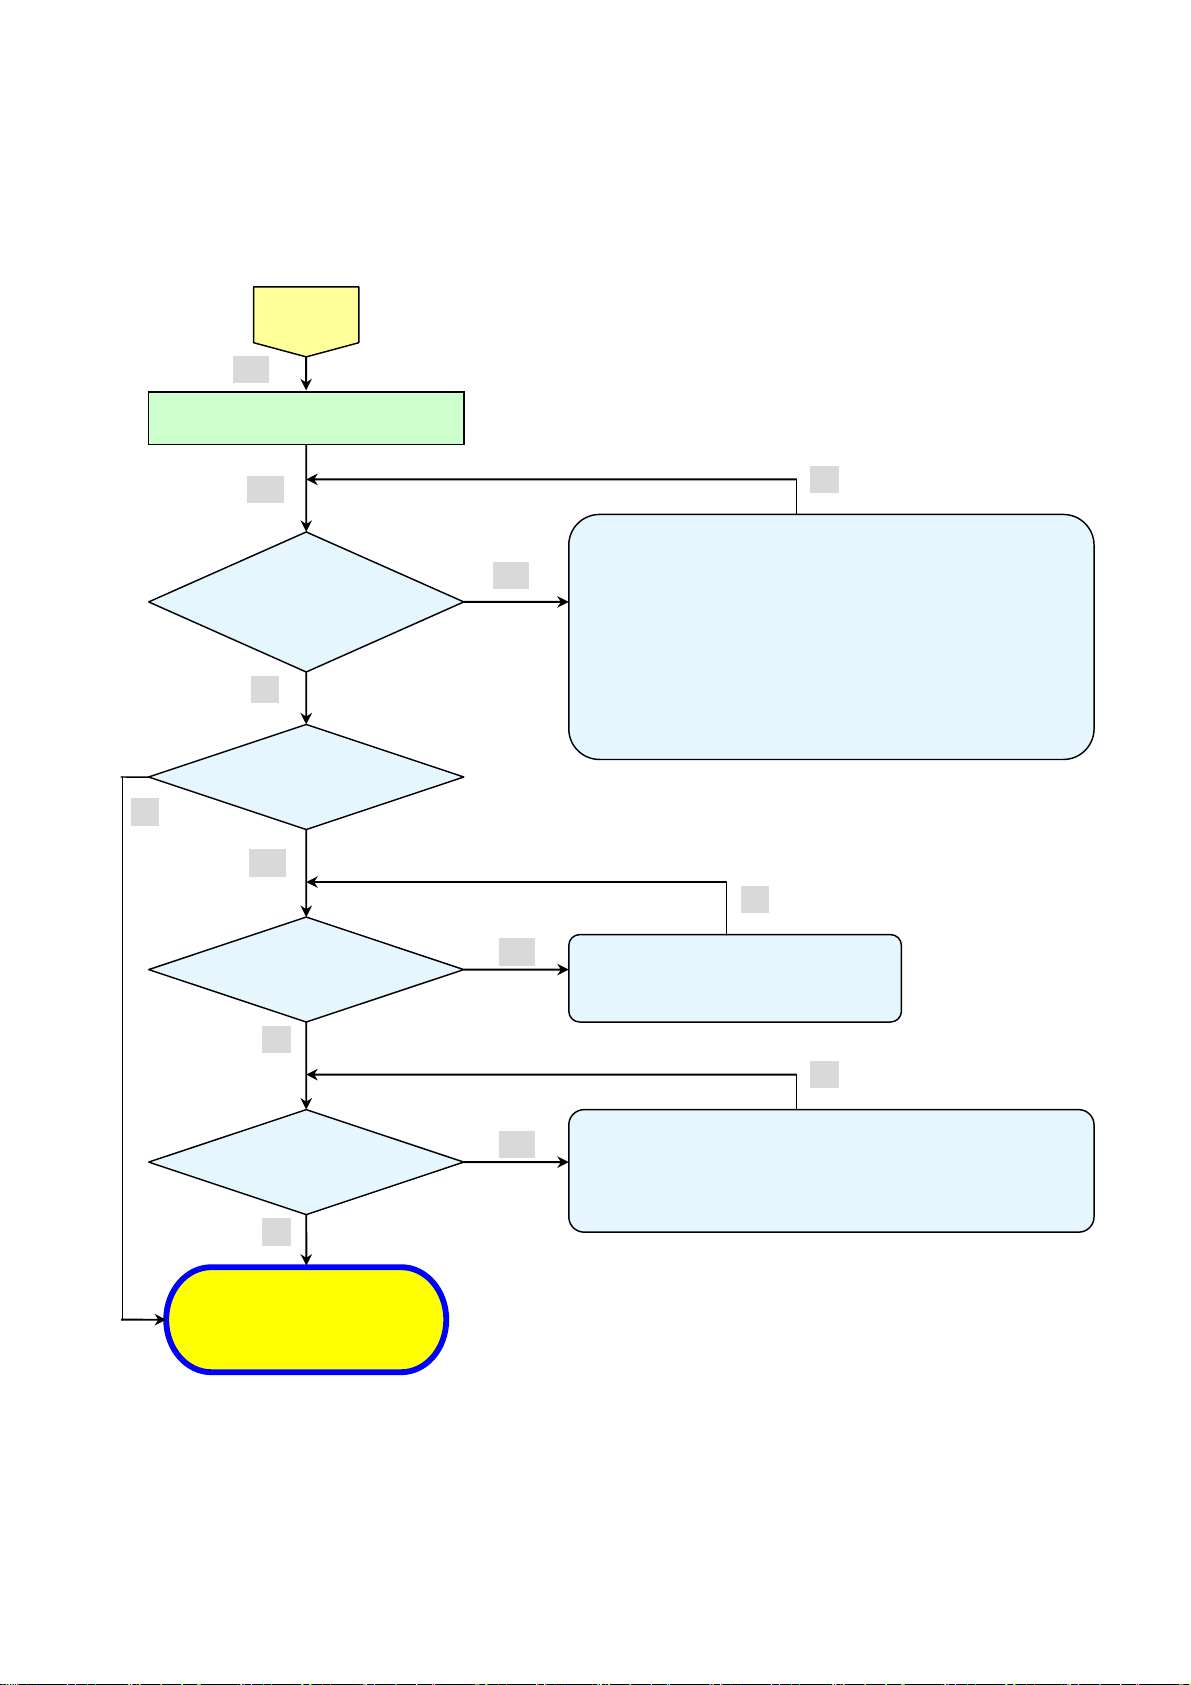
play
y
Image
Display
Yes
Projector logo
screen dis
Confirmation with none-signal state
Yes
Still dark after the
lamp is on for more
than 1min
No
Menu display
Yes
Input each signal
No
Yes
No
No
• CW Sensor Board Ass’y malfunction
• Main Board
• DMD Set malfunction
Ass’y malfunction
No
• Lamp deterioration (malfunction/usage time)
• Power Supply Unit malfunction
(No change occurs even after lamp replacement.)
• DMD Set malfunction
(No change occurs even after lamp replacement.)
No
• Remote controller set malfunction, Low battery,
and outside operation rang
• Main Board Ass’y malfunction
• Connector (CN371)、(CN5 of MIS PWB) disconnected
• IR PWB Ass’y malfunction
Yes
Image display
normally
• Check the pattern generator setting is wrong
• Main Board Ass’y malfunction
No
• DMD Set malfunction
• Setting on PC side(external output setting, resolution, etc.)
• Cable malfunction (disconnection and pins broken)
No
Yes
Speaker work
normall
Yes
Check the
projection
Screen
• Connector (CN372) or (CN2 of Keypad) disconnected
No
• Speaker Ass’y malfunction
• Audio Board Ass’y malfunction
• Main Board and Keypad Board Ass’y malfunction
No
Company Confidential LGE_______________________ Delta____________
20
2007/11/30
Delta Elec. Inc. DP-3510 YYDA & DP-2510 YYDA rev.00
p
d
Check using all black/white screens with
Check the
projection
Screen
Yes
PC connection
Yes
No
Are abnormalities
noticeable on
projection screen?
Yes
No
No
Does the lamp
go off during
o
eration?
Yes
Is LAMP Light again?
Yes
• Black lines on screen (horizontal and vertical)
→ DMD Set malfunction
• Missing pixels (Missing white: 1 or more, missing black: 5 or more, or
sequence missing pixels)
→ DMD Set malfunction
• Shadows on screen
→ Dirt on DMD/projection lens surface
• Bluish shadows on corners of screen (during white screen display)
→ Shifted optical axis of Lens Base Unit
No
• Lamp malfunction
• Power Supply Unit malfunction
No
No
Over Temp LED:
ON
Yes
No
• Temperature protector operated due to the increase in
temperature based on o perating environment
• Temperature protector operated due to blocke
suction and exhaust holes or dirty fan
System OK
Normal operation
Company Confidential LGE_______________________ Delta____________
21
2007/11/30

Delta Elec. Inc. DP-3510 YYDA & DP-2510 YYDA rev.00
Common problems and solutions
These guidelines provide tips to deal with problems you may encounter while using the
projector. If the problem remains unsolved, contact your dealer for assistance.
Often after time spent troubleshooting, the problem is traced to something as simple as a loose connection.
Check the following before proceeding to the problem-specific solutions.
• Use some other electrical device to confirm that the electrical outlet is working.
• Ensure the projector is turned on.
• Ensure all connections are securely attached.
• Ensure the attached device is turned on.
• Ensure a connected PC is not in suspending mode.
Ensure a connected notebook computer is configured for an external display. (This is usually done by pressing an
Fn-key combination on the notebook.)
Image Problems
Problem: No image appears on the screen
1. Verify the settings on your notebook or desktop PC.
2. Turn off all equipment and power up again in the correct order.
Problem: The image is blurred
1. Adjust the Focus on the projector.
2. Press the Auto button on the remote control or projector.
3. Ensure the projector-to-screen distance is within the 10-meter (33-feet) specified range.
4. Check that the projector lens is clean.
Problem: The image is wider at the top or bottom (trapezoid effect)
1. Position the projector so it is as perpendicular to the screen as possible.
2. Use the Keystone button on the remote control or projector to correct the problem.
Problem: The image is reversed
Check the Projection setting on the Installation I menu of the OSD.
Company Confidential LGE_______________________ Delta____________
22
2007/11/30

Delta Elec. Inc. DP-3510 YYDA & DP-2510 YYDA rev.00
Problem: The image is streaked
1. Set the Frequency and Tracking settings on the Computer menu of the OSD to the default
settings.
2. To ensure the problem is not caused by a connected PC’s video card, connect to another
computer.
Problem: The image is flat with no contrast
Adjust the Contrast setting on the Image menu of the OSD.
Problem: The color of the projected image does not match the source image.
Adjust the Color Temperature and Gamma settings on the Image menu of the OSD.
Lamp Problems
Problem: There is no light from the projector
1. Check that the power cable is securely connected.
2. Ensure the power source is good by testing with another electrical device.
3. Restart the projector in the correct order and check that the Power LED is green.
4. If you have replaced the lamp recently, try resetting the lamp connections.
5. Replace the lamp module.
6. Put the old lamp back in the projector and have the projector serviced.
Problem: The lamp goes off
1. Power surges can cause the lamp to turn off. Re-plug power cord. When the Ready LED is
on, press the power button.
2. Replace the lamp module.
3. Put the old lamp back in the projector and have the projector serviced.
Company Confidential LGE_______________________ Delta____________
23
2007/11/30

Delta Elec. Inc. DP-3510 YYDA & DP-2510 YYDA rev.00
Remote Control Problems
Problem: The projector does not respond to the remote control
1. Direct the remote control towards remote sensor on the projector.
2. Ensure the path between remote and sensor is not obstructed.
3. Turn off any fluorescent lights in the room.
4. Check the battery polarity.
5. Replace the batteries.
6. Turn off other Infrared-enabled devices in the vicinity.
7. Have the remote control serviced.
Audio Problems
Problem: There is no sound
1. Adjust the volume on the remote control.
2. Adjust the volume of the audio source.
3. Check the audio cable connection.
4. Test the source audio output with other speakers.
5. Have the projector serviced.
Problem: The sound is distorted
1. Check the audio cable connection.
2. Test the source audio output with other speakers.
Company Confidential LGE_______________________ Delta____________
24
2007/11/30

Delta Elec. Inc. DP-3510 YYDA & DP-2510 YYDA rev.00
Peripheral Test
ITEM DESCRIPTION
Remote Control
Press
Test
Button Test
Color Test
Press
Press
Sound Test Press (Enter) / ► to test the sound function of the internal speaker.
Company Confidential LGE_______________________ Delta____________
25
(Enter) / ►
(Enter) / ►
(Enter) / ►
to test the IR remote controller for diagnostic.
to test the button on keypad.
to select different colors on screen.
2007/11/30

Delta Elec. Inc. DP-3510 YYDA & DP-2510 YYDA rev.00
4.DISASSEMBLY AND ASSEMBLY
Removing the Lamp Cover and Lamp Module
D
I
S
A
S
S
E
M
B
L
Y
Look the full set projector. Look at the IO side.
Look at the keypad of top side. Look at the keypad of top side.
Loose these two screws. Remove and take out the lamp cover.
Company Confidential LGE_______________________ Delta____________
26
2007/11/30
 Loading...