

Page 1

LN500 series
Upgrading map
Please read this instruction
booklet carefully and completely
before connecting, operating or
adjusting this product.
ENGLISH
DEUTSCH
SLOVENIAN
LN500_LGEUK_ENG_MFL42172806
P/N : MFL42172806
Page 2

3 Package contents
3 The Steps for upgrade
4-5 Safety note
6-7 PC application installation
8-13 Firmware Upgrade
14 Upgrading application of navigation and
map
2
The product is made for upgrading map and navigation of LN500
series.
LN500 and LN505 are upgraded when you insert the SD card into the
device automatically after firmware.
LN510 and LN515 are upgraded by replacing the old SD card with the
bundled new one.
Firmware version : 2.0.0
Operating environment : WINDOWS 2000 / XP / VISTA(32bit)
Page 3

3
Package contents
1) SD memory card
- Map (Navigation program included)
- Software (for upgrading device firmware)
2) Owner’s Manual
3) Quick Setup Guide (for Navigation software)
- QSG(PDF file) is included in SD card.
4) Map CD (Optional)
The steps for upgrade
1) Device Firmware Upgrade : Upgrade it after S/W installation.
2) Upgrading navigation application and map : Insert bundled new
SD memory card. The process to upgrade is different depend on
models. Refer to the Page 14 for more information.
Page 4

4
Safety note
<When you use the software to upgrade Firmware>
1) The power should be supplied during upgrading Firmware.
- Connect cigar cable or DC adapter to device.
- Fully charge the device when using the built-in battery of it.
2) Do not disconnect USB cable during upgrade.
If the USB cable is disconnected during upgrade, the error message will be shown. Click [OK] to let the application to be terminated automatically.
- Error message : USB is disconnected! Close to terminate the
application.
<Map CD (Optional)>
1) For detail the direction (about map handling), see User’s Manual
in LGE PC portal on CD.
Page 5

5
2) Do not close the program during upgrade.
If you activate the upgrade program again after closing it forcibly,
the error message will be displayed. When you enter the STEP 5,
the error message is displayed as shown below.
- Error message : During upgrade the program is closed abruptly.
Please push the reset button to restart it.
<In using SD memory card for upgrade.>
1) TMC will not be supported on this unit even after upgrade is completed by the software.
- Even if TMC button is displayed on menu, the function is not
available.
2) [Navi Menu - Setup - Display - Day&Night - Auto] on navigation
menu may not be available even after upgrade is completed by
the software.
3) The information of [Setup - Extras - Tutorial] on navigation menu
may be different from that of the navigation software of the
upgraded device.
Page 6
6
PC application installation
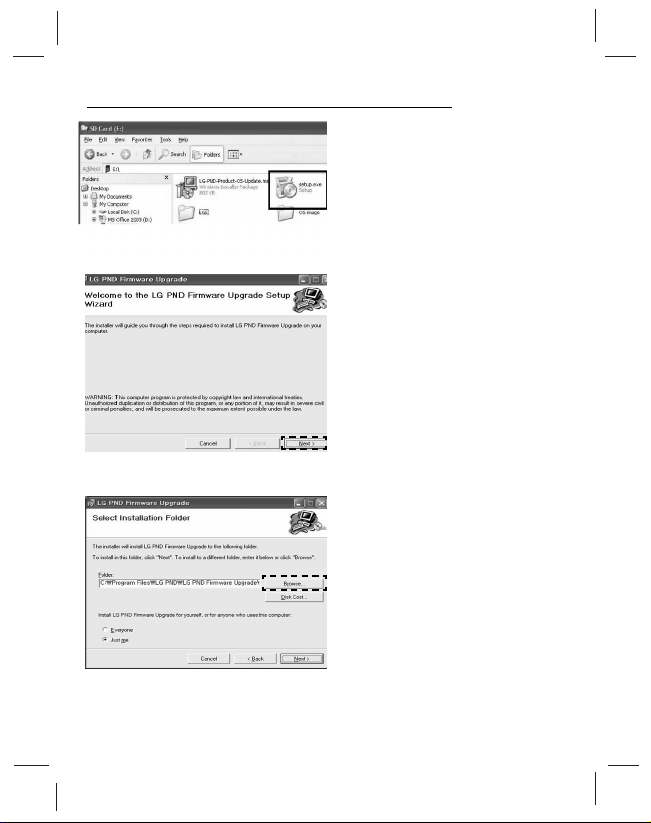
1) Click the “Setup.exe” for installation.
2) When LG PND Firmware
upgrade is displayed, click
[NEXT] to move to the next
step.
3) Select the installation path.
- You can enter the path direct-
ly or click [Browse].
- The default folder is <C:\pro-
gram files\LG PND\LG PND
Firmware Upgrade>.
Page 7
7
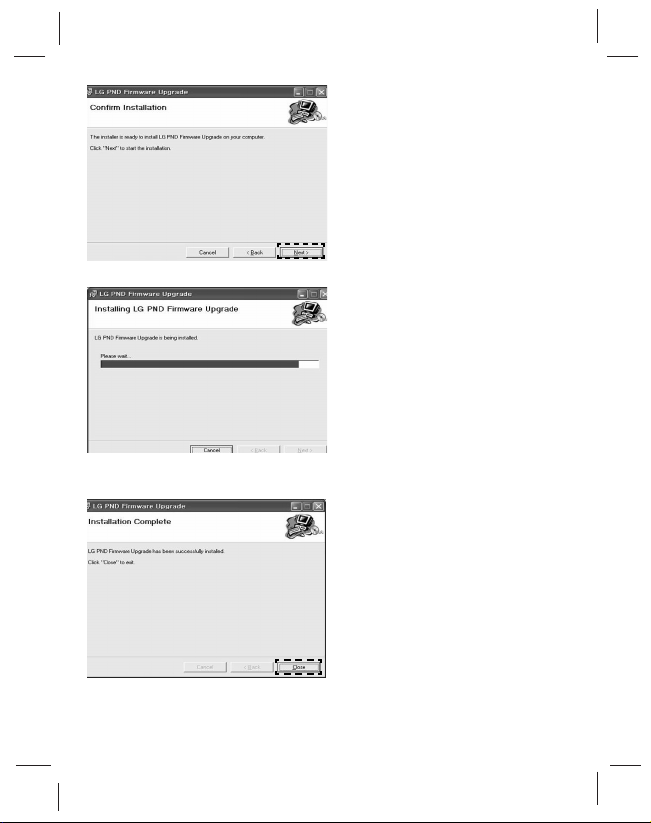
4) When the installer is ready to
install, click <Next> to start
installation.
5) LG PND Firmware Upgrade is
being installed.
6) Click [Close] to finish installation when the message as
below is displayed.
Page 8
8
Firmware Upgrade
<Start the Firmware upgrade application>
<STEP 1: The guide for connecting device>
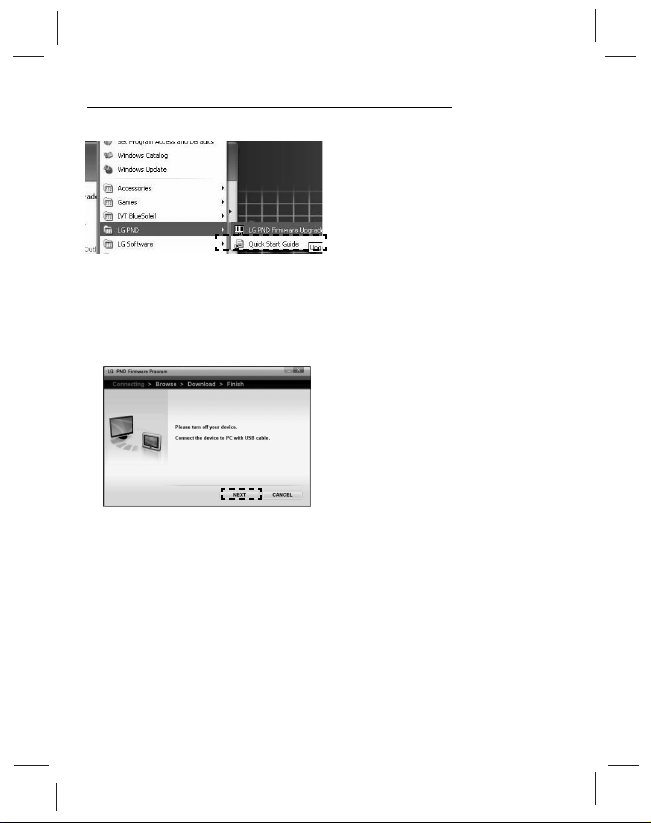
1) Start Firmware Upgrade application (START -> PROGRAM> LGPND -> FIRMWARE
UPGRADE).
Or click the shortcut icon on
desktop.
2) After do application, the connecting method will be shown.
<Message>
Please turn off your device.
Connect the device to PC with
USB cable.
- Click [NEXT] to move to next
step.
* Click [CANCEL] in any steps to cancel for upgrading.
Page 9
9
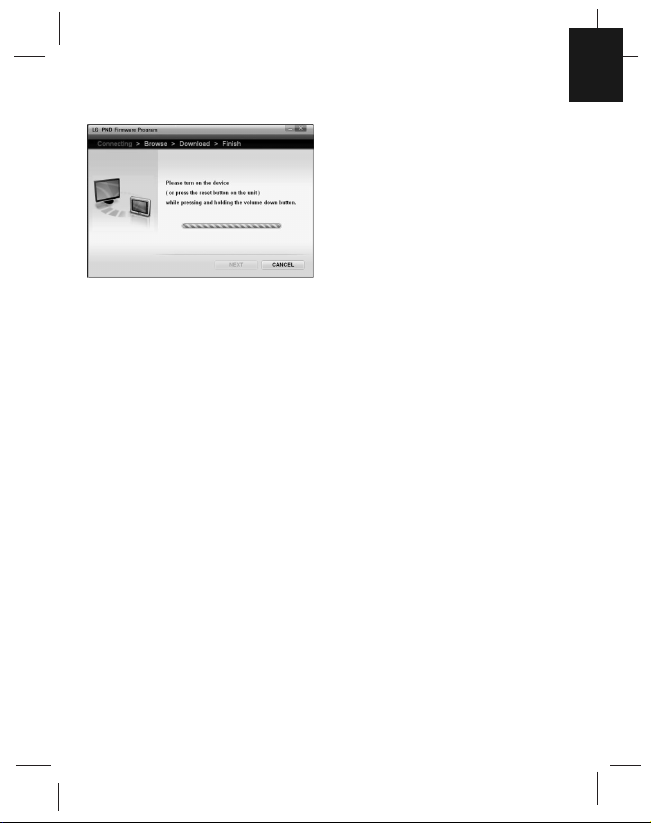
<STEP 2: Connecting the USB>
3) Press and hold the volume(-)
key, then press reset button.
<Message>
Please turn on the device ( or
press the reset button on the
unit)while pressing and holding
the volume (-) button.
- The software will automatically
activate USB connection.
- When USB is connected, you
can move to next step automatically.
- In case that you connect USB
for the first time, you can move
to the <STEP 4> after installing
the USB driver in <STEP 3>.
- If USB is not connected, you
cannot move to the next step.
Page 10
10
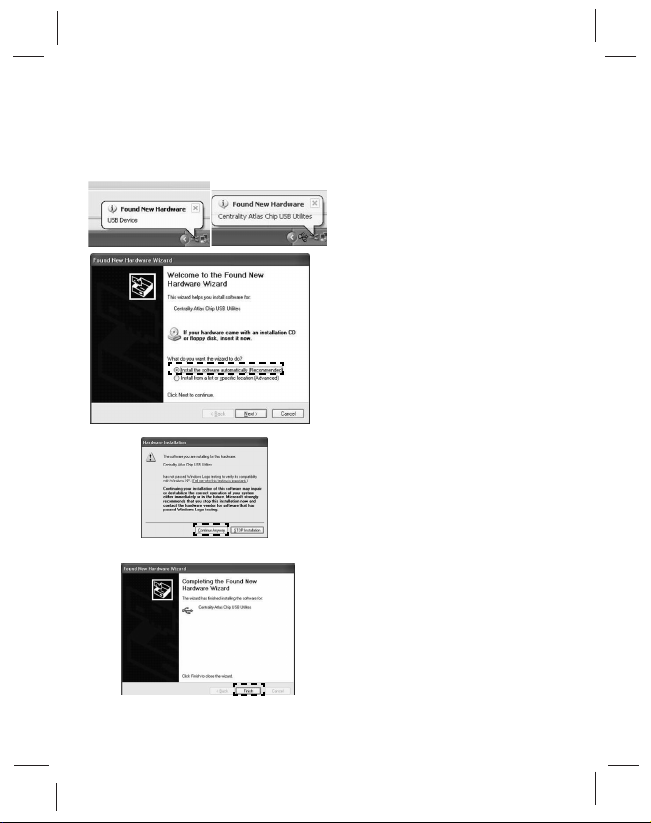
<STEP 3: Installation of the
USB driver when you activate
the application for the first
time.>
1. Computer recognizes the
device automatically when you
connect USB for the first time.
2. The installer starts installing
the driver.
3. Select the recommend item
and click [NEXT]. The driver is
automatically installed.
- When the pop-up window as
below appears, click [Continue
Anyway].
4. After installation is finished,
click [FINISH].
5. Then, you can move to the
next step.
Page 11
11
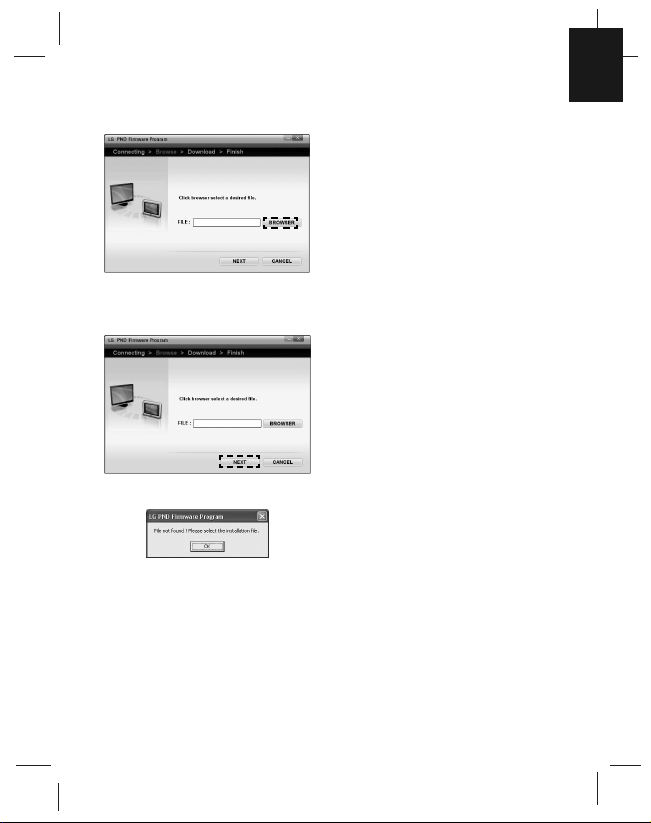
<STEP 4: Browsing files.>
4) Click [BROWSER] to move to
the file browsing window.
Then, a file you want to
upgrade.
<Message>
Click browser select a desired
file.
5) Click [NEXT] to move to the
<STEP 5>
- If the selected file does not exist
and you enter a wrong file
name, the error message as
below will appear.
<Error Message>
File not found! Please select the
installation file.
Page 12
12
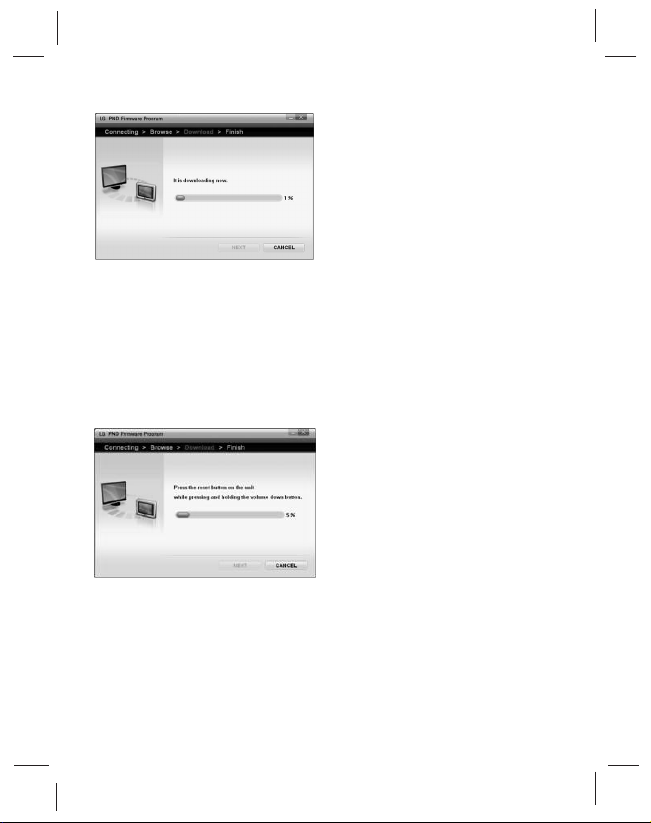
<STEP 5: E- boot update>
<STEP 6:Reset>
6) It is updating the E - boot.
<Message>
It is downloading now
(Please wait.)
7) After E-boot update is finished,
the progress bar will stop at
5% and the next step will start
automatically.
8) Press and hold the volume (-)
Key, then press reset button.
<Message>
Please press the reset button on
the unit while pressing and holding the volume(-) button.
- The software will automatically
activate USB connection.
- USB must be connected, then
you can move to next step automatically.
Page 13
13
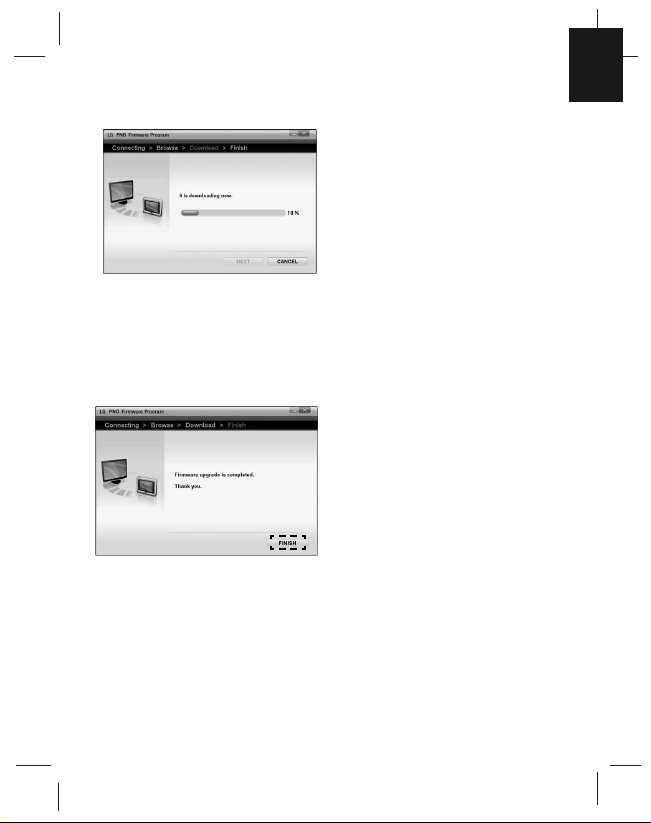
<STEP 7: Download / Update>
<STEP 8: Update completed.>
9) Downloading and Updating
start.
<Message>
It is downloading now.
(Please wait)
10) After downloading and updat-
ing, next step will start.
11) Update Completed.
<Message>
Firmware upgrade is completed.
Thank you.
12) Click [FINISH] to finish
upgrading.
Page 14
14
7. Upgrading navigation application and map
You should complete firmware upgrade before upgrading map software.
(Do upgrade after PC software install and Firmware upgrade.)
The process to upgrade is different depend on models.
z LN500
The navigation application and maps of LN500 are upgraded
when you put the SD card to the device automatically. After
upgrading, remove the SD card before restart.
z LN510 and LN515
Just replace the old SD card by the bundled new one.
z LN 505
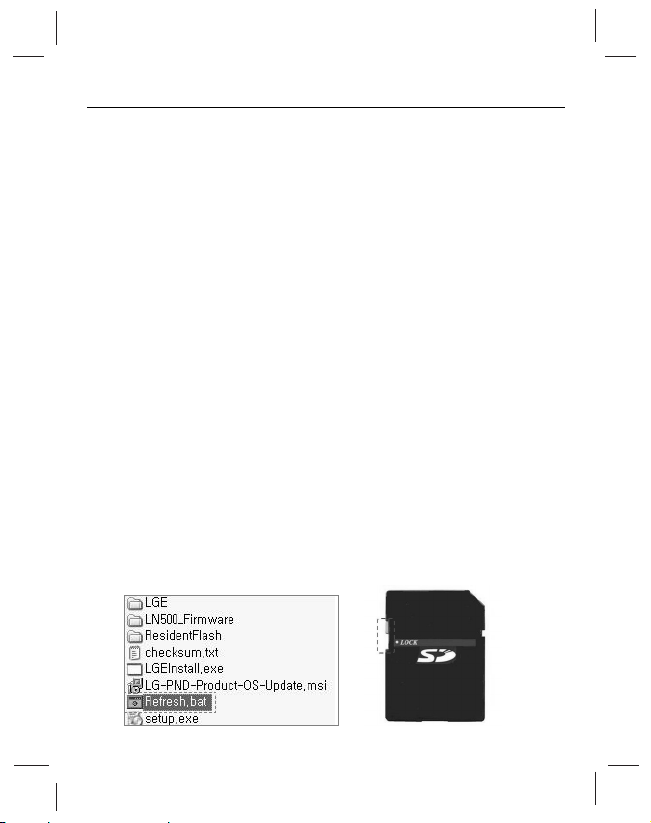
First of all, make sure that SD writing protection switch is off. And
then the navigation application will be upgraded when you put the
SD card to the devices automatically.
! CAUTION (LN505) !
- Don’t remove SD card from the device. The maps are in the SD
card.
- After navigation application is upgraded once, the install program
will be deactivated. So, if you want to reinstall the navigation application with this SD card, insert the SD card into the SD reader of
your PC and double-click the “refresh.bat” file on the SD root directory. Then the install program will be activated. And then insert the
SD card to the device.
Page 15

Serie LN500 - Aktualisierung
der Karten
Bitte lesen Sie diese
Bedienungsanleitung vor
Anschluss, Bedienung und
Einstellung dieses Gerätes
sorgfältig durch.
DEUTSCH
LN500_LGEUK_ENG_MFL42172806
P/N : MFL42172806
Page 16

3 Lieferumfang
3 Aktualisierung der Daten
4-5 Sicherheitshinweise
6-7 Installation der PC-Anwendung
8-13 Firmware-Aktualisierung
14
Navigationssoftware und Karten aktualisieren
2
Dieses Produkt dient zur Aktualisierung der Karten- und
Navigationsdaten für Navigationsgeräte der Serie LN500.
Die Aktualisierung der Modelle LN500 und LN505 wird beim Einsetzen
der SD-Karte in das Gerät und nach der Firmware-Aktualisierung
automatisch gestartet.
Die Aktualisierung der Modelle LN510 und LN515 erfolgt durch
Austauschen der alten SD-Karte gegen die neue Karte.
Firmware-Version: 2.0.0
Betriebssysteme: WINDOWS 2000/XP/VISTA (32 Bit)
Page 17

3
Lieferumfang
1) SD-Speicherkarte
- Karte (einschl. Navigationssoftware)
- Software (zur Aktualisierung der Geräte-Firmware)
2) Benutzerhandbuch
3) Schnellanleitung zur Installation (der Navigationssoftware)
- Das Schnellstarthandbuch (PDF-Datei) ist auf der SD-Karte
gespeichert.
4) Karten-CD (Optional)
Schritte zur Aktualisierung
1) Aktualisierung der Geräte-Firmware: Die Aktualisierung erfolgt
nach der Installation der Software.
2) Navigationssoftware und Karten aktualisieren: Setzen Sie die
mitgelieferte SD-Speicherkarte ein. Der Aktualisierungsvorgang
unterscheidet sich je nach Modell. Weitere Informationen finden
Sie auf Seite 14.
Page 18

4
Sicherheitshinweise
<Aktualisierung der Firmware mit Hilfe der Software>
1) Während der Firmware-Aktualisierung sollte das Gerät mit Strom
versorgt werden.
- Schließen Sie das Kabel für den Zigarettenanzünder oder den
Gleichstromadapter an das Gerät an.
- Falls das Gerät während der Aktualisierung über die Akku-
Batterie mit Strom versorgt wird, laden Sie die Batterie vollständig auf.
2) Das USB-Kabel darf während der Aktualisierung nicht abgezogen
werden.
Falls das USB-Kabel während der Aktualisierung doch getrennt
wird, erscheint eine Fehlermeldung. Klicken Sie in diesem Fall auf
[OK], um die Anwendung automatisch zu beenden.
- Fehlermeldung : USB-Kabel wurde getrennt! Schließen Sie
dieses Fenster zum Beenden der Anwendung.
<Karten-CD (Optional)>
1) Detaillierte Anleitungen (zum Umgang mit den Karten) finden Sie
im Benutzerhandbuch des LGE PC-Portals auf der CD.
Page 19

5
2) Die Anwendung darf während der Aktualisierung nicht beendet
werden.
Wenn die Aktualisierungssoftware nach dem Beenden durch den
Bediener neu gestartet wird, erscheint diese Fehlermeldung. Beim
Durchführen von SCHRITT 5 wird die folgende Fehlermeldung
eingeblendet.
- Fehlermeldung: Das Programm wurde während der
Aktualisierung unerwartet beendet. Bitte drücken Sie zum
Neustart die Reset-Taste.
<Aktualisierung der Firmware über die SD-Speicherkarte>
1) Mit diesem Gerät ist kein TMC (Staufrühwarnung) möglich, selbst
nach einer Aktualisierung der Software.
- Auch wenn der Eintrag TMC im Menü aufgeführt wird, steht
diese Funktion nicht zur Verfügung.
2) Das Navigationsmenü [Navi Menu (Navigationsmenü) - Setup
(Einstellungen) - Display (Anzeige) - Day&Night (Tag-/Nachtfahrt)
- Auto (Autom.)] steht möglicherweise nicht zur Verfügung, selbst
nach einer Aktualisierung der Software.
3) Der Inhalt der Kurzanleitung im Navigationsmenü unter [Setup
(Einstellungen) - Extras (Extras) - Tutorial (Kurzanleitung)] kann
sich von der aktualisierten Navigationssoftware unterscheiden.
Page 20

6
Installation der PC-Anwendung
1) Klicken Sie zum Starten der
Installation auf die Datei
“Setup.exe”.
2) Wenn die LG PND FirmwareAktualisierung erscheint,
klicken Sie für den nächsten
Schritt auf [NEXT] (Weiter).
3) Wählen Sie ein Verzeichnis für
die Installation.
- Geben Sie das Verzeichnis
entweder direkt ein oder
klicken Sie auf [Browse]
(Durchsuchen), um einen
Ordner festzulegen.
- Das Standardverzeichnis
lautet <C:\Programme\LG
PND\LG PND Firmware
Upgrade>.
Page 21

7
4) Sobald das Programm bereit
ist, klicken Sie zum Beginn der
Installation auf [Next] (Weiter).
5) Die LG PND FirmwareAktualisierung wird daraufhin
durchgeführt.
6) Wenn die nebenstehende
Meldung angezeigt wird,
klicken Sie auf [Close]
(Schließen), um die Installation
abzuschließen.
Page 22

8
Firmware-Aktualisierung
<Programm zur Firmware-Aktualisierung starten>
<SCHRITT 1: Anleitung zum
Anschluss des Gerätes>
1) Starten Sie das Programm zur
Firmware-Aktualisierung
(START -> PROGRAMME->
LGPND -> FIRMWARE
UPGRADE).
Das Programm kann auch
über die Verknüpfung auf dem
Desktop gestartet werden.
2) Nach dem Start des
Programms werden die
Anschlussmöglichkeiten
angezeigt.
<Meldung>
Bitte schalten Sie das Gerät aus.
Schließen Sie das Gerät über
das USB-Kabel am PC an.
- Klicken Sie für den nächsten
Schritt auf [NEXT] (Weiter).
* Klicken Sie auf [CANCEL] (Abbrechen), um die Aktualisierung
jederzeit zu beenden.
Page 23

9
<SCHRITT 2: USB-Anschluss>
3) Halten Sie die Lautstärketaste
(-) gedrückt und drücken Sie
die Reset-Taste.
<Meldung>
Bitte halten Sie die Lautstärketaste
(-) gedrückt und schalten Sie das
Gerät ein (bzw. drücken Sie die
Reset-Taste am Gerät).
- Die USB-Verbindung wird
daraufhin von der Software
automatisch aktiviert.
- Nach erfolgter USB-Verbindung
wechselt das Programm
automatisch zum nächsten
Schritt.
- Installieren Sie Bei der erstmali-
gen USB-Verbindung das USBLaufwerk in <SCHRITT 3> und
fahren Sie mit <SCHRITT 4>
fort.
- Der nächste Schritt kann nur
durchgeführt werden, wenn ein
USB-Anschluss vorgenommen
wurde.
Page 24

10
<SCHRITT 3: Installation des
USB-Gerätes beim erstmaligen
Starten der Software>
1. Der Computer erkennt das
USB-Gerät beim ersten
Anschluss automatisch.
2. Daraufhin werden die Treiber
für das USB-Gerät installiert.
3. Wählen Sie den empfohlenen
Eintrag und klicken Sie auf
[NEXT] (Weiter). Die Treiber
werden automatisch installiert.
- Falls das folgende Fenster
eingeblendet wird, klicken Sie
auf [Continue Anyway]
(Trotzdem fortsetzen).
4. Klicken Sie nach Abschluss
der Installation auf [FINISH]
(Fertig stellen).
5. Fahren Sie nun mit dem
nächsten Schritt fort.
Page 25

11
<SCHRITT 4: Nach Dateien
suchen>
4) Klicken Sie auf [BROWSER]
(Durchsuchen), um das
Dateifenster einzublenden.
Wählen Sie hier eine Datei zur
Aktualisierung aus.
<Meldung>
Klicken Sie auf Durchsuchen, um
die gewünschte Datei zu suchen.
5) Klicken Sie auf [NEXT]
(Weiter), um mit <SCHRITT 5>
fortzufahren.
- Falls die ausgewählte Datei
nicht existiert und ein falscher
Dateiname eingegeben wurde,
wird die nebenstehende
Fehlermeldung eingeblendet.
<Fehlermeldung>
Datei nicht gefunden! Bitte
wählen Sie eine
Installationsdatei.
Page 26

12
<SCHRITT5: E-Boot-Update>
<SCHRITT 6:Reset>
6) Aktualisierung des E-Boot.
<Meldung>
Dateien werden geladen.
(Bitte warten.)
7) Nach dem E-Boot-Update wird
der Fortschrittsbalken bei 5%
angehalten und automatisch
der nächste Schritt durchgeführt.
8) Halten Sie die Lautstärketaste
(-) gedrückt und drücken Sie
die Reset-Taste.
<Meldung>
Bitte halten Sie die Lautstärketaste
(-) gedrückt und drücken Sie die
Reset-Taste am Gerät.
- Die USB-Verbindung wird von
der Software automatisch
aktiviert.
- Der nächste Schritt kann nur
durchder geführt werden, wenn
ein USBAnschluss vorgenommen wurde.
Page 27

13
<SCHRITT 7:
Laden/Aktualisierung>
<SCHRITT 8: Aktualisierung
abgeschlossen>
9) Ladevorgang und Aktualisierung werden gestartet.
<Meldung>
Dateien werden geladen.
(Bitte warten)
10) Nach dem Laden und Aktuali-
sieren wird automatisch der
nächste Schritt durchgeführt.
11) Die Aktualisierung ist jetzt
abgeschlossen.
<Meldung>
Firmware-Aktualisierung abgeschlossen. Vielen Dank.
12) Klicken Sie auf [FINISH]
(Fertig stellen), um die
Aktualisierung zu beenden.
Page 28

14
7. Navigationssoftware und Karten aktualisieren
Vor der Aktualisierung der Karten sollte eine Firmware-Aktualisierung
durchgeführt werden.
(Die Aktualisierung sollte nach der Installation der PC-Software und
nach der Firmware-Aktualisierung vorgenommen werden.)
Der Aktualisierungsvorgang unterscheidet sich je nach Modell.
z LN500
Navigationssoftware und Karten des LN500 werden beim
Einführen der SD-Karte in das Gerät automatisch aktualisiert.
Entfernen Sie nach der Aktualisierung die SD-Karte und führen
Sie einen Neustart durch.
z LN510 und LN515
Es muss lediglich die alte SD-Karte durch die mitgelieferte neue
Karte ersetzt werden.
z LN 505
Stellen Sie zunächst sicher, dass der Schreibschutz der SD-Karte
deaktiviert ist. Die Navigationssoftware wird beim Einführen der
SD-Karte in das Gerät automatisch aktualisiert.
! ACHTUNG (LN505) !
- Die SD-Karte nicht vom Gerät entfernen. Die Karten sind auf der
SD-Karte gespeichert.
- Nach der Aktualisierung der Navigationssoftware wird das
Installationsprogramm beendet. Falls die Navigationssoftware auf
dieser SD-Karte neu installiert werden muss, setzen Sie die SDKarte im SD-Kartenleser des PCs ein und doppelklicken Sie im
Hauptverzeichnis der SD-Karte auf die Datei “refresh.bat”.
Daraufhin wird das Installationsprogramm gestartet. Setzen Sie
nun die SD-Karte im Gerät ein.
Page 29

Posodobitev zemljevida za serijo LN500
Preden priključite, zaženete ali
prilagodite ta izdelek, podrobno
in v celoti preberite to knjižico z
navodili.
LN500_LGEUK_SLOVEN_MFL42172806
P/N : MFL42172806
SLOVENIAN
Page 30

3 Vsebina paketa
3 Navodila za posodobitev
4–5 Nasveti za varnost
6–7 Namestitev računalniške aplikacije
8–13 Posodobitev vgrajene programske
opreme
14 Nadgradnja programske opreme za
navigacijo in zemljevidov
2
Izdelek je narejen za posodobitev zemljevida in navigacije serije
LN500.
Programska oprema naprav LN500 in LN505 se samodejno posodobi,
ko v napravo vstavite kartico SD.
Programsko opremo naprav LN510 in LN515 nadgradite tako, da staro
kartico SD zamenjate s tukaj priloženo.
Različica vdelane programske opreme: 2.0.0
Delovno okolje: WINDOWS 2000/XP/ VISTA (32-bitna)
Page 31

3
Vsebina paketa
1) Pomnilniška kartica SD
– Zemljevid (navigacijski program je priložen)
– Programska oprema (za posodobitev vgrajene programske
opreme naprave)
2) Navodila za uporabo
3) Kratka navodila za namestitev (za programsko opremo za
navigacijo)
– QSG (datoteka PDF) je priložen pomnilniški kartici SD
4) CD z zemljevidom (izbirno)
Navodila za posodobitev
1) Posodobitev vgrajene programske opreme: opremo posodobite z
namestitvijo programske opreme.
2) Nadgradnja programske opreme za navigacijo in zemljevidov:
vstavite priloženo novo pomnilniško kartico SD. Postopek
nadgradnje se lahko razlikuje glede na model. Za več podrobnosti
glejte stran 14.
Page 32

4
Nasveti za varnost
<Med posodabljanjem vgrajene programske opreme>
1) Med posodobitvijo mora biti naprava priključena v omrežje.
– Napravo povežite z adapterjem DC ali cigaretnim priključkom v
avtomobilu.
– Če uporabljate baterijo, jo pred posodobitvijo napolnite.
2) Med posodobitvijo ne odklopite kabla USB.
Če kabel USB odklopite med posodobitvijo, bo prikazano
sporočilo o napaki. Kliknite [OK] (V redu), če želite, da se
aplikacija samodejno zapre.
– Sporočilo o napaki: USB is disconnected! Close to terminate the
application (Kabel USB ni povezan. Zaprite to okno, če želite
zapustiti aplikacijo).
<CD z zemljevidom (izbirno)>
1) Za podrobnosti o uporabi zemljevida si oglejte Priročnik za
uporabnike, ki je v mapi LGE PC Portal na CD-ju.
Page 33

5
2) Med posodobitvijo ne zaprite programa.
Če program po prisilni zaustavitvi ponovno zaženete, bo prikazano
sporočilo o napaki. Pri petem koraku bo prikazano sporočilo o
napaki, kot je prikazano spodaj.
– Sporočilo o napaki: During upgrade the program is closed
abruptly. Please push the reset button to restart it (Program je
bil nasilno zaustavljen med posodobitvijo. Če ga želite ponovno
zagnati, pritisnite gumb za ponastavljanje).
<Uporabljanje pomnilniške kartice SD za posodobitev>
1) Funkcija TMC te naprave ne bo na voljo niti po posodobitvi
programske opreme.
– Tudi če bo v meniju prikazan gumb TMC, funkcija še vedno ne
bo na voljo.
2) Funkcije [Navi Menu - Setup - Display - Day&Night - Auto]
(Navigacijski meni - Nastavitve - Zaslon - Dan & Noč Samodejno) na navigacijskem meniju ne bodo na voljo niti, ko bo
posodobitev zaključena.
3) Informacije [Setup - Extras - Tutorial] (Nastavitve - Dodatno Vadnica) na navigacijskem meniju se lahko razlikujejo od tistih na
napravi s posodobljeno programsko opremo.
Page 34

6
Namestitev računalniške aplikacije
1) Za namestitev kliknite datoteko
»Setup.exe«.
2) Ko se prikaže stran LG PND
Firmware upgrade
(Posodobitev programske
opreme LG PND), kliknite
[Next] (Naprej) in nadaljujte z
naslednjim korakom.
3) Izberite pot namestitve.
– Pot lahko vnesete ročno ali z
možnostjo [Browse]
(Prebrskaj).
– Privzeta mapa je »C:\pro-
gram files\LG PND\LG PND
Firmware Upgrade>.
Page 35

7
4) Ko je namestitveni program
pripravljen, kliknite [Next]
(Naprej) in zaženite namestitev.
5) Posodobitev vgrajene programske opreme LG PND je v
teku.
6) Ko se prikaže spodnje sporočilo, kliknite [Close] (Zapri) in
zaključite namestitev.
Page 36

8
Posodobitev vgrajene programske opreme
<Zagon aplikacije za posodobitev vgrajene programske opreme>
<1. KORAK: Navodila za
povezovanje naprave>
1) Zaženite aplikacijo za
posodobitev vgrajene programske opreme (START ->
PROGRAM-> LGPND ->
FIRMWARE UPGRADE) ali
kliknite bližnjico na namizju.
2) Po zagonu aplikacije bo
prikazan način povezave.
<Sporočilo>
Please turn off your device
(Izklopite napravo). Connect the
device to PC with USB cable
(Napravo povežite z računalnikom
prek kabla USB).
– Kliknite [NEXT] (Naprej) in
nadaljujte z naslednjim
korakom.
* Kadar koli lahko kliknete [CANCEL] (Prekliči), če želite zaustaviti
posodabljanje.
Page 37

9
<2. KORAK: Priključitev kabla
USB>
3) Pritisnite in držite gumb za nastavljanje glasnosti (-) in nato
pritisnite gumb za ponastavljanje.
<Sporočilo>
Please press the reset button on
the unit while pressing and holding the volume(-) button (Medtem
ko držite gumb za nastavljanje
glasnosti (-), pritisnite gumb za
ponastavljanje).
– Programska oprema bo samod-
ejno aktivirala povezavo USB.
– Ko je naprava USB povezana,
lahko nadaljujete z naslednjim
korakom.
– V primeru, da napravo USB
povezujete prvič, lahko s 4.
korakom nadaljujete, ko
namestite gonilnike za USB (3.
korak).
– Če naprava USB ni povezana,
ne morete nadaljevati.
Page 38

10
<3. KORAK: Namestitev
gonilnika USB, ko aplikacijo
zaganjate prvič>
1. Ko napravo USB povežete
prvič, jo računalnik samodejno
prepozna.
2. Namestitveni program začne
nameščati gonilnik.
3. Izberite priporočeni element in
kliknite [NEXT] (Naprej).
Gonilnik bo nameščen
samodejno.
– Če se prikaže pojavno okno (kot
je prikazano spodaj), kliknite
[Continue Anyway] (Vseeno
nadaljuj).
4. Po končani namestitvi kliknite
[FINISH] (Končaj).
5. Potem lahko nadaljujete z
naslednjim korakom.
Page 39

11
<4. KORAK: Iskanje po
datotekah>
4) Kliknite [BROWSER]
(Pregledovalnik), če želite
datoteko premakniti v okno za
pregledovanje. Nato kliknite
datoteko, ki jo želite posodobiti.
<Sporočilo>
Click browser select a desired file
(Kliknite pregledovalnik in izberite
želeno datoteko).
5) Kliknite [NEXT] (Naprej) in
nadaljujte z naslednjim
korakom (<Korak 5>).
– Če izbrana datoteka ne obstaja
ali če ste vnesli neveljavno ime
datoteke, se bo prikazalo
sporočilo o napaki.
<Sporočilo o napaki>
File not found! Please select the
installation file (Datoteke ni
mogoče najti! Izberite
namestitveno datoteko).
Page 40

12
<5. KORAK: Posodabljanje
prek storitve E-boot>
<6. KORAK: Ponastavitev>
6) Posodabljanje prek storitve Eboot poteka.
<Sporočilo>
Prenos poteka
(Prosimo, počakajte).
7) Ko bo posodabljanje prek
storitve E-boot zaključeno, se
bo vrstica poteka ustavila pri 5
% in naslednji korak se bo
zagnal samodejno.
8) Pritisnite in držite gumb za nastavljanje glasnosti (-) in nato
pritisnite gumb za ponastavljanje.
<Sporočilo>
Medtem ko držite gumb za nastavljanje glasnosti (-), pritisnite
gumb za ponastavljanje.
– Programska oprema bo samod-
ejno aktivirala povezavo USB.
– Naprava USB mora biti
povezana, šele nato lahko
nadaljujete z naslednjim
korakom.
Page 41

13
<7. KORAK: Prenos /
Posodobitev>
<8. KORAK: Posodobitev
zaključena>
9) Začetek prenosa in
posodobitve.
<Sporočilo>
Prenos poteka.
(Prosimo, počakajte.)
10) Po prenosu in posodobitvi,
nadaljujte z naslednjim
korakom.
11) Posodobitev zaključena.
<Sporočilo>
Vgrajena programska oprema
uspešno posodobljena.
Hvala.
12) Če želite zaključiti namestitev,
pritisnite [FINISH](Zaključi).
Page 42

14
7. Nadgradnja programske opreme za navigacijo in zemljevidov
Preden posodobite zemljevid, morate posodobiti vgrajeno programsko
opremo.
(Ko namestite programsko opremo in posodobite vgrajeno programsko
opremo, posodobite še zemljevid.)
Postopek nadgradnje se lahko razlikuje glede na model.
z LN500
Pri LN500 se programska oprema in zemljevidi samodejno
posodobijo, ko vstavite kartico SD. Ko programsko opremo
nadgradite, pred ponovnim zagonom odstranite kartico SD.
z LN510 in LN515
Staro kartico SD zamenjajte s tukaj priloženo.
z LN 505
Najprej preverite, ali je zaščita proti pisanju na kartico SD
izklopljena. Nato bo programska oprema za navigacijo samodejno
nadgrajena, takoj ko vstavite kartico SD.
! POZOR (LN505) !
– Kartice SD ne odstranite iz naprave. V kartici SD so shranjeni
zemljevidi.
– Ko je programska oprema nadgrajena, se program za namestitev
deaktivira. Če želite s to kartico SD ponovno namestiti programsko
opremo za navigacijo, jo vstavite v računalnikov bralnik kartic in
dvokliknite datoteko »refresh.bat« v korenskem imeniku v kartici
SD. Program za namestitev se aktivira. Nato kartico SD vstavite v
napravo.
Page 43

Page 44

 Loading...