

Page 1
DISHWASHER
OWNER'S MANUAL
MODEL : D1422W(L,M,T,B,C,D,A)F(B,U)
D1423W(L,M,T,B,C,D,A)F(B,U)
Please read this manual carefully before operating your
dishwasher. Retain it for future reference.
You may also find user manual in video version at following link
www.guidelg.com/dishwasher
Page 2

ONTENTS
C
SAFETY AND CAUTION 3
INSTALLATION INSTRUCTIONS 5
PARTS NAME 9
FUNCTION OF CONTROL BUTTON 10
BEFORE USING FOR THE FIRST TIME 13
HOW TO USE AND OPERATE 15
OPERATING SEQUENCE 21
PROGRAM 22
USER MAINTENANCE INSTRUCTIONS 23
TROUBLE SHOOTING GUIDE 24
SPECIFICATION
Page 3

AFETY AND CAUTION
S
IMPORTANT SAFETY INSTRUCTIONS
WARNING
- When using your dishwasher, follow basic precautions,
including the following:
• Please read this manual carefully before using
the dishwasher for the first time.
• This manual contains very important notes
regarding the installation, use and maintenance
of your dishwasher.
• The manufacturer can not be responsible for
problems caused by ignoring these safety and
caution instructions.
• This dishwasher is designed for normal
household use.
• Do not use the dishwasher for industrial and
commercial use, or other purpose.
• The appliance is not intended for use by young
children or infirm persons without supervision.
• Check packaging and dishwasher immediately
for signs of transport damage. If the appliance
is damaged, do not put it into use but contact
your supplier without delay.
■
During installation
• Electrical connection must be in accordance
with the rating label.
• Electrical safety is only guaranteed when the
earth system of your house is in accordance
with the related local regulations.(Do not use
an extension cable or cord.)
• If the hot water exceeds 65ºC, adjust the water
heater setting. If the hot water temperature can
not be maintained below 65ºC, the dishwasher
must be connected to cold water.
• If power supply cord is damaged, it must only
be replaced by the manufacturer or its service
agent or a similar qualified person in order to
avoid a hazard.
• This appliance must be positioned so that the
plug is accessible.
• The appliance is to be connected to the water
mains using new hose-sets and that old hosesets should not be reused.
■
During use
• Only suitable household utensils should be
placed in the dishwasher.
(Please avoid utensils; that are nonheatresistant, metal decorated, etc.)
• Do not use any kinds of solvent in your
dishwasher. They may cause an explosion or
fire.
• Do not spray water on the appliance.
It may cause the failure of electric parts or
electric shock.
• Do not push down or sit on the inner door
when the door opened. It may cause the
deformation or failure of your dishwasher.
• Do not use the detergent for hand washing.
The detergent for dishwasher should be used
for normal operation.
• This appliance is fitted with a safety function
that automatically stops the operation of the
dishwasher when it is exposed to heavy
disturbance on its mains.
• Dishwasher detergents are strongly alkaline.
They can be extremely dangerous if
swallowed. Avoid contact with skin and eyes
and keep children away from the dishwasher
when the door is open.
Check that the detergent receptacle is empty
after completion of the wash cycle.
■
Child Safety
• Controls may be locked using “Child Lock”
mode to prevent from all the setting from
being changed by a child.
• Keep children away from detergents and rinseaids.
• Do not allow children to operate the
dishwasher.
• Young children should be supervised to ensure
that they do not play with the appliance.
3
Page 4
AFETY AND CAUTION
S
CAUTION
Most appliances recommend they be placed upon a dedicated circuit; that is, a single outlet circuit
which powers only that appliance and has no additional outlets or branch circuits. Check the
specification page of this owner's manual to be certain.
Do not overload wall outlets. Overloaded wall outlets, loose or damaged wall outlets, extension cords,
frayed power cords, or damaged or cracked wire insulation are dangerous. Any of these conditions
could result in electric shock or fire. Periodically examine the cord of your appliance, and if its
appearance indicates damage or deterioration, unplug it, discontinue use of the appliance, and have the
cord replaced with an exact replacement part by an authorized servicer.
Protect the power cord from physical or mechanical abuse, such as being twisted, kinked, pinched,
closed in a door, or walked upon. Pay particular attention to plugs, wall outlets, and the point where the
cord exits the appliance.
CAUTION
This appliance is not intended for use by persons (including children) with reduced physical, sensory or
mental capabilities, or lack of experience and knowledge, unless they have been given supervision or
instruction concerning use of the appliance by a person responsible for their safety.
Children should be supervised to ensure that they do not play with the appliance.
concerning the Power Cord
The instructions shall state the substance of the following :
SAVE THESE INSTRUCTIONS
GROUNDING INSTRUCTIONS
This appliance must be grounded. In the event of a malfunction or breakdown, grounding will
reduce the risk of electric shock by providing a path of least resistance for electric current. This
appliance is equipped with a cord having an equipment-grounding conductor and a grounding
plug. The plug must be plugged into an appropriate outlet that is installed and grounded in
accordance with all local codes and ordinances.
WARNING - Improper connection of the equipment-grounding conductor can result in a risk of
electric shock. Check with a qualified electrician or service representative if you are in doubt
whether the appliance is properly grounded. Do not modify the plug provided with the appliance;
if it will not fit the outlet have a proper outlet installed by a qualified electrician.
Disposal of your old appliance
1. When this crossed-out wheeled bin symbol is attached to a product
it means the product is covered by the European Directive
2002/96/EC.
2. All electrical and electronic products should be disposed of
separately from the municipal waste stream via designated
collection facilities appointed by the government or the local
authorities.
3. The correct disposal of your old appliance will help prevent
potential negative consequences for the environment and human
health.
4. For more detailed information about disposal of your old appliance,
please contact your city office, waste disposal service or the shop
where you purchased the product.
4
Page 5
NSTALLATION INSTRUCTIONS
I
WARNING
A qualified electrician/plumber or competent person should carry out any electrical/plumbing
work required to install this appliance.
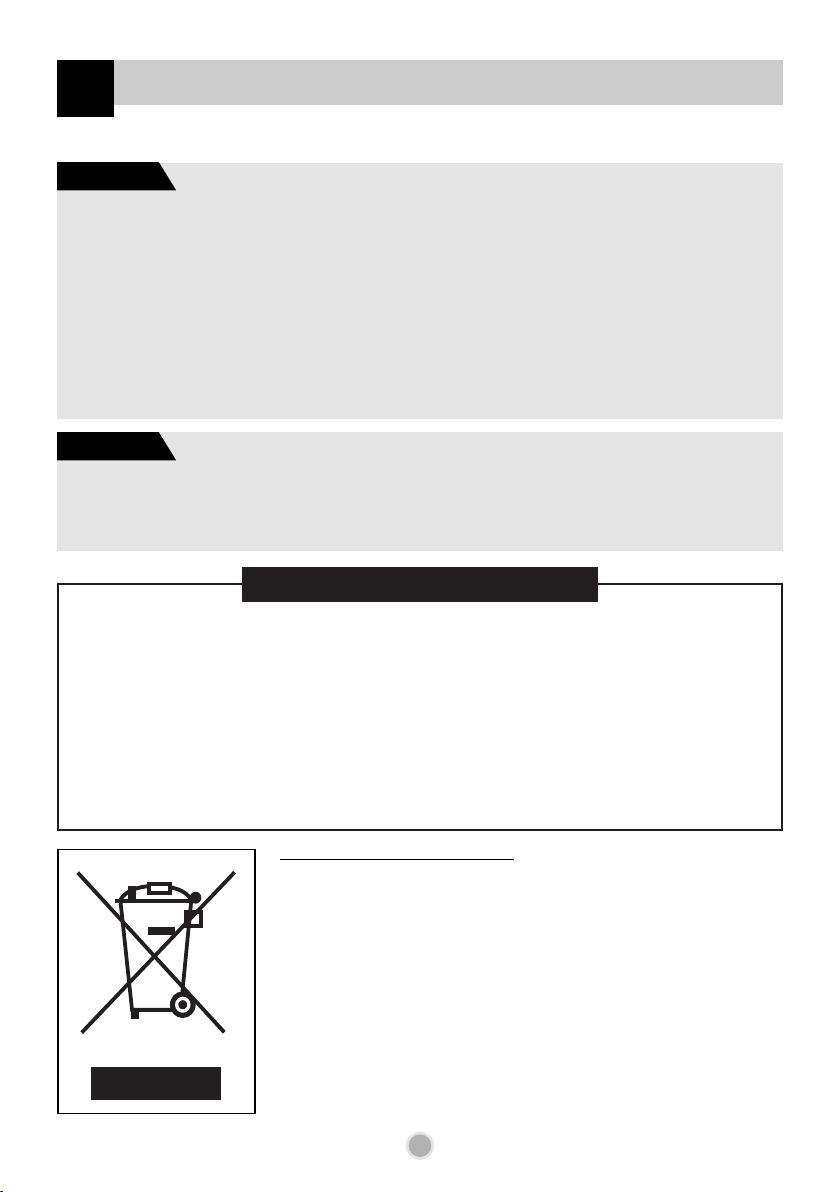
Step 1 :
PREPARE CUPBOARD OPENING
This dishwasher is designed to fit the size
1
shown as below.
Select a location as close to sink as
2
possible for ease of connection to the
water and drain pipes.
To ensure good drainage, the dishwasher
3
should not be installed more than 3 meters
away from the sink.
If dishwasher is installed in a corner, a
4
minimum of 5cm of space is required
between the washer and an adjacent
cabinet or wall.
Step 2 :
PREPARATION FOR ELECTICAL WIRING
CAUTION
For personal safety, remove house
fuse or open circuit breaker before
installation. Do not use an extension
cord or adapter plug with this
appliance. Electrical and earthing
connections must comply with the
national electrical code/provincial and
municipal code and/or other local
codes.
This appliance must be supplied with
1
correct rating voltage and hertz as shown
on instruction manual, and connected to
an individual, properly earthed branch
circuit, protected by a minimum 15 amp
circuit breaker or time delay fuse.
Wiring must be 2 wire with Earth.
The power plug must be in a accessible
2
location adjacent to and not behind the
dishwasher and within 1.2 meters of the
dishwasher side.(See page 7 Fig.A)
3
The power plug must be correctly
earthed, if in doubt, have it checked by a
qualified Electrician. No other appliance
should be connected to the same plug
outlet by a double adapter or similar
plug.
Unit:mm
Any bare wood surrounding the
dishwasher should be sealed with a
waterproof paint or sealant to prevent
swelling.
Dangerous voltage
To indicate hazards arising
from dangerous voltages.
Note – In case of application
in a warning sign the rules
according to ISO 3864 shall
be adhered to.
5
Page 6
NSTALLATION INSTRUCTIONS
I
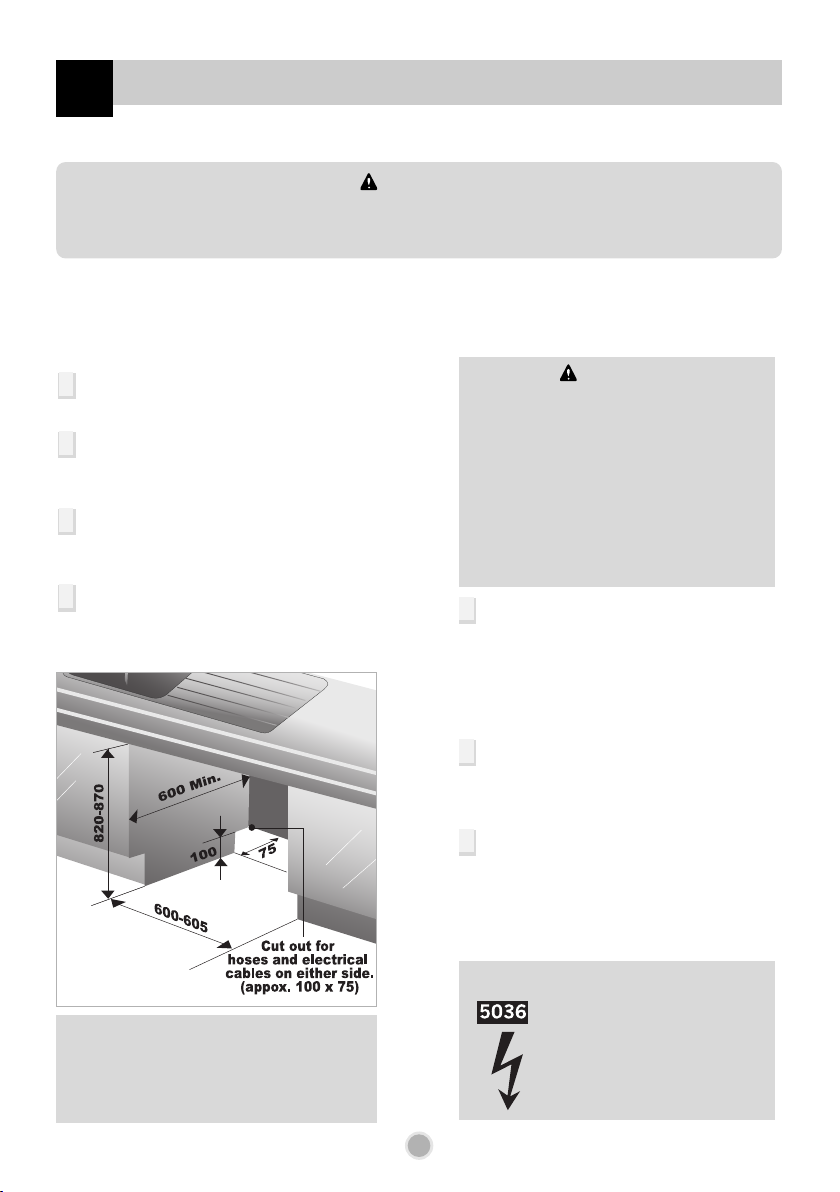
Step 3 :
PREPARING THE DISHWASHER
FOR INSTALLATION
Lay the dishwasher on its back.
1
Adjust the legs to the required height
2
as shown in below figure.
Adjust
leg
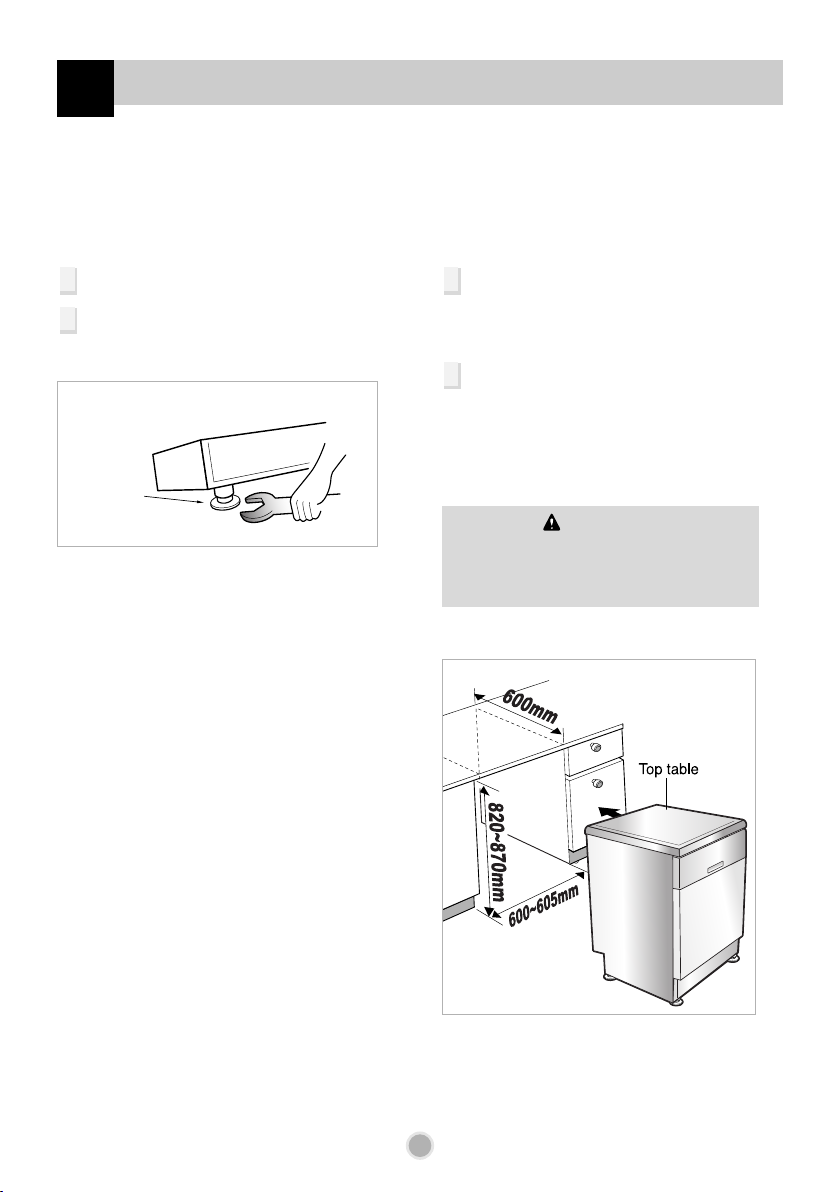
Step 4 :
INSTALLING THE
DISHWASHER IN CUPBOARD
Before sliding the dishwasher into the
1
cupboard opening, all necessary height
and balancing adjustments should be
made using a spanner.
2
Slide the dishwasher into the cabinet
opening carefully. Make sure that the
drain hose inside the cabinet is not
kinked or stretched.
CAUTION
If the height of the cupboard is below
850mm, you should remove the top table
by unscrewing the 2 screws. (Two of rear)
6
Page 7
NSTALLATION INSTRUCTIONS
I
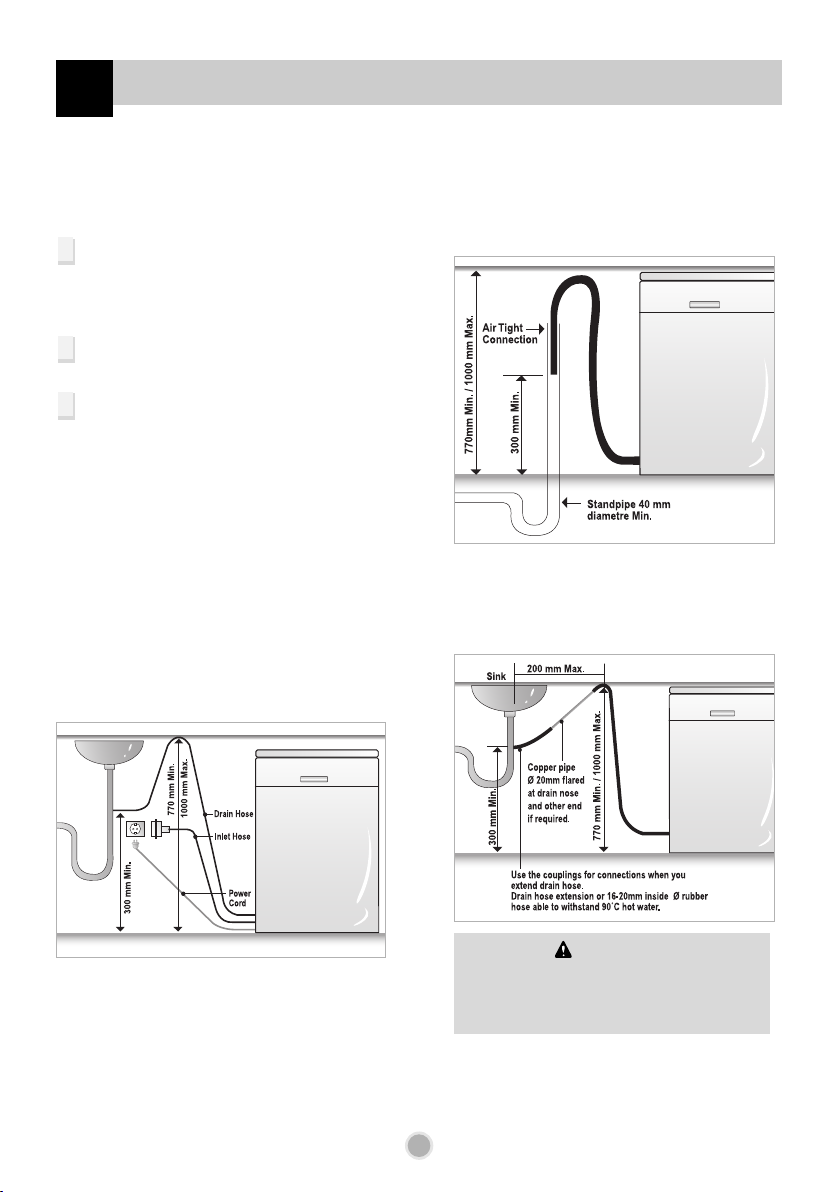
Step 5 :
DRAIN LINE CONNECTION
If the end of drain hose does not fit to
1
the drain line, use a rubber
connector(not supplied) that is
resistant to heat and detergent.
This should be available from a
2
plumbing shop or DIY merchants.
There are two typical connections as
3
shown in Figure A, B.
The “S” trap spigot must be drilled out
cleanly and free of obstruction to its
maximum internal diameter, if used for
drainage.
To prevent siphoning, one of the following
methods must be used:
¡ÆWhen the drain hose is connected to a
sink “s” trap or waste disposal unit, the
hose must be looped up to the underside
of the bench top and secured.
¡ÆWhen the drain hose is connected to a
separate standpipe, it is essential that an
airtight connection be made.
Refer to Fig.B
Fig. B : Drainage connection - stand pipe.
Drain hose Extension
Extend drain hose as shown below.
Fig. A
CAUTION
When you connect or extend drain hose,
make sure that drain hose is not kinked.
(Bends should have a 40 mm radius.)
7
Page 8
NSTALLATION INSTRUCTIONS
Water tap
Water supply
hose
I
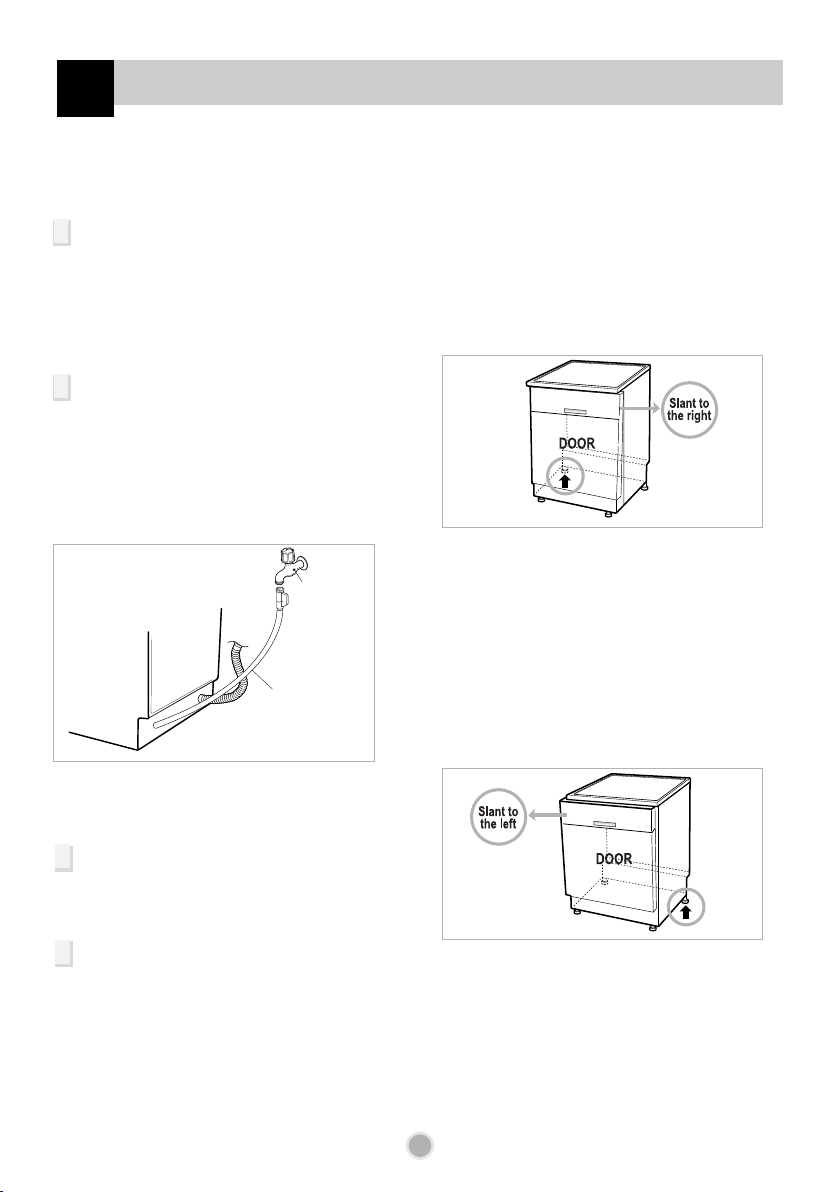
Step 6 :
WATER SUPPLY CONNECTION
Connect the water supply hose to the
1
water tap as shown.(Some models
consist of an inlet valve and hose.)
This dishwasher may be fed with either
hot or cold water. If the water can not be
maintained below 65ºC, the dishwasher
must be connected to cold water.
When connecting, the sealant tape or
2
sealing compound to avoid water leaks.
Make sure that the line is not kinked or
sharply bent.
The new hose-sets supplied with the
appliance are to be used and that old
hose-sets should not be reused.
Step 8 :
HOW TO LEVEL THE DISHWASHER
After installing the dishwasher, you may
notice a slight sticking of the door to the
dishwasher, when you open or close the door.
If this does happen you need to adjust the level
of the dishwasher.
Case 1. In case the door is slanted to the right
Fig. C
• If the door slants to the right, see fig, C and
follow these instructions:
1) Unscrew(counter-clockwise) the left leg of
the back side and correct the level.
2) Check the opening of door and repeat if
necessary until the door opens and closes
properly.
• When the product is correctly leveled, There
should be no slant , stickiness or friction
sound.
Case 2. In case the door is slanted to the left
Step 7 :
FINAL CHECK AND ASSEMBLING
Securely hand tighten supply hose to the
1
water supply.
Plug the power supply cord into an earthed
electrical point and switch on.
After installing and prior to using the
2
dishwasher with crockery, we recommend
that you use the dishwasher on ‘Quick’
mode to rinse through. At this stage it is
useful to ensure that there are no operating
problems or water leaks.
When the dishwasher is used for the first,
there may be a loud noise, if this happens,
turn off the power and restart the
dishwasher.
8
Fig. D
• If the door slants to the left, see fig. D and
follow these instructions:
1) Check the opening of door if there still
remains sticky or friction sound.
2) Check the opening of door and repeat if
necessary until the door opens and closes
properly.
• When the product is correctly leveled, There
should be no slant , stickiness or friction
sound.
Page 9

ARTS NAME
P
1. Control Panel
2. Door Handle
3. Front Cover
4. Lower Cover
5. Display Window
6. Power Button
7. Drain Hose
8. Inlet Hose
9. Power Cord
10. Adjustable Leg
¡The appearance and specifications may vary without notice.
11. Upper Rack
12. Cutlery Basket
13. Detergent And Rinse Aid Dispenser
14. Vapor Vent Cover
15. Upper Spray Arm
16. Lower Spray Arm
17. Filter ASM
18. Lower Rack
19. Salt Container Cap
Funnel
9
Page 10
UNCTION OF CONTROL BUTTON
F
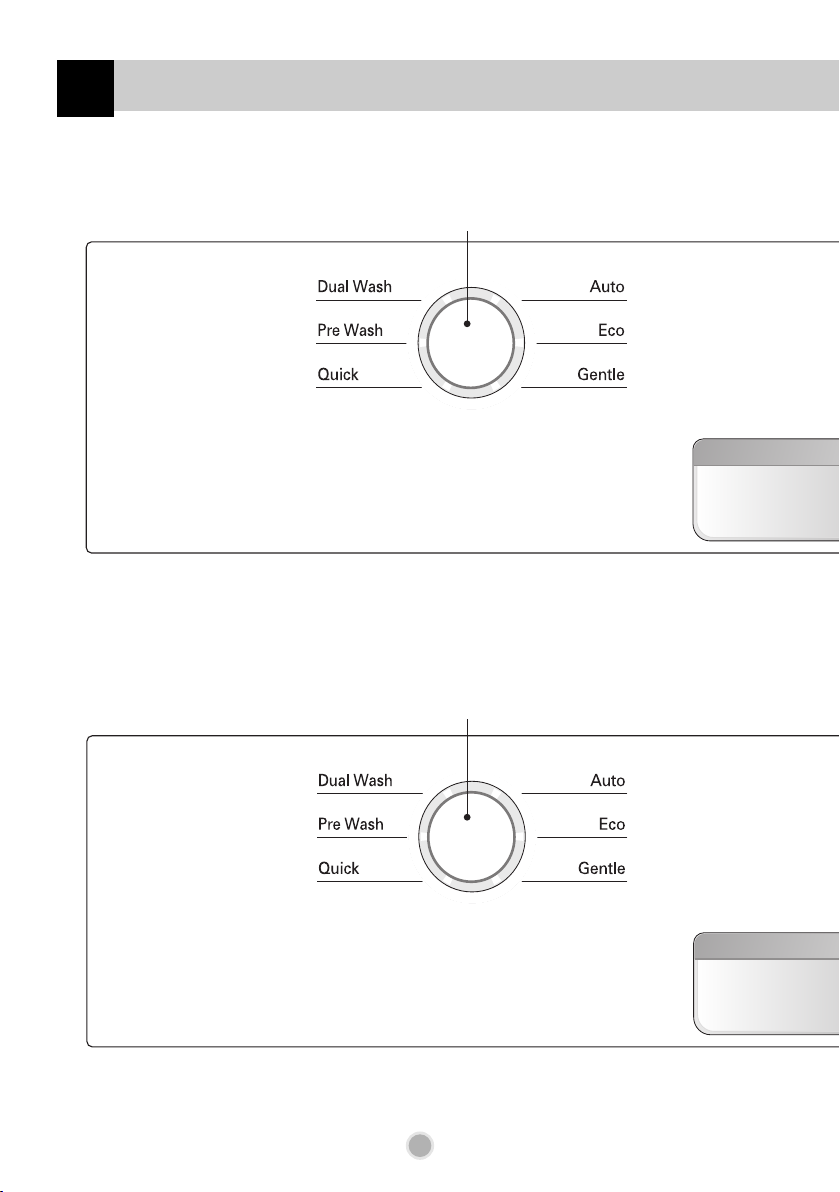
§ MODEL : D1423W(L,M,T,B,C,D,A)F(B,U)
¤¤
Program
§ MODEL : D1422W(L,M,T,B,C,D,A)F(B,U)
¤¤
Program
10
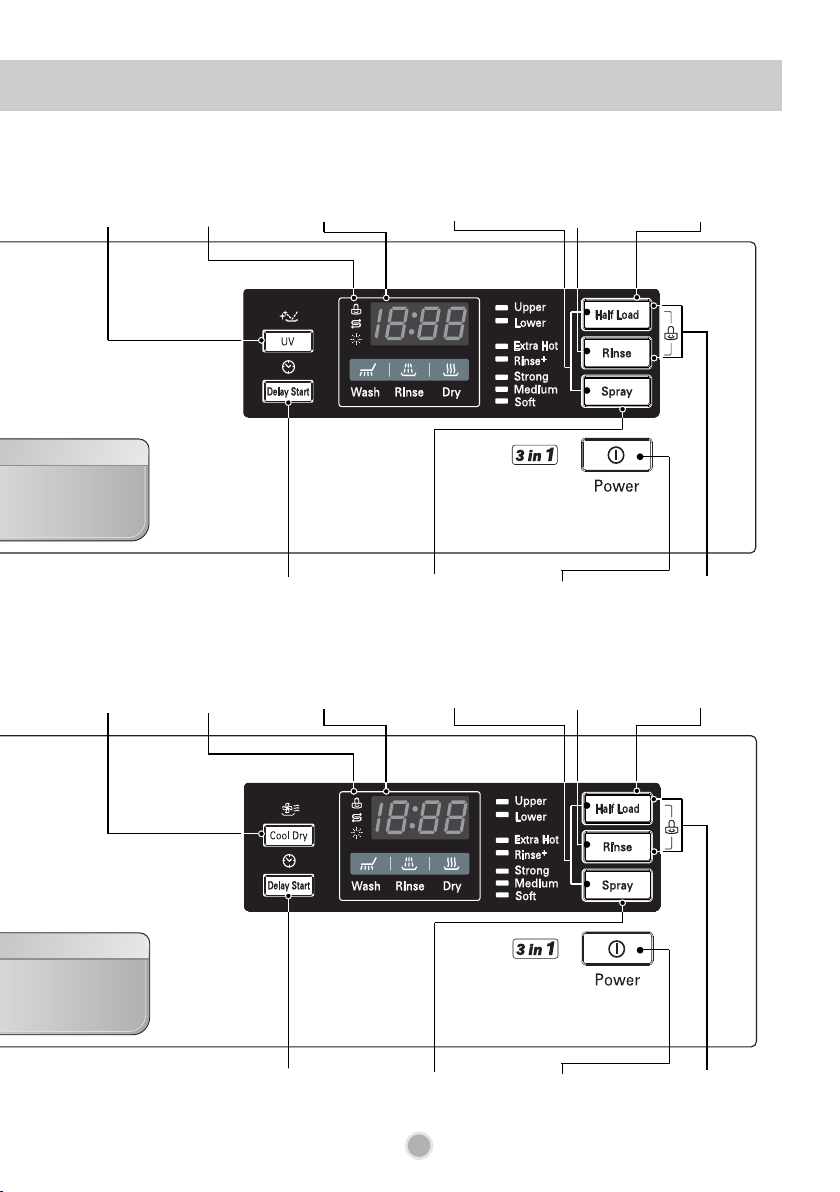
Page 11
¤¤ŁŁ
UV
¤¤ØØ
Indicator
¤¤ŒŒ
Time Left
¤¤ºº
Beep On/Off
¤¤
Rinse
¤¤
Half Load
¤¤ŁŁ
Cool Dry
¤¤ØØ
Indicator
¤¤ææ
Delay Start
¤¤ŒŒ
Time Left
¤¤ææ
Delay Start
¤¤
Spray
¤¤ºº
Beep On/Off
¤¤
Spray
11
¤¤
Power
¤¤
¤¤
Power
Rinse
¤¤
Child Lock
¤¤
Half Load
¤¤
Child Lock
Page 12

UNCTION OF CONTROL BUTTON
F
¤¤
Program
• When you want to select program, press this button.
¤¤ŁŁ
UV
• If you want to sterilize the dishes, press UV button.
• After drying cycle, sterilizer will be performed by UV lamp.
• At this time, “St” code is displayed in display window.
• When you open the door of dishwasher, UV lamp is turned off.
Don’t look at the lamp directly with the naked eye.
Cool Dry
• When you want better drying performance, press this button.
• This process is not part of the program.
• After drying cycle, the fan will operate for a few more minutes to diminish any remaining moisture.
At this time, “Cd” code is displayed in display window.
• If you want, you can open the door and unload the dishes at any time.
¤¤ØØ
Indicator
• Child Lock.
• Refill with special salt.
• Refill with rinse aid.
¤¤ŒŒ
Time Left
• Before starting, the display window shows the running time of the selected program.
• After starting, the display window shows the remaining time.
• If the dishwasher has a trouble, the trouble type is displayed.
“OE”, “FE”, “IE”, “EI”, “HE”, “CE”, “LE”, “tE”
• If this error letters are displayed, please refer to the trouble shooting guide page 25 and follow the guide.
¤¤ºº
Beep On/Off
• The dishwasher must be switched on.
• The beep on/off function can be set by pressing the Half Load and Spray button simultaneously for a
few seconds. Then, a “On” will appear in the display.
• The beep on/off function is automatically canceled when power failure occur.
¤¤
Rinse
• Repeated pressing of the Rinse button will select Extra Hot, Rinse+, Extra Hot & Rinse+.
• If you select the Extra Hot function, the operating temperature will be up to 80¡. (Dual wash, Auto, Eco)
• When you select Rinse+, an additional rinse cycle is added.
¤¤
Half Load
• In case of small load, use upper or lower rack only to save energy.
• With each press, can select Upper or Lower rack only.
• In case you don’t select this button, the machine always works vario washing, which operate upper and
lower spray arm alternately.
¤¤
Child Lock
• Used to lock or unlock the control buttons to prevent all the setting from being changed by a child.
• This function is automatically canceled when power failure occur.
• For locking/ unlocking, press Half Load and Rinse button for a few seconds simultaneously.
¤¤
Power
• For operating, press this button first for power on.
• After operating, this button automatically switches off for safety and energy saving.
• In case of irregular surge disturbance to the machine, the power may be automatically turned off for safety.
¤¤
Spray
• With each press, the level of water jet is changed to Strong, Medium and Soft in a sequence.
¤¤ææ
Delay Start
• If you want to delay the start of selected program, press this button.
• Pressing this button will increase time by 1 hour.
• The delay start time can be adjusted from 1 hour to 19 hours.
12
Page 13
EFORE USING FOR THE FIRST TIME
B
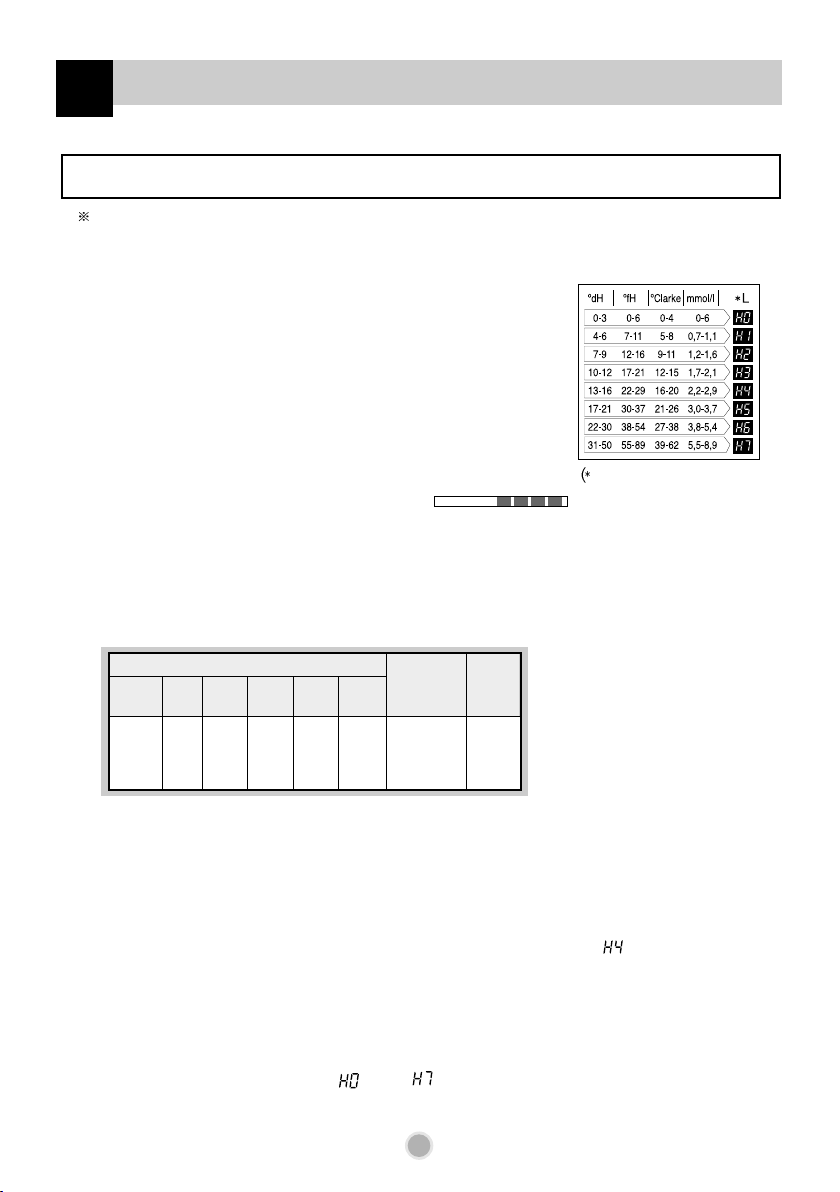
Hardness setting
You have to check your water hardness and set the softening system level before
operating your dishwasher.
Step 1. Check and find water hardness level
< Water hardness level >
§ Method 1
1) Check the water hardness of your area.
(Your water utility company can help you with this.)
2) Set the softening system level of your dishwasher
according to the water hardness level.
Refer to the Step 2.
¡Æ
Method 2
L : Softening system level)
1) Check your water hardness by using test strip. ( )
2) Test Procedure
¤Immerse all reaction zones of the test strip for approx.1sec (not in running water!).
¤ŁShake off excess liquid from the strip and wait for 1min.
Then, the green color of the reaction zone will change to the red-violet.
¤ØCount the number of red-violet from the strip.
< Water hardness level >
number of
the areas
(red-violet)
1
2
3
4
°
d
<7
7 - 14
14 - 21
>21
Hardness range
°
°
e
f
<9
<12,5
9 - 17,5
12,5 - 25
17,5 - 26
25 - 37
>26
>37
mmol/l
(Ca+Mg)
<1,3
1,3 - 2,5
2,5 - 3,8
>3,8
mg/l
Ca
<50
50 - 100
100 - 150
>150
quality
moderately hard
very hard
Water
soft
hard
Softening
system
level
H0, H1
H2, H3
H4, H5
H6, H7
1 °e = 14.25 mg/l CaCO
1 °f = 10 mg/l CaCO
1 °d = 10 mg/l CaO (=1,78 °f) (=1,25 °e)
3
3
3) Set the softening system level of your dishwasher according to the water hardness level.
Refer to the Step 2.
Step 2. Setting up the softening system level of your dishwasher
Adjust the water softener to the setting to the corresponding hardness of the water in your area.
The water softener has 8 adjustment levels.
The dishwasher is programmed at the factory for a water hardness level of “ ”.
This can be checked and altered by using the buttons on the control panel.
1. First, ensure the dishwasher is switched off.
2. Press UV(Cool Dry) and Power button simultaneously and keep them pressed.
3. To change the setting:
Simply press the UV(Cool Dry) button, then the figure will change one by one.
The display will change between “ ” and “ ”.
4. Once the hardness setting is correctly adjusted, press the Spray button.
The hardness setting is then saved.
13
Page 14
EFORE USING FOR THE FIRST TIME
B
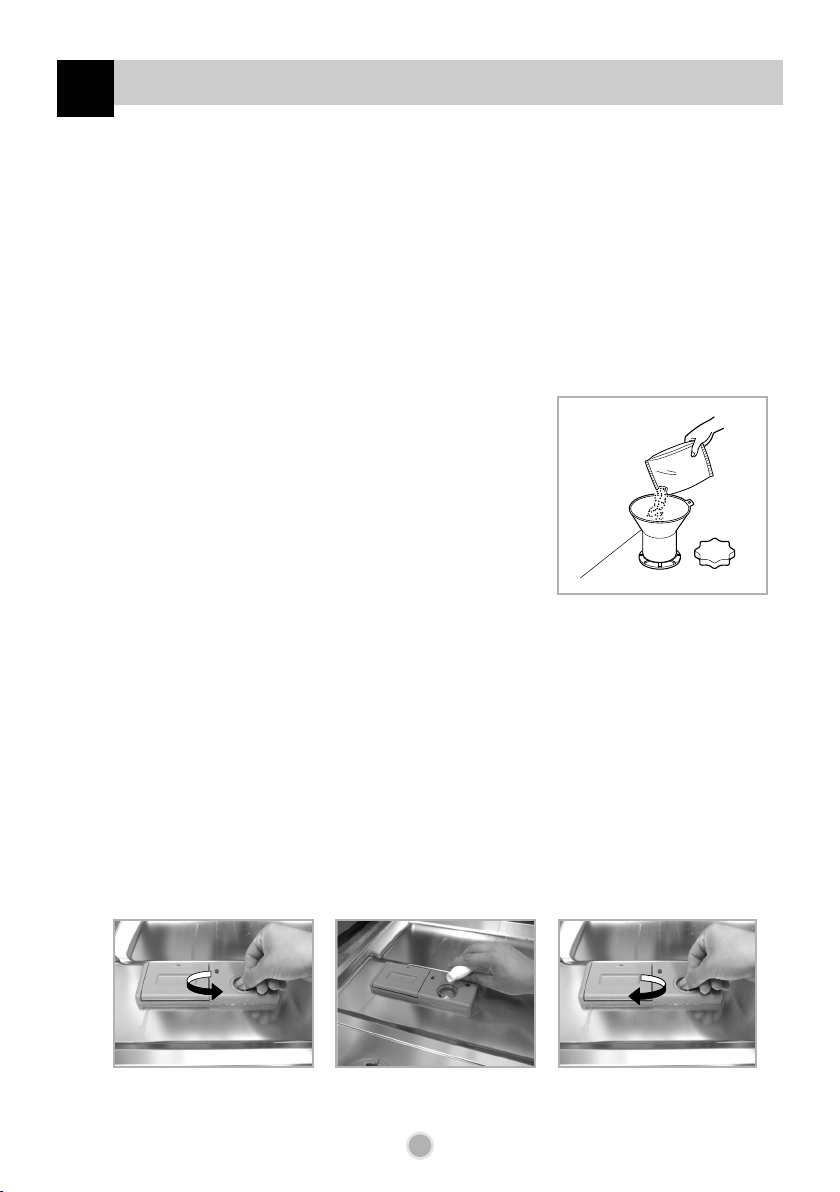
Step 3
Step 4
. Salt Filling
This model has a water softener to soften hard water.
Please read these notes carefully for correct operation.
In order to provide satisfactory rinsing results, the dishwasher requires soft water, i.e., containing
little or no lime, otherwise water stains will be left behind on the dishes and interior containers.
If the tap water exceeds a certain level of hardness, it must be softened, I.e.,decalcified.
This id achieved by adding a special salt to the water softener inside the dishwasher.
The required amount of salt is set up according to how hard your tap water is.
§ Filling with Salt
• Remove lower rack and unscrew the cap of salt container.
• Before using your dishwasher for the first time, fill with salt.
The container has a capacity of 1.9kg salt.
Use a funnel for ease and clean filling, ensuring that coarse salt
or regenerating salt intended for dishwashers is used.
• After filling, wipe off any spilled salt to seal the cap properly.
• Screw the cap tightly to prevent any suds from penetrating into
the container.
. Adding Rinse Aid
§ For filling
To fill the Rinse Aid chamber, rotate the round cap counter clockwise and remove. Fill the container
to the maximum level with a good quality Rinse Aid, then replace and lock the cap.
The Rinse Aid is automatically dispensed during the final rinse cycle.
The dosage is factory set to suit most installations. If, after washing, you notice cloudy spots, streaks
or water marks on your glassware, it may be necessary to increase the setting. To do this, remove the
cap and rotate the indicator arrow to a higher setting then replace the cap . If the glasses are smeared
or foam is present on the bottom of the glass or the bottom of the machine, select a lower setting.
14
Page 15
OW TO USE AND OPERATE
H
1. Loading your Dishwasher
For better washing performance, always load
the dishwasher according to the instructions.
Before loading items into the dishwasher clean
off large particles of food, in particular
insoluble items such as bones, pips, etc.
When loading the dishwasher, please act
accordingly:
¡ÆPosition crockery such that water will
contact all surfaces.
¡ÆDeep based items should be placed at an
angle to help water run off and dry properly.
¡ÆItems with burnt on food should be soaked
prior to loading in the dishwasher.
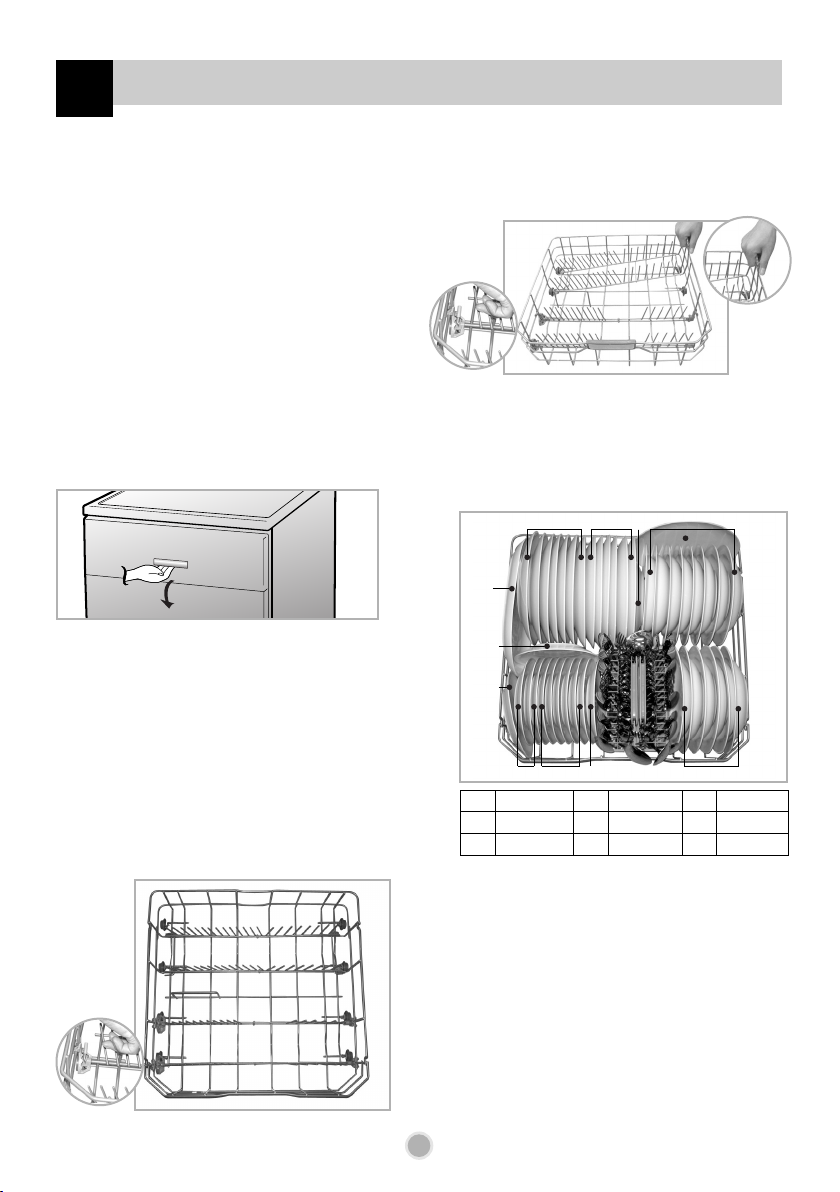
2. Loading the Lower Rack
The lower basket is best loaded with dinner
plates, soup bowls, dishes, pots, pans, lids and
even the grill tray.
Plates should be positioned upright and facing
the centre of the rack and pots, pans and large
dishes must be turned upside down.
§ How to use
[D1422W(L,M,T,B,C,D,A)F(B,U)]
§ How to use
[D1423W(L,M,T,B,C,D,A)F(B,U)]
Fold-down dividers at the lower and the upper
rack can be lowered to improve stacking of
pots and pans.
§ Loading examples (Energy test)
a
d
g
g
d
f
Milk
Egg
Margarine
cdde
Tea
b
Oat
e
d
edfd
Meat
c
Spinach
f
Take care not to obstruct the rotation of the
spray arms and ensure that large items do
not prevent the detergent dispenser lid from
opening.
15
Page 16
OW TO USE AND OPERATE
H
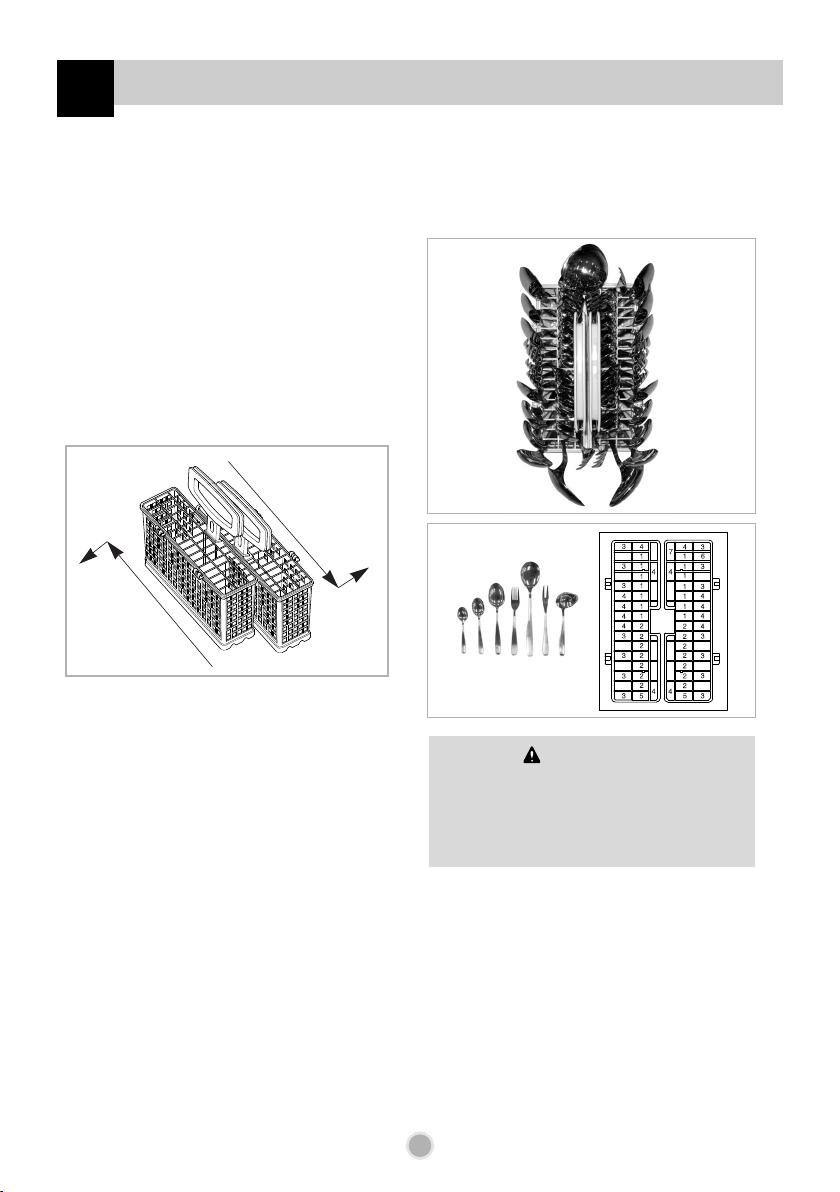
3. Using the Cutlery Basket
Cutlery should be mixed within each section
of the cutlery basket to prevent nesting of
similar items. Place the cutlery in the cover
with the handles down. The cover can be
hinged and clipped away from the basket if
you choose not to use them.
Place knives in the separate rack for located in
the top of the dishwasher.
Take care when loading and unloading
sharp items.
§ How to use
¤
¤Ł
¤Ł
¤
Slide two baskets in opposite directions, then
pull them apart.
§ Loading examples (Energy test)
1 2 3 4 5 6 7
WARNING
Knives and other utensils with sharp
points must be loaded in the basket with
their points down or placed in a
horizontal position.
16
Page 17
OW TO USE AND OPERATE
H
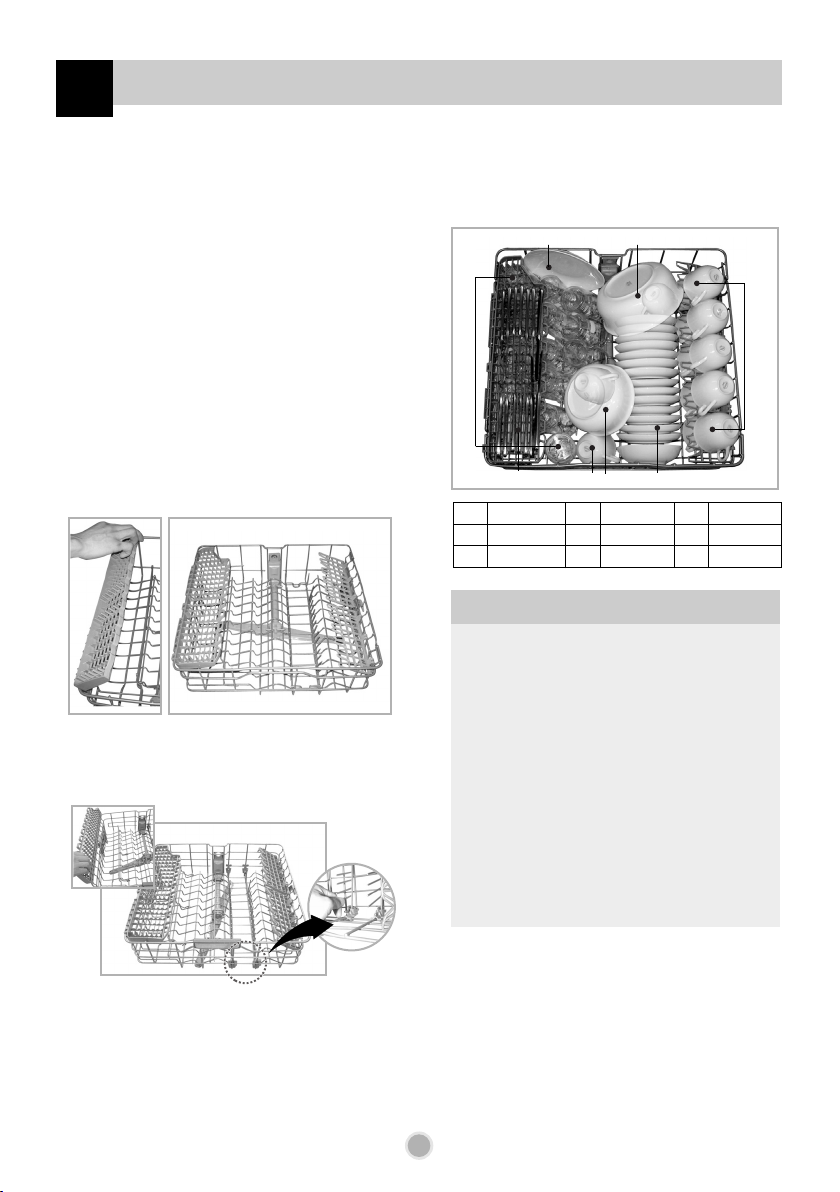
4. Loading the Upper Rack
It is best to load this with more delicate items
such as, small plates, long cutlery, cups, glasses
and dishwasher safe plastic items. Plates should
be positioned upwards with the plate bottom
facing the front of the rack.
Cups, glasses and bowls must be positioned
upside down.
Extra cups or cooking utensils can be laid on
the fold down cup racks, which also provides
support for long stem glasses.
Take care not to obstruct the rotation of the
spray arm under the upper rack.
§ Loading examples (Energy test)
d
a
c
b
§ How to use
[D1422W(L,M,T,B,C,D,A)F(B,U)]
§ How to use
[D1423W(L,M,T,B,C,D,A)F(B,U)]
Fold-down dividers at the upper rack can be
lowered to improve stacking of dishes.
f
f
Tea
Oat
f
Meat
c
Spinach
f
b
b
e
a
d
g
b
Milk
Egg
Margarine
Non Dishwasher Safe Items
The combination of high water temperatures and
dishwasher detergent may damage particular items,
therefore we do not recommend using the
dishwasher to wash the following:
■ Copper or anodized aluminum
■ Hand painted silver or gold leaf crockery
■ Wood or bone handled utensils
■ Iron or non rust proof utensils
■ Plastic items that which are not dishwasher safe.
17
Page 18

OW TO USE AND OPERATE
H
5. Adjusting the Upper Rack
Your upper rack can be raised or lowered to
cater for different sized crockery. Before
adjusting, ensure that the rack is empty.
You can change the position of the upper rack
by lifting the rack upward, into the upper
position, or by pulling on the two levers on
either side of the rack to move it down to its
lower position.
We recommend that where possible the upper
rack remains level.
And when you pull the rack upward, hold the
middle location of the upper rack
( marked position)
After adjusting the rack levels, check
that the spray arm is free to rotate.
WARNING
Before adjusting, ensure the rack is
empty of all crockery.
Otherwise crockery may be damaged
or you may be injured.
6. Adding Detergent
• Detergent must be put into the detergent
chamber before starting every program except
the Pre Wash.
• Please follow the manufacturer’s instructions
within the manual, when determining the correct
amount of detergent to use.
• If your dishes are moderately dirty, you may use
slightly less detergent than recommended.
• Chambers hold 15g and 25g.
• The amount of detergent required depends on
the program. Please refer to the guide table.
PROGRAM AMOUNT OF DETERGENT
Dual Wash 25g
Auto 20g
Eco 15g
Gentle 15g
Quick 10g
Pre Wash No detergent
• After the detergent is supplied, the chamber
lid should be closed.
• The detergent is dispensed automatically
during the operation.
• The chamber lid remains open after
operation.
Detergent Information
Use only the detergent intended for
household dishwashers. (Ordinary handwashing detergent should not be used,
because the foam can interfere with proper
operation.)
18
Page 19

OW TO USE AND OPERATE
H
Push latch to open
Place proper
detergent into this
compartment
WARNING
The detergent used is a special
Dishwasher detergent and like all
household chemicals it should be
treated as harmful and kept out of
reach of children. After completion of
the wash program, the detergent
compartment should be checked and
any remaining detergent removed.
7. Refilling
§ For refilling Rinse Aid
Depending on the dosage setting and the
number of washes, the chamber may need to
be topped up, approximately once a month.
The rinse aid level can be checked by two
methods.
• By the indicator window on the dispenser
when the dishwasher door is fully open.
●
Black indicates sufficient Rinse Aid
O
Clear indicates Rinse Aid required
• By the light on the control panel, being lit,
when the dishwasher is working on.
When the lamp is lit, it means the rinse
aid is almost empty. Refill the Rinse Aid
chamber as soon as possible.
ATTENTION
Using combined detergent products
(ex.3 in 1)
Some products integrated rinse aid
work best specific programs only.
Yow will obtain optimum rinsing and
drying results by using conventional
and separate salt and rinse aid.
Products that replace regeneration salt
can only be used within a specific
water hardness range.
Please contact the detergent
manufacturer if the drying performance
is very poor or you find the white film,
when you use the combined detergent
products.
We do not warrant the complaints that
are directly related to the use of these
products.
Rinse Aid Information
Rinse Aid is necessary to remove spots and
streaks from dishes as well as improved
drying. Using the correct amount will improve
wash performance. However, using too much
can produce excess foam leading to possible
water leaks.
19
Page 20

OW TO USE AND OPERATE
H
¡Æ For refilling Salt
When the salt container is empty, the salt refill
lamp will automatically turn on during
operation. The salt should be refilled after the
cycle has finished. We recommended the salt
refill should always be carried out, as
mentioned previous page, prior to starting the
next operation. This will immediately thin and
drain away any excess salt solution.
When the lamp is lit, this means that the
salt aid is almost empty. Refill the Salt
Aid chamber as soon as possible.
Note
• After filling with salt, it may take a little
while before the indicator light turns off.
• When the control is set to “ ”, it is not
necessary to fill up with salt as no salt is
consumed while the dishwasher is
operating. If the control is set between
“ ” and “ ”, then salt must be added
to the dispenser.
8. Drying
■ To assist drying, we recommend that the
door be fully opened after the cycle.
9. Energy Test(EN50242)
■ Appliance loaded in accordance with
standard specifications.
• Example of loaded dishwasher : p.15~17
• Capacity : 14 place settings
• Comparability course : Eco
• Rinse Aid setting : 4
• Reference cleaner : 8g of detergent onto the
inside surface of the door and fill 27g into
the detergent dispenser.
• Height-adjustable Rack-U must be inserted
into the uppermost position.
WARNING
Do not pour detergent into the salt
container. This will destroy the water
softener.
20
Page 21

PERATING SEQUENCE
O
Press the “Power” button
Check there is rinse aid
and salt
The corresponding indicator lights will
illuminate if refilling is required.
Open the door and check
the filters
Ensure they are clean and properly
positioned (See “User Maintenance
Instructions”).
Load the dishes
Remove any excess food.
Pull the lower rack out and arrange the
dishes and cutlery.
Pull the upper rack out and arrange the
cups, glasses, etc.
CAUTION
Do not load the items in upper rack with
the lower rack is pulled out and loaded.
Ensure the spray arms can
freely rotate
Measure out detergent
Add the required amount of detergent into
the dispenser and close the lid.
Setting and starting the
program
Press the program button to select the
desired program.
After 5 seconds, the machine will start.
If necessary, select the option function
corresponding to the desired program.
The indicator lights of the program and all
the phases of the program will come on.
Before starting, the display window shows
the running time of the selected program.
After starting, the display window shows
the remaining time.
The time in the display window will start
to decrease minute by minute.
If the door is opened during the program
a safety device ensures that the machine
stops.
Once the door is re-closed the program
will start from where it was interrupted.
At the end of the
washing program
“End”is displayed on the digital display
and a buzzer sounds.
And the dishwasher automatically
switches off for safety and energy saving
later.
If you select “UV” function, the dishwasher
automatically switches off after sterilizing
action.
If you selected “Cool Dry” function, the
display then shows “Cd” to indicate that
the dishwasher is in “Cool Dry” mode.
And then the dishwasher automatically
switches off later.
CAUTION
Empty the lower rack first and then the
upper one;this will avoid water dripping
from the upper rack onto the dishes
below.
WARNING
In general it is not advisable to open
the door while the machine is working.
If the door is opened, a safety device
ensures that the machine stops.
Care must be taken if the door is
opened during the hot phase or
immediately after a program has
finished, as steam may escape.
CAUTION
That the door should not be left in the
open position since this could present a
tripping hazard.
21
Page 22

ROGRAM
P
¢”Running time may vary according to the water temperature, water pressure and voltage.
¢”Running time doesn’t include “Cool Dry - 30min”.
Program
Pre Wash Rinse 1 Rinse 2 Rinse 3
¡
40
Main Wash
¡
60
Dual Wash
WASH
Auto
The program sequence is optimized and adapted in accordance with how dirty the
dishes are.
¡
43
Eco
¡
45
Gentle
¡
50
¡
50
Quick
Pre Wash
Dual Wash
This program is ideal for very dirty crockery, in
particular pots, pans and casserole dishes.
This program will be able to control the water jet
level of each spray arm differently.
Auto
During the Auto program, the degree of soiling
in the dishes is determined by the amount of
clouding of the water.
According the degree of soiling, the program
automatically adjust the washing time,
temperature. As a result, the energy and water
consumption is kept as low as possible. The “F”
on display means that the sensor is sensing the
status of the dishwasher.
RINSE
Heating
Rinse
¡
70
¡
60
¡
70
¡
65
DRY
COOL
DRY
and water consumption for a good washing
performance. It is recommended that it will be
used every time.
Gentle
This program is for washing delicate items like
glasses.
Quick
Can use for lightly soiled recently used dishes
and cutlery.
When you select “Quick” program, After
finishing, “Cool Dry” function is automatically
performed for the better drying result.
Eco
This program offers the most efficient energy
Pre Wash
Can use this program for only removing soil
before washing dishes by hand.
¡Æ Auto Restart
If the dishwasher is turned off by a power failure, it will restart from the position it stopped at
adjusting accordingly when you press the Power button again.
22
22
Page 23

SER MAINTENANCE INSTRUCTIONS
upper STS filter
outer filter
mesh filter
U
To prevent trouble and poor operating, it is important to check filters and spray
arms at regular intervals.
Filters
• Remove the lower rack first.
• Turn the mesh filter counterclockwise.
• Take out the mesh filter, upper STS filter
and outer filter.
• Clean them if necessary.
• Replace them in the reverse order.
¡Æ After each cycle, clean the filter for
the better washing result.
¡Æ Before starting, check that the filter is
assembled well. If the filter is not
assembled correctly, you might have
a poor cleaning result.
Lower Spray Arm
• Check that the water jet holes are not
blocked.
• If cleaning is required, remove the arm by
pulling up.
• Clean the spray arm and replace it pulling
down.
Upper Spray Arm
• Pull the upper rack forwards.
• Check that the water jet holes are not
blocked.
• If cleaning is required, remove the arm by
unscrewing the nut.
• Clean the spray arm and replace it in the
reverse order.
23
23
Page 24

ROUBLE SHOOTING GUIDE
T
■ If a problem occurs check below to see whether this can be solved.
■ In the unlikely event that the problem cannot be rectified, please contact a
service engineer.
Problem
No lights come on when
the power is turned on.
The machine does not
start.
The spray arms do not
rotate smoothly.
White deposits are left
on the dishwasher after
washing.
Streaks are left on
glassware.
Dry results are not
satisfactory.
Washing results are not
satisfactory.
• Plug is not properly inserted into
the socket.
• Fuses blown or circuit breaker
tripped.
• The electricity of the house was
cut off.
• Door is not fully closed.
• The start button is not pressed.
• The mounting of the spray arms is
blocked by food particles.
• The amount of detergent or rinseaid set incorrectly.
• The salt container is empty.
• The salt container cap is not
securely screwed on.
• Too little Rinse-Aid dispensed.
• Too little Rinse-Aid dispensed.
• Incorrect amount of detergent.
• Utensils incorrectly arranged or
overloaded.
• Filters are clogged.
• Water jet holes of spray arms
blocked.
• Spray arm's rotation obstructed by
utensils.
• Unsuitable program selected.
SolutionPossible Causes
• Check the plug.
• Check the electricity.
• Call for service.
• Close the door.
• Press the start button.
• Clean the holes of the
spray arm.
• Check the detergent
or rinse-aid.
• Check the salt
container or cap.
• Fill the rinse-aid.
• Adjust the level of
rinse-aid container.
24
24
Page 25

ROUBLE SHOOTING GUIDE
T
Problem
The display shows "OE"
code. (Water is not
pumped away.)
The display shows "IE"
code.
The display shows "EI"
code.
(Automatically Drain
pump operated.)
The display shows "FE"
code. (Automatically
Drain pump operated.)
The display shows "HE"
code.
The display shows "tE"
code.
• The drain hose is kinked.
• The filter is clogged.
• Motor trouble.
(Washing motor or Drain motor)
• Water is not supplied.
• Water tap is not opened.
• Water sensor has a trouble.
• Water is leaking from the hose
connections.
• Damage to the unit has been
caused by a water leak.
• Excessive water is supplied than
the normal water level.
• There is a problem with the inlet
valve.
• The water heater circuit is damaged.
• Thermistor trouble or very high inlet
water temperature.
SolutionPossible Causes
• Straighten hose(s).
• Clean the filter.
• If you can not solve
the problem, call for
service.
• Check the water tap.
• If you can not solve
the problem, call for
service.
• Close the water tap
and unplug the power
plug.
• Call for service.
The display shows "LE"
code.
The display shows "CE"
code.
• Motor trouble.
• Motor trouble.
25
25
Page 26

M
EMO
26
Page 27

M
EMO
27
Page 28

819mm
567mm
598mm
600mm
600mm
850mm
819mm
567mm
598mm
D1422W(L,M,T,B,C,D,A)F
D1423W(L,M,T,B,C,D,A)F
D1422W(L,M,T,B,C,D,A)B
D1423W(L,M,T,B,C,D,A)B
D1422W(L,M,T,B,C,D,A)U
D1423W(L,M,T,B,C,D,A)U
Capacity
Weight
Power Supply
14 Place settings
See rating label
See rating label
Power Consumption
Water Feed Pressure
See rating label
50 ~ 800 kPa
Page 29

٢٧
ﻥﻮﺤﺼﻟﺍ ﺔﻟﺎﺴﻏ
ﻚﻟﺎﳌﺍ ﻞﻴﻟﺩ
D1422W(L,M,T,B,C,D,A) F(B,U)U
D1423W(L,M,T,B,C,D,A) F(B,U)U
.ﻥﻮﺤﺼﻟﺍ ﺔﻟﺎﺴﻏ ﻞﻴﻐﺸﺗ ﻞﺒﻗ ﺔﻳﺎﻨﻌﺑ ﻞﻴﻟﺪﻟﺍ ﺍﺬﻫ ﺓﺀﺍﺮﻗ ﻰﺟﺮﻳ
.ﻞﺒﻘﺘﺴﳌﺍ ﻲﻓ ﻊﺟﺮﻤﻛ ﻪﺑ ﻆﻔﺘﺣﺍ
: ﻞﻳﺩﻮﳌﺍ
ﻲﻟﺎﺘﻟﺍ ﻂﺑﺍﺮﻟﺍ ﻦﻣ ﻮﻳﺪﻴﻓ ﺔﺨﺴﻧ ﻲﻓ ﻡﺪﺨﺘﺴﳌﺍ ﻞﻴﻟﺩ ﻰﻠﻋ ﻝﻮﺼﳊﺍ ﺎﹰﻀﻳﺃ ﻚﻨﻜﳝ
www.guidelg.com/dishwasher
P/No.: MFL62077124
Page 30

٢
ﺕﺎﻳﻮﺘﶈﺍ
ﻥﻮﺤﺼﻟﺍ ﺔﻟﺎﺴﻏ
٣ ﺭﺬﳊﺍﻭ ﺔﻣﻼﺴﻟﺍ
٥ ﺐﻴﻛﺮﺘﻟﺍ ﺕﺎﻤﻴﻠﻌﺗ
٩ ﺀﺍﺰﺟﻷﺍ ﺀﺎﻤﺳﺃ
١٠ ﻢﻜﺤﺘﻟﺍ ﺭﺍﺭﺯﺃ ﻒﺋﺎﻇﻭ
١٣ ﺓﹼﺮﻣ ﻝﻭﻷ ﻡﺍﺪﺨﺘﺳﻻﺍ ﻞﺒﻗ
١٥ ﻞﻴﻐﺸﺘﻟﺍﻭ ﻡﺍﺪﺨﺘﺳﻻﺍ ﺔﻴﻔﻴﻛ
٢١ ﻞﻴﻐﺸﺘﻟﺍ ﻞﺴﻠﺴﺗ
٢٢ ﺞﻣﺎﻧﺮﺒﻟﺍ
٢٣ ﻡﺪﺨﺘﺴﻤﻠﻟ ﺔﻧﺎﻴﺼﻟﺍ ﺕﺎﻤﻴﻠﻌﺗ
٢٤ ﺎﻬﻠﺣﻭ ﻞﻛﺎﺸﳌﺍ ﺪﻳﺪﲢ ﻞﻴﻟﺩ
ﺕﺎﻔﺻﺍﻮﳌﺍ
Page 31

٣
ﺭﺬﳊﺍﻭ ﺔﻣﻼﺴﻟﺍ
ﻚﻟﺫ ﻲﻓ ﺎﲟ .ﺓ
ﹼ
ﺮﻣ ﻝﻭﻷ ﻥﻮﺤﺼﻟﺍ ﺔﻟﺎﺴﻏ ﻞﻴﻐﺸﺗ ﻞﺒﻗ ﺔﻴﺳﺎﺳﻷﺍ ﺔﻣﻼﺴﻟﺍ ﺕﺍﺀﺍﺮﺟﺇ ﻉﺎﺒﺗﺍ ﻰﺟﺮﻳ - ﺮﻳﺬﲢ
:ﺔﻴﻟﺎﺘﻟﺍ ﺕﺎﻤﻴﻠﻌﺘﻟﺍ
ﻞﻴﻐﺸﺘﻟﺍ ﺀﺎﻨﺛﺃ
ﺔﻟﺎﺴﻏ ﻲﻓ ﺔﺒﺳﺎﻨﻣ ﺔﻴﻟﺰﻨﳌﺍ ﻲﻧﺍﻭﻷﺍ ﻊﺿﻭ ﺐﺠﻳ •
ﺓﺭﺍﺮﺤﻠﻟ ﺔﻣﻭﺎﻘﻣ ﺮﺒﻐﻟﺍ ﻲﻧﺍﻭﻷﺍ ﺐﻨﲡ ﻰﺟﺮﹸﻳ) ﻥﻮﺤﺼﻟﺍ
.(ﺎﻫﺮﻴﻏﻭ ﻥﺩﺎﻌﳌﺎﺑ ﺔﻓﺮﺧﺰﳌﺍﻭ
ﻥﻮﺤﺼﻟﺍ ﺔﻟﺎﺴﻏ ﻲﻓ ﻞﻴﻟﺎﶈﺍ ﻦﻣ ﻉﻮﻧ ﻱﺃ ﻡﺪﺨﺘﺴﺗ ﻻ •
.ﻖﻳﺮﺣ ﻭﺃ ﺭﺎﺠﻔﻧﺇ ﺙﻭﺪﺤﺑ ﺐﺒﺴﺘﻳ ﺪﻗ ﻚﻟﺫ ﻥﻷ
ﻱﺩﺆﻳ ﻚﻟﺫ ﻥﻷ ﺝﺭﺎﳋﺍ ﻦﻣ ﺯﺎﻬﳉﺍ ﻰﻠﻋ ﺀﺎﳌﺍ ﺵﺮﺗ ﻻ •
ﺔﻣﺪﺻ ﺙﻭﺪﺣﻭ ﺔﻴﺋﺎﺑﺮﻬﻜﻟﺍ ﺀﺍﺰﺟﻷﺍ ﻲﻓ ﻞﻠﺧ ﻰﻟﺇ
.ﺔﻴﺋﺎﺑﺮﻬﻛ
ﻥﻷ ﻪﻴﻠﻋ ﺲﻠﲡ ﻭﺃ ﻞﻔﺳﺃ ﻰﻟﺇ ﻲﻠﺧﺍﺪﻟﺍ ﺏﺎﺒﻟﺍ ﻊﻓﺪﺗ ﻻ •
.ﺯﺎﻬﳉﺍ ﻲﻓ ﻞﻠﺧ ﻭﺃ ﺏﺎﺒﻟﺍ ﻥﺯﺍﻮﺗ ﻝﻼﺘﺧﺍ ﻱﺩﺆﻳ ﻚﻟﺫ
ﻮﻬﻓ ﻦﻳﺪﻴﻟﺍ ﻒﻴﻈﻨﺘﻟ ﻒﻴﻈﻨﺘﻟﺍ ﺓﺩﺎﻣ ﻡﺪﺨﺘﺴﺗ ﻻ •
.ﻥﻮﺤﺼﻟﺍ ﺔﻟﺎﺴﻏ ﻲﻓ ﻱﺩﺎﻌﻟﺍ ﻡﺍﺪﺨﺘﺳﻼﻟ
ﻰﻠﻋ ﻞﻤﻌﻳ ﺔﻣﻼﺳ ﻡﺎﻈﻧ ﻰﻠﻋ ﺯﺎﻬﳉﺍ ﺍﺬﻫ ﻱﻮﺘﺤﻳ •
ﻦﻣ ﺪﻳﺪﺷ ﺯﺍﺰﺘﻫﻻ ﺖﺿﺮﻌﺗ ﺍﺫﺇ ﺔﻟﺎﺴﻐﻟﺍ ﻑﺎﻘﻳﺇ
.ﺎﻬﺒﻧﺍﻮﺟ
ﻱﻮﻠﻗ ﻥﻮﺤﺼﻟﺍ ﺕﻻﺎﺴﻐﻟ ﻒﻴﻈﻨﺘﻟﺍ ﻕﻮﺤﺴﻣ ﻥﺇ •
ﺐﻨﲡ ،ﻪﻋﻼﺘﺑﺍ ﺪﻨﻋ ﺓﺭﻮﻄﳋﺍ ﺔﻳﺎﻏ ﻲﻓ ﻮﻫﻭ ﺔﻳﺎﻐﻠﻟ
ﻝﺎﻔﻃﻷﺍ ﺀﺎﻘﺑ ﻦﻣ ﺪﻛﺄﺗﻭ ﲔﻌﻟﺍ ﻭﺃ ﺓﺮﺸﺒﻠﻟ ﻪﺘﺴﻣﻼﻣ
.ﻪﺤﺘﻓ ﺪﻨﻋ ﺔﻟﺎﺴﻐﻟﺍ ﺏﺎﺑ ﻦﻋ ﻦﻳﺪﻴﻌﺑ
ﻦﻣ ﺀﺎﻬﺘﻧﻹﺍ ﺪﻌﺑ ﻞﻴﺴﻐﻟﺍ ﻞﺋﺎﺳ ﺔﻳﻭﺎﺣ ﻍﺍﺮﻓ ﻦﻣ ﺪﻛﺄﺗ •
.ﻞﻴﺴﻐﻟﺍ ﺓﺭﻭﺩ
ﻝﺎﻔﻃﻷﺍ ﺔﻣﻼﺳ
ﻞﻔﻄﻟﺍ ﻞﻔﻗ» ﻝﻼﺧ ﻦﻣ ﻢﻜﺤﺘﻟﺍ ﺔﺣﻮﻟ ﻞﻔﻗ ﻦﻜﳝ •
.ﻝﺎﻔﻃﻷﺍ ﻞﺒﻗ ﻦﻣ ﺮﻴﻴﻐﺗ ﻱﺃ ﺙﺍﺪﺣﺇ ﻊﻨﳌ «(child lock)
ﻦﻋ ﺓﺪﻴﻌﺑ ﻒﻄﺸﻟﺍ ﺩﺍﻮﻣﻭ ﻲﻠﳉﺍ ﻞﺋﺎﺳ ﻆﻔﺣﺇ •
.ﻝﺎﻔﻃﻷﺍ
.ﻥﻮﺤﺼﻟﺍ ﺔﻟﺎﺴﻏ ﺍﻮﻠﻐﺸﻳ ﻥﺄﺑ ﻝﺎﻔﻃﻸﻟ ﺢﻤﺴﺗ ﻻ •
.ﺯﺎﻬﳉﺎﺑ ﺍﻮﺜﺒﻌﻳ ﻻ ﻰﺘﺣ ﺭﺎﻐﺼﻟﺍ ﻝﺎﻔﻃﻷﺍ ﺔﺒﻗﺍﺮﻣ ﺐﺠﻳ •
ﺔﻟﺎﺴﻏ ﻡﺍﺪﺨﺘﺳﺍ ﻞﺒﻗ ﺔﻳﺎﻨﻌﺑ ﻞﻴﻟﺪﻟﺍ ﺍﺬﻫ ﺓﺀﺍﺮﻗ ﻰﺟﺮﹸﻳ •
.ﺓﹼﺮﻣ ﻝﻭﻷ ﻥﻮﺤﺼﻟﺍ
ﺔﻴﻔﻴﻛ ﻝﻮﺣ ﺔﹼﻤﻬﻣ ﺕﺎﻤﻴﻠﻌﺗ ﻰﻠﻋ ﻞﻴﻟﺪﻟﺍ ﺍﺬﻫ ﻱﻮﺘﺤﻳ •
.ﺎﻬﺘﻧﺎﻴﺻﻭ ﺎﻬﺒﻴﻛﺮﺗﻭ ﻥﻮﺤﺼﻟﺍ ﺔﻟﺎﹼﺴﻏ ﺐﻴﻛﺮﺗ
ﺞﺘﻨﺗ ﻞﻛﺎﺸﻣ ﻱﺃ ﻦﻋ ﺔﻴﻟﻭﺆﺴﻣ ﻱﺃ ﻊﻨﺼﳌﺍ ﻞﹼﻤﺤﺘﻳ ﻻ •
.ﻩﺬﻫ ﺭﺬﳊﺍﻭ ﺔﻣﻼﺴﻟﺍ ﺕﺎﻤﻴﻠﻌﺗ ﻝﺎﻤﻫﺇ ﻦﻋ
ﻱﺩﺎﻌﻟﺍ ﻡﺍﺪﺨﺘﺳﻼﻟ ﻩﺬﻫ ﻥﻮﺤﺼﻟﺍ ﺔﻟﺎﺴﻏ ﺖﻤﹼﻤﺻ •
.ﻝﺰﻨﳌﺍ ﻲﻓ
ﺽﺍﺮﻏﻸﻟ ﻩﺬﻫ ﻥﻮﺤﺼﻟﺍ ﺔﻟﺎﺴﻏ ﻡﺪﺨﺘﺴﺗ ﻻ •
ﺮﻴﻏ ﻯﺮﺧﺃ ﺽﺍﺮﻏﺃ ﻱﺃ ﻭﺃ ﺔﻳﺭﺎﺠﺘﻟﺍ ﻭﺃ ﺔﻴﻋﺎﻨﺼﻟﺍ
.ﺎﻬﻟ ﺔﻤﹼﻤﺼﳌﺍ
ﻞﺒﻗ ﻦﻣ ﻡﺍﺪﺨﺘﺳﻼﻟ ﺔﻤﹼﻤﺼﻣ ﺮﻴﻏ ﺔﻟﺎﺴﻐﻟﺍ ﺍﺬﻫ •
.ﺓﺰﺠﻌﻟﺍ ﻦﺴﻟﺍ ﺭﺎﺒﻜﻟﺍ ﻭﺃ ﻝﺎﻔﻃﻷﺍ
ﻝﺎﺣ ﻲﻓﻭ ﻞﻘﻨﻟﺍ ﻦﻋ ﺔﲡﺎﻧ ﺭﺍﺮﺿﺃ ﺩﻮﺟﻭ ﻡﺪﻋ ﻦﻣ ﺪﻛﺄﺗ •
ﺓﺮﺷﺎﺒﻣ ﻞﺼﺗﺍﻭ ﺭﺎﻬﳉﺍ ﻞﻐﺸﺗ ﻻ ﺭﺍﺮﺿﺃ ﻱﺃ ﺩﻮﺟﻭ
.ﻉﺯﻮﳌﺎﺑ
ﺐﻴﻛﺮﺘﻟﺍ ﺀﺎﻨﺛﺃ
ﻰﻠﻋ ﺏﻮﺘﻜﻣ ﺎﳌﹰﺎﻘﻓﻭ ﻲﺋﺎﺑﺮﻬﻜﻟﺍ ﺭﺎﻴﺘﻟﺍ ﻞﺻﻮﺗ ﻦﻣ ﺪﺑﻻ •
.ﺔﻴﺋﺎﺑﺮﻬﻜﻟﺍ ﺕﺎﺒﻠﻄﺘﳌﺍ ﻖﺼﻠﻣ
ﻡﺎﻈﻧ ﻢﺘﻳ ﺎﻣﺪﻨﻋ ﺔﻴﺋﺎﺑﺮﻬﻜﻟﺍ ﺔﻣﻼﺴﻟﺍ ﻥﺎﻤﺿ ﻢﺘﻳ •
ﻻ) ﺔﻴﻠﶈﺍ ﲔﻧﺍﻮﻗﻷﺍ ﻖﻓﻭ ﻚﻟﺰﻨﻣ ﻲﻓ ﻲﺿﺭﻷﺍ ﻞﻴﺻﻮﺘﻟﺍ
.(ﻲﻓﺎﺿﺇ ﻞﻴﺻﻮﺗ ﻞﺒﻴﻛ ﻭﺃ ﻚﻠﺳ ﻡﺪﺨﺘﺴﺗ
ﻦﻣ ﺮﺜﻛﺃ ﺀﺎﳌﺍ ﺓﺭﺍﺮﺣ ﺖﻧﺎﻛ ﺍﺫﺇ ﻦﺧﺎﺴﻟﺍ ﺀﺎﳌﺍ ﻂﺒﻀﺑ ﻢﻗ •
ﺾﻴﻔﺨﺗ ﻰﻠﻋ ﺭﺪﻘﻟﺍ ﻡﺪﻋ ﻝﺎﺣ ﻲﻓﻭ ،ﺔﻳﻮﺌﻣ ﺔﺟﺭﺩ ٦٥
.ﺩﺭﺎﺒﻟﺍ ﺀﺎﳌﺎﺑ ﺔﻟﺎﺴﻐﻟﺍ ﻞﻴﺻﻮﺗ ﺐﺠﻳ ﺓﺭﺍﺮﳊﺍ ﺔﺟﺭﺩ
ﻦﻣ ﺪﺑ ﻼﻓ ﻲﺋﺎﺑﺮﻬﻜﻟﺍ ﻚﻠﺴﻠﻟ ﺭﺮﺿ ﺙﻭﺪﺣ ﻝﺎﺣ ﻲﻓ •
ﻱﺃ ﻭﺃ ﺔﻛﺮﺸﻟﺍ ﻲﻨﻓ ﻭﺃ ﺯﺎﻬﳉﺍ ﻉﺯﻮﻣ ﻞﺒﻗ ﻦﻣ ﻪﻟﺍﺪﺒﺘﺳﺍ
.ﺮﻄﺧ ﻱﺃ ﺐﻨﺠﺘﻟ ﻚﻟﺬﻟ ﻞﻫﺆﻣ ﺺﺨﺷ
ﺲﺑﺎﻘﻠﻟ ﻝﻮﺻﻮﻟﺍ ﻞﹼﻬﺴﺗ ﺔﻘﻳﺮﻄﺑ ﺯﺎﻬﳉﺍ ﺐﻴﻛﺮﺗ ﺐﺠﻳ •
.ﻲﺋﺎﺑﺮﻬﻜﻟﺍ
ﻩﺎﻴﳌﺍ ﻢﻴﻃﺍﺮﺧ ﻦﻣ ﺓﺪﻳﺪﺟ ﺔﻋﻮﻤﺠﻣ ﻡﺍﺪﺨﺘﺳﺍ ﺐﺠﻳ •
ﻢﻴﻃﺍﺮﳋﺍ ﻡﺍﺪﺨﺘﺳﺍ ﻡﺪﻋ ﻦﻣ ﺪﻛﺄﺘﻟﺍﻭ ﺯﺎﻬﳉﺍ ﺍﺬﻫ ﻊﻣ
.ﺔﳝﺪﻘﻟﺍ
ﺔﻣﻼﺴﻟﺍ ﻞﺟﺃ ﻦﻣ ﺔﹼﻣﺎﻫ ﺕﺎﻤﻴﻠﻌﺗ
Page 32

٤
ﺭﺬﳊﺍﻭ ﺔﻣﻼﺴﻟﺍ
ﻲﺋﺎﺑﺮﻬﻜﻟﺍ ﺭﺎﻴﺘﻟﺍ ﻚﻠﺴﺑ ﻖﹼﻠﻌﺘﻳ
ﹰ
ﺍﺯﺎﻬﺟ ﺪﲤ ﻂﻘﻓ ﺪﺣﺍﻭ ﺬﻔﻨﻣ ﺕﺍﺫ ﺔﻴﺋﺎﺑﺮﻬﻛ ﺓﺭﺍﺩ ﻱﺃ ،ﺎﻬﻟﺔﺼﺼﺨﻣ ﺔﻴﺋﺎﺑﺮﻬﻛ ﺓﺭﺍﺩ ﻰﻠﻋ ﻰﻠﻋ ﺔﻴﻟﺰﻨﳌﺍ ﺓﺰﻬﺟﻷﺍ ﻊﺿﻭ ﺐﺠﻳ
.ﺮﻣﻷﺍ ﺍﺬﻫ ﻦﻣ ﺪﻛﺄﺘﻠﻟ ﻚﻟﺎﳌﺍﻞﻴﻟﺩ ﻲﻓ ﺕﺎﻔﺻﺍﻮﳌﺍ ﺔﺤﻔﺻﺔﻌﺟﺍﺮﻣ ﻰﺟﺮﻳ .ﺔﻴﻋﺮﻓ ﺕﺍﺭﺍﺩ ﻭﺃ ﺬﻓﺎﻨﻣ ﻱﺃ ﺩﻮﺟﻭ ﻥﻭﺩ ،ﻂﻘﻓﹰﺍﺪﺣﺍﻭ
ﻭﺃ ﺪﻳﺪﻤﺘﻟﺍ ﻙﻼﺳﺃ ﻭﺃﺔﻜﻜﻔﺘﳌﺍﻭ ﺔﻔﻟﺎﺘﻟﺍ ﺪﺧﺂﳌﺍﻭ ﺪﺋﺍﺰﻟﺍ ﻞﻤﳊﺍ ﺕﺍﺫ ﺭﺎﻴﺘﻟﺍ ﺬﺧﺂﻣ ﻥﺇ.ﻲﺋﺎﺑﺮﻬﻜﻟﺍ ﺭﺎﻴﺘﻟﺍ ﺬﺧﺂﻣ ﻞﻤﺣ ﺓﺩﺎﻳﺰﺑ ﻢﻘﺗ ﻻ
ﻢﻗ .ﺔﻴﺋﺎﺑﺮﻬﻛ ﺔﻣﺪﺻ ﻭﺃﹰﺎﻘﻳﺮﺣ ﺐﺒﺴﻳ ﺪﻗ ﺎﻬﻨﻣ ﻱﺃﻭ،ﹰﺍﺮﻄﺧ ﻞﻜﺸﺗ ﺎﻬﻠﻛ ﺔﺷﻭﺪﺍ ﻭﺃﺔﻗﺰﻤﳌﺍ ﻭﺃ ﺔﻔﻟﺎﺘﻟﺍ ﻭﺃﺔﻗﻭﺮﶈﺍ ﻙﻼﺳﻷﺍ
ﻒﻗﻮﺗﻭ ﻲﺋﺎﺑﺮﻬﻜﻟﺍ ﺭﺎﻴﺘﻟﺍ ﻦﻋﺯﺎﻬﳉﺍ ﻞﺼﻔﺑ ﻢﻗ ﺎﻬﻴﻓ ﻞﻠﳋﺍﻉﺍﻮﻧﺃ ﻦﻣ ﻉﻮﻧ ﻱﺃ ﺔﻈﺣﻼﻣ ﻝﺎﺣ ﻲﻓﻭ ﺔﻳﺭﻭﺩ ﺓﺭﻮﺼﺑ ﻙﻼﺳﻷﺍ ﺺﺤﻔﺑ
.ﻒﻟﺎﺘﻟﺍ ﻚﻠﺴﻟﺍ ﻝﺍﺪﺒﺘﺳﺍﺺﹼﺼﺨﺘﻣ ﻲﹼﻨﻓ ﻦﻣ ﺐﻠﻃﺍﻭ ﻪﻣﺍﺪﺨﺘﺳﺍﻦﻋ
،ﻚﻣﺪﻘﺑ ﻩﺄﻄﺗ ﻥﺃ ﻭﺃ ﻪﻴﻠﻋ ﺏﺎﺒﻟﺍ ﻕﻼﻏﺇ ﻭﺃ ﻪﻗﺮﺧ ﻭﺃ ﻩﺪﻘﻋﻭﺃ ﻪﻴﻨﺛ ﻢﺘﻳ ﻥﺄﻛ ،ﻱﺩﺎﳌﺍ ﻡﺍﺪﺨﺘﺳﻻﺍ ﺀﻮﺳ ﻦﻣ ﻚﻠﺴﻟﺍ ﺔﻳﺎﻤﺣ ﻰﺟﺮﻳ
.ﺯﺎﻬﳉﺍ ﻦﻣ ﻙﻼﺳﻷﺍ ﺝﻭﺮﺧﻦﻛﺎﻣﺁﻭ ﻲﺋﺎﺑﺮﻬﻜﻟﺍ ﺭﺎﻴﺘﻟﺍﺬﺧﺂﻣﻭ ،ﺔﻴﺋﺎﺑﺮﻬﻜﻟﺍ ﺲﺑﺍﻮﻘﻟﺍﻊﻣ ﻞﻣﺎﻌﺘﻟﺍ ﺪﻨﻋ ﺭﺬﳊﺍﻰﺟﺮﻳ ﺎﻤﻛ
ﺮﻳﺬﲢ
ﺕﺎﻤﻴﻠﻌﺘﻟﺍ ﻩﺬﻫ ﻆﻔﺣﺇ
(ﺾﻳﺭﺄﺘﻟﺍ) ﻲﺿﺭﻷﺍ ﻞﻴﺻﻮﺘﻟﺍ ﺕﺎﻤﻴﻠﻌﺗ
ﻞﻴﺻﻮﺘﻟﺍ ﻞﻤﻌﻴﺳ ﻞﻤﻌﻟﺍ ﻦﻋ ﻒﻗﻮﺗ ﻭﺃ ﺎﻣ ﻞﻄﻋ ﺙﻭﺪﺣ ﻝﺎﺣ ﻲﻔﻓ ،ﺯﺎﻬﳉﺍ ﺍﺬﻬﻟ ﻲﺿﺭﻷﺍ ﻞﻴﺻﻮﺘﻟﺍ ﻦﻣ ﺪﺑ ﻻ
ﺕﺍﺫ ﺓﺭﺍﺩ ﻰﻟﺇ ﻲﺋﺎﺑﺮﻬﻜﻟﺍ ﺭﺎﻴﺘﻟﺍ ﺭﻭﺮﻣ ﻞﻴﻬﺴﺗ ﻝﻼﺧ ﻦﻣ ﺔﻴﺋﺎﺑﺮﻬﻛ ﺔﻣﺪﺻ ﺙﻭﺪﺣ ﺮﻄﺧ ﻦﻣ ﻞﻴﻠﻘﺘﻟﺍ ﻰﻠﻋ ﻲﺿﺭﻷﺍ
ﻚﻟﺬﻟ ﺐﺳﺎﻨﻣ ﺬﺧﺄﻣ ﻰﻟﺇ ﻪﻠﻴﺻﻮﺗ ﻢﺘﻴﻟ ﻲﺿﺭﺃ ﻚﻠﺳﻭ ﺚﻟﺎﺛ ﻲﺿﺭﺃ ﺲﺒﻘﲟ ﺯﺎﻬﳉﺍ ﺪﻳﻭﺰﺗ ﰎ ﺎﻤﻛ .ﺔﻠﻴﻠﻗ ﺔﻣﻭﺎﻘﻣ
.ﺔﻴﻠﶈﺍ ﲔﻧﺍﻮﻘﻟﺍ ﺐﺴﺣ ﺔﻴﺿﺭﻷﺍ ﺓﺭﺍﺪﻟﺍ ﻰﻟﺇ ﻝﻮﺻﻮﻣﻭ ﺲﺒﻘﳌﺍ
،ﺔﻴﺋﺎﺑﺮﻬﻜﻟﺍ ﺔﻣﺪﺼﻟﺍ ﺙﻭﺪﺣ ﺮﻄﺧ ﻰﻟﺇ ﻱﺩﺆﻳ ﺪﻗ ﺔﻴﺿﺭﻷﺍ ﺓﺭﺍﺪﻟﺍ ﻰﻟﺇ ﺢﻴﺤﺻ ﺮﻴﻐﻟﺍ ﻞﻴﺻﻮﺘﻟﺍ ﻱﺩﺆﻳ ﺪﻗ - ﺮﻳﺬﲢ
ﻝﺎﺣ ﻲﻓ .ﺯﺎﻬﳉﺍ ﺲﺒﻘﻣ ﻞﻳﺪﻌﺗ ﻝﻭﺎﲢ ﻻﻭ ،ﺺﺼﺨﺘﻣ ﻲﺋﺎﺑﺮﻬﻛ ﻭﺃ ﻲﹼﻨﻓ ﻞﺒﻗ ﻦﻣ ﻞﻴﺻﻮﺘﻟﺍ ﺀﺍﺮﺟﺇ ﻦﻣ ﺪﻛﺄﺗ
.ﺬﺧﺄﳌﺍ ﻞﻳﺪﻌﺗ ﺺﹼﺼﺨﺘﻣ ﻲﻨﻓ ﻦﻣ ﺐﻠﻃﺃ ،ﺬﺧﺄﳌﺎﺑ ﺲﺑﺎﻘﻟﺍ ﺐﻴﻛﺮﺗ ﺔﻴﻧﺎﻜﻣﺇ ﻡﺪﻋ
ﱘﺪﻘﻟﺍ ﻙﺯﺎﻬﺟ ﻦﻣ ﺺﻠﺨﺘﻟﺍ
ﹼ
ﻥﺃ ﻲﻨﻌﻳ ﺏﺮﺿ ﺓﺭﺎﺷﺇ ﺎﻬﻴﻠﻋ ﻡﻮﺳﺮﳌﺍﻭ ﺕﻼﺠﻌﻟﺍ ﺕﺍﺫ ﺕﻼﻤﻬﳌﺍ ﺔﻠﺳ ﺭﺎﻌﺷ ﺭﻮﻬﻇ ﻥﺇ .١
. ﺔﻴﺑﺭﻭﻷﺍ ﺕﺎﻤﻴﻠﻌﺘﻠﻟ ﻊﺿﺎﺧ ﺯﺎﻬﳉﺍ ﺍﺬﻫ
ﻊﻀﺨﺗ ﺕﺎﻳﺪﻠﺒﻟﺍ ﺔﻣﺎﻤﻗ ﺕﺎﻳﻮﻠﺣ ﻦﻋ ﺔﻠﺼﻔﻨﻣ ﺕﺎﻳﻭﺎﺣ ﻲﻓ ﺓﺰﻬﺟﻷﺍ ﻊﻴﻤﺟ ﻲﻣﺭ ﺐﺠﻳ .٢
.ﺔﻴﻠﶈﺍ ﺕﺎﻄﻠﺴﻟﺍ ﻭﺃ ﺔﻣﻮﻜﳊﺍ ﻞﺒﻗ ﻦﻣ ﺎﻬﻴﻠﻋ ﻖﻓﺍﻮﻣ ﺕﺂﺸﻨﻣ ﻞﺒﻗ ﻦﻣ ﺔﳉﺎﻌﻤﻠﻟ
ﺔﻨﻜﳑ ﺭﺎﻄﺧﺃ ﺙﻭﺪﺣ ﻊﻨﳝ ﺔﺤﻴﺤﺻ ﺔﻘﻳﺮﻄﺑ ﺔﳝﺪﻘﻟﺍ ﻚﺗﺰﻬﺟﺃ ﻦﻣ ﺺﻠﺨﺘﻟﺍ ﻥﺇ .٣
.ﻥﺎﺴﻧﻹﺍ ﺔﺤﺼﺑﻭ ﺔﺌﻴﺒﻟﺎﺑ
ﻝﺎﺼﺗﻻﺍ ﻰﺟﺮﻳ ﺔﳝﺪﻘﻟﺍ ﻚﺗﺰﻬﺟﺃ ﻦﻣ ﺺﻠﺨﺘﻟﺍ ﺔﻴﻔﻴﻛ ﻝﻮﺣ ﻞﻴﺻﺎﻔﺘﻟﺍ ﻦﻣ ﺪﻳﺰﳌ .٤
.ﺯﺎﻬﳉﺍ ﻪﻨﻣ ﺖﻳﺮﺘﺷﺍ ﻱﺬﻟﺍ ﺮﺠﺘﳌﺍ ﻭﺃ ﺕﺎﻳﺎﻔﻨﻟﺍ ﺔﻣﺪﺧ ﻭﺃ ﻚﺘﻨﻳﺪﻣ ﺔﻳﺪﻠﺑ ﺐﺘﻜﲟ
EC / ٩٦ / ٢٠٠٢
ﻲﻠﻳ ﺎﻣ ﻥﻮﻤﻀﻣ ﺕﺎﻤﻴﻠﻌﺘﻟﺍ ﺩﺪﲢ
ﺎﲟ) ﺓﺮﺻﺎﻘﻟﺍ ﺔﻳﺪﺴﳉﺍ ﻭﺃﺔﻴﺴﳊﺍ ﻭﺃ ﺔﻴﻨﻫﺬﻟﺍ ﺕﺍﺭﺪﻘﻟﺍﻱﻭﺫ ﻦﻣ ﺺﺨﺷ ﻱﺃ ﻪﻠﻤﻌﺘﺴﻳﻥﺃ ﺽﺮﻐﺑ ﺯﺎﻬﳉﺍ ﺍﺬﻫﻢﻤﺼﻳ ﻢﻟ
ﺺﺨﺷ ﻞﺒﻗ ﻦﻣ ﺯﺎﻬﳉﺍ ﻝﺎﻤﻌﺘﺳﺍ ﺕﺎﻤﻴﻠﻌﺗ ﻭﺃ ﻑﺍﺮﺷﺇ ﺖﲢ ﺍﺬﻫ ﻢﺘﻳ ﻢﻟ ﺎﻣ ،ﺔﻓﺮﻌﳌﺍﻭ ﺓﺮﺒﳋﺍ ﺩﻭﺪﺤﻣ ﻭﺃ،(ﻝﺎﻔﻃﻷﺍ ﻚﻟﺫ ﻲﻓ
.ﻪﺘﻣﻼﺳ ﻦﻋ ﻝﻮﺌﺴﻣ
.ﺯﺎﻬﳉﺎﺑ ﻢﻬﺜﺒﻋ ﻡﺪﻋ ﻥﺎﻤﻀﻟﻝﺎﻔﻃﻷﺍ ﻰﻠﻋ ﻑﺍﺮﺷﻹﺍﻲﻐﺒﻨﻳ
ﺮﻳﺬﲢ
Page 33

٥
ﺐﻴﻛﺮﺘﻟﺍ ﺕﺎﻤﻴﻠﻌﺗ
ﺮﻳﺬﲢ
.(ﺐﻴﺑﺎﻧﺃ ﻲﻨﻓﻭ ﻲﺋﺎﺑﺮﻬﻛ) ﺺﺘﺨﻣ ﺺﺨﺷ ﻞﺒﻗ ﻦﻣ ﺔﻴﺋﺎﺑﺮﻬﻜﻟﺍ ﺕﻼﻴﺻﻮﺘﻟﺍﻭ ﺐﻴﺑﺎﻧﻷﺍ ﻞﻴﺻﻮﺗ ﺕﺎﻴﻠﻤﻋ ﺀﺮﺟﺇ ﺐﺠﻳ
:١ ﺓﻮﻄﳋﺍ
ﻥﺰﳋﺍ ﲔﺑ ﺐﺳﺎﻨﻣ ﻥﺎﻜﻣ ﺮﻴﻀﲢ
ﻥﺎﻜﳌﺍ ﻲﻓ ﻊﺴﺘﺘﻟ ﺔﻤﻤﺼﻣ ﻩﺬﻫ ﻥﻮﺤﺼﻟﺍ ﺔﻟﺎﺴﻏ
.ﻩﺎﻧﺩﺃ ﺓﺭﻮﺼﻟﺍ ﻲﻓ ﲔﺒﳌﺍ
ﺀﺍﺮﺟﻹ ﻞﻴﺴﻐﻟﺍ ﺽﻮﺣ ﻦﻣﹰﺎﺒﻳﺮﻗﹰﺎﻧﺎﻜﻣ ﺮﺘﺧﺇ
.ﺔﻟﻮﻬﺴﺑ ﻒﻳﺮﺼﺘﻟﺍ ﺐﻴﺑﺎﻧﺃﻭ ﻩﺎﻴﳌﺍ ﺕﺍﺪﻳﺪﲤ
٣ ﺪﻌﺒﻳ ﻥﺎﻜﻣ ﻲﻓ ﻥﻮﺤﺼﻟﺍ ﺔﻟﺎﺴﻏ ﺐﻴﻛﺮﺗ ﺐﺠﻳ
ﻒﻳﺮﺼﺗ ﻰﻠﻋ ﻝﻮﺼﺤﻠﻟ ﻞﻴﺴﻐﻟﺍ ﺽﻮﺣ ﻦﻋ ﺭﺎﺘﻣﺃ
.ﺀﺎﻤﻠﻟ ﺪﻴﺟ
ﻙﺮﺗ ﻦﻣ ﺪﺑ ﻻ ﺔﻳﻭﺍﺯ ﻲﻓ ﺔﻟﺎﺴﻐﻟﺍ ﺐﻴﻛﺮﺗ ﻝﺎﺣ ﻲﻓ
.ﺓﺭﻭﺎﺍ ﻥﺰﳋﺍ ﻭﺃ ﺭﺍﺪﳉﺍ ﲔﺑﻭ ﺎﻬﻨﻴﺑ ﻢﺳ ٥ ﺔﻓﺎﺴﻣ
:٢ ﺓﻮﻄﳋﺍ
ﺕﺍﺪﻳﺪﻤﺘﻟﺍ ﺀﺍﺮﺟﻹ ﺔﻣﺯﻼﻟﺍ ﺕﺍﺀﺍﺮﺟﻻﺍ
ﺔﻴﺋﺎﺑﺮﻬﻜﻟﺍ
ﺩﺩﺮﺘﻟﺍ ﻖﺑﺎﻄﻳ ﻲﺋﺎﺑﺮﻬﻛ ﺭﺎﻴﺘﺑ ﺯﺎﻬﳉﺍ ﺍﺬﻫ ﺪﻳﻭﺰﺗ ﺐﺠﻳ
ﻞﺼﻳﻭ ،ﻡﺪﺨﺘﺴﳌﺍ ﻞﻴﻟﺩ ﻰﻠﻋ ﻦﻳﺭﻮﻛﺬﳌﺍ ﺖﻟﻮﭭﻟﺍﻭ
ﹰ
ﺎﻴﺿﺭﺃ ﺔﻟﻮﺻﻮﻣ ﺔﺼﺼﺨﻣ ﺔﻴﺋﺎﺑﺮﻬﻛ ﺓﺭﺍﺩ ﻖﻳﺮﻃ ﻦﻋ
ﺐﺠﻳ .ﻊﻃﺎﻗ ﺭﺎﻴﺗ ﺮﺧﺆﻣ ﻭﺃ ﺮﻴﺒﻣﺃ ١٥ ﻊﻃﺎﻘﺑ ﺔﻴﻤﺤﻣﻭ
.ﲔﻜﻠﺳ ﻖﻳﺮﻃ ﻦﻋ ﺔﻴﺿﺭﻷﺍ ﺓﺭﺍﺪﻟﺎﺑ ﻞﻴﺻﻮﺘﻟﺍ
ﻥﺎﻜﻣ ﻲﻓ ﻲﺋﺎﺑﺮﻬﻜﻟﺍ ﺭﺎﻴﺘﻟﺍ ﺲﺑﺎﻗ ﻞﺻﻭ ﺐﺠﻳ
ﺔﻟﺎﺴﻏ ﻒﻠﺧ ﺲﻴﻟﻭ ﺐﻧﺎﺠﺑ ﻪﻴﻟﺇ ﻝﻮﺻﻮﻟﺍ ﻞﻬﺴﻳ
ﺔﻟﺎﺴﻏ ﻦﻋ ﺮﺘﻣ ١٫٢ ﺔﻓﺎﺴﻣ ﻊﻔﺗﺮﻳﻭ ﻥﻮﺤﺼﻟﺍ
.(٧ ﺔﺤﻔﺼﻟﺍ ﺁ ﺓﺭﻮﺼﻟﺍ ﺮﻈﻧﺃ) ﻥﻮﺤﺼﻟﺍ
ﻲﻓ ،ﺯﺎﻬﳉﺍ ﺍﺬﻬﻟ ﻲﺿﺭﻷﺍ ﻞﻴﺻﻮﺘﻟﺍ ﻦﻣ ﺪﺑ ﻻ
ﺺﺤﻔﺗ ﻰﺟﺮﹸﻳ ﺕﻼﻴﺻﻮﺘﻟﺍ ﻦﻣ ﺪﻛﺄﺘﻟﺍ ﻡﺪﻋ ﻝﺎﺣ
ﻡﺪﻋ ﺐﺠﻳ .ﺺﺼﺨﺘﻣ ﻲﺋﺍﺮﻬﻛ ﻞﺒﻗ ﻦﻣ ﺕﻼﻴﺻﻮﺘﻟﺍ
ﺮﺒﻋ ﻲﺋﺎﺑﺮﻬﻜﻟﺍ ﺪﺧﺄﳌﺍ ﺲﻔﻧ ﻰﻟﺇ ﺮﺧﺁ ﺯﺎﻬﺟ ﻱﺃ ﻞﺻﻭ
.ﺔﻠﺛﺎﳑ ﺔﻠﺻﻮﻣ ﻱﺃ ﻱﺃ ﺬﺧﺄﻤﻠﻟ ﻒﻋﺎﻀﻣ ﻞﺻﻭ
ﻪﻴﺒﻨﺗ
ﻢﺘﻴﺳ ﻲﺘﻟﺍ ﺔﻴﻟﺰﻨﳌﺍ ﺔﻴﺋﺎﺑﺮﻬﻜﻟﺍ ﺓﺭﺍﺪﻟﺍ ﻞﺼﻓ ﺐﺠﻳ
.ﺔﻣﻼﺴﻠﻟ ﻱﺯﺍﺮﺘﺣﺍ ﺀﺍﺮﺟﺈﻛ ﻚﻟﺫﻭ ﺎﻬﻴﻠﻋ ﺯﺎﻬﳉﺍ ﻞﺻﻭ
ﻝﻮﺤﻣ ﺲﺑﺎﻗ ﻭﺃ ﻲﻓﺎﺿﺇ ﻞﻴﺻﻮﺗ ﻚﻠﺳ ﻡﺪﺨﺘﺴﺗ ﻻ
ﺔﻴﺋﺎﺑﺮﻬﻜﻟﺍ ﺕﻼﻴﺻﻮﺘﻟﺍ ﺔﻘﺑﺎﻄﻣ ﺐﺠﻳ ﺎﻤﻛ ،ﻲﻓﺎﺿﺇ
.ﺔﻴﻨﻃﻮﻟﺍ ﻭﺃ ﺔﻴﻠﶈﺍ ﺔﻜﺒﺸﻟﺍ ﻊﻣ
ﺓﺩﺎﲟ ﻥﻮﺤﺼﻟﺍ ﺔﻟﺎﺴﻐﺑ ﻂﻴﶈﺍ ﺐﺸﳋﺍ ﻦﻫﺩ ﺐﺠﻳ
ﺔﺠﻴﺘﻧ ﺐﺸﳋﺍ ﻢﺨﻀﺘﻳ ﻻ ﻰﺘﺣ ﺀﺎﳌﺍ ﺫﺎﻔﻨﻟ ﺔﻌﻧﺎﻣ
.ﺭﺎﺨﺒﻟﺍ
ﲔﺒﻧﺎﳉﺍ ﻯﺪﺣﺍ ﻲﻓ ﺎﻨﻫ ﻊﻄﻗﺍ
.ﺔﻴﺋﺎﺑﺮﻬﻜﻟﺍ ﺕﻼﺒﻴﻜﻟﺍﻭ ﻢﻴﻃﺍﺮﺨﻠﻟ
(٧٥ X ١٠٠ ﻲﻟﺍﻮﺣ)
ﻢﻠﻣ : ﺓﺪﺣﻮﻟﺍ
٨٧٠-٨٦٠
ﻞﻗﻷﺍ ﻰﻠﻋ
٦٠٠
١٠٠
٧٥
٦٠٥-
٦٠٠
ﺯﺎﻬﺠﻠﻟ ﺔﻴﺋﺎﺑﺮﻬﻜﻟﺍ ﺔﻴﻄﻟﻮﻔﻠﻟ ﺽﺮﻌﺘﻟﺍ ﺓﺭﻮﻄﺧ
ﺔﻴﻄﻟﻮﻔﻠﻟ ﺽﺮﻌﺘﻟﺍ ﻦﻋ ﺔﻤﺟﺎﻨﻟﺍ ﺮﻃﺎﺍ ﻥﺎﻴﺒﺘﻟ
.ﺯﺎﻬﺠﻠﻟ ﺔﻴﺋﺎﺑﺮﻬﻜﻟﺍ
ﺭﻮﻬﻇ ﻊﻣ ﺯﺎﻬﳉﺍ ﻞﻴﻐﺸﺗ ﻝﺎﺣ ﻲﻓ – ﻪﻳﻮﻨﺗ
ﻭﺰﻳﻷﺍ ﺪﻋﺍﻮﻘﺑ ﻡﺍﺰﺘﻟﻻﺍ ﻲﻐﺒﻨﻴﻓ ﺮﻳﺬﺤﺘﻟﺍ ﺔﻣﻼﻋ
. ٣٨٦٤
Page 34

٦
ﺐﻴﻛﺮﺘﻟﺍ ﺕﺎﻤﻴﻠﻌﺗ
: ٣ ﺓﻮﻄﳋﺍ
ﺐﻴﻛﺮﺘﻠﻟ ﻥﻮﺤﺼﻟﺍ ﺔﻟﺎﺴﻏ ﺮﻴﻀﲢ
.ﺎﻫﺮﻬﻇ ﻰﻠﻋ ﻥﻮﺤﺼﻟﺍ ﺔﻟﺎﺴﻏ ﻊﺿ
.ﺏﻮﻠﻄﳌﺍ ﻉﺎﻔﺗﺭﻻﺍ ﺐﺳﺎﻨﺘﻟ ﻥﻮﺤﺼﻟﺍ ﻞﺟﺭﺃ ﻂﺒﺿﺍ
ﻰﻏﺮﺒﻟﺍ ﻂﺒﺿﺍ
: ٤ ﺓﻮﻄﳋﺍ
ﻥﺰﳋﺍ ﲔﺑ ﻥﻮﺤﺼﻟﺍ ﺔﻟﺎﺴﻏ ﺐﻴﻛﺮﺗ
ﺔﻟﺎﺴﻐﺑ ﺹﺎﳋﺍ ﻉﺎﻔﺗﺭﻻﺍﻭ ﺔﺣﺎﺴﳌﺍ ﻂﺒﺿ ﺐﺠﻳ
.ﺔﻟﻮﻤﺼﻟﺍ ﺡﺎﺘﻔﻣ ﻡﺍﺪﺨﺘﺳﺎﺑ ﻥﻮﺤﺼﻟﺍ
ﺪﻛﺄﺗﻭ ﺔﻳﺎﻨﻌﺑ ﺎﻬﻧﺎﻜﻣ ﻲﻓ ﻥﻮﺤﺼﻟﺍ ﺔﻟﺎﺴﻏ ﻞﺧﺩﺃ
.ﺓﺩﻭﺪﳑ ﻭﺃ ﻱﻮﻠﻣ ﺮﻴﻏ ﻒﻴﻔﺠﺘﻟﺍ ﻡﻮﻃﺮﺧ ﻥﺃ ﻦﻣ
ﻢﻠﻣ
٦٠٠
ﻢﻠﻣ ٨٧٠-٨٦٠
ﻢﻠﻣ ٦٠٥-
٦٠٠
ﺎﻴﻠﻋ ﺔﺣﻮﻟ
ﻪﻴﺒﻨﺗ
ﻦﻣ ﺪﺑ ﻻ ،ﻢﻠﻣ ٠٥٨ ﻦﻣ ﻞﻗﺃ ﻥﺍﺰﳋﺍ ﻉﺎﻔﺗﺭﺍ ﻥﺎﻛ ﺍﺫﺇ
ﻲﻓ ﲔﻴﻏﺮﺒﻟﺍ) .ﲔﻴﻏﺮﺑ ﻮﺧﺮﺑ ﺎﻴﻠﻌﻟﺍ ﺔﺣﻮﻠﻟﺍ ﻉﺰﻧ
(ﻒﻠﳋﺍ
Page 35

٧
ﺐﻴﻛﺮﺘﻟﺍ ﺕﺎﻤﻴﻠﻌﺗ
ﺃ ﻞﻜﺸﻟﺍ
ﻰﻧﺩﻷﺍ ﻰﻠﻋ ﻢﻠﻣ ٣٠٠
ﻰﻧﺩﻷﺍ ﻰﻠﻋ ﻢﻠﻣ ٧٧٠
ﻰﺼﻗﻷﺍ ﻰﻠﻋ ﻢﻠﻣ ١٠٠٠
ﻡﻮﻃﺮﺧ
ﻒﻳﺮﺼﺘﻟﺍ
ﻡﻮﻃﺮﺧ
ﺀﺎﳌﺍ ﻝﻮﺧﺩ
ﻚﻠﺳ
ﺭﺎﻴﺘﻟﺍ
: ٥ ﺓﻮﻄﳋﺍ
ﻒﻳﺮﺼﺘﻟﺍ ﻂﺧ ﻞﻴﺻﻮﺗ
ﻂﳋﹰﺎﻤﺋﻼﻣ ﻒﻳﺮﺼﺘﻟﺍ ﻡﻮﻃﺮﺧ ﻑﺮﻃ ﻦﻜﻳ ﻢﻟ ﺍﺫﺇ
ﺓﺩﻭﺰﻣ ﺮﻴﻏ) ﺔﻴﻃﺎﻄﻣ ﺔﻠﻴﺻﻮﺗ ﻡﺪﺨﺘﺳﺇ ،ﻒﻳﺮﺼﺘﻟﺍ
ﺩﺍﻮﻣﻭ ﺓﺭﺍﺮﺤﻠﻟ ﺔﻣﻭﺎﻘﻣ ﻥﻮﻜﺗ ﻥﺃ ﺪﺑ ﻻ (ﺯﺎﻬﳉﺍ ﻊﻣ
.ﻞﻴﺴﻐﻟﺍ
ﺕﺍﻭﺩﻷﺍ ﻭﺃ ﺕﺍﻭﺍﺩﺮﳋﺍ ﺮﺠﺘﻣ ﻦﻣ ﺎﻬﻴﻠﻋ ﻝﻮﺼﳊﺍ ﻦﻜﳝ
.ﺔﻴﺤﺼﻟﺍ
ﺎﻤﻛ ﻞﻴﺻﻮﺘﻟﺍ ﺀﺍﺮﺟﻹ ﲔﺘﻴﺟﺫﻮﳕ ﲔﺘﻘﻳﺮﻃ ﻚﻟﺎﻨﻫ
.ﺏ ﻭ ﺍ ﲔﻠﻜﺸﻟﺍ ﻲﻓ ﲔﺒﻣ ﻮﻫ
ﻒﻳﺮﺼﺗ ﻰﻠﻋ ﻝﻮﺼﺤﻠﻟ s ﺔﻘﻳﺮﻄﺑ ﻡﻮﻃﺮﳋﺍ ﻖﻴﻠﻌﺗ ﺐﺠﻳ
.ﺪﻴﺟ
.ﲔﺘﻴﻟﺎﺘﻟﺍ ﲔﺘﻘﻳﺮﻄﻟﺍ ﻯﺪﺣﺇ ﻉﺎﺒﺗﺇ ﻦﻣ ﺪﺑ ﻻ ،ﺐﻌﺜﻟﺍ ﻊﻨﳌ
ﺲﺒﺤﻣ ﺔﻌﻟﺎﺑ ﻰﻟﺍ ﻒﻳﺮﺼﺘﻟﺍ ﻡﻮﻃﺮﺧ ﻞﻴﺻﻮﺗ ﺪﻨﻋ
ﻊﻓﺭ ﻦﻣ ﺪﺑ ﻻ ،ﺕﺎﻳﺎﻔﻨﻟﺍ ﻒﻳﺮﺼﺗ ﺓﺪﺣﻭ ﻭﺃ « S » ﻞﻜﺸﺑ
ﺓﺪﻋﺎﻘﻟﺍ ﺖﲢ ﻰﻟﺍ ﻪﻟﻮﺻﻭﻭ ﺎﻳﺮﺋﺍﺩ ﻒﻳﺮﺼﺘﻟﺍ ﻡﻮﻃﺮﺧ
.ﻡﺎﻜﺣﺈﺑ ﻪﺘﻴﺒﺜﺗﻭ ﻰﻠﻔﺴﻟﺍ
ﻢﺋﺎﻗ ﺏﻮﺒﻧﺃ ﻰﻟﺍ ﻒﻳﺮﺼﺘﻟﺍ ﻡﻮﻃﺮﺧ ﻞﻴﺻﻮﺗ ﺪﻨﻋ
ﺩﻭﺪﺴﻟﺍ ﻞﻴﺻﻮﺘﻟﺍ ﺀﺍﺮﺟﺇ ﺍﺪﺟ ﻢﻬﳌﺍ ﻦﻤﻓ ،ﻞﻘﺘﺴﻣ
.ﺀﺍﻮﻬﻠﻟ
.ﺏ ﻞﻜﺸﻟﺍ ﻊﺟﺍﺭ
ﻰﺼﻗﻷﺍ ﻰﻠﻋ ﻢﻠﻣ ١٠٠٠/ﻰﻧﺩﻷﺍ ﻰﻠﻋ ﻢﻠﻣ ٧٧٠
ﻰﻧﺩﻷﺍ ﻰﻠﻋ ﻢﻠﻣ ٣٠٠
ﻞﻴﺻﻮﺗ
ﺩﻭﺪﺳ
ﺀﺍﻮﻬﻠﻟ
ﻢﻠﻣ ٤٠ ﺮﻄﻘﺑ ﻢﺋﺎﻗ ﺏﻮﺒﻧﺃ
ﻰﻧﺩﻷﺍ ﻰﻠﻋ
ﻢﺋﺎﻗ ﺏﻮﺒﻧﺃ - ﻒﻳﺮﺼﺘﻟﺍ ﻞﻴﺻﻮﺗ : ﺏ ﻞﻜﺸﻟﺍ
ﻒﻳﺮﺼﺘﻟﺍ ﻡﻮﻃﺮﺧ ﺪﻳﺪﲤ
.ﻩﺎﻧﺩﺃ ﻞﻜﺸﻟﺍ ﻲﻓ ﲔﺒﻣ ﻮﻫ ﺎﻤﻛ ﻒﻳﺮﺼﺘﻟﺍ ﻡﻮﻃﺮﺧ ﺩﺪﻣ
ﻪﻴﺒﻨﺗ
ﻡﺪﻋ ﻦﻣ ﺪﻛﺄﺗ ﻒﻳﺮﺼﺘﻟﺍ ﻡﻮﻃﺮﺧ ﻞﻴﺻﻮﺗ ﺪﻨﻋ
(ﻢﻠﻣ ٠٤ ﺮﻄﻗ ﻒﺼﻨﺑ ﻡﻮﻃﺮﳋﺍ ﻲﻟ ﻦﻣ ﺪﺑ ﻻ) .ﻪﺋﺍﻮﺘﻟﺇ
ﻰﺼﻗﻷﺍ ﻰﻠﻋ ﻢﻠﻣ ٣٠٠
ﻰﺼﻗﻷﺍ ﻰﻠﻋ ﻢﻠﻣ ١٠٠٠/ﻰﻧﺩﻷﺍ ﻰﻠﻋ ﻢﻠﻣ ٧٧٠
ﻰﻧﺩﻷﺍ ﻰﻠﻋ ﻢﻠﻣ ٢٠٠
ﻲﺳﺎﺤﻧ ﺏﻮﺒﻧﺃ
ﻢﻠﻣ ٢٠ ﺮﻄﻘﺑ
ﻡﻮﻃﺮﺧ ﻲﻓ ﺞﻠﻔﻣ
ﻑﺮﻄﻟﺍﻭ ﻒﻳﺮﺼﺘﻟﺍ
.ﺔﺟﺎﳊﺍ ﺪﻨﻋ ﺮﺧﻵﺍ
.ﻒﻳﺮﺼﺘﻟﺍ ﻡﻮﻃﺮﺧ ﺪﻳﺪﲤ ﺪﻨﻋ ﻞﻴﺻﻮﺘﻠﻟ ﺔﻧﺮﻘﻣ ﻡﺪﺨﺘﺳﺍ
ﻲﻠﺧﺍﺩ ﺮﻄﻘﺑ ﻲﻃﺎﻄﻣ ﻡﻮﻃﺮﺧ ﻭﺃ ﻒﻳﺮﺼﺘﻟﺍ ﻡﻮﻃﺮﺧ ﺪﻳﺪﲤ
ﻡﹾ٩٠ ﺭﺎﳊﺍ ﺀﺎﻤﻠﻟ ﺔﻣﻭﺎﻘﻤﻠﻟ ﻞﺑﺎﻗ ﻢﻠﻣ ٠٢-٦١
ﺔﻋﻮﻟﺎﺒﻟﺍ
Page 36

٨
ﺐﻴﻛﺮﺘﻟﺍ ﺕﺎﻤﻴﻠﻌﺗ
: ٦ ﺓﻮﻄﳋﺍ
ﺀﺎﳌﺍ ﺩﺍﺪﻣﺇ ﻞﻴﺻﻮﺗ
ﻲﻓ ﺢﹼﺿﻮﻣ ﻮﻫ ﺎﻤﻛ ﺀﺎﳌﺍ ﺪﻳﻭﺰﺗ ﻡﻮﻃﺮﺧ ﻞﺻﻮﺑ ﻢﻗ
ﻝﻮﺧﺩ ﻡﺎﻤﺻ ﻦﻣ ﻥﹼﻮﻜﺘﺗ ﺕﻼﻳﺩﻮﳌﺍ ﺾﻌﺑ) ﻞﻜﺸﻟﺍ
ﻩﺬﻬﻟ ﺩﺭﻻﺍﻭ ﺭﺎﳊﺍ ﺀﺎﳌﺍ ﺩﺍﺪﻣﺇ ﻦﻜﳝ (ﻡﻮﻃﺮﳋﺍﻭ ﺀﺎﳌﺍ
ﺀﺎﳌﺍ ﻞﻴﺻﻮﺗ ﻦﻜﻤﳌﺍ ﻦﻣ ﻦﻜﻳ ﻢﻟ ﺍﺫﺇ ،ﺔﻟﺎﺴﻐﻟﺍ
ﻝﺎﺼﻳﺇ ﺐﺠﻳ ،ﺔﻳﻮﺌﻣ ﺔﺟﺭﺩ ٥٦ ﻦﻣ ﻞﻗﺃ ﺓﺭﺍﺮﺣ ﺔﺟﺭﺪﺑ
.ﺔﻟﺎﺴﻐﻟﺍ ﻩﺬﻬﻟ ﺩﺭﺎﺒﻟﺍ ﺀﺎﳌﺍ
ﻂﻳﺮﺷ ﻡﺍﺪﺨﺘﺳﺍ ﻦﻣ ﺪﺑ ﻻ ﻦﻣ ﺪﺑ ﻻ ﻞﻴﺻﻮﺘﻟﺍ ﺪﻨﻋ
.ﺐﻳﺮﺴﺘﻟﺍ ﻊﻨﳌ ﺓﺩﺎﻣ ﻭﺃ ﺐﻳﺮﺴﺘﻟﺍ ﻊﻨﻣ
.ﻲﻨﺤﻨﻣ ﻭﺃ ﻱﻮﺘﻠﻣ ﺮﻴﻏ ﻂﳋﺍ ﻥﺃ ﻦﻣ ﺪﻛﺄﺗ
ﺓﺪﻳﺪﳉﺍ ﻢﻴﻃﺍﺮﳋﺍ ﺕﺎﻋﻮﻤﺠﻣ ﻡﺍﺪﺨﺘﺳﺍ ﺐﺠﻳ
ﻡﺍﺪﺨﺘﺳﺍ ﺓﺩﺎﻋﺇ ﺐﺠﻳ ﻻﻭ ﺯﺎﻬﳉﺍ ﻊﻣ ﺓﺩﻭﺰﳌﺍ
.ﺔﳝﺪﻘﻟﺍ ﻢﻴﻃﺍﺮﳋﺍ ﺕﺎﻋﻮﻤﺠﻣ
: ٨ ﺓﻮﻄﳋﺍ
ﺔﻟﺎﺴﻐﻟﺍ ﻉﺎﻔﺗﺭﺍ ﻯﻮﺘﺴﻣ ﻂﺒﺿ ﺔﻴﻔﻴﻛ
ﺏﺎﺑ ﻕﻼﻏﺇﻭ ﺢﺘﻓ ﻝﻼﺧ ﺔﺑﻮﻌﺼﻟﺍ ﺾﻌﺒﺑ ﺕﺮﻌﺷ ﺍﺫﺇ
.ﺔﻟﺎﺴﻐﻟﺍ ﻉﺎﻔﺗﺭﺍ ﻂﺒﺿ ﺐﺠﻳ ﺔﻟﺎﺴﻐﻟﺍ
: ٧ ﺓﻮﻄﳋﺍ
ﻊﻴﻤﺠﺘﻟﺍﻭ ﻲﺋﺎﻬﻨﻟﺍ ﺺﺤﻔﻟﺍ
.ﺀﺎﳌﺍ ﺩﺍﺪﻣﻹ ﻡﺎﻜﺣﺈﺑ ﻩﺎﻴﳌﺍ ﻡﻮﻃﺮﺧ ﺪﺷ
ﺭﺎﻴﺘﻟﺍ ﺬﺧﺄﻣ ﻰﻟﺇ ﻲﺋﺎﺑﺮﻬﻜﻟﺍ ﺭﺎﻴﺘﻟﺍ ﺲﺑﺎﻗ ﻞﺧﺩﺃ
.ﺽﹼﺭﺆﳌﺍ
ﺎﻬﻠﺴﻏ ﺩﺍﺮﳌﺍ ﻲﻧﺍﻭﻷﺍ ﻊﺿﻭ ﻞﺒﻗﻭ ﺐﻴﻛﺮﺘﻟﺍ ﺪﻌﺑ
ﺔﻌﻳﺮﺴﻟﺍ ﺓﺭﻭﺪﻟﺍ» ﻰﻠﻋ ﺔﻟﺎﺴﻐﻟﺍ ﻞﻴﻐﺸﺗ ﻰﺟﺮﻳ
ﻲﻓ ﺔﻠﻜﺸﻣ ﺩﻮﺟﻭ ﻡﺪﻋ ﻦﻣ ﺪﻛﺄﺘﻠﻟ «(Quick)
.ﻩﺎﻴﻤﻠﻟ ﺏﺮﺴﺗ ﻭﺃ ﻞﻴﻐﺸﺘﻟﺍ
ﺔﻟﺎﺴﻐﻟﺍ ﻞﻴﻐﺸﺗ ﺪﻨﻋﹰﺎﻴﻟﺎﻋﹰﺎﺠﻴﺠﺿ ﻊﻤﺴﺗ ﺪﻗ
ﺓﺮﻣ ﺎﻬﻠﻴﻐﺸﺗ ﺪﻋﺃﻭ ﺔﻟﺎﺴﻐﻟﺍ ﺊﻔﻃﺃ ،ﺓﺮﻣ ﻝﻭﻷ
.ﺔﻴﻧﺎﺛ
ﲔﻤﻴﻟﺍ ﻰﻟﺍ ﻞﺋﺎﻣ ﺏﺎﺒﻟﺍ ﻥﺃ ﺔﻟﺎﺣ ﻲﻓ : ١ ﺔﻟﺎﳊﺍ
ﻲﻓ ﲔﺒﻣ ﻮﻫ ﺎﻤﻛ ﺭﺎﺴﻴﻟﺍ ﻰﻟﺍ ﻼﺋﺎﻣ ﺏﺎﺒﻟﺍ ﻥﺎﻛ ﺍﺫﺇ •
ﻞﻤﻌﻳ ﻰﺘﺣ ﻩﺎﻧﺩﺃ ﺓﺭﻮﻛﺬﳌﺍ ﺕﺍﺀﺍﺮﺟﻹﺍ ﺭﹼﺮﻛ ، ﺩ ﻞﻜﺸﻟﺍ
. ﻲﻐﺒﻨﻳ ﺎﻤﻛ ﺏﺎﺒﻟﺍ
ﻲﻓ (ﺔﻋﺎﺴﻟﺍ ﺏﺮﻘﻋ ﺲﻛﺎﻌﻣ ﻩﺎﲡﺎﺑ) ﻰﻏﺮﺒﻟﺍ ﺥﺭﺍ (١
.ﻉﺎﻔﺗﺭﻻﺍ ﻊﻓﺮﻟ ﻩﺭﻭﺩﻭ ﻒﻠﳋﺍ ﻲﻓ ﻰﻨﻤﻴﻟﺍ ﻞﺟﺮﻟﺍ
ﻭﺃ ﺔﺑﻮﻌﺻ ﻰﻘﺒﺗ ﺖﻧﺎﻛ ﺍﺫﺇ ﺏﺎﺒﻟﺍ ﺢﺘﻓ ﻦﻣ ﺪﻛﺄﺗ (٢
. ﻙﺎﻜﺘﺣﺍ ﺕﻮﺻ
ﻥﻼﻴﻣ ﺙﺪﺤﻳ ﻼﻓ ،ﺢﻴﺤﺻ ﻞﻜﺸﺑ ﺯﺎﻬﳉﺍ ﺀﺍﻮﺘﺳﺍ ﺪﻨﻋ •
.ﻙﺎﻜﺘﺣﺍ ﺕﻮﺻﻭ ﺔﺑﻮﻌﺻﻭ
ﻲﻓ ﲔﺒﻣ ﻮﻫ ﺎﻤﻛ ﲔﻤﻴﻟﺍ ﻰﻟﺍ ﻼﺋﺎﻣ ﺏﺎﺒﻟﺍ ﻥﺎﻛ ﺍﺫﺇ •
ﻞﻤﻌﻳ ﻰﺘﺣ ﻩﺎﻧﺩﺃ ﺓﺭﻮﻛﺬﳌﺍ ﺕﺍﺀﺍﺮﺟﻹﺍ ﺭﹼﺮﻛ ، ﺝ ﻞﻜﺸﻟﺍ
. ﻲﻐﺒﻨﻳ ﺎﻤﻛ ﺏﺎﺒﻟﺍ
ﻲﻓ (ﺔﻋﺎﺴﻟﺍ ﺏﺮﻘﻋ ﺲﻛﺎﻌﻣ ﻩﺎﲡﺎﺑ) ﻰﻏﺮﺒﻟﺍ ﺥﺭﺍ (١
.ﻉﺎﻔﺗﺭﻻﺍ ﻊﻓﺮﻟ ﻩﺭﻭﺩﻭ ﻒﻠﳋﺍ ﻲﻓ ﻯﺮﺴﻴﻟﺍ ﻞﺟﺮﻟﺍ
ﻭﺃ ﺔﺑﻮﻌﺻ ﻰﻘﺒﺗ ﺖﻧﺎﻛ ﺍﺫﺇ ﺏﺎﺒﻟﺍ ﺢﺘﻓ ﻦﻣ ﺪﻛﺄﺗ (٢
. ﻙﺎﻜﺘﺣﺍ ﺕﻮﺻ
ﻥﻼﻴﻣ ﺙﺪﺤﻳ ﻼﻓ ،ﺢﻴﺤﺻ ﻞﻜﺸﺑ ﺯﺎﻬﳉﺍ ﺀﺍﻮﺘﺳﺍ ﺪﻨﻋ •
.ﻙﺎﻜﺘﺣﺍ ﺕﻮﺻﻭ ﺔﺑﻮﻌﺻﻭ
ﻰﻟﺍ ﻞﺋﺎﻣ
ﲔﻤﻴﻟﺍ
ﺏﺎﺒﻟﺍ
ﺝ ﻞﻜﺸﻟﺍ
ﺏﺎﺒﻟﺍ
ﻰﻟﺍ ﻞﺋﺎﻣ
ﺭﺎﺴﻴﻟﺍ
ﺩ ﻞﻜﺸﻟﺍ
ﺭﺎﺴﻴﻟﺍ ﻰﻟﺍ ﻞﺋﺎﻣ ﺏﺎﺒﻟﺍ ﻥﺃ ﺔﻟﺎﺣ ﻲﻓ .٢ ﺔﻟﺎﳊﺍ
ﺀﺎﳌﺍ ﺔﻴﻔﻨﺣ
ﺀﺎﳌﺍ ﺩﺍﺪﻣﺇ ﻡﻮﻃﺮﺧ
Page 37

٩
ﺀﺍﺰﺟﻷﺍ ﺀﺎﻤﺳﺃ
ﻢﻜﺤﺘﻟﺍ ﺔﺣﻮﻟ .١
ﺪﻴﻟﺍ ﺾﺒﻘﻣ .٢
ﻲﻣﺎﻣﻷﺍ ﺀﺎﻄﻐﻟﺍ .٣
ﻞﻔﺳﻷﺍ ﺀﺎﻄﻐﻟﺍ .٤
ﺽﺮﻌﻟﺍ ﺝﺎﺟﺯ .٥
(ﻞﻴﻐﺸﺘﻟﺍ) ﺔﻗﺎﻄﻟﺍ ﺭﺯ .٦
ﻒﻳﺮﺼﺘﻟﺍ ﻡﻮﻃﺮﺧ .٧
ﺀﺎﳌﺍ ﺩﺍﺪﻣﺇ ﻡﻮﻃﺮﺧ .٨
ﺔﻗﺎﻄﻟﺍ ﻚﻠﺳ .٩
.ﺭﺎﻌﺷﺇ ﻱﺃ ﻥﻭﺪﺑ ﺕﺎﻔﺻﺍﻮﳌﺍﻭ ﺮﻬﻈﳌﺍ ﻒﻠﺘﺨﻳ ﺪﻗ
ﺕﺎﻘﺤﻠﳌﺍ
ﻊﻤﻘﻟﺍ
ﻞﻳﺪﻌﺘﻠﻟ ﺔﻠﺑﺎﻗ ﻞﺟﺭ .١٠
ﻰﻠﻋﻷﺍ ﻑﺮﻟﺍ .١١
ﺓﺮﻴﻐﺼﻟﺍ ﻞﻛﻷﺍ ﺕﺍﻭﺩﺃ ﻑﺭ .١٢
ﻒﻄﺸﻠﻟ ﺓﺪﻋﺎﺴﳌﺍ ﺓﺩﺎﳌﺍﻭ ﻞﻴﺴﻐﻟﺍ ﻞﺋﺎﺳ ﺝﺭﺩ .١٣
ﺭﺎﺨﺒﻟﺍ ﺔﺤﺤﺘﻓ ﺀﺎﻄﻏ .١٤
ﺎﻴﻠﻌﻟﺍ ﺵﺮﻟﺍ ﻉﺍﺭﺫ .١٥
ﻰﻠﻔﺴﻟﺍ ﺵﺮﻟﺍ ﻉﺍﺭﺫ .١٦
ﺓﺎﻔﺼﳌﺍ ﺔﻋﻮﻤﺠﻣ .١٧
ﻞﻔﺳﻷﺍ ﻑﺮﻟﺍ .١٨
ﺢﻠﳌﺍ ﺀﺎﻋﻭ ﺀﺎﻄﻏ .١٩
Page 38

١٠
ﺔﻟﻮﻤﳊﺍ ﻒﺼﻧ
ﺭﻮﻣﺯ
ﻑﺎﻘﻳﻹﺍ /ﻞﻴﻐﺸﺘﻟﺍ
ﻲﻘﺒﺘﳌﺍ ﺖﻗﻮﻟﺍ
UV
ﻞﻔﻄﻟﺍ ﺔﻳﺎﻤﺣ ﻞﻔﻗﺔﻗﺎﻄﻟﺍ
ﻞﻴﻐﺸﺘﻟﺍ ﺮﻴﺧﺄﺗ
ﺮﺷﺆﳌﺍ
ﺔﻟﻮﻤﳊﺍ ﻒﺼﻧ
ﺭﻮﻣﺯ
ﻑﺎﻘﻳﻹﺍ /ﻞﻴﻐﺸﺘﻟﺍ
ﻲﻘﺒﺘﳌﺍ ﺖﻗﻮﻟﺍ
ﺩﺭﺎﺒﻟﺍ ﻰﻠﻋ ﻒﻴﻔﺠﺘﻟﺍ
ﻞﻔﻄﻟﺍ ﺔﻳﺎﻤﺣ ﻞﻔﻗﺔﻗﺎﻄﻟﺍﻞﻴﻐﺸﺘﻟﺍ ﺮﻴﺧﺄﺗ
ﺮﺷﺆﳌﺍ
ﻢﻜﺤﺘﻟﺍ ﺭﺍﺭﺯﺃ ﻒﺋﺎﻇﻭ
: ﻞﻳﺩﻮﳌﺍ
D1423W(L,M,T,B,C,D,A) F(B, U)U
: ﻞﻳﺩﻮﳌﺍ
D1422W(L,M,T,B,C,D,A) F(B, U)UU
ﻒﻄﺸﻟﺍ
ﻒﻄﺸﻟﺍ
ﺵﺮﻟﺍ
ﺵﺮﻟﺍ
Page 39

١١
ﺞﻣﺎﻧﺮﺒﻟﺍ
ﺞﻣﺎﻧﺮﺒﻟﺍ
Page 40

١٢
ﻢﻜﺤﺘﻟﺍ ﺭﺍﺭﺯﺃ ﻒﺋﺎﻇﻭ
ﻒﻄﺸﻟﺍ
،(+ﻒﻄﺷ) Rinse+ ،(ﹰﺍﺪﺟ ﻦﺧﺎﺳ) Extra Hot ﺭﺎﻴﺘﺧﻻ ﺭﹼﺮﻜﺘﻣ ﻞﻜﺸﺑ ﻒﻄﺸﻟﺍ ﺭﺯ ﻰﻠﻋ ﻂﻐﺿﺇ •
Extra Hot
،ﻲﺟﻭﺰﻟﺍ ﻞﻴﺴﻐﻟﺍ) . ﻡﹾ٨٠ ﻰﻟﺍ ﺓﺭﺍﺮﳊﺍ ﺔﺟﺭﺩ ﻊﻔﺗﺮﺗ ، «(ﺍﺪﺟ ﻦﺧﺎﺳ) Extra Hot» ﺔﻔﻴﻇﻭ ﺕﺮﺘﺧﺍ ﺍﺫﺇ •
(ﻱﺩﺎﺼﺘﻗﻻﺍ ،ﻲﺋﺎﻘﻠﺘﻟﺍ
.ﺔﻴﻓﺎﺿﺇ ﻒﻄﺷ ﺓﺭﻭﺩ ﻞﻤﻌﺗ ، «(+ ﻒﻄﺷ) Rinse+» ﺭﺎﻴﺘﺧﺍ ﺪﻨﻋ •
ﺔﻟﻮﻤﳊﺍ ﻒﺼﻧ
.ﺔﻗﺎﻄﻟﺍ ﺮﻴﻓﻮﺘﻟ ﻞﻔﺳﻷﺍ ﻭﺃ ﻰﻠﻋﻷﺍ ﻑﺮﻟﺍ ﻡﺪﺨﺘﺳﺍ ﺓﺮﻴﻐﺼﻟﺍ ﺔﻟﻮﻤﳊﺍ ﺔﻟﺎﺣ ﻲﻓ •
.ﺭﺰﻟﺍ ﻂﻐﻀﺗ ﺓﺮﻣ ﻞﻛ ﻊﻣ (ﻞﻔﺳﻷﺍ) Lower ﻭﺃ (ﻰﻠﻋﻷﺍ) Upper ﻑﺮﻟﺍ ﺮﺘﺧﺇ •
ﻰﻠﻋﻸﻟ ﺵﺮﻟﺍ ﻉﺍﺭﺫ ﻙﹼﺮﺤﺘﺗ ﺚﻴﺣ ﻲﻠﻜﻟﺍ ﻞﺴﻐﻟﺎﻳ ﻡﻮﻘﺘﺳ ﺔﻟﺎﺴﻐﻟﺍ ﻥﺈﻓ ﺭﺰﻟﺍ ﻂﻐﺿ ﻡﺪﻋ ﻝﺎﺣ ﻲﻓ •
.ﺏﻭﺎﻨﺘﻣ ﻞﻜﺸﺑ ﻞﻔﺳﻷﺍﻭ
ﻞﻔﻄﻟﺍ ﺔﻳﺎﻤﺣ ﻞﻔﻗ
.ﻝﺎﻔﻃﻷﺍ ﻞﺒﻗ ﻦﻣ ﺎﻫﺮﻴﻴﻐﺗ ﻊﻨﳌ ﻢﻜﺤﺘﻟﺍ ﺔﺣﻮﻟ ﺭﺍﺭﺯﺃ ﻞﻔﻗ ﻚﻓ ﻭﺃ ﻞﻔﻘﻟ ﻡﺪﺨﺘﺴﻳ •
.ﻲﺋﺎﺑﺮﻬﻜﻟﺍ ﺭﺎﻴﺘﻟﺍﺍ ﻉﺎﻄﻘﻧﺍ ﺪﻨﻋﹰﺎﻴﺋﺎﻘﻠﺗ ﺔﻔﻴﻇﻮﻟﺍ ﻩﺬﻫ ﺀﺎﻐﻟﺇ ﻢﺘﻳ •
.ﻥﺍﻮﺛ ﻊﻀﺒﻟﹰﺎﻌﻣ (ﻒﻄﺷ) Rinse ﺭﺯﻭ (ﻞﻤﳊﺍ ﻒﺼﻧ) Half Load ﺭﺯ ﻂﻐﺿﺇ ﻞﻔﻘﻟﺍ ﺀﺎﻐﻟﻹ ﻭﺃ ﻞﻔﻘﻠﻟ •
ﺔﻗﺎﻄﻟﺍ
.ﺯﺎﻬﳉﺍ ﻞﻴﻐﺸﺘﻟ ﺭﺰﻟﺍ ﺍﺬﻫ ﻂﻐﺿﺇ •
.ﺔﻗﺎﻄﻟﺍ ﺮﻴﻓﻮﺗﻭ ﺔﻣﻼﺴﻠﻟﹰﺎﻴﺋﺎﻘﻠﺗ ﺯﺎﻬﳉﺍ ﺊﻔﻄﻨﻳ ﻞﻴﻐﺸﺘﻟﺍ ﺪﻌﺑ •
.ﺔﻣﻼﺴﻠﻟﹰﺎﻴﺋﺎﻘﻠﺗ ﻲﺋﺎﺑﺮﻬﻜﻟﺍ ﺭﺎﻴﺘﻟﺍ ﻊﻄﻘﻨﻳ ﺯﺎﻬﳉﺍ ﻲﻓ ﺊﺟﺎﻔﻣ ﻞﻠﺧ ﺙﻮﺣ ﻝﺎﺣ ﻲﻓ •
ﺵﺮﻟﺍ
.ﻲﻟﺍﻮﺘﻟﺍ ﻰﻠﻋ (ﻒﻴﻌﻀﻟﺍ) Soft ﻰﻟﺇ (ﻂﺳﻮﺘﳌﺍ) Medium ﻰﻟﺇ (ﻱﻮﻘﻟﺍ) Strong ﻦﻣ ﺀﺎﳌﺍ ﻂﻐﺿ ﺮﻴﻐﺘﻳ ﺭﺰﻟﺍ ﻂﻐﺿ ﺎﻤﻠﻛ
•
ﻞﻴﻐﺸﺘﻟﺍ ﺮﻴﺧﺄﺗ
.ﺏﻮﻠﻄﳌﺍ ﺞﻣﺎﻧﺮﺒﻟﺍ ﻞﻴﻐﺸﺗ ﺮﻴﺧﺄﺗ ﺕﺩﺭﺃ ﺍﺫﺇ ﺭﺰﻟﺍ ﺍﺬﻫ ﻂﻐﺿﺇ •
.ﺔﻋﺎﺳ ﺖﻗﻮﻟﺍ ﺓﺩﺎﻳﺰﻟ ﺭﺰﻟﺍ ﺍﺬﻫ ﻂﻐﺿﺇ •
.ﺔﻋﺎﺳ ١٩ ﻰﻟﺇ ﺔﻋﺎﺳ ﻦﻣ ﻞﻴﻐﺸﺘﻟﺍ ﺮﻴﺧﺄﺗ ﻂﺒﺿ ﻦﻜﳝ •
&
.(ﻒﻄﺷﻭ ﹰﺍﺪﺟ ﻦﺧﺎﺳ) Rinse+
ﺞﻣﺎﻧﺮﺒﻟﺍ
.ﺞﻣﺎﻧﺮﺒﻟﺍ ﺭﺎﻴﺘﺧﻻ ﺭﺰﻟﺍ ﺍﺬﻫ ﻰﻠﻋ ﻂﻐﺿﺇ •
UV
.«UV» ﺭﺯ ﻰﻠﻋ ﻂﻐﺿﺍ ، ﻥﻮﺤﺼﻟﺍ ﻢﻴﻘﻌﺗ ﺕﺩﺭﺃ ﺍﺫﺇ •
.«UV» ﺔﺒﳌ ﺓﺀﺎﺿﺈﺑ ﺔﻤﻘﻌﳌﺍ ﻞﻤﻌﺘﺳ ،ﻒﻴﻔﺠﺘﻟﺍ ﺓﺭﻭﺩ ﺪﻌﺑ •
.ﺔﺷﺎﺸﻟﺍ ﺓﺬﻓﺎﻧ ﻲﻓ «St» ﺽﺮﻋ ﻢﺘﻴﺳ ﻥﻷﺍ •
.ﻕﺎﺒﻃﻷﺍ ﺔﻟﺎﺴﻏ ﺏﺎﺑ ﺢﺘﻓ ﻦﻋ ﺔﻴﺠﺴﻔﻨﺒﻟﺍ ﻕﻮﻓ ﺔﻌﺷﻷﺍ ﺔﺒﳌ ﺊﻔﻄﻨﺗ •
.ﲔﻌﻠﻟ ﻲﻗﺍﻭ ﺀﺍﺪﺗﺭﺍ ﻥﻭﺩ ﺓﺮﺷﺎﺒﻣ ﺔﺒﻤﻠﻟﺍ ﻰﻟﺇ ﺮﻈﻨﺗ ﻻ
ﺩﺭﺎﺒﻟﺍ ﻰﻠﻋ ﻒﻴﻔﺠﺘﻟﺍ
.ﻒﻴﻔﺠﺘﻠﻟ ﻞﻀﻓﺃ ﺀﺍﺩﺃ ﻖﻴﻘﲢ ﻲﻓ ﲔﺒﻏﺮﺗ ﺖﻨﻛ ﺍﺫﺇ ﺭﺰﻟﺍ ﺍﺬﻫ ﻰﻠﻋ ﻲﻄﻐﺿﺍ •
.ﺞﻣﺎﻧﺮﺒﻟﺍ ﻦﻣ ﺀﺰﺟ ﺖﺴﻴﻟ ﺔﻴﻠﻤﻌﻟﺍ ﻩﺬﻫ •
ﺰﻣﺮﻟﺍ ﺽﺮﻋ ﻢﺘﻴﺳ ﺬﺋﺪﻨﻋ .ﺔﻴﻘﺒﺘﻣ ﺔﺑﻮﻃﺭ ﻱﺃ ﺔﻟﺍﺯﻹ ﺔﻴﻓﺎﺿﺇ ﻖﺋﺎﻗﺩ ﺓﺪﻌﻟ ﺔﺣﻭﺮﳌﺍ ﻞﻤﻌﺗ ﻑﻮﺳ ،ﻒﻴﻔﺠﺘﻟﺍ ﺓﺭﻭﺩ ﺀﺎﻬﺘﻧﺍ ﺪﻌﺑ •
.ﺽﺮﻌﻟﺍ ﺓﺬﻓﺎﻧ ﻲﻓ «Cd»
.ﻚﻟﺫ ﻲﻓ ﲔﺒﻏﺮﺗ ﺖﻨﻛ ﺍﺫﺇ ﺖﻗﻭ ﻱﺃ ﻲﻓ ﻕﺎﺒﻃﻷﺍ ﻎﻳﺮﻔﺗﻭ ﺏﺎﺒﻟﺍ ﺢﺘﻓ ﻚﻨﻜﳝ •
ﺮﺷﺆﳌﺍ
.ﻝﺎﻔﻃﻷﺍ ﺔﻳﺎﻤﳊ ﻞﻴﻐﺸﺘﻟﺍ ﻞﻔﻗ •
.ﺹﺎﳋﺍ ﺢﻠﳌﺎﺑ ﻸﻣﺇ •
.ﻒﻄﺸﻟﺍ ﺪﻋﺎﺴﲟ ﻸﻣﺇ •
ﻲﻘﺒﺘﳌﺍ ﺖﻗﻮﻟﺍ
.ﺏﻮﻠﻄﳌﺍ ﺞﻣﺎﻧﺮﺒﻠﻟ ﻡﺯﻼﻟﺍ ﺖﻗﻮﻟﺍ ﺔﺷﺎﺸﻟﺍ ﺽﺮﻌﺗ :ﺀﺪﺒﻟﺍ ﻞﺒﻗ •
.ﻲﻘﺒﺘﳌﺍ ﺖﻗﻮﻟﺍ ﺔﺷﺎﺸﻟﺍ ﺽﺮﻌﺗ :ﺀﺪﺒﻟﺍ ﺪﻌﺑ •
.ﺔﻜﺸﳌﺍ ﺰﻣﺭ ﺔﻟﺎﺴﻐﻟﺍ ﺽﺮﻌﺗ ،ﻥﻮﺤﺼﻟﺍ ﺔﻟﺎﺴﻏ ﻲﻓ ﺔﻠﻜﺸﻣ ﻱﺃ ﺖﺛﺪﺣ ﺍﺫﺇ •
«tE» ، «LE» ، «CE» ، «HE» ، «EI» ، «IE» ، «FE» ، «OE»
.ﻞﻴﻟﺪﻟﺍ ﻊﺒﺗﺍﻭ ٢٥ ﺔﺤﻔﺼﻟﺍ ﻲﻓ ﻪﺣﻼﺻﺍﻭ ﻞﻛﺎﺸﳌﺍ ﺪﻳﺪﲢ ﻞﻴﻟﺩ ﺔﻌﺟﺍﺮﻣ ﻰﺟﺮﻳ ﺄﻄﳋﺍ ﺰﻣﺭ ﺮﻬﻇ ﺍﺫﺇ •
ﻑﺎﻘﻳﻹﺍ /ﻞﻴﻐﺸﺘﻟﺍ ﺭﻮﻣﺯ
.ﻥﻮﺤﺼﻟﺍ ﺔﻟﺎﺴﻏ ﻞﻴﻐﺸﺗ ﻦﻣ ﺪﺑ ﻻ •
ﺭﺯﻭ (ﻞﻤﳊﺍ ﻒﺼﻧ) Half Load ﺭﺯ ﻰﻠﻋ ﻂﻐﻀﻟﺍ ﻝﻼﺧ ﻦﻣ ﺭﻮﻣﺰﻟﺍ ﻑﺎﻘﻳﺇ/ﻞﻴﻐﺸﺗ ﺔﻔﻴﻇﻭ ﻂﺒﺿ ﻚﻨﻜﳝ •
.ﺽﺮﻌﻟﺍ ﺝﺎﺟﺯ ﻰﻠﻋ ﻞﻴﻐﺸﺗ ﺮﻬﻈﻳ ﺎﻫﺪﻨﻋﻭ ﺓﺩﻭﺪﻌﻣ ﻥﺍﻮﺜﻟﻭﹰﺎﻌﻣ (ﺵﺮﻟﺍ) Spray
.ﻲﺋﺎﺑﺮﻬﻜﻟﺍ ﺭﺎﻴﺘﻟﺍ ﻉﺎﻄﻘﻧﺍ ﺪﻨﻋﹰﺎﻴﺋﺎﻘﻠﺗ ﻑﺎﻘﻳﻹﺍ /ﻞﻴﻐﺸﺘﻟﺍ ﺭﻮﻣﺯ ﺀﺎﻐﻟﺇ ﻢﺘﻳ •
Page 41

١٣
ﺔﻴﻧﺎﺜﻟﺍ ﺔﻘﻳﺮﻄﻟﺍ
.ﺭﺎﺒﺘﺧﻻﺍ ﻂﻳﺮﺷ ﻡﺍﺪﺨﺘﺳﺎﺑ ﺀﺎﳌﺍ ﺮﺴﻋ ﺔﺟﺭﺩ ﻦﻣ ﻲﻘﻘﲢ.(١
ﺭﺎﺒﺘﺧﻻﺍ ﺕﺍﺀﺍﺮﺟﺇ.(٢
.(!ﻱﺭﺎﳉﺍ ﺀﺎﳌﺍ ﻲﻓ ﺲﻴﻟﻭ) ﺎﹰﺒﻳﺮﻘﺗ ﺓﺪﺣﺍﻭ ﺔﻴﻧﺎﺛ ﺓﺪﳌ ﺭﺎﺒﺘﺧﻻﺍ ﻂﻳﺮﺸﺑ ﺔﺻﺎﳋﺍ ﻞﻋﺎﻔﺘﻟﺍ ﻖﻃﺎﻨﻣ ﻊﻴﻤﺟ ﻲﺴﻤﻏﺇ
.ﺓﺪﺣﺍﻭ ﺔﻘﻴﻗﺩ ﺓﺪﳌ ﻱﺮﻈﺘﻧﺍﻭ ﺪﺋﺍﺯ ﺀﺎﻣ ﻱﺃ ﻦﻣ ﺺﻠﺨﺘﻠﻟ ﻂﻳﺮﺸﻟﺍ ﻱﺰﻫ
.ﻲﺠﺴﻔﻨﺒﻟﺍ-ﺮﻤﺣﻷﺍ ﻰﻟﺇ ﻞﻋﺎﻔﺘﻟﺍ ﺔﻘﻄﻨﳌ ﺮﻀﺧﻷﺍ ﻥﻮﻠﻟﺍ ﺮﻴﻐﺘﻳ ﻑﻮﺳ ﺬﺋﺪﻌﺑ
.ﻂﻳﺮﺸﻟﺍ ﻲﻓ ﺔﻴﺠﺴﻔﻨﺒﻟﺍ-ﺀﺍﺮﻤﳊﺍ ﺕﺎﻣﻼﻌﻟﺍ ﺪﻌﺑ ﻢﻗ
ﺀﺎﳌﺍ ﺮﺴﻋ ﺩﺍﺪﻋﺇ
.ﻕﺎﺒﻃﻷﺍ ﺔﻟﺎﺴﻏ ﻞﻴﻐﺸﺗ ﻞﺒﻗ ﻒﻴﻔﺨﺘﻟﺍ ﻡﺎﻈﻧ ﻯﻮﺘﺴﻣ ﻂﺒﺿﻭ ﺀﺎﳌﺍ ﺮﺴﻋ ﺔﺟﺭﺩ ﻦﻣ ﻖﻘﺤﺘﻟﺍ ﻚﻴﻠﻋ ﺐﺠﻳ
ﺀﺎﳌﺍ ﺮﺴﻋ ﺔﺟﺭﺩ ﻯﻮﺘﺴﻣ ﻰﻠﻋ ﻲﻓﺮﻌﺗﻭ ﻲﺼﺤﻓﺇ .١ ﺓﻮﻄﳋﺍ
.ﻚﺘﻘﻄﻨﻣ ﻲﻓ ﺀﺎﳌﺍ ﺓﺭﻮﺴﻋ ﻊﻣ ﻖﻓﺍﻮﺘﻳ ﺎﲟ ﺀﺎﳌﺍ ﺮﹼﺴﻴﻣ ﻂﺒﻀﺑ ﻢﻗ
.ﺕﺎﺟﺭﺩ ٨ ﻰﻠﻋ ﺀﺎﳌﺍ ﺮﺴﻴﻣ ﻱﻮﺘﺤﻳ
ﺔﺣﻮﻟ ﻰﻠﻋ ﺭﺍﺭﺯﻷﺍ ﻡﺍﺪﺨﺘﺳﺎﺑ ﺔﻤﻴﻘﻟﺍ ﻩﺬﻫ ﺮﻴﻴﻐﺗﻭ ﻂﺒﺿ ﻦﻜﳝﻭ ،ﻊﻨﺼﳌﺍ ﻲﻓ « » ﻰﻠﻋ ﺀﺎﳌﺍ ﺓﺭﻮﺴﻋ ﻂﺒﺿ ﰎ
.ﻢﻜﺤﺘﻟﺍ
.ﻥﻮﺤﺼﻟﺍ ﺔﻟﺎﺴﻏ ﺀﺎﻔﻃﺇ ﻦﻣ ﺪﻛﺄﺗ .١
.ﲔﻃﻮﻐﻀﻣ ﺎﻤﻬﻘﺑﺃﻭﹰﺎﻌﻣ (ﺔﻗﺎﻄﻟﺍ) Power ﻭ
((ﺩﺭﺎﺒﻟﺍ ﻰﻠﻋ ﻒﻴﻔﺠﺘﻟﺍ
)Cool Dry)UV ﻱﺭﺯ ﻂﻐﺿﺇ .٢
.ﻯﺮﺧﻷﺍ ﻮﻠﺗ ﺓﺪﺣﺍﻭ ﺮﻴﻐﺘﺗ ﻢﻴﻘﻟﺍ ﺪﺠﺘﺳﻭ
((ﺩﺭﺎﺒﻟﺍ ﻰﻠﻋ ﻒﻴﻔﺠﺘﻟﺍ
)Cool Dry)UV ﻂﻐﺿﺇ :ﻂﺒﻀﻟﺍ ﺔﻤﻴﻗ ﺮﻴﻴﻐﺘﻟ .٣
.« » ﻭ « » ﲔﺑ ﻢﻴﻗ ﺔﺷﺎﺸﻟﺍ ﺽﺮﻌﺘﺳ
.ﺔﻤﻴﻘﻟﺍ ﻆﻔﺣ ﻢﺘﻴﻟ ،(ﺵﺮﻟﺍ) Spray ﺭﺯ ﻂﻐﺿﺇ ﺔﺤﻴﺤﺼﻟﺍ ﻂﺒﻀﻟﺍ ﺔﻤﻴﻗ ﻰﻠﻋ ﻞﺼﲢ ﺎﻣﺪﻨﻋ .٤
1°e = 14.25 mg/l CaCO3
1°f = 10 mg/l CaCO3
(1°d = 10 mg/l CaO (=1,78°f) (=1,25°e
ﻰﻟﻭﻷﺍ ﺔﻘﻳﺮﻄﻟﺍ
.ﻚﺘﻘﻄﻨﻣ ﻲﻓ ﺀﺎﳌﺍ ﺮﺴﻋ ﺔﺟﺭﺩ ﻦﻣ ﻲﻘﻘﲢ.(١
(.ﺮﻣﻷﺍ ﺍﺬﻫ ﻲﻓ ﻩﺎﻴﳌﺍ ﻖﻓﺮﻣ ﺔﻛﺮﺷ ﻙﺪﻋﺎﺴﺗ ﻥﺃ ﻦﻜﳝ)
ﻯﻮﺘﺴﳌ ﺎﹰﻘﻓﻭ ﻕﺎﺒﻃﻷﺍ ﺔﻟﺎﺴﻏ ﻲﻓ ﻒﻴﻔﺨﺘﻟﺍ ﻡﺎﻈﻧ ﻯﻮﺘﺴﻣ ﻲﻄﺒﺿﺇ.(٢
.٢ ﺓﻮﻄﳋﺍ ﻰﻟﺇ ﻲﻌﺟﺭﺇ .ﺀﺎﳌﺍ ﺮﺴﻋ
<ﺀﺎﳌﺍ ﺮﺴﻋ ﻯﻮﺘﺴﻣ>
7>
14 - 7
21 - 14
21<
9>
17,5 - 9
26 - 17,5
26<
12,5>
25 - 12,5
37 - 25
37<
1,3>
2,5 - 1,3
3,8 - 2,5
3,8<
H0, H1
H2, H3
H4, H5
H6, H7
1
2
3
4
d°e°f°
mmol/l
(Ca+Mg)
mg/l
Ca
ﺀﺎﳌﺍ ﺮﺴﻋ ﻕﺎﻄﻧ
ﻡﺎﻈﻧ ﻯﻮﺘﺴﻣ
ﻒﻴﻔﺨﺘﻟﺍ
ﻖﻃﺎﻨﳌﺍ ﺩﺪﻋ
(ﻲﺠﺴﻔﻨﺑ-ﺮﻤﺣﺃ)
ﺀﺎﳌﺍ ﺔﻴﻋﻮﻧ
ﻒﻴﻔﺧ
ﺮﺴﻌﻟﺍ ﻂﺳﻮﺘﻣ
ﺮﺴﻋ
ﺍﺪﺟ ﺮﺴﻋ
50>
100 - 50
150 - 100
150<
.٢ ﺓﻮﻄﳋﺍ ﻰﻟﺇ ﻲﻌﺟﺭﺇ .ﺀﺎﳌﺍ ﺮﺴﻋ.ﺀﺎﳌﺍ ﺮﺴﻋ ﻯﻮﺘﺴﳌ ﺎﹰﻘﻓﻭ ﻕﺎﺒﻃﻷﺍ ﺔﻟﺎﺴﻏ ﻲﻓ ﻒﻴﻔﺨﺘﻟﺍ ﻡﺎﻈﻧ ﻯﻮﺘﺴﻣ ﻲﻄﺒﺿﺇ .(٣
.ﻚﺑ ﺔﺻﺎﳋﺍ ﻕﺎﺒﻃﻷﺍ ﺔﻟﺎﺴﻏ ﻲﻓ ﻒﻴﻔﺨﺘﻟﺍ ﻡﺎﻈﻧ ﻯﻮﺘﺴﻣ ﺩﺍﺪﻋﺇ .٢ ﺓﻮﻄﳋﺍ
<ﺀﺎﳌﺍ ﺮﺴﻋ ﻯﻮﺘﺴﻣ>
* L)
(
ﻒﻴﻔﺨﺘﻟﺍ ﻡﺎﻈﻧ ﻯﻮﺘﺴﻣ
:
Page 42

١٤
ﺓﹼﺮﻣ ﻝﻭﻷ ﻡﺍﺪﺨﺘﺳﻻﺍ ﻞﺒﻗ
ﺢﻠﳌﺍ ﺀﻞﻣ .٣ ﺓﻮﻄﳋﺍ
.ﺯﺍﺮﻄﻟﺍ ﺍﺬﻬﺑ ﺔﺻﺎﺧ ﺀﺎﻤﻠﻟ ﺓﺮﹼﺴﻴﻣ ﺓﺩﺎﻣ ﺪﺟﻮﻳ
.ﺢﻴﺤﺻ ﻞﻴﻐﺸﺗ ﻰﻠﻋ ﻝﻮﺼﺤﻠﻟ ﻦﻌﻤﺘﺑ ﺕﺎﻤﻴﻠﻌﺘﻟﺍ ﻩﺬﻫ ﺓﺀﺍﺮﻗ ﻰﺟﺮﻳ
ﹰ
ﺎﻌﻘﺑ ﻙﺮﺘﻳ ﺪﻗ ﻚﻟﺫ ﻥﻷ ﱘﻼﻟﺍ ﻰﻠﻋ ﻱﻮﺘﲢﻻ ﻥﺃ ﺐﺤﻳﻭ ،ﺔﻴﺿﺮﻣ ﻒﻄﺷ ﺞﺋﺎﺘﻧ ﻰﻠﻋ ﻝﻮﺼﺤﻠﻟ ﺮﹼﺴﻴﻣ ﺀﺎﻣ ﻰﻠﻋ ﻝﻮﺼﳊﺍ ﺐﺠﻳ
.ﺔﻟﺎﺴﻐﻠﻟ ﺔﻴﻠﺧﺍﺪﻟﺍ ﺀﺍﺰﺟﻷﺍﻭ ﻲﻧﺍﻭﻷﺍ ﻰﻠﻋ
ﻰﻠﻋ ﺓﺩﺎﻤﺘﻋﺇ ﺮﹼﺴﻴﳌﺍ ﺢﻠﳌﺍ ﺔﻴﻤﻛ ﺪﻳﺪﲢ ﻢﺘﻳﻭ ،ﺀﺎﻤﻠﻟ ﺮﹼﺴﻴﻣ ﺔﻓﺎﺿﺇ ﺐﺠﻴﻓﹰﺍﺮﻴﺴﻋ ﺭﻮﺒﻨﺼﻟﺍ ﻦﻣ ﺝﺮﺨﻳ ﻱﺬﻟﺍ ﺀﺎﳌﺍ ﻥﺃ ﻝﺎﺣ ﻲﻓ
.ﻩﺎﻴﳌﺍ ﺓﺭﺎﺴﻋ ﺔﺣﺭﺩ
ﺢﻠﳌﺍ ﺀﻞﻣ
.ﻪﺤﺘﻔﻟ ﺓﻮﺒﻌﻟﺍ ﺀﺎﻄﻏ ﺮﻳﻭﺪﺘﺑ ﻢﻗﻭ ﻲﻔﻠﺴﻟﺍ ﻑﺮﻟﺍ ﻉﺰﻧﺇ •
١٫٩ ﻲﻟﺇ ﻞﺼﺗ ﺓﻮﺒﻌﻟﺍ ﺔﻌﺳ ﻥﺃ ﺚﻴﺣ ﺓﹼﺮﻣ ﻝﻭﻷ ﺔﻟﺎﺴﻐﻟﺍ ﻞﻴﻐﺸﺗ ﻞﺒﻗ ﺢﻠﳌﺍ ﻸﻣﺇ •
.ﻎﻠﻛ
ﺢﻠﳌﺍ ﺍﺬﻫ ﻥﺃ ﻦﻣ ﺪﻛﺄﺗﻭ ،ﻦﻣﺁﻭ ﻒﻴﻈﻧ ﻞﻜﺸﺑ ﺓﻮﺒﻌﻟﺍ ﺀﻞﻣ ﻥﻮﻜﻴﻟ ﻊﻤﻘﻟﺍ ﻞﻤﻌﺘﺳﺇ
.ﻥﻮﺤﺼﻟﺍ ﺕﻻﺎﺴﻏ ﻲﻓ ﻡﺍﺪﺨﺘﺳﻼﻟ
.ﺓﻮﺒﻌﻟﺍ ﺝﺭﺎﺧ ﻪﺑﺮﺴﺗ ﰎ ﺢﻠﻣ ﻱﺃ ﺢﺴﲟ ﻢﻗ ﺓﻮﺒﻌﻟﺍ ﺀﻞﻣ ﺪﻌﺑ •
.ﺓﻮﺒﻌﻟﺍﺍ ﺝﺭﺎﺧ ﺢﻠﻤﻠﻟ ﺏﺮﺴﺗ ﻱﺃ ﻊﻨﳌ ﻢﻜﺤﻣ ﻞﻜﺸﺑ ﺀﺎﻄﻐﻟﺍ ﻕﻼﻏﺈﺑ ﻢﻗ •
ﻒﻄﺸﻠﻟ ﺪﻋﺎﺴﻣ ﺔﻓﺎﺿﺇ .٤ ﺓﻮﻄﳋﺍ
ﻒﻄﺸﻟﺍ ﺪﻋﺎﺴﻣ
ﺔﻴﻋﻮﻨﺑ ﺓﻮﺒﻌﻟﺍ ﺀﻞﻣﺇ ﻢﺛ ،ﻪﻧﺎﻜﻣ ﻦﻣ ﻪﻋﺰﻧﺍﻭ ﺔﺤﺘﻔﻟ ﺔﻋﺎﺴﻟﺍ ﺏﺭﺎﻘﻋ ﺲﻜﻋ ﺀﺎﻄﻐﻟﺍ ﺮﻳﻭﺪﺘﺑ ﻢﻗ ،ﻒﻄﺸﻟﺍ ﺪﻋﺎﺴﻣ ﺓﻮﺒﻋ ﺀﻞﳌ
.ﹰﺍﺪﻴﺟ ﻪﻘﻠﻏﺃﻭ ﻪﻧﺎﻜﻣ ﻰﻟﺇ ﺀﺎﻄﻐﻟﺍ ﺪﻋﺃ ﻚﻟ ﺪﻌﺑ ،ﺪﺣ ﻰﺼﻗﺃ ﻰﻟﺇ ﻒﻄﺸﻟﺍ ﺪﻋﺎﺴﲟ ﻦﻣ ﺓﺪﻴﺟ
.ﻞﻴﺴﻐﻠﻟ ﺓﺭﻭﺩ ﺮﺧﺁ ﻝﻼﺧ ﻲﺋﺎﻘﻠﺗ ﻞﻜﺸﺑ ﻒﻄﺸﻟﺍ ﺪﻋﺎﺴﻣ ﻦﻣ ﺺﻠﺨﺘﻟﺍ ﻢﺘﻴﺳ
ﺔﻴﺑﺎﺒﺿ ﻊﻘﺑ ﺔﻳﺅﺭ ﻝﺎﺣ ﻲﻓ ،ﻲﻧﺍﻭﻷﺍ ﻢﻈﻌﻣ ﻢﺋﻼﺘﻟ ﻊﻨﺼﳌﺍ ﻞﺒﻗ ﻦﻣ ﺔﻃﻮﺒﻀﻣ ﻒﻄﺸﻟﺍ ﺪﻋﺎﺳ ﻢﻨﻣ ﺔﻣﺪﺨﺘﺴﳌﺍ ﺔﻴﻤﻜﻟﺍ ﻥﺇ
ﺔﻤﻴﻘﻴﻟﺇ ﺮﺷﺆﳌﺍ ﻢﻬﺳ ﺓﺭﺍﺩﺇﻭ ﺀﺎﻄﻏ ﺔﻟﺍﺯﺇ ﺮﺒﻋ ﻚﻟﺫﻭ ﺔﻠﻤﻌﺘﺴﳌﺍ ﻒﻄﺸﻟﺍ ﺪﻋﺎﺴﻣ ﺔﻋﺮﺟ ﺔﻴﻤﻛ ﺓﺩﺎﻳﺰﺑ ﻢﻗ ﺀﺎﻣ ﺕﺎﻣﻼﻋ ﻭﺃ
.ﻰﻧﺩﻷﺍ ﺔﻤﻴﻘﻟﺍ ﺮﺘﺧﺇ ﺕﺎﻣﻼﻋ ﺎﻬﻴﻠﻋ ﻭﺃ ﻲﻧﺍﻭﻷﺍ ﻰﻠﻋ ﺓﻮﻏﺭ ﺕﺮﻬﻇ ﺍﺫﺇﻭ ،ﺀﺎﻄﻐﻟﺍ ﺓﺩﺎﻋﺇ ﻢﺛ ﻦﻣﻭ ،ﻰﻠﻋﺃ
Page 43

١٥
ﻥﻮﺤﺼﻟﺍ ﺔﻟﺎﹼﺴﻏ ﻞﻴﻤﲢ .١
ﻞﻴﻤﺤﺘﺑ ﻢﻗ ﺞﺋﺎﺘﻨﻟﺍ ﻞﻀﻓﺃ ﻰﻠﻋ ﻝﻮﺼﳊﺍ ﺕﺩﺭﺃ ﺍﺫﺇ
.ﺕﺎﻤﻴﻠﻌﺘﻠﻟﹰﺎﻘﻓﻭ ﻥﻮﺤﺼﻟﺍ ﺔﻟﺎﹼﺴﻏ
ﺎﻬﻔﻴﻈﻨﺘﺑ ﻥﻮﺤﺼﻟﺍ ﺔﻟﺎﹼﺴﻏ ﻲﻓ ﻲﻧﺍﻭﻷﺍ ﻊﺿﻭ ﻞﺒﻗ ﻢﻗ
ﺮﻴﻏﻭ ﻡﺎﻈﻌﻟﺍ :ﻞﺜﻣ ﺎﻬﻴﻠﻋ ﺔﻛﻭﺮﺘﳌﺍ ﺓﺮﻴﺒﻜﻟﺍ ﺎﻳﺎﻘﺒﻟﺍ ﻦﻣ
.ﻚﻟﺫ
:ﻥﻮﺤﺼﻟﺍ ﺔﻟﺎﺴﻏ ﻞﻴﻤﲢ ﺪﻨﻋ ﻲﻠﻳﺎﻣ ﻉﺎﺒﺗﺍ ﻰﺟﺮﻳ
ﻦﻣ ﺢﻄﺳﻷﺍ ﻊﻴﻤﺟ ﻦﻜﲤ ﺔﻘﻳﺮﻄﺑ ﺕﺎﻳﺍﺭﺎﺨﻔﻟﺍ ﻊﺿ
.ﺀﺎﳌﺍ ﺓﺎﻗﻼﻣ
.ﺎﻬﻓﺎﻔﺟ ﻞﻬﺴﺗ ﺔﻘﻳﺮﻄﺑ ﺔﻘﻴﻤﻌﻟﺍ ﻲﻧﺍﻭﻷﺍ ﻊﺿﻭ ﺐﺠﻳ
ﻲﻓ ﺎﻬﻌﺿﻭ ﻞﺒﻗﹰﺎﻣﺎﻌﻃ ﻱﻮﺘﲢ ﻲﺘﻟﺍ ﻲﻧﺍﻭﻷﺍ ﻊﻘﻧ ﺐﺠﻳ
.ﺔﻟﺎﹼﺴﻐﻟﺍ
ﻲﻠﻔﺴﻟﺍ ﻑﺮﻟﺍ ﻞﻴﻤﲢ .٢
ﺔﻴﻋﻭﺃﻭ ،ﻥﻮﺤﺼﻟﺍ ﻞﻴﻤﺤﺘﻟ ﻞﻀﻓﻷﺍ ﻲﻫ ﻰﻠﻔﺴﻟﺍ ﺔﻠﺴﻟﺍ
ﻰﺘﺣﻭ ،ﺔﻴﻄﻏﻷﺍﻭ ،ﺓﻼﻘﳌﺍﻭ ،ﺭﻭﺪﻘﻟﺍﻭ ،ﻕﺎﺒﻃﻷﺍﻭ ،ﺀﺎﺴﳊﺍ
ﺔﻤﻴﻘﺘﺴﻣ ﻥﻮﺤﺼﻟﺍ ﻊﺿﻭ ﻦﻣ ﺪﺑ ﻻﻭ .ﻪﻳﻮﺸﺘﻟﺍ ﺔﻴﻨﻴﺻ
ﺭﻭﺪﻘﻟﺍﺐﻴﻠﻘﺗ ﻦﻣ ﺪﺑ ﻻﻭ .ﻑﺮﻟﺍ ﻂﺳﻭ ﻰﻟﺍ ﻪﺠﺘﺗ ﻲﻫﻭ
.ﺓﺮﻴﺒﻜﻟﺍ ﻕﺎﺒﻃﻷﺍﻭﺓﻼﻘﳌﺍﻭ
ﻡﺍﺪﺨﺘﺳﻻﺍ ﺔﻴﻔﻴﻛ
D1422W(L,M,T,B,C,D,A) F(B, U)U
ﻡﺍﺪﺨﺘﺳﻻﺍ ﺔﻴﻔﻴﻛ
D1423W(L,M,T,B,C,D,A) F(B, U)U
ﲔﺴﺤﺘﻟ ﻱﻮﻠﻌﻟﺍﻭ ﻲﻠﻔﺴﻟﺍ ﲔﻓﺮﻟﺍ ﻲﻓ ﻊﻃﺍﻮﻘﻟﺍ ﻲﻨﺛ ﻦﻜﳝ
.ﺎﻬﻀﻌﺑ ﻕﻮﻓ ﻲﻧﺍﻭﻷﺍ ﺐﻴﺗﺮﺗ
(ﺔﻗﺎﻄﻟﺍ ﺺﺤﻓ) ﻞﻴﻤﺤﺘﻟﺍ ﺔﻠﺜﻣﺃ
a
d
g
b
e
c
f
ﺐﻴﻠﺣ
ﺾﻴﺑ
ﻲﻋﺎﻨﺻ ﺔﻨﻤﺳ
ﻱﺎﺷ
ﻥﺎﻓﻮﺷ
ﻡﻮﳊ
ﺦﻧﺎﺒﺳ
c d d
d
e
g
d
d
f
d
e
ﻉﺍﺭﺫ ﻥﺍﺭﻭﺩ ﻝﻼﺧ ﺝﺮﺨﺗ ﺮﻴﺒﻜﻟﺍ ﻡﺎﺴﺟﻷﺍ ﻉﺪﺗ ﻻ ﻥﺃ ﻪﺒﺘﻧﺇ
.ﻒﻴﻈﻨﺘﻟﺍ ﻞﺋﺎﺳ ﺝﺮﺨﻣ ﺪﺴﺗ ﻻ ﻥﺃﻭ ،ﺵﺮﻟﺍ
ﻞﻴﻐﺸﺘﻟﺍﻭ ﻡﺍﺪﺨﺘﺳﻻﺍ ﺔﻴﻔﻴﻛ
Page 44

١٦
ﻞﻴﻐﺸﺘﻟﺍﻭ ﻡﺍﺪﺨﺘﺳﻻﺍ ﺔﻴﻔﻴﻛ
ﺮﻳﺬﲢ
ﺔﺒﺑﺪﳌﺍ ﻑﺍﺮﻃﻷﺍ ﺕﺍﺫ ﺕﺍﻭﺩﻷﺍﻭ ﲔﻛﺎﻜﺴﻟﺍ ﻊﺿﻭ ﺐﺟﻮﺘﻳ
ﻲﻓ ﻊﺿﻮﺗ ﻥﺃ ﻭﺃ ﻞﻔﺳﻷ ﺓﺩﺎﳊﺍ ﺎﻬﻓﺍﺮﻃﺃﻭ ﺔﻠﺴﻟﺍ ﻞﺧﺍﺩ
.ﺔﻴﻘﻓﺃ ﺔﻴﻌﺿﻭ
ﻞﻛﻷﺍ ﺕﺍﻭﺩﺃ ﺔﻠﺳ ﻝﺎﻤﻌﺘﺳﺍ .٣
ﻊﻨﳌ ﺔﻠﺴﻟﺍ ﻲﻓ ﺎﻬﻀﻌﺑ ﻊﻣ ﻞﻛﻷﺍ ﺕﺍﻭﺩﺃ ﻊﺿﻭ ﺐﺠﻳ
.ﺔﻠﺛﺎﳑ ﺕﺍﻭﺩﺃ ﻊﻣ ﺎﻬﻠﺧﺍﺪﺗ
ﻦﻜﳝﻭ ﺎﻬﺑ ﺹﺎﳋﺍ ﺀﺎﻄﻐﻟﺍ ﻰﻠﻋ ﺓﺮﻴﻐﺼﻟﺍ ﺕﺍﻭﺩﻷﺍ ﻊﺿ
ﻡﺪﻋ ﺪﻨﻋﹰﺍﺪﻴﻌﺑ ﺎﻬﺋﺎﻘﺑﺍﻭ ﺎﻬﻴﻠﻋ ﺾﺑﺎﻘﳌﺍ ﻊﺿﻭ
.ﻝﺎﻤﻌﺘﺳﻻﺍ
.ﻞﺼﻔﻨﻣ ﻥﺎﻜﻣ ﻲﻓ ﲔﻛﺎﻜﺴﻟﺍ ﻊﺿﻭ ﺐﺠﻳ
.ﺓﺩﺎﳊﺍ ﺕﺍﻭﺩﻷﺍ ﻎﻳﺮﻔﺗﻭ ﻞﻴﻤﲢ ﺪﻨﻋ ﺭﺬﺣﺍ
ﺎﻤﻬﺒﺤﺳﺍ ﻢﺛ ﺲﻛﺎﻌﻣ ﻩﺎﲡﺎﺑ ﲔﺘﻠﺴﻟﺍ ﺐﺤﺳﺍ
.ﺾﻌﺑ ﻦﻋ ﺎﻤﻫﺩﺎﻌﺑﻻ
ﻡﺍﺪﺨﺘﺳﻻﺍ ﺔﻴﻔﻴﻛ
(ﺔﻗﺎﻄﻟﺍ ﺺﺤﻓ) ﻞﻤﳊﺍ ﺔﻠﺜﻣﺃ
1
2
3 4
5 6
7
Page 45

١٧
ﻞﻴﻐﺸﺘﻟﺍﻭ ﻡﺍﺪﺨﺘﺳﻻﺍ ﺔﻴﻔﻴﻛ
ﻥﻮﺤﺼﻟﺍ ﺔﻟﺎﹼﺴﻏ ﻲﻓ ﺔﻨﻣﺁ ﺮﻴﻐﻟﺍ ﺕﺍﻭﺩﻷﺍ
ﺪﻗ ﻒﻴﻈﻨﺘﻟﺍ ﺩﺍﻮﻣ ﻊﻣﹰﺍﺪﺟ ﺓﺭﺎﳊﺍ ﻩﺎﻴﳌﺍ ﺞﻳﺰﻣ ﻥﺇ
ﻡﺪﻌﺑ ﻲﺻﻮﻧ ﺎﻨﻧﺈﻓ ﺍﺬﻬﻟﻭ ،ﺕﺍﻭﺩﻷﺍ ﺾﻌﺑ ﻒﻠﺗ ﺐﺒﺴﻳ
:ﺔﻴﻟﺎﺘﻟﺍ ﺕﺍﻭﺩﻷﺍ ﻡﺍﺪﺨﺘﺳﺍ
ﺩﻮﻴﻟﺍ ﻊﻣ ﻡﻮﻴﻨﻴﳌﻷﺍ ﻭﺃ ﺱﺎﺤﻨﻟﺎﺑ ﺔﻤﻌﻄﳌﺍ ﺩﺍﻮﳌﺍ
ﺐﻫﺬﻟﺍ ﻭﺃ ﺔﻀﻔﻟﺎﺑﹰﺎﻳﻭﺪﻳ ﺎﻬﻴﻠﻋ ﻡﻮﺳﺮﳌﺍ ﺕﺎﻳﺭﺎﺨﻔﻟﺍ
ﻭﺃ ﺐﺸﳋﺍ ﻦﻣ ﺾﺑﺎﻘﻣ ﻱﻮﺘﲢ ﻲﺘﻟﺍ ﻡﺎﻌﻄﻟﺍ ﺕﺍﻭﺩﺃ
ﻢﻈﻌﻟﺍ
ﺃﺪﺼﻟﺍ ﻡﻭﺎﻘﺗ ﻻ ﻲﺘﻟﺍ ﺕﺍﻭﺩﻷﺍ ﻭﺃ ﺪﻳﺪﳊﺍ
ﻥﻮﺤﺼﻟﺍ ﺕﻻﺎﺴﻏ ﻢﺋﻼﻳ ﻻ ﻱﺬﻟﺍ ﻚﻴﺘﺳﻼﺒﻟﺍ
(ﺔﻗﺎﻄﻟﺍ ﺺﺤﻓ) ﻞﻴﻤﺤﺘﻟﺍ ﺔﻠﺜﻣﺃ
a
d
g
b
e
c
f
ﺐﻴﻠﺣ
ﺾﻴﺑ
ﻲﻋﺎﻨﺻ ﺔﻨﻤﺳ
ﻱﺎﺷ
ﻥﺎﻓﻮﺷ
ﻡﻮﳊ
ﺦﻧﺎﺒﺳ
d
c
b
f
fb
a
ﻱﻮﻠﻌﻟﺍ ﻑﺮﻟﺍ ﻞﻴﻤﲢ .٤
ﻞﺜﻣ ﺔﺳﺎﺴﳊﺍ ﻲﻧﺍﻭﻷﺎﺑ ﻑﺮﻟﺍ ﺍﺬﻫ ﻞﻴﻤﲢ ﻞﻀﻓﻷﺍ ﻦﻣ
ﲔﺟﺎﻨﻔﻟﺍﻭ ﺔﻠﻳﻮﻄﻟﺍ ﺕﺍﻭﺩﻷﺍﻭ ﺓﺮﻴﻐﺼﻟﺍ ﻥﻮﺤﺼﻟﺍ
ﺕﻻﺎﺴﻐﻟ ﺢﻠﺼﺗ ﻲﺘﻟﺍ ﺔﻴﻜﻴﺘﺳﻼﺒﻟﺍ ﺕﺍﻭﺩﻷﺍﻭ ﺱﻭﺆﻜﻟﺍﻭ
ﻪﺟﺍﻮﻳ ﺚﻴﺣ ﻰﻠﻋﻸﻟ ﻥﻮﺤﺼﻟﺍ ﻊﺿﻭ ﺐﺠﻳ ،ﻥﻮﺤﺼﻟﺍ
ﺱﻭﺆﻜﻟﺍﻭ ﲔﺟﺎﻨﻔﻟﺍ ﻊﺿﻮﺗ .ﻑﺮﻟﺍ ﻡﺎﻣﺃ ﻦﺤﺼﻟﺍ ﻞﻔﺳﺃ
ﺦﺒﻄﻟﺍ ﺕﺍﻭﺩﺃﻭ ﺓﺪﺋﺍﺰﻟﺍ ﲔﺟﺎﻨﻔﻟﺍ ﻊﺿﻮﺗﻭ ،ﺔﺑﻮﻠﻘﻣ ﻱﺩﺎﺑﺰﻟﺍﻭ
.ﺢﺘﻔﻠﻟ ﻞﺑﺎﻘﻟﺍ ﲔﺟﺎﻨﻔﻟﺍ ﻑﺭ ﻲﻠﻋ
.ﻱﻮﻠﻌﻟﺍ ﻑﺮﻟﺍ ﻲﻓ ﻩﺎﻴﳌﺍ ﺵﺎﺷﺭ ﻉﺍﺭﺫ ﺔﻛﺮﺣ ﺔﻗﺎﻋﺇ ﻦﻣ ﻪﺒﺘﻧﺇ
ﻡﺍﺪﺨﺘﺳﻻﺍ ﺔﻴﻔﻴﻛ
ﻒﺻ ﲔﺴﺤﺘﻟ ﻱﻮﻠﻌﻟﺍ ﻑﺮﻟﺍ ﻲﻓ ﺰﺟﺍﻮﳊﺍ ﻝﺍﺰﻧﺇ ﻦﻜﳝ
.ﻥﻮﺤﺼﻟﺍ
ﻡﺍﺪﺨﺘﺳﻻﺍ ﺔﻴﻔﻴﻛ
D1422W(L,M,T,B,C,D,A) F(B, U)U
D1423W(L,M,T,B,C,D,A) F(B, U)U
b
Page 46

١٨
ﻞﻴﻐﺸﺘﻟﺍﻭ ﻡﺍﺪﺨﺘﺳﻻﺍ ﺔﻴﻔﻴﻛ
ﻱﻮﻠﻌﻟﺍ ﻑﺮﻟﺍ ﻂﺒﺿ .٥
ﺔﻋﻮﻤﺠﻣ ﺏﺎﻌﻴﺘﺳﻻ ﻱﻮﻠﻌﻟﺍ ﻑﺮﻟﺍ ﻉﺎﻔﺗﺭﺍ ﺮﻴﻴﻐﺗ ﻦﻜﳝ
ﺮﻴﻴﻐﺗ ﺪﻨﻋ ﻑﺮﻟﺍ ﻮﻠﺧ ﻦﻣ ﺪﻛﺄﺗ ،ﺕﺎﻳﺭﺎﺨﻔﻟﺍ ﻦﻣ ﺔﻔﻠﺘﺨﻣ
.ﻉﺎﻔﺗﺭﻻﺍ
ﻦﻣ ﻭﺃ ﻰﻠﻋﻷﺍ ﻰﻟﺇ ﻪﻌﻓﺮﺑ ﻑﺮﻟﺍ ﻉﺎﻔﺗﺭﺍ ﺮﻴﻴﻐﺗ ﻚﻨﻜﳝ
ﻪﻀﻴﻔﺨﺗﻭ ﻉﺎﻔﺗﺭﻻﺍ ﺮﻴﻴﻐﺗ ﻲﻀﺒﻘﻣ ﻰﻠﻋ ﻂﻐﻀﻟﺍ ﻝﻼﺧ
.ﻞﻔﺳﻸﻟ
ﻑﺮﻟﺍ ﺐﺤﺳ ﺪﻨﻋﻭ ،ﻱﻮﺘﺴﻣ ﻱﻮﻠﻌﻟﺍ ﻑﺮﻟﺍ ﺀﺎﻘﺑﺈﺑ ﻲﺻﻮﻧﻭ
.ﻪﻔﺼﺘﻨﻣ ﺖﻧ ﻑﺮﻟﺎﺑ ﻚﺴﻣﺃ ،ﻡﺎﻣﻷﺍ ﻰﻟﺇ
(ﻪﺑ ﻙﺎﺴﻣﻻﺍ ﻥﺎﻜﻣ )
ﺵﺮﻟﺍ ﻉﺍﺭﺫ ﻥﺃ ﻦﻣ ﻑﺮﻟﺍ ﻯﻮﺘﺴﻣ ﻂﺒﺿ ﺪﻌﺑ ﺪﻛﺄﺗ
.ﺭﺔﻛﺮﳊﺍ ﺓﹼﺮﺣ
ﺮﻳﺬﲢ
ﻊﻴﻤﺟ ﻦﻣ ﻑﺮﻟﺍ ﻮﻠﺧ ﻦﻣ ﻉﺎﻔﺗﺭﻻﺍ ﻂﺒﺿ ﻞﺒﻗ ﺪﻛﺄﺗ
ﻚﻟﺫ ﻱﺩﺆﻳ ﺪﻗﹴﻥﺍﻭﺃ ﺩﻮﺟﻭ ﻝﺎﺣ ﻲﻔﻓ .ﺕﺍﻭﺩﻷﺍﻭ ﻲﻧﺍﻭﻷﺍ
.ﻯﺫﺄﺑ ﻚﺘﺑﺎﺻﺇ ﻭﺃ ﻲﻧﺍﻭﻷﺍ ﻢﻄﲢ ﻰﻟﺇ
ﻒﻴﻈﻨﺘﻟﺍ ﺓﺩﺎﻣ ﺔﻓﺎﺿﺇ .٦
ﺞﻣﺎﻧﺮﺑ ﻱﺄﺑ ﺀﺪﺒﻟﺍ ﻞﺒﻗ ﻒﻴﻈﻨﺘﻟﺍ ﺩﺍﻮﻣ ﺔﻓﺎﺿﺇ ﺐﺠﻳ •
.(Pre Wash) ﻞﻴﺴﻐﻟﺍ ﻞﺒﻗ ﺞﻣﺎﻧﺮﺑ ﺍﺪﻋ
ﻡﺍﺪﺨﺘﺳﻻﺍ ﻞﻴﻟﺩ ﻲﻓ ﻊﻨﺼﳌﺍ ﺕﺎﻴﺻﻮﺗ ﻉﺎﺒﺗﺍ ﻰﺟﺮﻳ •
.ﺔﺑﻮﻠﻄﳌﺍ ﻒﻴﻈﻨﺘﻟﺍ ﺩﺍﻮﻣ ﺔﻴﻤﻛ ﻦﻣ ﺪﻛﺄﺘﻠﻟ
ﺔﻴﻤﻜﻟﺍ ﻦﻣ ﻂﻴﺴﺑ ﻞﻜﺸﺑ ﻞﻗﺃ ﺔﻴﻤﻛ ﻡﺪﺨﺘﺳﺍ ﻦﻜﳝ •
.ﺥﺎﺴﺗﻻﺍ ﺔﻄﺳﻮﺘﻣ ﺖﻧﺎﻛ ﺍﺫﺇ ﺔﻳﺩﺎﻌﻟﺍ
.ﻡﺍﺮﺟ ٥٢ﻭ ﻡﺍﺮﺟ ٥١ ﺕﺎﻳﻭﺎﳊﺍ ﻞﻤﲢ •
،ﺏﻮﻠﻄﳌﺍ ﺞﻣﺎﻧﺮﺒﻟﺍ ﻰﻠﻋ ﻞﻴﺴﻐﻟﺍ ﺩﺍﻮﻣ ﺔﻴﻤﻛ ﺪﻤﺘﻌﺗ •
.ﻝﻭﺪﳉﺍ ﺔﻌﺟﺍﺮﻣ ﻰﺟﺮﻳ
ﺪﻌﺑ ﻒﻴﻈﻨﺘﻟﺍ ﺩﺍﻮﻣ ﻞﻴﻤﲢ ﻥﺰﺨﻣ ﺀﺎﻄﻏ ﻕﻼﻏﺇ ﺐﺠﻳ •
ﺎﻬﺌﻠﻣ
ﻞﻴﺴﻐﻟﺍ ﺪﻨﻋﹰﺎﻴﺋﺎﻘﻠﺗ ﻞﻴﺴﻐﻟﺍ ﺩﺍﻮﻣ ﺝﺮﺨﺗ •
ﺪﻌﺑ ﺡﻮﺘﻔﻣ ﻒﻴﻈﻨﺘﻟﺍ ﺩﺍﻮﻣ ﻥﺰﺨﻣ ﺀﺎﻄﻏ ﻰﻘﺒﻳ •
ﻞﻤﻌﻟﺍ
ﻒﻴﻈﻨﺘﻟﺍ ﺩﺍﻮﻣ ﺔﻴﻤﻛ ﺞﻣﺎﻧﺮﺒﻟﺍ
ﻡﺍﺮﺟ ٢٥
(ﻲﺋﺎﻨﺜﻟﺍ ﻞﻴﺴﻐﻟﺍ)Dual Wash
ﻡﺍﺮﺟ ٢٠ (ﻲﻟﻵﺍ)Auto
ﻡﺍﺮﺟ ١٥ (ﻮﻜﻳﺍ)Eco
ﻡﺍﺮﺟ ١٥ (ﻒﻴﻄﻟ)Gentle
ﻡﺍﺮﺟ ١٠ (ﻊﻳﺮﺴﻟﺍ)Quick
ﻒﻴﻈﻨﺗ ﺩﺍﻮﻣ ﻥﻭﺪﺑ
(ﻞﻴﺴﻐﻟﺍ ﻞﺒﻗ)Pre Wash
ﻒﻴﻈﻨﺘﻟﺍ ﺩﺍﻮﻣ ﺕﺎﻣﻮﻠﻌﻣ
ﺎﻬﻣﺍﺪﺨﺘﺳﺍ ﺐﺠﻳ ﻲﺘﻟﺍ ﻒﻴﻈﻨﺘﻟﺍ ﺩﺍﻮﻣ ﻡﺪﺨﺘﺳﺍ
ﺔﻴﻟﺰﻨﳌﺍ ﻥﻮﺤﺼﻟﺍ ﺕﻻﺎﺴﻏ ﻊﻣ
ﺔﻟﺎﹼﺴﻏ ﻊﻣ ﻲﻟﺰﻨﳌﺍ ﻲﻠﳉﺍ ﻞﺋﺎﺳ ﻡﺍﺪﺨﺘﺳﺍ ﺐﺠﻳ ﻻ)
ﺞﻣﺎﻧﺮﺑ ﻦﻣ ﺮﻴﻐﺗ ﺪﻗ ﺔﲡﺎﻨﻟﺍ ﺓﻮﻏﺮﻟﺍ ﻥﻷ ﻥﻮﺤﺼﻟﺍ
.(ﻞﻴﺴﻐﻟﺍ
Page 47

١٩
ﻞﻴﻐﺸﺘﻟﺍﻭ ﻡﺍﺪﺨﺘﺳﻻﺍ ﺔﻴﻔﻴﻛ
.ﺢﺘﻔﻠﻟ ﺝﻻﺰﳌﺍ ﻰﻠﻋ ﻂﻐﺿﺍ
ﻞﺋﺎﺳ ﻊﺿ
ﺐﺳﺎﻨﳌﺍ ﻞﻴﺴﻐﻟﺍ
.ﺓﺮﻴﺠﳊﺍ ﻩﺬﻫ ﻲﻓ
ﺮﻳﺬﲢ
ﻥﻮﺤﺼﻟﺍ ﺕﻻﺎﹼﺴﻐﺑ ﺹﺎﺧ ﻒﻈﻨﻣ ﻡﺍﺪﺨﺘﺳﺍ ﻢﺘﻳ
ﻪﻧﻷ ﻒﻈﻨﳌﺍ ﺍﺬﻫ ﻊﻣ ﻞﻣﺎﻌﺘﻟﺍ ﺪﻨﻋ ﺭﺬﳊﺍ ﺐﺠﻳ ﺍﺬﻬﻟﻭ
،ﹰﺍﺮﻄﺧ ﻞﻜﺸﺗ ﺔﻴﺋﺎﻴﻤﻴﻛ ﺓﺩﺎﻣ ﺕﺎﻔﻈﻨﳌﺍ ﻲﻗﺎﺑ ﻞﺜﻣ
ﺪﻘﻔﺗ ﺐﺠﻳ .ﻝﺎﻔﻃﻷﺍ ﻦﻋﹰﺍﺪﻴﻌﺑ ﺎﻬﻴﻠﻋ ﻅﺎﻔﳊﺍ ﺐﺠﻳﻭ
ﺞﻣﺎﻧﺮﺑ ﻞﻛ ﻦﻣ ﺀﺎﻬﺘﻧﻻﺍ ﺪﻌﺑ ﻒﻴﻈﻨﺘﻟﺍ ﺓﺩﺎﻣ ﻥﺰﺨﻣ
.ﺔﻴﻗﺎﺑ ﺓﺩﺎﻣ ﻱﺃ ﻦﻣ ﺺﻠﺨﺘﻟﺍﻭ
ﻪﻴﺒﻨﺗ
.ﻒﻴﻈﻨﺘﻟﺍ ﺕﺎﺠﺘﻨﻣ ﻦﻣ ﺞﻳﺰﻣ ﻡﺍﺪﺨﺘﺳﺍ
ﺓﺪﻋﺎﺴﻣ ﺩﺍﻮﻣ ﻰﻠﻋ ﻒﻴﻈﻨﺘﻟﺍ ﺩﺍﻮﻣ ﺾﻌﺑ ﻱﻮﺘﲢ
ﺞﻣﺍﺮﺑ ﺾﻌﺑ ﻊﻣ ﺯﺎﺘﳑ ﻞﻜﺸﺑ ﻞﻤﻌﺗ ﻲﻫﻭ ﻒﻄﺸﻠﻟ
.ﻂﻘﻓ ﻞﺴﻐﻟﺍ
ﻝﻼﺧ ﻦﻣ ﺔﺠﻴﺘﻧ ﻞﻀﻓﺃ ﻰﻠﻋ ﻝﻮﺼﳊﺍ ﻚﻨﻜﳝ
.ﺔﻠﺼﻔﻨﻣﻭ ﺔﻳﺩﺎﻋ ﺢﻠﻣﻭ ﺓﺪﻋﺎﺴﻣ ﺩﺍﻮﻣ ﻡﺍﺪﺨﺘﺳﺍ
ﻦﻜﳝ ﺪﻳﺪﺠﺘﻟﺍ ﺢﻠﻣ ﻝﺪﺒﺘﺴﺗ ﻲﺘﻟﺍ ﺩﺍﻮﳌﺍ ﻥﺇ
.ﺔﻨﻴﻌﻣ ﺓﺭﻮﺴﻋ ﺔﺒﺴﻧ ﺕﺍﺫ ﻩﺎﻴﻣ ﻲﻓ ﺎﻬﻣﺍﺪﺨﺘﺳﺍ
ﻥﺎﻛ ﺍﺫﺇ ﻒﻴﻈﻨﺘﻟﺍ ﺩﺍﻮﻣ ﻊﹼﻨﺼﲟ ﻝﺎﺼﺗﻻﺍ ﻲﺟﺮﹸﻳ
ﺕﺎﻣﻼﻋ ﺭﻮﻬﻇ ﻝﺎﺣ ﻲﻓ ﻭﺃ ﹰﺍﺪﺟﹰﺎﺌﻴﺳ ﻒﻴﻔﺠﺘﻟﺍ
ﻒﻴﻈﻨﺗ ﺓﺩﺎﻣ ﻡﺍﺪﺨﺘﺳﺍ ﺪﻨﻋ ﺾﻴﺑﻷﺍ ﻂﻳﺮﺸﻟﺍ
.ﺔﻠﻣﺎﻜﺘﻣ
ﻦﻣ ﻒﻴﻈﻨﺗ ﺩﺍﻮﻣ ﻡﺍﺪﺨﺘﺳﺍ ﻊﻣ ﻞﻤﻌﻟﺍ ﻦﻤﻀﻧ ﻻ ﻦﺤﻧ
.ﻉﻮﻨﻟﺍ ﻙﺍﺫ
ﻒﻄﺸﻟﺍ ﺪﻋﺎﺴﻣ ﻦﻋ ﺕﺎﻣﻮﻠﻌﻣ
ﺕﺎﻣﻼﻌﻟﺍﻭ ﻊﻘﺒﻟﺍ ﺔﻟﺍﺯﺇ ﻰﻠﻋ ﻒﻄﺸﻟﺍ ﺪﻋﺎﺴﻣ ﻞﻤﻌﻳ
ﻡﺍﺪﺨﺘﺳﺍﹼﻥﺇ .ﻲﻧﺍﻭﻷﺍ ﻑﺎﻔﺟ ﻦﻣ ﻦﺴﺤﻳﻭ ﻥﻮﺤﺼﻟﺍ ﻦﻋ
،ﻲﻧﺍﻭﻷﺍ ﻞﻴﺴﻏ ﺔﻴﻋﻮﻧ ﻦﻣ ﻦﺴﺤﻳ ﺔﺒﺳﺎﻨﳌﺍ ﺔﻴﻤﻜﻟﺍ
ﺓﺪﺋﺍﺯ ﺓﻮﻏﺭ ﺪﹼﻟﻮﻳ ﺪﻘﻓ ﺓﺪﺋﺍﺯ ﺔﻴﻤﻛ ﻡﺍﺪﺨﺘﺳﺍ ﺎﹼﻣﺃ
.ﻩﺎﻴﻤﻠﻟ ﺏﺮﺴﺗﻭ
ﺔﺌﺒﻌﺘﻟﺍ ﺓﺩﺎﻋﺇ .٧
ﻒﻄﺸﻟﺍ ﺪﻋﺎﺴﻣ ﺔﺌﺒﻌﺗ ﺓﺩﺎﻋﻹ
ﺪﻋﺎﺴﻣ ﻥﺍﺰﺧ ﺀﻞﻣ ﺓﺩﺎﻋﺇ ﻰﻟﺇ ﺔﻟﺎﺴﻐﻟﺍ ﺝﺎﺘﲢ ﺪﻗ
،ﻡﺍﺪﺨﺘﺳﻻﺍ ﻰﻠﻋﹰﺍﺩﺎﻤﺘﻋﺍ ﻚﻟﺫﻭ ﺮﻬﺷ ﻞﻛ ﺓﺮﻣ ﻒﻄﺸﻟﺍ
ﲔﺘﻟﺎﳊﺍ ﺪﺣﺄﺑ ﻒﻄﺸﻟﺍ ﺪﻋﺎﺴﻣ ﺔﻟﺎﺣ ﺪﻘﻔﺗ ﻦﻜﳝﻭ
:ﲔﺘﻴﻟﺎﺘﻟﺍ
ﻦﻜﳝ ﻲﺘﻟﺍﻭ ﻥﺰﺍ ﻰﻠﻋ ﺓﺩﻮﺟﻮﳌﺍ ﺮﺷﺆﳌﺍ ﺓﺬﻓﺎﻧ ﻝﻼﺧ ﻦﻣ •
ﺔﺣﻮﺘﻔﻣ ﻥﻮﺤﺼﻟﺍ ﺔﻟﺎﺴﻏ ﺏﺎﺑ ﻥﻮﻜﻳ ﺎﻣﺪﻨﻋ ﺎﻬﺘﻳﺅﺭ
.ﹰﺎﻴﻠﻛ
ﺔﻴﻓﺎﻛ ﺔﻴﻤﻛ ﺩﻮﺟﻭ ﻰﻠﻋ ﻝﺪﻳ ﺩﻮﺳﻷﺍ
ﺔﻴﻓﺎﻛ ﺔﻴﻤﻛ ﺩﻮﺟﻭ ﻡﺪﻋ ﻰﻠﻋﹼﻝﺪﻳ ﺾﻴﺑﻷﺍ
ﺀﺎﻨﺛﺃ ﻢﻜﺤﺘﻟﺍ ﺔﺣﻮﻟ ﻰﻠﻋ ﺮﻫﺎﻈﻟﺍ ﺀﻮﻀﻟﺍ ﻝﻼﺧ ﻦﻣ •
ﻥﻮﺤﺼﻟﺍ ﺔﻟﺎﺴﻏ ﻞﻤﻋ
ﺪﻋﺎﺴﻣ ﺮﺷﺆﻣ
ﻒﻄﺸﻟﺍ
ﺔﻌﻓﺍﺮﻟﺍ ﻂﺒﺿﺍ
(ﻒﻄﺸﻟﺍ)
ﻥﺃ ﻲﻨﻌﻳﹰﺍﺮﻫﺎﻇ ﺀﻮﻀﻟﺍ ﻥﻮﻜﻳ ﺎﻣﺪﻨﻋ
.ﺀﺎﻬﺘﻧﻹﺍ ﻰﻠﻋ ﺏﺭﺎﻗ ﻒﻄﺸﻟﺍ ﺪﻋﺎﺴﻣ
Page 48

٢٠
ﻞﻴﻐﺸﺘﻟﺍﻭ ﻡﺍﺪﺨﺘﺳﻻﺍ ﺔﻴﻔﻴﻛ
ﺢﻠﳌﺍ ﺀﻞﻣ ﺓﺩﺎﻋﻹ
ﺢﻠﳌﺍ ﺮﺷﺆﻣ ﺀﻲﻀﻴﺳ ﹰﺎﻏﺭﺎﻓ ﺢﻠﳌﺍ ﻥﺰﺨﻣ ﻥﻮﻜﻳ ﺎﻣﺪﻨﻋ
ﺀﻞﻣ ﺐﺠﻳ .ﻥﻮﺤﺼﻟﺍ ﺔﻟﺎﺴﻏ ﻞﻴﻐﺸﺗ ﻝﻼﺧﹰﺎﻴﺋﺎﻘﻠﺗ
ﺢﺼﻨﻧ ﺎﻨﻧﺃ ﺎﻤﻛ .ﻞﻴﺴﻐﻟﺍ ﺓﺭﻭﺩ ﻦﻣ ﺀﺎﻬﺘﻧﻻﺍ ﺪﻌﺑ ﺢﻠﳌﺍ
ﻦﻣ ﺪﺋﺍﺯ ﺢﻠﻣ ﻱﺃ ﺔﻟﺍﺯﻹ ﻞﻴﺴﻐﻟﺎﺑ ﺀﺪﺒﻟﺍ ﻞﺒﻗ ﺢﻠﳌﺍ ﺀﻞﲟ
.ﺔﻘﺑﺎﺴﻟﺍ ﺓﺮﳌﺍ
ﺔﻈﺣﻼﻣ
ﺊﻔﻄﻴﻟ ﺢﻠﳌﺍ ﺀﻞﻣ ﺪﻌﺑ ﺖﻗﻮﻟﺍ ﺾﻌﺑ ﺐﻠﻄﺘﻳ ﺪﻗ •
ﺮﺷﺆﳌﺍ
ﺀﻞﳌ ﺔﺟﺎﺣ ﻼﻓ « » ﻰﻠﻋ ﻞﻤﻌﻳ ﺯﺎﻬﳉﺍ ﻥﺎﻛ ﺍﺫﺇ •
ﺎﹼﻣﺃ ،ﺞﻣﺎﻧﺮﺒﻟﺍ ﺍﺬﻫ ﻲﻓ ﺢﻠﳌﺍ ﻡﺪﺨﺘﺴﻳ ﻻ ﻪﻧﻷ ﺢﻠﳌﺍ
ﻭ « » ﲔﺑ ﺞﻣﺍﺮﺒﻟﺍ ﻰﻠﻋ ﻞﻤﻌﻳ ﺯﺎﻬﳉﺍ ﻥﺎﻛ ﺍﺫﺇ
.ﻥﺰﺨﻤﻠﻟ ﺢﻠﳌﺍ ﺔﻓﺎﺿﺇ ﺐﺠﻴﻓ « »
ﺮﻳﺬﲢ
ﻥﻷ ﺢﻠﳌﺍ ﻥﺰﺨﻣ ﻰﻟﺇ ﻒﻴﻈﻨﺘﻟﺍ ﺩﺍﻮﻣ ﺔﻓﺎﺿﺈﺑ ﻢﻘﺗ ﻻ
.ﺀﺎﳌﺍ ﺮﹼﺴﻴﻣ ﻒﻠﺘﻴﺳ ﻚﻟﺫ
ﻒﻴﻔﺠﺘﻟﺍ .٨
ﹰ
ﻼﻣﺎﻛ ﺏﺎﺒﻟﺍ ﺢﺘﻔﺑ ﺢﺼﻨﻧ ﻒﻴﻔﺠﺘﻟﺍ ﻰﻠﻋ ﺓﺪﻋﺎﺴﻤﻠﻟ
.ﻞﻴﺴﻐﻟﺍ ﺓﺭﻭﺩ ﺀﺎﻬﺘﻧﺇ ﺪﻌﺑ
(EN٥٠٢٤٢)ﺔﻗﺎﻄﻟﺍ ﺺﺤﻓ .١٠
.ﺔﻴﺳﺎﻴﻘﻟﺍ ﺕﺎﻔﺻﻮﻤﻠﻟﹰﺎﻘﻓﻭ ﺯﺎﻬﳉﺍ ﻞﻴﻤﲢ ﰎ
١٧-١٥ ﺹ «ﺔﻠﹼﻤﶈﺍ ﻥﻮﺤﺼﻟﺍ ﺔﻟﺎﹼﺴﻏ ﻦﻋ ﻝﺎﺜﻣ •
ﹰ
ﺎﻧﺎﻜﻣ
١٤ ـﻟ ﻂﺒﺿ :ﺔﻌﺴﻟﺍ •
ﻮﻜﻳﺇ :ﺔﻧﺭﺎﻘﳌﺍ ﻡﺎﻈﻧ •
٤ :ﻒﻄﺸﻟﺍ ﺪﻋﺎﺴﻣ ﻂﺒﺿ •
ﺢﻄﺳ ﻞﺧﺍﺩ ﻒﻈﻨﳌﺍ ﻦﻣ ﻡﺍﺮﺟ ٨ :ﻒﻈﻨﳌﺍ ﻊﺟﺮﻣ •
ﻒﻈﻨﳌﺍ ﻥﺰﺨﻣ ﻲﻓ ﻡﺍﺮﺟ ٢٧ ﺀﻞﻣﻭ ﺏﺎﺒﻟﺍ
ﻞﺑﺎﻘﻟﺍ U ﻑﺮﺣ ﻞﻜﺷ ﻰﻠﻋ ﻱﺬﻟﺍ ﻑﺮﻟﺍ ﻝﺎﺧﺩﺇ ﺐﺠﻳ •
.ﻰﻠﻋﻷﺍ ﻊﺿﻮﻟﺍ ﻲﻓ ﻉﺎﻔﺗﺭﻻﺍ ﻂﺒﻀﻟ
ﺪﻗ ﺢﻠﳌﺍ ﻥﺃ ﻲﻨﻌﺗ ﺮﺷﺆﳌﺍ ﺓﺀﺎﺿﺇ ﻥﺇ
ﻉﺮﺳﺄﺑ ﻪﺌﻠﻣ ﺓﺩﺎﻋﺈﺑ ﻢﻗ ،ﹰﺎﺒﻳﺮﻘﺗ ﻍﺮﻓ
.ﻦﻜﳑ ﺖﻗﻭ
Page 49

٢١
ﻞﻴﻐﺸﺘﻟﺍ ﻞﺴﻠﺴﺗ
«(Power) ﻞﻴﻐﺸﺘﻟﺍ» ﺭﺯ ﻂﻐﺿﺇ
ﻒﻄﺸﻠﻟ ﺪﻋﺎﺴﻣ ﺩﻮﺟﻭ ﻦﻣ ﺪﻛﺄﺗ
ﺢﻠﻣﻭ
ﺓﺩﺎﻋﺇ ﻰﻟﺇ ﺝﺎﺘﲢ ﻲﺘﻟﺍ ﺩﺍﻮﳌﺍ ﺕﺍﺮﺷﺆﻣ ﺀﻲﻀﺘﺳ
.ﺔﺌﺒﻌﺘﻟﺍ
ﺮﺗﻼﻔﻟﺍ ﻦﻣ ﺪﻛﺄﺗﻭ ﺏﺎﺒﻟﺍ ﺢﺘﻓﺇ
ﺢﻴﺤﺻ ﻞﻜﺸﺑ ﺔﺒﻛﺮﻣﻭ ﺎﻬﺘﻓﺎﻈﻧ ﻦﻣ ﺪﻛﺄﺗ
.(ﻡﺪﺨﺘﺴﻤﻠﻟ ﺔﻧﺎﻴﺼﻟﺍ ﺕﺎﻤﻴﻠﻌﺗ)
ﻥﻮﺤﺼﻟﺍ ﻞﹼﻤﺣ
.ﺪﺋﺍﺯ ﻡﺎﻌﻃ ﻱﺃ ﺔﻟﺍﺯﺈﺑ ﻢﻗ
.ﺕﺍﻭﺩﻷﺍﻭ ﻥﻮﺤﺼﻟﺍ ﺐﹼﺗﺭﻭ ﻲﻠﻔﺴﻟﺍﹼﻑﺮﻟﺍ ﺐﺤﺳﺇ
ﺱﻭﺆﻜﻟﺍﻭ ﲔﺟﺎﻨﻔﻟﺍ ﺐﹼﺗﺭﻭ ﻱﻮﻠﻌﻟﺍﹼﻑﺮﻟﺍ ﺐﺤﺳﺇ
.ﺎﻫﺮﻴﻏﻭ
ﻪﻴﺒﻨﺗ
ﹼ
ﻑﺮﻟﺍ ﻥﻮﻜﻳ ﺎﻣﺪﻨﻋ ﻱﻮﻠﻌﻟﺍﹼﻑﺮﻟﺍ ﻲﻓ ﺊﺷ ﻱﺃ ﻞﹼﻤﲢ ﻻ
.ﹰﺎﺑﻮﺤﺴﻣ ﻲﻠﻔﺴﻟﺍ
ﻉﺭﺫﺃ ﺔﻛﺮﺣ ﺔﻳﺮﺣ ﻦﻣ ﺪﻛﺄﺗ
ﺀﺎﳌﺍ ﺕﺎﺷﺎﺷﺭ
ﻒﻴﻈﻨﺘﻟﺍ ﺓﺩﺎﻣ ﺱﺎﻴﻘﺑ ﻢﻗ
ﻰﻟﺇ ﻒﻴﻈﻨﺘﻟﺍ ﺩﺍﻮﻣ ﻦﻣ ﺔﺑﻮﻠﻄﳌﺍ ﺔﻴﻤﻜﻟﺍ ﻒﺿﺃ
.ﺀﺎﻄﻐﻟﺍ ﻖﻠﻏﺃﻭ ﻥﺰﺍ
ﺮﻳﺬﺣ
ﻲﻫﻭ ﻥﻮﺤﺼﻟﺍ ﺔﻟﺎﺴﻏ ﺏﺎﺑ ﺢﺘﻔﺑﹰﺎﻣﻮﻤﻋ ﺢﻨﻳ ﻻ
ﻰﻠﻋ ﻞﻤﻌﺗ ﺔﻣﻼﺴﻟﺍ ﺔﻴﻟﺁ ﻥﺈﻓ ﺢﺘﻔﻟﺍ ﻝﺎﺣ ﻲﻓﻭ ،ﻞﻤﻌﺗ
ﻲﻓ ﺭﺬﳉﺍﻭ ﺔﻄﻴﳊﺍ ﺬﺧﺃ ﺐﺠﻳ .ﺔﻟﺎﺴﻐﻟﺍ ﻞﻤﻋ ﻒﻗﻭ
ﺪﻌﺑﻭ ﻝﻼﺧﹰﺎﺻﻮﺼﺧﻭ ﻞﻤﻌﺗ ﻲﻫﻭ ﺔﻟﺎﺴﻐﻟﺍ ﺢﺘﻓ ﻝﺎﺣ
.ﺭﺎﺨﺒﻟﺍ ﺝﻭﺮﺧ ﻰﻟﺇ ﻱﺩﺆﻳ ﻚﻟﺫ ﻥﻷ ،ﺭﺎﳊﺍ ﺀﺎﳌﺍ ﺔﻠﺣﺮﻣ
ﻪﻴﺒﻨﺗ
ﻥﻷ ﻱﻮﻠﻌﻟﺍ ﻑﺮﻟﺍﹼﻢﺛ ﻦﻣﻭﹰﻻﻭﺃ ﻲﻠﻔﺴﻟﺍ ﻑﺮﻟﺍ ﻍﺍﺮﻓﺈﺑ ﻢﻗ
ﻂﻗﺎﺴﺘﻟﺍ ﻦﻣ ﻱﻮﻠﻌﻟﺍ ﻑﺮﻟﺍ ﻦﻣ ﺀﺎﳌﺍ ﺕﺍﺮﻄﻗ ﻊﻨﳝ ﻚﻟﺫ
.ﻞﻔﺳﻷﺍ ﻲﻓ ﻲﻧﺍﻭﻷﺍ ﻰﻠﻋ
ﺪﻌﺑﻭ ،ﺕﺮﺘﺧﺍ ﻱﺬﻟﺍ ﺞﻣﺎﻧﺮﺒﻟﺍ ﻦﻣﺯ ﺮﻬﻈﻴﺳ ﺎﻤﻛ
ﻦﻣﺰﻟﺍ ﺃﺪﺒﻳ ﻢﺛ ﻦﻣﻭ ،ﻲﻘﺒﺘﳌﺍ ﻦﻣﺰﻟﺍ ﺮﻬﻈﻴﺳ ﺀﺪﺒﻟﺍ
.ﻯﺮﺧﺃ ﺪﻌﺑ ﺔﻘﻴﻗﺩ ﻥﺎﺼﻘﻨﻟﺎﺑ
ﻒﻗﻮﺘﺗ ﻞﻴﻐﺸﺘﻟﺍ ﺓﺭﻭﺩ ﻝﻼﺧ ﺕﺎﺒﻟﺍ ﺢﺘﻓ ﰎ ﺍﺫﺇ
ﺓﺩﺎﻋﺇ ﺪﻨﻋﻭ ،ﺔﻣﻼﺳ ﺀﺍﺮﺟﺈﻛ ﻞﻤﻌﻟﺍ ﻦﻋ ﺔﻟﺎﺴﻐﻟﺍ
ﺔﻄﻘﻨﻟﺍ ﻦﻣ ﻞﻤﻌﻠﻟ ﺔﻟﺎﺴﻐﻟﺍ ﺩﻮﻌﺘﺳ ﺏﺎﺒﻟﺍ ﻕﻼﻏﺇ
.ﺎﻫﺪﻨﻋ ﺖﻔﻗﻮﺗ ﻲﺘﻟﺍ
ﻞﻴﺴﻐﻟﺍ ﺞﻣﺎﻧﺮﺑ ﺔﻳﺎﻬﻧ ﻲﻓ
ﻖﻠﻄﻨﻴﺳﻭ ﺔﻳﺎﻬﻨﻟﺍ ﻲﻫﻭ End ﺔﻤﻠﻛ ﺽﺮﻋ ﻢﺘﻴﺳ
ﺔﻟﺎﹼﺴﻏ ﺊﻔﻄﻨﺘﺳ ﻚﻟﺫ ﺪﻌﺑﻭ ،ﺭﻮﻣﺯ ﺕﻮﺻ
ﻆﻔﺣﻭ ﺔﻣﻼﺴﻠﻟ ﻲﺋﺎﻘﻠﺗ ﻞﻜﺸﺑ ﻞﻜﺸﺑ ﻥﻮﺤﺼﻟﺍ
.ﺔﻗﺎﻄﻟﺍ
ﻥﻮﺤﺼﻟﺍ ﺔﻟﺎﺴﻏ ﻒﻗﻮﺘﺗ ، «UV» ﺔﻔﻴﻇﻭ ﺕﺮﺘﺧﺍ ﺍﺫﺇ
.ﻢﻴﻘﻌﺘﻟﺍ ﺔﻴﻠﻤﻋ ﺪﻌﺑ ﺎﻴﺋﺎﻘﻠﺗ ﻞﻤﻌﻟﺍ ﻦﻋ
ﺩﺭﺎﺒﻟﺍ ﻰﻠﻋ ﻒﻴﻔﺠﺘﻟﺍ ﺔﻔﻴﻇﻭ ﺭﺎﻴﺘﺧﺍ ﺔﻟﺎﺣ ﻲﻓ
ﻰﻠﻋ «Cd» ﺽﺮﻋ ﻢﺘﻳ ﺬﺋﺪﻨﻋ ،«Cool Dry»
ﻲﻓ ﻕﺎﺒﻃﻷﺍ ﺔﻟﺎﺴﻏ ﻥﺃ ﻰﻟﺇ ﺓﺭﺎﺷﻺﻟ ﺔﺷﺎﺸﻟﺍ
ﻢﺛ ﻦﻣﻭ .ﺩﺭﺎﺒﻟﺍ “Cool Dry”ﻰﻠﻋ ﻒﻴﻔﺠﺘﻟﺍ ﻊﺿﻭ
ﺎﹰﻴﺋﺎﻘﻠﺗ ﻞﻴﻐﺸﺘﻟﺍ ﻦﻋ ﻒﻗﻮﺘﺗ ﻕﺎﺒﻃﻷﺍ ﺔﻟﺎﺴﻏ ﻥﺈﻓ
.ﺪﻌﺑ ﺎﻤﻴﻓ
ﺞﻣﺎﻧﺮﺒﻟﺍ ﺀﺪﺑﻭ ﻂﺒﺿ
.ﺏﻮﻠﻄﳌﺍ ﺞﻣﺎﻧﺮﺒﻟﺍ ﺭﺎﻴﺘﺧﻻ ﺞﻣﺎﻧﺮﺒﻟﺍ ﺭﺯ ﻂﻐﺿ
ﺮﺘﺧﺇ ،ﻥﺍﻮﺛ ٥ ﺪﻌﺑ ﻞﻤﻌﻟﺎﺑ ﺔﻟﺎﹼﺴﻐﻟﺍ ﺃﺪﺒﺘﺳ
ﺀﻲﻀﺘﺳ ﺚﻴﺣ ،ﺞﻣﺎﻧﺮﺒﻟﺍ ﻊﻣ ﺔﺑﻮﻠﻄﳌﺍ ﺔﻔﻴﻇﻮﻟﺍ
ﻒﺋﺎﻇﻮﻟﺍ ﻊﻴﻤﺟﻭ ﺕﺮﺘﺧﺍ ﻱﺬﻟﺍ ﺞﻣﺎﻧﺮﺒﻟﺍ ﺕﺍﺮﺷﺆﻣ
.ﻯﺮﺧﻷﺍ
ﻪﻴﺒﻨﺗ
ﻪﻠﺜﳝ ﺪﻗ ﺎﳌ ﺢﺘﻔﻟﺍ ﺔﻴﻌﺿﻭ ﻲﻓ ﺏﺎﺒﻟﺍ ﻙﺮﺗ ﻲﻐﺒﻨﻳ ﻻ
.ﻢﺋﺎﻗ ﺮﻄﺧ ﻦﻣ ﺍﺬﻫ
Page 50

٢٢
ﺞﻣﺎﻧﺮﺒﻟﺍ
ﻲﺋﺎﻨﺜﻟﺍ ﻞﻴﺴﻐﻟﺍ
ﹰ
ﺎﺻﻮﺼﺧ ﺥﺎﺴﺗﻻﺍ ﺓﺪﻳﺪﺸﻟﺍ ﻲﻧﺍﻭﻸﻟ ﻲﻟﺎﺜﻣ ﺞﻣﺎﻧﺮﺒﻟﺍ ﺍﺬﻫ
.ﻕﺎﺒﻃﻷﺍﻭ ﻲﻟﺎﻘﳌﺍﻭ ﻖﻳﺭﺎﺑﻷﺍ
ﺔﺷﺎﺷﺭ ﻉﺍﺭﺫ ﻞﻛ ﻂﻐﻀﺑ ﻢﻜﺤﺘﻟﺍ ﺞﻣﺎﻧﺮﺒﻟﺍ ﺍﺬﻫ ﺢﻤﺴﻳ
.ﻯﺮﺧﻷﺍ ﻥﻭﺩ ﺎﻫﺪﺣﻮﻟ ﺀﺎﻤﻠﻟ
ﻲﻟﻵﺍ
ﻲﻧﺍﻭﻷﺍ ﺥﺎﺴﺗﺍ ﺔﺟﺭﺩ ﺪﻳﺪﲢ ﺞﻣﺎﻧﺮﺒﻟﺍ ﺍﺬﻫ ﻝﻼﺧ ﻢﺘﻳ
ﻂﺒﻀﺑ ﺞﻣﺎﻧﺮﺒﻟﺍ ﻡﻮﻘﻳ ﺚﻴﺣ ،ﻩﺎﻴﳌﺍ ﺮﻜﻌﺗ ﺔﺟﺭﺩ ﺐﺴﺣ
ﻥﺈﻓ ﻚﻟﺬﻟ ﺔﺠﻴﺘﻧﻭ ،ﻩﺎﻴﳌﺍ ﺓﺭﺍﺮﺣ ﺔﺟﺭﺩﻭ ﻒﻴﻈﻨﺘﻟﺍ ﻦﻣﺯ
ﺭﻮﻬﻇ ﻥﺇ .ﻦﻜﳝﺎﻣ ﻞﻗﺃ ﻥﻮﻜﻳ ﺀﺎﺑﺮﻬﻜﻟﺍﻭ ﺀﺎﳌﺍ ﻙﻼﻬﺘﺳﺍ
ﺔﻟﺎﺣ ﻊﺑﺎﺘﻳ ﺮﻌﺸﺘﺴﳌﺍ ﻥﺃ ﻲﻨﻌﻳ ﺔﺷﺎﺸﻟﺍ ﻰﻠﻋ «F» ﻑﺮﺣ
.ﻞﻴﺴﻐﻟﺍ
ﻮﻜﻳﺍ
ﻊﻣ ﻩﺎﻴﳌﺍ ﻙﻼﻬﺘﺳﺍﻭ ﺔﻗﺎﻄﻟﺎﺑ ﺮﻴﻓﻮﺘﻠﻟ ﺞﻣﺎﻧﺮﺒﻟﺍ ﺍﺬﻫ
.ﺓﺮﻣ ﻞﻛ ﻲﻓ ﻪﻣﺍﺪﺨﺘﺳﺎﺑ ﺢﺼﻨﻳﻭ ،ﺪﻴﺟ ﻞﻴﺴﻏ
ﻒﻴﻄﻟ
.ﺱﻭﺆﻜﻟﺍ ﻞﺜﻣ ﺔﺳﺎﺴﳊﺍ ﻲﻧﺍﻭﻷﺍ ﻞﺴﻐﻟ ﺞﻣﺎﻧﺮﺒﻟﺍ ﺍﺬﻫ
ﻊﻳﺮﺴﻟﺍ
ﺔﻠﻤﻌﺘﺴﳌﺍ ﻲﻧﺍﻭﻷﺍ ﻞﻴﺴﻐﻟ ﺞﻣﺎﻧﺮﺒﻟﺍ ﺍﺬﻫ ﻡﺪﺨﺘﺴﻳ
ﻞﻴﻐﺸﺗ ﻢﺘﻴﺳ ﺞﻣﺎﻧﺮﺒﻟﺍ ﺍﺬﻫ ﻦﻣ ﺀﺎﻬﺘﻧﻻﺍ ﺪﻨﻌﻓ ،ﹰﺎﺜﻳﺪﺣ
ﻰﻠﻋ ﻝﻮﺼﺤﻠﻟ ﻲﺋﺎﻘﻠﺗ ﻞﻜﺸﺑ «ﺩﺭﺎﺒﻟﺍ ﻒﻴﻔﺠﺘﻟﺍ» ﺞﻣﺎﻧﺮﺑ
.ﺓﺪﻴﺟ ﺞﺋﺎﺘﻧ
ﻞﻴﺴﻐﻟﺍ ﻞﺒﻗ
ﻞﺒﻗ ﻲﻧﺍﻭﻷﺍ ﻦﻋ ﺥﺎﺳﻭﻷﺍ ﺔﻟﺍﺯﻹ ﺞﻣﺎﻧﺮﺒﻟﺍ ﺍﺬﻫ ﻡﺪﺨﺘﺴﻳ
.ﹰﺎﻳﻭﺪﻳ ﺎﻬﺴﻏ
ﺔﻴﺋﺎﻘﻠﺘﻟﺍ ﻞﻴﻐﺸﺘﻟﺍ ﺓﺩﺎﻋﺇ
ﺪﻨﻋ ﺔﻴﻧﺎﺛ ﻞﻤﻌﻠﻟ ﺩﻮﻌﺘﺳ ﺎﻬﻧﺈﻓ ﻲﺋﺎﺑﺮﻬﻜﻟﺍ ﺭﺎﻴﺘﻟﺍ ﻉﺎﻄﻘﻧﺇ ﺔﺠﻴﺘﻧ ﻥﻮﺤﺼﻟﺍ ﺔﻟﺎﹼﺴﻏ ﺀﺎﻔﻃﺇ ﰎ ﺍﺫﺇﹰﺎﻴﻟﺁ ﻞﻴﻐﺸﺘﻟﺍ ﺓﺩﺎﻋﺇ
.(ﺔﻗﺎﻄﻟﺍ) Power ﺭﺯ ﻰﻠﻋ ﻂﻐﻀﻟﺍ ﺪﻌﺑﻭ ﺔﻗﺎﻄﻟﺍ ﺓﺩﻮﻋ
ﻒﻴﻔﺠﺘﻟﺍ
ﺩﺭﺎﺒﻟﺍ
ﻒﻴﻔﺠﺘﻟﺍ
ﺭﺎﳊﺍ ﻒﻄﺸﻟﺍ
ﻡﹾ٧٠
ﻡﹾ٦٠
ﻡﹾ٧٠
ﻡﹾ٦٥
ﻒﻄﺸﻟﺍ
٣ ﻒﻄﺸﻟﺍ ٢ ﻒﻄﺸﻟﺍ ١ ﻒﻄﺸﻟﺍ
ﻞﺴﻐﻟﺍ
ﻞﺴﻐﻟﺍ ﻞﺴﻐﻟﺍ ﻞﺒﻗ
ﻡﹾ٦٠ ﻡﹾ٤٠
.ﻲﻧﺍﻭﻷﺍ ﺥﺎﺴﺗﺍ ﻖﻓﻭ ﻦﹼﺴﺤﻣ ﺞﻣﺎﻧﺮﺒﻟﺍ ﺍﺬﻫ
ﻡﹾ٤٣
ﻡﹾ٤٥
ﺞﻣﺎﻧﺮﺒﻟﺍ
Dual Wash
(ﻲﺋﺎﻨﺜﻟﺍ ﻞﻴﺴﻐﻟﺍ)
Auto
(ﻲﻟﻵﺍ)
Eco
(ﻮﻜﻳﺍ)
Gentle
(ﻒﻴﻄﻟ)
Quick
(ﻊﻳﺮﺴﻟﺍ)
Pre Wash
(ﻞﻴﺴﻐﻟﺍ ﻞﺒﻗ)
ﻡﹾ٥٠ﻡﹾ٥٠
.ﻲﺋﺎﺑﺮﻬﻜﻟﺍ ﺭﺎﻴﺘﻠﻟﺍ ﺓﻮﻗﻭ ﺀﺎﳌﺍ ﻂﻐﺿﻭ ﺀﺎﳌﺍ ﺓﺭﺍﺮﺣ ﺔﺟﺭﺩ ﻰﻠﻋﹰﺍﺩﺎﻤﺘﻋﺍ ﻞﻴﻐﺸﺘﻟﺍ ﻦﻣﺯ ﻒﻠﺘﺨﻳ ﺪﻗ
.ﺔﻘﻴﻗﺩ ٣٠ ﻮﻫﻭ (Cool Dry) ﺩﺭﺎﺒﻟﺍ ﻒﻴﻔﺠﺘﻟﺍ" ﻦﹼﻤﻀﺘﻳ ﻻ ﻞﻴﻐﺸﺘﻟﺍ ﻦﻣﺯ
Page 51

٢٣
ﻡﺪﺨﺘﺴﻤﻠﻟ ﺔﻧﺎﻴﺼﻟﺍ ﺕﺎﻤﻴﻠﻌﺗ
.ﺊﻴﺳ ﻞﻴﻐﺸﺗﻭ ﻞﻛﺎﺸﻣ ﺙﻭﺪﺣ ﻱﺩﺎﻔﺘﻟ ﻢﻈﺘﻨﻣ ﻞﻜﺸﺑ ﺀﺎﳌﺍ ﺕﺎﺧﺎﺨﺑ ﻉﺭﺫﺃﻭ ﺮﺗﻼﻔﻟﺍ ﺪﻘﻔﺘﺑ ﺢﺼﻨﻳ
ﻲﻓﺎﺼﳌﺍ
.ﹰﻻﻭﺃ ﻲﻠﻔﺴﻟﺍ ﻑﺮﻟﺍ ﺐﺤﺳﺇ •
.ﺔﻋﺎﺴﻟﺍ ﺏﺭﺎﻘﻋ ﺲﻜﻋ ﺔﻴﻜﺒﺸﻟﺍ ﺓﺎﻔﺼﳌﺍ ﺭﺩﺃ •
ﺓﺎﻔﺼﳌﺍﻭ STS ﺓﺎﻔﺼﻣﻭ ﺔﻴﻜﺒﺸﻟﺍ ﺓﺎﻔﺼﳌﺍ ﺐﺤﺳﺇ •
.ﺔﻴﺟﺭﺎﳋﺍ
.ﺔﺟﺎﳊﺍ ﺖﻋﺩ ﺍﺫﺇ ﻢﻬﻔﻴﻈﻨﺘﻳ ﻢﻗ •
.ﺐﻴﺗﺮﺘﻟﺍ ﺐﺴﺣ ﻢﻬﻧﺎﻜﻣ ﻰﻟﺇ ﻢﻬﺗﺪﻋﺈﺑ ﻢﻗ •
upper STS filter
outer filter
Coarse filter
fine filter
mesh filter
ﺔﻴﻜﺒﺸﻟﺍ ﺓﺎﻔﺼﳌﺍ
STS ﺓﺎﻔﺼﻣ
ﺎﻴﻠﻌﻟﺍ
ﺔﻴﺟﺭﺎﳋﺍ ﺓﺎﻔﺼﳌﺍ
ﻲﻠﻔﺴﻟﺍ ﺵﺎﺷﺮﻟﺍ ﻉﺍﺭﺫ
.ﺓﺩﻭﺪﺴﻣ ﺮﻴﻏ ﺀﺎﳌﺍ ﺥﺎﺨﺑ ﺕﺎﺤﺘﻓ ﻥﺃ ﻦﻣ ﺪﻛﺄﺗ •
ﺎﻬﺟﺮﺧﺃﻭ ﻉﺍﺭﺬﻟﺍ ﺐﺤﺳﺇ ﻒﻴﻈﻨﺘﻠﻟ ﺔﺟﺎﳊﺍ ﻝﺎﺣ ﻲﻓ •
.ﺎﻬﻧﺎﻜﻣ ﻦﻣ
ﺐﺤﺴﻟﺎﺑ ﺎﻬﻧﺎﻜﻣ ﻰﻟﺇ ﺎﻫﺪﻋﺃﻭ ﺵﺎﺷﺮﻟﺍ ﻉﺍﺭﺫ ﻒﹼﻈﻧ •
.ﻞﻔﺳﻸﻟ
ﺔﻳﻮﻠﻌﻟﺍ ﺵﺎﺷﺮﻟﺍ ﻉﺍﺭﺫ
.ﻡﺎﻣﻷﺍ ﻰﻟﺇ ﻱﻮﻠﻌﻟﺍ ﻑﺮﻟﺍ ﺐﺤﺳﺇ •
.ﺓﺩﻭﺪﺴﻣ ﺮﻴﻏ ﺀﺎﳌﺍ ﺥﺎﺨﺑ ﺕﺎﺤﺘﻓ ﻥﺃ ﻦﻣ ﺪﻛﺄﺗ •
ﻚﻓ ﺪﻌﺑ ﻉﺍﺭﺬﻟﺍ ﺐﺤﺳﺇ ﻒﻴﻈﻨﺘﻠﻟ ﺔﺟﺎﳊﺍ ﻝﺎﺣ ﻲﻓ •
.ﻲﻏﺍﺮﺒﻟﺍ
.ﺎﻬﻧﺎﻜﻣ ﻰﻟﺇ ﺎﻫﺪﻋﺃﻭ ﺵﺎﺷﺮﻟﺍ ﻉﺍﺭﺫ ﻒﹼﻈﻧ •
ﺵﺮﻟﺍ ﻉﺍﺭﺫ
ﻰﻠﻋﻷﺍ
ﻞﻴﺴﻏ ﺓﺭﻭﺩ ﻞﻛ ﺪﻌﺑ ﻲﻓﺎﺼﳌﺍ ﻒﻴﻈﻨﺘﺑ ﻢﻗ
.ﻞﻀﻓﺄﺠﺋﺎﺘﻧ ﻰﻠﻋ ﻝﻮﺼﺤﻠﻟ
ﻞﻜﺸﺑ ﺔﺒﻛﺮﻣ ﻲﻓﺎﺼﳌﺍ ﻥﺃ ﻞﻴﻐﺸﺘﻟﺍ ﻞﺒﻗ ﺪﻛﺄﺗ
ﻰﻟﺇ ﻱﺩﺆﻳ ﺢﻴﺤﺼﻟﺍ ﺐﻴﻛﺮﺘﻟﺍ ﻡﺪﻋ ﻥﻷ ،ﺢﻴﺤﺻ
.ﺀﻲﺳ ﻞﻴﺴﻏ
Page 52

٢٤
ﺎﻬﻠﺣﻭ ﻞﻛﺎﺸﳌﺍ ﺪﻳﺪﲢ ﻞﻴﻟﺩ
.ﺎﻬﻟ ﻞﺣ ﺩﻮﺟﻭ ﻦﻋ ﻩﺎﻧﺩﺃ ﻝﻭﺪﳉﺍ ﻰﻟﺇ ﺮﻈﻧﺃ ﺎﻣ ﺔﻠﻜﺸﻣ ﺙﻭﺪﺣ ﻝﺎﺣ ﻲﻓ
.ﺔﻣﺪﳋﺍ ﺰﻛﺮﲟ ﻝﺎﺼﺘﻟﺍ ﺝﺮﻳ ﺔﻠﻜﺸﳌﺍ ﻞﺣ ﻰﻠﻋ ﺓﺭﺪﻘﻟﺍ ﻡﺪﻋ ﻝﺎﺣ ﻲﻓ
ﻞﳊﺍ ﻞﻤﺘﶈﺍ ﺐﺒﺴﻟﺍ ﺔﻠﻜﺸﳌﺍ
ﻞﻴﻐﺸﺗ ﺪﻨﻋ ﺕﺍﺮﺷﺆﻣ ﻱﺃ ﺀﻲﻀﺗ ﻻ
،ﺯﺎﻬﳉﺍ
،ﺔﻟﺎﹼﺴﻐﻟﺍ ﻞﻴﻐﺸﺗ ﻦﻜﳝ ﻻ
ﻙﹼﺮﺤﺘﺗ ﻻ ﻩﺎﻴﳌﺍ ﺕﺎﺷﺎﺷﺭ ﻉﺭﺫﺃ
.ﺔﺳﻼﺴﺑ
ﺀﺎﻬﺘﻧﻻﺍ ﺪﻌﺑ ﺀﺎﻀﻴﺑ ﺕﺎﻔﻠﺨﻣ ﺭﻮﻬﻇ
.ﻞﻴﺴﻐﻟﺍ ﻦﻣ
ﻲﻧﺍﻭﻷﺍ ﻲﻠﻋ ﺕﺎﻣﻼﻋ ﺭﻮﻬﻇ
.ﺔﻴﺟﺎﺟﺰﻟﺍ
.ﺐﺠﻳ ﺎﻤﻛ ﻢﺘﻳ ﻻ ﻒﻴﻔﺠﺘﻟﺍ
.ﺔﻴﺿﺮﻣ ﻲﻏ ﻞﺴﻐﻟﺍ ﺞﺋﺎﺘﻧ
ﺬﺧﺄﳌﺍ ﻲﻓ ﺲﺑﺎﻘﻟﺍ ﻝﺎﺧﺩﺇ ﻢﺘﻳ ﻢﻟ •
.ﺢﻴﺤﺻ ﻞﻜﺸﺑ ﻲﺋﺎﺑﺮﻬﻜﻟﺍ
.ﻩﺀﺎﻔﻄﻧﺍ ﻭﺃ (ﺯﻮﻴﻓ) ﻊﻃﺎﻗ ﻕﺍﺮﺘﺣﺍ •
.ﻲﺋﺎﺑﺮﻬﻜﻟﺍ ﺭﺎﻴﺘﻟﺍ ﻊﻄﻗ ﰎ •
.ﺪﻴﺟ ﻞﻜﺸﺑ ﺏﺎﺒﻟﺍ ﻕﻼﻏﺇ ﻢﺘﻳ ﻢﻟ •
.ﻞﻴﻐﺸﺘﻟﺍ ﺭﺯ ﻂﻐﺿ ﻢﺘﻳ ﻢﻟ •
ﻉﺍﺭﺬﺑ ﺔﻘﻟﺎﻋ ﻡﺎﻌﻃ ﺎﻳﺎﻘﺑ ﺩﻮﺟﻭ •
.ﺵﺎﺷﺮﻟﺍ
ﺪﻋﺎﺴﻣ ﻭﺃ ﻒﻴﻈﻨﺘﻟﺍ ﺓﺩﺎﻣ ﺔﻴﻤﻛ •
.ﺔﺤﻴﺤﺻ ﺮﻴﻏ ﻒﻄﺸﻟﺍ
.ﻍﺭﺎﻓ ﺢﻠﳌﺍ ﻥﺰﺨﻣ •
.ﻕﻼﻏﻹﺍ ﻢﻜﺤﻣ ﺮﻴﻏ ﺢﻠﳌﺍ ﻥﺰﺨﻣ ﺀﺎﻄﻏ •
.ﻒﻄﺸﻟﺍ ﺪﻋﺎﺴﻣ ﻦﻣ ﺮﻴﺜﻜﻟﺍ ﺝﺍﺮﺧﺇ ﰎ •
.ﻒﻄﺸﻟﺍ ﺪﻋﺎﺴﻣ ﻦﻣ ﺮﻴﺜﻜﻟﺍ ﺝﺍﺮﺧﺇ ﰎ •
.ﻒﻴﻈﻨﺘﻟﺍ ﺩﺍﻮﻣ ﻦﻣ ﺔﺤﻴﺤﺻ ﺮﻴﻏ ﺔﻴﻤﻛ •
.ﺓﺮﻴﺜﻛ ﻭﺃﹰﺍﺪﻴﺟ ﺔﺒﺗﺮﻣ ﺮﻴﻏ ﻡﺎﻌﺼﻟﺍ ﺕﺍﻭﺩﺃ •
.ﺓﺩﻭﺪﺴﻣ ﻩﺎﻴﳌﺍ ﺵﺭ ﺕﺎﺤﺘﻓ •
ﺕﺍﻭﺩﺄﺑ ﺓﺪﻴﻘﻣ ﻩﺎﻴﳌﺍ ﺵﺭ ﻉﺭﺫﺃ ﺔﻛﺮﺣ •
.ﻡﺎﻌﻄﻟﺍ
.ﺐﺳﺎﻨﻣ ﺮﻴﻏ ﻒﻴﻈﻨﺗ ﺞﻣﺎﻧﺮﺑ ﺭﺎﻴﺘﺧﺍ ﰎ •
.ﻲﺋﺎﺑﺮﻬﻜﻟﺍ ﺲﺒﻘﻟﺍ ﺪﻘﻔﺗ •
.ﺀﺎﺑﺮﻬﻜﻟﺍ ﺪﻘﻔﺗ •
.ﺔﻣﺪﳋﺎﺑ ﻞﺼﺗﺍ •
.ﺏﺎﺒﻟﺍ ﻖﻠﻏﺃ •
.ﺀﺪﺒﻟﺍ ﺭﺯ ﻂﻐﺿﺇ •
.ﻩﺎﻴﳌﺍ ﺵﺭ ﺕﺎﺤﺘﻓ ﻒﻈﻧ •
ﻭﺃ ﻒﻴﻈﻨﺘﻟﺍ ﺓﺩﺎﻣ ﺪﻘﻔﺗ •
.ﻒﻄﺸﻟﺍ ﺪﻋﺎﺴﻣ
ﻭﺃ ﺢﻠﳌﺍ ﻥﺰﺨﻣ ﺪﻘﻔﺗ •
.ﺀﺎﻄﻐﻟﺍ
.ﻒﻄﺸﻟﺍ ﺪﻋﺎﺴﲟ ﻸﻣﺇ •
ﺪﻋﺎﺴﻣ ﻯﻮﺘﺴﻣ ﻂﺒﺿﺍ •
.ﻒﻄﺸﻟﺍ
Page 53

٢٥
ﺎﻬﻠﺣﻭ ﻞﻛﺎﺸﳌﺍ ﺪﻳﺪﲢ ﻞﻴﻟﺩ
ﻞﳊﺍ ﻞﻤﺘﶈﺍ ﺐﺒﺴﻟﺍ ﺔﻠﻜﺸﳌﺍ
.«OE» ﺔﺷﺎﺸﻟﺍﺍ ﻰﻠﻋ ﺮﻬﻈﻳ
(ﻩﺎﻴﳌﺍ ﻒﻳﺮﺼﺗ ﻦﻜﳝ ﻻ)
.«IE» ﺰﻣﺭ ﺔﺷﺎﺸﻟﺍ ﻰﻠﻋ ﺮﻬﻈﻳ
.«EI» ﺰﻣﺭ ﺔﺷﺎﺸﻟﺍ ﻰﻠﻋ ﺮﻬﻈﻳ
(.ﺔﻴﺋﺎﻘﻠﺘﻟﺍ ﻒﻴﻔﺠﺘﻟﺍ ﺔﺨﻀﻣ)
.«FE» ﺰﻣﺭ ﺔﺷﺎﺸﻟﺍ ﻰﻠﻋ ﺮﻬﻈﻳ
(.ﺔﻴﺋﺎﻘﻠﺘﻟﺍ ﻒﻴﻔﺠﺘﻟﺍ ﺔﺨﻀﻣ)
.«HE» ﺰﻣﺭ ﺔﺷﺎﺸﻟﺍ ﻰﻠﻋ ﺮﻬﻈﻳ
.«tE» ﺰﻣﺭ ﺔﺷﺎﺸﻟﺍ ﻰﻠﻋ ﺮﻬﻈﻳ
.«LE» ﺰﻣﺭ ﺔﺷﺎﺸﻟﺍ ﻰﻠﻋ ﺮﻬﻈﻳ
.«CE» ﺰﻣﺭ ﺔﺷﺎﺸﻟﺍ ﻰﻠﻋ ﺮﻬﻈﻳ
.ﻲﻨﺜﻣ ﻒﻴﻔﺠﺘﻟﺍ ﻡﻮﻃﺮﺧ •
.ﺓﺩﻭﺪﺴﻣ ﺓﺎﻔﺼﳌﺍ •
ﻭﺃ ﻞﻴﺸﻐﻟﺍ ﻙﹼﺮﺤﻣ) ﻞﻤﻌﻳ ﻻ ﻙﹼﺮﶈﺍ •
.(ﻒﻴﻔﺠﺘﻟﺍ ﻙﹼﺮﺤﻣ
.ﻩﺎﻴﳌﺍ ﺩﻮﻳﺰﺗ ﻢﺘﻳ ﻻ •
.ﻩﺎﻴﳌﺍ ﺭﻮﺒﻨﺻ ﺢﺘﻓ ﻢﺘﻳ ﻢﻟ •
.ﹰﺍﺪﻴﺟ ﻞﻤﻌﻳ ﻻ ﺀﺎﳌﺍ ﺮﺷﺆﻣ •
.ﺀﺎﳌﺍ ﺪﻳﻭﺰﺗ ﻡﻮﻃﺮﺧ ﻦﻣ ﺏﺮﺴﺗ ﺪﺟﻮﻳ •
.ﺀﺎﳌﺍ ﻲﻓ ﺏﹼﺮﺴﺗ ﺐﺒﺴﺑ ﺯﺎﻬﳉﺍ ﻲﻓ ﻒﻠﺗ •
.ﻱﺩﺎﻴﺘﻋﻻﺍ ﺪﻳﻭﺰﺘﻟﺍ ﻕﻮﻔﻳ ﺀﺎﳌﺍ ﺪﻳﻭﺰﺗ •
.ﺀﺎﳌﺍ ﻝﺎﺧﺩﺇ ﻡﺎﹼﻤﺻ ﻲﻓ ﺔﻠﻜﺸﻣ ﺪﺟﻮﻳ •
.ﺔﻔﻟﺎﺗ ﺀﺎﳌﺍ ﲔﺨﺴﺗ ﺓﺭﺍﺩ •
ﺪﻳﻭﺰﺘﻟﺍ ﻢﺘﻳ ﻭﺃ ﺓﺭﺍﺮﳊﺍ ﻥﺍﺰﻴﻣ ﻲﻓ ﺔﻠﻜﺸﻣ •
.ﺓﺭﺍﺮﳊﺍ ﻊﻔﺗﺮﻣ ﺀﺎﲟ
ﻙﹼﺮﶈﺍ ﻲﻓ ﺔﻠﻜﺸﻣ •
ﻙﹼﺮﶈﺍ ﻲﻓ ﺔﻠﻜﺸﻣ •
.ﻡﻮﻃﺮﳋﺍ ﺔﻳﻮﺴﺘﺑ ﻢﻗ •
.ﻲﻓﺎﺼﳌﺍ ﻒﹼﻈﻧ •
ﻞﺼﺗﺇ ﺔﻠﻜﺸﳌ ﻼﲢ ﻢﻟ ﺍﺫﺇ •
.ﺔﻣﺪﳋﺍ ﺰﻛﺮﲟ
.ﺀﺎﳌﺍ ﺭﻮﺒﻨﺻ ﺪﻘﻔﺗ •
ﻞﺼﺗﺇ ﺔﻠﻜﺸﳌ ﻼﲢ ﻢﻟ ﺍﺫﺇ •
.ﺔﻣﺪﳋﺍ ﺰﻛﺮﲟ
ﻉﺰﻧﺍﻭ ﺀﺎﳌﺍ ﺭﻮﺒﻨﺻ ﻖﻠﻏﺃ •
.ﻲﺋﺎﺑﺮﻬﻜﻟﺍ ﺭﺎﻴﺘﻟﺍ ﺲﺑﺎﻗ
.ﺔﻣﺪﳋﺍ ﺰﻛﺮﲟ ﻞﺼﺗﺇ •
Page 54

٢٦
ﻢﻠﻣ ٨٩٥
ﻢﻠﻣ ٦٠٠
ﻢﻠﻣ ٨٥٠
ﻂﺒﻀﻠﻟ ﻥﺎﻜﻣ ١٤ ﺔﻌﺴﻟﺍ
ﻝﺪﻌﳌﺍ ﻖﺼﻠﻣ ﻰﻠﻋ ﻥﺯﻮﻟﺍ
ﻝﺪﻌﳌﺍ ﻖﺼﻠﻣ ﻰﻠﻋ ﺔﻗﺎﻄﻟﺍ ﺩﹼﻭﺰﻣ
ﻝﺪﻌﳌﺍ ﻖﺼﻠﻣ ﻰﻠﻋ ﺔﻗﺎﻄﻟﺍ ﻙﻼﻬﺘﺳﺍ
ﺭﺎﺑ ﻮﻠﻴﻛ ٨٠٠~ ٥٠ ﺀﺎﳌﺍ ﺪﻳﻭﺰﺗ ﻂﻐﻇ
ﻢﻠﻣ ٥٩٨
D1422W(L,M,T,B,C,D,A)B
D1423W(L,M,T,B,C,D,A)B
ﻢﻠﻣ ٥٦٧
ﻢﻠﻣ ٨١٩
ﻢﻠﻣ ٦٠٠
ﻢﻠﻣ ٥٩٨
ﻢﻠﻣ ٥٦٧
ﻢﻠﻣ ٨١٩
D1422W(L,M,T,B,C,D,A)U
D1423W(L,M,T,B,C,D,A)U
D1422W(L,M,T,B,C,D,A)F
D1423W(L,M,T,B,C,D,A)F
 Loading...