

ENGLISH
FRANÇAIS
B2000
User Guide
Please read this manual carefully before operating your mobile phone.
Retain it for future reference.
Issue 1.1
P/N : MMBB0154110 Printed in Korea
B2000 User Guide
B2000_RSA_Cover 2005.6.29 3:48 PM Page 1

B2000
USER’S MANUAL
GPRS & MMS Phone
Please read this manual carefully before
operating your mobile phone.
Retain it for future reference.
ENGLISH
B2000_RSA_eng.qxd 2005.6.29 4:21 PM Page 1
Introduction . . . . . . . . . . . . . . . . . . . . . . . . . . . 4
Guidelines for safe and efficient use . . . . . . 5
Overview
Parts of the Phone . . . . . . . . . . . . . . . . . . . . . 9
• Front view . . . . . . . . . . . . . . . . . . . . . . . . . . . 9
• Rear view . . . . . . . . . . . . . . . . . . . . . . . . . . 10
Key Description. . . . . . . . . . . . . . . . . . . . . . . 11
• Keypad Description . . . . . . . . . . . . . . . . . . . 11
• Letter Keys . . . . . . . . . . . . . . . . . . . . . . . . . 12
Display Information
Display Information . . . . . . . . . . . . . . . . . . . 13
• On-Screen Icons . . . . . . . . . . . . . . . . . . . . . 13
Getting Started
Installation . . . . . . . . . . . . . . . . . . . . . . . . . . . 14
• Inserting the SIM Card . . . . . . . . . . . . . . . . 14
• Removing the SIM Card . . . . . . . . . . . . . . . 14
• Installing the Battery . . . . . . . . . . . . . . . . . . 14
• Charging the Battery . . . . . . . . . . . . . . . . . . 15
• Disconnecting the charger. . . . . . . . . . . . . . 15
Making and Answering Calls . . . . . . . . . . . . 16
• Making a call . . . . . . . . . . . . . . . . . . . . . . . . 16
• International Calls . . . . . . . . . . . . . . . . . . . . 16
• Making a call using the Phonebook . . . . . . 16
Additional Functions
In call Menu . . . . . . . . . . . . . . . . . . . . . . . . . . 17
• During a call . . . . . . . . . . . . . . . . . . . . . . . . 17
• Multiparty or Conference Calls . . . . . . . . . . 18
Access Codes . . . . . . . . . . . . . . . . . . . . . . . . 20
• PIN code (4 to 8 digits) . . . . . . . . . . . . . . . . 20
• PIN2 code (4 to 8 digits) . . . . . . . . . . . . . . . 20
• PUK code (4 to 8 digits) . . . . . . . . . . . . . . . 20
• PUK2 code (4 to 8 digits) . . . . . . . . . . . . . . 20
• Security code (4 to 8 digits) . . . . . . . . . . . . 20
Accessing the Menu
Menu Tree . . . . . . . . . . . . . . . . . . . . . . . . . . . 21
Messages [Menu 1] . . . . . . . . . . . . . . . . . . . . 23
• Write text message [Menu 1-1] . . . . . . . . . . 23
• Write multimedia message [Menu 1-2] . . . . 24
• Inbox [Menu 1-3] . . . . . . . . . . . . . . . . . . . . . 28
• Outbox [Menu 1-4]. . . . . . . . . . . . . . . . . . . . 29
• Drafts [Menu 1-5]. . . . . . . . . . . . . . . . . . . . . 29
• Listen to voice mail [Menu 1-6] . . . . . . . . . . 30
• Info message [Menu 1-7] . . . . . . . . . . . . . . 30
• Templates [Menu 1-8] . . . . . . . . . . . . . . . . . 31
• Settings [Menu 1-9] . . . . . . . . . . . . . . . . . . . 32
Call register [Menu 2] . . . . . . . . . . . . . . . . . . 35
• Missed calls [Menu 2-1] . . . . . . . . . . . . . . . 35
• Received calls [Menu 2-2]. . . . . . . . . . . . . . 35
• Dialled calls [Menu 2-3]. . . . . . . . . . . . . . . . 35
2 B2000 User Guide
Contents
B2000_RSA_eng.qxd 2005.6.29 4:21 PM Page 2

• Delete recent calls [Menu 2-4] . . . . . . . . . . 35
• Call charges [Menu 2-5] . . . . . . . . . . . . . . . 35
• GPRS information [Menu 2-6]. . . . . . . . . . . 36
Profiles [Menu 3] . . . . . . . . . . . . . . . . . . . . . . 37
• Activate [Menu 3-x-1]. . . . . . . . . . . . . . . . . . 37
• Personalise [Menu 3-x-2] . . . . . . . . . . . . . . 37
• Rename [Menu 3-x-3] . . . . . . . . . . . . . . . . . 38
Settings [Menu 4] . . . . . . . . . . . . . . . . . . . . . 39
• Date & Time [Menu 4-1] . . . . . . . . . . . . . . . 39
• Phone settings [Menu 4-2] . . . . . . . . . . . . . 39
• Call settings [Menu 4-3] . . . . . . . . . . . . . . . 40
• Security settings [Menu 4-4] . . . . . . . . . . . . 42
• Network settings [Menu 4-5] . . . . . . . . . . . . 45
• GPRS setting [Menu 4-6] . . . . . . . . . . . . . . 45
• Reset settings [Menu 4-7] . . . . . . . . . . . . . . 46
Organiser [Menu 5] . . . . . . . . . . . . . . . . . . . . 47
• Alarm clock [Menu 5-1] . . . . . . . . . . . . . . . . 47
• Scheduler [Menu 5-2] . . . . . . . . . . . . . . . . . 47
• Phonebook [Menu 5-3] . . . . . . . . . . . . . . . . 48
FM Radio [Menu 6] . . . . . . . . . . . . . . . . . . . . 53
• Listen radio [Menu 6-1] . . . . . . . . . . . . . . . . 53
• Channels [Menu 6-2] . . . . . . . . . . . . . . . . . . 54
Fun & Tools [Menu 7] . . . . . . . . . . . . . . . . . . 55
• Favorites [Menu 7-1] . . . . . . . . . . . . . . . . . . 55
• Games [Menu 7-2]. . . . . . . . . . . . . . . . . . . . 55
• Calculator [Menu 7-3] . . . . . . . . . . . . . . . . . 55
• My folder [Menu 7-4] . . . . . . . . . . . . . . . . . . 56
• Unit converter [Menu 7-5] . . . . . . . . . . . . . . 56
• World time [Menu 7-6]. . . . . . . . . . . . . . . . . 56
• Voice recorder [Menu 7-7] . . . . . . . . . . . . . . 56
• Memory status [Menu 7-8] . . . . . . . . . . . . . 57
Internet [Menu 8] . . . . . . . . . . . . . . . . . . . . . . 58
• Home [Menu 8-1]. . . . . . . . . . . . . . . . . . . . . 58
• Bookmarks [Menu 8-2] . . . . . . . . . . . . . . . . 58
• Profiles [Menu 8-3] . . . . . . . . . . . . . . . . . . . 58
• Go to URL [Menu 8-4]. . . . . . . . . . . . . . . . . 60
• Cache settings [Menu 8-5] . . . . . . . . . . . . . 60
• Cookies settings [Menu 8-6] . . . . . . . . . . . . 60
• Security certification [Menu 8-7] . . . . . . . . . 60
• Reset profiles [Menu 8-8] . . . . . . . . . . . . . . 60
• Browser version [Menu 8-9] . . . . . . . . . . . . 60
On browsing menu . . . . . . . . . . . . . . . . . . . . 61
Java [Menu 9] . . . . . . . . . . . . . . . . . . . . . . . . 62
• Applications [Menu 9-1] . . . . . . . . . . . . . . . . 62
• Download [Menu 9-2] . . . . . . . . . . . . . . . . . 62
• Profiles [Menu 9-3] . . . . . . . . . . . . . . . . . . . 62
Accessories. . . . . . . . . . . . . . . . . . . . . . . . . . 63
Care and Maintenance . . . . . . . . . . . . . . . . . 64
Trouble Shooting . . . . . . . . . . . . . . . . . . . . . 65
Technical Data. . . . . . . . . . . . . . . . . . . . . . . . 67
B2000 User Guide 3
B2000_RSA_eng.qxd 2005.6.29 4:21 PM Page 3
4 B2000 User Guide
Introduction
Congratulations on your purchase of the advanced and compact B2000 cellular phone, designed to
operate with the latest digital mobile communication technology.
This user’s guide contains important
information on the use and operation of this
phone. Please read all the information
carefully for optimal performance and to
prevent any damage or misuse of the phone.
Any changes or modifications not
expressively approved in this user’s guide
could void your warranty for this equipment.
B2000_RSA_eng.qxd 2005.6.29 4:21 PM Page 4

Read these simple guidelines. Breaking the rules
may be dangerous or illegal. Further detailed
information is given in this manual.
Exposure to radio frequency energy
Radio wave exposure and Specific Absorption
Rate (SAR) information
This mobile phone model B2000 has been
designed to comply with applicable safety
requirement for exposure to radio waves. This
requirement is based on scientific guidelines that
include safety margins designed to assure the
safety of all persons, regardless of age and
health.
• The radio wave exposure guidelines employ a
unit of measurement known as the Specific
Absorption Rate, or SAR.
Tests for SAR are conducted using
standardized method with the phone
transmitting at its highest certified power level in
all used frequency bands.
• While there may be differences between the
SAR levels of various LG phone models, they
are all designed to meet the relevant guidelines
for exposure to radio waves.
• The SAR limit recommended by the
International Commission on Non-Ionizing
Radiation Protection (ICNIRP), which is 2W/kg
averaged over ten (10) gram of tissue.
• The highest SAR value for this model phone
tested by DASY4 for use at the ear is 1.10
W/kg (10g).
• SAR data information for residents in
countries/regions that have adopted the SAR
limit recommended by the Institute of Electrical
and Electronics Engineers (IEEE), which is 1.6
W/kg averaged over one (1) gram of tissue.
Product care and maintenance
Warning: Use only batteries, charger and
accessories approved for use with this
particular phone model.
The use of any other types may invalidate any
approval or warranty applying to the phone,
and may be dangerous.
• Do not disassemble this unit. (Take it to a
qualified service technician when repair work is
required.)
• Keep away from electrical appliances such as a
TV, radio or personal computer.
B2000 User Guide 5
Guidelines for safe and efficient use
B2000_RSA_eng.qxd 2005.6.29 4:21 PM Page 5

• The unit should be kept away from heat sources
such as radiators or cookers.
• Do not drop.
• Do not subject this unit to mechanical vibration
or shock.
• The coating of the phone may be damaged if
covered with wrap or vinyl wrapper.
• Use dry cloth to clean the exterior of the unit.
(Do not use solvent such as benzene, thinner or
alcohol.)
• Do not subject this unit to excessive smoke or
dust.
• Do not keep the phone next to credit cards or
transport tickets; it can affect the information on
the magnetic strips.
• Do not tap the screen with a sharp object;
otherwise, it may damage the phone.
• Do not expose the phone to liquid or moisture.
• Use the accessories like an earphone
cautiously. Do not touch the antenna
unnecessarily.
Efficient phone operation
To enjoy optimum performance with minimum
power consumption please:
• Hold the phone upright as you speak to any
other telephone. While speaking directly into the
microphone, angle the antenna in a direction up
and over your shoulder.
• If your mobile phone supports infrared, never
direct the infrared ray at anyone’s eye.
Electronic devices
All wireless phones may get interference,
which could affect performance.
• Do not use your mobile phone near medical
equipment without requesting permission. Avoid
placing the phone over the pacemaker, i.e. in
your breast pocket.
• Some hearing aids might be disturbed by mobile
phones.
• Minor interference may affect TVs, radios, PCs,
etc.
6 B2000 User Guide
Guidelines for safe and efficient use
B2000_RSA_eng.qxd 2005.6.29 4:21 PM Page 6

Road safety
Check the laws and regulations on the use of
mobile phones in the areas when you drive.
• Do not use a hand-held phone while driving.
• Give full attention to driving.
• Use a handsfree kit, if available.
• Pull off the road and park before making and
answering a call if driving conditions so require.
• RF energy may affect some electonic system in
your motor vehicle such as car stereo, safety
equipment.
• When your vehicle is equipped with an Air bag,
do not place objects including either installed or
portable wireless equiment. It can cause
serious injury due to improper performance.
Blasting area
Do not use the phone where blasting is in
progress. Observe restrictions, and follow any
regulations or rules.
Potentially explosive atmospheres
• Do not use the phone at a refuelling point. Don’t
use near fuel or chemicals.
• Do not transport or store flammable gas, liquid,
or explosives in the compartment of your
vehicle, which contains your mobile phone and
accessories.
In aircraft
Wireless devices can cause interference in
aircraft.
• Turn off your mobile phone before boarding any
aircraft.
• Do not use it on the ground without crew
permission.
Children
Keep the phone in a safe place out of children’s
reach. It includes small parts which if detached
may cause a choking hazard.
B2000 User Guide 7
B2000_RSA_eng.qxd 2005.6.29 4:21 PM Page 7

Emergency calls
Emergency call may not be available under all
cellular networks.
Therefore, you should never depend solely on the
phone for emergency calls. Check with your local
service provider.
Battery information and care
• You do not need to completely discharge the
battery before recharging. Unlike other battery
systems, there is no memory effect that could
compromise the battery’s performance.
• Use only LG batteries and chargers. LG
chargers are designed to maximize the battery
life.
• Do not disassemble or short-circuit the battery
pack.
• Keep the metal contacts of the battery pack
clean.
• Replace the battery when it no longer provides
acceptable performance. The battery pack may
be recharged hundreds of times until it needs
replacing.
• Recharge the battery if it has not been used for
a long time to maximize usability.
• Do not expose the battery charger to direct
sunlight or use it in high humidity, such as the
bathroom.
• Do not leave the battery in hot or cold places,
this may deteriorate the battery performance.
8 B2000 User Guide
Guidelines for safe and efficient use
B2000_RSA_eng.qxd 2005.6.29 4:21 PM Page 8
B2000 User Guide 9
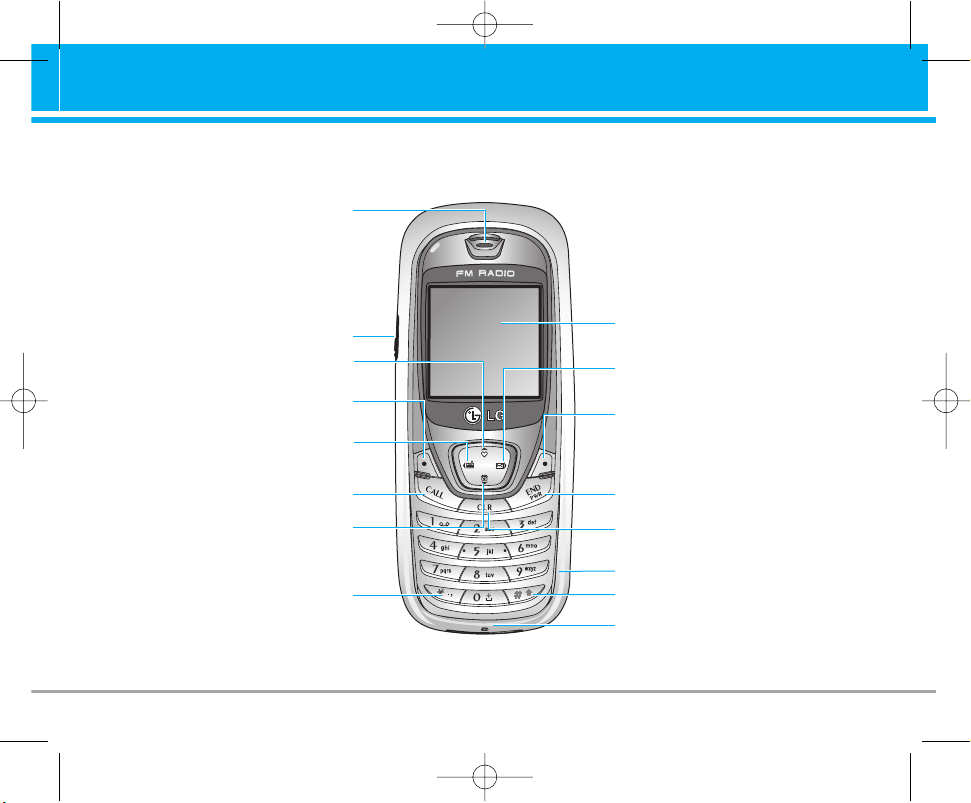
Parts of the Phone
Front view
Earpiece
Favorites key
Headset jack
Soft Left key
Radio hot key
Send key
Phone book list key
Star key
Display Screen
Message key
Soft Right key
End/Power key
Numeric keys
Microphone
Clear/Cancel key
Hash key
B2000_RSA_eng.qxd 2005.6.29 4:21 PM Page 9
10 B2000 User Guide
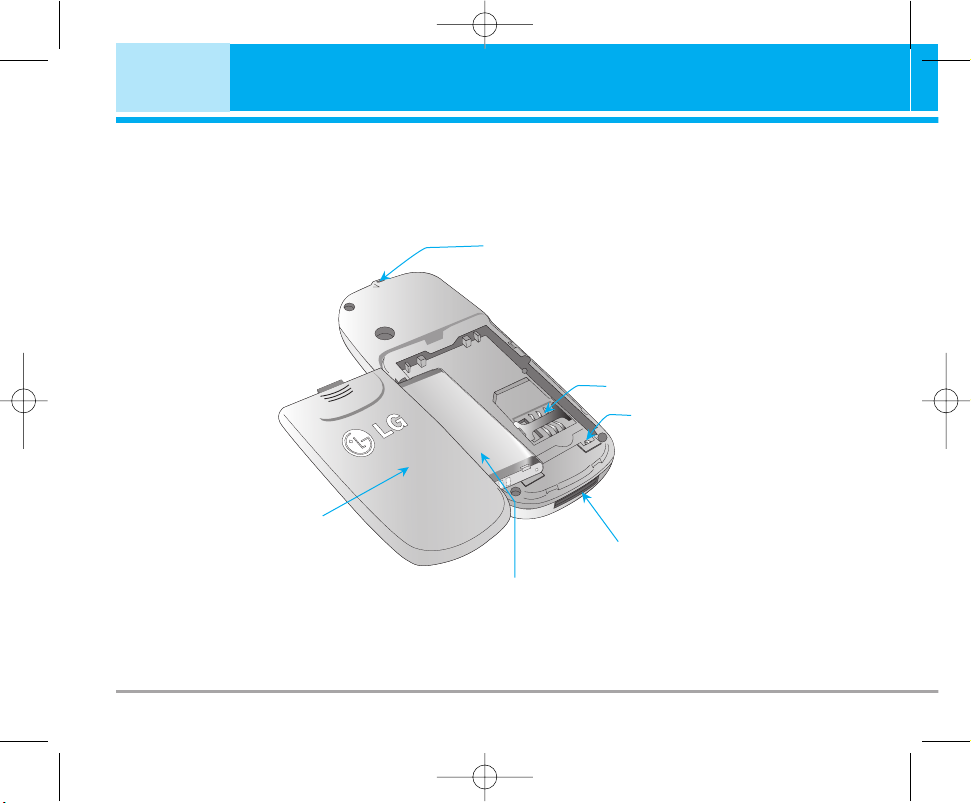
Parts of the Phone
Rear view
Handstrap Hole
SIM Card Socket
Battery
cover
Cable Connector/
Battery Charging Connector/
Hands-Free Car kit Connector
Battery Terminals
Battery
B2000_RSA_eng.qxd 2005.6.29 4:21 PM Page 10
The following shows key components of the phone.
Keypad Description
B2000 User Guide 11
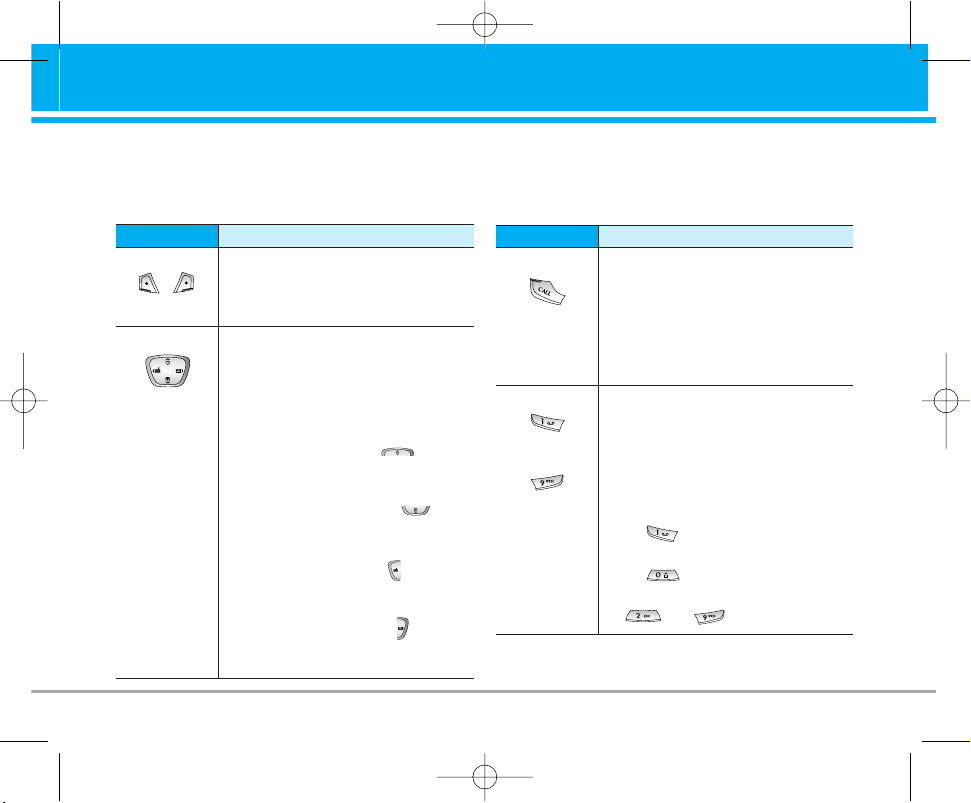
Key Description
Soft Left Key/Soft Right Key
Each of these keys performs the
function indicated by the text on
the display immediately above it.
Key Description
Navigation Keys
Use to scroll through menus and
move the cursor.
You can also use these keys for
quick access to the following
functions.
• Up navigation key ( ):
A shortcut key to the Favorites
menu.
• Down navigation key ( ):
A shortcut key to the
Phonebook.
• Left navigation key ( ):
A shortcut key to
the FM Radio.
• Right navigation key ( ):
A shortcut key to the
message inbox.
Send Key
You can dial a phone number and
answer a call. If you press this
key without entering a number,
your phone shows the most
recently dialled, received and
missed numbers.
Key Description
Numeric Keys
These keys are used mainly to
dial in standby mode and enter
numbers or characters in editing
mode. When you press these
keys for a long time.
• Used to call your voicemail box
by .
• Used to call for international call
by .
• Used to call Speed dials by from
to .
~
B2000_RSA_eng.qxd 2005.6.29 4:21 PM Page 11
Letter Keys
Each key can be used for several symbols. These
are shown below.
12 B2000 User Guide
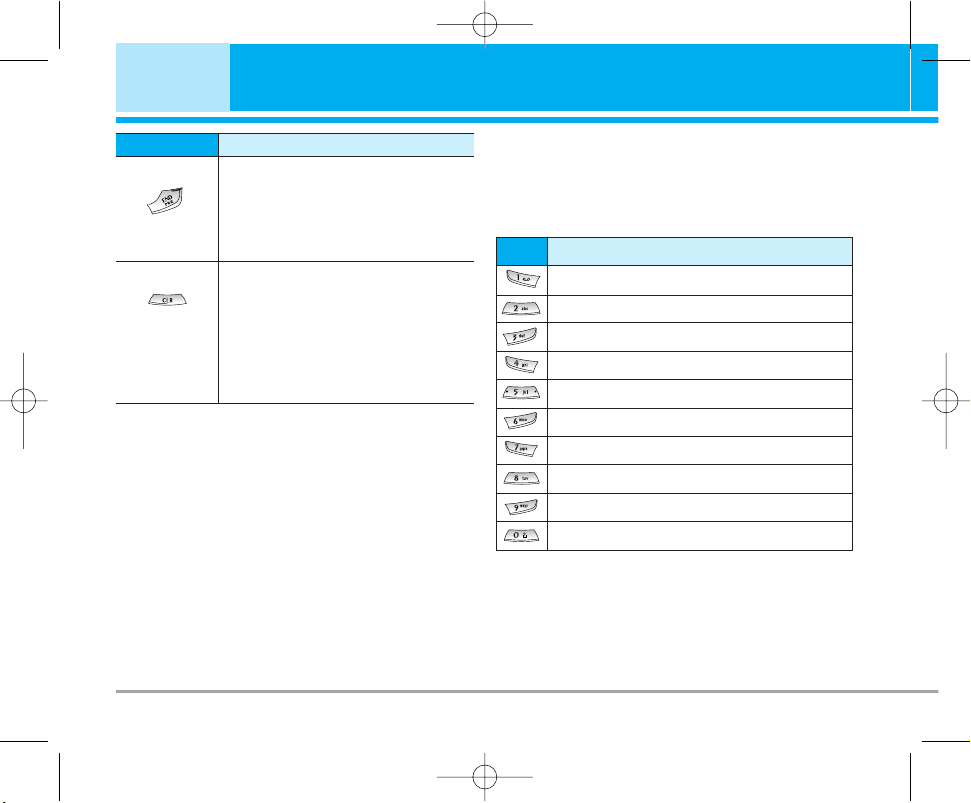
Key Description
END/PWR Key
Used to end or reject a call. This
key is also used as Power Key by
pressing this key for a few
seconds.
Key Description
You can delete the characters, go
back to the menu.
In addition, you can view voice
memo list when you press this
key shortly in standby mode.
Long press of this key in standby
mode starts voice memo
recording.
Key
Description
. , / ? ! - : ' " 1
A B C 2 Ä À Á Â Ã Å Æ Ç a b c ä à á â ã å æ ç
D E F 3 Ë È É Ê d e f ë è é ê
G H I 4 Ï Ì Í Î ˝ g h i ï ì í î ©
J K L 5 j k l
M N O 6 Ñ Ö Ø Ò Ó Ô Õ OE m n o ñ ö ø ò ó ô õ oe
P Q R S 7 ß Í p q r s ß ß
T U V 8 Ü Ù Ú Û t u v ü ù ú û
W X Y Z 9 w x y z
[space] 0
B2000_RSA_eng.qxd 2005.6.29 4:21 PM Page 12

The screen displays several icons. These are described below.
On-Screen Icons
B2000 User Guide 13
Display Information
Tells you the strength of the network
signal.
Icon/Indicator
Description
Call is connected.
You can use GPRS service.
Shows that you are using a roaming
service.
The alarm has been set and is on.
Tells you the status of the battery.
You have received a text message.
You have received a voice message.
You have received a push message.
You can view your schedule.
All audible signals are turned off.
General menu in profile.
Loud menu in profile.
Silent menu in profile.
Icon/Indicator
Description
Headset menu in profile.
Car menu in profile.
You can divert a call.
B2000_RSA_eng.qxd 2005.6.29 4:21 PM Page 13
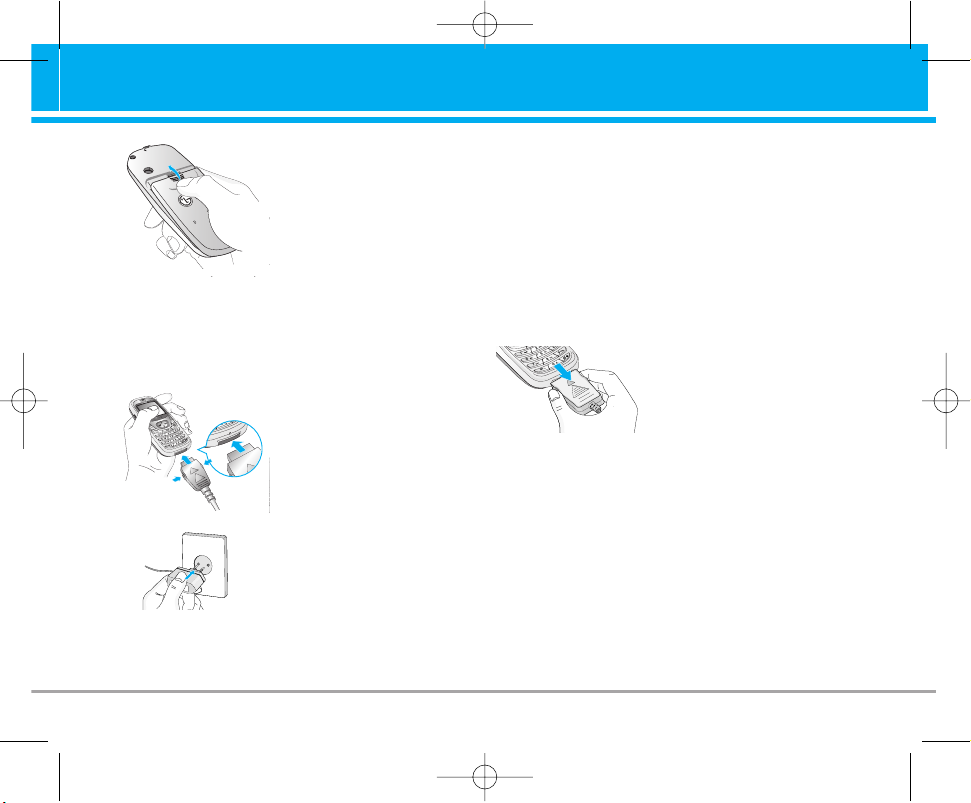
1. Inserting the SIM Card
Locate the SIM card socket in the back of the
phone. Follow the steps below to install the SIM
card.
1. Remove the battery if
attached.
2. Slide the SIM card into
the slot, under the silvery
holders, with the golden
connectors facing down.
14 B2000 User Guide
Installation
2. Removing the SIM Card
Follow the steps below to remove the SIM card.
1. Remove the battery if
attached.
2. Take out the SIM card
from the slot.
n Notice
• Removing the battery from the phone whilst it is
switched on may cause it to malfunction.
• The metal contact of the SIM card can be easily
damaged by scratches. Pay special attention to the
SIM card when you handle and install. Follow the
instructions supplied with the SIM card.
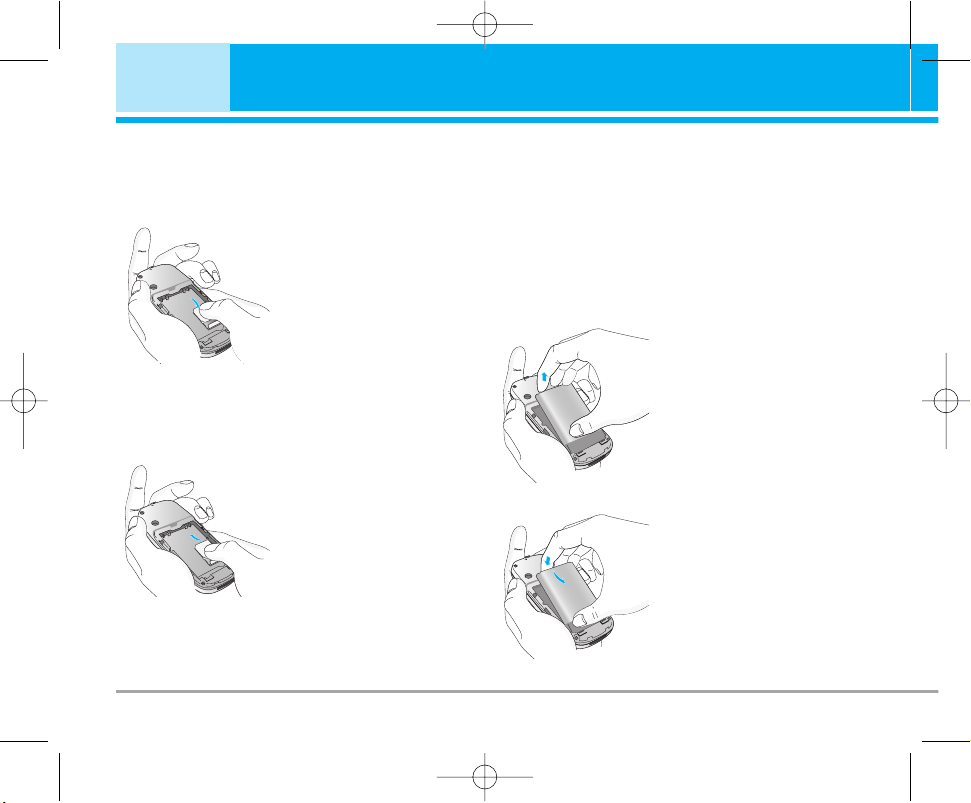
3. Installing the Battery
1. Position the lugs on the
bottom of the battery into
the retaining holder.
2. Then push to the half of
the battery into position.
B2000_RSA_eng.qxd 2005.6.29 4:21 PM Page 14
B2000 User Guide 15
3. Lay the battery cover in
place of the phone and
slide it until the latch
clicks.
4. Charging the Battery
To connect the travel adapter to the phone, you
must have installed the battery.
1. With the arrow facing
you as shown in the
diagram push the plug
on the battery adapter
into the socket on the
bottom of the phone until
it clicks into place.
2. Connect the other end of
the travel adapter to the
mains socket. Use only
the included packing
charger.
n Warning
Do not force the connector as this may damage the
phone and/or the travel adapter.
n Note
“Battery Charging” is displayed on the screen after
connecting the travel adapter. Only if the battery is
totally empty, Call indicator Light is on without displaying
“Battery Charging”.
5. Disconnecting the charger
Disconnect the travel
adapter from the phone by
pressing its side buttons as
shown in the diagram.
n Note
• Ensure the battery is fully charged before using the
phone.
• Do not remove your battery or the SIM card while
charging.
• The moving bars of battery icon will stop after charging
is complete.
n Note
If the battery does not charge,
• switch the phone off.
• ensure the battery is correctly fit.
B2000_RSA_eng.qxd 2005.6.29 4:21 PM Page 15

Making a call
1. Key in phone number including the area code.
If you want to delete number, press .
2. Press to call the number.
3. Press to end the call.
International Calls
1. Press and hold the key for the
international prefix. “+” character may replace
with the international access code.
2. Enter the country code, area code, and the
phone number.
3. Press .
Making a call using the Phonebook
1. In standby mode, press [Names].
2. When the menu is displayed, you select
Search by pressing .
3. If you find out the desired item through
searching by a name or a number, press
to call.
16 B2000 User Guide
Making and Answering Calls
B2000_RSA_eng.qxd 2005.6.29 4:21 PM Page 16
The menu displayed on the handset screen
during a call is different to the default main menu
reached from the idle screen, and the options are
described here.
1 During a call
1-1. Putting a Call on Hold
When a call is made or answered, press the
[Send] to place it on hold. When a call is held,
press the [Send] to make it active.
1-2 Making a Second Call
You can get a dial number from phonebook to
make a second call.
Press [Names] then select Search. To save
the dial number into phonebook during call, press
[Names] then select Add new.
1-3 Swapping Between Two Calls
To switch between two calls, select [Options],
then select Swap or just press [Send] key.
You can make one of two calls focused by
pressing up/down arrow key. If you want to end
one of two calls, make the call you want to end
focused, then press [End] key when the call
you want to end is focused.
1-4 Answering an Incoming Call
To answer an incoming call when the handset is
ringing, simply press the [Send] key.
The handset is also able to warn you of an
incoming call while you are already in a call. A
tone sounds in the earpiece, and the display will
show that a second call is waiting. This feature,
known as Call Waiting, is only available if your
network supports it. For details of how to activate
and deactivate it see Call waiting [Menu 4-3-4].
If Call Waiting is on, you can put the first call on
hold and answer the second, by pressing
[Send] or by selecting [Answer], then
Hold & Answer.
You can end the current call and answer the
waiting call by selecting [Menu], then End &
Answer.
1-5 Rejecting an Incoming Call
When not in a call you can reject an incoming call
without answering it by simply pressing the
[End] key for a long time.
When in a call you can reject an incoming call by
pressing the [Menu] key and selecting
Multiparty/Reject or by pressing [End] key.
B2000 User Guide 17
In call Menu
B2000_RSA_eng.qxd 2005.6.29 4:21 PM Page 17

1-6 Muting the Microphone
You can mute the microphone during a call by
pressing the [Options] key then selecting
Mute. The handset can be unmuted by pressing
the [Unmute].
When the handset is muted, the caller cannot
hear you, but you can still hear them.
1-7 Switching DTMF Tones on During a Call
To turn DTMF tones on during a call, for example,
to allow your handset to make use of an
automated switchboard, select [Options], then
DTMF On. DTMF tones can be turned off the
same way.
1-8 Calling up Messages and SIM Tool Kit
main menu
The Messages and SIM Tool kit main menu
options can be reached from the in-call menu by
selecting [Options]. SIM Tool Kit menu is
shown only when SIM in the handset supports
SIM Tool Kit service.
2 Multiparty or Conference Calls
The multiparty or conference service provides you
with the ability to have a simultaneous
conversation with more than one caller, if your
network service provider supports this feature.
A multiparty call can only be set up when you
have one active call and one call on hold, both
calls having been answered. Once a multiparty
call is set up, calls may be added, disconnected
or separated (that is, removed from the multiparty
call but still connected to you) by the person who
set up the multiparty call.
The maximum callers in a multiparty call is five.
Once started, you are in control of the multiparty
call, and only you can add calls to the multiparty
call.
2-1 Making a Second Call
You can make a second call while you are
already in a call. To do this, enter the second
number and press [Send]. When you get
second call the first call is automatically put on
hold. You can swap between calls by selecting
[Options] then Swap.
18 B2000 User Guide
In call Menu
B2000_RSA_eng.qxd 2005.6.29 4:21 PM Page 18

2-2 Setting up a Multiparty Call
You can connect a call on hold to the currently
active call to form a multiparty call by selecting
[Options] then Multiparty/Join all.
2-3 Putting the Multiparty Call on Hold
To put a multiparty call on hold, select
[Options] then Multiparty/Hold all.
2-4 Activate the Multiparty Call on Hold
To make a multiparty call on hold active, select
[Options] then Multiparty/Join all.
2-5 Adding Calls to the Multiparty Call
To join an active call to the held multiparty call,
select [Options] then Multiparty/Join all.
2-6 Displaying Callers in a Multiparty Call
To scroll though the numbers of the callers who
make up a multiparty call on the handset screen,
press and keys.
2-7 Putting a Member of a Multiparty Call on
Hold
To place one selected caller (whose number is
currently displayed on-screen) of a multiparty call
on hold, select [Options] then Multiparty/
Exclude.
2-8 A Private Call in a Multiparty Call
To have a private call with one caller of a
multiparty call, display the number of the caller
you wish to talk to on the screen, then select
[Options] and Multiparty/Private to put all the
other callers on hold.
2-9 Ending a Multiparty Call
The currently displayed caller of a multiparty call
can be disconnected by pressing the
[End] key. To end a multiparty call, press
[Options] then select Multiparty/End.
Selecting [Options] then Multiparty/End all,
will end all the active and held calls.
B2000 User Guide 19
B2000_RSA_eng.qxd 2005.6.29 4:21 PM Page 19

You can use the access codes described in this
section to avoid unauthorized use of your phone.
The access codes (except PUK and PUK2 codes)
can be changed by using [Menu 4-4-6].
PIN code (4 to 8 digits)
The PIN (Personal Identification Number) code
protects your SIM card against unauthorized use.
The PIN code is usually supplied with the SIM
card. When PIN code is set On, your phone will
request the PIN code every time it is switched on.
On the contrary, when PIN code is set Off, your
phone connects to the network directly without
the request PIN code.
PIN2 code (4 to 8 digits)
The PIN2 code, supplied with some SIM cards, is
required to access some functions such as
Advice of call charge, Fixed Dial number. These
functions are only available if supported by your
SIM card.
PUK code (4 to 8 digits)
The PUK (PIN Unblocking Key) code is required
to change a blocked PIN code. The PUK code
may be supplied with the SIM card. If not, contact
your local service provider for the code. If you
lose the code, contact your service provider.
PUK2 code (4 to 8 digits)
The PUK2 code, supplied with some SIM cards,
is required to change a blocked PIN2 code. If you
lose the code, contact your service provider.
Security code (4 to 8 digits)
The security code protects the unauthorized use
of your phone. It is usually supplied with the
phone. This code is required to delete all phone
entries and to activate “Reset settings” menu.
The default number is “0000”.
20 B2000 User Guide
Access Codes
B2000_RSA_eng.qxd 2005.6.29 4:21 PM Page 20
1 Messages
1 Write text message
2 Write multimedia
message
3 Inbox
4 Outbox
5 Drafts
6 Listen to voice mail
7 Info message
8 Templates
9 Settings
2 Call register
1 Missed calls
2 Received calls
3 Dialled calls
4 Delete recent calls
5 Call charges
6 GPRS information
3 Profiles
1 Vibrate only
2 Quiet
3 General
4 Loud
5 Headset
6 Car
4 Settings
1 Date & Time
2 Phone settings
3 Call settings
4 Security settings
5 Network settings
6 GPRS setting
7 Reset settings
B2000 User Guide 21
Menu Tree
B2000_RSA_eng.qxd 2005.6.29 4:21 PM Page 21
22 B2000 User Guide
Menu Tree
5 Organiser
1 Alarm clock
2 Scheduler
3 Phonebook
6 FM Radio
1 Listen radio
2 Channels
7 Fun & Tools
1 Favorites
2 Games
3 Calculator
4 My folder
5 Unit converter
6 World time
7 Voice recorder
8 Memory status
8 Internet
1 Home
2 Bookmarks
3 Profiles
4 Go to URL
5 Cache settings
6 Cookies settings
7 Security
certification
8 Reset profiles
9 Browser version
9 Java
1 Applications
2 Download
3 Profiles
10 SIM Service
This menu depends
on SIM and the
network services.
B2000_RSA_eng.qxd 2005.6.29 4:21 PM Page 22
This menu includes functions related to SMS
(Short Message Service), MMS (Multimedia
Message Service), voice mail, as well as the
network’s service messages.
Write text message [Menu 1-1]
You can write and edit text message, checking
the number of message pages.
1. Enter the Messages menu by pressing
[Select].
2. If you want to write a new message, select
Write text message.
3. To make text input easier, use T9. For details,
see How to Use T9 (Page 26).
4. Press [Insert] to attach the followings.
5. If you want to set option for your text, or to
finish your writing, press [Options].
n Note
The phone which supports EMS release 5 is available to
send colour pictures, sounds, text styles, etc.. The other
party may not receive pictures, sounds or text styles you
sent properly if the phone does not support such
options.
Options
• Send
Sends text messages.
1. Enter numbers of recipient.
2. Press key to add more recipients.
3. You can add phone numbers in the phone
book.
4. Press after entering numbers.
• Save
Saves the message.
• Font
You can select Size and Style of fonts.
• Colour
You can select Colour of foreground and
background.
• Alignment
You can make the message contents aligned
Right, Centre or Left.
B2000 User Guide 23
Messages [Menu 1]
B2000_RSA_eng.qxd 2005.6.29 4:21 PM Page 23
• Add T9 dictionary
You can add your own word. This menu can be
shown only when edit mode is Predictive
(T9Abc/T9abc/T9ABC).
• T9 languages
Select a T9 input mode.
• Exit
If you press Exit while writing a message, you
can end the writing message and back to the
Message menu. The message you have written
is not saved.
Insert
• Symbol
You can add special characters.
• Picture
You can insert the Default pictures or pictures
in My folder that are available for short
messages.
• Sound
You can insert sounds that are available for
short messages.
• Text templates
You can use Text templates already set in the
phone.
• Phonebook
You can add phone numbers or e-mail
addresses in Phonebook.
• Signature
You can add your contact information to the
message.
Write multimedia message [Menu 1-2]
You can write and edit multimedia messages,
checking message size.
1. Enter the Messages menu by pressing
[Select].
2. If you want to write a new message, select
Write multimedia message.
3. You can create a new message or choose one
of the multimedia message templates already
made.
4. Press Insert to add Symbol, Picture, Sound,
Text templates, Phonebook or Signature.
24 B2000 User Guide
Messages [Menu 1]
B2000_RSA_eng.qxd 2005.6.29 4:21 PM Page 24
Options
• Send
You can send multimedia messages to multiple
recipients, prioritise your message, and make it
sent later as well.
• Preview
You can preview multimedia messages you
wrote.
• Save
You can save multimedia messages in the
drafts or as templates.
• Add slide
You can add a slide before or after current slide.
• Move to slide
You can move to previous or next slide.
• Delete slide
You can delete current slides.
• Set slide format
- Set timer
You can set timer for slide, text, picture and
sound.
- Swap text and picture
You can switch the position of picture and text
of the message.
• Remove media
You can remove pictures or sounds in the slide.
This option can be shown only when any media
exists.
• Add T9 dictionary
You can add your own word. This menu can be
shown only when edit mode is Predictive
(T9Abc/T9abc/T9ABC).
• T9 languages
Select a T9 input mode.
• Exit
You can back to the Message menu.
n Note
If you select the picture (15K) on writing multimedia
message, loading duration will take around 15 seconds
at least. Furthermore, you can’t activate any key during
loading time. After 15 seconds, it is available to write
multimedia message.
B2000 User Guide
25
B2000_RSA_eng.qxd 2005.6.29 4:21 PM Page 25
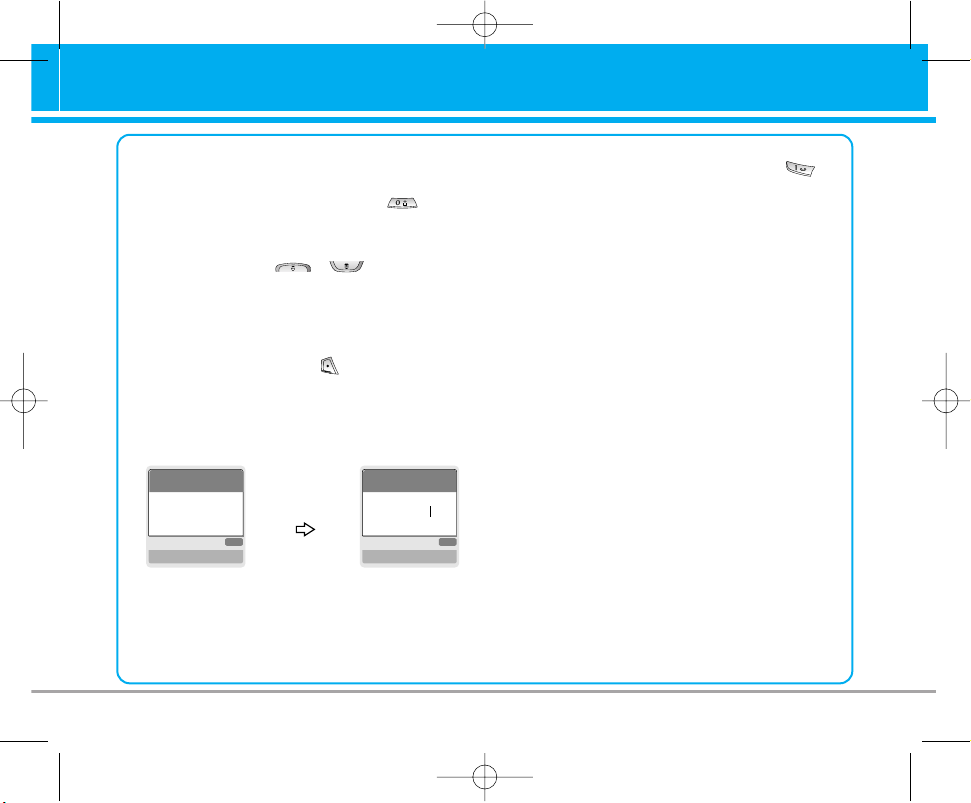
How to Use T9
T9 allows you to input text quickly.
In T9, you only need to press the key with the
corresponding letter once. This is based on a
built-in dictionary to which you can also add
new words.
• Writing words by using T9.
1. Start writing a word by using the keys
to .
Press each key only once for one letter.
To write for instance ‘Girl’,
press , , , .
The characters that you enter appear
blocked.
The word changes after each keystroke.
Therefore you shouldn’t pay too much
attention to how the word appears on the
display until you have pressed all the
appropriate keys .
To delete a character to the left, press
.
To insert several numbers, hold down
and key in the numbers.
If you hold down, you can change the
type of language. (You can also use
options.)
Also, the phone supports three modes:
Predictive (T9Abc, T9ABC, T9abc),
Multitap (ABC, abc), Numeric (123). If
you want to change a mode, press
key.
Alternatively: Press key and select
insert symbols.
Select the desired character
and press Select.
26 B2000 User Guide
Messages [Menu 1]
(For r)
(For i)(For G)
(For l)
B2000_RSA_eng.qxd 2005.6.29 4:21 PM Page 26
160 1
T9Abc
157 1
His
159 1
I
T9abc
T9abc
156 1
Girl
158 1
Hi
T9abc
T9abc
B2000 User Guide 27
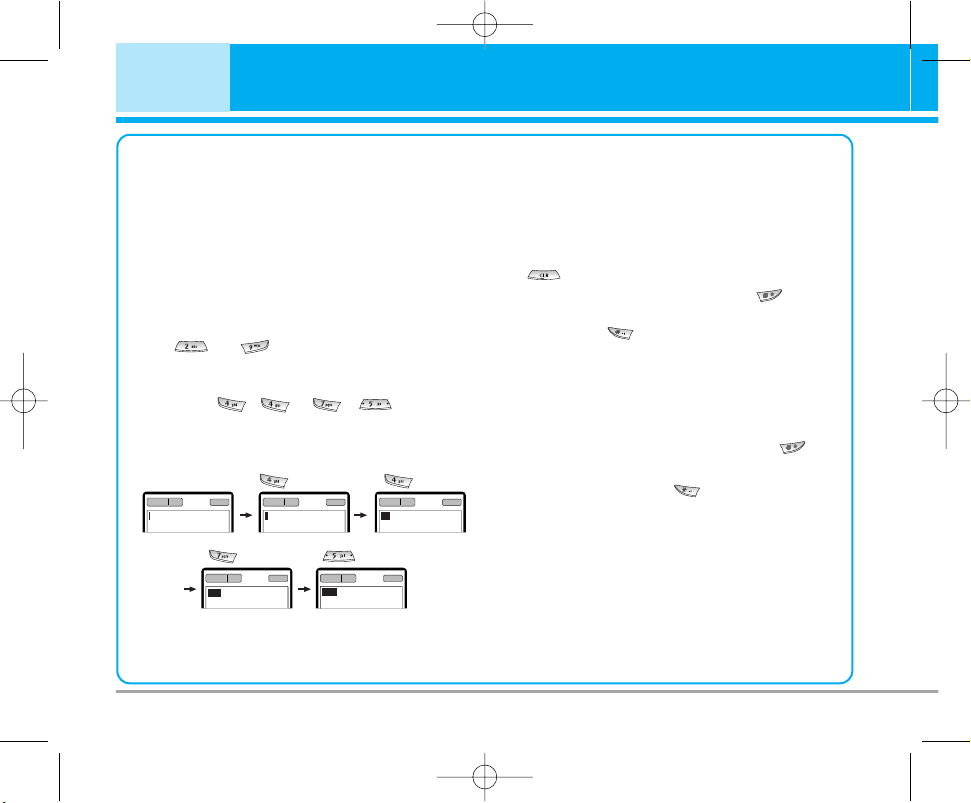
2. When you have finished writing a word,
check whether the word is correct.
If the word is correct: Press and
write the next word.
If the word is not correct: Search by
, (Previous and
Next word).
Alternatively: If there is no word you want
you can add your own
word.
Press [Options] in the
Predictive edit mode.
Select Add T9 dictionary
Menu. You can see the
following.
3. To insert a punctuation mark, press
repeatedly until the desired mark appears.
T9 languages
•
You can select T9 Languages by
selecting Menu. In T9 mode, you can also
select T9 Off menu. (Default is T9 On)
ABC
Word
Save Back
ABC
Word
Save Back
LGGSM
Input
your word
B2000_RSA_eng.qxd 2005.6.29 4:21 PM Page 27
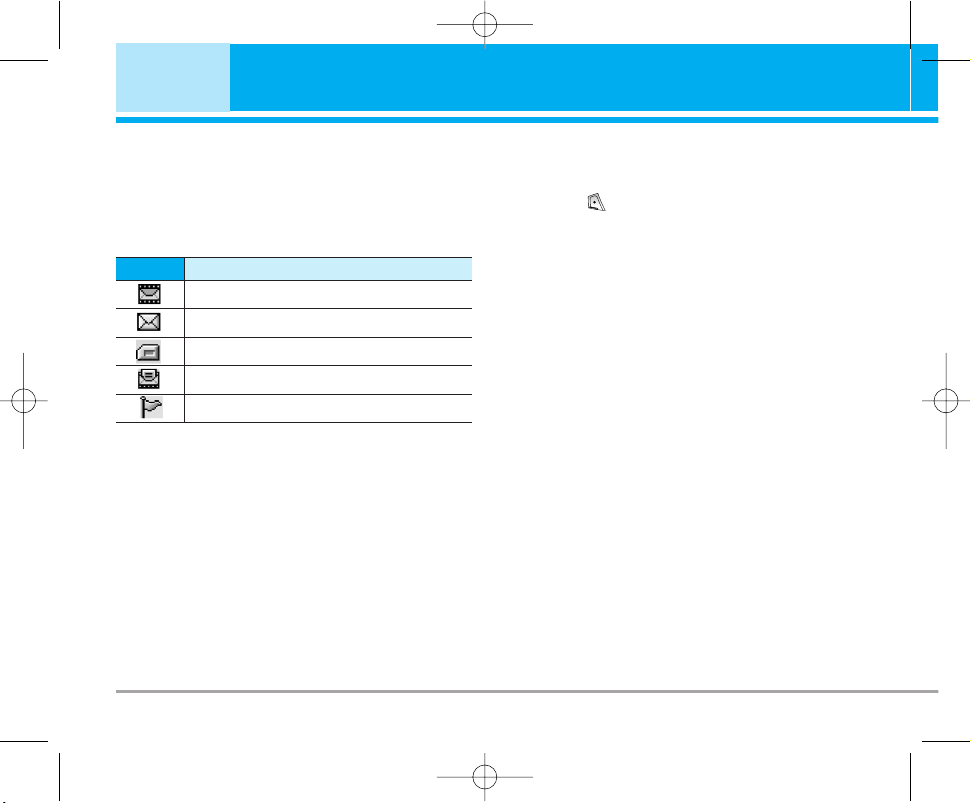
Inbox [Menu 1-3]
You will be alerted when you have received
messages. They will be stored in Inbox.
In Inbox, you can identify each message by
icons. For detail, see the icon directive.
If the phone shows ‘No space for SIM message’,
you have to delete only SIM messages from
Inbox.
If the phone displays ‘No space for
message’, you can make space of each
repository as deleting messages, media and
applications.
❈ SIM message
SIM message means the message exceptionally
stored in SIM card. For notified multimedia
message, you have to wait for downloading and
processing of the message.
For notification setting, see [Menu 1-9-2] for
detail.
To read a message, select one of the messages
by pressing .
Reply
You can reply to the sender.
Forward
You can forward the selected message to another
party.
Return call
You can call back to the sender.
Delete
You can delete the current message.
Extract
You can extract picture, sound and text. They will
be saved in My folder or Phonebook.
View information
You can view information about received
messages; Sender’s address, Subject (only for
Multimedia message), Message date & time,
Message type, Message size.
28 B2000 User Guide
Messages [Menu 1]
Multimedia message
Icon
Description
Short message
SIM message
Read
Notified multimedia message
B2000_RSA_eng.qxd 2005.6.29 4:21 PM Page 28
Replay (applicable to Multimedia message only)
You can replay multimedia messages.
❈ Receive (In the case of notification message)
If Multimedia message is set to Auto download
off, you can get only Notification. To receive a
message, you need to select [Receive].
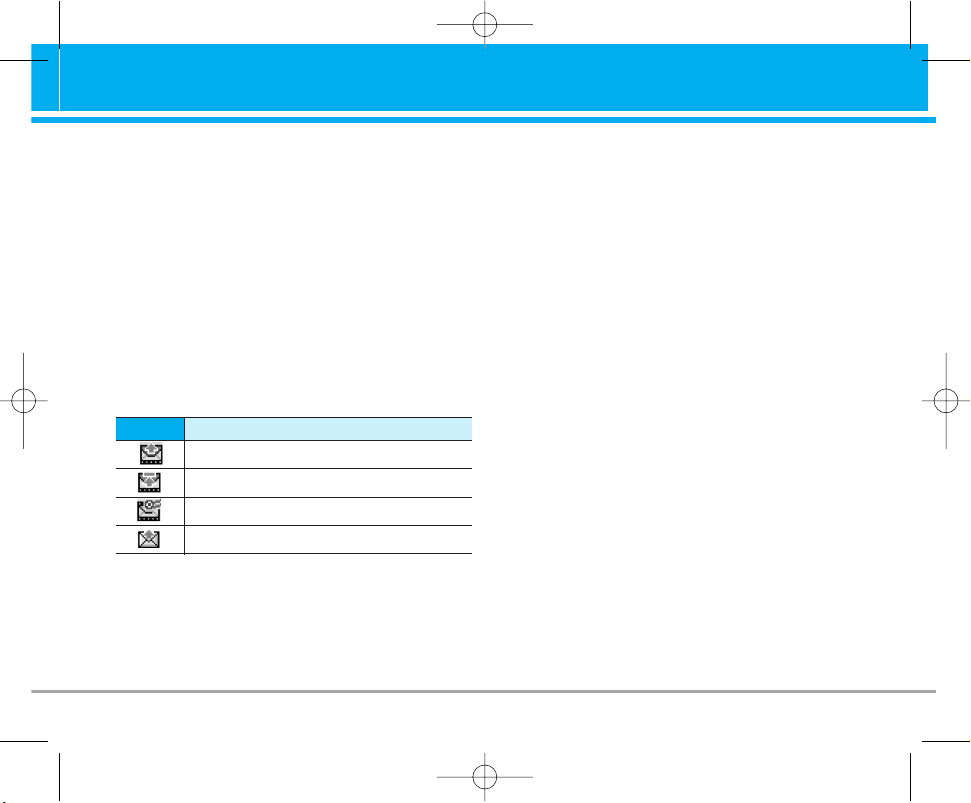
Outbox [Menu 1-4]
You can see sent and unsent messages here. For
sent message, you can see the delivery status.
The browsing is same as that for the inbox
message.
❈ When you already sent the message:
Forward
You can forward the current message to other
recipients.
Delete
You can delete the current message.
View information
You can view information about outbox
messages; Recipient’s address, Subject (only for
Multimedia message), Message date & time,
Message type, Message size.
❈ When you didn’t send the message:
View
You can view the messaage.
Send
You can send the message.
Delete
You can delete the current message.
View information
You can view information about outbox messages.
Drafts [Menu 1-5]
You can view the messages saved as a draft. The
draft messages are listed with the date and time
when they were saved. Scroll through the list
using up/down navigation keys.
B2000 User Guide 29
Sent
Icon
Description
Failed
Delivery confirmed
SMS sent
B2000_RSA_eng.qxd 2005.6.29 4:21 PM Page 29

Each draft has the following options. Press
[Options].
View
You can view the selected message.
Edit
You can edit the selected message.
Send
You can send the selected message.
Delete
Deletes the selected message from the drafts
folder.
View information
You can view the information of selected
message: subject (only for multimedia message),
the date and time when saved, message type
and size, the priority (only for multimedia
message).
Delete all
Deletes all the messages from drafts folder.
Listen to voice mail [Menu 1-6]
You can listen to voice mail.
Info message [Menu 1-7]
Info service messages are text messages
delivered by the network to GSM. They provide
general information such as weather reports,
traffic news, taxis, pharmacies, and stock prices.
Each type of information has the number;
therefore, you can contact service provider as
long as you have input the certain number for the
information. When you have received an info
service message, you can see the popup
message to show you that you have received a
message or the info service message is directly
displayed. To view the message again or not in
standby mode, follow the sequence shown below;
Read [Menu 1-7-1]
1. When you have received an info service
message and select Read to view the
message,it will be displayed on the screen. You
can read another message by scrolling ,
or [Next].
30 B2000 User Guide
Messages [Menu 1]
Multimedia message
Icon
Description
Text message
Delivery confirmed
B2000_RSA_eng.qxd 2005.6.29 4:21 PM Page 30

2. The message will be shown until another
message is reached.
Topics [Menu 1-7-2]
• Add new
You can add Info service message numbers in
the Phone memory with its nickname.
• View list
You can see Info service message numbers
which you added. If you press [Options], you
can edit and delete info message category
which you added.
• Active list
You can select Info service message numbers
in the active list. If you activate an info service
number, you can receive messages sent from
the number.
Templates [Menu 1-8]
Text templates [Menu 1-8-1]
You have 6 text templates. You can change the
predefined templates into your favorite ones or fill
the <empty>s.
Multimedia templates [Menu 1-8-2]
You can use the following options.
• Preview
You can preview multimedia messages you
wrote.
• Save
You can save multimedia messages in the
outbox or as templates.
• Add slide
You can add a slide before or after current slide.
• Move to slide
You can move to previous or next slide.
• Delete slide
You can delete current slides.
• Set slide format
- Set timer
You can set timer for slide, text, picture and
sound.
• Remove media
You can remove pictures or sounds in the slide.
This option can be shown only when any media
exists.
B2000 User Guide 31
B2000_RSA_eng.qxd 2005.6.29 4:21 PM Page 31

• Add T9 dictionary
You can add your own word. This menu can be
shown only when edit mode is Predictive
(T9Abc/T9abc/T9ABC).
• T9 languages
Select a T9 input mode.
• Exit
You can back to the Message menu.
Signature [Menu 1-8-3]
You can make your Signature. Key in Name,
Phone number, Fax number and Email.
Settings [Menu 1-9]
Text message [Menu 1-9-1]
• Message types
Text, Voice, Fax, Natl. paging, X.400, E-mail,
ERMES
Usually, the type of message is set to Text. You
can convert your text into alternative formats.
Contact your service provider for the availability
of this function.
• Validity period
This network service allows you to set how long
your text messages will be stored at the
message centre.
• Delivery report
If you set to Yes, you can check whether your
message is sent successfully.
• Reply via same service centre
When a message is sent, it allows the
recipients to reply and charge the cost of the
reply to your telephone bill.
• SMS centre
If you want to send the text message, you can
receive the address of SMS centre through this
menu.
Multimedia message [Menu 1-9-2]
• Priority
You can send the message after setting the
level of priority: Low, Normal and High.
• Validity period
This network service allows you to set how long
your text messages will be stored at the
message centre.
32 B2000 User Guide
Messages [Menu 1]
B2000_RSA_eng.qxd 2005.6.29 4:21 PM Page 32

• Delivery report
If it is set to Yes in this menu, you can check
whether your message is sent successfully.
• Auto download
On: The messages are downloaded
automatically on receipt.
Off: Requires to confirm the message which
you want to download.
Home network only: In home network, you can
activate Auto download “On” menu, Otherwise,
you can activate Auto download in roaming
network when you set Off.
• Network settings
In order to download MMS from the server, you
need to set up a CSD or GPRS data
connection. If you select multimedia message
server, you can set URL for multimedia
message server. You can set over 5 profiles to
connect service.
- Homepage
This menu allows to connect MMS centre
(MMSC).
- Bearer
• Data
• GPRS
- Data settings
Appears only if you select Data settings as a
Bearer/service.
IP address
Dial number: Enter the telephone number to
dial to access your WAP gateway.
User ID
Password
Call type: Select the type of data call,
Analogue or Digital (ISDN).
Call speed: The speed of your data
connection 9600 or 14400.
- GPRS settings
The service settings are only available when
GPRS is chosen as a bearer service.
IP address
APN: Insert APN (Access Point Name) of
GPRS.
User ID
Password
- Connection type
The options for connection type are Temporary
or Continuous.
B2000 User Guide 33
B2000_RSA_eng.qxd 2005.6.29 4:21 PM Page 33

- Secure settings
Depending on the chosen gateway port, you
can select this option On or Off.
• Permitted types
Personal: Personal message.
Advertisements: Commercial message.
Information: Necessary information.
Voice mail centre [Menu 1-9-3]
You can receive the voicemail if this feature is
supported by your network service provider.
When a new voicemail is arrived, the symbol will
be displayed on the screen. Please check with
your network service provider for details of their
service in order to configure the phone
accordingly.
1. Hold down key in standby mode.
2. You can check the following submenus.
• Home
You can listen to voice mails by selecting
Home.
• Roaming
Even when you are in abroad, you can listen to
voice mails if roaming service is supported.
Info message
(Dependent to network and subscription) [Menu 1-9-4]
• Receive
- Yes
If you select this menu, your phone will
receive Info service messages.
- No
If you select this menu, your phone will not
receive Info service messages any more.
• Alert
- Yes
Your phone will beep when you have received
Info service message numbers.
- No
Your phone will not beep even though you
have received info service messages.
• Languages
You can select the language you want by
pressing [On/Off]. Then, the info service
message will be shown in the language that you
selected.
Push messages [Menu 1-9-5]
You can set the option whether you will receive
the message or not.
34 B2000 User Guide
Messages [Menu 1]
B2000_RSA_eng.qxd 2005.6.29 4:21 PM Page 34

Missed calls [Menu 2-1]
This menu shows recently missed numbers. You
can call these numbers, save and view the date
and the time.
Received calls [Menu 2-2]
This menu shows recently received numbers. You
can call these numbers, save and view the date
and the time.
Dialled calls [Menu 2-3]
This menu shows the latest dialled numbers up to
20.
Delete recent calls [Menu 2-4]
You can delete recent calls of Missed calls,
Received calls, Dialled calls or All calls.
Call charges [Menu 2-5]
Within these submenus, you can view the
duration and the call cost of your calls.
Call duration [Menu 2-5-1]
This function allows you to view the duration of
your Last Call, All Calls, Received calls and
Dialled calls in hours, minutes and seconds. You
can also reset the call timers.
1. Press [Menu] in standby mode.
2. Press for direct access or use and
to enter Call register, then select Call
charges.
3. Scroll to highlight Call duration and Press
[Select].
The following 5 submenus: Last call, All calls,
Received calls, Dialled calls and Reset all.
Call costs [Menu 2-5-2]
This function allows you to check the cost of your
last call, all calls, remaining and reset the cost. To
reset the cost, you need the PIN2 code.
1. Press [Menu] in standby mode.
2. Press for direct access or use and
to enter Call register, then select Call
charges.
3. Scroll to highlight Call costs and Press
[Select].
The following 4 submenus: Last call, All calls,
Remaining and Reset all.
B2000 User Guide 35
Call register [Menu 2]
B2000_RSA_eng.qxd 2005.6.29 4:21 PM Page 35

n Note
The actual cost invoiced for calls by your service
provider may vary, depending upon network features,
rounding-off for billing, tax, and etc.
Settings (SIM Dependent) [Menu 2-5-3]
• Set tariff
You can set the currency type and the unit
price. Contact your service providers to obtain
charging unit prices. To select the currency or
unit in this menu, you need the PIN2 code.
n Note
When all units have been used, no calls can be made
except emergency calls. Depending on the SIM card,
you need the PIN2 code to set a call cost limit.
• Set credit
This network service allows you to limit the cost
of your calls by selected charging units. If you
select Read, the number of remaining unit is
shown. If you select Change, you can change
your charge limit.
• Auto display
This network service allows you to see
automatically the cost of your last calls. If set to
On, you can see the last cost when the call is
released.
GPRS information [Menu 2-6]
You can check the amount of data transferred
over the network through GPRS. In addition, you
can view how much time you are online.
Call duration [Menu 2-6-1]
You can check the duration of Last call and All
calls. You can also reset the call timers.
Data volumes [Menu 2-6-2]
You can check the Sent, Received or All data
volumes and Reset all.
36 B2000 User Guide
Call register [Menu 2]
B2000_RSA_eng.qxd 2005.6.29 4:21 PM Page 36

In this menu, you can adjust and customize the
phone tones for different events and
environments.
1. Press [Menu] in standby mode.
2. Press for direct access or use and .
Vibrate only
You can adjust the profile as Vibrate only if you
need vibration mode. In the mode, all kinds of
alert are Vibrate or Silent.
Quiet
You can adjust the profile as Quiet if you are in
quiet place.
General
You can adjust the profile as General.
Loud
You can adjust the profile as Loud if you are in a
noisy environment.
Headset
You can adjust the profile as Headset when you
put on a headset.
Car
You can adjust the profile as Car when you
activate Handsfree kit.
n Note
Headset and Car profiles can be activated only when
Handsfree kit or Ear microphone put on the handset.
However, their properties can be personalised.
Activate [Menu 3-x-1]
Activates the selected Profile.
Personalise [Menu 3-x-2]
Each has the submenus as shown below except
for Vibrate only.
Call alert type
Allows to select alert type such as Ring, Vibrate,
etc. for the incoming for adjusting environment.
Ring tone
Allows to set the ring tone for adjusting
environment.
B2000 User Guide 37
Profiles [Menu 3]
B2000_RSA_eng.qxd 2005.6.29 4:21 PM Page 37

Ring volume
Allows to set the ring volume for adjusting
environment. The volume of Power on/off sound
and all the alert sounds set according to Ring
volume.
Message alert type
Allows to alert when receiving a message for
adjusting environment.
Message tone
Allows to select the alert tone for message
reception.
Keypad volume
Allows to set the keypad volume for adjusting
environment.
Keypad tone
Allows to select the keypad tone for adjusting
environment.
Effect sound volume
Allows to set the effect sound volume for
adjusting environment.
Power on/off volume
Allows to set the power on/off volume for
adjusting environment
Auto answer
This function will be activated only when your
phone is connected to the headset or handsfree
kit.
• Off: The phone will not answer automatically.
• After 5 secs: After 5 seconds, the phone will
answer automatically.
• After 10 secs: After 10 seconds, the phone will
answer automatically.
Rename [Menu 3-x-3]
You can change the default profile name except
of Vibrate only, Headset, and Car menus.
n Note
If you set the Handsfree kit to the phone, you can’t use
the vibrate mode related with Call alert type or
Message alert menu. In car menu, the following
submenus are available;
- Call alert type: Ring, No alert
- Message alert type: Ring once, Ring periodically, No
alert
38 B2000 User Guide
Profiles [Menu 3]
B2000_RSA_eng.qxd 2005.6.29 4:21 PM Page 38

You can set the following menus for your
convenience and preferences.
1. Press [Menu] in standby mode.
2. Press for direct access to enter Settings.
Date & Time [Menu 4-1]
You can set functions relating to the date and
time.
Set date [Menu 4-1-1]
You can enter the current date.
Date format [Menu 4-1-2]
You can set the Date format such as
DD/MM/YYYY, MM/DD/YYYY, YYYY/MM/DD.
(D: Day / M: Month / Y: Year)
Set time [Menu 4-1-3]
You can enter the current time.
Time format [Menu 4-1-4]
Your can set the time format between 24-hour
and 12-hour.
Phone settings [Menu 4-2]
You can set functions relating to the phone.
Wallpaper [Menu 4-2-1]
You can select the background pictures in
standby mode.
• Default
You can select a picture or an animation of
wallpaper by pressing or .
• Myfolder
You can select a picture or an animation as
wallpaper.
Greeting note [Menu 4-2-2]
If you select On, you can edit the text which is
displayed in standby mode.
Language [Menu 4-2-3]
You can change the language for the display
texts in your phone.
This change will also affect the Language Input
mode.
B2000 User Guide 39
Settings [Menu 4]
B2000_RSA_eng.qxd 2005.6.29 4:21 PM Page 39

Backlight [Menu 4-2-4]
You can set the light-up duration of the LCD
display.
LCD contrast [Menu 4-2-5]
You can set the brightness of LCD by pressing
, .
Information window [Menu 4-2-6]
You can preview the current state of the selected
menu before open the menu. The state is shown
at bottom of the display.
Menu colour [Menu 4-2-7]
You can select the preferred menu colour among
various combination.
Network name [Menu 4-2-8]
If you select on, you can see the network service
provider name which is displayed in standby
mode.
Call settings [Menu 4-3]
You can set the menu relevant to a call by
pressing [Select] in the Setting menu.
Call divert [Menu 4-3-1]
The Call divert service allows you to divert
incoming voice calls, fax calls, and data calls to
another number. For details, contact your service
provider.
• All voice calls
Diverts voice calls unconditionally.
• If busy
Diverts voice calls when the phone is in use.
• If no reply
Diverts voice calls which you do not answer.
• If out of reach
Diverts voice calls when the phone is switched
off or out of coverage.
• All data calls
Diverts to a number with a PC connection
unconditionally.
40 B2000 User Guide
Settings [Menu 4]
B2000_RSA_eng.qxd 2005.6.29 4:21 PM Page 40

• All fax calls
Diverts to a number with a fax connection
unconditionally.
• Cancel all
Cancels all call divert service.
The submenus
Call divert menus have the submenus shown
below.
- Activate
Activate the corresponding service.
To voice mail centre
Forwards to message centre. This function is
not shown at All data calls and All fax calls
menus.
To other number
Inputs the number for diverting.
To favourite number
You can check recent 5 diverted numbers.
- Cancel
Deactivate the corresponding service.
- View status
View the status of the corresponding service.
Answer mode [Menu 4-3-2]
• Press any key
If you select this menu, you can receive a call
by pressing any key except [End] key and
key.
• Send only
If you select this menu, you can receive a call
by only pressing [Send] key.
Send my number
(network and subscription dependent) [Menu 4-3-3]
• On
You can send your phone number to another
party. Your phone number will be shown on the
receiver’s phone.
• Off
Your phone number will not be shown.
• Set by network
Select this to reset the phone to the setting that
you have agreed upon with your service
provider.
B2000 User Guide 41
B2000_RSA_eng.qxd 2005.6.29 4:21 PM Page 41

Call waiting (network dependent) [Menu 4-3-4]
• Activate
If you select Activate, you can accept a waiting
(receiving) call.
• Cancel
If you select Cancel, you cannot recognize the
waiting (receiving) call.
• View status
Shows the status of Call waiting.
Minute minder [Menu 4-3-5]
If you select On, you can check the call duration
by beep sound every minute during a call.
Auto redial [Menu 4-3-6]
• On
When this function is activated, the phone will
automatically try to redial in the case of failure
to connect a call.
• Off
Your phone will not make any attempts to redial
when the original call has not connected.
Closed user group
(network dependent) [Menu 4-3-7]
Restricts usage of the phone with numbers that
belong to certain user groups. When this function
is used, every outgoing call is associated with a
group index. If a group index is specified, it is
used for all outgoing calls. If no group index is
specified, the network will use the preferential
index (a specific index that is stored in the
network).
Default: Activate the default group agreed on
with the network operator.
Set: Setting the selected CUG Index.
Edit: Editing the CUG name and CUG Index.
Delete: Deleting the selected CUG.
Delete all: Deleting All CUG.
Security settings [Menu 4-4]
PIN code request [Menu 4-4-1]
In this menu, you can set the phone to ask for the
PIN code of your SIM card when the phone is
switched on. If this function is activated, you’ll be
requested to enter the PIN code.
42 B2000 User Guide
Settings [Menu 4]
B2000_RSA_eng.qxd 2005.6.29 4:21 PM Page 42

1. Select PIN code request in the security settings
menu, and then press [Select].
2. Set On/Off.
3. If you want to change the setting, you need to
enter PIN code when you switch on the phone.
4. If you enter wrong PIN code more than 3
times, the phone will lock out. If the PIN is
blocked, you will need to key in PUK code.
5. You can enter your PUK code up to 10 times. If
you put wrong PUK code more than 10 times,
you can not unlock your phone.
You will need to contact your service provider.
Phone lock [Menu 4-4-2]
You can use security code to avoid unauthorized
use of the phone.
Whenever you switch on the phone, the phone
will request security code if you set phone lock to
On. If you set phone lock to Automatic, your
phone will request security code only when you
change your SIM card.
Automatic key lock [Menu 4-4-3]
When you enable Automatic key lock, keypad will
be locked automatically on an idle screen after 10
seconds without any key requesting.
n Note
• If you want to lock your phone keypad manually, enter
Top menu and press key.
• If you want to unlock your phone keypad, press
[unlock] key and then press key. But if you
enabled Automatic key lock before, your phone keypad
will be unlock and then after 10 seconds the keypad
will be lock up again automatically.
Call barring [Menu 4-4-4]
The Call barring service prevents your phone
from making or receiving certain category of calls.
This function requires the call barring password.
You can view the following submenus.
• All outgoing
The barring service for all outgoing calls.
• Outgoing international
The barring service for all outgoing international
calls.
• Outgoing international except home country
The barring service for all international outgoing
calls except home network.
• All incoming
The barring service for all incoming calls
B2000 User Guide 43
B2000_RSA_eng.qxd 2005.6.29 4:21 PM Page 43

• Incoming when abroad
The barring service for all incoming calls when
roaming
• Cancel all
You can cancel all barring services.
• Change password
You can change the password for Call Barring
Service.
Each call barring menu has following
submenus:
• Activate
Allows to request the network to set call
restriction on.
• Cancel
Set the selected call restriction off.
• View status
View the status whether the calls are barred or
not.
Fixed dial number (SIM dependent) [Menu 4-4-5]
You can restrict your outgoing calls to selected
phone numbers. The numbers are protected by
your PIN2 code.
• Activate
You can restrict your outgoing calls to selected
phone numbers.
• Cancel
You can cancel fixed dialling function.
• Number list
You can view the number list saved as Fixed
dial number.
Change codes [Menu 4-4-6]
PIN is an abbreviation of Personal Identification
Number used to prevent use by only
unauthorized person.
You can change the access codes: PIN2 code,
Security code.
1. If you want to change the Security
code/PIN/PIN2 code input your original code,
and then press [OK].
44 B2000 User Guide
Settings [Menu 4]
B2000_RSA_eng.qxd 2005.6.29 4:21 PM Page 44

2. Input new Security code/PIN/PIN2 code and
verify them.
Network settings [Menu 4-5]
You can select a network which will be registered
either automatically or manually. Usually, the
network selection is set to Automatic.
Automatic [Menu 4-5-1]
If you select Automatic mode, the phone will
automatically search for and select a network for
you. Once you have selected “Automatic”, the
phone will be set to “Automatic” even though the
power is off and on.
Manual [Menu 4-5-2]
The phone will find the list of available networks
and show you them. Then you can select the
network which you want to use if this network has
a roaming agreement with your home network
operator. The phone let you select another
network if the phone fails to access the selected
network.
Preferred [Menu 4-5-3]
You can set a list of preferred networks and the
phone attempts to register with first, before
attempting to register to any other networks. This
list is set from the phone’s predefined list of
known networks.
GPRS setting [Menu 4-6]
You can set GPRS service depending on various
situation.
Power on [Menu 4-6-1]
If you select this menu, the phone is automatically
registered to a GPRS network when you switch
the phone on. Starting a WAP or PC dial-up
application created the connection between phone
and network and data transfer is possible. When
you end the application, GPRS connection is
ended but the registration to the GPRS network
remains.
When needed [Menu 4-6-2]
If you select this menu, the GPRS connection is
established when you connect a WAP service
and closed when you end the WAP connection.
B2000 User Guide 45
B2000_RSA_eng.qxd 2005.6.29 4:21 PM Page 45

Reset settings [Menu 4-7]
You can initialize all factory defaults. You need
Security code to activate this function.
46 B2000 User Guide
Settings [Menu 4]
B2000_RSA_eng.qxd 2005.6.29 4:21 PM Page 46

Description
Weekly
Key
Daily
Alarm clock [Menu 5-1]
You can set up to 5 alarm clocks to go off at a
specified time.
1. Select On and enter the alarm time you want.
2. Select the repeat period: Once, Mon~Fri,
Mon~Sat, Everyday.
3. Select the alarm tone you want and press
[OK].
4. Edit the alarm name and press [OK].
Scheduler [Menu 5-2]
When you enter this menu a Calendar will show
up. On top of the screen there are sections for
date. Also on bottom of the screen there are
sections for icons (schedule, memo). Whenever
you change the date, the calendar will be
updated according to the date.
And square cursor will be used to locate the
certain day. If you see under bar on the calendar,
it means that there is a schedule or memo that
day. This function helps to remind you of your
schedule and memo. The phone will sound an
alarm tone if you set this for the note.
To change the day, month, and year.
n Note
Your phone should be switched on to use this function.
Add new [Menu 5-2-1]
You can edit maximum 39 characters and take up
to 20 notes.
• Schedule
Input the subject, the schedule time, the repeat,
the alarm by pressing allowed keys.
• Memo
1. Select Add new by pressing [Select].
2. Press Memo.
3. Input the memo and then press [OK].
B2000 User Guide 47
Organiser [Menu 5]
Yearly
Description
Monthly
Key
B2000_RSA_eng.qxd 2005.6.29 4:21 PM Page 47

View [Menu 5-2-2]
Shows the note for the chosen day. Use ,
to browse through the note lists. If you set
alarm for the note, Alarm watch is displayed. At
that time, if you press [Select], you can see
the note in detail. Press [Options] to delete,
edit the note you selected.
View all [Menu 5-2-3]
Shows the notes that are set for all days. Use
, to browse through the note lists.
You can use the same menu as “View” by
pressing [Options].
Delete past [Menu 5-2-4]
You can delete the past schedule that has been
already notified you.
Delete all [Menu 5-2-5]
You can delete for the all note(s).
Phonebook [Menu 5-3]
1. To use Phonebook, press [Names] in
standby mode.
2. To use Phonebook, press [Menu] in
standby mode and select Organiser.
Search (Calling from phonebook) [Menu 5-3-1]
1. In standby mode, press [Names].
2. Search by pressing [Select].
3. Enter the name whose phone numbers or
e-mail address you want to search or Select
‘List’ to view phonebook.
4. Instant searching is available by inputting the
initial letter of the name or number you want to
search.
5. If you want to edit, delete, or copy an entry,
select [Options].
The following menu will be displayed.
• Edit: You can edit the name, number, E-mail
and fax by pressing [OK].
• Write message: After you have found the
number you want, you can send a message to
the selected number.
• Copy: You can copy an entry from SIM to
phone or from phone to SIM.
• Main number: You can select the one out of
mobile, home, office that you often use. The
main number will be displayed first, if you set
this.
• Delete: You can delete an entry.
48 B2000 User Guide
Organiser [Menu 5]
B2000_RSA_eng.qxd 2005.6.29 4:21 PM Page 48

Add new [Menu 5-3-2]
You can add phonebook entry by using this
function. Phone memory capacity is 200 entries.
SIM card memory capacity depends on the
cellular service provider.
You can also save 25 characters of name in The
Phone memory, and save characters in the SIM
card. The number of character is SIM dependent
feature.
1. Open the phonebook first by pressing
[Names] in standby mode.
2. Scroll to highlight Add new, and press
[Select].
3. Select the memory you want to save: SIM or
Phone. If set to Phone, you need to select
which number you want as Main number.
a. Press [OK] to input a name.
b. Press [save], then you can input a number.
c. Press [Save], then you can set a group
for the entry by pressing , .
d. Press [Save], then you can set a character
and a picture for the entry by pressing
, , , .
e. Press [Save].
Caller groups [Menu 5-3-3]
You can list up to 20 members per one group.
There are 7 groups you can make lists to.
1. In standby mode, press [Names].
2. Scroll to Caller groups item then press
[Select], and every Group list will be displayed.
3. Select Group name you want by pressing
[Select].
• Member list
Shows the group members you have selected.
• Group ring tone
Allows you to specify ring tone for the group
members’ call.
• Group icon
Allows you to select the icon dependent on
Group.
• Add member
You can add group members. Each group
member should not exceed 20.
B2000 User Guide 49
B2000_RSA_eng.qxd 2005.6.29 4:21 PM Page 49

• Remove member
You can remove the member from the Group
member list. But the name and the number
still remain in phonebook.
• Rename
You can change a group name.
Speed dial [Menu 5-3-4]
You can assign any of the keys, to
with a Name list entry. You can call directly by
pressing this key for 2-3 seconds.
1. Open the phonebook first by pressing
[Names] in standby mode.
2. Scroll to Speed dial, then press [Select].
3. If you want to add Speed dial, select (Empty).
Then, you can search the name in phonebook.
4. Select allocated a name by speed dial, and
choose Change or Delete to edit the name.
• Change
You can allocate a new phone number to the
dial key.
• Delete
You can remove the allocated phone number
from the dial key.
Settings [Menu 5-3-5]
1. Press [Names] in standby mode.
2. Scroll to Settings, then press [Select].
• Set memory
Scroll to highlight Set memory, then press
[Select].
- If you select Variable, when adding entry, the
phone will ask where to store.
- If you select SIM or Phone, the phone will
store an entry to SIM or phone.
• Search by
Scroll to highlight Search by, then press
[Select].
- If you select Variable, the phone will ask
how to search.
- If you select Name or Number, the phone
will search an entry by Name or Number.
• View options
Scroll to highlight View options, then press
[Select]
- Name only: Set the phonebook list with
displaying only name.
50 B2000 User Guide
Organiser [Menu 5]
B2000_RSA_eng.qxd 2005.6.29 4:21 PM Page 50

- With pictures: Set the phonebook list with
the information of character and picture.
- Name & number: Set the phonebook list
with displaying name and number.
Copy all [Menu 5-3-6]
You can copy/move entries from SIM card
memory to Phone memory and vice versa.
1. Open the Phonebook first by pressing
[Names] in standby mode.
2. Scroll to Copy all, then press [Select] to
enter this menu.
• SIM to Phone: You can copy the entry from
SIM Card to Phone memory.
• Phone to SIM: You can copy the entry from
Phone memory to SIM Card.
3. You can see the following submenus.
• Keep original: When copying, Original Dial
Number is kept.
• Delete original: When copying, Original Dial
Number will be erased.
Delete all [Menu 5-3-7]
You can delete all entries in SIM, Phone, and
Voice. This function requires Security code except
for voice.
1. Press [Names] in standby mode and select
Delete all, press [Select].
2. Then select a memory to erase.
3. Enter security code and Press [OK] or
[Back].
Information [Menu 5-3-8]
• Service dial number
Use this function to access a particular list of
services provided by your network operator (if
supported by the SIM card).
1. Open the phonebook first by pressing
[Names] in standby mode and select
Information.
2. Scroll to Service dial number, then press
[Select] to enter.
3. The names of the available services will be
shown.
4. Use and to select a service. Press
[Send].
B2000 User Guide 51
B2000_RSA_eng.qxd 2005.6.29 4:21 PM Page 51

• Memory status
This feature allows you to see how many free
and in-use are in your phonebook.
1. Open the phonebook first by pressing
[Names] in standby mode. Select
Information by pressing [Select].
2. Scroll to Memory status, then press [OK].
• Own number
(SIM dependent)
You can check your own number in SIM card.
52 B2000 User Guide
Organiser [Menu 5]
B2000_RSA_eng.qxd 2005.6.29 4:21 PM Page 52

B2000 User Guide 53
FM Radio [Menu 6]
(Long press) Scans
downward/upward to the next
receivable radio station.
(Short press) Changes the frequency
0.05 MHz at a time.
Key operations
Increases/Decreases the volume
level (6 volume levels including
mute).
Left/Right
navigation keys
Up/Down
navigation keys
You can search radio stations and enjoy listening
to the radio.
In standby mode, pressing the Radio hot key
( ) accesses this menu.
Listen radio [Menu 6-1]
Connect the FM Radio headset into headset jack
on the left side of the phone to activate this
menu.
You can turn on the radio by long press of the
Radio hot key ( ).
The following screen is displayed.
1. Search the desired radio station using the
left/right navigation keys.
n Note
To improve the radio reception, extend the headset cord
which functions as the FM antenna.
2. Press and hold down the corresponding
number key of a channel to store the currently
selected radio station into. “Done” message will
be popped up and the selected channel will be
coloured.
n Note
You can preset up to 10 channels.
3. After presetting radio channels, you can listen
to other channel by pressing the corresponding
number key (short press).
4. You can access the following option menus by
pressing the left soft key [Options].
Frequency
display
Frequency
status bar
Volume level
Preset channel display
Preset channel
stations
Stereo indicator
B2000_RSA_eng.qxd 2005.6.29 4:21 PM Page 53

• Exit radio
Stops the radio play and goes back to standby
mode.
• Radio alarm
To set the radio alarm. The steps to set the
radio alarm are same to the ones to set the
alarm clock. (See page 47.)
• Save channel
To save the radio station. The list of 10 channel
status appears. After selecting an (empty)
channel, press the left soft key [Save]. If you
select an occupied channel, “Replace?”
message will be popped up. And if you select
Yes, the channel will be replaced by the new
station.
• Delete channel
After selecting the channel to delete, press the
left soft key [Delete]. You’ll be asked to confirm
this action.
• Activate speaker
Select this to listen to the radio through the
built-in speaker. To turn off the speaker, select
“Deactivate speaker”.
• Maintain play
If you set this option to On, the radio will keep
playing even when you get out of the “Listen
radio” menu and use other menu features.
n Note
• When you receive a call, the radio is muted
automatically, and you can answer the call by pressing
the . When you end the call, the radio is resumed.
• When you receive a message, you will hear the
message receipt tone and the radio keeps playing.
Channels [Menu 6-2]
Opens up the channel list.
After storing radio stations to the preset channels,
you can listen to the radio by selecting the
desired channel.
54 B2000 User Guide
FM Radio [Menu 6]
B2000_RSA_eng.qxd 2005.6.29 4:21 PM Page 54

Favorites [Menu 7-1]
You can set up to 9 menus which you have used
often in Favorites.
You can connect this menu directly by pressing
hot key .
If you want to register the menu in favorites,
select <Empty> on a list. If the menu is already
registered, the options are displayed as follows:
- Select: Activate the registered menu.
- Change: Change the menu.
- Delete: Delete the registered menu.
- Delete all: Delete all menus which are
registered in Favorites.
- Information: View the information of registered
menu.
Games [Menu 7-2]
The phone offers you the games to play with.
n Note
• The control keys are different depending on a game.
However, each one has an introduction to explain the
main control keys. The rest ones are as follows.
[Common Key Function]
: Game menu
: Back
: Pause or resume a game
Calculator [Menu 7-3]
This contains the standard functions such as +, -,
x, ÷ : Addition, Subtraction, Multiplication, and
Division.
1. Input the numbers by pressing numeric keys.
2. Use a navigation key to select a sign for
calculation.
3. Then input the numbers.
4. Press [Result] to view the result.
5. Press [Reset] or enter numbers to repeat the
procedure above.
6. Use key to erase any numbers or signs.
7. If you press key, you can input a minus
number. In addition, If you press key, you
can input a decimal number.
8. To end Calculator, press [Back].
B2000 User Guide 55
Fun & Tools [Menu 7]
B2000_RSA_eng.qxd 2005.6.29 4:21 PM Page 55

My folder [Menu 7-4]
Enables you to view the downloaded pictures and
sounds. They can be set as Wallpaper or Ring
tone. You can view, listen, delete or rename
downloaded data.
Pictures [Menu 7-4-1]
Sound [Menu 7-4-2]
The Submenus for each main one
• Send message
You can write Short message/Multimedia
message (available depending on type of
Media) with attachment pictures or sounds.
• Set as Wallpaper/Set as ring tone
You can set downloaded sounds or pictures as
wallpaper or Ring tone.
• Delete
You can delete each downloaded content.
• Delete all
You can delete all downloaded contents.
Unit converter [Menu 7-5]
This converts any measurement into a unit you
want. There are 4 types that can be converted
into units: Length, Area, Weight, and Volume.
1. You can select one of four unit types by
pressing [Unit] key.
2. Select the standard value by using , .
3. Select the unit you want to convert by pressing
and .
4. You can check the converted value for the unit
you want. Also, you can input a decimal
number by pressing .
World time [Menu 7-6]
You can view clocks of the world’s major cities.
1. Select the city belonged to the time zone by
pressing , key.
2. You can set the current time to the city time
you select by pressing [Set].
Voice recorder [Menu 7-7]
The voice memo feature you to record up to 10
voice messages and each memo is up to 20
seconds.
56 B2000 User Guide
Fun & Tools [Menu 7]
B2000_RSA_eng.qxd 2005.6.29 4:21 PM Page 56

Record [Menu 7-7-1]
1. You can record voice memo in Voice recorder
menu and also holding down in the
standby mode.
2. Once recording is started, the message
Recording and the remaining time is displayed.
3. If you want to finish recording, press [Save].
4. Key in Voice memo title, press [OK].
View list [Menu 7-7-2]
The phone shows voice memo list. You can
Playback and Delete the recorded voice memo.
Memory status [Menu 7-8]
You can check the size of free memory and each
menu of memory such as text/picture message,
inbox, outbox.
n PC Sync
PC Sync is a program for data exchange between PC
and the phone by data cable. For more information, you
can use the guide of PC Sync Help file in CD.
B2000 User Guide 57
B2000_RSA_eng.qxd 2005.6.29 4:21 PM Page 57

The phone supports services based on Wireless
Application Protocol (WAP). You can access
services supported by your network. The services
menu allows you to get the information such as
news, weather reports, and flight times.
Home [Menu 8-1]
Connect to a homepage. The homepage may be
the site which is defined in the activated profile. It
will be defined by Service Provider if you don’t
make in activated profile.
Bookmarks [Menu 8-2]
Press [Select] to access available options,
or press [Back] to exit.
• Connect: Connect to the selected bookmark.
• Add new: Add a new bookmark manually.
• Edit: Edit the title and the address of the
selected bookmark.
• Delete: Delete the selected bookmark from the
bookmark list.
Profiles [Menu 8-3]
You can make up to 5 profiles and activate only
one out of them. Scroll to the desired profile and
press to access available options.
• Activate
You can activate the profile you want.
• Settings
You can edit and change WAP settings of the
selected profile.
- Homepage
This setting allows you to enter the address
(URL) of a site you want to use as homepage.
You do not need to type “http://” at the front of
each URL as the WAP Browser will
automatically add it.
- Bearer
You can set the bearer data service.
• Data
• GPRS
- Data settings
Appeares only if you select Data settings as a
Bearer\service.
IP address: Enter the IP address of the WAP
gateway you want.
Dial number: Enter the telephone number to
dial to access your WAP gateway.
User ID: The users identity for your dial-up
server (and NOT the WAP gateway).
58 B2000 User Guide
Internet [Menu 8]
B2000_RSA_eng.qxd 2005.6.29 4:21 PM Page 58

Password: The password required by your
dial-up server (and NOT the WAP gateway) to
identify you.
Call type: Select the type of data call:
Analogue or Digital (ISDN).
Call speed: The speed of your data
connection; 9600 or 14400.
Linger time: You need to enter timeout
period. After entering that, the WAP navigation
service will be unavailable if any data is not
input or transferred.
- GPRS settings
The service settings are only available when
GPRS is chosen as a bearer service.
IP address: Input the IP address of the WAP
gateway you access.
APN: Input the APN of the GPRS.
User ID: The users identify for your APN
server.
Password: The password required by your
APN server.
- Connection type
The options for connection type are
Continuous, Temporary or HTTP and depend
on the gateway you are using.
Continuous
A confirmed delivery mechanism but
generates more network traffic.
Temporary
A non-confirmed (connectionless) service.
- Proxy settings
IP address: Input the IP address of the proxy.
Port: Input the port number of the proxy.
- DNS settings
Insert the primary and secondary DNS if
required by the network operator.
- Secure settings
According to the used gateway port, you can
choose this option as On or Off.
• Rename
Edit the Profile Name.
• Delete
Delete the Profile.
• Add new
You can add a new profile manually.
B2000 User Guide 59
B2000_RSA_eng.qxd 2005.6.29 4:21 PM Page 59

Go to URL [Menu 8-4]
You can directly connect to the site you want. You
need to enter a specific URL.
Cache settings [Menu 8-5]
You can remove the contents of Cache memory
or change the Cache mode.
Clear cache [Menu 8-5-1]
The contents of Cache memory will be removed.
Check cache [Menu 8-5-2]
You can set the option whether you will check the
cache memory or not.
Cookies settings [Menu 8-6]
The information or services you have accessed
are saved in the cache memory of the phone.
Clear cookies [Menu 8-6-1]
Removes all context saved in cookie.
Check cookies [Menu 8-6-2]
Check whether a cookie is used or not.
Security certification [Menu 8-7]
A list of the available certificates is shown.
Reset profiles [Menu 8-8]
You can reset profiles to return to original
settings.
Browser version [Menu 8-9]
The WAP Browser version is displayed.
60 B2000 User Guide
Internet [Menu 8]
B2000_RSA_eng.qxd 2005.6.29 4:21 PM Page 60

If you are on line, you can view the following
menus.
• Home
Refer to [Menu 8-1].
• Reload
Reloads the current page.
• Bookmarks
See [Menu 8-2].
• Save as bookmark
You can save a site as bookmark.
• Go to URL
You can move to the site you want. In this
menu, you can also edit the site address.
• Clear cache
The contents of cache memory will be removed.
B2000 User Guide 61
On browsing menu
B2000_RSA_eng.qxd 2005.6.29 4:21 PM Page 61

Applications [Menu 9-1]
Java Menu Options
Scroll to an application and select Options.
1. New: You can create new folder.
2. Move: You can select a folder which you want.
3. About: Shows Java MIDP information.
4. Info: Displays information about the selected
MIDlet.
5. Remove: Deletes the selected MIDlet.
6. Update: Accesses the server and updates the
selected MIDlet.
7. Options: Some Java applications may require
a data connection to be made. Select this to
set the connecting options.
8. Rename: You can rename the application.
9. Exit: Exits from Applications.
Download [Menu 9-2]
You can edit and set MIDlet server address.
Download MIDlets using WAP Browser and store
them in the phone. You can also view the list of
MIDlets stored on the Applicatons screen.
Profiles [Menu 9-3]
Some Java applications may require a network
connection to operate, for example, multiplayer
games. You can set up to 5 profiles and activate
the desired one. This is similar to wap profile
setting. Refer to wap profiles when you set this.
JAVA™, is a trademark of Sun
Microsystems, Inc.
62 B2000 User Guide
Java [Menu 9]
B2000_RSA_eng.qxd 2005.6.29 4:21 PM Page 62

There are various accessories for your mobile
phone. You can select these options according to
your personal communication requirements.
Battery pack
Stereo Headset
Includes earpiece and
microphone so allows
hands-free operation.
Connect this to the phone to
listen to the radio.
Travel Adapter
This charger allows you to
charge the battery while
away from home or your
office.
Data cable/CD
You can connect your phone
to PC to exchange the data
between them.
n Note
• Always use genuine LG accessories.
• Failure to do this may invalidate your warranty.
• Accessories may be different in different regions;
please check with our regional service company or
agent for further enquires.
B2000 User Guide
63
Accessories
B2000_RSA_eng.qxd 2005.6.29 4:21 PM Page 63

When using this unit, basic safety precautions
as below should be always followed.
• Do not disassemble this unit. (Take it to a
qualified service technician when repair work is
required.)
• Away from electrical appliance such as a TV,
radio or personal computer.
• The unit should be situated away from heat
sources such as radiators or cookers.
• Do not drop.
• Do not subject this unit to mechanical vibration
or shock.
• The coating of the phone may be damaged if
covered with wrap or vinyl wrapper.
• Use dry cloth to clean the exterior of the unit.
(Do not use solvent such as benzene, thinner or
alcohol.)
• Do not subject this unit to excessive smoke or
dust.
• Do not keep the phone next to credit cards or
transport tickets; it can affect the information on
the magnetic strips.
• Do not tap the screen with a sharp object;
otherwise, it may damage the phone.
• Do not expose the phone to liquid or moisture.
• Use the accessories like an earphone
cautiously. Do not touch the antenna
unnecessarily.
Caring for the Battery
• You do not need to completely discharge the
battery before recharging. Unlike other battery
systems, there is no memory effect that could
compromise the battery’s performance.
•
Use only LG batteries and chargers. LG chargers
are designed to maximize the battery life.
• Do not disassemble or short-circuit the battery
pack.
• Keep the metal contacts of the battery pack
clean.
• Replace the battery when it no longer provides
acceptable performance. The battery pack may
be recharged hundreds of times until it needs
replacing.
• Recharge the battery if it has not been used for
a long time to maximize usability.
• Do not expose the battery charger to direct
sunlight or use it in high humidity, such as the
bathroom.
• Do not leave the battery in hot or cold places,
this may deteriorate the battery performance.
64 B2000 User Guide
Care and Maintenance
B2000_RSA_eng.qxd 2005.6.29 4:21 PM Page 64

This chapter lists some problems that you might encounter while using your phone. Some problems
require that you call your service provider, but most of problems you encounter are easy to correct
yourself.
B2000 User Guide 65
Trouble Shooting
Possible causesMessage Possible Corrective measures
There is no SIM card in the phone or
you may have inserted it incorrectly.
SIM error Make sure that the SIM card is correctly
inserted.
Signal weak
Outside GSM network
No connection
to the network
Move higher to a window or open space.
Check service provider coverage map.
When you want to change a security
code you have to confirm the new code
by entering it again. The two codes that
you have entered do not match.
Codes do not
match
Contact your Service Provider.
Not supported by Service Provider or
registration required
Function
cannot be set
Contact your Service Provider.
Dialling error
New SIM card inserted
Charge limit reached
Calls not
available
New network not authorized.
Check for new restrictions.
Contact Service Provider or reset limit
with PIN 2.
On/Off key pressed too briefly
Battery empty
Battery contacts dirty
Phone cannot
be switched on
Press On/Off key for at least two
seconds.
Charge battery. Check charging indicator
in the display.
Clean contacts.
B2000_RSA_eng.qxd 2005.6.29 4:21 PM Page 65

66 B2000 User Guide
Trouble Shooting
Possible causesMessage Possible Corrective measures
Battery totally empty
Temperature out of range
Contact problem
No mains voltage
Charger defective
Wrong charger
Battery defective
Charging error Charge battery.
Make sure the ambient temperature is
right, wait for a while, and then charge
again.
Check power supply and connection to
the phone.
Check the battery contacts, clean them if
necessary.
Plug in to a different socket or check
voltage.
If the charger does not warm up, replace
it.
Only use original LG accessories.
Replace battery.
Signal too weakPhone loses
network
Reconnection to another service
provider is automatic.
The Fixed dial number function is on.Number not
permitted
Check settings.
B2000_RSA_eng.qxd 2005.6.29 4:21 PM Page 66

General
Product name: B2000
System: GSM 900/GSM 1800/GSM 1900
Ambient Temperatures
Max: +55°C
Min: -10°C
B2000 User Guide 67
Technical Data
B2000_RSA_eng.qxd 2005.6.29 4:21 PM Page 67

B2000_RSA_eng.qxd 2005.6.29 4:21 PM Page 68

B2000
GUIDE DE L’UTILISATEUR
Téléphone GPRS & MMS
Veuillez lire attentivement ce manuel avant
d’utiliser votre téléphone et conservez-le pour
référence.
FRANÇAIS
B2000_RSA.qxd 2005.6.29 4:13 PM Page 1

Présentation ...................................................... 4
Recommandations pour une utilisation
sûre et efficace ................................................. 5
Généralités
Description du téléphone ............................... 9
• Vue avant ....................................................... 9
• Vue arrière ................................................... 10
Description des touches ............................... 11
• Description du clavier ................................... 11
• Touches alphabétiques ................................ 12
Informations à l’écran
Informations à l ’écran .................................. 13
• Icônes affichées à l ’écran ........................... 13
Mise en service
Installation ..................................................... 14
• Insertion de la carte SIM .............................. 14
• Retrait de la carte SIM ................................. 14
• Installation de la batterie .............................. 14
• Chargement de la batterie ........................... 15
• Débranchement du chargeur ....................... 15
Émission et réception d ’un appel .............. 16
• Émission d ’un appel ................................... 16
• Appels internationaux .................................. 16
•
Emission d ’un appel à l ’aide du répertoire
.... 16
Fonctions additionnelles
Menu En appel ............................................... 17
• Pendant un appel ......................................... 17
• Appels multi-parties ou de conférence ........ 18
Codes d ’accès .............................................. 21
• Code PIN (4 à 8 chiffres) ............................. 21
• Code PIN2 (4 à 8 chiffres) ........................... 21
• Code PUK (4 à 8 chiffres) ........................... 21
• Code PUK2 (4 à 8 chiffres) ......................... 21
• Code de sécurité (4 à 8 chiffres) ................. 21
Description des menus
Arborescence des menus ............................ 22
Messages [Menu 1] ....................................... 24
• Ecrire Texto [Menu 1-1] ............................... 24
• Écrire un MMS [Menu 1-2] ........................... 26
• Boîte de réception [Menu 1-3] ..................... 30
• Boîte d ’envoi [Menu 1-4] ............................. 31
• Brouillons [Menu 1-5] ................................... 32
• Messagerie vocale [Menu 1-6] .................... 33
• Message d ’information [Menu 1-7] ............. 33
• Modèles [Menu 1-8] ..................................... 34
• Règlages [Menu 1-9] ................................... 35
Journal des appels [Menu 2] ........................ 39
• Appels en absence [Menu 2-1] .................... 39
• Appels reçus [Menu 2-2] .............................. 39
• Appels émis [Menu 2-3] ............................... 39
2 B2000 GUIDE DE L’UTILISATEUR
Sommaire
B2000_RSA.qxd 2005.6.29 4:13 PM Page 2

• Supprimer les appels récents [Menu 2-4] .... 39
• Frais d ’appel [Menu 2-5] ............................. 39
• Info GPRS [Menu 2-6] ................................. 40
Profils audio [Menu 3] .................................. 42
• Activer [Menu 3-x-1] ..................................... 42
• Personnaliser [Menu 3-x-2] .......................... 42
• Renommer [Menu 3-x-3] .............................. 43
Réglages [Menu 4] ........................................ 44
• Date et heure [Menu 4-1] ............................. 44
• Téléphone [Menu 4-2] .................................. 44
• Appels [Menu 4-3] ........................................ 45
• Sécurité [Menu 4-4] ..................................... 48
• Réseau [Menu 4-5] ...................................... 50
• GPRS [Menu 4-6] ........................................ 51
• Réinitialiser réglages [Menu 4-7] ................. 51
Agenda [Menu 5] ........................................... 52
• Réveil [Menu 5-1] ......................................... 52
• Calendrier [Menu 5-2] .................................. 52
• Répertoire [Menu 5-3] .................................. 53
FM Radio [Menu 6] ........................................ 58
• Écouter la radio [Menu 6-1] ......................... 58
• Canaux [Menu 6-2] ...................................... 59
Outils [Menu 7] .............................................. 60
• Raccourcis [Menu 7-1] ................................. 60
• Jeux [Menu 7-2] ........................................... 60
• Calculette [Menu 7-3] ................................... 60
• Mon dossier [Menu 7-4] ............................... 61
• Convertisseur d ’unités [Menu 7-5] .............. 61
• Fuseaux horaires [Menu 7-6] ....................... 62
• Mémo vocal [Menu 7-7] ............................... 62
• Etat mémoire [Menu 7-8] ............................. 62
Internet [Menu 8] ........................................... 63
• Page d ’accueil [Menu 8-1] .......................... 63
• Favoris [Menu 8-2] ....................................... 63
• Profils [Menu 8-3] ......................................... 63
• Accéder à l ’URL [Menu 8-4] ........................ 65
• Réglages cache [Menu 8-5] ......................... 65
• Réglages cookies [Menu 8-6] ...................... 65
• Certificats [Menu 8-7] ................................... 65
• Réinitialiser les profils [Menu 8-8] ................ 65
• Version du navigateur [Menu 8-9] ................ 65
Sur le menu de navigation ........................... 66
Java [Menu 9] ................................................ 67
• Mes jeux & applications [Menu 9-1] ............ 67
• Télécharger [Menu 9-2] ............................... 67
• Profils [Menu 9-3] ......................................... 67
Accessoires ................................................... 68
Dépannage ..................................................... 69
Données techniques ..................................... 71
B2000 GUIDE DE L’UTILISATEUR 3
B2000_RSA.qxd 2005.6.29 4:13 PM Page 3

4 B2000 GUIDE DE L’UTILISATEUR
Présentation
Félicitations! Vous venez de faire l’acquisition du B2000, un téléphone portable sophistiqué et compact,
conçu pour tirer parti des toutes dernières technologies de communication mobile numérique.
Ce guide de l’utilisateur contient des
informations importantes sur l’utilisation et le
fonctionnement de ce téléphone. Veuillez lire
attentivement toutes ces informations afin de
faire fonctionner votre téléphone de manière
optimale et de prévenir tout dommage ou
toute mauvaise utilisation de celui-ci. Les
changements ou modifications non approuvés
dans ce guide de l’utilisateur peuvent annuler
la garantie de votre téléphone portable.
B2000_RSA.qxd 2005.6.29 4:13 PM Page 4

Lisez ces recommandations. Leur non-respect
peut s’avérer dangereux, voire illégal. Des
informations détaillées sont également
disponibles dans ce manuel.
Exposition aux radiofréquences
Informations sur l’exposition aux ondes radio
et sur le DAS (Débit d’Absorption Spécifique)
Le téléphone portable B2000 est conforme aux
exigences de sécurité relatives à l’exposition aux
ondes radio. Ces exigences sont basées sur des
recommandations scientifiques qui comprennent
des marges de sécurité destinées à garantir la
sécurité de toutes les personnes, quels que
soient leur âge et leur condition physique.
•
Les recommandations relatives à l’exposition aux
ondes radio utilisent une unité de mesure connue
sous le nom de débit d’absorption spécifique
(DAS). Les tests de DAS sont effectués via des
méthodes normalisées, en utilisant le niveau de
puissance certifié le plus élevé du téléphone,
dans toutes les bandes de fréquence utilisées.
• Même si tous les modèles de téléphones LG
n’appliquent pas les mêmes niveaux de DAS, ils
sont tous conformes aux recommandations
appropriées en matière d’exposition aux ondes
radio.
• La limite de DAS recommandée par l’ICNIRP
(Commission internationale de protection contre
les rayonnements non ionisants) est de 2 W/kg
en moyenne sur dix (10) grammes de tissu
humain.
• La valeur de DAS la plus élevée pour ce
modèle a été évaluée par DASY4 à 1.10 W/kg
(10 g), dans le cadre d’une utilisation à l’oreille.
• La valeur de DAS applicable aux habitants de
pays/régions ayant adopté la limite de DAS
recommandée par l’IEEE (Institut des
Ingénieurs Électriciens et Électroniciens) est de
1,6 W/kg en moyenne pour un (1) gramme de
tissu humain.
Entretien et réparation
Avertissement: utilisez uniquement des
batteries, chargeurs et accessoires agréés
pour ce modèle de téléphone.
L’utilisation de tout autre type de produit peut
s’avérer dangereuse et annuler les accords ou
garanties applicables au téléphone.
•
Ne démontez pas votre téléphone. (Lorsqu’il doit
être réparé, emmenez-le chez un technicien.)
• Ne placez pas votre téléphone près d’appareils
électriques, tels qu’un téléviseur, une radio ou
un ordinateur.
B2000 GUIDE DE L’UTILISATEUR 5
Recommandations pour une utilisation sûre et efficace
B2000_RSA.qxd 2005.6.29 4:13 PM Page 5

• Ne placez pas votre téléphone à proximité de
sources de chaleur, telles qu’un radiateur ou
une cuisinière.
• Ne le faites pas tomber.
• Ne soumettez pas votre téléphone à des
vibrations mécaniques ou à des chocs.
• Si vous appliquez un revêtement vinyle sur la
coque de votre téléphone, vous risquez de
l’endommager.
• Pour nettoyer l’extérieur du combiné, utilisez un
chiffon sec. (N’utilisez pas de solvant, tel que du
benzène, un diluant ou de l’alcool.)
• Ne placez pas votre téléphone dans des
endroits trop enfumés ou trop poussiéreux.
• Ne placez pas votre téléphone à proximité de
cartes de crédit ou de titres de transport, car il
pourrait nuire aux données des bandes
magnétiques.
• Ne touchez pas l’écran avec un objet pointu,
vous risqueriez d’endommager votre téléphone.
• Ne mettez pas votre téléphone en contact avec
des liquides ou des éléments humides.
Fonctionnement optimal du
téléphone
Pour tirer le meilleur parti des performances
de votre téléphone tout en préservant la
batterie, prenez en compte les conseils
suivants:
• Lorsque vous êtes en communication,
maintenez le téléphone à votre oreille. Tout en
parlant dans le microphone, essayez de diriger
l’antenne vers le haut, au-dessus de votre
épaule. S’il s’agit d’une antenne déployable,
dépliez-la lors d’un appel.
• Si votre téléphone portable prend en charge
une connexion infrarouge, ne dirigez jamais le
rayon vers les yeux de quelqu’un.
Appareils électroniques
Tous les téléphones sans fil peuvent
provoquer des interférences risquant
d’affecter les performances des appareils
électroniques.
• N’utilisez pas votre téléphone près
d’équipements médicaux sans permission.
Évitez de placer votre téléphone à proximité de
votre stimulateur cardiaque (par exemple, dans
votre poche poitrine).
6 B2000 GUIDE DE L’UTILISATEUR
Recommandations pour une utilisation sûre et efficace
B2000_RSA.qxd 2005.6.29 4:13 PM Page 6

•
Les téléphones portables peuvent nuire au bon
fonctionnement de certaines prothèses auditives.
• Des interférences mineures peuvent perturber le
bon fonctionnement des téléviseurs, radios,
ordinateurs, etc.
Sécurité au volant
Vérifiez les lois et règlements en vigueur en
matière d’utilisation des téléphones portables
dans les zones où vous conduisez.
• Ne tenez pas le téléphone dans votre main
alors que vous conduisez.
• Concentrez toute votre attention sur la conduite.
•
Si vous disposez d’un kit mains libres, utilisez-le.
• Quittez la route et garez-vous avant d’émettre
ou de recevoir un appel.
• Les radiofréquences peuvent affecter certains
systèmes électroniques de votre véhicule, tels
que le système audio stéréo ou les
équipements de sécurité.
• Si votre véhicule est équipé d’un airbag, ne
gênez pas son déclenchement avec un
équipement sans fil portable ou fixe. En
entravant le fonctionnement de l’airbag, vous
vous exposez à de graves blessures.
Zone de dynamitage
N’utilisez pas votre téléphone lorsque des
opérations de dynamitage sont en cours.
Respectez les restrictions, les règlements et les
lois.
Sites potentiellement dangereux
• N’utilisez pas votre téléphone dans une stationservice. N’utilisez pas votre téléphone à
proximité de carburant ou de produits
chimiques.
• Ne transportez pas et ne stockez pas de
produits dangereux, de liquides ou de gaz
inflammables dans le coffre de votre voiture, à
proximité de votre téléphone portable et de ses
accessoires.
Dans un avion
Les appareils sans fil peuvent générer des
interférences dans les avions.
• Éteignez votre téléphone avant d’embarquer
dans un avion.
• Ne l’utilisez pas sur la piste sans autorisation de
l’équipage.
B2000 GUIDE DE L’UTILISATEUR 7
B2000_RSA.qxd 2005.6.29 4:13 PM Page 7

Avec les enfants
Conservez votre téléphone dans un endroit sûr,
hors de la portée des enfants. En effet, votre
téléphone est composé de petites pièces qui
peuvent présenter un danger d’étouffement.
Appels d’urgence
Les numéros d’urgence peuvent ne pas être
disponibles sur tous les réseaux de téléphones
portables. Vous ne devez donc pas dépendre
uniquement de votre téléphone portable pour
émettre un appel d’urgence. Renseignez-vous
auprès de votre fournisseur de service local.
Informations sur la batterie et
précautions d’usage
• Il n’est pas nécessaire de décharger
complètement la batterie avant de la recharger.
Contrairement aux autres batteries, elle n’a pas
d’effet mémoire pouvant compromettre ses
performances.
• Utilisez uniquement les batteries et chargeurs
LG. Les chargeurs LG sont conçus pour
optimiser la durée de vie de votre batterie.
• Ne démontez pas et ne court-circuitez pas la
batterie.
• Les contacts métalliques de la batterie doivent
toujours Rester propres.
• Procédez au remplacement de la batterie
lorsque ses performances ne sont plus
acceptables. La batterie peut être rechargée
des centaines de fois avant qu’il soit nécessaire
de la remplacer.
• Rechargez la batterie en cas de non-utilisation
prolongée afin d’optimiser sa durée d’utilisation.
• N’exposez pas le chargeur de la batterie au
rayonnement direct du soleil. Ne l’utilisez pas
non plus dans des lieux très humides, tels que
les salles de bain.
• Ne placez pas votre téléphone dans des
endroits chauds ou froids, cela pourrait affecter
les performances de la batterie.
8 B2000 GUIDE DE L’UTILISATEUR
Recommandations pour une utilisation sûre et efficace
B2000_RSA.qxd 2005.6.29 4:13 PM Page 8

B2000 GUIDE DE L’UTILISATEUR 9
Description du téléphone
Vue avant
Écouteur
Touche favoris
Prise du kit piéton
Touche programmable gauche
Touche Radio
Touche d’envoi
Touché repertoire
Touche étoile
Écran d’affichage
Touche de message
Touche programmable droite
Touche FIN/MARCHE/ARRET
Touches numériques
Microphone
Touche de suppression
Touche dièse
B2000_RSA.qxd 2005.6.29 4:13 PM Page 9

10 B2000 GUIDE DE L’UTILISATEUR
Description du téléphone
Vue arrière
Orifice pour dragonne
Socle pour carte SIM
Couverture
Batterie
Connecteur de câble
du chargeur de batterie
Contacts de la batterie
Batterie
B2000_RSA.qxd 2005.6.29 4:13 PM Page 10

Voici les éléments clés du téléphone.
Description du clavier
B2000 GUIDE DE L’UTILISATEUR 11
Description des touches
Touche de fonction gauche/
Touche de fonction droite
Chacune de ces touches exécute la
fonction indiquée par le texte qui
s’affiche juste au-dessus à l’écran.
Touche Description
Touches de navigation
Permettent de faire défiler les
noms, les numéros de téléphone,
les menus ou les options de
paramètre.
Touche rapide WAP (=touche de
confirmation) Maintenez cette
touche enfoncée pour vous
connecter directement au WAP.
• Touche de navigation haut ( ):
touche de raccourci permettant
d'accéder au menu Favoris.
• Touche de navigation haut ( ):
touche de raccourci permettant
d'accéder au Répertoire.
Touche Envoyer
Vous pouvez composer un numéro
de téléphone et répondre à un
appel. Si vous appuyez sur cette
touche sans saisir un numéro, votre
téléphone affiche les numéros que
vous avez récemment composés,
les numéros d’appels reçus et ceux
que vous avez manqués.
Touche Description
Pavé numérique
Ces touches permettent
principalement de composer des
numéros en mode veille et de saisir
des numéros ou caractères en
mode édition. Lorsque vous
appuyez longuement sur ces
touches.
~
• Touche de navigation gauche ( ):
touche de raccourci permettant
d'accéder à la Radio FM.
• Touche de navigation droite ( ):
touche de raccourci permettant
d'accéder à la boîte de réception.
B2000_RSA.qxd 2005.6.29 4:13 PM Page 11

Touches alphabétiques
Chaque touche vous permet d’utiliser plusieurs
symboles. Le tableau suivant répertorie les
différents symboles.
12 B2000 GUIDE DE L’UTILISATEUR
Description des touches
Touche MARCHE/ARRÊT
Permet de mettre fin à un appel
ou de le refuser.
Cette touche sert également de
touche de mise sous tension
lorsque vous appuyez sur celle-ci
pendant quelques secondes.
Touche Description
Vous pouvez supprimer des
caractères ou retourner au menu.
• En appuyant sur , vous
pouvez interroger votre boîte
vocale.
• En appuyant sur , vous
pouvez passer un appel
international.
• En appuyant sur les touches
à , vous pouvez
composer rapidement un numéro.
Touche
Description
. , / ? ! - : ' " 1
A B C 2 Ä À Á Â Ã Å Æ Ç a b c ä à á â ã å æ ç
D E F 3 Ë È É Ê d e f ë è é ê
G H I 4 Ï Ì Í Î ˝ g h i ï ì í î ©
J K L 5 j k l
M N O 6 Ñ Ö Ø Ò Ó Ô Õ OE m n o ñ ö ø ò ó ô õ oe
P Q R S 7 ß Í p q r s ß ß
T U V 8 Ü Ù Ú Û t u v ü ù ú û
W X Y Z 9 w x y z
[Espace] 0
B2000_RSA.qxd 2005.6.29 4:13 PM Page 12

Plusieurs icônes s’affichent à l’écran. En voici la description.
Icônes affichées à l’écran
B2000 GUIDE DE L’UTILISATEUR 13
Informations à l’écran
Indique la force du signal du
réseau.
Icone/Indicateur
Description
Vous pouvez utiliser le service
GPRS.
Indique que vous utilisez un service
d’itinérance.
L’alarme a été paramétrée et est
activée.
Indique l’état de la batterie.
Vous avez reçu un message texte.
Vous avez reçu un message vocal.
Vous avez reçu un message Push.
Vous pouvez afficher votre agenda.
Tous les signaux sonores sont
désactivés.
Menu Général activé dans le profil.
Menu Fort activé dans le profil.
Menu Silencieux activé dans le
profil.
Icone/Indicateur
Description
Menu Casque activé dans le profil.
Menu Voiture activé dans le profil.
Vos appels sont renvoyés.
L’appel est connecté.
B2000_RSA.qxd 2005.6.29 4:13 PM Page 13

14 B2000 GUIDE DE L’UTILISATEUR
Installation
1. Insertion de la carte SIM
Trouvez la prise de la carte SIM située à l’arrière
du téléphone. Suivez les étapes ci-dessous pour
installer la carte SIM.
1. Enlevez la batterie si elle
est fixée.
2. Glissez la carte SIM
dans son logement, sous
le porte-carte argenté,
avec les connecteurs
dorés orientés vers le
bas.
2. Retrait de la carte SIM
Suivez les étapes ci-dessous pour retirer la carte
SIM.
1. Enlevez la batterie si elle
est fixée.
2. Sortez la carte SIM de
son logement.
n Attention
• Le retrait de la batterie du téléphone pendant que ce
dernier est connecté peut provoquer des
dysfonctionne-ments.
• Le contact métallique de la carte SIM peut facilement
être endommagé par des rayures. Faites très attention
à la carte SIM lorsque vous la manipulez et l’installez.
Suivez les instructions fournies avec la carte SIM.
3. Installation de la batterie
1. Positionnez les ergots
situés au bas de la
batterie dans les
encoches prévues à cet
effet.
2. Ensuite, poussez jusqu’à
ce que la moitié de la
batterie soit en place.
B2000_RSA.qxd 2005.6.29 4:13 PM Page 14

B2000 GUIDE DE L’UTILISATEUR 15
3. Attachez le couvercle en
le faisant glisser vers le
haut jusqu’au clic.
4. Chargement de la batterie
Pour brancher le chargeur au téléphone, vous
devez installer la batterie.
1. La flèche vous faisant
face, comme indiqué
dans l’illustration,
branchez la fiche de le
chargeur de batterie sur
la prise, en bas du
téléphone, jusqu’à ce
qu’elle soit insérée dans
son logement. Vous
devez sentir un déclic.
2. Branchez l’autre
extrémité de le chargeur
sur la prise murale.
Utilisez uniquement le
chargeur livré avec le
pack.
n Avertissement
Ne forcez pas le connecteur car cela peut endommager
le téléphone et/ou le chargeur.
n Remarque
Le message “Batterie en charge” s’affiche à l’écran
lorsque vous connectez le chargeur de voyage. Si la
batterie est complètement vide, le message “Batterie en
charge” s’affiche après un délai assez long.
5. Débranchement du chargeur
Débranchez le chargeur du
téléphone en appuyant sur
ses boutons latéraux
comme indiqué dans
l’illustration.
n Remarque
• Assurez-vous que la batterie est complètement
chargée avant d’utiliser le téléphone.
• Ne retirez pas la batterie ou la carte SIM pendant le
chargement.
• Les barres animées de l’icône de la batterie
s’arrêteront dès la fin du chargement.
n Remarque
Si la batterie ne se charge pas:
• Éteignez le téléphone.
• Assurez-vous que la batterie est correctement insérée.
B2000_RSA.qxd 2005.6.29 4:13 PM Page 15

Émission d’un appel
1. Saisissez le numéro de téléphone comprenant
l’indicatif de zone.
Si vous souhaitez supprimer un numéro,
appuyez sur la touche .
2. Appuyez sur la touche pour appeler le
numéro.
3. Appuyez sur la touche pour mettre fin à la
conversation.
Appels internationaux
1. Maintenez la touche enfoncée pour
obtenir l’indicatif international. Le caractère “+”
peut remplacer le code d’accès international.
2. Saisissez le code pays, l’indicatif de zone, et le
numéro de téléphone.
3. Appuyez sur la touche .
Emission d’un appel à l’aide du
répertoire
1. En mode veille, appuyez sur la touche
[Noms].
2. Lorsque le menu s’affiche, sélectionnez
Rechercher en appuyant sur la touche .
3. Si vous trouvez l’élément souhaité en
recherchant à partir du nom ou du numéro,
appuyez sur la touche pour appeler le
correspondant.
16 B2000 GUIDE DE L’UTILISATEUR
Émission et réception d’un appel
B2000_RSA.qxd 2005.6.29 4:13 PM Page 16

Le menu affiché sur l’écran du combiné pendant
un appel est différent du menu principal par
défaut que vous obtenez à partir de l’écran de
veille. Voici la description des options.
1 Pendant un appel
1-1 Mettre un appel en attente
Lorsque vous émettez ou recevez un appel,
appuyez sur la touche. [Envoyer] pour le
mettre en attente.
Lorsqu’un appel est mis en attente, appuyez sur
la touche [Envoyer] pour l’activer.
1-2 Émettre un deuxième appel
Vous pouvez composer un numéro à partir du
répertoire pour émettre un deuxième appel.
Appuyez sur la touche [Noms] puis sélectionnez
Rechercher. Pour enregistrer le numéro dans le
répertoire pendant l’appel, appuyez sur la touche
[Noms] puis sélectionnez Ajouter nouveau.
1-3 Basculer entre deux appels
Pour basculer entre deux appels, sélectionnez la
touche [Options], puis sélectionnez Permuter ou
appuyez simplement sur la touche [Envoyer].
Vous pouvez vous concentrer sur un des deux
appels en appuyant sur la touche fléchée haut/bas.
Si vous voulez mettre fin à l’un des deux appels,
mettez en évidence l’appel auquel vous souhaitez
mettre fin, puis appuyez sur la touche
[Terminer] après avoir sélectionné l’appel que
vous souhaitez terminer.
1-4 Réception d’un appel entrant
Pour répondre à un appel entrant lorsque le
combiné sonne, appuyez simplement sur la
touche [Envoyer].
Le combiné peut également vous prévenir
lorsque vous recevez un appel entrant en cours
de communication. Un son se fait entendre dans
l’écouteur, et l’écran affiche un second appel en
attente. Cette fonction, appelée Mise en attente,
n’est disponible que si votre réseau la prend en
charge. Pour plus d’informations sur l’activation et
la désactivation de cette fonction, reportez-vous à
la rubrique Mise en attente [Menu 4-4-4]. Si la
Mise en attente est activée, vous pouvez mettre
en attente le premier appel et répondre au
second, en appuyant sur la touche [Envoyer]
ou en sélectionnant la touche [Répondre],
puis le menu En attente et Répondre.
Vous pouvez mettre fin à l’appel actuel et
répondre à l’appel en attente en sélectionnant la
touche [Menu], puis le menu Terminer et
Répondre.
B2000 GUIDE DE L’UTILISATEUR 17
Menu En appel
B2000_RSA.qxd 2005.6.29 4:13 PM Page 17

1-5 Refus d’un appel entrant
Lorsque vous n’êtes pas en communication vous
pouvez refuser un appel entrant sans y répondre
en appuyant simplement sur la touche
[Terminer] ou sur la touche longuement quand le
clapet est fermé.
Lorsque vous êtes en communication, vous
pouvez refuser un appel entrant en appuyant sur
la touche [Menu] et en sélectionnant Multi-
parties/Rejeter ou en appuyant sur la touche
[Terminer].
1-6 Désactivation du son du microphone
Vous pouvez désactiver le son du microphone
pendant un appel en appuyant sur la touche
[Options] puis en sélectionnant Muet.
Vous pouvez réactiver le son du combiné en
appuyant sur la touche [Désactiver le mode
Muet].
Lorsque le son du combiné est désactivé, votre
correspondant ne peut pas vous entendre, mais
vous pouvez encore l’entendre.
1-7 Activation des tonalités DTMF pendant un
appel
Pendant un appel, les tonalités DTMF sont
activées par défaut, afin de permettre, par
exemple, d’utiliser un standard automatisé de
type audiotel. Pour les désactiver, sélectionnez la
touche [options], puis Désactiver DTMF. Les
tonalités DTMF peuvent être activées de nouveau
de la même manière.
1-8 Appel des messages et menu principal du
jeu d’outils SIM
Il est possible d’accéder aux services SIM de
votre opérateur dans le menu En appel en
sélectionnant la touche [Options]. Le menu
des services SIM s’affiche uniquement lorsque la
carte SIM du combiné supporte cette
fonctionnalité.
2 Appels multi-parties ou de
conférence
Le service de multi-parties ou de conférence vous
permet d’avoir une conversation simultanée avec
plusieurs appelants, si le fournisseur de service
du réseau prend en charge cette fonction.
Il est possible de configurer uniquement un appel
multi-parties lorsque vous disposez d’un appel
18 B2000 GUIDE DE L’UTILISATEUR
Menu En appel
B2000_RSA.qxd 2005.6.29 4:13 PM Page 18

actif et d’un appel en attente, et que vous avez
répondu aux deux appels. Dès qu’un appel multiparties est configuré, la personne qui a configuré
cet appel peut ajouter, déconnecter ou séparer
les appels (c’est-à-dire, retirer un appel de l’appel
multi-parties tout en restant connecté avec vous).
Le nombre maximum d’appelants dans un appel
multi-parties est de cinq. Dès le départ, vous
contrôlez l’appel multi-parties, et vous êtes le seul
à pouvoir y ajouter des appels.
2-1 Émission d’un second appel
Vous pouvez émettre un second appel pendant
que vous êtes en communication. Pour cela,
saisissez le second numéro et appuyez sur la
touche [Envoyer]. Lorsque vous obtenez le
second appel,le premier est automatiquement mis
en attente. Vous pouvez basculer entre deux
appels en sélectionnant la touche [Options]
puis Basculer.
2-2 Configuration d’un appel multi-parties
Vous pouvez connecter un appel en attente avec
l’appel actuellement actif pour former un appel
multi-parties en sélectionnant la touche
[Options], puis Conférence/Joindre tout.
2-3 Mise en attente de l’appel multi-parties
Pour mettre en attente un appel multi-parties,
sélectionnez la touche [Options] puis
Conférence/Maintenir Tt.
2-4 Activer l’appel multi-parties en attente
Pour rendre actif un appel multi-parties en
attente, sélectionnez la touche [Options], puis
Multi-parties/Tout joindre.
2-5 Ajout d’appels à l’appel multi-parties
Pour joindre un appel actif à l’appel multi-parties
mis en attente, sélectionnez la touche
[Options] puis Multi-parties/Tout joindre.
2-6 Affichage des appelants dans un appel
multi-parties
Pour faire défiler les numéros des appelants qui
composent un appel multi-parties sur l’écran du
combiné, appuyez sur les touches et .
B2000 GUIDE DE L’UTILISATEUR 19
B2000_RSA.qxd 2005.6.29 4:13 PM Page 19

2-7
Mise en attente de l’un des membres d’un
appel multi-parties
Pour mettre en attente un appelant sélectionné
(dont le numéro est affiché à l’écran) d’un appel
multi-parties mis en attente, sélectionnez la touche
[Options], puis Multi-parties/Exclure.
2-8 Un appel privé lors d’un appel multi-
parties
Pour établir une communication privée avec un
appelant dans le cadre d’un appel multi-parties,
affichez à l’écran le numéro de cet appelant, puis
sélectionnez la touche [Options] et Multi-
parties/Privé pour mettre tous les autres
appelants en attente.
2-9 Fin d’un appel multi-parties
L’appelant actuellement affiché d’un appel multiparties peut être déconnecté en appuyant sur la
touche [Terminer].
Pour mettre fin à un appel multi-parties, appuyez
sur la touche [Options], puis sélectionnez
Multi-parties/Terminer multi-parties.
En sélectionnant la touche [Options] puis
Multi-parties/Tout terminer, tous les appels
actifs et en attente prennent fin.
20 B2000 GUIDE DE L’UTILISATEUR
Menu En appel
B2000_RSA.qxd 2005.6.29 4:13 PM Page 20

Vous pouvez utiliser les codes d’accès décrits
dans cette section pour éviter l’utilisation non
autorisée de votre téléphone. Les codes d’accès,
à l’exception des codes PUK et PUK2, peuvent
être modifiés en utilisant [Menu 4-4-6].
Code PIN (4 à 8 chiffres)
Le code PIN (Personal Identification Number,
numéro d’identification personnel) protège votre
carte SIM contre toute utilisation non autorisée.
Le code PIN est généralement fourni avec la
carte SIM. Lorsque le code PIN est activé, votre
téléphone vous demande ce code à chaque fois
que vous le mettez en marche. Par contre,
lorsque le code PIN est désactivé, votre
téléphone se connecte directement au réseau
sans demander ce code.
Code PIN2 (4 à 8 chiffres)
Le code PIN2, fourni avec certaines cartes SIM,
est nécessaire pour accéder à plusieurs fonctions
telles que Conseil sur les frais d’appel, Numéro
fixe à composer. Ces fonctions ne sont
disponibles que si votre carte SIM les prend en
charge.
Code PUK (4 à 8 chiffres)
Le code PUK (PIN Unblocking Key, clé de
déblocage personnelle) est nécessaire pour
modifier un code PIN bloqué. Le code PUK peut
être fourni avec la carte SIM. Dans le cas
contraire, contactez votre fournisseur de service
local pour obtenir le code. Si vous perdez le
code, contactez également votre fournisseur de
service local.
Code PUK2 (4 à 8 chiffres)
Le code PUK2, fourni avec certaines cartes SIM,
est nécessaire pour modifier un code PIN2
bloqué. Si vous perdez le code, contactez
également votre fournisseur de service local.
Code de sécurité (4 à 8 chiffres)
Le code de sécurité empêche toute utilisation non
autorisée de votre téléphone. Il est généralement
fourni avec le téléphone. Ce code est nécessaire
pour supprimer toutes les entrées de téléphone et
pour activer le menu “Réinitialiser les
paramètres”. Le nombre par défaut est “0000”.
B2000 GUIDE DE L’UTILISATEUR 21
Codes d’accès
B2000_RSA.qxd 2005.6.29 4:13 PM Page 21

22 B2000 GUIDE DE L’UTILISATEUR
Arborescence des menus
1 Messages
1 Ecrire Texto
2 Écrire un MMS
3 Boîte de réception
4 Boîte d ’envoi
5 Brouillons
6 Message d
’information
7 Modèles
8 Règlages
2 Journal des
appels
1 Appels en absence
2 Appels reçus
3 Appels émis
4 Supprimer les
appels récents
5 Frais d ’appel
6 Info GPRS
3 Profils audio
1 Vibreur seul
2 Silencieux
3 Général
4 Fort
5 Kit piéton
6 Kit voiture
4 Réglages
1 Date et heure
2 Téléphone
3 Appels
4 Sécurité
5 Réseau
6 GPRS
7 Réinitialiser
réglages
B2000_RSA.qxd 2005.6.29 4:13 PM Page 22

B2000 GUIDE DE L’UTILISATEUR 23
5 Agenda
1 Réveil
2 Calendrier
3 Répertoire
6 FM Radio
1 Écouter la radio
2 Canaux
7 Outils
1 Raccourcis
2 Jeux
3 Calculette
4 Mon dossier
5 Convertisseur d
’unités
6 Fuseaux horaires
7 Mémo vocal
8 Etat mémoire
8 Internet
1 Page d ’accueil
2 Favoris
3 Profils
4 Accéder à l ’URL
5 Réglages cache
6 Réglages cookies
7 Certificats
8 Réinitialiser les
profils
9 Version du
navigateur
9 Java
1 Mes jeux &
applications
2 Télécharger
3 Profils
10 Service SIM
Ce menu dépend
des services SIM et
du réseau.
B2000_RSA.qxd 2005.6.29 4:13 PM Page 23

Ce menu comprend les fonctions en rapport avec
les SMS (Short Message Service, Service de
messages courts), les MMS (Multimedia Message
Service, Service de messagerie multimédia), la
boîte vocale, ainsi que les messages de service
du réseau.
Ecrire Texto [Menu 1-1]
Vous pouvez écrire et modifier un message texte,
en vérifiant le nombre de pages du message.
1. Entrez dans le menu Messages en appuyant
sur la touche [Sélect].
2. Si vous souhaitez écrire un nouveau message,
sélectionnez Ecrire Texto.
3. Pour faciliter la saisie du texte, utilisez T9.
Pour plus d’informations, reportez-vous à la
rubrique Comment utiliser le mode T9 (Page
28).
4. Appuyez sur [Insérer] pour joindre la pièce.
5. Si vous voulez définir une option pour votre
texte, ou terminer sa rédaction, appuyez sur la
touche [Options].
n Remarque
Le téléphone prenant en charge EMS version 5, permet
d’envoyer des images en couleur, des sons, des styles
de texte, etc. Le correspondant peut ne pas recevoir
correctement les photos, les sons ou les styles de texte
que vous avez envoyés, si son téléphone ne prend pas
en charge de telles options.
Options
• Envoyer
Permet d’envoyer des messages texte.
1. Entrez les numéros des destinataires.
2. Appuyez sur la touche pour ajouter
d’autres destinataires.
3. Vous pouvez ajouter des numéros de
téléphone au répertoire.
4. Appuyez sur la touche après avoir saisi
les numéros.
• Enregistrer
Permet de stocker les messages dans la Boîte
d’envoi.
• Police
Sélectionnez la Taille et le Style des polices.
24 B2000 GUIDE DE L’UTILISATEUR
Messages [Menu 1]
B2000_RSA.qxd 2005.6.29 4:13 PM Page 24

• Couleur
Sélectionnez la Couleur du premier plan et de
l’arrière-plan.
• Alignement
Vous pouvez créer des contenus de messages
alignés à Droite, au Centre ou à Gauche.
• Ajouter dictionnaire T9
Vous pouvez ajouter vos propres mots. Ce
menu s’affiche uniquement lorsque le mode
édition est Intuitif (T9Abc/T9abc/T9ABC).
• Langue T9
Sélectionnez un mode de saisie T9.
• Quitter
Si vous appuyez sur Quitter pendant la
rédaction d’un message, vous pouvez stopper
l’écriture du message et revenir au menu
Message. Le message que vous avez rédigé
n’est pas enregistré.
Insérer
• Symbole
Vous pouvez ajouter des caractères spéciaux.
• Images
Vous pouvez insérer des images par défaut ou
les photos de Mon dossier qui sont disponibles
pour les messages courts.
• Sons
Vous pouvez insérer les sons qui sont
disponibles pour les messages courts.
• Modèles de texte
Vous pouvez utiliser les Modèles de texte
prédéfinis dans le téléphone.
• Répertoire
Vous pouvez ajouter les numéros de téléphone
ou les adresses électroniques dans le
Répertoire..
• Signature
Vous pouvez ajouter vos informations de
contact au message.
B2000 GUIDE DE L’UTILISATEUR 25
B2000_RSA.qxd 2005.6.29 4:13 PM Page 25

Écrire un MMS [Menu 1-2]
Vous pouvez écrire et modifier des messages
multimédias, en vérifiant la taille du message.
1. Activez le menu Messages en appuyant sur la
touche [Sélect].
2. Si vous souhaitez rédiger un nouveau
message, sélectionnez Ecrire MMS.
3. Vous pouvez créer un nouveau message ou
choisir un des modèles de message
multimédia déjà créé.
4. Appuyez sur Insérer pour ajouter Symbole,
Image, Son, Modèles de texte, Répertoire or
Carte de visite.
Options
• Envoyer
Vous pouvez envoyer des messages multimédias
à plusieurs destinataires, donner la priorité à
votre message, et aussi l’envoyer plus tard.
• Aperçu
Vous pouvez afficher un aperçu des messages
multimédias que vous avez rédigés.
• Enregistrer
Vous pouvez enregistrer des messages
multimédias dans la boîte d’envoi ou en tant
que modèles.
• Ajouter une diapo
Vous pouvez ajouter une diapo avant ou après
la diapo actuelle.
• Aller aux diapos
Vous pouvez accéder à la diapositive
précédente ou suivante.
• Supprimer la diapo
Vous pouvez supprimer les diapositives actuelles.
• Définir format diapo
- Définir la minuterie
Vous pouvez définir le minuteur pour la
diapositive, le texte, l’image et le son.
- Échanger texte et images
Vous pouvez modifier la position des images
et du texte dans le message.
• Supprimer pièce jointe
Vous pouvez supprimer les images ou les sons
de la diapositive. Cette option est disponible
uniquement lorsque tous les médias existent.
26 B2000 GUIDE DE L’UTILISATEUR
Messages [Menu 1]
B2000_RSA.qxd 2005.6.29 4:13 PM Page 26

• Ajout dictionnaire
Vous pouvez ajouter vos propres mots. Ce
menu s’affiche uniquement lorsque le mode
édition est Intuitif (T9Abc/T9abc/T9ABC).
• Langue du T9
Sélectionnez un mode de saisie T9.
• Quitter
Vous pouvez revenir au menu Messages.
n Remarque
Si vous sélectionnez l'image (15 K) au moment de la
composition d'un message multimédia, le chargement
prendra environ 15 secondes (minimum). Vous ne
pourrez pas activer d'autres touches pendant le
chargement. Au bout de 15 secondes, vous pouvez
composer votre message multimédia.
B2000 GUIDE DE L’UTILISATEUR
27
B2000_RSA.qxd 2005.6.29 4:13 PM Page 27

28 B2000 GUIDE DE L’UTILISATEUR
Messages [Menu 1]
Comment utiliser le mode T9?
Le mode T9 vous permet de saisir du texte
rapidement.
Dans ce mode, appuyez simplement une fois
sur la touche comportant la lettre
correspondante.
T9 est basé sur un dictionnaire intégré auquel
vous pouvez également ajouter de nouveaux
mots.
• Saisie des mots à l’aide du mode T9.
1. Commencez la saisie d’un mot avec la
série de touches à Appuyez
seulement une fois sur chaque touche
pour obtenir une lettre. Exemple: pour
écrire “Fille”.
Le mot change après chaque frappe. Par
conséquent, vous ne devez pas faire trop
attention à l’apparence du mot sur l’écran
tant que vous n’avez pas appuyé sur toutes
les touches appropriées..
Pour supprimer un caractère situé à
gauche, appuyez sur . Pour insérer
plusieurs numéros, maintenez la touche
enfoncée et saisissez les numéros.
Si vous maintenez la touche enfoncée,
vous pouvez modifier le type de langue.
(Vous pouvez également utiliser les
options.) De plus, le téléphone prend en
charge trois modes: Intuitif (T9Abc, T9ABC,
T9abc), Multitap (ABC, abc), Numérique
(123). Si vous souhaitez changer de mode,
appuyez sur la touche .
Autre possibilité: Appuyez sur la touche
et sélectionner
Insérer symboles.
Sélectionnez le
caractère souhaité et
appuyez sur
Sélectionner.
(pour f)
(pour i)
(pour l) (pour l) (pour e)
B2000_RSA.qxd 2005.6.29 4:13 PM Page 28
T9Abc
160 1
157 1
T9abc
159 1
155 1
T9abc
T9abc
e
158 1
155 1
T9abc
T9abc

B2000 GUIDE DE L’UTILISATEUR 29
2. Lorsque vous avez terminé la saisie d’un
mot, vérifiez qu’il est correctement
orthographié.
Si le mot est correct: Appuyez sur la
touche et
saisissez le mot suivant.
Si le mot n’est pas: Recherchez à l’aide
de la touche ,
(Mot précédent
et Mot suivant).
Autre possibilité: Si vous ne souhaitez
aucun des mots
proposés, vous pouvez
ajouter vos propres
mots. Appuyez sur la
touche [Options] en
mode édition Intuitif.
Sélectionnez Ajouter
menu du dictionnaire
T9. Vous pouvez voir ce
qui suit.
3. Pour insérer une marque de ponctuation,
appuyez sur la touche à plusieurs
reprises jusqu’à ce que la ponctuation
souhaitée apparaisse.
T9 languages
• Vous pouvez choisir T9 Langues en
sélectionnant Menu.
ABC
Mot
Sauvegarder
Retour
ABC
Mot
Sauvegarder
Retour
LGGSM
Saisissez
votre mot
B2000_RSA.qxd 2005.6.29 4:13 PM Page 29

Boîte de réception [Menu 1-3]
Vous êtes averti lorsque vous recevez des
messages. Ils sont stockés dans la Boîte de
réception. Les messages de la boîte de réception
sont identifiés par des icônes. Pour plus
d’informations, reportez-vous aux instructions sur
les icônes.
Si le téléphone affiche “Pas d’espace pour
message SIM”, vous devez supprimer tous les
messages SIM de votre boîte d’envoi ou boîte de
réception. Si le téléphone affiche “Pas d’espace
pour message”, vous pouvez libérer de l’espace
dans chaque dossier en supprimant les
messages, les médias et les applications.
❈ Message SIM
“Message SIM” signifie que le message a été
exceptionnelle-ment stocké sur la carte SIM.
Pour le message multimédia notifié, vous devez
attendre le téléchargement et le traitement du
message. Pour plus d’informations sur les
paramètres de notification, reportez-vous au
[Menu 1-8-2].
Pour lire un message, sélectionnez un des
messages en appuyant sur la touche .
Répondre
Vous pouvez répondre à l’expéditeur.
Transférer
Vous pouvez transférer le message sélectionné à
une autre personne.
Appeler
Vous pouvez rappeler l’expéditeur.
Supprimer
Vous pouvez supprimer le message actuel.
Extraire
Vous pouvez extraire des images, du son et du
texte. Ces derniers seront enregistrés dans Mon
dossier, Répertoire, ou dans les favoris WAP.
30 B2000 GUIDE DE L’UTILISATEUR
Messages [Menu 1]
Message multimédia
icône Description
Message court
Message SIM
Lire
Message multimédia notifié
B2000_RSA.qxd 2005.6.29 4:13 PM Page 30

Afficher les informations
Vous pouvez afficher les informations sur les
messages reçus: l’adresse de l’expéditeur, l’objet
(uniquement pour les messages multimédias), la
date et heure du message, le type et la taille du
message.
Réécouter (uniquement pour les message multimédias)
Vous pouvez ré-écouter les messages multimédias.
❈ Récéption (en cas de message de notification)
Si le message multimédia est défini sur
Téléchargement auto désactivé, vous ne
pouvez obtenir que la Notification. Pour recevoir
un message, vous devez sélectionner [Recevoir].
Bien que le message multimédia soit défini sur
Téléchargement auto activé, vous pouvez
obtenir un message de notification en fonction de
l’environnement du réseau ou pour d’autres
raisons.
Boîte d’envoi [Menu 1-4]
C’est ici que vous pouvez visualiser les
messages envoyés ou non. Pour le message
envoyé, vous pouvez voir l’état de livraison. La
navigation est identique à celle de la boîte de
réception.
❈ Lorsque vous utilisez le message qui a
déjà été envoyé
Transférer
Vous pouvez transférer le message actuel à
d’autres destinataires.
Supprimer
Vous pouvez supprimer le message actuel.
Afficher les informations
Vous pouvez afficher les informations sur les
messages de la boîte d’envoi: l’adresse de
l’expéditeur, l’objet (uniquement pour les
messages multimédias), la date et heure du
message, le type et la taille du message.
B2000 GUIDE DE L’UTILISATEUR 31
Envoyé
icône Description
Non envoyé
Livraison confirmée
Message court envoyé
B2000_RSA.qxd 2005.6.29 4:13 PM Page 31
 Loading...