

LG AX140 User Guide

AX140
USER GUIDE
ENGLISH
AX140
Please read this manual carefully before operating your mobile
phone. Retain it for future reference.
USER GUIDE
P/N : MMBB0241501
H

Copyright ©2007 LG Electronics, Inc. All rights reserved.
LG and the LG logo are registered trademarks of LG
Group and its related entities. All other trademarks are the
property of their respective owners.
Important Safety Precautions
1
Important Safety Precautions
Read these instructions. Breaking the rules may be dangerous or
illegal. Further detailed information is given in this user guide.
WARNING! Violation of the instructions may cause serious injury or
death.
1. Never use an unapproved battery since this could
damage the phone and/or battery and could cause
the battery to explode.
2. Never place your phone in a microwave oven as it will
cause the battery to explode.
3. Never store your phone in temperatures less than
-4°F or greater than 122°F.
4. Do not dispose of your battery by fire or with
hazardous or flammable materials.
5. When riding in a car, do not leave your phone or set
up the hands-free kit near to the air bag. If wireless
equipment is improperly installed and the air bag is
deployed, you may be seriously injured.
6. Do not use a hand-held phone while driving.
7. Do not use the phone in areas where its use is
prohibited. (For example: aircraft)
Important Safety Precautions
2
Important Safety Precautions
1. Do not expose the battery charger or adapter to direct
sunlight or use it in places with high humidity, such as
a bathroom.
2. Do not use harsh chemicals (such as alcohol, benzene,
thinners, etc.) or detergents to clean your phone. This
could cause a fire.
3. Do not drop, strike, or shake your phone severely. It
may harm the internal circuit boards of the phone.
4. Do not use your phone in high explosive areas as the
phone may generate sparks.
5. Do not damage the power cord by bending, twisting,
pulling, or heating. Do not use the plug if it is loose as
it may cause a fire or electric shock.
6. Do not place any heavy items on the power cord. Do
not allow the power cord to be crimped as it may
cause electric shock or fire.
7. Do not handle the phone with wet hands while it is
being charged. It may cause an electric shock or
seriously damage your phone.
8. Do not disassemble the phone.
3
Important Safety Precautions
1. Do not place or answer calls while charging the phone as
it may short-circuit the phone and/or cause electric
shock or fire.
2. Do not hold or let the antenna come in contact with
your body during a call.
3. Make sure that no sharp-edged items such as animal’s
teeth or nails, come into contact with the battery. This
could cause a fire.
4. Store the battery out of reach of children.
5. Be careful that children do not swallow any parts (such
as rubber plugs, earphone, connection parts of the
phone, etc.) This could cause asphyxiation or
suffocation resulting in serious injury or death.
6. Unplug the power cord and charger during lightning
storms to avoid electric shock or fire.
7. Only use the batteries and chargers provided by LG. The
warranty will not be applied to products provided by
other suppliers.
8. Only authorized personnel should service the phone and
its accessories. Faulty installation or service may result in
accidents and consequently invalidate the warranty.
9. An emergency call can be made only within a service
area. For an emergency call, make sure that you are
within a service area and that the phone is turned on.

Table of Contents
4
Table of Contents
Important Safety
Precautions 1
Table of Contents 4
Welcome 9
Technical Details 10
FCC RF Exposure Information 12
Phone Overview 14
Menus Overview 15
Menu Access 16
Getting Started with Your
Phone 17
The Battery 17
Installing the Battery 17
Removing the Battery 17
Charging the Battery 17
Battery Charge Level 17
Turning the Phone On and Off 18
Turning the Phone On 18
Turning the Phone Off 18
Signal Strength 18
Screen Icons 18
Making Calls 18
Redialing Calls 19
Receiving Calls 19
Quick Access to
Convenient Features 20
Manner mode 20
Lock Mode 20
Mute Function 20
Call Waiting 20
Caller ID 21
Speed Dialing 21
Entering and Editing
Information 22
Text Input 22
Key Functions 22
Text Input Modes 22
Changing Letter Case 23

5
Table of Contents
Contacts in Your Phone’s
Memory 24
Searching Your Phone’s Memory 24
Scrolling Through Your Contacts 24
Making a Call From Your Phone’s
Memory 25
Using Phone Menus 26
Messaging 26
1. New Message 26
2. Inbox 28
3. Sent 29
4. Drafts 30
5. Voicemail 30
6. Templates 30
7. Settings 30
Auto Save 31
Auto Delete 31
Entry Mode 31
Speed Messaging 31
Auto View 31
Auto Play 31
Signature 31
Callback # 32
8. Delete All 32
Organizer 32
1. Calendar 32
2. Notepad 33
Phone Info 34
1. My Number 34
2. SW Version 34
3. Icon Glossary 34
Voice Service 34
1. Voice Dialing 34
2. Record Voice 35
Contacts 36
1. New Contact 36
2. Contact List 36
3. Groups 37
4. Speed Dials 37
5. My Contact Info 38

Table of Contents
6
Table of Contents
Recent Calls 38
1. Missed Calls 38
2. Dialed Calls 39
3. Received Calls 39
4. All Calls 39
5. Call Timer 39
My Media 40
1. Images 40
2. Audio 40
Tools 40
1. My Menu 40
2. Alarm Clock 41
3. Ez Tip Calc 41
4. Calculator 41
5. World Clock 42
6. Stopwatch 42
7. Unit Converter 42
Settings 43
1. Sound 43
1.1 Ringtones 43
1.2 Volume 43
1.3 Message Alerts 43
1.4 Alert Type 44
1.5 Service Alerts 44
1.5.1 Service Change 44
1.5.2 Minute Beep 44
1.5.3 Call Connect 44
1.5.4 Back to Top 44
1.6 Power On/Off Tones 44
2. Display 45
2.1 Wallpaper 45
2.2 Banner 45
2.3 Backlight 45
2.4 LCD Contrast 45
2.5 Menu Style 46
2.6 Languages 46
2.7 Clocks & Calendar 46

7
Table of Contents
2.8 Dialing Fonts 46
2.9 Color Schemes 46
3. Security 47
3.1 Lock Phone 47
3.2 Restricted Calls 47
3.3 Emergency #s 48
3.4 Change Lock Code 48
3.5 Reset Default 48
4. Call Settings 49
4.1 Answer Options 49
4.2 Auto Retry 49
4.3 One-Touch Dial 49
4.4 Voice Privacy 50
4.5 Auto Volume 50
4.6 Airplane Mode 50
4.7 TTY Mode 50
5. Network 51
5.1 System Select 51
5.2 Set NAM 51
5.3 Auto NAM 52
5.4 Serving System 52
6. Voice Service 52
6.1 Set Voice Dialing 52
6.2 Train Words 53
7. Memory 53
7.1 Common Memory 53
7.2 Reserved Memory 53
Safety 54
TIA Safety Information 54
Exposure to Radio Frequency
Signal 54
Antenna Care 54
Phone Operation 55
Tips on Efficient Operation 55
Driving 55
Electronic Devices 55
Pacemakers 55
Persons with pacemakers: 56
Hearing Aids 56
Other Medical Devices 56
Health Care Facilities 56
Vehicles 57

Table of Contents
8
Table of Contents
Posted Facilities 57
Aircraft 57
Blasting Areas 57
Potentially Explosive Atmosphere 57
For Vehicles Equipped with an
Air Bag 58
Safety Information 58
Charger and Adapter Safety 58
Battery Information and Care 59
Explosion, Shock, and Fire
Hazards 59
General Notice 60
Warning! Important safety
information 62
Avoiding hearing damage 62
Using your phone safely 62
Avoiding hearing damage 63
Using headsets safely 63
FDA Consumer Update 64
10 Driver Safety Tips 74
Consumer Information on
SAR 78
FCC Hearing-Aid Compatibility
(HAC) Regulations for Wireless
Devices 80
Accessories 83
Limited Warranty
Statement 84
Index 88

Welcome
9
Welcome
Thank you for choosing the
advanced and compact AX140
cellular phone, designed to
operate with the latest digital
mobile communication
technology, Code Division
Multiple Access (CDMA). Along
with the many advanced features
of the CDMA system, this phone
offers:
G
Significantly enhanced voice
clarity
.
G
Large, easy-to-read, 8-line
backlit LCD with status icons.
G
Paging, messaging, voice mail,
and caller ID.
G
22-key keypad.
G
Menu-driven interface with
prompts for easy operation and
configuration.
G
Any key answer, auto answer,
auto retry, one-touch and speed
dialing with 99 memory
locations.
G
Bilingual (English and Spanish)
capabilities.
G
Internal antenna (described as
antenna throughout this user
guide).
Important Information
This user’s guide provides
important information on the use
and operation of your phone.
Please read all the information
carefully prior to using the
phone for the best performance
and to prevent any damage to or
misuse of the phone. Any
unapproved changes or
modifications will void your
warranty.
Technical Details
10
Technical Details
FCC Part 15 Class B Compliance
This device and its accessories
comply with part 15 of FCC rules.
Operation is subject to the
following two conditions: (1) This
device and its accessories may not
cause harmful interference, and
(2) this device and its accessories
must accept any interference
received, including interference
that causes undesired operation.
Technical Details
The AX140 is a dual mode
phone that operates on both
(Code Division Multiple Access
CDMA) frequencies: cellular
services at 800 MHz and
(Personal Communication
Services PCS) at 1.9 GHz.
CDMA technology uses a feature
called DSSS (Direct Sequence
Spread Spectrum) that enables
the phone to keep
communication from being
crossed and to use one
frequency channel by multiple
users in the same specific area.
This results in a 10-fold capacity
increase when compared with
analog mode. In addition,
features such as soft / softer
handoff, hard handoff, and
dynamic RF power control
technologies combine to reduce
call interruptions.
The Cellular and PCS CDMA
networks consist of MSO (Mobile
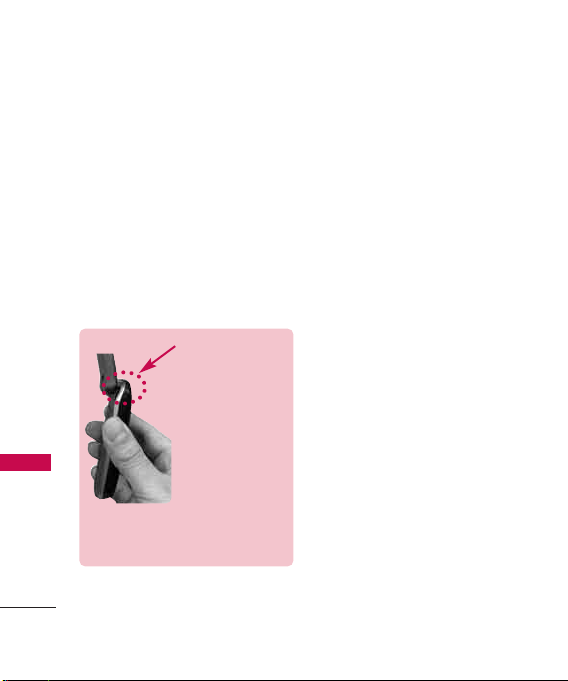
TIP
If you hold the
phone enclosing
the upper edge,
you may interfere
with the antenna's
ability to receive a
clear signal which
affects call quality
for voice.
NOTE
Antenna equipped
inside your phone.
11
Technical Details
Switching Office), BSC (Base
Station Controller), BTS (Base
Station Transmission System),
and MS (Mobile Station).
* TSB-74: Protocol between an
IS-95A system and ANSI JSTD-008
1xRTT system receives twice as
many subscribers in the wireless
section as IS-95. Its battery life
is twice as long as IS-95.
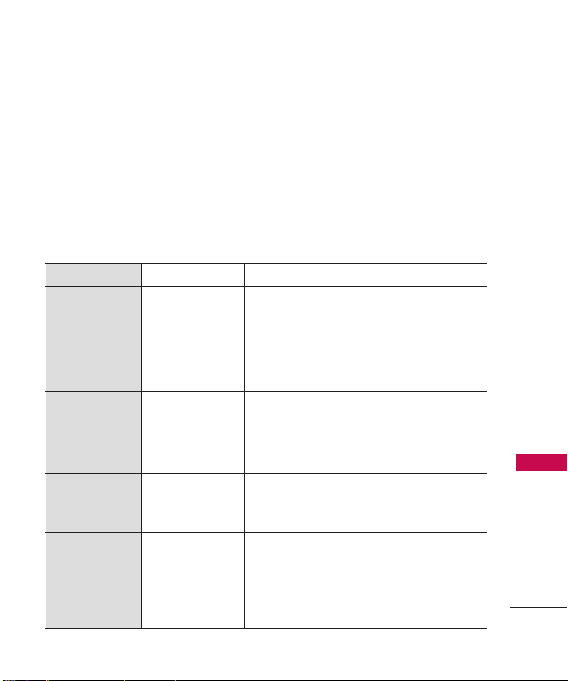
The following table lists some
major CDMA standards.
CDMA Standard
Designator Description
Basic Air
Interface
TIA/EIA-95A
TSB-74
ANSI J-STD-008
TIA/EIA-IS2000
CDMA Dual-Mode Air Interface
14.4kbps radio link protocol and
inter-band operations
IS-95 adapted for PCS frequency band
cdma2000 1xRTT AirInterface
Network
TIA/EIA/IS-634
TIA/EIA/IS/651
TIA/EIA/IS-41-C
TIA/EIA/IS-124
MAS-BS
PCSC-RS
Intersystem operations
Non-signaling data comm.
Service
TIA/EIA/IS-96-B
TIA/EIA/IS-637
IS-801
Speech CODEC
Short message service
Position Determination Service (gpsOne)
Performance
TIA/EIA/IS-97
TIA/EIA/IS-98
ANSI J-STD-018
ANSI J-STD-019
TIA/EIA/IS-125
Cellular base station
Cellular mobile station
PCS personal station
PCS base station
Speech CODEC

Technical Details
12
Technical Details
FCC RF Exposure Information
WARNING! Read this
information before operating the
phone.
In August 1996, the Federal
Communications Commission
(FCC) of the United States, with its
action in Report and Order FCC
96-326, adopted an updated
safety standard for human exposure
to Radio Frequency (RF)
electromagnetic energy emitted by
FCC regulated transmitters. Those
guidelines are consistent with the
safety standard previously set by
both U.S. and international
standards bodies.
The design of this phone complies
with the FCC guidelines and these
international standards.
Bodily Contact During
Operation
This device was tested for typical
use with the back of the phone
kept 0.6 inches (1.5 cm) from
the body. To comply with FCC
RF exposure requirements, a
minimum separation distance of
0.6 inches (1.5 cm) must be
maintained between the user’s
body and the back of the phone,
including the antenna, whether
extended or retracted. Thirdparty belt-clips, holsters, and
similar accessories containing
metallic components should not
be used. Avoid the use of
accessories that cannot maintain
0.6 inches (1.5 cm) distance
between the user’s body and the
back of the phone and have not
been tested for compliance with
FCC RF exposure limits.

13
Welcome
Vehicle-Mounted External
Antenna
(Optional, if available.)
A minimum distance of 8 inches
(20cm) must be maintained
between the user/ bystander and
the vehicle-mounted external
antenna to satisfy FCC RF
exposure requirements. For more
information about RF exposure,
visit the FCC website at
www.fcc.gov.
Caution
Use only the supplied and
approved antenna. Use of
unauthorized antennas or
modifications could impair call
quality, damage the phone, void
your warranty and/or result in
violation of FCC regulations.
Do not use the phone with a
damaged antenna. If a damaged
antenna comes into contact with
the skin a minor burn may result.
Contact your local dealer for a
replacement antenna.
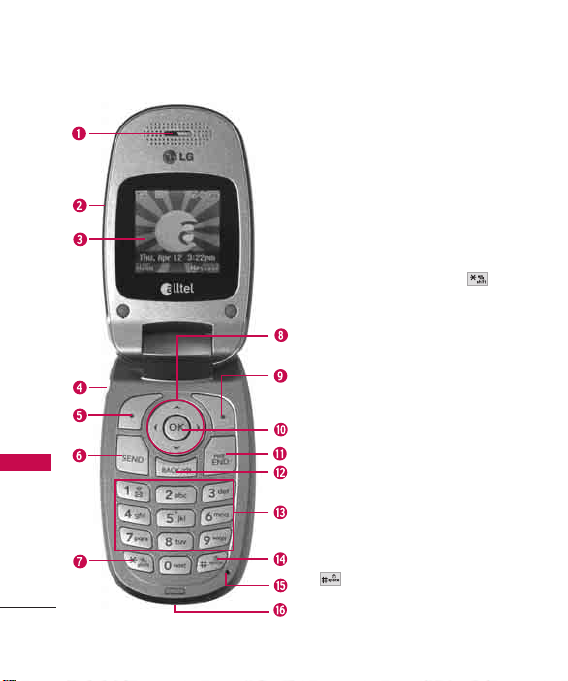
Phone Overview
14
Phone Overview
1. Earpiece Lets you hear the caller.
2. Flip Open the case to answer an incoming call
and close to end the call.
3. LCD Screen Displays messages and indicator
icons.
4. Earphone Jack Allow the use of a headset to hear
caller's voice.
5. Left Soft Key Use to display the function setting
menu.
6. SEND Key Use to place or answer calls.
7.
Manner Mode Key
Use to set Manner mode
(from standby mode press and hold for
about 3 seconds).
8. Navigation Key Use for quick access to Contact
List, Organizer, Ringtones and Wallpaper.
9. Right Soft Key Use to select an action within a
menu.
10 .
OK Key
Selects the function displayed at the
bottom of the LCD between the Left and Right
Soft Key functions.
11. END/PWR Key Use to turn the power on/off
and to end a call. Also use to return to the main
menu display screen.
12 . BACK Key Press to delete a single space or
character. Press and hold to delete entire words.
Press this key once in a menu to go back one
level.
13 . Alphanumeric Keypad Use to enter numbers
and characters and select menu items.
14 .
Lock Mode Key
Use in standby mode to set the
lock function by pressing and holding the key
for about 3 seconds.
15 . Microphone Lets callers hear you.
16 . Charger Port Connects the charger to the
phone.

Menus Overview
15
Menus Overview
Messaging
1. New Message
2. Inbox
3. Sent
4. Drafts
5. Voicemail
6. Templates
7. Settings
1. Auto Save
2. Auto Delete
3. Entry Mode
4. Speed
Messaging
5. Auto View
6. Auto Play
7. Signature
8. Callback #
8. Delete All
1. Inbox
2. Sent
3. Drafts
4. All Messages
Organizer
1. Calendar
2. Notepad
Phone Info
1. My Number
2. SW Version
3. Icon Glossary
Voice Service
1. Voice Dialing
2. Record Voice
Contacts
1. New Contact
2. Contact List
3. Groups
4. Speed Dials
5. My Contact Info
Recent Calls
1. Missed Calls
2. Dialed Calls
3. Received Calls
4. All Calls
5. Call Timer
1. Last Call
2. Home Calls
3. Roam Calls
4. All Calls
My Media
1. Images
2. Audio
1. Default
2. Downloaded
3. Recorded Voice
Tools
1. My Menu
2. Alarm Clock
3. Ez Tip Calc
4. Calculator
5. World Clock
Menus Overview
16
Menus Overview
6. Stopwatch
7. Unit Converter
Settings
1. Sound
1. Ringtones
2. Volume
3. Message Alerts
4. Alert Type
5. Service Alerts
6. Power On/Off
Tones
2. Display
1. Wallpaper
2. Banner
3. Backlight
4. LCD Contrast
5. Menu Style
6. Languages
7. Clocks &
Calendar
8. Dialing Fonts
9. Color Schemes
3. Security
1. Lock Phone
2. Restricted Calls
3. Emergency #s
4. Change Lock
Code
5. Reset Default
4. Call Settings
1. Answer Options
2. Auto Retry
3. One-Touch Dial
4. Voice Privacy
5. Auto Volume
6. Airplane Mode
7. TTY Mode
5. Network
1. System Select
2. Set NAM
3. Auto NAM
4. Serving System
6. Voice Service
1. Set Voice
Dialing
2. Train Words
7. Memory
1. Common
Memory
2. Reserved
Memory
Menu Access
Press Left Soft Key
Menu
to access nine
phone menus. There
are two methods of
accessing menus and
submenus:
G
Use the navigation
key to highlight and
select, or
G
Press the number key
that corresponds to the
menu (or submenu).

Getting Started with Your Phone
17
Getting Started with Your Phone
The Battery
Installing the Battery
Remove the battery cover, insert
the battery into the opening by
first aligning the bottom of the
battery with the terminals near
the bottom of the phone. Align
the battery cover over the
battery then slide it slightly
upward until it clicks into place.
Removing the Battery
Turn the phone off. Slide the
battery cover downward and
remove it. Use the opening near
the top of the battery to lift the
battery out.
Charging the Battery
Warning! Use only the charger
provided with the phone. Using
any charger other than the one
included with the AX140 may
damage your phone or battery.
1. Plug the end of the adapter
into the phone’s charger port
and the other end into an
electrical outlet.
2. The charge time varies
depending upon the battery
level.
Battery Charge Level
The battery charge level is shown
at the top right of the LCD
screen. When the battery charge
level becomes low, the low
battery sensor alerts you in three
ways: sounding an audible tone,
blinking the battery icon, and
displaying a warning message. If
the battery charge level becomes
exceedingly low, the phone
automatically switches off and
Note
It is important to fully charge the
battery before initial use of the
phone.

Getting Started with Your Phone
18
Getting Started with Your Phone
any function in progress is not
saved.
Turning the Phone On and
Off
Turning the Phone On
1. Install a charged battery or
connect the phone to an
external power source.
2. Press for about 3
seconds until the LCD screen
lights up.
Turning the Phone Off
1. Press and hold until the
display turns off.
Signal Strength
Call quality depends on the
signal strength in your area. The
signal strength is indicated on
the screen as the number of bars
next to the signal strength icon:
The more bars, the better the
signal strength.
If the signal quality is poor, move
to an open area.
If you are in a building, the
reception may be better near a
window.
Screen Icons
To see the icon glossary, go to
Menu
->
Phone Info
->
Icon
Glossary
on your phone.
Making Calls
1. Make sure the phone is
turned on. If not, press
for about 3 seconds.
2. Enter the phone number
(include the area code if
needed).
3. Press .
lf the phone is locked, enter
the lock code.
19
Getting Started with Your Phone
4. Press to end the call.
Redialing Calls
1. Press twice to redial the
last number you dialed. The
last 120 numbers (dialed,
received, missed) are stored in
the call history list and you
can also select any of these to
redial.
Receiving Calls
1. When the phone rings or
vibrates, press to answer.
2. Press twice to end the
call.
Note
If the phone is restricted, you can
only dial phone numbers saved in
the Emergency Numbers or your
Contacts list. To turn off this
function:
Menu
->
Settings
->
Security
->
Enter lock code
->
Restricted Calls
->
None
->
OK
Note
If you press while the phone is
ringing, the ringing or vibration is
muted for that call.
Manner mode
Sets the phone to vibrate instead
of ring ( is displayed). To
quickly set Manner mode press
and hold . To return to
Normal mode, press and hold
.
Lock Mode
Sets your phone to require a 4digit password in order to use
the phone.
To quickly lock your phone press
for three seconds. To
cancel, press Right Soft Key
Unlock and enter the password.
Mute Function
The Mute Function is used
during a phone call. To quickly
activate Mute press Left Soft Key
Mute
, then to cancel press
Left Soft Key
Unmute
.
Call Waiting
Your cellular service may offer
call waiting. While a call is in
progress, two beeps indicate
another incoming call. When call
waiting is enabled, you may put
the active call on hold while you
answer the other incoming call.
Check with your cellular service
provider for information about
this function.
1. Press to receive a waiting
call.
2. Press again to switch
between calls.
Note
Until you change it, the default
lock code/password is the last 4
digits of your phone number.
Quick Access to Convenient Features
20
Quick Access to Convenient Features

21
Quick Access to Convenient Features
Caller ID
Caller ID displays the phone
number or name of the incoming
call. If the caller’s identity is
stored in Contacts, the name will
appear along with the phone
number. Check with your service
provider to ensure they offer this
feature.
Speed Dialing
Speed dialing is a convenient
feature that allows you to make
phone calls quickly. A number
key can be assigned to a specific
phone number. By pressing and
holding down a number key, your
phone will recall the phone
number associated from the
Contacts list and display it
briefly while simultaneously
dialing that phone number for
you. Speed Dial Number 1 is set
to Voice Mailbox by default and
is unchangeable.
Dialing Single Digit Speed
Dials (from 2 to 9)
Press and hold the Speed Dial
number.
OR
Enter the speed dial number
and press .
Dialing Double Digit Speed
Dials (from 10 to 99)
Press the first digit and then
press and hold the key of the
last digit.
OR
Enter the first and second
digits and press .

Entering and Editing Information
22
Entering and Editing Information
Text Input
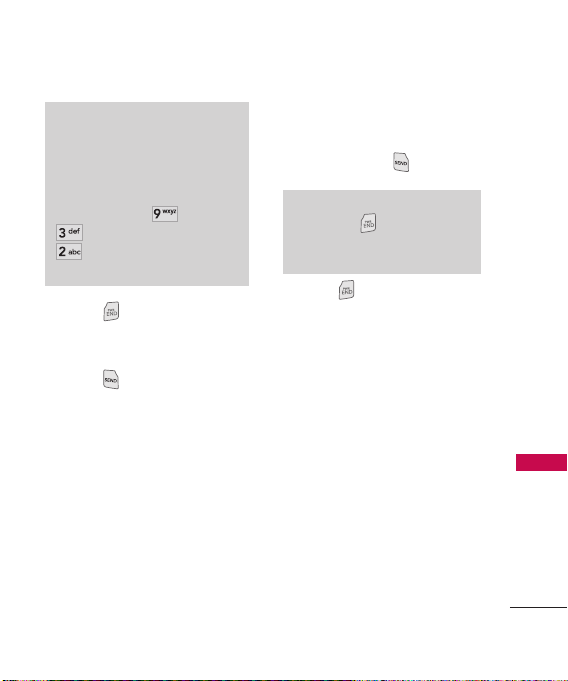
Key Functions
Left Soft Key:
Press to scroll through the
following text input
modes: T9Word
(T9WORD/ T9Word/
T9word) -> Abc
(ABC/Abc/abc) -> 123 ->
Symbols
Shift: Press to change
case.
T9 text: T9Word ->
T9WORD -> T9word
Abc text: Abc -> ABC ->
abc
Next: In T9 mode, press
to display other
matching words.
Space: Press to complete
a word and insert a space.
Clear: Press to delete a
single space or
character. Hold to delete
the whole message.
Punctuation: In T9 mode,
press to insert
punctuation in a word and
complete a sentence.
Text Input Modes
There are four modes for
entering text; numbers, special
characters, and punctuation. In a
text entry field, pressing Left
Soft Key displays a pop-up
list of text modes.
T9Word (T9) Mode
Also known as predictive text
mode, T9 allows the phone to
automatically translate keystrokes
into common words that are in the
T9 internal database. The
technology allows words to be
entered by a single keypress for
/

23
Entering and Editing Information
each letter as opposed to the
multi-tap method where selecting a
single letter requires multiple key
presses.
Abc (Multi-tap) Mode
Use to add words to the T9
database.
123 (Numbers) Mode
Use to type numbers using one
keystroke per number.
Symbols Mode
Use to insert special characters
or punctuation. There are 36
special characters.
Changing Letter Case
Text can be capitalized when in
T9 and Abc input mode. Press
to reach the following:
Initial Cap (T9Word/ Abc)
Only the first letter is capitalized
and subsequent letters are lower
case.
Caps Lock (T9WORD/ ABC)
All letters are capitalized.
Lower Case (T9word/ abc)
All letters are in lower case.

Contacts in Your Phone’s Memory
24
Contacts in Your Phone’s Memory
Searching Your Phone’s
Memory
The AX140 phone is able to
perform a dynamic search of the
contents in your phone’s
memory. A dynamic search
compares entered letters or
numbers against the entries in
your Contacts. A matching list is
displayed in descending order.
You can then select a number
from the list to call or edit. There
are several ways to search.
Scrolling Through Your
Contacts
1. Press
Contact List
to
display your Contacts
alphabetically.
2. Use to scroll through the
list.
Searching by Letter
1. Press
Contact List
to
display your Contacts
alphabetically.
2. Press (or press repeatedly)
the key on the keypad that
corresponds with the search
letter.
Searching Options
1. Press
Contact List
.
2. Press Right Soft Key
Options
.
3. Select the search criteria (use
then press , or press
the corresponding number on
the keypad):
Send Message
: Send a text
message to the selected
contact.
Delete
: Delete the selected
entry in your Contacts.
Edit
: Edit the selected
contact information.
Call
Delete All
: Deletes all
contacts.
Cancel

25
Contacts in Your Phone’s Memory
Making a Call From Your
Phone’s Memory
Once you have stored phone
numbers in your Contacts, you
can place calls to those numbers
quickly and easily.
G
By pressing Send Key
after searching for a phone
number in Contacts or Recent
Calls and highlighting it.
G
By using Speed Dialing.
From Contacts
1. Press
Contact List
to
display your Contacts
alphabetically.
2. Use to select the Contact
entry, then press .
3. Use to select the phone
number.
4. Press to place the call.
From Recent Calls
1. Press Left Soft Key
Menu
.
2. Press
Recent Calls
.
3. Use to select the type of
recent call, then press .
Missed Calls/Dialed Calls
/
Received Calls/All Calls
4. Use to select the phone
number.
5. Press to place the call.
Speed Dialing
For a single-digit Speed Dial,
press and hold the digit or press
the digit, then press . For a
double-digit Speed Dial, press
the first digit and hold the
second digit or press the first
and second digits, then press
.

26
Messaging
The phone can store up to 115
messages (50 inbox text
messages, 50 text sent message,
15 text draft messages). The
AX140 supports up to 160
characters. The information
stored in the message is
determined by phone mode and
service capability. Other limits
such as available characters per
message may exist, please check
with your service provider for
system features and capabilities.
1. New Message
Allows you to send text
messages, pages, and e-mail
transmissions. Each message has
a destination (Address 1) and
information (Message). These
are dependent upon the type of
message you want to send.
The Basics of Sending a Text
Message
1. Press Left Soft Key , ,
.
2. Enter the recipient's address.
3. Press to access the
message screen.
4.
Type your message (text or
e-mail).
5. Press Send.
A confirmation message is
displayed.
Customizing the Text Message
Using Options
1. Create a new message.
2. Press Right Soft Key
Options
.
3. Select the option(s) to
customize.
Contacts
To select a recipient
from your Contacts list.
Using Phone Menus
Messaging
Messaging
 Loading...