

Page 1

P/NO : MFL67798204
Ceiling suspended air conditioner
Copyright © 2017 LG Electronics Inc. All Rights Reserved.
www.lg.com
Please read this manual carefully before operating
your set and retain it for future reference.
OWNER’S MANUAL
AIR
CONDITIONER
ENGLISH
ภาษาไทย
Page 2

TIPS FOR SAVING ENERGY
2
ENGLISH
TIPS FOR SAVING ENERGY
Here are some tips that will help you minimize the power consumption when you use the air
conditioner. You can use your air conditioner more efficiently by referring to the instructions
below:
• Do not cool excessively indoors. This may be harmful for your health and may consume more
electricity.
• Block sunlight with blinds or curtains while you are operating the air conditioner.
• Keep doors or windows closed tightly while you are operating the air conditioner.
• Adjust the direction of the air flow vertically or horizontally to circulate indoor air.
• Speed up the fan to cool or warm indoor air quickly, in a short period of time.
• Open windows regularly for ventilation as the indoor air quality may deteriorate if the air conditioner is used for many hours.
• Clean the air filter once every 2 weeks. Dust and impurities collected in the air filter may block
the air flow or weaken the cooling / dehumidifying functions.
For your records
Staple your receipt to this page in case you need it to prove the date of purchase or for warranty
purposes. Write the model number and the serial number here:
Model number :
Serial number :
You can find them on a label on the side of each unit.
Dealer’s name :
Date of purchase :
Page 3

IMPORTANT SAFETY INSTRUCTIONS
IMPORTANT SAFETY INSTRUCTIONS
READ ALL INSTRUCTIONS BEFORE USING THE APPLIANCE.
Always comply with the following precautions to avoid dangerous situations and ensure peak
performance of your product
WARNING
!
It can result in serious injury or death when the directions are ignored
CAUTION
!
It can result in minor injury or product damage when the directions are ignored
WARNING
!
• Installation or repairs made by unqualified persons can result in hazards to you and others.
• Installation MUST comply with local building codes.
If there is no local codes, comply with the Nation Electrical Code NFPA 70/ANSI C1-1003,
Canadian Electrical Code Part1 CSA C.22.1. or current edition.
• The information contained in the manual is intended for use by a qualified service technician
familiar with safety procedures and equipped with the proper tools and test instruments.
• Failure to carefully read and follow all instructions in this manual can result in equipment malfunction, property damage, personal injury and/or death.
3
ENGLISH
Installation
• Do not use a defective or underrated circuit breaker. Use this appliance on a dedicated circuit.
There is risk of fire or electric shock.
• For electrical work, contact the dealer, seller, a qualified electrician, or an Authorized Service
Center. Do not disassemble or repair the product. There is risk of fire or electric shock.
• Always ground the product. There is risk of fire or electric shock.
• Install the panel and the cover of control box securely. There is risk of fire or electric shock.
• Always install a dedicated circuit and breaker. Improper wiring or installation may cause fire or
electric shock
• Use the correctly rated breaker or fuse. There is risk of fire or electric shock.
• Do not modify or extend the power cable. There is risk of fire or electric shock.
• Do not install, remove, or re-install the unit by yourself (customer). There is risk of fire, electric
shock, explosion, or injury.
• Be cautious when unpacking and installing the product. Sharp edges could cause injury. Be
especially careful of the case edges and the fins on the condenser and evaporator.
• For installation, always contact the dealer or an Authorized Service Center. There is risk of
fire, electric shock, explosion, or injury.
• Do not install the product on a defective installation stand. It may cause injury, accident, or
damage to the product.
• Be sure the installation area does not deteriorate with age. If the base collapses, the air conditioner could fall with it, causing property damage, product failure, and personal injury.
• Do not let the air conditioner run for a long time when the humidity is very high and a door or
a window is left open. Moisture may condense and wet or damage furniture.
Page 4

4
ENGLISH
Operation
• Take care to ensure that power cable could not be pulled out or damaged during operation.
• Do not place anything on the power cable. There is risk of fire or electric shock.
• Do not plug or unplug the power supply plug during operation. There is risk of fire or electric
• Do not touch(operate) the product with wet hands. There is risk of fire or electric shock.
• Do not place a heater or other appliances near the power cable. There is risk of fire and elec-
• Do not allow water to run into electric parts. There is risk of fire, failure of the product, or elec-
• Do not store or use flammable gas or combustibles near the product. There is risk of fire or
• Do not use the product in a tightly closed space for a long time. Oxygen deficiency could
• When flammable gas leaks, turn off the gas and open a window for ventilation before turning
• If strange sounds, or smell or smoke comes from product. Turn the breaker off or disconnect
• Stop operation and close the window in storm or hurricane. If possible, remove the product
• Do not open the inlet grill of the product during operation.(Do not touch the electrostatic filter,
• When the product is soaked (flooded or submerged), contact an Authorized Service Center.
• Be cautious that water should not enter the product. There is risk of fire, electric shock, or
• Ventilate the product from time to time when operating it together with a stove, etc. There is
• Turn the main power off when cleaning or maintaining the product. There is risk of electric
• When the product is not to be used for a long time, disconnect the power supply plug or turn
• Take care to ensure that nobody should step on or fall onto the outdoor unit. This could result
IMPORTANT SAFETY INSTRUCTIONS
There is risk of fire or electric shock.
shock.
tric shock.
tric shock.
failure of product.
occur.
the product on. Do not use the telephone or turn switches on or off. There is risk of explosion
or fire
the power supply cable. There is risk of electric shock or fire.
from the window before the hurricane arrives. There is risk of property damage, failure of
product, or electric shock.
if the unit is so equipped.) There is risk of physical injury, electric shock, or product failure.
There is risk of fire or electric shock.
product damage.
risk of fire or electric shock.
shock.
off the breaker. There is risk of product damage or failure, or unintended operation.
in personal injury and product damage.
CAUTION
!
Installation
• This appliance is intended to be used by expert or trained users in shops, in light industry and
on farms, or for commercial use by lay persons.
• Always check for gas (refrigerant) leakage after installation or repair of product. Low refrigerant levels may cause failure of product.
• Install the drain hose to ensure that water is drained away properly. A bad connection may
cause water leakage.
• Keep level even when installing the product. To avoid vibration or water leakage.
Page 5

IMPORTANT SAFETY INSTRUCTIONS
• Do not install the product where the noise or hot air from the outdoor unit could damage the
neighborhoods. It may cause a problem for your neighbors.
• Use two or more people to lift and transport the product. Avoid personal injury.
• Do not install the product where it will be exposed to sea wind (salt spray) directly. It may
cause corrosion on the product. Corrosion, particularly on the condenser and evaporator fins,
could cause product malfunction or inefficient operation.
Operation
• This appliance is not intended for use by persons (including children) with reduced physical,
sensory or mental capabilities, or lack of experience and knowledge, unless they have been
given supervision or instruction concerning use of the appliance by a person responsible for
their safety.
• Children being supervised not to play with appliance.
• Do not expose the skin directly to cool air for long periods of time. (Don't sit in the draft.) This
could harm to your health.
• Do not use the product for special purposes, such as preserving foods, works of art, etc. It is
a consumer air conditioner, not a precision refrigeration system. There is risk of damage or
loss of property.
• Do not block the inlet or outlet of air flow. It may cause product failure.
• Use a soft cloth to clean. Do not use harsh detergents, solvents, etc. There is risk of fire, electric shock, or damage to the plastic parts of the product.
• Do not touch the metal parts of the product when removing the air filter. They are very sharp!
There is risk of personal injury.
• Do not step on or put anyting on the product. (outdoor units) There is risk of personal injury
and failure of product.
• Always insert the filter securely. Clean the filter every two weeks or more often if necessary.
A dirty filter reduces the efficiency of the air conditioner and could cause product malfunction
or damage.
• Do not insert hands or other objects through the air inlet or outlet while the product is operated. There are sharp and moving parts that could cause personal injury.
• Do not drink the water drained from the product. It is not sanitary and could cause serious
health issues.
• Use a firm stool or ladder when cleaning or maintaining the product. Be careful and avoid personal injury.
• Replace the all batteries in the remote control with new ones of the same type. Do not mix
old and new batteries or different types of batteries. There is risk of fire or explosion
• Do not recharge or disassemble the batteries. Do not dispose of batteries in a fire. They may
burn or explode.
• If the liquid from the batteries gets onto your skin or clothes, wash it well with clean water.
Do not use the remote if the batteries have leaked. The chemicals in batteries could cause
burns or other health hazards.
• If you eat the liquid from the batteries, brush your teeth and see doctor. Do not use the remote if the batteries have leaked. The chemicals in batteries could cause burns or other
health hazards.
5
ENGLISH
Page 6

6
TABLE OF CONTENTS
ENGLISH
TABLE OF CONTENTS
2 TIPS FOR SAVING ENERGY
3 IMPORTANT SAFETY INSTRUCTIONS
7 BEFORE USE
7 Preparing for operation
7 Usage
7 Cleaning and maintenance
7 Service
8 PRODUCT INTRODUCTION
8 Name and function of parts
9 Operation Indication Lamps
10 Wireless Remote Controller
12 OPERATING INSTRUCTION
12 How to insert the Batteries
12 Wireless Remote Controller Maintenance
13 INSTALLATION INSTRUCTIONS
13 Installer Setting - Setting Address of Central Control
13 Installer Setting - Checking Address of Central Control
14 OWNER'S INSTRUCTION
14 Cooling Mode -Standard Operation
14 Cooling Mode - Power Cooling
15 Auto Operation Mode
16 Dehumidification Mode
17 Fan Mode
18 Temperature Setting/Room Temperature checking
19 Airflow setting
19 Celsius/fahrenheit switching
20 Timer
21 MAINTENANCE AND SERVICE
21 Indoor Unit
22 Operation tips!
23 Troubleshooting Tips! Save time and money!
23 Call the service immediately in the following situations
Page 7

BEFORE USE
BEFORE USE
Preparing for operation
- Contact an installation specialist for installation.
- Use a dedicated circuit.
Usage
- Being exposed to direct airflow for an extended period of time could be hazardous to your
health. Do not expose occupants, pets, or plants to direct airflow for extended periods of time.
- Due to the possibility of oxygen deficiency, ventilate the room when used together with stoves
or other heating devices.
- Do not use this air conditioner for non-specified special purposes (e.g. preserving precision devices, food, pets, plants, and art objects). Such usage could damage the items.
Cleaning and maintenance
- Do not touch the metal parts of the unit when removing the filter. Injuries can occur when handling sharp metal edges.
- Do not use water to clean inside the air conditioner. Exposure to water can destroy the insulation, leading to possible electric shock.
- When cleaning the unit, first make sure that the power and breaker are turned off. The fan rotates at a very high speed during operation. There is a possibility of injury if the unit’s power is
accidentally triggered on while cleaning inner parts of the unit.
7
ENGLISH
Service
For repair and maintenance, contact your authorized service dealer.
Page 8

PRODUCT INTRODUCTION
8
ENGLISH
PRODUCT INTRODUCTION
Name and function of parts
7
6
4
5
1
4
3
1 Indoor unit
2 Outdoor unit
3 Remote controller
4 Inlet air
5 Discharge air
6 Refrigerant piping, connection electric wire
7 Drain pipe
8 Ground wire
Wire to ground outdoor unit to prevent electrical shocks.
2
8
Page 9
PRODUCT INTRODUCTION
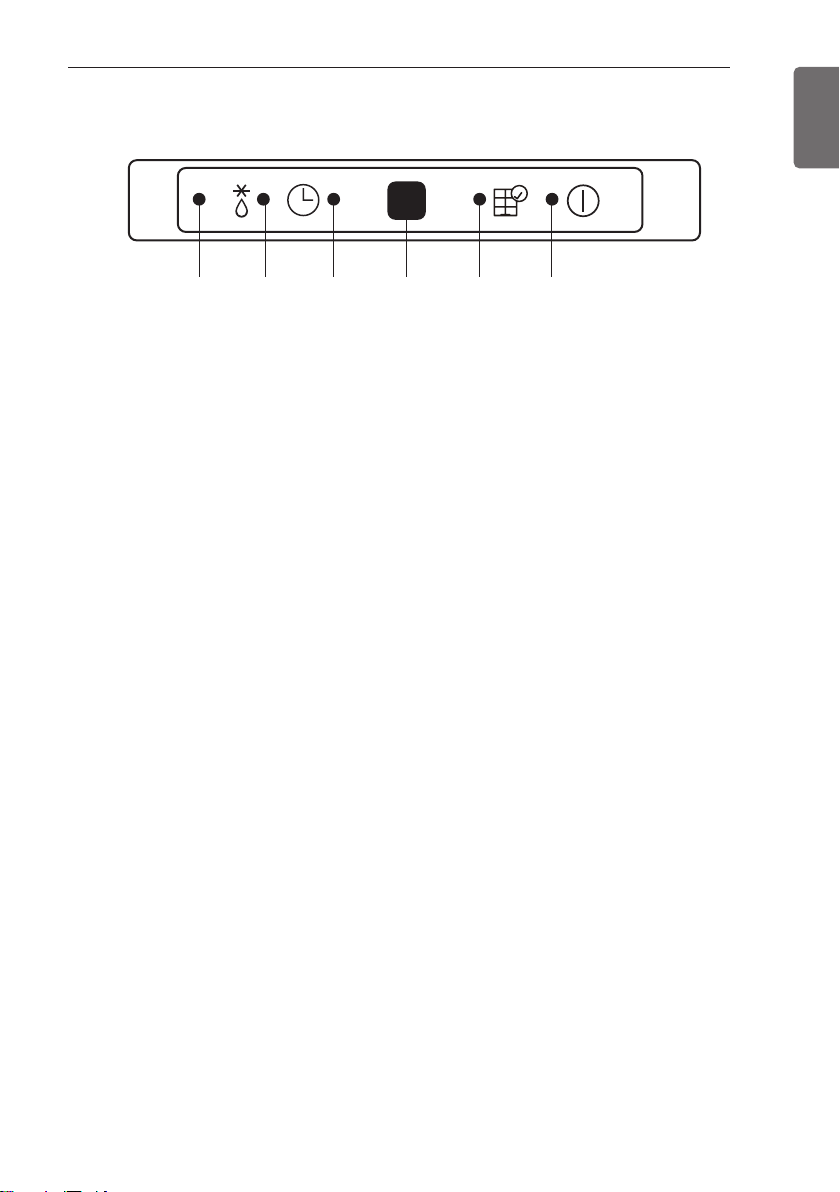
Operation Indication Lamps
123 4 5 6
1 Forced operation : Operation procedures when remote control can’t be used.
2 Defrost Mode : Lights up during defrost mode or hot start operation.
(heat pump model only)
3 Timer : Lights up during timer operation.
4 Signal Receptor : Receives the signal from remote control (signal receiving sound: two short
beeps and one long beep)
5 Filter sign : Lights up after 2400 hours from the time of first operation.
6 On/Off : Lights up during system operation.
9
ENGLISH
Page 10
PRODUCT INTRODUCTION
10
ENGLISH
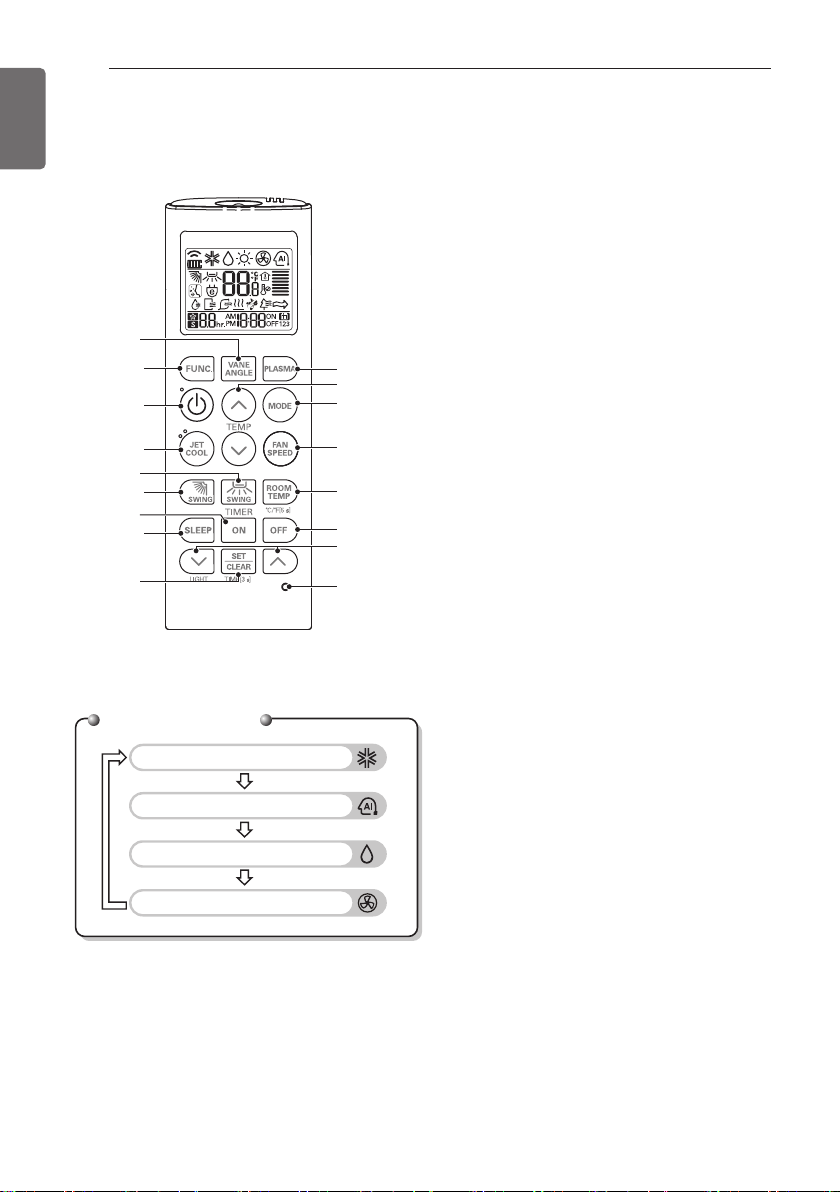
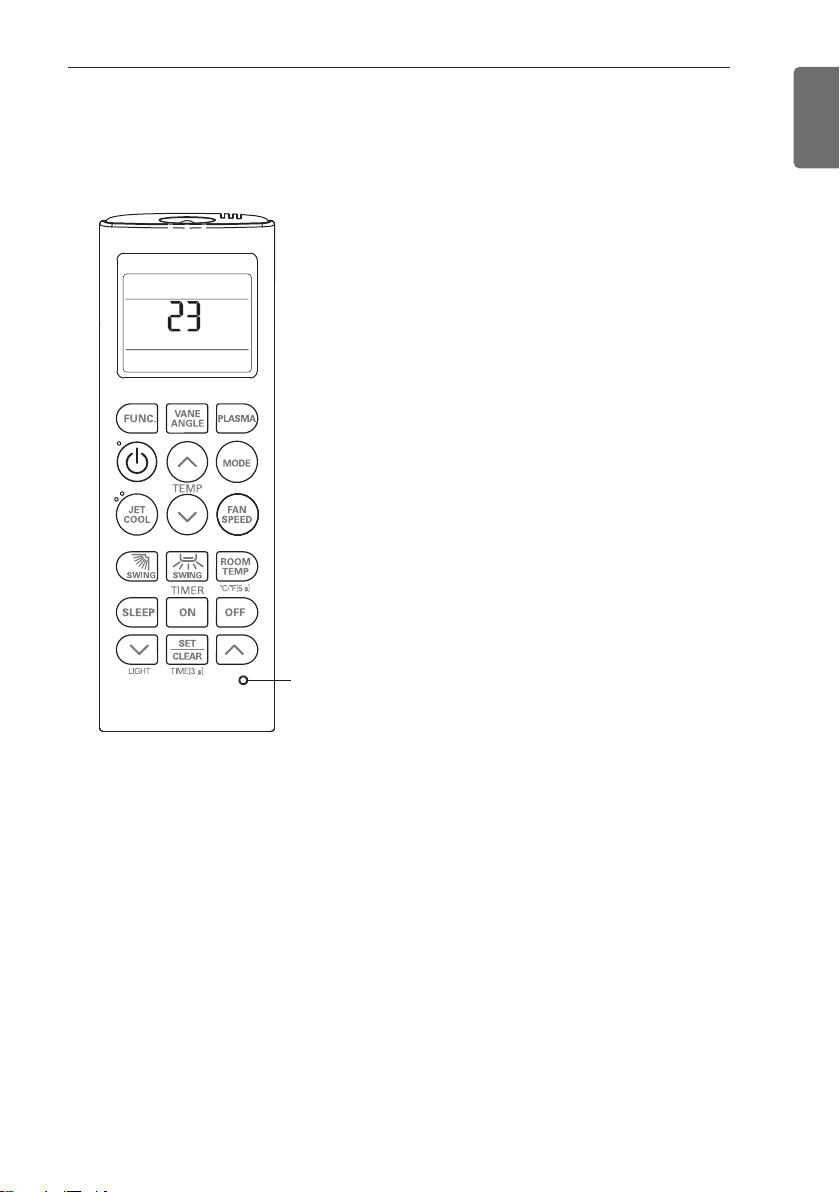
Wireless Remote Controller
This air-conditioner is equipped with wireless remote controller basically. But if you want to be
available with wired remote controller, you pay for it.
1
VANE ANGLE button (Useless)
Used to set each vane angle.
2
FUNCTION SETTING button (Useless)
Used to set or clear auto clean, smart clean,
electric heater or individual vane angle control.
3
ON/OFF button
1
2
3
4
5
6
7
8
9
Operation Mode
Cooling Mode
Auto Operation Mode
Dehumidification Mode
Fan Mode
10
11
12
13
14
15
16
17
Used to turn on/off the unit.
4
JET COOL button
Speed cooling operates super high fan speed.
5
LEFT/RIGHT AIRFLOW button (Useless)
Used to set the desired left/right(horizontal)
airflow direction.
6
UP/DOWN AIRFLOW button
Used to stop or start louver movement and
set the desired up/down airflow direction.
7
ON TIMER button
Used to set the time of starting operation.
8
SLEEP TIMER button
Used to set the time of sleeping operation.
(Refer to timer setting)
9
SET / CLEAR button
Used to SET / CLEAR the timer.
Used to set the current time (if it input for 3
seconds)
10
PLASMA button (Useless)
Used to start or stop the plasma-purification
function.
11
ROOM TEMPERATURE SETTING button
Used to select the room temperature.
12
OPERATION MODE SELECTION button
Used to select the operation mode.
13
INDOOR FAN SPEED SELECTION button
Used to select fan speed in four steps low,
medium, high and auto.
14
ROOM TEMPERATURE CHECKING button
Used to check the room temperature.
15
OFF TIMER button
Used to set the time of stopping operation.
16
TIMER SETTING(Up/Down)/LIGHT button
Used to set the timer.
Used to adjust the brightness.(if it is not
time adjust mode)
17
RESET button
Used to reset the remote controller.
Page 11
CAUTION
!
Caution of handling the Remote Controller
- Aim at the signal receiver on the wired remote controller so as to operate.
- Be sure that there are no obstructions between the remote controller and the signal receptor.
- Do not drop or throw the remote controller.
- Do not place the remote controller in a location exposed to direct sunlight, or near
the heating unit, or any other heat source.
- Block a strong light over the signal receptor with a curtain or etc. so as to prevent
the abnormal operation. (ex:electronic
quick start, ELBA, inverter type fluorescent lamp)
NOTE
!
-
The wireless remote controller do not
operate the swirl mode.
-
The actual product can be different from
above contents depending upon model
type.
PRODUCT INTRODUCTION
11
ENGLISH
Page 12
OPERATING INSTRUCTION
12
ENGLISH
OPERATING INSTRUCTION
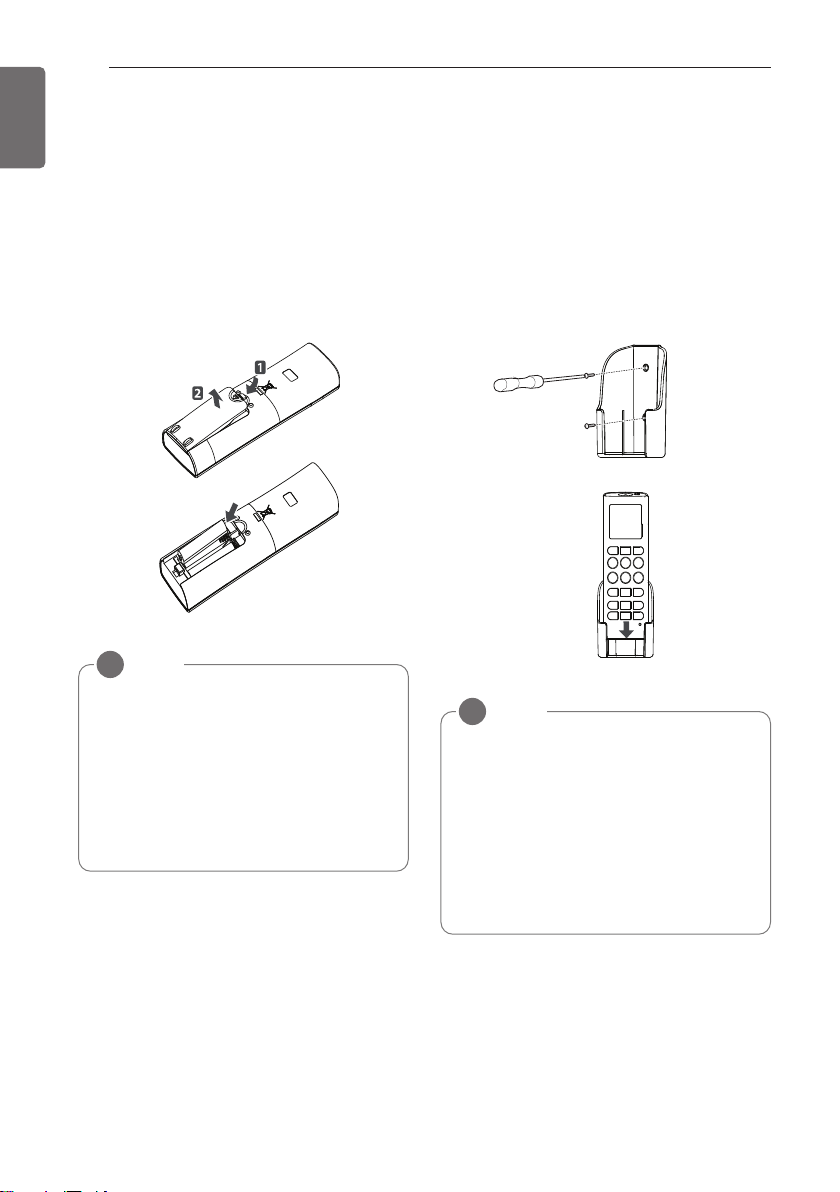
How to insert the Batteries
Remove the battery cover by pulling it according to the arrow direction.
Insert new batteries making sure that the (+)
and (-) of battery are installed correctly.
Reattach the cover by sliding it back into position.
NOTE
!
- Always use/replace both batteries of
same type.
- If the system is not to be used for a
long time, remove the batteries to save
their working life.
- If the display screen of remote con-
troller starts, fading replace both of the
batteries.
Wireless Remote Controller
Maintenance
Choose a suitable place where its safe & easy
to reach.
Fix the holder to wall etc with the supplied
screws firmly.
Slide the remote controller inside the holder.
NOTE
!
- Remote controller should never be exposed to direct sunlight.
- Signal transmitter & receiver should always be clean for proper communication. Use a soft cloth to clean them.
- In case some other appliances also get
operated with remote control, change
their position or consult your serviceman.
Page 13
INSTALLATION INSTRUCTIONS
INSTALLATION INSTRUCTIONS
Installer Setting - Setting Address of Central Control
1 With the MODE button pressed, press the
RESET button.
2 By using the temperature setting button,
set the indoor unit address.
• Setting range : 00 ~ FF
3 After setting the address, press the
ON/OFF button toward the indoor unit 1
time.
4 The indoor unit will display the set address
to complete the address setting.
- The address display time and method can
differ by the indoor uint type.
5 Reset the remote controller to use the
general operation mode.
13
ENGLISH
RESET button
Installer Setting - Checking Address of Central Control
1 With the FUNC. button pressed, press the RESET button.
2 Press the ON/OFF button toward the indoor unit 1 time, and the indoor unit will display the
set address in the display window.
- The address display time and method can differ by the indoor unit type.
3 Reset the remote controller to use the general operation mode.
Page 14
OWNER'S INSTRUCTION
14
ENGLISH
OWNER'S INSTRUCTION
Cooling Mode Standard Operation
Cooling Mode - Power Cooling
1 Press the ON/OFF button.
The unit will respond with beep sound.
2 Press MODE button to select Cooling
Mode.
3 Set the desired temperature by pressing
TEMP button.
Press ROOM TEMP button to check the
room temperature. When setting the desired temperature is higher than room temperature, cooling wind isn’t blow out.
-
Setting Temp. Range : 18~30 °C(64~86 °F)
1 Press the ON/OFF button.
The unit will respond with beep sound.
2 Press MODE button to select Cooling
Mode.
3 Press the JET COOL button. The unit will
operate in super high fan speed in cooling
mode.
4 To cancel the Power Cooling Mode press
the JET COOL or FAN SPEED or TEMP.
again and the unit will operate in high fan
speed in Cooling Mode.
Page 15
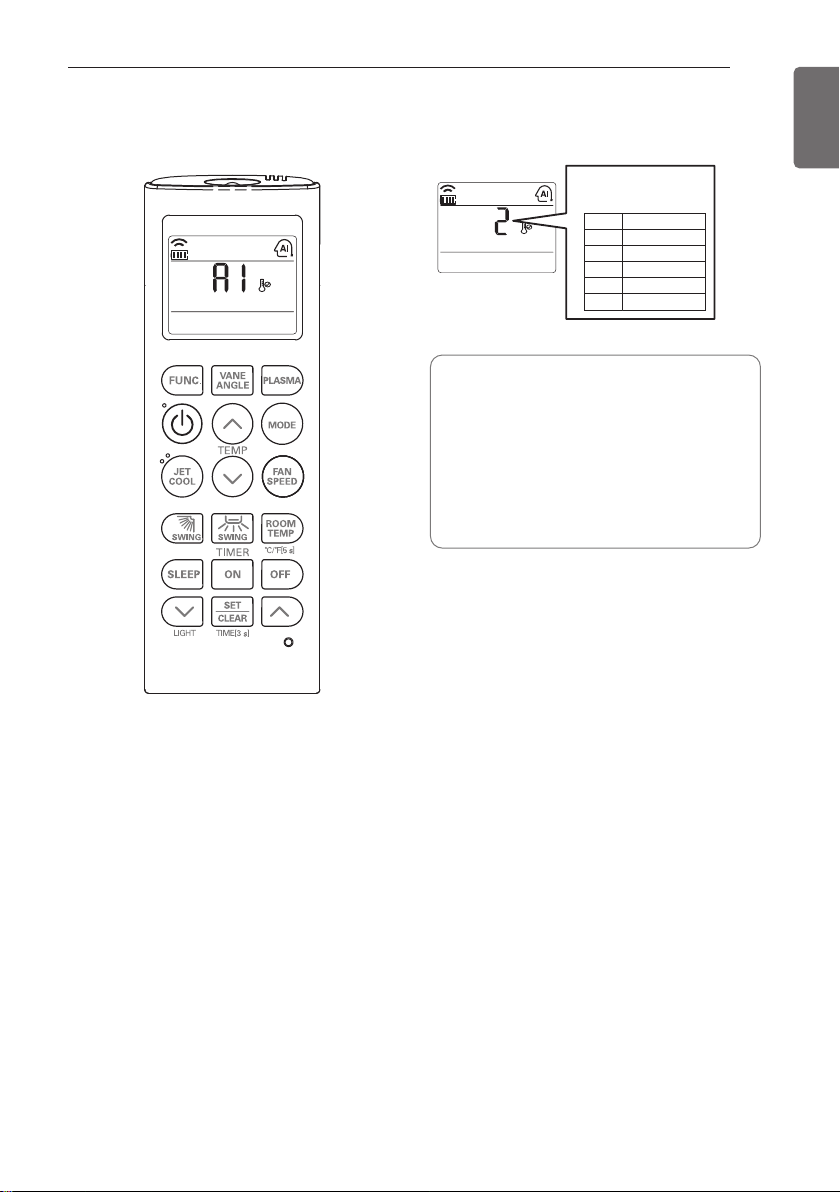
Auto Operation Mode
Code Feel
2 Cold
1 Slightly cool
0 Neutral
-1 Slightly warm
-2 Warm
❈ Please select the code
depend on your feeling.
OWNER'S INSTRUCTION
During Auto Operation Mode
- If the system is not operating as desired, manually switch to another mode.
The system will not automatically
switch from the cooling mode to the
heating mode, or from heating to cooling, then you must set the mode and
the desired temperature again.
15
ENGLISH
1 Press the ON/OFF button.
The unit will respond with beep sound.
2 Press MODE button to select Auto Opera-
tion Mode.
3 Set the desired temperature.
The temperature and fan speed are automatically set by the electronic controls
based on the actual room temperature.
If you feel hot or cold, press TEMP. buttons for more cooling or heating effect.
You cannot switch the indoor fan speed. It
has already been set by the Auto Operation Mode rule.
Page 16

OWNER'S INSTRUCTION
16
ENGLISH
Dehumidification Mode
During Dehumidification Mode
- If you select the dehumidification mode
on the operation selection button, the
indoor unit starts to run the dehumidification function, automatically setting
the room temp. and air volume to the
best condition for dehumidification
based on the sensed room temp.
In this case, the setting temp. is not displayed in the Remote Controller and you
are not able to control the room temp.
either.
- During the healthy dehumidification
function, the air volume is automatically
set according to the algorithm responding to the current room temp. and
makes the room condition healthy and
comfortable even in the high humidity
season.
1 Press the ON/OFF button.
The unit will respond with beep sound.
2 Press MODE button to select Dehumidifi-
cation Mode.
3 Set the fan speed. You can select the fan
speed in four steps - low, medium, high, or
auto. Each time the button is pressed, the
fan speed mode is shifted.
Page 17

Fan Mode
OWNER'S INSTRUCTION
Natural Wind by the auto Logic
- For more fresh feeling than other fan
speed, press the Indoor Fan Speed Selector and set to auto mode. In this
mode, the wind blows like natural
breeze by automatically changing fan
speed according to the auto logic.
During Fan Mode
- The outdoor compressor doesn't work.
Have a function to circulate the indoor
as it sends out the air that doesn't have
much temperature difference with indoor.
17
ENGLISH
1 Press the ON/OFF button.
The unit will respond with beep sound.
2 Press MODE button to select Fan Mode.
3 Set the fan speed. You can select the fan
speed in four steps - low, medium, high, or
auto. Each time the button is pressed, the
fan speed mode is shifted.
Page 18

OWNER'S INSTRUCTION
18
ENGLISH
Temperature Setting/Room Temperature checking
We can simply adjust the desired temperature
- Press the buttons to adjust the desired
temperature
Room temp: Indicate the current room
temperature
Set temp: Indicate the temperature that
user want to set
The cooling mode doesn't work if desired
temperature is higher than room temperature.
Please lower the desired temperature.
: Increase 1 °C or 1 °F per one
time pressing
: Decrease 1 °C or 1 °F per one
time pressing
Whenever press button, the room temperature will be displayed within 5 seconds.
After 5 seconds, it turns to display the
desired temperature.
Because of location of remote controller,
the real room temperature and the this
displayed value can be different.
Page 19

Airflow setting
OWNER'S INSTRUCTION
Up/down airflow direction control
The SWING (up/down) airflow can be adjusted
by using the remote controller.
1 Press the ON/OFF button to start the unit.
2 Press SWING (up/down) airflow button and
the louvers will swing up and down.
NOTE
!
- Always use the remote controller to adjust the up/down airflow direction.
Manually moving the direction louver by
hand, could damage the air conditioner.
19
ENGLISH
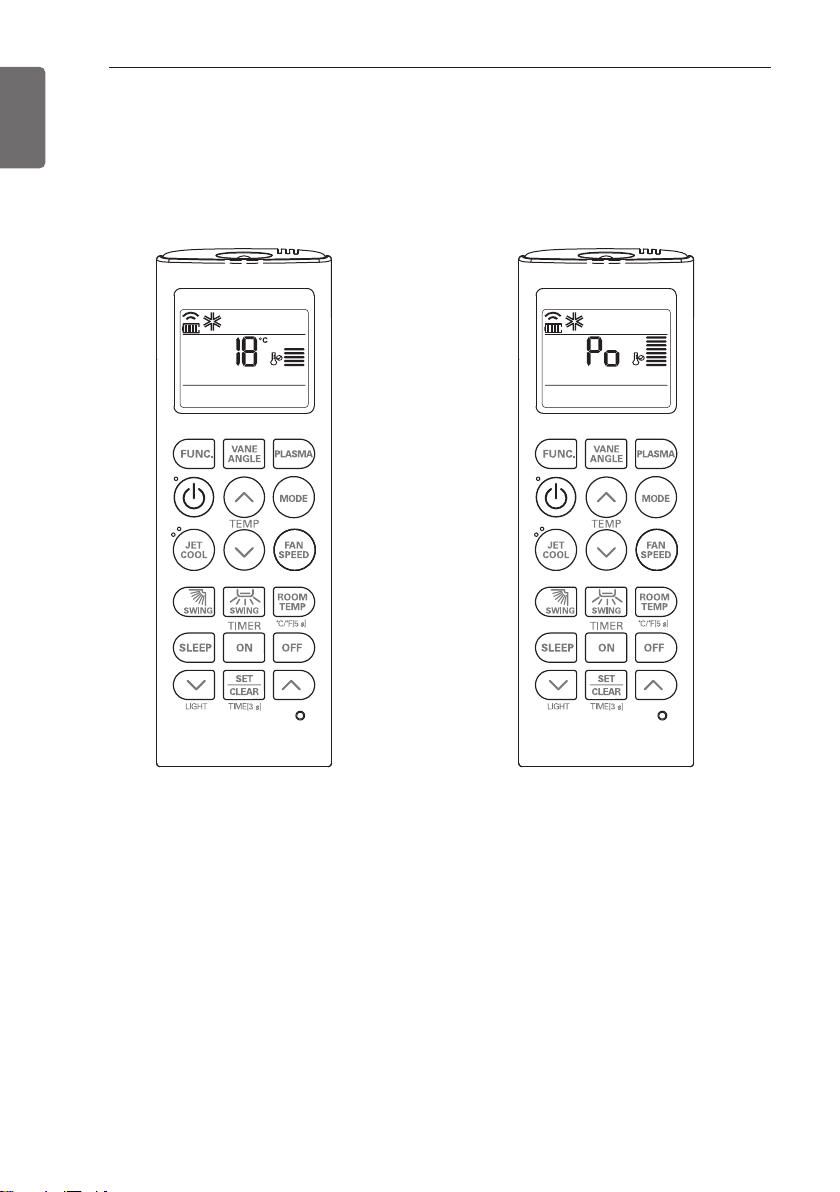
Celsius/fahrenheit switching
- Press the ROOM TEMP button (5 seconds)
to change from celsius to fahrenheit or from
fahrenheit to celsius.
- Whenever press TEMP. button in fahrenheit
mode, the temperature
will increase/drop 1 °F.
Page 20

OWNER'S INSTRUCTION
Timer Sleep Timer ON Timer OFF
20
ENGLISH
Timer
Setting the Current Time
1 Press the SET/CLEAR button for 3 seconds.
2 Press TIME SETTING buttons until the desired time is set.
3 Press the SET / CLEAR button.
NOTE
!
Check the indicator for A.M. and P.M.
Timer Setting
1 Press the TIMER button to turn timer on or off.
2 Press TIME SETTING buttons until the desired time is set.
3 Press the SET / CLEAR button.
NOTE
!
Select one of the following 3 types of operation.
To cancel the Timer Setting
- If you wish to cancel all timer setting, press the SET/CLEAR button.
- If you wish to cancel each timer setting, press the TIMER button to turn timer sleep or on or off
as you want.
And then press the SET/CLEAR button aiming the remote controller at the signal receptor.
(The timer lamp on the air conditioner and the display will go off.)
Page 21

B
e
n
z
e
n
e
C
L
B
A
R
G
E
S
I
N
N
E
R
Air outlet vent
Air inlet
vent
(inlet grille)
Air filters
(behind
inlet grille)
Louver
MAINTENANCE AND SERVICE
MAINTENANCE AND SERVICE
21
ENGLISH
Indoor Unit
Grille, Case and Remote Control
- Turn the system off before cleanining, To
clean, wipe with a soft, dry cloth. Do not use
bleach or abrasives.
CAUTION
!
Supply power must be disconnected before cleaning the indoor unit.
Air Filters
The air filters behind the front grille should be
checked and cleaned once every 2 weeks or
more often if neccessary.
- Never use any of the followings:
Water hotter than 40 °C.
Could cause deformation and/or discoloration.
Volatile substances.
Could damage the surfaces of the air conditioner.
- Remove the Air filters.
Take hold of the tab and pull slightly forward
to remove the filter.
CAUTION
!
When the air filter is to be removed, do
not touch the metal parts of the indoor
unit.
It may cause an injury.
- Clean dirt from the air filter using a vacuum
cleaner or washing with water.
If dirt is conspicuous, wash with a neutral detergent in lukewarm water.
If hot water (40 °C or more) is used, it may
be deformed.
- After washing with water, dry well in the
shade.
Do not expose the air filter to direct sunlight
or heat from a fire when drying it.
- Install the air filter.
Page 22

22
MAINTENANCE AND SERVICE
ENGLISH
Do not overc ool the room.
This is not good for the health
and wastes electricity.
Ke ep blinds or curtains close d.
Do not let direct sunshine
enter the room when the air
conditioner is in operation.
Ke ep the room te mperature
uniform.
Adjust the vertical airow direction to ensure a uniform
temperature in the room.
M ake sure that the doors
and w indows are s hut tight.
Avoid opening doors and windows as much as possible to
keep the cool air in the room.
Clean the air filter regularly.
Blockages in the air lter reduce the airow and lower
cooling and dehumidifying effects. Clean at least once
every two weeks.
Ventilate the room oc cas ionally.
Since windows are kept
closed, it is a good idea to
open them and ventilate the
room now and then.
When air conditioner is not going to
be used for a long time.
- Operate the air conditioner at the following
settings for 2 to 3 hours.
Type of operation: Fan operation
mode.(refer fan mode)
This will dry out the internal mechanisms.
- Turn o the breaker.
- Remove the batteries from the remote controller.
Helpful information
The air lters and your electiric bill.
If the air lters become clogged with dust, the
cooling capacity will drop, and 6 % of the electricity used to operate the air conditioner will
be wasted.
When the air conditioner is to be
used again.
- Clean the air lter and install it in the indoor
unit. (refer air lters)
- Check that the air inlet and outlet of the indoor/outdoor unit are not blocked.
- Check that the ground wire is connected correctly. It may be connect to the indoor unit
side.
CAUTION
Turn o the breaker when the air conditioner is not going to be used for a long
time.
Dirt may collect and may cause a re.
!
Operation tips!
Page 23

MAINTENANCE AND SERVICE
Troubleshooting Tips! Save time and money!
Check the following points before requesting repairs or service.... If the malfunction persist,
please contact your dealer.
23
ENGLISH
The air conditioner
does not operate.
- Have you made a
mistake in timer operation?
- Has the fuse blown
or has the circuit
breaker been
tripped?
Doe s not cool or heat
effec tively.
- Is the air filter dirty?
See air filter cleaning
instructions.
- The room may have
been very hot when
the room air conditioner was first
turned on. Allow
time for it to cool
down.
- Has the temperature
been set incorrectly?
- Are the indoor unit's
air inlet or outlet
vents obstructed?
T
he room has a pecu-
liar odor.
- Check that this is not
a damp smell exuded by the walls,
carpet, furniture or
cloth items in the
room.
The air conditioner operation is noisy.
- For a noise that
sounds like water
flowing.
* This is the sound
of freon flowing inside the air conditioner unit.
- For a noise that
sounds like the compressed air releasing
into atmosphere.
-
This is the sound of
the dehumidifying
water being
processed inside the
air conditioning unit.
It seems that condensation is leaking from
the air conditioner.
- Condensation occurs
when the airflow
from the air conditioner cools the
warm room air.
Crack s ound is heard.
- This sound is generated by the expansion/ constriction of
the front panel, etc.
due to changes of
temperature.
Filter s ign lamp (LED)
is O N.
- Cleaning the filter,
press the Timer button and ◀button of
wired remote controller at the same
time for 3 seconds.
Air conditioner does
not ope rate for about
3 minutes w hen
res tart.
- This is the protector
of the mechanism.
- Wait about three
minutes and operation will begin.
R emote control dis play is faint, or no dis play at all.
- Are the batteries depleted?
- Are the batteries inserted in the opposite (+) and (-)
directions?
Call the service immediately in the following situations
- Anything abnormal such as burning smell, loud noise etc. happen. Stop the unit and turn the
breaker off. Never try to repair by yourself or restart the system in such cases.
- Main power cord is too hot or damaged.
- Error code is generated by self diagnosis.
- Water leaks from indoor unit even if the humidity is low.
- Any switch, breaker (safety, earth) or fuse fails to work properly
Us er mus t carry routine checkup & c leaning to avoid unit’ s poor performance .
In cas e of s pecial s ituation, the job mus t be carried out by service person only.
Page 24

Page 25

ภาษาไทย
คู
่
โปรดอ่านคู
เครื่องปรับอากาศแบบแขวนใต้ฝ้า
ชใรากอืม
งาน
้
่
ยอ้ีนบับฉอืม
่
ศากาอบัรปงอ่ืรคเ
กดยีอเะลงา
่
ชใม่ิรเะจ่ีทนอ
งานและเก็บคู่วไอืม
้
ชใอ่ืพเ
้
้อ้
ตคานอนใงิองา
P/NO : MFL67798204
www.lg.com
Copyright © 2017 LG Electronics Inc. All Rights Reserved.
Page 26

ภาษาไทย
เคล็ดลับสำหรับการประหยัดพลังงาน
2
ทำความสะอาดแผ่นกรองอากาศทุกๆ 2 สัปดาห์
Page 27

ภาษาไทย
คําแนะนําความปลอดภ ส่ีทยัําคัญ
คำแนะนำความปลอดภัยที่สำคัญ
อ่านคำแนะนำทั้งหมดก่อนที่จะใช้เครื่องใช้ไฟฟ้า
ผล ฑณัภติ
าแนะนําต
สามารถทํางานด
์
่
้
อ่ืพเ อมสเ้ีนปไอ ห ณรากนาถสงย่ีลเกีล
ดุสงูสพาภิธทิสะรปยว
์
ํ
คมาติตับิฏปาณุรก
นอืตเำค
ห ตยฉเกิพเกา
อคําแนะนําอาจส่งผลให้เก จเดาบรากดิ
่
็
งรแนุรบ ห ดไติวีชยีสเอืร
้
งัวะรรวคอ้ข
ห ตยฉเกิพเกา
อคําแนะนําอาจส่งผลให้เก จเดาบรากดิ
่
็
บเล็กน้อยห ฑณัภติลผอืร
นอืตเำค
• การต ง้ัตดิ ห ซอืร
• การต ตะจง้ัตดิ
ถ้าไม่ข้อกำหนดีม ท้องถ ใน่ิ หติดตั้งสอดคล้องกับข้อกำหนด
ข้อกำหนดการไฟฟ้าส่วนที่ 1 CSA C.22.1. ของแคนาดา หรือฉบับปัจจุบัน
• ข้อม ูคนใลู
เพื่อความปลอดภัยและการใช้อุปกรณ์และเครื่องมือทดสอบที่เหมาะสม
• หากไม่อ
ณรกปุอ
่
องสอดคล้ข้อกำหนดบักงอ ทราคาอ
้
่
่
์
ยีสเมาวคดิกเ หายต
การติดตั้ง
• อย่าใช้เบรคเกอร์วงจรทช่ีํา ดุร ห ปราการตัอีมอืร
• สําห ฟฟไบบะรนางบัร
อนุญาต อย่าแยกส่วนประกอบห ซอืร
• ให้ต่อสายด สนิําห ฑณัภติลผบัร
• ต ลกดิปะลแงผแง้ัตดิ
• ต รอกเครบเะลแรจงวง้ัตดิ
ได
้
• มีความเสี่ยงที่จะทำให้เกิดเพลิงไหม้หรือไฟฟ้าช็อตได้ ควรใช้เบรคเกอร์หรือฟิวส์ที่มีอัตราการป้องกันที่ถูกต้อง
• อย่าปร นย่ีลปเบั ห ทะจ่ีทงย่ีสเมาวคีม ฟไยาสงอขวายมาวคยายขอืร
• อย่าต กออดอถ ง้ัตดิ ห ดงอ่ืรคเง้ัตดิตอืร
ห ดไอืร
้
• ใช้ความระม นรากนใงัวะรดั
ให้ใช้ความระม ปเงัวะรดั
• สําห ใ ง้ัตดิตรากบัร ห้ต ตดิ
ไหม้ ไฟฟ้าช
• อย่าต ช่ีทน้ืพนบงอ่ืรคเง้ัตดิ
• ต้องแน่ใจว่าบร มไง้ัตดิต่ีทน้ืพณวเิ
เสียห ชงอ่ืรคเ ยา
• อย่าปล่อยให้เคร ทศากาอบัรปงอ่ื
วไง้ิท
้
ํ
ทะจ่ีทงย่ีสเมาวคีม
าให้เก ไงิลพเดิ หม้ห ฟฟไอืร้าช็อตได
า ให้ต ตดิ
้
คุมอย
องควบ
่
์
็
จเดาบรากบัร
บได
้
ํ
า ฑณัภติลผาอเ
็
็
นกลั่นตัวเป็นหยดน้ำ ทำให้เฟอร์นิเจอร์เปียกหรือเสียหายได้้ืชมาวค
่
ดิบเะร ตอ ห ดไอืร
ํ
า ทจาอ ดุร
ํ
า ดไลคคุบะลแดุร
มเชี่ยวชาญไ่ีทลคคุบยดโมซแมอ
่
องถิ่น
้
คงสะรปุถตัวีม้ีนบับฉอืม
์
มไะลแดยีอเะลยดโนา
่
ยพัรทอ
่
์
จนทแวัตอ
่
่
์
่
้
ํ
จนทแวัตอ
าหน่ายห ยนูศอืร
้
ํ
าให้ได้ร จเดาบรากบั
มอ่ืสเ ห รจาอศากาอบัรปงอ่ืรคเ ดุรทนาฐกา ่วงหล่น ทำให้ทร ยพั ์สิน
่
้
็
ํ
างานเป
้
ชใรากอ่ืพเ
งานโดยช
้
ํ
คมาติตับิฏป
าแนะนํา งทั้ หมดในคู
้
ํ
าหน่าย ผู้ขาย ช่างไฟฟ
จเดาบบัร
ฟไยาสนิดเราก อมสเ ห มไ่ีทง้ัตดิตรากอืร
์
็
จเดาบรากบัร
บได
็
บได
ฑณัภติลผมซแมอ
คกูล( งอเวัตยว
์
้
าลวเมาตปไ
้
สะจงรต ยดโ
งผลให้เป็นอ ตง้ัทยารตนั
่
ฟฟไราก
าสากล 3001-1C ISNA/07 APFN
้
่
็
จเดาบรากดิกเ นิส
บต
่
ํ
ตนักงอ
ากว่ก่ีทาําหนด ใช
่
้
์
ํ
ทะจ่ีทงย่ีสเมาวคีม อมสเ
าให้เก ไงิลพเดิ หม้ห ฟฟไอืร้าช็อตได
้
็
่ีทผ่านการรับรองในด้านการปฏิบัติงานคินคทเงา
่
/ะลแ ลคคุบอ ห ทอืรําให้เส ดไติวีชยี
้
้
ํ
ทะจ่ีทงย่ีสเมาวคีม
าให้เก ไงิลพเดิ หม้ห ฟฟไอืร้าช็อตได
ํ
ทะจ่ีทงย่ีสเมาวคีม งแน่นหนาา
าให้เก ไงิลพเดิ หม้ห ฟฟไอืร้าช็อตได
เหมาะสม อาจทําให้เก ไงิลพเ ดิ หม้ห ฟฟไอืร้าช็อต
่
ํ
าให้เก ไงิลพเดิ หม้ห ฟฟไอืร้าช็อตได
ํ
ทะจ่ีทงย่ีสเมาวคีม )า
าให้เก ไงิลพเดิ หม้ ไฟฟ้าช
ฑณั
ภติลผง้ัตดิตรากะลแกออ
ขอบแหลมคมอาจทําให้เก จเดาบรากดิ
์
ดไ่ีทรากิรบ
ุนอบัร ญ ทะจ่ีทงย่ีสเมาวคีม อมสเตา
้
เิตับุอ บ ห ุต ห ทอืรําให้ผล ฑณัภติ
็
ปเง้ัทกีอ ยารตนัอีม่ีท
นการทําให้แน่ใจว่า
เสียหายได
์
ิตับมสณุคีม่ีทา ห ตดิตอืร
รอซเนดเนอคงอขบีรคะลแนาฐงอขบอขณวเิรบ่ีทษศเิพน
้
อคุณและผู้อื่นได้
่
สะจ ้ีนบับฉอืม
งผลให้เก นใ ิตกปดิผมาวคดิ
่
ชใงอ่ืรคเ
ไฟฟ้านี้ในวงจรไฟฟ้ก่ีทาําหนด
้
์
้
ยนูศ่ีทอ
่
์
้
เะรงอ่ืรคเะลแ หย
เสียหายได
์
้
้
็
ํ
าให้เก งิลพเดิ
้
ูตะรปดิปเะลแกามงูสศากาอนใน้ืชมาวคอ่ืมเนานาลวเะยะรน ห อืร หน้าต่าง
3
ดไ่ีทรากิรบ
บัร
้
้
ดิบเะร ตอ
็
บได
้
Page 28

ภาษาไทย
คําแนะนําความปลอดภ ส่ีทยัําคัญ
4
การทำงาน
• ให้ใช้ความระม ใอ่ืพเงัวะรดั ห้แน่ใจว่าสายไฟฟ้าจะไม่ถ ามกอองึดกู ห ทอืรําให้เสียหายระหว
อยู
่
• อย่าวางส ทะจ่ีทงย่ีสเมาวคีม ฟไยาสนบงล ๆดใงอขง่ิ
• อย่าเส ก๊ัลปบยี ห ชใะณขนใฟไยาสก๊ัลปดอถอืร
• อย่าส ท(ขณะ สัผมั
• อย่าวางเคร ทงอ่ืําความร้อนห ชใ
ช็อตได
้
• อย่าให้น
• อย่าเก็บห ชใอืร้ก๊าซไวไฟห ลกใฟไดิตราสอืร
• อย่าใช้ผล ฑณัภติ
• เม กอ่ื
• ห ๆกลปแงัดงยีสเีมกา ห ลเงัดงยีสเีมอืร
• เม มุสรมดิกเอ่ื ห รอฮเุยาพอืร
• อย่าเปิดตะแกรงทางเข
• เม ฑณัภติลผอ่ื
• ์ฑณัภติลผา้ขเำ้น้หใรวค่มไงัวะรดัมะร ทะจ่ีทงย่ีสเมาวคีม ําให้เก ไงิลพเดิ หม้ ฟฟไดิกเ ้ าช็
• ระบายอากาศของเคร ปเงอ่ื
• ปิดแหล่งไฟฟ้าห ทอ่ืมเกัลําความสะอาดห บอืรํา ฑณัภติลผาษกัรงุร
• เม มไอ่ื่ใช
• ให้ใช้ความระม ใอ่ืพเงัวะรดั ห้แน่ใจว่าไม่ม กดใลคคุบี
ํ
าเข
้
ห ฟฟไ ดิกเอืร
๊
อย่าใช้โทรศัพท์ ห ชติวสดิปดิปเอืร
ห ฟฟไดิกเอืร
ไงิลพเดิหม้ห ฟฟไอืร้าช็อตได
ไฟฟ
้
้
ํ
ทะจ่ีทงย่ีสเมาวคีม
าให้เก ไงิลพเดิ หม้ห ฟฟไอืร้าช็อตได
งานอยู
้
ํ
า ฑณัภติลผ )นาง
สน้ิชนใปไา
้
าช็อตได
้
าช็อตได
้
เปียกโชก (น
์
้ดไตอ็ชา
ฑณัภติลผงอข
วนของไฟฟ้าได
่
้
์
ไว่ัรฟไวไซา หล ให้ปิดแก๊สและเปิดหน้าต
ํ
าให้เก ฟฟไดิ้าช็อตห ไงิลพเดิกเอืร หม้ได
ทะจ่ีทงย่ีสเมาวคีม
รอฮเุยาพ่ีทนอ่ก
์
้
้
ดไรากงอขงย่ีสเมาวค
้
ฑณัภติลผ
เป็นเวลานาน ให้ถอดปล จวัตก๊ั่ายไฟฟ้าห ใอืร ห้ปิดเบรคเกอร
์
ได
้
์
ทจาอ้ีนง่ิส ราคาอกอนยาภ
์
งอ่ืรคเอืร
้ฟ้
้
้ดไดาลพดิผนางำท์ฑณัภติลผ
ปเบคแดิป่ีทน้ืพนใ
ในคเิร ห้ห ชใดุย้งานและปิดหน้าต่าง หากเป็นไปได้ ให้ย้ายผล ฑณัภติ ์จากหน้าต่าง
์
งึถามะจนคเิร ทะจ่ีทงย่ีสเมาวคีม ําให้ทร ยพั ์ ยีสเมาวคดิกเนิส ห ดาลพดิผนางำท์
็
จเดาบบัร
บทางร
ํ
าท่วมห ูยอมจอืร
้
้
็
ยีสเมาวคบัร หายห จใง้ัต้ดไ่มไยดโ้ดไดาลพดิผนางำทอืร
ํ
าให้เก จเดาบรากดิ
้
็
นเวลานาน อาจทําให้ขาดออกซ ดไนจเิ
์
่
็
กน้อย ห ฑณัภติลผกาจกออนัวคีมอืร
ฑณัภติลผงอขา
ในขณะทํางาน (ห รพมาวคีมงอ่ืรค
์
่
น
่ใต้
ชใอ่ืมเวารคง้ัรคน
งานร
้
็
บต
้
ํ
าให้เก ไงิลพเดิ หม้ห ฟฟไอืร้าช็อตได
่
ลกใ ๆน่ือา
้
ํ
ทะจ่ีทงย่ีสเมาวคีม
าให้เก ไงิลพเดิ หม
ฑณัภติลผบัก
์
ํ
ทะจ่ีทงย่ีสเมาวคีม ฟไ
าให้เก ดิบเะรรากดิ ห ไงิลพเอืร หม้ได
้
เกา
ฟฟไดิกเ ยากงา
าช็อต ห จเดาบรากดิกเอืร
้
ํ
า) ให้ต ตดิ
้
่
้
่
ยนูศอ
่
ปเ ฟไ าตเบักมว
ํ
ทะจ่ีทงย่ีสเมาวคีม
าให้เก ไงิลพเดิ หม้ห ฟฟไอืร้าช็อตได
ํ
ทะจ่ีทงย่ีสเมาวคีม กยีปเอืมตอน
าให้เก ไงิลพเดิ หม้ห ฟฟไอืร้าช็อตได
ํ
ทะจ่ีทงย่ีสเมาวคีม ฟไยาสบัก
าให้เก ไงิลพเดิ หม้ ห ฟฟไอืร้า
้
ํ
ทะจ่ีทงย่ีสเมาวคีม
าให้เก ไงิลพเดิ หม้ ห อาจทำให้อืร
้
กศากาอยาบะรอ่ืพเงา
่
์
็
นต
้
์
นบนืยปไน้ึขวา ห รอืร่วงหล
ยีสเมาวคดิกเะลแลคคุบอ หายต
ภติลผดิปเะจ่ีทนอ
ให้ปิดเบรคเกอร์ห ฟไยาสดอถอืร
์
อม อย
้
่
็
บต่ลคคุบอ
ดไ่ีทรากิรบ
ุนอบัร ญาต
้
ํ
ทะจ่ีทงย่ีสเมาวคีม
าให้เก ฟฟไดิ้าช็อตได
์
่
่
ํ
กงอ่ืรคเ่ีทงา
ทะจ่ีทงย่ีสเมาวคีม ําให้การทํา
เวัตงอขนว
้
า ทงัลํางาน
้
้
ดาลพดิผนางำท์ฑณัภติลผ
ฟฟไงอรกวัตสัผมัสา
ยติถสา์) มี
้
ทะจ่ีทงย่ีสเมาวคีม ําให้เก
้
สงอ่ืรค
่
นาง
่
้
ฑณั
์
้
ฑณัภติลผ ยา
อต ห ฑณัภติลผอืร ์เสียหายได
ํ
ทะจ่ีทงย่ีสเมาวคีม น
าให้เก ไงิลพเดิ หม้ห อืร
สงัยปไน
่
ฑณัภติลผอ
ได
์
้
ูยอ่ีทนว
่
งัวะรรวคอ้ข
ง้ัตดิตราก
เครื่องใช้ไฟฟ้านี้เหมาะสำหรับใช้งานโดยผู้เชี่ยวชาญหรือผู้ที่ได้รับการฝึกอบรม, ในงานอุตสาหกรรมเบาในฟาร์ม
•
หรือในเชิงพานิชย์
• ห ไว่ัรรากบอสจวรตน่ัม หล (สารทําความเย็น) ของก๊าซ ห ง้ัตดิต่ีทกาจงัล ห ซอืร
• ต ทง้ัตดิ่อระบายน
• ร มแบัดะราษกั
ํ
ทราสบัดะร
าความเย็นต
ํ
าให้เก ไว่ัรรากดิ หลของน
้
ํ
า นยาบะรอ่ืพเ
้
ํ
า อาจทําใ ้ดไดาลพดิผนางำท์ฑณัภติลผห
่
้
ํ
า ใอ่ืพเ ห้แน่ใจว่าจะม นยาบะรรากี
้
ํ
าได
้
้
ฑณัภติลผง้ัตดิต่ีทะณขนใ
์
อ่ืพเ ห นอืทเะสน่ัสรากงย่ีลเกีล
ํ
า งอ่ืรคเกาจปไกออ
้
ห ไว่ัรรากอืร หลของน
่
ฑณัภติลผมซแมอ
์
ตมอ่ืชเราก ่อท มไ่ี ่ทจาอีด
ํ
า
้
Page 29

ภาษาไทย
คําแนะนําความปลอดภ ส่ีทยัําคัญ
5
• อย่าต ฑณัภติลผง้ัตดิ
ต
บนอ่ืพเอ
่
้
• ใช้คนสองคนห วกกามอืร
• อย่าต ฑณัภติลผง้ัตดิ
ผล ฑณัภติ
ผล ฑณัภติ
์
ทํา ดาลพดิผนาง ห ทอืรํางานไม
์
์
กจาอนัม นา
อให้เก ัปดิ ญหาต
่
่
์
รกดักกูถ
อนได
่
้
นวกบรงยีสเ่ีท่ีทนใ ห รศากาออืร
บนอ่ืพเอ
านของคุณ
่
้
กยรากนใน้ันา ห ยกยโอืร
รกดักราก
อน โดยเฉพาะอย
่
่
สงอ่ืรคเกาจนอ
้
ฑณัภติลผยา
้
ห จเดาบรากงย่ีลเกลี
์
่
ดไพาภิธทิสะรปีม
้
ูยอ่ีทนว่ภายนอกอาคารก่อให้เก ยหายีสเมาวคดิ
่
สีม่ีทมล( ลเะทมล บักงรตยดโสัผมัสจาอ่ีทณวเิรบนใ
่
รอซเนดเนอคนใง่ิยงา
ห รมาวคยาบะรบีรคอืร
์
็
บต่ลคคุบอ
การทำงาน
• อย่าให้ผิวห ยเศากาอบักสัผมัสงัน
ต
่
• อย่าใช้ผล ฑณัภติ
ทําให้เย็นท ตกูถ่ี้องแม่นยํา ทะจ่ีทงย่ีสเมาวคีม
• อย่าป ทน้ักดิ
• ใช้ผ้านุ่มทําความสะอาด อย่าใช้ผงซ ขเกอฟกั ้มข้ ท ะจ่ีทงย่ีสเมาวคีม ฯลฯ ยาละลวัต น
ไฟฟ้าช็อต ห สน้ิชอืร
• อย่าส สน้ิชสัผมั
ส่วนบุคคลได
• อย่ายนื หร ฑณัภติลผนบงอขง่ิสงาวอื
• ใส่ต ใงอรกวั ห้แน่นหนาอยู่เสมอ ทํา าดปัส 2 ๆกุทงอรกวัตดาอะสมาวค ห์ ห บอืร่อยกว่น้ันา หากต้องการ
ิตกป ห ยีสเมาวคอืร หายต
• อย่าสอดมือห ทนใดใน่ือุถตัวอืร
บุคคลได
• อย่าด นม่ื
• ใช้ม้านง่ั ห ขแ่ีทดไนับอืร
ต่อบุคคล
• ใส่แบตเตอร ใ
แตกต
่
• อย่าชาร์จใหม่ห สน้ิชกยแอืร
• หากของเห วิผนบสัผมัส่ีรอตเตบแกาจวล ห งัน ห ผอ้ืสเอืร้าของคุณ ให้ซ ดกั้วยน
• ห เงอขนาทะรปบัรณุคกา ห ขเ่ีรอตเตบแกาจวล
ณุคงอขพาภขุส อ
์
ขเนัดมลอ
าห ไรากงอขกอออืร หลของอากาศ อาจก่อให
่
้
่
ปเ่ีทนว็นโลห ฑณัภติลผงอขะ
่
้
กส่ีทงอรกวัต
็
จเดาบบัร
บได
้
ํ
าจากท่อระบายน
้
นัอ่ี หม่และให้เป็นประเภทเด ง้ัท นักวยี ห ยอ ลรทโนอคทมโีรนใดม
ไว่ัรรากีม่ีรอตเตบแ
ห
ล กจาอ่ีรอตเตบแนใีมคเราส ่อให้เก ไยอรดิ หม้ห ปเอืร ็ ตยารตนัอน ่ ดพาภขุสอ ้ ดไ ๆน่
ไว่ัรรากีม่ีรอตเตบแ
หล กจาอ่ีรอตเตบแนใีมคเราส ่อให้เก ไยอรดิ หม้ห ปเอืร ็ ตยารตนัอน ่ ดพาภขุสอ ้ ดไ ๆน่ือนา ้
็
นโดยตรงเป็นระยะเวลานาน (อย่าน ปเจาอ้ีนง่ิส )มลสแะรกงาทศิทนใง่ั ็
คงสะรปุถตัวอ่ืพเ
ชเ ษศเิพ
่
์
็
ปเ่ีทนว
่
่
้
ํ
า ฑณัภติลผกาจ
้
็
ํ
ทอ่ืมเงรแง
าความสะอาด ห บอืรํา ฑณัภติลผาษกัรงุร
่
ํ
าให้เก ยีสเมาวคดิ หายห ูสอืร ญหายต่ยพัรทอ์สินได
กิตสาพน
์
์
้ดไดาลพดิผนางำท์ฑณัภติลผ้หใำท
ํ
า ทจาอะลแ ศากาอบัรปงอ่ืรคเงอขงอรกวัตงอขนาง
ทรากนใพาภิธทิสะรปดละจกรป
ฑณัภติลผอ
ได
้
์
ขเนัดมลอ
าห ฑณัภติลผ่ีทะณขกอออืร
้
ไม
่
์
ํ
ทะจ่ีทงย่ีสเมาวคีม ่ีรอตเตบแงอขนักงา
าให้เก ไงิลพเดิ หม้ห ดไดิบเะรอืร
าไป ให้แปรงฟ ยทพแบพปไะลแณุคงอขนั
้
าอาษกัรราก น ห มไศากาอบัรปงอ่ืรคเอืค่ีน ฯลฯ ะปลิศนาง รา
ฑณัภติลผงอข ์ได้ ยีสเมาวคบัร หายได้
ยอ ่ีรอตเตบแงอขนว
่
้
ศากาองอรกงอ่ืรคเดอถะณข
ณรกปุอดุช( ์ท ตงย่ีสเมาวคีม )ราคาอกอนง้ัตดิต่ี ่อการบาดเจ็บต่ อืรหลคคุบอ
ทํางานอยู
กจาอะลแยัมานอขุสกูถ
่
์
อให้เก ัปดิ ญห ดไงรแนรุ่ีทพาภขุสา
่
์
่
้
ทจาอ ฟไงอกนใ่ีรอตเตบแง้ิทา
าให้ไหม้ห ดไดิบเะรอืร
ํ
าสะอาดให้สะอาด อย่าใช้ร ทมโี ห
้
ําให้เก ไงิลพเดิ หม้
กามมคมาวคีม
สีม ่วนท ้หใำทจาอง่ึซ ่ีทนอ่ืลคเะลแมค่ี
ะลแงัวะรดัมะร ห จบเดาบรากงย่ีลเกีล ็
ํ
อย่าใช้ร ทมโี ห
์
้
ํ
าให้เก ดิผมาวคดิ
กเ่ีรอตเตบแนปา
าและใหม่ห ่ีทดินชอืร
่
ํ
ทจาอ )อืลกเงออะลงอขบอกะรปนว
าให
อน อาจทําให
้
่ใช่
้ดไดาลพดิผนางำท์ฑณัภติลผ
ตงย่ีสเมาวคีม !
่ บ็จเดาบรากอ
้
้
ือนา ้
กา
ระบบ
้
้
ยารตนัอน
กา
Page 30

ภาษาไทย
สารบัญ
6
สา ญับร
2
3
7
7
การใชงาน
7
การทําความสะอาดและการบํา าษกัรงุร
7
7
ชในอ่ก
้
รากิรบราก
8
8
หลอดไฟแสดงการทํางาน
9
10
12
12
การบํา รไบบแลรทโนอคทมโีราษกัรงุร
12
13
13
13
14
กงัฟะลแอ่ืช
์
กอืมู่ค ารใช้งาน
สใรากีธิว
่
กอืมู่ค า
คง้ัตราก
่
คง้ัตราก
่
กอืมู่ค ารแนะนำการใช้งาน
สบัลด็ลคเ กบัรหำ ารประหยัดพลังงาน
่
ี
ทสำคัญยัภดอลปม
้
งาน
รพมาวคมยีรตเ
อมสําห ทรากบัร
้
วคำนะนแำค า
ํ
างาน
์ฑณัภติลผำนะนแ
สน้ิชงอขนัช
วนประกอบ
่
รไบบแลรทโนอคทมโีร
สาย
้
ํ
ท่ีรอตเตบแ
าอย่างไร
สาย
้
้
งัตดิตร
คง้ัตราก – ง้ัตดิตรากา
ูยอ่ีทา่ของระบบควบคุมส่วนกลาง
่
ูยอ่ีทบอสจวรต ราก – ง้ัตดิตรากา
ของระบบควบคุมส่วนกลาง
่
โหมดทําความเย็แบบปกติ - น
14
โหมดทําความเย
14
โหมดการทํา ิตัมนโตัอนาง
15
โหมดไล
16
โห มลดัพดม
17
18
19
19
20
21
21
22
23
23
คง้ัต่ณุอา ห ชเจวรต /ิมูภ
การต คง้ั่าการไห ศากาองอขนยีวเล
การสลับเซลเซียส/ฟาเรนไฮต์
การตั้งค่าเพื่อควบคุมเวลาการเปิด/ปิด
กา ษกัรงุรำบร าและการบริการ
็
เคล
็
เคล
ชใกยีรเ
็
น้ืชมาวค
่
็
ณุอค ห นใิมูภ ห้อง
สงอ่ืรคเวัต
ูยอ่ีทนว่ภายในอาคาร
่
ํ
ทรากบัลด
างาน!
กแรากนใบัลด
ไขปัญหา! ประห าและเงิน!ลวเง้ัทดัย
้
ดไรากิรบ
้
้
งรแงัลพบบแ - น
ณรากนาถสนใีทนัท
ตงัด่อไปนี้
์
Page 31

ภาษาไทย
ชในอ่ก
้
งาน
ก่อนใช้งาน
7
วคมยีรตเ า สำหรมอ้รพม กบั า งำทร าน
ชใราก )ุถต
งานเช
้
ํ
ทอ่ืพเง้ัตดิตรากนา
า ง้ัตดิตราก
้
ใ นจเิซกออดาขรากงอข ห้ระบายอากาศห้องเม ชใอ่ื้งานร
มไ่ีทษศเิพ
์
่
่ได้
ํ
ทจาอน้ันน
าให้เก ยีสเมาวคดิ หายต่สน้ิชอ่วนได
ตดิต -่อผู
- ใช้วงจรไฟฟ้ก่ีทาําหนดไว
การใชงาน
- การส ไ่ีทศากาอบักสัผมั หลผ่านโดยตรงเป็นระยะเวลานานอาจเป
อย่าให้ผู้อาศัยในอาคาร สัตว์ งย้ีลเ ห ตอืร้นไม
- เน ปเมาวคีมกาจงอ่ื
ทําความร้ๆน่ือนอ
- อย่าใช้เคร คงสะรปุถตัวอ่ืพเ้ีนศากาอบัรปงอ่ื
าชวย่ีชเ ญด
้
้
้
้
็
นไปได
้
ัวะปลิศะลแ ชืพ งย้ีลเ
กา วคำทร ามสะอาดและกา ษกัรงุรำบร า
- อย่าส สน้ิชสัผมั
การบาดเจ
- อย่าใช้น
- ขณะทํา ตกรแบัดนัอ งอ่ืรคเวัตดาอะสมาวค
มลดัพ ห รเมาวค่ีทนุม
กระแสไฟฟ
็
ํ
าทําความสะอาดด
้
่
ํ
นบักสัผมัส่ีทราก
าสามารถทํา นะจง่ึซ นวนฉยาล
้
้
ปเ่ีทนว็นโลห นุ่ฝงอรกน่ผแดอถะณขงอ่ืรคเวัตงอขะ
็
ดไน้ึขดิกเถรามาสบ
้
้
ลโบอขบัจอ่ืมเ ห แ่ีทะ หลมคม
องแน่ใจก่อนว่า ได้ปิดไฟและเบรคเกอร์รบยีรเ้อยแล้ว
้
ะรนใกามงูสว หว่างการใช
ิอเงับยดโงอ่ืรคเงอขา ญขณะทํา สน้ิช ดาอะสมาวค
โดยเฉพาะส่วนที่เป็นวงจรอุปกรณ์ไฟฟ้า
ศากาอบัรปงอ่ืรคเงอขนในา
ํ
าไปสู่ท่ีทรากําให้เก ฟฟไดิ้าช็อตได
็
ปเมาวคีม นาง
้
นไปได้ของการได
่
็
ไ่ีทศากาอ บักสัผมัส หลผ่านโดยตรงเป็นระยะเวลานาน
วไุบะร ้ (เช
ตยารตนัอน
พาภขุสอ
่
่
่
้
งอ่ืรคเงอขนใยาภนว
ณรกปุอาษกัรมอนถราก น
้
้
็
จ
เดาบบัร
บหากเปิดการจ่าย
ฟไาตเบักมว ห ณรกปุออืร
อาหาร สัตว
์
์
์
กา กิรบร าร
สําห ซรากบัร
อมและบํา ใ าษกัรงุร ห้ต ตดิ
่
ํ
จนทแวัตอ
่
าหน่ดไ่ีทยา
ุนอบัร ญาตในการให้บร รากิ
้
Page 32

ภาษาไทย
แนะนําผล ฑณัภติ
8
่
ื
ช ช์กงัฟะลแอ
5
1
2
3
ช่องลมเข้า
4
5
ท่อสารทําความเย
6
ท่อระบายน
7
สายด นิ
8
3
สงอ่ืรคเวัต
่
สงอ่ืรคเวัต
่
ํ
า
้
์
์ฑณัภติลผำนะนแ
ั
นของช้นส่วนประกอบ
4
1
4
ูยอ่ีทนว่ภายในอาคาร
ูยอ่ีทนว่ภายนอกอาคาร
ลรทโลอคทมโีร
มลยาจะรกงอ่ช
็
สงอ่ืรคเวัตนิดยาสดิต
่
6
ตมอ่ืชเราก น
อสายไฟ
่
ูยอ่ีทนว
่
ิ
7
2
8
ปอ่ืพเราคาอกอนยาภ
มไนักงอ
้
เก ฟฟไดิ้าช๊อต
่ให้
Page 33

ภาษาไทย
หลอดไฟแสดงกา งำทร าน
1 2 3 4 5 6
แนะนําผล ฑณัภติ
์
9
การใช
1
2
้
โหมดทําละลายน
3
4
5
6
ัสบัรวัต ญญาณ: ร ัสบั ญญ ัสบัร งยีสเ( ลรทโนอคทมโีรกาจณา ญญ บ๊ีบงยีสเะลแ ง้ัรค 2 ๆน้ัสงัดบ๊ีบงยีสเ :ณา
สัญญาณแผ่นกรอง: หลอดไฟจะสว่น้ึขงา ห ผกาจงัล
เปิด/ปิด: หลอดไฟจะสว
มุ่ปดกบบแนาง ชใรากีธิว
ํ
าแข็ง: ห ลอดไฟจะสว
้
:าลวเมุคบวคงอ่ืรคเ หลอดไฟจะสว
่
้
อากาศร้อน (รุ
)ง้ัรค 1 วาย
ะรน้ึขงา หว
่
่
่
่
มไอ่ืมเนาง
สามารถใช
่
ะรน้ึขงา หว่างโหมดการละลายน
ะรน้ึขงา หว่างการทํา าลวเง้ัตรากีมยดโนาง
ท
งอ่ืรคเ่ีทงา
รมาวคม๊ัปน
ํ
างาน
อนเท่)น้ันา
้
่
้
ดไลรทโนอคทมโีร
้
ํ
าแข็งห ทรากม่ิรเอืร
้
งมโว่ัช 004,2 าลวเนา ห ชใกาจงัล
้
ํ
างานขณะ
กรแง้ัรคนาง
Page 34

ภาษาไทย
10
3
4
6
8
9
5
7
14
15
16
10
12
13
2
1
แนะนําผล ฑณัภติ
์
ส้รไบบแลรทโนอคทมโีร าย
็
ปเ้ีนศากาอบัรปงอ่ืรคเ
ณรกปุอน
แต่หากคุณต้องการใช
์
้
11
17
โหมดกา งำทร าน
โหมดทําความเย็น
โหมดการทํา ิตัมนโตัอนาง
โหมดไล
โห มลดัพดม
น้ืชมาวค
่
รไบบแลรทโลอคทมโีรีม่ีท
้
ต ะจณุค ยาสีมบบแลรทโลอคทมโีร
องจ่ายต่างหาก
้
1
2
3
4
5
6
7
8
9
10
11
12
13
14
15
16
17
ปไว่ัทยดโยาส
ปุ่ม VANE ANGLE
ใช้เพ คง้ัตรากอ่ื
ปุ
่
ใช้เพ คง้ัตรากอ่ื
ทํา ะยิรฉจัอดาอะสมาวค
ทิศทางลมแต่ละด้าน
ปุ่ม ON/OFF
ใช้เพ งอ่ืรคเวัตดิป/ดิปเอ่ื
ปุ่ม JET COOL
การทําความเย็นอย่างรวดเร็ว ความเร
ปุ่ม LEFT/RIGHT )นุ่ระาพ
ใช้ต คง้
ั
่
(แบบแนวนอน)
ปุ่ม UP/DOWN AIRFLOW
ใช้เพ ดิปอ่ื ห ไนอ่ืลคเรากดิปเอืร หวของช่องระบาย
ปุ่ม ON TIMER
ใช้ต งการเริ่มใช้งาน และหยุดการทำงานอขาลวเง้ั
ปุ่ม SLEEP TIMER
ใช้เพ คง้ัตอ่ื
ปุ่ม SET / CLEAR
ใช้เคร RAELC / TES าลวเมุคบวคงอ่ื
ใช้เพ คง้ัตอ่ื
)ีทานิว 3
ปุ
่
ใช้เพ ดิปเอ่ื ห กงัฟดิปอืร
ฟอกอากาศ plasma
ปุ่ม ROOM TEMPERATURE SETTING
ใช
เล ณุอกอื
้
ปุ่ม OPERATION MODE SELECTION
ใช้เล โกอื หมดการทํางาน
ปุ่ม INDOOR FAN SPEED SELECTION
ใช้เล รเมาวคกอื
ปุ่ม ROOM TEMPERATURE CHECKING
ใช้เพ ชเจวรตอ่ื
FFO มุ่ป TIMER
ใช้ต รากงอขาลวเง้ั ห ทรากดุย
ปุ
่
ใช้เพ คง้ัตอ่ื
ปุ่ม RESET
ใช้เพ คง้ัตอ่ื
าแต
่
่
าห ทอืรําความสะอาดล
่
หรือการควบคุมครีบบังคับ
ไรากงาทศิทา ห ซ ศากาองอขนยีวเล
คง้ัตะลแ ศากาอ
่
ตมาวคมาตงล/น้ึข
องการ
้
่
คง้ัตราก่ีทูด(
าเคร Timer Sleep)าลวเมุคบวคงอ่ื
่
่
ห ิมูภ ห้อง
็
่
่
( นับุจจัปาลวเา หากป้อนข้ปเลูมอ็นเวลา
)นุ่ระาพฉเ( AMSALP ม
์
็
ิตัมนโตัอะลแ งูส งาลก
ณุอค ห ิมูภ ห้อง
ไรากงาทศิทา ห ศากาองอขนยีวเล
ทรากนัช
ดไมลดัพงอขว
ํ
างาน
าลวเมุคบวคงอ่ืรคเา
ใลรทโลอคทมโีรา หม
ํ
า งอ่ืรคเงอขนาง
้
่
ฉเ( WOLFRIA
งอ่ืรคเกัพรากงอขาลวเา
ุป )งล/น้ึข( GNITTES REMIT ม
ม LIGHT
/
่
้
็
)กอืลเงาท( GNITTES NOITCNUF ม
ิตัมนโตัองา
าย/ขวา
้
ํ
ต นอตน้ัข่ีสนใ
า
่
มลงาทศิทมุคบวคบีรคงอขมุมะล
ดุสงูสมลดัพว
Page 35

ภาษาไทย
งัวะรรวคอ้ข
กนใงัวะรรวคอ้ข ารใช้ร ลรทโลอคทมโี
- ในการใช้งานเคร ใ งอ่ื ห้ช ณรกปุองัยปไงาทศิท้ี
ัสบัร ญญ ยาสีมบบแลรทโนอคทมโีรงอขณา
- ต้องแน่ใจว่าไม่ม ะรงาวขดีกง่ิสี หว่วัตงา
- อย่าทําหล่นห วขอืร
- อย่าวางร บักสัผมัส่ีท่ีทนาถสนใลรทโนอคทมโี
แสงแดดโดยตรงห ลกใอืร
ร้อนห แอืร หล่งความร
- ใช้ม่าน ห ปเ ๆน่ือุดสัวอืร
ทําให้เคร ทงอ่ืํางานไม่ดไิตกป
(เช่น การเปิดการทํา ยองอ่ืรคเงอขนาง
รวดเร็ว ELBA ห ตนซเสรเออูลฟฟไดอล
รอวเนิอ
เตอร์)
์
เงรแนุร ดดแงสแ ห ณรกปุออืน
ัสบัรวัตะลแลรทโนอคทมโีร ญญาณ
้
้
ๆน่ือ นอ
้
็
นต
้
์
้
หมายเหตุ
- ร รไบบแลรทโนอคทมโี
ควบคุมโหมดการทำงานหมุนวน
- ผล ฑณัภติ
์
ูยอน้ึข
บชนิดของเครื่องปรับอากาศัก
่
สายจะไมสามารถ
้
ตกตแจาองิรจ
างจากเนื้อหาข้างต้น
่
ลรทโนอคทมโีราปงา
ณรกปุอบัก
ทําความ
์
น้ักดิปอ่ืพเ น
ัสบัร ญญาณอาจ
าง
่
์
่
แนะนําผล ฑณัภติ
์
ดินช
์
11
Page 36

ภาษาไทย
คู
12
ชใรากอืม
่
งาน
้
กอืมู่ค ารใช้งาน
กีธิว ารใส่แบตเตอร ่ยอำท่ี างไร
ใส
่
และ (-) อย่ตกูถงา้อง
- ให้ใช้/เปล อมสเนักวยีดเดินช่ีรอตเตบแนย่ี
- ห ากไม่ได้ใช้งานระบบเป็นเวลานาน ให้นํา
- ห ากหน
ใ่ีรอตเตบแ หม่เข้าไปโดยต้องแน่ใจว่าได้ใส
ขเบัลกนอ่ืลเยดโดิปาฝดิป
้
หมายเหตุ
แบตเตอร ชใรากุยาอดืยอ่ืพเกออ่ี
้
จางลง ให้เปล ก 2 ง้ัท่ีรอตเตบแนย่ี
่ีทา
งาน
้
อน
้
ํ
นอ่ืพเรศกูลงาทศิทมาต่ีรอตเตบแดิปาฝงึด
าฝาปิดออก
่
กา ษกัรงุรำบร า ลรทโนอคทมโีร
แบบไร้สาย
ให้เล เ่ีทณวเิรบกอื ห ขเถรามาสง่ึซมสะาม
)+( ว้ัข
ใช้ใ่ีทูรกส ห้มาต ขเดึย่ีทดิ
หนา
สไลด
งะลแยัภดอลป
ายดาย
่
กบักาํา น่นแ้หใๆน่ืออืรห งพแ
้
์
ใลรทโนอคทมโีร ห้เข้าก ดึย่ีทบั
หมายเหตุ
- ต้องไม่ปล่อยให้ร บักสัผมัสลรทโนอคทมโี
ม่ิรเลรทโนอคทมโีรงอขลผงดสแอจา
แสงแดดโดยตรง
- ต สวั
่
ใอ่ืพเ ห้ม ี ำทด็ชเมุ่นา้ผ้ชใ้หใ ด่ีทราสอ่ืสรากี
ความสะอาด
- ห ชใงอ่ืรคเีมกา
ห ูผบักาษกึรปอืร
ัสบัรวัตะลแง ญญาณต้องสะอาดอยู่เสมอ
ไฟฟ
้
้
ชเลรทโนอคทมโีร
ใ นักน ห้เปล ตนย่ีําแหน่ง
่
บร รากิ
้ให้
ดไงึถา้อย่าง
้
ดมุคบวค่ีทน่ือดินชา
วย
้
Page 37

ภาษาไทย
กอืมู่ค า ง้ตัดิตร
คู
่
ง้ัตดิตรากอืม
13
ปุ่ม RESET
กดด้วยปุ่ม MODE แล้วกดปุ่ม RESET
1
2
3
4
ใช้ปุ่คง้ัตม
• คง้ัตราก
ห คง้ัตกาจงัล
อาคาร
- ระยะเ ตงดสแรากีธิวะลแาลว
ณุอา ห คง้ัตอ่ืพเิมูภ
่
สงอ่ืรคเ
ูยอ่ีทนว่ภายในอาคาร
่
วง : 00 ~ FF
่าช่
าตําแหน่ง ให้กดปุ่ม ON/OFF 1
่
สงอ่ืรคเวัต
ูยอ่ีทนว่ภายในอาคารจะแสดงตําแหน่ง
่
คง้ัตรากดุสน้ิสอ่ืพเ
าตําแหน่ง
่
าตําแหน
่
สงอ่ืรคเวัตงาทปไ้ีชยดโ ง้ัรค
่
อาคาร
คง้ัต
5
่
ทํา ปไว่ัทนาง
ใลรทโนอคทมโีรวัตา หม่ ให้ใช้โหมดการ
งาลกนว่สมุคบวคบบะรงอขู่ยอ่ีทา่คง้ัตราก-ง้ัตดิตรากา่คง้ัตราก
วัตงอขง
่
ูยอ่ีทนว่ภายใน
ํ
าแหน่งอาจแตกต่าง
สงอ่ืรคเวัตงอขดินชมาตปไนัก
ูยอ่ีทนว่ภายใน
่
กดด้วยปุ่ม FUNC แล้วกดปุ่ม RESET
1
กดปุ
2
่
อาคารจะแสดงตําแหน่งในหน้าต่างแสดงผล
คง้ัต
3
่
ใยดโ ง้ัร
ค 1 FFO/NO ม ห้ช สงอ่ืรคเวัตงัยปไ้ี
ํ
ตงดสแรากีธิวะลแาลวเะยะร -
าแหน่งอาจแตกต
ใลรทโนอคทมโีรวัตา หม่ ให้ใช้โหมดการทํา ปไว่ัทนาง
งาลกนว่สมุคบวคบบะรงอขู่ยอ่ีทบอสจวรตราก-ง้ัตดิตรากา่คง้ัตราก
ูยอ่ีทนว
่
่
่
สงอ่ืรคเวัตงอขดินชมาตปไนักงา
่
สงอ่ืรคเวัตะลแราคาอนใยาภ
่
ูยอ่ีทนว่ภายในอาคาร
ูยอ่ีทนว่ภายใน
Page 38

ภาษาไทย
คู
่
14
ํ
นะนแรากอืม
าการใช้งาน
กอืมู่ค ารแนะนำการใช้งาน
วคำทดมหโ ามเย็น - แบบปกติ วคำทดมหโ า -งัลพบบแ - น็ยเม
แรง
กดปุ่ม ON/OFF
1
กดปุ
2
่
คง้ัต่ณุอา ห ต่ีทมาติมูภ
3
TEMP
กดปุ
่
ห้อง
ห คง้ัตกา
จะไม่ม ยเมลี
- ต คง้ั่าช
(64~86 °F)
่
่
ณุอา ห ต่ีทิมูภ
็
ดงอนสบอตะจงอ่ืรคเ
บ๊ีบงยีสเยว
้
โกอืลเอ่ืพเ EDOM ม หมดทําความเย็น
องการ โดยการกดปุ่ม
้
้
ามกออดัพน
ณุองอขาลวเงว ห C° 03~81 : ิมูภ
็
ชเจวรตอ่ืพเ PMET MOOR ม
วกงูสรากงอ
ณุอา ห ิมูภ ห้อง
่
ณุอค ห ิมูภ
กดปุ่ม ON/OFF
1
กดปุ
2
่
กดปุ่ม JET COOL
3
ในโห
4
มดทําความเย
ทํา โนใกิลเกยราก ห ทงัลพดม
JET COOL ห DEEPS NAF อืร ห กีอ PMET อืร
โหมดทําความเย็น
ดงอนสบอตะจงอ่ืรคเ
้
โกอืลเอ่ืพเ EDOM ม หมดทําความเย็น
ดุส่ีทงรแ
็
ํ
ทะจงอ่ืรคเะลแง้ัรค
างานด
้
บ๊ีบงยีสเยว
ํ
ทะจงอ่ืรคเ น
างานด
้
ํ
าความเย็น ให้กด
มลดัพยว
นใดุส่ีทงรแมลดัพยว
Page 39

ภาษาไทย
โหมดกา งำทร า ิตัมนโตัอน
คู
่
ํ
นะนแรากอืม
าการใช้งาน
15
กดปุ่ม ON/OFF
1
กดปุ
2
่
คง้ัต่ณุอา ห ต่ีทมาติมูภ
3
ลเาณุรก รกอื ห ข สั ูยอน้ึ
ูรมาวคบัก
สึกของคุณ
้
รหัส ความรู้สึก
2 เย็น
1 เย็นเล็กน้อย
0 ปานกลาง
-1 อุ่นเล็กน้อย
-2 อุ่น
่
่วหะรนใู่ยอ างโหมดกา งำทร า ิตัมนโตัอน
- ห ากระบบไม่ทํางานตามต้องการ ให้ใช้มือ
โปไนอ่ืลเ หมดการทํา น่ือนาง
นย่ีลปเ่มไะจบบะร
โกาจ หมดการทําความเย็น เป็นโหมดทําความ-
รอน ห โกาจอืร หมดทํา
้
ความร้อนเป็นโหมดทำ
น้ันงัด ิตัมนโตัอยดโน็ยเมาวค คุณต้องกําหนด
โห ณุอะลแดม ห ต่ีทิมูภ้องการ ง้ัรคกีอ
ดงอนสบอตะจงอ่ืรคเ
บ๊ีบงยีสเยว
้
โกอืลเอ่ืพเ EDOM ม หมดการทํางาน
ิตัมนโตัอ
องการ
้
ิตัมนโตัอา่คน็ปเมลดัพม็รเมาวคะลแิมูภหณุอ
-ณุอมาต ์สกินอรทคลเิอรจงวยดโมุคบวคกูถ่ีท
ดก้หใวานหอืรหนอ้รกึสู้รณุคกาห งอ้หิมูภห
่มไณุค น้ึขนอ้รอืรหน็ยเ้หใอ่ืพเ PMET มุ่ป
ราคาอนใยาภมลดัพว็รเมาวคนย่ีลปเถรามาส
นางำทรากดมหโยดโดนหำกกูถะารพเ ้ดไ
ิตัมนโตัอ
Page 40

ภาษาไทย
คู
่
16
ํ
นะนแรากอืม
าการใช้งาน
ควา่ลไดมหโ มชืน
้
ความชืน่ลไดมหโนใู่ยอ
- ห โกอืลเณุคกา ห ุป่ีทน้ืชมาวคดลดม
ทํา กงัฟ นาง
ในกรณ ชเี
- ระหว่กงัฟงา
ป ทะลแ นับุจจั
สะดวกสบายแม
์
่
ณุอมุคบวค ห นใิมูภ ห้องได
์
ํ
าให้สภาพห้องม ะลแน่ืชดสมาวคี
้
ณุอ งอ่ืรคเนิดเม่ิรเ ห นใิมูภ ห้องต คง้ั
ูยอน้ึขน้ืชมาวคดล
่
ณุอง้ัตราก ้ีนน ห มไะจ ิมูภ
้
ํ
กกูถ่ีทศากาอณามิรป
าห มาติตัมนโตัอยดโดน
ตงอนสบอตรากีธิวนอตน้ัข
่
้
รากกอืลเม
่
ราคาอวัตนใยาภน้ืชมาวคดลนัช
่
ํ
สดุส่ีทีด่ีทพาภสศากาอณามิรปะลแ
าห รากบัร
ูรบัรรากบัก
ณุอ ห นใิมูภ ห้อง
้
แสดง
่
มไะจณุคง้ัทะลแลรทโนอคทมโีรนใ
สามารถ
่
พาภขุสอ่ืพเน้ืชมาวคดลนัช
ณุออ ห นใิมูภ ห้องใน
็
กงูสน้ืชมาวคีม่ีทลากูดฤนใ
ตาม
ิตัมนโตัอา
กดปุ่ม ON/OFF
1
กดปุ
2
่
คง้ัต่าความเร็มลดัพว
3
ตอน – ต
นอ่ืลเ
ดงอนสบอตะจงอ่ืรคเ
้
ํ
า งูส งาลก ห ิตัมนโตัออืร
่
ุปดกอ่ืมเง้ัรคกุท
ม โหมดความเร
่
โกอืลเอ่ืพเ EDOM ม หมดไล
็
รเมาวคกอืลเถรามาสณุค
บ๊ีบงยีสเยว
น้ืชมาวค
่
ดไมลดัพงอขว
น้ัข่ีสนใ
้
็
ะจมลดัพงอขว
Page 41

ภาษาไทย
คู
่
ํ
นะนแรากอืม
าการใช้งาน
17
มลดัพดมหโ
กดปุ่ม ON/OFF
1
กดปุ
2
่
คง้ัต่าความเร็มลดัพว
3
ตอน – ต
นอ่ืลเ
ดงอนสบอตะจงอ่ืรคเ
้
ํ
า งูส งาลก ห ิตัมนโตัออืร
่
ุปดกอ่ืมเง้ัรคกุท
ม โหมดความเร
่
โกอืลเอ่ืพเ EDOM ม ห มลดัพดม
รเมาวคกอืลเถรามาสณุค
ลมธรรมชา จิต า บบแมลงรแบัรปมรกแรปโก
โลจ ิตัมนโตัอกิ
- เพ วกกามน่ืชดสมาวคอ่ื
ให้กดปุ
่
ในโห ลคดัพะจมล ้ีนดม
่วหะรนใู่ยอ า มลดัพดมหโง
- คอมเพรสเซอร์ภายนอกอาคารไม่ทํางาน
ใช้กงัฟ
ต
่
บ๊ีบงยีสเยว
็
ดไมลดัพงอขว
น้ัข่ีสนใ
้
็
ะจมลดัพงอขว
้ีนนัช ห ราคาอนใศากาอนยีวเนุม
์
ณุอกาจงา ห ิมูภ ห้องมากน ามกออ กั
่
ิตัมนโตัอบบแมลงรแบัรป
ายลมตามธรรมชาติ
้
็
รเมาวค บัรปรากยดโ
ลปะจงอ่ืรคเกาจงอ่ืนเ
่
ณุอีม่ีทมลยอ ห มไิมูภ่แตก
ๆน่ือบบแมลดัพงรแา
โง้ัตอ่ืพเมลดัพงรแมาวค กอืลเม หมด
มาติตัมนโตัอยดโมลดัพว
ิตัมนโตัอกิจลโบบแมลงรแบัรปรากมรกแรปโ
Page 42

ภาษาไทย
คู
่
18
ํ
นะนแรากอืม
าการใช้งาน
่
คง้ัต า ชเจวรต / ิมูภหณุอ
็
งอ้หนใิมูภหณุอค
ณุอบัรปถรามาสารเ ห ดไิมูภ้ง่ายตามทต่ี้องการ
- ให้กดปุ
่
ณุอ ห ิมูภ ห
้
คง้ัต่ณุอา ห ณุอุบะร :ิมูภ ห ูผ่ีทิมูภ้ใช้ต
โหมดความเย็นไม่ทํางาน หากต้องการให
อุณห วกงูสิมูภ
โปรดลดอุณห ใิมูภ ห้ต
ไอ่ืมเ หร่ก็ตามท ุปดก่ี
็
เปนแสดงนย่ีลปเ
ตกาจงอ่ืนเ
ท ทแ่ี
้
ต่นักงา
ณุอบัรปอ่ืพเม ห ต่ีทมาติมูภ
: เพ C°1 น้ึขม่ิ ห ต F°1 อืร
ห ง้ัรคง่ึน
: ลดลง 1°C ห ต F°1 อืร
่ึน
ห ง้ัรคง
ณุองดสแ :งอ ห ิมูภ ห้องป นับุจจั
ณุอา ห ิมูภ ห้อง
่
ํ
า ต่ีทมาตงล
่
ณุอ ม ห ิมูภ ห้องจะแสดงขน้ึ
่
ีทานิว 5 นใยาภาม ห ลแีทานิว 5 กาจงัล ้
ณุอ ห ต ่ีทมาติมูภ ้องการ
ํ
าแหน
่
คะลแ งิรจ
่
องการ
้
อการกด
่
อการกด
่
้
องการ
้
ณุอ ลรทโนอคทมโีรง ห ิมูภ ห้อง
ง้ัตรากงอ
้
ะจ ว
กตแจาองอ่ืรคเวัตงอขงดสแ่ีทา
Page 43

ภาษาไทย
กา ่คง้ตัร ากา องอขนยีวเลหไร ากาศ
ทศิทมุคบวค างกา งอขนยีวเลหไร
อากาศ ขึ้น/ลง
การ SWING ไห ถรามาส )งล/น้ึข( ศากาองอขนยีวเล
ปร ดไบั้โดยใช
้
คู
่
ํ
นะนแรากอืม
าการใช้งาน
19
ลรทโลอคทมโีร
กา ซเลซเบัลสร
ี
ยส/ฟาเรนไฮต์
กดปุ
1
่
กดปุ่ม SWING ไห )งล/น้ึข( ศากาองอขนยีวเล
2
และฝาช่องระบายอากาศ จะแกว
หมายเหตุ
- ให้ใช้ร รากงาทงาทศิทบัรปอ่ืพเลรทโลอคทมโี
ไห อมสเ งล/น้ึข ศากาองอข นยีวเล
การใช
- กดปุ
- เม กดใอ่ื
ณุอ ห F° 1 งลดล/น้ึขม่ิพเะจิมูภ
้
เสียหายได
่
ปเสยีซเลซเ
สยีซเลซเ
็
้
็
นฟาเรนไฮต์ ห ตฮไนรเาฟกาจอืร
ทจาอง่ิดวนแนใศากาอ
ุปดก่ีทมาต
ม TEMP ในโหมดฟาเรนไฮต์
่
ชใดิปเอ่ืพเ FFO/NO ม
้
ํ
าให้เคร ศากาอบัรปงอ่ื
งอ่ืรคเ
่
ไรากงาทศิทบัรปบีรคบัรปอืม หลของ
งละลแน้ึขง
เป็น
์
กาจนย่ีลปเอ่ืพเ )ีทานิว 5( PMET MOOR ม
Page 44

ภาษาไทย
คู
่
20
ํ
นะนแรากอืม
าการใช้งาน
การควบคุมเวลาเปิด/ปิด
่คง้ตั าเวลา นับุจจัป
กดปุ่ม SET/CLEAR เป
1
็
ีทานิว 3 าลวเน
กดปุ
2
่
กดปุ่ม SET / CLEAR
3
คง้ัตง่ัทะรกนจ GNITTES EMIT ม
าได
่
้
หมายเหตุ
บวัตบอสจวรต
ส้ีชงําห .M.P ะลแ .M.A บัร
่
้
1
2
3
่
่คงัต า ลวเมุคบวคงอืรคเ า
กดปุ
่
กดปุ
่
กดปุ่ม SET / CLEAR
ดิปเอ่ืพเ REMIT ม ห าลวเมุคบวคงอ่ืรคเดิปอืร
คง้ัตง่ัทะรกนจ GNITTES EMIT ม
าได
่
้
หมายเหตุ
กอืลเ ห ทรากงอขทภเะรปมาสนใง่ึน
าลวเมุคบวคงอ่ืรคเ ห ดิปาลวเมุคบวคงอ่ืรคเดิปเาลวเมุคบวคงอ่ืรคเงอ่ืรคเกัพดุย
้
ั
ท กำ า กกิลเกยร า ่คง
- หากคุณต
- ห ากคุณต
ห คง้ัตรากดิปอืร
้
้
ัส
ญญาณ (ห ะลแศากาอบัรปงอ่ืรคเ่ีทาลวเง้ัตรากฟไดอล หน้ )ปไบัดะจลผงดสแอจ า
ตร า ลวเมุคบวคงอืรคเ า
าตามต้องการ
่
ํ
า ตงัด นาง
อไปนี้
่
่
ง้ัทาลวเง้ัตรากกิลเกยรากงอ หมด ให้กดปุ่ม SET/CLEAR
ตแาลวเง้ัตรากกิลเกยรากงอ
ละค่า ให้กดปุ
่
ใน้ันกาจะลแ ห้กดปุ่ม SET/CLEAR โดยให้ช
ต ่ีทาลวเมาต
องการ
้
ต ่ีทาลวเมาต
องการ
้
่
งอ่ืรคเกัพาลวเง้ัตอ่ืพเ REMIT ม ห คง้ัตรากดิปเอืร
โีร้ี
า
่
บัรวัตงัยปไลรทโนอคทม
Page 45

ภาษาไทย
กา ษกัรงุรำบร าและกา กิรบร าร
การบํรงุรา รากิรบรากะลแาษกั
21
่
สงอืรคเวัต
่
่
ภู่ยอทีนว ายในอาคาร
ลรทโนอคทมโีระลแ งอ่ลก งรกแะต
- ให้ป กงอ่ืรคเบบะรดิ
ทําความสะอาดให้เช็ดด้วยผ้านุ่มแห้ง
อย่าใช้สารฟอกห รกดักราสอืร
ํ
ทะจ่ีทนอ
าความสะอาด ในการ
่
อน
่
หมายเหตุ
ต้แดัตงอ หล่งจ่ายไฟก่อนทํา งอ่ืรคเดาอะสมาวค
ภายในอาคาร
แผ่นกรองอากาศ
ดศากาองอรกน่ผแ
านห ดงรกแะตงัล
ตรวจเช็คและทํา าดปัส 2 ๆกุทดาอะสมาวค ห์ ห บอืร่อย
้
กว่ น้ันา หากจําเป็น
- ห ้ามใช้ส ตงัด ๆดใง่ิ
ํ
น
าร้อนกว่า 40 °C
้
อาจก่อให้เก /ะลแิตกปดิผมาวคดิ ห ดไีสนย่ีลปเรากอืร
อไปนี้:
่
สารระเหย
ยีสเมาวคดิกเจาอ ห บัรปงอ่ืรคเงอขวิผน้ืพงอขยา
อากาศ
S
I
N
N
E
R
B
e
n
e
z
n
e
S
C
O
N
I
U
R
C
L
B
A
E
G
R
านหน้า ควรจะ
้
- ศากาองอรกน่ผแดอถ
การนําแผ่นกรองออกมา ให้กดแป้นค้างไว้และดั ปไน
ข้างหน้าเล็กน้อย
งัวะรรวคอ้ข
ยอ กออศากาองอรกน่ผแดอถอ่ืมเ
ส่ปเ่ีทนว็นโลห ฑณัภติลผงอขะ
อาคารอาจทําให้เก จเดาบรากดิ ็บได้
- ทําความสะอาดฝุ
่
ุฝดูดงอ่ืรคเ
น ห ลอืร้างด้วยน
่
ถ้าสกปรกเป็นทเ่ี ห็นได้ช ใ นจเดั ห้ล้างด้วยสาร
ชะล้างท ปเ่ี็นกลาง ทําความสะอาดในน
ํ
ห ากน
าร้อน (40°C ห รอืร้อนมากกว
้
รปูร่างได
้
- ห ล่ีทกาจงัล
อย่าให้แผ่น งรตยดโดดแงสแสัผมัสศากาองอรก
้
ห รมาวคอืร
ํ
างด้วยน
าสะอาด ควรทําให้แห้งในร
้
้
้
- ต ศากาองอรกน่ผแง้ัตดิ
ช่องระบายอากาศ
แผ่นกรองอากาศ
(ด้านหลังตะแกรง)
ช่องลมเข้า
(ตะแกรง)
์
ํ
าเปล่า
้
ํ
ทอ่ืมเฟไกาจนอ
าให้แห้ง
ช่องลมออก
่
ํ
าอุ่น
้
่
น้ิชสัผมัสา
นใยาภงอ่ืรคเ
ดศากาองอรกแผ่นงอขงออะลน
วย
้
ดิผะจจาอนัม )า
ม
่
Page 46

22
การบํรงุรา รากิรบรากะลแาษกั
กบัลด็ลคเ า งำทร าน!
อย่า ปไนิกเน็ยเงอ้ห้หใ
็
ปเ่ีน
มไ่ีทลผน
ตีด
่
่วจใ่นแดรปโ า ะลแูตะรปดิป้ดไ
่
ยว้ดฟไา่คงอืลปเ
ยเมาวคาษกัรอ่ืพเ
่
็
นในห้อง
ภาษาไทย
หน้าต่า ว้ลแทินสง
ห ะลแูตะรปดิปเรากงย่ีลเกีล
หน้าต่างให้มากท ทเดุส่ี
อบัรปงอ่ืรคเอ่ืมเ ากา มำนกูถ่มไะจศ าใช
เป็ นเวลานาน
- ให้เป คง้ัตรากมาตศากาอบัรปงอ่ืรคเดิ
ประเภทของการทํางาน: การทํางานในโห มลดัพดม
โ่ีทูด( ห )มลดัพดม
- ปิดเบรคเกอร
งมโว่ัช 3-2 าลวเ
น ทะจ้ี ําให้กลไกภายในแห้ง
์
งัวะรรวคอ้ข
ปิดเบรคเกอร์มไอ่ืมเ่ได้ใช
เวลานาน
ไหม้ได
้
น้ิสะลแพาภขุสอ
อย่าปล่อยให้แสงเข้ามาในห้อง
โดยตรงเม บัรปงอ่ืรคเนาง้ชใอ่ื
ท วคำ ามสะอา งอรกงอ่ืรคเด
อากาศอย่า อมสเำ่ำมสง
แผ
น หล
ทะจ่ีทาําได
้
่
้
การทําความเย็นและกํา ดัจ
น้ืชมาวค ทําความสะอาดอย่างน้
2 ๆกุท
สัปดาห์
อไปนี้เป็น
่าต่
ปเศากาอบัรปงอ่ืรคเ
กจาอะลแมสะสะจจาอกรปกสง่ิส
อให้เก งิลพเดิ
่
ลรทโนอคทมโีรกาจกออ่ีรอตเตบแดอถ -
้ผดิปอืรหดืมงอ้ห้หใำท าม่าน
ู่ยอศากาอ
้
ถ้าแผ
่
ทําความเย็นจะลดลง และจะสูญ ฟฟไนางงัลพยีสเ
ต่ีท ้องใช้ทอ่ืพเําให้เคร ทศาก
ชใอ่ืมเ
- ทํา วัตง้ัตดิ
็
น
อากาศ)
- ตรวจเช็คท่อลมด ขเนั้าห งอ่ืรคเวัตงอขกอออืร
ภายใน/ภายนอกอาคารว่าไม่ลบกูถ็อก
- ตรวจเช็คสายด วนิ
อาคาร
เท นักมยี
ณุอ ห ทเิมูภ
ให บะร้ ายอากา น็ปเงอ้หนใศ
ไรากดละจนัตดุอ่ีทงอรก
พาภิธทิสะรปดละลแ ศากาองอข
เปิดหน้าต่างและระบายอากาศเป็น
ยอ
ใอ่ืพเง่ิดวนแ ห้แน่ใจว่าท ง้ัทว่ั ห้องมี
นักา
่
รคง้ัรค าว
ดิปกาจงอ่ืนเ หน้าต่างไว้ตลอดเวลา
็
ปเงึจ น้ันงัด
วารคง้ัรค
์นชยโะรปน็ปเ่ีทลูมอ้ข
คลิบะลแศากาองอรกแผ่น
าไฟฟ้าของท่าน
่
ดนัตดุอศากาองอรกน
วยฝุ
้
้
สงอ่ืรคเ
่
ตมอ่ืชเจาอ
อเข้สบักา
่
ูยอ่ีทนว
่
อบัรปงอ่ืรคเ ากา ง้ัรคกีอศ
่
่
ตมอ่ืชเา
อได้อย่ตกูถงา้อง
่
่
าอบัรปงอ่ื
จะรกงอ้หิมูภหณุอ้หใำท ายเท่า
ไรากงาทศิทบัรป หลของอากาศใน
รากนใีด่ีทดิควนแน
งอรกที่แผ่นูด( ราคาอนใยาภ
ูยอ่ีทงอ่ืรคเงอขนว
ภายใน
่
้
ํ
างาน
ตะลแศากาองอรกแผ่นดาอะสมาวค
รากพาภิธทิสะรป น
า 6 %
Page 47

ตรวจเช็ตดุจค่างๆ ก
ของคุณ
ท งำ าน
- คุณได้ทํา นใดาลพดิผ
ห มไอืร่?
- ฟิวส์ขาดห รอกเครบเอืร
วงจรทํางานห มไอืร
- แผ่น ศากาองอรก
สกปรกห มไอืร่?
ทํา แผ่นดาอะสมาวค
กรองอากาศ
- ห ้องอาจร้อนมากใน
ช่วงแรกท รากดิปเ่ี
ทํา บัรป งอ่ืรคเงอขนาง
อากาศ ให้เวลาสําห บัร
- ได้ต คง้ั่ณุอา ห กูถิมูภ
ต้องห มไอืร่?
- ม ชน้ักดิปงอขง่ิสี
เข้าห งอขกอองาทอืร
ส
ห มไอืร่?
อบัรปงอ่ืรคเ ากาศไม่
วคำท า วคอืรหน็ยเม าม
่
ิ
สะร
ปีม่มไนอ้ร
ํ
คูดดรปโ
าแนะนําการ
ูยอ่ีทนว่ภายในอาคาร
กนใบัลด็ลคเ า หญัปขไ้กแร า ลวเง้ัทดัยหะรป ! า !นิงเะลแ
ซอขะจ่ีทนอ
่
ํ
ทรากาลวเง้ัตราก
างาน
ภิธท าพ
งลน็ยเศากาอ้หใำท
องทาง
่
อมห ชใอืร
่
- ตรวจเช็คว่าน มไ่ี่ได
็
เป
ห ผอืร้าในห้อง
์
่
งำท านเสีงัดงย
- สําห น้ันงัดงยีสเบัร
เห นงยีสเบักนอืม
* น สารทำงอขงยีสเอืค่ี
- สําห เน้ันงยีสเบัร ห นอืม
ัก
ปล่อยสู
- น นงอขงยีสเอืค่ี
การกํา น้ืชมาวคดัจ
อากาศ
งอ่ืรคเวัตงอขศากาอ
้
อบัรปงอ่ืรคเ ากาศ
่
รอฟเ มรพ งันผ
์
ํ
าจาก
้
....รากิรบ ห ูยอิตกปดิผมาวคดิกเงคงัยกา
ด ่วนอืมหเู ามีนำหยด
ๆกลปแน่ิลกีมงอ้ห
้
ยดโน้ืชบัอน่ิลกน
- เก นแบวครากดิ
รอจเิน
์
- เส รสกูถ้ีนงยี
ํ
าไหล
้
นใยาภลหไน็ยเมาวค
ศากาอบัรปงอ่ืรคเวัต
ศากาอดัองอ่ืรคเบ
ศากายรรบน้ัช
(LED) เปิดอยู่
- การทําความสะอาด
บัรปงอ่ืรคเ นใยาภ
้
มกออ าจาก
อบัรปงอ่ืรคเ ากาศ
็
ี
สเนิย้ดไ
ยงร้าว
้
ั
สงอรกวัต
ญญาณไฟ
ใ งอรกวัต ห้กดปุ่ง้ัตม
ีทานิว 3
่
น้ึขงา
าน
้
็
ปเนักวยีดเาลวเ
นเวลา
การไหลของอากาศจาก
อากาศเย
ร้อนของห้อง
ห ด งผแงอขวัตด
หน
้
ณุอ ห ิมูภ
เวลาและปุ่ม ◄ สาย
การบํรงุรา รากิรบรากะลแาษกั
ตดิตดรปโ
่
เคร อบัรปงอ่ื ากาศไม่
งำท านประมาณ 3
นา จงัลห ีท ากกดเปิด
ีมอ่ืมเน
- ส ปวัตอืค้ีนง่ิ
งอ่ืรคเงอขน
คอมเพรสเซอร์
ศากาอ่ีทามศากาอบัรป
- ให้รอประมาณ 3 นาที
่
/วัตยายขรากยดโ
เลย
- แบตเตอรี่หมดห มไอืร่?
ีมกาจงอ่ืนเ ฯลฯ า
- ใส่แบตเตอร )+( ว้ัขบัลส่ี
งอขงลปแนย่ีลปเราก
และ (-) ห มไอืร่?
นใลรทโนอคทมโีร
23
ํ
จนทแวัตอ
่
าหน่าย
ภาษาไทย
ง้ัรคกีองอ่ืรคเ
ํ
างาน
งอขนักงอ
งดสแลรทโนอคทมโีร
งดสแ่มไอืรห ๆนอืลเ
้
ทม่ิรเะจะลแ
่
่
ชติวส -
เบรกเกอร
์
้
กิรบ า ถสนใีทนัท้ดไร านกา ีนปไอ่ตงัด์ณร
ชเ น้ึขดิกเิตกป
ไน่ิลก น หม
่
รอกเครบเดิปะลแงอ่ืรคเดิป
่
ปไนิกเนอ ห ยีสเมาวคดิกเอืร หาย
้
็
์
รสกูถรากน
)นิดยาส ( ห สวิฟอืร์ทํางานไม่เหมาะสม
้
์
ดงอ่ืรคเมอ
งอเวัตยว ห ใบบะรม่ิรเอืร หม
้
้
้ว่
ฯลฯ งัดงยีสเ
ดยัฉจินิวรากยดโน้ึขงา
วยตนเอง
้
ตน้ืชมาวคา
ํ
าก็ตาม
่
่
เร ชใกยี
- ส มไ่ีทดใง่ิ
อย่าทําการพยายามซ
- สายไฟห รกัล
- รห ผสั ปเดาลพดิ
ํ
- น
า ไวัร ห มแราคาอนใยาภงอ่ืรคเวัตกาจล
้
ผู้ใช้งานต้องตรวจสอบและทําความสะอาดเป็นประจํา อ่ืพเ ห มไงย่ีลเกีล
การทํางานต
ํ
า สําห ใ ษศเิพีณรกบัร ห้ช่างบร ทเรากิ ่ ปเน้ันา ็นผู้ดํา รากนินเ
่
้
ลกงัดีณรกนใ
าว
่
เคร พาภิธทิสะรปีมงอ่ื
่ให้
Page 48

 Loading...