

Page 1

ENGLISH
OWNER'S MANUAL
AIR PURIFIER
ESPAÑOL
Read this owner’s manual thoroughly before operating the
appliance and keep it handy for reference at all times.
Model name: AS560DWR0
MFL69726848
Rev.01_082818
Copyright © 2018 LG Electronics Inc. All rights reserved.
www.lg.com
Page 2

ENGLISH
Table of Contents
This manual is produced for a group of
products and may contain images or content
different from the model you purchased.
This manual is subject to revision by the
manufacturer.
Safety Instructions ........................ 03
Unpacking .......................................09
Parts......................................................09
Removing Packing Materials ................10
Remote Control Setup ..........................12
Installation ......................................13
Transporting or Moving the Product .....13
Installing the Product ............................13
Operation ........................................14
Product Overview .................................14
Starting the Air Purifier ..........................20
Using Smart Mode ................................20
Using Booster Mode .............................21
Using Dual Mode ..................................21
Using Single Mode ...............................22
Adjusting the Purifier Fan Speed..........22
Adjusting the Clean Booster Fan Speed
Rotating the Clean Booster ..................23
Checking the Air Quality .......................24
Setting the Sleep Timer ........................27
Locking the Control Panel Buttons .......27
..23
Smart Functions ............................ 28
Using the SmartThinQ™ Application....28
Audible Diagnosis .................................30
Maintenance ................................... 32
Cleaning the Exterior ...........................33
Cleaning the Filter ................................34
Replacing the Filter ...............................34
Cleaning the PM Sensor ......................35
Storage ................................................36
Before Calling for Service............37
Product Specifications ................. 41
Warranty (USA) ..............................42
Page 3
ENGLISH
Safety Instructions
READ AND SAVE THESE INSTRUCTIONS
This guide contains many important safety messages. Always read and obey all safety messages.
This is the safety alert symbol. It alerts you to safety messages that inform you of hazards
that can kill or hurt you or others, or cause damage to the product.
All safety messages will be preceded by the safety alert symbol and the hazard signal word
WARNING or CAUTION. These words mean:
-
WARNING
CAUTION
This equipment is home (class B) EMI suitable equipment, which is mainly for home use, and it can
be used in all regions.
You can be killed or seriously injured if you do not follow these instructions.
- Indicates an imminently hazardous situation which, if not avoided, may
result in minor or moderate injury or product damage.
.
Warning
To reduce the risk of re, electric shock or personal injury when
using this product, follow basic safety precautions including the
following:
CHILDREN IN THE HOUSEHOLD
This appliance is not intended for use by persons (including
children) with reduced physical, sensory or mental capabilities or
lack of experience and knowledge, unless they have been given
supervision or instruction concerning use of the appliance by a
person responsible for their safety. Children should be supervised
to ensure that they do not play with the appliance.
03
Page 4

ENGLISH
INSTALLATION
•Install the product near an easily accessible electrical outlet.
•Do not install the product on an uneven or inclined surface.
•Do not install the product in a damp area and keep away from
splashing rain or water.
•Do not install the product in an area exposed to direct sunlight or
near heat-generating equipment.
•Do not install the product in a place where combustible gas may
leak or industrial oil or metallic particulates are present.
POWER
•This product is designed to use a standard 115 V, 60 Hz outlet.
Always check the supply voltage before using it.
•Make sure the product does not pinch or crush the power cord
or plug.
•Unplug the product before cleaning it or replacing the lter.
•Do not touch the power plug with wet hands.
•Make sure the plug is clean and dry before plugging it rmly into
the outlet.
•When unplugging the power cord, always pull it by the plug.
•Unplug the product during electrical storms or when not in use
for a long time.
04
Page 5

ENGLISH
•Do not bend the power cable excessively or place a heavy
object on top of it.
•Do not extend the length of the power cable or alter it.
•Do not use several devices on a multi-socket extension outlet.
•Unplug the product before cleaning or attempting any user
maintenance. Turning the controls to the OFF position does not
disconnect the appliance from the power supply.
•Take care to ensure that the power cable cannot be pulled out or
damaged during operation. There is risk of re or electric shock.
•If the supply cord is damaged, it must be replaced by the
manufacturer, its service agent or similarly qualied person in
order to avoid a hazard.
USE
•If the product is submerged in water, stop using it and contact
the LG Service Center.
•If there is a gas leak (isobutane, propane, LNG, etc.), do
not touch the product or power plug and ventilate the area
immediately.
•Do not use abrasive or metal brushes, cloths or sponges to
clean the product.
•If you detect any abnormal noise, odor or smoke, unplug the
product immediately and contact an LG Service Center.
•Only an LG Electronics authorized repair person should
disassemble, repair, or modify the product.
05
Page 6

ENGLISH
•Do not use the product near an open ame. Do not use or store
combustible or ammable substances near the product, such as
ether, benzene, alcohol, drugs, propane, butane, combustible
sprays, insecticide, air freshener, cosmetics, candles, and lamps.
•Do not place the power cord under rugs, carpeting or mats.
•Do not allow animals or pets to chew on the power cord.
•Do not allow children to climb on or play with the product.
•Do not move the product when it is in operation.
•Do not place objects or containers on top of the product.
•Do not insert hands or metal objects into the air inlet or outlet.
•Do not impact the product.
•To avoid injury, take care around pinch points when detaching or
reattaching product parts.
•Unplug the product when not in use for a long time.
•Do not install or use broken parts.
•Unplug the product before cleaning it.
•Do not put ammable substances into the product.
•Do not operate the product while its cover is open.
•Do not swallow the battery. It may cause injury, including
damage to internal organs, or death.
DISPOSAL
•Dispose of the packing materials (vinyl, styrofoam etc.) to keep
them out of the reach of children.
06
Page 7

ENGLISH
Caution
To reduce the risk of re, electric shock, or personal injury when
using the product, follow basic safety precautions, including the
following:
INSTALLATION
•Do not tilt the product while moving or transporting it.
•This product is not designed for maritime use or for mobile
installations such as RVs, trailers, or aircraft.
•Avoid installing product within 3 1/4 ft (1 m) of any TV or audio
equipment.
•Do not place the product under bright light.
•The appliance shall be installed in accordance with national
wiring regulations.
•When moving or storing the product, wrap the power cord
around the base of the product to prevent personal injury,
damage to the cord or damage to oors.
•Dropping the product may cause personal injury or product
malfunction.
USAGE
•Do not use the product for removal of toxic gas such as carbon
monoxide.
•Do not use the product for ventilation purposes.
•Do not connect the product to a power supply with unstable
voltage for extended periods.
•Do not place obstacles around the air inlet or outlet.
•For safe use of the product, children or others with reduced
mental capabilities need to be closely monitored by a person
who is responsible for their safety.
07
Page 8

ENGLISH
•Do not place the product near curtains.
•Use this product only for its intended purpose. This product
is not intended for use in preserving animals/plants, precision
equipment, artwork, etc.
•Do not climb or place objects on the product.
•Do not operate the product with wet hands.
•Do not let the moisture from a humidier directly touch the
product.
•Do not use the product while it is not in an upright position.
•Do not use the product near objects vulnerable to heat.
•Use the lter only for its intended purpose.
•Do not use detergents, cosmetics, chemicals, air fresheners, or
disinfectants in the product.
•Do not place magnetic or metal objects on top of the product.
•Clean with a soft cloth only. Do not use strong detergents or
solvents to clean the product.
•Use the Booster mode only when necessary.
•Do not insert any objects into the Booster.
•Do not operate the product while the Booster cover and grille are
separated.
•Do not insert hands or metal objects into the Booster.
•Do not modify the battery. Doing so may cause a re or electric
shock.
•Inserting the battery incorrectly may cause an explosion.
•Do not recharge or take apart the battery. Doing so may result in
an explosion.
•Do not burn the battery or leave it near heat. Doing so may
result in an explosion.
08
Page 9
ENGLISH
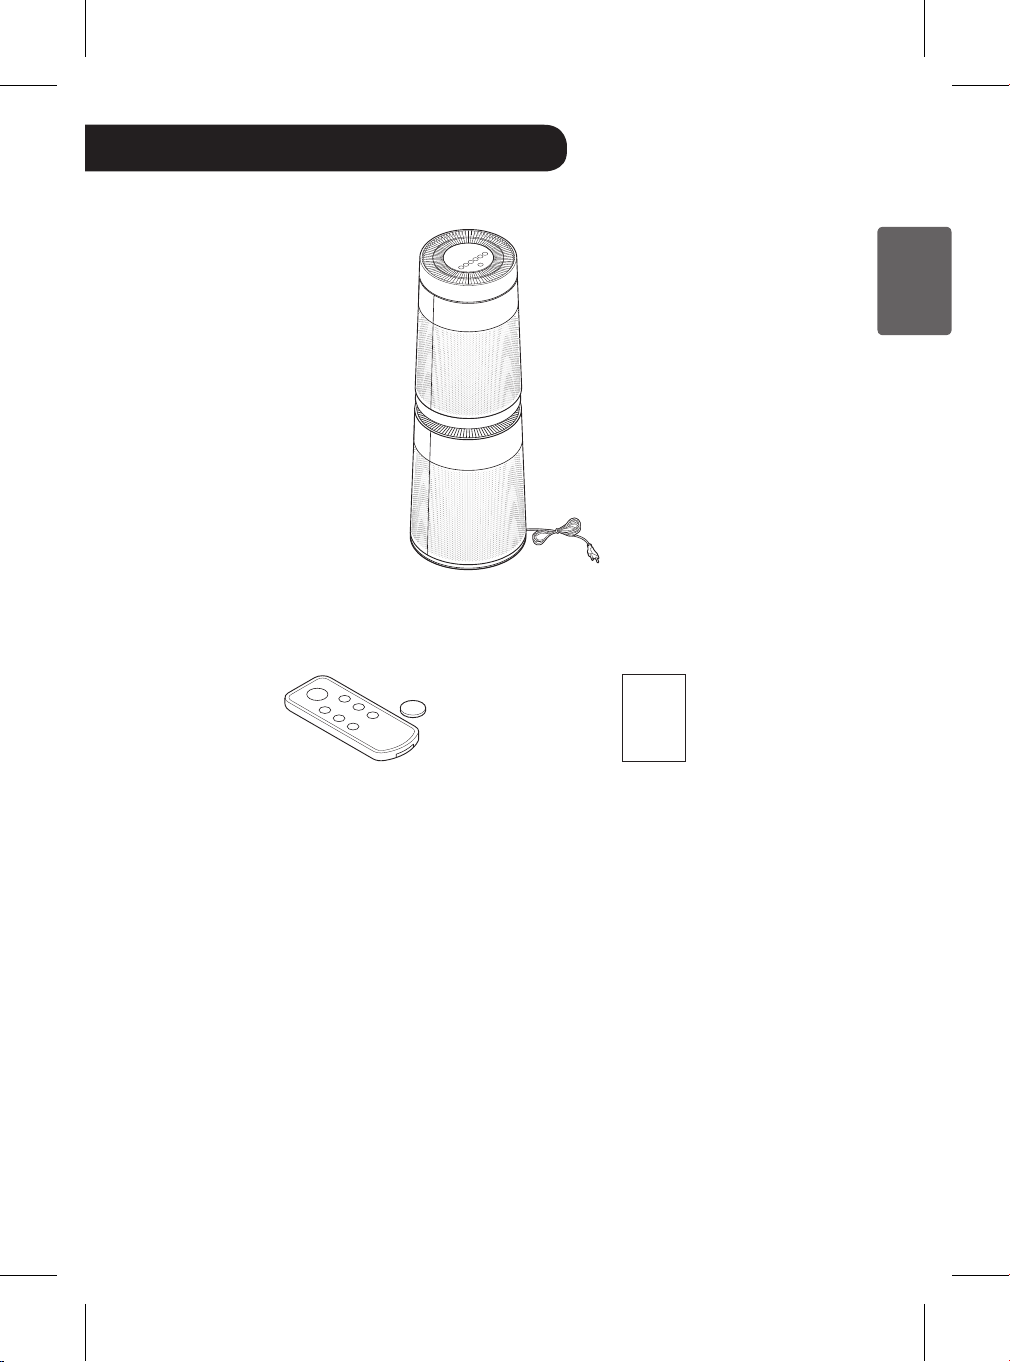
Unpacking
Parts
Air Purier
Owner’s
Manual
Remote Control /
Battery (CR2025, 1 Unit)
•The appearance or components of the product may differ depending on the model.
•The shape of the power plug differs depending on the country.
Owner’s Manual
09
Page 10
ENGLISH
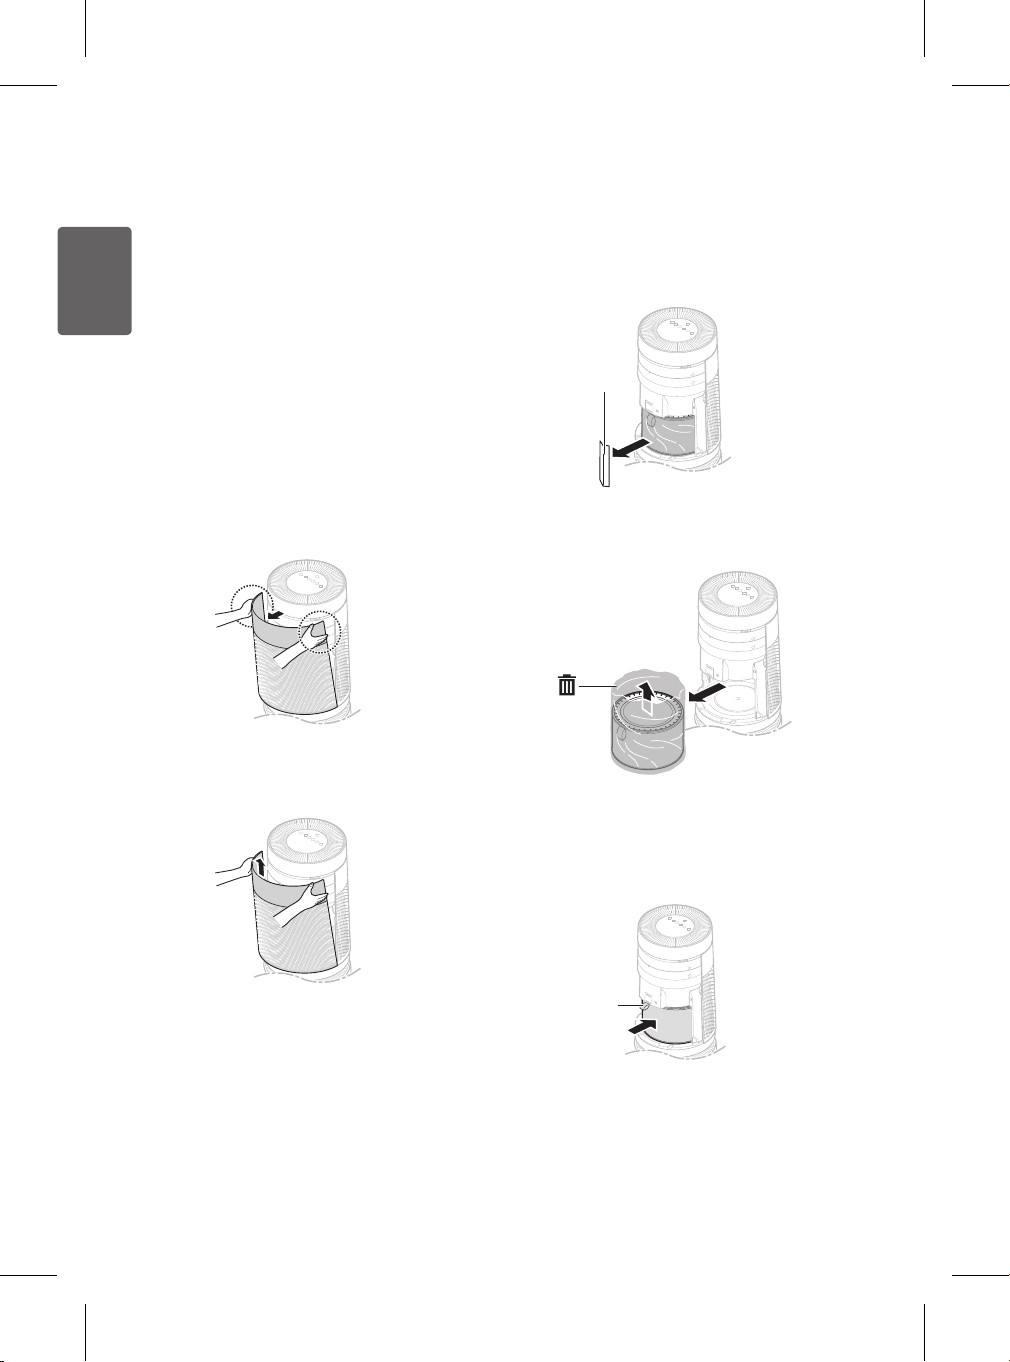
Removing Packing
Materials
Unpack the product and remove any packing
tape or protective vinyl before using the
product.
Pull out the product from the
1
packaging and remove the packing
tape attached to the product.
Grab the top end of the back cover
2
and gently pull it.
•You will see "PM 1.0 & GAS
SENSOR SYSTEM" on the back
cover of the product.
Remove the upper back from the
3
product.
Remove the support located at the
4
lter inlet.
•Upper lter inlet: 1 support
•Lower lter inlet: 2 supports
Support
Remove the lter, unwrap it, and
5
discard the plastic wrapper.
Install the lter in the product.
6
•Make sure that the handle faces
upward.
10
Handle
Page 11
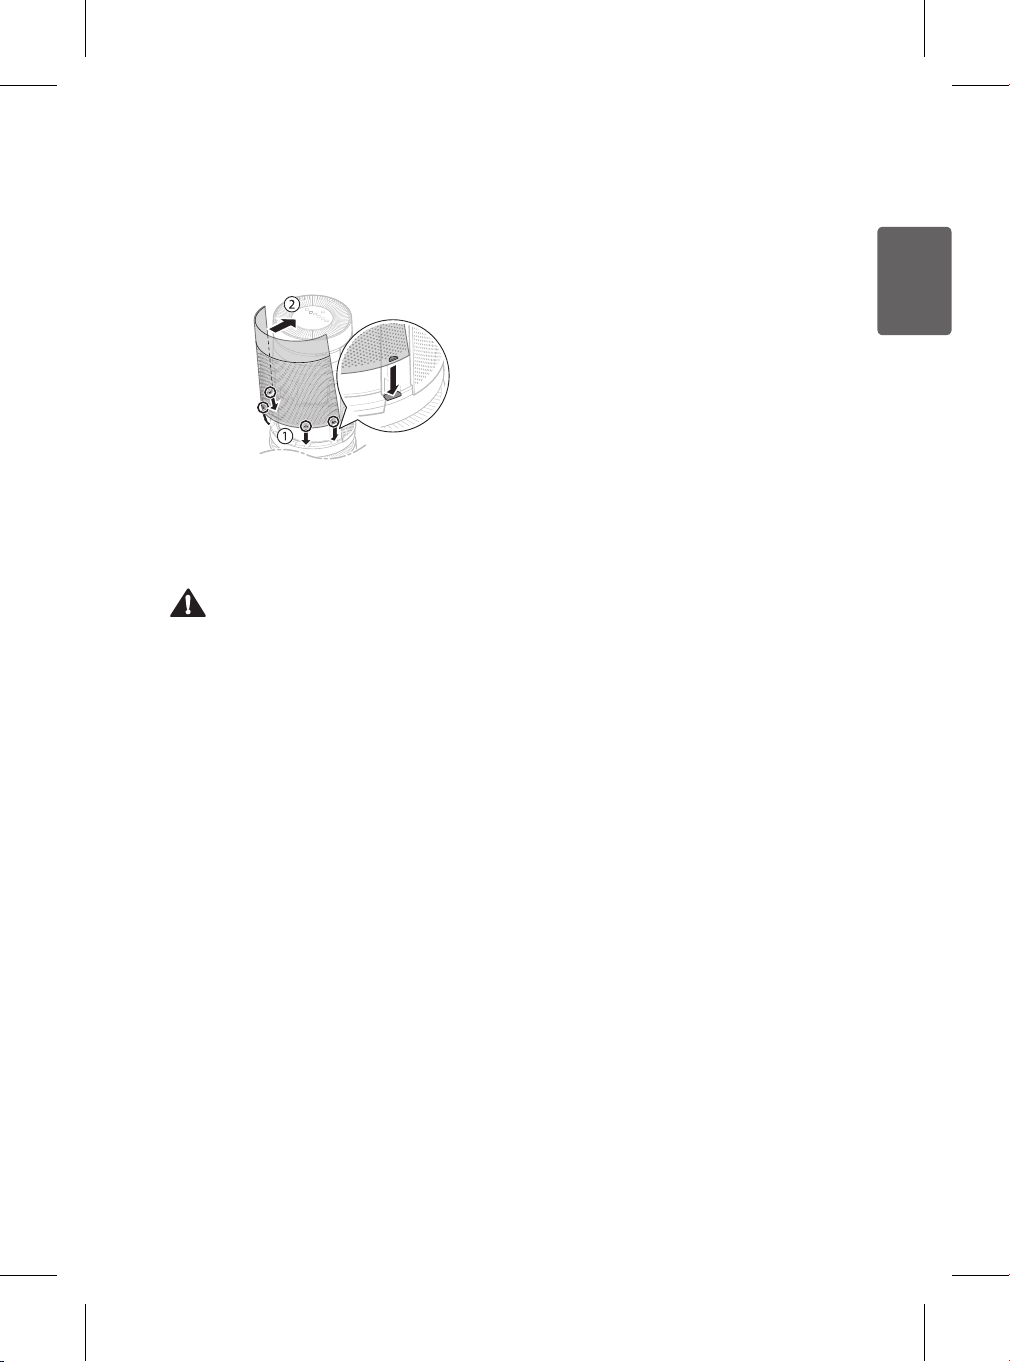
ENGLISH
Insert the tabs on the bottom of the
7
upper back cover into the slots in the
product and close the cover.
Follow steps 2 through 7 to unpack
8
and install the lower lter.
Caution
•Failure to remove the foam supports may
affect the performance of the product.
Please be sure to remove them before
use.
•Make sure that you remove the lter’s
protective packaging prior to use otherwise
it may result in product malfunction.
•Pay attention to the direction of the lter
when you install the lter otherwise it may
cause malfunction or failure of the product.
11
Page 12
ENGLISH
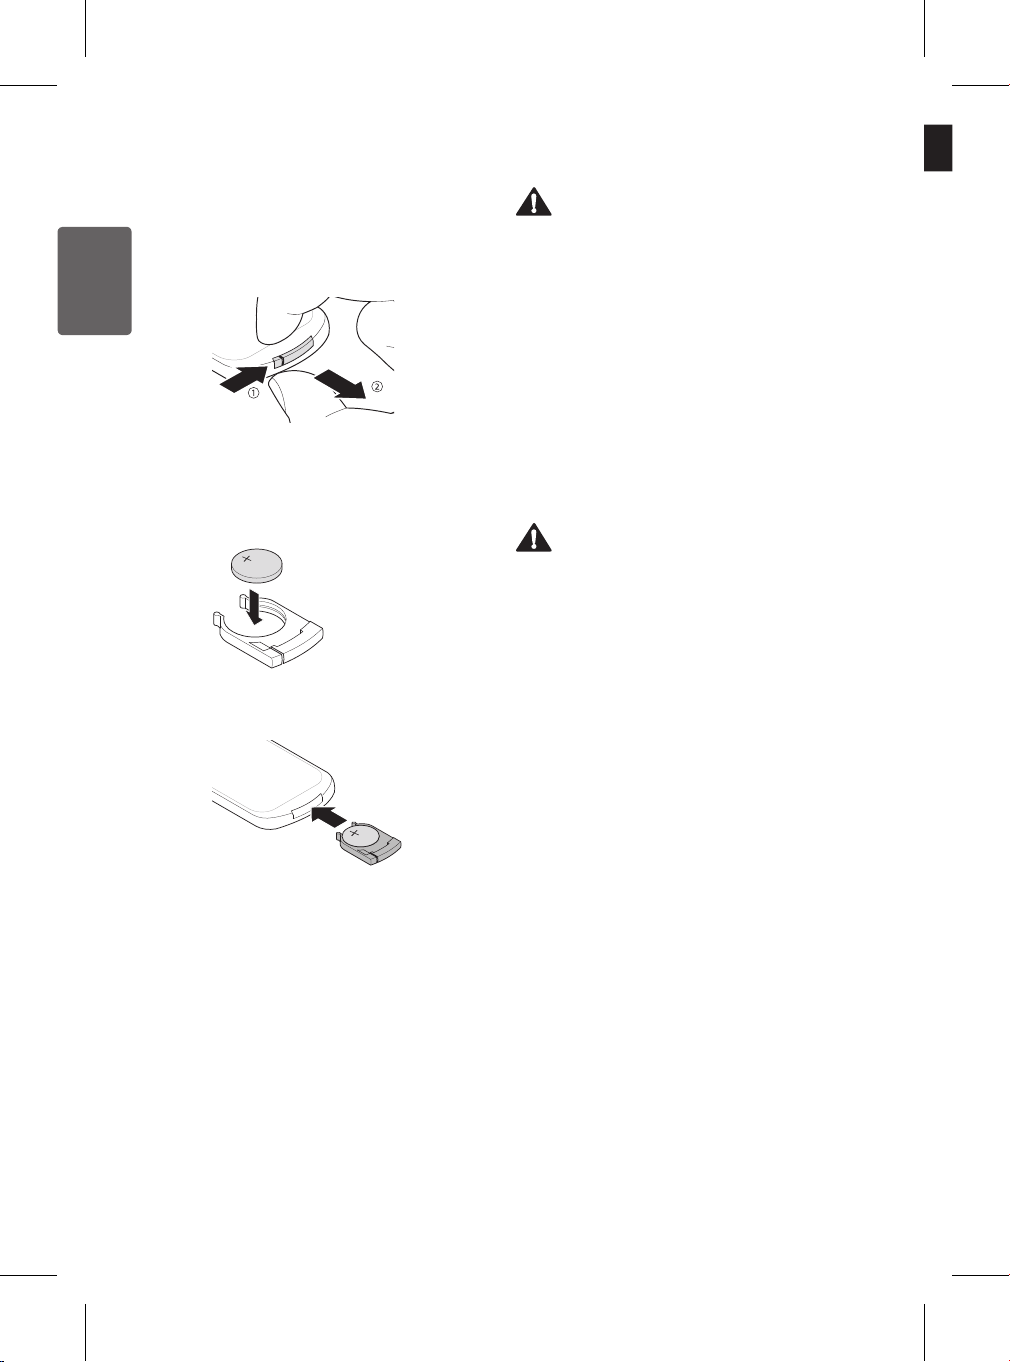
Remote Control Setup
With the bottom of the remote facing
1
up, remove the battery tray from the
remote.
Insert the battery provided with the
2
product into the tray.
•The (+) electrode of the battery
must face upward.
Insert the battery tray into the remote.
3
Back
Warning
•A button/coin-shaped battery is used in the
remote.
•Do not swallow the battery. It may cause
injury, including damage to internal organs,
or death.
•If the battery is swallowed, consult a
physician immediately. Damage to internal
organs, or in severe cases death, may
occur within 2 hours of swallowing.
•Keep the battery out of reach of children.
•If the battery tray is not secured rmly, stop
using the remote immediately and keep it
away from children.
Caution
•Do not modify the battery. Doing so may
cause a re or electric shock.
•The battery may explode if recharged,
disassembled, or installed improperly.
•Do not expose the battery to re or heat.
Doing so may cause it to explode.
Note
•Replace the used battery with the proper
battery type (CR2025).
•If the remote does not work as expected,
try to replace the battery or check the
polarity (+, -) of the battery. If the problem
continues, contact the LG Service Center.
•Dispose of the used battery according to
environmental regulations.
12
Page 13
ENGLISH
Installation
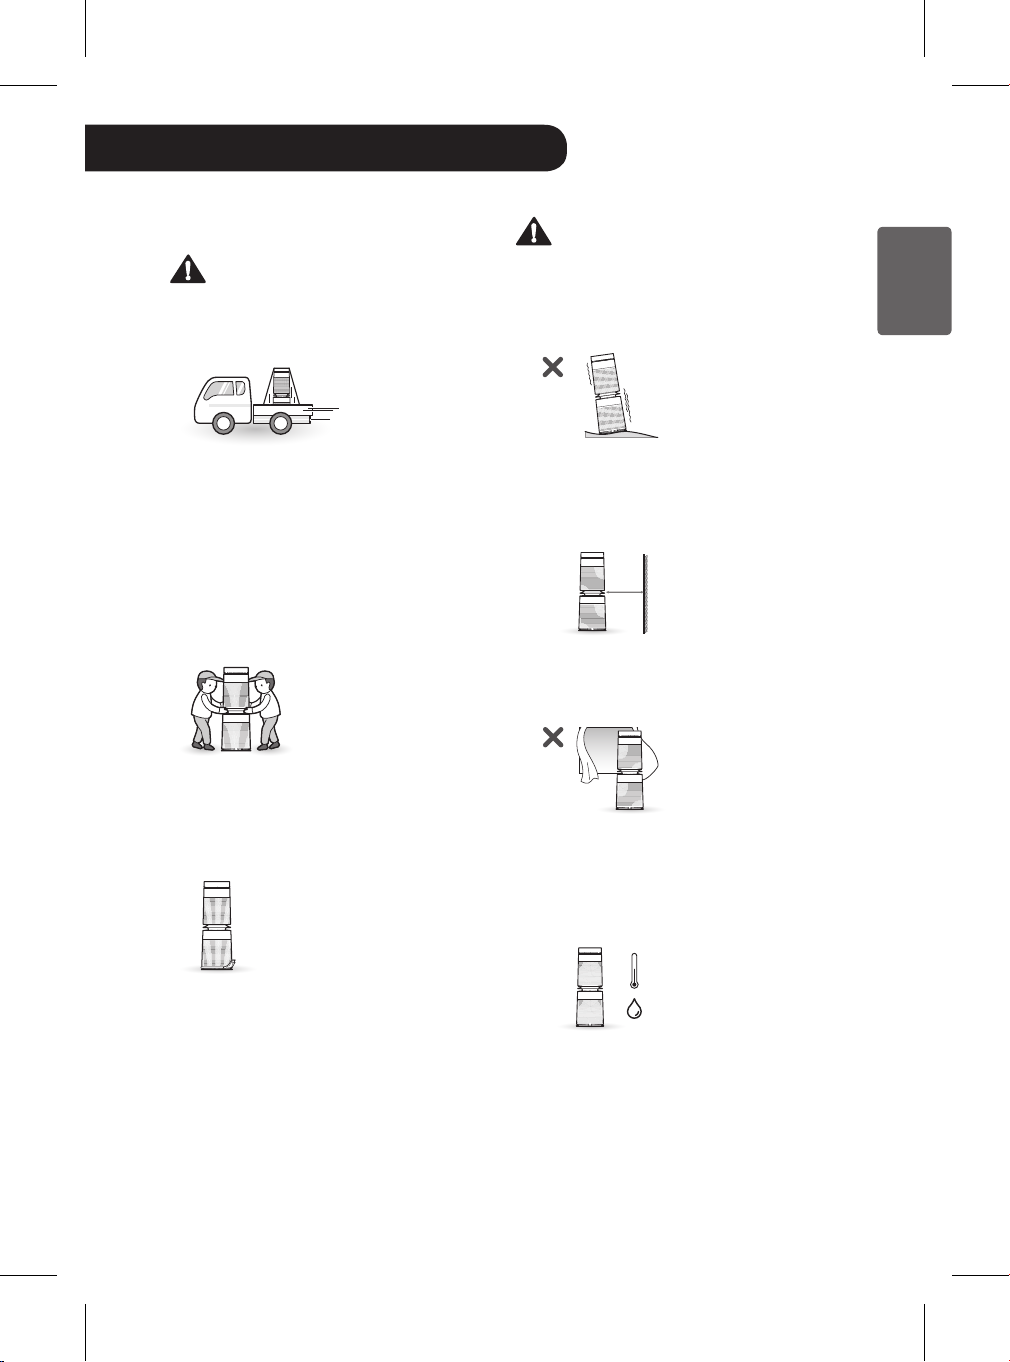
Transporting or Moving the
Product
Caution
Transport the product in a well-secured
and upright position. Impacts may cause
product damage.
The product is heavy. Use two people
when moving it.
•Dropping the product may cause
personal injury or product malfunction.
•Do not hold the outer cover when you
carry the product. The cover may open
accidentally, causing the product to
drop.
Installing the Product
Caution
Install the product on a strong, level
surface. Installing the product on a weak
or tilted surface may cause noise and
vibration or tipping, resulting in injury.
Allow a 3.25 ft (1 m) clearance between
the product and surrounding surfaces
or objects. The air inlet needs space to
function properly.
1 m
Do not install the product near curtains which
could block the air inlet or outlet. Doing so
may result in product malfunction or failure.
When moving or storing the product, wrap
the power cord around the base of the
product to prevent personal injury, damage
to the cord or damage to oors.
Product performance may be affected by
environmental factors such as temperature
and humidity.
•For optimal performance, use in an area
with a 40% to 70% humidity level.
%
To reduce the risk of electric shock, this
equipment has a polarized plug (one blade
is wider than the other). This plug will t in
a polarized outlet only one way. If the plug
does not t fully in the outlet, reverse the
plug. If it still does not t, contact qualied
personnel to install the proper outlet. Do not
alter the plug in any way.
13
Page 14
ENGLISH
Operation
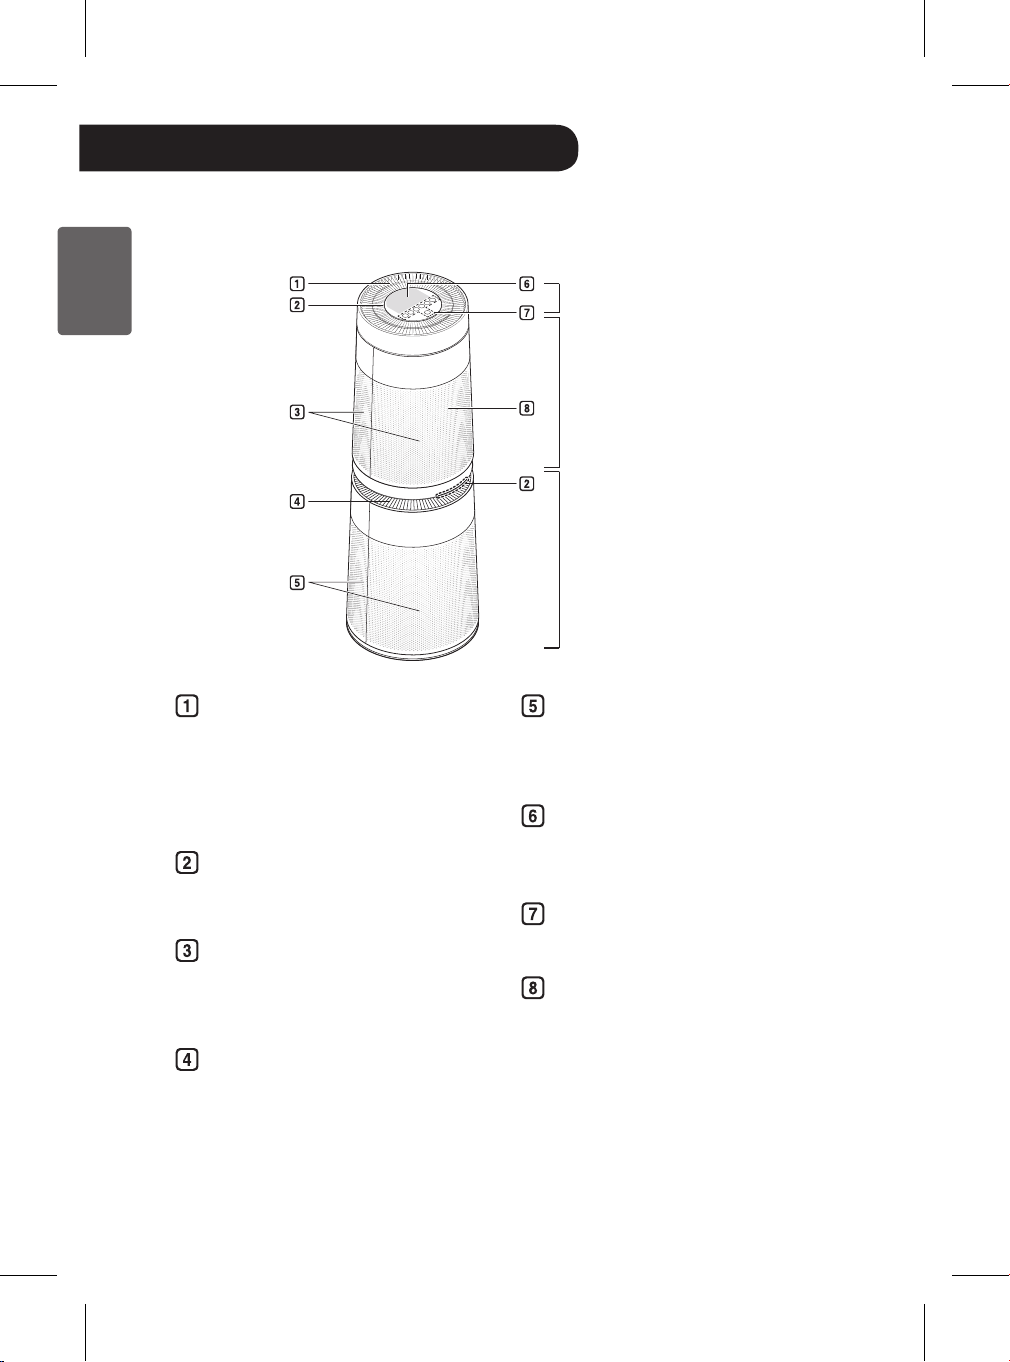
Product Overview
Front
Upper Air Outlet/Clean Booster
•Discharges puried air through the
upper lter.
•Controls the direction of the air so
that it reaches every corner of the
room.
Air Quality Indicator Light
Changes color to indicate the air
quality.
Upper Air Inlet (Top Cover)
Draws air into the upper section of the
air purier. The front and rear covers
can be removed separately.
Clean Booster
Upper Section
Lower Section
Lower Air Inlet (Bottom Cover)
Draws air into the lower section of the
air purier. The front and rear covers
can be removed separately.
Status Panel
Indicates air quality and settings
status.
Control Panel
Set or adjust product functions.
Receiver for Remote Control Signal
Lower Air Outlet
Discharges puried air through the
lower lter.
•The appearance or components of the product may differ depending on the model.
14
Page 15
ENGLISH
Back
Smart Diagnosis Speaker
In the event of a malfunction or failure,
use the Smart Diagnosis option to
check the product condition.
(See Smart Functions.)
PM 1.0 (super ultra-ne dust)
sensor
Detects the PM (particulate matter)
density for very ne particles.
Odor (Gas) Sensor
Detects odors in the air.
Filter
Removes ultra-ne dust particles,
possible sources of sick house
syndrome, smog, and odors.
15
Page 16
ENGLISH
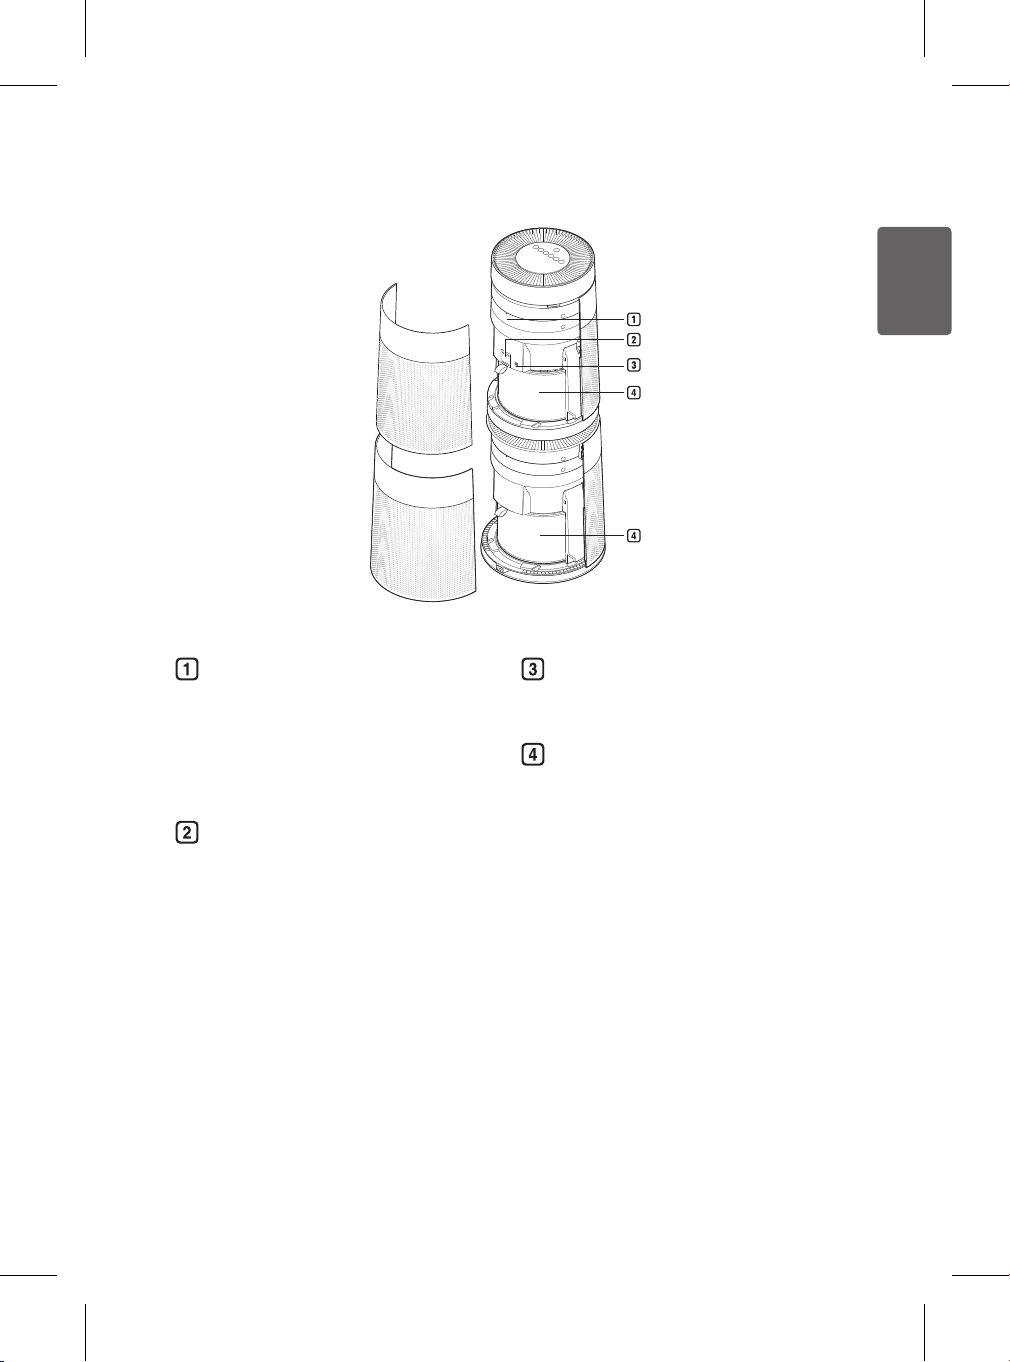
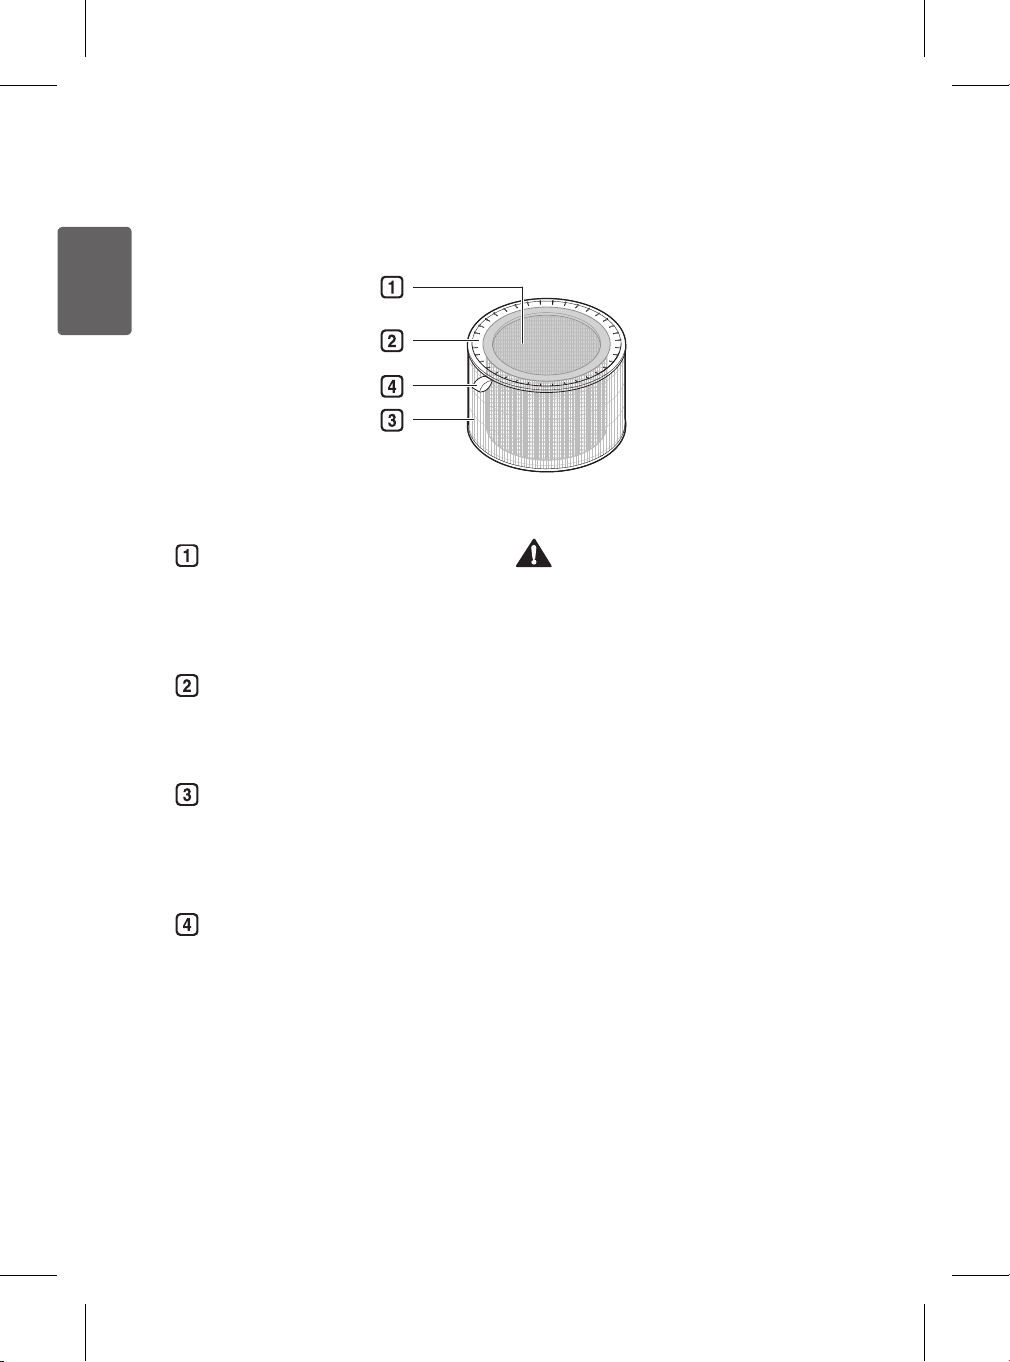
Filter System
Total Deodorizing Care Filter
Removes unpleasant everyday
odors from sources such as diapers,
cigarette smoke, and strong-smelling
foods.
True HEPA lter
Removes super ultra-ne particles,
such as ne sand and cigarette ash,
from the air.
Ultra-ne Filter
This prelter on the outside of the
combined lter primarily removes
large airborne particulates such as
pet hair.
Filter Handle
Used to remove the lter from the air
purier.
Caution
•Filters 1 and 2 are assembled together. Do
not try to separate the two lters.
•The lter is not a toy. Use it only for its intended
purpose.
Note
•For best performance, keep windows or
doors closed while using the air purier. To
avoid elevated carbon dioxide levels, do not
operate the air purier in a tightly enclosed
space for extended periods.
•Carbon monoxide (CO) is a harmful gas that
is mainly introduced with outside air, and
cannot be removed with a lter.
•The deodorization performance of the
lter may decrease sharply if used for an
extended time in an area with very strong
odors. Replace the lter if it starts to emit
rather than trap unpleasant odors.
•Very strong odors should be eliminated by
ventilating the area rst. Then use the air
purier to remove any lingering odors.
16
Page 17

ENGLISH
Control Panel
Start/Stop Button
Press to start or stop the air purier.
Mode Button
Press to set the operating mode.
•Press and hold the button for 3
seconds to turn on/off the overall air
quality indicator light. (See Turning
the Indicator Light On/Off.)
Speed Button
Press repeatedly to adjust the fan
speed.
•Press and hold for 3 seconds to
activate the Wi-Fi registration mode.
Once the product is registered in
the smartphone app, pressing and
holding the button for 3 seconds
turns on the Wi-Fi.
•To turn off the Wi-Fi, press and hold
the Start/Stop and Speed buttons
at the same time until the Wi-Fi
icon turns off in the display.
Booster Speed Button
Press repeatedly to adjust the fan
speed of the Clean Booster.
Swing Button
Press while in Booster mode to rotate
the Clean Booster left and right.
Indicator Button
Press repeatedly to see the PM
(particulate matter) densities by
particle size.
Sleep Timer Button
Press repeatedly to schedule a delay
time until the air purier turns off
automatically.
•Press and hold for 3 seconds to
lock or unlock the control panel
buttons. (See Locking the Control
Panel Buttons.)
17
Page 18

ENGLISH
Status Display Panel
Air Quality Status Display
Overall air quality (color)
①
PM particle size and density
②
(color)
PM density or Sleep Timer delay
③
time
Odor level (color)
④
Operating Mode Display
Fan Speed and Booster Speed
Display
Speed: Displays the air purier's
fan speed.
Booster Speed: Displays the
Clean Booster’s fan speed.
Icons
Icon Description
It is time to replace the upper lter.
It is time to replace the lower lter.
The Wi-Fi function is activated.
The Sleep Timer function is
activated.
The “On/Off Reservation” has
been set in the LG SmartThinQ
application.
The control panel is locked.
18
Page 19

ENGLISH
Remote Control
Start/Stop Button
Press to start or stop the air purier.
Speed Button
Press to adjust the fan speed.
Sleep Timer Button
Press repeatedly to schedule a delay
time until the air purier turns off
automatically.
Booster Speed Button
Press to adjust the fan speed of the
Clean Booster.
Light Button
Press to turn the overall air quality
indicator light off or on.
Mode Button
Press to set the operating mode.
Caution
•Do not press multiple buttons at the same
time. Doing so may cause the product to
stop operating or malfunction.
•Do not kick or step on the remote control.
Doing so may result in damage.
•Do not use the remote near water or in
high humidity. Doing so may result in re
or electric shock.
•Do not expose the remote to re or heat.
Doing so may result in a re or product
deformation.
•Remove and store the battery in a safe
location if you don't intend to use the
remote control for a long time. Failure to
do so may result in battery leakage or
product failure.
Note
•For best performance, aim the front of the
remote at the signal receptor on the front
of the product.
•The remote may not work properly at a
distance greater than 23 ft (7 m) from the
front of the product.
•If the remote control does not work even
after replacing the battery, contact the
nearest service center.
•The remote control may not work properly
if the signal receptor is in direct sunlight
or other strong light such as 3-wavelength
uorescent lamps or neon signs.
•A replacement remote control can be
purchased from the www.lg.com website
or by calling an LG Service Center.
Swing Button
Press while in Booster mode to rotate
the Clean Booster left and right.
19
Page 20

ENGLISH
Starting the Air Purier
Using Smart Mode
Press the Start/Stop button to turn the air
purier on or off.
Note
•The product defaults to Booster mode
when used for the rst time.
•The operating mode defaults to the last
mode selected, even after a power failure.
•The air purier sensor takes 30 seconds
to stabilize and will then display the PM
levels. During stabilization,
appears in the display. You can specify
the sensor stabilization time using the Air
Quality Sensor Operation Time option in
the LG SmartThinQ application.
– 'Always On': The sensor stabilization
turns on the rst time the product is
used and stays on thereafter.
– 'Only During Operation': The sensor
stabilization turns on or off with the
product.
Ready
Use Smart mode to automatically adjust the
operating mode and fan speed based on the
overall air quality.
Press the Mode button to choose the Smart
mode.
•Each time you press the button, the
operating mode changes in the following
order: Smart → Booster → Dual →
Single.
Note
•Smart mode disables the Speed, Booster
Speed, and Swing buttons.
•Smart mode operates either the Clean
Booster or the air purier and controls the
fan speed depending on the air quality.
20
Page 21

ENGLISH
Using Booster Mode
Using Dual Mode
The Clean Booster puries air and then uses
the fan to quickly circulate it throughout the
room.
Press the Mode button to choose the
Booster mode.
•Each time you press the button, the
operating mode changes in the following
order: Smart → Booster → Dual →
Single.
Caution
Keep hands away from the Clean Booster
fan and other moving parts.
Note
•When the Booster mode is selected, the
Clean Booster fan rises up at a 55° angle
to push the air forward and help circulate
it.
•To control the fan speed of the Clean
Booster, see Adjusting the Clean
Booster Fan Speed.
•To rotate the Clean Booster left and right,
see Rotating the Clean Booster.
•If the product is unplugged before the
Clean Booster is completely closed, simply
plug the product in again. The Clean
Booster will swing left and right and will
then close completely.
Dual mode uses both the upper and lower
sections of the air purier to quickly purify
indoor air.
Press the Mode button to choose Dual
mode.
•Each time you press the button, the
operating mode changes in the following
order: Smart → Booster → Dual →
Single.
21
Page 22

ENGLISH
Using Single Mode
Single mode uses the lower section of the air
purier to purify the air.
Press the Mode button to choose Single
mode.
•Each time you press the button, the
operating mode changes in the following
order: Smart → Booster → Dual →
Single.
Note
For best performance, the fan on the upper
section of the air purier runs on low speed
in Single mode.
Adjusting the Purier Fan
Speed
Press the Speed button to adjust the air
purier fan speed. The fan speed can only be
adjusted while the air purier is running.
•Each time you press the button, the speed
changes in the following order: Auto →
Low → Middle → High → Turbo.
Purier Fan Speed Display
As the fan speed is adjusted, the lighted
bars on the display increase or decrease in
increments of two. For example, a medium
fan speed would appear as shown.
22
Note
•The fan speed is set to Auto when you
rst start the air purier. The Auto setting
controls the fan speed automatically
according to the overall air quality.
•You can control the fan speed only in the
Booster, Dual, and Single modes.
Page 23

ENGLISH
Adjusting the Clean
Booster Fan Speed
Press the Booster Speed button to adjust
the Clean Booster fan speed. The Clean
Booster fan speed can only be adjusted
when the air purier is in Booster mode.
•Each time you press the button, the speed
changes in the following order: Auto →
Low → Middle → High → Turbo.
Booster Fan Speed Display
As the booster fan speed is adjusted, the
lighted bars on the display increase or
decrease in increments of two. For example,
a medium booster fan speed would appear
as shown.
Rotating the Clean Booster
While in Booster mode, press the Swing
button to rotate the Clean Booster left and
right.
Caution
Keep hands away from the Clean Booster
and other moving parts.
Note
•The Clean Booster rotates 35° to each
side.
•The Swing button only works in the
Booster mode.
Note
•In Smart mode, the Clean Booster fan
automatically matches the speed of the air
purier fan. For example, if the air purier
fan speed is automatically set to Low, the
Clean Booster fan speed also changes to
Low.
•The Clean Booster fan can only be
adjusted in Booster mode.
23
Page 24

ENGLISH
Checking the Air Quality
The overall air quality is indicated by the color of the air quality indicator light and the information
displayed on the status panel.
Understanding the Overall Air Quality Level
The overall air quality level is determined based on the PM density and odor level detected.
The detection ranges are separated into 4 levels, and the overall air quality indicator light
turns green, yellow, orange, or red depending on the highest contamination level detected.
Overall Air
Quality
Red Very Bad 255 or more 56 or more 56 or more Very strong 4
Orange Bad 155~254 36~55 36~55 Strong 3
Yellow Normal 55~154 13~35 13~35 Normal 2
Green Good 54 or less 12 or less 12 or less Weak 1
•The overall air quality is indicated by the color of the overall air quality indicator light and of
the overall air quality status
•The level (color) displayed is based on the highest level detected, whether PM density or
odor level.
State
PM10
(ne dust)
Checking the Air Quality Using
the Indicator Light
The color of the overall air quality indicator
light provides an easy way to gauge the
overall air quality.
Upper Overall Air Quality
Indicator Light
PM density (μg/m³) Odor Level
(ultra ne dust)
in the display panel.
PM2.5
PM1.0
(super ultra ne dust)
State Level
Turning the Indicator Light On/Off
Press and hold the Mode button for 3
seconds to turn the overall air quality
indicator light on or off.
Lower Overall Air Quality
Indicator Light
Note
During the initial PM sensor stabilization,
which lasts for 30 seconds, the overall air
quality indicator light turns white. The odor
sensor takes 2 minutes to stabilize, and the
odor level is not reected in the overall air
quality indicator during this time.
24
Note
•The overall air quality indicator light turns
off when the Sleep Timer is set.
•Turning on the overall air quality indicator
light after the Sleep Timer has been set
turns on the overall air quality indicator on
the display panel as well.
Page 25

ENGLISH
Checking Air Quality on the
Status Display Panel
The status display panel shows the overall
air quality, PM density, and odor level.
•Overall air quality: The color of the overall
air quality icon
panel shows the overall air quality level.
•PM density: The PM density is shown in
the display and is also indicated by the
color of the PM particle size indicator,
which shows the highest detected level
among the 3 particle sizes.
– If all PM densities are at the Good
level, the display shows the PM10 (ne
dust) density value.
– If any of the PM densities is worse than
the Normal level, the display shows
the value for the PM particle size with
the highest density. If some or all of the
PM densities are the same, the display
shows the highest PM density in the
following order of preference: PM1.0,
PM2.5, and PM10 (super ultra-ne,
ultra-ne, and ne).
•Odor level: The color of the odor level icon
in the status panel display indicates the
odor level.
in the status display
In the example shown, the PM1.0 level
is displayed, which means that the
concentration of super ultra ne dust is
highest.
The color of the PM particle size indicator
is based only on the PM density level. The
color of the odor level indicator
only on the odor level. But the color of the
overall air quality icon
the highest detected level, whether from PM
density or odor.
If the odor level is Normal, but the PM1.0
density level is Bad, the overall air quality
indicators will be orange. But if the odor level
becomes Very Strong, the overall air quality
indicators will turn red.
is based
is based on
Checking the PM Density Levels
With the air purier running, press the
Indicator button repeatedly to show the PM
densities by particle size.
•Whenever you press the button, the
display changes in the following order:
PM10 → PM2.5 → PM1.0.
•The display shows each PM density for
approximately 10 seconds.
PM particle size
and density level
color
Overall air quality
Odor level color
PM density
25
Page 26

ENGLISH
Note
•PM (particulate matter) density is displayed
in increments of 1 unit, from 8 to 999. PM
density values are based on the data sheet
provided by the sensor manufacturer.
•The PM10 and PM2.5 air quality values
follow those provided by the United States
EPA (Environmental Protection Agency) for
2015.
– The overall air quality level displayed
on the product may differ from the level
announced by the EPA.
•The PM1.0 density is displayed in the
same manner as the PM2.5 density and is
based on LG Electronics standards.
•The PM10 and PM2.5 densities displayed
by the product could differ from the EPA
forecast and from densities measured by
other products or devices.
– Differences in PM density values may
be the result of different methods of
measuring or differences in the actual
PM density levels.
– The PM density measurement was
tested using LG Electronics’ standard
test materials.
•Using the product near a humidier, mist
generator, air-conditioner or other device
which generates steam or micro-particles
could affect the PM densities.
•The overall air quality level is a result of
both PM densities and the odor level. It
may differ from the PM10, PM2.5 and
PM1.0 density levels.
•Even two products placed in the same
space could measure the PM10 density
differently due to air circulation.
•The chemicals contained in air fresheners,
perfumes, deodorizers or cosmetics may
affect the overall air quality display due to
odor sensor.
•The PM density displayed may change
with environmental factors such as the
presence of sofas, beds, carpets, vacuum
cleaners, humidity, smoke, bugs, pets or
cooking oils.
•The PM densities may be affected by
changes in the outside environment such
as construction, heavy trafc or pollen.
•The micro dust density could be higher
near outside doors, windows, vents or in
areas where outside air enters.
•Use ONLY water to clean the sensor.
Using anything else could cause product
failure.
•The ne dust density could be affected
by cooking or using humidiers, sprays or
other products which generate steam or
ne particles.
26
Page 27

ENGLISH
Setting the Sleep Timer
Press the Sleep Timer button on the control
panel or the remote while the air purier is
running to turn it off automatically after a set
time delay.
•Press the button repeatedly to select from
among preset time delays: After 2 hours→
After 4 hours → After 8 hours → After 12
hours → Cancel.
•Once the Sleep Timer is set, all lights on
the product are turned off except for the
Sleep Timer icon
Note
•To help you fall asleep, the fan speed is
set to Low for a preset time after which it
switches to the Auto mode.
•To adjust the fan speed when the Sleep
Timer is set, press the Speed button.
(Except in Smart mode)
•After the Sleep Timer is set, press the
button once more to see the delay time. To
cancel the Sleep Timer, press the button
repeatedly until the display activates again.
•The Sleep Timer remains on even if the
power goes off and then on due to a
blackout.
and a few other icons.
Locking the Control Panel
Buttons
Press and hold the Sleep Timer button for
3 seconds while the air purier is running
to lock the control panel buttons. This helps
prevent children or others from changing
settings accidentally.
(Lock) is displayed on the status panel.
•
Note
•To unlock the control panel, press and hold
Sleep Timer for 3 seconds.
•Pulling out the power plug will also unlock
the control panel.
•The control panel will remain locked even
if the product is turned off.
•If you turn off the product on the control
panel, the product will not turn off.
•When you turn off the product with the
remote control, the lock is held and the
product is turned off.
27
Page 28

ENGLISH
Smart Functions
Using the SmartThinQ™
Application
Install the LG SmartThinQ application on
your smartphone to add convenient features.
Installing Smart ThinQ
Find and install the LG SmartThinQ
application from the Apple App Store/Google
Play Store on your smartphone. For more
information on how to use LG SmartThinQ,
refer to the Help menu in the app.
Wi-Fi Function
Smart Diagnosis™
Troubleshoot problems with the air purier
using the Smart Diagnosis function in the
application.
Settings
Use the Settings feature to congure
product or application settings.
Note
•Wi-Fi only supports 2.4 GHz frequency.
•When registering the product, make
sure that the Wi-Fi connection of the
smartphone is on.
•If you delete the registered product from
the app while the Wi-Fi is turned off, press
and hold the Wi-Fi button twice to activate
the Wi-Fi registration again.
•To just turn the Wi-Fi back on, press and
hold the Wi-Fi button once. The Wi-Fi
connection will be reestablished within
1 minute. (Pressing and holding the
button more than once initiates the Wi-Fi
registration mode.)
•A wireless router and cable and an
Internet connection are required to use the
smartphone application.
•To connect to the Internet, contact an
Internet service provider (ISP). The
wireless router and cable can also be
purchased from and installed by the ISP.
If installing the wireless router yourself,
refer to the user manual enclosed with the
router.
•If possible, install the wireless router
close to the product. The signal strength
depends on the location and distance
from the router, and will affect the data
transmission rate from the router to the
product.
•Contact your Internet service provider for
assistance with issues like signal strength
and network settings.
•For best results, set the security protocol
on the router to WPA2. If the WEP protocol
is used, the product may fail to register on
the network.
•Set the wireless network name (SSID) to
any alphanumeric combination. For best
results, do not use special characters. The
SSID is what appears in the list when you
search for available Wi-Fi networks on
your smartphone.
•Connect only to wireless networks you are
authorized to use. Unauthorized
Wi-Fi connections are illegal, and may
subject you to legal action.
•These instructions are accurate at the
time of publication. The LG SmartThinQ
application may be changed without prior
notice to users.
28
Page 29

ENGLISH
Wireless LAN Module
Specications
Model LCW-003
Frequency
Range
Output
Power
(max)
FCC Notice (For transmitter module
contained in this product)
This equipment has been tested and found
to comply with the limits for a Class B digital
device, pursuant to Part 15 of the FCC
Rules. These limits are designed to provide
reasonable protection against harmful
interference in a residential installation.
This equipment generates, uses, and can
radiate radio frequency energy and, if not
installed and used in accordance with the
instructions, may cause harmful interference
to radio communications. However, there
is no guarantee that interference will not
occur in a particular installation. If this
equipment does cause harmful interference
to radio or television reception, which can
be determined by turning the equipment
off and on, the user is encouraged to try to
correct the interference by one or more of the
following measures:
- Reorient or relocate the receiving antenna.
- Increase the separation between the
equipment and the receiver.
- Connect the equipment to an outlet on
a circuit different from that to which the
receiver is connected.
- Consult the dealer or an experienced radio/
TV technician for help.
2412 – 2462 MHz
IEEE 802.11b: 17.56 dBm
IEEE 802.11g: 25.53 dBm
IEEE 802.11n: 25.29 dBm
This device complies with part 15 of the FCC
Rules. Operation is subject to the following
two conditions:
(1) this device may not cause harmful
interference and
(2) this device must accept any interference
received, including interference that may
cause undesired operation of the device.
Any changes or modications in construction
of this device which are not expressly
approved by the party responsible for
compliance could void the user’s authority to
operate the equipment.
FCC RF Radiation Exposure Statement
This equipment complies with FCC radiation
exposure limits set forth for an uncontrolled
environment. This transmitter must not be
co-located or operating in conjunction with
any other antenna or transmitter.
This equipment should be installed and
operated with a minimum distance of 20
cm (7.8 inches) between the antenna and
your body. Users must follow the specic
operating instructions for satisfying RF
exposure compliance.
Open Source Software License
Notice
Visit http://opensource.lge.com to obtain
open source codes developed under GPL,
LGPL, MPL or other open source licenses
that are included in this product.
In addition to source codes, you can also
download the contents of all licenses,
copyright indications and indication of no
warranty.
If you request open source codes for any
software included in this product by sending
an email to opensource@lge.com within
three years of purchasing the product, we will
send the codes on a CD-ROM with minimal
charges for the CD and shipping.
29
Page 30
ENGLISH
Smart Diagnosis Function
•This only applies to models with the
logo.
Troubleshoot problems with the product
using the Smart Diagnosis function in the LG
SmartThinQ application.
Diagnosis via Wi-Fi
Make sure the product is connected to
1
Wi-Fi.
Open the app and select the product
2
from the list of registered products.
Press the menu icon at the top right of
the screen in the app.
Select Smart Diagnosis from the
3
menu in the app and tap the Start
Smart Diagnosis button. The results
of the diagnosis will appear in the app.
•If the network connection is not stable, you
may need to press the Retry button to run
the diagnosis again.
•If Wi-Fi connection issues persist, tap the
Audible Diagnosis button in the app to
run Smart Diagnosis by recording audible
tones.
Note
For further assistance in troubleshooting any
issues, contact an LG Service Center.
Audible Diagnosis
•This only applies to models with the
logo.
Troubleshoot product issues with the
assistance of the LG Service Center. Only
use this function when directed to do so by
the call center agent. Smart Diagnosis cannot
be used unless the appliance is connected to
power.
Open the LG SmartThinQ application
1
on the smart phone.
Press the Smart Diagnosis button.
2
Follow the instructions on the smart
3
phone.
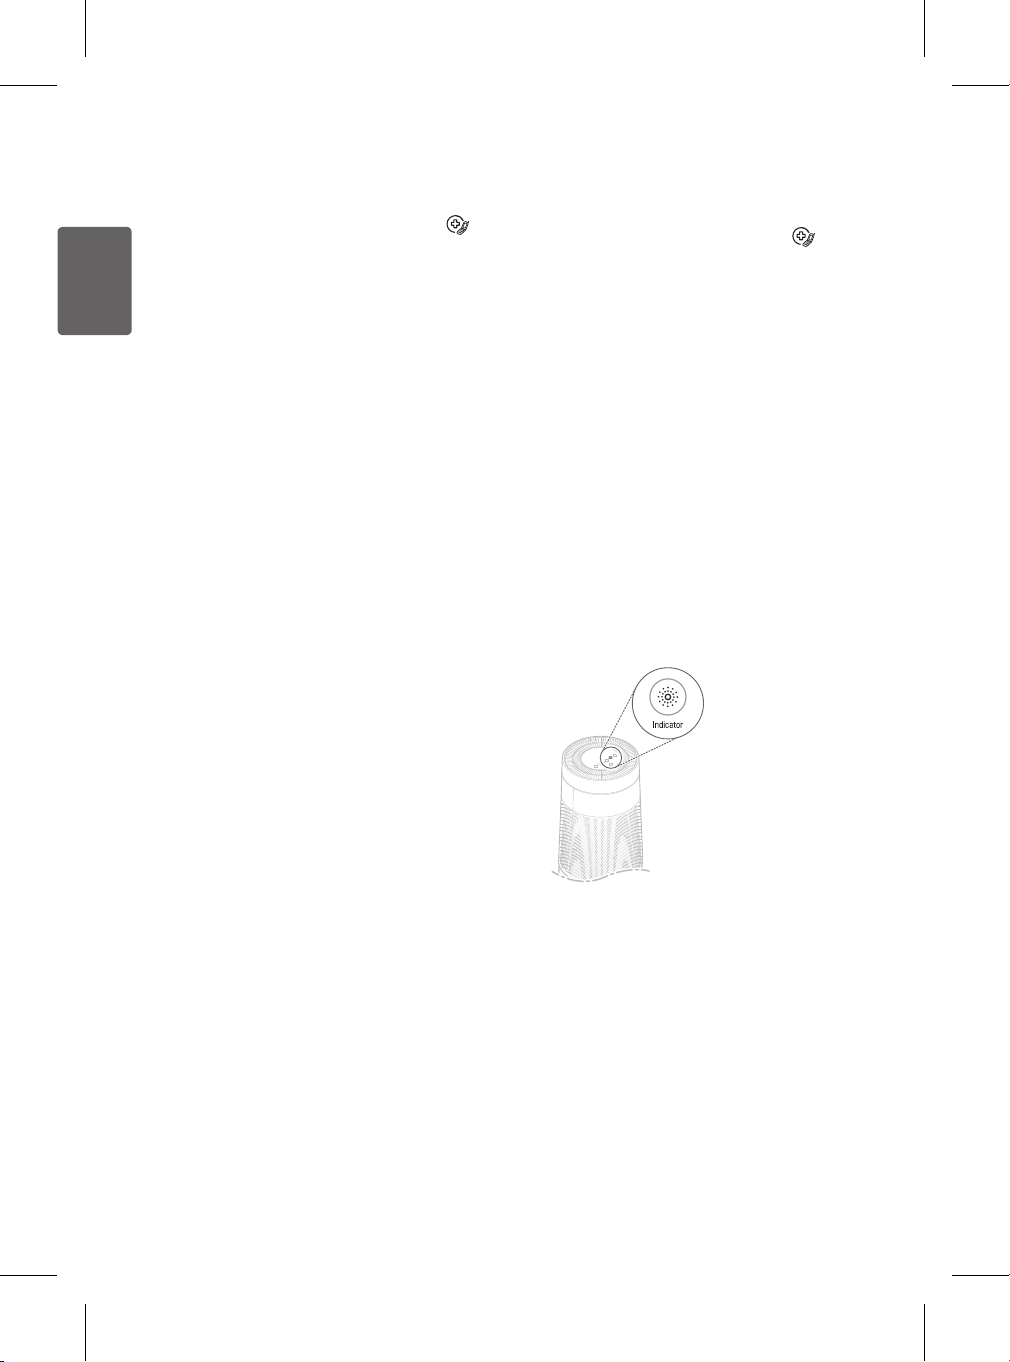
Press and hold the Indicator button
4
for 5 seconds to start the Smart
Diagnosis function.
30
Page 31

ENGLISH
Place the phone near the product.
5
•The microphone on your phone
should face the Smart Diagnosis
(
) logo on the back of the
product. Do not move the phone
away from the product while data is
being transmitted.
•You need to keep the phone near
the product while the data is being
transmitted for Smart Diagnosis.
•The data transmission sounds
resemble fax transmission sounds,
and you may nd them startling or
unpleasant. It is important to keep
the phone close to the product
throughout the transmission to
provide an accurate diagnosis.
After the data transfer is complete, the
6
service agent will explain the result of
the Smart Diagnosis.
•After the service agent explains
the diagnosis result, take the
recommended measures.
Note
•The Smart Diagnosis function depends
on the local call quality.
•The communication performance will
improve and you may get more accurate
results if you use a landline phone.
•Poor call quality may interfere with an
accurate diagnosis.
31
Page 32
ENGLISH
Maintenance
Caution
•Turn off and unplug the product before
cleaning it or replacing the lter.
•Do not spray water directly on the product.
•After cleaning the product or replacing the
lter, assemble the product in the reverse
order of disassembly.
•To help you distinguish between the front
and back covers, the front cover has an
LG logo on it.
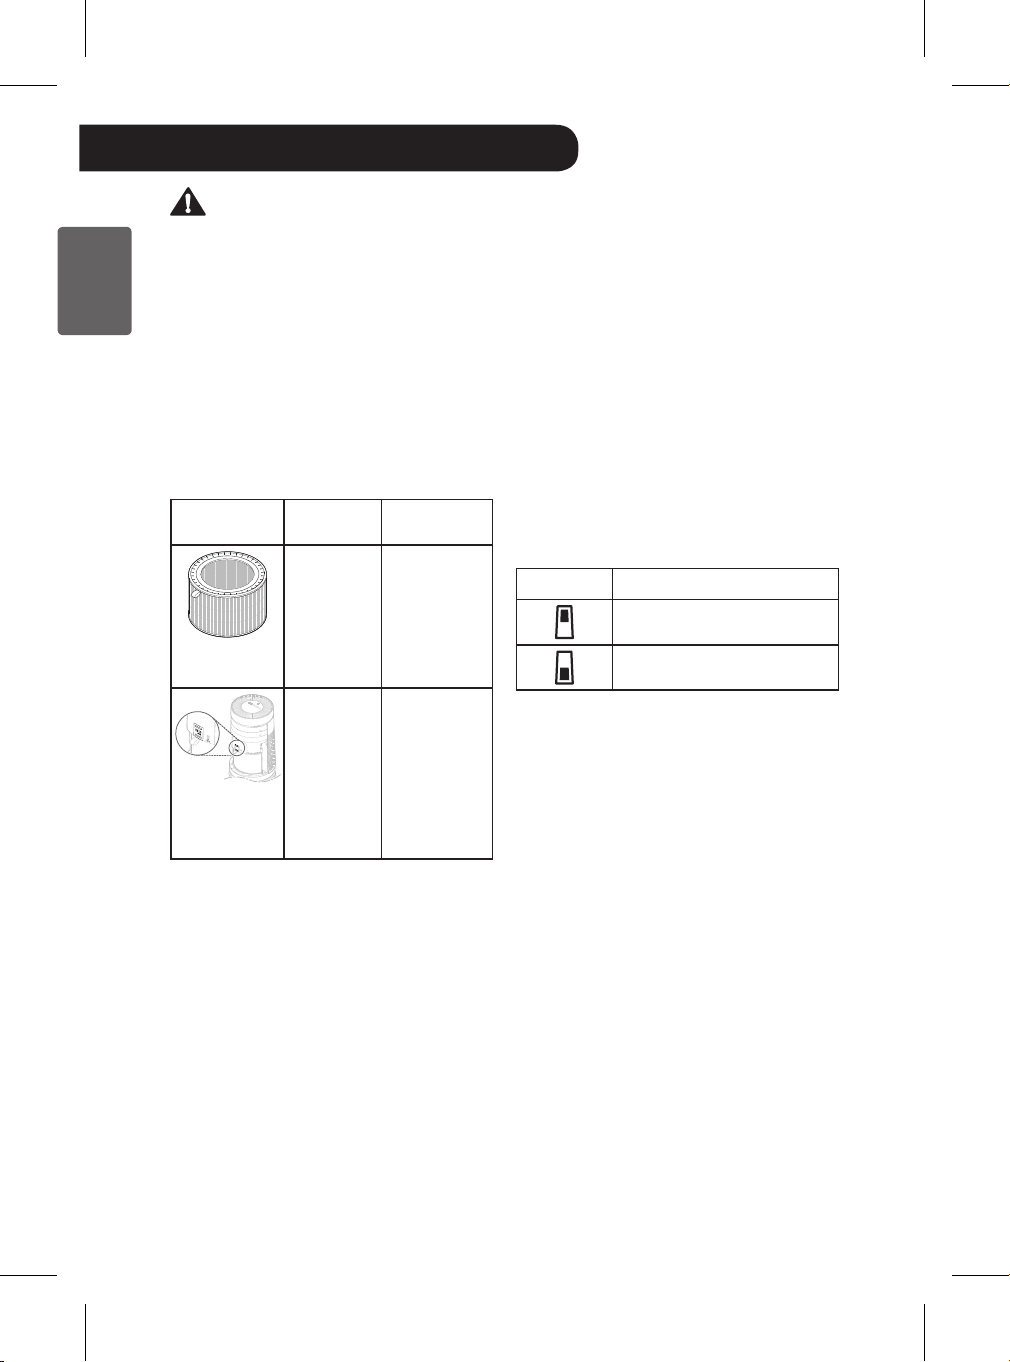
Scheduled Maintenance
Component
Filter
PM 1.0 (super
ultra-ne dust)
sensor
Cleaning
Frequency
Ultra-ne lter
only
If contaminated,
clean the ultrane lter with a
vacuum cleaner
or soft brush.
2 months -
Note
•The operating environment and length
of operation may affect the cleaning
frequency. Clean the product more
frequently if used in a dusty environment.
•Failure to perform regular cleaning
and maintenance may result in poor
performance and odor.
Replacement
Frequency
The whole lter
1 year
•To purchase replacement lters, visit the
LG website at www.lg.com
•Service to clean or replace lters is not
covered under the product warranty, and a
fee will be charged.
•If the PM density on the status display
panel does not change for a long period,
clean the PM1.0 sensor even if it hasn't
been 2 months since it was last cleaned.
For more information on cleaning the
PM1.0 sensor, see Cleaning the PM
Sensor.
Alerts on the Status Panel
The status display panel shows an alert
when the lter needs to be replaced.
Alert Measures
Replace the upper lter.
Replace the lower lter.
Note
•Filter replacement alerts appear based
on the maximum usage time, taking into
account the operating hours of the product.
The replacement frequency is determined
by the operating hours and environment.
•For more information on how to reset a
lter replacement alert, see Resetting the
Filter Replacement Alert.
•The cost of replacing lters is not covered
under the warranty.
32
Page 33

ENGLISH
Caution
•Do not attempt to disassemble the Clean
Booster.
•If the Clean Booster cover comes loose,
snap the 3 retaining hooks back into
place before using the product.
Wipe the exterior with a soft cloth.
2
•Do not unscrew the 2 screws xing the
Clean Booster grille on the back of the
product.
Cleaning the Exterior
Remove dust from the air inlet and
1
outlet using a vacuum cleaner and
crevice tool.
Caution
•Do not clean the product with an alkaline
detergent.
•Do not wipe the product surface using
sulfuric acid, hydrochloric acid or organic
solvent (thinner, kerosene etc.) or attach
a sticker on the product. Doing so may
damage the product surface.
•Keep water from getting inside the product.
Note
The front and back covers can be removed
from the product for easier cleaning. Wash
them in water and place them in a shady
spot to dry completely before reassembling.
33
Page 34

ENGLISH
Cleaning the Filter
Replacing the Filter
Separate the cover from the product.
1
•For more information on how to
remove and reassemble the cover,
please see Removing Packing
Materials.
Remove dust from the ultra-ne lter
2
using a vacuum cleaner with a crevice
tool or soft brush attachment.
Caution
•Do not wash the lter with water. Doing so
may reduce the lifespan of the lter.
•Take care when using vacuum tools to
avoid damaging the product or the lter.
Remove the cover and replace the
1
lter.
•For more information on how to
remove the cover and replace
the lter, please see Removing
Packing Materials.
•Protect the oor with newspaper
or paper towels to catch any falling
debris before removing the lter.
Once you have replaced the lter,
2
reset the lter replacement alert.
Resetting the Upper Filter
Replacement Alert
Press and hold the Speed and Indicator
buttons simultaneously for 3 seconds.
•The
(Upper Filter Replacement Alert)
is reset.
34
Page 35

ENGLISH
Resetting the Lower Filter
Replacement Alert
Press and hold the Indicator and Sleep
Timer buttons simultaneously for 3
seconds.
•The
(Lower Filter Replacement Alert)
is reset.
Cleaning the PM Sensor
Clean the PM1.0 super ultra-ne dust sensor
lens regularly. The sensor is used to detect
both ne dust and larger dust.
Remove the rear cover from the
1
product.
•For more information on how to
remove and reassemble the cover,
please see Removing Packing
Materials.
Open the sensor cover.
2
Moisten the lens with a cotton swab
3
dipped in water, then wipe it clean
using a dry cotton swab.
35
Page 36

ENGLISH
Close the sensor cover and
4
reassemble the rear cover.
Turn off the power and unplug the
2
product from the electrical outlet.
•Wind the power cord around the
bottom of the product.
Note
The shape of the power plug differs
depending on the country.
Note
To avoid product failure, do not use any uids
other than water to clean the sensor.
Storage
If the product is not used for a long period
of time, store it in a dry place out of direct
sunlight.
Operate the product in Dual mode for
1
at least an hour on a clear day.
•This removes the moisture and
prevents molds from building up
inside the product.
Cover the product to prevent dust
3
or foreign substances from getting
inside. Store the product out of direct
sunlight.
Caution
Do not store the product in direct sunlight or
where there is high humidity. Doing so may
cause product deformation, malfunction, or
odor.
36
Page 37

ENGLISH
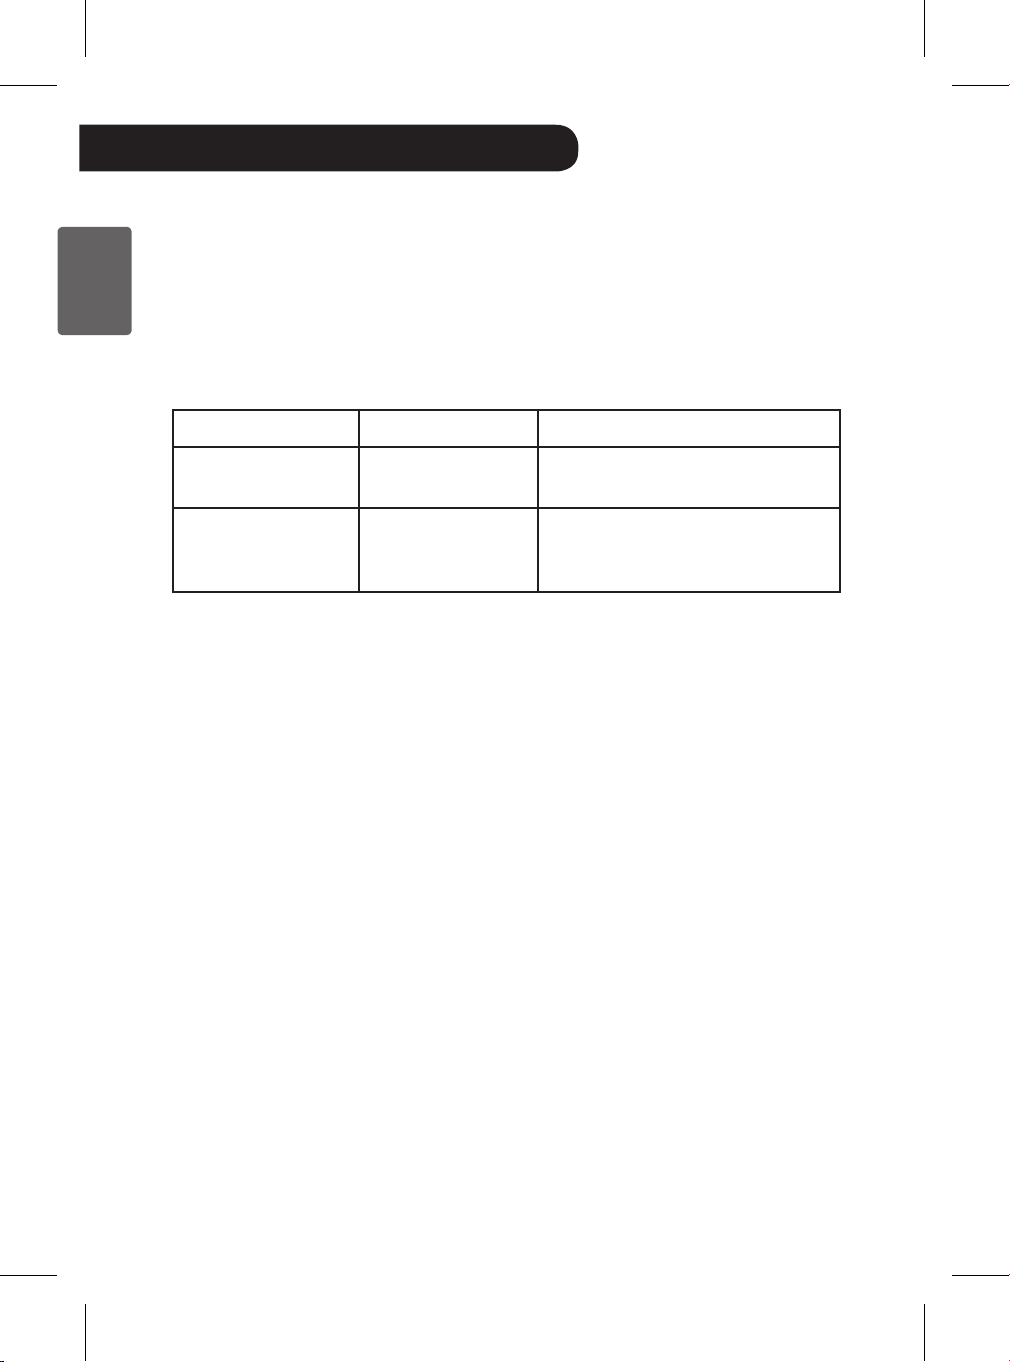
Before Calling for Service
If the product malfunctions, check the following before contacting the LG Customer
Information Center.
Symptom Cause Solution
The product does not
operate.
Power plug is unplugged
or loose in the outlet.
•Insert the power plug into the
outlet properly.
The fan is noisy even
on Low speed.
The air purier is not
removing dust or
odors.
There is a strong
odor, but the overall
air quality indicator
light does not change
color.
The ultra ne lter is dirty. •Clean the ultra ne lter.
The True HEPA lter is
dirty.
Air is extremely dusty or
odors very strong.
The ultra ne lter is dirty. •Clean the ultra ne lter.
The combined lter is
dirty.
The space is too large for
the air purifer.
Objects are blocking the air
circulation.
The product is installed in
a corner.
The overall air quality
indicator light is already
orange or red.
•Replace the lter.
•Ventilate the indoor air before
you use the product.
•Replace the lter.
•Use a product that ts the size
of the room.
•Do not install product near
open doors or windows.
•Remove obstacles or relocate
the air purier.
•Relocate the product with
sufcient clearance.
•The PM density level may be
higher than the odor level. The
color of the overall air quality
indicator light is based on
whichever is higher.
•The odor sensor detects
harmful gases. While some
strong smells such as food
smells may be unpleasant, the
sensor may not react to them,
even though the combined lter
is working to remove the odors.
37
Page 38

ENGLISH
Symptom Cause Solution
The overall air quality
indicator light stays
red for a long period.
The buttons on the
control panel do not
work.
The ne dust density
does not change.
The ne dust density
remains high.
The color should change
if the air purier is moved
to a cleaner area. If it
doesn’t, clean the sensor
or unplug the product
briey.
A spray product such as
cooking oil, perfume, or
deodorizer was used near
the air purier.
The Lock icon
showing on the status
display panel.
The sensor may be dirty.
The air purier is installed
in an enclosed space.
The product may be
installed near a constant
ow of outside air.
is
•If the odor level is beyond the
capacity of the air purier, the
display may not change.
•Clean the sensor area.
•Remove the power plug from
the outlet and reconnect it one
minute later.
•Do not spray substances near
the air purier.
•Press and hold the Sleep
Timer button for 3 sec. or
longer to disable the Lock
function.
•Clean the PM 1.0 (super ultra-
ne dust) sensor.
•If there is little air circulation or
incoming air in the space, the
air quality may stay the same.
•In an environment where
outside air is supplied
continuously, the density may
remain high.
The color of the
overall air quality
indicator does not
match the dust
density level.
The overall air quality
level is different than
the EPA overall air
quality level.
38
The odor level may be
higher than the dust
density level.
The EPA method of
measuring overall air
quality may be different.
•The overall air quality level
is determined by the higher
of the PM density and odor
levels.
•Even if the PM density is low,
if the odor level is high, the
overall air quality indicator will
reect the odor level.
•The EPA measurement is
an average value over time.
The air purier measures air
quality in real time. So the
results may be different.
Page 39

ENGLISH
Symptom Cause Solution
•The odor of activated charcoal
is not harmful. This is similar to
the smell you may experience
in a brand new car. The odor
will go away after 1-2 weeks
of use.
•Do not use the air purier in
place of a vent fan or range
hood. Ventilate smoke or
strong odors rst, then use
the air purier to eliminate
lingering odors.
•Replace the lter. The lter
replacement frequency may
differ depending on the usage
environment.
•Running the air purier for an
extended period near where
you cook, broil or fry food may
rapidly shorten the lifespan of
the lter.
•Use a range hood or ventilate
the room while cooking, and
only use the air purier to
remove lingering odors.
There is a strange
smell coming from
the air outlet and the
lter.
The air purier is new.
The air purier is installed
in a smoky or smelly area.
The lter is no longer
working and needs to be
replaced.
The air purier is installed
near a stove.
The Clean Booster is
not working.
There is a noise
when starting or
stopping the Clean
Booster
Is the operation mode
set to the Clean Booster
mode?
-
•The booster fan speed and
booster fan rotation functions
work only in the Clean Booster
mode.
•The Clean Booster is trying to
nd the correct angle.
39
Page 40

ENGLISH
Symptom Cause Solution
I can't connect to the
product in the LG
SmartThinQ app.
I can’t register the
product in the LG
SmartThinQ app.
The PM density levels
are different between
the product and the
LG SmartThinQ app.
The air purier may be
unplugged.
The wireless router
connected to the product
is not working.
The product may be
too far away from your
wireless router.
Your wireless router may
not be working properly.
The PM densities may
be for different particle
sizes or the application
may not have updated the
information.
•Plug in the air purier.
•Power off the wireless router
then power it on again.
•Check if there is an Internet
connection problem with the
router.
•Move the product near
the wireless router while
registering it.
•Some carriers provide routers
that are available to their
members only. If you have an
outdated model, contact your
carrier to have it replaced with
a newer one.
•Make sure that you are
comparing the PM density
values for the same size
particles.
•If the PM density values
for the same particle size
differ, the LG SmartThinQ
application may have a longer
delay in updating than the
product.
40
Page 41

ENGLISH
Product Specications
Height
WidthDepth
The external appearance and dimensions of the product are subject to change without prior
notice.
Model AS560DWR0
Power 115 V~, 60 Hz
Without the Clean Booster running:
14.7 in. x 42.2 in. x 14.7 in. (373 mm x 1,073 mm x 373 mm)
Exterior dimensions
(Width X Height X Depth)
With the Clean Booster running:
14.7 in. x 51.6 in. x 14.7 in. (373 mm x 1,310 mm x 373 mm)
41
Page 42
ENGLISH
Warranty (USA)
ARBITRATION NOTICE: THIS LIMITED WARRANTY CONTAINS AN ARBITRATION PROVISION
THAT REQUIRES YOU AND LG TO RESOLVE DISPUTES BY BINDING ARBITRATION INSTEAD
OF IN COURT, UNLESS YOU CHOOSE TO OPT OUT. IN ARBITRATION, CLASS ACTIONS AND
JURY TRIALS ARE NOT PERMITTED. PLEASE SEE THE SECTION TITLED “PROCEDURE FOR
RESOLVING DISPUTES” BELOW.
Should the LG Air Purier fail due to a defect in materials or workmanship under normal home use,
during the warranty period set forth below, LG will at its option repair or replace the product. This limited
warranty is valid only to the original retail purchaser of the product and applies only when purchased and
used within the United States, including U.S. Territories. Proof of original retail purchase is required to
obtain warranty service under this limited warranty.
Warranty Period Scope of Warranty Remark
One (1) year from date of
original retail purchase
Ten (10) years from date
of original retail purchase
•Replacement products and parts are warranted for the remaining portion of the original
warranty period or ninety (90) days, whichever is greater.
•Replacement products and parts may be new or remanufactured.
THIS WARRANTY IS IN LIEU OF ANY OTHER WARRANTY, EXPRESS OR IMPLIED,
INCLUDING WITHOUT LIMITATION, ANY WARRANTY OF MERCHANTABILITY OR
FITNESS FOR A PARTICULAR PURPOSE. TO THE EXTENT ANY IMPLIED WARRANTY
IS REQUIRED BY LAW, IT IS LIMITED IN DURATION TO THE EXPRESS WARRANTY
PERIOD ABOVE. NEITHER THE MANUFACTURER NOR ITS U.S. DISTRIBUTOR
SHALL BE LIABLE FOR ANY INCIDENTAL, CONSEQUENTIAL, INDIRECT, SPECIAL,
OR PUNITIVE DAMAGES OF ANY NATURE, INCLUDING WITHOUT LIMITATION, LOST
REVENUES OR PROFITS, OR ANY OTHER DAMAGE WHETHER BASED IN CONTRACT,
TORT, OR OTHERWISE.
Some states do not allow the exclusion or limitation of incidental or consequential damages or
limitations on how long an implied warranty lasts, so the above exclusion or limitation may not
apply to you. This warranty gives you specic legal rights and you may also have other rights
that vary from state to state.
THIS LIMITED WARRANTY DOES NOT COVER:
•Service trips to deliver, pick up, or install or repair the product; instruction to the customer on
operation of the product; repair or replacement of fuses or correction of wiring or plumbing, or
correction of unauthorized repairs/installation.
•Failure of the product to perform during power failures and interrupted or inadequate electrical
service.
Any internal / functional
parts and labor
Smart Inverter Motor
LG will provide parts and labor to repair
or replace defective parts.
Parts Only. Customer will be responsible
for any labor or in-home service to
replace defective parts.
42
Page 43

ENGLISH
•Damage caused by leaky or broken water pipes, frozen water pipes, restricted drain lines,
inadequate or interrupted water supply or inadequate supply of air.
•Damage resulting from operating the product in a corrosive atmosphere or contrary to the
instructions outlined in the product’s owner’s manual.
•Damage to the product caused by accidents, pests and vermin, lightning, wind, re, oods, or
acts of God.
•Damage or failure caused by unauthorized modication or alteration, or if it is used for other
than the intended purpose, or any water leakage where the unit was not properly installed.
•Damage or failure caused by incorrect electrical current, voltage, or plumbing codes,
commercial or industrial use, or use of accessories, components, or consumable cleaning
products that are not approved by LG.
•Damage caused by transportation and handling, including scratches, dents, chips, and/or other
damage to the nish of your product, unless such damage results from defects in materials or
workmanship and is reported within one (1) week of delivery.
•Damage or missing items to any display, open box, discounted, or refurbished product.
•Products with original serial numbers that have been removed, altered, or cannot be readily
determined. Model and serial numbers, along with original retail sales receipts, are required for
warranty validation.
•Increases in utility costs and additional utility expenses.
•Repairs when the product is used for other than normal and usual household use (e.g.
commercial use, in ofces and recreational facilities) or contrary to the instructions outlined in
the product’s owner’s manual.
•Costs associated with removal of the product from your home for repairs.
•The removal and reinstallation of the product if it is installed in an inaccessible location or is
not installed in accordance with published installation instructions, including LG’s owner’s and
installation manuals.
•Damage resulting from misuse, abuse, improper installation, repair, or maintenance. Improper
repair includes use of parts not approved or specied by LG.
The cost of repair or replacement under these excluded circumstances shall be borne
by the consumer.
TO OBTAIN WARRANTY SERVICE AND ADDITIONAL INFORMATION
For additional product information, visit the LG website at http://www.lg.com
For assistance using this product or to schedule service, contact LG Electronics at 1-800-243-0000 (US).
For further assistance, write: LG Electronics, 201 James Record Road, Huntsville, Alabama 35813
43
Page 44

ENGLISH
PROCEDURE FOR RESOLVING DISPUTES:
ALL DISPUTES BETWEEN YOU AND LG ARISING OUT OF OR RELATING IN ANY WAY
TO THIS LIMITED WARRANTY OR THE PRODUCT SHALL BE RESOLVED EXCLUSIVELY
THROUGH BINDING ARBITRATION, AND NOT IN A COURT OF GENERAL JURISDICTION.
BINDING ARBITRATION MEANS THAT YOU AND LG ARE EACH WAIVING THE RIGHT TO A
JURY TRIAL AND TO BRING OR PARTICIPATE IN A CLASS ACTION.
Denitions. For the purposes of this section, references to “LG” mean LG Electronics U.S.A.,
Inc., its parents, subsidiaries and afliates, and each of their ofcers, directors, employees,
agents, beneciaries, predecessors in interest, successors, assigns and suppliers; references to
“dispute” or “claim” shall include any dispute, claim or controversy of any kind whatsoever (whether
based in contract, tort, statute, regulation, ordinance, fraud, misrepresentation or any other legal
or equitable theory) arising out of or relating in any way to the sale, condition or performance of
the product or this Limited Warranty.
Notice of Dispute. In the event you intend to commence an arbitration proceeding, you must rst
notify LG in writing at least 30 days in advance of initiating the arbitration by sending a letter to
LG at LG Electronics, USA, Inc. Attn: Legal Department- Arbitration 1000 Sylvan Ave, Englewood
Cliffs 07632. You and LG agree to engage in good faith discussions in an attempt to amicably
resolve your claim. The notice must provide your name, address, and telephone number; identify
the product that is the subject of the claim; and describe the nature of the claim and the relief
being sought. If you and LG are unable to resolve the dispute within 30 days, either party may
proceed to le a claim for arbitration.
Agreement to Binding Arbitration and Class Action Waiver. Upon failure to resolve the
dispute during the 30 day period after sending written notice to LG, you and LG agree to resolve
any claims between us only by binding arbitration on an individual basis, unless you opt out as
provided below. Any dispute between you and LG shall not be combined or consolidated with
a dispute involving any other person’s or entity’s product or claim. More specically, without
limitation of the foregoing, any dispute between you and LG shall not under any circumstances
proceed as part of a class or representative action. Instead of arbitration, either party may bring
an individual action in small claims court, but that small claims court action may not be brought on
a class or representative basis.
Arbitration Rules and Procedures. To begin arbitration of a claim, either you or LG must make
a written demand for arbitration. The arbitration will be administered by the American Arbitration
Association (“AAA”) and will be conducted before a single arbitrator under the AAA’s Consumer
Arbitration Rules that are in effect at the time the arbitration is initiated (referred to as the “AAA
Rules”) and under the procedures set forth in this section. The AAA Rules are available online at
www.adr.org/consumer. Send a copy of your written demand for arbitration, as well as a copy of
this provision, to the AAA in the manner described in the AAA Rules. You must also send a copy
of your written demand to LG at LG Electronics, USA, Inc. Attn: Legal Department- Arbitration
1000 Sylvan Avenue Englewood Cliffs, NJ 07632. If there is a conict between the AAA Rules
and the rules set forth in this section, the rules set forth in this section will govern. This arbitration
provision is governed by the Federal Arbitration Act. Judgment may be entered on the arbitrator’s
award in any court of competent jurisdiction. All issues are for the arbitrator to decide, except that
44
Page 45

ENGLISH
issues relating to the scope and enforceability of the arbitration provision and to the arbitrability of
the dispute are for the court to decide. The arbitrator is bound by the terms of this provision.
Governing Law. The law of the state of your residence shall govern this Limited Warranty and
any disputes between us except to the extent that such law is preempted by or inconsistent with
applicable federal law.
Fees/Costs. You do not need to pay any fee to begin an arbitration. Upon receipt of your written
demand for arbitration, LG will promptly pay all arbitration ling fees to the AAA unless you seek
more than $25,000 in damages, in which case the payment of these fees will be governed by the
AAA Rules. Except as otherwise provided for herein, LG will pay all AAA ling, administration and
arbitrator fees for any arbitration initiated in accordance with the AAA Rules and this arbitration
provision. If you prevail in the arbitration, LG will pay your attorneys’ fees and expenses as long as
they are reasonable, by considering factors including, but not limited to, the purchase amount and
claim amount. Notwithstanding the foregoing, if applicable law allows for an award of reasonable
attorneys’ fees and expenses, an arbitrator can award them to the same extent that a court would.
If the arbitrator nds either the substance of your claim or the relief sought in the demand is
frivolous or brought for an improper purpose (as measured by the standards set forth in Federal
Rule of Civil Procedure 11(b)), then the payment of all arbitration fees will be governed by the AAA
Rules. In such a situation, you agree to reimburse LG for all monies previously disbursed by it that
are otherwise your obligation to pay under the AAA Rules. Except as otherwise provided for, LG
waives any rights it may have to seek attorneys’ fees and expenses from you if LG prevails in the
arbitration.
Hearings and Location. If your claim is for $25,000 or less, you may choose to have the
arbitration conducted solely on the basis of (1) documents submitted to the arbitrator, (2) through
a telephonic hearing, or (3) by an in-person hearing as established by the AAA Rules. If your
claim exceeds $25,000, the right to a hearing will be determined by the AAA Rules. Any in-person
arbitration hearings will be held at a location within the federal judicial district in which you reside
unless we both agree to another location or we agree to a telephonic arbitration.
Opt Out. You may opt out of this dispute resolution procedure. If you opt out, neither you nor LG
can require the other to participate in an arbitration proceeding. To opt out, you must send notice
to LG no later than 30 calendar days from the date of the rst consumer purchaser’s purchase of
the product by either: (i) sending an e-mail to optout@lge.com, with the subject line: “Arbitration
Opt Out” or (ii) calling 1-800-980-2973. You must include in the opt out e-mail or provide by
telephone: (a) your name and address; (b) the date on which the product was purchased; (c) the
product model name or model number; and (d) the serial number (the serial number can be found (i)
on the product; or (ii) online by accessing https://www.lg.com/us/support/repair-service/schedulerepair-continued and clicking on “Find My Model & Serial Number”).
You may only opt out of the dispute resolution procedure in the manner described above (that
is, by e-mail or telephone); no other form of notice will be effective to opt out of this dispute
resolution procedure. Opting out of this dispute resolution procedure will not affect the coverage
of the Limited Warranty in any way, and you will continue to enjoy the full benets of the Limited
Warranty. If you keep this product and do not opt out, then you accept all terms and conditions of
the arbitration provision described above.
45
Page 46

MEMO
ENGLISH
 Loading...