

Page 1

www.lg.com
OWNER’S MANUAL
Model name: AS401WWA1
AIR PURIFIER
Read this owner's manual thoroughly before operating the
appliance and retain it for future reference.
MFL68181332
Rev.00_050216
ENGLISH
ESPAÑOL
Page 2

2
TABLE OF CONTENTS
ENGLISH
TABLE OF CONTENTS
3
PRODUCT FEATURES
4
SAFETY INSTRUCTIONS
8
PRODUCT OVERVIEW
8 Front
8 Back
9 Control Panel and Display
10 Multi-Stage Filtration System
11
INSTALLATION
11 Choosing the Proper Location
11 Tips for Using the Air Purifier
12 Initial Installation of Filter
13
OPERATION
13 Air Purification
13 Lighting
14 PM Indicator Display
14 Air Quality Indicator Light
16 Sleep Timer
17 Lock Function
18 Filter Reset
19
MAINTENANCE
19 Cleaning the Filters
21 Filter Maintenance Schedule
21 Cleaning the Exterior
22 Cleaning the Sensor
23 Storing the Product
24
TROUBLESHOOTING
26
SPECIFICATIONS
27
WARRANTY
Page 3
PRODUCT FEATURES
3
ENGLISH
SMART AIR QUALITY SYSTEM
The air quality display senses and shows indoor particulate levels in real time. It can sense fine
particulate matter as small as 1.0 micron.
MULTI-STAGE FILTRATION SYSTEM
The combination of the washable pre-filter, PuriCare main filter, and deodorizing filter provide
fresh indoor air by removing invisible air pollutants. Remove irritants ranging from pet hair and
pollen to tobacco smoke odors and VOCs (volatile organic compounds).
LODECIBEL QUIET OPERATION
In the sleep mode, the air purifier runs at only 20 dB and can be scheduled to shut off
automatically, making falling asleep easy.
MAIN FILTER
The Main Filter captures particles as small as 0.3 microns. This particulate matter can
include pollen, mold spores, and dust.
PRODUCT FEATURES
Page 4

4
SAFETY INSTRUCTIONS
ENGLISH
SAFETY INSTRUCTIONS
READ AND SAVE THESE INSTRUCTIONS
Your safety and the safety of others are very important.
We have provided many important safety messages in this manual and on the appliance. Always
read and follow all safety messages.
This is the safety alert symbol. This symbol alerts you to potential hazards that can kill or
injure you or others. All safety messages will follow the safety alert symbol and either the
word WARNING or CAUTION.
These words mean:
WARNING
If you do not follow instructions, it could result in death or serious injury.
CAUTION
If you do not follow instructions, it could result in minor or moderate injury or damage to the
product.
All safety messages will tell you what the potential hazard is, tell you how to reduce the
chance of injury, and tell you what may happen if the instructions are not followed.
IMPORTANT SAFETY INSTRUCTIONS
WARNING
To reduce the risk of explosion, fire, death, electric shock, scalding, or injury to persons
when using this appliance, follow basic precautions, including the following:
Installation
• Do not modify or extend the power cord.
• Do not plug the product into an outlet which is loose or damaged.
• Never attempt to operate this appliance if it is damaged, malfunctioning, partially
disassembled, or has missing or broken parts, including a damaged cord or plug.
• Do not use the product in locations where it will be exposed to high humidity, moisture, or oil
splatter such as in the bathroom, laundry, or near the stove.
• Connect the product to a properly rated, protected, and sized power circuit to avoid electrical
overload.
• In the event of a gas leak (propane gas, LP gas, etc.) do not operate this or any other
appliance. Open a window or door to ventilate the area immediately.
• Do not store or use gasoline or other flammable vapors and liquids in the vicinity of this or any
other appliance.
• If you detect a strange sound, a chemical or burning smell, or smoke coming from the
product, unplug it immediately and contact an LG Electronics customer information center.
!
!
!
!
Page 5

SAFETY INSTRUCTIONS
5
ENGLISH
• Be careful not to allow the power cord to be pinched, crushed or damaged under heavy
objects.
• Do not install the product in direct sunlight, near heat sources such as furnaces or ovens, near
fireplaces or other open flames, or in wet or humid locations.
• Keep packing materials out of the reach of children. Packaging material can be dangerous for
children. There is a risk of suffocation.
• Store and install the product where it will not be exposed to temperatures below freezing or
exposed to outdoor weather conditions.
Operation
Read all instructions before using the product and save these instructions.
• Use this product only for its intended purpose.
• Do not tamper with controls.
• Do not allow children to play on or with the product. Close supervision of children is
necessary when the product is used near children.
• Repair or immediately replace all power cords that have become damaged. Do not use a cord
that shows cracks or abrasion damage along its length or at either end.
• Do not grasp the power cord or touch the appliance controls with wet hands.
• Do not modify or extend the power cord.
• If the product has been submerged, contact LG Electronics customer information center for
instructions before resuming use.
• This appliance is not intended for use by persons (including children) with reduced physical,
sensory or mental capabilities, or lack of experience and knowledge, unless they have been
given supervision or instruction concerning the use of the appliance by a person responsible
for their safety.
• If the electrical supply cord is damaged, it must only be replaced by the manufacturer or its
service agent or a similar qualified person in order to avoid a hazard.
• Never unplug the appliance by pulling on the power cord. Always grip the plug firmly and pull
straight out from the outlet.
• Do not place obstacles at the air suction port or discharge port of the product.
• Do not move the product while it is under operation.
• Do not put hands , glue or metal objects near the air suction port or discharge port of the
product.
• Do not install the product in locations with excessive industrial oil smoke or metallic dust.
Doing so may result in fire or product failure.
• Use only the handle to move the product.
• Do not repair or replace any part of the appliance. All repairs and servicing must be performed
by qualified service personnel unless specifically recommended in this owner's manual. Use
only authorized factory parts.
• Disconnect the appliance from the power supply before cleaning and attempting any user
maintenance. Turning the controls to the OFF position does not disconnect the appliance
from the power supply.
Page 6

6
SAFETY INSTRUCTIONS
ENGLISH
• Do not disassemble or repair the appliance by yourself.
• Avoid any impact to the front panel of the appliance.
California Safe Drinking Water and Toxic Enforcement Act
WARNING: This product contains chemicals known to the State of California to cause cancer and
birth defects or other reproductive harm.
Wash hands after handling.
CAUTION
To reduce the risk of injury to persons, malfunction, or damage to the product or property
when using the appliance, follow basic safety precautions, including the following:
Installation
• Avoid installing within 3 1/4 ft (1 m) of any TV or audio equipment.
• Do not use this appliance as a substitute for a ventilation fan or hood for a range.
• Unplug the appliance and wait for the fan to stop rotating before servicing or cleaning. The fan
rotates at a high speed and may cause injury.
• Do not use the product to remove toxic gas such as carbon monoxide.
• Install the product on a firm and level surface. Avoid dropping or impacts to the product.
• Provide clearance of at least 5 ft (1.5 m) from lighting appliances and at least 4 in. (10 cm)
from walls. Failure to do so may result in product discoloration or loss of cleaning
performance.
• Use only 115 V.
• This appliance is not designed for maritime use or for mobile installations such as in RVs,
trailers, or aircraft.
Operation
• This product is not intended for use in preserving animals/plants, precision equipment, art
pieces, etc. Use this appliance only for its intended purpose.
• Do not use solvents or strong detergents to clean the product. Doing so may result in fire and
product deformation.
• Unplug the product if it will remain unused for a long time.
• Do not place objects on or step on the Air Purifier.
• Insert all filters (including the pre-filter) before operating, and clean the filter regularly
following the schedule suggested in this owner's manual. Failure to do so may shorten the
effective life of the filter.
• Remove the tie from the power cord before use.
!
Page 7

SAFETY INSTRUCTIONS
7
ENGLISH
• Allow the pre-filter to dry completely, out of direct sunlight, after washing. Do not operate
appliance with a damp filter. Do not operate appliance without pre-filter.
• Do not insert inflammables inside the product.
• Do not place the appliance where it can come into contact with the moisture from a
humidifier.
• Do not open the rear panel while the product is in operation.
Page 8
8
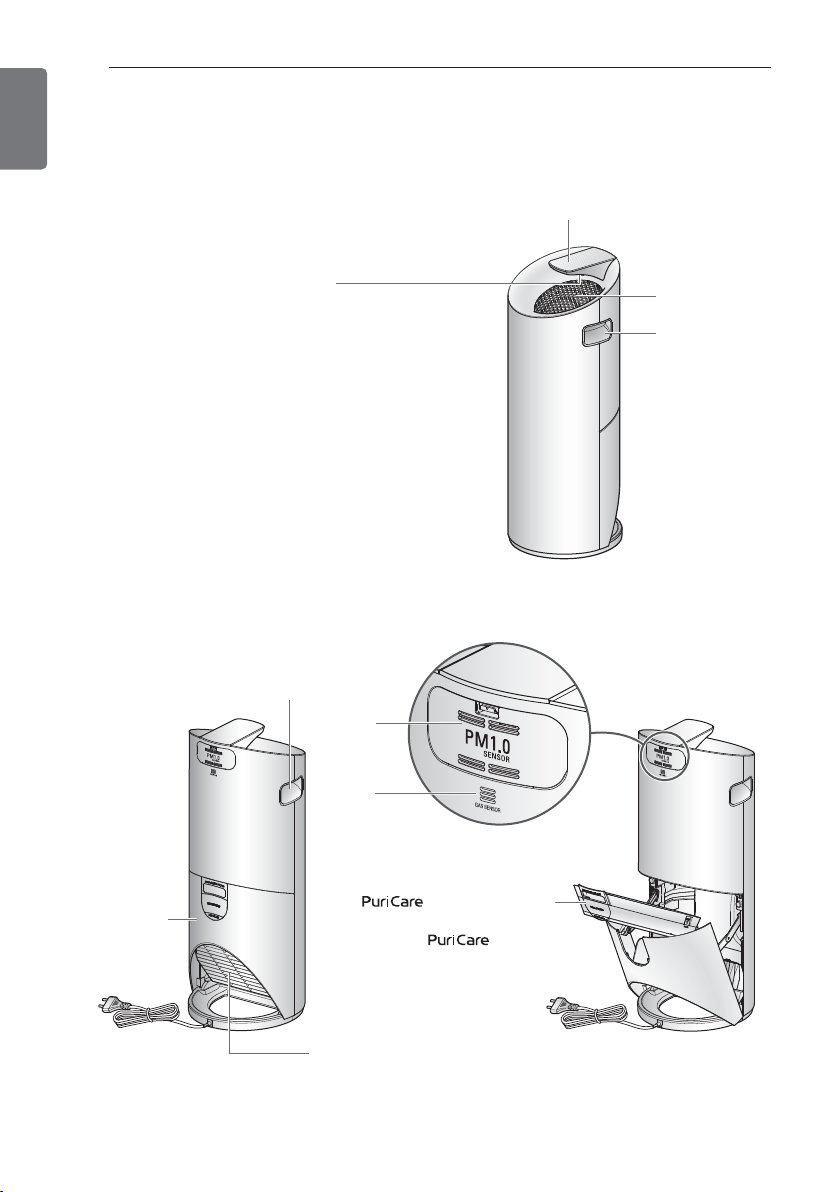
PRODUCT OVERVIEW
ENGLISH
Handle
Dust
sensor
Odor
sensor
Rear panel
Power cord
Air inlet
Filtration System
(Pre-Filter
+ Main Filter
+ Deodorizing Filter)
@
h The shape of power cord can be different by country.
Display
Air outlet
Handle
Air Quality Indicator Light
Light indicates the overall indoor air quality as detected
by the dust and odor sensor.
• Air Quality Levels
(contaminated) Red → Orange → Yellow → Green (clean)
Back
Front
PRODUCT OVERVIEW
Page 9
PRODUCT OVERVIEW
9
ENGLISH
Start/Stop button Starts and stops the product.
Fan Speed button Adjusts the speed and volume of the fan.
Indicator button Toggles between PM density results for different dust particle sizes.
Sleep Timer button Sets the appliance to sleep mode and automatically turns it off after
the selected amount of time.
Filter Reset button Resets operating time after replacing the filter.
Lock function Locks control panel so product won't be accidentally turned off or
settings changed by children or others.
Filter Life light Turns on when filter needs to be replaced
(after 4000 hours of operation).
* After replacing the filter, use the Filter Reset function to reset the
operating time.
PM density display Shows the density of dust for three different particle sizes.
Lighting button Turn the air quality indicator light on/off.
Control Panel and Display
h Guide to PM (Particulate Matter)
PM10: dust particle size is equal or below 10 μm
(Sources include nearby fires and dust stirred up by vehicles on roads.)
PM2.5: dust particle size is equal or below 2.5 μm
(Sources include exhaust from motor vehicles or power plants, wood burning fires, and
some industrial processes.)
PM1.0: dust particle size is equal or below 1.0 μm (Sources include cigarette smoke and smog.)
Odor/Dust display
PM density display
Fan speed display
Filter life light
Fan Speed button
Filter Reset button
PM10
PM2.5
PM1.0
Auto
Reset(3sec.)
Odor
Speed
Dust
(3sec.)
hr
Indicator
Overall air quality display
Displays one of 4 colors to
indicate the overall air quality.
Sleep Timer display
Lock display
Lock function
Indicator button
Lighting button
Lighting Sleep Timer
Sleep Timer button
Start/Stop button
Page 10

10
PRODUCT OVERVIEW
ENGLISH
NOTE
!
• The effective life of the filters varies depending on the operational environment.
• The composition of filters can vary by model.
• Replacement filters can be purchased from a nearby LG service center or online through
LG.com.
• Use only the filters designed and approved by the manufacturer for use with this product.
Filter name Function
Pre-Filter
Filters out large particles to prolong the lifespan of the Main
Filter.
Main Filter
Removes fine particles such as dead ticks, pollen, cigarette smoke
(particulates), micro dust motes, and animal fur.
Deodorizing Filter
Comprehensively removes odors from cigarette smoke, garbage, pets,
strong acids or bases (vinegar, bleach).
h The life-expectancy of the filters depends on the usage environment of the air purifier.
h Do not discard the filter case. Replacement filters do not include a new case.
Multi-Stage Filtration System
Main Filter Case
Pre-Filter
Deodorizing Filter
Main Filter
Deodorizing Filter Case
Page 11

INSTALLATION
11
ENGLISH
This product is not designed for maritime use or for mobile installations such as in RVs,
trailers, or aircraft. Failure to follow this warning can result in product failure.
• Place within reach of a power outlet.
• Make sure air inlet and outlet are free from obstacles.
• Place on a level, stable surface where air circulates freely.
Tips for Using the Air Purifier
• Avoid using the air purifier while cooking strong-smelling or fried foods such as fish.
- The vaporized oil from the cooking may affect the performance and life-expectancy of the
filters and the odors may cling to the filter.
• Do not place the air purifier closer than 3 1/4 ft (1 m) to the bed.
- The fan speed in sleep mode is low, but it could cause an unwanted draft.
• Do not place the air purifier in a corner.
- Avoid surrounding the appliance with furniture and electronic equipment or crowding it into a
corner. The air purifier works best when air is free to circulate around it.
• Please use the table or on the floor.
!
WARNING
This appliance is not intended for use by persons (including children) with reduced physical,
sensory or mental capabilities, or lack of experience and knowledge, unless they have been
given supervision or instruction concerning use of the appliance by a person responsible for
their safety.
Children should be supervised to ensure that they do not play with the appliance.
!
WARNING
This appliance has a polarized plug (one blade is wider than the other). To reduce the risk of
electric shock, this plug is intended to fit in a polarized outlet only one way. If the plug does
not fit fully in the outlet, reverse the plug. If it still does not fit, contact a qualified electrician.
Do not attempt to defeat this safety feature.
!
WARNING
INSTALLATION
Choosing the Proper Location
Page 12

12
INSTALLATION
ENGLISH
1. Pull to open the rear panel.
3. Remove the filter from its packaging.
5. Close the rear panel.
2. Remove the filter from the appliance.
4. Insert the filters with the deodorizing filter
facing up. Make sure to slide the tabs on
the top of the handle into the grooves at
the top of the rear panel.
6. Place the air purifier on a stable, level
surface with a clear area around it for air to
circulate.
Remove
the
vinyl.
Initial Installation of Filter
Remove the packaging before installing the filter.
Remove packaging from the filter before use or the product will not be able to circulate air.
!
CAUTION
Page 13

OPERATION
13
ENGLISH
Air Purification
The air purifier cleans and refreshes indoor air.
1. Press the button to turn on the air purifier.
• A chime sounds and the PM density display and the fan speed display turn on.
2. Press the Speed button to select the desired fan speed.
• Press the button repeatedly to toggle through the settings: Auto → Low → Medium → High
→ Turbo → Auto.
• The default mode is AUTO.
(The AUTO mode controls fan speed based on the air quality.)
Lighting
Press the Lighting button to turn the air quality indicator light on/off.
• The sensor takes 30 seconds on initial startup to stabilize and prepare an air quality level
reading. After 30 seconds, the indoor air quality and PM density levels are displayed.
Indoor Air Quality Color Range
(contaminated) red → orange → yellow → green (clean)
Reset(3sec.)
(3sec.)
Speed
Lighting Sleep Timer
Indicator
Reset(3sec.)
(3sec.)
Speed
Lighting Sleep Timer
Indicator
OPERATION
Auto Low Medium High Turbo
Auto Auto Auto Auto Auto
Page 14

14
OPERATION
ENGLISH
PM Indicator Display
1. Press the Indicator button to check the density of PM10/PM2.5/PM1.0.
• Pressing the button repeatedly toggles through to check the density of PM10 → PM2.5 →
PM1.0 in turn. The selected density displays for 10 seconds before the display reverts to the
highest measured PM (particulate matter) level.
2. Check the dust particle size LED indicators.
• PM density is displayed based on the dust density result with the highest contamination
level.
For example, if PM10 density is 100 (normal), PM2.5 is 50 (bad), and PM1.0 is 30 (normal),
the value for PM2.5 is displayed for PM density.
Air Quality Indicator Light
Overall indoor air quality is displayed as one of four colors depending on the contamination level
of PM10, PM2.5, PM1.0, and odors.
(contaminated) red → orange → yellow → green (clean)
• The color that the air quality indicator light displays is based on the worst level among PM10,
PM2.5, PM1.0, and odor.
Reset(3sec.)
(3sec.)
Speed
Lighting Sleep Timer
Indicator
Indoor Air Quality Levels
h PM density ranges from 8 to 999 in increments of 1. PM density values follow the data
sheets provided by the sensor supplier.
Overall
air quality
Red
Orange
Yellow
Green
Status
Dust density (unit μg/m3)
Odor density
PM 10 PM 2.5 PM 1.0 Odor
Very Bad
Equal or above 255
Equal or above 56 Equal or above 56
Strong
Weak
Bad 155~254 36~55 36~55
Normal 55~154 13~35 13~35
Good 0~54 0~12 0~12
↕
Page 15

OPERATION
15
ENGLISH
•
In the example above, the PM1.0 density displays at 50 ug/m³ (a bad or orange level) and the dust particle
size LED indicator for PM1.0 is lit. This indicates that the PM1.0 level is higher than the PM10 or PM2.5
levels. If all the PM density levels are normal/good and the air quality indicator light is orange/red, the level
of odors is very high.
Odor
PM10
Auto
Reset(3sec.)
(3sec.)
Speed
Lighting Sleep Timer
Indicator
Dust
NOTE
• PM10 and PM2.5 density levels follow standards provided by the U.S. EPA (Environmental Protection
Agency).
- The overall air quality level displayed on the product may differ from the level announced by the EPA.
• The PM density level for PM1.0 is displayed in the same manner as the PM density level for PM2.5 (using
standards developed by LG Electronics).
• The displayed density of PM10 / PM2.5 could differ from the forecast of the EPA and from other
measurement devices or products.
- Indicated dust concentration values can differ from each other depending on the differences in dust
measuring methods and also from real dust concentration levels.
- The assessment of dust density was made against dust used for LG Electronics standards tests.
• The use of products which generate steam and micro particles (humidifiers, cooling devices, sprayers, etc.)
can change the micro dust density.
• Because the indoor air quality display shows the overall dust and odor level, it could differ from the density
value of PM10, PM2.5, and PM1.0.
• Even in the same space, the PM10 density value could differ from other products due to air circulation.
• The displayed PM density value could change depending on the installation environment (including the
presence of sofas, beds, carpets, vacuum cleaners, humidity, smoke, bugs, oils, and other factors).
• The displayed density value of PM10/PM2.5/PM1.0 could change depending on the surrounding
environment (construction site, roadside, factory, etc.)
• The density of micro dust could be higher near exit doors, windows, and vents or anywhere where outside
air enters.
• Do not clean the sensor with anything but water. Doing so may cause product failure.
Page 16

16
OPERATION
ENGLISH
Sleep Timer
Use this to set the air purifier to sleep mode before it turns off automatically.
1. Press the button to turn on the air purifier.
2. Press the Sleep Timer set the amount of time in sleep mode until the air purifier
automatically turns off.
• The amount of time in sleep mode can be set by pressing Sleep Timer repeatedly to toggle
through the options: 2 hours, 4 hours, 8 hours, 12 hours, disabled (reverts to normal display).
• For example, if set for two hours the product operates for two hours in sleep mode then
automatically turns off.
Once Sleep Timer is set, only the Sleep Timer LED is lighted. All other lights on the product,
including the air quality light, are turned off. The fan is maintained at a low speed to keep noise
to a minimum. Once Sleep Timer is set, pressing the Sleep Timer button again displays the set
turn off time and wakes the display up.
3. To disable the Sleep Timer function, press the Sleep Timer button repeatedly until 12 appears
in the display. Press once more to disable the function and return the display to normal.
4. Even though Sleep Timer function, Lock function and Filter Life light can appear on the display.
5. Once The product is turned off, Sleep Timer function set is off.
Odor
Speed
Dust
hr
(3sec.)
Indicator
PM10
Auto
Reset(3sec.)
Lighting Sleep Timer
After setting
sleep mode
Odor
Speed
Dust
(3sec.)
Indicator
PM10
Auto
Reset(3sec.)
Lighting Sleep Timer
Page 17

OPERATION
17
ENGLISH
Lock Function
1. Press the button.
2. Press and hold the Speed Button and Indicator Button at the same time for 3
seconds or until a beep sounds and the lights up.
• The Lock function helps protect the product from unwanted operation by children or others.
• To disable the Lock function, press and hold the Speed and Indicator buttons at the
same time for 3 seconds. A beep sounds and the Lock display turns off when the Lock
function is disabled.
• The Lock function cannot be set while the power cord is unplugged.
Reset(3sec.)
(3sec.)
Speed
Lighting Sleep Timer
Indicator
Page 18

18
OPERATION
ENGLISH
Filter Reset
The Filter Life light turns on based on the operating time.
Filter Life light turns on after 4,000 hours.
It is time to replace the filter.
If Filter Life light turns on.
1.
Press the button to turn off the product and then unplug the product.
2. Open the rear panel of the product and check the filter. If the filters are contaminated, clean or
replace them.
Refer to the Maintenance section of this manual for instructions on cleaning and replacing the
filters.
Resetting the Filter Life Light
Press and hold the Reset button for 3 seconds or longer (Filter Reset function).
Odor
PM10
PM2.5
PM1.0
Auto
Reset(3sec.)
(3sec.)
Speed
Lighting Sleep Timer
Indicator
Dust
hr
Page 19

MAINTENANCE
19
ENGLISH
MAINTENANCE
Cleaning the Filters
1. Turn off the power and unplug the appliance.
Then pull open the rear panel.
2. Pull the filter set by the top handle to remove it from
the appliance.
• Dust may accumulate on the filter net.
• Before disassembling filter set, move the filters
to a convenient location for vacuuming.
• Place a newspaper or paper towel down to catch
any loose dust.
3. While holding the filter case over the newspaper,
push up on the sides of the pre-filter to separate
it from the filter set.
Clean the pre-filter using a vacuum cleaner or brush.
If the filter is very dirty, rinse it under running water
after cleaning it with a vacuum cleaner.
• Allow pre-filter to dry completely, out of direct sunlight, before reinstalling.
• Do not use pre-filter while damp. Doing so may cause odor.
• Do not operate air purifier without pre-filter installed.
!
CAUTION
Reset(3sec.)
(3sec.)
Speed
Lighting Sleep Timer
Indicator
Page 20

20
MAINTENANCE
ENGLISH
• Do not wash the Main Filter or the deodorizing filter with water. Replace them when
they become very dirty. Do not expose them to water during operation.
• The life-expectancy of filters may differ depending on the usage environment.
4. Press in the marked tabs on the sides of the deodorizing filter case to separate it from the
PuriCare main filter case.
5. Remove and replace the deodorizing filter if
necessary.
• Do not operate the air purifier without the
deodorizing filter.
6. Remove and replace the PuriCare main filter if
necessary. Make sure to completely insert the new
filter so it fits under the four tabs on the inside of the filter case.
7. After cleaning or replacing filters, reassemble the filters and filter cases. Insert the bottom tab
on the deodorizing filter case into the bottom slot on the PuriCare main filter case before
snapping the two cases together. Then fit the tabs on the pre-filter into the slots on the
PuriCare main filter case and push down on the sides to lock the pre-filter in place.
8. Insert the filters back into the air purifier with the deodorizing filter facing up. Remember to fit
the two tabs on the filter case handle into the slots on the top of the rear panel.
9. Close the rear panel.
Pre-Filter
Main Filter Case
Deodorizing Filter
Deodorizing Filter Case
Main Filter
Page 21

MAINTENANCE
21
ENGLISH
CAUTION
• Do not clean the body or display using products containing bleach or other alkalines.
• Do not clean the surface of the Air Purifier using sulfuric acid, hydrochloric acid or organic
solvents (thinners, kerosene, or others). Do not put stickers on the surface. Doing so may
damage the surface of the product.
• Do not use abrasive pads or cloths when cleaning. They may scratch the surface of the
product.
• Do not allow water inside product while cleaning the exterior. Turn off power and unplug
the power cord before cleaning. (Always check whether fan is moving.)
!
Cleaning the Exterior
Wipe the Air Purifier with a soft cloth and warm water.
The air inlet especially can accumulate dust and should be cleaned periodically.
* Contact an LG Customer Information Center for replacement filters.
Filter Maintenance Schedule
Filter types Classification Cleaning cycle Cleaning Method
Pre-Filter washable
about every
month
Clean pre-filter with vacuum cleaner or
brush, followed by rinsing under running
water if very dirty.
Main
Filter
not washable,
replace
about every 12
months
* The replacement cycle for
Main Filter and Deodorizing Filter may
vary depending on the usage
environment.
Deodorizing Filter
Page 22

22
ENGLISH
MAINTENANCE
Cleaning the Sensor
Turn off and unplug the product.
Open the dust sensor cover.
Clean the dust sensor lens with cotton swab.
(Clean once every six months.)
CAUTION
• Use only water to clean the sensor. Failure to follow this warning can result in product
failure.
!
Page 23

MAINTENANCE
23
ENGLISH
Storing the Product
If the product will not be used for an extended period, store it in a dry place out of direct sunlight.
1. Press the button to turn on the air purifier.
• Run the air purifier for an hour on a clear day to remove
any musty odor and mold located inside the product.
2. Press the button to turn off the air purifier and then
unplug it.
3. Remove the filters and store them tightly in a vinyl bag out
of direct sunlight.
• If the filters are stored in a humid place, they may take
on a musty or mildewy odor.
4. Clean the air purifier before storing it. Store the appliance in a vinyl cover to prevent any dust
or foreign objects from getting inside.
• Use a soft cloth when cleaning the appliance to avoid
scratching the surface.
• Store the appliance in a cool area out of direct sunlight.
5. Do not store the product where it will be exposed to high
humidity or direct sunlight.
• Doing so may result in odor, product deformation, or product malfunction.
Power plug
Reset(3sec.)
(3sec.)
Speed
Lighting Sleep Timer
Indicator
Page 24

24
TROUBLESHOOTING
ENGLISH
TROUBLESHOOTING
Before Calling for Service
Problem Possible Cause Solutions
Air purifier does
not turn on.
• Power cord not plugged in.
• Incorrect power rating.
• Plug cord securely into socket.
• Make sure outlet is rated for 115V.
Air output is weak,
product makes a
noise.
• Pre-filter is clogged.
• Dust accumulation on the
Puricare Main Filter.
• Clean the pre-filter.
• Replace the Puricare Main Filter.
Air purification
does not work
well.
• Indoor air quality is very bad.
• Dust has built up on the prefilter or Puricare Main Filter.
• Usage area is too large.
• Nearby objects are blocking air
circulation.
• The product is installed in a
corner.
• Ventilate the room before using the air
purifier.
• Clean the pre-filter or replace the
Puricare Main Filter.
• Use the product in a smaller area or an
area more protected from the influx of
outside air.
• Remove nearby obstacles or move the
product to a different location.
• Move the product.
Strange odor
coming from air
outlet.
• Installed in area with heavy
smoke or odors.
• Odor coming from deodorizing
filter.
• Very heavy smoke or odors may
degrade the performance of the filters.
Ventilate the area before using the air
purifier.
• Replace the deodorizing filter.
There is an odor,
but the Indicator
lamp does not
change.
• Odor sensor may not respond
to food odors as harmful.
• Odor sensor may not respond to food
odors as harmful, but odors are
removed by the deodorizing filter.
Air quality shows
red continuously.
• Air purifier may be unable to
process amount of
contamination in air.
• Water or oil sprayed near air
purifier.
• Try moving product to another room to
clear the indicator.
• Do not spray water or oil near the air
purifier.
Buttons do not
work.
• Lock function is enabled.
• Press and hold Speed button and
Indicator button for 3 seconds to
disable the Lock function.
If there is a problem with the product, check the following first before calling for service.
Page 25

TROUBLESHOOTING
25
ENGLISH
Problem Possible Cause Solutions
There has been no
change in micro
dust
concentration.
• Sensor may be dirty or blocked
by foreign material.
• Air purifier may be in enclosed
area.
• See instructions for cleaning sensor.
• Indoor air quality may stay the same in
an enclosed area.
The fine dust
concentration
value keeps
showing high.
• Air purifier installed in area
with constant influx of outside
air.
• Levels can remain high in areas where
there is a constant influx of outside air.
Air quality light
remains
red/orange while
PM levels show
low/normal.
• Air quality issue is from odor.
• The air quality indicator is an overall
evaluation based on odor and dust. If
an odor is strong while PM levels are
low, the light may remain on
red/orange.
The air quality
indicator differs
from the EPA
guide.
• The air purifier and EPA air
quality values are measured
differently.
• The EPA guide indicates an average
value during a given time period and
the air purifier's air quality indicator
measures and displays on a real-time
basis.
The filter produces
odors.
• The deodorizing filter has
become dirty.
• The air purifier is being used
instead of a vent hood while
cooking.
• Replace the filter. Filter life-expectancy
can vary based on usage environment.
• Filter life can be greatly reduced if the
air purifier is used while cooking
strong-smelling or oily food. Do not
use the product in place of a vent
hood. Ventilate the area during
cooking to remove strong odors and
oily splatter, then use the air purifier to
eliminate any remaining odors.
Page 26

26
SPECIFICATIONS
ENGLISH
The external dimensions, design and product standards may change to improve the quality of the
product.
*CADR(Clean Air Delivery Rate)
Model name AS401WWA1
Power supply 115 V~ / 60 Hz
Suggested room size 217 ft²
CADR*(ft³/min)
Smoke CADR : 140
Dust CADR : 175
Pollen CADR : 160
Product size
(width x height x depth)
11 5/8 in. × 30 43/64 in. × 12 1/8 in.
(295 mm × 779 mm × 308 mm)
SPECIFICATIONS
Height
Width
Depth
Page 27

WARRANTY
27
ENGLISH
WARRANTY (USA)
Should the LG Air Purifier fail due to a defect in materials or workmanship under normal home use, during the
warranty period set forth below, LG will at its option repair or replace the product. This limited warranty is valid
only to the original retail purchaser of the product and applies only when purchased and used within the United
States, including U.S. Territories. Proof of original retail purchase is required to obtain warranty service under
this limited warranty.
Warranty Period Scope of Warranty Remark
One (1) year from date of
original retail purchase
Any internal /
functional parts and
labor
LG will provide parts and labor to repair or replace
defective parts.
Ten (10) years from date of
original retail purchase
Smart
Inverter Motor
Parts Only. Customer will be responsible for any labor
or in-home service to replace defective parts.
•Replacement products and parts are warranted for the remaining portion of the original warranty period or
ninety (90) days, whichever is greater.
•Replacement products and parts may be new or remanufactured.
THIS WARRANTY IS IN LIEU OF ANY OTHER WARRANTY, EXPRESS OR IMPLIED, INCLUDING WITHOUT
LIMITATION, ANY WARRANTY OF MERCHANTABILITY OR FITNESS FOR A PARTICULAR PURPOSE. TO
THE EXTENT ANY IMPLIED WARRANTY IS REQUIRED BY LAW, IT IS LIMITED IN DURATION TO THE
EXPRESS WARRANTY PERIOD ABOVE. NEITHER THE MANUFACTURER NOR ITS U.S. DISTRIBUTOR
SHALL BE LIABLE FOR ANY INCIDENTAL, CONSEQUENTIAL, INDIRECT, SPECIAL, OR PUNITIVE
DAMAGES OF ANY NATURE, INCLUDING WITHOUT LIMITATION, LOST REVENUES OR PROFITS, OR
ANY OTHER DAMAGE WHETHER BASED IN CONTRACT, TORT, OR OTHERWISE.
Some states do not allow the exclusion or limitation of incidental or consequential damages or limitations on how
long an implied warranty lasts, so the above exclusion or limitation may not apply to you. This warranty gives you
specific legal rights and you may also have other rights that vary from state to state.
THIS LIMITED WARRANTY DOES NOT COVER:
•Service trips to deliver, pick up, or install or repair the product; instruction to the customer on operation of
the product; repair or replacement of fuses or correction of wiring or plumbing, or correction of unauthorized
repairs/installation.
•Failure of the product to perform during power failures and interrupted or inadequate electrical service.
•Damage caused by leaky or broken water pipes, frozen water pipes, restricted drain lines, inadequate or
interrupted water supply or inadequate supply of air.
•Damage resulting from operating the product in a corrosive atmosphere or contrary to the instructions outlined
in the product’s owner’s manual.
•Damage to the product caused by accidents, pests and vermin, lightning, wind, fire, floods, or acts of God.
•Damage or failure caused by unauthorized modification or alteration, or if it is used for other than the intended
purpose, or any water leakage where the unit was not properly installed.
•Damage or failure caused by incorrect electrical current, voltage, or plumbing codes, commercial or industrial
use, or use of accessories, components, or consumable cleaning products that are not approved by LG.
•Damage caused by transportation and handling, including scratches, dents, chips, and/or other damage to the
finish of your product, unless such damage results from defects in materials or workmanship and is reported
within one (1) week of delivery.
•Damage or missing items to any display, open box, discounted, or refurbished product.
•Products with original serial numbers that have been removed, altered, or cannot be readily determined. Model
and serial numbers, along with original retail sales receipts, are required for warranty validation.
•Increases in utility costs and additional utility expenses.
•Repairs when the product is used for other than normal and usual household use (e.g. commercial use, in
offices and recreational facilities) or contrary to the instructions outlined in the product’s owner’s manual.
Page 28

28
WARRANTY
ENGLISH
•Costs associated with removal of the product from your home for repairs.
•The removal and reinstallation of the product if it is installed in an inaccessible location or is not installed in
accordance with published installation instructions, including LG’s owner’s and installation manuals.
•Damage resulting from misuse, abuse, improper installation, repair, or maintenance. Improper repair includes
use of parts not approved or specified by LG.
The cost of repair or replacement under these excluded circumstances shall be borne by the consumer.
TO OBTAIN WARRANTY SERVICE AND ADDITIONAL INFORMATION
For additional product information, visit the LG website at http://www.lg.com
For assistance using this product or to schedule service, contact LG Electronics at 1-800-243-0000 (US).
For further assistance, write: LG Electronics, 201 James Record Road, Huntsville, Alabama 35813
Page 29

 Loading...