

ENGLISH
OWNER'S MANUAL
LG
AIR PURIFIER
Please read this manual carefully before operating your set and
retain it for future reference.
Model name: AM30GUWF1
MFL66979828
Rev.00_072017
www.lg.com

TABLE OF CONTENTS
ENGLISH
TABLE OF CONTENTS
3 SAFETY INSTRUCTIONS
7 HOW TO INSTALL
7 Selecting installation place
7 Use the air purifier as this.
8 NAME OF THE PARTS
8 Product
9 Operation indicator and control part
10 Filter system
11 Humidification cleaning filter system
12 HOW TO USE
12 Air cleaning operation
13 Indicator display
15 Ionizer operation
15 Sleep operation
16 Lock function
16 Filter check display
17 Checklist before using the humidification
cleaning function
20 HOW TO CLEAN
20 How to clean the exterior
20 How to clean the dust sensor
21 How to clean the air outlet
22 Filter cleaning
23 How to clean and replace various filters
23 How to clean the tray and the
humidification filter
25 HOW TO STORE
26 TROUBLESHOOTING
BEFORE CALLING FOR
SERVICE
28 PRODUCT SPECIFICATION
19 Humidification cleaning
function
19 Humidification cleaning operation
SAFETY INSTRUCTIONS
ENGLISH
!
!
!
!
3
SAFETY INSTRUCTIONS
READ THESE INSTRUCTIONS CAREFULLY
This guide contains many important safety messages. Always read and obey all safety messages.
This is the safety alert symbol. It alerts you to safety messages that inform you of hazards that can
kill or hurt you or others, or cause damage to the product.
All safety messages will be preceded by the safety alert symbol and the hazard signal word
WARNING or CAUTION. These words mean:
Warning
You can be killed or seriously injured if you do not follow these instructions.
Caution
Indicates an imminently hazardous situation which, if not avoided, may result in minor or moderate
injury or product damage.
This equipment is home (class B) EMI suitable equipment, which is mainly for home use, and it
can be used in all regions.
Warning
To reduce the risk of re, electric shock or personal injury when using this product,
follow basic safety precautions including the following:
CHILDREN IN THE HOUSEHOLD
This appliance is not intended for use by persons (including children) with reduced
physical, sensory or mental capabilities or lack of experience and knowledge,
unless they have been given supervision or instruction concerning use of the
appliance by a person responsible for their safety. Children should be supervised to
ensure that they do not play with the appliance.
INSTALLATION
• Install the product near an easily accessible electrical outlet.
• Do not install the product on an uneven or inclined surface.
• Do not install the product in a damp area and keep away from splashing rain or
water.

4
ENGLISH
POWER
SAFETY INSTRUCTIONS
• Do not install the product in an area exposed to direct sunlight or near heat-
generating equipment.
• Do not install the product in a place where combustible gas may leak or industrial
oil or metallic particulates are present.
• This product is for AC 220–240 V. Always check the supply voltage before using
it.
• Be careful not to let the power plug pressed by the back of the product.
• Remove the power plug when you clean the product or replace the lter.
• Do not touch the power plug with wet hands.
• Insert the plug into the outlet tightly after removing the moisture and dust on it
completely.
• When unplugging the power cord, always pull it by the plug.
• Unplug the product during thunder or lightning or when not in use for a long time.
• Do not bend the power cable excessively or place a heavy object on top of it.
• Do not extend the length of the power cable or alter it.
• Do not use several devices on a multi-socket extension outlet.
• The appliance shall be disconnected from its power source during service and
when replacing parts.
• Take care to ensure that power cable could not be pulled out or damaged during
operation. There is risk of re or electric shock.
• If the supply cord is damaged, it must be replaced by the manufacturer, its
service agent or similarly qualied person using only genuine replacement parts
in order to avoid a hazard.
USE
• If the product is immersed in water, stop using it and contact the LG Electronics
service center.
• If there is a gas leakage (isobutane, propane, LNG, etc.), do not touch the
product or power plug and ventilate the area immediately.
• Do not clean the product with brushes, cloths or sponges with rough surfaces or
which are made of metallic material.
• If you detect any abnormal noise, odor or smoke, unplug the product immediately
and contact an LG Electronics service center.
SAFETY INSTRUCTIONS
ENGLISH
!
5
• Only an authorized repair person from LG Electronics service center should
disassemble, repair, or modify the product.
• Do not use or store re, combustibles (ether, benzene, alcohol, drugs, propane,
butane, combustible spray, insecticide, air freshener, cosmetics etc.) or
ammable materials (candles, lamps etc.) near the product.
• Do not place the power cord under rugs, carpeting or mats.
• Do not allow animals or pets to chew on the power cord.
• Do not allow children to climb on or play with the product.
• Do not move the product when it is in operation.
• Do not place coee, ower vase or drinks on top of the product.
• Do not insert hands or metal objects into the air inlet or outlet.
• Do not impact the product.
• Be careful not to allow any part of your body to be pinched when you detach and
re-attach parts of the product.
• Unplug the product when not in use for a long time.
• Do not install and use broken parts.
• Do not clean the product when it is plugged in.
• Do not put ammables into the product.
• Do not operate the product while its cover is open.
DISPOSAL
• Dispose of the packing materials (vinyl, styrofoam etc.) to keep them out of reach
of children.
Caution
To reduce the risk of re, electric shock, or personal injury when using the product,
follow basic safety precautions, including the following:
INSTALLATION
• Do not tilt the product to pull or push it while transporting.
• Do not install the product in transportation equipment (vehicle/vessel etc.).
• Do not place the product near a TV or a stereo equipment.
• Do not place the product under bright light.
• The appliance shall be installed in accordance with national wiring regulations.

6
ENGLISH
USAGE
SAFETY INSTRUCTIONS
• Do not use the product for removal of toxic gas such as carbon monoxide.
• Do not use the product for ventilation purposes.
• Do not use the product for a long time in a region with unstable voltage.
• Do not place obstacles around the air inlet or outlet.
• For safe use of the product, children or others with reduced mental capabilities
need to be closely monitored by a person who is responsible for their safety.
• Do not place the product near curtains.
• Do not use the product for special purposes such as preserving plants, precision
instrument, artworks etc.
• Do not climb or place objects on top of the product.
• Do not operate the product with wet hands.
• Do not let the moisture from the humidier directly touch the product.
• Do not use the product while it is not in upright position.
• Do not use the product near objects vulnerable to heat.
• Use the lter only for its intended purpose.
• Do not use detergents, cosmetics, chemicals, air fresheners, or disinfectants in
the product.
• Do not place magnetic or metal objects on top of the product.
• Do not clean with strong detergents of solvent types, but use soft cloth.
HOW TO INSTALL
ENGLISH
!
!
HOW TO INSTALL
Selecting installation place
Main Unit
• Place with handy power connections
• Place with no obstacle to clog air inlet
• Place with horizontal surface and rich air circulation
Warning
There can be product failure if the air purier is installed on a moving vehicle such as cars,
boats and others.
Warning
This appliance is not intended for use by persons (including children) with reduced
physical, sensory or mental capabilities, or lack of experience and knowledge, unless they
have been given supervision or instruction concerning use of the appliance by person
responsible for their safety.
Children should be supervised to ensure that they do not play with the appliance.
7
Use the air purier as this.
• Reduce the use of air purier if possible when you cook smelly food such as sh grill.
- The vaporized oil from the cooking may aect to the performance and lifetime of the lters,
and the odor may stick on the lter as well.
• Maintain a minimum distance of 1 meter from the air purier when you sleep.
- The fan speed of the air purier is not that high. However you may feel a chill.
• Do not place in a corner edge.
- Avoid a place surrounded with furniture and electronic equipment, or in a corner edge.
The air purier will not function well if it is installed in a corner edge.
NAME OF THE PARTS
ENGLISH
8
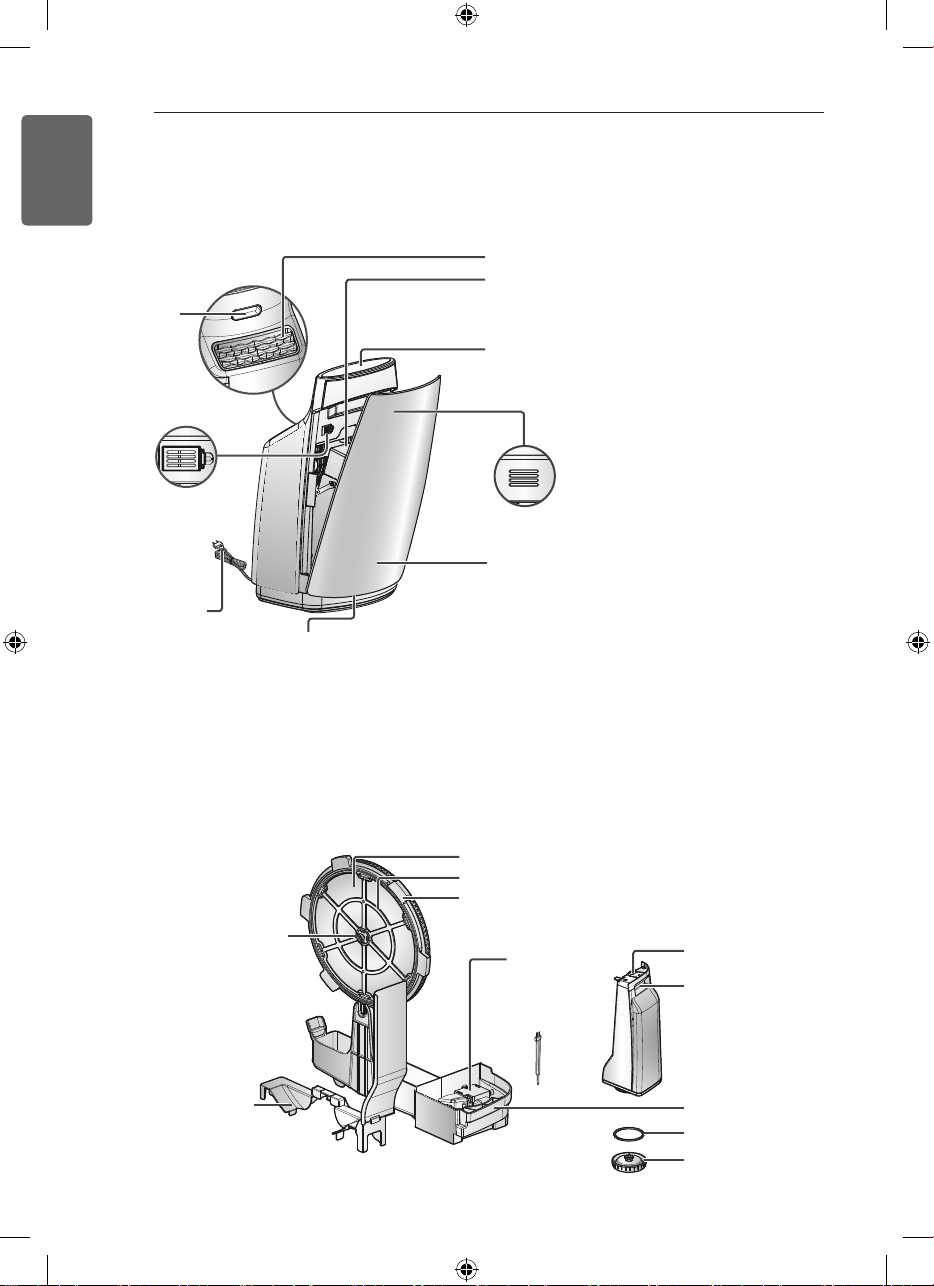
NAME OF THE PARTS
Product
Main unit
Handle
Sensor part
(odor sensor)
Power cord
Cleanliness indicator lamp
It is the lamp indicating the room air cleanliness status.
According to the room cleanliness degree detected by the dust sensor and the odor sensor, the cleanliness is
displayed.
• Overall cleanliness display
(Contaminated) red → orange → green → blue (clean)
After starting the operation, during the sensor stabilization time (30 sec.), the cleanliness indicator lamp is
lighted with white color. After 30 seconds, it displays the room cleanliness.
According to the initial detection value, the cleanliness displayed on the product may be dierent.
Air discharge outlet cover
Filter case
Pre lter + Allergen lter + Deodorization
lter + HEPA lter
Display part
Sensor part
(dust sensor)
Front panel
Humidication function part
Humidication
lter shaft
Tray support
Humidication lter
Humidication lter cover
Humidication lter case
Float
Cleaning brush
(Separately packaged
along with the manual.)
Water tank
Tank lever
Tray
Packing
Cap
ENGLISH
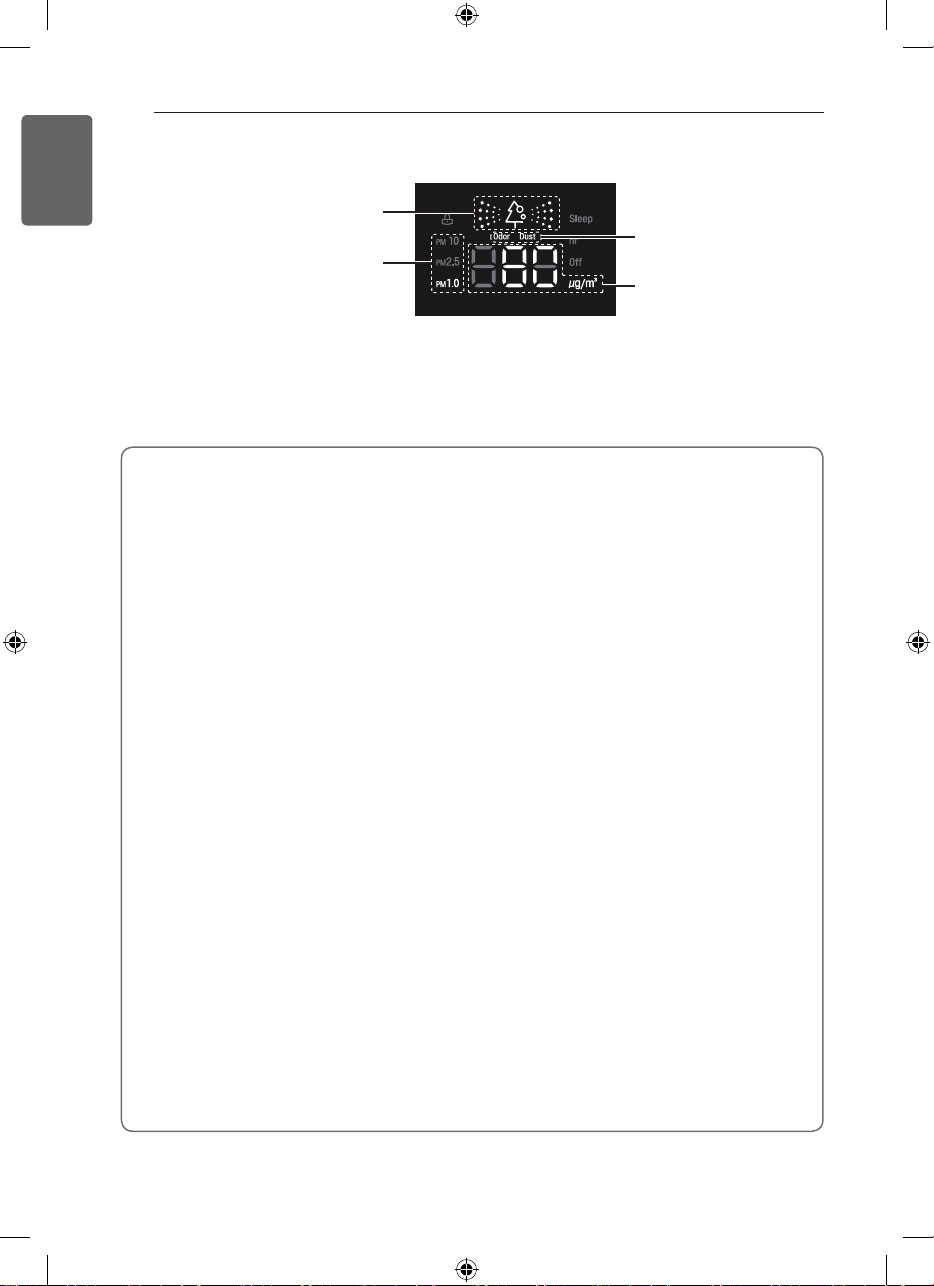
Operation indicator and control part
NAME OF THE PARTS
9
Overall cleanness including odor and
Dust indicator display Mode button Ionizer button No water displayIndicator button
Start/Stop button Use to start and stop the product.
Mode button It displays status of the product. (Air Purifying or Humidifying)
Speed button It adjusts wind volume.
Indicator button It selects micro dust size and displays dust density.
Sleep button
Ionizer button It generates ion and romoves various bactteria in the indoor air.
Lock function
Filter Check display
No water display
Humidity display When you operate Humidifying, it indicates indoor humidity.
Dust indicator display Dust indicator display
Overall Cleanness display
dust is displayed in 4-level color
Lock display Sleep display
Wind speed display
Mode display Filter Check display
Start/stop button Speed button Sleep button Ionizer display
It adjusts wind volume for sound sleep and can set the time when
the clean lighting is turned o.
Pressing the Mode button and the Speed button together for
3seconds lock/unlock the lock function.
If the Filter display on, check if the lter is contaminated, and if it is
seriously contaminated, clean or replace the lter.
When you operate Humidifying, it displays If there is no water in the
tank. After you pour water into the tank, it is o.
Odor/dust display
Humidity display
Dust particle size guide
PM10 : dust particle size is equal or below 10μm (occurs in the combustion at the site,
automobile exhaust, etc.)
PM2.5 : dust particle size is equal or below 2.5μm (consists of ion, carbon compounds, and
metal compounds)
PM1.0 : dust particle size is equal or below 1.0μm (cigarette smoke, etc.)

NAME OF THE PARTS
ENGLISH
!
10
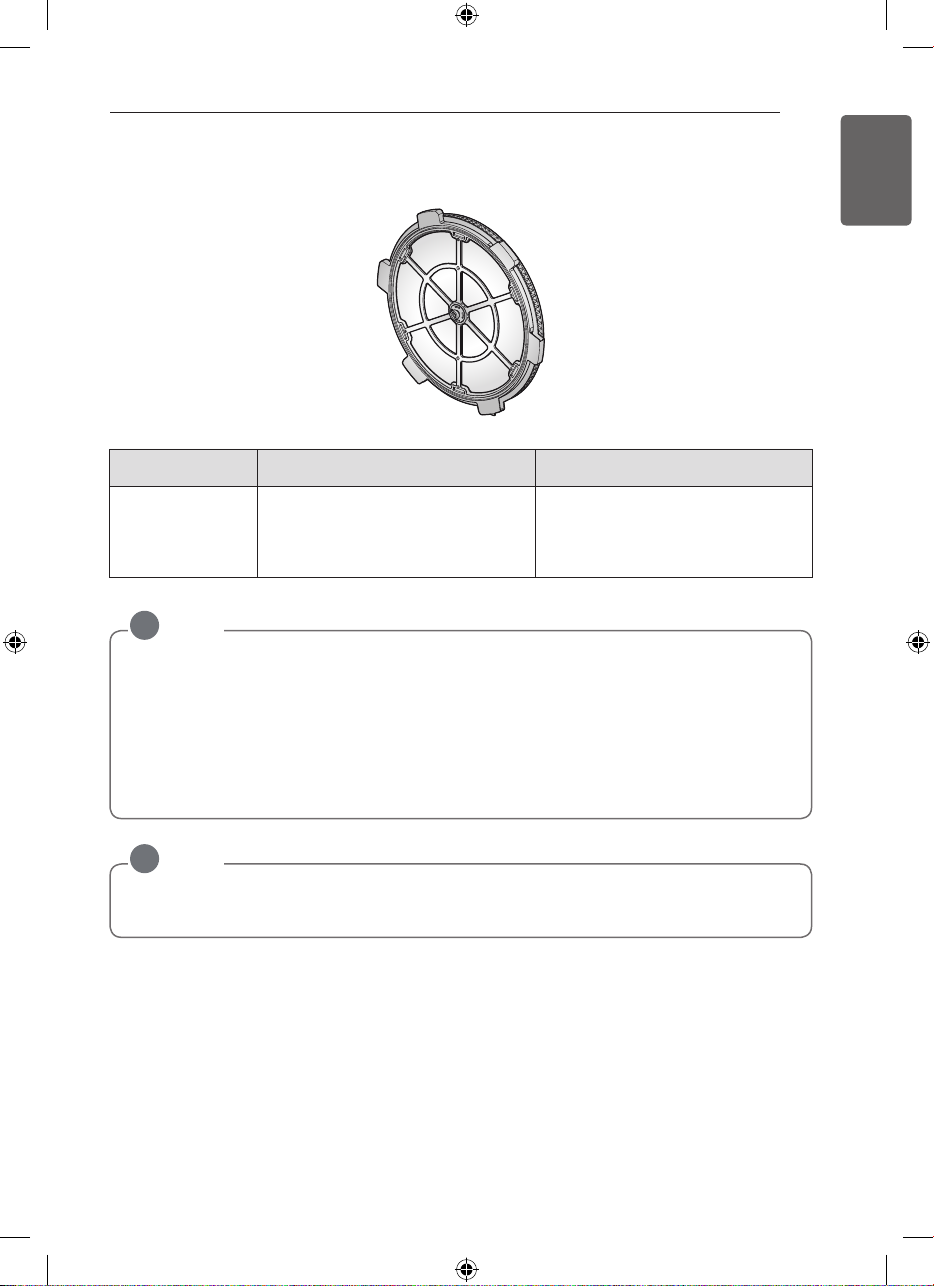
Filter system
Pre Filter
Filter name Function
Pre-Filter
Allergen lter It absorbs and decomposes allergen which could cause allergy.
Deodorization lter
HEPA lter
The lter washing and replacement cycles may depend on the user environment.
Allergen lter HEPA lter
Deodorization
Filter
It is lter for large particles removal and is done with anti-biotic
treatment, which helps the life extension.
The comprehensive deodorization lter removes cigarette smoke(odor),
putrid food odor, animal hair odor, NO2, toilet odor, alkali & acid odor,
organic compound(VOCs).
HEPA lter removes minute particles such as acarid dead body, pollen,
cigarette smoke(particles), minute dust, oating fungus, animal hair
and so on.
Filter case
NOTE
• If you request lter cleaning to the service center, we will clean it with a charge for actual
cost.
• The lter replacement frequency can vary depending on the operational environment.
• The lter composition can vary depending on a model in use.
• If you need more and change lter, please contact the LG service center.
• Nothing but an operation with the lter equipped guarantees a normal air purication
process.
NAME OF THE PARTS
ENGLISH
!
!
Humidication cleaning lter system
Filter name Function Cleaning and replacement cycle
11
Humidication
cleaning lter
NOTE
• The lifespan of the humidication lter may be dierent by the water quality.
• Even within 6 months, if it becomes the following status, please replace.
- Water stain or odor is not removed even after mending.
- Discoloration (black, yellow) or dirtiness is severe.
- The white lump on the humidication lter remains even after the washing.
- The damage or deformation is severe. (Please replace according to the manual in the
separately sold parts.)
NOTE
• According to the waste separation method, please dispose the worn humidication lter.
• Humidication lter material: PET
It is lter for large particles removal
and is done with anti-biotic
treatment, which helps the life
extension.
Cleaning period: Once per week or
more
Replacement cycle: about 1 year
HOW TO USE
ENGLISH
!
12
HOW TO USE
Air cleaning operation
It puries the indoor with clean and fresh air.
1. Press the
2. Set to the cleaning operation mode with
3. Select the desired wind amount with
• Whenever you press the
High → Auto.
• At the initial operation, it is set to the automatic operation. (In the automatic operation mode,
the wind amount is automatically controlled according to the indoor air contamination degree)
• After starting the operation, during the sensor stabilization period (30 sec.), the display part
prepares the cleanliness display.
button to start the air cleaner operation.
mode button.
Speed button.
Speed button, it repeats in the order of Auto → Low → Mid →
…
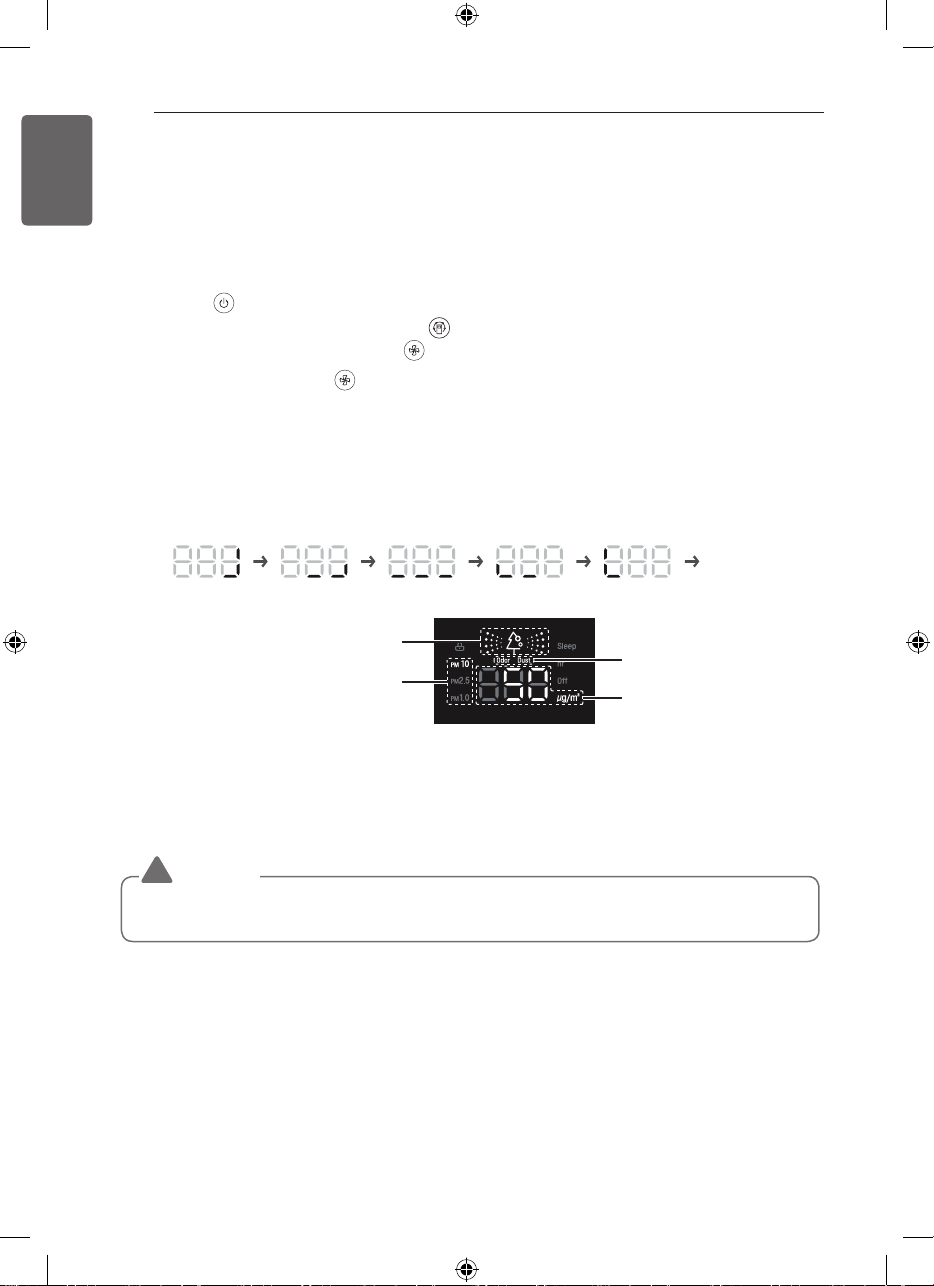
Overall cleanliness color display
Dust particle size
After 30 seconds, the overall cleanliness and the dust density is displayed. But, odor sensor is
stabilized 2 min. after starting the operation, so before that time, it displays the cleanliness with the
PM10/PM2.5/PM1.0 contamination level.
CAUTION
If the front panel is not properly closed or open, ‘OPEN’ is displayed on the display part, and
it does not operate.
Odor/dust display part
Dust density display

HOW TO USE
ENGLISH
13
Indicator display
1. Press the Indicator button and check the density of PM10 / PM2.5 / PM1.0.
• Pressing the button each time checks the density of PM10 → PM2.5 → PM1.0 in turn.
Pressing the Indicator button during operation displays the density of PM10 / PM2.5 / PM1.0
at the display for 10 seconds.
Overall cleanliness color display
Odor/dust display part
Dust particle size
Dust density display
• Check the dust particle size display window.
• Dust density is displayed based on the dust density window with the highest contamination
level.
Example) When PM10 density is 79 (normal), and PM2.5 is 90 (bad), and PM1.0 is
Cleanliness is displayed in 4-level color depending on the contamination level of PM10 /
PM2.5 / PM1.0 and odor.
(Contaminated) Red → Orange → Green → Blue (clean)
• When the displayed cleanliness is above bad/very bad, the cause of bad level (dust/odor) is
displayed in addition to cleanliness color display.
Overall cleanliness color is displayed based on the worst level among PM10 / PM2.5 / PM1.0
and odor.
50 (normal), PM2.5 value is displayed for dust density.
Checking method of overall cleanliness
Overall
cleanliness
Red Very Bad
Orange Bad 81~150 51~100 51~100 Strong 3
Green Normal 31~80 16~50 16~50 Normal 2
Blue Good
Dust density is displayed in the unit of one from 8 to 999.
When it comes to the dust density values, we referred to the data sheets provided by the sensor
supplier.
Status
Equal or above
Equal or below 30Equal or below 15Equal or below
Dust density (unit μg/m3)
PM10 PM2.5 PM1.0 Level
151
Equal or above
101
Equal or above
101
15
State
Very
strong
Weak 1
Odor density
4
HOW TO USE
ENGLISH
14
Example)
Overall cleanliness color display
Odor/dust display part
Dust particle size
Dust density display
• Explanation on the display : Since PM1.0 density is Bad(Orange) with 80μg/m3, display dust
at the odor/dust display. Since ‘odor’ is displayed at the odor/dust display, odor density is also
strong. Since PM1.0 is displayed at the dust particle size display, the density level of PM1.0 is
higher than that of PM10 or PM2.5
Reference
• PM10 and PM2.5 cleanliness follows the provided by the Ministry of environment(Air
KOREA). (2015)
- The overall cleanliness level displayed on the product may be dierent from a level
announced by Ministry of environment(Air KOREA).
• The dust density level for PM1.0 has been displayed in the same manner as the dust
density level for PM2.5. (LG Electronics standards)
• The displayed density of PM10 / PM2.5 could dier from the forecast of the Ministry of
environment(Air KOREA) and from other measurement devices or products.
- Indicated dust concentration values can dier from each other depending on the
dierences in dust measuring methods and also from real dust concentration levels.
- The assessment of dust density was made against dust used for LG Electronics
standards tests.
• In case you use the product which generates steam and micro particles (humidier,
cooling device, spray, etc.), micro dust density could change.
• Since the cleanliness display shows overall dust and odor, it could dier from the density
value of PM10, PM2.5, and PM1.0.
• Even in the same space, the PM10 density value could dier from other products due to
air circulation.
• The overall cleanliness display could change in response to the chemicals contained in
air freshener, perfume, deodorizer, and cosmetics.
• The displayed dust density value could change depending on the installation environment
(aected by sofa, bed, carpet, vacuum cleaner, humidity, smoke, bugs, fats, etc.)
• The displayed density value of PM10/PM2.5/PM1.0 could change depending on the
surrounding environment (construction site, road side, plant, etc.)
• The density of micro dust could be measured high near exit doors, windows, and
ventilation holes or under the environment where outside air ows in.
• Do not clean the sensor with other materials other than alcohole or water. It may cause
product failure.

ENGLISH
Ionizer operation
It generates negative ion and removes various bacteria in the air.
HOW TO USE
15
1. Start the air purier by pressing the
2. Press the
Ionizer button.
button.
• It removes hazardous substances such as bacteria, virus and others in the air.
• Whenever it is pressed it changes the operation sequence as Ionizer → reset function →
Ionizer.
①
Ion Cluster
generation by
the polar linkage
of water particle
in the air
②
Sterilization
ion encircles
various
hazardous
substances.
③
Generation of
OH(hydroxyl)
that is weak
to dierent
chemical
reactions
④
Reaction
between
hydroxyl (OH)
and hazardous
substances
⑤
Clean air
removed
hazardous
substances
Sleep operation
It makes quiet and pleasant environment when sleeping.
1. Start the air purier by pressing the
2. Press the
Sleep button.
• It changes to low noise operation that ts for sleeping.
• When Sleep Mode is on, Sleep Mode is only displayed.
• The reservation time can be set in the order of 2 hours → 4hours → 8hours → 12hours →
Disable.
3. Fan speed at Sleep Mode.
• If the
Sleep button is pressed, it runs automatically as Low fan speed for an hour and the
fan speed after is controlled by the air quality.
• During the Sleep Mode you may change the fan speed in sequence of Auto → Low → Mid →
High whenever
Speed button is pressed.
4. How to disable Sleep Mode: Press the
Once Sleep Mode is set, all other display is o except the Sleep Mode.
button.
Sleep button again.

HOW TO USE
ENGLISH
16
Lock function
1. Press the button.
2. Press the
• It sets Lock function
• It may protect the product by unwanted operation by children or others.
• Press the
the Lock function.
• If press of any button does not work, check for the Lock function and disable the Lock.
• If power cord is unplugged, the lock function is also disabled.
Even when the product is stop, you may enable and disable Lock function by pressing Mode
button and
Mode button and Speed button simultaneously for over 3 seconds.
with the sound "Ting".
Mode button and Speed button simultaneously for over 3 seconds to disable
Speed button simultaneously for over 3 seconds.
Filter check display
1. If the lter check display on, turn o the power of the operating product by pressing button
and unplug the power cord from the outlet.
2. Open the front panel of the product and check the lter. If the lters are contaminated, clean or
replace.
For lter cleaning and replacement, refer to pages 22~23.
<How to initialize lter replacement (How to turn o lter replacement indicator)>
Method 1. Unplug the power cord from power outlet.
Method 2. Press
Since the lter replacement display is automatically turned o after 24 hours, replace the lter in
time.
Speed button and Sleep button for 3 seconds or longer.

HOW TO USE
ENGLISH
Checklist before using the humidication cleaning
function
Check the humidication lter assembly status
1. Separate the water tank.
2. Separate the tray.
• Be careful not to have overow of the water, and lightly lift
and pull to the arrow direction to separate.
17
3. Correctly assemble both sides of the humidication lter case to the tray xing part as in the
gure, and assemble the tray to the main unit.
• If the humidication lter is not correctly assembled, abnormal noise occurs and the
humidication does not work.

HOW TO USE
ENGLISH
!
!
!
18
Water tank water supply
1. Open the water tank cap and supply tab water into the water
tank.
• Fill the water as much as there is no water leaking when the
water tank cap is assembled.
CAUTION
• Using tab water is more hygienic. Tab water is
processed with chlorine, and various viruses are hard
to multiply, but if water other than tab water (well
water, puried water, mineral water, etc.) is used, it is
easier for mold or various viruses to multiply.
• Do not supply 40 ˚C or more hot water, aroma oil,
chemical, contaminant, or air freshener. (Cause of
malfunction and failure)
• Water tank may fall down, so make sure to hold the
water tank with both hands.
2. Lock the water tank cap.
• Make sure to check if the water leaks.
• Make sure to wipe out the moisture around the water tank.
• If the water tank cap packing is omitted during the assembly,
the water may easily spill, and it may cause electric shock or
product damage.
CAUTION
• When you insert the water tank, check if the tray
humidication lter and oat are correctly assembled.
If they are not correctly assembled, it may cause
insucient humidication or failure.
3. Assemble the water tank to the main unit.
• If the water tank is not correctly mounted, it may cause
malfunction or noise.
NOTE
• When you unscrew or lock the water tank cap, and
when you supply water into the water tank, while
holding the water tank with hand, force to unscrew or
lock.
• When you unscrew or lock the water tank cap,
carefully check OPEN / CLOSE arrow direction on
the water tank cap.

Humidication cleaning function
ENGLISH
!
Humidication cleaning function
Humidication cleaning operation
1. Press the button.
2. Set to the humidication cleaning mode with
• You cannot set to the desired humidity.
• During the humidication cleaning operation, the humidication is done with ne particle, so
you will not see the spraying.
3. Select the desired wind amount with Speed button.
• Whenever you press the Speed button, it is changed in the order of Auto → Low → Mid →
High → Auto.
NOTE
• When there is no water in the water tank, the no-water lamp is turned on and buzzer
sounds, but the operation does not stop. During the humidication operation, when you
separate the water tank and tray from the product, no-water is turned on and buzzer
sounds also, but the operation does not stop. During the operation, do not separate the
water tank or the tray.
• During the operation, if no-water lamp is turned on, make sure to turn o the power,
separate the water tank, supply water into the water tank, combine with the main unit, and
operate.
• There are cases not becoming adequate humidity or rising too high according to the area
or state of the installed room
It does not become adequate humidity. --- Operate with higher wind amount.
It is over adequate humidity. --- Turn o the humidication cleaning operation.
Mode button.
19
4. After the humidication cleaning operation, when
you turn o the power, press
button to change to the cleaning operation and
operate for about 5 minutes.
• The wet humidication lter is dried quickly and
maintained cleanly.
operation mode
Humidication
lter

HOW TO CLEAN
ENGLISH
!
!
20
HOW TO CLEAN
How to clean the exterior
Soak soft cloth in warm water, squeeze it well, and wipe the humidication air cleaner.
CAUTION
• Do not wipe the main unit control part and display part with alkali detergent.
• Do not use sulfuric acid, hydrochloric acid, or organic solvent (thinner, lamp oil, etc.) to
wipe the surface of the humidication air cleaner, and do not attach stickers, etc. It may
damage the surface.
How to clean the dust sensor
Dust sensor is a device to detect the degree of the contamination of the ne dust and big dust,
and lens part shall be periodically cleaned to maintain the performance.
1. If it was in operation, press
power, pull out the cord, and then open the front panel.
• When you open the front panel, the water in the tray
may spill, so do not open it hard.
2. Wipe the dust sensor lens with cotton swab.
• After the cleaning, close the dust sensor part cover in
the reverse order.
NOTE
• Clean the dust sensor lens about once per 2 months. But, the cleaning cycle is dierent
according to the usage environment and usage time, so in an environment with a lot of
dust, frequently clean it.
button to turn o the
Dust sensor
lens
Front
panel

ENGLISH
How to clean the air outlet
!
1. Hold the air outlet cover’s wave pattern part and lift
upward to separate.
2. Use the cleaning brush and cleaner inlet to remove
the dust on the safety blocking net.
3. Wash the separated air outlet cover in running
water with soft brush.
• After washing it, completely dry in a shadow until
the moisture disappears.
HOW TO CLEAN
21
4. During the assembly after the cleaning, insert the
air outlet cover by matching the back part of the
cover to the product as in the right side gure, and
settle down the front part.
NOTE
• Clean the air outlet about once per 1~2 months.
But, the cleaning cycle is dierent according to the usage environment and usage time,
so in an environment with a lot of dust, frequently clean it.

HOW TO CLEAN
ENGLISH
!
22
Filter cleaning
1. If it is in operation, turn o the power and pull out the cord.
Pull the front panel forward to open.
2. Pull the lter case upward and take out from the main unit.
3. Pull the Pre Filter forward and separate from the lter case.
NOTE
• After washing the Pre Filter, if it is not suciently
dried, there may be odor, so completely dry it at a
place with good wind ventilation.
• If the lter is contaminated too severely, it needs to
be replaced. (After the lter cleaning, close the front
panel. If it is not completely closed, it will not operate.)
Front
panel
4. Clean the disassembled lter according to the lter
cleaning method in the next page.
• Replace the replacing lter with about 1 year cycle.
• Do not wash the replacing lter with water.
5. During the lter cleaning, also clean inside the main unit
with cleaner cleaning brush.
6. After the cleaning, assemble in the reverse order of the
disassembly.
Allergen lter HEPA lter
Pre Filter
Deodorization
Filter
Filter case

ENGLISH
How to clean and replace various lters
!
Filter type Classication Cleaning cycle How to clean
Clean the Pre-lter with a vacuum cleaner or
Pre-Filter For washing
Allergen lter
About a month
washing Cycle
a soft brush, and when the contamination is
severe, use a neutral detergent and water to
clean it o.
HOW TO CLEAN
23
Deodorization
lter
HEPA lter
For
replacement
About 12
months cycle
replacement
The replacement cycle for this lters may be
dierent according to the usage environment.
CAUTION
• The lter cleaning or replacement service during the use of the product is a charged
service.
How to clean the tray and the humidication lter
Classication
Water tank – Daily
Tray – Daily
Humidication
lter
Replacement
cycle
6~12
months
Cleaning
cycle
Once or
more per
week
How to clean
• When you supply water into the water tank, ll about 1/3, and
wash by shaking 4~5 times.
• Dissolve 10g neutral detergent or citric acid in 1L warm water,
soak for 1~2 hours, and wash using the cleaning brush. After
the washing, suciently rinse with running water.
• If there are white powder generated around the humidication
lter and the humidication lter case, it may cause odor and
noise, so make sure to clean them with soft brush.
* Wash by
shaking the
water tank 4~5
times.
*
During the humidication
lter case washing,
it may be
damaged, so
carefully
wash it.
*
While you are holding the case,
use brush, cotton
swab, etc. to softly
wipe the
humidication
lter, gear,
and case.
*
After neutral detergent or
citric acid
washing, rinse
with clean water.
* Citric acid: you can purchase at pharmacy or internet.

HOW TO CLEAN
ENGLISH
!
24
• Frequently wash the water tank and the tray. Water stain is removed, and you can use the
product hygienically.
• Do not disassemble the oat of the tray. It may cause failure.
If it is disassembled by shock, assemble in the order as in the right side gure.
• Do not disassemble the humidication lter case. The humidication lter and case may be
deformedb or damaged.
• When you wipe with brush, wipe softly. If you press too hard, the ber may be damaged.
NOTE
• If you do not rinse it enough, there may be
odor of detergent or citric acid, and it may
cause discoloration or deformation of the
product.
• During the use, a white lump may be
attached to the humidication lter, or
there may be red or yellow discoloration.
These are the impurities such as calcium
contained in the tab water, and it is a normal
phenomenon.
①
Insert oat under
this projection.
②
Insert the
projection of the
oat into the hole.
③
Insert into the
hole of the
projection on the
opposite side of
the oat.

ENGLISH
HOW TO STORE
1. On a sunny day, operate in clean operation mode for 1 hour
or more, and press
• If you operate it for 1 hour or longer on a sunny day, you
can remove the moisture and mold inside the product.
2. Pull out the power plug.
3. Clean the humidication air cleaner main unit cleanly and
store it well. When you store it for a long period of time,
remove the tray and the water tank, and pack the lter and
main unit well with vinyl cover, etc. so that dust or foreign
object may not enter inside the product.
• During the cleaning, wipe with soft cloth. Scratching, etc.
may damage the exterior.
• Do not store it at a place with a lot of moisture or exposed
to the direct sunlight. It may cause odor, deformation, or
malfunction.
button to stop the operation.
HOW TO STORE
Power plug
25

TROUBLESHOOTING BEFORE CALLING FOR SERVICE
ENGLISH
26
TROUBLESHOOTING BEFORE CALLING
FOR SERVICE
If there is a problem with the product, check the following cases rst before requesting service to
the service center.
Symptom Check Actions
It does not start at
all.
Wind amount is
small and there is
a noise.
Air purication
does not work
well.
There is a strange
odor coming out
of air outlet.
There is an odor,
but the Indicator
lamp does not
change.
The Indicator lamp
is continuously on
with red color.
Button does not
work well.
• Isn’t the power plug pulled
out?
• Isn’t the voltage too low? • Check if it is 220–240 V~.
• Is the pre lter clogged? • Clean the pre lter.
• Is dust accumulated on the
HEPA lter?
• Is the indoor contamination
severe?
• Is dust accumulated on the
pre lter?
• Is dust accumulated on the
HEPA lter?
• Isn’t the usage place too
wide?
• Are there obstacles nearby? • Please remove obstacles.
• Is the product installed in a
corner?
• Is it used at a place with a lot
of smoke or odor?
• Is there abnormal odor from
the deodorization lter?
• Isn’t red light turned on in the
Indicator lamp?
• Doesn’t the color change
even if it is moved to a clean
room?
• Did you use spray near the
Air Purier?
• Is the lock lamp on the
operation part turned on?
• Insert correctly into the socket.
• Clean the HEPA lter.
• Ventilate rst before usage.
• Clean the pre lter.
• Clean the HEPA lter.
• Use the product appropriate for the usage
area. (Avoid places with uent ventilation
such as entrance, window, etc.)
• Please change the installation location.
• Very heavy smoke or odors may
degrade the performance of the lters.
Ventilate the area before using the air
purier.
• Replace the deodorizing lter.
• Odor sensor may not respond to
food odors as harmful, but odors are
removed by the deodorizing lter.
• If the quantity of odor is greater than the
ability that can be processed by the Air
Purier, the display may not change.
• Do not use sprays near the Air Purier.
• Press Mode button and Speed button
together for 3 sec. to reset the lock
setting.

TROUBLESHOOTING BEFORE CALLING FOR SERVICE
ENGLISH
Symptom Check Actions
27
There has been
no change in
micro dust
concentration.
The ne dust
concentration
value keeps
showing high.
There is dierence
between the
comprehensive
cleanliness level
color and dust
concentration
value.
There is dierence
between the
Ministry of
environment( Air
KOREA) guide and
comprehensive
cleanliness level.
The lter
produces odors.
The odor and dust
indicator do not
display.
• Sensor may be dirty or
blocked by foreign material.
• Air purier may be in
enclosed area.
• Is the place of installation
located where the inow of
air is made constantly?
• Doesn’t the odor / dust
indicator display ‘Odor’?
• Is there dierence
between the Ministry of
environment(Air KOREA)
guide and dust concentration
value of the air cleaner?
• Doesn’t the deodorization
lter produce any odor?
• The wireless router
connected with the product is
not working.
• Does the comprehensive
cleanliness level turn yellow
or green?
• See instructions for cleaning sensor.
• Indoor air quality may stay the same in
an enclosed area.
• In an environment where the inow of
air is made, the concentration value can
keep showing high.
• The comprehensive cleanliness level
evaluates odor and dust concentration
comprehensively and then displays.
If an odor is strong although the dust
concentration is low, the comprehensive
cleanliness level may display a dierent
color.
• There can be dierence between the
Ministry of environment(Air KOREA)
guide which indicates an average
value during a given period time and
comprehensive cleanliness level
indicated on the air cleaner which is
measured and then displayed on a real
time basis.
• The lter replacement frequency
can dier depending on the user
environment.
• The life of the lter can get sharply
reduced if it is used for long when you
cook food or grill sh / meat. Open the
window and ventilate the room as much
as possible when you cook food. After
ventilation, use the air cleaner in order
to accomplish the purpose of eliminating
remaining odors.
• Only when the dust concentration level
is Bad / Very Bad or odor concentration
Strong / Very Strong, the odor / dust
indicator displays a substance as the
cause of pollution.

PRODUCT SPECIFICATION
ENGLISH
28
PRODUCT SPECIFICATION
Height
Width
The external dimension, design and product standard can change to improve the quality of the
product.
Model name AM30GUWF1
Power supply 220–240 V~ 50/60 Hz
Weight of Product 10.2 kg
Appearance Size(mm) 450(w) x 635(H) x 305(D)
Power consumption 45 W
The rating on the manual displays a range for possible usage, so it could be dierent from the
rating on the label, which displays the rating of the using region on the produc
Depth
 Loading...