

Page 1

ENGLISH
LG
Air-to-Water Heat Pump
LG
Models : AH Series
IMPORTANT
• Please read this owner's manual carefully and
thoroughly before installing and operating your
Air-to-Water Heat Pump.
• Please retain this owner's manual for future
reference after reading it thoroughly.
Owner's Manual
Dear Owner
Thank you for installing LG Air-to-Water Heat Pump.
Your best choice guarantees you a great
performance and service to make your life
comfortable & pleasant.
FRANÇAIS
Page 2
2 Air-to-Water Heat Pump Owner’s Manual
Air-to-Water Heat Pump Owner’s Manual
TABLE OF CONTENTS
FOR YOUR RECORDS
Write the model and serial numbers here:
Model #
Serial #
You can find them on a label on the side of each
unit.
Installer's Name
Purchased Date
■
Staple your receipt to this page in the event you
need it to prove date of purchase or for warranty
issues.
READ THIS MANUAL
Inside you will find many helpful hints on how to use and
maintain your AWHP properly. Just a little preventive
care on your part can save you a great deal of time and
money over the life of your product.
You'll find many answers to common problems in the
chart of troubleshooting tips. If you review our chart of
Troubleshooting Tips first, you may not need to call for
service at all.
PRECAUTION
• Contact the authorized service technician for repair or
maintenance of this unit.
• Contact the installer for installation of this unit.
• AWHP is not intended for use by young children or
invalids without supervision.
• Young children should be supervised to ensure that
they do not play with AWHP.
• When the power cable is to be replaced, replacement
work shall be performed by authorized personnel only
using only genuine replacement parts.
• Installation work must be performed in accordance
A. Safety Precautions.........................3
B. Product Introduction......................6
C. Owner's instruction........................8
D. Using Thermostat.........................33
E. Maintenance and Service ............37
F. Disposal Requirements................39
Page 3
Safety Precaution
Owner’s Manual 3
ENGLISH
Safety Precautions
To prevent injury to the user or other people and property damage, the following instructions must be followed.
■ Incorrect operation due to ignoring instruction will cause harm or damage. The seriousness is classified by
the following indications.
This symbol indicates the possibility of death or serious injury.
This symbol indicates the possibility of injury or damage.
WARNING
Always ground the product.
• There is a risk of electric shock.
Do not use a defective or underrated
circuit breaker. Use the correctly rated
breaker and fuse.
• There is risk of fire or electric shock .
Do not use a multi outlet. Always use
this appliance on a dedicated circuit and
breaker.
• Otherwise it can cause electric shock or fire.
For electrical work, contact the dealer, seller,
a qualified electrician, or an Authorized
Service Center. Do not disassemble or repair
the product by yourself.
• There is risk of fire or electric shock.
Always ground the product as per the
wiring diagram. Do not connect the
ground wire to gas or water pipes
lightening rod or telephone ground wire.
• There is risk of fire or electric shock.
Install the panel and the cover of control
box securely.
• There is risk of fire or electric shock due to
dust , water etc.
Use the correctly rated breaker or fuse.
• There is risk of fire or electric shock.
Do not modify or extend the power
cable. If the power cable or cord has
scratches or skin peeled off or
deteriorated then it must be replaced.
• There is risk of fire or electric shock.
For installation, removal or reinstall ,
always contact the dealer or an
Authorized Service Center.
• There is risk of fire, electric shock, explosion,
or injury.
Do not install the product on a defective
installation stand. Be sure that the
installation area does not deteriorate with
age.
• It may cause product to fall.
Never install the outdoor unit on a
moving base or a place from where it
can fall down.
• The falling outdoor unit can cause damage
or injury or even death of a person.
When the product is soaked (flooded or
submerged) in water , contact an
Authorized Service Center for repair
before using it again.
• There is risk of fire or electric shock.
Be sure to check the refrigerant to
be used. Please read the label on the
product.
• Incorrect refrigerant can prevent the normal
operation of the unit.
Don't use a power cord, a plug or a
loose socket which is damaged.
• Otherwise it may cause a fire or electrical
shock.
Do not touch , operate, or repair
the product with wet hands.
• There is risk of electric shock or fire.
Do not place a heater or other heating
appliances near the power cable.
• There is risk of fire and electric shock.
Do not allow water to run into electric
parts. Install the unit away from water
sources.
• There is risk of fire, failure of the product, or
electric shock.
Do not store or use or even allow
flammable gas or combustibles near the
product.
• There is risk of fire.
WARNING
CAUTION
Page 4

Safety Precaution
4 Air-to-Water Heat Pump Owner’s Manual
Indoor/outdoor wiring connections must
be secured tightly and the cable should
be routed properly so that there is no
force pulling the cable from the
connection terminals.
• Improper or loose connections can cause
heat generation or fire.
Safely dispose off the packing materials.
Like screws, nails, batteries, broken
things etc after installation or service
and then tear away and throw away the
plastic packaging bags.
• Children may play with them and cause
injury.
Make sure to check that the power
device is not dirty, loose or broken and
then Turn on the power.
• Dirty, loose or broken power device can
cause electric shock or fire.
Do not use the product in a tightly
closed space for a long time. Perform
ventilation regularly.
• Oxygen deficiency could occur and hence
harm your health.
Do not open the front cover or grille of the
product during operation. (Do not touch the
electrostatic filter, if the unit is so equipped.)
• There is risk of physical injury, electric
shock, or product failure.
If strange sounds, smell or smoke comes
from product, immediately turn the breaker
off or disconnect the power supply cable.
• There is risk of electric shock or fire.
Ventilate the product room from time to
time when operating it together with a
stove, or heating element etc.
• Oxygen deficiency can occur and hence
harm your health.
Turn the main power off when cleaning
or repairing the product.
• There is risk of electric shock.
Take care to ensure that nobody
especially kids could step on or fall onto
the outdoor unit.
• This could result in personal injury and
product damage.
Take care to ensure that power cable
could not be pulled out or damaged
during operation.
• There is risk of fire or electric shock.
Do not place ANYTHING on the power
cable.
• There is risk of fire or electric shock.
When flammable gas leaks, turn off the
gas and open a window for ventilation
before turn the product on.
• Do not use the telephone or turn switches on
or off. There is risk of explosion or fire.
In outdoor unit the step-up capacitor
supplies high voltage electricity to the
electrical components. Be sure to
discharge the capacitor completely
before conducting the repair work.
• An charged capacitor can cause electrical
shock.
When installing the unit, use the
installation kit provided with the product.
• Otherwise the unit may fall and cause severe
injury.
Be sure to use only those parts which
are listed in the service parts list. Never
attempt to modify the equipment.
• The use of inappropriate parts can cause an
electrical shock, excessive heat generation
or fire.
Page 5
Safety Precaution
Owner’s Manual 5
ENGLISH
CAUTION
Two or more people must lift and
transport the product.
• Avoid personal injury.
Do not install the product where it will be
exposed to sea wind (salt spray) directly.
• It may cause corrosion on the product.
Keep level even when installing the
product.
• To avoid vibration or noise.
Do not install the product where the noise
or hot air from the outdoor unit could
damage or disturb the neighborhoods.
• It may cause a problem for your neighbors
and hence dispute.
Always check for gas (refrigerant)
leakage after installation or repair of
product.
• Low refrigerant levels may cause failure of
product.
Do not use the product for special
purposes, such as preserving foods,
works of art, etc. It is a consumer AWHP,
not a precision refrigeration system.
• There is risk of damage or loss of property.
Do not block the inlet or outlet of air
flow.
• It may cause product failure.
Use a soft cloth to clean. Do not use
harsh detergents, solvents or splashing
water etc .
• There is risk of fire, electric shock, or
damage to the plastic parts of the product.
Do not step on or put anyting on the
product. (outdoor units)
•
There is risk of personal injury and failure of product.
Do not insert hands or other objects
through the air inlet or outlet while the
product is operating.
• There are sharp and moving parts that could
cause personal injury.
Be cautious when unpacking and
installing the product.
• Sharp edges could cause injury.
If the refrigerant gas leaks during the
repair, do not touch the leakaing
refrigerant gas.
• The refrigernat gas can cause frostbite (cold
burn)
Do not tilt the unit when removing or
uninstalling it.
• The condensed water inside can spill .
Do not mix air or gas other than the
specified refrigerant used in the system .
• If air enters the refrigerant system, an
excessively high pressure results, causing
equipment damage or injury.
If the refrigerant gas leaks during the
installation, ventilate the area immediately.
• Otherwise it can be harmfull for your health.
Dismantling the unit, treatment of the
refrigerant oil and eventual parts should
be done in accordance with local and
national standards.
Do not expose your skin or kids or
plants to the cool or hot air draft.
• This could harm to your health.
Use a firm stool or ladder when cleaning,
maintaining or repairing the product at
an height.
• Be careful and avoid personal injury.
Page 6
6 Air-to-Water Heat Pump Owner’s Manual
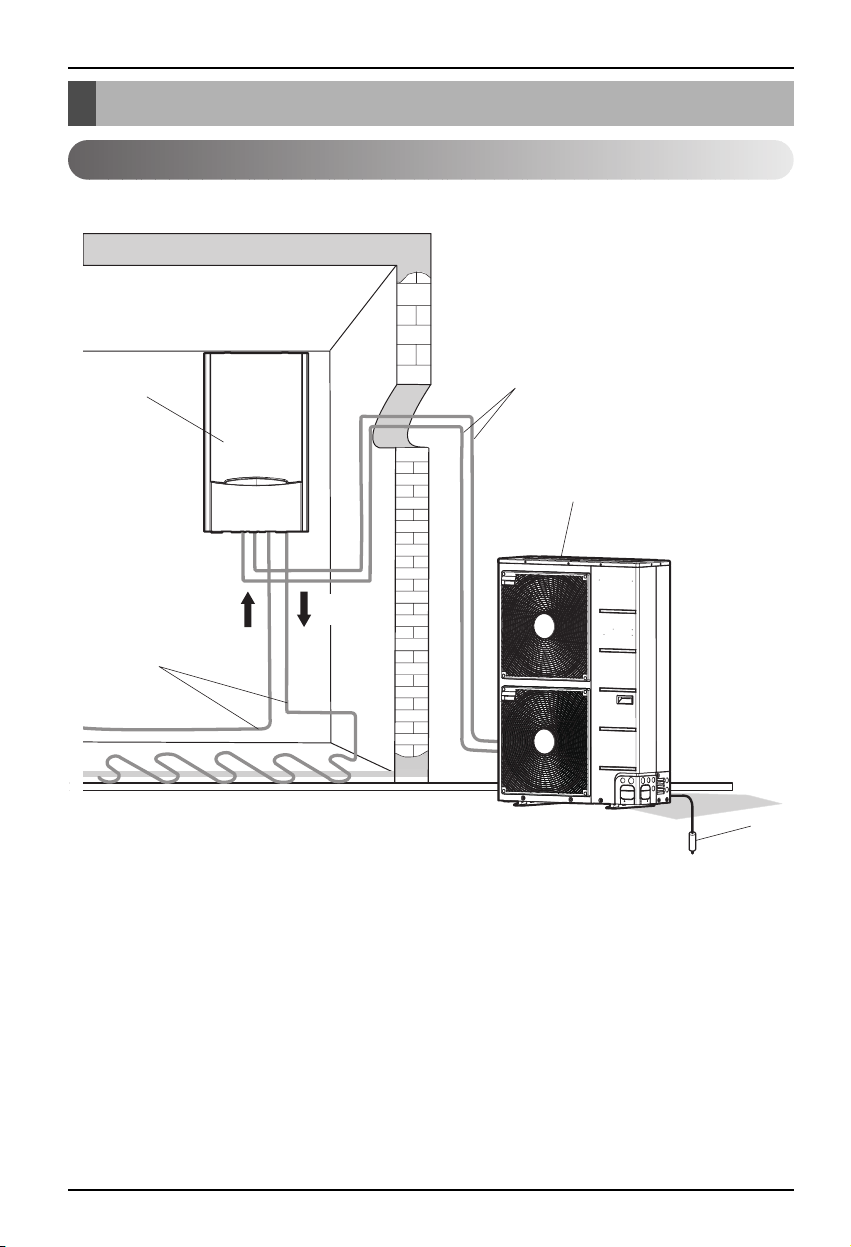
Product Introduction
Product Introduction
1. Indoor unit
2. Outdoor unit
3. Refrigerant pipe and connecting cable
4. Water pipe
5. Ground wire to ground outdoor unit to prevent electrical shocks.
*
The shape of products can be chaged according to the model capacity and type.
1
2
5
4
3
Water
Inlet
Water
Outlet
Typical Installation Scene
Page 7
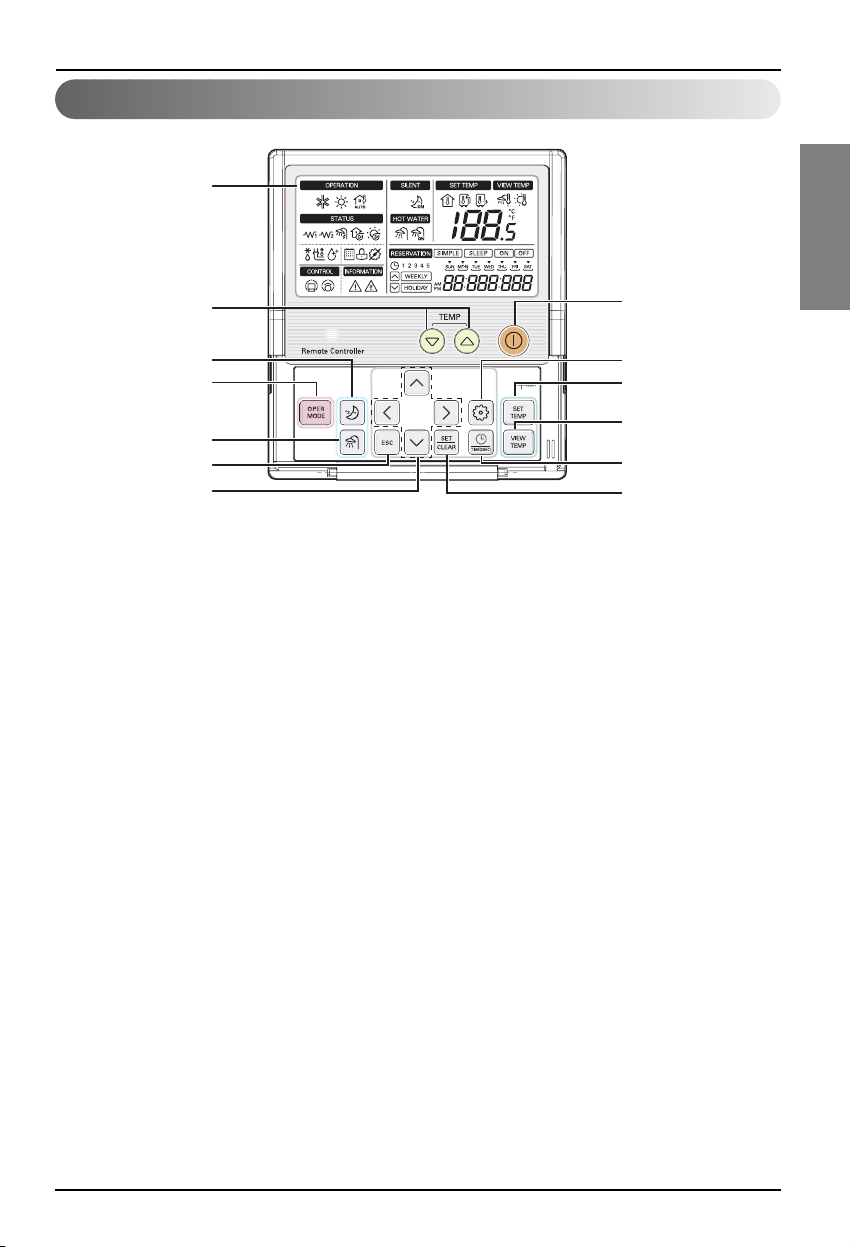
Product Introduction
Owner’s Manual 7
ENGLISH
❊ Some functions may not be operated and displayed depending on the model.
Control Panel
1. Display panel
2. Change temperature button
3. Silent mode On/Off button
4. Operation mode selection button
5. Water heating Enable/Disable
button
6. ESC button
7. Direction button
(Up, Down, Left, Right)
8. Power button
9. Function setting button
10. Temperature setting mode
button
11. Temperature view mode button
12. Programming button
13. Set/Clear button
1
2
3
4
5
6
7
8
9
10
11
12
13
Page 8
8 Air-to-Water Heat Pump Owner’s Manual
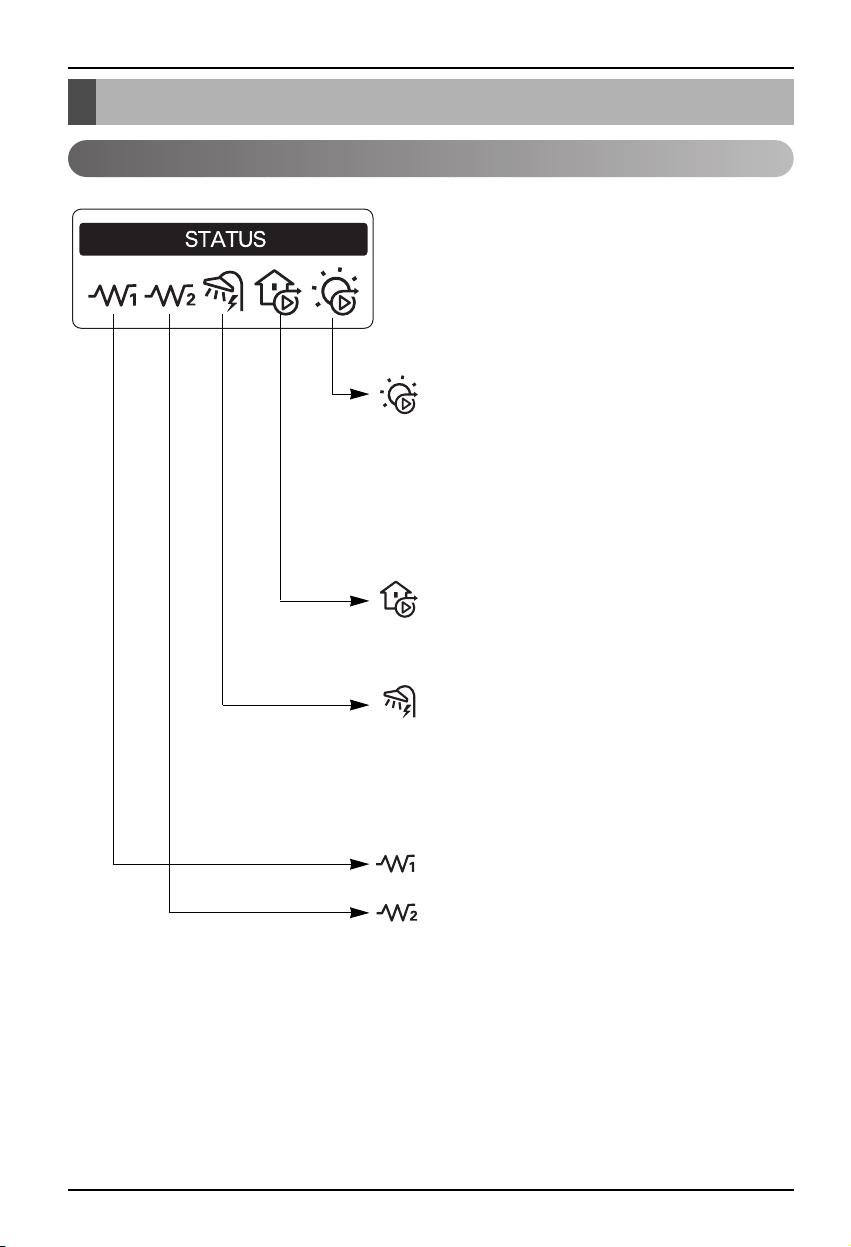
Owner's instruction
AUXILIARY SOLAR THERMAL PUMP
This icon indicates that auxiliary solar thermal
pump is active.
NOTE : As installation of auxiliary solar thermal
pump is not compulsory but recommendation
according to field condition, this icon can be seen
although no auxiliary solar thermal pump is
installed.
Water Pump
This icon indicates that the water pump inside
the indoor unit is active.
Sanitary Water Tank heater
This icon indicates that sanitary water tank
electric heater which is located inside sanitary
water tank is active.
The icon is not used when sanitary water tank is
not installed.
Electric Heater STEP ONE
Electric Heater STEP TWO
These icons indicate that the backup electric
heater which is located inside the indoor unit is
operating.
Monitoring Information
Owner's instruction
Page 9
Owner’s Manual 9
ENGLISH
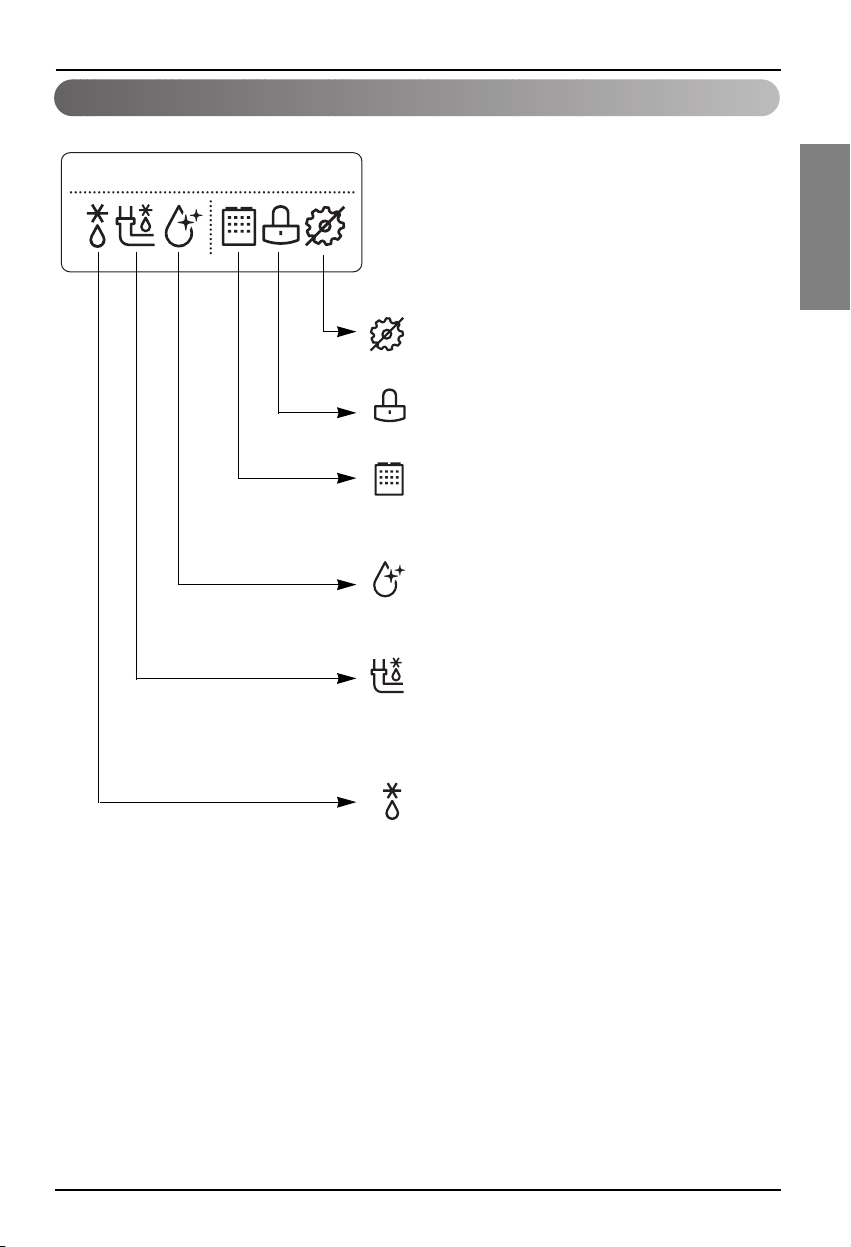
Owner's instruction
Monitoring Information
NO FUNCTION
Child Lock
Outdoor
This icon indicates that the outdoor unit is active.
Disinfection
This icon indicates disinfecting operation is
ongoing in sanitary water tank.
Maintain lowest temperature
The purpose of this mode is maintaining the
temperature to prevent damage by freezing of
water pipe.
Defrosting
This icon indicates that the defrost mode is
active.
In space heating operation or sanitary water tank
heating operation, freezing of the outdoor heat
exchanger may be occured due to low outdoor
temperature and humidity. If this risk occurs, the
product goes into defrost operation. It reverses
the cycle and takes heat from the indoor system
to prevent freezing of the outdoor system. This
mode is automatically operating.
Page 10
10 Air-to-Water Heat Pump Owner’s Manual
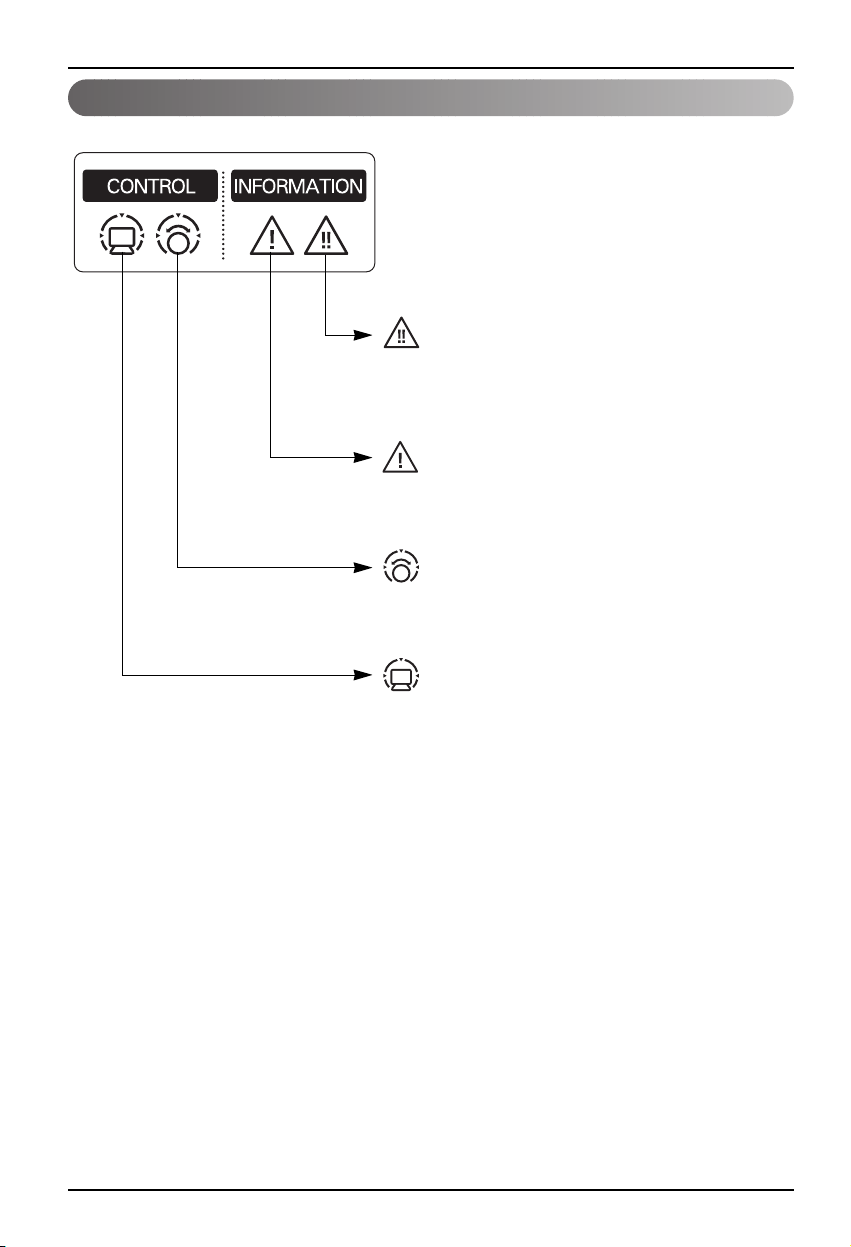
Owner's instruction
Monitoring Information
Heavy trouble
This icon indicates that heavy trouble is
occurred.
Slight trouble
This icon indicates that slight trouble is occurred.
Thermostat
This icon indicates connection with thermostat.
Central Controller
This icon indicates that the product is controlled
by the central controller.
Page 11
Owner’s Manual 11
ENGLISH
Owner's instruction
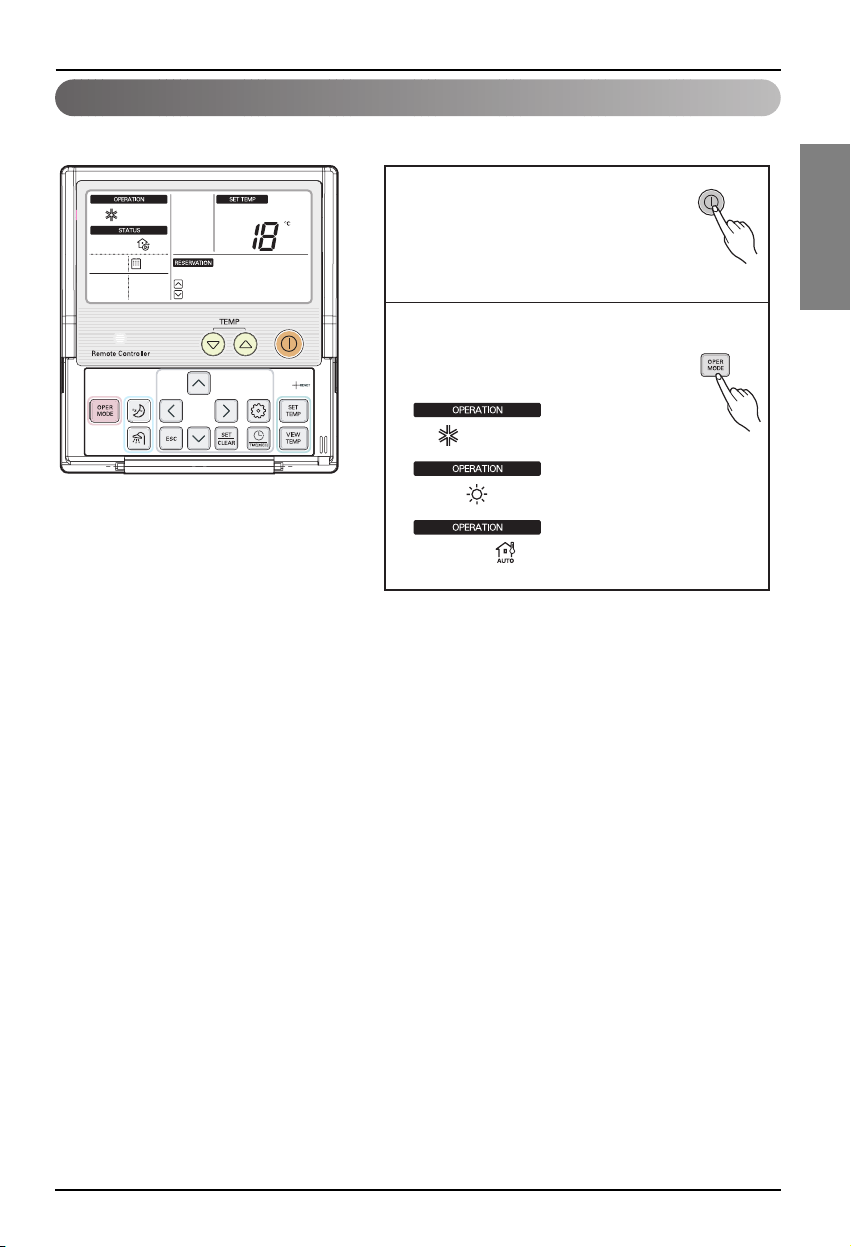
Mode Change
Turn on the product and select operation mode.
Operation Mode
• Cooling Operation - The product yields cool water to use in under floor cooling or FCU cooling.
• Heating Operation - The product yields hot water to use in under floor heating or FCU heating.
• Weather dependent Heating Operation - In this mode, heating setpoint is automatically determined
by pre-defined temperature profile. For more detail, please
refer description on Function Code 24 and 25.
Press Power Button to turn on the
1
product.
Press OPER MODE Button to select
2
each operation mode.
: Cooling operation
: Heating operation
: Weather dependent
operation
Page 12
12 Air-to-Water Heat Pump Owner’s Manual
Owner's instruction
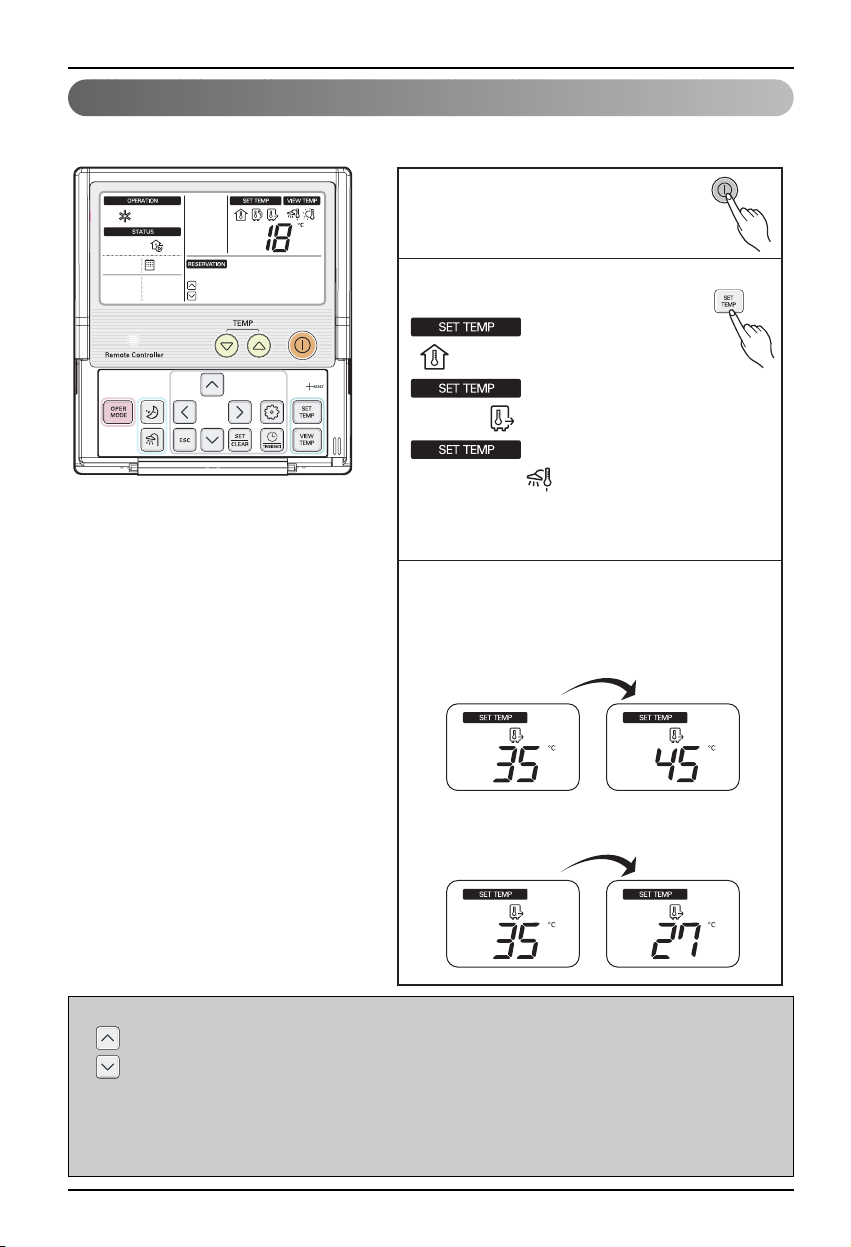
Selecting Target Temperature
You can set the proper temperature each mode.
❊ Note
: Decrease 1°C or 2°F per one time pressing
: Increase 1°C or 2°F per one time pressing
• We can change the temperature range of each mode on installation setting mode. Please refer
Function Code 11 to 15.
• Room Temperature setting is available when Remote Room Air Sensor (sold separately) is
installed. Please refer Function Code 03.
1
2
<Room Temperature and Sanitary Water Tank
Temperature mode could be selected when Remote
Air Sensor and Sanitary Water Tank Kit are installed.>
3
Press Power Button to turn on the
product.
Press SET TEMP Button to select
each operation mode.
: Room Temperature
Leaving Water Temperature
:
: Sanitary Water Tank
Temperature
Adjust desired temperature by pressing
Change Temperature buttons on each mode.
Ex1) Setting Temperature as 45°C on Leaving
Water Temperature.
Ex2) Setting Temperature as 27°C on Leaving
Water Temperature.
Page 13

Owner’s Manual 13
ENGLISH
Owner's instruction
Cooling Mode
Please refer to the manual of product.
In this mode, cooling operation is activated to achieve the temperature set point.
❊ Note
: Decrease 1°C or 2°F per one time pressing
: Increase 1°C or 2°F per one time pressing
We can change the temperature range of each mode on installation setting mode.
Please refer function code from 11 to 15.
Press Power Button to turn on the
1
product.
Press Mode Selection Button to select
2
Cooling operation mode.
: Cooling operation icon
Adjust desired temperature by pressing
3
Change Temperature buttons on each mode.
Ex1) Setting Temperature as 18°C on
Leaving Water Temperature
Ex1) Setting Temperature as 20°C on Room
Temperature.
Page 14

14 Air-to-Water Heat Pump Owner’s Manual
Owner's instruction
Heating Mode
In this mode, heating operation is activated to achieve the temperature set point.
Press Power Button to turn on
1
the product.
Press Mode Selection Button to select
2
Heating operation mode.
: Heating operation icon
Adjust desired temperature by pressing
3
Change Temperature buttons.
Ex) Setting Temperature as 55°C on
Leaving Water Temperature.
Ex) Setting Temperature as 30°C on Room
Temperature.
Page 15

Owner’s Manual 15
ENGLISH
Owner's instruction
Weather-dependent Operation
This mode is only applied to heating.
In order to save energy and to give highest comfort, setting temperature will follow outside
temperature. If outdoor temperature decreases, heating capacity for the house will increase
automatically in order to keep same room temperature. All parameters will be set by installer during
start-up procedure and will be adapted to the site characteristic.
Press Power Button to turn on
1
the product.
Press Mode Selection Button to select
2
External Control operation mode.
: Weather Dependent
operation icon
Adjust the desired temperature level by
3
pressing Change Temperature buttons.
Auto-Adjustable
Target Temperature
Value #1 of
Function Code
24 or 25
Value #2 of
Function Code
24 or 25
Value #1 of
Function Code 23
Ex) Decreasing temperature profile by 3°C
(based on room air temperature)
<Temperature adjust step (unit : °C)>
-5, -4, -3, -2, -1, 0, 1, 2, 3, 4, 5
Cold Hot
Temperature profile
of Weather-dependent
operation
Value #2 of
Function Code 23
Outdoor
air temperature
Page 16

16 Air-to-Water Heat Pump Owner’s Manual
Owner's instruction
View Temperature
Temperature Temperature Range Displayed as
below 11 Lo
Air 11 ~ 39 actual temperature
above 39 Hi
below 0 Lo
Water 0 ~ 92 actual temperature
above 92 Hi
(unit:°C)
Press repeatedly View Temperature
1
Button to select each Temperature.
: View Room Temperature
: View Inlet Temperature
: View Outlet Temperature
: View Sanitary Water Temperature
(ONLY displayed when sanitary
water heating mode)
: View Solar Power Temperature
(ONLY displayed when sanitary
water heating mode)
Whenever press View Temperature button,
2
the room temperature will be displayed
during 5seconds.
Page 17

Owner’s Manual 17
ENGLISH
Owner's instruction
Sanitary Water Heating Operation
<Note>
• This function is not used when the sanitary water tank is not installed.
• If you want to know more information, refer function code [15, 26~29] on installation
information section
Press repeatedly View Button to enable
1
sanitary tank heating.
<Sanitary Water Heating Disable>
<Sanitary Water Heating enable>
Sanitary water heating operation is operating
2
only on enable condition.
During operation, segment will be on.
<Sanitary Water Heating ON>
Page 18

18 Air-to-Water Heat Pump Owner’s Manual
Owner's instruction
Silent Mode Operation
Silent mode operation is that the outdoor unit works at reduced capacity so that the noise produced
by the outdoor unit drops.
This implies that the indoor heating and cooling capacity will also drop. Beware of this
when a certain level of heating or cooling is required indoors.
Silent mode operation may not work while the product is proceeding higher priority
operation such as defrost operation, anti-freezing operation, and etc.
((When this mode is not operated by the priority order, ONLY display .)
Press Silent Mode Button.
1
This button ON or OFF silent mode.
<Silent Mode OFF>
<Silent Mode ON>
Page 19

Owner’s Manual 19
ENGLISH
Owner's instruction
This function is to prevent children or other people from using controller.
Child Lock
Press Function Setting Button to enter
1
user setting mode.
(The segment will be flashed)
Press set / clear button to finish the selection.
2
The segment will be disappear.
During Child Lock, icon and 'CL' will be
3
displayed during 3 seconds whenever
entering any kind of buttons except for view
temperature button and setting/clear button .
To release this setting, pressing
4
function Setting button until
icon flash and then enter
setting/clear button.
Page 20

20 Air-to-Water Heat Pump Owner’s Manual
Owner's instruction
When the error is occurred on indoor unit, the error code will be displayed on control panel.
Error code display
Slight trouble
A problem is found inside the indoor unit. In most case, this trouble is concerned with
sensor problems. The outdoor unit is operating under emergency mode operation
condition which is configured by DIP switch No. 4 of the indoor unit PCB.
<Display>
Heavy trouble
a problem is found inside the outdoor unit. As the outdoor unit has problem, the
emergency mode operation is performed by electric heater located in the indoor unit.
<Display>
Critical error
On critical error, the product will be unconditional stop.
At this time, CH' and error code No. keep display by turns.
<Display>
Page 21

Owner’s Manual 21
ENGLISH
Owner's instruction
You can set current time.
Setting Current Time
<Note>
The current time have set as 12:00 initially.
Keep pressing programming button for 3
1
seconds to enter Setting current time mode.
Ex) Changing Current Time
as 'Monday / PM 10:20'.
Press left, right button to adjust the current
2
day.
Press down button to move to AM/ PM
3
part and adjust it. (The 'AM/ PM segment
will be flashed)
Press right button to move to 'Hour'
4
part. (the 'Hour' segment will be flashed)
Press up, down button to adjust the Hour.
5
Page 22

22 Air-to-Water Heat Pump Owner’s Manual
Owner's instruction
Press right button to move to 'Minute' part.
6
(the 'Minute' segment will be flashed)
Press up, down button to adjust the Minutes.
7
If you finish the setting, press set / clear
8
button .
Press exit button to exit or system will
9
automatically release without any
input after 25 seconds.
Page 23

Owner’s Manual 23
ENGLISH
Owner's instruction
Programming : Setting Simple Reservation
You can easily turn-on reservation.(ONLY enable when unit is stand-by.)
Press programming button to enter the
1
Programming mode. (the segment flashing)
Ex) Setting Simple Reservation time as '3'
hours.
Press up, down button to adjust the
2
reservation time.
If you finish the setting, press setting/cancel
3
button to complete programming.
Press exit button to exit or system will
4
automatically release without any input after
25 seconds.
Page 24

24 Air-to-Water Heat Pump Owner’s Manual
Owner's instruction
Programming : Setting Sleep Reservation
You can easily turn-off(sleep) reservation.(ONLY enable when unit is operating.)
Press programming button to enter the
1
Programming mode. Repeat pressing button
to select [sleep reservation]. (the segment
flashing)
Ex) Setting Simple Reservation time as '3'
hours.
Press up, down button to adjust the
2
reservation time.
If you finish the setting, press setting/cancel
3
button to complete programming.
Press exit button to exit or system will
4
automatically release without any input after
25 seconds.
Page 25

Owner’s Manual 25
ENGLISH
Owner's instruction
Programming : Setting ON Reservation
This function is able to turn-on after a setting time.
Press programming button to enter the
1
Programming mode. Repeat pressing button
to select [on reservation]. (the segment
flashing)
Ex) Setting On Reservation time as PM 10:20.
Press up, down button to adjust AM / PM.
2
Press right button to move to 'Hour'
3
part. (the 'Hour' segment will be flashed)
Press up, down button to adjust the Hour.
4
Page 26

26 Air-to-Water Heat Pump Owner’s Manual
Owner's instruction
Press right button to move to 'Minute'
5
part. (the 'Minute' segment will be flashed)
Ex) Setting On Reservation time as PM 10:20.
Press up, down button to adjust the
6
Minutes.
If you finish the setting, press setting/cancel
7
button to complete programming.
Press exit button to exit or system will
8
automatically release without any input after
25 seconds.
Page 27

Owner’s Manual 27
ENGLISH
Owner's instruction
Programming : Setting OFF Reservation
This function is able to turn-off after a setting time.
Press programming button to enter the
1
Programming mode. Repeat pressing button
to select [off reservation]. (the segment
flashing)
Ex) Setting Off Reservation time as PM 11:20.
Press up, down button to adjust AM / PM.
2
Press right button to move to 'Hour'
3
part. (the 'Hour' segment will be flashed)
Press up, down button to adjust the Hour.
4
Page 28

28 Air-to-Water Heat Pump Owner’s Manual
Owner's instruction
Press right button to move to 'Minute'
5
part. (the 'Minute' segment will be flashed)
Press up, down button to adjust the
6
Minutes.
If you finish the setting, press setting/cancel
7
button to complete programming.
Press exit button to exit or system will
8
automatically release without any input after
25 seconds.
Page 29

Owner’s Manual 29
ENGLISH
Owner's instruction
Programming : Weekly Reservation
The weekly reservation is active after setting current time.
Press programming button to enter the
1
Programming mode. Repeat pressing button
to select [Weekly reservation].
(The segment will be flashed)
Ex) Setting one action as below.
- Day : TUE
- ON Time : 11:30 AM
- OFF Time : 12:30 PM
Press left, right button to adjust the current
2
day.
Press up, down button to adjust the action
3
number.
Press right button to move to 'Hour'
4
Part on ON Time section.
(The 'Hour' segment will be flashed)
Start Time Section
Page 30

30 Air-to-Water Heat Pump Owner’s Manual
Owner's instruction
Press up, down button to adjust the Hour on
5
Start Time section.
Press right button to move to 'Minute' Part on
6
Start time section.
(The 'Minute' segment will be flashed)
Press up, down button to adjust the Minute
7
on Start Time section.
Press right button to move to 'Hour'
8
Part on OFF Time section.
(The 'Hour' segment will be flashed)
Off Time Section
Page 31

Owner’s Manual 31
ENGLISH
Owner's instruction
Please refer the process from No.5 to
9
No.7 for setting OFF Time. It is same method.
If you finish the setting, press setting/cancel
10
button to complete programming.
The under bar segment will be created,
when it finished.
Please refer the process from No.2 to
11
No.10 for setting other day weekly program.
It is same method.
Press exit button to exit or system will
12
automatically release without any input after
25 seconds.
<Note>
Description of weekly reservation
<Start Time Section> <Off Time Section>
Action
Start Time
From
<Start Time Section> <Off Time Section>
❋ Two actions per weekday can be programmed, in total 14 actions
Off Time
To
Page 32

32 Air-to-Water Heat Pump Owner’s Manual
Owner's instruction
Programming : Holiday Reservation
This function is to automatically stop the machine working on some days.
Press programming button to enter the
1
Programming mode. Repeat pressing button
to select [Holiday reservation].
(The segment will be flashed)
Ex) Setting holiday on Friday.
Press left, right button to adjust the holiday.
2
When you press set / clear button after
3
finishing the selection, the day selected
will be disappear.
Press exit button to exit or system will
4
automatically release without any input after
25 seconds.
Page 33

Owner’s Manual 33
ENGLISH
Using Thermostat
Using Thermostat
Supported Thermostat Specification
Installing and Wiring Thermostat
1. NEVER USE 230V AC Thermostat and 24V AC Thermostat at the same time. If used
together, it causes short-circuit and yields power cut-off by circuit breaker.
2. Some electro-mechanical type thermostat has internal delay time to protect compressor. In
that case, mode change can takes time more than user's expectation. Please read
thermostat manual carefully if the product does not response quickly.
3. Setting temperature range by thermostat can be different with that of the product. The
heating or cooling set temperature should be chosen within the setting temperature range of
the product.
supports following thermostats.
CAUTION
The term "thermostat", which is widely used in this chapter, is a kind of 3rd party accessory.
LG Electronics does not supply thermostat and it should be supplied 3rd party manufacturers.
Room thermostat can be used for easy and convenience control. To utilize thermostat more
efficiently and correctly, this chapter presents information about using thermostat.
(1) : There is no electric circuit inside the thermostat and electric power supply to the thermostat is
not required.
(2) : Electric circuit such as display, LED, buzzer, etc is included in the thermostat and electric power
supply is required.
(3) : Thermostat generates ‘Heating ON or Heating OFF’ signal according to user’s heating target
temperature.
(4) : Thermostat generates both ‘Heating ON or Heating OFF’ and ‘Cooling ON or Cooling OFF’
signal according to user’s heating and cooling target temperature.
Please refer ‘Conditions if Accessories are Installed’ of Chapter 4 and ‘Thermostat’ of Chapter 7 of
Installation Manual.
Type
(1)
(2)
SupportedOperating ModePower
YesHeating Only (3)230 V ACMechanical
YesHeating / Cooling (4)
YesHeating Only (3)24 V AC
YesHeating / Cooling (4)
YesHeating Only (3)230 V ACElectrical
YesHeating / Cooling (4)
YesHeating Only (3)24 V AC
YesHeating / Cooling (4)
Page 34

34 Air-to-Water Heat Pump Owner’s Manual
Using Thermostat
How to use Thermostat
Operating Thermostat with Control Panel
To find how to turn on and off, how to set target temperature, how to change operating mode, etc,
please refer thermostat operating manual provided by thermostat manufacturer.
• Following features are permitted when thermostat is installed :
• SET TEMP button
• VIEW TEMP button
• Temperature adjust button (*)
• Sanitary water heating Enable / Disable
• Silent operation On / Off
(*) : Adjusted temperature is only used to control electric heater on / off condition.
The product does not turn on / off according to the setting temperature at the control panel. It
turns on / off according to the thermostat signal.
• Following features are NOT permitted when thermostat is installed :
• Operating mode (cooling/ heating/ weather-dependent) selection
• Time scheduling
• Operation On / Off
Page 35

Owner’s Manual 35
ENGLISH
Using Thermostat
Emergency Operation
• Definition of terms
- Trouble : a problem which can stop system operation, and can be resumed temporally under
limited operation without certificated professional's assist.
- Error : problem which can stop system operation, and can be resumed ONLY after certificated
professional's check.
- Emergency mode : temporary heating operation while system met Trouble.
• Objective of introducing 'Trouble'
- Not like airconditioning product, Air-to-Water heat pump is generally operation in whole winter
season without any system stopping.
- If system found some problem, which is not critical to system operating for yielding heating
energy, the system can temporarily continue in emergency mode operation with end user's
decision.
• Classified Trouble
- Trouble is classified two levels according to the seriousness of the problem : Slight Trouble and
Heavy trouble
- Slight Trouble : a problem is found inside the indoor unit. In most case, this trouble is concerned
with sensor problems. The outdoor unit is operating under emergency mode operation condition
which is configured by DIP switch No. 4 of the indoor unit PCB.
- Heavy trouble : a problem is found inside the outdoor unit. As the outdoor unit has problem, the
emergency mode operation is performed by electric heater located in the indoor unit.
- Option Trouble : a problem is found for option operation such as water tank heating. In this
trouble, the troubled option is assumed as if it is not installed at the system.
• Emergency operation level
- When system met trouble, it stops operation and wait for user’s decision : Calling service center
or starting emergency operation.
- To start emergency operation, user simply push ON / OFF button once more.
- Two different levels are prepared for emergency operation : High temperature cycle and low
temperature cycle.
- In emergency operation mode, user can not adjust target temperature.
DIP
Switch
High temperature cycle OFF 55°C 30 °C 70 °C
Low temperature cycle ON 30 °C 25 °C 70 °C
Target
Leaving Water
Temperature
Target
Room Air
Temperature
Target
Sanitary Water
Temper
ature
Page 36

36 Air-to-Water Heat Pump Owner’s Manual
Using Thermostat
• Following features are permitted in emergency operation :
- Operation On/Off
- VIEW TEMP button(*)
- Temperature adjust button (*)
- Sanitary water heating Enable / Disable
(*) : Temperature measured by failed sensor is displayed as ‘- -’.
(*) : Adjusted temperature is only used to control electric heater on / off condition.
The product does not turn on / off according to the setting temperature at the control panel. It turns
on / off according to the thermostat signal.
• Following features are NOT permitted in emergency operation :
- Operating mode (cooling/ heating/ weather-dependent) selection
- Time scheduling
- SET TEMP button
- Silent operation On / Off
• Duplicated trouble : Option trouble with Slight or Heavy trouble
- If option trouble is occurred with slight (or heavy) trouble at the same time, the system puts higher
priority to slight (or heavy) trouble and operates as if slight (or heavy) trouble is occurred.
- Therefore, sometimes sanitary water heating can be impossible in emergency operation mode.
When sanitary water is not warming up while emergency operation, please check if sanitary water
sensor and related wiring are all Ok.
• Emergency operation is not automatically restarted after main electricity power is reset.
- In normal condition, the product operating information is restored and automatically restarted
after main electricity power is reset.
- But in emergency operation, automatic re-start is prohibited to protect the product.
- Therefore, user must restart the product after power reset when emergency operation has been
running.
Page 37

Owner’s Manual 37
ENGLISH
Maintenance and Service
Maintenance and Service
Maintenance activities
In order to ensure optimal availability of the unit, a number of checks and inspections on the unit and
the field wiring have to be carried out at regular intervals, preferably yearly. This maintenance should
be carried out by your local agreed technician.
Call the service immediately in the following situations
1. Anything abnormal such as burning smell, loud noise etc. happen. Stop the unit and turn the
breaker off. Never try to repair by yourself or restart the system in such cases.
2. Main power cord is too hot or damaged.
3. Error code is generated by self diagnosis.
4. Water leaks from indoor unit.
5. Any switch, breaker (safety, earth) or fuse fails to work properly
User must carry routine checkup & cleaning to avoid unit’s poor performance.
In case of special situation, the job must be carried out by the only service person.
When the unit is not going....
• If the product is not used for long time, we strongly recommend
NOT TO SWITCH OFF THE POWER SUPPLY to the product.
• If power is not supplied, some special product-protecting actions
(such as water pump anti-locking) will not performed.
CAUTION
Page 38

38 Air-to-Water Heat Pump Owner’s Manual
Maintenance and Service
Troubleshooting Tips! Save time and money!
Check the following points before requesting repairs or service.... If the malfunction persist, please contact your dealer.
AWHP does not operate.
The room has a peculiar odor.
AWHP does not operate for
about 3 minutes when restart.
Does not cool or heat effectively.
The unit operation is noisy.
Steam is raised in outdoor unit.
Control panel display is faint, or
no display at all.
• Have you made a mistake in timer operation?
• Has the fuse blown or has the circuit breaker
been tripped?
•
Check that this is not a damp smell exuded by the
walls, carpet, furniture or cloth items in the room.
• This is the protector of the mechanism.
•
Wait about three minutes and operation will begin.
• The room may have been very hot when the
AWHP was first turned on. Allow time for it to
cool down.
•
Has the setting temperature been set incorrectly?
• Refrigerant flow sound
- While the system is being started or stopping,
sound from the refrigerant flow may be heard.
• Sound for the indoor unit heat exchanger
- During the cooling operation, a sound may be
heard from the indoor unit heat exchanger due
to water freezing or melting.
• Water noise
- During starting or stopping of the unit, noise
can appear in water piping
• During defrost
- Noise can appear in unit due to defrosting of
water.
• Steam from outdoor heat exchanger
- During defrosting operation, ice on the
outdoor heat exchanger is melted, resulting
in making steam.
• Has the circuit breaker been tripped?
53
-
-
-
-
44, 45, 46
-
-
Case Explanation See page
Page 39

Owner’s Manual 39
ENGLISH
Disposal Requirements
Disposal Requirements
Dismantling of the unit, treatment of the refrigerant, of oil and of other parts must be done in
accordance with relevant local and national legislation.
Your product is marked with this symbol. This means that electrical and
electronic products shall not be mixed with unsorted household waste.
Do not try to dismantle the system yourself: the dismantling of the system, treatment of the
refrigerant, of oil and other parts must be done by a qualified installer is accordance with relevant
local and national legislation.
Units must be treated at a specialized treatment facility for re-use, recycling and recovery. By
ensuring this product is disposed off correctly, you will help to prevent potential negative
consequences for the environment and human health. Please contact the installer or local authority
for more information.
Page 40

P/No.: MFL57490701 Printed in Korea
After reading this manual, keep it in a place easily accessible to the user for future reference.
 Loading...