

Page 1
Wireless Kit
OWNER’S MANUAL
MODEL: ACC96WK
(ACC96T,ACC96R)
Before connecting, operating or adjusting this product,
please read this owner’s manual carefully and completely.
Call us and we will
guide you through
your first recording,
for free.
1-800-243-0000
Specifications
Wireless TX
Dimensions (approx.)(w x h x d) . . . . . . . . . . . . . . . . . . . . . . . . . .149 X 79 X 151 mm (5.8 x 3.1 x 5.9 inches)
Mass (approx.) . . . . . . . . . . . . . . . . . . . . . . . . . . . . . . . . . . . . . . . . . . . . . . . . . . . . . . . . . . .0.15 kg (0.33 lbs)
Transmission Output . . . . . . . . . . . . . . . . . . . . . . . . . . . . . . . . . . . . . . . . . . . . . . . . . . . . . . . . . . . . . .2.4GHz
Power Supply . . . . . . . . . . . . . . . . . . . . . . . . . . . . . . . . . . . . . . . . . . . . . . . . . . . . . . . . . . . . . . . . . . . .DC 7V
Wireless RX
Power requirements . . . . . . . . . . . . . . . . . . . . . . . . . . . . . . . . . . . . . . . . . . . . . . . . . . . . . . . .AC 120 V, 60 Hz
Power consumption . . . . . . . . . . . . . . . . . . . . . . . . . . . . . . . . . . . . . . . . . . . . . . . . . . . . . . . . . . . . . . . . .50 W
Dimensions (approx.)(w x h x d) . . . . . . . . . . . . . . . . . . . . . . . .111 X 266 X 180 mm (4.3 x 10.4 x 7.0 inches)
Mass (approx.) . . . . . . . . . . . . . . . . . . . . . . . . . . . . . . . . . . . . . . . . . . . . . . . . . . . . . . . . . . . .1.3 kg (2.86 lbs)
Reception Output . . . . . . . . . . . . . . . . . . . . . . . . . . . . . . . . . . . . . . . . . . . . . . . . . . . . . . . . . . . . . . . . .2.4GHz
Amplifier . . . . . . . . . . . . . . . . . . . . . . . . . . . . . .155W + 155W (Reated Output Power: 130W, 4Ω, THD 10 %)
1. Read these instructions. - All these safety and operating
instructions should be read before the product is operated.
2. Keep these instructions. - The safety, operating and use
instructions should be retained for future reference.
3. Heed all warnings. - All warnings on the product and in the
operating instructions should be adhered to.
4. Follow all instructions. - All operating and use instructions
should be followed.
5. Do not use this apparatus near water. – For example:
near a bath tub, wash bowl, kitchen sink, laundry tub, in a
wet basement; or near a swimming pool; and other areas
located near water.
6. Clean only with dry cloth. – Unplug this product from the
wall outlet before cleaning. Do not use liquid cleaners.
7.
Do not block any ventilation openings. Install in accordance with the manufacturer’s instructions. -
Slots and
openings in the cabinet are provided for ventilation and to
ensure reliable operation of the product and to protect it
from over- heating. The openings should never be blocked
by placing the product on a bed, sofa, rug or other similar
surface. This product should not be placed in a built-in
installation such as a bookcase or rack unless proper ventilation is provided or the manufacturer’s instructions have
been adhered to.
8. Do not install near any heat sources such as radiators,
heat registers, stoves, or other apparatus (including
amplifiers) that produce heat.
9. D
o not defeat the safety purpose of the polarized or
grounding-type plug. A polarized plug has two
blades
with one wider than the other. A grounding
type plug
has two blades and a third grounding prong. The wide
blade or the third prong are provided for your safety. If
the provided plug does not fit into your outlet, consult
an electrician for replacement of the obsolete outlet.
10. Protect the power cord from being walked on or
pinched particularly at plugs, convenience receptacles, and the point where they exit from the apparatus.
11. Only use attachments/accessories specified by the
manufacturer.
12. Use only with the cart, stand, tripod, bracket, or table
specified by the manufacturer, or sold with apparatus.
When a cart is used, use caution when moving the
cart/apparatus combination to avoid injury from tipover.
13. Unplug this apparatus during lightning storms or
when unused for long periods of time.
14.
Refer all servicing to qualified service personnel.
Servicing is required when the apparatus has been
damaged in any way, such as power-supply cord or
plug is damaged, liquid has been spilled or objects
have fallen into the apparatus, the apparatus has been
exposed to rain or moisture, does not operate normally, or has been dropped.
IMPORTANT SAFETY INSTRUCTIONS
CAUTION:
PLEASE READ AND OBSERVE ALL WARNINGS AND INSTRUCTIONS IN THIS OWNER’S MANUAL. AND
THOSE MARKED ON THE PRODUCT. RETAIN THIS BOOKLET FOR FUTURE REFERENCE.
This product has been designed and manufactured to assure personal safety. Improper use can result in electric shock or fire
hazard. The safeguards incorporated in this product will protect you if you observe the following procedures for installation,
use, and servicing.
This product does not contain any parts that can be repaired by the user.
DO NOT REMOVE THE CABINET COVER, OR YOU MAY BE EXPOSED TO DANGEROUS VOLTAGE. REFER SERVICING TO QUALIFIED SERVICE PERSONNEL ONLY.
This lightning flash with arrowhead symbol within
an equilateral triangle is intended to alert the user
to the presence of uninsulated dangerous voltage
within the product’s enclosure that may be of sufficient magnitude to constitute a risk of electric shock
to persons.
The exclamation point within an equilateral triangle
is intended to alert the user to the presence of
important operating and maintenance (servicing)
instructions in the literature accompanying the
product.
CAUTION:
Do not block any ventilation openings. Install in accordance
with the manufacturer's instructions.
Slots and openings in the cabinet are provided for ventilation
and to ensure reliable operation of the product and to protect
it from over heating.
The openings should be never be blocked by placing the
product on a bed, sofa, rug or other similar surface.This
product should not be placed in a built-in installation such as
a bookcase or rack unless proper ventilation is provided or
the manufacturer's instruction have been adhered to.
CAUTION concerning the Power Cord
Most appliances recommend they be placed upon a dedicated circuit;
That is, a single outlet circuit which powers only that appliance and has no additional outlets or branch circuits. Check
the specification page of this owner's manual to be certain.
Do not overload wall outlets. Overloaded wall outlets, loose
or damaged wall outlets, extension cords, frayed power
cords, or damaged or cracked wire insulation are dangerous.
Any of these conditions could result in electric shock or fire.
Periodically examine the cord of your appliance, and if its
appearance indicates damage or deterioration, unplug it, discontinue use of the appliance, and have the cord replaced
with an exact replacement part by an authorized servicer.
Protect the power cord from physical or mechanical abuse,
such as being twisted, kinked, pinched, closed in a door, or
walked upon. Pay particular attention to plugs, wall outlets,
and the point where the cord exits the appliance.
To disconnect power from the mains, pull out the mains cord
plug. When installing the product, ensure that the plug is easily accessible.
FCC WARNING: This equipment may generate or use radio
frequency energy. Changes or modifications to this equipment may cause harmful interference unless the modifications are expressly approved in the instruction manual. The
user could lose the authority to operate this equipment if an
unauthorized change or modification is made.
REGULATORY INFORMATION: FCC Part 15
This equipment has been tested and found to comply with
the limits for a Class B digital device, pursuant to Part 15 of
the FCC Rules. These limits are designed to provide reasonable protection against harmful interference when the
product is operated in a residential installation. This product
generates, uses, and can radiate radio frequency energy
and, if not installed and used in accordance with the instruction manual, may cause harmful interference to radio communications. However, there is no guarantee that interference will not occur in a particular installation. If this product
does cause harmful interference to radio or television reception, which can be determined by turning the product off and
on, the user is encouraged to try to correct the interference
by one or more of the following measures:
• Reorient or relocate the receiving antenna.
• Increase the separation between the product and
receiver.
• Connect the product into an outlet on a circuit different
from that to which the receiver is connected.
• Consult the dealer or an experienced radio/TV technician for help.
- Labelling information: This device complies with Part 15 of
the FCC Rules. Operation is subject to the following two
conditions: (1) this device may not cause harmful interference, and (2) this device must accept any interference
received, including interference that may cause undesired
operation.
- RF Exposure Statement: The antenna(s) used for this transmitter must be installed to provide a separation distance of
at least 20 cm from all persons and must not be colocated
or operating in conjunction with any antenna or transmitter
other than those contained in this device.
FCC COMPLIANCE: The responsible party for this product’s
compliance is:
LG Electronics U.S.A., Inc.,1000 Sylvan Avenue,
Englewood Cliffs, NJ.
Phone: 1-201-816-2000.
FCC Regulations Part 15 Declaration of Conformity
(DoC)
LG Corporation declares that the equipment described in
this document is within the requirements of the Code of
Federal Regulations listed below:
Title 47 Part 15, Subpart B, Class B for a digital device.
This declaration is based upon the compliance of the Audio
data transceiver to the above standards. LG has determined
that the models listed have been shown to comply with the
applicable technical standards if no unauthorized change is
made in the equipment and if the equipment is properly
maintained and operated.
Apparatus shall not be exposed to dripping or splashing and
no objects filled with liquids, such as vases, shall be placed
on the apparatus.
CAUTION: TO REDUCE THE RISK
OF ELECTRIC SHOCK
DO NOT REMOVE COVER (OR BACK)
NO USER-SERVICEABLE PARTS INSIDE
REFER SERVICING TO QUALIFIED SERVICE
PERSONNEL.
WARNING: TO PREVENT FIRE OR ELECTRIC SHOCK
HAZARD, DO NOT EXPOSE THIS PRODUCT TO RAIN
OR MOISTURE.
CAUTION
RISK OF ELECTRIC SHOCK
DO NOT OPEN
ACC96WK_US 4/27/06 2:33 PM Page 1
Page 2
Setup
Note:
If there is a product with a strong electromagnetic field nearby, interference may occur.
(Ex : Micro wave oven)
Wireless TX
LED indicator of
Wireless TX
* LED indicator - “BLUE”
The main set is turned on, everthing is connected and
transmitting.
* LED indicator - “RED”
The
Wireless TX
is in standby mode.
* LED indicator - “OFF (No display)”
The main set is turned off.
Wireless RX
LED indicator of
Wireless RX
* LED indicator - “BLUE”
The Wireless TX
is receiving a signal of
Wireless TX.
* LED indicator - “RED”
The
Wireless RX
is in standby mode.
Note:
If there is no audio signal for longer than 5 minutes, the unit
and transmitter will automatically swith to a power saving
mode. In power saving mode, both LEDs will turn red. LEDs
will turn blue when an audio signal returns.
If you operate main unit then wireless speakers (rear speakers) sound within a few seconds in standby mode.
Changing a channel of Wireless
TX and Wireless RX
If there is a similar wireless product nearby, interference may
occur. In this case, change to another channel using
ID/CHANNEL (ID./CH.) button of Wireless TX.
Manual setting
Press ID/CHANNEL (ID./CH.) button for about 3
seconds.
If the wireless TX and wireless RX signals do not match after
operating as above, operate it again about three times.
Auto setting
1Disconnect the DC power cable from the Wireless TX.
2 Connect the DC power cable Wireless TX while you
pressing the ID/CHANNEL (ID.CH.) button of Wiress
TX.
- The blue LED indicator
will flicker.
3Disconnect the DC power cable from the Wireless TX
and release the ID/CHANNEL (ID.CH.) button of Wiress
TX.
4 Connect the DC power cable Wireless TX.
Note:
The wireless speakers may not receive the changed channel
of
trans-
mitter. In this case set the
ID as below.
Setting an ID of Wireless TX and
Wireless RX
When the unit is manufactured,the ID is already set.
If an interference occurs or you use a new Wireless RX, set
a new ID.
1. Set the wireless TX and wireless RX within 50cm of
eachother.
2. Turn the Wireless TX and Wireless RX on.
3.
Press the
ID/CHNNEL (ID./CH.) button of Wireless TX and
ID button of Wireless RX at the same time for about 3 seconds
.
4. Release the ID/CHNNEL (ID./CH.) button of Wireless TX
and ID button of Wireless RX.
- ID is set up.
Notes:
If there is a product with a strong electromagnetic field nearby,
interference may occur.
Do not operate a portable transmitter (such as a wireless network
device) near this product.
LED indicator
Displays the operating
status.
SIGNAL
ID./CH. DC IN
SOUND SIGNAL
connector
ID/CHANNEL (ID./CH.)
button
DC IN connector
LED indicator
Displays the operated
status.
ID. button (or ID button)
Wireless speaker connector
Power cord
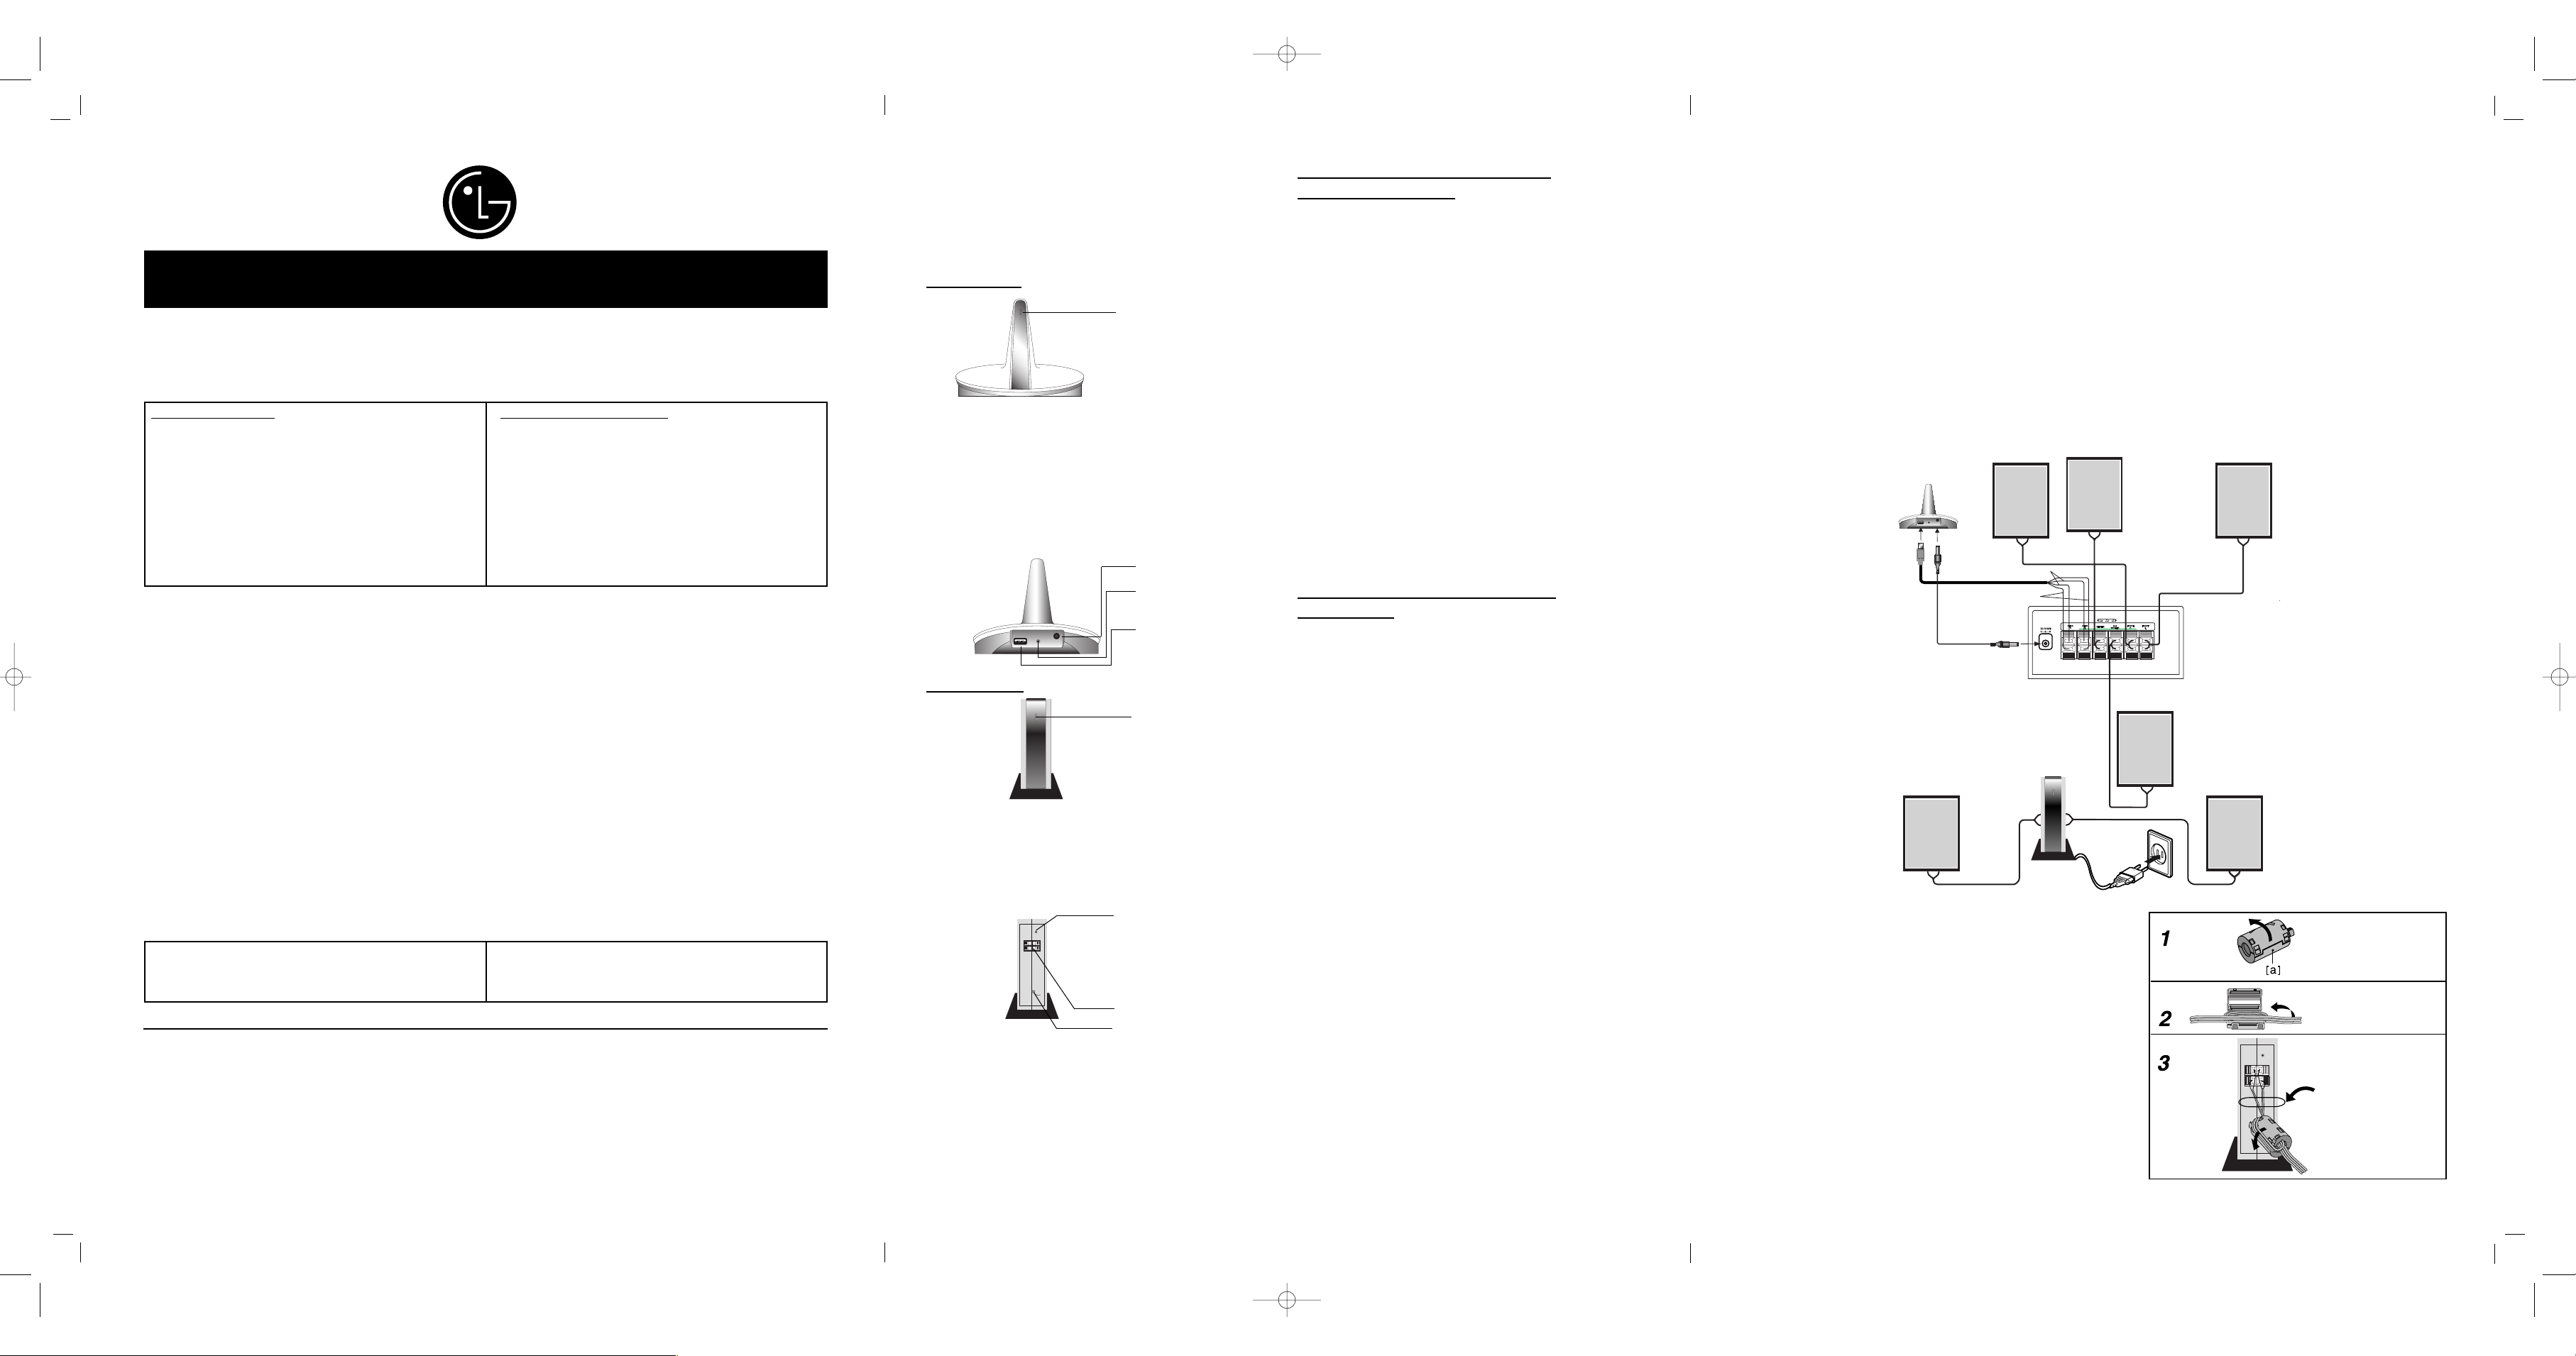
Connection
Connect the speakers to the front (right, left) or center
speaker connectors at the main set.
Connect the subwoofer to the woofer connector.
Connect the power cord of the Wireless RX to the outlet,
then connect the Wireless RX and the rear speaker (right,
left) with the speaker cable.
Connect the DC IN connector of the Wireless TX and the
Wireless TX (DC 7V OUT) connector at the main set with
the DC power cable.
Connect the SOUND SIGNAL connector of the Wireless
TX and rear (right, left) speaker of connectors of the main
set with the sound signal cable.
Set the distance between this unit and Wireless RX within
10m.
Notes:
Optimum performance can be implemented only when the
Wireless TX and the Wireless RX within distance of 2m to 10m is
used since communication failure may occur if longer distance is
used.
Be sure to match the speaker cable to the appropriate terminal on
the components: + to + and – to –. If the cables are reversed, the
sound will be distorted and will lack base.
It takes about a few seconds (and may take longer) for the
Wireless
TX
and
Wireless RX
to communicate with each other.
When the unit is turned off, the Wireless RX is in standby mode
(off) automatically after about 10 seconds.
If the Wireless RX is turned off, the wireless speaker will not func-
tion.
Front speaker
(Right)
Front speaker
(Left)
Center
speaker
Rear speaker
Rear speaker
Wireless TX
Wireless RX
DC power cable
(Right)
(Left)
Subwoofer
SIGNAL
ID./CH. DC IN
Sound signal
Black
Red
cable
This LG Electronics product, will be repaired or replaced, at LG’s option, if it proves to be defective in material or workmanship, under normal use, during the warranty period (“Warranty Period”) listed below, effective from the date (“Date
of Purchase”) of original consumer purchase of the product. This warranty is good only to the original purchaser of the
product and effective only when used in the United States, excluding U.S. Territories.
THIS WARRANTY IS IN LIEU OF ANY OTHER WARRANTIES, EXPRESS OR IMPLIED, INCLUDING WITHOUT LIMITATION, ANY
WARRANTY OF MERCHANTABILITY OR FITNESS FOR A PARTICULAR PURPOSE. TO THE EXTENT ANY IMPLIED WARRANTY
IS REQUIRED BY LAW, IT IS LIMITED IN DURATION TO THE EXPRESS WARRANTY PERIOD ABOVE. LG ELECTRONICS WILL
NOT BE LIABLE FOR ANY INCIDENTAL, CONSEQUENTIAL, INDIRECT, SPECIAL OR PUNITIVE DAMAGES OF ANY NATURE,
EVEN IF ADVISED OF THE POSSIBILITY OF SUCH DAMAGES, INCLUDING WITHOUT LIMITATION, LOST REVENUES OR PROFITS, LOST OR CORRUPTED PROGRAMMING OR DATA, OR ANY OTHER DAMAGE WHETHER BASED IN CONTRACT, TORT OR
OTHERWISE. Some states do not allow the exclusion or limitation of incidental or consequential damages or limitation on how long an
implied warranty lasts, so the above exclusion or limitation may not apply to you. This warranty gives you specific legal rights and you
may also have other rights that may vary from state to state.
THIS LIMITED WARRANTY DOES NOT APPLY TO:
• Damages or operating problems that result from shipping, installation, adjustment of user controls, calibration,
maintenance or failure to maintain, or separate system components; and
• Damages or operating problems that result from normal wear and tear, misuse, abuse, operation outside environ-
mental specifications or contrary to the requirements or precautions in the Operating Guide, accident, lightning
strikes or other natural causes, unauthorized modification or alteration, incorrect electrical current or voltage,
reception problem caused by inadequate home antenna or faulty antenna connections, computer software, institutional or commercial use, or other causes not arising out of defect in material or workmanship.
Therefore, the cost of repair or replacement of such defective product shall be borne by the consumer.
CUSTOMER INTER-ACTIVE CENTER NUMBERS:
WARRANTY PERIOD:
LABOR: 90 days from the Date of Purchase.
PAR TS: One Year from the Date of Purchase.
* Parts replaced are warranted for the remaining portion of
the original warranty period.
HOW SER
VICE IS HANDLED:
Call 1-800-243-0000 for instructions on getting the
defective unit repaired or replaced.
Please retain dated sales receipt and your box to return
the unit to LG for repair or replacement.
Shipping both ways will be paid by LG during the Warranty
Period. After the Warranty Period, you pay inbound shipping charges and LG pays return shipping charges.
Visit our website at: http://www.lgservice.com
For nearest Authorized Service Center, Where to buy,
Product Assistance, or Customer Assistance
Call 1-800-243-0000 (24 hours a day, 365 days per year)
and select appropriate options from the menu.
Or visit our website at http://www.lgservice.com
LG Electronics, Inc.
Limited Warranty - USA
LG ELECTRONICS U.S.A., INC.
1000 SYLVAN AVENUE
ENGLEWOOD CLIFFS, NJ
P/N : 3834RV0052F
Issue O
Printed in Indonesia
About Ferrite Core
Be sure to attach the ferrite core to the speaker cables (for
connecting to this unit).
This ferrite core can reduce noises.
How to attach the ferrite core
1 Press the stopper [a] of the ferrite core to open.
2 Wind the cable once on the ferrite core.
3 Close the ferrite core unitl it clicks.
Note:
Attach the ferrite core near the unit (Refer to the fig.3 and comment.).
The length here is
as short as
possible.
ACC96WK_US 4/27/06 2:33 PM Page 2
 Loading...