


www.lg.com
OWNER'S MANUAL
A9
Make sure to read the “SAFETY INSTRUCTIONS” carefully before starting to use this product.
Please keep this Owner’s Manual within easy reach of the user.
As the product is only intended for domestic use such as household cleaning, it must not be used for
commercial, experimental or industrial purposes.
Make sure to fully charge the product’s battery before first use of the product after purchasing it.
EN ENGLISH RU РУССКИЙ KK ҚАЗАҚША
MFL69883625
Copyright © 2019-2020 LG Electronics Inc. All Rights Reserved

TABLE OF CONTENTS
SAFETY INSTRUCTIONS ..............................................................4
Safety Messages...............................................................................................4
INSTALLATION .............................................................................12
Parts and Specifications..................................................................................12
Installing the Charging Station .......................................................................16
Storing the Accessories...................................................................................20
OPERATION ................................................................................. 22
Getting Started ................................................................................................22
Charging the Battery .......................................................................................24
Using the Mop Nozzle .....................................................................................25
Using the Nozzles ...........................................................................................29
Using the Tools ................................................................................................29
MAINTENANCE ............................................................................ 32
Cleaning the Appliance ..................................................................................32
TROUBLESHOOTING .................................................................. 37
Before Calling for Service ...............................................................................37
This manual may contain images or content
different from the model you purchased.
This manual is subject to revision by the
manufacturer.
Rev.02_013120
EN
SAFETY INSTRUCTIONS
Safety Messages
Reading Safety Messages
The following safety guidelines are intended to prevent unforeseen risks
or damage from unsafe or incorrect operation of the appliance.
The guidelines are separated into ‘WARNING’ and ‘CAUTION’ as
described below.
This symbol is displayed to indicate matters and operations
that can cause risk. Read the part with this symbol carefully
and follow the instructions in order to avoid risk.
WARNING
This indicates that the failure to follow the instructions can cause
serious injury or death.
CAUTION
This indicates that the failure to follow the instructions can cause the
minor injury or damage to the product.
WARNING
To reduce the risk of explosion, fire, death, electric shock,
injury or scalding to persons when using this product, follow
basic precautions, including the following:
Technical Safety
• This appliance is not intended for use by persons (including children) with
reduced physical, sensory or mental capabilities, or lack of experience
and knowledge, unless they have been given supervision or instruction
concerning use of the appliance by a person responsible for their safety.
Children should be supervised to ensure that they do not play with the
appliance.
• If the power supply cord is damaged, it must be replaced by an LG
Electronics service center or dealer in order to avoid a potential hazard.
4
EN
EN
• Do not allow children to play with or hang on the appliance.
• Do not use the appliance on a wet surface.
• Place the cords from other appliances out of the area to be cleaned.
Battery
• Never use the battery, adapter, and the charging station from other
appliances with this appliance. Use only the battery and the charging
station provided by LG Electronics.
• Never use the battery, adapter, and the charging station from this
appliance with other appliances.
• Do not use the battery if it is leaking or has changed shape. If skin or
eyes come into contact with battery fluid, thoroughly wash the affected
area immediately with clean water and seek medical attention.
• Replace the battery when it is no longer able to hold a charge.
• Refer to the Charging section instructions for the method of replacing the
battery.
• When disposing of this appliance, make sure to remove the battery from
the appliance.
• Follow all local ordinances and regulations when handling or disposing of
the battery.
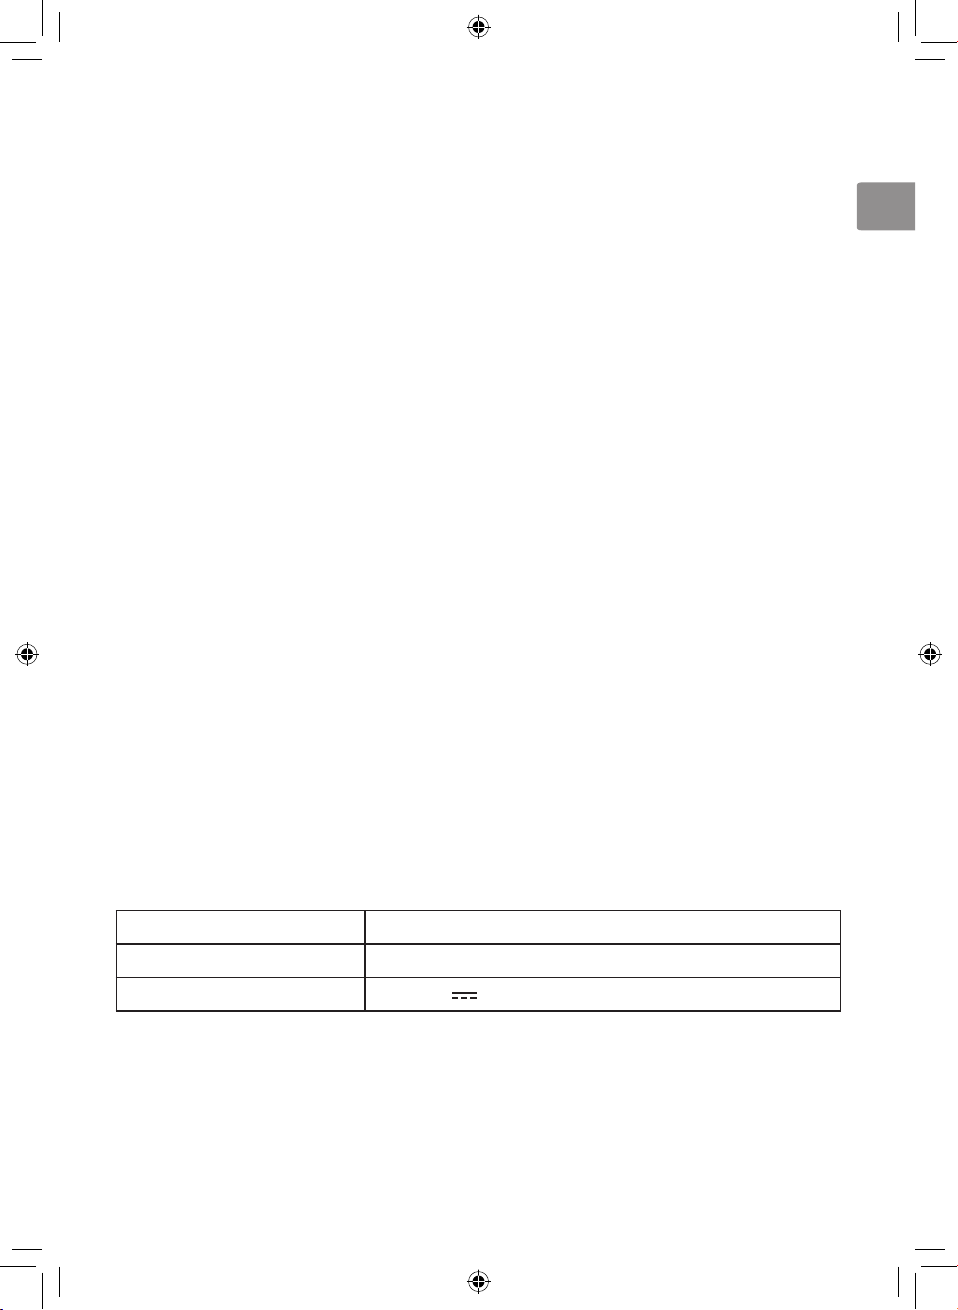
Battery Specifications
• One or two batteries are provided, the number of batteries varies
depending on the model purchased.
Model Name EAC63382***
Type Rechargeable Lithium-ion Battery
Rated Capacity 25.55 V
, 2000 mAh
Installation
• To avoid an electrical shock or fire, do not install, charge or store the
appliance where it may be exposed to water, rainfall or high humidity.
• Install, charge and store the appliance in a well-ventilated place.
5
EN
• Avoid operating the appliance in areas where there is a risk of leakage of
flammable gas, industrial oil or metallic dust.
• Do not store or install the appliance, power cord or plug near heating
devices or open flames.
• Install the charging station on a firm, level surface.
• To prevent tipping, floor standing mode installations should be anchored
to the wall using the provided stand anchoring screw, anchoring block
and double-sided tape.
• In wall-mounted mode installations, the charging station should be
secured tightly to the wall using the provided wall anchoring screws.
• Use the anchoring screws only when attaching to concrete or similar solid
surfaces.
• Never drill into a wall without first checking that the area behind it is free
from power conduits, plumbing, vents, or cables.
• Do not use or store the appliance at temperatures below 5 °C or above
38 °C.
• Do not store or install the appliance where it is exposed to temperatures
below freezing or exposed to outdoor weather conditions.
• When installing or moving the appliance, be careful not to pinch, crush, or
damage the power cord or plug.
Operation
• Read all instructions before using the appliance, and save these
instructions.
• Use only as described in this manual. Use only manufacturer’s
recommended attachment.
• This appliance is designed for normal indoor domestic use only. It is not
to be used for any non-residential, commercial, or industrial application.
• Do not use or store the appliance in any outdoor location, garage
environment or on wet surface.
• This product should only be used with a 100 V - 240 V~ 50/60 Hz. Make
sure to check the power specifications of the place where you intend to
use the appliance.
• Do not handle the power cord, plug, or appliance controls with wet hands.
6

EN
EN
• Wipe any moisture or dirt off the cord or plug with a dry cloth.
• Unplug the power cord using the plug, not the cord. Pulling on the cord
can damage it and result in electric shock or fire.
• Never attempt to operate this appliance if it is damaged, malfunctioning,
partially disassembled, or has missing or broken parts, including a
damaged cord or plug. Take it to an authorized LG Electronics service
center or dealer for assistance.
• Do not apply excessive force to the power cord to bend it, or place it
under a heavy object as this will damage it.
• Do not use multiple-outlet adapters with this appliance. Make sure to use
a power socket with a capacity of 10 A.
• Do not plug the appliance into a damaged or loose outlet.
• Make sure to unplug the power cord when the appliance is not to be used
for an extended period of time.
• Do not damage, alter, excessively bend, twist, pull, pinch or heat the
power cord.
• Before using the appliance, remove any wire or string on the floor.
• Avoid touching the prongs of the power plug with your finger(s) when
unplugging the power cord.
• Do not cover the power cord with a rug or carpeting.
• Push the power plug firmly into the wall outlet so that it is not loose.
• If the product has been submerged, contact an LG Electronics service
center or dealer for instructions before resuming use.
• If the product makes a strange noise or emits an odor or smoke,
discontinue use and contact an LG Electronics customer information
center.
• Only qualified technicians or service personnel from LG Electronics may
disassemble, repair or modify the appliance.
• Never insert a sharp metallic object such as a pin, nail or knife in a hole
or gap in the appliance or the charging station.
• Do not vacuum liquids with this appliance. Make sure that no water,
beverage or detergent gets inside the appliance or the charging station.
7

EN
• Do not allow the appliance to sweep up blades, thumb tacks, sawdust,
sharp objects, or hot or cold ashes.
• Do not allow children to use the appliance.
• Do not let children or pets get close to the appliance when using,
charging or storing.
• Do not insert the nozzle or tools in your mouth.
• Keep clothing and hair, fingers, or other parts of the body away from
openings and moving parts.
• Do not operate the appliance with the suction inlet or outlet blocked.
• Do not use in an enclosed space where vapors are present from paint
thinner, mothproofing substances, flammable dust or other explosive or
toxic materials.
• Make sure that the filter is installed before use.
• Do not use with the dust bin opened.
• Do not touch the charging terminals on the appliance or the charging
station, or insert an electrified object inside the appliance or the station.
• Always store the appliance on the floor standing or wall-mounted
charging station when it is not in use.
• Do not lean the appliance on walls, chairs or tables.
• If the earth leakage breaker is tripped when the product is put on the
charging station, immediately remove the appliance from the charging
station. Contact an LG Electronics customer service center.
• Use extra care when cleaning on stairs.
• Do not use or store a heating device or flammable substance (ether,
benzene, alcohol, chemicals, combustible sprays, insecticide, air
freshener or cosmetics) in close proximity to the appliance.
• Do not attempt to clean up a liquid substance (water, beverage), odorous
substances (candy, chocolate, pet excrement), metallic objects (blades,
pins), flammable substances, surfactants, or glass shards with this
appliance.
• In the event of a gas leak (natural gas, propane gas, etc.) do not operate
this or any other appliance. Open a window or door to ventilate the area
immediately.
8
EN
EN
• Do not hold the charging station upside down with the battery in the
charging station.
• Do not disassemble, remove or short-circuit the battery.
• Do not expose the appliance, and the battery in particular, to heat, a
heating device or direct sunlight.
• Do not keep the appliance or its battery inside a vehicle which is exposed
to direct sunlight.
• Never allow any water, beverage or detergent to get inside the battery
• Do not apply physical impacts to the battery.
Maintenance
• Make sure to unplug the power cord when cleaning or maintaining the
charging station.
• Do not wash the inlet port or the dust bin with water or detergent.
• Do not use detergents, polishes or air fresheners to clean the dust bin.
• Do not apply or spray a flammable substance (gasoline or thinner) or
surfactants (detergent or bath soap) on the appliance.
• Wash hands after handling nozzles. The nozzles contain carbon fiber,
and contact may cause minor skin irritation.
Disposal
• Keep packing materials out of the reach of children. Packaging materials
can pose a suffocation risk for children.
• Destroy the carton, plastic bag, and other packing materials after the
appliance is unpacked. Children might use them for play. Cartons
covered with rugs, bedspreads, or plastic sheets can become airtight
chambers.
• Dispose of this appliance according to local, state, and regional laws and
regulations.
• Contact your local city council or the related government authority before
disposing of this appliance.
9
EN
Mop Nozzle
• Do not vacuum sharp objects (glass pieces, wire, blades, pins, etc.) with
the mop nozzle attached. When cleaning the mop pads after mopping,
you could be injured by a sharp object embedded in the mop.
CAUTION
To reduce the risk of injury to persons, malfunction, or damage
to the product or property when using the appliance, follow basic
safety precautions, including the following:
Operation
• This appliance has a built-in safety device to prevent damage from
overheating. If the appliance becomes overheated after extended use,
it may automatically turn off. If this occurs, leave the appliance in a cool,
well-ventilated area for about an hour before turning on the power again.
• Do not subject the product to shocks or drop it.
• Secure the appliance in the charging station when not in use, to avoid it
falling over.
• Do not install wet or damp filters.
• Make sure to wipe up any liquid such as water or oil or pet excrement
from the floor before using the appliance.
• Do not clean the product with a volatile or organic solvent (thinner or
acetone).
• Always use a soft cloth to clean the appliance.
• Remain aware of your surroundings while using the appliance to avoid
colliding with people or animals.
• Do not kick or apply force to the appliance.
• Do not put any object other than the appliance, especially a metallic or
magnetic object, on the charging station.
• Do not clean the same spot repeatedly for an extended period of time.
• Vibration from the inlet port or rotating brush may damage the floor or the
carpet.
• Keep fingers away from pinch points when assembling the appliance or
the charging station.
10

EN
EN
• Do not let a child or a pet hang onto the charging station.
• Follow all applicable state and local codes and regulations when installing
the mounting station.
• Do not use the double-sided tape to anchor the charging station on
wallpaper. Use the provided screws to anchor the charging station. The
weight of the charging station and the appliance could damage the paper.
• Do not apply force or any impact to the Cyclonic Mesh Filter.
• Do not remove the battery during operation.
Mop Nozzle
• Do not store the appliance by attaching the water tank filled with water to
the mop nozzle.
• Do not store the water tank where the temperature is 0 °C or lower.
• Do not use the mop nozzle to clean the same spot repeatedly for an
extended period of time. The water injection at the mop nozzle may
cause water to get into the dust inlet and damage the appliance.
• Do not use the mop nozzle for any purpose (for example, polishing a car,
cleaning windows) other than domestic floor cleaning.
• Do not step on the mop nozzle. Doing so may result in product damage.
• Do not use the mop nozzle to vacuum up liquids (water, beverage).
• When using the mop nozzle, always attach the mop pads. Failure to do
so may cause damage to the floor or carpet.
• Do not clean carpets with the mop nozzle. The carpet may get wet or
stick to the Velcro, causing damage to the carpet.
• Do not clean a coated floor with the mop nozzle. Cleaning a coated floor
repeatedly could cause the coating to peel off.
• Do not clean delicate floating floors with the mop nozzle. The floors could
absorb moisture and become deformed.
• Do not clean a rough floor with the mop nozzle.
• Wet floors can pose a slip hazard. Allow floors to dry completely before
allowing anyone to walk on them.
11
EN
INSTALLATION
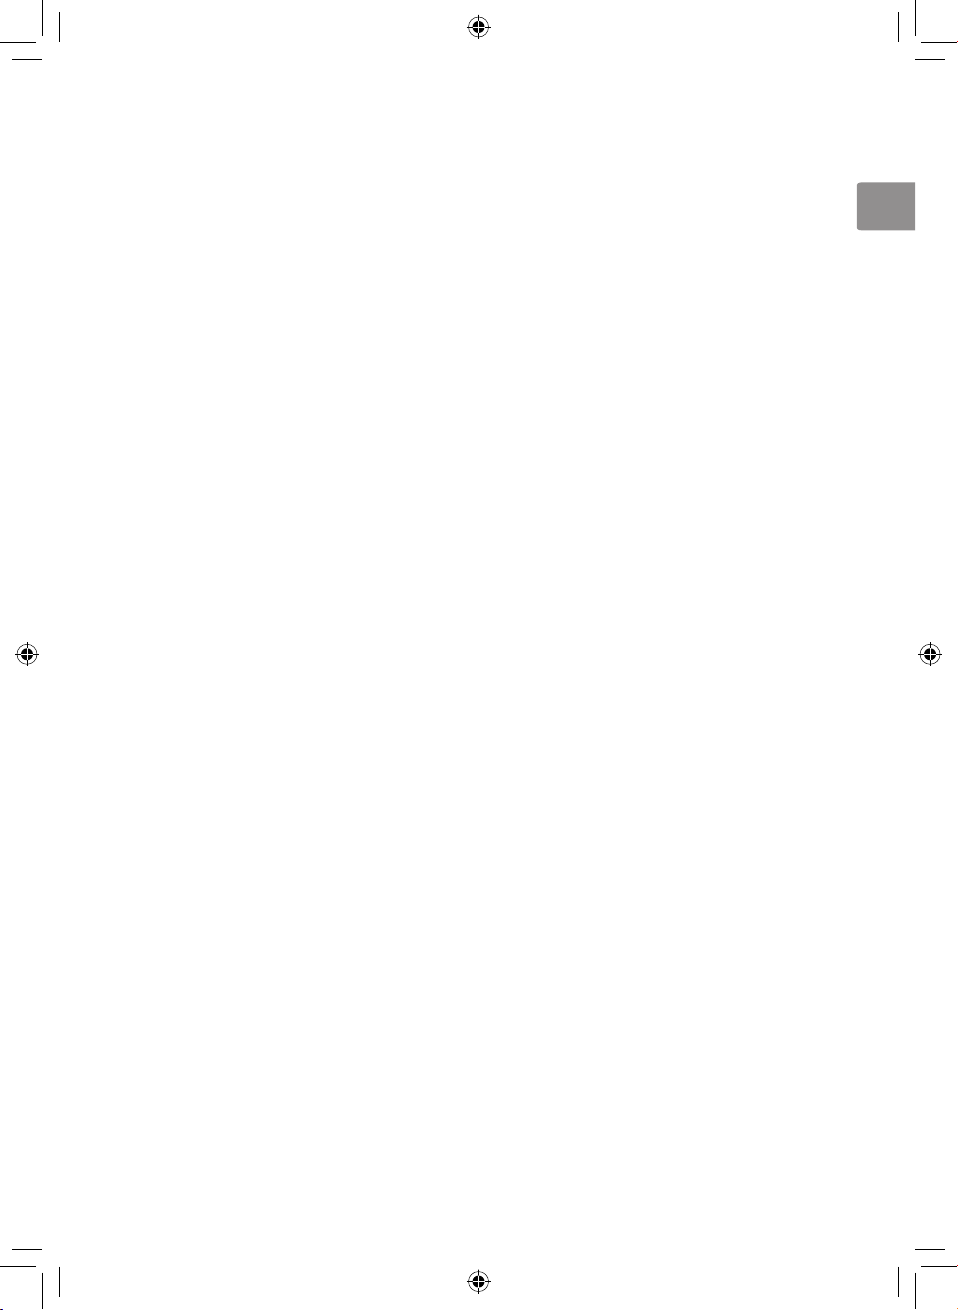
Parts and Specifications
Floor Standing Mode Wall-Mount Mode
Adapter
a
Charging Station with Tool Holders
b
Battery
c
Product Body
d
Product Body
Extension Pipe
e
Nozzle
f
Floor Stand Dock
g
Floor Stand Pipe
h
Detachable Nozzle Storage
i
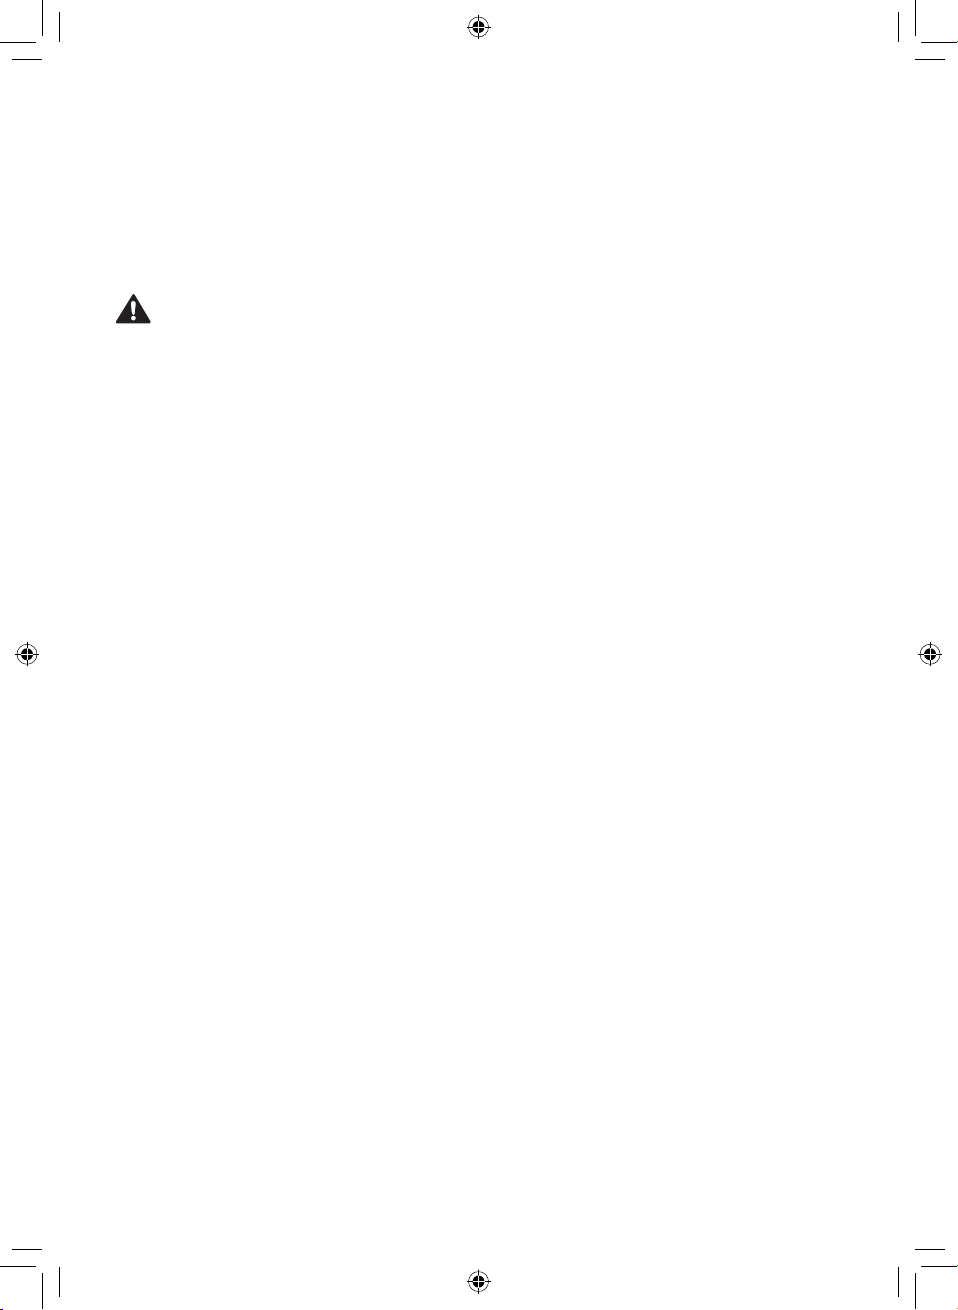
Exhaust Filter
a
Pre-filter
b
Cyclonic Mesh Filter
c
12
EN
EN
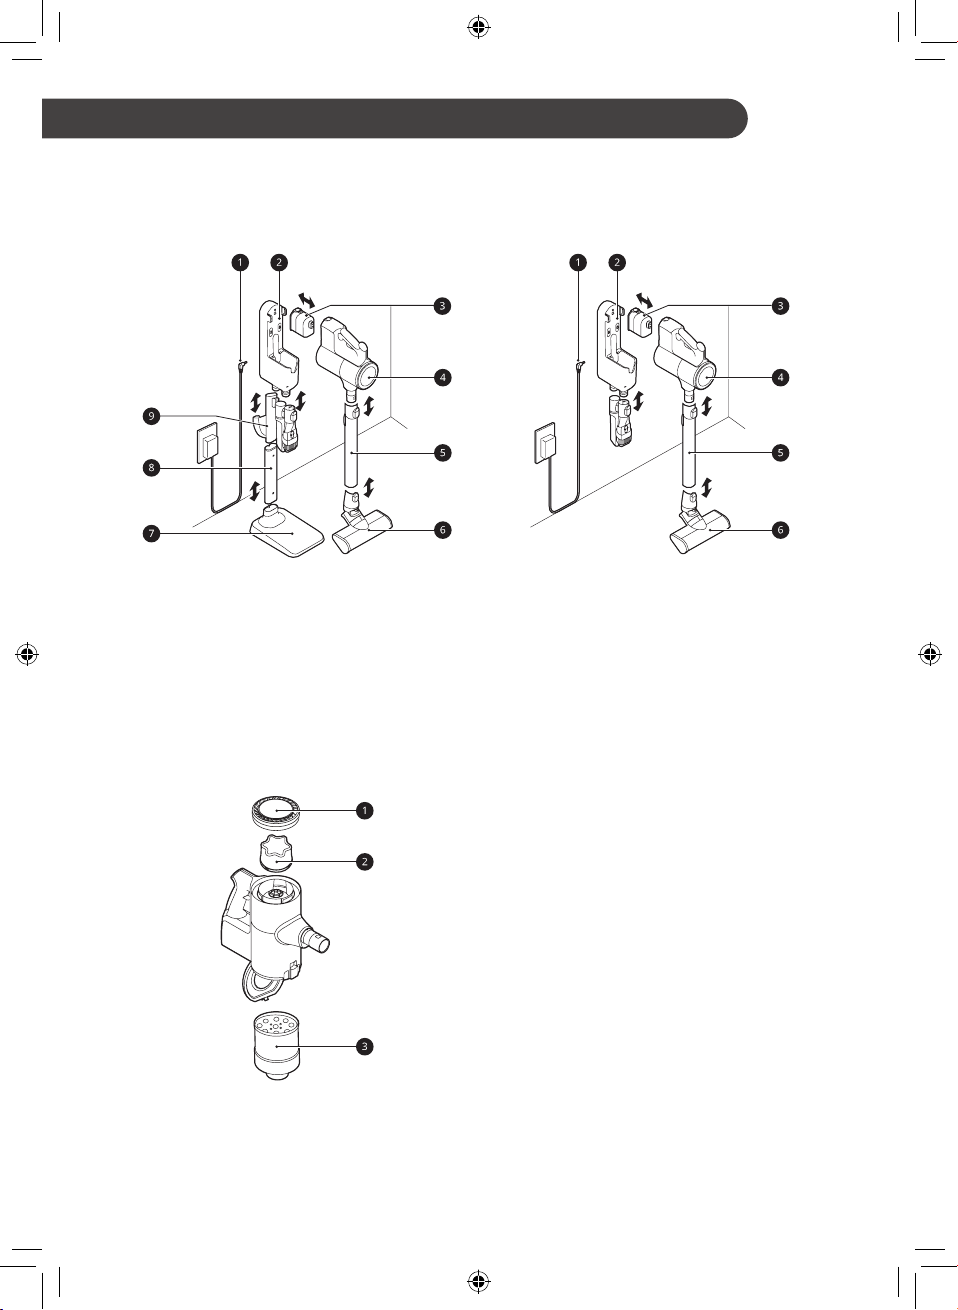
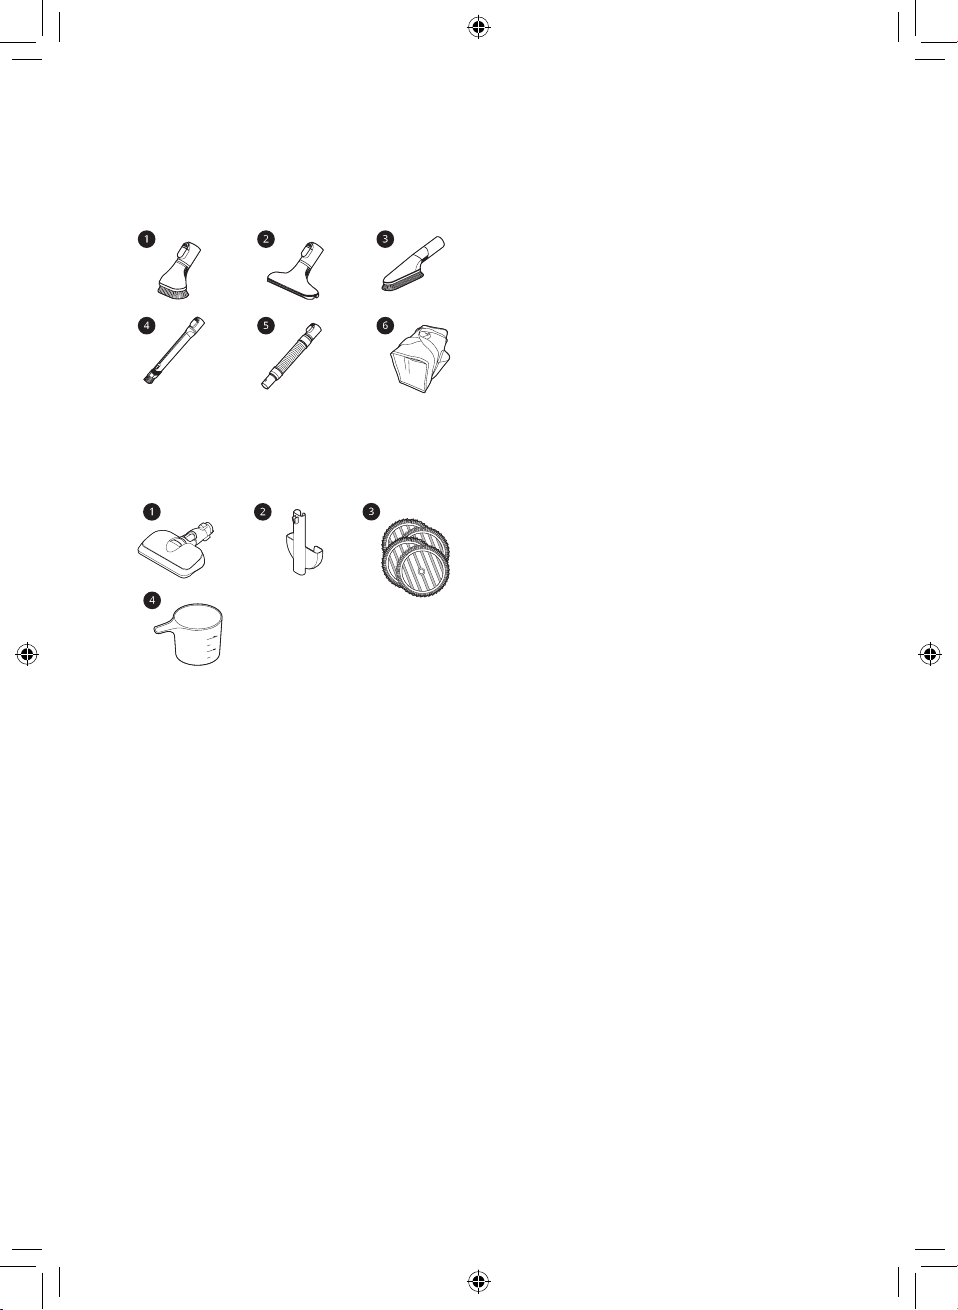
Accessories
Included Accessories
* This accessory is only available on some models.
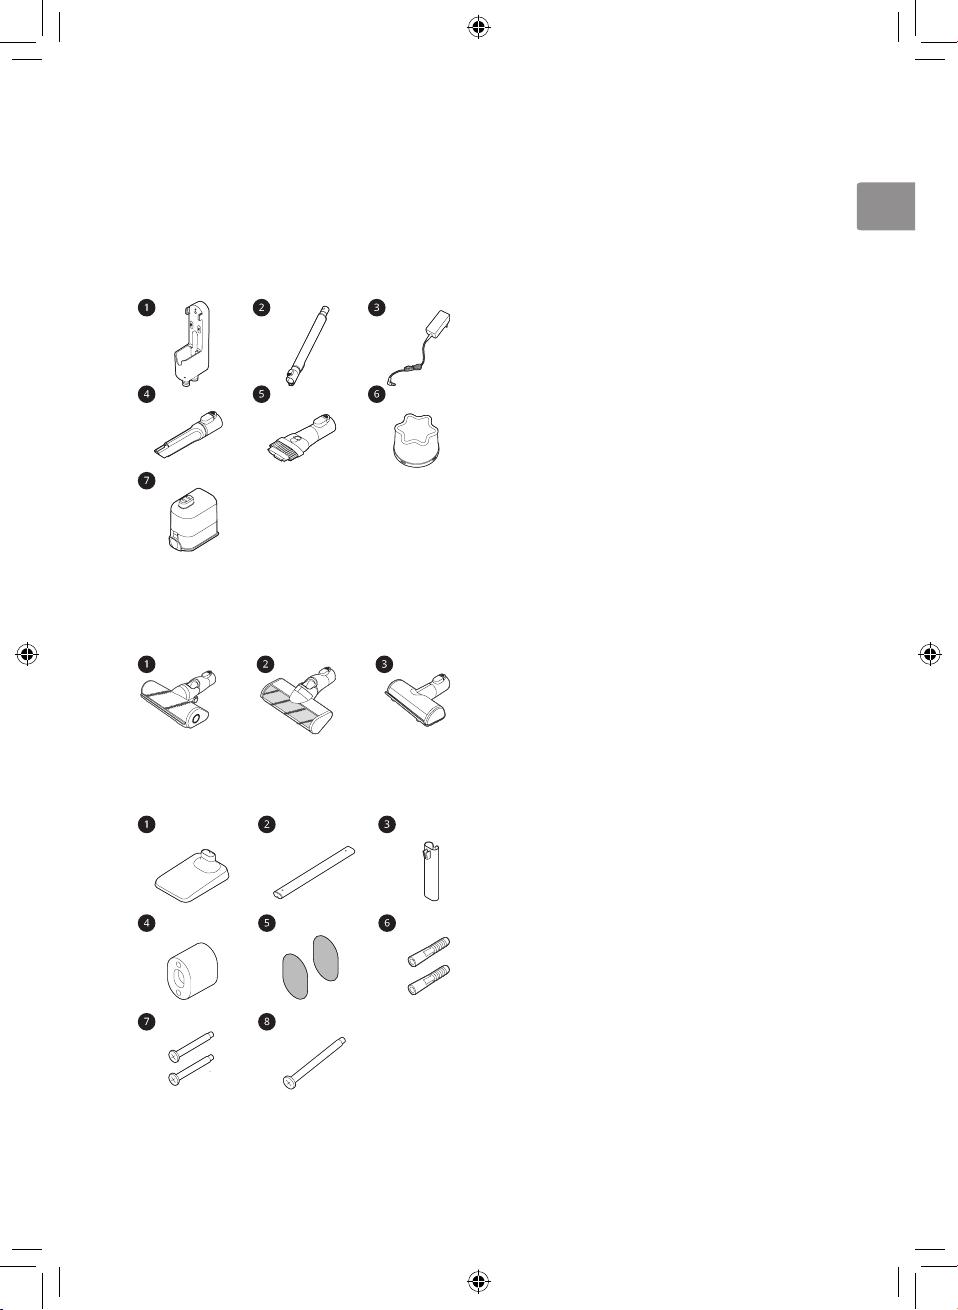
Nozzles
Installation Kit
Charging Station
a
Extension Pipe
b
Adapter
c
Crevice Tool
d
Combination Tool
e
Pre-filter
f
Battery (Dual Battery*)
g
Power Drive Carpet Nozzle*
a
Power Drive Floor Nozzle*
b
Bedding Power Punch*
c
Floor Stand Dock*
a
Floor Stand Pipe*
b
Detachable Nozzle Storage*
c
Wall Anchoring Block*
d
Double-Sided Tape*
e
Drywall Anchor*
f
Wall Anchoring Screw*
g
Stand Anchoring Screw*
h
13
EN
Tools and Accessory Bag
Hard Dirt Tool*
a
Mattress Tool*
b
Multi-angle Tool*
c
Flexible Crevice Tool*
d
Flexible Hose Extension*
e
Accessory Bag*
f
Mop Kit
Mop Nozzle*
a
Detachable Nozzle and Mop Pads Storage*
b
Mop Pads for General Cleaning*
c
Measuring Cup*
d
NOTE
The mop pads, batteries, exhaust filter and the pre-filter will eventually need to be replaced. Contact the
customer service department of LG Electronics if the problem persists.
14
EN
EN
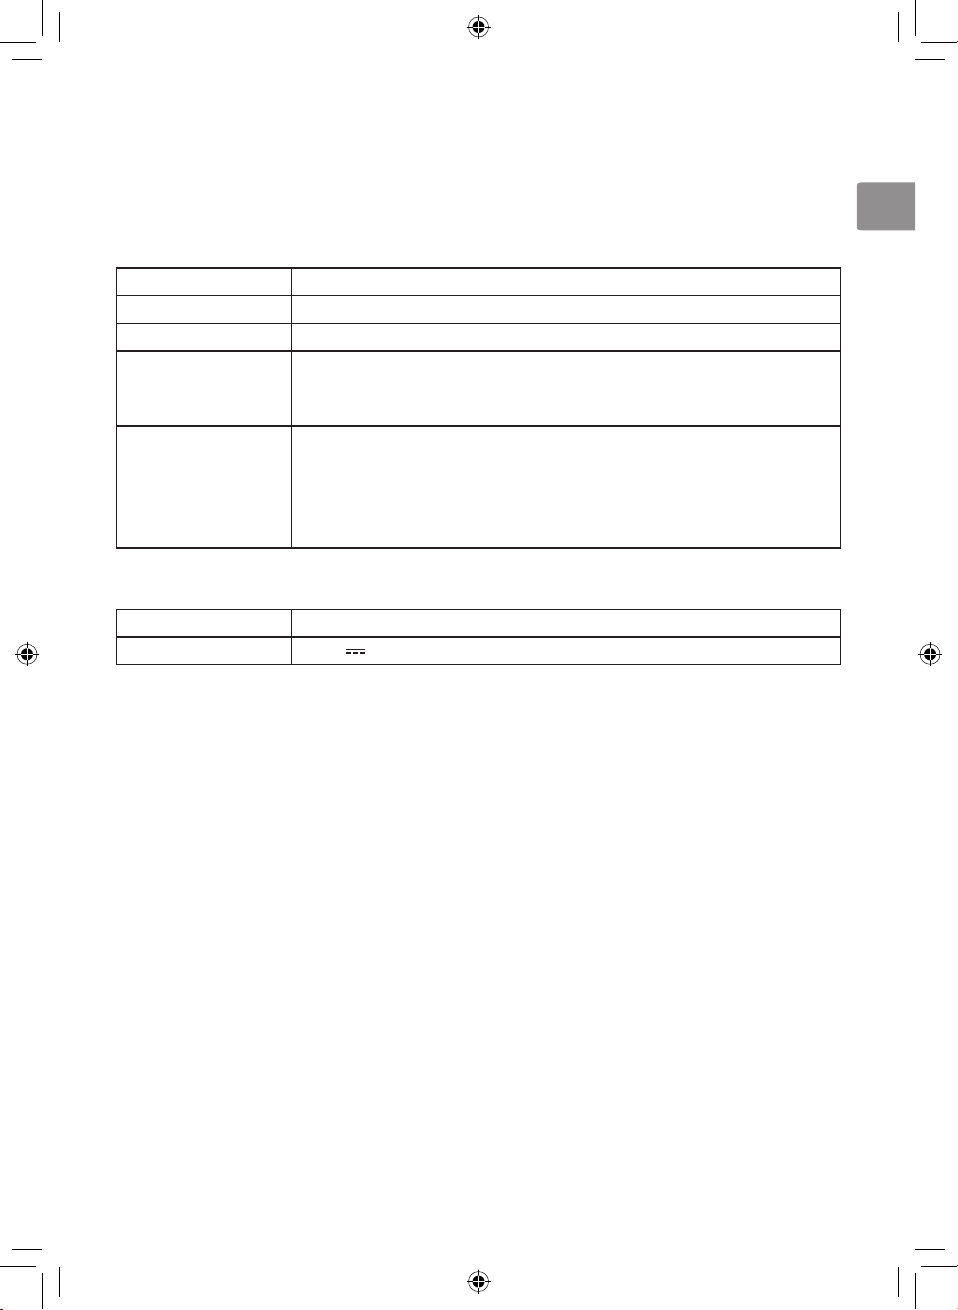
Specifications
Appliance
Model A9**********
Dimensions 260 mm (W) x 270 mm (D) x 1120 mm (H)
Weight Approximately 2.7 kg
Power Consumption 400 W in Turbo Mode (Maximum 450 W)
250 W in Power Mode
80 W in Normal Mode
Battery Run Time Up to 6 minutes in Turbo Mode
Up to 9 minutes in Power Mode
Up to 30 minutes in Normal Mode (with the Power Drive Nozzle)
Up to 40 minutes in Normal Mode (without the Power Drive Nozzle)
Up to 80 minutes in Only Mopping Mode (Recommended duration of use)
Charger Adaptor
Input 100 V - 240 V~ 50/60 Hz
Output 29.4 V
• Dimensions are given for the assembled product body, extension pipe and nozzle.
• Battery run time is the result of using a fully charged battery according to the LG Electronics test
standard. Results may be dif ferent depending on actual use environment and period of use.
• The Power Drive Nozzle contains the direct drive motor that rotates the nozzle cleaning head directly.
15
EN
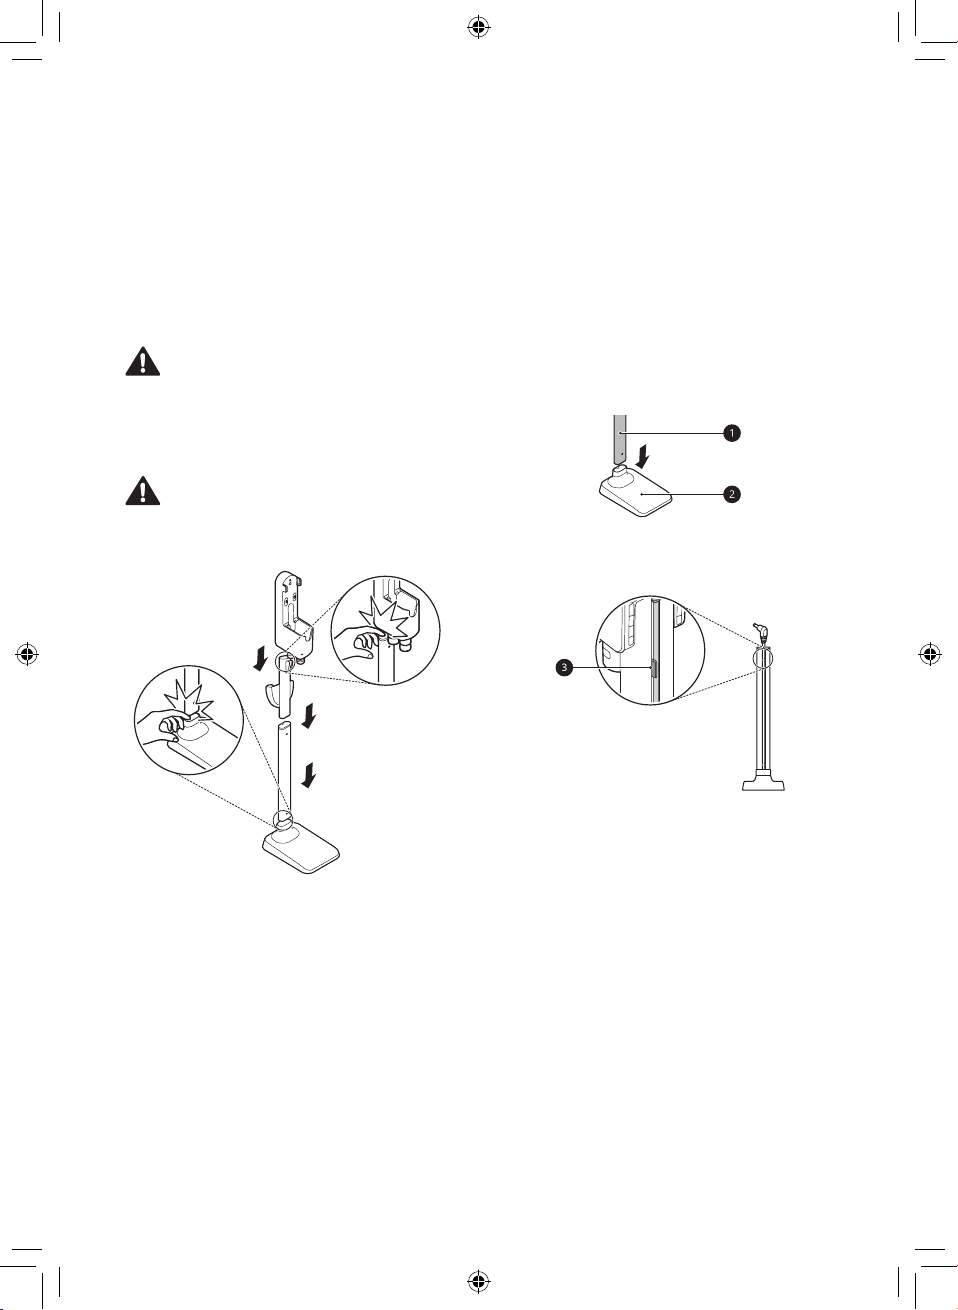
Installing the Charging
Station
Floor Standing Installation
Install the charging station on a hard and level
floor.
WARNING
• To prevent tipping, floor standing mode
installations should be anchored to the wall
using the provided stand anchoring screw,
anchoring block and double-sided tape.
CAUTION
• Keep fingers away from pinch points when
assembling the appliance or the charging
station.
Remove the protective film attached to the
1
charging station, the product body, and the
nozzle.
• Failure to remove the film may affect
product performance.
Place the floor stand dock b on a hard and
2
level floor and assemble the floor stand pipe
a.
• Once assembled, the floor stand dock
and the floor stand pipe cannot be
disassembled.
Clip the power cord tidily into the cord keeper
3
c on the back of the floor stand pipe.
• Do not allow children or pets to hang onto
the charging station. They could be injured or
cause damage to the appliance.
• Take care not to drop the product parts while
unpacking them to avoid appliance damage or
personal injury.
• Do not use double-sided tape to attach the
charging station to wallpaper. The weight of the
charging station and the product body could
damage the paper.
16
EN
EN
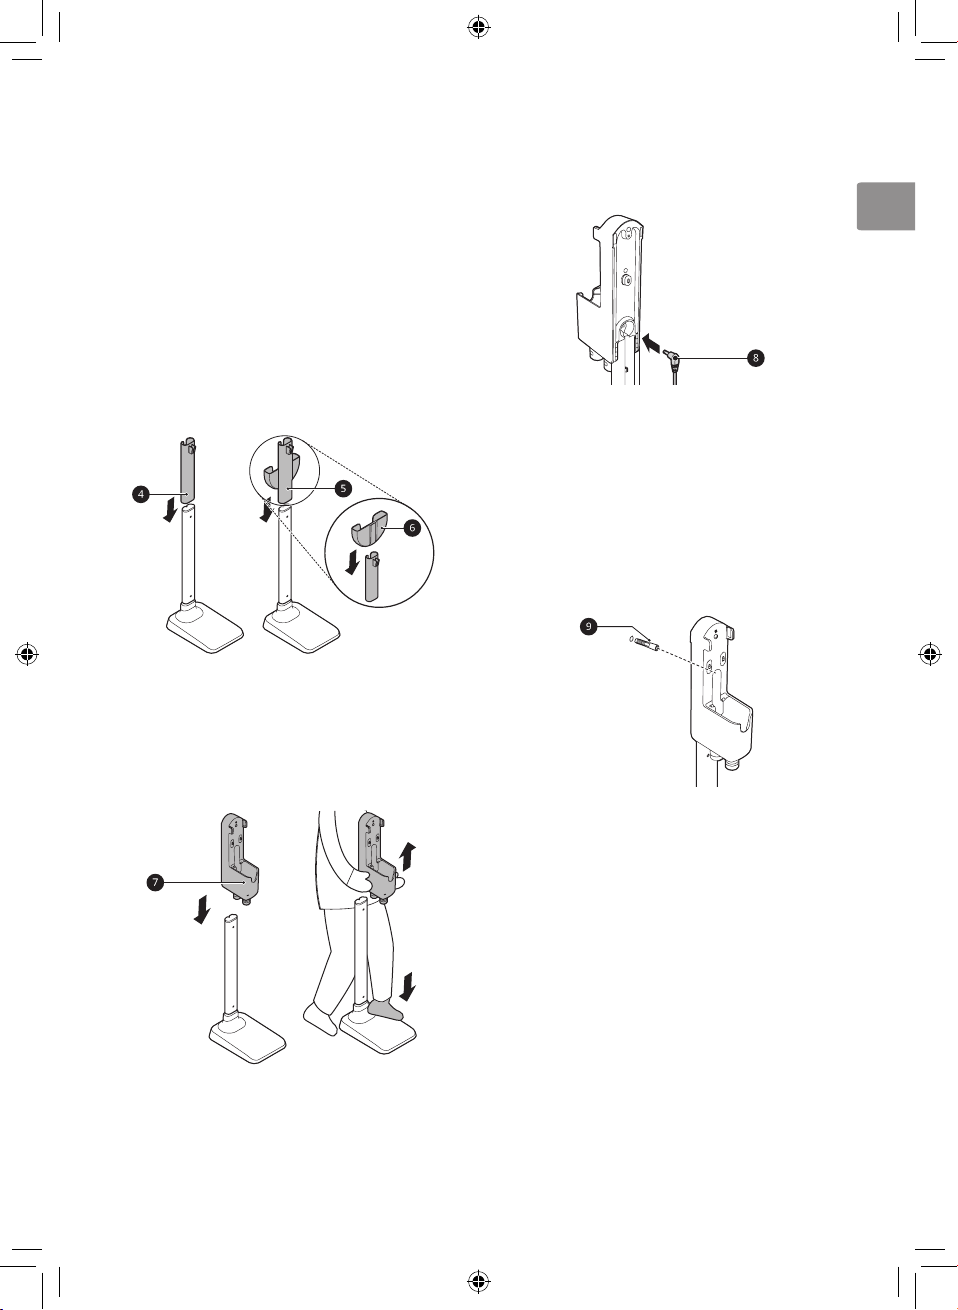
Slide the detachable nozzle storage d or
4
detachable nozzle and mop pads storage e
onto the floor stand pipe.
• This accessory is only available on some
models.
• Attach the detachable mop pads storage
f module onto the detachable nozzle
storage module, if they did not come
pre-assembled. Once assembled, the
two modules may be difficult to be
disassembled.
• Make sure not to pinch or tangle the power
cord behind the mop pads storage.
Assemble the charging station g onto the top
5
of the floor stand pipe.
• The charging station can be removed as
needed. To remove it, hold the floor stand
dock steady and pull up on the charging
station.
Connect the power adapter h to the port on
6
the back of the charging station.
Drill a hole and insert the drywall anchor i.
7
• Before drilling, make sure that there are no
pipes or electrical wires inside the wall at
the desired location.
• For drywall anchor: use 6.5 mm drill bit
• Recommended diameter of hole: 6.5 mm
• Recommended depth: 60 mm
• If screwing into drywall, the drywall anchor
should be used.
17
EN
Anchor the charging station to the wall with the
8
stand anchoring screw j.
Plug the power cord into the power outlet.
9
Use double-sided tape
Use double-sided tape to attach the wall anchoring
block a to the charging station and the wall.
• Do not use double-sided tape on wallpaper.
• Remove the center section of double-sided
tape. Attach the wall anchoring block to the
charging station by using the tape.
• Attach the second piece of double-sided tape
to the other side of the wall anchoring block,
and use it to temporarily anchor the charging
station to the wall in the desired location.
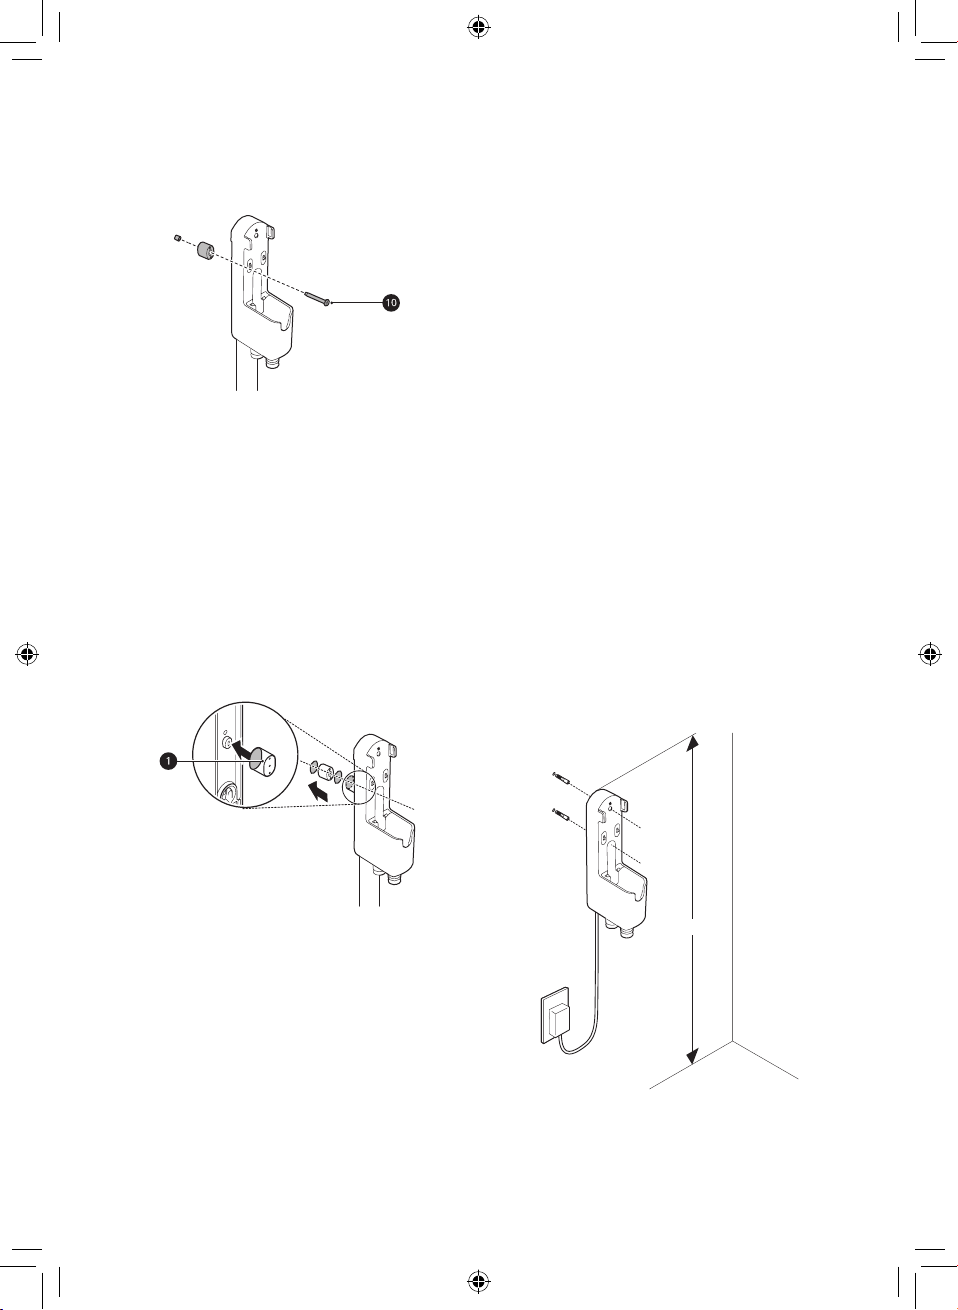
Wall-Mounted Installation
For wall-mounted installations, the charging station
must be attached securely to the wall using the
provided (short) wall anchoring screws.
Connect the power adapter to the port on the
1
back of the charging station.
Before drilling, make sure that there are no
2
pipes or electrical wires inside the wall at the
desired location.
Hold the charging station at least 1 m from the
3
floor and near enough to easily reach a power
outlet. Mark the positions of the screw holes
on the wall.
Drill 2 holes at the marked positions and insert
4
the drywall anchor.
• Before drilling, make sure that there are no
pipes or electrical wires inside the wall at
the desired location.
• For drywall anchor: use 6.5 mm drill bit
• Recommended diameter of hole: 6.5 mm
• Recommended depth: 60 mm
• If screwing into drywall, the drywall anchor
should be used.
18
1m
EN
EN
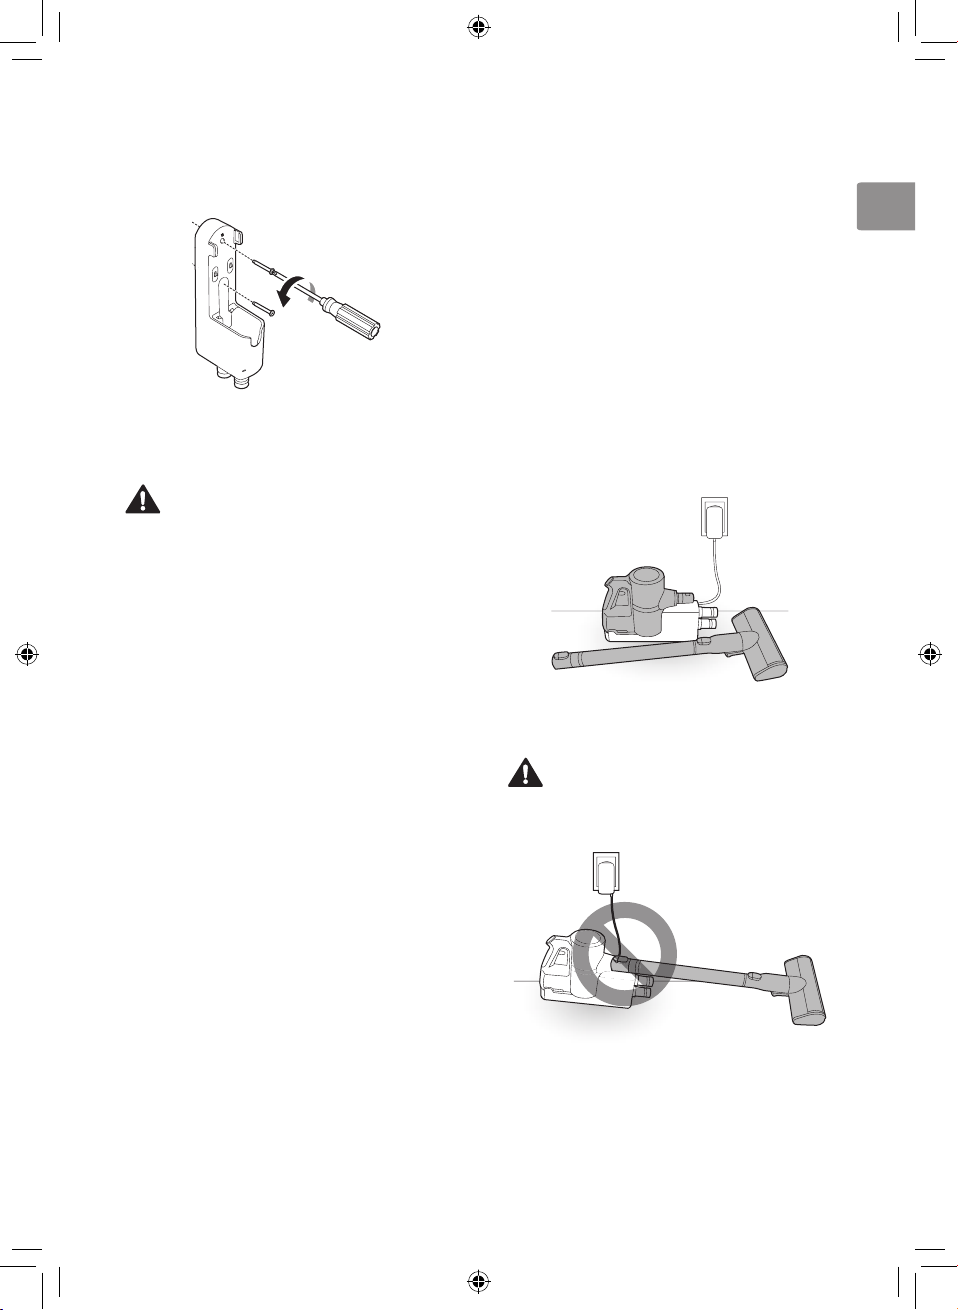
Attach the charging station to the wall with the
5
wall anchoring screws.
Plug the power cord into the power
6
outlet.
CAUTION
• Do not allow children or pets to hang onto
the charging station. They could be injured or
cause damage to the appliance.
NOTE
• The cost of a service call to install or reinstall
the charging station is not covered under the
warranty.
• The detachable nozzle storage cannot be
attached to the charging station in a wallmounted installation.
Compact Installation
For safety and convenience, install the charging
station using the floor standing or wall-mounted
installation methods. If you choose not to install
the charging station, place it on a level floor for
charging or storage.
Connect the power adapter to the port on the
1
back of the charging station.
Place the charging station on a hard and level
2
floor.
Separate the extension pipe and nozzle from
3
the product body before charging or storing
the appliance.
Plug the power cord into the power outlet.
4
CAUTION
• Leaving the appliance on a level floor for a
long time with the extension pipe and nozzle
attached may damage the appliance.
19
EN
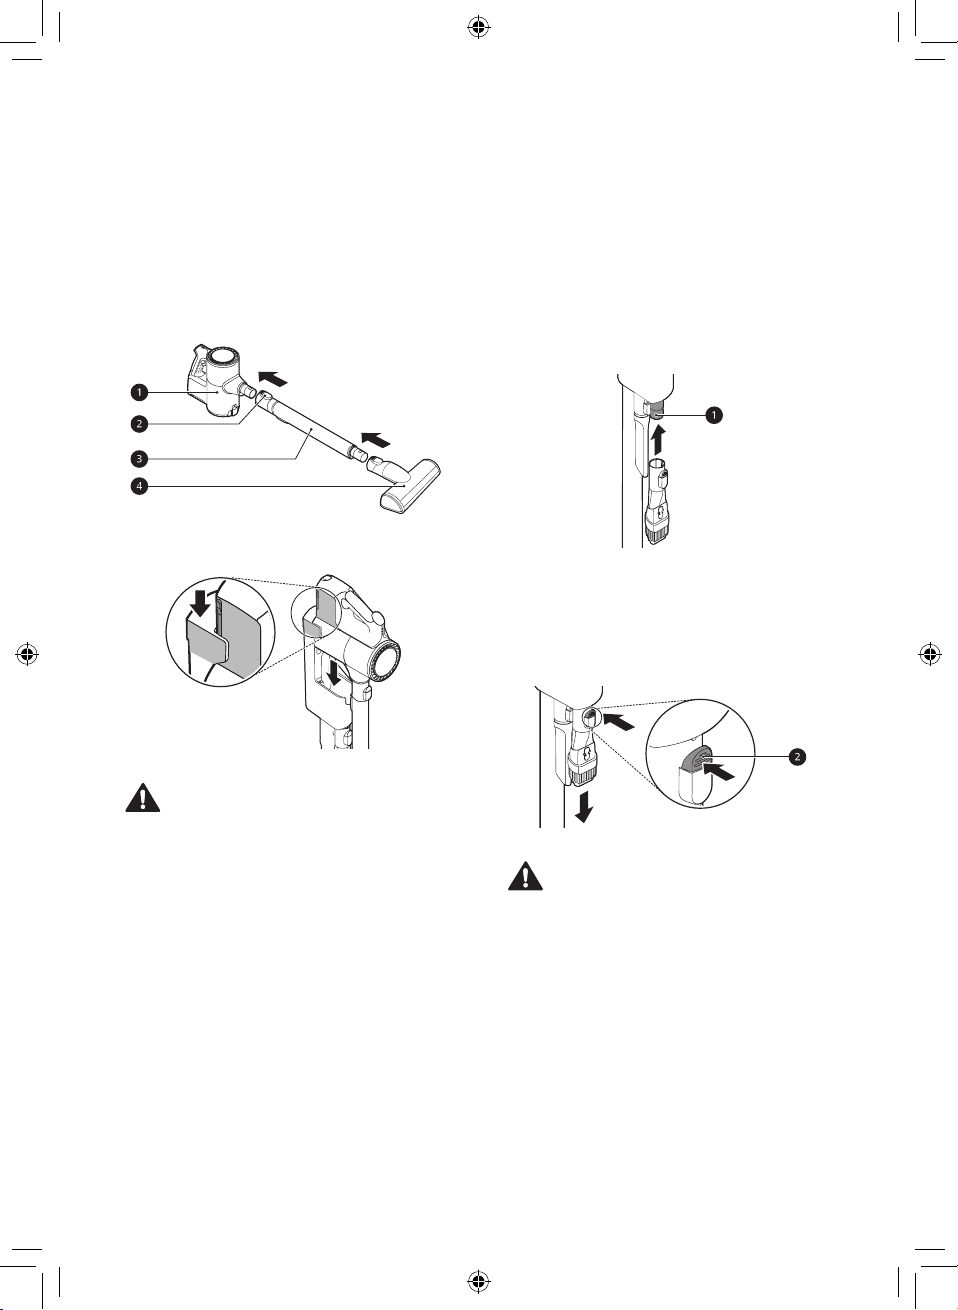
Assembling the Appliance
Follow these steps to safely assemble the
appliance.
Firmly attach the extension pipe c, nozzle d,
1
or tool onto the product body a.
• To detach the extension pipe, press the
extension pipe release button b.
Put the product body on the charging station.
2
Storing the Accessories
Storing the Tools
Store the frequently used tools such as the
combination tool and crevice tool at the bottom of
the charging station.
Attach the combination tool and crevice tool to
1
the tool holders a.
Press and hold the inlet release button b and
2
pull downward to remove the combination tool
or crevice tool.
• Store auxiliary nozzles or tools in the
accessory bag.
CAUTION
• Keep fingers away from pinch points when
assembling the appliance or the charging
station.
20
CAUTION
• Do not store the product body or battery in the
accessory bag. If the appliance or battery are
damaged, it could cause an explosion or fire.
• Do not throw or drop the accessory bag
containing accessories. It may damage the
appliance or cause personal injury.
NOTE
• Do not use the accessory bag for purposes
other than for storage of nozzles or tools.
EN
EN
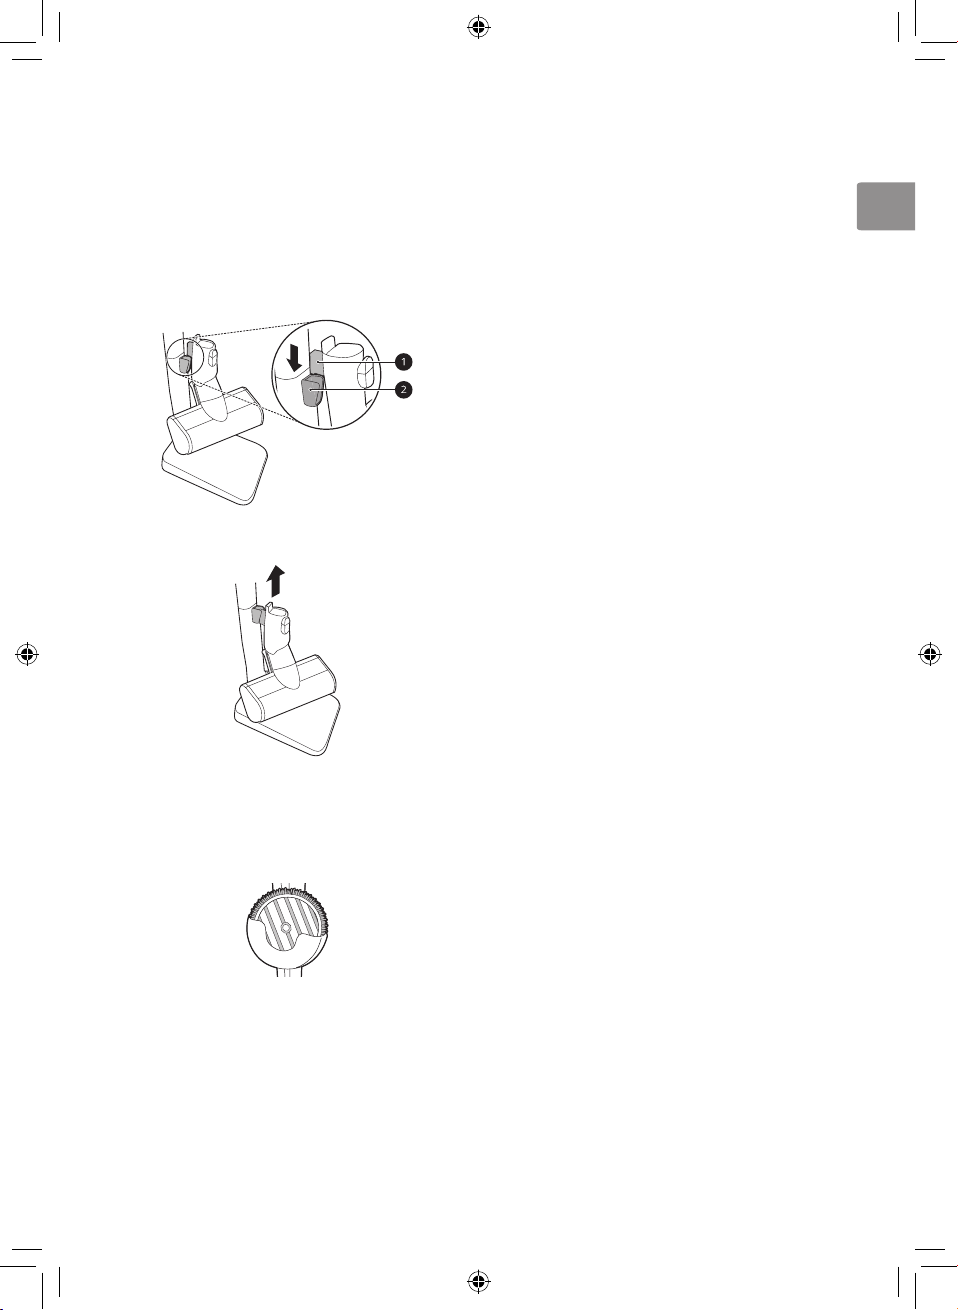
Storing the Nozzles
When a nozzle is not in use, store it in the
convenient detachable nozzle storage so you can
easily find it.
To store, slide the hook a on the nozzle into
1
the nozzle storage cradle b.
Lift the nozzle to remove it from the cradle.
2
Storing the Mop Pads
Up to 2 mop pads can be stored in the detachable
mop pads storage.
21
EN
OPERATION
Getting Started
Before Using the Appliance
• Close the dust bin cover properly before using
the appliance. If the dust bin cover is left open,
the suction strength may deteriorate and affect
the cleaning performance.
• Support the bottom of the appliance when
cleaning an elevated surface.
• Store the appliance in the charging station
or place it flat on the floor when not in use.
Leaning the appliance against a wall or chair
can result in product damage or personal injury
if the appliance falls.
• Make sure that the exhaust filter or pre-filter is
properly assembled before using the appliance.
• Environmental conditions such as temperature
and humidity may cause static electricity to
accumulate on the appliance. Please contact
LG Electronics customer information center if
the problem persists.
• Make sure to remove any foreign object
such as a sock or stocking before using the
appliance. Any foreign object on the inlet port
or extension pipe will prevent the appliance
from functioning properly.
• Please use the product at normal room
temperatures as the battery runtime may
deteriorate severely if used at temperatures
lower than 5 °C or higher than 38 °C for an
extended period of time.
• The battery runtime is dependent on the
surface type and the suction power.
• Follow manufacturer’s recommendations when
cleaning flooring, carpets, and rugs.
• To avoid scratches on polished floors, keep the
brushes of the nozzles and tools free from grit,
sand, or abrasive objects.
• Refer to the Parts and Specifications section
for battery runtime details.
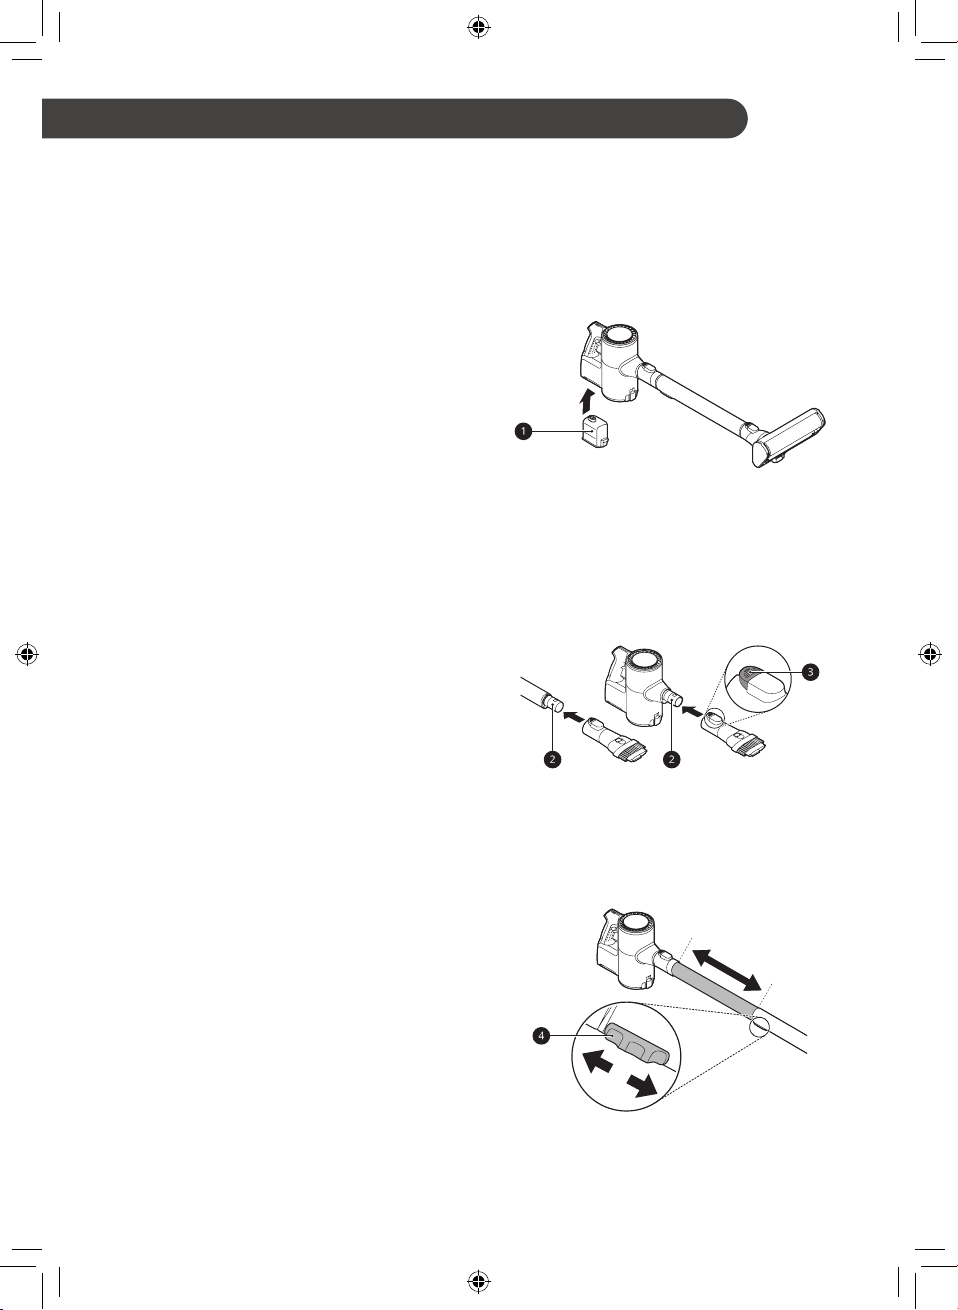
Assembling Attachments
Nozzles and tools can be attached to either the
product body or the end of the extension pipe.
Insert the fully charged battery a into the
1
cavity at the bottom of the handle on the
product body.
Attach the nozzles, tools, or extension pipe
2
by sliding them onto the inlet b on the body
until they click into place. The nozzles and
tools can also be attached to the end of the
extension pipe b.
• Detach the accessories by pressing the
release button c.
Adjust the extension pipe by pressing the
3
length adjustment button d on the back of the
pipe and sliding until it clicks into place at the
desired length.
• The extension pipe extends in four steps.
22
EN
EN
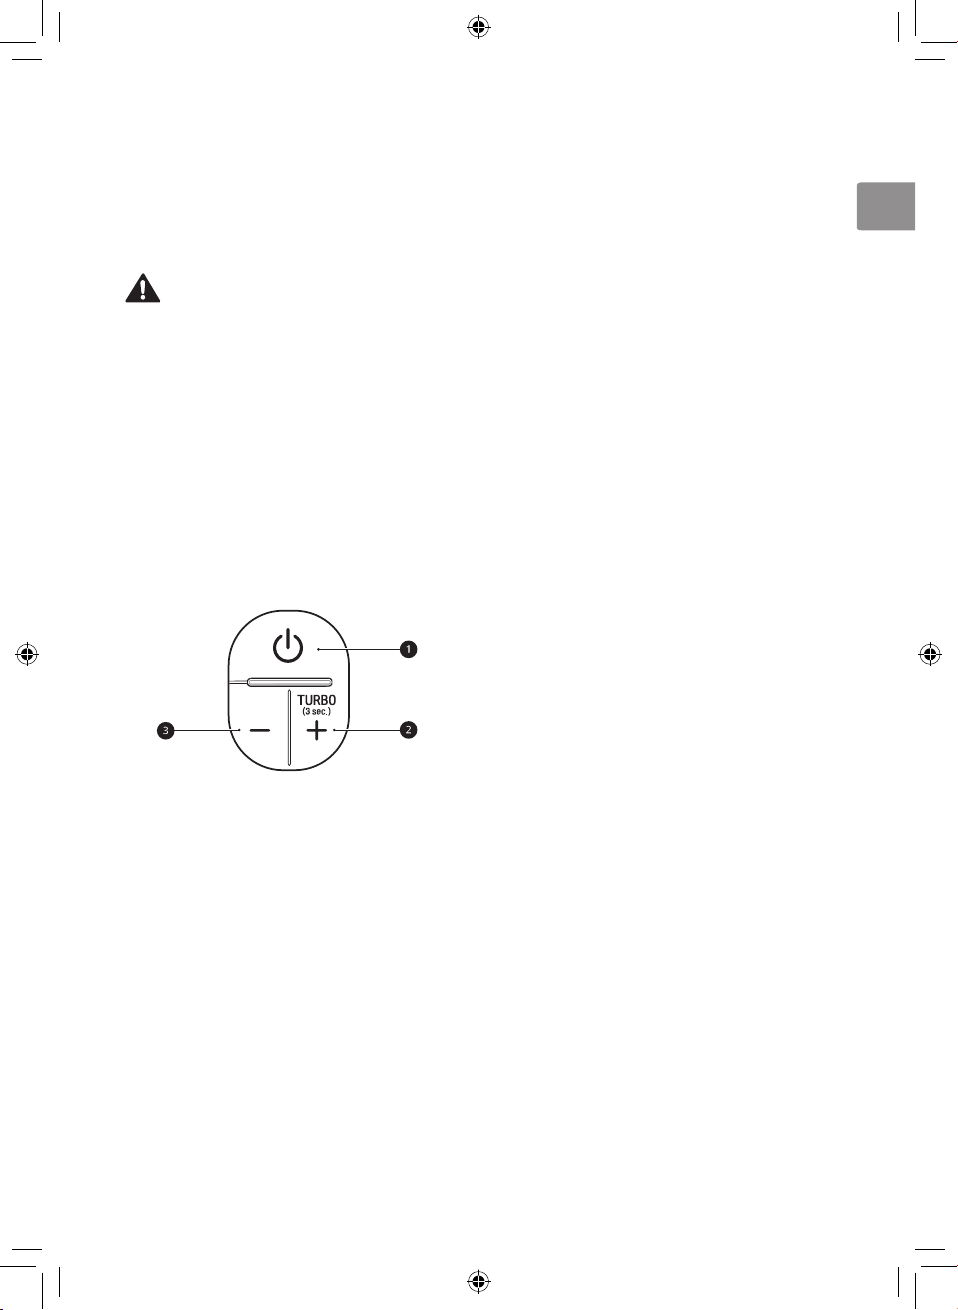
Press the Power button to activate the Normal
4
mode.
• To turn off the appliance, press the Power
button again.
CAUTION
• Running the appliance for a long period of time
with a tool connected may cause the motor to
overheat.
• This appliance has a built-in safety device
to prevent overheating. If the appliance
becomes overheated af ter extended use, it
may automatically turn off. If this occurs, leave
the appliance in a cool, well-ventilated area
for about an hour before turning on the power
again.
Adjusting the Suction Power
Adjust the suction power using the suction power
adjustment button on the handle.
Adjusting the Suction Power with Mop
Nozzle
• Press the power On/Off button a to turn the
appliance on or off.
• Only Mopping Mode: Press the power On/Off
button a to activate the Only Mopping Mode.
• Normal Mode: Press suction power up button
b to increase the suction power.
• Power Mode: Press suction power up button b
to increase the suction power.
• Turbo Mode: Press and hold the suction power
up button b for more than 3 seconds.
• Press the suction power down button c to
decrease the suction power by a step.
• Press the suction power down button c to
switch the suction power from the Tu r bo →
Power → Normal → Only Mopping.
• You cannot select Turbo mode directly from
Normal mode. You must switch to the Power
mode first. (Only Mopping → Normal →
Power → Tu r bo)
• Press the power On/Off button a to turn the
appliance on or off.
• Normal Mode: Press the power On/Off button
a to activate the Normal mode.
• Power Mode: Press suction power up button b
to increase the suction power.
• Turbo Mode: Press and hold the suction power
up button b for more than 3 seconds.
• Press the suction power down button c to
decrease the suction power by a step.
• Press the suction power down button c to
switch the suction power from the Tu r bo →
Power → Normal.
• You cannot select Tu rbo mode directly from
Normal mode. You must switch to the Power
mode first. (Normal → Power → Tur b o)
23
EN
Charging the Battery
Before Charging the Battery
• Make sure that the adapter is connected to
both the charging station and the power outlet.
• Fully charging a single battery usually takes 3.5
hours. It will take twice as long to charge both
the main and auxiliary batteries.
• The battery will not be charged if the indoor
temperature is below 5 °C. Only charge the
battery when indoor temperatures are between
5 °C and 38 °C.
• The battery will eventually need to be replaced.
Due to the battery characteristics, runtime is
shortened after using the appliance repeatedly
for an extended period.
• The last bar on the batter y indicator begins to
flash when the battery needs to be recharged.
Use the appliance with a fully charged the
batt er y.
• To maintain battery life on dual-battery
models, swap the positions of the two batteries
periodically, between the main body and the
auxiliary charging station.
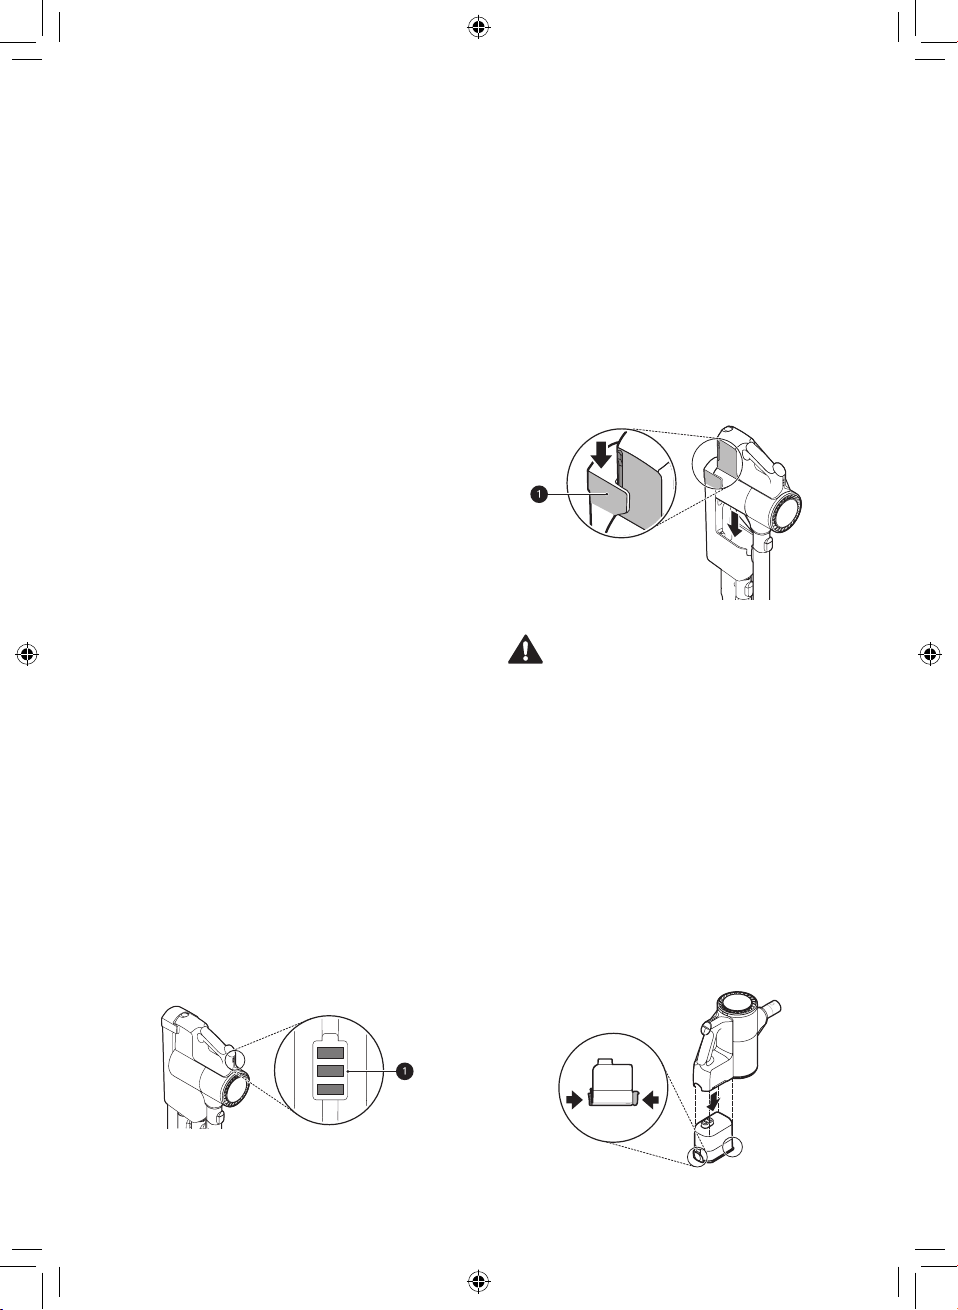
Battery Level Indicator
The remaining battery level is shown on the
battery level indicator a above the handle of the
product body.
• The remaining battery level is displayed in
3 stages according to the remaining battery
po we r.
• The battery level indicator flashes when the
battery needs to be charged.
• As the product is charging, 3 bars light up on
the battery level indicator to indicate the level
of charge.
• Once the battery is fully recharged, 3 bars will
remain lighted on the battery level indicator.
Charging the Product Body
Storing the appliance on the charging station
automatically recharges the battery.
Press the Power button to turn the appliance
1
off.
Put the product body onto the charging station
2
by aligning it to the hook a of the charging
station.
• The battery level indicator starts to flash
and begins charging the battery.
CAUTION
• Make sure to securely fit the product body onto
the charging station. If the appliance falls of f
the charging station, it could cause injuries,
property damage or product damage.
Charging the Auxiliary Battery
An auxiliary battery can be stored and charged in
the base of the charging station.
• If the main battery is charging on the charging
station, the auxiliar y battery will only start
charging once the main battery is fully charged.
Remove the discharged battery from the
1
product body by pressing the battery release
button on either side of the battery and pulling.
24
EN
EN
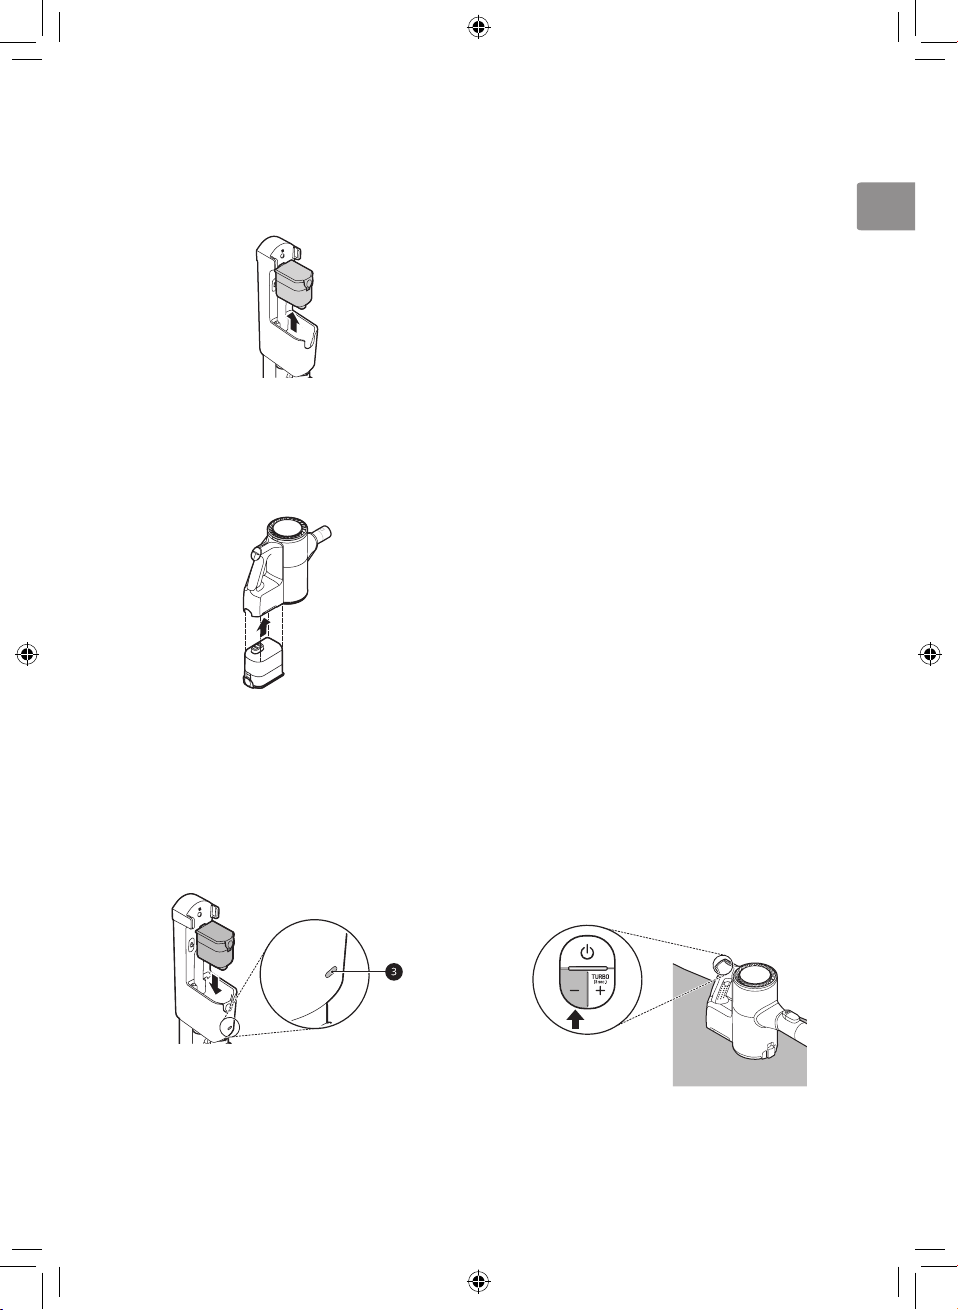
Remove the battery in the charging station by
2
pressing the button at the rear of the battery
and lifting the battery.
Insert the fully charged battery into the cavity
3
at the bottom of the handle on the product
body.
• The battery will only fit into the cavity if
aligned properly.
Insert the discharged battery into the auxiliary
4
charging station.
• The battery will only fit into the cavity if
aligned properly.
• The auxiliary charging indicator c flashes
while recharging is in progress.
• When charging is complete, the auxiliary
charging indicator c stays lit.
Using the Mop Nozzle
This feature is only available on some models.
Before Using the Mop Nozzle
• The mop pads only rotate at one speed
regardless of what suction power setting the
product body is set to.
• Set the water adjustment button to the STOP
position before carrying the appliance around
with the mop nozzle attached.
• Do not use a soiled mop pad to clean floors.
• To prevent product damage, the mop
attachment plate will automatically stop if
there are foreign objects stuck in the plate or
if it is subjected to a strong impact. Turn the
appliance off immediately and remove the
foreign objects or obstructions before resuming
use.
• If you hear a noise while mopping, the mop
pad may have dropped off the mop attachment
plate. Turn off the product immediately and
reattach the mop to the attachment plate before
resuming use.
Using the Mop Nozzle
It is suitable for cleaning dust and mop cleaning at
the same time.
• When you attach the mop nozzle, the product
will operate initially in only mop mode with
suction OFF.
• Press the “+” button if you wish to carry out
both dust cleaning and mop cleaning at the
same time in only mop mode.
• Press the “-” button in normal mode if you wish
to use the only mop mode.
25
EN
NOTE
• When you separate the mop nozzle in power
mode or turbo mode, the product body will
operate more powerfully to facilitate the use of
a different nozzle.
• When you replace the mop nozzle during
product operation, the product will operate in
only mop mode with suction OFF.
• If you use mop cleaning with suction OFF for
a long period of time, the safety device (motor
overheating prevention device) will operate,
stopping product operation, in order to protect
the mop nozzle. (Recommended duration of
use: 80 minutes) It is not a sign of malfunction.
Use the product after allowing the mop nozzle
to cool for 1 hour.
Using the Wet Mop Pads
Remove dust and mop the floor at the same time
with the mop nozzle.
• Clean the dust bin before using the wet mop
pads.
Filling the Water Tank
Before mopping, you must fill the water tank and
attach it to the mop nozzle.
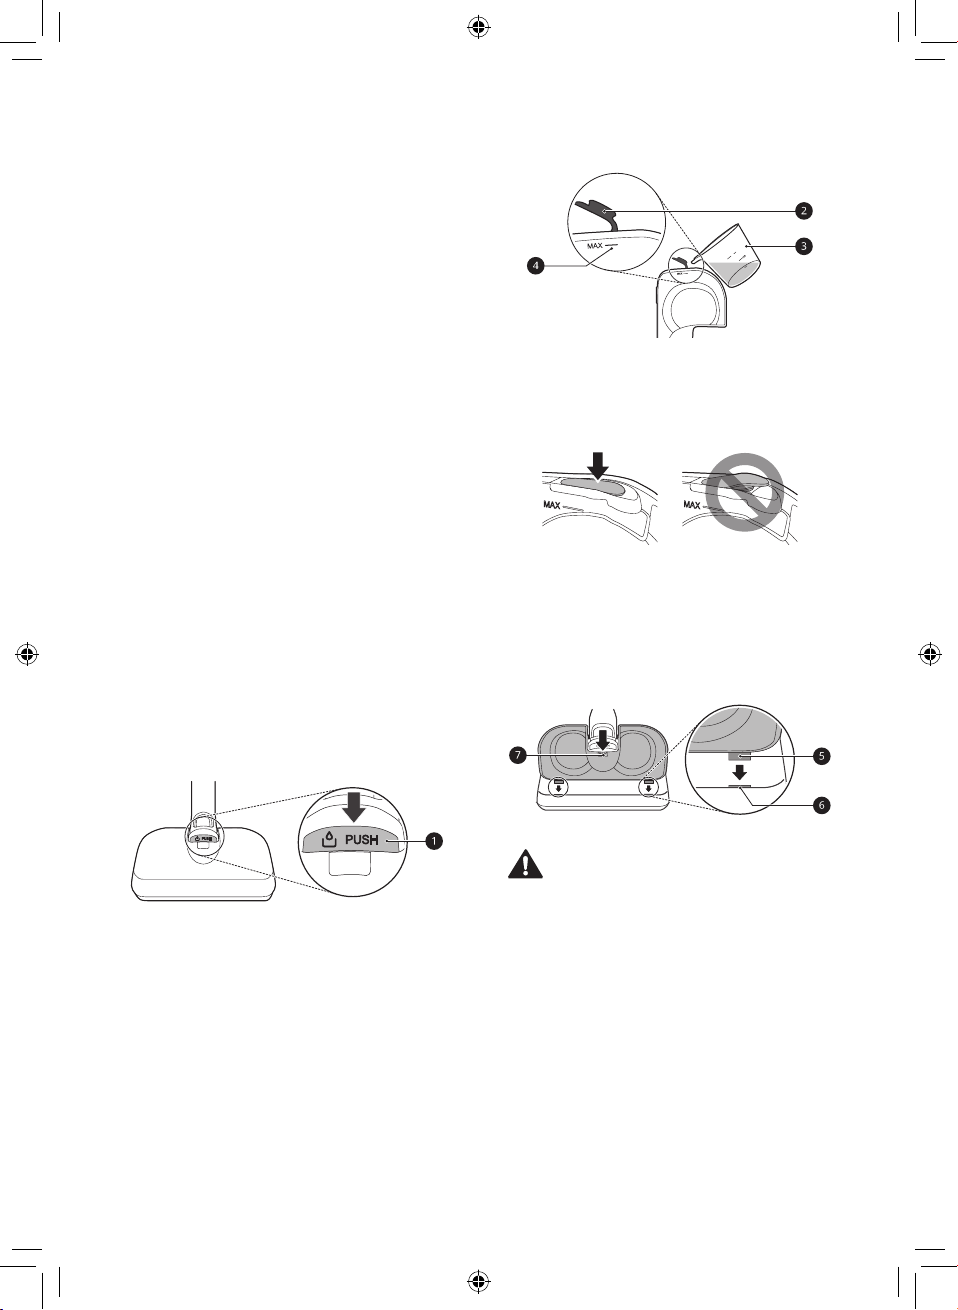
Close the water inlet cap tightly.
3
• If the water inlet cap is not closed properly,
water may leak.
Attach the water tank to the mop nozzle again.
4
• Insert the 2 tabs e at the front of the water
tank into the slots f on the top of the mop
nozzle. Push down the water tank to fix it.
• Press down at the center g to lock the tank
in place.
Press the PUSH button a to remove the water
1
tank from the mop nozzle.
Open the water inlet cap b on the side of the
2
water tank and fill the tank with water using
the measuring cup c.
• Open only one water inlet cap to fill the
water. Opening both caps may cause the
water to flush.
• Do not fill the tank over the MAX line d.
• Do not put liquid other than water in the
water tank.
• Do not put hot water in the water tank.
26
CAUTION
• Do not slam down or throw the mop nozzle
onto the floor. Doing so may result in an injury
or product damage.
• Do not let the appliance stand on the floor while
the wet mop pads are attached. Doing so may
result in damage or swelling to wood flooring.
Attaching the Mop Pads
Use the standard mop pads for general cleaning.
For stubborn stains, use the heavy duty mop pads.
• Use only authorized LG Electronics mop pads.
EN
EN
Wet both sides of the mop pads with water
1
then squeeze out any excess water before
attaching the pads.
• Attaching and using mop pads in a dry state
may affect the cleaning performance.
Place the mop nozzle upside down on the
2
floor.
Align and attach the center of the mop pad
3
with the center of the mop attachment plate.
• Attach the mop pad so the striped side
is visible. Attaching the mop pad upside
down or improperly may affect the cleaning
performance.
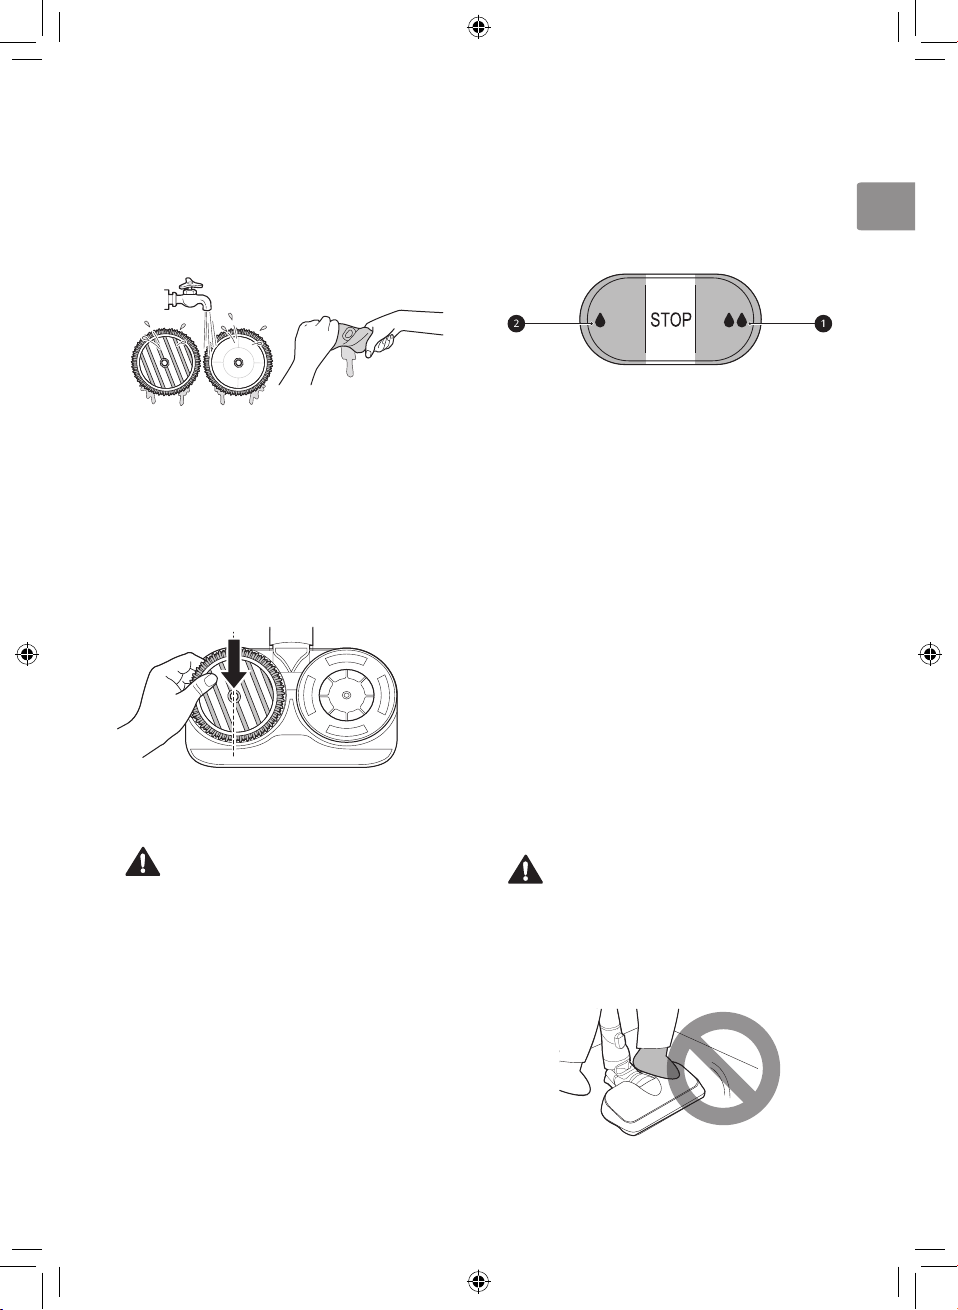
Adjusting the Amount of Water
Press the water adjustment buttons to adjust the
amount of water released onto the mop pad to
either High Mode or Low Mode.
• High Mode: Press the High Mode button a all
the way down to clean ingrained dirt or supply
a large amount of water.
• Low Mode: Press the Low Mode button b
all the way down to supply a small amount of
water for cleaning wood or other flooring that
can be damaged by too much water.
• STOP: Press the Low Mode or High Mode
button halfway to toggle back to the STOP
position. This stops the supply of water so you
can go over areas that are already wet.
• To clean with a dry mop, set the water
adjustment buttons to the STOP position.
• By default, the water adjustment button is set to
the Low Mode.
Cleaning with the Mop Nozzle
Attach the mop nozzle to the appliance.
4
WARNING
• To avoid injury, do not attach the mop pad while
the mop attachment plate is rotating.
• Do not inser t your hand into the rotating mop
attachment plate. Doing so may result in injury.
Attach the water tank and mop pads to the
1
mop nozzle.
Press the Power button to start cleaning.
2
CAUTION
• Set the water adjustment button to the STOP
position when not using the appliance for an
extended period of time. Failure to do so may
result in product failure.
• Do not step on the mop nozzle. Doing so may
result in product damage.
27
EN
Drying the Water Tank and Mop
Pads
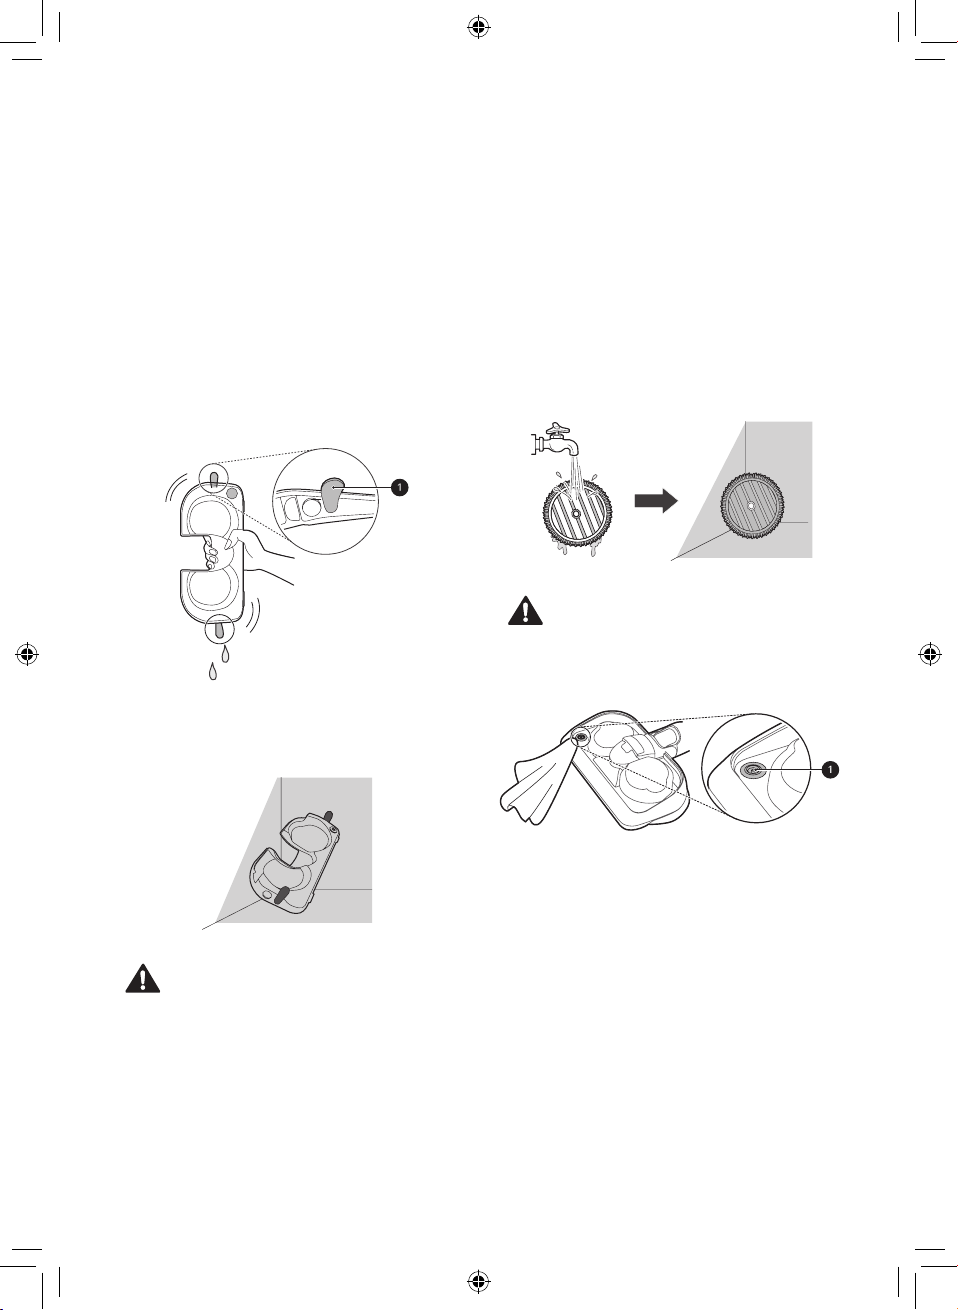
Drying the Water Tank
When cleaning is completed, make sure to empty
the water and dry it before storing the mop nozzle.
Otherwise the water may be contaminated and
give off a bad smell.
Open the 2 water inlet caps a on the side
1
of the water tank and empty the water in the
water tank. Shake the water tank to remove
the remaining water.
Leave the 2 water inlet caps open and allow
2
the water tank to dry in a well-ventilated area
out of direct sunlight for at least 24 hours.
Drying the Mop Pads
After using the mop pads, hand wash them and
allow them to dry before storing them.
Separate the mop pads from the mop
1
attachment plate.
Hand wash the pads with a neutral detergent.
2
Set the pads in a well-ventilated area out of
3
direct sunlight for at least 24 hours or until
completely dry.
CAUTION
• After cleaning, wipe off any remaining water on
the water supply inlet a on the mop nozzle with
a soft cloth. The water could drip onto the floor
and damage it.
CAUTION
• Turn the water inlet caps to make sure they
remain open.
• Do not remove the water inlet caps from the
water tank.
• Do not add detergent, vinegar or baking soda
to the water tank when washing.
28
• Do not pull or stretch the rubber gasket on the
water supply inlet on the mop nozzle. Doing so
could tear or damage the rubber.
NOTE
• Storing mop pads in a damp state can result in
an unpleasant odor.
• Hand-wash the mop pads with a neutral
detergent.
• Do not use bleach or fabric softener when
washing the mop pads.
• Do not dry the pads in a clothes dryer.
• Do not boil the mop pad. The mop pad may
become deformed.
EN
EN
Using the Nozzles
This feature is only available on some models.
Before Using the Nozzles
• Specialized attachments can help you clean
more effectively.
• Nozzles can be attached to the product body or
the extension pipe.
• Adjust the suction power if the inlet gets stuck
on the floor, carpet, or bedding.
Using the Tools
This feature is only available on some models.
Before Using the Tools
• Specialized attachments can help you clean
more effectively.
• Tools can be attached to the product body or
the extension pipe.
• Adjust the suction power if the inlet gets stuck
on the floor, carpet, or bedding.
Power Drive Carpet Nozzle
Use this nozzle to clean carpets or rugs.
• If used on hard flooring, this nozzle will be
noisy.
CAUTION
• Do not use this nozzle on PVC play mats for
children. Doing so may cause static electricity
to accumulate on the appliance.
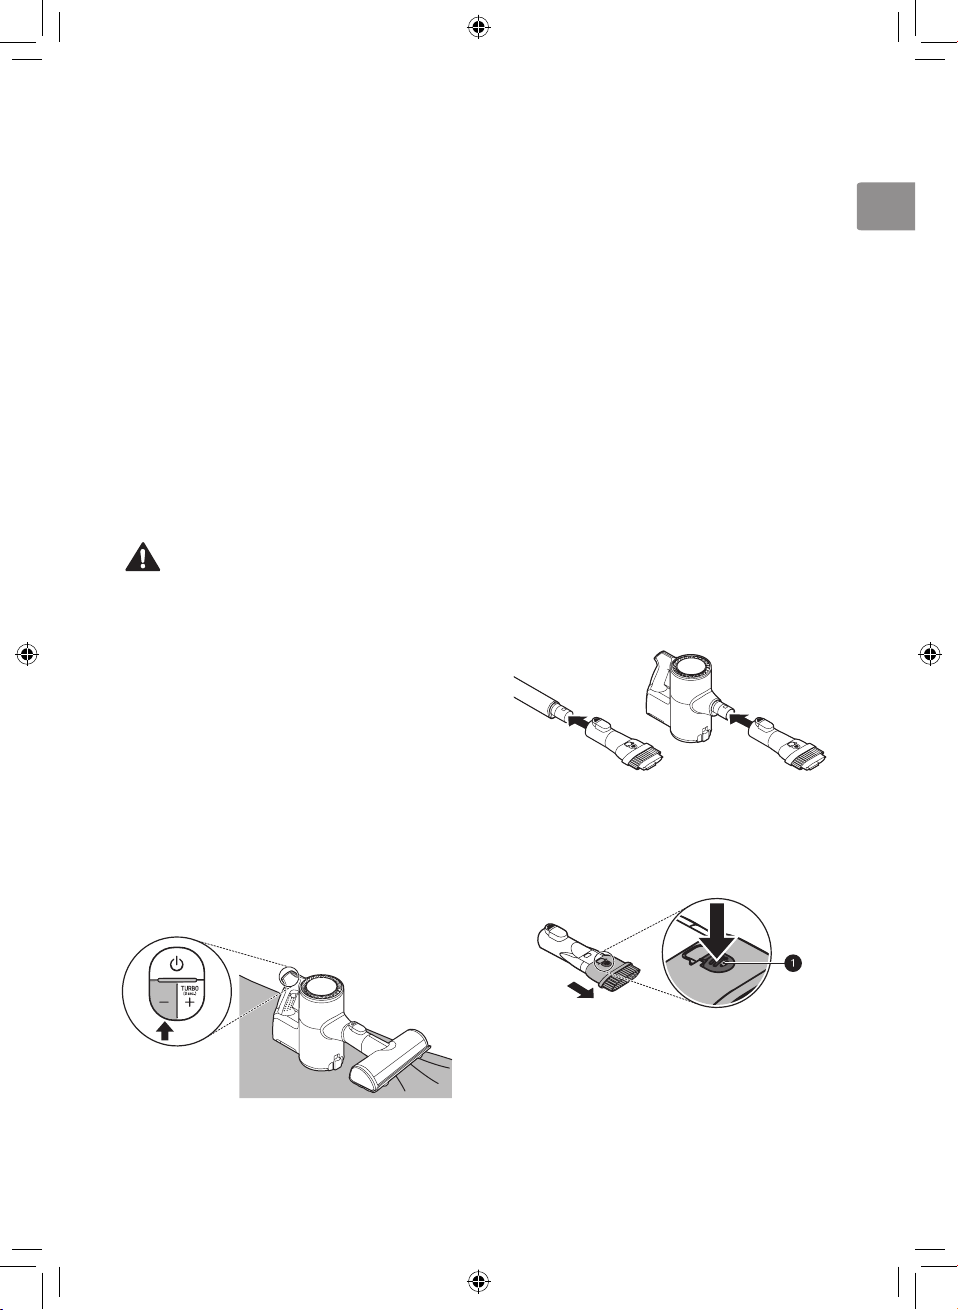
Power Drive Floor Nozzle
Use this nozzle to clean hard floor surfaces.
Bedding Power Punch Nozzle
The Bedding Power Punch Nozzle lets you clean
sheets and bedding more effectively. It removes
dust in bedding using strong suction and a
punching motion.
• Lower the suction level when vacuuming
bedding such as duvet covers to avoid the thin
fabric getting sucked into the nozzle.
Total Care Tools
Combination Tool
Can be used in either basic mode or brush mode
for cleaning corners or small gaps where dust and
dirt gather.
• Basic Mode
Use the tool in the basic mode to clean flat
surfaces such as sofas or mattresses.
• Brush Mode
Use the tool in the brush mode to clean delicate
surfaces such as frames or furniture.
− To convert modes, press the adjustment
button a and push forward.
29
EN
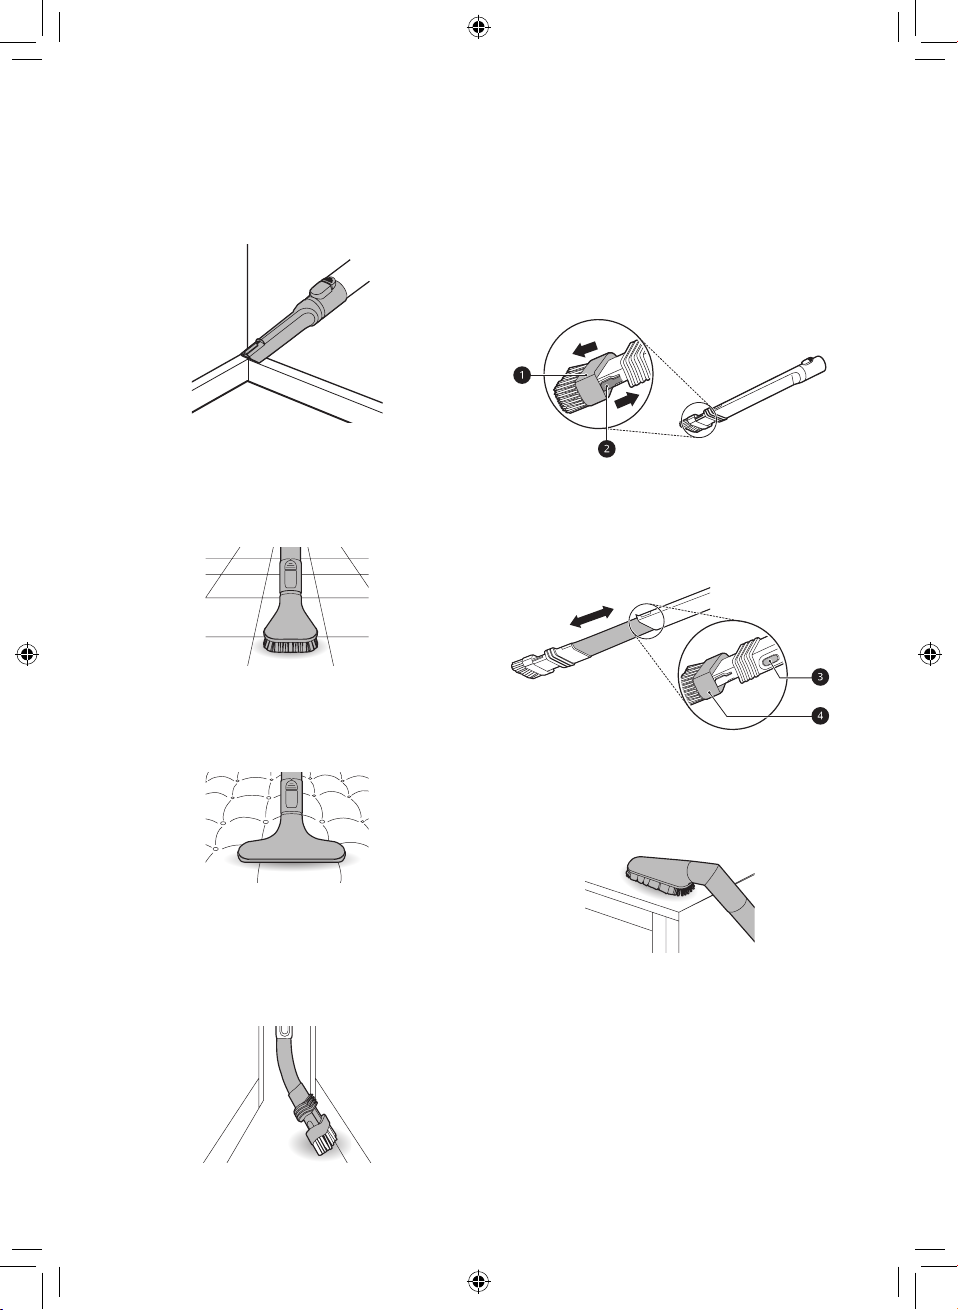
Crevice Tool
Use this tool to remove dust from corners or
narrow spaces.
• Using the Brush
To convert the tool from crevice to brush mode,
grab the sides of the brush head a and pull the
brush down.
− To convert back to the crevice mode, press in
on the brush release button b and slide the
brush up.
Hard Dirt Tool
• Firm bristles remove solidified dirt from hard
surfaces. Clean up hair or foreign objects
that are entangled in carpets or rugs.
Mattress Tool
Use this tool to clean up dust and foreign objects
from mattresses, delicate fabrics, and upholstery.
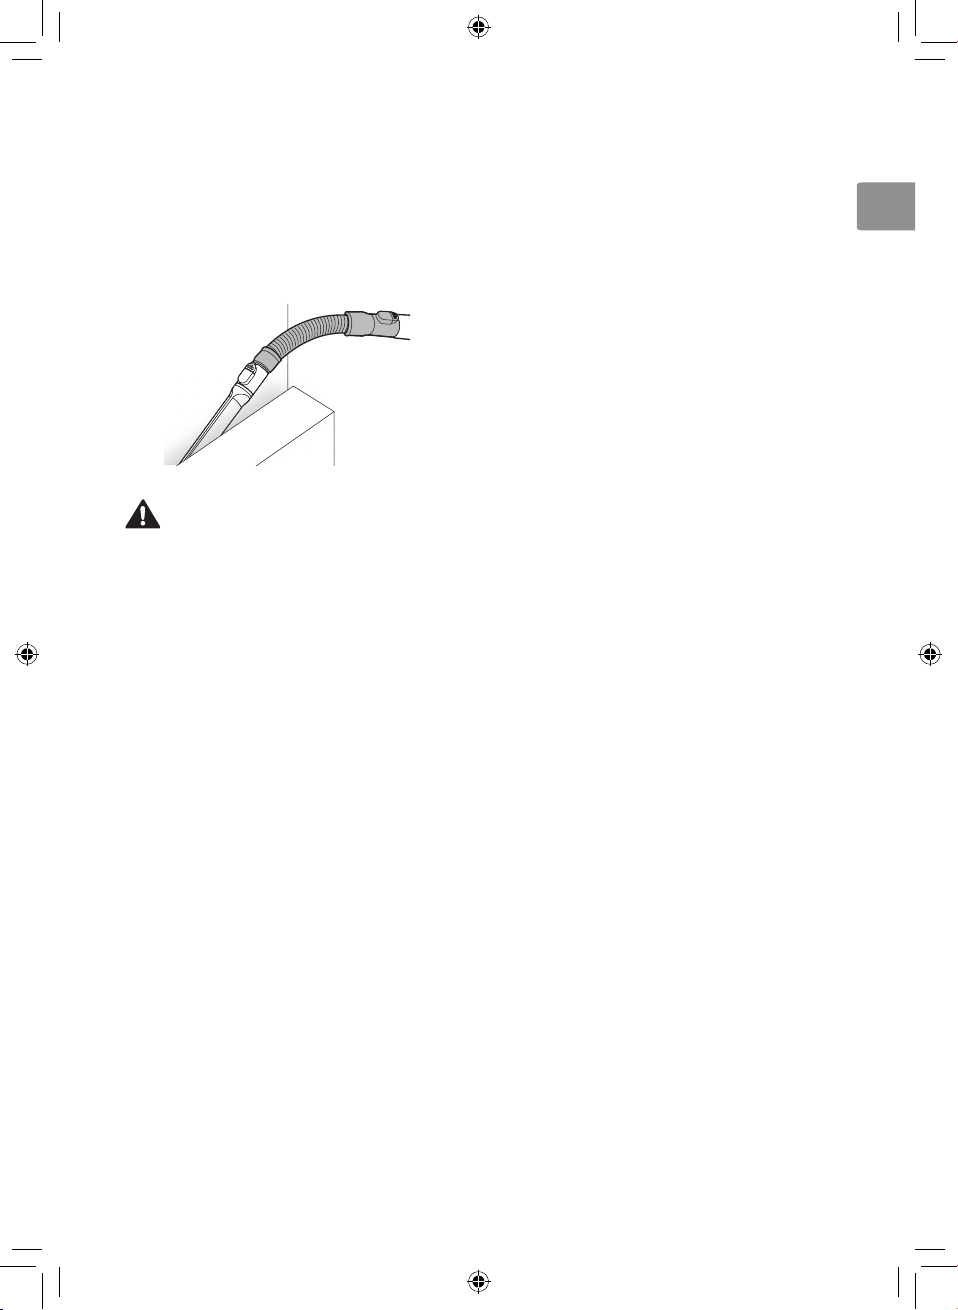
Flexible Crevice Tool
This tool is flexible and its length can be adjusted,
making it especially useful for cleaning inside
vehicles or in narrow spaces under and behind
furniture where an angled tool is needed.
• Adjusting the Length
− To adjust the length of the tool, press and
hold the release button c on the side of the
tool. Pull or push on the brush head d to
extend or retract the extension tube.
Multi-angle Tool
This tool has a soft brush that can be adjusted to
a variety of angles, making it especially useful for
cleaning vehicle consoles or the tops of furniture.
30
EN
EN
Flexible Hose Extension
Connect this flexible, extendable hose between the
product body and the tools to clean hard to reach
areas.
• The flexible hose extension cannot be used
with the Power Drive Nozzle.
CAUTION
• Do not use the appliance for any purpose other
than domestic household cleaning.
• Keep fingers away from pinch points when
assembling the appliance or the charging
station.
• Using the appliance for a long time with a tool
connected may overheat the motor.
• If any foreign object is sucked into the inlet
during cleaning, the appliance might stop in
order to prevent damage to the product body
or motor. Immediately stop using the appliance
and remove the foreign object before resuming
cleaning.
• Do not use tools to clean a TV, monitor or LCD
display as they may scratch these surfaces.
31

EN
MAINTENANCE
Cleaning the Appliance
Before Cleaning the Appliance
• Turn off the power before cleaning the
appliance.
• To maintain the optimum suction power, the
Cyclonic Mesh Filter, the exhaust filter and the
pre-filter should be cleaned at least once a
month.
• The pre-filter will wear out with time and
use and will eventually need to be replaced.
Contact the customer service department of LG
Electronics if the problem persists.
Removing Foreign Objects
In order to maintain product performance, be sure
to remove any foreign objects and dust from inside
the product body, extension pipe or air inlets.
• Foreign materials inside the product can cause
noise, have poor suction, or shut down during
operation.
• If the inside of the product body, extension
pipe, inlets, pre-filter, or exhaust filter is
clogged with foreign objects, the power
automatically turns off to protect the appliance.
Separate the battery from the product body and
remove the foreign objects before resuming
use of the appliance.
Cleaning the Dust Bin
Empty and clean the dust bin after every use.
• If the dust bin is completely full of dust or the
filter is clogged, the suction power may be
reduced.
Remove the battery from the product body
1
before cleaning the dust bin.
Press the dust bin cover release button a to
2
open the dust bin cover. Empty the dust bin by
shaking.
• Be careful as dust or foreign objects may
spill out when opening the dustbin. Empty
the dust bin into a wastebasket or where
dust and foreign objects can be emptied
easily.
Insert the crevice tool c into the Cyclonic
3
Mesh Filter b and turn it counterclockwise to
remove the filter.
32

EN
EN
Wash the Cyclonic Mesh Filter under running
4
water.
• To avoid odor, allow the Cyclonic Mesh
Filter to dry completely in a well-ventilated
area out of direct sunlight for at least 24
hours before reassembling.
Use the combination tool to clean out dust or
5
foreign objects inside the dust bin.
WARNING
• Never wash the product body with water. Water
could reach the motor and cause electric shock
or fire.
• Do not use the product body to suck up oils or
any liquids, including water.
• Do not use the appliance without the Cyclonic
Mesh Filter installed. Doing so could damage
the product.
• Do not inser t fingers or sharp objects into
the motor to avoid product damage, personal
injury, or electric shock.
• Do not allow foreign objects to reach the motor
to avoid product damage, explosion or fire.
Cleaning the Filters
Clean the pre-filter and exhaust filter at least once
a month to maintain the optimum suction power of
the appliance.
• Clean the filters more frequently if the
appliance is used regularly or in areas with a
lot of dust.
Rotate the exhaust filter a to the unlocked
1
position b to separate it from the product
body.
Lift out the pre-filter c from the product body.
2
Use the combination tool d to clean any dust
3
off the motor.
• Do not wash the motor with water.
CAUTION
• Do not apply force or allow impacts to the
Cyclonic Mesh Filter. Doing so could deform
the filter, compromise product per formance, or
cause the product to malfunction.
33

EN
Clean the exhaust filter by brushing the dust
4
off or by washing it in running water.
• To avoid odor, allow the exhaust filter to dry
completely in a well-ventilated area out of
direct sunlight for at least 24 hours before
reassembling.
Clean the pre-filter by brushing the dust off or
5
by washing it in running water.
• As a spare pre-filter is provided for
your convenience, use two pre-filters
alternatively if necessary.
• To avoid odor, allow the pre-filter to dry
completely in a well-ventilated area out of
direct sunlight for at least 24 hours before
reassembling.
CAUTION
• Do not use the appliance without the exhaust
filter and pre-filter installed. Doing so could
result in product damage.
Cleaning the Power Drive Carpet
Nozzle/Power Drive Floor Nozzle
Clean the brush and roller heads before each use.
• If the brush contains foreign objects, the brush
may not spin or a noise may occur during
operation.
Press the nozzle release button a to remove
1
the nozzle from the extension pipe or product
body.
Turn the nozzle upside down and rotate the
2
cover lock slot b counterclockwise.
Insert the clean, dry pre-filter and rotate the
6
exhaust filter to the locked position e to
reassemble it on the product body.
34
Pull the brush cover forward and pull the brush
3
out.

EN
EN
Attach the crevice tool to the product body
4
and use the vacuum to remove foreign objects
and dust from the brush and the bottom of the
nozzle.
Use a damp towel or cloth to remove any
5
remaining foreign objects and dust from the
brush and the bottom of the nozzle.
• Do not rinse or submerge the rotating brush
or nozzle in water.
Slide the brush back into the nozzle and rotate
6
the cover back into place. Turn the cover lock
clockwise to lock the cover.
Cleaning the Bedding Power
Punch Nozzle
Separate the Bedding Power Punch Nozzle
1
from the product body and turn the nozzle
upside down.
Attach the crevice tool to the product body and
2
use the vacuum to remove foreign objects and
dust from the bottom of the Bedding Power
Punch Nozzle.
Use a damp towel or cloth to remove any
3
remaining foreign objects and dust from the
bottom of the Bedding Power Punch Nozzle.
After cleaning, wipe the nozzle dry.
• Do not rinse or submerge the Bedding
Power Punch Nozzle in water.
WARNING
• Never wash the rotating brush and the nozzle
with water. Water could reach the motor and
cause electric shock or fire.
• Do not use the rotating brush and the nozzle to
suck up oils or any liquids, including water.
CAUTION
• Keep fingers away from pinch points when
assembling the appliance or the charging
station.
• Do not use the rotating brush as a wet mop.
WARNING
• Never wash the Bedding Power Punch Nozzle
with water. Water could reach the motor and
cause electric shock or fire.
• Do not use the Bedding Power Punch Nozzle to
suck up oils or any liquids, including water.
35

EN
Cleaning the Mop Nozzle
Press the nozzle release button a to remove
1
the mop nozzle from the extension pipe.
Attach the crevice tool to the product body and
2
use the vacuum to remove foreign objects and
dust from the bottom of the mop nozzle.
Use a damp towel or cloth to remove any
3
remaining foreign objects and dust from the
bottom of the mop nozzle.
• Foreign objects remaining on the nozzle
may result in a bad smell.
WARNING
• Always separate the mop nozzle from the
product body or remove the battery before
cleaning. If the mop attachment plate starts to
rotate during cleaning, it could cause an injury.
• Never wash the mop nozzle with water. Water
could reach the motor and cause electric shock
or fire.
• Do not use the mop nozzle to suck up oils or
any liquids, including water.
36

EN
EN
TROUBLESHOOTING
Before Calling for Service
Troubleshooting Guide
Save time and money by checking the following before calling for service.
Symptoms Possible Causes & Solution
The appliance
does not
operate.
Suction power is
too weak.
The product
body does not
appear to be
charging.
A strange odor is
coming from the
appliance.
Battery is fully discharged.
• Charge the battery.
Appliance is turned off.
• Press the power button to turn on the appliance.
Dust bin is full of dust.
• Empty the dust bin.
Filters are clogged.
• Clean the pre-filter and the exhaust filter.
Inlet is clogged.
• Remove any foreign objects from inside the product body or the extension pipe.
Foreign object is on rotating brush, or in inlet port.
• Remove any foreign objects (thread, hair) from the rotating brush or the inlet port.
Power adapter is not connected to the charging station.
• Plug the adapter firmly into the charging station.
Power cord is unplugged.
• Plug the power cord securely into the charging station.
Foreign object is on the charging terminals.
• Remove dirt or foreign objects from the charging terminals with a dry cloth.
Appliance was purchased within the last 3 months.
• The cleaner may emit a smell of rubber for about 3 months after purchase.
Dust bin is full of dust.
• The dust in the bin may cause some odor. Empty the bin and clean it.
Foreign object is on the filter.
• The filter may emit an odor if it has not been cleaned for some time. Clean the
pre-filter and exhaust filter regularly.
Pre-filter was installed while damp or wet.
• Wash the pre-filter with running water. To avoid odor, allow the pre-filter to dry
completely in a well-ventilated area out of direct sunlight for at least 24 hours
before reassembling.
Exhaust filter was installed while damp or wet.
• Wash the exhaust filter with running water. To avoid odor, allow the exhaust filter
to dry completely in a well-ventilated area out of direct sunlight for at least 24
hours before reassembling.
Foreign object is on the dust inlet of the mop nozzle.
• Wet dust in the mop nozzle may result in odor. Make sure to wipe the dust inlet of
the mop nozzle with a wet wipe after each use.
37

EN
Symptoms Possible Causes & Solution
Hot air is
expelled from
the appliance.
The appliance
makes too much
noise.
The appliance
turns off
unexpectedly
or by itself
after the motor
speed fluctuates
repeatedly.
The rotating
brush does not
rotate.
The mop pad
attachment plate
does not rotate.
There is no water
coming out of
the mop nozzle.
There is
moisture in the
water tank.
Using the mop
nozzle makes the
floor dirtier.
Appliance is operating.
• The hot air originates from cooling of the motor and is not a sign of malfunction.
Vacuum cleaner operates in Turbo mode.
• The motor may be louder at the higher suction power settings. This is normal.
Battery is not fully charged.
• The battery must be fully charged before cleaning. If the problem persists
when the battery is fully charged and the pipes and attachments are clear from
obstructions, contact an LG customer information center for service.
Foreign object is in the product body, extension pipe, inlet port or nozzle.
• Remove any foreign objects from the product body, extension pipe, inlet port or
nozzle.
Filters are clogged.
• Clean the pre-filter and the exhaust filter.
Brush is improperly installed.
• Remove the brush, clean it if necessary and attach it again.
Foreign object is on rotating brush.
• Remove any foreign objects from the rotating brush.
Mop pads are improperly installed.
• Remove the mop pads, clean it if necessary and attach it again.
Mop nozzle is strongly pressed.
• The mop attachment plate stops automatically to protect the product. This is not a
failure. Attach the mop pads securely to the mop attachment plate and press the
power button to resume use.
Foreign object is between mop attachment plate and mop pads.
• Remove foreign objects from the mop nozzle attachment plate and press the
power button to resume use.
Water tank is empty.
• Fill the water tank. Remove the battery or detach the nozzle before filling the
water tank.
Water tank is improperly attached to mop nozzle.
• Properly attach the water tank to the mop nozzle. Remove the battery or detach
the nozzle before properly securing the water tank to the nozzle.
Water supply adjustment button is set to STOP.
• Press the High or Low water adjustment button all the way down. The water will
not come out if the button is set to STOP.
Water tank is not allowed to dry completely after use.
• Empty the water tank, set it out of direct sunlight, and allow it to dry completely
after use.
Mop pads is not cleaned properly after use.
• Clean the mop pads thoroughly after each use. Cleaning with a soiled mop may
make the floor dirtier.
38
System Standards Information
EAC - Eurasian Conformity Mark
The Eurasian Conformity mark (EAC) is a certification mark to indicate that the product
conforms to all technical regulations of the Eurasian Customs Union procedures
Information of the Packaging Materials
The symbol “not for food products” is applied in accordance with the technical regulations of
the Customs Union “On the safety of packaging” 005/2011 and indicates that the packaging of
this product is not intended for reuse and is recyclable. It is prohibited to use the packaging of
this product for storage of food products.
The symbol “Moebius loop” indicates the possibility of recycling the package. The symbol can
be supplemented by the designation of the packaging material in the form of a digital and / or
letter designation.
Information of the Production Date
“Production date indicated on the label located inside the battery cavity at the bottom of the handle on the
product body. • Format of Date: YYYY/MM”
LG Customer Support Service
Information on certification of our devices, data on the certificate number and its validity period, you can get
in the LG Customer Support Service by free phones.

Memo

RU
РУКОВОДСТВО ПОЛЬЗОВАТЕЛЯ
A9
Обязательно внимательно прочитайте «Технику безопасности», прежде чем использовать данный
прибор.
Храните данное руководство пользователя в пределах легкой досягаемости для пользователя.
Так как этот прибор предназначен исключительно для домашнего использования, например домашней
уборки, он не должен использоваться для коммерческих, экспериментальных или промышленных целей.
Перед первым использованием прибора после покупки обязательно полностью зарядите его
аккумулятор.
Copyright © 2019-2020 LG Electronics Inc. Все права защищены.
www.lg.com


СОДЕРЖАНИЕ
В данном руководстве могут встречаться
изображения или материалы, не
относящиеся к купленной вами модели.
Производитель может вносить изменения
в содержание руководства.
ТЕХНИКА БЕЗОПАСНОСТИ ........................................................4
Сообщения по технике безопасности ............................................................4
УСТАНОВКА ................................................................................ 14
Компоненты и их характеристики.................................................................14
Установка зарядной станции .......................................................................18
Хранение принадлежностей .........................................................................22
ЭКСПЛУАТАЦИЯ ......................................................................... 24
Начало работы ..............................................................................................24
Зарядка аккумулятора ..................................................................................26
Использование моющей насадки .................................................................27
Использование насадок ................................................................................31
Использование дополнительных насадок ................................................... 32
ТЕХНИЧЕСКОЕ ОБСЛУЖИВАНИЕ ........................................... 34
Чистка прибора .............................................................................................34
ПОИСК И УСТРАНЕНИЕ НЕИСПРАВНОСТЕЙ ......................... 39
Перед обращением в сервисный центр ......................................................39
RU
ТЕХНИКА БЕЗОПАСНОСТИ
Сообщения по технике безопасности
Чтение сообщений по технике безопасности
Следующие рекомендации по технике безопасности призваны
предотвратить непредвиденные риски и ущерб, вызванные
небезопасной либо неверной эксплуатацией прибора.
Рекомендации делятся на две категории: ОСТОРОЖНО!
и ВНИМАНИЕ! (см. ниже).
Этим символом помечены действия, связанные
с повышенной опасностью. Внимательно прочтите
соответствующий текст и следуйте инструкциям, чтобы
избежать риска.
ОСТОРОЖНО!
Означает, что несоблюдение инструкций может привести
к серьезной травме или смерти.
ВНИМАНИЕ!
Означает, что несоблюдение инструкций может привести
к легкой травме или к поломке изделия.
ОСТОРОЖНО!
Чтобы снизить опасность пожара, удара током или
получения травм при использовании изделия, необходимо
принять следующие основные меры предосторожности.
Техническая безопасность
• Изделие не предназначено для использования лицами
(включая детей) со сниженными физическими или умственными
способностями, болезнями органов чувств, недостаточным опытом
и знаниями. Указанные категории должны использовать изделие
после обучения и под присмотром лица, ответственного за их
безопасность. Не позволяйте детям играть с пылесосом.
4

RU
RU
• Если кабель питания поврежден, во избежание потенциальной
опасности его необходимо заменить в сервисном центре или у
дилера LG Electronics.
• Не разрешайте детям играть с прибором или висеть на нем.
• Не пользуйтесь прибором на мокрой поверхности.
• Уберите кабели от других приборов с места, где будет проводиться
уборка.
Аккумулятор
• Не используйте с данным прибором аккумулятор, адаптер и
зарядную станцию от других приборов. Используйте только
аккумулятор и зарядную станцию, предоставленные LG Electronics.
• Не используйте аккумулятор, адаптер и зарядную станцию от
данного прибора с другими приборами.
• Не используйте потекший или деформированный аккумулятор. При
попадании электролита аккумулятора на кожу или в глаза сразу же
тщательно промойте место попадания чистой водой и обратитесь за
медицинской помощью.
• Если аккумулятор больше не держит заряд, его следует заменить.
• Способ замены аккумулятора описан в разделе «Зарядка».
• При утилизации прибора обязательно выньте из него аккумулятор.
• При работе с аккумулятором и его утилизации соблюдайте все
местные постановления и регламенты.
Технические характеристики аккумулятора
• В комплект входит один или два аккумулятора. Их количество
зависит от приобретенной модели.
Название модели EAC63382***
Тип Перезаряжаемый литий-ионный
аккумулятор
Номинальные
25.55 V
, 2000 мАч
характеристики
5

RU
Установка
• Во избежание поражения электрическим током или пожара не
рекомендуется устанавливать, заряжать и хранить прибор в тех
местах, где он может подвергаться воздействию воды, дождя или
высокой влажности.
• Прибор необходимо устанавливать, заряжать и хранить в хорошо
проветриваемом помещении.
• Не эксплуатируйте прибор в тех местах, где существует опасность
утечки легковоспламеняющегося газа, технического масла или
металлической пыли.
• Нельзя хранить или располагать прибор, кабель или вилку питания
рядом с обогревательными приборами или источниками открытого
пламени.
• Зарядную станцию необходимо располагать на твердой ровной
поверхности.
• Чтобы предотвратить опрокидывание, напольную стойку следует
прикрепить к стене с помощью поставляемого в комплекте
крепежного винта для стойки, крепежного блока и двустороннего
скотча.
• При настенной установке зарядную станцию необходимо надежно
закрепить на стене с помощью поставляемых в комплекте
крепежных винтов для стены.
• Крепежные винты следует использовать только при креплении на
бетонную или аналогичную твердую поверхность.
• Не сверлите стену, не проверив сначала, нет ли в ней
кабелепроводов, водопроводных труб, вентиляционных каналов или
кабелей.
• Не используйте и не храните прибор при температуре ниже 5 °C или
выше 38 °C.
• Не храните и не устанавливайте прибор в тех местах, где он будет
подвержен воздействию погодных условий или отрицательных
температур.
• При установке или перемещении прибора соблюдайте осторожность,
чтобы не пережать, не сдавить или не повредить кабель или вилку
питания.
6

RU
RU
Эксплуатация
• Перед использованием прибора необходимо ознакомиться со всеми
инструкциями и сохранить их.
• Используйте прибор только в соответствии с настоящим
руководством. Используйте только те приспособления, которые
рекомендованы производителем.
• Данный прибор предназначен только для использования в быту
в обычных условиях внутри помещений. Он не предназначен для
небытового, коммерческого или промышленного применения.
• Не используйте прибор вне помещений, в гараже или на мокрой
поверхности.
• Данное изделие следует подключать только к розеткам электросети
со следующими параметрами: 100–240 В перем. тока, 50/60 Гц.
Проверьте характеристики электросети в месте, где будет
использоваться прибор.
• Не прикасайтесь к кабелю, вилке электропитания или кнопкам
управления мокрыми руками.
• Сухой тканью сотрите с кабеля питания и с вилки воду или грязь.
• При отключении прибора от сети беритесь за вилку, а не за кабель.
Отключение за кабель может привести к его повреждению и
привести к поражению электрическим током или возгоранию.
• Ни в коем случае не пытайтесь использовать поврежденное,
неисправное, частично разобранное изделие, с отсутствующими или
сломанными деталями (включая поврежденный кабель или вилку).
Отнесите его в авторизованный сервисный центр или к дилеру LG
Electronics для получения помощи.
• Не прилагайте чрезмерных усилий к кабелю питания, не перегибайте
его и не помещайте под тяжелые предметы, так как это может
привести к его повреждению.
• Не используйте с данным прибором адаптеры с несколькими
розетками. Удостоверьтесь, что используемая розетка рассчитана на
ток 10 A.
• Не подключайте прибор в поврежденную или плохо закрепленную
розетку.
7

RU
• Если прибор не будет использоваться длительное время, всегда
отключайте кабель питания от розетки электросети.
• Старайтесь не повреждать, не перекручивать, не зажимать и не
нагревать кабель питания, не вносить в него изменения и не сгибать
его слишком сильно.
• Перед использованием прибора следует удалить с пола проволоку
или нитки.
• При отсоединении кабеля питания от электросети не прикасайтесь
пальцами к штырям вилки питания.
• Не кладите ковровые покрытия поверх кабеля питания.
• При подключении к электросети вилку необходимо плотно вставить в
розетку, чтобы она не болталась.
• Если изделие погружалось в воду, прежде чем продолжить его
использование, необходимо обратиться в сервисный центр или к
дилеру LG Electronics для получения указаний.
• Если прибор издает необычный шум или от него исходит запах или
дым, следует прекратить его использование и обратиться в центр
информационной поддержки LG Electronics.
• Разбирать, ремонтировать прибор или вносить в него изменения
разрешено только квалифицированным техникам или
обслуживающему персоналу LG Electronics.
• Запрещено вставлять острые металлические предметы, такие как
спицы, гвозди или ножи, в отверстия или зазоры на приборе или
зарядной станции.
• Данный прибор не предназначен для всасывания жидкостей.
Следите за тем, чтобы внутрь прибора и зарядной станции не
попадала вода, другие жидкости или моющие средства.
• Не допускайте, чтобы при уборке в прибор попадали лезвия,
канцелярские кнопки, опилки, острые предметы, горячий или
холодный пепел.
• Не разрешайте пользоваться прибором детям.
• Не разрешайте детям или домашним животным приближаться к
прибору во время его использования, зарядки или хранения.
• Не берите в рот насадки.
8

RU
RU
• Не приближайте одежду, волосы, пальцы или другие части тела к
отверстиям или подвижным частям прибора.
• Не эксплуатируйте прибор с заблокированным входным или
выходным отверстием для втягивания воздуха.
• Не используйте прибор в замкнутом пространстве, где присутствуют
испарения растворителя для краски, веществ для защиты от моли,
воспламеняемая пыль или другие взрывоопасные или токсичные
материалы.
• Перед использованием прибора необходимо убедиться, что в него
вставлен фильтр.
• Не используйте прибор с открытым пылесборником.
• Не прикасайтесь к зарядным клеммам прибора или зарядной
станции и не вставляйте наэлектризованные предметы внутрь
прибора или станции.
• Когда прибор не используется, его необходимо хранить в напольной
или настенной зарядной станции.
• Прибор нельзя опирать на стену, стул или стол.
• Если при размещении изделия в зарядной станции произошло
короткое замыкание, следует незамедлительно снять прибор с
зарядной станции. Необходимо обратиться в сервисный центр LG
Electronics.
• Уборку на лестнице следует проводить с особой осторожностью.
• Не используйте и не храните любые нагревательные приборы или
легковоспламеняющиеся вещества (эфир, бензин, спирт, химикаты,
горючие аэрозоли, инсектициды, освежители воздуха или косметику)
в непосредственной близости от прибора.
• Не собирайте прибором жидкости (воду, напитки), пахучие вещества
(леденцы, шоколад, экскременты животных), металлические
предметы (лезвия, булавки), воспламеняющиеся вещества,
поверхностно-активные вещества или осколки стекла.
• В случае утечки газа (природного газа, пропана и т. д.) не
используйте данный прибор, а также любые другие приборы.
Незамедлительно откройте окно или дверь, чтобы проветрить
помещение.
9

RU
• Не разрешено держать зарядную станцию в перевернутом
положении, если в ней находится аккумулятор.
• Не пытайтесь самостоятельно разбирать или извлекать аккумулятор
и не допускайте его короткого замыкания.
• Не подвергайте прибор, в частности аккумулятор, воздействию
тепла, обогревательных приборов и прямых солнечных лучей.
• Не оставляйте прибор или аккумулятор в транспортном средстве,
которое находится под воздействием прямых солнечных лучей.
• Не допускайте попадания воды, напитков или чистящих средств
внутрь аккумулятора.
• Не прикладывайте физические усилия к аккумулятору.
Техническое обслуживание
• Перед очисткой и обслуживанием зарядной станции всегда
отсоединяйте от электросети кабель питания.
• Не мойте входное отверстие или контейнер для пыли с помощью
воды или чистящих средств.
• Для очистки пылесборника не пользуйтесь чистящими средствами,
полировальными веществами или освежителями воздуха.
• Не наносите и не распыляйте на поверхность прибора
воспламеняющиеся вещества (бензин или растворитель) или
поверхностно-активные вещества (чистящие средства или туалетное
мыло).
• После того как брали в руки насадку, необходимо вымыть руки.
Насадки содержат углеродное волокно, которое при контакте с кожей
может вызывать незначительное раздражение.
Утилизация
• Упаковочные материалы необходимо хранить вне досягаемости от
детей. Они могут представлять для детей опасность удушения.
10

RU
RU
• После распаковки прибора следует уничтожить картонную коробку,
пластиковый пакет и другие упаковочные материалы, поскольку дети
могут воспользоваться ими для игр. Картонные коробки, накрытые
ковровым покрытием, покрывалом или пленкой могут не пропускать
воздух.
• Утилизацию данного бытового прибора следует проводить в
соответствии с местными, государственными и региональными
регламентами и законодательством.
• Перед утилизацией прибора необходимо обратиться в местную
городскую администрацию или соответствующий орган власти.
Моющая насадка
• Не рекомендуется засасывать установленной насадкой острые
предметы (осколки стекла, проволоку, лезвия, булавки и т.д.). При
стирке моющих щеток после уборки можно получить повреждения от
острых предметов, застрявших в щетке.
ВНИМАНИЕ!
Чтобы при использовании прибора снизить опасность
получения травмы, возникновения неисправности или
повреждения изделия или имущества, необходимо
соблюдать основные меры предосторожности, в том числе
перечисленные ниже.
Эксплуатация
• В данном приборе имеется встроенное предохранительное
устройство, предотвращающее повреждение вследствие перегрева.
При перегреве прибора после продолжительного использования он
может автоматически отключиться. В этом случае, прежде чем снова
включить прибор, его необходимо оставить в прохладном хорошо
проветриваемом помещении примерно на час.
• Не подвергайте прибор ударам и не роняйте его.
• Когда прибор не используется, закрепите его в зарядной станции,
чтобы исключить падение.
• Не устанавливайте влажные или мокрые фильтры.
11

RU
• Перед использованием прибора вытрите с пола любые жидкости,
такие как вода, масло или экскременты животных.
• Не очищайте прибор с помощью летучих или органических средств
(растворителей или ацетона).
• Для очистки прибора используйте только мягкую ткань.
• При использовании прибора следите за окружающей обстановкой,
чтобы избежать столкновения с людьми или животными.
• Не пинайте прибор и не прикладывайте к нему больших усилий.
• Не устанавливайте в зарядную станцию какие-либо другие
предметы, особенно с металлическими или магнитными свойствами.
• Не убирайте одно и то же место в течение длительного периода
времени.
• Вибрация от входного отверстия или вращающейся щетки может
повредить пол или ковровое покрытие.
• При сборке прибора или зарядной станции не подносите пальцы к
тем местам, где их может защемить.
• Не позволяйте детям и животным висеть на зарядной станции.
• При установке зарядной станции соблюдайте все применимые
государственные или местные нормы и регламенты.
• Не используйте двусторонний скотч для крепления зарядной станции
на обои. Для ее крепления пользуйтесь поставляемыми в комплекте
винтами. Обои могут повредиться под весом зарядной станции и
прибора.
• Не прикладывайте усилий к циклонному сетчатому фильтру и не
допускайте ударов по нему.
• Не извлекайте аккумулятор во время работы.
Моющая насадка
• Не помещайте на хранение прибор, если на моющую насадку
установлен заполненный бачок для воды.
• Не храните бачок для воды при температуре 0 °C или ниже.
12

RU
RU
• Не убирайте моющей насадкой в одном и том же месте в течение
длительного периода времени. Впрыск воды на моющую насадку
может привести к попаданию воды на входное пылевое отверстие и
повредить прибор.
• Не используйте моющую насадку для каких-либо целей помимо
уборки полов (например, для полировки машины, мойки окон).
• Не наступайте на моющую насадку. Это может привести к
повреждению изделия.
• Не используйте моющую насадку для собирания жидкостей (воды,
напитков).
• При использовании моющей насадки всегда устанавливайте на
нее моющие щетки. В противном случае можно повредить пол или
ковровое покрытие.
• Не производите чистку ковровых покрытий с помощью моющей
насадки. Ковровое покрытие может зацепиться за «липучку», что
приведет к его повреждению.
• Не мойте моющей насадкой пол с нанесенным покрытием. При
неоднократной мойке такого пола покрытие может отслоиться.
• Не мойте моющей насадкой чувствительный съемный пол. Пол
может впитать влагу и деформироваться.
• Не мойте моющей насадкой неровный пол.
• На мокром полу можно поскользнуться. Перед тем как ходить по
полу, дайте ему полностью высохнуть.
13

RU
УСТАНОВКА
Компоненты и их характеристики
Напольный вариант Настенный вариант
Адаптер
a
Зарядная станция с держателями для
b
насадок
Аккумулятор
c
Корпус прибора
d
Корпус прибора
Телескопическая трубка
e
Насадка
f
Платформа напольной стойки
g
Труба напольной стойки
h
Съемный модуль для хранения насадок
i
Выходной фильтр
a
Фильтр предварительной очистки
b
Циклонный сетчатый фильтр
c
14

RU
RU
Принадлежности
Принадлежности, входящие в комплект
* Данная принадлежность доступна не у всех моделей.
a
b
c
d
e
f
g
Насадки
a
b
c
Зарядная станция
Телескопическая трубка
Адаптер
Щелевая насадка
Комбинированная насадка
Фильтр предварительной очистки
Аккумулятор (двойной аккумулятор *)
Насадка с электроприводом для ковра *
Насадка с электроприводом для пола *
Насадка для взбивания постельного белья*
Набор для установки
Платформа напольной стойки *
a
Труба напольной стойки *
b
Съемный модуль для хранения насадок *
c
Крепежный блок для стены *
d
Двусторонний скотч *
e
Дюбель для гипсокартона *
f
Крепежный винт для стены *
g
Крепежный винт для стойки *
h
15

RU
Дополнительные насадки
Насадка для твердых загрязнений *
a
Насадка для матрасов *
b
Насадка с переменным углом *
c
Гибкая щелевая насадка *
d
Гибкий удлинительный шланг *
e
Мешок для дополнительных насадок *
f
Моющий набор
Моющая насадка *
a
Съемный модуль для хранения насадок и
b
моющих щеток *
Стандартные моющие щетки для общей
c
уборки *
Мерный стакан *
d
ПРИМЕЧАНИЕ.
Моющие щетки, аккумуляторы, выходной фильтр и фильтр предварительной очистки со временем
нуждаются в замене. Обратитесь в отдел обслуживания клиентов LG Electronics, если проблема не
устранена.
16

RU
RU
Технические характеристики
Прибор
Модель A9**********
Размеры 260 (Ш) × 270 (Г) × 1120 мм (В)
Масса Около 2,7 кг
Потребляемая
мощность
Время работы от
аккумулятора
400 Вт в турбо-режиме (не более 450 Вт)
250 Вт в режиме повышенной мощности
80 Вт в обычном режиме
До 6 минут в турбо-режиме
До 9 минут в режиме повышенной мощности
До 30 минут в обычном режиме (с насадкой с электроприводом)
До 40 минут в обычном режиме (без насадки с электроприводом)
До 80 минут в режиме «Мытье полов» (рекомендуемая
продолжительность использования)
Адаптер питания зарядного устройства
Входные
параметры
Выходные
параметры
• Приведенные размеры соответствуют прибору, состоящему из корпуса, телескопической трубки и
насадки в сборе.
• Время работы от аккумулятора представляет собой результат использования полностью
заряженного аккумулятора согласно стандарту испытаний LG Electronics. Результаты могут
отличаться в зависимости от реальных условий и периода использования.
• В насадке с электроприводом имеется электродвигатель с прямым приводом, который
непосредственно вращает чистящую головку насадки.
100–240 В перем. тока, 50/60 Гц
29.4 V
17

RU
Установка зарядной
станции
Напольная установка
Установите зарядную станцию на твердом
ровном полу.
ОСТОРОЖНО!
• Чтобы предотвратить опрокидывание,
напольную стойку следует прикрепить к
стене с помощью поставляемого в комплекте
крепежного винта для стойки, крепежного
блока и двустороннего скотча.
ВНИМАНИЕ!
• При сборке прибора или зарядной станции
не подносите пальцы к тем местам, где их
может защемить.
Снимите защитную пленку с зарядной
1
станции, корпуса прибора и насадки.
• Если пленку не снять, она может
отрицательно повлиять на работу
прибора.
Поместите платформу напольной стойки b
2
на твердый ровный пол и установите на нее
трубу напольной стойки a.
• После сборки разобрать платформу
и трубу напольной стойки будет
невозможно.
Прочно зажмите шнур питания в держателе
3
для шнура c, расположенном на задней
стороне трубы напольной стойки.
• Не позволяйте детям или животным висеть
на зарядной станции. Они могут получить
травму или повредить прибор.
• Соблюдайте осторожность, чтобы не
уронить части прибора при распаковке и не
повредить прибор или не получить травму.
• Не используйте двухсторонний скотч для
крепления зарядной станции на обои. Обои
могут повредиться под весом зарядной
станции и корпуса прибора.
18

RU
RU
Вставьте съемный модуль для хранения
4
насадок d или съемный модуль для
хранения моющей насадки и моющих щеток
e в опорную трубу зарядной станции.
• Данный аксессуар доступен только для
некоторых моделей.
• Установите съемный модуль для
хранения моющих щеток f на съемный
модуль для хранения насадок, если они
не идут в уже собранном виде.
• После сборки разъединение двух этих
модулей может представлять трудность.
• Убедитесь, что кабель питания не зажат
за модулем для хранения моющих щеток.
Установите зарядную станцию g сверху
5
трубы напольной стойки.
• При необходимости зарядную станцию
можно снять. Для этого необходимо
неподвижно удерживать платформу
напольной стойки и потянуть зарядную
станцию вверх.
Подключите адаптер питания h к разъему
6
на задней стороне зарядной станции.
Просверлите отверстие и вставьте в него
7
дюбель для соответствующей поверхности
стены i.
• Перед сверлением отверстий
удостоверьтесь, что в месте сверления
внутри стены отсутствуют трубы или
электрическая проводка.
• Для дюбеля для гипсокартона:
используйте сверло 6,5 мм.
• Рекомендуемый диаметр отверстия:
6,5 мм
• Рекомендуемая глубина: 60 мм
• При закручивании винтов в гипсокартон
используйте дюбели для гипсокартона.
19

RU
Закрепите зарядную станцию на стене
8
крепежным винтом для стойки j.
Подключите кабель питания к розетке.
9
используйте двусторонний скотч
Для прикрепления крепежного блока для стены
a к зарядной станции и к стене используйте
двусторонний скотч.
• Не используйте двусторонний скотч на обоях.
• Извлеките центральную секцию
двустороннего скотча. Прикрепите крепежный
блок к зарядной станции с помощью скотча.
• Закрепите вторую часть двустороннего
скотча на настенном крепежном блоке и
используйте его, чтобы временно закрепить
зарядную станцию на стене в нужном месте.
Настенная установка
При настенной установке зарядную станцию
необходимо прочно закрепить на стене с
помощью поставляемых в комплекте (коротких)
крепежных винтов для стены.
Подключите адаптер питания к разъему на
1
задней стороне зарядной станции.
Перед сверлением отверстий
2
удостоверьтесь, что в месте сверления
внутри стены отсутствуют трубы или
электрическая проводка.
Зарядная станция должна располагаться
3
не менее чем в 1 м от пола на достаточно
близком расстоянии от розетки, чтобы до
нее дотягивался шнур питания. Отметьте на
стене положение отверстий под винты.
Просверлите 2 отверстия в отмеченных
4
местах и вставьте в них дюбель для
соответствующей поверхности стены.
• Перед сверлением отверстий
удостоверьтесь, что в месте сверления
внутри стены отсутствуют трубы или
электрическая проводка.
• Для дюбеля для гипсокартона:
используйте сверло 6,5 мм.
• Рекомендуемый диаметр отверстия: 6,5 мм
• Рекомендуемая глубина: 60 мм
• При закручивании винтов в гипсокартон
используйте дюбели для гипсокартона.
20
1m

RU
RU
Закрепите зарядную станцию на стене
5
крепежными винтами.
Подключите кабель питания к розетке.
6
ВНИМАНИЕ!
• Не позволяйте детям или животным висеть
на зарядной станции. Они могут получить
травму или повредить прибор.
ПРИМЕЧАНИЕ.
• Стоимость вызова мастера для установки
зарядной станции не покрывается
гарантийными обязательствами.
• При установке зарядной станции на стену
съемный модуль для хранения насадок
нельзя крепить к зарядной станции.
Компактная установка
Из соображений безопасности и удобства
установку зарядной станции следует выполнять
на напольную стойку или на стену. Если решите
не выполнять установку зарядной станции, для
зарядки и хранения разместите ее на ровном
полу.
Подключите адаптер питания к разъему на
1
задней стороне зарядной станции.
Разместите зарядную станцию на твердом
2
ровном полу.
Перед зарядкой прибора или помещением
3
его на хранение следует отсоединить от
корпуса телескопическую трубку и насадку.
Подключите кабель питания к розетке.
4
ВНИМАНИЕ!
• Если надолго оставить прибор с
телескопической трубкой и насадкой на
ровном полу, оно может повредиться.
21

RU
Сборка прибора
Для безопасной сборки прибора произведите
следующие действия.
Хранение
принадлежностей
Прочно закрепите телескопическую трубку
1
c и насадку d или насадку на корпусе
прибора a.
• Чтобы отсоединить телескопическую
трубку, следует нажать на кнопку
отсоединения телескопической трубки b.
Поместите корпус прибора на зарядную
2
станцию.
Хранение насадок
Часто используемые насадки, такие как
комбинированная или щелевая насадка,
рекомендуется хранить на нижней части
зарядной станции.
Прикрепите комбинированную и щелевую
1
насадки к держателям для насадок a.
Чтобы снять комбинированную и щелевую
2
насадки, необходимо нажать и удерживать
кнопку извлечения b и потянуть насадку
вниз.
• Дополнительные насадки можно хранить
в мешке для дополнительных насадок.
ВНИМАНИЕ!
• При сборке прибора или зарядной станции
не подносите пальцы к тем местам, где их
может защемить.
22
ВНИМАНИЕ!
• Не храните корпус прибора или аккумулятор
в мешке для принадлежностей. При
повреждении прибора или аккумулятора
может произойти взрыв или возгорание.
• Не бросайте и не роняйте мешок для
принадлежностей, в котором находятся
принадлежности. Это может их повредить
или причинить травму.
ПРИМЕЧАНИЕ.
• Не используйте мешок для принадлежностей
для других целей помимо хранения насадок.
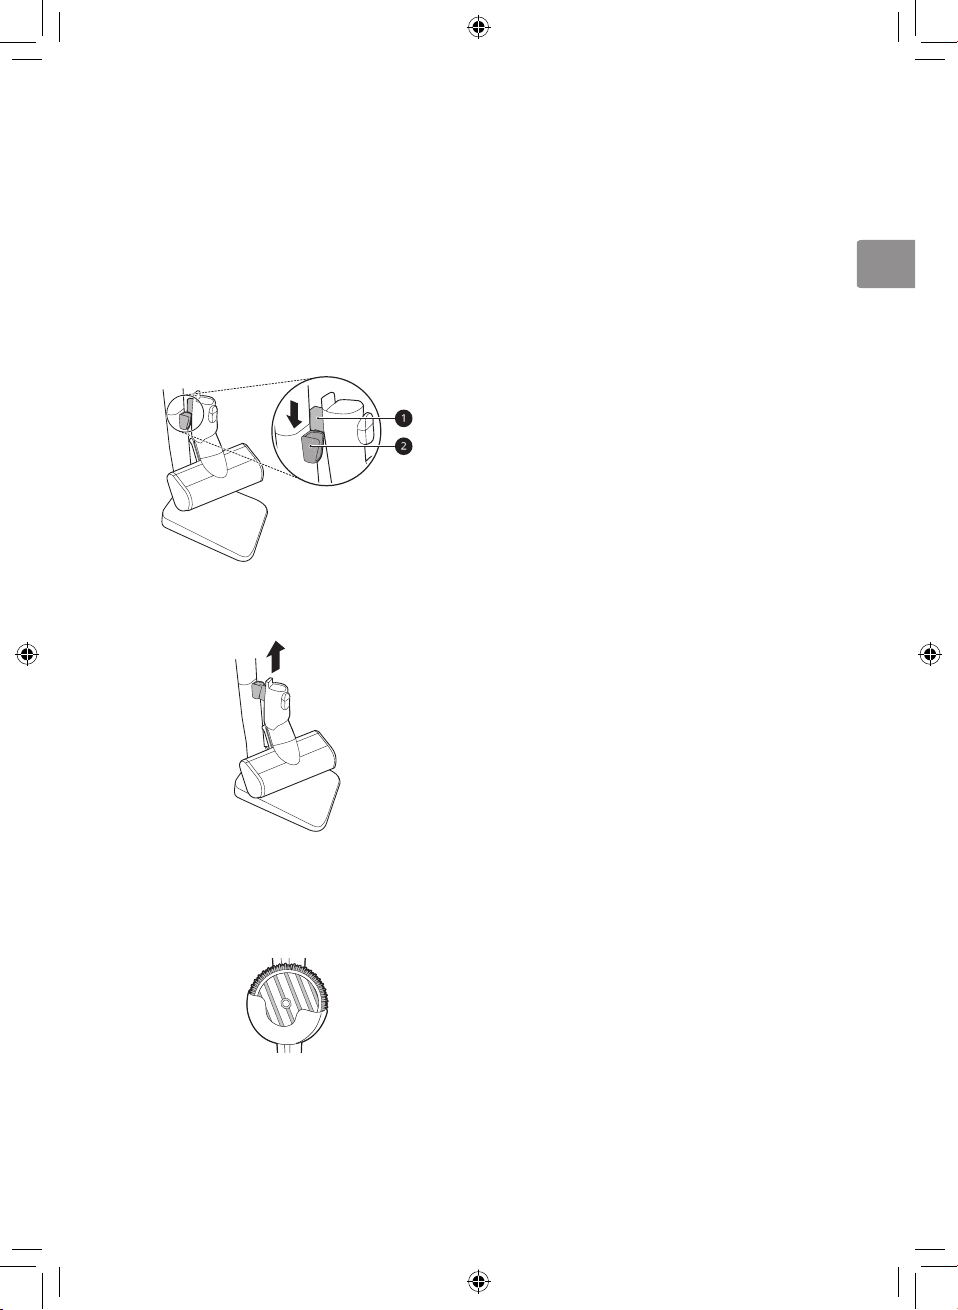
RU
RU
Хранение насадок
Когда насадка не используется, ее можно
хранить в удобном съемном модуле для
хранения насадок, где ее можно будет легко
найти.
Чтобы поместить насадку на хранение,
1
задвиньте крюк a, расположенный на
насадке, в держатель для хранения
насадок b.
Чтобы снять насадку с держателя, его
2
необходимо приподнять.
Хранение моющих щеток
Съемный модуль для хранения моющих щеток
рассчитан на хранение 2 щеток.
23

RU
ЭКСПЛУАТАЦИЯ
Начало работы
Подготовка к использованию
прибора
• Перед использованием прибора закройте
крышку пылесборника. Если ее оставить
открытой, мощность всасывания может
ухудшиться, что повлияет на эффективность
уборки.
• Во время очистки возвышенных
поверхностей поддерживайте прибор за
нижнюю часть.
• Когда прибор не используется, храните
его на зарядной станции или положите его
плашмя на пол. Если опереть прибор о стену
или стул, то в случае падения он может
повредиться или причинить травму.
• Перед использованием прибора
удостоверьтесь, что в него правильно
установлены выходной фильтр и фильтр
предварительной очистки.
• Условия окружающей среды, такие как
температура и влажность, могут привести
к накоплению статического электричества
на приборе. При регулярном возникновении
такой проблемы обратитесь в центр
информационной поддержки LG Electronics.
• Прежде чем использовать прибор,
уберите любые посторонние предметы,
например носки или чулки. Попадание
посторонних предметов во входное
отверстие телескопической трубки будет
препятствовать правильной работе прибора.
• Использовать прибор следует при обычной
комнатной температуре, поскольку
при температуре ниже 5 °C или выше
38 °C время работы аккумулятора
может значительно сократиться на
продолжительное время.
• Время работы от аккумулятора зависит от
типа поверхности и мощности всасывания.
• При чистке напольных, ковровых покрытий
и половиков соблюдайте рекомендации
производителя.
• Чтобы избежать нанесения царапин на
полированный пол, необходимо следить,
чтобы на щетках насадок не было камешков,
песка или абразивных предметов.
• Для получения информации по
продолжительности работы от
аккумулятора см. раздел «Компоненты и их
характеристики».
24
Установка принадлежностей
Насадки можно устанавливать либо на корпус
прибора, либо на телескопическую трубку.
Вставьте полностью заряженный
1
аккумулятор a в полость в нижней части
ручки на корпусе прибора.
Чтобы закрепить насадку или
2
телескопическую трубку на корпусе,
следует надеть их на входной патрубок
b, расположенный на корпусе, до
защелкивания в надлежащем положении.
Насадки также можно устанавливать на
конце телескопической трубки b.
• Чтобы снять принадлежности, следует
нажать на кнопку отсоединения c.
Чтобы отрегулировать длину
3
телескопической трубки, нажмите на кнопку
регулировки длины d, расположенную с
обратной стороны трубки, и выдвигайте
трубку до защелкивания на необходимой
длине.
• Телескопическая трубка выдвигается в
четыре шага.

RU
RU
Для включения обычного режима работы
4
нажмите на кнопку включения Power.
• Чтобы выключить прибор, нажмите
кнопку Power повторно.
ВНИМАНИЕ!
• Работа прибора с надетой насадкой в
течение продолжительного времени может
привести к перегреву электродвигателя.
• В данном приборе имеется встроенное
предохранительное устройство,
предотвращающее перегрев. При перегреве
прибора после продолжительного
использования он может автоматически
отключиться. В этом случае, прежде чем
снова включить прибор, его необходимо
оставить в прохладном хорошо
проветриваемом помещении примерно на
час.
Регулировка мощности
всасывания
Мощность всасывания регулируется с помощью
кнопки регулировки мощности всасывания,
расположенной на ручке.
• Чтобы включить или выключить прибор,
нажмите на кнопку включения/выключения
питания a.
• Обычный режим: Для включения прибора
в обычном режиме нажмите на кнопку
включения/выключения питания a.
• Режим повышенной мощности: Чтобы
увеличить мощность всасывания, нажмите на
кнопку повышения мощности b.
• Турбо-режим: Нажмите и удерживайте
кнопку повышения мощности всасывания b
дольше 3 секунд.
• Чтобы уменьшить мощность всасывания на
один шаг, нажмите на кнопку уменьшения
мощности c.
• Чтобы переключать мощность всасывания в
последовательности турбо-режим → режим
повышенной мощности → обычный
режим, нажимайте на кнопку уменьшения
мощности всасывания c.
• Включить турбо-режим непосредственно
из обычного режима нельзя. Сначала
необходимо переключиться в режим
повышенной мощности. (обычный режим
→ режим повышенной мощности → турборежим)
Регулировка силы всасывания с
помощью кнопки на рукоядке
пылесоса
• Чтобы включить или выключить прибор,
нажмите на кнопку включения/выключения
питания a.
• Режим мытья полов: Для включения
режима мытье полов нажмите на кнопку
включения/выключения питания a.
• Обычный режим: Чтобы увеличить
мощность всасывания, нажмите на кнопку
повышения мощности b.
• Режим повышенной мощности: Чтобы
увеличить мощность всасывания, нажмите на
кнопку повышения мощности b.
• Турбо-режим: Нажмите и удерживайте
кнопку повышения мощности всасывания b
дольше 3 секунд.
• Чтобы уменьшить мощность всасывания на
один шаг, нажмите на кнопку уменьшения
мощности c.
• Чтобы переключать мощность всасывания в
последовательности турбо-режим → режим
повышенной мощности → обычный
режим → режим мытья полов, нажимайте
на кнопку уменьшения мощности всасывания
c.
• Включить турбо-режим непосредственно
из обычного режима нельзя. Сначала
необходимо переключиться в режим
повышенной мощности. (режим мытья
полов → обычный режим → усиленный
режим → турбо режим)
25

RU
Зарядка аккумулятора
Подготовка к зарядке
аккумулятора
• Убедитесь, что адаптер питания подключен к
зарядной станции, и розетке электросети.
• Для полного заряда одного аккумулятора
требуется 3,5 часа. Для заряда основного и
запасного аккумулятора времени потребуется
в два раза больше.
• При температуре в помещении ниже 5 °C
аккумулятор заряжаться не будет. Заряжать
аккумулятор необходимо только при
температуре в помещении от 5 °C до 38 °C.
• Со временем аккумулятор потребуется
заменить. Характеристиками аккумулятора
обусловлено сокращение времени его
работы при многократном использовании
прибора в течение продолжительного
времени.
• Когда аккумулятор необходимо перезарядить,
на индикаторе заряда начинает мигать
последнее деление. Использовать прибор
необходимо с полностью заряженным
аккумулятором.
• Чтобы продлить срок службы аккумулятора
на моделях с двумя аккумуляторами
необходимо периодически менять местами
основной аккумулятор на корпусе прибора
и дополнительный аккумулятор на зарядной
станции.
• Когда аккумулятор полностью заряжен, на
индикаторе уровня заряда аккумулятора
остается гореть 3 деления.
Зарядка в корпусе прибора
При хранении прибора на зарядной станции его
аккумулятор автоматически перезаряжается.
Выключите прибор, нажав на кнопку
1
питания.
Поместите корпус прибора на зарядную
2
станцию, совместив его с крюком a на
зарядной станции.
• Начнется зарядка аккумулятора, а
индикатор уровня заряда начнет мигать.
Индикатор уровня заряда
аккумулятора
Оставшийся уровень заряда аккумулятора
отображается на индикаторе уровня заряда
аккумулятора a, расположенном над ручкой на
корпусе прибора.
• Оставшийся уровень заряда аккумулятора
отражается тремя делениями в соответствии
с оставшейся мощностью аккумулятора.
• Когда аккумулятор необходимо зарядить,
индикатор уровня заряда аккумулятора
начинает мигать.
• По мере зарядки прибора на индикаторе
уровня заряда аккумулятора загораются 3
деления, показывающие уровень заряда.
26
ВНИМАНИЕ!
• Убедитесь, что корпус прибора надежно
зафиксирован на зарядной станции. Падение
прибора с зарядной станции может стать
причиной травмы, повреждения имущества
или самого прибора.
Зарядка дополнительного
аккумулятора
Дополнительный аккумулятор можно хранить и
заряжать в основании зарядной станции.

RU
RU
• Если основной аккумулятор заряжается
на зарядной станции, дополнительный
аккумулятор начнет заряжаться только после
полной зарядки основного аккумулятора.
Чтобы удалить разряженный аккумулятор
1
из корпуса прибора, нажмите на кнопку
отсоединения аккумулятора на одной из его
сторон и потяните за аккумулятор.
Чтобы вынуть аккумулятор из зарядной
2
станции, нажмите на кнопку, находящуюся в
задней части аккумулятора и приподнимите
его.
Полностью заряженный аккумулятор
3
следует вставить в полость в нижней части
ручки корпуса прибора
• Аккумулятор войдет в полость, только
если будет ровно расположен.
Вставьте разряженный аккумулятор в
4
дополнительную зарядную станцию.
• Аккумулятор войдет в полость, только
если будет ровно расположен.
• В ходе зарядки будет мигать
дополнительный индикатор зарядки c.
• После завершения зарядки
дополнительный индикатор зарядки c
горит непрерывно.
Использование моющей
насадки
Данная функция доступна только на некоторых
моделях.
Подготовка к использованию
моющей насадки
• Моющие щетки вращаются только с одной
скоростью независимо от настроек мощности
всасывания, установленных на корпусе
прибора.
• Перед переноской прибора с установленной
моющей насадкой необходимо привести
кнопку регулировки объема воды в
положение STOP.
• Не используйте для мытья полов грязные
щетки.
• Чтобы предотвратить повреждение прибора,
пластина для установки щеток автоматически
останавливается при застревании в ней
посторонних предметов или при сильном
ударе. Необходимо сразу выключить прибор
и перед возобновлением работы удалить
посторонние предметы или препятствия.
• Если во время мытья пола слышится
посторонний шум, это означает, что
моющая щетка могла выпасть из пластины
для установки щеток. Необходимо сразу
отключить прибор и перед возобновлением
работы закрепить щетку на пластине.
27

RU
Использование моющей
насадки
Подходит для сухой и влажной уборки
одновременно.
• При установке моющей насадки продукт
изначально будет работать в режиме мытья
полов с выключенным режимом сухой
уборки.
• Нажмите кнопку «+», чтобы выполнить сухую
и влажную уборку одновременно.
• Нажмите кнопку «-» в нормальном режиме,
чтобы перейти к режиму мытья полов.
ПРИМЕЧАНИЕ.
• При отделении моющей насадки при работе
в усиленном или турбо режимах основной
корпус пылесоса будет работать с большей
мощностью для облегчения использования
другой насадки.
• При подсоединении моющей насадки во
время эксплуатации продукт будет работать
в режиме влажной уборки с выключенным
режимом сухой уборки.
• Если вы используете режим влажной уборки
с выключенным режимом сухой уборки в
течение длительного времени, сработает
защитное устройство (устройство защиты от
перегрева двигателя), продукт выключится с
целью защиты механизмов моющей насадки.
(Рекомендованное время использования:
до 80 минут). Это не является признаком
неисправности. Используйте продукт после
остывания моющей насадки в течение 1 часа.
Заполнение бачка для воды
Перед мытьем пола необходимо заполнить
бачок для воды и закрепить его на моющей
насадке.
Нажмите на кнопку PUSH a и снимите
1
бачок с моющей насадки.
Откройте колпачок для заливки воды b
2
сбоку бачка для воды и залейте воду в
бачок, используя мерный стакан c.
• Для заливки воды открывайте только
один колпачок. Если открыть оба
колпачка, вода может выливаться.
• На заполняйте бачок выше отметки MAX
d.
• На заливайте в бачок другие жидкости
кроме воды.
• Не заливайте в бачок горячую воду.
Плотно закройте колпачок для заливки
3
воды.
• Если колпачок не будет как следует
закрыт, вода может вытекать из него.
Использование влажных
моющих щеток
Моющая насадка позволяет одновременно
удалять пыль и мыть пол.
• Перед использованием влажных моющих
щеток необходимо очистить пылесборник.
28

RU
RU
Снова закрепите бачок на моющей насадке.
4
• Вставьте 2 язычка e, расположенных в
передней части бачка, в пазы f сверху
моющей насадки. Нажмите на бачок,
чтобы зафиксировать его на месте.
• Чтобы зафиксировать бачок следует
нажать на него по центру в точке g.
ВНИМАНИЕ!
• Не ударяйте моющей насадкой по полу и не
бросайте его на пол. Это может привести
к получению травмы или к повреждению
изделия.
• Не оставляйте прибор стоящим на полу,
когда на нем закреплены влажные моющие
щетки. Это может привести к набуханию
деревянного напольного покрытия.
Установка моющих щеток
Для общей уборки используйте стандартные
моющие щетки. Для выведения
трудноудалимых пятен используйте усиленные
моющие щетки.
• Используйте только те моющие щетки,
которые разрешены LG Electronics.
Намочите обе стороны моющих щетки
1
водой, затем отожмите их, чтобы удалить
излишки воды.
• Если установить и использовать
невыжатые щетки, это может сказаться
на эффективности уборки.
Совместите центр щетки с центром
3
пластины для установки щеток и закрепите
щет к у.
• Устанавливать щетки следует полосатой
стороной наружу. Установка щетки
в перевернутом положении или
неправильная ее установка может
сказаться на эффективности уборки.
Установите моющую насадку на прибор.
4
ОСТОРОЖНО!
• Чтобы избежать получения травмы не
устанавливайте щетку на пластину для
установки щеток, пока она вращается.
• Не прикасайтесь к вращающимся пластинам
для установки щеток. Это может привести к
получению травмы.
Регулировка объема воды
Чтобы отрегулировать объем воды,
выпускаемой на моющие щетки, нажмите на
одну из кнопок регулировки: кнопку большого
объема или кнопку малого объема.
Положите перевернутую моющую насадку
2
на пол.
• Большой объем: Для уборки въевшейся
грязи или для подачи повышенного объема
воды полностью нажмите кнопку большого
объема a.
• Малый объем: Для подачи небольшого
объема воды для уборки деревянного или
иного напольного покрытия, которое может
быть повреждено избытком воды, полностью
нажмите на кнопку малого объема b.
29

RU
• ОСТАНОВКА: Чтобы переключиться обратно
в положение остановки STOP нажмите
на кнопку малого объема или большого
объема наполовину. Это прекратит подачу
воды, чтобы можно было пройтись щеткой по
уже влажным участкам.
• Для уборки мокрыми щетками установите
кнопки регулировки объема воды в
положение STOP.
• По умолчанию кнопка регулировки объема
воды установлена на малый объем.
Уборка моющей насадкой
Установите на моющую насадку бачок с
1
водой и моющие щетки.
Нажмите на кнопку включения и
2
приступайте к уборке.
ВНИМАНИЕ!
• Если прибор не будет использоваться
продолжительное время, установите кнопку
регулировки объема воды в положение
STOP. Несоблюдение этого требования
может привести к поломке прибора.
• Не наступайте на моющую насадку. Это
может привести к повреждению изделия.
Оставьте оба колпачка открытыми
2
и оставьте бачок сохнуть в хорошо
проветриваемом помещении вне
досягаемости прямых солнечных лучей не
меньше чем на 24 часа.
ВНИМАНИЕ!
• Поверните колпачки для заливки воды в
сторону, чтобы они не закрылись.
• Не снимайте колпачки с бачка.
• При мытье бачка не добавляйте в него
моющее средство, уксус или пищевую соду.
Сушка бачка для воды и
моющих щеток
Сушка бачка для воды
После завершения уборки обязательно
вылейте воду из бачка и высушите его, прежде
чем помещать моющую насадку на хранение.
В противном случае остатки воды после уборки
могут издавать неприятный запах.
Откройте два колпачка для заливки воды a
1
сбоку бачка и вылейте из него воду. Чтобы
удалить остатки воды, потрясите бачок.
30
Сушка моющих щеток
После использования моющих щеток
их следует постирать вручную и перед
помещением их на хранение дать им
высохнуть.
Снимите моющие щетки с пластины для
1
установки щеток.
Постирайте щетки вручную с нейтральным
2
моющим средством.

RU
RU
Разместите щетки в хорошо
3
проветриваемом помещении вне
досягаемости прямых солнечных лучей
не менее чем на 24 часа или до полного
высыхания.
ВНИМАНИЕ!
• После уборки вытрите мягкой тканью
оставшуюся воду с входного отверстия для
подачи воды a на моющей насадке. Вода
может капать на пол и испортить покрытие.
Дополнительные насадки
помогают проводить уборку с
большей эффективностью.
• Насадки можно устанавливать на корпус
прибора или на телескопическую трубку.
• Если входное отверстие насадок
«прилипает» к полу, ковровому покрытию
или постельным принадлежностям, следует
отрегулировать мощность всасывания.
Насадка с электроприводом
для ковра
Данная насадка используется для уборки
ковровых покрытий и половиков.
• Её использование на твердом напольном
покрытии может создавать шум.
ВНИМАНИЕ!
• Не используйте данную насадку на игровых
ковриках из ПВХ для детей. При этом на
приборе может скапливаться статическое
электричество.
• Не вытягивайте и не растягивайте резиновую
прокладку, расположенную на входном
отверстии для подачи воды на моющей
насадке. При этом можно порвать или
повредить резину.
ПРИМЕЧАНИЕ.
• Хранение моющих щеток во влажном
состоянии может привести к появлению
неприятного запаха.
• Постирайте моющие щетки с нейтральным
моющим средством.
• Не используйте для стирки отбеливатель или
умягчители ткани.
• Не сушите щетки в сушилке для белья.
• Не кипятите моющие щетки. Они могут от
этого деформироваться.
Использование насадок
Данная функция доступна только на некоторых
моделях.
Насадка с электроприводом
для пола
Данная насадка используется для уборки на
твердых напольных покрытиях.
Насадка для взбивания
постельного белья
Насадка для взбивания постельного белья
позволяет более эффективно чистить простыни
и другие постельные принадлежности. Она
удаляет пыль из постельных принадлежностей
с помощью мощного всасывания и ударных
движений.
• Чтобы избежать засасывания тонких
тканей в прибор следует понижать
мощность всасывания при чистке таких
принадлежностей, как, к примеру,
пододеяльники.
31

RU
− Для смены режимов следует нажать
на кнопку регулировки a и сдвинуть ее
вперед.
Использование
дополнительных насадок
Данная функция доступна только на некоторых
моделях.
Подготовка к использованию
насадок
• Специальные насадки помогают проводить
уборку с большей эффективностью.
• Насадки можно устанавливать на корпус
прибора или на телескопическую трубку.
• Если входное отверстие «прилипает» к
полу, ковровому покрытию или постельным
принадлежностям, следует отрегулировать
мощность всасывания.
Насадки для ухода
Комбинированная насадка
Может быть использована в стандартном
режиме или в режиме щетки для очистки
углов или небольших зазоров, в которых
скапливается пыль и грязь.
• Стандартный режим щелевой насадки
Насадка используется в режиме щелевой
насадки для очистки плоских поверхностей,
таких как диваны или матрасы.
Щелевая насадка
Данная насадка используется для удаления
пыли из углов или ограниченных пространств.
Насадка для твердых загрязнений
• Жесткая щетина удаляет затвердевшую
грязь с твердых поверхностей.
Используется для уборки шерсти или
посторонних предметов, застрявших в
ковровых покрытиях или половиках.
Насадка для матрасов
Данная насадка используется для удаления
пыли и посторонних предметов с матрасов,
тонких тканей и обивки.
• Режим щетки
Насадка используется в режиме щетки для
очистки чувствительных поверхностей, таких
как рамы или мебель.
32

RU
RU
Гибкая щелевая насадка
Данная насадка гнется и может регулироваться
по длине, что делает ее особенно полезной
для уборки внутри автомобилей или в
ограниченных пространствах, а также под и за
мебелью, где необходима насадка, изогнутая
под углом.
• Использование щетки
Для использования насадки с щеткой
необходимо нажать на головку щетки a с двух
сторон и потянуть вниз.
− Для возврата в режим щелевой насадки
нажмите на кнопку разблокировки щетки b
и сдвиньте щетку вверх.
Насадка с переменным углом
На данной насадке имеется мягкая щетка,
которую можно поворачивать под разными
углами, что делает ее особенно полезной
при очистке панелей автомобиля или сверху
мебели.
Гибкий удлинительный шланг
Данный гибкий растягивающийся шланг
подсоединяется между корпусом прибора и
насадками, чтобы можно было дотянуться до
труднодоступных мест.
• Гибкий удлинительный шланг нельзя
использовать с насадкой с электроприводом.
• Регулировка по длине
− Чтобы отрегулировать длину насадки,
нажмите и удерживайте кнопку
разблокировки c, расположенную
сбоку насадки. Чтобы вытянуть или
задвинуть телескопическую трубку,
потяните или нажмите на головку щетки d
соответственно.
ВНИМАНИЕ!
• Не используйте данный бытовой прибор для
каких-либо целей кроме домашней уборки.
• При сборке прибора или зарядной станции
не подносите пальцы к тем местам, где их
может защемить.
• Работа прибора с надетой насадкой в
течение продолжительного времени может
привести к перегреву электродвигателя.
• Если в ходе уборки во входное отверстие
засосет какой-либо посторонний предмет,
прибор может прекратить работу, чтобы
предотвратить повреждение корпуса
прибора или электродвигателя. Немедленно
прекратите использование прибора и перед
возобновлением уборки удалите посторонний
предмет.
• Не используйте насадки для очистки
телевизоров, мониторов или ЖК-дисплеев,
поскольку они могут поцарапать их
поверхность.
33
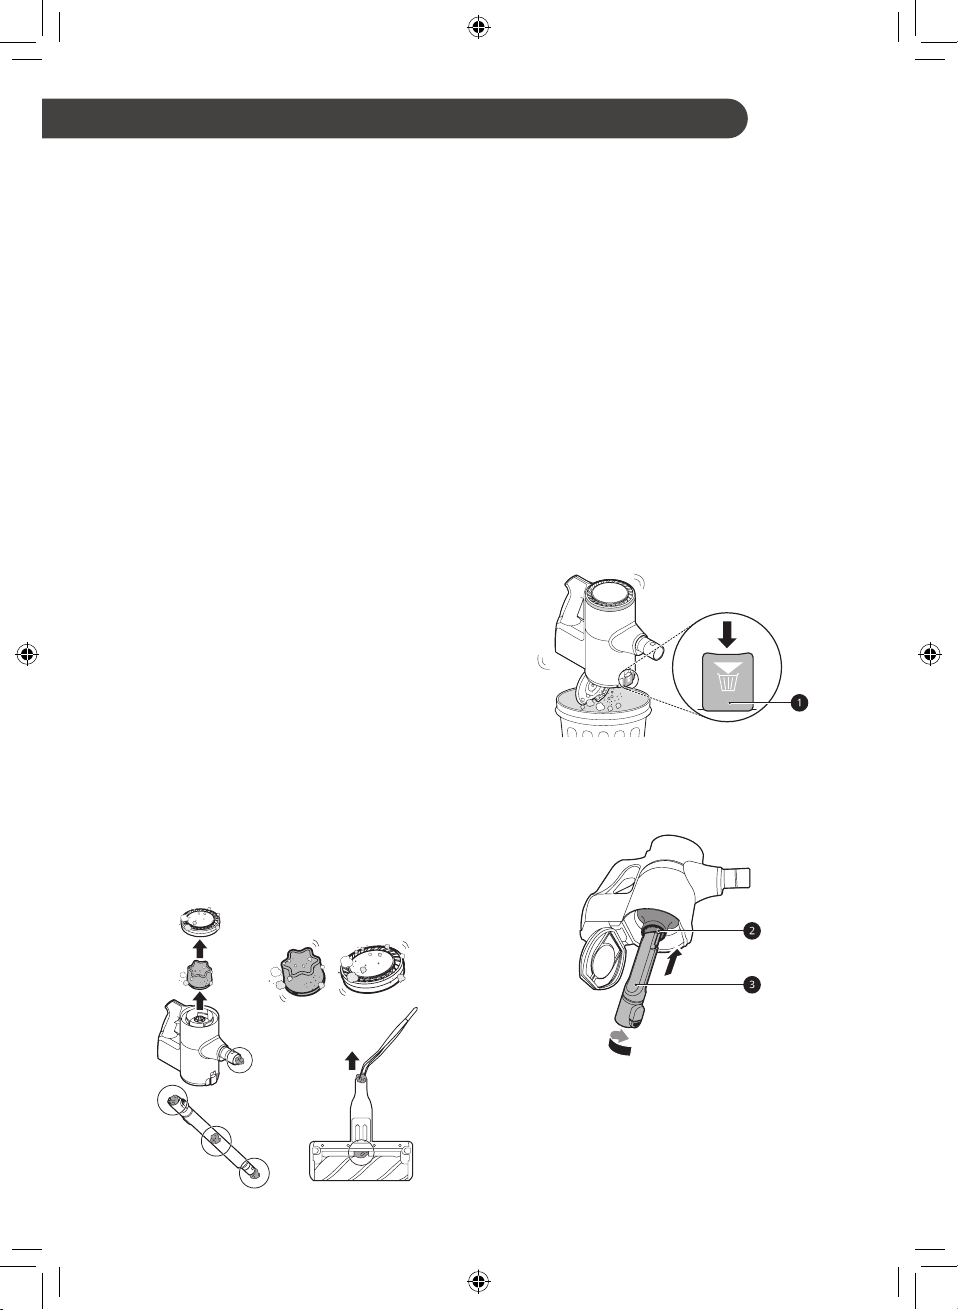
RU
ТЕХНИЧЕСКОЕ ОБСЛУЖИВАНИЕ
Чистка прибора
Подготовка к чистке прибора
• Перед чисткой прибора выключите его.
• Для поддержания оптимальной мощности
всасывания необходимо не реже раза в
месяц чистить циклонный сетчатый фильтр,
выходной фильтр и фильтр предварительной
очистки.
• Фильтр предварительной очистки со
временем подвергается износу в результате
использования и со временем нуждается в
замене. Обратитесь в отдел обслуживания
клиентов LG Electronics, если проблема не
устранена.
Удаление посторонних
предметов
Для сохранения производительности прибора
всегда удаляйте посторонние предметы
изнутри корпуса, телескопической трубки и
входных воздушных отверстий.
• Посторонние предметы, находящиеся
внутри изделия, могут создавать шум,
препятствовать всасыванию или вызывать
отключение прибора при эксплуатации.
• Если корпус прибора, телескопическая
трубка, входные отверстия, фильтр
предварительной очистки и выходной
фильтр будут забиты изнутри посторонними
предметами, прибор автоматически
выключится в целях защиты. Перед
возобновлением работы прибора следует
отсоединить аккумулятор с корпуса и удалить
посторонние предметы.
Очистка пылесборника
После каждого использования необходимо
очищать пылесборник и удалять из него пыль.
• Если пылесборник будет полностью заполнен
пылью, или будет забит фильтр, это может
вызвать снижение мощности всасывания.
Перед очисткой пылесборника выньте
1
аккумулятор из корпуса прибора.
Нажмите на кнопку разблокировки
2
крышки пылесборника a и откройте ее.
Опорожните пылесборник, встряхивая его.
• Будьте осторожны, так как пыль
и посторонние предметы могут
рассыпаться при открытии
пылесборника. Опорожните пылесборник
в мусорное ведро или в такое место,
куда из него можно легко удалить пыль и
посторонние предметы.
Вставьте щелевую насадку c в циклонный
3
сетчатый фильтр b и поверните ее против
часовой стрелки, чтобы вынуть фильтр.
34

RU
RU
Промойте циклонный сетчатый фильтр под
4
проточной водой.
• Чтобы избежать возникновения запаха,
перед обратной установкой циклонный
сетчатый фильтр необходимо полностью
высушить в хорошо проветриваемом
помещении вне досягаемости прямых
солнечных лучей в течение не менее чем
24 часов.
Для очистки пылесборника от пыли или
5
посторонних предметов используйте
комбинированную насадку.
ВНИМАНИЕ!
• Не прикладывайте усилий к циклонному
сетчатому фильтру и не допускайте ударов
по нему. Это может деформировать фильтр,
ухудшить характеристики бытового прибора
или вызвать его неисправность.
Очистка фильтров
Для поддержания оптимальной мощности
всасывания прибора необходимо не реже
раза в месяц выполнять очистку фильтра
предварительной очистки и выходной фильтр.
• При повышенной частоте использования
прибора или его использовании в сильно
запыленных местах очистку фильтров
необходимо выполнять чаще.
Поверните выходной фильтр a в
1
разблокированное положение b и выньте
его из корпуса прибора.
ОСТОРОЖНО!
• Мыть корпус прибора водой нельзя. Вода
может попасть в двигатель и стать причиной
поражения электрическим током или
возгорания.
• Не используйте корпус прибора для
всасывания масел или любых других
жидкостей, включая воду.
• Не используйте прибор без циклонного
сетчатого фильтра. Это приведет к
повреждению прибора.
• Во избежание повреждения изделия, травм
или поражения электрическим током не
вставляйте пальцы или острые предметы в
электродвигатель.
• Во избежание повреждения изделия, взрыва
или возгорания не позволяйте посторонним
предметам попадать в электродвигатель.
Приподнимите фильтр предварительной
2
очистки c и выньте его из корпуса прибора.
35
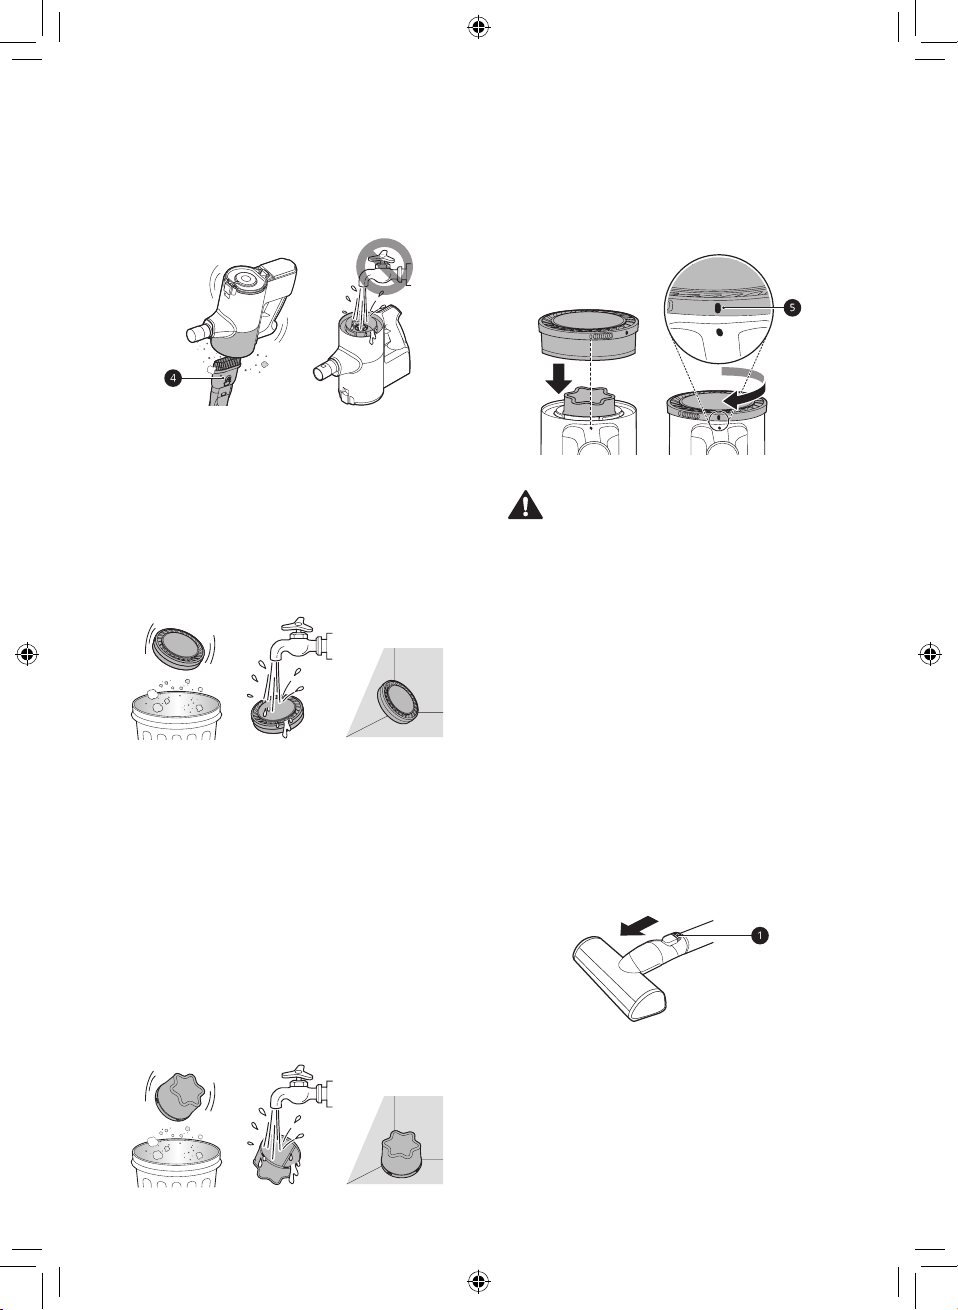
RU
Для очистки электродвигателя от пыли
3
используйте комбинированную насадку d.
• Не мойте электродвигатель водой.
Выходной фильтр очищают путем сметания
4
с него пыли или его промывки под
проточной водой.
• Чтобы избежать возникновения запаха,
перед обратной установкой выходной
фильтр необходимо полностью высушить
в хорошо проветриваемом помещении
вне досягаемости прямых солнечных
лучей в течение не менее чем 24 часов.
Фильтр предварительной очистки очищают
5
путем сметания с него пыли или его
промывки под проточной водой.
• Поскольку для вашего удобства
предусмотрен запасной
предварительный фильтр, при
необходимости используйте два
предварительных фильтра.
• Чтобы избежать возникновения запаха,
перед обратной установкой фильтр
предварительной очистки необходимо
полностью высушить в хорошо
проветриваемом помещении вне
досягаемости прямых солнечных лучей в
течение не менее чем 24 часов.
При обратной установке в корпус
6
прибора вставьте чистый сухой фильтр
предварительной очистки и поверните
выходной фильтр до его блокировки e.
ВНИМАНИЕ!
• Не используйте прибор без фильтра для
мелкой пыли и фильтра предварительной
очистки. Это может привести к повреждению
прибора.
Очистка универсальной
насадки с электроприводом /
насадки с электроприводом
для твердых покрытий
Щетку и валик необходимо чистить перед
каждым использованием.
• Если в щетке имеются посторонние
предметы, она может не вращаться либо при
работе издавать сильный шум.
Нажмите кнопку разблокировки насадки a
1
и снимите его с телескопической трубки или
с корпуса прибора.
36
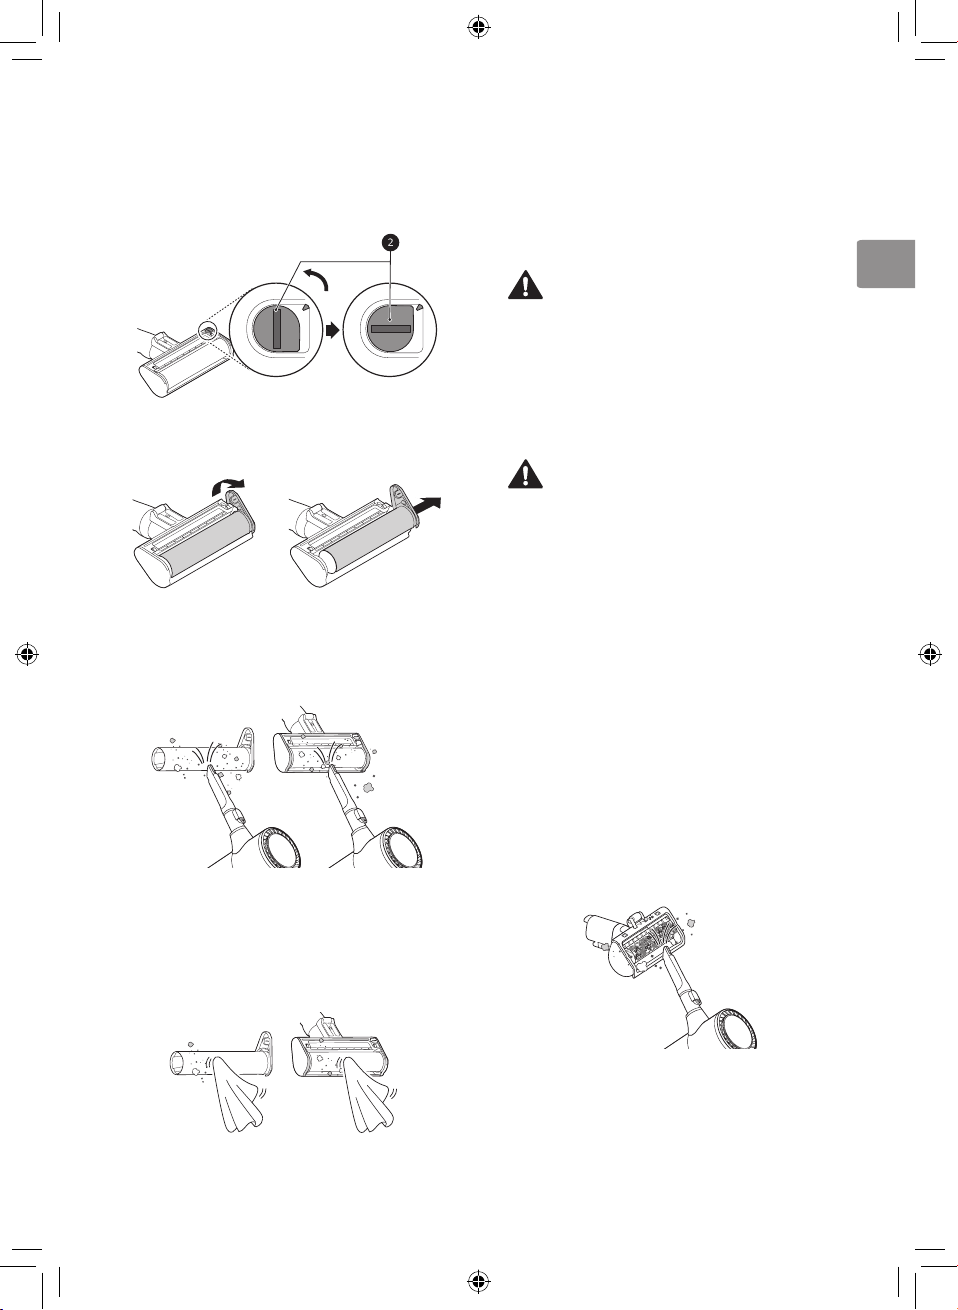
RU
RU
Переверните насадку и поверните щелевой
2
паз блокировки крышки b против часовой
стрелки.
Задвиньте щетку обратно в насадку и
6
поверните крышку для установки на место.
Поверните фиксатор крышки по часовой
стрелке, чтобы заблокировать ее.
Потяните крышку щетки вперед и вытяните
3
щет к у.
Установите щелевую насадку на корпус и
4
с помощью вакуума удалите посторонние
предметы и пыль из щетки и с нижней части
насадки.
Удалите любые оставшиеся посторонние
5
предметы и пыль с щетки и нижней части
насадки влажным полотенцем или тканью.
• Не промывайте вращающуюся щетку или
насадку водой и не погружайте их в воду.
ОСТОРОЖНО!
• Не мойте вращающуюся щетку и насадку
водой. Вода может попасть в двигатель и
стать причиной поражения электрическим
током или возгорания.
• Не используйте вращающуюся щетку и
насадку для всасывания масел или любых
других жидкостей, включая воду.
ВНИМАНИЕ!
• При сборке прибора или зарядной станции
не подносите пальцы к тем местам, где их
может защемить.
• Не используйте вращающуюся щетку в
качестве швабры.
Очистка насадки для
выбивания постельных
принадлежностей
Снимите насадку для выбивания
1
постельных принадлежностей с корпуса
прибора и переверните его.
Установите щелевую насадку на корпус
2
прибора и с помощью вакуума удалите
посторонние предметы и пыль с нижней
части насадки для выбивания постельных
принадлежностей.
37

RU
Удалите любые оставшиеся посторонние
3
предметы и пыль с нижней части
насадки для выбивания постельных
принадлежностей влажным полотенцем или
тканью. После очистки протрите насадку
насухо.
• Не промывайте насадку для выбивания
постельных принадлежностей водой и не
погружайте ee в воду.
ОСТОРОЖНО!
• Не мойте насадку для выбивания постельных
принадлежностей водой. Вода может попасть
в двигатель и стать причиной поражения
электрическим током или возгорания.
• Не используйте насадку для выбивания
постельных принадлежностей для
всасывания масел или любых других
жидкостей, включая воду.
Очистка моющей насадки
Установите щелевую насадку на корпус
2
прибора и с помощью вакуума удалите
посторонние предметы и пыль с нижней
части моющей насадки.
Удалите любые оставшиеся посторонние
3
предметы и пыль с нижней части моющей
насадки влажным полотенцем или тканью.
• Посторонние предметы, оставшиеся
на насадке могут издавать неприятный
запах.
Нажмите кнопку разблокировки насадки
1
a и снимите моющую насадку с
телескопической трубки.
38
ОСТОРОЖНО!
• Перед очисткой всегда снимайте моющую
насадку с корпуса прибора и вынимайте
аккумулятор. Если пластина для установки
щеток начнет вращаться во время очистки,
она может причинить травму.
• Не мойте моющую насадку водой. Вода
может попасть в двигатель и стать причиной
поражения электрическим током или
возгорания.
• Не используйте моющую насадку для
всасывания масел или любых других
жидкостей, включая воду.
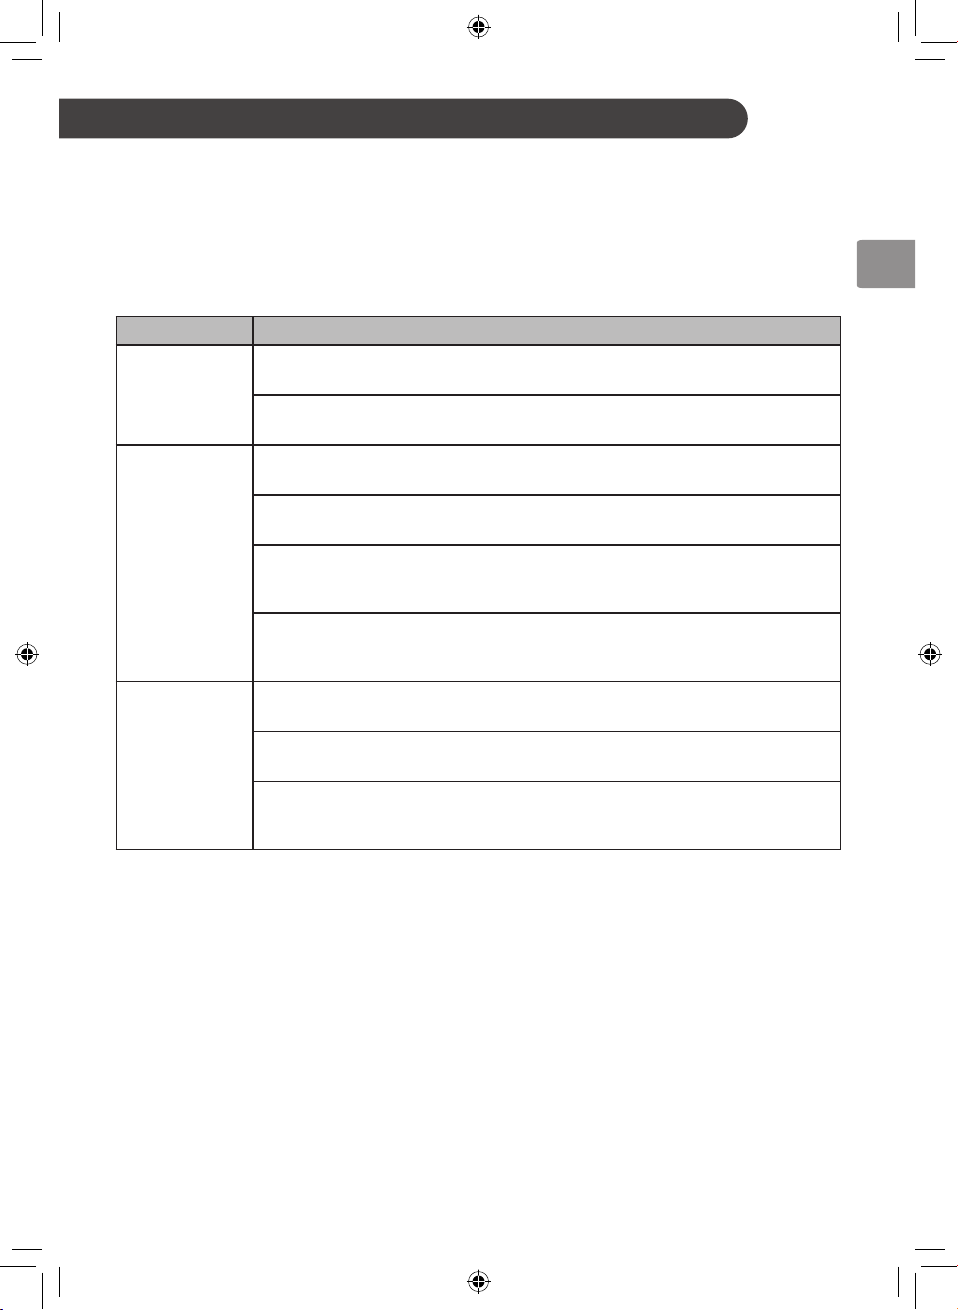
RU
RU
ПОИСК И УСТРАНЕНИЕ НЕИСПРАВНОСТЕЙ
Перед обращением в сервисный центр
Руководство по поиску и устранению неисправностей
Выполнение следующих проверок перед обращением в сервисный центр может сэкономить время и
деньги.
Признак Возможная причина и решение
Аккумулятор полностью разряжен.
Прибор не
работает.
Слабая
мощность
всасывания.
Корпус прибора
не подает
признаков,
указывающих
на то, что идет
зарядка.
• Зарядите аккумулятор.
Прибор выключен.
• Включите прибор кнопкой включения питания.
Пылесборник заполнен пылью.
• Опорожните пылесборник.
Фильтры засорены.
• Выполните очистку фильтра предварительной очистки и выходной фильтр.
Входное отверстие засорено.
• Удалите посторонние предметы изнутри корпуса прибора или из
телескопической трубки.
Посторонние предметы на вращающейся щетке или во входном отверстии.
• Удалите посторонние предметы (нити, шерсть) с вращающейся щетки или из
входного отверстия.
Адаптер питания не подключен к зарядной станции.
• Вставьте разъем адаптера в зарядную станцию до упора.
Шнур питания не включен в розетку.
• Надежно подключите шнур питания к разъему зарядной станции.
Посторонние предметы на зарядных клеммах.
• Удалите грязь или посторонние предметы с зарядных клемм с помощью сухой
ткани.
39

RU
Признак Возможная причина и решение
Прибор был приобретен меньше 3 месяцев назад.
• В течение примерно 3 месяцев с момента покупки от пылесоса может
исходить запах резины.
Пылесборник заполнен пылью.
• Причиной запаха может быть пыль, находящаяся в пылесборнике.
Опустошите пылесборник и очистите его.
Посторонние предметы на фильтре.
• Если фильтр какое-то время не чистили, от него может исходить запах.
Регулярно выполняйте очистку фильтра предварительной очистки и выходной
фильтр.
Прибор
выделяет
необычный
запах.
Из прибора
выходит
горячий поток
воздуха
Прибор издает
сильный шум.
Прибор
неожиданно
самостоятельно
отключается
после
повторяющегося
изменения
скорости
вращения
двигателя.
Фильтр предварительной очистки был установлен во влажном состоянии.
• Промойте фильтр предварительной очистки под проточной водой. Чтобы
избежать возникновения запаха, перед обратной установкой фильтр
предварительной очистки необходимо полностью высушить в хорошо
проветриваемом помещении вне досягаемости прямых солнечных лучей в
течение не менее чем 24 часов.
Выходной фильтр был установлен во влажном состоянии.
• Промойте выходной фильтр под проточной водой. Чтобы избежать
возникновения запаха, перед обратной установкой выходной фильтр
необходимо полностью высушить в хорошо проветриваемом помещении вне
досягаемости прямых солнечных лучей в течение не менее чем 24 часов.
Посторонние предметы на входном отверстии моющей насадки.
• Мокрая пыль, находящаяся в моющей насадке, может издавать запах. После
каждого использования обязательно протирайте входное пылевое отверстие
моющей насадки.
Устройство работает.
• Воздух нагревается при охлаждении мотора, что не является признаком
неисправности.
Пылесос работает в турбо-режиме.
• Двигатель может работать громче при установке повышенной мощности
всасывания. Это нормально.
Аккумулятор заряжен не полностью.
• Перед использованием прибора необходимо полностью заряжать
аккумулятор. Если данная проблема не устранена после полной зарядки
аккумулятора, очистки телескопической трубки и насадок от посторонних
предметов, обратитесь в центр информационной поддержки LG за
обслуживанием.
Посторонние предметы в корпусе прибора, телескопической трубке,
входном отверстии или насадке.
• Удалите посторонние предметы из корпуса прибора, телескопической трубки,
входного отверстия или насадки.
Фильтры засорены.
• Выполните очистку фильтра предварительной очистки и фильтра для мелкой
пыли.
40

RU
RU
Признак Возможная причина и решение
Вращающаяся
щетка не
вращается.
Пластина для
установки
моющих щеток
не вращается.
Из моющей
насадки не идет
вода.
Бачок для воды
влажный.
Пол
загрязняется
при
использовании
моющей
насадки.
Щетка установлена неправильно.
• Снимите щетку, очистите ее при необходимости и установите обратно.
Посторонние предметы на вращающейся щетке.
• Удалите посторонние предметы с вращающейся щетки.
Неправильно установлены моющие щетки.
• Снимите моющие щетки, очистите их при необходимости и установите
обратно.
Моющая насадка сильно прижата.
• Пластина для установки моющих щеток автоматически прекращает вращение
для защиты изделия. Это не является неисправностью. Надежно установите
моющие щетки на пластину и нажмите на кнопку включения прибора для
возобновления работы.
Посторонние предметы между пластинами для установки моющих щеток и
моющими щетками.
• Удалите посторонние предметы с пластины для установки моющих щеток и
нажмите кнопку включения прибора для возобновления работы.
Бачок для воды пуст.
• Заполните бачок водой. Снимите аккумулятор или насадку перед
заполнением бачка для воды.
Бачок для воды неправильно установлен на моющую насадку.
• Правильно установите бачок на моющую насадку. Снимите аккумулятор или
насадку перед установкой бачка на насадку.
Кнопка регулировки подачи воды установлена в положение STOP.
• Полностью нажмите кнопку большого или малого объема подачи воды. Если
кнопка установлена в положение STOP вода идти не будет.
Бачок для воды не высох полностью после использования.
• После использования опорожните бачок для воды, поместите его вне
досягаемости прямых солнечных лучей и дайте полностью высохнуть.
Моющие щетки после использования не очищены надлежащим образом.
• Тщательно стирайте моющие щетки после каждого использования. Уборка
грязными щетками может приводить к загрязнению пола.
41

Информация о системных стандартах
ЕАС — знак соответствия требованиям технических регламентов Таможенного союза
Знак соответствия требованиям технических регламентов Таможенного союза
(ЕАС) является знаком сертификации, подтверждающим, что продукт соответствует
всем техническим нормативным документам Таможенного союза Евразийского
экономического союза.
Информация об упаковочных материалах
Символ «не для пищевой продукции» применяется в соответствие с техническим
регламентом Таможенного союза «О безопасности упаковки» 005/2011 и указывает на
то, что упаковка данного продукта не предназначена для повторного использования
и подлежит утилизации. Упаковку данного продукта запрещается использовать для
хранения пищевой продукции.
Символ «петля Мебиуса» указывает на возможность утилизации упаковки. Символ
может быть дополнен обозначением материала упаковки в виде цифрового и/или
буквенного обозначения.
Информация о дате производства
Дата изготовления указана на этикетке, расположенной внутри батарейного отсека в нижней части
ручки на корпусе изделия. Формат даты: ГГГГ / ММ
Служба поддержки клиентов компании LG
Информацию по сертификации наших приборов, данные о номере сертификата и сроке его действия,
вы можете получить в Службе поддержки клиентов LG по бесплатным телефонам.

ПАЙДАЛАНУШЫ НҰСҚАУЛЫҒЫ
A9
Бұл өнімді пайдалануды бастамас бұрын «ҚАУІПСІЗДІК НҰСҚАУЛЫҚТАРЫ» мұқият оқып шығыңыз.
Пайдаланушыға арналған бұл нұсқаулықты пайдаланушыға оңай қолжетімді болатын жерде сақтаңыз.
Бұл өнім үй шаруашылығында тазалау сияқты тек тұрмыстық мақсатта пайдалануға арналған. Оны
коммерциялық, тәжірибелік немесе өндірістік мақсаттарда пайдалануға болмайды.
Өнімді сатып алғаннан кейін оны алғаш рет пайдаланудан бұрын өнімнің батареясын толық зарядтаңыз.
KK
Авторлық құқық © 2019-2020 ж. LG Electronics Inc. Барлық құқықтары қорғалған
www.lg.com

МАЗМҰНЫ
Бұл нұсқаулық сатып алынған үлгіден
басқа суреттер немесе мазмұндарды
қамтуы мүмкін.
Бұл нұсқаулық өндіруші тарапынан қарап
шығуы тиіс.
ҚАУІПСІЗДІК НҰСҚАУЛЫҚТАРЫ .................................................4
Қауіпсіздік хабарлары ......................................................................................4
ОРНАТУ ........................................................................................14
Бөлшектер және техникалық сипаттамалары .............................................14
Зарядтау станциясын орнату ......................................................................18
Қосалқы жабдықтарды сақтау ......................................................................22
ПАЙДАЛАНУ ................................................................................24
Алғашқы іске қосу ..........................................................................................24
Батареяны зарядтау ......................................................................................26
Еден жуғыш саптамасын пайдалану ...........................................................27
Саптамаларды пайдалану ............................................................................31
Құралдарды пайдалану ................................................................................32
ТЕХНИКАЛЫҚ ҚЫЗМЕТ КӨРСЕТУ ........................................... 34
Құрылғыны тазалау ......................................................................................34
АҚАУЛАРДЫ ЖОЮ .....................................................................39
Қызмет көрсетуді шақырмастан бұрын ........................................................ 39
KK
ҚАУІПСІЗДІК НҰСҚАУЛЫҚТАРЫ
Қауіпсіздік хабарлары
Қауіпсіздік хабарларын оқу
Келесі қауіпсіздік нұсқаулары құрылғыны қауіпті не қате
пайдаланудан пайда болатын күтпеген қауіптерді не зақымдарды
алдын алуға арналған.
Нұсқаулар төменде сипатталғандай «ЕСКЕРТУ» және
«АБАЙЛАҢЫЗ» болып бөлінеді.
Бұл белгі қауіпке себеп болуы мүмкін мәселелер және
операцияларға көрсетіледі. Осы белгіге ие бөлімді мұқият
оқып, қауіптің алдын алу үшін нұсқауларды орындаңыз.
ЕСКЕРТУ
Бұл нұсқаулар орындалмаған жағдайда зақымдалуға немесе
өлімге әкелуі мүмкін екенін білдіреді.
АБАЙЛАҢЫЗ
Бұл нұсқаулар орындалмаған жағдайда өнімнің аз деңгейде
зақымдалуы мен бұзылуын білдіреді.
ЕСКЕРТУ
Құрылғыны пайдаланған кезде жарылу, өрт, өлім, тоқ
соғу, зақымдау немесе адамды күйдіру қаупін алдын
алу үшін мыналарды қоса негізгі қауіпсіздік шараларын
қолданыңыз:
Техникалық қауіпсіздік
• Бұл құрылғы физикалық, сезгіштік не ақыл-ой мүмкіндіктері шектеулі
немесе қауіпсіздік үшін жауапты тұлға тарапынан құрылғыны
пайдалануға қатысты нұсқаулар берілмесе, тәжірибеге және білімге
ие болмаған адамдар (балаларды қоса) тарапынан пайдаланылуға
арналмаған. Құрылғымен ойнамауы үшін балалар бақылауда болуы
керек.
4

KK
KK
• Егер қуат сымы зақымдалса, ықтимал қауіптің алдын алу үшін оны
LG Electronics қызмет көрсету орталығы немесе дилер ауыстыруы
керек.
• Балалардың құрылғымен ойнауына немесе оған асылуына рұқсат
бермеңіз.
• Құрылғыны ылғал бетте пайдаланбаңыз.
• Тазаланатын аймақтан басқа құрылғылардың сымдарын алып
тастаңыз.
Батарея
• Басқа құрылғылардың батареясын, адаптерін және зарядтау
станциясын осы құрылғымен пайдалануға болмайды. Тек LG
Electronics компаниясы қамтамасыз еткен батарея мен зарядтау
станциясын пайдаланыңыз.
• Осы құрылғының батареясын, адаптерін және зарядтау станциясын
басқа құрылғылармен пайдалануға болмайды.
• Сұйықтық ағып тұрған немесе пішіні өзгерген батареяны
пайдаланбаңыз. Егер теріге немесе көзге батарея сұйықтығы тиіп
кетсе, сол аймақты дереу таза сумен толық жуып, медициналық
көмекке жүгініңіз.
• Зарядтауға келмейтін батареяны ауыстырыңыз.
• Батареяны ауыстыру әдісі туралы білу үшін Зарядтау бөлігі
нұсқаулығын қараңыз.
• Осы құрылғыны жою барысында, міндетті түрде құрылғыдан
батареяны алып тастаңыз.
• Батареяны жою барысында барлық жергілікті ережелерді және
талаптарды орындаңыз.
Батареяның техникалық сипаттамалары
• Бір немесе екі батарея беріледі, батареялар саны сатып алынған
үлгіге байланысты өзгереді.
5

KK
Үлгі атауы EAC63382***
Түрі Қайта зарядталатын литий-ион батарея
Номиналды
25.55 V
, 2000 mAh
сыйымдылығы
Орнату
• Тоқ соғуды немесе өрттің шығуын болдырмау мақсатында,
құрылғыны су, жаңбыр тамшылары немесе жоғары ылғалдылық әсер
ететін орынға орнатпаңыз, зарядтамаңыз немесе сақтамаңыз.
• Құрылғыны жақсы желдетілетін орынға орнатыңыз, зарядтаңыз және
сақтаңыз.
• Құрылығыны тұтанғыш газ, өндірістік май ағу немесе металл
шаңдардың болу қаупі бар аймақтарда қолданудан аулақ болыңыз.
• Құрылғыны, қуат сымын немесе ашаны жылытқыш құрылғыларға
немесе ашық алау көздеріне жақын сақтамаңыз немесе орнатпаңыз.
• Зарядтау станциясын берік, тегіс бетке орнатыңыз.
• Ауып кетуін болдырмау үшін тік тұратын зарядтау қондырғысы
тұғырды бекіткіш бұранда, бекіткіш блок және екі бүйірлік таспаның
көмегімен қабырғаға бекітілуі тиіс.
• Қабырғаға орнатылатын зарядтау қондырғысында, зарядтау
станциясы берілген қабырғаға бекіткіш бұрандалардың көмегімен
қабырғаға берік бекітілуі тиіс.
• Бекіткіш бұрандаларды тек бетон немесе соған ұқсас қатты беттерге
жалғау кезінде пайдаланыңыз.
• Алдымен оның артындағы аймақта қуат тізбектерінің, құбырлардың,
желдеткіштердің немесе кабельдердің бар не жоқ екенін
тексерместен қабырғаны бұрғылауға болмайды.
• Құрылғыны 5 °C градустан төмен немесе 38 °C градустан жоғары
температурада пайдаланбаңыз немесе сақтамаңыз.
• Құрылғыны температурасы нөлден төмен немесе сыртқы ауа-райы
жағдайлары әсер ететін орында сақтамаңыз немесе орнатпаңыз.
• Құрылғыны орнату немесе жылжыту барысында, қуат сымының
немесе ашаның қысылып қалмауын, сынбауын немесе
зақымдалмауын қадағалаңыз.
6

KK
KK
Пайдалану
• Құрылғыны пайдаланбас бұрын барлық нұсқаулықтарды оқып, осы
нұсқаулықтарды сақтаңыз.
• Тек осы нұсқаулықта сипатталғаны бойынша пайдаланыңыз. Тек
өндіруші ұсынған тіркелгіні пайдаланыңыз.
• Бұл құрылғы тек қалыпты ішкі тұрмыстық пайдалануға арналған. Ол
басқа бір тұрмыстық емес, коммерциялық немесе өндірістік қолдану
мақсатында пайдалануға арналмаған.
• Құрылғыны ауладағы орында, гаражда немесе ылғал бетте
пайдаланбаңыз немесе сақтамаңыз.
• Құрылғы тек 100 В – 240 В ~ 50/60 Гц, шығыста пайдаланылады.
Құрылғы пайдаланылатын жердегі электр қуатының техникалық
сипаттамаларын міндетті түрде тексеріп шығыңыз.
• Қуат сымын, ашаны немесе құрылғының басқару элементтерін су
қолыңызбен ұстамаңыз.
• Сымдағы немесе ашадағы кез келген ылғалды немесе кірді құрғақ
матамен сүртіп алыңыз.
• Сымнан емес ашадан ұстап қуат сымын суырып алыңыз. Сымды
тарту арқылы оны зақымдап алуыңыз және ток соғу немесе өрттің
шығуына себеп болуы мүмкін.
• Зақымдалған болса немесе зақымдалған сым не аша сияқты
бөлшектері жетіспесе не сынған болса, ешқашан бұл құрылғыны
пайдаланбаңыз. Көмек алу үшін өкілетті LG Electronics қызмет
көрсету орталығына немесе дилерге апарыңыз.
• Қуат сымын қатты күш салып майыстырмаңыз немесе оны ауыр
заттың астына қоймаңыз, себебі ол зақымдалуы мүмкін.
• Бұл құрылғымен бірнеше шығысты адаптерлерді пайдаланбаңыз.
Міндетті түрде сыйымдылығы 10 А қуат розеткасын пайдаланыңыз.
• Құрылғыны зақымдалған немесе бұзылған розеткаға енгізбеңіз.
• Құрылғы ұзақ уақыт пайдаланылмайтын кезде қуат сымын
ажыратыңыз.
• Қуат сымын зақымдамаңыз, ауыстырмаңыз, күшпен майыстырмаңыз,
бүкпеңізғ тартпаңыз, қыспаңыз немесе қыздырмаңыз.
• Құрылғыны пайдаланбас бұрын кез келген сымын немесе бауын
еденнен алып тастаңыз.
7

KK
• Қуат сымын суырып алған кезде оның айырларына саусағыңызды
(саусақтарыңызды) тигізбеңіз.
• Қуат сымын алашалармен немесе кілемдермен жауып тастамаңыз.
• Қуат ашасы түсіп қалмауы үшін қабырға розеткасына қатты басып
салыңыз.
• Егер өнім суға батырылған болса, қайта пайдаланбас бұрын
нұсқаулықтар алу үшін LG Electronics қызмет көрсету орталығына
немесе дилерге хабарласыңыз.
• Егер өнімнен түсініксіз шу немесе иіс я түтін шығатын болса, LG
Electronics компаниясының тұтынушыларға ақпараттық қызмет
көрсету орталығына хабарласыңыз.
• Тек LG Electronics компаниясының білікті техниктері немесе қызмет
көрсетуші персоналы құрылғыны бөлшектей, жөндей немесе өңдей
алады.
• Ешқашан құрылғы немесе зарядтау станциясының тесігіне немесе
саңылауына ине, шеге немесе пышақ сияқты өткір металл заттарды
енгізбеңіз.
• Бұл құрылғымен сұйықтықтарды соруға болмайды. Құрылғы ішіне
немесе зарядтау станциясына су, сусындар немесе жуғыш заттың
енуіне жол бермеңіз.
• Құрылғының өткір жүздерді, түйреуіштерді, жоңқаларды, өткір
заттарды немесе ыстық я суық күлдерді сыпырып тартып алуына жол
бермеңіз.
• Балалардың құрылғыны пайдалануына рұқсат бермеңіз.
• Құрылғыны пайдалану, зарядтау немесе жинау барысында
балалардың немесе үй жануарларының оның қасында тұрына
болмайды.
• Саптаманы немесе құралдарды аузыңызға салмаңыз.
• Киімді және шашты, саусақтарды немесе дененің басқа бөліктерін
саңылауларға және қозғалмалы бөліктерге жақындатпаңыз.
• Құрылғыны сору кірісі немесе шығысы бұғатталған болса
қолданбаңыз.
• Бояу еріткіштен, күйеден қорғауыш заттардан, тұтанатын заттардан
немесе басқа жарылғыш я уытты заттардан болатын булар жиналған
жабық кеңістікте пайдаланбаңыз.
8

KK
KK
• Сүзгі міндетті түрде пайдалану алдында орнатылған болуы керек.
• Шаң жинағыш контейнерін ашып қойып пайдаланбаңыз.
• Құрылғыдағы және зарядтау станциясындағы зарядтау
клеммаларына қол тигізбеңіз немесе құрылғы ішіне не станциясына
электр тогы бар затты енгізбеңіз.
• Құрылғыны мәндетті түрде, пайдаланыста болмаған кезде, тік
тұратын зарядтау немесе қабырғаға орнатылатын зарядтау
станциясында сақтаңыз.
• Құрылғыны қабырғаларға, орындықтарға немесе үстелдерге сүйеп
қоймаңыз.
• Егер жерге тұйықтауды ажыратқыш өнімді зарядтау станциясына
орнатқанда іске қосылса, құрылғыны зарядтау станциясынан дереу
алып тастаңыз. LG Electronics компаниясының тұтынушыға қызмет
көрсету орталығына хабарласыңыз.
• Баспалдақтарды тазалағанда өте мұқият болыңыз.
• Жылыту құрылғысын немесе тұтанатын заттарды (эфир, бензол,
спирт, химиялық заттар, жанғыш спрей, инсектицид, ауа сергітуші
немесе косметиканы) құрылғыға жақын ұстамаңыз.
• Сұйық заттарды (су, сусындар), иісі бар заттарды (кәмпит, шоколад,
үй жануарларының нәжістері), металл заттарды (пышақтар, инелер),
тұтанғыш заттарды, сурфактанттарды немесе шыны жарықшақтарды
осы құрылғымен тазалап алуға әрекеттенбеңіз.
• Газ шыққан жағдайда (табиғи газ, пропан газ, т.б.) осы немесе қандай
да бір басқа құрылғыны қолданбаңыз. Аймақты дереу желдету үшін
терезені немесе есікті ашыңыз.
• Батарея зарядтау станциясында тұрғанда, зарядтау станциясын
төңкеріп ұстамаңыз.
• Батареяны бөлшектеуге, алуға немесе қысқа тұйықтауға болмайды.
• Құрылғыға, әсіресе батареяға жылудың, жылыту құрылғысының
немесе тікелей күн сәулесінің әсерін тигізбеңіз.
• Құрылғыны немесе оның батареясын тікелей күн сәулесі түсетін
көліктің ішінде қалдыруға болмайды.
• Батареяның ішіне су, сусын немесе жуғыш құралдың енуіне жол
бермеңіз.
• Батареяға физикалық күш түсірмеңіз.
9

KK
Техникалық қызмет көрсету
• Зарядтау станциясын тазалау немесе оған техникалық қызмет
көрсету кезінде қуат сымын желіден ажыратыңыз.
• Кіріс портын немесе шаң жинағыш контейнерді сумен немесе
еріткішпен жумаңыз.
• Шаң жинағыш контейнерді тазалау үшін еріткіштерді, әрлеу
сұйықтықтарын немесе ауа сергітуші құралдарды пайдаланбаңыз.
• Тұтанатын заттарды (бензин немесе еріткіш) немесе
сурфактанттарды (жуғыш құрал немесе сабын) құрылғыға
қолданбаңыз немесе сеппеңіз.
• Саптамаларды ұстаған соң қолдарыңызды жуыңыз. Саптама
көміртек талшықтарын қамтиды, әрі аздаған тері тітіркенуін тудыруы
мүмкін.
Жою
• Қаптау материалдарын балалардың қолы жетпейтін жерде ұстаңыз.
Қаптау материалдары балалардың тұншығу қаупіне әкелуі мүмкін.
• Құрылғыларды қаптамадан шығарған соң, картон, пластик сөмкені
және басқа да қаптау материалдарын жойыңыз. Балалар оларды
ойнау мақсатында пайдалануы мүмкін. Алашалармен, төсек
жаймаларымен немесе полиэтилен жаймалармен жабылған
картондар герметика камераларға айналуы мүмкін.
• Осы құрылғыны жергілікті, мемлекеттік және аймақтық заңдар мен
ережелерге сәйкес жойыңыз.
• Осы құрылғыны жою алдында жергілікті қалалық кеңеске немесе
қатысты үкіметтік орынға хабарласыңыз.
Еден жуғыш саптамасы
• Жалғанған еден жуғыш саптамасымен өткір заттарды (шыны
бөлшектер, сым, өткір жүздер, инелер, т.б.) сорып тартқызбаңыз.
Еденді жуған соң еден жуғыш төсемелерді тазалау барысында, еден
жуғышқа енген өткір заттармен жарақат алуыңыз мүмкін.
10
KK
KK
АБАЙЛАҢЫЗ
Құрылғыны пайдаланған кезде адамдарға келетін, өнімнің
немесе мүліктің дұрыс жұмыс істемеу, зақымдалу қаупін
азайту үшін келесі нұсқаулармен бірге негізгі қауіпсіздік
бойынша алдын ала сақтық шараларын орындаңыз:
Пайдалану
• Бұл құрылғыда қатты қызу салдарынан зақымдалудың алдын
алатын ендірмелі қорғау құрылғысы бар. Егер құрылғыны ұзақ
уақыт пайдаланудан кейін қатты қызып кететін болса, ол автоматты
түрде өшуі мүмкін. Егер осы жағдай орын алса, қуатты іске қоспас
бұрын құрылғыны салқын, жақсы желдетілетін аймақта бір сағатқа
қалдырыңыз.
• Өнімнің соғылуына немесе оның ауып кетуіне жол бермеңіз.
• Құрылғыны пайдаланбаған жағдайда, оның ауып кетуін болдырмау
мақсатында, зарядтау станциясына орнатып қойыңыз.
• Ылғал немесе сулы сүзгілерді орнатпаңыз.
• Құрылғыны пайдаланбас бұрын, міндетті түрде едендегі су, май
немесе үй жануарларының нәжісін сүртіп алыңыз.
• Өнімді ұшпа немесе органикалық ерітіндімен (еріткіш немесе ацетон)
тазаламаңыз.
• Құрылғыны тазалау үшін әрқашан жұмсақ матаны пайдаланыңыз.
• Құрылғыны пайдалану барысында, адамдарға немесе жануарларға
соқтығыспас үшін айналадағылардан алшақ болыңыз.
• Құрылғыны теппеңіз немесе күш қолданбаңыз.
• Зарядтау станциясына құрылғыдан басқа, әсіресе металл немесе
магнитті заттарды қоюға болмайды.
• Бір нүктені қайта-қайта ұзақ уақыт бойы тазалауға болмайды.
• Кіріс порты немесе айналмалы щетка туғызатын діріл еденді немесе
кілемді зақымдауы мүмкін.
• Құрылғыны немесе зарядтау станциясын бөлшектеу барысында
саусақтарыңызды қысып қалатын аймақтардан сақтаңыз.
11

KK
• Баланың немесе үй жануарының зарядтау станциясына асылуына
жол бермеңіз.
• Бекітілетін станцияны орнату барысында, барлық қолданыстағы
мемлекеттік және жергілікті кодекстер мен ережелерге сәйкес
орындаңыз.
• Зарядтау станциясын қабырға қағазына бекіту үшін екі бүйірлік
таспаны пайдаланбаңыз. Зарядтау станциясын бекіту үшін берілген
бұрандаларды пайдаланыңыз. Зарядтау станциясы мен құрылғы
салмағы қағазды зақымдауы мүмкін.
• Циклонды тор сүзгіні күшпен қолданбаңыз немесе қандай да бір күш
түсірмеңіз.
• Пайдалану барысында батареяны алып тастамаңыз.
Еден жуғыш саптамасы
• Құрылғыны су толтырылған су ыдысы еден жуғыш саптамасына
жалғаулы күйде сақтамаңыз.
• Су ыдысын температурасы 0 °C немесе одан төмен градуста
сақтамаңыз.
• Еден жуғыш саптамасын бір нүктені қайта-қайта ұзақ уақыт бойы
тазалау үшін пайдаланбаңыз. Еден жуғыш саптамасына судың енуі
нәтижесінде су шаң жинайтын кіріске жетіп, құрылғыны зақымдауы
мүмкін.
• Еден жуғыш саптамасын үйдегі еденді тазалаудан басқа мақсатта
(мысалы, көлікті жуып тазалау, терезелерді тазалау) пайдаланлаңыз.
• Еден жуғыш саптамасын аяқпен баспаңыз. Осылай жасау арқылы
өнімді зақымдауыңыз мүмкін.
• Еден жуғыш саптамасын сұйықтықтарды (су, сусын) сорып алу үшін
пайдаланбаңыз.
• Еден жуғыш саптамасын пайдаланған кезде, міндетті түрде еден
жуғыш төсемені жалғаңыз. Олай жасамаған жағдайда еденді немесе
кілемді зақымдауыңыз мүмкін.
• Кілемдерді еден жуғыш саптамасымен тазаламаңыз. Кілем
ылғалдануы немесе Жабысқақ таспаға жабысып қалуы мүмкін,
нәтижесінде кілем зақымдалады.
12
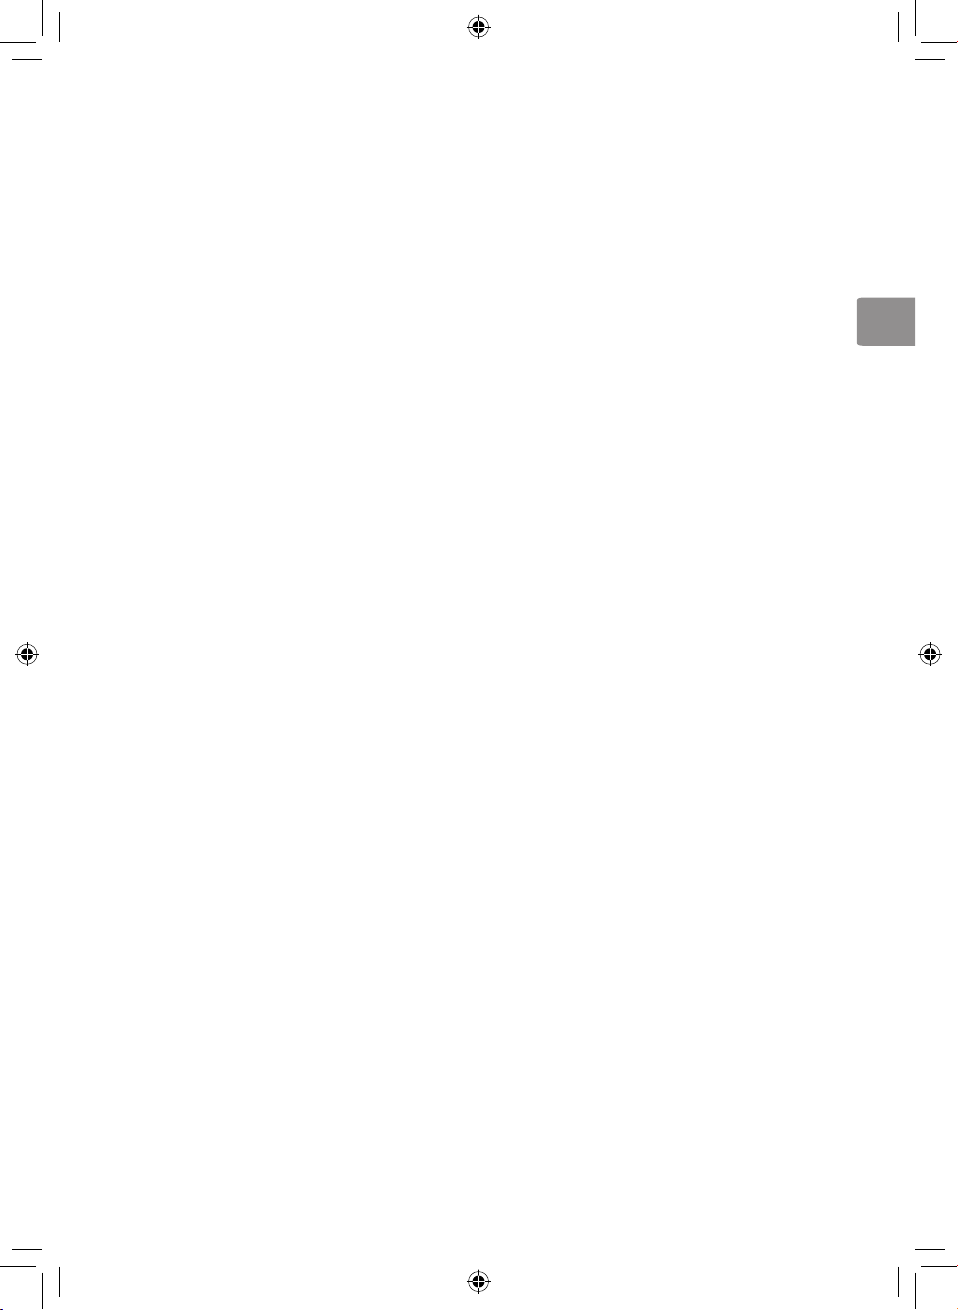
KK
KK
• Боялған еденді еден жуғыш саптамасымен тазаламаңыз. Боялған
еденді қайта-қайта тазалау нәтижесінде жабынның жойылуына
әкелуі мүмкін.
• Нәзік алынбалы еденді еден жуғыш саптамасымен тазаламаңыз.
Едендер ылғалды сіңіріп, деформациялануы мүмкін.
• Қара еденді еден жуғыш саптамасымен тазаламаңыз.
• Ылғал едендер тайып құлау қатерін тудырады. Кез келген адамның
еденнің үстінде жүруі алдында оны толық кебуіне мүмкіндік беріңіз.
13

KK
ОРНАТУ
Бөлшектер және техникалық сипаттамалары
Тік тұратын зарядтау
қондырғысы режимі
Адаптер
a
Құрал ұстағыштары бар зарядтау станциясы
b
Батарея
c
Өнім корпусы
d
Өнім корпусы
Қабырғаға орнатылатын
зарядтау қондырғысы режимі
Ұзартқыш түтік
e
Саптама
f
Тік тұратын док-станция
g
Тік тұратын құбыр
h
Алынбалы саптама сақтау орны
i
14
Ауа сүзгісі
a
Алдын ала тазалау сүзгісі
b
Циклонды тор сүзгі
c

KK
KK
Қосалқы жабдықтар
Қосалқы жабдықтары қамтылған
*Бұл қосалқы жабдық тек кейбір үлгілерде қолжетімді.
Саптамалар
Зарядтау станциясы
a
Ұзартқыш түтік
b
Адаптер
c
Қуысты тазалау құралы
d
Қиыстыру құралы
e
Алдын ала тазалау сүзгісі
f
Батарея (Қос батарея*)
g
Кілем қондырмасының қуат жетегі*
a
Еден қондырмасының қуат жетегі*
b
Төсек-орын тазалағышы*
c
Орнату жинағы
Тік тұратын док-станция*
a
Тік тұратын құбыр*
b
Алынбалы саптама сақтау орны*
c
Қабырғаға бекіткіш блок*
d
Екі бүйірлік таспа*
e
Гипс-картонға бекіткіш*
f
Қабырғаға бекіткіш бұранда*
g
Тұғырды бекіткіш бұранда*
h
15

KK
Құралдар мен қосалқы жабдыққа арналған сөмке
Күрделі шаңды тазалау құралы*
a
Матрасты тазалау құралы*
b
Көп бұрышты тазалау құралы*
c
Иілгіш қуысты тазалау құралы*
d
Иілгіш ұзартпалы құбыршек*
e
Қосалқы жабдыққа арналған сөмке*
f
Еден жуғыш жинағы
Еден жуғыш саптамасы*
a
Алынбалы саптама және еден жуғыш
b
төсемелерді сақтау орны*
Жалпы тазалауға арналған еден жуғыш
c
төсемелері*
Өлшеу қақпағы*
d
ЕСКЕРТПЕ
Еден жуғыш төсемелерді, батареяларды, ауа сүзгісі және алдын ала тазалау сүзгісін уақыты келе
ауыстыру қажет болады. Егер мәселе шешілмесе, LG Electronics тұтынушыларға қызмет көрсету
бөліміне хабарласыңыз.
16

KK
KK
Техникалық сипаттамалар
Құрылғы
Үлгі A9**********
Өлшемдері 260 мм (Е) x 270 мм (Ұ) x 1120 мм (Б)
Салмағы Шамамен 2,7 кг
Тұтынылатын қуат Турбо режимінде 400 Вт (Ең көп 450 Вт)
Қуат режимінде 250 Вт
Қалыпты режимде 80 Вт
Батареяның іске
қосу уақыты
Зарядтағыш адаптер
Кіріс 100 В – 240 В ~ 50/60 Гц
Шығыс 29.4 V
• Өлшемдері жиналған өнім корпусы, ұзартқыш түтік және саптама үшін берілген.
• Батареяның іске қосу уақыты LG Electronics сынақ стандартына сәйкес толық зарядталған батарея
нәтижесі. Нәтижелер нақты пайдалану ортасы мен пайдалану кезеңіне байланысты өзгеше болуы
мүмкін.
• Еркін жүретін саптама саптаманың тазалауыш басын тікелей айналдыратын тікелей жүргізетін
мотордан тұрады.
Турбо режимінде 6 минутқа дейін
Қуат режимінде 9 минутқа дейін
Қалыпты режимде 30 минутқа дейін (Еркін жүретін саптамамен)
Қалыпты режимде 40 минутқа дейін (Еркін жүретін саптамасыз)
80 минутқа дейін тек "еденді жуу" режимінде (ұсынылған пайдалану
ұзақтығы)
17
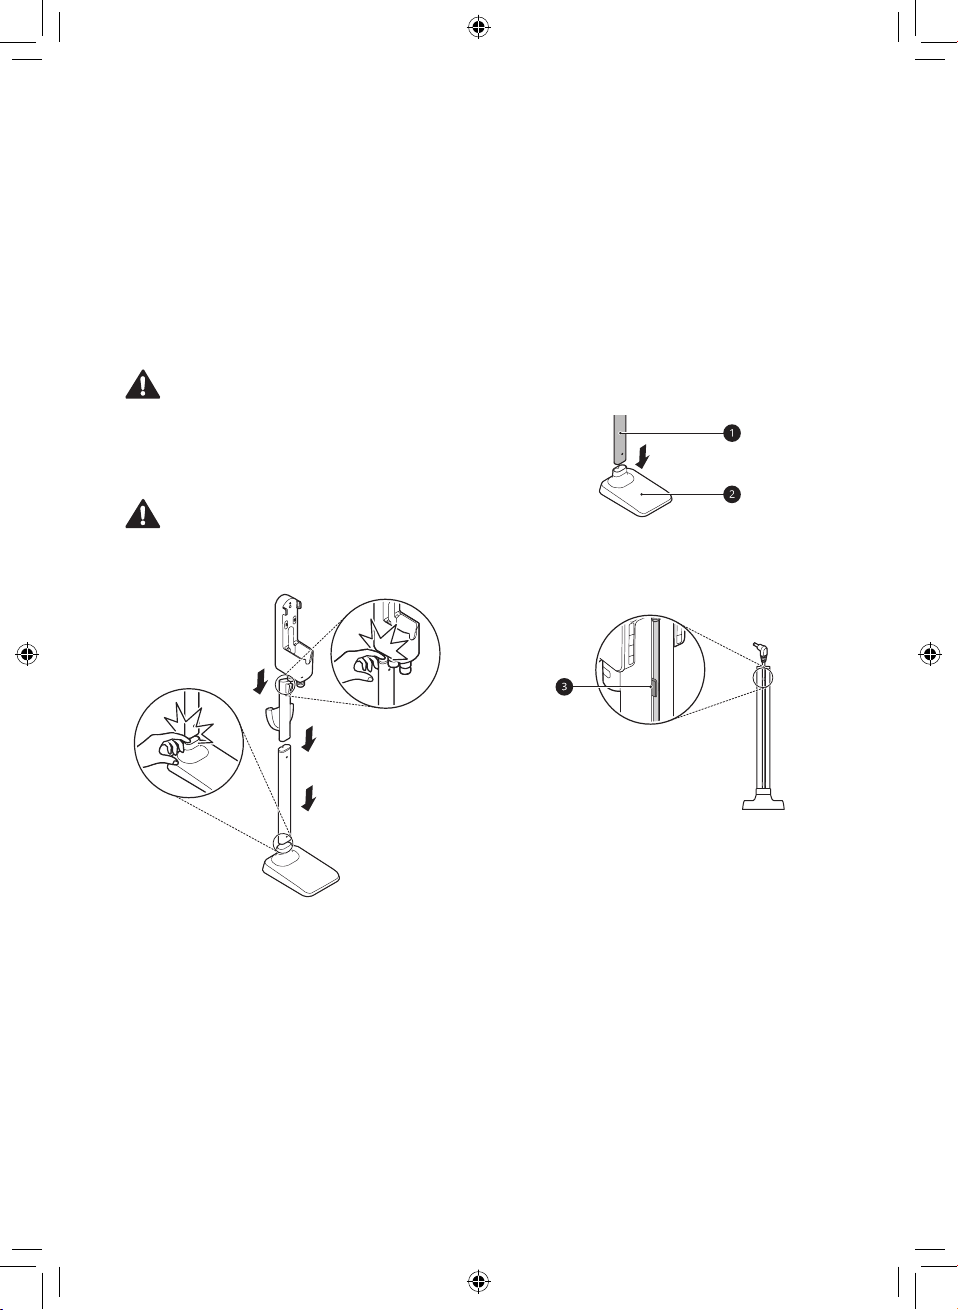
KK
Зарядтау станциясын
орнату
Тік тұратын зарядтау
станциясын орнату
Зарядтау станциясын қатты және тегіс еденге
орнатыңыз.
ЕСКЕРТУ
• Ауып кетуін болдырмау үшін тік тұратын
зарядтау қондырғысы тұғырды бекіткіш
бұранда, бекіткіш блок және екі бүйірлік
таспаның көмегімен қабырғаға бекітілуі тиіс.
АБАЙЛАҢЫЗ
• Құрылғыны немесе зарядтау станциясын
бөлшектеу барысында саусақтарыңызды
қысып қалатын аймақтардан сақтаңыз.
Зарядтау станциясына, өнім корпусына
1
және саптамаға бекітілген қорғаныс
пленкасын алыңыз.
• Пленкасын алып тастамаған жағдайда
өнімнің өнімділігіне әсерін тигізуі мүмкін.
Тік тұратын док-станцияны b қатты және
2
тегіс еденге орнатып, тік тұратын құбырды
бекітіңіз a.
• Бекітіп болған соң, тік тұратын док-
станция мен тік тұратын құбыр
бөлшектенбейді.
Қуат сымын тік тұратын құбырдың артқы
3
жағындағы сым ұстағышқа c мұқият
бекітіңіз.
• Балалардың немесе үй жануарларының
зарядтау станциясына асылуына жол
бермеңіз. Олар жарақат алуы немесе
құрылғыны зақымдауы мүмкін.
• Құрылғының зақымдалуын немесе адамның
жарақаттануын болдырмау мақсатында,
қаптамадан оларды шығару барысында, өнім
бөлшектерін түсіріп алмаңыз.
• Зарядтау станциясын қабырға қағазына
жалғау үшін екі бүйірлік таспаны
пайдаланбаңыз. Зарядтау станциясы
мен өнім корпусының салмағы қағазды
зақымдауы мүмкін.
18
 Loading...