

Page 1
global_main.book.book Page 1 Tuesday, March 23, 2021 2:52 PM
OWNER'S MANUAL
VACUUM CLEANER
Before beginning installation, read these instructions
carefully. This will simplify installation and ensure that the
product is installed correctly and safely. Leave these
instructions near the product after installation for future
reference.
ENGLISH
A9**********
MFL69883669
Rev.01_032321
www.lg.com
Copyright © 2021 LG Electronics Inc. All Rights Reserved.
Page 2
global_main.book.book Page 2 Tuesday, March 23, 2021 2:52 PM
TABLE OF CONTENTS
This manual may contain images or
content that may be different from the
model you purchased.
This manual is subject to revision by the
manufacturer.
SAFETY INSTRUCTION
READ ALL INSTRUCTIONS BEFORE USE...........................................................3
WARNING............................................................................................................3
CAUTION ...........................................................................................................10
CARING FOR THE ENVIRONMENT..................................................................12
INSTALLATION
Product Overview.............................................................................................14
Installing the Charging Station ......................................................................18
Storing the Accessories...................................................................................20
OPERATION
Getting Started.................................................................................................22
Charging the Battery .......................................................................................24
Using the Mop Nozzle .....................................................................................25
Using the Nozzles and Tools...........................................................................28
SMART FUNCTIONS
Using LG ThinQ Application............................................................................31
Smart Diagnosis Function...............................................................................34
MAINTENANCE
Cleaning the Appliance ...................................................................................35
Cleaning the Nozzles .......................................................................................38
TROUBLESHOOTING
Before Calling for Service................................................................................42
APPENDIX
Information.......................................................................................................46
Page 3
WARNING
global_main.book.book Page 3 Tuesday, March 23, 2021 2:52 PM
SAFETY INSTRUCTION
SAFETY INSTRUCTION
READ ALL INSTRUCTIONS BEFORE USE
The following safety guidelines are intended to prevent unforeseen
risks or damage from unsafe or incorrect operation of the appliance.
The guidelines are separated into ‘
described below.
Safety Messages
This symbol is displayed to indicate matters and
operations that can cause risk. Read the part with this
symbol carefully and follow the instructions in order to
avoid risk.
WARNING
This indicates that the failure to follow the instructions can
cause serious injury or death.
WARNING
’ and ‘
CAUTION
’ as
3
ENGLISH
CAUTION
This indicates that the failure to follow the instructions can
cause the minor injury or damage to the product.
WARNING
• To reduce the risk of explosion, fire, death, electric shock, injury or
scalding to persons when using this product, follow basic
precautions, including the following:
Technical Safety
• This appliance can be used by children aged from 8 years and above
and persons with reduced physical, sensory or mental capabilities or
lack of experience and knowledge if they have been given supervision
or instruction concerning use of the appliance in a safe way and
Page 4

global_main.book.book Page 4 Tuesday, March 23, 2021 2:52 PM
4
SAFETY INSTRUCTION
understand the hazards involved. Children shall not play with the
appliance. Cleaning and user maintenance shall not be made by
children without supervision.
• Children of less than 3 years should be kept away unless continuously
supervised.
• Do not allow the appliance to be used as a toy. Close attention is
necessary when used by or near children.
• Do not allow children to play with or hang on the appliance.
• Do not use the appliance with damaged power cord or plug. The cord
must be replaced. If the appliance is not working as it should, has
been dropped, damaged, left outdoors, or dropped into water, return
it to an LG Electronics service centre.
• Do not pull or carry by cord, use cord as a handle, close a door on
cord, or pull cord around sharp edges or corners. Do not run
appliance over cord. Keep cord away from heated surfaces.
• Do not unplug by pulling on cord. To unplug, grasp the plug, not the
cord.
• Place the cords from other appliances out of the area to be cleaned.
Battery
• Never use the battery, adapter, and the charging station from other
appliances with this appliance. Use only the battery and the charging
station provided by LG Electronics.
• Never use the battery, adapter, and the charging station from this
appliance with other appliances.
• Unplug the power cord and remove the battery if the appliance will
not be used for an extended period of time.
• Do not use modified or damaged batteries.
• Do not disassemble, remove or short-circuit the battery.
• When disposing of the battery or the appliance, remove the battery
from the appliance and safely dispose of it.
• Have specifically designated battery packs replaced when it is no
longer able to hold a charge.
Page 5

global_main.book.book Page 5 Tuesday, March 23, 2021 2:52 PM
SAFETY INSTRUCTION
• Refer to the
Charging the Battery
section instructions for the
method of replacing the battery.
• When disposing of this appliance, follow regulations for disposal of
rechargeable lithium-ion batteries.
• Follow all local ordinances and regulations when handling or
disposing of the battery.
• Prevent unintentional starting. Ensure the switch is in the off position
before connecting to the battery pack, picking up or carrying the
appliance.
• Disconnect the battery pack from the appliance before making any
adjustments, changing accessories, cleaning, serviing, or storing
appliance.
• When battery pack is not in use, keep it away from other metal
objects, like paper clips, coins, keys, nails, screws or other small metal
objects, that can make a connection from one terminal to another.
• Under abusive conditions, liquid may be ejected from the battery. If
this happens, avoid contact. If contact accidentally occurs, flush with
water. If liquid contacts eyes, additionally seek medical help.
5
ENGLISH
• If the appliance is to be stored unused for a long period, the batteries
should be removed.
• Before removing the battery, you must turn off this appliance.
Battery Specifications
• One or two batteries are provided, the number of batteries varies
depending on the model purchased.
-
Model Name
-
Type
: Rechargeable Lithium-ion Battery
-
Rated Capacity
: EAC63382204
: 25.2 V%, 2400 mAh
Installation
• To avoid an electrical shock or fire, do not install, charge or store the
appliance where it may be exposed to water, rainfall or high
humidity.
Page 6

global_main.book.book Page 6 Tuesday, March 23, 2021 2:52 PM
6
SAFETY INSTRUCTION
• Install, charge and store the appliance in a well-ventilated place.
• Avoid operating the appliance in areas where there is a risk of
leakage of flammable gas, industrial oil or metallic dust.
• Do not store or install the appliance, power cord or plug near heating
devices or open flames.
• Install the charging station on a firm, level surface.
• To prevent tipping, floor standing mode installations should be
anchored to the wall using the provided stand anchoring screw,
anchoring block and double-sided tape.
• In wall-mounted mode installations, the charging station should be
secured tightly to the wall using the provided wall anchoring screws.
• Use the anchoring screws only when attaching to concrete or similar
solid surfaces.
• Never drill into a wall without first checking that the area behind it is
free from power conduits, plumbing, vents, or cables.
• Do not use or store the appliance at temperatures below 5 ℃ or
above 38 ℃.
• Do not store or install the appliance where it is exposed to
temperatures below freezing or exposed to outdoor weather
conditions.
• When installing or moving the appliance, be careful not to pinch,
crush, or damage the power cord or plug.
Operation
• Read all instructions before using the appliance, and save these
instructions.
• Use only as described in this manual. Use only manufacturer’s
recommended attachment.
• This appliance is designed for normal indoor domestic use only. It is
not to be used for any non-residential, commercial, or industrial
application.
Page 7

global_main.book.book Page 7 Tuesday, March 23, 2021 2:52 PM
SAFETY INSTRUCTION
7
• This product should only be used with a 100 - 240 V~ 50/60 Hz, 0.8
amp outlet. Make sure to check the power specifications of the place
where you intend to use the appliance.
• Do not handle the power cord, plug, or appliance controls with wet
hands.
• Wipe any moisture or dirt off the cord or plug with a dry cloth.
• Never attempt to operate this appliance if it is damaged,
malfunctioning, partially disassembled, or has missing or broken
parts, including a damaged cord or plug. Take it to an authorized LG
Electronics service centre or dealer for assistance.
• Do not apply excessive force to the power cord to bend it, or place it
under a heavy object as this will damage it.
• Do not use multiple-outlet adapters with this appliance. Make sure to
use a power socket with a capacity of 10 A.
• Do not plug the appliance into a damaged or loose outlet.
• Make sure to unplug the power cord when the appliance is not to be
used for an extended period of time.
ENGLISH
• Do not damage, alter, excessively bend, twist, pull, pinch or heat the
power cord.
• Before using the appliance, remove any wire or string on the floor.
• Avoid touching the prongs of the power plug with your finger(s) when
unplugging the power cord.
• Do not cover the power cord with a rug or carpeting.
• Push the power plug firmly into the wall outlet so that it is not loose.
• If the product has been submerged, contact an LG Electronics service
centre or dealer for instructions before resuming use.
• If the product makes a strange noise or emits an odour or smoke,
discontinue use and contact an LG Electronics customer information
centre.
• Only qualified technicians or service personnel from LG Electronics
may disassemble, repair or modify the appliance.
• Never insert a sharp metallic object such as a pin, nail or knife in a
hole or gap in the appliance or the charging station.
Page 8
global_main.book.book Page 8 Tuesday, March 23, 2021 2:52 PM
8
SAFETY INSTRUCTION
• Do not vacuum liquids with this appliance. Make sure that no water,
beverage or detergent gets inside the appliance or the charging
station.
• Do not allow the appliance to sweep up blades, thumb tacks,
sawdust, sharp objects, or hot or cold ashes.
• Do not allow children to use the appliance.
• Do not let children or pets get close to the appliance when using,
charging or storing.
• Do not insert the nozzle or tools in your mouth.
• Keep clothing and hair, fingers, or other parts of the body away from
openings and moving parts.
• Do not operate the appliance with the suction inlet or outlet blocked.
• Do not use the appliance without the dust bin and filters in place.
• Do not use in an enclosed space where vapors are present from paint
thinner, mothproofing substances, flammable dust or other
explosive or toxic materials.
• Do not touch the charging terminals on the appliance or the charging
station, or insert an electrified object inside the appliance or the
station.
• Always store the appliance on the floor standing or wall-mounted
charging station when it is not in use.
• Do not lean the appliance on walls, chairs or tables.
• If the earth leakage breaker is tripped when the product is put on the
charging station, immediately remove the appliance from the
charging station. Contact an LG Electronics customer service centre.
• Use extra care when cleaning on stairs.
• Do not use or store a heating device or flammable substance(ether,
benzene, alcohol, chemicals, combustible sprays, insecticide, air
freshener or cosmetics) in close proximity to the appliance.
• Do not attempt to clean up a liquid substance (water, beverage),
odourous substances (candy, chocolate, pet excrement), metallic
objects (blades, pins), flammable substances, burning/
smoking(cigarettes, matches, or hot ashes), surfactants, or glass
shards with this appliance.
Page 9

global_main.book.book Page 9 Tuesday, March 23, 2021 2:52 PM
SAFETY INSTRUCTION
9
• In the event of a gas leak(natural gas, propane gas, etc.), do not
operate this or any other appliance. Open a window or door to
ventilate the area immediately.
• Do not hold the charging station upside down with the battery in the
charging station.
• Do not expose the appliance, and the battery in particular, to heat, a
heating device or direct sunlight.
• Do not keep the appliance or its battery inside a vehicle which is
exposed to direct sunlight.
• Never allow any water, beverage or detergent to get inside the
battery.
• Do not apply physical impacts to the battery.
Maintenance
• Make sure to unplug the power cord when cleaning or maintaining
the charging station.
• Do not wash the inlet port or the dust bin with water or detergent.
ENGLISH
• Do not use detergents, polishes or air fresheners to clean the dust
bin.
• Do not apply or spray a flammable substance (gasoline or thinner) or
surfactants (detergent or bath soap) on the appliance.
• Wash hands after handling nozzles. The nozzles contain carbon fiber,
and contact may cause minor skin irritation.
Disposal
• Keep packing materials out of the reach of children. Packaging
materials can pose a suffocation risk for children.
• Destroy the carton, plastic bag, and other packing materials after the
appliance is unpacked. Children might use them for play. Cartons
covered with rugs, bedspreads, or plastic sheets can become airtight
chambers.
• Dispose of this appliance according to local, state, and regional laws
and regulations.
Page 10
CAUTION
global_main.book.book Page 10 Tuesday, March 23, 2021 2:52 PM
10
SAFETY INSTRUCTION
• Contact your local city council or the related government authority
before disposing of this appliance.
Mop Nozzle
• Do not vacuum sharp objects (glass pieces, wire, blades, pins, etc.)
with the mop nozzle attached. When cleaning the mop pads after
mopping, you could be injured by a sharp object embedded in the
mop.
CAUTION
• To reduce the risk of injury to persons, malfunction, or damage to the
product or property when using the appliance, follow basic safety
precautions, including the following:
Operation
• This appliance has a built-in safety device to prevent damage from
overheating. If the appliance becomes overheated after extended
use, it may automatically turn off. If this occurs, leave the appliance
in a cool, well-ventilated area for about an hour before turning on the
power again.
• Do not subject the product to shocks or drop it.
• Do not install wet or damp filters.
• Always use a soft cloth to clean the appliance. Do not clean the
product with a volatile or organic solvent(thinner or acetone).
• Do not clean the same spot repeatedly for an extended period of
time. Doing so may damage the carpet or flooring surface.
• Keep fingers away from pinch points when assembling the appliance
or the charging station.
• Do not use the double-sided tape to anchor the charging station on
wallpaper. Use the provided screws to anchor the charging station.
The weight of the charging station and the appliance could damage
the paper.
Page 11
global_main.book.book Page 11 Tuesday, March 23, 2021 2:52 PM
SAFETY INSTRUCTION
11
• Do not apply force or any impact to the Cyclonic Mesh Filter.
• Do not remove the battery during operation.
Mop Nozzle
• Do not use the mop nozzle for any purpose(for example, polishing a
car, cleaning windows) other than domestic floor cleaning.
• Do not use the mop nozzle to vacuum up liquids(water, beverage).
• When using the mop nozzle, always attach the mop pads.
• Do not clean a coated, rough or delicate floating floor and carpets
with the mop nozzle.
• Do not use the mop nozzle to clean the same spot repeatedly for an
extended period of time. The water injection at the mop nozzle may
cause water to get into the dust inlet and damage the appliance.
• Do not step on the mop nozzle.
• Wet floors can pose a slip hazard. Allow floors to dry completely
before allowing anyone to walk on them.
ENGLISH
• Do not store the appliance by attaching the water tank filled with
water to the mop nozzle.
Page 12
global_main.book.book Page 12 Tuesday, March 23, 2021 2:52 PM
12
SAFETY INSTRUCTION
CARING FOR THE ENVIRONMENT
Disposal of Your Old Appliance
• All electric and electronic products, marked with this
symbol (the “crossed-out wheeled bin”) must be disposed
of separately from regular household waste, via
designated collection facilities appointed by the
government or the local authorities. Consumers may hand
over old appliances at the point of sales upon buying a new
equivalent appliance. Consumers may also hand over, free
of charge, old appliances of very small size (< 25 cm) at
authorized point of sales, without the obligation to buy a
new equivalent appliance. Please contact your point of
sales concerning this latter take-back modality.
• The correct disposal of your old appliance will help prevent
potential negative consequences for the environment and
human health. A mindful management of old appliances
by consumers may help the environmentally sound re-use,
recycling and recovery of old appliances and the related
materials.
• For more detailed information about disposal of your old
appliance, please contact your city office, waste disposal
service or the shop where you purchased the product.
(www.lg.com/global/recycling)
Page 13
global_main.book.book Page 13 Tuesday, March 23, 2021 2:52 PM
SAFETY INSTRUCTION
Disposal of Waste Batteries/Accumulators
• This symbol may be combined with chemical symbols for
mercury (Hg), cadmium (Cd) or lead (Pb) if the battery
contains more than 0.0005% of mercury, 0.002% of
cadmium or 0.004% of lead.
• All batteries/accumulators should be disposed separately
from the municipal waste stream via designated collection
facilities appointed by the government or the local
authorities.
• The correct disposal of your old batteries/accumulators
will help to prevent potential negative consequences for
the environment, animal and human health.
• For more detailed information about disposal of your old
batteries/ accumulators, please contact your city office,
waste disposal service or the shop where you purchased
the product. (http://www.lg.com/global/sustainability/
environment/take-back-recycling/global-network-europe)
13
ENGLISH
Page 14
global_main.book.book Page 14 Tuesday, March 23, 2021 2:52 PM
14
INSTALLATION
INSTALLATION
Product Overview
The images in this guide may be different from the actual components and accessories, which are subject
to change by the manufacturer without prior notice for product improvement purposes.
Front View
*1 This feature is only available on some models.
a
Charging Station
b
Auxiliary Charging Station
c
Battery (Dual Battery*1)
d
Product Body
e
Extension Pipe
f
Nozzle
g
Floor Stand Dock
h
Floor Stand Pipe
i
Adapter
j
Detachable Nozzle Storage
k
Tool Holders
l
Exhaust Filter
m
Pre-filter
n
Kompressor Lever
o
Cyclonic Mesh Filter
Page 15
global_main.book.book Page 15 Tuesday, March 23, 2021 2:52 PM
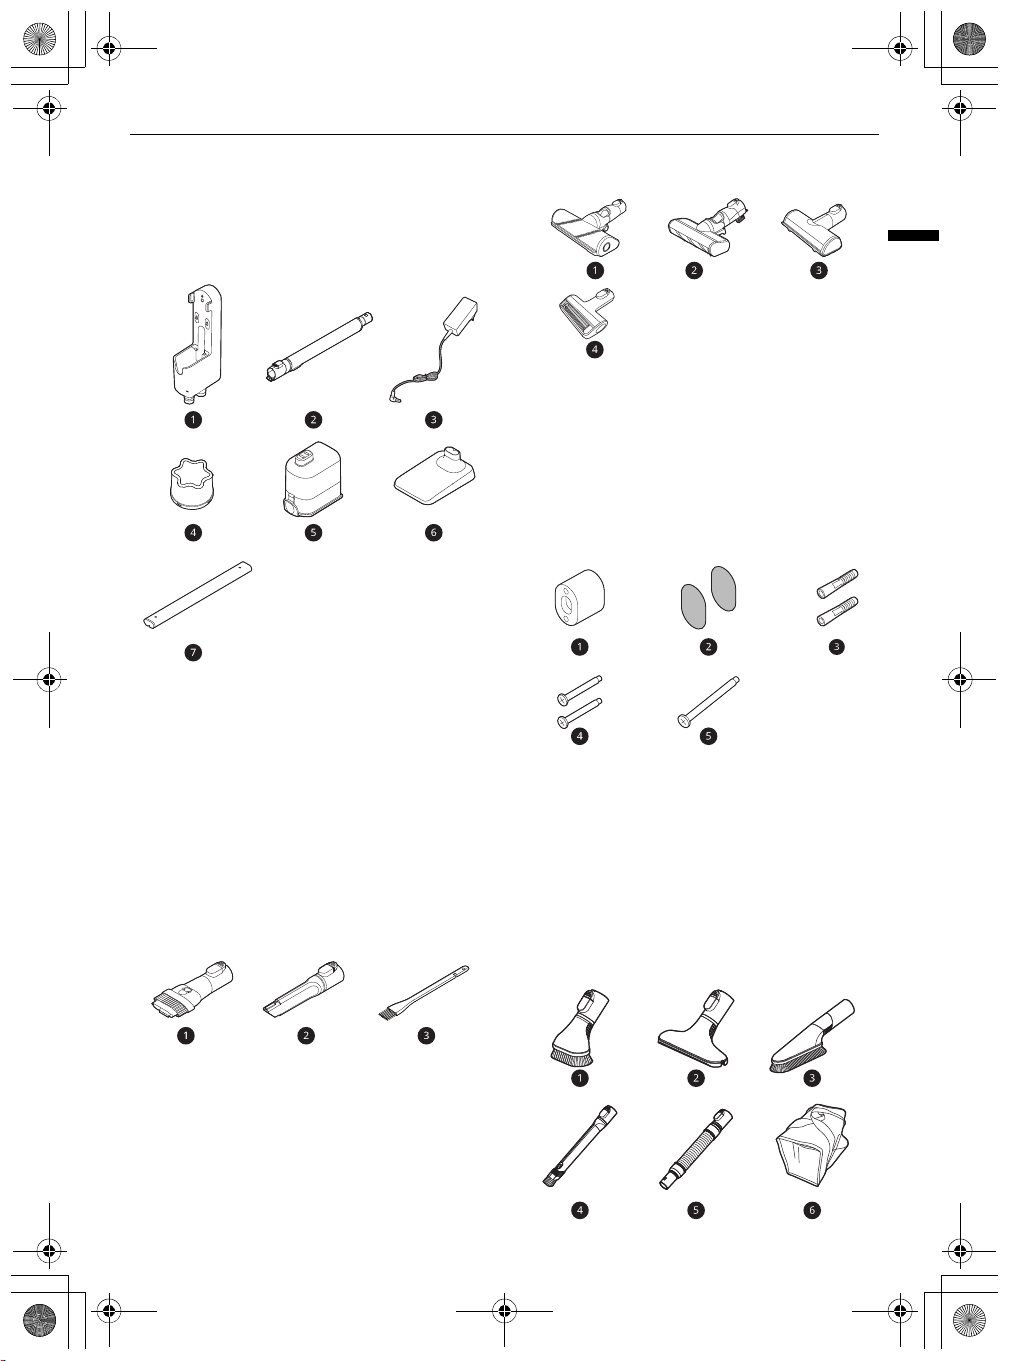
Accessories
*1 This accessory is only available on some models.
Included Accessories
a
Charging Station
b
Extension Pipe
c
Adapter
d
Pre-filter
e
Battery (Dual Battery*1)
f
Floor Stand Dock
g
Floor Stand Pipe
Basic Accessories
*1
*1
INSTALLATION
Nozzles
a
Carpet Nozzle
b
Slim Hard Floor Nozzle
c
Bedding Nozzle
d
Pet Nozzle
*1
*1
*1
*1
Installation Kit
a
Wall Anchoring Block
b
Double-Sided Tape
c
Drywall Anchor
d
Wall Anchoring Screw
e
Stand Anchoring Screw
*1
*1
*1
*1
*1
Tools and Accessory Bag
15
ENGLISH
a
Combination Tool
b
Crevice Tool
c
Cleaning Brush
Page 16
NOTE
global_main.book.book Page 16 Tuesday, March 23, 2021 2:52 PM
16
INSTALLATION
a
Hard Dirt Tool
b
Mattress Tool
c
Multi-angle Tool
d
Flexible Crevice Tool
e
Flexible Hose Extension
f
Accessory Bag
*1
*1
*1
*1
Mop Kit
Specifications
a
Mop Nozzle
b
Detachable Nozzle and Mop Pads Storage
c
Mop Pads for General Cleaning
*1
*1
d
Measuring Cup
• The mop pads, batteries, exhaust filter and the
pre-filter will eventually need to be replaced.
Contact an LG Electronics customer service
centre.
*1
*1
*1
*1
Appliance
Model
Dimensions (Width X
Depth X Height)
Weight
Power Consumption
Battery Run Time
(Using two battery)
Battery Run Time
(Using one battery)
• Dimensions are given for the assembled product body, extension pipe and nozzle.
A9**********
260 mm X 270 mm x 1120 mm
Approximately 2.6 kg
370 W in
120 W in
68 W in
Using with the Nozzle
Up to 12 minutes in
Up to 40 minutes in
Up to 80 minutes in
Using with the Nozzle
Up to 6 minutes in
Up to 20 minutes in
Up to 40 minutes in
Turbo Mode
Power Mode
Normal Mode
Turbo Mode
Power Mode
Normal Mode
Turbo Mode
Power Mode
Normal Mode
(Maximum 590 W)
*1
*1
Using with the Tool
Up to 14 minutes in
Up to 60 minutes in
Up to 120 minutes in
Using with the Tool
Up to 7 minutes in
Up to 30 minutes in
Up to 60 minutes in
Turbo Mode
Power Mode
Normal Mode
Turbo Mode
Power Mode
Normal Mode
Page 17
global_main.book.book Page 17 Tuesday, March 23, 2021 2:52 PM
INSTALLATION
• Suction power is an average of suction power with IEC 62885-2, 5.8 standard tested by an independent
test lab. Individually measured data would be different from a lab test result.
• Battery run time is the result of using a fully charged battery according to the LG Electronics test
standard. Results may be different depending on actual use environment and period of use.
*1 The Nozzle contains the direct drive motor that rotates the nozzle cleaning head directly.
17
Charger Adaptor
Model ADC-30FSA-30 29430EPG
Input
Output
100-240 V~, 50/60 Hz, 0.8 A
29.4 V%, 1.0 A
ENGLISH
Page 18
global_main.book.book Page 18 Tuesday, March 23, 2021 2:52 PM
18
INSTALLATION
4
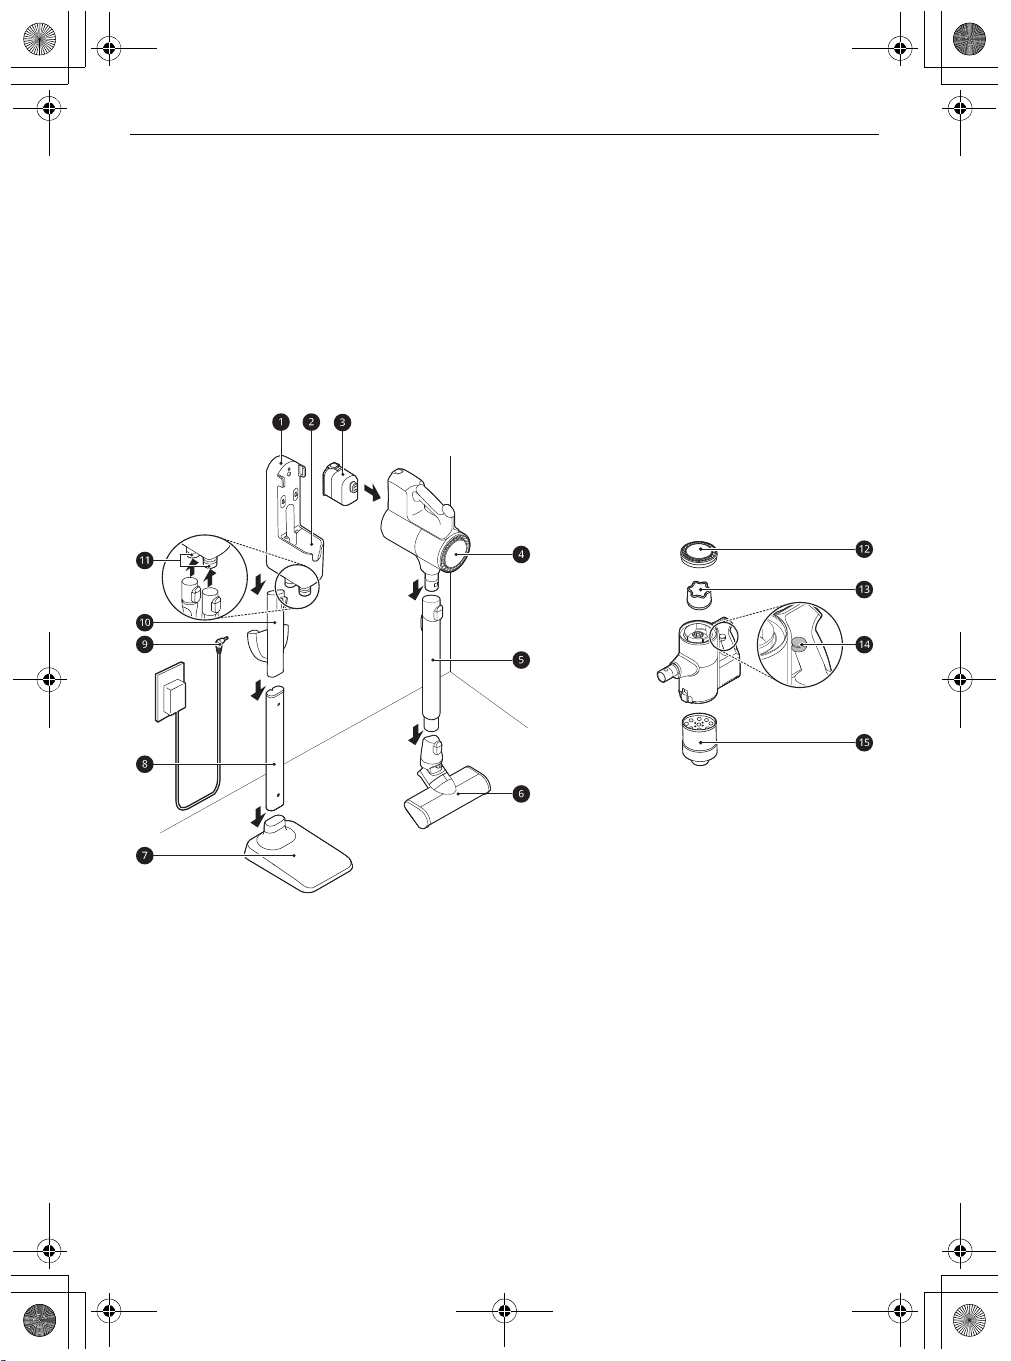
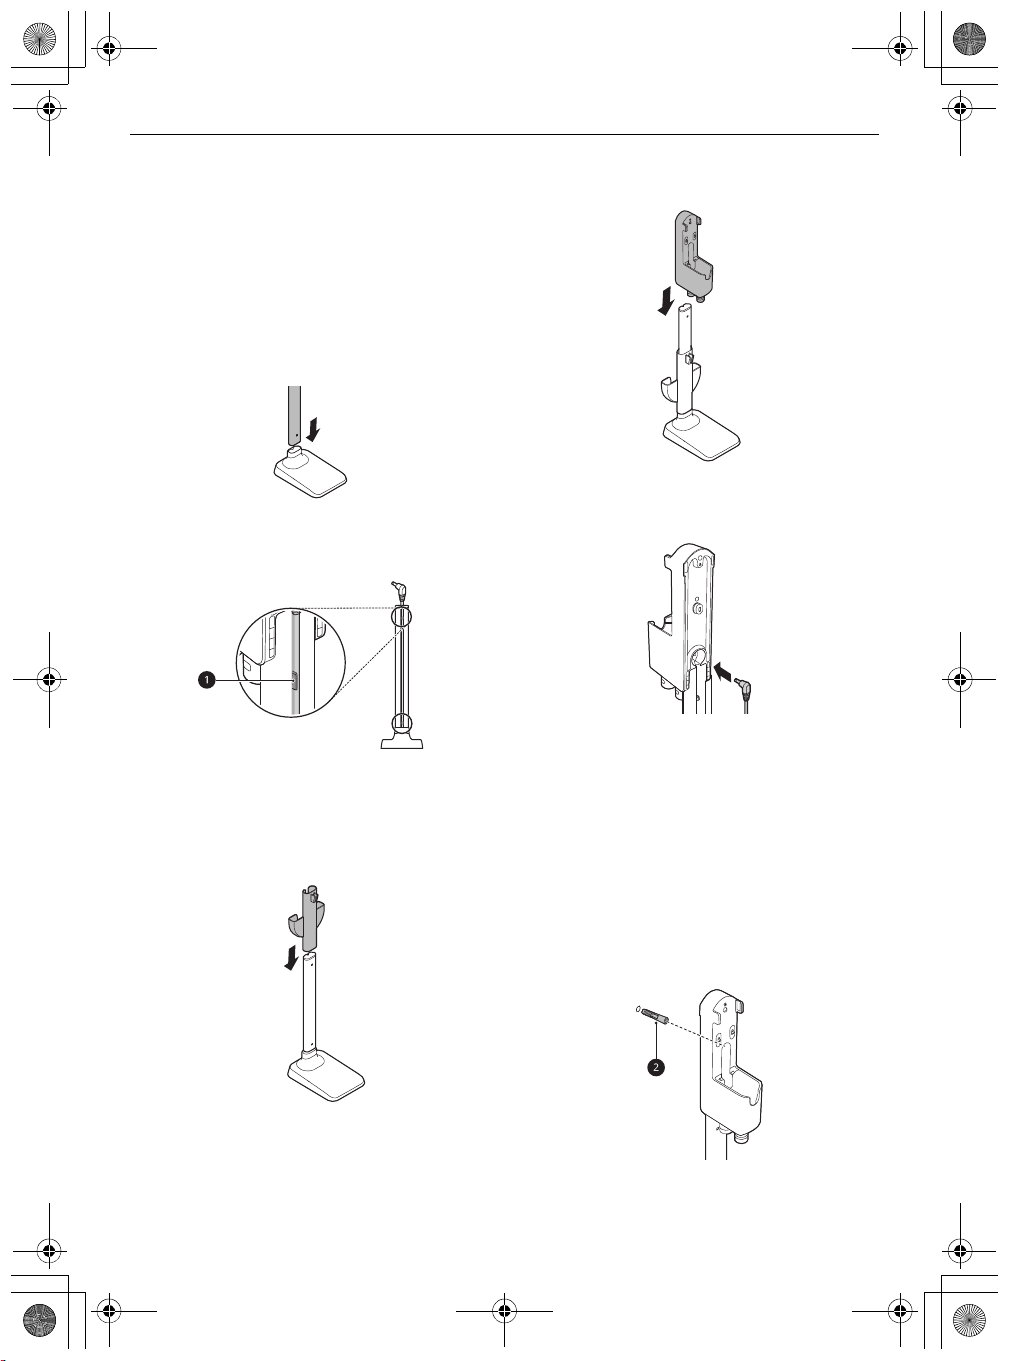
Installing the Charging
Assemble the charging station onto the top of
the floor stand pipe.
Station
Self-Standing Installation
Follow the steps below to install the charging
station on a hard and level floor.
1
Place the floor stand dock on a hard and level
floor and assemble the floor stand pipe.
5
Connect the power adapter to the port on the
2
Clip the power cord tidily into the cord keeper
a
on the back of the floor stand pipe.
back of the charging station.
3
Slide the detachable nozzle storage onto the
floor stand pipe.
• Make sure not to pinch or tangle the power
cord behind the mop pads storage.
6
Drill a hole in the wall and insert the drywall
anchor
b
if needed.
• Before drilling, make sure that there are no
pipes or electrical wires inside the wall at the
desired location.
• For drywall anchor: use 1/4″ (6.5 mm) drill bit
• For concrete or wall stud: use 1/8″ (3 mm)
drill bit
• If screwing into drywall, use the drywall
anchor.
7
Align the wall anchoring block c of the
charging station, and fix the charging station
Page 19
NOTE
global_main.book.book Page 19 Tuesday, March 23, 2021 2:52 PM
to the wall by tightening the anchoring screw
d
all the way.
8
Plug the power cord into the power outlet.
• The charging station can be removed as needed.
To remove it, hold the floor stand dock steady
and pull up on the charging station.
INSTALLATION
2
Attach the second piece of double-sided tape
to the other side of the wall anchoring block to
secure it to the wall.
• Do not use double-sided tape on wallpaper.
19
Wall-Mounted Installation
For wall-mounted installations, the charging
station must be attached securely to the wall using
the provided(short) wall anchoring screws.
• The detachable nozzle storage cannot be
attached to the charging station in a wallmounted installation.
ENGLISH
Using Double-Sided Tape to Secure
the Appliance
1
Use the double-sided tape a to attach the wall
anchoring block
• Remove the centre section of double-sided
tape before attaching it to the wall
anchoring block.
b
to the charging station.
1
Connect the power adapter to the port on the
back of the charging station.
2
Drill 2 holes and insert the drywall anchors(if
needed) at least 1 m from the floor and near
enough to easily reach a power outlet.
• Before drilling, make sure that there are no
pipes or electrical wires inside the wall at the
desired location.
• For drywall anchor: use 6.5 mm drill bit
• For concrete or wall stud: use 3 mm drill bit
Page 20
CAUTION
global_main.book.book Page 20 Tuesday, March 23, 2021 2:52 PM
20
INSTALLATION
• If screwing into drywall, use the drywall
anchors.
1m
3
Attach the charging station to the wall with the
wall anchoring screws.
4
Plug the power cord into the power outlet.
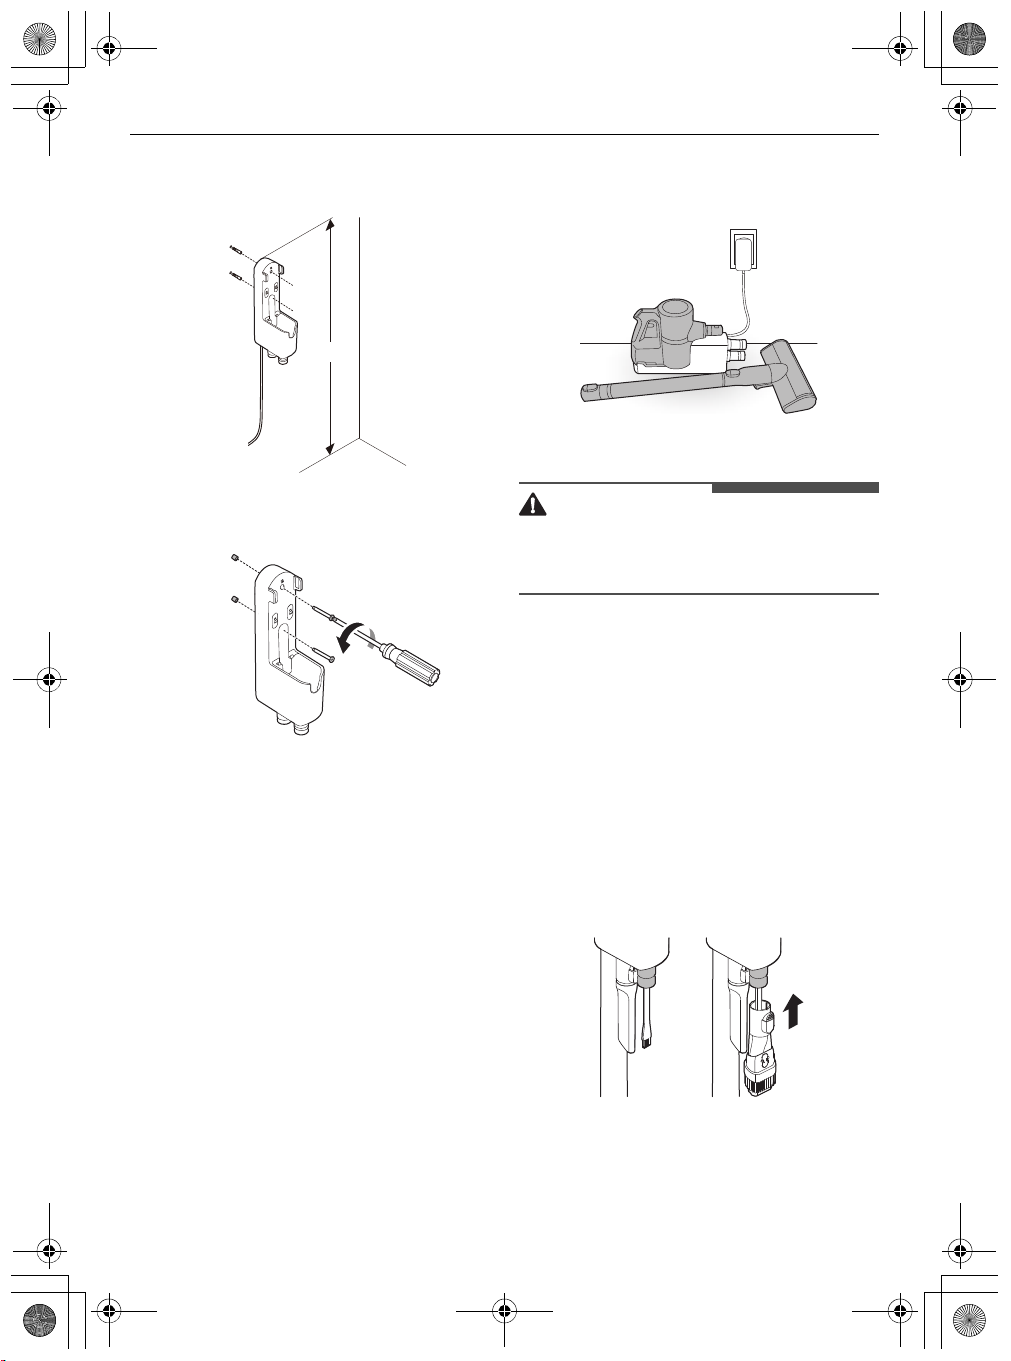
Compact Installation
For safety and convenience, install the charging
station using the self-standing or wall-mounted
installation methods. If you choose not to install
the charging station, place it on a level floor for
charging or storage.
3
Separate the extension pipe and nozzle from
the product body before charging or storing
the appliance.
4
Plug the power cord into the power outlet.
• Leaving the appliance on a level floor for a long
time with the extension pipe and nozzle attached
may damage the appliance.
Storing the Accessories
Storing the Tools
Store the frequently used tools such as the
combination tool, crevice tool and cleaning brush
at the bottom of the charging station.
• Slide the cleaning brush up into the tool holder.
• Slide the combination tool over the cleaning
brush and onto the tool holder.
• To remove a tool, press the release button at the
front of the tool.
1
2
Connect the power adapter to the port on the
back of the charging station.
Place the charging station on a hard and level
floor.
Page 21
global_main.book.book Page 21 Tuesday, March 23, 2021 2:52 PM
Storing the Nozzles
When a nozzle is not in use, store it in the
convenient detachable nozzle storage so you can
easily find it.
• The nozzle storage cradle is compatible with the
Slim Hard Floor Nozzle
or the
Bedding Nozzle
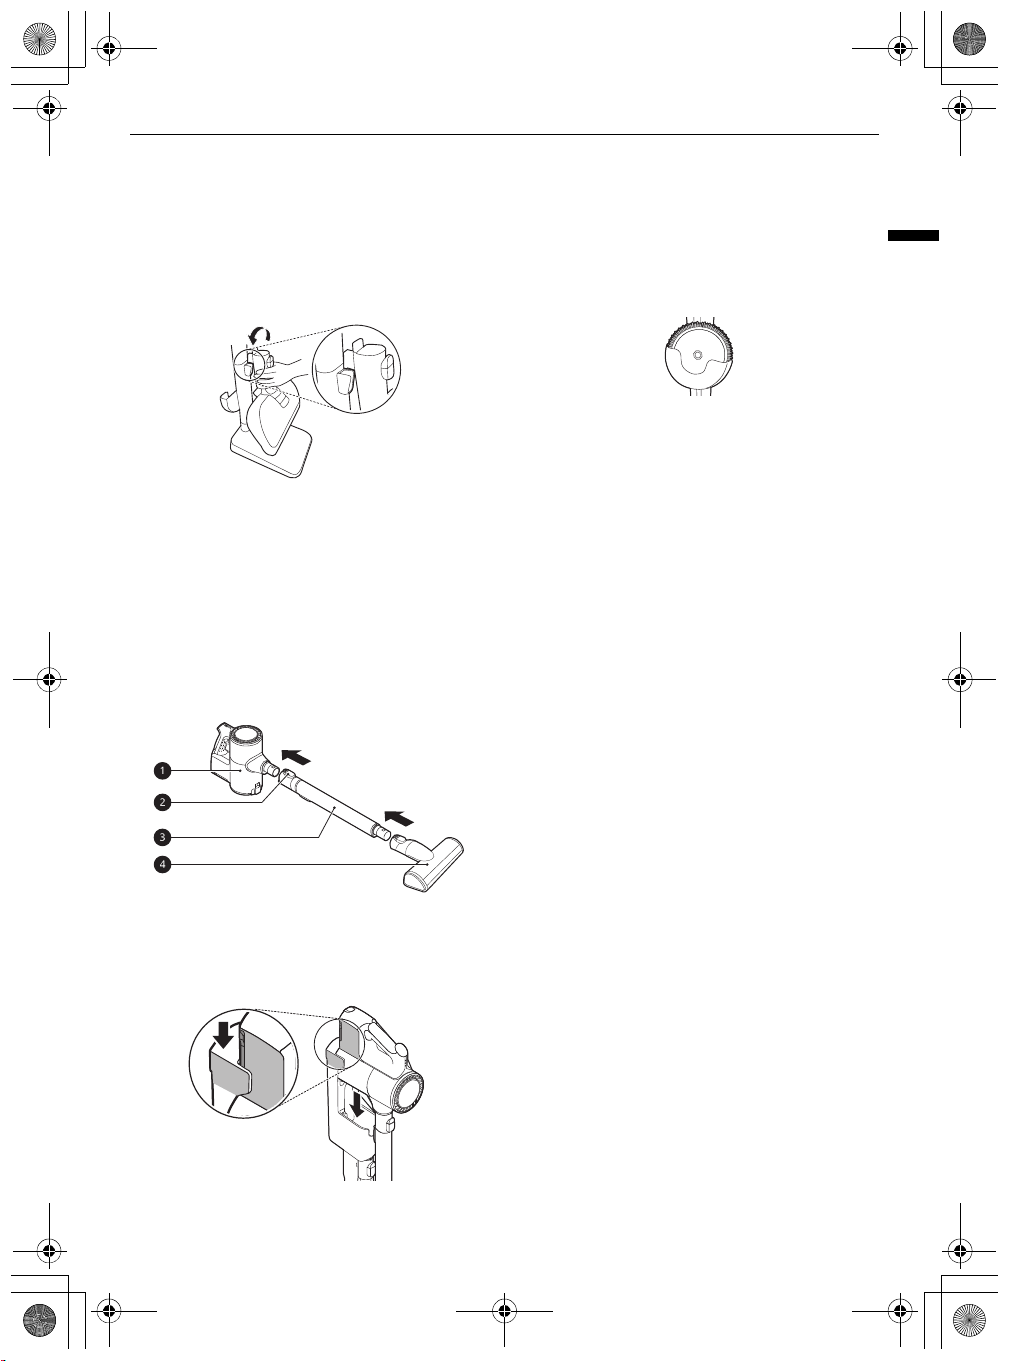
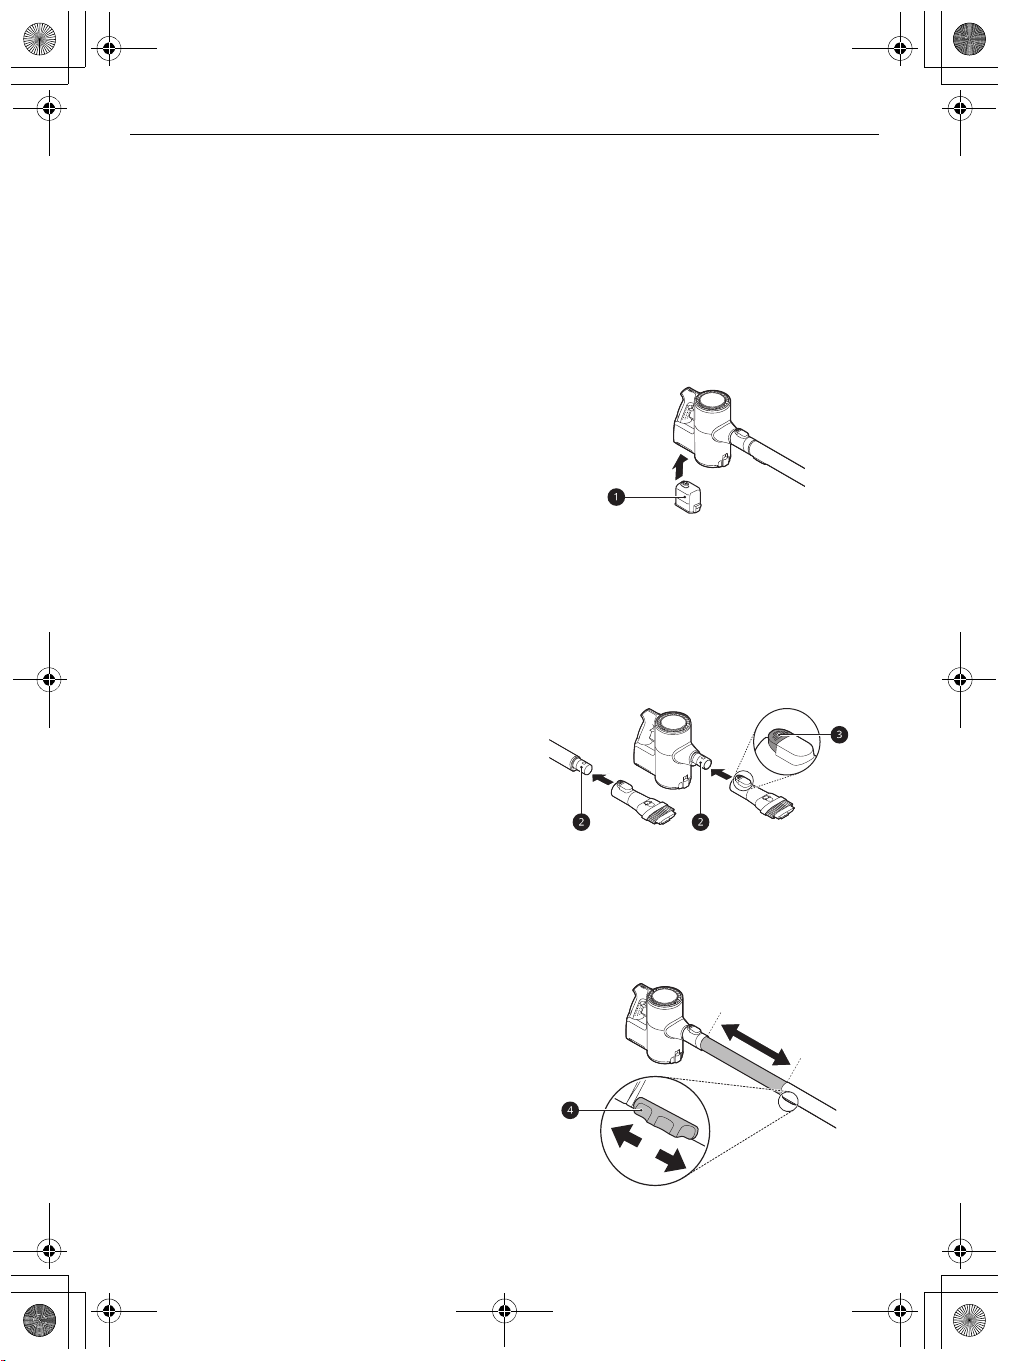
Assembling the Appliance
Follow these steps to safely assemble the
appliance.
1
Firmly attach the extension pipe c, nozzle d,
or tool onto the product body
• To detach the extension pipe, press the
extension pipe release button
a
.
b
.
INSTALLATION
Storing the Mop Pads
Up to 2 mop pads can be stored in the detachable
mop pads storage.
• Store the mop pads completely in a dry state. It
can result in an unpleasant odour.
.
21
ENGLISH
2
Put the product body on the charging station.
Charging the Battery
• See
on installing and charging the battery.
for instructions
Page 22
global_main.book.book Page 22 Tuesday, March 23, 2021 2:52 PM
22
OPERATION
OPERATION
Getting Started
Before Using the Appliance
• Support the bottom of the appliance when
cleaning an elevated surface.
• To avoid scratches on polished floors, keep the
brushes of the nozzles and tools free from grit,
sand, or abrasive objects.
• Make sure that the exhaust filter or pre-filter is
properly assembled before using the appliance.
• Close the dust bin cover properly before using
the appliance. If the dust bin cover is left open,
the suction strength may deteriorate and affect
the cleaning results.
• Store the appliance in the charging station or
plac e it flat on th e floor w hen n ot in use . Lea ning
the appliance against a wall or chair can result in
product damage or personal injury if the
appliance falls.
• Environmental conditions such as temperature
and humidity may cause static electricity to
accumulate on the appliance. Please contact LG
Electronics customer information centre if the
problem persists.
• Make sure to remove any foreign object such as
a sock or stocking before using the appliance.
Any foreign object on the inlet port or extension
pipe will prevent the appliance from functioning
properly.
• Please use the product at normal room
temperatures as the battery runtime may
deteriorate severely if used at temperatures
lower than 5 ℃ or higher than 38 ℃ for an
extended period of time.
• The battery runtime is dependent on the surface
type and the suction power.
• Follow manufacturer’s recommendations when
cleaning flooring, carpets, and rugs.
• Refer to the
runtime details.
Specifications
section for battery
Assembling Attachments
Nozzles and tools can be attached to either the
product body or the end of the extension pipe.
1
Insert the fully charged battery a into the
cavity at the bottom of the handle on the
product body.
2
Attach the nozzles, tools, or extension pipe by
sliding them onto the inlet
they click into place. The nozzles and tools can
also be attached to the end of the extension
pipe
b
.
• Detach the accessories by pressing the
release button
3
Adjust the extension pipe by pressing the
length adjustment button
pipe and sliding until it clicks into place at the
desired length.
• The extension pipe extends in four steps.
c
b
on the body until
.
d
on the back of the
Page 23
global_main.book.book Page 23 Tuesday, March 23, 2021 2:52 PM
4
Press the
mode.
• To turn off the appliance, press the
Power
button again.
button to activate the
Normal
Power
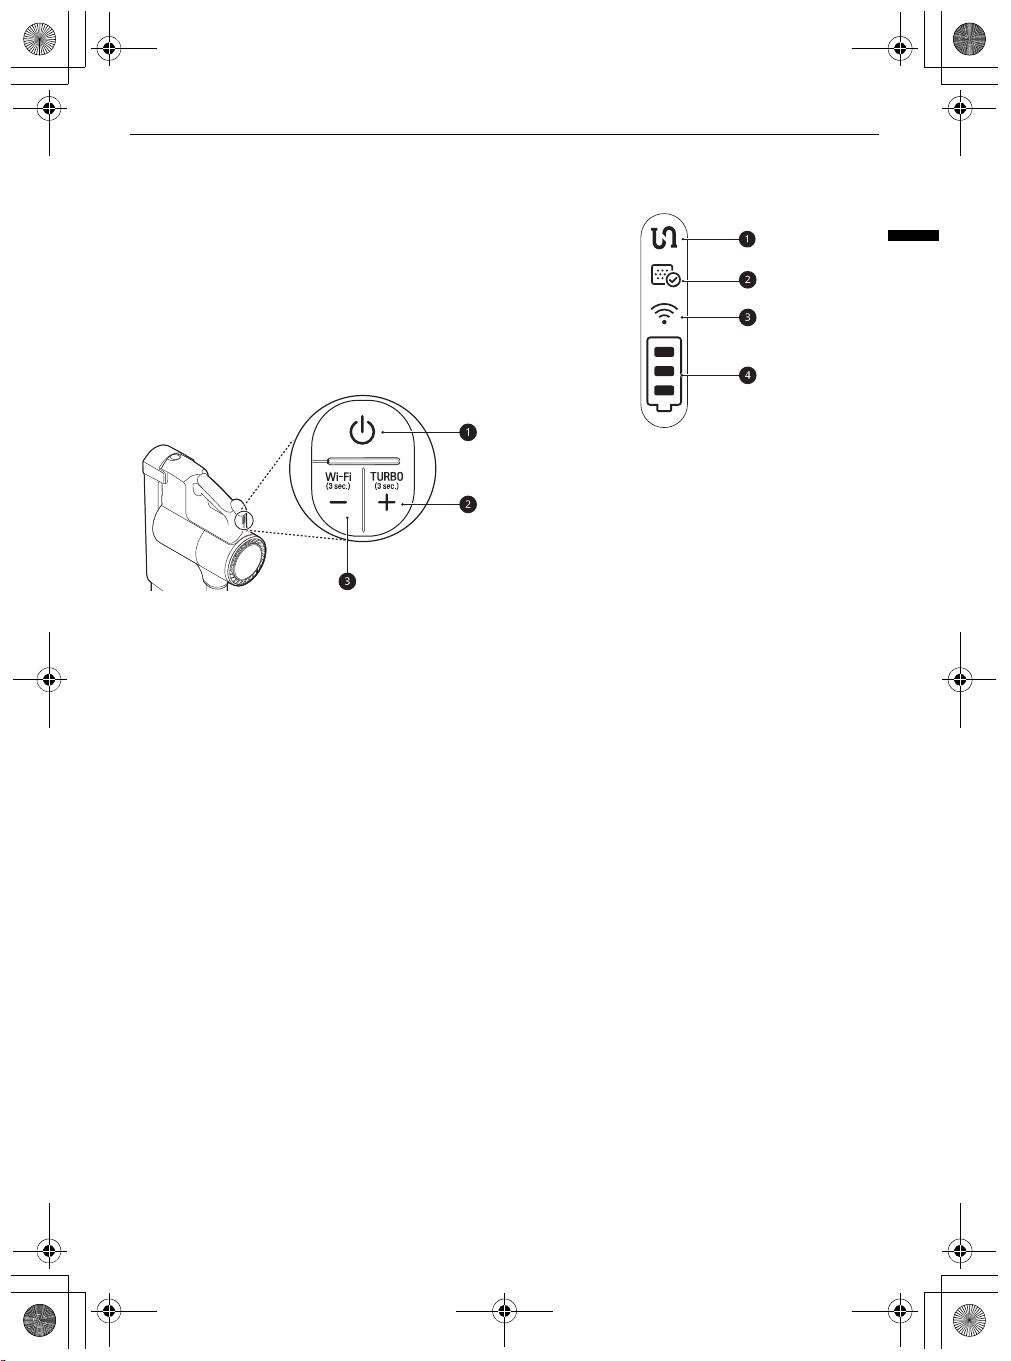
Adjusting the Suction Power
Adjust the suction power using the suction power
adjustment button on the handle.
a
Power Button
• Press the
on or off.
• Press the
mode.
b
Suction Power Up (+) Button / Turbo Mode
• Press the + button to increase the suction
power. (
• Press and hold the + button for more than 3
seconds to activate
mode.
c
Suction Power Down (-) Button / Wi-Fi Mode
• Press the - button to decrease the suction
power. (
• Press and hold the - button for 3 seconds to
activate Wi-Fi and connect the appliance in
the
Display
The handle of the appliance displays indicators for
clogged objects, filter cleaning alerts, appliance
Power
button to turn the appliance
Power
button to activate
Normal~Power~Turbo
Turbo
Turbo~Power~Normal
LG ThinQ
application.
Normal
)
mode from
)
Power
OPERATION
connection status, and the remaining battery
charge.
a
Clogged Objects Indicator
• This indicator lights up when the interior of
the product body, extension pipe, inlets,
nozzle, exhaust filter, pre-filter, or cyclonic
mesh filter is clogged with foreign objects.
• If clogging persists, the motor will cycle and
the appliance will shut off. Remove the
foreign objects and clean the exhaust filter,
pre-filter and cyclonic mesh filter following
the steps in the Removing Foreign Objects
section.
b
Filter Cleaning Cycle Alarm Indicator
• This indicator lights up when the appliance is
used for a certain period of time. Clean the
exhaust filter, pre-filter and cyclonic mesh
filter if necessary.
c
Wi-Fi Indicator
• This indicator blinks when the appliance is
connecting to the
home Wi-Fi network, and the indicator lights
up when the connection is complete.
d
Battery Level Indicator
• The remaining battery level is displayed in 3
stages according to the remaining battery
power.
• The battery level indicator blinks when the
battery needs to be charged.
• As the product is charging, bars light up on
the battery level indicator to indicate the level
of charge.
• Once the battery is fully recharged, 3 bars will
remain lighted on the battery level indicator.
LG ThinQ
23
ENGLISH
application or
Page 24

WARNING
CAUTION
global_main.book.book Page 24 Tuesday, March 23, 2021 2:52 PM
24
OPERATION
Charging the Battery
Before Charging the Battery
• Make sure that the adapter is connected to both
the charging station and the power outlet.
• Fully charging a single battery usually takes 4
hours. It will take twice as long to charge both
the main and auxiliary batteries.
• The battery will not be charged if the indoor
temperature is below 5 ℃. Only charge the
battery when indoor temperatures are between
5 ℃ and 38 ℃.
• The battery will eventually need to be replaced.
Due to the battery characteristics, runtime is
shortened after using the appliance repeatedly
for an extended period.
• The last bar on the battery indicator begins to
flash when the battery needs to be recharged.
Use the appliance with a fully charged battery.
• To maintain battery life on dual-battery models,
swap the positions of the two batteries
periodically, between the main body and the
auxiliary charging station.
Charging the Product Body
Storing the appliance on the charging station
automatically recharges the battery.
• If you don't hear a beep, reload the
appliance on the charging station.
• Make sure to securely fit the product body onto
the charging station. If the appliance falls off the
charging station, it could cause injuries, property
damage or product damage.
Charging the Auxiliary Battery
An auxiliary battery can be stored and charged in
the base of the charging station.
• Keep fingers away from pinch points when
assembling or disassembling the battery from
the product body or the charging station to
avoid personal injury.
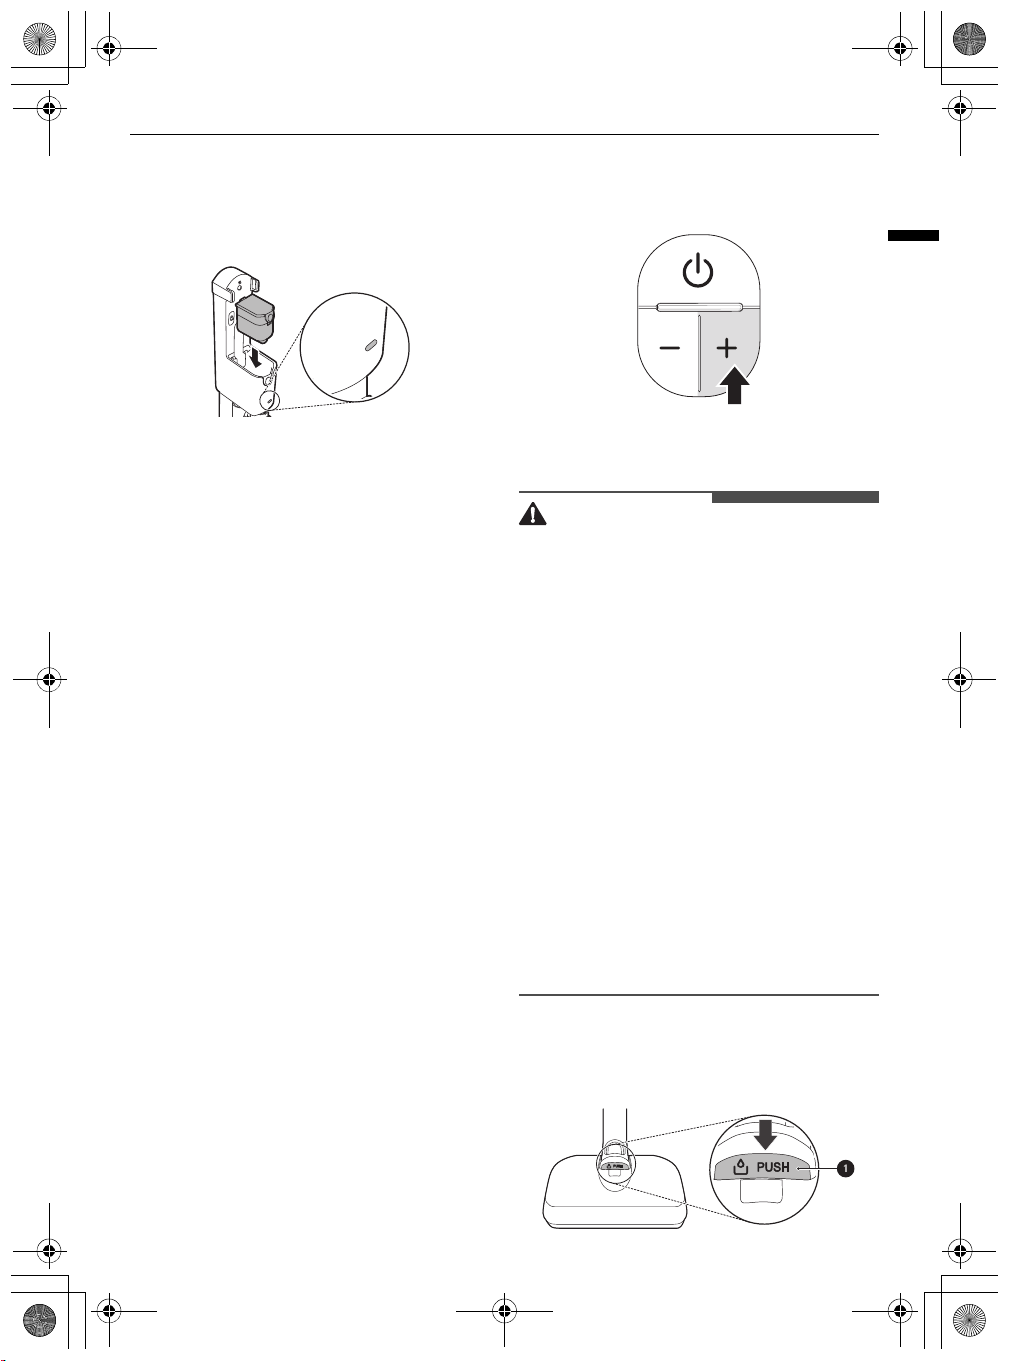
1
Press the
off.
2
Put the product body onto the charging station
by aligning it to the hook
station.
• The battery level indicator starts to blink and
Power
button to turn the appliance
a
of the charging
begins charging the battery.
1
Remove the discharged battery from the
product body by pressing the battery release
button on either side of the battery and pulling.
2
Insert the discharged battery into the auxiliary
charging station.
• The battery will only fit into the cavity if
aligned properly.
Page 25
CAUTION
global_main.book.book Page 25 Tuesday, March 23, 2021 2:52 PM
• The auxiliary charging indicator blinks while
recharging is in progress.
• The auxiliary charging indicator lights up
when charging is complete.
Using the Mop Nozzle
Before Using the Mop Nozzle
• The mop pads only rotate at one speed
regardless of what suction power setting the
product body is set to.
• To prevent product damage, the mop
attachment plate will automatically stop if there
are foreign objects stuck in the plate or if it is
subjected to a strong impact. Turn the appliance
off immediately and remove the foreign objects
or obstructions before resuming use.
• If you hear a noise while mopping, the mop pad
may have dropped off the mop attachment
plate. Turn off the product immediately and
reattach the mop to the attachment plate before
resuming use.
• Do not use a soiled mop pad to clean floors.
• Use only authorized LG Electronics mop pads.
• Empty the dust bin and clean the fine dust filter
and the pre-filter after using the mop nozzle.
STOP
25
OPERATION
• Press the
function.
• Press the
button once to turn off the dust suction function.
• Do not assemble or disassemble the nozzle while
the appliance is turned on. Doing so may result
in injury.
• Set the water adjustment button to the
position when not using the appliance for an
extended period of time. Failure to do so may
result in product failure.
• Do not let the appliance stand on the floor while
the wet mop pads are attached. Doing so may
result in damage or swelling to wood flooring.
• Do not use on PVC or PU mat for infants or
children. Friction can cause the motor to
overheat.
• If you use the mop nozzle for a long time with the
suction off, the motor may overheat
(recommended duration of use: 80 minutes).
When the moter overheats, the overheating
prevention function is activated and the
appliance is automatically turned off. Use the
appliance after cooling the heat for about one
hour in a cool, well-ventilated place.
~
button to turn on the dust suction
!
button once while pressing the ~
ENGLISH
Using the Wet Mop Pads
Press the
mode and not turn on the dust suction function.
Power
button. You can use the only mop
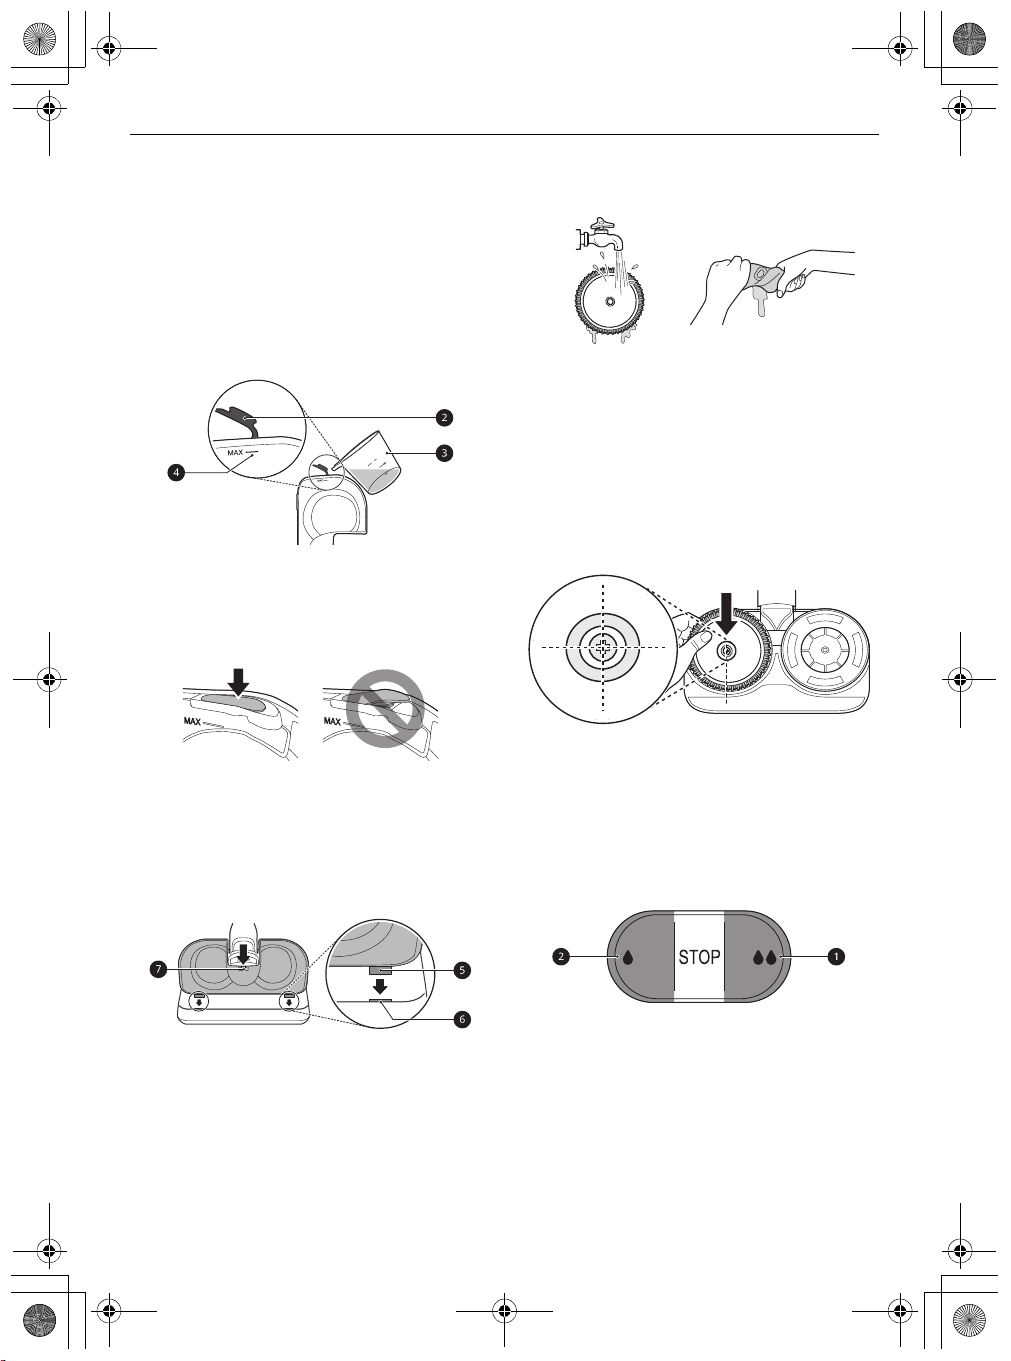
Filling the Water Tank
1
Press the
tank from the mop nozzle.
PUSH
button a to remove the water
Page 26
global_main.book.book Page 26 Tuesday, March 23, 2021 2:52 PM
26
OPERATION
2
Open the water inlet cap b on the side of the
water tank and fill the tank with water using
the measuring cup
• Open only one water inlet cap to fill the
water. Opening both caps may cause the
water to flush.
• Do not fill the tank over the
• Do not put liquid other than water and hot
water in the water tank.
3
Close the water inlet cap tightly.
• If the water inlet cap is not closed properly,
water may leak.
c
.
MAX
line d.
• Attaching and using mop pads while they
are dry may affect the cleaning results.
2
Place the mop nozzle upside down on the floor.
3
Align and attach the centre of the mop pad
with the centre of the mop attachment plate.
• Attach the Velcro on the mop pad to the mop
plate. Attaching the mop pad upside down
or improperly may affect the cleaning
results.
4
Attach the water tank to the mop nozzle again.
e
• Insert the 2 tabs
tank into the slots
nozzle. Press down at the centre
the tank in place.
at the front of the water
f
on the top of the mop
g
Attaching the Mop Pads
1
Wet both sides of the mop pads with water
then squeeze out any excess water before
attaching the pads.
• Do not attach pads while they are dripping
wet.
to lock
4
Attach the mop nozzle to the appliance.
Adjusting the Amount of Water
Press the water adjustment buttons to adjust the
amount of water released onto the mop pad to
either
High Mode
•
High Mode
the way down to clean ingrained dirt or supply a
large amount of water.
•
Low Mode
way down to supply a small amount of water for
cleaning wood or other flooring that can be
damaged by too much water.
•
STOP
: Press the
button halfway to toggle back to the
or
Low Mode
: Press the
: Press the
Low Mode
High Mode
Low Mode
or
.
button a all
button b all the
High Mode
STOP
Page 27
WARNING
CAUTION
CAUTION
global_main.book.book Page 27 Tuesday, March 23, 2021 2:52 PM
position. This stops the supply of water so you
can go over areas that are already wet.
• To avoid injury, do not attach the mop pad while
the mop attachment plate is rotating.
• Do not let the appliance stand on the floor while
the wet mop pads are attached. Doing so may
result in damage or swelling to wood flooring.
Using with the Mop Nozzle
1
Attach the water tank and mop pads to the
mop nozzle.
2
Set the water adjustment button to the
position.
3
Press the
Power
button to start cleaning.
STOP
OPERATION
a soft cloth. The water could drip onto the floor
and damage it.
• Do not pull or stretch the rubber gasket on the
water supply inlet. Doing so may tear or damage
it.
1
Open the 2 water inlet caps a on the side of
the water tank and empty the water tank.
Shake the water tank to remove the remaining
water.
27
ENGLISH
Drying the Water Tank and Mop
Pads
Drying the Water Tank
When cleaning is completed, make sure to empty
the water tank and dry it before storing the mop
nozzle.
• Turn the water inlet caps to make sure they
remain open when storing the water tank. If
caps are closed and not properly dried, it may
cause odour.
• Do not remove the water inlet caps from the
water tank. Caps may tear.
• Do not add detergent, vinegar or baking soda to
the water tank when washing. It is not easily
removed in the water tank, which may soil the
floor.
• After cleaning, wipe off any remaining water on
the water supply inlet
a
on the mop nozzle with
2
Leave the 2 water inlet caps open and allow the
water tank to dry in a well-ventilated area out
of direct sunlight for at least 24 hours.
• Keep the water tank after water is
completely empty and dry. Moisture or
residual water in the tank may cause odour.
Drying the Mop Pads
After using the mop pads, hand wash them and
allow them to dry before storing them.
Page 28
CAUTION
CAUTION
CAUTION
global_main.book.book Page 28 Tuesday, March 23, 2021 2:52 PM
28
OPERATION
nozzle, making it difficult to operate, causing
damage to the mat or static electricity on the
• Do not use as follows, as it may become
deformed.
- Do not use bleach or fabric softener when
washing the mop pads.
- Do not dry the pads in a clothes dryer.
- Do not boil the mop pad.
1
Separate the mop pads from the mop
attachment plate.
appliance. Clean mats using the crevice tool.
Carpet Nozzle
Use this nozzle to clean carpets or rugs.
• If used on hard flooring, this nozzle will be noisy.
Slim Hard Floor Nozzle
2
Hand wash the pads with a neutral detergent.
• Storing mop pads in a damp state can result
in an unpleasant odour. Set the pads in a
well-ventilated area out of direct sunlight for
at least 24 hours or until completely dry.
Using the Nozzles and
Tools
Before Using the Nozzles and
Tools
Some accessories are only available on some
models.
Specialized attachments can help you clean more
effectively. Tools and nozzles can be attached to
the product body or the extension pipe.
• Adjust the suction power if the inlet gets stuck on
the floor, carpet, or bedding.
• Each Nozzle is equipped with a motor and may
make a sound when operating.
Use this nozzle to clean hard floor surfaces.
• While cleaning, it was not intended, but pressing
the
PUSH
brush. Please attach the brush again.
button on the nozzle may remove the
Pet Nozzle
It is suitable for soft surfaces and pet hair removal.
• Do not use the nozzle following surface. It may
cause scratch or damage. Especially, do not
clean a coated or lacquered floor. If used
repeatedly, the coating may wear off.
- Clothing, bedding
- Leather cushioned sofas, cushions
- Carpet
- Vinyl flooring, tiles, marble, etc.
• Do not use the
Floor Nozzle
infants and children. The mat may stick to the
Carpet Nozzle
on PVC or polyurethane mats for
or
Slim Hard
Page 29
global_main.book.book Page 29 Tuesday, March 23, 2021 2:52 PM
Bedding Nozzle
This nozzle lets you clean sheets and bedding more
effectively. It removes dust in bedding using strong
suction and a punching motion.
• Lower the suction level when vacuuming
bedding such as duvet covers to avoid the thin
fabric getting sucked into the nozzle.
Crevice Tool
Use this tool to remove dust from corners or
narrow spaces.
• Use it for areas with static electricity such as
mats.
• Use it with the
of furniture, mats, or tight areas like corners.
Turbo
mode to clean pet hair out
OPERATION
Use the tool in the crevice mode to clean flat
surfaces such as sofas or mattresses.
•
Brush Mode
Use the tool in the brush mode to clean delicate
surfaces such as frames or furniture.
- To convert modes, press the adjustment
button
a
and push forward.
29
Hard Dirt Tool
Firm bristles remove solidified dirt from hard
surfaces. Clean up hair or foreign objects that are
entangled in carpets or rugs.
ENGLISH
Combination Tool
Can be used in either crevice mode or brush mode
for cleaning corners or small gaps where dust and
dirt gather.
•
Crevice Mode
Mattress Tool
Use this tool to clean up dust and foreign objects
from mattresses, delicate fabrics, and upholstery.
Page 30

global_main.book.book Page 30 Tuesday, March 23, 2021 2:52 PM
30
OPERATION
Flexible Crevice Tool
This tool is flexible and its length can be adjusted,
making it especially useful for cleaning inside
vehicles or in narrow spaces under and behind
furniture where an angled tool is needed.
Using the Brush
To convert the tool from crevice to brush mode,
press in on the sides of the brush head
the brush down.
• To convert back to the crevice mode, press in on
the brush release button
up.
b
and slide the brush
a
and pull
Multi-angle Tool
This tool has a soft brush that can be adjusted to a
variety of angles, making it especially useful for
cleaning vehicle consoles or the tops of furniture.
Flexible Hose Extension
Connect this flexible, extendable hose between the
product body and the tools to clean hard to reach
areas.
• The flexible hose extension cannot be used with
the Nozzle.
Adjusting the Length
To adjust the length of the tool, press and hold the
release button
push on the brush head
extension tube.
c
on the side of the tool. Pull or
d
to extend or retract the
Using the Kompressor Lever
Use the Kompressor lever to compress hair and
fibers inside the dust bin after vacuuming and
before emptying the dust bin.
• The vacuum must be turned off before using the
Kompressor lever.
• Compressing the dust clears it off the interior
walls of the dust bin and allows you to vacuum
for longer periods before emptying the dust bin.
It also makes cleaning the dust bin easier and
less messy.
• The dust bin must be at least half full for the
compression plate to be effective.
• Press the Kompressor lever down several times
to compress the dust and clean off the interior
walls of the dust bin.
Page 31

NOTE
NOTE
NOTE
global_main.book.book Page 31 Tuesday, March 23, 2021 2:52 PM
SMART FUNCTIONS
Using LG ThinQ Application
The
LG ThinQ
communicate with the appliance using a
smartphone.
LG ThinQ Application Features
•
Setting the default mop operation
- This function allows the setting of the default
operation mode of the Mop Nozzle.
•
Cleaning History
- Shows the cleaning history, such as monthly
cleaning time, cleaning frequency, and
cleaning mode, etc.
• Assembled suction tool is displayed on the
screen during cleaning.
• A notification is displayed on the screen if the
pre-filter and the exhaust filter need cleaning.
application allows you to
SMART FUNCTIONS
for product improvement purposes without
notice to users.
Before Using LG ThinQ
Application
1
Use a smartphone to check the strength of the
wireless router (Wi-Fi network) near the
appliance.
• If the appliance is too far from the router,
the signal becomes weak. It may take a long
time to register or fail to install the
application.
2
Turn off the
your smartphone.
Mobile data
or
Cellular Data
31
ENGLISH
on
Filter Cleaning Cycle Alarm
•
- After using the appliance for a centain period
of time, a notification is displayed on the
screen of your smartphone. Clean the exhaust
filter or pre-filter, if necessary.
•
Cleaning Mode
- The cleaning mode you are using is displayed
on the screen of your smartphone.
•
Filter Cleaning Guide
- Guide to cleaning the filters.
Smart Diagnosis
•
- This function provides useful information for
diagnosing and solving issues with the
appliance based on the pattern of use.
• If you change your wireless router, Internet
service provider, or password, delete the
connected appliance from the
application and connect it again.
• This information is current at the time of
publication. The application is subject to change
™
LG ThinQ
3
Connect your smartphone to the wireless
router.
• To verify the Wi-Fi connection, check that the f
icon on the control panel is lit.
• The appliance supports 2.4 GHz Wi-Fi networks
only. To check your network frequency, contact
your Internet service provider or refer to your
wireless router manual.
•
LG ThinQ
connection problems or any faults,
malfunctions, or errors caused by network
connection.
is not responsible for any network
Page 32

NOTE
NOTE
global_main.book.book Page 32 Tuesday, March 23, 2021 2:52 PM
32
SMART FUNCTIONS
Connecting the Appliance to LG
• The surrounding wireless environment can
make the wireless network service run slowly.
• If the appliance is having trouble connecting to
the Wi-Fi network, it may be too far from the
router. Purchase a Wi-Fi repeater (range
extender) to improve the Wi-Fi signal strength.
• The network connection may not work properly
depending on the Internet service provider.
• The Wi-Fi may not connect or the connection
may be interrupted because of the home
network environment.
• If the appliance cannot be connected due to
problems with the wireless signal transmission,
unplug the appliance and wait about a minute
before trying again.
• If the firewall on your wireless router is enabled,
disable the firewall or add an exception to it.
• The wireless network name (SSID) should be a
combination of English letters and numbers. (Do
not use special characters.)
• Smartphone user interface (UI) may vary
depending on the mobile operating system (OS)
and the manufacturer.
• If the security protocol of the router is set to
WEP
, network setup may fail. Change the
security protocol (
connect the product again.
WPA2
is recommended), and
Installing the LG ThinQ
ThinQ
Wi-Fi Indicator f Status
Indicator
Status
Blinking The appliance is connecting.
ON The appliance has finished
OFF The appliance has been
Connecting the Appliance Initially
Select your appliance on menu by pressing the
a Product (+)
ThinQ
to connect your appliance.
Connecting Additional Users
Remove the appliance from the charging station.
Follow the instructions under
Appliance Initially
• The usage history will be reset if you delete a
connected appliance in
• If the Wi-Fi signal is weak, the appliance may be
temporarily disconnected to the application.
When the Wi-Fi signal moves to the normal
position, the appliance is connected to the
application again.
Application
Description
connecting.
The appliance is connected to Wi-Fi.
disconnected.
button. Follow instructions in the
Connecting the
.
LG ThinQ
.
Add
LG
Search for the
Google Play Store or Apple App Store on a
smartphone. Follow instructions to download and
install the application.
LG ThinQ
application from the
Turning Wi-Fi On/Off on the
Appliance
Disconnecting from Wi-Fi
To save energy, turn off the Wi-Fi function by
pressing the
appliance is charging on the charging station.
Reconnecting to Wi-Fi
Follow the steps below on the appliance.
1
Press and hold the
until the
Wi-Fi
button for 3 seconds while the
Wi-Fi
f
icon blinks in the display.
button for 3 seconds
Page 33

global_main.book.book Page 33 Tuesday, March 23, 2021 2:52 PM
2
Press the
• After the icon turns off, wait for a while and
• The time before the icon turns on may vary
Wi-Fi
button for 3 seconds again.
turn it on again.
depending on the network environment.
Wireless LAN Module
Specifications
Model LCW-007
Frequency
Range
Output Power
(Max.)
Wireless function S/W version: V 1.0
2412 to 2472 MHz
IEEE 802.11b: 17.59 dBm
IEEE 802.11g: 17.39 dBm
IEEE 802.11n(HT20): 16.64 dBm
IEEE 802.11n(HT40): 17.05 dBm
Exposure to Radio Frequency
Energy
This device has been designed to comply with
applicable safety requirements for exposure to
radio waves. The radio wave exposure guidelines
employ a unit of measurement known as the
Specific Absorption Rate, or SAR. Tests for SAR are
conducted using standardized methods with the
device transmitting at its highest certified power
level in all used frequency bands.
The SAR limit recommended by the International
Commission on Non-Ionizing Radiation Protection
(ICNIRP) is 4 W/kg averaged over 10 g of tissue for
the Limb SAR.
The highest SAR value tested for this model is as
follow :
Limb SAR : 0.092 W/kg
This transmitter must not be co-located or
operating in conjunction with any other antenna or
transmitter.
SMART FUNCTIONS
33
Declaration of Conformity
Hereby, LG Electronics declares that the radio
equipment type Vacuum Cleaner is in compliance
with Directive 2014/53/EU. The full text of the EU
declaration of conformity is available at the
following internet address:
http://www.lg.com/global/support/cedoc/cedoc#
LG Electronics European Shared Service Centre B.V.
Krijgsman 1, 1186 DM Amstelveen, The
Netherlands
Standby Power Consumption
Standby power consumption
Network standby power
consumption
The period of time after which the
power management function, or a
similar function, switches the
equipment automatically into
standby and/or off mode and/or
the condition providing networked
standby
0.5 W
2.0 W
20 min.
Open Source Software Notice
Information
To obtain the source code under GPL, LGPL, MPL,
and other open source licenses, that is contained in
this product, please visit http://
opensource.lge.com. In addition to the source
code, all referred license terms, warranty
disclaimers and copyright notices are available for
download.
LG Electronics will also provide open source code to
you on CD-ROM for a charge covering the cost of
performing such distribution (such as the cost of
media, shipping, and handling) upon email request
to opensource@lge.com. This offer is valid for a
period of three years after our last shipment of this
product. This offer is valid to anyone in receipt of
this information.
ENGLISH
Page 34

NOTE
global_main.book.book Page 34 Tuesday, March 23, 2021 2:52 PM
34
SMART FUNCTIONS
Smart Diagnosis Function
Use this feature to help you diagnose and solve
problems with your appliance.
• For reasons not attributable to LGE’s negligence,
the service may not operate due to external
factors such as, but not limited to, Wi-Fi
unavailability, Wi-Fi disconnection, local app
store policy, or app unavailability.
• The feature may be subject to change without
prior notice and may have a different form
depending on where you are located.
Using LG ThinQ to Diagnose
Issues
If you experience a problem with your Wi-Fi
equipped appliance, it can transmit
troubleshooting data to a smartphone using the
LG ThinQ
• Launch the
application.
Smart Diagnosis
LG ThinQ
the instructions provided in the
application.
application and select the
feature in the menu. Follow
LG ThinQ
Page 35

WARNING
CAUTION
CAUTION
global_main.book.book Page 35 Tuesday, March 23, 2021 2:52 PM
MAINTENANCE
Cleaning the Appliance
Before Cleaning the Appliance
To maintain the optimum suction power, the
cyclonic mesh filter, the exhaust filter and the prefilter should be cleaned regularly and washed
under running water at least once a month.
• Turn off the power before cleaning the
appliance.
• The frequency of cleaning varies depending on
the usage environment and usage time. In a
dusty environment, clean frequently.
• Never wash the Nozzle, rotating brush or
product body with water. Water could reach the
motor and cause electric shock or fire.
• Do not allow foreign objects to enter the motor.
Doing so may cause electric shock, fire or
product damage.
• Do not insert fingers or sharp objects into the
motor. Doing so could cause product damage,
personal injury or electric shock.
MAINTENANCE
battery from the product body and remove the
foreign objects before resuming use of the
appliance.
• Check the inside of the product body, above the
Kompressor working plate, the extension pipe,
inlets, exhaust filter, pre-filter and cyclonic mesh
filter for foreign objects.
• If the inlets are not completely blocked, the
foreign objects clogging alarm indicator may not
light up.
• If the sound of the appliance becomes loud or
the cleaning results is poor, check for foreign
objects.
35
ENGLISH
• Do not apply force or allow impacts to the
cyclonic mesh filter. Doing so could deform the
filter, compromise product performance, or
cause the product to malfunction.
• If the Kompressor lever does not return to the
top, remove the cyclonic mesh filter from the
dust bin and clean it. A clogged or dirty filter may
cause poor cleaning results.
Removing Foreign Objects
If the appliance is clogged with foreign objects, the
suction power changes, the motor cycles
repeatedly, and the foreign objects clogging alarm
icon blinks.
If clogging persists, the appliance will turn off
automatically to prevent damage. Separate the
Cleaning the Dust Bin
Empty and clean the dust bin after every use.
• If the dust bin is completely full of dust or the
filter is clogged, the suction power may be
reduced.
• Do not use the appliance without the cyclonic
mesh filter installed. Doing so could damage the
appliance.
Page 36

WARNING
global_main.book.book Page 36 Tuesday, March 23, 2021 2:52 PM
36
MAINTENANCE
1
Remove the battery from the product body
before cleaning the dust bin.
2
Push down the Kompressor lever a several
times to collect and compact the dust from the
outside of the cyclonic mesh filter and the
interior walls of the dust bin.
• Foreign objects which become lodged in the
cyclonic mesh filter may be difficult to
dislodge with the Kompressor lever. Remove
the cyclonic mesh filter and use the provided
cleaning brush to clean it.
3
Press the dust bin cover release button b to
open the dust bin cover. Shake the dust bin to
empty it.
• Be careful as dust or foreign objects may
spill out when opening the dust bin. Empty
the dust bin into a wastebasket or where
dust and foreign objects can be easily
removed.
• The dust bin can be wrapped in a plastic bag
to contain the dust when emptying the dust
bin.
• Do not force the Kompressor lever down if
foreign objects are caught around the working
plate of the Kompressor system. Doing so may
cause product damage.
4
Insert the crevice tool d into the cyclonic mesh
filter
c
and turn it counterclockwise to remove
the filter.
5
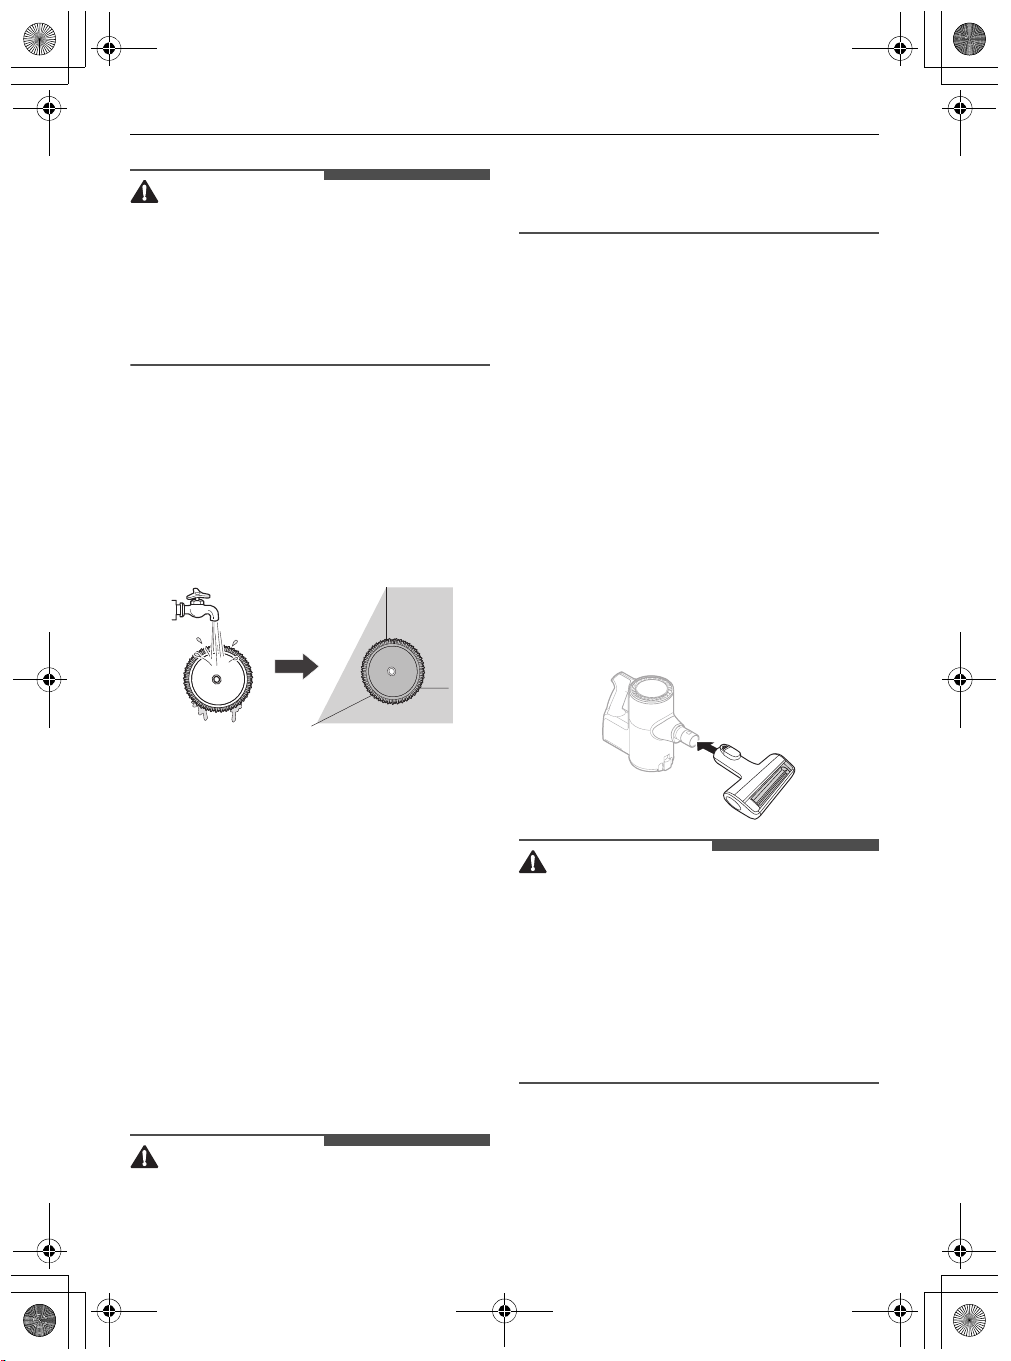
Wash the cyclonic mesh filter under running
water.
• To avoid odour and the malfunction of the
motor, allow the cyclonic mesh filter to dry
completely in a well-ventilated area out of
direct sunlight for at least 24 hours before
reassembling.
• If the Kompressor lever does not slide down
smoothly, foreign objects may be trapped
between the dust bin and the cyclonic mesh
filter. Clean the dust bin and cyclonic mesh filter
to avoid product damage.
6
Use the combination tool e to clean out dust
or foreign objects inside the dust bin.
• Do not wash the product body or motor with
water.
Page 37

CAUTION
global_main.book.book Page 37 Tuesday, March 23, 2021 2:52 PM
7
Turn the product body over and lift the
Kompressor lever
the working plate with the provided cleaning
brush.
• Do not push the Kompressor lever down
hard. The working plate may be damaged.
8
Turn the product body over again and shake it
while pressing down the lever to remove the
dust.
9
Wrap the provided cleaning brush with a wet
paper towel, tucked into the slots
handle.
f
up to clean the inside of
g
on the
MAINTENANCE
37
Cleaning the Filters
Clean the exhaust filter and the pre-filter when the
K
filter cleaning icon
• Clean the filters more frequently if the appliance
is used regularly or in areas with a lot of dust.
• Do not use the appliance without the exhaust
filter and pre-filter installed. Doing so could
result in product damage.
1
Remove the battery from the product body.
2
Rotate the exhaust filter a to the unlocked
position
body.
b
lights up.
to separate it from the product
ENGLISH
10
Turn the product body over, lift the
Kompressor lever
the working plate with the towel-wrapped
brush handle.
h
up, and clean the inside of
3
Lift out the pre-filter c from the product body.
4
Use the combination tool d to clean any dust
off the motor.
Page 38

CAUTION
global_main.book.book Page 38 Tuesday, March 23, 2021 2:52 PM
38
MAINTENANCE
• Do not wash the motor with water.
5
Clean filters by brushing the dust off and wash
them in running water at least once a month.
• To avoid odour and the malfunction of the
motor, allow the exhaust filter to dry
completely in a well-ventilated area out of
direct sunlight for at least 24 hours before
reassembling.
6
Insert the dried pre-filter and rotate the
exhaust filter to the locked position
reassemble it on the product body.
e
to
the nozzle starts to operate during cleaning, it
could cause an injury.
• Keep fingers away from pinch points when
assembling the nozzle on the appliance or the
rotating brush on the nozzle.
• Do not use the rotating brush as a wet mop. It
may cause product damage.
• Do not rinse or submerge the rotating brush or
nozzle in water. It may cause product damage.
Cleaning the Carpet Nozzle
Clean the brush and roller heads before each use.
• If the brush contains foreign objects, the brush
may not spin or a noise may occur during
operation.
1
Press the nozzle release button a to remove
the nozzle from the extension pipe or product
body.
2
Turn the nozzle upside down and rotate the
cover lock slot
b
counterclockwise.
Cleaning the Nozzles
Clean the nozzle and rotating brush regularly.
• Always separate the nozzle from the product
body or remove the battery before cleaning. If
3
Pull the brush cover forward and pull the brush
out.
Page 39

global_main.book.book Page 39 Tuesday, March 23, 2021 2:52 PM
4
Attach the crevice tool to the product body and
use the vacuum to remove foreign objects and
dust from the brush and the bottom of the
nozzle.
5
Use a damp towel or cloth to remove any
remaining foreign objects and dust from the
brush and the bottom of the nozzle. Remove
foreign objects, debris and hair from all Rollers
of the nozzles using tweezers.
• Wrap the handle of the cleaning brush with
a wet towel or cloth and use it to clean the
rotating brush and nozzle.
MAINTENANCE
2
Turn the nozzle upside down and remove the
rotating brush while holding down the
button on the nozzle.
3
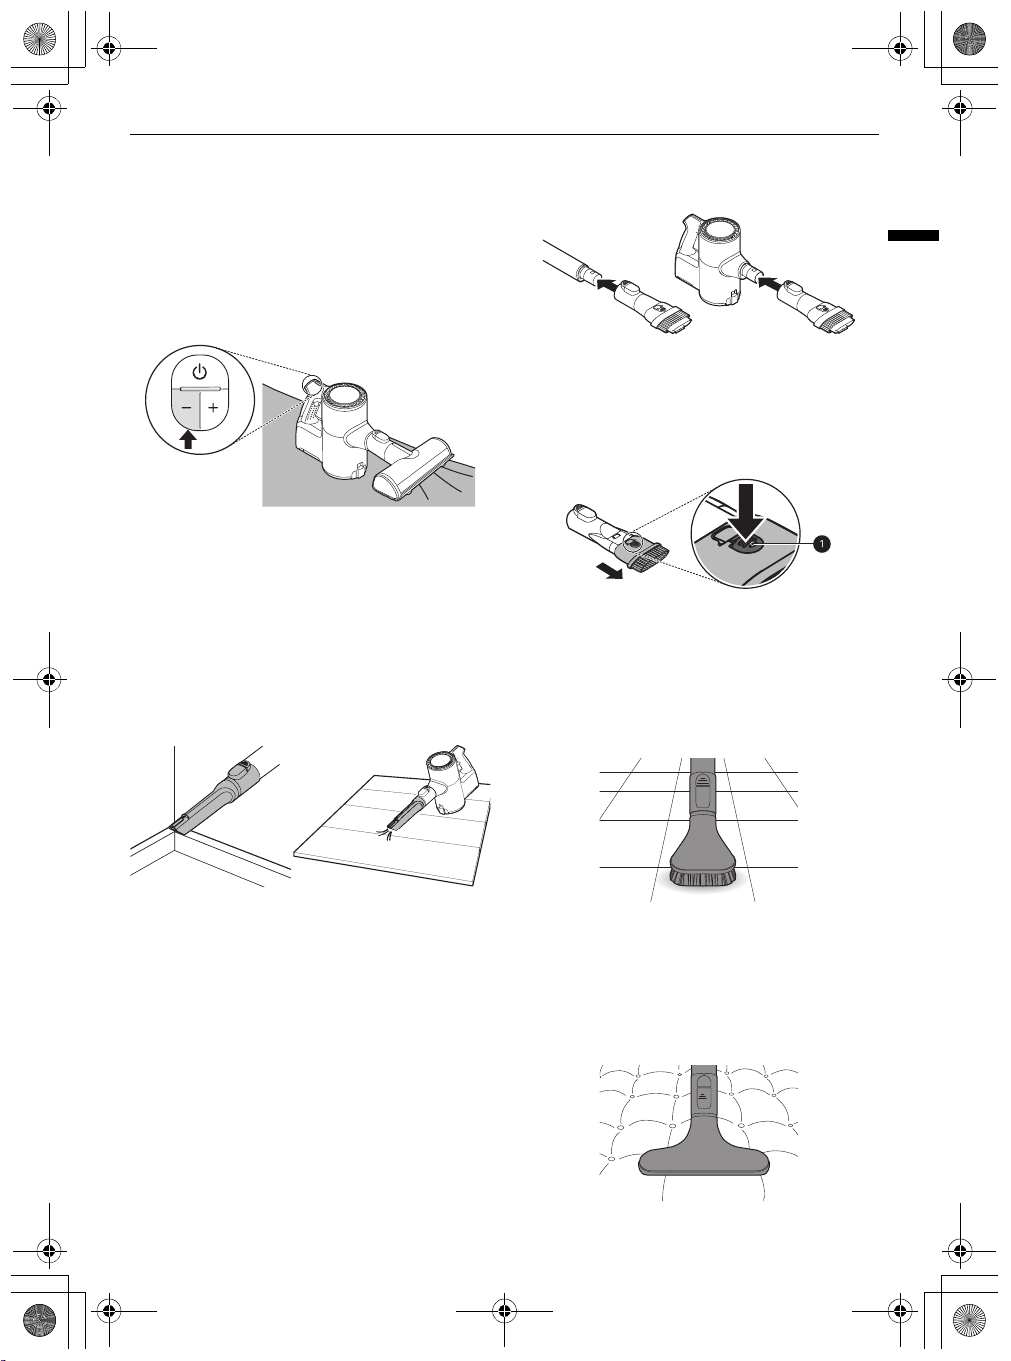
Attach the crevice tool to the product body and
use the vacuum to remove foreign objects and
dust from the brush and the bottom of the
nozzle.
PUSH
39
ENGLISH
6
Slide the brush back into the nozzle and rotate
the cover back into place. Turn the cover lock
clockwise to lock the cover.
Cleaning the Slim Hard Floor
Nozzle
1
Press the nozzle release button a to remove
the nozzle from the extension pipe or product
body.
4
Use a damp towel or cloth to remove any
remaining foreign objects and dust from the
brush and the bottom of the nozzle. Remove
foreign objects, debris and hair from all Rollers
of the nozzles using tweezers.
• Wrap the handle of the cleaning brush with
a wet towel or cloth and use it to clean the
rotating brush and nozzle.
5
Slide the brush back into the nozzle until it
clicks into place.
Page 40

global_main.book.book Page 40 Tuesday, March 23, 2021 2:52 PM
40
MAINTENANCE
5
Cleaning the Pet Nozzle
1
Press the nozzle release button a to remove
the nozzle from the extension pipe or product
body.
2
Remove the rotating brush while holding down
the
PUSH
button on the nozzle.
Insert the left side of the brush b into the
groove
6
Press the cover of the brush to lock the brush
until a clicking sound is heard.
Cleaning the Bedding Nozzle
c
inside the nozzle.
3
Attach the crevice tool to the product body and
use the vacuum to remove foreign objects and
dust from the brush and the bottom of the
nozzle.
4
Use a damp towel or cloth to remove any
remaining foreign objects and dust from the
brush and the bottom of the nozzle. Remove
foreign objects, debris and hair from all Rollers
of the nozzles using tweezers.
1
Press the nozzle release button to remove the
nozzle from the extension pipe or product
body and turn the nozzle upside down.
2
Attach the crevice tool to the product body and
use the vacuum to remove foreign objects and
dust from the bottom of the nozzle. Use a
damp towel or cloth to remove any remaining
foreign objects and dust from the bottom of
the nozzle. Remove foreign objects, debris and
hair from all Rollers of the nozzles using
tweezers.
Cleaning the Mop Nozzle
1
Press the nozzle release button to remove the
mop nozzle from the extension pipe and turn
the nozzle upside down.
Page 41

global_main.book.book Page 41 Tuesday, March 23, 2021 2:52 PM
2
Use a damp towel or cloth to remove any
remaining foreign objects and dust from the
bottom of the mop nozzle. Remove foreign
objects, debris and hair from all Rollers of the
nozzles using tweezers.
MAINTENANCE
41
ENGLISH
Page 42

global_main.book.book Page 42 Tuesday, March 23, 2021 2:52 PM
42
TROUBLESHOOTING
TROUBLESHOOTING
Before Calling for Service
Operation
Symptoms Possible Cause & Solution
The appliance does not
operate.
Suction power is too
weak.
The product body does
not appear to be
charging.
Hot air is coming from
the product body.
The Kompressor lever
does not return.
Battery is fully discharged.
• Charge the battery.
Appliance is turned off.
• Press the
Dust bin is full of dust.
• Empty the dust bin.
Filters are clogged.
• Clean the pre-filter and the exhaust filter.
Inlet is clogged.
• Remove any foreign objects from inside the product body or the extension
pipe.
Foreign object is on rotating brush, or in inlet port.
• Remove any foreign objects (thread, hair) from the rotating brush or the
inlet port.
Power adapter is not connected to the charging station.
• Plug the adapter firmly into the charging station.
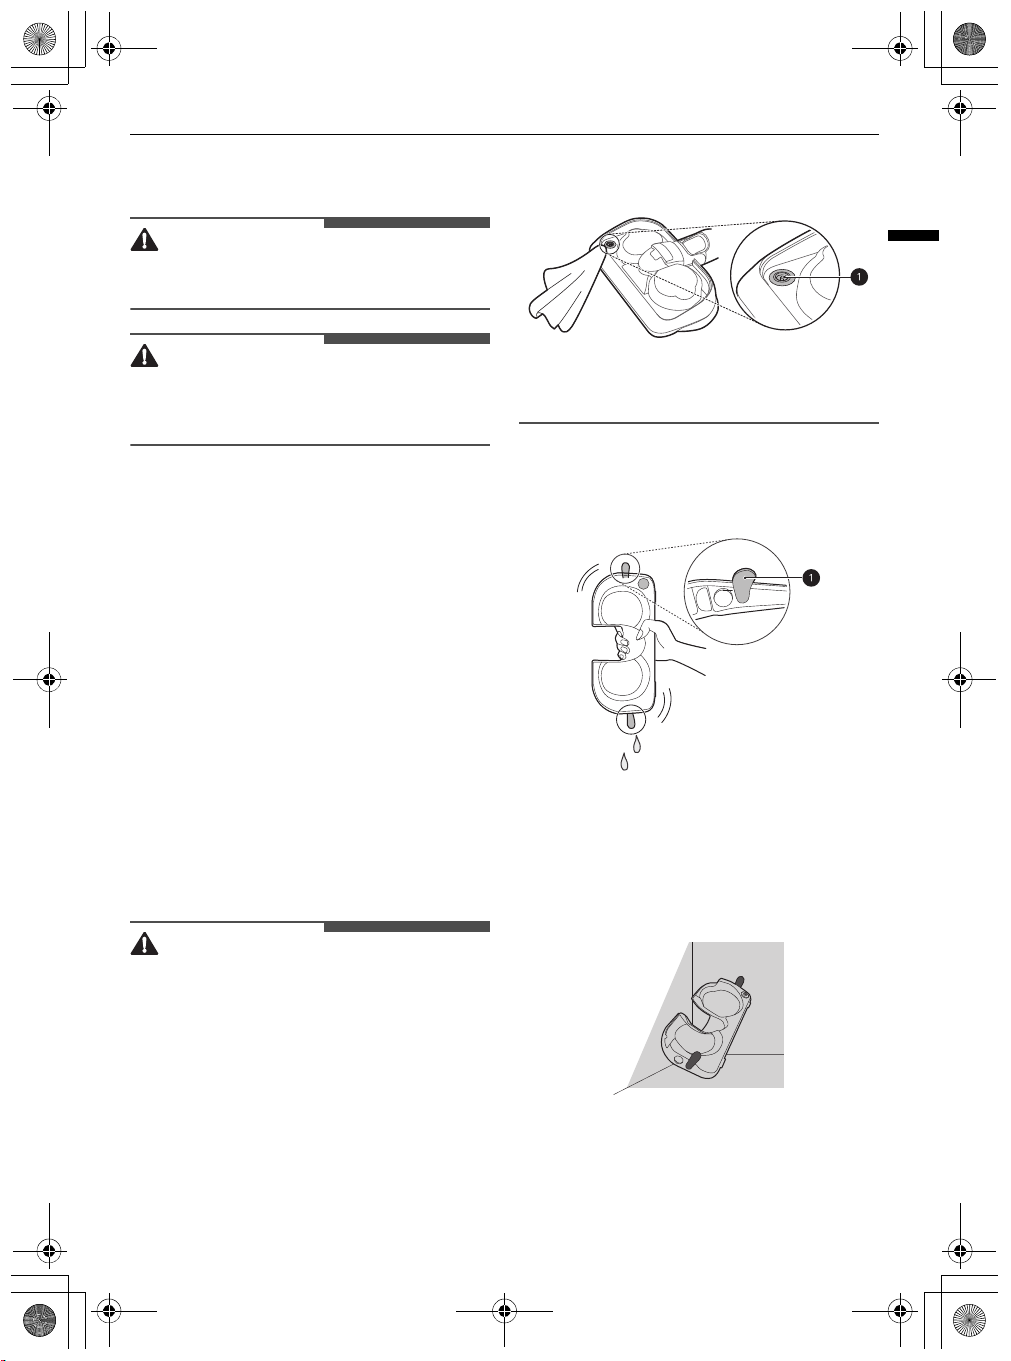
Power cord is unplugged.
• Plug the power cord securely into the charging station.
Foreign object is on the charging terminals.
• Remove dirt or foreign objects from the charging terminals with a dry
cloth.
Motor is cooling.
• If the appliance is running normally, the hot air is a result of the motor
cooling and is not a sign of malfunction.
Foreign objects which become lodged in the cyclonic mesh filter may be
difficult to dislodge with the Kompressor lever.
• Remove the cyclonic mesh filter and use the provided cleaning brush to
clean it.
Power
button to turn on the appliance.
Page 43

global_main.book.book Page 43 Tuesday, March 23, 2021 2:52 PM
Symptoms Possible Cause & Solution
A strange odour is
coming from the
appliance.
The appliance makes
too much noise.
The appliance turns off
unexpectedly or by
itself after the motor
speed fluctuates
repeatedly.
The rotating brush
does not rotate.
Appliance was purchased within the last 3 months.
• The cleaner may emit a smell of rubber for about 3 months after purchase.
Dust bin is full of dust.
• The dust in the bin may cause some odour. Empty the bin and clean it.
Foreign object is on the filter.
• The filter may emit an odour if it has not been cleaned for some time. Clean
the pre-filter and exhaust filter regularly.
Pre-filter, Fine dust filter or the Cyclonic Mesh Filter were installed while
damp or wet.
• Wash the filters with running water. To avoid odour, allow the pre-filter to
dry completely in a well-ventilated area out of direct sunlight for at least 24
hours before reassembling.
Exhaust filter was installed while damp or wet.
• Wash the exhaust filter with running water. To avoid odour, allow the
exhaust filter to dry completely in a well-ventilated area out of direct
sunlight for at least 24 hours before reassembling.
Vacuum cleaner is running in Turbo mode.
• The motor may be louder at the higher suction power settings. This is
normal.
Battery is not fully charged.
• The battery must be fully charged before cleaning. If the problem persists
when the battery is fully charged and the pipes and attachments are clear
from obstructions, contact an LG customer information centre for service.
Foreign object is in the product body, extension pipe, inlet port or
nozzle.
• Remove any foreign objects from the product body, extension pipe, inlet
port or nozzle.
Filters are clogged.
• Clean the pre-filter and the exhaust filter.
Brush is improperly installed.
• Remove the brush, clean it if necessary and attach it again.
Foreign object is on rotating brush.
• Remove any foreign objects from the rotating brush.
TROUBLESHOOTING
43
ENGLISH
Page 44

global_main.book.book Page 44 Tuesday, March 23, 2021 2:52 PM
44
TROUBLESHOOTING
Mop Nozzle
Symptoms Possible Cause & Solution
The mop pad
attachment plate does
not rotate.
There is no water
coming out of the mop
nozzle.
There is moisture in
the water tank.
A strange odour is
coming from the
appliance.
Using the mop nozzle
makes the floor dirtier.
The appliance makes
too much noise.
Mop pads are improperly installed.
• Remove the mop pads, clean them if necessary and attach them again.
Mop nozzle is pressed too hard against the floor.
• The mop attachment plate stops automatically to protect the product. This
is not a failure. Attach the mop pads securely to the mop attachment plate
and press the power button to resume use.
Foreign object is between mop attachment plate and mop pads.
• Remove foreign objects from the mop nozzle attachment plate and press
the power button to resume use.
Water tank is empty.
• Fill the water tank. Remove the battery or detach the nozzle before filling
the water tank.
Water tank is improperly attached to mop nozzle.
• Properly attach the water tank to the mop nozzle. Remove the battery or
detach the nozzle before properly securing the water tank to the nozzle.
Water supply adjustment button is set to STOP.
• Press the
water will not come out if the button is set to
The water outlet was clogged by hard water scale or other foreign
substances.
• Use a sharp pin to remove the blockage.
Water tank is not allowed to dry completely after use.
• Empty the water tank, set it out of direct sunlight, and allow it to dry
completely after use.
Foreign object is on the dust inlet of the mop nozzle.
• Wet dust in the mop nozzle may result in odour. Make sure to wipe the
dust inlet of the mop nozzle with a wet wipe after each use.
Mop pads are not cleaned properly after use.
• Clean the mop pads thoroughly after each use. Using soiled mop pads may
make the floor dirtier.
This is the sound generated when the pump at the inlet of the mop is
operating.
• This is normal.
The mop pads were improperly attached on the plates.
• Align and attach the centre of the mop pad with the centre of the mop
attachment plate.
High
or
Low
water adjustment button all the way down. The
STOP
.
Page 45

global_main.book.book Page 45 Tuesday, March 23, 2021 2:52 PM
Wi-Fi
Symptoms Possible Cause & Solution
Your home appliance
and smartphone are
not connected to the
Wi-Fi network.
Battery is fully discharged.
• Charge the battery, then register your appliance on
The password for the Wi-Fi that you are trying to connect to is incorrect.
• Find the Wi-Fi network connected to your smartphone and remove it, then
register your appliance on
Mobile data for your smartphone is turned on.
• Turn off the
using the Wi-Fi network.
The wireless network name (SSID) is set incorrectly.
• The wireless network name (SSID) should be a combination of English
letters and numbers. (Do not use special characters.)
The router frequency is not 2.4 GHz.
• Only a 2.4 GHz router frequency is supported. Set the wireless router to 2.4
GHz and connect the appliance to the wireless router. To check the router
frequency, check with your Internet service provider or the router
manufacturer.
The distance between the appliance and the router is too far.
• If the distance between the appliance and the router is too far, the signal
may be weak and the connection may not be configured correctly. Move
the location of the router so that it is closer to the appliance.
Mobile data
LG ThinQ
of your smartphone and register the appliance
TROUBLESHOOTING
LG ThinQ
.
45
ENGLISH
.
Page 46

global_main.book.book Page 46 Tuesday, March 23, 2021 2:52 PM
46
APPENDIX
APPENDIX
Information
Italy Warranty
La presente Garanzia si intende aggiuntiva e non sostitutiva di ogni altro diritto di cui gode l’acquirente del prodotto
ed, in particolare, non pregiudica in alcun modo i diritti del consumatore stabiliti agli articoli da 128 a 134 del “Codice
del Consumo”, D.Lgs. 206/2005 (c.d. “Garanzia Legale”). La Garanzia Legale ha una durata di 24 mesi a partire dalla
consegna del bene ed è prestata dal venditore presso cui è stato effettuato l’acquisto del prodotto. In base alla Garanzia
Legale il consumatore che abbia denunciato al venditore i difetti del bene entro due mesi dalla loro scoperta, ha diritto alla
riparazione o sostituzione del prodotto non conforme, ovvero puo richiederne una congrua riduzione del prezzo, oppure
ancora la risoluzione del contratto di acquisto. Maggiori informazioni su tali rimedi e sulle relative condizioni di applicabilità
possono essere consultate al seguente indirizzo, che contiene un estratto del Codice del Consumo in materia di Garanzia
Legale: www.lg.com/it/supporto/garanzia. La presente garanzia, prestata da LG ai sensi dell’articolo 133 del Codice del
Consumo, e per contro disciplinata dai termini e condizioni del presente certificato.
Le procedure di assistenza ed i servizi aggiuntivi descritti nella presente garanzia, potranno subire delle variazioni che
saranno pubblicate nella pagina “Garanzia Prodotti” del sito www.lg.com/it – nell’area Supporto.
Termini e condizioni della garanzia
x La garanzia LG Electronics copre eventuali difetti dei materiali e di fabbricazione. Di conseguenza tutti gli altri tipi di
difetti e danni sono esclusi, come quelli da uso inappropriato, impostazioni errate, errata calibrazione e installazione,
mancata osservanza delle istruzioni contenute nel manuale d’uso, così come danni causati da fattori esterni, danni
estetici, normale usura nel tempo. La garanzia non copre altresì la sostituzione, riparazione o manutenzione di parti
consumabili quali ad esempio cinghie, filtri e guarnizioni.
x La garanzia LG Electronics ha validità a partire dalla data di acquisto del prodotto e si applica solo dietro presentazione
della prova di acquisto originale (non manoscritta). Il documento deve essere in grado di far capire inequivocabilmente il
prodotto a cui si riferisce.
x La garanzia LG Electronics diviene nulla in caso di alterazione o di lavori di riparazione eseguiti da persona non
autorizzata da LG Electronics, in caso di manomissione o rimozione del numero di serie del prodotto, in caso di
rilavorazione o utilizzo professionale del prodotto, intenendosi per tale l’utilizzo da parte dell’utente nell’ambito della
propria attività imprenditoriale, commerciale, artigianale o professionale.
x La decisione se riparare, sostituire o rimborsare, conformemente a quanto segue, il prodotto spetta esclusivamente a
LG Electronics. Le parti e le unità sostituite o rimborsate diventano proprietà di LG Electronics.
x Altri costi diversi da quelli di riparazione o sostituzione (ad esempio: installazione e disinstallazione prodotti, utilizzo di
autoscale, ponteggi o altri sistemi di elevazione) non sono coperti dalla garanzia LG Electronics.
x LG Electronics non è responsabile per qualsiasi perdita o danno a software o a dispositivi di archiviazione dati, nonché
danni derivanti dal mancato uso del prodotto.
x A seconda del difetto presentato dal prodotto, il Centro di assistenza, in accordo con LG, potrà procedere con la
riparazione o la sostituzione del prodotto completo.
Nella sostituzione potranno essere impiegati prodotti o parti, identici o con pari caratteristiche.
I prodotti sostitutivi o le parti utilizzate per le riparazioni potranno essere nuovi o ricondizionati. Nei casi in cui non sia
possibile applicare le soluzioni sopra descritte, LG si impegna a rimborsare il prezzo di acquisto al cliente applicando
un abbattimento in ragione della data di acquisto del prodotto stesso. La tabella di abbattimento ai fini del rimborso
è consultabile al sito www.lg.com/it/supporto. Il servizio per il cliente è completamente gratuito se il prodotto viene
riscontrato difettoso. Se il prodotto non viene riscontrato difettoso, il costo di manodopera dell’intervento, dell’uscita a
domicilio e di un eventuale trasporto del prodotto, potranno essere addebitati al cliente stesso da parte del centro di
assistenza.
x I prodotti nuovi riscontrati danneggiati alla prima apertura della confezione originale LG, non devono essere installati o
inviati/portati in riparazione presso i Centri di assistenza. I clienti finali devono rivolgersi al rivenditore che, a seconda
del caso, provvederà a fornire al cliente la soluzione più idonea, in accordo con LG Electronics.
x Questo prodotto LG Electronics è garantito per un periodo di ventiquattro (24) mesi.
x La garanzia di 10 anni sulle parti copre il solo costo dei seguenti componenti: Compressore frigorifero; Motore Direct
Drive Lavatrice (Statore, Rotore) ed il Compressore Inverter dello Split Aria Condizionata montato a muro (monosplit);
Dual Inverter Compressor ed Inverter Motor Asciugatrici; motore inverter aspirapolvere, magnetron inverter.
Dopo il secondo anno di garanzia, i costi della manodopera e dell’eventuale diritto di chiamata restano comunque a
carico del cliente.
x Le batterie interne ai prodotti hanno una garanzia di 2 anni
Page 47

global_main.book.book Page 47 Tuesday, March 23, 2021 2:52 PM
External Power Supply Information
Manufacturer’s name or trade
mark, commercial registration
number and address
Manufacturer; LG Electronics Inc.
Commercial registration number;
107-86-14075
Address; LG Twin Towers, 128
Yeoui-daero, Yeongdeungpo-gu,
Seoul, 07336, Korea
Наименование или търговска
марка на производителя,
номер на търговската
регистрация и адрес;
Název výrobce nebo ochranná
známka, obchodní registrační
číslo a adresa
Producentens navn eller
varemærke,
handelsregisternummer og adresse
Naam of handelsmerk van de
fabrikant, handelsregisternummer
en adres
Tootja nimi või kaubamärk,
äriregistri number ja aadress
Valmistajan nimi tai tavaramerkki,
kaupparekisterinumero ja osoite
Raison sociale ou marque déposée,
numéro d’enregistrement au
registre du commerce et adresse du
fabricant
Name oder Handelsmarke des
Herstellers, Handelsregisternummer
und Anschrift
Το όνομα ή το εμπορικό σήμα
του κατασκευαστή, ο αριθμός
του εμπορικού μητρώου του
και η διεύθυνσή του·
A gyártó neve vagy védjegye,
cégjegyzékszáma és címe
Nome o marchio del fabbricante,
numero di iscrizione nel registro
delle imprese e indirizzo del
fabbricante
Ražotāja nosaukums vai preču
zīme, uzņēmuma reģistrācijas
numurs un adrese
Gamintojo pavadinimas arba prekės
ženklas, komercinis registracijos
numeris ir adresas
L-isem tal-manifattur jew il- marka
kummerċjali, in-numru ta’
reġistrazzjoni kummerċjali
u l-indirizz
Nazwa lub znak towarowy
producenta, numer rejestru
handlowego i adres
Marca comercial ou nome, número
de registo comercial e endereço do
fabricante
$'&)6$(3*
Идентификатор
на модела
značka modelu
Modellens
Typeaanduiding Voedingsspanning
Mudelitähis Sisendpinge
Mallitunniste Ottojännite Tuloverkkotaajuus
Référence
du modèle
Modellkennung Eingangsspannung
Αναγνωριστικό
του μοντέλου
Modellazonosító Bemenő feszültség
Modelio žymuo Įėjimo įtampa
Входно
напрежение
Vstupní
napětí
Indgangsspænding
Tension d’entrée
Τάση εισόδου
Tensione di ingresso
Napięcie
wejściowe
Tensão de entrada
APPENDIX
Input
voltage
V(В)
100 -240 50 / 60 29,4
Input
AC frequency
Hz(Гц)
Честота на входния
променлив ток
Vstupní frekvence Výstupní napětí
Inputvekselstrømsfrekvens
Voedingsfrequentie
Sisendvahelduvvoolu
sagedus
Fréquence du CA
d’entrée
Eingangswechselstromfrequenz
Συχνότητα
εναλλασσόμενου
ρεύματος εισόδου
Bemenő váltóáram
frekvenciája
Frequenza di ingresso
CA
Ieejas maiņstrāvas
frekvence
Įėjimo kintamosios
srovės dažnis
Frekwenza tal-input AC
Wejściowa
częstotliwość
prądu przemiennego
Frequência da
alimentação de CA
Output
voltage
V(В)
Изходно
напрежение
Udgangsspændin
Uitgangsspanning
Väljundpinge
Antojännite
Tension de sorti
Ausgangsspannun
Τάση εξόδου
Kimenő feszültsé
Tensione di uscita
Izejas spriegum
Išėjimo įtamp
Vultaġġ tal-output
Napięcie
wyjściowe
Tensão de saíd
47
ENGLISH
Page 48

global_main.book.book Page 48 Tuesday, March 23, 2021 2:52 PM
48
APPENDIX
Output
current
A
1,0 29,4 87,0 76,0 0,10
Изходен ток
Výstupní proud
Udgangsstrømsstyrke Udgangseffekt
Väljundvool Väljundvõimsus
Antovirta Antoteho
Ένταση ρεύματος
εξόδου
Output
power
W(Вт)
Изходна
мощност
Výstupní
výkon
Ισχύς εξόδου
Kimenő
teljesítmény
Average active
%
Среден КПД в
работен режим
Průměrná
účinnost v
aktivním režimu
Gennemsnitlig
effektivitet i aktiv
tilstand
Gemiddelde actieve
Tööseisundi keskmine
energiatõhusustegur
Aktiivitilan
keskimääräinen
hyötysuhde
Rendement moyen en
mode actif
Durchschnittliche
Μέση ενεργός
απόδοση
Aktív üzemmódban
mért átlagos
hatásfok
Rendimento medio in
modo attivo
at low load (10 %)
%
КПД при малък
товар (10 %)
Účinnost při malém
zatížení (10 %)
Effektivitet ved lav
belastning (10 %)
belasting (10 %)
Energiatõhusustegur
väikesel koormusel
(10 %)
Hyötysuhde alhaisella
kuormituksella
(10 %)
Rendement à faible
charge (10 %)
Last
(10 %)
Απόδοση σε
χαμηλό φορτίο
(10 %)
Hatásfok alacsony
(10 %-os)
terhelésnél
Rendimento a basso
carico (10 %)
power consumption
Консумирана
мощност на
празен ход
Spotřeba energie ve
stavu bez zátěže
Effektforbrug i nullasttilstand
Energieverbruik in nietbelaste toestand
Tarbimisvõimsus
koormamata seisundis
Kuormittamattoman
tilan tehonkulutus
Consommation
électrique hors charge
Leistungsaufnahme bei
Nulllast
Κατανάλωση
ισχύος σε
κατάσταση άνευ
φορτίου
Üresjárási
üzemmódban mért
energiafogyasztás
Potenza assorbita nella
condizione a vuoto
No-load
W(Вт)
Izejas jauda Vidējā aktīvā efektivitāte
Išėjimo galia
Kurrent tal-output Potenza tal-output
Prąd wyjściow
Corrente de saíd
Moc wyjściowa
Potência de saída
Efektivitāte pie zemas
slodzes (10 %)
Vidutinis aktyviosios
veiksenos efektyvumas
tal-modalità attiva
Średnia sprawność
podczas pracy
modo ativo (10%)
Efektyvumas esant
mažai apkrovai (10 %)
baxxa (10 %)
Sprawność przy niskim
obciążeniu (10 %)
Jaudas izmantojums
bezslodzes režīmā
Vartojamoji galia be
apkrovos
Konsum ta’ enerġija
mingħajr tagħbija
Zużycie energii w stanie
bez obciążenia
Consumo energético
em vazio
Page 49

global_main.book.book Page 49 Tuesday, March 23, 2021 2:52 PM
Manufacturer’s name or trade
mark, commercial registration
number and address
Manufacturer; LG Electronics Inc.
Commercial registration number;
107-86-14075
Address; LG Twin Towers, 128
Yeoui-daero, Yeongdeungpo-gu,
Seoul, 07336, Korea
Denumirea producătorului sau
marca comercială, numărul de
înregistrare la Registrul Comerțului
și adresa
Názov alebo ochranná známka
podniku a adresa
Naziv proizvajalca ali blagovna
znamka, številka vpisa v register
gospodarskih družb in naslov
Nombre o marca, número del
registro mercantil y dirección del
fabricante
Tillverkarens namn eller varumärke,
organisationsnummer och adress
Ime ili žig proizvođača, broj upisa
u trgovački registar i adresa
proizvođača;
Nafn framleiðanda,
viðskiptanúmer og heimilisfang
Aimn an déantóra,
cláruimhir trachtála agus seoladh
Ime ili žig proizvođača, broj
upisa u trgovački registar i adresa
proizvođača;
Име на производител,
број во регистар на трговски
претпријатија и адреса
Produsentens navn,
kommersielt registreringsnummer
og adresse
Naziv proizvođača,
Üreticinin adı,
ticari sicil numarası ve adresi
Emri i Prodhuesit,
numri i regjistrimit të biznesit dhe
adresa tregtare
Вытворца,
нумар гандлёвай рэгістрацыі і
адрас
Өндірушінің атауы,
коммерциялық тіркеу нөмірі
жəне мекенжайы
Наименование производителя,
номер и адрес коммерческой
регистрации
Виробник,
номер та адреса комерційної
реєстрації
$'&)6$(3*
modela
Modellbeteckning
modela
Auðkenni gerðar
Aitheantóir múnla
modela
Идентификатор
на модел
oznaka modela
Model
numarası
i Modelit
Ідэнтыфікатар
мадэлі
Үлгі
идентификаторы
Модель
Модель Вхідна напруга
49
Input
voltage
V(В)
Input
AC frequency
Hz(Гц)
APPENDIX
Output
voltage
V(В)
ENGLISH
100 -240 50 / 60 29,4
Tensiune de intrare
Vhodna napetost
Tensión
de entrada
Ingående spänning
Ulazni napon Izlazni napon
Inntaksspenna
Voltas
ionchuir
Ulazni napon
Влезен напон
Inngangsspenning
Ulazni napon
Giriş voltajı
Tensioni
në Hyrje
Увах однае
напружанне
Кіріс кернеу
Напряжение
на входе
Frecvența c.a. de intrare
Frekvencia vstupného
striedavého prúdu
Frekvenca vhodne
izmenične napetosti
Frecuencia de la CA de
entrada
Ingående frekvens
(växelström)
Frekvencija ulaznog
izmjeničnog napona
AC inntakstíðni
Minicíocht
AC aschuir
Frekvencija ulaznog
izmjeničnog napona
Влезна ефикасност
на наизменична
струја
Vekselstrømfrekvens
inngang
Ulazna frekvencija
naizmenične struje
Giriş AC frekansı
Frekuenca Hyrëse AC
Частата ўваходнага
пераменнага току
Кіріс айнымалы
ток жиілігі
Частота
переменного
тока на входе
Частота вхідного
змінного струму
Tensiune de ieșir
Výstupné napätie
Izhodna napetos
Tensión de salid
Utgående spänning
Úttaksspenna
Voltas aschuir
Izlazni napon
Излезен напон
Utgangsspenning
Izlazni napon
Çıkış voltajı
Tensioni
në Dalje
Выхадное
напружанне
Шығыс кернеy
Напряжение
на выходе
Вихідна
напруга
Page 50

global_main.book.book Page 50 Tuesday, March 23, 2021 2:52 PM
50
APPENDIX
Output
current
A
1,0 29,4 87,0 76,0 0,10
Curent de ieșir
Výstupný prúd
Izhodni tok Izhodna moč
Intensidad de salid
Utgående ström
Izlazna jakost struje Izlazna snaga
Úttaksstraumur
Sruth aschuir
Izlazna jakost struje Izlazna snaga
Излезна
струја
Utgangsstrøm
Izlazna
struja
Çıkış akımı Çıkış gücü
Rryma
në Dalje
Выхадны
ток
Шығыс ток Шығыс қуат
Сила тока
на выходе
Сила вихідного
струму
Output
power
W(Вт)
Putere de ieșire
Výstupný výkon
Potencia de salida
Utgående effekt
Cumhacht
aschuir
Излезна моќ
Utgangseffekt
Izlazna snaga
Fuqia në Dalje
Выхадная
магутнасць
Выходная
мощность
Вихідна
потужність
Average active
%
Randament mediu în
mod activ
Priemerná účinnosť v
aktívnom režime
Povprečni izkoristek v
aktivnem stanju
activo (10 %).
Genomsnittlig
verkningsgrad i aktivt
läge
Prosječna učinkovitost
pod opterećenjem
Meðaltal
rekstarvirkni
Mean-éifeachtúacht
gníomhach
Prosječna
učinkovitost pod
opterećenjem
Просечна
активна
ефикасност
Gjennomsnittlig aktiv
effektivitet
aktivnog režima
Ortalama aktif
verimlilik
Rendimenti aktiv
mesatar
Сярэдняя
актыўная
прадукцыйнасць
Орташа белсенді
тиімділік
Среднее значение
КПД в работе
Середній
робочий
ККД
at low load (10 %)
Randamentul la sarcină
redusă
(10 %)
Účinnosť pri nízkej
záťaži (10 %)
Izkoristek pri nizki
obremenitvi (10 %)
Verkningsgrad vid
låg last (10 %)
Učinkovitost pri niskom
opterećenju (10 %)
Afkastageta við
lítið álag (10
Éifeachtútlach ag
ualach íseal (10 %)
Učinkovitost pri niskom
opterećenju (10 %)
Ефикасност при
ниско
оптоварување
(10 %)
Effektivitet ved lav
belastning (10 %)
opterećenju (10 %)
Düşük yükte verimlilik
(% 10)
Rendimenti me ngarkesë
të ulët (10 %)
Прадукцыйнасць
пры нізкай
нагрузцы (10 %)
Төмен жүктемедегі
тиімділік (10 %)
КПД при низкой
нагрузке (10 %)
ККД з низьким
рівнем
навантаження (10 %)
%
%)
power consumption
Puterea absorbită în
regim fără sarcină
Spotreba energie v stave
bez záťaže
Poraba energije v stanju
brez obremenitve
Consumo eléctrico en
vacío
Elförbrukning vid
noll-last
Potrošnja energije u
stanju bez opterećenja
Orkunotkun án álags
Ídiú cumhachta gan
ualach
Potrošnja energije
u stanju bez
opterećenja
Потрошувачка на
енергија
без оптоварување
Strømforbruk uten
belastning
Utrošak struje bez
opterećenja
Yükleme yokken
güç tüketimi
Konsumi
pa ngarkesë
Энергаспажыванне
без нагрузкі
Жүктемесіз қуатты
тұтыну
Потребление
электроэнергии
без нагрузки
Споживання
електроенергії без
навантаження
No-load
W(Вт)
Page 51

it_main.book.book Page 1 Tuesday, March 23, 2021 2:57 PM
MANUALE D’USO
ASPIRAPOLVERE
Prima di iniziare l’installazione, leggere attentamente queste
istruzioni. In tal modo, l’apparecchiatura sarà installata
facilmente e in maniera corretta e sicura. Dopo l’installazione,
conservare queste istruzioni accanto al prodotto per utilizzi
futuri.
ITALIANO
A9**********
www.lg.com
Copyright © 2021 LG Electronics Inc. All Rights Reserved.
Page 52

it_main.book.book Page 2 Tuesday, March 23, 2021 2:57 PM
INDICE
Questo manuale può contenere testo o
immagini che non si riferiscono al
modello acquistato.
Il presente manuale è soggetto a revisioni
da parte del produttore.
ISTRUZIONE PER LA SICUREZZA
LEGGERE TUTTE LE ISTRUZIONI PRIMA DELL’USO ........................................3
AVVERTENZA.......................................................................................................3
ATTENZIONE .....................................................................................................11
ATTENZIONE PER L’AMBIENTE .......................................................................13
INSTALLAZIONE
Panoramica del prodotto................................................................................15
Installazione della stazione di ricarica...........................................................19
Conservare gli accessori..................................................................................21
USO
Iniziare...............................................................................................................23
Carica della batteria.........................................................................................25
Utilizzo della spazzola mop.............................................................................26
Utilizzo delle spazzole e degli accessori........................................................30
FUNZIONI SMART
Usare l’applicazione LG ThinQ........................................................................33
Funzione Smart Diagnosis ..............................................................................36
MANUTENZIONE
Pulizia dell'elettrodomestico ..........................................................................37
Pulizia delle spazzole .......................................................................................40
RISOLUZIONE DEI PROBLEMI
Prima di chiamare l’assistenza .......................................................................44
APPENDICE
Informazioni .....................................................................................................48
Page 53

AVVERTENZA
it_main.book.book Page 3 Tuesday, March 23, 2021 2:57 PM
ISTRUZIONE PER LA SICUREZZA
ISTRUZIONE PER LA SICUREZZA
LEGGERE TUTTE LE ISTRUZIONI PRIMA DELL’USO
Le seguenti linee guida sulla sicurezza hanno lo scopo di prevenire
rischi o danni imprevisti derivanti da un funzionamento non sicuro o
errato dell'elettrodomestico. Le linee guida sono suddivise in
‘
AVVERTENZA
Messaggi di sicurezza
Indica che il mancato rispetto delle istruzioni può provocare
lesioni personali gravi o fatali.
’ e ‘
ATTENZIONE
Questo simbolo indica operazioni o condizioni
pericolose. Consultare con la massima attenzione il
testo riportato assieme a questo simbolo e attenersi alle
istruzioni per evitare rischi.
AVVERTENZA
’ come descritto di seguito.
3
ITALIANO
ATTENZIONE
Indica che il mancato rispetto delle istruzioni può provocare lievi
lesioni personali o danni all'elettrodomestico.
AVVERTENZA
• Per ridurre il rischio di esplosioni, incendi, scosse elettriche, ustioni o
lesioni personali anche fatali, quando si utilizza l'elettrodomestico è
indispensabile attenersi alle seguenti precauzioni basilari per la
sicurezza:
Sicurezza tecnica
• Questo elettrodomestico può essere adoperato da bambini di
almeno 8 anni di età, da persone con capacità fisiche, sensoriali o
mentali ridotte, e da persone prive di esperienza sotto sorveglianza,
Page 54

it_main.book.book Page 4 Tuesday, March 23, 2021 2:57 PM
4
ISTRUZIONE PER LA SICUREZZA
solo se è stato spiegato l'uso corretto dell'elettrodomestico e
descrivendone i relativi pericoli. con l'elettrodomestico. La pulizia e la
manutenzione non devono essere effettuate da bambini senza la
supervisione degli adulti.
• I bambini di età inferiore a 3 anni devono essere tenuti lontani se non
sorvegliati costantemente.
• Non permettere che l'elettrodomestico venga utilizzato come un
giocattolo. È necessaria la massima attenzione quando viene
utilizzato da o vicino a bambini.
• Non lasciare che i bambini giochino o si appendano
all'elettrodomestico.
• Non utilizzare l'elettrodomestico con cavo di alimentazione o spina
danneggiati. Il cavo deve essere sostituito. Se l'elettrodomestico non
funziona come dovrebbe, è caduto, è stato danneggiato, lasciato
all'aperto o è caduto in acqua, restituirlo a un centro di assistenza LG
Electronics.
• Non tirare o trasportare con il cavo, non utilizzare il cavo come
maniglia, non chiudere una porta sul cavo o tirare il cavo attorno a
spigoli o angoli appuntiti. Non far passare l'elettrodomestico sul
cavo. Tenere il cavo lontano dalle superfici riscaldate.
• Non scollegare tirando il cavo. Per scollegare, afferrare la spina, non
il cavo.
• Posizionare i cavi di altri elettrodomestici fuori dall'area da pulire.
Batteria
• Non utilizzare mai la batteria, l'adattatore e la stazione di ricarica di
altri strumenti con questo elettrodomestico. Utilizzare solo la batteria
e la stazione di ricarica fornite da LG Electronics.
• Non utilizzare mai la batteria, l'adattatore e la stazione di ricarica di
questo elettrodomestico con altri elettrodomestici.
• Scollegare il cavo di alimentazione e rimuovere la batteria se
l'elettrodomestico non verrà utilizzato per un periodo di tempo
prolungato.
• Non utilizzare batterie modificate o danneggiate.
Page 55

it_main.book.book Page 5 Tuesday, March 23, 2021 2:57 PM
ISTRUZIONE PER LA SICUREZZA
• Non smontare, rimuovere o cortocircuitare la batteria.
• Quando si smaltisce la batteria o l'elettrodomestico, rimuoverla dallo
stesso e smaltirla in modo sicuro.
• Sostituire le batterie quando non sono più in grado di mantenere la
carica.
• Fare riferimento alle istruzioni della sezione
Carica della batteria
per il metodo di sostituzione.
• Quando si smaltisce questo elettrodomestico, attenersi alle
normative per lo smaltimento delle batterie agli ioni di litio
ricaricabili.
• Seguire tutte le ordinanze e le normative locali durante la
manipolazione o lo smaltimento della batteria.
• Impedire l'avvio involontario. Assicurarsi che l'interruttore sia in
posizione di spegnimento prima di collegare le batterie, sollevare o
trasportare l'elettrodomestico.
• Scollegare le batterie dall'elettrodomestico prima di effettuare
qualsiasi regolazione, cambiare accessori, pulire, riparare o riporre
l'elettrodomestico.
5
ITALIANO
• Quando le batterie non sono in uso, tenerle lontano da altri oggetti
metallici, come graffette, monete, chiavi, chiodi, viti o altri piccoli
oggetti metallici, che possono stabilire una connessione da un
terminale all'altro.
• In condizioni di cattivo uso, il liquido potrebbe fuoriuscire dalla
batteria. In tal caso, evitare il contatto. In caso di contatto accidentale,
sciacquare con acqua. Se il liquido entra in contatto con gli occhi,
consultare anche un medico.
• Se l'elettrodomestico deve essere conservato inutilizzato per un
lungo periodo, le batterie devono essere rimosse.
• Prima di rimuovere la batteria, bisogna spegnere questo
elettrodomestico.
Specifiche della batteria
• Sono fornite una o due batterie, il cui numero varia a seconda del
modello acquistato.
Page 56

it_main.book.book Page 6 Tuesday, March 23, 2021 2:57 PM
6
ISTRUZIONE PER LA SICUREZZA
-
Nome modello
-
Tipo
: Batteria ricaricabile agli ioni di litio
-
Capacità stimata
: EAC63382204
: 25,2 V%, 2400 mAh
Installazione
• Per evitare scosse elettriche o incendi, non installare, caricare o
conservare l’elettrodomestico dove potrebbe essere esposto ad
acqua, pioggia o umidità elevata.
• Installare, caricare e conservare l'elettrodomestico in un luogo ben
ventilato.
• Evitare di utilizzare l'elettrodomestico in aree in cui sussiste il rischio
di perdite di gas infiammabili, oli industriali o polvere metallica.
• Non conservare o installare l'elettrodomestico, il cavo di
alimentazione o la spina vicino a dispositivi di riscaldamento o
fiamme libere.
• Installare la stazione di ricarica su una superficie solida e piana.
• Per evitare il ribaltamento, le installazioni in modalità a pavimento
devono essere ancorate alla parete utilizzando la vite di ancoraggio
del supporto, il blocco di ancoraggio e il nastro biadesivo in
dotazione.
• Nelle installazioni in modalità a parete, la stazione di ricarica deve
essere fissata saldamente alla parete utilizzando le viti di ancoraggio
a parete in dotazione.
• Utilizzare le viti di ancoraggio solo quando si fissano a superfici solide
in calcestruzzo o simili.
• Non perforare mai una parete senza prima aver verificato che l'area
dietro di essa sia priva di condotti di alimentazione, tubature, prese
d'aria o cavi.
• Non utilizzare o conservare l'elettrodomestico a temperature
inferiori a 5 ℃ o superiori a 38 ℃.
• Non conservare o installare l’elettrodomestico dove è esposto a
temperature inferiori allo zero o esposto alle condizioni atmosferiche
esterne.
Page 57

it_main.book.book Page 7 Tuesday, March 23, 2021 2:57 PM
ISTRUZIONE PER LA SICUREZZA
• Durante l'installazione o lo spostamento dell'elettrodomestico, fare
attenzione a non pizzicare, schiacciare o danneggiare il cavo di
alimentazione o la spina.
Uso
• Leggere tutte le istruzioni prima di utilizzare l'elettrodomestico e
conservare queste istruzioni.
• Utilizzare solo come descritto in questo manuale. Utilizzare solo gli
accessori consigliati dal produttore.
• Questo elettrodomestico è progettato solo per il normale uso
domestico interno. Non deve essere utilizzato per applicazioni non
residenziali, commerciali o industriali.
• Questo prodotto deve essere utilizzato solo con una presa da 100 240 V~ 50/60 Hz, 0,8 amp. Assicurarsi di controllare le specifiche di
alimentazione del luogo in cui si intende utilizzare l'elettrodomestico.
• Non toccare il cavo di alimentazione, la spina o i comandi
dell'elettrodomestico con le mani bagnate.
7
ITALIANO
• Rimuovere l'umidità o lo sporco dal cavo o dalla spina con un panno
asciutto.
• Non provare mai a utilizzare l'elettrodomestico se è danneggiato, se
funziona male, se è stato parzialmente smontato e se alcuni
componenti, inclusi cavo e spina, mancano o sono danneggiati.
Portarlo a un centro di assistenza o rivenditore autorizzato LG
Electronics per assistenza.
• Non applicare una forza eccessiva al cavo di alimentazione per
piegarlo o posizionarlo sotto un oggetto pesante poiché questo lo
danneggerebbe.
• Non utilizzare adattatori per prese multiple con questo
elettrodomestico. Assicurarsi di utilizzare una presa di corrente con
una capacità di 10 A.
• Non collegare l'elettrodomestico a una presa danneggiata o
allentata.
Page 58

it_main.book.book Page 8 Tuesday, March 23, 2021 2:57 PM
8
ISTRUZIONE PER LA SICUREZZA
• Assicurarsi di scollegare il cavo di alimentazione quando si prevede di
non utilizzare l'elettrodomestico per un periodo di tempo
prolungato.
• Non danneggiare, alterare, piegare eccessivamente, torcere, tirare,
pizzicare o riscaldare il cavo di alimentazione.
• Prima di utilizzare l'elettrodomestico, rimuovere qualsiasi filo o cavo
dal pavimento.
• Evitare di toccare i poli della spina di alimentazione con le dita
quando si scollega il cavo di alimentazione.
• Non coprire il cavo di alimentazione con un tappeto o una moquette.
• Spingere saldamente la spina di alimentazione nella presa a muro in
modo che non sia allentata.
• Se il prodotto è stato immerso, contattare un centro di assistenza o
un rivenditore LG Electronics per istruzioni prima di riprendere l'uso.
• Se il prodotto fa uno strano rumore o emette un odore o fumo,
interromperne l'uso e contattare un centro informazioni per i clienti
di LG Electronics.
• Solo i tecnici qualificati o il personale di assistenza di LG Electronics
possono smontare, riparare o modificare l'elettrodomestico.
• Non inserire mai un oggetto metallico appuntito come uno spillo, un
chiodo o un coltello in un foro o spazio nell'elettrodomestico o nella
stazione di ricarica.
• Non aspirare liquidi con questo elettrodomestico. Assicurarsi che
l'acqua, la bevanda o il detersivo non entrino nell'elettrodomestico o
nella stazione di ricarica.
• Non lasciare che l'elettrodomestico raccolga lame, puntine da
disegno, segatura, oggetti appuntiti o cenere calda o fredda.
• Non permettere ai bambini di utilizzare l'elettrodomestico.
• Non lasciare che bambini o animali domestici si avvicinino
all'elettrodomestico durante l'uso, la ricarica o la conservazione.
• Non inserire le spazzole e gli accessori in bocca.
• Tenere vestiti, capelli, dita o altre parti del corpo lontani dalle
aperture e dalle parti in movimento.
Page 59

it_main.book.book Page 9 Tuesday, March 23, 2021 2:57 PM
ISTRUZIONE PER LA SICUREZZA
9
• Non mettere in funzione l'elettrodomestico con l'ingresso o l'uscita di
aspirazione ostruiti.
• Non utilizzare l'elettrodomestico senza il contenitore della polvere e i
filtri in posizione.
• Non utilizzare in uno spazio chiuso dove sono presenti vapori di
diluenti per vernici, sostanze antitarme, polvere infiammabile o altri
materiali esplosivi o tossici.
• Non toccare i terminali di ricarica dell'elettrodomestico o della
stazione di ricarica, né inserire oggetti elettrificati all'interno
dell'elettrodomestico o della stazione.
• Conservare sempre l'elettrodomestico sulla stazione di ricarica a
pavimento o a parete quando non è in uso.
• Non appoggiare l'elettrodomestico su pareti, sedie o tavoli.
• Se l'interruttore di dispersione a terra scatta quando il prodotto viene
posizionato sulla stazione di ricarica, rimuovere immediatamente
l'elettrodomestico dalla stazione di ricarica. Contattare un centro di
assistenza clienti LG Electronics.
ITALIANO
• Prestare particolare attenzione durante la pulizia delle scale.
• Non utilizzare o conservare dispositivi di riscaldamento o sostanze
infiammabili (etere, benzene, alcol, prodotti chimici, spray
combustibili, insetticidi, deodoranti per ambienti o cosmetici) nelle
immediate vicinanze dell'elettrodomestico.
• Non tentare di pulire una sostanza liquida (acqua, bevanda), sostanze
odorose (caramelle, cioccolato, escrementi di animali domestici),
oggetti metallici (lame, spilli), sostanze infiammabili, oggetti che
bruciano/fanno fumo (sigarette, fiammiferi o ceneri calde),
tensioattivi o frammenti di vetro con questo elettrodomestico.
• In caso di fuga di gas (gas naturale, gas propano, ecc.), non utilizzare
questo o qualsiasi altro elettrodomestico. Aprire una finestra o una
porta per ventilare immediatamente l'area.
• Non tenere la stazione di ricarica capovolta con la batteria nella
stazione di ricarica.
• Non esporre l'elettrodomestico, e in particolare la batteria, al calore,
a un dispositivo di riscaldamento o alla luce solare diretta.
Page 60

it_main.book.book Page 10 Tuesday, March 23, 2021 2:57 PM
10
ISTRUZIONE PER LA SICUREZZA
• Non tenere l'elettrodomestico o la sua batteria all'interno di un
veicolo esposto alla luce solare diretta.
• Non permettere mai che acqua, bevanda o detergente penetri
all'interno della batteria.
• Non applicare impatti fisici alla batteria.
Manutenzione
• Assicurarsi di scollegare il cavo di alimentazione durante la pulizia o
la manutenzione della stazione di ricarica.
• Non lavare la porta di ingresso o il contenitore della polvere con
acqua o detergente.
• Non utilizzare detergenti, lucidanti o deodoranti per ambienti per
pulire il contenitore della polvere.
• Non applicare o spruzzare sostanze infiammabili (benzina o diluente)
o tensioattivi (detergente o sapone da bagno) sull'elettrodomestico.
• Lavarsi le mani dopo aver maneggiato gli ugelli. Gli ugelli contengono
fibra di carbonio e il contatto può causare lievi irritazioni alla pelle.
Smaltimento
• Tenere i materiali di imballaggio fuori dalla portata dei bambini. I
materiali di imballaggio possono rappresentare un rischio di
soffocamento per i bambini.
• Distruggere il cartone, il sacchetto di plastica e altri materiali di
imballaggio dopo aver disimballato l'elettrodomestico. I bambini
potrebbero usarli per giocare. I cartoni ricoperti di tappeti, copriletti
o fogli di plastica possono diventare camere ermetiche.
• Smaltire questo elettrodomestico secondo le leggi e le normative
locali, statali e regionali.
• Contattare il consiglio comunale locale o l'autorità governativa
correlata prima di smaltire questo elettrodomestico.
Page 61

ATTENZIONE
it_main.book.book Page 11 Tuesday, March 23, 2021 2:57 PM
ISTRUZIONE PER LA SICUREZZA
11
Spazzola mop
• Non aspirare oggetti appuntiti (pezzi di vetro, fili, lame, spilli, ecc.) con
la spazzola mop agganciato. Quando si puliscono i panni morbidi del
mop dopo l’utilizzo, ci si potrebbe ferire con un oggetto appuntito
all’interno del mop.
ATTENZIONE
• Per ridurre il rischio di lesioni alle persone, malfunzionamenti o danni
al prodotto o agli oggetti durante l'utilizzo dell'elettrodomestico,
seguire le precauzioni di sicurezza di base, comprese le seguenti:
Uso
• Questo elettrodomestico è dotato di un dispositivo di sicurezza
integrato per evitare danni da surriscaldamento. Se
l'elettrodomestico si surriscalda dopo un uso prolungato, potrebbe
spegnersi automaticamente. In tal caso, lasciare l'elettrodomestico in
un luogo fresco e ben ventilato per circa un'ora prima di riaccenderlo.
ITALIANO
• Non far prendere urti al prodotto e non farlo cadere.
• Non installare filtri bagnati o umidi.
• Utilizzare sempre un panno morbido per pulire l'elettrodomestico.
Non pulire il prodotto con un solvente volatile o organico (diluente o
acetone).
• Non pulire ripetutamente lo stesso punto per un periodo di tempo
prolungato. Ciò potrebbe danneggiare la moquette o la superficie del
pavimento.
• Tenere le dita lontane dai punti di schiacciamento durante il
montaggio dell'elettrodomestico o della stazione di ricarica.
• Non utilizzare il nastro biadesivo per ancorare la stazione di ricarica
alla carta da parati. Utilizzare le viti in dotazione per ancorare la
stazione di ricarica. Il peso della stazione di ricarica e
dell'elettrodomestico potrebbero danneggiare la carta.
• Non applicare forza o alcun impatto al filtro antipolvere in metallo.
Page 62

it_main.book.book Page 12 Tuesday, March 23, 2021 2:57 PM
12
ISTRUZIONE PER LA SICUREZZA
• Non rimuovere la batteria durante l’uso.
Spazzola mop
• Non utilizzare la spazzola mop per scopi (ad esempio, lucidare
un'auto, pulire i vetri) non legati alla pulizia dei pavimenti domestici.
• Non utilizzare la spazzola mop per aspirare liquidi (acqua, bevande).
• Quando si utilizza la spazzola mop, attaccare sempre i panni morbidi
per mop.
• Non pulire pavimenti e tappeti rivestiti, ruvidi o delicati con la
spazzola mop.
• Non utilizzare la spazzola mop per pulire ripetutamente lo stesso
punto per un periodo di tempo prolungato. L'iniezione di acqua alla
spazzola mop può fare entrare acqua nel punto di ingresso della
polvere e danneggiare l'elettrodomestico.
• Non calpestare la spazzola mop.
• I pavimenti bagnati possono rappresentare un pericolo di
scivolamento. Lasciare asciugare completamente i pavimenti prima
di consentire a chiunque di camminarci sopra.
• Non riporre l'elettrodomestico attaccando il serbatoio dell'acqua
pieno alla spazzola mop.
Page 63

it_main.book.book Page 13 Tuesday, March 23, 2021 2:57 PM
ISTRUZIONE PER LA SICUREZZA
ATTENZIONE PER L’AMBIENTE
Smaltimento delle apparecchiature obsolete
• Tutte le apparecchiature elettriche ed elettroniche,
contrassegnate da questo simbolo (“bidone della
spazzatura barrato da una croce”), devono essere raccolte
e smaltite separatamente rispetto agli altri rifiuti urbani
misti mediante impianti di raccolta specifici installati da
enti pubblici o dalle autorità locali. Si ricorda che gli utenti
finali domestici possono consegnare gratuitamente le
apparecchiature elettriche ed elettroniche a fine vita
presso il punto vendita all’atto dell’acquisto di una nuova
apparecchiatura equivalente. Gli utenti finali domestici
possono inoltre consegnare gratuitamente
apparecchiature elettriche ed elettroniche di piccolissime
dimensioni (non eccedenti i 25 cm) a fine vita direttamente
presso un punto vendita a ciò abilitato, senza obbligo di
acquistare una apparecchiatura nuova di tipo equivalente.
Si prega di informarsi previamente presso il punto vendita
prescelto circa tale ultima modalità di conferimento
dell’apparecchiatura a fine vita.
13
ITALIANO
• Il corretto smaltimento dell'unità obsoleta contribuisce a
prevenire possibili conseguenze negative sulla salute degli
individui e sull'ambiente. Una gestione responsabile del
fine vita delle apparecchiature elettriche ed elettroniche da
parte degli utenti contribuisce al riutilizzo, al riciclaggio ed
al recupero sostenibile dei prodotti obsoleti e dei relativi
materiali.
• Per informazioni più dettagliate sullo smaltimento delle
apparecchiature obsolete, contattare l'ufficio del comune
di residenza, il servizio di smaltimento rifiuti o il punto
vendita in cui è stato acquistato il prodotto. (www.lg.com/
global/recycling)
Page 64

it_main.book.book Page 14 Tuesday, March 23, 2021 2:57 PM
14
ISTRUZIONE PER LA SICUREZZA
Smaltimento delle batterie/accumulatori
• Questo simbolo potrebbe essere associato ai simboli
chimici del mercurio (Hg), cadmio (Cd) o piombo (Pb) se la
batteria contiene più di 0,0005% di mercurio, 0,002% di
cadmio o 0,004% di piombo.
• Tutte le batterie e gli accumulatori dovrebbero essere
smaltiti separatamente rispetto alla raccolta differenziata
municipale, mediante impianti di raccolta specifici
designati dal governo o dalle autorità locali.
• Il corretto smaltimento di batterie e accumulatori obsoleti
contribuisce a prevenire possibili conseguenze negative
sull'ambiente, sulla salute umana e su tutte le altre specie
viventi.
• Per informazioni più dettagliate sullo smaltimento di
batterie e accumulatori obsoleti, contattare il comune, il
servizio di smaltimento rifiuti o il negozio in cui è stato
acquistato il prodotto. (http://www.lg.com/global/
sustainability/environment/take-back-recycling/globalnetwork-europe)
Page 65

it_main.book.book Page 15 Tuesday, March 23, 2021 2:57 PM
INSTALLAZIONE
15
INSTALLAZIONE
Panoramica del prodotto
Le immagini in questa guida possono essere differenti dai reali componenti e accessori, che sono soggetti
a modifiche senza preavviso da parte del produttore per migliorare il prodotto.
Vista frontale
*1 Questa caratteristica è disponibile solo su alcuni
modelli.
ITALIANO
a
Stazione di ricarica
b
Stazione di ricarica della batteria addizionale
c
Batteria (Batteria doppia*1)
d
Corpo del prodotto
e
Tubo telescopico estendibile
f
Spazzola
g
Pedana per supporto da pavimento
h
Tubo per supporto da pavimento
i
Adattatore
j
Supporto per spazzola addizionale
k
Porta accessori
l
Filtro HEPA
m
Pre-filtro
n
Leva del compressore
o
Filtro antipolvere in metallo
Page 66

it_main.book.book Page 16 Tuesday, March 23, 2021 2:57 PM
16
INSTALLAZIONE
Accessori
*1 Questo accessorio è disponibile solo su alcuni
modelli.
Accessori inclusi
a
Stazione di ricarica
b
Tubo telescopico estendibile
c
Adattatore
d
Pre-filtro
e
Batteria (Batteria doppia*1)
f
Pedana per supporto da pavimento
g
Tubo per supporto da pavimento
*1
*1
Spazzole
a
Spazzola per tappeti
b
Spazzola Slim per pavimenti duri
c
Spazzola per materassi
d
Spazzola Mini
*1
*1
*1
Kit di installazione
a
Blocco di ancoraggio a muro
b
Nastro biadesivo
c
Ancoraggio per cartongesso
d
Vite di ancoraggio a muro
e
Vite di ancoraggio del supporto
*1
*1
*1
*1
*1
*1
Accessori di base
a
Accessorio Combination
b
Accessorio Crevice
c
Pennello per pulizia
Accessori e borsa porta-accessori
Page 67

NOTA
it_main.book.book Page 17 Tuesday, March 23, 2021 2:57 PM
a
Accessorio per sporco ostinato
b
Accessorio per materassi
c
Accessorio multi-angolo
d
Accessorio Crevice flessibile
e
Tubo flessibile ed estendibile
f
Borsa porta- accessori
Kit mop
INSTALLAZIONE
*1
*1
*1
*1
*1
*1
a
Spazzola mop
b
Porta spazzola addizionale e supporto panni
morbidi
c
Panni morbidi per mop
d
Misurino
• Potrebbe essere fine sarà necessario sostituire i
panni morbidi, le batterie, il filtro HEPA e il
prefiltro. Contattare un centro di assistenza
clienti LG Electronics.
*1
*1
*1
*1
17
ITALIANO
Specifiche
Elettrodomestico
Modello
Dimensioni
(Larghezza X
Profondità X Altezza)
Peso
Consumo energetico
Autonomia della
batteria
(Utilizzo di due
batterie)
A9**********
260 mm X 270 mm x 1120 mm
Circa 2,6 kg
370 W in
120 W in
68 W in
Utilizzo con la spazzola
Fino a 12 minuti in
Fino a 40 minuti in
Fino a 80 minuti in
Normale
Modalità Turbo
Modalità Power
Modalità Normale
*1
Modalità Turbo
Modalità Power
Modalità
(Massimo 590 W)
Utilizzo con la spazzola
Fino a 14 minuti in
Fino a 60 minuti in
Fino a 120 minuti in
Normale
Modalità Turbo
Modalità Power
Modalità
Page 68

it_main.book.book Page 18 Tuesday, March 23, 2021 2:57 PM
18
INSTALLAZIONE
Autonomia della
batteria
(Utilizzo di una
batteria)
• Le dimensioni sono fornite per il corpo del prodotto assemblato, tubo telescopico e spazzola.
• La potenza di aspirazione è una media della potenza con lo standard IEC 62885-2, 5.8 testato da un
laboratorio di prova indipendente. I dati misurati individualmente sarebbero diversi dai risultati di un
test di laboratorio.
• L’autonomia della batteria è il risultato dell'utilizzo di una batteria completamente carica secondo lo
standard di test di LG Electronics. I risultati possono essere diversi a seconda dell'ambiente di utilizzo
effettivo e del periodo di utilizzo.
*1 La spazzola contiene il motore ad azionamento diretto che ruota direttamente la testina di pulizia delle
spazzole.
Utilizzo con la spazzola
Fino a 6 minuti in
Fino a 20 minuti in
Fino a 40 minuti in
Normale
*1
Modalità Turbo
Modalità Power
Modalità
Utilizzo con la spazzola
Fino a 7 minuti in
Fino a 30 minuti in
Fino a 60 minuti in
Normale
Modalità Turbo
Modalità Power
Modalità
Adattatore per caricatore
Modello ADC-30FSA-30 29430EPG
Ingresso
Uscita
100-240 V~, 50/60 Hz, 0,8 A
29,4 V%, 1,0 A
Page 69

it_main.book.book Page 19 Tuesday, March 23, 2021 2:57 PM
Installazione della stazione
di ricarica
A libera installazione
Seguire i passaggi seguenti per installare la
stazione di ricarica su un pavimento duro e piano.
1
Posizionare la pedana del supporto da
pavimento su un pavimento duro e piano e
assemblare il tubo del supporto da pavimento.
2
Aggancia il cavo di alimentazione in modo
ordinato al fermacavi
supporto da pavimento.
a
sul retro del tubo del
INSTALLAZIONE
4
Montare la stazione di ricarica sulla parte
superiore del tubo del supporto da pavimento.
5
Collegare l'alimentatore alla porta sul retro
della stazione di ricarica.
19
ITALIANO
3
Far scorrere il porta spazzola addizionale sul
tubo del supporto da pavimento.
• Assicurati di non pizzicare o aggrovigliare il
cavo di alimentazione dietro il contenitore
dei panni morbidi del mop.
6
Praticare un foro nel muro e inserire
l'ancoraggio del muro a secco
• Prima di forare, assicurarsi che non ci siano
tubi o cavi elettrici all'interno del muro nella
posizione desiderata.
• Per l'ancoraggio del muro a secco: utilizzare
una punta da trapano da 1/4″ (6,5 mm)
• Per montanti in cemento o muri: utilizzare
una punta da trapano da 1/8″ (3 mm)
• Se si avvita nel muro a secco, utilizzare
l'ancora per cartongesso.
b
se necessario.
Page 70

NOTA
it_main.book.book Page 20 Tuesday, March 23, 2021 2:57 PM
20
INSTALLAZIONE
7
Allineare il blocco di ancoraggio a parete c
della stazione di ricarica e fissarla alla parete
stringendo la vite di fissaggio
8
Collegare il cavo di alimentazione alla presa di
corrente.
• La stazione di ricarica può essere rimossa
secondo necessità. Per rimuoverla, tenere fermo
la pedana del supporto da pavimento e tirare
verso l'alto la stazione di ricarica.
d
fino in fondo.
• Rimuovere la sezione centrale del nastro
biadesivo prima di fissarlo al blocco di
ancoraggio a parete.
2
Attaccare il secondo pezzo di nastro biadesivo
all'altro lato del blocco di ancoraggio a muro
per fissarlo.
• Non utilizzare nastro biadesivo sulla carta da
parati.
Utilizzo del nastro biadesivo per
proteggere l'elettrodomestico
1
Usare il nastro biadesivo a per fissare il blocco
di ancoraggio a parete
ricarica.
b
alla stazione di
Installazione a parete
Per le installazioni a parete, la stazione di ricarica
deve essere fissata saldamente alla parete
utilizzando le viti di fissaggio a parete (corte) in
dotazione.
• Il porta spazzola addizionale non può essere
fissato alla stazione di ricarica in un'installazione
a parete.
1
Collegare l'alimentatore alla porta sul retro
della stazione di ricarica.
2
Praticare 2 fori e inserire i tasselli per
cartongesso (se necessario) ad almeno 1 m dal
pavimento e abbastanza vicini da raggiungere
facilmente una presa di corrente.
Page 71

ATTENZIONE
1m
it_main.book.book Page 21 Tuesday, March 23, 2021 2:57 PM
• Prima di forare, assicurarsi che non ci siano
tubi o cavi elettrici all'interno del muro nella
posizione desiderata.
• Per l'ancoraggio del muro a secco: utilizzare
una punta da trapano da 6,5 mm
• Per montanti in cemento o muro: utilizzare
una punta da trapano da 3 mm
• Se si avvita nel muro a secco, utilizzare gli
ancoraggi per cartongesso.
3
Fissare la stazione di ricarica alla parete con le
viti di fissaggio a parete.
INSTALLAZIONE
2
Posizionare la stazione di ricarica su un
pavimento duro e piano.
3
Separare il tubo telescopico e la spazzola dal
corpo del prodotto prima di caricare o riporre
l'elettrodomestico.
4
Collegare il cavo di alimentazione alla presa di
corrente.
• Lasciare l'elettrodomestico su un pavimento
piano per lungo tempo con il tubo telescopico e
la spazzola attaccati può danneggiare
l'elettrodomestico.
21
ITALIANO
4
Collegare il cavo di alimentazione alla presa di
corrente.
Installazione compatta
Per sicurezza e comodità, installare la stazione di
ricarica utilizzando i metodi a libera installazione o
montata a parete. Se si sceglie di non installare la
stazione di ricarica, posizionarla su un pavimento
piano per la ricarica o la conservazione.
1
Collegare l'alimentatore alla porta sul retro
della stazione di ricarica.
Conservare gli accessori
Conservazione degli accessori
Conservare gli accessiru utilizzati di frequente
come l'accessorio Combination, accessorio Crevice
eil pennello per la pulizia dell'elettrodomestico,
nella parte inferiore della stazione di ricarica.
• Far scorrere il pennello per la pulizia nel porta
accessori.
• Far scorrere l'accessorio Combination sul
pennello per la pulizia e all'interno del porta
accessori.
Page 72

it_main.book.book Page 22 Tuesday, March 23, 2021 2:57 PM
22
INSTALLAZIONE
• Per rimuovere un accessorio, premere il
pulsante di rilascio nella parte anteriore del
accessorio.
Conservazione delle spazzole
Quando una spazzola non è in uso, riporla nel
porta spazzola addizionale così da poterlo trovare
facilmente.
• Il porta spazzola addizionale è compatibile con la
Spazzola Slim per pavimenti duri
per materassi
.
o il
Spazzola
• Per staccare il tubo telescopico, premere il
suo pulsante di rilascio
2
Posizionare il corpo del prodotto sulla stazione
di ricarica.
• Vedere
Ricarica della batteria
sull’installazione e ricarica della batteria.
b
.
per istruzioni
Assemblaggio
dell'elettrodomestico
Seguire questi passaggi per montare in sicurezza
l'elettrodomestico.
1
Fissare saldamente il tubo telescopico
estendibile
corpo del prodotto
c
, la spazzola d, o l'accessorio sul
a
.
Conservare i panni morbidi del
mop
Si possono conservare fino a 2 panni morbidi del
mop nel contenitore dei morbidi del mop.
• Conservare i panni morbidi del mop in uno stato
totalmente asciutto. Può provocare un odore
sgradevole.
Page 73

it_main.book.book Page 23 Tuesday, March 23, 2021 2:57 PM
USO
Iniziare
Prima di utilizzare
l'elettrodomestico
• Sostenere la parte inferiore
dell'elettrodomestico durante la pulizia di una
superficie elevata.
• Per evitare graffi sui pavimenti levigati,
mantenere le spazzole e gli accessori lontani da
pietrisco, sabbia o oggetti abrasivi.
• Assicurarsi che il filtro HEPA o il prefiltro sia
correttamente assemblato prima di utilizzare
l'elettrodomestico.
• Chiudere correttamente il coperchio del
contenitore della polvere prima di utilizzare
l'elettrodomestico. Se il coperchio del
contenitore della polvere viene lasciato aperto,
la forza di aspirazione potrebbe deteriorarsi e
influire sui risultati della pulizia.
• Riporre l'elettrodomestico nella stazione di
ricarica o appoggiarlo in piano sul pavimento
quando non viene utilizzato. Appoggiare
l'elettrodomestico contro una parete o una sedia
può provocare danni al prodotto o lesioni
personali in caso di caduta.
• Condizioni ambientali come la temperatura e
l'umidità possono causare l'accumulo di
elettricità statica sull'elettrodomestico.
Contattare il centro informazioni per i clienti di
LG Electronics se il problema persiste.
• Assicurarsi di rimuovere qualsiasi oggetto
estraneo come un calzino o una calza prima di
utilizzare l'elettrodomestico. Qualsiasi oggetto
estraneo nella porta di ingresso o nel tubo
telescopico impedirà il corretto funzionamento
dell'elettrodomestico.
• Utilizzare il prodotto a temperature ambiente
normali poiché l'autonomia della batteria può
deteriorarsi gravemente se utilizzata a
temperature inferiori a 5 ℃ o superiori a 38 ℃
per un periodo di tempo prolungato.
• La durata della batteria dipende dal tipo di
superficie e dalla potenza di aspirazione.
USO
• Seguire le raccomandazioni del produttore
durante la pulizia di pavimenti, tappeti e
moquette.
• Fare riferimento alla sezione
dettagli sull'autonomia della batteria.
Specifiche
23
per i
Assemblaggio delle parti
Le spazzole e gli accessori possono essere fissati al
corpo del prodotto o all'estremità del tubo
telescopico.
1
Inserire la batteria completamente carica a
nella cavità della parte inferiore
dell'impugnatura del prodotto.
2
Collegare le spazzole, gli accessori, il tubo
telescopico facendoli scorrere sulla testa del
prodotto
Le spazzole e gli accessori possono essere
anche fissati all'estremità del tubo telescopico
b
• Scollegare gli accessori premendo il
3
Regolare il tubo telescopico premendo il
pulsante di regolazione della lunghezza
retro del tubo e scorrere fino a quando non
scatta in posizione alla lunghezza desiderata.
b
finché non scattano in posizione.
.
pulsante di rilascio
c
.
d
sul
ITALIANO
Page 74

it_main.book.book Page 24 Tuesday, March 23, 2021 2:57 PM
24
USO
• Il tubo telescopico si estende in quattro
misure.
4
Premere il pulsante
modalità
• Per spegnere l’elettrodomestico premere di
Normale
nuovo il pulsante
Power
.
Power
per attivare la
.
Regolazione della potenza di
aspirazione
Regolare la potenza di aspirazione utilizzando il
pulsante di regolazione della potenza di
aspirazione sull'impugnatura.
• Tenere premuto il pulsante + per più di 3
Turbo
secondi per attivare la modalità
modalità
c
Pulsante di riduzione della potenza di
aspirazione (-) / modalità Wi-Fi
• Premere il pulsante - per diminuire la potenza
di aspirazione. (
• Tenere premuto il pulsante - per 3 secondi
per attivare il Wi-Fi e connettere
l'elettrodomestico nell'applicazione
ThinQ
.
Power
.
Turbo~Power~Normale
dalla
LG
Display
L’impugnatura dell’elettrodomestico visualizza
indicatori per oggetti ostruiti, avvisi di pulizia del
filtro, stato di connessione dell’elettrodomestico e
carica residua della batteria.
)
a
Tasto Power
• Premere il pulsante
spegnere l'elettrodomestico.
• Premere il pulsante
modalità
b
Pulsante di aumento dell'aspirazione (+) /
modalità Turbo
• Premere il pulsante + per aumentare la
potenza di aspirazione.
Normale~Power~Turbo
(
Normale
Power
Power
.
per accendere o
per attivare la
)
a
Spia di oggetti ostruiti
• Questo indicatore si accende quando
l'interno del corpo del prodotto, del tubo
telescopico, degli ingressi, della spazzola, del
filtro HEPA, del prefiltro o del filtro
antipolvere in metallo è ostruito da oggetti
estranei.
• Se l'intasamento persiste, il motore si avvia e
l'elettrodomestico si spegne. Rimuovere gli
oggetti estranei e pulire il filtro HEPA,
prefiltro e il filtro antipolvere in metallo
seguendo i passaggi nella sezione Rimozione
di oggetti estranei.
b
Spia di allarme del ciclo di pulizia del filtro
• Questa spia si accende quando
l'elettrodomestico viene utilizzato per un
certo periodo di tempo. Se necessario, pulire
il filtro HEPA, il prefiltro e il filtro antipolvere
in metallo.
c
Spia Wi-Fi
Page 75

AVVERTENZA
it_main.book.book Page 25 Tuesday, March 23, 2021 2:57 PM
• Questa spia lampeggia quando
l’elettrodomestico si connette
all'applicazione
domestica e la spia si accende quando la
connessione è completa.
d
Spia livello batteria
• Il livello di carica residua della batteria viene
visualizzato in 3 fasi in base alla carica residua
della batteria.
• La spia del livello della batteria lampeggia
quando la batteria deve essere caricata.
• Durante la ricarica del prodotto, le barre si
illuminano sulla spia del livello della batteria
per indicare il livello di carica.
• Una volta che la batteria è completamente
ricaricata, rimarranno accese 3 barre sulla
spia del livello della batteria.
LG ThinQ
o alla rete Wi-Fi
Carica della batteria
Prima di caricare la batteria
• Assicurarsi che l'adattatore sia collegato sia alla
stazione di ricarica che alla presa di corrente.
• La ricarica completa di una singola batteria
richiede solitamente 4 ore. Ci vorrà il doppio del
tempo per caricare sia la batteria principale che
quella addizionale.
• La batteria non verrà caricata se la temperatura
interna è inferiore a 5 ℃. Caricare la batteria solo
quando la temperatura interna è compresa tra 5
℃ e 38 ℃.
• Alla fine sarà necessario sostituire la batteria. A
causa delle caratteristiche della batteria,
l'autonomia si riduce dopo aver utilizzato
l'elettrodomestico ripetutamente per un periodo
prolungato.
• L'ultima barra dell'indicatore della batteria inizia
a lampeggiare quando questa deve essere
ricaricata. Utilizzare l'elettrodomestico con una
batteria completamente carica.
• Per mantenere la durata della batteria sui
modelli a doppia batteria, scambiare
periodicamente le posizioni delle stesse, tra il
corpo del prodotto e la stazione di ricarica della
batteria addizionale.
USO
25
Caricamento del corpo del
prodotto
Riponendo l'elettrodomestico sulla stazione di
ricarica la batteria viene ricaricata
automaticamente.
1
Premere il tasto
l’elettrodomestico.
2
Posizionare il corpo del prodotto sulla stazione
di ricarica allineandolo al gancio
stazione di ricarica.
• L'indicatore del livello della batteria inizia a
lampeggiare e inizia a caricare la batteria.
• Se non si sente un segnale acustico,
ricaricare l’elettrodomestico sulla stazione di
ricarica.
• Assicurarsi di montare saldamente il corpo del
prodotto sulla stazione di ricarica. Se
l'elettrodomestico cade dalla stazione di ricarica,
potrebbe causare lesioni, danni alle cose o danni
al prodotto.
Power
per spegnere
a
della
Carica della batteria
addizionale
Una batteria addizionale può essere conservata e
caricata nella base della stazione di ricarica.
ITALIANO
Page 76

ATTENZIONE
ATTENZIONE
it_main.book.book Page 26 Tuesday, March 23, 2021 2:57 PM
26
USO
• Per evitare danni al prodotto, la piastra di
fissaggio dei panni si fermerà automaticamente
• Tenere le dita lontane dai punti di
schiacciamento durante il montaggio o lo
smontaggio della batteria dal corpo del prodotto
o dalla stazione di ricarica per evitare lesioni
personali.
1
Rimuovere la batteria scarica dal corpo del
prodotto premendo il pulsante di rilascio della
batteria su entrambi i lati e tirando.
2
Inserire la batteria scarica nella stazione di
ricarica addizionale.
• La batteria entrerà nella cavità solo se
allineata correttamente.
• L'indicatore di carica addizionale lampeggia
durante la ricarica.
• L'indicatore di carica addizionale si accende
quando la carica è completa.
se ci sono oggetti estranei bloccati all’interno o
se è soggetta a un forte impatto. Spegnere
immediatamente l'elettrodomestico e
rimuovere gli oggetti estranei o le ostruzioni
prima di riprendere l'uso.
• Se si sente un rumore durante la pulizia, il panno
morbido del mop potrebbe essere caduto dalla
piastra di fissaggio dello stesso. Spegnere
immediatamente il prodotto e ricollegare il mop
alla piastra di fissaggio prima di riprendere l'uso.
• Non usare un panno sporco per pulire i
pavimenti.
• Utilizzare solo panni morbidi per mop autorizzati
da LG Electronics.
• Svuotare il contenitore e pulire il filtro per la
polvere sottile e il prefiltro dopo aver utilizzato la
spazzola mop.
Utilizzo dei panni morbidi
bagnati
Premere il pulsante
l'unica modalità mop e non attivare la funzione di
aspirazione della polvere.
• Premere il pulsante
aspirazione della polvere.
Power
. È possibile utilizzare
~
per attivare la funzione di
Utilizzo della spazzola mop
Prima di utilizzare la spazzola
mop
• I panni morbidi del mop ruotano solo a una
velocità indipendentemente dalla potenza di
aspirazione impostata sul corpo del prodotto.
• Premere il pulsante
preme il pulsante
funzione di aspirazione della polvere.
• Non montare o smontare la spazzola mentre
l'elettrodomestico è acceso. Ciò potrebbe
provocare lesioni.
!
una volta mentre si
~
una volta per disattivare la
Page 77

it_main.book.book Page 27 Tuesday, March 23, 2021 2:57 PM
• Impostare il pulsante di regolazione dell'acqua
in posizione
l'elettrodomestico per un periodo di tempo
prolungato. In caso contrario, potrebbe
verificarsi un guasto del prodotto.
• Non appoggiare l'elettrodomestico sul
pavimento mentre i panni morbidi bagnati sono
attaccati. Ciò potrebbe causare danni o gonfiore
al pavimento in legno.
• Non utilizzare su tappetini in PVC o PU per
neonati o bambini. L'attrito può causare il
surriscaldamento del motore.
• Se si utilizza a lungo la spazzola del mop con
l'aspirazione disattivata, il motore potrebbe
surriscaldarsi (durata di utilizzo consigliata: 80
minuti). Quando il motore si surriscalda, si attiva
la funzione di prevenzione surriscaldamento e
l'elettrodomestico si spegne automaticamente.
Utilizzare l'elettrodomestico dopo averlo
raffreddato per circa un'ora in un luogo fresco e
ben ventilato.
STOP
quando non si utilizza
Riempimento del serbatoio
dell'acqua
1
Premere il pulsante
serbatoio dell'acqua dalla spazzola mop.
PUSH
a per rimuovere il
USO
• Non mettere liquidi diversi da acqua e acqua
calda nel serbatoio.
3
Chiudere bene il tappo di ingresso dell'acqua.
• Se il tappo di ingresso dell'acqua non è
chiuso correttamente, l'acqua potrebbe
fuoriuscire.
4
Attaccare nuovamente il serbatoio dell'acqua
alla spazzola mop.
• Inserisci le 2 linguette
anteriore del serbatoio dell'acqua nelle
fessure
f
sulla parte superiore della
spazzola mop. Premere verso il basso al
centro
g
per bloccare il serbatoio in
posizione.
e
nella parte
27
ITALIANO
2
Aprire il tappo di ingresso dell’acqua b sul lato
del serbatoio dell'acqua e riempire il serbatoio
con acqua utilizzando il misurino
• Aprire solo un tappo di ingresso per riempire
l'acqua. L'apertura di entrambi i tappi può
far scorrere l'acqua.
• Non riempire il serbatoio oltre la linea
d
.
c
.
MAX
Fissaggio dei panni morbidi per mop
1
Inumidire entrambi i lati dei panni morbidi del
mop con acqua, quindi eliminare l'acqua in
eccesso prima di fissare i panni morbidi.
• Non fissare i panni morbidi mentre
gocciolano.
Page 78

AVVERTENZA
ATTENZIONE
ATTENZIONE
it_main.book.book Page 28 Tuesday, March 23, 2021 2:57 PM
28
USO
• Fissare e utilizzare i panni morbidi del mop
mentre sono asciutti può influire sui risultati
della pulizia.
2
Posizionare la spazzola mop capovolta sul
pavimento.
3
Allineare e fissare il centro del panno morbido
per mop con il centro della piastra di fissaggio.
• Attaccare il velcro sul panno morbido per
mop alla piastra del mop. Applicare il mop
capovolto o in modo improprio può influire
sui risultati della pulizia.
pavimenti che possono essere danneggiati da
troppa acqua.
•
STOP
: Premere il pulsante
Modalità alta
STOP
. Ciò interrompe la fornitura di acqua in
modo da poter passare su aree già bagnate.
• Per evitare lesioni, non applicare il panno
morbido per mop mentre la piastra di fissaggio
mop sta ruotando.
• Non appoggiare l'elettrodomestico sul
pavimento mentre i panni morbidi bagnati sono
attaccati. Ciò potrebbe causare danni o gonfiore
al pavimento in legno.
a metà per tornare alla posizione
Modalità bassa
Utilizzo con la spazzola mop
1
Attaccare il serbatoio dell'acqua e i panni
morbidi del mop alla spazzola.
2
Impostare il pulsante di regolazione dell’acqua
sulla posizione
STOP
.
o
4
Attaccare la spazzola mop all'elettrodomestico.
Regolazione della quantità di acqua
Premere i pulsanti di regolazione dell'acqua per
regolare la quantità di acqua rilasciata sul panno
morbido del mop sulla
bassa
.
•
Modalità alta
alta
a fino in fondo per pulire lo sporco radicato
o fornire una grande quantità di acqua.
Modalità bassa
•
bassa
b fino in fondo per fornire una piccola
quantità di acqua per la pulizia del legno o di altri
Modalità alta
: Premere il pulsante
: Premere il pulsante
o
Modalità
Modalità
Modalità
3
Premere il pulsante
pulizia.
Power
per avviare la
Asciugatura del serbatoio
dell'acqua e dei panni morbidi
Asciugatura del serbatoio dell'acqua
Al termine della pulizia, assicurarsi di svuotare il
serbatoio dell'acqua e asciugarlo prima di riporre
la spazzola mop.
• Ruotare i tappi di ingresso dell'acqua per
assicurarsi che rimangano aperti quando si
ripone il serbatoio dell'acqua. Se i tappi sono
chiusi e non adeguatamente asciugati, possono
causare cattivi odori.
Page 79

ATTENZIONE
it_main.book.book Page 29 Tuesday, March 23, 2021 2:57 PM
• Non rimuovere i tappi di ingresso dell'acqua dal
serbatoio. I tappi possono strapparsi.
• Non aggiungere detersivo, aceto o bicarbonato
di sodio nel serbatoio dell'acqua durante il
lavaggio. Non è facilmente rimovibile nel
serbatoio dell'acqua, che potrebbe sporcare il
pavimento.
• Dopo la pulizia, rimuovere l'acqua residua
dall'ingresso di alimentazione
mop con un panno morbido. L'acqua potrebbe
gocciolare sul pavimento e danneggiarlo.
• Non tirare o allungare la guarnizione in gomma
sull'ingresso di alimentazione dell'acqua. Ciò
potrebbe strapparlo o danneggiarlo.
1
Aprire i 2 tappi di ingresso dell'acqua a sul lato
del serbatoio e svuotare il serbatoio. Agitare il
serbatoio per rimuovere l'acqua rimanente.
a
sulla spazzola
USO
l'acqua residua nel serbatoio possono
causare cattivi odori.
29
Asciugatura dei panni morbidi per
mop
Dopo aver usato i panni morbidi per mop, lavali a
mano e lasciali asciugare prima di riporli.
• Non utilizzare come segue, poiché potrebbe
deformarsi.
- Non usare candeggina o ammorbidente per
lavare i panni morbidi per mop.
- Non asciugare gi panni morbidi in
un'asciugatrice.
- Non far bollire i panni morbidi per mop.
ITALIANO
2
Lasciare aperti i 2 tappi di ingresso dell'acqua e
lasciare asciugare il serbatoio in un'area ben
ventilata al riparo dalla luce solare diretta per
almeno 24 ore.
• Conservare il serbatoio dopo che l'acqua è
completamente vuota e asciutta. L'umidità o
1
Separare i panni morbidi per mop dalla piastra
di fissaggio.
2
Lavare a mano i panni morbidi per mop con un
detergente neutro.
• La conservazione dei panni morbidi per mop
all’umidità può provocare un odore
sgradevole. Posizionare i panni morbidi in
un'area ben ventilata al riparo dalla luce
solare diretta per almeno 24 ore o fino a
completa asciugatura.
Page 80

ATTENZIONE
ATTENZIONE
it_main.book.book Page 30 Tuesday, March 23, 2021 2:57 PM
30
USO
Utilizzo delle spazzole e
degli accessori
Prima dell'utilizzo di spazzole e
accessori
Alcuni accessori sono disponibili solo su alcuni
modelli.
Gli accessori specializzati possono aiutarti a pulire
in modo più efficace. Strumenti e spazzole possono
essere fissati al corpo del prodotto o al tubo
telescopico.
• Regolare la potenza di aspirazione se l'ingresso
rimane bloccato sul pavimento, sul tappeto o
sulla biancheria da letto.
• Ogni spazzola è dotata di un motore e può
emettere un suono durante il funzionamento.
• Non utilizzare il
Slim per pavimenti duri
poliuretano per neonati e bambini. Il tappetino
potrebbe aderire alla spazzola, rendendone
difficile il funzionamento, danneggiando il
tappetino o l'elettricità statica
sull'elettrodomestico. Pulisci i tappetini usando
lo strumento per fessure.
Spazzola per tappeti
su tappetini in PVC o
o
Spazzola
Spazzola Mini
È adatto per superfici morbide e rimozione dei peli
degli animali domestici.
• Non utilizzare la spazzola seguendo la superficie.
Potrebbe causare graffi o danni. In particolare,
non pulire un pavimento rivestito o laccato. Se
usato ripetutamente, il rivestimento potrebbe
consumarsi.
- Abbigliamento, biancheria da letto
- Divani imbottiti in pelle, cuscini
- Tappeti
- Pavimenti in vinile, piastrelle, marmo, ecc.
Spazzola per materassi
Spazzola per tappeti
Utilizza questo spazzola per pulire tappeti o
tappetini.
• Se utilizzato su pavimenti duri, questo spazzola
risulterà rumorosa.
Spazzola Slim per pavimenti
duri
Utilizzare questa spazzola per pulire i pavimenti
duri.
• Durante la pulizia potrebbe capitare
inavvertitamente di premere il pulsante
sulla spazzola che potrebbe rimuovere la
spazzola. Si prega di attaccare di nuovo la
spazzola.
PUSH
Questa spazzola consente di pulire lenzuola e
materassi in modo più efficace. Rimuove la polvere
dalla biancheria da letto utilizzando una forte
aspirazione e un movimento di punzonatura.
• Abbassare il livello di aspirazione per la pulizia
della biancheria da letto come i copripiumini per
evitare che il tessuto sottile venga risucchiato
nella spazzola.
Page 81

it_main.book.book Page 31 Tuesday, March 23, 2021 2:57 PM
Accessorio Crevice
Utilizzare questo accessorio per rimuovere la
polvere da angoli o spazi ristretti.
• Usalo per aree con elettricità statica come le
stuoie.
• Usalo con la modalità
animali domestici da mobili, tappetini o aree
strette come gli angoli.
Turbo
per pulire i peli di
Accessorio Combination
Può essere utilizzato in modalità fessura o in
modalità spazzola per pulire angoli o piccoli spazi
dove si accumulano polvere e sporco.
•
Modalita' Crevice
Utilizzare lo strumento in modalità Crevice per
pulire superfici piane come divani o materassi.
USO
31
Accessorio per sporco ostinato
Le setole dure rimuovono lo sporco incrostato dalle
superfici dure. Rimuovi i peli o gli oggetti estranei
che sono impigliati in tappeti o tappetini.
Accessorio per materassi
Utilizzare questo strumento per rimuovere polvere
e corpi estranei da materassi, tessuti delicati e
tappezzeria.
ITALIANO
Modalità spazzola
•
Utilizzare lo strumento in modalità spazzola per
pulire superfici delicate come cornici o mobili.
- Per passare da una modalità all’altra, premere
il pulsante di regolazione
avanti.
a
e spingere in
Accessorio Crevice flessibile
Questo accessorio è flessibile e la sua lunghezza
può essere regolata, rendendolo particolarmente
utile per la pulizia all'interno di veicoli o in spazi
ristretti sotto e dietro i mobili dove è necessario
uno strumento angolato.
Uso della spazzola
Per convertire l'accessorio dalla modalità Crevice
alla modalità spazzola, premere sui lati della
testina del spazzola
a
e abbassa la spazzola.
Page 82

it_main.book.book Page 32 Tuesday, March 23, 2021 2:57 PM
32
USO
• Per tornare alla modalità Crevice, premere il
pulsante di rilascio della spazzola
scorrere la spazzola verso l'alto.
Regolare la lunghezza
Per regolare la lunghezza dell'accessorio, premere
e tenere premuto il pulsante di rilascio
dello strumento. Tirare o spingere la testina della
d
spazzola
telescopico.
per estendere o ritrarre il tubo
b
e fai
c
sul lato
Accessorio multi-angolo
Questo accessorio ha una spazzola morbida che
può essere regolata su una varietà di angoli,
rendendolo particolarmente utile per la pulizia
delle console dei veicoli o delle parti superiori dei
mobili.
• Il tubo flessibile ed estendibile non può essere
utilizzata con la spazzola.
Utilizzo della leva del
compressore
Utilizzare la leva del compressore per comprimere
peli e fibre all'interno del contenitore della polvere
dopo aver aspirato e prima di svuotarlo.
• L'aspirazione deve essere disattivata prima di
utilizzare la leva del compressore.
• La compressione della polvere elimina dalle
pareti interne del contenitore e consente di
aspirare per periodi più lunghi prima di svuotare
il contenitore. Inoltre, rende la pulizia del
contenitore della polvere più facile.
• Il contenitore della polvere deve essere almeno
mezzo pieno affinché la piastra di compressione
sia efficace.
• Premere più volte la leva del compressore per
comprimere la polvere e pulire le pareti interne
del contenitore.
Tubo flessibile ed estendibile
Collegare questo tubo flessibile ed estensibile tra il
corpo del prodotto e gli accessori per pulire le aree
difficili da raggiungere.
Page 83

NOTA
NOTA
it_main.book.book Page 33 Tuesday, March 23, 2021 2:57 PM
FUNZIONI SMART
Usare l’applicazione LG
ThinQ
L’applicazione
con l’elettrodomestico tramite uno smartphone.
Caratteristiche
dell’applicazione LG ThinQ
•
Impostare il funzionamento predefinito della
spazzola mop
- Questa funzione consente l'impostazione
della modalità di funzionamento predefinita
della spazzola mop.
•
Cronologia della pulizia
- Mostra la cronologia della pulizia, come il
tempo di pulizia mensile, la frequenza di
pulizia e la modalità di pulizia, ecc.
• Lo strumento di aspirazione assemblato viene
visualizzato sullo schermo durante la pulizia.
• Una notifica viene visualizzata sullo schermo se il
prefiltro e il filtro HEPA devono essere puliti.
LG ThinQ
permette di comunicare
FUNZIONI SMART
• Se si cambia il router wireless, il fornitore di
servizi internet o la password, eliminare
l’elettrodomestico registrato dall’applicazione
LG ThinQ
• Queste informazioni sono aggiornate al
momento della pubblicazione. L'applicazione è
soggetta a modifiche ai fini del miglioramento
del prodotto senza preavviso agli utenti.
e connetterlo di nuovo.
Prima di utilizzare
l’applicazione LG ThinQ
1
Utilizzare uno smartphone per verificare la
potenza del router wireless (rete Wi-Fi) vicino
all'elettrodomestico.
• Se la distanza tra l’elettrodomestico e il
router fosse eccessiva, la potenza del
segnale si indebolisce. Potrebbe volerci
molto tempo per effettuare la registrazione
o l’installazione dell’applicazione potrebbe
non andare a buon fine.
33
ITALIANO
•
Allarme ciclo di pulizia filtro
- Dopo aver utilizzato l'elettrodomestico per un
certo periodo di tempo, sullo schermo dello
smartphone viene visualizzata una notifica.
Pulire il filtro HEPA o il prefiltro, se necessario.
•
Modalità di pulizia
- La modalità di pulizia che stai utilizzando viene
visualizzata sullo schermo del tuo
smartphone.
•
Guida alla pulizia del filtro
- Guida alla pulizia dei filtri.
Smart Diagnosis
•
- Questa funzione fornisce informazioni utili per
la diagnosi e la risoluzione dei problemi in
base al modello di utilizzo.
™
2
Disattivare la
proprio smartphone.
3
Collegare lo smartphone al router wireless.
Conn. dati
o i
Dati cellulare
dal
Page 84

NOTA
NOTA
it_main.book.book Page 34 Tuesday, March 23, 2021 2:57 PM
34
FUNZIONI SMART
consigliato), e connettere nuovamente il
prodotto.
• Per verificare la connessione Wi-Fi, controllare
f
che l’icona
illuminata.
• Il dispositivo supporta soltanto reti Wi-Fi a 2,4
GHz. Per controllare la frequenza della propria
rete, è necessario contattare il provider di servizi
internet o fare riferimento al proprio manuale
per il router wireless.
•
LG ThinQ
problemi relativi alla connessione di rete né di
guasti, malfunzionamenti o errori causati dalla
connessione di rete.
• L'ambiente wireless circostante potrebbe
causare rallentamenti nel servizio di rete
wireless.
• In caso di problemi di connessione
dell'elettrodomestico alla rete Wi-Fi, è possibile
che l'elettrodomestico sia troppo distante dal
router. Acquistare un ripetitore Wi-Fi (range
extender) per aumentare l'intensità del segnale
Wi-Fi.
• La connessione di rete potrebbe non funzionare
correttamente a seconda del fornitore del
servizio Internet.
• La connessione Wi-Fi potrebbe non avvenire o
potrebbe interrompersi a causa dell’ambiente
della rete domestica.
• Se il elettrodomestico non può essere registrato
a causa di problemi con la trasmissione del
segnale wireless, disconnettere il
elettrodomestico e aspettare per circa un
minuto prima di provare nuovamente.
• Se il firewall sul router wireless è attivo,
disattivarlo o aggiungere una eccezione.
• Il nome della rete wireless (SSID) dovrebbe
essere una combinazione di lettere inglesi e
numeri. (Non utilizzare caratteri speciali)
• L'interfaccia utente smartphone (IU) può variare
a seconda del sistema operativo mobile (OS) e
del produttore.
• Se il protocollo di sicurezza del router è
impostato su
possibile impostare la rete. Cambiare il
protocollo di sicurezza (
sul pannello di controllo sia
non è responsabile di eventuali
WEP
, potrebbe non essere
WPA2
è quello
Installazione dell’applicazione
LG ThinQ
Cercare l’applicazione per smartphone
su Google Play o Apple App Store. Seguire le
istruzioni per scaricare e installare l’applicazione.
Collegamento
dell'elettrodomestico a LG
ThinQ
Stato indicatore Wi-Fi
indicator
Lampegg
iamento
Connessione iniziale dell'elettrodomestico
Selezionare il proprio elettrodomestico nel menu
premendo il pulsante
Segui le istruzioni
proprio elettrodomestico.
Collegamento di utenti aggiuntivi
Rimuovere l'elettrodomestico dalla stazione di
ricarica. Segui le istruzioni sotto
iniziale dell'elettrodomestico
• La cronologia di utilizzo verrà reimpostata se
elimini un elettrodomestico collegato in
ThinQ
LG ThinQ
f
Stato
Descrizione
e
L’elettrodomestico si sta
connettendo.
ON L'elettrodomestico ha terminato la
connessione.
L'elettrodomestico è connesso al
Wi-Fi.
OFF L'elettrodomestico è stato
scollegato.
Aggiungi un prodotto (+)
LG ThinQ
.
per connettere il
Connessione
.
LG
.
Page 85

it_main.book.book Page 35 Tuesday, March 23, 2021 2:57 PM
• Se il segnale Wi-Fi è debole, l'elettrodomestico
potrebbe essere temporaneamente scollegato
dall'applicazione. Quando il segnale Wi-Fi si
sposta nella posizione normale,
l'elettrodomestico viene nuovamente connesso
all'applicazione.
Attivazione/Disattivazione del
Wi-Fi sull'elettrodomestico
Disconnessione dal Wi-Fi
Per risparmiare energia, disattivare la funzione WiFi premendo il pulsante
l'elettrodomestico si sta caricando sulla stazione di
ricarica.
Riconnessione al Wi-Fi
Seguire i passaggi seguenti sull'elettrodomestico.
1
Tieni premuto il pulsante
fino a quando
2
Premere il pulsante
• Dopo che l'icona si è spenta, attendi qualche
istante e riaccendila.
• Il tempo prima che l'icona si accenda può
variare a seconda dell'ambiente di rete.
Wi-Fi
per 3 secondi mentre
Wi-Fi
per 3 secondi
f
l'icona lampeggia sul display.
Wi-Fi
ancora per 3 secondi.
Specifiche del modulo LAN
wireless
Modello LCW-007
FUNZIONI SMART
35
Esposizione all'energia in
radiofrequenza
Questo dispositivo è stato progettato per essere
conforme ai requisiti di sicurezza applicabili per
l'esposizione alle onde radio. Le linee guida
sull'esposizione alle onde radio utilizzano un'unità
di misura nota come Tasso di Assorbimento
Specifico o SAR. I test per il SAR vengono condotti
utilizzando metodi standardizzati con il dispositivo
che trasmette al massimo livello di potenza
certificato in tutte le bande di frequenza utilizzate.
Il limite SAR raccomandato dalla Commissione
Internazionale per la Protezione dalle Radiazioni
Non Ionizzanti (ICNIRP) è di 4 W / kg, calcolato in
media su 10 g di tessuto per Limb SAR.
Il valore SAR più elevato testato per questo
modello è il seguente:
SAR degli arti: 0,092 W / kg
Questo trasmettitore non deve essere posizionato
o funzionare insieme ad altre antenne o
trasmettitori.
Dichiarazione di conformità
Con la presente, LG Electronics dichiara che il tipo
di apparecchiatura radio Aspirapolvere è conforme
alla Direttiva 2014/53/EU. Il testo completo della
dichiarazione di conformità EU è disponibile al
seguente indirizzo internet:
http://www.lg.com/global/support/cedoc/cedoc#
LG Electronics European Shared Service Centre B.V.
Krijgsman 1, 1186 DM Amstelveen, Paesi Bassi
ITALIANO
Intervallo di
frequenza
Potenza di
uscita (Max.)
Versione software funzione wireless: V 1.0
da 2412 a 2472 MHz
IEEE 802.11b: 17.59 dBm
IEEE 802.11g: 17.39 dBm
IEEE 802.11n(HT20): 16.64 dBm
IEEE 802.11n(HT40): 17.05 dBm
Consumo energetico standby
Consumo energetico standby
Consumo energetico standby rete
0,5 W
2,0 W
Page 86

NOTA
it_main.book.book Page 36 Tuesday, March 23, 2021 2:57 PM
36
FUNZIONI SMART
Il lasso di tempo al termine del
quale la funzione di gestione
dell’energia, o una funzione
analoga, imposta
automaticamente l’apparecchio in
modalità standby e/o spento e/o in
condizione di standby rete
20 min.
Informazioni avviso software
Open Source
Per ottenere il codice sorgente sotto GPL, LGPL,
MPL e altre licenze open source, contenuto in
questo prodotto, visitare il sito http://
opensource.lge.com. Oltre al codice sorgente,
sono disponibili per il download tutti i termini di
licenza citati, le esclusioni di garanzia e le note sul
copyright.
LG Electronics fornirà anche il codice open source
su CD-ROM su richiesta tramite e-mail all'indirizzo
opensource@lge.com addebitando il costo delle
spese di distribuzione (ad esempio il costo di
supporti, spedizione e gestione). L’offerta è valida
per un periodo di tre anni a partire dalla nostra
ultima spedizione di questo prodotto. L’offerta è
valida per gli utenti che avranno ricevuto queste
informazioni.
Utilizzare LG ThinQ per
diagnosticare problemi
Se si riscontra un problema con l’elettrodomestico
dotato di Wi-Fi, è possibile trasmettere ad uno
smartphone i dati per la risoluzione del problema
utilizzando l’applicazione
• Lanciare l’applicazione
caratteristica
Seguire le istruzioni fornite nell’applicazione
ThinQ
Smart Diagnosis
.
LG ThinQ
LG ThinQ
.
e selezionare la
nel menu.
LG
Funzione Smart Diagnosis
Utilizzare questa caratteristica aiuterà a
diagnosticare e risolvere problemi con
l’elettrodomestico.
• Per motivi non imputabili a negligenza da parte
di LGE, il servizio potrebbe non funzionare per
via di fattori esterni quali, ma non solo, Wi-Fi non
disponibile, Wi-Fi non connessa, politica dell’app
store locale o app non disponibile.
• La caratteristica potrebbe essere soggetta a
cambiamenti senza preavviso e potrebbe avere
una forma diversa in base alla posizione
dell’utente.
Page 87

AVVERTENZA
ATTENZIONE
it_main.book.book Page 37 Tuesday, March 23, 2021 2:57 PM
MANUTENZIONE
Pulizia
dell'elettrodomestico
Prima di pulire
l'elettrodomestico
Per mantenere la potenza di aspirazione ottimale,
il filtro antipolvere in metallo, il filtro HEPA e il
prefiltro devono essere puliti regolarmente e lavati
sotto l'acqua corrente almeno una volta al mese.
• Spegnere l'alimentazione prima di pulire
l'elettrodomestico.
• La frequenza della pulizia varia a seconda
dell'ambiente e del tempo di utilizzo. In un
ambiente polveroso, pulire frequentemente.
• Non lavare mai la spazzola o il corpo del
prodotto con acqua. L'acqua potrebbe
raggiungere il motore e provocare scosse
elettriche o incendi.
• Non far entrare oggetti estranei nel motore. Ciò
potrebbe causare scosse elettriche, incendi o
danni al prodotto.
• Non inserire le dita o oggetti appuntiti nel
motore. Ciò potrebbe causare danni al prodotto,
lesioni personali o scosse elettriche.
MANUTENZIONE
37
Rimozione di oggetti estranei
Se l'elettrodomestico è ostruito da oggetti estranei,
la potenza di aspirazione cambia, il motore si avvia
ripetutamente e l'icona dell'allarme di intasamento
lampeggia.
Se l'ostruzione persiste, l'elettrodomestico si
spegnerà automaticamente per evitare danni.
Separare la batteria dal corpo del prodotto e
rimuovere gli oggetti estranei prima di riprendere
l'uso dell'elettrodomestico.
• Controllare se l'interno del prodotto, sopra la
piastra di lavoro del compressore, il tubo
telescopico, le bocchette d’ingresso, il filtro
HEPA, il prefiltro e il filtro antipolvere in metallo
presentano corpi estranei.
• Se le bocchette di ingresso non sono
completamente bloccate, l'indicatore di allarme
di intasamento di oggetti estranei potrebbe non
accendersi.
• Se il suono dell'elettrodomestico diventa forte o
i risultati della pulizia sono scadenti, controllare
la presenza di oggetti estranei.
ITALIANO
• Non applicare forza e non far prendere urti al
filtro antipolvere in metallo. Ciò potrebbe
deformare il filtro, compromettere le prestazioni
del prodotto o causare il malfunzionamento.
• Se la leva del compressore non torna in alto,
rimuovere il filtro antipolvere in metallo dal
contenitore raccogli polvere e pulirlo. Un filtro
ostruito o sporco può causare scarsi risultati di
pulizia.
Page 88

ATTENZIONE
AVVERTENZA
it_main.book.book Page 38 Tuesday, March 23, 2021 2:57 PM
38
MANUTENZIONE
Pulizia del contenitore della
polvere
Svuotare e pulire il contenitore della polvere dopo
ogni utilizzo.
• Se il contenitore della polvere è completamente
pieno di polvere o il filtro è intasato, la potenza di
aspirazione potrebbe ridursi.
• Non utilizzare l'elettrodomestico senza il filtro
antipolvere in metallo installato. Ciò potrebbe
danneggiare l'elettrodomestico.
1
Rimuovere la batteria dal corpo del prodotto
prima di pulire il contenitore della polvere.
2
Spingere verso il basso la leva del compressore
a
più volte per raccogliere e compattare la
polvere proveniente dall'esterno del filtro
antipolvere in metallo e dalle pareti interne del
contenitore della polvere.
• Gli oggetti estranei che si depositano nel
filtro antipolvere in metallo possono essere
difficili da rimuovere con la leva del
compressore. Rimuovere il filtro antipolvere
in metallo e utilizzare la spazzola di pulizia in
dotazione per pulirlo.
contenere la polvere durante lo
svuotamento.
• Se la leva del compressore non scorre
dolcemente verso il basso, oggetti estranei
potrebbero rimanere intrappolati tra il
contenitore della polvere e il filtro antipolvere in
metallo. Pulire il contenitore della polvere e il
filtro antipolvere in metallo per evitare danni al
prodotto.
• Non forzare la leva del compressore verso il
basso se corpi estranei sono impigliati intorno
alla piastra di lavoro del sistema compressore.
Ciò potrebbe causare danni al prodotto.
4
Inserire l'accessorio Crevice d nel filtro
antipolvere in metallo
antiorario per rimuovere il filtro.
c
e ruotarlo in senso
3
Premere il pulsante di rilascio del coperchio del
contenitore della polvere
il contenitore della polvere per svuotarlo.
• Fare attenzione perché polvere o oggetti
estranei potrebbero fuoriuscire quando si
apre il contenitore della polvere. Svuotarlo in
un cestino o dove la polvere e gli oggetti
estranei possono essere facilmente rimossi.
• Il contenitore della polvere può essere
avvolto in un sacchetto di plastica per
b
per aprirlo. Scuoti
5
Lavare il filtro antipolvere in metallo sotto
l'acqua corrente.
• Per evitare cattivi odori e il
malfunzionamento del motore, lasciare
asciugare completamente il filtro
antipolvere in metallo in un'area ben
Page 89

ATTENZIONE
it_main.book.book Page 39 Tuesday, March 23, 2021 2:57 PM
ventilata e al riparo dalla luce solare diretta
per almeno 24 ore prima di rimontarlo.
6
Utilizzare l'accessorio Combination e per
pulire la polvere o gli oggetti estranei
all'interno del contenitore della polvere.
• Non lavare il corpo del prodotto o il motore
con acqua
MANUTENZIONE
9
Avvolgere la spazzola per la pulizia in dotazione
con un asciugamano di carta bagnato, infilato
nelle fessure
10
Capovolgere il corpo del prodotto, sollevare la
leva del compressore
piano di lavoro con l’impugnatura della
spazzola avvolto in un asciugamano.
g
sull’impugnatura.
h
e pulire l'interno del
39
ITALIANO
7
Capovolgere il corpo del prodotto e sollevare la
leva del compressore
piano di lavoro con la spazzola di pulizia in
dotazione.
• Non spingere la leva del compressore verso
il basso con forza. La piastra di lavoro
potrebbe essere danneggiata.
8
Capovolgere nuovamente il corpo del prodotto
e scuoterlo premendo la leva verso il basso per
rimuovere la polvere.
f
per pulire l'interno del
Pulizia dei filtri
Pulire il filtro HEPA e il prefiltro quando l'icona di
K
pulizia del filtro
• Pulire i filtri più frequentemente se
l'elettrodomestico viene utilizzato regolarmente
o in zone con molta polvere.
• Non utilizzare l'elettrodomestico senza il filtro
HEPA e il prefiltro installati. Ciò potrebbe causare
danni al prodotto.
1
Rimuovere la batteria dal corpo del prodotto.
si accende.
Page 90

ATTENZIONE
it_main.book.book Page 40 Tuesday, March 23, 2021 2:57 PM
40
MANUTENZIONE
2
Ruotare il filtro HEPA a in posizione sbloccata
b
per separarlo dal corpo del prodotto.
3
Sollevare il prefiltro c dal corpo del prodotto.
4
Usare l'accessorio Combination d per pulire il
motore dalla polvere.
• Non lavare il motore con acqua.
solare diretta per almeno 24 ore prima di
rimontarlo.
6
Inserire il prefiltro asciutto e ruotare il filtro
HEPA in posizione di blocco
sul corpo del prodotto.
e
per rimontarlo
Pulizia delle spazzole
Pulire regolarmente la spazzola e setole rotanti.
5
Pulire i filtri spazzolando via la polvere e lavarli
in acqua corrente almeno una volta al mese.
• Per evitare cattivi odori e il
malfunzionamento del motore, lasciare
asciugare completamente il filtro HEPA in
un'area ben ventilata al riparo dalla luce
• Separare sempre la spazzola dal corpo del
prodotto o rimuovere la batteria prima della
pulizia. Se la spazzola inizia a funzionare durante
la pulizia, potrebbe causare lesioni.
• Tenere le dita lontane dai punti di pizzicamento
quando si monta la spazzola
sull'elettrodomestico o le setole rotanti sulla
spazzola.
• Non utilizzare le setole rotanti come un mop
bagnato. Potrebbe causare danni al prodotto.
• Non sciacquare o immergere le setole rotanti o
la spazzola in acqua. Potrebbe causare danni al
prodotto.
Pulizia spazzola per tappeti
Pulire la spazzola e le setole del rullo prima di ogni
utilizzo.
Page 91

it_main.book.book Page 41 Tuesday, March 23, 2021 2:57 PM
• Se le setole contengono oggetti estranei,
potrebbero non ruotare o potrebbe verificarsi
un rumore durante il funzionamento.
1
Premere il pulsante di rilascio della spazzola a
per rimuoverla dal tubo telescopico o dal corpo
del prodotto.
2
Capovolgere la spazzola e ruotare la fessura di
blocco del coperchio
3
Tirare in avanti il rullo della spazzola ed
estrarlo.
b
in senso antiorario.
MANUTENZIONE
spazzola. Rimuovere oggetti estranei, detriti e
peli da tutti dal rullo utilizzando una pinzetta.
• Avvolgere il manico della spazzola per la
pulizia con un asciugamano o un panno
umido e usarlo per pulire il rullo rotante e la
spazzola.
6
Far scorrere il rullo nella spazzola ruotare il
coperchio di nuovo in posizione. Ruotare il
blocco del coperchio in senso orario per
bloccarlo.
Pulizia Slim per pavimenti duri
1
Premere il pulsante di rilascio della spazzola a
per rimuoverla dal tubo telescopico o dal corpo
del prodotto.
41
ITALIANO
4
Attaccare l'accessorio Crevice al corpo del
prodotto e utilizzare l'aspirapolvere per
rimuovere oggetti estranei e polvere dalla
spazzola e dal rullo della spazzola.
5
Utilizzare un asciugamano o un panno umido
per rimuovere eventuali corpi estranei e
polvere rimasti sul rullo e sul fondo della
2
Capovolgere la spazzola e rimuovere il rullo
rotante tenendo premuto il pulsante
sulla spazzola.
PUSH
Page 92

it_main.book.book Page 42 Tuesday, March 23, 2021 2:57 PM
42
MANUTENZIONE
3
Attaccare l'accessorio Crevice al corpo del
prodotto e utilizzare l'aspirapolvere per
rimuovere oggetti estranei e polvere dalla
spazzola e dal rullo della spazzola.
2
3
4
Utilizzare un asciugamano o un panno umido
per rimuovere eventuali corpi estranei e
polvere rimasti sul rullo e sul fondo della
spazzola. Rimuovere oggetti estranei, detriti e
peli da tutti dal rullo utilizzando una pinzetta.
• Avvolgere il manico della spazzola per la
pulizia con un asciugamano o un panno
umido e usarlo per pulire il rullo rotante e la
spazzola.
4
Rimuovere il rullorotante tenendo premuto il
pulsante
Attaccare l'accessorio Crevice al corpo del
prodotto e utilizzare l'aspirapolvere per
rimuovere oggetti estranei e polvere dalla
spazzola e dal rullo della spazzola.
Utilizzare un asciugamano o un panno umido
per rimuovere eventuali corpi estranei e
polvere rimasti sul rullo e sul fondo della
spazzola. Rimuovere oggetti estranei, detriti e
peli da tutti dal rullo utilizzando una pinzetta.
PUSH
sulla spazzola.
5
Far scorrere il rullo nella spazzola ruotare il
coperchio di nuovo in posizione.
Spazzola Mini
1
Premere il pulsante di rilascio della spazzola a
per rimuoverla dal tubo telescopico o dal corpo
del prodotto.
5
Inserisci il lato sinistro del rullo b nella
scanalatura
c
all’interno della spazzola.
Page 93

it_main.book.book Page 43 Tuesday, March 23, 2021 2:57 PM
6
Premere il coperchio della spazzola per
bloccarla finché non si sente un clic.
Pulizia spazzola per materassi
1
Premere il pulsante di rilascio della spazzola
per rimuoverla dal tubo telescopico o dal corpo
del prodotto e capovolgere la spazzola.
2
Attaccare l'accessorio Crevice al corpo del
prodotto e utilizzare l'aspirapolvere per
rimuovere oggetti estranei e polvere dalla
spazzola. Utilizzare un asciugamano o un
panno umido per rimuovere eventuali corpi
estranei e polvere rimasti sulla spazzola.
Rimuovere oggetti estranei, detriti e peli da
dalla spazzola utilizzando una pinzetta.
MANUTENZIONE
oggetti estranei, detriti e peli dalla spazzola
utilizzando una pinzetta.
43
ITALIANO
Pulizia spazzola Mop
1
Premere il pulsante di rilascio della spazzola
per rimuovere la spazzola mop dal tubo
telescopico e capovolgere la spazzola.
2
Utilizzare un asciugamano o un panno umido
per rimuovere eventuali corpi estranei e
polvere rimasti sulla spazzola mop. Rimuovere
Page 94

it_main.book.book Page 44 Tuesday, March 23, 2021 2:57 PM
44
RISOLUZIONE DEI PROBLEMI
RISOLUZIONE DEI PROBLEMI
Prima di chiamare
l’assistenza
Uso
Sintomi Causa & Soluzione
L’elettrodomestico non
funziona.
La potenza di
aspirazione è troppo
debole.
Il corpo del prodotto
non sembra essere in
carica.
L'aria calda proviene
dal corpo del prodotto.
La leva del
compressore non
ritorna.
La batteria è completamente scarica.
• Caricare la batteria.
L'elettrodomestico è spento.
• Premere il tasto
Il contenitore della polvere è pieno.
• Svuota il contenitore della polvere.
I filtri sono ostruiti.
• Pulire il prefiltro e il filtro HEPA.
L'ingresso è ostruito.
• Rimuovere qualsiasi oggetto estraneo dall'interno del corpo del prodotto
o dal tubo telescopico.
Un oggetto estraneo si trova sulla spazzola rotante o nella porta di
ingresso.
• Rimuovere qualsiasi oggetto estraneo (filo, capelli) dalla spazzola rotante
o dalla porta di ingresso.
L'adattatore di alimentazione non è collegato alla stazione di ricarica.
• collegare saldamente l'adattatore alla stazione di ricarica.
Il cavo di alimentazione è scollegato.
• Collegare saldamente il cavo di alimentazione alla stazione di ricarica.
Un oggetto estraneo è sui terminali di ricarica.
• Rimuovere sporco o oggetti estranei dai terminali di ricarica con un panno
asciutto.
Il motore si sta raffreddando.
• Se l'elettrodomestico funziona normalmente, l'aria calda è il risultato del
raffreddamento del motore e non è segno di malfunzionamento.
Gli oggetti estranei che si depositano nel filtro antipolvere in metallo
possono essere difficili da rimuovere con la leva del compressore.
• Rimuovere il filtro antipolvere in metallo e utilizzare il pennello per la
pulizia in dotazione per pulirlo.
Power
per accendere l’elettrodomestico.
Page 95

it_main.book.book Page 45 Tuesday, March 23, 2021 2:57 PM
Sintomi Causa & Soluzione
Dall'elettrodomestico
esce uno strano odore.
L'elettrodomestico fa
troppo rumore.
L'elettrodomestico si
spegne
inaspettatamente o da
solo dopo che la
velocità del motore
oscilla ripetutamente.
Il rullo rotante della
spazzola non ruota.
L'elettrodomestico è stato acquistato negli ultimi 3 mesi.
• Il detergente può emettere odore di gomma per circa 3 mesi dopo
l'acquisto.
Il contenitore della polvere è pieno.
• La polvere nel cestino può causare cattivi odori. Svuota il cestino e
puliscilo.
Un oggetto estraneo è sul filtro.
• Il filtro può emettere un cattivo odore se non è stato pulito per un po 'di
tempo. Pulire regolarmente il prefiltro e il filtro HEPA.
Il prefiltro, il filtro per polveri sottili o il filtro antipolvere in metallo sono
stati installati mentre erano umidi o bagnati.
• Lavare i filtri con acqua corrente. Per evitare il cattivo odore, lasciare
asciugare completamente il prefiltro in un'area ben ventilata e al riparo
dalla luce solare diretta per almeno 24 ore prima di rimontarlo.
Il filtro HEPA è stato installato mentre era umido o bagnato.
• Lavare il filtro HEPA con acqua corrente. Per evitare il cattivo odore,
lasciare asciugare completamente il filtro HEPA in un'area ben ventilata e
al riparo dalla luce solare diretta per almeno 24 ore prima di rimontarlo.
L'aspirapolvere sta entrando in modalità Turbo.
• Il motore potrebbe essere più rumoroso alle impostazioni di potenza di
aspirazione più elevate. E 'normale.
La batteria non è completamente carica.
• La batteria deve essere completamente caricata prima della pulizia. Se il
problema persiste quando la batteria è completamente carica e i tubi e gli
attacchi sono liberi da ostruzioni, contattare un centro informazioni clienti
LG per assistenza.
Un oggetto estraneo si trova nel corpo del prodotto, nel tubo
telescopico, nell'ingresso o nella spazzola.
• Rimuovere qualsiasi oggetto estraneo dal corpo del prodotto, dal tubo
telescopico, dall'ingresso o dalla spazzola.
I filtri sono ostruiti.
• Pulire il prefiltro e il filtro HEPA.
Il rullo non è installato correttamente.
• Rimuovere il rullo della spazzola, puliro se necessario e rimontarlo.
Un oggetto estraneo è sul rullo rotante del spazzola.
• Rimuovere qualsiasi oggetto estraneo dalla rullo rotante della spazzola.
RISOLUZIONE DEI PROBLEMI
45
ITALIANO
Page 96

it_main.book.book Page 46 Tuesday, March 23, 2021 2:57 PM
46
RISOLUZIONE DEI PROBLEMI
Spazzola mop
Sintomi Causa & Soluzione
La piastra di fissaggio
del panno morbido del
mop non ruota.
Non esce acqua dalla
spazzola mop.
C'è umidità nel
serbatoio dell'acqua.
Dall'elettrodomestico
esce uno strano odore.
L'uso della spazzola
mop rende il
pavimento più sporco.
I panni morbidi del mop non sono installati correttamente.
• Rimuovere i panni morbidi del mop, pulirli se necessario e rimontarli.
La spazzola mop è premuta troppo forte contro il pavimento.
• La piastra di fissaggio del mop si ferma automaticamente per proteggere
il prodotto. Questo non è un guasto. Attaccare saldamente i panni morbidi
del mop alla piastra di fissaggio del mop e premere il pulsante di
accensione per riprendere l'uso.
Un oggetto estraneo si trova tra la piastra di fissaggio del mop e i panni
morbidi.
• Rimuovere gli oggetti estranei dalla piastra di collegamento della spazzola
mop e premere il pulsante di accensione per riprendere l'uso.
Il serbatoio dell'acqua è vuoto.
• Riempi il serbatoio dell'acqua. Rimuovere la batteria o staccare la spazzola
prima di riempire il serbatoio dell'acqua.
Il serbatoio dell'acqua non è fissato correttamente alla spazzola mop.
• Fissare correttamente il serbatoio dell'acqua alla spazzola mop.
Rimuovere la batteria o staccare la spazzola prima di fissare correttamente
il serbatoio dell'acqua alla spazzola.
Il pulsante di regolazione della fornitura d'acqua è impostato su STOP.
• Premi il pulsante di regolazione dell’acqua fino in fondo
Basso
. L’acqua non uscirà se il pulsante è impostato su
L'uscita dell'acqua era ostruita da calcare o altre sostanze estranee.
• Usa uno spillo appuntito per rimuovere il blocco.
Il serbatoio dell'acqua non può asciugarsi completamente dopo l'uso.
• Svuotare il serbatoio dell'acqua, ripararlo dalla luce solare diretta e
lasciarlo asciugare completamente dopo l'uso.
Un oggetto estraneo si trova sull'ingresso della polvere della spazzola
mop.
• La polvere bagnata nella spazzola mop può provocare cattivi odori.
Assicurarsi di pulire l'ingresso della polvere della spazzola mop con un
panno umido dopo ogni utilizzo.
I panni morbidi per mop non vengono puliti adeguatamente dopo l'uso.
• Pulire accuratamente i panni morbidi del mop dopo ogni utilizzo. L'uso dei
panni morbidi per mop sporchi può rendere il pavimento più sporco.
Alto
STOP
oppure
.
Page 97

it_main.book.book Page 47 Tuesday, March 23, 2021 2:57 PM
Sintomi Causa & Soluzione
L'elettrodomestico fa
troppo rumore.
Wi-Fi
Sintomi Causa & Soluzione
Il dispositivo casalingo
e lo smartphone non
sono collegati alla rete
Wi-Fi.
RISOLUZIONE DEI PROBLEMI
Questo è il suono generato quando la pompa all'ingresso del mop è in
funzione.
• Questo è normale.
I panni morbidi per mop erano attaccati in modo improprio alle piastre.
• Allineare e fissare il centro del panno morbido per mop con il centro della
piastra di fissaggio.
La batteria è completamente scarica.
• Caricare la batteria, quindi registrare l'elettrodomestico su
La password per il Wi-Fi con la quale si sta tentando di accedere non è
corretta.
• Cercare la rete Wi-Fi collegata allo smartphone e rimuoverla, quindi
effettuare la registrazione dell’applicazione su
La Conn. Dati per lo smartphone è attiva.
• Disattivare la
del dispositivo utilizzando la rete Wi-Fi.
Il nome della rete wireless (SSID) non è stato impostato correttamente.
• Il nome della rete wireless (SSID) dovrebbe essere una combinazione di
lettere inglesi e numeri. (Non utilizzare caratteri speciali)
La frequenza del router non è 2,4 GHz.
• È supportata solo la frequenza del router a 2,4 GHz. Impostare il router
wireless a 2,4 GHz e collegare l'applicazione al router wireless. È possibile
controllare la frequenza del router tramite il provider di servizi Internet o
il produttore del router.
La distanza tra il dispositivo e il router è eccessiva.
• Se la distanza tra il dispositivo e il router fosse eccessiva, la potenza del
segnale si indebolirebbe e la connessione potrebbe non configurarsi
correttamente. Spostare il router perché sia più vicino al dispositivo.
Conn. Dati
dello smartphone ed effettuare la registrazione
LG ThinQ
LG ThinQ
.
47
.
ITALIANO
Page 98

it_main.book.book Page 48 Tuesday, March 23, 2021 2:57 PM
48
APPENDICE
APPENDICE
Informazioni
Garanzia Italia
La presente Garanzia si intende aggiuntiva e non sostitutiva di ogni altro diritto di cui gode l’acquirente del prodotto
ed, in particolare, non pregiudica in alcun modo i diritti del consumatore stabiliti agli articoli da 128 a 134 del “Codice
del Consumo”, D.Lgs. 206/2005 (c.d. “Garanzia Legale”). La Garanzia Legale ha una durata di 24 mesi a partire dalla
consegna del bene ed è prestata dal venditore presso cui è stato effettuato l’acquisto del prodotto. In base alla Garanzia
Legale il consumatore che abbia denunciato al venditore i difetti del bene entro due mesi dalla loro scoperta, ha diritto alla
riparazione o sostituzione del prodotto non conforme, ovvero puo richiederne una congrua riduzione del prezzo, oppure
ancora la risoluzione del contratto di acquisto. Maggiori informazioni su tali rimedi e sulle relative condizioni di applicabilità
possono essere consultate al seguente indirizzo, che contiene un estratto del Codice del Consumo in materia di Garanzia
Legale: www.lg.com/it/supporto/garanzia. La presente garanzia, prestata da LG ai sensi dell’articolo 133 del Codice del
Consumo, e per contro disciplinata dai termini e condizioni del presente certificato.
Le procedure di assistenza ed i servizi aggiuntivi descritti nella presente garanzia, potranno subire delle variazioni che
saranno pubblicate nella pagina “Garanzia Prodotti” del sito www.lg.com/it – nell’area Supporto.
Termini e condizioni della garanzia
x La garanzia LG Electronics copre eventuali difetti dei materiali e di fabbricazione. Di conseguenza tutti gli altri tipi di
difetti e danni sono esclusi, come quelli da uso inappropriato, impostazioni errate, errata calibrazione e installazione,
mancata osservanza delle istruzioni contenute nel manuale d’uso, così come danni causati da fattori esterni, danni
estetici, normale usura nel tempo. La garanzia non copre altresì la sostituzione, riparazione o manutenzione di parti
consumabili quali ad esempio cinghie, filtri e guarnizioni.
x La garanzia LG Electronics ha validità a partire dalla data di acquisto del prodotto e si applica solo dietro presentazione
della prova di acquisto originale (non manoscritta). Il documento deve essere in grado di far capire inequivocabilmente il
prodotto a cui si riferisce.
x La garanzia LG Electronics diviene nulla in caso di alterazione o di lavori di riparazione eseguiti da persona non
autorizzata da LG Electronics, in caso di manomissione o rimozione del numero di serie del prodotto, in caso di
rilavorazione o utilizzo professionale del prodotto, intenendosi per tale l’utilizzo da parte dell’utente nell’ambito della
propria attività imprenditoriale, commerciale, artigianale o professionale.
x La decisione se riparare, sostituire o rimborsare, conformemente a quanto segue, il prodotto spetta esclusivamente a
LG Electronics. Le parti e le unità sostituite o rimborsate diventano proprietà di LG Electronics.
x Altri costi diversi da quelli di riparazione o sostituzione (ad esempio: installazione e disinstallazione prodotti, utilizzo di
autoscale, ponteggi o altri sistemi di elevazione) non sono coperti dalla garanzia LG Electronics.
x LG Electronics non è responsabile per qualsiasi perdita o danno a software o a dispositivi di archiviazione dati, nonché
danni derivanti dal mancato uso del prodotto.
x A seconda del difetto presentato dal prodotto, il Centro di assistenza, in accordo con LG, potrà procedere con la
riparazione o la sostituzione del prodotto completo.
Nella sostituzione potranno essere impiegati prodotti o parti, identici o con pari caratteristiche.
I prodotti sostitutivi o le parti utilizzate per le riparazioni potranno essere nuovi o ricondizionati. Nei casi in cui non sia
possibile applicare le soluzioni sopra descritte, LG si impegna a rimborsare il prezzo di acquisto al cliente applicando
un abbattimento in ragione della data di acquisto del prodotto stesso. La tabella di abbattimento ai fini del rimborso
è consultabile al sito www.lg.com/it/supporto. Il servizio per il cliente è completamente gratuito se il prodotto viene
riscontrato difettoso. Se il prodotto non viene riscontrato difettoso, il costo di manodopera dell’intervento, dell’uscita a
domicilio e di un eventuale trasporto del prodotto, potranno essere addebitati al cliente stesso da parte del centro di
assistenza.
x I prodotti nuovi riscontrati danneggiati alla prima apertura della confezione originale LG, non devono essere installati o
inviati/portati in riparazione presso i Centri di assistenza. I clienti finali devono rivolgersi al rivenditore che, a seconda
del caso, provvederà a fornire al cliente la soluzione più idonea, in accordo con LG Electronics.
x Questo prodotto LG Electronics è garantito per un periodo di ventiquattro (24) mesi.
x La garanzia di 10 anni sulle parti copre il solo costo dei seguenti componenti: Compressore frigorifero; Motore Direct
Drive Lavatrice (Statore, Rotore) ed il Compressore Inverter dello Split Aria Condizionata montato a muro (monosplit);
Dual Inverter Compressor ed Inverter Motor Asciugatrici; motore inverter aspirapolvere, magnetron inverter.
Dopo il secondo anno di garanzia, i costi della manodopera e dell’eventuale diritto di chiamata restano comunque a
carico del cliente.
x Le batterie interne ai prodotti hanno una garanzia di 2 anni
Page 99

it_main.book.book Page 49 Tuesday, March 23, 2021 2:57 PM
Informazioni sull'alimentatore esterno
Manufacturer’s name or trade
mark, commercial registration
number and address
Manufacturer; LG Electronics Inc.
Commercial registration number;
107-86-14075
Address; LG Twin Towers, 128
Yeoui-daero, Yeongdeungpo-gu,
Seoul, 07336, Korea
Наименование или търговска
марка на производителя,
номер на търговската
регистрация и адрес;
Název výrobce nebo ochranná
známka, obchodní registrační
číslo a adresa
Producentens navn eller
varemærke,
handelsregisternummer og adresse
Naam of handelsmerk van de
fabrikant, handelsregisternummer
en adres
Tootja nimi või kaubamärk,
äriregistri number ja aadress
Valmistajan nimi tai tavaramerkki,
kaupparekisterinumero ja osoite
Raison sociale ou marque déposée,
numéro d’enregistrement au
registre du commerce et adresse du
fabricant
Name oder Handelsmarke des
Herstellers, Handelsregisternummer
und Anschrift
Το όνομα ή το εμπορικό σήμα
του κατασκευαστή, ο αριθμός
του εμπορικού μητρώου του
και η διεύθυνσή του·
A gyártó neve vagy védjegye,
cégjegyzékszáma és címe
Nome o marchio del fabbricante,
numero di iscrizione nel registro
delle imprese e indirizzo del
fabbricante
Ražotāja nosaukums vai preču
zīme, uzņēmuma reģistrācijas
numurs un adrese
Gamintojo pavadinimas arba prekės
ženklas, komercinis registracijos
numeris ir adresas
L-isem tal-manifattur jew il- marka
kummerċjali, in-numru ta’
reġistrazzjoni kummerċjali
u l-indirizz
Nazwa lub znak towarowy
producenta, numer rejestru
handlowego i adres
Marca comercial ou nome, número
de registo comercial e endereço do
fabricante
$'&)6$(3*
Идентификатор
на модела
značka modelu
Modellens
Typeaanduiding Voedingsspanning
Mudelitähis Sisendpinge
Mallitunniste Ottojännite Tuloverkkotaajuus
Référence
du modèle
Modellkennung Eingangsspannung
Αναγνωριστικό
του μοντέλου
Modellazonosító Bemenő feszültség
Modelio žymuo Įėjimo įtampa
Input
voltage
V(В)
100 -240 50 / 60 29,4
Входно
напрежение
Vstupní
napětí
Indgangsspænding
Tension d’entrée
Τάση εισόδου
Tensione di ingresso
Napięcie
wejściowe
Tensão de entrada
APPENDICE
Input
AC frequency
Hz(Гц)
Честота на входния
променлив ток
Vstupní frekvence Výstupní napětí
Inputvekselstrømsfrekvens
Voedingsfrequentie
Sisendvahelduvvoolu
sagedus
Fréquence du CA
d’entrée
Eingangswechselstromfrequenz
Συχνότητα
εναλλασσόμενου
ρεύματος εισόδου
Bemenő váltóáram
frekvenciája
Frequenza di ingresso
CA
Ieejas maiņstrāvas
frekvence
Įėjimo kintamosios
srovės dažnis
Frekwenza tal-input AC
Wejściowa
częstotliwość
prądu przemiennego
Frequência da
alimentação de CA
Output
voltage
V(В)
Изходно
напрежение
Udgangsspændin
Uitgangsspanning
Väljundpinge
Antojännite
Tension de sorti
Ausgangsspannun
Τάση εξόδου
Kimenő feszültsé
Tensione di uscita
Izejas spriegum
Išėjimo įtamp
Vultaġġ tal-output
Napięcie
wyjściowe
Tensão de saíd
49
ITALIANO
Page 100

it_main.book.book Page 50 Tuesday, March 23, 2021 2:57 PM
50
APPENDICE
Output
current
A
1,0 29,4 87,0 76,0 0,10
Изходен ток
Výstupní proud
Udgangsstrømsstyrke Udgangseffekt
Väljundvool Väljundvõimsus
Antovirta Antoteho
Ένταση ρεύματος
εξόδου
Output
power
W(Вт)
Изходна
мощност
Výstupní
výkon
Ισχύς εξόδου
Kimenő
teljesítmény
Average active
%
Среден КПД в
работен режим
Průměrná
účinnost v
aktivním režimu
Gennemsnitlig
effektivitet i aktiv
tilstand
Gemiddelde actieve
Tööseisundi keskmine
energiatõhusustegur
Aktiivitilan
keskimääräinen
hyötysuhde
Rendement moyen en
mode actif
Durchschnittliche
Μέση ενεργός
απόδοση
Aktív üzemmódban
mért átlagos
hatásfok
Rendimento medio in
modo attivo
at low load (10 %)
%
КПД при малък
товар (10 %)
Účinnost při malém
zatížení (10 %)
Effektivitet ved lav
belastning (10 %)
belasting (10 %)
Energiatõhusustegur
väikesel koormusel
(10 %)
Hyötysuhde alhaisella
kuormituksella
(10 %)
Rendement à faible
charge (10 %)
Last
(10 %)
Απόδοση σε
χαμηλό φορτίο
(10 %)
Hatásfok alacsony
(10 %-os)
terhelésnél
Rendimento a basso
carico (10 %)
power consumption
Консумирана
мощност на
празен ход
Spotřeba energie ve
stavu bez zátěže
Effektforbrug i nullasttilstand
Energieverbruik in nietbelaste toestand
Tarbimisvõimsus
koormamata seisundis
Kuormittamattoman
tilan tehonkulutus
Consommation
électrique hors charge
Leistungsaufnahme bei
Nulllast
Κατανάλωση
ισχύος σε
κατάσταση άνευ
φορτίου
Üresjárási
üzemmódban mért
energiafogyasztás
Potenza assorbita nella
condizione a vuoto
No-load
W(Вт)
Izejas jauda Vidējā aktīvā efektivitāte
Išėjimo galia
Kurrent tal-output Potenza tal-output
Prąd wyjściow
Corrente de saíd
Moc wyjściowa
Potência de saída
Efektivitāte pie zemas
slodzes (10 %)
Vidutinis aktyviosios
veiksenos efektyvumas
tal-modalità attiva
Średnia sprawność
podczas pracy
modo ativo (10%)
Efektyvumas esant
mažai apkrovai (10 %)
baxxa (10 %)
Sprawność przy niskim
obciążeniu (10 %)
Jaudas izmantojums
bezslodzes režīmā
Vartojamoji galia be
apkrovos
Konsum ta’ enerġija
mingħajr tagħbija
Zużycie energii w stanie
bez obciążenia
Consumo energético
em vazio
 Loading...