

LG 9QK F8010P Users manual

Digital Photo Frame
User's Guide
F8010P
M
ake sure to read the Important Precautions before using the product.
Keep the User's Guide(CD) in an accessible place for future reference.
S
ee the label attached on the product and give the information to your dealer when you ask
for service.

Table of Contents
Preparation and
Installation /
Connection
Menu and
Functions
Important Safety Precaution .......................................................... 1
Product Overview ........................................................................... 4
Package Contents 4
Identifying the Parts 5
Remote Control Button Names and Functions 7
Remote Control Sensor / Replacing the Remote Control Battery 8
Product Installation and Connection ............................................ 9
Using the Stand / Connecting the Power Adapter 9
Connecting USB / Connecting Memory Card 10
Getting Started .............................................................................. 12
First-time Setup 12
Key-Help 13
Home Menu .................................................................................... 14
Screen Display and Buttons 14
Using the Slide Show Menu ......................................................... 15
Slide Show Menu Function 15
Using the Music Menu .................................................................. 17
Playing Music 17
Playing Screen Composition and Buttons 18
Using the Video Menu .................................................................. 19
Playing Video 19
Playing Screen Composition and Buttons 20
File Management ........................................................................... 21
Screen Composition and Buttons 21
File Management Menu 22
File Copy / Delete 23
Selecting All File / Unselecting All File 24
Network Setup ............................................................................... 25
Setting up Wi-Fi Connection 25
Checking Connection Status 27
Using the Network Menu .............................................................. 28
Using Picasa/Flickr 28
Using YouTube 32
Using FrameIT 33
Using Internet Radio 34
Using Home Network 35
Windows Media Player 11 - Media Sharing ................................ 37
Using Bluetooth® .......................................................................... 40
Connecting to a Bluetooth®-enabled Device 40
Sending Files to the Photo Frame 41
Setup .............................................................................................. 42
Power On Message Function 44
Appendix
Troubleshooting ............................................................................ 45
Specifications ................................................................................ 47
Service Information ...................................................................... 48

Digital Photo Frame
Important Safety Precaution
This unit has been engineered and manufactured to ensure your personal safety, however improper use may
result in potential electrical shock or fire hazards. In order to allow the proper operation of all safeguards
incorporated in this display, observe the following basic rules for its installation, use, and service.
On Safety
Use only the power cord supplied with the unit. In case you use another power cord, make sure that it is certified
by the applicable national standards if not being provided by the supplier. If the power cable is faulty in any way,
please contact the manufacturer or the nearest authorized repair service provider for a replacement.
Operate the display only from a power source indicated in the specifications of this manual or listed on the
display. If you are not sure what type of power supply you have in your home, consult with your dealer.
Overloaded AC outlets and extension cords are dangerous. So are frayed power cords and broken plugs. They
may result in a shock or fire hazard. Call your service technician for replacement.
As long as this unit is connected to the AC wall outlet, it is not disconnected from the AC power source even if the
unit is turned off.
Do not Open the Display:
■ There are no user serviceable components inside.
■ There are Dangerous High Voltages inside, even when the power is OFF.
■ Contact your dealer if the display is not operating properly.
To Avoid Personal Injury:
■ Do not place the display on a sloping shelf unless properly secured.
■ Use only a stand recommended by the manufacturer.
■ Do not drop an object on or apply impact to the product. Do not throw any toys or objects on the product
screen. This can cause personal injury, and/or damage the product.
To Prevent Fire or Hazards:
■ Always turn the display OFF if you leave the room for more than a short period of time. Never leave the display
ON when leaving the house.
■ Keep children from dropping or pushing objects into the display's cabinet openings. Some internal parts carry
hazardous voltages.
■ Do not add accessories that have not been designed for this display.
■ When the display is to be left unattended for an extended period of time, unplug it from the wall outlet.
■ Never touch the power cord during periods of thunder and lightning. This can be very dangerous and can
cause electric shock.
On Installation
Do not allow anything to rest upon or roll over the power cord, and do not place the display where the power cord
is subject to damage.
Do not use this display near water such as near a bathtub, washbowl, kitchen sink, laundry tub, in a wet
basement, or near a swimming pool.
Displays are provided with ventilation openings in the cabinet to allow the release of heat generated during
operation. If these openings are blocked, built-up heat can cause failures which may result in a fire hazard.
Therefore, NEVER:
■ Place the display in a built-in enclosure unless proper ventilation is provided.
■ Place the display near or over a radiator or heat source.
Do not rub or strike the Active Matrix LCD with anything hard as this may scratch, mar, or damage the Active
Matrix LCD permanently.
Do not press the LCD screen with your finger for a long time as this may cause some afterimages.
1
Some dot defects may appear as Red, Green or Blue spots on the screen. However, this will have no impact or
effect on the display performance.
Leaving a fixed image on the screen for a long time may cause damage to the screen and cause image burn-in.
Make sure to use a screen saver on the product. Burn-in and related problems are not covered by the warranty
on this product.
Make sure the panel faces forward and hold it with both hands to move. If you drop the product, the damaged
product can cause electric shock or fire. Contact an authorized the service center for repair.
Avoid high temperatures and humidity.
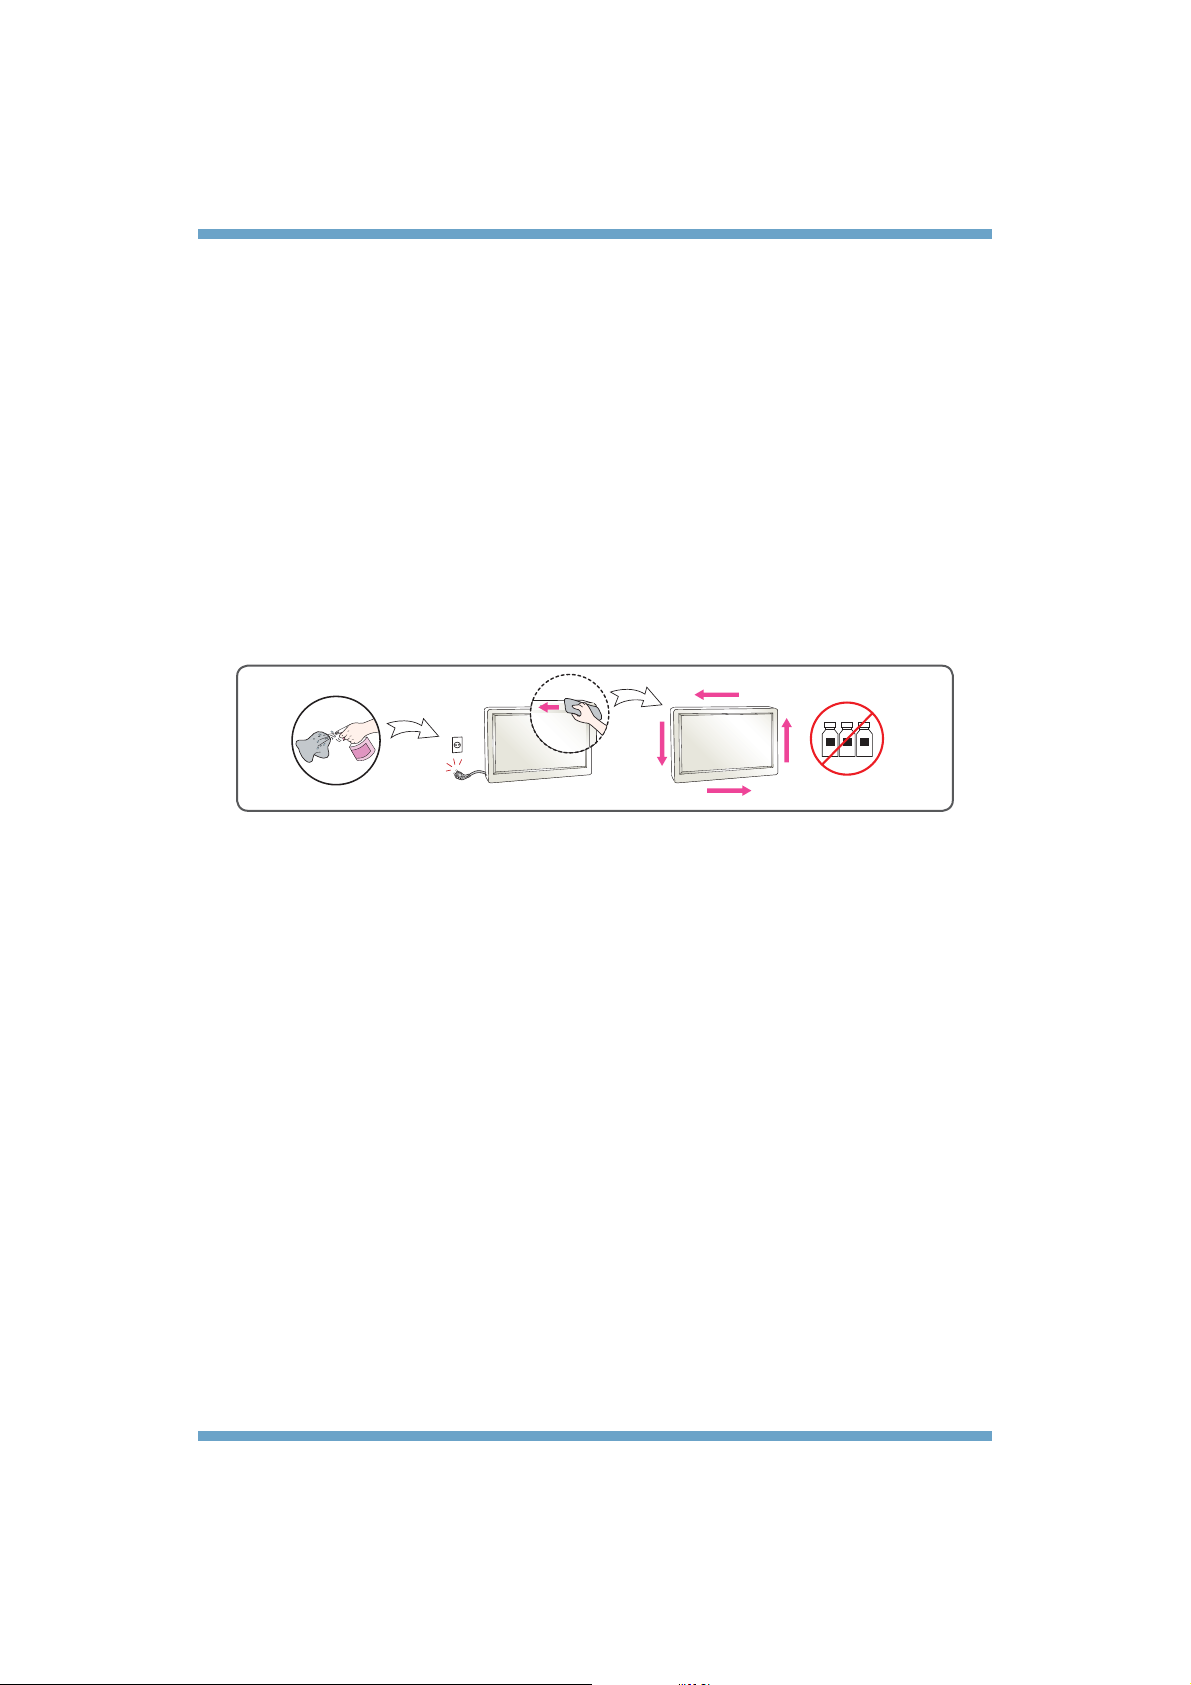
On Cleaning
■ Unplug the display before cleaning the face of the display screen.
■ Use a slightly damp (not wet) cloth. Do not use an aerosol directly on the display screen because over-
spraying may cause electrical shock.
■ When cleaning the product, unplug the power cord and scrub gently with a soft cloth to prevent scratching. Do
not clean with a wet cloth or spray water or other liquids directly onto the product. An electric shock may occur.
(Do not use chemicals such as benzene, paint thinners or alcohol)
■ Spray water onto a soft cloth 2 to 4 times, and use it to clean the front frame; wipe in one direction only.
Too much moisture may cause staining.
WATER
CHEMICALS
On Repacking
■ Do not throw away the carton and packing materials. They make an ideal container in which to transport the
unit. When shipping the unit to another location, repack it in its original material.
On Disposal
■ The fluorescent lamp used in this product contains a small amount of mercury.
■ Do not dispose of this product with general household waste.
■ Disposal of this product must be carried out in accordance to the regulations of your local authority.
2

Federal Communication Commission Interference Statement
This equipment has been tested and found to comply with the limits for a Class B digital device,
pursuant to Part 15 of the FCC Rules. These limits are designed to provide reasonable protection
against harmful interference in a residential installation. This equipment generates, uses and can
may cause harmful interference to radio communications. However, there is no guarantee that interference will
not occur in a particular installation. If this equipment does cause harmful interference to radio or television
reception, which can be determined by turning the equipment off and on, the user is encouraged to try to correct
the interference by one of the following measures:
■ Reorient or relocate the receiving antenna.
■ Increase the separation between the equipment and receiver.
■ Connect the equipment into an outlet on a circuit different from that to which the receiver is connected.
■ Consult the dealer or an experienced radio/TV technician for help.
IMPORTANT NOTE:
FCC Radiation Exposure Statement:
This equipment complies with FCC radiation exposure limits set forth for an uncontrolled environment. This
equipment should be installed and operated with minimum distance 20cm between the radiator & your body.
For product available in the USA/Canada market, only channel 1~11 can be operated. Selection of other
channels is not possible.
FCC Caution:
Any changes or modifications not expressly approved by the party responsible for compliance could void the
user's authority to operate this equipment. This device complies with Part 15 of the FCC Rules. Operation is
subject to the following two conditions: (1) This device may not cause harmful interference, and (2) this device
must accept any interference received, including interference that may cause undesired operation. This device
and its antenna(s) must not be co-located or operating in conjunction with any other antenna or transmitter.
IC Radiation Exposure Statement:
This equipment complies with IC RSS-102 radiation exposure limits set forth for an uncontrolled environment.
This equipment should be installed and operated with minimum distance 20 cm between the radiator & your
body. This Class [B] digital apparatus complies with Canadian ICES-003.
Cet appareil numérique de la classe [B] est conforme à la norme NMB-003 du Canada
radiate radio frequency energy and, if not installed and used in accordance with the instructions,
3

Di
g
it
Ph
F
al
Product Overview
Package Contents
■ Check the package contents.
Package Contents
Digital Photo Frame
oto
rame
Digital Photo Frame
Remote Control CD User's Guide / Cards
USB Cable
(for PC connection)
Note
■ The Digital Photo Frame and its accessories may look different from those shown here.
Power Adapter
4
Di
g
it
Ph
F
al
Product Overview
Identifying the Parts
Identifying the Parts
oto
rame
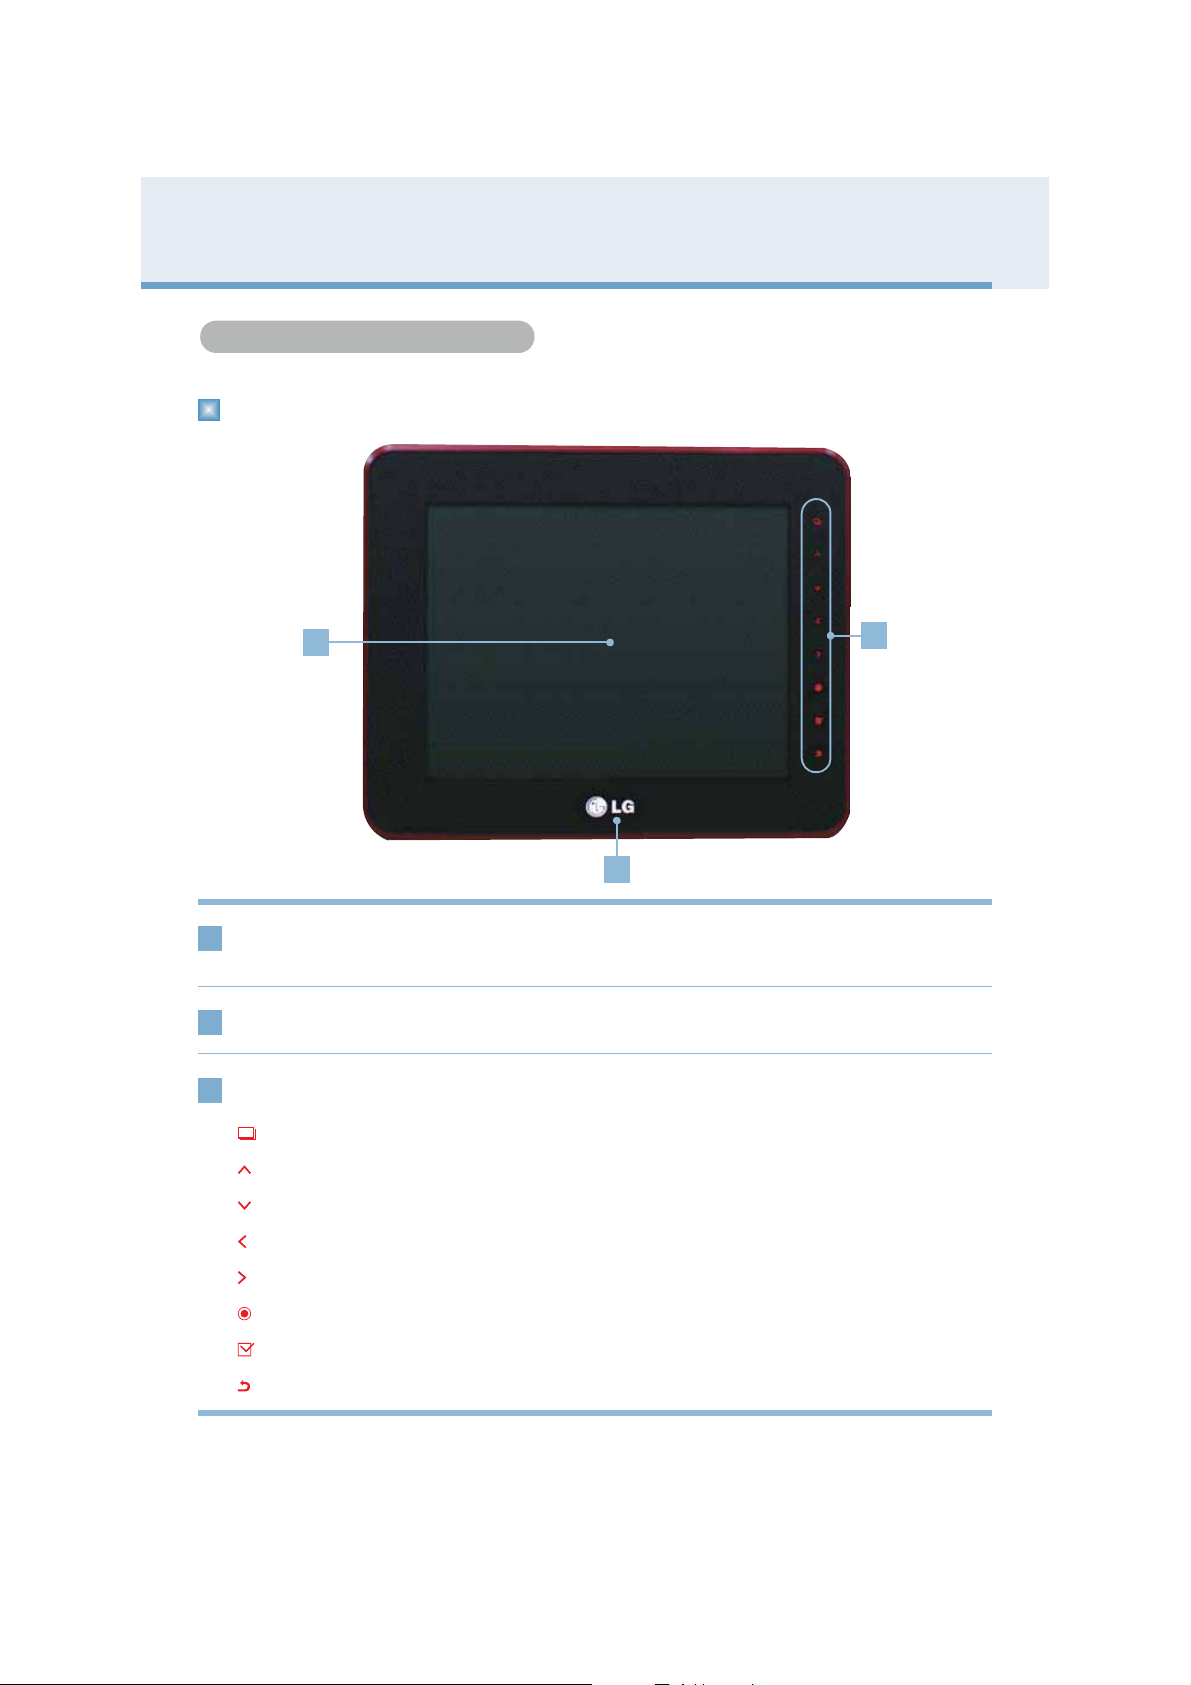
Front
Remote Control
1
Sensor
1
2
The remote control sensor is located at the center of the product. Point at the
remote control sensor when using remote control.
3
LG Logo
2
Touch Key Button
3
MENU Button
UP Button
DOWN Button
LEFT Button
RIGHT Button
OK Button
SELECT Button
BACK Button
If connecting to the power, LG logo's light is on.
Displays pop-up menu
Goes up
Goes down
Goes left
Goes right
OK (The Play/Pause button is used to play Slide Show, Music, and Video files.)
Press once to select a file in the List mode; press again to cancel selection.
Short press: Exit / Long press: Go to Home Menu
5
Di
g
it
Ph
F
al
Product Overview
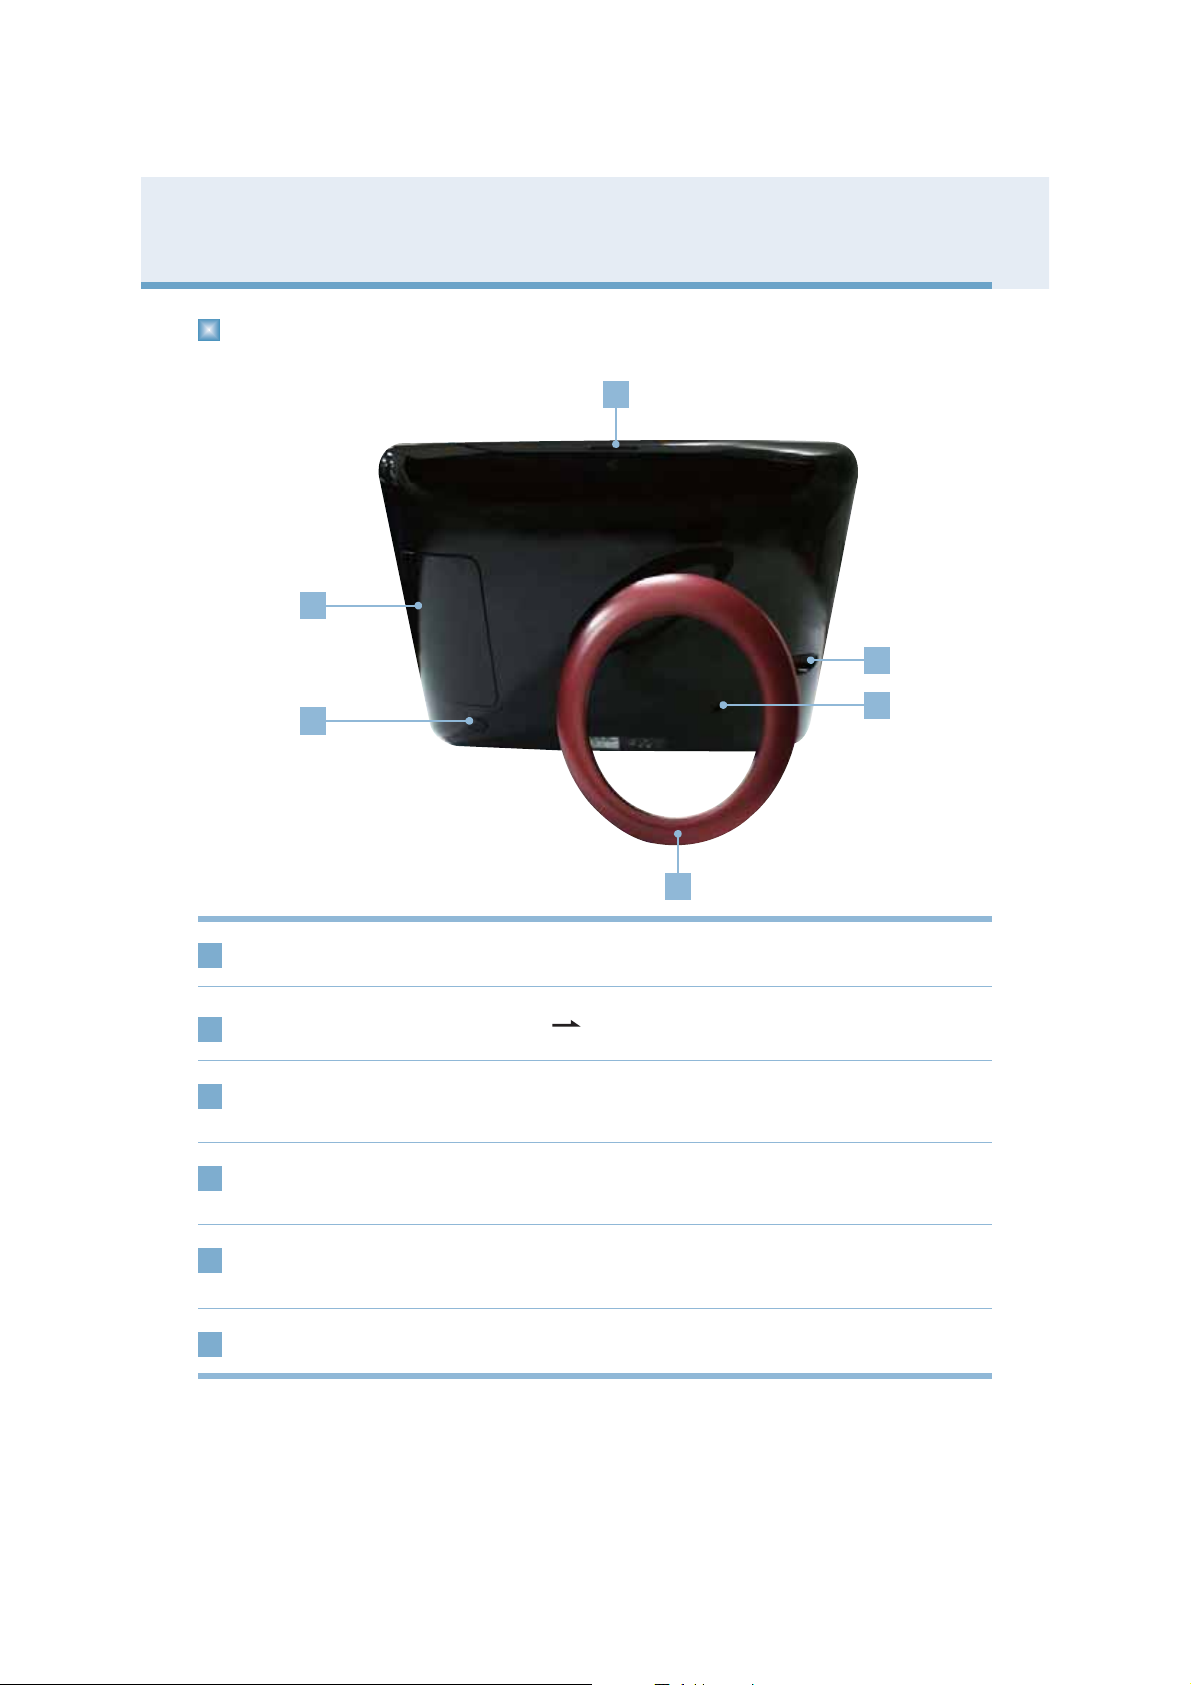
Back
oto
rame
POWER Button
1
2
1
You can turn the power on and off.
3
4
5
6
Connecting Part to External Device ( Page 10)
2
Power Saving Button
3
DC 9V IN Terminal
4
Kensington Security Slot
5
(Separate purchase required)
Stand
6
If pressing once, the screen goes to Power Saving mode, and if
pressing once again, it goes back to original screen.
You can connect the power adapter to the DC 9V IN Terminal, and
then plug the adapter into a power outlet.
Connected to a locking cable that can be purchased separately at
most computer stores.
6
Di
g
it
Ph
F
al
Product Overview
Remote Control Button Names and Functions
oto
rame
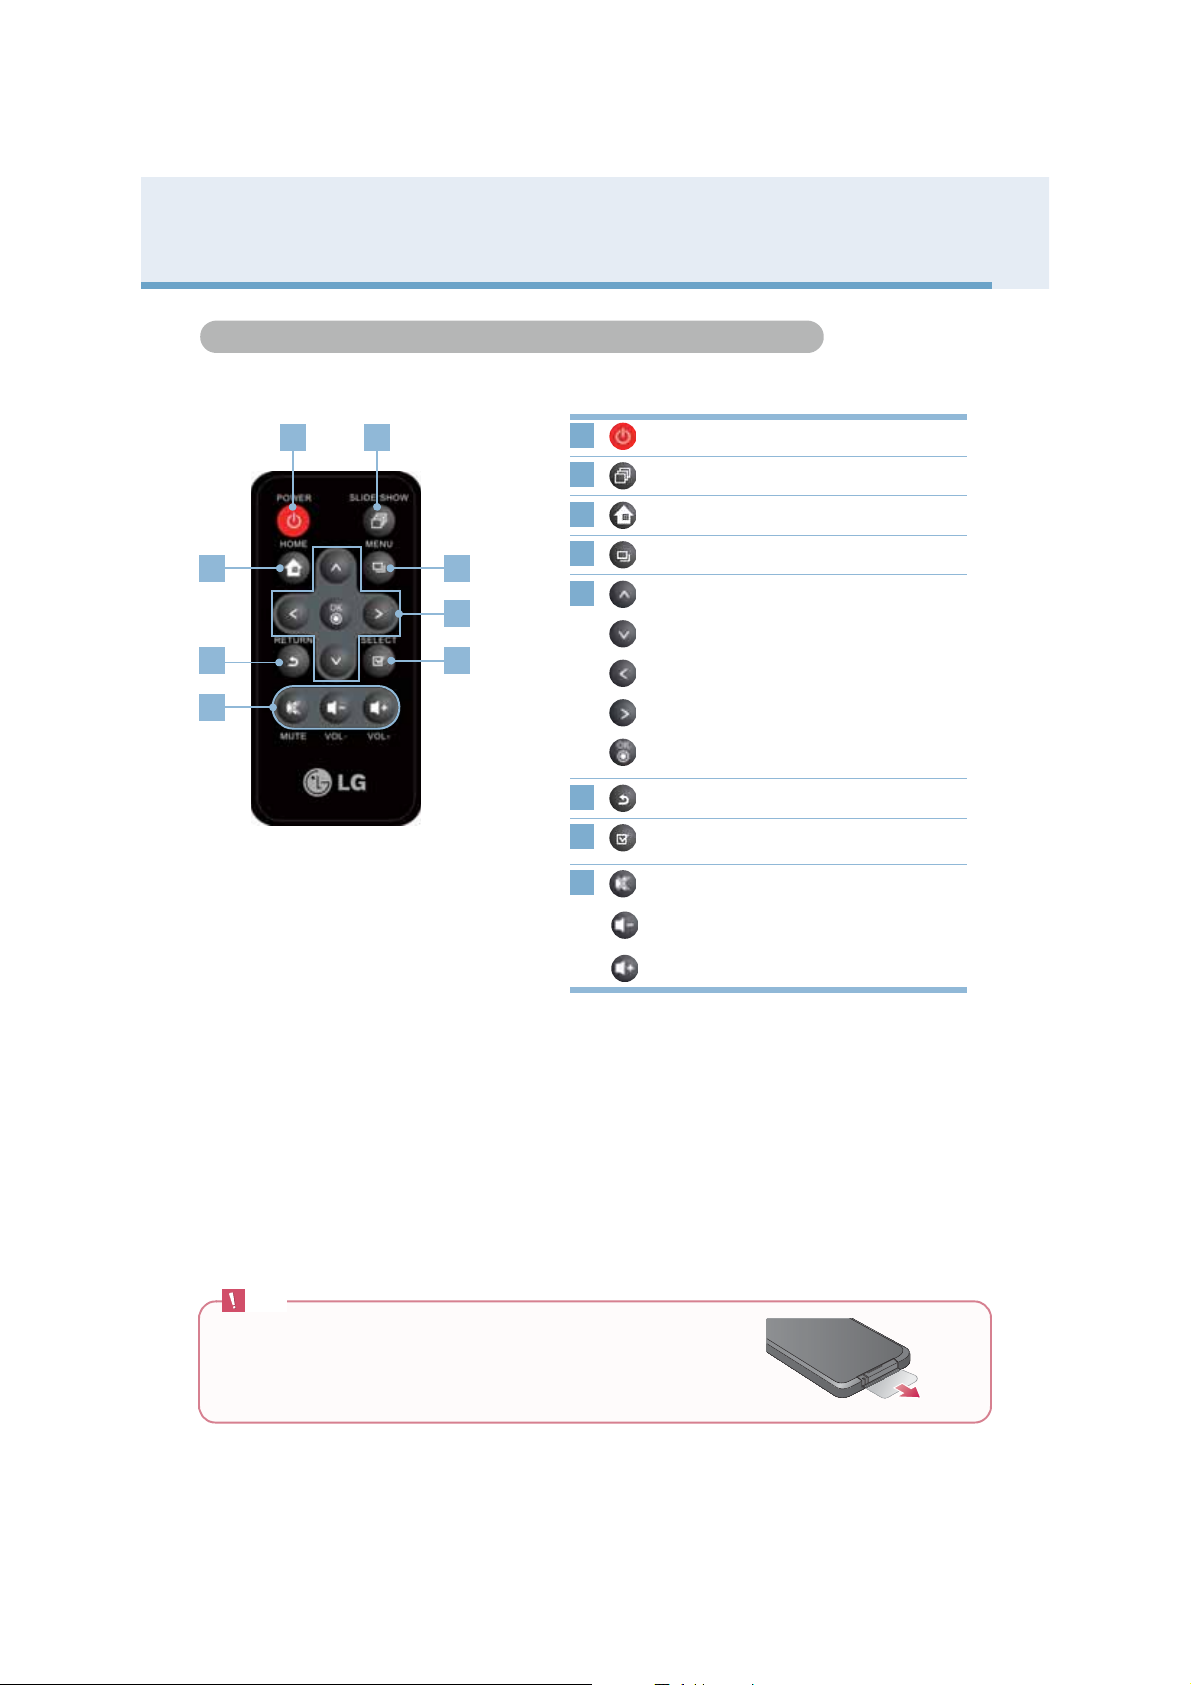
Remote Control Button Names and Functions
3 4
6
8
1 2
5
7
1
2
3
4
5
6
7
8
Turns the power ON/OFF
Goes to Slide Show
Goes to Home Menu
Displays pop-up menu
Goes up
Goes down
Goes left
Goes right
OK (The Play/Pause button is used to play
Slide Show, Music, and Video files.)
Goes to previous screen
Press once to select a file in the List mode;
press again to cancel selection.
Enables the Mute function
Decreases the volume
Increases the volume
Note
■ Before using the remote control, remove the plastic insulating
sheet from the battery chamber as illustrated.
7
Di
g
it
Ph
F
al
oto
rame
Product Overview
Remote Control Sensor / Replacing the Remote Control Battery
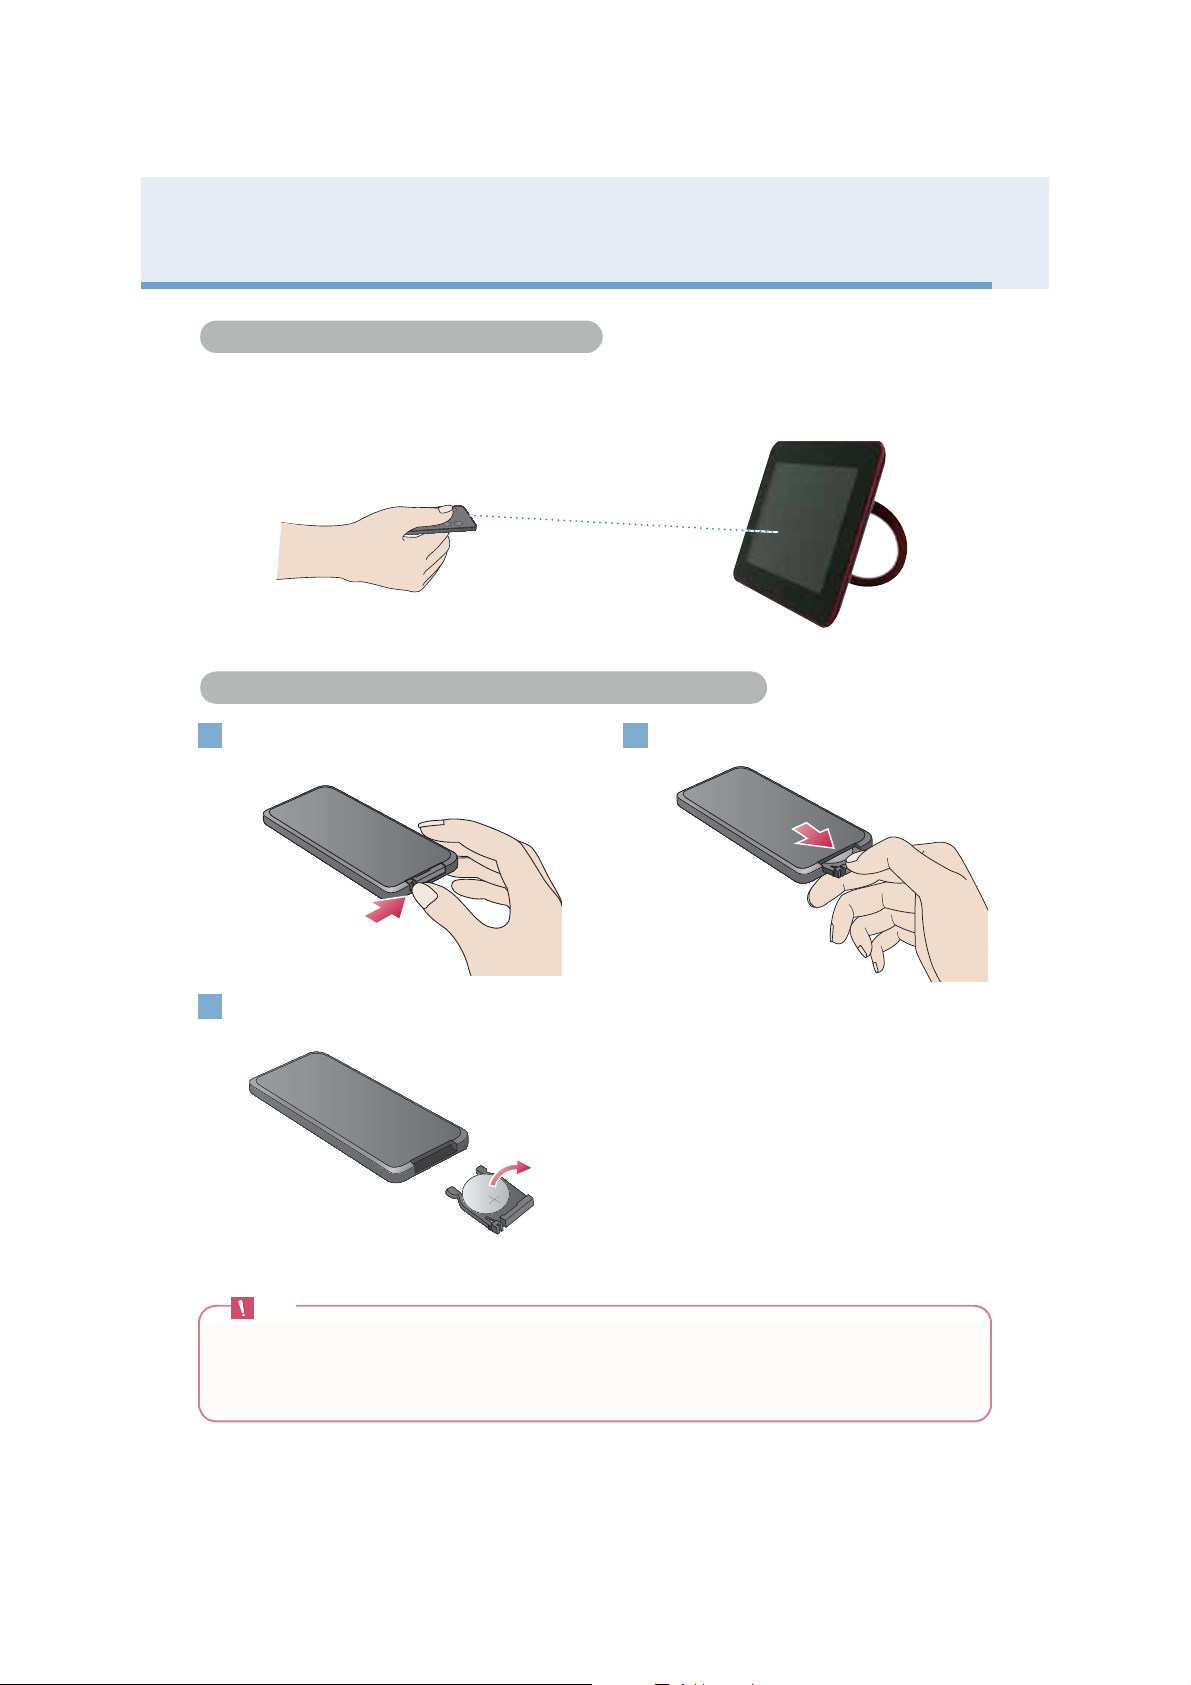
Remote Control Sensor
The remote control sensor is lo ca ted at the cen ter of the product. Point at the remote con trol s ens or
when using remote control.
Replacing the Remote Control Battery
Push the tab of the battery holder on the
1 2
rear bottom side of the remote control.
Replace the battery (Lithium Cell
3
CR2025 3V) and push the holder in.
Note
■ Please use only the assigned battery. Otherwise, serious damage to health and property may occur. The
battery could explode, for instance.
■ Please be careful that the foreign substance goes into inside of remote control when changing battery.
■ Use the battery correctly, or it could cause leakage or corrosion.
Pull the battery holder out.
8
Di
g
it
Ph
F
al
oto
rame
Product Installation and Connection
Using the Stand / Connecting the Power Adap te r
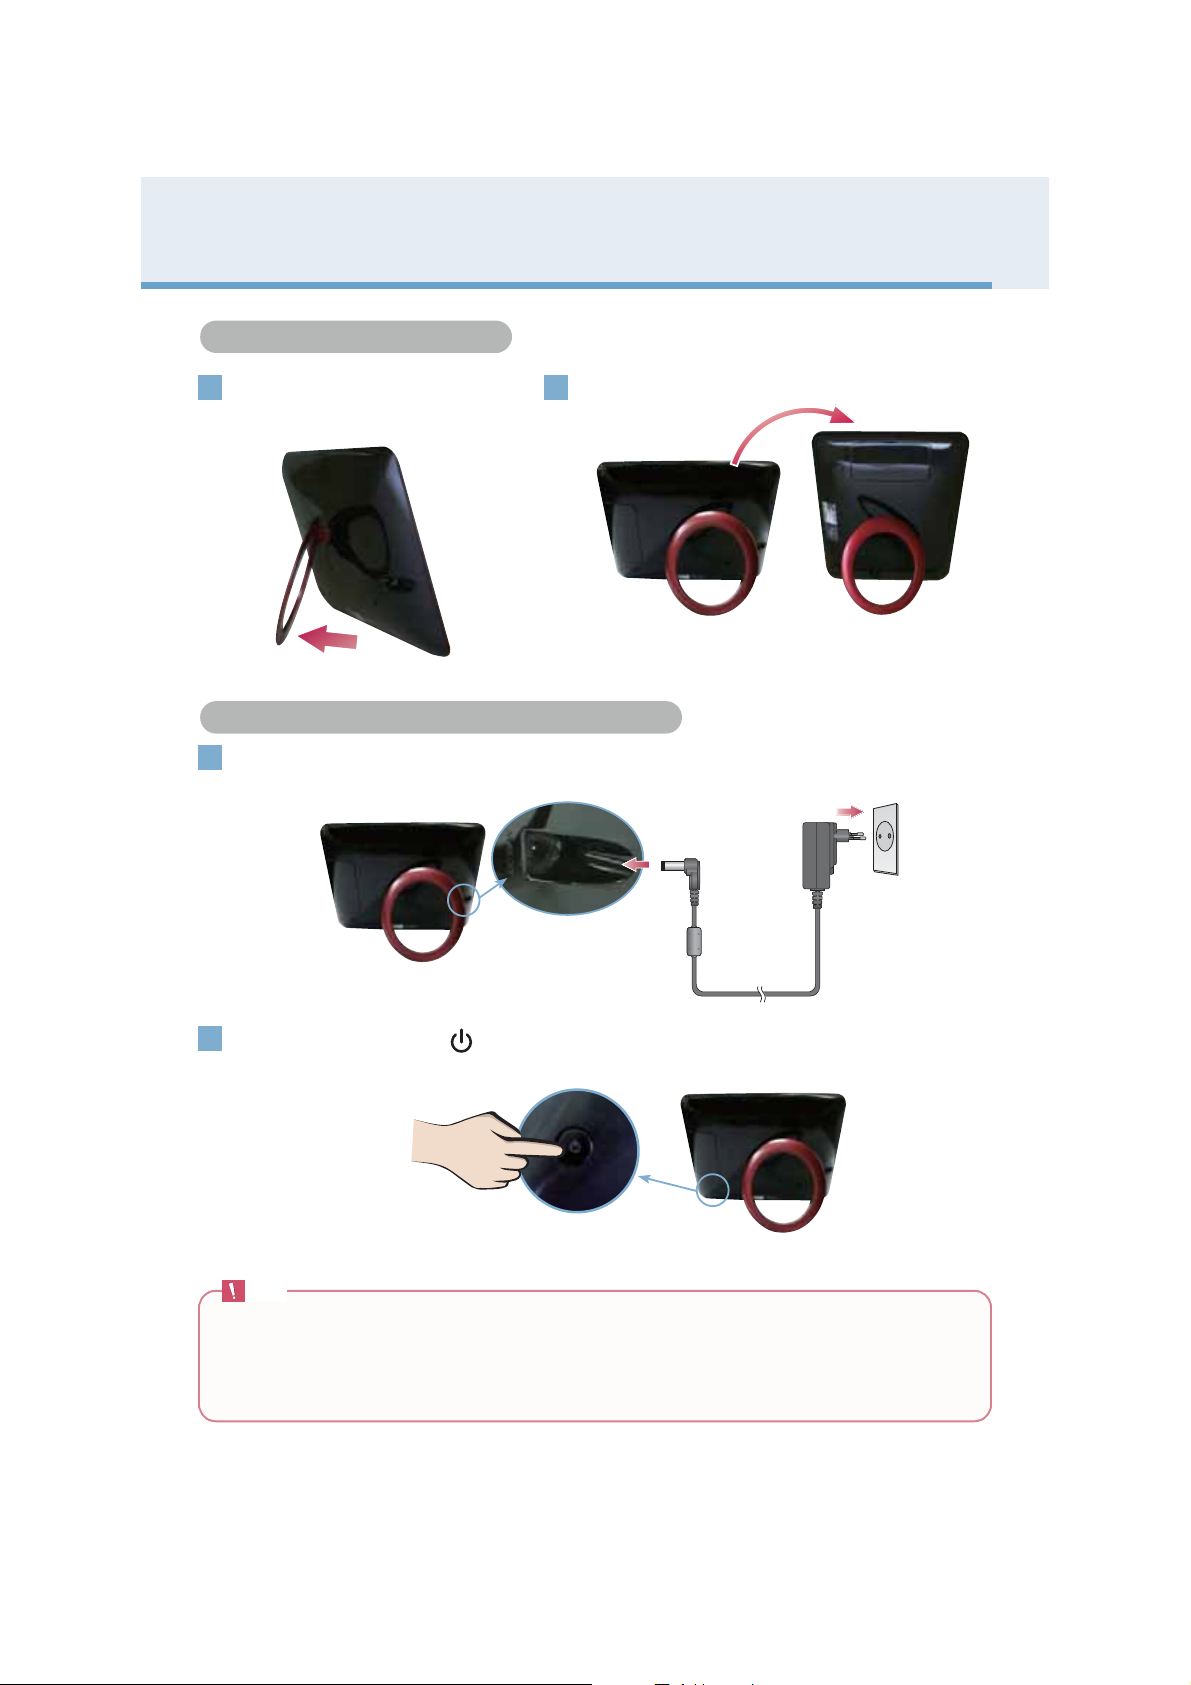
Using the Stand
Gently pull out the product stand
1 2
until the product is firmly placed
on a flat surface.
Connect the power ada pter to the DC 9V IN Terminal of the prod uct as illu strated, a nd then pl ug
1
the adapter into a power outlet.
Connecting the Power Adapter
You can place the product horizontally or vertically.
2
Press the POWER button on the back of the pro du ct o r on the rem ote to turn the pow e r on .
When turning off the power , press th e POWER b utton f or 2 ~3 secon ds unt il the scree n go es off .
Note
■ After setting up the stand, please check if the product is stable. If the product is not placed properly,
possible damage may occur from the product's knocking or falling down.
■ If you select Auto in Orientation of the Setup menu, the image automatically rotates as well.
However, menus and Key-Help do not rotate.
■ The product and its accessories may look different from those shown here.
9
Di
g
it
Ph
F
al
oto
rame
Product Installation and Connection
Connecting USB / Connecting Memor y C ar d
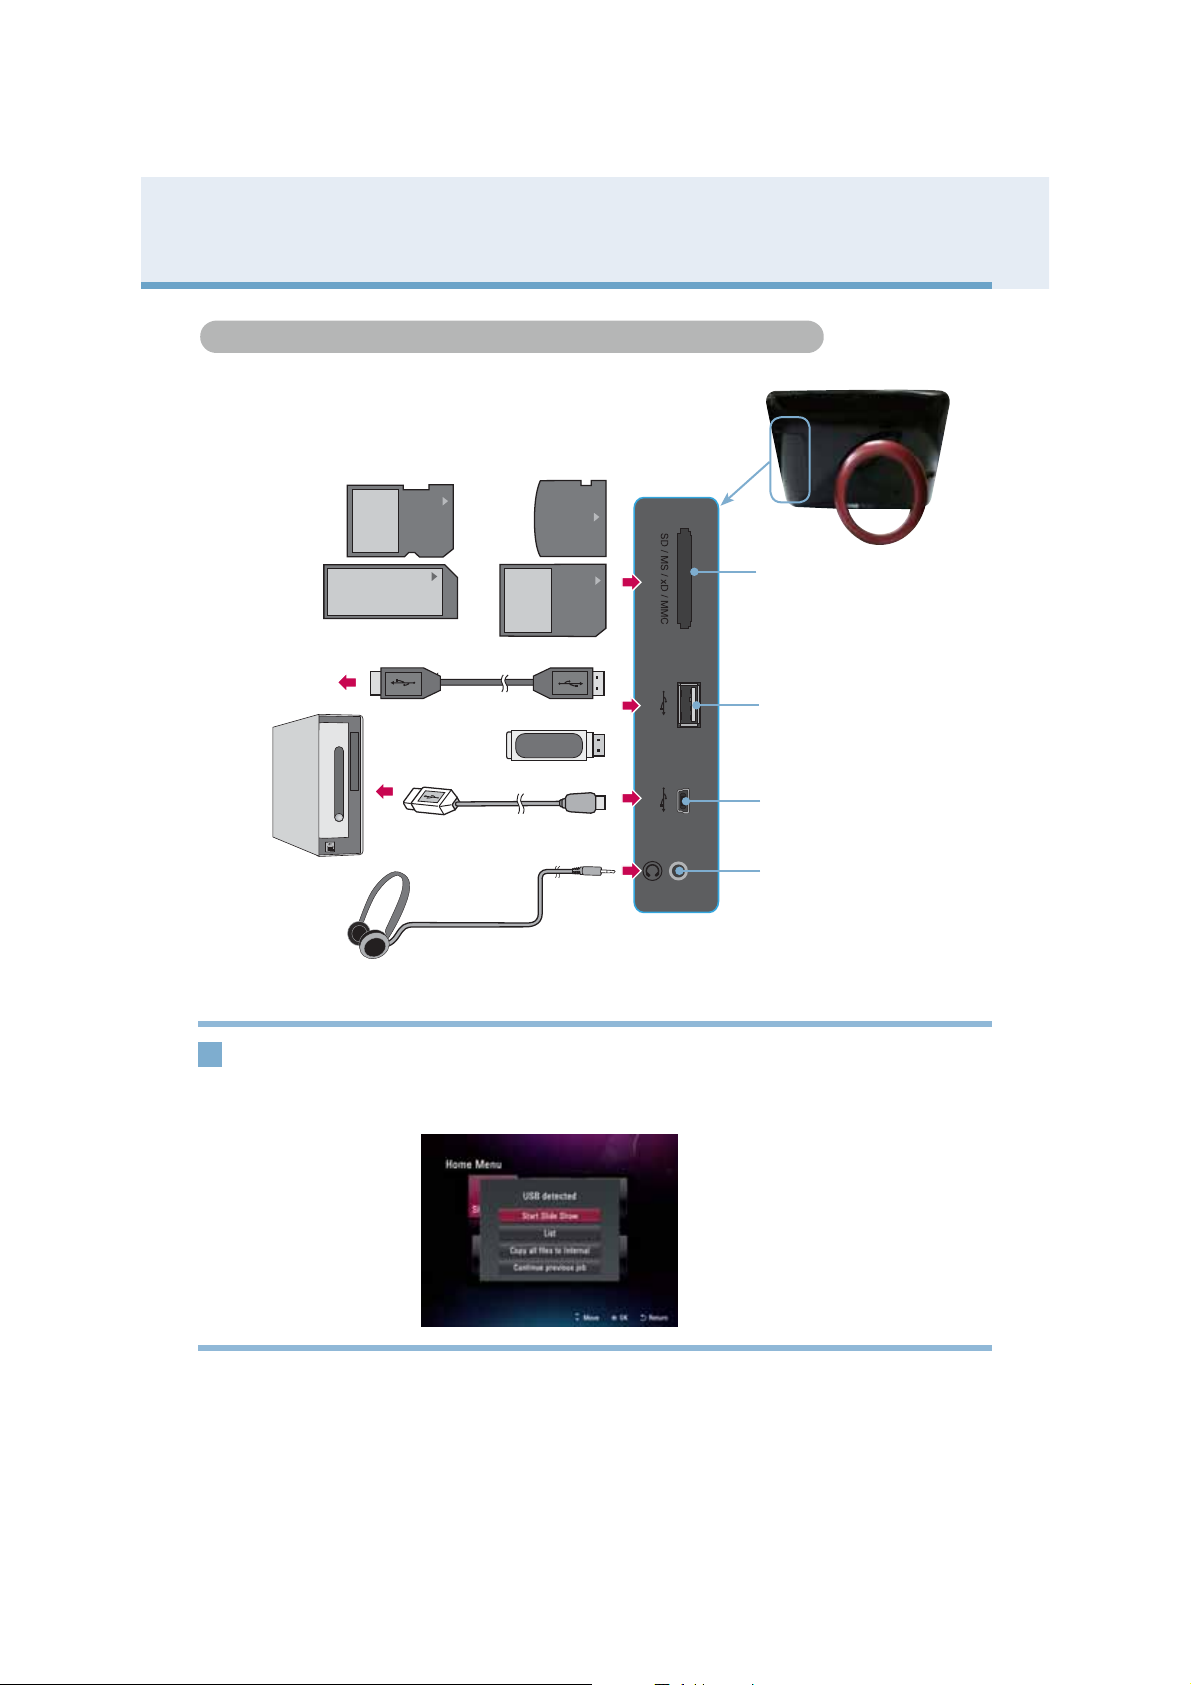
Connecting USB / Connecting Memory Card
PC
USB Flash
Drive
SD
MS
USB Extension Cable
USB Flash Drive
USB Cable
Earphone
xD
MMC
SD/MS/xD/MMC Terminal
Used to insert a memory
card
USB Terminal
Used to insert a USB flash
drive
USB Terminal
Used to connect to a PC
Earphone Jack
Used to connect to a
earphone
Storage device
1
connection
1. Please connect to product's USB terminal.
2. Please connect to USB terminal of external storage device.
3. If external storage device is read, a window pops up as below.
Please select an operation you want.
10
Di
g
it
Ph
F
!
al
oto
rame
Product Installation and Connection
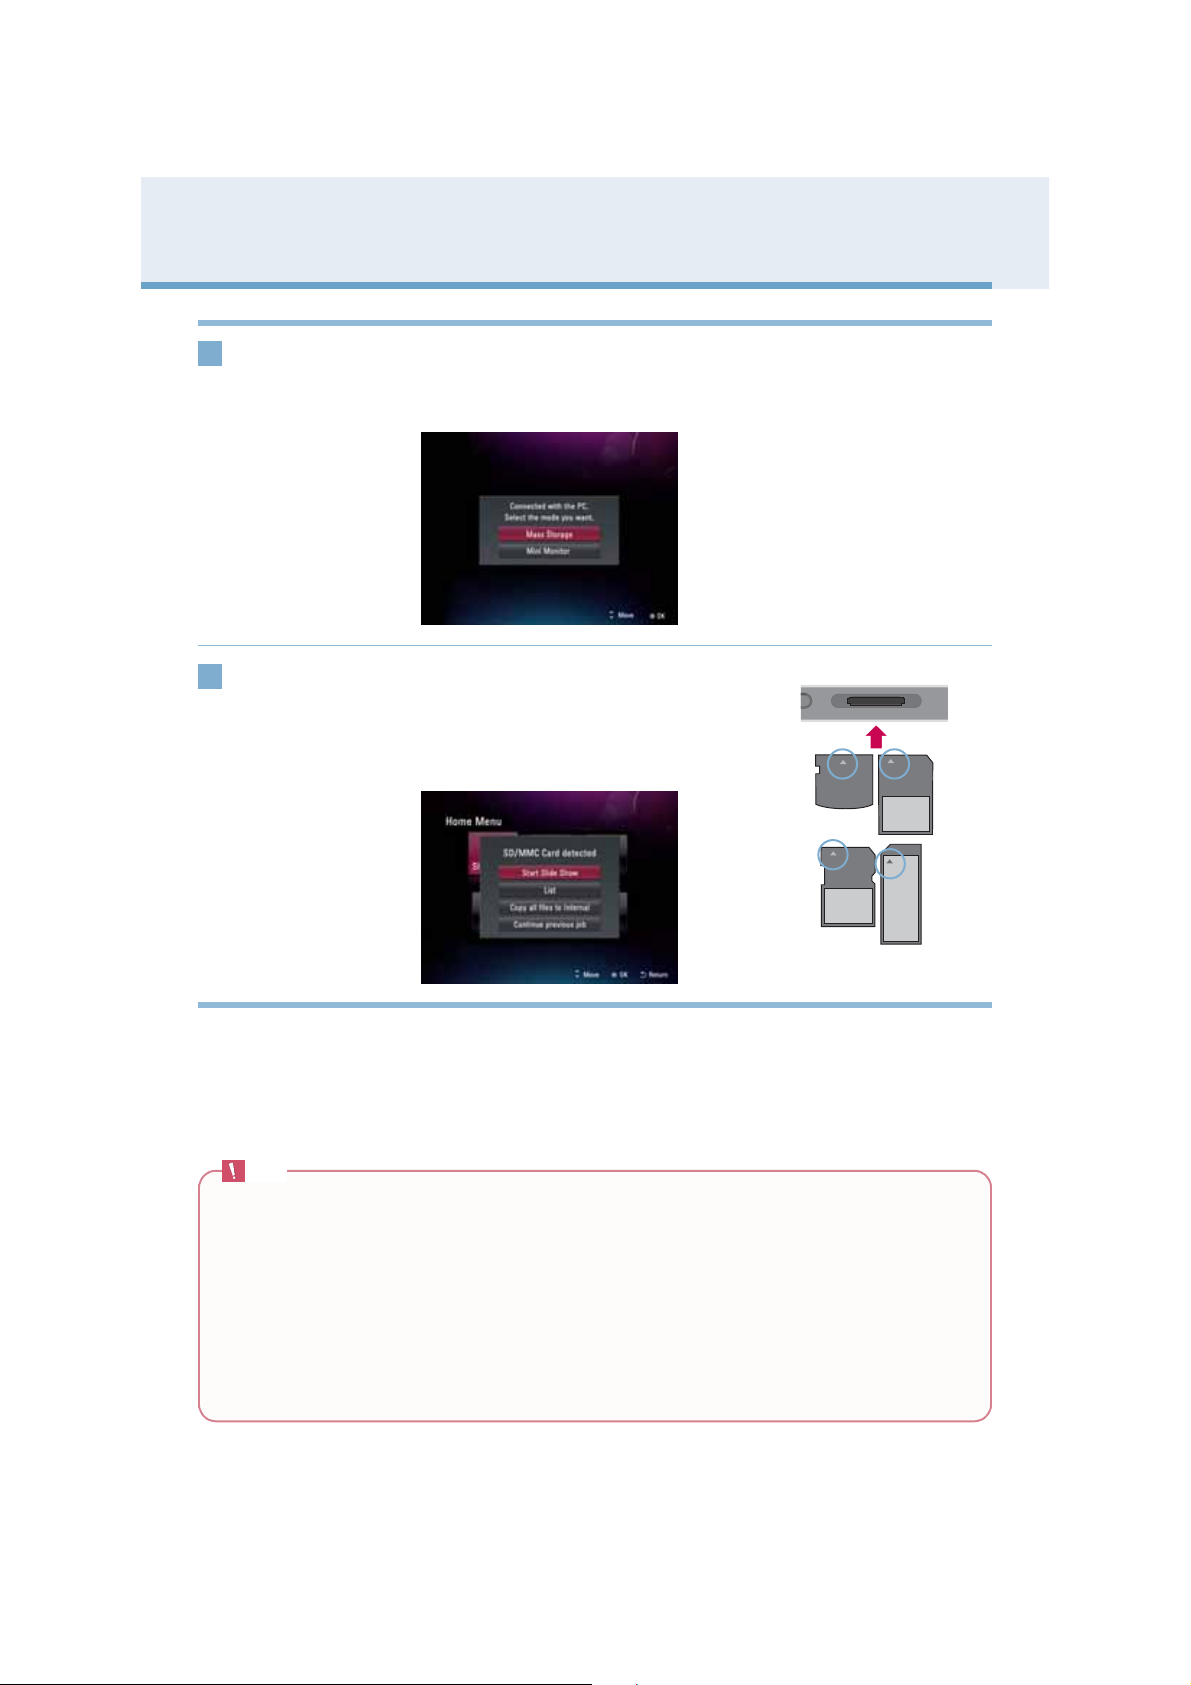
PC connection
2
3
Memory card!slot
(SD/MS/xD/MMC)
1. Please connect to product's USB terminal using a provided USB cable.
2. Please connect to PC's USB terminal.
3. If PC is read, a window pops up as below. Please select the mode you want use
from Mass Storage and Mini Monitor.
1. Make sure the memory card is in the correct
orientation.
2. Please push into the slot.
3. If external memory card is read, a window pops
up as below. Please select an operation you
want.
xD
SD
SD/MS/xD/MMC
MMC
MS
Note
■ The internal memory of the product is 2GB. If the memory is full, no more files are saved.
■ Two or more external devices can be connected to the product at the same time.
■ Do not turn the product off or remove external devices while moving, saving, playing or deleting files.
■ Removing external devices during file playback may cause the product to malfunction. When this
happens, turn the power off and on again.
■ When connecting external storage devices to the product, use the cables included with the devices. (For
more information on storage devices and cable purchase, contact the relevant service centers for help.)
■ This product doesn't support any external hard drives and card readers.
■ When connecting the product to a PC by the USB cable, the disk volume name (Ex: E:, F:, G:, and so
on) of the removable disk may vary depending on computer circumstance.
11
Di
g
it
Ph
F
al
oto
rame
Getting Started
First-tim e Setup
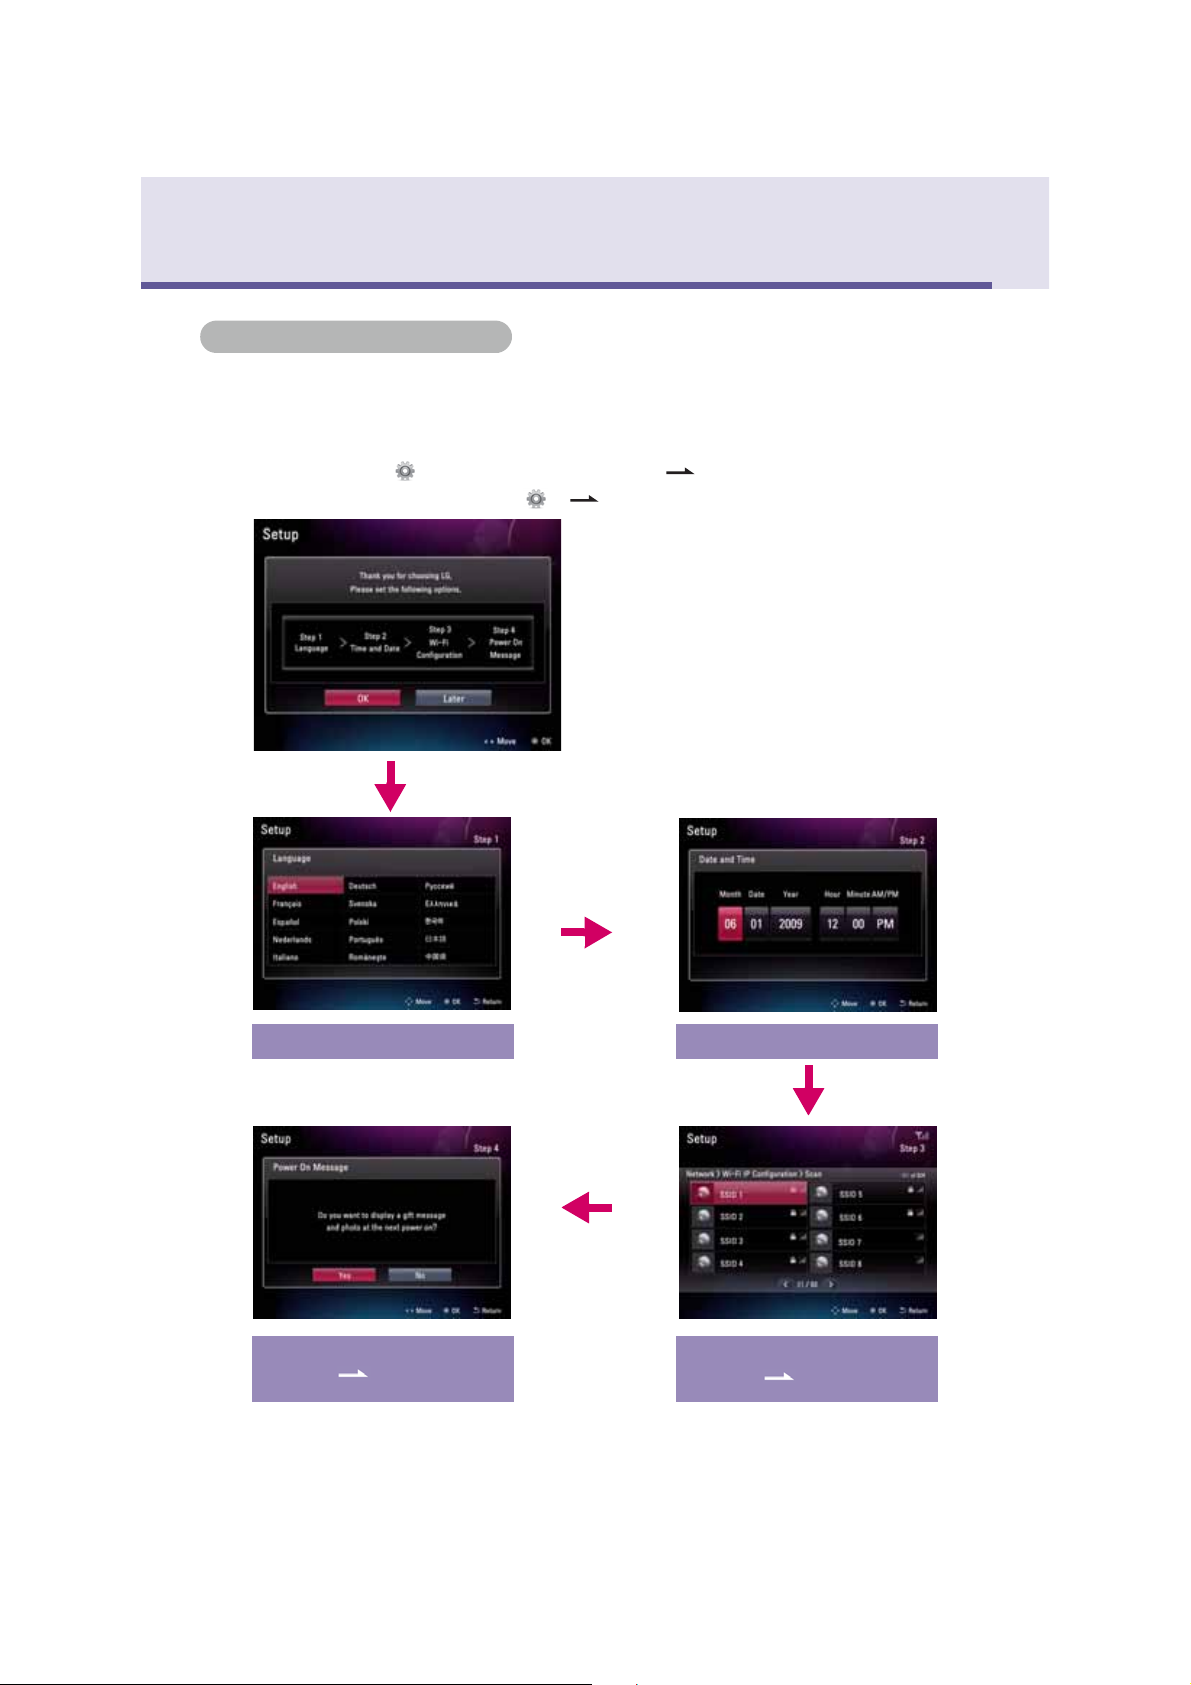
First-time Setup
■ When turning on the power for the first time, the Setup wizard appears, which will guide you
through the Language,Date and Time, Wi-Fi Configuration, and Power On Message settings
step by step. Once the setup is completed, it won’t appear again. If you reset the product, the
Setup wizard reappears.
■ Please refer to Setup for details about each menu. ( Page 42)
■ You can change setup again at Setup . ( Page 42)
Step 1: Set Language
Step 4: Set Power On Message
( Page 44)
Step 2: Set Date and Time
Step 3: Set Wi-Fi Configuration
( Page 25)
12
Di
g
it
Ph
F
Getting Started
Key-Help
Key-Help
■ Key-Help is located at the bottom right corner of each menu to show tips about how to use the
buttons. Please refer to it for how to operate the buttons of the product.
al
oto
Key-Help
rame
13
Di
it
Ph
F
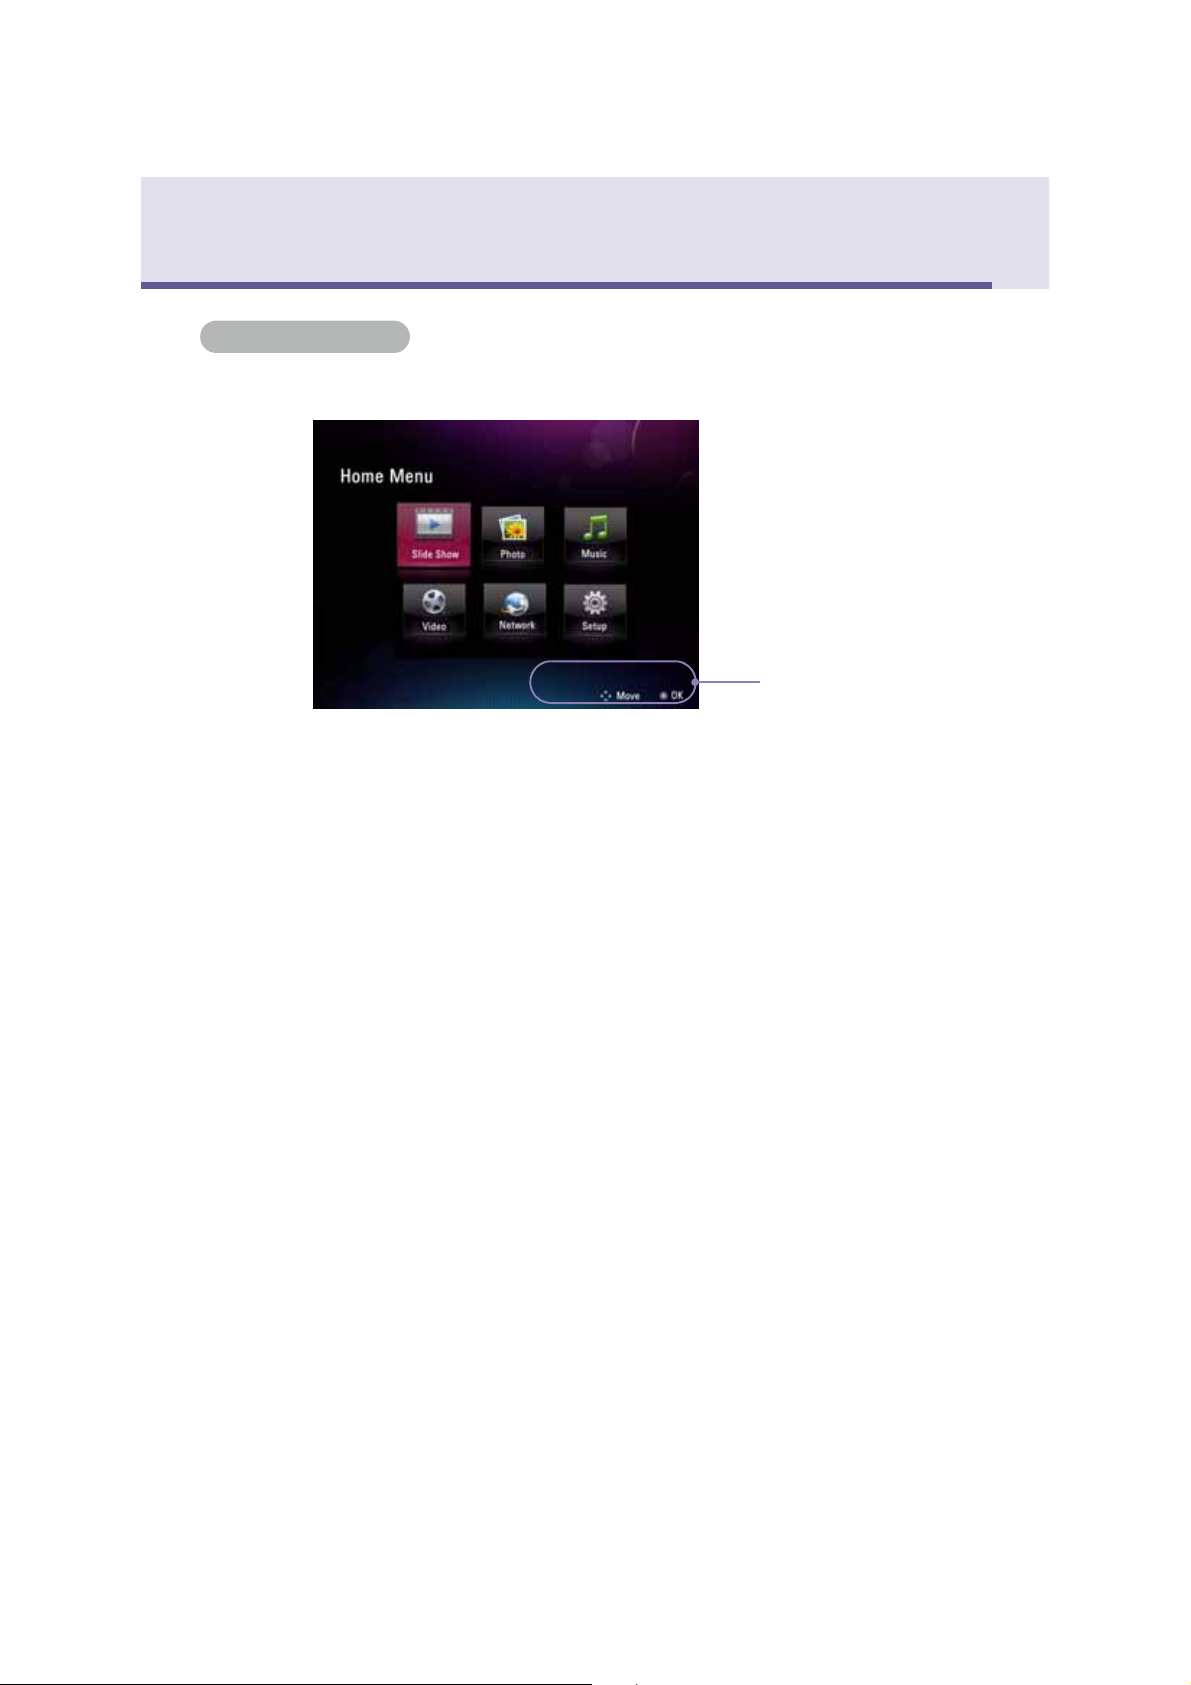
Home Menu
Screen Display and Buttons
Please select a desired menu.
g
al
1 2 3
4 5 6
oto
Screen Display and Buttons
rame
7
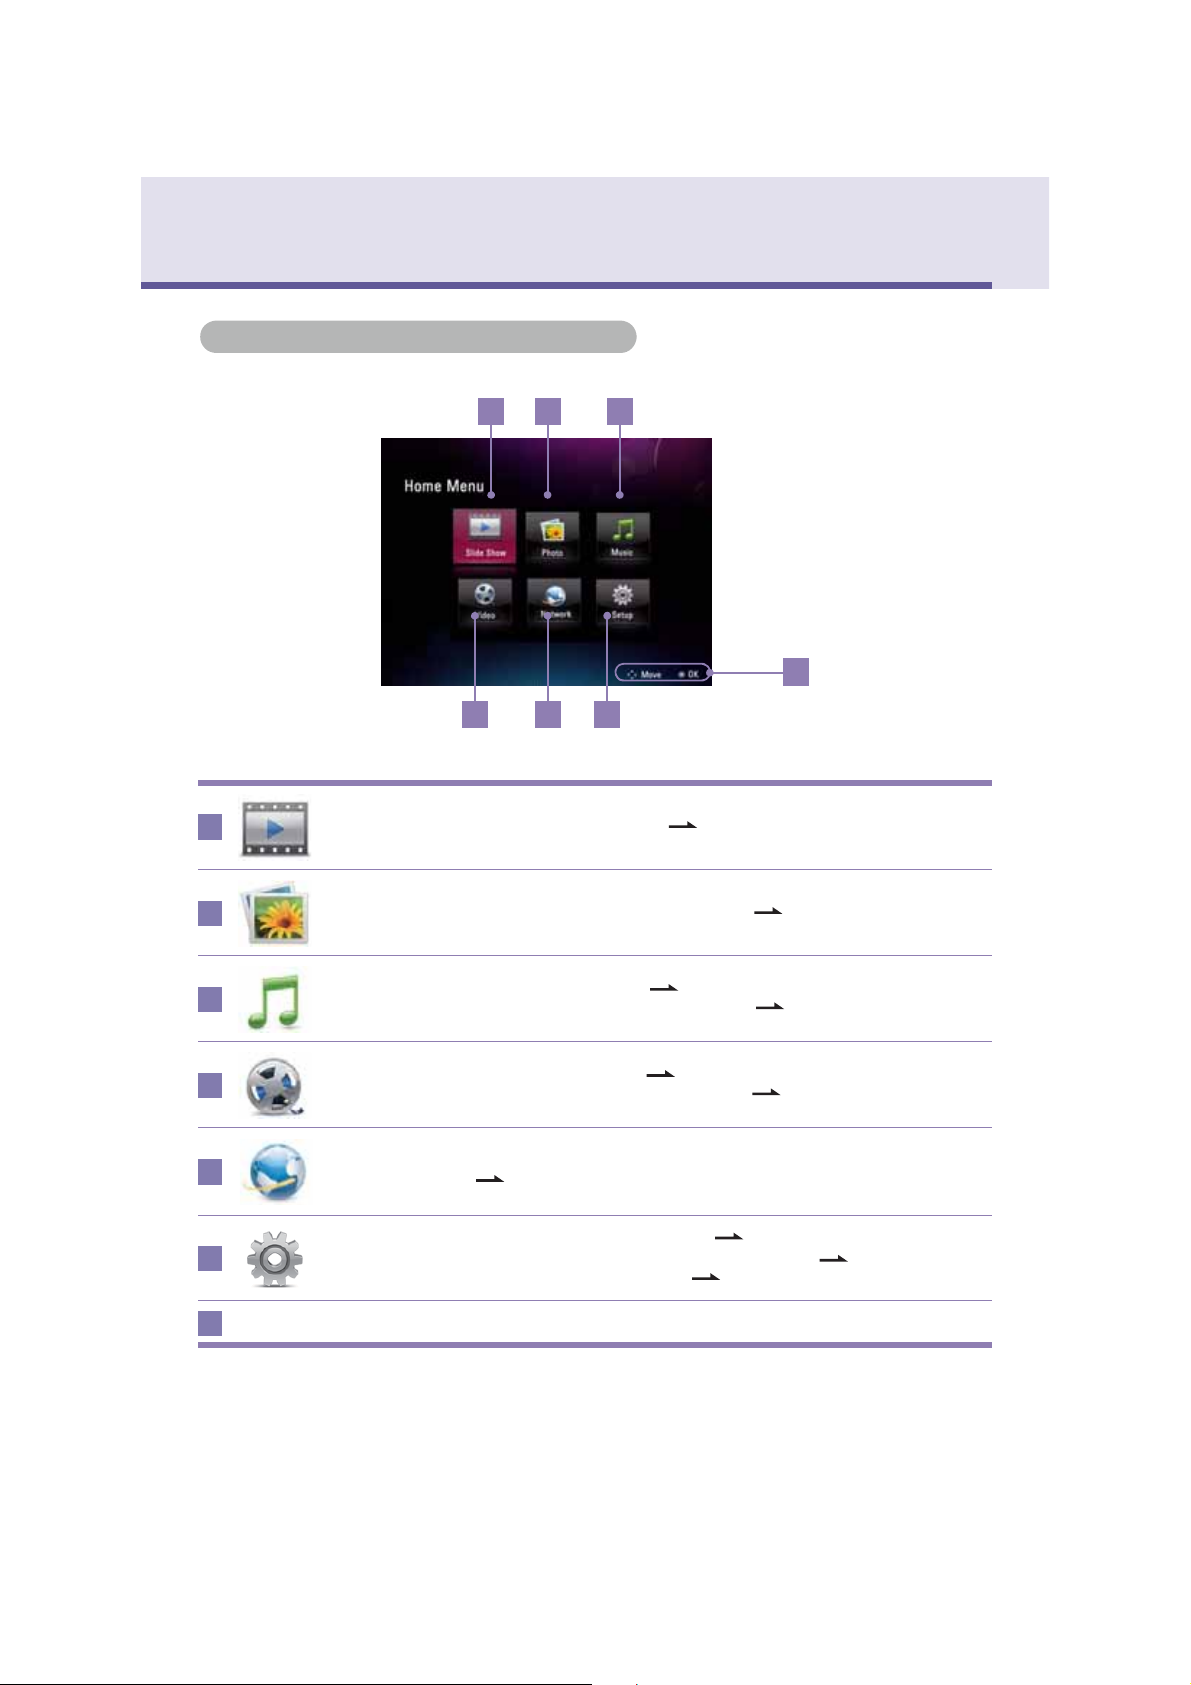
1
2
3
4
5
6
7
Slide Show
Photo You can select and manage the photo. ( Page 21)
Music
Video
Network
Setup
Key-Help
You can display the photo. ( Page 15)
You can play the music. ( Page 17)
You can select and manage the music. ( Page 21)
You can play the video. ( Page 19)
You can select and manage the video. ( Page 21)
You can use the provided applications in the Network menu.
( Page 28)
You can set up Wi-Fi connection. ( Page 25)
You can enable/disable the Bluetooth
You can set up other settings. ( Page 42)
®
function. ( Page 40)
14
 Loading...