

Page 1
LG9250
Ellipse
Printed in Korea
P/NO : MMBB0370601(1.0)
H
LG9250
Page 2

Copyright ©2010 LG Electronics, Inc. All rights reserved.
LG and the LG logo are registered trademarks of LG
Group and its related entities. All other trademarks are
the property of their respective owners.
Page 3

Important Safety Precautions
Read these instructions. Breaking the rules may be dangerous or
illegal. Further detailed information is given in this user guide.
WARNING! Violation of the instructions may cause serious injury or
death.
1. Never use an unapproved battery since this could
damage the phone and/or battery and could cause
the battery to explode.
2. Never place your phone in a microwave oven as it will
cause the battery to explode.
3. Never store your phone in temperatures less than
-4°F or greater than 122°F.
4. Do not dispose of your battery by fire or with
hazardous or flammable materials.
5. When riding in a car, do not leave your phone or set
up the hands-free kit near to the air bag. If wireless
equipment is improperly installed and the air bag is
deployed, you may be seriously injured.
6. Do not use a hand-held phone while driving.
7. Do not use the phone in areas where its use is
prohibited. (For example: aircraft)
Important Safety Precautions
1
Page 4

Important Safety Precautions
1. Do not expose the battery charger or adapter to direct
sunlight or use it in places with high humidity, such as
a bathroom.
2. Do not use harsh chemicals (such as alcohol, benzene,
thinners, etc.) or detergents to clean your phone. This
Important Safety Precautions
2
could cause a fire.
3. Do not drop, strike, or shake your phone severely. It
may harm the internal circuit boards of the phone.
4. Do not use your phone in high explosive areas as the
phone may generate sparks.
5. Do not damage the power cord by bending, twisting,
pulling, or heating. Do not use the plug if it is loose as
it may cause a fire or electric shock.
6. Do not place any heavy items on the power cord. Do
not allow the power cord to be crimped as it may
cause electric shock or fire.
7. Do not handle the phone with wet hands while it is
being charged. It may cause an electric shock or
seriously damage your phone.
8. Do not disassemble the phone.
Page 5
1. Do not place or answer calls while charging the phone as it may
short-circuit the phone and/or cause electric shock or fire.
2. Do not hold or let the antenna come in contact with your body
during a call.
3. Make sure that no sharp-edged items such as animal’s teeth or
nails, come into contact with the battery. This could cause a fire.
4. Store the battery out of reach of children.
5. Be careful that children do not swallow any parts (such as
rubber plugs, earphone, connection parts of the phone, etc.)
This could cause asphyxiation or suffocation resulting in serious
injury or death.
6. Unplug the power cord and charger during lightning storms to
avoid electric shock or fire.
7. Only use the batteries and chargers provided by LG. The
warranty will not be applied to products provided by other
suppliers.
8. Only authorized personnel should service the phone and its
accessories. Faulty installation or service may result in accidents
and consequently invalidate the warranty.
9. Your service provider programs one or more emergency phone
numbers, such as 911, that you can call under any
circumstances, even when your phone is locked. Your phone’s
preprogrammed emergency number(s) may not work in all
locations, and sometimes an emergency call cannot be placed
due to network, environmental, or interference issues.
Important Safety Precautions
3
Page 6

Table of Contents
Important Safety
Precautions 1
Table of Contents 4
Welcome 11
Technical Details 12
Important Information 12
Tab le o f C onte nts
Technical Details 12
FCC RF Exposure Information 13
Bodily Contact During Operation 13
Vehicle-Mounted External Antenna 15
FCC Notice and Cautions 15
Part 15.105 statement 16
Phone Overview 17
Menus Overview 22
4
Getting Started with Your
Phone 24
The Battery 24
Installing the Battery 24
Removing the Battery 24
Charging the Battery 25
Charging with USB 26
How to Install Your microSD
Card 26
How to Remove Your microSD
Card 27
Battery Temperature Protection 28
Battery Charge Level 28
Turning the Phone On and Off 28
Turning the Phone On 28
Turning the Phone Off 29
Signal Strength 29
Making Calls 29
™
™
Page 7

Redialing Calls 30
Receiving Calls 30
Quick Access to Convenient
Features 32
Vibrate Mode 32
Mute Function 32
Quick Volume Adjustment 32
Call Waiting 32
Shortcuts 33
Voice Commands 34
Contacts in Your Phone’s
Memory 35
Storing Basics 35
Editing Individual Entries 36
Speed Dial 36
Storing a Number with Pauses 37
Adding Additional Phone Number(s)
to Existing Contact 38
Changing the Default Number 39
Deleting 40
Speed Dialing 41
Using Phone Menus 43
MESSAGING 43
1. New Message 44
1.1 Text Message 44
1.2 Picture Message 46
1.3 Video Message 49
1.4 Voice Message 51
2. Messages 51
3. Drafts 55
4. Voicemail 56
5. Settings 57
6. Erase All 60
Tab le o f C onte nts
5
Page 8

Table of Contents
RECENT CALLS 61
1. Missed 61
2. Received 61
3. Dialed 62
4. All 63
5. View Timers 63
CONTACTS 65
Tab le o f C onte nts
1. New Contact 65
2. Contact List 65
3. Favorites 66
4. Groups 67
5. Speed Dials 68
6. My Name Card 69
MY STUFF 70
1. Ringtones & Sounds 70
1.1 My Ringtones 70
6
1.2 My Sounds 71
2. Pictures & Videos 72
2.1 My Pictures 72
2.2 My Videos 73
2.3 Take Picture 75
2.4 Record Video 76
BREW 78
1. BREW Apps 78
Web 80
1. Start Browser 80
My Music 81
Playing Your Music 81
Controlling the Music Player 82
Tools 83
1. Voice Commands 83
1.1 Call <Name or Number> 84
Page 9

1.2 Send Msg to <Name or
Number> 84
1.3 Go to <Menu> 84
1.4 Check <Item> 85
1.5 Contacts <Name> 85
1.6 Help 85
2. Bluetooth Menu 85
2.1 Add New Device 86
My Phone Name 88
Turn On/Off 89
Discovery Mode 89
Supported Profiles 90
3. Calculator 91
4. Ez Tip Calculator 92
5. Calendar 92
6. Alarm Clock 93
7. Stopwatch 94
8. World Clock 95
9. Notepad 95
10. USB Mass Storage 96
Settings 97
1. Sounds Settings 97
1.1 Easy Set-up 97
1.2 Master Volume 97
1.3 Call Sounds 98
1.3.1 Call Ringtone 98
1.3.2 Call Vibrate 98
1.3.3 Call ID Announcement 98
1.4 Alert Sounds 99
1.5 Keypad Volume 99
1.6 Digit Dial Readout 100
1.7 Service Alerts 100
1.8 Power On/Off 101
1.9 Voice Clarity 101
2. Display Settings 102
2.1 Easy Set-up 102
Tab le o f C onte nts
7
Page 10

Table of Contents
2.2 Banner 102
2.2.1 Personal Banner 103
2.3 Backlight 103
2.4 Brightness 104
2.5 Wallpaper 104
2.6 Charging Screen 105
2.7 Font Size 106
2.8 Menu Font Type 106
Tab le o f C onte nts
2.9 Clock Format 107
3. Phone Settings 108
3.1 Airplane Mode 108
3.2 Set Shortcuts 108
3.2.1 Set My Shortcuts 108
3.2.2 Set QwertyShortcut 109
3.3 Voice Commands 109
3.3.1 Confirm Choices 110
3.3.2 Sensitivity 110
3.3.3 Adapt Voice 110
8
3.3.4 Prompts 111
3.3.5 CLR Key Activation 111
3.4 Language 111
3.5 Location 112
3.6 Security 113
3.6.1 Edit Codes 113
3.6.2 Restrictions 113
3.6.3 Phone Lock 114
3.6.4 Lock Phone Now 115
3.6.5 Reset Default 115
3.6.6 Emergency numbers 116
3.7 System Select 116
3.8 NAM Select 117
3.9 BREW & Web 117
4. Call Settings 118
4.1 Answer Options 118
4.2 End Call Options 118
4.3 Auto Retry 119
Page 11

4.4 TTY Mode 119
4.5 One Touch Dial 121
4.6 Voice Privacy 122
4.7 DTMF Tones 122
5. USB Mode 123
6. Memory 123
6.1 Save Options 123
6.2 Phone Memory 124
6.3 Card Memory 125
7. Phone Info 125
7.1 My Number 125
7.2 ESN/MEID 126
7.3 SW/HW Version 126
7.4 Icon Glossary 126
Safety 127
TIA Safety Information 127
Exposure to Radio Frequency
Signal 127
Antenna Care 127
Phone Operation 128
Tips on Efficient Operation 128
Driving 128
Electronic Devices 128
Pacemakers 128
Persons with Pacemakers: 129
Hearing Aids 129
Other Medical Devices 129
Health Care Facilities 129
Vehicles 130
Posted Facilities 130
Aircraft 130
Blasting Areas 130
Potentially Explosive
Atmosphere 130
For Vehicles Equipped with
an Air Bag 131
Tab le o f C onte nts
9
Page 12

Table of Contents
Safety Information 131
Charger and Adapter Safety 131
Battery Information and Care 132
Explosion, Shock, and Fire
Hazards 132
General Notice 133
Warning! Important safety
information 135
Tab le o f C onte nts
Using your phone safely 135
Avoiding hearing damage 135
Using headsets safely 135
FDA Consumer Update 136
10 Driver Safety Tips 146
Consumer Information on
SAR 150
10
FCC Hearing-Aid Compatibility
(HAC) Regulations for Wireless
Devices 153
Accessories 156
Limited Warranty
Statement 157
Index 161
Some content in this user guide may
differ from your phone depending on
the phone software. Features and
specifications are subject to change
without prior notice.
Page 13

Welcome
Thank you for choosing the
Ellipse
cellular phone - designed
to operate with the latest digital
mobile communication
technology, Code Division
Multiple Access (CDMA). Along
with the many advanced features
of the CDMA system, such as
greatly enhanced voice clarity,
this compact phone offers:
●
54-key internal keypad.
●
21-key external keypad and
screen with auto screen lock.
●
Customizable display themes
and screensavers.
●
Built-in 3.0 Megapixel digital
camera.
●
External, easy-to-read, LCD
screen with status icons.
●
Internal, easy-to-read, backlit
LCD with status icons.
●
Messaging and Voicemail
capabilities.
●
HTML Web Browser
●
Long battery standby and talk
time.
●
Any key answer, auto answer
with hands-free accessories,
auto retry, one-touch and
speed dialing with 999
memory locations.
●
Bilingual (English and Spanish)
capability.
●
Bluetooth®wireless
technology.
Note
The Bluetooth®word mark and
logos are owned by the Bluetooth
SIG, Inc. and any use of such marks
by LG Electronics is under license.
Other trademarks and trade names
are those of their respective owners.
Wel come
11
Page 14

Technical Details
Important Information
This user’s guide provides
important information on the use
and operation of your phone.
Please read this guide carefully
prior to using the phone to be
able to use your phone to its
greatest advantage and to
prevent any accidental damage
or misuse. Any unapproved
changes or modifications will
Technical Details
void your warranty.
Technical Details
The
Ellipse
is an all digital phone
that operates on both Code
Division Multiple Access (CDMA)
frequencies: cellular services at
800 MHz and Personal
Communication Services (PCS)
at 1.9 GHz.
CDMA technology uses a feature
called DSSS (Direct Sequence
12
Spread Spectrum) that enables
the phone to keep
communication from being
crossed and to use one
frequency channel by multiple
users in the same specific area.
This results in a 10-fold capacity
increase when compared with
analog mode. In addition,
features such as soft/softer
handoff, hard handoff, and
dynamic RF power control
technologies combine to reduce
call interruptions.
The Cellular and PCS CDMA
networks consist of MSO
(Mobile Switching Office), BSC
(Base Station Controller), BTS
(Base Station Transmission
System), and MS (Mobile
Station).
1xRTT system receives twice as
many subscribers in the wireless
Page 15

section as IS-95. Its battery life is
twice as long as IS-95. Highspeed data transmission is also
possible. EV-DO system is
optimized for data service and is
much faster than 1xRTT system
in applicable area.
The table on the following page
lists some major CDMA
standards.
FCC RF Exposure Information
WARNING! Read this
information before operating
the phone.
In August 1996, the Federal
Communications Commission
(FCC) of the United States, with
its action in Report and Order
FCC 96-326, adopted an
updated safety standard for
human exposure to Radio
Frequency (RF) electromagnetic
energy emitted by FCC regulated
transmitters. Those guidelines are
consistent with the safety
standard previously set by both
U.S. and international standards
bodies. The design of this phone
complies with the FCC guidelines
and these international
standards.
Bodily Contact During
Operation
This device was tested for typical
use with the back of the phone
kept 0.79 inches (2.0 cm) from
the body. To comply with FCC RF
exposure requirements, a
minimum separation distance of
0.79 inches (2.0 cm) must be
maintained between the user’s
body and the back of the phone,
including the antenna, whether
extended or retracted. Thirdparty belt-clips, holsters, and
Technical Details
13
Page 16

Technical Details
CDMA Standard
Basic Air
Interface
Network
Technical Details
Service
Performance
similar accessories containing
metallic components should not
be used. Avoid the use of
14
Designator
TIA/EIA-95A
TSB-74
ANSI J-STD-008
TIA/EIA-IS2000
ANSI TIA/EIA 553A
TIA/EIA/IS-634
TIA/EIA/IS/651
TIA/EIA/IS-41-C
TIA/EIA/IS-124
TIA/EIA/IS-96-B
TIA/EIA/IS-99
TIA/EIA/IS-637
TIA/EIA/IS-657
IS-801
TIA/EIA/IS-707-A
TIA/EIA/IS-97
TIA/EIA/IS-98
ANSI J-STD-018
ANSI J-STD-019
TIA/EIA/IS-125
Description
CDMA Dual Mode Air Interface
14.4kbps radio link protocol and interband operations
IS-95 adapted for PCS frequency band
cdma2000 1xRTT AirInterface
MAS-BS
PCSC-RS
Intersystem operations
Non-signaling data comm.
Speech CODEC
Sync Data and Fax
Short message service
Packet Data
Position Determination
Service (gpsOne)
High Speed Packet Data
Cellular base station
Cellular mobile station
PCS personal station
PCS base station
Speech CODEC
accessories that cannot maintain
0.79 inches (2.0 cm) distance
between the user’s body and the
Page 17

back of the phone and have not
been tested for compliance with
FCC RF exposure limits.
Vehicle-Mounted External
Antenna
(Optional, if available.)
To satisfy FCC RF exposure
requirements, keep 8 inches (20
cm) between the user /
bystander and vehicle-mounted
external antenna. For more
information about RF exposure,
visit the FCC website at
www.fcc.gov.
FCC Notice and Cautions
This device and its accessories
comply with part 15 of FCC
rules. Operation is subject to the
following two conditions: (1)
This device and its accessories
may not cause harmful
interference, and (2) this device
and its accessories must accept
any interference received,
including interference that
causes undesired operation.
Any changes or modifications
not expressly approved in this
user guide could void your
warranty for this equipment. Use
only the supplied antenna. Use
of unauthorized antennas (or
modifications to the antenna)
could impair call quality, damage
the phone, void your warranty
and/or violate FCC regulations.
Don't use the phone with a
damaged antenna. A damaged
antenna could cause a minor skin
burn. Contact your local dealer
for a replacement antenna.
Technical Details
15
Page 18

Technical Details
Part 15.105 statement
This equipment has been tested
and found to comply with the
limits for a class B digital device,
pursuant to Part 15 of the FCC
Rules. These limits are designed
to provide reasonable protection
against harmful interference in a
residential installation. This
equipment generates, uses, and
can radiate radio frequency
Technical Details
energy and, if not installed and
used in accordance with the
instructions, may cause harmful
interference to radio
communications. However, there
is no guarantee that interference
will not occur in a particular
installation. if this equipment
does cause harmful interference
or television reception, which can
be determined by turning the
equipment off and on, the user is
encouraged to try to correct the
interference by one or more of
16
the following measures:
- Reorient or relocate the
receiving antenna.
- Increase the separation between
the equipment and receiver.
- Connect the equipment into an
outlet on a circuit different from
that to which the receiver is
connected.
- Consult the dealer or an
experienced radio/TV
technician for help.
Page 19
* Standby mode is when the phone is
waiting for input from you. No menu is
displayed and the phone isn’t performing
any action. It’s the starting point for all of
the instruction steps.
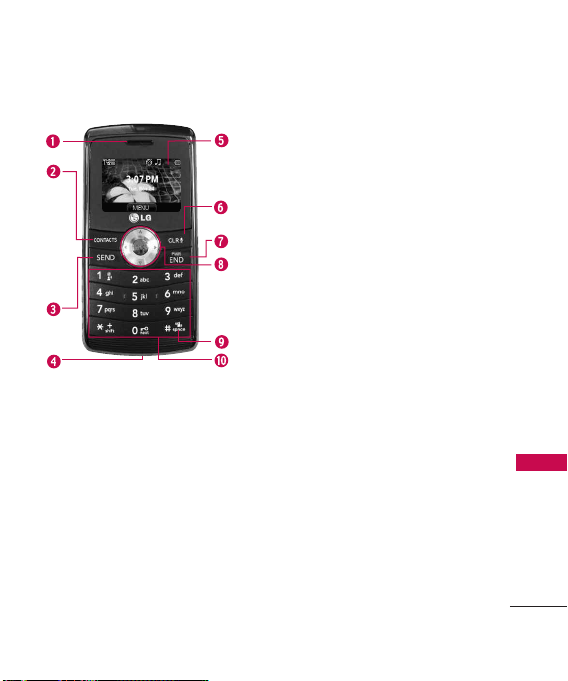
Phone Overview
1. Earpiece Lets you hear the caller.
2. CONTACTS Key Use to access the Contact List.
3. SEND Key Use to make and answer calls.
4. Accessory/ Charger Port Connects the phone to
the battery charger, or other compatible accessories.
5. External LCD Screen Allows you to view incoming
calls, messages and notifications as well as a wide
variety of content you select for viewing.
6. CLR Key / Voice Commands Key Deletes single
spaces or characters with a quick touch, but press
and hold to delete entire words. Also backs out of
menus, one level at a time. In standby mode*, simply
press the key to start Voice Commands or press and
hold to start recording a new sound.
7. PWR/END Key Use to turn the power on/off and to
end a call. Also returns to standby mode.*
8. OK Key/ Directional Keys
access the Menu, and accept entered or highlighted
information. Use for quick, convenient navigation.
From standby mode, access My Music (by pressing
Up), My Pictures (Left), Messaging (Down), and the
Bluetooth Menu (Right). You can view more
information on page 33. When navigating menus, use
the Directional Keys to scroll to choices and settings.
9. Vibrate Mode Key From standby mode*, press and
hold for about 3 seconds to activate Vibrate Mode.
10. Alphanumeric keypad Use to enter numbers and
characters and select menu items
Use to unlock the screen,
Phone Overview
17
Page 20
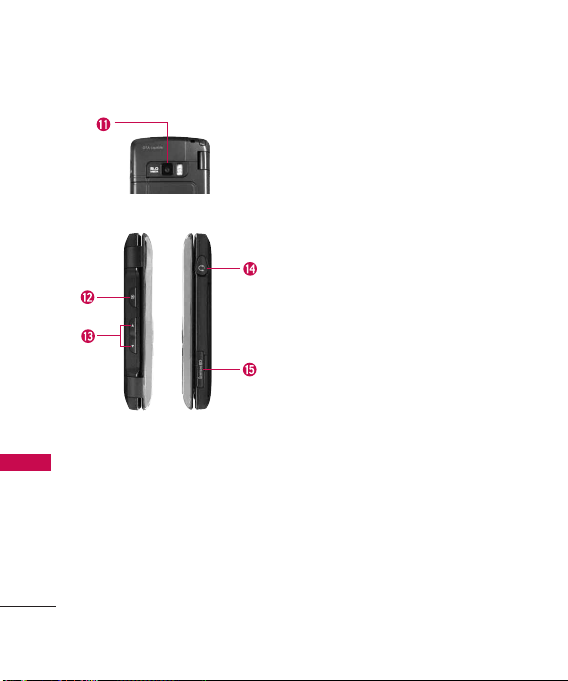
Phone Overview
Phone Overview
18
11. Camera Lens Used for taking pictures and
recording video. Keep it clean for optimal quality.
12. Camera Key Use for quick access to Camera
function.
13. Vo lum e Keys Use to adjust the Master Volume in
standby mode and the Earpiece Volume during a
call.
14. Headset Jack Allows you to plug in an optional
headset for convenient, hands-free conversations.
Plug headset into the 2.5mm jack located at the
top right corner of the device.
™
15. microSD
Slot Accommodates an optional
™
microSD
card.
Page 21

Phone Overview
1. Left Soft Key
2. FAVO RITE S Key Add up to 10 favorite contacts
3. Message Key Use for quick access to New Text
Use to access Message menu
when in Standby mode, or other function
displayed at the bottom left of the LCD.
or groups as Favorites, so you can easily make
calls, send messages, and review messages.
Message.
4. Shift Key Use to change letter case when
typing.
5. Sym Key Use to insert symbols (displayed at
the top of designated keys) into your text.
6. Game Directional Keys Use for game
navigation and for general browsing.
7. Alphanumeric Keypad Use to enter numbers
and characters and select menu items.
19
Page 22

Phone Overview
8. Space/ Voice Commands Key Use to enter a
space while editing. The TTS (Text to Speech)
function is available with when viewing
received messages in the Messaging Inbox and
Notepad notes. Press to activate Voice
Commands in standby mode.
9. Return Key Moves cursor to the next line.
10. CLR Key Press to delete a single space or
character, or press and hold to delete entered
text. Press once in a menu to go back one
level.
11. Speakerphone Key Use to activate
Speakerphone Mode.
12. Directional Keys Use for quick, convenient
Phone Overview
navigation. From standby mode, access the
Browser, Calendar, My Shortcuts and BREW
(you can change any of these to other menus
in the Settings menu).
13. OK Key Use to activate a selected screen item
or to select the option displayed in the center
of the bottom of the LCD.
20
14 . PWR/END Key Use to turn the power on/off
and to end a call. Use to return to standby
mode.
15. SEND Key Use to make or answer calls.
16. Right Soft Key Use to access the Contact List
when in Standby mode, or select the option
displayed at the bottom right of the LCD.
17. LCD Screen Displays incoming calls, messages
and indicator icons as well as a wide variety of
content you select to view.
18 . Light Sensor Automatically adjusts the
brightness of the internal LCD. To disable this
sensor and set the brightness to a fixed level,
use the Brightness submenu in the Display
menu.
19. Speakers Let you hear the caller's voice while
in speakerphone mode. Also let you hear
music and video sounds.
Page 23

Using the QWERTY Keypad
When writing a message (Text, Picture Video or Voice), use the
QWERTY keypad.
Press this key to access your
Favorites contacts list. From here
you can easily make calls, send
and view messages.
Use the navigation keys to go to next
field such as recipient address, text,
picture and video depending on the
message types. Use the Key to
send a message when finished.
Use to enter numbers.
Phone Overview
Use to enter
letters.
Press this key first and then any key
with a symbol on it to insert that
symbol in your message.
Use to insert a
space between a
letter, words and
sentences.
Use to go to next
line editing your
message.
Use to delete a letter,
words or sentences. Also
use it to exit the menu and
go back to standby mode.
21
Page 24

Menus Overview
Menus Overview
22
Messaging
1. New Message
2. Messages
3. Drafts
4. Voicemail
5. Settings
1. Messages View
2. Entry Mode
3. Auto Save Sent
4. Auto Erase Inbox
5. Messaging Font
Size
6. Text Auto View
7 Text Delivery
Receipt
8. Text Auto Scroll
9. Multimedia Auto
Receive
10. Quick Text
11. Voicemail #
12. Callback #
13. Signature
6. Erase All
Recent Calls
1. Missed
2. Received
3. Dialed
4. All
5. View Timers
Contacts
1. New Contact
2. Contact List
3. Favorites
4. Groups
5. Speed Dials
6. My Name Card
My Stuff
1. Ringtones &
Sounds
2. Pictures & Videos
BREW
Web
My Music
1. All Songs
2. Playlists
3. Artists
4. Genres
5. Albums
6. Manage My Music
7. Music Settings
8. Sync Music
Tools
1. Voice Commands
2. Bluetooth Menu
3. Calculator
4. Ez Tip Calculator
5. Calendar
Page 25

6. Alarm Clock
7. Stopwatch
8. World Clock
9. Notepad
10. USB Mass Storage
Settings
1. Sounds Settings
1. Easy Set-up
2. Master Volume
3. Call Sounds
4. Alert Sounds
5. Keypad Volume
6. Digit Dial
Readout
7. Service Alerts
8. Power On/Off
9. Voice Clarity
2. Display Settings
1. Easy Set-up
2. Banner
3. Backlight
4. Brightness
5. Wallpaper
6. Charging Screen
7. Font Size
8. Menu Font Type
9. Clock Format
3. Phone Settings
1. Airplane Mode
2. Set Shortcuts
3. Voice
Commands
4. Language
5. Location
6. Security
7. System Select
8. NAM Select
9. BREW & Web
4. Call Settings
1. Answer Options
2. End Call
Options
3. Auto Retry
4. TTY Mode
5. One Touch Dial
6. Voice Privacy
7. DTMF Tones
5. USB Mode
6. Memory
1. Save Options
2. Phone Memory
3. Card Memory
7. Phone Info
1. My Number
2. ESN/MEID
3. SW/HW Version
4. Icon Glossary
Menus Overview
23
Page 26

Getting Started with Your Phone
The Battery
Note
It is important to fully charge the
battery before initial use of the
phone.
Getting Started with Your Phone
The phone comes with a
rechargeable battery. The battery
charge level is shown at the top
of the LCD screen.
Installing the Battery
To install the battery, insert the
top edge (opposite the battery
terminals) of the battery into the
opening on the back of the
phone. Push the battery down
until it clicks into place.
24
Removing the Battery
Turn power off. Slide the battery
release latch away from the edge
of the battery, then lift the edge
of the battery to remove it.
Page 27

Charging the Battery
Your
Ellipse
device comes with a
cableless travel adapter and a
USB data cable which are
connected together to charge
your phone. To charge your
phone:
Notice
Please use only an approved
charging accessory to charge your
LG phone.
Improper handling of the charging
port, as well as the use of an
incompatible charger, may cause
damage to your phone and void the
warranty.
1. Connect the cableless wall
adapter and USB data cable.
When connecting as shown
below, the LG logo on the
USB cable should face toward
you.
2. Gently uncover the accessory
charging port, then plug the
end of the AC adapter into
the phone’s charger port and
the other end into an
electrical outlet.
Notice
Please make sure that the
'B' Side faces up before inserting a
charger or data cable into the
charger port of your phone.
Getting Started with Your Phone
25
Page 28
Getting Started with Your Phone
Charging with USB
You can use your computer to
charge your phone. Connect
one end of the USB cable to the
charging accessory port on your
Getting Started with Your Phone
phone and the other end to a
powered USB port on your PC.
A USB Hub should be powered
by an external power source (see
Note below).
Note
●
Low-power USB ports are not
supported, such as the USB port
on your keyboard or bus-powered
USB hub.
26
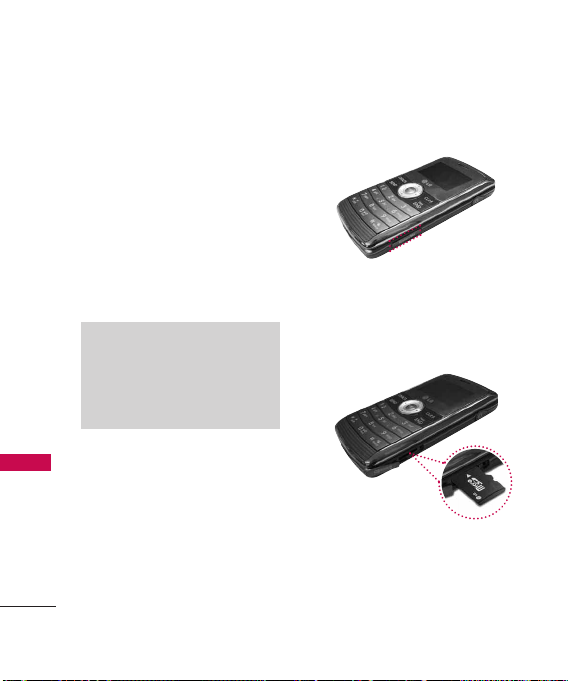
How to Install Your
microSD™Card
1. Locate the microSD™slot on
the right side of the phone
and gently uncover the slot
opening.
Page 29

2. Insert the microSD™card
facing up and push until it
clicks into the slot. If you
insert the card in the wrong
direction, it may damage your
phone or your card.
How to Remove Your
microSD™Card
1. Push the card in to release the
exposed edge of the
™
microSD
2. Remove the microSD
from the slot and replace the
cover.
card to eject it.
™
card
Note
●
Do not attempt to remove the
™
microSD
card while reading or
writing to the card.
●
Users wishing to transfer music
onto a MicroSD
™
card inserted
into this phone (through MTP
Sync) should format the MicroSD
card on this handset before using
it through(Menu -> Settings ->
Memory -> Card Memory ->
Options -> Format). Warning:
Formatting the MicroSD
erase all contents on the card. In
the event the MicroSD
™
™
card will
card is
used on this phone without first
formatting it, errors may occur.
Song files stored on a microSD
card that are downloaded or
otherwise purchased from third
party providers, may be protected
by DRM and may not be playable
on this phone.
Getting Started with Your Phone
™
TM
27
Page 30

Getting Started with Your Phone
Battery Temperature
Protection
Though extremely rare, if the
battery becomes overheated, the
phone will automatically turn off.
Getting Started with Your Phone
When you turn the phone back
on, a message will notify you
that the phone was powered off
for your safety.
Battery Charge Level
You can find the battery charge
level at the top right of the LCD
screen. When the charge level
becomes low, the battery sensor
sounds a warning tone, blinks the
battery icon, and displays a
warning message. As the charge
level approaches empty, the
phone automatically switches off,
unsaved items may be lost or
erased as a result.
28
Turning the Phone On and
Off
Turning the Phone On
Using the Internal Keypad
1. Install a charged battery or
connect the phone to external
power source.
2. Open the flip and press
for a few seconds until the
LCD screen lights up.
Using the External Power Key
1. Install a charged battery or
connect the phone to external
power source.
2. Press for a few seconds
until the LCD screen lights up.
Page 31

Turning the Phone Off
Using the Internal Keypad
1. Press and hold until the
display turns off.
Using the External Power Key
1. Unlock the screen by pressing
.
2. Press and hold until the
display turns off.
Signal Strength
Call quality depends on the
signal strength in your area. You
can tell how much signal strength
you have by the number of bars
next to the signal strength icon;
the more bars, the stronger the
signal. If you’re having problems
with signal quality, move to an
open area or, when inside a
building, try moving towards a
nearby window.
Making Calls
Make sure the phone is turned
on.
Note
To activate the speakerphone during
a call, simply open the flip.
Using the External Keypad
1. Unlock the screen by pressing
.
2. Enter the phone number
(include the area code, if
needed).
3. Press the key.
4. Press the key to end
the call.
Getting Started with Your Phone
29
Page 32

Getting Started with Your Phone
Using the Internal Keypad
1. Open the flip and enter the
phone number (include the
area code, if needed).
2. Press the key.
Getting Started with Your Phone
3. Press the key to end
the call.
Correcting Dialing Mistakes
If you make a mistake while
dialing a number, press
once to erase the last digit
entered, or hold down for
at least 2 seconds to delete all
digits. When using external
keypad, use .
30
Redialing Calls
Press and hold the external
key or the internal
key to redial the last number you
dialed, received or missed. The
last 270 calls are stored in the
call history list and you can
select any of these to redial.
Receiving Calls
Using the External Keypad
1. When the phone rings or
vibrates, press the key.
2. Press the key to end
the call.
Note
Simply press the key to
immediately silence the ringtone or
vibration for that call. Or, you can
press the key to unlock the
screen, then select
Options > Quiet
.
Page 33

Using the Internal Keypad
1. There are several ways of
answering a call, depending on
your selected Answer Options
(for instructions on how to
set your preferences, see page
124):
●
Flip Open:
Open the flip to
answer.
●
Any Key:
Press the key
or, with the phone unlocked,
press any other key except the
key.
●
Auto with Handsfree:
The call
automatically connects when
connected to a handsfree
device.
If none of the Answer Option
boxes are checked, only the
SEND
Key will answer a call.
Note
If you press the Left Soft Key
[Quiet] while the phone is ringing
and the flip is open, the ringing or
vibration is muted for that call.
If you press the Right Soft Key
[Ignore] while the phone is ringing
and the flip is open, the call will end
or go to voicemail.
If you press [Text] while the
phone is ringing and the flip is
already open, the call will end and
will be able to select a Quick Text
message to send to the caller.
Getting Started with Your Phone
31
Page 34

Quick Access to Convenient Features
Vibrate Mode
Sets the phone to vibrate instead
of ring ( is displayed on the
Status bar). To set Vibrate Mode,
Quick Access to Convenient Features
press and hold on the
internal keypad, or on the
external keypad (after unlocking
the phone if locked).
To return to Normal Mode, press
and hold again on the
internal keypad, or on the
external keypad.
Mute Function
The Mute Function prevents the
transmission of your voice to the
caller. To quickly activate Mute
using the internal keypad, press
the Left Soft Key
To unmute press the Left Soft
Key
When the flip is closed, press
[Mute], and press . To unmute,
press
[Unmute]
32
[Unmute]
[OPTIONS]
[OPTIONS],
, and press .
[Mute]
again.
, highlight
highlight
Quick Volume Adjustment
Quickly adjust ringer and
earpiece volumes by pressing the
upper volume key to increase
and the lower volume key to
decrease.
Note
The earpiece volume can only be
adjusted during a call.
Call Waiting
During a call, one beep indicates
that you have another incoming
call.
Ignoring a Call Waiting
If you don't want to answer the
.
incoming call, press the Right
Soft Key
the flip is open. When the flip is
closed, you can ignore the call
by pressing
selecting
Ignore
[Ignore]
[OPTIONS]
.
when
and
Page 35

Answering a Call Waiting
1. Press the internal key /
external key to
automatically put the first call
on hold and answer the new
call.
2. Press the internal key /
external key again to
put the second call on hold
and return to the first call.
Shortcuts
Your
Ellipse
device has shortcut
keys built in to allow quick and
convenient access to phone
features.
Note
The preset shortcuts for the internal
keypad can be changed to suit your
needs.
External Directional Keys
Shortcut Access
1. Unlock the screen by pressing
.
2. Press the Navigation Key:
●
Up Navigation Key
accesses My Music
●
Down Navigation Key
accesses Messaging
●
Left Navigation Key
accesses My Pictures
●
Right Navigation Key
accesses Bluetooth Menu
Internal Directional Keys
Shortcut Access
1. Open the flip.
2. Press the Navigation Key:
Quick Access to Convenient Features
33
Page 36

Quick Access to Convenient Features
●
Up Navigation Key
accesses Web
●
Down Navigation Key
Quick Access to Convenient Features
accesses My Shortcuts
●
Left Navigation Key
accesses Calendar
●
Right Navigation Key
accesses BREW
Voice Commands
Voice Commands allow you to
do things by verbal command
(for example, make calls, call
voicemail and more).
1. Access the Voice Commands
feature:
●
With the flip open, press
.
34
●
With the flip closed and the
screen unlocked, give the
a quick press (an
extended press activates the
Voice Recorder feature
instead).
2. Follow the prompts to use
your voice command(s).
Note
Voice Commands can also be started
with the designated key on your
®
Bluetooth
manual of the Bluetooth
further instructions.
device. Please check the
®
device for
Page 37

Contacts in Your Phone’s Memory
Storing Basics
Using the Internal Keypad
1. Open the flip.
2. Enter a number (max. 48
digits), then press the Left
Soft Key
3. Use the Directional Key
to scroll to
Contact/ Update Existing
then press .
4. Use the Directional Key
to scroll to
Work/ Mobile 2/ Fax
press .
5. Enter a name (max. 32
characters), then press to
save.
6. Press to exit, to
call, or the Right Soft Key
options.
[Save]
Add New
Mobile 1/ Home/
[Options]
for other
.
, then
Using the External Keypad
1. Unlock the screen by pressing
.
2. Enter a number (max. 48
digits), then press
[Options]
3. Press to
4. Use the Directional Key
,
to scroll to
Work/ Mobile 2/ Fax
press .
5. Enter a name (max. 32
characters), then press to
save.
Using the External Keypad with
the Contacts Menu
1. Unlock the screen by pressing
2. Press
.
once or twice.
[MENU]
Save
.
Mobile 1/ Home/
, then
.
Contacts in Your Phone’s Memory
35
Page 38

Contacts in Your Phone’s Memory
3. Use the Directional Key
to scroll to
then press .
4. Press
Contacts in Your Phone’s Memory
5. Enter the name, then use the
Directional Key to scroll
down to the phone number
type you want to enter.
6. Enter the number, then press
Contacts
New Contact
to save.
Editing Individual Entries
Using the Internal Keypad
1. Press the Right Soft Key
[Contacts]
Directional Key to scroll
to an entry.
2. Press the Left Soft Key
[Edit]
, then use the
.
36
,
.
3. Use the Directional Key
to scroll to the information to
customize.
4. Change the entry as you
want, then press to save
your changes.
Note
The external keypad cannot be used
to customize an existing Contact
entry.
Speed Dial
Allows you to set up your Speed
Dials.
Using the Internal Keypad
1. Press the Right Soft Key
[Contacts]
Directional Key to scroll
to an entry.
2. Press the Left Soft Key
[Edit]
, then use the
.
Page 39

3. Use the Directional Key
to scroll to a phone number,
then press the Right Soft Key
[Options]
.
4. Use the Directional Key
to scroll to
Set Speed Dial
then press .
5. Assign a Speed Dial digit.
●
Use the keypad to enter a
digit, then press to set.
●
You can also use the
Directional Key to
scroll to the Speed Dial
digit, then press to set.
6. Screen prompt appears
Assign
Speed Dial to Contact?
Ye s
to select
, then press
again to save.
,
Press
Storing a Number with
Pauses
Pauses allow you to enter
additional series of numbers to
access automated systems such
as Voicemail or credit billing
numbers. Pause types are:
Wa it
(W) -- the phone stops
dialing until you press the Left
Soft Key
advance to the next number.
2-Sec Pause
waits two seconds before
sending the next string of digits.
Using the Internal Keypad
1. Enter a number, then press the
Right Soft Key
[Options]
2. Use the Directional Key
to scroll to
Pause
press .
[Release]
(P) -- the phone
.
Add 2-Sec
or
Add Wait
to
, then
Contacts in Your Phone’s Memory
37
Page 40

Contacts in Your Phone’s Memory
3. Enter additional number(s)
(e.g., pin number, credit card
number, etc.).
4. Press the Left Soft Key
[Save]
Contacts in Your Phone’s Memory
.
5. Complete the Contact entry
as necessary.
Using the External Keypad
1. Unlock the screen by pressing
.
2. Enter a number, then press
[Options]
3. Use the Directional Key
Add Wait
Save
Add 2-Sec Pause
, then press .
[Options]
.
to scroll to
or
4. Enter additional number(s)
(e.g., pin number, credit card
number, etc.).
5. Press
select
38
6. Complete the Contact entry
as necessary.
Adding Additional Phone
Number(s) to Existing
Contact
From Standby Mode Using the
Internal Keypad
1. Enter a phone number, then
press the Left Soft Key
[Save]
.
2. Use the Directional Key
.
and
to scroll to
then press .
3. Use the Directional Key
to scroll to an existing entry,
then press .
4. Use the Directional Key
to scroll to
Work/ Mobile 2/ Fax
press to save.
Update Existing
Mobile 1/ Home/
,
, then
Page 41

From the Contact List Screen
Using the Internal Keypad
1. Press the Right Soft Key
[Contacts]
2. Use the Directional Key
to scroll to an entry, then
press the Left Soft Key
[Edit]
3. Use the Directional Key
to scroll to the phone number
field to add, then enter the
number and press to
save.
.
.
Changing Saved Information
Using the Internal Keypad
1. Press the Right Soft Key
[Contacts]
2. Use the Directional Key
to scroll to a Contact entry,
then press the Left Soft Key
[Edit]
.
.
3. Use the Directional Key
to scroll to the field you want
to change.
4. Make the changes, then press
to save.
Changing the Default
Number
The Default Number is the first
phone number you entered when
you created the Contact.
Another number can be saved as
the Default Number.
Using the Internal Keypad
1. Press the Right Soft Key
[Contacts]
2. Use the Directional Key
to scroll to an entry.
3. Press the Left Soft Key
[Edit]
.
.
Contacts in Your Phone’s Memory
39
Page 42

Contacts in Your Phone’s Memory
4. Use the Directional Key
to highlight a phone number,
then press the Right Soft Key
[Options]
5. Use the Directional Key
Contacts in Your Phone’s Memory
to highlight
then press .
6. A confirmation message is
displayed. Press to set
the new number as the
default.
7. Press again to save.
Deleting
Deleting a Phone Number
Using the Internal Keypad
1. Press the Right Soft Key
[Contacts]
2. Use the Directional Key
to scroll to an entry.
40
.
Set As Default
.
3. Press the Left Soft Key
[Edit]
.
4. Use the Directional Key
to scroll to a phone number.
5. Press and hold to delete
,
it.
6. Press to save.
Note
This will only work when you have
more than one number listed per
contact.
Deleting a Contact Entry Using
the Internal Keypad
1. Press the Right Soft Key
[Contacts]
2. Use the Directional Key
to scroll to an entry.
3. Press the Right Soft Key
[Options]
Erase
.
, then press
.
Page 43

4. Press
[Yes]
.
Removing a Speed Dial
Using the Internal Keypad
1. Press the Right Soft Key
[Contacts]
2. Use the Directional Key
to highlight a Contact entry
to edit and press
3. Select the phone number with
the Speed Dial, then press
4. Press the Right Soft Key
[Options]
5. Press
Dial
6. Press
7. Press to save.
[EDIT]
.
.
[VIEW].
.
.
Remove Speed
[Yes]
.
Speed Dialing
Allows you to make phone calls
quickly and easily to numbers
stored in Contacts. You need to
set Speed Dials in your Contacts
before using this feature.
Note
Speed Dial 1 is for Voicemail.
Single Digit Speed Dials
From the Standby screen, press
and hold the Speed Dial digit.
Your phone recalls the phone
number from your Contacts,
displays it, and dials it for you.
Contacts in Your Phone’s Memory
41
Page 44

Contacts in Your Phone’s Memory
Multiple Digit Speed Dials
When you press and hold a
number key, it signals the phone
to attempt a Speed Dial
transmission. To dial Speed Dials
Contacts in Your Phone’s Memory
with multiple digits, press the
first digit(s) as necessary, then
press and hold the last digit. For
example, to Speed Dial 25, press
, then press and hold .
Note
You can also enter the Speed Dial
digit(s), then press the internal
key / external key.
42
Page 45

MESSAGING
The phone can store over 690
different messages (including a
maximum of 300 SMS and 100
MMS messages). The
information stored in the
message is determined by phone
model and service capability.
Other limits to available
characters per message may
exist. Please check with your
service provider for system
features and capabilities.
Shortcut
From standby mode with the flip
open, pressing the Message Key
is a shortcut key to a NEW
TEXT MESSAGE.
●
When in Standby mode, with
the flip open, you can open
the Messaging Menu by
pressing the Left Soft Key
[Message]
.
Using Phone Menus
●
You can call the person that
sent you a message by simply
highlighting the received
message and pressing the
internal Send key or the
external Send key when
the message is highlighted.
New Message Alert
Your phone will alert you when
you have new messages.
1. The phone displays a message
on the screen and the
message alert ringtone will
sound (depending on the
Master Volume settings).
2. The message icon ( ) is
displayed on the display
screen. In the case of a high
priority message, the icon
( ) is displayed on the
screen.
MESSAGING
43
Page 46

MESSAGING
1. New Message
Allows you to send messages
(Text, Picture, Video, and Voice).
Options are dependent upon the
type of message you want to
send.
1.1 Text Message
Using the Internal Keypad
1. Open the flip and press
[MENU]
.
MESSAGING
2. Press
3. Press
4. Press
5. Enter the phone number of
the recipient or the email
address for an email message.
You can enter up to 10
addresses for a single
message.
6. Press .
44
Messaging
New Message
Text Message
7. Type your message.
[SEND]
To
field and press
Te x t
field and press
.
.
8. Press
A sending screen is displayed.
Customizing the Message Using
Options
1. Create a new Text Message
(follow steps 1-4 from the
previous section).
2. Go to the
the Right Soft Key
[Add]
.
.
.
.
3. Select the option(s) to
customize.
From Contacts/ From Recent
Calls/ Favorites/ Groups
4. Go to the
the Right Soft Key
[Options]
5. Select the option(s) to
customize.
Page 47

Insert Quick Text Allows you
to insert a Quick Text saved
on the phone.
Save As Draft Saves the
message into the Drafts folder.
Add Allows you to add
Singnature or Contact
Number/Email.
Copy Text Allows you to copy
text that has been entered.
Paste Allows you to paste
copied text.
Priority Level Allows you to
set the message priority.
High/ Normal
Callback # Inserts a pre-
programmed callback number
with your message.
On/ Off/ Edit
Save Quick Text Allows you to
save entered text as a Quick
Text for future use.
Cancel Message Cancels
message editing and goes to
Message menu.
6. Complete and send by
pressing , or .
Using the External Keypad
1. Unlock the screen by pressing
once or twice.
2. Press
[MENU]
.
3. Use the Directional Key
to scroll to
Messaging
,
then press .
4. Press
Message
New Text
.
5. Enter the phone number of
the recipient or the email
address for an email message.
NOTE
You can only enter to 1 address for
the message.
MESSAGING
45
Page 48

MESSAGING
6. Press
change the entry mode or
enter the address from your
Contacts or group.
7. Press .
8. Type your message (text or
email).
9. Press
select Send.
A sending screen is displayed.
MESSAGING
1.2 Picture Message
[OPTIONS]
[OPTIONS]
Sending a Message Using the
Internal Keypad
1. Press the Left Soft Key
[Message]
2. Press
3. Press
4. Enter the cellular phone
number or email address of
the recipient.
.
New Message
Picture Message
46
to
and
.
5. Press .
6. Type your message.
7. Use the Directional Key
to highlight the
and press the Left Soft Key
[My Pictures]
Directional Key to scroll
to the image you want to
send, then press .
8. Use the Directional Key
to highlight the
field, then press the Left Soft
Key
Directional Key to scroll
to the audio file you want to
send then press .
9. Use the Directional Key
to highlight the
.
field, then press the Left Soft
Key
Directional Key to
choose
From Contacts
.
Picture
. Use the
Sound
[Sounds]
. Use the
Name Card
[Contacts]
. Use the
My Name Card
, and press
field
/
Page 49

10. Use the Directional Key
Subject
to highlight the
and enter the subject.
11. Press
A confirmation message is
displayed.
[SEND]
field
.
Customizing the Message Using
Options
1. Create a new Picture Message
(follow steps 1-4 from the
previous section).
To
2. With the
press the Right Soft Key
[Add]
3. Select the option(s) to
customize.
: field highlighted,
.
From Contacts/ From Recent
Calls/ Favorites/ Groups
4. With the
Te x t
field
highlighted, press the Right
Soft Key
[Options]
.
5. Select the option(s) to
customize.
Preview Displays the Picture
message as it would be seen
by the recipient.
Save As Draft Saves the
message into the Drafts folder.
Insert Quick Text Allows you
to insert quick text
customized on phone.
Copy Text Allows you to copy
text that has been entered.
Paste Allows you to paste
copied text.
Add Slide Insert multiple
pictures into a picture
message.
Priority Level Allows you to
set the message priority.
High/ Normal
MESSAGING
47
Page 50

MESSAGING
Delivery Notice
Cancel Message Cancels
message editing and goes to
Message menu.
6. With the
Name Card
press the Right Soft Key
[Options]
7. Select the options to
customize.
MESSAGING
Preview/ Save As Draft/ Add
Slide*/ Priority Level/
Delivery Notice/ Cancel
Message
8. Complete and send by
pressing , or save the
message.
48
Picture,Sounds
field highlighted,
.
* Add Slides to Your Picture
Message
When you want to send multiple
pictures, use the Add Slide
option. This allows you to create
or
one picture message with
multiple pictures attached to it.
Adding Slides Using the
Internal Screen
1. Create a picture message
(follow steps 1-4 from the
Picture Message section in
page 46).
2. Add a multimedia item to your
message.
3. Highlight one of the fields and
press the Right Soft Key
[Options]
4. Press
.
Add Slide
.
Page 51

5. Continue adding slides and
text as desired. Use the
Directional Key to scroll
to the following (or previous)
slides.
6. Complete and send by
pressing , or .
1.3 Video Message
Sending a Video Message Using
the Internal Keypad
1. Press the Left Soft Key
[Message]
2. Press
3. Press
4. Enter the cellular phone
number or email address of
the recipient.
5. Press the Directional Key
fields as necessary.
.
New Message
Video Message
downward and fill in the
.
.
6. Use the Directional Key
to highlight
the Left Soft Key
[Videos]
7. Use the Directional Key
to scroll to the video file you
want to send, then press .
8. Press
Video
.
[SEND]
and press
to send.
Customizing the Message Using
Options
1. Create a new Video Message
(follow steps 1-4 from the
previous section).
To
2. With the
press the Right Soft Key
[Add]
3. Select the option(s) to
customize.
: field highlighted,
.
From Contacts/ From Recent
Calls/ Favorites/ Groups
MESSAGING
49
Page 52

MESSAGING
4. With the
highlighted, press the Right
Soft Key
5. Select the option(s) to
customize.
Preview Displays the Picture
message as it would be seen
by the recipient.
Save As Draft Saves the
message into the Drafts folder.
MESSAGING
Insert Quick Text Allows you
to insert quick text
customized on phone.
Copy Text Allows you to copy
text that has been entered.
Paste Allows you to paste
copied text.
Add Slide Insert multiple
pictures into a picture
message.
50
Te x t
field
[Options]
Priority Level Allows you to
set the message priority.
.
High/ Normal
Delivery Notice
Cancel Message Cancels
message editing and goes to
Message menu.
6. With the
7. Select the options to
Picture,Sounds
Name Card
press the Right Soft Key
[Options]
customize.
field highlighted,
.
or
Preview/ Save As Draft/ Add
Slide*/ Priority Level/
Delivery Notice/ Cancel
Message
8. Complete and send by
pressing , or save the
message.
Page 53

1.4 Voice Message
Sending a Voice Message Using
the Internal Keypad
1. Press the Left Soft Key
[Message]
2. Press
3. Press
4. Press to start recording.
5. Record your voice message.
6. Press to stop recording.
7. Enter the cellular phone
number or email address of
the recipient.
8. Press the Directional Key
downward and fill in the
fields as necessary.
9. Press
.
New Message
Voice Message
[SEND]
.
.
.
2. Messages
The phone can store several
hundred messages (including a
maximum of 300 received SMS
and 100 received MMS
messages). The information
stored in the message is
determined by the phone mode
and service capability. Other
limits to available characters per
message may exist. Please check
with your service provider for
system features and capabilities.
When your phone receives a
message, you are alerted by:
●
a notification message on the
screen.
●
an alert tone or vibration,
depending on your Master
Volume settings.
MESSAGING
51
Page 54

MESSAGING
Sorting Your Messages
You can choose to view your
messages by Time (sorted into
Inbox and Sent folders) or by
Contact (all messages in one
folder, sorted by address).
To change the message view:
1. Open the flip, then press the
Left Soft Key
Message
].
Settings
Messages View
MESSAGING
[
2. Press
3. Press
then choose:
●
TIME - to view messages
separated into Inbox and Sent
folders.
●
CONTACT - to view all
messages in a single Messages
folder. Sent and received
messages are organized by
Contact, alphabetically.
52
Viewing Your Messages
Using the Internal Keypad
1. Open the flip and press
MENU].
[
2. Press Messaging.
3. Press Messages.
4. Use the Directional Key
to scroll to a message entry.
.
5. Options from here:
,
●
Press the Left Soft Key
Reply].
[
●
Press [OPEN] to
open the message.
●
Press the Right Soft Key
[Options]
.
Erase/ Add to Contacts/
Manage Messages/
Messages View
Page 55

Message options are different
when using the 'Time' Messages
View option. While viewing
messages in the Inbox and Sent
folders, highlight a message and
press the Right Soft Key
for the options below:
Inbox folder Options
Reply Replies to the message
sender.
Reply With Copy Replies to
the message sender with a
copy of their message
included.
Forward Forwards a received
message to other destination
address(es).
Add To Contacts Stores the
callback number, email
address, and numbers from
the address of the received
message into your Contacts.
Extract Addresses Allows you
to extract a call back numbers
or email addresses in the
message.
Sort By Sender/ Time Allows
you to sort messages by
sender or time.
Extract Addresses Allows the
address(es) included in the
message to be extracted for
viewing.
Manage Inbox Allows you to
select multiple messages for
deletion or locking.
Message Info Displays
information about the
selected Inbox message.
Sent folder Options
Forward Forwards a sent
message to other destination
address(es).
MESSAGING
53
Page 56

MESSAGING
MESSAGING
54
Send/Resend Allows you to
retransmit the selected
message. For multimedia
messages, ‘Resend’ is
displayed.
Add To Contacts Stores the
callback number, email
address, and numbers from
the address of the received
message into your Contacts.
Sort By Recipients/ Time
Allows you to sort messages
by recipients or time.
Messages View Allows you to
change the messages view
setting (see page 53).
Manage Sent Allows you to
select multiple messages for
deletion or locking.
Message Info Displays
information about the
selected Sent message.
NOTE
Options may vary depending on the
type of message.
Message Icon Reference
New Text Message
Message Read
Te x t
High Priority
Lock
Multimedia Message
Unread
Multimedia Message
Read
Page 57

Message Icon Reference
Message Sent
Message Delivered
Message Failed
Pending Message
Multiple Messages Sent
Multiple Messages
Delivered
Multiple Messages
Failed
Multiple Messages
Delivery Incomplete
3. Drafts
Displays messages started, but
not yet sent.
Using the Internal Keypad
1. Open the flip and press
[MENU]
.
2. Press
3. Press
4. Use the Directional Key
to scroll to a message entry.
5. Options from here:
●
●
Messaging
Drafts
.
.
Press the Left Soft Key
[Erase]
.
Press
[EDIT]
.
MESSAGING
55
Page 58

MESSAGING
●
Press the Right Soft Key
Send Sends the selected
message to the recipient.
Add To Contacts Stores the
callback number, email
address, and numbers from
the address included in the
Draft message into your
Contacts.
MESSAGING
56
Manage Drafts Allows you to
erase, lock, or unlock your
Draft messages.
Message Icon Reference
Text Message Draft
Multimedia Message
Draft
[Options]
.
4. Voicemail
Allows you to view the number of
new voice messages recorded in
the Voicemail box. Once you
exceed the storage limit, old
messages are overwritten. When
you have a new voice message,
your phone will alert you.
Checking Your Voicemail Box
Using the Internal Keypad
1. Open the flip and press
[MENU]
.
2. Press
3. Press
4. Options from here:
●
Press the Left Soft Key
[Clear]
counter, if you have a new
voicemail.
Messaging
Voicemail
to clear the Voicemail
.
.
Page 59

●
Press or
listen to the message(s).
[CALL]
Checking Your Voicemail Box
1. Dial your wireless phone
number, then press from
your phone or dial your
wireless phone number from
any touch-tone phone.
2. When the recorded
announcement begins, press
# to interrupt the recorded
message.
3. Enter your password/security
code. Once entered, you will
be able to access your
voicemail box.
to
5. Settings
Allows you to configure settings for
Messaging:
1. Open the flip and press
[MENU]
.
2. Press
3. Press
4. Use to highlight
Messaging
Settings
Messages View/ Entry
Mode
/ Auto Save Sent/
Auto Erase Inbox/
Messaging Font Size/ Te x t
Auto View/ Text Delivery
Receipt/ Text Auto Scroll/
Multimedia Auto Receive/
Quick Text/ Voicemail #/
Callback #/ Signature
press .
5. Use to highlight one
of the settings and press
to select it.
.
.
MESSAGING
then
57
Page 60

MESSAGING
Messaging Settings Sub-Menu
Descriptions
1. Messages View
Select Time to display messages
chronologically in the Inbox and
Outbox. Select
all messages alphabetically in
one folder.
2. Entry Mode
Select T9Word , Abc , ABC or
MESSAGING
12 3 to be your default input
method.
3. Auto Save Sent
Select On to automatically save
sent messages. Select
you don't want to save them.
Prompt to be asked after
Select
every message.
58
Contact to sort
Off if
4. Auto Erase Inbox
Select On to automatically
delete read messages when you
exceed the storage limit. Or,
Off.
select
5. Messaging Font Size
Select
Normal
or
Large
for the
size of messaging characters.
6. Text Auto View
Select On to automatically
display message content on the
screen. Select
automatically display content
and read it aloud.
Select
requiring the message to be
opened to view it.
On+Readout to
Off for more privacy by
Page 61

7. Text Delivery Receipt
Select On to display the
Message Delivered icon (see
page 55) to Sent messages that
were delivered successfully. Or,
Off.
select
8. Text Auto Scroll
Select On to automatically scroll
text down while viewing
messages. Or, select
Off.
9. Multimedia Auto Receive
Select On to automatically
download attachments in
received multimedia messages.
Or, select
Off.
10. Quick Text
Displays your list of text phrases
to help you to reduce manual
input into messages. Use this
menu to edit and add text.
11. Voicemail #
Allows you to manually enter the
access number for Voicemail
Service. This number should be
only used when a VMS
(Voicemail Service) access
number is not provided from the
network.
12. Callback #
Select On to automatically send
a designated callback number
with your messages.
Or, select
Off.
13. Signature
Select Custom to create/edit a
signature to automatically send
with your messages. Select
None for no signature.
MESSAGING
59
Page 62

MESSAGING
6. Erase All
You can erase messages stored in
your Inbox, Sent, or Drafts
folders. You can also erase all
messages at the same time.
Using the Internal Keypad
1. Open the flip and press
[MENU]
.
MESSAGING
60
2. Press
3. Press
following options:
●
Messaging
Erase All
Press
Messages
Erase Received
to erase All (read
and unread) Messages or
Only read Messages in the
Inbox.
.
for the
●
Press
Messages
Erase Sent
to erase all
unlocked messages stored in
the Sent folder.
●
Press
Erase Drafts
erase all unlocked messages
stored in the Drafts folder.
●
Press
Erase All
to erase
all messages from the Inbox,
Sent, and Drafts folders
(except locked messages).
You can choose whether or
not unread messages will
also be erased.
NOTE
The Message View setting (Time or
Contact), affects the Erase All
submenu names, but nonetheless
they function the same.
Ye s
4. Select
to erase the
messages selected.
to
Page 63

RECENT CALLS
The Recent Calls Menu is a list
of the most recent phone
numbers or Contact entries for
calls you placed, accepted, or
missed. It's continually updated
as new numbers are added to the
beginning of the list and the
oldest entries are removed from
the bottom of the list.
1. Missed
Allows you to view the list of
missed calls; up to 90 entries.
Using the Internal Keypad
1. Open the flip and press
[MENU]
.
2. Press
3. Press
4. Use the Directional Key
to scroll to an entry, then
Recent Calls
Missed
.
.
RECENT CALLS
●
Press to view the entry.
●
Press to place a call to
the number.
●
Press the Right Soft Key
[Options]
Save To Contacts (Contact
Info)/ Erase/
Lock(Unlock)/ Erase All/
View Timers
●
Press the Left Soft Key
[Message]
this contact one of the
following:
Text Message/ Picture
Message/ Video Message/
Voice Message
2. Received
Allows you to view the list of
incoming calls; up to 90 entries.
to select:
to send
RECENT CALLS
61
Page 64

RECENT CALLS
Using the Internal Keypad
1. Open the flip and press
[MENU]
2. Press
3. Press
4. Use the Directional Key
to scroll to an entry, then
●
Press to view the entry.
●
RECENT CALLS
Press to place a call to
the number.
●
Press the Right Soft Key
Save To Contacts (Contact
Info)/ Erase/
Lock(Unlock)/ Erase All/
View Timers
●
Press the Left Soft Key
this contact one of the
following:
62
.
Recent Calls
Received
[Options]
[Message]
.
.
to select:
to send
Text Message/ Picture
Message/ Video Message/
Voice Message
3. Dialed
Allows you to view the list of
outgoing calls; up to 90 entries.
Using the Internal Keypad
1. Open the flip and press
[MENU]
.
2. Press
3. Press
4. Use the Directional Key
to scroll to an entry, then
●
●
●
Recent Calls
Dialed
.
.
Press to view the entry.
Press to place a call to
the number.
Press the Right Soft Key
[Options]
to select:
Save To Contacts (Contact
Page 65

Info)/ Erase/
Lock(Unlock)/ Erase All/
View Timers
●
Press the Left Soft Key
[Message]
to send
this contact one of the
following:
Text Message/ Picture
Message/ Video Message/
Voice Message
4. All
Allows you to view the list of the
most recent calls; up to 270
entries.
Using the Internal Keypad
1. Open the flip and press
[MENU]
.
2. Press
3. Press
4. Use the Directional Key
to scroll to an entry, then
Recent Calls
All
.
.
●
Press to view the entry.
●
Press to place a call to
the number.
●
Press the Right Soft Key
[Options]
to select:
Save To Contacts (Contact
Info)/ Erase/
Lock(Unlock)/ Erase All/
View Timers
●
Press the Left Soft Key
[Message]
to send
this contact one of the
following:
Text Message/ Picture
Message/ Video Message/
Voice Message
Shortcut
To quickly view a list of all your
recent calls, press the internal
key or the external key from
standby mode.
RECENT CALLS
63
Page 66

RECENT CALLS
5. View Timers
Allows you to view the duration
of the different call types.
Using the Internal Keypad
1. Open the flip and press
[MENU]
.
2. Press
3. Press
4. Use the Directional Key
RECENT CALLS
to scroll to a call list.
Last Call/ All Calls/ Received
Calls/ Dialed Calls/ Roaming
Calls/ Transmit Data/
Received Data/ Total Data/
Last Reset/ Lifetime Calls/
Lifetime Data Counter
64
Recent Calls
View Timers
5. Reset the selected call timer
by pressing the Left Soft Key
[Reset]
, or reset all the
timers by pressing the Right
Soft Key
you want to reset all the
timers at once.
.
.
NOTE
Last Reset, Lifetime Calls, and
Lifetime Data Counter cannot be
reset.
[Reset All]
if
Page 67

CONTACTS
CONTACTS
The Contacts Menu allows you
to store names, phone numbers
and other information in your
phone’s memory.
Shortcut
With the flip open, the Right Soft
Key
[Contacts]
to the Contact List.
Pressing the Favorites Key is a
shortcut to the Favorites menu.
1. New Contact
Allows you to add a new entry to
your Contact List.
NOTE
Using this submenu, the number is
saved as a new Contact. To save the
number into an existing Contact,
edit the Contact entry.
is a shortcut
Using the Internal Keypad
1.
Open the flip and press
[
MENU
].
2. Press
3. Press
Contacts
.
New Contact
.
4. Enter the name.
5.
Use the Directional Key
to scroll to the phone number
type.
6. Enter the number and press
to save.
NOTE
For more detailed information, see
page 35.
2. Contact List
Allows you to view your Contact
List.
CONTACTS
65
Page 68

CONTACTS
Using the Internal Keypad
1. Open the flip and press
[MENU]
2. Press
3. Press
4. Press the Directional Key
to scroll through your
Contacts alphabetically.
●
Press the Right Soft Key
CONTACTS
one of the following:
New Contact/ Erase/
New Text Message/
New Picture Message/
New Video Message/
New Voice Message/ Call/
Manage Contacts/ Set As
Favorite/ Send Name Card
●
Press the Left Soft Key
entry.
66
.
Contacts
Contact List
[Options]
[Edit]
to edit the
.
.
to select
●
Press
[VIEW]
to view
the entry.
NOTE
You can also use the External Keypad
to access your Contacts List:
1. Press to unlock the screen.
2. Press
3. Use to scroll to
4. Press
[Menu]
[CONTACTS]
.
and press .
Contact List
.
3. Favorites
Allows you to add to and view
your Favorites contact list.
SHORTCUT
From standby mode, with the flip
open, pressing is a shortcut to
the Favorites menu.
Using the Internal Keypad
1. Open the flip and press
[MENU]
.
2. Press
Contacts
.
Page 69

3. Press
TIP
You can add up to 10 contacts
and/or contact groups as Favorites
to easily make calls, send messages,
and view messages.
Fav or ite s
.
4. With the ADD square
selected, press to add a
Favorite.
5. Select whether you want to
add a favorite from your
Contacts / Group
.
6. Use the Directional Key
to scroll through your
Contacts or Groups
alphabetically and press
[MARK]
.
7. Press the Left Soft Key
[Done]
. Once you have
added Contacts to the
Favorites list, the following
options will become available
in the Favorites menu:
Left Soft Key :
OK Key :
Right Soft Key :
View
MESSAGES
Options
Move Position/ Remove/
Remove All
4. Groups
Allows you to view your grouped
Contacts, add a new group,
change the name of a group,
delete a group, or send a
message to everyone in the
selected group.
CONTACTS
67
Page 70

CONTACTS
Using the Internal Keypad
1. Open the flip and press
[
MENU
2. Press
3. Press
4. Use the Directional Key
to highlight a group.
●
Press the Left Soft Key
CONTACTS
group to the list.
●
Press the Right Soft Key
one of the following:
New Text Message/ New
Picture Message/ New
Video Message/ New
Voice Message/ Edit/
Erase Group / Add/ Set
As Favorite/ Send Name
Card
68
]
.
Contacts
Groups
[New]
[Options]
.
.
to add a new
to select
●
Press
the Group information.
[VIEW]
to view
5. Speed Dials
Allows you to view your list of
Speed Dials or designate Speed
Dials for numbers entered in
your Contacts.
Using the Internal Keypad
1. Open the flip and press
[
MENU
]
.
2. Press
3. Press
Contacts
.
Speed Dials
.
Page 71

4. Use the Directional Key
[OOppttiioonnss]]
to scroll to a Speed Dial
position, or enter the Speed
Dial digit, and press
[SET]
.
5. Use the Directional Key
to scroll to a Contact entry,
then press . If the contact
has more than one phone
number saved, you will need
to highlight the number you
want to set as a Speed Dial
and press .
[Yes]
6. Press
.
6. My Name Card
Allows you to view and edit your
own Contact information
including name, phone numbers,
and email addresses.
Edit Using the Internal Keypad
1. Open the flip and press
[
MENU
]
.
2. Press
3. Press
4. Press
Contacts
.
My Name Card
[EDIT]
.
.
5. Use the Directional Key
to scroll to information fields,
enter your information as
necessary, then press
[SAVE]
.
TIP
You may send your name card using
the Right Soft Key
(after step 3).
[
CONTACTS
69
Page 72

MY STUFF
MY STUFF
1. Ringtones & Sounds
1.1 My Ringtones
Allows you to set a ringtone as
your phone's ringer or alert
sounds, and download new
ringtones.
Using the Internal Keypad
1. Open the flip and press
[MENU]
Sounds
.
My Stuff
Ringtones &
.
My Ringtones
MY STUFF
2. Press
3. Press
4. Press
70
5. Use to scroll to a
ringtone and press
[PLAY]
to preview the
ringtone or press the Left Soft
[Set As]
Key
ringtone as one of the
following:
●
selected ringtone as your
phone's default ringtone.
●
select the Contact to be
identified by the ringtone you
.
.
selected.
●
corresponding number key to
set the ringtone for one of the
following:
to set the
Ringtone:
Contact ID
Sets the
:
Alert Sounds
Scroll and
: Press the
All Messages/ Text Message/
Multimedia Message/
Voicemail
Page 73

1.2 My Sounds
Allows you to select a desired
sound or record a new sound.
Using the Internal Keypad
1. Open the flip and press
[MENU]
.
2. Press
3. Press
Sounds
4. Press
5. Press
scroll and select a sound using
the Directional Key .
Options with a sound file
highlighted are:
●
1. Ringtone
My Stuff
.
Ringtones &
.
My Sounds
Record New
.
or
Press the Left Soft Key
[Set As]
.
: Sets the selected
ringtone as your phone's
default ringtone.
2. Contact ID
: Scroll and
select the Contact to be
identified by the ringtone
you selected.
3. Alert Sounds
: Press the
corresponding number key
to set the ringtone for one
of the following:
All
Messages/ Text Message/
Multimedia Message/
Voicemail
●
Press
●
Press the Right Soft Key
[PLAY]
[Options]
.
for one of
the following options:
Send/ Rename/ Move/
Copy/ Lock(Unlock)/
Erase/ Erase All/ File Info
MY STUFF
71
Page 74

MY STUFF
2. Pictures & Videos
View, take, and trade your digital
pictures and videos right from
your wireless phone.
Using the Internal Keypad
1. Open the flip and press
[MENU]
.
2. Press
3. Press
4. Use the Directional Key
MY STUFF
to highlight an option and
press , or press the
corresponding number key.
2.1 My Pictures
Allows you to view and manage
the pictures stored in your
phone. You can also take new
photos and download new
pictures.
72
My Stuff
Pictures & Videos
Using the Internal Keypad
1. Open the flip and press
[MENU]
.
2. Press
3. Press
4. Press
.
5. Use the Directional Key
to highlight a picture and
.
press the Left Soft Key
[Erase]
picture. Press
view the selected picture.
Press the Right Soft Key
the following options.
Send
Via Bluetooth
Set As
External Wallpaper/ Picture
ID
My Stuff
.
Picture & Videos
My Pictures
to erase the selected
[Options]
As Picture Message/
Internal Wallpaper/
.
[VIEW]
to access
.
to
Page 75

Take Picture Turns on the
camera function.
Slide Show Allows you to
play all your pictures.
Edit Allows you to edit the
picture.
Manage My Pictures Allows
you to send, erase, move,
copy, lock and unlock
pictures.
Print via Bluetooth/
Print
Print Preferences
Rename Allows you to
rename the selected picture.
Lock(Unlock)
Erase All
Allows you to erase
all pictures at once.
File Info
Name/ Date/ Time/
Resolution/ Size
NOTE
You can still access Options by
pressing the Right Soft Key
while viewing a picture in full screen.
NOTE
Not all options are available for
images protected by DRM (Digital
Rights Management). Also,
Bluetooth options are available only
when you select a Bluetooth device.
2.2 My Videos
Allows you to view and manage
the videos stored in your phone.
You can also record and
download new videos.
NOTE
File storage varies according to the
size of each file as well as memory
allocation of other applications.
Using the Internal Keypad
1. Open the flip and press
[MENU]
.
MY STUFF
73
Page 76

MY STUFF
2. Press
3. Press
4. Press
5. Select a video with the
Directional Key and
press the Right Soft Key
[Options]
Select one of the following
options (Options are
dependent on file types):
Send a Video
MY STUFF
Send
Message/ Via Bluetooth
Record Video Turns on the
video camera function.
Manage My Videos Allows
you to play, erase, move,
copy, lock and unlock the file.
Set As Wallpaper Displays
the selected video file as the
background for your phone.
74
My Stuff
.
Pictures & Videos
My Videos
.
.
Rename Allows you to
rename the selected video.
.
Name/ Date/ Time/
File Info
Duration/ Size
6. Press [PLAY] to play.
Options available while
playing a video are:
●
: To adjust the volume.
●
Left Soft Key : Mute/
Unmute.
●
: Pause/ Play.
●
Up Directional Key :
Expands to full screen.
●
Down Directional Key :
To stop the video.
●
Right Directional Key :
To fast forward.
●
Left Directional Key :
To rewind the video.
Page 77

2.3 Take Picture
Take pictures straight from your
phone.
Camera Lens
Camera Key
Tips
●
Use the Up/Down Directional
Keys to change the brightness
level before taking the picture.
●
Avoid jolting the camera.
●
Wipe the camera lens with a soft
cloth.
●
Take care not to cover the lens
with your finger.
Using the Internal Keypad
1. Open the flip and press
[MENU]
.
2. Press
3. Press
4. Press
My Stuff
.
Pictures & Videos
Tak e Pic tu re
.
5. Set the brightness by pressing
the Directional Key ,
zoom by pressing the
Directional Key , and
press the Right Soft Key
[
Options
] to change the
following options:
RESOLUTION 2048X 1536/
1600X1200/ 1280X960/
640X480/ 320X240
FLASH On/ Off
SELF TIMER Off/ 3 Seconds/
5 Seconds/ 10 Seconds
.
MY STUFF
75
Page 78

MY STUFF
SHOT MODE Off/ Smile
Shot/ Panorama/ Intelligent
Shot/ Dual Display
WHITE BALANCE Auto/
Sunny/ Cloudy/ Fluorescent/
Glow
COLOR EFFECTS Normal/
Negative/ Aqua/ Sepia/
Black&White
SHUTTER SOUND
No Sound /Say “Cheese”/
MY STUFF
Smile
SAVE OPTION Internal/
External
CAPTURE Camera/ Video
6. Take a picture by pressing
or located above the
Right Soft Key .
7. Save, send, or erase the
picture.
76
Shutter/
●
Press the Left Soft Key
[Save]
to store it in My
Pictures.
●
Press
[SEND]
to send a
picture message.
●
Press the Right Soft Key
[Erase]
to delete it.
2.4 Record Video
Lets you record a video with
sound.
Using the Internal Keypad
1. Open the flip and press
[MENU]
.
2. Press
3. Press
4. Press
5. Hold the phone horizontally
to record videos.
My Stuff
.
Pictures & Videos
Record Video
.
.
Page 79

6. Set the brightness by pressing
the Directional Key ,
zoom by pressing the
Directional Key or press
the Right Soft Key
[
Options
] to change other
the following options:
RECORDING TIME For
Send/ For Save
RESOLUTION 320X240/
176X144
FLASH On/ Off
SAVE OPTION Internal/
External
COLOR EFFECTS Normal/
Negative/ Aqua/ Sepia/
Black&White
WHITE BALANCE Auto/
Sunny/ Cloudy/ Fluorescent/
Glow
CAPTURE Camera/ Video
[REC]
7. Press
to begin
recording, and again to stop.
8. Save, send, or erase the
video.
●
Press the Left Soft Key
[Save] to store it in My
Videos.
●
Press [SEND] to send a
video message.
●
Press the Right Soft Key
[Erase] to delete it.
MY STUFF
77
Page 80

BREW
BREW
Brew allows you to do more than
just talk on your phone. Brew is a
technology and service that
allows you to download and use
applications on your phone. With
Brew, it is quick and easy to
personalize your phone to suit
your lifestyle and tastes. Just
download the applications that
appeal to you. With a wide range
of software available, from
ringtones to games to
productivity tools, you can be
BREW
assured that you will find
something useful, practical, or
down right entertaining.
78
Downloading Applications
You can download applications
and use Brew anywhere on the
network, as long as your handset
has a digital signal available.
Incoming Calls
While downloading an
application, incoming calls will
automatically be sent to your
voicemail, if available. If you do
not have voicemail, downloading
will not be interrupted by an
incoming call, and the caller will
receive a busy signal.
When using applications, an
incoming call will automatically
pause the application and allow
you to answer the call. When you
complete your call, you can
resume using the application.
Page 81

1. BREW Apps
Allows you to download
applications from the many fun
and available options.
1. Open the flip and press ,
.
2. Use to highlight an
option:
Browse Catalog/ Search
Note
If you attempt to download an
application when the file memory is
full, the following error message will
occur: "Sorry, not enough space to
complete the download. Would you
like to make space available and try
again?"
BREW
79
Page 82

Web
Web
The Web feature allows you to
view Internet content.
Accessibility and selections
within this feature are dependent
upon your service provider. For
specific information on Web
contact your service provider.
1. Start Browser
Allows you to initiate an Web
session.
1. Open the flip and press ,
Web
80
.
Ending an Web Session
End an Web session by pressing
.
Navigating Through the
Browser
On-screen items may be
presented in one of the following
ways:
Numbered options
You can use your numeric
keypad to access those links and
options.
Scrolling
Use to scroll through the
content if the current page does
not fit on one screen.
Fast Scrolling
Press and hold to quickly
move the cursor up and down on
the current screen.
Clearing Out Text/Numbers
Entered
When entering text, numbers or
symbols in a text entry field,
press to clear the last
number, letter, or symbol. Press
and hold to clear the input
field completely.
Page 83

My Music
My Music
Allows you to listen to music on
your phone. You can transfer
music between your phone and
your PC, manage and organize
your music files, and more.
Shortcut
Unlock the exterior screen by
pressing then press the Music
shortcut key .
NOTE
File storage varies according to the
size of each file as well as memory
allocation of other applications.
Using the Internal Keypad
1. Open the flip and press
[MENU]
.
2. Press
2. Use the Directional Key
to scroll to a category, then
press .
My Music
.
Playing Your Music
It’s easy to find and play the music
you’ve stored in your phone.
Access My Music
Using the External Keypad
1. Unlock the exterior screen by
pressing , press
MENU
], scroll to
[
with
2. Use the Directional Key
to select
MY MUSIC
then press .
Play All Songs/ All
Songs/ Playlists/ Artists/
Genres/ Albums/ Music
Settings
and press .
While playing music
Use the Directional Key
to scroll through the songs
and press to play a song.
Press Right on the Directional
Key to skip to the next song
or press and hold the same
Directional Key to fast forward.
My Music
81
Page 84

My Music
Press Left on the Directional
Key to go back to
previous songs or press and
hold the same Directional Key
to rewind.
3. Press to pause the song.
Using the Internal Keypad
1. Open the flip and press
[MENU]
.
2. Press
3. Scroll to one of the following
My Music
options, then press .
My Music
Play All Songs/ All Songs/
Playlists/ Artists/ Genres/
Albums/ Manage My Music/
Music Settings/ Sync Music
4. Scroll to a song and press
to start the Music Player.
Controlling the Music Player
If you have the flip open while
listening to your music, use the
82
following to control the Music
Player:
●
Left Soft Key
[Mute/Unmute]
Mute or
unmute the song.
●
Right Soft Key
[Options]
allows you to
choose:
Home Screen/ Exit Player/
Go to My Music/ Repeat/
.
Shuffle/ Sound Effect/ Add
Song to Playlist/ Music
Only/ Song Info
●
Side Volume Keys : Adjust the
volume.
●
/ Scroll through
the song list.
●
Play / Pause the current
song.
●
Play the previous song.
●
Play the next song.
Page 85

Tools
Your phone tools include Voice
Commands, Bluetooth Menu,
Calculator, Ez Tip Calculator,
Calendar, Alarm Clock,
Stopwatch, World Clock,
Notepad and USB Mass Storage.
1. Voice Commands
This feature provides you with
the following options equipped
with AVC (Advanced Voice
Commands) technology. Each
option has its detailed
information on the phone and
you can check it out by pressing
the Left Soft Key
Voice Commands Settings
Using the Internal Keypad
1. Open the flip and press
[MENU].
2. Press
3.
Press
Tools
Voice Commands
[Info]
.
.
4.
Press the Right Soft Key
[Settings]
.
Confirm Choice
Always Confirm/ Never Confirm
Sensitivity
Automatic/ Less Sensitive.
Adapt Voice If the phone asks
you to repeat your voice
command too often, train the
phone to recognize your voice
patterns.
Digits
Prompts
Playback/ Timeout
- For Mode, set to
Readout + Alerts/ Readout/
Ton e s O n ly.
- For Audio Playback,
set to
Earpiece
- For Timeout, set to
or
10 seconds.
.
Automatic/
More Sensitive /
Tra i n Wo r ds / Tr a in
Mode/ Audio
Speakerphone
.
Tools
Tools
Prompts/
or
5seconds
83
Page 86

Tools
CLR Key Activation If set to On,
this setting allows you to
activate Voice Command feature
with CLR key from external
On/ Off
screen.
1.1 Call <Name or
Number>
Say "Call" and then call someone
simply by saying the phone
number or name. Please speak
clearly and say the contact
names exactly as they're saved in
your Contacts list. When you
have more than one number for a
Tools
contact, you can state the name
and then the number type of the
contact (for example, 'Call John
Work').
1.2 Send Msg to <Name or
Number>
Say 'Send Message' and the
voice command will prompt you
for the type of message. After
84
choosing the message type, you
will be asked for the contact
name or number; the phone will
automatically create a new
message. If you say a fullsentence command, such as
'Send Text Message to Bob', it
will automatically start a text
message. Remember to say the
contact name exactly as it is
entered in your Contacts list.
1.3 Go to <Menu>
The 'Go to' command allows you
to access a menu within the
phone (for example, 'Go to
Contacts List’).
If no menu option is stated, a list
of options will be provided.
Please note that the options
available with the Flip closed are
different from those available
with the Flip open.
Page 87

1.4 Check <Item>
The "Check" command allows
you to check out a wide range of
items such as Phone Status,
Voicemail, Messages, Missed
Calls, Time, Signal Strength,
Battery Level and Volume.
1.5 Contacts <Name>
You can look up names in your
Contacts (for example, 'Contacts
John') as well as manage your
Contact List by calling, creating,
erasing or modifying.
Call/ Read out/ Create New/
Modify/ Erase
1.6 Help
Provides a general guideline for
using Voice Commands.
NOTE
When saying phone numbers in a
Voice Command, say the numbers
continuously (e.g., avoid pausing
between numbers).
2. Bluetooth Menu
The
Ellipse
is compatible with
devices that support the
Bluetooth
Dial Up Networking, Stereo,
Phonebook Access, Basic
Printing, Object Push, File
Transfer, Basic Imaging and
Human Interface profiles.
You may create and store 20
pairings within the
connect to one device at a time.
The approximate communication
range for Bluetooth
technology is up to 30 feet (10
meters).
Bluetooth QD ID B015118
®
Headset, Handsfree,
Ellipse
®
wireless
and
Tools
85
Page 88

Tools
NOTE
Your phone is based on the
®
Bluetooth
guaranteed to work with all devices
enabled with Bluetooth
technology.
Phone does not support ALL
Bluetooth
specification, but it is not
®
OBEX Profiles.
2.1 Add New Device
Pairing is the process that allows
a handset to locate, establish,
and register 1-to-1 connection
with a target device.
Tools
NOTE
Read the user guide of each
®
Bluetooth
trying to pair with your phone
because the instructions may be
different.
accessory that you are
86
®
wireless
To Pair with a New Bluetooth
Device Using the Internal
Keypad
1. Follow the other device’s
Bluetooth
®
instructions to set
that device to pairing mode.
2. Open the flip and press
[
MENU
]
.
3. Press
4. Press
5. Press
6. If Bluetooth
Tools
.
Bluetooth Menu
Add New Device
®
power is set to
off, you will be prompted to
turn power on. Select
Ye s
press then press
again.
7. The device will appear in
New Device
menu once it has
been located. Highlight the
device and press .
®
.
.
and
Add
Page 89

8. The handset may prompt you
for the passkey in BT. Consult
the Bluetooth
®
accessory
instructions for the
appropriate passkey in BT
(typically “0000” - 4 zeroes).
Enter the passkey and press
.
9. Once pairing is successful,
select either
Always Ask
Always Connect
or
(except for
audio devices) and press .
10. Once connected, you will
see the device listed in the
BLUETOOTH MENU.
Icon Reference in the Add New
Device List
When the Bluetooth®wireless
connection is started and paired
devices are found, the following
icons will display to demonstrate
the type of device found (see
below).
When an audio device is
found by your
device
When a PC is found by
your
When a PDA is found by
your
When another phone
device is found by your
Ellipse
Ellipse
Ellipse
device
Ellipse
device
device
Tools
87
Page 90

Tools
Tools
88
When a printer is found by
Ellipse
your
When other undefined
devices are found by your
Ellipse
device
When a keyboard is found
Ellipse
by your
When Car kit or Handsfree
device is searched by your
Ellipse
device
●
Icon References When
Successfully Connected
When an only mono
headset is connected with
Ellipse
your
When an only stereo
headset is connected with
Ellipse
your
When stereo headsets and
mono headsets are all
connected with your
Ellipse
device
When Car kit or Handsfree
device is connected with
Ellipse
your
device
device
device
device
device
My Phone Name
Allows you to edit the name of
your phone as it appears to
other Bluetooth devices, when
Add New Device menu is
highlighted.
Using the Internal Keypad
1.
Open the flip and press
[
MENU
].
2. Press
3. Press
4. Press the Right Soft Key
[Options]
5. Press
6. Press to clear the
existing name or edit it.
7. Use the keypad to enter a
new custom name.
8. Press to save and exit.
Tools
.
Bluetooth Menu
.
My Device Info
.
.
Page 91

Turn On/Off
Allows you to set the phone's
Bluetooth
Using the Internal Keypad
1.
2.
3.
4. Press the Left Soft Key
®
power On/Off.
Open the flip and press
[
MENU
].
Press
Press
[Turn On]
NOTE
By default, your device’s Bluetooth
functionality is turned off.
Tools
.
Bluetooth Menu
/ [
Tur n Of f
].
Discovery Mode
Allows you to set whether your
device is able to be found by
other Bluetooth
area.
Using the Internal Keypad
1.
Open the flip and press
[
MENU
].
.
2.
Press
3.
Press
4. Press the Right Soft Key
®
[Options]
5. Press
6. Select
Tools
Bluetooth Menu
.
Discovery Mode
On/Off
®
devices in the
.
.
.
Tools
.
89
Page 92

Tools
Supported Profiles
Allows you to see profiles that
Ellipse
your
Using the Internal Keypad
1.
Open the flip and press
[
MENU
].
2.
Press
3.
Press
4. Press the Right Soft Key
[Options].
5. Press
Profiles
Tools
.
TIPS
●
The Human Interface Design
(HID) profile is supported only for
keyboard input and available when
the flip is open or closed.
90
phone can support.
Tools
.
Bluetooth Menu
Supported
TIPS
●
The Headset and Handsfree
profiles support voice calls with a
compatible Bluetooth
car kit. Bluetooth
supported by
with the ability to use the
integrated music player (and
optional Bluetooth
headset) to listen to music,
.
providing you with lots of listening
enjoyment.
●
The Object Push profile allows
you to transfer a contact entry
(vCard) and/or transfer a calendar
event (vCal) to another OPPenabled Bluetooth
●
The Phonebook Access profile
allows your car kit and your phone
to share information. By pairing
the devices and connecting with
this profile, you can access and
use your phone book data while in
your vehicle.
®
Stereo profiles
Ellipse
®
stereo
®
device.
®
headset or
provides you
Page 93

TIPS
●
The File Transfer profile allows
sending or receiving nonprotected data files to a
compatible Bluetooth
●
The Basic Printing profile allows
you to transfer user-generated
images to a printer and print them
out.
1. Open the flip and press , ,
and .
2. Highlight the picture you want to
print.
3. Press the Right Soft Key
Options
.
4. Scroll to
5. Select
6. Select
7. Complete the pairing process.
8. Scroll to the device and press
Print
Print via Bluetooth
Search New Device
[PRINT]
.
®
device.
and press .
.
.
3. Calculator
Allows you to perform simple
mathematical calculations.
Using the Internal Keypad
1.
Open the flip and press
[
MENU
].
2. Press
3. Press
4. Enter numbers and appropriate
operation key(s) to perform
desired calculations. To cancel a
calculation, press the Left Soft
Key
Tools
.
Calculator
[Clear]
.
.
Tools
91
Page 94

Tools
5. Press the Right Soft Key
[Operators]
or power for exponential numbers.
4. Ez Tip Calculator
Allows you to quickly and easily
calculate bill amount(s) using
the bill total, tip % and number
of people as variables.
Using the Internal Keypad
1.
Open the flip and press
[
MENU
].
2. Press
Tools
3. Press
4. Enter values for all variable
fields (Total bill, Tip (%),
Split) and the corresponding
calculation fields (tip and total
for each person) are updated
automatically.
92
Tools
Ez Tip Calculator
to add parenthesis
.
5. Press the Left Soft Key
[Reset]
for another
calculation.
5. Calendar
Allows you to keep your agenda
convenient and easy to access.
Simply store your appointments,
and your phone will alert you
with reminders.
Using the Internal Keypad
Shortcut
With the flip open, the Directional
Key is a Shortcut to Calendar
.
in standby mode by default.
1.
Open the flip and press
[
MENU
].
2. Press
3. Press
Tools
Calendar
.
.
Page 95

4. Use the Directional Key
to scroll to the scheduled day.
Left Moves cursor to the
previous day.
Right Moves cursor to the
next day.
Up Moves to the previous
week.
Down Moves to the next
week.
5. Press the Left Soft Key
[Add]
.
6. Enter a Subject.
7. Scroll to a Calendar setting
field, then press the Left Soft
[Set]
Key
. For each
Calendar event you can set:
●
Start Time
●
Repeat
●
Alerts
●
Vibrate
●
End Time
●
Until
●
Tones
[SAVE]
8. Press
to save the
Calendar item.
6. Alarm Clock
Allows you to set up to ten
alarms. At the alarm time, a
notification can be displayed on
the LCD screen and the alarm
will sound(depending on your
Master Sound settings).
Using the Internal Keypad
1.
Open the flip and press
[
MENU
].
2. Press
3. Press
4. Press the Left Soft Key
Add
[
Tools
Alarm Clock
].
.
.
Tools
93
Page 96

Tools
5. Enter the alarm information
including:
●
Turn On/Off●Set Time
●
Repeat
Use the Directional Key
to scroll to the information
you want to set, then press
the Left Soft Key
to enter your choices.
6. Press
all of the Alarm fields as
necessary.
Tools
When the alarm sounds, the
alarm notification includes the
option to "snooze" or
"dismiss" the alarm, but you
can quickly turn it off by
pressing , the
any of the alphanumeric
or the vibrate mode key.
Opening and closing the flip
will also end the alarm.
94
[SAVE]
●
Ringtone
[Set]
after setting
volume keys,
keys,
7. Stopwatch
Allows you to use your phone as
a stopwatch.
Using the Internal Keypad
1.
Open the flip and press
[
MENU
].
3. Press
4. Press
5. Press
options from here:
●
●
6. Press the Right Soft Key
[Reset]
stopwatch.
Tools
.
Stopwatch
[START]
.
, then
Press the Left Soft Key
[Lap]
.
Press
[STOP]
to stop.
to reset the
Page 97

8. World Clock
[SSeett
]
Allows you to determine the
current time in another time
zone or country by navigating
with the left or right Directional
Key.
Using the Internal Keypad
1.
Open the flip and press
[
MENU
].
2. Press
3. Press
4. Press the Right Soft Key
a list of available cities.
5. Select a city from the list,
then press . The display
shows the position of the city
on a global map.
6. Press again to zoom in
on the city and view its date
and time infomation.
Tools
World Clock
[Cities]
.
.
to choose from
NOTE
With the Left Soft Key
DDSSTT]
set to daylight saving time.
[
9. Notepad
Allows you to add, read, edit,
and erase notes to yourself.
Using the Internal Keypad
1.
Open the flip and press
[
MENU
].
2. Press
3. Press
4. Press the Left Soft Key
[Add]
5. After filling in the note, press
Tools
.
Notepad
to write a new note.
to save it.
.
Tools
95
Page 98

Tools
10. USB Mass Storage
This menu allows you to transfer
content from your phone to
your Windows
or Windows Vista
versa) when your phone is
connected to your Windows
Windows 7 or Windows Vista
PC with a compatible USB
cable. Mac OS operating system
is not supported.
You can
when a microSD
inserted in your phone (see
Tools
page 26 for more information)
and the phone is connected to
your PC with a USB cable.
NOTE
Do not insert or remove the
microSD
deleting or downloading
Pictures/Videos/Music/Sounds.
96
®
only
access this menu
™
card while playing,
XP, Windows 7
™
PC (or vice
™
card is
Using the Internal Keypad
1.
Open the flip and press
[
MENU
2. Press
3. Press
®
XP,
™
Storage
].
Tools
USB Mass
.
.
Page 99

Settings
Settings
1. Sounds Settings
Provides options to customize
the phone’s sounds.
1.1 Easy Set-up
Allows you quickly set the main
Sounds Settings.
Using the Internal Keypad
1.
Open the flip and press
[
MENU
].
2.
Press
3. Press
4. Press
5. Quickly and easily set your
phone sounds settings for
keypad volume as well as
incoming calls and messages.
Settings
.
Sounds Settings
Easy Set-up.
NOTE
Set each alert separately with Ring
Only, Vibrate Only, Ring and Vibrate,
Be Silent, and ringtone as necessary.
1.2 Master Volume
Allows you to set volume
settings.
Using the Internal Keypad
1.
Open the flip and press
[
MENU
].
2.
Press
3. Press
4. Press
.
5. Adjust the volume with the
Directional Key then
press to save the setting.
●
You can test the volume at
each master volume level with
the Left Soft Key
[Play]
.
Settings
.
Sounds Settings
Master Volume
Settings
.
.
97
Page 100

Settings
1.3 Call Sounds
Allows you to set how the
phone alerts you for various
types of incoming calls. The
Sounds
menu has three
submenus that are set
independently.
1.3.1 Call Ringtone
Using the Internal Keypad
1.
Open the flip and press
[
MENU
].
Settings
2.
Press
3. Press
4. Press
5. Press
6. Use the Directional Key
to scroll to a ringtone then
press to save the sound.
98
Settings
.
Sounds Settings
Call Sounds
Call Ringtone
.
.
1.3.2 Call Vibrate
Using the Internal Keypad
1.
Call
.
Open the flip and press
[
MENU
].
2.
Press
3. Press
4. Press
5. Press
6.
Use the Directional Key
to scroll to a setting, then
.
press
On/ Off
.
1.3.3 Call ID Announcement
Using the Internal Keypad
1.
Open the flip and press
[
MENU
].
2.
Press
3. Press
Settings
.
Sounds Settings
Call Sounds
Call Vibrate
Settings
.
.
.
Sounds Settings
.
.
 Loading...