

Page 1

OWNER’S MANUAL
Safety and Reference
LED TV*
* LG LED TVs are LCD TVs with LED backlighting.
Please read this manual carefully before operating your TV and
retain it for future reference.
65SK9500PSA
65SK8500PSA
55SK8500PSA
75SK8000PSA
65SK8000PSA
55SK8000PSA
65UK7500PSA
55UK7500PSA
49UK7500PSA
86UK6520PSA
86UK6570PSA
75UK6520PSA
75UK6570PSA
70UK6540PSA
70UK6550PSA
65UK6530PSF
65UK6540PSB
65UK6550PSB
55UK6540PSB
55UK6550PSB
55UK6530PSF
55UK6500PSA
50UK6510PSF
50UK6520PSA
50UK6550PSB
50UK6500PSA
43UK6510PSF
43UK6520PSA
43UK6500PSA
65UK6350PSC
55UK6360PSF
55UK6350PSC
55UK6300PSB
49UK6300PSB
49UK6310PSE
43UK6310PSE
43UK6300PSB
60UK6200PSA
55UK6200PSA
49UK6200PSA
43UK6200PSA
32LK610BPSA
49LK5700PSC
49LK5750PSA
43LK5700PSC
43LK5750PSA
65SK9500PDA
65SK8500PDA
55SK8500PDA
65SK8000PDA
55SK8000PDA
65UK7500PDA
55UK7500PDA
49UK7500PDA
86UK6570PDA
75UK6570PDA
70UK6550PDA
65UK6550PDB
55UK6550PDB
50UK6500PDA
65UK6350PDC
65UK6300PDB
55UK6350PDC
49UK6300PDB
43UK6300PDB
60UK6200PDA
55UK6200PDA
49UK6200PDA
43UK6200PDA
32LK610BPDA
49LK5700PDC
43LK5700PDC
32LK615BPSB
49UK7510PSB
50UK6300PSB
50UK6300PDB
*MFL70301602*
(1805-REV03)
www.lg.com
Copyright ⓒ 2018 LG Electronics Inc. All Rights Reserved.
Page 2
ENGLISH
Important Safety Instruction
• Read these instructions.
• Keep these instructions.
• Heed all warnings.
• Follow all instructions.
• Do not use this apparatus near water.
• Clean only with dry cloth.
• Do not block any ventilation openings. Install in accordance with the manufacturer’s instructions.
• Do not install near any heat sources such as radiators, heat registers, stoves, or other apparatus (including ampliers) that produce heat.
• Do not defeat the safety purpose of the polarized or grounding-type plug. A polarized plug has two blades with one wider than the other. A
grounding type plug has two blades and a third grounding prong. The wide blade or the third prong are provided for your safety. If the provided
plug does not t into your outlet, consult an electrician for replacement of the obsolete outlet.
• Protect the power cord from being walked on or pinched particularly at plugs, convenience receptacles, and the point where they exit from the
apparatus.
• Only use attachments/accessories specied by the manufacturer.
• Use only with the cart, stand, tripod, bracket, or table specied by the manufacturer, or sold with the apparatus. When a cart is used, use
caution when moving the cart/apparatus combination to avoid injury from tip-over.
• Unplug this apparatus during lightning storms or when unused for long periods of time.
• Refer all servicing to qualied service personnel. Servicing is required when the apparatus has been damaged in any way, such as power-supply
cord or plug is damaged, liquid has been spilled or objects have fallen into the apparatus, the apparatus has been exposed to rain or moisture,
does not operate normally, or has been dropped.
2
Page 3

ENGLISH
Warning! Safety Instructions
CAUTION
RISK OF ELECTRIC SHOCK
DO NOT OPEN
CAUTION : TO REDUCE THE RISK OF ELECTRIC SHOCK DO NOT REMOVE
COVER (OR BACK). NO USER SERVICEABLE PARTS INSIDE. REFER TO
QUALIFIED SERVICE PERSONNEL.
The symbol is intended to alert the user to the presence of
uninsulated dangerous voltage within the product’s enclosure
that may be of sucient magnitude to constitute a risk of electric
shock to persons.
The symbol is intended to alert the user to the presence of
important operating and maintenance (servicing)
instructions in the literature accompanying the device.
WARNING : TO REDUCE THE RISK OF FIRE AND ELECTRIC SHOCK, DO
NOT EXPOSE THIS PRODUCT TO RAIN OR MOISTURE.
• TO PREVENT THE SPREAD OF FIRE, KEEP CANDLES OR OTHER ITEMS
WITH OPEN FLAMES AWAY FROM THIS PRODUCT AT ALL TIMES.
• Do not place the TV and/or remote control in the following
environments:
- Keep the product away from direct sunlight.
- An area with high humidity such as a bathroom
- Near any heat source such as stoves and other devices that
produce heat.
- Near kitchen counters or humidiers where they can easily be
exposed to steam or oil.
- An area exposed to rain or wind.
- Do not expose to dripping or splashing and do not place objects
lled with liquids, such as vases, cups, etc. on or over the
apparatus (e.g., on shelves above the unit).
- Near ammable objects such as gasoline or candles, or expose
the TV to direct air conditioning.
- Do not install in excessively dusty places.
Otherwise, this may result in re, electric shock, combustion/
explosion, malfunction or product deformation.
• Ventilation
- Install your TV where there is proper ventilation. Do not install in
a conned space such as a bookcase.
- Do not install the product on a carpet or cushion.
- Do not block or cover the product with cloth or other materials
while unit is plugged in.
• Take care not to touch the ventilation openings. When watching
the TV for a long period, the ventilation openings may become hot.
• Protect the power cord from physical or mechanical abuse, such as
being twisted, kinked, pinched, closed in a door, or walked upon.
Pay particular attention to plugs, wall outlets, and the point where
the cord exits the device.
• Do not move the TV whilst the Power cord is plugged in.
• Do not use a damaged or loosely tting power cord.
• Be sure do grasp the plug when unplugging the power cord. Do
not pull on the power cord to unplug the TV.
• Do not connect too many devices to the same AC power outlet as
this could result in re or electric shock.
• Disconnecting the Device from the Main Power
- The power plug is the disconnecting device. In case of an
emergency, the power plug must remain readily accessible.
• Do not let your children climb or cling onto the TV. Otherwise, the
TV may fall over, which may cause serious injury.
• Outdoor Antenna Grounding (Can dier by country):
- If an outdoor antenna is installed, follow the precautions below.
An outdoor antenna system should not be located in the vicinity
of overhead power lines or other electric light or power circuits,
or where it can come in contact with such power lines or circuits
as death or serious injury can occur.
Be sure the antenna system is grounded to provide some
protection against voltage surges and built-up static charges.
Section 810 of the National Electrical Code (NEC) in the U.S.A.
provides information with respect to proper grounding of the
mast and supporting structure, grounding of the lead-in wire
to an antenna discharge unit, size of grounding conductors,
location of antenna discharge unit, connection to grounding
electrodes and requirements for the grounding electrode.
Antenna grounding according to the National Electrical Code,
ANSI/NFPA 70
3
Page 4

ENGLISH
• Grounding (Except for devices which are not grounded.)
- TV with a three-prong grounded AC plug must be connected to
a three-prong grounded AC outlet. Ensure that you connect the
earth ground wire to prevent possible electric shock.
• Never touch this apparatus or antenna during a lightning storm.
You may be electrocuted.
• Make sure the power cord is connected securely to the TV and wall
socket if not secured damage to the Plug and socket may occur and
in extreme cases a re may break out.
• Do not insert metallic or inammable objects into the product. If a
foreign object is dropped into the product, unplug the power cord
and contact the customer service.
• Do not touch the end of the power cord while it is plugged in. You
may be electrocuted.
• If any of the following occur, unplug the product
immediately and contact your local customer service.
- The product has been damaged.
- If water or another substance enters the product (like an AC
adapter, power cord, or TV).
- If you smell smoke or other odors coming from the TV
- When lightning storms or when unused for long periods of time.
Even the TV is turned o by remote control or button, AC power
source is connected to the unit if not unplugged in.
• Do not use high voltage electrical equipment near the TV (e.g., a
bug zapper). This may result in product malfunction.
• Do not attempt to modify this product in any way without written
authorization from LG Electronics. Accidental re or electric shock
can occur. Contact your local customer service for service or repair.
Unauthorized modication could void the user’s authority to
operate this product.
• Use only an authorized attachments / accessories approved by
LG Electronics. Otherwise, this may result in re, electric shock,
malfunction, or product damage.
• Never disassemble the AC adapter or power cord. This may result in
re or electric shock.
• Handle the adapter carefully to avoid dropping or striking it. An
impact could damage the adapter.
• To reduce the risk of re or electrical shock, do not touch the TV
with wet hands. If the power cord prongs are wet or covered with
dust, dry the power plug completely or wipe dust o.
• Batteries
- Store the accessories (battery, etc.) in a safe location out of the
reach of children.
- Do not short circuit, disassemble, or allow the batteries to
overheat. Do not dispose of batteries in a re. Batteries should
not be exposed to excessive heat.
• Moving
- When moving, make sure the product is turned o, unplugged,
and all cables have been removed. It may take 2 or more people
to carry larger TVs. Do not press or put stress on the front panel
of the TV. Otherwise, this may result in product damage, re
hazard or injury.
• Keep the packing anti-moisture material or vinyl packing out of the
reach of children.
• Do not allow an impact shock, any objects to fall into the product,
and do not drop anything onto the screen.
• Do not press strongly upon the panel with a hand or a sharp
object such as a nail, pencil, or pen, or make a scratch on it. It may
causedamage to screen.
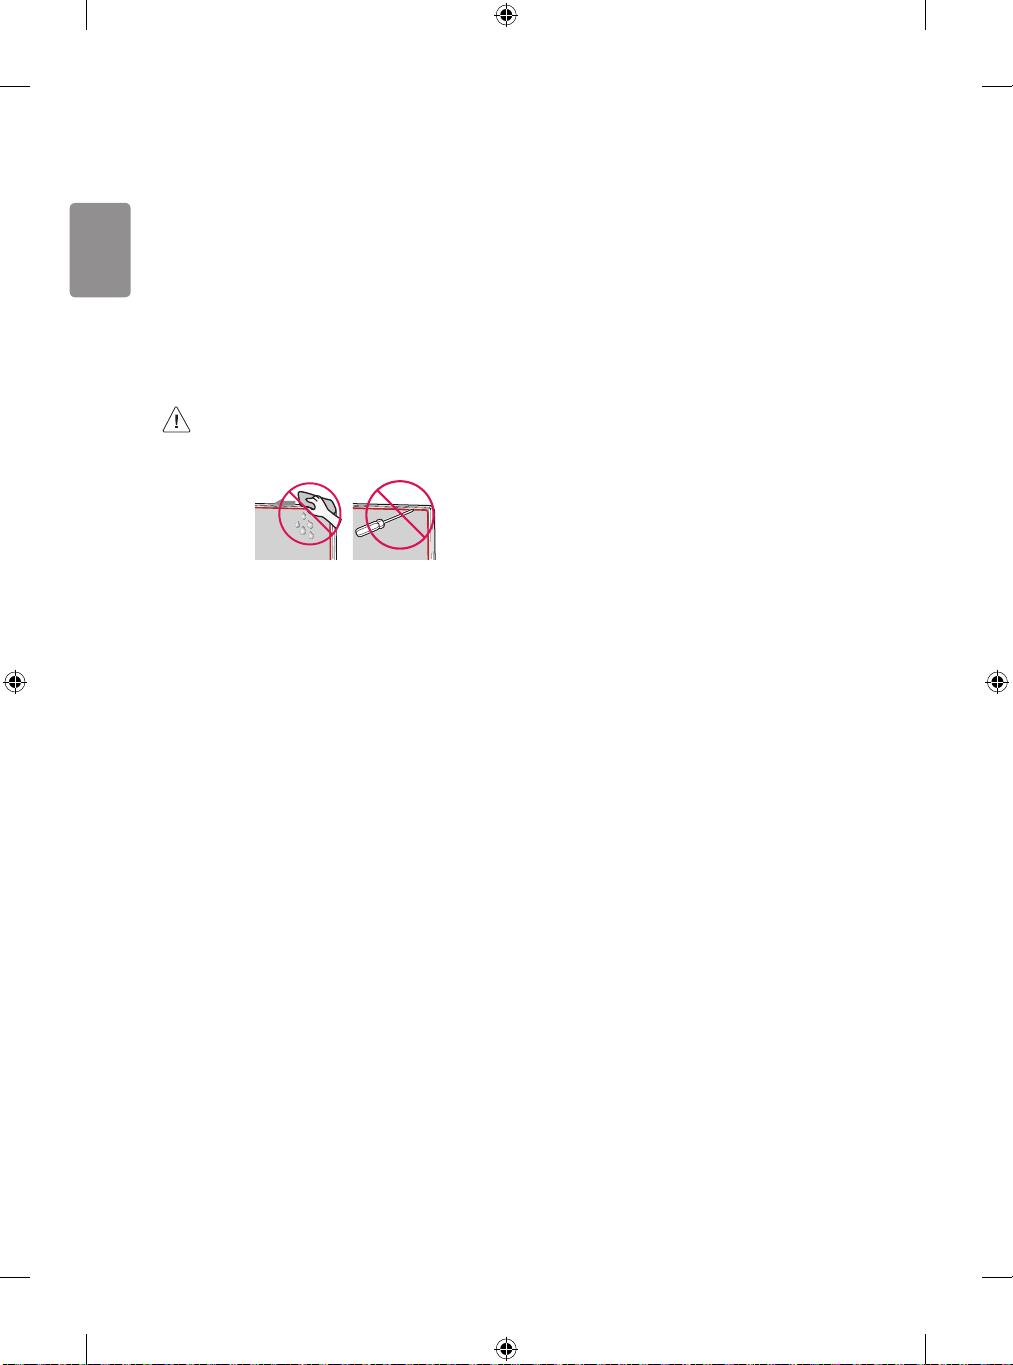
• Cleaning
- When cleaning, unplug the power cord and wipe gently with a
soft/dry cloth. Do not spray water or other liquids directly on the
TV. Do not clean your TV with chemicals including glass cleaner,
any type of air freshener, insecticide, lubricants, wax (car,
industrial), abrasive, thinner, benzene, alcohol etc., which can
damage the product and/or its panel. Otherwise, this may result
in electric shock or product damage.
4
Page 5
ENGLISH
Preparing
<
Optional Extras
• When the TV is turned on for the rst time after being shipped
from the factory, initialization of the TV may take approximately
one minute.
• Image shown may dier from your TV.
• Your TV’s OSD (On Screen Display) may dier slightly from that
shown in this manual.
• The available menus and options may dier from the input source
or product model that you are using.
• New features may be added to this TV in the future.
• The device must be easily accessed to a location outlet near the
access. Some devices are not made by turning on / o button,
turning o the device and unplugging the power cord.
• The items supplied with your product may vary depending upon
the model.
• Product specications or contents of this manual may be changed
without prior notice due to upgrade of product functions.
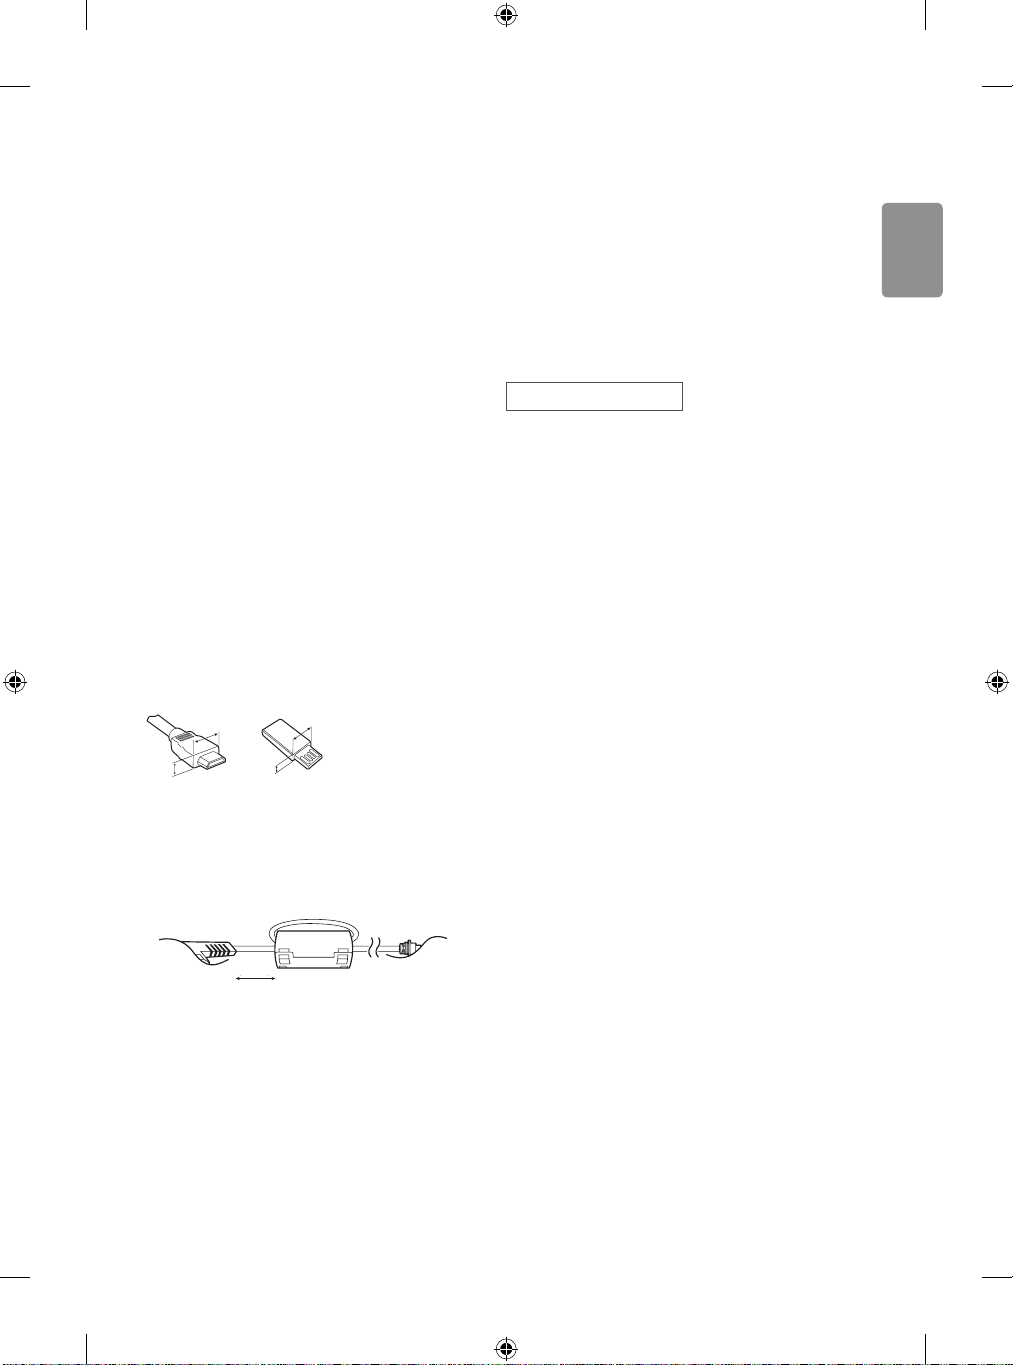
• For an optimal connection, HDMI cables and USB devices should
have bezels less than 10 mm thick and 18 mm width.
• Use an extension cable that supports USB 2.0 if the USB cable or
USB ash drive does not t into your TV’s USB port.
• Use a certied cable with the HDMI logo attached. If you do not use
a certied HDMI cable, the screen may not display or a connection
error may occur.
• Recommended HDMI cable types (3 m or less)
- High-Speed HDMI®/™ cable
- High-Speed HDMI®/™ cable with Ethernet
B
A
B
*A < 10 mm
A
18 mm
*B
Optional extras can be changed or modied for quality improvement
without any notication. Contact your dealer for buying these items.
These devices work only with certain models.
The model name or design may be changed due to the manufacturer’s
circumstances or policies.
Magic Remote Control
(Depending upon model)
AN-MR18BA
Check whether your TV model supports Bluetooth in the Wireless
Module Specication to verify whether it can be used with the Magic
Remote.
• How to use the ferrite core, (Depending upon model).
- Use the ferrite core to reduce the electromagnetic interference in
the power cord. Wind the power cord on the ferrite core once.
[Wall side]
10 cm (+ / -2 cm)
[TV side]
5
Page 6
ENGLISH
A
B
Wall Mounting Bracket
(Depending upon model)
Make sure to use screws and wall mounts that meet the VESA standard.
Standard dimensions for the wall mount kits are described in the
following table.
49UK75*
43/50UK65*
Model
VESA (A x B) 200 x 200
Standard screw
Number of screws
Wall mount bracket
(optional)
Model
VESA (A x B)
Standard screw M6 M8
Number of screws 4 4
Wall mount bracket
(optional)
43/50UK63*
43UK62*
32LK61*
43LK57*
M6
4
LSW240B
MSW240
65SK95*
55/65SK85*
65SK80*
65UK75*
65UK65*
65UK63*
60UK62*
300 x 300 600 x 400
OLW480B LSW640B
55SK80*
55UK75*
55UK65*
49/55UK63*
49/55UK62*
49LK57*
300 x 300
M6
4
OLW480B
MSW240
75SK80*
70/75/86UK65*
Lifting and moving the TV
When moving or lifting the TV, read the following to prevent the TV
from being scratched or damaged and for safe transportation regardless
of its type and size.
• It is recommended to move the TV in the box or packing material
that the TV originally came in.
• Before moving or lifting the TV, disconnect the power cord and
all cables.
• When holding the TV, the screen should face away from you to
avoid damage.
• Hold the top and bottom of the TV frame rmly. Make sure not to
hold the transparent part, speaker, or speaker grille area.
• Use at least two people to move a large TV.
• When transporting the TV by hand, hold the TV as shown in the
following illustration.
• When transporting the TV, do not expose the TV to jolts or
excessive vibration.
• When transporting the TV, keep the TV upright; never turn the TV
on its side or tilt towards the left or right.
• When handling the TV, be careful not to damage the protruding
buttons.
6
Page 7

ENGLISH
• Avoid touching the screen at all times, as this may result in
damage to the screen.
• Do not place the product on the oor with its front facing
down without padding. Failure to do so may result in
damage to the screen.
• Do not move the TV by holding the cable holders, as the
cable holders may break, and injuries and damage to the
TV may occur, (Depending upon model).
• When attaching the stand to the TV set, place the screen
facing down on a cushioned table or at surface to protect
the screen from scratches.
Mounting on the Table
• Do not apply foreign substances (oils, lubricants, etc.) to
the screw parts when assembling the product.
(Doing so may damage the product.)
• If you install the TV on a stand, you need to take actions
to prevent the product from overturning. Otherwise, the
product may fall over, which may cause injury.
• Do not use any unapproved items to ensure the safety and
product life span.
• Any damage or injuries caused by using unapproved items
are not covered by the warranty.
• Make sure that the screws are fastened tightly. (If they
are not fastened securely enough, the TV may tilt forward
after being installed.)
• Do not fasten the screws with excessive force otherwise
they may strip and become loose.
1 Lift and tilt the TV into its upright position on a table.
• Leave a minimum of 10 cm space from the wall for proper
ventilation.
10 cm
10 cm
(Depending upon model)
2 Connect the power cord to a wall outlet.
10 cm
10 cm
10 cm
Securing TV to the Wall
(Depending upon model)
1 Insert and tighten the eye-bolts or TV brackets and bolts on the back
of the TV.
• If there are bolts inserted at the eye-bolts position, remove the
bolts rst.
2 Mount the wall brackets with the bolts to the wall. Match the
location of the wall bracket and the eye-bolts on the rear of the TV.
3 Connect the eye-bolts and wall brackets tightly with a sturdy rope or
cable. Make sure to keep the rope parallel to the at surface.
• Use a platform or cabinet that is strong and large enough to
support the TV securely.
• Brackets, bolts, and ropes are optional. You can obtain additional
accessories from your local dealer.
7
Page 8

ENGLISH
Mounting to the Wall
An optional wall mount can be used with your LG Television. Consult
with your local dealer for a wall mount that supports the VESA
standard used by your TV model. Carefully attach the wall mount
bracket at the rear of the TV. Install the wall mount bracket on a solid
wall perpendicular to the oor. If you are attaching the TV to other
building materials, please contact qualied personnel to install the
wall mount. Detailed instructions will be included with the wall mount.
We recommend that you use an LG brand wall mount. The LG wall
mount is easy to adjust or to connect the cables. When you do not use
LG’s wall mount bracket, use a wall mount bracket where the device is
adequately secured to the wall with enough space to allow connectivity
to external devices. If you are using a non-adjustable mount, attach the
mount to the wall. Attach the cables to the TV rst, then attach the TV
to the mount.
10 cm
10 cm
10 cm
10 cm
10 cm
• Do not use a sharp object when you detached the cable
cover. This could damage the cable or the cabinet. It may
also cause personal harm, (Depending upon model).
• When installing the wall mounting bracket, it is recommended to
cover the stand hole using tape, in order to prevent the inux of
dust and insects, (Depending upon model).
(Depending upon model)
• Remove the stand before installing the TV on a wall
mount by performing the stand attachment in reverse.
• For more information of screws and wall mount bracket,
refer to the Separate purchase.
• If you intend to mount the product to a wall, attach VESA
standard mounting interface (optional parts) to the back
of the product. When you install the set to use the wall
mounting bracket (optional parts), x it carefully so as
not to drop.
• When mounting a TV on the wall, make sure not to install
the TV by hanging the power and signal cables on the
back of the TV.
• Do not install this product on a wall if it could be exposed
to oil or oil mist. This may damage the product and cause
it to fall.
Stand hole
8
Page 9

ENGLISH
Connections
You can connect various external devices to the TV. For more
information on external device’s connec tion, refer to the manual
provided with each device.
Antenna/Cable
Connect an antenna, cable, or cable box to watch TV while referring to
the following. The illustrations may dier from the actual items and an
RF cable is optional.
• Make sure not to bend the copper wire of the RF cable.
Copper wire
• Complete all connections between devices, and then connect the
power cord to the power outlet to prevent damage to your TV.
• To improve the picture quality in a poor signal area, purchase a
signal amplier.
• Use a signal splitter to use 2 TVs or more.
• If the antenna is not installed properly, contact your dealer for
assistance.
• This TV cannot receive ULTRA HD (3840 x 2160 pixels) broadcasts
directly because the related standards have not been conrmed,
(Depending upon model).
Other connections
Connect your TV to external devices. For the best picture and audio
quality, connect the external device and the TV with the HDMI cable.
HDMI
• Supported HDMI Audio format :
(Depending upon model)
DTS (44.1 kHz / 48 kHz / 88.2 kHz / 96 kHz),
DTS HD (44.1 kHz / 48 kHz / 88.2 kHz / 96 kHz / 176.4 kHz / 192
kHz),
True HD (48 kHz),
Dolby Digital / Dolby Digital Plus (32 kHz / 44.1 kHz / 48 kHz),
PCM (32 kHz / 44.1 kHz / 48 kHz / 96 kHz / 192 kHz)
(Only UHD models)
• ( ) Picture Additional Settings
- On : Support 4K @ 50/60 Hz (4:4:4, 4:2:2, 4:2:0)
- O : Support 4K @ 50/60 Hz 8bit (4:2:0)
If the device connected to Input Port also supports ULTRA HD Deep
Color, your picture may be clearer. However, if the device doesn’t
support it, it may not work properly. In that case, change the TV’s
- This feature is available only on certain models which support
HDMI ULTRA HD Deep Color.
External Devices
Supported external devices are: Blu-ray player, HD receivers, DVD
players, VCRs, audio systems, USB storage devices, PC, gaming devices,
and other external devices.
• If you record a TV program on a Blu-ray/DVD recorder or VCR, make
sure to connect the TV signal input cable to the TV through a DVD
recorder or VCR. For more information about recording, refer to the
manual provided with the connected device.
• The external device connections shown may dier slightly from
illustrations in a manual.
• Connect external devices to the TV regardless about the order of
the TV port.
• If you connect a gaming device to the TV, use the cable supplied
with the gaming device.
• Refer to the external equipment’s manual for operating
instructions.
• In PC mode, there may be noise associated with the resolution,
vertical pattern, contrast or brightness. If noise is present, change
the PC output to another resolution, change the refresh rate to
another rate or adjust the brightness and contrast on the PICTURE
menu until the picture is clear.
• Some USB Hubs may not work. If a USB device connected through
a USB Hub is not detected, connect it directly to the USB port on
the TV.
• When connecting via a wired LAN, it is recommended to use a CAT
7 cable.
• For LK series, HDR (High Dynamic Range) pictures can be viewed
over the Internet or via USB and HDMI 1.4 compatible devices.
setting to o.
9
Page 10
ENGLISH
Remote RS-232C setup
Using Button
To obtain the RS-232C external control setup information, please
visit www.lg.com. Download and read the manual, (Depending upon
model).
• Do not drop the product or let it fall over when connecting
external devices. Otherwise, this may result in injury or
damage to the product.
• When connecting external devices such as video game
consoles, make sure the connecting cables are long
enough. Otherwise, the product may fall over, which may
cause injury or damage the product.
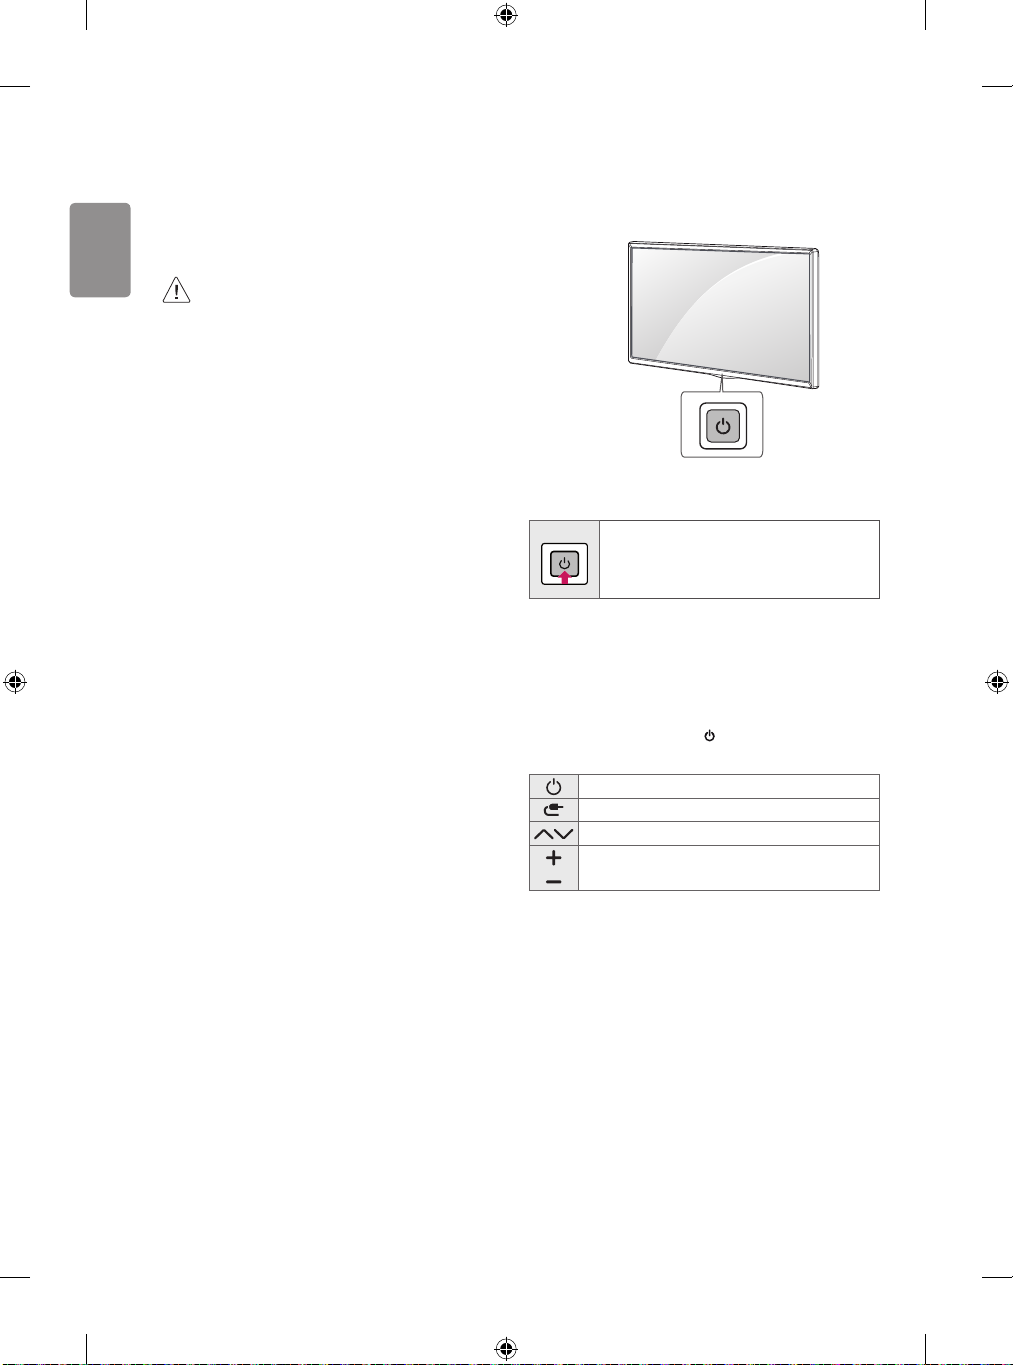
You can simply operate the T V functions, using the button.
Basic functions
Power On (Press)
Power O 1 (Press and Hold)
Menu Control (Press 2)
Menu Selection (Press and Hold 3)
1 All running apps will close, and any recording in progress will stop.
2 You can access and adjust the menu by pressing the button when
TV is on.
3 You can use the function when you access menu control.
Adjusting the menu
When the TV is turned on, press the button one time. You can adjust
the Menu items using the button.
Turns the power o.
Changes the input source.
Scrolls through the saved Channels.
10
Adjusts the volume level.
Page 11
ENGLISH
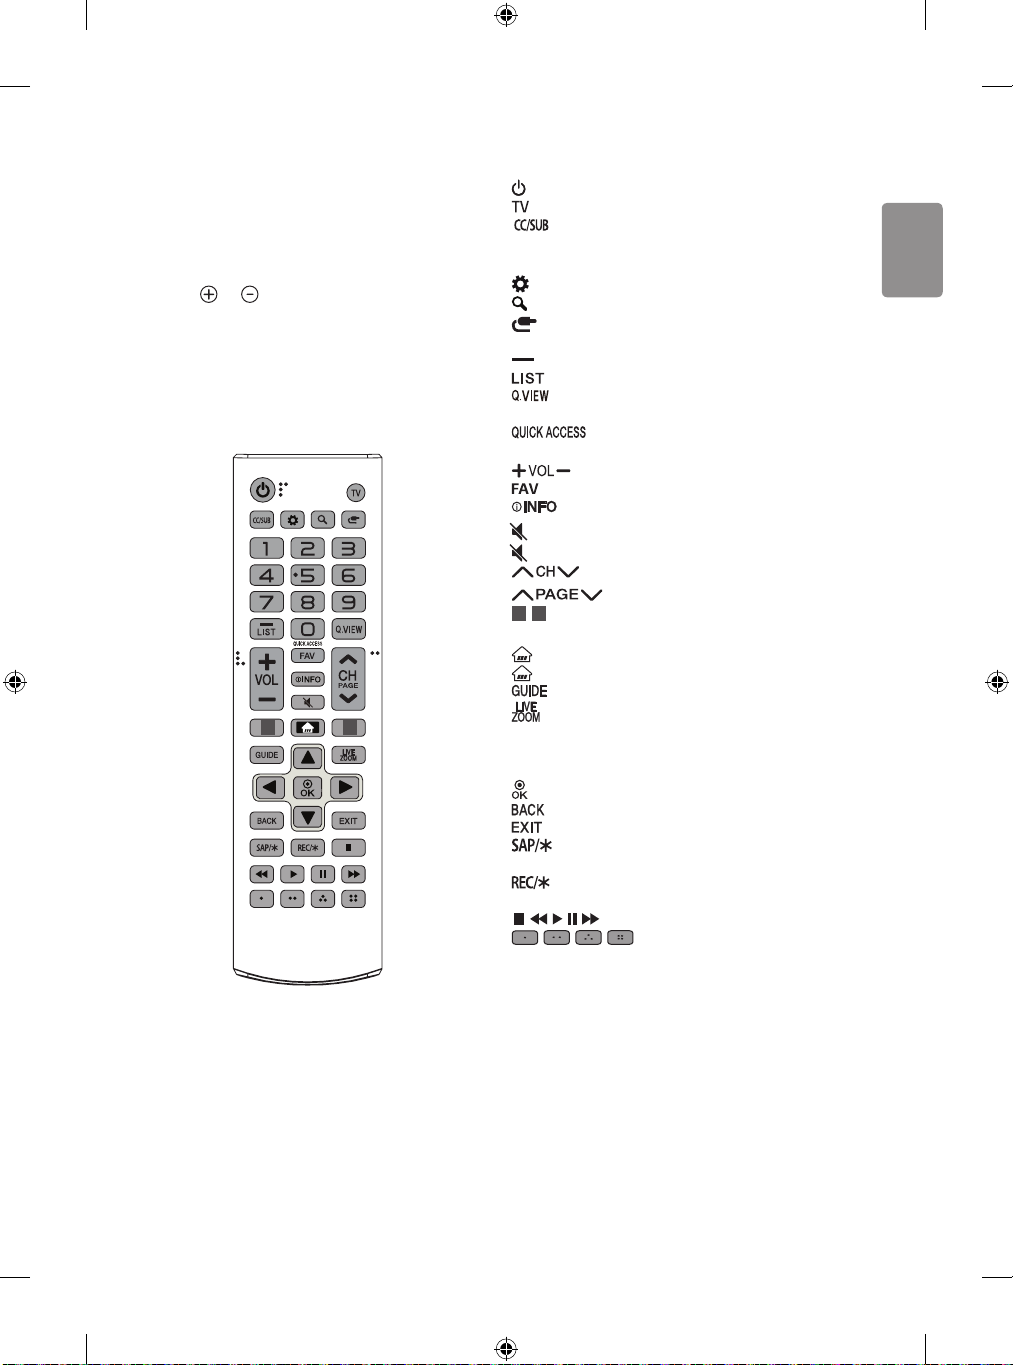
Using Remote Control
* To use the button, press and hold for more than 3 seconds.
(Depending upon model)
The descriptions in this manual are based on the buttons on the remote
control. Please read this manual carefully and use the TV correctly.
To install batteries, open the battery cover, replace batteries (1.5 V AAA)
matching the
and ends to the label inside the compartment,
and close the battery cover. To remove the batteries, perform the
installation actions in reverse. This remote uses infrared light. When in
use, it should be pointed in the direction of the TV’s remote sensor.
Make sure to point the remote control toward the remote control sensor
on the TV.
1 2
(POWER) Turns the TV on or o.
Returns to the last TV channel.
Activates or deactivates the subtitles.
Activates your preferred subtitle in digital mode. (Depending upon
country)
(Q. Settings) Accesses the Quick Settings.
(Search) Shows the search mode.
(Input) Changes the input source.
Number button Enters numbers.
(Dash) Inserts a dash between numbers such as 2-1 and 2-2.
Accesses the saved channel list.
Alternates between the two last channels selected (pressing
repeatedly).
*
You can access the application or Live TV channel by
using the number buttons as registered.
Adjusts the volume level.
Accesses your favorite channel list.
Shows information on the current program.
(MUTE) Mutes all sounds.
* (MUTE) Accesses the Accessibility menu.
Scrolls through the saved channels.
Moves to the previous or next screen.
1, 2
Streaming Service buttons Connects to the Video
Streaming Service.
(Home) Accesses the Home menu.
* (Home) Shows the previous history.
Displays the program event according to time scheduler.
By zooming in on the selected area, you can view it in full
screen.
Navigation button (up / down / left / right)
Scrolls through menus or options.
Selects menus or options and conrms your input.
Returns to the previous screen.
Clears all on-screen displays and returns to TV viewing.
Enables SAP (Secondary Audio Program) Feature,
(Depending upon model).
Starts to record. (Only Time Machine
Ready
supported model)
(Depending upon model)
, , , , Control buttons for media contents
, , , These access special functions in some
menus.
(Some buttons and services may not be provided depending on models
or regions.)
11
Page 12
ENGLISH
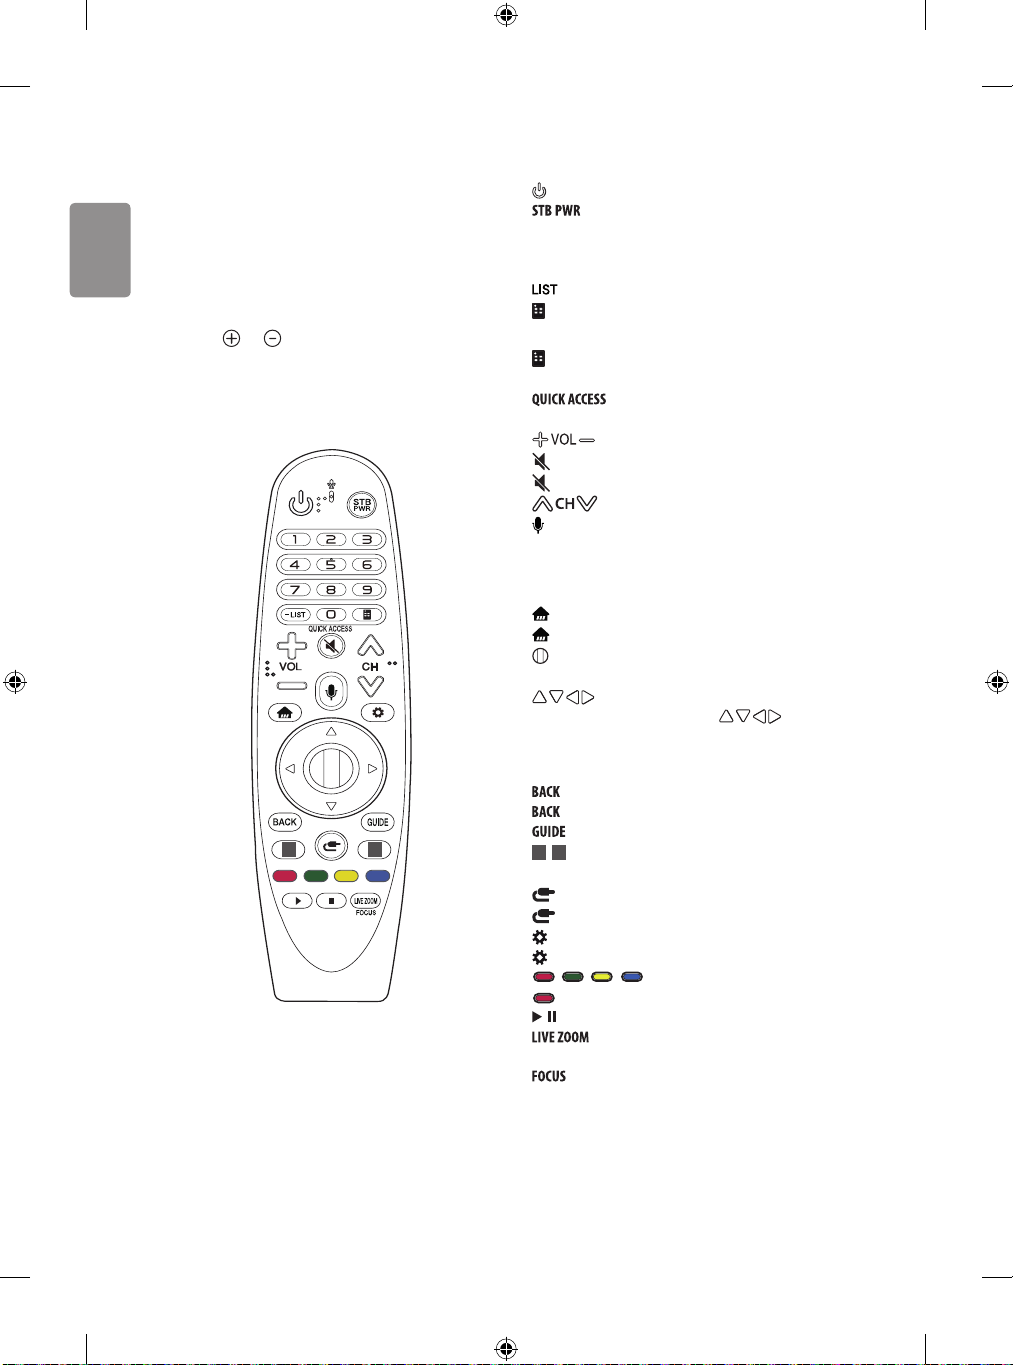
Using Magic Remote Control
* To use the button, press and hold for more than 3 seconds.
(Depending upon model)
The descriptions in this manual are based on the buttons on the remote
control. Please read this manual carefully and use the TV correctly.
When the message “Magic remote battery is low. Please Change the
battery.” is displayed, replace the batteries.
To install batteries, open the battery cover, replace batteries (1.5 V AA)
matching the
and close the battery cover. Be sure to point the magic remote toward
the remote control sensor on the TV. To remove the batteries, perform
the installation actions in reverse. This remote uses infrared light. When
in use, it should be pointed in the direction of the TV’s remote sensor.
(Some buttons and services may not be provided depending on models
or regions.)
and ends to the label inside the compartment,
1 2
(POWER) Turns the TV on or o.
You can turn your set-top box on or o by adding the set-
top box to the universal remote control for your TV.
Number buttons Enters numbers.
- (Dash) Inserts a dash between numbers such as 2-1 and 2-2.
Accesses the saved channel list.
(Screen Remote) Displays the Screen Remote.
- Accesses the Universal Control Menu in some regions.
* (Screen Remote) SAP (Secondary Audio Program) Feature can
be enabled by pressing the key.
buttons corresponding to the features.
* (Voice recognition)
Network connection is required to use the voice recognition function.
Once the voice display bar is activated on the TV screen, press and hold
the button and speak your command out loud.
menu. You can change Channels by using the wheel button.
button to scroll the menu. If you press buttons while the
pointer is in use, the pointer will disappear from the screen and Magic
Remote will operate like a general remote control. To display the
pointer on the screen again, shake Magic Remote to the left and right.
1, 2
Streaming Service.
, Control buttons for media contents
full screen.
pointed.
* You can access apps or Live TV using the number
Adjusts the volume level.
(MUTE) Mutes all sounds.
* (MUTE) Accesses the Accessibility menu.
Scrolls through the saved Channels.
(HOME) Accesses the Home menu.
* (HOME) Shows the previous history.
Wheel (OK) Press the center of the Wheel button to select a
(up/down/left/right) Press the up, down, left or right
Returns to the previous level.
* Clears on-screen displays and returns to last input viewing.
Displays the program event according to time scheduler.
Streaming Service buttons Connects to the Video
(INPUT) Changes the input source.
* (INPUT) Displays all the lists of external inputs.
(Q. Settings) Accesses the Quick Settings.
* (Q. Settings) Displays the All Settings menu.
, , , These access special functions in some menus.
* (Red Button) : Runs the record function.
By zooming in on the selected area, you can view it in
* You can zoom in on the area where the remote control is
12
Page 13

ENGLISH
Registering Magic Remote Control
How to register the Magic Remote Control
To use the Magic Remote, rst pair it with your TV.
1 Put batteries into the Magic Remote and turn the TV on.
2 Point the Magic Remote at your TV and press the Wheel (OK) on
the remote control.
* If the TV fails to register the Magic Remote, try again after turning
the TV off and back on.
How to deregister the Magic Remote Control
Press the and (HOME) buttons at the same time, for ve
seconds, to unpair the Magic Remote with your TV.
* Pressing and holding the button will let you cancel and re-
register Magic Remote at the same time.
• Do not mix new batteries with old batteries. This may
cause the batteries to overheat and leak.
• Failure to match the correct polarities of the battery
may cause the battery to burst or leak, resulting in re,
personal injury, or ambient pollution.
• This apparatus uses batteries. In your community there
might be regulations that require you to dispose of these
batteries properly due to environmental considerations.
Please contact your local authorities for disposal or
recycling information.
• Batteries inside or inside the product shall not be exposed
to excessive heat such as sunshine, re or the like.
Troubleshooting
Cannot control the TV with the remote control.
• Check if anything such as tape has been placed over the receiver.
• Check if there is any obstacle between the product and the remote
control.
• Replace the batteries with new fresh ones.
No image display and no sound is produced.
• Check if the product is turned on.
• Check if the power cord is connected to a wall outlet.
• Check if there is a problem in the wall outlet by connecting other
products.
The TV turns o suddenly.
• Check the power control settings. The power supply may be
interrupted.
• Check if the auto-o function is activated in the settings menu.
• If there is no signal while the TV is on, the TV will turn o
automatically after 15 minutes of inactivity.
Abnormal Display
• If the TV feels cold to the touch, there may be a small icker when
it is turned on. This is normal; there is nothing wrong with T V.
Some minute dot defects may be visible on the screen, appearing
as tiny red, green, or blue spots. However, they have no adverse
eect on the TV’s performance. Avoid touching the LCD screen or
holding your nger(s) against it for long periods of time. Doing so
may produce some temporary distortion eects on the screen.
• This panel is an advanced product that contains millions of pixels.
In a very few cases, you could see ne dots on the screen while
you’re viewing the TV. Those dots are deactivated pixels and do not
aect the performance and reliability of the TV.
• Displaying a still image for a prolonged period of time may cause
an image sticking. Avoid displaying a xed image on the TV screen
for a extended length of time.
13
Page 14
ENGLISH
Generated Sound
• Cracking noise A cracking noise that occurs when watching or
turning o the TV is generated by plastic thermal contraction due
to temperature and humidity. This noise is common for products
where thermal deformation is required.
• Electrical circuit humming/panel buzzing A low level noise
is generated from a high-speed switching circuit, which supplies a
large amount of current to operate a product. It varies depending
upon the product. This generated sound does not aect the
performance and reliability of the product.
• When cleaning the product, be careful not to allow any
liquid or foreign objects to enter the gap between the
upper, left or right side of the panel and the guide panel,
(Depending upon model).
• Make sure to wring any excess water or cleaner from the
cloth.
• Do not spray water or cleaner directly onto the TV screen.
• Make sure to spray just enough of water or cleaner onto a
dry cloth to wipe the screen.
14
Page 15

ENGLISH
Specications
Product specications may be changed without prior notice due to upgrade of product functions.
(Depending upon country)
Broadcasting Specifications
For SK9500PS, SK8500PS, SK8000PS, UK7500PS,
UK6520PS, UK6570PS, UK6540PS, UK6550PS,
UK6530PS, UK6500PS, UK6510PS, UK6350PS,
UK6360PS, UK6300PS, UK6310PS, UK6200PS,
LK610BPS, LK5700PS, LK5750PS, LK615BPS,
Television system SBTVD NTSC, PAL-M/N DVB-T/T2 NTSC, PAL-M/N
Program coverage
(Band)
External antenna
impedance
(Only LK61*)
As band channels can vary per country, the user cannot change or adjust the operating frequency. This product is congured for the regional
frequency table.
For consideration of the user, this device should be installed and operated with a minimum distance of 20 cm between the device and the body.
FCC ID: BEJLGSWFAC71
IC: 2703H-LGSWFAC71
VHF 2-13, UHF 14-69, DTV 2-69, CATV 1-135 VHF 2-13, UHF 14-69, DTV 2-69, CATV 1-125
Frequency Range Output Power (Max.)
2400 to 2483.5 MHz
5150 to 5725 MHz
5725 to 5850 MHz
UK7510PS series
Digital Analog Digital Analog
Wireless module(LGSWFAC71) Specifications
Wireless LAN (IEEE 802.11a/b/g/n/ac)
For SK9500PD, SK8500PD, SK8000PD, UK7500PD,
UK6570PD, UK6550PD, UK6500PD, UK6350PD,
UK6300PD, UK6200PD, LK610BPD, LK5700PD series
75 Ω
15 dBm
14.5 dBm
14.5 dBm
15
Page 16

ENGLISH
(Except for LK61*)
Wireless module (LGSBWAC72) Specifications
Wireless LAN (IEEE 802.11a/b/g/n/ac)
Frequency Range Output Power (Max.)
2400 to 2483.5 MHz
5150 to 5725 MHz
5725 to 5850 MHz
Bluetooth
Frequency Range Output Power (Max.)
2400 to 2483.5 MHz 8.5 dBm
As band channels can vary per country, the user cannot change or adjust the operating frequency. This product is congured for the regional
frequency table.
For consideration of the user, this device should be installed and operated with a minimum distance of 20 cm between the device and the body.
FCC ID: BEJLGSBWAC72
IC: 2703H-LGSBWAC72
Environment condition
Operating Temperature 0 °C to 40 °C
Operating Humidity Less than 80 %
Storage Temperature -20 °C to 60 °C
Storage Humidity Less than 85 %
• The energy information provided on the product is shown in accordance with the applicable regulations of each respective country, (Depending
upon the country).
- The Energy consumption was measured in accordance with IEC 62087.
• The actual energy consumption depends on the usage environment, (Example: content watched, TV settings, etc.).
15 dBm
14.5 dBm
14.5 dBm
16
Page 17

ENGLISH
Open Source Software
Notice Information
Regulatory
To obtain the source code under GPL, LGPL, MPL, and other open
source licenses, that is contained in this product, please visit http://
opensource.lge.com.
In addition to the source code, all referred license terms, warranty
disclaimers and copyright notices are available for download.
LG Electronics will also provide open source code to you on CD-ROM
for a charge covering the cost of performing such distribution (such
as the cost of media, shipping, and handling) upon email request to
opensource@lge.com.
This oer is valid for a period of three years after our last shipment of
this product. This oer is valid to anyone in receipt of this information.
Licenses
Supported licenses may dier by model.
WARNING!
Never place a television set in an unstable location. A television set may
fall, causing serious personal injury or death. Many injuries, particularly
to children, can be avoided by taking simple precautions such as:
• Using cabinets or stands recommended by the manufacturer of the
television set.
• Only using furniture that can safely support the television set.
• Ensuring the television set is not overhanging the edge of the
supporting furniture.
• Not placing the television set on tall furniture (for example,
cupboards or bookcases) without anchoring both the furniture and
the television set to a suitable support.
• Not placing the television set on cloth or other materials that may
be located between the television set and supporting furniture.
• Educating children about the dangers of climbing on furniture to
reach the television set or its controls.
If your existing television set is being retained and relocated, the same
considerations as above should be applied.
Symbols
Refers to alternating current (AC).
Refers to direct current (DC).
Refers to class II equipment.
Refers to stand-by.
Refers to “ON” (power).
Refers to dangerous voltage.
17
Page 18

Record the model number and serial number of the TV.
Refer to the label on the back cover and quote this
information to your dealer when requiring any service.
Model
Serial No.
Page 19

SMART TV Quick Setup Guide
* Image shown may differ from your TV.
* Image shown on a PC or mobile phone may vary depending on the OS(Operating System).
* App icon positions may vary on the platform, depending upon the software version.
Network Settings
1 Press the (Home) button on the remote to
access the Home menu. Point the (Settings)
icon and select by pressing the Wheel (OK)
button on the remote.
2 Point the
( )
(All Settings) icon and select
by pressing the Wheel (OK) button on the
remote.
3 Select the Network
All Settings
Wired Connection
→
(
(Ethernet) or Wi-Fi Connection.
NETWORK
Picture
Sound
TV Name
Wired Connection (Ethernet)
Channels
Not Connected
Wi-Fi Connection
Not Connected
Network
Wi-Fi Direct
General
Safety
Accessibility
4 The device automatically tries to connect to the
network available (wired network first).
When you select the Wi-Fi Connection, the
network list available is displayed. Choose the
network you wish to use.
WI-FI CONNECTION
Picture
Network /
Sound
ꔐ
Channels
Network
General
Safety
Accessibility
Add a Hidden Wireless Network
Connect via WPS PBC
Connect via WPS PIN
Advanced Wi-Fi Settings
For wireless AP (Router) that have the
symbol, you need to enter the security key.
5 If the connection is successful, the "Connected
to Internet" is displayed.
NETWORK
Picture
Sound
TV Name
Wired Connection (Ethernet)
Channels
Not Connected
Wi-Fi Connection
Connected to Internet
Network
Wi-Fi Direct
General
Safety
)
Accessibility
You can check the status of connection in
Advanced Wi-Fi settings.
WI-FI CONNECTION
Picture
Network /
Sound
ꔐ
Channels
Network
General
Safety
Accessibility
Add a Hidden Wireless Network
Connect via WPS PBC
Connect via WPS PIN
Advanced Wi-Fi Settings
www.lg.com
Page 20

Troubleshooting Network Problems
1 Press the (Home) button on the remote to
access the Home menu. Point the (Settings)
icon and select by pressing the Wheel (OK)
button on the remote.
2 Point the ( ) (All Settings) icon and select
by pressing the Wheel (OK) button on the
remote.
All Settings
(
3 Select the Network → Wired Connection
(Ethernet) or Wi-Fi Connection → Advanced
Wi-Fi Settings.
Picture
Sound
Channels
Network
General
Safety
Accessibility
NETWORK
TV Name
Wired Connection (Ethernet)
Not Connected
Wi-Fi Connection
Not Connected
Wi-Fi Direct
WI-FI CONNECTION
Picture
Network /
Sound
ꔐ
Channels
Network
General
Add a Hidden Wireless Network
Connect via WPS PBC
Safety
Connect via WPS PIN
Advanced Wi-Fi Settings
Accessibility
Follow the instructions below that match to your
network status.
Check the TV or the AP (Router).
When X appears next to TV:
Check the connection status of the TV, AP
1
(Router) and cable modem.
Power off and power on in the following order;
2
(1st) the cable modem, wait for the cable
modem to reset, (2nd) the AP (Router), wait for
the AP (Router) to reset and (3rd) the TV.
If you are using a static IP, enter the IP directly.
3
Contact internet service provider or AP (Router)
4
manufacturer.
Check the AP (Router) or consult your Internet
service provider.
)
When X appears next to Gateway:
Unplug the power cord of the AP (Router) or
1
cable modem, wait 5 seconds. Reapply power.
Initialize (Reset) the AP (Router) or cable
2
modem.
Contact Internet service provider or AP (Router)
3
manufacturer.
When X appears next to DNS:
Unplug the power cord of the AP (Router) or
1
cable modem, wait 5 seconds. Reapply power.
After the cable modem or AP (Router) has
2
initialized (Reset), try to reconnect.
Check that the MAC address of the TV/AP
3
(Router) is registered with your Internet service
provider. (The MAC address displayed on the
right pane of the network status window
should be registered with your Internet service
provider.)
Check the AP (Router) manufacturer’s website
4
to make sure your router has the latest firmware
version installed.
Page 21

SmartShare PC SW Installing & Setting
1 Install the SmartShare PC SW programme on your PC.
2 Go to . Then, select your region.
3 Select Support.
4 Select Software & Drivers. Then, select SmartShare.
5 Download the SmartShare PC SW and install it on your PC. You can run the program when installation is
complete.
NOTE
ySmartshare service is only available if TV and other devices are connected via a single AP (Router).
SmartShare Connection to Smartphone
1 Check that Wi-Fi is enabled on your smartphone. To use SmartShare, both devices must
on the same local network.
2 Install/run the app for sharing content on your smartphone (It's called LG TV Plus on LG
phones).
3 Enable your smartphone to share content files with other devices.
4 Open Device Connector application.
(Home) → Device Connector
5 Select the file type you want to play (movie, audio or photo).
6 Select a movie, music or photo file to play on the TV.
7 Play the media file to view and enjoy it on your TV.
Smartphone
→
→
CONTENT SHARE.
Updating the TV Firmware
* If the TV is turned on for the first time after it was shipped from the factory, initialization of the TV may
take a few minutes.
1 (Home) → (Settings)
UPDATES
2 After checking the version of the software, update it.
If you check the "Allow Automatic Updates", you can update the software automatically.
Picture
Sound
Channels
Network
General
Safety
Accessibility
( ) (All Settings)
→
GENERAL
Eco Mode
Mobile TV On
LG Wireless Keyboard
Settings Help
No Signal Image
Reset to Initial Settings
About This TV
User Agreements
→
Picture
Sound
Channels
Network
General
Safety
Accessibility
General
ABOUT THIS TV
General /
Software Version xx.xx.xx
ꔐ
Allow Automatic Updates
CHECK FOR UPDATES
TV Information
User Guide
Open Source Software Notice
Set ID : 1
About This TV
→
CHECK FOR
→
Page 22

Wi-Fi Direct Setting
Picture
Sound
Channels
Network
General
Safety
Accessibility
WI-FI Direct
Network /
REFRESH LIST
ꔐ
If a local network is not available, you can connect a portable device directly to the TV
using Wi-Fi Direct.
With , you can share files or screens of devices connected to Wi-Fi Direct.
1 When you open Wi-Fi Direct menu, a list of available devices appears.
2 When you are prompted to request connection, select Yes . Wi-Fi Direct is now
connected to your TV.
* You can only use devices that support Wi-Fi Direct.
Miracast Setting
Miracast allows a portable device to send video and sound securely to the TV wirelessly.
1 Miracast should be set to "ON" on your portable device.
2 When your TV is detected, select the device on your portable device.
When connection is completed, the device screen appears on the TV screen.
(Home) → (Settings) → ( ) (All Settings) → Network → Wi-Fi Direct
Please call LG Customer Service if you experience any problems.
Page 23

Guide d’installation rapide du téléviseur SMART
* Les images présentées pourraient ne pas correspondre à votre téléviseur.
* Les images affichées sur un ordinateur ou un téléphone mobile peuvent varier en fonction du SE (système
d’exploitation).
* L’emplacement de l’icône de l’application peut varier sur la plateforme, en fonction de la version du logi-
ciel.
Paramètres réseau
1 Appuyez sur le bouton (Accueil) de la
télécommande pour accéder au menu d’accueil.
Visez l’icône (Paramètres) et sélectionnez-la
en appuyant sur le bouton Molette (OK) de la
télécommande.
2 Visez l’icône
( )
(Tous les paramètres) et
sélectionnez-la en appuyant sur le bouton
Molette (OK) de la télécommande.
Tous les paramètres
3 Sélectionnez le Réseau
Connexion filaire
→
(
(Ethernet) ou Connexion Wi-Fi.
RÉSEAU
Image
Son
NOM DE LA TV
Connexion filaire (Ethernet)
Chaînes
Non connecté
Connexion Wi-Fi
Non connecté
Réseau
Wi-Fi Direct
Général
Sécurité
Accessibilité
4 L’appareil tente automatiquement de se
connecter au réseau disponible (réseau filaire en
premier).
Lorsque vous sélectionnez la Connexion Wi-Fi, la
liste des réseaux disponibles s’affiche. Choisissez
le réseau que vous voulez utiliser.
CONNEXION WI-FI
Image
Réseau /
Son
ꔐ
Chaînes
Réseau
Général
Sécurité
Accessibilité
Ajoutez un réseau sans fil caché
Se connecter via WPS-PBC
Se connecter via PIN WPS
Paramètres Wi-Fi avancés
Pour les points d’accès sans fil (routeur) affichant
le symbole , vous devez saisir le code de
sécurité.
5 Lorsque la connexion est établie, la mention
«Connecté à Internet» est affichée.
RÉSEAU
Image
Son
NOM DE LA TV
Connexion filaire (Ethernet)
Chaînes
Non connecté
Connexion Wi-Fi
Connecté à Internet
Réseau
Wi-Fi Direct
Général
)
Sécurité
Accessibilité
Vous pouvez vérifier l’état de la connexion dans
Paramètres Wi-Fi avancés.
CONNEXION WI-FI
Image
Réseau /
Son
ꔐ
Chaînes
Réseau
Général
Sécurité
Accessibilité
Ajoutez un réseau sans fil caché
Se connecter via WPS-PBC
Se connecter via PIN WPS
Paramètres Wi-Fi avancés
www.lg.com
Page 24

Dépannage des problèmes réseau
1 Appuyez sur le bouton (Accueil) de la
télécommande pour accéder au menu d’accueil.
Visez l’icône (Paramètres) et sélectionnez-la
en appuyant sur le bouton Molette (OK) de
la télécommande.
2 Visez l’icône ( ) (Tous les paramètres) et
sélectionnez-la en appuyant sur le bouton
Molette (OK) de la télécommande.
Tous les paramètres
(
3 Sélectionnez le Réseau → Connexion filaire
(Ethernet) ou Connexion Wi-Fi → Paramètres
Wi-Fi avancés.
Image
Son
Chaînes
Réseau
Général
Sécurité
Accessibilité
RÉSEAU
NOM DE LA TV
Connexion filaire (Ethernet)
Non connecté
Connexion Wi-Fi
Non connecté
Wi-Fi Direct
CONNEXION WI-FI
Image
Réseau /
Son
ꔐ
Chaînes
Réseau
Général
Ajoutez un réseau sans fil caché
Se connecter via WPS-PBC
Sécurité
Se connecter via PIN WPS
Paramètres Wi-Fi avancés
Accessibilité
Suivez les instructions ci-dessous qui correspondent
à l’état de votre réseau.
Vérifiez le téléviseur ou le point d’accès (routeur).
Lorsqu’une croix (X) apparaît à côté du téléviseur:
Vérifiez l’état de la connexion du téléviseur, du point
1
d’accès (routeur) et du modem câble.
Mettez les appareils hors tension et sous tension
2
dans l’ordre suivant : (1) le modem câble, attendez
que le modem câble se réinitialise; (2) le point
d’accès (routeur), attendez que le routeur se
réinitialise et (3) le téléviseur.
Si vous utilisez une adresse IP fixe, saisissez-la
3
directement.
Communiquez avec le fournisseur d’accès à Internet
4
ou avec le fabricant du point d’accès (routeur).
Vérifiez le point d’accès (routeur) ou consultez
votre fournisseur d’accès à Internet.
)
Lorsqu’une croix (X) apparaît à côté de la
passerelle:
Débranchez le cordon d’alimentation du point d’accès
1
(routeur) ou du modem câble, attendez 5 secondes,
puis rebranchez-le.
Réinitialisez le point d’accès (routeur) ou le modem
2
câble.
Communiquez avec le fournisseur d’accès Internet
3
ou le fabricant du point d’accès (routeur).
Lorsqu’une croix (X) apparaît à côté du DNS:
Débranchez le cordon d’alimentation du point d’accès
1
(routeur) ou du modem câble, attendez 5 secondes,
puis rebranchez-le.
Une fois que le modem câble ou le point
2
d’accès (routeur) est réinitialisé, essayez de vous
reconnecter.
Vérifiez que l’adresse MAC du téléviseur ou du
3
point d’accès (routeur) est enregistrée auprès de
votre fournisseur d’accès à Internet. (L’adresse
MAC affichée dans le volet droit de la fenêtre d’état
du réseau doit être enregistrée auprès de votre
fournisseur d’accès Internet.)
Consultez le site Web du fabricant de votre point
4
d’accès (routeur) afin de vérifier que celui-ci exécute
la dernière version du microprogramme.
Page 25

Installation et configuration du logiciel PC SmartShare
1 Installez le logiciel PC SmartShare sur votre ordinateur.
2 Rendez-vous sur , puis sélectionnez votre région.
3 Sélectionnez Soutien.
4 Sélectionnez Logiciels et micrologiciels. Sélectionnez Partage "SmartShare".
5 Téléchargez le logiciel PC SmartShare et installez-le sur votre ordinateur. Vous pouvez exécuter le
programme lorsque l’installation est terminée.
REMARQUE
yLe service Smartshare est offert uniquement si le téléviseur et les autres appareils sont connectés au
même point d’accès (routeur).
Connexion SmartShare à un téléphone intelligent
1 Vérifiez que l’option Wi-Fi est activée sur votre téléphone intelligent. Pour utiliser
SmartShare, les deux appareils doivent être sur le même réseau local.
2 Installez/exécutez l’application de partage de contenu sur votre téléphone intelligent (sur
les téléphones LG, il s’agit de LGTVPlus).
3 Activez l’option sur votre téléphone intelligent afin de partager des fichiers avec d’autres
appareils.
4 Ouvrez l’application Connecteur de périphérique.
(Accueil) → Connecteur de périphérique → Téléphone intelligent → PARTAGE
DE CONTENU.
5 Sélectionnez le type de fichier que vous voulez lire (film, musique ou photo).
6 Sélectionnez un fichier de film, de musique ou de photo à lire.
7 Lisez le fichier multimédia sur votre téléviseur.
Mise à jour du micrologiciel du téléviseur
* S’il s’agit de la première fois que le téléviseur est allumé depuis sa sortie d’usine, l’initialisation peut
prendre quelques minutes.
1 (Accueil) → (Paramètres) → ( )
téléviseur → Rechercher des mises à jour
2 Vérifiez d’abord la version du logiciel, puis mettez-le à jour.
Si vous cochez la case «Autoriser les mises à jour automatiques», vous pouvez mettre à jour le logiciel
automatiquement.
GÉNÉRAL
Image
Son
Mode éco.
Télé mobile active
Chaînes
Réseau
Clavier sans fil LG
Aide relative aux Paramètres
Général
Image Aucun signal
Sécurité
Réinitialiser les paramètres initiaux
À propos de ce téléviseur
Accessibilité
Accords utilisateur
(Tous les paramètres)
À PROPOS DE CE TÉLÉVISEUR
Image
Général /
Son
Version du logiciel xx.xx.xx
ꔐ
Autoriser les mises à jour automatiques
Chaînes
Rechercher des mises à jour
Réseau
Renseignements sur le téléviseur
Général
Guide de l’utilisateur
Sécurité
Notice de logiciel ouvert
ID du groupe: 1
Accessibilité
Général → À propos de ce
→
Page 26

Configuration de Wi-Fi Direct
Image
Son
Chaînes
Réseau
Général
Sécurité
Accessibilité
WI-FI Direct
Réseau /
ACTUALISER LA LISTE
ꔐ
Wi-Fi Direct
S’il n’y a pas de réseau local disponible, vous pouvez connecter un appareil mobile
directement au téléviseur à l’aide de Wi-Fi Direct.
Grâce à , vous pouvez partager des fichiers ou les écrans d’appareils
connectés à Wi-Fi Direct.
1 Lorsque vous ouvrez le menu Wi-Fi Direct, une liste d’appareils disponibles
apparaît.
2 Lorsque vous êtes invité(e) à demander une connexion, sélectionnez OK. Wi-
Fi Direct est à présent connecté à votre téléviseur.
* Vous ne pouvez utiliser que les périphériques qui prennent en charge Wi-Fi
Direct.
Configuration de Miracast
Miracast permet à un appareil mobile d’envoyer sans fil et de manière sécuritaire des vidéos et
du contenu audio au téléviseur.
1 L’option Miracast doit être sur «ON» (activée) sur votre appareil mobile.
2 Lorsque votre téléviseur est détecté, sélectionnez-le sur vot re appareil mobile.
Une fois la connexion établie, l’écran de l’appareil apparaît sur le téléviseur.
(Accueil) → (Paramètres) → ( ) (Tous les paramètres) → Réseau
→
Appelez le service à la clientèle de LG si vous constatez le moindre problème.
Page 27

Guía de conguración rápida del SMART TV
* La imagen que se muestra puede ser diferente a su televisor.
* La imagen que se muestra en una PC o un teléfono móvil puede variar según el sistema operativo
(sistema operativo).
* Las posiciones de los íconos de la aplicación pueden variar en la plataforma según la versión del software.
Configuración de la red
1 Presione el botón (Inicio) del control remoto
para acceder al menú Inicio. Vaya al ícono
(Configuración) y selecciónelo con el botón
Rueda (Aceptar) del control remoto.
2 Vaya al ícono
( )
(Todos los ajustes) y
selecciónelo con el botón Rueda (Aceptar)
del control remoto.
3 Seleccione Red
Todos los ajustes
Conexión cableada
→
(
(Ethernet) o Conexión Wi-Fi.
RED
Imagen
Audio
Nombre de la TV
Conexión cableada (Ethernet)
Canales
No conectado
Conexión Wi-Fi
No conectado
Red
Wi-Fi Direct
General
Seguridad
Accesibilidad
4 El dispositivo intenta conectarse
automáticamente a la red disponible (primero,
la red cableada).
Cuando selecciona Conexión Wi-Fi, se muestra
la lista de redes disponibles. Seleccione la red
que desea usar.
CONEXIÓN WI-FI
Imagen
Red /
Audio
ꔐ
Canales
Red
General
Seguridad
Accesibilidad
Agregar una red inalámbrica oculta
Conectarse a través de WPS PBC
Conectar mediante WPS PIN
Configuración avanzada de Wi-Fi
Para el AP inalámbrico (enrutador) que tiene el
símbolo , debe ingresar la clave de seguridad.
5 Si la conexión es exitosa, se muestra "Conectado
a Internet".
RED
Imagen
Audio
Nombre de la TV
Conexión cableada (Ethernet)
Canales
No conectado
Conexión Wi-Fi
Conectado a Internet
Red
Wi-Fi Direct
General
)
Seguridad
Accesibilidad
Puede verificar el estado de conexión en
Configuración avanzada de Wi-Fi.
CONEXIÓN WI-FI
Imagen
Red /
Audio
ꔐ
Canales
Red
General
Seguridad
Accesibilidad
Agregar una red inalámbrica oculta
Conectarse a través de WPS PBC
Conectar mediante WPS PIN
Configuración avanzada de Wi-Fi
www.lg.com
Page 28

Resolución de problemas de red
1 Presione el botón (Inicio) del control remoto
para acceder al menú Inicio. Vaya al ícono
(Configuración) y selecciónelo con el botón
Rueda (Aceptar) del control remoto.
2 Vaya al ícono ( ) (Todos los ajustes) y
selecciónelo con el botón Rueda (Aceptar)
del control remoto.
Todos los ajustes
(
3 Seleccione Red → Conexión cableada
(Ethernet) o Conexión Wi-Fi → Configuración
avanzada de Wi-Fi.
RED
Imagen
Audio
Nombre de la TV
Conexión cableada (Ethernet)
Canales
No conectado
Conexión Wi-Fi
No conectado
Red
Wi-Fi Direct
General
Seguridad
Accesibilidad
CONEXIÓN WI-FI
Imagen
Red /
Audio
ꔐ
Canales
Red
General
Agregar una red inalámbrica oculta
Conectarse a través de WPS PBC
Seguridad
Conectar mediante WPS PIN
Configuración avanzada de Wi-Fi
Accesibilidad
Siga las instrucciones que están a continuación y
que se relacionan con el estado de red.
Revise el televisor o el AP (enrutador).
Cuando aparece X al lado del televisor:
Revise el estado de la conexión del TV, el Punto
1
de Acceso (Router), y módem de cable.
Apague y encienda en el siguiente orden:
2
(Primero) el módem de cable, espere que el
módem de cable se restablezca, (Segundo) el
Punto de Acceso (Router), espere a que el Punto
de Acceso (Router) se restablezca, (Tercero) la
TV.
Si usa una dirección IP estática, ingrésela
3
directamente.
Comuníquese con el proveedor de servicios de
4
Internet o la empresa de AP (enrutador).
Revise el AP (enrutador) o consulte a su
)
proveedor de servicios de Internet.
Cuando aparece X junto a la puerta de enlace:
Desenchufe el cable de alimentación del AP
1
(enrutador) e intente conectarlo después de 5
segundos.
Inicialice (restablezca) el AP (enrutador).
2
Comuníquese con el proveedor de servicios de
3
Internet o la empresa de AP (enrutador).
Cuando aparece X junto a DNS:
Desconecte el cable de alimentación del Punto
1
de Acceso (Router), y del módem de cable ,
espere 5 segundos. Vuelva a conectar los cables
de alimentación, y vuelva a intentar la conexión.
Inicialice (Reset) el Punto de Acceso (Router), o
2
el módem de cable.
Verifique que la dirección MAC del TV/AP
3
(enrutador) esté registrada con su proveedor
de servicios de Internet. (La dirección MAC que
se muestra en el panel derecho de la ventana
de estado de red debe registrarse con su
proveedor de servicios de Internet.)
Consulte el sitio web del fabricante del
4
AP (enrutador) para asegurarse de que su
enrutador tenga instalada la última versión de
firmware.
Page 29

Instalación y configuración de SmartShare PC SW
1 Instale el programa SmartShare PC SW en su PC.
2 Vaya a . Luego, seleccione su región.
3 Seleccione Soporte.
4 Select Software y actualizaciones. Then, selec t SmartShare.
5 Descargue el Software SmartShare PC e instálelo en su PC. Puede ejecutar el programa al finalizar la
instalación.
NOTA
yEl servicio Smartshare solo está disponible si el televisor y otros dispositivos están conectados a
través de un solo AP (enrutador).
Conexión de SmartShare a un teléfono inteligente
1 Verifique que la conexión Wi-Fi esté activada en su teléfono inteligente. Para utilizar
SmartShare, ambos dispositivos deben estar en la misma red local.
2 Instale y ejecute la aplicación para compartir contenido en su teléfono inteligente (se
llama LG TV Plus en teléfonos LG).
3 Permita que su teléfono inteligente comparta archivos de contenido con otros
dispositivos.
4 Abra la aplicación Conector de Dispositivo.
(Inicio) → Conector de Dispositivo → Teléfono Inteligente → COMPARTIR
CONTENIDO.
5 Seleccione el tipo de archivo que desea reproducir (película, audio o foto).
6 Seleccione una película, música o archivo de fotografía para reproducir en el televisor.
7 Reproduzca el archivo multimedia para verlo y disfrutarlo en su televisor.
Actualización del firmware del televisor
* Cuando el televisor se enciende por primera vez después de que se envía de fábrica, la inicialización del
televisor puede tardar unos minutos.
1 (Inicio) → (Configuración) → ( )
BUSCAR ACTUALIZACIONES
2 Después de verificar la versión del software, actualícela.
Si marca la opción "Permitir Actualizaciones Automáticas", puede actualizar el software
automáticamente.
GENERAL
Imagen
Audio
Modo Eco
TV móvil activo
Canales
Red
Teclado inalámbrico LG
Ayuda para la configuración
General
Imagen sin señal
Seguridad
Restablecer la configuración inicial.
Acerca de este TV
Accesibilidad
Acuerdos del usuario
(Todos los ajustes)
ACERCA DE ESTE TV
Imagen
General /
Audio
Versión de sof tware xx.xx.xx
ꔐ
Canales
BUSCAR ACTUALIZACIONES
Red
Información del TV
General
Guía del usuario
Seguridad
Aviso de software de código abierto
ID de configuración: 1
Accesibilidad
General → Acerca de este TV
→
Permitir Actualizaciones Automáticas
→
Page 30

Configuración de Wi-Fi Direct
Imagen
Audio
Canales
Red
General
Seguridad
Accesibilidad
WI-FI Direct
Red /
ACTUALIZAR LISTA
ꔐ
Direct
Si no hay una red local disponible, puede conectar un dispositivo portátil
directamente al televisor con Wi-Fi Direct.
Con , puede compartir archivos o pantallas de dispositivos conectados
a Wi-Fi Direct.
1 Cuando abre el menú Wi-Fi Direct, aparece una lista de los dispositivos
disponibles.
2 Cuando se le indica que solicite conexión, seleccione OK. Wi-Fi Direct ahora
está conectado a su televisor.
* Solo puede utilizar dispositivos compatibles con Wi-Fi Direct.
Configuraciones Miracast
Miracast permite que el dispositivo portátil envíe vídeos y sonidos al TV sin cables de
1 Miracast debe configurarse en "ENCENDIDO" en su dispositivo móvil.
2 Cuando se detecta el televisor, seleccione el dispositivo en su dispositivo portátil.
Cuando se completa la conexión, aparece la pantalla del dispositivo en la pantalla del
televisor.
(Inicio) → (Configuración) → ( ) (Todos los ajustes) → Red → Wi-Fi
form
Comuníquese con el Servicio de atención al cliente de LG si tiene algún problema.
Page 31

Guia Rápido de Conguração SMART TV
* As imagens neste guia podem ser diferentes da TV.
* As imagens do PC ou Telefone podem ser diferentes dependendo do sistema operacional.
* A posição dos ícones de Aplicativos podem variar na plataforma, dependendo da versão de software.
Ajustes de Rede
1 No controle remoto, pressione o botão
(Home) para acessar o menu principal. No
menu, selecione (CONFIGURAÇÕES) e
pressione o botão Scroll (OK).
2 Selecione
( )
(Todas as Configurações) e
pressione o botão Scroll (OK).
Todas as Configurações
3 No menu selecione Rede
Conexão com fio
→
(
(Ethernet) ou Conexão da rede Wi-Fi.
REDE
Imagem
Som
Nome da TV
Conexão com fio (Ethernet)
Canais
Não conectado
Conexão da rede Wi-Fi
Não conectado
Rede
Wi-Fi Direct
Geral
Segurança
Acessibilidade
4 O dispositivo será conectado automaticamente
em uma rede disponível (rede com fio em
primeiro lugar).
Ao selecionar Conexão da rede Wi-Fi, uma lista
de redes será disponibilizada. Selecione a rede
desejada.
CONEXÃO DA REDE WIFI
Imagem
Rede /
Som
ꔐ
Canais
Rede
Geral
Segurança
Acessibilidade
Adicionar uma rede sem fio oculta
Conectar através de WPS PBC
Conectar através de WPS PIN
Configurações avançadas de Wi-Fi
Para roteadores protegidos, o símbolo é
exibido indicando a necessidade de senha para
acessar a rede.
5 Caso a conexão esteja correta, a mensagem
"Conectado à Internet" será exibida.
REDE
Imagem
Som
Nome da TV
Conexão com fio (Ethernet)
Canais
Não conectado
Wi-Fi Connection
Conectado à Internet
Rede
Wi-Fi Direct
)
Geral
Segurança
Acessibilidade
Caso deseje, verifique o status da conexão
acessando a opção Configurações avançadas
de Wi-Fi.
CONEXÃO DA REDE WIFI
Imagem
Rede /
Som
ꔐ
Canais
Rede
Geral
Segurança
Acessibilidade
Adicionar uma rede sem fio oculta
Conectar através de WPS PBC
Conectar através de WPS PIN
Configurações avançadas de Wi-Fi
www.lg.com
Page 32

Problemas de Rede - Soluções
1 No controle remoto, pressione o botão
(Home) para acessar o menu principal. No menu,
selecione (CONFIGURAÇÕES) e pressione o
botão Scroll (OK).
3 Selecione
( )
(Todas as Configurações) e
pressione o botão Scroll (OK).
Todas as Configurações
(
4 Selecione Rede → Conexão com fio (Ethernet)
ou Conexão da rede Wi-Fi → Configurações
avançadas de Wi-Fi.
Imagem
Som
Canais
Rede
Geral
Segurança
Acessibilidade
REDE
Nome da TV
Conexão com fio (Ethernet)
Não conectado
Conexão da rede Wi-Fi
Não conectado
Wi-Fi Direct
CONEXÃO DA REDE WIFI
Imagem
Rede /
Som
ꔐ
Canais
Rede
Geral
Adicionar uma rede sem fio oculta
Conectar através de WPS PBC
Segurança
Conectar através de WPS PIN
Configurações avançadas de Wi-Fi
Acessibilidade
As instruções abaixo servem para verificar o status
da conexão de rede.
Verifique a TV ou o Roteador.
Quando o X estiver próximo do ícone TV:
Verifique o status da conexão na TV, Roteador e
1
Modem.
Desligue os equipamentos na ordem: (1º) o
2
modem, aguarde o modem reiniciar, (2º) o roteador, aguarde o roteador reiniciar e (3º) a TV.
Nos casos de endereço IP estático será necessá-
3
rio inseri-lo manualmente.
Se o problema persistir, contate o provedor de
4
internet ou o fabricante do roteador.
Verifique o roteador ou contate o provedor de
internet.
)
Quando o X estiver próximo do ícone Gateway:
Desconecte o cabo de força da tomada do ro-
1
teador ou modem, aguarde 5 segundos e torne
a conectar.
Reinicie o roteador e o modem.
2
Contate seu provedor de internet e o fabricante
3
do roteador.
Quando o X estiver próximo do ícone DNS:
Desconecte o cabo de força da tomada do ro-
1
teador ou modem, aguarde 5 segundos e torne
a conectar.
Reinicie o roteador e o modem e tente reconec-
2
tar
Verifique se o endereço MAC da TV/Roteador
3
está registrado no seu provedor de internet (o
endereço MAC é exibido na janela de status de
rede. Envie este número ao seu provedor para
registrá-lo).
Verifique no site do fabricante do seu roteador
4
se a última versão do firmware está instalada.
Page 33

Instalar & Configurar o SmartShare PC Software
1 Instale o SmartShare PC em seu computador.
2 Acesse . Se necessário, selecione seu país ou região.
3 Selecione Suporte.
4 Selecione Software & Drivers. Então, selecione SmartShare.
5 Faça o download e instale o software. Após a finalização da instalação será possível executar e configurar
o programa.
NOTE
yA função Smartshare está disponível na TV e em dispositivos conectados ao mesmo roteador.
SmartShare - Conectando um Smartphone
1 Ative a conexão Wi-Fi no Smartphone. Para conectar usando o SmartShare, os dispositi-
vos (TV e Smartphone) devem estar conectados na mesma rede.
2 No Smartphone, instale ou execute o aplicativo de compartilhamento (se desejar instale
o aplicativo LG TV Plus).
3 Ative o compartilhamento para compartilhar conteúdo com outros dispositivos.
4 Acesse (Home) e execute o aplicativo Conector de Dispositivos. No menu acesse a
opção Smartphone
5 Selecione o tipo de arquivo desejado (filme, música ou foto).
6 Selecione o conteúdo desejado para reproduzi-lo na TV.
7 Inicie a reprodução do conteúdo selecionado na TV.
→
COMPARTILHAMENTO DE CONTEÚDO.
Atualizando o Software da TV
* Ao ligar a TV pela primeira vez, a inicialização do aparelho pode levar alguns minutos.
1 (Home) → (CONFIGURAÇÕES)
TV
VERIFICAR POR ATUALIZAÇÕES
→
2 Após verificar, execute o processo de atualização.
Se desejar, selecione a opção "Permitir Atualizações Automáticas", para atualizar o software da TV
automaticamente.
GERAL
Imagem
Som
Modo Eco
TV Mobile ativada
Canais
Rede
Teclado LG Sem Fio
Ajuda com as configurações
Geral
Proteção de Tela
Segurança
Redefinir para Configurações Iniciais
Sobre esta TV
Acessibilidade
Acordos de Usuário
( ) (Todas as Configurações)
→
Imagem
Som
Canais
Rede
Geral
Segurança
Acessibilidade
SOBRE ESTA TV
Geral /
Versão do software xx.xx.xx
ꔐ
Permitir Atualizações Automáticas
Verificar por atualizações
Informações da TV
Guia do Usuário
Aviso sobre Software de Código...
Definir ID : 1
→
Geral
→
Sobre esta
Page 34

Ajustar Wi-Fi Direct
WIFI DIRECT
Imagem
REDE /
Som
Canais
Rede
Geral
Segurança
Acessibilidade
ATUALIZAR ...
Rede → Wi-Fi Direct
ꔐ
Caso uma rede local não esteja disponível, conecte-se diretamente a TV usando a
função Wi-Fi Direct.
Usando , será possível compartilhar telas ou arquivos usando Wi-Fi
Direct.
1 Ao selecionar o menu Wi-Fi Direct, uma lista de dispositivos disponíveis será
exibida.
2 Quando a solicitação de conexão for exibida, selecione Sim. O dispositivo Wi-
Fi Direct estará conectado com sua TV.
* Somente dispositivos Wi-Fi Direct estarão disponíveis para conexão.
Ajustar Miracast
Miracast permite o compartilhamento de áudio e vídeo sem fio do dispositivo para a TV.
1 Ative a função Miracast no seu dispositivo.
2 Quando a TV detectar, selecione o seu dispositivo.
Quando a conexão estiver completa a tela do dispositivo será exibida na TV.
(Home) → (CONFIGURAÇÕES) → ( ) (Todas as Configurações) →
Por favor, entre em contato com o SAC para mais informações.
Page 35

OWNER’S MANUAL
EXTERNAL CONTROL
DEVICE SETUP
Please read this manual carefully before operating the set and retain it for
future reference.
www.lg.com
Page 36

2
ENG
ENGLISH
KEY CODES
2
KEY CODES
• This feature is not available for all models.
Code
(Hexa)
00 CH +, PR + R/C Button 53 List R/C Button
01 CH -, PR - R/C Button 5B Exit R/C Button
02 Volume + R/C Button 60 PIP(AD) R/C Button
03 Volume - R/C Button 61 Blue R/C Button
06 > (Arrow Key / Right Key) R/C Button 63 Yellow R/C Button
07 < (Arrow Key / Left Key) R/C Button 71 Green R/C Button
08 Power R/C Button 72 Red R/C Button
09 Mute R/C Button 79 Ratio / Aspect Ratio R/C Button
0B Input R/C Button 91 AD (Audio Description) R/C Button
0E SLEEP R/C Button 9E LIVE MENU R/C Button
0F TV, TV/RAD R/C Button 7A User Guide R/C Button
10 - 19 * Number Key 0 - 9 R/C Button 7C Smart / Home R/C Button
1A Q.View / Flashback R/C Button 7E SIMPLINK R/C Button
Function Note
Code
(Hexa)
Function Note
1E FAV (Favorite Channel) R/C Button 8E ►►(Forward) R/C Button
20 Text (Teletext) R/C Button 8F ◄◄(Rewind) R/C Button
21 T. Opt (Teletext Option) R/C Button AA Info R/C Button
28 Return (BACK) R/C Button AB Program Guide R/C Button
30 AV (Audio / Video) Mode R/C Button B0 ►(Play) R/C Button
39 Caption/Subtitle R/C Button B1 ꕗ (Stop / File List) R/C Button
40 Λ
41
42 My Apps R/C Button BB Soccer R/C Button
43 Menu / Settings R/C Button BD ꔄ (REC) R/C Button
44 OK / Enter R/C Button DC 3D R/C Button
45 Q.Menu R/C Button 99 AutoConfig R/C Button
4C List, - (ATSC Only) R/C Button 9F App / * R/C Button
4D PICTURE R/C Button 9B TV / PC R/C Button
52 SOUND R/C Button
* Key code 4C (0x4C) is available on ATSC/ISDB models which use major/minor channel.
(For South Korea, Japan, North America, Latin America except Colombia models)
(Arrow Key / Cursor Up)
V (Arrow Key / Cursor
Down)
R/C Button B5 RECENT R/C Button
R/C Button BA
ꕘ (Freeze / Slow Play /
Pause)
R/C Button
Page 37

ENGENGLISH
EXTERNAL CONTROL DEVICE SETUP
(PC
USB IN
(TV)
(PC
(PC)
3
3
EXTERNAL CONTROL DEVICE SETUP
• Image shown may differ from your TV.
Connect the USB to Serial converter/RS-232C input jack to an external control device (such as a computer
or an A/V control system) to control the product’s functions externally.
Note: The type of control port on the TV can be different between model series.
* Please be advised that not all models support this type of connectivity.
* Cable is not provided.
USB to Serial converter with USB Cable
USB Type
)
• LGTV supports PL2303 chip-based (Vendor ID : 0x0557, Product ID : 0x2008) USB to serial converter
which is not made nor provided by LG.
• It can be purchased from computer stores that carry accessories for IT support professionals.
USB IN
RS-232C With RS232C Cable
DE9 (D-Sub 9pin) Type
• You need to purchase the RS-232C (DE9, D-Sub 9pin female-to-female type) to RS-232C cable required
for the connection between the PC and the TV, which is specified in the manual.
(TV)
)
The connection interface may differ from your TV.
RS-232C IN
(CONTROL & SERVICE)
(TV)
Page 38

4
ENG
ENGLISH
EXTERNAL CONTROL DEVICE SETUP
USB IN
(TV)
(PC)
(PC)
RS-232C IN
(CONTROL & SERVICE)
(TV)
(PC
USB IN
(TV)
(PC)
(PC)
RS-232C IN
(CONTROL & SERVICE)
(TV)
(TV)
(PC)
(PC
SERVICE ONLY
1
3
2
4
Phone jack Type
• You need to purchase the phone-jack to RS-232 cable required for the connection between the PC and
the TV, which is specified in the manual.
* For other models, connect to the USB port.
* The connection interface may differ from your TV.
1
3
(TV)
(TV)
- or
)
2
1
3
SERVICE ONLY
)
RS-232C IN
2
(CONTROL & SERVICE)
Customer Computer RS-232C configurations
3-Wire Configurations(Not standard)
1
5
RXD 2 2 TXD
PC TV
TXD 3 1 RXD
GND 5 3 GND
6
RS-232C
(Serial port)
Set ID
For Set ID number, see "Real Data Mapping" on p.6
1. Press SETTINGS to access the main menus.
2. Press the Navigation buttons to scroll to (*General → About this TV or OPTION) and press OK.
3. Press the Navigation buttons to scroll to SET ID and press OK.
4. Scroll left or right to select a set ID number and select CLOSE. The adjustment range is 1-99.
5. When you are finished, press EXIT.
* (Depending on model)
9
RXD 3 2 TXD
TXD 2 1 RXD
GND 5 3 GND
D-Sub 9 Phone
OR
Page 39

ENGENGLISH
EXTERNAL CONTROL DEVICE SETUP
5
5
Communication Parameters
• Baud rate : 9600 bps (UART)
• Data length : 8 bits
• Parity : None
• Stop bit : 1 bit
• Communication code : ASCII code
• Use a crossed (reverse) cable.
Command reference list
(Depending on model)
COMMAND1 COMMAND2
01. Power* k a 00 to 01 15. Balance k t 00 to 64
02. Aspect
Ratio
03. Screen
Mute
04. Volume
Mute
05. Volume
Control
06. Contrast k g 00 to 64
07.
Brightness
08. Color/
Colour
09. Tint k j 00 to 64
10.
Sharpness
11. OSD
Select
12. Remote
Control Lock
Mode
13. Treble k r 00 to 64
k c (p.7)
k d (p.7)
k e 00 to 01 18. Equalizer j v (p.8)
k f 00 to 64
k h 00 to 64
k i 00 to 64 22. Key m c Key Codes
k k 00 to 32
k l 00 to 01
k m 00 to 01
DATA
(Hexadecimal)
16. Color
(Colour)
Temperature
17. ISM
Method (Only
Plasma TV)
19. Energy
Saving
20. Tune
Command
21. Channel
(Programme)
Add/Del(Skip)
23. Control
Backlight,
Control Panel
Light
24. Input
select (Main)
25. 3D (Only
3D models)
26. Extended
3D (Only 3D
models)
27. Auto
Configure
COMMAND1 COMMAND2
x u 00 to 64
j p (p.8)
j q 00 to 05
m a (p.9)
m b 00 to 01
m g 00 to 64
x b (p.11)
x t (p.11 )
x v (p.12)
j u (p.12)
DATA
(Hexadecimal)
14. Bass k s 00 to 64
* Note: During playing or recording media, all commands except Power (ka) and Key (mc) are not
executed and treated as NG.
With RS232C cable, TV can communicate "ka command" in power-on or power-off status. but with
USB-to-Serial converter cable, the command works only if TV is on.
Page 40

6
ENG
ENGLISH
EXTERNAL CONTROL DEVICE SETUP
6
Transmission / Receiving Protocol
Transmission
[Command1][Command2][ ][Set ID][ ][Data][Cr]
[Command 1] : First command to control the TV. (j, k, m or x)
[Command 2] : Second command to control the TV.
[Set ID] : You can adjust the [Set ID] to choose desired monitor ID number in option menu.
Adjustment range in TV is 1 to 99. If [Set ID] value is selected to ‘0’, every connected set
can be controlled.
* [Set ID] is indicated as decimal (1 to 99) on menu and as Hexadecimal (0x00 to 0x63) on
transmission/receiving protocol.
[DATA] : To transmit command data (hexadecimal). Transmit ‘FF’ data to read status of command.
[Cr] : Carriage Return - ASCII code ‘0x0D’
[ ] : Space – ASCII code ‘0x20’
OK Acknowledgement
[Command2][ ][Set ID][ ][OK][Data][x]
* The set transmits ACK (acknowledgement) based on this format when receiving normal data. At this time,
if the data is data read mode, it indicates present status data. If the data is data write mode, it returns the
data of the PC computer.
Error Acknowledgement
[Command2][ ][Set ID][ ][NG][Data][x]
* The set transmits ACK (acknowledgement) based on this format when receiving abnormal data from
non-viable functions or communication errors.
Data 00: Illegal Code
Real data mapping (Hexadecimal b Decimal)
* When you enter the [data] in hexadecimal, refer to following conversion table.
* Channel Tune (ma) Command uses two-byte hexadecimal value([data]) to select channel number.
00 : Step 0 32 : Step 50 (Set ID 50) FE : Step 254
01 : Step 1 (Set ID 1) 33 : Step 51 (Set ID 51) FF : Step 255
... ... ...
0A : Step 10 (Set ID 10) 63 : Step 99 (Set ID 99) 01 00 : Step 256
... ... ...
0F : Step 15 (Set ID 15) C7 : Step 199 27 0E : Step 9998
10 : Step 16 (Set ID 16) C8 : Step 200 27 0F : Step 9999
... ... ...
Page 41

ENGENGLISH
EXTERNAL CONTROL DEVICE SETUP
* Commands may work differently depending on model and signal.
01. Power (Command: k a)
► To control Power *On or Off of the set.
Transmission[k][a][ ][Set ID][ ][Data][Cr]
Data 00 : Power Off 01 : *Power On
Ack [d][ ][Set ID][ ][OK/NG][Data][x]
* In case of video mute on only, TV will display On
Screen Display(OSD). But, in case of Screen mute
on, TV will not display OSD.
7
7
Ack [a][ ][Set ID][ ][OK/NG][Data][x]
► To Show TV is Power On or *Off
Transmission [k][a][ ][Set ID][ ][FF][Cr]
Ack [a][ ][Set ID][ ][OK][Data][x]
* Similarly, if other functions transmit ‘FF’ data
based on this format, Acknowledgement feedback
presents status about each function.
02. Aspect Ratio (Command: k c)
(Main Picture Size)
► To adjust the screen format. (Main picture format)
You can also adjust the screen format using the
Aspect Ratio in the Q.MENU. or PICTURE menu.
Transmission [k][c][ ][Set ID][ ][Data][Cr]
Data 01 : Normal screen
(4:3)
02 : Wide screen
(16:9)
04 : Zoom
05 : Zoom 2
(Latin America
except Colombia
Only)
06 : Set by Program/
Original
Ack [c][ ][Set ID][ ][OK/NG][Data][x]
07 : 14:9
(Europe, Colombia, Mid-East,
Asia except South Korea and
Japan)
09 : * Just Scan
0B : Full Wide
(Europe, Colombia, MidEast, Asia except South
Korea and Japan)
10 to 1F : Cinema Zoom 1 to 16
0c : 21:9 (Depending on model)
* Using the PC input, you select either 16:9 or 4:3
screen aspect ratio.
* In DTV/HDMI/Component mode (high-definition),
Just Scan is available.
* Full wide mode may work differently based on
model and is supported for DTV fully, and ATV,
AV partially.
04. Volume Mute (Command: k e)
► To control volume mute on/off.
You can also adjust mute using the MUTE button
on remote control.
Transmission [k][e][ ][Set ID][ ][Data][Cr]
Data 00 : Volume mute on (Volume off)
01 : Volume mute off (Volume on)
Ack [e][ ][Set ID][ ][OK/NG][Data][x]
05. Volume Control (Command: k f)
► To adjust volume.
You can also adjust volume with the volume
buttons on remote control.
Transmission [k][f][ ][Set ID][ ][Data][Cr]
Data Min : 00 to Max : 64
Ack [f][ ][Set ID][ ][OK/NG][Data][x]
06. Contrast (Command: k g)
► To adjust screen contrast.
You can also adjust contrast in the PICTURE
menu.
Transmission [k][g][ ][Set ID][ ][Data][Cr]
Data Min : 00 to Max : 64
Ack [g][ ][Set ID][ ][OK/NG][Data][x]
07. Brightness (Command: k h)
► To adjust screen brightness.
You can also adjust brightness in the PICTURE
menu.
Transmission [k][h][ ][Set ID][ ][Data][Cr]
03. Screen Mute (Command: k d)
► To select screen mute on/off.
Transmission [k][d][ ][Set ID][ ][Data][Cr]
Data 00 : Screen mute off (Picture on)
Video mute off
01 : Screen mute on (Picture off)
10 : Video mute on
Data Min : 00 to Max : 64
Ack [h][ ][Set ID][ ][OK/NG][Data][x]
Page 42

8
ENG
ENGLISH
EXTERNAL CONTROL DEVICE SETUP
8
08. Color/Colour (Command: k i)
► To adjust the screen Color(Colour).
You can also adjust colour in the PICTURE menu.
Transmission [k][i][ ][Set ID][ ][Data][Cr]
Data Min : 00 to Max : 64
Ack [i][ ][Set ID][ ][OK/NG][Data][x]
09. Tint (Command: k j)
► To adjust the screen tint.
You can also adjust tint in the PICTURE menu.
Transmission [k][j][ ][Set ID][ ][Data][Cr]
Data Red : 00 to Green : 64
Ack [j][ ][Set ID][ ][OK/NG][Data][x]
10. Sharpness (Command: k k)
► To adjust the screen sharpness.
You can also adjust sharpness in the PICTURE
menu.
Transmission [k][k][ ][Set ID][ ][Data][Cr]
Data Min : 00 to Max : 32
Ack [k][ ][Set ID][ ][OK/NG][Data][x]
13. Treble (Command: k r)
► To adjust treble.
You can also adjust in the AUDIO menu.
Transmission [k][r][ ][Set ID][ ][Data][Cr]
Data Min : 00 to Max : 64
Ack [r][ ][Set ID][ ][OK/NG][Data][x]
* (Depending on model)
14. Bass (Command: k s)
► To adjust Bass.
You can also adjust in the AUDIO menu.
Transmission [k][s][ ][Set ID][ ][Data][Cr]
Data Min : 00 to Max : 64
Ack [s][ ][Set ID][ ][OK/NG][Data][x]
* (Depending on model)
15. Balance (Command: k t)
► To adjust balance.
You can also adjust balance in the AUDIO menu.
Transmission [k][t][ ][Set ID][ ][Data][Cr]
Data Min : 00 to Max : 64
Ack [t][ ][Set ID][ ][OK/NG][Data][x]
11. OSD Select (Command: k l)
► To select OSD (On Screen Display) on/off when
controlling remotely.
Transmission [k][l][ ][Set ID][ ][Data][Cr]
Data 00 : OSD off 01 : OSD on
Ack [l][ ][Set ID][ ][OK/NG][Data][x]
12. Remote control lock mode (Command: k m)
► To lock the front panel controls on the monitor and
remote control.
Transmission [k][m][ ][Set ID][ ][Data][Cr]
Data 00 : Lock off 01 : Lock on
Ack [m][ ][Set ID][ ][OK/NG][Data][x]
* If you are not using the remote control, use this
mode.
When main power is off & on (plug-off and plug-in,
after 20 - 30 seconds), external control lock is
released.
* In the standby mode (DC off by off timer or ‘ka’,
‘mc’ command), and if key lock is on, TV will not
turn on by power on key of IR & Local Key.
16. Color(Colour) Temperature (Command: x u)
► To adjust colour temperature. You can also adjust
Color(Colour) Temperature in the PICTURE menu.
Transmission [x][u][ ][Set ID][ ][Data][Cr]
Data Min : 00 to Max : 64
Ack [u][ ][Set ID][ ][OK/NG][Data][x]
17. ISM Method (Command: j p) (Only Plasma TV)
► To control the ISM method. You can also adjust
ISM Method in OPTION menu.
Transmission [j][p][ ][Set ID][ ][Data][Cr]
Data Min : 02: Orbiter
08: Normal
20: Color(Colour) Wash
Ack [p][ ][Set ID][ ][OK/NG][Data][x]
Page 43

ENGENGLISH
EXTERNAL CONTROL DEVICE SETUP
9
9
18. Equalizer (Command : j v)
► Adjust EQ of the set.
Transmission [j][v][ ][Set ID][ ][Data][Cr]
MSB
0 0 0 0 0 0 0 0
LSB
Frequency Data
7 6 5
0 0 0
0 0 1
0 1 0
0 1 1
1 0 0
Acknowledgement [v][ ][Set ID][ ][OK/NG][Data][x]
Frequency
1st Band
2nd Band
3rd Band
4th Band
5th Band
4 3 2 1 0 Step
0 0 0 0 0
0 0 0 0 1
... ... ... ... ...
1 0 0 1 1
1 0 1 0 1
0(decimal)
1(decimal)
...
19(decimal)
20(decimal)
* It depends on model, and can adjust when sound
mode is EQ adjustable value.
19. Energy Saving (Command: j q)
► To reduce the power consumption of the TV. You
can also adjust Energy Saving in PICTURE menu.
Transmission [j][q][ ][Set ID][ ][Data][Cr]
Data
00 : Off
01 : Minimum
02 : Medium
03 : Maximum
04 : Auto (For LCD TV / LED TV) /
Intelligent sensor (For PDP TV)
05 : Screen off
* (Depending on model)
Ack [q][ ][Set ID][ ][OK/NG][Data][x]
20. Tune Command (Command: m a)
* This command may work differently depending on
model and signal.
• For Europe, Mid-East, Colombia, Asia except
South Korea and Japan Model
► Select channel to following physical number.
Transmission [m][a][ ][Set ID][ ][Data 00][ ]
[Data 01][ ][Data 02][Cr]
* Analog Antenna/Cable
[Data 00][Data 01] Channel Data
Data 00 : High byte channel data
Data 01 : Low byte channel data
- 00 00 ~ 00 C7 (Decimal : 0 ~ 199)
Data 02 : Input Source (Analog)
- 00 : Antenna TV (ATV)
- 80 : Cable TV (CATV)
* Digital Antenna/Cable/Satellite
[Data 00][Data 01]: Channel Data
Data 00 : High Channel data
Data 01 : Low Channel data
- 00 00 ~ 27 0F (Decimal: 0 ~ 9999)
Data 02 : Input Source (Digital)
- 10 : Antenna TV (DTV)
- 20 : Antenna Radio (Radio)
- 40 : Satellite TV (SDTV)
- 50 : Satellite Radio (S-Radio)
- 90 : Cable TV (CADTV)
- a0 : Cable Radio (CA-Radio)
* Tune Command Examples:
1. Tune to the Analog antenna (PAL) Channel 10.
Set ID = All = 00
Data 00 & 01 = Channel Data is 10 = 00 0a
Data 02 = Analog Antenna TV = 00
Result = ma 00 00 0a 00
2. Tune to the digital antenna (DVB-T) Channel 01.
Set ID = All = 00
Data 00 & 01 = Channel Data is 1 = 00 01
Data 02 = Digital Antenna TV = 10
Result = ma 00 00 01 10
3. Tune to the satellite (DVB-S) Channel 1000.
Set ID = All = 00
Data 00 & 01 = Channel Data is 1000 = 03 E8
Data 02 = Digital Satellite TV = 40
Result = ma 00 03 E8 40
Ack [a][ ][Set ID][ ][OK][Data 00][Data 01]
[Data 02][x][a][ ][Set ID][ ][NG][Data 00][x]
• For South Korea, North/Latin America except
Colombia Model
► To tune channel to following physical/major/minor
number.
Transmission [m][a][ ][0][ ][Data00][ ][Data01]
[ ][Data02][ ][Data03][ ][Data04][ ][Data05][Cr]
Digital channels have a Physical, Major, and Minor
channel number. The Physical number is the actual
digital channel number, the Major is the number that
the channel should be mapped to, and the Minor is
the sub-channel. Since the ATSC tuner automatically
maps the channel from the Major / Minor number,
the Physical number is not required when sending a
command in Digital.
Page 44

10
ENG
ENGLISH
EXTERNAL CONTROL DEVICE SETUP
10
* Analog Antenna/Cable
Data 00 : Physical Channel Number
- Antenna (ATV) : 02~45 (Decimal: 2 ~ 69)
- Cable (CATV) : 01, 0E~7D (Decimal : 1, 14~125)
[Data 01 ~ 04]: Major/Minor Channel Number
Data 01 & 02: xx (Don't care)
Data 03 & 04: xx (Don't care)
Data 05: Input Source (Analog)
- 00 : Antenna TV (ATV)
- 01 : Cable TV (CATV)
* Digital Antenna/Cable
Data 00 : xx (Don't care)
[Data 01][Data 02]: Major Channel Number
Data 01 : High byte Channel Data
Data 02 : Low byte Channel Data
- 00 01 ~ 27 0F (Decimal: 1 ~ 9999)
[Data 03][Data 04]: Minor Channel Number
Data 03 : High byte Channel Data
Data 04 : Low byte Channel Data
Data 05 : Input Source (Digital)
- 02 : Antenna TV (DTV) – Use Physical Channel
Number
- 06 : Cable TV (CADTV) – Use Physical Channel
Number
- 22 : Antenna TV (DTV) – Don’t Use Physical
Channel Number
- 26 : Cable TV (CADTV) - Don’t Use Physical
Channel Number
- 46 : Cable TV (CADTV) – Use Physical/Major
Channel Number Only (One Part Channel)
- 66 : Cable TV (CADTV) – Use Major Channel
Number Only (One Part Channel)
- 0b : Cable DTV Plus – Use Physical Channel
Number
- 2b : Cable DTV Plus – Don’t Use Physical
Channel Number
- 4b : Cable DTV Plus – Use Physical/Major
Channel Number Only (One Part Channel)
- 6b : Cable DTV Plus – Use Major Channel
Number Only (One Part Channel)
Two bytes are available for each major and minor
channel data, but usually the low byte is used alone
(high byte is 0).
* Tune Command Examples:
1. Tune to the Analog cable (NTSC) channel 35.
Set ID = All = 00
Data 00 = Channel Data is 35 = 23
Data 01 & 02 = No Major = 00 00
Data 03 & 04 = No Minor = 00 00
Data 05 = Analog Cable TV = 01
Total = ma 00 23 00 00 00 00 01
2. Tune to the digital antenna (ATSC) channel 30-3.
Set ID = All = 00
Data 00 = Don’t know Physical = 00
Data 01 & 02 = Major is 30 = 00 1E
Data 03 & 04 = Minor is 3 = 00 03
Data 05 = Digital Antenna TV = 22
Total = ma 00 00 00 1E 00 03 22
Ack [a][ ][Set ID][ ][OK][Data 00][Data 01]
[Data 02][Data 03][Data 04][Data 05]
[x][a][ ][Set ID][ ][NG][Data 00][x]
• For Japan Model
► To tune channel to following physical/major/minor
number.
Transmission [m][a][ ][0][ ][Data00][ ][Data01]
[ ][Data02][ ][Data03][ ][Data04][ ][Data05][Cr]
* Digital Antenna/Satellite
Data 00: xx (Don't care)
[Data 01][Data 02]: Major Channel Number
Data 01: High byte Channel Data
Data 02: Low byte Channel Data
- 00 01 ~ 27 0F (Decimal: 1 ~ 9999)
[Data 03][Data 04]: Minor/Branch Channel Number
(Don’t care in Satellite)
Data 03: High byte Channel Data
Data 04: Low byte Channel Data
Data 05 : Input Source (Digital/Satellite for Japan)
- 02 : Antenna TV (DTV)
- 42 : Antenna TV (DTV) – Use Physical/Major
Channel Number Only (One Part Channel)
- 62 : Antenna TV (DTV) – Use Major Channel
Number Only (One Part Channel)
- 07 : BS (Broadcasting Satellite)
- 08 : CS1 (Communication Satellite 1)
- 09 : CS2 (Communication Satellite 2)
* Tune Command Examples:
1
Tune to the digital antenna (ISDB-T) channel 17-1
Set ID = All = 00
Data 00 = Don’t know Physical = 00
Data 01 & 02 = Major is 17 = 00 11
Data 03 & 04 = Minor/Branch is 1 = 00 01
Data 05 = Digital Antenna TV = 02
Total = ma 00 00 00 11 00 01 02
.
Page 45

ENGENGLISH
EXTERNAL CONTROL DEVICE SETUP
11
11
2. Tune to the BS (ISDB-BS) channel 30.
Set ID = All = 00
Data 00 = Don’t know Physical = 00
Data 01 & 02 = Major is 30 = 00 1E
Data 03 & 04 = Don’t Care = 00 00
Data 05 = Digital BS TV = 07
Total = ma 00 00 00 1E 00 00 07
* This feature is varied based on the model.
Ack [a][ ][Set ID][ ][OK][Data 00][Data 01]
[Data 02][Data 03][Data 04][Data 05]
[x][a][ ][Set ID][ ][NG][Data 00][x]
21. Channel(Programme) Add/Del(Skip)
(Command: m b)
► To skip current channel(programme) for next time.
Transmission [m][b][ ][Set ID][ ][Data][Cr]
Data 00 : Del(ATSC,ISDB)/Skip(DVB) 01 : Add
Ack [b][ ][Set ID][ ][OK/NG][Data][x]
* Set the saved channel status to del(ATSC, ISDB)/
skip(DVB) or add.
22. Key (Command: m c)
► To send IR remote key code.
Transmission [m][c][ ][Set ID][ ][Data][Cr]
Data Key code - p.2.
Ack [c][ ][Set ID][ ][OK/NG][Data][x]
23. Control Backlight (Command: m g)
• For LCD TV / LED TV
► To control the backlight.
Transmission [m][g][ ][Set ID][ ][Data][Cr]
Data Min : 00 to Max : 64
Ack [g][ ][Set ID][ ][OK/NG][Data][x]
Control Panel Light (Command: m g)
24. Input select (Command: x b)
(Main Picture Input)
► To select input source for main picture.
Transmission [x][b][ ][Set ID][ ][Data][Cr]
Data
00 : DTV
02 : Satellite DTV
ISDB-BS (Japan)
03 : ISDB-CS1 (Japan)
04 : ISDB-CS2 (Japan)
11 : CATV
20 : AV or AV1 21 : AV2
40 : Component1
60 : RGB
90 : HDMI1
92 : HDMI3
Ack [b][ ][Set ID][ ][OK/NG][Data][x]
* This function depends on model and signal.
01 : CADTV
10 : ATV
41 : Component2
91 : HDMI2
93 : HDMI4
25. 3D(Command: x t) (only 3D models)
(Depending on model)
► To change 3D mode for TV.
Transmission [x][t][ ][Set ID][ ][Data 00][ ][Data 01]
[ ][Data 02][ ][Data 03][Cr]
* (Depending on model)
Data Structure
[Data 00] 00 : 3D On
01 : 3D Off
02 : 3D to 2D
03 : 2D to 3D
[Data 01] 00 : Top and Bottom
01 : Side by Side
02 : Check Board
03 : Frame Sequential
04 : Column interleaving
05 : Row interleaving
[Data 02] 00 : Right to Left
01 : Left to Right
[Data 03] 3D Effect(3D Depth): Min : 00 - Max : 14
(*transmit by Hexadecimal code)
• For Plasma TV
► To control the panel light.
Transmission [m][g][ ][Set ID][ ][Data][Cr]
Data Min : 00 to Max : 64
Ack [g][ ][Set ID][ ][OK/NG][Data][x]
Page 46

12
ENG
ENGLISH
EXTERNAL CONTROL DEVICE SETUP
12
* [Data 02], [Data 03] functions depend on model
and signal.
* If [Data 00] is 00 (3D On), [Data 03] has no
meaning.
* If [Data 00] is 01 (3D off) or 02 (3D to 2D), [Data
01], [Data 02] and [Data 03] have no meaning.
* If [Data 00] is 03 (2D to 3D), [Data 01] and
[Data 02] have no meaning.
* If [Data 00] is 00 (3D On) or 03 (2D to 3D), [Data
03] works when 3D Mode (Genre) is manual only.
* All 3D pattern options ([Data 01]) may not be
available according to broadcasting/video signal.
[Data 00] [Data 01] [Data 02] [Data 03]
00 O O O
01 X X X
02 X X X
03 X O O
X : don’t care
Ack [t][ ][Set ID][ ][OK][Data00][Data01][Data02]
[Data03][x]
[t][ ][Set ID][ ][NG][Data00][x]
26. Extended 3D(Command: x v) (only 3D models)
(Depending on model)
► To change 3D option for TV.
Transmission [x][v][ ][Set ID][ ][Data 00][ ]
[Data 01][Cr]
[Data 00] 3D option
00 : 3D Picture Correction
01 : 3D Depth (3D Mode is Manual Only)
02 : 3D Viewpoint
06 : 3D Color Correction
07 : 3D Sound Zooming
08 : Normal Image View
09 : 3D Mode (Genre)
3) When [Data 00] is 06, 07
00 : Off
01 : On
4) When [Data 00] is 08
00 : Revert to 3D video from 3D-to-2D
converted 2D video
01 : Change 3D video to 2D video, except
2D-to-3D video
* If conversion condition doesn’t meet, command is
treated as NG.
5) When [Data 00] is 09
00 : Standard
02 : Cinema
04 : Manual
Ack [v][ ][Set ID][ ][OK][Data00][Data01][x]
[v][ ][Set ID][ ][NG][Data00][x]
01 : Sport
03 : Extreme
05 : Auto
27. Auto Configure (Command: j u)
(Depending on model)
► To adjust picture position and minimize image
shaking automatically. It works only in RGB (PC)
mode.
Transmission [j][u][ ][Set ID][ ][Data][Cr]
Data 01 : To set Auto Configure
Ack [u][ ][Set ID][ ][OK/NG][Data][x]
[Data 01] It has own range for each 3D option
determined by [Data 00].
1) When [Data 00] is 00
00 : Right to Left
01 : Left to Right
2) When [Data 00] is 01, 02
Data Min: 0 - Max: 14 (*transmit by Hexadecimal
code)
Data value range(0 - 20) converts Viewpoint range
(-10 - +10) automatically (Depending on model)
* This option works when 3D Mode (Genre) is manual
only.
Page 47

 Loading...