

Page 1
ENGLISH
LG 8575 TOUCH
Please read this manual carefully before operating your mobile
phone. Retain it for future reference.
USER GUIDE
P/N : MMBB0354301(1.0) LG-AX8575
H
Page 2

Copyright ©2009 LG Electronics, Inc. All rights reserved.
LG and the LG logo are registered trademarks of LG
Group and its related entities. All other trademarks are the
property of their respective owners.
Page 3

Important Safety Precautions
Read these instructions. Breaking the rules may be dangerous or
illegal. Further detailed information is given in this user guide.
WARNING! Violation of the instructions may cause serious injury or
death.
1. Never use an unapproved battery since this could
damage the phone and/or battery and could cause
the battery to explode.
2. Never place your phone in a microwave oven as it will
cause the battery to explode.
3. Never store your phone in temperatures less than
-4°F or greater than 122°F.
4. Do not dispose of your battery by fire or with
hazardous or flammable materials.
5. When riding in a car, do not leave your phone or set
up the hands-free kit near to the air bag. If wireless
equipment is improperly installed and the air bag is
deployed, you may be seriously injured.
6. Do not use a hand-held phone while driving.
7. Do not use the phone in areas where its use is
prohibited. (For example: aircraft)
Important Safety Precautions
1
Page 4

Important Safety Precautions
1. Do not expose the battery charger or adapter to direct
sunlight or use it in places with high humidity, such as
a bathroom.
2. Do not use harsh chemicals (such as alcohol, benzene,
thinners, etc.) or detergents to clean your phone. This
Important Safety Precautions
2
could cause a fire.
3. Do not drop, strike, or shake your phone severely. It
may harm the internal circuit boards of the phone.
4. Do not use your phone in high explosive areas as the
phone may generate sparks.
5. Do not damage the power cord by bending, twisting,
pulling, or heating. Do not use the plug if it is loose as
it may cause a fire or electric shock.
6. Do not place any heavy items on the power cord. Do
not allow the power cord to be crimped as it may
cause electric shock or fire.
7. Do not handle the phone with wet hands while it is
being charged. It may cause an electric shock or
seriously damage your phone.
8. Do not disassemble the phone.
Page 5

1. Do not place or answer calls while charging the phone as it may
short-circuit the phone and/or cause electric shock or fire.
2. Do not hold or let the antenna come in contact with your body
during a call.
3. Make sure that no sharp-edged items such as animal’s teeth or
nails, come into contact with the battery. This could cause a fire.
4. Store the battery out of reach of children.
5. Be careful that children do not swallow any parts (such as
rubber plugs, earphone, connection parts of the phone, etc.)
This could cause asphyxiation or suffocation resulting in serious
injury or death.
6. Unplug the power cord and charger during lightning storms to
avoid electric shock or fire.
7. Only use the batteries and chargers provided by LG. The
warranty will not be applied to products provided by other
suppliers.
8. Only authorized personnel should service the phone and its
accessories. Faulty installation or service may result in accidents
and consequently invalidate the warranty.
9. Your service provider programs one or more emergency phone
numbers, such as 911, that you can call under any
circumstances, even when your phone is locked. Your phone’s
preprogrammed emergency number(s) may not work in all
locations, and sometimes an emergency call cannot be placed
due to network, environmental, or interference issues.
Important Safety Precautions
3
Page 6

Table of Contents
Important Safety
Precautions 1
Table of Contents 4
Welcome 9
Technical Details 10
FCC RF Exposure Information 12
Bodily Contact During Operation 12
Vehicle-Mounted the External
Table of Contents
Antenna 13
FCC Notice and Cautions 13
Caution 14
Part 15.19 statement 14
Part 15.21 statement 14
Part 15.105 statement 15
Phone Overview 16
Quick Glance of the Touch
Screen and How to Use It 18
Calibrating the Touch
Screen 19
Shortcut Menu 20
Entering and Editing
Information 22
4
Getting Started with Your
Phone 29
The Battery 29
Charging the Battery 29
Charging with USB 30
How to Install a microSD™Card 30
How to Remove a microSD
Card 31
Battery Temperature Protection 32
Battery Charge Level 32
Turning the Phone On and Off 32
Signal Strength 33
Screen Icons 33
Making Calls 33
Redialing Calls 34
Receiving Calls 34
™
Menu Tree on the Touch
Screen 35
Menu Access 35
Shortcut Menu on the Touch
Screen 36
Quick Access to Convenient
Features 38
Page 7

Lock Mode 38
Quick Volume Adjustment 38
Vibrate Mode 38
Call Waiting 38
Voice Commands 39
Contacts in Your Phone’s
Memory 40
Storing Basics 40
Changing Contact Entries 41
Speed Dial 41
Storing a Number with Pauses 42
Deleting 42
3D (Three-axis-accelerometer)
Rotation 43
Camera Features 43
Camera Features 44
Video Camera 46
Picture Editing 48
Video Player Controls 50
Video Editing 50
Using Phone Menus 52
MESSAGING 52
1. New Message 52
1.1 Text Message 52
1.2 Picture Message 55
1.3 Video Message 57
1.4 Voice Message 58
2. Messages 59
3. Drafts 61
4. Voicemail 61
5. Settings 62
6. Erase Options 64
Alltel Shop 65
1. Alltel Shop 65
2. Settings 66
3. Help 67
Alltel Web 67
Multimedia 75
1. Take Photo 75
2. Record Video 76
3. Record Voice 77
4. Images 77
5. Videos 79
6. Audios 80
6.1 My Ringtones 80
6.2 My Sounds 80
Table of Contents
5
Page 8

Table of Contents
7. My FM Radio 81
Contacts 84
1. New Contact 84
2. Contact List 85
3. Favorites 86
4. Groups 87
5. Speed Dials 87
6. My Name Card 88
RECENT CALLS 89
Table of Contents
1. Missed Calls 89
2. Received Calls 90
3. Dialed Calls 90
4. All Calls 91
5. View Timers 92
Music 93
1. My Music 93
Tools 97
1. Voice Commands 97
1.1 Call <Name or Number> 98
1.2 Send Msg to <Name or
Number or Group> 99
1.3 Go to <Menu> 99
6
1.4 Check <Item> 99
1.5 Contacts <Name> 99
1.6 Redial 100
1.7 Play 100
1.8 Help 100
2. Alarm Clock 100
3. Calendar 101
4. Ez Tip Calculator 101
5. Notepad 102
6. Calculator 103
7. World Clock 103
8. Stopwatch 104
9. Drawing Pad 104
10. USB Mass Storage 105
Settings 106
1. Bluetooth Menu 106
2. Sounds Settings 111
2.1 Easy Set-Up 111
2.2 Master Volume 111
2.3 Call Sounds 112
2.3.1 Call Ringtone 112
2.3.2 Call Vibrate 112
2.3.3 Call ID Readout 113
2.4 Alert Sounds 113
2.5 Button Sounds 114
Page 9

2.6 Digit Dial Readout 114
2.7 Service Alerts 115
2.8 Power On/Off 115
3. Display Settings 116
3.1 Easy Set-Up 116
3.2 Banner 116
3.2.1 Personal Banner 116
3.2.2 ERI Banner 117
3.3 Backlight 117
3.4 Wallpaper 118
3.5 Charging Screen 118
3.6 Display Themes 119
3.7 Fonts 119
3.8 Dial Fonts 120
3.9 Clock Format 120
3.10 Shortcut Bin 121
3.11 Music Handle 121
4. Touch Settings 122
5. Phone Settings 122
5.1 Airplane Mode 122
5.2 Voice Commands 123
5.3 Language 123
5.4 Location 124
5.5 Current Country 125
5.6 Security 125
5.6.1 Edit Codes 126
5.6.2 Restrictions 126
5.6.3 Phone Lock 127
5.6.4 Lock Phone Now 128
5.6.5 Reset Default 128
5.6.6 Restore Phone 129
5.7 System Select 130
5.8 NAM Select 130
6. Call Settings 131
6.1 Answer Options 131
6.2 Show Dialpad 132
6.3 Auto Retry 132
6.4 TTY Mode 133
6.5 One Touch Dial 135
6.6 Voice Privacy 13 5
6.7 DTMF Tones 136
7. USB Auto Detection 136
8. Memory 137
8.1 Save Options 138
8.2 Phone Memory 138
8.3 Card Memory 139
9. Phone Info 139
9.1 My Number 140
9.2 SW/HW Version 140
9.3 Icon Glossary 141
Table of Contents
7
Page 10

Table of Contents
10. Set-Up Wizard 141
Safety 142
TIA Safety Information 142
Exposure to Radio Frequency
Signal 142
Antenna Care 142
Phone Operation 143
Tips on Efficient Operation 143
Driving 143
Electronic Devices 143
Table of Contents
Pacemakers 143
Persons with pacemakers: 144
Hearing Aids 14 4
Other Medical Devices 144
Health Care Facilities 144
Vehicles 145
Posted Facilities 145
Aircraft 145
Blasting Areas 145
Potentially Explosive Atmosphere 145
For Vehicles Equipped with an
Air Bag 146
Safety Information 146
Charger and Adapter Safety 146
Battery Information and Care 147
8
Explosion, Shock, and Fire
Hazards 147
General Notice 148
Warning! Important safety
information 150
Avoiding hearing damage 150
Using your phone safely 150
Avoiding hearing damage 151
Using headsets safely 151
FDA Consumer Update 152
10 Driver Safety Tips 162
Consumer Information
on SAR 166
FCC Hearing-Aid Compatibility
(HAC) Regulations for
Wireless Devices 169
Accessories 172
Limited Warranty
Statement 173
Index 177
Page 11

Welcome
Thank you for choosing the
LG 8575 Touch cellular phone
designed to operate with the
latest digital mobile
communication technology,
Code Division Multiple Access
(CDMA). Along with the many
advanced features of the CDMA
system, such as greatly enhanced
voice clarity, this compact phone
offers:
●
City ID
●
Touch Screen and auto Touch
Screen lock.
●
Display themes and
Wallpapers for customization.
●
Built-in 3.2 Megapixel digital
camera (with video mode).
●
Large, easy-to-read, backlit
LCD with status icons.
●
Messaging Voicemail, and
caller ID.
●
HTML Browser.
●
Dolby®Mobile
●
FM Radio
●
Long battery standby and talk
time.
●
Easy operation with intuitive
touch screen Menus and
prompts.
●
Any Key answer, Auto-answer
with Handsfree, auto retry,
One Touch and Speed Dialing
(with 999 memory locations).
●
Bilingual (English and Spanish)
capability.
●
Bluetooth®wireless
technology.
●
1GB of internal memory for
music
Note
The Bluetooth®word mark and
logos are owned by the Bluetooth
SIG, Inc. and any use of such marks
by LG Electronics is under license.
Other trademarks and trade names
are those of their respective owners.
Welcome
9
Page 12

Technical Details
Important Information
This user’s guide provides
important information on the use
and operation of your phone.
Please read all the information
carefully prior to using the phone
for the best performance and to
prevent any damage to or misuse
of the phone. Any unapproved
changes or modifications will void
your warranty.
Technical Details
FCC Part 15 Class B
Compliance
This device and its accessories
comply with part 15 of FCC
rules. Operation is subject to the
following two conditions: (1)
This device and its accessories
may not cause harmful
interference, and (2) this device
and its accessories must accept
any interference received,
including interference that
causes undesired operation.
10
Technical Details
The LG 8575 Touch is an all
digital phone that operates on
both Code Division Multiple
Access (CDMA) frequencies:
Cellular services at 800 MHz
and Personal Communication
Services (PCS) at 1.9 GHz.
CDMA technology uses a feature
called DSSS (Direct Sequence
Spread Spectrum) that enables
the phone to keep
communication from being
crossed and to use one frequency
channel by multiple users in the
same specific area. This results in
a 10-fold capacity increase when
compared with analog mode. In
addition, features such as soft /
softer handoff, hard handoff, and
dynamic RF power control
technologies combine to reduce
call interruptions.
Page 13

The Cellular and PCS CDMA
networks consist of MSO (Mobile
Switching Office), BSC (Base
Station Controller), BTS (Base
Station Transmission System), and
MS (Mobile Station).
CDMA Standard
Basic Air
Interface
Network
Service
1x EV-DO
Related
interface
Designator
TIA/EIA-95A
TSB-74
ANSI J-STD-008
TIA/EIA-IS2000
TIA/EIA/IS-634
TIA/EIA/IS/651
TIA/EIA/IS-41-C
TIA/EIA/IS-124
TIA/EIA/IS-96-B
TIA/EIA/IS-637
TIA/EIA/IS-657
IS-801
TIA/EIA/IS-707-A
TIA/EIA/IS-856
TIA/EIA/IS-878
TIA/EIA/IS-866
TIA/EIA/IS-890
Description
CDMA Dual-Mode Air Interface
14.4kbps radio link protocol and interband operations
IS-95 adapted for PCS frequency band
CDMA2000 1xRTT Air Interface
MAS-BS
PCSC-RS
Intersystem operations
Non-signaling data comm.
Speech CODEC
Short Message Service
Packet Data
Position Determination Service (gpsOne)
High Speed Packet Data
CDMA2000 High Rate Packet Data Air
Interface
1xEV-DO Inter-Operability Specification for
CDMA2000 Access Network Interfaces
Recommended Minimum Performance
Standards for CDMA2000 High Rate
Packet Data Access Terminal Test
Application Specification (TAS) for High
Rate Packet Data Air Interface
Technical Details
11
Page 14

Technical Details
* TSB-74: Protocol between an IS-
95A system and ANSI J-STD008
Its battery life is twice as long as
IS-95. High-speed data
transmission is also possible.
The following tab lists some
major CDMA standards.
FCC RF Exposure Information
Technical Details
WARNING! Read this
information before operating
the phone.
In August 1996, the Federal
Communications Commission
(FCC) of the United States, with
its action in Report and Order
FCC 96-326, adopted an
updated safety standard for
human exposure to Radio
Frequency (RF) electromagnetic
energy emitted by FCC regulated
transmitters. Those guidelines are
consistent with the safety
12
standard previously set by both
U.S. and international standards
bodies. The design of this phone
complies with the FCC guidelines
and these international
standards.
Bodily Contact During
Operation
This device was tested for typical
use with the back of the phone
kept 0.79 inches (2.0 cm) from
the body. To comply with FCC
RF exposure requirements, a
minimum separation distance of
0.79 inches (2.0 cm) must be
maintained between the user’s
body and the back of the phone,
including the antenna, whether
extended or retracted. Thirdparty belt-clips, holsters, and
similar accessories containing
metallic components should not
be used. Avoid the use of
Page 15

accessories that cannot maintain
0.79 inches (2.0 cm) distance
between the user’s body and the
back of the phone and have not
been tested for compliance with
FCC RF exposure limits.
Vehicle-Mounted the External
Antenna
(Optional, if available.)
To satisfy FCC RF exposure
requirements, keep 8 inches (20
cm) between the user /
bystander and vehicle-mounted
the external antenna. For more
information about RF exposure,
visit the FCC website at
www.fcc.gov.
FCC Notice and Cautions
This device and its accessories
comply with part 15 of FCC
rules. Operation is subject to the
following two conditions: (1)
This device and its accessories
may not cause harmful
interference, and (2) this device
and its accessories must accept
any interference received,
including interference that
causes undesired operation.
Any changes or modifications
not expressly approved in this
user guide could void your
warranty for this equipment. Use
only the supplied antenna. Use
of unauthorized antennas (or
modifications to the antenna)
could impair call quality, damage
the phone, void your warranty
and/or violate FCC regulations.
Technical Details
13
Page 16

Technical Details
Don't use the phone with a
damaged antenna. A damaged
antenna could cause a minor skin
burn. Contact your local dealer
for a replacement antenna.
Caution
Use only the supplied and
approved antenna. Use of
unauthorized antennas or
modifications could impair call
Technical Details
quality, damage the phone, void
your warranty and/or result in
violation of FCC regulations. Do
not use the phone with a
damaged antenna. If a damaged
antenna comes into contact with
the skin a minor burn may result.
Contact your local dealer for a
replacement antenna.
14
Part 15.19 statement
This device and its accessories
comply with part15 of FCC rules.
Operation is subject to the
following two conditions:
(1) This device & its accessories
may not cause harmful
interference.
(2) This device & its accessories
must accept any interference
received, including
interference that may cause
undesired operation.
Part 15.21 statement
Change or Modifications that are
not expressly approved by the
manufacturer could void the
user's authority to operate the
equipment.
Page 17

Part 15.105 statement
This equipment has been tested
and found to comply with the
limits for a class B digital device,
pursuant to Part 15 of the FCC
Rules. These limits are designed
to provide reasonable protection
against harmful interference in a
residential installation. This
equipment generates, uses, and
can radiate radio frequency
energy and, if not installed and
used in accordance with the
instructions, may cause harmful
interference to radio
communications. However, there
is no guarantee that interference
will not occur in a particular
installation. if this equipment
does cause harmful interference
or television reception, which can
be determined by turning the
equipment off and on, the user is
encouraged to try to correct the
interference by one or more of
the following measures:
- Reorient or relocate the
receiving antenna.
- Increase the separation between
the equipment and receiver.
- Connect the equipment into an
outlet on a circuit different from
that to which the receiver is
connected.
- Consult the dealer or an
experienced radio/TV
technician for help.
Technical Details
15
Page 18
Phone Overview
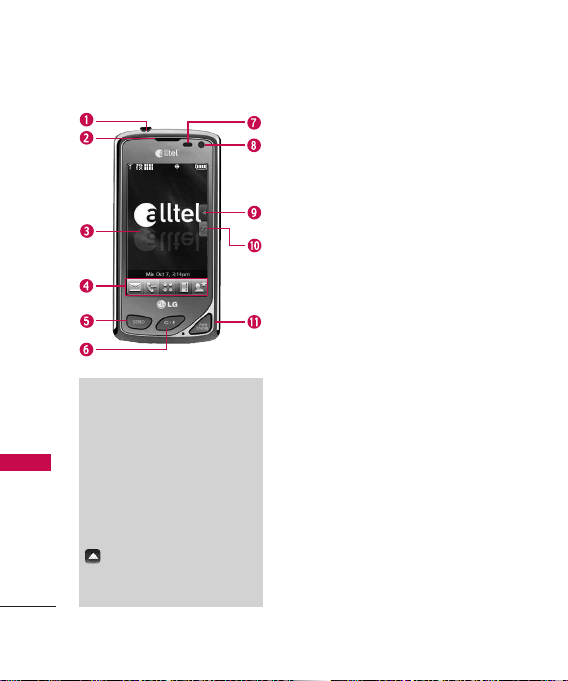
Phone Overview
Note
The SEND Key, CLR/ Voice
Commands Key, and PWR / END
Key are not illuminated when the
display is off. Press the Unlock
Key, or any other exterior key, to
illuminate the display and keys.
To unlock the screen and keys,
lightly press and slide the icon
upwards to reveal the
Standby mode Touch Screen and
Touch Soft Keys.
16
1.
3.5mm Headset Jack Allows you to plug in an optional
wired headset for convenient, hands-free conversations.
The 3.5mm jack also allows you to connect
headphones normally used with other mp3 players.
2. Earpiece Lets you hear the caller.
3. Touch Screen Displays incoming calls, messages and
indicator icons as well as a wide variety of content you
select to view.
4. Touch Soft Keys Touch Keys on this Touchpad
provide easy access to Messages, the phone Dialpad,
the Main Menu, the Contact List, and Favorites which
easily activate with the touch of your fingertip.
5. SEND Key Use to answer incoming calls and to place
calls from the Dialpad. From Standby mode, pressing
this key will open the All Calls list.
6. Clear Key / Voice Command Key Deletes single
spaces or characters. Also backs out of menus, one
level at a time. While in Standby mode, use for quick
access to Voice Command or press and hold to
access Voice Recorder.
7.
Proximity Sensor This sensor locks the Touch screen
during a call if an object (like your head) comes within
close proximity, to prevent accidental keypresses. Please
note that some phone cases may engage the sensor.
The sensor is disabled when using the Speakerphone, a
Bluetooth headset or the headset jack
8. Light Sensor Detects the amount of light, adjusts
brightness of the LCD. This conserves power and
extends battery life.
9. Shortcut Bin Touch Key Allows quick access to a
customizable Shortcut Menu.
Music Handle Touch Key
10.
the My Music applica
11. PWR/END Key Use to turn the power on/off and to
end a call. Also returns to Standby mode.
This shortcut k
tion.
ey opens
Page 19

12. Camera Lens Used for taking pictures and
recording video. Keep it clean for optimal photo
quality.
13. Accessory/ Charger Port Connects the phone
to the battery charger, or other compatible
accessories.
14. Side Volume Keys Use to adjust the Master
Volume in Standby mode* and the Earpiece
Volume during a call.
15. Speakerphone Keys Press to activate or
deactivate the Speakephone function.
16. Lock/ Unlock Key Press to lock or unlock the
Touch Screen and keys.
17. My Music Key Use for quick access to your
music. Download, store and listen to music right
from your phone.
18. Camera Key Use for quick access to Camera
function. Press and hold the Camera Key to
record Video.
* Standby mode is when the phone is waiting for
input from you. No menu is displayed and the
phone isn’t performing any action. It’s the starting
point for all of the instruction steps.
Phone Overview
17
Page 20

Quick Glance of the Touch Screen and How to Use It
Touch Sensitive Soft Keys
Quick Glance of the Touch Screen and How to Use It
(,,,,)
1. Make sure your hands are clean
and dry. Remove moisture from
the surface of your hands. Don't
use the touch keys in a humid
environment.
2. Touch screen is sensitive to your
light touch. You don't need to
press it forcefully to use it.
Protect your phone from severe
impact because touch screen
sensors may become damaged
from harsh use.
3.
Use the tip of your finger to touch
the center of a touch key. If you
touch off-center it may activate
the nearby function instead.
4. The touch feedback level can be
adjusted to your preference.
5. When both the LCD screen and
backlight are off, all keys are
deactivated. Press the Unlock
Key ( ) twice to turn on and
unlock the Touch Screen.
18
6. The Proximity Sensor protects
against accidental key presses
during phone calls by locking the
screen.
Keep metal and other conductive
7.
material away from the surface of
touch screen because contact may
cause electronic interference.
How to Unlock
Press the
Touch the
icon and slide up
to unlock the
screen.
OR
Unlock Key on
the side of your
phone. Press
twice if the
backlight is off.
Page 21

Calibrating the Touch Screen
Calibration allows the phone to
recognize the accuracy of your
touch.
1. Unlock the Touch Screen by
sliding the Slide icon up or
press the Unlock Key ( ) on
the right side of your phone.
Then, touch the Menu Touch
Soft Key .
2. Touch the Settings icon .
3. Touch
Touch Settings
4. Place your finger on the Touch
Screen and apply gentle upward
pressure to scroll the list up,
then touch
Calibration
.
.
5. Touch the target each time it
appears.
6. After setting calibration, touch
Check calibration or Save
without check.
●
If you touch Check calibration,
touch each target as it appears
again. The screen will display a
purple dot to indicate the
location of your touch. If you
are satisfied with your accuracy,
touch Yes to save, or touch No
to try again.
●
Touch Save without check to
save without viewing your touch
accuracy.
Calibrating the Touch Screen
19
Page 22
Shortcut Menu
Touch Screen Shortcut Menu
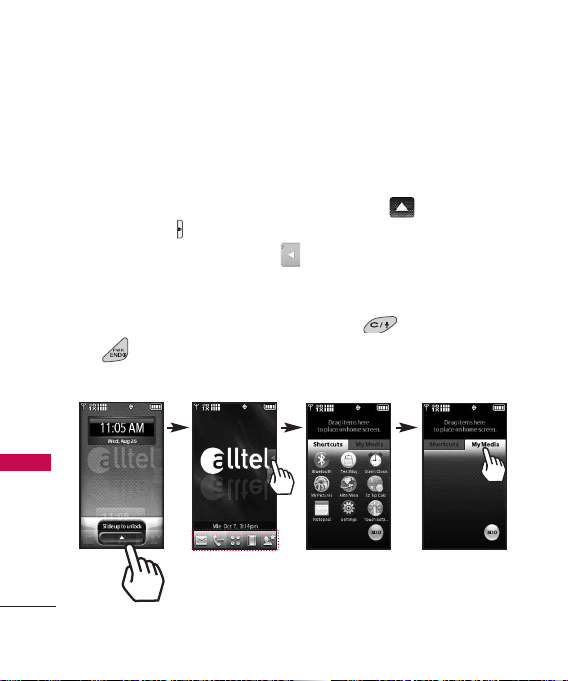
The Touch Screen Shortcut Menu allows instant access to menus and
phone features with the quick touch of your fingertip. To use the
Shortcut Menu:
1. Unlock the Touch Screen by sliding the Slide icon up or press the
Unlock Key ( ) on the right side of your phone.
2. Touch the Shortcut Menu icon .
3. Touch the My Media tab to access, and/or manage, shortcuts to your
favorite Media files (including pictures, videos, and music).
4. To close the Shortcut Menu, press the Clear or PWR/END
Shortcut Menu
20
Key.
Page 23
Touch Soft Keys
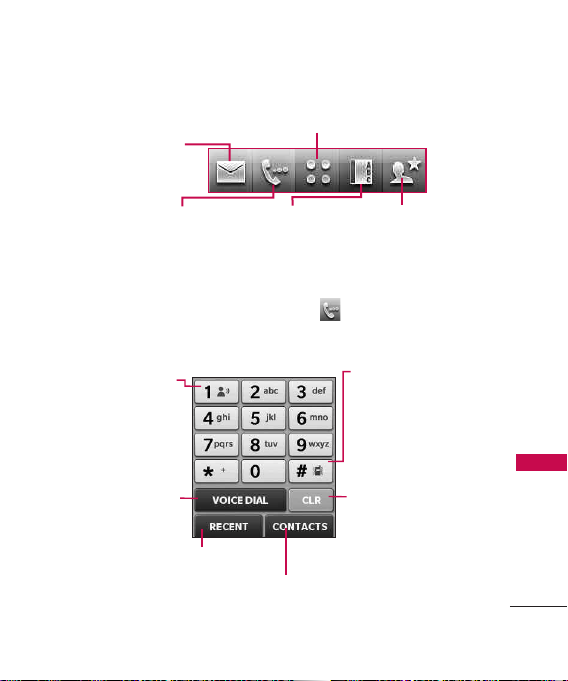
Messages: Displays the
Messages menu.
Menu: Displays the Main Menu.
Phone: Displays the Dialpad Touch
Keys so you can make a call. Dial
manually using the numeric keys or
easily from your Recent Calls,
Contacts, or Voice Dial.
Contacts:
Displays your
Contact List.
Favorites: Displays
your favorite
contacts.
When you touch the Phone Touch Soft Key the following Dialpad
is displayed:
Touch and hold this
Touch Key to call your
voice mail box.
Touch this Touch Key
to dial using Voice
Command.
Touch this Touch Key to view the
recent call history.
Touch this Touch Key to display your
Contact List to view or call a Contact.
Touch and hold this
Touch Key to toggle
your phone between
Vibrate Mode and
Normal Mode.
Touch this Touch Key
to delete digits entered
one by one. Hold down
to delete the entire
entry.
Shortcut Menu
21
Page 24

Entering and Editing Information
Text Input
You can enter information using
the Touch Screen keypad. There
are special key functions to help
you with text entry.
Entering and Editing Information
Using the Touch Screen
1. Unlock the Touch Screen by
sliding the Slide icon up or
press the Unlock Key ( ) on the
right side of your phone.
2. Touch the Message Touch Soft
Key .
22
3. Touch .
4. Select
5. Touch the Text Field to begin
6. To access Text Input options,
Text Entry Options.
Insert Quick Text/ Save As Draft/ Add/ Copy
Text/ Paste/ Format Text/ Priority Level/
Callback#/ Save Quick Text/ Cancel Message
Touch to minimize the touch keypad.
Touch to change text input modes.
Handwriting/ Keypad Toggle Key.
NEW
Text Message
entering text. A touch keypad will
popup.
press the Text Options Touch Key
. The options are:
Insert Quick Text/ Save As Draft/
Add/ Copy Text/ Paste/ Format
Text/ Priority Level/ Callback#/
Save Quick Text/ Cancel Message
.
Page 25

Changing Input Method
When entering text, besides
"typing" the text with Touch
Keys, you also have the option to
write with your fingertip. The
Touch Screen interprets your
movements into characters.
1. Touch a text field, then touch
on the right side of the
display.
2.
Use your fingertip to write each
character you want. You must
write in the box that appears in
the lower half of the screen. If the
Touch Screen does not display
the character you intended, press
the Clear/Voice Commands Key
to delete characters, and
try again. For instructions on how
to better use the handwriting
function, see the next page.
TIP
When you "write" on the Touch
Screen, the interpreted movements
will be displayed. Gaps in lines may
indicate that you need to press
slightly harder for more constant
contact with the Touch Screen.
NOTE
The handwriting option may not be
available for all text entry fields.
Handwriting
Recognition
Field
Entering and Editing Information
23
Page 26
Entering and Editing Information
To change from "writing" to
"typing":
In the hand-writing screen, touch
on the right-hand side.
Entering and Editing Information
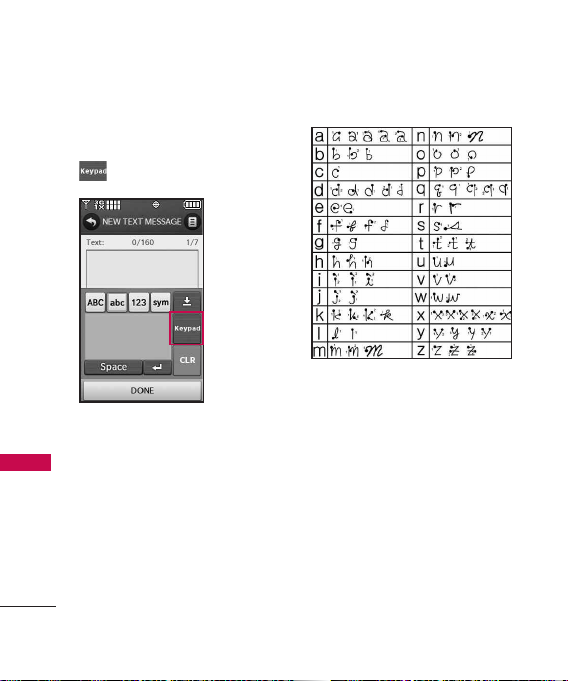
The following tables may help in
understanding how the Touch
Screen interprets movements into
characters.
24
Writing in Lower-Case
Page 27
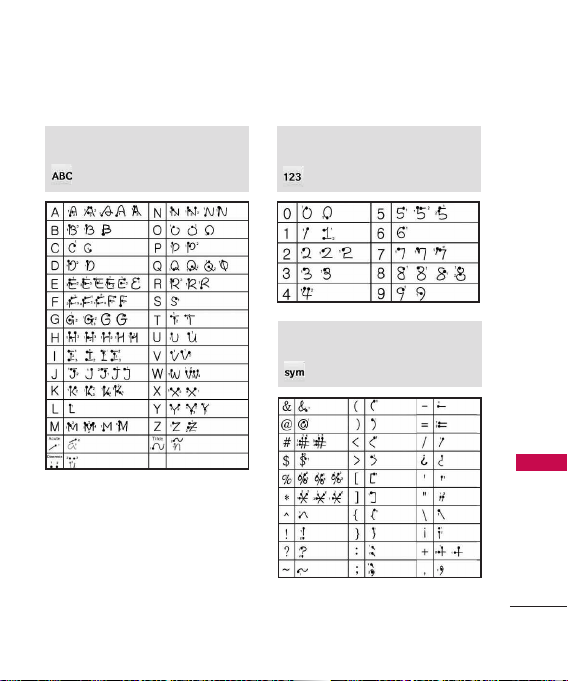
Writing in Upper-Case
NOTE
You must touch the All Caps Touch Key
to write in upper-case letters.
NOTE
You must touch the All Caps Touch Key
to write in upper-case letters.
Entering and Editing Information
NOTE
You must touch the All Caps Touch Key
to write in upper-case letters.
25
Page 28
Menus Overview
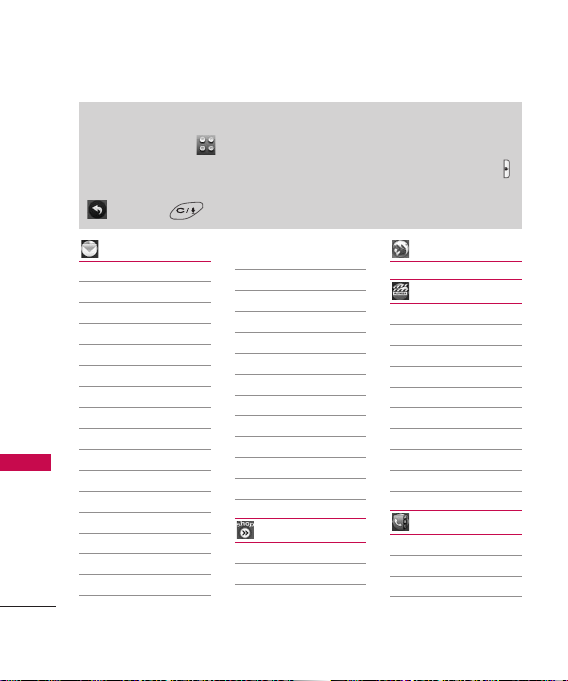
Menu Access
Touch the MENU Touch Key to have access to phone menus.
To access the MENU, unlock first by pressing down the unlock key
on the left side of your phone. To go back to standby mode, touch
or press at the bottom center of your phone.
Menus Overview
26
Messaging
New Message
Text Message
Picture Message
Video Message
Voice Message
Messages
Drafts
Voicemail
Settings
Messages View
Entry Mode
Text Entry Settings
Auto Save Sent
Auto Erase Inbox
Message Font Size
Text Auto View
Text Auto Scroll
Multimedia Auto
Receive
Quick Text
Voicemail#
Callback#
Signature
Delivery Receipt
Speed Messaging
Erase Options
Erase Inbox
Erase Sent
Erase Drafts
Erase All
Alltel Shop
Alltel Shop
Settings
Help
Alltel Web
Multimedia
Take Photo
Record Video
Record Voice
Images
Videos
Audios
My Ringtones
My Sounds
My FM Radio
Contacts
New Contact
Contact List
Favorites
Groups
Page 29

Speed Dials
My Name Card
Recent Calls
Missed Calls
Received Calls
Dialed Calls
All Calls
View Timers
Music
My Music
All Songs
Playlists
Artists
Genres
Albums
Manage My Music
Erase
Move to Card
Move to Phone
Lock/Unlock
Music Settings
Repeat
Shuffle
Music Only
Tools
Voice Commands
Call <Name or
Number>
Send Msg to
<Name or Number>
Go to <Menu>
Check <Item>
Contacts <Name>
Redial
Play
Help
Alarm Clock
Calendar
Ez Tip Calculator
Notepad
Calculator
World Clock
Stopwatch
Drawing Pad
USB Mass Storage
Settings
Bluetooth Menu
Sounds Settings
Easy Set-up
Master Volume
Call Sounds
Call Ringtone
Call Vibrate
Caller ID
Readout
Alert Sounds
Text Message
Multimedia
Message
Voicemail
Emergency Tone
Missed Call
Button Sounds
Digit Dial Readout
Service Alerts
ERI
Minute Beep
Call Connect
Charge Complete
Power On/Off
Menus Overview
27
Page 30

Menus Overview
Menus Overview
28
Power On
Sound
Power On
Vibrate
Power Off
Sound
Power Off
Vibrate
Display Settings
Easy Set-up
Banner
Personal Banner
ERI Banner
Backlight
Wallpaper
My Pictures
My Videos
Fun Animations
Buy Wallpaper
Charging Screen
Display Themes
Fonts
Dial Fonts
Clock Format
Shortcut Bin
Music Handle
Touch Settings
Auto Lock
Vibrate Type
Vibrate Level
Vibrate Effect
Sound
Calibration
Phone Settings
Airplane Mode
Voice Commands
Confirm Choices
Sensitivity
Adapt Voice
Prompt Mode
Audio Playback
Prompt Timeout
CLR Key
Activation
Info
Language
Location
Current Country
Security
Edit Codes
Restrictions
Phone Lock
Lock Phone
Now
Reset Default
Restore Phone
System Select
NAM Select
Call Settings
Answer Options
Show Dialpad
Auto Retry
TTY Mode
One Touch Dial
Voice Privacy
DTMF Tones
USB Auto Detection
Memory
Save Options
Pictures
Videos
Sounds
Phone Memory
Card Memory
Phone Info
Set-up Wizard
Page 31
Getting Started with Your Phone
The Battery
Note
It is important to fully charge the
battery before initial use of the
phone.
The phone comes with a
rechargeable battery. The battery
charge level is shown at the top
of the LCD screen.
Installing the Battery
To install the battery, insert the
edge with the battery contacts
into the opening on the back of
the phone. Push the battery
down until it clicks into place,
then attach the back cover.
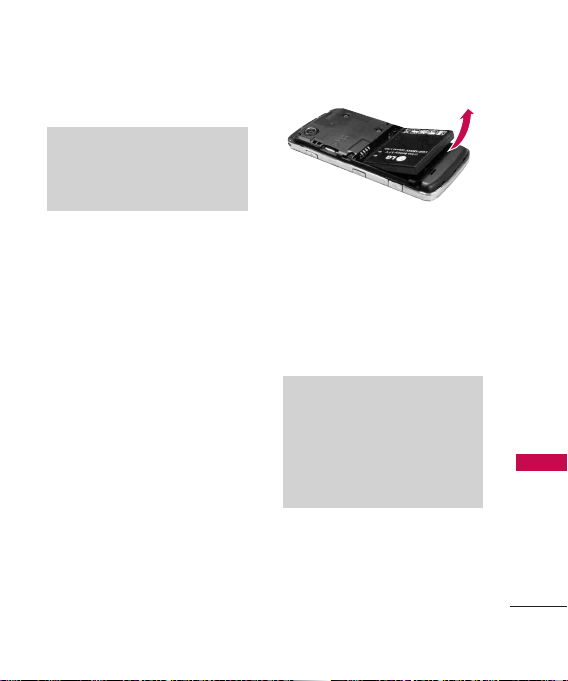
Removing the Battery
Turn power off and slide the
back cover down to remove it.
Use the fingertip cutout at the
edge of the battery to lift the
edge of the battery to remove it.
Charging the Battery
Your LG 8575 Touch device
comes with a cableless wall
adapter and a USB data cable
which connect together to
charge your phone. To charge
your phone:
NOTICE
Please use only an approved charging
accessory to charge your LG phone.
Improper handling of the charging port,
as well as the use of an incompatible
charger, may cause damage to your
phone and void the warranty.
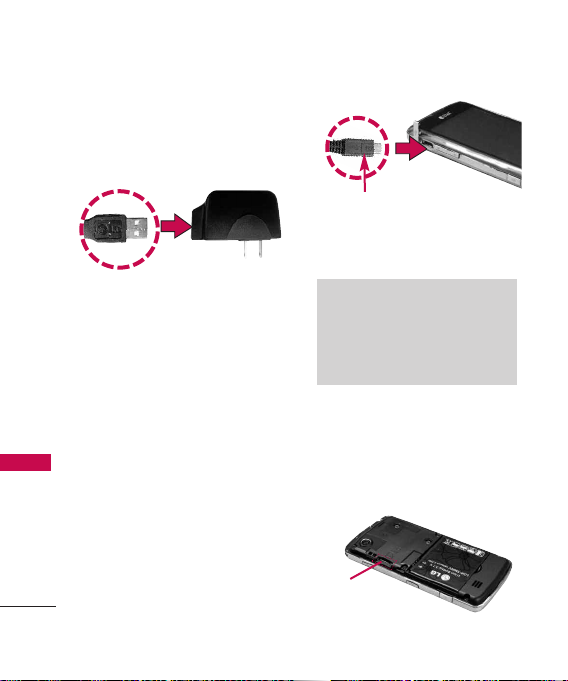
Connect the USB data cable
1.
into the cableless wall adapter,
as shown below.
2. Gently uncover the phone's
accessory/ charging port.
Getting Start ed with Your Phone
29
Page 32
Getting Started with Your Phone
Then plug the end of the AC
adapter into the accessory/
charger port and the other
end into an electrical outlet.
Getting Start ed with Your Phone
Cableless Wall Adapter
3. The charge time varies
depending upon the battery
level.
Charging with USB
You can use your computer to
charge your phone. To be able
to charge with the USB cable,
you may need to have the
necessary USB Driver installed on
your PC first. Connect one end
of the USB cable to the charging
accessory port on your phone
and the other end to a buspowered USB port on your PC.
30
Notice
Please make sure that the 'B' side is
facing up before inserting a charger
or data cable into the charger port of
your phone.
Note
Low-powered USB ports are not
supported, such as the USB port on
your keyboard or bus-powered USB
hub.
How to Install a microSD
Card
1. Remove the back cover and
locate the microSD
the left side.
™
microSD
™
slot on
™
Page 33
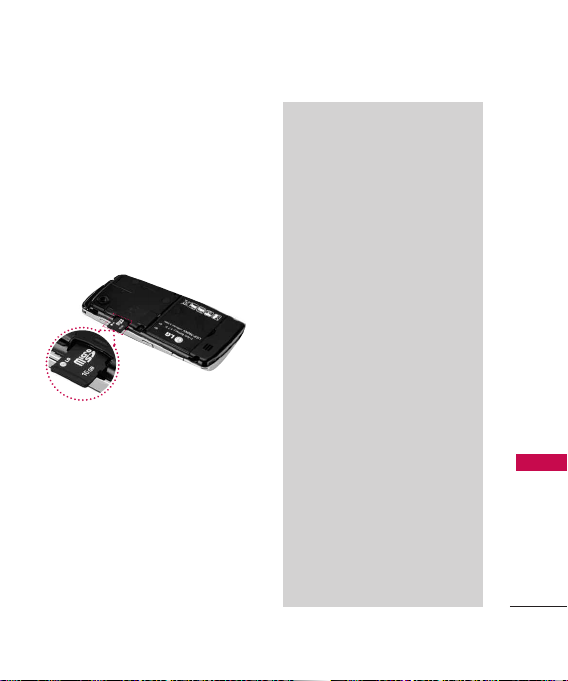
2. Insert the microSD™card
(purchased separately) with
the logos facing up. Push in
until it clicks into the slot.
Please note that if you insert
the card in the wrong
direction, it may damage your
phone or your card.
How to Remove a
™
microSD
1.
Card
Gently push the card in, this
will release the exposed edge of
the microSD
™
card to eject it.
2. Remove the microSD™card
from the slot and replace the
cover.
Note
• Do not attempt to remove the
™
microSD
card while reading or
writing to the card.
• Users wishing to transfer or
download music onto a MicroSD
card inserted into this phone
(through either Music Sync or
Over the Air) should format the
™
card on this handset
MicroSD
before using it through (Menu ->
Settings -> Memory -> Card
Memory -> Format). Warning:
Formatting the MicroSD
erase all contents on the card. In
the event the MicroSD
used on this phone without first
formatting it, the phone may
display “License acquisition failed”
during OTA downloading or Music
Sync. Song files downloaded or
otherwise purchased from third
party providers and stored on a
™
card inserted into this
MicroSD
device may be protected or
encrypted by such provider and
cannot be played on this device.
™
™
card will
card is
™
Getting Start ed with Your Phone
31
Page 34

Getting Started with Your Phone
Battery Temperature
Protection
Though extremely rare, if the
battery becomes overheated, the
phone will automatically turn off.
Getting Start ed with Your Phone
When you turn the phone back
on, a message pops up alerting
you that the phone was powered
off for your safety.
Battery Charge Level
You can find the battery charge
level at the top right of the LCD
screen. When the charge level
becomes low, the battery sensor
sounds a warning tone, blinks the
battery icon, and/or displays a
warning message. As the charge
level approaches empty, the
phone automatically switches off
without saving.
32
Turning the Phone On and
Off
Turning the Phone On
1. Install a charged battery or
connect the phone to an
external power source.
2. Press the PWR/END
Key for a few seconds until
the Touch Screen lights up.
Turning the Phone Off
1. Unlock the Touch Screen by
sliding the Slide icon up
to unlock or press the Unlock
Key ( ) on the right side of
your phone.
2. Press and hold the PWR/END
Key until the display
turns off.
Page 35
Signal Strength
Call quality depends on the
signal strength in your area. You
can tell how much signal strength
you have by the number of bars
next to the signal strength icon:
the more bars, the stronger the
signal. If you’re having problems
with signal quality, move to an
open area or, when inside a
building, try moving near a
window.
Screen Icons
When the phone is on, the top
line of the LCD screen displays
phone status icons. To view what
they mean:
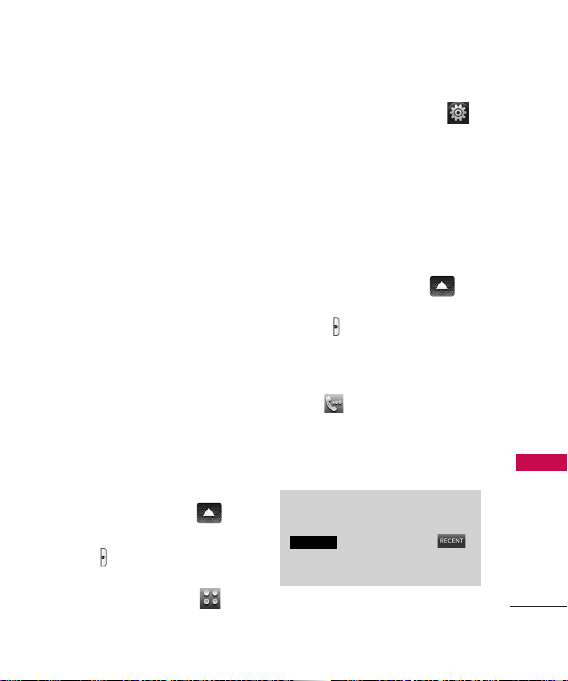
1. Unlock the Touch Screen by
sliding the Slide icon up
to unlock or press the Unlock
Key ( ) on the right side of
your phone and touch the
Menu Touch Soft Key .
2. Touch the Settings icon .
3. Scroll the list up, then touch
Phone Info
4. Touch
.
Icon Glossary
.
Making Calls
1. Unlock the Touch Screen by
sliding the Slide icon up
to unlock or press the Unlock
Key ( ) on the right side of
your phone.
2. Touch the Phone Touch Soft
Key , to display the dialpad
you can use to dial. Enter the
phone number you want to
call.
Note
You can search your Contact List
CONTACTS
( ) or Recent Calls ( )
and select a number to call instead of
manually dialing.
Getting Start ed with Your Phone
33
Page 36
Getting Started with Your Phone
3. Press the SEND Key or
touch the Call touch key
to place the call.
CALL
4. Press the PWR/END
Getting Start ed with Your Phone
Key or touch the End touch
key to end the call.
END
Correcting Dialing Mistakes
If you make a mistake while
dialing a number, touch the Clear
touch key once to erase
the last digit entered, or hold the
Clear touch key down for at least
2 seconds to delete all digits.
CLR
Redialing Calls
You can also press the SEND
Key twice to redial the last
number you dialed, received or
missed in the call history. With
the Touch Screen unlocked, press
the SEND Key once to
view a list of all of your recent
calls. The last 270 calls (90
34
Received, 90 missed and 90
Dialed) are stored in the call
history list. Touch the Dial touch
key next to any of the
entries to place a call to that
number.
Receiving Calls
1. When the phone rings and/or
vibrates, unlock the Touch
Screen by sliding the Slide
icon up, then touch the
Answer touch key ,
or press the SEND Key.
2. Press the PWR/END Key
to end the call.
Answer
Page 37
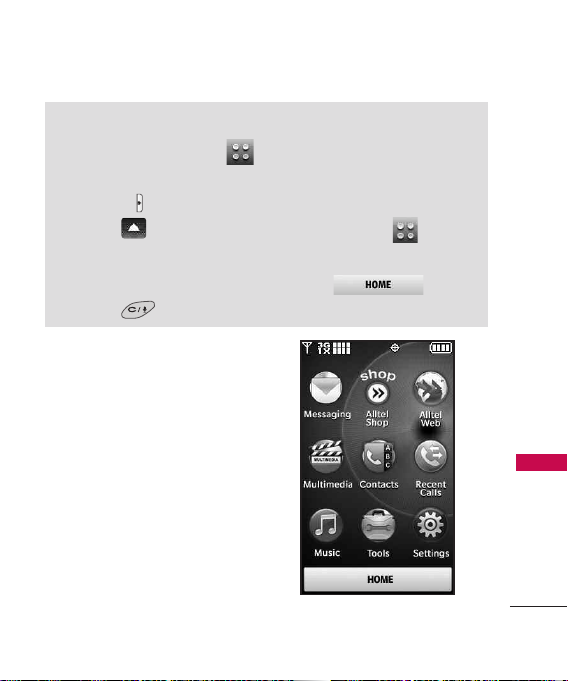
Menu Tree on the Touch Screen
Menu Access
The Menu Touch Soft Key provides access to nine phone
menus. To access the main menus, unlock first by pressing the
unlock key ( ) on the right side of your phone or sliding the
Slide icon up. Touch the Menu Touch Soft Key at the
bottom of the screen to open the main menus. To go back to
Standby mode, touch the Home touch key or press
the Clear Key at the bottom center of your phone.
The main menus are displayed as
shown to the right. Touch any of
the menu icons with your
fingertip to go to that menu.
Menu Tree on the Touch Screen
35
Page 38
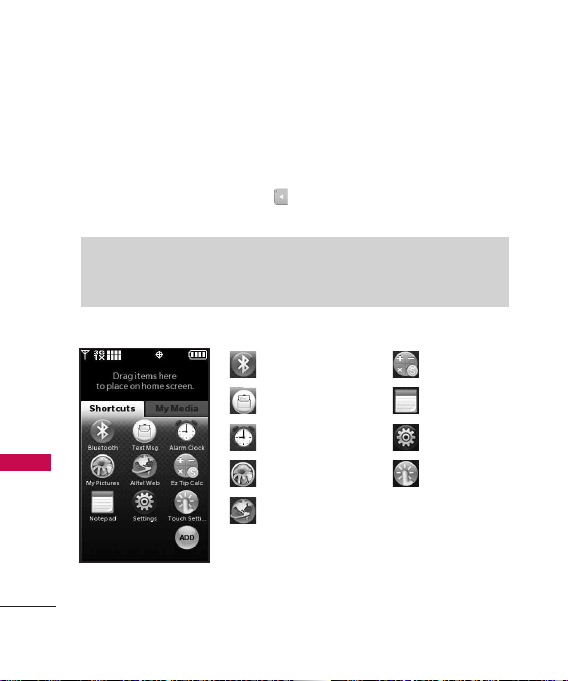
Shortcut Menu on the Touch Screen
Touch Screen Shortcut Menu
The Shortcut Menu allows quick, direct access to several frequently
used device features from the Touch Screen. Up to 11 shortcuts can be
set. To access the Shortcut Menu, unlock the Touch Screen, then
Shortcut Menu on the Touch Screen
touch the Shortcut Menu icon . By default, the shortcuts below are
provided, but you can customize them to your preferences.
Note
Touch the My Media tab to set up to 11 media files (picture, video, or music)
with shortcut access.
36
Bluetooth
Text Msg
Alarm Clock
My Pictures
Alltel Web
Ez Tip Calc
Notepad
Settings
Touch Settings
Page 39
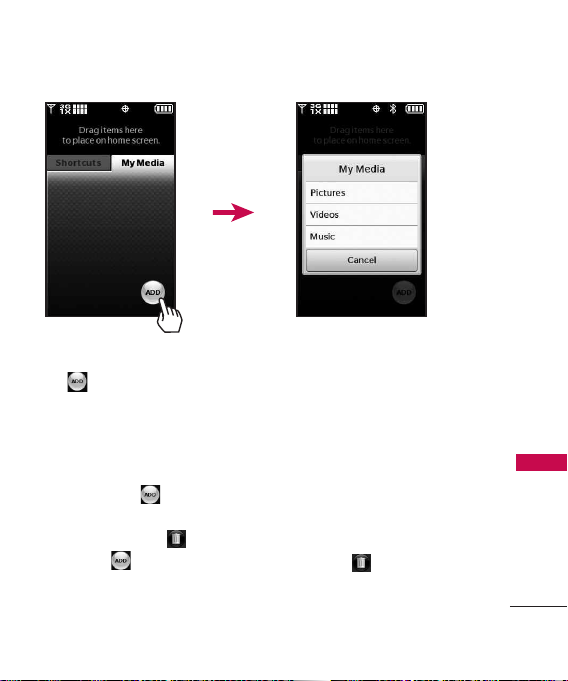
Shortcut Menu on the Touch Screen
Touch the My Media tab
and touch the Add touch
key to add files to
this shortcut menu.
Use the My Media sub
menus to add shortcuts to
your selected media files.
Managing Shortcuts
You can add, delete, and rearrange shortcut icons. To add, touch the
Add touch key , scroll to the feature you want, then touch it. To
remove from the Shortcuts menu, drag and drop the icon on the
Trashcan touch key (When you hold down a Shortcut item, the Add
touch key turns into the Trash can touch key ). To move an
icon, drag and drop it on another icon, they will exchange places.
37
Page 40
Quick Access to Convenient Features
Lock Mode
Sets your phone to require a 4
digit password in order to use
the phone.
Quick Access to Convenient Features
To set lock mode on, touch
Menu
->
Phone Settings
Enter
Phone Lock Code
Touch
Lock Phone Now
Quick Volume Adjustment
Quickly adjust ringer and
earpiece volumes by pressing the
upper side volume key to
increase and lower side key to
decrease.
Note
The earpiece volume can only be
adjusted by the side volume keys
during a call.
38
Settings
->
Security
Note
To turn sounds off, unlock the
phone, press and hold the lower side
volume key for 3 seconds, then
press and hold the upper side
volume key to return to normal
->
->
->
.
sounds mode.
Vibrate Mode
Sets the phone to vibrate instead
of ring ( is displayed on the
Notifications bar). To set Vibrate
Mode, touch the Phone Touch
Soft Key to display the
keypad touch keys then touch and
hold the Pound touch key .
To return to Normal Mode,
touch and hold the Pound touch
key .
Call Waiting
During a call, one beep indicates
that you have another incoming
call.
Page 41
Ignoring a Call Waiting
If you don't want to answer the
incoming call, touch on
Ignore
the Touch Screen. The Call
Waiting beep stops and the call
goes to your voicemail, if
available.
Answering a Call Waiting
1. Press , to automatically
put the first call on hold and
answer the new call.
2. Press again, to put the
second call on hold and return
to the first caller.
Voice Commands
Voice Commands allow you to
do things by verbal command
(e.g., make calls, check Voicemail,
etc.). For more information, see
page 97.
With the Touch Screen unlocked,
press a quick once (an
extended press activates the
Voice Recorder feature instead).
2. Follow the prompts to use
your voice command(s).
Note
Voice Commands can also be started
with the designated key on your
®
Bluetooth
manual of the Bluetooth
further instructions.
device. Please check the
®
device for
Quick Access to Convenient Features
39
Page 42
Contacts in Your Phone’s Memory
Storing Basics
1. Unlock the Touch Screen by
sliding the Slide icon up
to unlock or press the Unlock
Contacts in Your Phone’s Memory
Key ( ) on the right side of
your phone.
2. Touch the Contact Touch Soft
Key .
3. Touch the New touch key
.
New
4. Touch a field, use the pop-up
touch keys to enter
information, then touch the
Done touch key . Do
this for each field you want to
enter.
5. When all fields are complete,
touch the Save touch key
.
SAVE
OR
40
DONE
1. Unlock the Touch Screen by
sliding the Slide icon up
to unlock or press the Unlock
Key ( ) on the right side of
your phone.
2. Touch the Phone Touch Soft
Key for the phone
dialing keypad.
3. Use the Dialpad that pops up
to enter the phone number
and touch the Save touch key
.
SAVE
4. Touch
Add New Contact/
Update Existing
5. Touch
Mobile 1/ Home/
Work/ Mobile 2/ Fax
6. Enter information into the
remaining fields, as necessary,
and touch the Save touch key
SAVE
.
.
to save.
Page 43
Changing Contact Entries
1. Unlock the Touch Screen by
sliding the Slide icon up
to unlock or press the Unlock
Key ( ) on the right side of
your phone.
2. Touch the Contact List Touch
Soft Key .
3. Touch the Contact you want
to customize.
4. Touch the Edit touch key
, touch and edit the
EDIT
fields you want to change
then touch the Done touch
key .
DONE
5. Touch the Save touch key
when edits are
SAVE
complete.
Speed Dial
Allows you to set up your Speed
Dials.
1. Unlock the Touch Screen by
sliding the Slide icon up
to unlock or press the Unlock
Key ( ) on the right side of
your phone.
2. Touch the Contacts Touch
Soft Key .
3. Touch the Contact you want
to set with a Speed Dial, then
touch the Options icon .
4. Touch
Set Speed Dial
touch the phone number to
set with a Speed Dial.
5. Touch an unassigned Speed
Dial number.
6. You will be prompted "Assign
Speed Dial to Contact?"
Ye s
Touch
.
, then
Contacts in Your Phone’s Memory
41
Page 44
Contacts in Your Phone’s Memory
4. Touch
Storing a Number with Pauses
Pauses allow you to enter
additional series of numbers to
access automated systems such
as Voicemail or credit billing
Contacts in Your Phone’s Memory
numbers. Pause types are:
The phone stops dialing
(W)
until you press the Release touch
RELEASE
key on the Touch
Screen, to advance to the next
2-Sec Pause (P)
number.
phone waits two seconds before
sending the next string of digits
automatically.
1. Unlock the Touch Screen by
sliding the Slide icon up
to unlock or press the Unlock
Key ( ) on the right side of
your phone.
2. Touch the Phone Touch Soft
Key .
3. Enter the number, then touch
the Options icon .
42
Wait
The
Add 2-Sec Pause/ Add
, then enter additional
Wait
numbers.
5. Touch the Save touch key
SAVE
Contact entry as necessary.
Deleting
Deleting a Contact Entry
1. Unlock the Touch Screen by
sliding the Slide icon up
to unlock or press the Unlock
Key ( ) on the right side of
your phone.
2. Touch the Contacts Touch
Soft Key .
3. Touch the Contact you want
to erase (search using # or
alphabet letters at the bottom
of the screen, if necessary).
4. Touch the Erase touch key
ERASE
5. Touch
Yes
, then complete the
.
.
Page 45
Camera Features
3D (Three-axis-accelerometer) Rotation
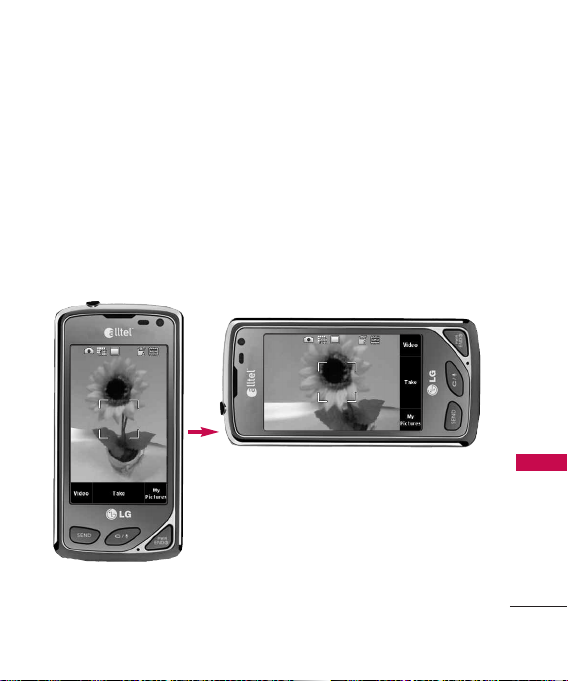
3D Rotation is a feature that allows you to have flexibility in how you
view content on your screen. Simply turn your LG 8575 Touch device
from vertical to horizontal (or horizontal to vertical ) and get a whole
new perspective. LG 8575 Touch senses the change in orientation and
can automatically adjusts to fit the screen. View an image in wide
screen orientation. This feature is helpful when you're looking at your
pictures, browsing your music by album artwork, viewing Browser
websites, or even entering text.
Rotate
LG 8575 Touch
Drag or flick left or right.
sideways.
Camera Features
43
Page 46
Camera Features
Camera Features
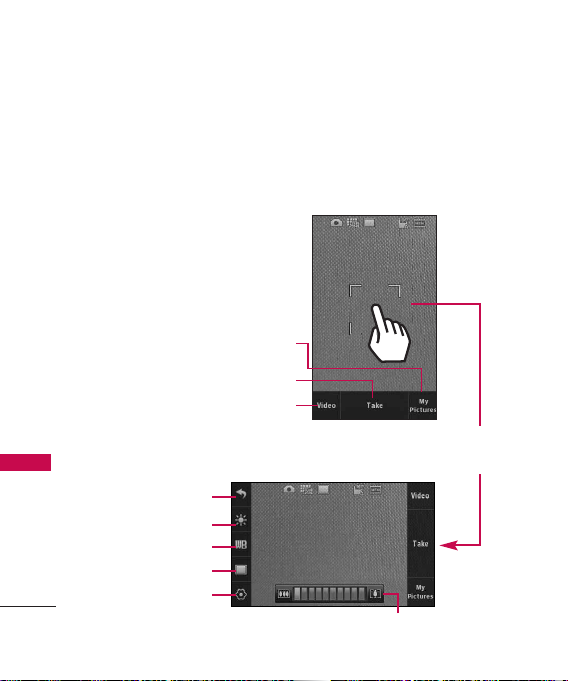
The built-in 3.2 MP camera feature
is complete with optics for superior
photo capabilities with various
options, effects, and controls.
Camera Features
Touch to take a picture
Back
Birghtness Settings
White Balance Settings
Shot Type
Camera Settings
44
Touch to go to My
Pictures
Touch to change to
video feature
Zoom(not available at the highest resolution)
Camera Settings
The images below show how to
access the camera settings.
Touch the screen to access
menu settings and rotate
8575 Touch
sideways.
LG
Page 47
Options in Camera Mode
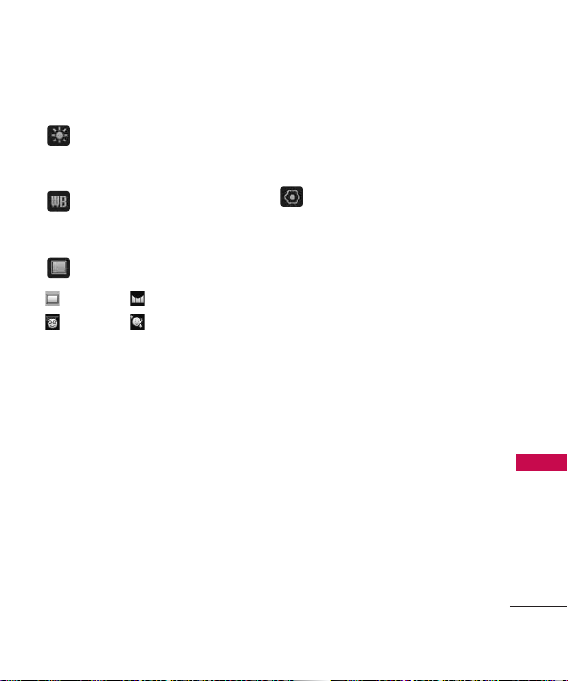
Brightness Setting
the level of brightness you
want.
White Balance
Sunny/ Cloudy/
Fluorescent/ Glow
Touch
Auto/
Shot Types
Normal Panorama
Intelligent Facial Makeover
Normal
: No effect applied to
picture.
Panorama
from left to right. Take the first
shot, align the shadow of the first
shot with the next shot, then
take that picture. Align and take
the third shot to automatically
join the three shots together into
one panoramic shot.
Intelligent
automatically adjust for up to 5
ambient conditions so that the
best picture is taken.
: Take series of pictures
: Camera will
Facial Makeover
detects faces for better portrait
quality. Also removes blemishes
and enhances facial features.
: Automatically
Camera Settings
Allows you to configure the
following camera settings:
Resolution:
1600x1200 / 1280x960/
800x480 / 640x480
Keep in mind that higher
resolution, uses more memory.
And, zoom is not available if set
to the highest resolution.
Shutter Sound: Shutter / No
Sound / Say “Cheez”/ Ready 1-2-3
Color Effects:
Aqua/ Sepia/ Black&White
Self Timer:
Seconds/ 10 Seconds
Auto Save
Save Option
2048x1536/
Normal/ Negative/
Off/ 3 Seconds/ 5
On/ Off
Internal/ External
Camera Features
45
Page 48
Camera Features
Video Camera
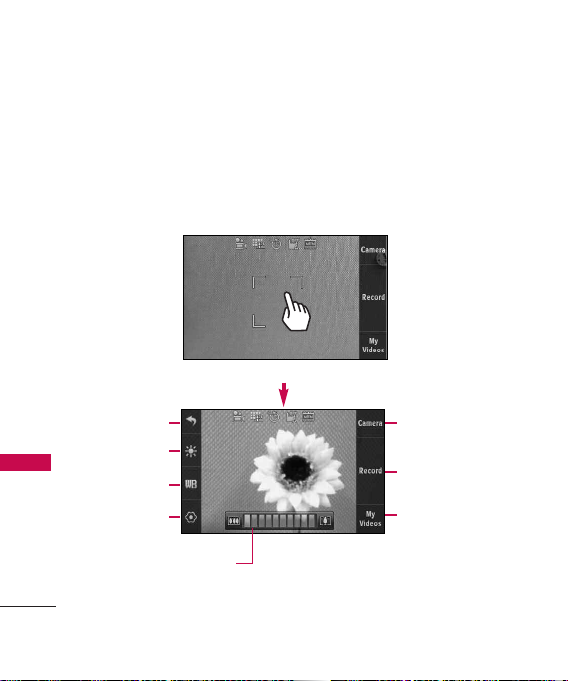
The built-in video camera feature comes with options similar to the
Camera feature.
Video Camera Settings
The images below show how to access the video settings.
Camera Features
Touch the screen for video options
Brightness
White Balance
Record Settings
Zoom Setting Touch and
slide right to zoom in or left
to zoom out
46
Back
Touch to change to
Camera mode
Touch to begin
recording/end recording
Touch to go to
My Videos
Page 49

Options in Video Mode
Settings
Recording Time
Save
For Send
time so the video clip can be
sent in a video message. Please
note that the video clip may still
need to be shortened for
Sending.
For Save
saved as a high quality video clip
to the phone (regardless of
resolution setting). Video clips
recorded in the For Save setting
can be sent in a video message
only if the recorded output is
less than 500KB.
: For Send/ For
: Limits the recording
: Allows the video to be
Resolution
176X144
Color Effects
/ Aqua / Sepia / Black&White
Auto Save
Save Option
: 320 X 240 /
: Normal / Negative
: On / Off
: Internal/ External
After Recording Video
After recording, use the Touch
screen to select what to do with
the video clip. Depending on the
size, the options are:
Play / Erase / Send / Save
or
Play / Erase / Save
Camera Features
47
Page 50
Camera Features
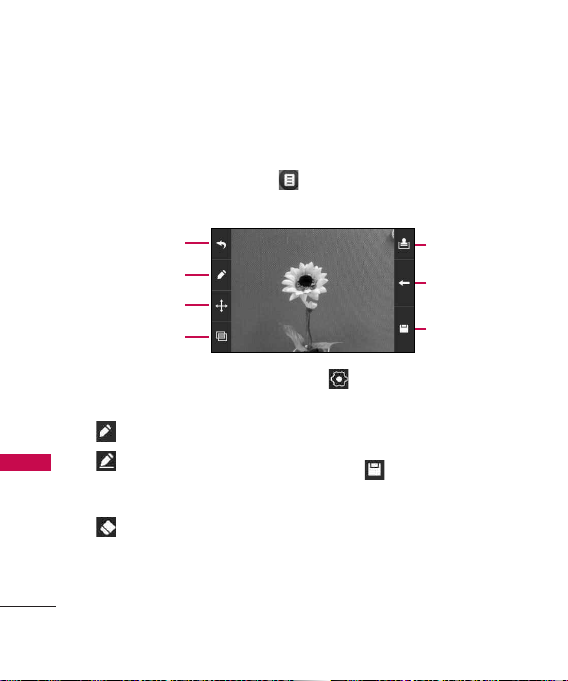
Picture Editing
With the LG 8575 Touch’s many picture editing features, you have
endless possibilites in creating fun pictures. To edit while viewing a
picture, touch the Options icon , then touch Edit.
Editing Touch Keys
Back
Drawing
Composition
Camera Features
Adjustments
Stamp
Undo
Save
Drawing
1. Touch the Drawing touch key
. Options available are:
●
Pen
: Allows you to draw on
the image using your finger (or
a stylus).
●
Eraser
: Allows you to erase
the Pen drawings with your
finger (or a stylus).
48
●
Settings
: Allows you to
configure the color and width
for the Pen. Also allows you to
set the Eraser width.
2. Press Save to save and exit.
Page 51
Composition
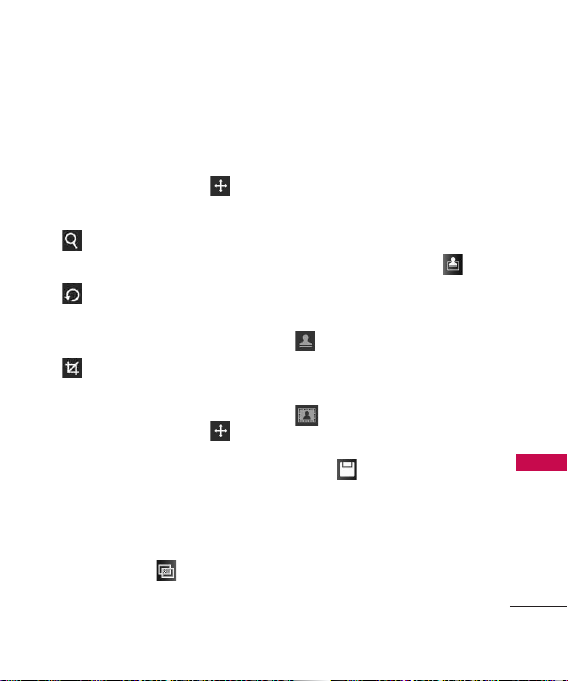
1. You can change the photo's
composition. Touch the
Composition touch key .
Options available are:
●
Zoom
: Allows you to zoom
in/out.
●
Rotate
: Allows you to
rotate the image 90 degrees
at a time.
●
Crop
: Allows you to crop
the image. Once you select an
area to crop, touch the
Composition touch key to
finalize cropping.
Adjustments
Improve your photos by adjusting
Contrast, Sharpness, Blur or
Brightness. Touch the
Adjustments icon , then touch
on the scroll bar of each
adjustment to increase (right
side) or to decrease (left side).
Frames and Stamps
The LG 8575 Touch has multiple
frames and stamps to choose
from to enhance your pictures.
1. Touch the Overlay icon .
The following options are
available:
●
Stamp
: Allows you to use
stamps to enhance your
image.
●
Frame
: Allows you to use
a frame for your image.
2. Touch Save to save the
image and exit.
Camera Features
49
Page 52
Camera Features
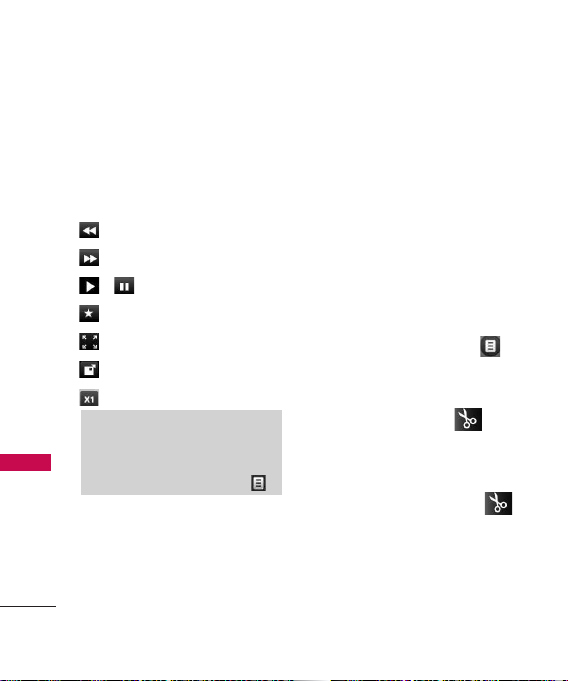
Video Player Controls
To display the video player
controls, simply touch the Touch
Screen while the video is playing
to display the following:
Rewind
Fast Forward
/ Play/ Pause
Camera Features
Marks as favorite
Display in wide screen
Display in normal size
Display in small size
Note
Touching the screen while a video
clip is playing also provides access
the video editing options icon .
Video Editing
When you select a video to edit,
a video editor screen is displayed.
50
Editing a Video to Send
You can edit a video then send a
video message to friends and
family.
1. Access My Videos (via the
Multimedia, for example),
touch the video clip to open
it. As the clip begins to play,
touch the screen to display
the video player controls.
2. Touch the Options icon ,
then touch
Msg
3. Touch the Clip icon at
the point in the video where
you want the video to start
(indicated by a red triangle),
then touch the Clip icon
where you want the video to
end (indicated by a blue
triangle).
Edit For Video
.
Page 53
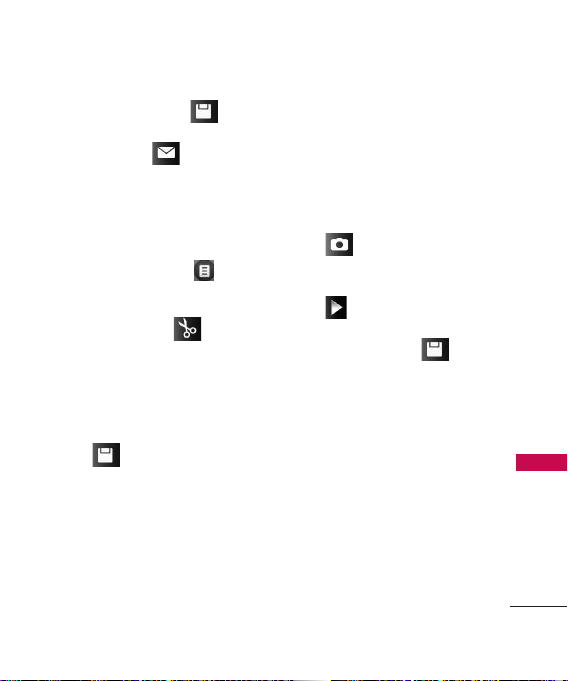
4. Touch the Save icon to
save the edited video or touch
the Send icon to send it.
Editing Using Video Effects
Access My Videos, touch the
video clip to open it. Touch the
screen as it begins to play, then
touch the Options icon .
●
Multi Trim
Use the Clip icon to
create a new video with up to
3 clips from the current video.
You can add a fade effect
between the clipped video
pieces by touching the Save
icon and then Save with
Fade Effect.
●
Multi Capture
You can capture still images
from video footage and save in
your device's picture gallery.
You can save up to 5 still
shots. Touch the Snapshot
icon to capture. The
Player will pause at that
position, so touch the Play
icon to resume playing the
clip. After clip capture(s),
touch the Save icon to
save.
Camera Features
51
Page 54
Using Phone Menus
MESSAGING
The phone can store up to 540
messages. The information
stored in the message is
determined by phone mode and
service capability. Other limits to
available characters per message
may exist. Please check with your
service provider for system
features and capabilities.
Shortcut
Simply touch the Messages Touch
MESSAGING
Soft Key while in Standby mode.
New Message Alert
Your phone will alert you when
you have new messages.
1. The phone displays a message
on the screen.
2. The message icon ( ) is
displayed on the Notification
bar. In the case of a high
priority message, ( ) is
displayed.
52
1. New Message
Allows you to send messages
(Text, Picture, Video and Voice).
Each message can have multiple
destination addresses and can
contain various items of
information. These are
dependent upon the type of
message you want to send.
1.1 Text Message
Sending a Basic Message
1. Unlock the Touch Screen by
sliding the Slide icon up
to unlock or press the Unlock
Key ( ) on the right side of
your phone and touch the
Menu Touch Soft Key .
2. Touch .
3. Touch
4. Touch
New Message
Text Message
.
.
Page 55

5. Touch to enter the
NEW#
recipient's phone number or
email address using the touch
keys, then touch the Done
touch key .
DONE
6. Touch the Text area to enter
your message. Use the keypad
that pops up, or touch the
Pen touch key to write
PEN
in your message. Please note
that you can rotate your
phone 90 degrees counterclockwise to use the onscreen QWERTY. When
finished entering text, touch
the Done touch key .
DONE
7. Touch the Send touch key
.
SEND
A sending screen is displayed.
Other Message Options
Entering saved addresses in the
To: field
1. Follow steps 1-4 from the
Sending a Basic Message
instructions. Then, touch the
Favorite touch key
Favorite
or touch the Contact touch
key .
Contacts
●
Favorite
Your list of
Favorite Contacts is displayed.
Select the one(s) to receive
your message.
●
Contacts
Your Contact List
is displayed. Select the ones
you want to receive your
message.
MESSAGING
53
Page 56
MESSAGING
Note
To copy a destination address from
Recent Calls or Groups, touch the
New # touch key , touch the
Options icon , then touch
Recent Calls
your selection.
or Groups and touch
Text Field Options
1. Touch the text entry area, then
touch the Options icon .
2. Select from the following
MESSAGING
options.
Note
Options are dependent on the
message type and current field.
Insert Quick Text
to insert a quick text. See page
63 for more information.
Save As Draft
message into the Drafts folder.
Add
Allows you to add a
Graphic, Animation, Sound, or
Contact Number/Email.
54
New #
Allows you
Saves the
From
Format Text
Allows you to
change the look of the text.
Alignment/ Font Size/ Font
Style/ Text Color/ Background
Priority Level
Allows you to
set the priority level for the
message.
High/ Normal
Callback #
Inserts a preprogrammed callback number
with your message.
On/ Off/ Edit
Save Quick Text
Allows you
to add the text entered as a
Quick Text.
Cancel Message
Cancels
message editing and goes to
Message menu.
3. Complete and then send the
message by pressing or
touching the Send touch key
.
SEND
Page 57
1.2 Picture Message
1. Unlock the Touch Screen by
sliding the Slide icon up
to unlock or press the Unlock
Key ( ) on the right side of
your phone and touch the
Menu Touch Soft Key .
2. Touch .
3. Touch
New Message
4. Touch
Picture Message
5. Enter the destination
address(es) by touching the
Favorite touch key
Favorite
address from a Favorites entry,
the Contact touch key
Contact
address from your Contact
List, the New # touch key
to manually enter
New #
the address, or the Online
.
.
to copy the
to copy the
Album touch key
Online Album
to send to
your Online Album.
6. Touch the Done touch key
after entering the
DONE
recipient(s) (up to 10).
7. Touch the Text field, then type
your message with the touch
keypad.
8. Touch the Picture field. The
pictures in your phone will
display. To select a picture,
simply touch it, then touch
the Select touch key
SELECT
.
9. Touch the Send touch key
. A confirmation
SEND
message is displayed.
MESSAGING
55
Page 58
MESSAGING
Other Picture Message
Options
Using the To: Field Options
1. Touch the New # touch key
, then Touch the
New #
Options icon .
2. Select from the following
options:
From Contacts/ From Recent
Calls/ Favorites/ Groups/
MESSAGING
Online Album
Using the Text or Subject Field
Options
1. Touch the Options icon .
2. Select from the following
options:
Preview
Displays the Picture
message as it would be seen
by the recipient.
Save As Draft
message into the Drafts folder.
56
Saves the
Insert Quick Text
to insert quick text
customized on the phone.
Add Slide
pictures and sound into a
picture message.
Priority Level
to the message.
Allows you
Insert multiple
Gives priority
High/ Normal
Cancel Message
Adding Slides to Your Picture
Message
When you want to send multiple
pictures and sound, use the Add
Slide option. This allows you to
create one picture message with
multiple pictures and sound
attached to it.
1. Create a new picture message.
2. Add a picture or sound to
your message.
Page 59
3. Touch the Next Slide touch
key .
4. Add another picture or sound
file to the new Slide.
5. Repeat adding slides, text and
pictures as necessary. Touch
the Previous Slide/ Next Slide
touch keys / to scroll
through the slides attached to
your picture message.
6. Complete the message then
send the message.
1.3 Video Message
1. Unlock the Touch Screen by
sliding the Slide icon up
to unlock or press the Unlock
Key ( ) on the right side of
your phone and touch the
Menu Touch Soft Key .
2. Touch .
New Message
3. Touch
4. Touch
Video Message
5. Enter the destination
address(es) by touching the
Favorite touch key
Favorite
address from a Favorites entry,
the Contact touch key
Contact
address from your Contact
List, the New # touch key
to manually enter
New #
the address, or the Online
Album touch key
Online Album
your Online Album.
6. Touch after entering
7. Touch the text field, then type
DONE
the recipient(s) (up to 10).
your message with the touch
keypad.
.
.
to copy the
to copy the
to send to
MESSAGING
57
Page 60
MESSAGING
8.
Touch the video field, touch to
select the video to send, then
touch change to .
9. Touch the Send touch key
to send.
1.4 Voice Message
The Basics of Sending a
Message
1. Unlock the Touch Screen by
MESSAGING
58
sliding the Slide icon up
to unlock or press the Unlock
Key ( ) on the right side of
your phone and touch the
Menu Touch Soft Key .
2. Touch .
New Message
3. Touch
4. Touch
Voice Message
5. Touch the Record touch key
your message.
SELECT
.
.
to start recording
6. Touch the Stop touch key
to end recording.
Enter the destination
7.
address(es) by touching the
Favorite touch key
to copy the address from a
Favorites entry, the Contact
touch key to copy
the address from your Contact
List, the New # touch key
New #
the address, or the Online
Album touch key
Online Album
your Online Album.
8. Touch the Done touch key
after entering
DONE
recipient(s) (up to 10).
9. Touch Text, and/or Subject
fields to add to your message.
10. Touch the Send touch key
SEND
FavoriteSEND
Contact
to manually enter
to send to
to send.
Page 61
2. Messages
When your phone receives a
message, you are alerted by:
●
A notification message on the
screen.
●
An alert tone and/or vibration,
depending on your volume
settings.
If you don’t respond to the
notification within a few minutes,
the notification message disappears
and the New Message icon is
displayed on the Notification bar
instead ( indicates a high
priority message). You can choose
to view your messages by the time
received (sorted into Inbox and
Sent folders) or by Contact (all
messages in one folder sorted by
address).
To change the message view:
1. Unlock the Touch Screen by
sliding the Slide icon up
to unlock or press the Unlock
Key ( ) on the right side of
your phone and touch the
Menu Touch Soft Key .
2. Touch .
Settings
3. Touch
4. Touch
.
Messages View
, then
touch a setting.
Time / Contact
5. Touch the Save touch key
.
SAVE
Viewing Your Messages
1. Unlock the Touch Screen by
sliding the Slide icon up
to unlock or press the Unlock
Key ( ) on the right side of
your phone and touch the
Menu Touch Soft Key .
2. Touch .
3. Touch
Messages
(or
Inbox
depending on your Messages
View configuration).
MESSAGING
,
59
Page 62
MESSAGING
4. Touch a message entry.
5. Options available for a
received message:
●
REPLY
message.
●
ERASE
message.
●
FORWARD
message.
●
The Options key , for the
MESSAGING
following options:
Reply with Copy/ Save Quick
Text/ Lock/Unlock/ Add To
Contacts/ Extract Address/
Message Info
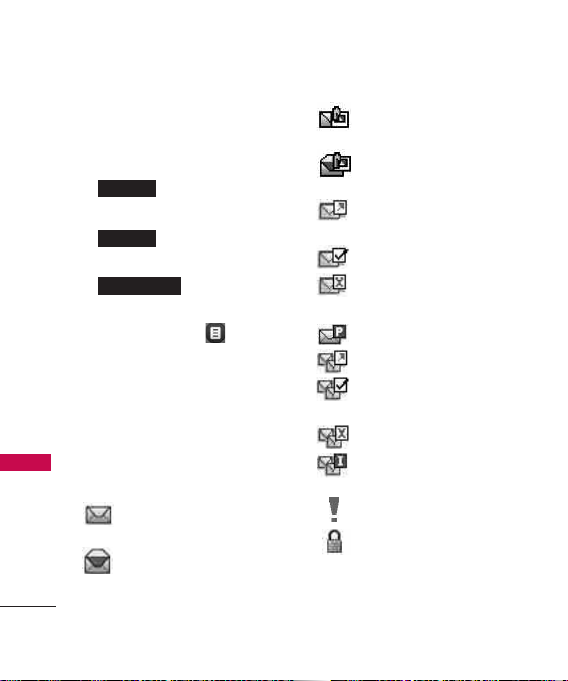
Message Icon Reference
New/Unread Text
Messages
Opened/Read Text
Messages
60
, to reply to the
, to erase the
, to forward the
New/Unread
Picture/Video Messages
Open/Read
Picture/Video Messages
Text/Picture/Video
Messages sent
Message delivered
Text/Picture/Video
Messages failed
Message pending
Multiple Messages sent
Multiple Messages
delivered
Multiple Messages failed
Multiple Messages
incomplete
Priority High
Locked
Page 63
3. Drafts
Your phone allows you to save
Drafts of messages. When Drafts
are saved, they are saved in the
Drafts folder.
1. Unlock the Touch Screen by
sliding the Slide icon up
to unlock or press the Unlock
Key ( ) on the right side of
your phone and touch the
Menu Touch Soft Key .
2. Touch .
3. Touch
Drafts
.
4. Touch a message entry.
5. Options from here:
●
Touch the Send touch key
to send the
SEND
message.
●
Touch the Options icon
.
Preview / Save As Draft /
Priority Level / Callback #
Message Icon Reference
Draft Text Message
Draft Picture/Video
Message
4. Voicemail
Allows you to view the number of
new voice messages recorded in
the Voicemail box. Once you
exceed the storage limit, old
messages may be overwritten.
When you receive a new voice
message, your phone will alert you.
Checking Your Voicemail Box
1. Unlock the Touch Screen by
sliding the Slide icon up
to unlock or press the Unlock
Key ( ) on the right side of
your phone and touch the
Menu Touch Soft Key .
MESSAGING
61
Page 64
MESSAGING
2. Touch .
3. Touch
Voicemail
4. Options from here:
●
Touch the Clear touch key
to clear the
CLEAR
Voicemail counter.
●
Press the SEND Key or
touch the Call touch key
to listen to the
CALL
MESSAGING
message(s).
5. Settings
Allows you to configure settings
for your messages.
1. Unlock the Touch Screen by
sliding the Slide icon up
to unlock or press the Unlock
Key ( ) on the right side of
your phone and touch the
Menu Touch Soft Key .
62
2. Touch .
.
3. Touch
Settings
.
Message Settings Sub-Menu
Descriptions
1. Messages View
Select
Time
chronologically in Inbox and Sent
folders. Select
all messages chronologically by
Contact in one message folder.
to display messages
Contact
to sort
2. Entry Mode
Select T9 Word , Abc , ABC or
123 to be your default input
method.
3. Text Entry Settings
Allows you to activate/deactivate
the text entry settings Show
Candidate, Word Correction, or
Word Prediction.
Page 65

4. Auto Save Sent
Select Onto automatically save
your Sent messages.
Select
Off
save them.
Select
whenever a new message is sent.
if you don't want to
Prompt
to be asked
5. Auto Erase Inbox
Select On to automatically
delete read messages when you
exceed the storage limit.
6. Message Font Size
Select Small or Large for the size
of the Messaging characters.
7. Text Auto View
Select On to automatically
display message content on the
screen. Select On+Readout to
automatically display content
and read it aloud.
Select Off for more security and
privacy by requiring the message
to be opened to view it.
8. Text Auto Scroll
Select On to automatically scroll
text down while viewing
messages. Or, select Off.
9. Multimedia Auto Receive
Select On to automatically
download attachments to
Multimedia messages. Or, select
Off.
10. Quick Text
Displays your list of Quick Text
phrases to help you to reduce
manual input into messages. Use
this submenu to edit and add
text.
11. Voicemail #
Allows you to manually enter the
access number for Voicemail
Service. This number should be
only used when a VMS
(Voicemail Service) access
number is not provided by the
network.
MESSAGING
63
Page 66
MESSAGING
12. Callback #
Select On to automatically send
a designated callback number
with your messages. Or, select
Off.
13. Signature
Select Custom to create/edit a
signature to automatically send
with your messages. Select None
for no signature.
14. Delivery Receipt
MESSAGING
When set to On, the phone will
indicate Sent messages as having
been successfully delivered.
Please see page 60 for the icon
indicating a "Message Delivered".
15. Speed Messaging
Allows you to send messages
quickly to your Speed Dial
contacts. Create a message and
enter the text and content. Then,
select the New# options and
press and hold down the Speed
64
Dial number; the message will
automatically be sent to that
Speed Dial contact.
6. Erase Options
Allows you to erase all messages
stored in your Inbox, Sent, or
Drafts folders. Or, to erase all
messages at once.
1. Unlock the Touch Screen by
sliding the Slide icon up
to unlock or press the Unlock
Key ( ) on the right side of
your phone and touch the
Menu Touch Soft Key .
2. Touch .
3. Touch
Erase Options
options available are:
Erase Inbox/ Erase Sent/
Erase Drafts/ Erase All
. The
Page 67
Alltel Shop
Alltel Shop
Alltel Shop allows you to do
more than just talk on your
phone. Alltel Shop is a
technology and service that
allows you to download and use
applications on your phone. With
Alltel Shop, it is quick and easy
to personalize your phone to suit
your lifestyle and tastes. Just
download the applications that
appeal to you. With a wide range
of software available, from
ringtones and wallpapers to
games and productivity tools,
you can be assured that you will
find something useful, practical,
or downright entertaining.
Downloading Applications
You can download applications
and use Alltel Shop anywhere on
the network, as long as your
handset has a digital signal
available. Most applications do
not use a network connection
while in use.
Incoming Calls
While downloading an
application, incoming calls will
momentarily pause downloading.
When the call is ended,
downloading will resume.
When using applications, an
incoming call will automatically
pause the application and allow
you to answer the call. When you
complete your call, you can
resume using the application.
1. Alltel Shop
Allows you to download selected
applications while displaying the
Alltel Apps application list
relayed from the server
connection.
Alltel Shop
65
Page 68
Alltel Shop
1. Unlock the Touch Screen by
sliding the Slide icon up
to unlock or press the Unlock
Key ( ) on the right side of
your phone and touch the
Menu Touch Soft Key .
2. Touch
3. Touch
Alltel Shop
4. Touch
Catalog
through the available
Alltel Shop
applications, or press
to search for a specific
application.
2. Settings
Allows you to Manage, Move and
Remove the Alltel Apps in your
phone.
1. Unlock the Touch Screen by
sliding the Slide icon up
to unlock or press the Unlock
66
.
to browse
Search
Key ( ) on the right side of
your phone and touch the
Menu Touch Soft Key .
2. Touch
Settings
3. Touch
following options:
Move Apps/ Manage Apps/
View Log
Removing Applications
Only removing an application
deletes it completely from the
memory of the phone. To restore
an application once it has been
removed, you will be charged to
download it again.
1. Access your Alltel Shop
applications.
2. Touch
3. Touch
for the
Settings
.
Manage Apps
.
Page 69
Alltel Web
4. Touch the application to be
deleted.
Remove
5. Touch
.
Note
Please note that sometimes the
Remove option is not available. To
remove the application, you must
Cancel Subscription.
select
3. Help
Gives information about several
applications.
1. Unlock the Touch Screen by
sliding the Slide icon up
to unlock or press the Unlock
Key ( ) on the right side of
your phone and touch the
Menu Touch Soft Key .
2. Touch
Help
3. Touch
.
Alltel Web
The Alltel Web feature allows you
to view Internet content.
Accessibility and selections
within this feature are dependent
upon your service provider. For
specific information on Alltel
Web contact your service
provider.
Start Browser
Starting an Alltel Web session.
1. Unlock the Touch Screen by
sliding the Slide icon up
to unlock or press the Unlock
Key ( ) on the right side of
your phone and touch the
Menu Touch Soft Key .
2. Touch .
3. After a few seconds, you will
see the home page.
Alltel Web
67
Page 70
Alltel Web
Ending an Alltel Web
Session
End an Alltel Web session by
pressing .
Browser Navigation
Links embedded in content
Select items or links by touching
it on the screen.
HINT
: If you’re having trouble
touching the exact link on the
screen, use the zoom function to
Alltel Web
zoom in so that there is a larger
area to touch to activate your
selection on the Touch Screen.
Scrolling / Fast Scrolling
Use your fingertip to scroll the
screen contents in the direction
you move your finger.
How quickly you move your
finger determines the quickness
of the scroll.
68
Panning
Panning is when you move
around the screen content by
pressing down lightly and
dragging the screen with your
fingertip (or pen-like stylus) to
the area you want to see.
Note
Do not use a sharp item for your
pen-like stylus because it could
scratch your screen.
Returning to Home Page
Touch the Command bar icon
, then touch the Home icon
.
Page 71
Using the Browser Menu
Touch (in the Browser
Command Bar) to view Browser
menu items.
Browser Menu Options
Touch the Command bar icon
, then touch the Options
icon .
●
Full Screen View
Use the
whole screen including the
annuciator and command bar
area to view pages. You can
get the command bar by
touching the Command bar
icon .
●
WWW
Takes you to the Go
To WWW screen where you
can enter the Web address
you wish to visit.
●
Add Bookmark
Allows you to
add bookmarks.
●
Find on Page
Allows you to
search for text you want to
find in the web page. (Search
text is not case-sensitive.)
●
History
Displays list of the
most recently web pages.
●
Display Mode
Changes the
layout of contents. The
options are:
Standard
Displays a standard
Browser screen with vertical
and horizontal page
navigation.
Page Overview
Allows you to
select the section to be
displayed on full page.
Fixed Width
Displays
vertically aligned contents of
the Web page which fit the
size of the screen. Allows
vertical navigation only.
Alltel Web
69
Page 72

Alltel Web
Alltel Web
70
Text Only
Displays only text
and excludes images used in
the Web page.
●
Send URL
Allows you to send
the link of the current page
via a text message.
●
Settings
Allows you to
configure to your preferred
Browser settings. The options
are:
JavaScript
Feed settings
ON / OFF
25 items/ 50
items/ 75 items
RSS Update
mode
Automatic/ Manual
Security
Cookies/ Send
Referrer/ Authentication
Caching/ SSL3.0/ TLS 1.0/
Root Certificates/ Current
Certificate
Manage Memory
Manages
memory used by browser.
Restore Defaults
Restore
default settings of Display
Mode, Security, Feed settings
or Restore All.
●
Information
Shows Web Page
Information or Browser
Information.
Entering/Deleting Text,
Numbers or Symbols
When a text entry field is
touched or tapped, a Touch
Keypad will pop up for you to
enter text numbers or symbols.
Simply touch the characters you
want and touch the Clear touch
key to delete.
Page 73
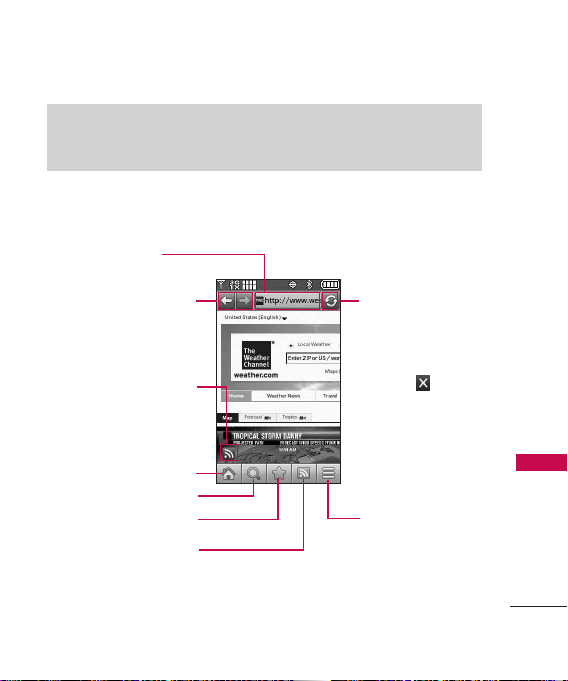
NOTE
When entering text in an entry field, turn the device 90 degrees (counterclockwise) to activate the Qwerty Touch Keypad instead of the Touch Keypad.
Command Bar Icons on the Touch Screen
Go To WWW
you the current page.
Appears when an RSS Feed
is available. Touch to add
Bookmark
RSS Reader Allows you to
Shows
Back/ Forward
RSS Feed Indicator
the feed.
Returns to
Home
Home Page
Zoom
Allows you to
view saved Bookmarks
access your RSS feeds.
Refresh
Allows you to
reload the current Web
page.
*While a page is
loading, is
displayed. Touch this
to stop loading the
page.
Menu Displays the
Browser menu
Alltel Web
71
Page 74
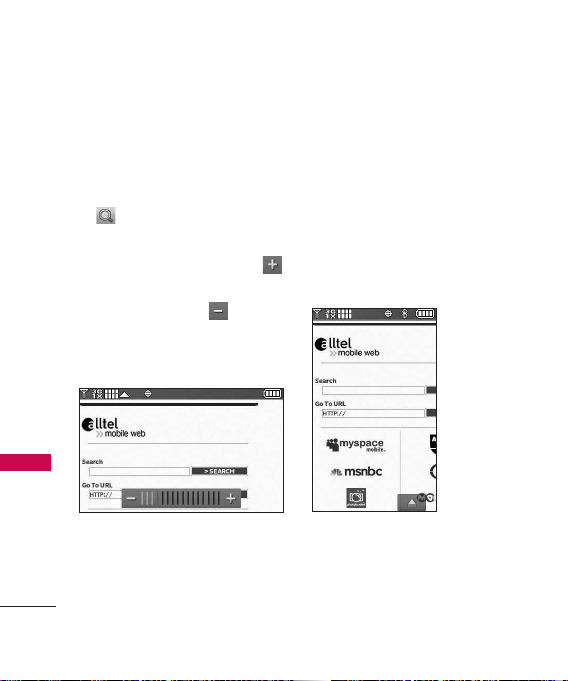
Alltel Web
ZOOM Options
1. Access the Browser.
2. With the Command Bar menu
open, touch the Zoom icon
to display the zoom
button.
●
Touch the Plus Zoom icon
to zoom in and touch the
Minus Zoom icon to zoom
out.
Alltel Web
Zoom With the Touch Screen
Zoom buttons
72
Fixed Width Display Mode
The Fixed Width View mode
simply resizes the page elements
(e.g., images and areas of text) so
that they are no wider than the
physical width of the screen,
causing the text to wrap at the
screen's edge.
[ Before Fixed
Width ]
Page 75
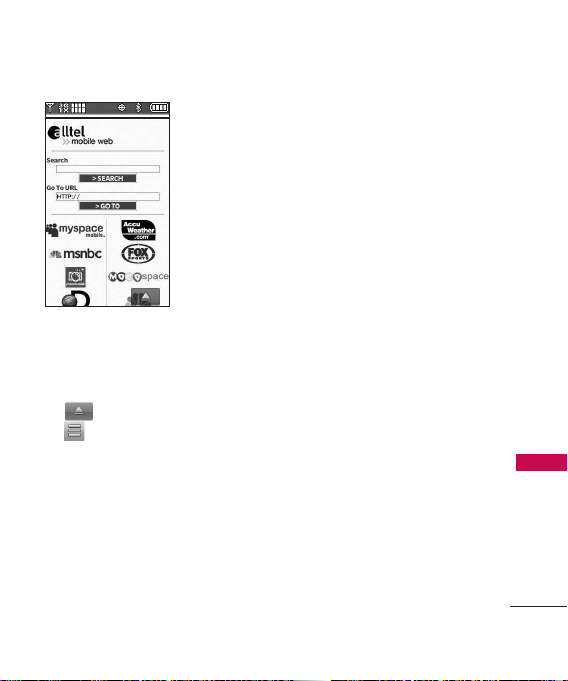
[ After Fixed
Width ]
From the Touch Screen:
1. Access the Browser.
2. Touch the Command bar icon
-> touch Options icon
.
3. Touch
4. Touch
5. Touch
Display Mode
Fixed Width
Save
.
.
.
Using RSS reader
RSS (Really Simple Syndication)
is a family of web feed formats
used to publish frequently
updated content such as blog
entries, news headlines or
podcasts. An RSS document,
which is called a feed, web feed,
or channel, contains either a
summary of content from an
associated web site or the full
text. RSS makes it possible for
people to keep up with their
favorite web sites in an
automated manner that is easier
than checking them manually.
Alltel Web
73
Page 76
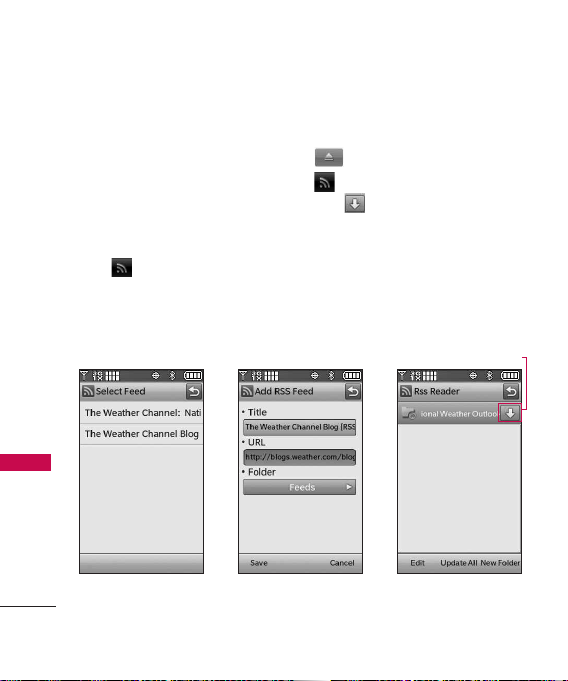
Alltel Web
Add New Feed
When a web page finishes
loading, the RSS Feed Indicator
will appear if an RSS feed is
available (see page 71 for
Indicator location).
Touch the RSS Feed indicator
icon and select the feed you
want to add. In the following
screen, touch
new feed.
Alltel Web
Save
74
Update Feeds
Touch the Command bar icon
> touch the RSS Feeds icon
> Touch the Feed Update
icon .
to save your
Feed Update Button
Page 77
Multimedia
Multimedia
1. Take Photo
Take pictures straight from your
phone.
Tips
●
To take a clear picture, set the
proper brightness level and zoom
before taking the picture. Zoom is
not available at the highest picture
resolution.
●
Avoid jolting the camera.
●
Wipe the camera lens with a soft
cloth.
Shortcuts
The Side Camera Key ( ) is a
shortcut key to Take Picture in
Standby mode. Press and hold the
Camera Key to record Video.
1. Unlock the Touch Screen by
sliding the Slide icon up
to unlock or press the Unlock
Key ( ) on the right side of
your phone and touch the
Menu Touch Soft Key .
2. Touch .
3. Touch
Take Photo
.
4. Touch the screen to set
camera options. For more
information on how to use the
camera, see the Camera
section on page 44.
●
Select the option(s) to
customize.
Brightness
White Balance
Auto/ Sunny/
Cloudy/ Fluorescent/ Glow
Shot Types
Normal/
Panorama/ Intelligent/ Facial
Makeover
Settings
Resolution
2048X1536/
1600X1200/ 1280X960/
800X480/ 640X480
Shutter Sound
Shutter/ No
Sound/ Say "Cheez"/
Ready!123
Multimedia
75
Page 78
Multimedia
Color Effects
Negative/ Aqua/ Sepia/
Black&White
Self Timer
Seconds/ 10 Seconds
Auto Save
Off/ 3 Seconds/ 5
On/ Off
Save Option
5. Touch the Take Picture touch
key to take the
Tak e
picture.
6. Touch the Save Picture touch
key . The picture is
Multimedia
Save
stored in My Pictures.
2. Record Video
Lets you record a video message
with sound.
1. Unlock the Touch Screen by
sliding the Slide icon up
to unlock or press the Unlock
Key ( ) on the right side of
your phone and touch the
Menu Touch Soft Key .
76
Normal/
Internal/ External
2. Touch .
Record Video
3. Touch
4. Touch the screen to set Video
options. For more information
on how to use Video
recording, see page 46.
●
Select the option(s) to
customize.
.
Brightness
White Balance
Cloudy/ Fluorescent/ Glow
Auto/ Sunny/
Settings
Recording Time
For Save
Resolution
176X144
Color Effects
Negative/ Aqua/ Sepia/
Black&White
Auto Save
For Send/
320X240/
Normal/
On/ Off
Save Option Internal/ External
Page 79
5. Record a video by touching
the Record touch key
, then touch the
Record
Stop touch key to
Stop
end recording.
Note
You can also press the side Camera
Key to start and stop recording.
6. Touch the Save touch key
. The video clip is
Save
stored in My Videos.
3. Record Voice
Allows you to use your phone as
a voice recorder.
1. Unlock the Touch Screen by
sliding the Slide icon up
to unlock or press the Unlock
Key ( ) on the right side of
your phone and touch the
Menu Touch Soft Key .
2. Touch .
Record Voice.
3. Touch
4. Start recording by pressing
.
Touch to stop.
Touch to pause.
5. After recording, voice memo is
automatically saved in your
phone.
4. Images
Allows you to view photos stored
in the phone.
Shortcut
Unlock the Touch Screen by sliding
the image up or press the
Unlock Key ( ) on the right side
of your phone, touch the Shortcut
icon to access the Shortcut
menu, then touch the My Pictures
icon .
Multimedia
77
Page 80
Multimedia
1. Unlock the Touch Screen by
sliding the Slide icon up
to unlock or press the Unlock
Key ( ) on the right side of
your phone and touch the
Menu Touch Soft Key .
2. Touch .
3. Touch
Images
4. Touch your desired picture.
Options from here:
Multimedia
●
Touch the Send touch key
SEND
to send a picture by
message, to an, online album,
social network or Via
Bluetooth.
●
Touch the Erase touch key
ERASE
to erase picture.
●
Touch the Favorite touch key
FAVORITE
favorite.
78
.
to set as
●
Touch the Options icon
for the options below:
Options for Standard Images:
Set As
Wallpaper/ Picture ID
Take Picture
Turns on the
camera function.
Slide Show
Allows you to
view the picture gallery images
in a slide show.
Edit
To edit the image.
Rename To rename the image.
Print
Via Bluetooth/
Preferences
File Info
Name/ Date/ Time/
Resolution/ Size/ Type
Options for Wallpaper Images:
Take Picture/ Wallpaper
Options for Images with DRM:
Set As/ Take Picture/ Slide
Show/ File Info
Page 81
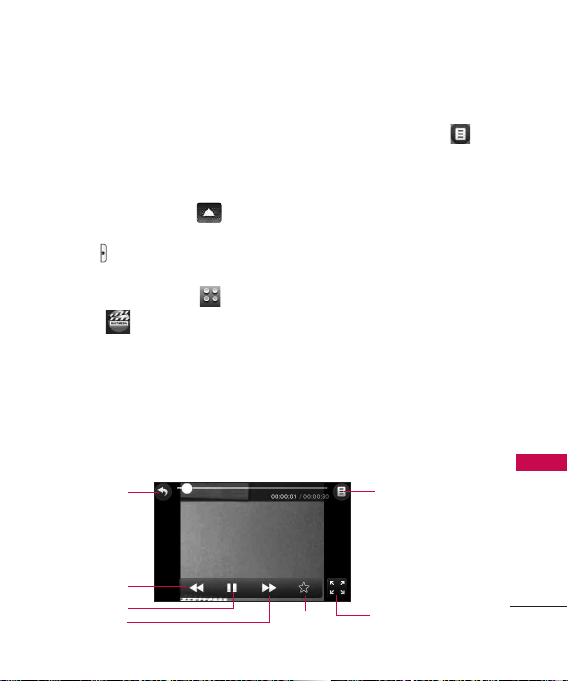
●
5. Videos
Allows you to view videos stored
in the phone.
1. Unlock the Touch Screen by
sliding the Slide icon up
to unlock or press the Unlock
Key ( ) on the right side of
your phone and touch the
Menu Touch Soft Key .
2. Touch .
3. Touch
Videos
.
4. From here you can select a
video to play or manage your
videos.
Video Player Options
Touch a video file to play it.
●
Touch the Options icon
to select one of the following
options (options are
dependent on file types).
Record Video
Turns on the
video camera function.
Erase
Allows you to select
video(s) to erase.
Move
Allows you to select
video(s) to move between
your phone and microSD card.
Lock/ Unlock Allows you to
select video(s) to Lock/ Unlock.
Erase All
From Card/ From
Phone
While the video is playing, touch the screen to access the on-screen
Back
Rewind
Pause
Fast Forward
Favorite
Player Options:
Send/ Edit for Video
Msg/ Multi Trim/
Multi Capture/ Add
Fade Effect/ Set as
Wallpaper/ Erase/
Rename/ File Info
Screen size
Multimedia
79
Page 82
Multimedia
6. Audios
6.1 My Ringtones
Allows you to set a ringtone or
download a new one.
1. Unlock the Touch Screen by
sliding the Slide icon up
to unlock or press the Unlock
Key ( ) on the right side of
your phone and touch the
Menu Touch Soft Key .
2. Touch .
Multimedia
Audios
3. Touch
My Ringtones
4. Touch
5. Touch a ringtone to select it.
Note
Touch the Play touch key to
play the ringtone.
6. Set the selected tone as:
Call Ringtone/ Contact ID/
Alert Sounds
80
●
Call Ringtone: Allows you to
set as a Ringtone for incoming
calls.
●
Contact ID: Allows you to set
the Ringtone to notify you
when a specific Contact is
calling you.
●
Alert Sounds: Allows you to
set the ringtone to notify you
whenever a new Text Message,
Multimedia Message and/or
Voicemail is received.
.
.
6.2 My Sounds
Allows you to select saved
sounds or to record a new
sound.
1. Unlock the Touch Screen by
sliding the Slide icon up
to unlock or press the Unlock
Key ( ) on the right side of
your phone and touch the
Menu Touch Soft Key .
Page 83
2. Touch .
3. Touch
Audios
.
4. Touch
My Sounds
.
5. Touch the Record New touch
key . Or touch a
sound using your fingertip.
Options for preloaded
sounds:
Send/ To Online Album/
Erase All/ File Info
Options for user-recorded
sounds:
Erase/ Send/ To Online
Album/ Rename/ Move/
Lock/ Erase All/ File Info
7. My FM Radio
Listen to FM broadcasts and
music from your phone. Wired
headphones, or a headset, are
required to use this feature.
Access FM Radio
1. Unlock the Touch Screen by
sliding the Slide icon up
to unlock or press the Unlock
Key ( ) on the right side of
your phone and touch the
Menu Touch Soft Key .
2. Touch .
3. Plug a wired headset into the
headset jack located at the
top left of the phone.
4. Touch
My FM Radio
.
Shortcut
With the Touch Screen unlocked
and a wired headset plugged in,
press the Music Key (located on
the right side of the phone), then
touch the FM Radio icon .
FM Frequency Range
: 87. 5MHz
-107.9 MHz.
Multimedia
81
Page 84
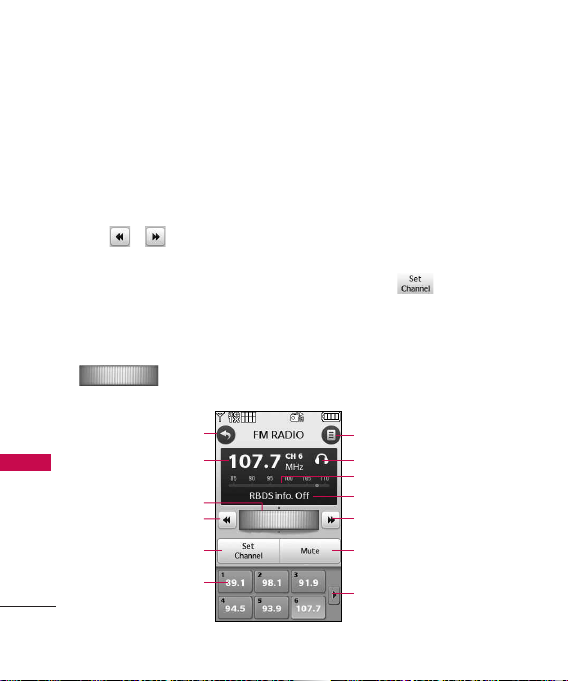
Multimedia
Automatic Scan Station Tuning
Available broadcast stations are
dependent on the transmission
signal strength in your current
location. Touch the Scan
Backward/ Scan Forward touch
keys / to scan through
the available FMradio
transmissions in your area.
Manual Tuner Wheel
Touch and drag your finger
across the tuner wheel icon
Multimedia
to manally tune to
a radio station frequency.
Back
Current Station
Frequency
Manual Tuner Wheel
Scan Backward
Sets Favorite Channels
Preset Favorite
Channels
82
Setting Favorite
Channels/Stations
Quickly access your favorite
stations. Set up to 12 stations
with simple touch access.
1. Access My FM Radio.
2. Tune to a station, then touch
change to
.
3. Touch an empty preset station
touch key at the bottom of
the Touch Screen.
Options
Sound Source
Current Frequency Location
Displays Song info
Scan Forward
Mute
Displays Preset Favorite
Stations 7-12
(Headset or Speaker)
Page 85
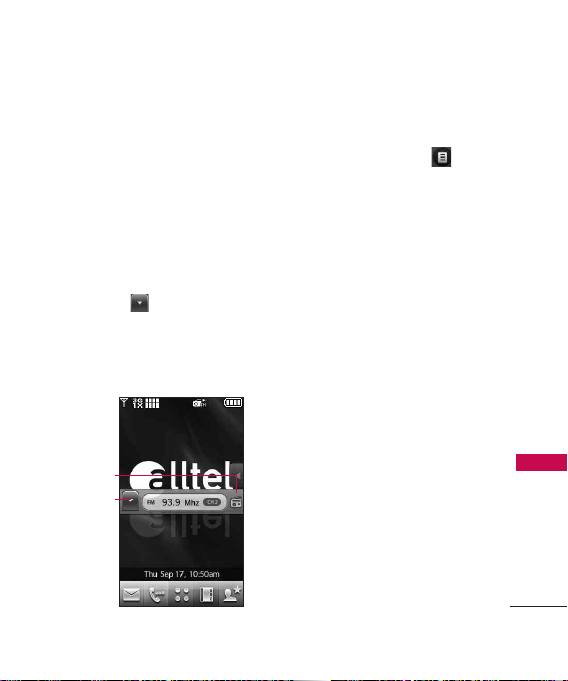
Using Saved Favorite
Channels/Stations
●
From My FM Radio, touch any
preset station to automatically
tune to it.
●
From Standby mode with FM
Radio playing in the background
Touch the Preset Station List
touch key to display your
preset favorite stations. Use
your fingertip to scroll the list
up or down. Touch the preset
station you want to listen to.
Returns to
FM Radio
Preset
Station List
FM Radio Options
While using the
My FM Radio
,
touch the Options icon to
select from the following options:
●
Exit FM Radio
Exits to
Standby mode.
●
Auto scan
Automatically
scans for available radio
frequencies.
●
Erase channel
Erases the
current preset channel.
●
Reset all channels
Resets all
preset FM Radio channels.
●
RBDS info On/Off
Toggles
Radio Broadcast Data System
display info on or off.
●
Listen Via
Allows you to
switch between listening from
the headset or phone’s
speaker.
Multimedia
83
Page 86
Multimedia/ Contacts
●
Go to My Music
My Music.
●
Home Screen
Standby mode with FM Radio
playing in the background.
FM Radio Icon Reference
Icons at the top of the LCD
screen indicate the FM Radio
Multimedia/ Contacts
status.
FM Radio playing.
FM Radio paused.
84
Returns to
Exits to
Contacts
The Contacts Menu allows you
to store names, phone numbers
and other information in your
phone’s memory.
1. New Contact
Allows you to add a new number
to your Contact List.
1. Unlock the Touch Screen by
sliding the Slide icon up
to unlock or press the Unlock
Key ( ) on the right side of
your phone and touch the
Menu Touch Soft Key .
2. Touch .
New Contact
3. Touch
4. Enter the name and other
contact information for each
field.
.
Page 87
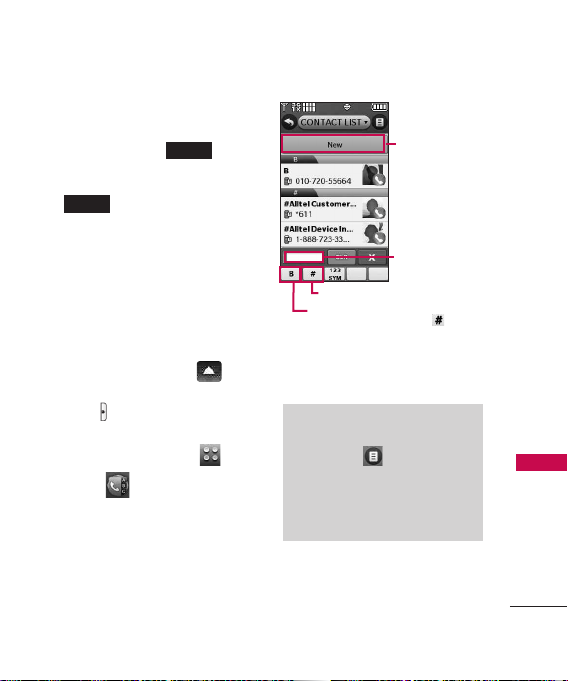
●
Touch a field, enter
information, then touch the
Done touch key .
DONE
5. Touch the Save touch key
SAVE
to save the
information.
2. Contact List
Allows you to view your Contact
List.
1. Unlock the Touch Screen by
sliding the Slide icon up
to unlock or press the Unlock
Key ( ) on the right side of
your phone and touch the
Menu Touch Soft Key .
2. Touch .
3. Touch
Contact List
.
Add a new contact.
Go to
ABC / 123/SYM Mode Toggle Key
Direct search touch keys. For example,
touch the Pound touch key to
display entries that begin with #,
touching a letter will display entries that
begin with that letter, etc.
Note
From this Contact List, touch the
Options icon . Then touch
Erase. With this menu you can erase
multiple contacts at the same time.
Select (mark) the Contacts you
want to delete then touch Erase.
4. Touch a Contact entry.
Contacts
85
Page 88
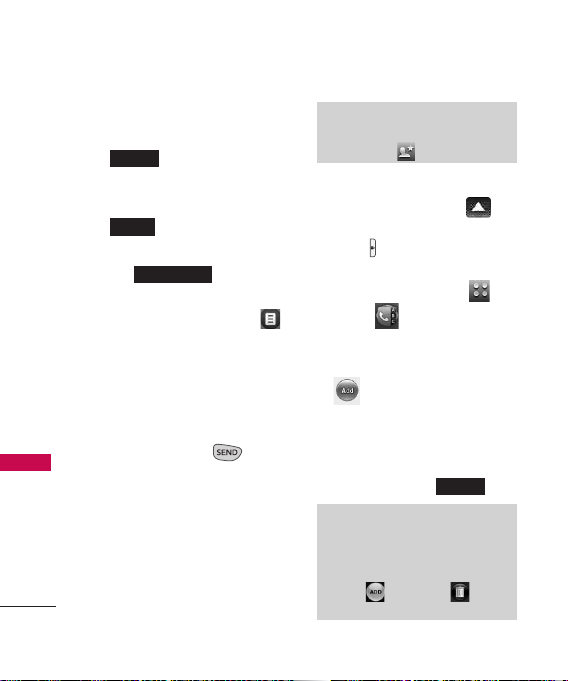
Contacts
5. Options from here:
●
Touch the Erase touch key
ERASE
Contact.
●
Touch the Edit touch key
EDIT
●
Touch the Message touch
key to send
MESSAGE
the Contact a message.
●
Touch the Options icon
to select one of the
following:
Contacts
Send Name Card/ Set As
Favorite/ Set Speed Dial/
Copy/ Copy All
●
Press the SEND Key
to call.
3. Favorites
Allows you to add Contact
entries or Contact groups to
your list of Favorites to easily
view, call, or send messages.
86
to erase the
to edit the Contact.
Shortcut
From the home screen, touch the
Favorites icon .
1. Unlock the Touch Screen by
sliding the Slide icon up
to unlock or press the Unlock
Key ( ) on the right side of
your phone and touch the
Menu Touch Soft Key .
2. Touch .
Favorites
3. Touch
.
4. Touch the Add touch key
.
5. Touch
CONTACT
or
GROUP
6. Mark the contact entry or
group to add and touch the
Done touch key .
DONE
Note
To remove a contact or group, go to
the Favorites screen and drag a
Favorite into the drag trash can
image ( changes to when
you begin to drag an item).
.
Page 89
4. Groups
Allows you to view your grouped
Contacts, add a new group,
change the name of a group,
delete a group, or send a message
to everyone in the selected group.
1. Unlock the Touch Screen by
sliding the Slide icon up
to unlock or press the Unlock
Key ( ) on the right side of
your phone and touch the
Menu Touch Soft Key .
2. Touch .
3. Touch
Groups
.
4. Options from here:
●
Touch the Options icon .
Manage Groups
Touch
edit, erase or send the
group contacts as name
cards (feature may not be
supported by/compatible
with all carriers).
to
●
Touch the New Group touch
key to add
NEW GROUP
a new group to the list.
●
Touch a group with at least
one member in it then
Touch the Options icon
to select Mark All / Unmark
All / Remove All.
Once one or more contacts is
marked, touch the Options
icon to select an option:
Remove/ New Text Message/
New Picture Message/ New
Video Message/ New Voice
Message/ Mark All/ Unmark
All/ Remove All
5. Speed Dials
Allows you to view your list of
Speed Dials or designate Speed
Dials for numbers entered in
your Contacts.
Contacts
87
Page 90
Contacts
1. Unlock the Touch Screen by
sliding the Slide icon up
to unlock or press the Unlock
Key ( ) on the right side of
your phone and touch the
Menu Touch Soft Key .
2. Touch .
3. Touch
Speed Dials
4. Touch the Speed Dial
position.
5. Touch the Contact you wish
Contacts
to assign a Speed Dial.
6. Touch the Contact number
you want to assign (if
applicable), then touch
88
6. My Name Card
Allows you to create, edit and view
your own Contact information
including name, phone numbers,
and email address.
1. Unlock the Touch Screen by
sliding the Slide icon up
.
Ye s
.
to unlock or press the Unlock
Key ( ) on the right side of
your phone and touch the
Menu Touch Soft Key .
2. Touch .
3. Touch
My Name Card
4. Touch .
5. Enter your information as
EDIT
necessary, then touch the
Save touch key .
.
SAVE
Page 91
Recent Calls
RECENT CALLS
The Recent Calls Menu is a list
of the last phone numbers or
Contact entries for calls you
placed, accepted, or missed. It's
continually updated as new
numbers are added to the
beginning of the list and the
oldest entries are removed from
the bottom of the list.
1. Missed Calls
Allows you to view the list of
missed calls; up to 90 entries.
1. Unlock the Touch Screen by
sliding the Slide icon up
to unlock or press the Unlock
Key ( ) on the right side of
your phone and touch the
Menu Touch Soft Key .
2. Touch .
3. Touch
Missed Calls
.
4. Touch a Missed Call entry to
view the entry. Options from
here:
●
Touch the Call touch key
to place a call to the
CALL
number.
●
Touch the Message touch key
MESSAGE
to send a
message.
●
Touch the Contact
Information touch key
CONTACT INFO
to view the
caller's contact entry.
OR
Touch the Save touch key
to save the contact
SAVE
information into your Contact
List.
●
Touch the Options icon .
Save To Contacts (Contact
info) / Erase/ Lock(Unlock)/
View Timers
Recent Calls
89
Page 92
Recent Calls
2. Received Calls
Allows you to view the list of
incoming calls; up to 90 entries.
1. Unlock the Touch Screen by
sliding the Slide icon up
to unlock or press the Unlock
Key ( ) on the right side of
your phone and touch the
Menu Touch Soft Key .
2. Touch .
Received Calls
3. Touch
Recent Calls
4. Touch a Received Call entry to
view the entry. Options from
here:
●
Touch the Call touch key
to place a call to the
CALL
number.
●
Touch the Message touch key
to send a message.
90
MESSAGE
●
Touch the Contact
Information touch key
CONTACT INFO
caller's contact entry.
.
to view the
OR
Touch the Save touch key
to save the call
SAVE
information into your Contact
List.
●
Touch the Options icon
for the following options:
Save to Contacts (Contact
info) / Erase/ Lock(Unlock)/
View Timers
3. Dialed Calls
Allows you to view the list of
outgoing calls; up to 90 entries.
1. Unlock the Touch Screen by
sliding the Slide icon up
to unlock or press the Unlock
Key ( ) on the right side of
your phone and touch the
Menu Touch Soft Key .
2. Touch .
3. Touch
Dialed Calls
.
Page 93
4. Touch a Dialed Call entry to
view the entry. Options from
here:
●
Touch the Call touch key
to place a call to the
CALL
number.
●
Touch the Message touch key
MESSAGE
to send a
message.
●
Touch the Contact
Information touch key
CONTACT INFO
to view the
caller's contact entry.
OR
Touch the Save touch key
to save the call
SAVE
information into your Contact
List.
●
Touch the Options icon
for the following options:
Save to Contacts (Contact
info) / Erase/ Lock(Unlock)/
View Timers
4. All Calls
Allows you to view the list of all
calls; up to 270 entries.
1. Unlock the Touch Screen by
sliding the Slide icon up
to unlock or press the Unlock
Key ( ) on the right side of
your phone and touch the
Menu Touch Soft Key .
2. Touch .
3. Touch
All Calls
.
4. Touch a Call entry to view the
entry. Options from here:
●
Touch the Call touch key
CALL
to place a call to the
number.
●
Touch the Message touch key
MESSAGE
●
Touch the Contact
Information touch key
CONTACT INFO
the caller's contact entry.
to send a message.
to view
Recent Calls
91
Page 94
Recent Calls
OR
Touch the Save touch key
to save the call
SAVE
information into your Contact
List.
●
Touch the Options icon
for the following options:
Save to Contacts (Contact
info) / Erase/ Lock(Unlock)/
View Timers
Shortcut
Recent Calls
To quickly view a list of all your
recent calls, press the SEND
Key from Standby mode.
5. View Timers
Allows you to view the duration
of the different call types. Also
allows you to view Data counters.
1. Unlock the Touch Screen by
sliding the Slide icon up
to unlock or press the Unlock
Key ( ) on the right side of
your phone and touch the
92
Menu Touch Soft Key .
2. Touch .
3. Touch View Timers.
4. Touch the Reset touch key
next to a call list to
reset it. Timers and Counters
available are:
Last Call/ All Calls/ Received
Calls/ Dialed Calls/ Roaming
Calls/ Transmit Data/
Received Data/ Total Data/
Last Reset/ Lifetime Calls/
Lifetime Data Counter
5. To reset all the recorded
timers at once, touch the
Reset All touch key .
Note
Not all Timers can be reset.
Page 95
Music
Music
1. My Music
The LG 8575 Touch allows you
to store and to listen to music
right from your phone.
Note
Storage availability depends on the
size of each file as well as memory
allocation of other applications.
Shortcut
• Press side Music Key when in
Standby mode to easily access My
Music.
Or
• Press the Menu Touch Soft Key
and then press the My Music
icon .
1. Unlock the Touch Screen by
sliding the Slide icon up
to unlock or press the Unlock
Key ( ) on the right side of
your phone and touch the
Menu Touch Soft Key .
2. Touch .
3. Touch
Music
.
4. Touch a submenu to access
your music.
Playing Your Music
It’s easy to find and play the
music you’ve stored in your
phone and memory card.
Access My Music
1. Unlock the Touch Screen by
sliding the Slide icon up
to unlock or press the Unlock
Key ( ) on the right side of
your phone and touch the
Menu Touch Soft Key .
Music
93
Page 96
Music
2. Touch .
3. Touch
Music
4. Touch one of the following
submenus.
All Songs/ Playlists/ Artists/
Genres/ Albums/ Manage
My Music/ Music Settings
5. Touch the name of the song
you want to hear to start the
music player.
Music Sub-Menu Options
Music
Play All
Allows you to play all songs.
All Songs
Allows you to view all of your
songs alphabetically. Touch a
song to play it.
Playlists
Allows you to view and play your
songs by playlist.
94
Playlists can be created on either
.
your phone or PC then
transferred between them, but
Playlists can only be managed
(add and delete songs) from
where they were created.
Artists
Allows you to view and play your
songs grouped by artist.
Genres
Allows you to view and play
songs by genre.
Albums
Allows you to view and play
songs by album.
Manage My Music
Allows you to manage your music
files. (
Erase/ Move to Card/
Move to Phone/ Lock/ Unlock
)
Music Settings
Allows you to set one of the
following modes:
Page 97
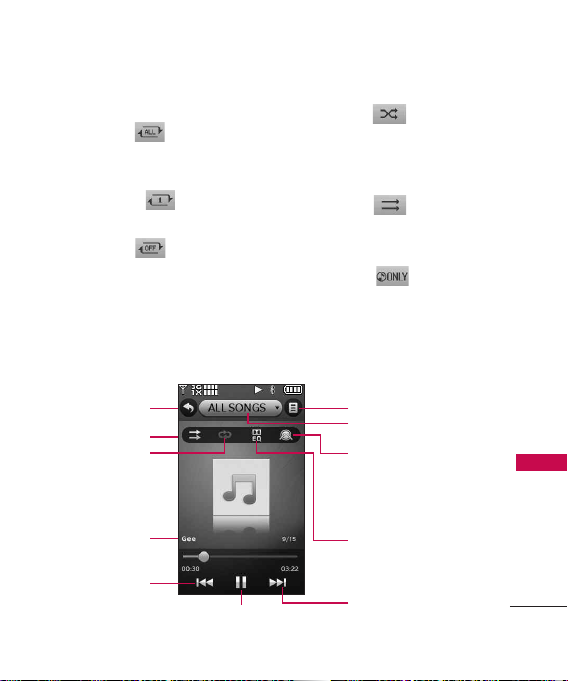
●
Repeat
:
Repeat All
: Repeats the
playlist once the last song is
played.
Repeat One
: Plays the
selected song repeatedly.
Repeat Off
: Plays all
songs in the list once, then
stops and exits the Music Player.
●
Shuffle
:
Music Player Controls
Back key
Shuffle
Repeat
Shuffle On
:
Shuffles music files in the
songs list and plays them in
random order.
Shuffle Off
: Plays the
music files in the order in
which they are displayed.
●
Music Only
: When
Music Only is set to On, is
displayed on the top-left
corner of the LCD screen.
Options
Selected Catalog
Extras
(*Join the Band/ Rhythmical
Beat/ Visual Effect/ Pick a Song
Image)
Music
Song Name
Rewind/ Skip Back
to Previous Song
Play/ Pause
EQUALIZER
(Manual/ Flat/ Bass
reble Boost/
Boost/ T
Vocal Boost/ Classical)
Fast Forward/
Skip to Next Song
95
Page 98
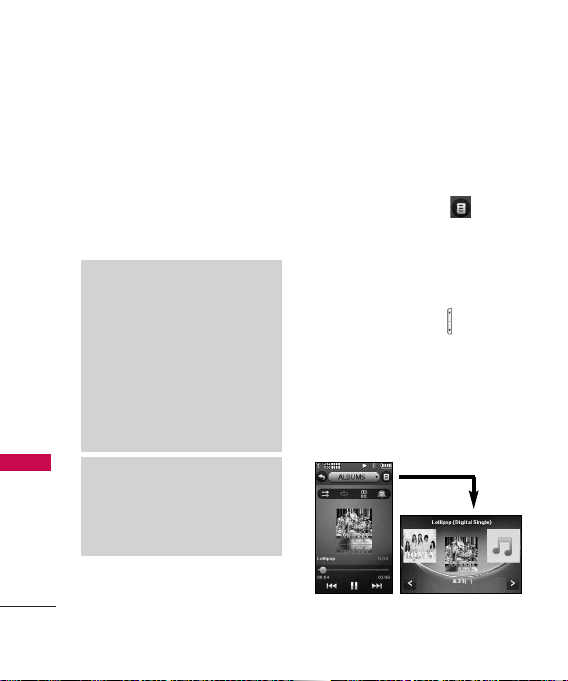
Music
On
: Allows you to listen
exclusively to your music
(as you do with MP3
Players) without being
interrupted by calls.
Off
: Wireless communications
are once again enabled.
TIP
• The LG 8575 Touch Music Player
has various EQ settings available
(Manual, Flat, Bass Boost, Treble
Boost, Vocal Boost, Classical) for
different playback conditions &
sound type.
Dolby Mobile is an audio processing
•
Music
technology platform that brings
rich, vibrant surround sound to
music on the LG 8575 Touch.
TIP
* This function allows you to join the
band by touching Cymbal, drum or
synthesizer and enjoy the music
play during the play.
96
Controlling the Music Player
While listening to your music,
use the following to control the
Music Player:
●
Options touch key : Allows
you to choose:
Exit Player/ Music Only
Mode/Add To Playlist/ Song
Info /Home Screen
●
Side Volume Keys : Adjust
the volume.
Landscape mode
While music is playing, rotate the
LG 8575 Touch device to enter
Landscape mode.
Page 99
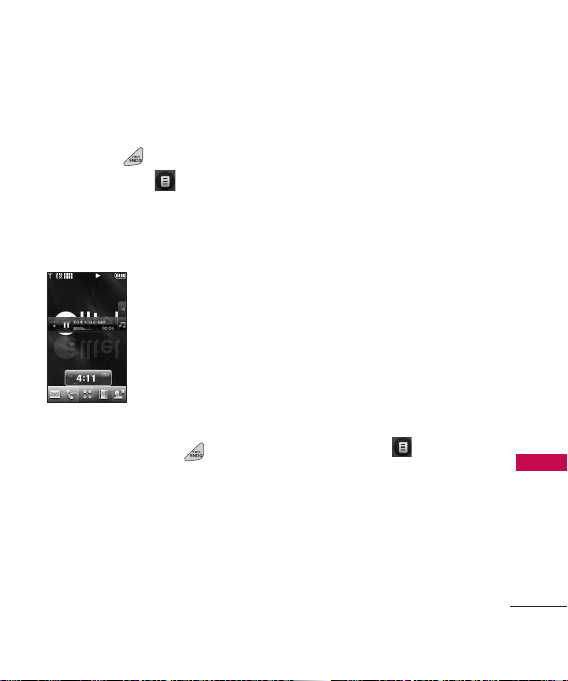
Tools
Background Music Mode
While music is playing, press the
PWR/ END Key (or touch
the Options icon > Home
Screen) to move
the Music Player to the
background of the Standby
mode screen.
Exit From the Music Player
Press the PWR/ END Key
twice to exit the Music Player.
Tools
Your phone tools include Voice
Commands, Calculator, Ez Tip
Calculator, Calendar, Alarm
Clock, Stopwatch, World Clock,
Notepad, Drawing Pad, and USB
Mass Storage.
1. Voice Commands
This feature provides you with
the following options equipped
with AVR (Advanced Voice
Recognition) technology. Each
option has its detailed
information on the phone. To
view the option details, touch
the Options icon , touch
INFO
and then touch the Voice
Command option for more
information.
Tools
97
Page 100
Tools
Access Voice Commands
1. Unlock the Touch Screen by
sliding the Slide icon up
to unlock or press the Unlock
Key ( ) on the right side of
your phone and touch the
Menu Touch Soft Key .
2. Touch .
3. Touch
Voice Commands
Voice Commands Settings
To customize your voice
commands, follow steps 1-3 of
Tools
the previous instructions, touch
the Options icon , then
SETTINGS
Confirm Choices
Always Confirm/Never Confirm
Sensitivity
Automatic/ Less Sensitive
Adapt Voice
Words
.
More Sensitive/
Train Digits/ Train
98
.
Automatic/
Prompt Mode
Readout + Alerts/ Readout/
Tones Only
Audio Playback
Earpiece
Prompt Timeout
seconds
CLR Key Activation
Info
Using Voice Commands
To access the Voice Command
options (below):
1. From Standby Mode, press
the Clear/Voice Command
Key .
2. When prompted, say the
name of the function (below)
you wish to use:
1.1
Call <Name or Number>
Say "Call" and then call someone
simply by saying the phone
Prompts/
Speakerphone/
5 seconds/ 10
ON/ OFF
Provides Settings Info.
 Loading...