

Page 1
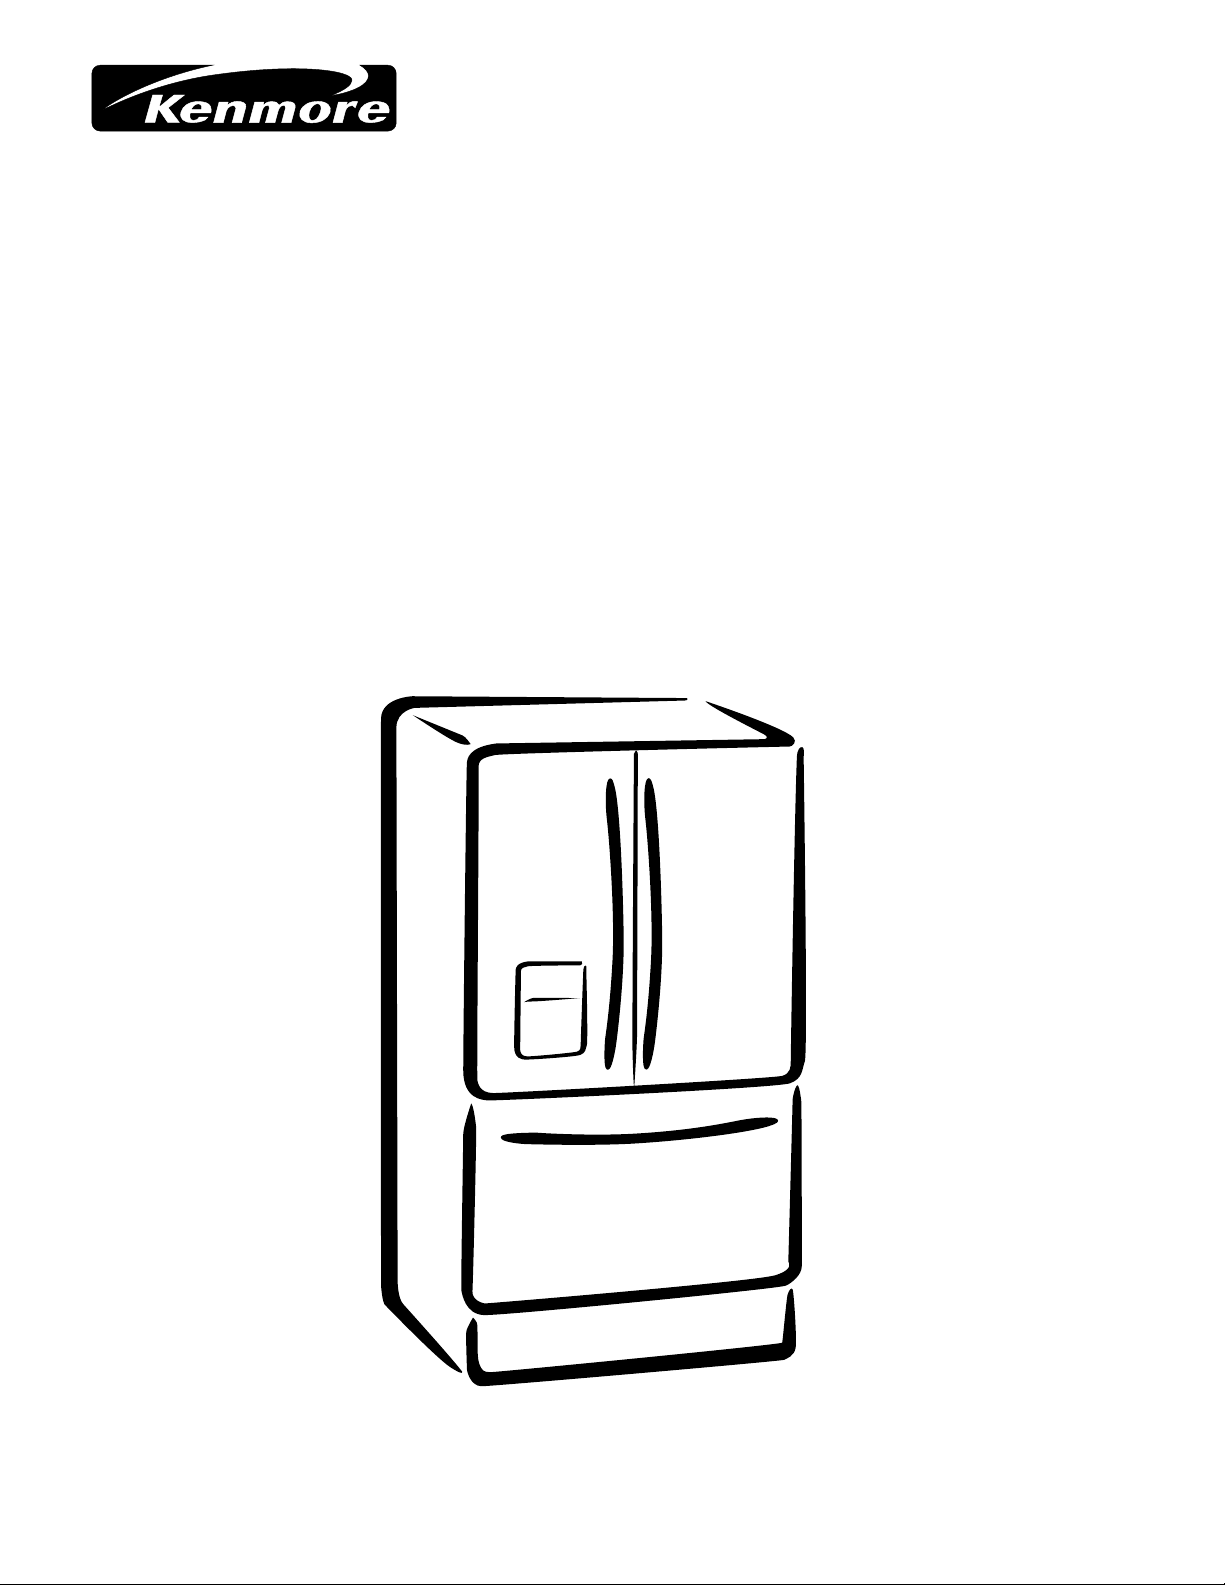
BOTTOM FREEZER REFRIGERATOR
Use & Care Guide
CONGELADOR INFERIOR REFRIGERADOR
Guía para el Uso y Cuidado
CONGÉLATEUR INFÉRIEUR RÉFRIGÉRATEUR
Guide d'Utilisation et d'Entretien
Models / Modelos / Modèles
795.7840 ,795.7841
=color number, número de color, numéro de couleur
*
*
*
ENGLISH ESPAÑOL FRANÇAIS
MFL472277303
Printed in Mexico
Sears, Roebuck and Co., Hoffman Estates, IL 60179 U.S.A.
www.sears.com
Page 2
TABLE OF CONTENTS
English Version 2
Warranty 3
Protection Agreements 4
Safety Instructions
Grounding Require ments 6
Parts and Features 7
Refrigerator Installation 8-15
Unpacking Your Refrigerator 8
Installation 8
Base Grille 8
Removing and Replacing
Your Refrigerator Doors 9-14
Leveling and Door Alignment 15
Using Your Refrigerator 16-23
Setting the Controls 16
Ensuring Proper Air Circulation 17
Multi Flow 17
Ice Bucket 18
Adjusting Controls Settings 18
Water Dispenser 19
Food Storage Guide 19
Storing Frozen Food 19
Refrigerator Shelves 20
Snack Pan 21
Crisper Humidity Control 21
Crisper Cover
Modular Door Bins
Dairy Corner
Egg box
5
Can Rack
Durabase
Ice Bin
Durabase Divider
Glide Out Drawer Basket 22
Filter 23
Care and Cleaning 24-25
General Cleaning Tips 24
Outside 24
Inside Walls 24
Door Liner and Gaskets 24
Plastic Parts 24
Condenser Coils 24
Light Bulb Replacement 24-25
Power Interruptions 25
When you go on vacation 25
About the Automatic Icemaker 26
Connecting the Water Line 27-29
Troubleshooting Guide
Customer Service Back Cover
21
21
21
21
22
22
22
22
30-33
2
Page 3
BOTTOM FREEZER REFRIGERATOR
R
WARRANTY - U.S.A.
Kenmore Appliance Warranty
One Year Limited Warranty
When installed, operated and maintained according to all instructions supplied with the product, if this appliance fails due
to a defect in material or workmanship within one year from the date of purchase, call 1-800-4-MY-HOME to arrange for
free repair.
If this appliance is used for other than private family purposes, this warranty applies for only 90 days from th date of
purchase.
This Warranty covers only defects in material and workmanship. Sears will NOT pay for:
1. Expendable items that can wear out from normal use, including but not limited to filters, belts, light bulbs, and bags.
2. A service technician to instruct the user in correct product installation, operation or maintenance.
3. A service technician to clean or maintain this product.
4. Damage to or failure of this product if it is not installed, operated or maintained according to all instructions supplied
with the product.
5. Damage to or failure of this product resulting from accident, abuse, misuse or use for other than its intended
purpose.
6. Damage to or failure of this product caused by the use of detergents, cleaners, chemicals or utensils other than
those recommended in all instructions supplied with the product.
7. Damage to or failure of parts or systems resulting from unauthorized modifications made to this product.
Disclaimer of implied warranties; limitation of remedies
Customer's sole and exclusive remedy under this limited warranty shall be product repair as provided herein. Implied
warranties, including warranties of merchantability or fitness for a particular purpose, are limited to one year or the
shortest period allowed by law. Sears shall not be liable for incidental or consequential damages.
Some states and provinces do not allow the exclusion or limitation of incidental or consequential damages, or limitations
on the duration of implied warranties of merchantability or fitness, so these exclusions or limitations may not apply to
you.
This warranty applies only while this appliance is used in the United States and Canada.
This warranty gives you specific legal rights, and you may also have other rights which vary from state to state.
Sears, Roebuck and Co., Dept. 817WA, Hoffman Estates, IL 60179
Sears Canada, Inc., Toronto, Ontario, Canada M5B 2B8
3
Page 4
PROTECTION AGREEMENTS
Master Protection Agreements
Congratulations on making a smart purchase. Your new
Kenmore product is designed and manufactured for years
of dependable operation. But like all products, it may
require preventive maintenance or repair from time to time.
That's when having a Master Protection Agreement can
save you money and aggravation.
The Master Protection Agreement also helps extend the life
of your new product. Here’s what the Agreement* includes:
product if four or more product failures occur within
twelve months.
Rental reimbursement if repair of your covered product
10% discount off the regular price of any non-covered
R
Parts and labor needed to help keep products operating
properly under normal use, not just defects. Our
coverage goes well beyond the product warranty. No
deductibles, no functional failure excluded from
coverage - real protection.
Expert service by a force of more than 10,000
authorized Sears service technicians, which means
someone you can trust will be working on your product.
Unlimited service calls and nationwide service, as
often as you want us, whenever you want us.
"No-lem on” guarantee - replacement of your covered
Product replacement if your covered product can’t be
Fixed.
Annual Preventive Maintenance Check at your
Request - no extra charge.
Fast help by phone - we call it Rapid Resolution -
phone support from a Sears representative on all
products. Think of us as a ”talking owner’s manual.”
Power surge protection against electrical damage due
to power fluctuations.
$250 Food Loss Protection annually for any food
spoilage that is the result of mechanical failure of any
’
Covered refrigerator or freezer.
takes longer than promised.
repair service and related installed parts.
Once you purchase the Agreement, a simple phone call is
all that it takes for you to schedule service. You can call
anytime day or night, or schedule a service appointment
online.
The Master Protection Agreement is a risk free purchase.
If you cancel for any reason during the product warranty
period, we will provide a full refund. Or, a prorated refund
anytime after the product warranty period expires.
Purchase your Master Protection Agreement today!
Some limitations and exclusions apply. For prices and
additional information in the U.S.A. call 1-800-827-6655.
*Coverage in Canada varies on some items. For full
details call Sears Canada at 1-800-361-6655.
Sears Installation Service
For Sears professional installation of home appliances,
garage door openers, water heaters, and other major
home items, in the U.S.A. or Canada call
1-800-4-MY-HOME .
R
PRODUCT RECORD
In the space below, record the date of purchase, model and serial number of your product. You will find the model and
serial number printed on an identification label located on the right-hand side of the refrigerator compartment. Have
these items of information available whenever you contact Sears concerning your product.
Model No.
Serial No. Dealer
Save these instructions and attach your sales receipt for future reference.
Date of Purchase
4
Page 5
IMPORTANT SAFETY INSTRUCTIONS
SAFETY MESSAGES
This guide contains many important safety messages. Always read and obey all safety messages.
This is the safety alert symbol. It alerts you to safety messages that inform you
of hazards that can kill or hurt you or others, or cause damage to the product.
All safety messages will be preceded by the safety alert symbol and the hazard
signal word DANGER, WARNING, or CAUTION. These words mean:
DANGER
You will be killed or seriously injured if you don’t follow instructions.
WARNING
You can be killed or seriously injured if you don’t follow instructions.
CAUTION
All safety messages will identify the hazard, tell you how to reduce the chance of injury and tell you what can happen if
the instructions are not followed.
Indicates an imminently hazardous situation which, if not avoided,
may result in minor or moderate injury, or product damage only.
WARNING
To reduce the risk of fire, electric shock, or injury
to persons when using your product, basic safety
precautions should be followed, including the following:
Read all instructions before using this appliance:
NEVER unplug your refrigerator by pulling on the power cord.
Always grip the plug firmly and pull it straight out from the
outlet.
Repair or replace immediately all electric service cords that
have become frayed or otherwise damaged. Do not use a cord
that shows cracks or abrasion damage along its length or at
either the plug or connector end.
Do not modify or extend the power cord lenght. It could
cause electric shock or fire.
When moving your refrigerator away from the wall,
be careful not to roll over or damage the power cord.
DO NOT store or use gasoline or other flammable vapors and
liquids in the vicinity of this or any other appliance.
DO NOT allow children to climb, stand, or hang on the
refrigerator doors or shelves in the refrigerator. They could
damage the refrigerator and seriously injure themselves.
Keep fingers out of “pinch point” areas; clearances between
the doors and cabinet are necessarily small. Be careful
when you open the doors when children are in the area.
Unplug your refrigerator before cleaning or making any repairs.
NOTE: We strongly recommend that any servicing be
p. erformed by a qualified technician.
Before replacing a burned-out light bulb, unplug the
refrigerator or turn off power at the circuit breaker or fuse box
in order to avoid contact with a live wire filament. (A burnedout light bulb may break when being replaced.)
either or both controls to the OFF position does not remove
power to the light circuit.
NOTE: Some models have LED interior lighting and
service should be perfomed by a qualified technitian.
NOTE: Setting
When you are finished, reconnect the refrigerator to the electrical
source and reset the controls. (Thermostat, Refrigerator
Control, and or Freezer Control, depending on the model)
to the desired setting.
This refrigerator must be properly installed in accordance
with the
to the front of the refrigerator.
After your refrigerator is in operation, do not touch the cold
surfaces in the freezer compartment when hands are damp or
wet. Skin may adhere to the extremely cold surfaces.
In refrigerators with automatic icemakers, avoid contact with
the moving parts of the ejector mechanism, or with the heating
element that releases the cubes. DO NOT place fingers or
hands on the automatic icemaking mechanism while the
refrigerator is plugged in.
DO NOT refreeze frozen foods which have thawed completely.
The United States Department of Agriculture in Home and
Garden Bulletin No. 69 says:
“...You may safely refreeze frozen foods that have thawed if
they still contain ice crystals or if they are still cold below
40°F (4°C).”
“...Thawed ground meats, poultry, or fish that have any off-odor
or off-color should not be refrozen and should not be eaten.
Thawed ice cream should be discarded. If the odor or color of
any food is poor or questionable, get rid of it. The food may be
dangerous to eat.”
“Even partial thawing and refreezing reduces the eating quality
of foods, particularly fruits, vegetables and prepared foods.
The eating quality of red meats is affected less than that of
many other foods. Use refrozen foods as soon as possible to
save as much of their quality as you can.”
Attention Installer Instructions that were taped
SAVE THESE INSTRUCTIONS
5
Page 6
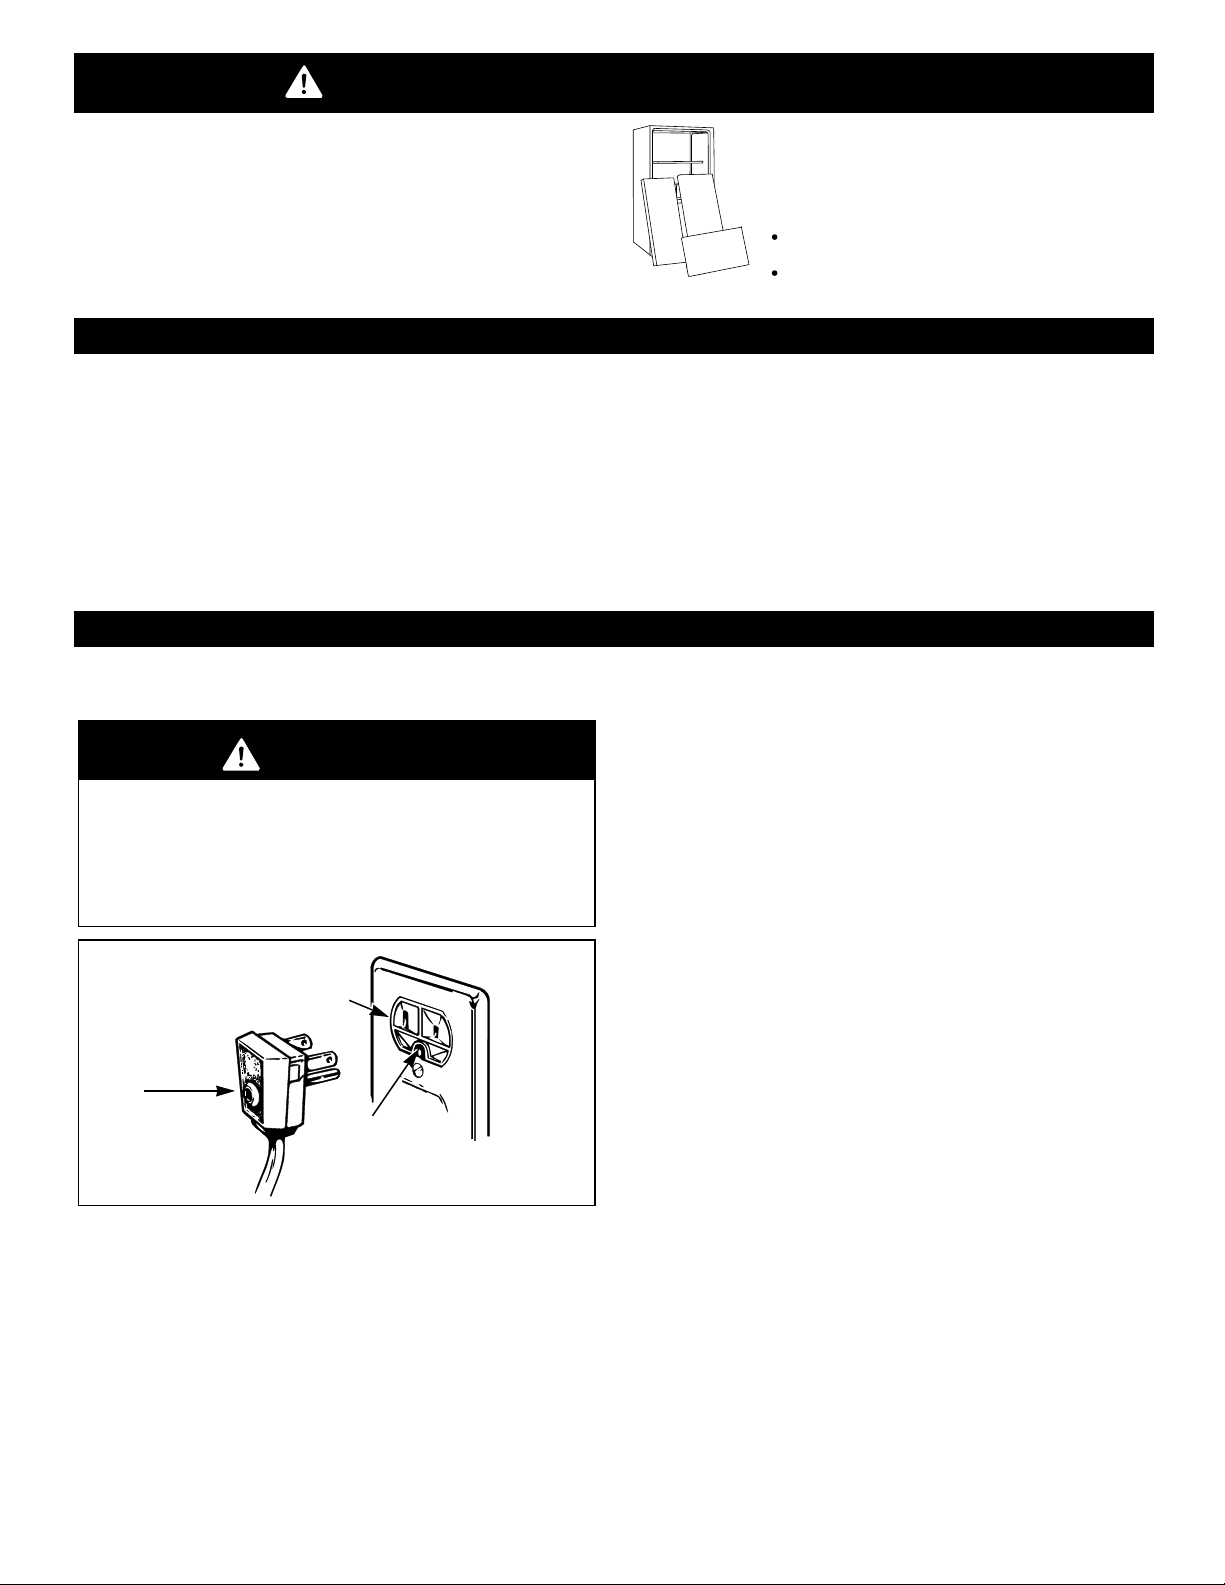
DANGER: RISK OF CHILD ENTRAPMENT
Junked or abandoned refrigerators are still
dangerous... even if they will sit for “just a few days”. If
you are getting rid of your old refrigerator, please follow
the instructions at right to help prevent accidents.
BEFORE YOU THROW AWAY
YOUR OLD REFRIGERATOR
OR FREEZER
Take off the doors.
Leave the shelves in place so that
children may not easily climb inside.
CFC DISPOSAL
Your old refrigerator may have a cooling system that used If you are throwing away your old refrigerator, make sure
CFCs (chlorofluorocarbons). CFCs are believed to harm the CFC refrigerant is removed for proper disposal by a
stratospheric ozone. qualified servicer. If you intentionally release this CFC
This appliance contains fluid (refrigerant, lubricant), is
made of parts and materials which are reusable and / or
recyclable. All the important materials should be sent to
the collecton center of waste material and can be reused
after rework (recycling).
For take back, please contact with the local agency.
refrigerant, you can be subject to fines and imprisonment
under provisions of environmental legislation.
GROUNDING REQUIREMENTS
IMPORTANT:
Please read carefully.
TO CONNECT ELECTRICITY
WARNING
Electrical Shock Hazard
FOR PERSONAL SAFETY, this appliance must be
properly grounded. Have the wall outlet and the
circuit checked by a qualified electrician to make sure
the outlet is properly grounded.
3-prong
grounding type
wall receptacle
3-prong
grounding
plug
Ensure proper
ground exists
before use.
RECOMMENDED GROUNDING METHOD
The refrigerator should always be plugged into its own
individual properly grounded electrical outlet rated for
115 Volts, 60 Hz, AC only, and fused at 15 or 20 amperes.
This provides the best performance and also prevents
overloading house wiring circuits which could cause a fire
hazard from overheated wires. It is recommended that a
separate circuit serving only this appliance be provided.
Use a receptacle which cannot be turned off with a switch
or pull chain. Do not use an extension cord.
Where a standard two-prong wall outlet is encountered,
it is your personal responsibility and obligation to have it
replaced with a properly grounded three-prong wall outlet.
Do not, under any circumstances, cut or remove the
third (ground) prong from the power cord.
NOTE: Before performing any type of installation,
cleaning, or removing a light bulb, turn the control
(Thermostat, Refrigerator Control or Freezer Control,
depending on the model) to OFF and then disconnect the
refrigerator from the electrical source. When you are
finished, reconnect the refrigerator to the electrical source
and reset the control (Thermostat, Refrigerator Control or
Freezer Control, depending on the model) to the desired
setting.
NOTE: Some models have LED interior lighting and service
should be perfomed by a qualified technitian.
USE OF EXTENSION CORDS
Because of potential safety hazards under certain
conditions, we strongly recommend against the use of
an extension cord. However, if you still elect to use
an extension cord, it is absolutely necessary that it be
a UL-listed (in the United States), 3-wire grounding type
appliance extension cord having a grounding type plug
and outlet, and that the electrical rating of the cord be 15
amperes (minimum) and 120 volts.
Use of an extension cord will increase the clearance
needed for the back of the refrigerator.
6
Page 7
PARTS AND FEATURES
B
E
A
M
L
C
K
D
J
N
O
Q
C
G
F
H
I
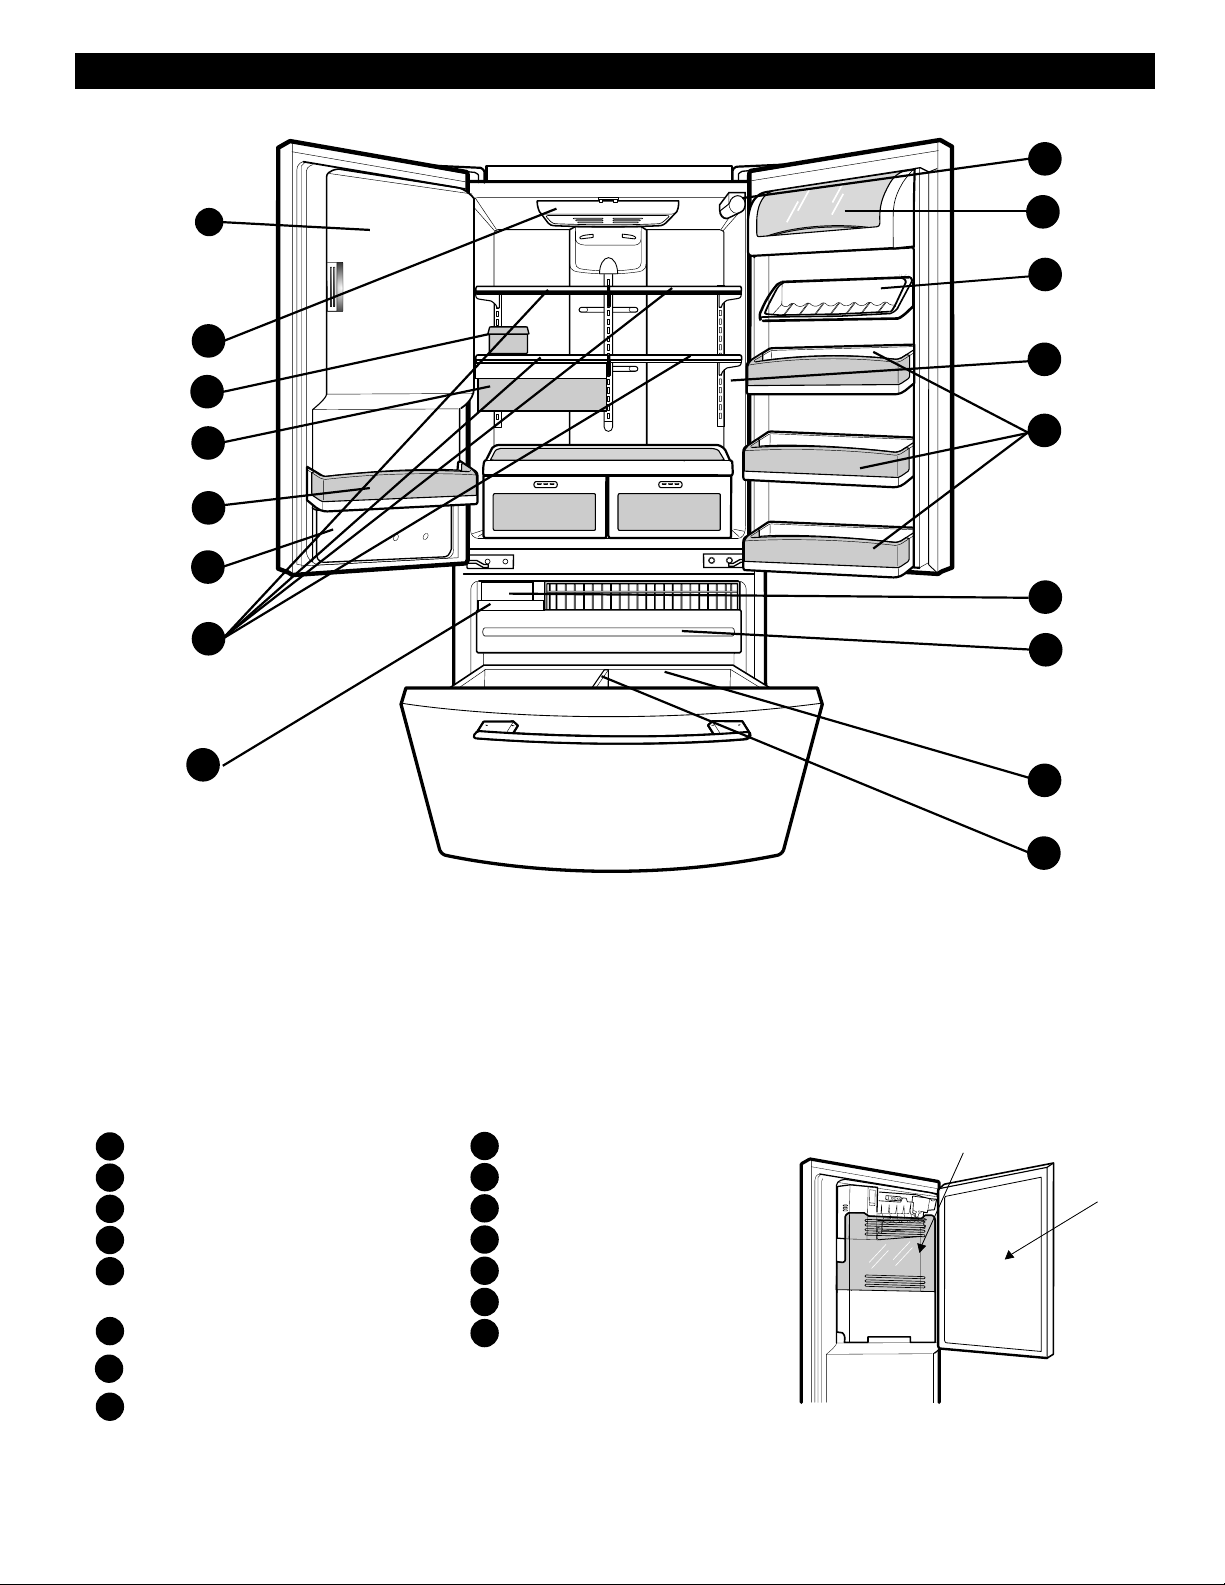
Use this section to become more familiar with the parts and features.
NOTE:This guide covers several different models. The refrigerator you have purchased may have some
or all of the items listed below. The locations of the features shown below may not match your model.
A
Refrigerator Light
Filter (Inside)
B
C
Modular Door Bins
Refrigerator
D
E
Ice Room
(Ice Maker
Pull out Drawer
F
G
Turbo Motor
Durabase
H
Shelves
and Ice Bucket)
I
Divider
J
Ice Bin
K
Water Tank Cover
L
Snack
Egg Box
M
Dairy Corner
N
O
Can Rack*
* On some models
Pan
Ice Bucket
Ice Room Door
7
Page 8
REFRIGERATOR INSTALLATION
WARNING
Excessive Weight Hazard
Use two or more people to move and install
refrigerator.
Failure to do so can result in back or other injury.
UNPACKING YOUR REFRIGERATOR
Remove tape and any temporary labels from your
refrigerator before using. Do not remove any warningtype labels, the model and serial number label, or the
TechSheet that is attached to back wall of the refrigerator.
To remove any remaining tape or glue, rub the area
briskly with your thumb. Tape or glue residue can also be
easily removed by rubbing a small amount of liquid dish
soap over the adhesive with your fingers. Wipe with warm
water and dry.
INSTALLATION
1.
To avoid vibration, the unit must be level. If required,
adjust the leveling screws to compensate for
unevenness of the floor. The front should be slightly
higher than the rear to aid in door closing. Leveling
screws can be turned easily by tipping the cabinet
slightly. Turn the leveling screws clockwise ( ) to
raise the unit, counterclockwise ( ) to lower it.
2.
Install this appliance in an area where the temperature
is between 55°F (13°C) and 110°F (43°C.) If the
temperature around the appliance is too low or high,
cooling ability may be adversely affected.
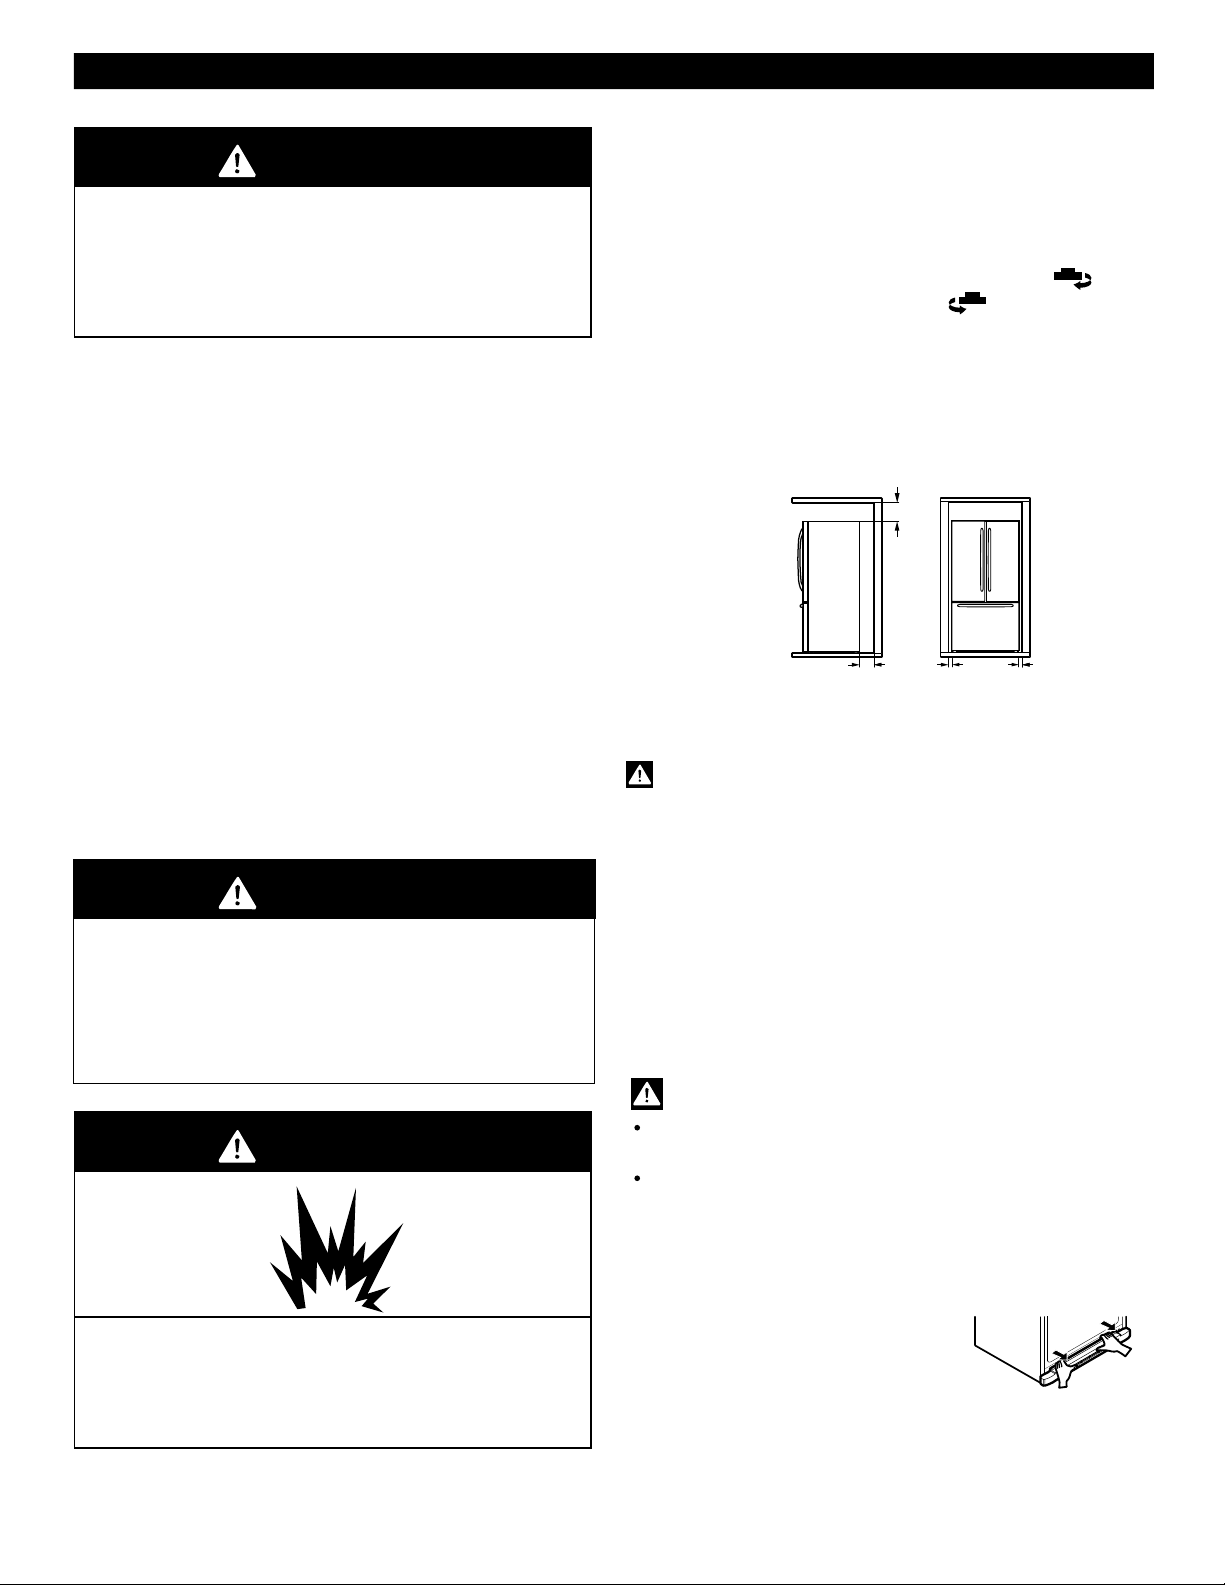
Allow the clearance of at least 2 inch from the top and
3.
0.125 inch from the side walls for better cooling efficiency,
ease of installation, proper air circulation and electrical
connections.
MIN 2"
(5 cm)
Do not use sharp instruments, rubbing alcohol, flammable
fluids, or abrasive cleaners to remove tape or glue. These
products can damage the surface of your refrigerator. For
more information, see the Important Safety Instructions
section.
Refrigerator shelves are installed in the shipping position.
Please reinstall shelves according to your individual
storage needs.
WARNING
When Moving Your Refrigerator:
Your refrigerator is heavy. When moving the
refrigerator for cleaning or service, be sure to protect
the floor. Always pull the refrigerator straight out when
moving it. Do not wiggle or walk the refrigerator when
trying to move it, as floor damage could occur.
WARNING
1"
(2.54 cm)
Too small a distance from adjacent items may result in
lowered freezing capability and increased electricity charge
consumption.
CAUTION: Avoid placing the unit near heat sources,
direct sunlight or moisture.
(0.3 cm)
0.125"
(0.3 cm)
0.125"
NEXT
1. Clean your refrigerator thoroughly and wipe off all dust
accumulated during shipping.
2. Install accessories such as ice cube bin, drawers,
shelves, etc., in their proper places. They are packed
together to prevent possible damage during shipment.
3. Let your refrigerator run for 2 or 3 hours before putting
food in it. Check the flow of cold air in the freezer
compartment to ensure proper cooling. Your refrigerator
is now ready for use.
WARNING:
Be careful when you work with hinge, base grille,
stopper etc. You may be injured.
Do not put hands or metal sticks into air vents, base
Grille, or bottom of refrigerator. You may be injured or
receive an electrical shock.
Explosion Hazard
Keep flammable materials and vapors, such as
gasoline, away from refrigerator.
Failure to do so can result in death, explosion or, fire.
BASE GRILLE
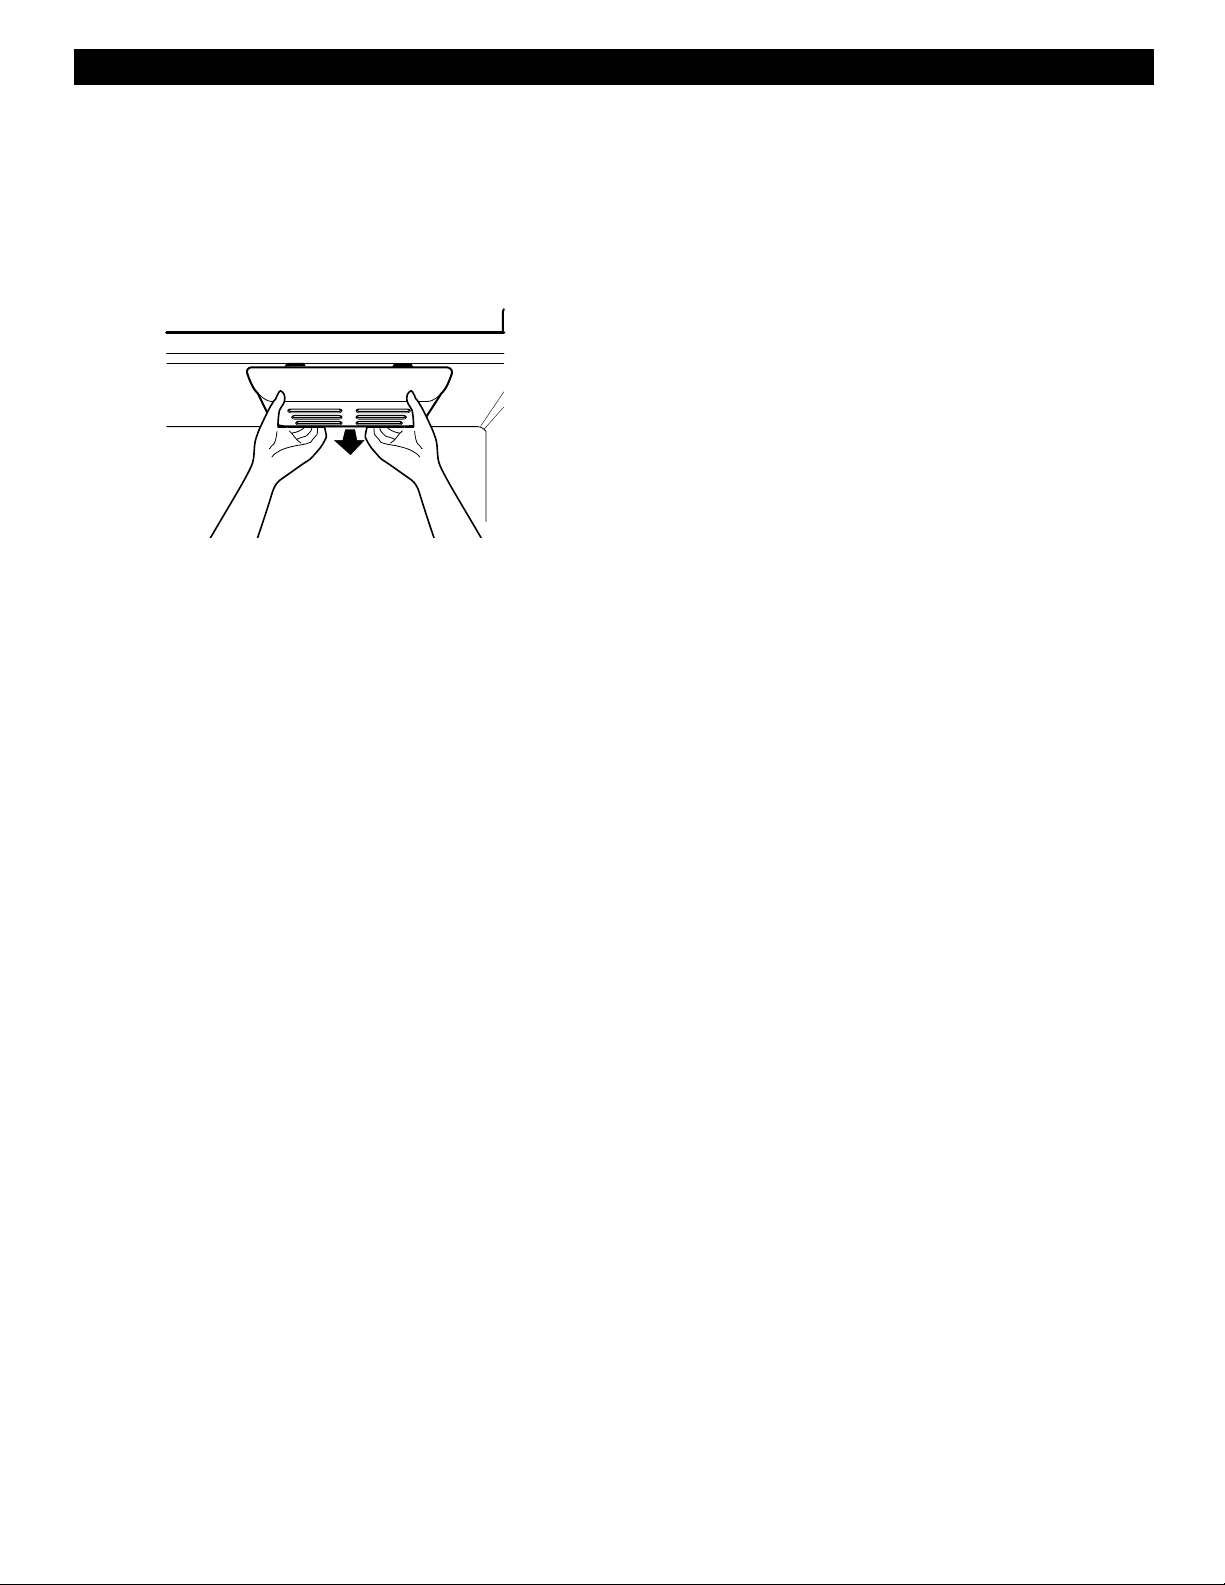
To remove the base grille
1. Grasp the grille with both hands.
2. Pull the grille toward yourself.
To install the base grille
1. Place clips in openings in the metal panel.
2. Push the grille toward the refrigerator until it snaps
into place.
8
Page 9
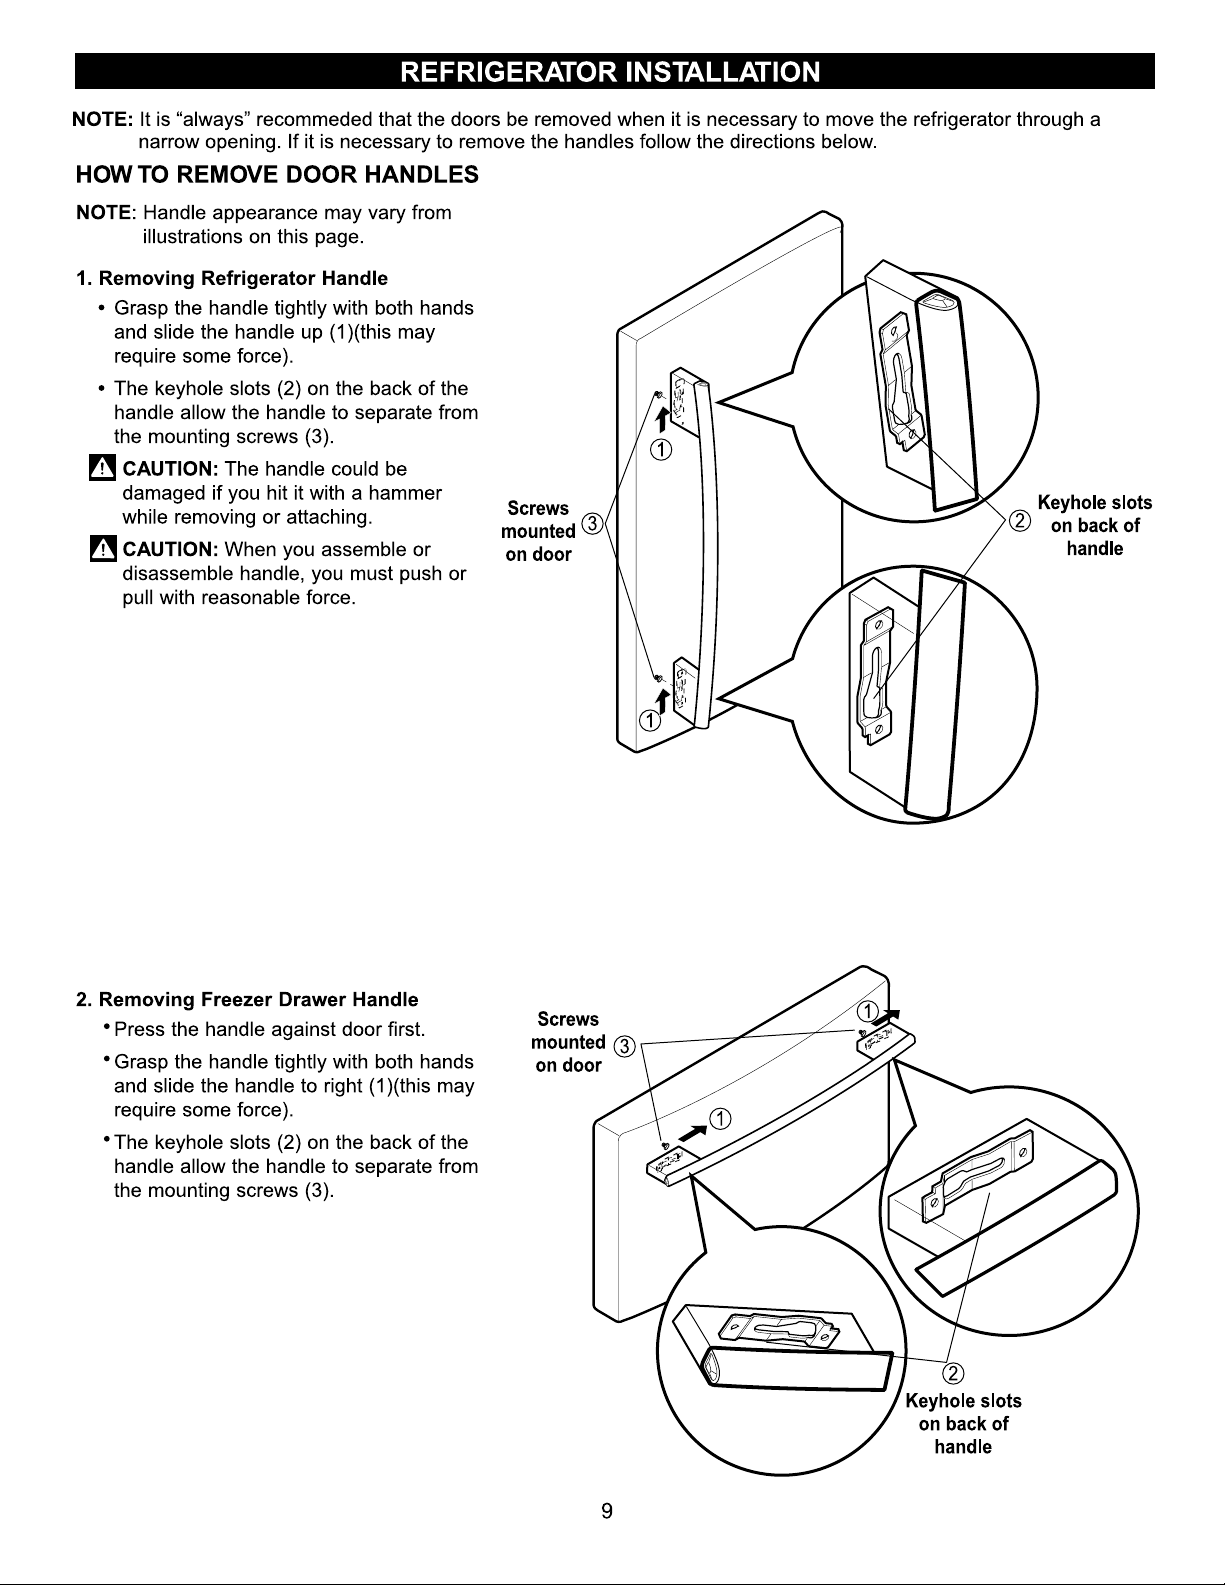
Page 10
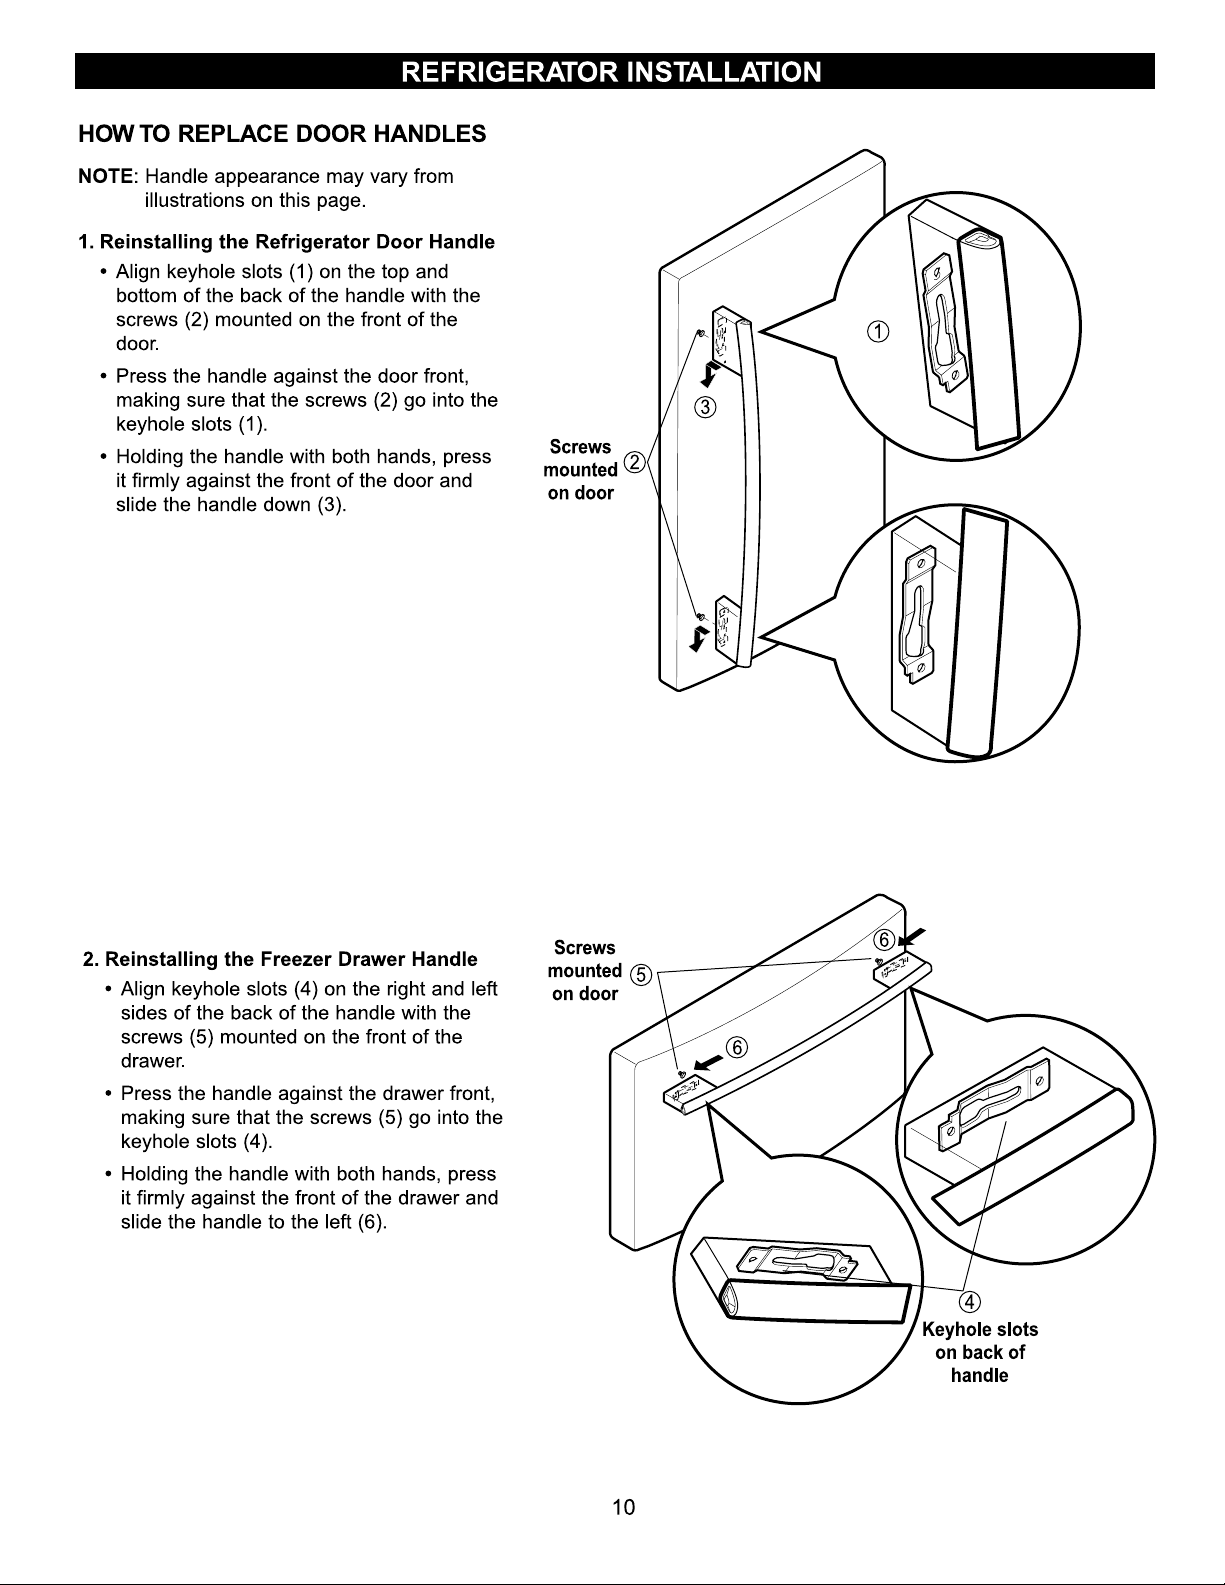
Page 11
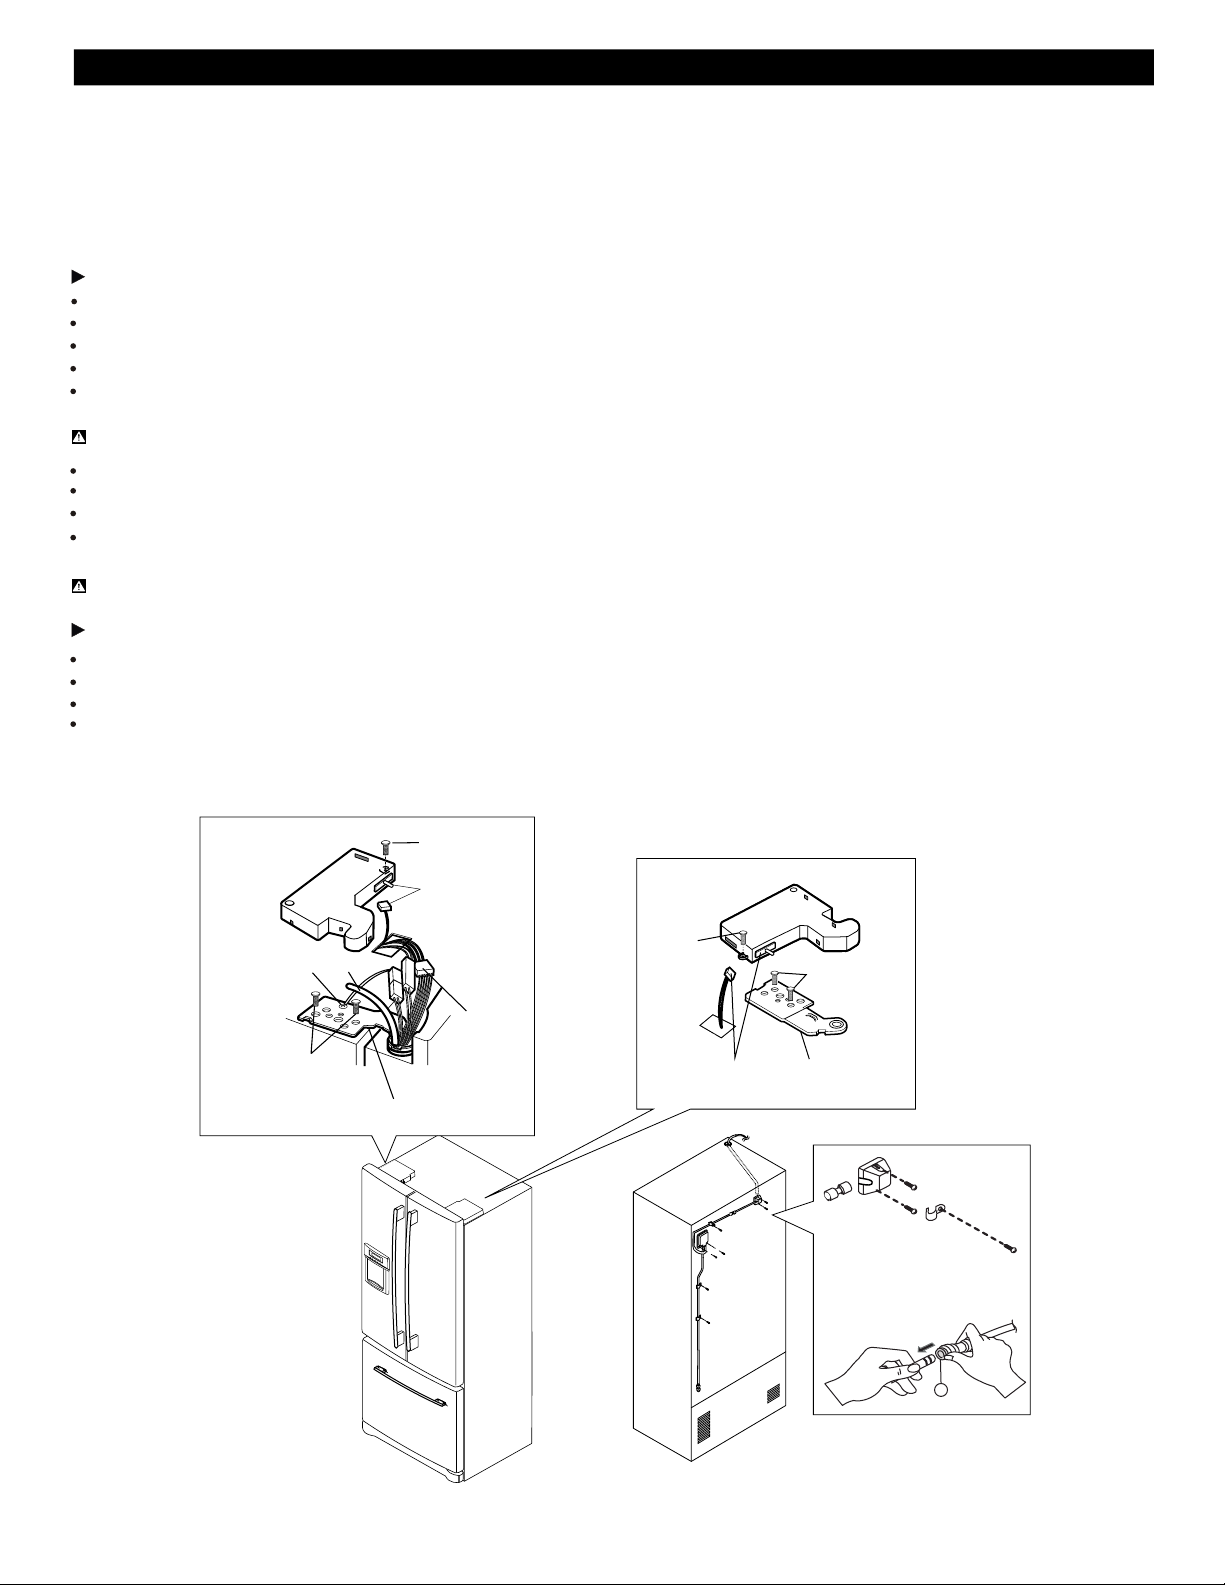
REFRIGERATOR INSTALLATION
Figure A
3
(1)
(2)
(7)
(5)
(6)
(4)
(8)
REMOVING REFRIGERATOR DOORS
1. Removing Refrigerator Door
NOTE: Handle appearance may vary.
IMPORTANT: Before you begin, turn the refrigerator OFF and unplug it. Remove food and any bins from doors.
Left Door
Loosen the screws and remove the cove on back side (see figure A).
Disconnect water supply tube by pushing back on the disconnect ring (3).
Loosen the cover screw (1).
Disconnect door switch wire (2).
Pull out the tube (4).
CAUTION: If a tube end is deformed or worn out, cut the damaged portion away.
Disconnect wire harness (5).
Remove the ground screw (6).
Loosen screws (7) and lift off the top hinge (8).
Place the door on a non-scratching surface with the inside up.
CAUTION: When removing top hinge, be careful that the door does not fall forward.
Right Door
Loosen the cover screw (1).
Disconnect door switch wire (2).
Loosen screws (7) and lift off the top hinge (8).
Place the door on a non-scratching surface with the inside up.
11
(1)
(2)
(7)
(8)
Page 12
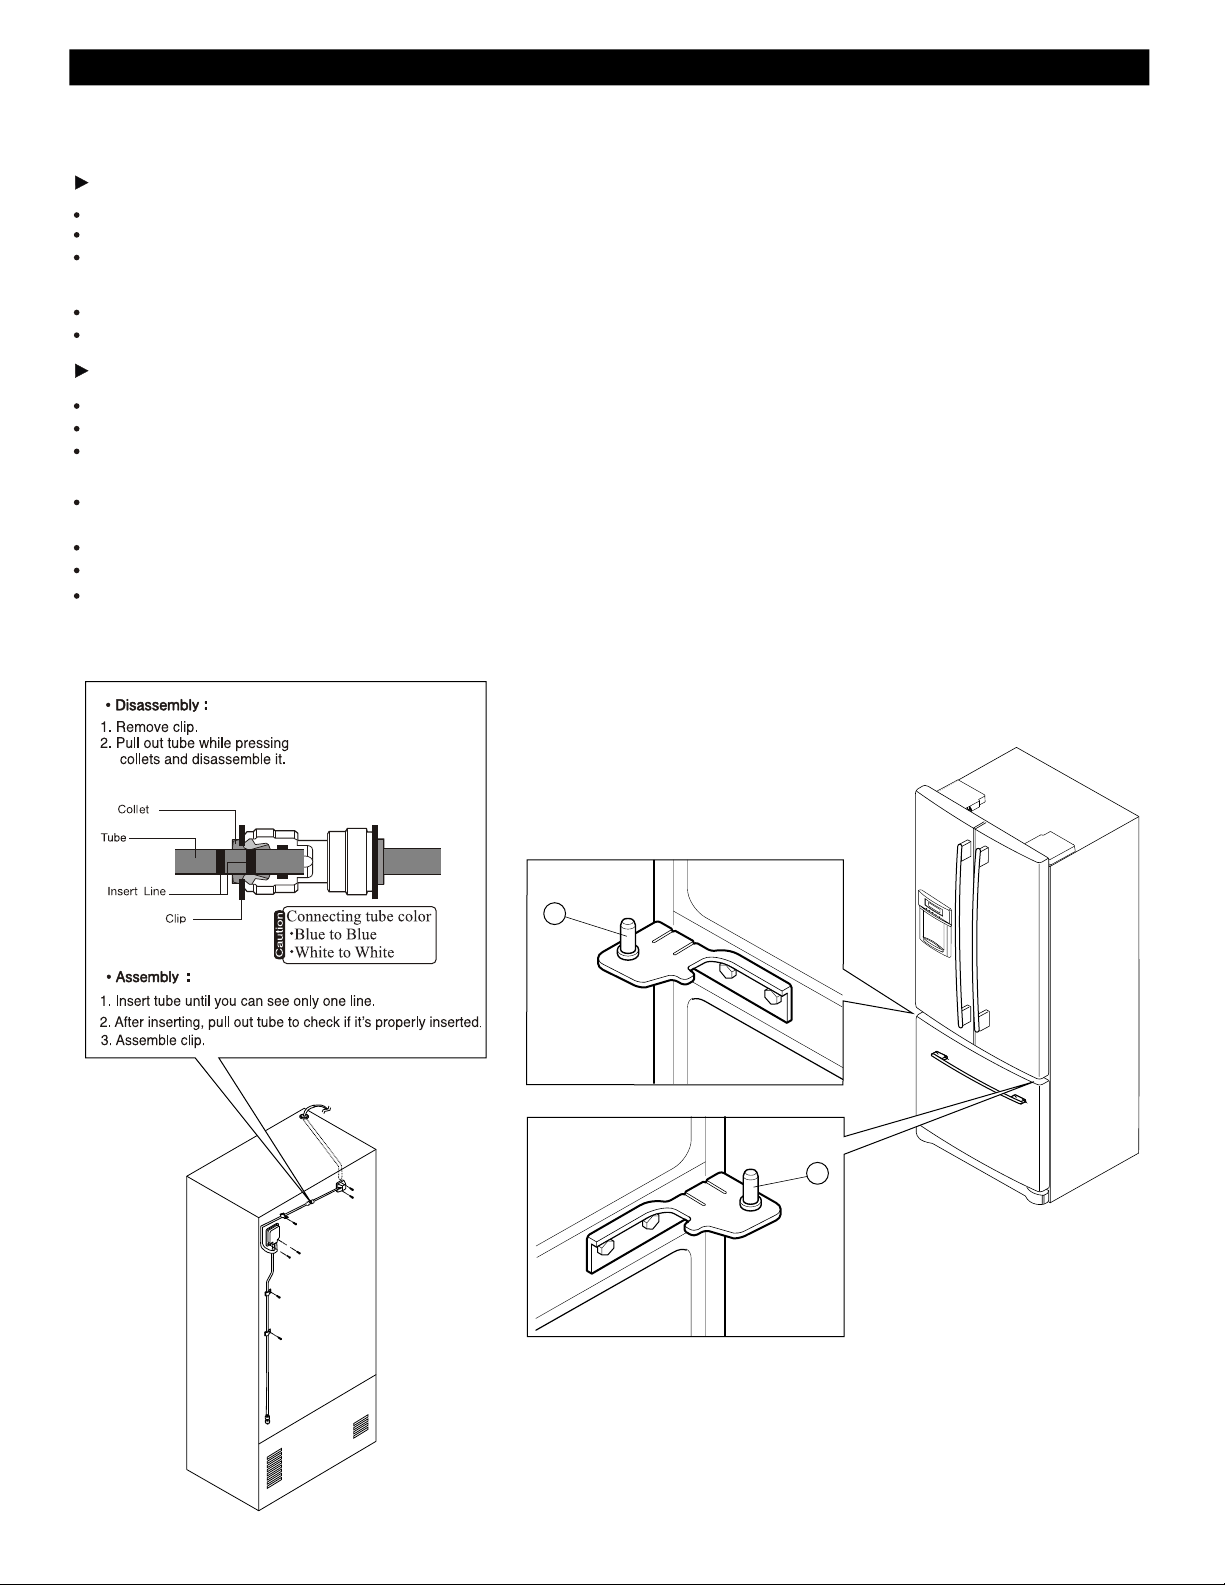
REFRIGERATOR INSTALLATION
2.Replacing Refrigerator Door
Right Door
Lower the door onto the middle hinge pin (9). Make sure the door is aligned with the cabinet.
Replace the top hinge (8) installing hinge screws (7) to secure it.
Make sure the gasket on the door is flush against the cabinet and is not folded. Support the door on the handle side while
securing hinge. Make sure the door is straight and the gap between the doors is even.
Connect the door switch wire (2).
Tighten the cover screw (1).
Left Door
Lower the door onto the middle hinge pin (10). Make sure the door is aligned with the cabinet.
Replace the top hinge (8) installing hinge screws (7) to secure it.
Make sure the gasket on the door is flush against the cabinet and is not folded. Support the door on the handle side while
tightening. And make sure the door is straight and the gap between the doors is even.
Insert the water supply tube (4) into the connector tube until you see only one scale mark.
(Fully insert the tube over 5/8” (15 mm)).
Install the ground screw (6) and connect the wire harness (5).
Connect the door switch wire (2).
Tighten the cover screw (1).
10
9
12
Page 13
REFRIGERATOR INSTALLATION
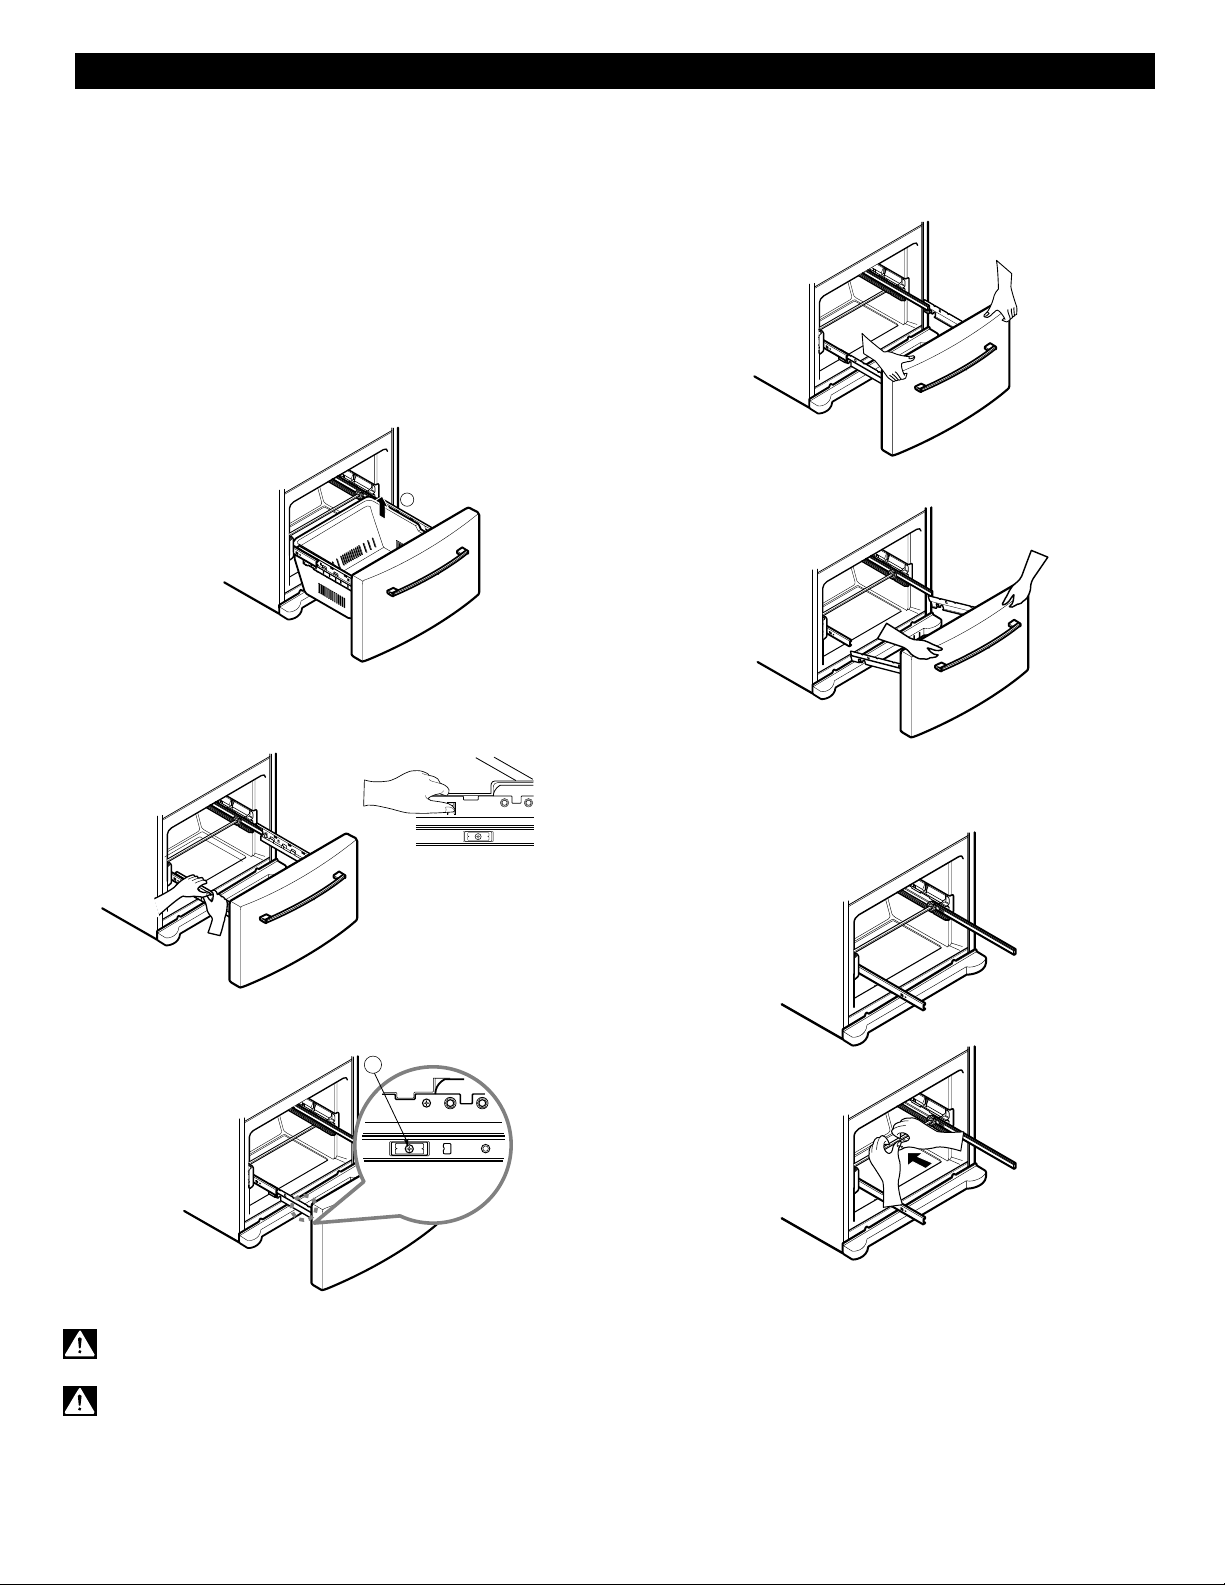
HOW TO REMOVE AND INSTALL THE
PULLOUT DRAWER
IMPORTANT: To avoid possible injury, product or property
damage, you will need two people to perform the following
instructions.
1. Removing Pullout Drawer
• Pull the drawer open to full lower extension. Remove the
lower basket (1) by lifting basket from rail system.
(If you tilt the door, it will be easier.)
1
• With both hands, hold both sides of the door and pull it
up to separate it from the rails.
• Press both hangers with your thumbs to lift it up.
• Separate the left and right rail cover.
• Remove the screws(2) of the rail on both sides.
2
• With both hands, hold the center of the bar and push it
in to let both rails fitted simultaneously.
CAUTION: When you remove the drawer, do not hold
handle. If it comes off, it could cause personal injury.
CAUTION: When laying down the drawer, be careful
not to damage the floor or hurt your feet by the sharp
edges on hinge side.
13
Page 14
REFRIGERATOR INSTALLATION
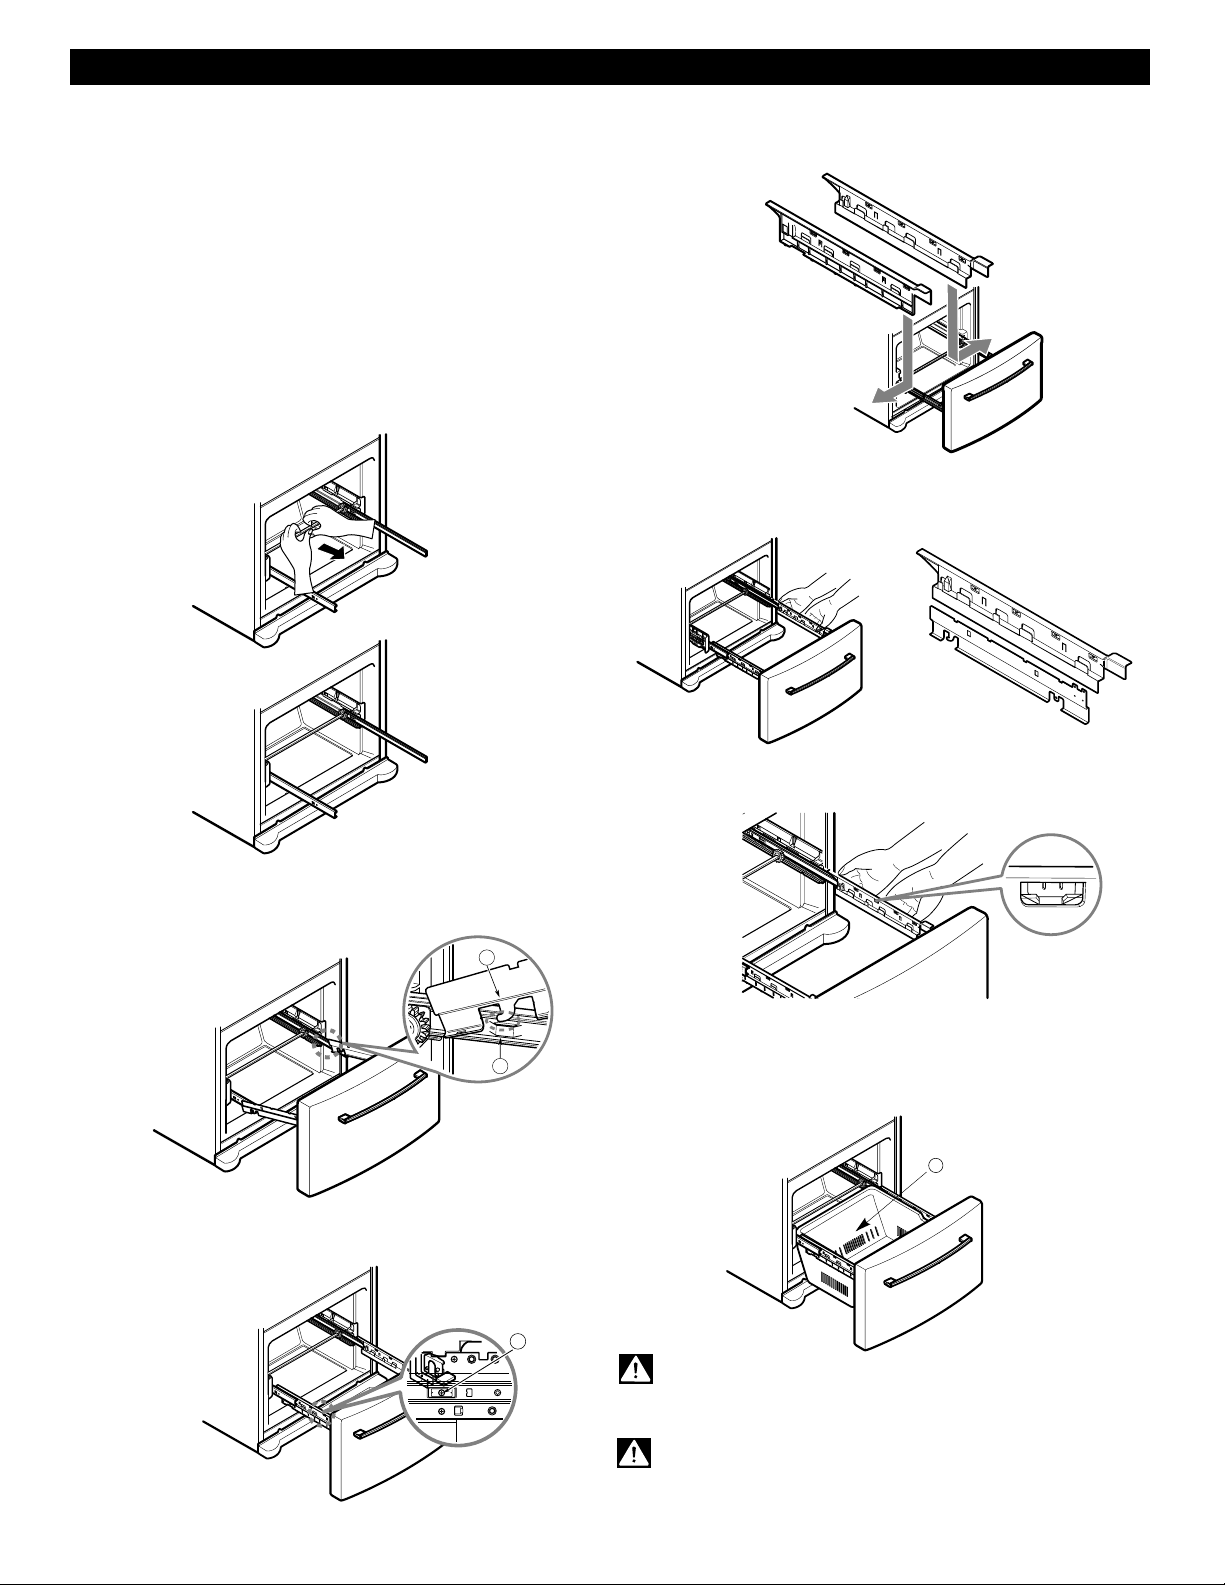
HOW TO REMOVE AND INSTALL THE
PULLOUT DRAWER
IMPORTANT: To avoid possible injur or product or property
damage, you will need two people to perform the following
instructions.
2. Installing Pullout Drawer
• With both hands, hold the center of the bar and pull it
out to let both rails out to full extension simultaneously.
• Make sure you have a right rail cover for each side.
Right
Rail cover
Left
Rail cover
• Align the top holes of the rail cover with the top holes of
the door supports to assemble the rail cover.
• Hook door supports (1) into rail tabes (2) .
1
2
• Lower door into final position and tighten the screws (3)
3
Assembly hole
• With the drawer pulled out to full extension, insert the
lower basket (4) in the rail assembly.
4
WARNING: To prevent accidental child and pet
entrapment or suffocation risk. DO NOT allow them to
play inside of drawer.
WARNING: DO NOT step or sit down on Freezer Door.
14
Page 15
REFRIGERATOR INSTALLATION
LEVELING AND DOOR ALIGNMENT
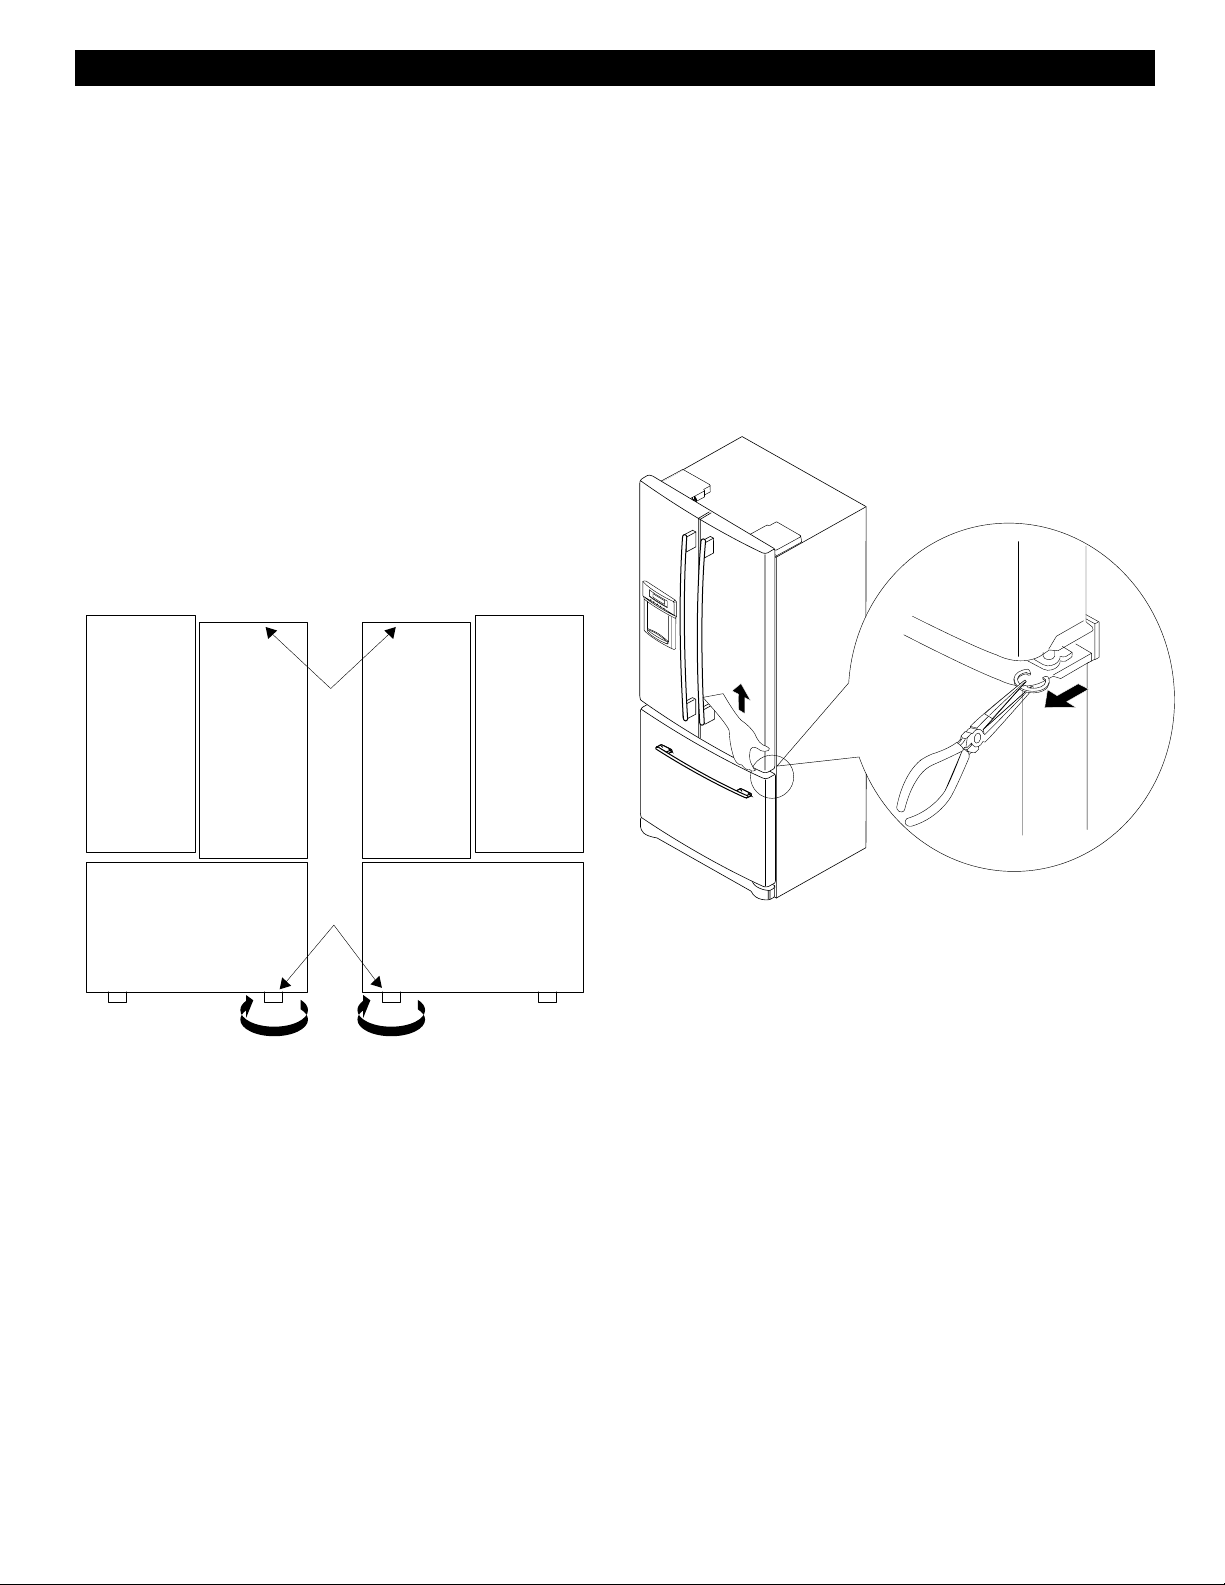
Leveling
Your refrigerator has two front leveling screws.
the right and one on the left. If your refrigerator seems
unsteady or you want the doors to close easier, adjust the
Refrigerator’s tilt using the instructions below:
1. Plug the refrigerator’s power cord into a 3-prong
grounded outlet. Move the refrigerator into its final
Position. Remove the base cover.
2. Turn the leveling screw clockwise to raise that side of
the refrigerator or counterclockwise to lower it. It may
take several turns of the leveling screw to adjust the tilt
of the refrigerator.
NOTE: Having someone push against the top of the
refrigerator takes some weight off the leveling screws.
This makes it easier to adjust the screws.
One on
Door Alignment
If the space between your doors is uneven, follow the
instructions below to align the doors:
1. With one hand, lift up the door you want to raise at
middle hinge.
2. With other hand, use pliers to insert snap ring as
shown.
3. Insert additional snap rings until the doors are aligned.
(Three snap rings are provided with the refrigerator.)
3. Open both doors again and check to make sure that
they close easily. If not, tilt the refrigerator slightly more
to the rear by turning both leveling screws clockwise. It
may take several more turns, and you should turn both
leveling screws the same amount.
4. Re-adjust if necessary.
5. Replace the base cover.
NOTE: Your new refrigerator is uniquely designed with
two fresh food doors. Either door can be opened or
closed independently of one another. You may have to
exert slight pressure on doors to get them to close
completely.
15
Page 16
USING YOUR REFRIGERATOR
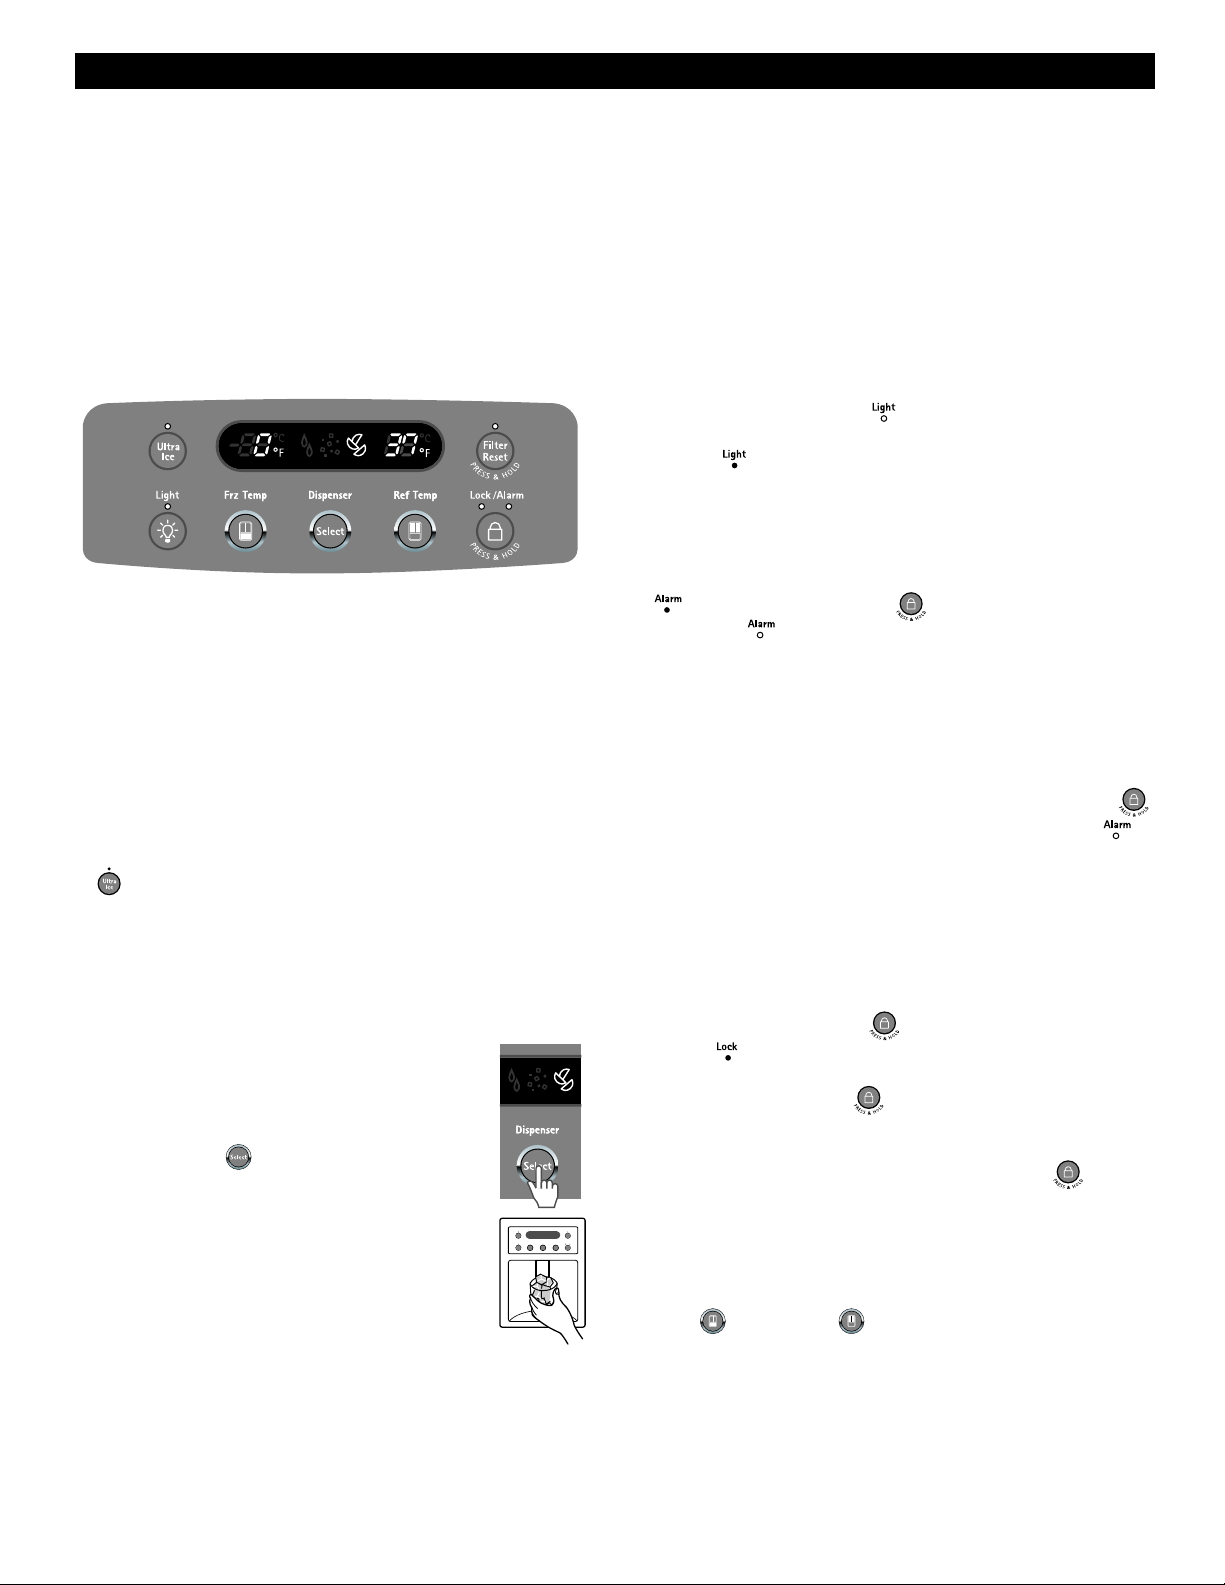
SETTING THE CONTROLS
Temperature
• Your refrigerator has a control pad on the dispenser that
lets you regulate the temperature in the freezer and
refrigerator compartments.
• Initially set the refrigerator control at 37°F (3°C) and the
freezer control at 0°F (–18°C). Leave it at this setting for
24 hours (one day) to stabilize. Then adjust the
compartment temperature as desired.
• Every time you press the freezer temperature adjust
button, the temperature changes in a circulating order of
“0” ’ “-1” ’ “-2” ’ “-3” ’ “-4” ’ “-6” ’ “8” ’ “6” ’ “5” ’ “4” ’
“3” ’ “2” ’ “1” ’ “0”.
• Every time you press the refrigerator temperature adjust
button, the temperature changes in a circulating order of
“37” ’ “36” ’ “35” ’ “34” ’ “33” ’ “46” ’ “45” ’ “44” ’ “43”
’ “42” ’ “41” ’ “40” ’ “39” ’ “38” ’ “37”.
Ultra Ice
• When you press the “Ultra Ice” button, the graphic
[ ] will light up in the display and it continues for
24hours. It will automatically shut o after 24hours have
passed.
Or you can stop this function manually by pressing the
button one more time.
• This function increases both icemaking and freezing
capabilities.
Dispenser
• You can select water, crushed ice, or cubed
ice by pressing button as you desire.
• There could be some dripping after
dispensing. It is recommended to hold your
cup for a couple of seconds after dispensing.
NOTE : The dispenser is desinged not to
operate while either refrigerator door is left open.
Filter
• Filter Reset : When the FILTER RESET icon turns on,
you have to change the water lter. Press the FILTER
RESET button for 3 seconds to turn the icon o.
You need to change the water lter approximately every
6 months.
WARNING: If a door is open, the dispenser will not
work.
Light
• The dispenser lighter is (OFF) after applying the
power, and when you press this button, the dispenser
light is (ON).
Alarm
• When the power is connected to the refrigerator, door
alarm is initially set ON and door alarm display will show
(ON). When you press button, the display will
change to (OFF) and door alram function is now
activated.
• When either refrigerator or the freezer door is left open
for more than 60 seconds, the alarm will ding to let you
know the door is open.
• When you close the door, the door alarm will stop
dinging.
• If you want to disable the door alarm function, press
button then the door alarm display will switched to
(OFF).
Lock
• When the power is initially connected to the refrigerator,
Lock function is o.
• If you want to activate Lock function to lock other
buttons, press and hold button for 3 seconds or
more. (ON) sign will be displayed and the Lock
function is now enabled.
• No buttons other than button will work even
including dispenser button while Lock function is
enabled.
• To disable the Lock function, press and hold button
for 3 seconds or more.
Temperature Mode Switch Function(°F <->°C)
• If you want to convert °F to °C or vice versa, press and
hold button and button simultaneously for 5
seconds or more.
16
Page 17
USING YOUR REFRIGERATOR
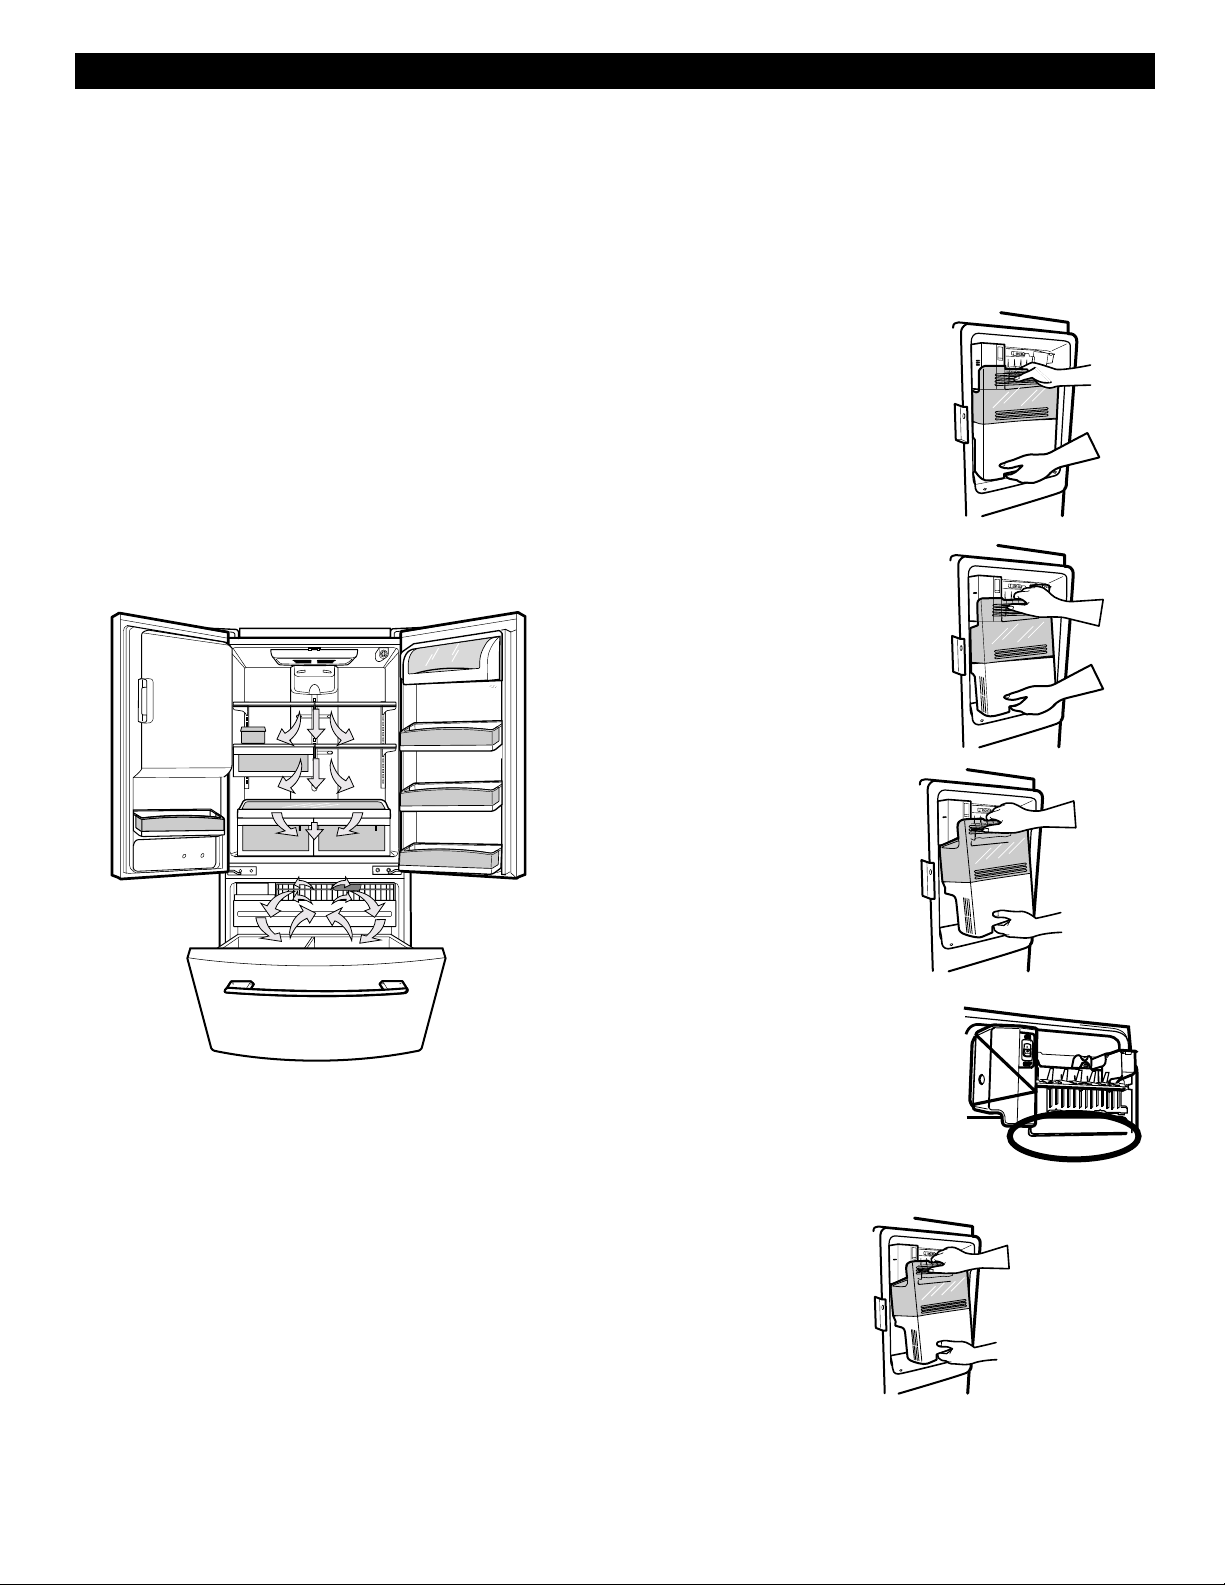
ENSURING PROPER AIR CIRCULATION
In order to ensure proper temperatures, air must flow
between the refrigerator and freezer sections. As shown
in the illustration below, air enters at top of the freezer and
circulates down. From bottom of the freezer, air is forced up
to top of refrigerator. Air enters refrigerator through top
vent, then circulates and exists at bottom, where it returns
to freezer.
MULTI-FLOW
Multi-Flow means powerful and effective cooling
operation. This is especially noticeable when new food
is placed in the refrigerator compartment.
If water or foreign substances enter the cool air vent
while cleaning, efficiency will be lowered. In addition, if
gasket is damaged, efficiency may be lowered because
of escaping cool air.
HOW TO USE A NEW DOOR ICE BUCKET
The ice maker will stop producing ice when ice bucket
is full. If you need more ice, please use the extra ice
bucket in
producing ice.
freezer compartment so icemaker can keep
How to remove the Door Ice Bucket.
1 . Grip the handle as
as shown in the
picture.
2. Lift the lower part
slightly.
Do not block any of cool air vents with food packages.
If the vents are blocked, airflow will be interrupted and
temperature and moisture problems may occur.
IMPORTANT: Because air circulates between both
sections, any odors formed in one section will transfer to
the other. You must thoroughly clean both sections to
eliminate odors. To prevent odor transfer and drying out of
food, wrap or cover foods tightly. (See the Food Storage
Guide section for details.)
DOOR ALARM
With this feature you´ll listen a alarm when the freezer or
refrigerator door is not closed within 1 minute after it is
opened. These tones repeat every 30 seconds.
The alarm is cancelled when the freezer or the
refrigerator is closed correctly.
3. Take the ice bucket
out slowly.
* Avoid touching the
automatic shut off arm when
replacing the ice bucket.
How to reinstall the Door Ice Bucket.
1. Replace ice bucket by slightly slanting it to avoid
touching the ice maker.
17
Page 18
USING YOUR REFRIGERATOR
CAUTIONS
Throw away the first 20 ice cubes made, and
the first 7 glass of dispensed water after installation.
This is also recommended if the refrigerator has not
been used for a long time.
Keep children away from the dispenser.
Children may play with or damage the controls.
Storing cans or other items in the ice bucket
may damage the
Never use thin crystal glass or crockery to
collect ice cubes.
Such glasses or containers may be broken.
Get ice cubes first into a glass before dispensing
water.
Water may splash if it is done in opposite way..
Keep your hands and tools out of the ice room
door and dispenser.
You could break something or injure yourself.
Shake the ice bucket occasionally to level the
ice in it.
Sometimes the ice piles up near the icemaker,
causing the icemaker to
cubes and stop producing ice.
Never use narrow or deep glass.
Ice could be stuck inside dispenser chute and,
the refrigerator could fail.
Keep the glass at a proper distance from
dispenser chute.
A glass too close to the outlet may hinder ice
from coming out.
Keep the ice room door closed tightly after
opening it.
If the ice room door were not closed tightly, the cold
air in the ice room
compartment and freeze food.
This could cause the ice maker not to produce ice.
Close the ice room door until you hear the sound
"Click".
When the door doesn't properly close, ice in the
ice room could be
formed within the refrigerator.
icemaker.
misread the amount of ice
would come into refrigerator
melt, or frost and icicle could be
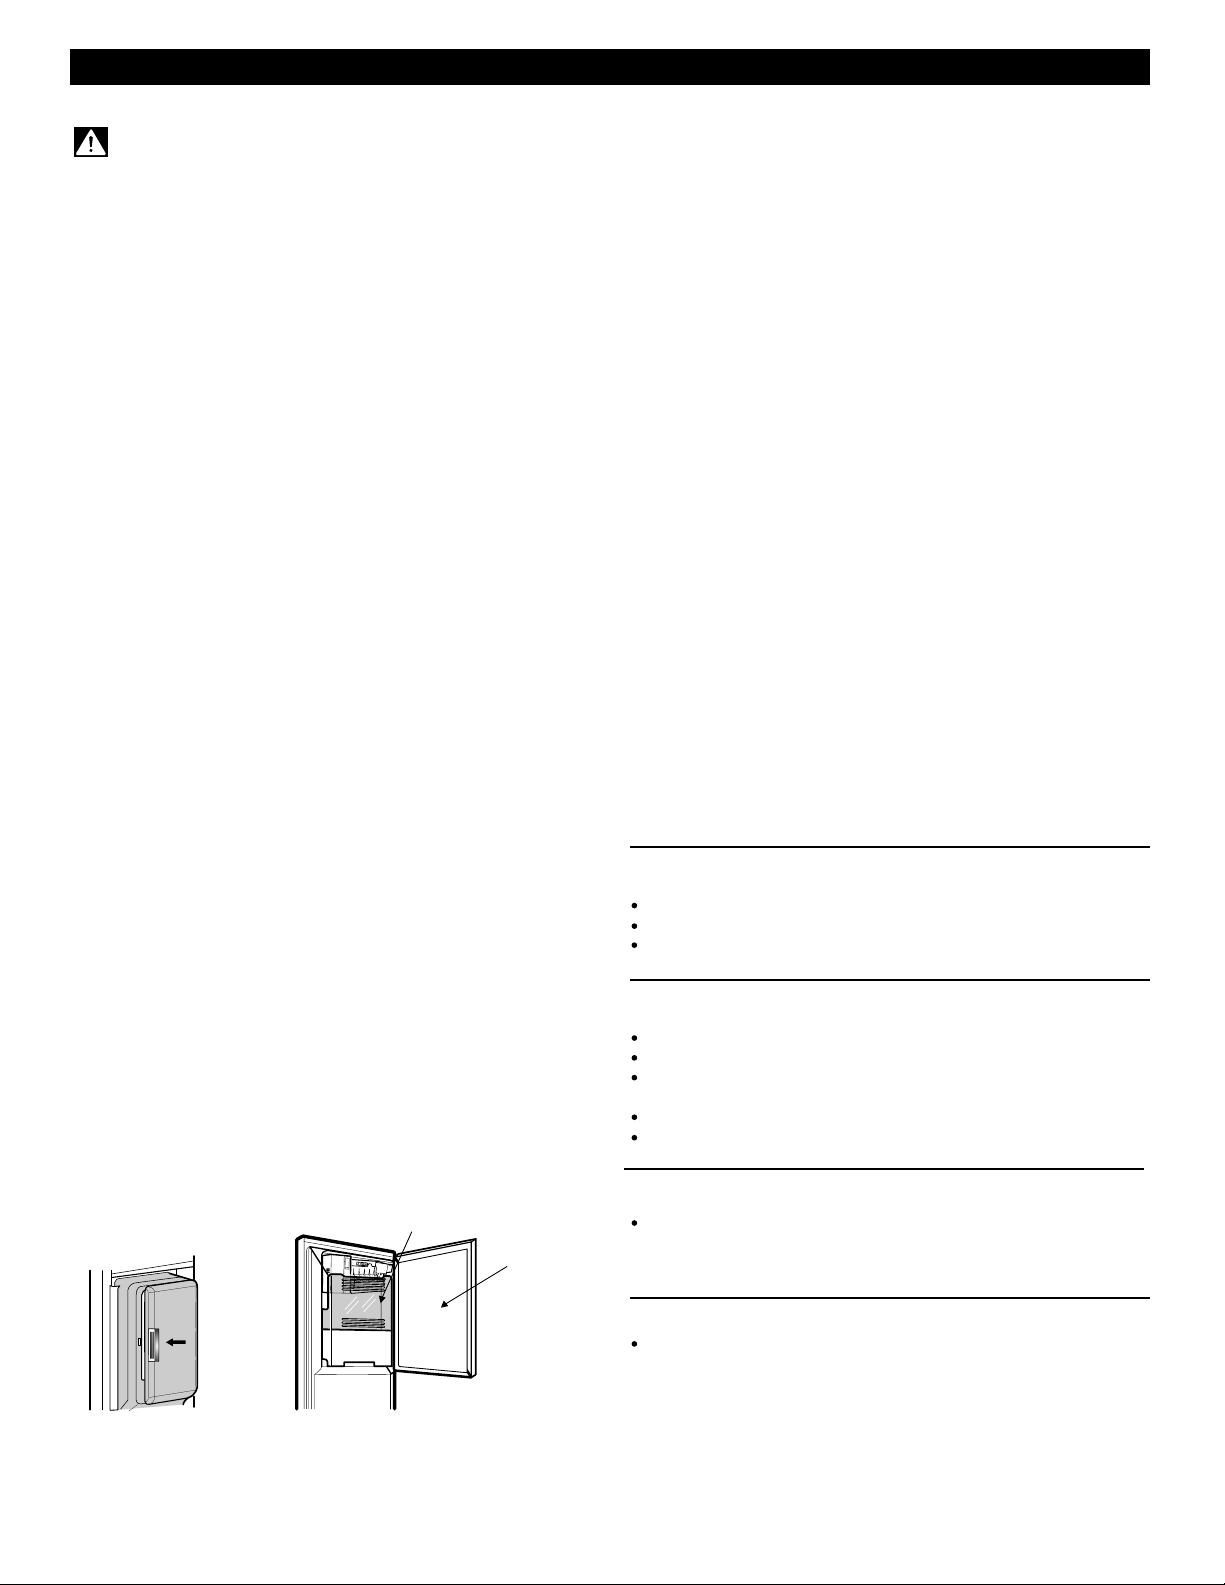
Ice Bucket
Ice Room Door
ADJUSTING CONTROL SETTINGS
Give the refrigerator time to cool down completely
before making final adjustments. It is best to wait
hours before doing this. The mid-settings indicated
in the refrigerator usage.
The controls are set correctly when milk or juice is
as cold as you like and when ice cream is firm.
The refrigerator control functions as the thermostat for the
entire appliance (refrigerator and freezer sections.) The
higher the number setting, the longer the compressor will
run to keep the temperature colder. The freezer control
adjusts the cold air flow from the freezer to the
refrigerator. Setting the freezer control to a lower
temperature keeps more cold air in the Freezer
compartment to make it colder.
If you need to adjust temperatures in the refrigerator or
freezer, start by adjusting the refrigerator first. Wait 24
hours after the refrigerator adjustment to check the
freezer temperature. If it is too warm or too cold, then
adjust the freezer control as well.
Use the settings listed in the chart below as a guide.
Always remember to wait at least 24 hours between
adjustments.
RECOMMENDED
CONDITION/REASON: ADJUSTMENT:
REFRIGERATOR section Turn
too warm REFRIGERATOR
Door opened often control to next
Large amount of food added higher number,
Room temperature very warm wait 24 hours,
then re-check
FREEZER section too warm/ Turn FREEZER
ice not made fast enough control to next
Door opened often higher number,
Large amount of food added wait 24 hours,
Very cold room temperature Then re-check
(can’t cycle often enough)
Heavy ice usage
Air vents blocked by items Move items out of
airstream
REFRIGERATOR section too Turn
cold REFRIGERATOR
Controls not set correctly for control to next
your conditions lower number,
wait 24 hours,
then re-check
FREEZER section too cold Turn FREEZER
Controls not set correctly for control to next
your conditions lower number,
wait 24 hours,
then re-check
18
Page 19
USING YOUR REFRIGERATOR
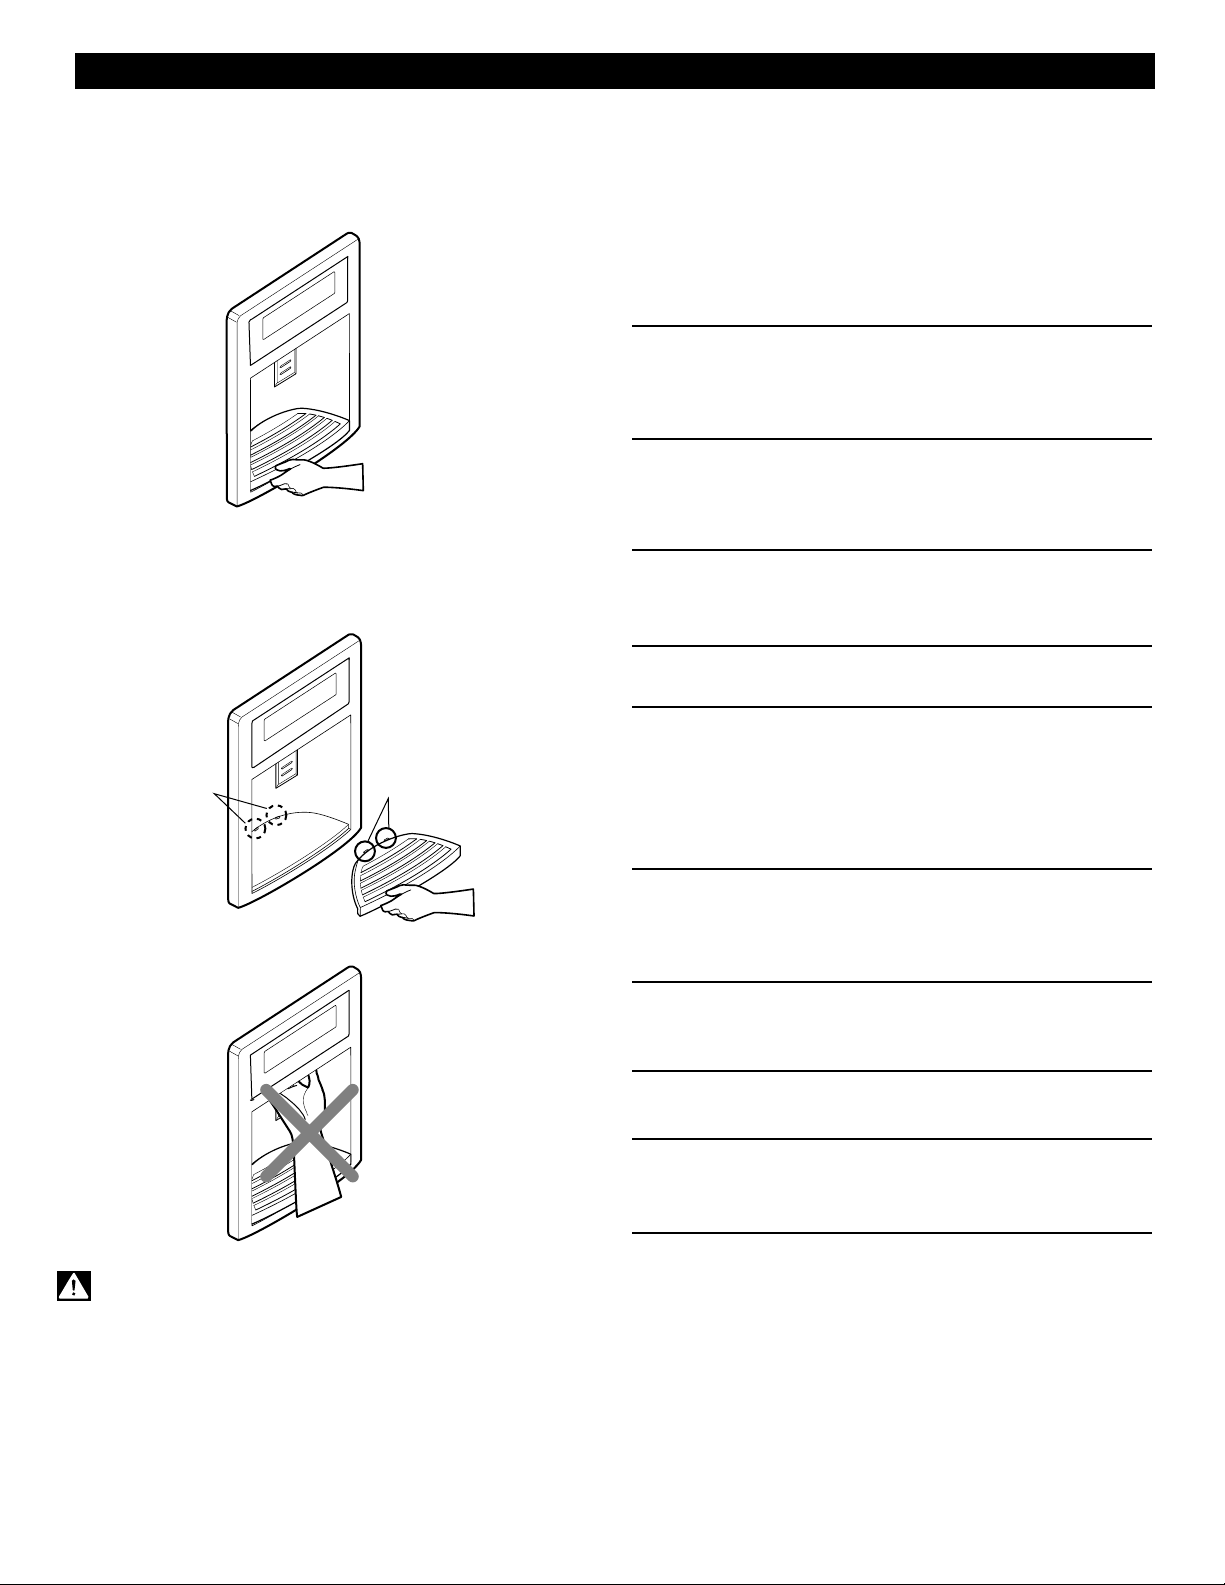
WATER DISPENSER
Tray can be easily removed by pressing and pulling it.
Tilt up the front of tray slightly and snap the ribs into the
holes to reinstall the tray.
FOOD STORAGE GUIDE
Storing Fresh Food
Wrap or store food in the refrigerator in airtight and
moisture-proof material unless otherwise noted. This
prevents food odor and taste transfer throughout the
refrigerator. For dated products, check date code to
ensure freshness.
Butter or margarine
Keep opened butter in a covered dish or closed
compartment. When storing an extra supply, wrap
in freezer packaging and freeze.
Cheese
Store in the original wrapping until you are ready to
use it. Once opened, rewrap tightly in plastic wrap or
aluminum foil.
Milk
Wipe milk cartons. For best storage, place milk on interior
shelf, not on door shelf.
Eggs
Store in original carton on interior shelf, not on door shelf.
Holes
WARNING: Do not throw your hands in the water & ice
opening. Doing so can result in amputation or cuts.
Ribs
Fruit
Wash, let dry, and store in refrigerator in plastic bags or in
the crisper. Do not wash or hull berries until you are ready
to use them. Sort and keep berries in their original
container in a crisper, or store in a loosely closed paper
bag on a refrigerator shelf.
Leafy vegetables
Remove store wrapping and trim or tear off bruised and
discolored areas. Wash in cold water and drain. Place in a
plastic bag or plastic container and store in the crisper.
Vegetables with skins (carrots, peppers)
Place in plastic bags or plastic container and store
in crisper.
Fish
Use fresh fish and shellfish the same day purchased.
Snack pan
Store most chef fresh in original wrapping as long as it is
airtight and moisture-proof. Rewrap if necessary.
Leftovers
Cover leftovers with plastic wrap or aluminum foil. Plastic
containers with tight lids can also be used.
STORING FROZEN FOOD
NOTE: For further information about preparing food for
freezing or food storage times, check a freezer guide or a
reliable cookbook.
19
Page 20
USING YOUR REFRIGERATOR
Packaging
Successful freezing depends on correct packaging. When
you close and seal the package, it must not allow air or
moisture in or out. If you do, you could have food odor
and taste transfer throughout the refrigerator and also dry
out frozen food.
Packaging recommendations:
Rigid plastic containers with tight-fitting lids
Straight-sided canning/freezing jars
Heavy-duty aluminum foil
Plastic-coated paper
Non-permeable plastic wraps
Specified freezer-grade self-sealing plastic bags
Follow package or container instructions for proper
freezing methods.
Do not use:
Bread wrappers
Non-polyethylene plastic containers
Containers without tight lids
Wax paper or wax-coated freezer wrap
Thin, semi-permeable wrap
Freezing
IMPORTANT: Do not store bottles in the freezer
compartment - they may break when frozen,
causing damage.
Your freezer will not quick-freeze any large quantity of
food. Do not put more unfrozen food into the freezer than
will freeze within 24 hours (no more than 2 to 3 lbs of food
per cubic foot of freezer space). Leave enough space in
the freezer for air to circulate around packages. Be careful
to leave enough room at the front so the door can close
tightly.
Storage times will vary according to the quality and type
of food, the type of packaging or wrap used (airtight and
moisture-proof) and the storage temperature. Ice crystals
inside a sealed package are normal. This simply means
that moisture in the food and air inside the package have
condensed, creating ice crystals.
NOTE: Allow hot foods to cool at room temperature for
30 minutes, then package and freeze. Cooling hot foods
before freezing saves energy.
NOTE: Do not store food near the sensor; it may cause
the sensor to malfunction.
REFRIGERATOR SECTION
REFRIGERATOR SHELVES
The shelves in your refrigerator are adjustable to meet
your individual storage needs. Your model may have
glass or wire shelves.
Storing similar food items together in your refrigerator and
adjusting the shelves to fit different heights of items will
make finding the exact item you want easier; it will also
reduce the amount of time the refrigerator door is open,
saving energy.
IMPORTANT: Do not clean glass shelves with warm
water when they are cold. Shelves may break if exposed
to sudden temperature changes or impact, such as
bumping. For your protection, glass shelves are made
with tempered glass, which will shatter into small pebblesized pieces.
NOTE: Glass shelves are heavy. Use special care when
removing them to avoid dropping them.
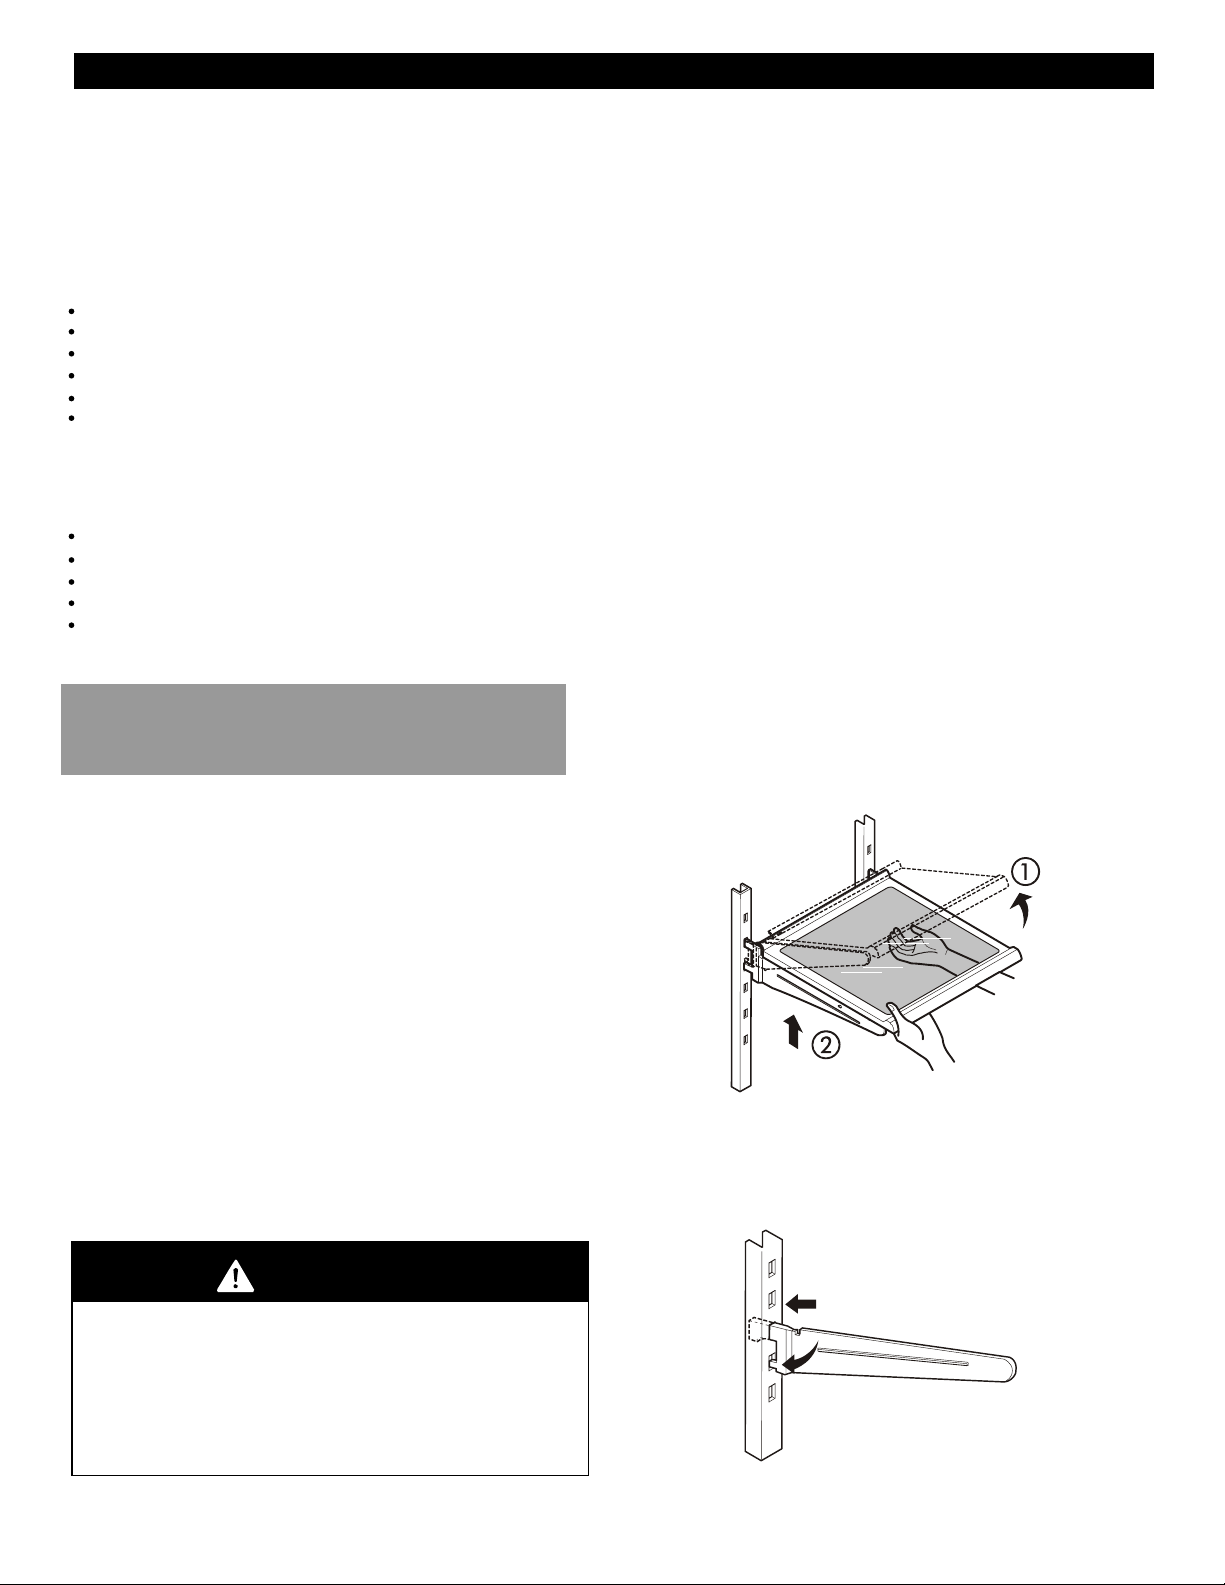
Adjusting Shelves
Remove shelves from the shipping position and replace
shelves in the position you want.
To remove a shelf Tilt up the front of the shelf in the
direction of (1) and lift it in the direction of (2). Pull the
shelf out.
To replace a shelf Tilt the front of the shelf up and
guide the shelf hooks into the slots at a desired height.
Then lower the front of the shelf so that the hooks drop
into the slots.
WARNING
Suffocation Hazard
When using dry ice, provide adequate ventilation.
Dry ice is frozen carbon dioxide (CO )2. When it
vaporizes, it can displace oxygen, causing dizziness,
light-headedness, unconsciousness and death by
suffocation. Open a window and do not breathe
the vapors.
20
Page 21
USING YOUR REFRIGERATORUSING YOUR REFRIGERATOR
NOTE: Make sure that shelves are level from one side to
the other. Failure to do so may result in the shelf falling or
spilling food.
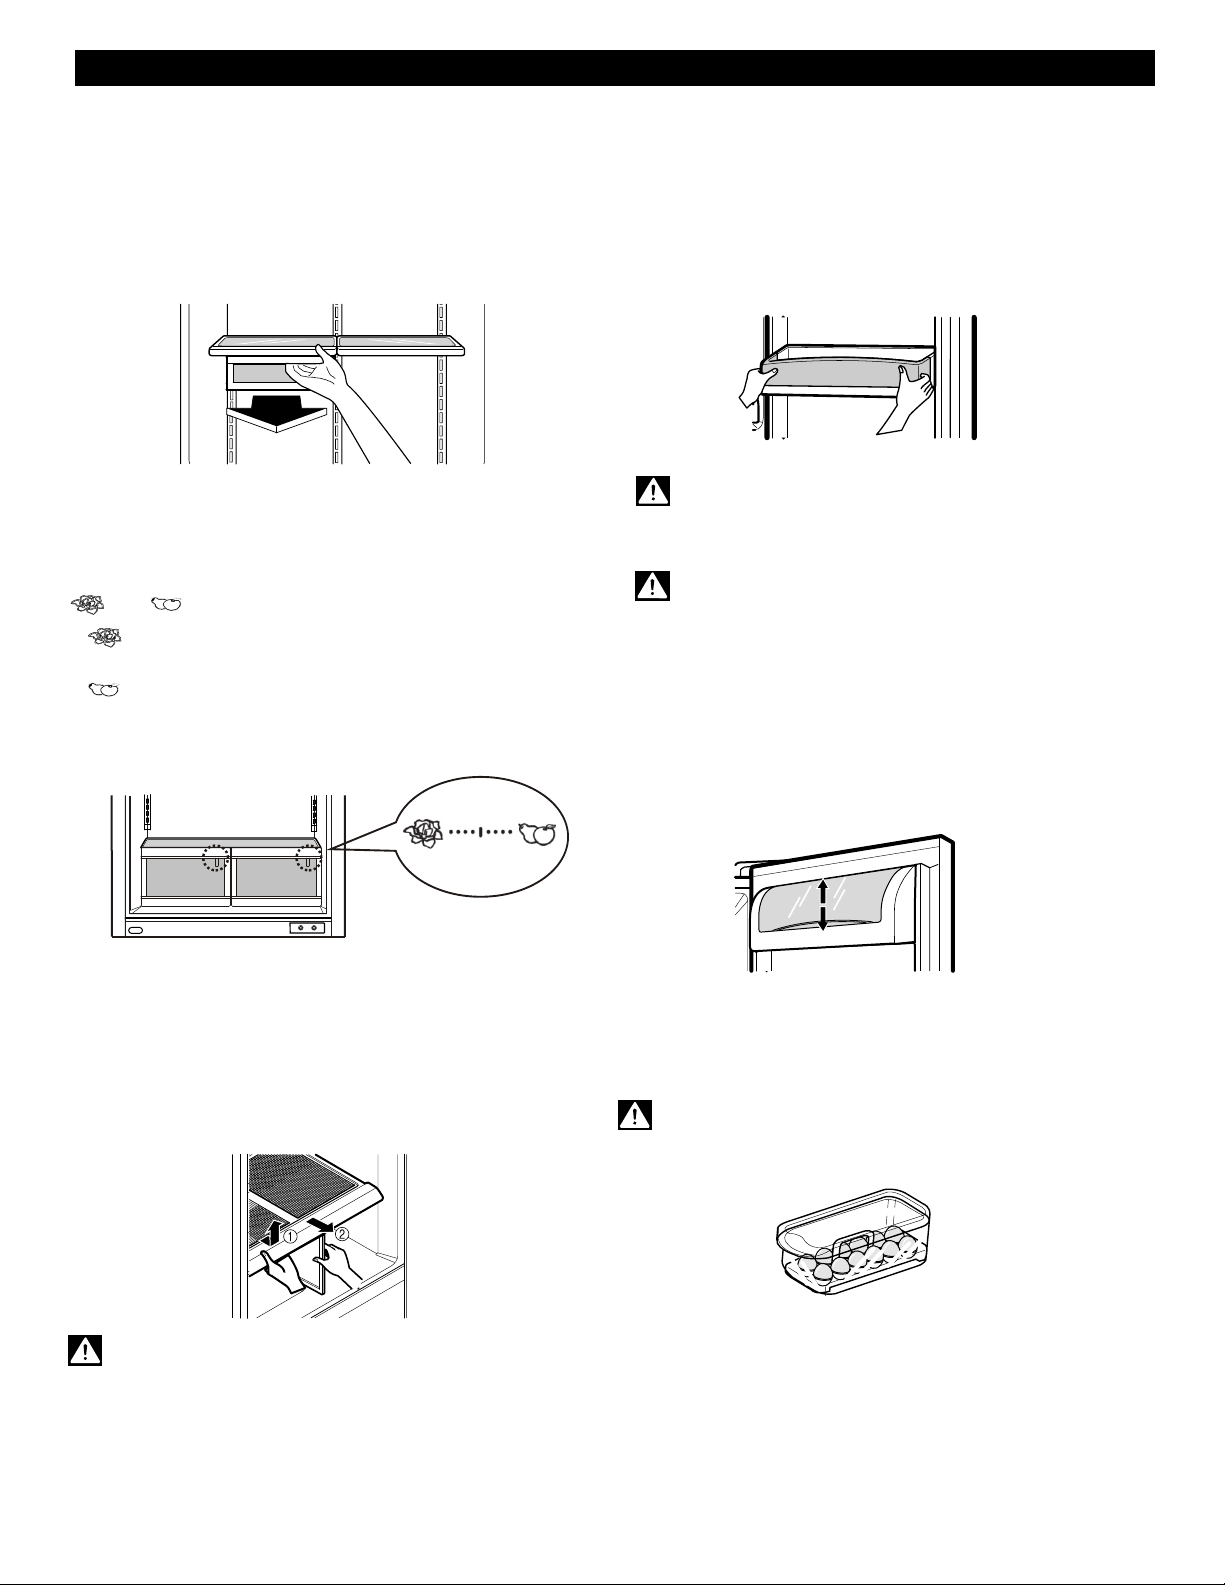
SNACK PAN
While holding the meat tray with one hand, pull it forward
slightly. Lift slightly and pull it out.
CRISPER HUMIDITY CONTROL
You can control the amount of humidity in the moisturesealed crispers. Adjust the control to any setting between
and
• : Lets moist air out of the crisper for best storage of
fruits.
• : Keeps moist air in the crisper for best storage of
fresh, leafy vegetables.
MODULAR DOOR BINS
The door bins are removable for easy cleaning and
adjusting.
1. To remove the bin, simply lift the bin up and pull
straight out.
2. To replace the bin, slide it in above the desired support
button and push down until it stops.
WARNING: Somebody can be hurt if door bins are not
firmly assembled.
NOTE: DO NOT adjust a bin that is loaded with food.
CAUTION: DO NOT allow children to play with
baskets. Sharp corners on baskets could cause injury.
DAIRY CORNER
1. To remove the dairy corner, simply lift it and pull
straight out.
CRISPER COVER
To remove cover frame:
1. Remove both crisper drawers.
2. Remove glass cover from frame. Set safely aside for
rest of crisper removal procedure.
3. While holding crisper cover frame support, pull the
frame up and out.
WARNING: Be careful when handling glass cover since
glass is not attached to cover.
2. To replace the dairy bin, slide it in above the desired
location and push down until it stops.
EGG BOX
Store Egg Box on interior shelf, not on door shelf.
CAUTION: Do not use the egg box as an ice storage
bin in the freezer compartment. The egg box can
easily break if it freezes.
21
Page 22
USING YOUR REFRIGERATOR
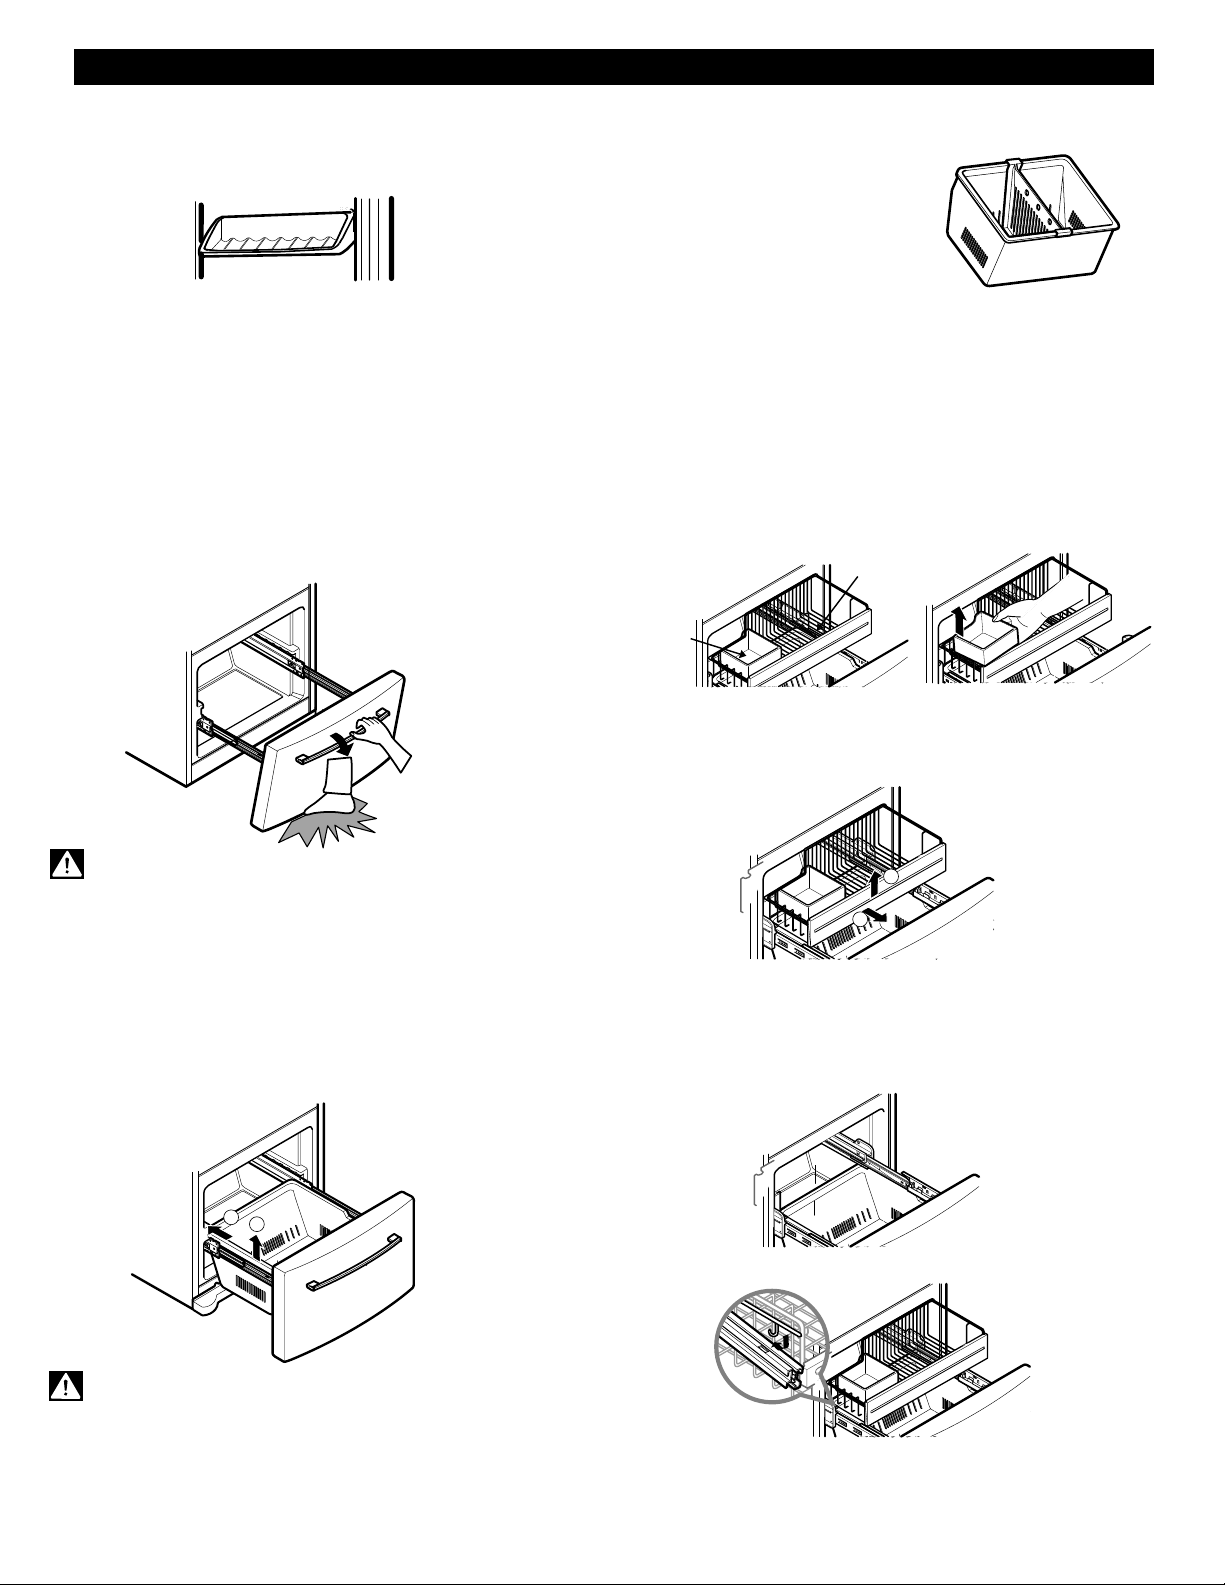
CAN RACK (On some models)
The Can Rack holds up to beverage cans.
1. To remove the Can Rack, simply lift the bin up and pull
straight out.
2. To install the Can Rack, slide it in above the desired
support button and push down until it stops.
FREEZER SECTION
TILTING DOOR
The tilting door provides easy access for stored foods.
How to use:
Tilt the door down and pull it out.
DURABASE DIVIDER
The Durabase divider allows you
to organize the
into sections.
1. To remove, pull divider staight up.
2. To install, hook top corners of divider over top edge of
durabase.
Durabase area
ICE BIN
1. To separate the ice bin, pull out the drawer as much as
possible.
2. Gently lift and pull out the ice bin.
3.
To reinstall, pull out the drawer as much as possible and set
the ice bin in its correct position, and then push in the drawer.
DRAWER
ICE BIN
WARNING: Be careful when you open tilting door so
that you do not injure your foot!
DURABASE
1. To remove the Durabase, push it back to the end as
much as possible. Tilt up the front of the Durabase and
pull straight out.
2. To install, insert the Durabase in rail assembly.
1
2
GLIDE OUT DRAWER BASKET-
To remove, lift basket up and pull out straight out.
1
2
2.1.To Install, pull both rails out to full extension.
Hook the basket supports into the rail tabs and push to
the back of compartment.
WARNING: When the guide of the freezer drawer is
removed, children may crawl inside.
22
Page 23
USING YOUR REFRIGERATOR
FILTER
It is recommended that you replace the filter when the
water filter indicator light turns on or your water dispenser
or ice maker decreases noticeably.
After changing the water filter cartridge, reset the water
filter status display and indicator light by pressing and
holding the BUTTON for 3 seconds.
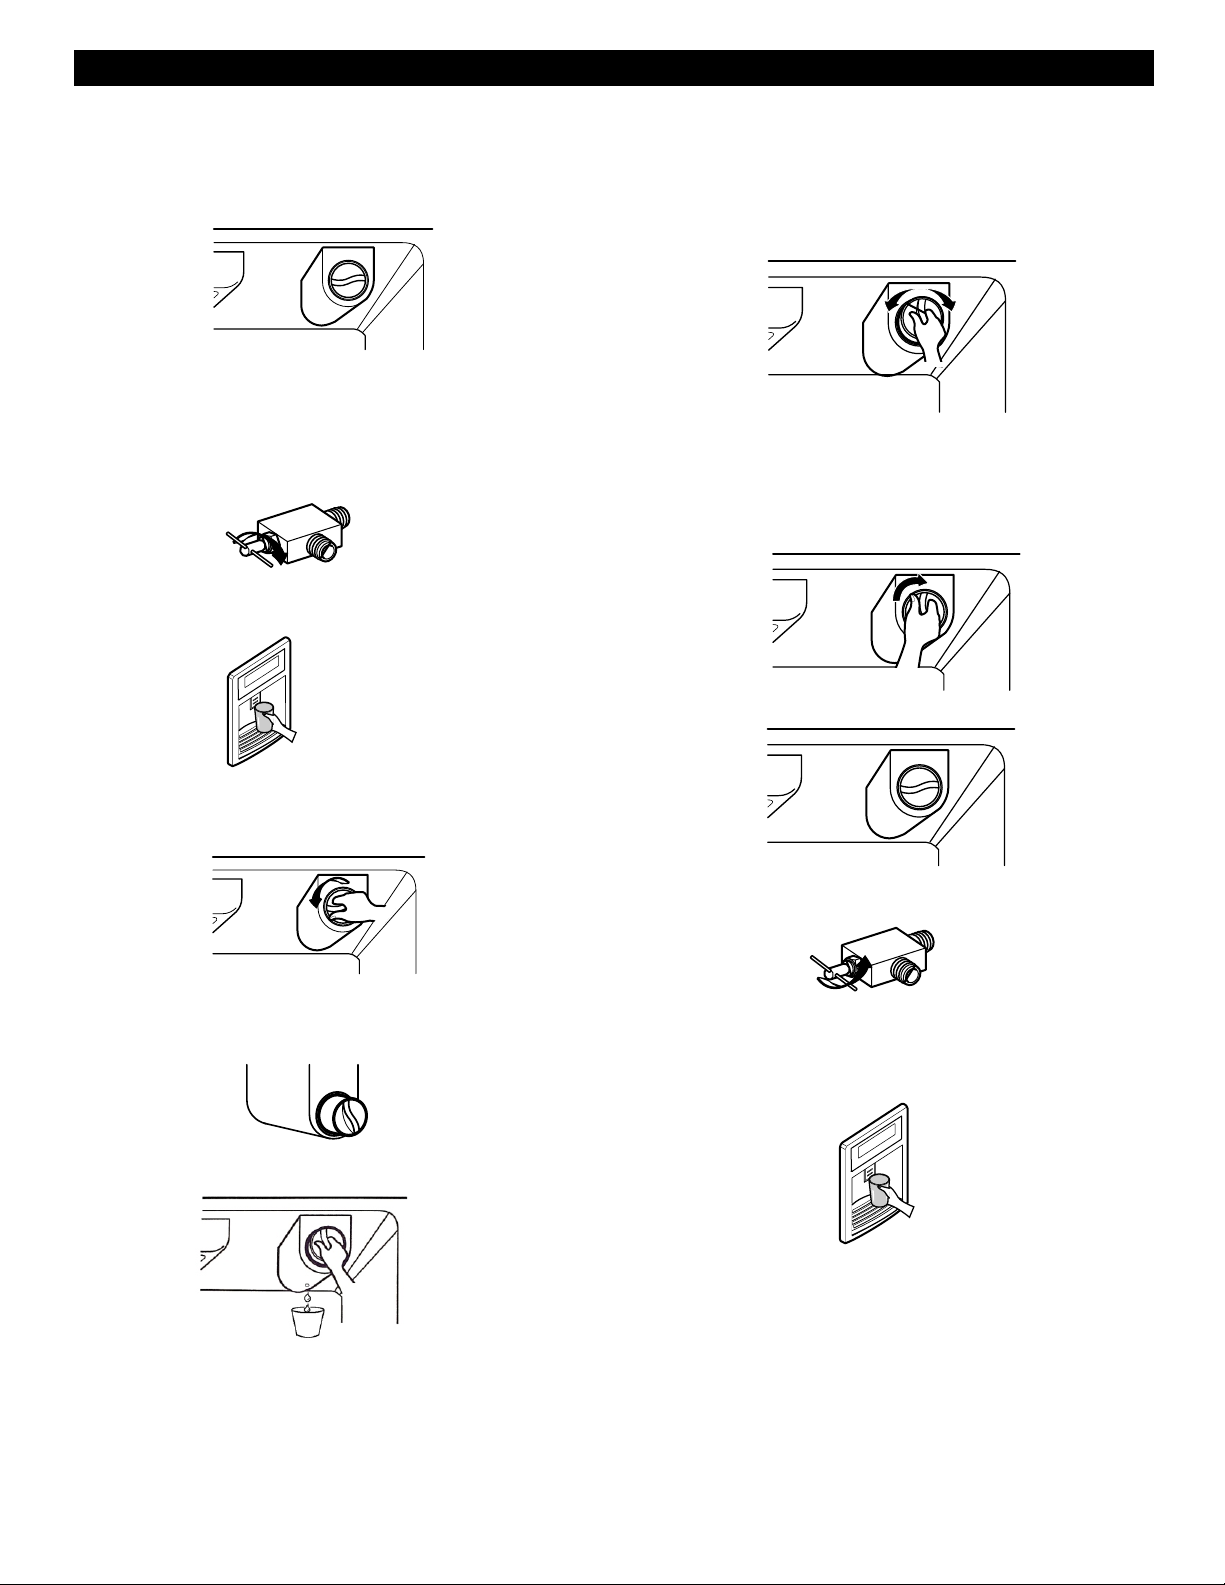
How to change the old cartridge.
1. Turn the shutoff valve off (house valve).
2. Dispense water from the system to empty
the tubing (approximately for 50 seconds).
4. Replace with a new cartridge.
Take the new cartridge out of its packaging and remove
protective cover from the o-rings.
With cartridge knob in the vertical position, push the new
filter cartridge into the cover until it stops.
If you can´t turn the filter from side to side, it isn’
inserted. Push it in firmly and twist it into place. You will
hear it click into place.
Using its handle, twist the cartridge clockwise about 1/4
turn. You will hear when it clicks into place.
t fully
3. Remove the old cartridge.
Rotate the knob of the cartridge counter clockwise.
When the cartridge is removed, it will click out of
place.
Pull out the cartridge.
NOTE: There will be water in the cartridge. Some spilling
may occur through the hole at rear bottom side of cover.
You may use a cup or something like that to prevent spilt
water drop into food.
5. Turn the shutoff valve on (house valve).
6. Flush water out from the system until air gets
eliminated and water start to dispense (approximately for
3 minutes).
NOTE: To purchase replacement water filter cartridges,
visit your local appliance dealer or part distributor.
23
Page 24
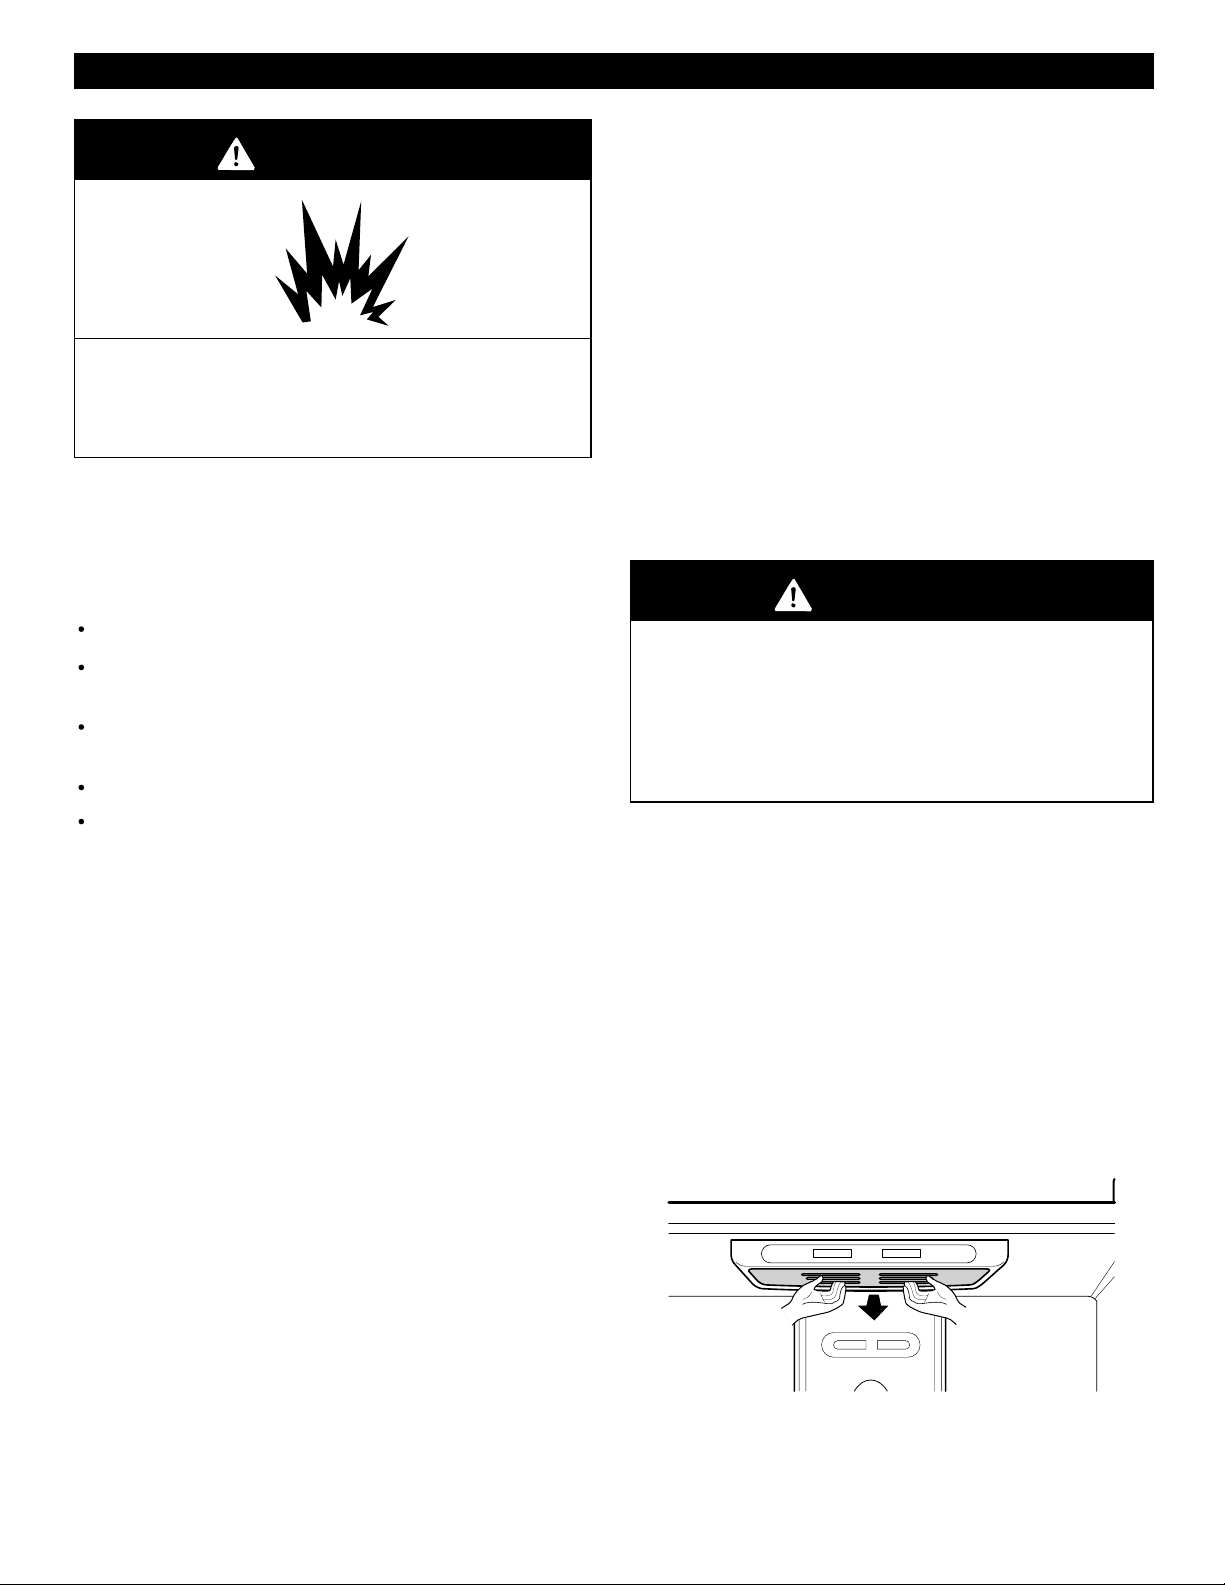
WARNING
CARE AND CLEANING
PLASTIC PARTS (covers and panels)
Do not use paper towels, window sprays, abrasive
cleansers, or flammable fluids. These can scratch or
damage the material.
CONDENSER COILS
Explosion Hazard
Use non-flammable cleaner.
Failure to do so can result in death, explosion, or fire.
Both the refrigerator and freezer sections defrost
automatically. However, clean both sections about once
a month to prevent odors. Wipe up spills immediately.
GENERAL CLEANING TIPS
Unplug refrigerator or disconnect power.
Remove all removable parts, such as shelves,
crispers, etc.
Use a clean sponge or soft cloth and a mild detergent in
warm water. Do not use abrasive or harsh cleaners.
Hand wash, rinse and dry all surfaces thoroughly.
Plug in refrigerator or reconnect power.
OUTSIDE
Waxing external painted metal surfaces helps provide rust
protection. Do not wax plastic parts. Wax painted metal
surfaces at least twice a year using appliance wax (or
auto paste wax). Apply wax with a clean, soft cloth.
For products with a stainless steel exterior, use a clean
sponge or soft cloth and a mild detergent in warm water.
Do not use abrasive or harsh cleaners. Dry thoroughly
with a soft cloth.
INSIDE WALLS (allow freezer to warm up so
cloth won’
t stick)
Remove grille base. See the grille base section
Use a vacuum cleaner with an extended attachment to
clean condenser coils.
Vacuum coils when dusty or dirty. Coils may need to be
cleaned as often as every other month.
Replace grille base.
.
LIGHT BULB REPLACEMENT
WARNING
Electrical Shock Hazard
Before replacing a burned-out light bulb, either unplug
the refrigerator or turn off power at the circuit breaker
or fuse box.
NOTE: Moving the control to the OFF position
does not remove power to the light circuit.
NOTE: Not all appliance bulbs will fit your refrigerator. Be
sure to replace the bulb with one of the same size, shape
and wattage.
To change the refrigerator light:
1. Unplug the power cord from the outlet.
2. Remove refrigerator shelves.
3. Release the hooks on both ends of the light shield and
pull the shield down to remove it.
4. Turn the bulb counterclockwise.
5. Assembly is the reverse order of disassembly.
To help remove odors, you can wash the inside of the
refrigerator with a mixture of baking soda and warm water.
Mix 2 tablespoons baking soda to 1 quart of water (26 g
soda to 1 liter water.) Be sure the baking soda is
completely dissolved so does it not scratch the surfaces
of the refrigerator.
DOOR LINERS AND GASKETS
Do not use cleaning waxes, concentrated detergents,
bleaches, or cleaners containing petroleum plastic parts.
24
Page 25
CARE AND CLEANING
To change the freezer light:
1. Unplug refrigerator or disconnect power.
2. Reach behind light shield to remove bulb.
3. Replace bulb with a 60-watt appliance bulb.
4. Plug in refrigerator or reconnect power.
POWER INTERRUPTIONS
If the electricity goes off, call the power company and ask
how long it will be off.
1. If the power will be out for 24 hours or less, keep
both refrigerator doors closed to help foods stay
cold and frozen.
2. If the power will be out for more than 24 hours:
a) Remove all frozen food and store it in a frozen
food locker.
OR
b)
Place 2 lbs of dry ice in the freezer for every cubic
foot of freezer space. This will keep the food frozen
for two to four days. While handling dry ice, wear
gloves to protect your hands from frostbite.
OR
c)
If neither a food locker nor dry ice is available,
consume or can perishable food at once.
WHEN YOU GO ON VACATION
If you choose to leave the refrigerator on while you
are away, follow these steps to prepare your refrigerator
before you leave.
1. Use up any perishables and freeze other items.
2. Empty the ice bin.
If you choose to turn the refrigerator off before you
leave, follow these steps.
1. Remove all food from the refrigerator.
2. Depending on your model, set the thermostat control
(refrigerator control) to OFF. See the
Controls section.
3.
Clean refrigerator, wipe it and dry well.
4. Tape rubber or wood blocks to the tops of both doors to
prop them open far enough for air to get in. This stops
odor and mold from building up.
Setting the
WHEN YOU MOVE
When you are moving your refrigerator to a new home,
follow these steps to prepare it for the move.
1. Remove all food from the refrigerator and pack all
frozen food in dry ice.
2. Depending on your model, turn the thermostat control
(refrigerator control) to OFF. See the
Controls section.
3. Unplug the refrigerator.
4. Empty water from the defrost pan.
5. Clean, wipe and dry thoroughly.
6. Take out all removable parts, wrap them well and tape
them together so they don’
move.
7. Depending on the model, raise the front of the
refrigerator so it rolls more easily OR screw in the
leveling legs all the way so they don’t scrape the floor.
See the
Door Closing section.
t shift and rattle during the
Setting the
8. Tape the doors shut and tape the power cord to the
refrigerator cabinet.
When you get to your new home, put everything back
and refer to the
preparation instructions.
Installing Your Refrigerator section for
25
Page 26
ABOUT THE AUTOMATIC ICEMAKER
WARNING
Personal Injury Hazard
Avoid contact with the moving parts of the ejector
mechanism, or with the heating element that releases
the cubes. DO NOT place fingers or hands on the
automatic icemaking mechanism while the refrigerator
is plugged in.
NOTE: Automatic Ice Maker feature is included only in
certain models. Please check your product specification.
OPERATION INSTRUCTIONS
A newly-installed refrigerator may take
12 to 24 hours to begin making ice.
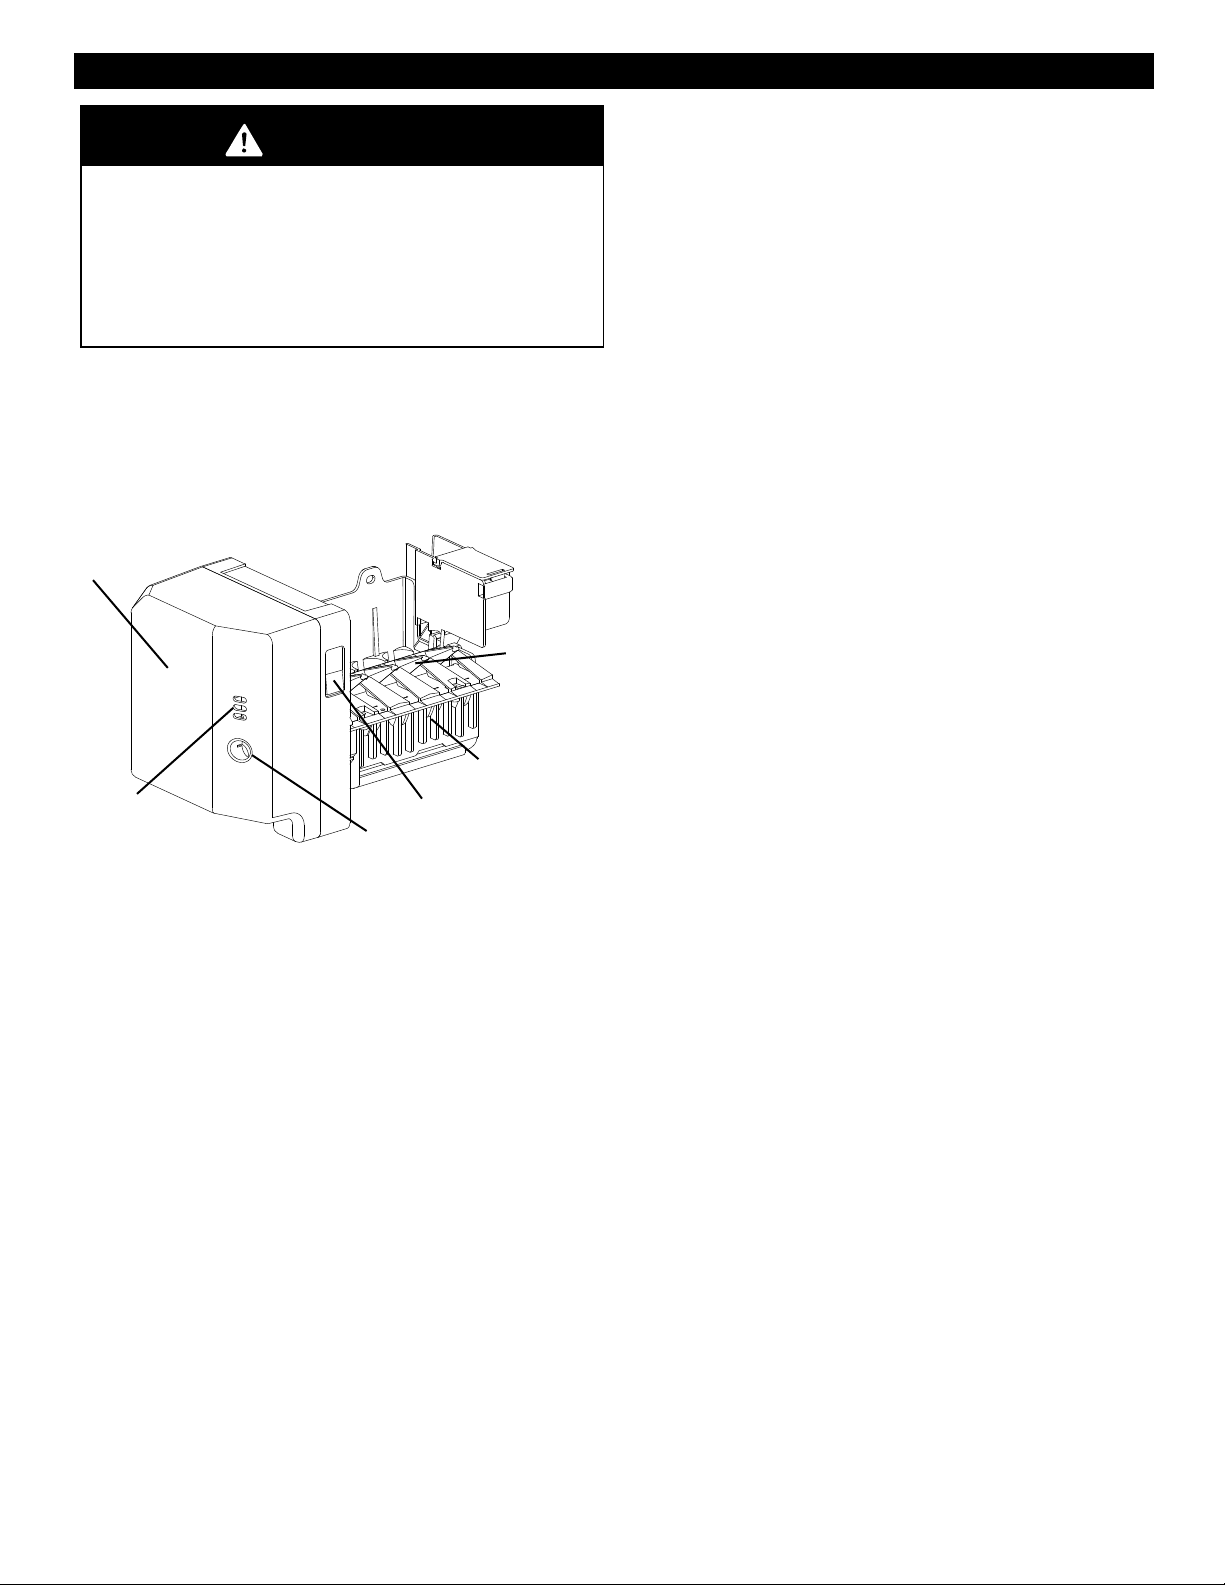
Icemaker
Automatic
Shut off Arm
Cube Size
Indicator Light
Power Switch
Cube Size
Select Button
Ejector
NOTE: If the cube size is smaller or larger than you
expected, you can regulate the size with the cube size
button.
Every time you press the cube size button, the indicator
moves up one light. The higher the light position, the larger
the cubes will be. Pressing at highest position returns
indicator to lowest position.
WHEN YOU SHOULD SET THE ICEMAKER
POWER SWITCH TO O (OFF)
• When the water supply will be shut off for several hours.
• When the ice storage bin is removed for more than a
minute or two.
• When the refrigerator will not be used for several days.
NORMAL SOUNDS YOU MAY HEAR
• The icemaker water valve will buzz as the icemaker fills
with water. If the power switch is in the I (on) position, it
will buzz even if it has not yet been hooked up to water.
To stop the buzzing, move the power switch to O (off).
NOTE: Keeping the power switch in the I (on) position
before the water line is connected can damage the
icemaker.
• You will hear the sound of cubes dropping into the bin
and water running in the pipes as the icemaker refills.
PREPARING FOR VACATION
The icemaker will produce five cubes per cycle —
approximately 60-80 cubes in a 24-hour period,
depending on freezer compartment temperature, room
temperature, number of door openings and other
operating conditions.
If the refrigerator is used before the water connection is
made to the icemaker, set the power switch to O (off).
When the refrigerator has been connected to the water
supply, set the power switch to I (on).
The icemaker will fill with water when it cools to freezing.
A newly-installed refrigerator may take 12 to 24 hours to
begin making ice cubes.
Throw away the first few batches of ice to allow the water
line to clear.
Be sure nothing interferes with the sweep of the feeler
arm.
When the bin fills to the level of the feeler arm, the
icemaker will stop producing ice.
It is normal for several cubes to be stuck together.
If ice is not used frequently, old ice cubes will become
cloudy, taste stale, and shrink.
Set the icemaker power switch to O (off)and shut off the
water supply to the refrigerator.
If the ambient temperature will drop below freezing, have
a qualified servicer drain the water supply system to
prevent serious property damage due to flooding from
ruptured water lines or connections.
26
Page 27
CONNECTING THE WATER LINE
NOTE: Water line installation is needed when the
Automatic Ice Maker and/or Water Dispenser features
are available on your product.
BEFORE YOU BEGIN
This water line installation is not warranted by the
refrigerator or icemaker manufacturer. Follow these
instructions carefully to minimize the risk of expensive
water damage.
Water hammer (water banging in the pipes) in house
plumbing can cause damage to refrigerator parts and lead
to water leakage or flooding. Call a qualified plumber to
correct water hammer before installing the water supply
line to the refrigerator.
To prevent burns and product damage, do not hook up
the water line to the hot water line.
If you use your refrigerator before connecting the water
line, make sure the icemaker power switch is in the
(off) position.
Do not install the icemaker tubing in areas where
temperatures fall below freezing.
When using any electrical device (such as a power
drill) during installation, be sure the device is doubleinsulated or grounded in a manner to prevent the hazard
of electric shock, or is battery-powered.
All installations must be in accordance with local plumbing
code requirements.
NOTE: Wear eye protection.
O
WHAT YOU WILL NEED
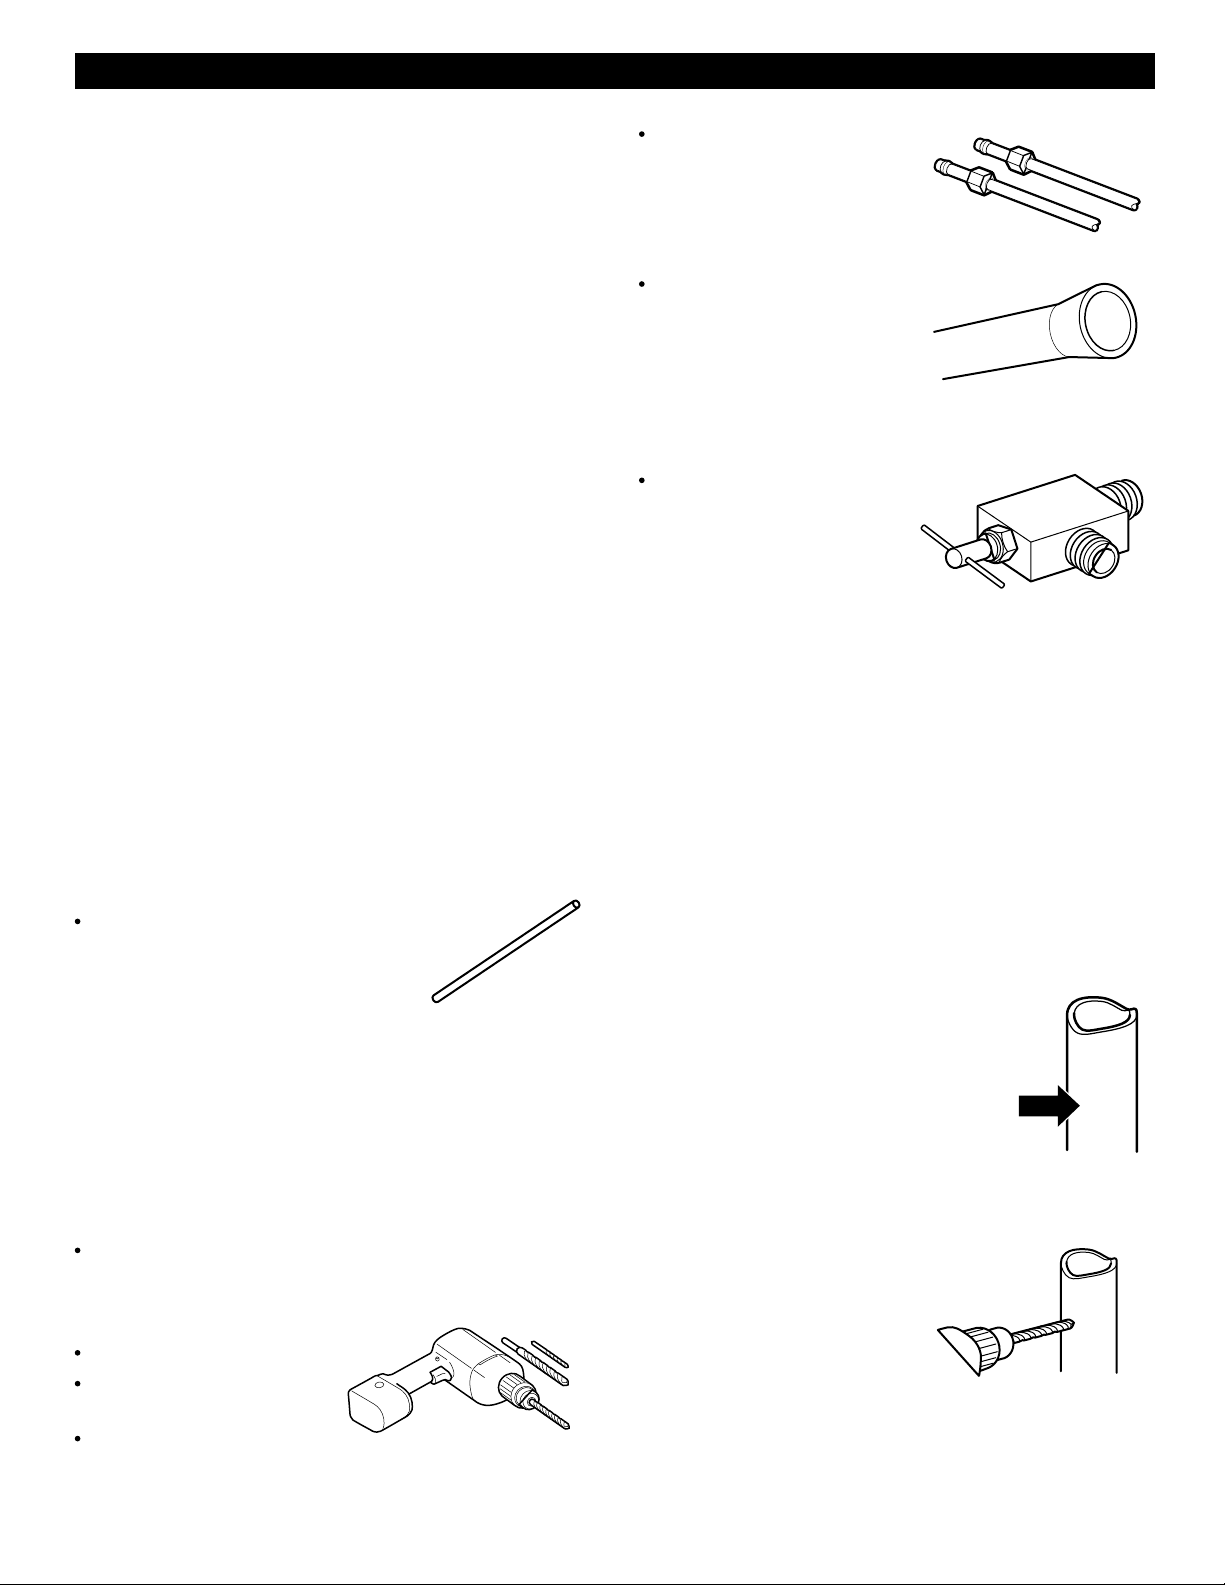
Copper Tubing
diameter to connect the refrigerator
to the water supply. Be sure both
ends of the tubing are cut square.
To determine how much tubing you need: measure
the distance from the water valve on the back of the
refrigerator to the water supply pipe. Then add 8 feet
(2.4 m). Be sure there is sufficient extra tubing (about 8 feet
[2.4 m] coiled into 3 turns of about 10
allow the refrigerator to move out from the wall after
installation.
Be sure that the kit you select allows at least 8 feet
(2.4 m) as described above.
A cold water supply
between 20 and 120 p.s.i. on models without a water
filter and between 40 and 120 p.s.i. on models with a
water filter.
Power drill
1/2”
or adjustable
wrench
Straight- and Phillips-
blade screwdriver
.
, 1/4” outer
[25 cm] diameter) to
. The water pressure must be
.
Two 1/4” outer diameter
compression nuts and
2 ferrules (sleeves)
connect the copper tubing to
the shutoff valve and the
refrigerator water valve.
If your existing copper water
line has a flared fitting at the
end, you will need an
adapter
plumbing supply stores) to
connect the water line to the refrigerator OR you can
cut off the flared fitting with a tube cutter and then use
a compression fitting.
Shutoff valve to connect to
the cold water line
shutoff valve should have a
water inlet with a minimum
inside diameter of 5/32” at
the point of connection to the
COLD WATER LINE. Saddle-type shutoff valves are
included in many water supply kits. Before purchasing,
make sure a saddle-type valve complies with your local
plumbing codes.
(available at
to
. The
INSTALLATION INSTRUCTIONS
Install the shutoff valve on the nearest frequently used
drinking water line.
1. SHUT OFF THE MAIN WATER SUPPLY
Turn on the nearest faucet to relieve the pressure on
the line.
2. CHOOSE THE VALVE LOCATION
Choose a location for the valve
that is easily accessible. It is best
to connect into the side of a
vertical water pipe. When it is
necessary to connect into a
horizontal water pipe, make the
connection to the top or side,
rather than at the bottom, to avoid
drawing off any sediment from the water pipe.
3. DRILL THE HOLE FOR THE VALVE
Drill a 1/4” hole in the water
pipe (even if using a selfpiercing valve) using a
sharp bit. Remove any burrs
resulting from drilling the
hole in the pipe. Take care
not to allow water to drain
into the drill. Failure to drill a 1/4
reduced ice production or smaller cubes.
hole may result in
27
Page 28
CONNECTING THE WATER LINE
INSTALLATION INSTRUCTIONS
(CONTINUED)
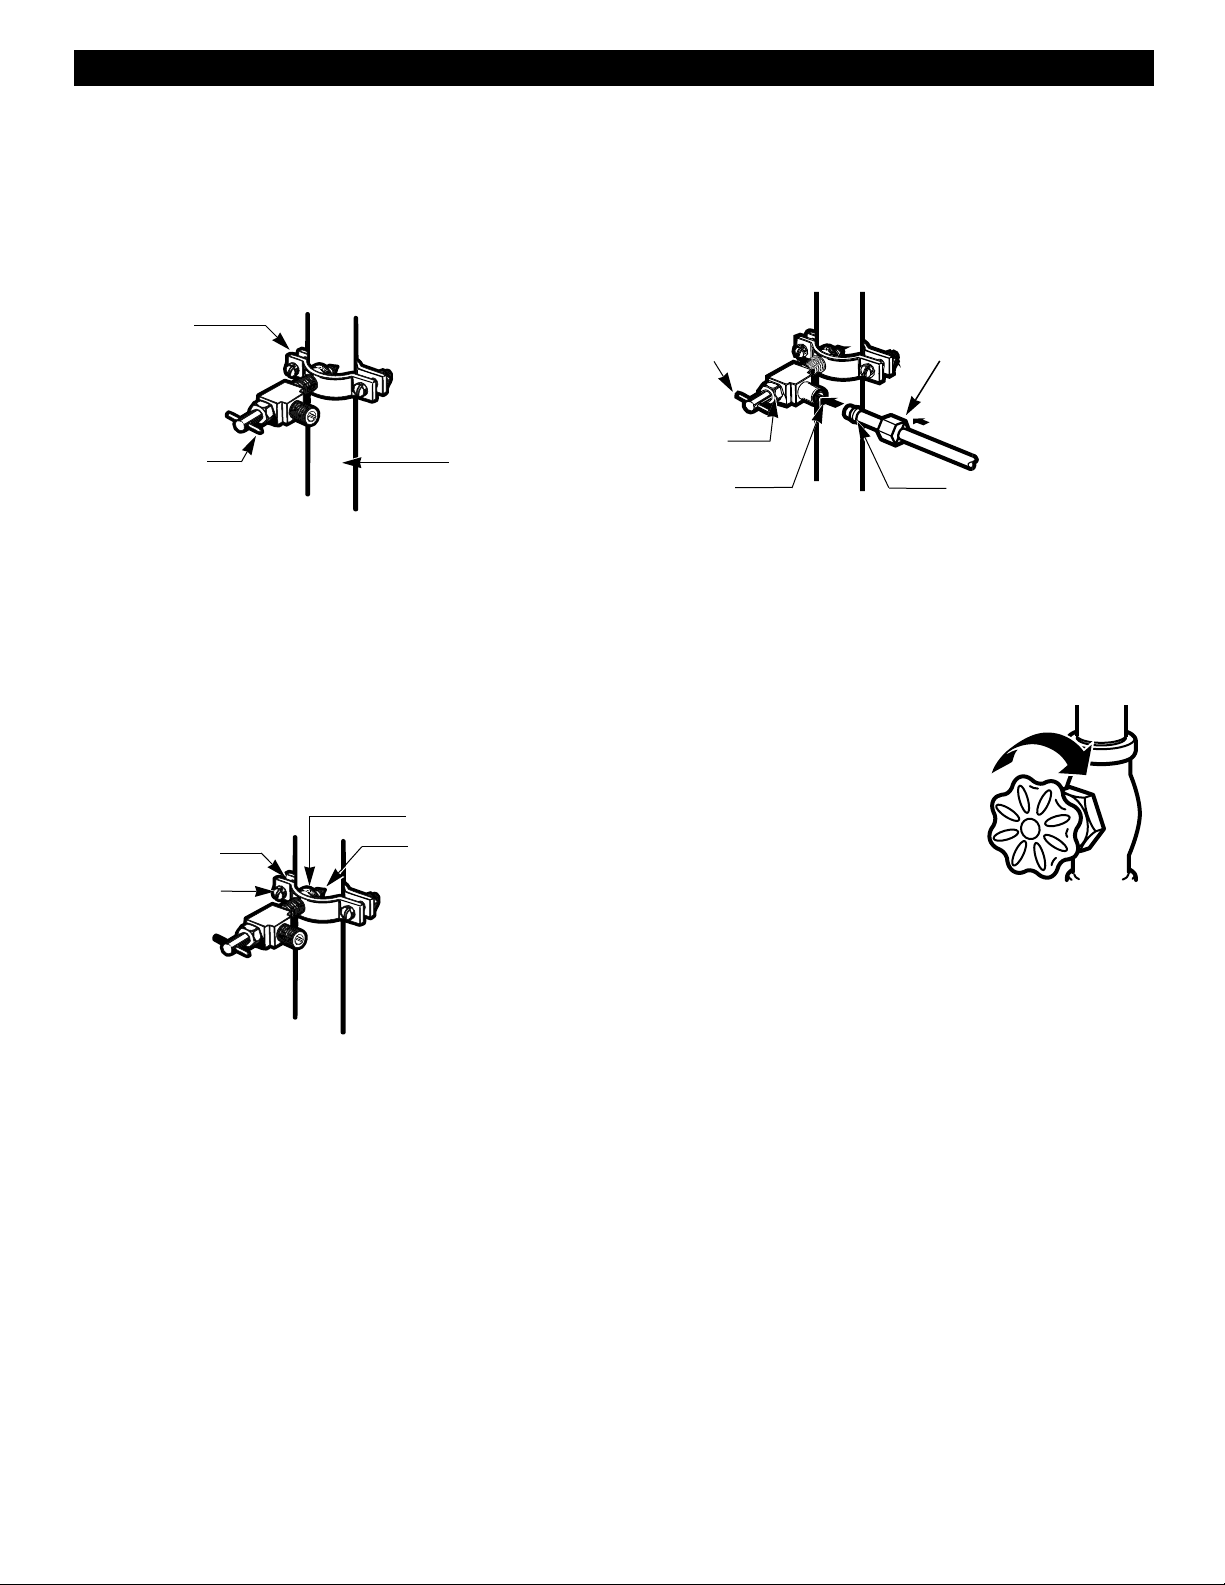
4. FASTEN THE SHUTOFF VALVE
Fasten the shutoff valve to the cold water pipe with
the pipe clamp.
Pipe Clamp
Saddle-Type
Shutoff Valve
NOTE: Commonwealth of Massachusetts Plumbing
Codes 248CMR shall be adhered to. Saddle valves
are illegal and use is not permitted in Massachusetts.
Consult with your licensed plumber.
5. TIGHTEN THE PIPE CLAMP
Tighten the clamp screws until the sealing washer
begins to swell.
NOTE: Do not overtighten or you may crush
the tubing.
Pipe Clamp
Clamp Screw
Vertical Cold
Water Pipe
Washer
Inlet End
7. CONNECT THE TUBING TO THE VALVE
Place the compression nut and ferrule (sleeve)
for copper tubing onto the end of the tubing and
connect it to the shutoff valve. Make sure the tubing is
fully inserted into the valve. Tighten the compression
nut securely.
Saddle-Type
Shutoff Valve
Packing
Nut
Outlet
Valve
NOTE: Commonwealth of Massachusetts Plumbing
Codes 248CMR shall be adhered to. Saddle valves
are illegal and use is not permitted in Massachusetts.
Consult with your licensed plumber.
Compression
Nut
Ferrule (sleeve)
8. FLUSH OUT THE TUBING
Turn the main water supply on
and flush out the tubing until the
water is clear.
Shut the water off at the water
valve after about one quart of
water has been flushed through
the tubing.
6. ROUTE THE TUBING
Route the tubing between the cold water line and the
refrigerator.
Route the tubing through a hole drilled in the wall or
floor (behind the refrigerator or adjacent base cabinet)
as close to the wall as possible.
NOTE: Be sure there is sufficient extra tubing (about
8 feet coiled into 3 turns of about 10 diameter) to
allow the refrigerator to move out from the wall after
installation.
28
Page 29
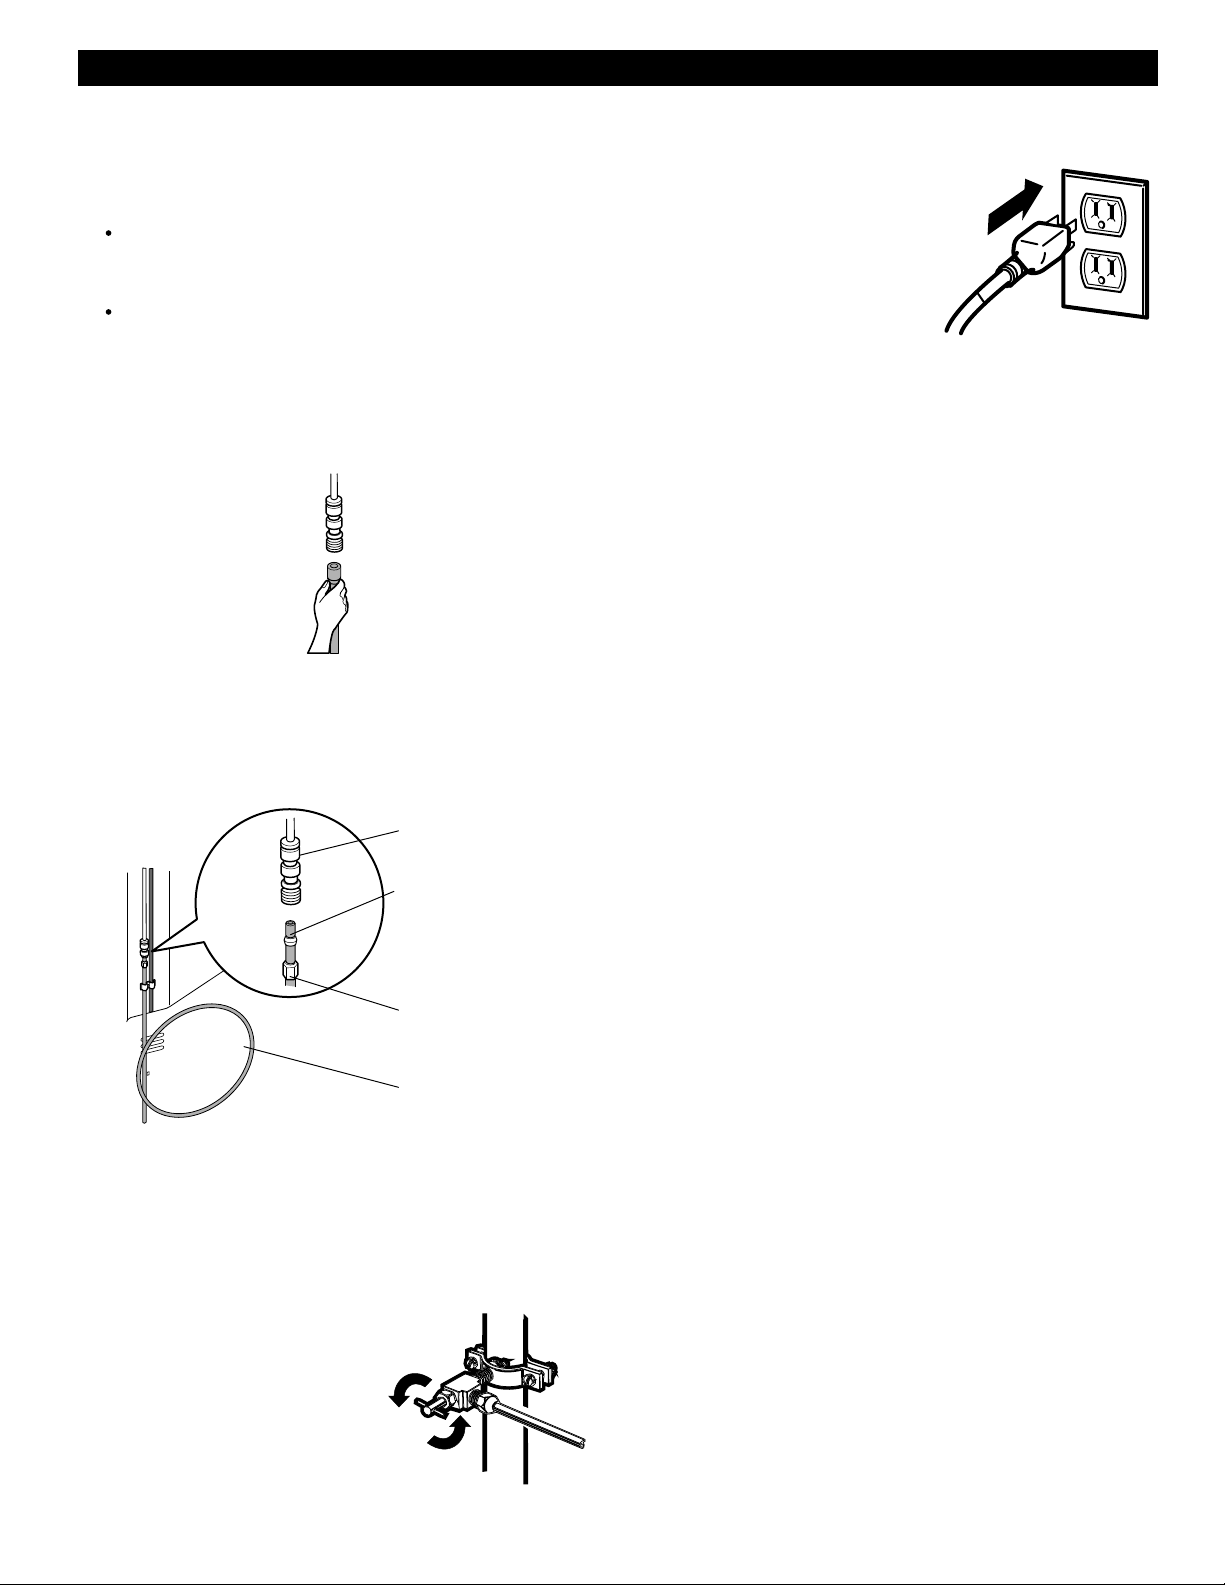
CONNECTING THE WATER LINE
9. CONNECT THE TUBING TO THE
REFRIGERATOR
NOTES:
Before making the connection to the refrigerator, be
sure the refrigerator power cord is not plugged into
the wall outlet.
If your refrigerator does not have a water filter,
we recommend installing one. If your water supply
has sand or particles that could clog the screen of
the refrigerator’
water line near the refrigerator.
Remove the plastic flexible cap from the refrigerator
connection.
Place the compression nut and ferrule (sleeve) onto
the end of the tubing.
s water valve. Install the filter in the
11.PLUG IN THE REFRIGERATOR
Arrange the coil of tubing so
that it does not vibrate against
the back of the refrigerator or
against the wall. Push the
refrigerator back to the wall.
12.START THE ICEMAKER
Set the icemaker power switch to the ON position.
The icemaker will not begin to operate until it reaches
its operating temperature of 15°F (-9°C) or below. It
will then begin operation automatically if the icemaker
power switch is in the I (on) position.
Insert the end of the tubing into the connection as far
as possible. While holding the tubing, tighten the fitting.
Refrigerator
Connection
Ferule
(sleeve)
1/4”
Compression
Nut
1/4”
Tubing
Fasten the tubing into the tubing Clamp attached to
the back of the refrigerator.
First, loosen the screw fastening the clamp. Next,
insert the tubing in the groove. Finally, re-fasten the
screw.
10.TURN THE WATER ON AT THE
SHUTOFF VALVE
Tighten any connections that
leak.
Reattach the compressor
compartment access cover.
29
Page 30
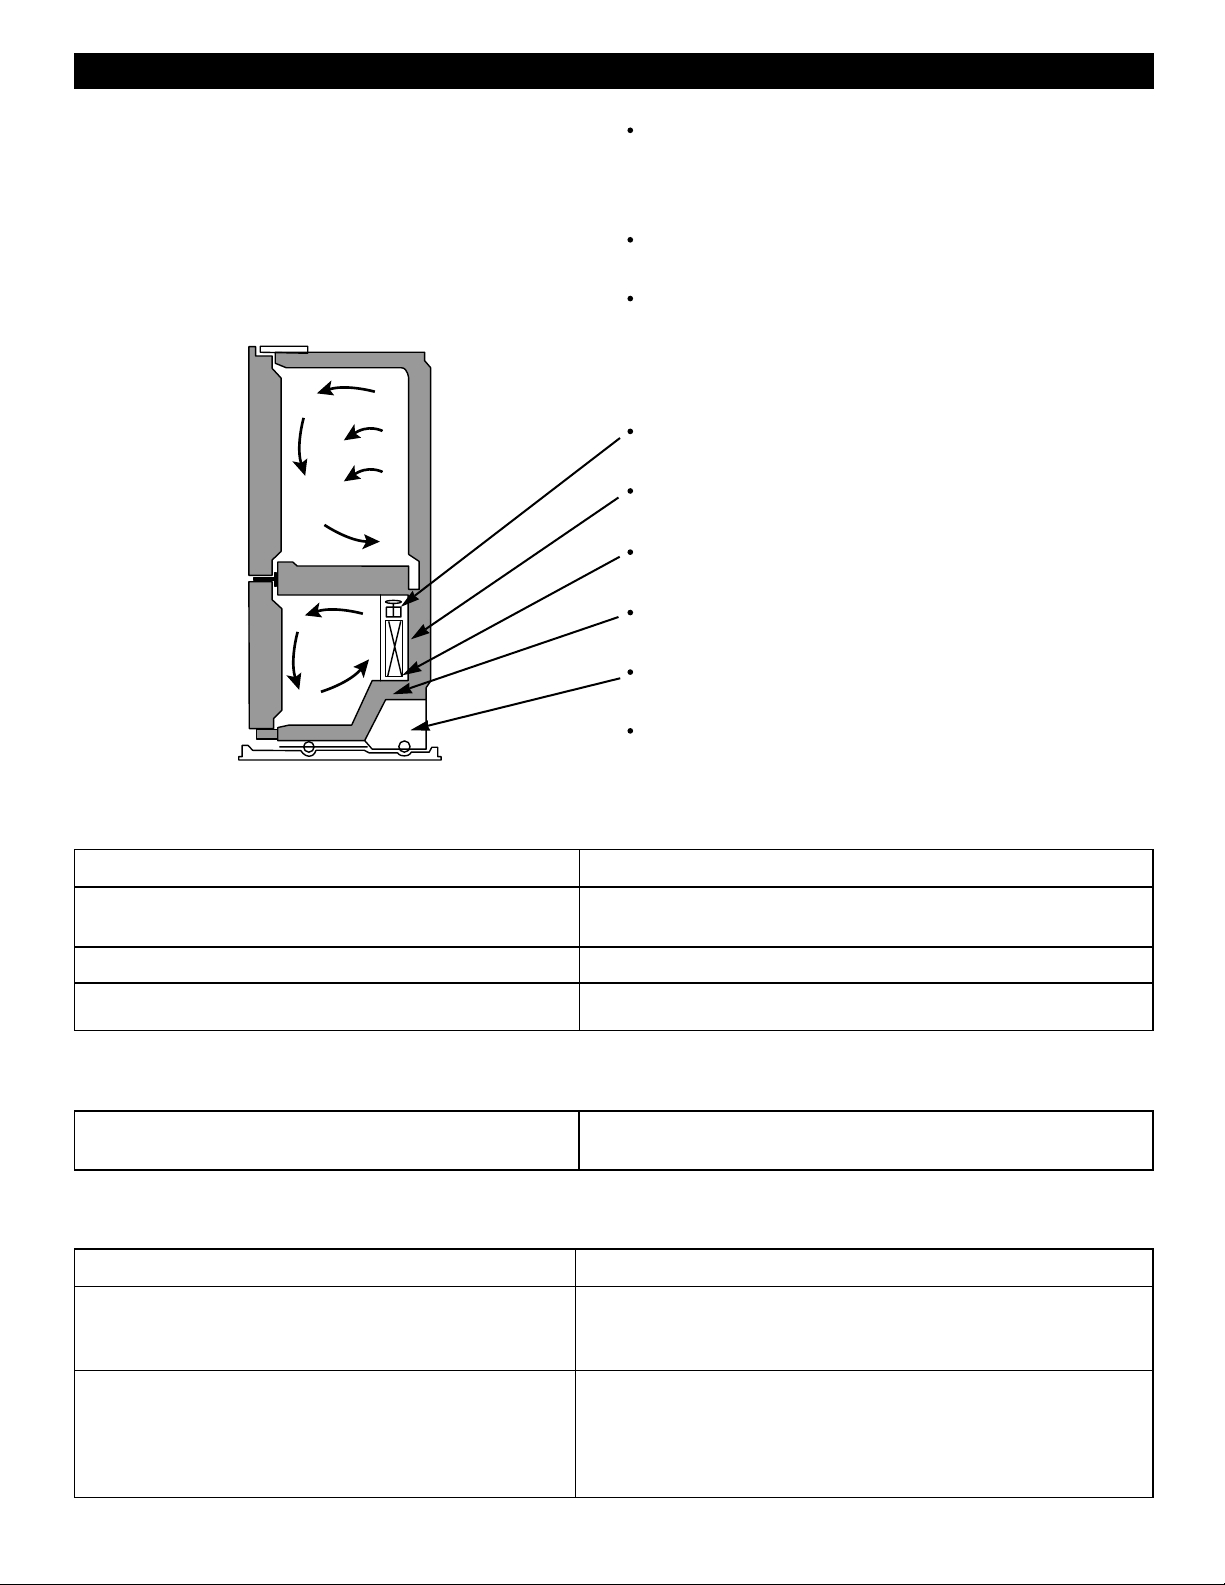
TROUBLESHOOTING GUIDE
UNDERSTANDING SOUNDS YOU MAY HEAR
Your new refrigerator may make sounds that your old one
didn’t make. Because the sounds are new to you, you
might be concerned about them. Most of the new sounds
are normal. Hard surfaces, like the floor, walls and
cabinets, can make the sounds seem louder than they
actually are. The following describes the kinds of sounds
and what may be making them.
The defrost timer will click when the automatic defrost
cycle begins and ends. The thermostat control (or
refrigerator control, depending on the model) will also
click when cycling on and off.
Rattling noises may come from the flow of refrigerant, the
water line, or items stored on top of the refrigerator.
Your refrigerator is designed to run more efficiently
to keep your food items at the desired temperature.
The high efficiency compressor may cause your new
refrigerator to run longer than your old one, and
you may hear a pulsating or high-pitched sound.
You may hear the evaporator fan motor circulating the air
through the refrigerator and freezer compartments.
As each cycle ends, you may hear a gurgling sound due
to the refrigerant flowing in your refrigerator.
Contraction and expansion of the inside walls may cause
a popping noise.
Water dripping on the defrost heater during a defrost
cycle may cause a sizzling sound.
You may hear air being forced over the condenser by the
condenser fan.
You may hear water running into the drain pan during the
defrost cycle.
REFRIGERATOR DOES NOT OPERATE
Check if... Then...
The power supply cord is unplugged. Firmly plug the cord into a live outlet with proper voltage.
A household fuse has blown or circuit Replace the fuse or reset the circuit breaker.
breaker tripped.
The refrigerator control is set to the OFF position. Refer to the Setting the Controls .
Refrigerator is in the defrost cycle. Wait about 30 minutes for defrost cycle to end.
VIBRATION OR RATTLING NOISE
Check if... Then...
The refrigerator is not resting solidly on Floor is weak or uneven or leveling legs need adjusting.
the floor. See Installation Section.
LIGHTS DO NOT WORK
Check if... Then...
The power supply cord is unplugged. Firmly plug the cord into a live outlet with proper voltage.
Light bulb is loose in the socket. Turn the refrigerator control to the OFF position and unplug
the refrigerator. Gently remove the bulb and reinsert. Then
plug in refrigerator and reset the refrigerator control.
Light bulb has burned out. Replace with an appliance bulb of the same wattage, size
and shape available at your local hardware store. (See the
Changing the Light Bulb(s) Section.) Turn
the temperature control to the OFF position and unplug the
refrigerator prior to replacement.
30
Page 31
TROUBLESHOOTING GUIDE
COMPRESSOR MOTOR SEEMS TO RUN TOO MUCH
Check if... Then...
The refrigerator that was replaced was an Modern refrigerators with more storage space require
older model. more operating time.
The room temperature is hotter than normal. The motor will run longer under warm conditions. At normal
room temperatures, expect your motor to run about 40% to
80% of the time. Under warmer conditions, expect it to run
even more often.
The door is opened often or a large amount Adding food and opening the door warms the refrigerator.
of food has just been added. It is normal for the refrigerator to run longer in order to cool
the refrigerator back down. Adding a large amount of food
warms the refrigerator. See the Food Storage Guide Section.
In order to conserve energy, try to get everything
you need out of the refrigerator at once, keep food organized
so it is easy to find and close the door as soon as the food
is removed.
The refrigerator was recently plugged in and The refrigerator will take up to 24 hours to cool
the refrigerator control was set correctly completely.
The refrigerator control was not set correctly for the
surrounding conditions.
The doors are not closed completely. Push the doors firmly shut. If they will not shut all the way, see
The condenser coils are dirty. This prevents air transfer and makes the motor work harder.
See the Adjusting control settings Section.
Doors will not close completely below.
Clean the condenser coils. Refer to the Care and Cleaning
section.
DOORS WILL NOT CLOSE COMPLETELY
Check if... Then...
The refrigerator is not level. See the Installation Section to level refrigerator.
Food packages are blocking the door open. Rearrange food containers to clear door and door shelves.
The ice bin, crisper cover, pans, shelves, door bins Push bins all the way in and put crisper cover, pans, shelves
or baskets are out of position. and baskets into their correct positions. See the
Refrigerator Section.
The gaskets are sticking. Clean gaskets and the surface that they touch. Rub a thin
coat of paraffin wax on the gaskets after cleaning.
The refrigerator wobbles or seems unstable. Level the refrigerator. Refer to the Door Closing and
Alignment Section.
Using Your
The doors were removed during product installation Remove and replace the doors according to the Removing,
and not properly replaced. and Replacing Refrigerator Doors
or call a qualified service technician.
section
FROST OR ICE CRYSTALS ON FROZEN FOOD
Check if... Then...
The door is not closing properly. See Doors will not close completely above.
The door is opened often. When the door is opened, warm, humid air is allowed in
the freezer resulting in frost.
31
Page 32
TROUBLESHOOTING GUIDE
ICE HAS OFF-TASTE OR ODOR
Check if... Then...
The icemaker was recently installed. Discard first few batches of ice to avoid discolored or
off-flavored ice.
The ice has been stored for too long. Throw away old ice and make new supply.
The food has not been wrapped tightly in Rewrap foods since odors may migrate to the ice if food
either compartment. is not wrapped properly.
The water supply contains minerals such as sulfur. A filter may need to be installed to eliminate taste and
odor problems.
The interior of refrigerator needs cleaning. See Care and Cleaning section.
Ice storage bin needs cleaning. Empty and wash bin. Discard old cubes.
THERE IS WATER IN THE DEFROST DRAIN PAN
Check if... Then...
The refrigerator is defrosting. The water will evaporate. It is normal for water to drip into the
defrost pan.
It is more humid than normal. Expect that the water in the defrost pan will take longer to
evaporate. This is normal when it is hot or humid.
THE REFRIGERATOR SEEMS TO MAKE TOO MUCH NOISE
Check if... Then...
The sounds may be normal for your refrigerator. Refer to the Understanding Sounds You May Hear section.
THE ICEMAKER IS NOT PRODUCING ICE OR ICE CUBES ARE FREEZING TOO SLOWLY
Check if... Then...
The freezer temperature is cold enough to produce ice. Wait 24 hours after hook-up for ice production. See the Setting
the Controls Section.
Door left open. Check to see if something is holding the door open.
CUBES PRODUCED BY ICEMAKER ARE TOO SMALL
Check if... Then...
Smaller cube size level is selected. Select larger cube size using cube size selector.
Water shutoff valve connecting refrigerator to water Call a plumber to clear the valve.
line may be clogged.
THE DOORS ARE DIFFICULT TO OPEN
Check if... Then...
The gaskets are dirty or sticky. Clean gaskets and the surfaces that they touch. Rub a thin
coat of appliance polish or kitchen wax on the gaskets after
cleaning
The door is reopened within a short time after having When you open the door, warmer air enters the refrigerator.
been opened. As the warm air cools, it can create a vacuum. If the door is
hard to open, wait 5 minutes to allow the air pressure to
equalize, then see if it opens more easily.
32
Page 33
TROUBLESHOOTING GUIDE
AUTOMATIC ICEMAKER DOES NOT WORK
Check if... Then...
Icemaker power switch in the O (off) position. Move the switch to the I (on) position.
Water supply turned off or not connected. See the Connecting the Water Line section.
Freezer compartment too warm. Wait 24 hours for the freezer to reach its ideal temperature.
Piled up cubes in the storage bin cause the icemaker Level cubes by hand.
to shut off.
TEMPERATURE IS TOO WARM OR THERE IS INTERIOR MOISTURE BUILDUP
Check if... Then...
The air vents are blocked. Cold air circulates Locate air vents by using your hand to sense airflow and
from the freezer to the fresh food section and move all packages that block vents and restrict airflow. Refer
back again through air vents in the wall dividing to multi flow Section for the location of
the two sections. air vents.
The doors are opened often. When the door is opened, warm humid air is allowed into
the refrigerator. The more the door is opened, the faster the
humidity builds up, and the more warm air the refrigerator
must cool. In order to keep the refrigerator cool, try to get
everything you need out of the refrigerator at once, keep
food organized so it is easy to find and close the door as
soon as the food is removed.
The control is not set correctly for the surrounding Refer to the Setting the Controls Section.
conditions. Wait 24 hours for temperatures to stabilize or even out. If the
temperature is too cold or too warm, move the dial one
number at a time.
A large amount of food has just been added Adding food warms the refrigerator. It can take a few hours
to the refrigerator or freezer. for the refrigerator to return to normal temperature.
The food is not packaged correctly. Wrap food tightly and wipe off damp containers prior to
storing in the refrigerator to avoid moisture accumulation. If
necessary, repackage food according to the guidelines in the
Food Storage Guide Section.
T. he doors are not closing completely. See Doors will not close completely
The weather is humid. In humid weather, air carries moisture into refrigerator
when doors are opened.
A self-defrost cycle was completed. It is normal for droplets to form on the back wall after the
refrigerator self-defrosts.
33
 Loading...