


LG Digital Signage
(MONITOR SIGNAGE)
32SM5D 43SM5D 49SM5D 55SM5D 65SM5D
32SM5KD 43SM5KD 49SM5KD 55SM5KD 65SM5KD
43SM3D 49SM3D 55SM3D
(M3 x L6)
Depending upon country / Závisí na zemi / Afhængigt af landet / En función del país /
Maan mukaan / Selon pays / Abhängig vom Land / Ανάλογα με τη χώρα / Országfüggő /
Tergantung pada negaranya / A seconda del Paese / Елге байланысты / 지역에 따라 다름 /
Afhankelijk van het land / Avhengig av land / Zależnie od kraju / Dependendo do país /
В зависимости от страны / Závisí od krajiny / Beroende på land / 視國家, 地區而定 /
AAA
Ülkeye bağlı / Залежно від країни / Mamlakatga bog’liq ravishda / 国によって異なります /
Depende do país / הנידמב יולת /
*MFL69868301*
P/No: MFL69868301 (1701-REV00)
Printed in Korea

English You can download the web manuals for this product at the following
websites. (Keyword : SM5D, SM3D, SM5KD)
Česky
Dansk Du kan downloade webvejledningen til dette produkt på følgende
Español Puede descargar los manuales web de este producto en los
Suomi Voit ladata tuotteen verkko-oppaat seuraavilta verkkosivuilta.
Français Vous pouvez télécharger le guide Web pour ce produit sur les sites
Deutsch
Ελληνικά Μπορείτε να κατεβάσετε τα εγχειρίδια web για αυτό το προϊόν
Magyar A termék internetes útmutatóját a következő weboldalakról töltheti
Bahasa
Indonesia
Můžete si stáhnout webové návody kobsluze tohoto produktu
znásledujících webových stránek. (Klíčové slovo : SM5D, SM3D,
SM5KD)
websteder. (Nøgleord : SM5D, SM3D, SM5KD)
siguientes sitios web. (Palabra clave : SM5D, SM3D, SM5KD)
(Avainsana : SM5D, SM3D, SM5KD)
suivants. (Mot-clé : SM5D, SM3D, SM5KD)
Sie können die Webhandbücher für dieses Produkt auf den folgenden
Websites herunterladen. (Schlüsselwort : SM5D, SM3D
στις παρακάτω τοποθεσίες web.
(Λέξη-κλειδί : SM5D, SM3D, SM5KD)
le. (Kulcsszó : SM5D, SM3D, SM5KD)
Anda dapat mengunduh manual web untuk produk ini di situs web
berikut. (Kata kunci : SM5D, SM3D, SM5KD)
, SM5KD
)
Italiano È possibile scaricare i manuali online di questo prodotto dai seguenti
siti Web. (Parola chiave : SM5D, SM3D, SM5KD)
Қазақша Бұл өнімге арналған пайдаланушы нұсқаулығын төмендегі
веб-сайттарынаң жүктеп алуға болады. (Негізгі сөз : SM5D,
SM3D, SM5KD)
한국어
Nederlands U kunt de internethandleidingen voor dit product vanaf de volgende
Norsk Du kan laste ned webhåndbøker for dette produktet fra de følgende
웹 매뉴얼을 통해 보다 상세한 제품정보를 확인 할 수 있습니다.
아래의 사이트를 참조하세요. (키워드 : SM5D, SM3D, SM5KD)
websites downloaden. (Term : SM5D, SM3D, SM5KD)
webområdene. (Nøkkelord : SM5D, SM3D, SM5KD)
• World Wide : www.lg.com
• 한국 : www.lge.co.kr
• Brazil : www.lg.com/br
•日本 : www.lg.com/jp

Polski
Português Pode transferir os manuais na Internet deste produto nos websites
Instrukcje obsługi tego produktu można pobrać na następujących
stronach internetowych. (Słowo kluczowe : SM5D, SM3D
que se seguem. (Palavra-chave : SM5D, SM3D, SM5KD)
, SM5KD
)
Русский
Slovenčina
Svenska Du kan hämta produktens onlinehandböcker på följande
台灣語 您可以於下列網站下載本產品的網頁手冊。
Онлайн-руководства для данного устройства можно
скачать на следующих веб-сайтах.
(Ключевое слово : SM5D, SM3D, SM5KD)
Webové príručky pre tento výrobok môžete stiahnuť na nasledujúcich
webových stránkach. (Kľúčové slovo : SM5D, SM3D
webbplatser. (Nyckelord : SM5D, SM3D, SM5KD)
(關鍵字 : SM5D, SM3D, SM5KD)
, SM5KD
)
Türkçe Bu ürünün web kılavuzlarını aşağıdaki web sitelerinden
indirebilirsiniz. (Anahtar sözcük : SM5D, SM3D, SM5KD)
Українська
O’zbekcha Ushbu mahsulot uchun qo‘llanmalarni quyidagi veb-saytlarda yuklab
日本語 この製品のWeb版取扱説明書は次のWebサイトからダウン
Português
Do Brasil
Завантажити веб-посібники для цього виробу можна на
веб-сайтах, поданих нижче. (Ключове слово : SM5D, SM3D
SM5KD)
olishingiz mumkin. (Kalit so’z : SM5D, SM3D, SM5KD)
ロードできます。 (キーワード : SM5D, SM3D, SM5KD)
Você pode fazer download dos manuais na Web deste produto nos
seguintes sites. (Palavra-chave : SM5D, SM3D, SM5KD)
,
(SM5KD ,SM3D ,SM5D
• World Wide : www.lg.com
• 한국 : www.lge.co.kr
• Brazil : www.lg.com/br
•日本 : www.lg.com/jp
SuperSign : http://partner.lge.com
(SM5KD ,SM3D ,SM5D

DVI-D IN
32SM5D 43SM5D 49SM5D 55SM5D
32SM5KD 43SM5KD 49SM5KD 55SM5KD
43SM3D 49SM3D 55SM3D
**SM5D, **SM3D

DVI-D IN

DVI-D IN
65SM5D 65SM5KD
65SM5D

DVI-D IN

2
1
3
A
B
2
4
A
B

OWNER’S MANUAL
LG Digital
Signage
(MONITOR SIGNAGE)
Please read this manual carefully before operating your set and retain it
for future reference.
32SM5D
43SM5D
49SM5D
55SM5D
65SM5D
43SM3D
49SM3D
55SM3D
32SM5KD
43SM5KD
49SM5KD
55SM5KD
65SM5KD
www.lg.com

2
TABLE OF CONTENTS
ENGLISH
SAFETY PRECAUTIONS ................3
- Precautions In Installing the Product .....................3
- Precautions to the AC Adapter and Electrical
Power ......................................................................................5
- Precautions In Moving the Product ........................7
- Precautions In Using the Product ............................8
- Mounting on a Wall .........................................................9
LICENSES .................................... 10
ASSEMBLY AND PREPARATION ..11
- Optional Accessories ....................................................12
- Parts and Buttons .........................................................14
- Assembling the Memory Cover..............................15
- Connecting the Stand ................................................. 16
- Connecting the Speakers ..........................................18
- Connecting the IR Sensor .........................................21
- Portrait Layout ................................................................22
- Attaching and removing the LG Logo
Bracket ................................................................................23
- Installing on a Wall ........................................................25
REMOTE CONTROL .................... 27
MAKING CONNECTIONS ........... 29
- Connecting to a PC.......................................................29
- External Device Connection .....................................29
- Using the Input List ......................................................31
TROUBLESHOOTING .................. 32
PRODUCT SPECIFICATIONS ...... 35

3
WARNING - This is a class A product. In a domestic environment this product may cause radio interference in which
case the user may be required to take adequate measures.
SAFETY PRECAUTIONS
Please read these safety precautions carefully before using the product.
WARNING
If you ignore the warning message, you may be seriously injured or there is a possibility of accident or death.
CAUTION
If you ignore the caution message, you may be slightly injured or the product may be damaged.
WARNING
• Indoor Use Only.
Precautions In Installing the Product
WARNING
• Keep away from heat sources like electrical heaters.
- Electrical shock, fire, malfunction, or deformation may occur.
• Keep the packing anti-moisture material or vinyl packing out of the reach of children.
- Anti-moisture material is harmful if swallowed. If swallowed by mistake, force the patient to vomit and visit the
nearest hospital. Additionally, vinyl packing can cause suffocation. Keep it out of the reach of children.
• Do not put heavy objects on the product or sit upon it.
- If the product collapses or is dropped, you may be injured. Children must pay particular attention.
• Do not leave the power or signal cable unattended on the pathway.
- The passerby can trip or fall, which can cause electrical shock, fire, product breakdown, or injury.
• Install the product in a neat and dry place.
- Dust or moisture can cause electrical shock, fire or product damage.
• If you can smell smoke or other odors or hear a strange sound unplug the power cord and contact the service center.
- If you continue to use without taking proper measures, electrical shock or fire can occur.
• If you dropped the product or the case is broken, turn off the product and unplug the power cord.
- If you continue to use without taking proper measures, electrical shock or fire can occur. Contact the service center.
ENGLISH

4
• Do not drop an object on or apply impact to the product. Do not throw any toys or objects on the product screen.
ENGLISH
- It can cause injury to human, problem to product and damage the display.
• Do not let the product fall or drop when connecting it with an external device.
- This may cause injury and/or damage to the product.
• When connecting it to a game device, keep a distance of four times the diagonal measurement of the screen from the
device.
- If the product falls because of the short cable, this may cause injury and/or damage to the product.
• Leaving a fixed image on the screen for a long time may cause damage to the screen and cause image burn-in. To use
the product for a long period of time, use a screen saver on the PC or utilize the residual image prevention function
on the product, and when the product is not used, turn off the power. Burn-in and related problems are not covered
by the warranty on this product.
• Do NOT install this product on a wall where there is high risk of exposure to oil fumes or mist.
- This may damage product and cause it to fall.
CAUTION
• Make sure the product ventilation holes are not blocked. Install the product in a suitably wide place (more than
100 mm from the wall).
- If you install the product too close to the wall, it may be deformed or fire can break out due to internal heat.
• Do not block the ventilation hole of the product by a tablecloth or curtain.
- The product can be deformed or fire can break out due to overheating inside the product.
• Install the product on a flat and stable place that has no risk of dropping the product.
- If the product is dropped, you may be injured or the product may be broken.
• Install the product where no EMI occurs.
• Keep the product away from direct sunlight.
- The product can be damaged.
• If you install the product in a place that does not meet the recommended conditions, this may cause serious damage
to the product’s picture quality, life cycle, and appearance. Please check with LG or a qualified installer before
installing. This caution applies to a place where there is an abundance of fine dust or oil mist, chemical substances are
used, the temperature is very high or low, the humidity is very high, or the product is likely to remain turned on for a
long period of time (airport and train station), failure to do so will invalidate the warranty.
• Do not install the product in an area with poor ventilation (e.g.on a bookshelf, in a closet) or outside and avoid placing
on cushions or carpets.
• In addition, do not install it where there are heating objects such as lighting equipment.

5
Precautions to the AC Adapter and Electrical Power
WARNING
• If water or any foreign substance goes inside the product (TV, monitor, power cord, or AC adapter), disconnect the
power cord immediately and contact the service center.
- Otherwise, this may cause a fire or electric shock due to damage to the product.
• Do not touch the power plug or AC adapter with wet hands. If the pins of the plug are wet or dusty, wipe and dry
them before use.
- Otherwise, this may cause a fire or electric shock.
• Make sure to completely insert the power cord into the AC adapter.
- If loosely connected, the poor connection may cause a fire or electric shock.
• Be sure to use power cords and AC adapters provided or approved by LG Electronics, Inc.
- The use of non-approved products may cause a fire or electric shock.
• When unplugging the power cord, always pull it by the plug. Do not bend the power cord with excessive force.
- The power line can be damaged, which may cause electric shock or fire.
• Be careful not to step or place heavy objects (electronic appliances, clothing, etc.) on the power cord or AC adapter.
Be careful not to damage the power cord or AC adapter with sharp objects.
- Damaged power cords may cause a fire or electric shock.
• Never disassemble, repair or modify the power cord or AC adapter.
- This may cause a fire or electric shock.
• Make sure to connect the power cable to the grounded current.
- You may be electrocuted or injured.
• Use the rated voltage only.
- The product can be damaged, or you may be electrocuted.
• In the presence of thunder and lightning, never touch the power cord and signal cable because it can be very
dangerous.
- It can cause electric shock.
• Do not connect several extension cords, electrical appliances, or electrical heaters to a single outlet. Use a power strip
with a grounding terminal designed for exclusive use with the computer.
- A fire can break out due to overheating.
• Do not touch the power plug with wet hands. Additionally, if the cord pin is wet or covered with dust, dry the power
plug completely or wipe dust off.
- You may be electrocuted due to excess moisture.
ENGLISH

6
• If you don’t intend to use the product for a long time, unplug the power cable from the product.
ENGLISH
- Covering dust can cause a fire, or insulation deterioration can cause electric leakage, electric shock or fire.
• Fix the power cable completely.
- If the power cable is not fixed completely, a fire can break out.
• Do not insert a conductor (like a metal chopstick) into one end of the power cable while the other end is connected
to the input terminal on the wall. Additionally, do not touch the power cable right after plugging into the wall input
terminal.
- You may be electrocuted.
• The appliance coupler is used as the disconnect device.
• Please make sure the device is installed near the wall outlet to which it is connected and that the outlet is easily
accessible.
• As long as this unit is connected to the AC wall outlet, it is not disconnected from the AC power source even if the
unit is turned off.
CAUTION
• Be sure to keep the outlet, AC adapter, and pins of the power plug clean from dust and etc.
- This may cause a fire.
• Do not unplug the power cord while the product is in use.
- Electrical shock can damage the product.
• Use only the power cord supplied with the unit. If you use another power cord, make sure that it is certified by the
applicable national standards when not provided by the supplier. If the power cable is faulty in any way, please contact
the manufacturer or the nearest authorized repair service provider for a replacement.

7
Precautions In Moving the Product
WARNING
• Make sure to turn off the product.
- You may be electrocuted or the product can be damaged.
• Make sure to remove all cables before moving the product.
- You may be electrocuted or the product can be damaged.
• Make sure the panel faces forward and hold it with both hands to move. If you drop the product, the damaged
product can cause electric shock or fire. Contact an authorized the service center for repair.
• Make sure the product is turned off, unplugged, and all cables have been removed. It may take 2 or more people to
carry larger apparatus. Do not press against or put stress on the front panel of the apparatus.
CAUTION
• Do not shock the product when moving it.
- You may be electrocuted or the product can be damaged.
• Do not dispose the product-packing box. Use it when you move.
ENGLISH

8
Precautions In Using the Product
ENGLISH
WARNING
• Do not disassemble, repair or modify the product at your own discretion.
- Fire or electric shock accident can occur.
- Contact the service center for check, calibration or repair.
• When the display is to be left unattended for an extended period of time, unplug it from the wall outlet.
• Keep the product away from water.
- Fire or electric shock accident can occur.
• Do not shock or scratch the front and sides of the screen with metallic objects.
- Otherwise, it may cause damage to the screen.
• Avoid high temperatures and humidity.
CAUTION
• Do not put or store inflammable substances near the product.
- There is a danger of explosion or fire due to careless handling of the inflammable substances.
• When cleaning the product, unplug the power cord and scrub gently with a soft cloth to prevent scratching. Do not
clean with a wet cloth or spray water or other liquids directly onto the product. An electric shock may occur. (Do not
use chemicals such as benzene, paint thinners, or alcohol.)
• Take a rest from time to time to protect your vision.
• Keep the product clean at all times.
• Take a comfortable and natural position when working with a product to relax the muscles.
• Take a regular break when working with a product for a long time.
• Do not press strongly upon the panel with a hand or sharp object such as nail, pencil, or pen, or make a scratch on it.
• Keep the proper distance from the product.
- Your vision may be impaired if you look at the product too closely.
• Set the appropriate resolution and clock by referring to the User’s Guide.
- Your vision can be impaired.
• Use authorized detergent only when cleaning the product. (Do not use benzene, thinner, or alcohol.)
- Product can be deformed.
• Do not expose to dripping or splashing and do not place objects filled with liquids, such as vases, cups, etc. on or over
the apparatus (e.g. on shelves above the unit).
• Batteries should not be exposed to excessive heat. For example, keep away from direct sunlight, open fireplace, and
electric heaters.
• Do NOT place non-rechargeable batteries in charging device.
• Using headsets (earphones) for a long time or listening loudly can cause damage to your hearing.

9
• Spray water onto a soft cloth 2 to 4 times, and use it to clean the front frame; wipe in one direction only. Too much
moisture may cause staining.
WATER
CHEMICALS
• Do not use products using high voltage around the Monitor. (e.g., a bug zapper)
- Monitor may have malfunction as its electrical shock.
Mounting on a Wall
• Do NOT install this product by yourself as you may injure yourself or cause damage to product. Please contact service
personnel authorised by manufacturer.
ENGLISH

10
LICENSES
ENGLISH
Supported licenses may differ by model. For more information of the licenses, visit www.lg.com.
The terms HDMI and HDMI High-Definition Multimedia Interface, and the HDMI logo are trademarks or registered
trademarks of HDMI Licensing LLC in the United States and other countries.
Manufactured under license from Dolby Laboratories. Dolby, Dolby Vision, Dolby Audio, and the double-D symbol are
trademarks of Dolby Laboratories.
For DTS patents, see http://patents.dts.com. Manufactured under license from DTS Licensing Limited. DTS, DTS-HD,
the Symbol, & DTS or DTS-HD and the Symbol together are registered trademarks of DTS, Inc. © DTS, Inc. All Rights
Reserved.

11
ASSEMBLY AND PREPARATION
CAUTION
• Always use genuine components to ensure safety and product performance.
• The product warranty will not cover damage or injury caused by the use of counterfeit components.
NOTE
• The accessories provided with your product may vary depending on the model or region.
• Product specifications or contents in this manual may be changed without prior notice due to upgrade of product
functions.
• SuperSign Software & Manual
- Downloading from the LG Electronics website.
- Visit the LG Electronics website (http://partner.lge.com) and download the latest software for your model.
• The warranty will not cover any damage caused by using the product in an excessively dusty environment.
ENGLISH

12
Optional Accessories
ENGLISH
Without prior notice, optional accessories are subject to change to improve the performance of the product, and new
accessories may be added. The illustrations in this manual may differ from the actual product and accessories.
Stand kit
Screws
Diameter 4.0 mm x Pitch 0.7 mm
Stand
ST-322T 32SM5*
ST-432T 43SM5*/43SM3D
ST-492T
ST-652T 65SM5*
49SM5*/55SM5*
49SM3D/55SM3D
Stand Spacers
32SM5* -
43SM5*
43SM3D
49SM5*
49SM3D
55SM5*
55SM3D
65SM5*
2 EA
Model
32SM5* 10 mm 6 EA
43SM5*
43SM3D
49SM5*
49SM3D
55SM5*
55SM3D
65SM5* 16 mm 8 EA
Length
(including
spring washer)
14 mm 8 EA
Quantity
Speakers
SP-5000
Speaker kit
(Only for **SM5D/**SM3D model)
Cable holder/
Cable Tie
Diameter 4.0 mm x
Pitch 0.7 mm x Length 8 mm
(including spring washer)
Screws
Screws
Diameter 4.0 mm x
Pitch 1.6 mm x Length 10 mm

13
Media Player
MP500/ MP700
KT-OPSA
Media Player kit
(It may not be supported depending on the model.)
Screws
Diameter 3.0 mm x Pitch 0.5 mm
Length 6mm
OPS kit
Screws
Diameter 3.0 mm x Pitch 0.5 mm
Length 8mm
ENGLISH
CD (Owner's Manual)/ Cards
Connecting Cable
Card (Easy Setup Guide) Power Cord
Pixel sensor kit
KT-SP0
NOTE
• Cable holder/cable tie may not be available in some areas or for some models.
• Optional accessories are available for some models. If necessary, please purchase them separately.
• Pixel sensor is sold separately. You can obtain additional accessories from your local retail store.
• Before you attach the OPS kit or Media Player, connect the cable to the port.

14
Parts and Buttons
ENGLISH
The image may be different according to the model.
• INPUT: Changes the input source.
• MENU: Accesses the main menus, or saves your input and exits the menus.
• : Adjust the up and down.
• : Moves left and right.
• AUTO/SET: Displays the current signal and mode.
• /I: Turns the power on or off.
Buttons

15
Assembling the Memory Cover
Assemble the cover with a screw as illustrated to prevent the USB memory from theft.
1
2
ENGLISH
NOTE
• 65SM5*
- When disassembling the set, remove the memory cover before unplugging the cable.
- When using the memory cover, check the size of the USB memory.
(A: 60 mm, B: 18 mm, C: 10 mm or smaller)

16
Connecting the Stand
ENGLISH
- For certain models only.
- The image may be different according to the model.
32SM5*
1
2

17
43/49/55/65SM5*, 43/49/55SM3D
1
2
ENGLISH
3

18
Connecting the Speakers
ENGLISH
- For certain models only.
- The image may be different according to the model.
32SM5D
1 Connect an input signal cable before installing the speakers.
2 Mount the speakers by using screws as shown below. Make sure the power cable is disconnected before making a
connection.
Basic installation
Installation with OPS connected

19
3 Then connect the speaker cable. After installing your speakers, use holders and cable ties to organize the speaker
cables.
Basic installation
Installation with OPS connected
ENGLISH

20
43/49/55/65SM5D, 43/49/55SM3D
ENGLISH
1 Connect an input signal cable before installing the speakers.
2 Mount the speakers by using screws as shown below. Make sure the power cable is disconnected before making a
connection.
3 Then connect the speaker cable. After installing your speakers, use holders and cable ties to organize the speaker
cables.
NOTE
• Please turn off the power before removing the cable. Connecting or removing the speaker cable while turned on may
result in no sound.

21
Connecting the IR Sensor
When you connect the cable to the product, the feature for receiving remote control signals is activated. Rotate the IR
sensor according to the screen orientation (Landscape/Portrait).
- The image may be different according to the model.
Basic installation
[Front] [Rear]
Landscape scene
ENGLISH
Portrait scene
[Front] [Rear]
[Front] [Rear]

22
Portrait Layout
ENGLISH
When installing in a portrait layout, rotate the monitor counterclockwise 90 degrees (when facing the screen).
Using Kensington Lock
(This is not available for all models.)
The Kensington security system connector is located at the back of the monitor. For more information on installation
and use of this system, refer to the manual provided with the Kensington security system or visit
http://www.kensington.com.
Connect the Kensington security system cable between the monitor and a table.
NOTE
• The Kensington security system is optional. You can obtain additional accessories from most electronics retail stores.
• The illustration shows a general example of installation and may look different from the actual product.

23
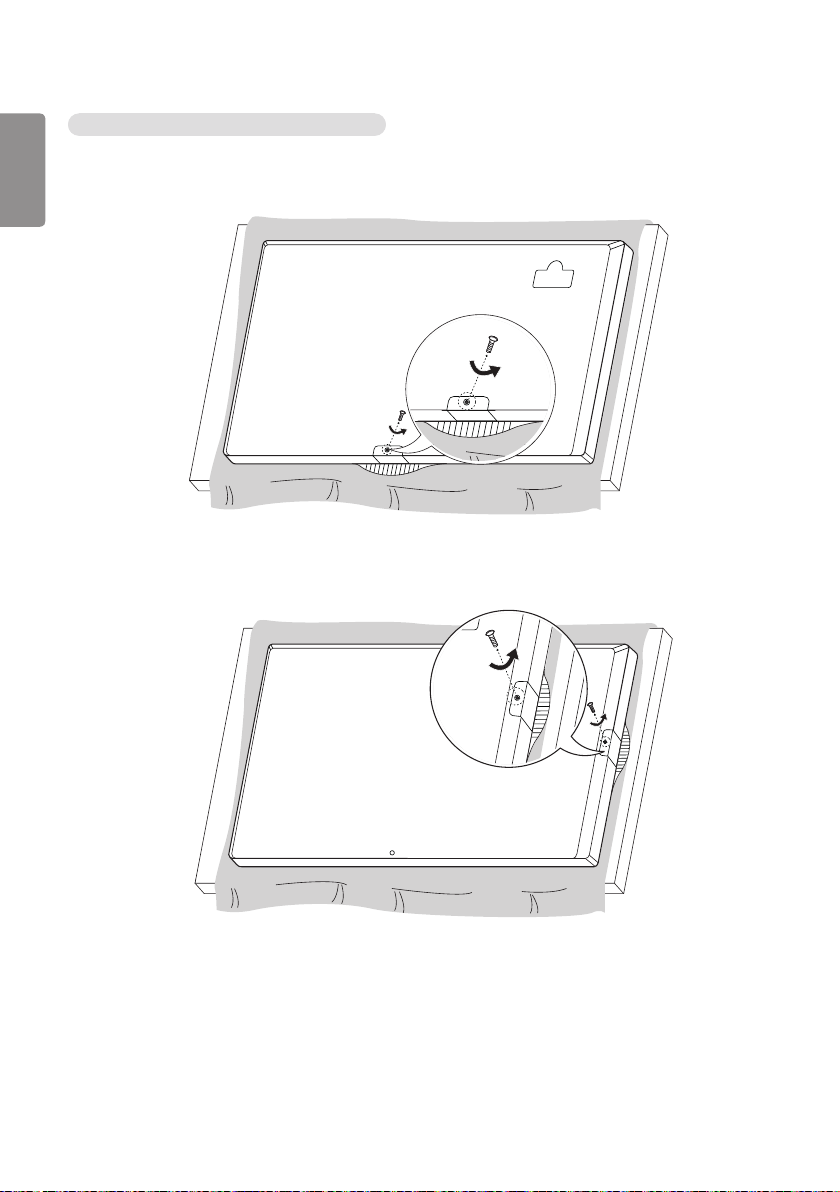
Attaching and removing the LG Logo Bracket
- For certain models only.
- The image may be different according to the model.
Removing the LG Logo Bracket
1 Lay a clean cloth on the floor, and then put the monitor on it with the screen face down. Using a screwdriver,
remove the screw that secures the LG Logo Bracket to the bottom rear of the monitor.
LG Logo Bracket
ENGLISH
2 After removing the screw, remove the LG Logo Bracket. When re-attaching the LG Logo Bracket, repeat the process
in reverse order.
24
Attaching the LG Logo Bracket on the right side
ENGLISH
1 Lay a clean cloth on the floor, and then put the monitor on it with the screen face down. Using a screwdriver,
remove the screw that secures the LG Logo Bracket to the bottom rear of the monitor.
2 After removing the screw, remove the LG Logo Bracket. Attach the LG Logo Bracket with a screw, aligning it with
the hole on the right side.
25
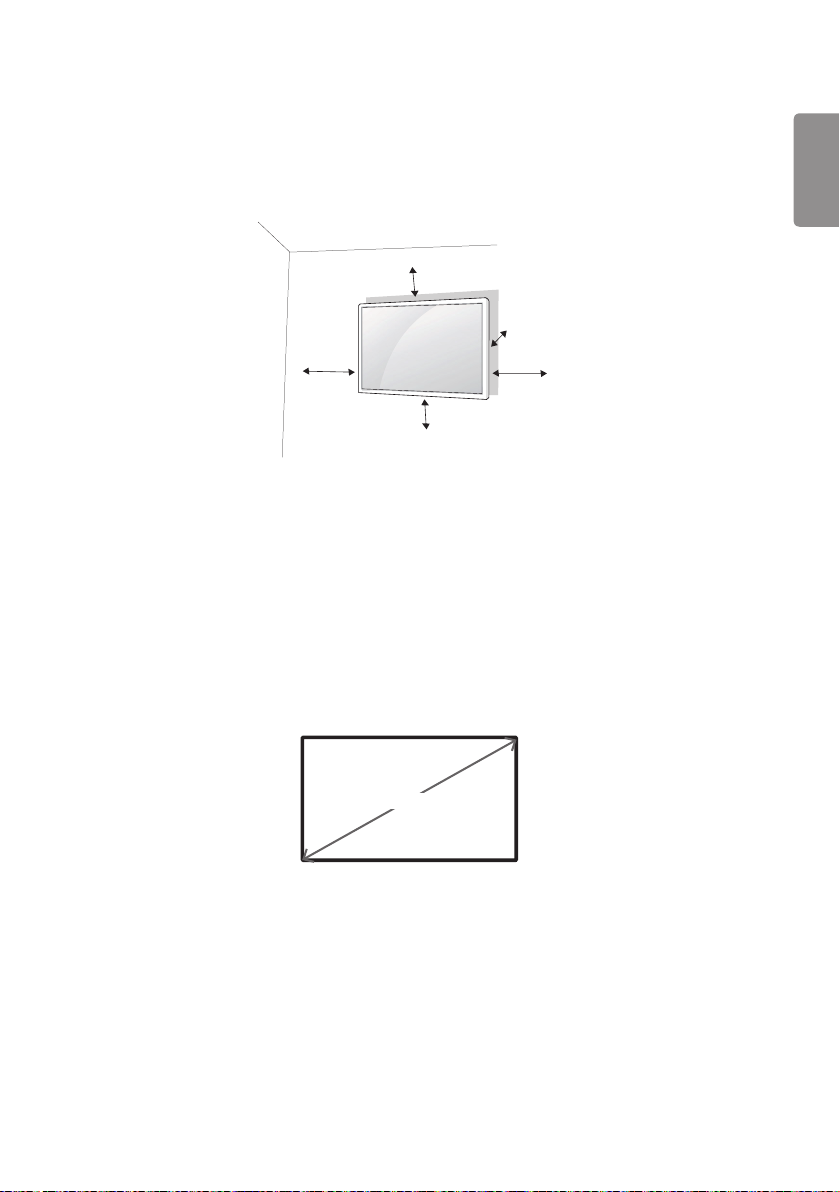
Installing on a Wall
For proper ventilation, allow a clearance of 100 mm on each side and from the wall. Detailed installation instructions
are available from your dealer, see the optional Tilt Wall Mounting Bracket Installation and Setup Guide.
100 mm
100 mm
100 mm
100 mm
To install your monitor on a wall, attach a wall mounting bracket (optional part) to the back of the monitor.
Make sure that the wall mounting bracket is securely fixed to the monitor and to the wall.
1 Use only screws and wall mounting brackets that conform to VESA standards.
2 Screws which are longer than standard length may damage the inside of the monitor.
3 A non-VESA standard screw may damage the product and cause the monitor to fall. LG Electronics is not liable for
any accidents related to the use of non-standard screws.
4 Please use VESA standard as below.
• 785 mm and above
* Fixing screws: Diameter 6.0 mm x Pitch 1.0 mm x Length 12 mm
100 mm
ENGLISH
785 mm

26
ENGLISH
CAUTION
• Disconnect the power cord before moving or installing the monitor to avoid risk of electric shock.
• If you install the monitor on a ceiling or slanted wall, it may fall and result in injury. Use an authorized LG wall mount
and contact your local dealer or qualified personnel to assist with the installation.
• Do not over tighten the screws as this may damage the monitor and void your warranty.
• Use only screws and wall mounting brackets that meet the VESA standard. Any damage or injuries caused by misuse
or use of improper accessories are not covered by the warranty.
• To prevent injury, this apparatus must be securely attached to the wall in accordance with the installation instructions.
(This pertains only to Australia and New Zealand.)
NOTE
• The wall mount kit includes the installation guide and all necessary parts.
• The wall mounting bracket is optional. You can obtain additional accessories from your local dealer.
• The length of screws required may differ depending on the wall mount. Be sure to use the correct length.
• For more information, please refer to the guide provided with the wall mount.

27
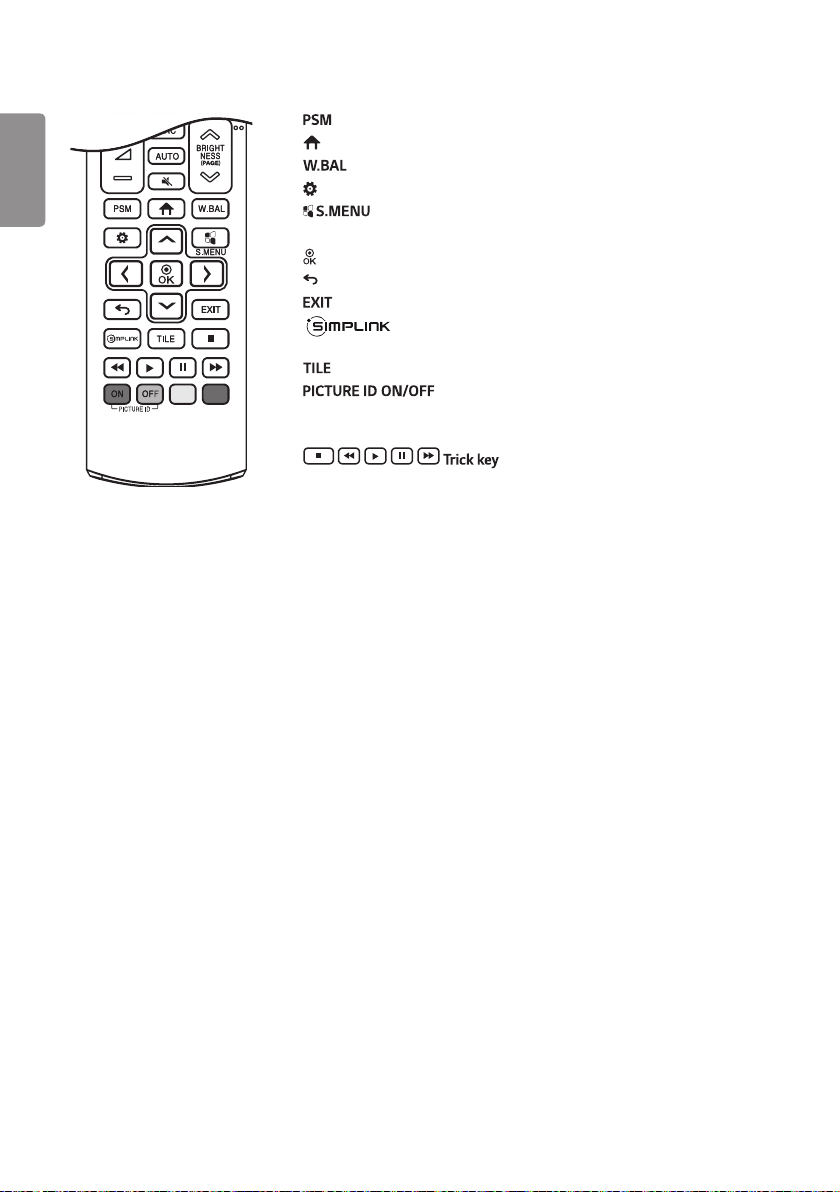
REMOTE CONTROL
The descriptions in this manual are based on the buttons on the remote control. Please read this manual carefully to
use the monitor correctly. To install batteries, open the battery cover, place batteries (1.5 V AAA) matching and
terminals to the labels inside the compartment, and close the battery cover. To remove the batteries, perform the
installation actions in reverse. The illustrations may differ from the actual accessories.
CAUTION
• Do not mix old and new batteries, as this may damage the remote control.
• Be sure to point the remote control toward the remote control sensor on the monitor.
• Some features of the remote control may not be supported in certain models.
(POWER) Turns the monitor on or off.
Turns the monitor on.
Turns the monitor off.
Adjusts the brightness of the picture to reduce energy
consumption.
Selects the input mode.
Used for viewing 3D videos.
Toggles between numerical and alphabetical.
Number and Alphabet buttons
Enters numerical or alphabetical characters depending upon the setting.
Deletes the entered numerical or alphabetical character.
Volume Up/Down Button Adjusts the volume.
Selects the Aspect Ratio mode.
Automatically adjusts picture position and minimizes image instability
(available for RGB input only).
Mutes all sounds.
Adjusts the brightness of the display. PAGE function is not
supported in this model.
ENGLISH
28
ENGLISH
Selects the Picture Mode.
Activates the Launcher.
Enters the White Balance menu.
Accesses the main menus or saves your input and exit menus.
SuperSign menu key.
Navigation Buttons Scrolls through menus or options.
Selects menus or options and confirms your input.
Allows you to move back one step in the user interaction function.
Quit all OSD tasks and applications.
Allows you to control various multimedia devices to enjoy
multimedia simply by using the remote control through the SimpLink menu.
Selects the TILE Mode.
When the Picture ID number matches the Set ID number,
you can control whichever monitor you want in multi-display format.
USB Menu Control Buttons Controls media playback.
May not be supported on some models.

29
MAKING CONNECTIONS
You can connect various external devices to your monitor. Change the input mode and select the external device you
want to connect. For more information about external device connections, see the user manual provided with each
device.
Connecting to a PC
Some of the cables are not provided.
This monitor supports the Plug and Play* feature.
* Plug and Play: a feature that enables a PC to recognize devices attached by the user without device configuration or
user intervention when powering up.
External Device Connection
Connect a HD receiver, DVD, or VCR player to the monitor and select an appropriate input mode.
Some of the cables are not provided. For the best picture and sound quality, connecting external devices to your
monitor using HDMI cables is recommended.
ENGLISH

30
ENGLISH
NOTE
• For the best image quality, using the monitor with HDMI connection is recommended.
• To comply with the specifications of the product, use a shielded interface cable with ferrite core, such as a D-sub
15-pin cable and DVI-D/HDMI cable.
• If you turn the monitor on when the set is cold, the screen may flicker. This is normal.
• Sometimes red, green, or blue spots may appear on the screen. This is normal.
• Use a High Speed HDMI®/TM cable.
• Use a certified cable with the HDMI logo attached. If you do not use a certified HDMI cable, the screen may not
display or a connection error may occur.
• Recommended HDMI Cable Types
- High-Speed HDMI®/TM Cable
- High-Speed HDMI®/TM Cable with Ethernet
• If you cannot hear any sound in HDMI mode please check your PC settings. Some PCs require you to manually change
the default audio output to HDMI.
• If you want to use HDMI-PC mode, you must set your PC/DTV to PC mode.
• You may experience compatibility issues if you use HDMI-PC mode.
• Make sure the power cable is disconnected.
• If you connect a gaming device to the monitor, use the cable provided with the gaming device.
• It is recommended to use the speakers that are provided as optional accessories.
• High Speed HDMI®/TM cables transmit a HD signal up to 1080p and higher.
CAUTION
• Connect the signal input cable and tighten it by turning the screws clockwise.
• Do not press the screen with your finger for a prolonged period as this may result in temporary distortion on the
screen.
• Avoid displaying static images on the screen for a long period of time to prevent image burn. Use a screensaver if
possible.
• A wireless communication device near your monitor can affect the image.

31
Using the Input List
→
• RGB → HDMI1 → HDMI2 → OPS / DVI-D → DISPLAYPORT
ENGLISH
32
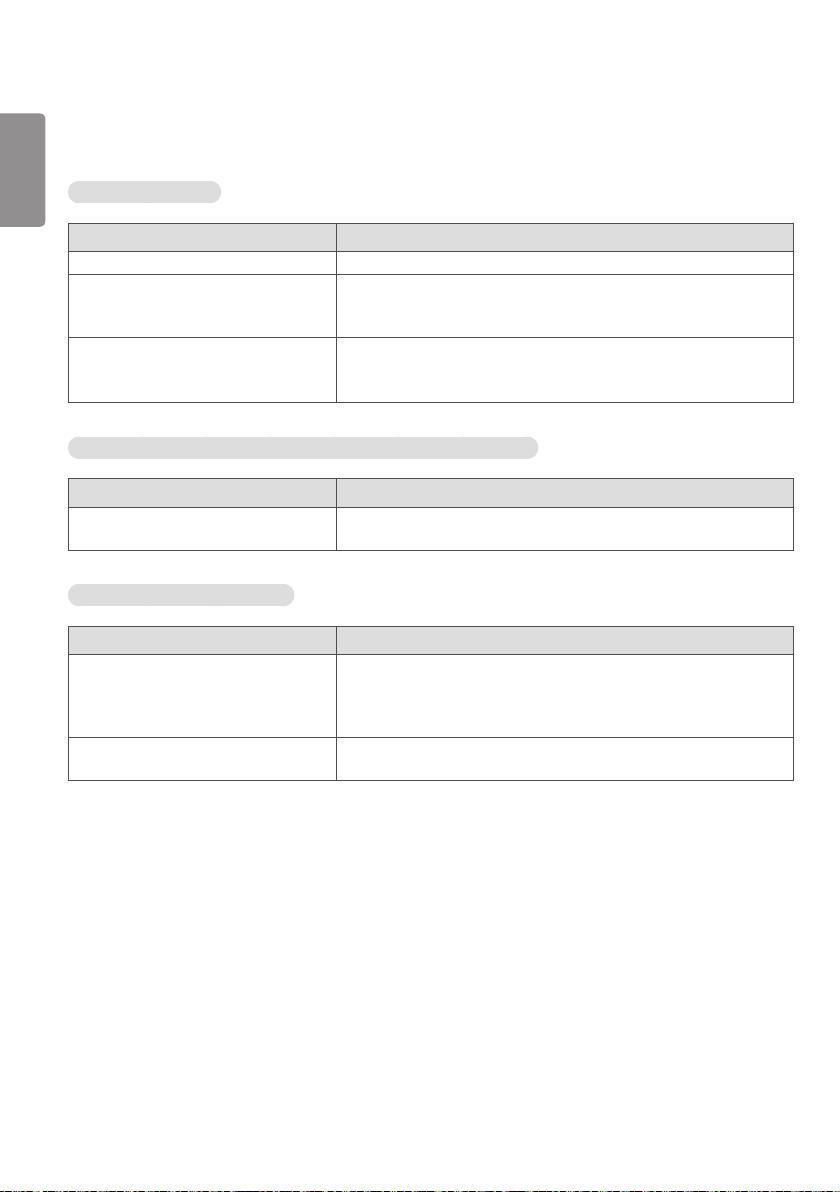
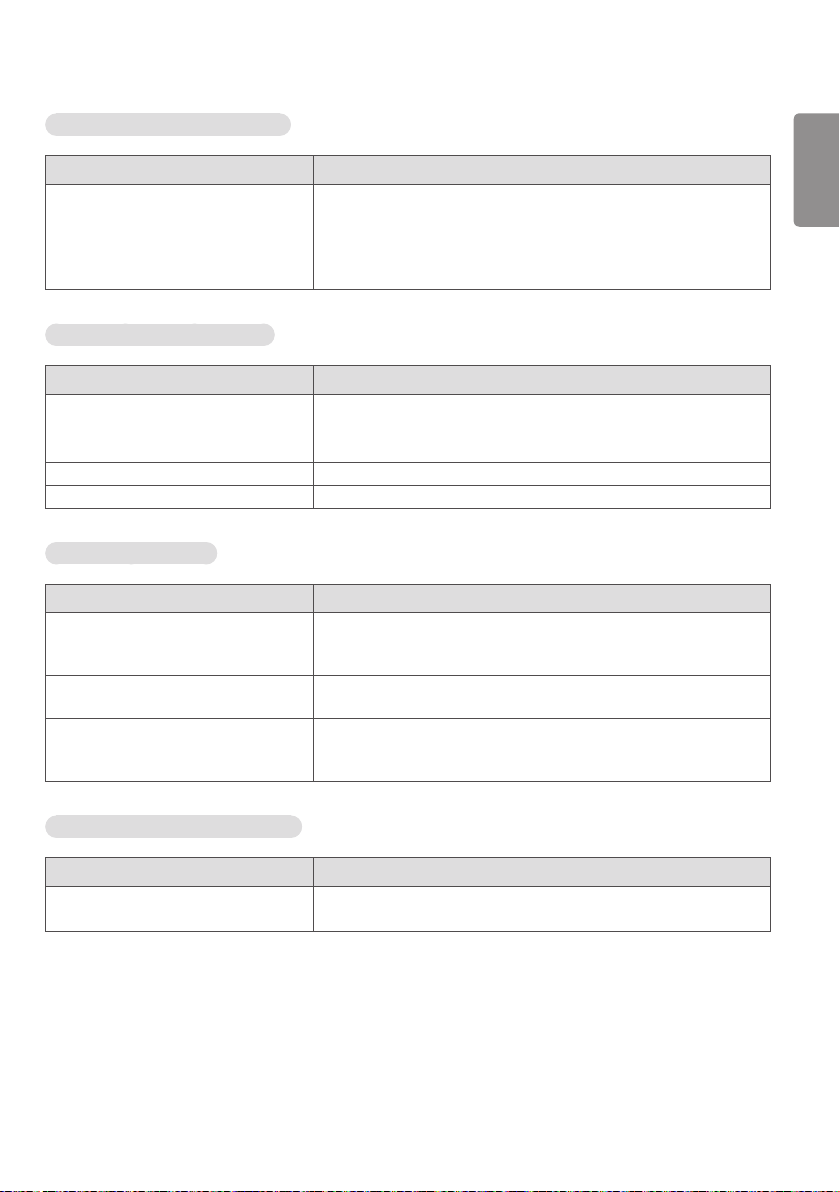
TROUBLESHOOTING
ENGLISH
No image is displayed.
Problem Action
Is the product power cord connected? • Check if the power cord is correctly plugged into the power outlet.
Does the “Invalid Format” message
appear?
Does the “No Signal” message appear? • The signal cable between PC and product is not connected. Check the
The Unknown Product message appears when the product is connected.
Problem Action
Did you install the driver? • Check if the Plug and Play function is supported by referring to the
The screen image looks abnormal.
Problem Action
Is the screen position wrong? • Check if the graphics card resolution and frequency are supported by
The screen is displayed abnormally. • The proper input signal is not connected to the signal port. Connect the
• The signal from the PC (Graphics card) is out of the vertical or
horizontal frequency range of the product. Adjust the frequency range
by referring to the Specifications in this manual.
signal cable.
• Press the INPUT menu in the remote control to check the input signal.
graphics card user manual.
the product. If the frequency is out of range, set to the recommended
resolution in the [Control Panel] → [Display] → [Setting] menu. (The
settings may differ depending on your operating system.)
signal cable that matches with the source input signal.
33
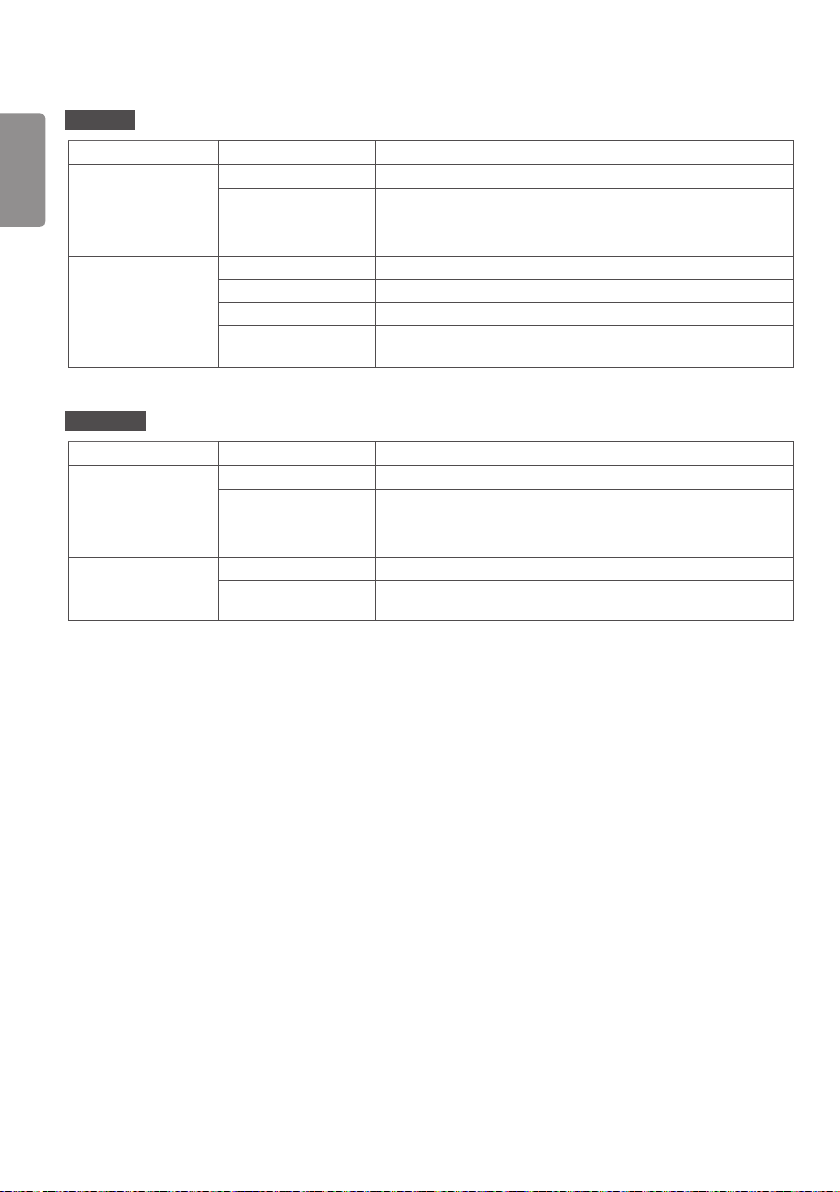
After-image appears on the product.
Problem Action
After-image appears when the product is
turned off.
The audio function does not work.
Problem Action
No sound? • See if the audio cable is connected properly.
Sound is too dull. • Select the appropriate equalizer sound.
Sound is too low. • Adjust the volume.
Screen color is abnormal.
Problem Action
Screen has poor color resolution (16
colors).
Screen color is unstable or mono-colored. • Check the connection status of the signal cable. Or, re-insert the PC
Do black spots appear on the screen? • Several pixels (red, green, blue, white, or black color) may appear on the
• If you use a fixed image for a long time, the pixels may be damaged.
Use the screen-saver function.
• When a dark image is displayed on the screen after an image with high
contrast (black and white or gray), this may cause image sticking. This
is normal for LCD screen products.
• Adjust the volume.
• See if the sound is set properly.
• Set the number of colors to more than 24 bits (true color). Select
[Control Panel] → [Display] → [Settings] → [Color Table] in Windows.
(The settings may differ depending on your operating system.)
graphics card.
screen, which can be attributable to the unique characteristics of the
LCD panel. This is not a malfunction of the LCD.
ENGLISH
The operation does not work normally.
Problem Action
The power suddenly turned off. • Is the Timer set?
• Check the power control settings. Power interrupted.

34
ENGLISH
CAUTION
• Image sticking does not occur when using constantly changing images but may occur when using a fixed image for an
extended period of time. Therefore, it is recommended that you use the instructions below to decrease the likelihood
of image sticking occurring when using a fixed image. It is recommended that you change the screen at least once
every 12 hours at the very minimum; if done more frequently, the prevention of image sticking is more effective.
Recommended operating conditions
1 Change the background and the character colors using the same time interval.
ID: UPM 123
PW: ****
When changing colors, using complementary colors helps to prevent image sticking.
BM BM BM
CF
ITO or MoTi Pixel Layer
Glass
OC
PI
LC
PI
TFT Layers
Glass
ID: UPM 123
PW: ****
CFCFCF
2 Change the image using the same time interval.
Make sure that the characters or images before changing the image remain in the same location after changing the
image.
What is image sticking?
When the LCD panel displays a static image for an extended period of time, it can cause a voltage difference between
the electrodes that operate the liquid crystals. When the voltage difference between the electrodes builds up over
time, liquid crystals have a tendency to remain aligned in one direction. During this process, a previously displayed image
remains visible. This phenomenon is referred to as image sticking.

35
PRODUCT SPECIFICATIONS
The product specifications below may be changed without prior notice due to upgrade of product functions.
“ ” refers to alternating current (AC), and “ ” refers to direct current (DC).
LCD screen Screen type Thin Film Transistor (TFT)
Liquid Crystal Display (LCD) Screen
Video signal Maximum resolution 3840 x 2160 @ 30 Hz (HDMI1, HDMI2, DP)
1920 x 1080 @ 60 Hz (OPS, DVI-D, RGB)
- This may not be supported on some OS or graphics card
types.
Recommended resolution 1920 x 1080 @ 60 Hz
- This may not be supported on some OS or graphics card
types.
Horizontal frequency RGB: 30 kHz to 83 kHz
HDMI/ DVI-D/ DisplayPort: 30 kHz to 83 kHz
Vertical frequency RGB: 56 Hz to 75 Hz
DVI-D/ OPS: 56 ~ 60 Hz
HDMI/ DP: 30Hz, 56 ~ 60Hz
Synchronization Separate Sync, Digital
Input/output ports
Embedded battery Applied
Environmental
Conditions
**SM5D/ **SM3D SPEAKER OUT, AUDIO IN/OUT, HDMI1, HDMI2, PIXEL SENSOR,
IR & LIGHT SENSOR, DP IN/OUT, DVI-D IN, RGB IN, LAN,
USB3.0 IN, RS-232 IN/OUT
**SM5KD AUDIO IN/OUT, HDMI1, HDMI2, PIXEL SENSOR, IR & LIGHT
SENSOR, DP IN/OUT, DVI-D IN, RGB IN, LAN, USB3.0 IN, RS232 IN/OUT
Operating Temperature 0 °C to 40 °C
Operating Humidity 10 % to 80 %
Storage Temperature -20 °C to 60 °C
Storage Humidity 5 % to 85 %
ENGLISH
* Applicable only for models that support the speakers
Audio RMS Audio Output 10 W + 10 W (R + L)
Input Sensitivity 0.7 Vrms
Speaker Impedance 6 Ω
* DP Cable: Use a DP cable that is certified to a DP 1.1a (SST) standard or higher.

36
32SM5D
ENGLISH
LCD screen Pixel pitch
Power Rated power
Dimensions (Width
x Height x Depth) /
Weight
32SM5KD
LCD screen Pixel pitch
Power Rated power
Dimensions (Width
x Height x Depth) /
Weight
Power consumption
Head
Head + Stand
Head + Speaker
Head + Speaker + Stand
Power consumption
Head
Head + Stand
0.36375 mm (H) x 0.36375 mm (V)
AC 100-240 V ~ 50/60 Hz 0.8 A
On Mode: 60 W (Typ.)
Sleep Mode: ≤ 0.5 W
Off Mode: ≤ 0.5 W
729.4 mm x 428.9 mm x 55.5 mm / 5.2 kg
729.4 mm x 481 mm x 154.2 mm / 6 kg
729.4 mm x 428.9 mm x 95.7 mm / 5.7 kg
729.4 mm x 481 mm x 154.2 mm / 6.5 kg
0.36375 mm (H) x 0.36375 mm (V)
AC 100-240 V ~ 50/60 Hz 0.8 A
On Mode: 60 W (Typ.)
Sleep Mode: ≤ 0.5 W
Off Mode: ≤ 0.5 W
729.4 mm x 428.9 mm x 55.5 mm / 5.4 kg
729.4 mm x 481 mm x 154.2 mm / 6.2 kg

37
43SM5D, 43SM3D
LCD screen Pixel pitch 0.4902 mm (H) X 0.4902 mm (V)
Power Rated power AC 100-240 V ~ 50/60 Hz 0.9 A
Dimensions (Width
x Height x Depth) /
Weight
Power
consumption
Head 969.6 mm x 563.9 mm x 38.6 mm / 9.8 kg
Head + Stand 969.6 mm x 622.2 mm x 193 mm / 12.3 kg
Head + Speaker 969.6 mm x 563.9 mm x 67.9 mm / 10.3 kg
Head + Speaker + Stand 969.6 mm x 622.2 mm x 193 mm / 12.8 kg
43SM5D On Mode: 75 W (Typ.)
Sleep Mode: ≤ 0.5 W
Off Mode: ≤ 0.5 W
43SM3D On Mode: 70 W (Typ.)
Sleep Mode: ≤ 0.5 W
Off Mode: ≤ 0.5 W
43SM5KD
LCD screen Pixel pitch 0.4902 mm (H) X 0.4902 mm (V)
Power Rated power AC 100-240 V ~ 50/60 Hz 0.9 A
Power consumption On Mode: 75 W (Typ.)
Sleep Mode: ≤ 0.5 W
Off Mode: ≤ 0.5 W
Dimensions (Width
x Height x Depth) /
Weight
Head 969.6 mm x 563.9 mm x 54 mm / 10.0 kg
Head + Stand 969.6 mm x 622.2 mm x 193 mm / 12.5 kg
ENGLISH

38
49SM5D, 49SM3D
ENGLISH
LCD screen Pixel pitch 0.55926 mm (H) X 0.55926 mm (V)
Power Rated power AC 100-240 V ~ 50/60 Hz 1.0 A
Dimensions (Width
x Height x Depth) /
Weight
Power
consumption
Head 1102.2 mm x 638.5 mm x 38.6 mm / 14.1 kg
Head + Stand 1102.2 mm x 696.8 mm x 219.6 mm / 17.4 kg
Head + Speaker 1102.2 mm x 638.5 mm x 67.9 mm / 14.6 kg
Head + Speaker + Stand 1102.2 mm x 696.8 mm x 219.6 mm / 17.9 kg
49SM5D On Mode: 85 W (Typ.)
Sleep Mode: ≤ 0.5 W
Off Mode: ≤ 0.5 W
49SM3D On Mode: 80 W (Typ.)
Sleep Mode: ≤ 0.5 W
Off Mode: ≤ 0.5 W
49SM5KD
LCD screen Pixel pitch 0.55926 mm (H) X 0.55926 mm (V)
Power Rated power AC 100-240 V ~ 50/60 Hz 1.0 A
Power consumption On Mode: 85 W (Typ.)
Sleep Mode: ≤ 0.5 W
Off Mode: ≤ 0.5 W
Dimensions (Width
x Height x Depth) /
Weight
Head 1102.2 mm x 638.5 mm x 54 mm / 14.3 kg
Head + Stand 1102.2 mm x 696.8 mm x 219.6 mm / 17.6 kg

39
55SM5D, 55SM3D
LCD screen Pixel pitch 0.630 mm (H) x 0.630 mm (V)
Power Rated power AC 100-240 V ~ 50/60 Hz 1.1 A
Dimensions (Width
x Height x Depth) /
Weight
Power
consumption
Head 1238 mm x 714.9 mm x 38.6 mm / 17.3 kg
Head + Stand 1238 mm x 773.4 mm x 219.6 mm / 20.6 kg
Head + Speaker 1238 mm x 714.9 mm x 67.9 mm / 17.8 kg
Head + Speaker + Stand 1238 mm x 773.4 mm x 219.6 mm / 21.1 kg
55SM5D On Mode: 100 W (Typ.)
Sleep Mode: ≤ 0.5 W
Off Mode: ≤ 0.5 W
55SM3D On Mode: 95 W (Typ.)
Sleep Mode: ≤ 0.5 W
Off Mode: ≤ 0.5 W
55SM5KD
LCD screen Pixel pitch 0.630 mm (H) x 0.630 mm (V)
Power Rated power AC 100-240 V ~ 50/60 Hz 1.1 A
Power consumption On Mode: 100 W (Typ.)
Sleep Mode: ≤ 0.5 W
Off Mode: ≤ 0.5 W
Dimensions (Width
x Height x Depth) /
Weight
Head 1238 mm x 714.9 mm x 54 mm / 17.5 kg
Head + Stand 1238 mm x 773.4 mm x 219.6 mm / 20.8 kg
ENGLISH
40
65SM5D
ENGLISH
LCD screen Pixel pitch 0.744 mm (H) x 0.744 mm (V)
Power Rated power AC 100-240 V ~ 50/60 Hz 1.4 A
Power consumption On Mode: 120 W (Typ.)
Sleep Mode: ≤ 0.5 W
Off Mode: ≤ 0.5 W
Dimensions (Width
x Height x Depth) /
Weight
Head 1456.9 mm x 838 mm x 41.1 mm / 27.7 kg
Head + Stand 1456.9 mm x 898.1 mm x 293.7 mm / 32.9 kg
Head + Speaker 1456.9 mm x 838 mm x 70.4 mm / 28.2 kg
Head + Speaker +
Stand
1456.9 mm x 898.1 mm x 293.7 mm / 33.4 kg
65SM5KD
LCD screen Pixel pitch 0.744 mm (H) x 0.744 mm (V)
Power Rated power AC 100-240 V ~ 50/60 Hz 1.4 A
Power consumption On Mode: 120 W (Typ.)
Sleep Mode: ≤ 0.5 W
Off Mode: ≤ 0.5 W
Dimensions (Width
x Height x Depth) /
Weight
Head 1456.9 mm x 838 mm x 56.5 mm / 27.9 kg
Head + Stand 1456.9 mm x 898.1 mm x 293.7 mm / 33.1 kg
41
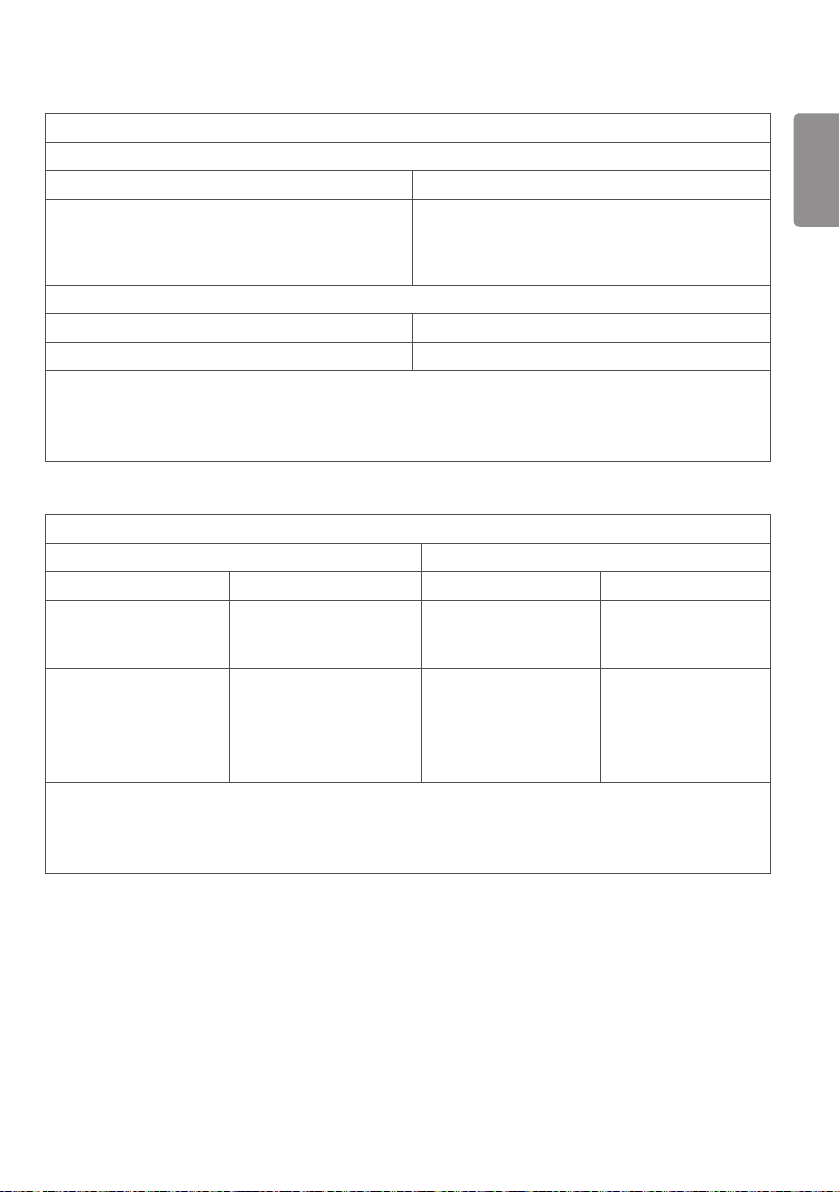
Wireless module(LGSBW41)Specifications
Wireless LAN (IEEE 802.11a/b/g/n)
Frequency range (MHz) Output power (Max.)
2400 to 2483.5 16 dBm
5150 to 5250 16 dBm
5725 to 5850 (Not for EU) 11.5 dBm
Bluetooth
Frequency range (MHz) Output power (Max.)
2400 to 2483.5 10 dBm
• As band channels can vary per country, the user cannot change or adjust the operating frequency. This product is
configured for the regional frequency table.
• For consideration of the user, this device should be installed and operated with a minimum distance of 20 cm
between the device and the body.
(Only HongKong)
Wireless module(LGSBW41)Specifications
Wireless LAN Bluetooth
Standard IEEE 802.11a/b/g/n Standard Bluetooth
2400 to 2483.5
Frequency range (MHz)
Output power (Max.)
• As band channels can vary per country, the user cannot change or adjust the operating frequency. This product is
configured for the regional frequency table.
• For consideration of the user, this device should be installed and operated with a minimum distance of 20 cm
between the device and the body.
5150 to 5250
5725 to 5850
802.11a: 13 dBm
802.11b: 15 dBm
802.11g: 14 dBm
802.11n - 2.4GHz: 16 dBm
802.11n - 5GHz: 16 dBm
Frequency range (MHz) 2400 to 2483.5
Output power (Max.) 10 dBm or Lower
ENGLISH

42
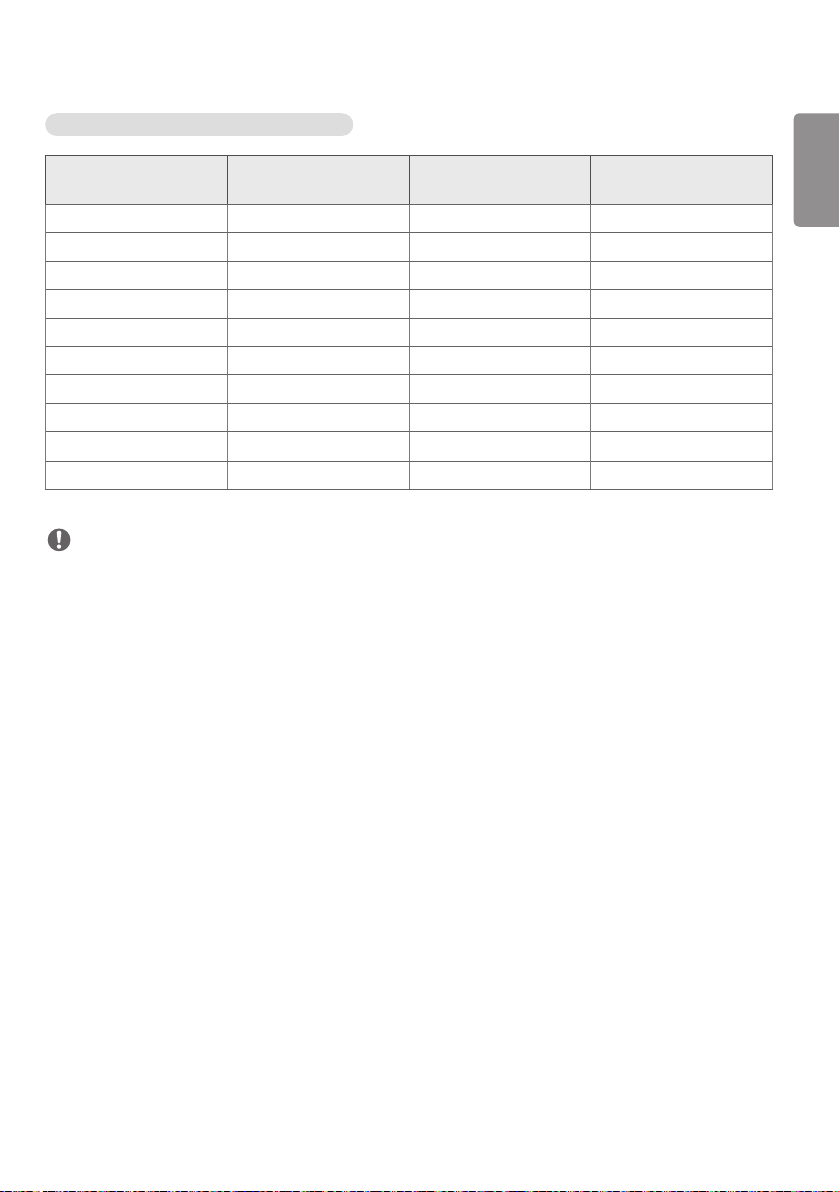
RGB (PC) Support Mode
ENGLISH
Resolution Horizontal frequency (kHz) Vertical frequency (Hz)
720 x 400 31.468 70.8
640 x 480 31.469 59.94
800 x 600 37.879 60.317
1024 x 768 48.363 60.0
1280 x 720 44.772 59.855
1600 x 900 60 60
1280 x 1024 63.981 60.02
1680 x 1050 65.29 59.954
1920 x 1080 67.5 60
HDMI/ DVI-D/ DisplayPort/ OPS (PC) Support mode
Resolution
800 x 600 37.879 60.317
1024 x 768 48.363 60
1280 x 720 44.772 59.855
1366 x 768 47.7 60
1280 x 1024 63.981 60.02
1680 x 1050 65.290 59.954
1920 x 1080 67.5 60
3840 x 2160 67.5 30 HDMI1/ HDMI2/ DP
Horizontal frequency
(kHz)
Vertical frequency (Hz) Remarks
43
HDMI/ DisplayPort/ OPS (DTV) Support Mode
Resolution
480/60p 31.5 60
576/50p 31.25 50
720/50p 37.5 50
720/60p 45 60
1080/50i 28.1 50
1080/60i 33.75 60
1080/50p 56.25 50
1080/60p 67.432 59.94
1080/60p 67.5 60
2160/30p 67.5 30 HDMI1/ HDMI2/ DP
Horizontal frequency
(kHz)
Vertical frequency (Hz) Remarks
NOTE
• PC resolutions available for the Input Label option in RGB / HDMI / DVI-D / DisplayPort input modes:
640 x 480/60 Hz, 1280 x 720/60 Hz, 1920 x 1080/60 Hz; 480p, 720p, and 1080p DTV resolutions.
• Vertical frequency: The product display functions by the screen image changing dozens of times every second like a
fluorescent lamp.
The vertical frequency or refresh rate is the number of image displays per second. The unit is Hz.
• Horizontal frequency: The horizontal interval is the time taken to display one horizontal line. When 1 is divided by
the horizontal interval, the number of horizontal lines displayed every second can be tabulated as the horizontal
frequency. The unit is kHz.
ENGLISH
ENERGY STAR® is a set of power-saving
guidelines issued by the U.S.Environmental
S. A.,
Protection Agency (EPA).
As an ENERGY STAR® Partner LGE U.
Inc. has determined that this product
meets the ENERGY STAR® guidelines for
Refer to ENERGYSTAR.gov for more information on the
ENERGY STAR® program.
energy efficiency.
Make sure to read the Safety Precautions before using
the product.
The model and serial numbers of the SET are located on
the back and one side of the SET. Record it below should
you ever need service.
MODEL
SERIAL
Temporary noise is normal when powering ON or OFF
this device.

USER MANUAL
LG Digital
Signage
(MONITOR SIGNAGE)
Please read this manual carefully before operation and retain it for future
reference.
webOS 3.2
www.lg.com

2
CONTENTS
ENGLISH
SETTINGS ......................................4
- Home ....................................................................................... 4
Global Buttons
Dashboard
Content Manager
- Ez Setting ............................................................................. 5
Video Wall
On/Off Scheduler
SI Server Setting
Server Setting
Fail Over
Status Mailing
Play via URL
Setting Data Cloning
Sync Mode
Multi Screen
- General ................................................................................10
Language
System Information
Set ID
Time & Date
Power
Network
Safety Mode
Expert Controls
- Display .................................................................................21
Picture Mode
Aspect Ratio
Rotation
Expert Controls
- Sound ................................................................................... 27
Sound Mode
Sound Out
Audio Out
Volume Increase Amount
AV Sync. Adjustment
Digital Audio Input
- Admin ................................................................................... 30
Lock Mode
Change PIN Code
Enterprise Settings
Reset to Initial Settings
Factory Reset

CONTENT MANAGER ................ 32
- Web Login ..........................................................................32
- Content Manager ..........................................................32
Player
Schedules
Template
- Group Manager 2.0 ......................................................39
- ScreenShare ......................................................................42
MANAGEMENT TOOLS .............. 43
- Control Manager ............................................................43
- Picture ID ............................................................................44
IR CODE ...................................... 45
CONTROLLING MULTIPLE
PRODUCTS .................................. 47
- Connecting cables .........................................................47
- Communication Parameter ......................................48
- Command Reference List ..........................................49
- Transmission/Reception Protocol .........................53
3
ENGLISH
To obtain the source code under GPL, LGPL, MPL,
and other open source licenses, that is contained
in this product, please visit
http://opensource.lge.com.
In addition to the source code, all referred license
terms, warranty disclaimers and copyright notices
are available for download.
LG Electronics will also provide open source code
to you on CD-ROM for a charge covering the
cost of performing such distribution (such as the
cost of media, shipping, and handling) upon email
request to opensource@lge.com. This offer is valid
for three (3) years from the date on which you
purchased the product.

4
ENGLISH
NOTE
• Software-related content may be changed without prior notice due to upgrades of the product functions.
• Some features described in the User Manual may not be supported in certain models.
• SNMP 2.0 is supported.
SETTINGS
Home
Global Buttons
• MOBILE URL: Provides information necessary to access the monitor set through an external device's browser.
With this feature, you can view QR code and URL information. In addition, by accessing the URL,
you can also run Content Manager and Group Manager 2.0, and Control Manager. (This featured
is optimized for Google Chrome.)
• Input: Navigate to the external input selection screen
• Settings: Navigate to the Settings screen
Dashboard
• This feature displays key information about your Signage monitor in the center of the home screen. In the Dashboard,
you can manually change settings by selecting the corresponding items.
NOTE
• If the dashboard is locked, the focus does not move.
Content Manager
• Player : Play a variety of content including images, videos, and SuperSign content.
• Scheduler : Manage schedules for content that will be played at different times.
• Template : You can create your own content using templates and media files.
• Group Manager 2.0 : Distribute content schedules and setting data to the connected device.
5
Ez Setting
Video Wall
Ez Setting Video Wall
Set Video Wall options to create a wide visual canvas.
• Tile Mode : Turn Tile Mode on or off.
• Tile Mode Setting : Display a single integrated screen on multiple Signage monitors.
• Natural Mode : Display the image excluding the area that overlaps with the monitor's bezel so that the image
displayed has a more natural feel to it.
• White Balance : Configure white balance settings (White Pattern, R/G/B-Gain, and Luminance).
• RESET : Reset to initial settings.
On/Off Scheduler
Ez Setting On/Off Scheduler
Set a schedule to use your signage by time and day of the week.
• On/Off Time Setting : Set on/off times for each day of the week.
• Holiday Setting : Set holidays by date and by day of the week.
SI Server Setting
EZ Setting SI Server Setting
Set up to connect your signage to an external SI server. Set up a server environment for SI app installation.
Server Setting
Ez Setting Server Setting
Set up to connect your signage to a SuperSign server.
• SuperSign premium servers
• SuperSign link servers
ENGLISH

6
Fail Over
ENGLISH
This feature enables automatically switching to other input sources in order of priority if the primary signal is
interrupted. It also enables the automatic playback of the content stored on your device.
• On/Off : Turns Fail Over on or off.
• Input Priority : Set the priority of input sources for fail over.
• Backup via Storage : Automatically play the content stored on the device when there is no input signal.
• Capture time Interval : Set the interval at which the image/video played on the screen will be automatically
Ez Setting Fail Over
captured when Backup via Storage has been set to Auto. (30 min, 1 hour, 2 hours, and 3
hours)
Status Mailing
Ez Setting Status Mailing
This feature configures the system so that the status of the device is assessed and then notified to the administrator
by e-mail.
• On/Off : Turns Status Mailing on or off.
• Mailing Option, SCHEDULE : Sets the email sending interval.
• User E-mail Address : Set the user email address of the sender.
• Sending Server (SMTP) : Set the address of the SMTP server.
• ID : Enter the account ID of the sender.
• Password : Enter the password for the sender's account.
• Recipient E-mail Address : Set the email address of the recipient.
• Message Delivery : Immediately assess the status of the device and deliver the information to the specified email
address.

7
NOTE
• If the status regarding any of the following items changes or becomes abnormal, a status message can be sent.
- 1. Temperature: If the monitor set reaches a dangerous temperature, its current temperature is recorded, and an
email containing such information is sent.
- 2. Validity of the temperature sensor: An email is sent if there is no temperature sensor connected, if the
communication status of the temperature sensor is unknown, or if the information provided by the chip provider is
abnormal.
- 3. Network Status (Wireless/Wired): An email is sent when the network's connection status is changed. The
maximum number of network status changes that can be saved is limited to 50. The saved value is reset once the
power turns off.
- 4. Screen Fault Detection: An email is sent when a "Check Screen" triggered by the Check screen Screen Fault
Detection has failed to perform.
- 5. No Signal Check: Checks whether there is a signal. If there are no signals for more than 10 seconds, an email is
sent.
- 6. Local Contents Schedule: An email is sent if it becomes impossible to play content between the start time and
end time of the playback schedule registered in Signage. However, this does not apply when termination was made
using the remote control.
- 7. SuperSign Schedule: An email is sent if it becomes impossible to play content between the start time and end
time of the playback schedule distributed to SuperSign. However, this does not apply when termination was made
using the remote control.
• Only SMTP ports 25, 465, and 587 are supported.
ENGLISH

8
Play via URL
ENGLISH
Play content you want to play automatically through the built-in web browser.
• URL Loader : Turns Play via URL on or off.
• Set URL : Enter the URL address to display automatically.
• Preview : Preview your desired website by accessing the specified URL.
• SAVE : Save the specified URL.
• Reboot to Apply : Restarts the monitor set after saving the specified URL.
Ez Setting Play via URL
NOTE
• This feature does not apply when Screen Rotation is enabled, and using this feature disables Preview .
Setting Data Cloning
Ez Setting Setting Data Cloning
This feature is used to copy and import the settings of the device to other devices.
• Export Setting Data : Export the settings of the device to another device.
• Import Setting Data : Import the settings of another device into the device.
Sync Mode
Ez Setting Sync Mode
Sync up time and content among multiple signages.
• RS-232C Sync : Sync up multiple signages connected by RS-232C.
• Network Content Sync : Sync up multiple signages connected to the same network.

9
Multi Screen
Ez Setting Multi Screen
This feature allows you to view multiple external inputs and videos on a single screen.
NOTE
• After entering multi-screen mode, the screen may flicker and the picture may appear abnormal on certain devices
while the optimal resolution is selected automatically. If this happens, please restart the monitor.
• In multi-screen mode, the DP daisy chain feature is not supported.
Selecting Screen Layout
When you enter multi-screen mode without having set any screen layout, the screen layout selection menu appears.
When the screen layout selection menu is not displayed on the screen, go to the screen layout menu bar by pressing
the up arrow key on your remote control and select your desired screen layout. If you want to close the screen layout
menu, press the back key.
Closing Screen Layout Menu
From the screen layout menu, press the up arrow key on the remote control to go to the screen layout menu bar and
select it or press the back key to close the screen layout menu.
Changing Screen Input
Press the button on the top right of each split screen to select the desired input.
NOTE
• Inputs which have already been selected for other split screens cannot be selected again. To select them, press the
RESET button to reset the inputs for all screens first.
• PIP mode works only when External Input Rotation is set to Off and Screen Rotation is set to Off.
ENGLISH
Playing Videos on Split Screens
Press the button on the upper right of each split screen, select Video File, and then select a storage device to view
the list of videos in the selected device. Next, select your desired video from the list to play it.
NOTE
• Videos created with HEVC, MPEG-2, H.264, or VP9 codecs can be played on split screens. When using PIP mode, the
following combinations cannot be used.
Main Sub
HEVC HEVC
H.264 HEVC
MPEG-2 HEVC
VP9 VP9

10
General
ENGLISH
Language
General Language
You can select the menu language to be displayed on the screen.
• Menu Language: Sets the language of your Signage monitor.
• Keyboard Language : Sets the language of the keyboard displayed on the screen.
System Information
General System Information
This feature displays information such as the device name, software version, and storage space.
Set ID
General Set ID
• Set ID (1~1000) : Assigns a unique Set ID number to each product when several products are connected via RS-
232C. Assign numbers ranging from 1 to 1000 and exit the option. You can control each product
separately by using the Set ID you assigned to each product.
• Auto Set ID : Automatically assigns a unique Set ID number to each product when several products are connected
for display.
• Reset Set ID : Reset the Set ID of the product to 1.
Time & Date
General Time & Date
This feature enables you to view and change the time and date on the device.
• Set Automatically : Set Time and Date.
• Daylight Saving Time : Set the start and end times for Daylight Saving Time. The DST start/end times function only
when you set them more than one day apart from each other.
• Time Zone: Configure the continent, country/region and city.

11
Power
General Power
No Signal Power Off (15 Min)
Set whether to use the 15 Min Auto Off feature.
• You can set this option to On or Off .
• If you set this feature to On , the product turns off when it has remained in No Signal status for 15 minutes.
• If you set this feature to Off , the 15 Min Force Off feature is disabled.
• It is recommended that you set this feature to Off if you intend to use the product for long periods of time as the
feature turns the power of the product off.
No IR Power Off (4hour)
Set whether to use 4 Hours Off feature.
• You can set this option to On or Off .
• If you set this feature to On the product turns off if there is no input from the remote control for 4 hours.
• If you set this feature to Off , the 4 Hours Off feature is disabled.
• It is recommended that you set this feature to Off if you intend to use the product for long periods of time as the
feature turns the power of the product off.
DPM
Set the Display Power Management (DPM) mode.
• If this feature is not set to Off, the monitor will enter DPM mode when there is no input signal.
• If you set this feature to Off , DPM is disabled.
ENGLISH

12
PM Mode
ENGLISH
• Power Off (Default) : Set the normal DC off mode.
• Sustain Aspect Ratio : Identical to normal DC off mode except that the Switching IC remains on. On certain
models, this applies only to a specific input mode (DisplayPort) and has the same effect as
Screen Off Always in other input modes.
• Screen Off : Automatically switches to Screen Off status when entering DPM/Auto mode, or in the case of Auto
Off (15 mins, 4 hours) or Abnormal Shut Down.
• Screen Off Always : Switches to Screen Off status when entering DPM/Auto, Auto Off (15 mins, 4 hours), Off
Timer, or Abnormal Shut Down mode, or when there is input from the remote control's Power
button or the monitor's Off button.
• Screen Off & Backlight On :
Partially turns on the backlight to keep the display at a proper temperature when in
Screen Off status.
NOTE
• In order for the screen to switch from Screen Off to On status, there must be input from the remote control's
Power or Input button, or the monitor's On button.
Power Off Delay (0~250)
• This feature prevents overload by implementing a power-on delay when multiple monitor sets turn on.
• You can set the delay interval in the range of 0 to 250 seconds.
Power On Status
• Select the operating status of the monitor when the main power has turned on.
• You can choose from among PWR (Power On), STD (Standby) , and LST (Last Status).
• PWR (Power On) keep the monitor powered on when the main power has turned on.
• STD (Standby) switch the monitor to Standby status when the main power has turned on.
• LST (Last Status) switches the monitor back to its previous status.
Wake On LAN
• Set whether to use Wake On LAN .
• You can set the feature to On or Off for each wired/wireless network.
• Wired : When set to On , the Wake On LAN feature is enabled, letting you turn the product on remotely through
a wired network.
• Wired : When set to On , the Wake On LAN feature is enabled, letting you turn the product on remotely through
a wireless network.

13
Power On/Off History
Display the device's power on/off history.
Network
General Network
Wired Connection (Ethernet)
• Wired Connection : Connects the monitor to a local area network (LAN) via the LAN port and configures network
settings. Only wired network connections are supported. After making a physical connection,
a small number of networks may require the display network settings to be adjusted. For
most networks, the display will automatically make a connection without any adjustments. For
detailed information, contact your Internet provider or consult your router manual.
Wireless Network Connection
If you have set your monitor up for a wireless network, you can view and connect to available wireless Internet
networks.
• Add a Hidden Wireless Network : You can add a wireless network by manually typing in its name.
• Connect via WPS PBC : Press the button on the wireless router that supports PBC to easily connect to the router.
• Connect via WPS PIN : Enter the PIN number in the web page of the PIN-supporting wireless router to connect to
the router in a simple manner.
• Advanced Wi-Fi Settings : When there is no available wireless network displayed on the screen, you can connect
to the wireless network by entering the network information directly.
3G/4G Connection
Connect to a network via a 3G/4G USB dongle.
ENGLISH
LAN Daisy Chain
• LAN Daisy Chain forms a daisy chain of LAN ports so that even if you connect only one monitor set to a network, the
other sets in the daisy chain are connected to the network.
• However, the first monitor set in the daisy chain must be connected to the network through a port that is not used
for the daisy chain connection.

14
SoftAP
ENGLISH
If you set up a SoftAP, you can connect many devices via a Wi-Fi connection without a wireless router and use wireless
Internet.
• To use SIGNAGE, you must have an Internet connection.
• The SoftAP and ScreenShare features cannot be used at the same time.
• On models that support Wi-Fi dongles, the SoftAP menu is enabled only when a Wi-Fi dongle is connected to the
product.
• SoftAp Access Information
- SSID: A unique identifier necessary to make a wireless Internet connection
- Security key: The security key you enter to connect to the desired wireless network
- Number of connected devices: Shows the number of devices currently connected to your Signage device via a Wi-Fi
connection. Up to 10 devices are supported.
UPnP
Open and block UDP port 1900, which is used for UPnP.
• The default setting is On . Setting this feature to Off blocks UDP port 1900, making the UPnP function unavailable.
• If you set this feature to Off , Sync Mode's "Network" option will be deactivated.
• If you set this feature to Off when the value for Sync Mode is "Network," the value switches to "Off," deactivating
the "Network" option.
• If you change the UPnP value, the change will not be applied before a reboot.
• If you set UPnP to Off , you cannot use Group Manager 2.0 properly.

15
Tips for Network Settings
• Use a standard LAN cable (Cat5 or higher with a RJ45 connector) with this display.
• Many network connection problems during set up can often be fixed by re-setting the router or modem. After
connecting the display to the home network, quickly power off and/or disconnect the power cable of the home
network router or cable modem, Then power on and/or connect the power cable again.
• Depending on the Internet service provider (ISP), the number of devices that can receive INTERNET service may be
limited by the applicable terms of service. For details, contact your ISP.
• LG is not responsible for any malfunction of the display or Internet connection failures due to communication errors/
malfunctions associated with your Internet connection or other connected equipment.
• LG is not responsible for problems within your INTERNET connection.
• You may experience undesired results if the network connection speed does not meet the requirements of the
content being accessed.
• Some INTERNET connection operations may not be possible due to certain restrictions set by the Internet service
provider (ISP) supplying your Internet connection.
• Any fees charged by an ISP including, without limitation, connection charges are your responsibility.
NOTE
• If you want to access the Internet directly on your display, the INTERNET connection should always be on.
• If you cannot access the Internet, check the network conditions from a PC on your network.
• When you use Network Setting, check the LAN cable or check if DHCP in the router is turned on.
• If you do not complete the network settings, the network may not function correctly.
CAUTION
• Do not connect a modular phone cable to the LAN port.
• Since there are various connection methods, please follow the specifications of your telecommunication carrier or
INTERNET service provider.
• Network setting menu will not be available until the display connected to physical network.
ENGLISH

16
Tips for When Configuring Wireless Network Settings
ENGLISH
• The wireless network may be affected by interference from a device that uses 2.4 GHz frequency, such as a wireless
telephone, Bluetooth device or microwave. Interference may also be caused by a device that uses 5 GHz frequency
such as Wi-Fi devices.
• The wireless network service may run slowly depending on the surrounding wireless environment.
• Some devices may have a network traffic jam if any local home networks are turned on.
• To connect to a wireless router, a router that supports wireless connection is necessary; the wireless connection
function of the corresponding router must also be activated. Ask the router manufacturer whether the router
supports wireless connection.
• To connect to a wireless router, verify the SSID and security settings of the wireless router. Please refer to the user
guide of the corresponding router regarding SSID and security settings of the wireless router.
• The monitor may not work properly if network devices (wire/wireless router or hub, etc.) are incorrectly set up. Be
sure to install the devices correctly by referring to their user guides before configuring the network connection.
• The connection method may vary according to the manufacturer of the wireless router.

17
Safety Mode
General Safety Mode
ISM Method
If a still image is displayed on the screen for an extended period of time, image sticking can occur. The ISM method is a
feature that prevents image sticking.
Screen Fault Detection
• The screen fault detection feature determines whether there is an abnormality at the end of screen; R, G, and B
OSDs are created in the upper left-hand corner of the panel at intervals of about one second, and then a pixel sensor
checks the area.
• Setting this feature to On enables the screen fault detection feature.
• Setting this feature to Off disables the screen fault detection feature.
ENGLISH
18
Expert Controls
ENGLISH
General Advanced Setting
Beacon
• This option enables BLE Beacon, one of Bluetooth 4.0's features.
• Beacon Mode (On/Off Toggle): enables the Beacon feature.
• The LG Beacon/iBeacon/Eddystone Type Beacon features are supported.
• LG Beacon/iBeacon
- Beacon UUID (hex): Set the UUID.
1. Field1: 4byte hex value (8 digits)
2. Field2: 2byte hex value (4 digits)
3. Field3: 2byte hex value (4 digits)
4. Field4: 2byte hex value (4 digits)
5. Field5: 6byte hex value (12 digits)
- Major (0–65535): Sets the Major value.
- Minor (0–65535): Sets the Minor value.
• Eddystone
- Frame: Set UUID or URL.
1. Beacon UUID (hex): Set the UUID.
(1) Field1: 10byte hex value (20 digits)
(2) Field2: 6byte hex value (12 digits)
2. Setting the URL method
- URL Prefix: Sets the prefix of the URL.
- URL Suffix: Set the suffix of the URL.
- URL: Enter the part of the URL that excludes the prefix and suffix.
- URL string length is limited to 17 characters.
• OK : The button used to confirm and apply the settings that you have entered.
NOTE
• Some models do not support background screening services in iOS.
• A reboot is recommended for the settings to be applied properly.
• The UUID value is hexadecimal and the exact number of digits must be entered.

19
OPS Control
• OPS Power Control : This feature enables you to control the power of the OPS as you turn on/off the display.
- Disable: Disable OPS Power Control.
- Sync (On): Synchronize the monitor's power status only when the monitor is on.
- Sync (On/Off): Synchronize the monitor's power status with the OPS.
• Control Interface Selection : This feature enables you to configure communication with the OPS connected to
your monitor.
- Display: Enable communication with external serial ports.
- OPS: Enable communication with the OPS connected to your monitor.
Background Image
This feature enables you to set the default background image.
• Booting Logo Image : Change the logo image that appears when the device boots up. If you set this option to Off,
no logo image appears when the device boots up.
• No Signal Image :
Changes the image that appears when there is no signal. If you set this option to Off, no image
appears when there is no signal.
Input Manager
This feature enables you to specify a label for each input source.
• PC: PC input devices
• DTV: HDMI, satellite and set-top boxes, DVD players, Blu-ray players, home theaters, game consoles, streaming boxes,
and camera input devices.
ENGLISH
20
SIMPLINK Setup
ENGLISH
• When the SIMPLINK Setup is set to On, you can use the SIMPLINK provided by LG Signage.
• Device ID : Set the ID of the device connected via CEC wiring. You can choose a value between All and E .
• StandBy : Sets the scenarios for sending and receiving the OpStandBy (0x0c) command. Detailed scenarios are as
follows:
Transmission Reception
All O O
Send Only O X
Receive Only X O
Crestron
• This function enables synchronization with applications provided by Crestron.
• Server : This menu sets the server's IP address for the network connection with the server (equipment provided by
Crestron).
• Port : This menu sets the port for the network connection with the server. The default port number is 41794.
• IP ID (1-254) : This menu sets a unique ID for synchronizing with the application.
21
Display
Picture Mode
Display Picture Mode
Mode
This feature enables you to choose the optimal picture mode for your installation environment.
• Mall/QSR , Transportation, Education , Gov./Corp., Game , and Photo : Display the picture optimally for your
installation environment.
• Normal : Display the picture at normal contrast, brightness, and sharpness.
• APS : Adjust the screen brightness to reduce power consumption.
• Expert, Calibration : Allow an expert, or anyone who loves picture quality, to manually tune to the best picture
quality.
NOTE
• The kinds of Picture Mode you can select may vary depending on the input signal.
• Expert is an option that allows a picture quality expert to fine-tune the picture quality using a specific image. Thus,
it may not be effective for a normal picture.
ENGLISH

22
Customize
ENGLISH
• Backlight/OLED Light : Adjust the brightness of the screen by adjusting the brightness of the backlight. The closer
the value is to 100, the brighter the screen is.
• Contrast : Adjust the difference between the light and dark areas of the picture. The closer the value is to 100, the
greater the difference is.
• Brightness : Adjust the overall brightness of the screen. The closer the value is to 100, the brighter the screen is.
• Sharpness : Adjust the sharpness of the edges of objects. The closer the value is to 50, the clearer and the sharper
the edge becomes.
• H Sharpness : Adjust the sharpness of the contrast edges on the screen from a horizontal point of view.
• V Sharpness : Adjust the sharpness of the contrast edges on the screen from a vertical point of view.
• Color : Soften or deepen the tints on the screen. The closer the value is to 100, the deeper the colors become.
• Tint : Adjust the balance between red and green levels displayed on the screen. The closer to Red 50, the redder the
color will be. The closer to Green 50, the greener the color will be.
• Color Temperature : The higher you set the color temperature, the cooler the colors on the screen will feel. The
lower you set the color temperature, the warmer the colors on the screen will feel.
• Expert Controls Customize the advanced options.
- Dynamic Contrast: Optimize the difference between the light and dark parts of the screen according to the
brightness of the image.
- Super Resolution: Sharpen the areas of the screen that are blurry or barely distinguishable.
- Color Gamut: Select the range of colors available.
- Dynamic Color: Adjust the tint and saturation of the image for a more vivid and lively display.
- Edge Enhancer: Provide much sharper and clearer edges to the picture.
- Color Filter: Accurately adjust color and tint by filtering a specific color area of RGB space.
- Preferred Color: Adjust the skin tint, grass tint, and sky tint to your preference.
- Gamma: Adjust gamma settings to compensate for the brightness of the input signal.
- White Balance: Adjust the overall color fidelity of the screen to your liking. In Expert mode, you can fine-tune the
picture using the Method/Pattern options.
- Color Management System: Experts use the color management system when they adjust the colors by using
the test pattern. The color management system allows you to make an adjustment
by selecting from among 6 different color spaces (Red/Yellow/Blue/Cyan/
Magenta/Yellow) without affecting other colors. In a normal picture, you may not
notice the color changes you have made.

23
• Picture Option : Customize the picture options.
- Noise Reduction: Remove randomly popping dots to make the picture look clearer.
- MPEG Noise Reduction: Reduce the noise generated in the process of creating a digital video signal.
- Black Level: Adjust the brightness and contrast of the screen by adjusting the black level of the screen.
- Real Cinema: Optimize the video image for a cinematic look.
- Motion Eye Care : Reduce eye fatigue by adjusting brightness levels and lessening blurriness based on the
displayed image.
- Aurora Led Backlight: Make the light areas of the screen lighter and the dark areas darker for maximum
contrast. Setting this feature to Off may increase the monitor's power consumption.
- TruMotion: Reduce image shaking and image sticking that can occur with moving images.
• Reset : Reset the picture settings. Because the picture settings are reset according to the monitor's picture mode,
please select the picture mode before resetting the picture settings.
ENGLISH

24
Aspect Ratio
ENGLISH
This feature enables you to change the picture size to view the picture at its optimal resolution.
• Full Wide : Stretch the picture to fill the screen.
• Original : Display the picture at its original resolution.
Display Aspect Ratio
Rotation
Display Rotation
Screen Rotation
• This feature rotates the screen clockwise.
• You can set this feature to Off/90/180/270.
• When set to off, this feature is deactivated.
• It is recommended that you use content designed to be used in Portrait mode.
External Input Rotation
• This feature rotates the externally inputted picture 90, 180, or 270 degrees clockwise.
• When this feature is set to On (90 or 270 degrees), as for ARC, the picture is resized to be Full Wide .
• When you intend to use the External Input Rotation feature in conjunction with WiDi, it is recommended that you set
the monitor's aspect ratio to Original . If you set the monitor's aspect ratio to Full Wide , the mouse cursor may be
inaccurately displayed.
• Please note that the degradation of picture quality that occurs when you have enabled External Input Rotation
during the use of external input has nothing to do with the product itself.
• When External Input Rotation is set to On, Multi Screen's PIP mode is disabled.

25
Expert Controls
Display Advanced Setting
UHD Deep Color
If you connect an UHD device to one of the Deep Color adjustable ports, you can select Deep Color On (6G) or Off (3G)
from the HDMI Ultra Deep Color settings menu.
If a compatibility issue occurs with a graphics card when the Deep Color option is set to On at 3840 x 2160 @ 60 Hz,
set the Deep Color option back to Off.
• HDMI and DP specifications may vary depending on the input port. Check the specifications of each device before
connecting to the monitor.
• HDMI input port 2 is best suited for high definition videos that are 4K@60 Hz (4:4:4, 4:2:2). However, video or audio
may not be supported depending on the specifications of the external device. If this is the case, please connect the
device to a different HDMI port.
OLED Panel Settings
• Clear Panel Noise : Correct issues that may arise when the screen is turned on for a long period of time.
Energy Saving
• Smart Energy Saving : Automatically adjust the brightness of the screen according to the brightness of the picture
to save energy.
- On: Enable the Smart Energy Saving feature.
- Off: Disable the Smart Energy Saving feature.
• Brightness Control : Adjust the brightness of the screen to save energy.
- Auto: Automatically adjust the brightness of the screen according to ambient light.
- Off: Disable energy saving.
- Minimum/Medium/Maximum: Use energy saving according to the energy saving level set for the monitor.
• Brightness Scheduling : Adjust the backlight at specified times.
- You can set this feature to On/Off .
- If the current time has not been set, Bright Scheduling is disabled.
- You can add up to six schedules, and they are sorted in ascending order by time.
- You can edit a schedule by selecting it from the list and pressing the OK button.
• Screen Off :
Turn off the screen, meaning the TV only produces sound. You can turn on the screen again by pressing
any button on the remote control except the power button.
ENGLISH

26
Adjust (RGB-PC)
ENGLISH
This feature enables you to configure the PC display options in RGB mode.
• Set Automatically : Automatically adjust the screen position, time, and phase. The image displayed on the screen
can be unstable for a few seconds in the process of the configuration.
• Resolution : Select the appropriate resolution.
• Position/Size/Phase : Adjust the options when the picture is not clear, especially when characters are shaky, after
the auto configuration.
• Reset : Resets the options
to default.
HDMI IT Contents
• Set the HDMI IT Contents function.
• Off : Disable the HDMI IT Contents function.
• On : Enable the HDMI IT Contents function.
This feature automatically changes the monitor's picture mode based on HDMI Contents information when an HDMI
signal is entered.
Even if the monitor's picture mode has been changed by the HDMI IT Contents feature, you can change the picture
mode again manually.
As this has a higher priority than the picture mode set by the user, the existing picture mode may be changed when
the HDMI signal changes.

27
Sound
Sound Mode
Sound Sound Mode
Sound Mode
The best sound quality will be selected automatically depending on the video type currently being watched.
• Standard : This sound mode works well for content of all types.
• Cinema : Optimize sound for watching movies.
• Clear Voice III Enhance voices so they can be heard more clearly.
• Sports : Optimize sound for watching sports.
• Music : Optimize sound for listening to music.
• Game : Optimize sound for playing video games.
Balance
• Balance : Adjust the output volume for the left speaker and the right speaker.
Equalizer
• Equalizer : Manually adjust sound by using the equalizer.
Reset
• Reset : Resets sound settings.
ENGLISH
28
Sound Out
ENGLISH
• Internal Speaker/External Speaker
or through an external speaker connected to it.
• SIMPLINK External Speaker: This feature is used when you have connected a home theater device to your
• LG Sound Sync / Bluetooth: Enables you to connect Bluetooth audio devices or Bluetooth headsets wirelessly to
Sound Sound Out
: You can output audio either through your Signage monitor's internal speaker
monitor via SIMPLINK. This feature enables audio to be outputted through the
connected device. This option is activated when SIMPLINK has been set to On.
your monitor so that you can enjoy richer audio conveniently.
NOTE
• Some recently connected devices may automatically attempt to reconnect to the Signage monitor when it is turned
on.
• It is recommended that you set LG audio devices that support LG Sound Sync to LG TV mode or LG Sound Sync mode
before connecting.
• Press Device Selection to view the devices that are or that can be connected and connect other devices.
• You can use the signage remote control to adjust the volume of the connected device.
• If the audio device fails to connect, check that it is switched on and available for connection.
• Depending on the type of the Bluetooth device, the device may not connect correctly or an abnormal behavior may
occur such as unsynchronized video and audio.
• Sound may stutter or sound quality may be reduced if:
- The Bluetooth device is too far from the Signage monitor.
- There is an obstructing object between the Bluetooth device and the Signage monitor.
- The Bluetooth device is used together with radio equipment such as a microwave oven or wireless LAN.
29
Audio Out
Sound Audio Out
• When set to Off : Disables the use of Audio Out. (No audio outputted.)
• When set to Variable : You can specify an output range for the external audio device connected to the monitor and
adjust the volume within the range. You can change the volume of an external audio device
within the range of 0 to 100 (the same as the Signage speaker volume). However, there may
be a difference in the actual volume level outputted.
• When set to Fixed : Set a fixed audio output level for the external audio device.
- If there is no external input, no external audio is outputted.
- The variable audio output level 100 is the same as the fixed audio output level.
Volume Increase Amount
Sound Volume Increase Amount
This feature enables you to adjust the amount of volume that increases/decreases when you press the up/down volume
key on your remote control. The higher the value you set, the faster the volume increases. Choose from among Low ,
Medium, and High to adjust the volume range.
AV Sync. Adjustment
Sound AV Sync. Adjustment
This feature adjusts audio timing to synchronize video and audio.
• External Speaker : Adjust the sync between video and audio coming from external speakers, such as those
connected to the digital audio output port, LG audio equipment, or headphones. Moving
closer to – speeds up the audio output, while moving closer to + slows down the audio output,
compared to the default value.
• Bypass : Output the broadcast signals or the sound from external devices without any audio delay. Audio may be
outputted earlier than video due to the processing time for video that is inputted into the monitor.
ENGLISH
Digital Audio Input
Sound Digital Audio Input
This feature enables you to choose an input source for audio output.
• Digital : Output the audio contained in the digital signal inputted from the connected digital input source (HDMI,
DISPLAYPORT, or OPS).
• Analog : Output audio from the digital input source (HDMI, DISPLAYPORT, or OPS) connected to the monitor through
the Audio In port.

30
Admin
ENGLISH
Lock Mode
Admin Lock Mode
Home Dashboard Lock
This feature enables you to restrict changes made to dashboard lock settings on the Home screen.
USB Lock
This feature enables you to configure the USB lock feature so that settings or content cannot be changed.
OSD Lock
This feature enables you to configure the OSD lock feature so that settings or content cannot be changed.
IR Operation Lock
• If you set this feature to Off (Normal) , you can use your remote control.
• If you set this feature to On (Power Key Only) , you can only use the power key.
• If you set this feature to On (Block All) , you cannot use your remote control. (However, Power On feature is
available.)
Local Key Operation Lock
• This feature enables you to configure the Local Key Operation Lock feature so that settings or content cannot be
changed.
• If you set this feature to Off (Normal) , you can use the local keys on the monitor.
• If you set this feature to On (Power Key Only) , you can only use the power key. (When you use a joystick, press
and hold a local key to turn on/off the monitor.)
• If you set this feature to On (Block All) , you can use the local keys. (However, Power On feature is available.)
Wi-Fi Lock
This feature enables you to turn the Wi-Fi feature on or off.
Screen Share Lock
This feature enables you to turn the Screen Share feature on or off.

31
Change PIN Code
This feature enables you to set the password you use to enter the Installation menu.
1 Enter a new 4-digit password.
2 Enter the same password again in the Confirm Password field for confirmation.
Enterprise Settings
• Enter your company account code to apply the corresponding enterprise settings.
• When your code has been entered, the monitor set gets reset, thereby applying the corresponding enterprise
settings.
• This feature does not get activated if a code has already been entered.
Reset to Initial Settings
This feature resets all items except the Quick Start items (Language, Time, and Auto Power Off) to their initial settings.
Factory Reset
This feature resets the items applicable for Reset to Initial Settings, Date, Time, Language, Network IP, and the Input
Label Internal Storage files.
However, Calibration mode's RGB gain is an exception.
ENGLISH

32
CONTENT MANAGER
ENGLISH
Web Login
• Different features are supported depending on the product.
This Signage product comes with a feature that enables you to access it on your PC or mobile device.
- Content Manager, Group Manager 2.0, Control Manager, Log Out, Change Password menus are provided.
• URL: https://set ip:443
• (The default password: 000000)
CAUTION
• Supported resolutions (this program is optimized for the following resolutions):
- PC: 1920x1080, 1280x1024
- Mobile: 360x640 (1440x2560, 1080x1920), DPR
• Supported browsers (this program is optimized for the following browsers):
- Chrome 56 or later (recommended)
Content Manager
Player
(Player)
The Content Manager app's player feature enables you to play and manage video content, image content, template
content, SuperSign content, and playlist content in an integrated way. (The OLED models do not support the playback
and management of image content and template content.)
Continuous Play
1 Select your desired type of content from the tab on the left and then select your desired content.
2 Click Play in the upper right-hand corner of the screen and enjoy the content you have selected.
Export
1 Select your desired type of content from the tab on the left and click Export in the upper right-hand corner of the
screen.
2 Select the content you wish to export.
3 Click Copy/Move in the upper right-hand corner of the screen and select the device to which you wish to export
the content. (If a content file stored on the target device has been selected, the processing of the content file is
skipped.)
4 You can see that the content has been moved/copied to the device.

33
Delete
1 Select your desired type of content from the tab on the left and click Delete in the upper right-hand corner of the
screen.
2 Select the content you wish to delete.
3 Click Delete in the upper right-hand corner of the screen.
4 You can see that the content has been deleted.
Filter / Sort
1 Click Filter / Sort in the upper right-hand corner of the screen.
2 1) Choose your desired sort criterion to sort content files either by file name or in the order they have been played
(the most recently played file shown at the top of the list).
2) It is possible to only view the content stored on your desired device by filtering content files by device.
3) It is possible to only view the content of your desired type by filtering content files by content type.
Create Playlist
When creating a playlist, you cannot include characters that cannot be used in file names on Windows — such as \, /,:,
*,?, ", <,>, and | — in the names of the files in the playlist. In addition, if the playlist contains content files whose names
include such characters, you cannot move or copy the playlist.
1 Select Playlist from the tab on the left and click Create Playlist in the upper right-hand of the screen.
2 Select the content you wish to add to the playlist and click Next in the upper right-hand of the screen.
3 Set a play time for each piece of content (applicable only for photo and template content), as well as other items
such as Conversion Effect, Ratio, and Auto Playback, and then click Complete in the upper right-hand corner of
the screen.
4 You can see a new Playlist has been created.
ENGLISH
34
Schedules
ENGLISH
The Content Manager app's scheduler feature enables certain content to be played at a scheduled time through a
playlist or external input.
(Scheduler)
Creating a Schedule
1 Click New Schedule in the upper right-hand corner of the screen.
2 Choose between Playlist and Input Source .
3 1) If you have selected Playlist , select the playlist you wish to schedule the playback of.
2) If you have selected Input Source , select the external input source you wish to schedule the playback of.
4 Enter schedule information and create a new schedule. (When creating a schedule, you cannot include characters
that cannot be used in file names on Windows — such as \, /,:, *,?, ", <,>, and | — in the name of the schedule file.
In addition, if the playlist linked to the schedule contains content files whose names include such characters, you
cannot move or copy the playlist.)
5 Watch the playlist or external input you selected play back at its scheduled time.
Importing a Schedule
1 Click Import in the upper right-hand corner of the screen.
2 Select the external storage device from which you wish to import a schedule.
3 Select the schedule you wish to import to your monitor. (You can only choose a single schedule.)
4 Click Select in the upper right-hand corner of the screen.
5 Check that the schedule has been imported to the monitor's internal storage memory.
Exporting a Schedule
1 Click Export in the upper right-hand corner of the screen.
2 Select the external storage device to which you wish to export a schedule.
3 Select the schedule you wish to export from your monitor. (You can choose multiple schedules.)
4 Click Select in the upper right-hand corner of the screen.
5 Check that the schedule has been exported to the external storage device you selected.
35
Deleting a Schedule
1 Click [Delete] in the upper right-hand corner of the screen.
2 Select the schedules you wish to delete.
3 Click Delete .
4 Check that the schedules have been deleted.
Calendar View
1 When you have registered schedules, click Calendar View .
2 You can see that the schedules registered are displayed in the form of a timetable.
Template
(Template)
The Content Manager app's editor feature enables you to add your desired templates.
1 Select the template of your desired format. (You can choose between Landscape mode and Portrait mode.)
2 Modify the template's text.
2-1. Apply your desired font style (text size, text thickness, underline, and italic).
3 Modify the media file.
4 Save the template by clicking Save in the top right-hand corner of the screen.
5 Check that the template you saved is shown in the template list.
ENGLISH
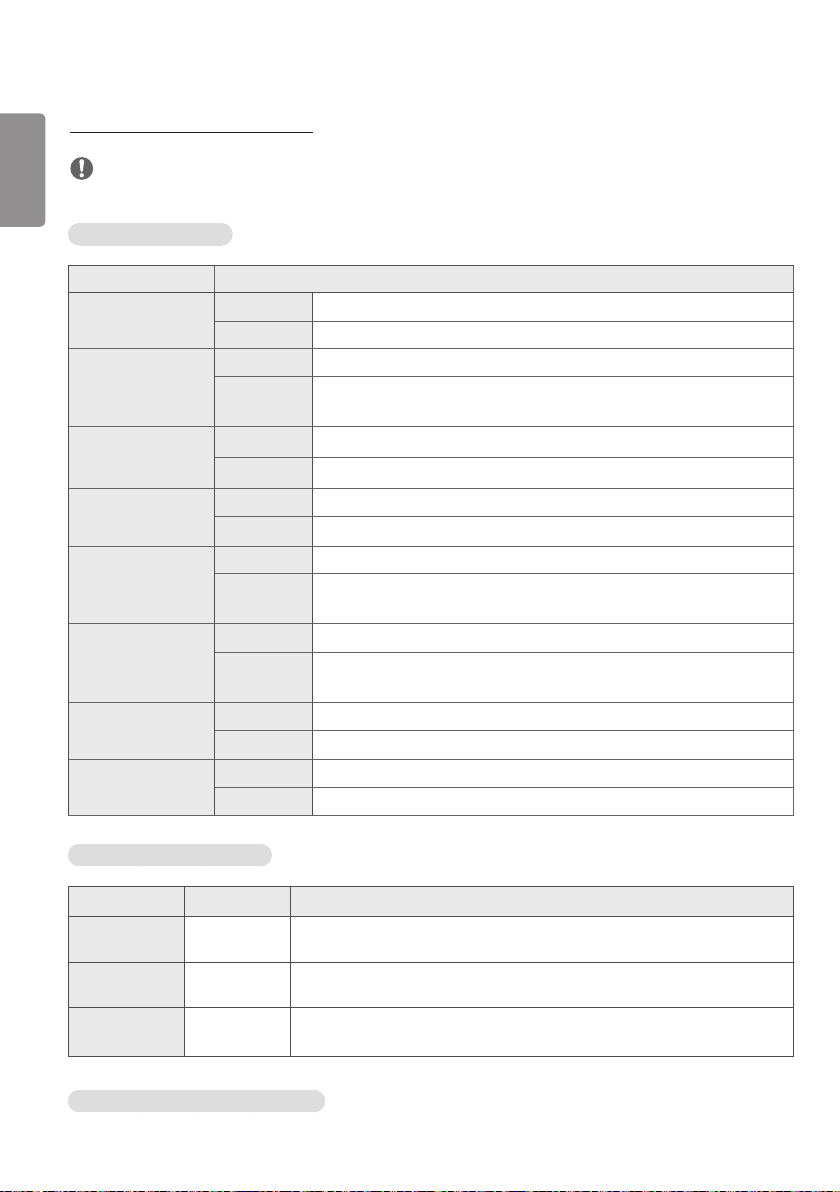
36
Supported Photo & Video Files
ENGLISH
NOTE
• Subtitles are not supported.
Supported video codecs
Extension Codec
.asf, .wmv Video VC-1 Advanced Profile (except for WMVA), VC-1 Simple and Main Profiles
Audio WMA Standard (excluding WMA v1/WMA Speech)
.avi Video Xvid (excluding 3 warp-point GMC), H.264/AVC, Motion Jpeg, MPEG-4
Audio MPEG-1 Layer I, II, MPEG-1 Layer III (MP3), Dolby Digital, LPCM, ADPCM,
DTS
.mp4, .m4v, .mov Video H.264/AVC, MPEG-4, HEVC
Audio Dolby Digital, Dolby Digital Plus, AAC, MPEG-1 Layer III (MP3)
.3gp
.3g2
.mkv Video MPEG-2, MPEG-4, H.264/AVC, VP8, VP9, HEVC
.ts, .trp, .tp, .mts Video H.264/AVC, MPEG-2, HEVC
.mpg, .mpeg, .dat Video MPEG-1, MPEG-2
.vob Video MPEG-1, MPEG-2
Video H.264/AVC, MPEG-4
Audio AAC, AMR-NB, AMR-WB
Audio Dolby Digital, Dolby Digital Plus, AAC, PCM, DTS, MPEG-1 Layer I, II, MPEG-1
Layer III (MP3)
Audio MPEG-1 Layer I, II, MPEG-1 Layer III (MP3), Dolby Digital, Dolby Digital Plus,
AAC, PCM
Audio MPEG-1 Layer I, II, MPEG-1 Layer III (MP3)
Audio Dolby Digital, MPEG-1 Layer I, II, DVD-LPCM
Supported Photo File Formats
File type Format Item
.jpeg, .jpg, .jpe JPEG • Min: 64 x 64
• Max: 7480 (W,H) x 4320 (H,W)
.png PNG • Min: 64 x 64
• Max: 7480 (W,H) x 4320 (H,W)
.bmp BMP • Min: 64 x 64
• Max: 7480 (W,H) x 4320 (H,W)
Tips for using USB/SD storage devices

37
• Only USB storage devices are recognized.
• USB storage devices connected to the monitor through a USB hub may not work properly.
• USB storage devices that use an automatic recognition program may not be recognized.
• USB storage devices that use their own drivers may not be recognized.
• The recognition speed of a USB storage device may depend on each device.
• Please do not turn off the display or unplug the USB device when the connected USB storage device is working.
When the device is suddenly separated or unplugged, the stored files or the USB storage device may be damaged.
• Please do not connect the USB storage device which was artificially maneuvered on the PC. The device may cause
the product to malfunction or fail to be played. Remember to only use USB storage devices that store normal music,
image, and/or movie files.
• Storage devices formatted with utility programs that are not supported by Windows may not be recognized.
• Please connect power to a USB storage device (over 0.5 A) which requires an external power supply. Otherwise, the
device may not be recognized.
• Please connect a USB storage device with the cable offered by the device maker.
• Some USB storage devices may not be supported or operated smoothly.
• File alignment methods of the USB storage device is similar to Windows XP and filenames can include up to 100
English characters.
• Be sure to back up important files since data stored in a USB memory device may be damaged. We will not be
responsible for any data loss.
• If the USB HDD does not have an external power source, the USB device may not be detected. So make sure to
connect it to an external power source.
- Please use a power adapter for an external power source. No USB cable is provided for an external power source.
ENGLISH

38
• If your USB storage device has multiple partitions, or if you use a USB multi-card reader, you can use up to four
ENGLISH
partitions or USB memory devices.
• If a USB storage device is connected to a USB multi-card reader, its volume data may not be detected.
• If the USB storage device does not work properly, remove it and connect it again.
• The speed at which a USB storage device is detected differs from device to device.
• If the USB storage device is connected in Standby Mode, a specific hard disk will automatically be loaded when the
display is turned on.
• The recommended capacity is 1 TB or less for a USB external hard disk and 32 GB or less for USB memory.
• Any device with more than the recommended capacity may not work properly.
• If a USB external hard disk with a Energy Saving feature does not work, turn the hard disk off and on again to make
it work properly.
• USB storage devices (USB 2.0 or below) are also supported. However, they may not work properly in the videos list.
• A maximum of 999 folders or files can be recognized under one folder.
• SDHC-type SDs are supported. To use an SDXC card, format it to the NTFS file system first.
• The exFAT file system is not supported for SD cards and USB storage devices.
• SD cards are not supported on some models.

39
Group Manager 2.0
This feature enables you to group together multiple monitor sets on a single network into the same group and to
distribute content (schedules and playlists) or copy setting data on a group basis. This feature has two modes, Master
and Slave, and it can access the browser on your PC or mobile device.
Master
• Add, edit, and delete group.
• Clone your device's settings data.
• Distribute Schedules and Playlists on a group basis.
• All monitor sets initially come in Master mode.
Slave
• Play Schedules and Playlists distributed in Master mode.
• Remove monitor sets for their groups.
• Monitor sets that have been added to a group are automatically switched to Slave mode. Conversely, when a monitor
set has been deleted from a group, it is automatically initialized and switched to Master mode.
• You can duplicate the master device's setting data to the group by using Data Cloning .
• You can re-download the content distributed to the group by using Sync .
ENGLISH

40
(Group Management)
ENGLISH
• Creating a New Group
1. Click Add New Group.
2. Enter a group name.
3. Click Add Device, select the devices you wish to add to the group, and add them.
4. Click Done, and you will see that a new group has been created.
• Editing a Group
1. Click the group you wish to edit.
2. Add a new device by using Add Device .
3. Delete a device by using Delete Device .
4. Check whether the devices in the group are connected to a network by using Device Check.
5. You can re-copy the master device's setting data to the group by using Data Cloning .
6. You can re-distribute the content distributed to the group by using Sync .
• Deleting a Group
1. Click Delete Group.
2. Select the group you wish to delete and click Delete .
3. Check that the group you selected has been deleted.
• All Devices View: This page enables you to manage all slave monitor sets that are connected to the same network.
1. Click All Devices View.
2. Click Reset Device Mode.
3. Select the slave monitor set whose device mode you wish to change and click Reset .
Data Cloning
1 Select your desired group and click Clone .
2 Check that the data have been copied on the slave sets.

41
Content Distribution
1 Select the type of content you wish to distribute (Schedules or Playlists).
2 Select the content you wish to distribute.
3 Select the group to which you wish to distribute the content and click Distribute .
4 Run the Content Manager app on the slave sets and check that the content has been distributed.
How to Use
• Monitors: Run/add/delete/edit apps in the Launcher bar.
• Mobile devices: Run the app in the Launcher bar or access the app from a mobile device using the QR code or URL
provided.
CAUTION
• You can create up to 25 groups.
• You can add up to 12 slave devices to a group.
• You can distribute the schedules stored on external devices after executing Content Manager's import operation.
• Make sure to delete all schedules stored on the slave sets before distributing any schedules.
• A list of devices you can add to your desired group appears only when the following conditions have been met:
- The devices you wish to add must be on the same network as the master device.
- The devices you wish to add must be in Master mode, and they must not belong to any existing group.
- The UPnP feature must be enabled (go to General > Network > UPnP and set it to On ).
• Group Manager 2.0 may not work properly in wireless network environments. It is recommended you use a wired
network.
ENGLISH

42
ScreenShare
ENGLISH
This feature allows the screen of a user's device such as a mobile or PC Windows to be shared with a display using a
wireless connection such as WiDi or Miracast.
How to Use ScreenShare
1 Connect according to the instructions provided by the guide that can be accessed through the CONNECTION GUIDE
button in the upper right.
2 Once the connection is established, Screen Share between the user device and the monitor is enabled.
NOTE
Configuring WiDi (Wireless Display)
WiDi, which is short for Wireless Display, is a system that wirelessly transmits video and audio files from a laptop that
supports Intel WiDi to the display.
This is available only in certain input modes (Composite/Component/RGB/HDMI/DP/OPS/DVI-D).
Other than these modes, LG Signage cannot be detected by your PC.
1 Connect your laptop to AP. (This feature can be used without an AP, but it is recommended that you connect to it for
optimal performance.)
2 Click Add Device in the top center of the screen, and then you will see a list of nearby WiDi-capable LG Signage
monitors. From the list of detected Signage monitors, select one you wish to connect to and click Connect.
Go to
PC Settings PC and Devices Devices on your laptop.
3 The screen of your laptop screen appears on the screen of the Signage monitor within 10 seconds. The wireless
environment may affect the screen from displaying. If the connection is poor, the Intel WiDi connection may be lost.
• For more information on how to use Intel WiDi, visit
• This feature only works properly with WiDi 3.5 or later versions.
• This feature only works on Windows 8.1 or later
http://intel.com/go/widi
.
MANAGEMENT TOOLS

43
Control Manager
Control and check the status of the display through the Web browser.
This function is available for PCs and mobile devices.
Different features are supported depending on the product.
Function
• Dashboard : Display a summary of the product's status and provides links to each page.
• Display and Sound : Provides features such as Screen Brightness, Sound, Input, and Reboot.
• Time & Date : Enable/disable Set Automatically feature and displays/changes the time set for the product.
• Network : Set the name and IP address of your Signage monitor.
• Screen Fault Detection : Display the video output status of the product.
• Tile Mode : Display the tile mode settings of the product.
• Fail Over : Turns the Fail Over feature on or off and sets related items.
• Play via URL : Turn Play via URL on or off and set URLs.
• S/W Update : Update the firmware of the product.
• Charts : Output the product's status information such as its temperature and fan status.
• Logs : Output product malfunction records.
• System Information : Output information such as the product's software version and model name.
NOTE
• When Screen Rotation On is set to On, Fault Detection does not work.
ENGLISH
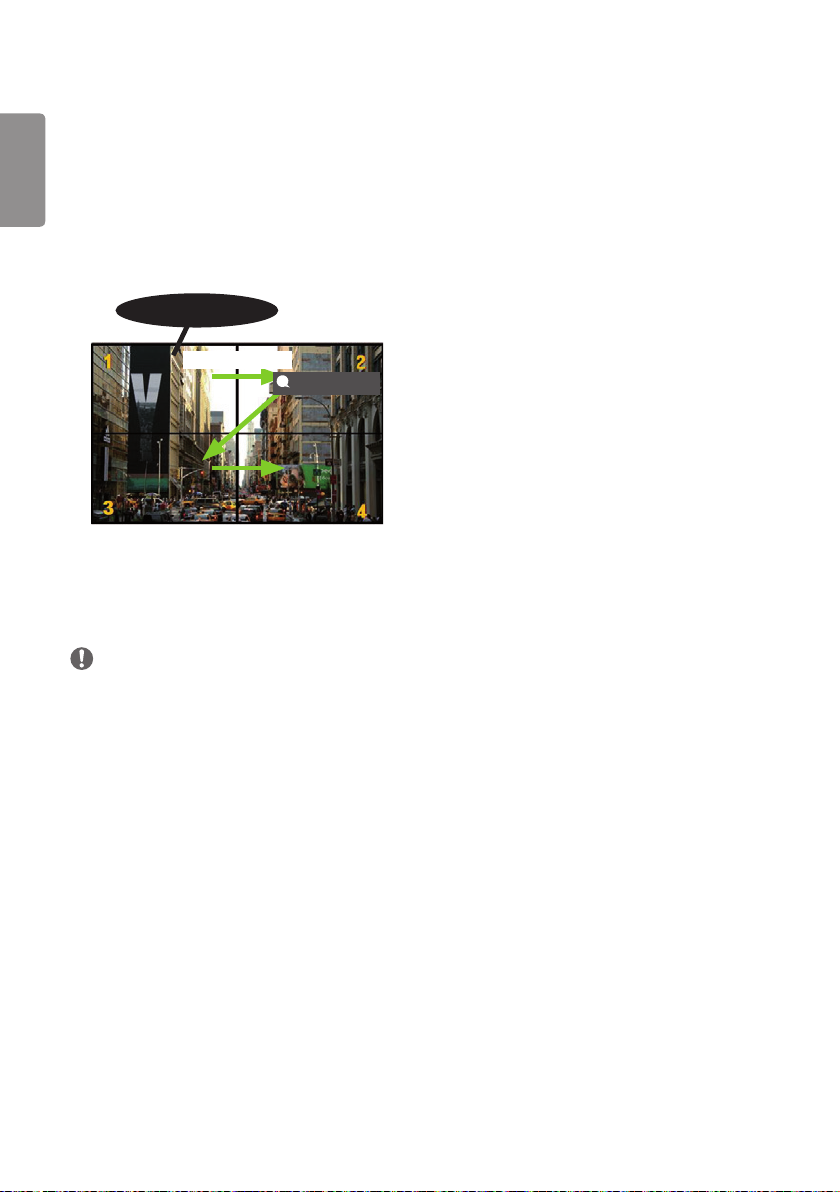
44
AUDIO
(RGB/DVI)
REMOTE
CONTROL IN
RS-232C OUT
RS-232C IN
RS-232C OUT
RS-232C IN
RS-232C OUT
RS-232C IN
Picture ID
ENGLISH
Picture ID is used to change the settings of a specific set (display) using a single IR receiver for multi-vision.
Communication is possible between a monitor with an IR receiver and other monitors using RS-232C cables. Each
monitor is identified by a Set ID. Setting Picture ID allows you to only use the remote control with monitors with a
Set ID that matches the Picture ID.
1 Assign Set ID to the installed monitors as shown below:
IR & Light Sensor
RS-232C Cable
Picture ID On [2]
2
Press the red Picture ID On button on the remote control.
3
Make sure that the Picture ID you set is identical to the Set ID of the monitory you wish to control.
• A set with a Set ID that is different from the Picture ID cannot be controlled by IR signals.
NOTE
• If Picture ID has been set to 2, only the upper right monitor, which has a Set ID of 2, can be controlled by IR
signals.
• If you press the green Picture ID Off button on your remote control, the Picture ID for all monitors are turned
off. If you then press any button on the remote control, all monitors can be controlled by IR signals regardless of their
Set ID's.
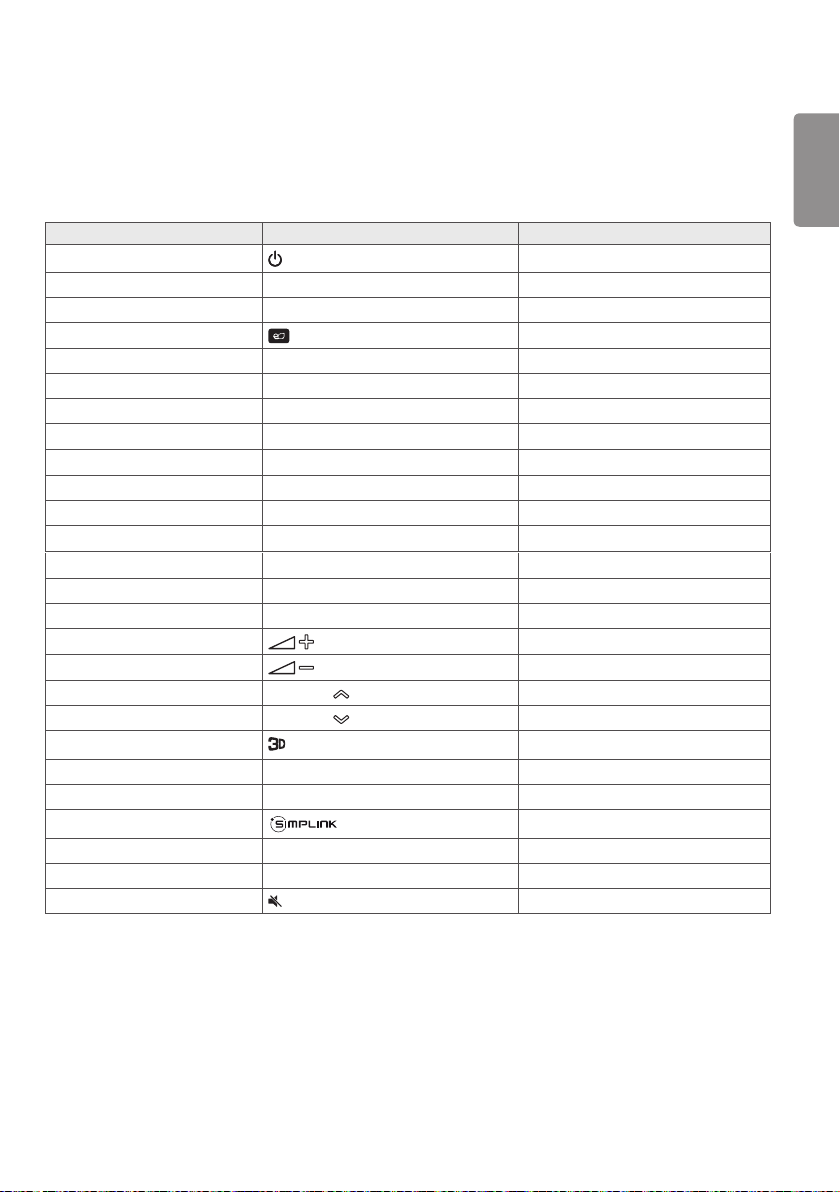
45
IR CODE
• All models do not support the HDMI/USB function.
• Some key codes may not be supported depending on the model.
Code (Hex) Function Remarks
08
C4 MONITOR ON Remote control button
C5 MONITOR OFF Remote control button
95 (Energy Saving Mode) Remote control button
0B INPUT (Select input) Remote control button
10 Number Key 0
11 Number Key 1 Remote control button
12 Number Key 2
13 Number Key 3
14 Number Key 4 Remote control button
15 Number Key 5 Remote control button
16 Number Key 6
17 Number Key 7 Remote control button
18 Number Key 8 Remote control button
19 Number Key 9 Remote control button
02
03
E0 Brightness (Page Up)
E1 Brightness (Page Down)
DC (3D) Remote control button
32 1/a/A Remote control button
2f CLEAR Remote control button
7E Remote control button
79 ARC (Mark/Aspect Ratio) Remote control button
4D PSM (Picture Mode)
09 (MUTE) Remote control button
(Power)
(Vol +)
(Vol -)
Remote control button
Remote control button
Remote control button
Remote control button
Remote control button
Remote control button
Remote control button
Remote control button
Remote control button
Remote control button
ENGLISH
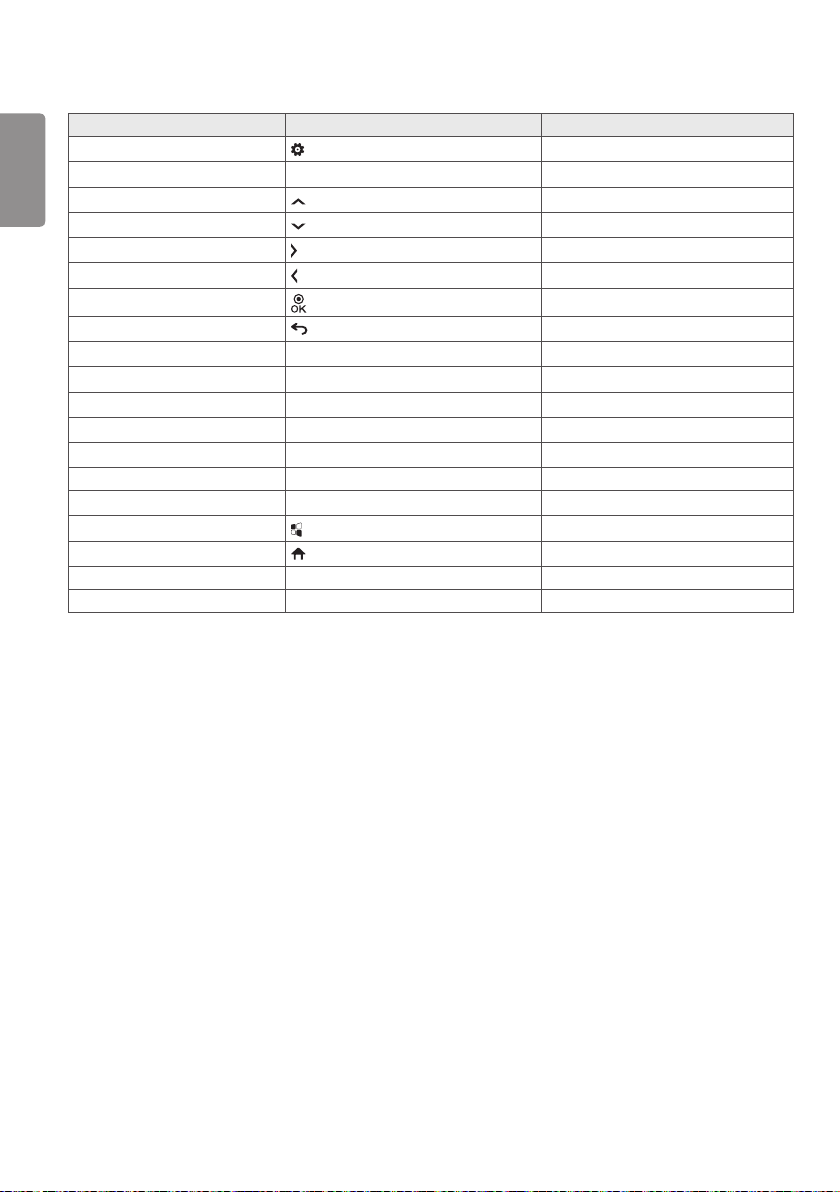
46
ENGLISH
43 (Settings/Menu) Remote control button
99 Auto Configuration Remote control button
40 (Up) Remote control button
41 (Down) Remote control button
06
07
44
28 (BACK) Remote control button
7B Tile Remote control button
5B
72
71
63
61 Blue Remote control button
5F
3F
7C
97 Swap Remote control button
96 Mirror Remote control button
Code (Hex) Function Remarks
(Right)
(Left)
(OK)
Exit Remote control button
Picture ID On (red) Remote control button
Picture ID Off (green) Remote control button
Yellow Remote control button
W.Bal Remote control button
(S.Menu) Remote control button
(Home) Remote control button
Remote control button
Remote control button
Remote control button
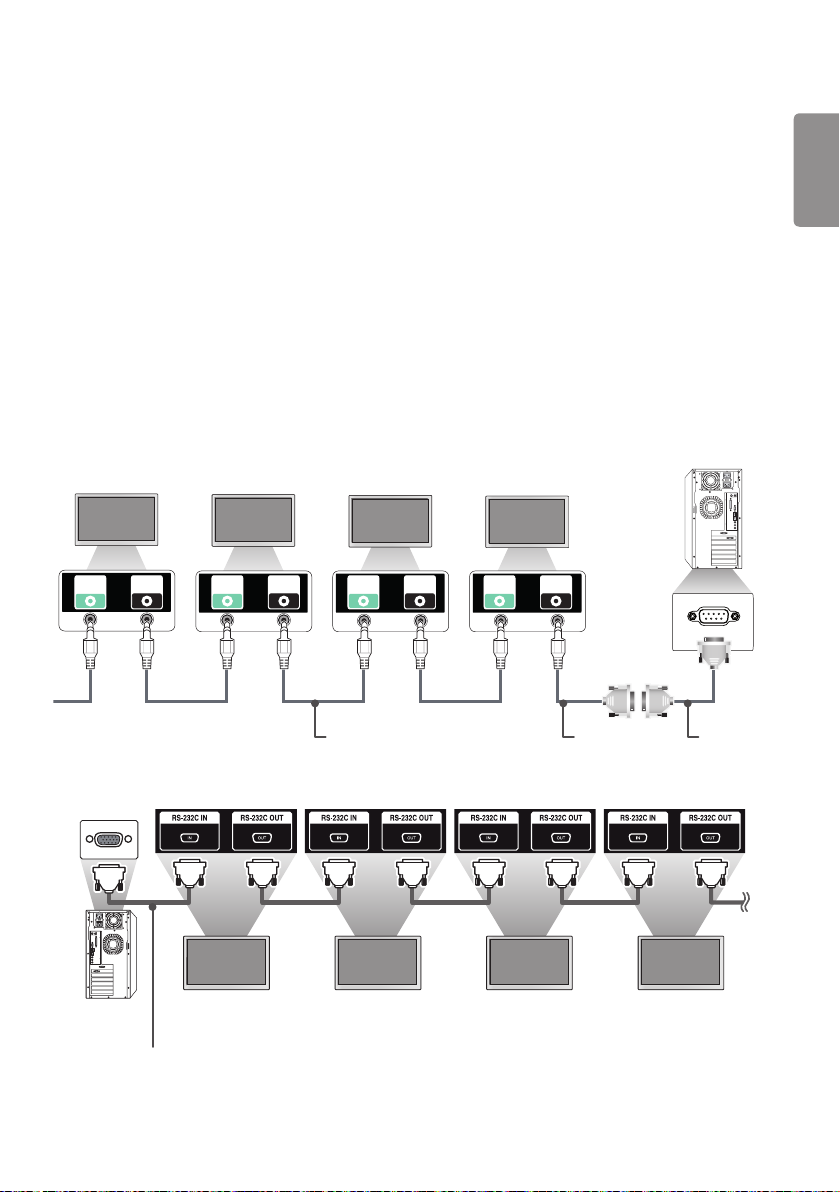
47
CONTROLLING MULTIPLE PRODUCTS
• This only applies to certain models.
Use this method to connect several products to a single PC. You can control several products at a time by connecting
them to a single PC.
In the Option menu, the Set ID must be between 1 and 1000 without being duplicated.
Connecting cables
• The image may be different according to the model.
Connect the RS-232C cable as shown in the picture.
The RS-232C protocol is used for communication between the PC and product. You can turn the product on/off, select
an input source and adjust the OSD menu from your PC.
PC
RS-232C
OUT
RS-232C
IN
RS-232C
OUT
RS-232C
IN
RS-232C
OUT
RS-232C
IN
Monitor 1 Monitor 2 Monitor 3Monitor 4
RS-232C
OUT
RS-232C
IN
ENGLISH
PC
Monitor 1 Monitor 2 Monitor 3 Monitor 4
RS-232C Cable (sold separately)
4P Cable (sold separately)
RS-232C
Gender
RS-232C Cable
(sold separately)
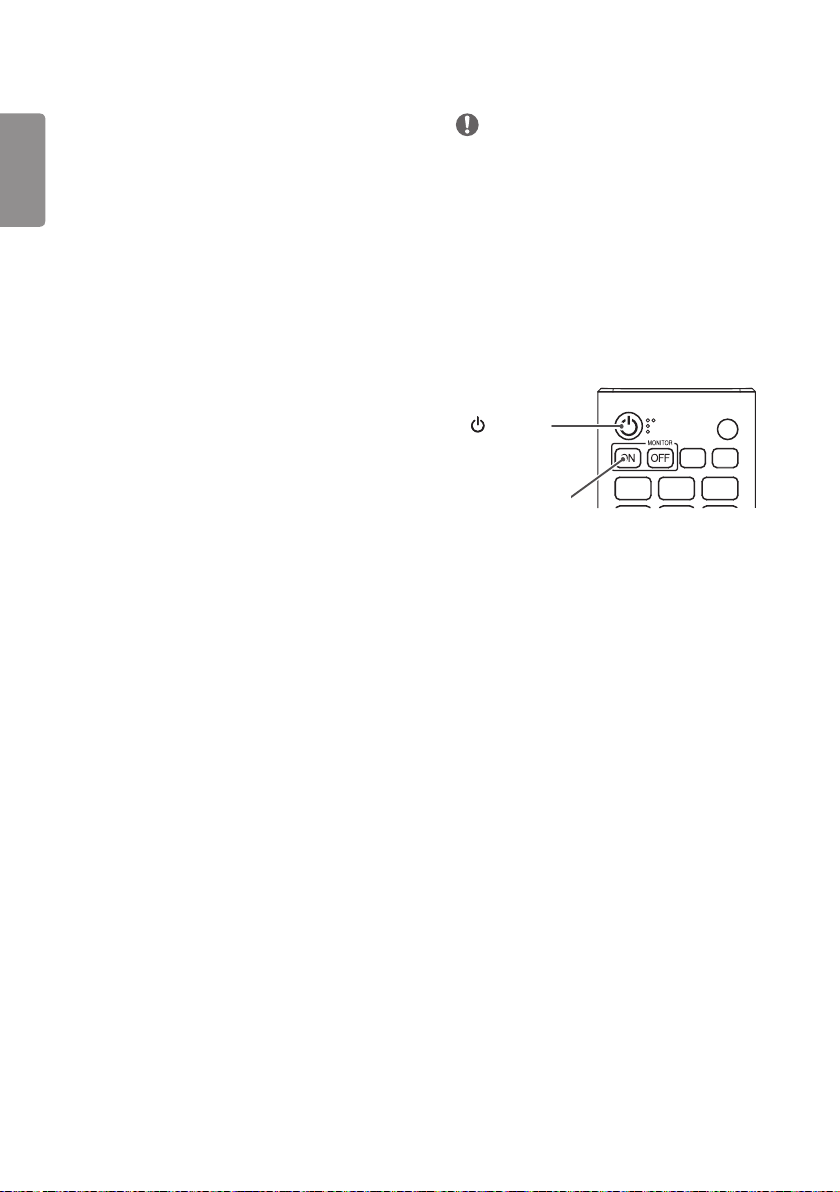
48
Communication Parameter
ENGLISH
Baud Rate: 9600 bps
Data Length: 8 bits
Parity Bit: None
Stop Bit: 1 bit
Flow Control: None
Communication Code: ASCII code
NOTE
• When using 3-wire connections (non-standard), an IR
daisy chain cannot be used.
• Be sure to only use the provided gender to connect
properly.
• When you have daisy-chained multiple Signage
products to control them simultaneously, if you
attempt to turn on/off the master device in a
continuous manner, some products may not turn
on. In this case, you can turn those monitors on by
pressing the MONITOR ON button, not the Power
button.
(Power)
MONITOR ON
 Loading...