

LG EG96 Series, 55EG96 Series, 65EG96 Series, EF95 Series, 55EF95 Series Owner's Manual

TCO
MARQUE: LG
REFERENCE: 55EG960V OLED 4K
CODIC: 4126670
OWNER’S MANUAL
Please read this manual carefully before operating your set and retain
it for future reference.
EG96** EF95**
www.lg.com
*MFL68823613*
P/NO : MFL68823613 (1502-REV01)
Printed in Korea

TABLE OF CONTENTS
A-2
TABLE OF CONTENTS
A-3 SETTING UP THE TV
A-3 Attaching the stand
A-7 Tidying cables
A-8 MAKING CONNECTIONS
A-8 Antenna connection
A-10 Satellite dish connection
A-11 HDMI connection
A-15 - ARC (Audio return channel)
A-16 DVI to HDMI connection
A-17 Component connection
A-19 Composite connection
A-20 Headphone connection
A-22 Audio connection
A-22 - Digital optical audio connection
A-24 USB connection
A-26 CI module connection
A-28 Euro scart connection
COMMON
LANGUAGE LIST
ENGLISH
DEUTSCH
FRANÇAIS
ITALIANO
ESPAÑOL
PORTUGUÊS
NEDERLANDS
ΕΛΛΗΝΙΚΆ
SLOVENŠČINA
B-1 SPECIFICATIONS
B-2 REGULATORY
LANGUAGE
COMMON
SETTING UP THE T V
A-3
SETTING UP THE TV
Image shown may dier from your TV.
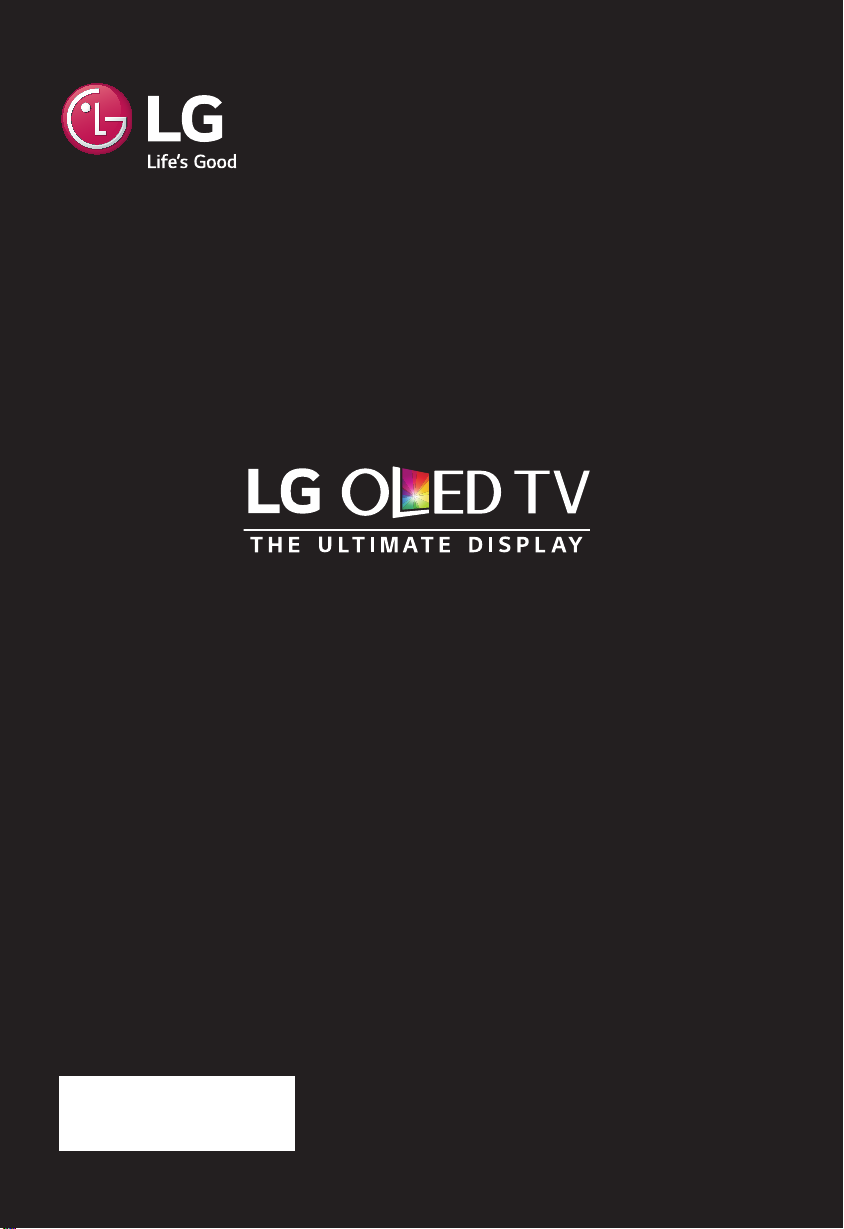
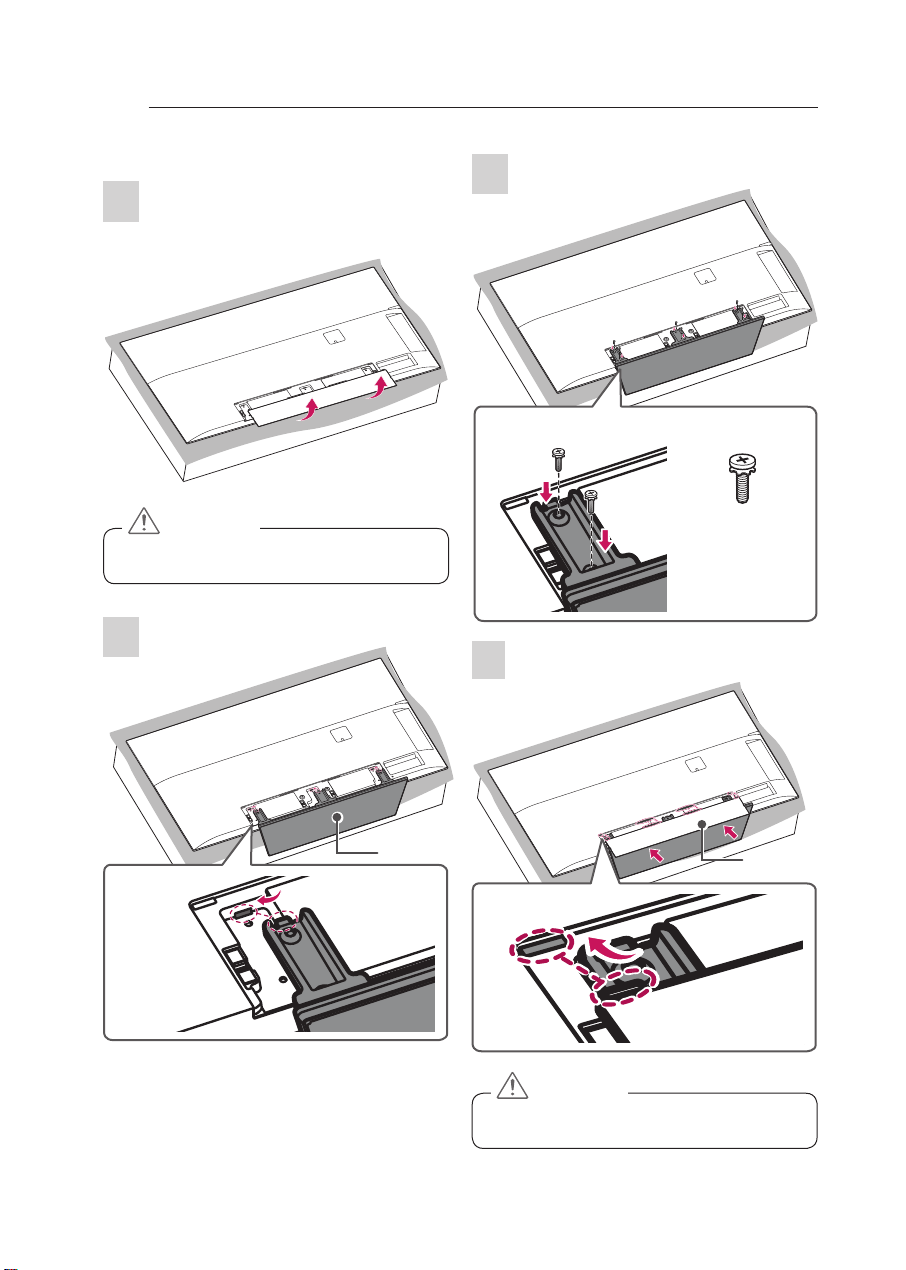
Attaching the stand
55EG96**
1
Protective package
1
1
Stand cover
1 When assembling the stand, lay the front screen Protec-
tive package included in the product box on a table or
product box and then place the TV screen face down on
the Protective Package.
CAUTION
yDo not lift your TV without the stand. The protrud-
ing Joystick Button may be damaged.
3
M4 x L20
5 EA
4
2
Stand cover
Stand assy
CAUTION
yInsert the protruding parts of the Stand Cover into
the holes.
SETTING UP THE T V
A-4
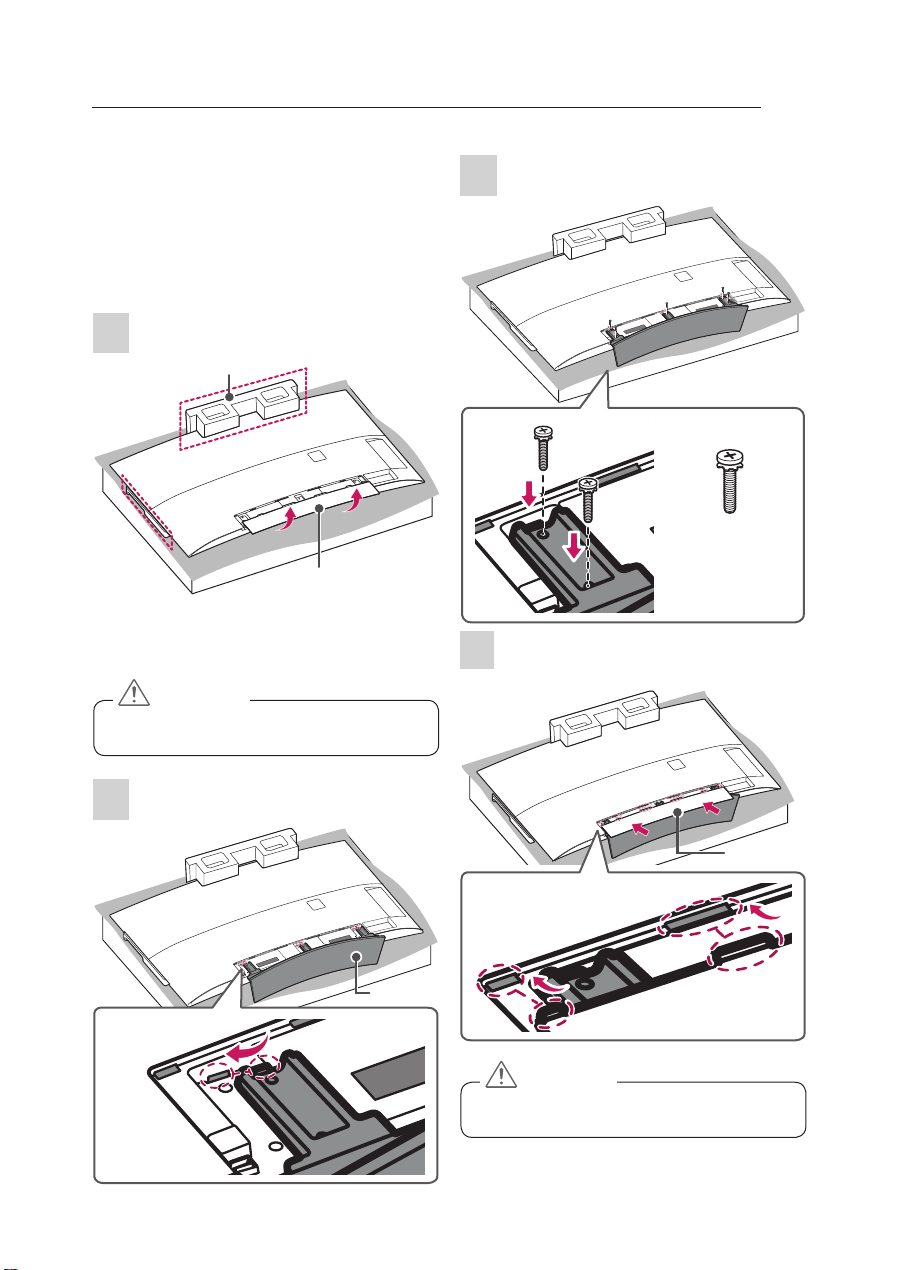
5
Stand
cover
65EG96**
1
Protective package
1
1
Stand cover
1 When assembling the stand, lay the front screen Protec-
tive package included in the product box on a table or
product box and then place the TV screen face down on
the Protective Package.
CAUTION
yDo not lift your TV without the stand. The protrud-
ing Joystick Button may be damaged.
Cover holder
CAUTION
yInsert the Cover Holder of the Stand Cover into the
holes until it clicks. Press the Stand Cover gently so
that the non-woven fabric inside is attached tightly.
2
Stand assy
SETTING UP THE T V
A-5
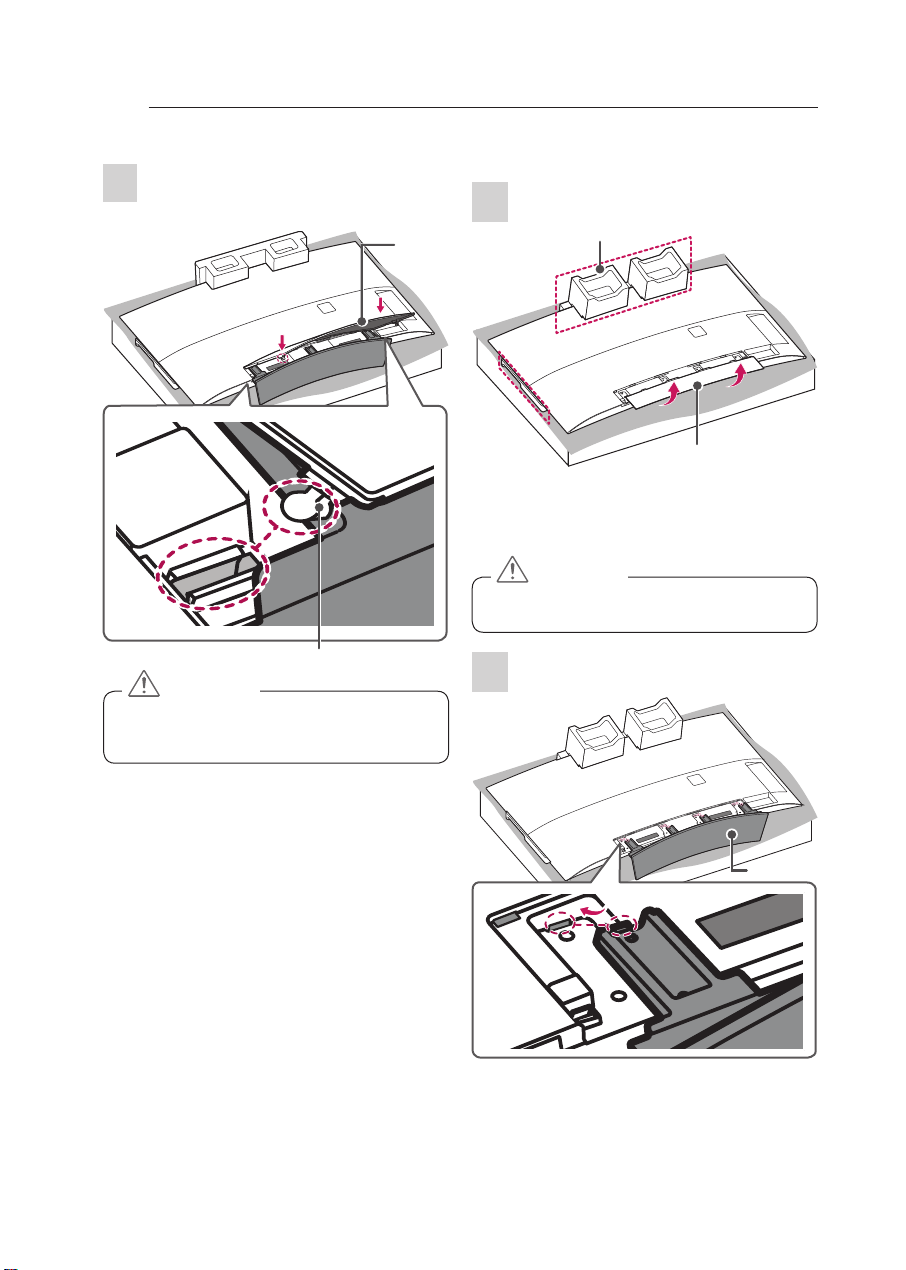
3
M4 x L20
8 EA
4
5
Stand
cover
Cover holder
CAUTION
yInsert the Cover Holder of the Stand Cover into the
holes until it clicks. Press the Stand Cover gently so
that the non-woven fabric inside is attached tightly.
Stand cover
CAUTION
yInsert the protruding parts of the Stand Cover into
the holes.
SETTING UP THE T V
A-6
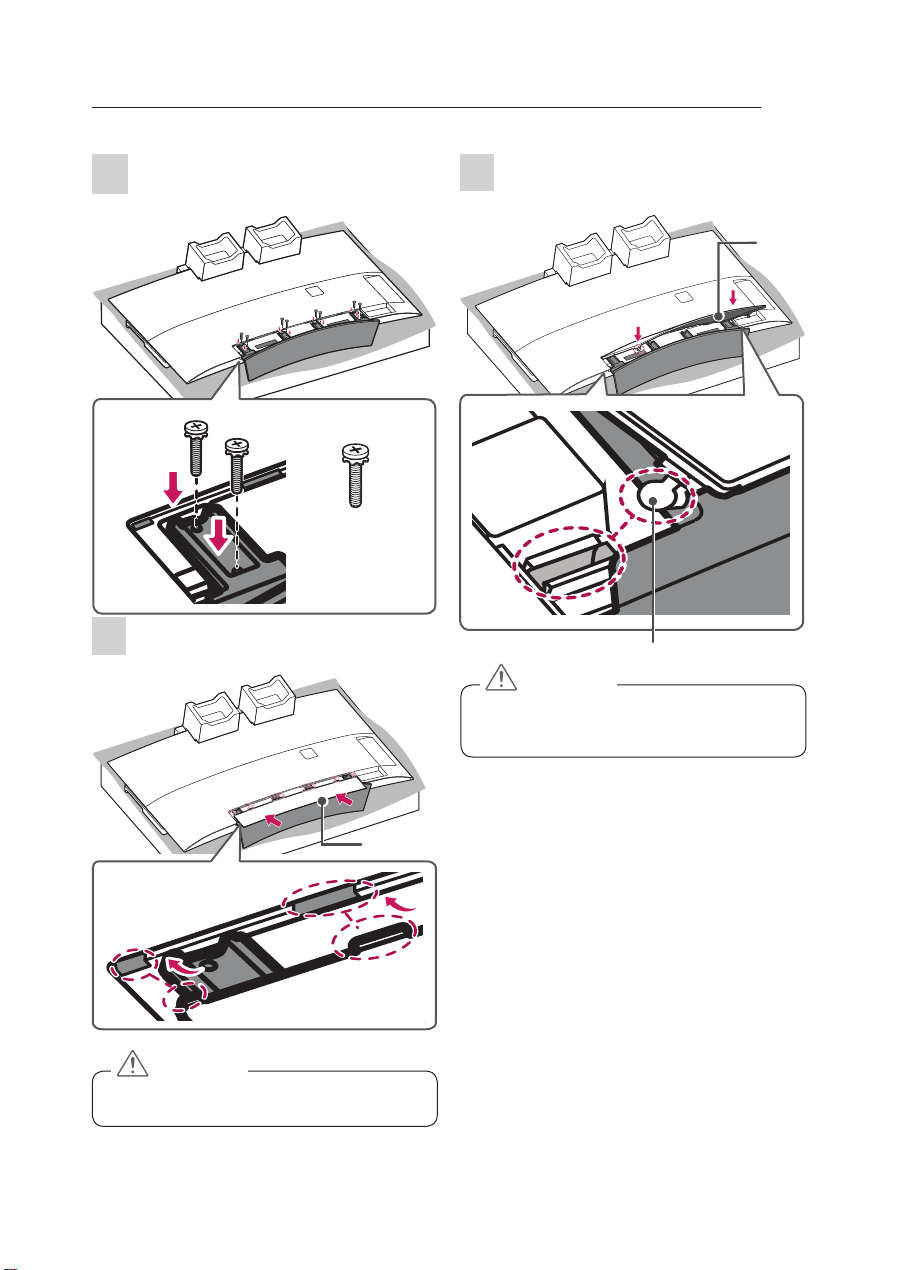
55EF95**
1
CAUTION
yDo not lift your TV without the stand. The protrud-
ing Joystick Button may be damaged.
2
3
M4 x L14
6 EA
4
Stand Assy
Stand cover
CAUTION
yInsert the protruding parts of the Stand Cover into
the holes.

SETTING UP THE T V
A-7
5
Stand
cover
Cover holder
CAUTION
yInsert the Cover Holder of the Stand Cover into the
holes until it clicks.
Tidying cables
Image shown may dier from your TV.
Gather and bind the cables with the cable holder.
Cable holder
CAUTION
yDo not move the TV by holding the cable holder,
as the cable holder may break, and injuries and
damage to the TV may occur.
NOTE
yRemove the stand before installing the TV on a
wall mount by performing the stand attachment in
reverse.
CAUTION
yWhen attaching the stand to the TV set, place the
screen facing down on a cushioned table or flat
surface to protect the screen from scratches.
yMake sure that the screws are inserted correctly
and fastened securely. (If they are not fastened
securely enough, the TV may tilt forward after being
installed.)
Do not use too much force and over tighten the
screws; otherwise screw may be damaged and not
tighten correctly.
MAKING CONNECTIONS
A-8
MAKING CONNECTIONS
This section on MAKING CONNECTIONS mainly uses
diagrams for the EG9609 models.
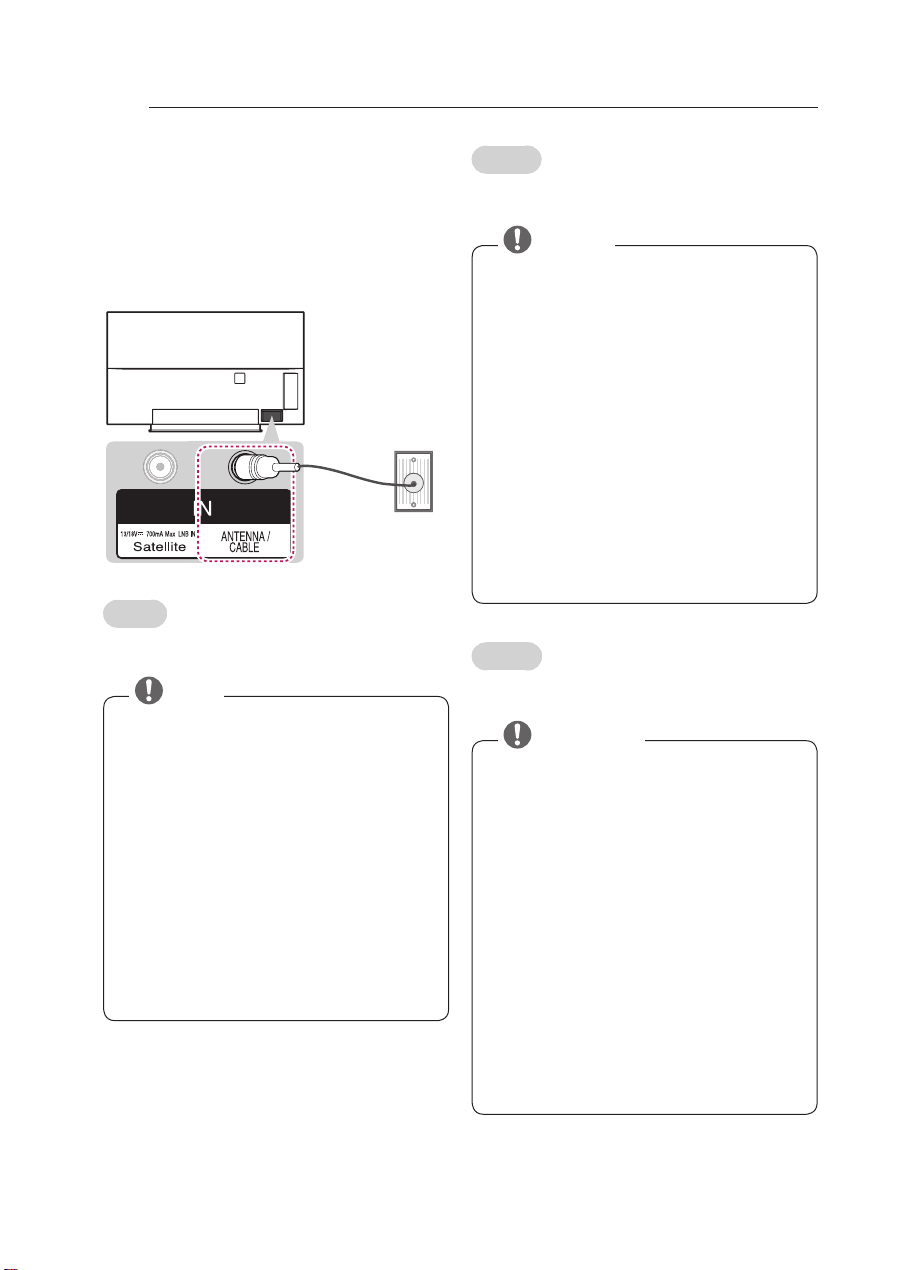
Antenna connection
(*Not
provided)
Wall
antenna
socket
English
Connect the TV to a wall antenna socket with an RF cable
(75 Ω).
NOTE
yThe external device connection may differ from the
model.
yUse a signal splitter to use more than 2 TVs.
yIf the image quality is poor, install a signal amplifier
properly to improve the image quality.
yIf the image quality is poor with an antenna
connected, try to realign the antenna in the correct
direction.
yAn antenna cable and converter are Not provided.
ySupported DTV Audio: MPEG, Dolby Digital, Dolby
Digital Plus, HE-AAC
yFor a location that is not supported with Ultra
HD broadcasting, this TV cannot receive Ultra HD
broadcasts directly. This TV cannot receive Ultra HD
(3840 x 2160 pixels) broadcasts directly because
the related standards have not been confirmed.
(Depending on model)
Deutsch
Schließen Sie das TV-Gerät mit einem HF-Kabel (75 Ω) an
eine Wandantennenbuchse an.
HINWEIS
yDer Anschluss für externe Geräte kann von Modell
zu Modell unterschiedlich sein.
yBei Verwendung von mehr als 2 TV-Geräten
verwenden Sie einen Signalsplitter.
yIst das Bild schlecht, installieren Sie einen
Signalverstärker, um die Bildqualität zu verbessern
yWenn die Bildqualität bei angeschlossener Antenne
schlecht ist, richten Sie die Antenne richtig aus
yAntennenkabel und Wandler sind nicht im
Lieferumfang enthalten.
yUnterstützter DTV-Ton: MPEG, Dolby Digital, Dolby
Digital Plus, HE-AAC
yAn Standorten, an denen Ultra HD-Übertragungen
nicht unterstützt werden, kann dieses TV-Gerät Ultra
HD-Übertragungen nicht direkt empfangen. Dieses
TV-Gerät kann u.U. keine Ultra HD-Übertragungen
(3.840 x 2.160 Pixel) direkt empfangen, da die
entsprechenden Standards nicht bestätigt wurden.
(abhängig vom Modell)
Français
Connectez la TV à une prise d’antenne murale avec un
câble RF (75 Ω).
REMARQUE
yLe raccordement du périphérique externe peut
différer du modèle.
yUtilisez un séparateur de signaux pour utiliser plus
de deux téléviseurs.
ySi la qualité d’image est mauvaise, installez
correctement un amplificateur de signaux pour
l’améliorer.
ySi vous utilisez une antenne et que la qualité d’image
est mauvaise, essayez de réaligner l’antenne dans la
bonne direction.
yLe câble et le convertisseur d’antenne ne sont pas
fournis.
yTechnologies audio TNT prises en charge : MPEG,
Dolby Digital, Dolby Digital Plus, HE-AAC
ySi l'emplacement ne prend pas en charge la
diffusion Ultra HD, ce téléviseur ne peut pas recevoir
de diffusion Ultra HD directement. Votre TV ne peut
pas recevoir de diffusions Ultra HD (3840 x 2160
pixels) directement car les normes à ce sujet n'ont
pas été confirmées. (selon le modèle)
MAKING CONNECTIONS
A-9
Italiano
Collegare il televisore all’antenna centralizzata con un cavo
RF (75 Ω).
NOTA
yIl collegamento del dispositivo esterno può variare
in base al modello.
yUtilizzare uno sdoppiatore del segnale per usare più
di 2 televisori.
ySe la qualità dell’immagine è scarsa, installare
correttamente un amplificatore del segnale per
migliorarla.
ySe la qualità dell’immagine è scarsa con un’antenna
collegata, provare a riallineare l’antenna nella
direzione corretta.
yIl cavo e il convertitore dell’antenna non sono in
dotazione.
yAudio DTV supportato: MPEG, Dolby Digital, Dolby
Digital Plus, HE-AAC
yPer posizioni non supportate da broadcasting Ultra
HD, il TV non è in grado di ricevere direttamente
programmi Ultra HD. Questa TV non può ricevere
direttamente trasmissioni Ultra HD (pixel 3840 x
2160) perché non sono stati confermati i relativi
standard. (in base al modello)
Español
Conecte la TV a una toma de pared de antena con un cable
RF (75 Ω).
NOTA
yLa conexión de dispositivos externos puede variar
entre distintos modelos.
yEmplee un divisor de señal cuando desee utilizar
más de dos TV.
ySi la imagen es de poca calidad, instale un
amplificador de señal correctamente para mejorar
la calidad de imagen.
ySi la imagen es de poca calidad con una antena
conectada, intente volver a orientar la antena en la
dirección adecuada.
yNo se suministran el cable de antena ni el conversor.
yAudio DTV admitido: MPEG, Dolby Digital, Dolby
Digital Plus, HE-AAC
yEn una ubicación que no sea compatible con
la emisión Ultra HD, esta TV no puede recibir
emisiones Ultra HD directamente. Esta TV no puede
recibir emisiones Ultra HD (3840 x 2160 píxeles)
directamente porque no se han confirmado los
estándares relacionados. (En función del modelo)
Português
Ligue a TV a uma tomada de antena de parede com um
cabo RF (75 Ω).
NOTA
yA ligação do dispositivo externo pode ser diferente
da do modelo.
yUtilize um separador de sinal se quiser utilizar mais
de 2 TVs.
ySe a qualidade de imagem for fraca, instale um
amplificador de sinal para melhorar a qualidade de
imagem.
ySe a qualidade de imagem for fraca mesmo que
tenha uma antena ligada, tente orientar a antena
para a direcção correcta.
yO cabo da antena e o conversor não são fornecidos.
yÁudio DTV suportado: MPEG, Dolby Digital, Dolby
Digital Plus, HE-AAC
yEsta TV não consegue receber transmissões Ultra HD
directamente em localizações que não suportam
transmissões Ultra HD. Esta TV não pode receber
directamente transmissões Ultra HD (3840 x 2160
píxeis), uma vez que as normas relacionadas não
foram confirmadas. (Dependendo do modelo)
Nederlands
Sluit de TV met behulp van een RF-kabel (75 Ω) aan op een
antenneaansluiting op de muur.
OPMERKING
yDe aansluiting van externe apparaten kan per model
verschillen.
yGebruik een signaalsplitter om meer dan twee TV’s
te gebruiken.
yAls de beeldkwaliteit slecht is, installeert u
een signaalversterker om de beeldkwaliteit te
verbeteren.
yAls de beeldkwaliteit slecht is terwijl een antenne
is aangesloten, probeert u de antenne in de juiste
richting te draaien.
yAntennekabel en converter worden niet
meegeleverd.
yOndersteunde DTV-au dio: MPEG, Dolby Digital,
Dolby Digital Plus, HE-AAC
yAls een locatie Ultra HD-uitzendingen niet
ondersteunt, kan deze TV geen rechtstreekse Ultra
HD-uitzendingen ontvangen. Deze TV kan niet
direct uitzendingen van Ultra HD (3840 x 2160
pixels) ontvangen omdat de bijbehorende normen
niet zijn bevestigd. (afhankelijk van het model)
MAKING CONNECTIONS
A-10
Ελληνικά
Συνδέστε την τηλεόραση σε μια υποδοχή κεραίας στον
τοίχο με ένα καλώδιο RF (75 Ω).
ΣΗΜΕΙΩΣΗ
yΗ σύνδεση εξωτερικών συσκευών ενδέχεται να
διαφέρει ανάλογα με το μοντέλο.
yΧρησιμοποιήστε ένα διαχωριστή σήματος για τη
χρήση περισσότερων από 2 τηλεοράσεων.
yΆν η ποιότητα της εικόνας δεν είναι καλή,
εγκαταστήστε έναν ενισχυτή σήματος για τη
βελτίωση της ποιότητας εικόνας.
yΆν η ποιότητα της εικόνας δεν είναι καλή μετά
τη σύνδεση της κεραίας, δοκιμάστε να αλλάξετε
τον προσανατολισμό της κεραίας στη σωστή
κατεύθυνση.
yΔεν παρέχεται καλώδιο κεραίας και μετατροπέας.
yΥποστηριζόμενος ήχος DTV: MPEG, Dolby Digital,
Dolby Digital Plus, HE-AAC
yΓια μια θέση που δεν υποστηρίζεται με μετάδοση
Ultra HD, αυτή η τηλεόραση δεν μπορεί να λάβει
απευθείας μεταδόσεις Ultra HD. Άυτή η τηλεόραση
δεν μπορεί να λάβει μεταδόσεις Ultra HD (3840 x
2160 pixel) απευθείας καθώς τα σχετικά πρότυπα
δεν έχουν επιβεβαιωθεί. (Άνάλογα με το μοντέλο)
Slovenščina
Televizor priključite v stensko antensko vtičnico s kablom
RF (75 Ω).
OPOMBA
yPovezava z zunanjo napravo je lahko odvisna od
modela.
yČe želite uporabljati več kot 2 televizorja, uporabite
razcepnik za signal.
yČe je kakovost slike slaba, jo izboljšajte tako, da
ustrezno namestite ojačevalnik signala.
yČe je kakovost slike slaba in uporabljate anteno,
usmerite anteno v ustrezno smer.
yKabel antene in pretvornik nista priložena.
yPodprte oblike zvoka za DTV: MPEG, Dolby Digital,
Dolby Digital Plus, HE-AAC
yNa območjih, kjer ni podprto oddajanje v Ultra
HD, televizor ne more neposredno prejemati
oddajanih signalov Ultra HD. Televizor ne sprejema
oblike zapisa Ultra HD (3840 x 2160 slikovnih pik)
neposredno, ker niso potrjeni ustrezni standardi.
(Odvisno od modela)
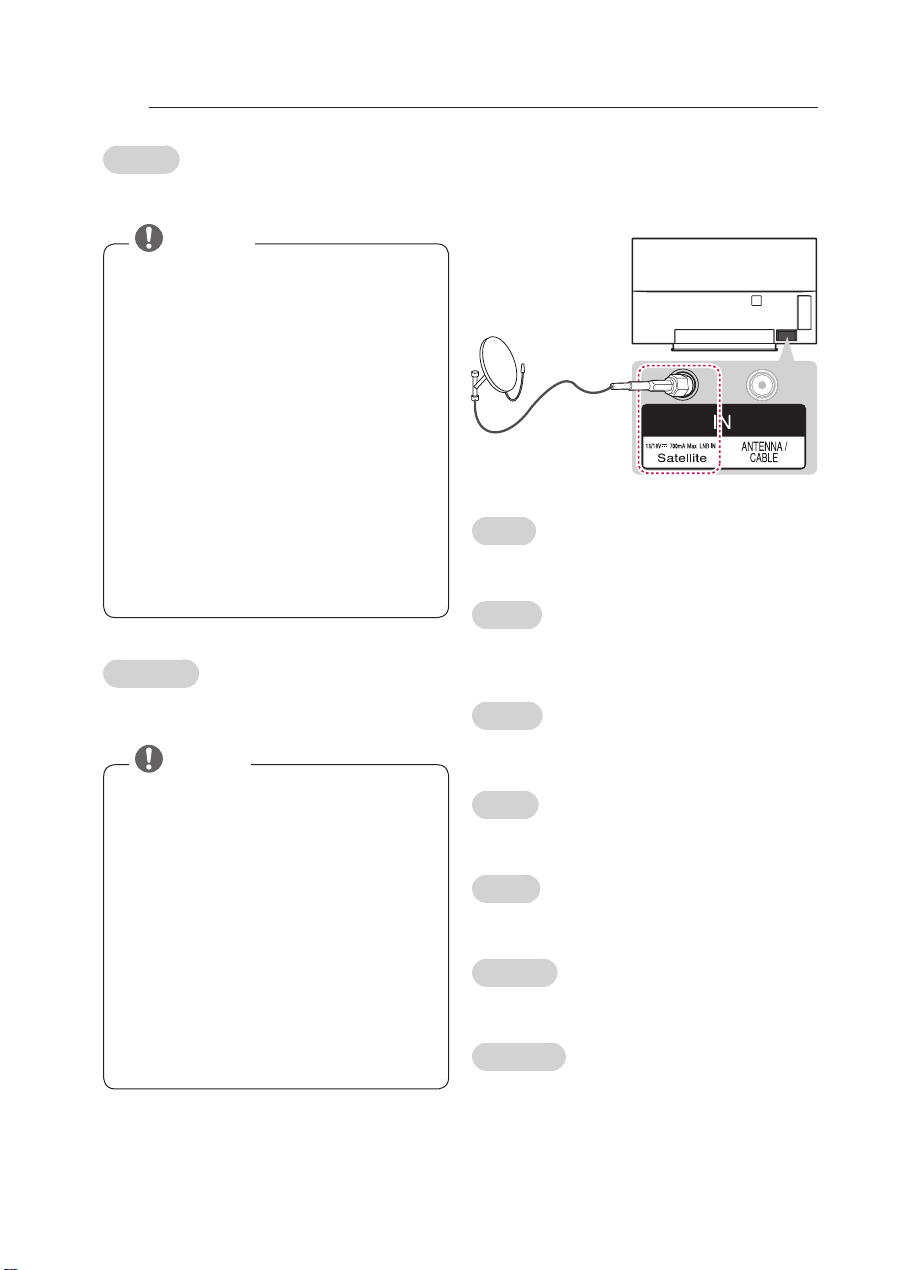
Satellite dish connection
(Only satellite models)
(*Not provided)
Satellite
Dish
English
Connect the TV to a satellite dish to a satellite socket with a
satellite RF cable (75 Ω).
Deutsch
Schließen Sie das TV-Gerät mit einem Satelliten-HF-Kabel
(75 Ω) an eine Satellitenschüssel oder an eine Satellitenbuchse an.
Français
Connectez la TV à une parabole satellite ou à une prise
satellite à l’aide d’un câble satellite RF (75 Ω).
Italiano
Collegare la TV a un’antenna satellitare e a una presa satellitare con un cavo RF satellitare (75 Ω).
Español
Para conectar la TV a una antena parabólica, enchufe un
cable de RF de satélite a una toma de satélite (75 Ω).
Português
Ligue a TV a uma antena parabólica ou uma tomada de
satélite com um cabo RF para satélite (75 Ω).
Nederlands
Sluit de TV met behulp van een RF-satellietkabel (75 Ω) aan
op een satellietschotel.
MAKING CONNECTIONS
A-11
Ελληνικά
Συνδέστε την τηλεόραση σε μια δορυφορική κεραία, μέσω
μιας δορυφορικής υποδοχής με δορυφορικό καλώδιο (75
Ω).
Slovenščina
S kablom RF za satelit povežite televizor s satelitskim
krožnikom prek vtičnice za satelit (75 Ω).
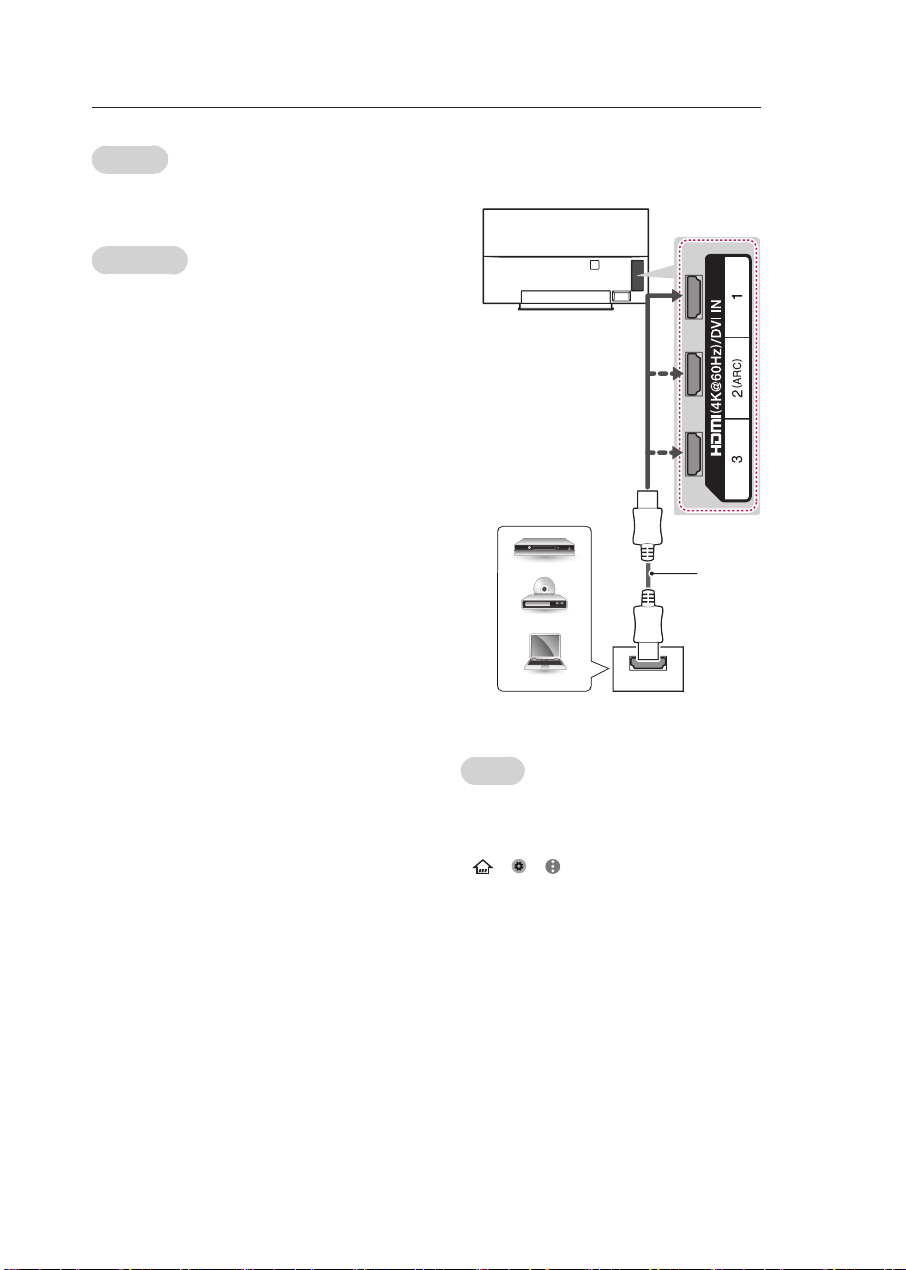
HDMI connection
(*Not
provided)
HDMI
DVD / Blu-Ray / PC /
HD Cable Box / HD STB
English
Transmits the digital video and audio signals from an
external device to the TV. Connect the external device and
the TV with the HDMI cable as shown.
➡ ➡ ➡ Picture ➡ HDMI ULTRA HD Deep
Colour :
yOn - Support 4K @ 50/60 Hz (4:4:4, 4:2:2, 4:2:0)
yO - Support 4K @ 50/60 Hz (4:2:0)
If the device connected to Input Port also supports ULTRA
HD Deep Colour, your picture may be clearer.
However, if the device doesn’t support it, it may not work
properly.
In that case, connect the device to a dierent HDMI port or
change the TV ’s HDMI ULTRA HD Deep Colour setting to
O. (This feature is available on certain models which are
supported ULTRA HD Deep Colour only. )

MAKING CONNECTIONS
A-12
NOTE
yThe external device connection may differ from the
model.
yIt is recommended to use the TV with the HDMI
connection for the best image quality.
yUse the latest High Speed HDMI™ Cable with CEC
(Customer Electronics Control) function.
yHigh Speed HDMI™ Cables are tested to carry an
HD signal up to 1080p and higher.
ySupported HDMI Audio format : Dolby Digital
(32Khz, 44.1Khz, 48Khz), DTS(44.1Khz, 48Khz), PCM
(32Khz, 44.1Khz, 48Khz, 96Khz, 192Khz)
Deutsch
Überträgt digitale Video- und Audiosignale von einem
externen Gerät an das TV-Gerät. Verbinden Sie das externe
Gerät, wie in der folgenden Abbildung gezeigt, mithilfe des
HDMI-Kabels mit dem TV-Gerät.
➡ ➡ ➡ Bild ➡ HDMI Ultra HD Deep Colour :
yEin - Unterstützt 4K bei 50/60Hz (4:4:4, 4:2:2, 4:2:0)
yAus - Unterstützt 4K bei 50/60Hz (4:2:0)
Wenn das über Eingang angeschlossene Gerät ULTRA HD
Deep Colour unterstützt, erhalten Sie unter Umständen ein
besseres Bild.
Unterstützt das Gerät die Technologie nicht, funktioniert es
möglicherweise nicht ordnungsgemäß.
Schließen Sie das Gerät in diesem Fall an einen anderen
HDMI-Anschluss an, oder deaktivieren(Aus) Sie die Einstellung ‚HDMI ULTRA HD Deep Colour‘ für Ihr TV-Gerät.
(Diese Funktion ist nur bei bestimmten Modellen verfügbar, die von ULTRA HD Deep Colour unterstützt werden.)
HINWEIS
yDer Anschluss für externe Geräte kann von Modell
zu Modell unterschiedlich sein.
yFür optimale Bildqualität wird empfohlen, den
HDMI-Anschluss des TV-Gerätes zu verwenden.
yVerwenden Sie das neueste Hochgeschwindigkeits-
HDMI™-Kabel mit CEC-Funktion (Customer
Electronics Control).
yHigh-Speed-HDMI™-Kabel sind für die Übertragung
von HD-Signalen bis zu 1080p und höher getestet.
yUnterstütztes HDMI-Audioformat: Dolby
Digital(32Khz, 44.1Khz, 48Khz), DTS(44.1Khz, 48Khz),
PCM(32Khz, 44.1Khz, 48Khz, 96Khz, 192Khz)
Français
Permet de transmettre les signaux vidéo et audio numériques d’un périphérique externe vers la TV. Connectez le
périphérique externe et la TV avec le câble HDMI comme
indiqué sur l’illustration suivante.
➡ ➡ ➡ Image ➡ HDMI ULTRA HD Deep
Colour :
yActivé - Prend en charge la 4K à50/60Hz (4:4:4, 4:2:2,
4:2:0)
yDésactivé - Prend en charge la 4K à50/60Hz (4:2:0)
Si le périphérique connecté au port Entrée prend également en charge ULTRA HD Deep Colour, votre image
pourra être plus précise.
Toutefois, si le périphérique ne prend pas en charge ce
paramètre, il se peut qu'il ne fonctionne pas correctement.
Dans ce cas, connectez le périphérique à un autre
portHDMI ou Désactivéz le paramètre HDMI ULTRA HD
Deep Colour du téléviseur.
(Cette fonction est disponible sur certains modèles prenant
en charge le paramètre ULTRA HD Deep Colour uniquement.)
REMARQUE
yLe raccordement du périphérique externe peut
différer du modèle.
yPour obtenir une meilleure qualité d’image, il est
recommandé d’utiliser la TV avec une connexion
HDMI.
yUtilisez le tout nouveau câble haut débit HDMI™
avec la fonction CEC (contrôles électroniques client).
yLes câbles HDMI™ haut débit sont testés pour
transporter un signal HD de 1080p ou supérieur.
yFormats audio HDMI pris en charge: Dolby
Digital(32Khz, 44.1Khz, 48Khz), DTS(44.1Khz, 48Khz),
PCM(32Khz, 44.1Khz, 48Khz, 96Khz, 192Khz)
Italiano
Il segnale digitale audio e video viene trasmesso da un
dispositivo esterno al televisore. Collegare il dispositivo esterno e il televisore mediante il cavo HDMI come mostrato
nell’illustrazione di seguito.
➡ ➡ ➡Immagine ➡ HDMI Ultra HD Deep
Colour :
yAttiva - Supporto 4K @ 50/60 Hz (4:4:4, 4:2:2, 4:2:0)
yDisattiva - Supporto 4K @ 50/60 Hz (4:2:0)
Se il dispositivo collegato alla porta Ingresso supporta
anche ULTRA HD Deep Colour, l'immagine sarà più chiara.
Tuttavia, se la funzionalità non è supportata, il dispositivo
potrebbe non funzionare correttamente.
In tal caso, collegare il dispositivo a una porta HDMI diversa
o modicare l'impostazione HDMI ULTRA HD Deep Colour
della TV su Disattiva.
(Questa funzione è disponibile su alcuni modelli che supportano solo ULTRA HD Deep Colour.)
MAKING CONNECTIONS
A-14
OPMERKING
yDe aansluiting van externe apparaten kan per
model verschillen.
yWij raden u aan de TV aan te sluiten door middel
van een HDMI-verbinding voor de hoogste
beeldkwaliteit.
yGebruik de nieuwste High Speed HDMI™-kabel met
CEC-functie (Customer Electronics Control).
yHDMI™-kabels van het type High Speed zijn getest
op het verzenden van HD-signalen tot 1080p en
hoger.
yOndersteunde HDMI-audio-indeling: Dolby
Digital(32Khz, 44.1Khz, 48Khz), DTS(44.1Khz, 48Khz),
PCM(32Khz, 44.1Khz, 48Khz, 96Khz, 192Khz)
Ελληνικά
Μεταδίδει τα ψηφιακά σήματα εικόνας και ήχου από
μια εξωτερική συσκευή στην τηλεόραση. Συνδέστε την
εξωτερική συσκευή και την τηλεόραση με το καλώδιο
HDMI, όπως φαίνεται στην εικόνα.
➡ ➡ ➡ Εικόνα ➡ HDMI ULTRA HD Deep
Colour :
yΕνεργοποίηση - Υποστήριξη 4K @ 50/60 Hz (4:4:4,
4:2:2, 4:2:0)
yΑπενεργοποίηση - Υποστήριξη 4K @ 50/60 Hz (4:2:0)
Εάν η συσκευή που έχει συνδεθεί στη θύρα Είσοδος
υποστηρίζει και ULTRA HD Deep Colour, η εικόνα ενδέχεται
να είναι πιο καθαρή.
Ωστόσο, εάν η συσκευή δεν το υποστηρίζει, η εκτέλεση της
λειτουργίας ενδέχεται να μην είναι σωστή.
Σε αυτήν την περίπτωση, συνδέστε τη συσκευή σε μια
διαφορετική θύρα HDMI ή Απενεργοποίησηστε τη
ρύθμιση HDMI ULTRA HD Deep Colour της τηλεόρασης.
(Άυτή η δυνατότητα είναι διαθέσιμη μόνο σε συγκεκριμένα
μοντέλα που υποστηρίζουν τη λειτουργία ULTRA HD Deep
Colour.)
ΣΗΜΕΙΩΣΗ
yΗ σύνδεση εξωτερικών συσκευών ενδέχεται να
διαφέρει ανάλογα με το μοντέλο.
yΓια τη βέλτιστη ποιότητα εικόνας, χρησιμοποιήστε
την τηλεόραση με σύνδεση HDMI.
yΧρησιμοποιήστε το καλώδιο HDMI™ υψηλής
ταχύτητας με λειτουργία CEC (Customer Electronics
Control).
yΤα καλώδια HDMI™ υψηλής ταχύτητας έχουν
ελεγχθεί για τη μετάδοση σήματος HD ανάλυσης
έως 1080p ή υψηλότερης.
yΥποστηριζόμενη μορφή ήχου HDMI: Dolby
Digital(32Khz, 44.1Khz, 48Khz), DTS(44.1Khz, 48Khz),
PCM(32Khz, 44.1Khz, 48Khz, 96Khz, 192Khz)
Slovenščina
Prenaša digitalne video in zvočne signale iz zunanje naprave na televizor. Povežite zunanjo napravo in televizor s
HDMI-kablom, kot je prikazano na naslednji sliki.
➡ ➡ ➡Slika ➡ HDMI ULTRA HD Deep Colour
:
yVklop - Podpira 4K pri 50 in 60Hz (4:4:4, 4:2:2, 4:2:0)
yIzklop - Podpira 4K pri 50 in 60Hz (4:2:0)
Če tudi naprava, priključena na vrata Vhod, podpira ULTRA
HD Deep Colour, bo slika morda jasnejša.
Če pa naprava te možnosti ne podpira, morda ne bo
delovala pravilno.
V tem primeru priključite napravo na druga vrata HDMI
ali spremenite nastavitev HDMI ULTRA HD Deep Colour
televizorja na Izklop.
(Ta funkcija je na voljo pri določenih modelih, ki podpirajo
možnost globokih barv televizorja ULTRA HD. )
OPOMBA
yPovezava z zunanjo napravo je lahko odvisna od
modela.
yZa najboljšo kakovost slike priporočamo uporabo
televizorja s HDMI-povezavo.
yUporabite najnovejši kabel HDMI™ za hitri prenos s
funkcijo CEC (Customer Electronics Control).
yKabli HDMI™ za hitri prenos so preizkušeni, tako da
lahko prenašajo signal visoke ločljivosti do 1080p in
več.
yPodprte oblike zvoka za HDMI: Dolby Digital(32Khz,
44.1Khz, 48Khz), DTS(44.1Khz, 48Khz), PCM(32Khz,
44.1Khz, 48Khz, 96Khz, 192Khz)
MAKING CONNECTIONS
A-15
ARC (Audio return channel)
English
yAn external audio device that supports SIMPLINK and
ARC must be connected using HDMI(4K @ 60 Hz)/DVI
IN 2 (ARC) port.
yWhen connected with a high-speed HDMI cable, the
external audio device that supports ARC outputs
optical SPDIF without additional optical audio cable
and supports the SIMPLINK function.
Deutsch
yEin externes Audiogerät, das SIMPLINK und ARC
unterstützt, muss über den HDMI(4K @ 60 Hz)/DVI IN
2 (ARC) angeschlossen werden.
yWenn der Anschluss mit einem High-Speed-HDMI-
Kabel erfolgt, gibt das externe Audiogerät, das
ARC unterstützt, SPDIF ohne zusätzliches optisches
Audiokabel aus und unterstützt die SIMPLINK-Funktion.
Français
yUn périphérique audio externe qui prend en charge les
technologies SIMPLINK et ARC doit être connecté au
port HDMI(4K @ 60 Hz)/DVI IN 2 (ARC).
ySi vous reliez un câble HDMI haut débit, le périphérique
audio externe qui prend en charge les sorties ARC,
prend également en charge la sortie optique SPDIF
sans câble audio optique supplémentaire, ainsi que la
fonction SIMPLINK.
Italiano
yPer il collegamento di un dispositivo audio esterno che
supporta le funzionalità SIMPLINK e ARC, usare la porta
HDMI(4K @ 60 Hz)/DVI IN 2 (ARC).
ySe si eettua il collegamento con un cavo HDMI ad
alta velocità, il dispositivo audio esterno che supporta
ARC trasmette il segnale SPDIF senza il cavo ottico
aggiuntivo e supporta la funzione SIMPLINK.
Português
yÉ necessário ligar um dispositivo de áudio externo que
suporte SIMPLINK e ARC utilizando a porta HDMI(4K @
60 Hz)/DVI IN 2 (ARC).
yQuando ligado a um cabo HDMI de alta velocidade, o
aparelho de áudio externo que suporta ARC transmite
SPDIF óptica sem um cabo de áudio óptico adicional e
suporta a função SIMPLINK.
Nederlands
yEen extern audioapparaat dat ondersteuning biedt
voor SIMPLINK en ARC, moet op de HDMI(4K @ 60 Hz)/
DVI IN 2 (ARC) worden aangesloten.
yBij aansluiting met een High Speed HDMI-kabel zorgt
het externe audioapparaat met ARC-ondersteuning
ervoor dat optische SPDIF wordt uitgevoerd zonder
extra optische audiokabel, en ondersteunt dit apparaat
de SIMPLINK-functie.
Ελληνικά
yΜια εξωτερική συσκευή ήχου η οποία υποστηρίζει
SIMPLINK και ARC πρέπει να συνδεθεί με τη χρήση της
θύρας εισόδου HDMI(4K @ 60 Hz)/DVI IN 2 (ARC).
yΚατά τη σύνδεση με καλώδιο HDMI υψηλής ταχύτητας,
η εξωτερική συσκευή ήχου που υποστηρίζει το ARC
παρέχει οπτικό σήμα SPDIF χωρίς πρόσθετο οπτικό
καλώδιο ήχου και υποστηρίζει τη λειτουργία SIMPLINK.
Slovenščina
yZunanja zvočna naprava, ki podpira funkciji SIMPLINK
in ARC, mora biti povezana z vhodnimi vrati HDMI(4K
@ 60 Hz)/DVI IN 2 (ARC).
yČe jo povežete s kablom HDMI za hitri prenos, zunanja
zvočna naprava, ki podpira funkcijo ARC, oddaja optični
zapis SPDIF brez dodatnega optičnega zvočnega kabla
in podpira funkcijo SIMPLINK.
Español
yHay que conectar un dispositivo de audio externo que
admita SIMPLINK y ARC utilizando el puerto HDMI(4K
@ 60 Hz)/DVI IN 2 (ARC).
yCuando esté conectado mediante un cable HDMI de
alta velocidad, el dispositivo de audio externo que
admite ARC emite el SPDIF óptico sin necesidad de un
cable óptico de audio adicional y admite la función
SIMPLINK.
MAKING CONNECTIONS
IN
AV2
( Audio in)
A-16
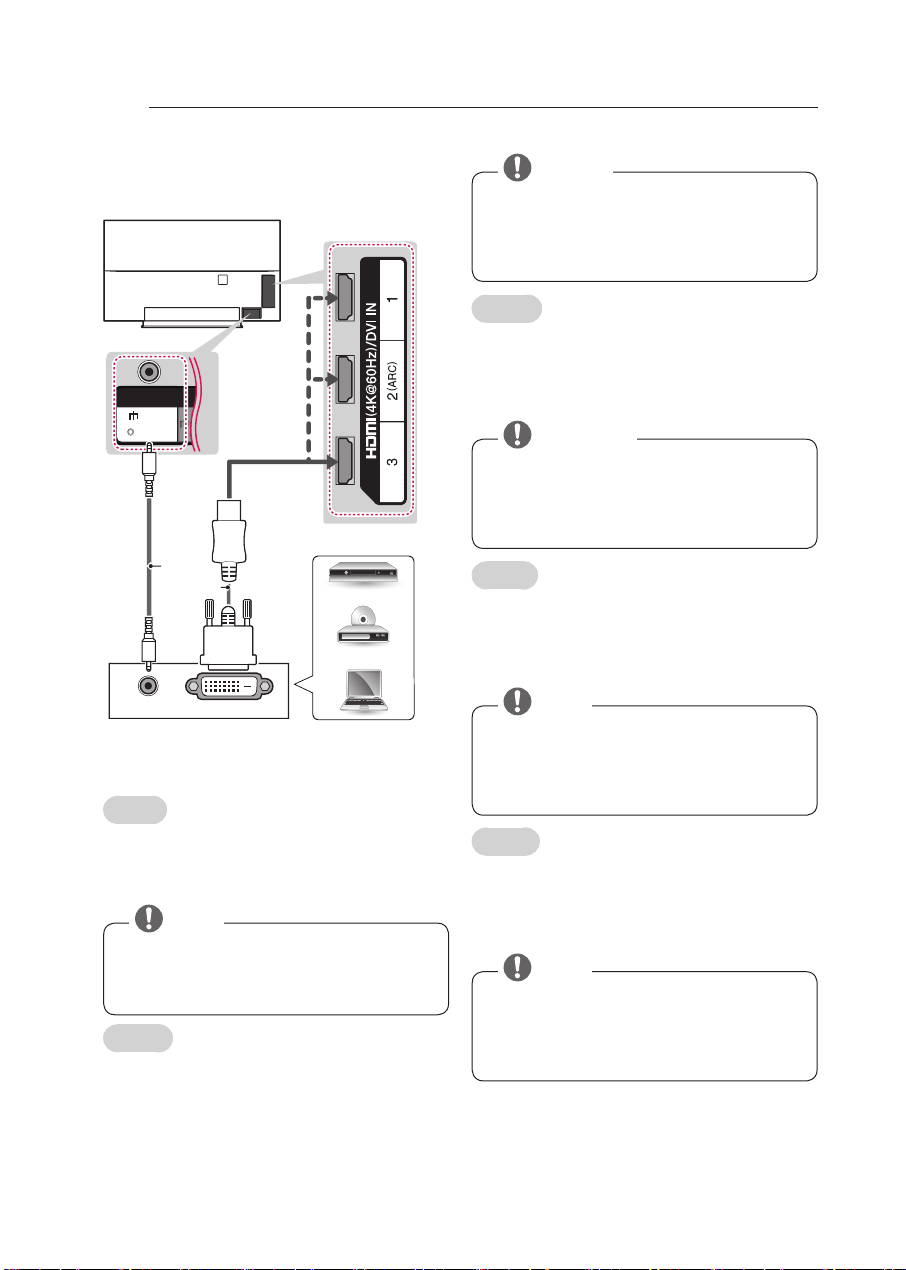
DVI to HDMI connection
(*Not
provided)
AUDIO OUT
English
Transmits the digital video signal from an external device
to the TV. Connect the external device and the TV with the
DVI-HDMI cable as shown. To transmit an audio signal, connect an audio cable.
yDepending on the graphics card, DOS mode may
not work if a DVI-HDMI cable is in use.
yWhen using the DVI-HDMI cable , Single link is only
supported.
Deutsch
Überträgt digitale Videosignale von einem externen Gerät
an das TV-Gerät. Verbinden Sie das externe Gerät, wie in
der folgenden Abbildung gezeigt, mithilfe des DVI-HDMIKabels mit dem TV-Gerät. Schließen Sie ein Audiokabel an,
um ein Audiosignal zu übertragen.
DVI OUT
DVD / Blu-Ray / PC /
HD Cable Box / HD STB
NOTE
HINWEIS
yAbhängig von der Grafikkarte funktioniert der
DOS-Modus bei Einsatz eines DVI-HDMI-Kabels
möglicherweise nicht.
yBei Verwendung des DVI-HDMI-Kabels wird nur eine
einfache Verbindung unterstützt.
Français
Permet de transmettre les signaux vidéo d’un périphérique
externe vers la TV. Connectez le périphérique externe et la
TV avec le câble DVI-HDMI comme indiqué sur l’illustration
suivante. Pour émettre un signal audio, raccordez un câble
audio.
REMARQUE
ySelon la carte graphique, le mode DOS peut ne pas
fonctionner si vous utilisez un câble pour établir la
connexion DVI-HDMI.
yLors de l’utilisation du câble DVI-HDMI, seule une
liaison unique peut être prise en charge.
Italiano
Il segnale digitale video viene trasmesso da un dispositivo
esterno al televisore. Collegare il dispositivo esterno e
il televisore mediante il cavo DVI-HDMI come mostrato
nell’illustrazione di seguito. Per trasmettere un segnale
audio, collegare un cavo audio.
NOTA
yA seconda della scheda grafica in uso, la modalità
DOS potrebbe non funzionare se si utilizza un cavo
DVI-HDMI.
yQuando si utilizza il cavo DVI-HDMI, è supportata
solo l’interfaccia Single link.
Español
Transmite la señal de vídeo digital de un dispositivo
externo a la TV. Use el cable DVI-HDMI para conectar el
dispositivo externo a la TV, tal y como se muestra en la
siguiente ilustración. Para transmitir una señal de audio,
conecte un cable de audio.
NOTA
yEn función de la tarjeta gráfica, puede que no
funcione el modo DOS si se está utilizando un cable
DVI-HDMI.
ySi se utiliza un cable DVI-HDMI, solo se admite un
enlace.
 Loading...