

Page 1
OWNER’S MANUAL
Please read this manual carefully before operating your
set and retain it for future reference.
65EC9700
*MFL68027942*
www.lg.com
P/NO : MFL68027942 (1408-REV00)
Page 2
2
IMPORTANT SAFETY INSTRUCTIONS
Always comply with the following precautions to avoid dangerous situations and ensure peak performance of your product.
ENGLISH
IMPORTANT SAFETY INSTRUCTIONS
WARNING/CAUTION
RISK OF ELECTRIC SHOCK
DO NOT OPEN
TO REDUCE THE RISK OF ELECTRIC SHOCK DO
NOT REMOVE COVER (OR BACK).
NO USER SERVICEABLE PARTS INSIDE.
REFER TO QUALIFIED SERVICE PERSONNEL.
The lightning flash with arrowhead symbol,
within an equilateral triangle, is intended to
alert the user to the presence of
uninsulated dangerous voltage within the product’s
enclosure that may be of sufficient magnitude to
constitute a risk of electric shock to persons.
The exclamation point within an equilateral
triangle is intended to alert the user to the
presence of important operating and
maintenance (servicing) instructions in the literature
accompanying the appliance.
WARNING/CAUTION
- TO REDUCE THE RISK OF FIRE AND ELECTRIC
SHOCK, DO NOT EXPOSE THIS PRODUCT TO
RAIN OR MOISTURE.
Read these instructions.
Keep these instructions.
Heed all warnings.
Follow all instructions.
Do not use this apparatus near water.
y
Clean only with a dry cloth.
y
Do not block any ventilation openings. Install in accordance
y
with the manufacturer’s instructions.
Do not install near any heat sources such as radiators, heat
y
registers, stoves, or other apparatus (including amplifiers)
that produce heat.
WARNING
If you ignore the warning message, you may be
seriously injured or there is a possibility of accident
or death.
CAUTION
If you ignore the caution message, you may be
slightly injured or the product may be damaged.
NOTE
The note helps you understand and use the product
safely. Please read the note carefully before using
the product.
WARNING
State of California to cause cancer and birth defects or other
reproductive harm.
: This product contains chemicals known to the
Wash hands after handling.
Do not defeat the safety purpose of the polarized or
y
grounding-type plug. A polarized plug has two blades with
one wider than the other. A grounding type plug has two
blades and a third grounding prong. The wide blade or the
third prong are provided for your safety. If the provided
plug does not fit into your outlet, consult an electrician for
replacement of the obsolete outlet (Can differ by country).
Do not press strongly upon the panel with a hand or a
y
sharp object such as a nail, pencil or pen, or make a scratch
on it.
Page 3

IMPORTANT SAFETY INSTRUCTIONS
3
Protect the power cord from being walked on or pinched
y
particularly at plugs, convenience receptacles, and the point
where they exit from the apparatus.
Only use attachments/accessories specified by the
y
manufacturer.
Use only with a cart, stand, tripod, bracket, or table
y
specified by the manufacturer, or sold with the apparatus.
When a cart is used, use caution when moving the cart/
apparatus combination to avoid injury from tip-over.
Unplug this apparatus during lightning storms or when
y
unused for long periods of time.
Refer all servicing to qualified service personnel. Servicing
y
is required when the apparatus has been damaged in any
way, such as power-supply cord or plug is damaged, liquid
has been spilled or objects have fallen into the apparatus,
the apparatus has been exposed to rain or moisture, does
not operate normally, or has been dropped.
CAUTION concerning the Power Cord
y
(Can differ by country):
Check the specification page of this owner’s manual to
be certain. Do not connect too many appliances to the
same AC power outlet as this could result in fire or electric
shock. Do not overload wall outlets. Overloaded wall
outlets, loose or damaged wall outlets, extension cords,
frayed power cords, or damaged or cracked wire insulation
are dangerous. Any of these conditions could result in
electric shock or fire. Periodically examine the cord of
your appliance, and if its appearance indicates damage or
deterioration, unplug it, discontinue use of the appliance,
and have the cord replaced with an exact replacement
part by an authorized service. Protect the power cord
from physical or mechanical abuse, such as being twisted,
kinked, pinched, closed in a door, or walked upon. Pay
particular attention to plugs, wall outlets, and the point
where the cord exits the appliance. Do not move the TV
with the power cord plugged in. Do not use a damaged
or loose power cord. Be sure do grasp the plug when
unplugging the power cord. Do not pull on the power cord
to unplug the TV.
Warning
y
do not expose this product to rain, moisture or other
liquids. Do not touch the TV with wet hands. Do not install
this product near flammable objects such as gasoline or
candles, or expose the TV to direct air conditioning.
- To reduce the risk of fire or electrical shock,
ENGLISH
Do not stick metal objects or any other conductive material
y
into the power cord. Do not touch the end of the power
cord while it is plugged in.
Keep the packing anti-moisture material or vinyl packing out
y
of the reach of children. Anti-moisture material is harmful
if swallowed. If swallowed by mistake, force the patient
to vomit and visit the nearest hospital. Additionally, vinyl
packing can cause suffocation. Keep it out of the reach of
children.
Do not expose to dripping or splashing and do not place
y
objects filled with liquids, such as vases, cups, etc. on or
over the apparatus (e.g. on shelves above the unit).
Page 4
4
IMPORTANT SAFETY INSTRUCTIONS
ENGLISH
Grounding
y
(Except for devices which are not grounded.)
Ensure that you connect the earth ground wire to
prevent possible electric shock (i.e. a TV with a threeprong grounded AC plug must be connected to a threeprong grounded AC outlet). If grounding methods are not
possible, have a qualified electrician install a separate
circuit breaker. Do not try to ground the unit by connecting
it to telephone wires, lightning rods, or gas pipes.
Short-circuit
Breaker
As long as this unit is connected to the AC wall outlet, it
y
Power Supply
is not disconnected from the AC power source even if the
unit is turned off.
Do not attempt to modify this product in any way without
y
written authorization from LG Electronics. Unauthorized
modification could void the user’s authority to operate this
product.
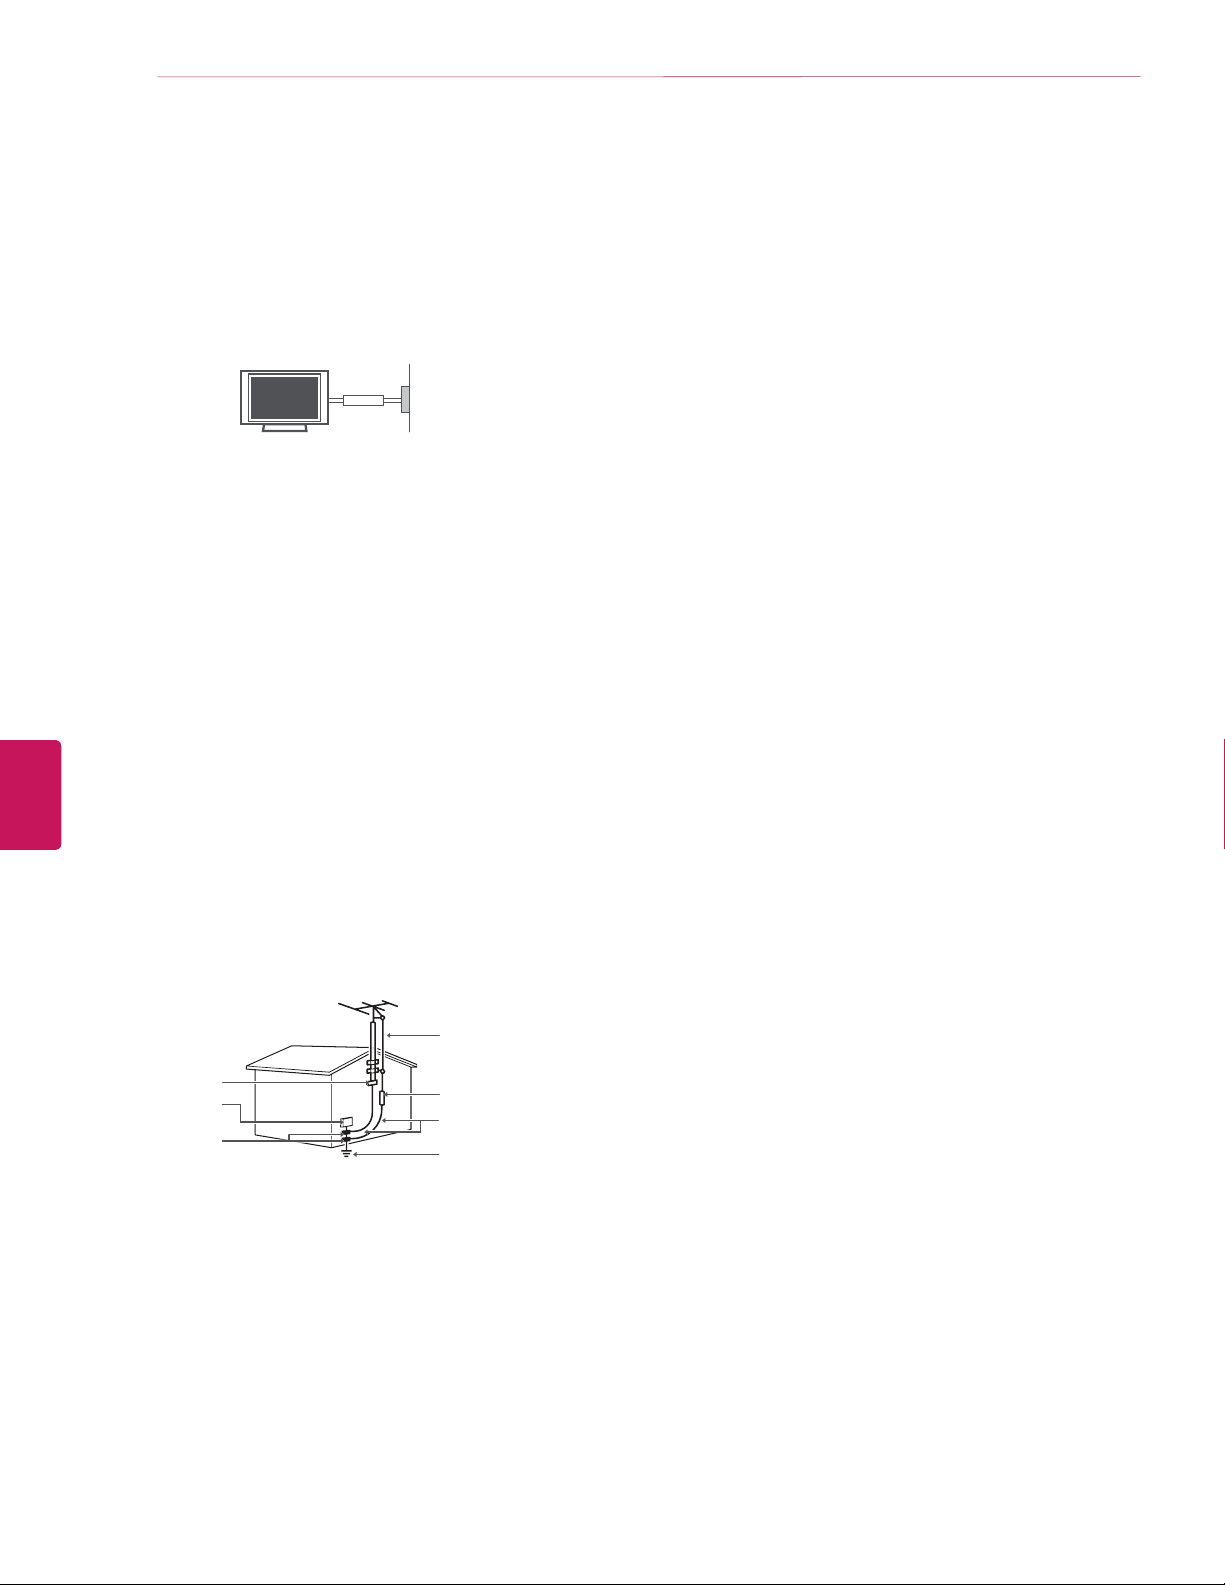
Outdoor Antenna Grounding
y
(Can differ by country):
If an outdoor antenna is installed, follow the precautions
below. An outdoor antenna system should not be located
in the vicinity of overhead power lines or other electric light
or power circuits, or where it can come in contact with
such power lines or circuits as death or serious injury can
occur. Be sure the antenna system is grounded so as to
provide some protection against voltage surges and builtup static charges. Section 810 of the National Electrical
Code (NEC) in the U.S.A. provides information with respect
to proper grounding of the mast and supporting structure,
grounding of the lead-in wire to an antenna discharge unit,
size of grounding conductors, location of antenna discharge
unit, connection to grounding electrodes and requirements
for the grounding electrode.
Antenna grounding according to the National Electrical
Code, ANSI/NFPA 70
Antenna Lead in Wire
Ground Clamp
Electric Service
Equipment
Ground Clamp
NEC: National Electrical Code
Antenna Discharge Unit
(NEC Section 810-20)
Grounding Conductor
(NEC Section 810-21)
Power Service Grounding
Electrode System
(NEC Art 250, Part H)
Cleaning
y
When cleaning, unplug the power cord and wipe gently
with a soft cloth to prevent scratching. Do not spray
water or other liquids directly on the TV as electric shock
may occur. Do not clean with chemicals such as alcohol,
thinners or benzine.
Moving
y
Make sure the product is turned off, unplugged and all
cables have been removed. It may take 2 or more people
to carry larger TVs. Do not press or put stress on the front
panel of the TV.
Ventilation
y
Install your TV where there is proper ventilation. Do not
install in a confined space such as a bookcase. Do not
cover the product with cloth or other materials while
plugged. Do not install in excessively dusty places.
If you smell smoke or other odors coming from the TV,
y
unplug the power cord and contact an authorized service
center.
Keep the product away from direct sunlight.
y
Never touch this apparatus or antenna during a thunder or
y
lightning storm.
When mounting a TV on the wall, make sure not to install
y
the TV by hanging the power and signal cables on the back
of the TV.
Do not allow an impact shock or any objects to fall into the
y
product, and do not drop anything onto the screen.
DISCONNECTING THE DEVICE FROM THE MAIN POWER
y
The Power Plug is the disconnecting device. In case
of an emergency, the Power Plug must remain readily
accessible.
Batteries
y
Store the accessories (battery, etc.) in a safe location out of
the reach of children.
This apparatus use batteries. In your community there
y
might be regulations that require you to dispose of these
batteries properly due to environmental considerations.
Please contact your local authorities for disposal or
recycling information.
Do not dispose of batteries in a fire.
y
Do not short circuit, disassemble or allow the batteries to
y
overheat.
Do not use high voltage electrical equipment near the TV,
y
(e.g. bug zapper). This may result in product malfunction.
Dot Defect
y
The Plasma or LCD panel is a high technology product with
resolution of two million to six million pixels. In a very few
cases, you could see fine dots on the screen while you’re
viewing the TV. Those dots are deactivated pixels and do
not affect the performance and reliability of the TV.
Page 5
Generated Sound
y
Cracking noise
or turning off the TV is generated by plastic thermal
contraction due to temperature and humidity. This noise
is common for products where thermal deformation is
required.
Electrical circuit humming/panel buzzing
is generated from a high-speed switching circuit, which
supplies a large amount of current to operate a product. It
varies depending upon the product.
This generated sound does not affect the performance and
reliability of the product.
Take care not to touch the ventilation openings. When
y
watching the TV for a long period, the ventilation openings
may become hot. This does not affect the performance of
the product or cause defects in the product.
Do not install this product on a wall if it could be exposed
y
to oil or oil mist. This may damage the product and cause it
to fall.
If the TV feels cold to the touch, there may be a small
y
flicker when it is turned on. This is normal, there is nothing
wrong with TV. Some minute dot defects may be visible
on the screen, appearing as tiny red, green, or blue
spots. However, they have no adverse effect on the TV’s
performance. Avoid touching the LCD screen or holding
your finger(s) against it for long periods of time. Doing so
may produce some temporary distortion effects on the
screen.
A cracking noise that occurs when watching
A low level noise
Preventing Image burn or Burn-in on your TV screen
IMPORTANT SAFETY INSTRUCTIONS
For USA and Canada
FCC NOTICE
This equipment has been tested and found to comply with
the limits for a Class B digital device, pursuant to Part 15
of the FCC Rules. These limits are designed to provide
reasonable protection against harmful interference in a
residential installation. This equipment generates, uses
and can radiate radio frequency energy and, if not installed
and used in accordance with the instructions, may cause
harmful interference to radio communications. However,
there is no guarantee that interference will not occur in a
particular installation. If this equipment does cause harmful
interference to radio or television reception, which can be
determined by turning the equipment off and on, the user
is encouraged to try to correct the interference by one or
more of the following measures:
- Reorient or relocate the receiving antenna.
- Increase the separation between the equipment and the
receiver.
- Connect the equipment to an outlet on a circuit different
from that to which the receiver is connected.
- Consult the dealer or an experienced radio/TV technician
for help.
This device complies with part 15 of the FCC Rules.
Operation is subject to the following two conditions: (1)
this device may not cause harmful interference and (2) this
device must accept any interference received, including
interference that may cause undesired operation of the
device.
Any changes or modifications in construction of this device
which are not expressly approved by the party responsible
for compliance could void the user’s authority to operate
the equipment.
5
ENGLISH
If a fixed image displays on the TV screen for a long period
y
of time, it will be imprinted and become a permanent
disfigurement on the screen. This is image burn or burn-in
and not covered by the warranty.
If the aspect ratio of the TV is set to 4:3 for a long period of
y
time, image burn may occur on the letterboxed area of the
screen.
Avoid displaying a fixed image on the TV screen for a long
y
period of time (1 or more hours for OLED). to prevent
image burn.
Preventing Screen Burn
y
Displaying still images, such as a station’s logo, subtitle,
screen menu, video game or computer screen, for a long
time may damage the screen, causing screen burn which
can remain for a long time or never disappear. Do not
display still images for over an hour.
NOTE TO CABLE/TV INSTALLER
This reminder is provided to call the CATV system
installer’s attention to Article 820-40 of the National Electric
Code (U.S.A.). The code provides guidelines for proper
grounding and, in particular, specifies that the cable ground
shall be connected to the grounding system of the building,
as close to the point of the cable entry as practical.
Page 6

6
IMPORTANT SAFETY INSTRUCTIONS
Viewing 3D Imaging
ENGLISH
WARNING
Viewing Environment
Viewing Time
y
- When watching 3D contents, take 5 to 15 minute breaks
every hour. Viewing 3D contents for a long period of time
may cause headache, dizziness, fatigue or eye strain.
Those that have a photosensitive seizure or
chronic illness
Some users may experience a seizure or other abnormal
y
symptoms when they are exposed to a flashing light or
particular pattern from 3D contents.
Do not watch 3D videos if you feel nausea, are pregnant
y
and/ or have a chronic illness such as epilepsy, cardiac
disorder, or blood pressure disease, etc.
3D Contents are not recommended to those who suffer
y
from stereo blindness or stereo anomaly. Double images or
discomfort in viewing may be experienced.
If you have strabismus (cross-eyed), amblyopia (weak
y
eyesight) or astigmatism, you may have trouble sensing
depth and easily feel fatigue due to double images. It is
advised to take frequent breaks than the average adult.
If your eyesight varies between your right and left eye,
y
revise your eyesight prior to watching 3D contents.
Symptoms which require discontinuation or
refraining from watching 3D contents
Do not watch 3D contents when you feel fatigue from lack
y
of sleep, overwork or drinking.
When these symptoms are experienced, stop using/
y
watching 3D contents and get enough rest until the
symptom subsides.
- Consult your doctor when the symptoms persist.
Symptoms may include headache, eyeball pain, dizziness,
nausea, palpitation, blurriness, discomfort, double image,
visual inconvenience or fatigue.
CAUTION
Viewing Environment
Viewing Distance
y
- Maintain a distance of at least twice the screen diagonal
length when watching 3D contents. If you feel discomfort
in viewing 3D contents, move further away from the TV.
Viewing Age
Infants / Children
y
- Usage/ Viewing 3D contents for children under the age of
5 are prohibited.
- Children under the age of 10 may overreact and become
overly excited because their vision is in development (for
example: trying to touch the screen or trying to jump into
it. Special monitoring and extra attention is required for
children watching 3D contents.
- Children have greater binocular disparity of 3D
presentations than adults because the distance between
the eyes is shorter than one of adults. Therefore they will
perceive more stereoscopic depth compared to adults for
the same 3D image.
Teenagers
y
- Teenagers under the age of 19 may be stimulated to light
coming from 3D videos. Advise them not to watch 3D
videos for a long time when they are tired.
Elderly
y
- The elderly may perceive less of a 3D effect than the
youth. Do not sit closer to the TV than the recommended
distance.
Cautions when using the 3D glasses
Make sure to use LG 3D glasses. Otherwise, you may not
y
be able to view 3D videos properly.
Do not use 3D glasses instead of your normal glasses,
y
sunglasses or protective goggles.
Using modified 3D glasses may cause eye strain or image
y
distortion.
Do not keep your 3D glasses in extremely high or low
y
temperatures. It will cause deformation.
The 3D glasses are fragile and are easy to be scratched.
y
Always use a soft, clean piece of cloth when wiping the
lenses. Do not scratch the lenses of the 3D glasses with
sharp objects or clean/wipe them with chemicals.
Page 7

LICENSES
LICENSES / OPEN SOURCE SOFTWARE NOTICE
7
Supported licenses may differ by model. For more information about licenses, visit
www.lg.com
.
OPEN SOURCE SOFTWARE NOTICE
To obtain the source code under GPL, LGPL, MPL and other open source licenses, that is contained in this product, please visit
opensource.lge.com
In addition to the source code, all referred license terms, warranty disclaimers and copyright notices are available for download.
LG Electronics will also provide open source code to you on CD-ROM for a charge covering the cost of performing such distribution (such
as the cost of media, shipping and handling) upon email request to
date on which you purchased the product.
.
opensource@lge.com
. This offer is valid for three (3) years from the
http://
ENGLISH
Page 8

8
TABLE OF CONTENTS
TABLE OF CONTENTS
2 IMPORTANT SAFETY INSTRUCTIONS
6 Viewing 3D Imaging
7 LICENSES
7 OPEN SOURCE SOFTWARE NOTICE
8 TABLE OF CONTENTS
9 INSTALLATION PROCEDURE
9 ASSEMBLING AND PREPARING
9 Unpacking
11 Optional Extras
12 Parts and Buttons
13 Using the Joystick Button
14 Lifting and Moving the TV
ENGLISH
14 Setting Up the TV
14 - Attaching the AV Cover
15 - Mounting on a Table
16 - Tidying Cables
16 - Mounting on a Wall
18 Using Built-in Camera
18 - Preparing Built-in Camera
19 - Name of Parts for the Built-In Camera
19 - Checking the Camera’s Shooting Range
31 MAGIC REMOTE FUNCTIONS
32 Registering Magic Remote
32 How to use Magic Remote
32 Precautions to Take when Using the Magic
Remote
33 USING THE USER GUIDE
34 SPECIFICATIONS
34 EXTERNAL CONTROL DEVICE SETUP
35 MAINTENANCE
35 Cleaning Your TV
35 - Screen, Frame, Cabinet, and Stand
35 - Power Cord
35 TROUBLESHOOTING
20 MAKING CONNECTIONS
20 Connecting to an Antenna or Cable
21 Connecting to an HD receiver, DVD Player, or VCR
21 - HDMI Connection
22 - DVI to HDMI Connection
23 - Connecting to a Mobile Phone
24 - Component Connection
25 - Composite Connection
26 Connecting a PC
26 - HDMI Connection or DVI to HDMI Connection
28 Connecting to an Audio System
28 - Digital Optical Audio Connection
29 Connecting headphones
30 Connecting a USB Device
NOTE
Image shown may differ from your TV.
y
Your TV’s OSD (On Screen Display) may differ slightly
y
from that shown in this manual.
The available menus and options may differ from the
y
input source or product model that you are using.
New features may be added to this TV in the future.
y
Page 9
INSTALLATION PROCEDURE / ASSEMBLING AND PREPARING
INSTALLATION PROCEDURE
Open the package and make sure all the accessories are included.
1
Connect an external device to the TV set.
2
Make sure the network connection is available.
3
You can use the TV network functions only when the network connection is made.
* When the TV is turned on for the first time after being shipped from the factory, initialization of the TV may take approximately one
minute.
ASSEMBLING AND PREPARING
9
Unpacking
Check your product box for the following items. If there are any missing accessories, contact the local dealer where you purchased
your product. The illustrations in this manual may differ from the actual product and item.
CAUTION
Do not use any unapproved items to ensure the safety and product life span.
y
Any damages or injuries by using unapproved items are not covered by the warranty.
y
In case of some model, the thin film on screen is a part of TV, So don’t take it off.
y
NOTE
The items supplied with your product may vary depending upon the model.
y
Product specifications or contents of this manual may be changed without prior notice due to upgrade of product functions.
y
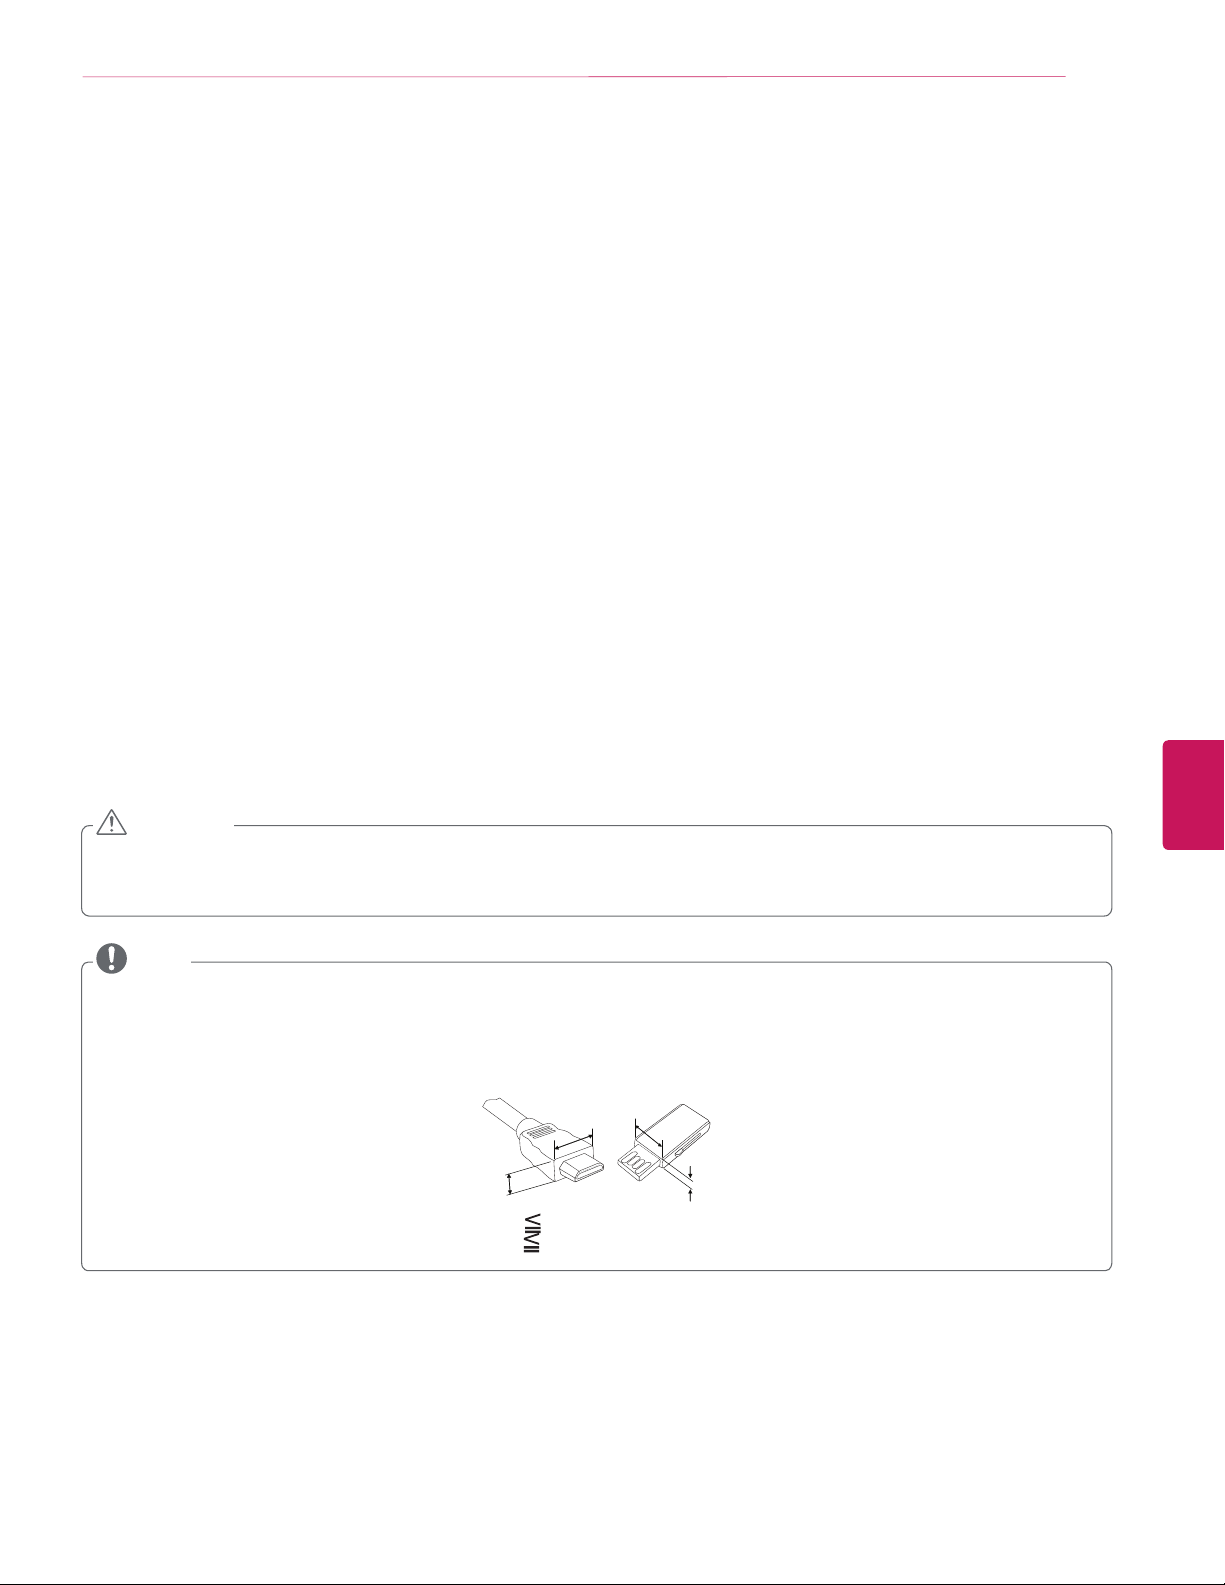
For an optimal connection, HDMI cables and USB devices should have bezels less than 10 mm thick (0.39 inches) and 18 mm (0.7
y
inches) width.
Use an extension cable that supports USB 2.0 if the USB cable or USB FLASH DRIVE does not fit into your TV’s USB port.
y
B
A
*A 10 mm (0.39 inches)
18 mm (0.7 inches)
*B
B
A
ENGLISH
Page 10

10
ASSEMBLING AND PREPARING
ENGLISH
Magic Remote,
Batteries (AA)
(See page 31.)
Cinema 3D Glasses
The number of 3D glasses may
differ depending upon the model or
country.
Composite Video Cable
(See page 24 and 25.)
Owner’s Manual
AV Cover
(See page 14.)
Cable Holder
(See page 16.)
Polishing cloth
Use this to remove dust from the
cabinet.
Component Video Cable
(See page 24.)
Screws
2 EA, M4 x L10
(See page 16.)
HDMI Cable
(See page 21 and 26.)
Cable Management
2 EA
(See page 16.)
Page 11

Optional Extras
Optional extras can be changed or modified for quality improvement without any notification.
Contact your dealer for buying these items.
These devices only work with certain models.
The model name or design may be changed manufacturer’s circumstances or policies.
ASSEMBLING AND PREPARING
11
AN-MR500
Magic Remote
AG-F***DP
Dual Play Glasses
AG-F***
Cinema 3D Glasses
LG Audio Device
ENGLISH
Page 12
12
ASSEMBLING AND PREPARING
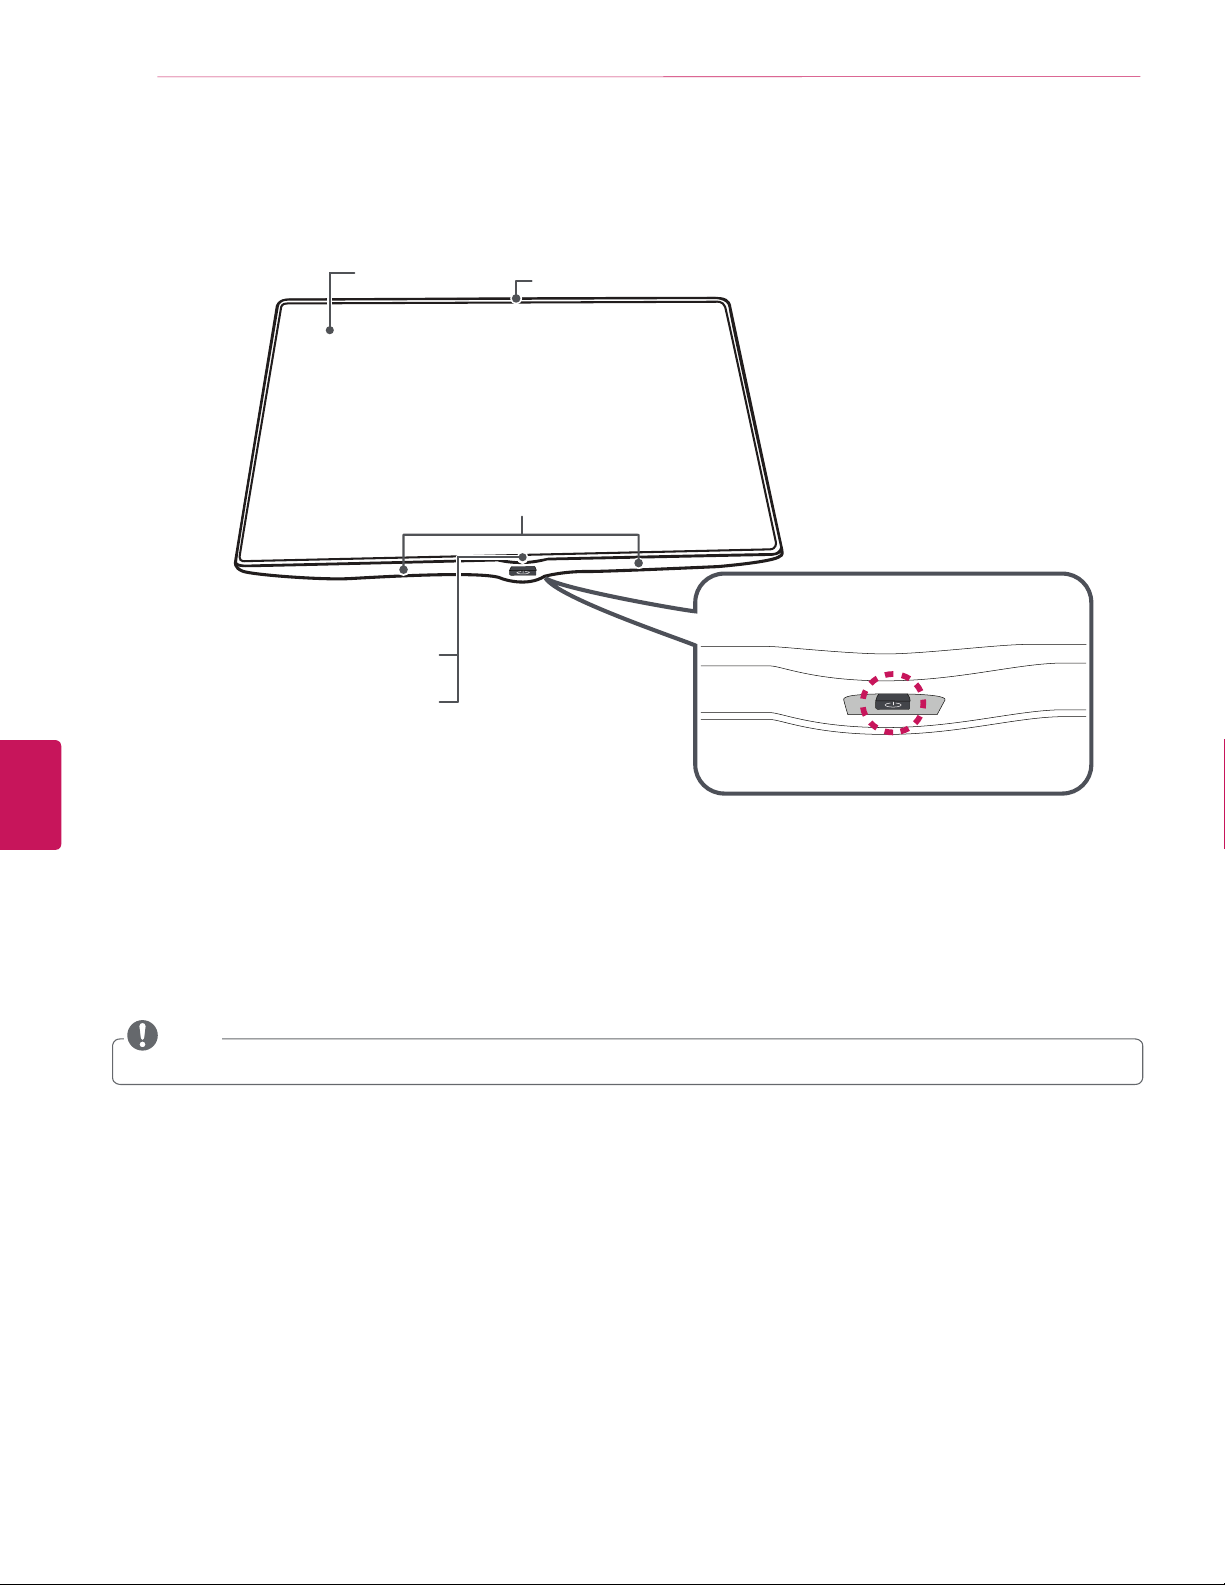
Parts and Buttons
ENGLISH
Screen
Remote Control Sensor and
Intelligent Sensor
LG Logo Light
Built-in Camera
Speakers
1
Joystick button
2
1
Intelligent sensor - Adjusts the image quality and brightness based on the surrounding environment.
2
Joystick button is located below the screen of TV.
NOTE
You can set the LG Logo Light to be on or off by selecting
y
GENERAL
in the main menus.
Page 13

Using the Joystick Button
You can operate the TV by pressing the button or moving the joystick left, right, up, or down.
Basic functions
ASSEMBLING AND PREPARING
13
Power On
Power Off
Volume
Control
Channels
Control
When the TV is turned off, place your finger on the joystick button and press it once and
release it.
When the TV is turned on, place your finger on the joystick button and press it once for a
few seconds and release it.
If you place your finger over the joystick button and move it left or right, you can adjust the
volume level you want.
If you place your finger over the joystick button and move it up or down, you can scroll
through the saved channels you want.
NOTE
When your finger over the joystick button and push it up, down, left, or right, be careful not to press the joystick button. If you
y
press the joystick button first, you may not be able to adjust the volume level and/or scroll through saved channels.
Adjusting the menu
When the TV is turned on, press the joystick button one time.
You can adjust the Menu items(
, , )moving the joystick button left or right.
TV off
close
Input
Turns the power off.
Clears on-screen displays and returns to TV viewing.
Changes the input source.
ENGLISH
Page 14
14
ASSEMBLING AND PREPARING
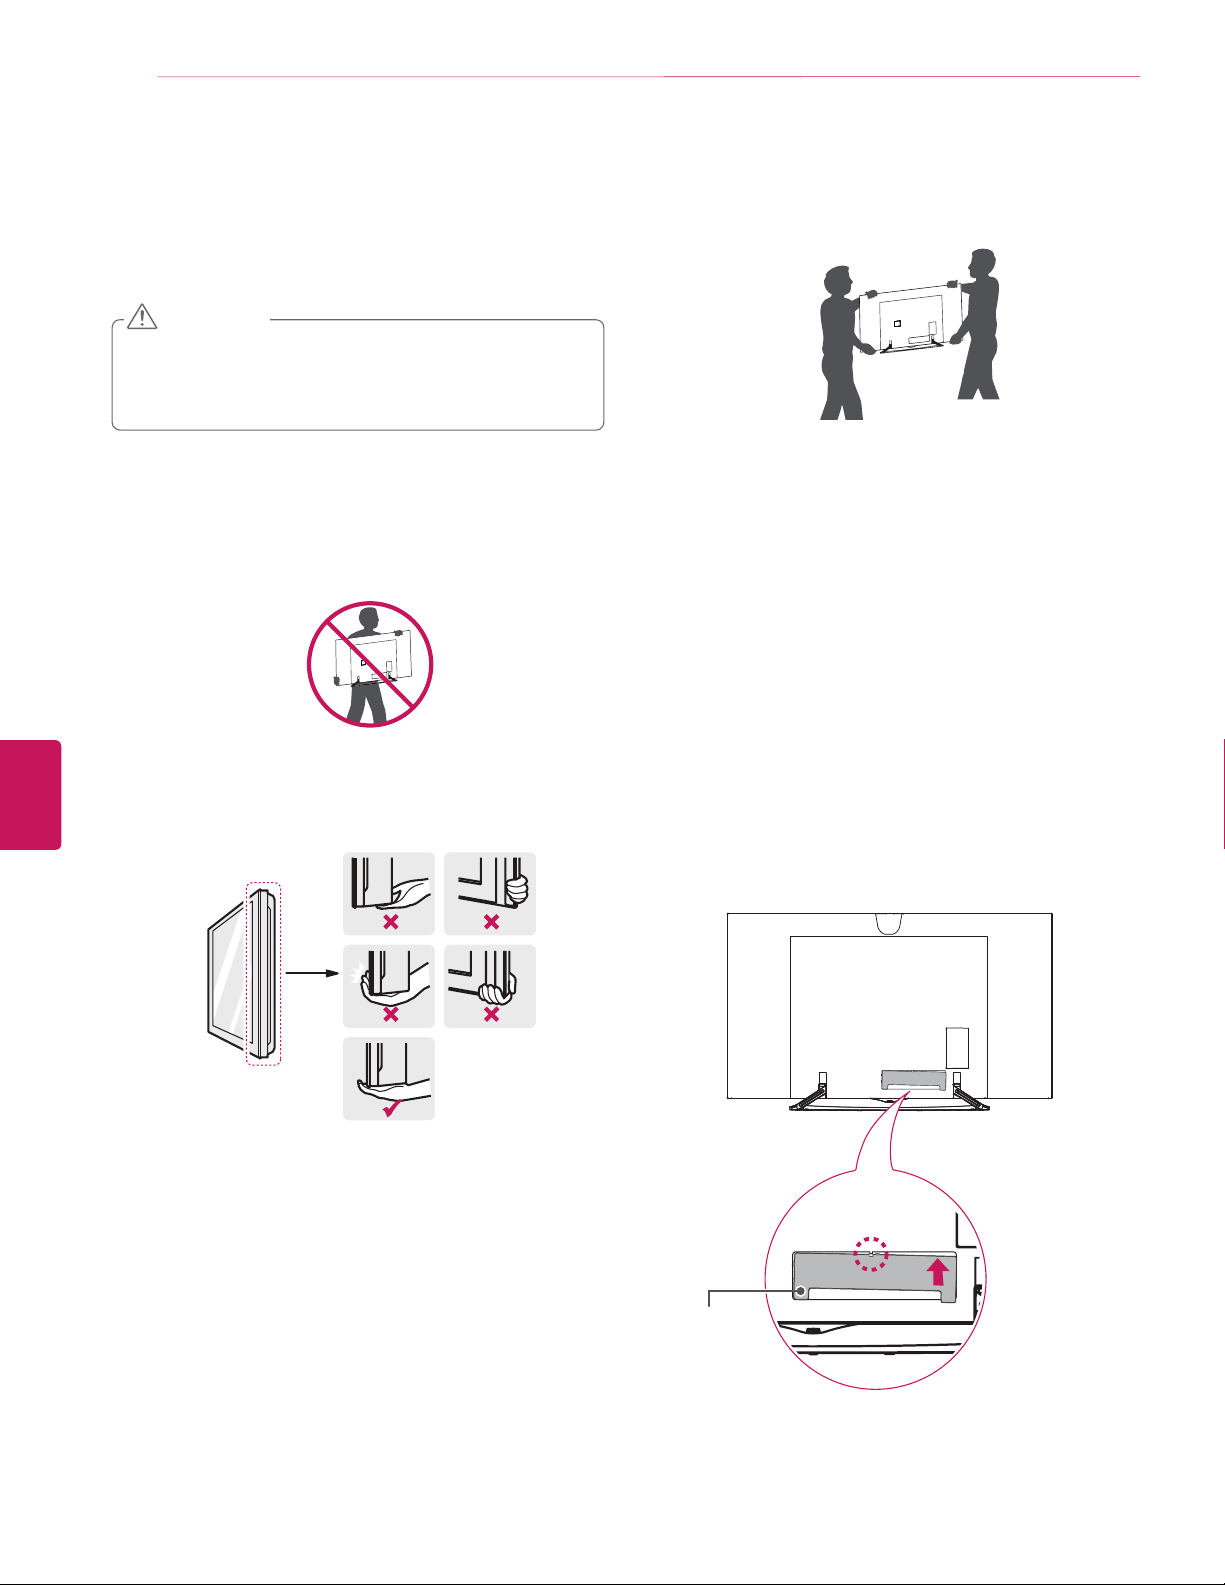
Lifting and Moving the TV
When moving or lifting the TV, read the following to prevent the
TV from being scratched or damaged and for safe transportation
regardless of its type and size.
CAUTION
Avoid touching the screen at all times, as this may result
y
in damage to the screen.
Do not place the product on the floor with its front facing
y
down. Doing so may result in damage to the screen.
It is recommended to move the TV in the box or packing
y
material that the TV originally came in.
Before moving or lifting the TV, disconnect the power
y
cord and all cables.
When holding the TV, the screen should face away from
y
you to avoid damage.
When transporting a large TV, there should be at least 2
y
people.
When transporting the TV by hand, hold the TV as shown
y
in the following illustration.
When transporting the TV, do not expose the TV to jolts or
y
excessive vibration.
When transporting the TV, keep the TV upright; never turn
y
the TV on its side or tilt towards the left or right.
Do not apply excessive pressure to cause flexing / bending
y
of frame chassis as it may damage screen.
Be sure to keep your TV upright instead of laying or tilting it
y
while moving the TV.
When handling the TV, be careful not to damage the
y
protruding joystick button.
ENGLISH
Hold the top and bottom of the TV frame firmly. Make
y
sure not to hold the transparent part, speaker, or speaker
grill area.
Setting Up the TV
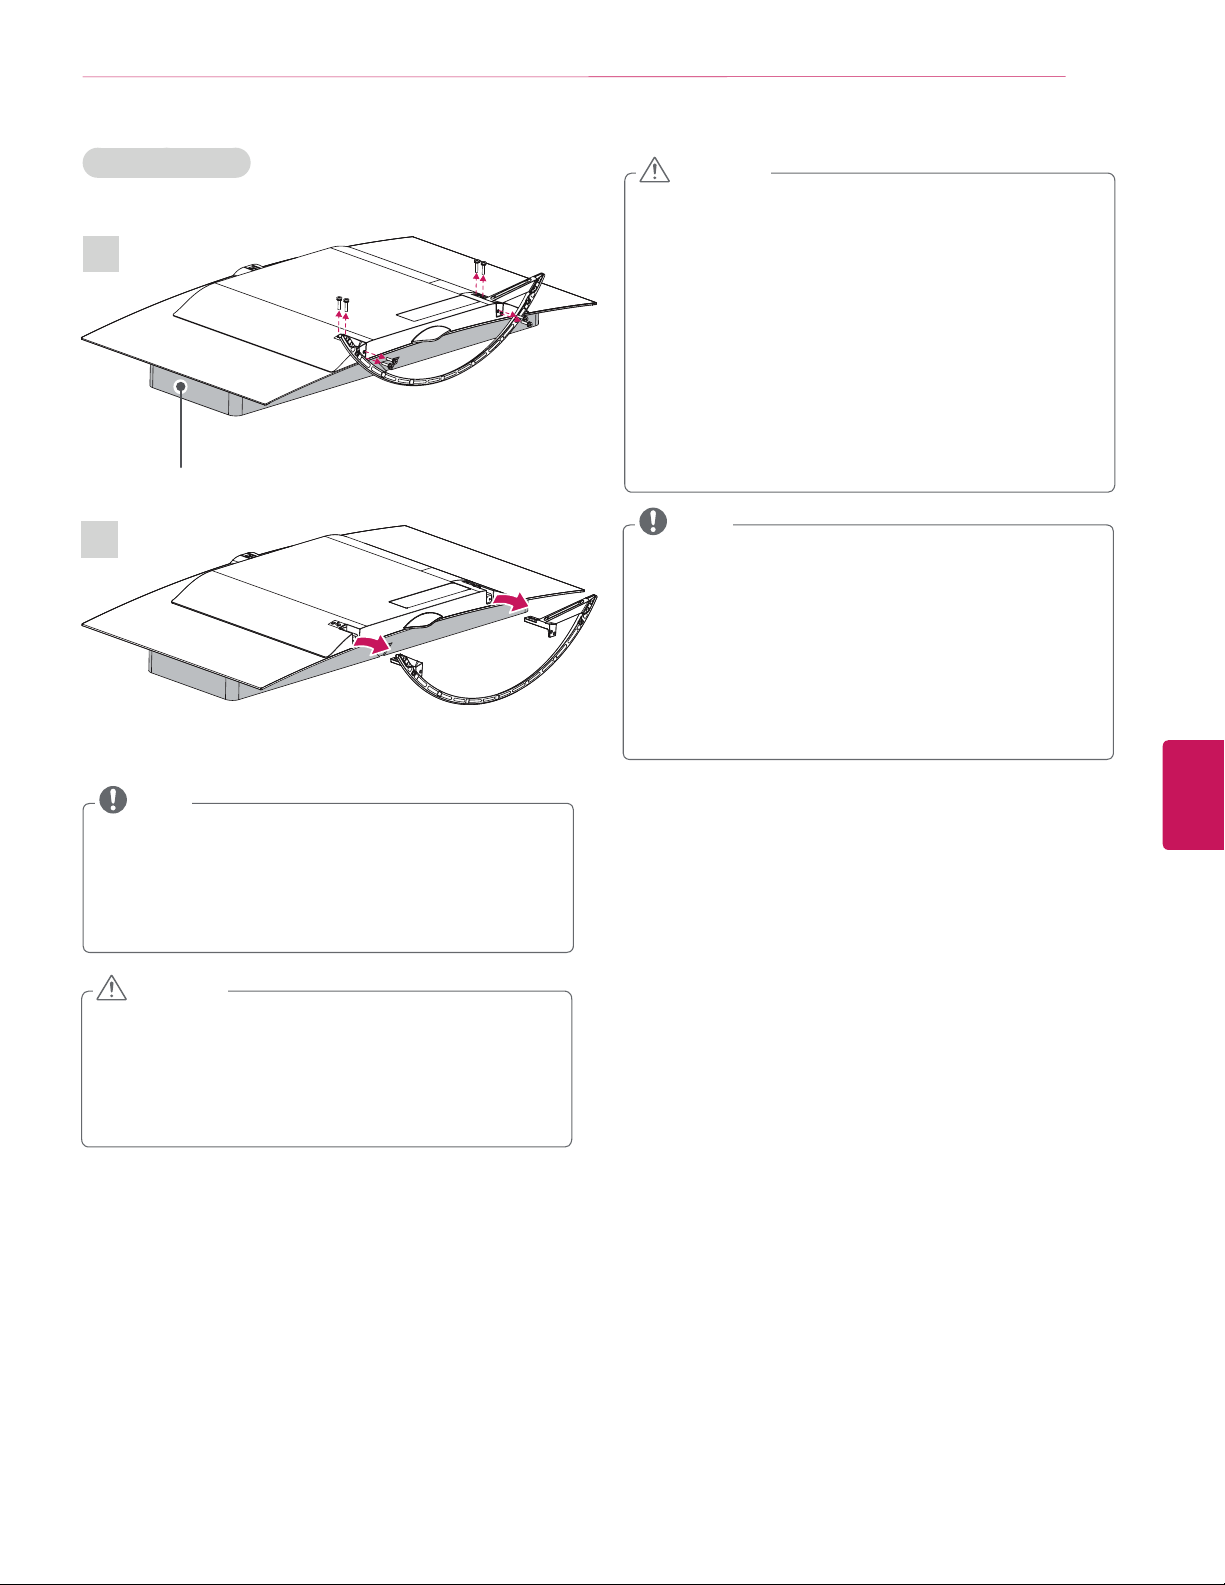
Attaching the AV Cover
Please assemble the AV cover as shown in the figure.
AV cover
Page 15

ASSEMBLING AND PREPARING
15
Mounting on a Table
Lift and tilt the TV into its upright position on a table.
1
- Leave a 10 cm (4 inch) (minimum) space from the wall for
proper ventilation.
10 cm
(4 inches)
10 cm
10 cm
10 cm
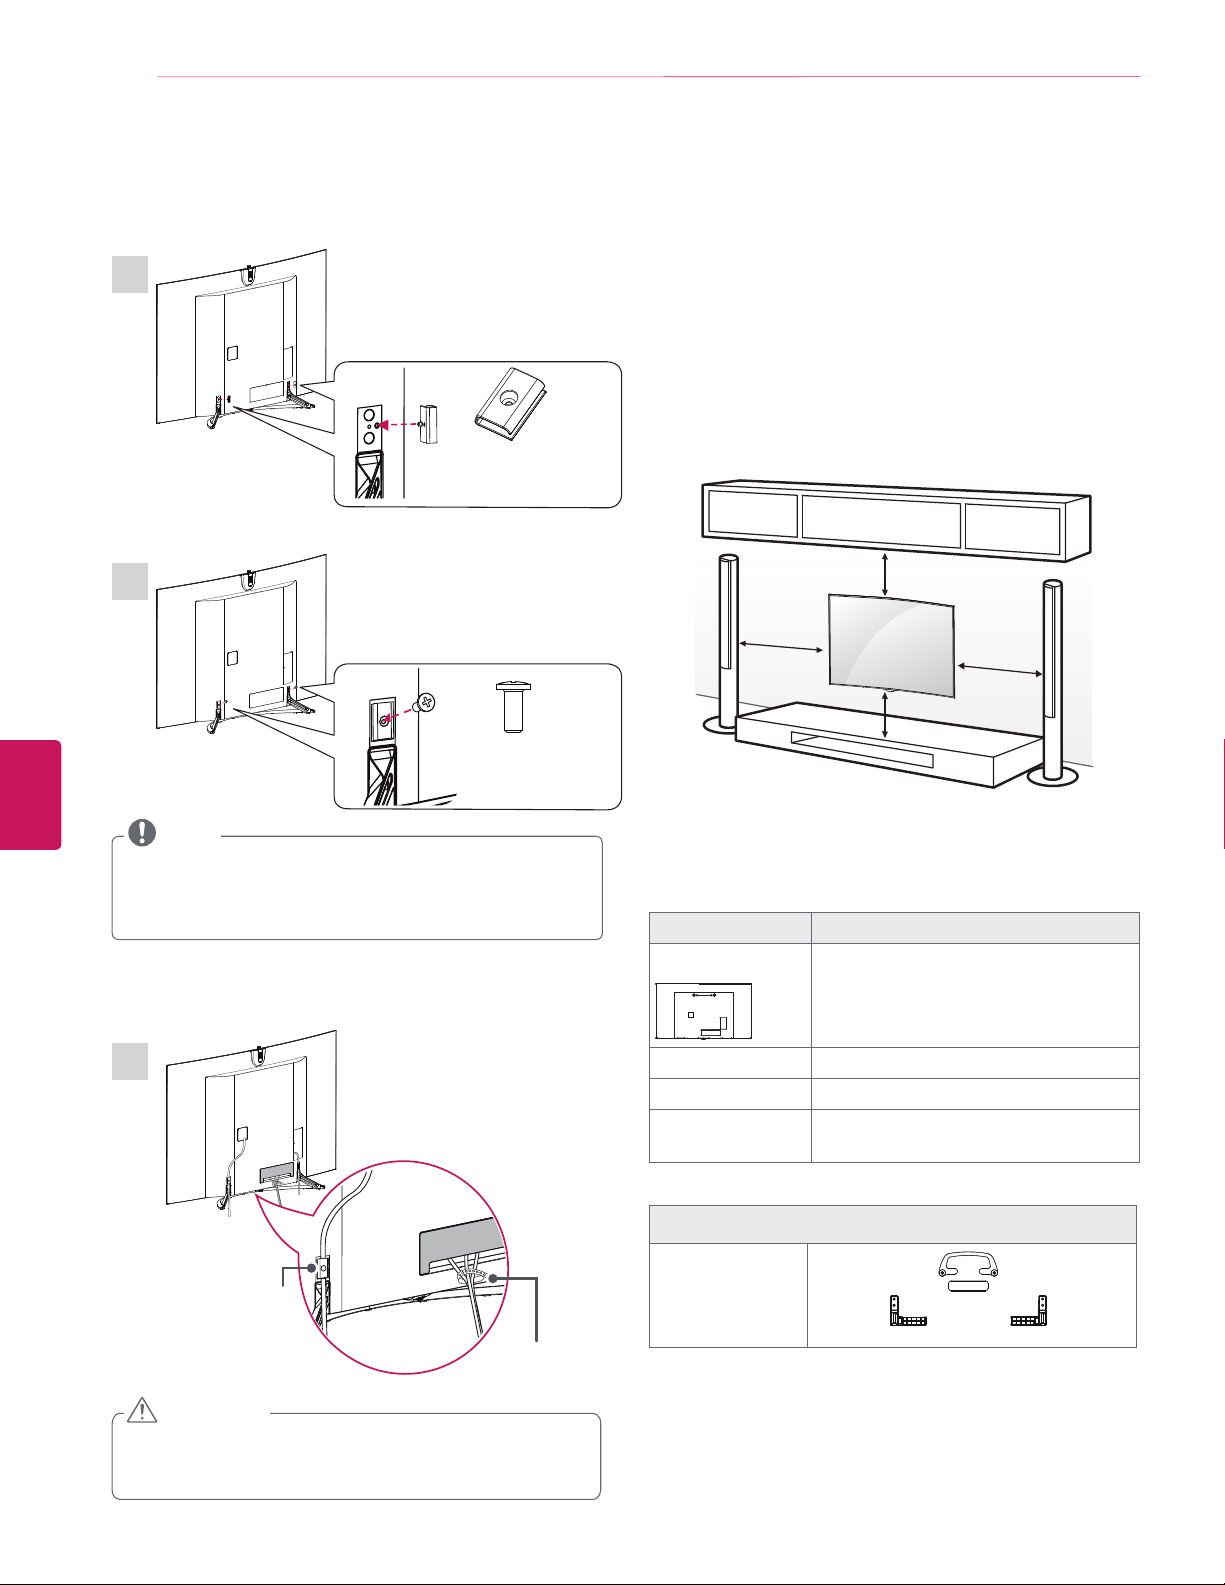
Securing the TV to a wall (optional)
Insert and tighten the eye-bolts, or TV brackets and bolts on
1
the back of the TV.
- If there are bolts inserted at the eye-bolt’s position,
remove the bolts first.
Mount the wall brackets with the bolts to the wall.
2
Match the location of the wall bracket and the eye-bolts on
the rear of the TV.
ENGLISH
Connect the power cord to a wall outlet.
2
CAUTION
Do not place the TV near or on sources of heat, as this
y
may result in fire or other damage.
Connect the eye-bolts and wall brackets
3
rope or cable.
Make sure to keep the rope parallel to the flat surface.
tightly with a sturdy
CAUTION
Make sure that children do not climb on or hang on the
y
TV.
NOTE
Use a platform or cabinet that is strong and large enough
y
to support the TV securely.
Brackets, bolts, and ropes are optional. You can obtain
y
additional accessories from your local dealer.
Page 16
16
ASSEMBLING AND PREPARING
Tidying Cables
Gather and bind the cables with the cable holder and Cable
Management.
ENGLISH
2
Mounting on a Wall
An optional wall mount can be used with your LG Television.
Consult with your local dealer for a wall mount used by your TV
1
Cable Management
2 EA
M4 x L10
model. Carefully attach the wall mount bracket at the rear of the
TV. Install the wall mount bracket on a solid wall perpendicular
to the floor. If you are attaching the TV to other building
materials, please contact qualified personnel to install the wall
mount. Detailed instructions will be included with the wall
mount. We recommend that you use an LG brand wall mount.
When you do not use LG’s wall mount bracket, please use wall
mount bracket which the distance to the wall is adequately
secured for seamless connectivity to external devices.
10 cm
(4 inches)
10 cm
10 cm
10 cm
2 EA
NOTE
When attaching the cable management, use a magnetic
y
screwdriver.
If you don’t have a magnetic screwdriver, insert the screws
y
into the cable management and then attach it to the TV.
3
Cable
Management
Cable Holder
Make sure to use screws and wall mounts that meet the
standard. Standard dimensions for the wall mount kits are
described in the following table.
Model 65EC9700
A
A
Standard screw M6
Number of screws 2
Wall mount bracket
(optional)
OSW200
210
OSW200
Wall mount bracket (optional)
CAUTION
Do not move the TV by holding the cable management
y
and cable band, as the cable holders may break, and
injuries and damage to the TV may occur.
Page 17
ASSEMBLING AND PREPARING
17
Removing a stand
1
Packing Brace
2
CAUTION
Disconnect the power first, and then move or install the
y
TV. Otherwise electric shock may occur.
If you install the TV on a ceiling or slanted wall, it may fall
y
and result in severe injury.
Use an authorized LG wall mount and contact the local
dealer or qualified personnel.
Do not over tighten the screws as this may cause damage
y
to the TV and void your warranty.
Use the screws and wall mounts that meet the standard.
y
Any damages or injuries by misuse or using an improper
accessory are not covered by the warranty.
You will need at least two people to remove the stand and
y
one more to separate the stand from the TV so it doesn’t
fall when the screws are removed.
NOTE
Use the screws that are listed on the standard screw
y
specifications.
The wall mount kit includes an installation manual and
y
necessary parts.
The wall mount bracket is optional. You can obtain additional
y
accessories from your local dealer.
The length of screws may differ depending upon the wall
y
mount. Make sure to use the proper length.
For more information, refer to the manual supplied with the
y
wall mount.
ENGLISH
NOTE
For more information about mounting on a wall, refer to the
y
OSW200 manual.
Remove the stand by placing the packing brace as shown in
y
the drawing to prevent damage.
When mounting the TV on a table, attach the stand by
y
performing the stand removal in reverse.
CAUTION
(When attaching the stand)
Make sure that the screws are fastened tightly. (If they
y
are not fastened securely enough, the TV may tilt forward
after being installed.)
Do not tighten the screws with too much force; otherwise
y
they may be damaged and come loose later.
Page 18

18
ASSEMBLING AND PREPARING
Using Built-in Camera
You can make a Skype video call or use the motion recognition
function using the built-in camera of the TV.
This TV does not support the use of an external camera.
ENGLISH
NOTE
Before using the built-in camera, you must recognize the
y
fact that you are legally responsible for the use or misuse
of the camera by the relevant national laws including the
criminal law.
The relevant laws include the Personal Information
y
Protection law which regulates the processing and
transferring of personal information and the law which
regulates the monitoring by camera in a workplace and
other places.
When using the built-in camera, the user must gain
y
consent from the persons being observed. Please avoid
using the camera in the following manner. We suggest
avoiding the following situations:
(1) Using the camera in areas where the use of camera is
generally prohibited such as restroom, locker room, fitting
room, and security area.
(2) Using the camera while causing the infringement of
privacy.
(3) Using the camera while causing the violation of the
relevant regulations or laws.
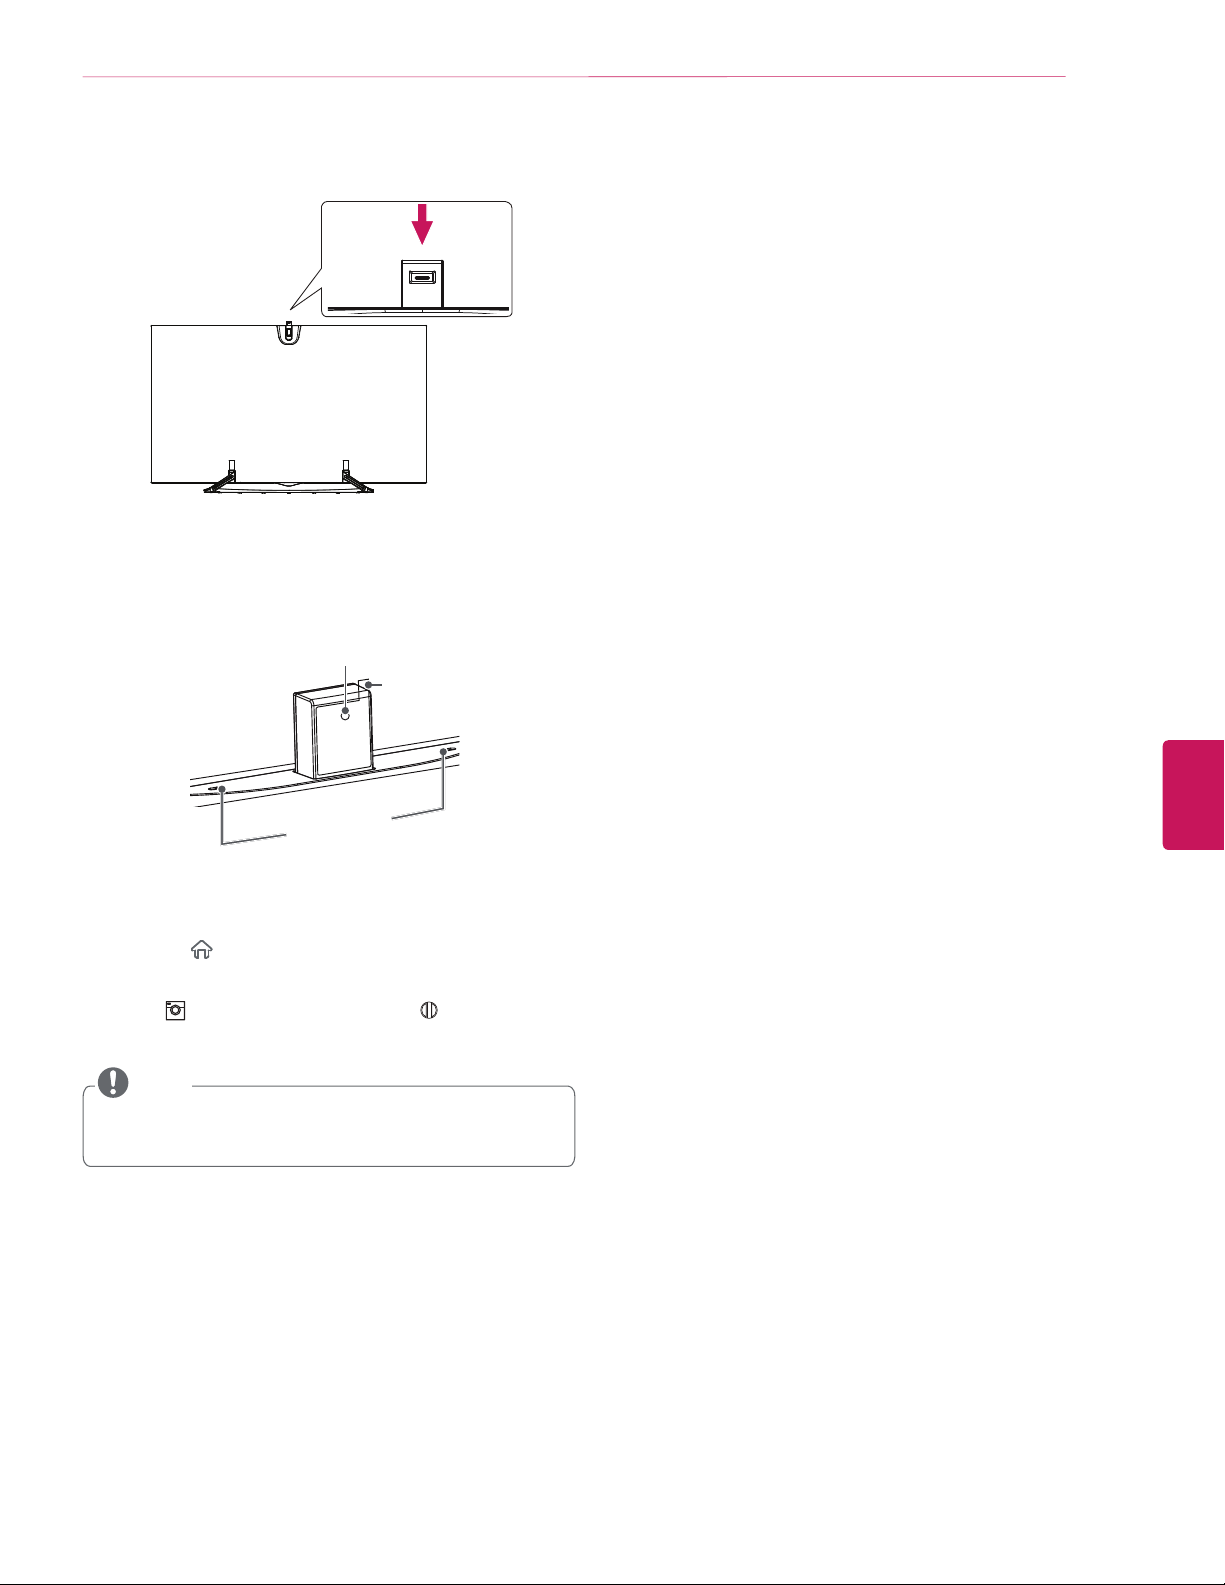
Preparing Built-in Camera
Pull up the built-in camera at the back of the TV.
1
NOTE
Remove the protective film before using the built-in
y
camera.
Slide
You can adjust the angle of the camera with the angle
2
adjustment lever on the back of the built-in camera (within 5
degrees vertically).
[Side View]
7
5
Lever
Lens
Page 19
Pull down the built-in camera when you are not using it.
3
Name of Parts for the Built-In Camera
ASSEMBLING AND PREPARING
19
Camera Lens
Protective
Film
Microphone
Checking the Camera’s Shooting Range
Press the
1
display the Home menu.
Select
2
button.
(Home)
CAMERA
NOTE
The optimal distance from the camera to use the motion
y
recognition function is between 1.5 m (5 ft) and 4.5 m
(15 ft).
button on the remote control to
and then press the
Wheel (OK)
ENGLISH
Page 20
20
MAKING CONNECTIONS
MAKING CONNECTIONS
You can connect various external devices to the TV. Supported external devices are: HD receivers, DVD players, VCRs, audio systems,
USB storage devices, PC, gaming devices, and other external devices. For more information on external device’s connection, refer to
the manual provided with each device.
NOTE
If you record a TV program on a DVD recorder or VCR, make sure to connect the TV signal input cable to the TV through a DVD
y
recorder or VCR. For more information of recording, refer to the manual provided with the connected device.
The external device connections shown may differ slightly from illustrations in this manual.
y
Connect external devices to the TV regardless of the order of the TV port.
y
If you connect a gaming device to the TV, use the cable supplied with the gaming device.
y
Refer to the external equipment’s manual for operating instructions.
y
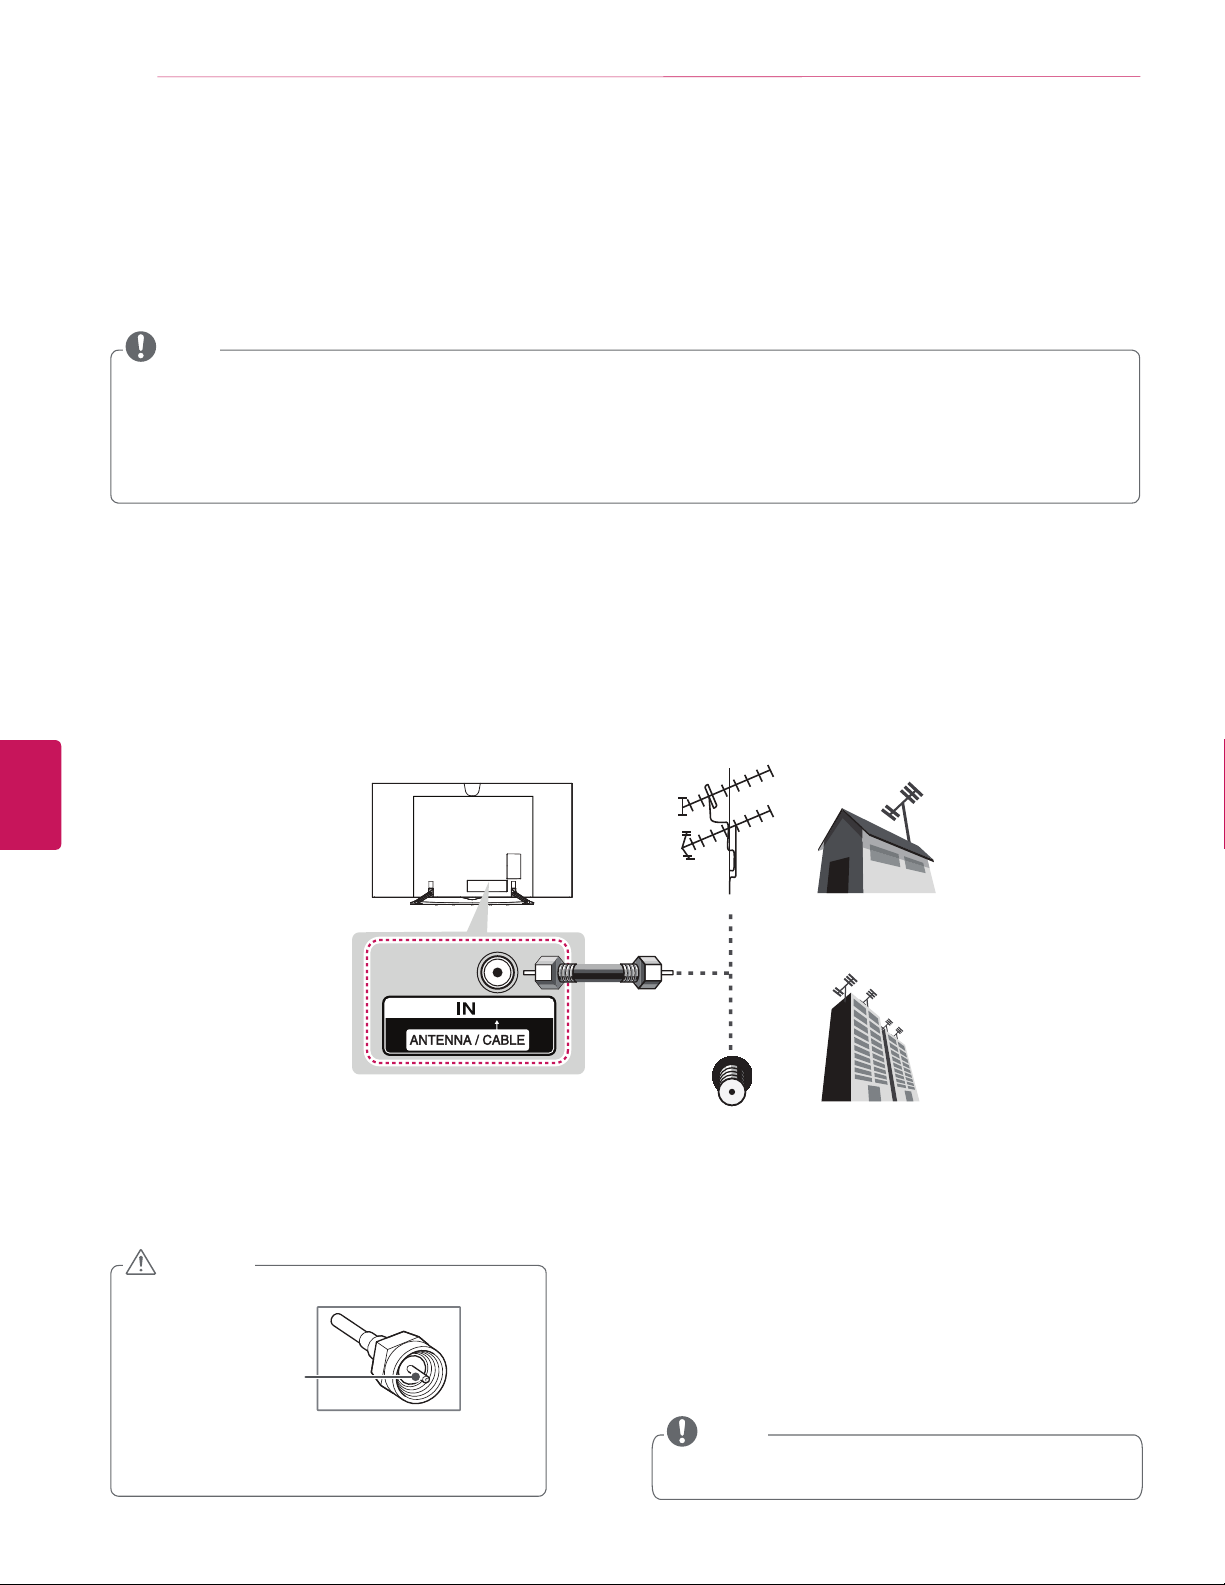
Connecting to an Antenna or Cable
Connect an antenna, cable, or cable box to watch TV while referring to the following. The illustrations may differ from the actual items
and a RF cable is optional.
ENGLISH
Antena VHF
Antena UHF
Antenna
(*Not Provided)
Coaxial (75Ω)
Terminal
CAUTION
Make sure not to bend the copper wire of the RF
y
cable.
Copper wire
Complete all connections between devices, and
y
then connect the power cord to the power outlet
to prevent damage to your TV.
NOTE
Use a signal splitter to use more than 2 TVs.
y
DTV Audio Supported Codec: MPEG, Dolby Digital.
y
Page 21
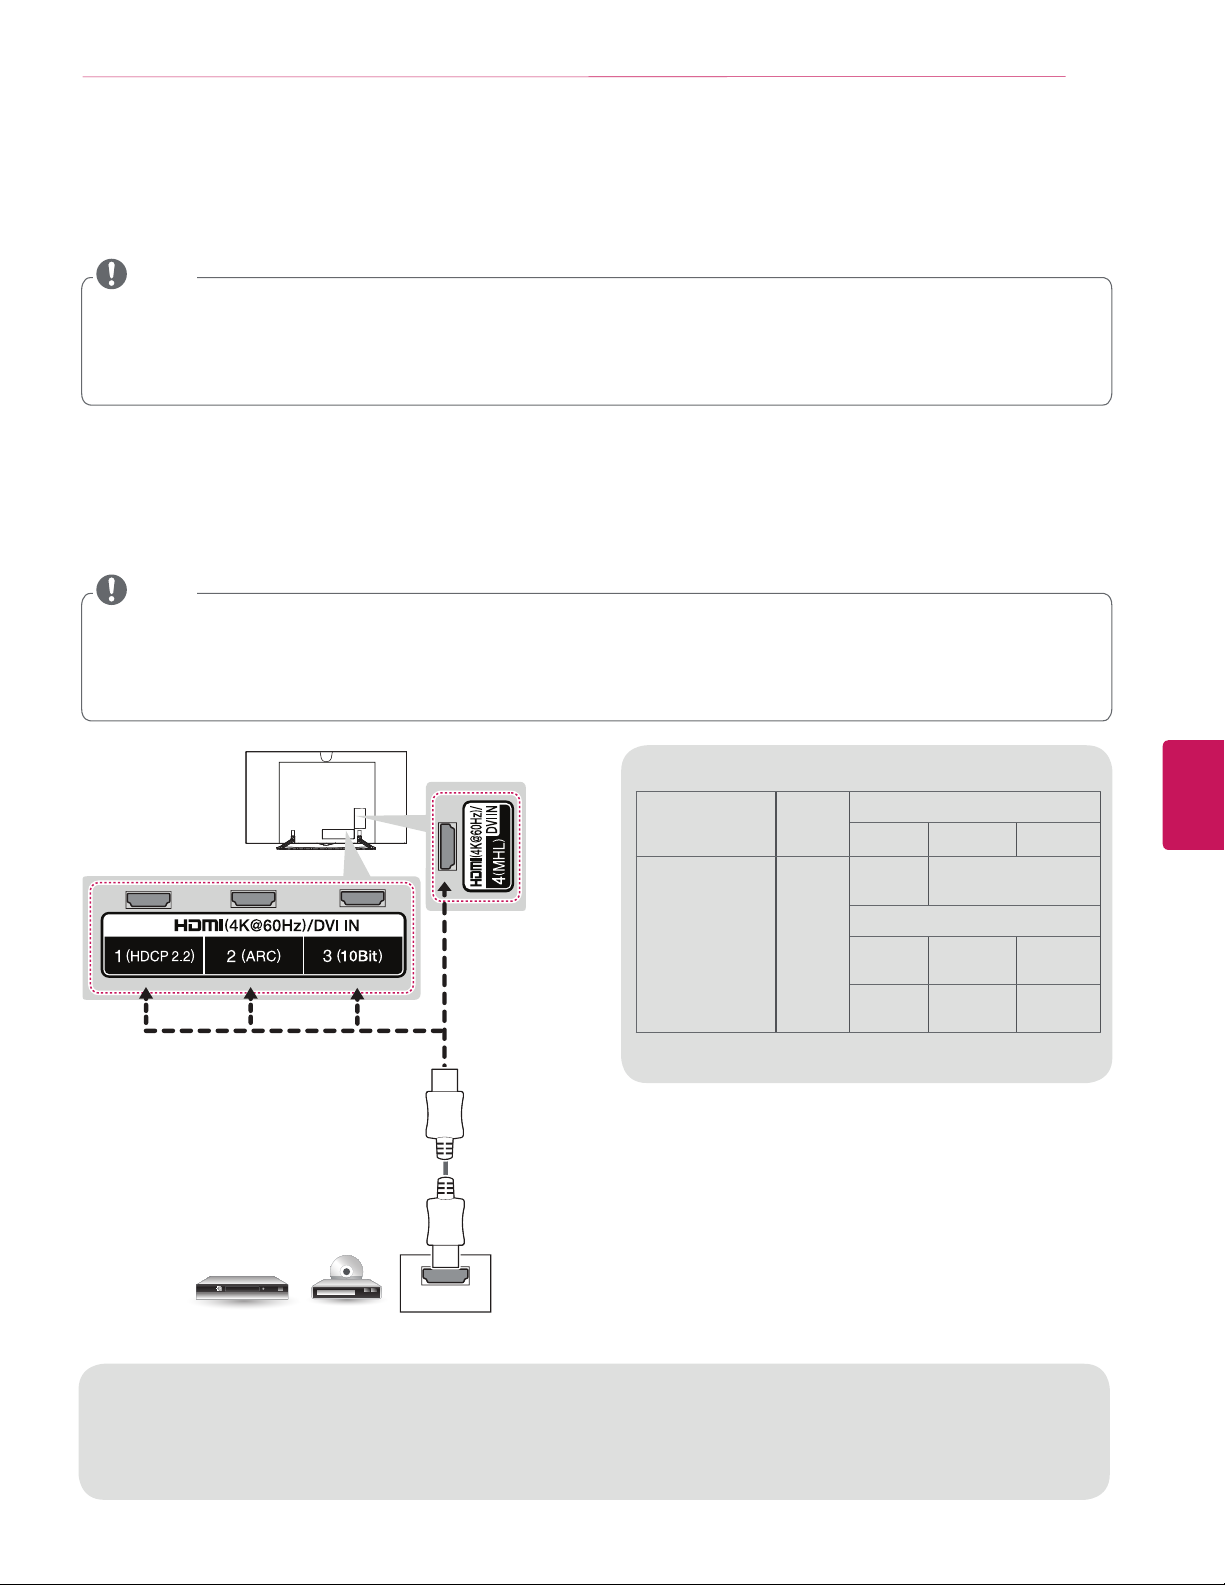
MAKING CONNECTIONS
Connecting to an HD receiver, DVD Player, or VCR
Connect an HD receiver, DVD Player, or VCR to the TV and select an appropriate input mode.
NOTE
HDMI specifications may be different for each input port, so make sure to check the device specifications before connecting.
y
The HDMI IN 3 port is especially suitable for the specifications to enjoy UHD Video (4:4:4, 4:2:2) of 4K @ 60 Hz. However, video
y
or audio may not be supported depending upon the specifications of the external equipment. In that case, use any other HDMI
IN port.
Contact customer service for more information on the HDMI specifications of each input port.
y
HDMI Connection
HDMI is the best way to connect a device.
Transmits digital video and audio signals from an external device to the TV. Connect the external device and the TV with the HDMI
cable as shown in the following illustration.
NOTE
Use the latest High Speed HDMI™ Cable that supports CEC (Customer Electronics Control) function.
y
High Speed HDMI™ Cables are tested to carry an HD signal up to 1080p and higher.
y
HDMI Audio Supported Format: PCM (32 kHz / 44.1 kHz / 48 kHz / 96 kHz / 192 kHz)
y
When you use an HDMI cable (HDMI port3), it is recommended that you use the cable provided. If you use a regular HDMI
y
cable, use a high-speed HDMI cable (3m or less).
21
HDMI Cable
DVD / Blu-Ray / HD Cable Box / HD STB
HDMI
4K @ 60 Hz Support Format
Resolution
Frame
Color Depth / Chroma Sampling
rate
(Hz)
8 bit 10 bit 12 bit
YCbCr
4:2:0
3840 X 2160p
4096 X 2160p
59.94
60.00
YCbCr
4:4:4
RGB
4:4:4
1 Supported at HDMI IN 3 Port only
YCbCr 4:2:2
1
1
YCbCr 4:2:0
1
1
--
--
ENGLISH
ARC (Audio Return Channel)
When connected with a high-speed HDMI cable, digital audio can be sent to a compactible device without an additional
y
optical audio cable.
ARC is only supported on the HDMI (4K @ 60Hz) / DVI IN 2 (ARC) port. An external audio device that supports ARC should
y
be connected to HDMI (4K @ 60Hz) / DVI IN 2 (ARC) if you wish to use ARC.
Page 22

22
MAKING CONNECTIONS
DVI to HDMI Connection
Transmits the digital video signal from an external device to the TV. Connect the external device and the TV with the DVI-HDMI cable
as shown in the following illustration. To transmit an audio signal, connect an audio cable.
NOTE
When using the HDMI/DVI cable, Single link is only supported.
y
ENGLISH
(*Not Provided)
AUDIO OUT
DVD / Blu-Ray / HD Cable Box
(*Not Provided)
DVI OUT
Page 23

MAKING CONNECTIONS
Connecting to a Mobile Phone
Mobile High-definition Link (MHL) is an interface for transmitting digital audio/visual signals from mobile phones to television sets.
NOTE
Connect the mobile phone to the HDMI (4K @ 60 Hz) / DVI IN 4 (MHL) port to view the phone screen on the TV.
y
This works only with an MHL-enabled phone.
y
With some MHL supporting mobile phones, you can use the TV remote to control the phone.
y
An MHL passive cable is needed to connect the TV and a mobile phone.
y
Remove the MHL cable from the TV when:
y
- the MHL function is disabled
- your mobile device is fully charged in standby mode
MHL Cable
23
(*Not Provided)
Mobile phone
ENGLISH
Page 24

24
MAKING CONNECTIONS
Component Connection
Transmits analog video and audio signals from an external device to the TV. Connect the external device and the TV with a component
cable as shown in the following illustration.
NOTE
If cables are installed incorrectly, it could cause the image to display in black and white or with distorted color.
y
Check to ensure the cables are matched with the corresponding color connection.
y
ENGLISH
YELLOW
(Use the composite video
(*Not Provided)
cable provided.)
YELLOW
WHITE
WHITE
WHITE
LR
AUDIO
GREEN
(Use the component video
cable provided.)
RED
RED
RED
VIDEO
BLUE
BLUE
BLUE
RED
RED
RED
GREEN
GREEN
(*Not Provided)
GREEN
DVD / Blu-Ray / HD Cable Box
Page 25

MAKING CONNECTIONS
25
Composite Connection
Transmits analog video and audio signals from an external device to the TV. Connect the external device and the TV with the composite
cable as shown in the following illustration.
NOTE
If you have a mono VCR, connect the audio cable from the VCR to the AUDIO L/MONO jack of the TV.
y
Check to ensure the cables are matched with the corresponding color connection.
y
VIDEO
YELLOW
YELLOW
YELLOW
YELLOW
(Use the composite video cable
provided.)
WHITE
WHITE
WHITE
( )
MONO
AUDIOLR
RED
RED
(*Not Provided)
RED
ENGLISH
VCR / DVD / Blu-Ray / HD Cable Box
Page 26

26
MAKING CONNECTIONS
Connecting a PC
NOTE
Use an HDMI connection for the best image quality.
y
Depending upon the graphics card, DOS mode video may not work if a HDMI to DVI Cable is in use.
y
In PC mode, there may be noise associated with the resolution, vertical pattern, contrast or brightness. If noise is present,
y
change the PC output to another resolution, change the refresh rate to another rate or adjust the brightness and contrast on the
PICTURE menu until the picture is clear.
The synchronization input form for Horizontal and Vertical frequencies is separate.
y
Depending upon the graphics card, some resolution settings may not allow the image to be positioned on the screen properly.
y
If you are using DVI out from a PC, you have to connect analog audio separately. Refer to the instructions on the next page.
y
When using the HDMI/DVI cable, Single link is only supported.
y
If Ultra HD content is played on your PC, video or audio may become disrupted intermittently depending upon your PC’s
y
performance.
HDMI specifications may be different for each input port, so make sure to check the device specifications before connecting.
y
The HDMI IN 3 port is especially suitable for the specifications to enjoy UHD Video (4:4:4, 4:2:2) of 4K @ 60 Hz. However, video
y
or audio may not be supported depending upon the specifications of the external equipment. In that case, use any other HDMI
IN port.
Contact customer service for more information on the HDMI specifications of each input port.
y
HDMI Connection or DVI to HDMI Connection
Choose method A or B to make connection.
ENGLISH
Method A: HDMI Connection
PC
HDMI Cable
HDMI
Page 27

Method B: DVI to HDMI Connection
MAKING CONNECTIONS
27
(*Not Provided)
PC
AUDIO OUT
(*Not Provided)
DVI OUT
ENGLISH
Page 28

28
MAKING CONNECTIONS
Connecting to an Audio System
You can use an optional external audio system instead of the built-in speaker.
Digital Optical Audio Connection
Transmits a digital audio signal from the TV to an external device. Connect the external device and the TV with the optical audio cable
as shown in the following illustration.
NOTE
Do not look into the optical output port. Looking at the laser beam may damage your vision.
y
Audio with ACP (Audio Copy Protection) function may block digital audio output.
y
ENGLISH
(*Not Provided)
OPTICAL AUDIO IN
Digital Audio System
Page 29

Connecting headphones
Listening to sound with headphones.
NOTE
Do not use headsets (earphones) at high volume or for a long time. It may cause damage to your hearing.
y
AUDIO menu options are disabled when headphones are connected.
y
When changing AV MODE with a headphone connected, the change is applied to video but not to audio.
y
Optical Digital Audio Out is not available when connecting a headphone.
y
Headphone impedance: 16
y
Max audio output: 0.627 mW to 1.334 mW
y
Headphone jack size: 3.5 mm (0.13 inches)
y
:
Headphone
MAKING CONNECTIONS
29
(*Not Provided)
ENGLISH
Page 30

30
MAKING CONNECTIONS
Connecting a USB Device
Connect a USB storage device such as USB flash memory, external hard drive, or a USB memory card reader to the TV and access the
Smart Share menu to use various multimedia files.
NOTE
Some USB Hubs may not work. If a USB device connected using a USB Hub is not detected, connect it directly to the USB port
y
on the TV.
Some USB device may not work if it does not meet USB 3.0 standard. In case, connect it to USB IN 2 or USB IN 3 port.
y
Choose any USB input port to connect.
It does not matter which port you use.
(*Not Provided)
ENGLISH
USB / USB HUB / HDD
Page 31

MAGIC REMOTE FUNCTIONS
MAGIC REMOTE FUNCTIONS
31
When the message
Magic Remote battery is low. Change the battery.
batteries, open the battery cover, replace batteries (1.5 V AA) matching
is displayed, replace the battery. To install
and ends to the label inside the
compartment, and close the battery cover. Failure to match the correct polarities of the battery may cause the battery
to burst or leak, resulting in fire, personal injury, or ambient pollution. Be sure to point the remote control at the
remote control sensor on the TV. To remove the batteries, perform the installation actions in reverse.
CAUTION
Do not mix old and new batteries, as this may damage the remote control.
y
This remote uses infrared light. When in use, it should be pointed in the direction of the TV’s remote sensor.
Press the center of the Wheel
button to select a menu.
You can change channels by using
Returns to the previous screen.
Switches among broadcast (antenna) and
Wheel (OK)
the wheel button.
(BACK)
#
(EXIT to LIVE)
various inputs.
(POWER)
Turns the TV on or off.
(up/down/left/right)
Press the up, down, left or right
button to scroll the menu.
If you press
the pointer is in use, the pointer
will disappear from the screen and
Magic Remote will operate like a
general remote control.
To display the pointer on the screen
again, shake Magic Remote to the
left and right.
Navigation buttons
buttons while
ENGLISH
Color buttons
These access special functions in some
(
Red, Green, Yellow, Blue)
Adjusts the volume level.
* Accesses the Universal Control Menu in
* Pressing and holding the
will display a menu to select an external
* By pressing and holding the
SAP(Secondary Audio Program) Feature can
also be enabled by pressing the
Displays the Screen Remote.
device that is connected to the TV.
Used for viewing 3D video.
Mutes all sounds.
VD function will be enabled.
Scrolls through the saved channels.
menus.
VOL
/INPUT
some regions.
button
(MUTE)
button,
key.
CH
/INPUT
VOL
.
CH
(Home)
Accesses the Home menu.
(Voice recognition)
Network connection is required to
use the voice recognition function.
1. Press the voice recognition
button.
2. Speak when the voice display
window appears on the left of the
TV screen.
* Use the Magic Remote no further
than 10 cm from your face.
* The voice recognition may fail
when you speak too fast or too
slowly.
* The recognition rate may
vary depending upon the
user’s characteristics (voice,
pronunciation, intonation, and
speed) and the environment (noise
and TV volume).
Page 32

32
MAGIC REMOTE FUNCTIONS
Registering Magic Remote
The Magic Remote operates by pairing with your TV.
ENGLISH
How to register the Magic Remote
To use the Magic Remote, first pair it with
your TV.
1 Put batteries into the Magic Remote and
turn the TV on.
(Wheel)
2 Point the Magic Remote at your TV and
press the
control.
* If the TV fails to register the Magic
Remote, try again after turning the TV off
and back on.
Wheel (OK)
How to deregister the Magic Remote
(BACK)
(Home)
Press the
same time, for five seconds, to unpair the
Magic Remote with your TV.
»
Pressing and holding the
button will let you cancel and re-register
Magic Remote at once.
(BACK)
on the remote
and
at the
(Home)
(EXIT to LIVE)
Precautions to Take when Using the
Magic Remote
Use the Magic remote within the maximum communication
y
distance (10 m, 32.8 ft). Using the remote control beyond
this distance, or with an object obstructing it, may cause a
communication failure.
A communication failure may occur due to nearby devices.
y
Electrical devices such as a microwave oven or wireless
LAN product may cause interference, as these use the same
bandwidth (2.4 GHz) as the Magic remote.
The Magic remote may be damaged or may malfunction if it
y
is dropped or receives a heavy impact.
Take care not to bump into nearby furniture or other people
y
when using the Magic remote.
Manufacturer and installer cannot provide service related to
y
human safety as the applicable wireless device has possibility
of electric wave interference.
It is recommended that an Access Point (AP) be located more
y
than 1 m (3.28 ft) away from the TV. If the AP is installed
closer than 1 m (3.28 ft), the Magic remote may not perform
as expected due to frequency interference.
How to use Magic Remote
Shake the Magic Remote slightly to the right and
y
left or press
the pointer appear on the screen.
(In some TV models, the pointer will appear when
you turn the Wheel button.)
If the pointer has not been used for a certain
y
period of time or Magic Remote is placed on a flat
surface, then the pointer will disappear.
If the pointer does not move as you wish, shake
y
Magic Remote to the left and right. The pointer
will move to the center of the screen.
The Magic Remote depletes batteries faster than
y
a normal remote due to the additional features.
(Home)
,
/INPUT
, buttons to make
Page 33

USING THE USER GUIDE
User Guide allows you to easily access detailed TV information.
USING THE USER GUIDE
33
Press
1
Select
2
(Home)
User Guide
button to access the Home menu.
and press the
Wheel (OK)
button.
Ö
ENGLISH
Page 34

34
SPECIFICATIONS / EXTERNAL CONTROL DEVICE SETUP
SPECIFICATIONS
Product specifications may be changed without prior notice due to upgrade of product functions.
Power requirement
Television System
Program Coverage
External Antenna Impedance
Operating Temperature
Environment
condition
Operating Humidity Less than 80 %
Storage Temperature -20 - 60 °C (- 4 °F ~ 140 °F)
Storage Humidity Less than 85 %
AC 120 V~ 50 / 60 Hz
NTSC-M, ATSC, 64 & 256 QAM
VHF 2-13, UHF 14-69, CATV 1-135, DTV 2-69, CADTV 1-135
Ω
75
0 - 40 °C (32 °F ~ 104 °F)
ENGLISH
MODELS
Dimensions
(W x H x D)
Weight
Current Value / Power consumption 5.4 A / 540 W
Frequency Range
Output Power (Max.)
Because band channel used by the country could be different, the user can not change or adjust the operating frequency and this
y
product is set for the regional frequency table.
This device should be installed and operated with minimum distance 20 cm (7.8 inch) between the device and your body. And this
y
phrase is for the general statement for consideration of user environment.
Contains FCC ID: BEJLGSWF41 / Contains IC: 2703H-LGSWF41
y
With stand
Without stand
With stand 25.5 kg (56.2 Ibs)
Without stand 24.1 kg (53.1 Ibs)
Wireless module (LGSWF41) Specifications
Standard
IEEE 802.11a/b/g/n/ac
2400 to 2483.5 MHz
5150 to 5250 MHz
5725 to 5850 MHz
802.11a: 11.5 dBm
802.11b: 14.5 dBm
802.11g: 16.5 dBm
802.11n - 2.4GHz: 16.5 dBm
802.11n - 5GHz: 14.5 dBm
802.11ac - 5GHz : 14.5 dBm
65EC9700
(65EC9700-UA)
1,447 x 880 x 256.6 (mm)
56.9 x 34.6 x 10.1 (inch)
1,447 x 844 x 56.3 (mm)
56.9 x 33.2 x 2.2 (inch)
Bluetooth module (BM-LDS401) Specifications
Standard Bluetooth Version 3.0
Frequency Range 2400 to 2483.5 MHz
Output Power (Max.) 10 dBm or Lower
Contains FCC ID : BEJLDS401 / Contains IC : 2703H-LDS401
y
EXTERNAL CONTROL DEVICE SETUP
To obtain the external control device setup information, please visit
www.lg.com
.
Page 35

MAINTENANCE / TROUBLESHOOTING
35
MAINTENANCE
Cleaning Your TV
Clean your TV regularly to keep it at peak performance and to extend the product lifespan.
CAUTION
Before cleaning, turn the power off and disconnect the power cord and all other cables.
y
When the TV is left unattended or unused for a long time, disconnect the power cord from the wall outlet to prevent possible
y
damage from lightning or power surges.
Screen, Frame, Cabinet, and Stand
To remove dust or light dirt, wipe the surface with a dry, clean, and soft cloth.
To remove major dirt, wipe the surface with a soft cloth dampened in clean water or a diluted mild detergent. Then wipe immediately
with a dry cloth.
CAUTION
Do not push, rub, or hit the surface with your fingernail or a sharp object, as this may result in scratches on the screen and
y
image distortions.
Do not use any chemicals, such as waxes, benzene, alcohol, thinners, insecticides, air fresheners, or lubricants, as these may
y
damage the screen’s finish and cause discoloration.
Do not spray liquid onto the surface. If water enters the TV, it may result in fire, electric shock, or malfunction.
y
Power Cord
Remove the accumulated dust or dirt on the power cord regularly.
TROUBLESHOOTING
Problem Solution
Check the remote control sensor on the product and try again.
Cannot control the TV with the remote
control.
No image display and no sound is
produced.
The TV turns off suddenly.
y
Check if there is any obstacle between the product and the remote control.
y
Check if the batteries are still working and properly installed ( to , to ).
y
Check if the product is turned on.
y
Check if the power cord is connected to a wall outlet.
y
Check if there is a problem in the wall outlet by connecting other products.
y
Check the power control settings. The power supply may be interrupted.
y
Check if the
y
If there is no signal while the TV is on, the TV will turn off automatically after 15 minutes of
y
inactivity.
Sleep Timer/Time Power Off
is activated in the
TIMERS
settings.
ENGLISH
Page 36

CHILD SAFETY:
PROPER TELEVISION PLACEMENT MATTERS
THE CONSUMER ELECTRONICS INDUSTRY CARES
BVcj[VXijgZgh!gZiV^aZghVcYi]Z gZhi d[ i]Z XdchjbZg ZaZXigdc^Xh^cYjhignVgZXdbb^iiZYid
bV`^c\]dbZZciZgiV^cbZcihV[ZVcYZc_dnVWaZ#
6hndjZc_dnndjgiZaZk^h^dc!eaZVhZcdiZi]ViVaaiZaZk^h^dch¸cZlVcYdaY"bjhiWZhjeedgiZYdc
egdeZghiVcYhdg^chiVaaZYVXXdgY^c\idi]ZbVcj[VXijgZg½hgZXdbbZcYVi^dch#IZaZk^h^dchi]Vi
VgZ^cVeegdeg^ViZanh^ijViZYdcYgZhhZgh!Wdd`XVhZh!h]ZakZh!YZh`h!heZV`Zgh!X]Zhih!XVgih!ZiX#!
bVn[VaadkZg!gZhjai^c\^c^c_jgn#
TUNE IN TO SAFETY
ALWAYS[daadli]ZbVcj[VXijgZg½hgZXdbbZcYVi^dch[dgi]ZhV[Z^chiVaaVi^dcd[ndjgiZaZk^h^dc#
ALWAYSgZVYVcY[daadlVaa^chigjXi^dch[dgegdeZgjhZd[ndjgiZaZk^h^dc#
NEVERVaadlX]^aYgZcidXa^bWdcdgeaVndci]ZiZaZk^h^dcdgi]Z[jgc^ijgZdcl]^X]i]ZiZaZk^h^dc
^heaVXZY#
NEVER eaVXZ i]ZiZaZk^h^dcdc[jgc^ijgZ i]Vi XVc ZVh^an WZ jhZYVhhiZeh!hjX]VhV X]Zhi d[
YgVlZgh#
ALWAYS^chiVaai]ZiZaZk^h^dcl]ZgZ^iXVccdiWZejh]ZY!ejaaZYdkZgdg`cdX`ZYYdlc#
ALWAYS gdjiZ XdgYhVcYXVWaZhXdccZXiZY id i]Z iZaZk^h^dchdi]Vi i]ZnXVccdiWZig^eeZY
dkZg!ejaaZYdg\gVWWZY#
WALL OR CEILING MOUNT YOUR TELEVISION
ALWAYSXdciVXindjggZiV^aZgVWdjiegd[Zhh^dcVa^chiVaaVi^dc^[ndj]VkZVcnYdjWihVWdjindjg
VW^a^inidhV[ZanbdjcindjgiZaZk^h^dc#
ALWAYSjhZVbdjcii]Vi]VhWZZcgZXdbbZcYZY Wni]ZiZaZk^h^dcbVcj[VXijgZgVcY]VhV
hV[ZinXZgi^ÅXVi^dcWnVc^cYZeZcYZciaVWdgVidgnhjX]VhJA!8H6!:IA#
ALWAYS[daadlVaa^chigjXi^dchhjeea^ZYWni]ZiZaZk^h^dcVcYbdjcibVcj[VXijgZgh#
ALWAYSbV`ZhjgZi]Vii]ZlVaadgXZ^a^c\l]ZgZndjVgZbdjci^c\i]ZiZaZk^h^dc^hVeegdeg^ViZ#
HdbZbdjcihVgZcdiYZh^\cZYidWZ bdjciZYidlVaahVcY XZ^a^c\hl^i]hiZZahijYhdg X^cYZg
WadX`XdchigjXi^dc#>[ndjVgZjchjgZ!XdciVXiVegd[Zhh^dcVa^chiVaaZg#
IZaZk^h^dch XVc WZ ]ZVkn# 6 b^c^bjb d[ ild eZdeaZ ^h gZfj^gZY [dg V lVaa dg XZ^a^c\ bdjci
^chiVaaVi^dc#
MOVING AN OLDER TELEVISION TO A NEW PLACE IN
YOUR HOME
BVcncZliZaZk^h^dc WjnZghbdkZi]Z^g daYZg8GIiZaZk^h^dch ^cidVhZXdcYVgn gddbV[iZgi]Z
ejgX]VhZd[VÆVi"eVcZaiZaZk^h^dc#HeZX^VaXVgZh]djaYWZbVYZ^ci]ZeaVXZbZcid[daYZg8GI
iZaZk^h^dch#
ALWAYSeaVXZndjgdaYZg8GIiZaZk^h^dcdc[jgc^ijgZi]Vi^hhijgYnVcYVeegdeg^ViZ[dg^ihh^oZ
VcYlZ^\]i#
NEVER eaVXZndjgdaYZg8GIiZaZk^h^dcdcVYgZhhZgl]ZgZX]^aYgZcbVnWZiZbeiZYidjhZi]Z
YgVlZghidXa^bW#
ALWAYSbV`ZhjgZndjgdaYZg8GIiZaZk^h^dcYdZhcdi]Vc\dkZgi]ZZY\Zd[ndjg[jgc^ijgZ#
CE.org/safety
Page 37

Declaration of Conformity
Trade Name LG
Model 65EC9700-UA
Responsible Party LG Electronics Inc.
Address 1000 Sylvan Ave.
Englewood Cliffs NJ 07632
U.S.A
TEL 201 - 266 - 2534
The model and serial number of the TV are
located on the back and one side of the TV.
Record them below should you ever need service.
MODEL
SERIAL
LG Customer Information Center
For inquires or comments, visit www.lg.com or call;
1-800-243-0000 USA, Consumer User
1-888-865-3026 USA, Commercial User
1-888-542-2623 CANADA
Register your product Online!
www.lg.com
Page 38

OWNER’S MANUAL
EXTERNAL CONTROL DEVICE SETUP
Please read this manual carefully before operating the set and retain it for
future reference.
www.lg.com
Page 39

KEY CODES
2
2
ENGLISH
ENG
KEY CODES
This feature is not available for all models.
Code
(Hexa)
00 CH +, PR + R/C Button 53 List R/C Button
01 CH -, PR - R/C Button 5B Exit R/C Button
02 Volume + R/C Button 60 PIP(AD) R/C Button
03 Volume - R/C Button 61 Blue R/C Button
06 > (Arrow Key / Right Key) R/C Button 63 Yellow R/C Button
07 < (Arrow Key / Left Key) R/C Button 71 Green R/C Button
08 Power R/C Button 72 Red R/C Button
09 Mute R/C Button 79 Ratio / Aspect Ratio R/C Button
0B Input R/C Button 91 AD (Audio Description) R/C Button
0E SLEEP R/C Button 7A User Guide R/C Button
0F TV, TV/RAD R/C Button 7C Smart / Home R/C Button
Function Note
Code
(Hexa)
Function Note
10 - 19 * Number Key 0 - 9 R/C Button 7E SIMPLINK R/C Button
1A Q.View / Flashback R/C Button 8E ŹŹ)RUZDUG R/C Button
1E FAV (Favorite Channel) R/C Button 8F ŻŻ5HZLQG R/C Button
20 Text (Teletext) R/C Button AA Info R/C Button
21 T. Opt (Teletext Option) R/C Button AB Program Guide R/C Button
28 Return (BACK) R/C Button B0 Ź3OD\ R/C Button
30 AV (Audio / Video) Mode R/C Button B1 廐 (Stop / File List) R/C Button
39 Caption/Subtitle R/C Button BA
40 ȁ
41
42 My Apps R/C Button DC 3D R/C Button
43 Menu / Settings R/C Button 99 AutoConfig R/C Button
44 OK / Enter R/C Button 9F App / * R/C Button
45 Q.Menu R/C Button
(Arrow Key / Cursor Up)
V (Arrow Key / Cursor
Down)
R/C Button BB Soccer R/C Button
R/C Button BD 幽 (REC) R/C Button
廑 (Freeze / Slow Play /
Pause)
R/C Button
4C List, - (ATSC Only) R/C Button
* Key code 4C (0x4C) is available on ATSC/ISDB models which use major/minor channel.
(For South Korea, Japan, North America, Latin America except Colombia models)
Page 40

EXTERNAL CONTROL DEVICE SETUP
3
3
EXTERNAL CONTROL DEVICE SETUP
Image shown may differ from your TV.
Connect the USB to Serial converter/RS-232C input jack to an external control device (such as a computer
or an A/V control system) to control the product’s functions externally.
Note: The type of control port on the TV can be different between model series.
* Please be advised that not all models support this type of connectivity.
* Cable is not provided.
USB to Serial converter with USB Cable
USB Type
(PC)
LGTV supports PL2303 chip-based (Vendor ID : 0x0557, Product ID : 0x2008) USB to serial converter
which is not made nor provided by LG.
It can be purchased from computer stores that carry accessories for IT support professionals.
USB IN
(TV)
ENGENGLISH
RS-232C With RS232C Cable
DE9 (D-Sub 9pin) Type
You need to purchase the RS-232C (DE9, D-Sub 9pin female-to-female type) to RS-232C cable required
for the connection between the PC and the TV, which is specified in the manual.
RS-232C IN
(CONTROL & SERVICE)
(PC)
The connection interface may differ from your TV.
(TV)
Page 41

EXTERNAL CONTROL DEVICE SETUP
4
4
ENGLISH
ENG
Phone jack Type
You need to purchase the phone-jack to RS-232 cable required for the connection between the PC and
the TV, which is specified in the manual.
* For other models, connect to the USB port.
* The connection interface may differ from your TV.
1
3
(PC)
- or
(PC)
2
1
3
2
SERVICE ONLY
RS-232C IN
(CONTROL & SERVICE)
(TV)
(TV)
Customer Computer RS-232C configurations
3-Wire Configurations(Not standard)
1
6
RS-232C
(Serial port)
Set ID
For Set ID number, see "Real Data Mapping" on p.6
1. Press SETTINGS to access the main menus.
2. Press the Navigation buttons to scroll to *HQHUDOĺ$ERXWWKLV79RU237,21 and press OK.
3. Press the Navigation buttons to scroll to SET ID and press OK.
4. Scroll left or right to select a set ID number and select CLOSE. The adjustment range is 1-99.
5. When you are finished, press EXIT.
* (Depending on model)
5
RXD 2 2 TXD
TXD 3 1 RXD
GND 5 3 GND
9
RXD 3 2 TXD
TXD 2 1 RXD
GND 5 3 GND
PC TV
OR
D-Sub 9 Phone
Page 42

EXTERNAL CONTROL DEVICE SETUP
5
5
Communication Parameters
Baud rate : 9600 bps (UART)
Data length : 8 bits
Parity : None
Stop bit : 1 bit
Communication code : ASCII code
Use a crossed (reverse) cable.
Command reference list
(Depending on model)
COMMAND1 COMMAND2
01. Power* k a 00 to 01 15. Balance k t 00 to 64
02. Aspect
Ratio
03. Screen
Mute
04. Volume
Mute
05. Volume
Control
06. Contrast k g 00 to 64
07.
Brightness
08. Color/
Colour
09. Tint k j 00 to 64
10.
Sharpness
11. OSD
Select
12. Remote
Control Lock
Mode
13. Treble k r 00 to 64
k c (p.7)
k d (p.7)
k e 00 to 01 18. Equalizer j v (p.8)
k f 00 to 64
k h 00 to 64
k i 00 to 64 22. Key m c Key Codes
k k 00 to 32
k l 00 to 01
k m 00 to 01
DATA
(Hexadecimal)
16. Color
(Colour)
Temperature
17. ISM
Method (Only
Plasma TV)
19. Energy
Saving
20. Tune
Command
21. Channel
(Programme)
Add/Del(Skip)
23. Control
Backlight,
Control Panel
Light
24. Input
select (Main)
25. 3D (Only
3D models)
26. Extended
3D (Only 3D
models)
27. Auto
Configure
COMMAND1 COMMAND2
x u 00 to 64
j p (p.8)
j q 00 to 05
m a (p.9)
m b 00 to 01
m g 00 to 64
x b (p.11)
x t (p.11)
x v (p.11)
j u (p.12)
DATA
(Hexadecimal)
ENGENGLISH
14. Bass k s 00 to 64
* Note: During playing or recording media, all commands except Power (ka) and Key (mc) are not
executed and treated as NG.
With RS232C cable, TV can communicate "ka command" in power-on or power-off status. but with
USB-to-Serial converter cable, the command works only if TV is on.
Page 43

EXTERNAL CONTROL DEVICE SETUP
6
6
ENGLISH
ENG
Transmission / Receiving Protocol
Transmission
[Command1][Command2][ ][Set ID][ ][Data][Cr]
[Command 1] : First command to control the TV. (j, k, m or x)
[Command 2] : Second command to control the TV.
[Set ID] : You can adjust the [Set ID] to choose desired monitor ID number in option menu.
Adjustment range in TV is 1 to 99. If [Set ID] value is selected to ‘0’, every connected set
can be controlled.
* [Set ID] is indicated as decimal (1 to 99) on menu and as Hexadecimal (0x00 to 0x63) on
transmission/receiving protocol.
[DATA] : To transmit command data (hexadecimal). Transmit ‘FF’ data to read status of command.
[Cr] : Carriage Return - ASCII code ‘0x0D’
[ ] : Space – ASCII code ‘0x20’
OK Acknowledgement
[Command2][ ][Set ID][ ][OK][Data][x]
* The set transmits ACK (acknowledgement) based on this format when receiving normal data. At this time,
if the data is data read mode, it indicates present status data. If the data is data write mode, it returns the
data of the PC computer.
Error Acknowledgement
[Command2][ ][Set ID][ ][NG][Data][x]
* The set transmits ACK (acknowledgement) based on this format when receiving abnormal data from
non-viable functions or communication errors.
Data 00: Illegal Code
Real data mapping (Hexadecimal Decimal)
* When you enter the [data] in hexadecimal, refer to following conversion table.
* Channel Tune (ma) Command uses two-byte hexadecimal value([data]) to select channel number.
00 : Step 0 32 : Step 50 (Set ID 50) FE : Step 254
01 : Step 1 (Set ID 1) 33 : Step 51 (Set ID 51) FF : Step 255
... ... ...
0A : Step 10 (Set ID 10) 63 : Step 99 (Set ID 99) 01 00 : Step 256
... ... ...
0F : Step 15 (Set ID 15) C7 : Step 199 27 0E : Step 9998
10 : Step 16 (Set ID 16) C8 : Step 200 27 0F : Step 9999
... ... ...
Page 44

EXTERNAL CONTROL DEVICE SETUP
* Commands may work differently depending on model and signal.
01. Power (Command: k a)
Ź To control Power *On or Off of the set.
Transmission[k][a][ ][Set ID][ ][Data][Cr]
Data 00 : Power Off 01 : *Power On
Ack [d][ ][Set ID][ ][OK/NG][Data][x]
* In case of video mute on only, TV will display On
Screen Display(OSD). But, in case of Screen mute
on, TV will not display OSD.
7
7
ENGENGLISH
Ack [a][ ][Set ID][ ][OK/NG][Data][x]
Ź To Show TV is Power On or *Off
Transmission [k][a][ ][Set ID][ ][FF][Cr]
Ack [a][ ][Set ID][ ][OK][Data][x]
* Similarly, if other functions transmit ‘FF’ data
based on this format, Acknowledgement feedback
presents status about each function.
02. Aspect Ratio (Command: k c)
(Main Picture Size)
Ź To adjust the screen format. (Main picture format)
You can also adjust the screen format using the
Aspect Ratio in the Q.MENU. or PICTURE menu.
Transmission [k][c][ ][Set ID][ ][Data][Cr]
Data 01 : Normal screen
(4:3)
02 : Wide screen
(16:9)
04 : Zoom
05 : Zoom 2
(Latin America
except Colombia
Only)
06 : Set by Program/
Original
Ack [c][ ][Set ID][ ][OK/NG][Data][x]
07 : 14:9
(Europe, Colombia, Mid-East,
Asia except South Korea and
Japan)
09 : * Just Scan
0B : Full Wide
(Europe, Colombia, MidEast, Asia except South
Korea and Japan)
10 to 1F : Cinema Zoom 1
to 16
* Using the PC input, you select either 16:9 or 4:3
screen aspect ratio.
* In DTV/HDMI/Component mode (high-definition),
Just Scan is available.
* Full wide mode may work differently based on
model and is supported for DTV fully, and ATV,
AV partially.
04. Volume Mute (Command: k e)
Ź To control volume mute on/off.
You can also adjust mute using the MUTE button
on remote control.
Transmission [k][e][ ][Set ID][ ][Data][Cr]
Data 00 : Volume mute on (Volume off)
01 : Volume mute off (Volume on)
Ack [e][ ][Set ID][ ][OK/NG][Data][x]
05. Volume Control (Command: k f)
Ź To adjust volume.
You can also adjust volume with the volume
buttons on remote control.
Transmission [k][f][ ][Set ID][ ][Data][Cr]
Data Min : 00 to Max : 64
Ack [f][ ][Set ID][ ][OK/NG][Data][x]
06. Contrast (Command: k g)
Ź To adjust screen contrast.
You can also adjust contrast in the PICTURE
menu.
Transmission [k][g][ ][Set ID][ ][Data][Cr]
Data Min : 00 to Max : 64
Ack [g][ ][Set ID][ ][OK/NG][Data][x]
07. Brightness (Command: k h)
Ź To adjust screen brightness.
You can also adjust brightness in the PICTURE
menu.
Transmission [k][h][ ][Set ID][ ][Data][Cr]
03. Screen Mute (Command: k d)
Ź To select screen mute on/off.
Transmission [k][d][ ][Set ID][ ][Data][Cr]
Data 00 : Screen mute off (Picture on)
Video mute off
01 : Screen mute on (Picture off)
10 : Video mute on
Data Min : 00 to Max : 64
Ack [h][ ][Set ID][ ][OK/NG][Data][x]
08. Color/Colour (Command: k i)
Ź To adjust the screen Color(Colour).
You can also adjust colour in the PICTURE menu.
Transmission [k][i][ ][Set ID][ ][Data][Cr]
Page 45

EXTERNAL CONTROL DEVICE SETUP
8
8
ENGLISH
ENG
Data Min : 00 to Max : 64
Ack [i][ ][Set ID][ ][OK/NG][Data][x]
09. Tint (Command: k j)
Ź To adjust the screen tint.
You can also adjust tint in the PICTURE menu.
Transmission [k][j][ ][Set ID][ ][Data][Cr]
Data Red : 00 to Green : 64
Ack [j][ ][Set ID][ ][OK/NG][Data][x]
10. Sharpness (Command: k k)
Ź To adjust the screen sharpness.
You can also adjust sharpness in the PICTURE
menu.
Transmission [k][k][ ][Set ID][ ][Data][Cr]
Data Min : 00 to Max : 32
Ack [k][ ][Set ID][ ][OK/NG][Data][x]
11. OSD Select (Command: k l)
Ź To select OSD (On Screen Display) on/off when
controlling remotely.
Transmission [k][l][ ][Set ID][ ][Data][Cr]
Data 00 : OSD off 01 : OSD on
* (Depending on model)
14. Bass (Command: k s)
Ź To adjust Bass.
You can also adjust in the AUDIO menu.
Transmission [k][s][ ][Set ID][ ][Data][Cr]
Data Min : 00 to Max : 64
Ack [s][ ][Set ID][ ][OK/NG][Data][x]
* (Depending on model)
15. Balance (Command: k t)
Ź To adjust balance.
You can also adjust balance in the AUDIO menu.
Transmission [k][t][ ][Set ID][ ][Data][Cr]
Data Min : 00 to Max : 64
Ack [t][ ][Set ID][ ][OK/NG][Data][x]
16. Color(Colour) Temperature (Command: x u)
Ź To adjust colour temperature. You can also adjust
Color(Colour) Temperature in the PICTURE menu.
Transmission [x][u][ ][Set ID][ ][Data][Cr]
Data Min : 00 to Max : 64
Ack [u][ ][Set ID][ ][OK/NG][Data][x]
Ack [l][ ][Set ID][ ][OK/NG][Data][x]
12. Remote control lock mode (Command: k m)
Ź To lock the front panel controls on the monitor and
remote control.
Transmission [k][m][ ][Set ID][ ][Data][Cr]
Data 00 : Lock off 01 : Lock on
Ack [m][ ][Set ID][ ][OK/NG][Data][x]
* If you are not using the remote control, use this
mode.
When main power is off & on (plug-off and plug-in,
after 20 - 30 seconds), external control lock is
released.
* In the standby mode (DC off by off timer or ‘ka’,
‘mc’ command), and if key lock is on, TV will not
turn on by power on key of IR & Local Key.
13. Treble (Command: k r)
Ź To adjust treble.
You can also adjust in the AUDIO menu.
Transmission [k][r][ ][Set ID][ ][Data][Cr]
Data Min : 00 to Max : 64
Ack [r][ ][Set ID][ ][OK/NG][Data][x]
17. ISM Method (Command: j p) (Only Plasma TV)
Ź To control the ISM method. You can also adjust
ISM Method in OPTION menu.
Transmission [j][p][ ][Set ID][ ][Data][Cr]
Data Min : 02: Orbiter
08: Normal
20: Color(Colour) Wash
Ack [p][ ][Set ID][ ][OK/NG][Data][x]
18. Equalizer (Command : j v)
Ź Adjust EQ of the set.
Transmission [j][v][ ][Set ID][ ][Data][Cr]
06%
/6%
)UHTXHQF\ 'DWD
000
001
010
011
Frequency
VW%DQG
QG%DQG
UG%DQG
WK%DQG
6WHS
0000 0
0000 1
... ... ... ... ...
0001 1
GHFLPDO
GHFLPDO
GHFLPDO
Page 46

EXTERNAL CONTROL DEVICE SETUP
9
9
100
Acknowledgement [v][ ][Set ID][ ][OK/NG][Data][x]
* It depends on model, and can adjust when sound
mode is EQ adjustable value.
WK%DQG
00101
GHFLPDO
19. Energy Saving (Command: j q)
Ź To reduce the power consumption of the TV. You
can also adjust Energy Saving in PICTURE menu.
Transmission [j][q][ ][Set ID][ ][Data][Cr]
Data
00 : Off
01 : Minimum
02 : Medium
03 : Maximum
04 : Auto (For LCD TV / LED TV) /
Intelligent sensor (For PDP TV)
05 : Screen off
* (Depending on model)
Ack [q][ ][Set ID][ ][OK/NG][Data][x]
20. Tune Command (Command: m a)
* This command may work differently depending on
model and signal.
For Europe, Mid-East, Colombia, Asia except
South Korea and Japan Model
Ź Select channel to following physical number.
Transmission [m][a][ ][Set ID][ ][Data 00][ ]
[Data 01][ ][Data 02][Cr]
* Analog Antenna/Cable
Set ID = All = 00
Data 00 & 01 = Channel Data is 10 = 00 0a
Data 02 = Analog Antenna TV = 00
Result = ma 00 00 0a 00
2. Tune to the digital antenna (DVB-T) Channel 01.
Set ID = All = 00
Data 00 & 01 = Channel Data is 1 = 00 01
Data 02 = Digital Antenna TV = 10
Result = ma 00 00 01 10
3. Tune to the satellite (DVB-S) Channel 1000.
Set ID = All = 00
Data 00 & 01 = Channel Data is 1000 = 03 E8
Data 02 = Digital Satellite TV = 40
Result = ma 00 03 E8 40
Ack [a][ ][Set ID][ ][OK][Data 00][Data 01]
[Data 02][x][a][ ][Set ID][ ][NG][Data 00][x]
For South Korea, North/Latin America except
Colombia Model
Ź To tune channel to following physical/major/minor
number.
Transmission [m][a][ ][0][ ][Data00][ ][Data01]
[ ][Data02][ ][Data03][ ][Data04][ ][Data05][Cr]
Digital channels have a Physical, Major, and Minor
channel number. The Physical number is the actual
digital channel number, the Major is the number that
the channel should be mapped to, and the Minor is
the sub-channel. Since the ATSC tuner automatically
maps the channel from the Major / Minor number,
the Physical number is not required when sending a
command in Digital.
* Analog Antenna/Cable
ENGENGLISH
[Data 00][Data 01] Channel Data
Data 00 : High byte channel data
Data 01 : Low byte channel data
- 00 00 ~ 00 C7 (Decimal : 0 ~ 199)
Data 02 : Input Source (Analog)
- 00 : Antenna TV (ATV)
- 80 : Cable TV (CATV)
* Digital Antenna/Cable/Satellite
[Data 00][Data 01]: Channel Data
Data 00 : High Channel data
Data 01 : Low Channel data
- 00 00 ~ 27 0F (Decimal: 0 ~ 9999)
Data 02 : Input Source (Digital)
- 10 : Antenna TV (DTV)
- 20 : Antenna Radio (Radio)
- 40 : Satellite TV (SDTV)
- 50 : Satellite Radio (S-Radio)
- 90 : Cable TV (CADTV)
- a0 : Cable Radio (CA-Radio)
* Tune Command Examples:
1. Tune to the Analog antenna (PAL) Channel 10.
Data 00 : Physical Channel Number
- Antenna (ATV) : 02~45 (Decimal: 2 ~ 69)
- Cable (CATV) : 01, 0E~7D (Decimal : 1, 14~125)
[Data 01 ~ 04]: Major/Minor Channel Number
Data 01 & 02: xx (Don't care)
Data 03 & 04: xx (Don't care)
Data 05: Input Source (Analog)
- 00 : Antenna TV (ATV)
- 01 : Cable TV (CATV)
* Digital Antenna/Cable
Data 00 : xx (Don't care)
[Data 01][Data 02]: Major Channel Number
Data 01 : High byte Channel Data
Data 02 : Low byte Channel Data
- 00 01 ~ 27 0F (Decimal: 1 ~ 9999)
[Data 03][Data 04]: Minor Channel Number
Data 03 : High byte Channel Data
Data 04 : Low byte Channel Data
Data 05 : Input Source (Digital)
- 02 : Antenna TV (DTV) – Use Physical Channel
Number
- 06 : Cable TV (CADTV) – Use Physical Channel
Page 47

EXTERNAL CONTROL DEVICE SETUP
10
10
ENGLISH
ENG
Number
- 22 : Antenna TV (DTV) – Don’t Use Physical
Channel Number
- 26 : Cable TV (CADTV) - Don’t Use Physical
Channel Number
- 46 : Cable TV (CADTV) – Use Major Channel
Number Only (One Part Channel)
Two bytes are available for each major and minor
channel data, but usually the low byte is used alone
(high byte is 0).
* Tune Command Examples:
1. Tune to the Analog cable (NTSC) channel 35.
Set ID = All = 00
Data 00 = Channel Data is 35 = 23
Data 01 & 02 = No Major = 00 00
Data 03 & 04 = No Minor = 00 00
Data 05 = Analog Cable TV = 01
Total = ma 00 23 00 00 00 00 01
2. Tune to the digital antenna (ATSC) channel 30-3.
Set ID = All = 00
Data 00 = Don’t know Physical = 00
Data 01 & 02 = Major is 30 = 00 1E
Data 03 & 04 = Minor is 3 = 00 03
Data 05 = Digital Antenna TV = 22
Total = ma 00 00 00 1E 00 03 22
Ack [a][ ][Set ID][ ][OK][Data 00][Data 01]
[Data 02][Data 03][Data 04][Data 05]
[x][a][ ][Set ID][ ][NG][Data 00][x]
Data 05 = Digital Antenna TV = 02
Total = ma 00 00 00 11 00 01 02
2. Tune to the BS (ISDB-BS) channel 30.
Set ID = All = 00
Data 00 = Don’t know Physical = 00
Data 01 & 02 = Major is 30 = 00 1E
Data 03 & 04 = Don’t Care = 00 00
Data 05 =
Total = ma 00 00 00 1E 00 00 07
* This feature is varied based on the model.
Ack [a][ ][Set ID][ ][OK][Data 00][Data 01]
[Data 02][Data 03][Data 04][Data 05]
[x][a][ ][Set ID][ ][NG][Data 00][x]
Digital BS TV = 07
21. Channel(Programme) Add/Del(Skip)
(Command: m b)
Ź To skip current channel(programme) for next time.
Transmission [m][b][ ][Set ID][ ][Data][Cr]
Data 00 : Del(ATSC,ISDB)/Skip(DVB) 01 : Add
Ack [b][ ][Set ID][ ][OK/NG][Data][x]
* Set the saved channel status to del(ATSC, ISDB)/
skip(DVB) or add.
For Japan Model
Ź To tune channel to following physical/major/minor
number.
Transmission [m][a][ ][0][ ][Data00][ ][Data01]
[ ][Data02][ ][Data03][ ][Data04][ ][Data05][Cr]
* Digital Antenna/Satellite
Data 00: xx (Don't care)
[Data 01][Data 02]: Major Channel Number
Data 01: High byte Channel Data
Data 02: Low byte Channel Data
- 00 01 ~ 27 0F (Decimal: 1 ~ 9999)
[Data 03][Data 04]: Minor/Branch Channel Number
(Don’t care in Satellite)
Data 03: High byte Channel Data
Data 04: Low byte Channel Data
Data 05 : Input Source (Digital/Satellite for Japan)
- 02 : Antenna TV (DTV)
- 07 : BS (Broadcasting Satellite)
- 08 : CS1 (Communication Satellite 1)
- 09 : CS2 (Communication Satellite 2)
* Tune Command Examples:
1
Tune to the digital antenna (ISDB-T) channel 17-1
Set ID = All = 00
Data 00 = Don’t know Physical = 00
Data 01 & 02 = Major is 17 = 00 11
Data 03 & 04 = Minor/Branch is 1 = 00 01
22. Key (Command: m c)
Ź To send IR remote key code.
Transmission [m][c][ ][Set ID][ ][Data][Cr]
Data Key code - p.2.
Ack [c][ ][Set ID][ ][OK/NG][Data][x]
23. Control Backlight (Command: m g)
For LCD TV / LED TV
Ź To control the backlight.
Transmission [m][g][ ][Set ID][ ][Data][Cr]
Data Min : 00 to Max : 64
Ack [g][ ][Set ID][ ][OK/NG][Data][x]
Control Panel Light (Command: m g)
For Plasma TV
Ź To control the panel light.
Transmission [m][g][ ][Set ID][ ][Data][Cr]
Data Min : 00 to Max : 64
.
Ack [g][ ][Set ID][ ][OK/NG][Data][x]
Page 48

EXTERNAL CONTROL DEVICE SETUP
11
11
24. Input select (Command: x b)
(Main Picture Input)
Ź To select input source for main picture.
Transmission [x][b][ ][Set ID][ ][Data][Cr]
Data
00 : DTV
02 : Satellite DTV
ISDB-BS (Japan)
03 : ISDB-CS1 (Japan)
04 : ISDB-CS2 (Japan)
11 : CATV
20 : AV or AV1 21 : AV2
40 : Component1
60 : RGB
90 : HDMI1
92 : HDMI3
Ack [b][ ][Set ID][ ][OK/NG][Data][x]
* This function depends on model and signal.
01 : CADTV
10 : ATV
41 : Component2
91 : HDMI2
93 : HDMI4
25. 3D(Command: x t) (only 3D models)
(Depending on model)
Ź To change 3D mode for TV.
Transmission [x][t][ ][Set ID][ ][Data 00][ ][Data 01]
[ ][Data 02][ ][Data 03][Cr]
* (Depending on model)
Data Structure
[Data 00] 00 : 3D On
01 : 3D Off
02 : 3D to 2D
03 : 2D to 3D
[Data 01] 00 : Top and Bottom
01 : Side by Side
02 : Check Board
03 : Frame Sequential
04 : Column interleaving
05 : Row interleaving
[Data 02] 00 : Right to Left
01 : Left to Right
[Data 03] 3D Effect(3D Depth): Min : 00 - Max : 14
(*transmit by Hexadecimal code)
* [Data 02], [Data 03] functions depend on model
and signal.
* If [Data 00] is 00 (3D On), [Data 03] has no
meaning.
* If [Data 00] is 01 (3D off) or 02 (3D to 2D), [Data
01], [Data 02] and [Data 03] have no meaning.
* If [Data 00] is 03 (2D to 3D), [Data 01] and
[Data 02] have no meaning.
* If [Data 00] is 00 (3D On) or 03 (2D to 3D), [Data
03] works when 3D Mode (Genre) is manual only.
* All 3D pattern options ([Data 01]) may not be
available according to broadcasting/video signal.
[Data 00] [Data 01] [Data 02] [Data 03]
00OOO
01XXX
02XXX
03 X O O
X : don’t care
Ack [t][ ][Set ID][ ][OK][Data00][Data01][Data02]
[Data03][x]
[t][ ][Set ID][ ][NG][Data00][x]
26. Extended 3D(Command: x v) (only 3D models)
(Depending on model)
Ź To change 3D option for TV.
Transmission [x][v][ ][Set ID][ ][Data 00][ ]
[Data 01][Cr]
[Data 00] 3D option
00 : 3D Picture Correction
01 : 3D Depth (3D Mode is Manual Only)
02 : 3D Viewpoint
06 : 3D Color Correction
07 : 3D Sound Zooming
08 : Normal Image View
09 : 3D Mode (Genre)
[Data 01] It has own range for each 3D option
determined by [Data 00].
1) When [Data 00] is 00
00 : Right to Left
01 : Left to Right
2) When [Data 00] is 01, 02
Data Min: 0 - Max: 14 (*transmit by Hexadecimal
code)
Data value range(0 - 20) converts Viewpoint range
(-10 - +10) automatically (Depending on model)
* This option works when 3D Mode (Genre) is manual
only.
3) When [Data 00] is 06, 07
00 : Off
01 : On
4) When [Data 00] is 08
00 : Revert to 3D video from 3D-to-2D
converted 2D video
01 : Change 3D video to 2D video, except
2D-to-3D video
* If conversion condition doesn’t meet, command is
treated as NG.
5) When [Data 00] is 09
00 : Standard
02 : Cinema
04 : Manual
Ack [v][ ][Set ID][ ][OK][Data00][Data01][x]
[v][ ][Set ID][ ][NG][Data00][x]
01 : Sport
03 : Extreme
05 : Auto
ENGENGLISH
Page 49

EXTERNAL CONTROL DEVICE SETUP
12
12
ENGLISH
ENG
27. Auto Configure (Command: j u)
(Depending on model)
Ź To adjust picture position and minimize image
shaking automatically. It works only in RGB (PC)
mode.
Transmission [j][u][ ][Set ID][ ][Data][Cr]
Data 01 : To set
Ack [u][ ][Set ID][ ][OK/NG][Data][x]
Page 50

SMART TV Quick Setup Guide
* Image shown may differ from your TV.
* Image shown on a PC or mobile phone may vary depending upon the Operating System (OS).
Wireless Network Connection
LG wireless
dongle
or
Wireless AP (Router)
ENGLISH
Wired Network Connection
Internet connection
Wired router
*MBM64101902*
P/NO : MBM64101902 (1404-REV02)
Page 51

Network Settings
ENGLISH
Premium Apps are pre-installed on the TV. These may vary by country.
Depending upon the version of the software, icon position can be changed.
Press the (Home) button to access the
1
Home menu. Select
(Settings) and press
Wheel (OK).
Select the Network Wired Connection
2
(Ethernet) or Wi-Fi Connection.
NETWORK
Quick
Picture
TV Name
LG Smart TV
Wired Connection (Ethernet)
Sound
Not connected
Wi-Fi Connection
Not connected
Network
Wi-Fi Direct
LG Connect Apps
General
Safety
Accessibility
The device automatically tries to connect to
3
the network available (wired network first).
When you select the Wi-Fi Connection, the
network list available is displayed. Choose the
network you wish to use.
If the connection is completed, Connected to
4
Internet is displayed.
NETWORK
Quick
Picture
TV Name
LG Smart TV
Wired Connection (Ethernet)
Sound
Wi-Fi Connection
Connected to Internet
Network
Wi-Fi Direct
LG Connect Apps
General
Safety
Accessibility
You can check the status of connection
in Advanced Settings.
WI-FI
Quick
Picture
iptime_xu.ji
Sound
Network
General
Safety
Accessibility
iptime_shinsung.kang
iptime_ungkee.choi
iptime_sungho.jo
iptime_seungjun.lee
Add a Hidden Wireless Network
Connect via WPS PBC
Connect via WPS PIN
Advanced Settings
WI-FI
Quick
Picture
iptime_xu.ji
Sound
Network
General
Safety
Accessibility
iptime_shinsung.kang
iptime_ungkee.choi
iptime_sungho.jo
iptime_seungjun.lee
Add a Hidden Wireless Network
Connect via WPS PBC
Connect via WPS PIN
Advanced Settings
For wireless AP (Router) that have the symbol,
you need to enter the security key.
Please call LG Customer Service if you experience any problems.
Page 52

Troubleshooting Network Problems
Depending upon the version of the software, icon position can be changed.
Press the (Home) button to access the
1
Home menu. Select
Wheel (OK).
Select the Network Wired Connection
2
(Ethernet) or Wi-Fi Connection
Settings.
(Settings) and press
Advanced
Check the AP (Router) or consult your Internet
service provider.
When X appears next to Gateway:
Unplug the power cord of the AP (Router),
1
cable modem, wait 10 seconds. Reapply
power.
Initialize (Reset) the AP (Router) or cable
2
modem.
Contact internet service provider or AP
3
(Router) companies.
ENGLISH
Quick
Picture
Sound
Network
General
Safety
Accessibility
NETWORK
TV Name
LG Smart TV
Wired Connection (Ethernet)
Wi-Fi Connection
Wi-Fi Direct
LG Connect Apps
WI-FI
Quick
Picture
Sound
Network
General
Add a Hidden Wireless Network
Connect via WPS PBC
Safety
Connect via WPS PIN
Advanced Settings
Accessibility
iptime_xu.ji
iptime_shinsung.kang
iptime_ungkee.choi
iptime_sungho.jo
iptime_seungjun.lee
Follow the instructions below that correlate to your
network status.
Check the TV or the AP (Router).
When X appears next to TV:
Check the connection status of the TV,
1
AP (Router) and cable modem.
Power off and power on in the following order;
2
(1st) the cable modem, wait for the cable
modem to reset (2nd) the AP (Router), wait for
the AP (Router) to reset and the (3rd) TV.
If you are using a static IP, enter the IP directly.
3
Contact internet service provider or AP (Router)
4
companies.
When X appears next to DNS:
Unplug the power cord of the cable modem
1
or the AP (Router), wait 10 seconds. Reapply
power.
After the cable modem or AP (Router) has
2
Initialized (Reset), try to reconnect.
Check that the MAC address of the TV/
3
AP (Router) is registered with your Internet
service provider. (The MAC address displayed
on the right pane of the network status
window should be registered with your
Internet service provider.)
Check the AP (Router) manufacturer’s
4
website to make sure your router has the
latest firmware version installed.
Page 53

ENGLISH
Install the SmartShare PC SW program on your PC.
Go to
1
2
3
4
www.lg.com
Select SUPPORT. Then, search for your model.
Select Drivers & Software or SOFTWARE UPDATE. Then, select SmartShare PC SW.
Download the SmartShare PC SW and Install it on your PC. You can run the program when
installation is complete.
. Then, select your region.
NOTE
ySmartShare service is only available if TV and other devices are connected via a single AP (Router).
SmartShare Connection to Smartphone
Installation & Setting
Check that Wi-Fi is enabled on your smartphone. To use SmartShare, both devices must on the
1
same local network.
Install/run the app for sharing content on your smartphone (It's called SmartShare on LG phones).
2
Enable your smartphone to share content files with other devices.
3
Open SmartShare application on TV. (Home) SmartShare
4
Select the file type you want to play (movie, audio or photo).
5
Select a movie, music or photo file to play on the TV.
6
Play the media file to view and enjoy it on your TV.
7
Please call LG Customer Service if you experience any problems.
Page 54

Updating the TV Firmware
(Home) (Settings) General ABOUT THIS TV CHECK FOR UPDATES
You can check the Software Version and update it.
If you check the Allow Automatic Updates, the TV will check for updated software automatically each
time the set is turned on (Internet Connection is required).
* When the TV is turned on for the first time after a software update, initialization of the TV may take up
to one minute.
Quick
Picture
Sound
Network
General
Safety
Accessibility
GENERAL
Language
Location
Time & Date
Timers
Motion Recognition
Launch Account Management
Home/Store Mode
Eco Mode
SIMPLINK
Reset to Initial Settings
About This TV
Accessibility
ABOUT THIS TV
Quick
Picture
Software Version xx.xx.xx
CHECK FOR UPDATES
Sound
Allow Automatic Updates
Model LG Smart TV
Network
Serial Number xxxxxxxx
Device Name LG Smart TV
General
webOS Version x.x~xxx-xx
User Agreements
Open Source Software Notice
Safety
Set ID : 1
1 99
ENGLISH
Page 55

Wi-Fi Direct Setting
ENGLISH
(Home) (Settings) Network Wi-Fi DIRECT
If a local network is not available, you can connect a portable device directly to the TV using Wi-Fi
Direct.
With SmartShare, you can share files or screens of devices connected to Wi-Fi Direct.
If Wi-Fi Direct is set to On, a list of available devices appears. Select your device.
1
WI-FI DIRECT
Quick
Picture
Sound
Network
General
Safety
Accessibility
When you are prompted to the connection request, select Yes. Wi-Fi Direct is now connected to
2
[TV][LG]
REFRESH LIST ON
your TV.
* If you are not using Wi-Fi Direct to minimize the interference between Wi-Fi devices,
it is recommended to set Wi-Fi Direct to Off. You can only use devices that support Wi-Fi Direct.
Please call LG Customer Service if you experience any problems.
Page 56

Miracast Setting
Miracast allows a portable device to securely send video and sound to the TV wirelessly.
(Home) Screen Share
Miracast should be set to ON on your portable device.
1
When your TV is detected, select the device on your portable device.
2
When connection is completed, the TV screen appears on the device screen.
WiDi (Wireless Display) Setting
ENGLISH
Intel’s WiDi (Wireless Display) technology enables easy and fast connection without wires or internet
network for mirrored and dual monitor display on your TV. You can sit back and experience your favorite
movies, videos, photos, online shows and more in full HD on your TV with great image clarity and sound.
(Home) Screen Share
On the TV Intel's WiDi is set to On. Your laptop runs the Intel WiDi ( ) program.
1
* LG TVs do not need to register.
* For more information on Intel WiDi, visit http://intel.com/go/widi .
* You can control your PC using the Magic Remote Control. (above WiDi version 4.2)
It detects LG Smart TVs available, which supports WiDi. In the list, select the TV you want and click
2
Connect. Enter the number shown on the screen into the input field (
click Continue.
Notebook Screen
) on your laptop and then
The laptop screen appears on the TV screen. The wireless environment may affect the screen
3
display. If the connection is poor, the Intel WiDi connection may be lost.
Page 57

Page 58

Magic
Remote
Information
Model
Name:
.LG
MBM63935925
( 1406-Rev04)
User
AN-MRSOOG
Life's Good
~
J:f
I.
cl'i'
i'!"'
JHH
(
1)
(2)
2. '?"'
3.
~~AI~
1.
2.121'!"1
ll)JHil
DK~ 2.12Z:!~ AI~ ~~g
01 CI
2Z!g
lVi
1.l10lW 9 2!C
~AIM
JJIOl
~
(2)
~
I~
!II
*
3 Jl I m m I
1
!"
.,
,.
"'
2.
9"1
111
C!I"XIl!
~rniAil!~Cl.
(2)
2:!EJ:I~
lliiOlE!
(3)
~Jil! 2.1
Sf.E?.:!OI~C/.
(
4)
2:!
(5)
2:!EJ:Ij
~~~
(6)
2WX15l!rn
(7)
2:!EAI~
OO
J~2l§N~OON~~2:!E~~~JI~D.
~!:ill'!
JH H
~l
l'!
Afi!J
JHI'l
:1.!
.!Ill'!
TV
A
I~AIJI ~UI~IM 2.12!':!~
All~2£!kl
,
1.llg~ JJIOl!\1~
*2lE2.4GHzU
c.!
A
:~m~
t:!
Aifi
?~ME
Jle
~2:!~1 ~UllOm
RF
2.12Z!OICU~2JeJ~AI~)
2.400
lH
"!
\;!
so
~
~
~
I
I
!'!
1!31CieJ
~
x
f~
ii!JII~
~mHo
o1
:iiUJIEJ-
~OH
2.12?:!
C/A
I OH
:i?kiiH.
2Z!~ Af~OfJ:
I
~~OIJlU.
~~
~Ol~2.1JiU. ~IOI
2.1-
§CI
l
~
OIAie
£1
)JJ,J£
~gjAI ~~
OHft~~
M ~51k11
!j!t-1
OISf:::AiE:l
~21~
2.12!':!0
OIUWII
Ai
~~OII2!E!atOI
GHz-
2.4835
79
XH~
-86
dBm
4 7.3x(~~ri~m1ol152.7
71
g ± 5 g
C!/2X
I
'<~ofX!llll!!
AA
1
.5
<!I"
XI 2
0
1;-
60
'2i'!
All!~rn
l
01
2l2t~~~IJ:
2/
E
E!!:f.
2:!e!AI~
Jf
OHAlE
2.f
§CI.
~JIC:&~ ~S:~ ~~
e!Cl
9.1
~~01
21C/.
H
AI~OIOl
1
~0{{011
GHz
l
V
JH AI§
1;
ill21
m101;e1
I
?:E
E!~.
JJIJ1
011
~
3.
:i22!l
Xll'!
NOO~~~M~~~~~~·
[
KC
M
.2:
~:~AlE~(?)
£1§
1'1
2 i MSI
P-CRM-LGE-
~IJ:
i'! l!!
;
20
14.
Ali~A
f/J:li
:1:~Jf: ~XIEXI
JIJHJI£1
https://manualmachine.com/2~gj: ~~~~~
~m!JI(~~~OI~~
~~~~Q
£!§
Of
.3
~ £!§'r:!~]
~
MR5
00G
(9)/CH~e.!~
~AI~~~ ~~JIJ
I)/AN-MR500G
lllE!rnJ
Table
of
Contents
1.
Overview
and
remote
(
ll
(2
2.
Precautions
3.
Customer
Ovelvlew and
1.
for
{l)~lliiiJtheMag
manual.
ltis
me
ltis
131'de
ootrequrelrep:;intedatthetv.(voicelalXJnliinsupjXIrt)
(2)
Specifications
iV\'~'
Model
Range
of
Olannel
Reception
Dimensions
We~ht
Power
specification of the
control
Overview
Specification
Support
Specifications
the
Remote
Control
K:
Ren!JteamlcreinthelV
uses
RF(~kl
FmiiJ!!OO!l
11111
Ojmtev.it!1in
!Om
-
No.
frequency
5e'l5itivity
(mm)
W
K1111
2.
47
400
.3
(exdud1119
source 2 alkaline
instea:l
of
IR (IrlaRed
lithe
tv
illd
does
GHz-2.4835
GH2
79
channels
·86
d8m
x
1hidlli€SS
34.4
x
(to~rmof±lmm)
ls1Jih
719±5g
battert)
~~~ri~
are
0
used
'C
-60
'C
2. Precautions
(1)
Alter
folklwing
(2)
If
reattempt
(3)
If
period
from
(
4J
Do
(5
Do
even
(6)
Do
(7J
There~
(8
Propei1y
3.~5upport
Refer
1.
Beschreibllng
-
Fembedienung
(1)
(2)
2.
Wamhinweise
3.
Kundendienst
1. lleschn!ibung
l~ht).
Spezlftkatlon der
(I)
8eschreibung
lnforrnationen
do'
Die
~~ndenfernleherzube<IOnen
ferrlbe:lieoonge
bediertwen:lenkaoo,kann'!J'Inmitd"leSerRFFembedienungmit
ihrem
beliebigen
zu
(2)
152.7
Technische
L
~!""'fi"~.
~
~
replacement
pairing
the
ooit
the
renrte
ri
time,
the
unit.
not
dismantle
not
drop
cause
not
immerse
dalljll'ofexpkllion
dispose
to
the
contact
Beschreibung
Technische
BedieoolliJS'nOituny
Fembed1en.mg
2.4
GH2
~ng
10m
be<lonen.
Modell
Kana
ri
the
in
accordance
does
not
operate
pairing
in
accordance
ro'ltroller
it
is
rerommended
or
exert
battery
1:1'
the
case
to
the
battel'(
ri
used
number
fir
Inhalt
und
technische
Spezifikation
unci
zur
Verv-iendung
lhres
kann
wie
n
mit
denen
Frequenzbereich
aus
i1
Jhrem
('Joice
Recog
Spezifikation
c~
I
battely,
use
the
remote~
with
user
manual.
after
replacement
ri
with
is
not
being
you
heat
to
the
exert
extreme
be
damaged.
in
water.
Wa
the
batteJy
batteries.
ser.ices
p!0\1ded
technische
Fembedienung
der
Magk:-Fembedi81
Femsehgeriits.
eine
sdmurlose
.
lmGegensatzzuherkiimmlkl'on
der
Femseher nur
d01
femseher
Haus
l.lld
nition
Unte~;Mzung
<fr,!'f
AN-MRSOOG
2.400GHz•ViS35GHz
Kanal79
·86dBm
battely,
the
user
manual.
used
fer
prolonged
remove
the
battel'(
battery.
impact
ttllt
may
is
Nlserted
reverse!(.
in
the
lV
Manual.
Spezifikation
fiili!!t
ung
finden
Maus
verwendet
aus
kul!el"
~nz
von
if9'11deiner
bei
einem
Abst.and
)
.;
• ,
Jllh~it.
der
Sie
werden
von
GrOBe
Gewicht
L.eist1Jngsquelle
Arbeitstemperatur
2.
Wamliinweise
(I)
No:hdem
(2)~~~~~~~'t~~~u~~~dem
Batteriewedlsel
=~~~~=~~~":~:rg:C:
vemnden
beschrieben,
(3)
wenn
Sie
ist
es
besser
(4)
Zerlegen und
(5)
Lassen
5ie
Oberrnii~
(6)
Die
Batterien
(7)
Es
besteht
einsetzen.
(8)
Entsorgen
3.
Kundendienst
Die
Kundendienst
Bedienungsanleitung
1.
~u
-
telecommande
in
(1)
Ape~>u
(2)
Sp€dtications
2.
Precautions
3. Support client
t
~
bis
;;)'
telecommancle
(
l)Aper>u
Les
k
instructions
Remote
cette
tehmnmande
televiseur
Avet:.
cette
=:ii:ce~~:~re
(2)
(mm)
1
a.,te4l=~l:r'su
Specifications
(o~~.\!~n)
2~kali-~~benlltl9t
0 t •
60
1;
5ie
d~
Batterien
ausgetauscht
haben,
verwenden
n1cht
mit
dem
Femseher
verbinden,
5ie
<le
Fembedierung,
wie
im
emeut
m~
dem
die
Fembedienung
die
Batterien
erflilzefl
Sie
die
Batterien
nicht
Druck
auf
die
sol~n
keinen
Expbsionsgefatlr
Sie
d~
Batterien
Rufnummer
des
Femsehers.
Table
des
et
specifications
etsp8dlic:ations
d'utilisation
se
trouvent
dans
vous
en
1'utilisant
comme
tetecommande
Handbuch
femseher
(Pairing).
fOr
1.3ngere
Zeit
herauszunehmen.
die
Batterien
nicht
fallen
und
Oben
Fembedienung
Kootakt
m~
WiHB
wenn
Sie
die
an
einem
daftir
""9esehenen
finden
Sle
in
der
matieres
de
Ia
de
Ia
de o tehmnmande
le
manuel
de
Ia
TV.
permet
de
oontniOr
une
souris
sans
9ui
utilise
Ia
radiofrequence
porteede
nicht
.
Sie
aus.
haben.
Batterien
Mag
votre
F1
l.
tom
benutzen,
keinen
verkehrt
Crt.
ic
2.
4Ghz,
.
2;
Pr6c',autlons
(1)1\pfisrorclmgidebattetie,procidezaosyncl'ronisationdeo
telecommande
(2)
~
les
&E!I11pl0.
(3)
En
longue
(4)
Ne
(5)
Ne
endommager
(6)
Ne
(7)
vous
diterioratioo
(8)
Les
3,.~c:f~
Veuillez
manuel
l!lil!lm
m:m&J
1.
Introdu~o e especifica~
remoto
(1)
(2)
2.
Cuidados
3. Suporte
47.3
(l) X
(...;~~piles)
Secteur
'
en
suivant
le
ne
fonctionne
a
nouveau
utiisation
il
vaut
1es
piles
su~r
de
son
boitier
les
piles
piles
oo
d'explosion
do-
1es
coordonnees
Cliente
en
de
m0ox
pres
chocs
et
dans
a
1'eovers
etre
indice
mode
J>a5,
Slivant
Ia
tilicommande
a1!everla
dune
a
~
son
de l'eau
jeties
du
~
telirommande
pies,
essayez
cas
de
non
penooe,
pas
~isser
faites
pas
pas
mettre
introduisez les
piles
usees
consulter
de
Ia
television.
Introdu<;lio
Especifi~iies
ao
·
-86~
+4~
:j-1.4
(t<Jeranc.es±
2p;"i:s
O'Cii60"C"
d'emploi.
meme
les instructions
source
tilirommande,
fonctionnement.
il y a
dans
service
'P:ljf
(LJ
X
152.7
(E)
•
I)
1
a~ines
'"
apris
avoir
clmgi
du
mode
pendant
une
batterie.
de
chaleur
cea
JXIU""<
un
risque
de
un
endroit
adapti
aft1chees
dans
1e
do controle
t
'1'
~
e
(mm)
troca
de
~11'05
de
acordo
1
troca
das
~lhas
.
utilizar 0 oonbOio-
desmonte
ou
aqtJel<l
deixe
cair
as pilhas
molle
as
~lhas
expiosao
se
as
pii'OS
em
para
contato
espec:ifica9)es
oo
Coo!J1jeM>jc--oomMdal'l
elM
emparelhar
com o manual
,
se o oontrole
de
pareamento ( confoone
as
ou
.
roocar
klca
l
recomendado.
atente
impresso
CIOidrole,J:IIIIIC)ID
(l)lntroduo;iio
As~deuliz>;iio
Esle-rEIIIiDiiii1~111D
l'liioelb;-~'l"pxion"""-~
rai>;ESie-rEIIIiDdeL4GizRf,I'J
iliOjio,detode"'railil!llm (9.!xrtfil!re:trile:ire1Dhz)
(2)
EspecWlcac;Oes
Tamanho
Alimentac;ao
T~de""'
2.
CUidados
(
I)!¢;
televis00
(
2)
!¢;a
novamente o processo
i
nstru¢es)
(
3)
Se
nao
recomendadorem::r.<eraspilhas
(
4)
rw
(5)
N3o
forte.
(
6)
rw
(
7)
~de
(8)
Qlloque
3,
SuJI\!I'bl.ao
ver
dados
do
sink
a1111raiD,..'Iflffilite-
_
2.400
l
47.3
(toleranda
utiliza.se 2 pilhas
por
.
~11'05.
que
estao
as
~11'05
no
""""'
..
YeZ.IXIIe~.sem
AN·MRSOOG
Gliz-
2~~iGHz
79
canals
'-86d8ni
X E
34.4
X A
152.7
± 1
mm)
~
~~~~
:
AA
I.SV,
alcalinas
o •ta
Gli"c
"""""nle o
comandocom
do
aparelho.
nlo
fundonar,
efetue
manua
alargados
periodosi
sofram
qualquer
impacto
na
posi<;iio
orada.
Marwl
de
lV.
em'"'
l
de
Indice
1. Sumario y
remoto
especificaciones
del
control
(1)
Sumario
(2)
Especificaciones
2.
Cuidados
3. Soporte
al
•
1. Sumarlo y especificaclone
(I)Sumario
(2)
I
Banda
a
T~de~
(
1)
(2)
(3)
(4)
(5)
(6)
(7)
(8)
Vea
Tv.
cliente
control
remolD
L.asirWtJc:001espa-a
manua
Este
~tonmambOOJdenbOdeocasad~"""'que
controles..-ara)llinfra
I'Odudl>;uOcadosdenbOdOradiodeow,esuna>11nJrerooto
Rfde
rn
Especficadones
~
Grado
Dimensiones
2.
clespues
con
sin
emparejar
Si
recomendable
No
No
No
No
Deseche
3.
las
l
de
!aN.
control
rem:.to
es
2.4GHzque
puo!e
fXIII>rodireaitin
.t,p.R\
l.,.,,r::
Modelo
de
frea.lencia
canal
de
recepci6n
(mm)
Peso
Energia
Cuiclados
de
colocar
el
televisor
de
no
funciona
despues
el
mando.
no
utiiO.
el
control rermto por
quita:r
desarme
las pil
deje
caer
las
pilas
sumerja
las pil
rooque
las
~las
las
pitas
Soporte
al
directiJnes y los
uti
lia
un
pn:xWo
ootrolardenbO
. (
Reanximmode'I'Jldea!'¥>
.
...lTll~ ~ilD;lhtrrclliiii·
las
acuerOO
las pilas.
as
ni
ni
as
en
a!
reves
usadas
cliente
teletonos
del
el
mardoa distaocia
Maljroestin81
p.:ra
coobdar
Ia
1V
usandolo
,
nojo
adieleldadek!;
COIWS'<icrolesquecorlrolabank!;
deun
rado
de
)
AN·MRSOOG
2.400
GHz
N
2.4835
79
canales
-86
dBm
k<ID4I.J\1r.'f~jx01gll52.7
~~~
?.:
~Js)
2
p~s1a~cilinas
01;-W1;
pilas,
hay
que emparejar
mn
las
instrucdones
de col
ocar
las
pilas,
reintente
un
tiempo
prolongado,
apliq
ue
calor.
golpee
Ia caja
para evi
que
de
hay
se!Vicio
tar
~igro
de
establecidos.
en
el
manual
agua
en
ya
los lugares
10
mon
GHz
el
mando
.
daiiarla
explosiOn.
e1
COO'Xl
es
de
un
Ia
13
~
1.
iil£llll£Bm!!t&.Jili~~•
11l
mJ~
(2)1!!fl!~
2.
i!~JJJj!j
3.~P!IH~
1.
l!WHfBll!lJ!:&.Pii~~-
(1)11!~
~~@ii~H~~m~~~~~~~mP~OO.
~iil£H~mP~a~m~m~m~~M~~
i/ll~~~~l"'al
~1iL'fliii~~~~tl8{)1BiiJJ!ll"'.ll..
~
Ji!Ji'lif(li!!Om~JIII
ffi~J!l~~S{)RFilll~H.
(2)1!!fl!~
;l::tj,(mm)
••
2.l1
••
(1)
i!!:I!REI!.it!!Fc
(2)
llltt!IJl'll!IJf~ii~H.R~i/lJ
.
Jt§JAfffiiJJ'iioJICJi!ll'l2.4
2.400
!U'
~ii~H~~
1Jil1~lf\,qEtll
GHz-
2.4835
GHz
79~
-86dBm
47.3
X
~l34.4
X M
1.5
mm)
152.7
V,
Iii~±!
7lg±Sg
('F@.ffl'fEI!.it!l)
AA
ilelll2-i'lt.l1i'fEI!.it!l
ot-60'C
J1!!
.
3.
fiPJJi~
il~I¥.1TViJI.BJ3'f;£Bij&~l!'i<!!llll.
13
1.
liJ£illlmJ!~BJJ~I!!fl!~
11l
mJ~
(2)1!!fl!~
2.)1-~Jj!j
3.
GHz
~J5!&~
1.
lil£Hli!!J!~Il§"!i!!fl!~
2.;uJ~IJI
(1)
(2)
(3)
(4)
(5)
(6J
(7)
•
(8)
3.
~*ft~TV~BilCf'lfBi&f!l~~m~.
'
~Fol~~lll1lil£il!l8{)~8Jl)<jtj:
Z.Ut~Vlllllit<iE:lil~lll.
m~
~ft
llm~~lffiit7.1<.
~it!lffl&lm~.
Rll~itllll@li&i!JFa~ltll&l.
~p.IJi~
'll~fi!li!o£1ij$£Bfo;~.
-~!!!~
ii:'ll:lll
COAeplKaHHe
1.
l(paTKGe
OnHtaHHe H TeXHMqecKMe
napaMeTpbl
nynbra
2.
Mepbl
3.
TexHHqecKaR
L
ICpmcoe
napiiMeTJIW
ynpaanettHll
(l
)l<pan<Oeon"ca'"'
~H~
pylC()9(),!t:.'TlleOOJKCJll1'(dTaUHHTel1eBMJq)a.
,llaHHb1HAHCTaHUH
A/lllynpaBIIeHH11TelleBIOOpOMOOll06Ho~M
KOMrlbiOTepa
43CTOT)'82.4rfUH80T1111'11te:OTnpe>K
ny11
Bi-1AI"f''ICCO,JTaHQIIellb1103B0111leT)'tlpaB1111Tb811106oM~npaBJie
BiXW'If
(2)
TexHHI.!ecKHe
l~"~
Ha3BaHHe
AMaro""
AMCTaHIIHOHHoro
ynpaaneHMR
(
1)
KparKoe
(2)
on•caHMe
TexHM4eCKMe
npeAocropolKHOCTH
bTOB1KOTOpblei1038011R1111ynpaani1TbTOJ1bK08npene!lclX
B p.wtyCe
P'll""
napaMerpbl
nOAAeplKKa
onMCaltlle
"rex-
nynbTa
jiiiCIIliiiiiOH
rl)
H0101lb30BatltiO
~
HblfinynbT
yn
HMeeTpa,!IHO
1
10
MerpoB.
(
fbAileP*KCI
napaMeTpb
l
,,;,..tii
MO,QenH
<acror
2.<100
fl'(
JlbTa
W
Mag
ic
HaXOA!ITOI
pa611eHI111r«l)(eT6bm.~b30Ba
S~•II!Ii!!
bi
WKI11lJ111
H
11XMOllellfMiffltlpaKpaOtbiX
pacroJHasattt~
AN·MRSOOG
rru
- 2.
4835
rru
79
KaHana
ro.rxx;a
;rr'~"'
4yBcrBifTellbHOCTbCMrHana
PalMepbl
~~~
Pa6o1.1aR
reHneparypa
(mm)
Bee
nHTaHM51
,
.
:z,.MeiJw~
(I) np,
"'"'"'
6arapeii
pMMeHeHHIO
nynbTa
{
2)
Ecmt
rrynbT
He
pa6maeT
=H~~~LIHIOnynbTaB
{3)
ECJ11.1
nyllbT
He
HCI1Qnb3YeJOI
8peMeHYI,
He06XQllHMO
(4)
He
pa3611pa~
H
8biCOKHX
{5)
~noc~~::a:r~:::rn~~=J:HIO
nJX>Ay<ra.
{6)
H36eran.
{7)
EcnYI
OnaoiOCTb
(8)
HcriOflb30BaHHble
Olel.ll1a.l"lbHO
3.T_._.~
no
eonpocaM
o6paUl(li1Tea,
'(Ka3aHHbiM 8 HHCTp'fl<l»1H
8
1
1.
H::::J:..-0)11\'!~~i±l*
(
1)11\'1~
H
1
21i±
2;:tt$!Ji
3.:iJ:A.~~-:--<t-t::A.
1.
H
HH
)
(I)IJ
<h?'J~o/O)Ifl';)ii!
<h?'HO/I:Ii.
lltMMI'J'<O/~I:Ii.
tl
l!1ii
~Jmto:<~. 'J
I
IOml;.l~Olll!l~ltl';to:cb!'iJI!~t
'CL'tt
He
TeMnepafYP.
KOHTaKTa
6arapeM c BOAoH.
6arapeM
ycraHOsneHbl
noepe>K,IleHHil
6aTapeM
OTBe,llet-IHble
3Kcnnyaralll*t
8
uryw:.6y
OCIAQei»KKH
If;
l)~:::J:..-O)••~ttif
~ftvA<OO<Ol
1
1
•
Jtl
l:b
<~·;?'J~o/l:li. ~4GIUIJIIIiU!l~
'<o:-Ol~Ht.l:t
.l
·86
W•J>MHa
He06x"""MO
,D,HCTaHUHQHtiOro
BbiTa!Qim>
nO.QBepraifre
H3,!lell~
no
3KOVT'(aTal.II1H
l
:li.
'Tvt'Ol!H:!I
AoH
47.l~
T011ii&IIH<I34.4
ArlMt<a
152
.7 (aoo;a<.*
7lrp.±Srp
(6e3
6arapeet<)
uJ!10~
~KM;•
o1;-60
c
C/leAOBaTb
ynpaBJleHHSI.
nocne
JaMeHbl
6ara~,
B
Tel.!eHllle
,QTlHTe!lbHOfO
6aTapeH
.
6aTapelot
BOlQE!IACTBMIO
Hen_paBHflbHO,
ycrpoHCTBa.
MecTa
'Tvt'
tyl1leCTB)'eT
He06XCW1MO
8b16paCbleaTb
.
11
cepeHOiOrO
KJllteHTOB
no
Terli$JHaM
Tetle8i00pa.
Oll!l!iOJ!
lll
l!:!ll~lt
,!:;l
:i~c 'Cfvt'!!ll';~ft
I:'
J'<o
/l'ft;J
o:cti<.ll~to:c;<~~ft,
.
fJir!!IIIIIWHHl
X
IHM)
~
""crpyi<UI1"
no
8
o6r.ny>KY!BaHH.Il
1
W
ft.
,
it<ltffto
l
t:lll<
Page 59

7-"r>/=?'-JI..
~fllll•
:'p<
.::47.3 X
-tl1i
(mm)
J~,
••
1~'?-'J-A
lll+'Fi&IUIDII
2.
;t:t~lJI
(1) !lilEJ;!*Olfi.til!!l;l:fl!llll.t.o:•
(
2)
(3)
<4>
(5)
(6)
(7)
(S)lli'
(9)ett
3.
**tllOJ~•Illi!ll:lcll<!!nt:t.>A~<--It
;f<-t-t/~-OJ;till;'i;Nllllll.
RegulatiOh
KCStlltement(~)
'
:U£.!2£
""~
tii!!OJll:!t!il:.
<'-'·>?0)'!0::J/Ollll!l&ll!l!ll.l:li!?"'C-<7•J:..-'1'!:
ri?-c<t=<"L
'·
<'-'·>?'J'!O::J/'!;!JIIIr~ifllll.t.o:L
i~ft'!:<!!lt'.ot:l'll:.
il>F;!on
IL't;l.l?t
ii-=>L
\f:;.
'l'<!!t~;t;
LJ:fll.l;l:
:i:J.A
11
....
-".t
1
J:iiQ.J:
f
~ ~~IJ:t
c
<2.!~'2.!t!2f
~34.4 X :&-~152.7
(±1mm0)1Hfl
l,
~'A~i~<>
AA1.5V.
7MJ'Jiliit!!2~il!lll
o'tNwt
''C'<t=;!oL
Alt:!I.6C
'b!l;l:fi'lit!!Ol
-c<t=;!oL
W
',
'il~l;i:
"'C;i;L'"'C(t=<"•'
""C.f:)f.l,fJL'""C"'<t:CL\
fJL
\T.:<t:
t·>l-;t;J:L'IIl!
',
~t!
Jf
5{!0I
.::f
~-§'
'Tl..ot''!;tlf'F1:-!t.o:L
titil!!'!:lll!'Jifll.
!lll!liiii!!J'!:ili!'t:ettit!!-~>
·:~~1J~=c,I:Ah
:::t::'~
.:;:li
8\l'a
~t!~t:~IJI t!IIf
f!~.§
ANATEL
Statement
=di~:~=~~
mesmo
de
estag'ies
intertereoc
ia a sistemas
Federal
Commooications
You
are
cautioned
by
user's
authority
equipment
limits
for a Oass B digital
FCCnJes
generates,
and,
this
equipment
reception,
off
intefference
Reorient
or
Increase
the
li1e
from
tl1at
ID
111e
device
oomplies
subject
to
this
device
this
device
interference
device.
caution
this
modes
and
RF
Radiation
equipment
that
ltle
part
has
.
if
not
installed
may
cause
will
not
does
and
on,
by
relocate
separation
~ui>ffier<
wtichltle
deal.-
or
the
following
may
not
must
that
equipment
not
co•!re:l
violate
complies
approved
the
This
the
1t1e
~~~~i=~~nc~Fn:=~~:O~~is
equipment
energy
·
i
nstructioos,
communications. However,
,
interfereoce
CL
\0
If
television
equipment
the
•
-
•
Connect
-
Coroult
This
is
ll
2
FCC
~:~~:.~\:':~~~,=~~party
operate
other
regulation
FCC
Ths
forth
for
an
uncontrolled
spedlic
opaating
Industry canada(IC) Statement
This
Ru
1)
2)
=i·ng
(Para
Brazil)
c:,r;~~~~uJ~~~~~
do
mesmo
tipo
e
nao
operando
em
carater
CDmmlssion(FCC)
changes
or
modifications
responsible
for
operate
been
tested
uses
and
and
harmful
there
OCOJr
in a
cause
which
can
the
user
or
more
the
receiVing
between
inlo
receive-
an
eJ<pel'or£e:l
wi1h
Part
two
cause
any
may
cause
and
For inOOor
by
!his
the
user
Exposure
wM
oompHance
the
equipment
and
found
device,
pursuant
can
radiate
used
in
interference
is
no
partiaJiar
harmful
be
determined
is
encouraged
of
the
antenna
the
an
outlet
is
CllllnedEd
oo.rrv
IS
of
the
conditions:
harmful
intert"erence
undesired
manual
authority
Statement:
FCC
radiation
guarantee
intefference
equ
oo
intert"erence,
use
to
one
accept
jXlde
causar
primc'lrio.
not
cou~
to
comply
to
radio
accordance
to
radio
ir&allation.
by
to
try
foiMng
measures:
.
ipment
and
a
drOJ<
tanocian
FCC
Rules.
received,
operation
ooly,
use
may
violate
to
use
the
exposure limits
nao
Statement
expressly
wkl
with
part
15
frequency
with
that
to
radio
turning
to
correct
receiver.
diferent
for
Operation
and
includ
of
the
outOOors
!he
proch.x:t.
of
the
or
the
f1el>.
FCC
set
ing
or
Avis
Cet
d'lndustrie
suiVantes:
ll
2
JC
This
forth
NOTE:
OR
THIS
SUCH
OPERATE
Avis
rayonnements
Cet
=~ents
REMARQUE:
LE
RADIOELECTRIQUES
AUTORISEES
DE~
ACCORDEE
IFT(Mexico)
~nra~~
(
(2)
C£
EU
in
CE
LG
vvith
nstnJ:OOro
device
complies
les. Operatioo
this
this
appareil
cet
cet
celles
Radiation
TV
appareil
FABlUCANT
1)
es
i
nterferencia
~;:,~ao
Stlltement
COnformily
Electronics
with
is
subject
device
may
not
cause
device
must
accept
interference
that
d'lndusbie
Canada
est
conforme a norme
Canada.
Son
fonctionnement
appareil
ne
doit
appareil
de«
accepter
pouvant
entrainer
Exposure
equipment
complies
for
an
uncontrolled
THE
MANUFACTURERE
INTERFERENCE
CAUSED
EQUIPMENT.
MOOIFICAT10NS
W.JLO
THE
EQUIPMENT
d'lndustrie
Canada
est
conforme
d'
IndustJie
N'EST
PAS
CAUSEES
APPORTEES APPORTEES
~OOIACATIONS
A
~IITIUSATEUR
de
este
equiJXl
posible
que
este
equijXl o disjX)Sitivo
perjudidal
qd~=~~~~:~~u:=~~~a,
Notice:
0197
hereby
following
declares
Directives.
the
environment. End
for
satisfyirg
RF
RSS-210
of
the
Industry
to
the
following
interference
and
any
interference.
may
cause
undesired
GlR-210
est
sujet
pas
provoquer d'interffrences
toute
les
interferences
son
dys-
fonctionnement.
Statement
with
IC
radiation
environment
IS
NOT
RESPONSIBLE
BY
UNAUTHORIZED
VOID
THE
USER~
.
sur I'exposttion aux
aux
limites
d'exposition
canaca
pour
unenvironnement
RESPONSIBlE
DES
PAR
DE?
MOOIFICATIONS
A
CET
POURRAIT
ANNULER
DE
FAJRE
FONCTIONNER
esta
sujeta a las
y
that
this
product
users
must
follow
the
exposure
oom~iance.
canada
two
conditions:
operation
of
des
rfglements
aux
deux
conditions
et
. y
compris
exposure
limits
set
FOR
Atf'(
RADIO
MOOIFICATIONS
TO
AUTHORITY
lU
aux
non
.
INTERFERENCES
NON
APPAREJL
~AUTORISATION
WPAREIL
siguientes
dos
no
cause
is
in
compliance
R&m Di
rective
1999/S/EC
The
prodocts
described
above
comply
with
the
requirements
of
the
directives
This
device
is a 2.4
for
use
in all
EU
~G=~T~~~~an
Nether1ands
Cf
Notified
Body
This
is a Oass
Explosive
device
transmitter
(such
blasting
caps
or
has
been
modified
[DEUTSCH]
EU·Konfonnititserldirung:
LG Electronics
er1<.1iirt
Richtlinieneotsprlcht:
R&TIE-~chtlinie
Die
OOen
beschriebenen
Anforderungen
VertreterffirEuropa:
LG Electronics
Inc.
[FRANI;AlS]
Notice
de
confonntte
LG
Electronics
atteste
Directivessuivantes.
Di
rective
1999/5/C£.
Lesproduitsdecritsd-dessussontenconfOffilib?aveclesexigences
essentielsdesdirectivesspfci-.fifes
Representant
en
LG Electronics
Inc.
[
17AUANO]
AI'Yiso
dl
confonnit\
LGdichiarachequestoprodottoecontormealleseguentidirettive.
Di
rettiva
R&m
Iprodottidescrittisoprasonoconformiairequisitiessenzialidelle
direttivespecific.ate.
Rappresentante
Amstet-leen,
PaesiBassi
GHz
member
statement:
B
product.
proximity
as
a
in
an
to
hiennit,
199'!/S/EC
der
aogegebenen
Krijgsman
que
des
Europe
Krijgsman
199'!/5
europeo:
wideband
states
1,
warning
wireless
explosive
be
qualified
dass
Produkte
1,
1186
UE
:
ces
produits
R&m
:
1,
1186
EU:
/CE
LG Electronics
specified.
netv.Qrl<
Richtlin
transmissio
and
EFTA
1186
OM
-Do
not
device)
environment
for
such
di
eses
PrOOukt
entspredlen
ien.
OM
Amstetveen
est
en
.
DM
Amstetveen,
Inc.
Krijgsman
essential
n
system,
countries
Amstelveen,
The
operate a portable
near
unshielded
unless
the
use.
den
folgenden
den
grundlegenden
,
Nieder1ande
conformrte
avec
Pays-Bas
1,
1186
intended
device
les
DM
[ESPANol]
Aviso
de
conformldad
con
irectivas.
equipos
radioelectrio:ls y equipos
1999/5/CE
las
directivas
europeo:
Inc
.
Krijgsman
dedara
por
oom
as
seguintes
acima
descritos
Ioc
Krijgsman
199'!/S/K
genoemde
van
de
gespecificeerde
Inc.
Krij;jsman
6~
ntpi
PoOIOEf;orWoj.loU
f'<onA"fJJU
(R&ffi)
npoiOvro
cruwopql(iwovrm!Jf:
OOflYI(ilv
.
OVTinpjownoc;:
Krijgsman
nyilatkozat
ezlrton
Ia UE:
especifhcadas.
1,
1186
DM
da
UE:
este
meio
Oiredivas.
estao
em
..
dficadas.
1,
1186
OM
(EU):
producten
voldoen
richtlijnen.
1,
1186
DM
611
TO
oop6v
1,
1186
OM
Amstelveen,
kijelenti,
hogy
terminales
Amstelveen,
Paises
que
este
produto
esta
conformidade
com
Amstelveen, HolaOOa
lgende
aan
de
essentiele
Amstelveen,
Neder1a00
npoi6v
OUIJIJOP<f.l(iJVtToiiJE
KOI
Tl)1.miKOfVWV10KoU
11~
ourn<il&K;
OMavOio
a
termek
megfelel
de
Bajos
em
os
requisitos
richtlljnen.
T1C;
ooa~
a
kOvetl<ezO
Porlapresente,LGEiectronicsdedaraqueesteproductocumplecon
lassiguientesd
Directiva
sOOre
telecoolunicad6n
losproductosdescritosanteriomlentewmplenconlosrequisitos
esendales
de
Representante
LG
Electronics
[PORTUGUEs]
Aviso
de
oonfonnidade
A
LG
Electronics
conformiclacle
Os
produtos
essenciaisdasdirectivasespe
Representanteauopeu:
LG
Eledro
nics
[NEDERLANDS]
Confonniteitsver1daring
LGverldaarthierbijdatditpnxluctvokloetaandevo
R&ffi·richtlijn
De
hlerboven
voorwaarden
EI.I"OpeeShoofcl:antoor:
LG
Electronics
[EMHNIIC'.]
litAfiXRiaupi!Oplp(I)(JI)c;E.E.:
H
lG
Electronics
Efil<;D<l~vi<,:
OOrjy(l
1999/5/EK
T'l'-oV
To
nopon6vw
TWV
avwli:pw
fupwndiK(x;
LG
Electronics
[MAGYAR
]
EU
megfele!Osegi
Az
LG
Electronics
iranyetvekel6irasainak:
1999/5/EK
R&TTE
iranyelv
A
fentiekben
bemutatott
tetmekek
teljesitik
a
megadott
UE:
ie
rndlowych
zasadnicze
EU:
!e
Hollandia
ten
pro:lukt
wymagania
Holandia
!eoto
'l'robet<
koncovYch
Nizozemsko
teniD
vjrobok
irilnyelvek
spelnia
i
koil<owych
je
dosa"'Je
ve
alapvetOet:lirasait.
EurOpa
lkepvlselet:
LG
Electronics
Krijgsman
1,
1186
DM
AtnsteM!en,
[POLSKI]
Deklaracja
zgodnoKI z normami
Arma
lG
Electronics
niniejszym
wymagania
p:miiszych
Dyrek1ywa
199'!/S/WE
urzqdzelilelekorooni<a<;yjnych
Pov.y.Zej
'fiYJllienboe
wymienionychclyrekty.v
PrzedstawkielnaEurol)l;
LG
Electronics
[<BKY)
Prohlaieni
o
Spolelnost
LG
shades
nasledujicini
smemk:e 0 radiokomunikablidl
Wizenichl99'l/S/K
=T,uktyjsouvsouladusezaldadnfmipoiadavky
ZastoupenivEvrope
LG
Electronics
[SLOVENSKY]
Yyhtasenie
o
Spotolnost
LG
sUiad
s
nasledujOOm
Smemica
R&m
dyrektyw.
w
produkty
Krijgsrnan
shode
s legislativou
Electronics
~mK:emi.
:
Krijggnan
zhode
pre
Electronics
i
smemicami
199'!/S/ES
sprnwle
.
:
l,
timiD
1,
oblast'
tjmtD
spelniajij
1186
1186
zaSwiadcza,
umjdzen
DM
ArnsteNeen,
prohoruje,le
a
telekomunikab"lich
DM
Amstelveen,
•
EU:
vyhlasuje,
.
VyS!iepopisane'l'rottyvyhovujuzlldadnimpoliadavi<amuvederrich
EurOpskezastupite
LG
[
Oeda~e
Prin
urrnatoareleDirective.
Electro
nics
Krijgsman
ROMANESTE]
de confonnitate
prezenta,
LG
rstvo
:
1,
Electronics
1186
dedar!
OM
UE:
Amstelveen,
d
acest
produs
li:llandsko
este
confom1
OJ
D;rectiva
R&m
1999/5/CE
ProdusuldesaismaiSU5esteconfomlwcerinteleesen9~ale
directivelorspecfficate
Reprezentanteuropean:
LG
Electronics
[6bllfAPCI<H
6ene»nca
CtiOCTOS!utOTOLGEiedronics.Qe1WJP11pa,oteTOJMnPQAYKr
CbOTBeTC"TBaHac.ne.Qf·MTe.Q11pemtBH.
R&m""""'""a
0nHcaH..urrno-ropenpo.QYKTCbOTBeTC1llaHa
Hanoc:cl'leHHTe,IIHpeKTl'eH.
Es~
LG
Electronics
[SVENSKA]
Meddelande
LG
Electron
gallandedirektiv:
R&ffi-<lirel.tivet199'l
Ovan
kravensomangesidirektiven.
Europeiskrepresentant
LG
Electronics
[NORSK]
Samsvarsmericnad
LGEiectronicserk.l<ererhefvedatdetteprOOulcteter
fulgendedirektivene
R&TTE-direktiv
Pr<x:luktene
direktivene.
Europeiskrepresentant:
LG
Electronics
[DANSK]
EU-overensstemmelsesertdering:
LGEie<:tronicserld~rerhermed,atdel:teproduktoverhoklerfdgendedirektNer.
R&m-<lirektN
Deprodu
deangivnedirektiver.
01HOCHO
ics
namnda
5001
kter;
]
npeacramrren
.
Krijgsman
1,
1186
CloOTIIeTCTBtte
199'!
/5/K
:
Krijgsmao
1,
1186
om
EU·regeleft!r1evnad:
intygar
hiinned
/S/
EG
produkter
stammer
:
Krijgsman
1,
1186
for
EU:
.
1999/5/EC
beskrives
ovenfor,
Krijgsman
1,
1186
199'!/5/EC
clererbeskrevet
OM
Amstetveen,
OlaOOa
c
HOpMMTe
Ha
EC:
OCI«lBHKTeHJHCI(Bafl.l~
DM
Amstelveen,
HH,Qep.l"la11!11111
att
den
har
prod!J«en
upplyUer
Overens
med
de
gruf"'ldlaggancle
OM
Amstelveen,
Nederlandema
ihenhokltilde
overOOider
kravene
i
de
OM
Amstelveen1 Nederland
ovenfor,
overholderdevigtigstekrav
angitte
Europaeiskreprcesentant:
LG
Electronk:S
Krijgsman
1,
1186
OM
Amstelveen,
Holland
[SOOM1]
EU·vaatlmustenmukaisuusilmoltus:
lGEiectronk:svakuuttaataten,ettatiim.lituoteonseur.taVien
direlc:tiivienmukainen.
R&m-direktiivi
1999/5/EC
Edella
mainitt.t
tuotteet
ovat
eriteltyjen
direktiivien
OM
Amstelveen,
et
see
direk.tiivide
OM
Amstelveen,
DM
Amstelveen,
direktivim:
norMito
DM
Amstelveen,
o~listen
Alankomaat
toode Uhiklub
IOppseadmete
oluliste
Holland
Nyderlal"ldai
direktivu
N'ldertande
jarg
nOuetele.
bOtisk.ajtim
vaatimusten
mukaisia.
Edustaja
Euroopassa
LG
[EESTI]
EO
Kaesolevaga
direktiividega
Raadiosec!_dmete
l99'l/S/EU
Eelnimetatu::l
fi:iljande
Euroopaesind
LG
[UEl\NliJ
EB
"
LGEiectron
R&TTE
Aulc.SCiaujvardintipro:luktaiatitinkanu~direktyv4esminius
reik.alavimus.
AtstnvasEtJropoje:
LG
[LATV!ESu]
Pazi.,oiums
LGEiectronicsarSopazii)O,kaSisizstradiijumsatbilstturpmak
minetajiimdirektivam.
R&m
JepriekS
prasiMm.
ParstavnieabaEiropii:
LG
i
[SLOVE
Jzjava o skladnosti
LGEiectronicsizjavl"
:
Electronk:s
Krijgsman
1,
1186
vastavuskimitus:
kinnitab
LG
Electronics,
..
ja
telekommunikatsioonivOrgu
tooted
vastavad
miirgitud
us:
Electronics
Krijgsman
1,
1186
K.]
atltlktles
deldarodja:
ics"parei~ia,kadSisproduktasatitinkatoldasdirektyvas.
dire~
1999/5/EB
Electronics
Krijgsman
1,
1186
par
atbilstibu
ES
direktiva
1999/5/EK
aprak.stitie
izstr&lajumi
atbilst
Electronics
Krijgsman
1,
1186
NSONA
]
EU:
,da · taizdelekvskladuznaslednjimi
..
miste
direktiiv
direktivami.
Direktiva
opremi
Zgoraj
Evropsk:izastopnik:
LG
Electrooics
[Sf<PSt<l]
Napomena
lG
Electronics
direktivama
R&m d
Prethodno
navedenihdirektiva.
Evropskipredstavnik:
LG
Electron
[HRVATSKI
Napomena o suldadnosti
lG
Electronics
sljedetim
R&m direktiva
Gore
direktiva.
Zastupnikza
LG
Electronics
[TURK<;!']
AB
Uygunluk
lG
E
olduQunu
R&TTE
Yukandaanlatllan Uriinler,
uyumludur.
Avrupatemsik:iliQi:
LG
Electronics
[SHQIP
Deldarata
LG Electronics
perputhje
D
irektivenR&ill199'l/S/"<f
Produktet
1999/5/ESo
ter
medsebojnem
opsani
:.
irektiva
opisani
ics
]
Direkt:ivama.
opisan
I)"Oizvod
lectronics,
beyaneder.
Direktifi
]
e
me
e
pershlwara
radijskiopremi
izdeld
izp:llnjujejo
Krijgsman
o
usldadenosti
ovim
izjavljuje
1999/5/EC
proizvodi
Krijgsman
ovim
putem izjavljuje
1999/S/E<:
sukladan
Europu:
Krijgsman
Bildiriml:
burada
bu
1999/5/EC
Krijgsman
Konfonnitetit
nepermjet
Direktivat
e
intelel<oroonikacijskiterm
prizna
.. vanju sk.ladnosti
bistvene
1,
1186
OM
Amstelveen,
sa
standardlma:
da
je
ovaj
proizvod
uskladeni
su s osnovnim
1,
1186
DM
Amstelveen,
s
EU
standardima:
cia
je
je
osnovnim
1,
1186
DM
Amstelveen,
Uriiniin
a~Qidaki
belirtilendirektiflerin
1,
1186
OM
Amstelveen, Hotl
per
BE·ni!:
ke5aj deklaron
se
mi!poshtme
.
me
~rt
perputhen
zahteve
ovaj
1-YQizvo:l
zahtjevima
Oirektifler
gereklilik.leri ile
ky
produkt
me
kerkesat
te
Oj:reT!e
navedenlh
Nizozemska
uskladen
sa
zahtevima
Holandija
sukladan
navedenih
Nizozemska
ile
uyumlu
anda
eshte
thelbesore
di
rektivavetespecifikuara.
perfaqesuesievropian
inalski
LG
Electronics
direktiv.
[BOSANSKI]
Napomena o usldatfenosti
LG
Electronics
sljedeCimdirektivama:
Oirektiva o radijskoj
199'!/S/EC
sledeClm
Opisanl
direktiva.
Predstavnikza
iz
LG
Electronics
[MAKE,QOHCK
M.JBeCTy&att.e
LGEiectronicsjaBHoH3}aeyeaAeKOOBOjnpolo1360.Qeeocor!lOCHOCTco
Ole.AHKTeAHpem1BM.
R&m
npo143110Al-1T"e
flOCO'feH11Te.QI1J)eKll-1BM.
Eeponom
LG
Electronics
[K,A3AI\WA]
EO
c:afiKeC'Titc
LG ElectroniCSOCbl
AHpetm-teanapra
PaJlloiO
AHpeKTio1BaCbl
}I{QFapbi,Qa
Heri3riTa!larrrapb1HacaH
Eypona,narueKinAiK:
LG
Electronics
[PYCCKHH]
Y&eAOMneHMe 0 COOTBeTCI"BMM
KOMOaK1SilG
Hl!leJ111e
ne
lloipeo<rneaR&ffi1999/S/EC
001-IC3HHble
YKa3aHHbiX,nl'4)elffi18
te
npe,!ICT
:
Krijgsman
1,
1186
DM
sa
ovim
proizvodi
Krijgsman
H]
.,.,..,.,,.
onHwaHH
npcrcraeHMK:
Krijgsman
lKCIHe
TeneKOMMYHHKal..IHRilbll<
01naTTallfaH
Krijgsman
Electronk:s
COOTBeTCT8yeT
BbiUJe
aBHTellbCTBOBfepone:
propisima
putem
izjavljuje
opremi i telekomunikacijskoj
uskladeni
su
sa
kljOCnim
Europu:
1,
1186
OM
1a
ycornaceHOCT
1999/S/K
norope
111l-101011H'feaaT
1,
1186
DM
TYPMbl
eo«!P'Yi:
~ap~lllb16¥n
cai1
eKeHiH
MafliMAei1l\i.
6HiM.QeP
K9pceriJlreH
Kene.Ai.
1, 1
186
OM
HOCTO~U(:IIM
0JeAYIOllll-1M
H3AeJ1H~
COOTBeTcrBYIOT
.
Amstelveen, Holande
da
je
CNaj
zahtjevlma
Amstelveen,
co
EY:
Amstelveen,
I®JblnFbiHblt\MbiHa
~l(l"ap.Qblt\1999/5/EC
Amst:e!veen,
MOpMaM
3a~B/HieT
AHperniBaM
OCHOfiHbiM
EU
:
proizvod
uskladen
termina!noj
opremi
navedenih
Ho
landija
OCHOBHHTe
yCJJOe~
XonaHAloija
AHpei<TI1BatlaPJiblf1
H~-t,AepnaHA
EC:
0
TOM,
"'TO
,llaHHOe
,
rpe6oBaHH~M
LG
Electronics
Krijgsman
I,
1186
DM
Amstelveen,
(YKpai"HCbka
]
niAT&eJIA*tHtul
UHM
npo,!l'fl(Ty
llo1peKrneaR&m,199'l/S/EC
sa
OnHcaHI
AHpeKTI1B.
YnoeHOBa>KeHa
lG
Japan
~
<*1~(1)(f}J!.tl});11:.ll>
OOlllll!Olll!JIII!Ji!lll!f~li.
Ollfb,IIIOlllil'71'-'ll<'ilJIII<Itn'~lfl!l*iii'!IJIIOl!IIPllUUi
IJ
JW1:7<h7llllll!(
1 OOlilll!il!ffltlo
OA
2
3
Ukraine
Bi,qnosiAMOCri
KOMnaHi~
LG
Electronics
BM~M
B~
Electronics
n~rnePA*'fE
A~I<THB,
ut0
npollY!ffi1
BiAnOBiAaiOTb~M
oco6a
y
Eeponi:
Krijgsman
I,
1186
:Olliff.Ol~o!llllll!
li'
..
liltl:l-'(
FH·SS!il(!lf!lll-.
t .
'll!
U'\
HitUII<il&t<l<li:'l'ttJ!UUill!l'fH<V"'"Iiiij)
11•'1.1J·Ml~:lt-'I:T~'f~7·$1l/iill!<iJJ13i!.h."tL\I~L':.!:~6tl£
L.t'"F~L',
)j-,
i'IOl'l!!b'l!!El-t
li'II!&Oll!!J!iJJl:l-t:.t,
d)(1)9lHI~(iJtUt.
~P
.
~OJ/11.
"'f::1.
7.f:if,5
~!D~J(1).:.t1JIE!t:C!Ii.
·
!t0.~~~;,~}
§!IHl!tUII/Oib';Jffll<ltn'tt
i111:
.
i\(1'lfl!l*lli~JIIOliiiPl!!IIIO&t<l<li:
OOlilllb'Glfllil*il!iJIIOl!IIPl!illli!l:)jl-
o!lel:
li.
"F!lill!l'ei:O:;!!IIIIii!,
I
~-r{-:..-3:.,.-0)~f!.tJ.!::')I:-:Jt.
OOlilllb'GlfliJI*IIi~/JIIOll<l>'l''il!tJ!illl!Mc'li7"l
f:~L
""C::fii!J.~Ti~(1)·
;~:~miltAS'C""-.E!IIIL'S"f:>itl'~L'
LG
Electronics
Japan
,3,,;,
~~3 ~l~t<;c<,
A,o.pecai•mopr
epa
:
n11
«.nr E.nEKTPOHIKC
eyn
6ace~Ha.
6 .
.. KHI
ten:
+38{044)201-43-50
HH.QepnaH,Ilbl
aatfAai)TaM
€C:
ei,QnoeiAHicrb
nepenNeHi
DM
Amstelveen,
'rv:.-;:1!0lii!IHl'l'·i!ill!llilll
l..lbOf"O
HlofliNE!.
BHHOiilH
BKimHlo1X
Hi,QepnaHA!-1
l
i.24GHdlf!illllcn'tt
4'f~Uii10oo
.
BRAZIL
~
Philippines
1111111111111111111111111111111111111111111111111111111
,
·c-F
.
""
I
~
0
Russian
0
Kazakhstan
[Specification]
1)
Model
2)
Batch/Serial
3)
Manufacturer
4)
Factory:
5)
Product
il;>b'l:il!III!I&IIU~t:WJI.
(
fl.
'(lflt.i'll!i!'f
iliiiOIJ!OJio
1""(:'-1U~L.
jH
f.JI§!i.Lt:tiS"fJ.!::'fiilb'
)
tJ7..:$1-;>--If;f.'-t-t~;-
l O:''Imoo•"
Israel
MoC
ID
MoC:
51-40461
MoC:
51-40800
Y«pa"iHU
B.
01004.
South
Africa
i:_
TA-2013/1704
IC~..SJ\
·· APPROVED
.~ANATEL
3805-13-9946
(01
)07893299650659
UAE
TRA
~R~m~~ZRfo:
DEALER
'
0014318/08
language
language
Name:
AN·MRSOOG
No.:
:
LG
OHSUNG
Name:
-
Electronics
ElectroniCS/
Magic
Remote
No:
Inc
.
HANSUNG
Russia,
Kazakhstan,
BelaRIS
lHl
Electronics
Page 60

LG
Life's Good
Register
for a
(54.6"
chance
diagonally)
your
No purchase necessary. Quarterly sweepstakes ends December
LG
to
Product
win a 55"
LG
See
official rules
30
on www.lgusa.com/register
now
class
Smart
TV
31
,
201
5.
Parh
Pnnted
MBM636
1n
Mexico
18504
Page 61

LG
Life's Good
Experience
Connect
support
advantage
• A team
• The personalized
representative handling every detail
• Customer service provided by trained experts
• Guided support
scheduling and onsite repairs
the
with
all
new
your
LG
VIP
dedicated
representative today
of
these
of
skilled professionals, all based
for
incredible
attention
Customer product operation, repair
of
one customer support
Care
Program.
customer
to
take
benefits:
in
the U.S.
of
your product care
Page 62

Toll free number
1-800-243-0000 USA
1-888-542-2623 CANADA
Page 63

Be
careful
when cleaning
the
TV
screen.
•
•
•
Make
Do
not
Make
sure
spray
sure
to
to
wring
water
spray
any
or
cleaner
just
excess
enough
water
directly
of
water
or
cleaner
onto
the
or
cleaner
from
TV
the
screen
onto
cloth.
.
a
dry
cloth
to
wipe
the
screen.
P/NO
Printed in Mexico
: M
BM638825
11111
*
11
11
11111
~
02
111
1111
111
B
M 6
(1
1
11
111111
111
11111111
11
3 8 8 2 5
402-RE
1111
11
11
11
0 2
VO
111111
11
*
l)
1
Page 64

CONNECTING VIA HDMI
•
All
HDMI
(For
•
The
enjoy
may
equipment.
(When
ports
the
detailed
HDMI IN
UHD
Video
not
be
you
connect
support
specifications
3
port
(4:4:4,
supported
In
that
case,
to
4K
is
especially
4:2:2)
depending
use
the
HDMIIN
resolution.
of
of
any
each
port,
suitable
4K/60
on
the
other
HDMI
3
port, use
refer
to
the
for
the
specifications
Hz. However,
specifications
IN
port.
the
HDMI
table
video
of
the
cable
below.)
to
or
audio
external
provided.)
BRANCHEMENT
•
Tous les
(Pour
reportez-vous
•
Le
permettant
Cependant,
Ia
video
Dans
(Lorsque
cable
connaltre
port
un
HDMI
ports
HDMI
le
ou
l'audio
tel
vous
en
cas,
fourni.)
HDMI
au
IN
visionnement
branchez
prennent
les
caracteristiques
tableau
3
est
raison
pourraient
utilisez
PAR
particulierement
des
un
HDMI
en
charge
techniques
ci-dessous.)
de
videos
caracteristiques
ne
pas
autre
port
un
appareil
adapte
UHD
etre
HDMI
au
Ia
resolution
(4:4:4
de
prises
port
de
chaque
aux
caracteristiques
et
4:2:2)
l'appareil
en
charge.
IN.
HDMI
IN
4K.
port,
de
externe,
3,
utilisez
4K/60
le
Hz.
11111111111111111111111111111111111111111111111111111111111111111
*
M B M 6 4 5
1 7 4 1 1
*
P/NO
: MBM64517411
Printed
in
Mexico
{1407-REVOl)
Page 65

Please
questions
direct
or
all
service-related
comments
www.lgusa.com/support
1.800.243.0000
CMZ01
LG
Electronics
to
or
call
First-Class
postage
required.
Post
Office
will
not
deliver
without
postage.
proper
online
Thank
product
Registering
if
your
you
and
product
<CD
PO
DENVER
LG
BOX
Electronics
174355
CO,
80217-4355
11.1111··1111111111•11•1111··1111••1•111·111111·1·1·1111111111.11
PROTECT YOUR INVESTMENT
DON'T
at
www.lgusa.com/register
Registering
for
purchasing
look
forward
your
LG
is
stolen
product
to
or
an
LG
sharing
is
lost.
FORGET TO REGISTER!
is
important,
product!
simple
some
and
0 Fill
quick
We
hope
insider
also
out
and
you
tips
serves
and
easy!
are
and
as a
return
enjoying
tricks
verification
with
this
your
you
of
card
new
soon.
ownership
In
addition,
•
Helpful
•
Reminders
•
More
•
Exclusive
•
Special
Welcome
efficient
you'll
emails
information
offers
to
on
about
warranty
and
the
LG
receive
how
product
on
promotions
family!
the
following
to
make
service
new
Please seal
the
downloads
products
benefits
most
with
and
and
tape.
and
of
your
firmware
innovations
Do
not
many
product
staple.
more:
1111111111111111111111111111111111111111!
111111111111111111111111
* 3 8 4 0 V A 0 0 4 2 G *
P/N:
3840VA0042G
Printed
in
Mexico
(1312-REV07)
Page 66

CMZ01
LG
Electronics
PROTECT YOUR INVESTMENT
1.
First
Street
City
Email
online
0
Mr
name
address
DON'T
at
www.lgusa.com/register
.
0
Mrs
.
0
Ms.
0
FORGET TO REGISTER!
within
Miss
the
Initial
G
next
10
Last
Fill
days
name
State
out
I
Province
and
return
ZIP
this
Apt
I
Postal
card
Code
2.
Telephone
(
3.
Date
)
of
I I
Month
www.lgusa.com/privacy
Failure
to
return
number
purchase
Day
this
card
will
Year
not
diminish
your
warranty
4.
5.
6.
rights
Model
Serial
Name
.
number
number
of
store
Copyright©
where
2013
purchased
All
Rights
Reserved
Page 67

Your
be
defective
below,
only
to
LG
Electronics
effective
the
original
in
material
from
("LG")
purchaser
the
or
date
LCD I LED
workmanship
LCD I
("Date
of
the
LED
Television
of
Purchase")
unit
and
LG
Electronics,
Television
("unit")
under
normal
effective
•
Limited
will be repaired
use,
of
original
only
when
Inc.
Warranty
during
the
consumer
used in
- USA
or
replaced,
warranty
purchase
the
United States, excluding U.S. Territories.
at
period
of
the
LG's
option,
("Warranty
unit.
This
if
it
proves
Period") listed
warranty
is
to
good
WARRANTY
LABOR:
PARTS:
Replacement
factory
Replacement
the
period.
THIS
LIMITATION,
THE
EXPRESS
BE
LIABLE
ANY
OR
DATA,
do
not
warranty
rights
One
One
remanufactured.
remaining
WARRANTY
EXTENT
WARRANTY
NATURE,
OR
allow
lasts, so
and you
PERIOD
(1)
(1)
Year
Units
Units
portion
IS
ANY
ANY
FOR
ANY
INCLUDING
ANY
the
exclusion
the
may
Year
from
the
from
the
and Repair Parts
and Repair Parts
of
the
original
IN
LIEU
OF
WARRANTY
IMPLIED
PERIOD
INCIDENTAL,
OTHER
above exclusion
also have
WARRANTY
WITHOUT
DAMAGE
or
limitation
other
ABOVE.
Date
of
Purchase.
Date
of
Purchase.
may
be
new
are
warranted
unit's
warranty
ANY
OTHER
OF
MERCHANTABILITY
NEITHER
CONSEQUENTIAL,
LIMITATION,
WHETHER
of
incidental
or
limitation
rights
that
WARRANTY,
IS
REQUIRED
vary
HOW
Please
ticket
warranty,
service person
CONSUMER
or
BASED
or
Please
getting
Visit
http:/
for
COMMERCIAL
Please
getting the
Visit
http:/
THE
MANUFACTURER
INDIRECT,
LOST
IN
consequential
may
not
from
state
SERVICE
retain
as evidence
and
Call
the
defective
our
website
/www.lg.com
Call
defective unit
our
website
/www.lg.com/
EXPRESS
OR
FITNESS
BY
LAW,
PROFITS,
CONTRACT,
damages
apply
to
to
state.
IS
HANDLED
dealer's
submit
at
the
USER
1-800-243-0000
at:
USER
(888)
at:
OR
FOR A PARTICULAR
IT
IS
NOR
SPECIAL,
LOST
TORT,
you.
This
dated
of
the
Date
a copy
time
unit
865-3026
us/
IMPLIED,
LIMITED
ITS
OR
OR
CORRUPTED
OR
or
limitations
warranty
warranty
repa ired
repaired
commercial/
U.S.
bill
of
sale
of
Purchase
of
the
bill
service is provided.
for
instruct
or
replaced.
for
instructions
or
replaced.
INCLUDING
IN
DURATION
DISTRIBUTOR
PUNITIVE
PROGRAMMING
OTHERWISE.
on
how
gives
you
or
delivery
for
proof
of
sale
to
ions on
display
WITHOUT
PURPOSE.
TO
SHALL
DAMAGES
Some
states
long
an
implied
speci
fic
of
the
on
TO
THE
OF
legal
THIS
LIMITED
• damage caused in shipping
• service required as a
including
consult
requi
rements).
•
installation
converters, cable
other
components
•
set-up
damage ca
•
damag
e caused
•
any
unit
any
other
•
replacement
The cost of repair or replace me
WARRANTY
incorrect
the
owner's
or
or
adjustment
us
ed
that
has been
unit.
of
result
or
insuffi
manual
repair
of
antenna
company
in a
video
on
consumer control
by
improper adjustmen
by
other system
modified
batteries
on
DOES
NOT
or
transit
of
improper
cie
nt
AC
for
power
systems,
supplied
system
components
or incorporated
the
remote
nt
und
er these e
APPLY
installation,
supply
equipment,
(please
supply
cable
s, or
ts
control.
xclud
TO:
•
damage
or
improper
nature
beyond
lightning
or
into
ed circumstances shall be b
water
•
image burn-in
•
repair
than an
units
•
•
units
been
•
units
disclaimer.
(including
personal
injury
maintenance
or
other
our
control
strike,
damage.)
or
replacement
LG
aut
purchased
where the
removed,
sold and labeled as
cosmetic
due
to
misuse, abuse, negligence,
or
storage,
causes beyond
include
power
hori
zed service
or
serviced
original
defaced
orne
but
surge
of
warranted
factory
or
changed in
"as
by the con sumer
damage),
or
our
control.
are
not
s,
power
parts
cente
rs .
outside
serial
is,
where is"
failur
to
acts
limited
outages
by
of
the
numbers
any
e, loss
of
(Causes
to
and
other
U.S.A.
have
way.
or
similar
.
Page 68

LCD I LED Television
Limited
Warranty
- USA
(continued)
CUSTOMER
To
Product
Authorized
CONCERNING
els. LCD/LED displays typically contain a small
inspected and is in compliance
operation
BEFORE
Please
Under some circumstances you
deposit
If a replacement
defective
Parts and service in accordance
Other
service
service,
To
assure
any
unit
INTERACTIVE
obtain
Information,
or
use
CALLING
have
your
for
advanced
unit
write
proper
to
the
Customer
Service
PIXEL
of
to
requirements
or
call
Factory
Center
FUNCTIONALITY:
your
display.
FOR
SERVICE:
unit's
model
shipment,
unit
is received, please use
an
LG
authorized
the
LG
credit
and
Service
CENTER
NUMBERS
Assistance,
or
Dealer
or
location:
Your LCD/LED television contains
with
manufacturer's
number, serial number,
may
be asked
or
cost
of
unreturned
service
with
will be
at
Customer
avoid unnecessary charges, you
Center.
center
the
LG
the
owner's
Interactive
Contact
CONSUMER
Please
and select
Or
visit
http:/
COMMERCIAL
Please
and select
Or
visit
USER
call
1-800-243-0000
the
appropriate
our
website
/www.lg.com
USER
call
(888)
the
appropriate
our
website
option
at:
865-3026
option
at:
from
from
the
the
http://www.lg.com/us/commercial/display
number
to
the
warranty
of
pixels
specifications, indicating
and
the
provide
carton
.
the
credit
loaner
and packaging
is LG's
expense.
Center.
Customer
unit.
If
that
do
not
date
of
purchase available.
card
information
from
responsibility
you
have
problems
must
obtain
Interactive
hundreds
function
that
that
and
a Return
Center
of
normally. Your display has been
any
pixel defects
for a non-warranty
replacement
will be
in
obtaining
Authorization
for
details
menu.
menu.
thousands
unit
provided
satisfactory
.
of
individual
do
not
service fee, as a
in
returning
without
before
pix-
effect
the
the
charge.
warranty
returning
for
your
Service
for
the
United States.
LG
LCD/LED Televisions are
LG
Electronics U.S.A.,
LG
Television is
TO
CONTACT
LG
Customer
P.
0.
Box
201
James
Huntsv
ATTN: CIC
marketed
Inc., 1000
provided
through
LG
ELECTRONICS BY
Interactive
Center
LG
Electronics Alabama,
240007
Record Road
ille, Alabama
and
Sylvan Avenue, Englewood Cliffs,
35824
distributed
in
the
United
MAIL:
NJ
States
07632
Inc.,
by:
the
authorized
LG
Service
11
1111111111111111111111
* 3 8 4 0 T W l 0 5 6 A *
111111
111
1111111111111111111111111111111
Center
1
P/NO 3840TWL056A (1312-REV02)
Print
ed in Mexico
 Loading...