

Page 1
ENGLISH
ESPAÑOL
Sears, Roebuck and Co., Hoffman Estates, IL 60179 U.S.A.
www.sears.com
Models/Modelos 721.62342
721.62344
MICROWAVE OVEN
Use and Care Guide
HORNO DE MICROONDAS
Manual de Uso y Cuidado
P/NO.: 3828W5A2979
721.62349
Page 2

2
ENGLISH
TABLE OF CONTENTS
Service Numbers ................................ Back cover
SAFETY............................................................3-4
Precautions To Avoid Possible Exposure
To Excessive Microwave Energy........................ 3
Grounding Instructions........................................ 3
Important Safety Instructions.............................. 4
UNDERSTANDING YOUR
MICROWAVE OVEN ......................................... 5-8
Specifications...................................................... 5
Installation........................................................... 5
Parts And Accessories........................................ 6
Control Panel...................................................... 6
Cookware Guide................................................. 7
Tips For Microwave Cooking .............................. 8
Cleaning.............................................................. 8
USING YOUR MICROWAVE OVEN ............... 9-18 Master Protection Agreements ......................... 40
Clock................................................................... 9
Kitchen Timer......................................................9
Child Lock........................................................... 9
Sensor Cook Operation Instruction .................. 10
Potato ............................................................... 10
Sensor Cook Table............................................ 11
Add Minute........................................................ 11
Auto Defrost...................................................... 12
Auto Defrost Table ............................................ 13
Timed Cooking.................................................. 13
Multi-Stage Cooking ......................................... 14
Microwave Power Levels.................................. 14
Cooking Tips................................................ 15-16
TROUBLESHOOTING .................................. 17-19
Questions And Answers .............................. 17-18
Before Calling For Service................................ 19
WARRANTY....................................................... 41
Page 3
ENGLISH
3
SAFETY
• Do not attempt to operate this oven with the door open, since open-door operation can result
in harmful exposure to microwave energy. It is important not to defeat or tamper with the safety
interlock.
• Do not operate the oven if it is damaged. It is particularly important that the oven door close
properly and that there is no damage to the:
– door (bent)
– hinges and latches (broken or loosened)
– door seals and sealing surfaces.
• Do not place any object between the oven front face and the door, or allow soil or cleaner
residue to accumulate on sealing surfaces.
• The oven should not be adjusted or repaired by anyone except properly qualified service
personnel.
PRECAUTIONS TO AVOID POSSIBLE EXPOSURE
TO EXCESSIVE MICROW AVE ENERGY ...
GROUNDING INSTRUCTIONS
This appliance must be grounded! If an electrical short circuit occurs, grounding reduces the risk of electric shock
by providing an escape wire for the electric current. This appliance is equipped with a cord having a grounding
wire with a grounding plug.
Put the plug into an outlet that is properly installed and grounded.
WARNING
If you use the grounding plug improperly, you risk electric shock.
Ask a qualified electrician or the Sears Service Department if you do not understand the grounding instructions or
if you wonder whether the appliance is properly grounded.
This appliance has a short power supply cord to reduce the risk of anyone’s tripping over or becoming entangled
in the cord. You may use an extension cord if you are careful.
If you use an extension cord, be sure that:
NOTE: This oven draws 14 amperes at 120 Volts, 60 Hz.
• The extension cord has the same electrical rating as
the appliance.
• The marked rating of the extension cord shall be
equal to or greater than the electrical rating of
the appliance.
• The extension cord is a grounding-type 3-wire cord.
• The extension cord does not drape over a
countertop or tabletop, where it can be pulled on
by children or tripped over accidentally.
• The electrical cord is dry and not pinched or
crushed in any way.
Page 4
4
ENGLISH
SAFETY
IMPORTANT SAFETY INSTRUCTIONS
The safety instructions below will tell you how to use your oven to avoid harm to yourself or damage to your oven.
WARNING – To reduce the risk of burns, electric shock, fire, injury to persons, or exposure to excessive
microwave energy:
SAVE THESE INSTRUCTIONS!
1. Read all the instructions before using your
oven.
2. Do not allow children to use this oven without
close supervision!
3. Read and follow the specific PRECAUTIONS TO
AVOID POSSIBLE EXPOSURE TO EXCESSIVE
MICROWAVE ENERGY found on page 3.
4. Do not tamper with the built – in safety switches
on the oven door! The oven has several built-in
safety switches to make sure the power is off
when the door is open.
5. When cleaning the door and the surfaces that
touch the door, use only mild, nonabrasive
soaps or detergents and a sponge or soft cloth.
6. If your oven is dropped or damaged, have it
thoroughly checked by a qualified service
technician before using it again.
7. To avoid a fire hazard:
a) Do not severely overcook foods. It can cause a
fire in the oven.
b) Do not use recycled paper products in your
oven. They can contain particles that can
cause arcing or may ignite.
c) Do not overcook potatoes. Overcooking
could cause a fire.
d) Do not store combustible items (bread,
cookies, etc.) in the oven, because if lightning
strikes the power lines, it may cause the oven to
turn ON.
e) Do not use wire twist-ties in the oven. Be
sure to remove them before placing the item in
the oven.
f) Do not use the cavity for storage purposes.
Do not leave paper products, cooking utensils,
or food in the cavity when not in use.
8. If a fire should start:
a) Keep the oven door closed.
b) Turn the oven off.
c) Disconnect the power cord or shut off the
power at the fuse or circuit breaker panel.
9. Do not use this oven for commercial purposes.
This microwave is made for household use only.
10. Install or locate this appliance in accordance with
the provided installation instructions.
11. To avoid electric shock:
a) This appliance must be grounded! Connect
it only to a properly grounded outlet. (See the
Grounding instructions on page 3.)
b) Do not operate this appliance if it has a
damaged cord or plug, if it is not working
properly, or if it has been damaged or dropped.
c) Do not immerse the electrical cord or plug
in water.
d) Keep the cord away from heated surfaces.
e) This appliance should be serviced only by
qualified service personnel.
12. Liquids such as water, coffee, or tea are able to be
overheated beyond the boiling point without
appearing to be boiling due to surface tension of
the liquid. Visible bubbling or boiling when the
container is removed from the microwave oven is
not always present. This could result in very hot
liquids suddenly boiling over when a spoon or other
utensil is inserted into the liquid. To reduce the risk
of injury to persons; 1) Do not overheat the liquid.
2) Stir the liquid both before and halfway through
heating it. 3) Use extreme care when inserting a
spoon or other utensil into the container, once
heating has begun. 4) Do not use straight-sided
containers with narrow necks. 5) After heating, allow
the container to stand in the microwave oven for a
short time before removing the container.
13. Keep the glass tray and the turntable roller rest in
the oven when you are cooking.
14. Do not use the oven outdoors. Do not store the
oven outdoors. Do not use this product near
water.
15. Do not cover or block any openings in the oven.
16. Do not run the microwave oven empty.
17. Do not let the cord hang over the edge of a table
or counter.
18. Do not heat glass turntable excessively.
– Do not cook bacon directly on the glass turntable.
– Do not allow the grey film on special microwave
cooking packages to touch the glass turntable.
Put the package on a microwave-safe dish.
– Keep a browning dish at least
3
16 inch above
the glass turntable. If you use the browning dish
incorrectly, you could break the glass turntable.
19. Be careful not to chip or scratch the edges of the
turntable. Chips or scratches may cause the
turntable to break during use.
Page 5
ENGLISH
5
UNDERSTANDING YOUR MICROWAVE OVEN
SPECIFICATIONS
*IEC 60705 RATING STANDARD
Specifications subject to change without prior notice.
Power Supply
Rated Power Consumption
Microwave Output
Rated Current
Overall Dimensions (WxHxD)
Oven Cavity Dimensions (WxHxD)
Capacity of Oven Cavity
120 V AC, 60 Hz
1,650 W
*1,200 W
13.8 A
22
19
/32 x 1317/32 x 175/16
169/16 x 109/32 x 1611/16
1.6 Cu. Ft.
INSTALLATION
1. Remove your Kenmore microwave oven and all
packing materials from the shipping carton.
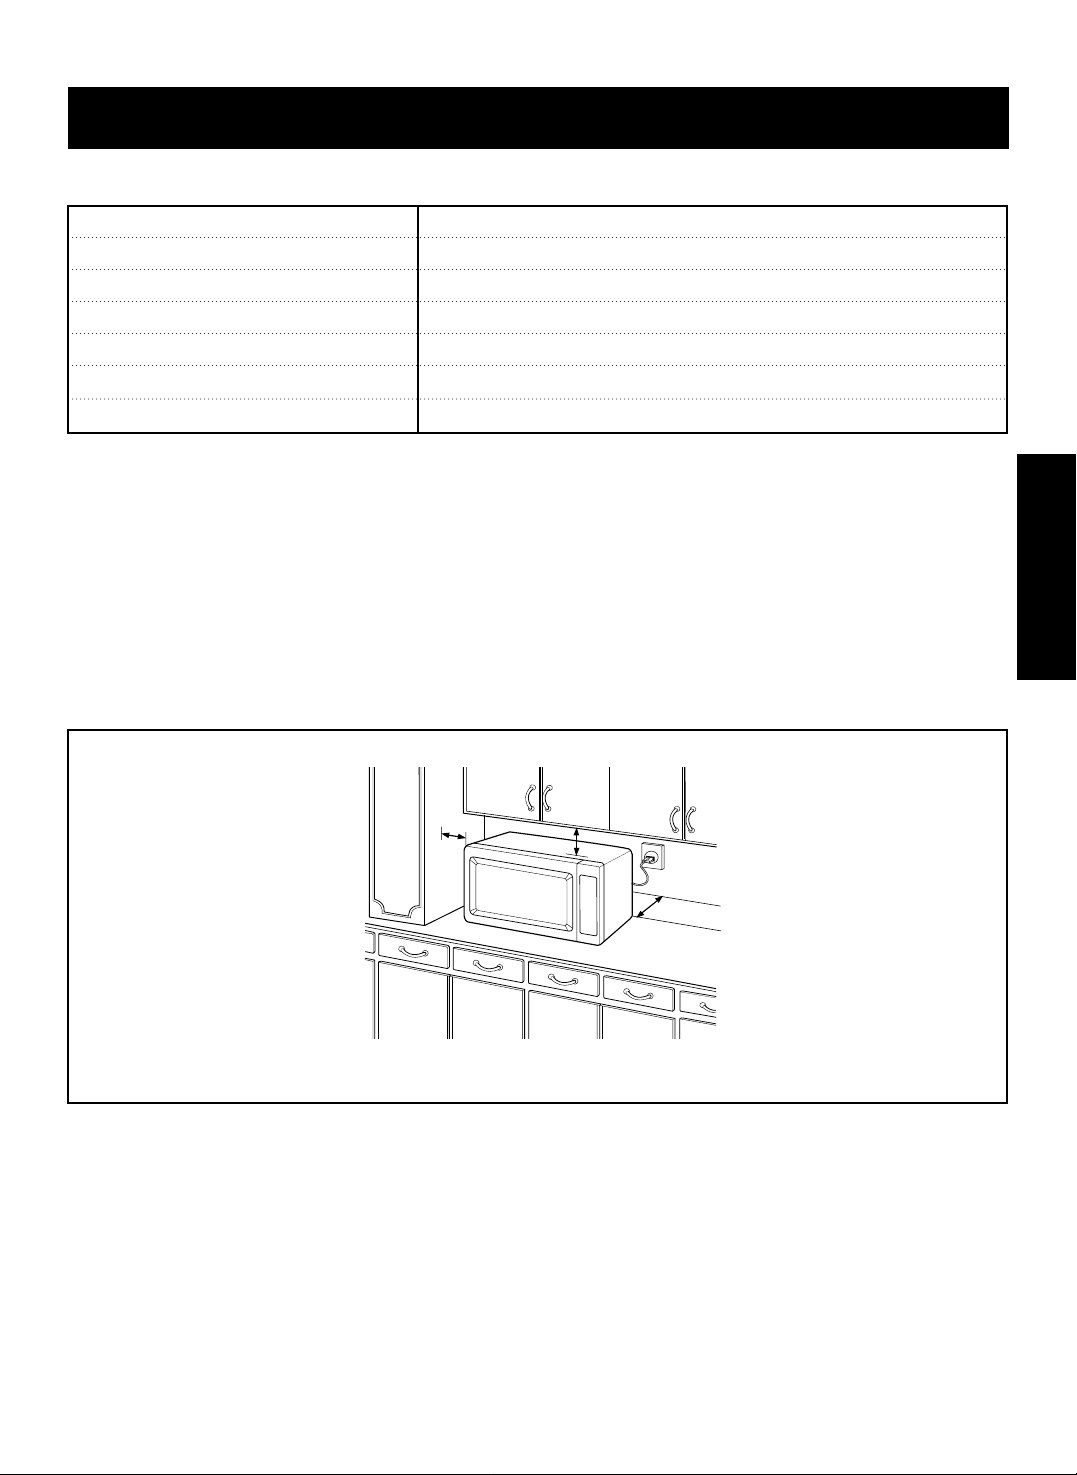
2. Place the oven on a level surface that provides at
least 4 inches of space at the left, right, top, and
rear sides for proper ventilation.
3. Place the turntable roller rest in the circle on the
oven floor and then place the glass turntable on the
top of the turntable roller rest.
NOTE: Never place the glass turntable in the oven
upside down. Blocking the inlet and/or outlet
openings can damage the oven.
4
i
n
c
h
e
s
4
inches
4
in
c
h
e
s
Countertop
Page 6
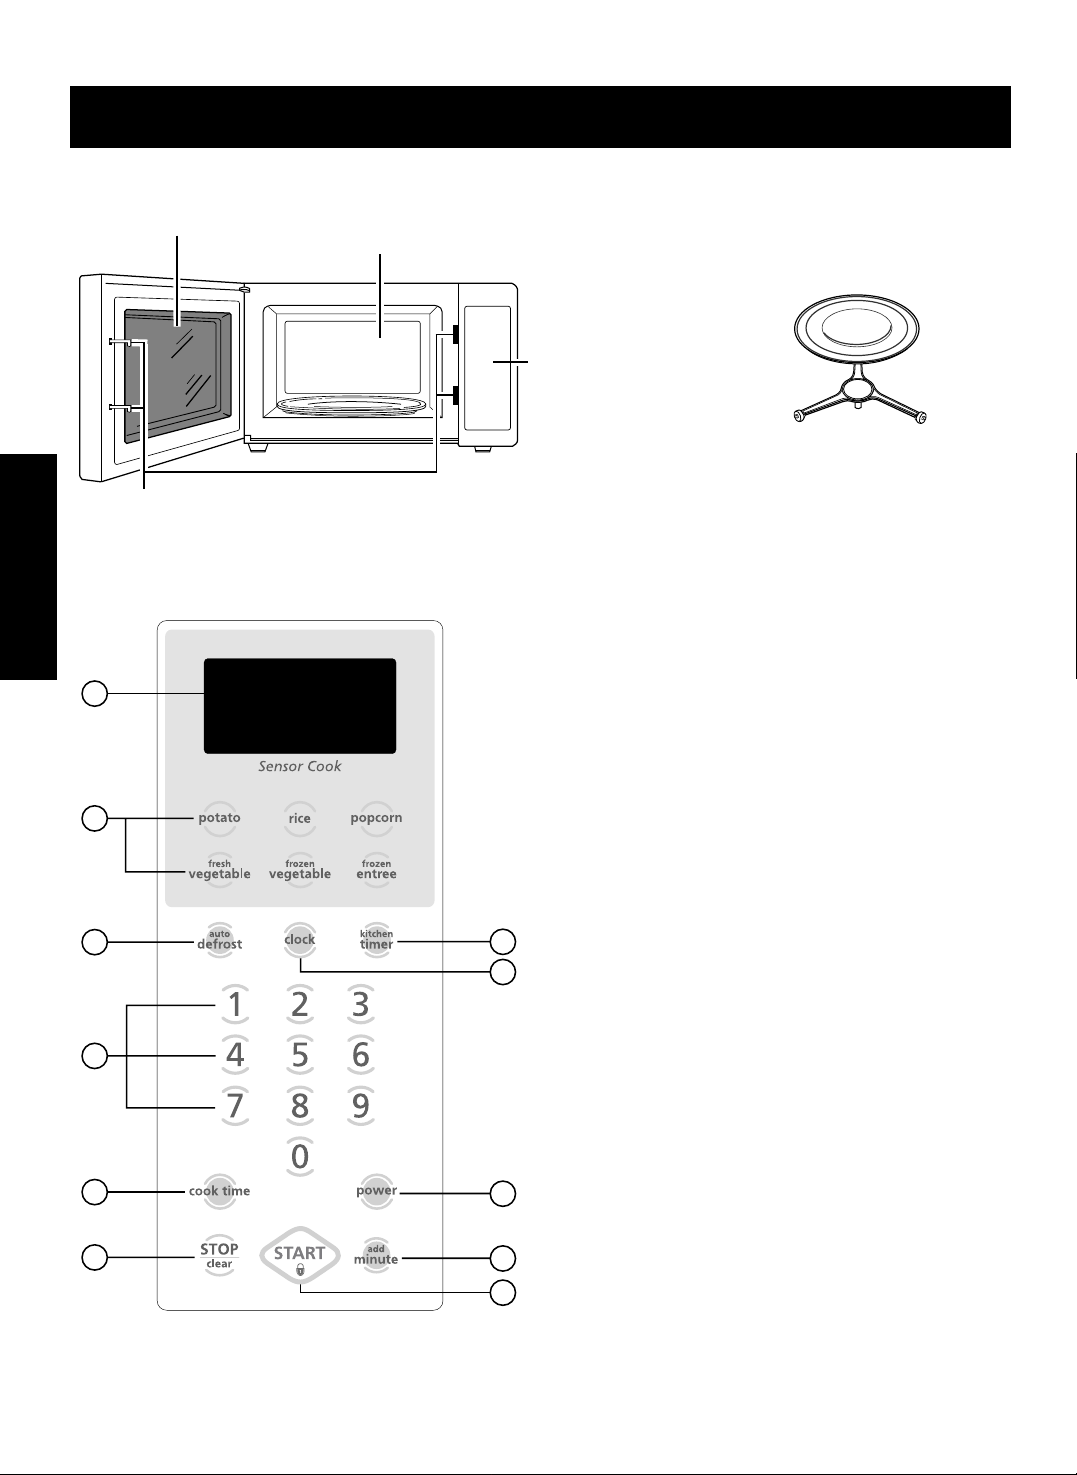
Your oven comes with the following accessories:
1 Use and Care Guide
1 Glass Turntable
1 Turntable Roller Rest
1. DISPLAY. The Display includes a clock and
indicators that tell you time of day, cooking time
settings, and cooking functions selected.
2. SENSOR COOK. This pad allows you to cook most of
your favorite foods without having to select cooking
times and power levels.
3. AUTO DEFROST. This pad is an accurate defrosting
method for frozen meat, poultry and fish up to 6.0 lbs
or 4.0 kgs.
4. NUMBER P ADS.Touch Number Pads to enter
cooking time, power level, quantities, or weights.
5. COOK TIME. Touch this pad to set a cooking time.
6. STOP/CLEAR. Touch this pad to stop the oven or
clear entries.
7. KITCHEN TIMER. Touch this pad to use your
microwave oven as a kitchen timer.
8. CLOCK. Touch this pad to enter the time of day.
9. POWER. Touch this pad to set a cooking power.
10. ADD MINUTE. Touch this pad to cook at 100% cook
power for 1 minute to 99 minute 59 seconds.
11. START. Touch this pad to start all entries (except the
Quick Touch Sensor, Express Defrost, Auto Cook
and Add Minute function which start automatically)
and to turn Child Lock on or off.
6
ENGLISH
UNDERSTANDING YOUR MICROWAVE OVEN
PARTS AND ACCESSORIES
CONTROL PANEL
Easy-Clean
Oven Cavity
See-Through Door
Safety Interlock System
Oven Control
Panel
Turntable
Roller Rest
Glass Turntable
7
8
9
10
11
3
4
5
6
2
1
Page 7
ENGLISH
7
UNDERSTANDING YOUR MICROWAVE OVEN
USE
Ovenproof Glass
• Glass treated for use in high-intensity heat
includes utility dishes, bread dishes, pie plates, cake
plates, liquid measuring cups, casseroles, and bowls
without metallic trim.
China
• Bowls, cups, serving plates, and platters without
metallic trim can be used in your oven.
Plastic
• When using plastic wrap as a cover, make sure that
the dish is deep enough so the plastic wrap does not
touch the food. As the food heats, it may melt the
plastic wrap wherever the wrap touches the food.
• Place plastic wrap loosely over the top of the dish
and secure it by pressing the wrap to the sides of
the dish.
• Vent by turning back one corner of the plastic wrap.
This will allow excess steam to escape.
• Use plastic dishes, cups, semi-rigid freezer
containers, and plastic bags only for short time
cooking. Use these with care because the
plastic may soften from the heat of the food.
Paper
• Microwave-safe paper towels, waxed paper, paper
napkins, and paper plates with no metallic trim or
design can be used in your oven.
• Refer to the manufacturer’s label for use of any
paper product in the microwave oven.
DO NOT USE
Metal Utensil
• Metal shields food from microwave energy and
produces uneven cooking. Avoid metal skewers,
thermometers, or foil trays.
• Metal utensils can cause arcing, which is a
discharge of electric current. Arcing can damage
your microwave oven.
Metal Decoration
• Do not use metal-trimmed or metal-banded
dinnerware, casserole dishes, etc.
Centura™ Tableware
• The Corning Company recommends that you
do not use Centura tableware and some Corelle™
closed-handle cups for microwave
cooking.
Aluminum Foil
• Avoid large sheets of aluminum foil because
they hinder cooking and may cause arcing.
• Use small pieces of foil to shield poultry legs
and wings.
• Keep all aluminum foil at least 1 inch from the walls
and door of the oven.
Wood
• Wooden bowls, boards, and baskets will dry out and
may split or crack when you use them in the
microwave oven.
Tightly Closed Containers
• Tightly closed cookware can explode. Be sure
to leave an opening for steam to escape from
covered cookware.
Brown Paper
• Avoid using brown paper bags. They absorb
heat and could burn.
Metal Twist Ties
• Always remove metal twist ties as they can become
hot and cause a fire.
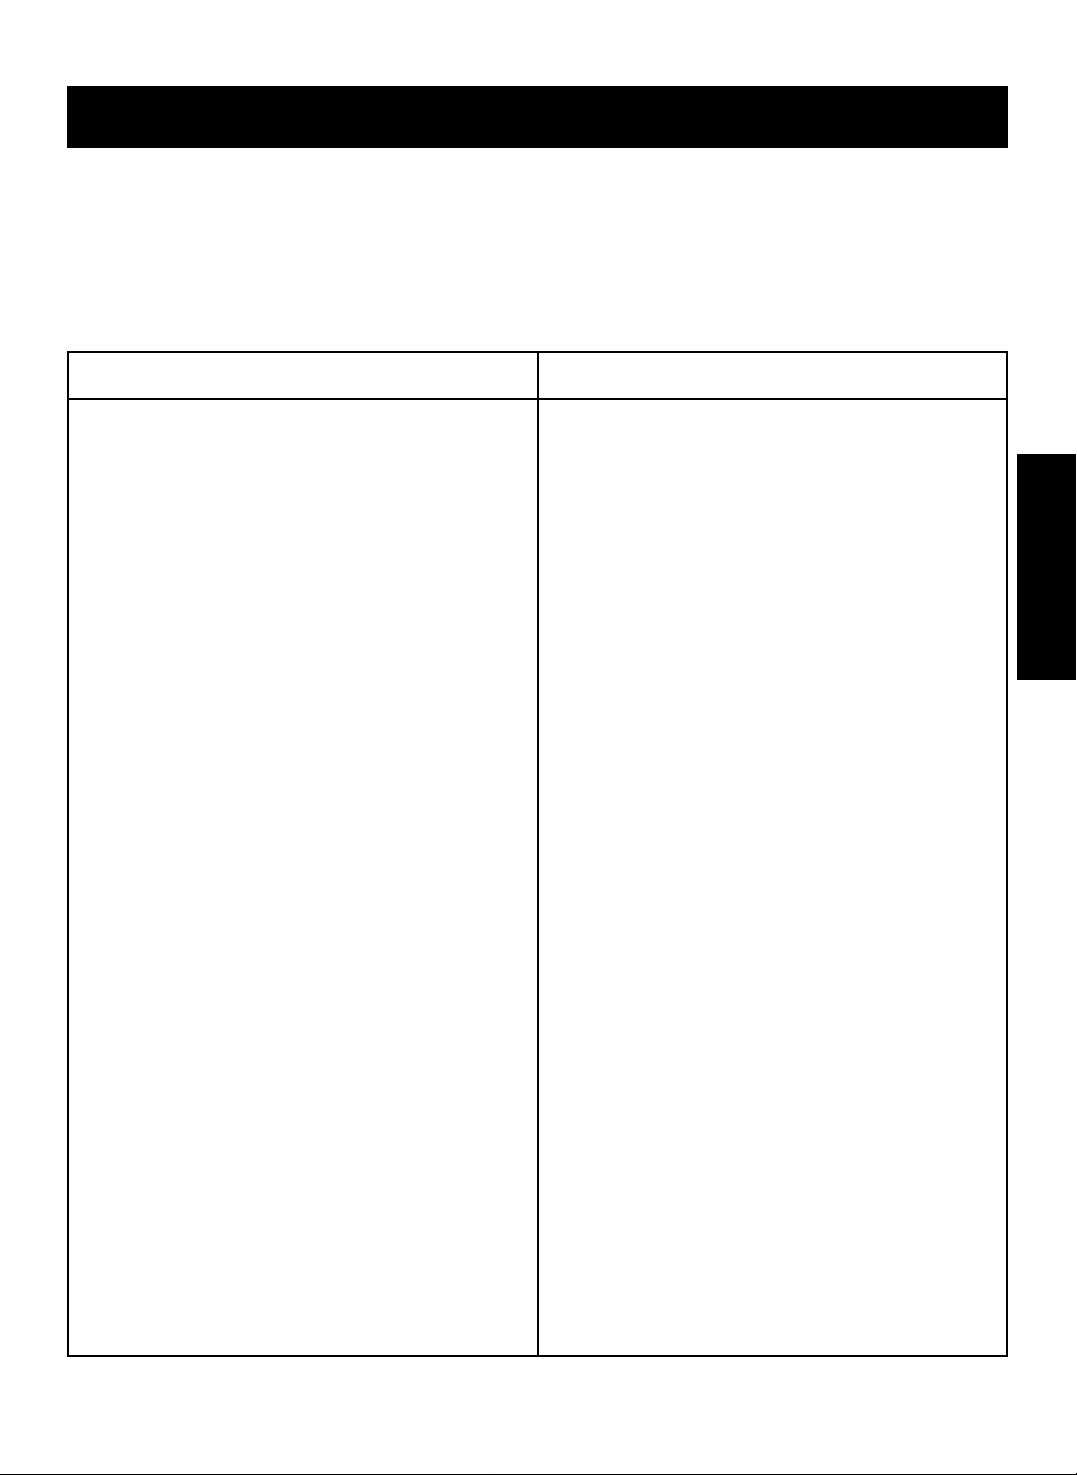
COOKWARE GUIDE
Most heat-resistant, non-metallic cookware is safe for use in your microwave oven. However, to test cookware
before using, follow these steps:
1. Place the empty cookware in the microwave oven.
2. Measure 1 cup of water in a glass measuring cup and place it in the oven beside the cookware.
3. Microwave on 100% power for 1 minute. If the dish is warm, it should not be used for microwave cooking.
Page 8

8
ENGLISH
UNDERSTANDING YOUR MICROWAVE OVEN
TIPS FOR MICROWAVE COOKING
BROWNING
Meat and poultry with high fat content that are cooked
for 10 or 15 minutes or longer will brown lightly. Foods
cooked a shorter time can be brushed with a browning
agent, such as Worcestershire sauce, soy sauce, or
barbecue sauce.
COVERING
A cover traps heat and steam and causes the food to
cook more quickly. Use a lid or microwave-safe plastic
wrap with one corner folded back to vent the excess
steam. Lids on glass casseroles can become hot
during cooking. Handle carefully. Waxed paper will
prevent the food from splattering in the oven and help
retain heat. When warming bread items, use waxed
paper, napkins, or paper towels. To absorb extra
moisture, wrap sandwiches and fatty foods in paper
towels.
SPACING
Arrange individual foods, such as baked potatoes,
cupcakes, and hors d’oeuvres in a circle and at least
1 inch apart. This will help the food cook more evenly.
STIRRING
Stirring blends flavors and redistributes the heat in
foods. Always stir from the outside toward the center
of the dish. Food at the outside of the dish heats first.
TURNING
Large foods, such as roasts and whole poultry, should
be turned so that the top and bottom cook evenly. Also
turn over chicken pieces and chops.
ARRANGEMENT
Do not stack food. Arrange in a single layer in the dish
for more even cooking. Because dense foods cook
more slowly, place thicker portions of meat, poultry, fish,
and vegetables toward the outside of the dish.
TESTING FOR DONENESS
Because foods cook quickly in a microwave oven, you
need to test frequently for doneness.
STANDING TIME
Depending on density, food often needs to stand from 2
to 15 minutes after you remove it from the oven.
Usually, you need to cover food during standing time to
retain heat. Remove most foods when they are slightly
undercooked and they will finish cooking during standing time. The internal temperature of food will rise about
10 °F during standing time.
SHIELDING
To prevent some portions of rectangular or square dishes from overcooking, you may need to shield
them with small strips of aluminum foil to block the
microwaves. You can also cover poultry legs and
wing tips with foil to keep them from overcooking.
Always keep foil at least 1 inch from oven walls
to prevent arcing.
PIERCING
Pierce the shell, skin, or membrane of foods before
cooking to prevent them from bursting. Foods that
require piercing include yolks and whites of eggs, hot
dogs, clams, oysters, and whole vegetables, such as
potatoes and squash.
CLEANING
Wipe the oven inside and outside with a soft cloth and
a mild detergent solution. Then rinse and wipe dry.
This should be done weekly or more often, if needed.
Never use cleaning powders or rough pads.
Excessive oil splatters on the inside top will be difficult
to remove if left for many days. Wipe splatters with a
wet paper towel, especially after cooking chicken or
bacon.
REMOVABLE PARTS
The turntable and turntable roller rest are removable.
They should be hand-washed in warm (not hot) water
with a mild detergent and a soft cloth. Once they are
clean, rinse well and dry with a soft cloth. Never use
cleaning powders, steel wool, or rough pads.
• The turntable may be cleaned at the sink. Be careful
not to chip or scratch the edges as this may cause
the turntable to break during use.
• The turntable roller rest should be cleaned regularly.
SPECIAL CARE
For best performance and safety, the inner door panel
and the oven front frame should be free of food or
grease buildup. Wipe often with a mild detergent; then
rinse and wipe dry. Never use cleaning powders or
rough pads.
After cleaning the control panel, touch STOP/CLEAR
to clear any entries that might have been entered
accidentally while cleaning the panel.
Page 9
ENGLISH
9
USING YOUR MICROWAVE OVEN
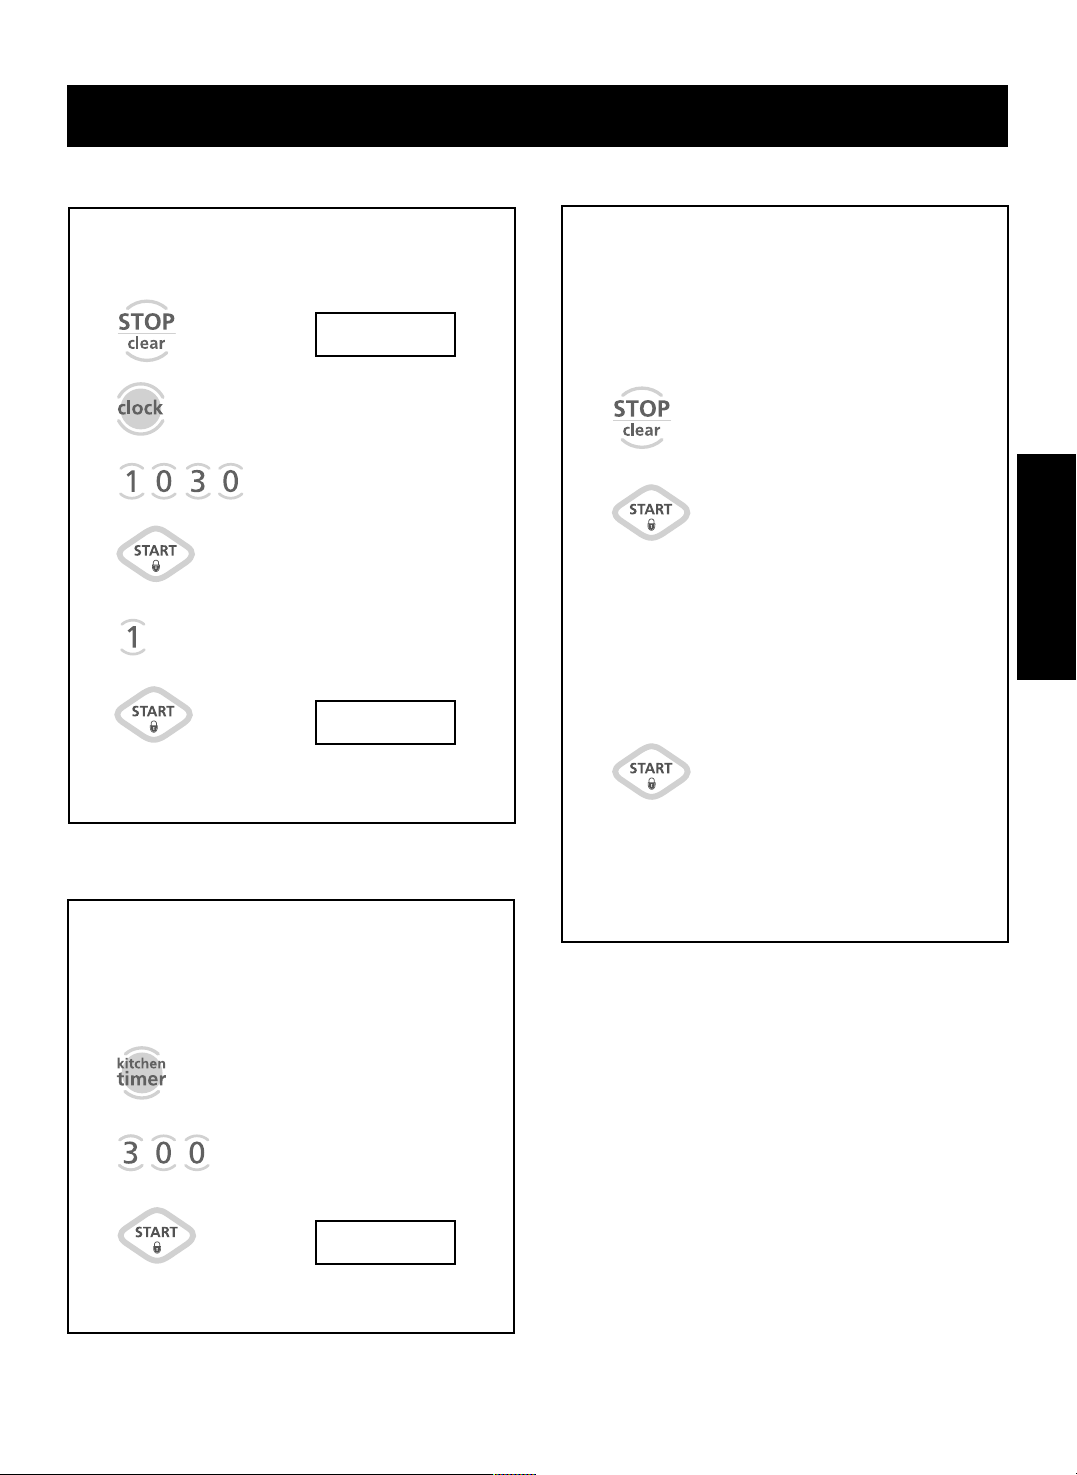
Example: To set the clock for 10:30(AM).
Touch: Display Shows:
CLOCK
1.
2.
3.
5.
NOTE: This is a 24 hour clock. You can switch
between AM and PM by touching 1 or 2 after step 4.
::
ENTER TIME OF DAY
10 ::30
TOUCH START
10 ::30
AM TOUCH
1
PM TOUCH 2
AM
10 ::30
TOUCH
START
::
ENTER TIME IN MIN
AND SEC
3 ::00
TOUCH START
You can use this safety feature to lock the control
panel so that children cannot use the oven when
you do not want them to and when you are
cleaning the oven.
T o set CHILD LOCK:
Touch: Display Shows:
CHILD LOCK
Touch and hold
until LOCKED
appears in
the display.
(approximately
4 seconds)
T o cancel CHILD LOCK:
Touch: Display Shows:
Touch and
hold until
LOCKED
disappears
from the
display.
(approximately
4 seconds)
Time of day.
Time of day.
1.
1.
2.
Your microwave oven can be used as a kitchen
timer. You can set up to 99 minutes, 99 seconds.
Example: To set 3 minutes.
Touch: Display Shows:
KITCHEN TIMER
TIMER and time
counting down.
1.
2.
3.
6.
4.
::
AM
10 ::30
3 ::00
Page 10
10
ENGLISH
USING YOUR MICROWAVE OVEN
SENSOR COOK OPERATION
INSTRUCTION
Sensor touch cooking provides exciting new features
to make microwaving easier. Sensor menu with all the
popular food choices, helps you to reheat perfectly
because it has been pre-programmed and can tell
how long to reheat food items.
Categories:
Potato, Rice
Popcorn, Fresh Vegetable
Frozen Vegetable, Frozen Entree
For most Sensor Cooking programs, a table with specific food examples and cooking instructions is provided in the next a few pages.
• The Sensor Touch system works by detecting a
build-up of vapor.
• Make sure the door remains closed.
• Once the vapor is detected, two beeps will sound.
• Opening the door or touching the STOP/CLEAR pad
before the vapor is detected will abort the process.
The oven will stop.
• Before using Sensor Cook, make sure the exterior of
the reheating container and the interior of the oven
are dry, to assure the best results.
• Room temperature should not exceed 95°F.
• Oven should be plugged in at least 5 minutes before
sensor cooking.
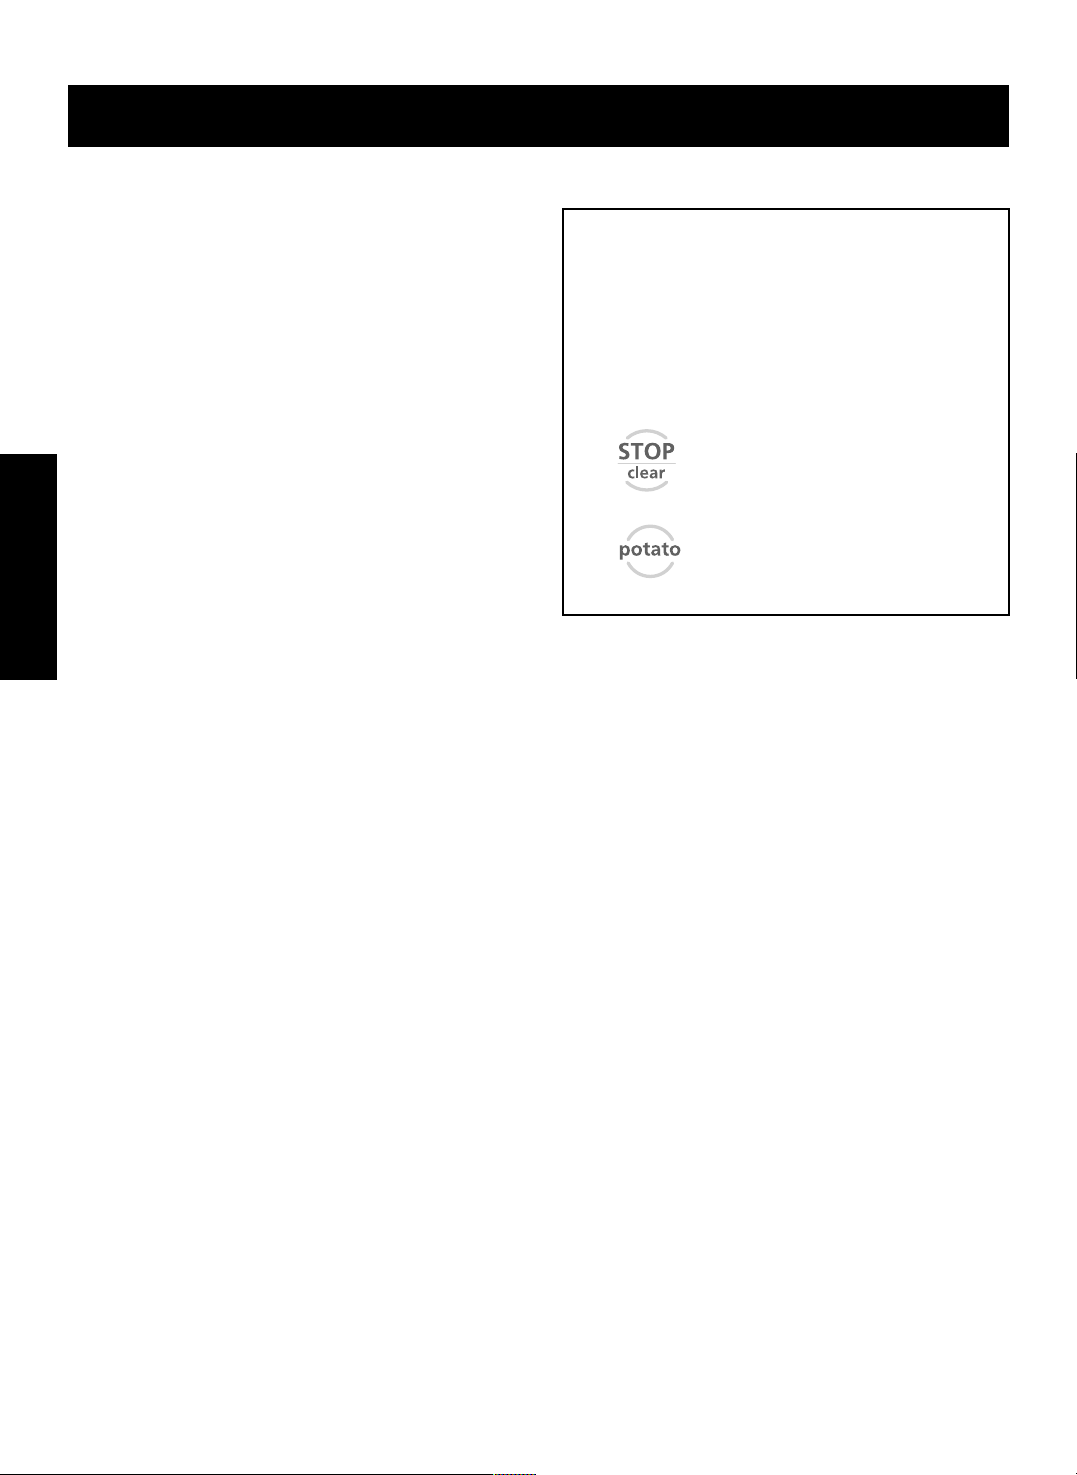
SENSOR COOK allows you to cook most of your
favorite foods without having to select cooking
times and power levels. This oven automatically
determines required cooking times for each food
item.
Example: To cook potato
Touch: Display Shows:
POTATO (EXAMPLE)
2.
POTATO
Time of day.
1.
Page 11
ENGLISH
11
USING YOUR MICROWAVE OVEN
SENSOR COOK TABLE
NOTE: If you open the door or press STOP during sensing, the process will be canceled.
CATEGORY
Potato
Rice
Popcorn
Fresh
Vegetable
Frozen
Vegetable
Frozen
Entrée
DIRECTION
Pierce each potato with a fork and place on the oven tray around
the edge, at least one inch apart.
Place rice and twice as much liquid (water or chicken or
vegetable stock) in a 2-quart microwavable dish. Cover with plastic wrap. When cooking is complete, allow 10 minutes standing
time. Stir for fluffier rice.
Place only bag of prepackaged microwave popcorn on the center
of turntable
Prepare as desired, wash, and leave residual water on the vegetables. Place in an appropriately-sized microwave container,
cover with plastic wrap and vent.
Remove from package, rinse off frost under running water. Place
in an appropriately-sized microwave container, cover with plastic
wrap and vent.
Remove from outer display package. Slit cover. If not in
microwave safe container, place on plate, cover with plastic wrap
and vent.
AMOUNT
1 - 4 medium approx.
10 oz. each
1 - 2 cups
Use medium or long grain
rice. Cook instant rice
according to directions on
the package.
Regular size
Use one fresh bag of popcorn
1 - 4 cups
1 - 4 cups
10 - 21 oz.
Time of day.
Twice
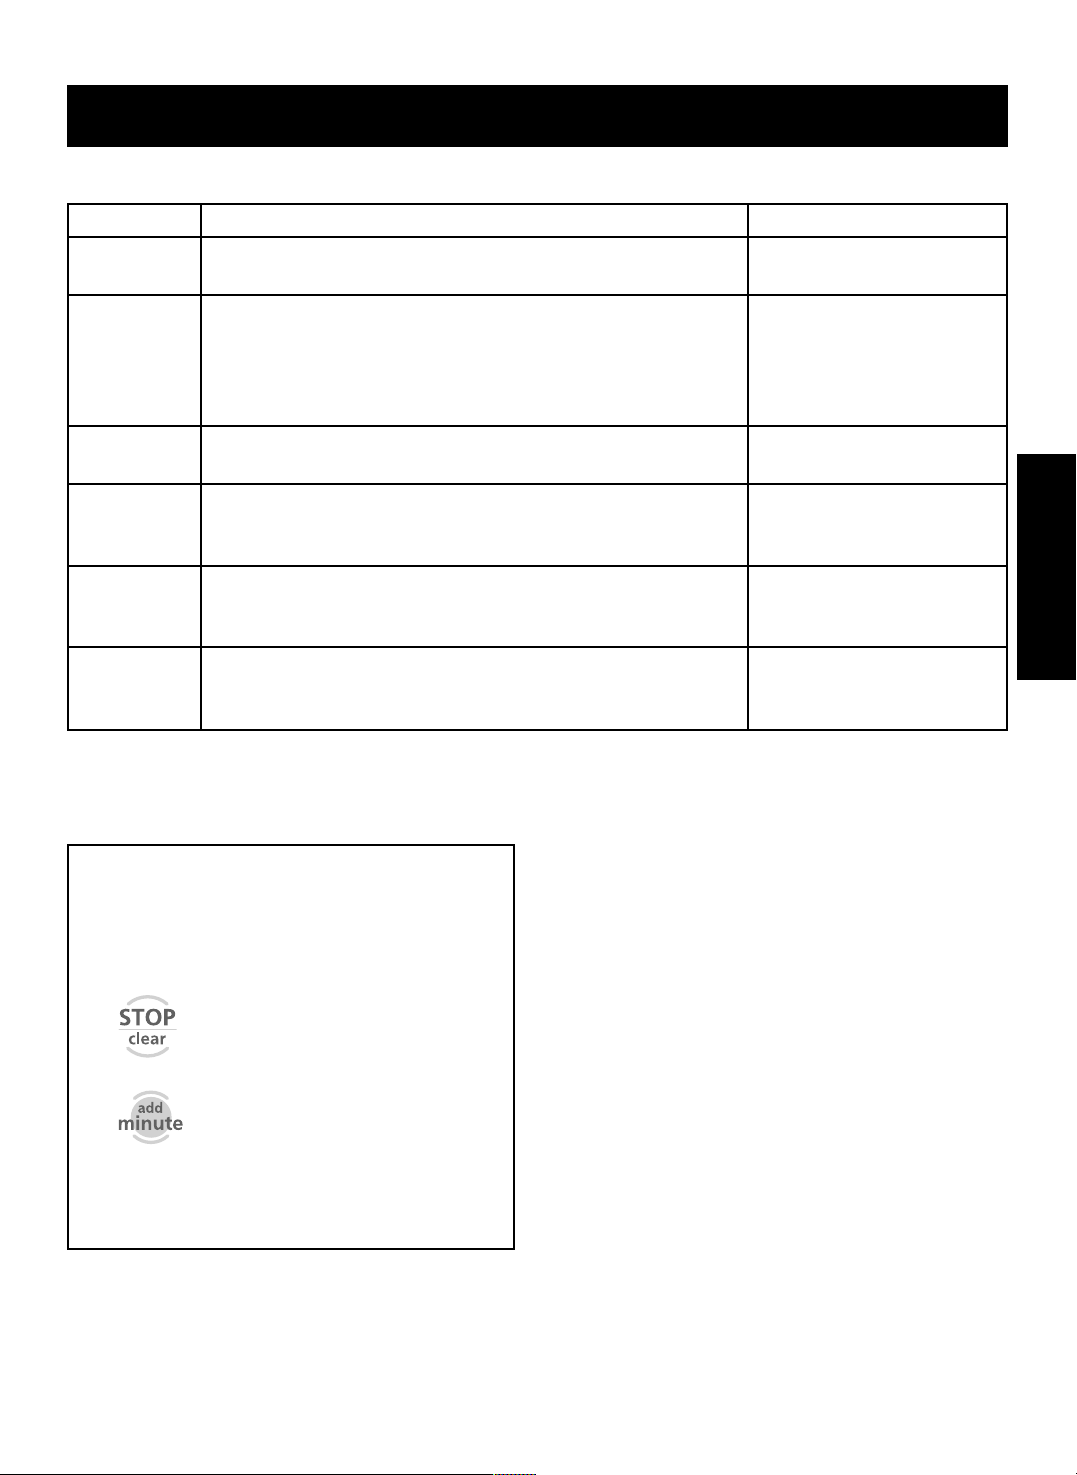
ADD MINUTE
A time-saving pad, this simplified control lets
you quickly set and start microwave cooking at
100% power without the need to touch START.
Example: To cook for 2 minutes.
Touch: Display Shows:
1.
2.
NOTE: If you touch ADD MINUTE, it will add 1
minute up to 99 min 59 seconds.
Time counting down
and power 100
Page 12
12
ENGLISH
USING YOUR MICROWAVE OVEN
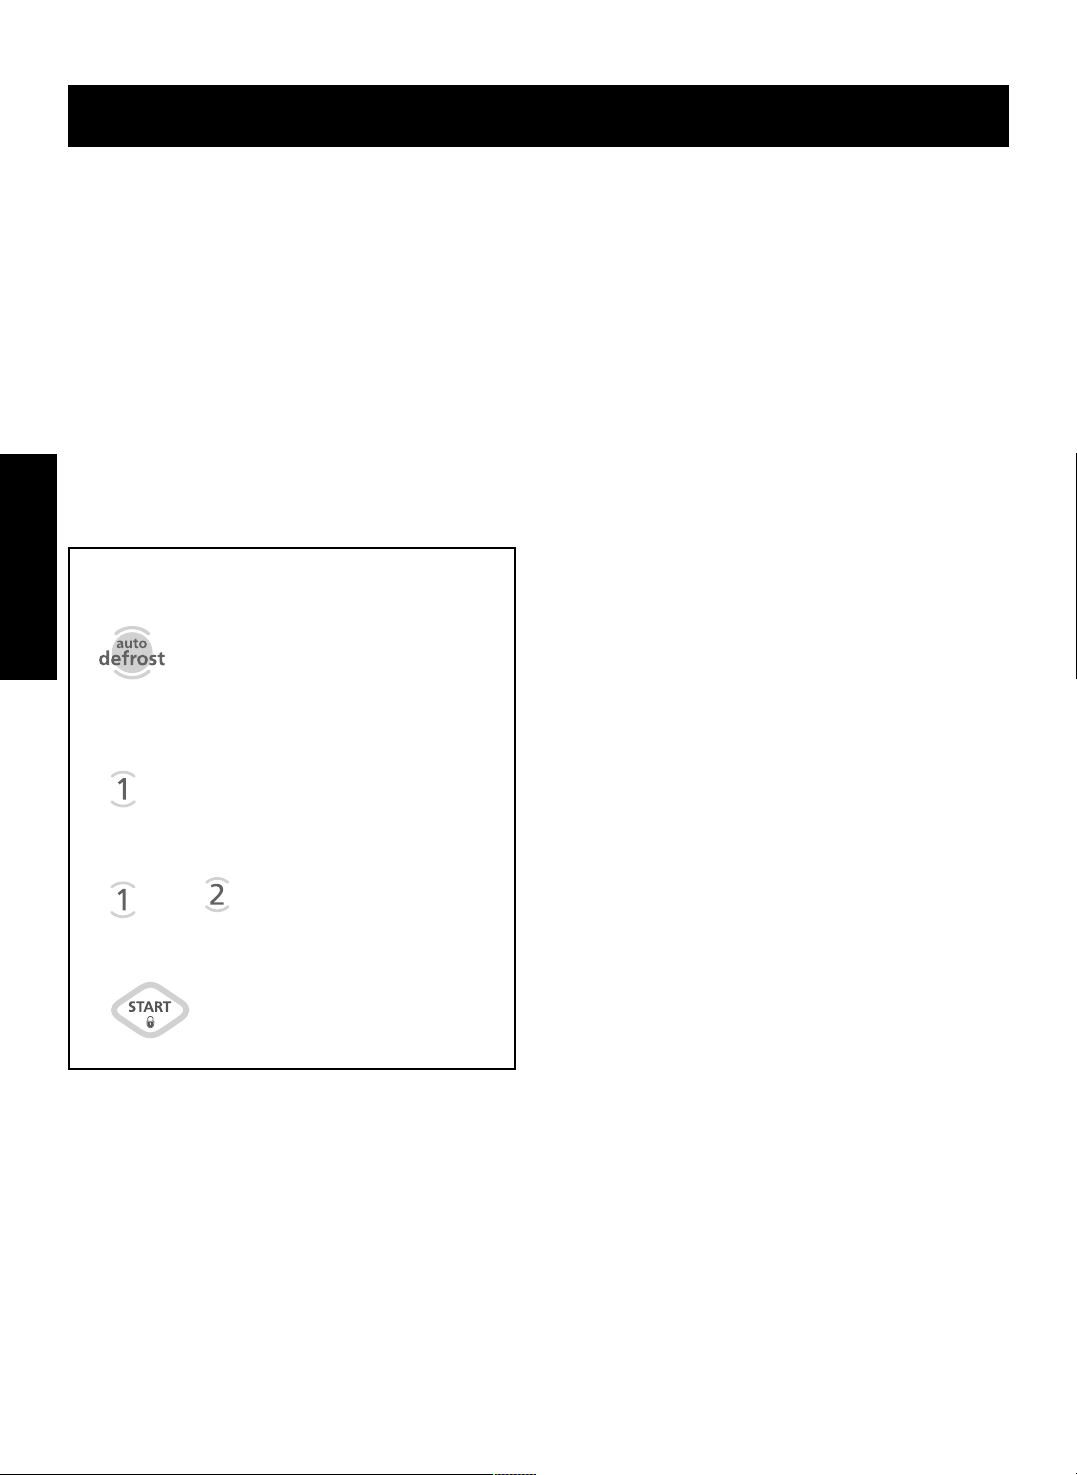
Example: To defrost 1.2 lbs of ground beef.
Touch: Display Shows:
AUTO DEFROST
1.
2.
3.
and
4.
Time counting down
and DEFROST .
to enter the weight
MEAT TOUCH
1
POULTRY TOUCH
2
FISH TOUCH
3
0 . 0
LBS ENTER
WEIGHT
1 . 2
LBS
TOUCH START
Three defrost sequences are preset in the oven.
The auto defrost feature provides you with the best
defrosting method for frozen foods. The cooking guide
will show you which defrost sequence is recommended
for the food you are defrosting.
For added convenience, the Auto Defrost
includes a built-in beep mechanism that reminds
you to check, turn over, separate, or rearrange to get
best defrost results. Three different defrosting levels
are provided.
1 MEAT
2 POULTRY
3 FISH
*Available weight is 0.1~6.0 lbs.
NOTE:
When you touch the START pad, the display changes
to defrost time count down. The oven will beep during
the DEFROST cycle. At this time, open the door and
turn, separate, or rearrange the food.
Remove any portions that have thawed.
Return frozen portions to the oven and touch
START to resume the defrost cycle.
OPERATING TIPS
• For best results, remove fish, shellfish, meat, and
poultry from its original closed paper or plastic package (wrapper). Otherwise, the wrap will hold steam
and juice close to the foods, which can cause the
outer surface of the foods to cook.
• For best results, shape your ground meat into the
form of a doughnut before freezing. When defrosting,
scrape off thawed meat when the beep sounds and
continue defrosting.
• Place foods in a shallow container or on a microwave
roasting rack to catch drippings.
• Food should still be somewhat icy in the center when
removed from the oven.
Page 13
ENGLISH
13
USING YOUR MICROWAVE OVEN
TIMED COOKING
1.
2.
5.
3.
4.
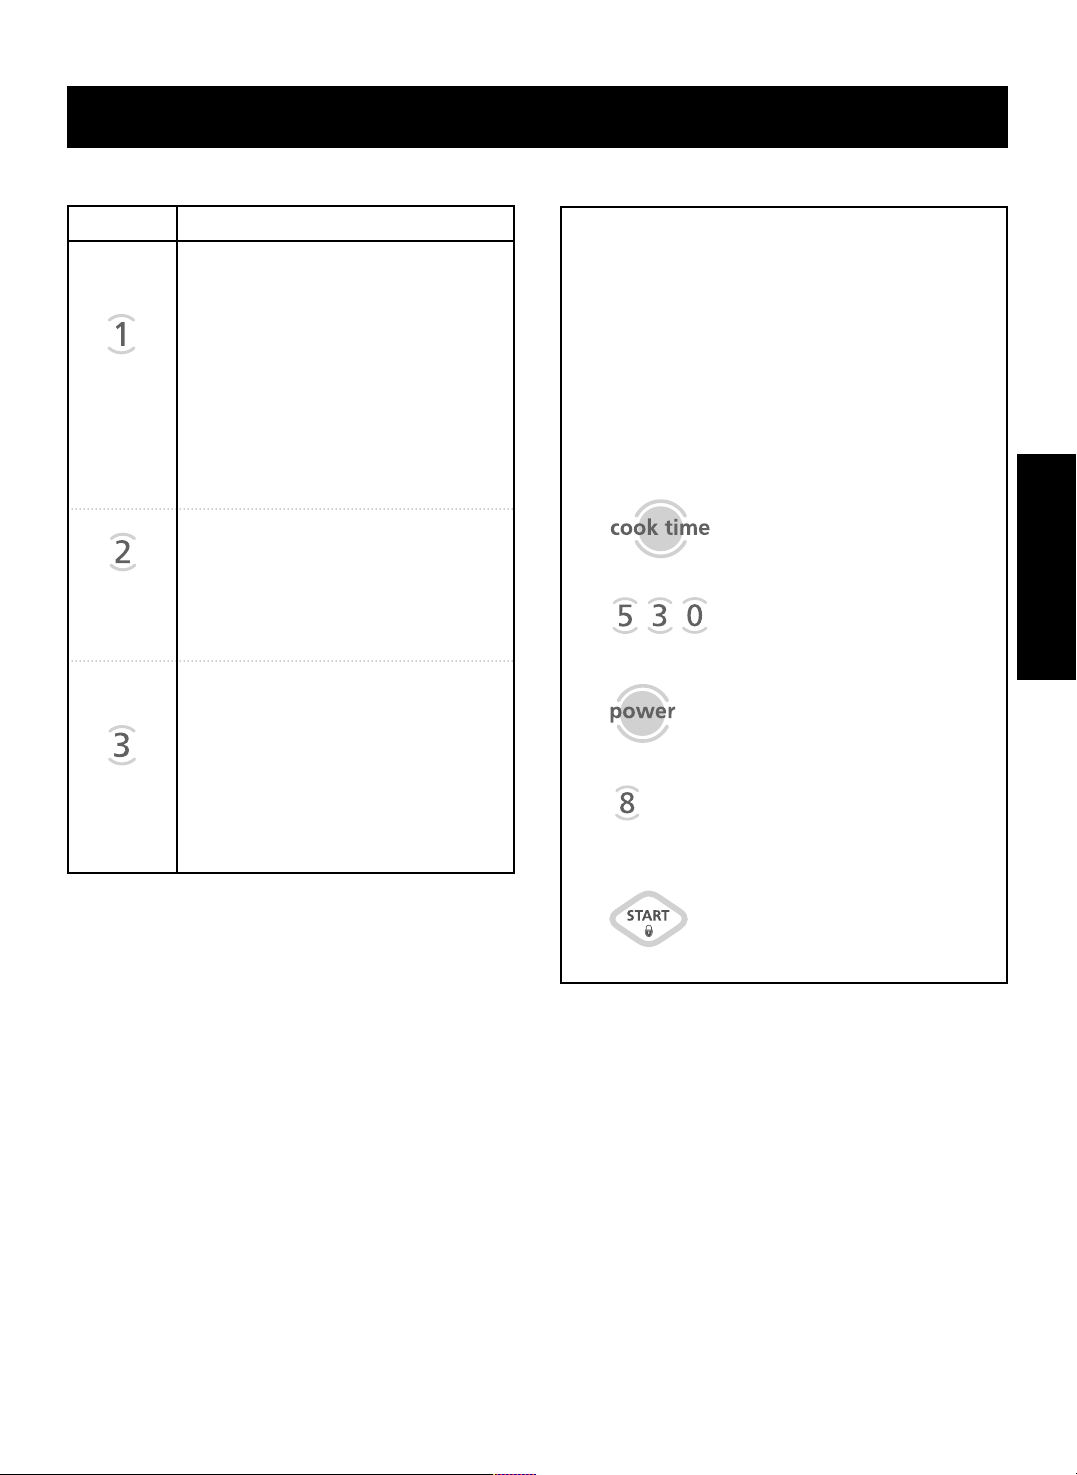
This feature lets you program a specific cook time
and power. For best results, there are 10 power
level settings in addition to HIGH power (100%).
Refer to the “Microwave Power Level Table” on
page 14 for more information.
NOTE: If you do not select a power level, the oven
will automatically cook at HIGH (100%) power.
Example: To cook for 5 minutes, 30 seconds
at 80% power.
Touch: Display Shows:
::
ENTER COOKING TIME
5 ::30
TOUCH START
OR POWER
ENTER POWER
LEVEL1 TO
10
5 ::30
POWER
80
TOUCH START
AUTO DEFROST TABLE
Category
MEAT
POUL TRY
FISH
Food to be Defrosted
Beef
Ground beef, Round steak,
Cubes for stew, T enderloin steak,
Pot roast, Rib roast, Rump roast,
Chuck roast, Hamburger patty
Lamb
Chops (1 inch thick), Rolled roast
Pork
Chops (
1
⁄2 inch thick), Hot dogs,
Spareribs, Country-style ribs.
Rolled roast, Sausage
Veal
Cutlets (1 lb.,
1
⁄2 inch thick)
Poultry
Whole (under 4 lbs.), Cut-up, Breasts
(boneless)
Cornish Hens
Whole
Turkey
Breast
Steaks/Chops
Round beef steak, Tenderloin steak
Lamb chops (1 inch thick)
Pork chops (1/2 inch thick)
Veal cutlets (1 lbs, 1/2 inch thick)
Fish
Fillets, Whole Steaks
Shellfish
Crab meat, Lobster tails, Shrimp,
Scallops
Time counting down
and POWER 80.
Page 14
14
ENGLISH
USING YOUR MICROWAVE OVEN
MICROWAVE POWER LEVELS
Your microwave oven has 10 cook power levels to let
you cook or heat a wide variety of foods. Refer to the
table below for suggestions:
Microwave Power Level Table
• Boiling water.
• Making candy.
• Cooking poultry pieces, fish, & vegetables.
• Cooking tender cuts of meat.
• Whole poultry.
• Reheating rice, pasta, & vegetables.
• Reheating prepared foods quickly.
• Reheating sandwiches.
• Cooking egg, milk, & cheese dishes.
• Cooking cakes, breads.
• Melting chocolate.
• Cooking veal.
• Cooking whole fish.
• Cooking puddings & custard.
• Cooking ham, whole poultry, & lamb.
• Cooking rib roast, sirloin tip.
• Thawing meat, poultry, & seafood.
• Cooking less tender cuts of meat.
• Cooking pork chops, roast.
• Taking chill out of fruit.
• Softening butter.
• Keeping casseroles & main dishes warm.
• Softening butter & cream cheese.
• Standing time.
10
(High)
9
8
7
6
5
4
3
2
1
0
Use
Power
Level
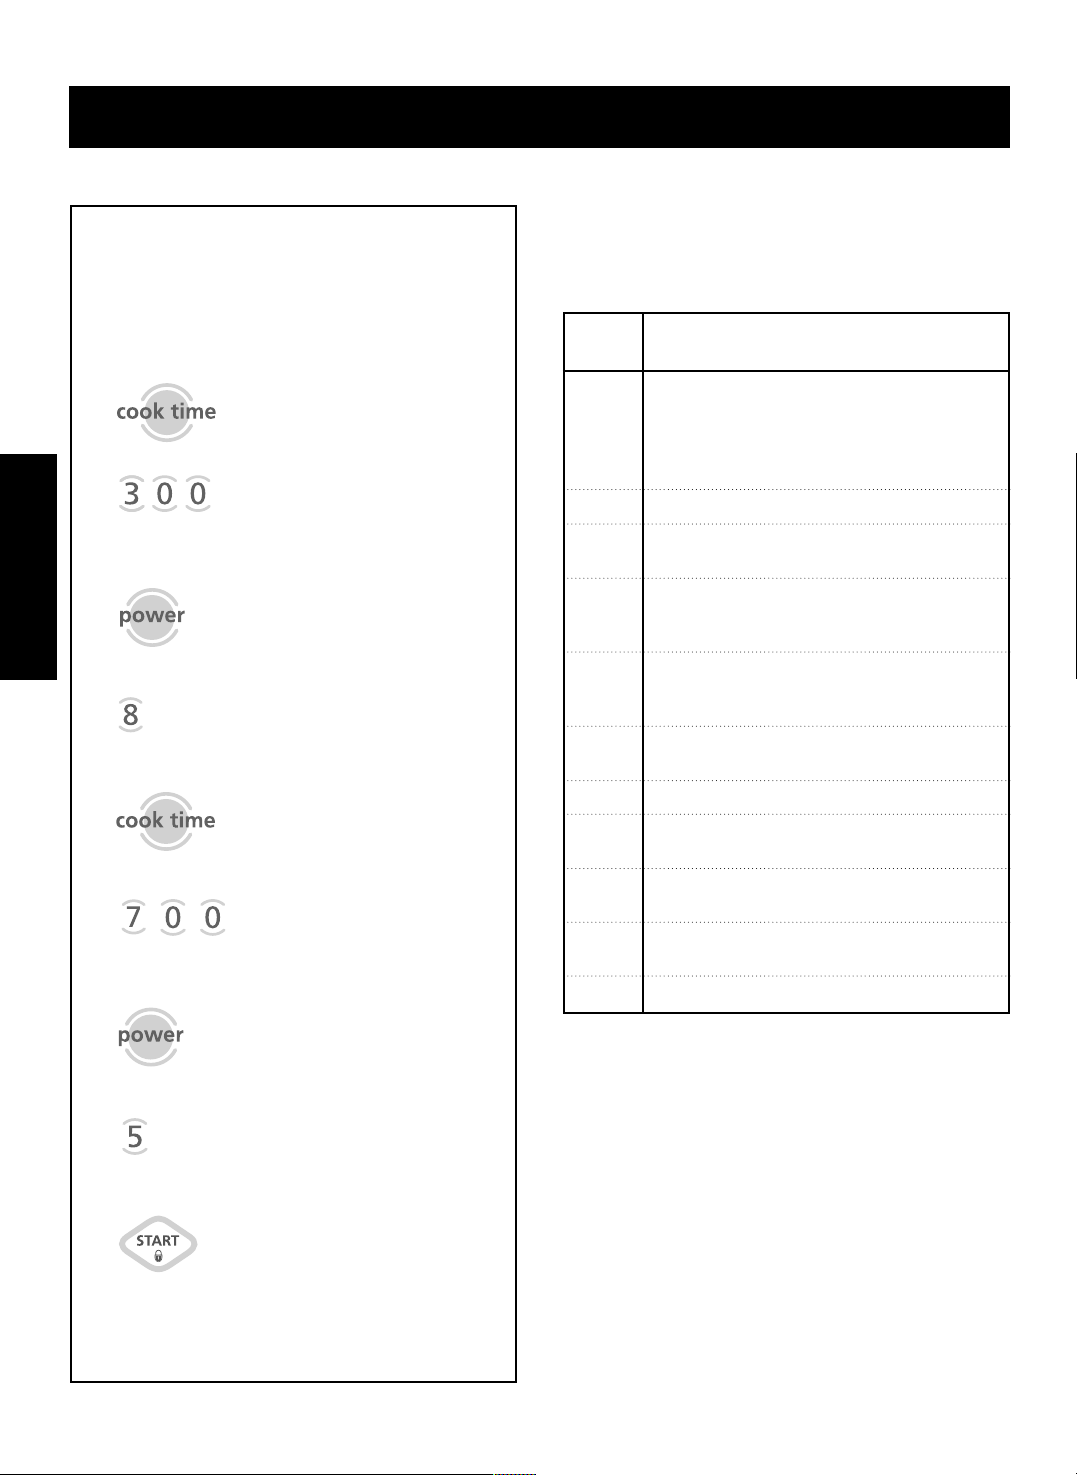
For best results, some recipes call for different cook
powers during different stages of a cook cycle. You
can program your oven to switch from one power
level to another for up to 2 stages.
Example: To set a 2-stage cook cycle.
Touch: Display Shows:
MULTI-STAGE COOKING
1.
2.
5.
3.
4.
6.
to set a 7 minute cook
time for second stage.
to set a 3 minute cook
time for first stage.
7.
9.
::
ENTER COOKING TIME
::
ENTER COOKING TIME
3 ::00
TOUCH START
OR POWER
7 ::00
TOUCH START
OR POWER
3 ::00
ENTER POWER
LEVEL 1 TO
10
7 ::00
ENTER POWER
LEVEL 1 TO
10
3 ::00
POWER
80
TOUCH START
8.
to set an 50%
cook power for
the second
stage.
to set an 80%
cook power for
the first stage.
7 ::00
POWER
50
TOUCH START
When the first stage is over, you will hear two
short tones as the oven begins the second
cook stage.
10.
Time counting down
and POWER 80.
Page 15
ENGLISH
15
Meat
1. No special techniques are required. Meat should be
prepared as with conventional cooking. Season if
desired. Always thoroughly defrost meat before cooking.
2. Place the meat on a microwave roasting rack or
microwave-proof plate and place on the turntable.
3. Cook according to the Meat Cooking Table (below).
Use the longer time for large cuts of meats and the
shorter time for small cuts of meats. For thicker
chops, use the longer time.
4. Turn the meat once halfway through the cooking
time.
5. Let stand for 5-10 minutes wrapped in foil after
cooking. The standing time is very important as it
completes the cooking process.
6. Make sure meat, especially pork, is thoroughly
cooked before eating.
Poultry
1. No special techniques are required. Poultry should
be prepared as with conventional cooking. Season if
desired.
2. Poultry should be thoroughly defrosted. Remove
giblets and any metal clamps.
3. Prick the skin and brush lightly with vegetable oil
unless the poultry is self-basting.
4. All poultry should be placed on a microwave roasting
rack or a microwave-proof plate and placed on the
turntable.
5. Cook according to the instructions in the Poultry
Cooking Table below. Turn over halfway through the
cooking time. Because of its shape, poultry has a
tendency to cook unevenly, especially in very bony
parts.Turning during roasting helps to cook these
areas evenly.
6. Let stand for 5-10 minutes wrapped in foil after
cooking before carving. The standing time is very
important, as it completes the cooking process.
7. Make sure poultry is thoroughly cooked before eating.
Whole poultry is completely cooked when the juices
run clear from the inside thigh when it is pierced with
a sharp knife. Poultry pieces should be pierced with
a sharp knife through the thickest part to ensure that
the juices are clear and the flesh is firm.
USING YOUR MICROWAVE OVEN
WARNING: Do not use aluminum foil during cooking cycle.
BEEF
Standing/Rolled Rib
– Medium
– Well-done
Ground Beef (to
brown for casserole)
Hamburgers,
Fresh or defrosted
(4 oz. each)
– 2 patties
– 4 patties
PORK
Loin, Leg
Bacon
– 4 slices
– 6 slices
Microwave
Power
8
8
HIGH(100%)
HIGH(100%)
HIGH(100%)
8
HIGH(100%)
HIGH(100%)
Cooking Time
Per Pound
9
1
/
2
to11
1
/
2
minutes
11
1
/2
to 14 minutes
61/2 to 91/2 minutes
21/2
to 41/2
minutes
31/2
to 51/2
minutes
121/2
to 161/2
minutes
2
1
/2
to 3
1
/2
minutes
3
1
/2
to 4
1
/2
minutes
Meat Cooking Table
CHICKEN
Whole
Breast (boned)
Portions
TURKEY
Whole
Microwave
Power
8
8
8
8
Cooking Time
Per Pound
11 to 15 minutes
10 to 14 minutes
11 to 17 minutes
11 to 15 minutes
Poultry Cooking Table
NOTES:
• The times listed above are only a guide. Allow for
difference in individual tastes and preferences. The
times may also vary due to the shape, cut, and
composition of the food.
• If whole poultry is stuffed, the weight of the stuffed
bird should be used when calculating the cooking
time.
NOTE: The times listed above are only a guide. Allow
for difference in individual tastes and preferences. The
times may also vary due to the shape, cut, and composition of the food.
Poultry
COOKING TIPS
Meat
Page 16
16
ENGLISH
USING YOUR MICROWAVE OVEN
COOKING TIPS
(continued)
Fish
1. Arrange fish in a large shallow non-metallic dish or casserole.
2. Cover with pierced microwave plastic wrap or casserole lid.
3. Place the dish on the turntable.
4. Cook according to the instructions in the Fresh Fish Cooking Table below. Flakes of butter can be added to the
fish if desired.
5. Let stand as directed in the Cooking Table before serving.
6. After standing time, check to see that the fish is thoroughly cooked. The fish should be opaque and flake easily.
Fresh Fish Cooking Table
Fish
Fish Fillets
Whole Mackerel,
Cleaned and Prepared
Whole Trout,
Cleaned and Prepared
Salmon Steaks
Microwave
Power
HIGH
HIGH
HIGH
HIGH
Cooking Time
Per Pound
4
1
/2
to 8 minutes
41/
2
to 8 minutes
5
1
/2
to 9 minutes
51/2
to 8 minutes
Standing
Time
2 to 3 minutes
3 to 4 minutes
3 to 4 minutes
3 to 4 minutes
Butter
Add 15 to 30 ml (1 to 2 tbsp lemon juice)
–
–
Add 15 to 30 ml (1 to 2 tbsp lemon juice)
Page 17
ENGLISH
17
TROUBLESHOOTING
Questions and Answers
Operation
Question
Why is the oven light not on during
cooking?
Why does steam come out of the air
exhaust vent?
Will the microwave oven be damaged if it
operates empty?
Does microwave energy pass through the
viewing screen in the door?
Why does a tone sound when a pad on
the control panel is touched?
Can my microwave oven be damaged if
food is cooked for too long?
When the oven is plugged into wall outlet
for the first time, it does not work properly.
What is wrong?
Why do I see light reflection around the
outer case?
What are the various sounds I hear when
the microwave oven is operating?
There may be several reasons why the oven light is not on.
Have you:
• Set a cooking time?
• Touched START?
Steam is normally produced during cooking. The microwave oven
has been designed to vent this steam.
Yes. Never operate the oven empty or without the glass turntable.
No. The metal screen bounces the energy back to the oven cavity.
The holes (or ports) allow only light to pass through. They do not
let microwave energy pass through.
The tone tells you that the setting has been entered.
Like any other cooking appliance, it is possible to overcook food
to the point that the food creates smoke and even possibly fire,
and damage to the inside of the oven. It is always best to be near
the oven while you are cooking.
The microcomputer controlling your oven may temporarily
become scrambled and fail to function as programmed when you
plug in for the first time or when power resumes after a power
interruption. Unplug the oven from the 120 volt household outlet
and then plug it back in to reset the microcomputer.
This light is from the oven light which is located between the
oven cavity and the outer wall of the oven.
The clicking sound is caused by a mechanical switch turning the
microwave oven’s magnetron ON and OFF.
The heavy hum and clunk is from the change in power the
magnetron draws as it is turned ON and OFF by a mechanical
switch.The change in blower speed is from the change in line
voltage caused by the magnetron being turned ON and OFF.
Answer
Page 18
18
ENGLISH
TROUBLESHOOTING
Questions and Answers (continued)
Food
Question
What is wrong when baked foods have a
hard, dry, brown spot?
Why do eggs sometimes pop?
Why are scrambled eggs sometimes a
little dry after cooking?
Is it possible to pop popcorn in a
microwave oven?
Why do baked apples sometimes burst
during cooking?
Why do baked potatoes sometimes
burn during cooking?
Why is a standing time recommended
after microwave cooking time is over?
Why is additional time required for
cooking food stored in the refrigerator?
A hard, dry, brown spot indicates overcooking. Shorten the cooking
or reheating time.
When baking, frying, or poaching eggs, the yolk may pop due to
steam build-up inside the yolk membrane. To prevent this,
simply pierce the yolk with a wooden toothpick before cooking.
CAUTION: Never microwave eggs in the shell.
Eggs will dry out when they are overcooked, even if the same
recipe is used each time. The cooking time may need to be varied
for one of these reasons:
• Eggs vary in size.
• Eggs are at room temperature one time and at refrigerator
temperature another time.
• Eggs continue cooking during standing time.
Yes, if using one of the two methods described below:
(1) microwave-popping devices designed specifically for microwave
cooking
(2) prepackaged commercial microwave popcorn that is made
for specific times and power output needed
Follow exact directions given by each manufacturer for
its popcorn popping product and do not leave the oven
unattended while the corn is being popped. If corn fails
to pop after the suggested time, discontinue cooking.
Overcooking could result in an oven fire.
CAUTION:
• Never use a brown paper bag for popping corn or attempt to
pop leftover kernels.
• Do not pop prepackaged commercial microwave popcorn
directly on the glass turntable. To avoid excessive heating of
the glass turntable, place the popcorn bag on a plate.
The peel has not been removed from the top half of each apple to
allow for expansion of the interior of the apple during cooking. As in
conventional cooking methods, the interior of the apple expands
during the cooking process.
If the cooking time is too long, fire could result. At the end of the
recommended cooking time, potatoes should be slightly firm.
CAUTION: Do not overcook.
Standing time allows foods to continue cooking evenly for a few
minutes after the actual microwave oven cooking cycle. The
amount of standing time depends upon the density of the foods.
As in conventional cooking, the initial temperature of food affects
total cooking time. You need more time to cook food taken out of a
refrigerator than for food at room temperature.
Answer
Page 19
ENGLISH
19
TROUBLESHOOTING
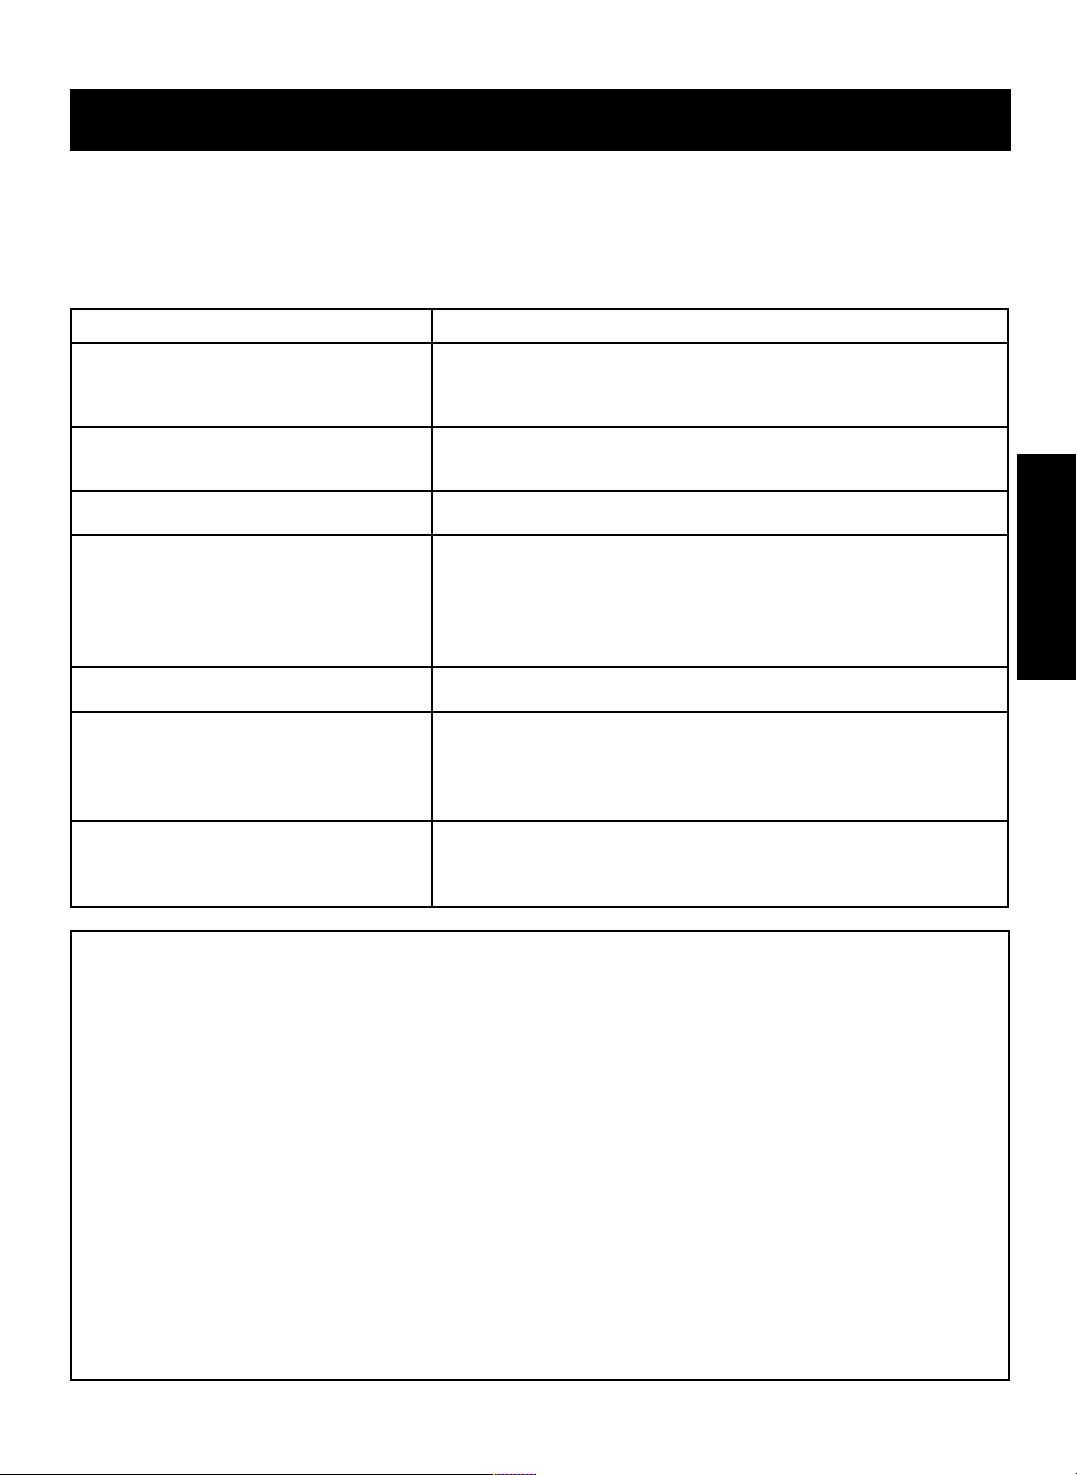
BEFORE CALLING FOR SERVICE
Problem
Oven does not start
Arcing or Sparking
Incorrect time of day
Unevenly Cooked Foods
Overcooked Foods
Undercooked Foods
Improper Defrosting
You can often correct operating problems yourself. If your microwave oven fails to work properly, locate the
operating problem in the list below and try the solutions listed for each problem.
If the microwave oven still does not work properly, contact the nearest Sears Authorized Service Center.
Sears Authorized Service Centers are fully equipped to handle your service requirements.
• Is the power cord plugged in?
• Is the door closed?
• Is the cooking time set?
• Are you using approved cookware?
• Is the oven empty?
• Have you tried to reset the time of day?
• Are you using approved cookware?
• Is the glass turntable in the oven?
• Did you turn or stir the food while it was cooking?
• Were the foods completely defrosted?
• Was the time/cooking power level correct?
• Was the time/cooking power level correct?
• Are you using approved cookware?
• Were the foods completely defrosted?
• Was the time/cooking power level correct?
• Are the ventilation ports clear?
• Are you using approved cookware?
• Was the time/cooking power level correct?
• Did you turn or stir the food during the defrosting cycle?
WARNING:
This equipment generates and uses ISM frequency
energy and if not installed and used properly, that is
in strict accordance with the manufacturer's instructions, may cause interference to radio and television
reception. It has been type tested and found to
comply with limits for ISM Equipment pursuant to
part 18 of FCC Rules, which are designed to provide
reasonable protection against such interference in a
residential installation.
However, there is no guarantee that interference will
not occur in a particular installation. If this equipment
does cause interference to radio or television reception, which can be determined by turning the equipment off and on, the user is encouraged to try to correct the interference by one or more of the following:
• Reorient the receiving antenna of the radio or television.
• Relocate the Microwave Oven with respect to the
receiver.
• Move the microwave oven away from the receiver.
• Plug the microwave oven into a different outlet so
that the microwave oven and the receiver are on different branch circuits.
The manufacturer is not responsible for any radio
or TV interference caused by unauthorized modifi-
cation to this microwave oven. It is the responsibility
of the user to correct such interference.
FEDERAL COMMUNICATIONS COMMISSION RADIO FREQUENCY INTERFERENCE
STATEMENT (U.S.A. ONLY)
Possible Causes
Page 20
Get it fixed, at your home or ours!
Your Home
For repair – in your home – of all major brand appliances,
lawn and garden equipment, or heating and cooling systems,
no matter who made it, no matter who sold it!
For the replacement parts, accessories and
owner’s manuals that you need to do-it-yourself.
For Sears professional installation of home appliances
and items like garage door openers and water heaters.
®
1-800-4-MY-HOME
Call anytime, day or night (U.S.A. and Canada)
www.sears.com www.sears.ca
For expert home solutions advice: www.managemyhome.com
(1-800-469-4663)
Our Home
For repair of carry-in items like vacuums, lawn equipment,
and electronics, call or go on-line for the location of your nearest
Sears Parts & Repair Service Center
1-800-488-1222 (U.S.A.) 1-800-469-4663 (Canada)
Call anytime, day or night
www.sears.com www.sears.ca
To purchase a protection agreement on a product serviced by Sears:
1-800-827-6655 (U.S.A.) 1-800-361-6665 (Canada)
Para pedir servicio de reparación
a domicilio, y para ordenar piezas:
1-888-SU-HOGAR
(1-888-784-6427)
®
Au Canada pour service en français:
1-800-LE-FOYER
(1-800-533-6937)
www.sears.ca
MC
® Registered Trademark / TM Trademark /
® Marca Registrada / TM Marca de Fábrica / SM Marca de Servicio de Sears Brands, LLC
MC
Marque de commerce / MD Marque déposée de Sears Brands, LLC © Sears Brands, LLC
SM
Service Mark of Sears Brands, LLC
 Loading...