

Page 1
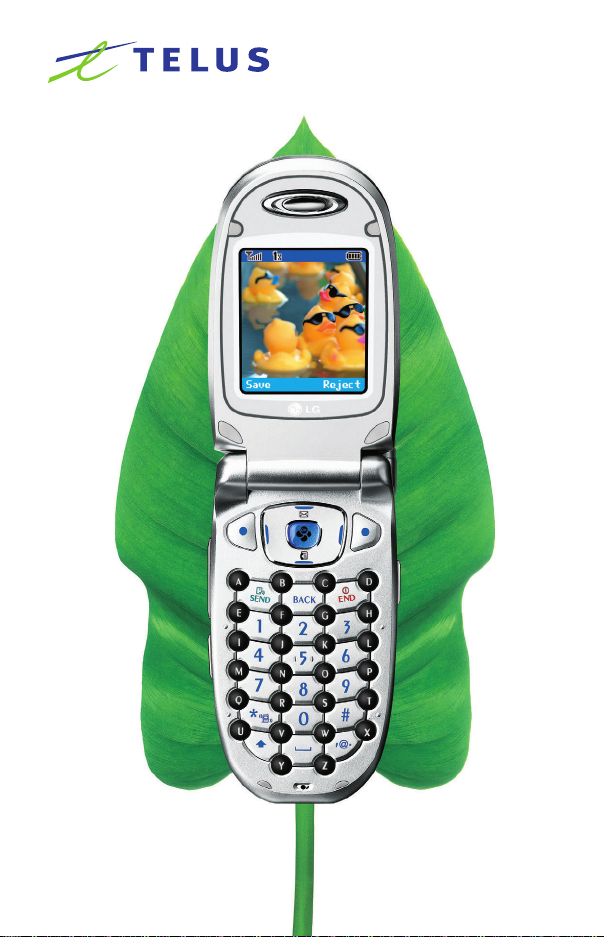
User Guide
LG6190
Page 2

Welcome . . . . . . . . . . . . . . . . . . . . . . . . . . . . . . . . . . . . 7
Check Accessories . . . . . . . . . . . . . . . . . . . . . . . . . . . . . . . . . 7
Important Information . . . . . . . . . . . . . . . . . . . . . . . . . . . . . . . 8
FCC RF Exposure Infomation . . . . . . . . . . . . . . . . . . . . . . . 10
Phone Overview . . . . . . . . . . . . . . . . . . . . . . . . . . . . 12
Menus Overview . . . . . . . . . . . . . . . . . . . . . . . . . . . . 14
Getting Your Phone Started . . . . . . . . . . . . . . . . . . 16
The Battery . . . . . . . . . . . . . . . . . . . . . . . . . . . . . . . . . . . . . . 16
Turning the Phone On and Off . . . . . . . . . . . . . . . . . . . . . . . 17
Screen Icons . . . . . . . . . . . . . . . . . . . . . . . . . . . . . . . . . . . . . 18
Making Calls . . . . . . . . . . . . . . . . . . . . . . . . . . . . . . . . . . . . . 19
Receiving Calls . . . . . . . . . . . . . . . . . . . . . . . . . . . . . . . . . . .19
Quick Access to Convenient Features . . . . . . . . . 20
Manner Mode . . . . . . . . . . . . . . . . . . . . . . . . . . . . . . . . . . . . . . . 20
Lock Mode . . . . . . . . . . . . . . . . . . . . . . . . . . . . . . . . . . . . . . . . . . 20
Mute Function . . . . . . . . . . . . . . . . . . . . . . . . . . . . . . . . . . . . . . . 21
Volume Quick Adjustment . . . . . . . . . . . . . . . . . . . . . . . . . . . . . . 21
Call Waiting . . . . . . . . . . . . . . . . . . . . . . . . . . . . . . . . . . . . . . . . . 22
Caller ID . . . . . . . . . . . . . . . . . . . . . . . . . . . . . . . . . . . . . . . . . . . . 22
Speed Dialing . . . . . . . . . . . . . . . . . . . . . . . . . . . . . . . . . . . . . . . 22
Hands-free dialing . . . . . . . . . . . . . . . . . . . . . . . . . . . . . . . . . . . 23
Entering and Editing Information . . . . . . . . . . . . . . 24
Text Input . . . . . . . . . . . . . . . . . . . . . . . . . . . . . . . . . . . . . . . . . . . 24
Text Input Examples . . . . . . . . . . . . . . . . . . . . . . . . . . . . . . . . . . 25
Contacts in Your Phone’s Memory . . . . . . . . . . . . 26
The Basics of Storing Contacts Entries . . . . . . . . . . . . . . . . . . . 26
Options to Customize Your Contacts . . . . . . . . . . . . . . . . . . . . . 28
Adding or Changing the Group . . . . . . . . . . . . . . . . . . . . . . 28
Changing the Call Ringer . . . . . . . . . . . . . . . . . . . . . . . . . . . 29
Adding or Changing the Memo . . . . . . . . . . . . . . . . . . . . . . 30
LG 6190
1
Page 3

Adding Speed Dial . . . . . . . . . . . . . . . . . . . . . . . . . . . . . . . . . 30
Editing Contacts Entries . . . . . . . . . . . . . . . . . . . . . . . . . . . . . . . 31
Adding Another Phone Number . . . . . . . . . . . . . . . . . . . . . . 31
Default Numbers . . . . . . . . . . . . . . . . . . . . . . . . . . . . . . . . . . 32
Changing the Default Number . . . . . . . . . . . . . . . . . . . . . . . 32
Editing Stored Phone Numbers . . . . . . . . . . . . . . . . . . . . . . 32
Editing Stored Names . . . . . . . . . . . . . . . . . . . . . . . . . . . . . . 33
Editing Customized Options . . . . . . . . . . . . . . . . . . . . . . . . . 33
Deleting . . . . . . . . . . . . . . . . . . . . . . . . . . . . . . . . . . . . . . . . . . . . 34
Deleting a Phone Number from a Contact . . . . . . . . . . . . . 34
Deleting a Contact Entry . . . . . . . . . . . . . . . . . . . . . . . . . . . . 34
Additional Ways to Delete a Contact . . . . . . . . . . . . . . . . . . 34
Deleting a Speed Dial . . . . . . . . . . . . . . . . . . . . . . . . . . . . . . 35
Phone Numbers With Pauses . . . . . . . . . . . . . . . . . . . . . . . . . . 36
Storing a Number With Pauses . . . . . . . . . . . . . . . . . . . . . . 36
Adding a Pause to an Existing Number . . . . . . . . . . . . . . . . 37
Searching Your Phone’s Memory . . . . . . . . . . . . . . . . . . . . . . . . 38
Scrolling Through Your Contacts . . . . . . . . . . . . . . . . . . . . . 38
Searching by Letter . . . . . . . . . . . . . . . . . . . . . . . . . . . . . . . . 38
Searching Options . . . . . . . . . . . . . . . . . . . . . . . . . . . . . . . . . 39
Making a Call From Y our Phone’s Memory . . . . . . . . . . . . . . . . 40
From Contacts . . . . . . . . . . . . . . . . . . . . . . . . . . . . . . . . . . . . 40
From Recent Calls . . . . . . . . . . . . . . . . . . . . . . . . . . . . . . . . . 40
Using Phone Menus . . . . . . . . . . . . . . . . . . . . . . . . . 41
Menu Access . . . . . . . . . . . . . . . . . . . . . . . . . . . . . . . . . . . . . . . . 41
Contacts (Menu 1) . . . . . . . . . . . . . . . . . . . . . . . . . . . . . . . . . . . 42
List Entries . . . . . . . . . . . . . . . . . . . . . . . . . . . . . . . . . . . . . . . . 43
New Entry . . . . . . . . . . . . . . . . . . . . . . . . . . . . . . . . . . . . . . . . 43
Speed Dial . . . . . . . . . . . . . . . . . . . . . . . . . . . . . . . . . . . . . . . 44
Groups . . . . . . . . . . . . . . . . . . . . . . . . . . . . . . . . . . . . . . . . . . 44
Erase All Contacts . . . . . . . . . . . . . . . . . . . . . . . . . . . . . . . . . 44
Call History (Menu 2) . . . . . . . . . . . . . . . . . . . . . . . . . . . . . . . . . 45
Recent Calls . . . . . . . . . . . . . . . . . . . . . . . . . . . . . . . . . . . . . . 46
2
LG 6190
Page 4

Incoming Calls . . . . . . . . . . . . . . . . . . . . . . . . . . . . . . . . . . . 46
Outgoing Calls . . . . . . . . . . . . . . . . . . . . . . . . . . . . . . . . . . . . 46
Missed Calls . . . . . . . . . . . . . . . . . . . . . . . . . . . . . . . . . . . . . 47
Erase Logs . . . . . . . . . . . . . . . . . . . . . . . . . . . . . . . . . . . . . . 47
Call Timers . . . . . . . . . . . . . . . . . . . . . . . . . . . . . . . . . . . . . . . 47
Messages (Menu 3) . . . . . . . . . . . . . . . . . . . . . . . . . . . . . . . . . . 48
Voice Mail . . . . . . . . . . . . . . . . . . . . . . . . . . . . . . . . . . . . . . . . 50
Text Messaging . . . . . . . . . . . . . . . . . . . . . . . . . . . . . . . . . . . 50
Send Message . . . . . . . . . . . . . . . . . . . . . . . . . . . . . . . . . 50
Inbox . . . . . . . . . . . . . . . . . . . . . . . . . . . . . . . . . . . . . . . . 52
Out of Memory Warning . . . . . . . . . . . . . . . . . . . . . . . . . 53
Message Icon Reference . . . . . . . . . . . . . . . . . . . . . . . . 53
Erase messages . . . . . . . . . . . . . . . . . . . . . . . . . . . . . . . 54
Outbox . . . . . . . . . . . . . . . . . . . . . . . . . . . . . . . . . . . . . . . 54
Draft . . . . . . . . . . . . . . . . . . . . . . . . . . . . . . . . . . . . . . . . . 55
Saved . . . . . . . . . . . . . . . . . . . . . . . . . . . . . . . . . . . . . . . . 55
Msg Settings . . . . . . . . . . . . . . . . . . . . . . . . . . . . . . . . . . 55
Picture Messaging . . . . . . . . . . . . . . . . . . . . . . . . . . . . . . . . 56
Send Message . . . . . . . . . . . . . . . . . . . . . . . . . . . . . . . . . 56
Inbox . . . . . . . . . . . . . . . . . . . . . . . . . . . . . . . . . . . . . . . . 58
Erase messages . . . . . . . . . . . . . . . . . . . . . . . . . . . . . . . 58
Outbox . . . . . . . . . . . . . . . . . . . . . . . . . . . . . . . . . . . . . . . 59
Draft . . . . . . . . . . . . . . . . . . . . . . . . . . . . . . . . . . . . . . . . . 59
Saved . . . . . . . . . . . . . . . . . . . . . . . . . . . . . . . . . . . . . . . . 59
Templates . . . . . . . . . . . . . . . . . . . . . . . . . . . . . . . . . . . . . 60
Msg Settings . . . . . . . . . . . . . . . . . . . . . . . . . . . . . . . . . . 60
Memory Status . . . . . . . . . . . . . . . . . . . . . . . . . . . . . . . . 60
Web Alerts . . . . . . . . . . . . . . . . . . . . . . . . . . . . . . . . . . . . . . . 60
E-mail . . . . . . . . . . . . . . . . . . . . . . . . . . . . . . . . . . . . . . . . . . . . 60
IM & Chat . . . . . . . . . . . . . . . . . . . . . . . . . . . . . . . . . . . . . . . . 61
TM
Do More
(Menu 4) . . . . . . . . . . . . . . . . . . . . . . . . . . . . . . . . . . . 62
Settings (Menu 5) . . . . . . . . . . . . . . . . . . . . . . . . . . . . . . . . . . . . 67
Sounds . . . . . . . . . . . . . . . . . . . . . . . . . . . . . . . . . . . . . . . . . . 68
LG 6190
3
Page 5

Ringers . . . . . . . . . . . . . . . . . . . . . . . . . . . . . . . . . . . . . . . 68
Key T ones . . . . . . . . . . . . . . . . . . . . . . . . . . . . . . . . . . . . . 68
Volume . . . . . . . . . . . . . . . . . . . . . . . . . . . . . . . . . . . . . . . 69
Alerts . . . . . . . . . . . . . . . . . . . . . . . . . . . . . . . . . . . . . . . . . 69
Display . . . . . . . . . . . . . . . . . . . . . . . . . . . . . . . . . . . . . . . . . . 70
Banner . . . . . . . . . . . . . . . . . . . . . . . . . . . . . . . . . . . . . . . 70
Backlight . . . . . . . . . . . . . . . . . . . . . . . . . . . . . . . . . . . . . . 70
Brightness . . . . . . . . . . . . . . . . . . . . . . . . . . . . . . . . . . . . 71
Wallpaper . . . . . . . . . . . . . . . . . . . . . . . . . . . . . . . . . . . . . 71
Sub LCD Contrast . . . . . . . . . . . . . . . . . . . . . . . . . . . . . . 71
Menu Style . . . . . . . . . . . . . . . . . . . . . . . . . . . . . . . . . . . . 71
Theme Colour . . . . . . . . . . . . . . . . . . . . . . . . . . . . . . . . . .72
Time . . . . . . . . . . . . . . . . . . . . . . . . . . . . . . . . . . . . . . . . . .72
Date . . . . . . . . . . . . . . . . . . . . . . . . . . . . . . . . . . . . . . . . . .72
Games/T ools . . . . . . . . . . . . . . . . . . . . . . . . . . . . . . . . . . . . . 73
Backlight . . . . . . . . . . . . . . . . . . . . . . . . . . . . . . . . . . . . . . 73
Volume . . . . . . . . . . . . . . . . . . . . . . . . . . . . . . . . . . . . . . . 73
Notification . . . . . . . . . . . . . . . . . . . . . . . . . . . . . . . . . . . . 73
System . . . . . . . . . . . . . . . . . . . . . . . . . . . . . . . . . . . . . . . . . . 74
Set Mode . . . . . . . . . . . . . . . . . . . . . . . . . . . . . . . . . . . . . 74
Set NAM . . . . . . . . . . . . . . . . . . . . . . . . . . . . . . . . . . . . . . 74
Call Guard . . . . . . . . . . . . . . . . . . . . . . . . . . . . . . . . . . . . 74
Security . . . . . . . . . . . . . . . . . . . . . . . . . . . . . . . . . . . . . . . . . . 75
Lock Phone . . . . . . . . . . . . . . . . . . . . . . . . . . . . . . . . . . . 75
Change Lock . . . . . . . . . . . . . . . . . . . . . . . . . . . . . . . . . . 76
Reset Defaults . . . . . . . . . . . . . . . . . . . . . . . . . . . . . . . . . 76
Airplane Mode . . . . . . . . . . . . . . . . . . . . . . . . . . . . . . . . . . . . . 76
Setup . . . . . . . . . . . . . . . . . . . . . . . . . . . . . . . . . . . . . . . . . . . . 77
Left Shortcut . . . . . . . . . . . . . . . . . . . . . . . . . . . . . . . . . . 77
Right Shortcut . . . . . . . . . . . . . . . . . . . . . . . . . . . . . . . . . 77
Call Answer . . . . . . . . . . . . . . . . . . . . . . . . . . . . . . . . . . . 77
Data Setup . . . . . . . . . . . . . . . . . . . . . . . . . . . . . . . . . . . 78
Auto-Answer . . . . . . . . . . . . . . . . . . . . . . . . . . . . . . . . . . . 79
4
LG 6190
Page 6

Language . . . . . . . . . . . . . . . . . . . . . . . . . . . . . . . . . . . . . 79
Voice Dial . . . . . . . . . . . . . . . . . . . . . . . . . . . . . . . . . . . . . . . . 80
Voice Commands . . . . . . . . . . . . . . . . . . . . . . . . . . . . . . 80
Driving Mode . . . . . . . . . . . . . . . . . . . . . . . . . . . . . . . . . . 80
Announce Alerts . . . . . . . . . . . . . . . . . . . . . . . . . . . . . . . . 80
Best Match . . . . . . . . . . . . . . . . . . . . . . . . . . . . . . . . . . . . 81
Train Commands . . . . . . . . . . . . . . . . . . . . . . . . . . . . . . . 81
Train Digits . . . . . . . . . . . . . . . . . . . . . . . . . . . . . . . . . . . . 82
Help . . . . . . . . . . . . . . . . . . . . . . . . . . . . . . . . . . . . . . . . . 82
Phone Info . . . . . . . . . . . . . . . . . . . . . . . . . . . . . . . . . . . . . . . 82
NAM . . . . . . . . . . . . . . . . . . . . . . . . . . . . . . . . . . . . . . . . . 82
Software Version . . . . . . . . . . . . . . . . . . . . . . . . . . . . . . .82
Hardware Version . . . . . . . . . . . . . . . . . . . . . . . . . . . . . .83
ESN . . . . . . . . . . . . . . . . . . . . . . . . . . . . . . . . . . . . . . . . .83
PRL . . . . . . . . . . . . . . . . . . . . . . . . . . . . . . . . . . . . . . . . . .83
Browser Version . . . . . . . . . . . . . . . . . . . . . . . . . . . . . . . .83
Icon Glossary . . . . . . . . . . . . . . . . . . . . . . . . . . . . . . . . . .83
Camera (Menu 6) . . . . . . . . . . . . . . . . . . . . . . . . . . . . . . . . . . . . . 84
Take Picture . . . . . . . . . . . . . . . . . . . . . . . . . . . . . . . . . . . . . . 85
Gallery . . . . . . . . . . . . . . . . . . . . . . . . . . . . . . . . . . . . . . . . . . 85
Picture Messaging . . . . . . . . . . . . . . . . . . . . . . . . . . . . . . . . . 86
Send Message . . . . . . . . . . . . . . . . . . . . . . . . . . . . . . . . . 86
Inbox . . . . . . . . . . . . . . . . . . . . . . . . . . . . . . . . . . . . . . . . 88
Erase messages . . . . . . . . . . . . . . . . . . . . . . . . . . . . . . . 88
Outbox . . . . . . . . . . . . . . . . . . . . . . . . . . . . . . . . . . . . . . . 88
Draft . . . . . . . . . . . . . . . . . . . . . . . . . . . . . . . . . . . . . . . . . 89
Saved . . . . . . . . . . . . . . . . . . . . . . . . . . . . . . . . . . . . . . . . 89
Templates . . . . . . . . . . . . . . . . . . . . . . . . . . . . . . . . . . . . . 89
Msg Settings . . . . . . . . . . . . . . . . . . . . . . . . . . . . . . . . . . . 89
Memory Status . . . . . . . . . . . . . . . . . . . . . . . . . . . . . . . . 89
Online Album . . . . . . . . . . . . . . . . . . . . . . . . . . . . . . . . . . . . . 90
Camera Settings . . . . . . . . . . . . . . . . . . . . . . . . . . . . . . . . . . 90
Shutter Sound . . . . . . . . . . . . . . . . . . . . . . . . . . . . . . . . . 90
LG 6190
5
Page 7

Resolution . . . . . . . . . . . . . . . . . . . . . . . . . . . . . . . . . . . . 90
Flash . . . . . . . . . . . . . . . . . . . . . . . . . . . . . . . . . . . . . . . . 90
File Quality . . . . . . . . . . . . . . . . . . . . . . . . . . . . . . . . . . . . 91
Safety . . . . . . . . . . . . . . . . . . . . . . . . . . . . . . . . . . . . . 92
TIA Safety Information . . . . . . . . . . . . . . . . . . . . . . . . . . . . . . . . . 92
Exposure to Radio Frequency Signal . . . . . . . . . . . . . . . . . 92
Antenna Care . . . . . . . . . . . . . . . . . . . . . . . . . . . . . . . . . . . . . 92
Phone Operation . . . . . . . . . . . . . . . . . . . . . . . . . . . . . . . . . . 93
Tips on Efficient Operation . . . . . . . . . . . . . . . . . . . . . . . . . . 93
Driving . . . . . . . . . . . . . . . . . . . . . . . . . . . . . . . . . . . . . . . . . . 93
Electronic Devices . . . . . . . . . . . . . . . . . . . . . . . . . . . . . . . . . 93
Pacemakers . . . . . . . . . . . . . . . . . . . . . . . . . . . . . . . . . . . . . . 93
Hearing Aids . . . . . . . . . . . . . . . . . . . . . . . . . . . . . . . . . . . . . . 94
Other Medical Devices . . . . . . . . . . . . . . . . . . . . . . . . . . . . . 94
Health Care Facilities . . . . . . . . . . . . . . . . . . . . . . . . . . . . . . 94
Vehicles . . . . . . . . . . . . . . . . . . . . . . . . . . . . . . . . . . . . . . . . . 94
Other Facilities . . . . . . . . . . . . . . . . . . . . . . . . . . . . . . . . . . . 95
Aircraft . . . . . . . . . . . . . . . . . . . . . . . . . . . . . . . . . . . . . . . . . . 95
Blasting Areas . . . . . . . . . . . . . . . . . . . . . . . . . . . . . . . . . . . . 95
Potentially Explosive Atmosphere . . . . . . . . . . . . . . . . . . . . 95
For Vehicles Equipped with an Air Bag . . . . . . . . . . . . . . . . 95
Charger and Adapter Safety . . . . . . . . . . . . . . . . . . . . . . . . . . . . 96
Battery Information and Care . . . . . . . . . . . . . . . . . . . . . . . . . . . 96
Safety Information . . . . . . . . . . . . . . . . . . . . . . . . . . . . . . . . . . . . 97
FDA Consumer Update . . . . . . . . . . . . . . . . . . . . . . . . . . . . . . 100
Consumer Information on SAR . . . . . . . . . . . . . . . . . . . . . . . . 108
Accessories . . . . . . . . . . . . . . . . . . . . . . . . . . . . . . . 110
Warranty Information . . . . . . . . . . . . . . . . . . . . . . . 112
Index . . . . . . . . . . . . . . . . . . . . . . . . . . . . . . . . . . . . . 114
6
LG 6190
Page 8

elcome
WWelcome
Congratulations for choosing the advanced and compact LG
6190 cellular phone, designed to operate with the latest digital
mobile communications technology. Along with the many
advanced features of the phone is the Fastap™ keypad for easy
data entry – a world first for TELUS Mobility and LG.
The Fastap™ keypad, introduced by Telus Mobility for the LG
6190 phone, is advanced technology created by Digit Wireless.
The Fastap™ keypad makes text entry easy for your messaging,
web browsing and data entry needs.
Other features include
● Large, 6-line 262K TFT display with two line external display.
● Integrated Digital Camera with flash, zoom and multi-shot
capabilities.
● Voice Command for hands-free usage.
● Picture Messaging to Receive and Send picture messages to
another picture messaging equipped handset.
● 500 entry phone book with 5 names and 3 emails per entry.
TELUS Mobility, the Telus Mobility logo, Do MoreTMand the Do
TM
logo are trademarks used with permission from TELUS
More
Corporation.
The trademarks, and logos related to Fastap are the property of Digit
Wireless, LLC and are used with their permission.
Check Accessories
Your mobile phone comes with a rechargeable battery and a
AC adaptor. Please verify that these accessories are included.
LG 6190
7
Page 9

Important Information
This user’s guide provides important information on the use
and operation of your phone. Please read all the information
carefully prior to using the phone for the best performance and
to prevent any damage to or misuse of the phone. Any
unapproved changes or modifications will void your warranty.
FCC Part 15 Class B Compliance
This device and its accessories comply with part 15 of FCC
rules. Operation is subject to the following two conditions: (1)
This device and its accessories may not cause harmful
interference, and (2) this device and its accessories must accept
any interference received, including interference that causes
undesired operation.
Industry Canada Compliance
This phone complies with Industry Canada RSS 133. This
phone complies with the Class B limits for radio noise
emissions as set out in the interference causing standard
entitled "Digital Apparatus" ICES-003 of Industry Canada.
Technical Details
The LG 6190 is an all digital phone that operates on both Code
Division Multiple Access (CDMA) frequencies: cellular services at
800 MHz and Personal Communication Services (PCS) at 1.9 GHz.
Also, the LG 6190 works on Advanced Mobile Phone Service
(AMPS). We call it a tri-mode phone. Since the phone operates
on Cellular, PCS and AMPS, the call fail rate is less than on a
conventional dual-mode or singlemode phone.
CDMA technology uses a feature called DSSS (Direct Sequence
Spread Spectrum) that enables the phone to keep
communication from being crossed and to use one frequency
channel by multiple users in the same specific area. This results
in a 10-fold capacity increase when compared with analog
mode. In addition, features such as soft / softer handoff, hard
Handoff, and dynamic RF power control technologies combine
to reduce call interruptions.
8
LG 6190
Page 10
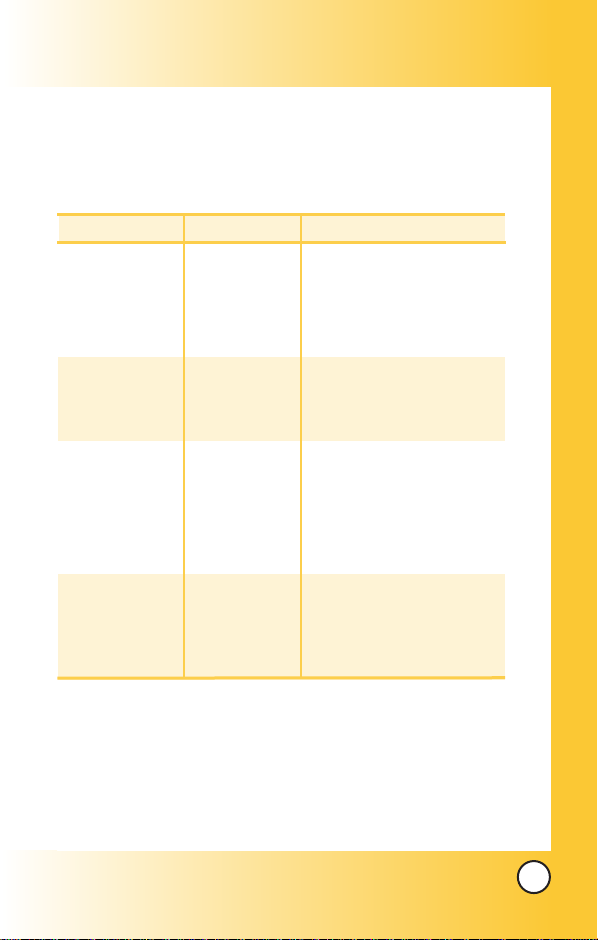
The Cellular and PCS CDMA networks consist of MSO (Mobile
Switching Office), BSC (Base Station Controller), BTS (Base
station Transmission System), and MS (Mobile Station). The
following table lists some major CDMA standards.
CDMA Standard
Basic Air Interface
Network
Service
Performance
Designator Description
TIA/EIA-95A
TSB-74
ANSI J-STD-008
TIA/EIA-IS2000
ANSI TIA/EIA 553A
TIA/EIA/IS-634
TIA/EIA/IS/651
TIA/EIA/IS-41-C
TIA/EIA/IS-124
TIA/EIA/IS-96-B
TIA/EIA/IS-99
TIA/EIA/IS-637
TIA/EIA/IS-657
IS-801
TIA/EIA/IS-707-A
TIA/EIA/IS-97
TIA/EIA/IS-98
ANSI J-STD-018
ANSI J-STD-019
TIA/EIA/IS-125
CDMA Dual-Mode Air Interface
14.4kbps radio link protocol and
inter-band operations
IS-95 adapted for PCS frequency
band cdma2000 1xRTTAirInterface
Advanced Mobile Phone Service
MAS-BS
PCSC-RS
Intersystem operations
Nom-signaling data comm.
Speech CODEC
Async Data and Fax
Short message service
Packet Data
Position Determination
Service (gpsOne)
High Speed Packet Data
Cellular base station
Cellular mobile station
PCS personal station
PCS base station
Speech CODEC
* TSB -74: Protocol between an IS-95A system and ANSI J-STD-008
1xRTT system receives twice as many subscribers in the wireless
section as IS-95. Its battery life is twice as long as IS-95. High-speed
data transmission is also possible.
LG 6190
9
Page 11

FCC RF Exposure Information
WARNING! Read this information before operating the phone.
In August 1996, the Federal Communications Commission
(FCC) of the United States, with its action in Report and Order
FCC 96-326, adopted an updated safety standard for human
exposure to Radio Frequency (RF) electromagnetic energy
emitted by FCC regulated transmitters. Those guidelines are
consistent with the safety standard previously set by U.S.,
Canadian and international standards bodies.
The design of this phone complies with the FCC guidelines and
these international standards.
Bodily Contact During Operation
This device was tested for typical use with the back of the
phone kept 3/4 inches (2 cm) from the body. To comply with IC
and FCC RF exposure requirements, a minimum separation
distance of 3/4 inches (2 cm) must be maintained between the
user’s body and the back of the phone, including the antenna,
whether extended or retracted. Third-party belt-clips, holsters,
and similar accessories containing metallic components should
not be used. Avoid the use of accessories that cannot maintain
3/4 inches (2 cm) distance between the user’s body and the
back of the phone and have not been tested for compliance
with IC and FCC RF exposure limits.
10
LG 6190
Page 12

Vehicle-Mounted External Antenna
(Optional, if available.)
A minimum distance of 8 inches (20 cm) must be maintained
between the user / bystander and the vehicle-mounted external
antenna to satisfy IC and FCC RF exposure requirements. For
more information about RF exposure, visit the FCC website at
www.fcc.gov.
Caution
Use only the supplied and approved antenna. Use of
unauthorized antennas or modifications could impair call
quality, damage the phone, void your warranty and/or result in
violation of FCC regulations.
Do not use the phone with a damaged antenna. If a damaged
antenna comes into contact with the skin a minor burn may
result. Contact your local dealer for a replacement antenna.
LG 6190
11
Page 13
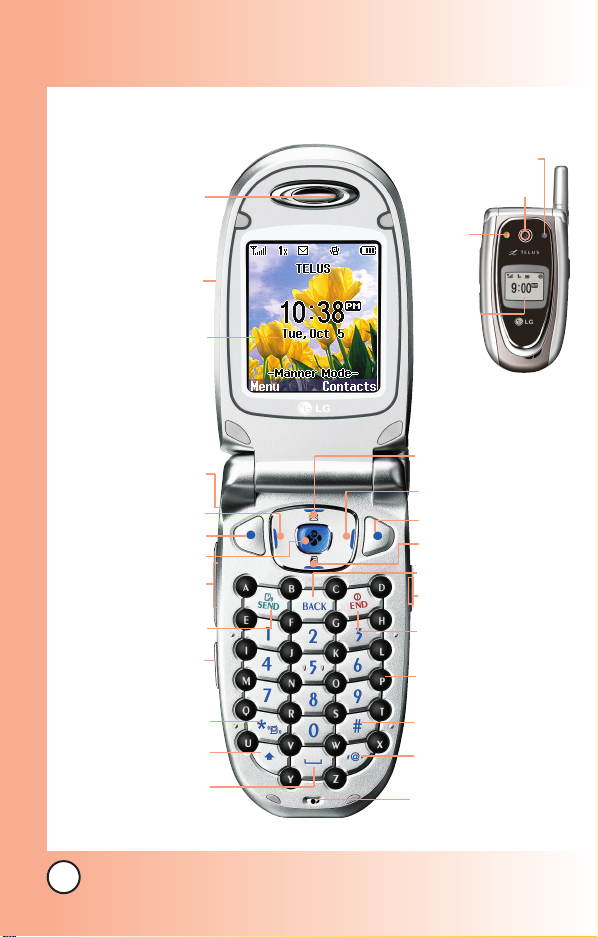
Phone Over
Phone Over
1. Earpiece
2. Flip
3. LCD Screen
view
view
Indicator Lamp
Camera Lens
Flash
Outside
Display
4. Headset Jack
5. Left Shortcut Key
6. Left Soft Key
7. Do MoreTMKey
8. Side Keys
9. SEND Key
10. Voice Command
Key
11. Manner Mode Key
12. Shift Key
13. Space Key
12
LG 6190
14. Message Key
15. Right Shortcut Key
16. Right Soft Key
17. Recent Calls Key
18.BACK Key
19.Camera Key
20.END Key
21.
Alphanumeric Fastap
Keypad
22. Lock Mode Key
Symbols/Smiley Key
23.
24. Microphone
TM
Page 14
1. Earpiece
2. Flip
Flip open the case to answer an incoming call and close to end the call.
3. LCD Screen Displays messages and indicator icons.
4. Headset Jack
5. Left Shortcut Key Use for quick access to create a quick link.
6. Left Soft Key Use to display the function setting menu.
7. Do More
menu or can be used to select a command.
8. Side Keys Use to adjust the ringer volume in the Main menu
screen and the earpiece volume during a call.
9. SEND Key Use to place or answer calls. Use for quick access to
Voice commands.
10. Voice Command Key Use for quick access to the Voice
Command module.
11. Manner Mode Key Use to set Manner Mode (from the Main
menu screen press and hold for about 3 seconds).
12. Shift Key
13. Space Key
14.
Message Key Use to retrieve or send voice and text messages.
TM
Key
Use in standby mode to access the Do More
Use to change a letter case.
Use to insert a space.
TM
15. Right Shortcut Key Use for quick access to create a quick link.
16. Right Soft Key Use to select an action within a menu.
17. Recent Calls Key Use to call to recent call number.
18. BACK Key
delete entire words. Press this key once in a menu to go back one level.
Press to delete a single space or character. Press and hold to
19. Camera Key Use for quick access to all camera functions.
20. END Key Use to turn the power on/off and to end a call. Also
use to return to the main menu display screen.
21. Alphanumeric FastapTMKeypad Use to enter numbers and
characters and select menu items.
-
~ : Text
-
: Text Messaging shortcut-: Picture Messaging shortcut
-
: Web Browser shortcut
22. Lock Mode Key
Use in the Main menu screen to set the lock
-
~ : Numbers
function by pressing and holding the key for about 3 seconds.
23. Symbols/Smiley Key Use to insert special characters or
punctuation or smiley symbols.
24. Microphone
LG 6190
13
Page 15
Menus Over
Menus Over
Press Left Soft Key Menu. Press to scroll.
view
view
Contacts
1. List Entries
2. New Entry
3. Speed Dial
4. Groups
5. Erase All Contacts
Call History
1. Recent Calls
2. Incoming Calls
3. Outgoing Calls
4. Missed Calls
5. Erase Logs
1. Recent Calls
2. Incoming Calls
3. Outgoing Calls
4. Missed Calls
5. All Calls
6. Call Timers
1. Last Call
2. Recent Calls
3. Lifetime
Messages
1. Voice Mail
2. Text Messaging
1. Send Message
2. Inbox
3. Erase Messages
4. Outbox
5. Draft
6. Saved
7. Msg Settings
1. Save to Outbox
2. Auto Delete Inbox
3. Auto Scrolling
4. Callback #
5. Msg Reminder
6. Canned Message
3. Picture Messaging
1. Send Message
2. Inbox
3. Erase Messages
4. Outbox
5. Draft
6. Saved
7. Templates
8. Msg Settings
9. Memory Status
4. Web Alerts
5. E-mail
6. IM & Chat
Do More
1. Wireless Web
2. Sounds
3. Images
4. Games
5. Tools
6. Memory Status
TM
14
LG 6190
Page 16
Settings
1. Sounds
1. Ringers
2. Key Tones
3. Volume
4. Alerts
2. Display
1. Banner
2. Backlight
3. Brightness
4. Wallpaper
5. Sub LCD Contrast
6. Menu Style
7. Theme Colour
8. Time
9. Date
3. Games/Tools
1. Backlight
2. Volume
3. Notification
4. System
1. Set Mode
2. Set NAM
3. Call Guard
5. Security
1. Lock Phone
2. Change Lock
3. Reset Defaults
6. Airplane Mode
7. Setup
1. Left Shortcut
2. Right Shortcut
3. Call Answer
4. Data Setup
5. Auto-Answer
6. Language
8. Voice Dial
1. Voice Commands
2. Driving Mode
3. Announce Alerts
4. Best Match
5. Train Commands
6. Train Digits
7. Help
9. Phone Info
1. NAM
2. Software Version
3. Hardware Version
4. ESN
5. PRL
6. Browser Version
7. Icon Glossary
Camera
1. Take Picture
2. Gallery
3. Picture Messaging
4. Online Album
5. Camera Settings
LG 6190
15
Page 17

Getting Y
Getting Y
The Battery
NOTE: It is important to fully charge the battery before initial use of
The phone comes with a rechargeable battery. Keep the battery
charged while not in use in order to maximize talk and standby time.
The battery charge level is shown at the top of the LCD screen.
Installing the Battery
1. Press down on the release button and slide the battery cover
down and remove.
2. Place the battery in the opening at a 45-degree angles with the
metal contacts at the bottom of the phone and press downwards
until the battery fits snug into place. The battery is uni-directional
and will only fit in one directional.
3. Slide the battery cover back on to the phone until you hear a click.
Removing the Battery
1. Make sure the power is off to avoid losing any stored
information.
2. Press down on the release button and slide the battery cover
down and remove.
3. Gently push the battery down on it’s contacts then pull out the
battery from the phone at a 45-degree angle.
4. Slide the battery cover back on to the phone until you hear a click.
Charging the Battery
To use the charger provided with your phone:
Warning! Use only the charger provided with the phone. Using
any charger other than the one included with the LG 6190
may damage your phone or battery.
1. Plug the round end of the adapter into the phone’s charger
jack and the other end into an electrical outlet.
2. The charge time varies depending upon the battery level. The
maximum charge time for a fully discharged battery is 3.5 hours.
our Phone Star
our Phone Star
the phone.
ted
ted
16
LG 6190
Page 18
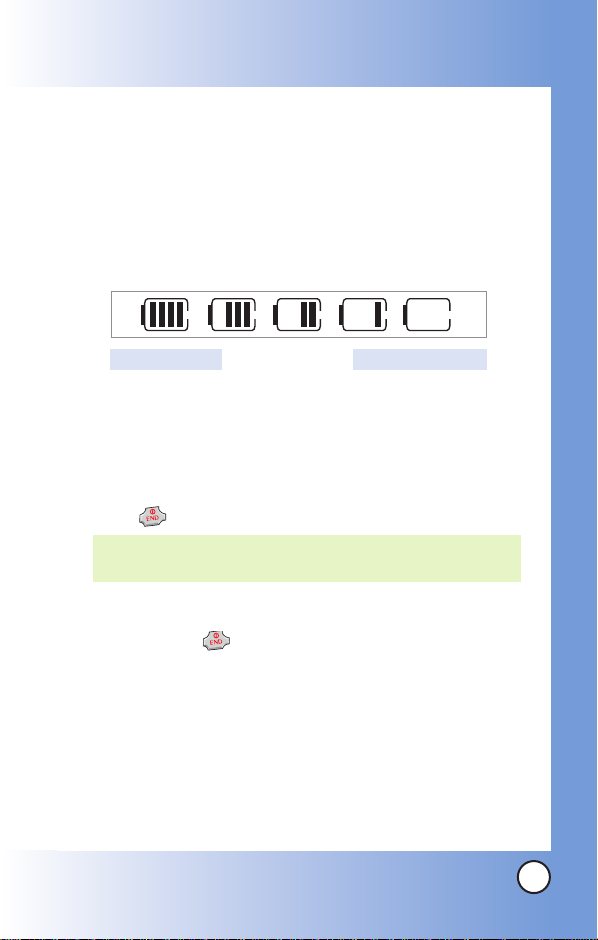
Battery Charge Level
The battery charge level is shown at the top right of the LCD
screen. When the battery charge level becomes low, the low
battery sensor alerts you in three ways: sounding an audible
tone, blinking the battery icon, and displaying
WARNING! If the battery charge level becomes exceedingly low,
LOW BATTERY
the phone automatically switches off and any function in
progress is not saved.
Fully DischargedFully Charged
Turning the Phone On and Off
Tur ning the Phone On
1. Install a charged battery or connect the phone to an external power
source such as a cigarette lighter charger or hands-free car kit.
2. Press for a few seconds until the LCD screen lights up.
NOTE: Like any other radio device, avoid any unnecessary
contact with the antenna while your phone is on.
Tur ning the Phone Off
1. Press and hold until the display turns off.
Signal Strength
Call quality depends on the signal strength in your area. The signal
strength is indicated on the screen as the number of bars next to the
signal strength icon: The more bars, the better the signal strength. If
the signal quality is poor, move to an open area. If you are in a
building, the reception may be better near a window.
LG 6190
17
Page 19

Getting Y
Getting Y
Screen Icons
When the phone is powered on, the top line of the LCD screen
displays icons indicating the status of the phone.
our Phone Star
our Phone Star
ted
ted
Icon
Signal strength indicator. The strength of the signal
received by the phone is indicated by the number of bars
displayed.
Battery indicator. Indicates battery charge level.
In use indicator. A call is in progress.
* No icon indicates the phone is in the Main menu screen.
No service indicator. The phone is not receiving a system
signal.
SSL
IS-2000 Service indicator
Digital indicator.
Roaming indicator. The phone is outside of the home
service area.
New text message indicator.
New text and voice message indicator.
New Picture Msgs.
Alarm.
1x Data Active.
Manner Mode.
Driving Mode.
Description
Analog indicator.
New voice mail indicator.
Silence All.
Announce Alerts.
18
LG 6190
Page 20
Making Calls
1.
Make sure the phone is turned on. If not, press for about 3 seconds.
2. Enter the phone number (include the area code if needed).
3. Press .
lf the phone is locked, enter the lock code.
Call Failed - indicates the call did not go through.
Restricted - indicates outgoing calls are in restricted mode.
See page 75 for more details.
4. Press to end the call.
NOTE: You can also dial Vanity Numbers
without a thought. Just enter them as numbers and
letters. When you press the phone will translate your
entry to all numbers automatically.
NOTE: The number keys have the patented Thumb-Friendly™
software, so hitting a letter that surrounds the number
key will result in the proper number being dialed.
Correcting Dialing Mistakes
(like 1-888-LGCANADA)
If you make a mistake while dialing a number, press once
to erase the last digit entered, or hold down for at least 2
seconds to delete all digits.
Navigation Down key
1. Press and hold to redial the last number you dialed.
The last 30 numbers are stored in the call history list and you
can also select one of these to redial.
Receiving Calls
1. When the phone rings or vibrates press to answer.
NOTE: If you press or the side key while the phone is
ringing, the ringing or vibration is muted for that call.
2. Press or the side key twice to end the call.
LG 6190
19
Page 21
Quick Access to Convenient Featur
Quick Access to Convenient Featur
es
es
Manner Mode
Use Manner Mode in public places. When Manner Mode is set,
is displayed on the screen, the key tones are silent, and the
phone is set to vibrate.
Manner Mode Quick Activation
1. From the Main menu screen press for 3 seconds.
Manner Mode Quick Cancellation
1. Press for 3 seconds to switch to Normal Mode.
Lock Mode
Use Lock Mode to prevent others from using your phone.
When Lock Mode is set, your 4-digit password is required to
use the phone.
NOTE: Your default lock code/password is the last 4 digits of your
phone number.
Lock Mode Quick Activation
1. From the Main menu screen, press for 3 seconds.
Lock Mode Quick Cancellation
1. Press Right Soft Key Unlock then enter your 4-digit
password.
20
LG 6190
Page 22

Mute Function
The Mute function prevents the other party from hearing your
voice, but allows you to hear the other party.
Mute Quick Activation
1. Press Right Soft Key Options and select Mute
during a call.
Mute Quick Cancellation
1. Press Right Soft Key Options and select Un
mute.
Volume Quick Adjustment
Use the side keys to adjust the earpiece and ringer volumes.
The upper key increases the volume and the lower key
decreases the volume.
●
Earpiece volume can be adjusted during a call.
NOTE: Key tone volume is adjustable only through the Settings
menu.
LG 6190
21
Page 23

Quick Access to Convenient Featur
Quick Access to Convenient Featur
es
es
Call Waiting
Your cellular service may offer call waiting. While a call is in
progress, two beeps indicate another incoming call. When call
waiting is enabled, you may put the active call on hold while
you answer the other incoming call. Check with your cellular
service provider for information about this function.
1. Press to receive a waiting call.
2. Press again to switch between calls.
Caller ID
Caller ID displays the phone number or name of the incoming call. If the
caller’s identity is stored in contacts, the name appears with the number.
Check with your service provider to ensure they offer this feature.
Speed Dialing
Speed dialing is a convenient feature that allows you to make phone
calls quickly and easily with a few keystrokes. Your phone recalls the
number from your contacts, displays it briefly, and then dials it.
Dialing Speed Dials from 1 to 9
Press and hold the Speed Dial number.
OR
Enter the speed dial number and press .
Dialing Speed Dials from 10 to 99
Press the first digit and then press and hold the key of the
last digit.
OR
Enter the first and second digits and press
22
LG 6190
.
Page 24
Hands-free dialing
You can make phone calls with just the sound of your voice.
You can either make a call from your contacts list or by digit
dialing.
1. From the Main menu, press the Voice Command Key ( )
or .
2. You will be taken to the Voice Command submenu, when
prompted say “Contacts” to dial a contact from your
phone book or “Digit Dial” to vocally dial a number.
NOTE: It is not necessary to train the phone to understand your
voice or the entry name before making a voice dial.
NOTE: Voice Command functionality is not available in French.
LG 6190
23
Page 25
Entering and Editing Infor
Entering and Editing Infor
mation
mation
Text Input
You can input and edit your Banner, Schedule, Contacts, and
Messaging.
Key Functions
Right Soft Key: Press to change case.
Abc -> ABC -> abc
Shift: Use to change case.
Space: Press to complete a word and insert a
space.
BACK: Press to delete a single space or
character. Hold to delete words.
Symbols: Use to insert special characters or
punctuation.
Smiley: Press key twice to insert smiley
symbols.
~
~
NOTE: The number keys have the patented Thumb-Friendly™
24
LG 6190
Use to type text.
Use to type numbers.
software, so even if you hit a few letters by mistake, you
will still get the number you want.
Page 26
Changing Letter Case
Using text input modes you can set the capitalization. Press
Right Soft Key to cycle through the following:
Initial Cap (Abc)
Only the first letter is capitalized. All subsequent letters are lower case.
Caps Lock (ABC)
All letters are capitalized.
Capitalizing Characters
Press to capitalize your next letter.
Lower Case (abc)
All letters are in lower case.
French Accented Characters
When in French mode, the phone will provide accented
characters by pressing the base letter key multiple times.(e.g.
Press once for e, twice for è, 3 times for é, etc.).
Text Input Examples
Display the text modes and select a text mode:
1.
In a text entry field, press Right Soft Key to display text modes.
2. Press to highlight the text input mode you want to use.
3. Press to select the highlighted text input mode.
Using Text Input
1. Press Right Soft Key to change to Abc mode.
2. Press .
Call the office is displayed.
LG 6190
25
Page 27
Contacts in Y
Contacts in Y
Contacts Entries
This allows you to have easy access to your most frequently
dialed phone numbers. You may store up to 500 entries with up
to 5 phone numbers each. Each entry may be up to 22
characters. Each phone number may be up to 48 digits.
our Phone’
our Phone’
s Memoryy
s Memor
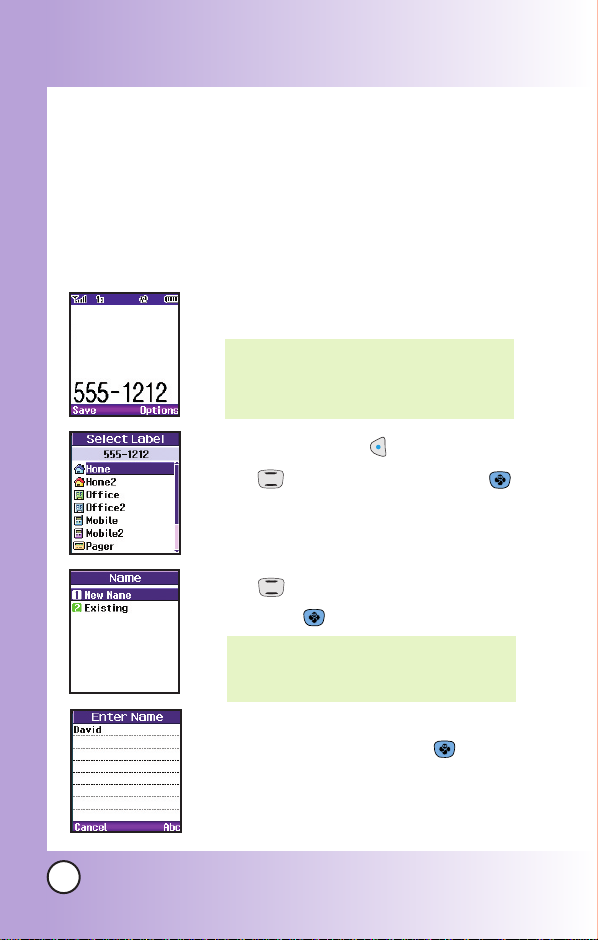
The Basics of Storing Contacts Entries
1.
From the Main menu screen enter the phone
number you want to save (up to 48 digits).
NOTE: Vanity Numbers must be entered
as numbers in contacts. This is to
avoid confusion of P & T which are
used as Hard and Soft Pauses.
2. Press Left Soft Key Save.
3. Use to select a Label and press .
Home / Home2 / Office / Office2 /
Mobile / Mobile2 / Pager / Fax / Fax2 /
None
4. Use to select New Name or Existing
and press .
NOTE: Use Existing to add another phone
number to a contact already stored
in memory.
26
5. Enter a name for the phone number (up
to 22 characters) and press .
A confirmation message is displayed
briefly.
LG 6190
Page 28
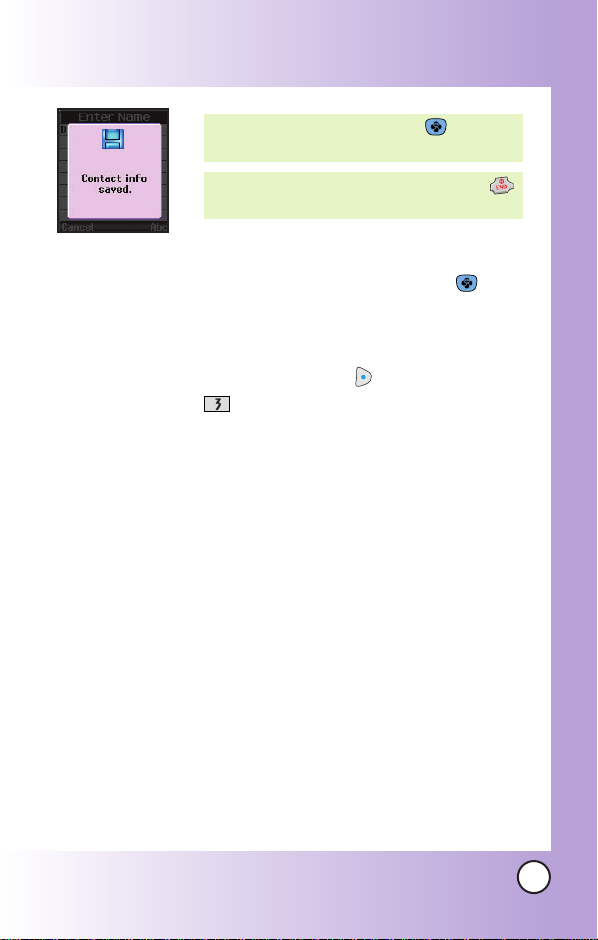
NOTE: To skip name entry, press to go to
the next step.
NOTE: If the information is complete, press
to return to the Main menu screen.
6. To customize the entry, highlight any field in
the Edit Entry submenu and press .
7. To add a speed to dial to an entry, highlight
the phone number in the Edit Entry
submenu and press Options and press
Set Speed Dial.
LG 6190
27
Page 29
Contacts in Y
Contacts in Y
our Phone’
our Phone’
s Memoryy
s Memor
Options to Customize Your Contacts
Once you have entered your contact information, you can edit
and/or customize the entry.
1. Press Right Soft Key Contacts and use to hightlight
the contact entry you want to edit , then press .
2. Press Left Soft Key Edit to access the Edit Entry screen.
3. Use to highlight the information you want to customize
and press .
Adding or Changing the Group
Allows you to manage your contacts entries by organizing them
into groups.
1. Press Right Soft Key Contacts and use to highlight
an entry, then press .
2. Press Left Soft Key Edit.
3. Use to highlight
4. Use to select the Group and press .
No Group / Family / Friends / Colleagues / Business /
School
5. Press Left Soft Key Done or continue editing the contact
entry.
NOTE: You can change the name of the group, add groups, and
delete groups.
28
LG 6190
No Group and press .
Page 30
Changing the Call Ringer
Allows you to identify who is calling, by setting different ringers
for different phone numbers in your contacts. It is automatically
set to the default ringer when the contact is saved.
1. Press Right Soft Key Contacts and use to highlight
an entry, then press .
2. Press Left Soft Key Edit.
3. Use to highlight Default Ringer and press .
4. Use to select the Ringer Type and press .
5. Press Left Soft Key Done or continue editing the
contact entry.
LG 6190
29
Page 31
Contacts in Y
Contacts in Y
Adding or Changing the Memo
Allows you to enter up to 48 characters as a memo to the
contact entry.
1. Press Right Soft Key Contacts and use to
highlight an entry, then press .
2. Press Left Soft Key Edit.
our Phone’
our Phone’
s Memoryy
s Memor
3. Use to highlight
4. Enter text and press .
5. Press Left Soft Key Done or continue editing the contact
entry.
Adding Speed Dial
1. Access your contacts and use to highlight an entry,
then press .
2. Use to highlight the phone number you want to set
with a Speed Dial, then press Left Soft Key Edit
3. Press Right Soft Key Options, then press Set
Speed Dial.
4. Enter a Speed Dial digit.
Use the Keypad
the Speed Dial digit
5. Press Left Soft Key Done or continue editing the
contact entry, or press to return to the Idle.
30
LG 6190
Memo and press .
press , or use to highlight
, then
press .
, then
.
Page 32
Editing Contacts Entries
Adding Another Phone Number
From the Main Menu Screen
1. From the Main menu screen, enter the phone number you
want to save (up to 48 digits).
2. Press Left Soft Key Save.
3. Use to highlight a Label and press .
Home / Home2 / Office / Office2 / Mobile / Mobile2 /
Pager / Fax / Fax2 / None
4. Use to highlight Existing and press .
5. Use to highlight the existing contact entry and press
.
A confirmation message is displayed.
Through Contacts
1.
From the Main menu screen, press Right Soft Key Contacts.
Your contacts are displayed alphabetically.
2. Use to highlight the contact entry you want to edit,
then press .
3. Press Left Soft Key Edit.
4. Use to highlight Add Number, then press .
5. Enter the number and press .
6. Use to highlight a Label, then press .
A confirmation message is displayed.
LG 6190
31
Page 33
Contacts in Y
Contacts in Y
Default Numbers
The phone number saved when a contact is created is the
Default Number. If more than one number is saved in a contact
entry, another number can be saved as the Default Number.
NOTE: The Default Number cannot be deleted by itself. The entire
contact entry can be deleted or another number can be set
as the Default Number allowing you to delete the original
saved number and keep the contact entry.
Changing the Default Number
1. From idle, press Right Soft Key Contacts. Your
contacts are displayed alphabetically.
2. Use to highlight the contact entry you want to edit,
then press .
3. Press Left Soft Key Edit.
4. Use to highlight the phone number you want to set as
the Default Number and press Right Soft Key Options.
5. Press Set as Default #.
A confirmation message is displayed.
Editing Stored Phone Numbers
1. From idle, press Right Soft Key Contacts.Your contacts
are displayed alphabetically.
2. Use to highlight the contact entry you want to edit, then
press .
3. Press Left Soft Key Edit.
4. Use to highlight the phone number and press .
5. Edit the phone number as necessary and press .
our Phone’
our Phone’
s Memoryy
s Memor
32
LG 6190
Page 34

Editing Stored Names
1. From the Main menu screen, press Right Soft Key
Contacts.
Your contacts are displayed alphabetically.
2. Use to highlight the contact entry you want to edit,
then press .
3. Press Left Soft Key Edit.
4. Use to highlight the name and press .
5. Edit the name as necessary and press .
Editing Customized Options
Edit any of the contacts options in the same manner as when
the contact is created.
1. From the Main menu screen, press Right Soft Key
Contacts.
Your contacts are displayed alphabetically.
2. Use to highlight the contact entry you want to edit,
then press .
3. Press Left Soft Key Edit.
4. Use to highlight the information you want to customize
and press .
5. Edit the information as necessary and press .
LG 6190
33
Page 35

Contacts in Y
Contacts in Y
our Phone’
our Phone’
s Memoryy
s Memor
Deleting
Deleting a Phone Number from a Contact
1. Press Right Soft Key Contacts.
2. Use to highlight the contact entry, then press .
3. Press Left Soft Key Edit.
4. Use to highlight the phone number to be deleted.
5. Press Right Soft Key Options.
6. Press Erase Number.
7. Press Erase number.
A confirmation message is displayed.
Deleting a Contact Entry
1. Press Right Soft Key Contacts.
2. Use to highlight the contact entry to be deleted, then
press .
3. Press Right Soft Key Options.
4. Press Erase Contact.
5. Press Erase.
A confirmation message is displayed.
Additional Ways to Delete a Contact
Once you accessed your contacts, pressing Right Soft Key
Options. at any point for the option to erase the entry.
34
LG 6190
Page 36

Deleting a Speed Dial
1. Press Right Soft Key Contacts.
2. Use to highlight the contact entry, then press .
3. Press Left Soft Key Edit
4. Use to highlight the number and press Options.
5. Press Remove Speed Dial.
6. Press Remove.
A confirmation message is displayed.
LG 6190
35
Page 37
Contacts in Y
Contacts in Y
our Phone’
our Phone’
s Memoryy
s Memor
Phone Numbers With Pauses
When you call automated systems such as voice mail or credit
billing numbers, you often have to enter a series of numbers.
Instead of entering these numbers by hand, you can store the
numbers in your contacts separated by special pause
characters (P, T). There are two different types of pauses you
can use when storing a number:
Hard pause (p)
The phone stops dialing until you press Left Soft Key Release
to advance to the next number.
2-sec pause (t)
The phone waits 2 seconds before sending the next string of digits.
Storing a Number With Pauses
1. Press Left Soft Key Menu.
2. Press Contacts.
3. Press New Entry.
4. Enter the number.
5. Press Right Soft Key Pause.
6. Use to select pause type and press .
Hard pause / 2-sec pause
7. Enter additional number(s) (e.g., pin number or credit card
number) and press .
8. Use to select a Label and press .
9. Enter a name (up to 22 characters).
A confirmation message is displayed.
36
LG 6190
Page 38
Adding a Pause to an Existing Number
1. Press Right Soft Key Contacts.
2. Use to highlight the contact entry to edit, then press
.
3. Press Left Soft Key Edit.
4. Use to highlight the number then press .
5. Press Right Soft Key Pause.
6. Press Hard pause or 2-sec pause.
7. Enter additional number(s) and press .
8. Use to select the label type and press .
A confirmation message is displayed.
LG 6190
37
Page 39
Contacts in Y
Contacts in Y
our Phone’
our Phone’
s Memoryy
s Memor
Searching Your Phone’s Memory
The LG 6190 phone is able to perform a dynamic search of the
contents in your phone’s memory. A dynamic search compares
entered letters or numbers against the entries in your contacts.
A matching list is displayed in descending order. You can then
select a number from the list to call or edit. There are several
ways to search:
● Scrolling Alphabetically
● Searching by Letter
● Searching by Options
- Find Name - Find Number
- Find Speed Dial - Find Group
- Find E-mail
Scrolling Through Your Contacts
1. Press Right Soft Key Contacts.
Contacts list is displayed alphabetically.
2. Use to scroll through the list.
Searching by Letter
1. Press Right Soft Key Contacts.
Contacts list is displayed alphabetically.
2. Press the corresponding Fastap
corresponds with the search letter. Spelling out the name
will narrow the search list.
TM
key on the keypad that
38
LG 6190
Page 40

Searching Options
1. Press Right Soft Key Contacts.
2. Press Right Soft Key Options.
3. Select the search criteria using (or press the corresponding
number on the keypad):
Find Name - Enter the character(s) to search for (such
as the first letters of the name).
Find Number - Enter the number(s) to search.
Find Speed Dial - Enter the speed dial number(s) to
search.
Find Group - Use to highlight the group to search
for and press .
Find E-mail - Enter the e-mail address to search.
4. A list of matches is displayed.
Use to highlight a matched entry.
5. Press to see more information or press to place a
call.
LG 6190
39
Page 41
Contacts in Y
Contacts in Y
our Phone’
our Phone’
s Memoryy
s Memor
Making a Call From Your Phone’s Memory
Once you have stored phone numbers into your contacts, you
can place calls to those numbers quickly and easily.
●
By pressing after you’ve searched for a phone
number in Contacts or Recent Calls.
●
Using Speed Dialing
●
Using Voice Dialing
From Contacts
1. Press Right Soft Key Contacts.
2. Use to select the contact entry and press .
3. Use to select the phone number.
4. Press to place the call.
From Recent Calls
1. Press Left Soft Key Menu.
2. Press Call History.
3. Use to select the type of recent call and press .
Recent Calls / Incoming Calls / Outgoing Calls /
Missed Calls / Erase Logs / Call Timers
4. Use to highlight the phone number.
5. Press to place the call.
40
LG 6190
Page 42

Using Phone Menus
Using Phone Menus
Menu Access
Press Left Soft Key Menu to have access to six phone
menus. There are two methods to access menus and
submenus:
●
Use the navigation key to highlight and select, or
●
Press the number key that corresponds to the menu or
submenu.
For example:
1. Press Left Soft Key Menu.
Six menu items are displayed.
Use to scroll through the list of menus.
2. Press the appropriate number key corresponding to the
menu item you want to select.
The sub-menu list will be displayed.
3. Press the appropriate number key corresponding to the
sub-menu you want to access.
4. Use to highlight your preferred setting and press
to select it.
NOTE: Press to go back one step while accessing the
menu or selecting a setting.
NOTE: Press to cancel without saving.
LG 6190
41
Page 43

Using Phone Menus
Using Phone Menus
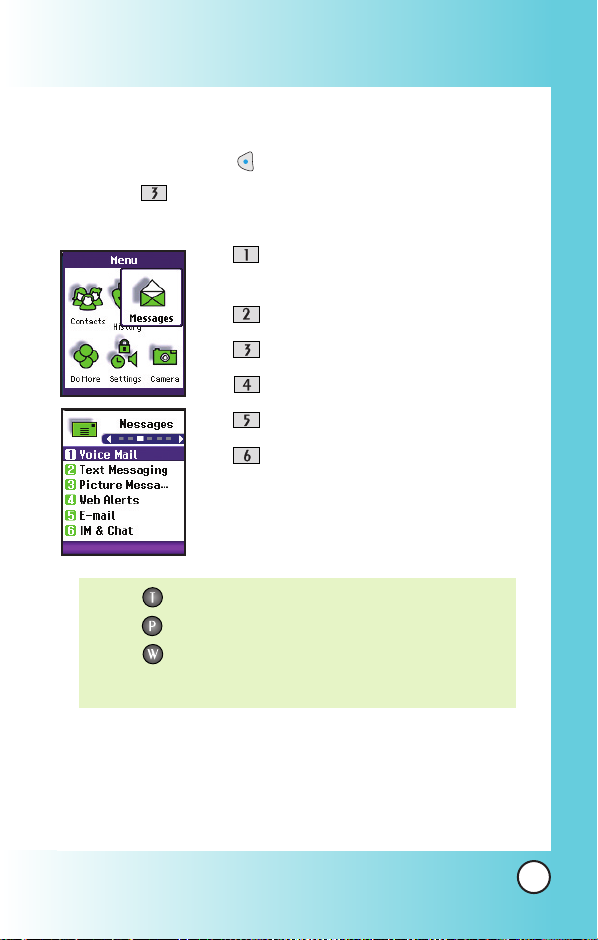
Contacts (Menu )
The Contacts Menu allows you to store names, phone numbers
and other information in your phone’s memory. When you
access your contacts, the number in parenthesis represents the
number of entries you have stored (up to 500).
Access and Options
1. Press Left Soft Key Menu.
2. Press Contacts.
3. Select a sub-menu.
●
List Entries
●
New Entry
●
Speed Dial
●
Groups
●
Erase All Contacts
42
LG 6190
Page 44
List Entries (Menu )
Allows you to view your contacts list.
1. Press , , .
2. Options from here:
●
Press to scroll through your contacts
alphabetically.
●
Press Right Soft Key Options to select one of the
following:
Send Text Msg / Send Picture Msg / Find Name /
Find Number / Find Speed Dial / Find Group /
Find E-mail / Erase Contact
●
Press Left Soft Key New to store a New Number
or New E-mail.
New Entry (Menu )
Allows you to add a new number.
NOTE: Using this sub-menu, the number is saved as a new
contact. To save the number into an existing contact, edit
the contact entry.
1. Press , , .
2. Enter the number and press .
3. Select the Label you want and press .
4. Enter the name and press .
5. Continue saving the entry as necessary.
LG 6190
43
Page 45

Using Phone Menus
Using Phone Menus
Speed Dial (Menu )
Allows you to view your list of Speed Dials or designate Speed
Dials for numbers entered in your contacts.
1. Press , , .
2. Use to highlight the Speed Dial position, or enter the
Speed Dial digit and press .
3. Use to highlight the contact and press .
4. Use to highlight the number and press .
A confirmation message is displayed.
Groups (Menu )
Allows you to view your grouped contacts, add a new group,
change the name of a group, or delete a whole group.
1. Press , , .
2. Options from here:
●
Use to highlight a group to view and press .
●
Press Left Soft Key Add to add a new group to the list.
●
Use to highlight a group and press Right Soft Key
Options to Edit title of the Erase group.
Erase All Contacts (Menu )
Allows you to erase all of your contacts at once.
1. press , , .
2. Enter the four-digit lock code.
3. Set Erase all # or Cancel.
44
LG 6190
Page 46

Call History (Menu )
The Recent Calls Menu is a list of the last phone numbers or
contact entries for calls you placed, accepted, or missed. It is
continually updated as new numbers are added to the
beginning of the list and the oldest entries are removed from
the bottom of the list.
NOTE: To view a quick list of all your recent calls, press from
the Main Menu.
●
●
●
indicates a dialed call.
indicates a received call.
indicates a missed call.
Access and Options
1. Press Left Soft Key Menu.
2. Press Call History.
3. Select a sub-menu.
●
●
●
●
●
●
Recent Calls
Incoming Calls
Outgoing Calls
Missed Calls
Erase Logs
Call Timers
LG 6190
45
Page 47

Using Phone Menus
Using Phone Menus
Recent Calls (Menu )
Allows you to view list of recent calls; up to 30 entries
1. Press , , .
2. Use to highlight an entry, then
●
Press to view the entry.
●
Press to place a call to the number.
●
Press Right Soft Key Options to select:
Save / Send Text Msg. / Send Picture Msg. / Prepend / Erase
Incoming Calls (Menu )
Allows you to view the list of incoming calls; up to 30 entries.
1. Press , , .
2. Use to highlight an entry, then
●
Press to view the entry.
●
Press to place a call to the number.
●
Press Right Soft Key Options to select:
Save / Send Text Msg. / Send Picture Msg. / Prepend /
Erase / Erase All
Outgoing
(Menu )
Calls
Allows you to view the list of outgoing calls; up to 30 entries.
1. Press , , .
2. Use to highlight an entry, then
●
Press to view the entry.
●
Press to place a call to the number.
●
Press Right Soft Key Options to select:
Save / Send Text Msg. / Send Picture Msg. / Prepend /
Erase / Erase All
46
LG 6190
Page 48

Missed Calls (Menu )
Allows you to view the list of missed calls; up to 30 entries.
1. Press , , .
2. Use to highlight an entry, then
●
Press to view the entry.
●
Press to place a call to the number.
●
Press Right Soft Key Options to select:
Save / Send Text Msg. / Send Picture Msg. / Prepend /
Erase / Erase All
Erase Logs (Menu )
Allows you to erase selected logs list(s).
1. Press , , .
2. Use to highlight the list of calls to erase and press .
Recent Calls / Incoming Calls / Outgoing Calls /
Missed Calls / All Calls
3. Press Erase or Cancel.
Call Timers (Menu )
Allows you to view the duration of selected calls.
1. Press , , .
2. Use to highlight a call list and press .
Last Call / Recent Calls / Lifetime
LG 6190
47
Page 49

Using Phone Menus
Using Phone Menus
Messages (Menu )
Text messages, Web Alerts, and the voice mail box become
available as soon as the phone is powered on.
These functions are made easier by the Fastap
●
Check types of messages by pressing the message key .
●
Make a call to the callback number by pressing during
a message check.
●
Read and edit messages saved in the outbox during
transmission and send them.
The phone can store up to 115 messages (for example, 50
inbox text messages, 50 outbox text messages, 30 draft text
messages, 15 saved text messages). The LG 6190 supports up
to 150 characters per message including header information.
The information stored in the message is determined by phone
mode and service capability. Other limits to available characters
per message may exist. Please check with your service provider
for system features and capabilities.
New Message Alert
There are three ways your phone alerts you to new messages.
1. The phone displays the message on the screen.
2. One of over 26 rings is heard, if selected.
3. The message icon ( ) is displayed on the display screen.
TM
keypad.
NOTE: If you receive the same message twice, your phone deletes
the older one and the new one is stored as a Duplicate.
48
LG 6190
Page 50
Access and Options
1. Press Left Soft Key Menu.
2. Press Messages.
3. Select a sub-menu.
●
Voice Mail : Shows the number of
messages in voice mail box.
●
●
●
●
●
NOTE: : Text messaging shortcut.
: Picture messaging shortcut.
: Web Browser shortcut.
You must press and hold the key for one or two seconds.
Text Messaging
Picture Messaging
Web Alerts
E-mail
IM & Chat
LG 6190
49
Page 51

Using Phone Menus
Using Phone Menus
Voice Mail (Menu )
Allows you to view new voice messages recorded in the voice
mail box. When you have a new voice message, your phone
will alert you.
Checking Your Voice Mail Box
1. Press , , .
2. Options from here:
●
Press Left Soft Key Clear to delete information,
and then select Clear Count.
●
Press to listen to the message(s).
Text Messaging (Menu )
Send Message (Menu or hold )
You can send text messages and pages from one phone to another.
Text messages: Transmits text (with or without numbers).
Page messages: Transmits only numbers without text.
1. Press Left Soft Key , , ,
or hold .
2. To enter a phone number, highlight Address 1 and press
. Enter the phone number and press to save or
press the Left Soft Key Cancel to exit without saving. A
Text Message can be sent up to 10 phone number addresses.
3. Enter the message. The text can be entered using the
keypad. To change the text input method or to add a
canned message, press Right Soft Key Abc or Left Soft
Key Options.
●
Canned Msgs
There are 9 "predefined" phrases included in the
Canned Msgs option.
50
LG 6190
Page 52

4. Select Options using Right Soft Key after entering the
number of other party and the content with the Navigation
Key. Select the item with .
Send Allows you to send the message.
Priority Allows you to give priority to message-
Normal or Urgent.
Callback # Allows you to insert a pre-programmed
callback number with your message.
Deferred Delays sending the message until the
programmed time frame.
Immediate / After 3 days / After 2 days /
After 1 day / After 12 hours / After 2
hours / After 1 hour / After 30 minutes.
Validity Validates delivery to the Short Message
Center (SMC) without being transmitted to
the destination address for certain periods
of time. Those messages will be deleted
within the programmed time frame.
Default / 3 days / 2 days / 1 day / 12
hours / 2 hours / 1 hour / 30 minutes.
Save Saves the message into the saved folder.
If you select Send, it notifies you that the message was sent
successfully.
NOTE: If you send a Text message to a phone that does not support
Text Messaging, you will still be notified that the message
was sent, however the message will not be received.
LG 6190
51
Page 53

Using Phone Menus
Using Phone Menus
Inbox (Menu )
Received text messages and page messages may be searched
and the contents may be viewed. Received messages are
displayed from newest to oldest.
To view the list of the received messages:
1. Press Left Soft Key , , , .
2. Select a message with and press Left Soft Key
Reply to forward or press Right Soft Key Options.
Erase Use to delete a selected message in the
Lock Lock a message so that it is not erased if
Message Info Provides message information.
3. Select a message with and press and press Right
Soft Key Options.
Forward Forward a received message to others.
Erase Deletes the selected message from the Inbox.
Canned Message
Extract Number
Extract Email You can extract an email address to save
Extract URL You can extract a URL string in the Text
Outbox.
the Erase Inbox or Erase All feature is used.
Allows you to define phrasses to insert as
Canned Message.
You can extract a phone number to either
save, prepend or call back.
over an existing email entry.
Message to save in an existing Phone Book
entry or you can go directly to the site
through the phone MiniBrowser.
52
LG 6190
Page 54

Save Message Save Inbox message into the Saved Folder.
Lock Locks or unlocks the selected message.
Locked messages cannot be deleted by the
Erase Inbox, Erase Outbox and Erase All
functions.
Message Info Provides message information.
Out of Memory Warning
If the memory is full, no more messages can be received until
enough memory space becomes available. The message Inbox
is 100% full. Please erase old message. is displayed and
new messages are not accepted.
Message Icon Reference
Icons
Sent
Fail
Delivery
Lock
Multi-
sending
Pending
Descriptions
Messages sent in Short Message Center
(SMC) have been transmitted.
Indicates a failed message transmission.
Message has been delivered.
Indicates that messages are locked.
Indicates more than one designated recipient.
Transmission is unavailable in a no service area or in
an analog service area. Messages are pending
transmission. Pending messages are transmitted
automatically when digital mode becomes available.
LG 6190
53
Page 55

Using Phone Menus
Using Phone Menus
Erase messages (Menu )
This allows you to erase all text messages stored in your Inbox,
Outbox or Saved Msgs folders. You can also erase all messages
stored in these folders at the same time.
●
Press Inbox to erase all messages stored in the
Inbox.
●
Press Outbox to erase all messages stored in the
Outbox.
●
Press Draft to erase all messages stored in the
Draft.
●
Press Saved to erase all messages stored in the
Saved Items folder.
●
Press All Messages to erase all messages stored
in the Inbox, Outbox, and Saved Items folder.
Outbox (Menu )
Up to 50 sent messages can be stored in the Outbox. Users may
view lists and contents of sent messages in this menu and may
also verify whether the transmission was successful or not.
1. Press Left Soft Key , , , .
2. Select a message with and press Left Soft Key
Resend or press Right Soft Key Options.
Erase Use to delete a selected message in the
Outbox.
Lock Lock a message so that it is not erased if
the Erase Inbox or Erase All feature is used.
Message Info Provides message information.
54
LG 6190
Page 56

Draft (Menu )
1. Press Left Soft Key , , , .
2. Select a message with .
3. Press to view the message.
Saved (Menu )
Displays all the saved and draft messages.
1. Press Left Soft Key , , , .
2. Select a message with and press Left Soft Key
Reply or press Right Soft Key Options.
●
Erase / Lock / Message Info
This function shows all the saved draft messages.
Saved List shows the number of saved messages.
Msg Settings (Menu )
1. Press Left Soft Key , , , .
Message Settings Sub-Menu Descriptions
Save to Outbox (Menu )
With this feature on, messages are automatically saved in the
Outbox when transmitted.
Auto Delete Inbox (Menu )
With this feature on, read messages(except locked messages)
are automatically deleted when you exceed the storage limit.
LG 6190
55
Page 57

Using Phone Menus
Using Phone Menus
Auto Scrolling (Menu )
Display automatically scrolls down while viewing message.
Callback # (Menu )
Allows you to automatically send a designated callback number
when you send a message.
Msg Reminder (Menu )
Allows you to select the alert type for a new message. Alert
types are Off, Once and Every 2 Min.
Canned Message (Menu )
Allows you to add a new canned message or edit your current
canned message list.
Picture Messaging (Menu )
You can send picture, text and sound from one phone to
another or to an email address conveniently. The Images and
sounds you can send must be pre-existing files. You cannot
take pictures or create sound files to add while composing a
Picture Message, they should be prepared before you create the
Picture Message.
Send Message (Menu or hold )
1. Press Left Soft Key , , , or hold .
2. Enter a caption and press .
56
LG 6190
Page 58

3. Press or Left Soft Key Select and select image.
4. Press and select sound.
5. Select Menu using Right Soft Key .
Next Press to enter email address or phone
numbers to send this Picture Message.
Preview To see the picture message as it would
be seen by the recipient.
Save To save the message in the Draft folder.
Slide Duration
To change the view duration on each slide.
Slide Format To change the position of the picture in
location to the header.
Add Slide To add another image.
Delete Image To delete the selected image.
6. Select Next and press .
7. Press to access your address book or to manually
enter a number.
8.
Enter the phone number, e-mail address or choose an entry
from your address book. To add another number or email
address, leave a space between the entries. Press Left Soft Key
Done.
9. Select Menu using Right Soft Key and select the item if
you wish to add options to the message.
Send Sends picture message to another phone.
Cancel Send Cancels the message sending.
Save Saves sent messages in Outbox when
transmitted.
LG 6190
57
Page 59

Using Phone Menus
Using Phone Menus
Advanced Send
●
Reports
Read Receipt notifies you when
message is read Delivery Report
notifies you when message is
download Anonymous Send instructs
the server to not show the From
address to the recipient of the message.
●
Message Title You can change the message title.
●
Priority & Class You can set a priority level from Low
to High and designate the message
either Personal, Advertisement or
Informational.
●
Cc and Bcc You can carbon copy or blind carbon
copy this message.
10. Use to scroll to the bottom of the picture message and
press Left Soft Key Send.
Inbox (Menu )
1. Press Left Soft Key , , , .
2. Select a message with .
3. Press to view the message.
Erase Messages (Menu )
This allows you to erase all text messages stored in your Inbox,
Outbox, Draft, Sent or Templates folders.You can also erase all
messages stored in these folders at the same time.
●
Press Inbox to erase all messages stored in the
Inbox.
58
LG 6190
Page 60

●
Press Outbox to erase all messages stored in the
Outbox.
●
Press Draft to erase all messages stored in the
Draft.
●
Press Saved to erase all messages stored in the
Saved Items folder.
●
Press All Messages to erase all messages stored
in the Inbox, Outbox, Draft and Saved Items folder.
Outbox (Menu )
1. Press Left Soft Key , , , .
2. Select a message with .
3. Press to view the message.
Draft (Menu )
1. Press Left Soft Key , , , .
2. Select a message with .
3. Press to view the message.
Saved (Menu )
1. Press Left Soft Key , , , .
2. Select a message with .
3. Press to view the message.
LG 6190
59
Page 61

Using Phone Menus
Using Phone Menus
Templates (Menu )
1. Press Left Soft Key , , , .
2. Select a message with .
3. Press to view the message.
Msg Settings (Menu )
1. Press Left Soft Key , , , .
Memory Status (Menu )
1. Press Left Soft Key , , , .
Web Alerts (Menu )
Web Msg are special links or message provided from the
carrier to inform you of special offers, bulletins and
announcements.
1. Press , , .
Web Msg is notified to the user with 4 kinds of alerts.
The Alert type is determined by its priority.
E-mail (Menu )
Allows you send an E-mail.
1. Press , , .
●
Launch MiniBrowser.
60
LG 6190
Page 62

IM & Chat (Menu )
Allows you to add new applications, and send and receive an
instant message at any time.
Allows you to chat with internet messanger user.
1. Press , , .
●
Launch MiniBrowser.
LG 6190
61
Page 63

Using Phone Menus
Using Phone Menus
Do MoreTM(Menu )
Your phone permits you to store up to 35 MB of memory. Each
item is also limited by size according to their content-type when
you download.
Access and Options
1. Press Left Soft Key Menu.
2. Press Do More.
To access to Wireless Web :
The MiniBrowser feature allows you to view Internet content
especially designed for the mobile phone interface. For specific
information on MiniBrowser access through your phone,
contact Telus Mobility.
1. In standby mode, press Left Soft Key Menu , ,
or hold . Or in standby mode, press .
2. Select ‘Wireless Web’ and press .
Ending a MiniBrowser Session
End a MiniBrowser session by pressing .
Navigating Through the Browser
On-screen items may be presented in one of the following ways:
62
LG 6190
Page 64
●
Numbered options
You can use your numeric keypad or you can select the
items by moving the cursor and pressing the appropriate
Soft Keys.
●
Links embedded in content
You can act on the options or the links by using the Soft
Keys just below the display screen.
●
Text or numbers
You can select the items by moving the cursor and pressing
the appropriate Soft Keys.
Scrolling
Use to scroll through the content if the current page does
not fit on one screen. The currently selected item is indicated by
a cursor on the screen.
Fast Scrolling
Press and hold to quickly move the cursor up and down
on the current screen.
Scrolling by Page
Press the Side Keys to move up and down a page at a time.
Bookmark
To add the page to Bookmark, press .
To go to your Bookmark list, press .
Home Page
To go to the Home Page, press and hold .
View Previous Page
To view the previous page, press .
LG 6190
63
Page 65

Using Phone Menus
Using Phone Menus
View Browser Menu
Press and hold ( ) to use the browser menu.
Soft Keys
To navigate to different screens or select special functions, use the Soft
Keys. The function associated with the Soft Keys can change for each
page and depends on each highlighted item.
Left Soft Key
Left Soft Key is used primarily for first options or selecting an item
but its function may change, depending on the content displayed.
Right Soft Key
Right Soft Key is used primarily for secondary options or a menu of
secondary options.
Entering Text, Numbers, or Symbols
When prompted to enter text, the current text entry method appears
above the Right Soft Key as abc, Symbols or Smiley.
To change the input mode, press the Right Soft Key . To create an
upper case character, use .
The current text method appears above the Right Soft Key as
ALPHA or SMART and allows you to shift input case sensitivity.
Clearing Out Text/Number Entered
When entering text or numbers, press to clear the last
number, letter or Symbol. Press and hold to clear the input
field completely.
64
LG 6190
Page 66
To download new ringtones :
1. In standby mode, press , .
2. Select ‘Sounds’ and press .
3. Select ‘Ringtones’ and press .
4. Select ‘Get New’ and press .
To download new wallpapers :
1. In standby mode, press , .
2. Select ‘Images’ and press .
3. Select ‘Wallpaper’ and press .
4. Select ‘Get New’ and press .
To play downloaded ringtones:
1. In standby mode, press , .
2. Select ‘Sounds’ and press .
3. Select ‘Ringtones’ and press .
4. Select a downloaded ringtone item which you want to play
and press or press Left Soft key Play to play the
selected ringtone.
To view downloaded wallpaper:
1. In standby mode, press , .
2. Select ‘Images’ and press .
3. Select ‘Wallpaper’ and press .
LG 6190
65
Page 67

Using Phone Menus
Using Phone Menus
4. Select a downloaded screensaver item which you want to
view and press or press Left Soft key View to view
the selected.
To view memory status:
1. In standby mode, press ,,.
To use optional functionality downloaded items
1. In standby mode, press , .
2. Select ‘Sounds’ or ‘Images’ and press .
3. Select ‘Ringtones’ or ‘Wallpapers’ and press .
4. Select a downloaded item and Right Soft key Options to
view the options sub menu.
5. In options menu, Press Play or View to play or view the
selected item.
6. In Options menu, Press Set As to set the selected item
as Caller ID, No Caller ID, Roaming, Voice Mail and Notification
for ringtones; and Wallpaper, Power On or Power Off for
wallpaper. In options menu.
7. Press Properties to view the selected item’s properties.
8. In options menu, Press Erase to erase the selected item.
66
LG 6190
Page 68
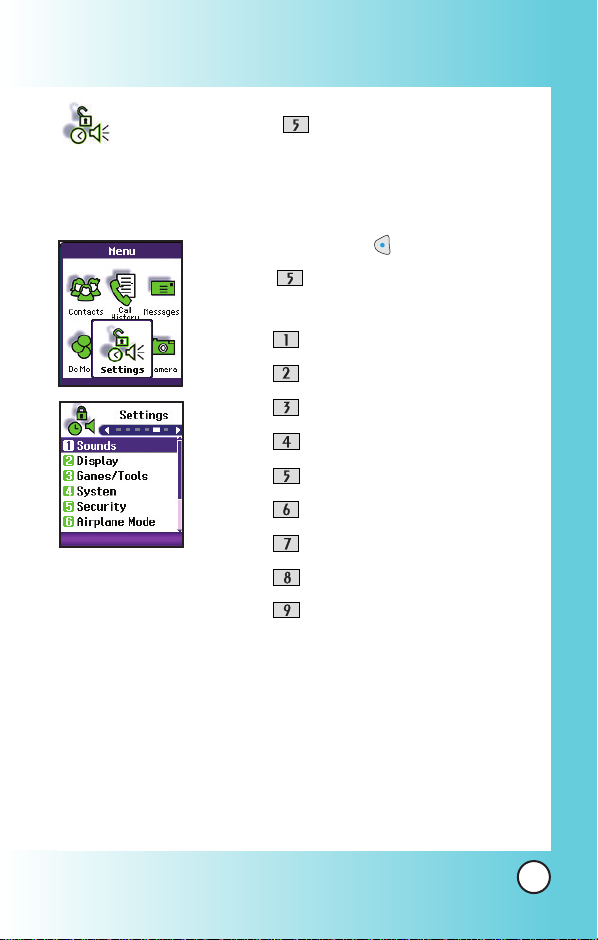
Settings (Menu )
The Setup menu has options to customize your phone.
Access and Options
1. Press Left Soft Key Menu.
2. Press Settings.
3. Select a sub-menu.
●
●
●
●
●
●
●
●
●
Sounds
Display
Games /Tools
System
Security
Airplane Mode
Setup
Voi ce Dial
Phone Info
LG 6190
67
Page 69

Using Phone Menus
Using Phone Menus
Sounds (Menu )
Options to customize the phone’s sounds.
Ringers (Menu )
Voice Calls
Assign ring tones for incoming calls.
1. Press , , , ,
2. Select Caller ID / No Caller ID.
3. Use to select a ringer then press to save the sound.
Messages
Assign ring tones for incoming calls.
1. Press , , , ,
2. Select Voice Mail / Text/Picture Msgs.
3. Use to select a ringer then press to save the sound.
Key Tones (Menu )
Allows you to select the Key Tone type.
1. Press , , , .
2. Select Normal / Long then press .
Normal Sends out a tone for a fixed period of time even if
you keep the key pressed.
Long Sends out a continuous tone for as long as you
keep the key pressed.
.
.
68
LG 6190
Page 70

Volume (Menu )
Allows you to set various volume settings.
1. Press , , , .
2. Select Ringer / Earpiece / Key Tones / Power On/Off /
Speaker.
3. Adjust the volume of the ringer with then press
to save the setting.
Alerts (Menu )
Allows you to set any of the four Alert options to either On or
Off.
1. Press , , , .
2. Select an alert option.
Service Change (Menu )
Alerts you when service changes. When you enter a
service area, the phone displays
Entering Service Area
message. When you leave a service area, the phone
displays
Minute Beep (Menu )
Leaving Service Area message.
Alerts you 10 seconds before the end of every minute during
a call.
Call Connect (Menu )
Alerts you when the call is connected.
Lost Connection (Menu )
Alerts you when you drop a call.
LG 6190
69
Page 71

Using Phone Menus
Using Phone Menus
Display (Menu )
Options to customize the phone’s display screen.
Banner (Menu )
Allows you to enter a string of up to 16 characters which display
on the LCD screen.
1. Press , , , .
2. Enter your banner text then press .
Backlight (Menu )
Allows you to set the duration for illuminating the backlight.
Main LCD, and Key Light Timer are set separately.
1. Press , , , .
2. Choose a Backlight sub-menu and press .
Screen / Keypad
Screen (Menu )
●
10 seconds
●
15 seconds
●
30 seconds
●
Always Off means that the backlight is never on.
●
Always On means that the backlight is always on.
Keypad (Menu )
●
10 seconds
●
30 seconds
●
On Flip Open
70
LG 6190
Page 72
Brightness (Menu )
Allows you to set the level of brightness for your LCD screen.
1. Press , , , .
2. Use to adjust the brightness level.
Wallpaper (Menu )
Allows you to choose the kind of background to be displayed
on the phone.
1. Press , , , .
2. Select from different images, then press .
3. Press Left Soft Key Save.
NOTE: Press Right Soft Key More for more image choices.
Default / Downloaded / Image Clips /
Gallery.
Sub LCD Contrast (Menu )
Allows you to set the level of contrast for your external LCD screen.
1. Press , , , .
2. Use to adjust the contrast level.
Menu Style (Menu )
Allows you to view the Menu as an Icon or List display.
1. Press , , , .
2. Select Icon or List and press .
LG 6190
71
Page 73

Using Phone Menus
Using Phone Menus
Theme Colour (Menu )
Allows you to choose the color of the background screen.
1. Press , , , .
2. Select Purple / Blue / Orange / Pink then press .
Time (Menu )
Allows you to choose the kind of time to be displayed on the
LCD screen.
1. Press , , , .
2. Select Digital(12H) / Digital(24H) / Analog then press
Left Soft Key Save.
Date (Menu )
Allows you to choose the kind of date to be displayed on the
LCD screen.
1. Press , , , .
2. Select Format1 / Format2 then press Left Soft Key
Save.
72
LG 6190
Page 74

Games/Tools (Menu )
Your phone allows you to alter the backlight, volume and
notification options.
Backlight (Menu )
●
10 seconds
●
25 seconds
●
1 minute
●
Always On means that the backlight is always on.
●
Always Off means that the backlight is never on.
Volume (Menu )
1. Press , , , .
2.
Adjust the volume with then press to save the
setting.
Notification (Menu )
1. Press , , , .
2.
Select Voice Mail / Text Message / Picture Message then
press
3.
Set On / Off with then press
.
.
LG 6190
73
Page 75
Using Phone Menus
Using Phone Menus
System (Menu )
The System menu allows you to designate specific system
network settings.
Set Mode (Menu )
Allows you to set up the phone producer’s management
environment. Leave this setting as the default unless you want
to alter system selection as instructed by your service provider.
1. Press , , , .
2.
Select Digital Only / Analog Only / Automatic / Home
Only then press
Set NAM (Menu )
Allows you to select the phone’s NAM (Number Assignment
Module) if the phone is registered with multiple service
providers.
1. Press , , , .
2. Select NAM1 / NAM2 then press .
.
Call Guard (Menu )
Call Guard alerts you when roaming charges apply.
1. Press , , , .
2. Select On / Off and press .
74
LG 6190
Page 76

Security (Menu )
The Security menu allows you to secure the phone electronically.
Lock Phone (Menu )
Keeps your phone from unauthorized use. Once the phone is
locked, it is in restricted mode until the lock code is entered.
You can receive phone calls and still make emergency calls.
You can modify the lock code using the Change Lock submenu
within the Security menu.
1. Press , , .
2. Enter the four-digit lock code.
The lock code is commonly the last 4 digits of your phone
number.
3. Press Lock Phone.
4. Select an option then press .
Unlock The phone is never locked (Lock mode
can be used).
Lock The phone is always locked.
When locked, you can receive incoming
calls or make only emergency calls.
On Power Up The phone will always lock when the
phone is powered up.
LG 6190
75
Page 77

Using Phone Menus
Using Phone Menus
Change Lock (Menu )
Allows you to enter a new four-digit lock code.
1. Press , , .
2. Enter the four-digit lock code.
3. Press Change Lock.
4. For confirmation, it will ask you to enter the new lock code
again.
Reset Defaults (Menu )
Allows you to reset your phone to the factory default settings.
1. Press , , .
2. Enter the four-digit lock code.
3. Press Reset Defaults.
4. Press , select Revert / Cancel then press .
Airplane Mode (Menu )
Tu rning [Airplane Mode] ON will prevent any outgoing and
incoming calls as well as any online access.
1. Press , , .
2. Select On or Off and press .
76
LG 6190
Page 78

Setup (Menu )
The Setup menu allows you to designate how the phone handles
both incoming and outgoing calls.
Left Shortcut (Menu )
Allows you to create a quick link by pressing .
1. Press , , , .
2. Press to select OK .
3. Select a menu and press .
Call History / Contacts / Tools / Settings
Right Shortcut (Menu )
Allows you to create a quick link by pressing .
1. Press , , , .
2. Press to select OK .
3. Select a menu and press .
Call History / Contacts / Tools / Settings
Call Answer (Menu )
Allows you to determine how to initiate an answered call.
1. Press , , , .
2. Select Send Key / Any Key / Flip Open then press .
LG 6190
77
Page 79

Using Phone Menus
Using Phone Menus
Data Setup (Menu )
Allows you to use wireless data communication services.
Wireless data communication services refers to the utilization of
subscriber terminals for access to the internet with personal
computers or laptops at 19.2 Kbps or at a maximum of 230.4
Kbps. The connection speed depends on your carrier’s network
and other variables. Check that your communications
information specifications match the network..
Data/Fax (Menu )
Allows you to use your phone to transmit data and faxes.
1. Press , , , , .
2. Use to select a setting, then press .
Off / Fax In Once / Fax In Always / Data In Once /
Data In Always
NOTE: The Data Connection Kit allows you to connect your PC or
PDA to your LG wireless phone, freeing you from having to
locate a telephone outlet. You can send or receive an e-mail,
a fax, or access the Internet anytime, anywhere.
Select Port (Menu )
Allows you to select the data port.
1. Press , , , , .
2. Select USB / RS-232C
(COM Port)
/ Closed then press
.
NOTE: When using the 1X HSPD data service via an RS-232C data
cable, the port speed is set to 115,200 (230,400 is not
supported). When using the 1X HSPD data service via a
USB data cable, you may get better port speed if the port
speed is set to 230,400 rather than 115,200.
78
LG 6190
Page 80

Auto-Answer (Menu )
Allows you to select the number of rings before the phone
automatically answers a call. This feature is intended for use
with hands free devices, but is an independent feature of the
phone and must be manually turned on/off when connected or
disconnected from the device.
1. Press , , , .
2. Select On / Off then press .
Language (Menu )
Allows you to set the bilingual feature according to your
preference. Choose between English and Français.
1. Press , , , .
2. Set English / Français with then press .
NOTE: Please see page 25 for Français accented character entry.
LG 6190
79
Page 81

Using Phone Menus
Using Phone Menus
Voice Dial (Menu )
Provides access to the voice dial available with your phone.
Voice Commands (Menu )
Allows you to set how you activate voice recognition.
1. Press , , ,
.
2. Use to select a setting, then press .
Flip open Activates voice recognition whenever
(When the phone
Side key only
you flip open the phone.
is already open, you activate voice recognition
by pressing the voice command key.)
Activates voice recognition when you flip
open the phone and press the voice
command key.
Driving Mode (Menu )
Allows you to switch hands-free calling on and off
during
driving without the need for a Car Kit.
1. Press , , ,
.
2. Use to select a setting, then press .
Activate / Deactivate
NOTE:
When flip is closed, you can press (Voice Command
Key) for three seconds to set Driving Mode.
Announce Alerts
(Menu )
Allows you to notify caller ID and sender of message by voice.
1. Press , , ,
80
LG 6190
.
Page 82

2. Use to select a setting, then press .
On / Off
NOTE:
When Announce Alerts is set, is displayed on the screen.
Best Match (Menu )
Allows you to set the number of recognition results to
display if your voice command does not have an exact
match in the phone's memory.
1. Press , , ,
.
2. Use to select a setting, then press .
1 Result Displays the name or number that best
matches the one you said.
4 Results
Displays the four names or numbers that
best match the one you said and asks you
if the first one is correct. If you say "Yes,"
the phone makes the call. If you say "No,"
the phone suggests the second one in the
list, and so on, up to the fourth result.
Train Commands (Menu )
Optional personalization feature that helps your phone
recognize the way you pronounce commands. If you do not
get consistently good results with the commands, perform
this brief, one-time session.
1. Press
, , , .
2. Use to select a setting, then press .
Training On / Training Off
LG 6190
81
Page 83

Using Phone Menus
Using Phone Menus
Train Digits (Menu )
Optional personalization feature that helps your phone
recognize the way you pronounce numbers. If you do not get
consistently good results with digit-dialing, perform this brief,
one-time session.
1. Press
2. Use to select a setting, then press .
Training On / Training Off
Help (Menu )
Allows you to set the phone to provide help for the Voice
Command feature.
, , , .
1. Press
2. Use to select a setting, then press .
On / Off
Phone Info (Menu )
The Phone Info menu provides you with specific information
pertaining to your phone model.
NAM (Menu )
Allows you to view your phone number.
1. Press , , , .
Software Version (Menu )
Allows you to view the S/W Ver.
1. Press , , , .
82
LG 6190
, , , .
Page 84

Hardware Version (Menu )
Allows you to view the H/W Ver.
1. Press , , , .
ESN (Menu )
Allows you to view the ESN Ver.
1. Press , , , .
PRL (Menu )
Allows you to view the PRL Ver.
1. Press , , , .
Browser Version (Menu )
Allows you to view the Browser Ver.
1. Press , , , .
Icon Glossary (Menu )
This list identifies the symbols you’ll see on your display
screen.
1. Press , , , .
LG 6190
83
Page 85
Using Phone Menus
Using Phone Menus
Camera (Menu )
Quick Access to Camera Feature
Press Camera key to access Camera Mode.
Access and Options
1. Press Left Soft Key Menu.
2. Press Camera.
3. Select a sub-menu.
●
Take Picture
●
Gallery
●
Picture Messaging
●
Online Album
●
Camera Settings
NOTE: Hold to send a Picture message.
84
LG 6190
Page 86

Take Picture (Menu )
1. Press , , .
NOTE: The text line below the phone icons indicates current
camera resolution, zoom, and number of photos saved in
your Gallery followed by the maximum number of
photos you can take.
2. Press Right Soft Key Options and change any of the
following settings as necessary.
Flash / Self Timer / Resolution / Brightness / White
Balance / Shutter Sound / Color Effects / Multishot
NOTE: Use to zoom in/out. Not avai lable in 640X480 mode.
3. Use the LCD screen as the camera view-finder.
4. Press (or the Side Camera key ) to take a picture.
5. Press Left Soft Key Save to save the photo into your
Gallery, or Press Right Soft Key Reject.
Gallery (Menu )
Allows you to view
photos stored in the phone.
1. Press , , .
2. Use to move the blue select box to one of your
pictures, then press Right Soft Key Options to select
one of the following:
Send / Send To Online Album / View Online Album /
Set As /
Erase
E
nlarge
/
Lock
All / Picture Info
/
Unlock
/
Rename/Erase
/
3. Press Left Soft Key Camera to take a photo .
LG 6190
85
Page 87

Using Phone Menus
Using Phone Menus
Picture Messaging (Menu )
You can send picture, text and sound from one phone to
another or to an email address conveniently. The images and
sounds you can send must be pre-existing from your Picture
Album and Voice Memo menu. You cannot take pictures or
create sound files to add while composing a Picture Message,
they should be prepared before you create the Picture Message.
See page 99 Voice Memo and page 56 Picture Album for more
information.
Send Message (Menu or hold )
1. Press , , , or hold
2. Enter the title and press .
3. Press or Left Soft Key Select to select image.
4. Using select your desired file, then press .
5. Press to highlight Add sound, then press .
6. Using select your desired file, then press .
7. Select Menu using Right Soft Key .
Next Press to enter email address or phone
numbers to send this Picture Message.
Preview To see the picture message as it
would be seen by the recipient.
Save To save the message in the Draft folder.
Slide Duration
Slide Format
Add Slide
Add Image
86
LG 6190
To change the view duration on each
slide.
To change the position of the picture
in location to the header.
To add another slide.
To add another image.
.
Page 88

8. Press Left Soft Key Next.
9. Press .
10. Enter the phone number, e-mail address or choose an entry
from your Address Book and press Left Soft Key Done.
11. Select Menu using Right Soft Key and select the item if
you wish to add options to the message.
Send Sends picture message to another phone.
Cancel Send Cancels the message sending.
Save Saves sent messages in Outbox when
transmitted.
Advanced Send
●
Reports Read Receipt notifies you when your
message is read.
●
Message Title You can change the message title.
●
Priority & Class You can set a priority level from Low
to High and designate the message
either Personal, Advertisement or
Informational.
●
Cc and Bcc You can carbon copy or blind carbon
copy this message.
12. Use to scroll to the bottom of the picture message and
press Left Soft Key Send.
LG 6190
87
Page 89

Using Phone Menus
Using Phone Menus
Inbox (Menu )
1. Press Left Soft Key , , , .
2. Select a message with .
3. Press to view the message.
Erase Messages (Menu )
This allows you to erase all text messages stored in your Inbox,
Outbox, Draft, Sent or Templates folders.You can also erase all
messages stored in these folders at the same time.
●
Press Inbox to erase all messages stored in the
Inbox.
●
Press Outbox to erase all messages stored in the
Outbox.
●
Press Draft to erase all messages stored in the Draft.
●
Press Saved to erase all messages stored in the
Saved Items folder.
●
Press All Messages to erase all messages stored
in the Inbox, Outbox, and Saved Items folder.
Outbox (Menu )
1. Press Left Soft Key , , , .
2. Select a message with .
3. Press to view the message.
88
LG 6190
Page 90
Draft (Menu )
1. Press Left Soft Key , , , .
2. Select a message with .
3. Press to view the message.
Saved (Menu )
1. Press Left Soft Key , , , .
2. Select a message with .
3. Press to view the message.
Templates (Menu )
1. Press Left Soft Key , , , .
2. Select a message with .
3. Press to view the message.
Msg Settings (Menu )
1. Press Left Soft Key , , , .
2. Press to select auto save.
3. Select a Auto Save or Do Not Save with .
4. Press to set the message.
Memory Status (Menu )
1. Press Left Soft Key , , , .
LG 6190
89
Page 91

Using Phone Menus
Using Phone Menus
Online Album (Menu )
1. Press , , .
2. Press to launch the MiniBrowser (charges will apply),
or press to exit.
Camera Settings (Menu )
Shutter Sound (Menu )
1. Press Left Soft Key , , , .
2. Select te photo taking tone of choice with , then press
.
Shutter / Chime
Resolution (Menu )
1. Press Left Soft Key , , , .
2. Use to select a setting, then press .
(640X480) / Med(320X240) / Lo(160X120)
Hi
Flash (Menu )
1. Press Left Soft Key , , , .
2. Use to select a setting, then press .
Always On / Always Off
90
LG 6190
Page 92

File Quality (Menu )
1. Press Left Soft Key , , , .
2. Use to select a setting, then press .
High / Normal / Economy
LG 6190
91
Page 93

Safety
Safety
TIA Safety Information
The following is the complete TIA Safety Information for wireless
handheld phones.
Exposure to Radio Frequency Signal
Your wireless handheld portable phone is a low power radio
transmitter and receiver. When it is ON, it receives and also sends
out Radio Frequency (RF) signals.
In August, 1996, the Federal Communications Commission (FCC)
adopted RF exposure guidelines with safety levels for handheld
wireless phones. Those guidelines are consistent with the safety
standards previously set by both U.S. and international standards
bodies:
ANSI C95.1 (1992) *
NCRP Report 86 (1986)
ICNIRP (1996)
Health Canada, Safety Code 6, 1999.
American National Standards Institute; National Council on
Radiation Protection and Measurements; International Commission
on Non-Ionizing Radiation Protection
Those standards were based on comprehensive and periodic
evaluations of the relevant scientific literature. For example, over 120
scientists, engineers, and physicians from universities, government
health agencies, and industry reviewed the available body of
research to develop the ANSI Standard (C95.1).
The design of your phone complies with the FCC guidelines, IC
Regulations(and those standards).
Antenna Care
Use only the supplied or an approved replacement antenna.
Unauthorized antennas, modifications, or attachments could
damage the phone and may violate FCC regulations.
92
LG 6190
Page 94

Phone Operation
NORMAL POSITION: Hold the phone as you would any other
telephone with the antenna pointed up and over your shoulder.
Tips on Efficient Operation
For your phone to operate most efficiently:
Do not touch the antenna unnecessarily when the phone is in use.
contact with the antenna affects call quality and may cause the
phone to operate at a higher power level than otherwise needed.
Driving
Check the laws and regulations on the use of wireless phones in the
areas where you drive and always obey them. Also, if using your
phone while driving, please observe the following:
●
Give full attention to driving -- driving safely is your first
responsibility;
●
Use hands-free operation, if available;
●
Pull off the road and park before making or answering a call if
driving conditions or the law so require.
Electronic Devices
Most modern electronic equipment is shielded from RF signals.
However, certain electronic equipment may not be shielded against
the RF signals from your wireless phone.
Pacemakers
The Health Industry Manufacturers Association recommends that a
minimum separation of six (6) inches be maintained between a
handheld wireless phone and a pacemaker to avoid potential
interference with the pacemaker. These recommendations are
consistent with the independent research by and recommendations
of Wireless Technology Research.
LG 6190
93
Page 95

Safety
Safety
Persons with pacemakers:
●
Should ALWAYS keep the phone more than six (6) inches from
their pacemaker when the phone is turned ON;
●
Should not carry the phone in a breast pocket;
●
Should use the ear opposite the pacemaker to minimize the
potential for interference;
●
Should turn the phone OFF immediately if there is any reason
to suspect that interference is taking place.
Hearing Aids
Some digital wireless phones may interfere with some hearing aids.
In the event of such interference, you may want to consult your
service provider
(or call the customer service line to discuss alternatives.).
Other Medical Devices
If you use any other personal medical device, consult the manufacturer
of your device to determine if it is adequately shielded from external RF
energy. Your physician may be able to assist you in obtaining this
information.
Health Care Facilities
Tu rn your phone OFF in health care facilities when any regulations
posted in these areas instruct you to do so. Hospitals or health care
facilities may use equipment that could be sensitive to external RF
energy.
Vehicles
RF signals may affect improperly installed or inadequately shielded
electronic systems in motor vehicles. Check with the manufacturer
or its representative regarding your vehicle. You should also
consult the manufacturer of any equipment that has been added to
your vehicle.
94
LG 6190
Page 96

Other Facilities
Tu rn your phone OFF in any facility where posted notices so require.
Aircraft
FCC regulations prohibit using your phone while in the air. Switch
OFF your phone before boarding an aircraft.
Blasting Areas
To avoid interfering with blasting operations, turn your phone OFF
when in a “blasting area” or in areas posted: “Turn off two-way
radio”. Obey all signs and instructions.
Potentially Explosive Atmosphere
Tu rn your phone OFF when in any area with a potentially explosive
atmosphere and obey all signs and instructions. Sparks in such areas
could cause an explosion or fire resulting in bodily injury or even
death.
Areas with a potentially explosive atmosphere are often, but not
always marked clearly. Potential areas may include: fueling areas
(such as gasoline stations); below deck on boats; fuel or chemical
transfer or storage facilities; vehicles using liquefied petroleum gas
(such as propane or butane); areas where the air contains chemicals
or particles (such as grain, dust, or metal powders); and any other
area where you would normally be advised to turn off your vehicle
engine.
For Vehicles Equipped with an Air Bag
An air bag inflates with great force. DO NOT place objects, including
either installed or portable wireless equipment, in the area over the
air bag or in the air bag deployment area. If in-vehicle wireless
equipment is improperly installed and the air bag inflates, serious
injury could result.
LG 6190
95
Page 97

Safety
Safety
Charger and Adapter Safety
●
The charger and adapter are intended for indoor use only.
●
Do not expose the battery charger or adapter to direct sunlight
or use it in places with high humidity, such as a bathroom.
Battery Information and Care
●
Please dispose of your battery properly or take it to your local
wireless carrier for recycling.
●
Do not dispose of your battery by fire or with hazardous or
flammable materials.
●
Never store your phone in temperatures less than -4° F or
greater than 122° F.
●
Never use an unapproved battery since this could damage the
phone and/or battery and could cause the battery to explode.
●
The battery does not need to be fully discharged before recharging.
●
Use only LG-approved chargers specific to your phone model
since they are designed to maximize battery life.
●
Do not disassemble or short-circuit the battery.
●
Keep the battery’s metal contacts clean.
●
Replace the battery when it no longer provides acceptable
performance. The battery can be recharged several hundred
times before replacement.
●
Recharge the battery after long periods of non-use to maximize
battery life.
●
Battery life will vary due to usage patterns and environmental
conditions.
●
Use of extended backlighting, MiniBrowser, and data connectivity
kits affect battery life and talk/standby times.
96
LG 6190
Page 98

Safety Information
Please read and observe the following information for safe and
proper use of your phone and to prevent damage. Also, keep the
user’s guide in an accessible place at all the times after reading it.
Explosion, Shock, and Fire Hazards
●
Unplug the power cord and charger during lightning storms to
avoid electric shock or fire.
●
Make sure that no sharp-edged items such as animal’s teeth,
nails, come into contact with the battery. There is a risk of this
causing a fire.
●
Do not use harsh chemicals(such as alcohol, benzene, thinners,
etc.) or detergents to clean your phone. There is a risk of this
causing a fire.
●
When riding in a car, do not leave your phone or set up the
hands-free kit near to the air bag. If wireless equipment is
improperly installed and the air bag is activated, you may be
seriously injured.
●
Do not handle the phone with wet hands while it is being
charged. It may cause an electric shock or seriously damage
your phone.
●
Do not drop, strike, or shake your phone severely. Such actions
may harm the internal circuit boards of the phone.
●
Be careful that children do not swallow any parts such as
rubber plugs (earphone, connection parts of the phone, etc.).
This could cause asphyxiation or suffocation.
●
Do not use your phone in high explosive areas as the phone
may generate sparks.
●
Do not put your phone in a place subject to excessive dust and
keep the minimum required distance between the power cord
and heat sources.
●
Unplug the power cord prior to cleaning your phone, and clean
the power plug pin when it is dirty.
LG 6190
97
Page 99

Safety
Safety
●
Do not damage the power cord by bending, twisting, pulling,
or heating. Do not use the plug if it is loose as it may cause a
fire or electric shock.
●
When using the power plug, ensure that it is firmly connected.
If it is not, it may cause excessive heat or fire.
●
Do not place any heavy items on the power cord. Do not allow
the power cord to be crimped as it may cause fire or electric
shock.
●
Do not disassemble the phone.
●
Do not place or answer calls while charging the phone as it
may short-circuit the phone and/or cause electric shock or fire.
●
If you put your phone in a pocket or bag without covering the
receptacle of the phone (power plug pin), metallic articles
(such as a coin, paperclip or pen) may short-circuit the phone.
Always cover the receptacle when not in use.
●
Do not short-circuit the battery. Metallic articles such as a coin,
paperclip or pen in your pocket or bag may short-circuit the +
and – terminals of the battery (metal strips on the battery)
upon moving. Short-circuit of the terminal may damage the
battery and cause an explosion.
●
Never place your phone in a microwave oven as it will cause
the battery to explode.
General Warnings and Cautions
●
Only use the batteries, antennas, and chargers provided by LG.
The warranty will not be applied to products provided by other
suppliers.
●
Store the battery in a place out of reach of children.
●
Using a damaged battery or placing a battery in your mouth
may cause serious injury.
98
LG 6190
Page 100

●
Do not place items containing magnetic components such as a
credit card, phone card, bank book or subway ticket near your
phone. The magnetism of the phone may damage the data
stored in the magnetic strip.
●
Do not hold or let the antenna come in contact with your body
during a call.
●
Talking on your phone for a long period of time may reduce call
quality due to heat generated during use.
●
When the phone is not used for a long period time, store it in a
safe place with the power cord unplugged.
●
Using the phone in proximity to receiving equipment (i.e., TV
or radio) may cause interference to the phone.
●
Only authorized personnel should service the phone and its
accessories. Faulty installation or service may result in accidents
and consequently invalidate the warranty.
●
Do not use the phone if the antenna is damaged. If a damaged
antenna contacts skin, it may cause a slight burn. Please contact
an LG Authorized Service Center to replace the damaged
antenna.
●
Do not use the phone in areas where its use is prohibited. (For
example: aircraft).
●
Do not immerse your phone in water. If this happens, turn it off
immediately and remove the battery. If the phone does not
work, take it to an LG Authorized Service Center.
LG 6190
99
 Loading...