

LG 51123 Owner's Manual [en,fr]
Pedestal Kit
Installation Instruction
For Washer, Dryer
Kit de pedestal
Instrucciones de montaje
Para lavadora y secadora
Piédestal
Guide d'installation
Pour laveuse et sécheuse
Models/Modelos/Modèles 796.5112#61#
796.5104#31#
# = color number, número de color, numéro de couleur
FRANÇAISESPAÑOLENGLISH
MFL67454004
Sears Brands Management Corporation, Hoffman Estates, IL 60179
Sears Canada inc., Toronto, Ontario, Canada M5B 2B8
www.sears.com
www.sears.ca
IMPORTANT: Read and follow these instructions.
WARNING
This product contains chemicals known to the State of California to cause cancer and birth defects or other
reproductive harm. Wash hands after handling. (USA only)
3
NOTICE
The installer must have electrical and mechanical
training and acceptable knowledge in the required work.
Safety is foremost---both your own and that of other people.
Many important safety instructions are provided in this
instruction and your appliance. Always read and observe all
safety instructions.
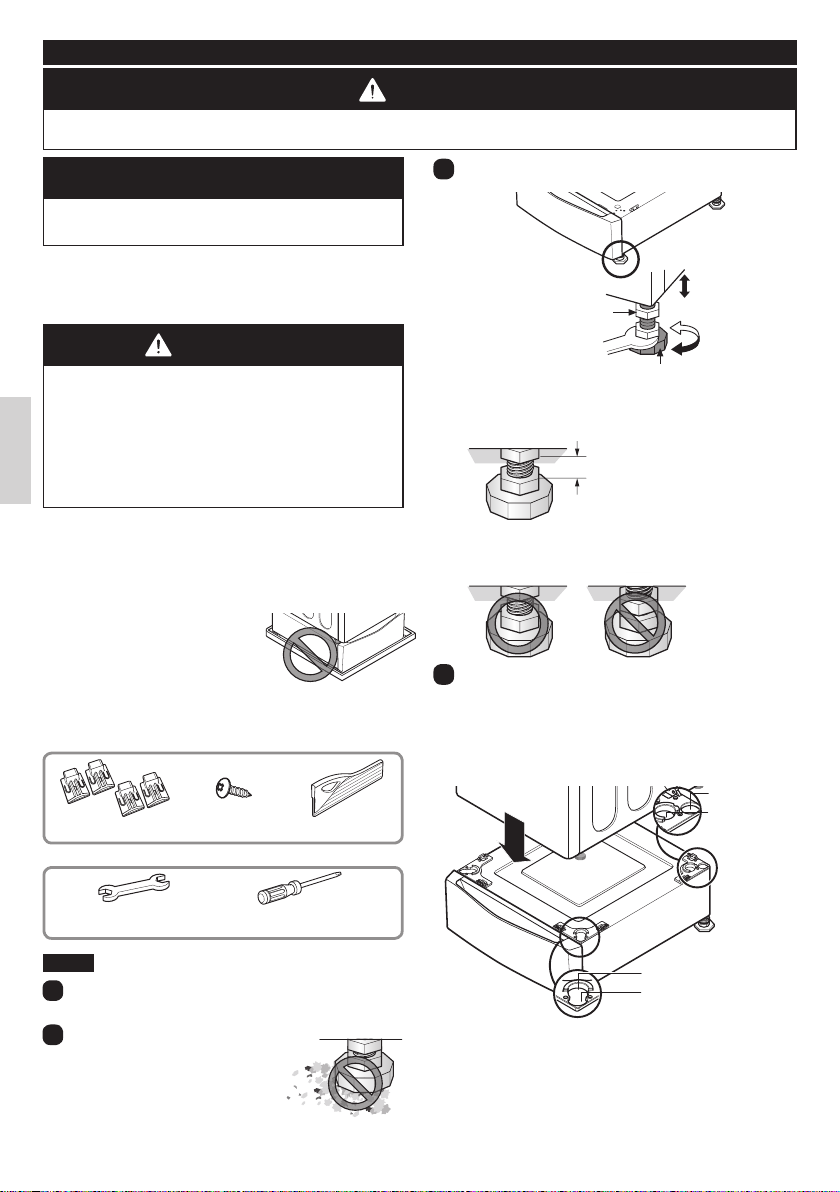
Level the pedestal on the clean area by adjusting the
feet.
Lock nut
WARNING
Excessive Weight Hazard
ENGLISH
Two or more people may be needed to install and
move the appliance and pedestal assembly.
Do not allow children to play on the drawer.
Do not step on the handle.
A stacked washer/dryer pair should never be mounted
on a pedestal.
NOTE: A firm, solid floor is even more critical to a front-loading
washer than to a top-loader. If your floor is wooden and /or
frame construction, you may need to reinforce it. Front-loaders
have substantially faster spin speed than top-loaders, causing
greater vibration. If the floor is not solid, your washer will
vibrate.
NOTE: If a drip pan must be used,
take extra care to follow the
instructions provided with the drip
pan and make sure the leveling
feet are adjusted for firm and even
contact with the pan. Use of drip
pans and failure to properly level
the machine may result in
increased vibration and noise during operation.
Included Accessories
18 Mounting screws -
4 T-clip Drawer Divied
Tools Needed
Size: 4 X 20 mm
NOTE: Do not extend the legs no more than necessary
to level the pedestal. The more the legs are extended,
the more the machines will vibrate.
After the washer is leveled, tighten the lock nuts up
toward the base of the washer using the wrench. All
four lock nuts should be tightened.
4
Position the washer or dryer on top of the pedestal.
NOTE: Because of the weight of the machines, two or
more people may be needed.
NOTE: If the washer was previously installed, unplug it,
disconnect the inlet hoses and drain hose. Drain the
water from the hoses.
Adjustable feet
Leg Extension
for washer
for dryer
11/16” or 17 mm
Open End Wrench
Phillips screwdriver
PEDESTAL INSTALLATION
1
Remove pedestal, installation hardware, and
instructions from the shipping carton.
2
Before installing the pedestal,
clean the area where the
laundry will be located. Make
sure the floor is clean and free
of foreign objects. Dust, water,
oil, detergent and so on could
cause vibration due to bad
contact of legs with floor.
for dryer
for washer
NOTE: The legs on the washer and dryer are not the
same, so the recesses in the brackets on top of the
pedestal are elongated. See the drawing above to
identify the different locations for the washer and dryer
legs. If the legs are not in the proper locations, the
machine will not align properly and cannot be anchored
to the pedestal.
2
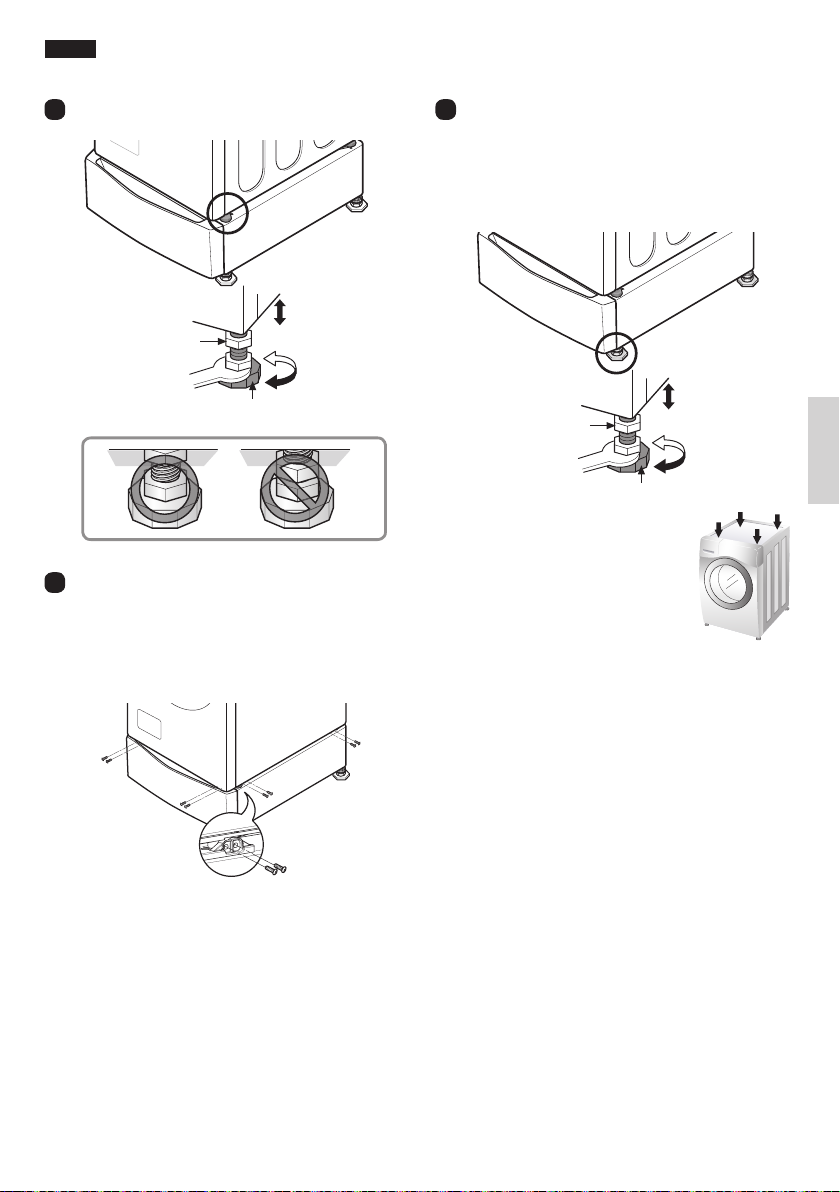
WASHER INSTALLATION
(See page 4 for dryer instructions.)
5
Level the washer on the pedestal by adjusting the
feet.
Lock nut
7
Move the washer to the desired place.
NOTE: The appliance and pedestal assembly must be
placed on a solid and level floor for proper operation.
Adjust the legs of the appliance and pedestal by turning
with a wrench. Then, tighten the lock nut against the
base of the pedestal with the wrench while holding the
leg to make sure it does not turn.
Adjustable feet
6
Check the alignment of the washer with the pedestal.
Make sure the washer base brackets align with the
brackets on the pedestal, then install 4 screws at
each corner to securely attach the appliance to the
pedestal.
NOTE: If the screws are not installed properly, noise
and vibration may result.
Lock nut
Adjustable feet
NOTE: Diagonal Check
Once the pedestal feet are adjusted,
rock the washer very firmly in a
diagonal direction. If one direction
moves more than the other, readjust
the front feet until both directions are
even.
NOTE: To make sure that the washer
is properly level, run the washer with a
test load: place approximately 6 pounds (3 kg) of
laundry in the machine. Then press POWER, select
RINSE & SPIN or EXPRESS WASH cycle, and then
press the START/PAUSE button. Verify that the washer
does not rock or vibrate excessively during the spin
cycle. If the washer vibrates or shakes, adjust the
leveling feet while the washer is spinning to minimize
the vibration.
ENGLISH
3

DRYER INSTALLATION
(See page 3 for washer instructions.)
5
Insert the T-clip of the 4 retainers into the dryer base
as shown. Press up on the back of the clip and pull
outward to lock into place.
Retainer
6
Position dryer on top of the pedestal.
ENGLISH
NOTE: Because of the weight of the dryer, two or more
people may be needed.
for dryer
for washer
7
Make sure the holes on the pedestal align with the
holes in the appliance, then install 4 screws at each
corner to securely attach the appliance to the
pedestal.
NOTE: If the screws are not installed properly, noise
and vibration may result.
T-clip
for washer
for dryer
8
Move the dryer to the desired location.
NOTE: The appliance and pedestal assembly must be
placed on a solid and level floor for proper operation.
Adjust the legs of the pedestal using the wrench
supplied. Tighten the lock nuts with the wrench.
Lock nut
Adjustable feet
NOTE: If dryer was previously installed, uninstall it as
follows:
A. Uninstalling an electric dryer:
1) Unplug the power supply cord,
2) Pull the dryer away from the wall enough to loosen
the vent clamp. Loosen the clamp and carefully
remove the exhaust vent from the dryer exhaust
outlet.
B. Uninstalling a gas dryer:
1) Unplug power supply cord.
2) Turn off the gas supply.
3) Pull the dryer away from the wall enough to loosen
the vent clamp. Loosen the clamp and carefully
remove the exhaust vent from the dryer exhaust
outlet.
4

WARRANTY
Kenmore Limited Warranty
When installed, operated and maintained according to all instructions supplied with the product, if this
appliance fails due to a defect in material and workmanship within one year from the date of purchase, call
1-800-4-MY-HOME® to arrange for free repair.
If the direct drive motor is defective in material or workmanship within the second through tenth year from purchase
date, call 1-800-4-MY-HOME® to receive a free replacement motor. After the first year from purchase date, you will
be responsible for the labor cost of motor installation.
If this appliance is ever used for other than private family purposes, this warranty applies for only 90 days from
the date of purchase. (Does Not Apply in Canada)
This warranty covers only defects in material and workmanship. Sears will NOT pay for:
1. Expendable items that can wear out from normal use, including but not limited to filters, belts, light bulbs,
and bags.
2. A service technician to instruct the user in correct product installation, operation or maintenance.
3. A service technician to clean or maintain this product.
4. Damage to or failure of this product if it is not installed, operated or maintained according to all the
instructions supplied with the product.
5. Damage to or failure of this product resulting from accident, abuse, misuse or use for other than its
intended purpose.
6. Damage to or failure of this product caused by the use of detergents, cleaners, chemicals or utensils
other than those recommended in all instructions supplied with the product.
7. Damage to or failure of parts or systems resulting from unauthorized modifications made to this product.
Disclaimer of lmplied warranties; limitation of remedies
Customer's sole and exclusive remedy under this limited warranty shall be product repair as provided herein.
Implied warranties, including warranties of merchantability or fitness for a particular purpose, are limited to one
year or the shortest period allowed by law. Sears shall not be liable for incidental or consequential damages.
Some states and provinces do not allow the exclusion or limitation of incidental or consequential damages, or
limitation on the duration of implied warranties of merchantability or fitness, so these exclusions or limitations
may not apply to you.
This warranty applies only while this appliance is used in the United States or Canada.
This warranty gives you specific legal rights, and you may also have other rights which vary from state to state.
Sears Roebuck & Co., Hoffman Estates, IL 60179
Sears Canada, Toronto, Ontario, Canada M5B 2B8
ENGLISH
5
 Loading...