

Page 1

x
PLASMA TV
Please read this manual carefully before operating the
set and retain it for future reference.
50PV490 50PZ850
60PV490 60PZ850
50PT490
50PT490U
50PT490R
P/NO : SAC34134232 (1106-REVO0) www.lg.com
Page 2
2 UCENSES
LICENSES
Supported licenses may differ by model. For more information about licenses, visit www.lg.com.
Manufactured under license from Dolby Laboratories. "Dolby" and the double-D
symbol are trademarks of Dolby Laboratories.
HDMI, the HDMI logo and High-Definition Multimedia Interface are trademarks or
registered trademarks of HDMI Licensing LLC.
ABOUT DIVX VIDEO: DivX® is a digital video format created by DivX, Inc. This is
an official DivX Certified® device that plays DivX video. Visit www.divx.com for
more information and software tools to convert your files into DivX video.
ABOUT DIVX VIDEO-ON-DEMAND: This DivX Certified® device must be registered
in order to play purchased DivX Video-on-Demand (VOD) movies. To obtain your
registration code, locate the DivX VOD section in your device setup menu. Go to
vod.divx.com for more information on how to complete your registration.
"DivX Certified@ to play DivX@ video up to HD 1080p, including premium
content."
"DivX®, DivX Certified® and associated Iogos are registered trademarks of DivX,
Inc. and are used under license."
"Covered by one or more of the following U.S. patents:
7,295,673; 7,460,668; 7,515,710; 7,519,274"
.... NOTE
• Image shown may differ from your TV.
• Your TV's OSD (On Screen Display) may differ slightly from that shown in this manual.
Page 3
IMPORTANT SAFETY INSTRUCTIONS 3
IMPORTANT SAFETY INSTRUCTIONS
Always comply with the following precautions to avoid dangerous situations and ensure peak performance
of your product.
Read these instructions.
WARNING/ CAUTION
Keep these instructions.
Heed all warnincL
Follow all instruction.
TO REDUCE THE RISK OF ELECTRIC
SHOCK DO NOT REMOVE COVER (OR
BACK). NO USER SERVICEABLE PARTS
INSIDE. REFER TO QUALIFIED SERVICE
PERSONNEL.
,_The lightning flash with arrowheadsymbol, within an equilateral triangle,
is intended to alert the user to the
presence of uninsulated "dangerous voltage"
within the product's enclosure that may be
of sufficient magnitude to constitute a risk of
electric shock to persons.
The exclamation point within an
equilateral triangle is intended to alert
the user to the presence of important
operating and maintenance (servicing)
instructions in the literature accompanying
the appliance.
WARNING/CAUTION
- TO REDUCE THE RISK OF FIRE AND
ELECTRIC SHOCK, DO NOT EXPOSE THIS
PRODUCT TO RAIN OR MOISTURE.
Do not use this apparatus near water.
Clean only with dry cloth.
Do not block any ventilation openings. Install
in accordance with the manufacturer's
instructions.
Do not install near any heat sources such
as radiators, heat registers, stoves, or other
apparatus (including amplifiers) that produce
heat.
Do not defeat the safety purpose of the
polarized or grounding-type plug. A polarized
plug has two blades with one wider than the
other. A grounding-type plug has two blades
and a third grounding prong. The wide blade
or the third prong are provided for your safety.
If the provided plug does not fit into your
outlet, consult an electrician for replacement
of the obsolete outlet. (Can differ by country)
Page 4
4 IMPORTANT SAFETY INSTRUCTIONS
Protect the power cord from being walked on
or pinched particularly at plugs, convenience
receptacles, and the point where they exit
from the apparatus.
Only use attachments/accessories specified
by the manufacturer.
Use only with a cart, stand, tripod, bracket,
or table specified by the manufacturer, or
sold with the apparatus. When a cart is used,
use caution when moving the cart/apparatus
combination to avoid injury from tip-over.
Unplug this apparatus during lightning
storms or when unused for long periods of
time.
Refer all servicing to qualified service
personnel. Servicing is required when
the apparatus has been damaged in any
way, such as power-supply cord or plug is
damaged, liquid has been spilled or objects
have fallen into the apparatus, the apparatus
has been exposed to rain or moisture, does
not operate normally, or has been dropped.
Never touch this apparatus or antenna during
a thunder or lightning storm.
When mounting a TV on the wall, make sure
not to install the TV by hanging the power
and signal cables on the back of the TV.
Do not allow an impact shock or any objects
to fall into the product, and do not drop
anything onto the screen.
CAUTION concerning the Power Cord:
It is recommended that appliances be
placed upon a dedicated circuit; that is, a
single outlet circuit which powers only that
appliance and has no additional outlets or
branch circuits. Check the specification page
of this owner's manual to be certain. Do not
connect too many appliances to the same
AC power outlet as this could result in fire or
electric shock. Do not overload wall outlets.
Overloaded wall outlets, loose or damaged
wall outlets, extension cords, frayed power
cords, or damaged or cracked wire insulation
are dangerous. Any of these conditions could
result in electric shock or fire. Periodically
examine the cord of your appliance, and
if its appearance indicates damage or
deterioration, unplug it, discontinue use of
the appliance, and have the cord replaced
with an exact replacement part by an
authorized service. Protect the power cord
from physical or mechanical abuse, such as
being twisted, kinked, pinched, closed in a
door, or walked upon. Pay particular attention
to plugs, wall outlets, and the point where
the cord exits the appliance. Do not move
the TV with the power cord plugged in. Do
not use a damaged or loose power cord. Be
sure do grasp the plug when unplugging the
power cord. Do not pull on the power cord
to unplug the TV.
Warning - To reduce the risk of fire or
electrical shock, do not expose this product
to rain, moisture or other liquids. Do not
touch the TV with wet hands. Do not install
this product near flammable objects such
as gasoline or candles, or expose the TV to
direct air conditioning.
Page 5
IMPORTANT SAFETY INSTRUCTIONS .5
Do not expose to dripping or splashing and
do not place objects filled with liquids, such
as vases, cups, etc. on or over the apparatus
(e.g. on shelves above the unit).
Grounding
Ensure that you connect the earth ground
wire to prevent possible electric shock
(i.e. a TV with a three-prong grounded AC
plug must be connected to a three-prong
grounded AC outlet). If grounding methods
are not possible, have a qualified electrician
install a separate circuit breaker. Do not try to
ground the unit by connecting it to telephone
wires, lightening rods, or gas pipes.
Power Supply
Short circuit Breaker
DISCONNECTING DEVICE FROM THE MAIN
POWER
The power outlet must remain readily
accessed in the event the device needs to
be unplugged.
As long as this unit is connected to the AC
wall outlet, it is not disconnected from the
AC power source even if the unit is turned
off.
Do not attempt to modify this product in any
way without written authorization from LG
Electronics. Unauthorized modification could
void the user's authority to operate this
product.
ANTENNAS Outdoor antenna grounding
(Can differ by country):
If an outdoor antenna is installed, follow
the precautions below. An outdoor antenna
system should not be located in the vicinity
of overhead power lines or other electric light
or power circuits, or where it can come in
contact with such power lines or circuits as
death or serious injury can occur. Be sure the
antenna system is grounded so as to provide
some protection against voltage surges
and built-up static charges. Section 810 of
the National Electrical Code (NEC) in the
U.S.A. provides information with respect to
proper grounding of the mast and supporting
structure, grounding of the lead-in wire to
an antenna discharge unit, size of grounding
conductors, location of antenna discharge
unit, connection to grounding electrodes and
requirements for the grounding electrode.
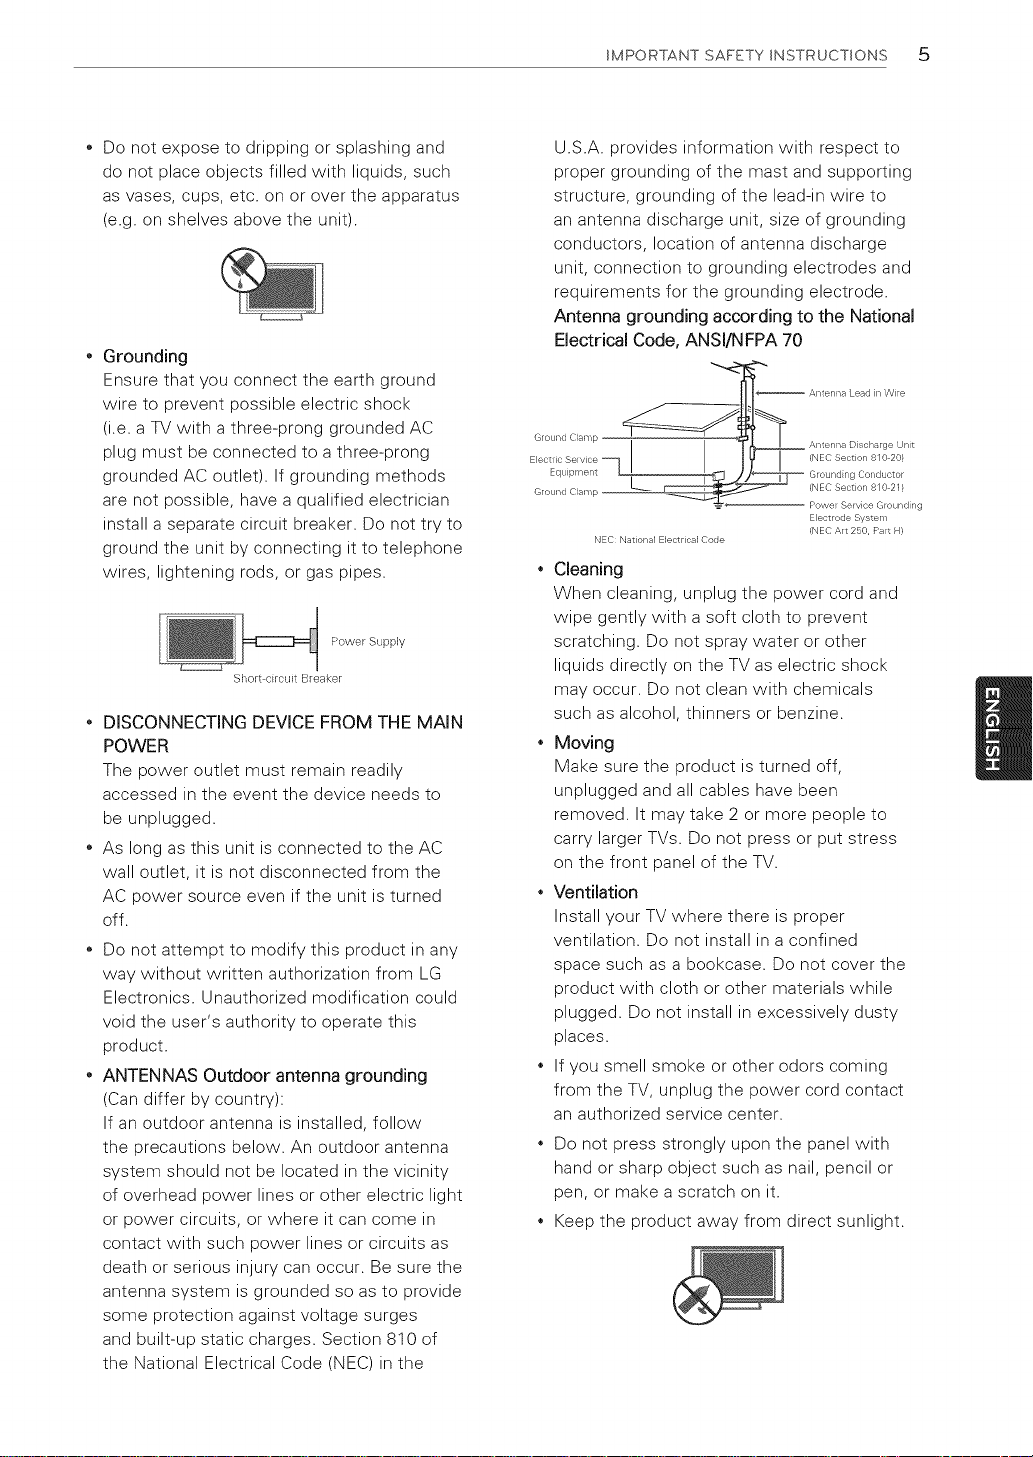
Antenna grounding according to the National
Electrical Code, ANSl/NFPA 70
Lead n Wire
Ground Clamp D scharge Unt
Electlic Selvice (NEC Sect on 8 0 20/
Equipment "_
Ground Clamp --
NEC National E}ectrical Code
(NEC Section 8/0 21}
Power Se vice Grounding
Electrode System
(NEC Art 250, Pat H)
Cleaning
When cleaning, unplug the power cord and
wipe gently with a soft cloth to prevent
scratching. Do not spray water or other
liquids directly on the TV as electric shock
may occur. Do not clean with chemicals
such as alcohol, thinners or benzine.
Moving
Make sure the product is turned off,
unplugged and all cables have been
removed. It may take 2 or more people to
carry larger TVs. Do not press or put stress
on the front panel of the TV.
Ventilation
Install your TV where there is proper
ventilation. Do not install in a confined
space such as a bookcase. Do not cover the
product with cloth or other materials while
plugged. Do not install in excessively dusty
places.
If you smell smoke or other odors coming
from the TV, unplug the power cord contact
an authorized service center.
Do not press strongly upon the panel with
hand or sharp object such as nail, pencil or
pen, or make a scratch on it.
Keep the product away from direct sunlight.
Page 6
6 IMPORTANT SAFETY INSTRUCTIONS
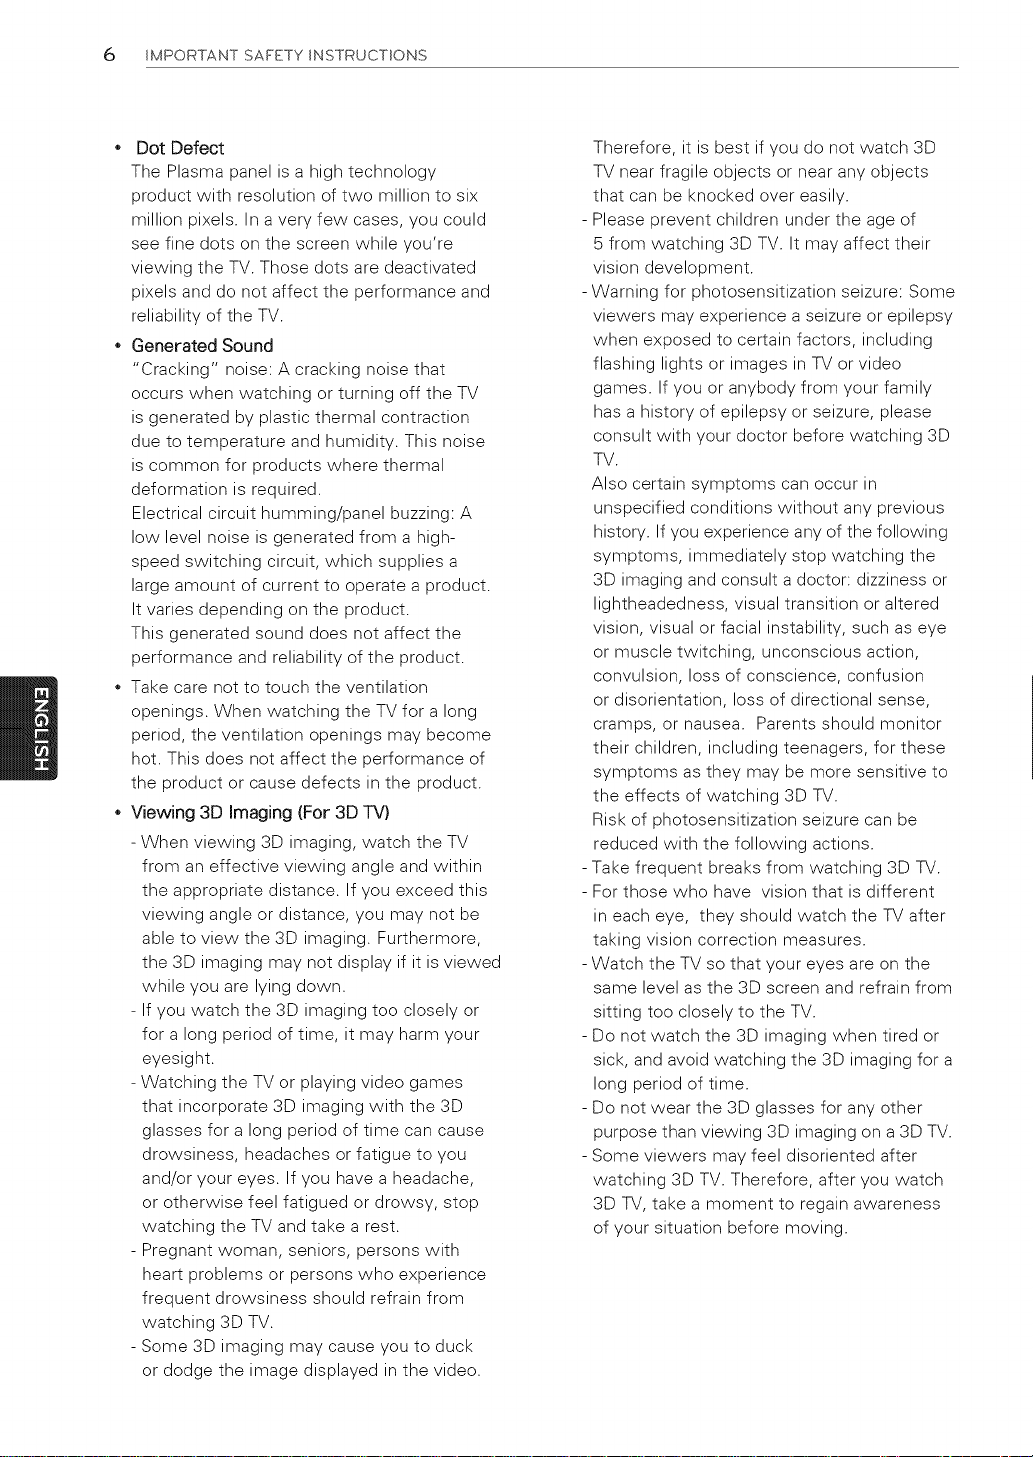
* Dot Defect
The Plasma panel is a high technology
product with resolution of two million to six
million pixels. In avery few cases, you could
see fine dots on the screen while you're
viewing the TV. Those dots are deactivated
pixels and do not affect the performance and
reliability of the TV.
Generated Sound
"Cracking" noise: A cracking noise that
occurs when watching or turning off the TV
is generated by plastic thermal contraction
due to temperature and humidity. This noise
is common for products where thermal
deformation is required.
Electrical circuit humming/panel buzzing: A
low level noise is generated from a high-
speed switching circuit, which supplies a
large amount of current to operate a product.
It varies depending on the product.
This generated sound does not affect the
performance and reliability of the product.
Take care not to touch the ventilation
openings. When watching the TV for a long
period, the ventilation openings may become
hot. This does not affect the performance of
the product or cause defects in the product.
* Viewing 3D Imaging (For 3D TV)
- When viewing 3D imaging, watch the TV
from an effective viewing angle and within
the appropriate distance. If you exceed this
viewing angle or distance, you may not be
able to view the 3D imaging. Furthermore,
the 3D imaging may not display if it is viewed
while you are lying down.
- If you watch the 3D imaging too closely or
for a long period of time, it may harm your
eyesight.
- Watching the TV or playing video games
that incorporate 3D imaging with the 3D
glasses for a long period of time can cause
drowsiness, headaches or fatigue to you
and/or your eyes. If you have a headache,
or otherwise feel fatigued or drowsy, stop
watching the TV and take a rest.
- Pregnant woman, seniors, persons with
heart problems or persons who experience
frequent drowsiness should refrain from
watching 3D TV.
- Some 3D imaging may cause you to duck
or dodge the image displayed in the video.
Therefore, it is best if you do not watch 3D
TV near fragile objects or near any objects
that can be knocked over easily.
- Please prevent children under the age of
5 from watching 3D TV. It may affect their
vision development.
- Warning for photosensitization seizure: Some
viewers may experience a seizure or epilepsy
when exposed to certain factors, including
flashing lights or images in TV or video
games. If you or anybody from your family
has a history of epilepsy or seizure, please
consult with your doctor before watching 3D
TV.
Also certain symptoms can occur in
unspecified conditions without any previous
history. If you experience any of the following
symptoms, immediately stop watching the
3D imaging and consult a doctor: dizziness or
lightheadedness, visual transition or altered
vision, visual or facial instability, such as eye
or muscle twitching, unconscious action,
convulsion, loss of conscience, confusion
or disorientation, loss of directional sense,
cramps, or nausea. Parents should monitor
their children, including teenagers, for these
symptoms as they may be more sensitive to
the effects of watching 3D TV.
Risk of photosensitization seizure can be
reduced with the following actions.
- Take frequent breaks from watching 3D TV.
- For those who have vision that is different
in each eye, they should watch the TV after
taking vision correction measures.
- Watch the TV so that your eyes are on the
same level as the 3D screen and refrain from
sitting too closely to the TV.
- Do not watch the 3D imaging when tired or
sick, and avoid watching the 3D imaging for a
long period of time.
- Do not wear the 3D glasses for any other
purpose than viewing 3D imaging on a 3D TV.
- Some viewers may feel disoriented after
watching 3D TV. Therefore, after you watch
3D TV, take a moment to regain awareness
of your situation before moving.
Page 7
ForUSAandCanada
Thisequipmenthasbeentestedandfound
tocomplywiththelimitsforaClassB
digitaldevice,pursuanttoPart15ofthe
FCCRules.Theselimitsaredesignedto
providereasonableprotectionagainstharmful
interferenceinaresidentialinstallation.
Thisequipmentgenerates,usesandcan
radiateradiofrequencyenergyand,ifnot
installedandusedinaccordancewiththe
instructions,maycauseharmfulinterference
toradiocommunications.Howeverthereis
noguaranteethatinterferencewillnotoccur
inaparticularinstallation.Ifthisequipment
doescauseharmfulinterferencetoradioor
televisionreception,whichcanbedetermined
byturningtheequipmentoffandon,theuser
isencouragedtotrytocorrecttheinterference
byoneormoreofthefollowingmeasures:
Reorientorrelocatethereceivingantenna.
Increasetheseparationbetweenthe
equipmentandthereceiver.
Connecttheequipmenttoanoutleton
acircuitdifferentfromthattowhichthe
receiverisconnected.
Consultthedealeroranexperiencedradio/
TVtechnicianforhelp.
Thisdevicecomplieswithpart15oftheFCC
Rules.Operationissubjecttothefollowing
twoconditions:(1)thisdevicemaynotcause
harmfulinterferenceand(2)thisdevicemust
acceptanyinterferencereceived,including
interferencethatmaycauseundesired
operationofthedevice.
Anychangesormodificationsinconstructionof
thisdevicewhicharenotexpresslyapproved
bythepartyresponsibleforcompliance
couldvoidtheuser'sauthoritytooperatethe
equipment.
IMPORTANT SAFETY INSTRUCTIONS 7
ThisreminderisprovidedtocalltheCATV
systeminstaller'sattentiontoArticle820-40of
theNationalElectricCode(U.S.A.).Thecode
providesguidelinesforpropergroundingand,
inparticular,specifiesthatthecableground
shallbeconnectedtothegroundingsystemof
thebuilding,asclosetothepointofthecable
entryaspractical.
Page 8
8 TABLEOFCONTENTS
TABLE OF CONTENTS
2 LICENSES
3
IMPORTANT SAFETY IN-
STRUCTIONS
8
TABLE OF CONTENTS
10 ASSEMBLING AND PREPARING
10 Unpacking
11 Additional accessories
13 Optional Extras
14 Parts and buttons
15 Lifting and moving the TV
15 Setting up the TV
15 - Attaching the stand
17 - Mounting on a table
18 - Mounting on a walt
19 - Tidying cables
19 - Attaching Pen Holder Bracket
20 REMOTE CONTROL
23 WATCHING TV
23 Connecting to an antenna or cable
23 - Connecting an antenna or basic cable
23 - Connecting a cable box
24 Turning the TV on for the first time
25 Watching TV
25 Managing channeis
25 - Setting up channeis
26 - Using favorite channels
27 - Checking current program info
29 Using additional options
29 - Adjusting aspect ratio
30 - Changing AV modes
30 - Using the input list
31 - Locking the buttons on the TV (Child
Lock)
31 Using the quick menu
32 Using the customer support
32 - Testing the Picture / Sound
32 - Using the product or service informa-
tion
33 3D IMAGING (FOR 3DTV)
33 3D Technology
33 - When watching 3D imaging
33 - When using 3D Glasses
33 - 3D Imaging Viewing Range
34 Viewing 3D Imaging
36 PENTOUCH
36 Using Pentouch
37 - Step of Using the Pentouch Program
37 - System Requirements
37 - Installing the Pentouch Program
37 - Installing the USB Dongle Driver
38 - Removing the Pentouch Program and
Driver
38 - Pairing between Touch Pen and Dongle
40 - Using the Pentouch Function
40 - Display Resolution Settings for Pen-
touch
42 Checking the Pentouch Functions
43 - Using Tootbar
44
46
48
48
49
50
- Using
- Using
- Using
- Using
- Using
- Using
Sketchbook
Photo Editor
Family Diary
Gallery
Internet
My Office
Page 9
TABLE OF CONTENTS 9
51 ENTERTAINMENT
51 - Connecting USB storage devices
52 - Browsing flies
54 - Viewing Videos
57 - DivX registration code
58 - Viewing Photos
60 - Listening to music
62 CUSTOMIZINGTV SETTINGS
62 The Main Menus
63 Customizing Settings
63 - CHANNEL Settings
64 - PICTURE Settings
68 - AUDIO Settings
69 - TIME Settings
70 - LOCK Settings
72 - OPTION Settings
74
MAKING CONNECTIONS
75
Connection Overview
76
Connecting to a HD receiver, DVD or VCR
player
76 - HDMI Connection
76 - DVl to HDMI Connection
76 - Component Connection
76 - Composite Connection
77 Connecting to a PC
77 - HDMI Connection
77 - DVl to HDMI Connection
77 - RGB Connection
78 Connecting to an Audio System
78 - Digital optical audio connection
78 Connecting to a USB
79 SIMPLINK Connection
79 - Activating and Using the SIMPLINK
menus
80 MAINTENANCE
80 Cleaning Your TV
80 - Screen and frame
80 - Cabinet and stand
80 - Power cord
80 Preventing "image burn" or "Burn-in" on
your TV screen
81 TROUBLESHOOTING
84 SPECIFICATIONS
88 IR CODES
9O EXTERNAL CONTROL DEVICE
SETUP
98 OPEN SOURCE LmCENSE
Page 10
10 ASSEMBLING AND PREPARING
ASSEMBLING AND PREPARING
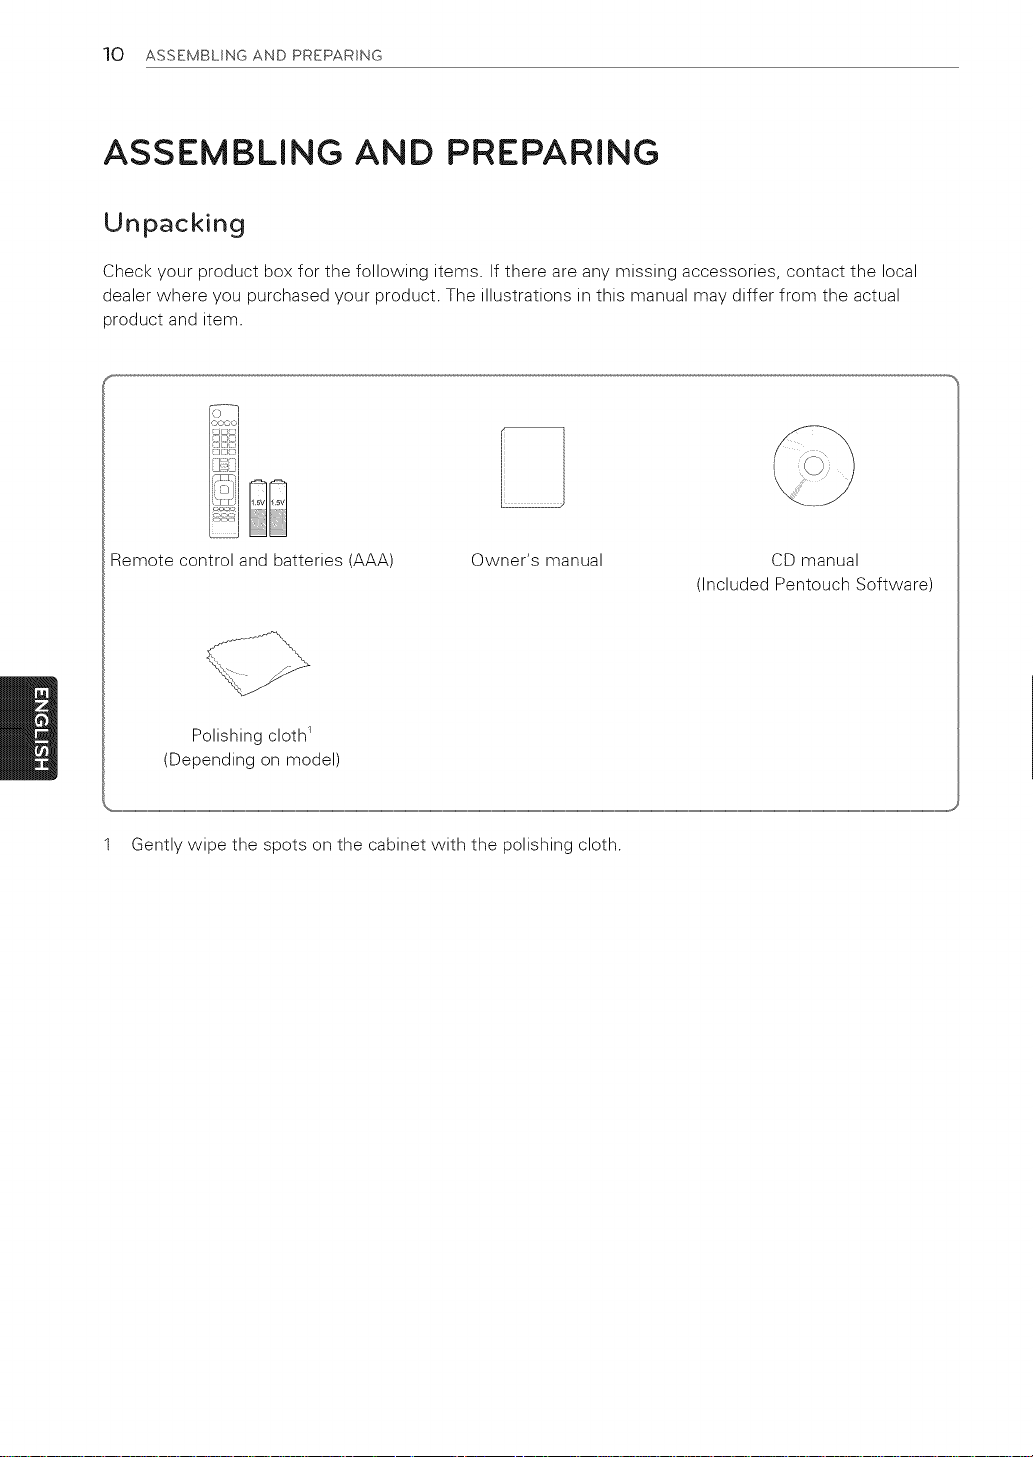
Unpacking
Check your product box for the following items. If there are any missing accessories, contact the local
dealer where you purchased your product. The illustrations in this manual may differ from the actual
product and item.
Remote control and batteries (AAA) Owner's manual CD manual
(Included Pentouch Software)
Polishing cloth 1
(Depending on model)
1 Gently wipe the spots on the cabinet with the polishing cloth.
Page 11
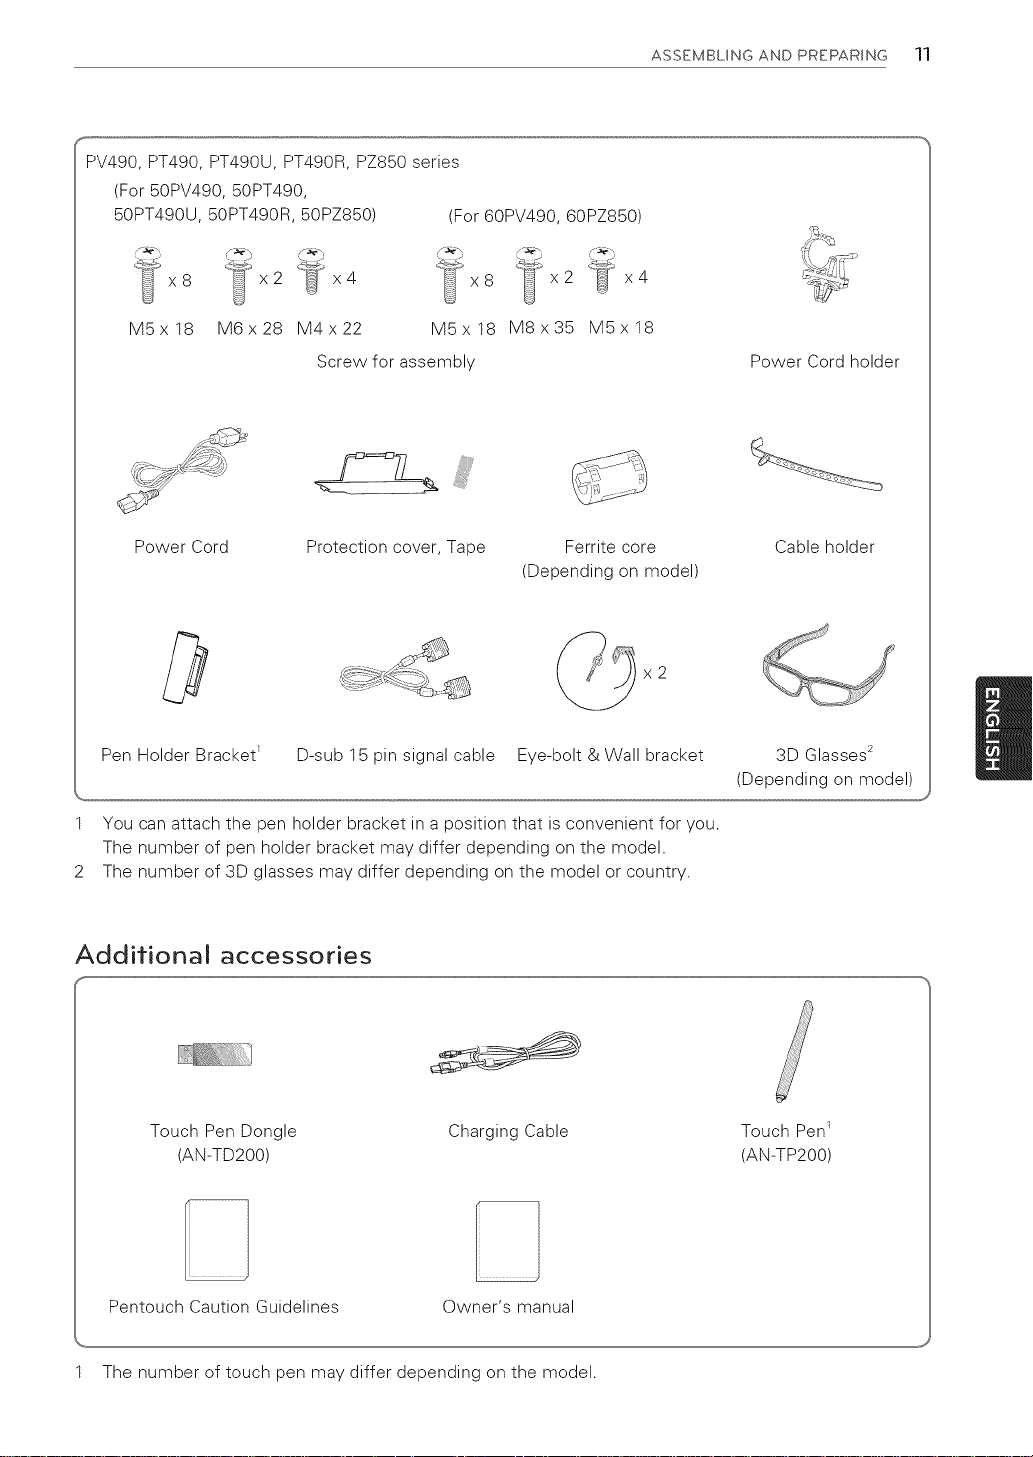
PT490, PT490U, PT490R, PZ850 series
(For 50PV490, 50PT490,
50PT490U, 50PT490R, 50PZ850) (For 60PV490, 60PZ850)
8-
x2 x4 x8 x2 x4
ASSEMBLING AND PREPARING 11
MSx 18
M6x28 M4x22 MSx18 MSx35 MSx18
Screw for assembly
Power Cord
Protection cover, Tape
Ferrite core
(Depending on model)
x2
Pen Holder Bracket E D-sub 15 pin signal cable Eye-bolt & Wall bracket
1 You can attach the pen holder bracket in a position that is convenient for you.
The number of pen holder bracket may differ depending on the model.
2 The number of 3D glasses may differ depending on the model or country.
Power Cord holder
Cable holder
3D Glasses s
(Depending on model)
Additional accessories
Touch Pen Dongle
(AN-TD200)
Pentouch Caution Guidelines
1 The number of touch pen may differ depending on the model.
Charging Cable
Owner's manual
Touch Pen1
(AN-TP200)
Page 12
12 ASSEMBLING AND PREPARING
CAUTION
_-@ NOTE
• The items supplied with your product may vary depending on the model.
• Product specifications or contents of this manual may be changed without prior notice due to
upgrade of product functions.
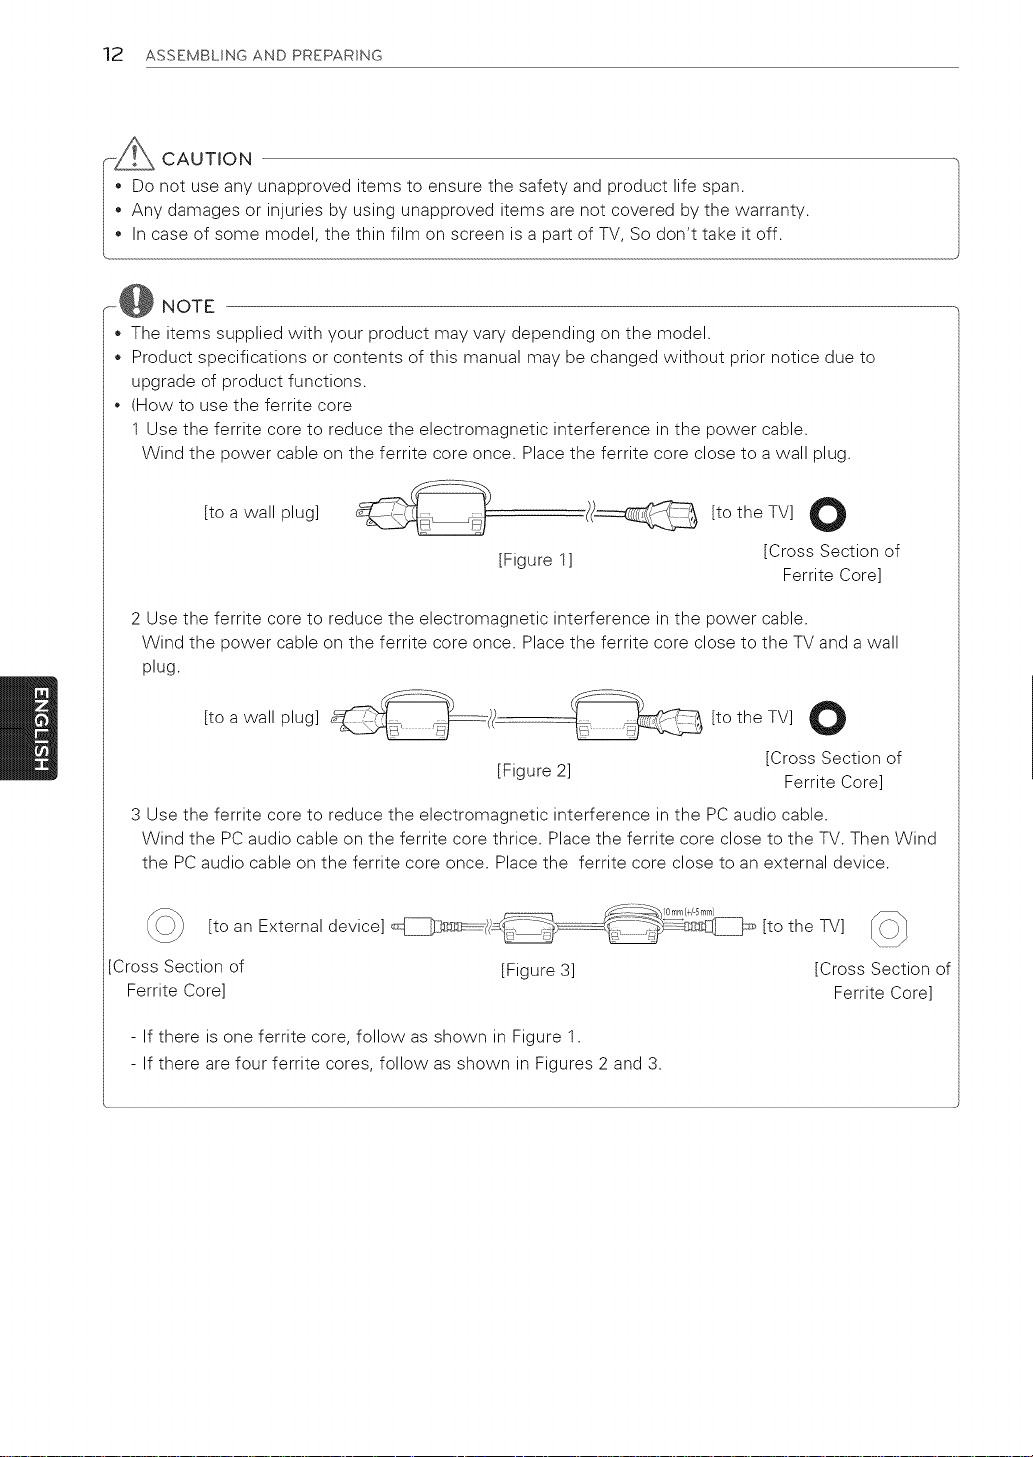
• IHow to use the ferrite core
1 Use the ferrite core to reduce the electromagnetic interference inthe power cable.
Wind the power cable on the ferrite core once. Place the ferrite core close to a wall plug.
[to a wall plug]
[Figure 1]
//___ [to the TV]
[Cross Section of
Ferrite Core]
2 Use the ferrite core to reduce the electromagnetic interference inthe power cable.
Wind the power cable on the ferrite core once. Place the ferrite core close to the TV and a wall
plug.
[to a wall plug] [to the TV]
[Figure 2]
[Cross Section of
Ferrite Core]
3 Use the ferrite core to reduce the electromagnetic interference inthe PC audio cable.
Wind the PC audio cable on the ferrite core thrice. Place the ferrite core close to the TV. Then Wind
the PC audio cable on the ferrite core once. Place the ferrite core close to an external device.
__10 mm(+/-5ram)
[to an External device] _m_--/ [to the TV]
Cross Section of [Figure 3] [Cross Section of
Ferrite Core] Ferrite Core]
- If there is one ferrite core, follow as shown in Figure 1.
- If there are four ferrite cores, follow as shown in Figures 2 and 3.
Page 13
ASSEMBLING AND PREPARING 13
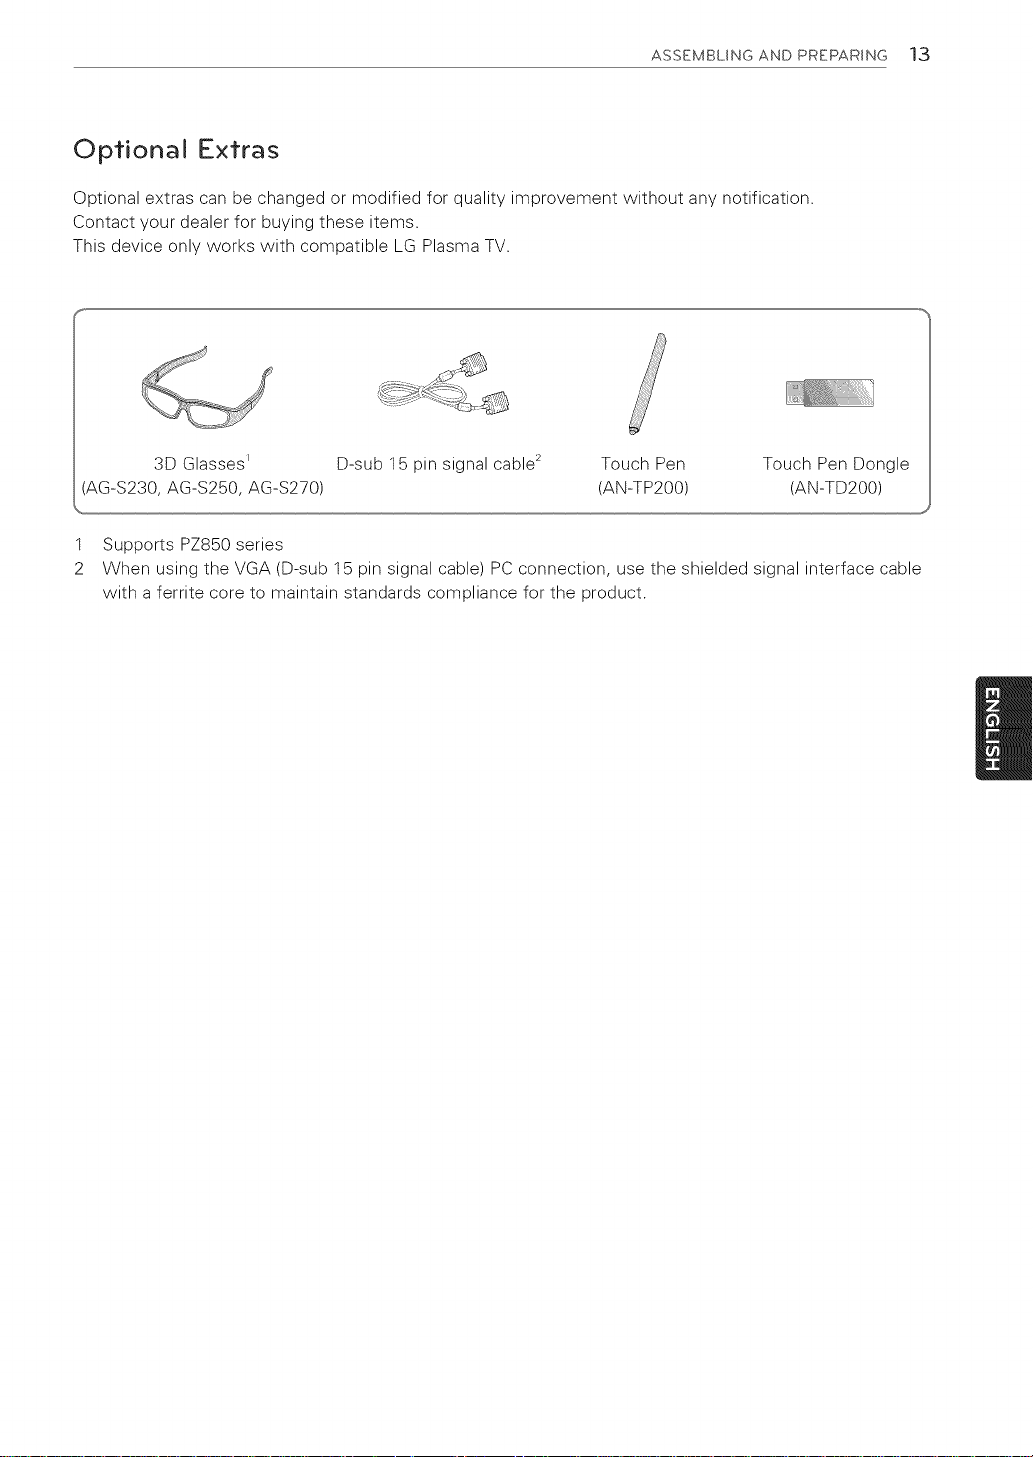
Optional Extras
Optional extras can be changed or modified for quality improvement without any notification.
Contact your dealer for buying these items.
This device only works with compatible LG Plasma TV.
3D Glasses _ D-sub 15 pin signal cable _
(AG-S230, AG-S250, AG-S270)
1 Supports PZ850 series
2 When using the VGA (D-sub 15 pin signal cable) PC connection, use the shielded signal interface cable
with a ferrite core to maintain standards compliance for the product.
Touch Pen Touch Pen Dongle
(AN-TP200) (AN-TD200)
Page 14
14 ASSEMBLING AND PREPARING
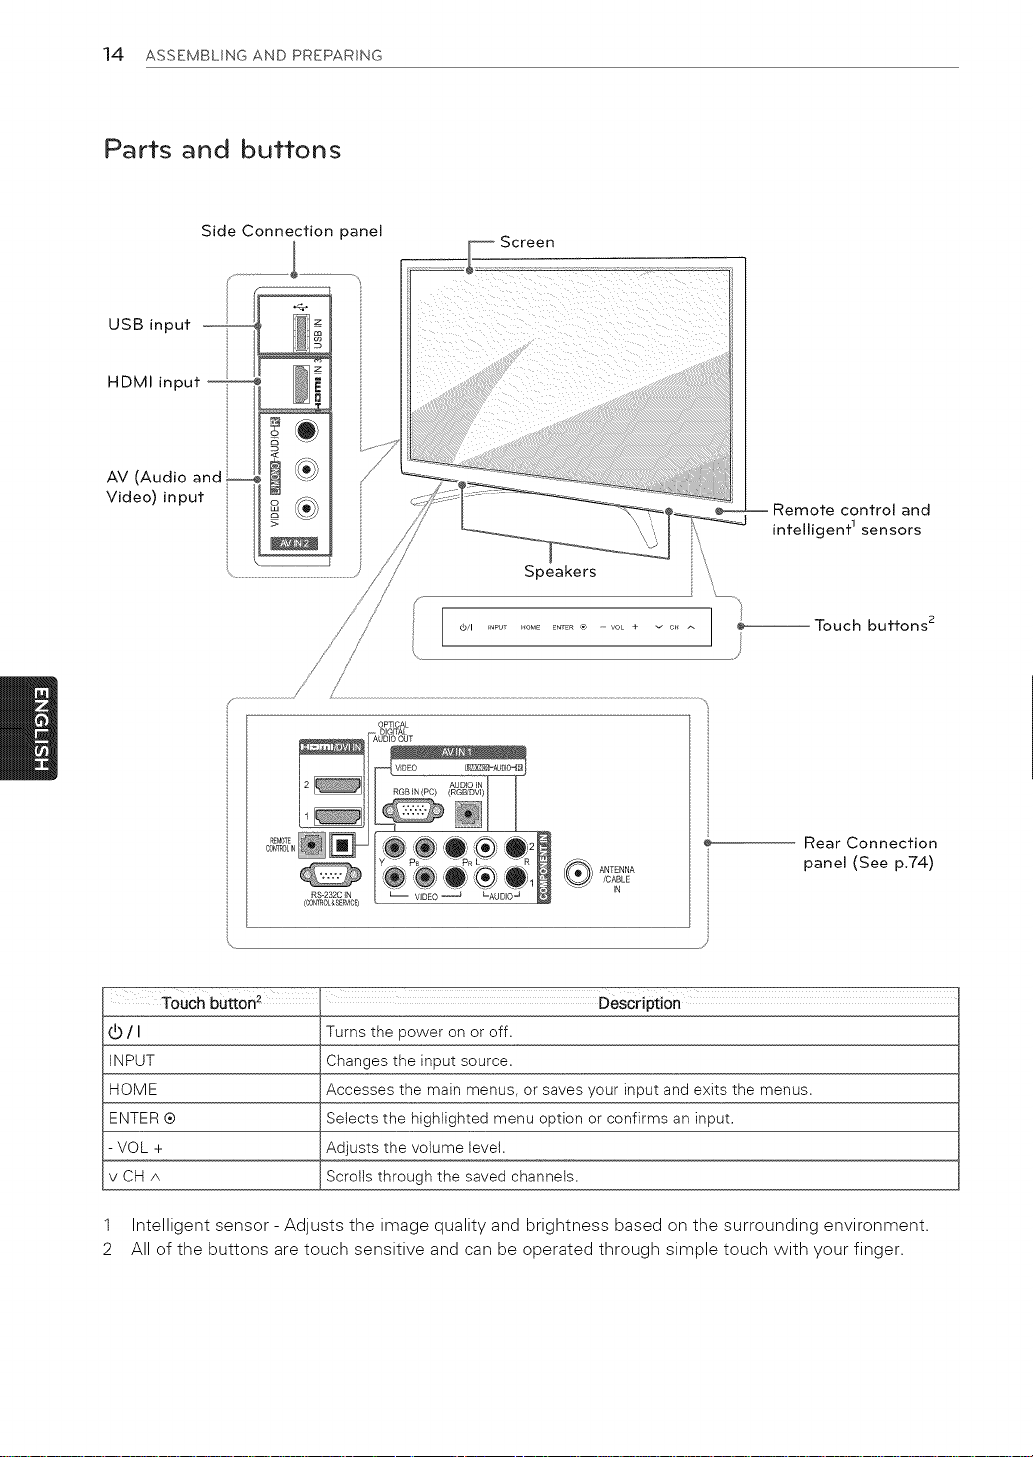
Parts and buttons
Side Connection panel
USB input
HDMI input
AV (Audio and
Video) input
/
/
Screen
Remote control and
intelligent 1sensors
Speakers
......... ,}
,_/i ................ _ .... + ...... _ Touch buttons 2
\
I
Rear Connection
panel (See p.74)
ToUch bUtton 2 Description
/ I Turns the power on or off.
INPUT Changes the input source.
HOME Accesses the main menus, or saves your input and exits the menus.
ENTER ® Selects the highlighted menu option or confirms an input.
- VOL + Adjusts the volume levet.
v CH A Scrolls through the saved channels.
1 Intelligent sensor - Adjusts the image quality and brightness based on the surrounding environment.
2 All of the buttons are touch sensitive and can be operated through simple touch with your finger.
Page 15
ASSEMBLING AND PREPARING 15
Lifting and moving the TV
When moving or lifting the TV, read the following
to prevent the TV from being scratched or
damaged and for save transportation regardless of
its type and size.
-_ CAUTION
* Avoid touching the screen at all times, as |
this may result in damage to the screen.
* It is recommended to move the TV in the
box or packing material that the TV originally
came in.
* Before moving or lifting the TV, disconnect
the power cord and all cables.
* When holding the TV, the screen should face
away from you to prevent damage.
* Hold the top and bottom of the TV frame
firmly. Make sure not to hold the transparent
part, speaker, or speaker grill area.
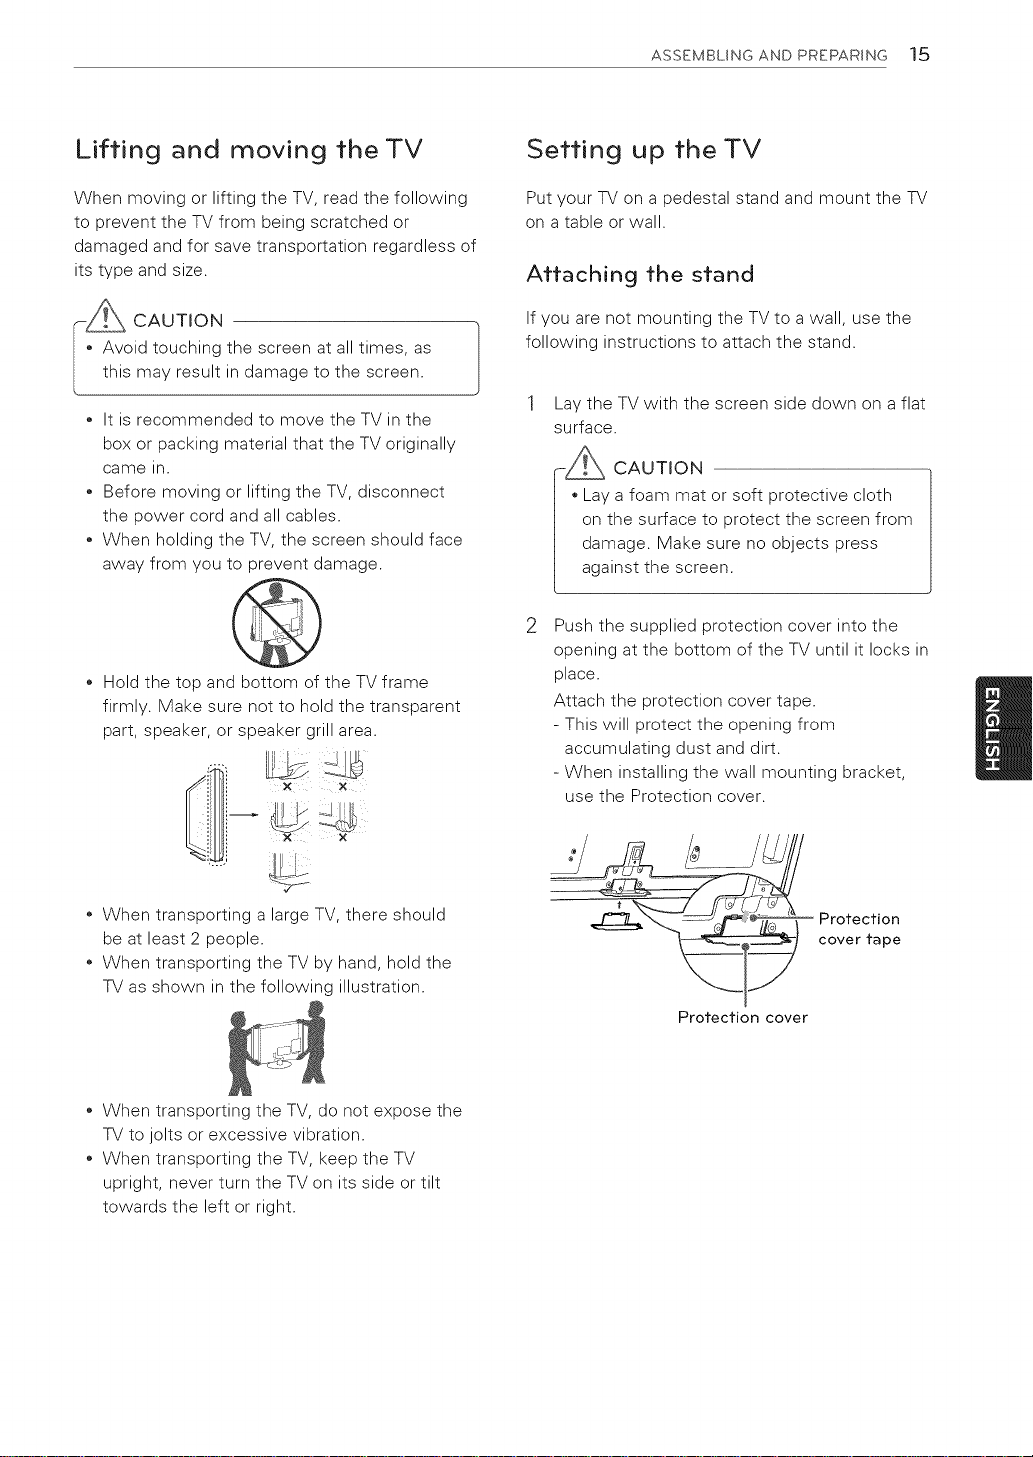
Setting up the TV
Put your TV on a pedestal stand and mount the TV
on a table or wall.
Attaching the stand
If you are not mounting the TV to a wall, use the
following instructions to attach the stand.
J
Lay the TV with the screen side down on a flat
surface.
CAUTION
*Lay a foam mat or softprotectivecloth
on thesurfaceto protectthe screenfrom
damage. Make sure no objects press
against the screen.
Push the supplied protection cover into the
opening at the bottom of the TV until it locks in
place.
Attach the protection cover tape.
- This will protect the opening from
accumulating dust and dirt.
- When installing the wall mounting bracket,
use the Protection cover.
_
* When transporting a large TV, there should
be at least 2 people.
* When transporting the TV by hand, hold the
TV as shown in the following illustration.
* When transporting the TV, do not expose the
TV to jolts or excessive vibration.
* When transporting the TV, keep the TV
upright, never turn the TV on its side or tilt
towards the left or right.
Protection
cover tape
Protection cover
Page 16
16 ASSEMBLING AND PREPARING
3
Assemble the parts of the STAND POLE with
the TV.
Model Screw for Number of
assembly screws
50PV490, M6 x 28 2
50PT490,
50PT490U,
50PT490R,
50PZ850
60PV490, M8 x 35 2
60PZ850
\
Stand Pole
Model Screw for Number of
50PV490, M4 x 22 4
50PT490,
50PT490U,
50PT490R,
50PZ850
60PV490, M5x18 4
60PZ850
assembly 'screws
Secure the TV and the STAND BASE with the
8 screws.
_ for assernbiY _urnber of screws I
Stand Base
CAUTION
Tighten the screws firmly to prevent
the TV from tilting forward. Do not over
tighten.
To detach the stand,
1 Lay the TV with the screen side down on a flat
surface.
2 Remove the 6 screws and pull the stand away
from the TV.
tD
/
Page 17
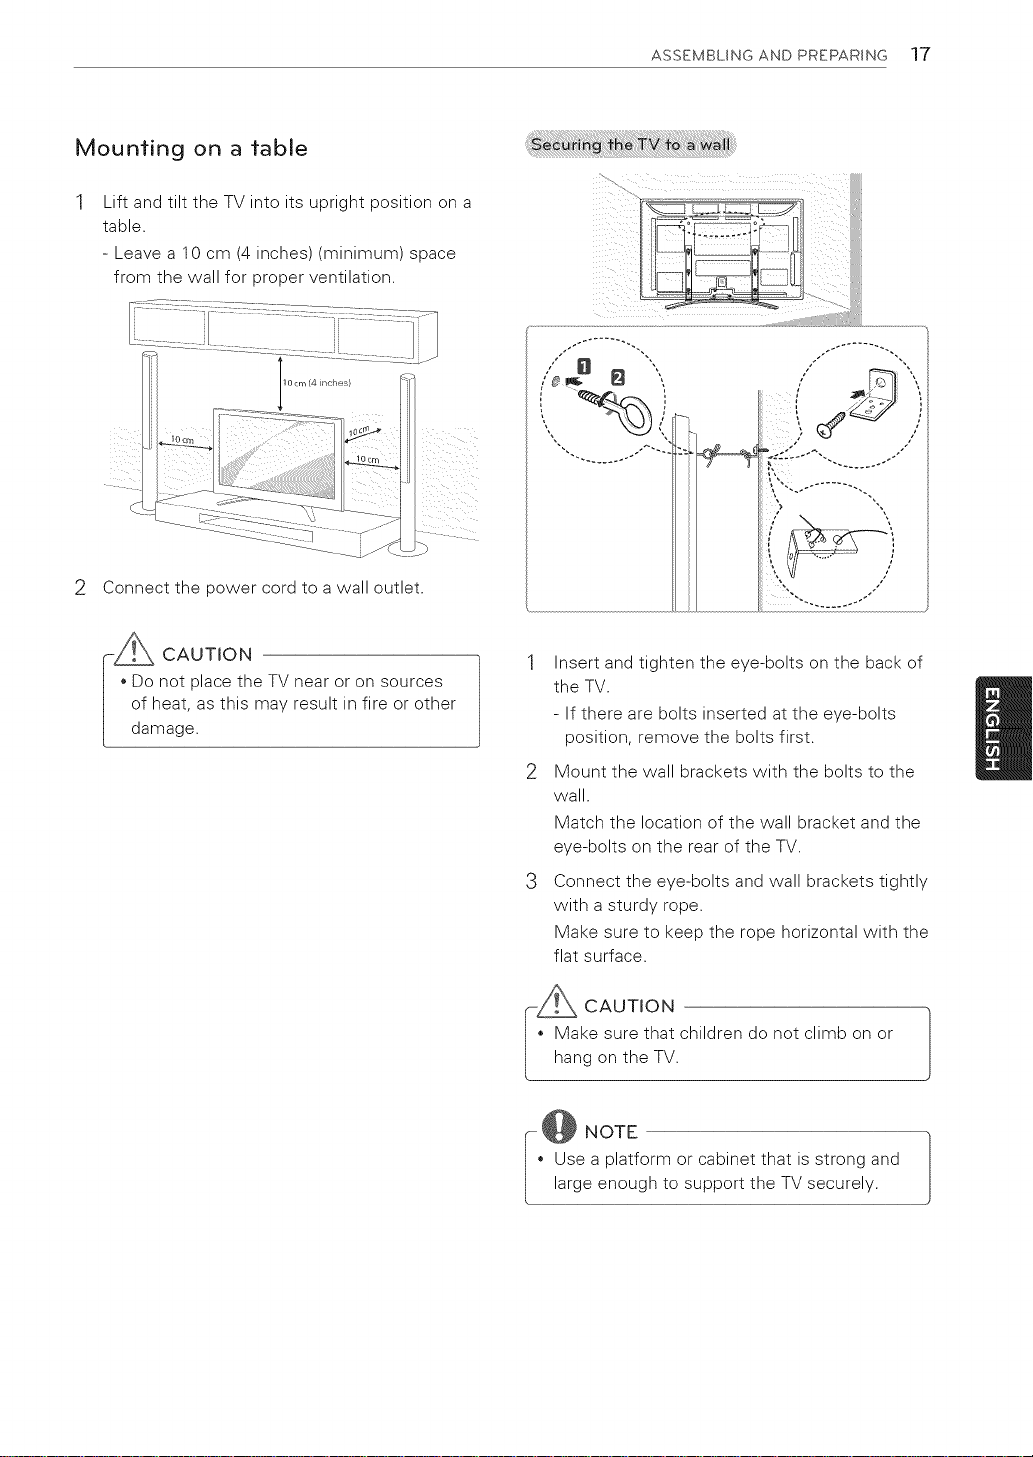
Mounting on a table
Lift and tilt the TV into its upright position on a
table.
- Leave a 10 cm (4 inches) (minimum) space
from the wall for proper ventilation.
2 Connect the power cord to a wall outlet.
ASSEMBLING AND PREPARING 17
CAUTION
Do not place the TV near or on sources
of heat, as this may result in fire or other
damage.
1 Insert and tighten the eye-bolts on the back of
the TV.
- If there are bolts inserted at the eye-bolts
position, remove the bolts first.
2 Mount the wall brackets with the bolts to the
wall.
Match the location of the wall bracket and the
eye-bolts on the rear of the TV.
3 Connect the eye-bolts and wall brackets tightly
with a sturdy rope.
Make sure to keep the rope horizontal with the
flat surface.
_ CAUTION
|* Make sure that children do not climb on or |
hang on the TV. J
i@ NOTE
Use a platform or cabinet that is strong and
large enough to support the TV securely. |
1
1
J
Page 18
18 ASSEMBLING AND PREPARING
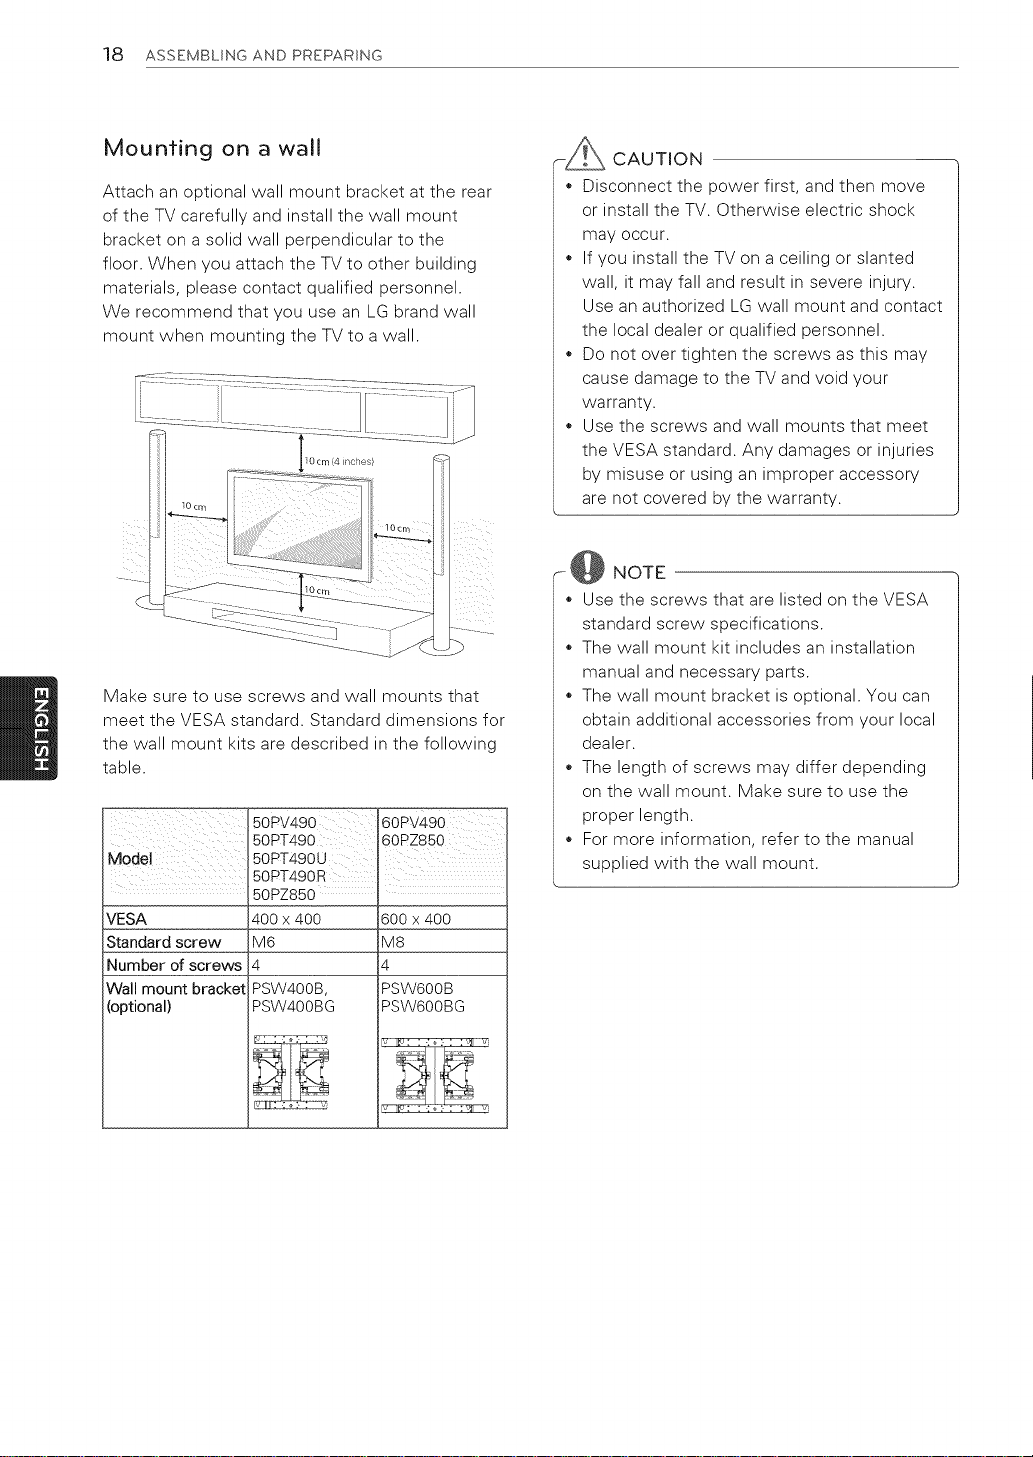
Mounting on a wall
Attach an optional wall mount bracket at the rear
of the TV carefully and install the wall mount
bracket on a solid wall perpendicular to the
floor. When you attach the TV to other building
materials, please contact qualified personnel.
We recommend that you use an LG brand wall
mount when mounting the TV to a wall.
Make sure to use screws and wall mounts that
meet the VESA standard. Standard dimensions for
the wall mount kits are described in the following
table.
50PV490 60PV490
50PT490 60PZ850
50PT490U
50PT490R ,
50PZ850
VESA 400 x 400 600 x 400
Standard screw M6 M8
Number of screws 4 4
Wall mount bracket PSW400B, PSW600B
(optional) PSW400BG PSW600BG
CAUTION
* Disconnect the power first, and then move
or install the TV. Otherwise electric shock
may occur.
* If you install the TV on a ceiling or slanted
wall, it may fall and result in severe injury.
Use an authorized LG wall mount and contact
the local dealer or qualified personnel.
Do not over tighten the screws as this may
cause damage to the TV and void your
warranty.
Use the screws and wall mounts that meet
the VESA standard. Any damages or injuries
by misuse or using an improper accessory
are not covered by the warranty.
y @ NOTE
* Use the screws that are listed on the VESA
standard screw specifications.
The wall mount kit includes an installation
manual and necessary parts.
The wall mount bracket is optional. You can
obtain additional accessories from your local
dealer.
The length of screws may differ depending
on the wall mount. Make sure to use the
proper length.
, For more information, refer to the manual
supplied with the wall mount.
Page 19
ASSEMBLING AND PREPARING 19
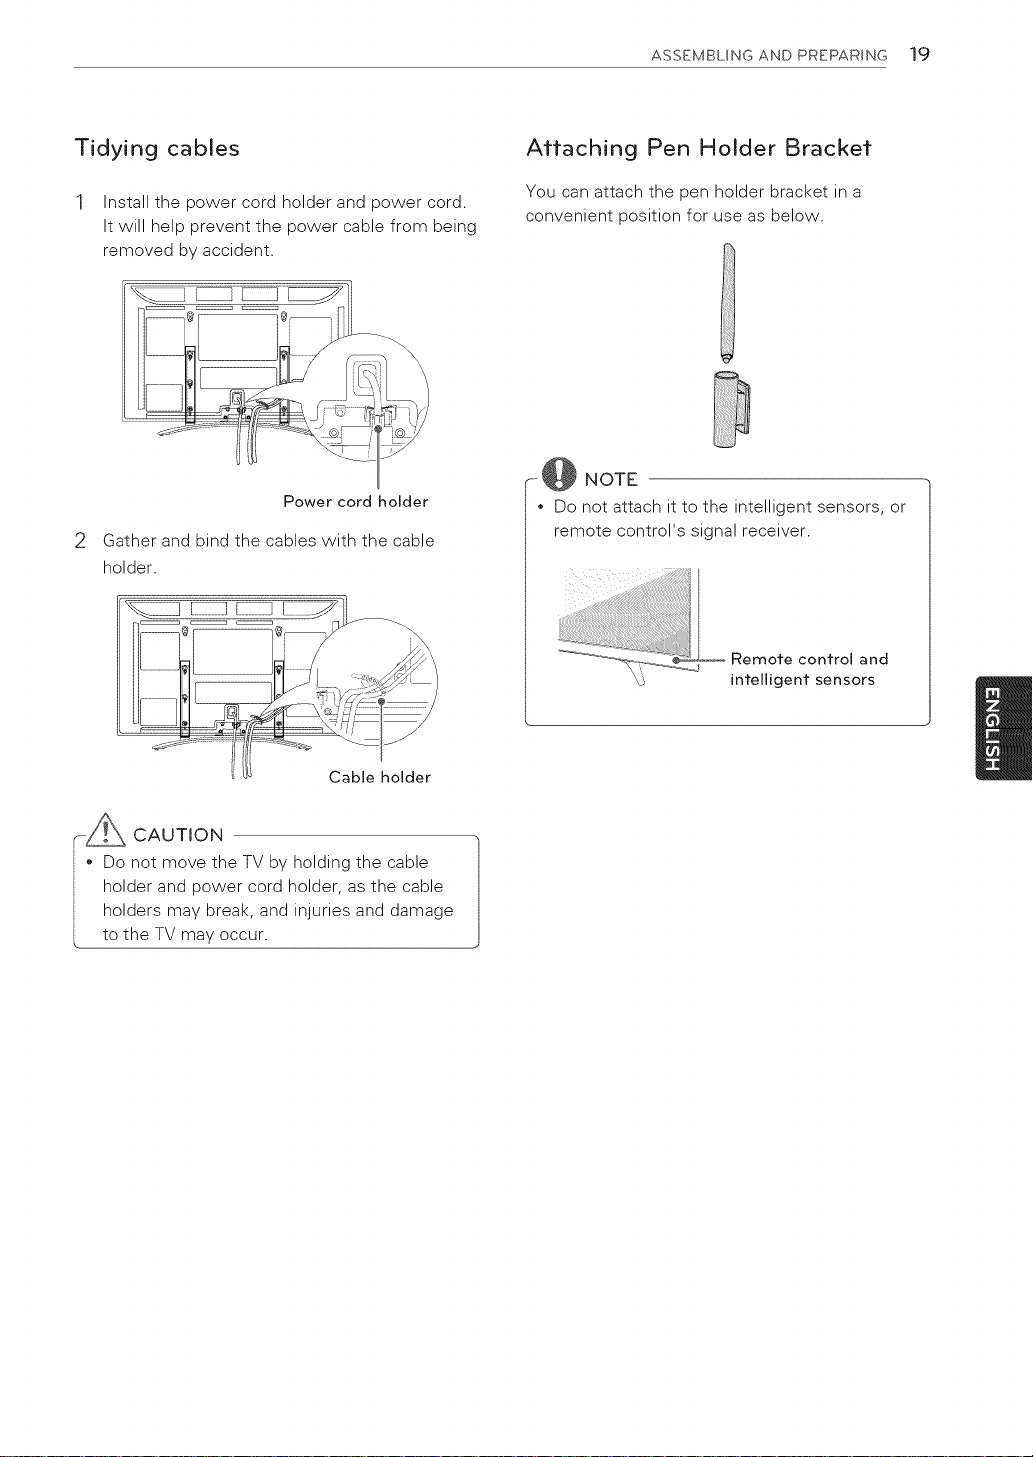
Tidying cables
1 Install the power cord holder and power cord.
It will help prevent the power cable from being
removed by accident.
Power cord holder
2
Gather and bind the cables with the cable
holder.
Attaching Pen Holder Bracket
You can attach the pen holder bracket in a
convenient position for use as below.
r @ NOTE
* Do not attach it to the intelligent sensors, or
remote control's signal receiver.
Remote control and
intelligent sensors
Cable holder
-_ CAUTION
* Do not move the TV by holding the cable
holder and power cord holder, as the cable
holders may break, and injuries and damage
to the TV may occur.
Page 20
20 REMOTE CONTROL
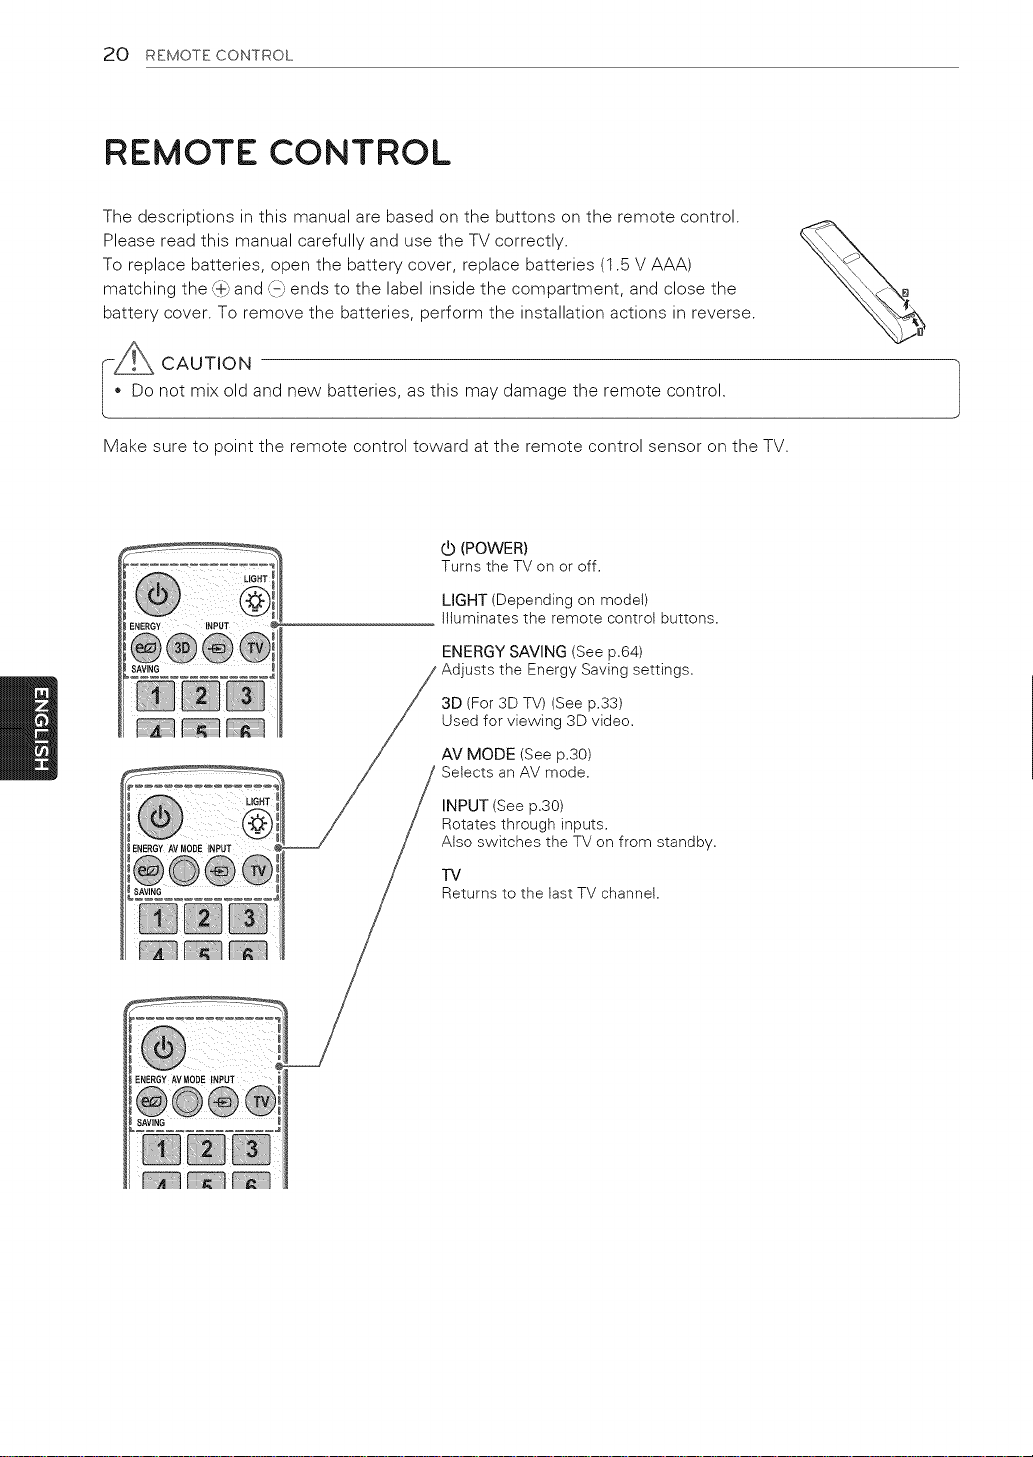
REMOTE CONTROL
The descriptions in this manual are based on the buttons on the remote control.
Please read this manual carefully and use the TV correctly.
To replace batteries, open the battery cover, replace batteries (1.5 V AAA)
matching the ,_,+}and {-} ends to the label inside the compartment, and close the
battery cover. To remove the batteries, perform the installation actions in reverse.
C_ CAUTION
, Do not mix old and new batteries, as this may damage the remote control.
Make sure to point the remote control toward at the remote control sensor on the TV.
(_ (POWER)
Turns the TV on or off.
LIGHT (Depending on model)
ENERGY INPUT
Illuminates the remote control buttons.
ENERGY SAVING (See p,64)
usts the Energy Saving settings,
3D (For 3D TV) (See p.33)
Used for viewing 3D video.
AV MODE (See p.30)
Selects an AV mode.
ENERGY AVMODE INPUT
)
ENERGY AVMODE INPUT
SAVING
INPUT (See p.30)
Rotates through inputs,
Aiso switches the TV on from standby,
TV
Returns to the last TV channel.
Page 21
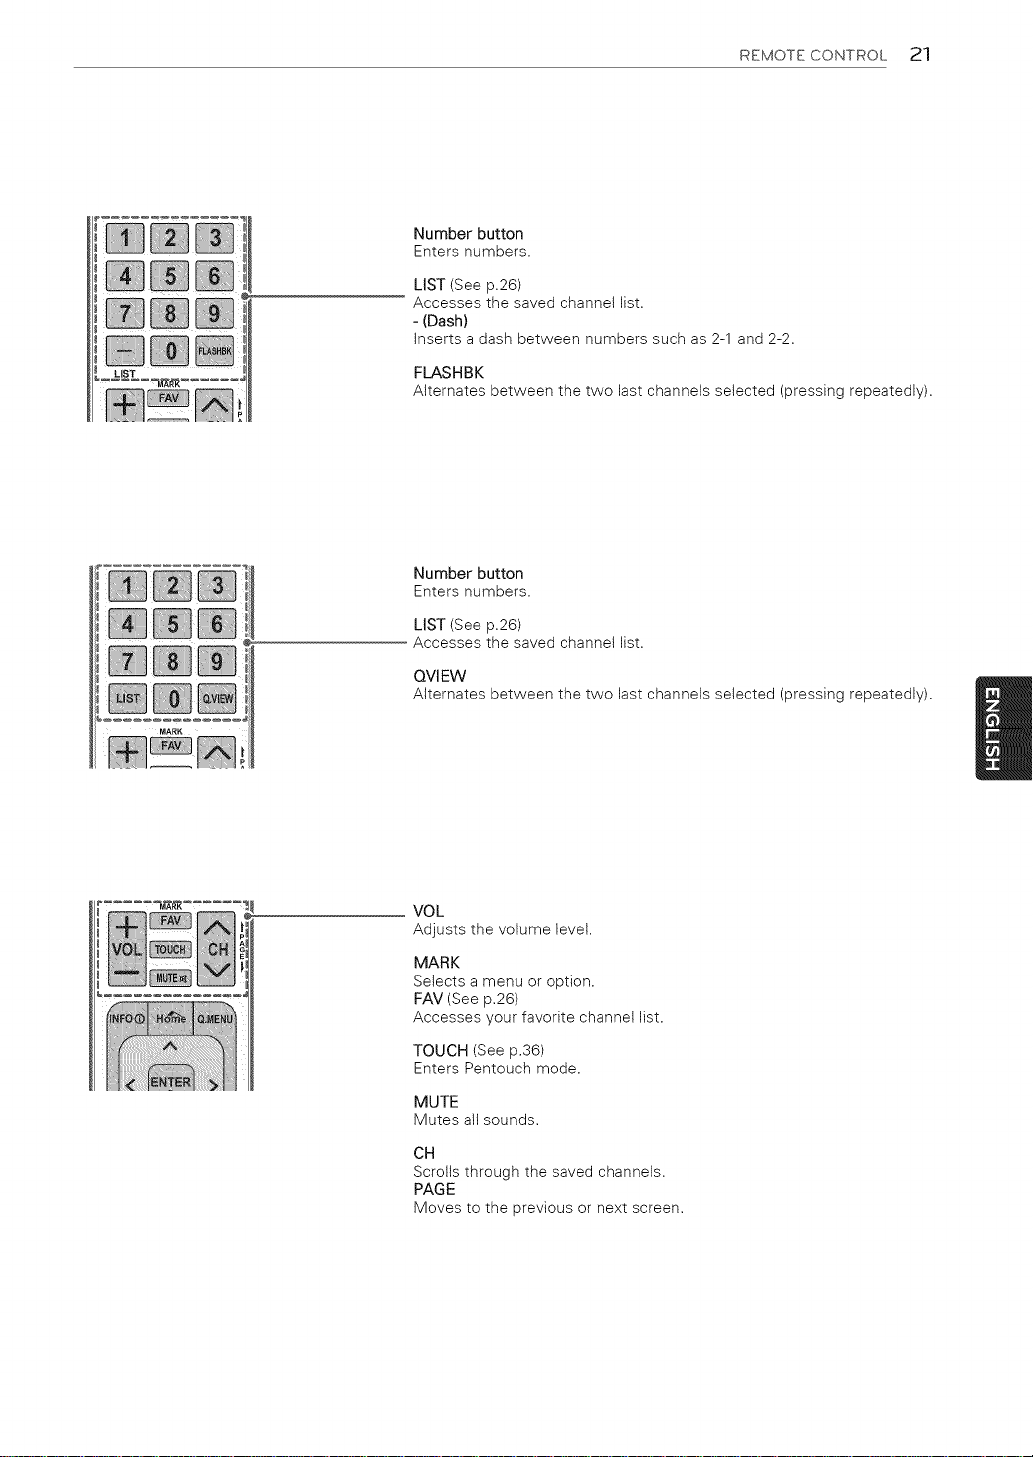
REMOTE CONTROL 21
Number button
Enters numbers,
LIST (See p.26)
Accesses the saved channel list.
- (Dash)
inserts a dash between numbers such as 2-1 and 2-2.
FLASHBK
Alternates between the two last channets selected (pressing repeatedly).
Number button
Enters numbers,
LIST (See p.26)
Accesses the saved channel list,
QVl EW
Alternates between the two last channets selected (pressing repeatedly).
VOL
Adjusts the volume level.
MARK
Selects a menu or option.
FAV (See p.26)
Accesses your favorite channel list.
TOUCH (See p.36)
Enters Pentouch mode.
MUTE
Mutes all sounds,
CH
Scrotts through the saved channels.
PAGE
Moves to the previous or next screen.
Page 22
22 REMOTE CONTROL
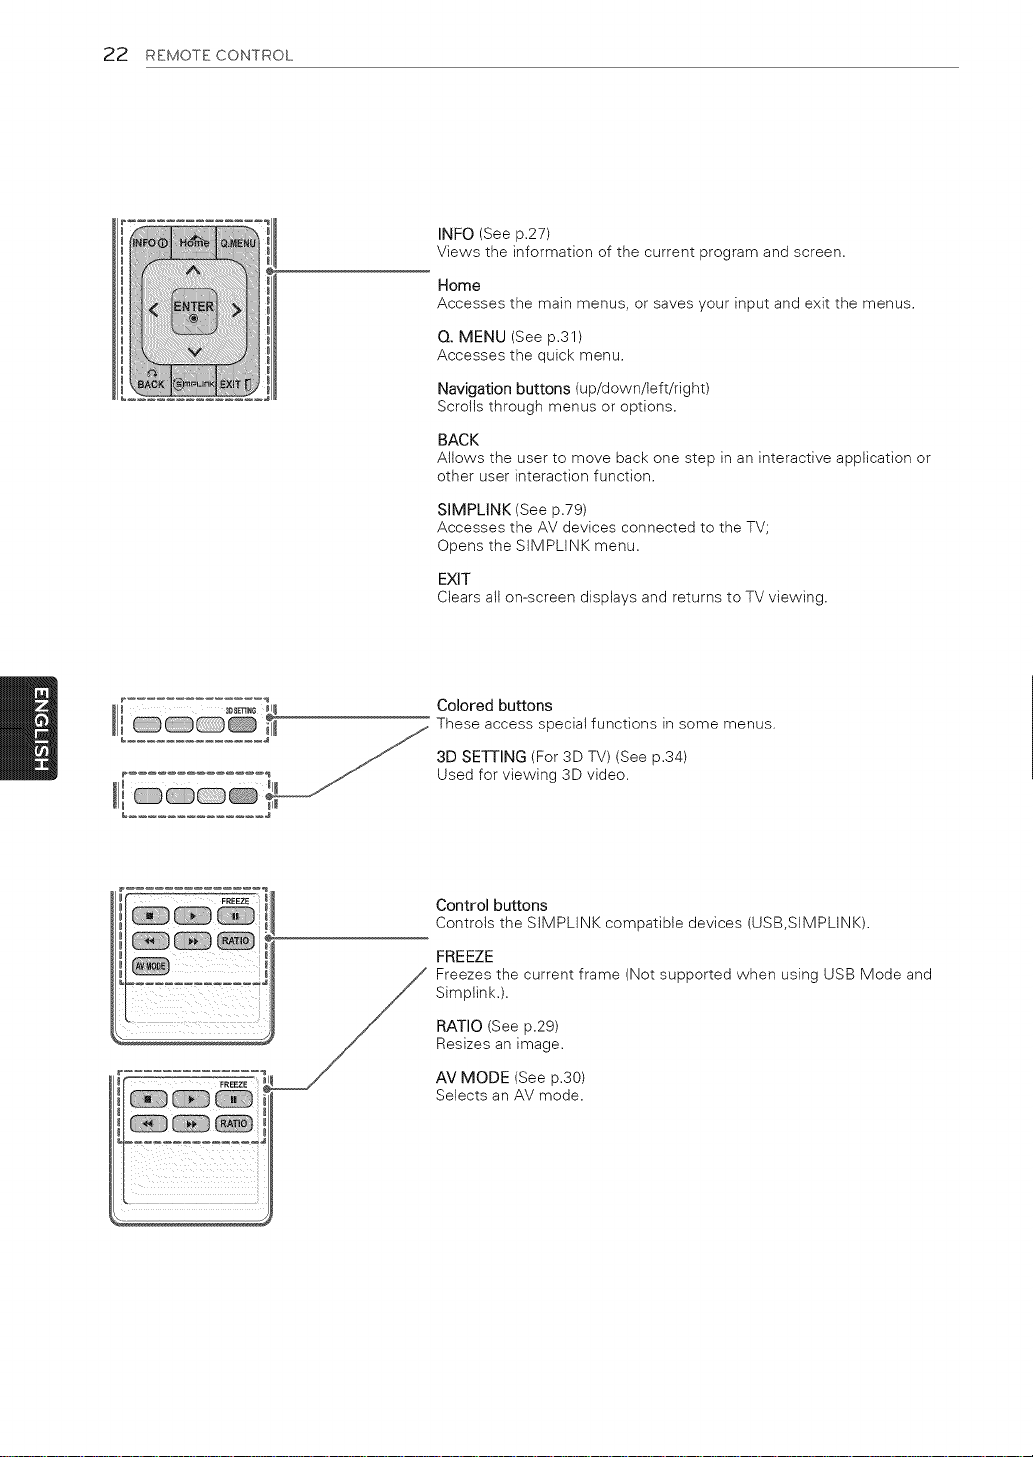
INFO (See p.27)
Views the information of the current program and screen.
Home
Accesses the main menus, or saves your input and exit the menus.
Q. MENU (See p.31)
Accesses the quick menu.
Navigation buttons (up/down/left/right)
Scrolls through menus or options.
BACK
Atlows the user to move back one step in an interactive application or
other user interaction function.
SIMPLINK (See p.79)
Accesses the AV devices connected to the TV;
Opens the SiMPLiNK menu.
EXIT
Clears all on-screen displays and returns to TV viewing.
Ii 3o_r_NG IJ_
ii _ ii
Colored buttons
These access special functions in some menus.
3D SEqI_ING (For 3D TV) (See p.34)
Used for viewing 3D video.
Control buttons
Controls the StMPLINK compatible devices (USB,StMPLINK).
FREEZE
Freezes the current frame (Not supported when using USB Mode and
Simptink.).
RATIO (See p.29)
Resizes an image.
AV MODE (See p.30)
Selects an AV mode,
Page 23
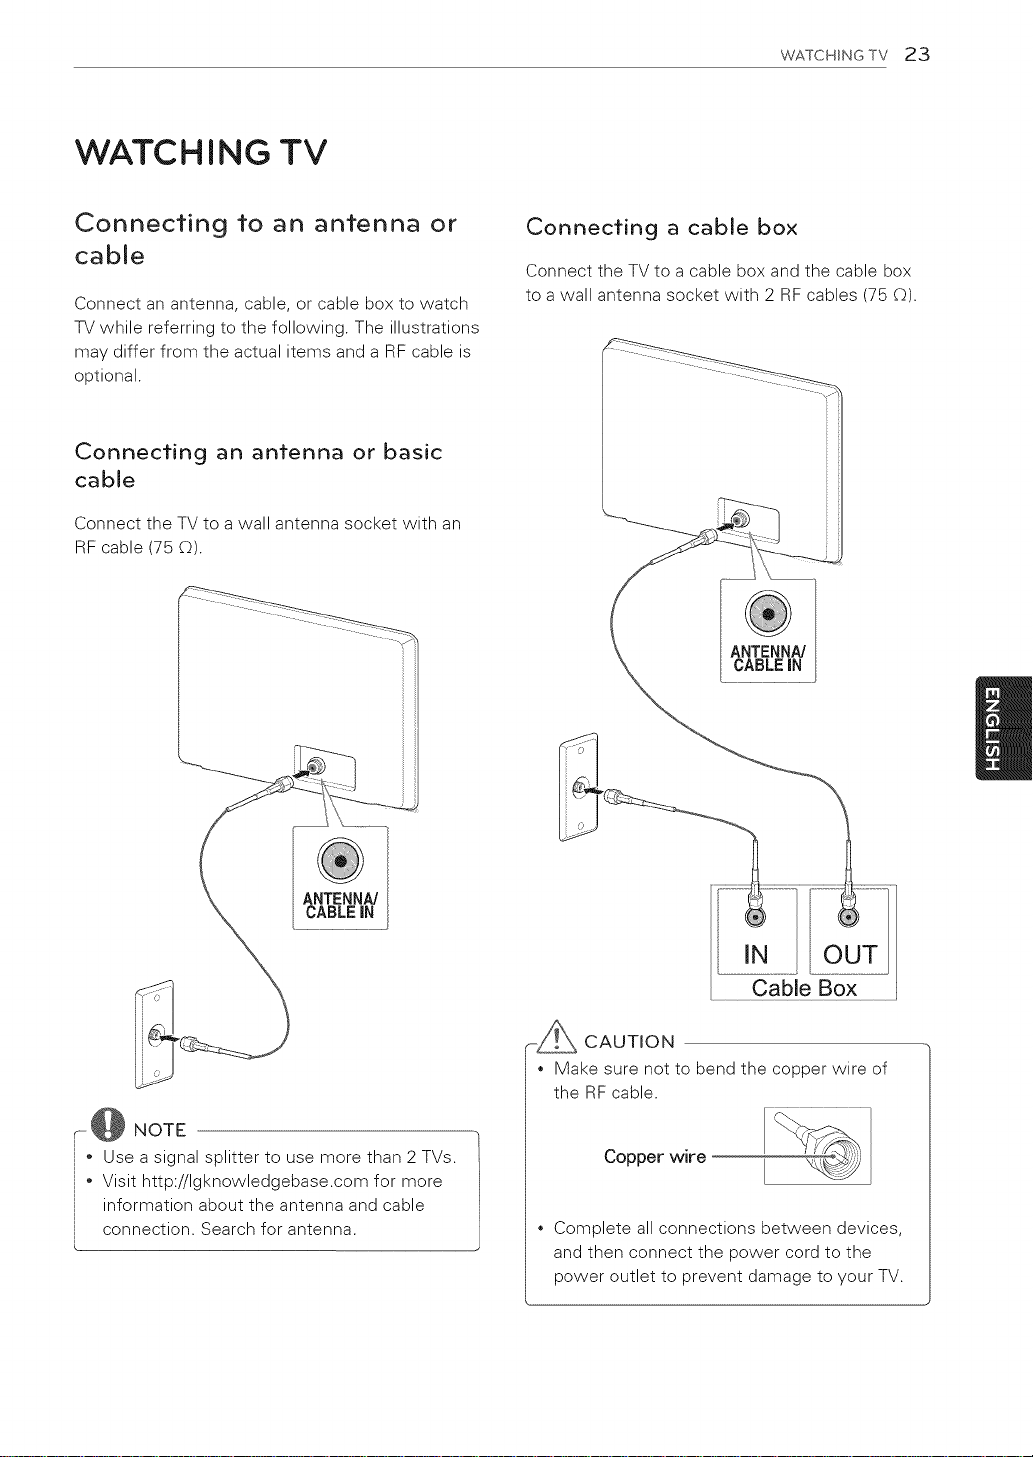
WATCHING TV
WATCHING TV 23
Connecting to an antenna or
cable
Connect an antenna, cable, or cable box to watch
TV while referring to the following. The illustrations
may differ from the actual items and a RF cable is
optional.
Connecting an antenna or basic
cable
Connect the TV to a wall antenna socket with an
RF cable (75 Q).
Connecting a cable box
Connect the TV to a cable box and the cable box
to a wall antenna socket with 2 RF cables (75 ©).
NOTE
* Use a signal splitter to use more than 2 TVs.
* Visit http://Igknowledgebase.com for more
information about the antenna and cable
connection. Search for antenna.
-_ CAUTION
* Make sure not to bend the copper wire of
the RF cable.
Copper wire
* Complete all connections between devices,
and then connect the power cord to the
power outlet to prevent damage to your TV.
Page 24
24 WATCHING TV
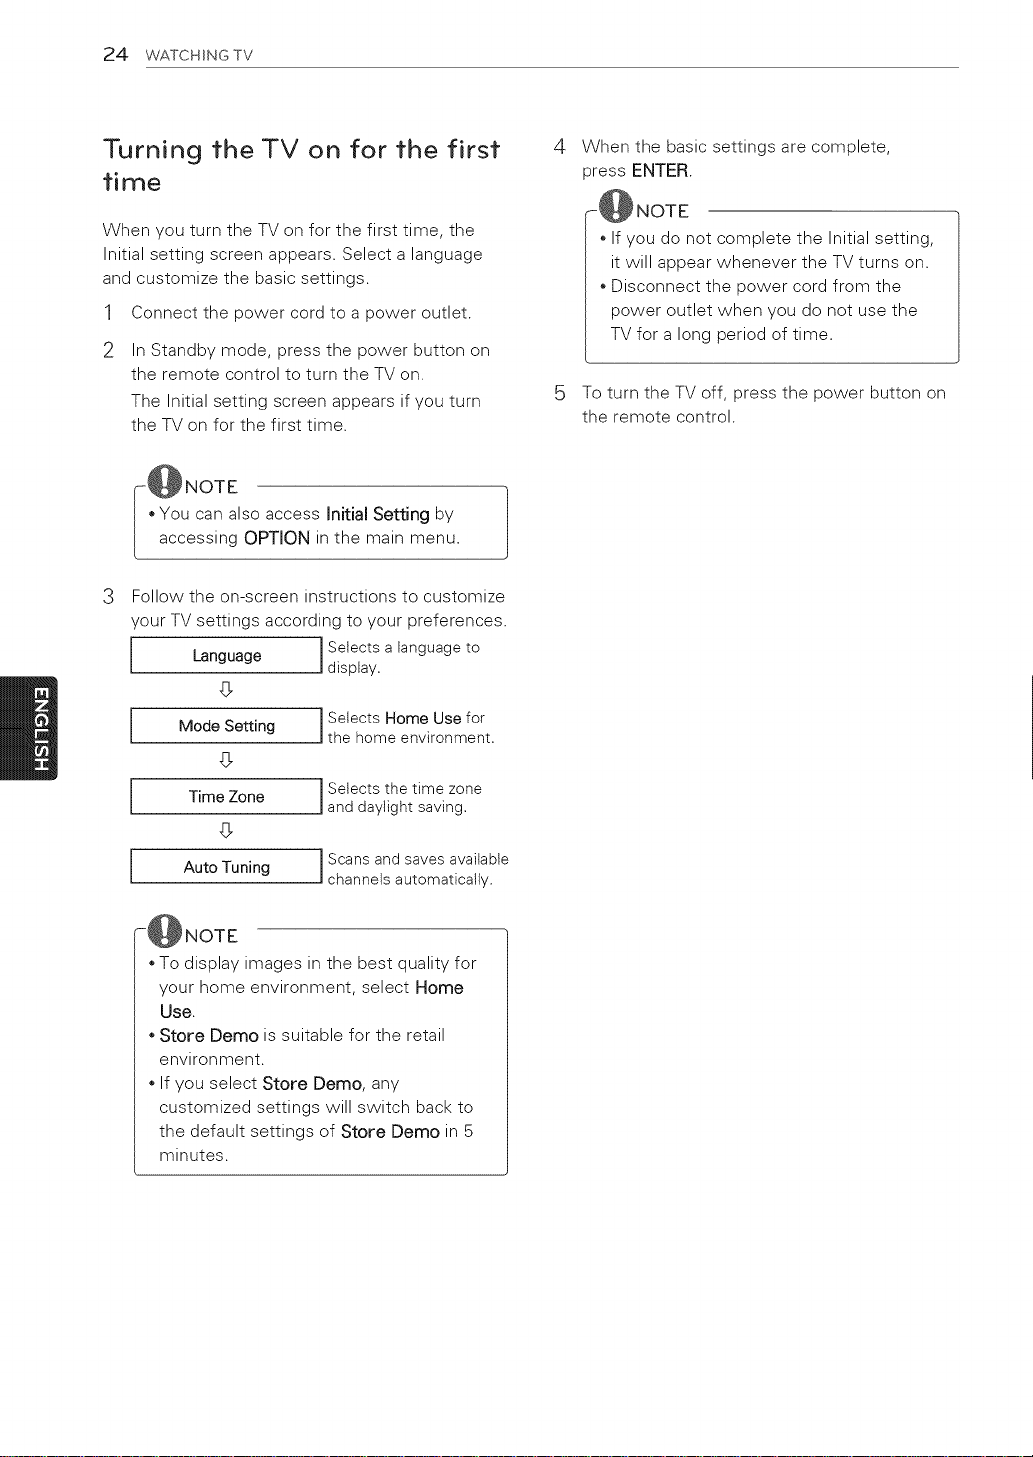
Turning the TV on for the first
time
When you turn the TV on for the first time, the
Initial setting screen appears. Select a language
and customize the basic settings.
1 Connect the power cord to a power outlet.
In Standby mode, press the power button on
the remote control to turn the TV on
The Initial setting screen appears if you turn
the TV on for the first time.
I_NOTE
You can also access Initial Setting by
accessing OPTION in the main menu. |
3 Follow the on-screen instructions to customize
your TV settings according to your preferences.
Language
_3
Mode Setting ISelects Home Use for
_3
Time Zone ISelects the time zone
_3
I Setects a language to
I
display.
Ithe home environment.
Iand daylight saving.
When the basic settings are complete,
press ENTER.
-@NOTE
* If you do not complete the Initial setting,
it will appear whenever the TV turns on.
, Disconnect the power cord from the
power outlet when you do not use the
TV for a long period of time.
5 To turn the TV off, press the power button on
the remote control.
]
J
Auto Tuning IScansand savesavailable
_-@NOTE
* To display images in the best quality for
your home environment, select Home
Use.
* Store Demo is suitable for the retail
environment.
* If you select Store Demo, any
customized settings will switch back to
the default settings of Store Demo in 5
minutes.
m
channels automatically,
Page 25
WATCHINGTV 25
Watching TV
In Standby mode, press the power button on
the remote control to turn the TV on.
2
Press INPUT and select TV.
3
Control the TV using the following buttons
while you are watching TV.
Button Description
CH (^, v} Scrolls through saved channels.
LIST1 Selects a channel on the saved
0-9
VOL (% -} Adjusts the volume level.
MUTE Mutes all sounds.
AV MODE 2 Selects an AV mode (See p.30).
Q,MENU
FLASHBK or Alternates between the last two
Q.VlEW channels selected.
RATIO Resizes an image (See p.29).
FREEZE
1 The Lock icon (_) appears in front of a
channel blocked with parental control.
2 Each AV mode has the optimized image and
sound settings. If you select Off, the image
and sound settings will be restored to the
previously customized settings.
channet list.
Selects a channel by entering
numbers.
Accesses the quick menus
(See p.31 ).
Freezes the current frame while you
are watching TV.
Managing channels
*The Digital broadcasting (DTV, Cable DTV) is not
available for Philippines.
Setting up channels
To
store channels automatically,
1
Press Home to access the main menus.
2
Press the Navigation buttons to scroll to
CHANNEL and press ENTER.
3
Press the Navigation buttons to scroll to Auto
Tuning and press ENTER.
4
Select Start to start automatic tuning.
The TV scans and saves available channels
automatically.
If the TV scans and saves channels,
the previously saved channels will be
overwritten.
5 When you are finished, press EXIT.
When you return to the previous menu, press
BACK.
To
store channels manually,
1
Press Home to access the main menus.
4 To turn the TV off, press the power button on
the remote control.
The TV switches to Standby mode.
2
Press the Navigation buttons to scroll
CHANNEL and press ENTER.
3
Press the Navigation buttons to scroll to
Manual Tuning and press ENTER.
4
Scroll through the channel types, and then add
or delete channels.
5 When you are finished, press EXIT.
When you return to the previous menu, press
BACK.
--@ NOTE
* If the TV scans a blocked channel, you will
be prompted to enter your password to keep
the channel scanned.
* You can store up to 1000 channels. The
number of channels that you can store
differs depending on the broadcasting signal
environment.
The channels are stored in the order of DTV,
TV, Cable DTV and Cable TV.
Page 26
26 WATCHINGTV
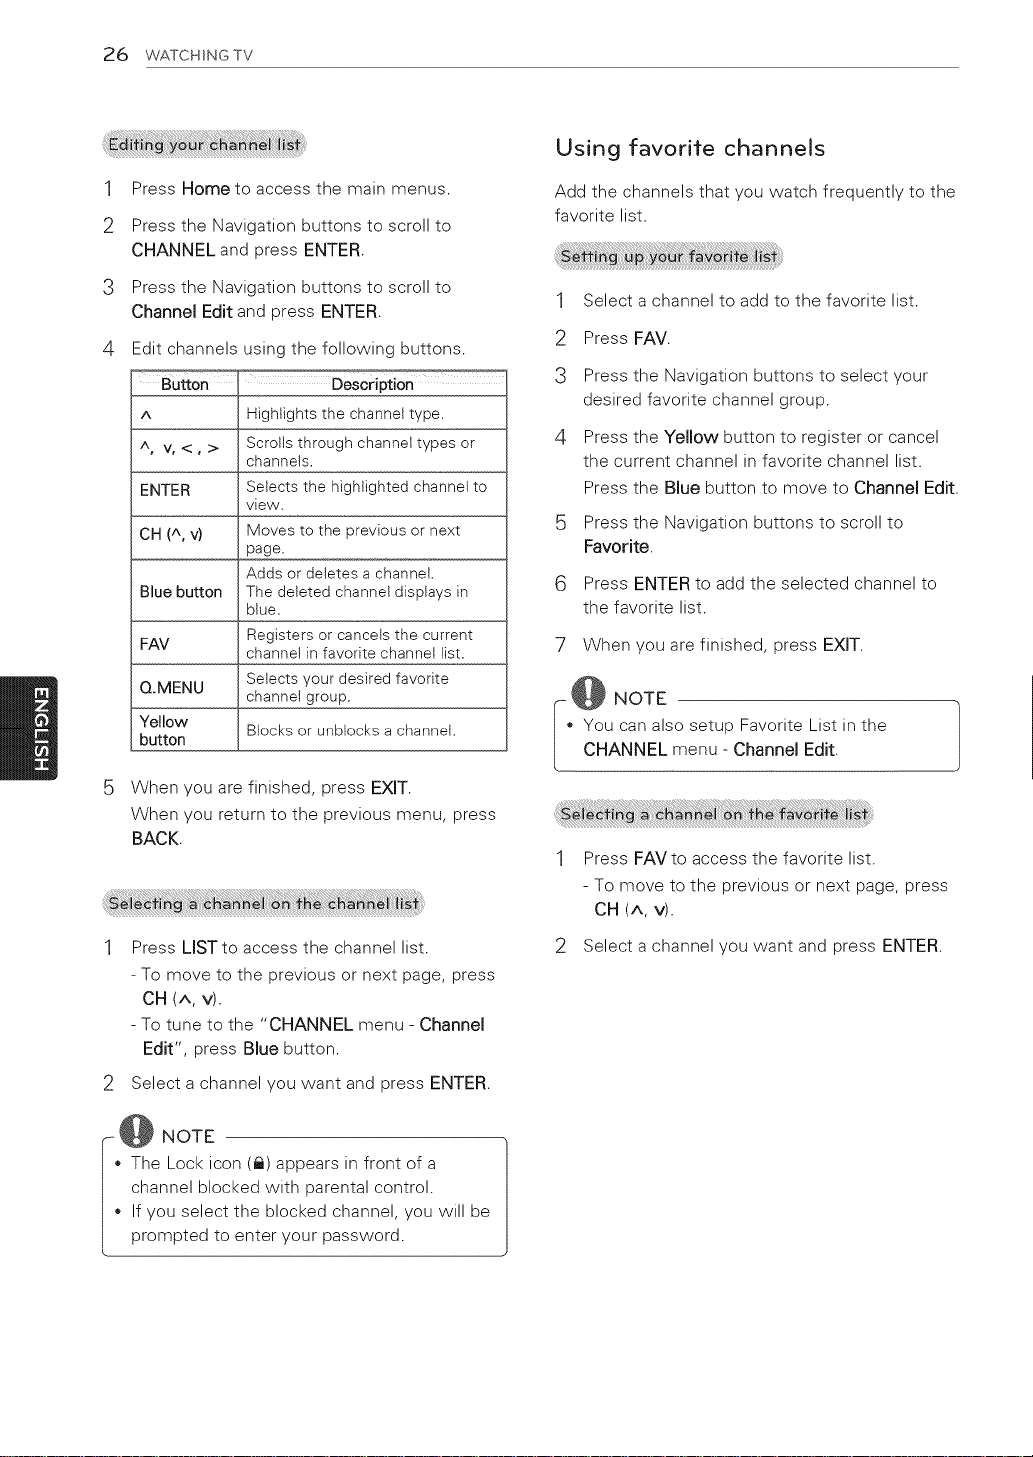
1
Press Home to access the main menus.
2
Press the Navigation buttons to scroll to
CHANNEL and press ENTER.
3
Press the Navigation buttons to scroll to
Channel Edit and press ENTER.
4
Edit channels using the following buttons.
Button Description
A Highlights the channel type.
A V,<, > Scrollsthrough channel types or
ENTER Selects the highlighted channel to
CH (A V) Moves to the previous or next
Blue button The deleted channel displays in
FAV Registers or cancels the current
Q.MENU Selects your desired favorite
Yellow
button
channels.
view.
page.
Adds or detetes achannet.
blue.
channetin favorite channel list.
channetgroup.
Blocks or unblocks a channel,
Using favorite channels
Add the channels that you watch frequently to the
favorite list.
1
Select a channel to add to the favorite list.
2
Press FAV.
3
Press the Navigation buttons to select your
desired favorite channel group.
4
Press the Yellow button to register or cancel
the current channel in favorite channel list.
Press the Blue button to move to Channel Edit.
5
Press the Navigation buttons to scroll to
Favorite.
6 Press ENTER to add the selected channel to
the favorite list.
7 When you are finished, press EXIT.
- @ NOTE
You can also setup Favorite List in the
CHANNEL menu - Channel Edit.
When you are finished, press EXIT.
When you return to the previous menu, press
BACK.
1 Press LIST to access the channel list.
- To move to the previous or next page, press
CH (A, V).
- To tune to the "CHANNEL menu - Channel
Edit", press Blue button.
2 Select a channel you want and press ENTER.
NOTE
• The Lock icon (_) appears in front of a
channel blocked with parental control.
• If you select the blocked channel, you will be
prompted to enter your password.
1 Press FAV to access the favorite list.
- To move to the previous or next page, press
CH (A, V).
2 Select a channel you want and press ENTER.
Page 27
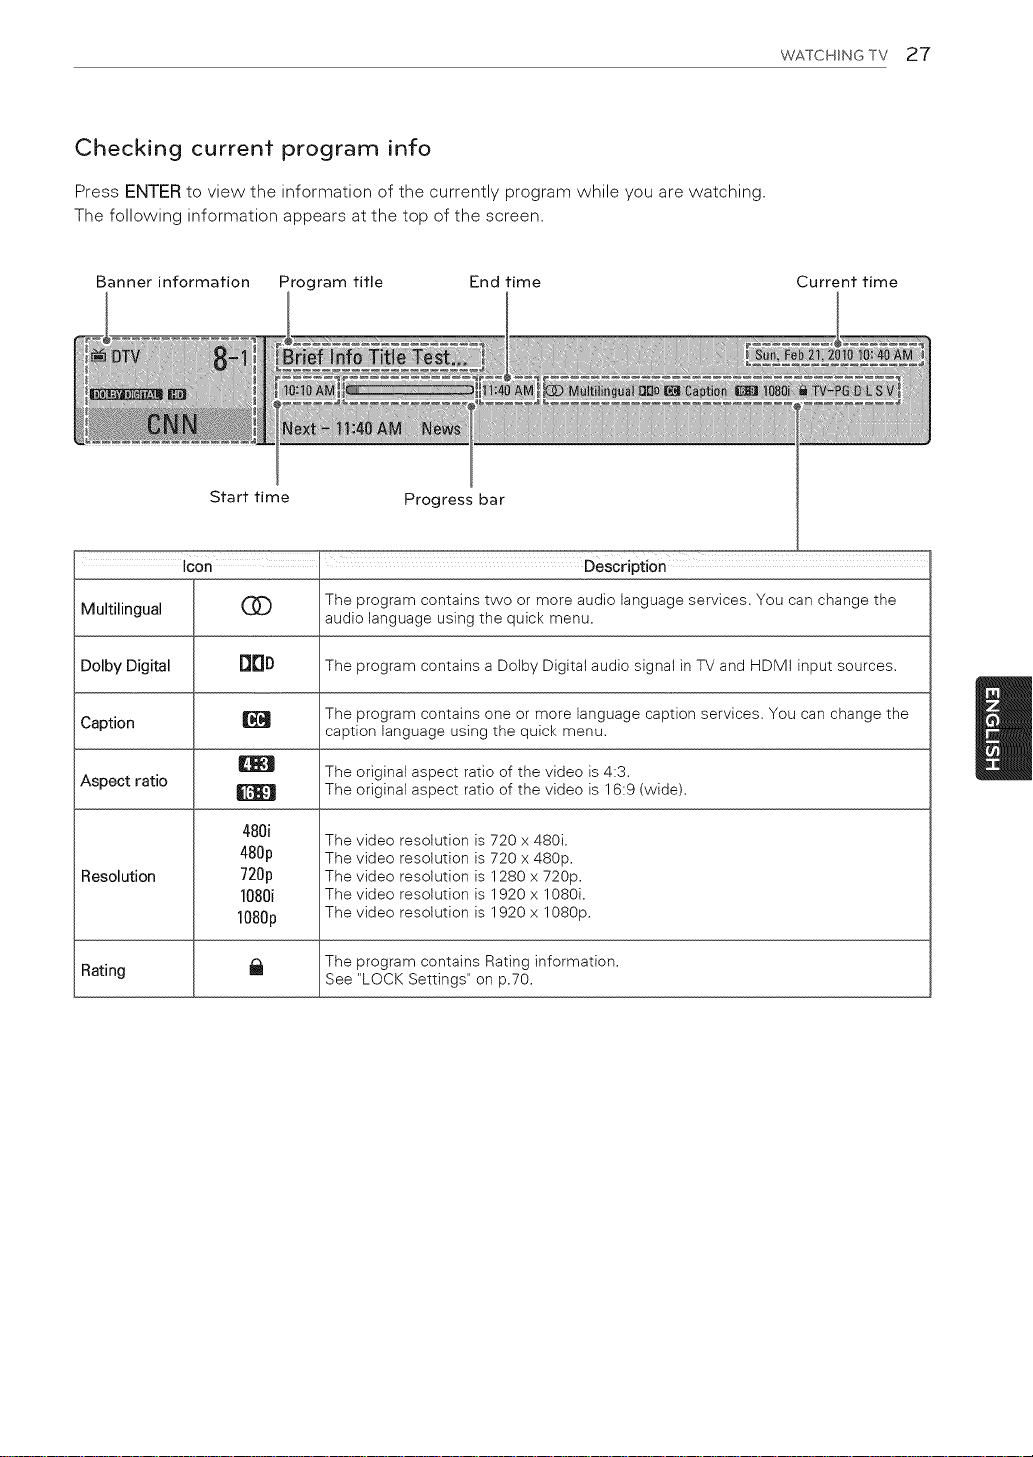
Checking current program into
Press ENTER to view the information of the currently program while you are watching.
The following information appears at the top of the screen.
WATCHING TV 27
Banner information Program title
Start time Progress bar
Icon ' Description
Multilingual audio language using the quick menu.
Dolby Digital The program contains a Dolby Digital audio signal in TV and HDMI input sources.
Caption caption language using the quick menu.
Aspect ratio The original aspect ratio of the video is 16:9 (wide).
Resolution
(X)
BOo
480i
480p
720p
1080i
1080p
The program contains two or more audio language services. You can change the
The program contains one or more language caption services. You can change the
The original aspect ratio of the video is 4:3.
The video resolution is 720 x 480i.
The video resolution is 720 x 480p.
The video resolution is 1280 x 720p.
The video resolution is 1920 x 1080i.
The video resolution is 1920 x 10SOp.
End time Current time
Rating See "LOCK Settings" on p.70.
The program contains Rating information.
Page 28

28 WATCHINGTV
•_or :>
INFO
^orv
Descripti
Shows current channel information.
Shows previous or next channet
information.
Changes a channel.
Page 29
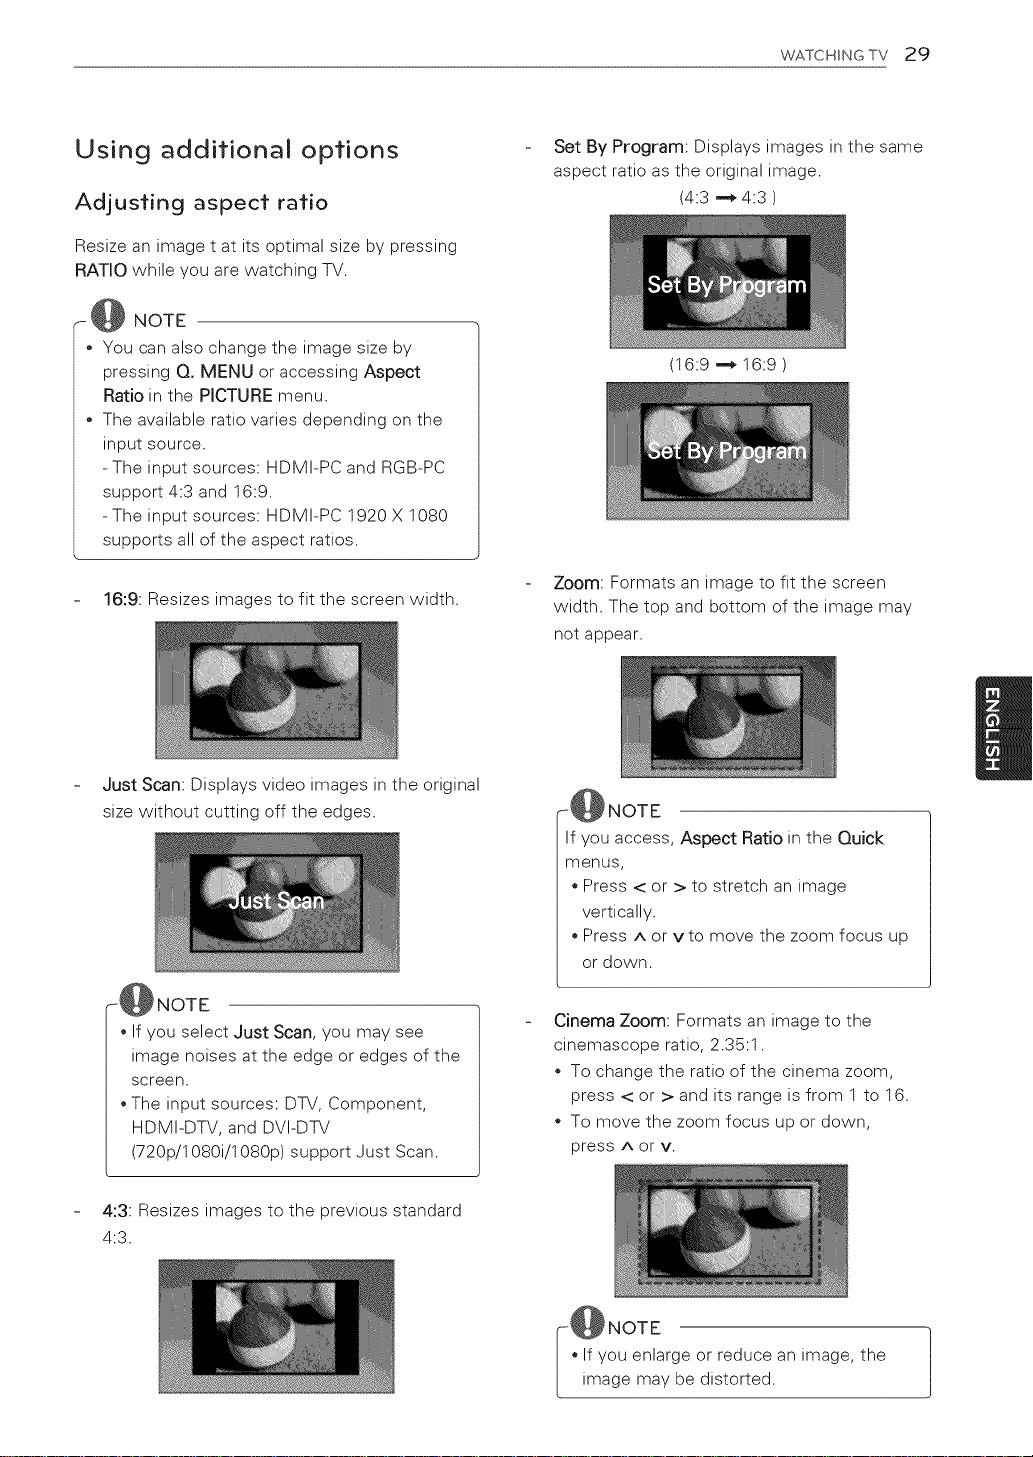
WATCHSNG TV 29
Using additional options
Adjusting aspect ratio
Resize an image t at its optimal size by pressing
RATIO while you are watching TV.
- @ NOTE
You can also change the image size by
pressing Q. MENU or accessing Aspect
Ratio in the PICTURE menu.
The available ratio varies depending on the
input source.
- The input sources: HDMI-PC and RGB-PC
support 4:3 and 16:9.
-The input sources: HDMI-PC 1920 X I080
supports all of the aspect ratios.
16:9: Resizes images to fit the screen width.
Set By Program: Displays images in the same
aspect ratio as the original image.
(4:3 -_ 4:3 )
(16:9 -_ 16:9 )
Zoom: Formats an image to fit the screen
width. The top and bottom of the image may
not appear.
Just Scan: Displays video images in the original
size without cutting off the edges.
-@NOTE
* If you select Just Scan, you may see
image noises at the edge or edges of the
screen.
The input sources: DTV, Component,
HDMI-DTV, and DVI-DTV
(720p/1080i/10SOp) support Just Scan.
4:3: Resizes images to the previous standard
4:3.
_@NOTE
If you access, Aspect Ratio in the Quick
menus,
Press < or > to stretch an image
vertically.
Press ^ or vto move the zoom focus up
or down.
Cinema Zoom: Formats an image to the
cinemascope ratio, 2.35:1.
To change the ratio of the cinema zoom,
press < or > and its range is from 1 to 16.
To move the zoom focus up or down,
press A or v.
@NOTE
If you enlarge or reduce an image, the
image may be distorted.
Page 30
30 WATCHINGTV
Changing AV modes
Each AV mode has optimized image and sound
settings.
Press AV MODE repeatedly to select an
appropriate mode.
Mode _ Description
Off Changes to the previously customized
Cinema Uses the optimized image and sound
Sport Uses the optimized image and sound
Game Uses the optimized image and sound
settings.
settings for a cinematic look.
settings for dynamic action sports.
settings for fast gaming.
When playing a video game using
PtayStation or Xbox. it is recommended
to use the Game mode.
When in Game mode, functions related
to picture quality wilt be optimized for
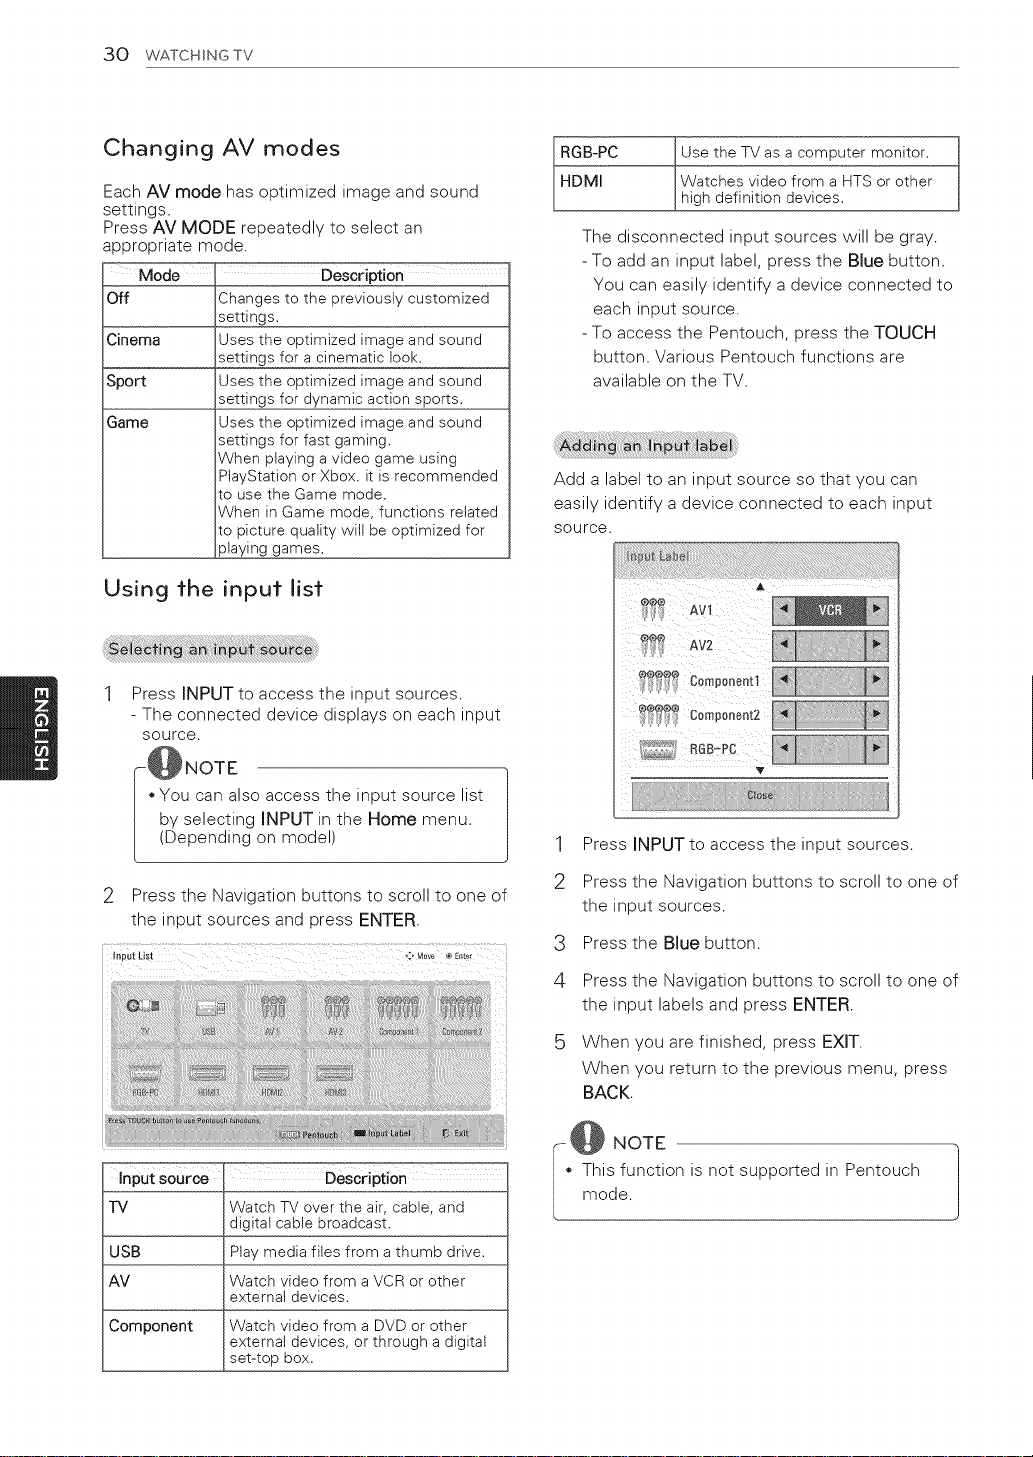
Using the input list
Press INPUT to access the input sources.
- The connected device displays on each input
source.
}NOTE
• You can also access the input source list
by selecting INPUT in the Home menu.
(Depending on model)
2 Press the Navigation buttons to scroll to one of
the input sources and press ENTER.
RGB-PC Usethe TVas a computer monitor.
HDMI Watches video from aHTS or otherhigh definition devices.
The disconnected input sources will be gray.
-To add an input label, press the Blue button.
You can easily identify a device connected to
each input source.
- To access the Pentouch, press the TOUCH
button. Various Pentouch functions are
available on the TV.
Add a label to an input source so that you can
easily identify a device connected to each input
source.
Y
1
Press INPUT to access the input sources.
2
Press the Navigation buttons to scroll to one of
the input sources.
3
Press the Blue button.
ii!ii i
iiiiiiiiiiiiiiiiiiii'iiii/ii/iiiiiiiiiiiiiiiiiiiiiiiiiiiiiiiiiiiiiiiiiiiiiiiiiiiiiiiiiiiiiiiiiiiiiiiiiiiiiiiiiiiiiiiiiiiiiiiiiiiiiiiiiiiiiiiiiiiiiii _iiiiiiiiiiiiiiiiiiii_iiii iiiiiii_iiiiiiii
Input source Description
TV Watch TV over the air, cable, and
digital cable broadcast.
USB Ptay media files from a thumb drive.
AV Watch video from a VCR or other
externat devices.
Component Watch video from a DVD or other
external devices, or through a digital
set-top box.
4
Press the Navigation buttons to scroll to one of
the input labels and press ENTER.
When you are finished, press EXIT.
When you return to the previous menu, press
BACK.
- @ NOTE
This function is not supported in Pentouch
mode.
Page 31

WATCHING TV 31
Locking the buttons on the TV
(Child Lock)
Lock the buttons on the TV to prevent any
unwanted operations or accidents by children.
Press Home to access the main menus.1
2
Press the Navigation buttons to scroll to LOCK
and press ENTER.
3
Input password.
4
Press the Navigation buttons to scroll to
Key Lock and press ENTER.
5 Select On to activate the Key lock feature.
- To deactivate the Key lock feature, select Off.
6 When you are finished, press EXIT.
When you return to the previous menu, press
BACK
@ NOTE
The TV is programmed to remember the last
setting after you turn the TV off.
If you turn the TV off with the Key lock
feature activated, r_, INPUT, CH (^, v) or
Number buttons on the remote control.
If you press any button on the TV with the
Key lock feature activated, _ Key Lock
appears on the screen.
Using the quick menu
Customize frequently used menus.
1 Press Q. MENU to access the quick menus.
2 Press the Navigation buttons to scroll through
the following menus.
@
@
@--
@
@
Description
Changesthe image size.
Changesthe image mode.
Changesthe sound mode.
Changesthe audio language
@ (Digitalsignal).
signal).
TV to turns off.
Sets the length of time until the
@
--@
@
theEditschannel,the channels to add or delete
Activates or deactivate the
on__
USBDevice Ejectsa USB device when a USB
}NOTE
The available menus and options may
differ from the input source that you are
using.
3
Press the Navigation buttons to scroll to the
option you want.
subtitles.
device is connected.
4 When you are finished, press Q. MENU.
Page 32

32 WATCHING TV
Using the customer support
Testing the Picture / Sound
To execute picture and sound tests.
Press Home to access the main menus.1
Press the Red button to access Customer
2
Support.
3
Press the Navigation buttons to scroll Picture
Test or Sound Test and press ENTER.
4
If you have any problem, press the Navigation
buttons to scroll to Yes and press ENTER.
When you are finished, press EXIT.
When you return to the previous menu, press
BACK.
Using the product or service
information
To check the product or service information
Press Home to access the main menus.1
Press the Red button to access Customer
2
Support and press ENTER.
3 Press the Navigation buttons to scroll Product/
Service Info..
You can check the various product/Service
infomation based on your model.
4 When you are finished, press EXIT.
When you return to the previous menu, press
BACK.
Page 33

3D IMAGING (FOR 3D
TV)
3D IMAGSNG 33
When using 3D Glasses
3D Technology
This TV can display in 3D via 3D broadcasting or
when the TV is connected to a compatible device,
such as a Blu-ray 3D Player. The viewer must
wear compatible 3D glasses in order to see these
images in 3D format.
When watching 3D imaging
After powering on the TV, a few seconds
may be needed for your TV to calibrate.
The TV may flicker slightly if the 3D imaging
is displayed under 3 wavelength fluorescent
light (50 Hz- 60 Hz) or magnetic fluorescent
lamp (50Hz- 60 Hz). In such instances, it is
recommended to turn the lights off.
If there is an obstacle between the TV and
the 3D glasses, the 3D imaging may not
display properly.
Do not use the TV in close proximity to other
electronic equipments and RF equipments.
The 3D imaging may not display if it is
viewed while you are lying down.
It may take a moment for you to see the
3D imaging if you look away from the TV
and then revert your eyes back to the 3D
program.
To watch the TV in 3D, you must put on your
3D glasses. For best results, you should
wear LG Brand 3D glasses. The 3D imaging
may not display properly when using another
brand of 3D glasses. Please see the 3D
glasses manual for instructions on how to
use the 3D glasses.
When watching 2D images, it is
recommended to take off the 3D glasses. If
you watch 2D images with the 3D glasses
on, you may see distorted images.
_ CAUTION
* 3D glasses are sold separately. Refer to the
3D glasses manual for operating instructions.
Do not use the 3D glasses to replace your
corrective glasses, sunglasses or protective
goggles.
Do not store the 3D glasses in hot or cold
locations.
Do not drop objects onto the 3D glasses. Do
not drop or bend the glasses.
Since the lenses of the 3D glasses are
easily scratched, make sure to clean only
with a soft cloth. Shake off any dust before
using the cloth since the glasses are easily
scratched.
3D Imaging Viewing Range
TV size, viewing angle & other circumstances
may change the viewing distance and the angle of
view.
ing Distance [Viewi"-------ng Angle 1
m - 10m / 120 ° (When the viewing
ft- 32.8 ft) [ distance is 2m (6.5 ft)) J
Page 34

34 3D 8MAGSNG
Viewing 3D Imaging
1 Play the 3D video or select 3D channel.
(2D to 3D mode is available with all contents.)
2 Press 3D and select same type in your
displayed picture on the screen.
(Select type on "3D Video" tab.)
1 Play the 3D video or select 3D channel.
2 Press 3D and select same type in your
displayed picture on the screen.
(Select type on "2D Video" tab.)
3 To turn off the 2D mode, press 3D and select
ENTER.
NOTE
I* Turn on the 3D mode automatically for HDMI /
input playing the 3D blueray titles.
3 Press ENTER on displayed information
window.
[_ power on your 3D glasses and put them on.
Sit 2 meter s from TV to enj£y the best 3D
i
view,
4 To turn off the 3D mode, press 3D and select
ENTER.
i¸" :: i" i ":i : : i"i
q
J
1
Press 3D SETTING.
2
Use the following options while viewing 3D
imaging.
Page 35

Description
3D Picture Size Cutsoff the outer edges of the
)icture and stretch it to fit the full
screen in 3D mode.
3D Depth Adjusts the distance between the
object and the background in the
)lcture to enhance the 3D effect in
2Dto 3D mode.
3D Viewpoint Brings the picture (including both the
object and background images) to
the front or back to enhance the 3D
effect in 3D mode.
3D Picture Adjusts the color and brightness
Balance difference between the right and left
sides of the picture in 3D mode.
3D Picture Changesthe order of images in the
Correction right and left sides of the picture in
3D mode.
-_ CAUTION
* Some menus may not work while watching
the TV in 3D.
The 3D imaging mode is disabled
automatically when switching DTV channels.
The screen may not be displayed properly
if you view 2D DTV images in 3D imaging
mode.
3D effect can be seen when 3D Mode is
selected appropriately for the 3D input signal
supplied to the TV.
, For *mpo files (3D camera files), the 3D
imaging mode is enabled automatically.
3D may not be displayed properly for some
PC graphics cards.
3D IMAGSNG 35
Page 36

36 PENTOUCH
PENTOUCH
Using Pentouch
Pentouch allows you to use touch pen supported
features like Sketchbook Photo Editor, Family
Diary, Gallery, Internet and My Office.
_ WARNING
Do not drop or throw the touch pen.Do not
swing the touch pen with the charging cable
connected to it. This can damage the product
or cause personal injury.
For people using pacemakers, the distance
between the touch pen and the pacemaker
should be at least 30 cm. Never use it
where wireless communication is prohibited.
Protect it from extreme vibrations or
magnetic objects.Wireless communications
can cause malfunctions or failures.
* Do not use or store the touch pen in direct
sunlight, near a hot object (e.g., a heater
or fireplace), or in dusty or high-humidity
environments.This can result in product
deformation, malfunction, failure, or fire.
* If abnormal sound, smoke, or odor is
detected, immediately remove the charging
cable and stop using the product. Contact a
service center. This can cause failures or fire.
* If fluid leaks from the touch pen, do not
touch the fluid with bare hands. If fluid
comes into contact with eyes, immediately
rinse eyes with abundant tap water, then
consult a doctor. The fluid can cause
blindness. If the fluid comes into contact
with skin or clothing, immediately wash it
off with tap water. If the fluid causes skin
inflammation or injury, consult a doctor.
* Do not allow the fluid to come into contact
with fire. Do not heat the product in a
microwave or convection oven.
* Use the specified USB cable when charging
the battery.
* Keep the touch pen out of reach of children
and away from unstable locations. Do not
let children or pets put the touch pen in their
mouths or lick the touch pen. Playing with or
swallowing it may cause serious injury.
* Do not use the touch pen with wet hands.
Do not let foreign substances (e.g., soft
drinks or water) enter the touch pen; if this
happens, do not use the touch pen. Do
not touch the optic receiver of the touch
pen with a sharp object. This can result in
electrical shock or damage the product.
* Do not use the product under extreme
temperature conditions. Do not use the
product immediately after going from the
cold outdoors to the warm indoors. This
can cause condensation in the pen. _ This
can result in damaging the product. Turn
off the power and wait several hours until
the moisture evaporates before using the
product.
* Never disassemble or modify the touch
pen. _ The product warranty does not cover
damage or injury caused by unauthorized
disassembly. This can result in electrical
shock or damage the product.
* If fluid leaks from the touch pen, the use of
fire in the vicinity is strictly prohibited. The
leaked fluid or gas can ignite a fire or cause
damage.
* Avoid extreme shocks or impacts to the
product, for example, placing a heavy object
on it or pressing it.
* Do not display fixed characters or images on
the screen for extended periods of time. This
can cause image sticking.
* Do not connect the charging cable to
peripheral devices or disks that are not
specified. This can cause malfunctions or
failures.
* Do not leave the touch pen on the floor.
Stepping on it can damage the product or
cause personal injury. Use the pen holder
provided with the touch pen.
* Be careful when disposing of the product.
The touch pen consists of a lithium-ion
battery and plastic material. Burning can be
dangerous, so dispose of it according to local
regulations.
* Do not remove the charging cable using
excessive force. This could damage the
charging port and PC.
* Do not handle the touch pen with excessive
force. If you use the touch pen with
excessive force, you may leave foreign
substances on the screen. Clean the product
with the product cleaning cloth provided.
* When multiple people use the touch pen,
make sure that sufficient space is available.
Collisions can cause injury or failures.
Page 37

PENTOUCH 37
Step of Using the Pentouch
Program
Follow the steps below to use the Pentoucn
function.
] Checkthe system requirements before
mstallatton.
2 Insta the Pentoucn program ana tne USB
aongle driver from tne installation CD.
3 Pair the pen ana tne aongte.
4. Connect the PC ana the TV.
5 Configure the PC screen.
6 Activate the Pentoucn mooe on the TV.
7 Start the Pentouch program.
System Requirements
Make sure that the drivers are installed properly to
allow proper operation of the touch pen.
Installing the Pentouch Program
Folios/the steps described in this manual to install
the program.
1
Prepare your computer and start it.
2
After the computer starts, insert the CD
provided. The installation screen appears
automatically.
(If the installation screen is not displayed
automatically, access My computer and then
click LG and index.htm to view the installation
screen.)
3
Click [Install the Pentouch Program] in the
installation window.
The default folder is used for installation.
A window appears to indicate that the
installation was completed successfully.
Installing the USB Dongle Driver
Install the Pentouch program before installing the
USB dongle driver.
Windows 7 Starter Edition is not supported.
su tingSystem
Windows XP 3_ bit
Windows Vista _32bit
Windows 7 bit
CPU: Dual-Core 2GHz or better
Memory: 1GB or more
HDD: 500MB or more
Display: Graphics card with 1920xl 080
(PV490, PZ850 series) or 1024x768 (Other
models) via an RGB or HDMI output port
Windows 7 is recommend due to its support
of multi-touch.
@ NOTE
You must log in as an administrator to install
or remove the included software.
Make sure to install the drivers found on the
CD provided.
You can also download this program from
the LG Electronics website.
Make sure to close all running applications
before installing the drivers.
Click [Install the Pentouch USB Dongle Driver]
in the installation window.
The default folder is used for installation.
A window appears to indicate that the
installation was completed successfully.
In Windows XP, the Found New Hardware
Wizard installs your driver automatically.
3 Restart your computer after the installation.
NOTE
Disconnect the USB dongle first to
driver.
install the
Page 38

38 PENTOUCH
Removing the Pentouch Program
and Driver
If there is a problem with the Pentouch program or
driver installation or if an error occurs while using
the program, follow the steps below to remove
the program or driver, and then reinstall them.
On your computer, select [Start] _ [Control
Panel] _ [Add/Remove Programs] to remove
the Pentouch program or driver.
- The installed driver: LG Pentouch Multi-touch
Driver
- The installed Pentouch program: Pentouch TV
Click [Yes]. A window appears telling you that
the program/driver has been removed.
3
Please reboot your PC after removing the
program or the driver.
Pairing between Touch Pen and
Dongle
Computer Rear Panel
l_
Pairing
0
Power / Home button
Touch pen tip switch
You need to pair the touch pen and the dongle
before using the touch pen.
Once paired, you do not need to pair them again
unless you:
• Bought a new pen
• Replaced the old pen with a new one
• Attempt to pair a new touch pen for using
two pens simultaneously
• This program allows pairing of up to two
pens and one dongle.
• If you want to use two pens simultaneously,
they must be paired with your dongle one at
a time.
• Pairing is not possible if a paired pen is
currently in use.
• If you pair a new touch pen when two pens
have already been paired with your dongle,
all the previous pairing data is deleted.
• Please use the installation CD provided
to install the driver on your PC. (For more
information on driver installation, see the
Driver Installation Guide.)
Indicator LED
y @ NOTE
• For more information, please refer to the
user manual [Touch Pen, Dongle).
• Touch pens and dongles are sold separately
at LG Electronics stores.
When you leave your touch pen unused for a
certain period of time (10 minutes), the pen
automatically powers off.
Page 39

PENTOUCH 39
Check that the LED indicator on the dongle
connected to the computer is red.
2
Keep the touch pen within 50 cm (20 inches)
of the dongle.
3
Press the d)/Home button on the touch pen
once.
4
The LED indicator on the touch pen will be red
for 2 seconds and blinks green 3 times when
pairing is complete.
If the LED indicator is red for 2 seconds and
5
blinks red 3 times, pairing is not successful.
Please try pairing again.
6
Once a pen is paired, the red LED blinks once
when you press the (b / Home button.
Pairing fails if the dongle driver is not installed
on the computer.
2
Pairing fails if the LED indicator on the dongle
is not red.
3
Remove the dongle from the PC, reinsert it
and try pairing.
Once paired, you can use the touch pen inthe
following ways.
1 Powering on
- Press the _/Home button once. The red and
green LEDs will remain lit to indicate that the
power is on.
2 Powering off
- Press and hold the d) / Home button.
When the red LED turns on once briefly and
once again, release the button. The red LED
blinks 3 times and the pen is then powered
off.
3 Pressing the _/Home button while using the
touch pen
- In the Pentouch program: Shows or hides
the toolbar of the feature.
- In Windows: Works in the same way as the
right-click function.
Point the touch pen at an object you want to
right-click, then press the button.
4 The double-click function may not work as
intended in Windows XP or Windows Vista.
If this is the case, use the _/Home button
(right-click) instead.
The touch pen works in the same way as a
mouse in Windows.
Press the _/Home button on the touch pen
and check that the red LED blinks once.
2
Press and hold the d) / Home button on the
touch pen for 9 to 10 seconds.
3
When the green light blinks once, release the
button. The red light blinks 3 times and the pen
is then in its initial state (unpaired).
Be careful not to unpair the pen by mistake. If
unpaired, try pairing it again.
2
If you unpair and pair a normally functioning
touch pen, the other paired pen may not work.
In this case, unpair the nonfunctioning touch
pen and pair it again by following the steps
described in the Pairing for the First Time
section.
NOTE
After 3 hours of a continuous charge, you
can use the touch pen for about 8 hours.
Pentouch operation may not be normal
while charging.
Green LED will be turned on during using
touch pen. If you don't use touch pen, it will
be automatically turned off after 1 minute.
Touch pen LED indicator for battery status
-Charging: Red LED
- Charging complete: Green LED
- Battery level 20% or less: Red LED blinks
every 3 seconds
- No battery power: Red LED blinks every
second and powers off automatically.
Page 40

40 PENTOUCH
Using the Pentouch Function
You need the following items to use the Pentouch
functions:
- Computer with RGB or HDMI output
- RGB or HDMI cable
After connecting the TV and the PC with an
RGB cable or an HDMI cable, use the INPUT
button on the remote control and select the
input connected to the PC.
Configure your PC screen by referring to the
[Display Resolution Setting for Pentouch]
section. If your PC is a notebook computer,
you should configure the video to only be
displayed on the TV and not on the PC screen.
3 Enter the Pentouch mode on your TV.
- Press TOUCH button on the remote control or
Home to access the main menus. Then press
the navigation buttons to scroll to Pentouch
and press ENTER.
4 Select the correct computer input connection
to enter the Pentouch mode.
Display Resolution Settings for
Pentouch
In Windows XP
Right-click the desktop and select [Properties]. In
the [Display Properties] window, set the screen
resolution to 1920x1080 (PV490, PZ850 series) or
1024x768 (Other models) under the [Settings] tab.
In Windows Vista
Right-click the desktop and select [Personalize]
and [Display Settings]. Set the screen resolution
to 1920xl 080 (PV490, PZ850 series) or 1024x768
(Other models) in the [Resolution] section.
In Windows 7
Right-click the desktop and select [Screen Reso-
lution]. Set the screen resolution to 1920x1080
(PV490, PZ850 series) or 1024x768 (Other models)
in the [Resolution] section.
Use the touch pen or the mouse to start the
Pentouch program. Pressing the d) / Home
button on the touch pen works in the same
way as right-clicking the mouse.
NOTE
* If you turn off the TV and turn it back on
while using the Pentouch function, the last
screen on which you were working appears.
* To switch from Pentouch mode to others
mode, either press the INPUT button on the
remote control to select the desired input
or press the TVbutton to return to the TV
viewing screen.
Method 1:
On your laptop, press the "Fn + switch screen"
key on the keyboard to display the computer
screen on your TV screen, then set the computer's
display resolution to 1920x1080 (PV490, PZ850
series) or 1024x768 (Other models).
* Note: The switch screen key of the laptop may
be subject to change by the manufacturer.
Fn+F7 Fn+F4 Fn+F5 Fn+F5
Fn+F7 Fn+F5 Fn+F8 Fn + F7
Method 2:
Open the control panel for the graphics card on
your computer.
Set [Display Mode] to the [Single Display] mode,
then select [LG TV] as the display to use.
* Set the computer's display resolution to
1920x1080 (PV490, PZ850 series) or 1024x768
(Other models).
Page 41

PENTOUCH 41
@ NOTE
* The method of changing display resolution
settings may vary according to the
computer's configuration.
* Pentouch does not support dual monitor
mode or duplicate [mirror) monitor mode.
Check that the PC screen is set to only be
displayed on the TV.
* The switch screen key of the laptop may be
subject to change by the manufacturer.
-_ CAUTION
* The double-click function may not work as
intended in Windows XP and Vista because
these operating systems do not use touch
drivers.
* The Pentouch operation may become slow
depending on the computer's performance.
* The screen size may change if you disconnect
the computer's output port and connect it
again. If this happens, set the computer
resolution again.
If nothing is shown on the TV and the laptop
screen when you press the switch screen
key (Fn + manufacturer-specified key), try
pressing the key again.
* The TV screen size may become smaller
when you press the switch screen key (Fn +
manufacturer-specified key). If this happens,
adjust the resolution again.
* Changing the desktop icon properties
in Windows 7 may affect the Pentouch
program.
* It is recommended not to run other
applications while using the Pentouch
program.
* If the point you touch on the TV screen
using the touch pen and the point indicated
as touched on the computer screen do
not match when the computer and TV are
connected by a PC signal (RGB) cable, use
the TV remote control to select [Menu]
[Picture] _ [Screen] (RGB-PC), then select
[Auto Config.] to adjust the screen.
* If the PC and TV are only connected by a PC
(RGB) signal cable, there will be no sound
from the TV. Please connect the PC and the
TV with a PC audio cable as well.
* The Play Video function in Photo Editor may
not work as intended, depending on the
codecs installed on your computer.
* Eraser function could be slower if drawing
objects are overlapped exceed program
performance depends on PC environment.
* If you want to open programs with a single
click in Window XP or Vista, On your PC, go
to Start _ Control Panel _ Folder Options
and select "Single-click to open an item (point
to select)."
* If your PC is running Windows XP, the virtual
keyboard will only support English.
* When changing to the Pentouch mode, or
when changing the resolution in Pentouch
mode for RGB input signals, images may not
be displayed properly for a while due to auto
adjustment.
Page 42

42 PENTOUCH
Checking the Pentouch
Functions
You see the home screen shown below when you
start the Pentouch.
1 Press TOUCH button on the remote control.
NOTE
I. You can also access the pentouch functions /
by selecting Pentouch in the main menus.
2 Touch the screen with the touch pen to select
Sketchbook, Photo Editor, Family Diary,
Gallery, Internet or My Office.
When you select the Setting,
1 Select Setting from the Pentouch Home
screen with the touch pen.
2 Select the desired option.
Option Description
q
J
Open folder Select a folder from which you will open
Save folder Select a folder to which you want to
Screensaver Select the standby time for the
Language Select and change the language you
)hotos or video flies.
save images.
screensaver.
wish to work in.
No:
Sketchbook
@ Select the background you want, then draw
)ictures on it.
@ Photo Editor
Draw or edit pictures on photos and videos.
Family Diary
@ A journal of photos, videos, notes, and sketches
for family events by date.
Gallery
O A collection of pictures drawn and saved in
Sketchbook, Photo Editor, Internet, and My
office.
Internet
O Launch the Web browser to capture the web
content, then draw or write memos on it.
My Office
Supports the glass effect in Microsoft
Office and PDF files.
Touch pen battery levet
Saving, opening folder location, screen saver
settings and selecting language
Quit the Pentouch program
DescriDti0n
Page 43

Using Toolbar
You can use the draw toolbar on all menu screens.
Display the toolbar by pointing the touch pen at
the bottom of the screen.
There are two types of toolbars: fixed and
specialized.
The fixed toolbar provides the functions used
for all menus.
The specialized toolbar provides the
functions used for a specific menu.
PENTOUCH 43
No, Description
@ Remove the background andall the drawings,
@
Undo up to 5 recent actions.
@
Ink pen, highlighter pen, magic pen.
@
Select the thickness of the current drawing tool.
@
Filla closed area with the selected color.
@
Eraser
@
Select a color for the current drawing tool.
@
Select any color from the color wheel.
@
Save
@
Print
* Descriptions for the specialized toolbar functions
are provided in the menu function description
section.
Page 44

44 PENTOUCH
Using Sketchbook
You can select the background you want, then
draw pictures on it.
1 Touch the screen with the touch pen to select
Sketchbook.
Touch the screen with the touch pen to select
the desired option or use the toolbar to draw a
picture.
8 e_cr_o_ r.............
No,
@
Enter Gatlery.
@
Enter the Pentouch Home menu.
Select them to go to the previous page or next
@
page.
You can move up to 3 pages.
@
Current page position
Toolbar functions
@
t
Description
No. Description
Select image for background.
@
m
insert basic figures.
Select the desired icon, then short tap to
create a default size figure.
@
insert text.
If you select an area to enter the text, a
keyboard will be displayed on the screen.
@
NOTE
• For some operating systems, two virtualkeyboards may be displayed.
Page 45

PZNTOUCH 45
When dragging a line, pen or shape, you can
only move or resize a single object at a time.
If you short tap an object and drag, the area of
the selected object will be displayed.
Move
You can move an object by dragging the area
of the selected object.
Expansion/ Reduction
You can expand or reduce an object by draggingone
of the 8 corners of the selected object. The object will
beresized basedon the corresponding corner/edge.
Rotation
Draginrotation to rotate the selected object.
Delete object from the screen.
i_¸_ !
Cut the range and Move / Expansion /
Reduction / Rotation.
@
Page 46

46 PENTOUCH
Using Photo Editor
You can draw or edit image on photos and video
capture images.
Touch the screen with the touch pen to select
Photo Editor.
Touch the screen with the touch pen to select
the desired option.
Nol Description
@ Enter Gallery.
@
Enter the Pentouch Home menu.
Select them to go to the previous page or next
@
page.
Select photo list view option.
@
Scattered view / Sorted view)
@
Page navigation scrollbar
Only one video can be played at a time; the
@
previously playing video is paused.
Select a photo or video you wish to decorate.
You can decorate the picture with the toolbar.
No_
@
Enter Gallery,
@
Open photo list.
Previews of all photos and videos in the folder
@
are shown here. (from new to old)
@
Toolbar functions
Description
_-@ NOTE
* When working with a video, you can use the
pause button and extract the image of the
paused frame to use it in Photo Editor.
* You can edit the photos or videos stored in
the Photo List.
The TV may not properly play the video files
in the Pentouch mode depending on your
computer.
Page 47

@
Move an object.
If you select an object, a mini pop-up win-
dow will display,
PENTOUCH 47
Frame for image.
Cut from the image.
Description
Bring to Front
Send to Back
Delete
After select area to cut, you can change
it's size.
Page 48

48 PENTOUCH
Using Family Diary
You can keep a journal of photos, videos, notes,
and sketches for family events by date.
1 Touch the screen with the touch pen to select
Family Diary.
2 Select the desired date with the touch pen.
3 Use the toolbar to create and decorate the
family diary.
Using Gallery
This is the gallery of the images you made and
saved using Sketchbook, Photo Editor, Internet
and My Office.
1 Touch the screen with the touch pen to select
Gallery.
2 Touch the screen with the touch pen to select
the desired option, and enjoy the Gallery
screen.
L ? ::7:::
Enter the Pentouch Home menu.
Select date.
Dates with images are shown with icons.
Select a date with images to see the screen.
Open the Family Diary screen.
Select Preview or Full Screen.
Draw or write here.
Description
No_
@
Enter the Pentouch Home menu,
Start stideshow from the first image on the
current page.
@
To stop the slide show, touch the screen while
the slide show is playing with the touch pen.
This will take you back to the previous screen.
Page button: Select them to go to the previous
@
page or next page.
@
Page navigation scrollbar
@
Enter the Galtery List.
When selected, the current image is deleted
@
and the next image is displayed.
Description
Page 49

Using Internet
You can capture web content to draw or write
memos on it.
1 Touch the screen with the touch pen to select
Jnternet.
2 Touch the screen with the touch pen to select
the desired option or use the toolbar.
@
No_
Memo
Select image for memo,
@
PENTOUCH 49
Description
Sele_l¥o_, Re,,on ...............
NO_
@
Enter the Pentouch Home menu.
Virtual keyboard tab: insert text.Select the virtual
@
keyboard tab to display the keyboard on the
screen.
if you select a pen icon on your TV, the drawing
mode will be activated.
@
When you in drawing mode, the virtual keyboard
will be hidden.
if you setect a mouse icon on your TV, the click
mode will be activated.
@
Drawings will be cleared when you exit the
drawing mode.
;'t_!i'"L............
Capture all
@
The Save confirmation message is shown.
Capture selection
@
The Save confirmation message is shown after
you setect an area to capture.
@
Save
Page 50

.50 PENTOUCH
Using My Office
You can draw or write in Microsoft Office or PDF
files.
Folders and formats supported are displayed in a
window.
Type
Office
Files
PDF
Files
2003 version ppt, doc, xis
2007 version pptx, docx, xtsx
All Microsoft PowerPoint flies (*.ppt, .pptx)
All Microsoft Word files (*.doc, .docx)
All Microsoft Excel files (*.xts, .xtsx)
Outlook data files (*.msg, *.eml)
Adobe PDF files (*.pdf)
supported file format
1 Touch the screen with the touch pen to select
My Office.
2 Touch the screen with the touch pen, then
in the Open popup window, select the file to
open.
No.
@
Enter the Pentouch Home menu.
Virtual keyboard tab: Insert text.
@
Select the virtual keyboard tab to display the
keyboard on the screen.
_you select a pen icon on your TV, the drawing
mode will be activated.
@
When you in drawing mode, the virtual
keyboard will be hidden.
If you select a mouse icon on your TV, the click
mode will be activated.
@
Drawings will be cleared when you exit the
drawing mode.
Description
CAUTION
* Applications that support Microsoft Office
and PDF files must be installed on your
computer.
3 Touch the screen with the touch pen to select
the desired option or use the toolbar.
No,
Memo
Select image for memo,
Description
@
Capture all
@
The Save confirmation message is shown.
Capture selection
@
The Save confirmation message is shown after
you setect an area to capture.
@
Save
Page 51

ENTERTAINMENT
Connecting USB storage devices
Connect USB storage devices such as a USB
flash drive or external hard drive to the TV and use
multimedia features (See "Browsing files" on p. 52).
Connect a USB flash drive or USB memory
card reader to the TV as shown in the following
illustration.
f_
__ or }
To disconnect a USB storage device,
make sure to end the connection properly to
prevent damages to the TV or files.
1 Press Q.MENU to access the quick menus.
2 Press tile Navigation buttons to scroll to USB
Device and press ENTER.
3 Disconnect the USB storage device only when
the message says that it is safe to remove.
CAUTION
* Do not turn the TV off or remove a USB
storage device while the USB storage device
is connected to the TV, as this could result
in loss of files or damage to the USB storage
device.
* Back up your files saved on a USB storage
device frequently, as you may lose or
damage the files and this may be not
covered by the warranty.
ENTERTASNMENT 51
* The TV recognizes only a USB storage
device.
* If you connect a USB storage device to the
TV through a USB hub, your TV may not
recognize the USB storage device.
* The TV may not recognize a USB storage
device that requires a special driver.
* The recognition speed of a USB storage
device may differ depending on the device.
* Only use a USB storage device which has
normal music or image files.
* Use only USB storage devices that are
formatted as a FAT 32 or NTFS file system.
* If you format a USB storage device as a
NTFS file system, you cannot delete the
saved files.
* You may need to connect a USB storage
device to an external power supply with a
power adapter.
* If the TV does not recognize a connected
USB storage device, replace the cable and
try again. Do not use an excessively long
cable.
* The TV does not support some USB storage
devices properly.
* You can use a multi-partition (up to 4) USB
storage device.
* You can use up to 4 USB storage devices at
a time by using a USB multi-card reader.
* The file alignment method of a USB storage
device is similar to the one of Window XP.
* You cannot create or delete a folder saved in
a USB storage device directly on the TV.
* The number of characters for a file name is
up to 100 English characters.
* If there are too many folders and files in one
folder, it may not operate properly.
* The recommended capacity for a USB
external hard disk is 1 TB or less and for a
USB storage device is 32 GB or less.
* If a USB external hard disk with the Energy
Saving feature does not work, turn the USB
external hard disk off and on again to make
it work properly. For more information, refer
to the user manual of the USB external hard
disk.
* USB storage devices below USB 2.0 are
supported as well. But they may not work
properly in the movie list.
* The electrostatic can cause USB device's
malfunction. In this case, USB Device has to
be plugged again.
Page 52

52 ENTERTAINMENT
Browsing files
Access the photo, music, or movie lists and
browse files.
1
Connect a USB storage device.
Press Home to access the main menus.
2
3
Press the Navigation buttons to scroll to MY
MEDIA and press ENTER.
4
Press Navigation buttons to scroll to MOVIE
LIST, PHOTO LIST, or MUSIC LIST and press
ENTER.
Select Drivel to access the connected USB
storage device.
6
Press the Navigation buttons to Select a folder/
file you want.
O @
O @
No: Description
@ Moves to the upper level folder.
O Current page number/total number of
pages
@ Current page number/total number of
pages
Contents under the folder focused on @
Available buttons on the remote control
BUtton
Green Moves to Photo List, Music List, or
button Movie List.
Yellow Change Numbers: Changes the number
button or thumbnails displayed at a time.
Blue
button
Allows you to mark certain files.
O @
Video • MPG, MPEG, DAT, TS, TRP, TP, VOD, MP4,
MOV, MKV, DivX, AVI, Motion JPEG (AVI,
MP4, MKV), ASF, WMV, FLV
• Resolution:
under 1920 pixel (width) x 1080 pixel (height)
• Frame Rate:
under 30 frame/sec (1920 x 1080), under 60
frame/sec (I 280 x 72@
• Max bitrate of playable movie file: 20 Mbps
(Mega bit per second)
• Bit rate of audio format: within 32 kbps to
320 kbps (MP3)
• Supported subtitle format: *.smi, *.srt, *.sub
(MicroDVD, SubViewer 1.0/2.0), *.ass, *ssa,
•txt (TMPtayer), *.psb (PowerDivX)
Page 53

ENTERTAINMENT 53
Photo JPG
Available size
Baseline: 64 pixel (W) x 64 pixet (H) - 15360
pixet (W) x 8640 pixel (H)
Progressive: 64 pixet (W) x 64 pixel (H) -
1920 pixel (W) x 1440 pixet (H)
* Do not use the progressive option when
saving JPG files on your PC.
It may take some time to open high-
resolution images in fult screen.
For3D_
F p¢ basetine
__ SOFI: Extend
__ I Sequential
I _,_ SOF2:
o Min:64x64
I _ ° Max- Normal
I _ Type: 15360
I _ ,_,_Progressive
I _Z ,* 4.9 size: 3,648
I ×2,736
I _ 2,592 x 1,944
_x.1'53A6
I _,* 3:2 size: 3,648
Music MP3
Bit rate range 32 Kbps-320 Kbps
Sampling rate (Sampling Frequency)
MPEG1 layer 3:32 kHz, 44.1 kHz,
48 kHz
MPEG2 layer 3:16 kHz, 22.05 kHz,
24 kHz
MPEG2.5 layer 3:8 kHz, 11.025 kHz,
12 kHz
* A copy-protected file will not play.
Page 54

54 ENTERTAINMENT
Viewing Videos
Your TV can display video files from a USB storage
device.
Press Home to access the main menus.
1
2
Press the Navigation buttons to scroll to MY
MEDIA and press ENTER.
3
Press the Navigation buttons to scroll to Movie
List and press ENTER.
Select Drivel to access the connected USB
4
storage device.
Press the Navigation buttons to scroll to a
folder/file you want and press ENTER.
6
Play a movie by using the following menus/
buttons.
Button
Navigation
button
ENTER
CH (A, V)
MARK
Menu
Play Marked
Mark All
Unmark All
Exit Mark
Mode
Scrolls through the flies.
Plays the highlighted fiie or enters
the mark mode.
Moves to the previous or next
page.
Enters the mark mode.
Ptays the selected video.
Selects all files.
Clears atl of your selections.
Exit the Mark Mode.
Description
Description
,- @ NOTE
* _ Abnormal files are displayed using this
graphic.
* _: Non-supported files are displayed using
this graphic.
7 Control playback by using the following
buttons.
sutton
[]
I!
I! and
<or:>
ENERGY
SAVING
Q.MENU
AV MODE
BACK
EXIT
stops the playback.
Ptays a video.
Pauses or resumes the playback.
Scans backward in a file.
Scans forward in a file.
Ptays videos in slow motion.
Skips to specific points in a file
during playback. The time of a
specific point will appear on the
status bar. in some files, this
function may not work properly.
increases or deceases the
brightness of your screen.
Shows the Option menu (See p.55).
Selects the desired source.
Hides the menu on screen.
To see the menu again, press
ENTER button to display.
Returns to TV viewing.
* Some user-created subtitles may not work
properly.
* Subtitles may not display some special
characters or HTML tags.
* Subtitles in the non-supported languages are
unavailable.
* The time information in an external subtitle
file should be arranged in ascending order to
play.
Description
Page 55

ENTERTASNMENT 55
* The screen may suffer from temporary
interruptions such as image stoppage or
faster playback when you change the audio
language.
If you play a damaged video file, the video
file may not be played correctly or some
player functions may not be unavailable.
The TV may not properly play the video files
produced with certain encoders.
If the recorded file does not have video or
audio, either video or audio is not outputted
If the TV plays the recorded file without
video or audio, either video or audio is not
outputted.
The TV may not smoothly play the video files
with a resolution higher than the supported
resolution for each frame.
The TV may not properly play the video
files not included on the specified type and
format.
The TV may not play the files encoded with
GMC (Global Motion Compensation) or
quarter-pel motion estimation.
The TV supports the only files saved in ASCII
code in subtitles.
The maximum number of characters
displayed on each subtitle line is 250
(Korean), 500 (English), and 500 (Numbers).
The TV supports the only 10,000 sync blocks
within the subtitle file.
The TV supports the H.264 codec up to the
profile level 4.1.
The TV does not support DTS audio codec.
The TV cannot play a video file whose size is
larger than 30 GB.
If you play a video file through the USB
connection that does not support the high
speed, the video player may not work
properly.
The TV supports a USB storage device
whose version is lower than 2.0. However,
the USB storage device may not work
properly in the movie list.
The video file and its subtitle should be in
the same folder and the name of the video
file and subtitle should be identical.
You can adjust the image by using ENERGY
SAVING and AV MODE. But you cannot
customize image options of each mode.
The TV may not play the video files in the
supported file format depending on the
encoded condition.
The TV will not play the video files that has a
damaged index or no index.
1 Press Q. MENU.
A pop-up window will appear.
2 Press the Navigation buttons to scroll to movie
list option and press ENTER.
3 Press the Navigation buttons to scroll to one of
the following options and press ENTER.
Set Video Play.
Option
Picture Size
Audio
Language
Subtitle
Language
Language
Code Page
Sync
Position
Size
Repeat
Selects your desired picture format
for videos.
• Full Mode: Files areplayed in full
screen mode accordingto the
aspect ratio of video.
• Original Mode: Filesare played in
their native size.
Changesthe Language Groupof
the audio for video files. Fileswith
a single audio track cannot be
selected.
The subtitles canbe turned on or
off.
Activated for SMt subtitles and
canselect the language within the
subtitle.
Subtitle font selection. When set
to default, contents are displayed
in the language set in "Option -
Language- Menu Language."
SUb to _pp0rted
Language Group
Latin1 I English,Spanish,
Korean _Engtish, Korean
Ifthe video is not synchronized
with the captions, it can beadjusted
by0.5 second.
Move the location of the subtitles.
Changesthe subtitle font size.
Turn on/off repeatfunction of movie
playback.When turned on, the
file within the folder will be played
backrepeatedly. When turned off,
if the next file name is similar to
the previous file, it canbe played
sequentially.
Description
Page 56

56 ENTERTAINMENT
NOTE
When replaying a video file after stopping,
select "Yes" to restart where it previously
stopped.
If continuous series files exist within the
folder, the next file will automatically be
played. But, this excludes cases when the
Repeat function of Movie List Option is
turned "On" (See p.55) or when set as Play
Marked.
Set Video.
Allows you to change Video presets. (Refer to
"PICTURE Settings" on p.64).
Set Audio.
Allows you to change Audio presets. (Refer to
"AUDIO Settings" on p.68).
Page 57

DivX registration code
The DivX registration code allows you to rent or
purchase the latest movies at www.divx.com/vod.
To play a rented or purchased DivX file, the file's
registration code should be same as your TV's
DivX registration code.
1 Press Home to access the main menus.
2 Press the Navigation buttons to scroll to MY
MEDIA and press ENTER.
3 Press the Blue button.
4 Press the Navigation buttons to scroll to DivX
VOD Registration and press ENTER.
5 View the registration code of your TV.
ENTERTASNMENT 57
You can deactivate all of the devices through the
web server and block devices from activating.
Delete the existing authentication information to
receive a new DivX user authentication for the
TV. Once this function is executed, a DivX user
authentication is required again to see DivX DRM
files.
1 Press Home to access the main menus.
2 Press the Navigation buttons to scroll to MY
MEDIA and press ENTER.
3 Press the Blue button.
4 Press the Navigation buttons to scroll to DivX
Deregistration and press ENTER.
5 Select Yes to confirm.
6 When you are finished, press ENTER.
@ NOTE
* While you are checking the registration code,
some buttons may not work.
If you use the DivX registration code of
another device, you cannot play the rented
or purchased DivX file. Make sure to use the
DivX registration code assigned to your TV.
The video or audio files that are not
converted by the standard DivX codec may
be corrupted or not be played.
The DivX VOD code allows you to activate
up to 6 devices under one account.
6 When you are finished, press EXIT.
When you return to the previous menu, press
BACK.
Page 58

58 ENTERTAINMENT
Viewing Photos
You can view image files saved on a USB storage
device. The displays on the screen may differ
based on the model.
1
Press Home to access the main menus.
2
Press the Navigation buttons to scroll to MY
MEDIA and press ENTER.
3
Press the Navigation buttons to scroll to Photo
List and press ENTER.
4
Select Drivel to access the connected USB
storage device.
Press the Navigation buttons to scroll to a
folder/file you want and press ENTER.
6
Vies/photos by using the following menus/
buttons.
y @ NOTE
• _ "Abnormal files are displayed using this
graphic.
• _ • Non-supported files are displayed using
this graphic.
7 The following options are available while
viewing photos.
Option Description
• Starts or stops a slideshow with
selected photos.
• If there are no selected photos,
Slideshow all photos saved in the current
folder display during a stideshow.
• To set a slideshow speed, select
Option.
• Turns the background music on
or off. To set the background
music folder, select Option.
Button
Navigation Scrolts the file.
button
ENTER
CH (A, V) Moves to the previous or next
MARK
Menu
View Marked
Mark All
Unmark All
Exit Mark
Mode
Views the highlighted file or enters
the mark mode.
page.
Enters the mark mode.
Views the selected photo.
Selects all files
Clears all of your selections.
Exits the Mark Mode.
Description ...........................
Description
BGM @
(Background [- NOTE
Music) | ° You can't change or set-up
| the BGM while viewing the
l *.mpo files (3D camera file).
Rotates photos clockwise (90°,
180° , 270 °, 360°).
i_ NOTE
o (Rotate)
O, Views the photo by zoom in 2, 4
(Zoom In) times by using Blue button.
e,_
(ENERGY Increases or decreases the
SAVING) brightness of your screen.
Option Shows the Option menu (See p.59).
Hide To display the options, press
Exit Moves to the previous menu
he supported photo size is
mited. You cannot rotate a
hoto if the resolution of the
tated width is larger than
e supported resolution size.
Hides the option window.
ENTER.
screen.
Page 59

NOTE
Option values changed in Photo List do not
affect Movie List and Music List.
Option values changed in Photo List or
Music List are changed likewise in Photo List
and Music List, but not Movie List.
1 Press Q. MENU.
A pop-up window will appears.
2 Press the Navigation buttons to scroll to photo
list option and press ENTER.
3
Press the Navigation buttons to scroll to one of
the following options and press ENTER.
Set Photo View.
ENTERTAINMENT 59
Option
Slide Speed
BGM
Setectsa slideshow speed (Fast,
Medium, Slow),
Selects a music folder for the
background music,
• Repeat
• Random
Description
NOTE
• You cannot change the music1
folder while the background I
music is playing. I
Set Video.
Allows you to change Video presets. (Refer to
"PICTURE Settings" on p.64).
Set Audio.
Allows you to change Audio presets. (Refer to
"AUDIO Settings" on p.68).
]
J
Page 60

60 ENTERTAINMENT
Listening to music
1
Press Home to access the main menus.
2
Press the Navigation buttons to scroll to MY
MEDIA and press ENTER.
3
Press the Navigation buttons to scroll to Music
List and press ENTER.
4
Select Drivel to access the connected USB
storage device.
Press the Navigation buttons to scroll to a
folder/file you want and press ENTER.
6
Play music by using the following menus/
buttons.
y @ NOTE
• _: Abnormal files are displayed using this
graphic.
• _: Non-supported files are displayed using
this graphic.
7 Control playback by using the following
buttons.
Button
[]
I!
Play with
Photo
e_
(ENERGY
SAVING}
Option
Hide To display the options, press
Exit Moves to the previous menu
Stops playback.
Plays a music file.
Pauses or resumes playback.
Skips to the previous file.
Skips to the next file.
Displays photos during playback.
increases or deceases the
brightness of your screen.
Shows the Option menu (See p.61 ).
Hides the option window.
ENTER.
screen.
Description
Button Description
Navigation Scrolts through the files.
button
ENTER the mark mode.
CH (A, V} Moves to the previous or next
MARK Enters the mark mode.
Menu _ _, Description
Play Marked Plays the selected music file.
Mark All Selects all files.
Unmark All Clears all of your selections.
Exit Mark
Mode
Ptays the highlighted file or enters
page.
Exits the Mark Mode.
Page 61

1 Press Q. MENU.
A pop-up window will appears.
2 Press the Navigation buttons to scroll to music
list option and press ENTER.
3 Press the Navigation buttons to scroll to one of
the following options and press ENTER.
- @ NOTE
Option values changed in Movie List does
not affect the Photo List and Music List.
• Option value changed in Photo List and
Music List are changed likewise in Photo List
and Music List.
Set Audio Play.
Select Repeat or Random option.
ENTERTASNMENT 61
Set Audio.
Allows you to change Audio presets. (Refer to
"AUDIO Settings" on p.68).
- @ NOTE
The TV will not play copy protected files.
If the TV is not in use for some time
during playback, the information box as a
screensaver will appear to prevent image
burn.
To return to the Music list screen, press
ENTER or BACK.
File name
Time elapsed /Duration
Page 62

62 CUSTOMIZING SETTINGS
CUSTOMIZING TV SETTINGS
The Main Menus
1 Press Home to access the main menus.
2 Press the Navigation buttons to scroll to one of the following menus and press ENTER.
3 Press the Navigation buttons to scroll to the setting or option you want and press ENTER.
4 When you are finished, press EXIT.
PICTURE (see P 64) AUDIO (see p:68)
AdjUsts the image size, Adjusts the sound quality;
quality; or effect, effect, or volume level:
............... TIME (See p.69)
-- Sets the timel datel
ii iin orT mer feature.
OPTION (See p.72)
customizes
the general settings:
i_iiiii_iiiiiiiiilW!!ii
MY MEDIA (See p.51)
Pentouch (see p:36)
Peniouch ali0ws you tO
Use various functions
with touch pen on the TV.
Page 63

Customizing Settings
CHANNEL Settings
1
Press Home to access the main menus.
2
Press the Navigation buttons to scroll to CHANNEL and press
ENTER.
3 Press the Navigation buttons to scroll to the setting or option you
want and press ENTER.
- To return to the previous level, press BACK.
4 When you are finished, press EXIT.
The available channel settings are described in the following.
[Channel Edit Adds or deletes channels on the channel (See p.26).
CUSTOMIZING SETTINGS 63
(See p.25).
Page 64

64 CUSTOMIZING SETTINGS
PICTURE Settings
1
Press Home to access the main menus.
2
Press the Navigation buttons to scroll to CHANNEL and press
ENTER.
3 Press the Navigation buttons to scroll to the setting or option you
want and press ENTER.
- To return to the previous level, press BACK.
4 When you are finished, press EXIT.
The available picture settings are described in the following.
setting
Aspect Ratio
Picture Wizard
Changes the image size to view images at its optimal size (See p.29).
Adjusts the image quality and calibrates the screen.
The customized options will be saved as Expert1 in the Picture Mode.
Energy Saving
_-@ NOTE
if you use Picture Wizard, the Energy saving feature will turn off automatically. |
To reset changes made by Picture Wizard, operate Picture Reset when Picture Mode is on
Expert1.
Reduces the power consumption by adjusting the screen brightness.
option
Intelligent sensor The most suitable picture is automatically adjusted according to the surrounding
Off Select if this feature is not necessary.
Minimum/ Selects the brightness level.
Medium/Maximum
Screen off The screen turns off in 3 seconds.
conditions.
Pressing any button of the remote control will turn on the screen again.
q
J
Page 65

CUSTOMIZING SETTINGS 65
Setting-- Description
Picture Mode Selects one of the preset image or customizes options in each mode for the best TV screen
)erformance, You are also able to customize advanced options of each mode,
The avaiJable preset picture modes vary depending on the TV,
Mode (Depending on model)
'vwtd Adjusts tne video image for the retail environment by enhancing the contrast,
brightnes_ color, and sharpness,
Standard Adjusts tne image for the normal environment,
APS Maximizes video images reducing power consumption without hurting picture
aualit .
3inema Ot)timizes tne video image for a cinematic look to enjoy movies as if you are in
a movie tneater.
THX Cinema Provides a cinema experience while watching a movie at home. The user
THX 3D Cinema. N 9e at)_eenjoy the best level of screen quality without any separate
THX Bright Room adjustments.
THX Cinema express the optimal screen quality when the room is dark.
THX Bright Room express the optimal screen quality when the room is
orignt.
When selecting THX Cinema, THX 3D Cinema or THX Bright Room,
Ast)ect ra_io changes to Just scan.
• THX :THX (Thomlinson Holman's Experiment)is an audio and video
certification standard established by George Lucas and Thomtinson. A
THX certified display guarantees screen quality that exceeds the display
standard specification in both hardware and software.
Sport Ot)dmlzes ideo images for high and dynamic actions by emphasizing primary
co_ors such as white, grass, or sky blue.
Game Ootimizes tne video image for a fast gaming screen such as PCs or games.
Photo Ootimizes tne still image like a photo file in USB mode.
e.gj when connecting the external device like a DSLR.
Expert Adjusts the detailed video image settings for video experts as well as general
viewers.
SCREEN (RGB- Customizes the PC display options.
PC) Option
Resolution Selects a proper resolution when your PC uses 1024 X 768, 1280 X 768, or
1360 X 768 resolution.
Auto Configure Sets the TV to optimize the options automatically for the TV display.
Position Locates the image at the proper position.
Size Adjusts the image size.
Phase Eliminates horizontal streaking.
Reset Restores the options to the default setting.
Page 66

66 CUSTOMIZING SETTINGS
Setting Description
Contrast increases or decreases the amplitude of the video signal You may use Contrast when the
bright part of the picture is saturated.
Brightness Adjusts the base level of the signal in the picture.
Sharpness Adjusts the levet of crispness in the edges between the light and dark areas of the picture.
The lower the levet, the softer the image.
Color Adjusts intensity of atl colors.
Tint Adjusts the batance between red and green levets.
Color Temp. Sets to warm to enhance hotter colors such as red, or set to cool to enhance cooler colors
such as blue.
Advanced Control Customizes the advanced options.
Picture Reset Restores the options of each mode to the factory default.
:7
Dynamic Contrast Adjusts the contrast to keep it at the best levet according to the brightness of the screen.
The picture is improved by making bright parts brighter and dark parts darker.
Dynamic Color Adjusts screen colors so that they look liveiier, richer and clearer. This feature enhances hue,
saturation and luminance so that red, blue and green white look more vivid.
Skin Color it detects the skin area of video and adjusts it to express a naturat skin color.
Noise Reduction
Digital Noise Reduction
Gamma
Reduces screen noise without compromising video quality.
Removes noise caused by compressing video.
You can adjust brightness of dark area and middle gray levet area of the picture.
>>Low: Make the dark and middle gray levet areas brighter.
7>Medium: Express the original picture level.
7>High: Make the dark and middle gray level area darker.
Black Level
Sets black level of the screen to proper level
7>Low: The reflection of the screen gets darker.
7>High: The reflection of the screen gets brighter.
Clear White
Eye Care
Makes the white area of screen brighter and more white.
Adjusts the brightness of the screen to prevent the screen from being too bright. Dims
extremely bright pictures.
This feature is enabled in "Picture Mode-Standard, Sport, Game".
Real Cinema or Film
Mode
Makes video clips recorded in film look more natural by eliminating judder effect.
DVD and Blu-ray movies are filmed at 24 frames per second (fps). With LG Real Cinema,
every frame is consistently processed 5 times in 1/24 of a second producing 120 fps with
TruMotion or 2 times in 1/24 of a second producing 48 fps without TruMotion, thus totally
eliminating the judder effect.
This function can also work when TruMotion is off.
Color Gamut Advanced Control
Maximizes the utilization of color to increase color quality.
>>Standard: Displays standard set of colors.
7>Wide: increase number of colors used.
Expert Control
Disptays color domain of the signal.
>>Standard: Displays standard set of colors.
7>Wide: increase number of colors used.
Edge Enhancer Shows clearer and distinctive yet natural edges of the video.
This function works well over Sharpness U160 value.
Page 67

CUSTOMIZING SETTINGS 67
Setting Description
xvYCC This is produces richer colors.
This feature represents rich colors as much as a conventional video signal.
This function is enabled in "Picture mode- Cinema, Expert" when xvYCC signal is inputted
through HDMI.
Color Filter This is the function to filter the specific colors of the video.
You can use the RGB filter to set color saturation and hue accurately.
Expert Pattern This is the pattern used for expert adjustment.
This function is enabled in "Picture Mode - Expert" when you watch DTV.
Color Temperature Adjusts the overall color of the screen by changing the white baseline.
a. Gamma : Select Low, Medium, High c. Method : 20 Point IRE
b. Method : 2 Points • IRE (institute of Radio Engineers) is the
• Pattern: inner, Outer unit to display the size of the video signal
• Red/Green/Blue Contrast, Red/Green/Blue and can be set among 0, 5, 10, 15 - 100
Brightness Plasma TV. You can adjust Red, Green or
d. Apply to all inputs Blue according to each setting.
• Red/Green/Blue: The adjustment range is
-50 - +50.
Color Management As the tool used by the experts to make adjustments by using the test patterns, this does
System not affect other colors but can be used to selectively adjust the 6 color areas (Red/Green/
Btue/Cya n/M agenta/Yellow).
Color difference may not be distinctive even when you make the adjustments for the general
video.
Adjusts Red/Green/Btue/Yetlow/Cyan/Magenta.
Red/Green/Blue/Yetlow/Cyan/Magenta Color: The adjustment range is -30 - +30.
Red/Green/Blue/Yeitow/Cyan/Magenta Tint: The adjustment range is -30 - +30.
This feature is disable in RGB-PC and HDMI-PC mode.
Page 68

68 CUSTOMIZING SETTINGS
AUDIO Settings
1
Press Home to access the main menus.
2
Press the Navigation buttons to scroll to AUDIO and press ENTER.
3
Press the Navigation buttons to scroll to the setting or option you
want and press ENTER.
- To return to the previous level, press BACK.
4
When you are finished, press EXIT.
The available audio settings are described in the following.
Setting Description
Auto Volume Activates the Auto Volume feature to keep the volume levet consistent whenever you change
Clear Voice II Sets whether to enhance human voice clarity. You can adjust the level of clarity when you set this
Balance Adjusts balance between the left and right speakers according to your room environment.
Sound Mode Selects one of the preset sound modes or customizes options in each mode.
channels. The volume level may not be consistent due to different signal conditions of broadcasting
stations.
feature on.
Mode
Standard Setect when you want standard-quality sound.
Music Setect when you listen to music.
Cinema Setect when you watch movies.
Sport Setect when you watch sports events.
Game Select when you play games.
_@ NOTE
if sound quality or volume is not at the levet you want, it is recommended to use a separate
home theater system or amplifier to cope with different user environments.
if the Clear Voice II feature is on, Infinite Surround will not be activated.
Option
nfinite Surround infinite Surround is a patented LG proprietary sound processing technology that
Treble Controls the dominant sounds in the output. When you turn up the treble, it will
Bass Controls the softer sounds in the output. When you turn up the bass, it will
Reset Resets the sound mode to the default setting.
TV Speaker Turns on the internal speaker of the TV when using an external Hi-Fi system. You can use the TV
speaker as an audio output device even if there is no video input.
strives immersive 5.1 surround sound with just two front speakers.
increase the output to the higher frequency range.
increase the output to the lower frequency range.
Page 69

TIME Settings
1
Press Home to access the main menus.
2
Press the Navigation buttons to scroll to TIME and press ENTER.
3
Press the Navigation buttons to scroll to the setting or option you
want and press ENTER.
- To return to the previous level, press BACK.
4
When you are finished, press EXIT.
The available time settings are described in the following
.......Setting Des0ripti0n
Clock Sets the time, date, time zone, and daylight-saving time feature.
The time will be set automatically according to a digital channel signal which includes time
information provided by the broadcasting station. If not, set the time and date manually.
CUSTOMIZING SETTINGS 6c)
Off Time/On Time Sets the time to turn on or off the TV automatically. To use this function, you should set the current
Sleep Timer Sets the length of time until the TV to turns off. When you turn the TV off and turn it on again, the
time and date in advance.
NOTE
• If you do not press any button within 2 hours after the TV turns on by the On Time feature,
the TV enters the Standby mode automatically.
• If you set both Off time and On time features to the same time, the Off time feature
overrides the On time feature.
Sleep timer feature wilt be set to off.
Page 70

70 CUSTOMIZING SETTINGS
LOCK Settings
1
Press Home to access the main menus.
2
Press the Navigation buttons to scroll to LOCKand press ENTER.
3
Press the Navigation buttons to scroll to the setting or option you
want and press ENTER.
- To return to the previous level, press BACK.
4
When you are finished, press EXIT.
The available lock settings are described in the following.
Setting
Lock System Activates or deactivates the lock system.
Set Password Changes the 4-digit password. The default PiN is "0 0 0 0".
Block Channel Blocks the channels that contain inappropriate contents for children by pressing the Yellow button.
Movie Rating Blocks the movies that are only broadcasted on the TV and contain inappropriate contents, based on
if you forget your password, press "0-3-2-5" on the remote control.
The Lock icon appears in front of the blocked channels. The channels can be selected but the screen
blank and the audio is muted.
To watch a locked channel, enter the password.
the Motion Picture Association of America (MPAA) rating.
J_ iiiiiiiiiiiiiiiiiiiiiliiiiiiiiiiiiiiii!iiiiiiiiiiiiiiiiiiiiiiiiii!iiiiiiiii_ii_!i_i_!ii_i_i__i_!_ii!_!iiiiiiiiiiiiiiiiiiiiiiiiiiiiiiiiiiiiii!iii!iiil;_,_
TV Rating-
Children
(Depending on
model)
G General audiences - All ages admitted
PG Parental guidance suggested - Some material may not be suitable for children
PGq3 Patents strongly cautioned - Some material may be inappropriate for children
under 13
R Restricted - Under 17 requires accompanying parent or adult guardian
c-i 7 No one 17 and under admitted
X Adults only
Blocking Off Permits all programs
Blocks the children's TV programs that parents do not want their children to watch. To block other
TV programs, you should set the TV Rating-General feature.
RSting
Age TV-Y (Atl children, including children from ages 2-6)
TV-Y7 (Directed to older children, suitable for children age 6 and above)
Fantasy Violence TY-Y7 (Directed to older children - Fantasy violence, suitable for children age 6
and above, containing more intense or combative fantasy violence)
Page 71

CUSTOMIZING SETTINGS 71
Setting
TV Rating-
General
Blocks the TV programs that you want based on the ratings by using the Parental Control Function
(V-Chip),
DeSCription ......
(Depending on
model)
-@ NOTE
The V-Chip electronically reads TV program ratings and allows parents to block program that
are unsuitable for children,
Rating
Age TV-G (General audience, suitable for all ages)
TV-PG (Parental guidance suggested, containing material that are unsuitable for
younger children)
TV-14 (Parents strongly cautioned, containing material that are unsuitable for
children age 14 and under)
TV-MA (Mature audience only, unsuitable for children age under 17)
Dialog
TV-PG or TV-14
(suggestive
diatogue_
Language TV-PG, TV-14, or TV-MA
(coarse language
Sex TV-PG, TV-14, or TV-MA
tsexual situation
Violence TV-PG, TV-14, or TV-MA
IV Rating-
English
(Depending on
model)
Selecting Canadian English rating system.
Rating
T Exempt
C Children
C8+ Children eight years and older
G General programming, suitable for all audiences
PG Parental Guidance
14+ Viewers 14 years and older
18+ Adult programming
Blocking Qff Permits alt programs
TV Rating-
French
(Depending on
model)
Selecting Canadian French rating system.
Rating
-- Exempt
G General
8ans+ General-Not convenient for little children
i3ans+ Not convenient for children of 13 years and younger
16ans+ Not convenient for children of 16 years and younger
i8ans+ This programs is only for adults
Blocking Off Permits all programs
Downloadable This function operates only when TV has received Region5 Rating data.
Rating The name of the rating option may differ.
-@ NOTE
This feature is available only for digitat channels.
Input Block Blocks the input sources,
Key Lock Locks or unlocks the buttons on the TV,
Page 72

72 CUSTOMIZING SETTINGS
OPTION Settings
1
Press Home to access the main menus.
2
Press the Navigation buttons to scroll to OPTION and press ENTER
3
Press the Navigation buttons to scroll to the setting or option you
want and press ENTER.
- To return to the previous level, press BACK.
4
When you are finished, press EXIT.
The available general settings are described in the following.
Setting !
Language Selects a desired language.
Menu Language Selects a language for the display text.
Audio Language Selects an audio language for your program. This feature operates only
Caption Sets whether to display captions and customize your option in each mode.
Mode
CC 1-4 (Closed Dis olavs the audio portion of a TV program as text on the TV screen.
Captioning) CC1 is the most common mode in use.
Text 1-4 - Field 2 data channels: two Captions (CC3, CC4) and two Text (T1, T2).
Service 1-6 This is only available for the digital broadcasting system.
Option (For DT\ CADTV)
Size Selects the word size.
Font Selects a typeface for the text.
Text Color Selects a color for the text.
Text Opacity Adjusts the opacity for the text color.
Bg Color Selects a background color.
Bg Opacity Adjusts the opacity for the background color.
Edge Type Selects an edge type.
Edge Color Selects a color for the edges.
in the DTV or CADTV mode.
- Field 1 data channels: two Captions (CC1, CC2) and two Text (T1, T2).
Page 73

setting DeSCription
ISM Method Prevents image sticking or removes a ghost image.
A frozen still picture displayed on the screen for prolonged periods can result in a ghost image.
Mode
Normal Sets it if image sticking is never a problem.
Orbiter Avoids a ghost image on the screen.
The image will move every 2 minutes to help prevent ghost images.
However, it is best not to atiow any fixed image to remain on the screen.
C01erWash Removes a ghost image on the screen.
The color block with the screen moved a little and the white pattern are
alternately displayed. It is difficult to see the after image on all colors.
Once it has been corrected it wilt not be visible in any color.
White Wash
Removes a ghost image on the screen.
Use sparingly. Watch the TV normally for a while before using this
feature to see if the ghost image disappears on its own.
NOTE
• An excessive ghosted image may be impossible to clear entirely]
_v_tt_onWhiteWash. To return to normal viewing, press the any ]
CUSTOMIZING SETTINGS 73
Initial Setting
Set ID Adds an ID to the connected devices.
Mode Setting
Resets the TV to factory default and erases all stored channels.
Customizes the TV settings to suit your preference. The initial setup screen will appear when you
turn on the TV for the first time.
-@ NOTE
When selecting "Lock System - On'in the LOCK menu, the message to enter the password
appears.
If you forget your password, press "0-3-2-5" on the remote control.
setting
Language Selects a desired language.
M0de Setting Selects Home Use for the home environment.
Selects Store Demo for the retail environment.
Selects Demo Mode to set to show special features of the TV. You can
Mute buttons.
When selecting Store Demo, Demo Mode will be activated.
Time Zone Sets the time zone and daylight saving.
Auto Tuning Scans and saves available channels automatically.
Default selection is "Home Use". We recommend setting the TV to "Home Use" mode for the best
picture in your home environment.
Option
Home use Selects it for the home environment.
Store Demo Selects it for the retail environment.
Demo Mode Sets to show speciat features of the TV. You can cancel the demo mode
by pressing any buttons except the Volume and Mute buttons.
the demo mode by pressing any buttons except the Volume and
Page 74

74 MAKING CONNECTIONS
MAKING CONNECTIONS
Connect various external devices to the TV and switch input modes to select an external device. For more
information of external device's connection, refer to the manual provided with each device.
Available external devices are: HD receivers, DVD players, VCRs, audio systems, USB storage devices, PC,
gaming devices, and other external devices.
-@ NOTE
If you record a TV program on a DVD recorder or VCR, make sure to connect the TV signal input cable
to the TV through a DVD recorder or VCR. For more information of recording, refer to the manual
provided with the connected device.
The external device connection may differ from the model.
Connect external devices to the TV regardless of the order of the TV port.
Page 75

MAKING CONNECTIONS 75
Connection Overview
Connect various external devices to the ports on the TV back panel.
1 Find an external device you want to connect to your TV as shown on the following illustration.
2 Check the connection type of the external device.
3 Go to the appropriate illustration and check the connection details.
HD Receiver
Speaker
PC
HDMI - See p.76
DVI - See p.76
Component - See p.76
Composite - See p.76
Digital - See p.78
RGB - See p.77
Memory storage - See p.78
Memory card reader - See p.78
USB
Q
Gaming device
@ NOTE
If you connect a gaming device to the TV, use the cable supplied with the gaming device.
Refer to the external equipment's manual for operating instructions.
Page 76

"76 MAKING CONNECTIONS
Connecting to a HD receiver,
DVD or VCR player
Connect a HD receiver, DVD, or VCR player to the
TV and select an appropriate input mode.
HDMI Connection
Transmits the digital video and audio signals from
an external device to the TV. Connect the external
device and the TV with the HDMI cable as shown
in the following illustration.
NOTE
with CEC (Customer Electronics Control)
function.
I[ se the latest High Speed HDMI TMCable
High Speed HDMI TMCables are tested to
carry an HD signal up to 1080p and higher.
Component Connection
Transmits the analog video and audio signals from
an external device to the TV. Connect the external
device and the TV with the component cable as
shown in the following illustration.
:LC
7@ NOTE
* If cables are installed incorrectly, it could
case the image to display in black and white
or with distorted color. Check to ensure the
cable are matched with the corresponding
color connection.
DVI to HDMI Connection
Transmits the digital video signal from an external
device to the TV. Connect the external device and
the TV with the DVI-HDMI cable as shown in the
following illustration. To transmit an audio signal,
connect an audio cable.
Composite Connection
Transmits the analog video and audio signals from
an external device to the TV. Connect the external
device and the TV with the composite cable as
shown in the following illustration.
@ NOTE
, If you have a mono VCR, connect the audio
cable from the VCR to the AUDIO L/MONO
jack of the TV.
Page 77

MAKING CONNECTIONS "77
Connecting to a PC
- @ NOTE
It is recommended to use the TV set with
the HDMI connection for the best image
quality.
HDMI Connection
Transmits the digital video and audio signals from
your PC to the TV. Connect the PC and the TV
with the HDMI cable as shown in the following
illustration.
DVI to HDMI Connection
Transmits the digital video signal from your PC to
the TV. Connect the PC and the TV with the DVI-
HDMI cable as shown in the following illustration.
To transmit an audio signal, connect an audio
cable.
RGB Connection
Transmits the analog video signal from your PC to
the TV. Connect the PC and the TV with the D-sub
15 pin signal cable as shown in the following
illustrations. To transmit an audio signal, connect
an audio cable.
--@ NOTE
* To get the best picture quality, adjust the PC
graphics card to 1920x1080 (PV490, PZ850
series) or 1024x768 (Other models).
. Depending on the graphics card, DOS mode
may not work if a HDMI to DVI Cable is in
use.
In PC mode, there may be noise associated
with the resolution,verticalpattern,contrast
or brightness.
Ifnoise ispresent, change the PC output to
another resolution,change the refresh rate
to another rate or adjust the brightness and
contrast on the PICTURE menu untilthe
picture isclear.
Avoid keeping a fixed image on the screen
for a long period of time. The fixed image
may become permanently imprinted on the
screen.
The synchronization inputform for Horizontal
and Verticalfrequencies isseparate.
Depending on the graphics card, some
resolutionsettings may not allow the image
to be positionedon the screen properly.
When selecting HDMI-PC, set the "Input
Label - PC" inthe INPUT menu.
Page 78

"78 MAKING CONNECTIONS
Connecting to an Audio
System
Use an optional external audio system instead of
the built-in speaker.
* If you use an optional external audio device
instead of the built-in speaker, set the TV
speaker feature to off (See p.68).
Digital optical audio connection
Transmits the digital audio signal from the TV to an
external device. Connect the external device and
the TV with the optical audio cable as shown in
the following illustration.
Connecting to a USB
Connect a USB storage device such as a USB
flash memory, external hard drive or a USB
memory card reader to the TV and access the
My media menu to use various multimedia files.
See "Connecting USB storage devices" on p.51 and
"Browsing files" on p. 52.
s_
__ or ]
Page 79

MAKING CONNECTIONS "79
SIMPLINK Connection
Use the TV remote control to play and control the
AV device connected with the HDMI cable through
HDMI-CEC. Your TV only works with the devices
that support HDMI-CEC. But only devices with the
@mPunK logo are fully supported.
Connect one end of the HDMI cable to the HDMI/
DVI IN or HDMI IN terminal on the rear of the TV
and the other end to the SIMPLINK device.
- @ NOTE
* If the connected device does not support
HDMI-CEC, the SIMPLINK feature is
unavailable.
* To operate SIMPLINK, you should use
an High Speed HDMI cable with the CEC
(Consumer Electronics Control) function.
* SIMPLINK may not work properly if you a
third-party device that has an HDMI-CEC
function.
Activating and Using the
SIMPLINK menus
Press SlMPLINKto access the SIMPLINK
menus.
2 Press the Navigation buttons to select to On.
3 Press the Navigation buttons to scroll to one of
the devices and press ENTER.
No:
@
Displays the previously viewed TV channel.
Playsdiscs. When multiple discs are
@
available,the title of the disc appears at the
bottom of the screen.
@
Controls the connected VCR.
HDD recordings playback: Controls the
@
recording stored in HDD.
Audio out to home theater speaker or Audio
@
out to TV: Changes the audio output between
-A check mark appears in front of the selected
device.
- Available devices display in a bright color.
- Unavailable devices display in grey.
Control the selected AV device.
4
- Direct Play: After connecting AV devices to
the TV, you can directly control the devices
and play media without additional settings.
- Select AV device: Enables you to select one
of the AV devices connected to the TV.
- Disc playback: Control connected AV devices
by pressing the Navigation buttons, ENTER,
_,, m, I|, _ and _,.
- Power off all devices: When you power off
the TV, all connected devices are turned off.
- Switch audio-out: Offers an easy way to
switch audio-out.
- Sync Power on: When the equipment with
SIMPLINK function connected HDMI terminal
starts to play, The TV will automatically turn
on.
Description
@ NOTE
* If you change the input source by pressing
INPUT, the progressing function of the
SIMPLINK device will stop.
If you select a device that has the
home theater feature, the sound output
automatically switches to the home theater
speaker and the TV speaker turns off.
If a connected SIMPLINK home theater
system does not play the audio from the TV,
connect the DIGITAL AUDIO OUT terminal
on the rear of the TV to the DIGITAL AUDIO
IN terminal on the back of the SIMPLINK
device with an optical cable.
Page 80

80 MAgNTENANCE
MAINTENANCE
Update and clean your TV regularly to keep the
best performance and to extend the product
lifespan.
Cleaning Your TV
CAUTION
Make sure to turn the power off and
disconnect the power cord and all other
cables first.
When the TV is left unattended and unused
for a long time, disconnect the power cord
from the wall outlet to prevent possible
damage from lightning or power surges.
Screen and frame
To remove dust or light dirt, wipe the surface with
a dry, clean, and soft cloth.
To remove major dirt, wipe the surface with a
soft cloth dampened in clean water or a diluted
mild detergent. Then wipe immediately with a dry
cloth.
CAUTION
Do not push, rub, or hit the surface with
your fingernail or a sharp object, as this may
result in scratches on the screen and image
distortions.
Do not use any chemicals, such as waxes,
benzene, alcohol, thinners, insecticides, air
fresheners, lubricants, as these may damage
the screen's finish and cause discoloration.
-_ CAUTION
Do not spray liquid onto the surface. If water
enters the TV, it may result in fire, electric
shock, or malfunction.
Do not use any chemicals as this may
deteriorate the surface.
Power cord
Remove the accumulated dust or dirt on the
power cord regularly.
Preventing "image burn" or
"Burn-in" on your TV screen
* If a fixed image displays on the TV screen for
a long period of time, it will be imprinted and
become a permanent disfigurement on the
screen. This is "image burn" or "burn-in" and
not covered by the warranty.
* If the aspect ratio of the TV is set to 4:3 for a
long period of time, image burn may occur on
the letterboxed area of the screen.
* Avoid displaying a fixed image on the TV screen
for a long period of time (1 or more hours for the
Plasma TV) to prevent image burn.
Cabinet and stand
To remove dust or light dirt, wipe the cabinet with
a dry, clean, and soft cloth.
To remove major dirt, wipe the cabinet with a
soft cloth dampened in a clean water or water
containing a small amount of mild detergent. Then
wipe immediately with a dry cloth.
Page 81

TROUBLESHOOTING 81
TROUBLESHOOTING
Problem ResolUtion ......
Cannot control the TV with the
remote control.
No image display and no sound is Check if the product is turned on.
)roduced. Check if the power cord is connected to a wall outlet.
Image appears slowly when the TV The image is muted during the product startup process. This is normal. If the
turns on. image does not appear in a few minutes, unplug the TV for 30 seconds and try
Cannot connect external devices. Refer to the "Connection Overview" and connect an external device.
The TV turns off suddenly. Check the power control settings. The power supply may be interrupted.
Check the remote control sensor on the product and try again,
Check if there is any obstacle between the product and the remote control.
t _, 'to (,-}').Check if the batteries are still working and properly installed _ o L/, ,.-.
Check if the appropriate input mode such as TV or VCR is set for using the
remote control.
Check if there is a problem in the wail outlet by connecting other products.
again. If the image still does not appear, contact the authorized service center
in your local area.
Check if the Auto sleep feature is activated in the Time settings.
Refer to the "Sleep Timer".
If there is no signal while the TV is on, the TV will turn off automatically after
15 minutes of inactivity.
Probiem ResOlUtion
No sound is produced while images
are displaying.
No output from one of the speakers
Unusual sound from inside the TV is
produced.
Press VOL + or - button,
Check if the sound is muted by pressing MUTE,
Scroll to other channels, There may a problem with the broadcast,
Check if the TV Speaker feature is activated in the menu option,
Adjust Balance in the menu option,
A change in ambient humidity or temperature may result in an unusual noise
when the product turns on or off. There is no problem with your product,
Page 82

82 TROUBLESHOOTING
An image displays in black and • Adjust the color setting in the menu option.
white or the color quality is poor. • Keep a sufficient distance between this product and other electronic products.
• Scroll to other channels. There may a problem with the broadcast.
Horizontal or vertical bars appears • Check if there are local interferences such as an electrical appliance or power
or images blur tool.
Lines or streaks appear on images • Check the antenna or aim the antenna to the proper direction.
Afterimages (ghosts) appear when • Pixets may have been damaged from a fixed image displayed for a long time
the product turns off (image burn). Use a screen saver to prevent the pixet damage on the screen.
The power is on but the screen • Adjust the brightness and contrast in the menu option.
appears extremely dark.
"No Signat" appears on the screen. •
The display offset is wrong.
Check if the signal cable is connected between the TV and products properly.
o
Check the selected input source by pressing INPUT.
Adjust the position setting in the Picture menu.
Check if the video card resolution and frequency are supported by the product.
if the frequency is out of range, set to the recommended resolution using the
display settings on the external device.
Thin lines appear in the background Check the video cable connections.
of the screen.
Horizontal noises appear or • Adjust the Phase setting in the menu option.
characters blur. Refer to the "SCREEN (RGB-PC)".
The reception on some channels is • Scroll to other channels. There may a problem with the broadcast.
)eer ° The station signal may be weak. Aim the antenna to the proper direction.
• Check if there is local interferences such as an electrical appliance or power
tool,
The file does not appear on the • Check whether the extension is supported.
Movie List.
Message is displayed • Check whether the file is playing normally on a PC. (Check whether the file is
saying "This file is invalid" or the damaged.)
audio is working normally but the • Check whether the resolution is supported.
video is not working normally. • Check whether the video/audio codec is supported.
• Check whether the frame rate is supported.
Message is displayed saying
"Unsupported Audio" or the video
is working normalty but the audio is
not working normally.
Subtitle is not working.
• Check whether the file is playing normally on a PC. (Check whether the file is
damaged.)
• Check whether the audio codec is supported.
• Check whether the bit rate is supported.
• Check whether the sample rate is supported.
• Check whether the file is playing normally on a PC. (Check whether the file is
damaged.)
• Check whether the video file and subtitle file name are the same.
• Check whether the video file and subtitle file are located in the same folder.
• Check whether the subtitle file is supported.
• Check whether the language is supported. (When you open the subtitle fi_e in
Memo Pad, you can check the language of the subtitle file.)
Page 83

TROUBLESHOOTING 83
Pr0biem _ Resolution
The touch pen does not work. Check that you used the remote control to enter Pentouch mode.
Check that the Pentouch dongte is connected to the computer and the red
LED is on.
Press the _ / Home button on the touch pen to check that it is powered on.
Check that the touch pen is paired for use. (The touch pen is correctly paired
if the red LED is on once when you press the _ / Home button on the touch
pen.)
Set the computer screen to display only on the TV.
The TV screen doesn't look normal Check that the computer is correctly connected to the TV.
when using Pentouch. Check that you are using the optimal resolution.
Set the aspect ratio on the TV to Just Scan.
The touch pen is touched on wrong
)ositions.
Set the computer screen to display only on the TV.
If the point you touch on the TV screen using the touch pen and the point
indicated as touched on the computer screen do not match when the
computer and the TV are connected by a PC signal (RGB) cable, use the TV
remote control to select (Menu] _ (Picture] _ (Screen] (RGB-PC), then select
[Auto Config.] to adjust the screen.
The touch pen movement is not
smooth.
Check whether the computer and the TV are too far from each other. Check
whether there are too many obstructions between the computer and the TV.
Check whether many other applications are running on the computer. (Please
avoid running other applications while using the Pentouch program.)
Page 84

84 SPECIFICATIONS
SPECIFICATIONS
Product specifications may be changed without prior notice due to upgrade of product functions.
Television System NTSC-M, ATSC, 64 & 256 QAM
Program Coverage VHF 2-13, UHF 14-69, CATV 1-135, DTV 2-69, CADTV 1-135
External Antenna Impedance 75
Environment Operating 0 - 40 °C
condition Temperature
Operating Humidity Less than 80 %
Storage Temperature -20- 60 °C
Storage Humidity Less than 85 %
MODELS
Dimensions Withstand 1168.7 mm x 777.0 mm x 349.2 mm 387.4 mm x 920.5 mm x 395.6 mm
(WxHxD) (46.0 inch x 30.5 inch x 13.7 inch) (54.6 inch x 36.2 inch x 15.5 inch)
Without stand 1168.7 mm x 712.2 mm x 52.5 mm 1387.4 mm x 834.7 mm x 52.5 mm
Weight With stand 29.7 kg (65.4 Ibs) 42.0 kg (92.5 Ibs)
Without stand 27.7 kg (61.0 Ibs) 38.5 kg (84.8 Ibs)
Current Value / Power consumption 3.3 A / 330 W 4.6 A / 460 W
Power requirement AC100 - 240 V - 50 / 60 Hz
X X X X X
(50PV490:UC) (60PV490LUC)
(46.0 inch x 28.0 inch x 2.0 inch) (54.6 inch x 32.8 inch x 2.0 inch)
5oP-r49o
(50PT490zUC)
(50PT490R-MD)
Dimensions With stand 1168.7 mm x777.0 mmx 349.2 mm
(Wx H x D) (46.0 inch x30.5 inch x 13.7 inch)
Without stand 1168.7 mmx 712.2 mmx 52.5 mm
(46.0 inch x 28.0 inch x 2.0 inch)
Weight With stand 29.4 kg (64.8 Ibs)
Without stand 27.4 kg (60.4 Ibs)
Current Value / Power consumption 3.0 A / 300 W
Power requirement AC100 - 240 V - 50 / 60 Hz
Page 85

SPECIFICATIONS 85
MODELS ...... (50PZ850-,UA)
Dimensions
(W x H x D)
Weight With stand 30.1 kg (66.3 Ibs) 42.0 kg (92.5 Ibs)
Current Value / Power consumption 3.7 A / 370 W 5.3 A / 530 W
Power requirement AC100 - 240 V - 50 / 60 Hz
With stand 1168.7 mm x 777.0 mm x349.2 mm 1387.1 mm x 920.5 mm x 395.6 mm
(46.0 inch x 30.5 inch x 13.7 inch) (54.6 inch x 36.2 inch x 15,5 inch)
Without stand 1168.7mmx712.2mmx52.Smm 1387.1mmx834.9mmx52.Smm
(46.0 inch x 28,0 inch x 2.0 inch) (54.6 inch x 32.8 inch x 2.0 inch)
Without stand 28.1 kg (61.9 Ibs) 38.5 kg (84.8 Ibs)
For TV By using a 2.4 GHz bandwidth radio frequency(RF).
• Output: 1 dBm or lower
• Maximum Communication Distance: 10 m (30 ft) in an open space
• Bandwidth: 2.4 GHz (2.4035 GHz- 2.4783 GHz)
• Transfer Rate: 250 kbps
• FCC ID of RF module inside TV
FCC ID: BEJLDS201
(60PZ850-UA)
5oPz85o
Page 86

86 SPECIFICATIONS
ResolUtion Horizontal
Frequency (KHz) Frequency(Hz)
720x400 31,469 70,08
640x480 31,469 59,94
800x600 37,879 60,31
1024x768 48,363 60,00
1360x768 47,712 60,015
1280xi024 63,981 60,02
1920xi080
RGB-PC
1920x1080
HDMFPC
66,587 59,934
67.5 60,00
For 50/60PV490, 50/60PZ850
Resolution Horizontal
720x480p
280x720p 45.00 60.00
920xi080i
920x1080p
Frequency (KHz)
31.47
31.50
59.94
60.00
44.96 59.94
33.72 59.94
33.75 60.00
26.97
27.00
33.71
33.75
67.432
67.50
23,976
24.00
29.97
30.00
59.94
60,00
Ve_ica!
FreqUency(Hz)
Component ports on the
TV
Video output ports
on DVD player
-i: ResolUfim_o Horizontal i Ve_ical
720x480i
Frequency (KHz) Frequency (Hz)
15,73 59.94
15,73 60,00
31,47 59.94
720x480p 31,50 60,00
44,96 59.94
280x720p 45,00 60,00
920xi080i
920x1080p
33,72 59.94
33,75 60,00
26.97
27.00
33.71
33.75
67.432
67.50
23,976
24.00
29.97
30.00
59.94
60,00
Page 87

SPECIFICATIONS87
!< ¸¸¸:/ : /:ii:::i / 7i7 7:1: i << 77!
Extension I
name ,
mpg, mpeg MPEG1, MPEG2 MP2, MP3, Dolby Digital, LPCM
dat MPEG1 MP2
ts, trp, tp MPEG2, H.264, AVS, VC1 MP2, MP3, Dotby Digital, AAC, HE-AAC
vob MPEG1,2 MP2, MP3, Dolby Digital, LPCM
MPEG4,DivX 3.11, DivX 4.12,
mp4, mov 1.01, Xvid 1.02, Xvid 1.03, Xvid AAC, HE-AAC, MP3
mkv H.264, MPEG-1,2,4 MP2, MP3, Dolby Digital, AAC (Only Motion JPEG
divx, avi 4, DivX 5, DivX 6, Xvid 1.00, Xvid MP2, MP3, Dolby Digital, LPCM,
Motion JPEG
(avi, mp4, mkv)
asf, wmv VC1 WMA
flv Sorenson H.263, H264 MP3, AAC
DivX 5.x, DivX 6, Xvid 1.00, Xvid
1.10-beta 1/2H.264
MPEG2, MPEG4, DivX 3.1 I, DivX
1.01, Xvid 1.02, Xvid 1.03, Xvid ADPCM, AAC, HE-AAC
1.10-beta 1/2H.264
JPEG LPCM, ADPCM
signal Resolution Frequency
, I (kHz)
720p 1280x720
io8o
.DMiinput
1080p
I080p 1920x1080 33.75
USB input
PC input
(PZ850series) 1920xi 080 66,587
Component
Resolution Playable 3D video format
Other Resolution
720p 1280x720 44,96/45,00
1080i 1920x1080 33,72/33,75
Signal Playable 3D videO format
720p, 1080i Top & Bottom, Side by Side
Video DeC0der .............. Audi0 Codec Max Res01ution
1920 x 1080 @ 30p
HE-AAC, LPCM 640x480@30p)
i
Top & Bottom, Side by Side
HDMi 3D Frame Packing
Top & Bottom, Side by Side
Top & Bottom, Side by Side, Checker Board
Single Frame Sequential
Top & Bottom, Side by Side, Checker Board
HDMI 3D Frame Packing
Top & Bottom, Side by Side
Checker Board
Top & Bottom, Side by Side
Checker Board, MPO (Photo)
Top & Bottom, Side by Side
Top & Bottom, Side by Side
Top & Bottom, Side by Side
1920xi080
Horizontai
44.96 / 45.00
89.90 / 90.00
33.72 / 33.75
67.432 / 67.50
27.00
53.95 / 54.00
33.75
Vertical
Frequency
(Hz)
59.94 / 60.00
24.00
23.98 / 24.00
30.00
30.00
59.93
59.94 / 60.00
59,94 / 60.00
Page 88

88 IR CODES
IR CODES
(Depending on model)
How to Connect
Connect your wired remote control to the Remote Control port on the TV.
Remote Control IR Codes
Output waveform
Single pulse, modulated with 37.917kHz signal at 455kHz
L Tc j
F 1
Frame configuration
1st frame
Low custom code
High custom code
Data code Data code
Repeat frame
J
Repeat code
I--
.I
Tf
Lead code
9ms 1
Repeat code
0,55 ms
I I__N
9 ms "_
Bit description
Bit"0" I--l__ Bit"1" J--I
Frame interval: Tf
The waveform is transmitted as long as a key is depressed.
I. _" "1
Tf Tf
I--] 1-11 1-11
Tf=108ms @455KHz
Page 89

IR CODES 89
Code
(Hexa)
08
45
43
OB
10-19
4C
1A
9
2
3
0
1
1E
4O
41
7
6
Function NOte
POWER Remote contro{ Button
Q.MENU
Home
INPUT
Number Key 0-9
(Dash)/LIST
FLASHBK or
Q.VIEW
MUTE/DELETE
VOL +
VOL -
CH A
CHv
FAV/MARK
A
V
< Remote control Button
> Remote control Button
(Power On/Off)
Remote control Button
Remote control Button
Remote control Button
Remote control Button
Remote control Button
Remote control Button
Remote control Button
Remote control Button
Remote control Button
Remote control Button
Remote control Button
Remote control Button
Remote control Button
Remote control Button
j0F
JDC
JBB
J6B
j D6
jC4
jc5
JBA
j D0
JBF
JD4
": !i _Z _
FunCtion . Note
TV
3D (For 3D TV)
EXIT
TOUCH
TV
POWER ON Discrete IR Code
POWER OFF Discrete IR Code
AV1 Discrete IR Code
AV2 Discrete IR Code
COMPONENT1 Discrete IR Code
COMPONENT2 Discrete IR Code
Remote control Button
Remote control Button
Remote control Button
Remote control Button
Discrete IR Code
(TV input Selection)
(Only Power On)
(Only Power Off)
(AV1 Input Selection)
(AV2 Input Selection)
(Component1 Input
Selection)
(Component2 Input
Selection)
44
28
79
BA
95
7E
AA
3O
72
71
63
61
BI
BA
8E
8F
BO
ENTER Remote control Button
BACK Remote control Button
RATIO Remote control Button
FREEZE Remote control Button
ENERGY SAVING
StMPLINK
INFO
AV MODE
RED
GREEN
BLUE
I!
44
Remote control Button
Remote control Button
Remote control Button
Remote control Button
Remote control Button
Remote control Button
Remote control Button
Remote control Button
Remote control Button
Remote control Button
Remote control Button
Remote control Button
Remote control Button
JD5
iCE
JCC
j E9
j76
j77
RGB-PC Discrete IR Code
(RGB-PC Input Selection
HDMI1 Discrete IR Code
(HDMI1 Input Selection
HDMI2 Discrete IR Code
(HDMI2 Input Selection
HDMI3 Discrete IR Code
(HDMI3 Input Selection
Ratio 4:3 Discrete IR Code
(Only 4:3 Mode)
Ratio 16:9 Discrete IR Code
(Only 16:9 Mode)
Ratio Zoom Discrete IR Code
(Only Zoom Mode)
Page 90

90 EXTERNAL CONTROL DEVICE SETUP
EXTERNAL CONTROL DEVICE SETUP
RS-232C Setup
Connect the RS-232C (serial port) input jack to
an external control device (such as a computer or
an A/V control system) to control the product's
functions externally.
Connect the serial port of the control device to the
RS-232C jack on the product back panel.
o
................8
@ NOTE
• RS-232C on this unit is intended to be used
with third party RS-232C control hardware
and software. The instructions below
are provided to help with programming
software or to test functionality using telenet
software. RS-232C connection cables are not
supplied with the product.
Type of connector;
D-Sub 9-Pin Male
0-- --0
RS-232C IN
(CONTROL & SERVICE)
No,
1
No connection
2
RXD(Receivedata)
3
TXD(Transmit data)
4
DTR(DTEside ready)
5
GND
6
DSR(DCEside ready)
7
RTS(Readyto send)
8
CTS(Clearto send)
9
No Connection
Pinname
Page 91

RS-232C configurations
7-Wire Configuration
(Serial female-female NULL modem cable)
PC TV
RXD
EXTERNAL CONTROL DEVICE SETUP 91
Set ID number.
TXD
TXD
GND
DTR
DSR
RTS
CTS
D-Sub 9 D-Sub 9
3-Wire Configurations(Not standard)
PC TV
RXD
TXD
GND
DTR
DSR
RTS
CTS
D-Sub 9 D-Sub 9
RY_
GND
DSR
DTR
CTS
RTS
TXD
RXD
GND
DSR
DTR
CTS
RTS
1 Press Home to access the main menus.
2 Press the Navigation buttons to scroll to
OPTION and press ENTER.
3 Press the Navigation buttons to scroll to Set ID
and press ENTER.
4 Scroll left or right to select a set ID number and
select CLOSE. The adjustment range is 1-99.
5 When you are finished, press EXIT.
*Real data mapping
0 : Step 0
A :Step 10 (SET ID 10)
F :Step 15 (SET ID 15)
10 : Step 16 (SET ID 16)
63 : Step 99 (SET ID 99)
64 : Step 100
Page 92

92 EXTERNAL CONTROL DEVICE SETUP
Communication Parameters
* Baud rate: 9600 bps (UART)
* Data length: 8 bits
* Parity None
* Stop bit: 1 bit
* Communication code: ASCII code
* Use a crossed (reverse) cable.
Command reference list
COMMAND2_ (He'decimal)DATAjijL COMMAND1 COMMAND2 (Hexadecimal}DATA
01. Power
02. Input Select
03, Aspect
Ratio
04, Screen
Mute
05, Volume
Mute
06, Volume
Control
k k r O0 - 64
x b (See p,94)i[15, Bass k s 00-64
k c (See p,94) 16, Balance k t O0 - 64
k d 00- 01 iiTV) x t (See p,95)
k e O0 - 01 x u O0 - 64
k f O0 - 64 ii3D (For 3D TV) x v (See p,95)
a O0 - 01 i 14. Treble
i[17, 3D (For 3D
18. Color
Temperature
irl 9, Extended
ii20,ISM
07. Contrast k g O0 - 64 JJMethod p (See p,96)
08. Brightness k h 00- 64 JJ21. Energy
09, Color k i O0 - 64 iiConfiguration u (See p,96)
JSaving q (See p,96)
ii22.Auto
ir24.Channet
10. Tint k j O0 - 64 iiAdd!Det m b O0 - 01
11, Sharpness k k O0 - 64 _oii25, Key m c (See p,96)
12,0SDSetect k I 00-01
13, Remote
Control k m O0 - 01
Lock Mode
p t,/t "_l I_U _mal) _xa_mal)
12s.Channel / J Jphysical Jmajor
IT . /m _a I program Iprogram
I 'un'ng J l ['high l!ovv _
DATA02
(Hexadecimal)
major low
minor high [minor low Zattribute
DATA04
(Hexadecimal)
Page 93

EXTERNAL CONTROL DEVICE SETUP 93
Transmission / Receiving protocol
[Commandl][Command2][ ][Set ID][ ][Data][Cr]
[Command 1] : First command to control the set.(j, k, m or x)
[Command 2] : Second command to control the set.
[Set ID] :You can adjust the set ID to choose desired set ID number in Option menu. Adjustment range is
1- 99. When selecting Set ID '0', every connected the set is controlled. Set ID is indicated as decimal (1
99) on menu and as Hexa decimal (0x0_ 0x63) on transmission/receiving protocol.
[DATA] : To transmit the command data.
Transmit the 'FF' data to read status of command.
[Cr] : Carriage Return
ASCII code '0x0D'
[] : ASCII code 'space (0x20)'
* In this model, set will not send the status during the standby mode.
[Command2][ ][Set ID][ ][OK][Data][x]
The set transmits ACK [acknowledgement) based on this format when receiving normal data. At this time,
if the data is data read mode, it indicates present status data. If the data is data write mode, it returns the
data of the PC computer.
* In this model, set will not send the status during the standby mode.
* Data Format
[Command 2] : Use as command.
[Set ID] : Use the small character, if set ID is 10, it will send the '0', 'a'.
[DATA] : Use the small character, if data is 0 x ab, it will send the 'a', 'b'.
[OK] : Use the large character.
[Command2][ ][Set ID][ ][NG][Data][x]
The set transmits ACK (acknowledgement) based on this format when receiving abnormal data from non-
viable functions or communication errors.
Data1: Illegal Code
Data2: Not supported function
Data3: Wait more time
* In this model, set will not send the status during the standby mode.
* Data Format
[Command 2] : Use as command.
[Set ID] : Use the small character, if set ID is 10, it will send the '0', 'a'.
[DATA] : Use the small character, if data is 0 x ab, it will send the 'a', 'b'.
[NG] : Use the large character
Page 94

94 EXTERNAL CONTROL DEVICE SETUP
01. Power (Command: k a)
To controt Power On/Off of the set.
s
Data 00: Power Off Data 01 : Power On
i: N
* in a like manner, if other functions transmit 'FF'
data based on this format, Acknowledgement data
feedback presents status about each function.
* Note: in this modet, set will send the Acknowledge
after power on processing completion.
There might be a time delay between command and
acknowledge.
02. Input Select (Command: x b)
To select input source for set.
s i
Data 00: DTV (Antenna) Data 01: DTV (Cable)
Data 10: Analog (Antenna) Data 11 : Analog (Cable)
Data 20:AV1 Data 21: AV2
Data 40:Component1
Data 41: Component2
Data 60: RGB-PC Data 90:HDMI1
Data 91:HDMI2 Data 92:HDMt3
n i a et N ]ix]
* Use the feature depending on your model.
03. Aspect Ratio (Command: k c)
To adjust the screen format.
et
Data 01:4:3 Data: 09: Just scan
Data 02:16:9 Data: 10: Cinema Zoom 1
Data 04: Zoom i
Data 06: Set by program Data 1F: Cinema Zoom16
i j J:_iii
04, Screen Mute (Command: k d)
To select screen mute on/off.
j
Data 00: Screen mute off (Picture on), Video-out
Mute off
Data 01: Screen mute on (Picture off)
Data 10: Video-out Mute on
:::ii:
* In case of Video-out Mute on only, TV will display On
Screen Display (OSD). But, in case of screen mute on,
TV will not display On Screen Display (OSD).
05, Volume Mute (Command: k e)
To control volume mute on/off.
You can also adjust mute using the MUTE button on
remote control.
mii
Data 00: Volume mute on (Volume off)
Data 01: Volume mute off (Volume on)
N
06,
Volume Control (Command: k f)
To adjust volume.
You can also adjust volume with the volume buttons
on remote control.
_s
Data Min: 00 - Max: 64 (*transmit by Hexadecimal
code)
*Refer to "Real data mapping".
07,
Contrast (Command: k g)
To adjust screen contrast.
You can also adjust contrast in the PICTURE menu.
Data Min: 00 - Max: 64 (*transmit by Hexadecimal
code)
* Refer to "Real data mapping ".
_iiii N li: iix]
08,
Brightness (Command: k h)
To adjust screen brightness.
You can also adjust brightness in the PICTURE
menu.
i: iiii
Data Min: 00 _ Max: 64 (*transmit by Hexadecimal
code)
*Refer to "Real data mapping".
et N
09,
Color (Command: k i)
To adjust screen color.
You can also adjust color in the PICTURE menu.
mi i
Data Min: 00 _ Max: 64 (*transmit by Hexadecimal
code)
*Refer to "Real data mapping".
!8 :::
10,
Tint (Command: k j)
To adjust screen tint.
You can also adjust tint in the PICTURE menu.
i :i : i ii
Data Red: 00 _ Green: 64 (*transmit by Hexadecimal
code)
*Refer to "Real data mapping".
ia j: i N]j
Sharpness (Command: k k)
To adjust screen sharpness.
You can also adjust sharpness in the PICTURE menu.
J
Data Min: 00 _ Max: 64 (*transmit by Hexadecimal
code)
*Refer to "Real data mapping".
k]:[:ij J: N
Page 95

EXTERNAL CONTROL DEVICE SETUP 95
12. OSD Select (Command: k I)
To select OSD (On Screen Display) on/off.
Data 00: OSD off Data 01: OSD on
KN
13. Remote Control Lock Mode (Command: k m)
To lock the remote control and the front panel
controls on the set.
Data 00: Lock off Data 01 : Lock on
: Ji J:ii K/
If you're not using the remote control and front panet
controls on the Monitor set, use this mode. When
main power is on/off, remote control lock is released.
If Key Lock is on in the standby mode, TV wilt not
turn on by POWER button of remote control and on
the TV.
14. Treble (Command: k r)
To adjust treble.
You can also adjust treble in the AUDIO menu.
Data Min: 00 - Max: 64 (*transmit by Hexadecimal
code)
*Refer to "Real data mapping".
i,
15. Bass (Command: k s)
To adjust bass.
You can also adjust bass in the AUDIO menu.
etj
Data Min: 00 - Max: 64 (*transmit by Hexadecimal
code)
*Refer to "Real data mapping".
Acknowledgement Is][ ][Set ID][ ][OK/NG][Data][x]
16. Balance (Command: k t)
To adjust balance.
You can also adjust balance in the AUDIO menu.
rni i i
Data Min: O0 _ Max: 64 (*transmit by Hexadecimal
code)
*Refer to "Real data mapping".
17.3D (Command: x t) (For 3D TV)
To change 3D mode for TV.
Data 1
00: 3D On 01: 3D Off
02: 3D to 2D 03: 2D to 3D
Data2
00: Top and Bottom 01 : Side by Side
02: Check Board 03: Frame Sequential
Data3
00: Right to Left
01: Left to Right
Data4
3D Depth: Min : 00 _ Max : 14
(*transmit by Hexadecimal code)
*If datal is 00(3D On), data4 has no meaning.
*If data1 is 01(3D Off) or 02(3D to 2D), data2, data3
and data4 have no meaning.
*If data1 is 03(2D to 3D), data2 and data3 have no
meaning.
Ol
o2
al _oData2 _Iata4
x : Don't care
18. Color Temperature (Command: x u)
To adjust color temperature.
You can also adjust color temperature in the
PICTURE menu.
Data Min: 00 _ Max: 64 (*transmit by Hexadecimal
code)
*Refer to "Real data mapping".
] i iJK!N
19. Extended 3D (Command: x v) (For 3D TV)
To change 3D option for TV.
ni
Data1 : 3D option
00: 3D Picture Correction
01: 3D Depth (2D to 3D Onty)
02: 3D Viewpoint
03: 3D Picture Size
04: 3D Picture Balance
05: 3D Optimization
Data2: It has own range for each 3D option
determined by Data1.
1) When Datal is 00
00: Right to Left 01: Left to Right
2) When Data1 is 01,02
Data Min: 00 _ Max: 14 (*transmit by Hexadecimal
code)
3) When Datal is 03
00: Just Scan 01 : 16:9
4) When Datal is 04
00: Off 01: On
5) When Datal is 05
Data Min: 00 _ Max: 02 (*transmit by Hexadecimal
code)
* Use the feature depending on your model.
Page 96

96 EXTERNALCONTROLDEVICESETUP
20, ISM Method (Command: j p)
To avoid having a fixed image remain on screen.
i
Data 02: Orbiter
04: White Wash
08: Normal
20: Color Wash
ii iet ]i KiN: ix]
21. Energy Saving (Command: j q)
To control the energy saving function.
i iiiii_ ii ii i:
Data 00: off
01: Minimum
02: Medium
03: Maximum
04: Auto/Intelligent sensor (depending on model)
05: Screen off
iiii K/N:ii iii
22. Auto Configuration (Command: j u)
To adjust picture position and minimize image
shaking automatically. Auto configuration only works
in RGB-PC mode.
Data 01: To set
i _ K N at
23. Channel Tuning (Command: m a)
To tune channel to following physical/major/minor
number.
s :i iiiiii et
: i :::ii:_ i:iii _ o4ii::::]i
Digital channels have a Physical, Major, and Minor
channel number. The Physical number is the actual
digital channet number, the Major is the number that
the channel should be mapped to, and the Minor is
the sub-channel. Since the ATSC tuner automatically
maps the channel to the Major number, the Physical
number is not required when sending a command.
Data 00: Physical Channel Number
NTSC air: 02-45, NTSC cable: 01, 0E-7D
ATSC air: 01-45, ATSC cable: 01-87
Data 01 & 02: Major Channel Number
Data 01: High byte Data 02: Low byte
Two bytes are available for the Major and Minor,
normally only the second byte is used.
Data 03 & 04: Minor Channel Number
Not needed for NTSC.
The table above lists the binary code which must
be converted to Hexadecimal before sending. For
example:
The binary code to tune the sub source to an NTSC
cable channel is "1000 0001 ", which translates to
"81 " in Hex.
* 7th bit : For which source do you want to change
the channel.
* 6th bit: Use a two part or one part channel. Most
cases just use 0 since it's ignored when using
NTSC.
* 5th bit: Use 0 with NTSC since it can only use
the physical channel number. Normally use 1 for
ATSC since most times it doesn't matter what the
physical number is.
* 4th bit: Set to 0.
* 3-0 bits: Choose signal type.
* Tune Command Examples:
1. Tune to the analog (NTSC) cable channel 35.
Data 00 = Physical of 35 = 23
Data 01 & 02 = No Major = 00 00
Data 03 & 04 = No Minor = 00 00
Data 05 = 0000 0001 in binary = 01
Total = ma 00 23 00 00 00 00 01
2. Tune to the digital (ATSC) local channel 30-3.
Data 00 = Don't know Physical = 00
Data 01 & 02 = Major is 30 = 00 1E
Data 03 & 04 = Minor is 3 = 00 03
Data 05 = 0010 0010 in binary = 22
Total = ma 00 00 00 1E 00 03 22
* Use the feature depending on your model.
24, Channel Add/Del (Command: m b)
To add and delete the channels.
i, i:
Data 00: Channel Delete Data 01: Channet Add
iet :i
25,
Key (Command: m c)
To send IR remote key code.
!!et i
iiiK/
When TV is in the standby mode, TV will turn on by
POWER button of remote control only,
Page 97

* Table List (Channel Tuning)
_'_::_ I 6 I Part I 5 I Physical
p!u_u_ _ Channel
Two On
Sub !1 I One I1 _NoUse
_W:x:::i'll ¸i i:i::i
Reserved
x o
x o
x o
x o
x o
x o
x o
x o
x x
x 1
EXTERNAL CONTROL DEVICE SETUP 97
2 1 0
o o o
o o 1
o 1 o
o 1 1
1 o o
1 o 1
1 1 o
1 1 1
x x x
1 1 1
step
NTSC Air
NTSC Cable
ATSC Air
ATSC Cable_std
ATSC Cable_hrc
ATSC Cable_irc
ATSC cable_auto
Reserved
Reserved
Page 98

98 OPEN SOURCE LICENSE
OPEN SOURCE LICENSE
Open source software notice
Please be informed that LG Electronics products may contain open source software listed in the tables
below.
License , Component
OpenSSL license - openssl
MIT license -libcurl
expat license - expat
Freetype license - freetype
JPEG license -libjpeg
Zlib/libpng license -libmng
X.net license - libicu
BSD license - strace
RSA data security license - MD5
I
- ncurses
-libpng
- rod5 checksum
- tinyxml
- zlib
- xySSL
LG Electronics products may also contain open source software listed as Components in the table below,
and you may download the complete source code thereof free of charge, from LG Electronics website
(http://opensource.lge.com) for a period of three (3) years from our last shipment of this product. Please be
informed that the open source software is subject to the terms and conditions of the applicable open
source licenses, which are provided to you hereinbelow.
License . Component
GNU GPL v2.0 - Linux kernel 2.6
GNU LGPL v2.1 - directFB
MPL 1.1 - nanox
I
- busybox
- e2fsprogs
- gdbserver
- jfsutils
- mtd-utits
- procps
- u-boot
- udhcpc
- gconv
- glibc
Page 99

OPEN SOURCE LICENSE 99
GNU GENERAL PUBLIC LICENSE
Version 2, June 1991
Copyright (C) 1989, 1991 Free Software Foundation, Inc.
51 Franklin Street, Fifth Floor, Boston, MA 02110-1301, USA
Everyone is permitted to copy and distribute verbatim copies
of this license document, but changing it is not allowed.
Preamble
The licenses for most software are designed to take away your freedom to share and change it. By contrast, the GNU
General Pubtic License is intended to guarantee your freedom to share and change free software--to make sure the
software is free for atl its users. This General Pubtic License applies to most of the Free Software Foundation's software
and to any other program whose authors commit to using it. (Some other Free Software Foundation software is covered
by the GNU Lesser General Public License instead.) You can apply it to your programs, too.
When we speak of free software, we are referring to freedom, not price. Our General Public Licenses are designed to
make sure that you have the freedom to distribute copies of free software (and charge for this service if you wish), that
you receive source code or can get it if you want it, that you can change the software or use pieces of it in new free
programs; and that you know you can do these things.
To protect your rights, we need to make restrictions that forbid anyone to deny you these rights or to ask you to sur-
render the rights. These restrictions translate to certain responsibilities for you if you distribute copies of the software,
or if you modify it.
For example, if you distribute copies of such a program, whether gratis or for a fee, you must give the recipients all the
rights that you have. You must make sure that they, too, receive or can get the source code. And you must show them
these terms so they know their rights.
We protect your rights with two steps: (1) copyright the software, and (2) offer you this license which gives you legal
permission to copy, distribute and/or modify the software.
Also, for each author's protection and ours, we want to make certain that everyone understands that there is no war-
ranty for this free software. If the software is modified by someone else and passed on, we want its recipients to know
that what they have is not the original, so that any problems introduced by others will not reflect on the original authors'
reputations.
Finally, any free program is threatened constantly by software patents. We wish to avoid the danger that redistributors
of a free program will individually obtain patent licenses, in effect making the program proprietary. To prevent this we
have made it clear that any patent must be licensed for everyone's free use or not licensed at all.
The precise terms and conditions for copying, distribution and modification follow.
TERMS AND CONDITIONS FOR COPYING, DISTRIBUTION AND MODIFICATION
0. This License applies to any program or other work which contains a notice placed by the copyright holder saying it
may be distributed under the terms of this General Public License. The "Program", below, refers to any such program
or work, and a "work based on the Program" means either the Program or any derivative work under copyright law: that
is to say, a work containing the Program or a portion of it, either verbatim or with modifications and/or translated into
another language. (Hereinafter, translation is included without limitation in the term "modification".) Each licensee is
addressed as "you".
Activities other than copying, distribution and modification are not covered by this License; they are outside its scope.
The act of running the Program is not restricted, and the output from the Program is covered only if its contents consti-
tute a work based on the Program (independent of having been made by running the Program). Whether that is true
depends on what the Program does.
Page 100

100 OPEN SOURCE LICENSE
1.You may copy and distribute verbatim copies of the Program's source code as you receive it, in any medium, provided
that you conspicuously and appropriately publish on each copy an appropriate copyright notice and disclaimer of war-
ranty; keep intact all the notices that refer to this License and to the absence of any warranty; and give any other
recipients of the Program a copy of this License along with the Program.
You may charge a fee for the physical act of transferring a copy, and you may at your option offer warranty protection in
exchange for a fee.
2. You may modify your copy or copies of the Program or any portion of it, thus forming a work based on the Program,
and copy and distribute such modifications or work under the terms of Section 1 above, provided that you also meet all
of these conditions:
a) You must cause the modified files to carry prominent notices stating that you changed the files and the date of any
change.
b) You must cause any work that you distribute or publish, that in whole or in part contains or is derived from the Program
or any part thereof, to be licensed as a whole at no charge to all third parties under the terms of this License.
c) If the modified program normally reads commands interactivety when run, you must cause it, when started running
for such interactive use in the most ordinary way, to print or display an announcement including an appropriate copyright
notice and a notice that there is no warranty (or else, saying that you provide a warranty) and that users may redistribute
the program under these conditions, and telling the user how to view a copy of this License. (Exception: if the Program
itself is interactive but does not normally print such an announcement, your work based on the Program is not required
to print an announcement.)
These requirements apply to the modified work as a whole. If identifiable sections of that work are not derived from the
Program, and can be reasonably considered independent and separate works in themselves, then this License, and its
terms, do not apply to those sections when you distribute them as separate works. But when you distribute the same
sections as part of a whole which is a work based on the Program, the distribution of the whole must be on the terms
of this License, whose permissions for other licensees extend to the entire whole, and thus to each and every part
regardless of who wrote it.
Thus, it is not the intent of this section to claim rights or contest your rights to work written entirely by you; rather, the
intent is to exercise the right to control the distribution of derivative or collective works based on the Program.
In addition, mere aggregation of another work not based on the Program with the Program (or with a work based on the
Program) on a volume of a storage or distribution medium does not bring the other work under the scope of this License.
3. You may copy and distribute the Program (or a work based on it, under Section 2) in object code or executable form
under the terms of Sections 1 and 2 above provided that you also do one of the following:
a) Accompany it with the complete corresponding machine-readable source code, which must be distributed under the
terms of Sections and 2 above on a medium customarily used for software interchange; or,
b) Accompany it with a written offer, valid for at least three years, to give any third party, for a charge no more than your
cost of physically performing source distribution, a complete machine-readable copy of the corresponding source code,
to be distributed under the terms of Sections and 2 above on a medium customarily used for software interchange; or,
c) Accompany it with the information you received as to the offer to distribute corresponding source code. (This alterna-
tive is allowed only for noncommercial distribution and only if you received the program in object code or executable
form with such an offer, in accord with Subsection b above.)
 Loading...