

Page 1
Creator Adviser Approver
User’s Guide Specication
In charger
DD/MM/YY
Woo Mi-ra
22/03/12
Shin Hye-jung
22/03/12
Kim Jong-ok
22/03/12
1. Model Description
Model PM97-Z Brand LG Part number
Sufx MP(PF) Product name 42/50PM47, 50/60PM67,
50/60PM68, 50/60PM97
MFL67377804
(1203-REV01)
2. Printing Specication
1. Trim Size (Format) : 182 mm x 257 mm
2. Printing Colors
Cover : 1 COLOR (BLACK)
Inside : 1 COLOR (BLACK)
3. Stock (Paper)
y Cover : Coated paper , S/W 150 g/m
y Inside : Uncoated paper ,
백상지
4. Printing Method : Off-set
5. Bindery : Perfect bind
6. Language : ENG/GER/FRE (3)
7. Number of pages : 100
“This part contain Eco-hazardous substances (Pb, Cd, Hg, Cr6+, PBB, PBDE, etc.) within LG standard level,
N
Details should be followed Eco-SCM management standard[LG(56)-A-2524].
O
Especially, Part should be followed and controlled the following specication.
T
(1)Eco-hazardous substances test report should be submitted
E
when Part certication test and First Mass Production.
S
(2) Especially, Don’t use or contain lead(Pb) and cadmium(Cd) in ink.
2
60 g/m
2
3. Special Instructions
(1) Origin Notication
* LGEIN : Printed in Indonesia * LGEWA : Printed in U.K.
* LGESP : Printed in Brazil * LGEMX : Printed in Mexico
* LGEND : Printed in China * LGEIL : Printed in India
* LGEMA : Printed in Poland
4. Changes
13
12
11
10
9
8
7
6
5
4
3
2
22/03/12 Woo Mi-ra EKPC300178 Manual drawing update (Add sentence related LAN cable
1
Rev.
DD/MM/YY Creator ECO Number Change description
No.
standard, Reect proofred language from foreign branch)
Page 2
Pagination sheet
Front
Cover
(ENG)
Total pages : 100 pages
P/No.
ENG
Cover
GER
Cover
FRE
Cover
Making
Connect
A-2 A-3
2 ... ... 25
2 ... ... 25
2 ... ... 25
A-4
Back
Cover
(ENG)
Back
Cover
(GER)
Back
Cover
(FRE)
Back
Cover
(ENG)
B-1
B-2 ... ... Blank
Page 3

OWNER’S MANUAL
PLASMA TV
Please read this manual carefully before operating
your set and retain it for future reference.
PM47**
PM67**
PM68**
PM97**
P/NO : MFL67377804 (1203-REV01)
Printed in Korea
www.lg.com
Page 4

TABLE OF CONTENTS
A-2
TABLE OF CONTENTS
A-3 SETTING UP THE TV
A-3 Attaching the stand
A-4 Tidying cables
LANGUAGE LIST
English
Deutsch
Français
B-1 MAKING CONNECTIONS
B-1 Antenna Connection
B-2 Satellite dish Connection
B-2 HDMI Connection
B-3 - ARC (Audio Return Channel)
B-4 DVI to HDMI Connection
B-5 RGB-PC Connection
B-5 Component Connection
B-6 Composite Connection
B-7 Audio Connection
B-7 - Digital optical audio connection
B-8 USB Connection
B-9 CI module Connection
B-10 Euro Scart Connection
COMMON
LANGUAGE
B-13 SPECIFICATIONS
COMMON
Page 5
SETTING UP THE TV
SETTING UP THE TV
A-3
Image shown may differ from your TV.
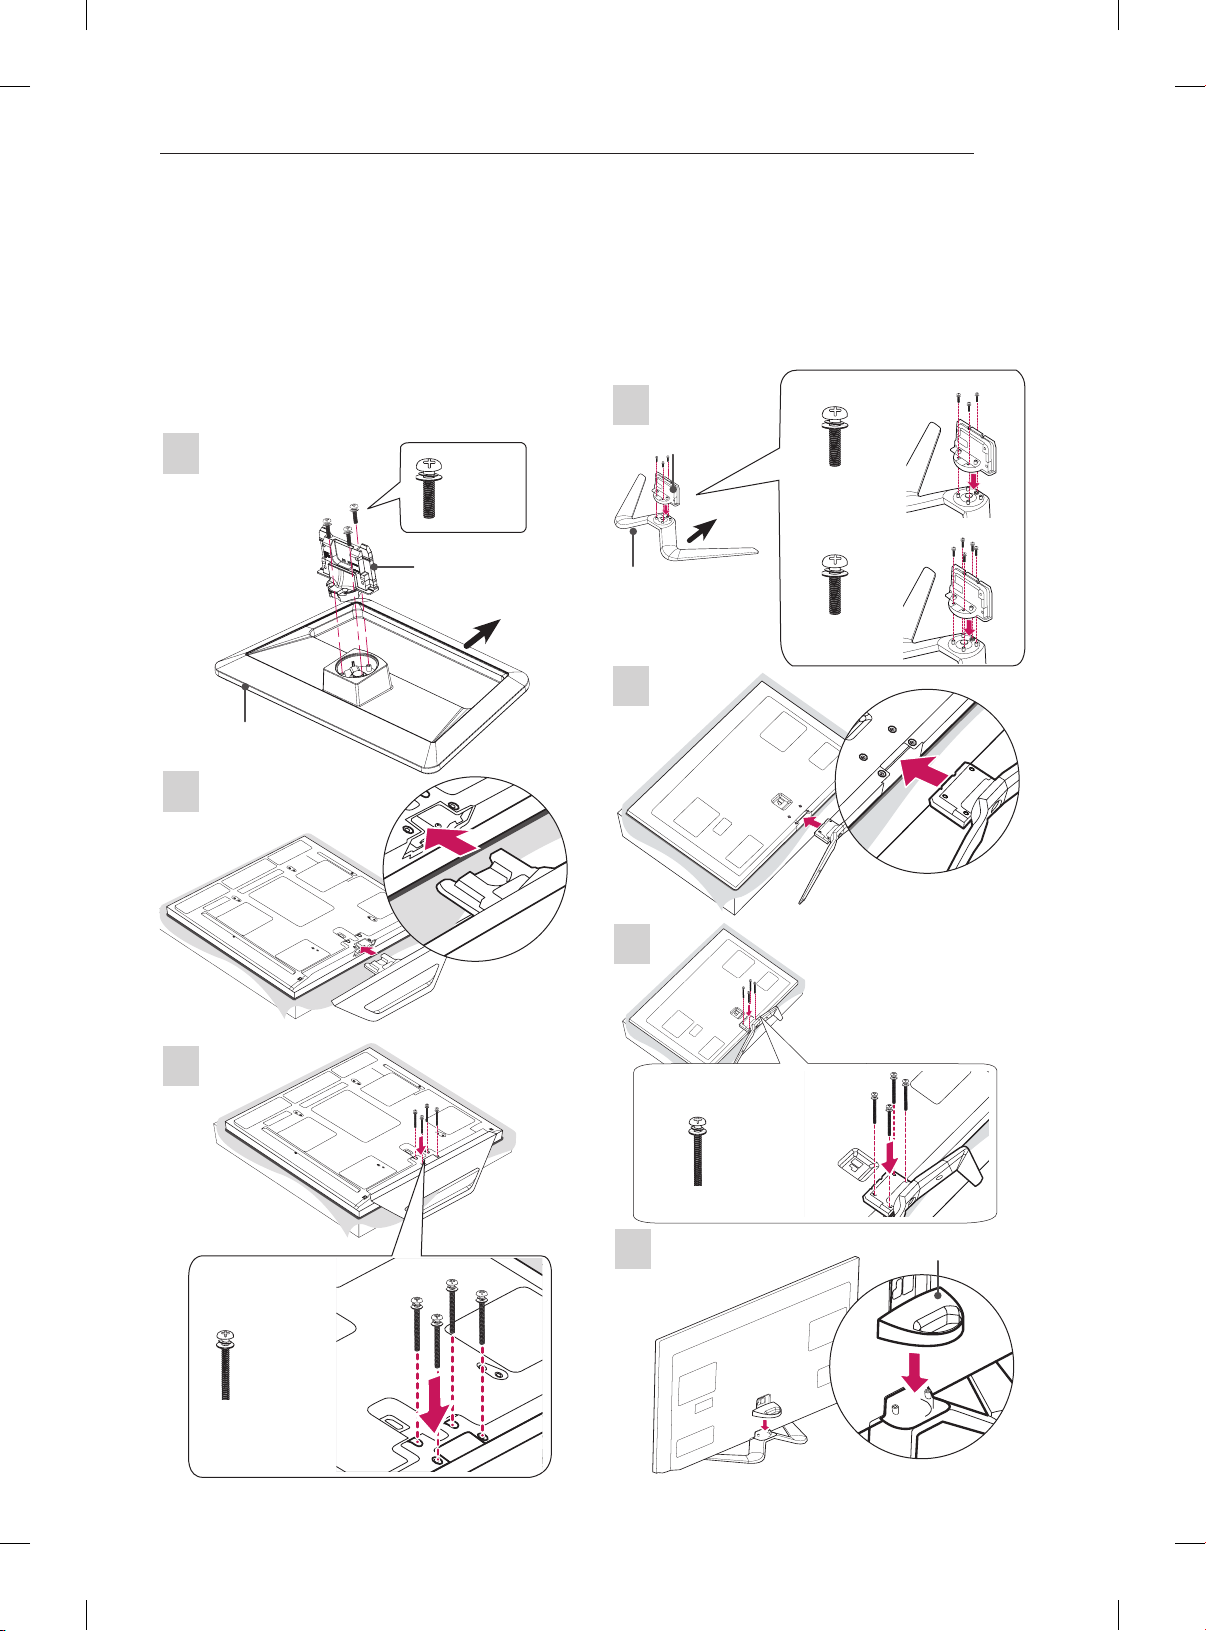
Attaching the stand
42/50PM47**, 50/60PM67**
1
Stand Body
Stand Base
2
M5 x 16
3EA
Front
50/60PM68**, 50/60PM97**
Only 50PM68**, 50PM97**
1
Stand Body
M5 x 16
Front
Stand Base
3EA
Only 60PM68**, 60PM97**
M5 x 16
5EA
2
3
3
M4 x 30
4EA
4
M4 x 30
4EA
Cable management
Page 6
SETTING UP THE TV
A-4
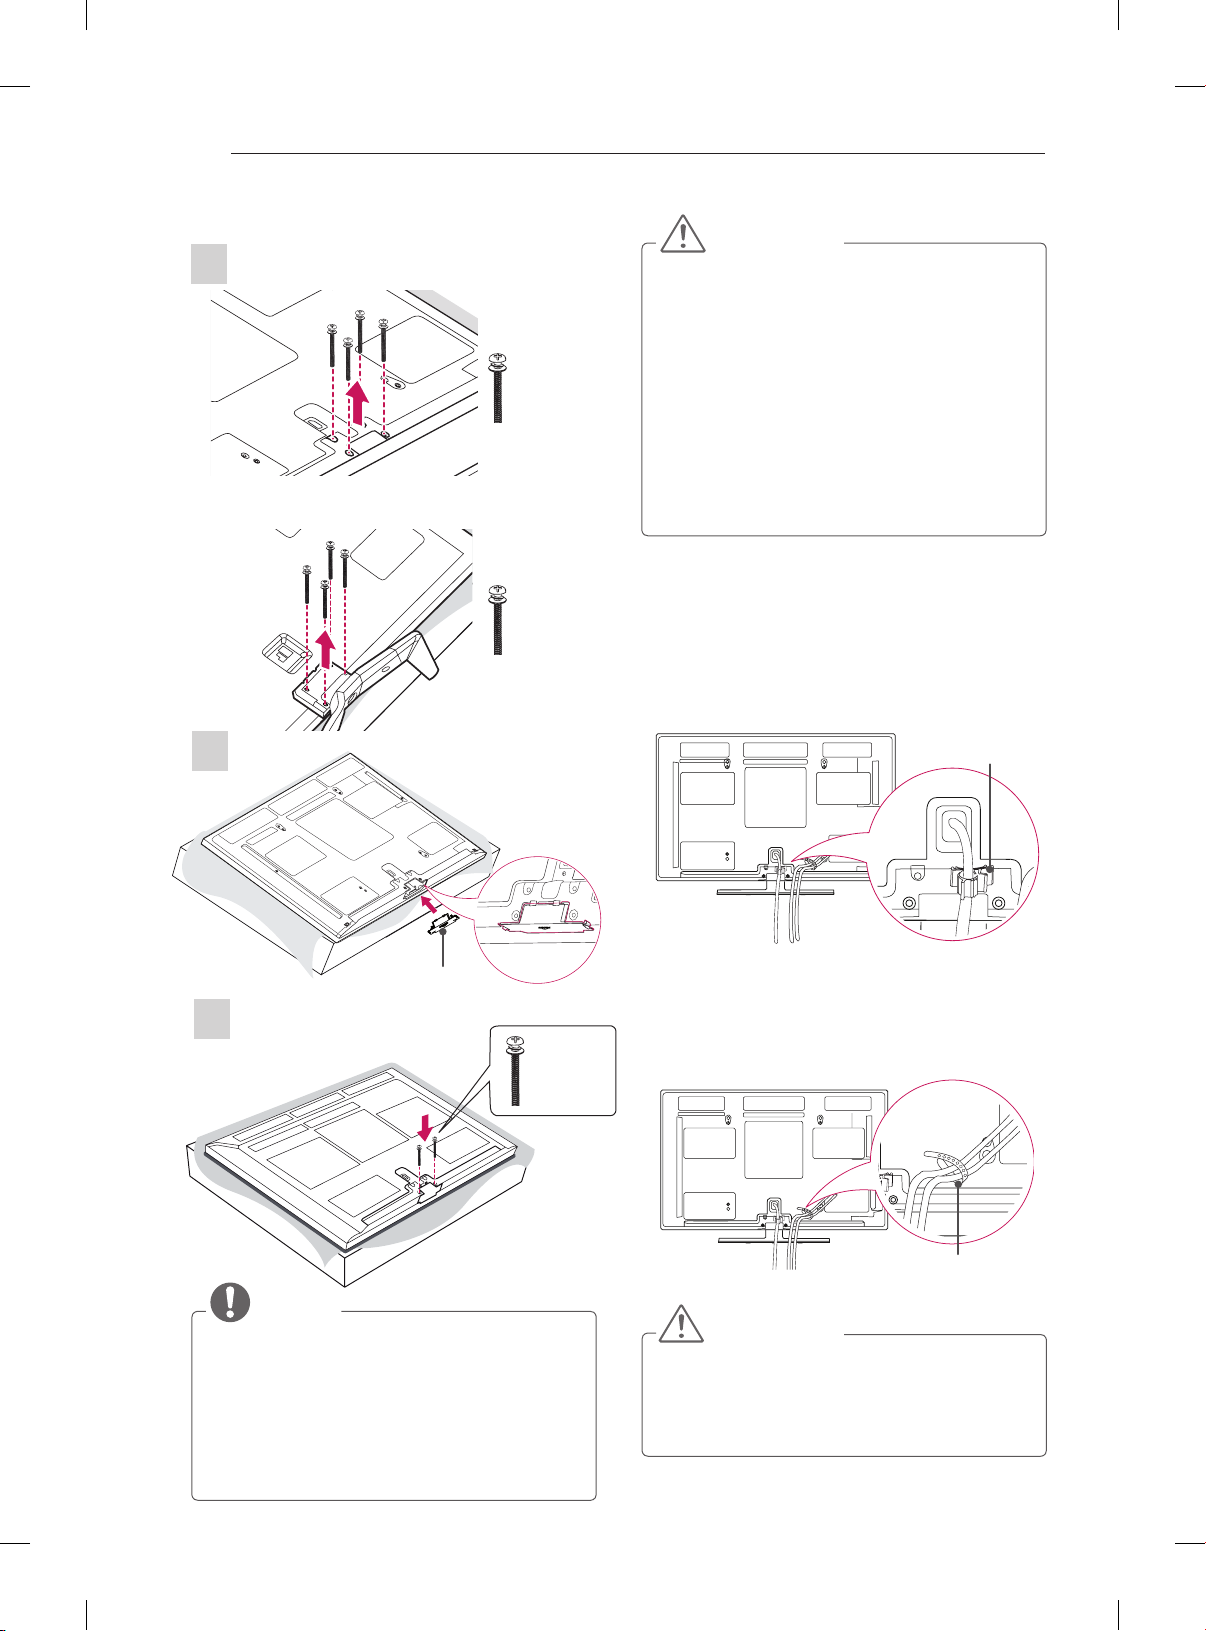
To detach the stand,
42/50PM47**, 50/60PM67**
1
50/60PM68**, 50/60PM97**
M4 x 30
4EA
CAUTION
yWhen attaching the stand to the TV
set, place the screen facing down on a
cushioned table or flat surface to protect the
screen from scratches.
yMake sure that the screws are fastened
completely. (If they are not fastened
securely enough, the TV may tilt forward
after being installed.)
Do not fasten the screws with too much
force; otherwise they may be worn out and
get loosened.
M4 x 30
4EA
2
Protection Cover
3
M4 x 30
2EA
Tidying cables
1 Install the Power Cord Holder and Power Cord.
It will help prevent the power cable from being
removed by accident.
Power Cord Holder
2 Gather and bind the cables with the Cable
Holder. Install the LAN Cable as shown to
reduce the electromagnetic wave.
NOTE
yWhen installing the wall mounting bracket,
use the Protection Cover.
yThis will protect the opening from
accumulating dust and dirt.
yRemove the stand before installing the TV
on a wall mount by performing the stand
attachment in reverse.
Cable Holder
CAUTION
yDo not move the TV by holding the cable
holder and power cord holder, as the cable
holders may break, and injuries and damage
to the TV may occur.
Page 7

OWNER’S MANUAL
PLASMA TV
Please read this manual carefully before operating
your set and retain it for future reference.
www.lg.com
Page 8
TABLE OF CONTENTS
2
ENGLISH
ENG
TABLE OF CONTENTS
3 LICENSES
3 OPEN SOURCE SOFTWARE NOTICE
4 SAFETYINSTRUCTIONS
10 - Viewing 3D Imaging (Only 3D models)
12 INSTALLATION PROCEDURE
12 ASSEMBLING AND PREPARING
12 Unpacking
15 Separate purchase
16 Parts and buttons
17 Lifting and moving the TV
18 Mounting on a table
19 Mounting on a wall
20 REMOTE CONTROL
21 MAGIC REMOTE CONTROL
FUNCTIONS
22 Registering Magic Remote Control
22 How to use Magic Remote Control
22 Precautions to Take when Using the Magic
Remote Control
23 USING THE USER GUIDE
24 MAINTENANCE
24 Cleaning your TV
24 - Screen, frame, cabinet and stand
24 - Power cord
24 TROUBLESHOOTING
25 EXTERNAL CONTROL DEVICE
SETUP
25 SPECIFICATIONS
WARNING
yIf you ignore the warning message, you may
be seriously injured or there is a possibility
of accident or death.
CAUTION
yIf you ignore the caution message, you may
be slightly injured or the product may be
damaged.
NOTE
yThe note helps you understand and use
the product safely. Please read the note
carefully before using the product.
Page 9
LICENSES / OPEN SOURCE SOFTWARE NOTICE
3
LICENSES
Supported licenses may differ by model. For more information about licenses, visit www.lg.com.
Manufactured under license from Dolby Laboratories. “Dolby” and the double-D
symbol are trademarks of Dolby Laboratories.
HDMI, the HDMI logo and High-Definition Multimedia Interface are trademarks or
registered trademarks of HDMI Licensing LLC.
ABOUT DIVX VIDEO: DivX® is a digital video format created by DivX, LLC, a
subsidiary of Rovi Corporation. This is an ofcial DivX Certied® device that plays
DivX video. Visit divx.com for more information and software tools to convert your
les into DivX video.
ABOUT DIVX VIDEO-ON-DEMAND: This DivX Certied® device must be registered
in order to play purchased DivX Video-on-Demand (VOD) movies. To obtain your
registration code, locate the DivX VOD section in your device setup menu. Go to vod.
divx.com for more information on how to complete your registration.
ENGENGLISH
“DivX Certied® to play DivX® video up to HD 1080p, including premium content.”
“DivX®, DivX Certied® and associated logos are trademarks of Rovi Corporation or
its subsidiaries and are used under license.”
“Covered by one or more of the following U.S. patents :
7,295,673; 7,460,668; 7,515,710; 7,519,274”
Manufactured under license under U.S. Patent Nos: 5,956,674; 5,974,380; 6,487,535
& other U.S. and worldwide patents issued & pending. DTS, the Symbol & DTS and
the Symbol together are registered trademarks & DTS 2.0+Digital Out is a trademark
of DTS, Inc. Product includes software. © DTS, Inc. All Rights Reserved.
OPEN SOURCE SOFTWARE NOTICE
To obtain the source code under GPL, LGPL, MPL and other open source licenses, that is contained in this
product, please visit http://opensource.lge.com .
In addition to the source code, all referred license terms, warranty disclaimers and copyright notices are
available for download.
LG Electronics will also provide open source code to you on CD-ROM for a charge covering the cost of
performing such distribution (such as the cost of media, shipping and handling) upon email request to
opensource@lge.com. This offer is valid for three (3) years from the date on which you purchased the
product.
Page 10
SAFETY INSTRUCTIONS
4
ENGLISH
ENG
SAFETY INSTRUCTIONS
Please read these safety precautions carefully before using the product.
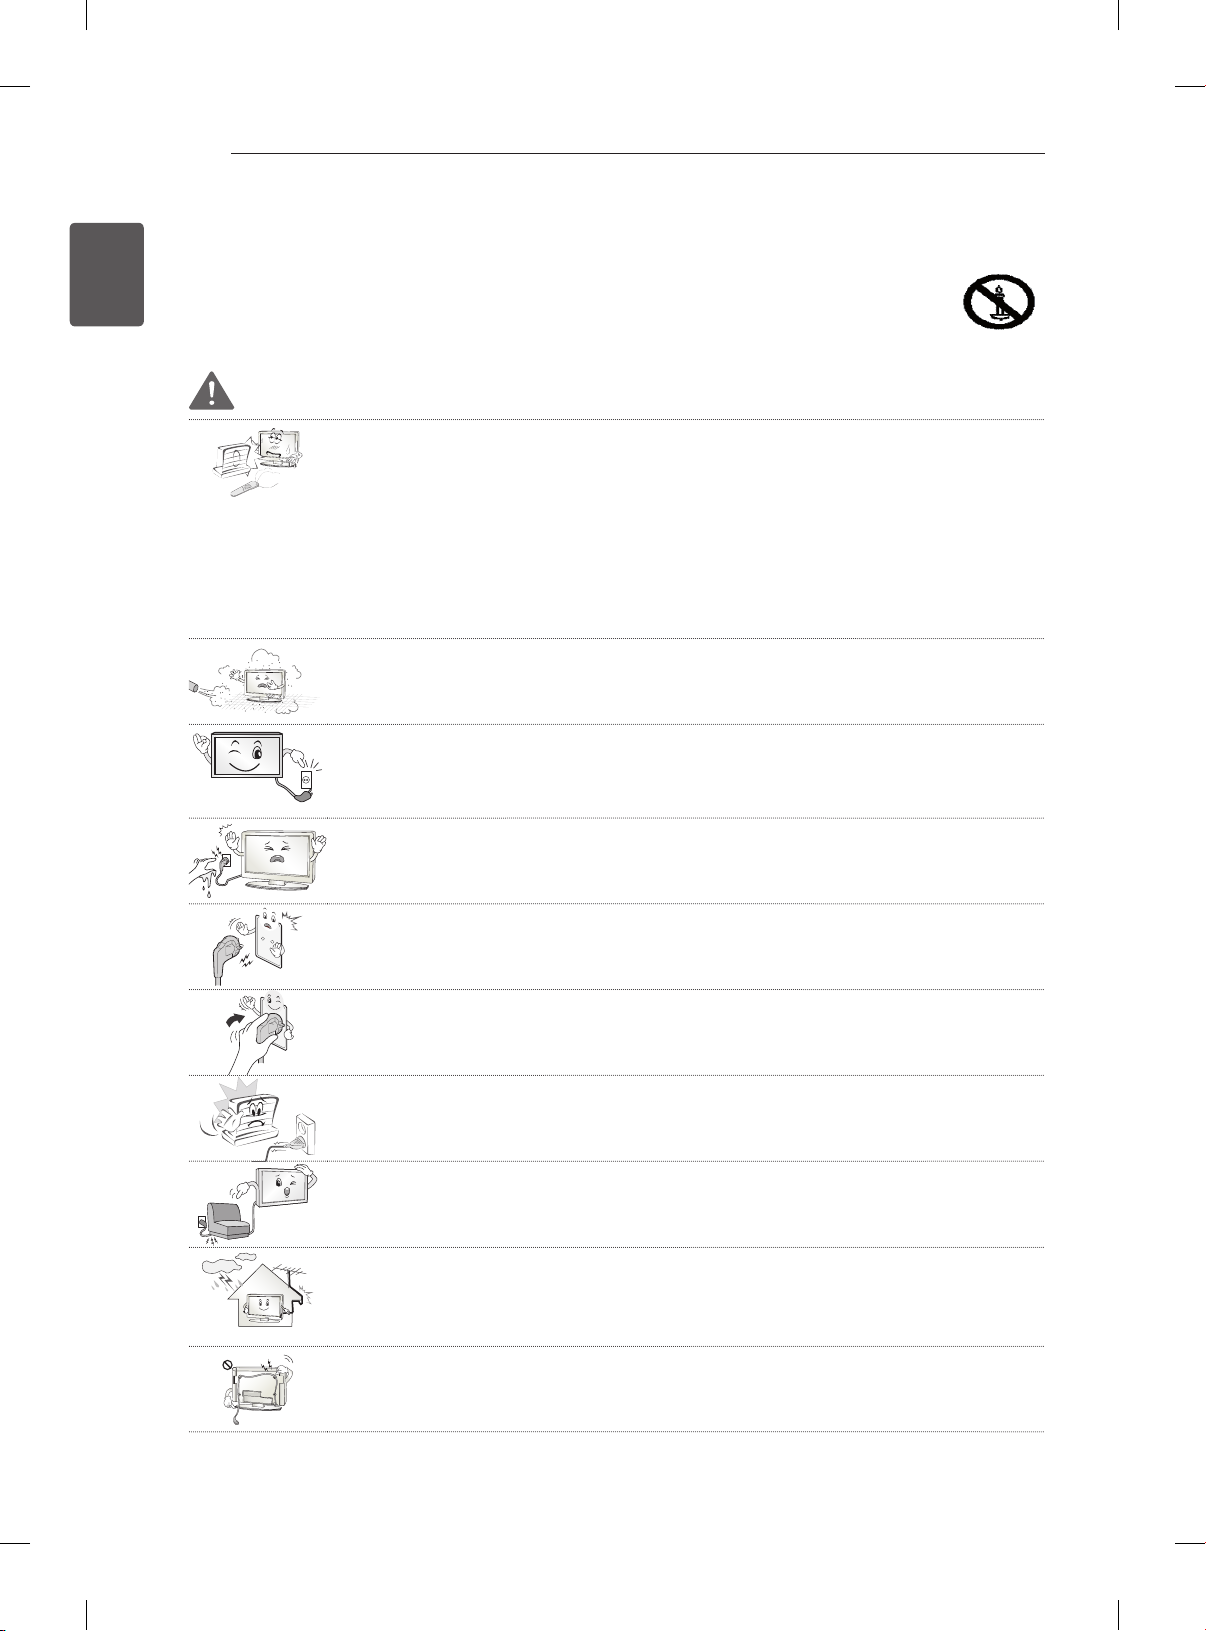
WARNING
Do not place the TV and remote control in the following environments:
y
- A location exposed to direct sunlight
- An area with high humidity such as a bathroom
- Near any heat source such as stoves and other devices that produce heat
- Near kitchen counters or humidifiers where they can easily be exposed to steam
or oil
- An area exposed to rain or wind
- Near containers of water such as vases
Otherwise, this may result in fire, electric shock, malfunction or product deformation.
Do not place the product where it might be exposed to dust.
y
This may cause a fire hazard.
Mains plug is the disconnecting device. The plug must remain readily operable.
y
Do not touch the power plug with wet hands. Additionally, if the cord pin is wet or
y
covered with dust, dry the power plug completely or wipe dust off.
You may be electrocuted due to excess moisture.
Make sure to connect the power cable to the grounded current. (Except for devices
y
which are not grounded.)
You may be electrocuted or injured.
Fix the power cable completely.
y
If the power cable is not fixed completely, a fire can break out.
Ensure the power cord does not come into contact with hot objects such as a
y
heater.
This may cause a fire or an electric shock hazard.
Do not place a heavy object, or the product itself, on power cables.
y
Otherwise, this may result in fire or electric shock.
Bend antenna cable between inside and outside building to prevent rain from
y
flowing in.
This may cause water damaged inside the Product and could give an electric
shock.
When mounting a TV it on the wall, make sure not to install TV by hanging power
y
and signal cables on the back of the TV.
It may cause fire, electric shock.
Page 11
Desiccant
SAFETY INSTRUCTIONS
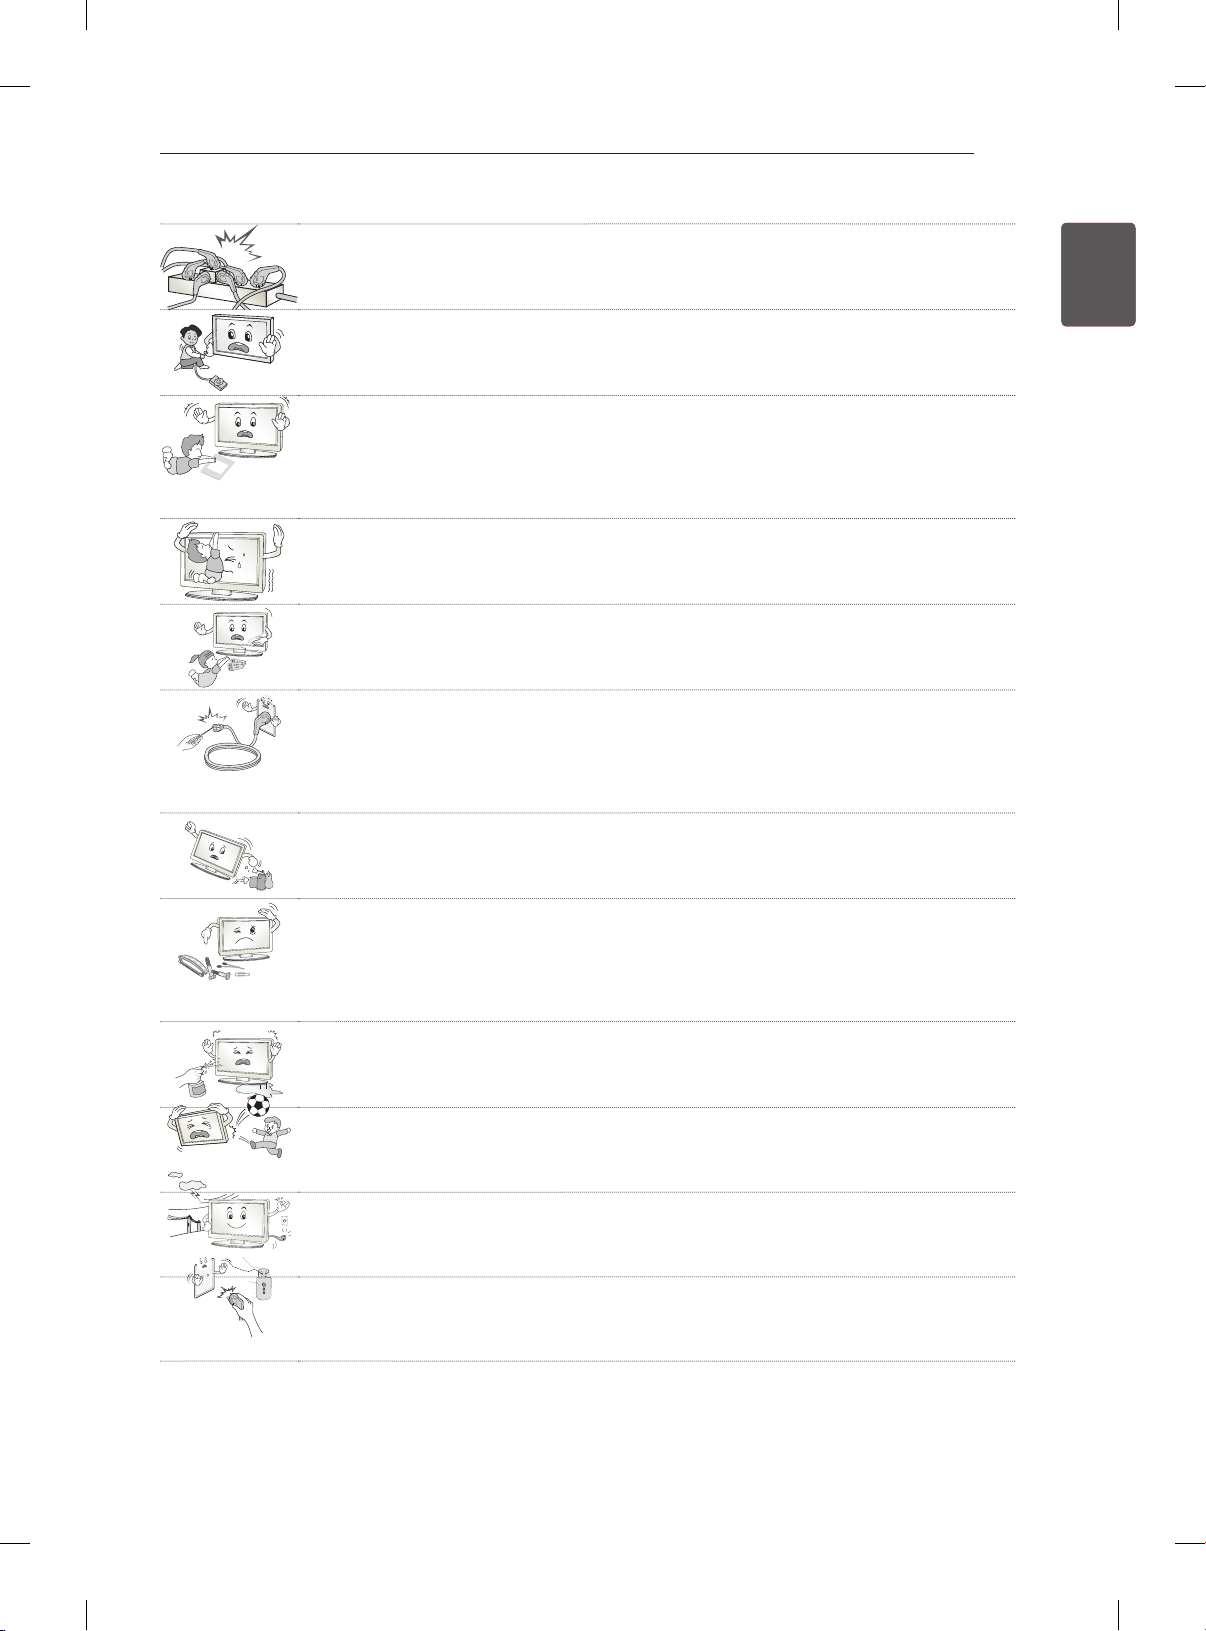
Do not plug too many electrical devices into a single multiple electrical outlet.
y
Otherwise, this may result in fire due to over-heating.
Do not drop the product or let it fall over when connecting external devices.
y
Otherwise, this may result in injury or damage to the product.
Keep the packing anti-moisture material or vinyl packing out of the reach of
y
children.
Anti-moisture material is harmful if swallowed. If swallowed by mistake, force the
patient to vomit and visit the nearest hospital. Additionally, vinyl packing can cause
suffocation. Keep it out of the reach of children.
Do not let your children climb or cling onto the TV.
y
Otherwise, the TV may fall over, which may cause serious injury.
Dispose of used batteries carefully to protect a child from eating them.
y
In case if they eat it, take them to consult a doctor immediately.
Do not insert a conductor (like a metal chopstick) into one end of the power cable
y
while the other end is connected to the input terminal on the wall. Additionally, do
not touch the power cable right after plugging into the wall input terminal.
You may be electrocuted.
(Depending on model)
Do not put or store inflammable substances near the product.
y
There is a danger of explosion or fire due to careless handling of the inflammable
substances.
5
ENGENGLISH
Do not drop metallic objects such as coins, hair pins, chopsticks or wire into the
y
product, or inflammable objects such as paper and matches. Children must pay
particular attention.
Electrical shock, fire or injury can occur. If a foreign object is dropped into the
product, unplug the power cord and contact the service centre.
Do not spray water on the product or scrub with an inflammable substance (thinner
y
or benzene). Fire or electric shock accident can occur.
Do not allow a impact shock or any objects to fall into the product, and do not drop
y
onto the screen with something.
You may be injured or the product can be damaged.
Never touch this product or antenna during a thunder or lighting storm.
y
You may be electrocuted.
Never touch the wall outlet when there is leakage of gas, open the windows and
y
ventilate.
It may cause a fire or a burn by a spark.
Page 12
SAFETY INSTRUCTIONS
6
ENGLISH
ENG
Do not disassemble, repair or modify the product at your own discretion.
y
Fire or electric shock accident can occur.
Contact the service center for check, calibration or repair.
If any of the following occur, unplug the product immediately and contact your local
y
service centre.
- The product has been impacted by shock
- The product has been damaged
- Foreign objects have entered the product
- The product produced smoke or a strange smell
This may result in fire or electric shock.
If you don’t intend to use the product for a long time, unplug the power cable from
y
the product.
Covering dust can cause a fire, or insulation deterioration can cause electric
leakage, electric shock or fire.
Apparatus shall not be exposed to dripping or splashing and no objects filled with
y
liquids, such as vases, shall be placed on the apparatus.
Page 13
SAFETY INSTRUCTIONS
5~7 times
7
CAUTION
Install the product where no radio wave occurs.
y
There should be enough distance between an outside antenna and power lines to
y
keep the former from touching the latter even when the antenna falls.
This may cause an electric shock.
Do not install the product on places such as unstable shelves or inclined surfaces.
y
Also avoid places where there is vibration or where the product cannot be fully
supported.
Otherwise, the product may fall or flip over, which may cause injury or damage to
the product.
If you install the TV on a stand, you need to take actions to prevent the product
y
from overturning. Otherwise, the product may fall over, which may cause injury.
If you intend to mount the product to a wall, attach VESA standard mounting interface (optional
y
parts) to the back of the product. When you install the set to use the wall mounting bracket (optional
parts), fix it carefully so as not to drop.
Only use the attachments / accessories specified by the manufacturer.
y
When installing the antenna, consult a qualified service man.
y
This may create a fire hazard or an electric shock hazard.
ENGENGLISH
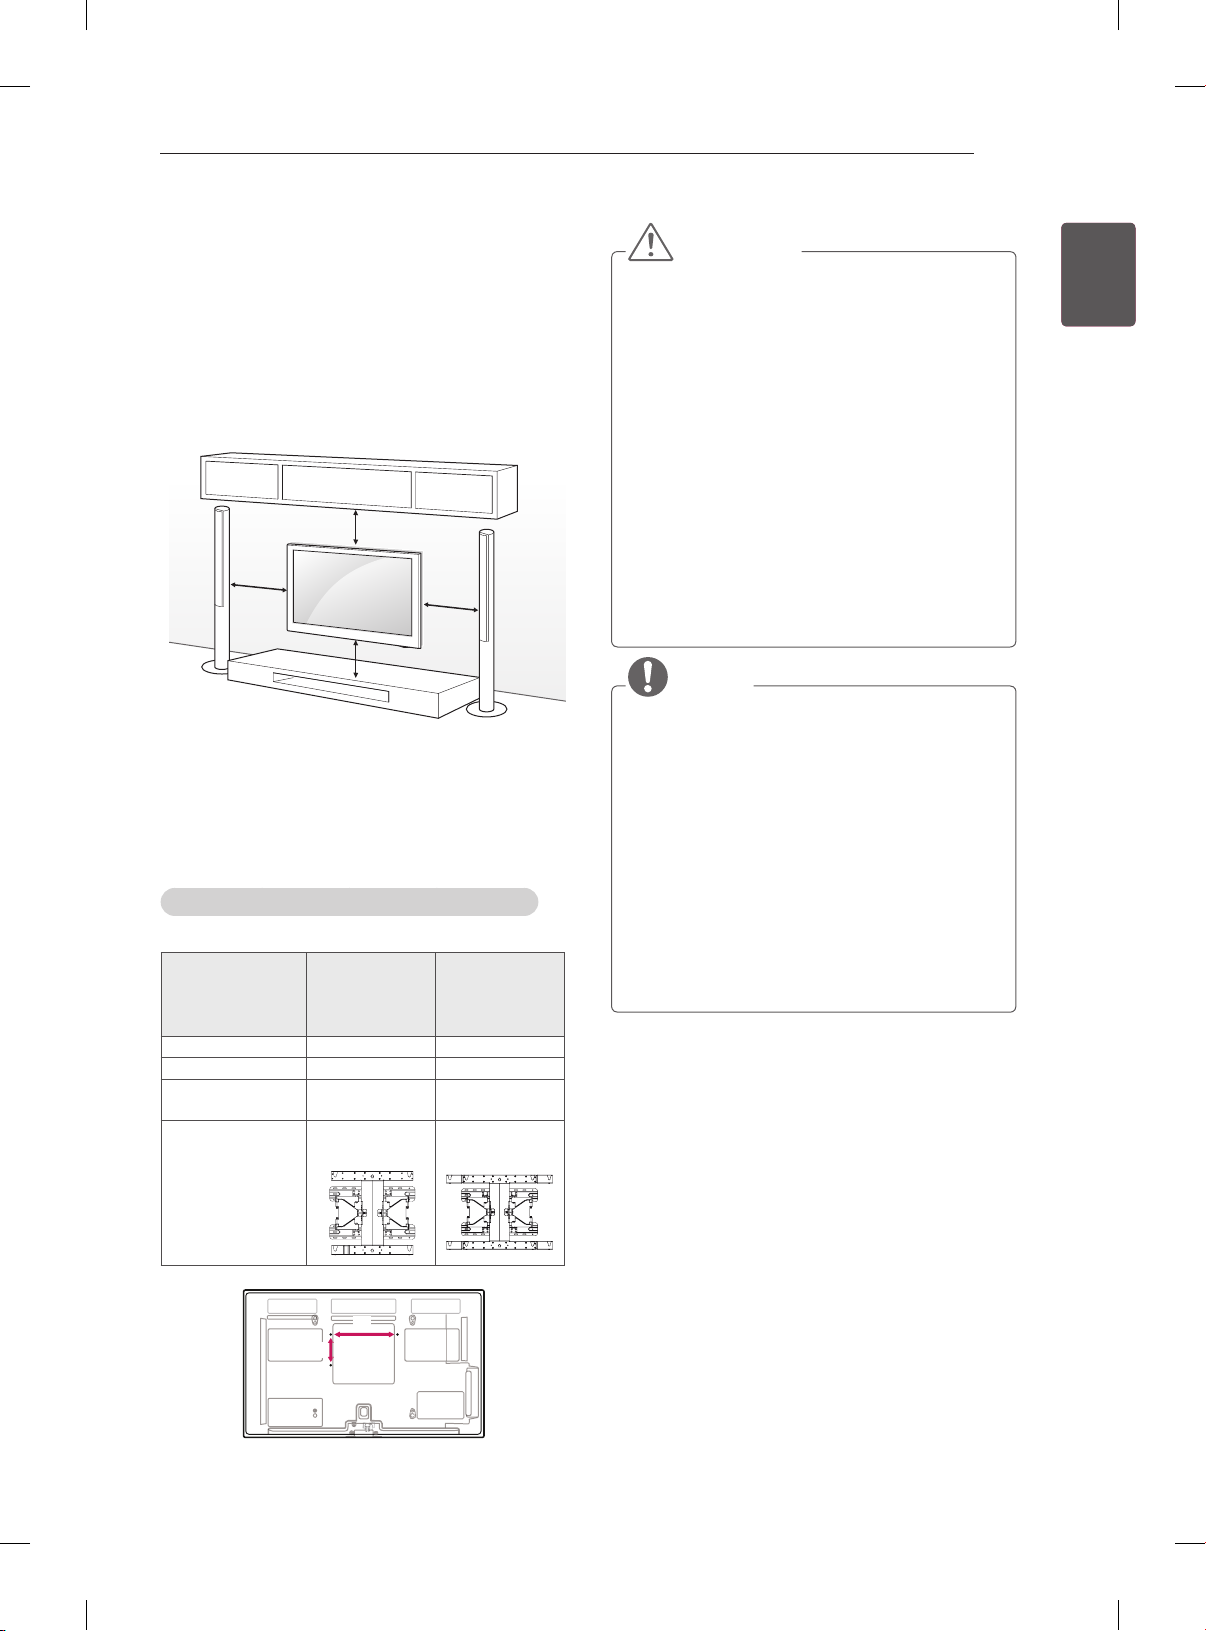
We recommend that you maintain a distance of at least 5 to 7 times the diagonal
y
screen size when watching TV.
If you watch TV for a long period of time, this may cause blurred vision.
Only use the specified type of battery.
y
This could cause damage to the remote control.
Do not mix new batteries with old batteries.
y
This may cause the batteries to overheat and leak.
Make sure there are no objects between the remote control and its sensor.
y
Signal from the remote control may be disturbed by sun light or other strong light.
y
In this case, darken the room.
When connecting external devices such as video game consoles, make sure the
y
connecting cables are long enough.
Otherwise, the product may fall over, which may cause injury or damage the
product.
Page 14
SAFETY INSTRUCTIONS
8
ENGLISH
ENG
Do not turn the product On/Off by plugging-in or unplugging the power plug to the
y
wall outlet. (Do not use the power plug for switch.)
It may cause mechanical failure or could give an electric shock.
Please follow the installation instructions below to prevent the product from
y
overheating.
- The distance between the product and the wall should be more than 10 cm.
- Do not install the product in a place with no ventilation (e.g., on a bookshelf or in
a cupboard).
- Do not install the product on a carpet or cushion.
- Make sure the air vent is not blocked by a tablecloth or curtain.
Otherwise, this may result in fire.
Take care not to touch the ventilation openings when watching the TV for long
y
periods as the ventilation openings may become hot. This does not affect the
operation or performance of the product.
Periodically examine the cord of your appliance, and if its appearance indicates damage or
y
deterioration, unplug it, discontinue use of the appliance, and have the cord replaced with an exact
replacement part by an authorized servicer.
Prevent dust collecting on the power plug pins or outlet.
y
This may cause a fire hazard.
Protect the power cord from physical or mechanical abuse, such as being twisted,
y
kinked, pinched, closed in a door, or walked upon. Pay particular attention to plugs,
wall outlets, and the point where the cord exits the appliance.
Do not press strongly upon the panel with a hand or sharp object such as nail,
y
pencil or pen, or make a scratch on it.
Avoid touching the screen or holding your finger(s) against it for long periods of
y
time. Doing so may produce some temporary distortion effects on the screen.
When cleaning the product and its components, unplug the power first and wipe it
y
with a soft cloth. Applying excessive force may cause scratches or discolouration.
Do not spray with water or wipe with a wet cloth. Never use glass cleaner, car or
industrial shiner, abrasives or wax, benzene, alcohol etc., which can damage the
product and its panel.
Otherwise, this may result in fire, electric shock or product damage (deformation,
corrosion or breakage).
As long as this unit is connected to the AC wall outlet, it is not disconnected from the AC power
y
source even if you turn off this unit by SWITCH.
When unplugging the cable, grab the plug and unplug it.
y
If the wires inside the power cable are disconnected, this may cause fire.
When moving the product, make sure you turn the power off first. Then, unplug the
y
power cables, antenna cables and all connecting cables.
The TV set or power cord may be damaged, which may create a fire hazard or
cause electric shock.
Page 15
SAFETY INSTRUCTIONS
When moving or unpacking the product, work in pairs because the product is
y
heavy.
Otherwise, this may result in injury.
Contact the service center once a year to clean the internal parts of the product.
y
Accumulated dust can cause mechanical failure.
Refer all servicing to qualified service personnel. Servicing is required when the
y
apparatus has been damaged in any way, such as power supply cord or plug is
damaged, liquid has been spilled or objects have fallen into the apparatus, the
apparatus has been exposed to rain or moisture, does not operate normally, or has
been dropped.
If the product feels cold to the touch, there may be a small “flicker” when it is turned
y
on. This is normal, there is nothing wrong with product.
The panel is a high technology display product with resolution of two million to six
y
million pixels. You may see tiny black dots and/or brightly coloured dots (red, blue
or green) at a size of 1 ppm on the panel. This does not indicate a malfunction and
does not affect the performance and reliability of the product.
This phenomenon also occurs in third-party products and is not subject to
exchange or refund.
You may find different brightness and colour of the panel depending on your
y
viewing position(left/right/top/down).
This phenomenon occurs due to the characteristic of the panel. It is not related with
the product performance, and it is not malfunction.
9
ENGENGLISH
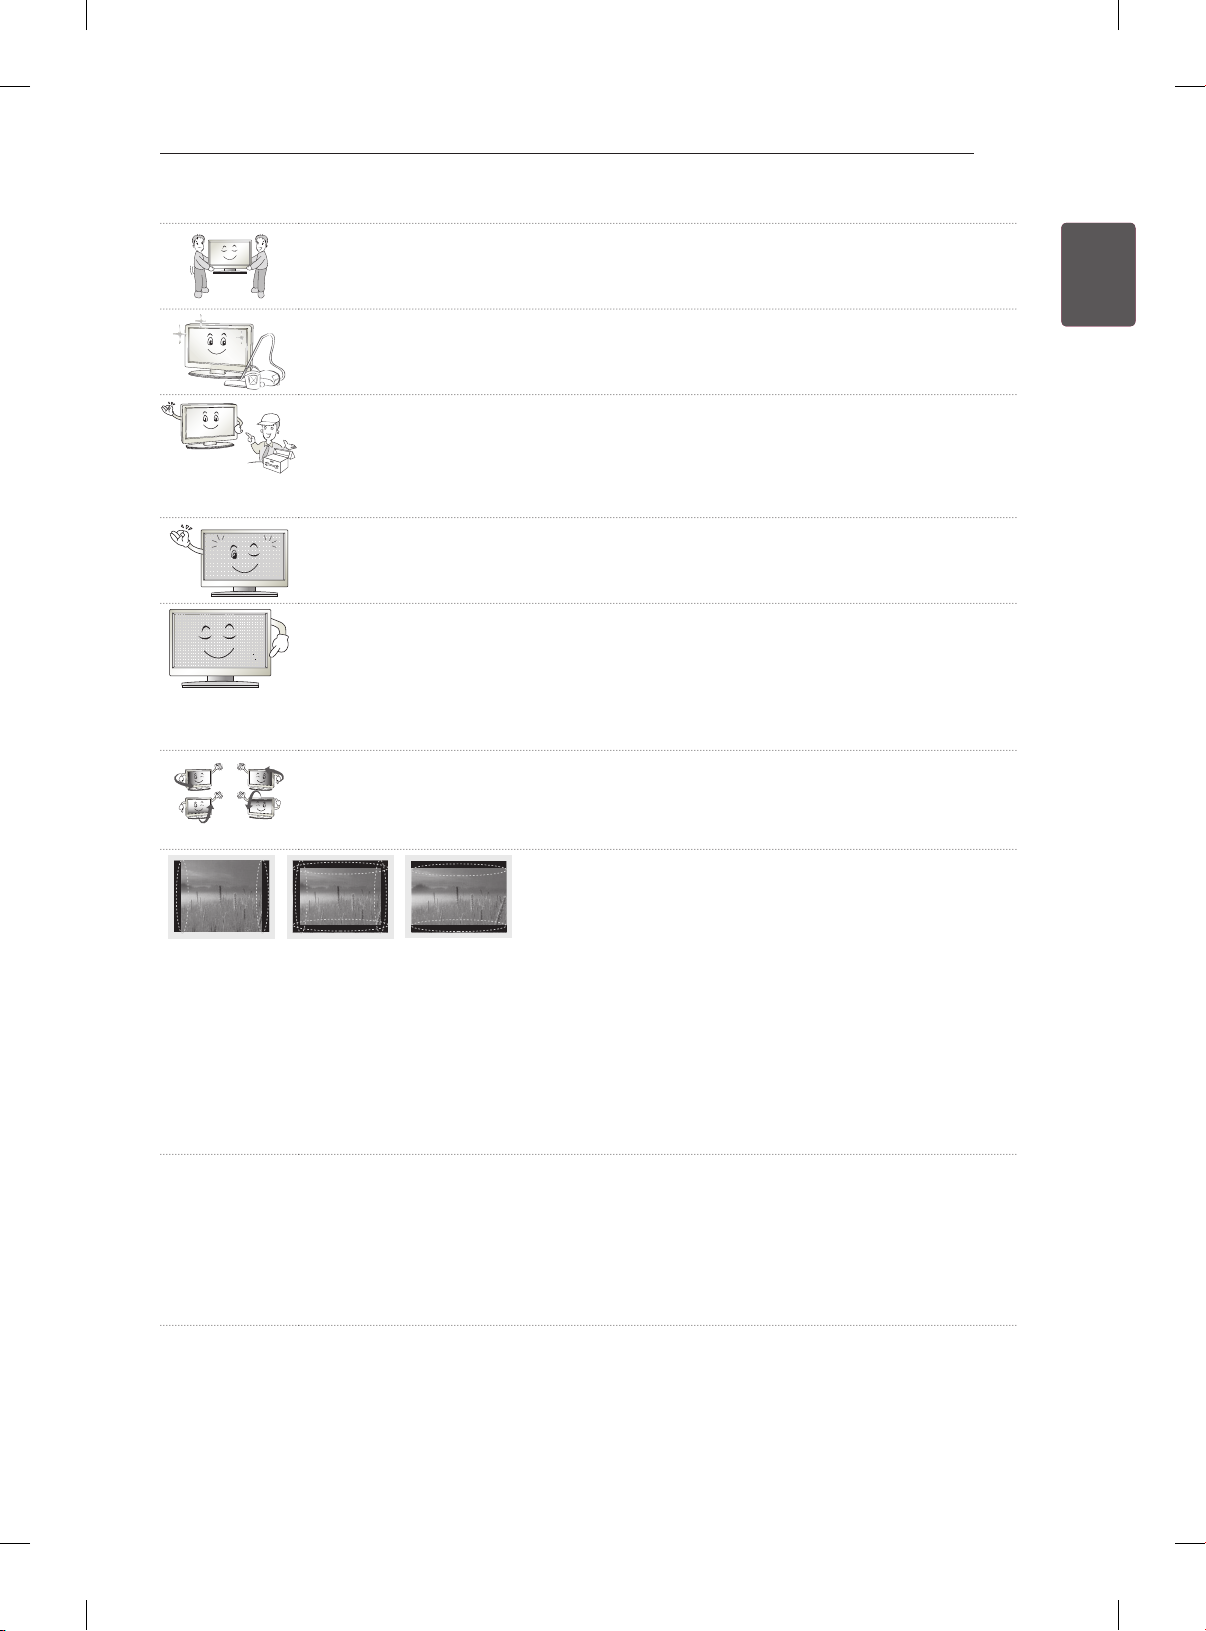
Displaying a still image (e.g., broadcasting channel logo, on-screen menu, scene from a video
y
game) for a prolonged time may cause damage to the screen, resulting in retention of the image,
which is known as image sticking. The warranty does not cover the product for image sticking.
Avoid displaying a fixed image on your television’s screen for a prolonged period (2 or more hours
for LCD, 1 or more hours for Plasma).
Also, if you watch the TV at a ratio of 4:3 for a long time, image sticking may occur on the borders of
the panel.
This phenomenon also occurs in third-party products and is not subject to exchange or refund.
Generated Sound
y
“Cracking” noise: A cracking noise that occurs when watching or turning off the TV is generated by
plastic thermal contraction due to tempera-ture and humidity. This noise is common for products
where thermal deformation is required. Electrical circuit humming/panel buzzing: A low level noise is
generated from a high-speed switching circuit, which supplies a large amount of current to operate a
product. It varies depending on the product.
This generated sound does not affect the performance and reliability of the product.
Page 16

SAFETY INSTRUCTIONS
10
ENGLISH
ENG
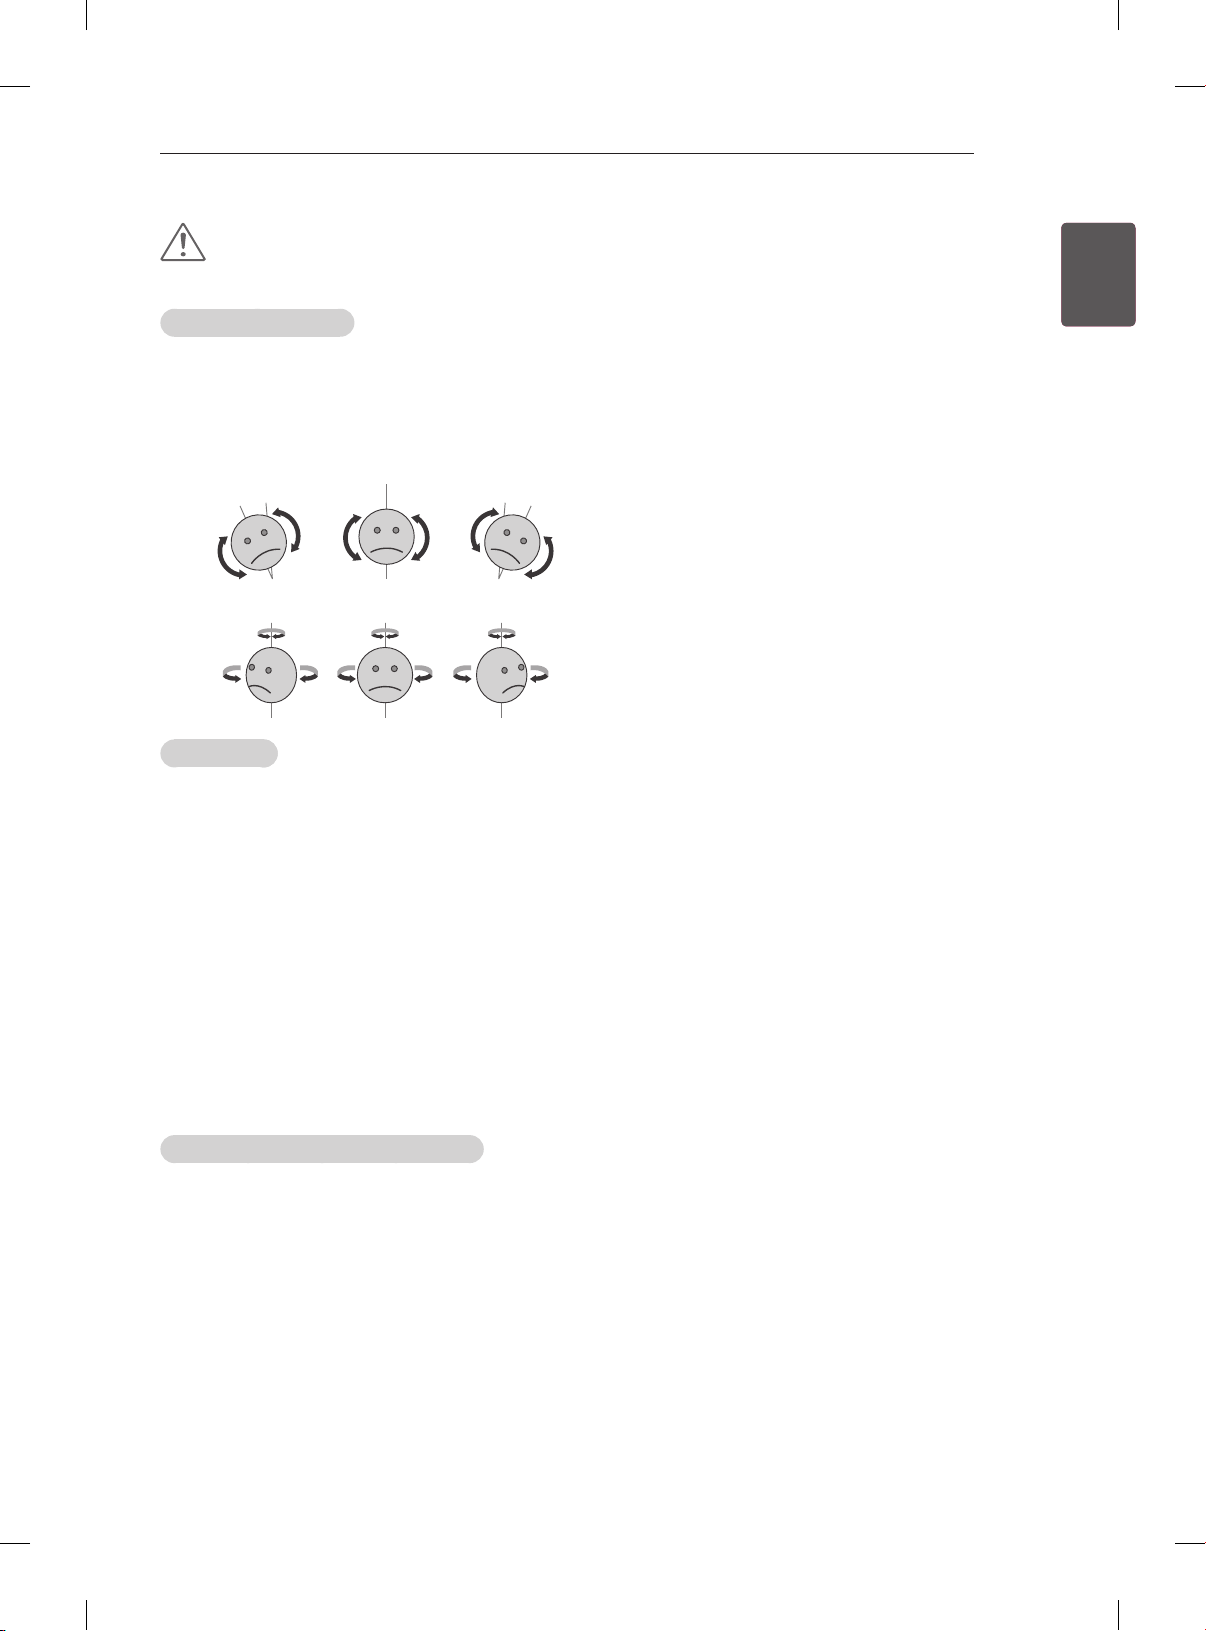
Viewing 3D Imaging (Only 3D models)
WARNING
Viewing Environment
yViewing Time
- When watching 3D contents, take 5 - 15 minute breaks every hour. Viewing 3D contents for a long
period of time may cause headache, dizziness, fatigue or eye strain.
Those that have a photosensitive seizure or chronic illness
ySome users may experience a seizure or other abnormal symptoms when they are exposed to a
ashing light or particular pattern from 3D contents.
yDo not watch 3D videos if you feel nausea, are pregnant and/ or have a chronic illness such as epilepsy,
cardiac disorder, or blood pressure disease, etc.
y3D Contents are not recommended to those who suffer from stereo blindness or stereo anomaly. Double
images or discomfort in viewing may be experienced.
yIf you have strabismus (cross-eyed), amblyopia (weak eyesight) or astigmatism, you may have trouble
sensing depth and easily feel fatigue due to double images. It is advised to take frequent breaks than
the average adult.
yIf your eyesight varies between your right and left eye, revise your eyesight prior to watching 3D
contents.
Symptoms which require discontinuation or refraining from watching 3D contents
yDo not watch 3D contents when you feel fatigue from lack of sleep, overwork or drinking.
yWhen these symptoms are experienced, stop using/watching 3D contents and get enough rest until the
symptom subsides.
- Consult your doctor when the symptoms persist. Symptoms may include headache, eyeball pain,
dizziness, nausea, palpitation, blurriness, discomfort, double image, visual inconvenience or fatigue.
Page 17
SAFETY INSTRUCTIONS
11
CAUTION
Viewing Environment
Viewing Distance
y
- Maintain a distance of at least twice the screen diagonal length when watching 3D contents. If you
feel discomfort in viewing 3D contents, move further away from the TV.
Viewing Position
y
- Face the center of the screen at eye level with the head looking straight ahead. Otherwise, you may
not be able to view 3D contents properly.
Viewing Age
yInfants/Children
- Usage/ Viewing 3D contents for children under the age of 5 are prohibited.
- Children under the age of 10 may overreact and become overly excited because their vision is in
development (for example: trying to touch the screen or trying to jump into it. Special monitoring
and extra attention is required for children watching 3D contents.
- Children have greater binocular disparity of 3D presentations than adults because the distance
between the eyes is shorter than that of adults. Therefore they will perceive more stereoscopic
depth compared to adults for the same 3D image.
yTeenagers
- Teenagers under the age of 19 may react with sensitivity due to stimulation from light in 3D
contents. Advise them to refrain from watching 3D contens for a long time when they are tired.
yElderly
- The elderly may perceive less 3D effect compared to the young. Do not sit closer to the TV than the
recommended distance.
ENGENGLISH
Cautions when using the 3D glasses
Make sure to use LG 3D glasses. Otherwise, you may not be able to view 3D videos properly.
y
Do not use 3D glasses instead of your normal glasses, sunglasses or protective goggles.
y
Using modied 3D glasses may cause eye strain or image distortion.
y
Do not keep your 3D glasses in extremely high or low temperatures. It will cause deformation.
y
The 3D glasses are fragile and are easily scratched. Always use a soft, clean piece of cloth when wiping
y
the lenses. Do not scratch the lenses of the 3D glasses with sharp objects or clean/wipe them with
chemicals.
yWhen watching 3D videos under uorescent lights or with three wave length lamps, you may experience
the screen blinking. When this occurs, turn the light off or turn it down.
yOther electronic or communication devices should be turned off or put away from the TV because it can
cause interference and prevent the 3D function from working properly.
yWhen you watch TV lying down, 3D images may look darker or invisible.
Page 18
ENGLISH
ENG
INSTALLATION PROCEDURE / ASSEMBLING AND PREPARING
12
NOTE
yImage shown may differ from your TV.
yYour TV’s OSD (On Screen Display) may differ slightly from that shown in this manual.
yThe available menus and options may differ from the input source or product model that you are
using.
yNew features may be added to this TV in the future.
yThe TV can be placed in standby mode in order to reduce the power consumption. And the TV should
be turned off if it will not be watched for some time, as this will reduce energy consumption.
yThe energy consumed during use can be significantly reduced if the level of brightness of the picture
is reduced, and this will reduce the overall running cost.
INSTALLATION PROCEDURE
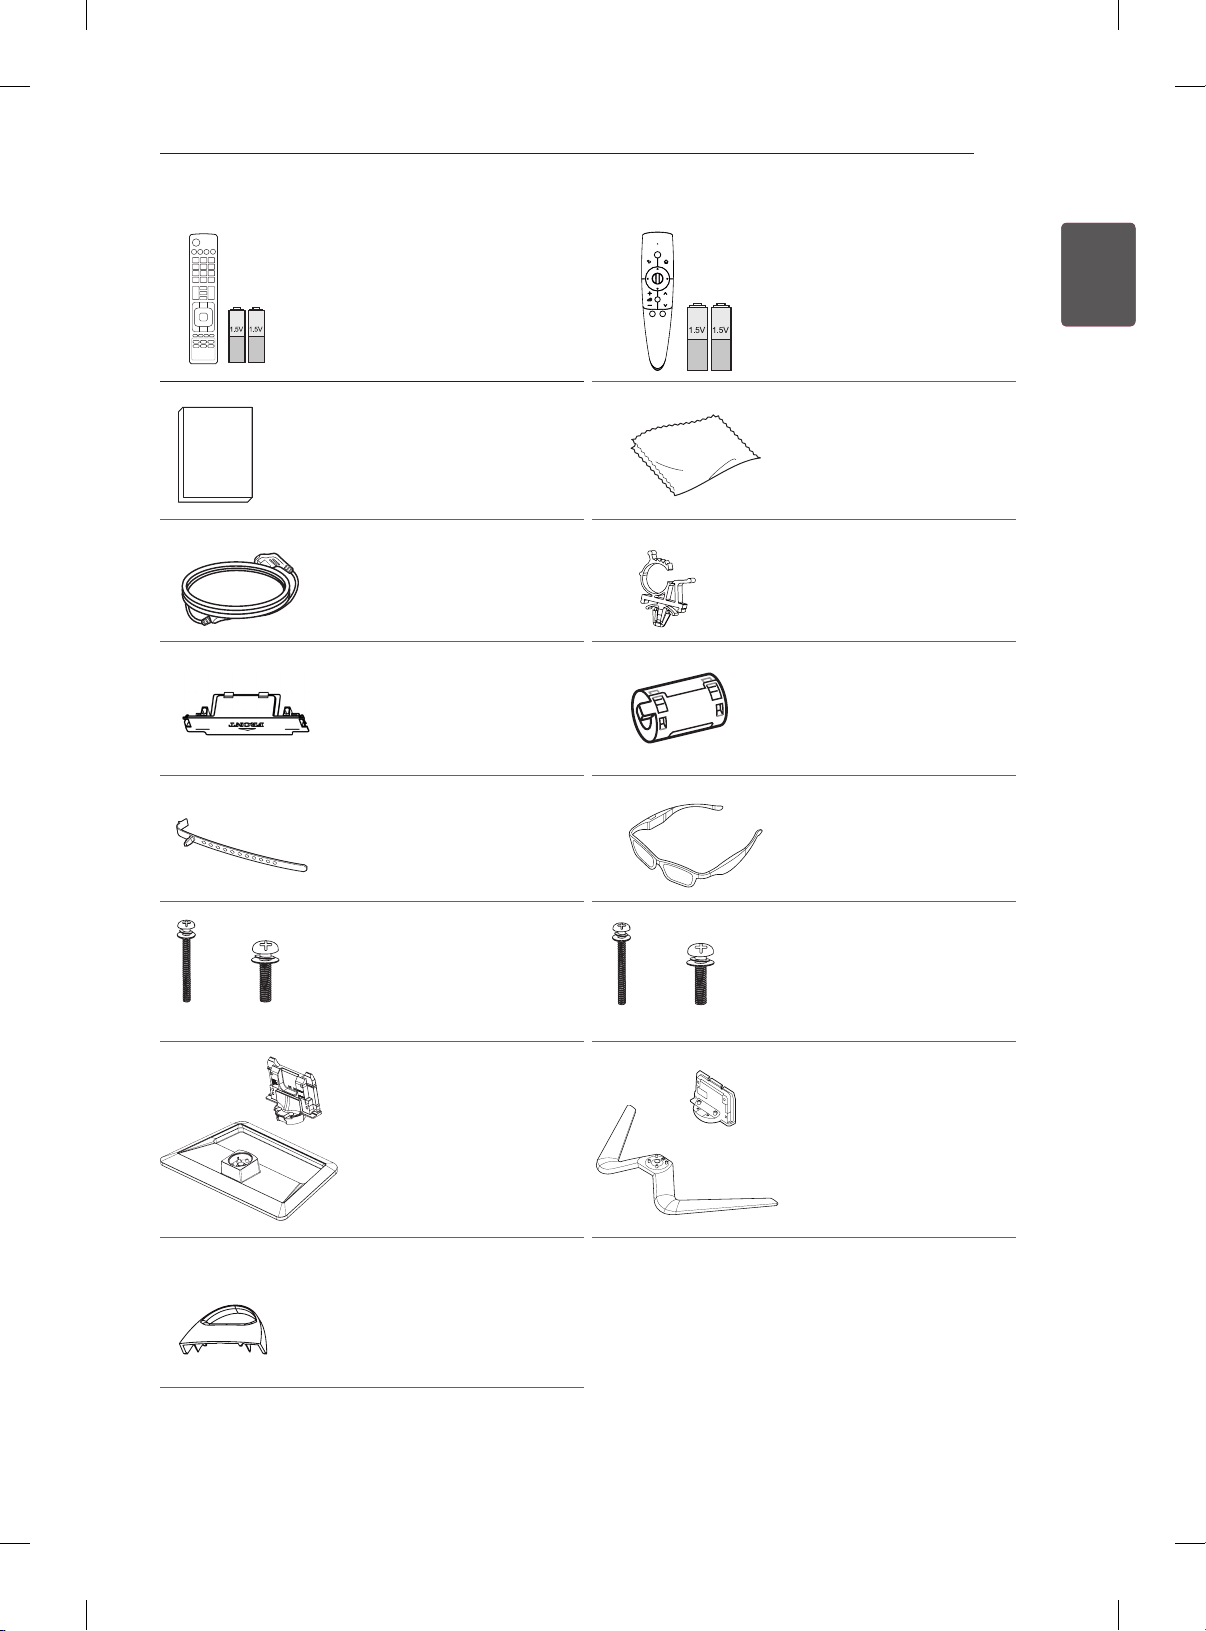
1 Open the package and make sure all the accessories are included.
2 Attach the stand to the TV set.
3 Connect an external device to the TV set.
4 Make sure the network connection is available.
You can use the TV network functions only when the network connection is made.
ASSEMBLING AND PREPARING
Unpacking
Check your product box for the following items. If there are any missing accessories, contact the local
dealer where you purchased your product. The illustrations in this manual may differ from the actual
product and item.
CAUTION
yDo not use any unapproved items to ensure the safety and product life span.
yAny damage or injuries caused by using unapproved items are not covered by the warranty.
ySome models have a thin film attached on to the screen and this must not be removed.
Page 19
ASSEMBLING AND PREPARING
AV MODE
INPUT
ENERGY
TV
SAVING
1 2 3
4 5 6
7 809
FLASHBK
LIST
MARK
FAV
P
A
G
3D
CHVOL
E
MUTE
INFO
MENU
Q.MENU
ENTER
EXIT
BACK
L/R SELECT
FREEZE
RATIO
Remote Control,
Batteries (AAA)
P
(See p. 20)
Magic Remote Control,
Batteries (AA)
(Only 50/60PM97**)
(See p. 21)
13
ENGENGLISH
Polishing cloth
(Depending on model)
Owner’s manual
Use this to remove dust
from the cabinet.
Power Cord Power Cord Holder
(See p. A-4)
Ferrite core
Protection Cover
(See p. A-4)
(Depending on model)
(See p. 14)
x 3x 4
M4 x 30 M5 x 16
Cable Holder
(Depending on model)
(See p. A-4)
Screw for assembly
(Only 42/50PM47**,
50/60PM67**, 50PM68**,
50PM97**)
(See p. A-3)
Stand Body / Stand Base
(Only 42/50PM47**,
50/60PM67**)
(See p. A-3)
Cable management
(Only 50/60PM68**,
50/60PM97**)
(See p. A-3)
x 5x 4
M4 x 30 M5 x 16
3D Glasses
(AG-350)
(Depending on model)
Screw for assembly
(Only 60PM68**, 60PM97**)
(See p. A-3)
Stand Body / Stand Base
(Only 50/60PM68**,
50/60PM97**)
(See p. A-3)
Page 20
ENGLISH
ENG
ASSEMBLING AND PREPARING
14
NOTE
The items supplied with your product may vary depending on the model.
y
Product specifications or contents of this manual may be changed without prior notice due to upgrade
y
of product functions.
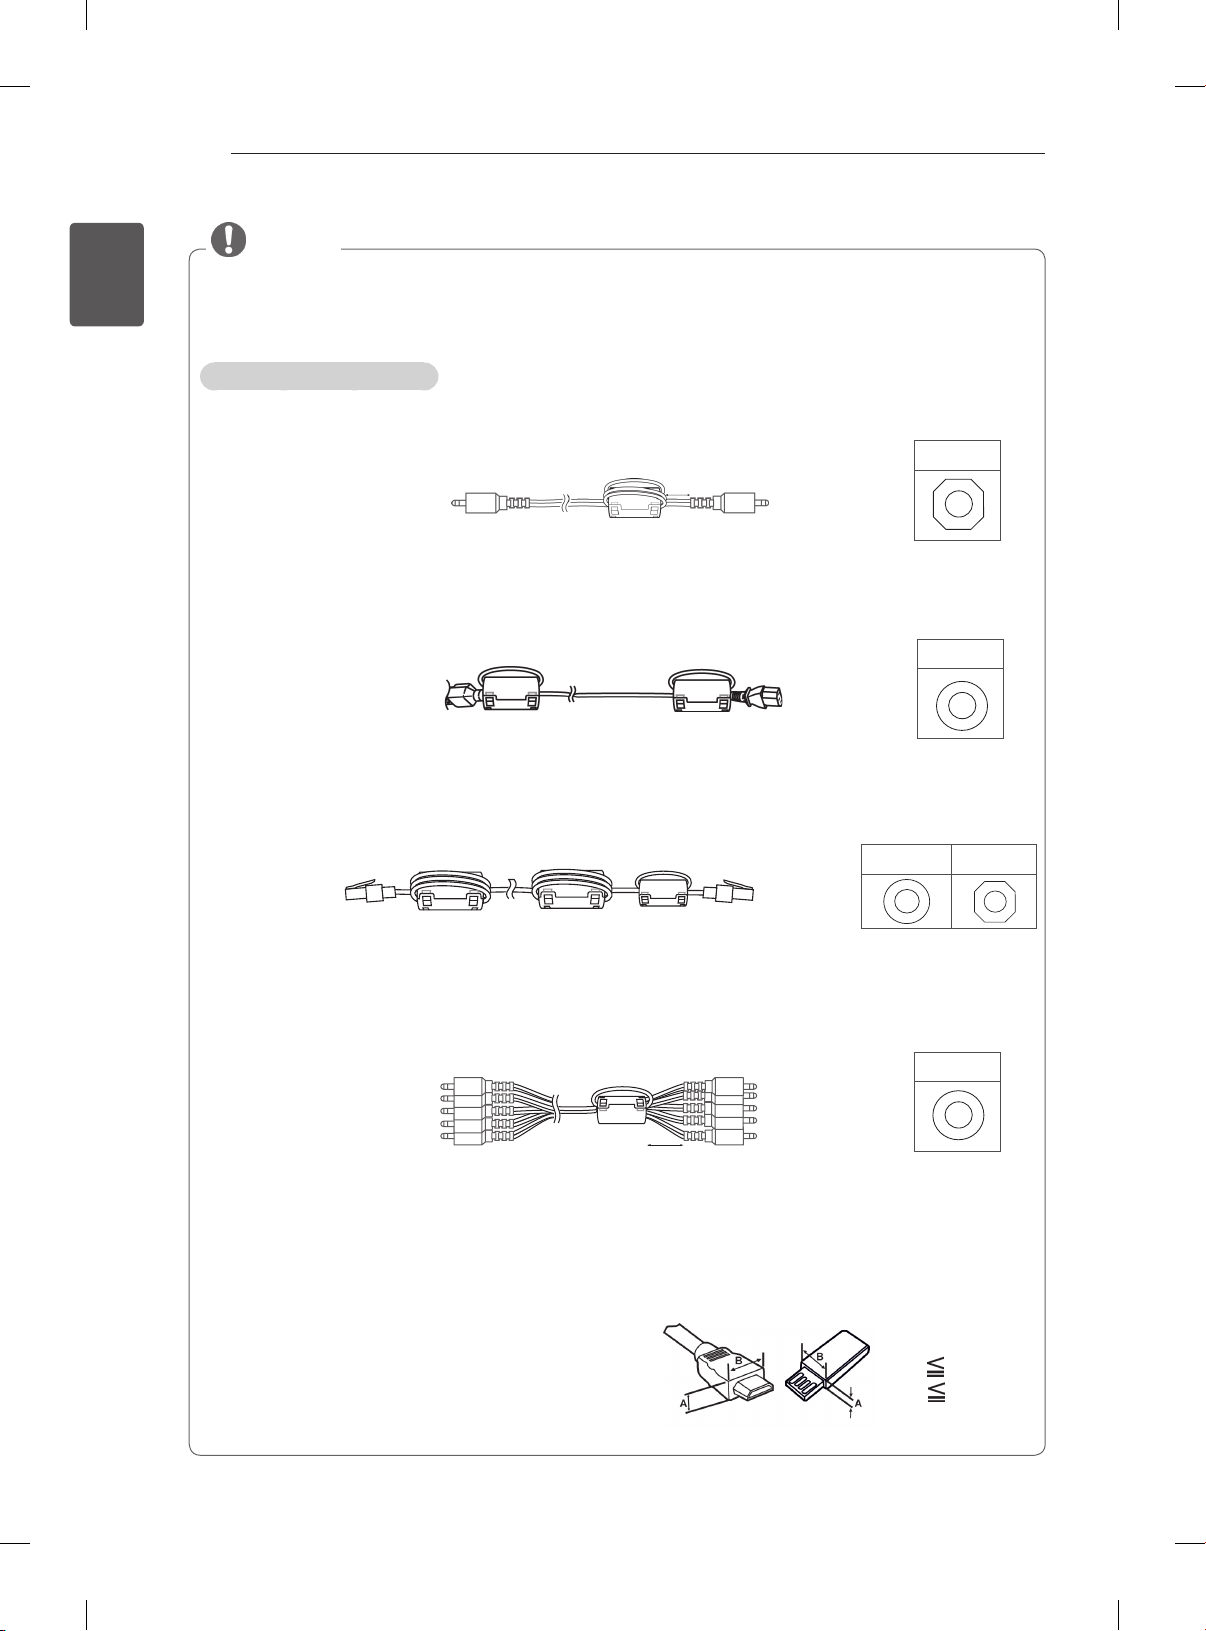
How to use the ferrite core
1 Use the ferrite core to reduce the electromagnetic interference in the PC audio cable.
Wind the PC audio cable on the ferrite core thrice. Place the ferrite core close to the TV.
(Gray)
10 mm(+ / - 5 mm)
[to an External device]
[to the TV]
[Figure 1]
[Cross Section of
Ferrite Core]
2 Use the ferrite core to reduce the electromagnetic interference in the power cable.
Wind the power cable on the ferrite core once. Place the ferrite core close to the TV and a wall plug.
(Black)
[to a wall plug]
[to the TV]
[Figure 2]
[Cross Section of
Ferrite Core]
3 Use the ferrite core to reduce the electromagnetic interference in the LAN cable. Wind the LAN
cable thrice on the ferrite core. Place the ferrite core close to the TV and an External device.
A (Gray) B (Gray)
[to an External
device]
[to the TV]
BAA
[Cross Section of
[Figure 3]
Ferrite Core]
4 Use the ferrite core to reduce the electromagnetic interference in the component Y, Pb, Pr, L, R
cable. Wind the component Y, Pb, Pr, L, R cable on the ferrite core once. Place the ferrite core close
to the TV.
[to an External device]
[to the TV]
(Black)
10 mm(+ / - 5 mm)
[Figure 4]
- If there are six ferrite cores, follow as shown in Figure 1,2 and 3.
- If there are seven ferrite cores, follow as shown in Figure 1,2,3 and 4.
For an optimal connection, HDMI cables and USB
y
devices should have bezels less than 10 mm thick
and 18 mm width. Use an extension cable that
supports USB 2.0 if the USB cable or USB memory
stick does not fit into your TV’s USB port.
[Cross Section of
Ferrite Core]
*A 10 mm
*B 18 mm
Page 21
ASSEMBLING AND PREPARING
15
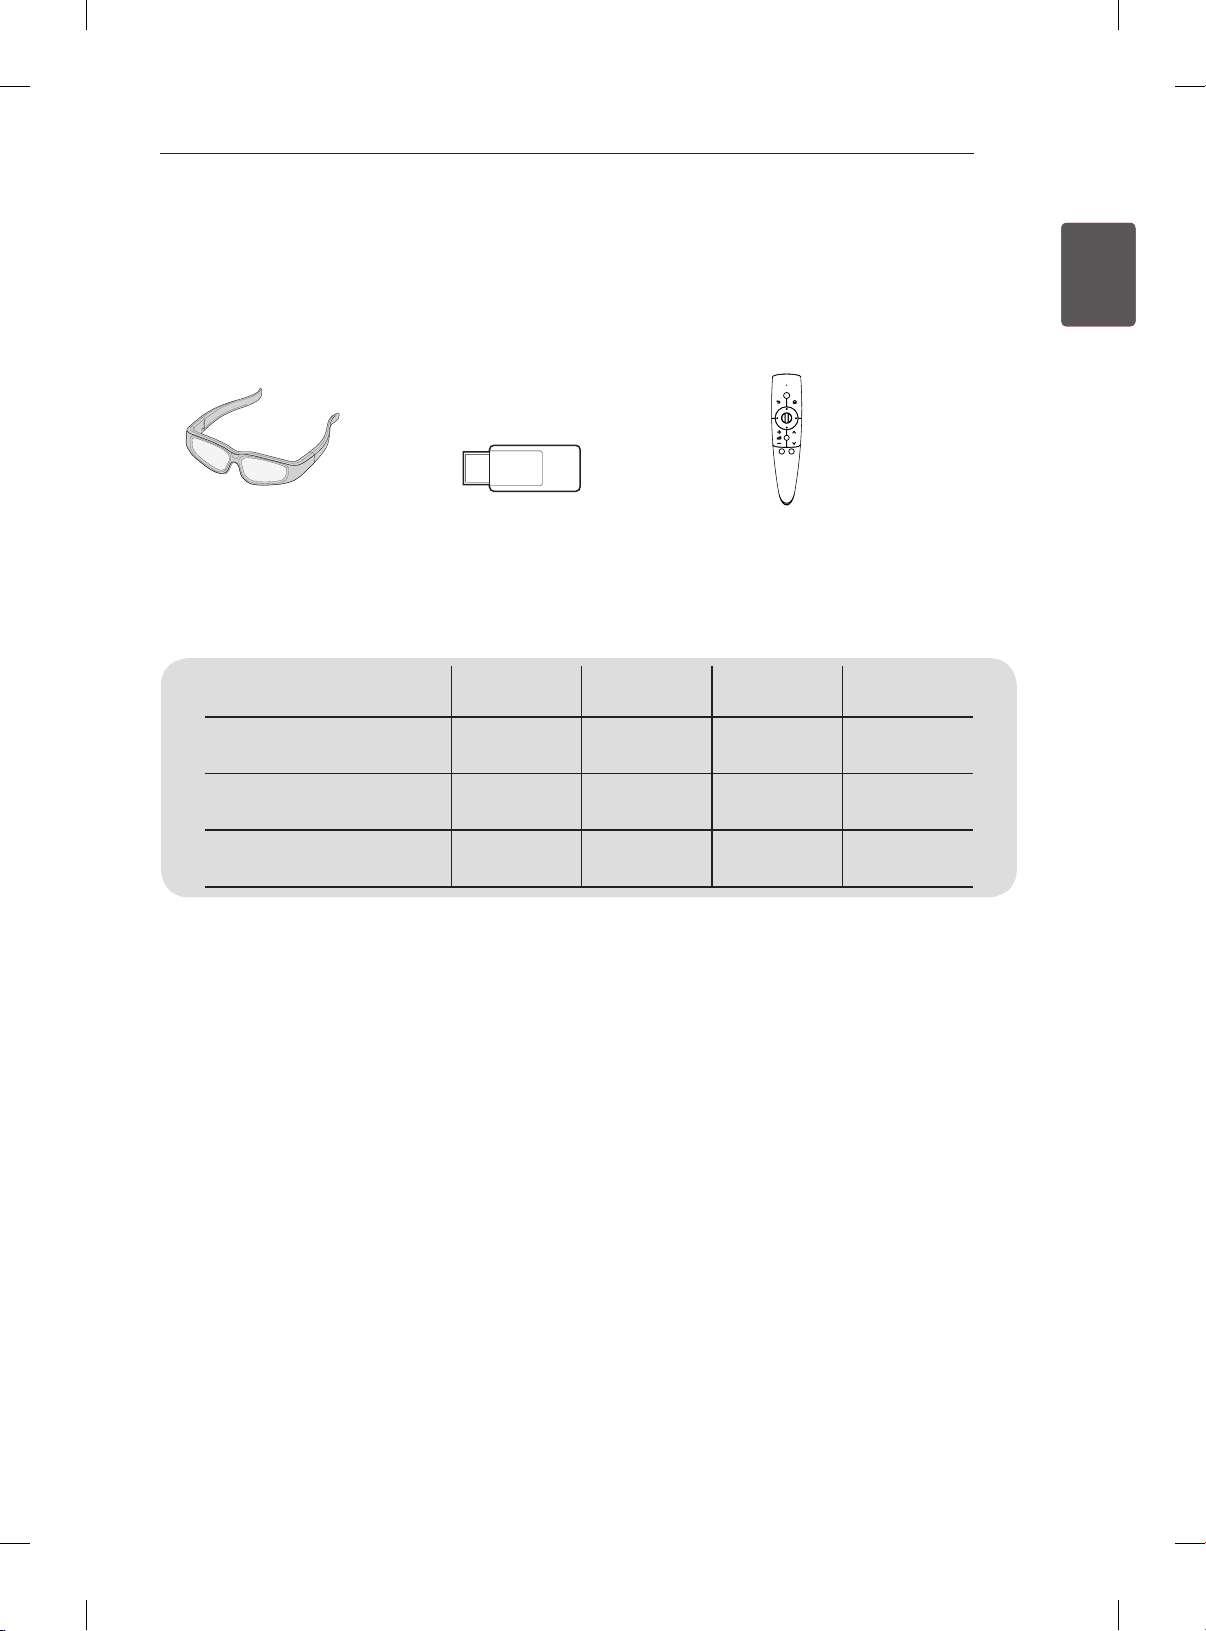
Separate purchase
Separate purchase items can be changed or modied for quality improvement without any notication.
Contact your dealer to buy these items.
These devices only work with certain models.
P
AG-S3**
3D Glasses
Compatibility
AG-S3**
3D Glasses
AN-WF100
Wireless LAN
AN-MR300
Magic Remote Control
AN-WF100
Wireless LAN
AN-MR300
Magic Remote Control
PM47** PM67** PM68** PM97**
• • • •
• •
• • • •
ENGENGLISH
The model name or design may be changed depending on the upgrade of product functions, manufacturer’s
circumstances or policies.
Page 22
ASSEMBLING AND PREPARING
IN 1 (ARC)
/ DVI IN 2
USB IN 1/ USB Apps
USB Hub HDD IN
USB IN 2
INPUT
SETTINGS
OK
AV IN 2
L/MONO
IN
3 4
HDMI
IN
RS-232C IN
(CONTROL & SERVICE)
AV IN 1
LAN
ANTENNA/
CABLE IN
LNB IN
Satellite
13 / 18V
700mA Max
AUDIO IN
(RGB/DVI)
RGB IN
(PC)
16
ENGLISH
ENG
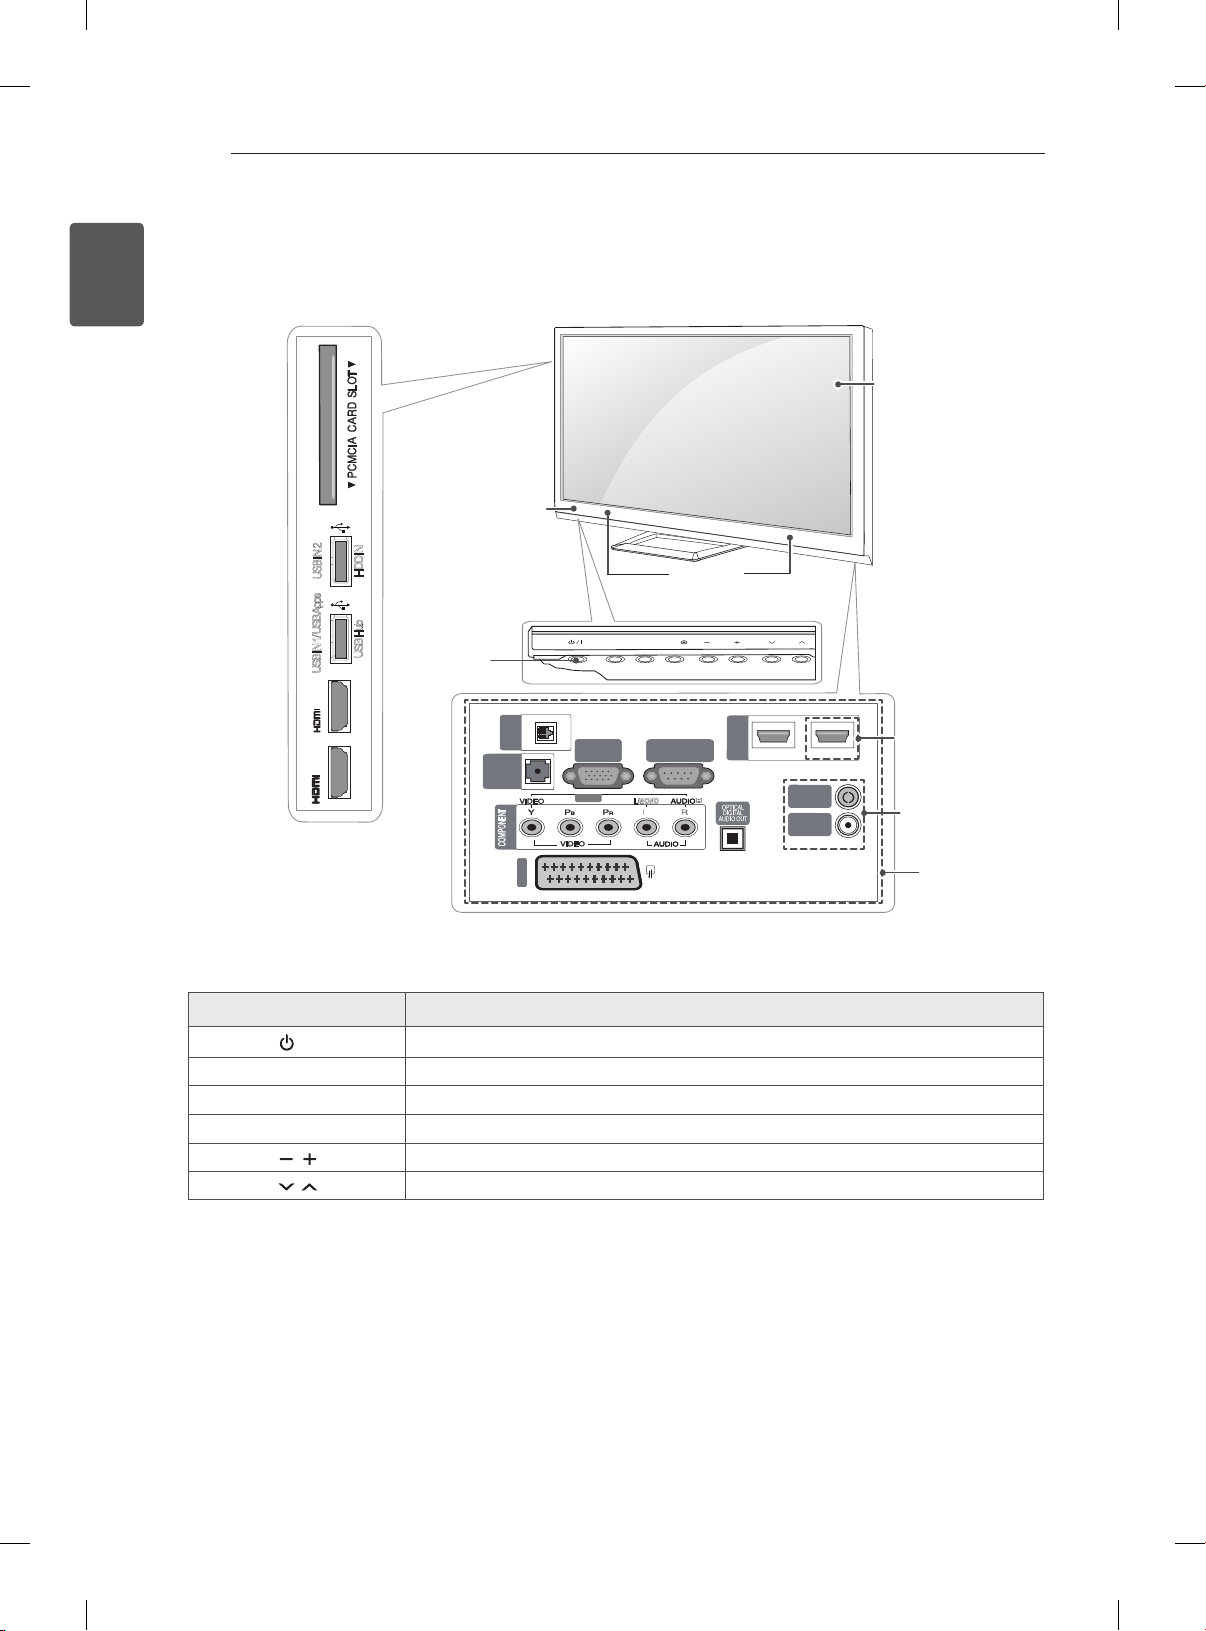
Parts and buttons
Remote control and
intelligent sensors
Screen
1
Power indicator
Speakers
Buttons
Except for
PM47**
Antenna cable
socket
Connection panel
Button Description
/
I
Turns the power on or off.
INPUT Changes the input source.
SETTINGS
ꔉ
OK
Accesses the main menus, or saves your input and exits the menus.
Selects the highlighted menu option or confirms an input.
Adjusts the volume level.
Scrolls through the saved programmes.
1 Intelligent sensor - Adjusts the image quality and brightness based on the surrounding environment.
2 Antenna cable socket - The Antenna cable socket may differ from the model.
2
Page 23
ASSEMBLING AND PREPARING
17
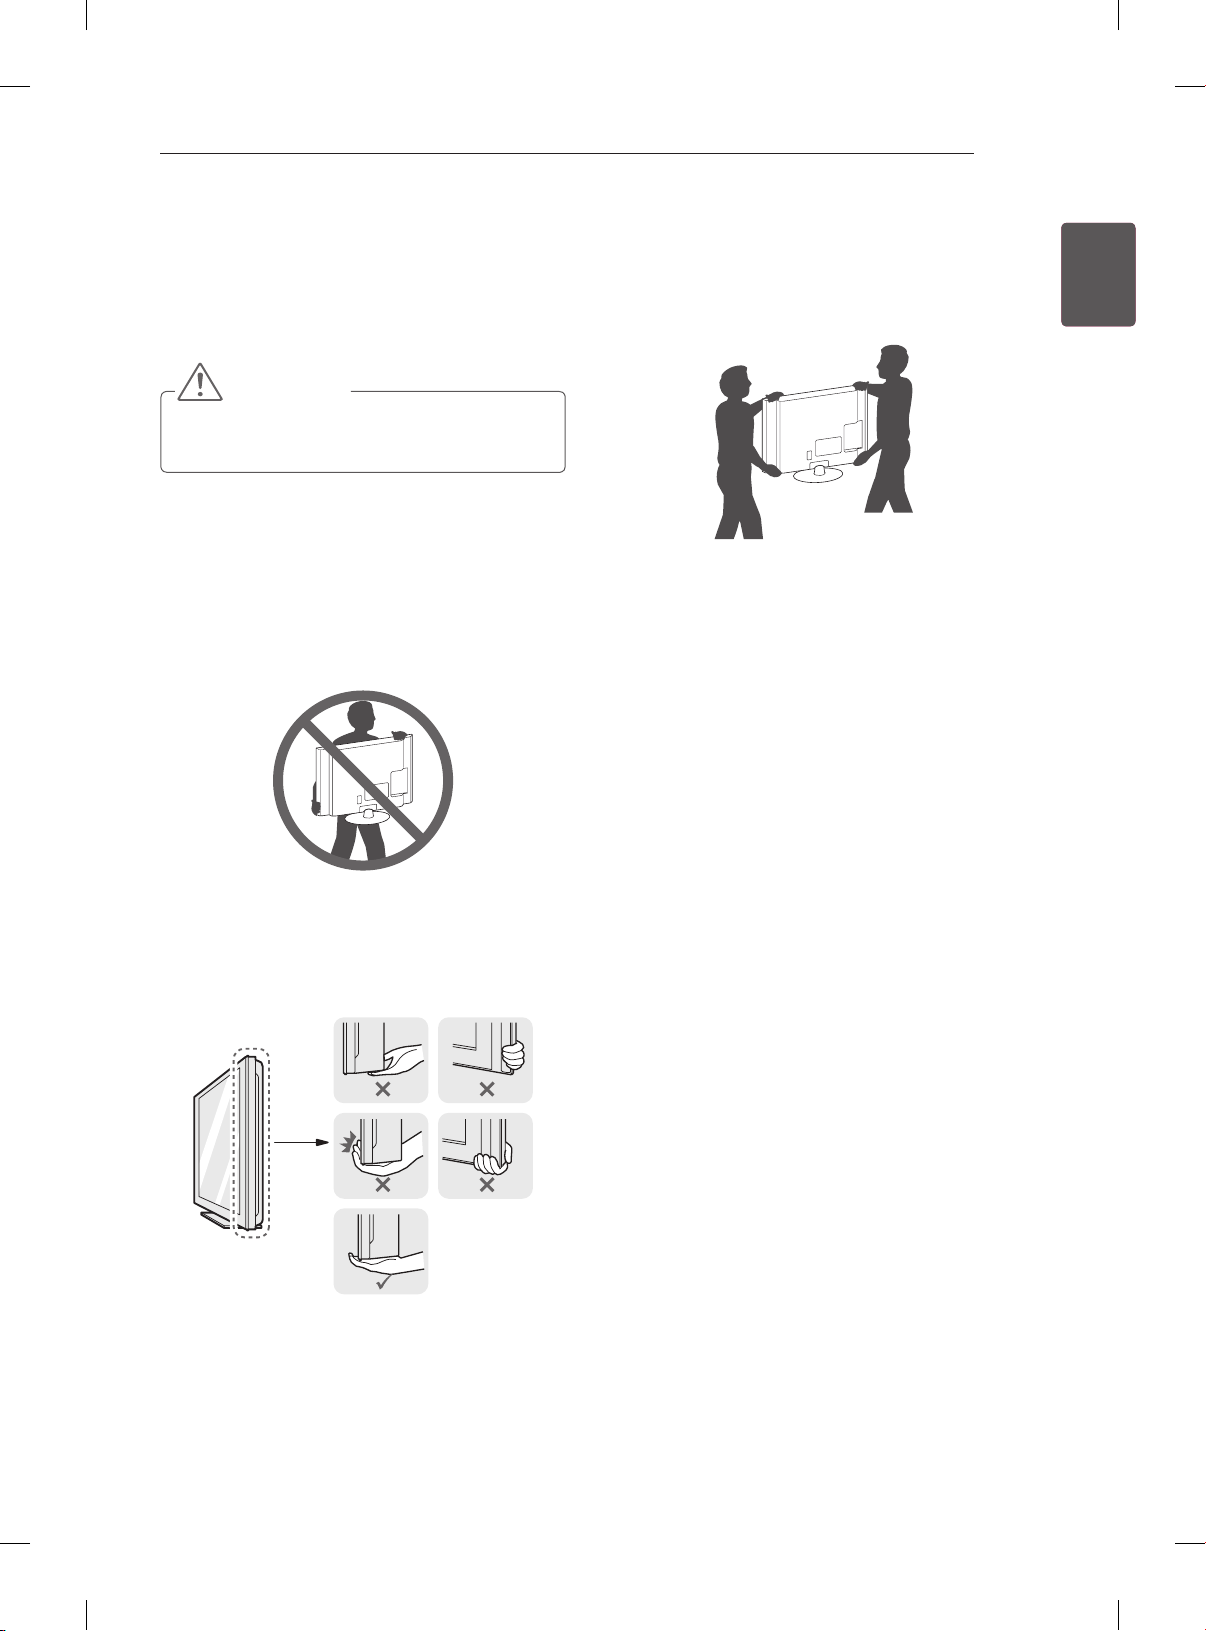
Lifting and moving the TV
Please note the following advice to prevent the
TV from being scratched or damaged and for safe
transportation regardless of its type and size.
CAUTION
yAvoid touching the screen at all times, as
this may result in damage to the screen.
yIt is recommended to move the TV in the box
or packing material that the TV originally came
in.
yBefore moving or lifting the TV, disconnect the
power cord and all cables.
yWhen holding the TV, the screen should face
away from you to avoid damage.
yWhen transporting a large TV, there should be
at least 2 people.
yWhen transporting the TV by hand, hold the TV
as shown in the following illustration.
yWhen transporting the TV, do not expose the
TV to jolts or excessive vibration.
yWhen transporting the TV, keep the TV upright,
never turn the TV on its side or tilt towards the
left or right.
ENGENGLISH
yHold the top and bottom of the TV frame rmly.
Make sure not to hold the transparent part,
speaker, or speaker grill area.
Page 24
ASSEMBLING AND PREPARING
18
ENGLISH
ENG
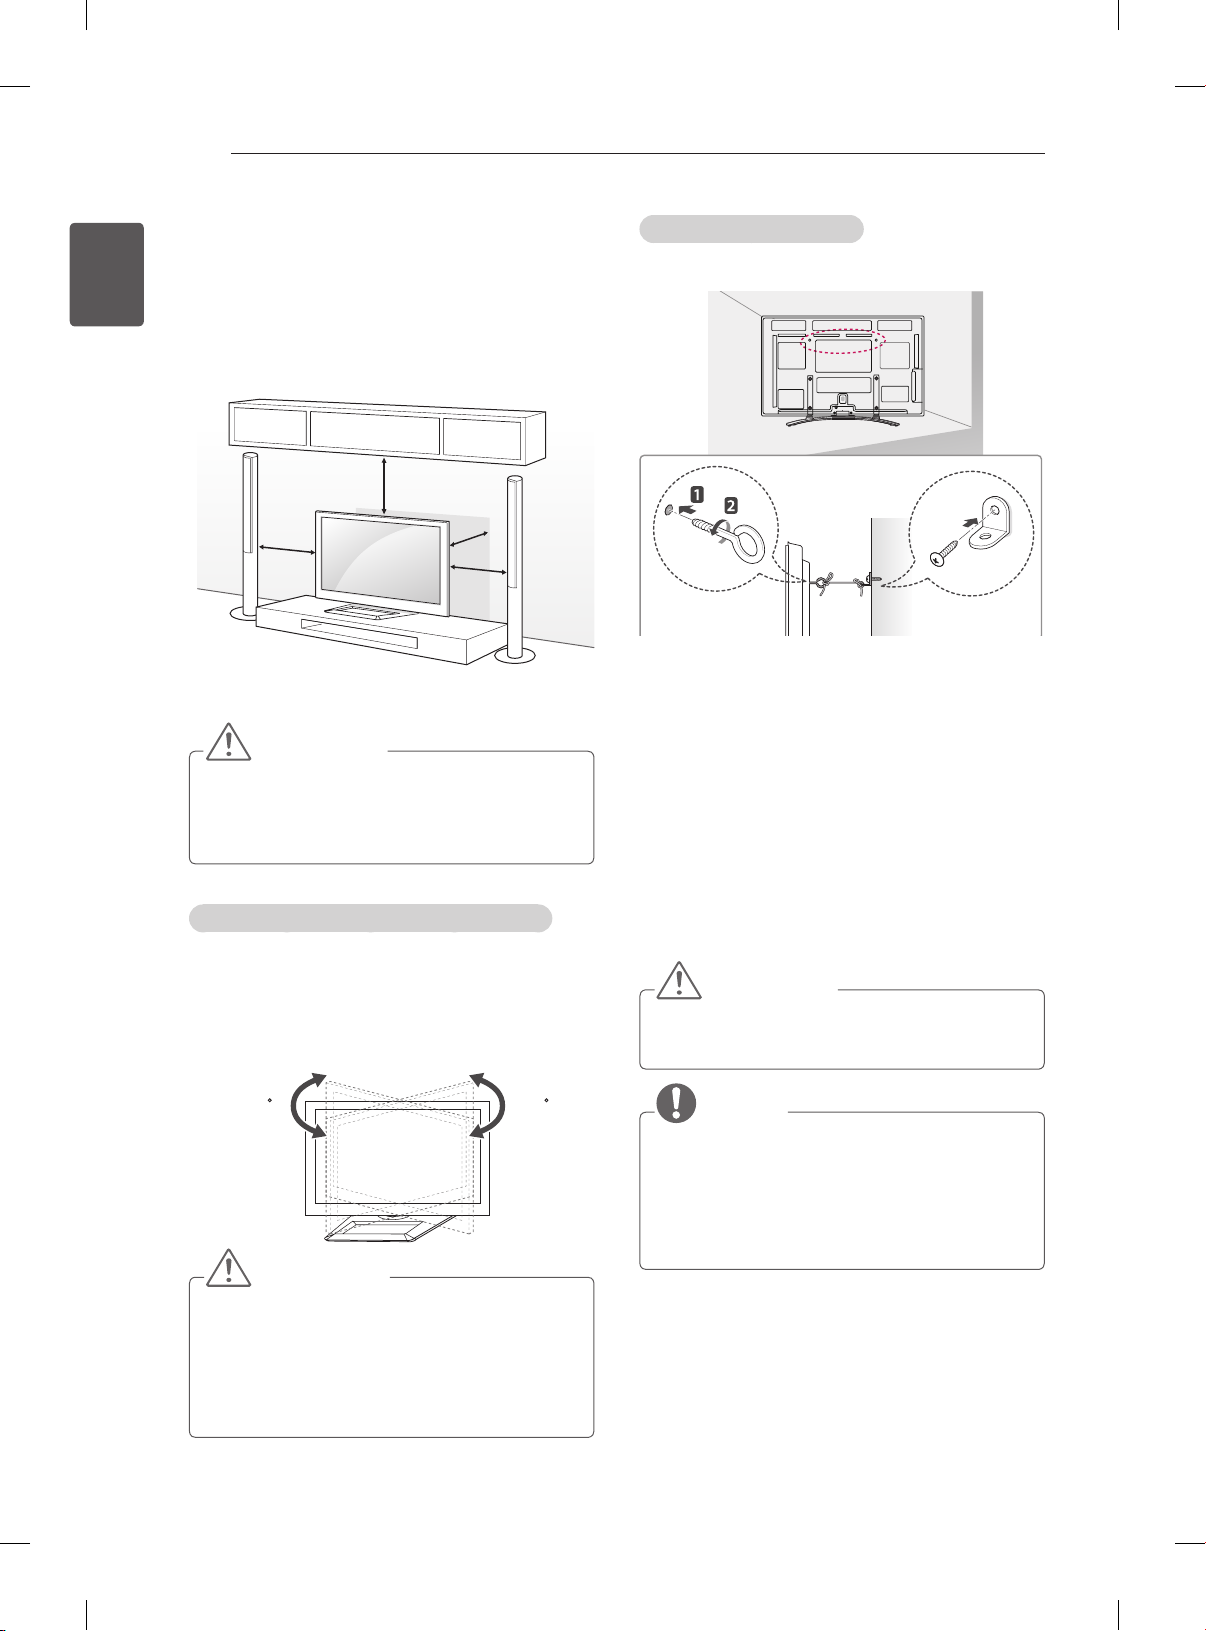
Mounting on a table
1 Lift and tilt the TV into its upright position on a
table.
- Leave a 10 cm (minimum) space from the
wall for proper ventilation.
10 cm
10 cm
2 Connect the power cord to a wall outlet.
CAUTION
yDo not place the TV near or on sources
of heat, as this may result in fire or other
damage.
Adjusting the angle of the TV to suit view
(This feature is not available for all models.)
Adjusting the angle of the TV to suit view
Swivel 20 degrees to the left or right and adjust the
angle of the TV to suit your view.
10 cm
10 cm
Securing the TV to a wall
(This feature is not available for all models.)
1 Insert and tighten the eye-bolts, or TV brackets
and bolts on the back of the TV.
- If there are bolts inserted at the eye-bolts
position, remove the bolts first.
2 Mount the wall brackets with the bolts to the
wall.
Match the location of the wall bracket and the
eye-bolts on the rear of the TV.
3 Connect the eye-bolts and wall brackets tightly
with a sturdy rope.
Make sure to keep the rope horizontal with the
at surface.
CAUTION
yMake sure that children do not climb on or
hang on the TV.
20
20
CAUTION
When adjusting the angle of the product,
watch out for your fingers.
»
Personal injury may occur if hands or fingers
are pinched. If the product is tilted too much,
it may fall, causing damage or injury.
NOTE
yUse a platform or cabinet that is strong and
large enough to support the TV securely.
yBrackets, bolts and ropes are not provided.
You can obtain additional accessories from
your local dealer.
Page 25
ASSEMBLING AND PREPARING
A
B
19
Mounting on a wall
Attach an optional wall mount bracket at the rear
of the TV carefully and install the wall mount
bracket on a solid wall perpendicular to the
oor. When you attach the TV to other building
materials, please contact qualied personnel.
LG recommends that wall mounting be performed
by a qualied professional installer.
10 cm
10 cm
10 cm
10 cm
Make sure to use screws and wall mount bracket
that meet the VESA standard. Standard
dimensions for the wall mount kits are described in
the following table.
Separate purchase(Wall Mounting Bracket)
Model 42/50PM47**
50PM67**
50PM68**
50PM97**
VESA (A x B) 400 x 400 600 x 400
Standard screw M6 M8
Number of
screws
Wall mount
bracket
4 4
PSW400B,
PSW400BG
60PM67**
60PM68**
60PM97**
PSW600B,
PSW600BG
CAUTION
yDisconnect the power first, and then move
or install the TV. Otherwise electric shock
may occur.
yIf you install the TV on a ceiling or slanted
wall, it may fall and result in severe injury.
Use an authorised LG wall mount and
contact the local dealer or qualified
personnel.
yDo not over tighten the screws as this may
cause damage to the TV and void your
warranty.
yUse the screws and wall mounts that meet
the VESA standard. Any damages or injuries
by misuse or using an improper accessory
are not covered by the warranty.
NOTE
yUse the screws that are listed on the VESA
standard screw specifications.
yThe wall mount kit includes an installation
manual and necessary parts.
yThe wall mount bracket is not provided. You
can obtain additional accessories from your
local dealer.
yThe length of screws may differ depending
on the wall mount. Make sure to use the
proper length.
yFor more information, refer to the manual
supplied with the wall mount.
ENGENGLISH
Page 26
REMOTE CONTROL
INFO
APP/
APP/
APP/
ORANGE
20
ENGLISH
ENG
REMOTE CONTROL
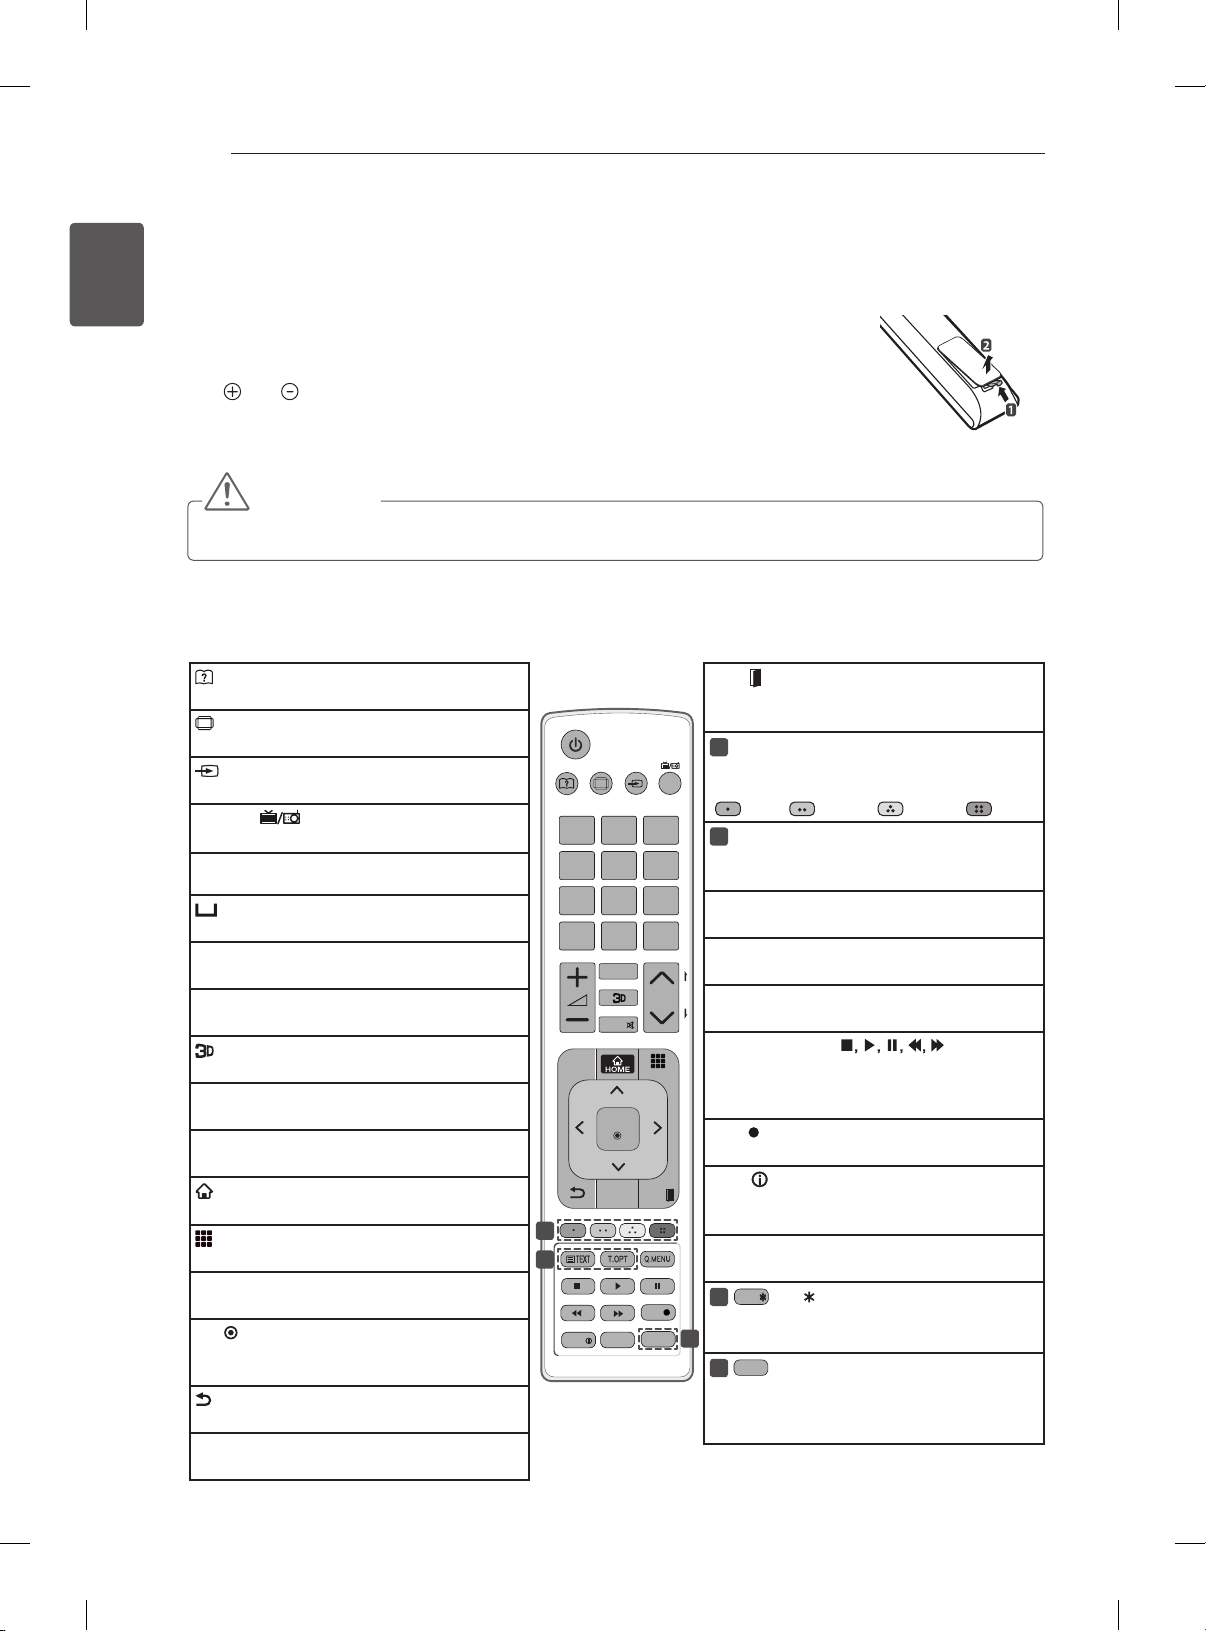
The descriptions in this manual are based on the buttons on the remote control.
Please read this manual carefully and use the TV correctly.
To replace batteries, open the battery cover, replace batteries (1.5 V AAA) matching
the and ends to the label inside the compartment, and close the battery cover.
To remove the batteries, perform the installation actions in reverse.
CAUTION
yDo not mix old and new batteries, as this may damage the remote control.
Make sure to point the remote control toward the remote control sensor on the TV.
(User Guide)
Sees user-guide.
RATIO
Resizes an image.
INPUT
Changes the input source.
TV/RAD
Selects Radio, TV and DTV programme.
LIST
Accesses the saved programme list.
(Space)
Opens an empty space on the screen keyboard.
Q.VIEW
Returns to the previously viewed programme.
FAV
Accesses your favourite programme list.
Used for viewing 3D video.
PAGE
Moves to the previous or next screen.
SETTINGS
Accesses the main menus.
HOME
Accesses the Home menus.
MY APPS
Shows the list of Apps.
1
2
Navigation buttons (up/down/left/right)
Scrolls through menus or options.
OK
Selects menus or options and confirms your
input.
(Back)
Returns to the previous level.
GUIDE
Shows programme guide.
RATIO INPUT
1
.,;@2 abc3 def
4
ghi5 jkl6 mno
7
pqrs8 tuv
LIST
0
FAV
MUTE
SETTINGS
OK
GUIDE
LIVE TV
AD
INFO
[
9
Q.VIEW
MY APPS
EXIT
SUBTITLE
REC
EXIT
Clears all on-screen displays and return to TV
viewing.
1
Colour buttons
These access special functions in some
TV/
RAD
menus.
( : Red, : Green, : Yellow, : Blue)
2
TELETEXT BUTTONS
These buttons are used for teletext.
For further details, see the ‘Teletext’ section.
wxyz
SUBTITLE
Recalls your preferred subtitle in digital mode.
Q. MENU
Accesses the quick menus.
P
A
G
LIVE TV
P
E
Return to LIVE TV.
Control buttons ( )
Controls the Premium contents, DVR or Smart
Share menus or the SIMPLINK compatible
devices (USB or SIMPLINK or DVR).
REC
Uses to adjust DVR menu.
Views the information of the current
programme and screen.
AD
Switches the Audio Description On or Off.
3
Select the MHP TV menu source.
(Only Italy) (Depending on model)
3
@
3
Direct access to your internet portal of
entertainment and news services developed
by Orange. (Only France)
Page 27
MAGIC REMOTE CONTROL FUNCTIONS
21
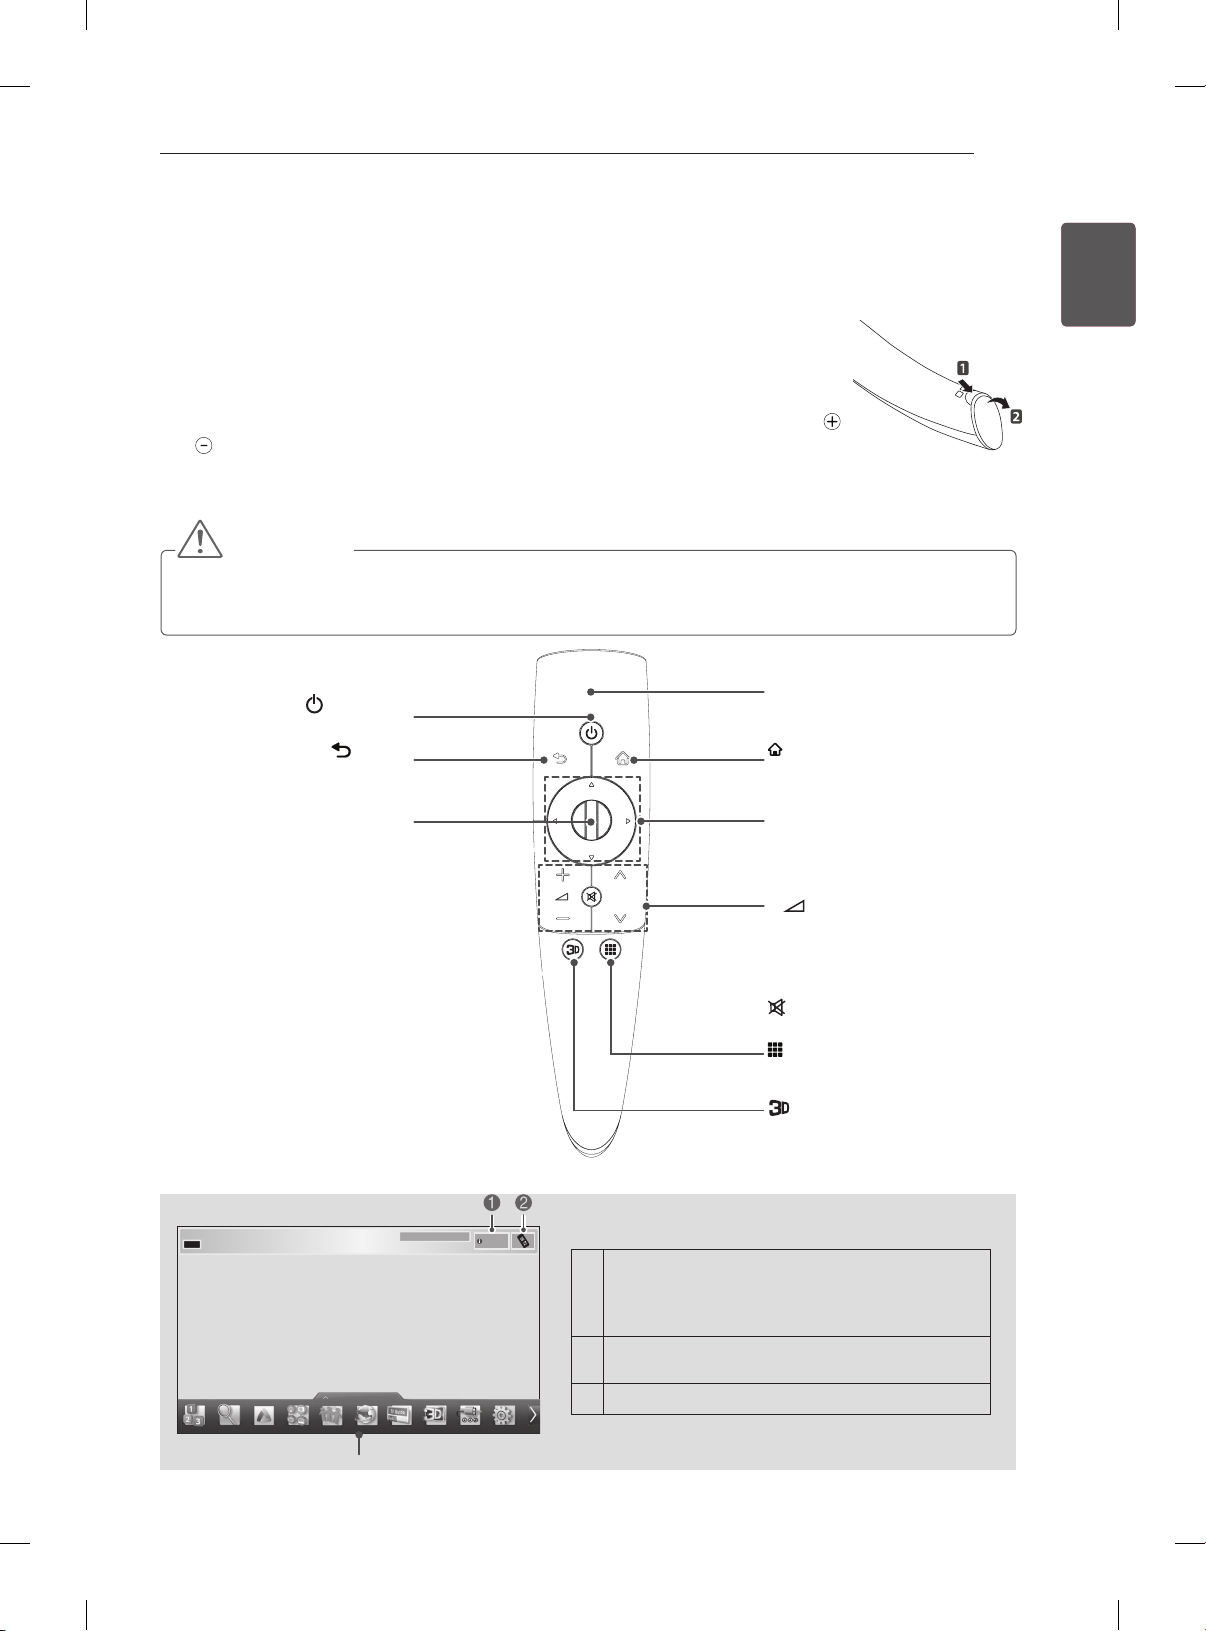
MAGIC REMOTE CONTROL FUNCTIONS
This item is not included for all models.
When the message “Magic Remote Control battery is low. Change the battery.” is
displayed, replace the battery.
To replace batteries, open the battery cover, replace batteries (1.5 V AA) matching
and ends to the label inside the compartment, and close the battery cover. Be sure
to point the remote control toward the remote control sensor on the TV.
To remove the batteries, perform the installation actions in reverse.
CAUTION
yDo not mix old and new batteries, as this may damage the remote control.
yDo not need Magic remote Dongle to operate the magic remote control. The Receiver is built into the TV.
Pointer (RF transmitter)
(POWER)
Turns the TV on or off.
BACK
Returns to the previous level.
Wheel(OK)
Selects menus or options and
confirms your input.
Scrolls through the saved
programmes.
If you press the navigation
button while moving the pointer
on the screen, the pointer
disappears, and the Magic
Remote Control works as a
regular remote control.
To display the pointer again,
shake the Magic Remote
Control from side to side.
BACK
HOME
P
MY APPS
Blinks the light when operating.
HOME
Accesses the Home menu.
Navigation buttons
(up/down/left/right)
Scrolls through menus or options.
+ -
Adjusts the volume level.
ꕌPꕍ
Scrolls through the saved
programmes or channels.
MUTE
Mutes all sounds.
MY APPS
Shows the list of Apps.
ENGENGLISH
11-1 Brief Info Title Test...
My Apps
3
Info.
Used for viewing 3D video.
If you press Wheel(OK) on the Magic Remote
Control, the following screen appears.
1
Shows information about the current
programme and screen.
Pressing this button will display number keypad
2
which you can select programme number.
You can select My Apps Menu.
3
Page 28
MAGIC REMOTE CONTROL FUNCTIONS
HOME
22
ENGLISH
ENG
Registering Magic Remote
Control
It is necessary to ‘pair’ (register) the magic remote
control to your TV before it will work.
How to register the Magic Remote Control
1 To register automatically,
turn the TV on and press the
Wheel(OK) button. When
registration is completed, the
completion message appears
on the screen.
2 If registration fails, turn the TV
off and back on, then press
the Wheel(OK) button to
complete registration.
How to re-register the Magic Remote Control
1 Press and hold the BACK
BACK
HOME
and HOME buttons together
for 5 seconds to reset, then
register it by following “How
to register the Magic Remote
Control” above.
2 To re-register the Magic
Remote Control, press and
hold the BACK button for 5
seconds toward the TV. When
registration is completed, the
completion message appears
on the screen.
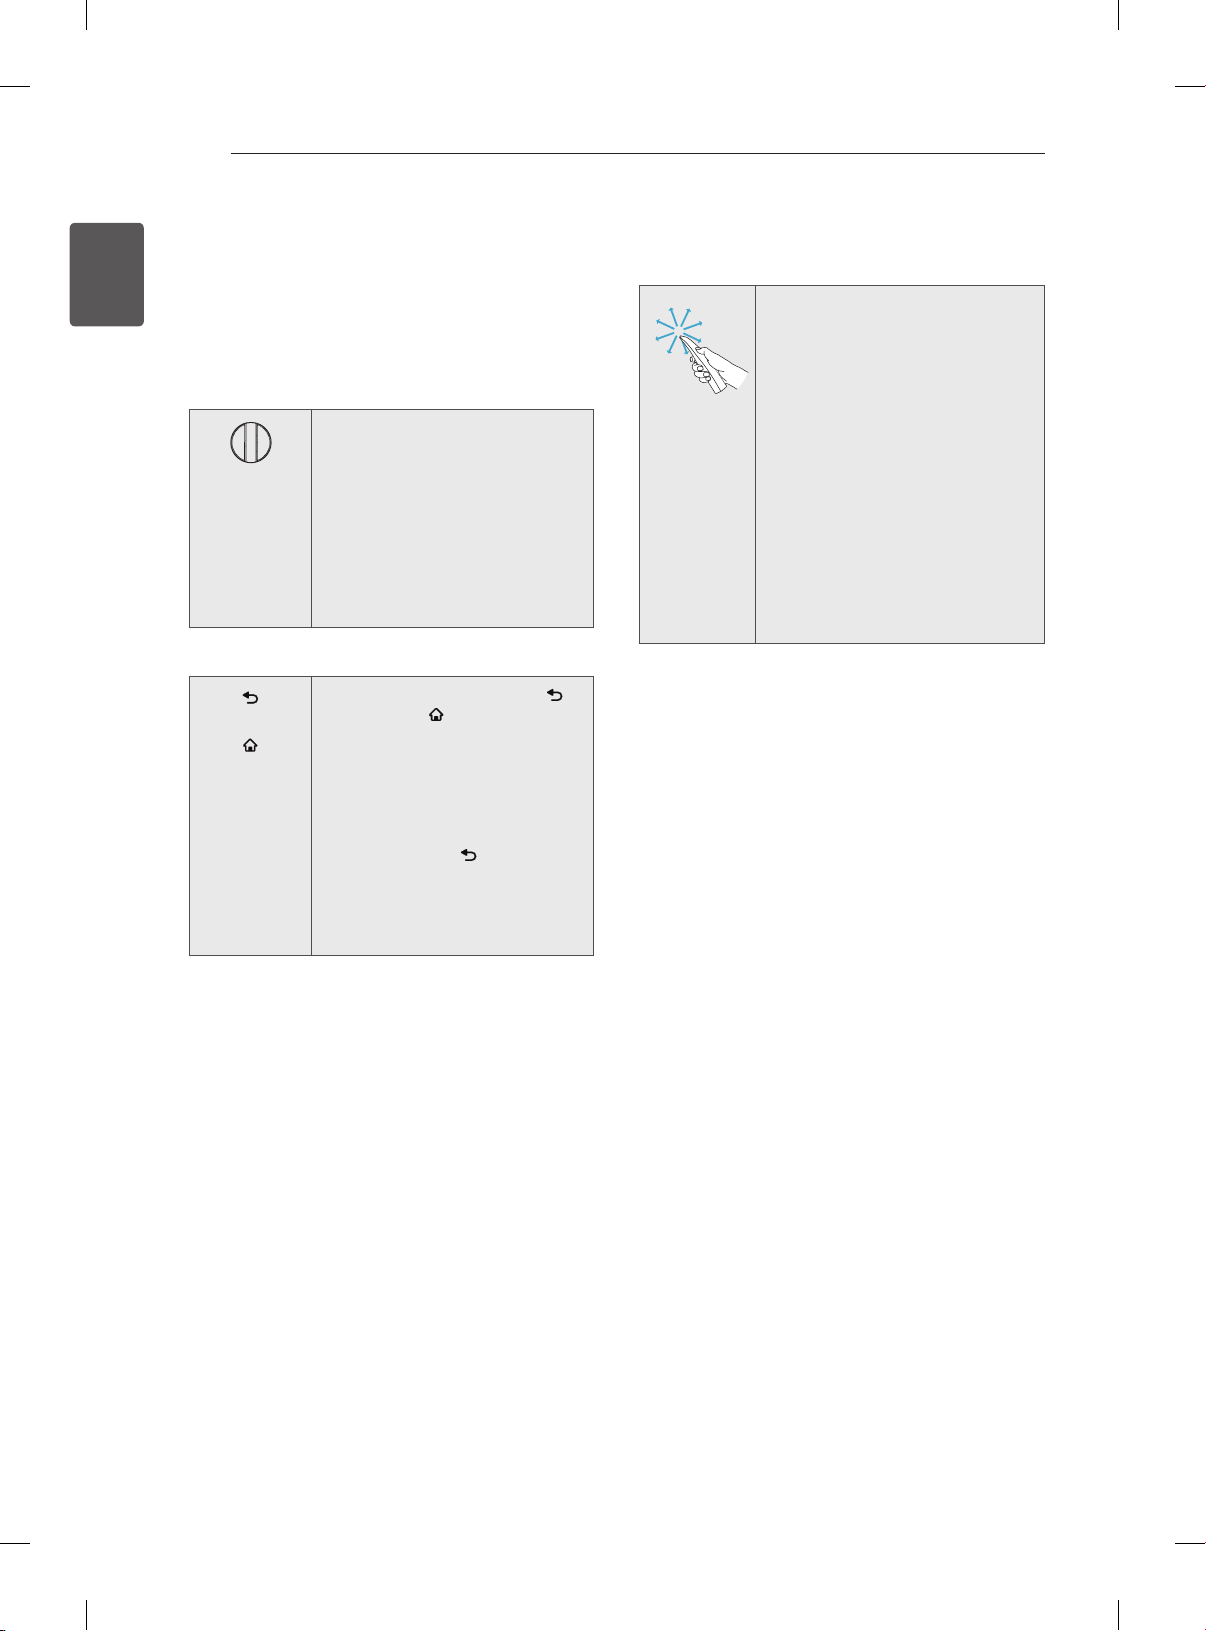
How to use Magic Remote
Control
1 If the pointer disappears, move
the remote control slightly
to left or right. Then, it will
automatically appear on the
screen.
»
If the pointer has not been
used for a certain period of
time, it will disappear.
2 You can move the pointer by
aiming the Pointer Receiver of
the remote control at your TV
then move it left, right, up or
down.
»
If the pointer does not work
properly, leave the remote
control for 10 seconds then
use it again.
Precautions to Take when
Using the Magic Remote
Control
Use the remote control within the maximum
y
communication distance (10 m). Using the
remote control beyond this distance, or
with an object obstructing it, may cause a
communication failure.
A communication failure may occur due to
y
nearby devices. Electrical devices such as
a microwave oven or wireless LAN product
may cause interference, as these use the
same bandwidth (2.4 GHz) as the Magic
Remote Control.
The Magic Remote Control may be damaged
y
or may malfunction if it is dropped or receives
a heavy impact.
Take care not to bump into nearby furniture
y
or other people when using the Magic
Remote Control.
Manufacturer and installer cannot provide
y
service related to human safety as the
applicable wireless device has possibility of
electric wave interference.
It is recommended that an Access Point (AP)
y
be located more than 1 m away from the
TV. If the AP is installed closer than 1 m, the
Magic Remote Control may not perform as
expected due to frequency interference.
Page 29

USING THE USER GUIDE
23
USING THE USER GUIDE
User Guide allows you to more easily access the detailed TV information.
1 Press the HOME button to access the
HOME menu.
2 Select User Guide and press Wheel(OK).
Input List Settings Live TV
Search
Internet3DLG Smart W
Programme Guide User Guide
Recent List
User Guide
NOTE
yYou can also access the User Guide by
pressing (User Guide) in the remote
control.
User Guide
1
PROGRAMME Setting
PICTURE, SOUND Setting
OPTION
LG SMART Function
Advanced Function
Information
3
To use input device
To use Energy Saving feature
To set time options
To set TV lock options
To set language
Disabled Assistance
To set Magic Remote Control
2
4
User Guide
PROGRAMME Setting
PICTURE, SOUND Setting
OPTION
LG SMART Function
Advanced Function
Information
HOME Settings OPTION Language
Selects Menu Language and Audio Language displayed on the screen.
Menu Language
Audio Language
Subtitle
Language
Try Now Close
Shows the description of the selected menu.
1
You can use ꕌ/ꕍto move between pages.
Moves to the selected menu directly from the
2
User Guide.
Zooms in or out the screen.
3
1
OPTION > To set language
HOME Settings OPTION Language
Selects Menu Language and Audio Language displayed on the screen.
Menu Language
Selects a language for the display text.
[In Digital Mode Only]
Audio Language
When watching a digital broadcast containing several
audio languages, you can select the language you want.
[In Digital Mode Only]
Use the Subtitle function when two or more subtitle
Subtitle
languages are broadcast.
Language
✎ If subtitle data in a selected language is not broadcast,
the default language subtitle will be displayed.
Try Now Close
2
Selects a language for the display text.
[In Digital Mode Only]
When watching a digital broadcast containing several
audio languages, you can select the language you want.
[In Digital Mode Only]
Use the Subtitle function when two or more subtitle
languages are broadcast.
✎ If subtitle data in a selected language is not broadcast,
the default language subtitle will be displayed.
Zoom Out
3
Zoom In
3
ENGENGLISH
Shows the current watching programme or
1
input source screen.
Allows to select the category you want.
2
Allows to select the item you want.
3
You can use ꕌ/ꕍ to move between pages.
Allows to browse the description of the
4
function you want from the index.
Page 30
MAINTENANCE / TROUBLESHOOTING
24
ENGLISH
ENG
MAINTENANCE
Cleaning your TV
Clean your TV regularly to keep the best performance and to extend the product lifespan.
CAUTION
yMake sure to turn the power off and disconnect the power cord and all other cables first.
yWhen the TV is left unattended and unused for a long time, disconnect the power cord from the wall
outlet to prevent possible damage from lightning or power surges.
Screen, frame, cabinet and stand
yTo remove dust or light dirt, wipe the surface with a dry, clean, and soft cloth.
yTo remove major dirt, wipe the surface with a soft cloth dampened in clean water or a diluted mild
detergent. Then wipe immediately with a dry cloth.
CAUTION
yAvoid touching the screen at all times, as this may result in damage to the screen.
yDo not push, rub, or hit the screen surface with your fingernail or a sharp object, as this may result in
scratches and image distortions.
yDo not use any chemicals as this may damage the product.
yDo not spray liquid onto the surface. If water enters the TV, it may result in fire, electric shock, or
malfunction.
Power cord
Remove the accumulated dust or dirt on the power cord regularly.
TROUBLESHOOTING
Problem Solution
Cannot control the
TV with the remote
control.
No image display
and no sound is
produced.
The TV turns off
suddenly.
When connecting to
the PC (RGB/HDMI
DVI), ‘No signal’ or
‘Invalid Format’ is
displayed.
yCheck the remote control sensor on the product and try again.
yCheck if there is any obstacle between the product and the remote control.
yCheck if the batteries are still working and properly installed ( to , to ).
yCheck if the product is turned on.
yCheck if the power cord is connected to a wall outlet.
yCheck if there is a problem in the wall outlet by connecting other products.
yCheck the power control settings. The power supply may be interrupted.
yCheck if the Auto sleep feature is activated in the Time settings.
yIf there is no signal while the TV is on, the TV will turn off automatically after 15
minutes of inactivity.
yTurn the TV off/on using the remote control.
yReconnect the RGB/HDMI cable.
yRestart the PC with the TV on.
Page 31

EXTERNAL CONTROL DEVICE SETUP / SPECIFICATIONS
25
EXTERNAL CONTROL DEVICE SETUP
To obtain the external control device setup information, please visit www.lg.com
SPECIFICATIONS
Product specications may be changed without prior notice due to upgrade of product functions.
Wireless LAN module(TWFM-B003D) specification
Standard IEEE802.11a/b/g/n
2400 to 2483.5 MHz
Frequency Range
Modulation CCK / OFDM / MIMO
Output Power
(Typical)
Data rate
Antenna Gain
(Typical)
Occupied bandwidth
Because band channel used by the country could be different, the user can not change or adjust the
y
operating frequency and this product is set for the regional frequency table.
5150 to 5250 MHz
5725 to 5850 MHz
802.11a: 11 dBm
802.11b: 15 dBm
802.11g: 13 dBm
802.11n - 2.4GHz: 13 dBm
802.11n - 5GHz: 13 dBm
802.11a/g: 54 Mbps
802.11b: 11 Mbps
802.11n: 300 Mbps
2400 to 2483.5 MHz: -2.5dBi
5150 to 5250 MHz: -2.2dBi
5725 to 5850 MHz: -2.9dBi
802.11a/b/g: HT20
802.11n: HT20/40
ENGENGLISH
Bluetooth module (BM-LDS302) specification
Standard Bluetooth Version 3.0
Frequency Range 2400 ~ 2483.5 MHz
Output Power (Max.) 10 dBm or lower
Data rate (Max.) 3 Mbps
Communication Distance Line of Open Sight approx. 10 m
Page 32

Page 33

BENUTZERHANDBUCH
PLASMA-TV
Bitte lesen Sie dieses Handbuch aufmerksam durch, bevor Sie
Ihr Gerät zum ersten Mal verwenden, und bewahren Sie es zur
späteren Verwendung auf.
www.lg.com
Page 34

INHALTSVERZEICHNIS
2
INHALTSVERZEICHNIS
DEUTSCH
DEU
3 LIZENZEN
3 ANMERKUNG ZU OPEN SOURCE-
4 SICHERHEITSHINWEISE
10
12 INSTALLATIONSVERFAHREN
12 MONTAGE UND VORBEREITUNG
12 Auspacken
15 Separat erhältlich
16 Teile und Tasten
17 Anheben und Bewegen des TV-Gerätes
18 Montage auf einem Tisch
19 Wandmontage
20 FERNBEDIENUNG
21 TASTENFUNKTIONEN DER MAGIC-
22 Registrieren der Magic-Fernbedienung
22 So wird die Magic-Fernbedienung
22 Vorsichtsmaßnahmen bei der Verwendung
23 DAS BENUTZERHANDBUCH
SOFTWARE
- Wiedergabe von 3D-Material (Nur 3D-Modelle)
FERNBEDIENUNG
verwendet
der Magic-Fernbedienung
VERWENDEN
WARNUNG
yBei Nichtbeachtung drohen schwere
Verletzungen, Unfälle und Tod.
24 WARTUNG
24 Reinigung des TV-Gerätes
24 - Bildschirm, Rahmen, Gehäuse und
Standfuß
24 - Netzkabel
24 FEHLERBEHEBUNG
25 EINRICHTUNG DER EXTERNEN
STEUERUNG
25 TECHNISCHE DATEN
VORSICHT
yBei Nichtbeachtung drohen leichte
Verletzungen oder eine Beschädigung des
Produkts.
HINWEIS
yDer Hinweis hilft Ihnen dabei, das Produkt
zu verstehen und sicher zu benutzen. Bevor
Sie das Produkt zum ersten Mal verwenden,
lesen Sie den Hinweis bitte aufmerksam
durch.
Page 35

LIZENZEN / ANMERKUNG ZU OPEN-SOURCE-SOFTWARE
LIZENZEN
Die unterstützten Lizenzen sind von Modell zu Modell verschieden. Weitere Informationen zu den Lizenzen
erhalten Sie unter www.lg.com.
Hergestellt unter Lizenz von Dolby Laboratories. „Dolby“ und das Doppel-D-Symbol
sind Marken der Firma Dolby Laboratories.
HDMI, das HDMI Logo und High-Definition Multimedia Interface sind Markenzeichen
oder eingetragene Markenzeichen von HDMI Licensing LLC.
ÜBER DIVX-VIDEO: DivX® ist ein digitales Videoformat der Firma DivX, LLC, einem
Tochterunternehmen der Rovi Corporation. Dieses Gerät ist ofziell DivX Certied®
zur Wiedergabe von DivX-Videos. Weitere Informationen und Software-Tools zum
Konvertieren von Dateien in das DivX-Format nden Sie unter divx.com.
3
DEUDEUTSCH
ÜBER DIVX VIDEO-ON-DEMAND: Dieses DivX Certied® Gerät muss registriert
werden, damit Sie gekaufte DivX Video-on-Demand-Inhalte (VOD) wiedergeben
können. Um einen Registrierungscode zu erhalten, rufen Sie im Einstellungsmenü
des Gerätes den Bereich „DivX VOD“ auf. Weitere Informationen darüber, wie Sie
Ihre Registrierung abschließen, nden Sie unter vod.divx.com.
„DivX Certied® zur Wiedergabe von DivX®-Videos bis zu HD 1080p, einschließlich
Premium-Inhalten.“
„DivX®, DivX Certied® sowie die entsprechenden Logos sind Marken der Rovi
Corporation oder ihrer Tochterunternehmen und werden unter Lizenz verwendet.“
„Geschützt durch eines oder mehrere der folgenden US-Patente:
7,295,673; 7,460,668; 7,515,710; 7,519,274”
Hergestellt unter Lizenz unter den US-Patentnummern: 5,956,674; 5,974,380;
6,487,535 und andere US- und weltweite Patente erteilt und angemeldet. DTS, das
Symbol und DTS sowie das Symbol sind eingetragene Marken und DTS 2.0+Digital
Out ist eine Marke von DTS, Inc. Das Produkt umfasst Software. © DTS, Inc. Alle
Rechte vorbehalten.
ANMERKUNG ZU OPEN SOURCE-SOFTWARE
Den Quellcode unter GPL, LGPL, MPL sowie weitere Open-Source-Lizenzen, der in diesem Produkt
enthalten ist, können Sie unter http://opensource.lge.com herunterladen.
Neben dem Quellcode stehen dort noch alle Lizenzbedingungen, auf die verwiesen wird,
Garantieausschlüsse sowie Urheberrechtshinweise zum Download bereit.
LG Electronics stellt Ihnen gegen eine Gebühr (für Distribution, Medien, Versand und Verwaltung) auch
den Quellcode auf CD-ROM bereit. Wenden Sie sich per E-Mail an LG Electronics: opensource@lge.com.
Dieses Angebot ist drei (3) Jahre ab Kaufdatum des Produkts gültig.
Page 36

SICHERHEITSHINWEISE
4
SICHERHEITSHINWEISE
DEUTSCH
DEU
Bevor Sie das Produkt zum ersten Mal verwenden, lesen Sie diese Sicherheitshinweise bitte
aufmerksam durch.
WARNUNG
Stellen Sie das TV-Gerät mit Fernsteuerung nicht in folgenden Umgebungen auf:
y
- Unter direkter Sonneneinstrahlung
- In Bereichen mit hoher Luftfeuchtigkeit, wie z. B. einem Badezimmer
- In der Nähe von Hitzequellen, wie z. B. Öfen und anderen hitzeerzeugenden Ge-
- In der Nähe von Küchenzeilen oder Befeuchtern, wo das Gerät leicht Dampf
- In Bereichen, die Regen oder Wind ausgesetzt sind
- In der Nähe von Behältern mit Wasser, wie z. B. Vasen
Andernfalls kann es zu Bränden, Stromschlägen, Fehlfunktionen oder Produktverformungen kommen.
Schützen Sie das Gerät vor Staub.
y
Es besteht Brandgefahr.
Wenn Sie das Gerät vom Stromnetz trennen möchten, müssen Sie den Netzste-
y
cker aus der Steckdose ziehen. Dieser Stecker muss jederzeit gut zugänglich sein.
Berühren Sie den Netzstecker nicht mit nassen Händen. Wenn die Kontaktstifte
y
nass oder verstaubt sind, trocknen Sie den Netzstecker vollständig ab, bzw. befreien Sie ihn von Staub.
Feuchtigkeit erhöht die Gefahr eines tödlichen Stromschlags.
Stellen Sie sicher, dass das Stromkabel geerdet ist. (Außer bei Geräten, die nicht
y
geerdet sind.)
Bei Nichtbeachtung besteht die Gefahr von Verletzungen oder eines tödlichen
Stromschlags.
Das Stromkabel muss vollständig in die Steckdose eingesteckt werden.
y
Ist das Stromkabel nicht fest in die Steckdose eingesteckt, besteht Brandgefahr.
räten
oder Öl ausgesetzt sein kann
Das Stromkabel darf nicht mit heißen Gegenständen wie einem Heizkörper in Be-
y
rührung kommen.
Andernfalls bestehen Brandgefahr und die Gefahr von Stromschlägen.
Stellen Sie keinen schweren Gegenstand oder das Gerät selbst auf das Stromka-
y
bel.
Andernfalls kann es zu Bränden und Stromschlägen kommen.
Platzieren Sie das Antennenkabel zwischen dem Innen- und Außenbereich des
y
Gebäudes so, dass kein Regen hereinfließen kann.
Etwaiger Wassereintritt kann zu Schäden am Gerät und Stromschlag führen.
Falls das TV-Gerät an der Wand montiert wird, darf es nicht an den Strom- und
y
Signalkabeln auf der Rückseite des TV-Gerätes aufgehängt werden.
Anderenfalls besteht die Gefahr von Bränden oder Stromschlägen.
Page 37

Desiccant
SICHERHEITSHINWEISE
Schließen Sie nicht zu viele Elektrogeräte an einer einzelnen Steckdose an.
y
Andernfalls kann es aufgrund von Überhitzung zu Bränden kommen.
Lassen Sie das Gerät beim Anschluss eines externen Gerätes nicht fallen.
y
Andernfalls können Verletzungen verursacht oder das Gerät beschädigt werden.
Bewahren Sie das Trockengranulat und die Vinyl-Verpackung außerhalb der
y
Reichweite von Kindern auf.
Trockengranulat ist bei Verschlucken gesundheitsschädlich. Falls es verschluckt
wurde, Erbrechen herbeiführen und die Person ins nächste Krankenhaus bringen.
Außerdem besteht Erstickungsgefahr durch die Vinyl-Verpackung. Bewahren Sie
sie außerhalb der Reichweite von Kindern auf.
Achten Sie darauf, dass sich Kinder nicht an das TV-Gerät hängen oder daran
y
hochklettern.
Andernfalls kann das Gerät umfallen, wodurch schwere Verletzungen hervorgerufen werden können.
Leere Batterien müssen sicher entsorgt werden, um zu verhindern, dass Kinder sie
y
verschlucken.
Wenn ein Kind eine Batterie verschluckt hat, sofort den Arzt aufsuchen.
Berühren Sie das Ende des Netzkabels nicht mit einem leitenden Gegenstand (wie
y
einer Gabel), während das Netzkabel mit der Steckdose verbunden ist. Berühren
Sie das Netzkabel nicht, kurz nachdem Sie es mit der Steckdose verbunden haben.
Es besteht die Gefahr eines tödlichen Stromschlags.
(Abhängig vom Modell)
Bringen Sie keine entflammbaren Stoffe in die Nähe des Gerätes.
y
Bei unsachgemäßem Umgang mit entflammbaren Stoffen besteht Explosionsgefahr.
5
DEUDEUTSCH
Es dürfen keine Metallgegenstände wie Münzen, Haarnadeln, Besteck oder Draht
y
bzw. entzündliche Gegenstände wie Papier oder Streichhölzer in das Gerät gelangen. Achten Sie insbesondere auf Kinder.
Es besteht die Gefahr von Stromschlag, Brand oder Verletzung. Wenn ein Gegenstand in das Gerät gelangt, ziehen Sie das Stromkabel, und wenden Sie sich an
den Kundendienst.
Sprühen Sie kein Wasser auf das Produkt, und bringen Sie es nicht mit entzünd-
y
lichen Stoffen (Verdünnungsmittel oder Benzol) in Verbindung. Es besteht Stromschlag- und Brandgefahr.
Setzen Sie das Produkt keinen Schlägen und Stößen aus. Sorgen Sie dafür, dass
y
keine Gegenstände auf das Gerät oder den Bildschirm fallen.
Es besteht Verletzungsgefahr. Außerdem kann das Produkt beschädigt werden.
Berühren Sie das Produkt oder die Antenne nicht während eines Gewitters.
y
Es besteht die Gefahr eines tödlichen Stromschlags.
Im Falle eines Gasaustritts berühren Sie keinesfalls die Steckdose. Öffnen Sie
y
zum Lüften die Fenster.
Durch Funken können ein Brand oder Verbrennungen hervorgerufen werden.
Page 38

6
DEUTSCH
DEU
SICHERHEITSHINWEISE
Sie dürfen das Gerät nicht eigenmächtig auseinanderbauen, reparieren oder ver-
y
ändern.
Es besteht Stromschlag- und Brandgefahr.
Wenden Sie sich zur Überprüfung, Kalibrierung oder Reparatur an den Kundendienst.
Ziehen Sie in jedem der folgenden Fälle sofort den Netzstecker, und setzen Sie
y
sich mit Ihrem Kundendienst vor Ort in Verbindung.
- Das Gerät wurde einer Erschütterung ausgesetzt
- Das Gerät wurde beschädigt
- Fremdkörper sind in das Gerät gelangt
- Vom Gerät sind Rauch oder ungewöhnliche Gerüche ausgegangen
Dies kann Brand oder Stromschlag verursachen.
Ziehen Sie das Stromkabel aus der Steckdose, wenn das Gerät für längere Zeit
y
nicht verwendet wird.
Wenn das Gerät eingestaubt ist, besteht Brandgefahr. Ein Verschleiß der Isolation
kann zu Kriechverlust, Stromschlag oder Brand führen.
Achten Sie darauf, dass keine Flüssigkeit auf das Gerät spritzt oder tropft. Stellen
y
Sie keine Gegenstände, die Flüssigkeiten enthalten (z. B. Vasen), auf dem Gerät
ab.
Page 39

VORSICHT
5~7 times
Stellen Sie das Gerät nicht in der Nähe von Funkwellen auf.
y
SICHERHEITSHINWEISE
7
Der Abstand zwischen einer Außenantenne und Stromleitungen muss groß genug
y
sein, um eine Berührung der beiden zu verhindern, selbst wenn die Antenne herunterfällt.
Andernfalls besteht die Gefahr von Stromschlägen.
Stellen Sie das Produkt nicht auf unstabilen Regalen oder geneigten Oberflächen
y
auf. Vermeiden Sie außerdem Stellplätze, die vibrieren oder auf denen das Produkt
keinen sicheren Halt hat.
Andernfalls kann das Gerät herunter- oder umfallen, wodurch Verletzungen oder
Beschädigungen am Gerät verursacht werden können.
Wenn Sie das TV-Gerät auf einem Standfuß aufstellen, müssen Sie durch vor-
y
beugende Maßnahmen ein Umkippen verhindern. Andernfalls kann das TV-Gerät
umfallen, wodurch Verletzungen hervorgerufen werden können.
Wenn Sie das TV-Gerät an der Wand montieren, befestigen Sie eine VESA-Standardwandhalterung
y
(optional) an der Rückseite des Gerätes. Wenn Sie das TV-Gerät mit der optionalen Wandhalterung
montieren möchten, befestigen Sie diese sorgfältig, um ein Herunterfallen zu vermeiden.
Verwenden Sie nur vom Hersteller empfohlenes Zubehör.
y
Konsultieren Sie bei der Installation der Antenne eine qualifizierte Fachkraft.
y
Andernfalls besteht Brandgefahr bzw. die Gefahr von Stromschlägen.
Wir empfehlen einen Abstand vom Gerät, der mindestens dem 5- bis 7-Fachen der
y
Bildschirmdiagonale entspricht.
Das Fernsehen über einen langen Zeitraum hinweg kann zu Seheintrübung führen.
DEUDEUTSCH
Verwenden Sie nur den angegebenen Batterietyp.
y
Andernfalls könnte die Fernbedienung beschädigt werden.
Alte und neue Batterien dürfen nicht zusammen verwendet werden.
y
Andernfalls könnten die Batterien überhitzen und auslaufen.
Es dürfen sich keine Gegenstände zwischen der Fernbedienung und dem Sensor
y
befinden.
Das Signal von der Fernbedienung kann durch Sonnenlicht oder andere starke
y
Lichteinstrahlung gestört werden. Verdunkeln Sie in diesem Fall den Raum.
Achten Sie beim Anschluss von externen Geräten, wie z. B. Videospielkonsolen,
y
darauf, dass die Anschlusskabel lang genug sind.
Ansonsten kann das Gerät umfallen, wodurch Verletzungen oder Beschädigungen
am Gerät verursacht werden können.
Page 40

8
DEUTSCH
DEU
SICHERHEITSHINWEISE
Schalten Sie das Gerät niemals ein oder aus, indem Sie den Stecker aus der
y
Steckdose ziehen. (Verwenden Sie das Stromkabel nicht als Ein- und Aus-Schalter.)
Ein mechanischer Defekt oder Stromschlag können die Folge sein.
Folgen Sie den unten stehenden Installationsanweisungen, um ein Überhitzen des
y
Gerätes zu verhindern.
- Der Abstand des Gerätes zur Wand sollte mindestens 10 cm betragen.
- Montieren Sie das Gerät nur an Orten mit ausreichender Belüftung (d. h. weder
in einem Regal oder Schrank).
- Stellen Sie es nicht auf Kissen oder Teppichen ab.
- Achten Sie darauf, dass die Belüftungsschlitze nicht durch eine Tischdecke oder
einen Vorhang verdeckt werden.
Andernfalls kann es zu einem Brand kommen.
Berühren Sie nicht die Lüftungsöffnungen, wenn das TV-Gerät über längere Zeit
y
läuft, da die Lüftungsöffnungen heiß werden können. Dies hat keinen Einfluss auf
den Betrieb oder die Leistung des Produkts.
Überprüfen Sie das Kabel an Ihrem Gerät regelmäßig. Weist es Anzeichen von Beschädigung oder
y
Abnutzung auf, trennen Sie das Stromkabel vom Netz, und verwenden Sie das Gerät nicht weiter.
Lassen Sie das Kabel durch einen autorisierten Servicepartner ersetzen.
Sorgen Sie dafür, dass die Kontaktstifte und die Steckdose frei von Staub sind.
y
Es besteht Brandgefahr.
Schützen Sie das Netzkabel vor mechanischen Beschädigungen, wie z. B. Verdre-
y
hen, Knicken, Eindrücken, Einklemmen in einer Tür oder Drauftreten. Achten Sie
besonders auf die Stecker, Steckdosen und den Bereich, an dem das Kabel aus
dem Gerät tritt.
Üben Sie keinen starken Druck mit der Hand oder einem spitzen Gegenstand wie
y
einem Nagel, Bleistift oder Kugelschreiber auf das Gerät aus. Verkratzen Sie das
Gerät nicht.
Vermeiden Sie es, den Bildschirm zu berühren oder mit den Fingern längere Zeit
y
auf den Bildschirm zu drücken. Dadurch kann es zu vorübergehenden Verzerrungseffekten auf dem Bildschirm kommen.
Ziehen Sie vor der Reinigung des Gerätes den Netzstecker, und reinigen Sie das
y
Gerät mit einem weichen Tuch. Übermäßiger Druck kann Kratzer oder Verfärbungen verursachen. Benutzen Sie weder Sprühflaschen noch nasse Tücher. Verwenden Sie vor allem keine Glasreiniger oder für Autos oder in der Industrie verwendete Reinigungsmittel, aggressive Mittel oder Wachs, Benzol, Alkohol usw. Diese
Mittel können das Gerät und seinen Bildschirm beschädigen.
Andernfalls kann es zu Bränden, Stromschlägen, Beschädigungen am Gerät (Verformung, Korrosion und Schäden) kommen.
Solange das Gerät an eine Wechselstrom-Steckdose angeschlossen ist, bleibt es auch dann mit der
y
Wechselstromquelle verbunden, wenn Sie es mit dem Schalter ausschalten.
Ziehen Sie das Netzkabel immer am Stecker aus der Steckdose.
y
Wenn die Kabel im Inneren des Netzkabels vom Stecker getrennt werden, kann
dies einen Brand verursachen.
Schalten Sie das Gerät aus, bevor Sie es bewegen. Ziehen Sie dann das Stromka-
y
bel, Antennenkabel und alle anderen Anschlusskabel.
Andernfalls kann das TV-Gerät oder das Stromkabel beschädigt werden, wodurch
es zu einem Brand oder Stromschlag kommen kann.
Page 41

SICHERHEITSHINWEISE
Das Gerät ist schwer und sollte stets mit zwei Personen bewegt oder ausgepackt
y
werden.
Andernfalls kann es zu Verletzungen kommen.
Wenden Sie sich einmal im Jahr an den Kundendienst, damit die innenliegenden
y
Bauteile des Produkts fachgerecht gereinigt werden.
Angesammelter Staub kann mechanische Fehler verursachen.
Wenden Sie sich bei Problemen an einen qualifizierten Kundendienstmitarbeiter.
y
Bitte setzen Sie sich mit dem Kundendienst in Verbindung, wenn das Gerät in
irgendeiner Weise beschädigt wurde, z. B. wenn das Stromkabel oder der Stecker
defekt sind, wenn Flüssigkeit über das Gerät gegossen wurde oder Gegenstände
in das Gerät gelangt sind, wenn das Gerät Regen oder Feuchtigkeit ausgesetzt
wurde, wenn das Gerät nicht ordnungsgemäß funktioniert oder wenn das Gerät
fallen gelassen wurde.
Wenn sich das Gerät kalt anfühlt, kann es beim Einschalten zu einem kurzen Flim-
y
mern kommen. Das ist normal und kein Fehler des Gerätes.
Der Bildschirm ist ein hochentwickeltes Gerät mit einer Auflösung von zwei bis
y
sechs Millionen Pixel. Unter Umständen sind winzige schwarze Punkte und/oder
bunte Punkte (rot, blau oder grün) von 1 ppm Größe auf dem Bildschirm zu sehen.
Dies deutet nicht auf eine Fehlfunktion hin und beeinträchtigt nicht die Leistung
und Zuverlässigkeit des Gerätes.
Diese Erscheinung tritt auch bei Geräten von Fremdanbietern auf und wird nicht
als Grund für Umtausch oder Rückerstattung anerkannt.
Je nach Ihrer Betrachtungsposition (von rechts, links, oben, unten) sind Helligkeit
y
und Farben auf dem Bildschirm möglicherweise unterschiedlich.
Diese Erscheinung ist auf die besonderen Eigenschaften des Bildschirms zurückzuführen. Es steht in keinem Zusammenhang mit der Leistung des Gerätes, und
es handelt sich hierbei nicht um eine Fehlfunktion.
9
DEUDEUTSCH
Durch das Anzeigen eines Standbilds (z. B. ein Programmlogo, Bildschirmmenü, Szene eines Vi-
y
deospiels) über einen längeren Zeitraum kann der Bildschirm beschädigt werden, und das Bild wird
eingebrannt. Das Einbrennen von Bildern wird bei diesem Gerät nicht von der Garantie gedeckt.
Vermeiden Sie die Anzeige von Standbildern auf dem Fernsehbildschirm über einen längeren Zeitraum (2 Stunden oder mehr bei LCD-Fernsehgeräten, 1 Stunde oder mehr bei Plasma-Fernsehgeräten).
Wird das Format über einen längeren Zeitraum auf 4:3 eingestellt, kann es an den Rändern des
Bildschirms zum Einbrennen kommen.
Diese Erscheinung tritt auch bei Geräten von Fremdanbietern auf und wird nicht als Grund für Umtausch oder Rückerstattung anerkannt.
Erzeugtes Geräusch
y
„Knacken“: Das beim Fernsehen oder Ausschalten des Gerätes zu hörende Knacken wird durch
Wärmeschrumpfung von Kunststoffen aufgrund von Temperatur und Feuchtigkeit verursacht. Dieses
Geräusch ist normal bei Geräten, bei denen die thermische Verformung erforderlich ist. Stromkreisbrummen/Bildschirmsummen: Der Hochgeschwindigkeitsschaltkreis, der eine große Menge Strom
für den Betrieb des Gerätes bereitstellt, gibt ein leises Geräusch ab. Dieses Geräusch ist je nach
Gerät anders.
Es hat keinen Einfluss auf die Leistung und Zuverlässigkeit des Gerätes.
Page 42

SICHERHEITSHINWEISE
10
Wiedergabe von 3D-Material (Nur 3D-Modelle)
DEUTSCH
DEU
WARNUNG
Betrachtungsumgebung
yBetrachtungszeit
- Unterbrechen Sie die Betrachtung von 3D-Inhalten jede Stunde für 5 bis 15 Minuten. Das Betrachten von 3D-Inhalten über einen längeren Zeitraum kann Kopfschmerzen, Schwindelgefühle, Müdigkeit oder Augenbelastungen verursachen.
Personen mit dem Risiko eines photosensiblen Anfalls oder einer chronischen Erkrankung
yEinige Benutzer erleben Anfälle oder andere unnormale Symptome, wenn sie Blitzlicht oder bestimmten
Mustern von 3D-Inhalten ausgesetzt werden.
yBetrachten Sie keine 3D-Videos, wenn Sie Übelkeit verspüren, schwanger sind oder an einer
chronischen Krankheit, wie Epilepsie, Herzstörungen, blutdruckbedingten Krankheiten usw., leiden.
yAußerdem sollten 3D-Inhalte von Personen mit Stereoblindheit oder Störungen des räumlichen Sehens
gemieden werden. Diese Personen sehen 3D-Bilder häug als Doppelbilder oder fühlen ein Unbehagen
beim Betrachten.
yWenn Sie an Strabismus (Schielen), Amblyopie (Schwachsichtigkeit) oder Astigmatismus
(Hornhautverkrümmung) leiden, haben Sie unter Umständen Probleme bei der Tiefenerkennung und
fühlen aufgrund der Doppelbilder eine schnellere Ermüdung. In diesen Fällen wird empfohlen, häugere
Pausen als durchschnittliche Erwachsene einzulegen.
yWenn Ihre Sehstärke auf beiden Augen unterschiedlich ist, korrigieren Sie diese vor dem Betrachten
von 3D-Inhalten.
Symptome, bei denen Sie das Betrachten von 3D-Inhalten abbrechen bzw. von ihrer Betrachtung
absehen sollten
yBetrachten Sie keine 3D-Inhalte, wenn Sie aufgrund von Schlafmangel, Überlastung oder
Alkoholkonsum müde sind.
yWenn die folgenden Symptome auftreten, stellen Sie die Betrachtung von 3D-Inhalten ein, und erholen
Sie sich so lange, bis die Symptome verklungen sind.
- Sprechen Sie mit Ihrem Hausarzt, falls die Symptome nicht nachlassen. Zu den Symptomen gehören Kopfschmerzen, schmerzende Augen, Schwindel, Übelkeit, Herzklopfen, verschwommene
Wahrnehmung, Benommenheit, Unbehagen, Sehen von Doppelbildern, Sehmüdigkeit.
Page 43

SICHERHEITSHINWEISE
VORSICHT
Betrachtungsumgebung
Betrachtungsabstand
y
- Wenn Sie die 3D-Funktion nutzen, halten Sie stets einen Betrachtungsabstand ein, der mindestens
dem 2-Fachen der Bildschirmdiagonalen entspricht. Wenn das Betrachten von 3D-Inhalten Unwohlsein verursacht, vergrößern Sie Ihren Abstand zum TV-Gerät.
yBetrachtungsposition
- Richten Sie Ihr Gesicht auf den Bildschirm (Augenhöhe), und schauen Sie dabei gerade nach vorn.
Andernfalls können Sie die 3D-Inhalte nicht richtig sehen.
11
DEUDEUTSCH
Betrachtungsalter
yKleinkinder/Kinder
- Die Verwendung bzw. das Betrachten von 3D-Inhalten ist für Kinder unter 5 Jahren verboten.
- Kinder unter 10 Jahren können überreagieren und übermäßig angeregt werden, da sich ihre Sehkraft noch in der Entwicklung befindet (sie versuchen z. B. den Bildschirm zu berühren oder in den
Bildschirm hineinzuspringen). Kinder sollten 3D-Inhalte daher nur unter Aufsicht und unter Anwendung besonderer Vorsicht betrachten.
- Kinder haben im Zusammenhang mit 3D-Darstellungen eine größere binokulare Disparität als Erwachsene, da der Abstand zwischen ihren Augen kleiner ist. Daher ist ihre Fähigkeit zur stereoskopischen Tiefenerkennung bei der Betrachtung eines 3D-Bildes ausgeprägter als bei Erwachsenen.
yJugendliche
- Jugendliche unter 19 Jahren reagieren möglicherweise sensibel gegenüber der Lichtstimulation bei
3D-Inhalten. Raten Sie ihnen, bei Müdigkeit nicht über längere Zeiträume 3D-Inhalte zu betrachten.
yÄltere Personen
- Ältere Personen erkennen möglicherweise einen geringeren 3D-Effekt als jüngere Personen. Sie
halten zudem in der Regel den empfohlenen Mindestabstand zum TV-Gerät ein.
Vorsicht bei der Verwendung der 3D-Brille
Verwenden Sie auf jeden Fall eine geeignete LG 3D-Brille. Andernfalls können Sie die 3D-Videos
y
möglicherweise nicht richtig sehen.
y Verwenden Sie die 3D-Brille nicht anstelle Ihrer normalen Brille, Sonnenbrille oder Schutzbrille.
y Die Verwendung abgeänderter 3D-Brillen kann die Augen überlasten oder eine Bildverzerrung zur Folge
haben.
y Bewahren Sie die 3D-Brille nicht bei extrem hohen oder niedrigen Temperaturen auf. Dadurch kann es
zu Verformungen kommen.
y Die 3D-Brille ist zerbrechlich und kann leicht zerkratzen. Verwenden Sie immer ein weiches, sauberes
Tuch, wenn Sie die Gläser säubern. Zerkratzen Sie die Oberäche der 3D-Brille nicht mit scharfen
Objekten, und verwenden Sie zum Reinigen keine Chemikalien.
yBeim Betrachten von 3D-Videos unter einer uoreszierenden Lichtquelle oder einer Lichtquelle mit drei
Wellenlängen kann es zu leichtem Bildackern kommen. Schalten Sie in diesem Fall das Licht aus, oder
verdunkeln Sie es.
yAndere Elektro- oder Kommunikationsgeräte sollten abgeschaltet oder vom TV-Gerät entfernt
aufbewahrt werden, da sie Störungen verursachen und die 3D-Funktion beeinträchtigen können.
yWenn Sie im Liegen fernsehen, können 3D-Bilder dunkler oder nicht sichtbar sein.
Page 44

12
DEUTSCH
DEU
INSTALLATIONSVERFAHREN
INSTALLATIONSVERFAHREN / MONTAGE UND VORBEREITUNG
HINWEIS
yIhr TV-Gerät kann von der Abbildung möglicherweise leicht abweichen.
yDas OSD-Menü (am Bildschirm angezeigtes Menü) Ihres TV-Gerätes kann sich leicht von dem in
diesem Handbuch unterscheiden.
yDie verfügbaren Menüs und Optionen können sich je nach verwendeter Eingangsquelle bzw. je nach
Modell unterscheiden.
yKünftig können diesem TV-Gerät neue Funktionen hinzugefügt werden.
yDas TV-Gerät kann in den Standby-Modus gesetzt werden, um den Stromverbrauch zu verringern.
Wenn längere Zeit nicht ferngesehen wird, sollte das Gerät ausgeschaltet werden, um Strom zu
sparen.
yDer Stromverbrauch des eingeschalteten TV-Gerätes kann erheblich verringert werden, wenn die
Helligkeit des Bildes vermindert wird.
1 Öffnen Sie die Packung, und stellen Sie sicher, dass alle Zubehörteile im Lieferumfang enthalten sind.
2 Befestigen Sie den Standfuß am TV-Gerät.
3 Verbinden Sie gegebenenfalls externe Zuspielgeräte mit dem TV-Gerät.
4 Stellen Sie sicher, dass eine Netzwerkverbindung vorhanden ist.
Sie können die Netzwerkfunktionen des Fernsehgeräts nur dann nutzen, wenn eine Netzwerkverbindung
hergestellt wurde.
MONTAGE UND VORBEREITUNG
Auspacken
Prüfen Sie, ob folgende Artikel in der Verpackung enthalten sind. Falls Zubehör fehlt, wenden Sie sich bitte
an den Händler, bei dem Sie das Gerät erworben haben. Die Abbildungen im Handbuch unterscheiden sich
möglicherweise von Ihrem Gerät.
VORSICHT
yUm die Sicherheit und Lebensdauer des Produkts sicherzustellen, verwenden Sie keine Fälschungen.
yDurch Fälschungen verursachte Beschädigungen sind nicht von der Garantie abgedeckt.
yBei einigen Modellen befindet sich ein dünner Film auf dem Bildschirm, der nicht entfernt werden darf.
Page 45

MONTAGE UND VORBEREITUNG
AV MODE
INPUT
ENERGY
TV
SAVING
1 2 3
4 5 6
7 809
FLASHBK
LIST
MARK
FAV
P
A
G
3D
CHVOL
E
MUTE
INFO
MENU
Q.MENU
ENTER
EXIT
BACK
L/R SELECT
FREEZE
RATIO
Fernbedienung und
Batterien (AAA)
P
(Siehe S. 20)
Magic-Fernbedienung,
Batterien (AA)
(Nur 50/60PM97**)
(Siehe S. 21)
13
DEUDEUTSCH
Reinigungstuch
(Abhängig vom Modell)
Verwenden Sie dieses, um
Benutzerhandbuch
das Gehäuse zu entstauben.
Netzkabel Netzkabelhalter
(Siehe S. A-4)
Ferritkern
Schutzabdeckung
(Siehe S. A-4)
(Abhängig vom Modell)
(Siehe S. 14)
x 3x 4
M4 x 30 M5 x 16
Kabelhalter
(Abhängig vom Modell)
(Siehe S. A-4)
Montageschraube
(
Nur
42/50PM47**,
50/60PM67**, 50PM68**,
50PM97**)
(Siehe S. A-3)
Standkörper /
Ständerplatte
(Nur 42/50PM47**,
50/60PM67**)
(Siehe S. A-3)
Kabelclip
(Nur 50/60PM68**,
50/60PM97**)
(Siehe S. A-3)
x 5x 4
M4 x 30 M5 x 16
3D-Brille
(AG-350)
(Abhängig vom Modell)
Montageschraube
(
Nur
60PM68**, 60PM97**)
(Siehe S. A-3)
Standkörper /
Ständerplatte
(Nur 50/60PM68**,
50/60PM97**)
(Siehe S. A-3)
Page 46

14
DEUTSCH
DEU
MONTAGE UND VORBEREITUNG
HINWEIS
Die im Lieferumfang enthaltenen Artikel sind modellabhängig.
y
Änderungen an den Produktspezifikationen oder am Inhalt dieses Handbuchs sind im Zuge von Aktu-
y
alisierungen der Produktfunktionen vorbehalten.
So verwenden Sie den Ferritkern
1 Verwenden Sie den Ferritkern, um die elektromagnetischen Interferenzen im Audiokabel des PCs
zu verringern. Wickeln Sie das Audiokabel des PCs dreimal um den Ferritkern herum. Platzieren Sie
den Ferritkern möglichst nah am Fernsehgerät.
[an ein externes Gerät]
10 mm(+ / - 5 mm)
[an den Fernseher]
(Grau)
[Abbildung 1]
[Querschnitt des
Ferritkerns]
2 Verwenden Sie den Ferritkern, um die elektromagnetischen Interferenzen im Netzkabel zu verrin-
gern.
Wickeln Sie das Netzkabel einmal um den Ferritkern herum. Platzieren Sie den Ferritkern möglichst
nah am Fernsehgerät und an einem Netzstecker/Netzsteckdose.
[an eine Netzsteckdose]
[Abbildung 2]
[an den Fernseher]
(Schwarz)
[Querschnitt des
Ferritkerns]
3 Mit dem Ferritkern verringern Sie die elektromagnetischen Störungen im LAN-Kabel. Wickeln Sie
das LAN-Kabel dreimal um den Ferritkern herum. Platzieren Sie den Ferritkern möglichst nah am
Fernsehgerät und an einem externen Gerät.
[an ein externes
Gerät]
BAA
[an den
Fernseher]
[Abbildung 3]
4
Verwenden Sie den Ferritkern, um die elektromagnetischen Interferenzen in den Component Y-, Pb-,
A (Grau) B (Grau)
[Querschnitt des
Ferritkerns]
Pr-, L- und R-Kabeln zu verringern. Wickeln Sie das Komponenten-Kabel Y, Pb, Pr, L, R einmal um
den Ferritkern herum. Platzieren Sie den Ferritkern möglichst nah am Fernsehgerät.
(Schwarz)
[an ein externes Gerät]
[an den Fernseher]
10 mm(+ / - 5 mm)
[Abbildung 4]
[Querschnitt des
Ferritkerns]
- Wenn Sie sechs Ferritkerne verwenden, folgen Sie den Anweisungen gemäß Abbildung 1, 2 und 3.
-
Wenn Sie sieben Ferritkerne verwenden, folgen Sie den Anweisungen gemäß Abbildung 1, 2, 3 und 4.
y Für eine optimale Verbindung sollte die Einfassung
von HDMI-Kabeln und USB-Geräten höchstens
10 mm dick und 18 mm breit sein. Verwenden Sie ein
Verlängerungskabel, das USB 2.0 unterstützt, wenn
das USB-Kabel oder der USB-Speicherstick nicht in
*A 10 mm
*B 18 mm
den USB-Anschluss Ihres TV-Geräts passt.
Page 47

MONTAGE UND VORBEREITUNG
15
Separat erhältlich
Separat zu erwerbende Artikel können zur Qualitätsverbesserung geändert werden, ohne dass dies explizit
mitgeteilt wird.
Diese Artikel können Sie über Ihren Fachhändler beziehen.
Diese Geräte sind nur mit bestimmten Modellen kompatibel.
P
DEUDEUTSCH
AG-S3**
3D-Brille
Kompatibilität
AG-S3**
3D-Brille
AN-WF100
W-LAN Adapter
AN-MR300
Magic-Fernbedienung
AN-WF100
W-LAN Adapter
AN-MR300
Magic-Fernbedienung
PM47** PM67** PM68** PM97**
• • • •
• •
• • • •
Produktbezeichnungen, Funktionalität und/oder Designs können im Zuge einer Qualitätsverbesserung
durch den Hersteller geändert werden, ohne dass dies explizit mitgeteilt wird.
Page 48

16
IN 1 (ARC)
/ DVI IN 2
USB IN 1/ USB Apps
USB Hub HDD IN
USB IN 2
INPUT
SETTINGS
OK
AV IN 2
L/MONO
IN
3 4
HDMI
IN
RS-232C IN
(CONTROL & SERVICE)
AV IN 1
LAN
ANTENNA/
CABLE IN
LNB IN
Satellite
13 / 18V
700mA Max
AUDIO IN
(RGB/DVI)
RGB IN
(PC)
Teile und Tasten
DEUTSCH
DEU
MONTAGE UND VORBEREITUNG
Fernbedienung
und intelligente
Sensoren
Betriebsanzeige
Taste
Bildschirm
1
Lautsprecher
Außer bei
PM47**
Buchse für
Antennenkabel
Anschlussfeld
Taste Beschreibung
/
I
Navigiert durch die gespeicherten Programme.
INPUT Regelt die Lautstärke.
SETTINGS Wählt die markierte Menüoption aus oder bestätigt eine Eingabe.
ꔉ
OK
Öffnet und schließt das Hauptmenü und speichert Ihre Eingaben.
Ändert die Eingangsquelle.
Navigiert durch die gespeicherten Programme.
1
Intelligenter Sensor - Einstellung der Bildqualität und Helligkeit entsprechend der Umgebungsbedingungen.
2 Buchse für Antennenkabel – Die Buchsen für das Antennenkabel sind je nach Modell unterschiedlich..
2
Page 49

MONTAGE UND VORBEREITUNG
17
Anheben und Bewegen des
TV-Gerätes
Lesen Sie folgende Hinweise, bevor Sie das TVGerät bewegen oder anheben, um Kratzer oder
Beschädigungen am TV-Gerät zu verhindern und
um einen reibungslosen Transport unabhängig von
Typ und Größe zu gewährleisten.
VORSICHT
yBerühren Sie nach Möglichkeit nicht den
Bildschirm, da er dadurch beschädigt
werden könnte.
yEs wird empfohlen, das TV-Gerät im
Originalkarton oder in der Originalverpackung
zu bewegen bzw. zu transportieren.
yTrennen Sie das Netzkabel und alle weiteren
Kabel, bevor Sie das TV-Gerät bewegen oder
anheben.
yHalten Sie das TV-Gerät so, dass sein
Bildschirm von Ihnen abgewendet ist, um
Beschädigungen zu vermeiden.
yGroße TV-Geräte sollten stets von mindestens
2 Personen transportiert werden.
yWenn das TV-Gerät von Hand transportiert
wird, halten Sie es wie in der folgenden
Abbildung gezeigt.
DEUDEUTSCH
ySetzen Sie das TV-Gerät während des
Transports keinen ruckartigen Bewegungen
oder starken Erschütterungen aus.
yHalten Sie das TV-Gerät beim Transport
aufrecht, drehen Sie es niemals auf die Seite,
und kippen Sie es nicht nach links oder rechts.
yHalten Sie das TV-Gerät oben und unten am
Rahmen gut fest. Halten Sie ihn nicht am
transparenten Teil, am Lautsprecher oder am
Lautsprechergrill fest.
Page 50

MONTAGE UND VORBEREITUNG
18
Montage auf einem Tisch
1 Heben Sie das TV-Gerät an, und kippen Sie es auf
DEUTSCH
DEU
2 Schließen Sie das Stromkabel an eine Steckdose an.
(Diese Funktion steht nicht bei allen Modellen zur Verfügung.)
Einstellen des TV-Gerätes für einen optimalen
Blickwinkel Drehen Sie das TV-Gerät um 20 Grad
nach links oder rechts, und stellen Sie den
Blickwinkel optimal ein.
einem Tisch in die aufrechte Position.
- Lassen Sie (mindestens) 10 cm Platz zur Wand,
um eine gute Belüftung zu gewährleisten.
10 cm
10 cm
10 cm
10 cm
VORSICHT
yStellen Sie das TV-Gerät nicht in die Nähe
von Wärmequellen, da dies einen Brand
oder Beschädigungen verursachen könnte.
Einstellen des Fernsehgerätes für einen optimalen Blickwinkel
Befestigen des TV-Gerätes an einer Wand
(Diese Funktion steht nicht bei allen Modellen zur
Verfügung.)
1 Setzen Sie die Ringschrauben oder TV-
Halterungen und Schrauben an der Rückseite
des TV-Gerätes ein, und befestigen Sie sie.
- Wenn an den Ringschraubenpositionen
Schrauben eingesetzt sind, entfernen Sie
zunächst die Schrauben.
2 Montieren Sie die Wandhalterungen mit den
Schrauben an der Wand.
Stimmen Sie die Position der Wandhalterung
auf die Ringschrauben an der Rückseite des
TV-Gerätes ab.
3 Verbinden Sie die Ringschrauben und
Wandhalterungen fest mit einem stabilen Seil.
Achten Sie darauf, dass das Seil horizontal
verläuft.
2020
VORSICHT
Wenn Sie das Produkt auf den optimalen
Winkel einstellen, sollten Sie darauf achten,
dass Sie Ihre Finger nicht einklemmen.
»
Das Einklemmen von Händen oder Fingern
kann Verletzungen verursachen. Wenn das
Gerät zu stark geneigt ist, kann es herunterfallen und beschädigt werden bzw. Verletzungen verursachen.
VORSICHT
yAchten Sie darauf, dass Kinder nicht auf das
TV-Gerät klettern oder sich daran hängen.
HINWEIS
yVerwenden Sie eine Haltevorrichtung oder
einen Schrank, der stabil und groß genug
ist, um das TV-Gerät sicher abzustützen.
yHalterungen, Seile und anderes
Befestigungsmaterial gehören nicht zum
Lieferumfang des Gerätes. Bitte wenden Sie
sich zum Erwerb von geeignetem Zubehör
an Ihren Fachhändler.
Page 51

MONTAGE UND VORBEREITUNG
A
B
19
Wandmontage
Befestigen Sie an der Rückseite des TV-Gerätes
sorgfältig eine optionale Wandhalterung, und
montieren Sie die Wandhalterung an einer stabilen
Wand, die senkrecht zum Fußboden steht.
Wenn Sie das TV-Gerät an anderen Baustoffen
befestigen möchten, fragen Sie zunächst bei einer
qualizierten Fachkraft nach.
LG empehlt, dass die Wandmontage von einem
qualizierten Techniker durchgeführt wird.
10 cm
10 cm
10 cm
10 cm
Verwenden Sie unbedingt Schrauben
und Wandhalterungen, die der VESANorm entsprechen. Die Standardmaße der
Wandmontagesätze können der folgenden Tabelle
entnommen werden.
Separat zu beziehen (Wandmontagehalterung)
Modell 42/50PM47**
50PM67**
50PM68**
50PM97**
VESA (A x B) 400 x 400 600 x 400
Standardschraube
Anzahl Schrauben
Wandmontage-
halterung
M6 M8
4 4
PSW400B,
PSW400BG
60PM67**
60PM68**
60PM97**
PSW600B,
PSW600BG
VORSICHT
yTrennen Sie erst das Netzkabel, bevor Sie
das TV-Gerät bewegen oder installieren.
Ansonsten besteht Stromschlaggefahr.
yWenn Sie das TV-Gerät an einer Decke
oder Wandschräge montieren, kann
es herunterfallen und zu schweren
Verletzungen führen.
Verwenden Sie eine zugelassene
Wandhalterung von LG, und wenden Sie
sich an Ihren Händler vor Ort oder an
qualifiziertes Fachpersonal.
yZiehen Sie die Schrauben nicht zu fest
an, da dies Beschädigungen am TV-Gerät
hervorrufen und zum Erlöschen Ihrer
Garantie führen könnte.
yVerwenden Sie die Schrauben und
Wandhalterungen, die der VESA-Norm
entsprechen. Schäden oder Verletzungen,
die durch unsachgemäße Nutzung oder die
Verwendung von ungeeignetem Zubehör
verursacht werden, fallen nicht unter die
Garantie.
HINWEIS
yVerwenden Sie die Schrauben, die unter den
Spezifikationen der VESA-Norm aufgeführt
sind.
yDer Wandmontagesatz beinhaltet eine
Installationsanleitung und die notwendigen
Teile.
yDie Wandhalterung ist optional.
Zusätzliches Zubehör erhalten Sie bei Ihrem
Elektrohändler.
yDie Schraubenlänge hängt von der
Wandbefestigung ab. Verwenden Sie
unbedingt Schrauben der richtigen Länge.
yWeitere Informationen können Sie dem
im Lieferumfang der Wandhalterung
enthaltenen Handbuch entnehmen.
DEUDEUTSCH
Page 52

FERNBEDIENUNG
INFO
APP/
APP/
APP/
ORANGE
20
FERNBEDIENUNG
DEUTSCH
DEU
Fernbedienung.
Lesen Sie dieses Handbuch bitte aufmerksam durch, und verwenden Sie das TVGerät bestimmungsgemäß.
Um die Batterien zu wechseln, öffnen Sie das Batteriefach, wechseln Sie die Batterien
(1,5 V, AAA), legen Sie die - und -Enden entsprechend der Kennzeichnung im
Fach ein, und schließen Sie das Batteriefach.
Gehen Sie zum Herausnehmen der Batterien in umgekehrter Reihenfolge vor.
Stellen Sie sicher, dass die Fernbedienung auf den Sensor am TV-Gerät gerichtet ist.
Die Beschreibungen in diesem Handbuch beziehen sich auf die Tasten der
VORSICHT
yVerwenden Sie niemals alte zusammen mit neuen Batterien, da dies Schäden an der Fernbedienung hervorrufen kann.
(Benutzerhandbuch)
Ruft das Benutzerhandbuch auf.
RATIO
Ändert die Bildgröße.
INPUT
Ändert die Eingangsquelle.
TV/RAD
Wählt Radio-, TV- und DTV-Programme.
LIST
1
.,;@2 abc3 def
4
ghi5 jkl6 mno
Zum Zugriff auf die Liste der gespeicherten
7
Programme.
(Leerzeichen)
Gibt ein Leerzeichen auf der Bildschirmtastatur wieder.
pqrs8 tuv
LIST
Q.VIEW
Kehrt zurück zum vorherigen Programm.
FAV
Zugriff auf die Liste der Lieblingskanäle.
SETTINGS
Wird zur Ansicht von 3D-Videos verwendet.
PAGE
Wechselt zum vorherigen oder nächsten Bildschirm.
SETTINGS
Öffnen der Hauptmenüs.
HOME
Öffnet die Startmenüs.
MY APPS
Zeigt die Liste der Apps an.
1
2
LIVE TV
Navigationstasten
(nach oben/nach unten/nach links/nach rechts)
Navigiert durch Menüs und Einstellungen.
INFO
OK
Wählt Menüs oder Einstellungen und speichert Ihre
Eingabe.
(Zurück)
Zurück zur vorherigen Ebene.
GUIDE
Öffnet den Programmführer.
RATIO INPUT
[
0
FAV
MUTE
MY APPS
OK
GUIDE
AD
9
Q.VIEW
EXIT
SUBTITLE
REC
EXIT
Ausblenden der Bildschirmmenüs und Zurückkehren zum TV-Bild.
1
Farbtasten
Öffnen Sonderfunktionen in manchen Menüs.
TV/
RAD
( : Rot, : Grün, : Gelb, : Blau)
2
TELETEXT-Tasten
Diese Tasten werden für Teletext verwendet.
Weitere Informationen dazu erhalten Sie im Abschnitt „Teletext“.
wxyz
SUBTITLE
Ruft den bevorzugten Untertitel im digitalen Modus
auf.
Q. MENU
P
A
Öffnet die Schnellmenüs.
G
P
E
LIVE TV
Rückkehr zum LIVE-TV.
Steuerungstasten ( )
Steuerung von Premium-Inhalten, DVR- oder Smart
Share-Menüs oder der SIMPLINK-kompatiblen
Geräte (USB oder SIMPLINK oder DVR).
REC
Einstellen des DVR-Menüs.
Anzeige von Informationen zum aktuellen Programm und Bildschirm.
AD
Schaltet die Audiobeschreibung ein oder aus.
3
3
Wählen Sie die Menüquelle für MHP TV.
(Nur Italien)(abhängig vom Modell)
@
3
Direkter Zugriff auf Ihr Internetportal für Unterhaltungs- und Nachrichtendienste von Orange. (Nur
Frankreich)
Page 53

TASTENFUNKTIONEN DER MAGIC-FERNBEDIENUNG
TASTENFUNKTIONEN DER MAGIC-
FERNBEDIENUNG
21
Dieses Teil ist bei keinem der Modelle im Lieferumfang enthalten.
Wenn die Meldung „Die Batterie der Magic-Fernbedienung ist schwach. Bitte Batterie
wechseln.“ angezeigt wird, wechseln Sie die Batterie.
Um die Batterien zu wechseln, öffnen Sie das Batteriefach, wechseln Sie die Batterien
(1,5 V, AA), legen Sie die - und -Enden entsprechend der Kennzeichnung im
Fach ein, und schließen Sie das Batteriefach. Richten Sie die Fernbedienung auf den
Fernbedienungssensor am TV-Gerät aus.
Gehen Sie zum Herausnehmen der Batterien in umgekehrter Reihenfolge vor.
VORSICHT
yVerwenden Sie niemals alte zusammen mit neuen Batterien, da dies Schäden an der Fernbedienung hervorrufen kann.
yEin RF-Dongle ist nicht erforderlich, da er bereits integriert ist.
Zeiger (HF-Sender)
(EIN/AUS)
Ein- oder Ausschalten des TV-Gerätes
Zurück zur vorherigen Ebene.
Wählt Menüs oder Einstellungen
und speichert Ihre Eingabe.
Navigiert durch die gespeicherten
Wenn Sie die Navigationstaste
drücken, während Sie den Zeiger
über den Bildschirm bewegen,
verschwindet der Zeiger, und die
Magic-Fernbedienung funktioniert
wie eine normale Fernbedienung.
Wenn Sie den Zeiger wieder
einblenden möchten, schütteln
Sie die Magic-Fernbedienung hin
BACK
Rad (OK)
Programme
und her.
BACK
HOME
P
MY APPS
Blinkt, wenn in Betrieb
HOME (Startseite)
Zugriff auf das Startmenü.
Navigationstasten
(nach oben/nach unten/nach links/nach rechts)
Navigiert durch Menüs und Einstellungen.
+ -
Regelt die Lautstärke.
ꕌPꕍ
Navigiert durch die gespeicherten
Programme oder Kanäle
MUTE (STUMM)
Stellt den Ton aus.
MY APPS
Zeigt die Liste der Apps an.
3D
Ansicht von 3D-Video.
DEUDEUTSCH
11-1 Kurzer Infotiteltest...
My Apps
3
Info.
Wenn Sie auf der Magic-Fernbedienung auf
Rad (OK) drücken, wird der folgende Bildschirm angezeigt.
1
Zeigt Informationen zum aktuellen Programm
und Bildschirm an.
Durch Drücken dieser Taste wird das Zahlenfeld angezeigt, über das Sie die Programm-
2
nummer auswählen können.
Wählen Sie das Menü „My Apps“ aus.
3
Page 54

TASTENFUNKTIONEN DER MAGIC-FERNBEDIENUNG
HOME
22
Registrieren der MagicFernbedienung
DEUTSCH
DEU
Damit die Magic-Fernbedienung funktioniert, muss
sie zuvor mit Ihrem TV-Gerät gekoppelt werden.
So wird die Magic-Fernbedienung registriert
So wird die Magic-Fernbedienung erneut
registriert
BACK
HOME
(Startseite)
1 Um die Registrierung
automatisch durchzuführen,
schalten Sie das TV-Gerät
ein, und drücken Sie 20
Sekunden lang auf die Taste
Rad (OK). Nach Abschluss
der Registrierung wird eine
entsprechende Meldung auf
dem Bildschirm angezeigt.
2 Wenn die Registrierung
nicht erfolgreich verläuft,
schalten Sie das TV-Gerät
aus und wieder ein. Drücken
Sie dann 20 Sekunden lang
die Taste Rad (OK), um die
Registrierung abzuschließen.
1 Drücken und halten Sie 5
Sekunden lang die Tasten
BACK und HOME , um die
Registrierung zurückzusetzen.
Führen Sie die Registrierung
dann durch, indem Sie
den vorangegangenen
Anweisungen unter ``So wird
die Magic-Fernbedienung
registriert´´ folgen.
2 Um die Magic-Fernbedienung
erneut zu registrieren,
drücken und halten Sie 5
Sekunden lang die Taste
BACK bei auf das TV
gerichteter Fernbedienung.
Wenn der Rückstellvorgang
abgeschlossen ist, erscheint
eine Information auf dem
Bildschirm.
So wird die MagicFernbedienung verwendet
1 Wenn der Zeiger nicht zu
sehen ist, bewegen Sie die
Fernbedienung etwas nach
links oder rechts. Daraufhin
wird der Zeiger automatisch
wieder auf dem Bildschirm
angezeigt.
»
Wurde der Zeiger über einen
längeren Zeitraum nicht verwendet, wird er ausgeblendet.
2 Sie können den Zeiger
bewegen, indem Sie
den Zeigersender an der
Fernbedienung auf Ihr TVGerät richten und dann die
Fernbedienung nach links,
rechts, oben oder unten
bewegen.
»
Wenn der Zeiger nicht ordnungsgemäß funktioniert,
warten Sie 10 Sekunden,
bevor Sie die Fernbedienung
erneut verwenden.
Vorsichtsmaßnahmen bei
der Verwendung der MagicFernbedienung
Verwenden Sie die Fernbedienung innerhalb
y
der maximalen Kommunikationsreichweite
(10 m). Wird die Fernbedienung außerhalb
dieser Entfernung verwendet oder befindet
sich ein Hindernis vor der Fernbedienung,
kann es zu einem Kommunikationsfehler
kommen.
Auch andere Geräte in der Nähe können
y
Kommunikationsfehler verursachen. Elektrogeräte, wie beispielsweise ein Mikrowellenherd oder ein kabelloses LAN-Produkt,
können zu Störungen führen, weil sie im
gleichen Frequenzbereich (2,4 GHz) arbeiten
wie die Magic-Fernbedienung.
Die Magic-Fernbedienung kann beschädigt
y
werden oder nicht mehr ordnungsgemäß
funktionieren, wenn sie herunterfällt oder
einen starken Stoß erhält.
Achten Sie beim Gebrauch der Magic-Fern-
y
bedienung darauf, nicht gegen in der Nähe
stehende Möbel oder Personen zu stoßen.
Hersteller und Installateur können keinen
y
Service bezüglich der Sicherheit von Personen bieten. Das Drahtlosgerät verursacht
eventuell Interferenzen aufgrund von elektromagnetischen Wellen.
Ein W-LAN Router (Sender) sollte sich min-
y
destens 1 m vom TV-Gerät entfernt befinden. Wenn er näher als 1 m vom TV-Gerät
entfernt ist, funktioniert die Magic-Fernbedienung aufgrund von Frequenzstörungen
möglicherweise nicht einwandfrei.
Page 55

DAS BENUTZERHANDBUCH VERWENDEN
DAS BENUTZERHANDBUCH VERWENDEN
Im Benutzerhandbuch erhalten Sie auf einfache Weise detaillierte Informationen zum TV-Gerät.
23
1 Drücken Sie die Taste HOME, um auf das
Startmenü zuzugreifen.
2 Wählen Sie Benutzerhandbuch, und drücken
Sie Rad (OK).
My Apps
Live-TV
Suchen
Internet3DLG Smart W
Programmführer Benutzerhandbuch
Neueste Liste
Eingangsliste Einstellungen
Benutzerhandbuch
HINWEIS
ySie können auch auf das Benutzerhandbuch
zugreifen, indem Sie auf der Fernbedienung
auf (Benutzerhandbuch) drücken.
Benutzerhandbuch
1
Einstellung SENDER
Einstellung BILD, TON
OPTION
LG SMART-Funktion
Erweiterte Funktion
Informationen
3
Verwendung eines Eingabegeräts
Verwendung der Energiesparfunktion
Festlegen von Zeitoptionen
Optionen für TV-Sperre auswählen
Festlegen der Sprache
Hilfe für Benutzer mit Behinderungen
Einrichten der Magic-Fernbedienung
2
4
Benutzerhandbuch
Einstellung SENDER
Einstellung BILD, TON
OPTION
LG SMART-Funktion
Erweiterte Funktion
Informationen
Zeigt die Beschreibung des ausgewählten
1
1
OPTION > Festlegen der Sprache
HOME Einstellungen OPTION Sprache
Wählt die am Bildschirm angezeigte Menü Sprache (Language) und Audiosprache.
Wählt eine Sprache für die Anzeige von Text aus.
Menü Sprache (Language)
[Nur im digitalen Modus]
Audiosprache
Wenn digital übertragene Sendungen mehrere Audiosprachen
enthalten, können Sie die gewünschte Sprache wählen.
[Nur im digitalen Modus]
Verwenden Sie die Funktion "Untertitel", wenn zwei oder mehr
Untertitel-
Untertitelsprachen gesendet werden.
sprache
✎ Wenn in einer ausgewählten Sprache keine Untertiteldaten ausge-
strahlt werden, wird die Standard-Untertitelsprache angezeigt.
3
Vergrößern
Schließen
Los
2
HOME Einstellungen OPTION Sprache
Wählt die am Bildschirm angezeigte Menü Sprache (Language) und Audiosprache.
Wählt eine Sprache für die Anzeige von Text aus.
Menü Sprache (Language)
[Nur im digitalen Modus]
Wenn digital übertragene Sendungen mehrere Audiosprachen
Audiosprache
enthalten, können Sie die gewünschte Sprache wählen.
[Nur im digitalen Modus]
Verwenden Sie die Funktion „Untertitel“, wenn zwei oder mehr
Untertitel-
Untertitelsprachen gesendet werden.
sprache
✎ Wenn in einer ausgewählten Sprache keine Untertiteldaten ausge-
strahlt werden, wird die Standard-Untertitelsprache angezeigt.
3
Verkleinern
Los
Menüs an.
Navigieren Sie mit ꕌ/ꕍ zwischen den Seiten.
Wechselt vom Benutzerhandbuch direkt zum
2
ausgewählten Menü.
Vergrößert oder verkleinert den Bildschirm.
3
DEUDEUTSCH
Schließen
Zeigt das aktuelle Programm oder den Ein-
1
gangsquellenbildschirm an.
Hier können Sie Ihre gewünschte Kategorie
2
auswählen.
Hier können Sie das gewünschte Element
3
auswählen.
Navigieren Sie mit ꕌ/ꕍ zwischen den Seiten.
Ermöglicht das Blättern durch die Beschrei-
4
bung Ihrer gewünschten Funktion aus dem
Index.
Page 56

WARTUNG / FEHLERBEHEBUNG
24
WARTUNG
DEUTSCH
DEU
Reinigung des TV-Gerätes
Reinigen Sie Ihr TV-Gerät regelmäßig für eine optimale Leistung und eine verlängerte Produktlebensdauer.
Bildschirm, Rahmen, Gehäuse und Standfuß
VORSICHT
yAchten Sie darauf, zuvor das Gerät auszuschalten und trennen Sie das Netzkabel sowie alle anderen Kabel
vom Gerät bzw. der Steckdose.
yWenn das TV-Gerät über einen längeren Zeitraum unbeaufsichtigt oder ungenutzt ist, ziehen Sie das Netzkabel
aus der Steckdose und trennen Sie alle Signalzuführungen, um mögliche Schäden durch Blitzschlag oder
Spannungsspitzen zu vermeiden.
yEntfernen Sie Staub oder leichte Verschmutzungen mit einem trockenen, sauberen und weichen Tuch.
yEntfernen Sie größere Verschmutzungen mit einem weichen Tuch. Feuchten Sie das Tuch mit
sauberem Wasser oder einem milden Reinigungsmittel an. Wischen Sie das Gerät anschließend
umgehend mit einem trockenen Tuch trocken.
VORSICHT
yBerühren Sie nach Möglichkeit nicht den Bildschirm, da er dadurch beschädigt werden könnte.
yDie Oberfläche darf weder gedrückt, gerieben, noch mit dem Fingernagel oder einem spitzen Gegenstand
gestoßen werden, da dies Kratzer und Bildverzerrungen verursachen kann.
yVerwenden Sie keine Chemikalien, da diese das Gerät beschädigen können.
ySprühen Sie keine Flüssigkeit auf die Oberfläche. Wenn Wasser in das TV-Gerät eindringt, kann dies zu Feuer,
elektrischem Schlag oder Fehlfunktionen führen.
Netzkabel
Entfernen Sie angesammelten Staub oder Schmutz regelmäßig vom Netzkabel.
FEHLERBEHEBUNG
Problem Lösung
Das TV-Gerät reagiert nicht auf
die Fernbedienung.
Weder Bild noch Ton wird
ausgegeben.
Das TV-Gerät schaltet sich
plötzlich ab.
Beim Anschließen an den PC
(RGB/HDMI DVI) wird entweder
„Kein Signal“ oder „Ungültiges
Format“ angezeigt.
yPrüfen Sie den Sensor der Fernbedienung, und versuchen Sie es erneut.
yPrüfen Sie, ob sich zwischen dem Produkt und der Fernbedienung ein Hindernis befindet.
yPrüfen Sie, ob die Batterien noch geladen sind und ordnungsgemäß eingesetzt wurden ( auf
, auf ).
yPrüfen Sie, ob das Gerät eingeschaltet ist.
yPrüfen Sie, ob das Netzkabel in der Steckdose steckt.
yPrüfen Sie, ob die Steckdose ordnungsgemäß funktioniert, indem Sie andere Geräte einstecken.
yÜberprüfen Sie die Steuerungseinstellungen der Stromversorgung. Die Stromversorgung ist
möglicherweise unterbrochen.
yPrüfen Sie, ob in den Zeiteinstellungen automatisches Abschalten aktiviert ist.
yWenn kein Signal besteht, obwohl das TV-Gerät eingeschaltet ist, schaltet sich das Gerät nach
15 Minuten automatisch ab.
ySchalten Sie das Fernsehgerät mit der Fernbedienung aus und dann erneut ein.
ySchließen Sie das RGB- oder HDMI-Kabel erneut an.
yStarten Sie den PC bei eingeschaltetem Fernsehgerät erneut.
Page 57

EINRICHTUNG DER EXTERNEN STEUERUNG / TECHNISCHE DATEN
EINRICHTUNG DER EXTERNEN STEUERUNG
Informationen zur Einrichtung der externen Steuerung erhalten Sie unter www.lg.com.
TECHNISCHE DATEN
Die Spezikationen können sich aus Gründen der Funktionsverbesserung ohne Vorankündigung ändern.
Spezifikation für WLAN-Modus (TWFM-B003D)
Standard IEEE 802.11a/b/g/n
2400 bis 2483,5 MHz
Frequenzbereich
Modulation CCK / OFDM / MIMO
Ausgangsleistung
(Typisch)
Datenrate
Antennen-Gain
(Typisch)
Belegte Bandbreite
Da der Frequenzkanal je nach Land variieren kann, kann die Betriebsfrequenz nicht durch die Benut-
y
zer geändert oder angepasst werden. Dieses Gerät ist entsprechend der regionalen Frequenztabelle
eingestellt.
5150 bis 5250 MHz
5725 bis 5850 MHz
802.11a: 11 dBm
802.11b: 15 dBm
802.11g: 13 dBm
802.11n - 2,4 GHz: 13 dBm
802.11n - 5 GHz: 13 dBm
802.11a/g: 54 Mb/s
802.11b: 11 Mb/s
802.11n: 300 Mb/s
2400 bis 2483,5 MHz: -2,5 dBi
5150 bis 5250 MHz: -2,2 dBi
5725 bis 5850 MHz: -2,9 dBi
802.11a/b/g: HT20
802.11n: HT20/40
25
DEUDEUTSCH
Spezifikation für Bluetooth-Modul (BM-LDS302)
Standard Bluetooth-Version 3.0
Frequenzbereich 2400 ~ 2483,5 MHz
Ausgangsleistung (Max.) 10 dBm oder niedriger
Datenrate (Max.) 3 Mbps
Kommunikationsentfernung Offene Sichtverbindung ca. 10 m
Page 58

Page 59

MANUEL D'UTILISATION
TV À ÉCRAN PLASMA
Veuillez lire attentivement ce manuel avant de mettre en
service votre produit et conservez-le afin de pouvoir vous y
référer ultérieurement.
www.lg.com
Page 60

2
TABLE DES MATIÈRES
3 LICENCES
3 INFORMATIONS SUR LES
FRANÇAIS
FRA
4 CONSIGNES DE SÉCURITÉ
10 - Visionnage d'images 3D (modèles 3D
12 PROCÉDURE D'INSTALLATION
12 ASSEMBLAGE ET PRÉPARATION
12 Déballage
15 Achat séparé
16 Pièces et boutons
17 Soulever et déplacer la TV
18 Installation sur une table
19 Fixation du support mural
TABLE DES MATIÈRES
LOGICIELS LIBRES
uniquement)
20 TÉLÉCOMMANDE
21 FONCTIONS DE LA
TÉLÉCOMMANDE MAGIC REMOTE
22 Enregistrement de la télécommande magic
remote
22 Comment utiliser la télécommande magic
remote
22 Consignes relatives à l'utilisation de la
télécommande magic remote
23 UTILISATION DU GUIDE DE
L'UTILISATEUR
24 MAINTENANCE
24 Nettoyage de votre TV
24 - Écran, cadre, boîtier et support
24 - Cordon d’alimentation
24 DÉPANNAGE
25
CONFIGURATION DU PÉRIPHÉRIQUE
DE CONTRÔLE EXTERNE
25 SPÉCIFICATIONS
AVERTISSEMENT
ySi vous ignorez ces messages d’avertissement,
vous risquez d’être gravement blessé, de
provoquer un accident ou d’entraîner la mort.
ATTENTION
ySi vous ignorez ces messages de sécurité,
vous risqueriez de vous blesser légèrement ou
d’endommager le produit.
REMARQUE
yLes remarques vous aident à comprendre et à
utiliser le produit en toute sécurité. Veuillez lire
attentivement les remarques avant d’utiliser le
produit.
Page 61

LICENCES / INFORMATIONS SUR LES LOGICIELS LIBRES
LICENCES
Les licences prises en charge peuvent varier d'un modèle à l'autre. Pour plus d'informations sur les
licences, consultez le site www.lg.com.
Fabriqué sous licence de Dolby Laboratories. « Dolby » et le symbole double-D sont
des marques commerciales de Dolby Laboratories.
3
HDMI, le logo HDMI et High-Definition Multimedia Interface sont des marques,
déposées ou non, de HDMI Licensing LLC.
À PROPOS DES VIDÉOS DIVX : DIVX® est un format de vidéo numérique créé par
DivX, LLC, liale de Rovi Corporation. Votre périphérique est ofciellement certié
par DivX (DivX Certied®), ce qui vous permet de lire des vidéos DivX. Rendez-vous
sur divx.com pour obtenir plus d'informations ainsi que des logiciels permettant de
convertir vos chiers au format DivX.
À PROPOS DE LA VIDÉO À LA DEMANDE DIVX : ce périphérique DivX Certied®
doit être enregistré pour pouvoir lire des vidéos à la demande DivX. Pour obtenir le
code d'enregistrement, accédez à la section DivX VOD (Vidéo à la demande DivX)
du menu de conguration du périphérique. Les instructions d'enregistrement sont
disponibles sur le site vod.divx.com.
« Certication DivX Certied® pour la lecture de vidéos DivX® jusqu'à 1080p en HD,
y compris le contenu Premium. »
« DivX®, DivX Certied® et leurs logos respectifs sont des marques commerciales
de Rovi Corporation ou de ses liales ; leur utilisation est régie par une licence. »
« Sous couvert d'un ou plusieurs brevets américains cités ci-dessous :
7,295,673; 7,460,668; 7,515,710; 7,519,274”
Fabriqué sous licence des brevets américains n° : 5 956 674 ; 5 974 380 ; 6 487 535
et d'autres brevets américains et mondiaux accordés et déposés. DTS, le symbole et
DTS et le symbole ensemble sont des marques déposées et DTS 2.0+Digital Out est
une marque commerciale de DTS, Inc. Ce produit comprend des logiciels. © DTS,
Inc. Tous droits réservés.
FRAFRANÇAIS
INFORMATIONS SUR LES LOGICIELS LIBRES
Pour obtenir le code source sous la licence publique générale, la licence publique générale limitée, la
licence publique Mozilla ou les autres licences libres de ce produit, rendez-vous sur http://opensource.lge.
com.
En plus du code source, tous les termes de la licence, ainsi que les exclusions de responsabilité et les
droits d'auteur, sont disponibles au téléchargement.
LG Electronics propose de vous fournir le code open source sur CD-ROM en échange des coûts couvrant
cet envoi, notamment le coût du support, des frais de port et de prise en charge, une fois la demande reçue
par LG Electronics à l'adresse suivante : opensource@lge.com. La validité de cette offre est de trois (3)
ans à partir de la date d'achat du produit.
Page 62

4
CONSIGNES DE SÉCURITÉ
Veuillez lire attentivement ces consignes de sécurité avant d'utiliser le produit.
FRANÇAIS
FRA
CONSIGNES DE SÉCURITÉ
AVERTISSEMENT
N'installez pas la TV et la télécommande dans les environnements suivants :
y
- Un emplacement exposé à la lumière directe du soleil ;
- Une zone fortement humide comme une salle de bain ;
- À proximité d'une source de chaleur comme une cuisinière et tout autre appareil
produisant de la chaleur ;
- À proximité d'un plan de travail de cuisine ou d'un humidificateur où elles
pourraient facilement être exposées à la vapeur ou à l'huile ;
- Une zone exposée à la pluie et au vent ;
- À proximité de conteneurs d'eau comme des vases.
Le non-respect de cette consigne peut provoquer un incendie, une électrocution,
un dysfonctionnement ou une déformation du produit.
N'installez pas le produit dans un endroit exposé à la poussière.
y
Le non-respect de cette consigne peut provoquer un incendie.
La fiche secteur est l'élément de déconnexion. La fiche doit être toujours
y
accessible.
Ne touchez pas la fiche d'alimentation avec les mains mouillées. En outre, si
y
la fiche du cordon est mouillée ou couverte de poussière, séchez ou essuyez
complètement le cordon d'alimentation.
L'humidité excessive peut provoquer des risques d'électrocution.
Veillez à raccorder le câble d'alimentation à une prise de terre. (Ne s'applique pas
y
aux appareils ne nécessitant pas une mise à la terre.)
Si ce n'est pas le cas, vous risquez d'être électrocuté ou blessé.
Fixez correctement le câble d'alimentation.
y
Si le câble d'alimentation n'est pas correctement fixé, un incendie peut se déclarer.
Assurez-vous que le cordon d’alimentation n’est pas en contact avec des objets
y
chauds comme un chauffage.
Le non-respect de cette consigne peut provoquer un incendie ou une électrocution.
Ne placez pas d’objets lourds, ou le produit lui-même, sur les câbles d’alimentation.
y
Le non-respect de cette consigne peut provoquer un incendie ou une électrocution.
Pliez le câble d’antenne entre le bâtiment intérieur et extérieur pour empêcher la
y
pluie de s’écouler à l’intérieur.
L’eau pourrait endommager le produit et provoquer une électrocution.
Lorsque vous fixez une TV au mur, veillez à ne pas l’accrocher à l’aide des câbles
y
d’alimentation ou de signal situés à l’arrière.
Cela risque de provoquer un incendie ou une électrocution.
Page 63

Desiccant
CONSIGNES DE SÉCURITÉ
Ne branchez pas trop d'appareils électriques sur une seule multiprise murale
y
Le non-respect de cette consigne peut provoquer un incendie résultant d'une
surchauffe.
Ne faites pas tomber le produit ou ne le laissez pas tomber lors du branchement
y
de périphériques externes.
Le non-respect de cette consigne peut entraîner des blessures ou endommager le
produit.
Conservez le matériau d'emballage anti-moisissure ou l'emballage en vinyle hors
y
de portée des enfants.
Le matériau anti-moisissure est dangereux en cas d'ingestion. En cas d'ingestion
par mégarde, faites vomir la personne et rendez-vous à l'hôpital le plus proche.
En outre, l'emballage en vinyle peut entraîner une asphyxie. Conservez-le hors de
portée des enfants.
Ne laissez pas les enfants grimper sur la TV ou s'agripper dessus.
y
Dans le cas contraire, la TV risque de tomber, ce qui peut entraîner des blessures
graves.
Respectez les règles de sécurité lors de la mise au rebut des batteries pour éviter
y
qu'un enfant ne les avale.
En cas d'ingestion, consultez immédiatement un médecin.
5
FRAFRANÇAIS
N'insérez pas de conducteur (comme une baguette métallique) dans l'une des
y
extrémités du câble d'alimentation si l'autre extrémité est reliée au terminal
d'entrée mural. En outre, ne touchez pas le câble d'alimentation juste après le
raccordement au terminal d'entrée mural.
Vous pourriez vous électrocuter. (selon le modèle)
Veillez à ne pas placer ou conserver des substances inflammables à proximité du
y
produit.
Une manipulation imprudente des substances inflammables présente un risque
d'explosion ou d'incendie.
Ne laissez pas tomber d'objets métalliques (pièces de monnaie, épingles à
y
cheveux, baguettes métalliques ou fils) ou d'objets inflammables (papier et
allumettes) dans le produit. Surveillez particulièrement les enfants.
Cela pourrait provoquer une électrocution, un incendie ou des blessures. Si un
corps étranger tombe dans le produit, débranchez le câble d'alimentation et
contactez le centre de services.
Ne vaporisez pas d'eau sur le produit ou ne le frottez pas avec une substance
y
inflammable (diluant ou benzène). Vous risqueriez de provoquer une électrocution
ou un incendie.
Évitez tout impact d’objets avec l’appareil ou toute chute d’objets sur l’appareil, et
y
ne laissez rien tomber sur l’écran.
Vous risqueriez de vous blesser ou d’endommager le produit.
Ne touchez jamais ce produit ou l’antenne en cas de tonnerre ou d’orage.
y
Vous pourriez vous électrocuter.
Ne touchez jamais la prise murale lors d’une fuite de gaz ; ouvrez les fenêtres et
y
aérez la pièce.
Le non-respect de cette consigne peut provoquer un incendie ou des brûlures
dues aux étincelles.
Page 64

6
FRANÇAIS
FRA
CONSIGNES DE SÉCURITÉ
Ne démontez pas le produit, ne le réparez pas et n'y apportez aucune modification.
y
Vous risqueriez de provoquer une électrocution ou un incendie.
Contactez le centre de services pour les vérifications, les calibrages et les
réparations.
Si vous êtes confronté à l'une des situations suivantes, débranchez immédiatement
y
le produit et contactez votre centre de services local.
- Le produit a reçu un choc
- Le produit a été endommagé
- Des corps étrangers sont entrés dans le produit
- Le produit dégage de la fumée ou une odeur étrange
Le non-respect de cette consigne peut provoquer un incendie ou une électrocution.
Si vous n'utilisez pas le produit pendant une période prolongée, débranchez le
y
câble d'alimentation du produit.
Une couche de poussière peut provoquer un incendie ; une détérioration de
l'isolation peut provoquer une fuite électrique, une électrocution ou un incendie.
N'exposez pas l'appareil à la pluie ni aux éclaboussures. Ne placez pas d'objets
y
contenant du liquide (tels qu'un vase) sur le produit.
Page 65

CONSIGNES DE SÉCURITÉ
5~7 times
ATTENTION
Installez le produit à l'écart des ondes radio.
y
La distance entre une antenne extérieure et les lignes d'alimentation doit être
y
suffisante pour éviter tout contact physique en cas de chute de l'antenne.
Le non-respect de cette consigne peut provoquer une électrocution.
N'installez pas le produit sur des étagères instables ou des surfaces inclinées.
y
Évitez également les endroits soumis à des vibrations ou ne permettant pas de
supporter correctement le produit.
Dans le cas contraire, le produit risque de tomber ou de se retourner, ce qui peut
provoquer des blessures ou endommager le produit.
Si vous installez la TV sur un support, veillez à empêcher le produit de se
y
renverser. Dans le cas contraire, le produit risque de tomber, ce qui peut entraîner
des blessures.
Si vous essayez de monter le produit sur un mur, fixez une interface de montage VESA standard
y
(pièces en option) à l'arrière du produit. Lorsque vous installez le poste à l'aide d'un support mural
(pièces en option), fixez-le solidement pour éviter qu'il ne tombe.
Utilisez uniquement des éléments de fixation/accessoires agréés par le fabricant.
y
Lors de l'installation de l'antenne, consultez un agent de maintenance qualifié.
y
Le non-respect de cette consigne peut provoquer un incendie ou une électrocution.
7
FRAFRANÇAIS
Nous vous recommandons de garder une distance équivalente à 5 à 7 fois la
y
diagonale de l'écran lorsque vous regardez la TV.
Regarder la TV de façon prolongée peut provoquer des troubles de la vue.
Utilisez uniquement le type de piles spécifié.
y
Le non-respect de cette consigne peut endommager la télécommande.
N'utilisez pas simultanément de nouvelles piles et des piles usagées.
y
Ceci pourrait provoquer la surchauffe des piles et une fuite de liquide.
Assurez-vous qu'aucun objet n'est placé entre la télécommande et son capteur.
y
La lumière du soleil ou un éclairage puissant peut perturber le signal de la
y
télécommande. Le cas échéant, assombrissez la pièce.
Lorsque vous branchez des périphériques externes comme des consoles de jeu
y
vidéo, veillez à ce que les câbles de raccordement soient assez longs.
Dans le cas contraire, le produit risque de tomber, ce qui peut provoquer des
blessures ou endommager le produit.
Page 66

8
FRANÇAIS
FRA
CONSIGNES DE SÉCURITÉ
Ne mettez pas le produit sous/hors tension en branchant et en débranchant le
y
cordon d'alimentation de la prise. (N'utilisez pas le cordon d'alimentation en tant
qu'interrupteur.)
Vous risqueriez de provoquer une panne mécanique ou une électrocution.
Veuillez suivre les instructions d'installation ci-après pour empêcher une surchauffe
y
du produit.
- La distance entre le produit et le mur doit être d'au moins 10 cm.
- N'installez pas le produit dans un endroit non aéré (par ex., dans une
bibliothèque ou dans un placard).
- N'installez pas le produit sur un tapis ou un coussin.
- Assurez-vous que l'aération n'est pas obstruée par une nappe ou un rideau.
Le non-respect de cette consigne peut entraîner un incendie.
Évitez de toucher les ouvertures de ventilation lors de l'utilisation prolongée
y
du téléviseur car elles peuvent surchauffer. Ceci n'affecte en aucun cas le
fonctionnement ou la performance du produit.
Examinez régulièrement le cordon de votre appareil et si vous détectez des signes
y
d'endommagement ou de détérioration, débranchez-le. Cessez alors d'utiliser l'appareil et demandez
à un prestataire de services autorisé de remplacer le cordon par une pièce identique.
Évitez de laisser la poussière s'accumuler sur les tiges de la fiche d'alimentation
y
ou de la prise électrique.
Le non-respect de cette consigne peut provoquer un incendie.
Protégez le cordon d'alimentation contre les mauvais traitements physiques ou
y
mécaniques, la torsion, la pliure, le pincement, et évitez qu'il ne puisse être pris
dans une porte ou que l'on puisse marcher dessus. Vérifiez soigneusement les
fiches, les prises murales et les points de sortie du cordon de l'appareil.
N'appuyez pas avec force sur l'écran avec la main ou avec un objet pointu, tel
y
qu'un clou, un crayon ou un stylo afin d'éviter de le rayer.
Évitez de toucher l'écran ou de maintenir les doigts dessus de manière prolongée.
y
Cela peut en effet provoquer des déformations provisoires de l'image.
Lors du nettoyage du produit et de ses composants, débranchez le cordon
y
d'alimentation et essuyez-les à l'aide d'un chiffon doux. Une pression excessive
peut provoquer des rayures ou une décoloration. Ne vaporisez pas d'eau et
n'utilisez pas de chiffon mouillé. N'utilisez jamais de produit à vitre, de produit
lustrant pour voiture ou industriel, d'abrasifs ou de cire, de benzène, d'alcool, etc.,
qui risqueraient d'endommager le produit et son écran.
Le non-respect de cette consigne peut provoquer un incendie ou une électrocution,
ou endommager le produit (déformation, corrosion ou cassure).
Tant que l'unité est connectée à la prise murale de secteur, elle n'est pas déconnectée de la source
y
d'alimentation secteur, même si vous avez éteint l'unité à l'aide de l'INTERRUPTEUR.
Pour débrancher le câble, tenez-le par la fiche.
y
Si les fils dans le câble d'alimentation sont déconnectés, cela peut provoquer un
incendie.
Veillez à mettre le produit hors tension lorsque vous le déplacez. Puis, débranchez
y
les câbles d'alimentation, les câbles d'antenne et tous les câbles de raccordement.
La TV ou le cordon d'alimentation peuvent être endommagés, ce qui peut
provoquer un incendie ou une électrocution.
Page 67

CONSIGNES DE SÉCURITÉ
Vous devez être deux pour déplacer ou déballer le produit car ce dernier est lourd.
y
Le non-respect de cette consigne peut entraîner des blessures.
Contactez le centre de services une fois par an pour nettoyer les composants
y
internes du produit.
Une accumulation de poussière peut provoquer des pannes mécaniques.
Confiez l'ensemble des réparations à du personnel qualifié. Confiez les
y
réparations à du personnel qualifié dans les cas suivants : si la fiche ou le cordon
d'alimentation secteur est endommagé, si un liquide a été renversé sur l'appareil
ou si des objets sont tombés sur l'appareil, si l'appareil a été exposé à la pluie ou à
l'humidité, si l'appareil ne fonctionne pas normalement ou s'il est tombé.
Si le produit est froid au toucher, il pourra se produire un petit « scintillement » à sa
y
mise en marche. Ce phénomène est normal et le produit n'est pas en cause.
L'écran haute technologie se caractérise par une résolution de deux millions à
y
six millions de pixels. Il est possible que de minuscules points noirs et/ou des
points lumineux (rouge, bleu ou vert) de la taille d'un ppm s'affiche à l'écran. Cela
n'indique pas un dysfonctionnement et n'affecte pas les performances et la fiabilité
du produit.
Ce phénomène survient également sur les produits tiers ; aucun échange ou
remboursement n'est possible.
Suivant votre position de visionnage (gauche/droite/haut/bas), la luminosité et la
y
couleur de l'écran peuvent varier.
Ce phénomène résulte des caractéristiques de l'écran. Il n'a aucun rapport avec
les performances du produit et n'indique pas un dysfonctionnement.
9
FRAFRANÇAIS
L'affichage d'une image fixe (logo d'un canal de diffusion, menu à l'écran, scène d'un jeu vidéo,
y
etc.) pendant une durée prolongée peut endommager l'écran et provoquer une image rémanente ;
ce phénomène s'appelle une brûlure d'écran. La garantie ne couvre pas le produit pour une brûlure
d'écran.
Évitez d'afficher une image fixe de façon prolongée sur l'écran de votre téléviseur (pas plus de
2 heures sur un écran LCD et pas plus d'une heure sur un écran plasma).
Si vous regardez votre TV de façon prolongée au format 4:3, une brûlure d'écran peut apparaître sur
le contour de l'écran.
Ce phénomène survient également sur les produits tiers ; aucun échange ou remboursement n'est
possible.
Sons générés
y
Bruit de craquement : un bruit de craquement, lorsque vous regardez ou éteignez la TV, est généré
par une contraction thermique plastique liée à la température et à l'humidité. Ce bruit est usuel sur
les produits nécessitant une déformation thermique. Bourdonnement du circuit électrique/de l'écran :
bruit faible généré par un circuit de commutation haute vitesse qui permet le fonctionnement du
produit en fournissant la majeure partie de l'alimentation. Il varie en fonction du produit.
Ce son généré n'affecte ni les performances ni la fiabilité du produit.
Page 68

10
Visionnage d'images 3D (modèles 3D uniquement)
Environnement de visionnage
FRANÇAIS
FRA
Personnes sujettes à des convulsions liées à la photosensibilité ou souffrant d'une maladie
chronique
CONSIGNES DE SÉCURITÉ
AVERTISSEMENT
yDurée de visionnage
- Lors du visionnage de contenu 3D, veillez à faire une pause de 5 à 15 minutes toutes les heures.
Le visionnage prolongé de contenu 3D peut provoquer des maux de tête, des vertiges et une
fatigue générale ou oculaire.
yCertains utilisateurs peuvent être victimes de crises d'épilepsie ou montrer des symptômes anormaux
lorsqu'ils sont exposés à une lumière clignotante ou à un type d'image précis provenant de contenu 3D.
yNe regardez pas de vidéos 3D si vous êtes nauséeux, attendez un enfant, souffrez d'une maladie
chronique comme l'épilepsie, présentez un trouble cardiaque, un problème de tension, etc.
yLe contenu 3D n'est pas recommandé aux personnes qui souffrent d'une cécité stéréo ou d'une
anomalie stéréo. Vous pourriez voir les images en double ou éprouver une gêne lors du visionnage.
ySi vous souffrez d'un strabisme (yeux qui louchent), d'une amblyopie (faiblesse de la vue) ou d'un
astigmatisme, vous pouvez rencontrer des problèmes de détection de la profondeur et éprouver
facilement une fatigue visuelle résultant de la vision des images en double. Il est recommandé de faire
davantage de pauses qu'un adulte ne présentant pas de gêne.
ySi votre vision varie d'un œil à l'autre, contrôlez votre vue avant de visionner du contenu 3D.
Symptômes nécessitant d'arrêter provisoirement ou définitivement de visionner du contenu 3D
yNe regardez pas du contenu 3D lorsque vous êtes fatigué à cause d'un manque de sommeil, d'une
surcharge de travail ou d'une surconsommation d'alcool.
yLorsque vous éprouvez ces symptômes, arrêtez d'utiliser/visionner du contenu 3D et reposez-vous
jusqu'à leur disparition.
- Consultez votre médecin si ces symptômes persistent. Symptômes possibles : maux de tête,
douleurs des globes oculaires, vertiges, nausée, palpitation, images floues, gêne, images en
double, gêne ou fatigue visuelle.
Page 69

CONSIGNES DE SÉCURITÉ
ATTENTION
Environnement de visionnage
yDistance de visionnage
- Lors du visionnage de contenu 3D, gardez une distance équivalente au double de la diagonale de
l'écran. Si vous ressentez une gêne lors du visionnage de contenu 3D, éloignez-vous davantage de
la TV.
yPosition de visionnage
- Placez-vous face au centre de l’écran, au niveau des yeux, la tête bien droite. Dans le cas
contraire, vous risquez de ne pas voir le contenu 3D correctement.
11
FRAFRANÇAIS
Âge pour le visionnage
yEnfants
- L’utilisation/le visionnage de contenu 3D par des enfants de moins de 5 ans est interdit.
- Les enfants de moins de 10 ans peuvent réagir de manière excessive car leur vision est en cours
de développement (ils peuvent, par exemple, essayer de toucher l’écran ou de sauter dedans). Il
est nécessaire d’apporter une surveillance spéciale et une attention particulière aux enfants qui
visionnent du contenu 3D.
- Les enfants présentent une plus grande disparité binoculaire des présentations en 3D que les
adultes car la distance entre leurs yeux est plus petite. En revanche, ils perçoivent davantage la
profondeur stéréoscopique des images 3D que les adultes.
yAdolescents
- Les adolescents de moins de 19 ans peuvent présenter une plus grande sensibilité du fait de la
stimulation résultant de la luminosité du contenu 3D. Conseillez-leur de ne pas regarder de contenu
3D de manière prolongée lorsqu’ils sont fatigués.
yPersonnes âgées
Les personnes âgées perçoivent moins les effets 3D que les personnes jeunes. Ne vous asseyez pas
plus près de la TV que la distance recommandée.
Mise en garde lors de l'utilisation de lunettes 3D
yVeillez à utiliser des lunettes 3D LG. Dans le cas contraire, vous risquez de ne pas voir les vidéos 3D
correctement.
yN'utilisez pas les lunettes 3D comme lunettes de vue, lunettes de soleil ou lunettes de protection.
yL'utilisation de lunettes 3D modiées peut entraîner une fatigue oculaire ou une distorsion de l'image.
yGardez vos lunettes 3D à l'abri des températures extrêmement froides ou chaudes. Cela pourrait les
déformer.
yLes lunettes 3D sont fragiles et se rayent facilement. Utilisez toujours un chiffon doux et propre pour
nettoyer les verres. Ne rayez pas les verres des lunettes 3D avec un objet pointu et n'y appliquez pas
de produits chimiques.
yL’écran peut clignoter lors du visionnage de vidéos 3D avec un éclairage uorescent ou à trois
longueurs d’onde. Le cas échéant, baissez ou éteignez la lumière.
yD’autres appareils électroniques ou de communication doivent être mis hors tension ou éloignés du
téléviseur car ils peuvent provoquer des interférences et empêcher le bon fonctionnement de la fonction
3D.
yLorsque vous regardez la TV en position allongée, les images 3D peuvent paraître plus sombres ou
invisibles.
Page 70

12
FRANÇAIS
FRA
PROCÉDURE D'INSTALLATION
PROCÉDURE D'INSTALLATION / ASSEMBLAGE ET PRÉPARATION
REMARQUE
yL’image ci-dessous peut être différente de celle affichée sur votre téléviseur.
yL'affichage à l'écran de votre TV peut différer légèrement de celui qui est présenté dans ce manuel.
yLes menus et options disponibles peuvent être différents selon la source d'entrée ou le modèle de
produit utilisé.
yDe nouvelles fonctionnalités pourront être ajoutées ultérieurement à ce téléviseur.
yLa TV peut être mise en mode veille pour réduire la consommation d'électricité. Pour réduire la
consommation d'énergie, la TV doit être éteinte si personne ne la regarde pendant un certain temps.
yLa consommation d'énergie pendant l'utilisation peut être limitée de façon significative en réduisant
la luminosité de l'image. Cela aura pour effet de réduire le coût global de fonctionnement.
yL’appareil doit être raccordé à une prise électrique située à proximité et facilement accessible. Sur
certains appareils ne disposant pas de bouton marche/arrêt, la mise hors tension de l’appareil
s’effectue en débranchant le cordon d’alimentation.
1 Ouvrez la boîte et assurez-vous d'avoir tous les accessoires.
2 Fixez le support au moniteur.
3 Connectez un périphérique externe au moniteur.
4 Assurez-vous que la connexion réseau est disponible.
Vous pouvez utiliser les fonctions réseau de la TV uniquement lorsque la connexion réseau est établie.
ASSEMBLAGE ET PRÉPARATION
Déballage
Vériez que la boîte de votre moniteur contient les éléments suivants. S'il manque des accessoires,
contactez le revendeur auprès duquel vous avez acheté votre produit. L'aspect réel des produits et articles
présentés dans ce manuel peut différer des illustrations.
ATTENTION
yAfin d'optimiser la sécurité et la durée de vie du produit, n'utilisez pas d'éléments non agréés.
yLa garantie ne couvre pas les dommages ou les blessures dus à l'utilisation d'éléments non agréés.
ySur certains modèles, un film fin est appliqué sur l’écran et celui-ci ne doit pas être retiré.
Page 71

ASSEMBLAGE ET PRÉPARATION
AV MODE
INPUT
ENERGY
TV
SAVING
1 2 3
4 5 6
7 809
FLASHBK
LIST
MARK
FAV
P
A
G
3D
CHVOL
E
MUTE
INFO
MENU
Q.MENU
ENTER
EXIT
BACK
L/R SELECT
FREEZE
RATIO
Télécommande et piles
(AAA)
P
(voir p. 20)
Télécommande Magic
Remote, piles (AA)
(Uniquement 50/60PM97**)
(voir p. 21)
13
Chiffon de nettoyage
(selon le modèle)
Manuel d’utilisation
Utilisez-le pour enlever la
FRAFRANÇAIS
poussière du boîtier.
Attache du cordon
Cordon d’alimentation
d’alimentation
(voir p. A-4)
Noyau de ferrite
Cache de protection
(voir p. A-4)
(selon le modèle)
(voir p. 14)
x 3x 4
M4 x 30 M5 x 16
Attache-câble
(selon le modèle)
(voir p. A-4)
Vis pour l’assemblage
(
Uniquement
42/50PM47**,
50/60PM67**, 50PM68**,
50PM97**)
(voir p. A-3)
Corps du support /
Base du support
(Uniquement 42/50PM47**,
50/60PM67**)
(voir p. A-3)
Serre-câble
(Uniquement 50/60PM68**,
50/60PM97**)
(voir p. A-3)
x 5x 4
M4 x 30 M5 x 16
Lunettes 3D
(AG-350)
(selon le modèle)
Vis pour l’assemblage
(
Uniquement
60PM68**,
60PM97**)
(voir p. A-3)
Corps du support /
Base du support
(Uniquement 50/60PM68**,
50/60PM97**)
(voir p. A-3)
Page 72

14
FRANÇAIS
FRA
ASSEMBLAGE ET PRÉPARATION
REMARQUE
Les éléments fournis avec votre produit diffèrent en fonction du modèle choisi.
y
Les caractéristiques des produits ou le contenu de ce manuel peuvent être modifiés sans préavis en
y
cas de mise à jour des fonctions.
Utilisation de la ferrite
1 La ferrite peut être utilisée pour réduire les ondes électromagnétiques dans le câble audio du PC.
Entourez le câble audio du PC autour de la ferrite trois fois. Placez la ferrite près du téléviseur.
(Gris)
10 mm(+ / - 5 mm)
[vers un périphérique externe]
[vers la TV]
[Figure 1]
[Vue transversale
d’une ferrite]
2 La ferrite peut être utilisée pour réduire les ondes électromagnétiques dans le câble d’alimentation.
Entourez le câble d’alimentation autour de la ferrite une seule fois. Placez la ferrite près du téléviseur
et d’une prise murale.
[vers une prise murale]
[vers la TV]
(Noir)
[Figure 2]
[Vue transversale
d’une ferrite]
3 La ferrite peut être utilisée pour réduire les ondes électromagnétiques dans le câble LAN. Enroulez
trois fois le câble LAN autour de la ferrite. Placez la ferrite près de la TV et d’un périphérique externe.
A (Gris) B (Gris)
[vers un
périphérique externe]
BAA
[vers la TV]
[Vue transversale
[Figure 3]
d’une ferrite]
4 La ferrite peut être utilisée pour réduire les ondes électromagnétiques dans le câble des composants
Y, Pb, Pr, L, R. Enroulez une fois le câble Composantes Y, Pb, Pr, L, R autour de la ferrite. Placez la
ferrite près du téléviseur.
(Noir)
[vers un périphérique externe]
[vers la TV]
10 mm(+ / - 5 mm)
[Figure 4]
- Si vous disposez de six ferrites, suivez les instructions des illustrations 1, 2 et 3.
- Si vous disposez de sept ferrites, suivez les instructions des illustrations 1, 2, 3 et 4.
y Pour une connexion optimale, les câbles HDMI et les
périphériques USB doivent comporter des connecteurs
d’une épaisseur inférieure à 10 mm et d’une largeur
inférieure à 18 mm. Utilisez une rallonge prenant en
charge USB 2.0 si le câble USB ou la clé USB ne
s’adapte pas au port USB de la TV.
[Vue transversale
d’une ferrite]
*A 10 mm
*B 18 mm
Page 73

ASSEMBLAGE ET PRÉPARATION
Achat séparé
Des articles vendus séparément peuvent faire l’objet de remplacements ou de modications sans préavis
dans le but d’améliorer la qualité du produit.
Contactez votre revendeur pour vous procurer ces articles.
Ces périphériques fonctionnent uniquement avec certains modèles.
15
P
AG-S3**
Lunettes 3D
Compatibilité
AG-S3**
Lunettes 3D
AN-WF100
LAN sans fil
AN-MR300
Télécommande Magic Remote
AN-WF100
LAN sans fil
AN-MR300
Télécommande Magic Remote
PM47** PM67** PM68** PM97**
• • • •
• •
• • • •
Le nom ou le design du modèle peut changer en cas de mise à niveau des fonctions du produit, des conditions de diffusion ou des politiques de confidentialité du fabricant.
FRAFRANÇAIS
Page 74

16
IN 1 (ARC)
/ DVI IN 2
USB IN 1/ USB Apps
USB Hub HDD IN
USB IN 2
INPUT
SETTINGS
OK
AV IN 2
L/MONO
IN
3 4
HDMI
IN
RS-232C IN
(CONTROL & SERVICE)
AV IN 1
LAN
ANTENNA/
CABLE IN
LNB IN
Satellite
13 / 18V
700mA Max
AUDIO IN
(RGB/DVI)
RGB IN
(PC)
Pièces et boutons
FRANÇAIS
FRA
ASSEMBLAGE ET PRÉPARATION
Télécommande et
capteurs intelligents
Voyant d’alimentation
Boutons
Écran
1
Haut-parleurs
Boutons
/
I
INPUT
SETTINGS
ꔉ
OK
Permet de mettre le moniteur sous/hors tension.
Permet de changer la source d’entrée.
Permet d’accéder au menu principal ou bien d’enregistrer votre entrée et de
quitter les menus.
Permet de sélectionner l’option du menu en surbrillance ou de confirmer une
entrée.
Description
Permet de régler le niveau du volume.
Permet de parcourir les chaînes enregistrées.
1 Capteur intelligent - Ajuste la qualité et la luminosité de l’image en fonction de l’environnement.
2 Prise du câble d’antenne - La prise du câble d’antenne peut différer du modèle.
Sauf pour le
modèle PM47**
Prise du câble
d’antenne
2
Panneau de
connexion
Page 75

ASSEMBLAGE ET PRÉPARATION
17
Soulever et déplacer la TV
Lisez les consignes suivantes an d'éviter de rayer
ou d'endommager la TV en la déplaçant, en la
soulevant ou en la transportant, quels que soient
le type et les dimensions de l'appareil.
ATTENTION
yÉvitez toujours de toucher l'écran, car vous
risqueriez de l'endommager.
yNous vous recommandons de déplacer la TV
dans sa boîte ou son emballage d'origine.
yAvant de déplacer ou de soulever la TV,
déconnectez le cordon d'alimentation et tous
les câbles.
yLorsque vous soulevez la TV, orientez l'écran à
l'opposé de vous pour éviter de l'endommager.
ySi votre téléviseur est volumineux, faites-vous
aider par une autre personne.
yLorsque vous transportez la TV, tenez-la
comme indiqué sur l'illustration suivante.
FRAFRANÇAIS
yLorsque vous transportez la TV, ne l'exposez
pas à des secousses ou à des vibrations
excessives.
yLorsque vous transportez la TV, maintenez-
la à la verticale, sans la coucher sur le côté ni
l'incliner vers la gauche ou la droite.
yMaintenez fermement la TV par le haut et le
bas du cadre. Veillez à ne pas la tenir par la
partie transparente, le haut-parleur ou la zone
de la grille du haut-parleur.
Page 76

ASSEMBLAGE ET PRÉPARATION
18
Installation sur une table
1 Soulevez et positionnez la TV à la verticale sur
FRANÇAIS
FRA
2 Branchez le cordon d'alimentation sur une prise
Ajustement de l’angle de la TV afin de trouver
le meilleur angle de vue
(Cette option n’est pas disponible sur tous les modèles.)
Ajustez l’angle de la TV an de trouver le meilleur
angle de vue. Faites pivoter la TV de 20 degrés
vers la gauche ou la droite ou réglez l’angle
d’inclinaison pour obtenir le meilleur confort visuel.
une table.
- Laissez au moins 10 cm entre le mur
et le moniteur pour assurer une bonne
ventilation.
10 cm
10 cm
murale.
10 cm
10 cm
ATTENTION
yNe placez pas la TV à côté ou sur des
sources de chaleur. Cela pourrait provoquer
un incendie ou d'autres dommages.
Fixation fiable de la TV au mur
(Cette option n'est pas disponible sur tous les
modèles.)
1 Insérez et serrez les boulons à œil, ou les
supports et les boulons à l'arrière de la TV.
- Si des boulons sont insérés dans les trous
des boulons à œil, dévissez d'abord ces
boulons.
2 Fixez les supports muraux avec les boulons
sur le mur.
Ajustez le support mural et les boulons à œil à
l'arrière de la TV.
3 Attachez les boulons à œil et les supports
muraux avec un cordon solide.
Le cordon doit rester en position horizontale
par rapport à la surface plane.
ATTENTION
yVeillez à empêcher les enfants de grimper
sur la TV ou de s'y suspendre.
20
20
ATTENTION
Faites attention à vos doigts lorsque vous
ajustez l’angle du produit.
»
Vous pourriez vous blesser en cas
d’écrasement des mains ou des doigts. Si
le produit est trop incliné, il peut tomber,
provoquant des dommages ou des blessures.
REMARQUE
yUtilisez une plate-forme ou un meuble d'une
largeur et d'une résistance suffisantes pour
soutenir en toute sécurité la TV.
yLes supports, les boulons et les cordons
ne sont pas fournis. Pour en savoir plus sur
les accessoires en option, contactez votre
revendeur.
Page 77

ASSEMBLAGE ET PRÉPARATION
A
B
19
Fixation du support mural
Prenez les précautions nécessaires pour xer
le support mural en option à l'arrière de la TV.
Installez-le sur un mur solide perpendiculaire au
sol. Contactez du personnel qualié pour xer la
TV sur d'autres matériaux de construction.
Pour l'installation murale, LG recommande
l'intervention de professionnels qualiés.
10 cm
10 cm
10 cm
10 cm
Veillez à utiliser des vis et un support mural
conformes aux normes VESA. Les dimensions
standard des kits de support mural sont indiquées
dans le tableau suivant.
Achat séparé (support mural)
Modèle 42/50PM47**
50PM67**
50PM68**
50PM97**
VESA (A x B) 400 x 400 600 x 400
Vis standard M6 M8
Nombre de vis 4 4
Support mural PSW400B,
PSW400BG
60PM67**
60PM68**
60PM97**
PSW600B,
PSW600BG
ATTENTION
yDébranchez le cordon d'alimentation avant
de déplacer ou d'installer la TV. Vous
éviterez ainsi tout risque d'électrocution.
ySi vous fixez la TV au plafond ou sur un mur
oblique, le produit risque de tomber et de
blesser quelqu'un.
Utilisez un support mural LG agréé et
contactez votre revendeur local ou une
personne qualifiée.
yNe serrez pas trop les vis. Cela pourrait
endommager la TV et entraîner l'annulation
de votre garantie.
yUtilisez des vis et supports de fixation
murale répondant aux spécifications de
la norme VESA. La garantie ne couvre
pas les dommages ou les blessures dus
à une mauvaise utilisation ou à l'utilisation
d'accessoires non agréés.
REMARQUE
yN'utilisez que des vis répondant aux
spécifications de la norme VESA.
yLe kit de support mural est fourni avec
un manuel d'installation et les pièces
nécessaires à l'installation.
yLe support mural est proposé en option.
Pour en savoir plus sur les accessoires en
option, contactez votre revendeur.
yLa longueur des vis dépend du modèle de
support mural. Vérifiez leur longueur avant
de procéder à l'installation.
yPour plus d'informations, consultez le
manuel fourni avec le support mural.
FRAFRANÇAIS
Page 78

20
APP/
APP/
APP/
@
ORANGE
INFO
TÉLÉCOMMANDE
Les descriptions contenues dans ce manuel font référence aux touches de la
télécommande.
Veuillez lire attentivement ce manuel et utiliser correctement la TV.
Pour changer les piles, ouvrez le couvercle et remplacez-les (modèle : 1,5 V AAA).
Faites correspondre les pôles et avec les signes sur l'étiquette placée à l'intérieur
du compartiment, puis refermez le couvercle.
FRANÇAIS
FRA
Pour retirer les piles, faites l'inverse de la procédure l'installation.
Les piles et batteries internes au produit ou raccordées à celui-ci ne doivent pas être
exposées à une chaleur excessive telle que celle du soleil, d’un feu ou d’uneorigine similaire.
Veillez à orienter la télécommande vers le capteur situé sur la TV.
Voir le guide de l'utilisateur.
Redimensionne une image.
Permet de changer la source d'entrée.
TV/RAD
Sélectionne le programme Radio, TV et TNT
LIST
Permet d'accéder à la liste des programmes.
Ouvre un espace vide sur le clavier de l’écran.
Q.VIEW
Revient au programme précédemment visionné.
FAV
Permet d'accéder à votre liste de canaux favoris.
Pour la lecture des vidéos en 3D.
PAGE
Passe à l'écran précédent ou suivant.
SETTINGS
Permet d'accéder aux menus principaux.
Permet d'accéder aux menus d'accueil.
Affiche la liste des applications.
Touches de navigation (haut/bas/gauche/droite)
Permettent de parcourir les menus ou options.
OK
Permet de sélectionner les menus ou options
et de confirmer votre entrée.
Permet de revenir au niveau précédent.
GUIDE
Présente le guide de programmes.
TÉLÉCOMMANDE
ATTENTION
yN'associez pas des piles neuves avec des piles anciennes, car cela pourrait endommager la télécommande.
(Guide de l’utilisateur)
RATIO
INPUT
(Espace)
HOME
MY APPS
(Retour)
1
.,;@2 abc3 def
4
ghi5 jkl6 mno
7
pqrs8 tuv
LIST
SETTINGS
1
2
LIVE TV
INFO
RATIO INPUT
[
0
FAV
MUTE
MY APPS
OK
GUIDE
AD
9
Q.VIEW
EXIT
SUBTITLE
REC
EXIT
Efface les informations affichées à l’écran et
revient à l’affichage TV.
1
Touches de couleur
Ces touches permettent d'accéder à des
TV/
RAD
fonctions spéciales dans certains menus.
( : rouge, : vert, : jaune, : bleu)
2
TOUCHES TÉLÉTEXTE
Ces touches sont utilisées pour le télétexte.
Pour plus de détails, voir la section « Télétexte ».
wxyz
SUBTITLE
Rappelle le sous-titrage de votre choix en
mode numérique.
Q. MENU
P
A
Permet d’accéder au menu rapide.
G
P
E
LIVE TV
Permet de revenir au programme en direct.
Touches de commande ( )
Contrôle le contenu Premium, les menus de
l'enregistreur numérique ou Smart Share ou
les périphériques SIMPLINK compatibles
(USB, SIMPLINK ou DVR).
REC
Permet de régler le menu de l'enregistreur
numérique.
Affiche les informations liées au programme
actuel et à l'écran.
AD
Active ou désactive la fonction de description audio.
3
3
Sélectionne la source de menu TV de la
plate-forme domestique multimédia.
(uniquement en Italie) (selon le modèle)
3
Permet d'accéder directement à votre portail
Internet de divertissement et aux services
d'informations développés par Orange.
(uniquement en France)
Page 79

FONCTIONS DE LA TÉLÉCOMMANDE MAGIC REMOTE
21
FONCTIONS DE LA TÉLÉCOMMANDE MAGIC REMOTE
Cet élément n'est pas intégré à tous les modèles.
Lorsque le message « La batterie de la télécommande magic remote est faible.
Remplacez les piles. » s'afche, remplacez la pile.
Pour changer les piles, ouvrez le couvercle et remplacez-les (modèle : 1,5 V AA).
Faites correspondre les pôles et avec les signes sur l'étiquette placée à l'intérieur
du compartiment, puis refermez le couvercle. Veillez à orienter la télécommande vers
le capteur situé sur la TV.
Pour retirer les piles, inversez la procédure d'installation.
Les piles et batteries internes au produit ou raccordées à celui-ci ne doivent pas être
exposées à une chaleur excessive telle que celle du soleil, d’un feu ou d’une origine similaire.
ATTENTION
yN'associez pas des piles neuves avec des piles anciennes, car cela pourrait endommager la télécommande.
yAucun dongle nécessaire pour faire fonctionner la Télécommande magic remote. Le récepteur est intégré au
téléviseur.
FRAFRANÇAIS
(MARCHE-ARRÊT)
Permet d'éteindre ou d'allumer
la TV.
Permet de revenir au niveau
Permet de sélectionner les
menus ou options et de con-
touche de navigation tout
en déplaçant le pointeur à
l'écran, le pointeur disparaît
et la télécommande magic
remote fonctionne comme une
télécommande classique.
Pour réafficher le pointeur,
tournez la télécommande
magic remote d'un côté et de
BACK (Retour)
précédent.
Molette (OK)
firmer votre entrée.
Permet de parcourir les
canaux enregistrés
Si vous appuyez sur la
l'autre.
11-1 Brief Info Title Test...
Mes Applications
Infos
BACK
Pointeur (émetteur RF)
Clignote en fonctionnement.
HOME (Accueil)
HOME
P
MY APPS
Si vous appuyez sur (OK) sur la molette de la
télécommande magic remote, l'écran suivant
apparaît.
1
Affiche des informations sur le programme et
l'écran actuels.
Appuyez sur ce bouton pour afficher le clavier
numérique et sélectionner le numéro de la
2
chaîne.
Vous pouvez sélectionner le menu Mes
3
applications.
Permet d'accéder au menu d'accueil.
Touches de navigation
(haut/bas/gauche/droite)
Permettent de parcourir les
menus ou options.
+ -
Permet de régler le niveau du
volume.
ꕌPꕍ
Permet de parcourir les chaînes
ou les canaux enregistrés
SOURDINE
Permet de couper tous les sons.
MY APPS
Affiche la liste des applications.
Permet de lire des vidéos 3D.
3
Page 80

FONCTIONS DE LA TÉLÉCOMMANDE MAGIC REMOTE
HOME
22
Enregistrement de la
télécommande magic
remote
Vous devez coupler (enregistrer) la télécommande
magic remote avec votre téléviseur avant de
l’utiliser.
FRANÇAIS
FRA
Comment enregistrer la télécommande magic
remote
Comment enregistrer à nouveau la
télécommande magic remote
BACK
(Retour)
HOME
(Accueil)
1 Pour l’enregistrer
automatiquement, allumez la
TV et appuyez sur la touche
Molette (OK). Une fois
l’enregistrement terminé, le
message de n apparaît à
l’écran.
2 Si l’enregistrement échoue,
éteignez la TV, rallumez-la,
puis appuyez sur la touche
Molette (OK) pour réessayer.
1 Maintenez les touches
BACK (Retour) et HOME
(Accueil) enfoncées pendant
5 secondes pour réinitialiser
l’enregistrement et le naliser
à l’aide des instructions
« Comment enregistrer
la télécommande magic
remote » ci-dessus.
2 Pour enregistrer à nouveau
la télécommande magic
remote, appuyez sur la touche
BACK (Retour) pendant
5 secondes en pointant la
télécommande vers la TV. Une
fois l’enregistrement terminé,
le message de n apparaît à
l’écran.
Comment utiliser la
télécommande magic
remote
1 Si le pointeur disparaît, bougez
doucement la télécommande
vers la gauche ou la droite. Il
réapparaîtra automatiquement
à l'écran.
»
Lorsque le pointeur n'est pas
été utilisé pendant un certain
laps de temps, il disparaît.
2 Vous pouvez bouger le pointeur
en pointant le récepteur de la
télécommande vers la TV, puis
en le bougeant vers la gauche,
la droite, le haut ou le bas.
»
Si le pointeur ne fonctionne
pas correctement,
patientez 10 secondes puis
recommencez.
Consignes relatives
à l'utilisation de la
télécommande magic
remote
La télécommande doit toujours se trouver à
y
une distance de communication maximum de
10 m. Si vous utilisez la télécommande à une
distance supérieure à celle recommandée
ou si un objet gêne la communication, cette
dernière pourrait échouer.
Un échec de communication peut résulter
y
des périphériques situés à proximité. Les
appareils électriques, comme les fours microondes ou les appareil LAN sans fil, peuvent
provoquer des interférences car ils utilisent
la même bande passante (2,4 GHz) que la
télécommande magic remote.
La télécommande magic remote peut
y
également être endommagée ou ne pas
fonctionner correctement suite à une chute
ou à un choc violent.
Veillez à ne pas cogner la télécommande
y
magic remote contre des meubles ou
d'autres personnes quand vous l'utilisez.
Le fabricant et l'installateur ne peuvent pas
y
fournir ce produit dans des services de
santé car le dispositif sans fil applicable peut
provoquer des interférences électriques.
Il est recommandé de placer un point d'accès
y
à plus d'un mètre de la TV. Si le point
d'accès est installé à moins d'un mètre, la
télécommande magic remote risque de ne
pas fonctionner à cause des interférences de
fréquence.
Page 81

UTILISATION DU GUIDE DE L'UTILISATEUR
UTILISATION DU GUIDE DE L'UTILISATEUR
Le guide de l'utilisateur vous permet d'accéder plus facilement aux informations complètes sur la TV.
23
1 Appuyez sur la touche d'accueil HOME pour
accéder au menu correspondant.
2 Sélectionnez Guide de l’utilisateur et appuyez
sur (OK) sur la molette.
Mes Applications
Liste récente
Guide de l’utilisateur
Liste des sources
Paramètres
Programme en direct
Recherche
Internet3DLG Smart W
Guide TV
Guide de l’utilisateur
REMARQUE
yVous pouvez également accéder au guide
de l'utilisateur en appuyant sur (Guide de
l'utilisateur) sur la télécommande.
Guide de l’utilisateur
1
Paramètre de CHAÎNE
Paramètre d’IMAGE et de SON
OPTION
Fonction LG SMART
Fonction Avancée
Information
3
Utilisation de la source
Utilisation de la fonction d’économie d’énergie
Réglage des options horaires
Réglage des options de verrouillage TV
Conguration de la langue
Assistance invalidité
Conguration de la télécommande Magic Motion
2
4
Guide de l’utilisateur
Paramètre de CHAÎNE
Paramètre d’IMAGE et de SON
OPTION
Fonction LG SMART
Fonction Avancée
Information
Affiche la description du menu sélectionné.
1
1
OPTION > Conguration de la langue
HOME Paramètres OPTION Langue
Permet de sélectionner Langue menu et Langue audio afchés à l’écran.
Langue menu
Permet de sélectionner une langue pour le texte d’afchage.
[En mode numérique uniquement]
Langue audio
Lorsque vous regardez une diffusion numérique contenant plusieurs
langues audio, vous pouvez sélectionner la langue de votre choix.
[En mode numérique uniquement]
Utilisez l'option Sous-titres quand deux langues des sous-titres, ou
Langue des
plus, sont diffusées.
sous-titres
✎ Si les données de sous-titres d'une langue sélectionnée ne sont
pas diffusées, la langue par défaut est diffusée.
3
Zoom avant
Fermer
Lancer
2
HOME Paramètres OPTION Langue
Permet de sélectionner Langue menu et Langue audio afchés à l’écran.
Langue menu
Permet de sélectionner une langue pour le texte d’afchage
[En mode numérique uniquement]
Lorsque vous regardez une diffusion numérique contenant plusieurs
Langue audio
langues audio, vous pouvez sélectionner la langue de votre choix.
[En mode numérique uniquement]
Utilisez l'option Sous-titres quand deux langues des sous-titres, ou
Langue des
plus, sont diffusées.
sous-titres
✎ Si les données de sous-titres d'une langue sélectionnée ne sont
pas diffusées, la langue par défaut est diffusée.
Lancer
Zoom arrière
3
Vous pouvez utiliser ꕌ/ꕍ pour parcourir les
pages.
Permet d'accéder directement au menu
2
sélectionné depuis le guide de l'utilisateur.
Permet d'effectuer un zoom avant ou arrière.
3
FRAFRANÇAIS
Fermer
Affiche la chaîne que vous regardez ou
1
l’écran des sources d’entrée disponibles.
Permet de sélectionner la catégorie
2
souhaitée.
Permet de sélectionner l'article souhaité.
3
Vous pouvez utiliser ꕌ/ꕍ pour parcourir les
pages.
Permet de parcourir la description de la
4
fonction qui vous intéresse depuis l'index.
Page 82

MAINTENANCE / DÉPANNAGE
24
MAINTENANCE
Nettoyage de votre TV
Nettoyez régulièrement votre TV pour conserver des performances optimales et pour allonger la durée de
vie du produit.
FRANÇAIS
FRA
Écran, cadre, boîtier et support
Cordon d’alimentation
Retirez régulièrement la poussière ou les saletés accumulées sur le cordon d’alimentation.
DÉPANNAGE
ATTENTION
yAvant toute chose, veillez à couper l’alimentation et à débrancher le cordon d’alimentation et tous les
autres câbles.
yLorsque vous prévoyez de ne pas utiliser le téléviseur pendant une longue période, débranchez le cordon
d’alimentation de la prise murale afin d’éviter tout endommagement dû à une étincelle ou une surtension.
yPour éliminer la poussière ou une saleté légère, essuyez la surface avec un chiffon doux, propre et sec.
yPour retirer des taches importantes, essuyez la surface avec un chiffon doux imbibé d'eau propre ou
d'un détergent doux dilué. Essuyez ensuite immédiatement avec un chiffon sec.
ATTENTION
yÉvitez toujours de toucher l'écran, car vous risqueriez de l'endommager.
yNe poussez pas, ne frottez pas ou ne cognez pas la surface de l'écran avec l'ongle ou un objet
contondant, car cela pourrait causer des rayures et des déformations de l'image.
yN'utilisez pas de produits chimiques car cela pourrait endommager le produit.
yNe pulvérisez pas de liquide sur la surface. Si de l'eau pénètre dans la TV, cela peut provoquer un
incendie, une électrocution ou un dysfonctionnement.
Problème Solution
Impossible de
commander
la TV avec la
télécommande.
Aucune image n'est
affichée et aucun
son n'est émis.
La TV s'éteint de
manière soudaine.
Une fois que vous
êtes connecté au PC
(RGB/ HDMI DVI),
le message « Aucun
signal » ou « Format
invalide » s’affiche.
yVérifiez le capteur de la télécommande sur la TV et essayez de nouveau.
yVérifiez qu'aucun obstacle n'est placé entre la TV et la télécommande.
yVérifiez si les piles fonctionnent et si elles sont correctement installées ( sur
, sur ).
yVérifiez si l'appareil est allumé.
yVérifiez si le cordon d'alimentation est raccordé à la prise murale.
yVérifiez la prise en branchant d'autres appareils.
yVérifiez les paramètres de contrôle de l'alimentation. Il peut y avoir une
coupure de courant.
yVérifiez si l'option Veille auto. est activée dans les réglages de l'heure.
ySi aucun signal n'est présent quand la TV est allumée, la TV s'éteint
automatiquement après 15 minutes d'inactivité.
yAllumez/éteignez le téléviseur à l’aide de la télécommande.
yReconnectez le câble RGB/HDMI.
yRedémarrez le PC une fois le téléviseur allumé.
Page 83

CONFIGURATION DU PÉRIPHÉRIQUE DE CONTRÔLE EXTERNE / SPÉCIFICATIONS
25
CONFIGURATION DU PÉRIPHÉRIQUE DE
CONTRÔLE EXTERNE
Pour obtenir plus d’informations sur la conguration du périphérique de contrôle externe, rendez-vous sur www.lg.com.
SPÉCIFICATIONS
Les spécications produit peuvent être modiées sans préavis en cas de mise à niveau des fonctions.
Spécifications du module LAN sans fil (TWFM-B003D)
Norme IEEE802.11a/b/g/n
2 400 à 2 483,5 MHz
Plage de fréquence
Modulation CCK / OFDM / MIMO
Puissance en sortie
(utilisation normale)
Débit
Gain de l'antenne
(utilisation normale)
Bande passante occupée
Comme le canal de bande utilisé varie d'un pays à l'autre, l'utilisateur ne peut pas modifier ou régler la
y
fréquence de fonctionnement. Ce produit est réglé conformément au tableau de fréquences régionales.
5 150 à 5 250 MHz
5 725 à 5 850 MHz
802.11a : 11 dBm
802.11b : 15 dBm
802.11g : 13 dBm
802.11n - 2,4 GHz : 13 dBm
802.11n - 5 GHz : 13 dBm
802.11a/g : 54 Mbit/s
802.11b : 11 Mbit/s
802.11n : 300 Mbit/s
2 400 à 2 483,5 MHz : -2,5 dBi
5 150 à 5 250 MHz : -2,2 dBi
5 725 à 5 850 MHz : -2,9 dBi
802.11a/b/g : HT20
802.11n : HT20/40
FRAFRANÇAIS
Spécifications du module Bluetooth (BM-LDS302)
Norme Version Bluetooth 3.0
Plage de fréquence 2 400 à 2 483,5 MHz
Puissance en sortie (max.) 10 dBm ou moins
Débit (max.) 3 Mbit/s
Distance de communication Visibilité d'environ 10 m
Page 84

Page 85

MAKING CONNECTIONS
B-1
MAKING
CONNECTIONS
This section on MAKING CONNECTIONS mainly
uses diagrams for the PM97** models.
Antenna Connection
Wall Antenna
Socket
English
Connect the TV to a wall antenna socket with an
RF cable (75 Ω).
NOTE
yUse a signal splitter to use more than 2 TVs.
yIf the image quality is poor, install a signal
amplifier properly to improve the image
quality.
yIf the image quality is poor with an antenna
connected, try to realign the antenna in the
correct direction.
yAn antenna cable and converter are not
supplied.
Deutsch
Schließen Sie das TV-Gerät mit einem RF-Kabel
(75 Ω) an eine Wandantennenbuchse an.
HINWEIS
yBei Verwendung von mehr als 2 TV-Geräten
verwenden Sie einen Signalsplitter.
yIst das Bild schlecht, installieren Sie einen
Signalverstärker, um die Bildqualität zu
verbessern.
yWenn die Bildqualität bei angeschlossener
Antenne schlecht ist, richten Sie die Antenne
richtig aus.
yAntennenkabel und Wandler sind nicht im
Lieferumfang enthalten.
Français
Connectez la TV à une prise d’antenne murale
avec un câble RF (75 Ω).
REMARQUE
yUtilisez un séparateur de signaux pour
utiliser plus de deux téléviseurs.
ySi la qualité d’image est mauvaise, installez
correctement un amplificateur de signaux
pour l’améliorer.
ySi vous utilisez une antenne et que la qualité
d’image est mauvaise, essayez de réaligner
l’antenne dans la bonne direction.
yLe câble et le convertisseur d’antenne ne
sont pas fournis.
Page 86

B-2
MAKING CONNECTIONS
Satellite dish Connection
(Only satellite models)
LNB IN
Satellite
13 / 18V
Satellite Dish
700mA Max
HDMI Connection
DVD / Blu-Ray / PC
HD Cable Box / HD STB
HDMI
(*Not Provided)
/ DVI IN 2
IN 1(ARC)
English
Connect the TV to a satellite dish to a satellite
socket with a satellite RF cable (75 Ω).
Deutsch
Schließen Sie das TV-Gerät mit einem SatellitenHF-Kabel (75 Ω) an eine Satellitenschüssel und an
eine Satellitenbuchse an.
Français
Connectez la TV à une parabole satellite ou à une
prise satellite à l’aide d’un câble satellite RF (75 Ω).
English
Transmits the digital video and audio signals from
an external device to the TV. Connect the external
device and the TV with the HDMI cable as shown.
Choose any HDMI input port to connect. It does
not matter which port you use.
NOTE
yIt is recommended to use the TV with the
HDMI connection for the best image quality.
yUse the latest High Speed HDMI™ Cable
with CEC (Customer Electronics Control)
function.
yHigh Speed HDMI™ Cables are tested to
carry an HD signal up to 1080p and higher.
ySupported DTV Audio: MPEG, Dolby Digital,
Dolby Digital Plus, HE-AAC
ySupported HDMI Audio format : Dolby
Digital, PCM (Up to 192 KHz, 32k/44.1k/48k
/88k/96k/176k/192k, DTS Not supported.)
Page 87

MAKING CONNECTIONS
B-3
Deutsch
Überträgt digitale Video- und Audiosignale von einem
externen Gerät an das TV-Gerät. Verbinden Sie
das externe Gerät, wie in der folgenden Abbildung
gezeigt, mithilfe des HDMI-Kabels mit dem TV-Gerät.
Wählen Sie zum Anschließen einen beliebigen HDMIEingang. Es ist egal, welchen Port Sie wählen.
HINWEIS
yFür optimale Bildqualität wird empfohlen,
den HDMI-Anschluss des TV-Gerätes zu
verwenden.
yVerwenden Sie das neueste
Hochgeschwindigkeits-HDMI™-Kabel mit
CEC-Funktion (Customer Electronics Control).
yHigh-Speed-HDMI™-Kabel sind für die
Übertragung von HD-Signalen bis zu 1080p
und höher getestet.
yUnterstützter DTV-Ton: MPEG, Dolby Digital,
Dolby Digital Plus, HE-AAC
yUnterstütztes HDMI-Audioformat: Dolby Digital,
PCM (bis zu 192 KHz, 32 KHz/44,1 KHz/
/48 KHz/88 KHz/96 KHz/176 KHz/192 KHz,
DTS wird nicht unterstützt.)
Français
Permet de transmettre les signaux vidéo et audio
numériques d’un périphérique externe vers la TV.
Connectez le périphérique externe et la TV avec le
câble HDMI comme indiqué sur l’illustration suivante.
Choisissez un port d’entrée HDMI pour établir la
connexion. Peu importe le port que vous utilisez.
ARC (Audio Return Channel)
English
An external audio device that supports
y
SIMPLINK and ARC must be connected
using HDMI IN 1 (ARC) port.
When connected with a high-speed HDMI
y
cable, the external audio device that
supports ARC outputs optical SPDIF without
additional optical audio cable and supports
the SIMPLINK function.
Deutsch
Ein externes Audiogerät, das SIMPLINK und
y
ARC unterstützt, muss über den HDMI IN 1
(ARC) angeschlossen werden.
Wenn der Anschluss mit einem High-Speed-
y
HDMI-Kabel erfolgt, gibt das externe Audiogerät, das ARC unterstützt, SPDIF ohne
zusätzliches optisches Audiokabel aus und
unterstützt die SIMPLINK-Funktion.
Français
Un périphérique audio externe qui prend en
y
charge les technologies SIMPLINK et ARC
doit être connecté au port HDMI IN 1 (ARC).
Si vous reliez un câble HDMI haut débit,
y
le périphérique audio externe qui prend en
charge les sorties ARC, prend également en
charge la sortie optique SPDIF sans câble
audio optique supplémentaire, ainsi que la
fonction SIMPLINK.
REMARQUE
yPour obtenir une meilleure qualité d’image,
il est recommandé d’utiliser la TV avec une
connexion HDMI.
yUtilisez le tout nouveau câble haut débit
HDMI™ avec la fonction CEC (contrôles
électroniques client).
yLes câbles HDMI™ haut débit sont testés
pour transporter un signal HD de 1080p ou
supérieur.
yTechnologies audio TNT prises en charge :
MPEG, Dolby Digital, Dolby Digital Plus,
HE-AAC
yFormats audio HDMI pris en charge : Dolby
Digital, PCM (jusqu’à 192 KHz, 32k/44,1k
/48k/88k/96k/176k/192k, DTS non pris en
charge)
Page 88

B-4
ARC)
MAKING CONNECTIONS
DVI to HDMI Connection
/ DVI IN 2
1
(*Not Provided)
AUDIO OUT
DVD / Blu-Ray / PC / HD Cable Box
DVI OUT
Deutsch
Überträgt digitale Videosignale von einem
externen Gerät an das TV-Gerät. Verbinden Sie
das externe Gerät, wie in der folgenden Abbildung
gezeigt, mithilfe des DVI-HDMI-Kabels mit dem
TV-Gerät. Schließen Sie ein Audiokabel an, um ein
Audiosignal zu übertragen.
Wählen Sie zum Anschließen einen beliebigen
HDMI-Eingang. Es ist egal, welchen Port Sie
wählen.
HINWEIS
yAbhängig von der Grafikkarte funktioniert
der DOS-Modus bei Einsatz eines HDMI-zuDVI-Kabels möglicherweise nicht.
Français
Permet de transmettre les signaux vidéo d’un
périphérique externe vers la TV. Connectez le
périphérique externe et la TV avec le câble DVIHDMI comme indiqué sur l’illustration suivante.
Pour émettre un signal audio, raccordez un câble
audio.
Choisissez un port d’entrée HDMI pour établir la
connexion. Peu importe le port que vous utilisez.
English
Transmits the digital video signal from an external
device to the TV. Connect the external device and
the TV with the DVI-HDMI cable as shown. To
transmit an audio signal, connect an audio cable.
Choose any HDMI input port to connect. It does
not matter which port you use.
NOTE
yDepending on the graphics card, DOS mode
may not work if a HDMI to DVI Cable is in use.
REMARQUE
ySelon la carte graphique, le mode DOS peut
ne pas fonctionner si vous utilisez un câble
pour établir la connexion HDMI-DVI.
Page 89

MAKING CONNECTIONS
AUDIO IN
(RGB/DVI)
AUDIO OUT
RGB OUT (PC)
RGB IN
(PC)
B-5
RGB-PC Connection
(*Not Provided)
PC
Component Connection
AV IN 2
IN
GREEN GREEN
BLUE BLUE
L/MONO
RED RED
WHITE WHITE
(*Not Provided)
RED
RED
English
Transmits the video signal from PC to the TV. To
transmit an audio signal, connect an audio cable.
Deutsch
Überträgt das Videosignal von Ihrem PC an das
TV-Gerät. Schließen Sie ein Audiokabel an, um ein
Audiosignal zu übertragen.
Français
Permet de transmettre les signaux vidéo de
l’ordinateur vers la TV. Pour émettre un signal
audio, raccordez un câble audio.
VIDEO
AUDIO
DVD / Blu-Ray / HD Cable Box
English
Transmits analog video and audio signals from an
external device to the TV. Connect the external
device and the TV with a component cable as shown.
NOTE
yIf cables are installed incorrectly, it could
case the image to display in black and white
or with distorted colour.
Page 90

B-6
MAKING CONNECTIONS
Deutsch
Überträgt analoge Video- und Audiosignale von
einem externen Gerät an das TV-Gerät. Verbinden
Sie das externe Gerät, wie in der folgenden
Abbildung gezeigt, mithilfe eines KomponentenKabels mit dem TV-Gerät.
HINWEIS
yWenn Kabel falsch angeschlossen werden, kann
dies dazu führen, dass ein Bild in Schwarz-Weiß
oder in verzerrten Farben erscheint.
Français
Permet de transmettre les signaux audio et vidéo
analogiques d’un périphérique externe vers la
TV. Connectez le périphérique externe et la TV
avec un câble composante comme indiqué sur
l’illustration suivante.
REMARQUE
ySi les câbles sont mal installés, l’image
peut s’afficher en noir et blanc ou avec des
couleurs de mauvaise qualité.
Composite Connection
IN
VIDEO
AV IN 2
YELLOW YELLOW
(*Not Provided)
WHITE
( )
MONO
R
L
L/MONO
WHITE
RED
AUDIO
RED
VCR / DVD / Blu-Ray / HD Cable Box
English
Transmits analog video and audio signals from an
external device to the TV. Connect the external device
and the TV with th e composite cable as shown.
Deutsch
Überträgt analoge Video- und Audiosignale von einem
externen Gerät an das TV-Gerät. Verbinden Sie das
externe Gerät, wie in der folgenden Abbildung gezeigt,
mithilfe des Composite-Kabels mit dem TV-Gerät.
Français
Permet de transmettre les signaux audio et vidéo
analogiques d’un périphérique externe vers la TV.
Connectez le périphérique externe et la TV avec
le câble composite comme indiqué sur l’illustration
suivante.
Page 91

MAKING CONNECTIONS
B-7
Audio Connection
(*Not Provided)
Digital Audio System
English
OPTICAL
AUDIO IN
Deutsch
Sie können anstelle der integrierten Lautsprecher
ein optionales externes Audiosystem verwenden.
HINWEIS
yWenn Sie ein optionales externes
Audiogerät und nicht den eingebauten
Lautsprecher nutzen, stellen Sie die
Funktion „TV Lautsprecher“ auf „Aus“.
Anschluss über ein digitales
optisches Audiokabel
Überträgt ein digitales Audiosignal vom TV-Gerät an
ein externes Gerät. Verbinden Sie das externe Gerät,
wie in der folgenden Abbildung gezeigt, mithilfe des
optischen Audiokabels mit dem TV-Gerät.
HINWEIS
yBlicken Sie nicht in den optischen
Ausgangsanschluss. Der Laserstrahl könnte
Ihren Augen schaden.
yDie Funktion Audio mit ACP (Audio-
Kopierschutz) blockiert möglicherweise den
digitalen Audioausgang.
You may use an optional external audio system
instead of the built-in speaker.
NOTE
yIf you use an optional external audio device
instead of the built-in speaker, set the TV
speaker feature to off.
Digital optical audio connection
Transmits a digital audio signal from the TV to an
external device. Connect the external device and
the TV with the optical audio cable as shown.
NOTE
yDo not look into the optical output port.
Looking at the laser beam may damage
your vision.
yAudio with ACP (Audio Copy Protection)
function may block digital audio output.
Français
Vous pouvez utiliser un système audio externe en
option à la place d’un haut-parleur intégré.
REMARQUE
ySi vous utilisez un périphérique audio
externe à la place du haut-parleur intégré,
les haut-parleurs TV doivent être désactivés.
Connexion audio optique
numérique
Permet de transmettre un signal audio numérique
de la TV au périphérique externe. Connectez le
périphérique externe et la TV avec le câble audio
optique comme indiqué sur l’illustration suivante.
REMARQUE
yNe regardez pas dans le port de sortie
optique. Le rayon laser risquerait de vous
abîmer la vue.
yLa fonction Audio avec ACP (protection copie
audio) peut bloquer la sortie audio numérique.
Page 92

B-8
/
DVI IN 2
USB IN 1/ USB Apps
USB Hub HDD IN
USB IN 2
MAKING CONNECTIONS
USB Connection
HDD
USB
HUB
(*Not Provided)
English
Connect a USB storage device such as a USB
ash memory, external hard drive, or a USB
memory card reader to the TV and access the
Smart Share menu to use various multimedia les.
NOTE
yTo use a USB Hub device, make sure that it
is connected to the USB Hub port.
yConnect the external power source if your
USB is needed.
ySome USB Hubs may not work. If a USB
device connected using a USB Hub is not
detected, connect it to the USB port on the
TV directly.
(*Not Provided)
Deutsch
Verbinden Sie ein USB-Speichergerät, z. B. USBFlash-Speicher, eine externe Festplatte oder einen
USB-Kartenleser für Speicherkarten mit dem
TV-Gerät, und greifen Sie auf das Menü „Smart
Share“ zu, um verschiedene Multimediadateien zu
verwenden.
HINWEIS
yWenn Sie einen USB Hub verwenden
möchten, stellen Sie sicher, dass er mit dem
Anschluss USB Hub verbunden ist.
ySchließen Sie eine externe Stromquelle an,
wenn eine USB-Verbindung erforderlich ist.
yEinige USB-Hubs funktionieren vielleicht
nicht. Falls ein über einen USB-Hub
verbundenes USB-Gerät nicht gefunden
wird, verbinden Sie es direkt mit dem USBAnschluss am TV-Gerät.
Français
Connectez un périphérique de stockage USB
comme une clé USB, un disque dur externe ou
une carte mémoire USB à la TV et accédez au
menu Smart Share pour utiliser divers chiers
multimédia.
REMARQUE
yPour utiliser un concentrateur USB, veillez à
le connecter au port
yConnectez la source d’alimentation externe
si une connexion USB est nécessaire.
yCertains ports USB peuvent ne pas
fonctionner. Si un appareil USB branché
sur un port USB n’est pas détecté alors
connectez-le directement au téléviseur.
USB Hub
.
Page 93

MAKING CONNECTIONS
B-9
CI module Connection
(*Not Provided)
Deutsch
Zeigen Sie verschlüsselte Dienste (Bezahldienste)
im digitalen TV-Modus an. Diese Funktion ist in
einigen Ländern nicht verfügbar.
HINWEIS
yÜberprüfen Sie, ob das CI-Modul richtig
herum in den PCMCIA-Kartensteckplatz
gesteckt wurde. Falls das Modul nicht
korrekt eingesetzt wurde, können TV-Gerät
und PCMCIA-Kartensteckplatz beschädigt
werden.
Français
Afchez les services cryptés (payants) en mode
TV numérique. Cette fonction n’est pas disponible
dans tous les pays.
REMARQUE
yVérifiez si le module CI est inséré dans le
bon sens dans la fente de la carte PCMCIA.
Si le module est mal inséré, la TV pourrait
subir des dommages ainsi que la fente de la
carte PCMCIA.
English
View the encrypted (pay) services in digital TV
mode. This feature is not available in all countries.
NOTE
yCheck if the CI module is inserted into the
PCMCIA card slot in the right direction. If the
module is not inserted properly, this can cause
damage to the TV and the PCMCIA card slot.
Page 94

B-10
A
1
MAKING CONNECTIONS
Euro Scart Connection
V IN
(*Not Provided)
AUDIO / VIDEO
English
Transmits the video and audio signals from an
external device to the TV set. Connect the external
device and the TV set with the euro scart cable as
shown. To display images by using progressive
scan, make sure to use the euro scart cable.
Output
Type
Current
AV1
(TV Out1)
input mode
Digital TV Digital TV O
Analogue TV, AV
Component / RGB
Analogue TVO(The input mode is
HDMI
1 TV Out : Outputs Analogue TV or Digital TV
signals.
AV1
(When DTV scheduled
recording is in progress
using recording
equipment.)
converted to DTV.)
Deutsch
Überträgt Video- und Audiosignale von einem
externen Gerät an das TV-Gerät. Verbinden Sie
das externe Gerät, wie in der folgenden Abbildung
gezeigt, mithilfe des Euro-Scart-Kabels mit dem
TV-Gerät. Verwenden Sie das Euro-Scart-Kabel,
um Bilder im Vollbildmodus anzuzeigen.
Ausgangstyp
Aktueller
Eingangsmodus
AV1
(TV-
Ausgang1)
AV1
(Wenn eine geplante
DTV-Aufnahme unter
Verwendung des
Aufnahmegeräts
aktiv ist.)
Digital-TV Digital-TV O
Analog-TV, AV
Component/RGB
HDMI
Analog-TV
O
(Der Eingangsmodus
wird auf DTV
geschaltet.)
1 TV-Ausgang: Ausgang für analoge und digitale
Fernsehsignale.
HINWEIS
yDas Euro-Scart-Kabel muss signaltechnisch
abgeschirmt sein.
yBei digitalem Fernsehen im 3D-Modus
können die TV-Ausgangssignale nicht über
ein SCART-Kabel ausgegeben werden. (Nur
3D-Modelle)
yWenn der 3D-Modus während einer
geplanten Aufnahme mit dem DigitalTV auf „Ein“ eingestellt ist, können die
Monitorausgangssignale nicht über das
SCART-Kabel ausgegeben werden. Die
Aufnahme ist dann nicht möglich. (Nur
3D-Modelle)
NOTE
yAny Euro scart cable used must be signal
shielded.
yWhen watching digital TV in 3D imaging
mode, TV out signals cannot be output
through the SCART cable. (Only 3D models)
yIf you set the 3D mode to On while a
scheduled recording is performed on digital
TV, monitor out signals cannot be output
through the SCART cable, and the recording
cannot be performed. (Only 3D models)
Page 95

MAKING CONNECTIONS
B-11
Français
Transmet les signaux audio et vidéo d’un appareil
externe au téléviseur. Raccordez l’appareil externe
et le téléviseur à l’aide d’un câble péritel comme
illustré ci-dessous. Pour afficher les images avec
balayage progressif, veillez à utiliser un câble
péritel.
Type de sortie
AV1
Mode
d'entrée actuel
TV numérique TV
TV analogique, AV
Composant/RVB
HDMI
1 Sortie TV : sortie de signaux en mode TV
analogique ou en mode TV numérique.
(sortie TV1)
numérique
TV
analogique
AV1
(Quand
l'enregistrement TNT
programmé est en
cours avec le matériel
d'enregistrement.)
O
O
(Le mode d'entrée
est converti en TNT.)
REMARQUE
yTous les câbles Euro scart utilisés doivent être
des câbles de signal blindés.
yQuand le mode 3D est sélectionné sur la
TV, les signaux de sortie TV ne peuvent pas
être émis via le câble péritel. (modèles 3D
uniquement)
ySi vous activez le mode 3D pendant l’exécution
d’un enregistrement programmé sur la TV, les
signaux de sortie ne peuvent pas être émis
via le câble péritel et l’enregistrement est
impossible. (modèles 3D uniquement)
English
Connect various external devices to the TV
and switch input modes to select an external
device. For more information of external device’s
connection, refer to the manual provided with each
device.
Available external devices are: HD receivers,
DVD players, VCRs, audio systems, USB storage
devices, PC, gaming devices, and other external
devices.
NOTE
yThe external device connection may differ
from the model.
yConnect external devices to the TV
regardless of the order of the TV port.
yIf you record a TV program on a DVD
recorder or VCR, make sure to connect the
TV signal input cable to the TV through a
DVD recorder or VCR. For more information
of recording, refer to the manual provided
with the connected device.
yRefer to the external equipment’s manual for
operating instructions.
yIf you connect a gaming device to the TV,
use the cable supplied with the gaming
device.
yIn PC mode, there may be noise associated
with the resolution, vertical pattern, contrast
or brightness. If noise is present, change
the PC output to another resolution, change
the refresh rate to another rate or adjust the
brightness and contrast on the PICTURE
menu until the picture is clear.
yIn PC mode, some resolution settings may
not work properly depending on the graphics
card.
Page 96

B-12
MAKING CONNECTIONS
Deutsch
Verbinden Sie mehrere externe Geräte mit dem
TV-Gerät, und wechseln Sie die Eingangsmodi,
um ein externes Gerät auszuwählen. Weitere
Informationen zum Anschluss von externen
Geräten entnehmen Sie bitte dem Handbuch des
jeweiligen Gerätes.
Verfügbare externe Geräte sind: HD-Receiver,
DVD-Player, Videorekorder, Audiosysteme, USBSpeichergeräte, PCs, Spielkonsolen und weitere
externe Geräte.
HINWEIS
yDer Anschluss für externe Geräte kann von
Modell zu Modell unterschiedlich sein.
yVerbinden Sie externe Geräte unabhängig
von der Reihenfolge der Anschlüsse mit
dem TV-Gerät.
yWenn Sie eine Fernsehsendung über DVD-
Player oder Videorekorder aufnehmen,
vergewissern Sie sich, dass das TV-Gerät
über das Eingangskabel für das TV-Signal
mit dem DVD-Player oder Videorekorder
verbunden ist. Weitere Informationen zu
Aufnahmen entnehmen Sie bitte dem
Handbuch des verbundenen Gerätes.
yAnweisungen zum Betrieb finden Sie im
Handbuch des externen Gerätes.
yWenn Sie eine Spielekonsole mit dem TV-
Gerät verbinden, verwenden Sie das mit der
Konsole mitgelieferte Kabel.
yIm PC-Modus kann es hinsichtlich
Auflösung, vertikalem Muster, Kontrast oder
Helligkeit zu Rauschen kommen. Wenn
Rauschen auftritt, stellen Sie den PC auf
eine andere Auflösung ein, ändern Sie die
Bildwiederholrate, oder passen Sie Helligkeit
und Kontrast im Menü „BILD“ an, bis das
Bild optimal ist.
yAbhängig von der Grafikkarte
funktionieren im PC-Modus einige
Auflösungseinstellungen möglicherweise
nicht ordnungsgemäß.
Français
Connectez divers périphériques externes à la
TV et changez de mode de source d’entrée pour
sélectionner un périphérique externe. Pour en
savoir plus sur le raccordement d’un périphérique
externe, reportez-vous au manuel fourni avec ce
dernier.
Les périphériques externes disponibles sont les
suivants : récepteurs HD, lecteurs DVD, VCR,
systèmes audio, périphériques de stockage USB,
PC, consoles de jeu et autres périphériques
externes.
REMARQUE
yLe raccordement du périphérique externe
peut différer du modèle.
yConnectez des périphériques externes à la
TV sans tenir compte de l’ordre du port TV.
ySi vous enregistrez un programme TV sur un
enregistreur de DVD ou un magnétoscope,
veillez à raccorder le câble de source
d’entrée du signal de la TV à la TV via un
enregistreur de DVD ou un magnétoscope.
Pour en savoir plus sur l’enregistrement,
reportez-vous au manuel fourni avec le
périphérique connecté.
yVeuillez consulter le manuel de l’équipement
externe contenant les instructions
d’utilisation.
ySi vous connectez une console de jeu à la
TV, utilisez le câble fourni avec la console
de jeu.
yEn mode PC, un bruit peut être associé
à la résolution, au modèle vertical, au
contraste ou à la luminosité. En présence
de bruit, changez la résolution de la
sortie PC, changez le niveau du taux de
rafraîchissement ou réglez la luminosité et
le contraste dans le menu IMAGE jusqu’à ce
que l’image soit nette.
yEn mode PC, certains réglages de la
résolution peuvent ne pas fonctionner
correctement en fonction de la carte
graphique utilisée.
Page 97

SPECIFICATIONS
SPECIFICATIONS
Product specications may be changed without prior notice due to upgrade of product functions.
For the power supply and power consumption, refer to the label attached to the product.
42PM47** 50PM47**
Dimensions
(W x H x D)
Weight
Dimensions
(W x H x D)
Weight
Dimensions
(W x H x D)
Weight
Dimensions
(W x H x D)
Weight
MODELS
With stand (mm)
Without stand (mm)
With stand (kg)
Without stand (kg)
MODELS
With stand (mm)
Without stand (mm)
With stand (kg)
Without stand (kg)
MODELS
With stand (mm)
Without stand (mm)
With stand (kg)
Without stand (kg)
MODELS
With stand (mm)
Without stand (mm)
With stand (kg)
Without stand (kg)
42PM4700-ZA
42PM470S-ZA
42PM470T-ZA
983.6 x 655.0 x 246.7 1168.0 x 758.0 x 297.0
983.6
x
601.3
x
58.0
20.6 28.2
19.0 25.8
50PM67** 50PM68**
50PM6700-ZA
50PM670S-ZD
50PM670T-ZA
50PM670S-ZA
50PM671S-ZA
1168.0 x 758.0 x 297.0 1168.0 x 768.0 x 297.0
1168.0 x 704.0 x 53.0 1168.0
28.8 28.1
26.4 26.4
50PM97** 60PM67**
50PM9700-ZA
50PM970S-ZA
50PM970T-ZA
1168.0 x 765.0 x 297.0 1386.8 x 883.2 x 354.7
1168.0
x
701.0
x
53.4 1386.8 x 818.2 x 53.0
28.2 40.6
26.5 36.4
60PM68** 60PM97**
60PM6800-ZF
60PM680S-ZF
60PM680T-ZF
1386.8 x 906.0 x 346.0 1386.8 x 897.0 x 346.0
1386.8 x 818.2 x 53.0 1386.8
39.8 40.2
36.4 36.8
50PM4700-ZA
50PM470S-ZA
50PM470T-ZA
1168.0 x 704.0 x 53.0
50PM6800-ZF
50PM680S-ZF
50PM680T-ZF
x
704.0
60PM6700-ZA
60PM670S-ZA
60PM670T-ZA
60PM9700-ZA
60PM970S-ZA
60PM970T-ZA
x
827.2
x
x
B-13
53.0
53.4
CI Module Size
(W x H x D)
Environment
condition
100.0 mm x 55.0 mm x 5.0 mm
Operating
Temperature
Operating Humidity Less than 80 %
Storage Temperature -20 °C to 60 °C
Storage Humidity Less than 85 %
0 °C to 40 °C
Page 98

SPECIFICATIONS
B-14
Satellite Digital TV1Digital TV2Digital TV Analogue TV
Television system DVB-T
DVB-C
DVB-S/S2
Programme coverage
VHF, UHF
C-Band, Ku-Band
Maximum number of
storable programmes
6,000 1,500
External antenna impedance 75 Ω
1 Only satellite models
2 Only DVB-T2 support models
DVB-T/T2
DVB-C
VHF, UHF
DVB-T
DVB-C
PAL/SECAM B/G/D/K,
SECAM L/L’
VHF: E2 to E12, UHF :
E21 to E69, CATV: S1 to
S20, HYPER: S21 to S47
HDMI/DVI-DTV supported mode
Resolution
720x480
Horizontal
Frequency (kHz)
31.469
31.5
720x576 31.25 50
37.5
1280x720
44.96
45
33.72
33.75
28.125
26.97
1920x1080
27
33.716
33.75
56.25
67.43
67.5
Vertical
Frequency
(Hz)
59.94
60
50
59.94
60
59.94
60
50
23.97
24
29.976
30.00
50
59.94
60
Component port connecting information
Component ports
on the TV
Video output ports
on DVD player
Y P
Y P
B
B
Y B-Y R-Y
Y Cb Cr
Y Pb Pr
Signal Component
480i/576i O
480p/576p O
720p/1080i O
1080p
(50 Hz / 60 Hz only)
O
P
R
P
R
Page 99

SPECIFICATIONS
3D supported mode
y Media contents and a player need to support HDMI 3D Frame Packing, HDMI 3D Side by Side, HDMI 3D
Top & Bottom to play in 3D.
y Video, which is input as HDMI,USB,DLNA, is switched into the 3D screen automatically. (This function does
not support all of the 3D video format. The specific 3D video format is not switched into the 3D screen automatically. )
y 2D->3D mode is available to watch for all signals.
y For models supporting WiDi, you can set the 3D mode in the same way as in RGB (PC) mode.
B-15
Input Signal Resolution
640X480
480p
576p 720X576
720p 1280X720
HDMI
1080i 1920X1080
1080p 1920X1080
RGB 1080p 1920X1080 67.5 60
720p 1280X720
Component
1080i 1920X1080
USB 1080p 1920X1080 33.75 30
DLNA 1080p 1920X1080 33.75 30
720X480
640X480
720X480
Horizontal
Frequency (kHz)
62.938 / 63
31.469 / 31.5
62.5
31.25
75 50
89.91/90 59.94 / 60
37.5 50
44.96 / 45 59.94 / 60
67.432 / 67.5 59.94 / 60
56.25
62.5
33.72 / 33.75 59.94 / 60
28.125 50
53.946 / 54 23.97 / 24
67.432/67.5 29.976 / 30
26.97 / 27 23.97 / 24
33.716 / 33.75 29.976 / 30.00
56.250 50
67.43 / 67.5 59.94 / 60
37.5 50
45 60
28.125 50
33.75 60
Signal Playable 3D video format
Frequency (Hz)
Vertical
59.94/ 60
50
50
Playable 3D video format
Frame packing, Line alternative
Side-by-side(Full), Top-and-Bottom,
Side-by-side(half)
Frame packing, Line alternative
Side-by-side(Full), Top-and-Bottom,
Side-by-side(half)
Frame packing, Line alternative
Side-by-side(Full), Top-and-Bottom
Side-by-side(half), Single Frame Sequential
Frame packing, Field alternative
Field alternative
Frame packing
Side-by-side(Full), Top-and-Bottom,
Side-by-side(half)
Frame packing, Line alternative
Side-by-side(Full), Top-and-Bottom,
Side-by-side(half), Checkerboard
Top-and-Bottom, Side-by-side(half),
Checkerboard, Single Frame Sequential,
Row Interleaving, Column Interleaving
Side by Side, Top & Bottom
Side by Side, Top & Bottom
Side by Side, Top & Bottom,
Checker Board, Single Frame Sequential,
Row Interleaving, Column Interleaving,
MPO(Photo)
(Photo : Side by Side(half), Top & Bottom)
Side by Side, Top & Bottom,
Checker Board, Single Frame Sequential,
Row Interleaving, Column Interleaving
(Photo : Side by Side(half), Top & Bottom)
DTV 720p, 1080i
Side by Side, Top & Bottom
Page 100

 Loading...