

Page 1
User’s Guide Specification
User’s Guide Specification
담 당 관리자
Model Description
1.
MODEL
SUFFIX
2.
42/50PC51-ZB
37/42LC41_51-ZA
EU
Printing Specification
BRAND
Product Name
LG
42/50PC51
37/42LC41_51
SHIN HJ
07.02.13.
Part No.
1. Trim Size (Format) : 185mm x 260 mm
2. Printing Colors
• Cover :
1 COLOR (BLACK)
• Inside : 1 COLOR (BLACK)
3. Stock (Paper)
• Cover : Coated paper, Snow White 150 g/㎡
• Inside : Uncoated paper , 백상지 60 g/㎡
4. Printing Method : Off-set
5. Bindery : Perfect bind
6. Language : English / German / French / Italian / Spanish / Portuguese
/ Netherlands / Greek / Hungarian/ Polish/ Czech/ Slovak/ Romanian/ Bulgarian
/ Swedish/ Norwegian/ Finnish/ Danish/ Estonia/ Lithuania/ Latvia/Slovenian (22)
7. Number of pages : 444
KIM JO
07.02.13.
MFL37396705
(0709-REV05)
Notes
4.
8
7
6
5
4
This part contain Eco-hazardous substances (Pb, Cd, Hg, Cr6+, PBB, PBDE, etc.) within LG standard level,
Details should be followed Eco-SCM management standard[LG(56)-A-2524].
Especially, Part should be followed and controlled the following specification.
(1) Eco-hazardous substances test report should be submitted when Part certification test and First Mass Production.
(2) Especially, Don’t use or contain lead(Pb) and cadmium(Cd) in ink.
Special Instructions3.
(1) Origin Notification
* LGEIN : Printed in Indonesia * LGEWA : Printed in U.K.
* LGESP : Printed in Brazil * LGEMX : Printed in Mexico
* LGEND : Printed in China * LGEIL : Printed in India
* LGEMA : Printed in Poland
Changes
09/13/07
08/13/07
SONG.J.S
SONG.J.S
S7-94818
S7-90869
Added the models except Hebrew.
(42PC5RVC-ZD/32LC44-ZB/32LC54-ZD/ 42LC54-ZD)
Added the 42PC5RV-ZD models.
3
2
1
REV.
NO.
07/25/07
05/21/07
03/23/07
MM/DD/YY
SONG.J.S
SONG.J.S
SHIN.H.J
SIGNATURE
S7-90045
S7-83053
S7-76579
CHANGE NO.
Added the models.(26LC3RA-ZA)
1. Added the sentence about protection film.
2. Amended Country fuction.
Update Polish Proofreading
CHANGE CONTENTS
Page 2
Pagination sheet
Pagination sheet
P/NO. MFL37396705
Total pages : 444 pages
LG(EN)
Front cover
P/no
Blank
Blank
Blank
Blank
Blank
LG(EN) LG(GE)
1
1
1
1
1
…. 17
…
…
…
…
17
17
19
17
LG(GE) LG(FR)
Back cover
LG(FR) LG(IT)
Back cover
LG(IT) LG(SP)
Back cover
LG(SP) LG(PO)
Back cover
Front coverBack cover
Front cover
Front cover
Front cover
Front cover
Blank
Blank
Blank
Blank
Blank
LG(PO) LG(NE)
1
1
1
1
1
…
…
…
…
…
17
17
17
17
17
Back cover
LG(NE) LG(GR)
Back cover
LG(GR) LG(HU)
Back cover
LG(HU) LG(PL)
Back cover
LG(PL) LG(CZ)
Back cover
Front cover
Front cover
Front cover
Front cover
Front cover
Page 3
Pagination sheet
Pagination sheet
Blank
Blank 1
Blank 1
1
…. 17
… 17
… 17
P/NO. MFL37396705
Total pages : 444 pages
LG(CZ) LG(SK)
Front coverBack cover
LG(SK) LG(RO)
Back cover
LG(RO) LG(BU)
Back cover
Front cover
Front cover
Blank 1
Blank 1
Blank 1
Blank 1
Blank 1
… 17
… 17
… 17
… 17
… 17
LG(BU) LG(SW)
Back cover
LG(SW) LG(NO)
Back cover
LG(NO) LG(FI)
Back cover
LG(FI) LG(DA)
Back cover
LG(DA) LG(EE)
Back cover
Front cover
Front cover
Front cover
Front cover
Front cover
Blank 1
Blank 1
… 17
… 17
LG(EE) LG(LT)
Back cover
LG(LT) LG(LA)
Back cover
Front cover
Front cover
Page 4
Pagination sheet
Pagination sheet
Blank
1
…. 17
P/NO. MFL37396705
Total pages : 444 pages
LG(LA) LG(SV)
Front coverBack cover
LG(SV)
Blank
1
…
17
BlankBlank
Back cover
Page 5

An extended Owner’s Manual that contains information on the advanced features of these LG TV sets is located on the CD- ROM provided in an electronic
version.
To read these files, you will need to use a Personal Computer (PC) equipped
with a CD- ROM drive.
Please read this manual carefully before operating your set.
Retain it for future reference.
Record model number and serial number of the set.
See the label attached on the back cover and quote
this information to your dealer when you require service.
LCD TV
PLASMA TV
OWNER’S MANUAL
LCD TV MODELS
26LC4
*
32LC4
*
37LC4
*
42LC4
*
26LC3
*
PLASMA TV MODELS
42PC5
*
42PC5RV
*
50PC5
*
26LC5*
32LC5*
37LC5*
42LC5*
P/NO : MFL37396705 (0709-REV05)
Printed in Korea
Page 6

Page 7
1
ENGLISH
SAFETY INSTRUCTIONS
• Please read these safety precautions carefully before using the product.
• In this manual, illustrations shown may differ slightly from your product.
If these warning messages are ignored, you risk serious injury, accident or death.
If these caution messages are ignored, you risk injury or damage to the product.
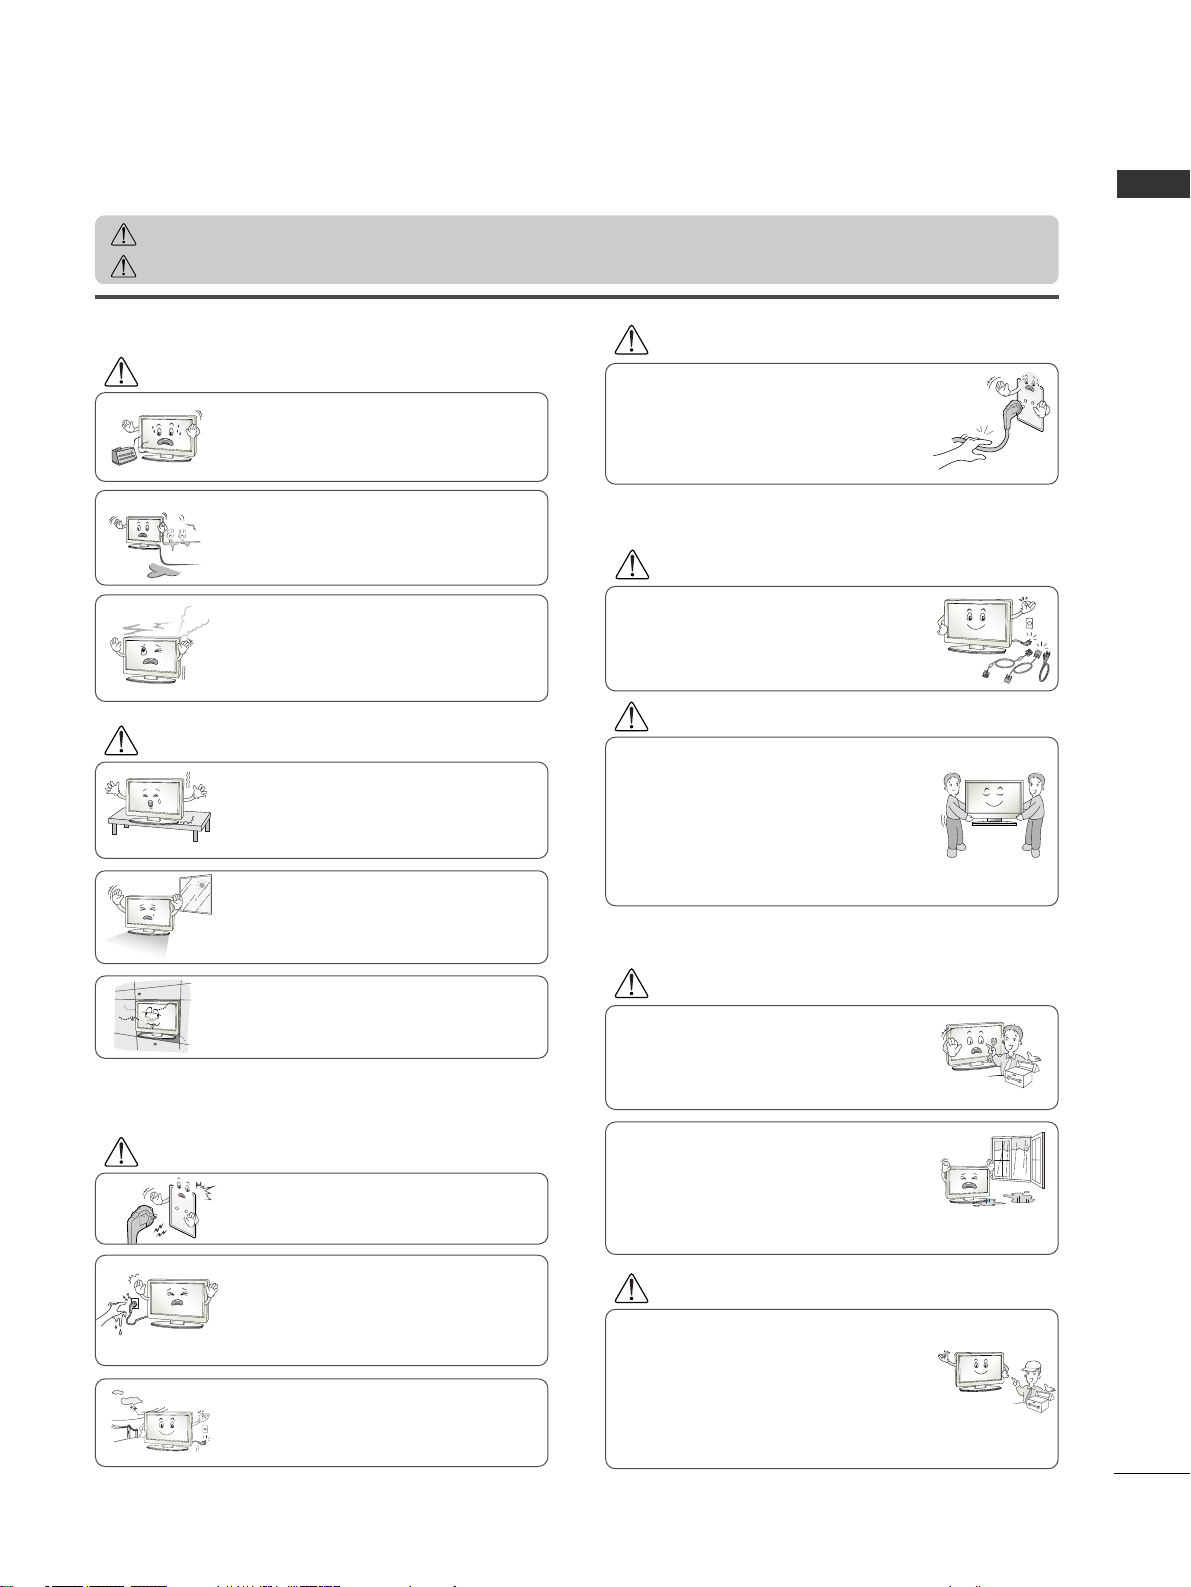
PPrreeccaauuttiioonn iinn IInnssttaalllliinngg tthhee PPrroodduucctt
WARNING
WARNING
CAUTION
Keep away from heat sources like electrical heaters.
- Electrical shock, fire, malfunction or deformation may occur.
If you can smell smoke, or other odors, or hear a
strange sound; unplug the power cord and contact the
service center.
- If you continue to use without taking proper measures, electrical shock or fire can occur.
Do not use the product in a damp place such as a bathroom or any place where it is likely to get wet.
- This may cause a fire or could give an electric shock.
Install the product on a flat and stable place that
has no risk of dropping the product.
- If the product is dropped, you may be injured or the
product may be damaged.
Keep the product away from direct sunlight.
- The product could be damaged.
Do not place the product in a built-in installation
such as bookcase or cabinet.
- Ventilation required.
EElleeccttrriiccaall PPoowweerr RReellaatteedd PPrreeccaauuttiioonnss
Make sure to connect the power cable to an electrical
ground.
- You may be electrocuted or injured.
Do not touch the power plug with wet hands.
Additionally, it the cord pin is wet or covered with
dust, dry the power plug completely or wipe dust off.
- You may be electrocuted due to excess moisture.
During a thunder or lightning storm, unplug the
power cable or signal cable.
- You may be electrocuted or a fire could break out.
Protect the power cord from physical or mechanical
abuse, such as being twisted, kinked, pinched, closed in
a door, or walked upon. Pay particular attention to plugs,
wall outlets, and the point where the cord exits the
appliance.
PPrreeccaauuttiioonnss iinn MMoovviinngg tthhee PPrroodduucctt
Do not shock the product when moving it.
- You may be electrocuted or the product could be damaged.
Make the panel face forward and hold it with both
hands to move.
- If you drop the product, the damaged product could
cause an electric shock or fire. Contact the service center for repair.
Make sure to turn off the product.
Make sure to remove all cables before moving the
product.
- You may be electrocuted or the product could be damaged.
PPrreeccaauuttiioonnss iinn UUssiinngg tthhee PPrroodduucctt
Do not disassemble, repair or modify the product in
any way.
- Fire or electrocution could occur.
- Contact the service center for check, calibration or
repair.
To reduce the risk of fire or electric shock, do not
expose this apparatus to rain or moisture.
The apparatus should not be exposed to dripping
or splashing and no objects filled with liquids, such
as vases, should be placed on the apparatus.
Refer all servicing to qualified service personnel.
Servicing is required when the apparatus has been
damaged in any way, such as if power supply cords or
plugs have been damaged, liquid has been spilt, objects
have fallen in the product, the product has been
exposed to rain or moisture, the product does not
operate normally, or the product has been dropped.
WARNING
WARNING
CAUTION
CAUTION
CAUTION
CAUTION
WARNING
Page 8
2
ENGLISH
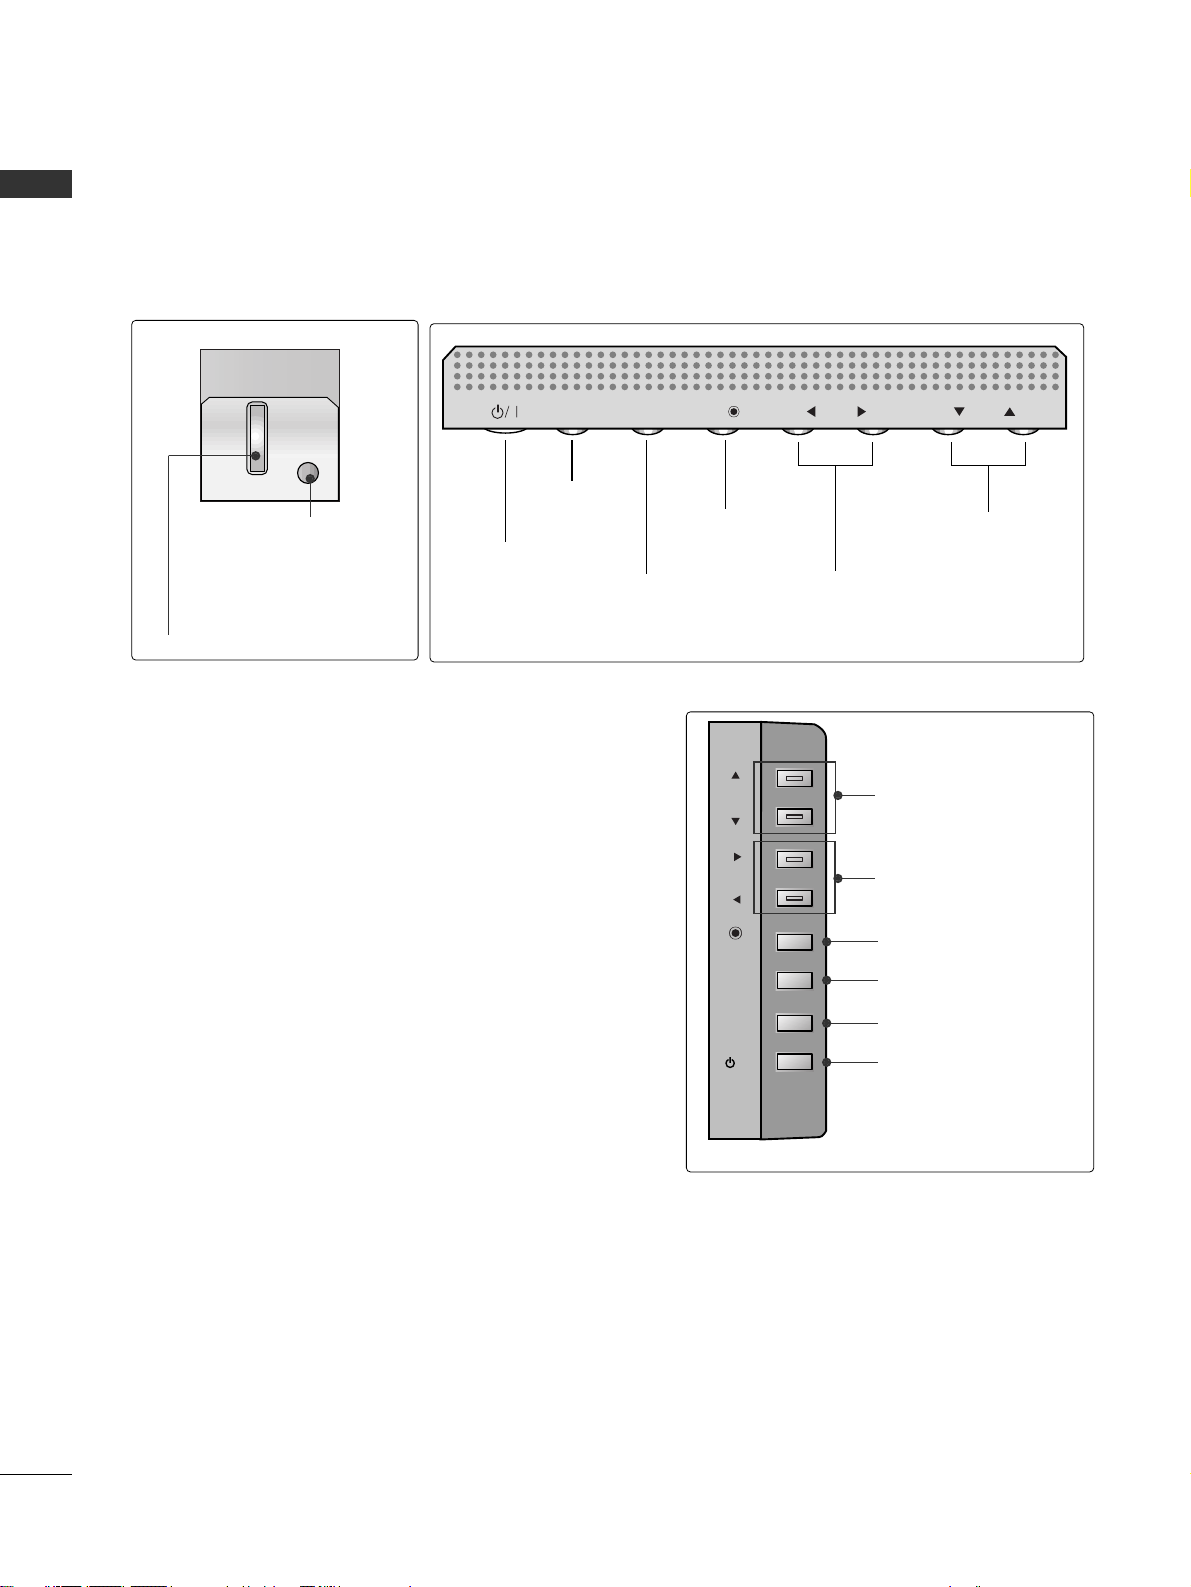
FRONT PANEL CONTROLS
■
This is a simplified representation of the front panel. Here shown may be somewhat different from your TV.
■
If your product has a protection film attached, remove the film and then wipe the product with a polishing
cloth.
PROGRAMME Buttons
VOLUME Buttons
MENU Button
OK Button
INPUT Button
POWER Button
PR
VOL
OK
MENU
INPUT
PROGRAMME Buttons
VOLUME Buttons
OK Button
MENU Button
INPUT Button
POWER Button
PREPARATION
Power/Standby Indicator
• illuminates red in standby mode.
• illuminates green when the set
is switched on.
Remote Control Sensor
PR
VOL
OK
MENU
INPUT
/I
Page 9
3
ENGLISH
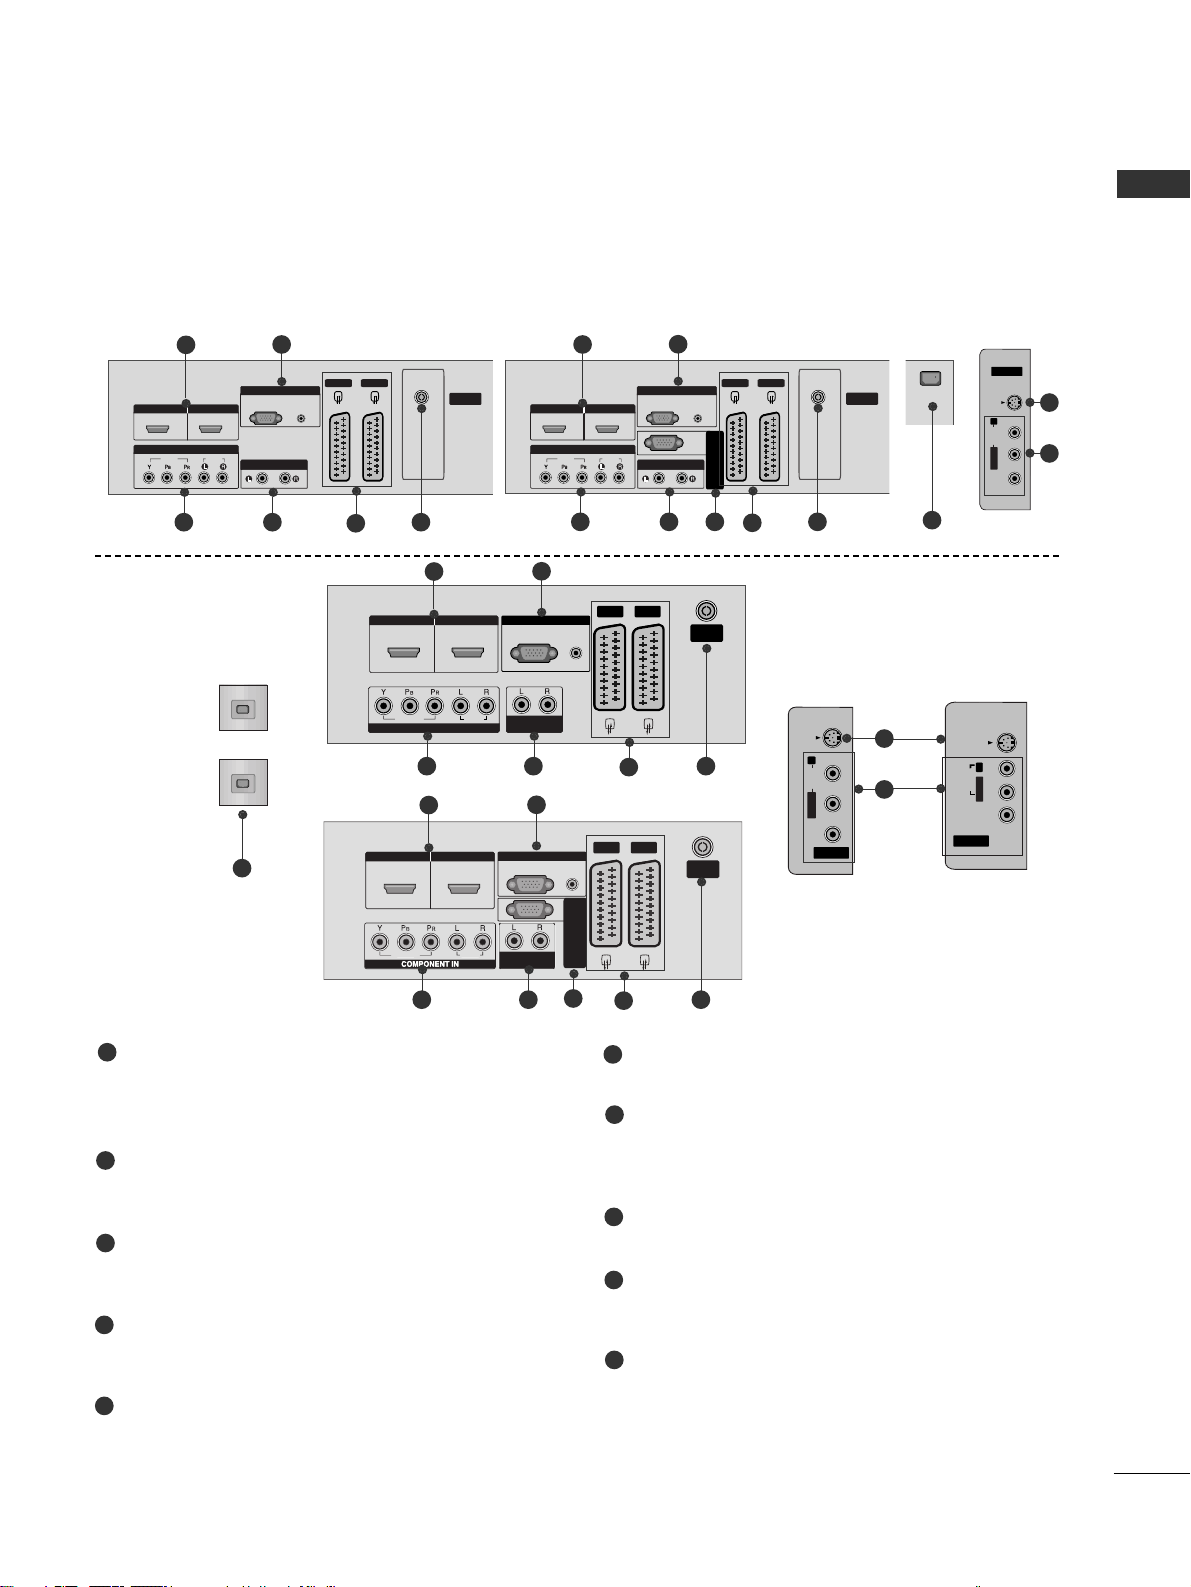
BACK PANEL INFORMATION
■
This is a simplified representation of the back panel. The illustrations shown here may differ slightly from your set.
AUDIO
(RGB/DVI)
RGB
(PC)
AV 1 AV 2
ANTENNA
IN
VARIABLE ARIABLE
AUDIO OUTAUDIO OUT
VIDEOVIDEO
AUDIOAUDIO
COMPONENTCOMPONENT IN
AV IN 3
L/MONO
R
AUDIO
VIDEO
HDMI/DVI IN HDMI IN
1 2
RGB INRGB IN
S-VIDEO
AV IN 3V IN 3
L/L/MONOMONO
R
AUDIOAUDIO
VIDEOVIDEO
S-VIDEOS-VIDEO
AV IN 3V IN 3
L/L/MONOMONO
R
AUDIOAUDIO
VIDEOVIDEO
S-VIDEOS-VIDEO
AV IN 3
L/MONO
R
AUDIO
VIDEO
S-VIDEO
12
VARIABLE
AUDIO OUT
RGB IN
COMPONENT IN
AUDIO
VIDEO
AV 1 AV 2
ANTENNA
IN
HDMI/DVI IN HDMI IN
AV IN 3
L/MONO
R
AUDIO
VIDEO
S-VIDEO
12
VARIABLE
AUDIO OUT
RGB IN
COMPONENT IN
AUDIO
VIDEO
AV 1 AV 2
ANTENNA
IN
HDMI/DVI IN HDMI IN
AV IN 3
L/MONO
R
AUDIO
VIDEO
S-VIDEO
1 2
VARIABLEARIABLE
AUDIO OUTAUDIO OUT
RGB
(PC)
RGB INRGB IN
COMPONENT INCOMPONENT IN
AUDIOAUDIO
VIDEOVIDEO
AV 1V 1 AV 2V 2
ANTENNAANTENNA
IN IN
AUDIO
(RGB/DVI)
HDMI/DVI INHDMI/DVI IN HDMI INHDMI IN
3
HDMI Input
Connect a HDMI signal to HDMI IN.
Or DVI(VIDEO)signal to HDMI/DVI port with DVI
to HDMI cable.
RGB/Audio Input
Connect the monitor output from a PC to the
appropriate input port.
Component Input
Connect a component video/audio device to
these jacks.
Variable Audio Output
Connect an external amplifier or add a subwoofer
to your surround sound system.
Euro Scart Socket (AV1/AV2)
Connect scart socket input or output from an
external device to these jacks.
Antenna Input
Connect over-the-air signals to this jack.
Power Cord Socket
This TV operates on an AC power. The voltage is
indicated on the Specifications page. Never
attempt to operate the TV on DC power.
S-Video Input
Connect S-Video out from an S-VIDEO device.
Audio/Video Input
Connect audio/video output from an external
device to these jacks.
RS-232C Input
(CONTROL&SERVICE)Port
Connect the serial port of the control devices
to the RS-232C jack.
1
2
3
4
5
6
7
8
9
4 6
7
5
1
2
1
2
8
9
3
7
4 6
5
10
1 2
VARIABLEVARIABLE
AUDIO OUTAUDIO OUT
RGB
(PC)
RGB INRGB IN
O
O
AV 1AV 1 AV 2AV 2
ANTENNAANTENNA
IN IN
AUDIO
(RGB/DVI)
HDMI/DVI INHDMI/DVI IN HDMI INHDMI IN
RS-232C IN
(CONTROL & SERVICE)
1
2
3 4 6
5
10
AV IN 3V IN 3
VIDEOVIDEO
S-VIDEOS-VIDEO
L/MONOMONO
R
AUDIOAUDIO
8
9
AUDIO
(RGB/DVI)
RGB
(PC)
AV 1 AV 2
ANTENNA
IN
VARIABLE ARIABLE
AUDIO OUTAUDIO OUT
VIDEOVIDEO
AUDIOAUDIO
COMPONENTCOMPONENT IN
AV IN 3
L/MONO
R
AUDIO
VIDEO
HDMI/DVI IN HDMI IN
1 2
RGB INRGB IN
S-VIDEO
RS-232C IN
(CONTROL & SERVICE)
3 4 6
5
1
2
10
VIDE
AUDI
Page 10
4
ENGLISH
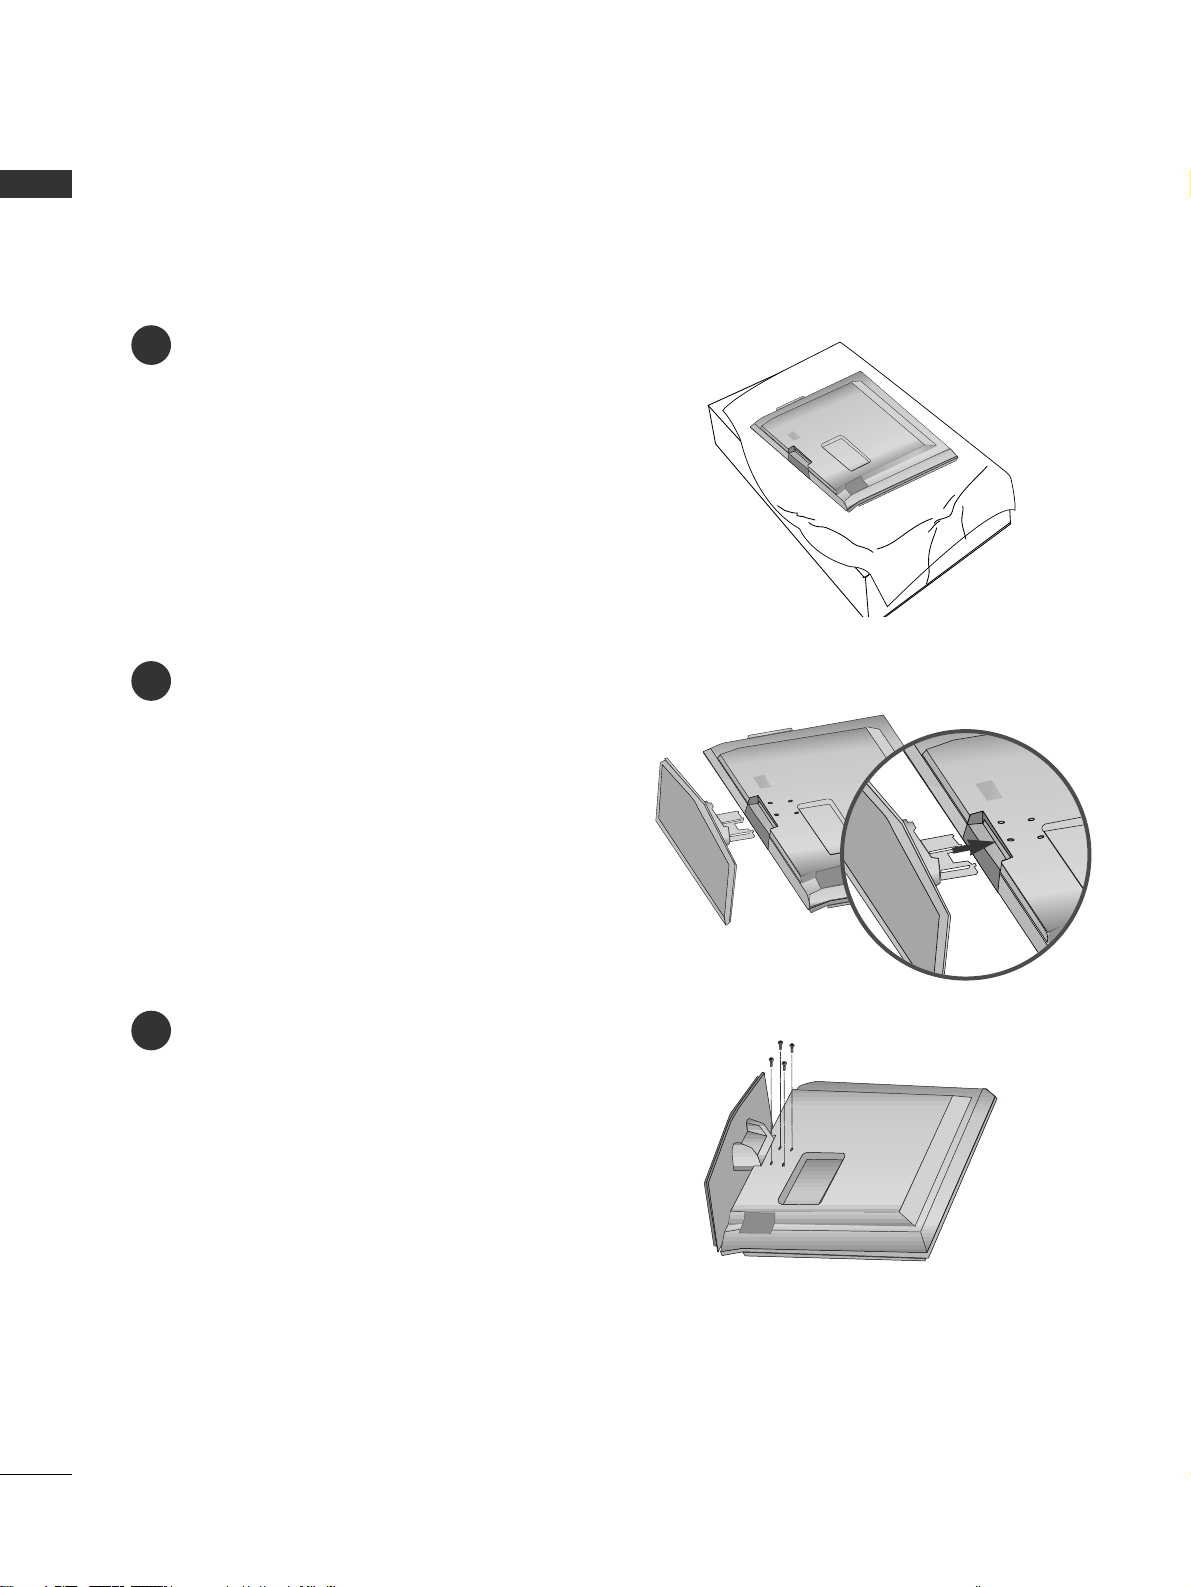
STAND INSTALLATION (Only 26, 32, 37 inch LCD TV models)
PREPARATION
1
2
3
Carefully place the product screen side down on
a cushioned surface that will protect product and
screen from damage.
Assemble the product stand with the product as
shown.
Install the 4 bolts securely, in the back of the
product in the holes provided.
Page 11
5
ENGLISH
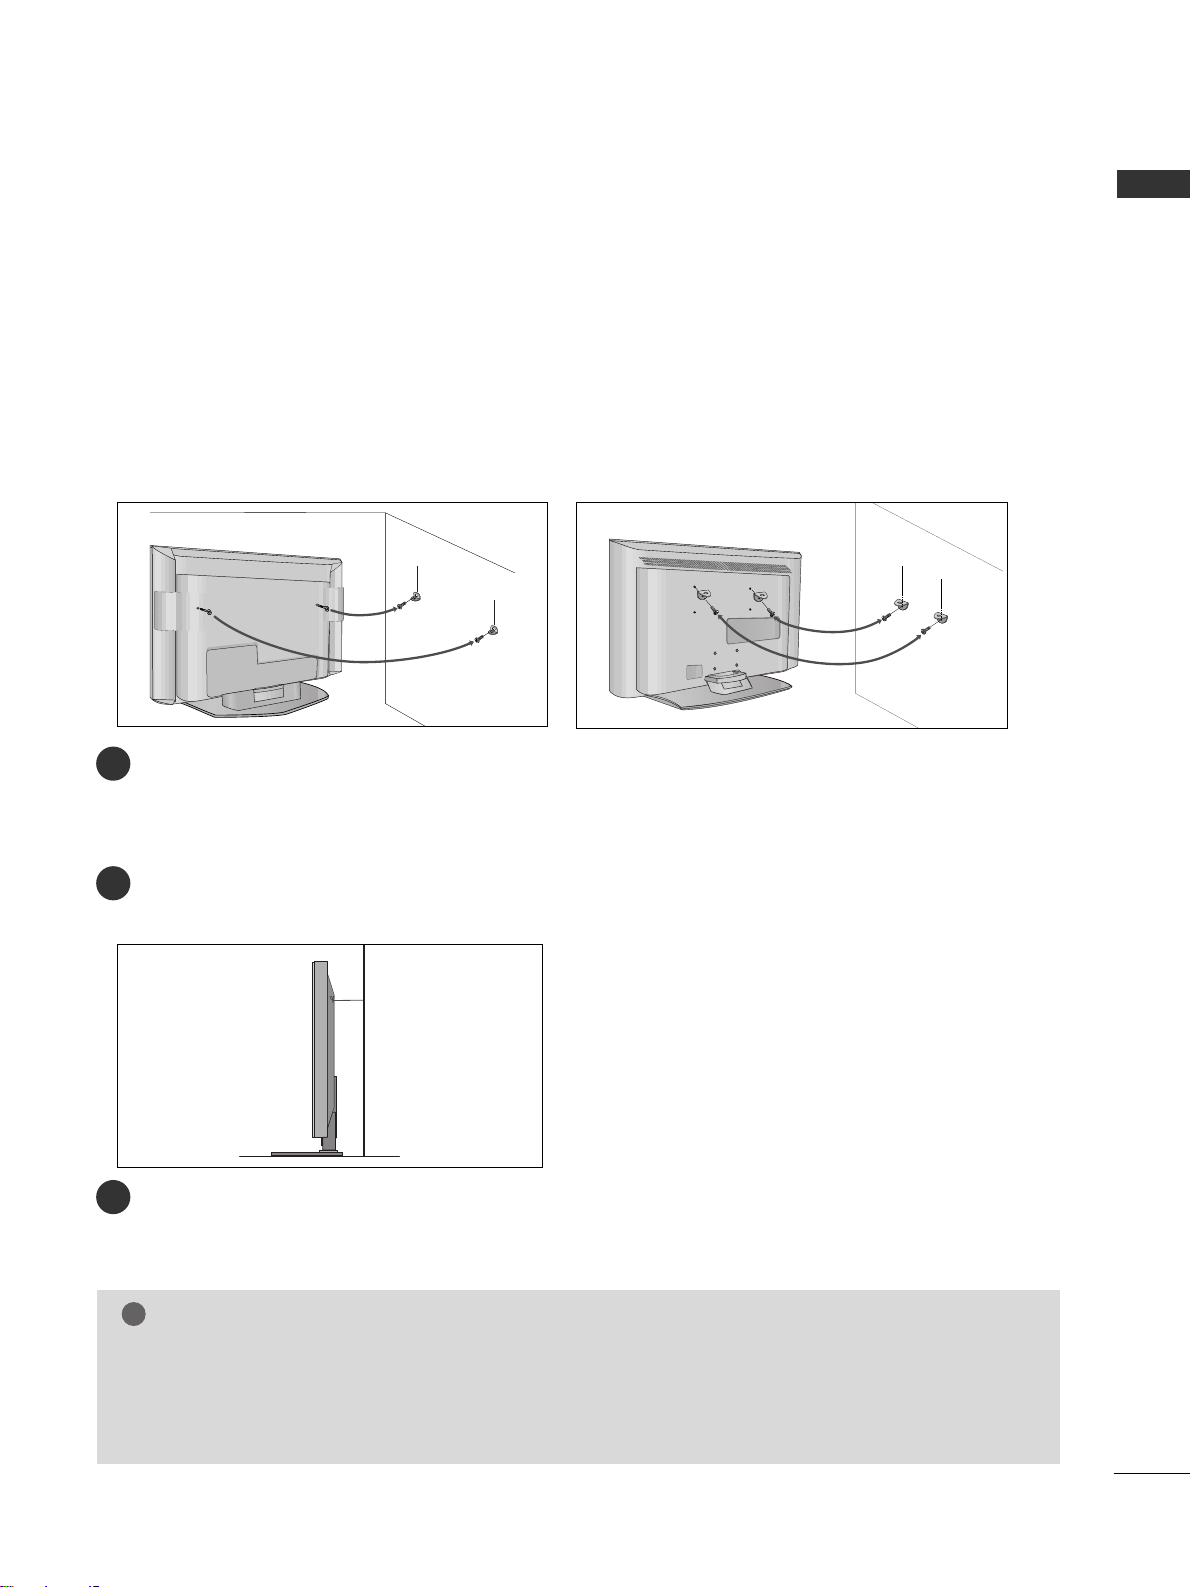
ATTACHING THE TV TO A WALL
Plasma TV models LCD TV models
2
1
■
This feature is not available for all models.
■
Set it up close to the wall so the product doesn’t fall over when it is pushed backwards.
■
The instructions shown below is a safer way to set up the product, which is to fix it on the wall so the
product doesn’t fall over when it is pulled in the forward direction. It will prevent the product from
falling for-ward and hurting people. It will also prevent the product from damage caused by fall. Please
make sure that children don’t climb on or hang from the product.
NOTE
!
GG
When moving the product to another place undo the ropes first.
GG
Use a product holder or a cabinet that is big and strong enough for the size and weight of the product.
GG
To use the product safely make sure that the height of the bracket that is mounted on the wall is same as
that of the product.
2
3
1
1
2
Use the eye-bolts or TV brackets/bolts to fix the product to the wall as shown in the picture.
(If your product has the bolts in the eye-bolts position before inserting the eye-bolts, loosen the bolts.)
* Insert the eye-bolts or TV brackets/bolts and tighten them securely in the upper holes.
Secure the wall brackets with the bolts (not provided as parts of the product, must purchase separately) on
the wall. Match the height of the bracket that is mounted on the wall.
3
Use a sturdy rope (not provided as parts of the product, must purchase separately) to tie the
product. It is safer to tie the rope so it becomes horizontal between the wall and the product.
Page 12
6
PREPARATION
ENGLISH
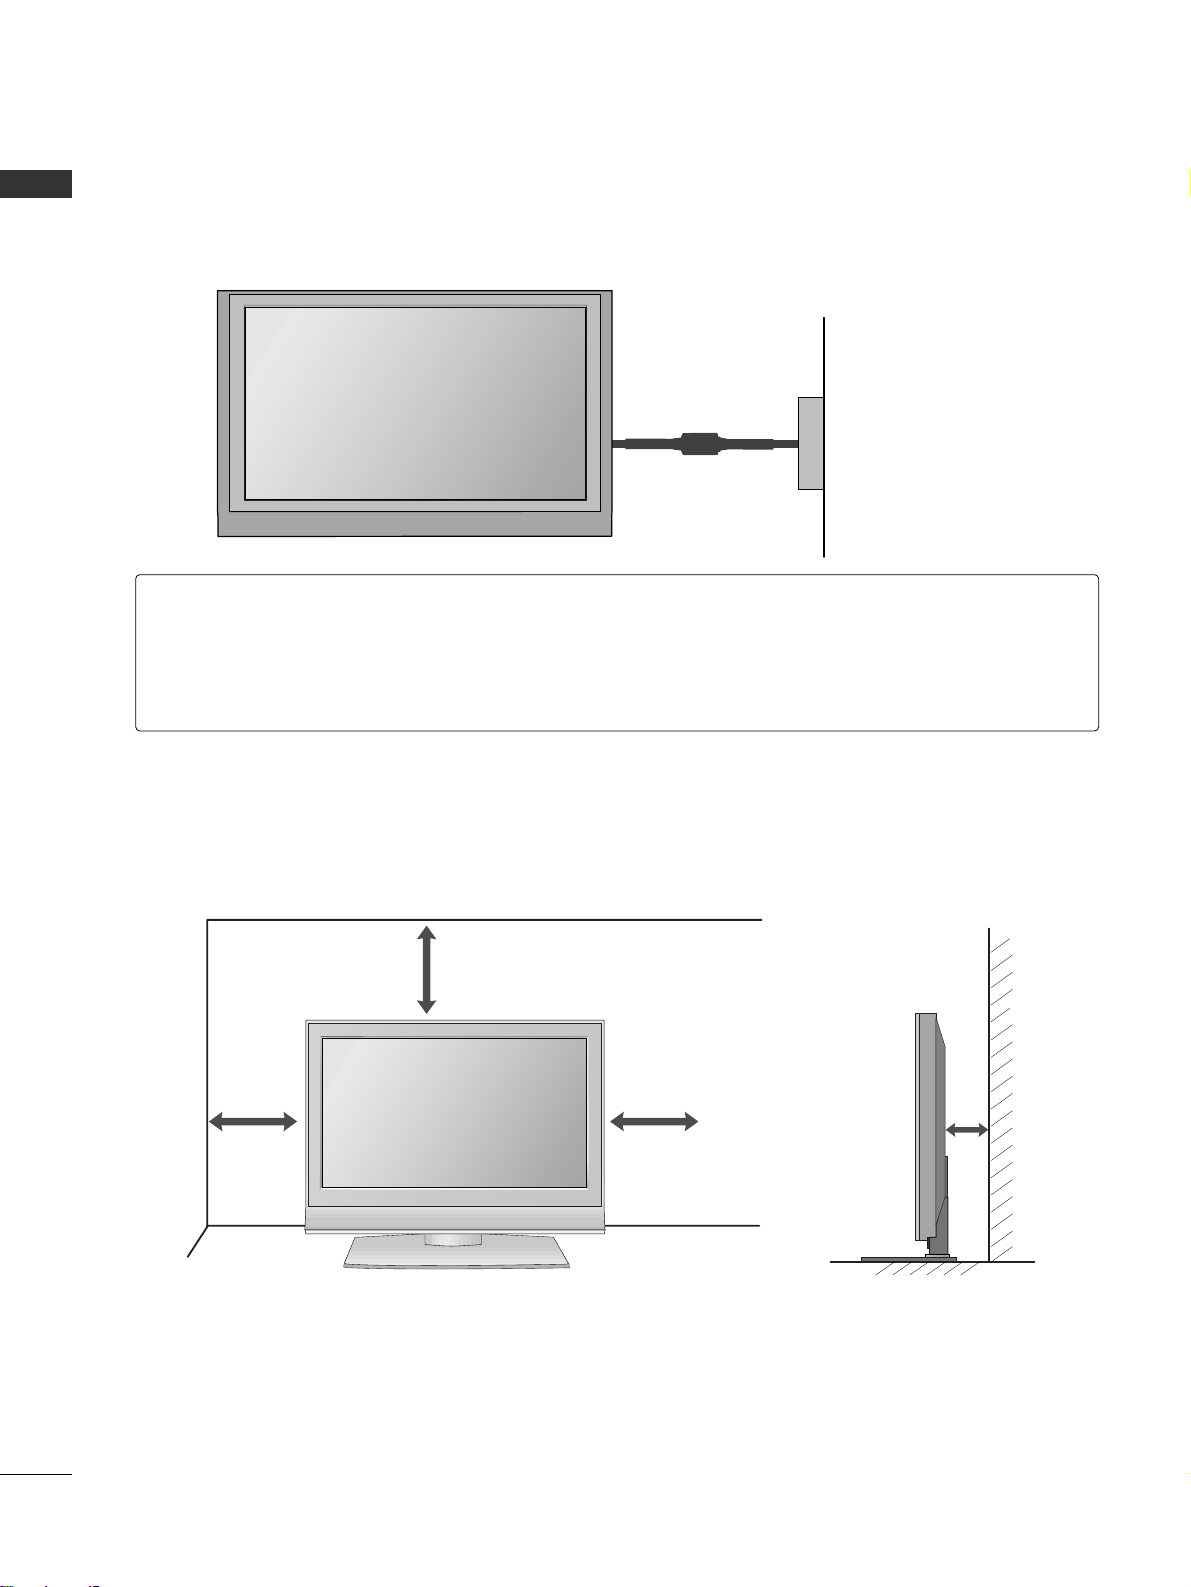
■
The TV can be installed in various ways such as on a wall, or on a desktop etc.
■
The TV is designed to be mounted horizontally.
DESKTOP PEDESTAL INSTALLATION
For proper ventilation, allow a clearance of 4inches on each side from the wall.
4 inches
4 inches
4 inches
4 inches
Power Supply
Short-circuit Breaker
GROUNDING
Ensure that you connect the earth ground wire to prevent possible electric shock. If grounding methods
are not possible, have a qualified electrician install a separate circuit breaker.
Do not try to ground the unit by connecting it to telephone wires, lightening rods, or gas pipes.
Page 13
7
ENGLISH
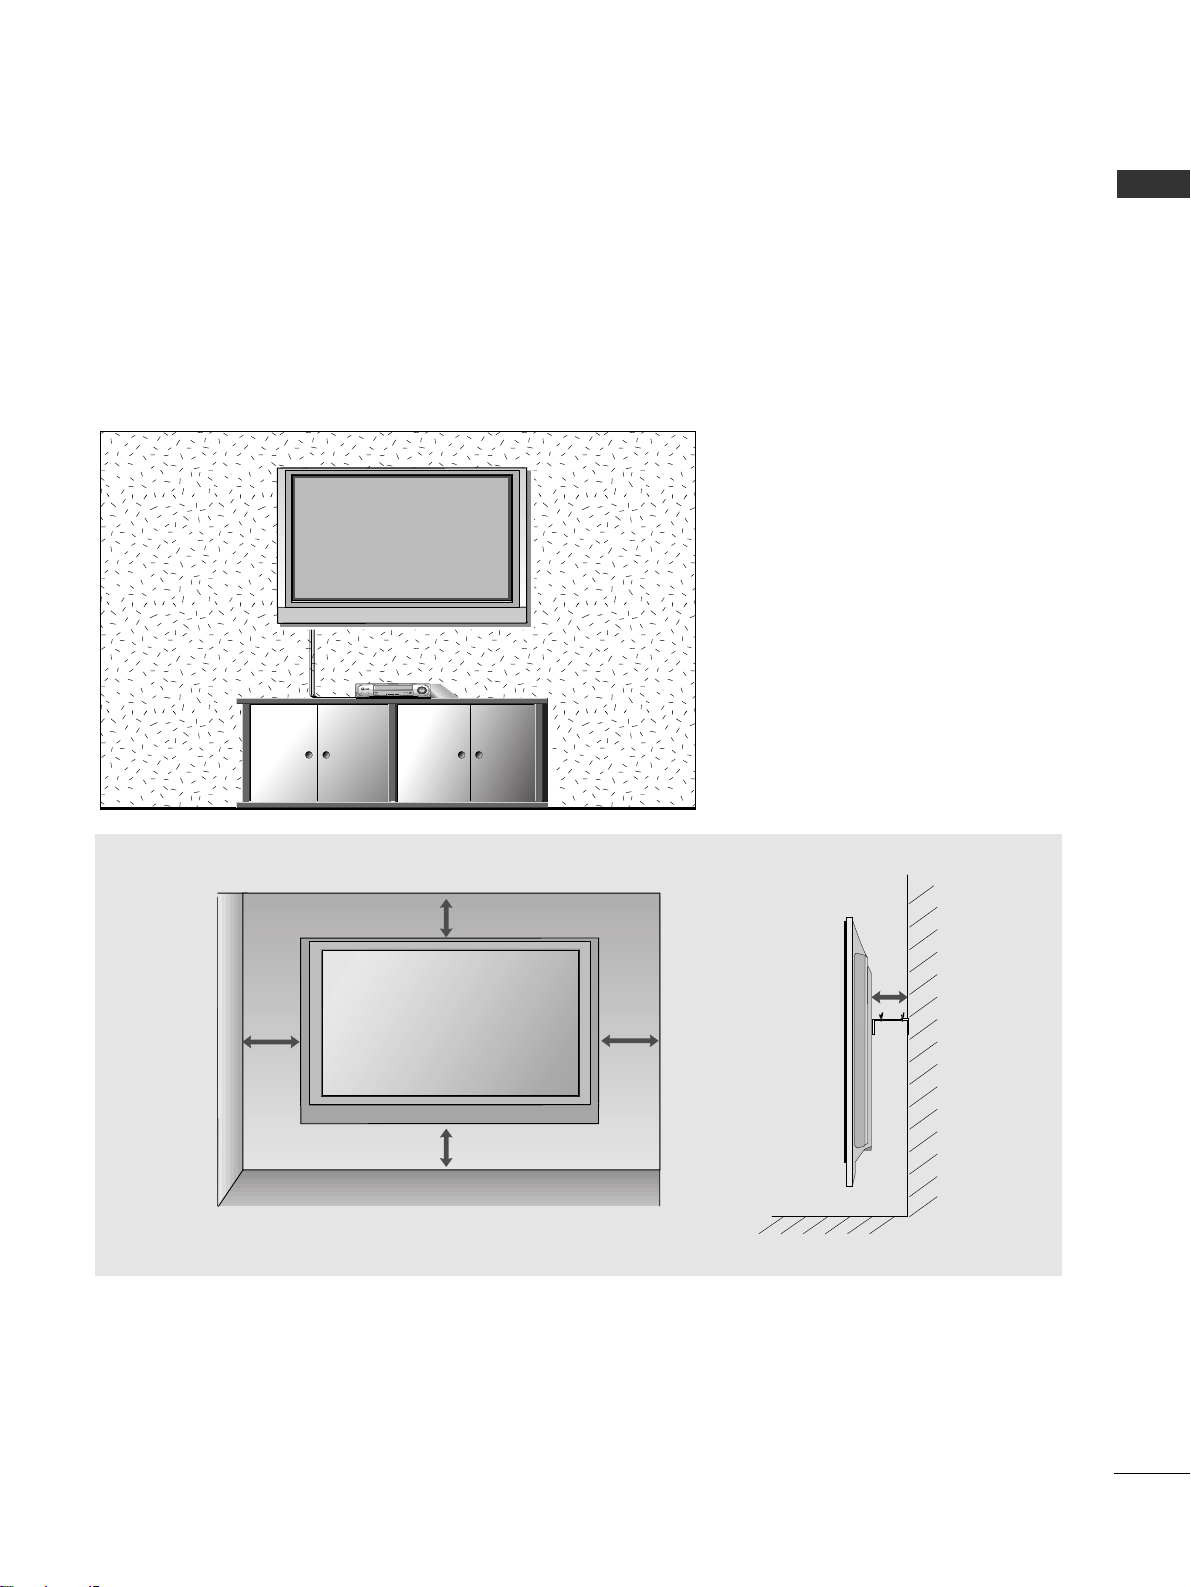
WALL MOUNT: HORIZONTAL INSTALLATION
For proper ventilation, allow a clearance of 4" on each side and from the wall. Detailed installation instructions are available from your dealer, see the optional Tilt Wall Mounting Bracket Installation and Setup Guide.
4 inches
4 inches
4 inches
4 inches
4 inches
Page 14
8
ENGLISH
WATCHING TV / PROGRAMME CONTROL
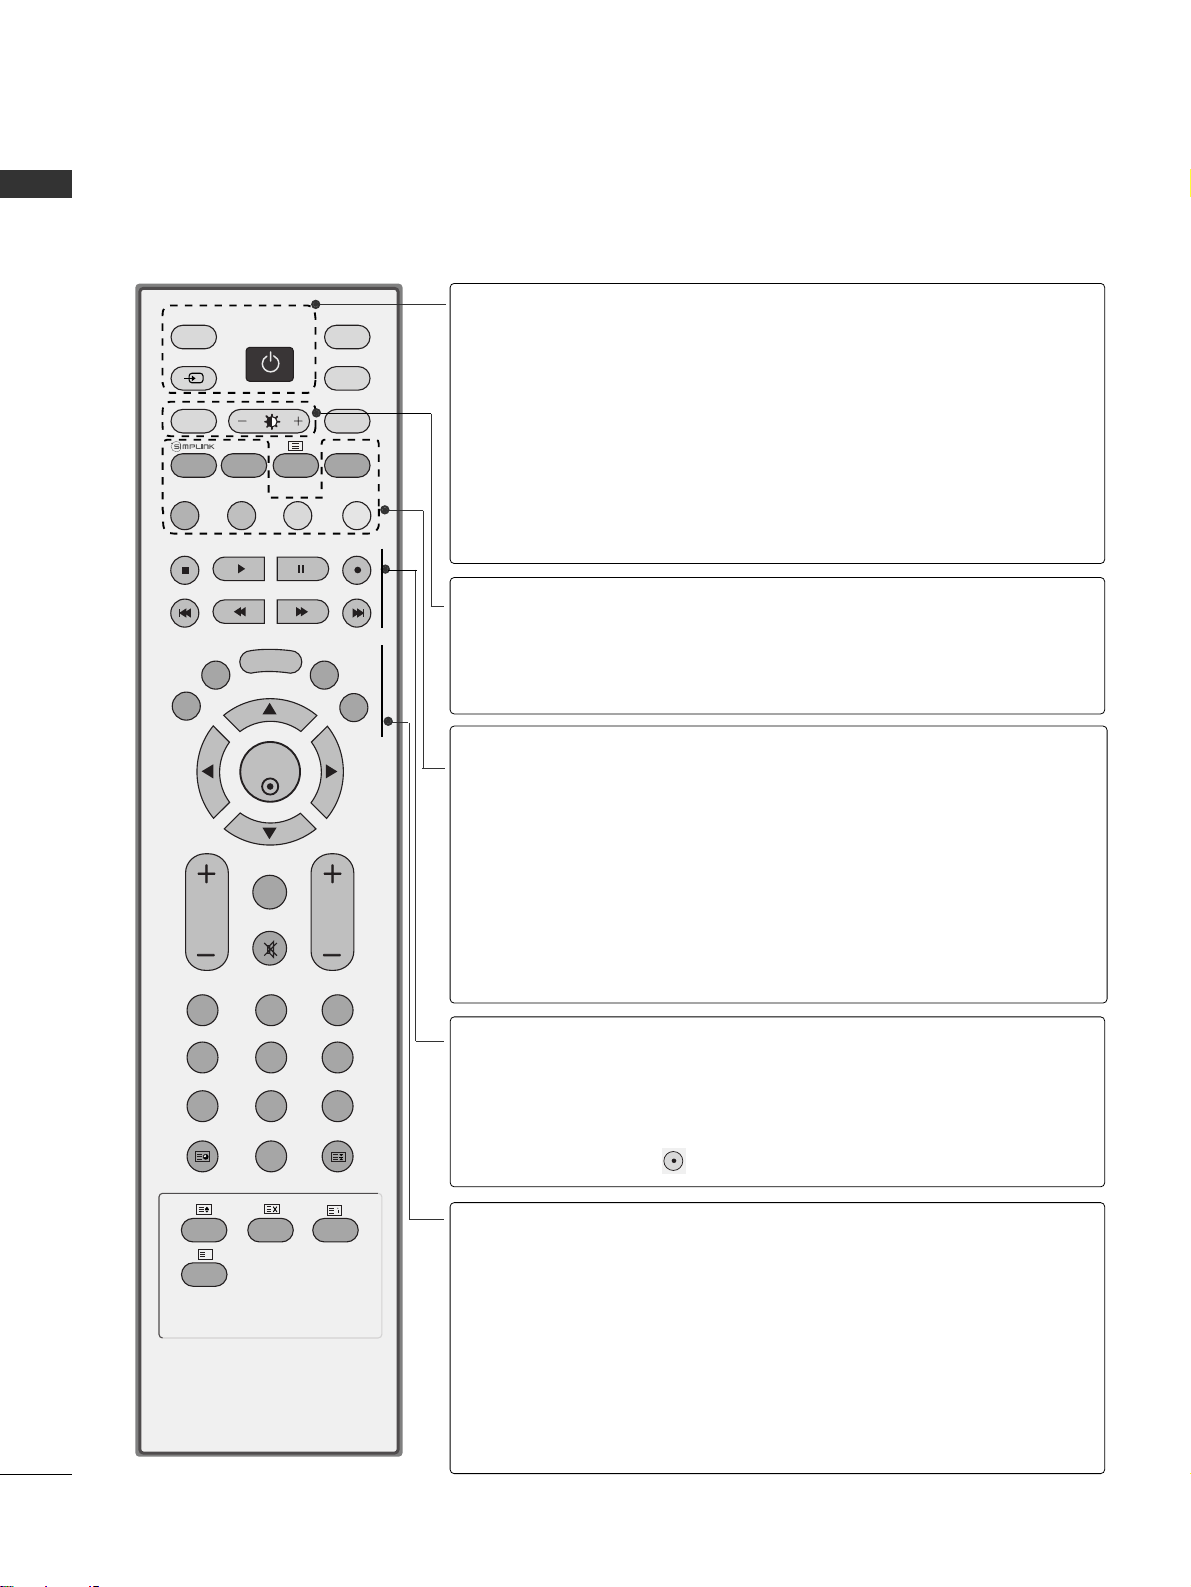
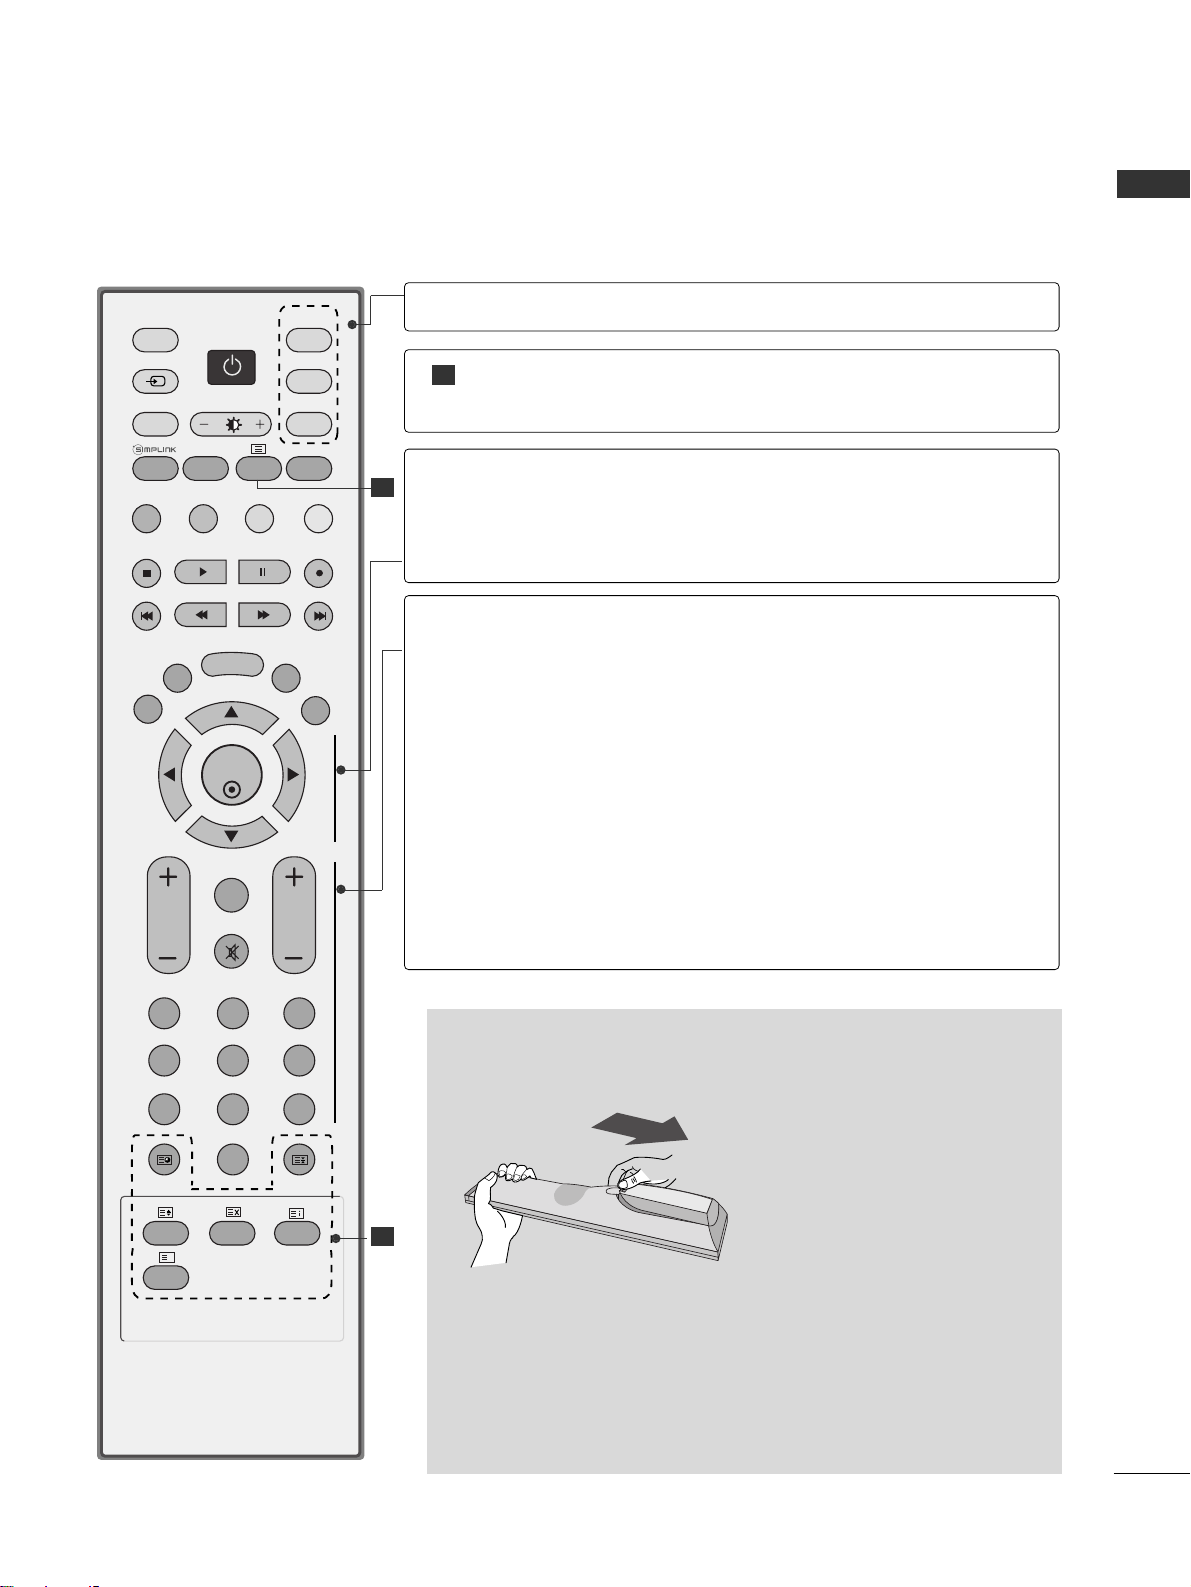
REMOTE CONTROL KEY FUNCTIONS
When using the remote control, aim it at the remote control sensor on the TV.
OK
INPUT MODE
TVTV
DVD
RATIO
EXIT
VOL
UPDATE
INDEX
PR
SLEEP
LIST
Q.VIEW
I/II
MENU
SIZE
VCR
POWER
123
456
789
*
0
FAV
REVEAL
?
TEXT
SIMPLINK
INPUT
MUTE
TIME
HOLD
POWER
TV INPUT
INPUT
Switches the set on from standby or off to standby.
Returns to the TV viewing from any mode.
Switches the set on from standby.
If you press the button once, the input source OSD
will appear on screen as shown. Press the
DD/ EE
button and then OK button to select the desired input
source (TV, AV1 , AV2, AV3, Component , RGB PC,
HDMI1 or HDMI2).
RATIO
Brightness
adjustment
Selects your desired picture format.
Adjusts screen brightness.
It returns to the default settings brightness by changing
mode source.
SIMPLINK
SLEEP
I/II
Coloured
buttons
See a list of AV devices connected to TV.
When you toggle this button, the Simplink menu appears
at the screen.
Sets the sleep timer.
Selects the sound output.
These buttons are used for teletext (only
TTEELLEETT EEXXTT
models) or
PPrrooggrraammmmee eeddiitt
.
VCR/DVD
control buttons
Controls some video cassette recorders or DVD players
when you have already selected DVD or VCR mode button.
Control connected AV devices by pressing the
DD
//
EE
//
FF
//
GG
,
OO KK
buttons and buttons for play, stop, pause,
fast reverse, fast forward, chapter skip.
(The button does not provide such functions.)
EXIT
LIST
MENU
Q.VIEW
*
Clears all on-screen displays and returns to TV viewing
from any menu.
Displays the programme table.
Selects a menu.
Returns to the previously viewed programme.
No function
Page 15
9
ENGLISH
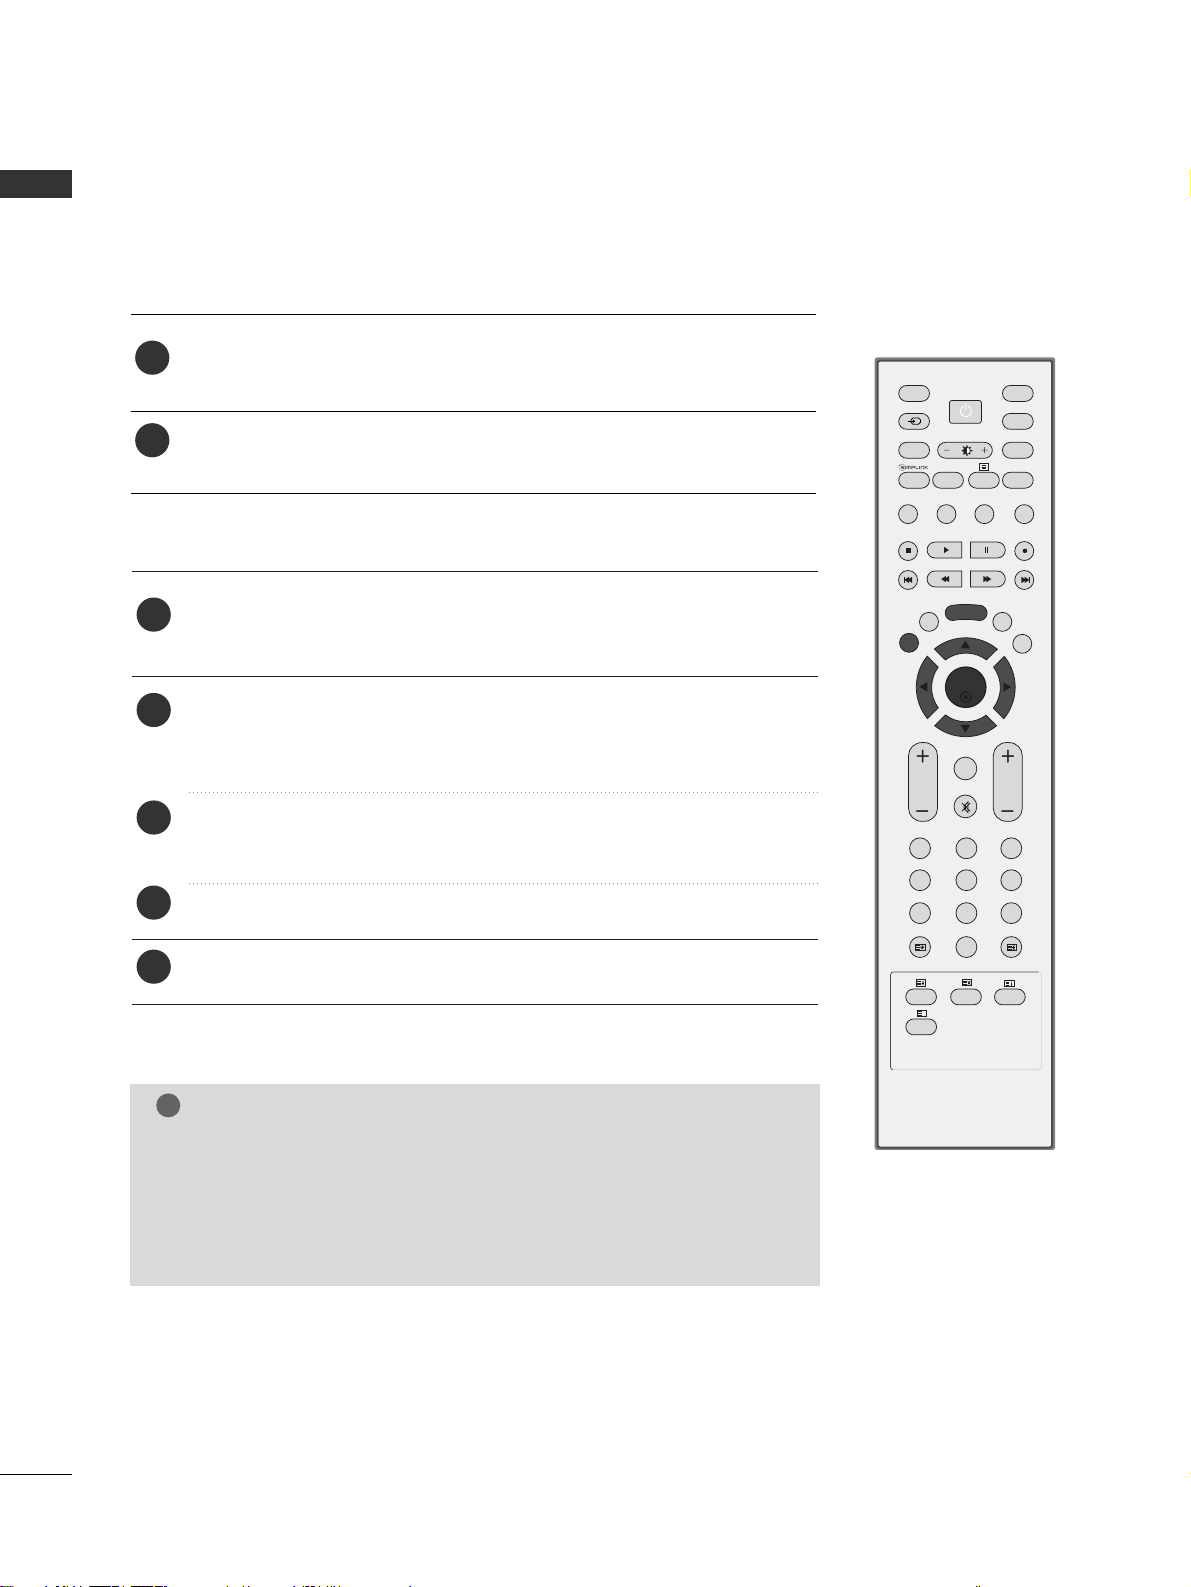
Installing Batteries
■
Open the battery compartment cover on the back side and install
the batteries matching correct polarity (+with +,-with -).
■
Install two 1.5V AA batteries. Don’t mix old or used batteries with
new ones.
■
Close cover.
OK
INPUT
MODE
TVTV
DVD
RATIO
EXIT
VOL
UPDATE
INDEX
PR
SLEEP
LIST
Q.VIEW
I/II
MENU
SIZE
VCR
POWER
123
456
789
*
0
FAV
REVEAL
?
TEXT
SIMPLINK
INPUT
MUTE
TIME
HOLD
1
1
1
MODE
Selects the remote operating modes.
TELETEXT
BUTTONS
These buttons are used for teletext.
For further details, see the ‘Teletext’ section.
THUMBSTICK
(Up/Down/Left
Right)
OK
Allows you to navigate the on-screen menus and adjust
the system settings to your preference.
Accepts your selection or displays the current mode.
VOLUME
UP/DOWN
FAV
MUTE
Programme
UP/DOWN
0~9 number
button
Adjusts the volume.
Displays the selected favourite programme.
Switches the sound on or off.
Selects a programme.
Selects a programme.
Selects numbered items in a menu.
Page 16
10
ENGLISH
AV IN 3
L/MONO
R
AUDIO
VIDEO
S-VIDEO
AV IN 3
L/MONO
R
AUDIO
VIDEO
S-VIDEO
AV IN 3
L/MONO
R
AUDIO
VIDEO
S-VIDEO
AV IN 3
L/MONO
R
AUDIO
VIDEO
S-VIDEO
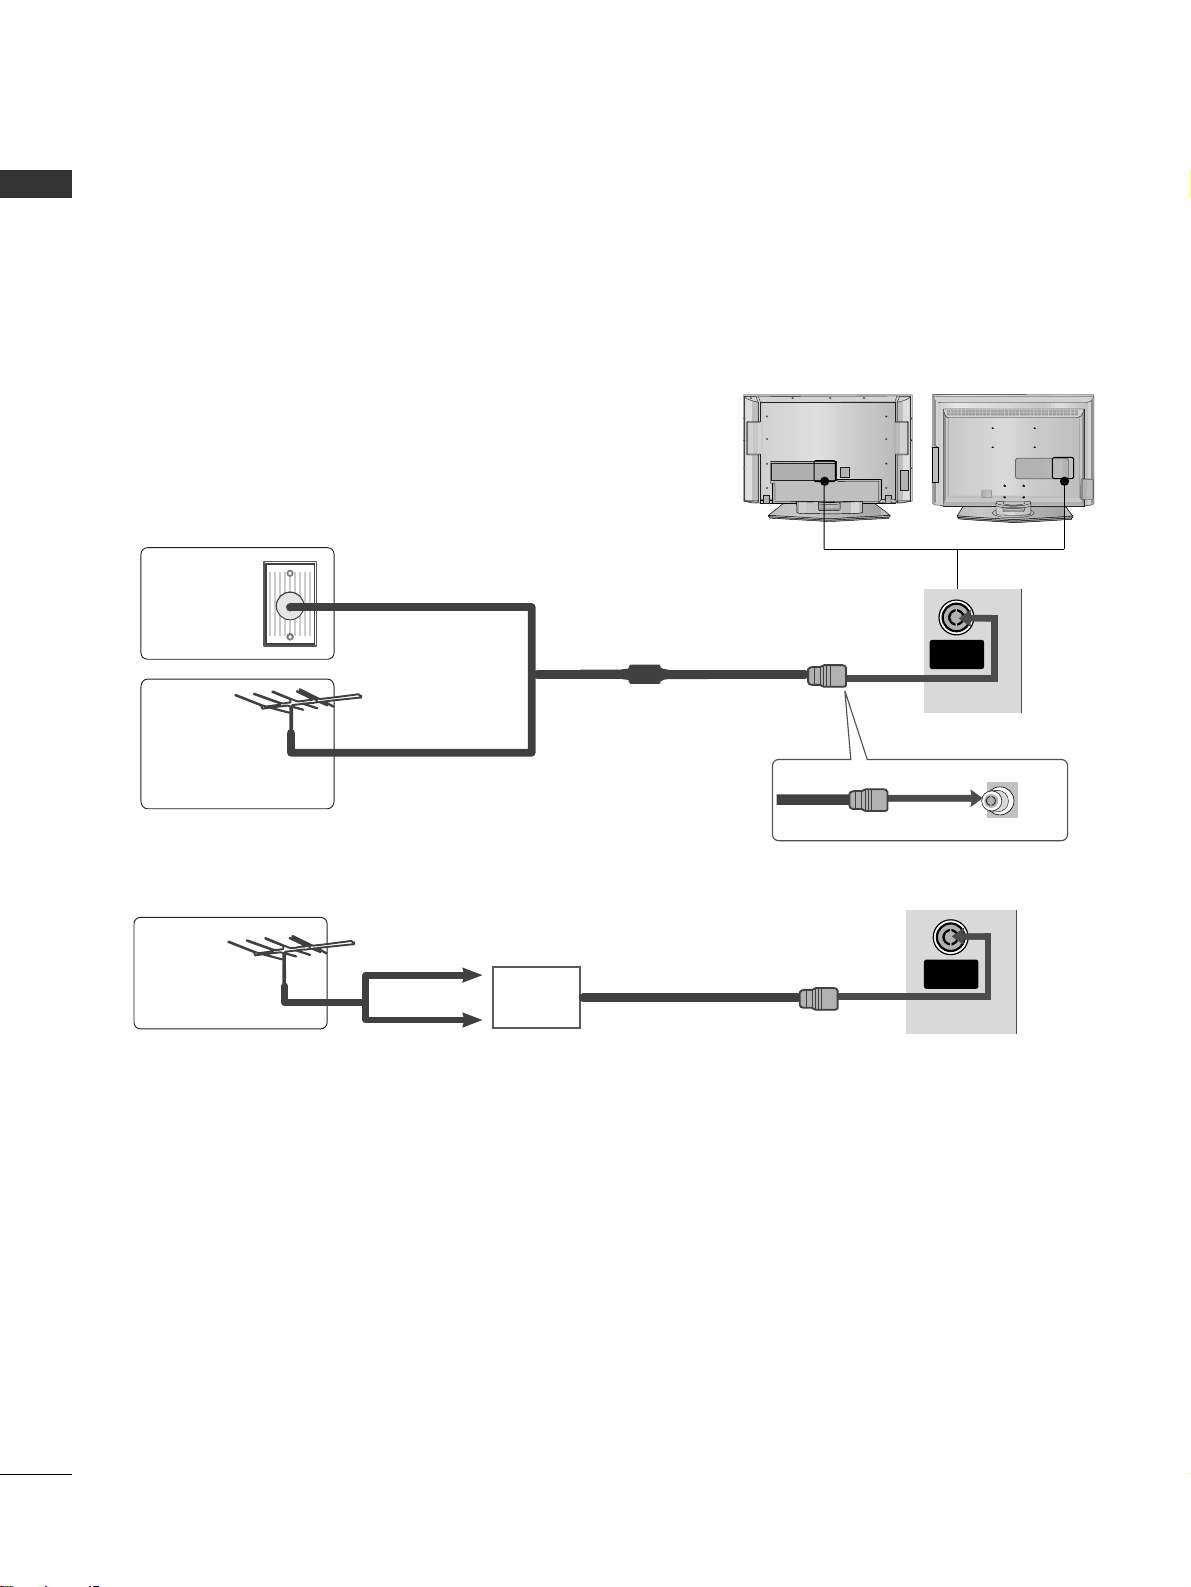
WATCHING TV / PROGRAMME CONTROL
ANTENNA CONNECTION
■
For optimum picture quality, adjust antenna direction.
■
An antenna cable and converter are not supplied.
Multi-family Dwellings/Apartments
(Connect to wall antenna socket)
Single-family Dwellings /Houses
(Connect to wall jack for outdoor antenna)
Outdoor
Antenna
Wall
Antenna
Socket
RF Coaxial Wire (75 ohm)
UHF
Signal
Amplifier
VHF
■
In poor signal areas,to get better picture quality, install a signal amplifier to the antenna as shown above.
■
If signal needs to be split for two TVs,use an antenna signal splitter for connection.
■
To prevent the equipment damage, never plug in any power cords until you have finished connecting all equipment.
ANTENNA
IN
ANTENNA
IN
Page 17
11
ENGLISH
Press the
VVOO LL ++//--
button to adjust the volume.
If you want to switch the sound off, press the
MMUUTTEE
button.
You can cancel the Mute function by pressing the
MMUUTTEE, VVOO LL ++//--
or
II //IIII
button.
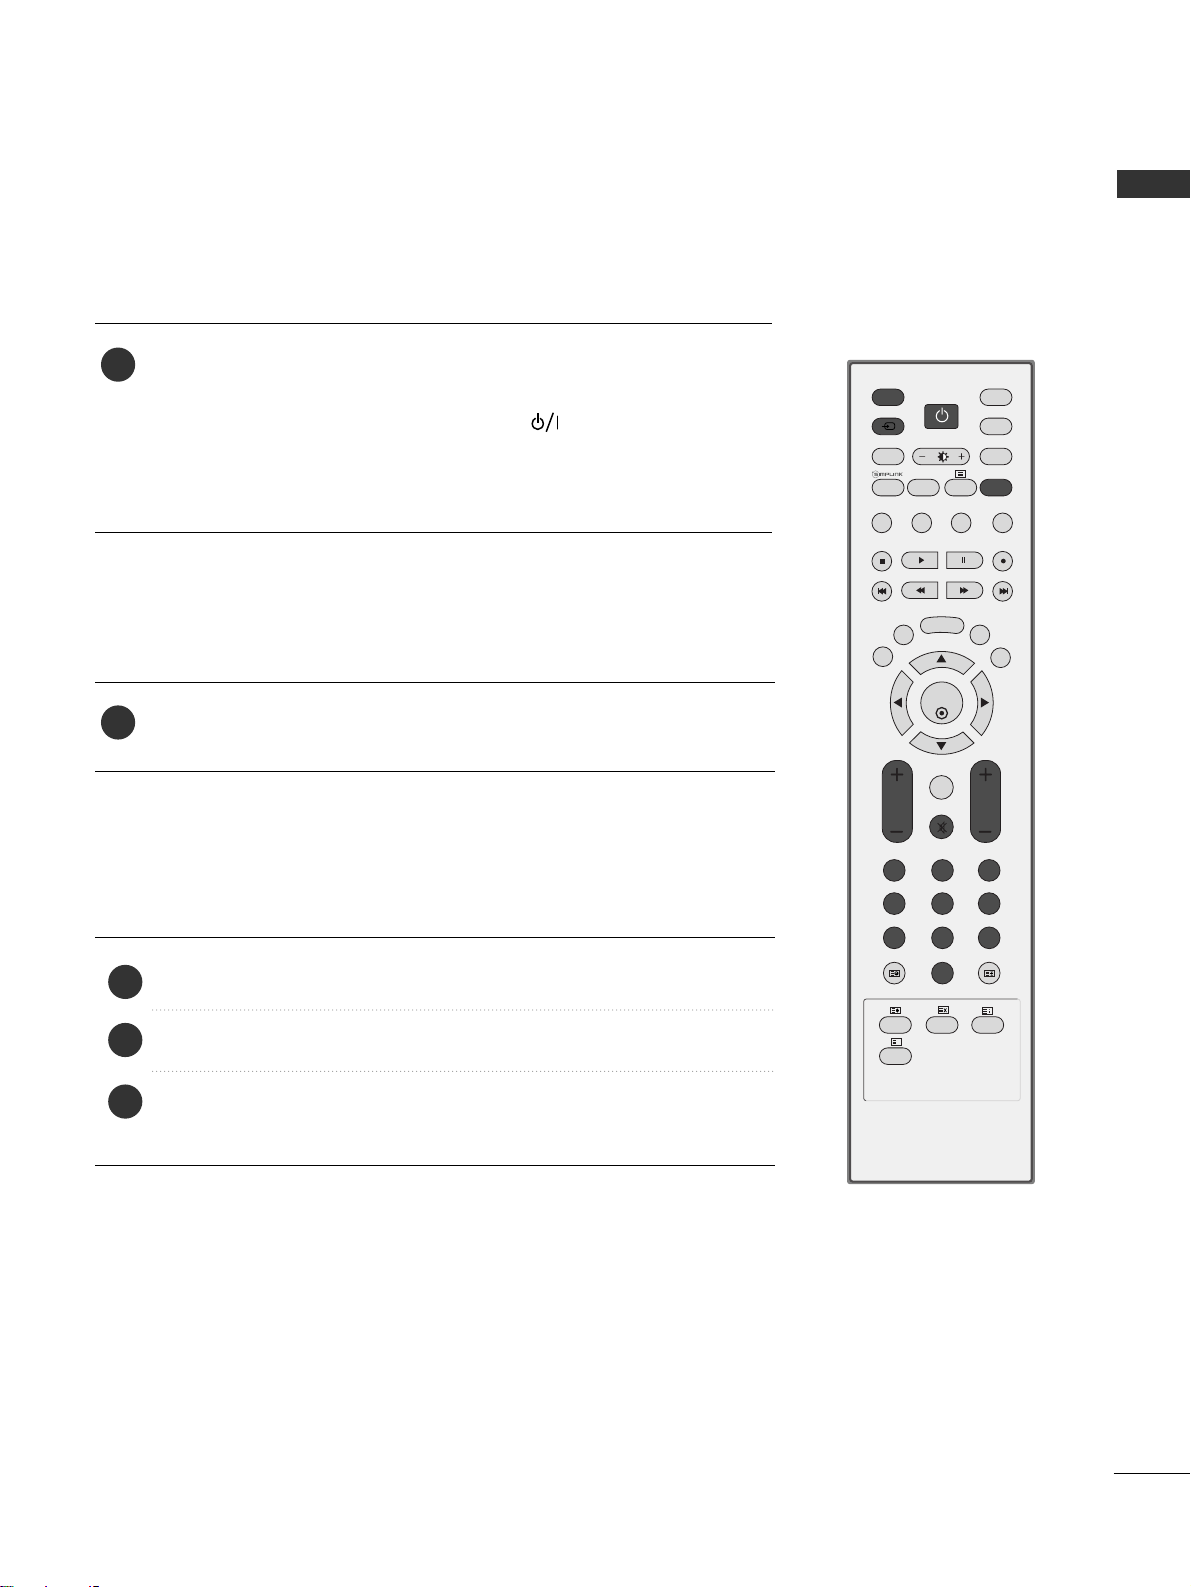
PROGRAMME SELECTION
TURNING ON THE TV
OK
INPUT MODE
TVTV
DVD
RATIO
EXIT
VOL
UPDATE
INDEX
PR
SLEEP
LIST
Q.VIEW
I/II
MENU
SIZE
VCR
POWER
123
456
789
*
0
FAV
REVEAL
?
TEXT
SIMPLINK
INPUT
MUTE
TIME
HOLD
If your TV will be turned on, you will be able to use its features.
First, connect power cord correctly.
At this moment, the TV switches to standby mode.
■
In standby mode to turn TV on, press the ,
IINNPPUUTT,PPRR
DD
//
EE
button on the TV or press the
PPOO WWEERR, TTVV, IINNPPUUTT, PPRR ++//--
,
NNuummbbeerr((00~99 ))
button on the remote control and then the TV will
switch on.
1
VOLUME ADJUSTMENT
Press the
PPRR ++//--
or
NNUU MMBBEERR
buttons to select a programme number.
2
3
1
1
Page 18
12
ENGLISH
WATCHING TV / PROGRAMME CONTROL
ON-SCREEN MENU LANGUAGE / COUNTRY SELECTION
Press the
DD
//
EE
// F//
G button and then,
OO KK
button to select your
desired language.
Press the
DD
//
EE
// F//
G button and then,
OO KK
button to select your
country.
Press the
MMEENN UU
button and then use
DD
//
EE
button to select the Option
menu.
Press the G button and then use
DD
//
EE
button to select Language.
The menus can be shown on the screen in the selected language.
Or, Press the
G button and then use
DD
//
EE
button to select Country.
Press the
G button and then use
DD
//
EE
button to select your desired lan-
guage or country.
Press the
OOKK
button.
Press the
EE XXIITT
button to return to normal TV viewing.
1
2
3
4
5
TThhiiss ffeeaattuurree iiss nnoott aavvaaiillaabbllee iinn aallll ccoouunnttrriieess..
Installation guide menu appears on TV screen when it is turned on for the first time.
1
2
* If you want to change Language/ Country selection
NOTE
!
GG
If you don’t finish set up
IInnssttaallllaattiioonn GGuuiiddee
by pressing
EEXXIITT
button
or time out of OSD (On Screen Display) display, it will continuously
appear until completing set up whenever the set is turned on.
GG
If you select wrong local country, the teletext may not appear correctly
on the screen and some problem may happen during teletext operation.
OK
INPUT MODE
TVTV
DVD
RATIO
EXIT
VOL
UPDATE
INDEX
PR
SLEEP
LIST
Q.VIEW
I/II
MENU
SIZE
VCR
POWER
123
456
789
*
0
FAV
REVEAL
?
TEXT
SIMPLINK
INPUT
MUTE
TIME
HOLD
Page 19
13
ENGLISH
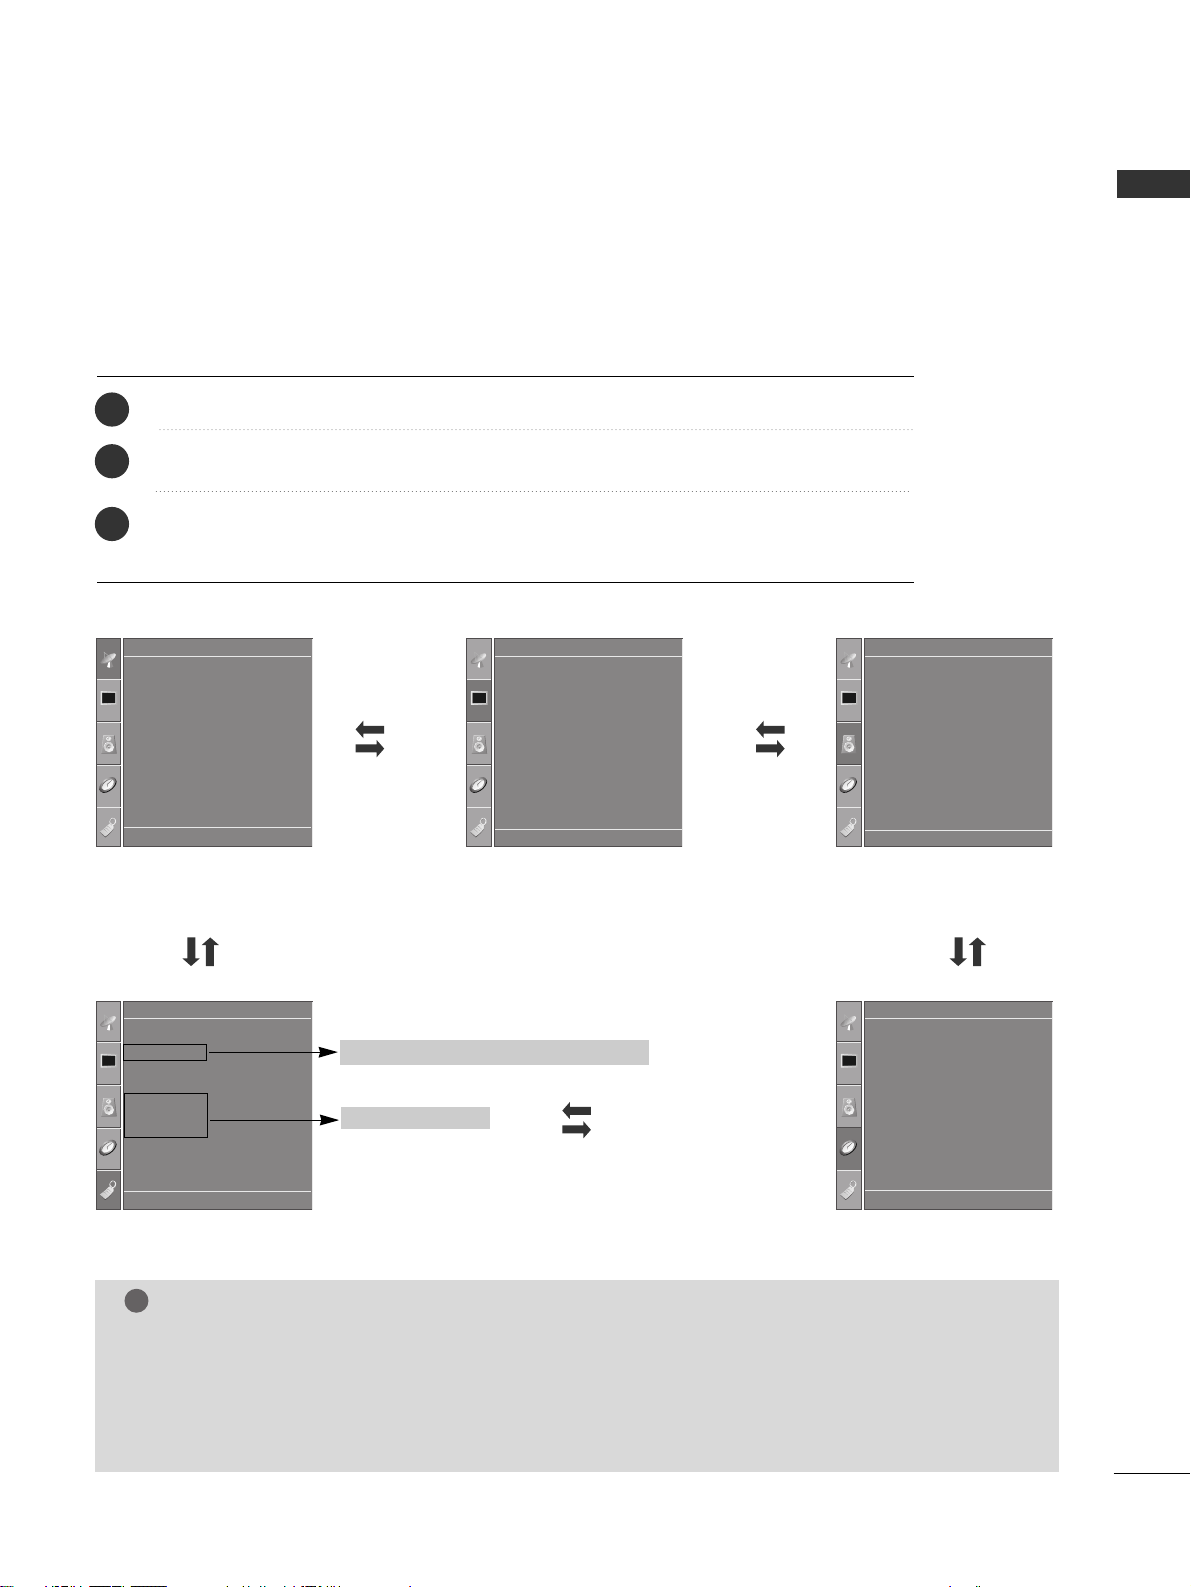
ON SCREEN MENUS SELECTION AND ADJUSTMENT
Press the
MMEENNUU
button and then
DD/ EE
button to display each menu.
Press the
GG
button and then
DD/ EE
button to select a menu item.
Change the setting of an item in the sub or pull-down menu with
F / G button.
You can move to the higher level menu by pressing the
OO KK
or
MMEENNUU
button.
Your TV's OSD (On Screen Display) may differ slightly from what is shown in this manual.
The OSD mainly use pictures for the Plasma TV models.
NOTE
!
a. The OSD (On Screen Display) function enables you to adjust the screen status conveniently since it pro-
vides graphical presentation.
b. In this manual, the OSD (On Screen Display) may be different from your TV’s because it is just example
to help the TV operation.
c. In the teletext mode, menus are not displayed
Setup MENU
Picture MENU
Audio MENU
Time MENU
Option MENU
1
2
3
Language
Country
SIMPLINK
Key Lock
ISM Method
Low Power
Option
Clock
Off Time
On Time
Sleep Time
Auto Sleep
Time
Picture Mode
Colour Temperature
XD
Advanced
Aspect Ratio
Picture Reset
Screen
XD Demo
Picture
Auto Tuning
Manual Tuning
Programme Edit
Favourite Programme
Setup
Sound Mode
Auto Volume
Balance 0
TV Speaker
Audio
* PLASMA TV models only
DE F G
OK MENU
DE F G
OK MENU
DE F G
OK MENU
DE F G
OK MENU
DE F G
OK MENU
* This feature is not available in all countries.
Page 20
14
ENGLISH
WATCHING TV / PROGRAMME CONTROL
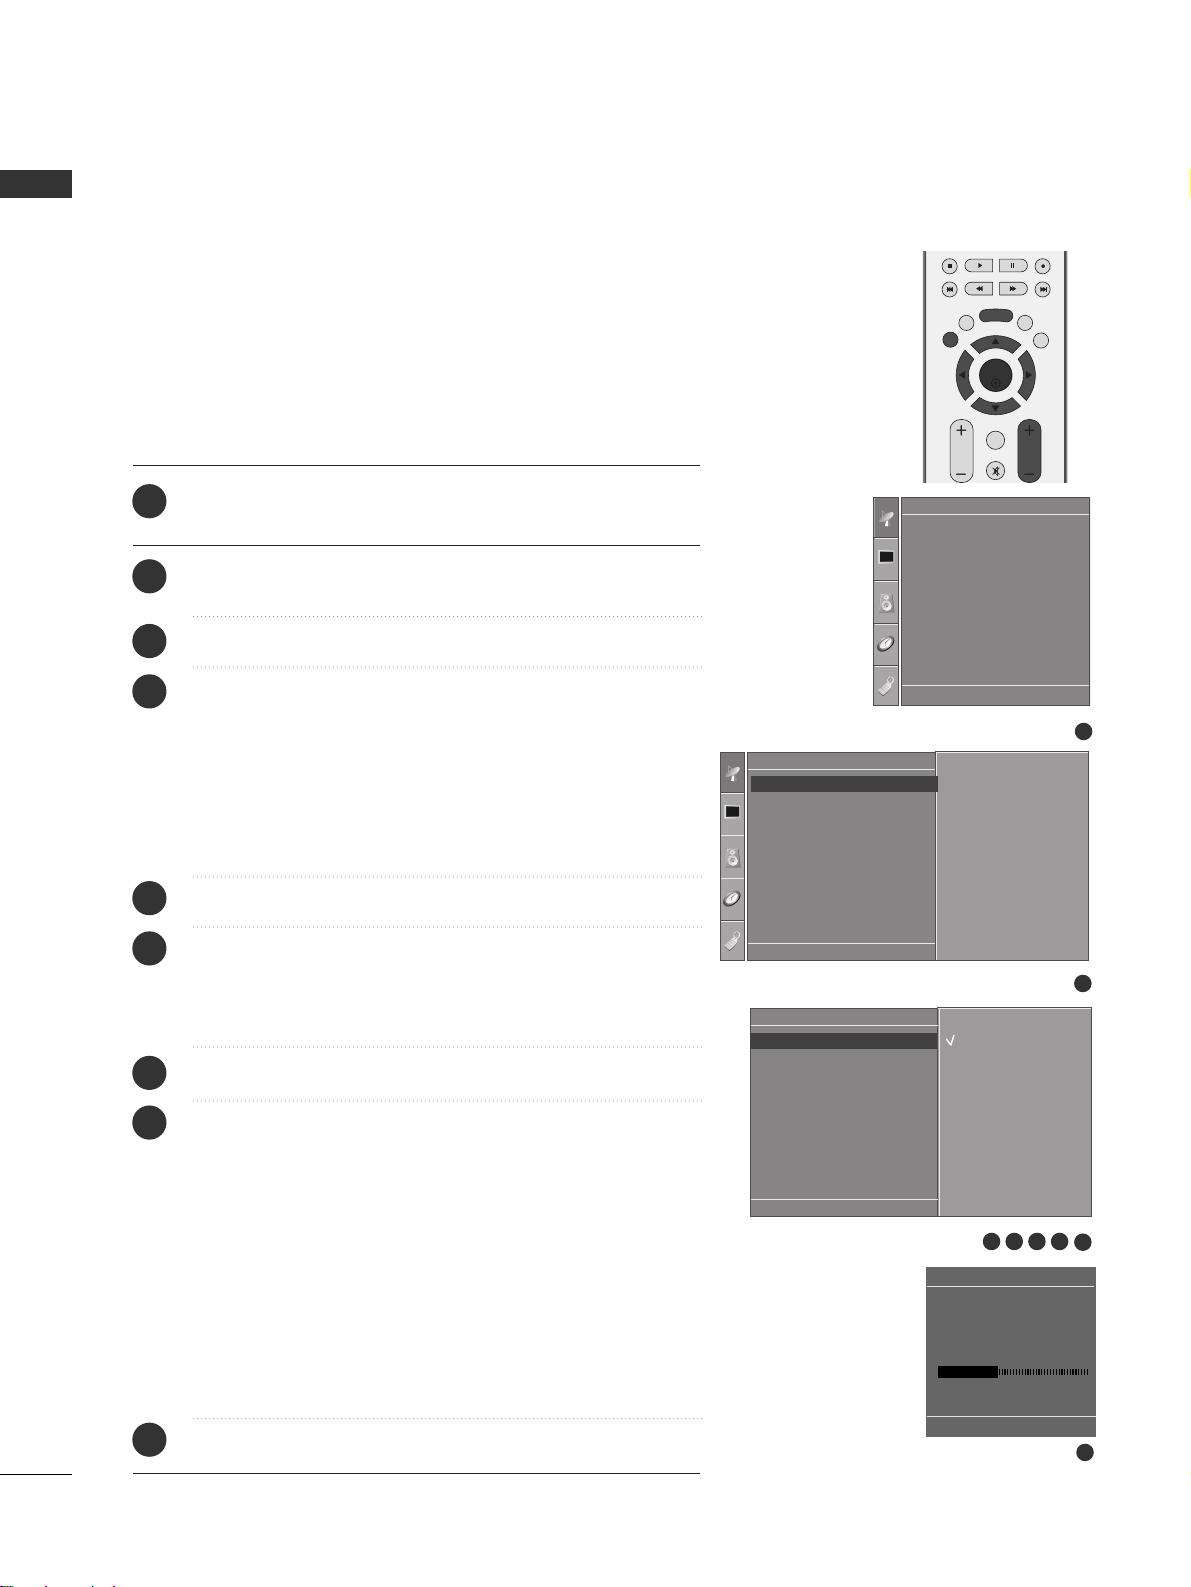
AUTO PROGRAMME TUNING
1
Auto Tuning
Manual Tuning
Programme Edit
Favourite Programme
Setup
Auto Tuning
System
Storage From
Search
System G
DE F G
OK MENU
2
Setup
Auto Tuning
Manual Tuning
Programme Edit
Favourite Programme
To Set
Auto Tuning G
DE F G
OK MENU
3 4 5 6
7
8
Auto Tuning
C 05 BG
5 35%
MENU Stop
BG
I
DK
L
OK
EXIT
VOL PR
LIST
Q.VIEW
MENU
*
FAV
Press the
MMEENNUU
button and then
DD
//
EE
button to select the
Setup menu.
Press the
GG
button and then
DD
//
EE
button to select Auto
Tuning.
Press the
GG
button and then
DD
//
EE
button to select System.
Press the
DD
//
EE
button to select a TV system menu;
BG: PAL B/G, SECAM B/G (Europe / East Europe / Asia /
NewZealand / M.East / Africa / Australia)
I : PAL I/II (U.K. / Ireland / Hong Kong / South Africa)
DK: PAL D/K, SECAM D/K (East Europe / China / Africa / CIS)
L : SECAM L/L’ (France)
M : (USA / Korea / Philippines) (option)
Press the
DD
//
EE
button to select Storage From.
Press the
FF
//
GG
button or NUMBER buttons to select the
beginning programme number. If you use NUMBER buttons, any
number under 10 is entered with a numeric ‘0’ in front of it,
i.e.‘
00 55
’ for 5.
Press the
DD
//
EE
button to select Search.
Press the
GG
button to begin auto tuning.
All receivable stations are stored. The station name is stored for
stations which broadcast VPS (Video Programme Service), PDC
(Programme Delivery Control) or TELETEXT data. If no station
name can be assigned to a station, the channel number is
assigned and stored as
C (V/UHF 01-69) or S (Cable 01-47),
followed by a number.
To stop auto tuning, press the
MMEENNUU
button.
When auto programming is completed, the Programme edit
menu appears on the screen. See the Programme edit section to
edit the stored programme.
Press the
EEXXIITT
button to return to normal TV viewing.
1
2
3
4
5
6
7
8
9
Up to 100 TV stations can be stored by programme numbers (0 to 99).
Once you have preset the stations, you will be able to use the PR +/- or
NUMBER buttons to scan the stations you have programmed.
Stations can be tuned using automatic or manual modes.
All stations that can be received are stored by this method. It is recommended that you use auto programme during installation of this set.
DE F G
OK MENU
Page 21

15
ENGLISH
APPENDIX
MAINTENANCE
TO VIEW THE USER'S GUIDE ON THE CD-ROM
Early malfunctions can be prevented. Careful and regular cleaning can extend the amount of time you will
have your new TV. Be sure to turn the power off and unplug the power cord before you begin any cleaning.
Cleaning the Screen
Here’s a great way to keep the dust off your screen for a while. Wet a soft cloth in a mixture of lukewarm
water and a little fabric softener or dish washing detergent. Wring the cloth until it’s almost dry, and then
use it to wipe the screen.
Make sure the excess water is off the screen, and then let it air-dry before you turn on your TV.
Cleaning the Cabinet
■
To remove dirt or dust, wipe the cabinet with a soft, dry, lint-free cloth.
■
Please be sure not to use a wet cloth.
Extended Absence
If you expect to leave your TV dormant for a long time (such as a vacation), it’s a good idea to unplug
the power cord to protect against possible damage from lightning or power surges.
CAUTION
1
2
To view the User's guide on the CD-ROM, Adobe Acrobat Reader must be installed on your PC.
The "ACRORD" folder on the CD-ROM contains the installation program for Acrobat Reader.
If you want to install Acrobat Reader, Open "My Computer" Open the folder "LG" Open the folder "ACRORD"
double-click your language.
TToo vviieeww tthhee UUsseerr''ss gguuiiddee
The User's guide files are included in the supplied CD-ROM.
Load the supplied CD-ROM into the CD-ROM drive of your PC.
After a while, the web page of the CD-ROM will open automatically.(Windows users only)
If the web page does not appear automatically, open the User's guide file directly.
Open "My computer" Open the folder "LG" Double click the "index.htm" file.
Page 22
16
ENGLISH
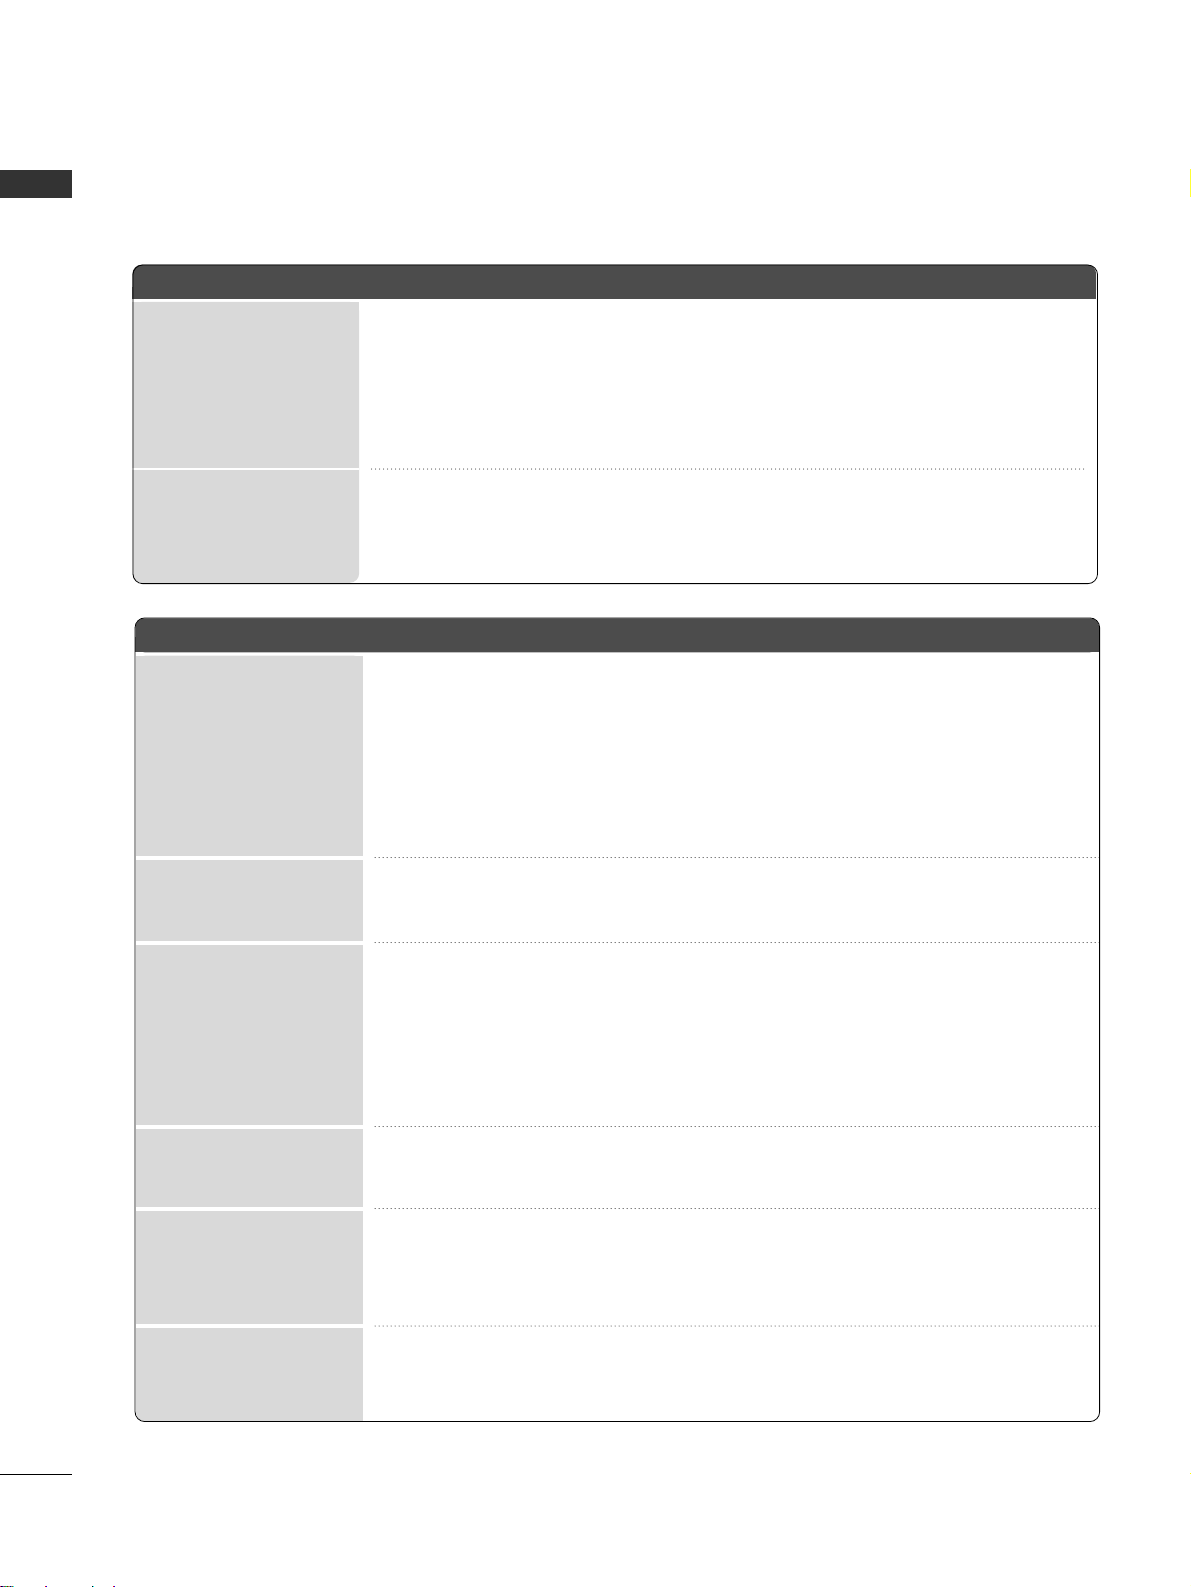
TROUBLESHOOTING
TThhee vviiddeeoo ffuunnccttiioonn ddooeess nnoott wwoorrkk..
NNoo ppiiccttuurree &&
NNoo ssoouunndd
NNoo oorr ppoooorr ccoolloorr
oorr ppoooorr ppiiccttuurree
PPoooorr rreecceeppttiioonn oonn
ssoommee cchhaannnneellss
LLiinneess oorr ssttrreeaakkss iinn
ppiiccttuurreess
HHoorriizzoonnttaall//vveerrttiiccaall
bbaarrss oorr ppiiccttuurree sshhaakkiinngg
PPiicctt uurree aappppeeaarrss ssllooww--
llyy aafftteerr sswwiittcchhiinngg oonn
■
Check whether the product is turned on.
■
Try another channel. The problem may be with the broadcast.
■
Is the power cord inserted into wall power outlet?
■
Check your antenna direction and/or location.
■
Test the wall power outlet, plug another product’s power cord into the outlet where the
product’s power cord was plugged in.
■
This is normal, the image is muted during the product startup process. Please contact
your service center, if the picture has not appeared after five minutes.
■
Adjust Color in menu option.
■
Keep a sufficient distance between the product and the VCR.
■
Try another channel. The problem may be with the broadcast.
■
Are the video cables installed properly?
■
Activate any function to restore the brightness of the picture.
■
Check for local interference such as an electrical appliance or power tool.
■
Station or cable product experiencing problems, tune to another station.
■
Station signal is weak, reorient antenna to receive weaker station.
■
Check for sources of possible interference.
■
Check antenna (Change the direction of the antenna).
TThhee ooppeerraattiioonn ddooeess nnoott wwoorrkk nnoorrmmaallllyy..
TThhee rreemmoottee ccoonnttrrooll
ddooeessnn’’tt wwoorrkk
PPoowweerr iiss ssuuddddeennllyy
ttuurrnneedd ooffff
■
Check to see if there is any object between the product and the remote control
causing obstruction.
■
Are batteries installed with correct polarity (+ to +, - to -)?
■
Correct remote operating mode set: TV, VCR etc.?
■
Install new batteries.
■
Is the sleep timer set?
■
Check the power control settings. Power interrupted
■
No broadcast on station tuned with Auto off activated.
APPENDIX
Page 23
17
ENGLISH
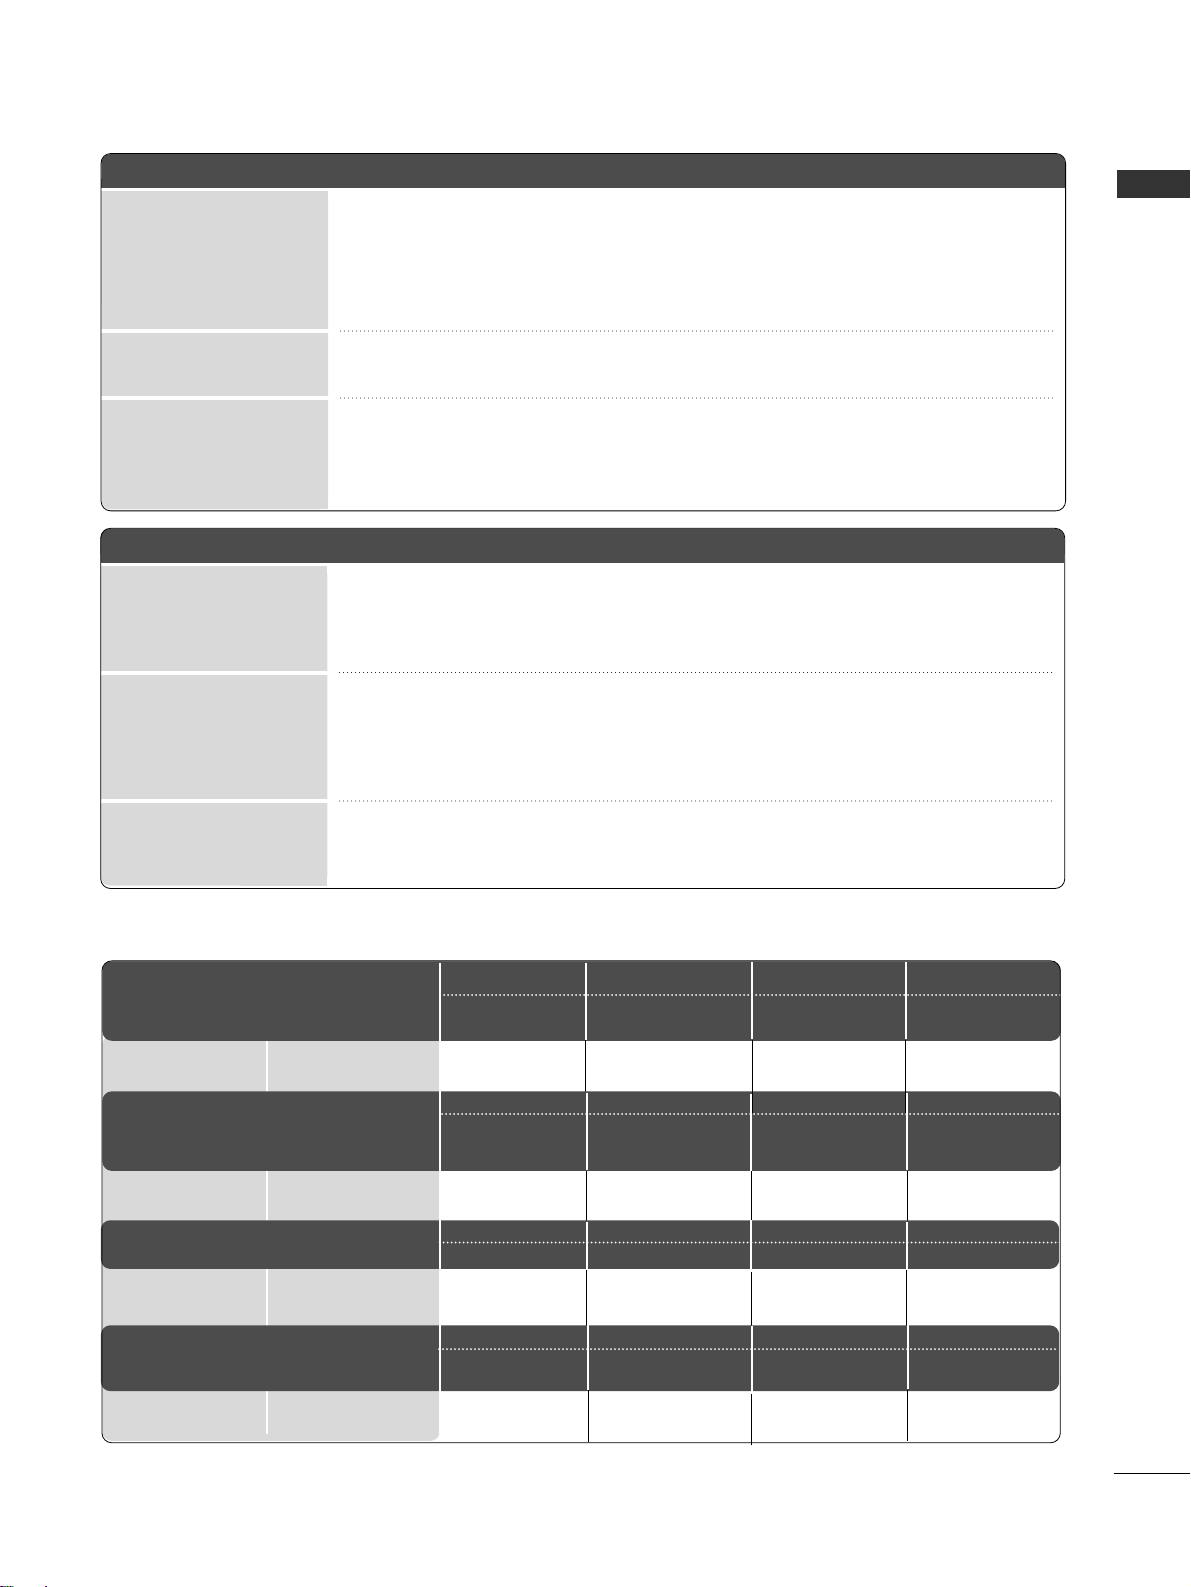
PPiiccttuurree OOKK &&
NNoo ssoouunndd
UUnnuussuuaall ssoouunndd ffrroomm
iinnssiiddee tthhee pprroodduucctt
NNoo oouuttppuutt ffrroomm oonnee
ooff tthhee ssppeeaakkeerrss
TThheerree iiss aa pprroobblleemm iinn PPCC mmooddee.. ((OOnnllyy PPCC mmooddee aapppplliieedd))
■
Adjust resolution, horizontal frequency, or vertical frequency.
■
Check the input source.
■
Work the Auto configure or adjust clock, phase, or H/V position.
■
Check the signal cable.
■
Reinstall the PC video card.
TThhee ssiiggnnaall iiss oouutt ooff
rraannggee..
SSccrreeeenn ccoolloouurr iiss
uunnssttaabbllee oorr ssiinnggllee
ccoolloouurr
VVeerrttiiccaall bbaarr oorr ssttrriippee
oonn bbaacckkggrroouunndd &&
HHoorriizzoonnttaall NNooiissee &&
IInnccoorrrreecctt ppoossiittiioonn
TThhee aauuddiioo ffuunnccttiioonn ddooeess nnoott wwoorrkk..
■
Press the
VVOOLL++//-- ((oorr VVoolluummee))
button.
■
Sound muted? Press
MMUUTTEE
button.
■
Try another channel. The problem may be with the broadcast.
■
Are the audio cables installed properly?
■
Adjust Balance in menu option.
■
A change in ambient humidity or temperature may result in an unusual noise when
the product is turned on or off and does not indicate a fault with the product.
WEIGHT
■
The specifications shown above may be changed without prior notice for quality improvement.
MODELS
Weight
with stand
without stand
10.1kg / 22.3 lbs
9.1kg / 20.1 lbs
13.9 kg / 30.7 lbs
11.3 kg / 24.9 lbs
20.0 kg / 44.1 lbs
16.3 kg / 35.9 lbs
Weight
with stand
without stand
MODELS
26LC41
*
26LC41-ZA
32LC41*/32LC43
*
32LC44
*
32LC41-ZA/32LC43-ZE
32LC43-ZA/32L C44-ZB
37LC41*/37LC43
*
37LC41-ZA
37LC43-ZA
42LC41*/42LC43
*
42LC41-ZA
42LC43-ZA
24.5 kg / 54.0 lbs
20 kg / 44.1 lbs
26LC5
*
26LC51-ZA
26LC51C-ZA
32LC5
*
32LC51-ZA/32LC52-ZC
32LC52C-ZC
32LC53-ZA/32LC54-ZD
37LC5
*
37LC51-ZA
37LC53-ZA
42LC5
*
42LC51-ZA
42LC53-ZA
42LC54-ZD
10.4kg / 22.9 lbs
9.0kg / 19.9 lbs
13.7kg / 30.2 lbs
11.2kg / 24.7 lbs
20.0 kg / 44.1 lbs
16.0 kg / 35.3 lbs
24.9 kg / 54.9 lbs
20.4 kg / 45.0 lbs
MODELS
26LC42
*
26LC42-ZC
32LC42
*
32LC42-ZC
37LC42
*
37LC42-ZC
42LC42
*
42LC42-ZC
Weight
with stand
without stand
9.62kg / 21.2 lbs
8.62kg / 19.0 lbs
14.4kg / 31.8 lbs
11.74kg / 25.9 lbs
20.0 kg / 44.1 lbs
16.3 kg / 36.0 lbs
24.5 kg / 54.0 lbs
20 kg / 44.1 lbs
MODELS
42PC5
*
42PC51-ZB
42PC52-ZD
50PC5
*
50PC51-ZB
50PC52-ZD
26LC3
*
26LC3RA-ZA
Weight
with stand
without stand
28.0 kg / 61.7 lbs
24.6kg / 54.2 lbs
39.3 kg / 86.6 lbs
34.6kg / 76.2 lbs
12.4 kg / 27.3 lbs
11.5 kg / 25.3 lbs
28.0 kg / 61.7 lbs
24.6kg / 54.2 lbs
42PC5RV
*
42PC5RV -ZD
42PC5RVC-ZD
Page 24

Page 25

Ein ausführlicheres Benutzerhandbuch mit erweiterten Funktionen dieser LG TVGeräte befindet sich auf der CD-ROM.
Um es lesen zu können, müssen Sie die Dateien auf einem Personal Computer
(PC) mit CD-ROM-Laufwerk öffnen.
Bitte lesen Sie vor Inbetriebnahme dieses Handbuch sorgfältig
durch.
Bewahren Sie die Anleitung für spätere Fragen sorgfältig auf.
Tragen Sie Modell- und Seriennummer des Gerätes hier ein.
Sie finden die Angaben auf dem Typenschild an der Rückwand
des Gerätes. Teilen Sie Ihrem Kundendienst die Nummern mit,
wenn Sie Hilfe benötigen.
LCD TV
PLASMA TV
BBeeddiieennuunnggssaannlleeiittuunngg
LCD TV-MODELLE
26LC4
*
32LC4
*
37LC4
*
42LC4
*
26LC3
*
PLASMA TV-MODELLE
42PC5
*
42PC5RV
*
50PC5
*
26LC5*
32LC5*
37LC5*
42LC5*
Page 26

Page 27
1
SICHERHEITSBESTIMMUNGEN
DEUTSCH
• Lesen Sie diese Sicherheitsmaßnahmen vor der ersten Verwendung des Produkts sorgfältig durch.
• Die Abbildungen in diesem Handbuch können vom tatsächlichen Aussehen Ihres Produkts abweichen, da sie lediglich
zur Verdeutlichung der Bestimmungen dienen.
Wenn Sie eine Warnmeldung ignorieren, kann es zu ernsthaften Verletzungen oder zu Unfällen und Todesfällen kommen.
Wenn Sie eine zur Vorsicht mahnende Meldung ignorieren, kann es zu leichten Verletzungen kommen oder das
Produkt kann beschädigt werden.
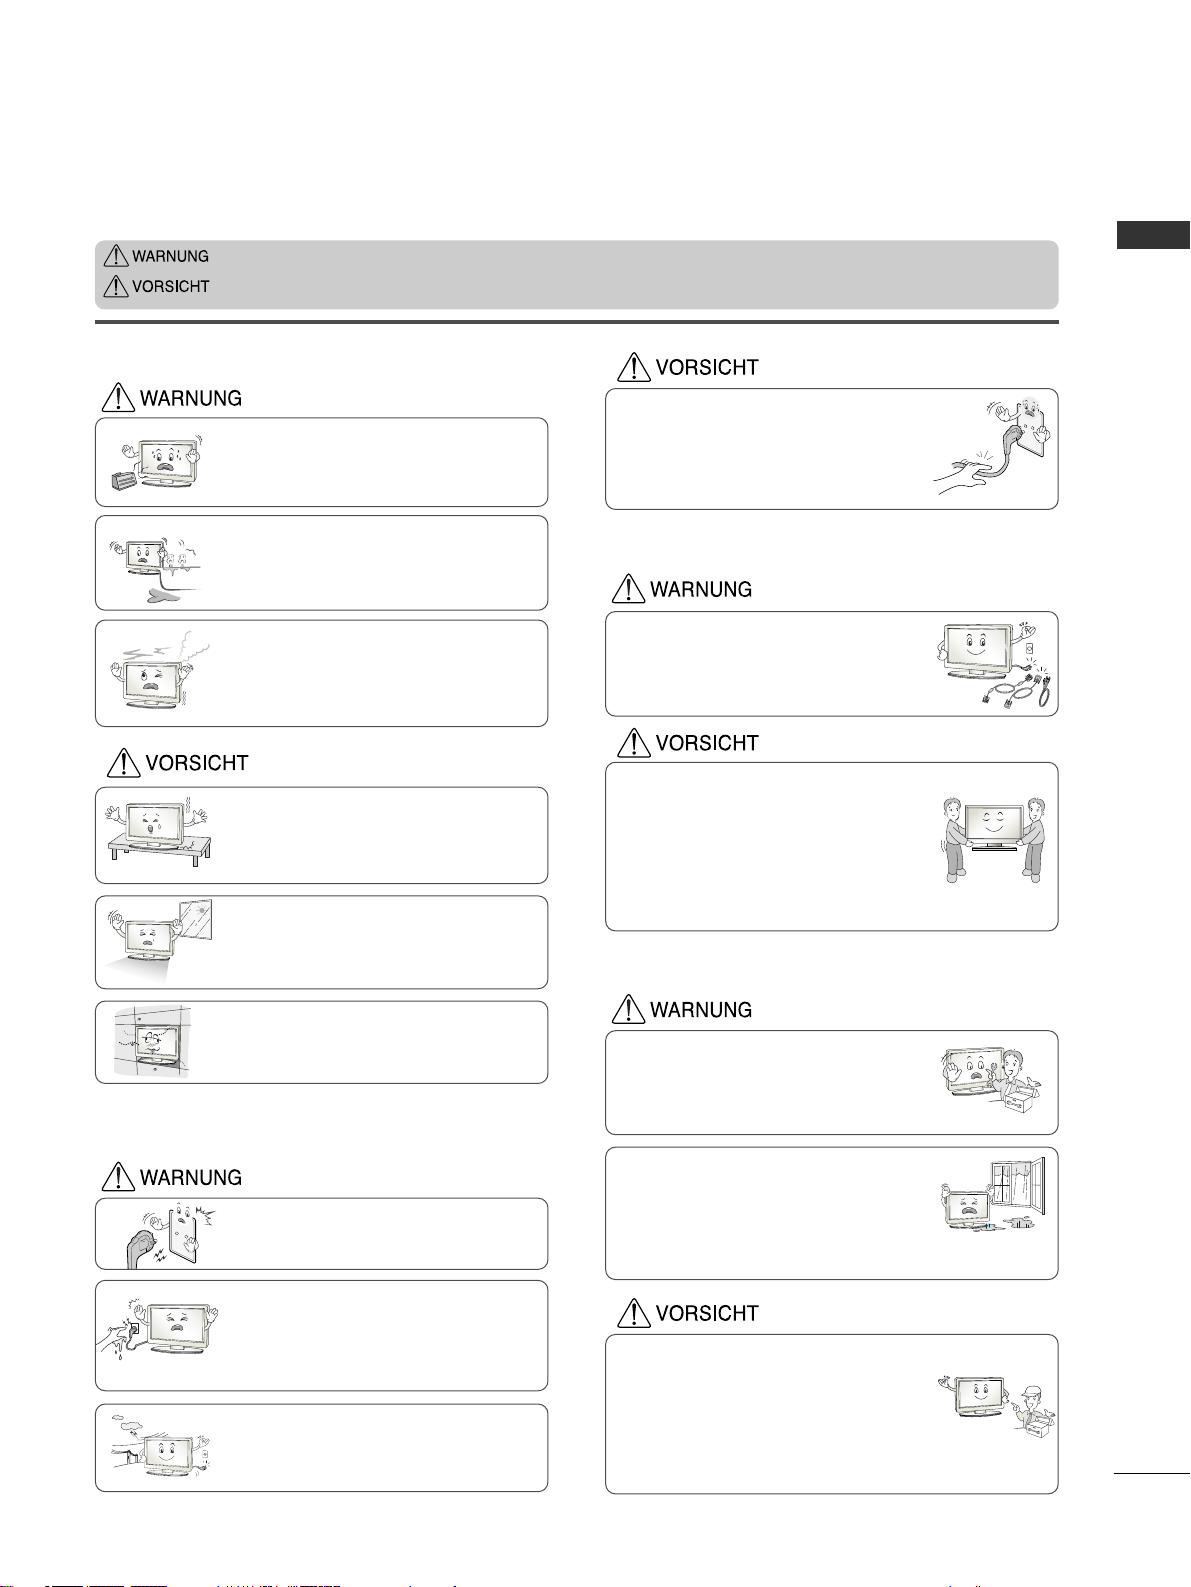
Vorsichtsmaßnahme bei der Installation des
Produkts
Halten Sie sich von Wärmequellen wie elektrischen
Heizungen fern.
- Es kann zu Stromschlägen, Feuer, Fehlfunktionen oder
Deformationen kommen.
Wenn es nach Rauch riecht, andere Gerüche wahrzunehmen
oder merkwürdige Geräusche zu hören sind, unterbrechen Sie
die Stromversorgung und kontaktieren Sie den Service.
- Wenn Sie weiterarbeiten, ohne die erforderlichen Maßnahmen zu tre-
ffen, kann es zu Stromschlägen oder Feuer kommen.
Verwenden Sie das Produkt nicht an feuchten Orten (z. B.
Badezimmer) oder an Stellen, an denen es nass werden
könnte.
- Dadurch kann es zu Bränden oder zu Stromschlägen kommen.
Installieren Sie das Produkt auf einer ebenen und stabilen Fläche, damit das Produkt nicht herunterfallen
kann.
- Falls das Produkt zu Boden fällt, könnten Sie verletzt oder das
Produkt könnte beschädigt werden.
Setzen Sie das Produkt nicht direktem Sonnenlicht
aus.
- Das Produkt könnte beschädigt werden.
Stellen Sie das Produkt nicht an Orten wie in
Bücherregalen oder Racks auf.
- Das Produkt muss gut belüftet sein.
Strombezogene Sicherheitsmaßnahmen
Vergewissern Sie sich, dass das Stromkabel an den
Erdungsstrom angeschlossen ist.
- Ansonsten könnten Sie einen Stromschlag erleiden oder verletzt
werden.
Berühren Sie den Netzstecker nicht mit nassen Händen. Falls
der Kontakt nass oder mit Staub bedeckt ist, trocknen Sie den
Netzstecker vollständig oder reinigen Sie ihn von Staub.
- Ansonsten könnten Sie durch Restfeuchtigkeit einen Stromschlag
erleiden.
Stecken Sie bei Gewittern das Strom- bzw. das
Signalkabel aus.
- Ansonsten könnten Sie einen Stromschlag erleiden oder
es könnte ein Feuer ausbrechen.
Schützen Sie das Stromkabel vor physikalischer oder
mechanischer Beeinträchtigung (Verdrehen, Knicken,
Einklemmen oder Darauftreten).
Achten Sie hierbei besonders auf Stecker, Steckdosen
und diejenigen Stellen, an denen das Kabel aus dem
Gerät herausführt.
Vorsichtsmaßnahme beim Bewegen des Produkts
Vermeiden Sie Erschütterungen beim Bewegen des
Produkts.
- Ansonsten könnten Sie einen Stromschlag erleiden oder das
Produkt könnte beschädigt werden.
Achten Sie darauf, dass der Monitor nach vorne zeigt und
halten Sie ihn zum Bewegen mit beiden Händen fest.
- Wenn Sie das Produkt fallen lassen, könnten Sie durch das
beschädigte Gerät einen Stromschlag erleiden oder es könnte
ein Brand verursacht werden. Wenden Sie sich bezüglich
Reparaturen an den Service.
Vergewissern Sie sich, dass das Produkt ausgeschaltet ist.
Vergewissern Sie sich, dass alle Kabel entfernt wurden,
bevor das Produkt bewegt wird.
- Ansonsten könnten Sie einen Stromschlag erleiden oder
das Produkt könnte beschädigt werden.
Vorsichtsmaßnahme beim Verwenden des Produkts
Demontieren Sie das Produkt nicht und führen Sie
Reparaturen und Änderungen nicht selbst durch.
- Feuer und Stromschläge können die Folge sein.
- Wenden Sie sich an den Service, wenn das Gerät überprüft,
kalibriert oder repariert werden soll.
Um das Brand- oder Stromschlagrisiko zu senken, darf das
Gerät nicht Regen oder Feuchtigkeit ausgesetzt werden.
Das Gerät darf nicht tropfendem oder spritzendem Wasser
ausgesetzt sein und es sollten keine mit Flüssigkeiten gefüllten Behälter (z. B. Vasen) auf dem Gerät abgestellt werden.
Überlassen Sie alle Servicearbeiten qualifizierten
Servicemitarbeitern. Servicearbeiten sind erforderlich, wenn
das Gerät in irgendeiner Form beschädigt wurde (z. B.:
Netzkabel oder -stecker ist beschädigt, Flüssigkeiten oder
Objekte sind in das Geräteinnere gelangt, Gerät war Regen
oder Feuchtigkeit ausgesetzt, normale Funktionsweise ist
gestört, Gerät wurde fallengelassen).
Page 28

DEUTSCH
2
FRONTKONSOLE
■
Hier sehen Sie die vereinfachte Darstellung der Vorderseite des TV-Geräts.Diese Darstellung könnte sich leicht
von dem Aussehen Ihres TV-Geräts unterscheiden.
■
Falls das Gerät mit einer Schutzfolie überzogen ist, ziehen Sie die Folie ab und wischen Sie das Gerät mit einem
Poliertuch ab.
Programme(Programm) Tasten
Volume(Lautstärke) Tasten
MENU(Menü)
-Ta st e
OK-Taste
Taste INPUT
Taste POWER
PR
VOL
OK
MENU
INPUT
Programme(Programm)
Ta s t e n
Volume(Lautstärke)
Ta s t e n
OK-Taste
MENU(Menü)
-Ta st e
Taste INPUT
Taste POWER
VORBEREITUNG
PPoowweerr//SSttaannddbbyy--AAnnzzeeiiggee
• Leuchtet im Standby-Modus rot.
• Leuchtet grün, wenn das Gerät
eingeschaltet ist.
Sensor für die Fernbedienung
PR
VOL
OK
MENU
INPUT
/I
Page 29
DEUTSCH
3
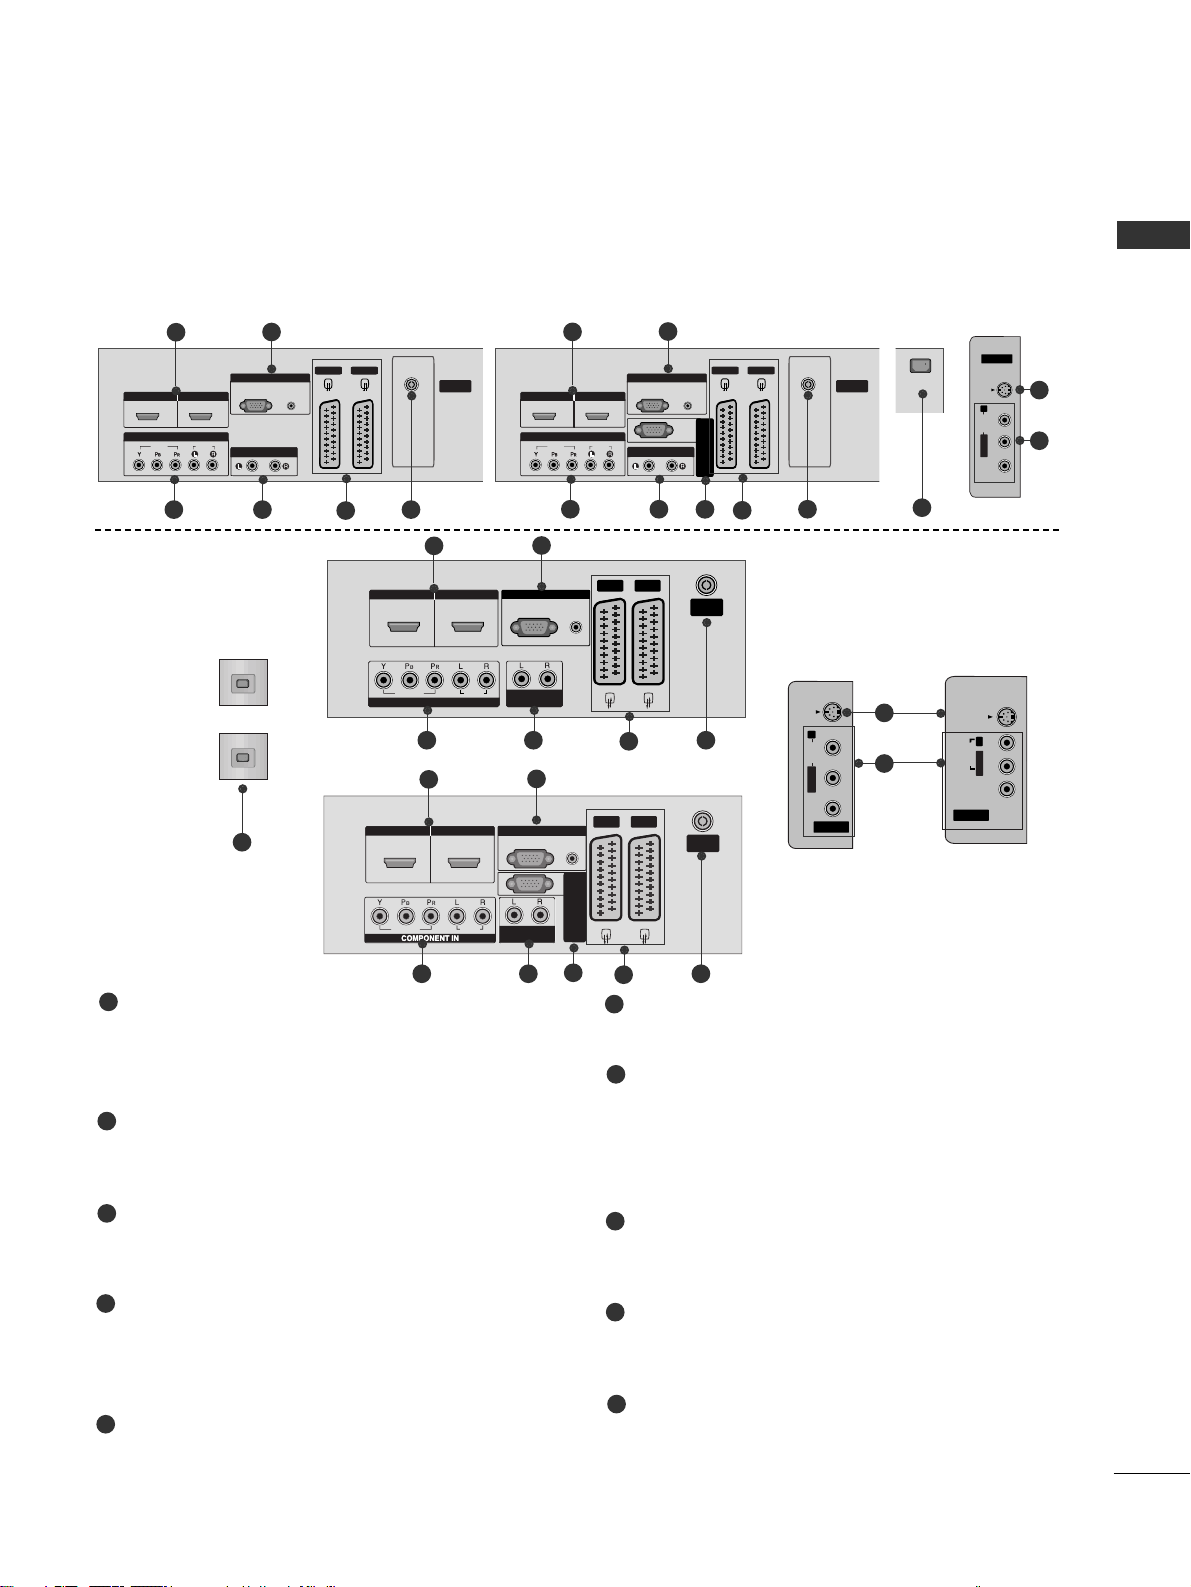
INFORMATIONEN ZUR RÜCKSEITE
A
Hier sehen Sie die vereinfachte Darstellung der Rückseite des TV-Geräts. Diese Darstellung könnte sich leicht
von dem Aussehen Ihres TV-Geräts unterscheiden.
HDMI-Eingang
Schließen Sie ein HDMI-Signal an HDMI IN an.
Oder schließen Sie ein DVI-(VIDEO)-Signal über ein
DVI-zu-HDMI-Kabel an den HDMI/DVI-ingang an.
RGB/Audio-Eingang
Schließen Sie das Monitor-Ausgangssignal eines PCs
an den entsprechenden Eingang an.
Komponent-Eingang
Für den Anschluss eines Komponent-Video oder
Audio-Geräts.
Variabel einsetzbarer Audioausgang
Für den Anschluss eines externen Verstärkers oder
eines zusätzlichen Subwoofers an Ihr SurroundSound-System.
Euro-Scart-Anschluss (AV1/AV2)
Für den Anschluss von Scart-Eingangs-und
Ausgangssignalen von externen Geräten.
Antenneneingang
Für den Anschluss von Antennensignalen.
Anschlussbuchse für Stromkabel
Dieses Fernsehgerät ist auf den Betrieb mit
Wechselstrom ausgelegt.Die Spannung finden Sie
auf der Seite „Spezifikationen “.Versuchen Sie
niemals,das Gerät mit Gleichstrom zu betreiben.
S-Video-Eingang
Für den Anschluss eines S-Video-Ausgangssignals von
einem S-VIDEO-Gerät
Audio/Video-Eingang
Für den Anschluss von Audio- oder Video-
Ausgangssignalen von externen Geräten
RS-232C-Eingang
(STEUERUNG&WARTUNG)
Für den Anschluss des seriellen Ports der
Steuergeräte an die RS-232C-Buchse.
1
2
3
4
5
6
7
8
9
10
AV IN 3V IN 3
L/L/MONOMONO
R
AUDIOAUDIO
VIDEOVIDEO
S-VIDEOS-VIDEO
AV IN 3
L/MONO
R
AUDIO
VIDEO
S-VIDEO
12
VARIABLE
AUDIO OUT
RGB IN
COMPONENT IN
AUDIO
VIDEO
AV 1 AV 2
ANTENNA
IN
HDMI/DVI IN HDMI IN
AV IN 3
L/MONO
R
AUDIO
VIDEO
S-VIDEO
12
VARIABLE
AUDIO OUT
RGB IN
COMPONENT IN
AUDIO
VIDEO
AV 1 AV 2
ANTENNA
IN
HDMI/DVI IN HDMI IN
AV IN 3
L/MONO
R
AUDIO
VIDEO
S-VIDEO
1 2
VARIABLEARIABLE
AUDIO OUTAUDIO OUT
RGB
(PC)
RGB INRGB IN
COMPONENT INCOMPONENT IN
AUDIOAUDIO
VIDEOVIDEO
AV 1V 1 AV 2V 2
ANTENNAANTENNA
IN IN
AUDIO
(RGB/DVI)
HDMI/DVI INHDMI/DVI IN HDMI INHDMI IN
1
2
8
9
3
7
4 6
5
VARIABLE
AUDIO OUT
RGB IN
O
O
AV 1
AV 2
ANTENNA
IN
HDMI/DVI IN
HDMI IN
1
2
3 4 6
5
10
AV IN 3V IN 3
VIDEOVIDEO
S-VIDEOS-VIDEO
L/MONOMONO
R
AUDIOAUDIO
V 2
ARIABLE
AUDIO OUT
VIDEO
AUDIO
COMPONENT
AV IN 3
L/MONO
R
AUDIO
VIDEO
RGB IN
S-VIDEO
V IN 3
L/
MONO
AUDIO
VIDEO
S-VIDEO
3 4 6
7
5
1
2
8
9
AUDIO
(RGB/DVI)
RGB
(PC)
AV 1 AV 2V 2
ANTENNA
IN
VARIABLE ARIABLE
AUDIO OUTAUDIO OUT
VIDEOVIDEO
AUDIOAUDIO
COMPONENTCOMPONENT IN
AV IN 3
L/MONO
R
AUDIO
VIDEO
HDMI/DVI IN HDMI IN
1 2
RGB INRGB IN
S-VIDEO
RS-232C IN
(CONTROL & SERVICE)
3 4 6
5
1
2
10
AV IN 3
S-VIDEO
R
AUDIO
MONO
L/
VIDEO
AV 2
ANTENNA
IN
VARIABLE
RGB IN
RGB
AUDIO
(PC)
(RGB/DVI)
AUDIO OUT
HDMI/DVI IN HDMI IN
1 2
COMPONENT
IN
AUDIO
VIDEO
AV 1 AV 2
HDMI/DVI IN
1 2
ANTENNA
IN
HDMI IN
AUDIO
(RGB/DVI)
AV 1
RGB IN
RGB
(PC)
VIDE
AUDI
VARIABLE
AUDIO OUT
RS-232C IN
(CONTROL & SERVICE)
Page 30

DEUTSCH
4
GRUNDANSCHLUSS(nur LCD-Fernsehgeräte mit 26",32"und 37")
VORBEREITUNG
1
2
3
Legen Sie das Produkt vorsichtig mit dem
Bildschirm nach unten auf eine weiche
Oberfläche, durch die das Produkt und der
Bildschirm vor Beschädigungen geschützt wird.
Befestigen Sie den Standfuß wie gezeigt am
Produkt.
Befestigen Sie die vier Schrauben an der
Rückseite des Produkts in den vorgesehenen
Bohrungen.
Page 31

PLASMA TV-MODELLE LCD TV-MODELLE
2
1
■
Diese Option ist nicht bei allen Modellen verfügbar.
■
Stellen Sie das Produkt nah an der Wand auf,so dass es nicht herunterfällt,wenn es nach hinten gedrückt wird.
■
Nachstehend finden Sie eine sicherere Montagemethode für das Produkt:die Anbringung an der Wand,um zu
verhindern,dass das Produkt umfällt,wenn es nach vorne gezogen wird.Dadurch wird das Herunterfallen des
Produkts und die damit verbundene Verletzung von Personen sowie die Beschädigung des Produkts vermieden.Achten Sie darauf,dass Kinder nicht am Produkt herumklettern oder sich an das Produkt hängen.
HINWEIS
!
GG
Lösen Sie die Schnüre,bevor Sie das Produkt versetzen
GG
Verwenden Sie eine Haltevorrichtung oder einen Schrank,der nach Größe und Stabilität für die Größe und
das Gewicht des Produkts geeignet ist.
GG
Für eine sichere Verwendung des Produkts sollten sich die Halterungen an der Wand auf gleicher Höhe mit
jenen am Fernsehgerät befinden.
2
3
1
1
2
Verwenden Sie die Ringschrauben oder TV-Halterungen und -Schrauben,um das Produkt wie in der Abbildung
dargestellt an der Wand anzubringen.
(Wenn bei Ihrem Produkt an der Stelle,an der die Ringschrauben angebracht werden sollen,Schrauben fixiert
sind,lockern Sie diese Schrauben.)
*Setzen Sie die Ringschrauben oder TV-Halterungen und -Schrauben ein und ziehen Sie sie in den oberen
Bohrungen fest.
Befestigen Sie die Wandhalterungen mit den Schrauben (nicht in der Lieferung enthalten)an der Wand.
Achten Sie auf die Höhe der Halterungen an der Wand.
3
Verwenden Sie eine feste Schnur (nicht in der Lieferung enthalten),um das Produkt festzubinden.
Die Schnur sollte für eine möglichst sichere Anbringung horizontal zwischen Wand und Produkt ausgerichtet sein.
DEUTSCH
5
ANBRINGEN DES FERNSEHGERÄTS AN DER WAND
2
Page 32

DEUTSCH
6
VORBEREITUNG
■
Das Fernsehgerät kann auf unterschiedliche Arten installiert werden,z.B.an der Wand oder auf einem Schreibtisch.
■
Das Gerät ist auf den Betrieb in horizontaler Position ausgelegt.
AUFSTELLEN MIT EINEM TISCHSTANDFUß
Lassen Sie für ausreichende Lüftung an jeder Seite und zur Wand einen Abstand von ca.10 cm.
4 inches
4 inches
4 inches
4 inches
Stromansch
luss
Sicherungsautomat
ERDUNG
Achten Sie darauf,den Erdungsleiter anzuschließen,um Stromschläge zu vermeiden.Wenn keine Erdung
möglich ist, lassen Sie einen Elektriker einen separaten Sicherungsautomaten installieren.Versuchen Sie
nicht,das Gerät durch den Anschluss an Telefonleitungen,Blitzableiter oder Gasleitungen zu erden.
Page 33

DEUTSCH
7
WANDMONTAGE: HORIZONTALE LAGE
Lassen Sie für ausreichende Lüftung an jeder Seite und zur Wand einen Abstand von ca.10 cm.
Ausführliche Montageanleitungen erhalten Sie bei Ihrem Händler (siehe auch das optional erhältliche
Montage-und Installationshandbuch zu verstellbaren Wandhalterungsklammern).
4 inches
4 inches
4 inches
4 inches
4 inches
Page 34

OK
INPUT MODE
TVTV
DVD
RATIO
EXIT
VOL
UPDATE
INDEX
PR
SLEEP
LIST
Q.VIEW
I/II
MENU
SIZE
VCR
POWER
123
456
789
*
0
FAV
REVEAL
?
TEXT
SIMPLINK
INPUT
MUTE
TIME
HOLD
POWER
TV INPUT
INPUT
Schaltet das Gerät aus dem Standby Ein oder in den
Standby Aus.
Rückkehr in den TV-Modus aus sämtlichen anderen Modi.
Schaltet das Gerät aus dem Standby-Modus ein.
Wenn Sie diese Taste einmal drücken,wird das OSD-Menü
“Signalquelle ”wie unten angezeigt.Drücken Sie
DD/ EE
und
dann OK,um die gewünschte Eingangsquelle (TV, AV1 ,
AV2, AV3 , Komponent , RGB PC, HDMI1 und HDMI2)
auszuwählen.
RATIO(VERHÄLTNIS)
Einstellung der
Helligkeit
Wählt Ihr gewünschtes Bildformat aus.
Stellt die Helligkeit ein.
Wenn Sie den Modus ändern,wird automatisch wieder die
voreingestellte Helligkeit eingestellt.
SIMPLINK
SLEEP
I/II
FARBIGE TAST EN
Zeigen Sie eine Liste aller mit dem Fernsehgerät verbundenen AVGeräte an. Wenn Sie diese Taste verwenden, wird das Menü
„Simplink“ (Simplink) auf dem Bildschirm angezeigt.
Stellt den Sleep Timer ein.(autom.Ausschaltfunktion)
Wählt den Audioausgang aus.
Diese Tasten werden für den Teletext (nur TELETEXT-Modelle)
oder die Programmsortierung verwendet.
Tasten zur
Steuerung des
Videorekorders
/DVD-Players
Ü ber diese Tasten k ö nnen bestimmte Videorekorder
gesteuert werden,wenn zuvor die Taste DVD oder VCR
bet ä tigt wurde.
Wählen Sie angeschlossene AV-Geräte über die Tasten
DD
//
EE
//
FF
//
GG
und
OOKK
aus und steuern Sie sie über die Tasten Play
(Wiedergabe), Stop (Stopp), Pause (Pause), Fast Reverse
(Schneller Rücklauf), Fast Forward (Schneller Vorlauf) und Chapter
Skip (Kapitel überspringen).
(Die Taste verfügt nicht über diese Funktionen.)
EXIT
LIST
MENU
Q.VIEW
*
Verlässt alle OSD-Menüs und kehrt in den TV-Modus zurück.
Zeigt die Programmtabelle an.
Wählt ein Menü aus.
Kehrt zum vorherigen Programm zurück.
Keine Funktion
TASTENFUNKTIONEN DER FERNBEDIENUNG
Richten Sie die Fernbedienung bei Bet ä tigung auf den Fernbedienungssensor des Fernsehger ä ts.
DEUTSCH
8
FERNSEHEN/PROGRAMMSTEUERUNG
Page 35

DEUTSCH
9
TELETEXT-
Ta s t e n
Einlegen der Batterien
■
Entfernen Sie den Deckel vom Batteriefach auf der Rückseite.
■
Legen Sie zwei 1,5 V-AA-Batterien korrekt ein (+ zu +, - zu -).
Verwenden Sie nicht gle-ichzeitig alte oder gebrauchte und neue
Batterien.
OK
INPUT
MODE
TVTV
DVD
RATIO
EXIT
VOL
UPDATE
INDEX
PR
SLEEP
LIST
Q.VIEW
I/II
MENU
SIZE
VCR
POWER
123
456
789
*
0
FAV
REVEAL
?
TEXT
SIMPLINK
INPUT
MUTE
TIME
HOLD
1
1
1
MODE
Stellt die Betriebsmodi der Fernbedienung ein.
Diese Tasten werden für den Teletext verwendet.
Weitere Informationen dazu erhalten Sie im Abschnitt
“Videotext”.
TASTENFELD
(nach oben/
unten)
OK
Ermöglicht die Navigation in den On-Screen-Menüs und
die individuelle Anpassung der Systemeinstellungen.
Bestätigt Ihre Auswahl oder zeigt den aktuellen Modus an.
VOLUME
(Lautstärke)
+ / -
FAV (MEINE)
MUTE
Programme
+ / -
Zahlentasten
0-9
Regelt die Lautstärke.
Zeigt die ausgewählten Lieblingsprogramme an.
Stellt den Ton Ein oder Aus.
Wählt ein Programm aus.
Wählt ein Programm aus.
Wählt einen Menüpunkt aus, der mit einer Zahl versehen ist.
Page 36

AV IN 3
L/MONO
R
AUDIO
VIDEO
S-VIDEO
AV IN 3
L/MONO
R
AUDIO
VIDEO
S-VIDEO
AV IN 3
L/MONO
R
AUDIO
VIDEO
S-VIDEO
AV IN 3
L/MONO
R
AUDIO
VIDEO
S-VIDEO
Mehrfamilienhäuser
(An Antennenbuchse anschließen)
Einfamilienhäuser
(An Wandanschluss der Außenantenne
anschließen)
Außenantenne
Antennenb
uchse in
der Wand
Koaxialkabel (75 Ohm)
Antenne
UHF
Signalve
rstärker
VHF
■
Um bei schlechtem Empfang eine bessere Bildqualität zu erhalten,bringen Sie einen Signalverstärker an der
Antenne an (siehe rechts).
■
Wenn das Signal für zwei TV-Geräte verwendet werden soll,verwenden Sie eine Signalweiche für den Anschluss.
■
Justieren Sie die Antennenausrichtung für optimale Bildqualität.
■
Antennenkabel und Wandler werden nicht mitgeliefert.
DEUTSCH
10
FERNSEHEN/PROGRAMMSTEUERUNG
ANTENNENANSCHLUSS
■
Wandantennenbuchse oder Außenantenne ohne Kabelboxanschluss Justieren Sie die Antennenausrichtung bei
Bedarf für optimale Bildqualität.
ANTENNA
IN
ANTENNA
IN
Page 37

DEUTSCH
11
Drücken Sie
VVOOLL ++//--
zur Änderung der Lautstärke.
Wenn Sie den Ton ganz ausstellen möchten, drücken Sie die Taste
MMUUTTEE
.
Diese Funktion wird über die Taste
MMUUTTEE
(Lautlos),
VVOOLL ++//--
oder
II //IIII
deaktiviert.
PROGRAMMAUSWAHL
EINSCHALTEN DES FERNSEHGERÄTS
OK
INPUT MODE
TVTV
DVD
RATIO
EXIT
VOL
UPDATE
INDEX
PR
SLEEP
LIST
Q.VIEW
I/II
MENU
SIZE
VCR
POWER
123
456
789
*
0
FAV
REVEAL
?
TEXT
SIMPLINK
INPUT
MUTE
TIME
HOLD
Wenn das Gerät eingeschaltet ist, stehen Ihnen unterschiedliche
Funktionen zur Verfügung.
Schließen Sie zunächst das Stromkabel ordnungsgemäß an. Das
Fernsehgerät wechselt dann in den Standby-Modus.
■
Schalten Sie das Fernsehgerät ein, indem Sie die Tasten ,
IINNPPUUTT
,
PPRR
DD/EE
am Fernsehgerät oder die Tasten
PPOO WWEERR
,
TTVV, IINNPPUUTT, PPRR ++//--, oodd ee rr
die
ZZaahhlleennttaasstteenn (( 00~99 ))
auf der
Fernbedienung betätigen.
1
LAUTSTÄRKEREGELUNG
Drücken
PPRR ++//--
oder NUMBER buttons to select a programme number.
2
3
1
1
Page 38

Drücken Sie
DD
//
EE
// F//
G und dann
OO KK
, um die gewünschte Sprache
auszuwählen.
Drücken Sie
DD
//
EE
// F//
G und dann
OO KK
, um das Land auszuwählen.
Drücken Sie die Taste
MMEENNUU
, und wählen Sie mit
DD
//
EE
das Menü Option
aus.
Drücken Sie
GG
und wählen Sie mit den Tasten
DD
//
EE
das Menü
SSpprraacchhee((LLaanngguuaaggee ))
. Das Menü lässt sich in der gewünschten Sprache
am Bildschirm anzeigen.
Alternativ drücken Sie
GG
und wählen Sie mit den Tasten
DD
//
EE
das
Menu
Land.
Drücken SieGGund dann
DD
//
EE
, um die gewünschte Sprache oder das
gewünschte Land auszuwählen.
Betätigen Sie die Taste
OOKK..
Betätigen Sie die Taste
EEXXIITT
, um zur normalen Fernsehansicht zurück-
zukehren.
1
2
3
4
5
DDiieessee FFuunnkkttiioonn iisstt iinn eeiinniiggeenn LLäännddeerrnn nniicchhtt vveerrffüüggbbaarr..
Beim ersten Einschalten wird das Installationsmenü auf dem TV-Bildschirm
angezeigt.
1
2
** WWeennnn SSiiee ddiiee SSpprraacchh--//LLäännddeerraauusswwaahhll äännddeerrnn wwoolllleenn
HINWEIS
!
GG
Falls Sie die
IInnssttaallllaattiioonnsshhaannddbbuucchh
nicht über die Schaltfläche
EEXXIITT
speichern oder die OSD-Bildschirmanzeige automatisch ausgeblendet
wird, erscheint der Einstellungsbildschirm bei jedem Einschalten des
Gerätes automatisch erneut.
GG
Falls Sie nicht das Land auswählen, in dem Sie sich gerade befinden, wird
der Videotext u. U. nicht korrekt angezeigt und lässt sich nicht fehlerlos
bedienen.
DEUTSCH
12
FERNSEHEN/PROGRAMMSTEUERUNG
ONSCREEN-MENÜ-SPRACH-/LÄNDERAUSWAHL
OK
INPUT MODE
TVTV
DVD
RATIO
EXIT
VOL
UPDATE
INDEX
PR
SLEEP
LIST
Q.VIEW
I/II
MENU
SIZE
VCR
POWER
123
456
789
*
0
FAV
REVEAL
?
TEXT
SIMPLINK
INPUT
MUTE
TIME
HOLD
Page 39

Um die einzelnen Menüs aufzurufen, drücken Sie die Taste
MMEENNUU
und anschließend die
Ta s t e
DD / EE
.
Um einzelne Menüpunkte aufzurufen, betätigen Sie zunächst die Taste
GG
und
anschließend die Taste
DD / EE
.
Mit der Taste
F / G ändern Sie die Einstellung des Menüpunktes im betreffenden
Untermenü bzw. Pulldown-Menü. Eine höhere Ebene im Menü erreichen Sie über die
Tasten
OO KK
oder
MMEENNUU
.
Das OSD-Menü (=am Bildschirm angezeigtes Menü)Ihres Fernsehgeräts könnte sich leicht von
den Abbildungen in diesem Handbuch unterscheiden.
Das OSD-Menü verwendet hauptsächlich Bilder für die Plasma-Fernsehgeräte.
1
2
3
HINWEIS
!
a. Aufgrund der grafischen Darstellung können Sie den Screen-Status bequem über die OSD- (On Screen
Display) Funktion einstellen.
b. Das OSD (On Screen Display) in diesem Handbuch entspricht möglicherweise nicht exakt dem Ihres
Fernsehgeräts, da es nur als erläuterndes Beispiel zum besseren Verständnis der Bedienung des
Fernsehgeräts dienen soll.
c. Im Videotext-Modus werden keine Menüs angezeigt.
MMee nnüü
EEIINNSSTT..
MMee nnüü
BBIILL DD
MMee nnüü
AA UUDDIIOO
MMee nnüü
ZZ EEIITT
MMee nnüü
OOPPTT IIOONN
Sprache(Language)
Land
SIMPLINK
Tastensperre
ISM Methode
Energiesparen
Option
Zeit
Ausschaltzeit
Einschaltzeit
Abschaltzeit
Auto-Aus
Zeit
Bildmodus
Farbtemperatur
XD
Erweitert
Seitenverhältnis
Bild Zurücksetzen
Anzeige
XD Demo
Bild
Auto. Einstellung
Man. Einstellung
Senderliste Ordnen
Meine Programme
Einst.
Ton-Modus
Auto. Lautstärke
Balance 0
TV Lautsprecher
Audio
* nur PLASMA
TV-MODELLE
DEUTSCH
13
AUSWAHL UND EINSTELLUNG DER OSD-MENÜS
DE F G
OK MENU
DE F G
OK MENU
DE F G
OK MENU
DE F G
OK MENU
DE F G
OK MENU
*
Diese Funktion ist in einigen Ländern nicht verfügbar.
Page 40

OK
EXIT
VOL PR
LIST
Q.VIEW
MENU
*
FAV
Auto. Einstellung
Man. Einstellung
Senderliste Ordnen
Meine Programme
Einst.
1
Auto. Einstellung
Fernsehnorm
Speichern Ab
Suchen
Fernsehnorm G
DE F G
OK MENU
2
Einst.
Auto. Einstellung
Man. Einstellung
Senderliste Ordnen
Meine Programme
Auswählen
Auto. Einstellung G
DE F G
OK MENU
3 4 5 6
7
8
Auto. Einstellung
C 05 BG
5 35%
MENU Stop
BG
I
DK
L
Drücken Sie die Taste
MMEENNUU
, und wählen Sie mit
DD
//
EE
das
Menü
Einst. aus.
Drücken Sie die Taste
GG
und anschließend die Taste
DD
//
EE
,
um die Option
Auto. Einstellung auszuwählen.
Drücken Sie
GG
und dann
DD
//
EE
, um Fernsehnorm
auszuwählen.
Drücken Sie
DD
//
EE
, um ein Fernsehnormmenü aufzurufen:
BBGG
: PAL B/G, SECAM B/G (Europa/ Osteuropa/ Asien/
Neuseeland/ Naher Osten/ Afrika/ Australien)
II
: PAL I/II (Großbritannien/ Irland/ Hong Kong/ Südafrika)
DDKK
: PAL D/K, SECAM D/K (Osteuropa, China, Afrika, GUS)
LL
: SECAM L/L’ (France)
MM
: (USA / Korea / Philippines) (optional)
Drücken Sie die Taste
DD
//
EE
, um den Menüpunkt Speichern
ab auszuwählen.
Drücken Sie
FF
//
GG
oder die ZAHLENtasten, um eine
Startnummer auszuwählen. Falls Sie die ZAHLENtasten verwenden, werden Zahlen unter 10 mit einer vorangestellten “
0”
eingegeben, z. B. “
05” für 5.
Drücken Sie die Taste
DD
//
EE
, um den Menüpunkt Suchen auszuwählen.
Drücken Sie zum Start der automatischen Einstellung die Taste GG.
Alle empfangenen Sender werden gespeichert. Zu allen
Sendern, die VPS (Video Programme Service), PDC (Programme
Delivery Control) oder Videotext-Daten übertragen, wird auch
der Sendername gespeichert. Wenn einem Sender kein Name
zugeordnet werden kann, wird die Programmnummer mit der
Kennung
C (V/UHF 01-69) oder S (Kabel- Sonderkanäle 01-
47) und nachfolgender Nummer gespeichert.
Drücken Sie die Taste
MMEENNUU
(Menü), um die automatische
Einstellung zu beenden.
Wenn die automatische Programmierung abgeschlossen ist,
wird das Menü Senderliste ordnen am Bildschirm angezeigt.
Wenn Sie die Anordnung der Programme ändern möchten,
lesen Sie weiter im Abschnitt „Senderliste ordnen“.
Drücken Sie die Taste
EEXXIITT
, um zur normalen Fernsehansicht
zurückzukehren.
1
2
3
4
5
6
7
8
9
Sie haben die Möglichkeit, bis zu 100 Fernsehsender auf den
Programmplätzen (0 bis 99) zu speichern.
Die programmierten Fernsehsender lassen sich mit der Taste PR +/oder mit den Zifferntasten aufrufen.
Sie können die Fernsehsender automatisch oder manuell einstellen.
Mit dieser Methode können alle empfangenen Fernsehsender
gespeichert werden. Wir empfehlen Ihnen, beim Einrichten dieses
Fern-sehgerätes die automatische Programmierung zu verwenden.
DEUTSCH
14
FERNSEHEN/PROGRAMMSTEUERUNG
AUTOMATISCHE PROGRAMMIERUNG
DE F G
OK MENU
Page 41

Frühzeitige Funktionsstörungen können verhindert werden. Durch die sorgfältige und regelmäßige Reinigung
des Geräts kann die Lebensdauer Ihres neuen Fernsehgeräts verlängert werden. Schalten Sie das Gerät aus
und ziehen Sie den Netzstecker, bevor Sie mit der Reinigung beginnen.
Reinigung des Bildschirms
Auf folgende Art und Weise halten Sie Ihren Bildschirm eine Zeit lang staubfrei. Befeuchten Sie ein weiches
Tuch mit einer Lösung aus lauwarmem Wasser und etwas Weichspüler oder Geschirrspülmittel. Wringen Sie
das Tuch aus, bis es fast trocken ist, und wischen Sie dann damit den Bildschirm ab.
Vergewissern Sie sich, dass kein überschüssiges Wasser am Bildschirm ist, und lassen Sie ihn dann
lufttrocknen, bevor Sie das Fernsehgerät wieder einschalten.
Reinigung des Gehäuses
■
Entfernen Sie Schmutz und Staub mit einem weichen, trockenen und flusenfreien Tuch vom Gehäuse.
■
Verwenden Sie dafür kein nasses Tuch.
Längere Abwesenheit
Wenn Sie das Fernsehgerät über einen längeren Zeitraum nicht verwenden (z. B. im Urlaub), ist es sin
nvoll, den Netzstecker zu ziehen, um das Gerät vor der Beschädigung durch Blitzschlag oder vor
Spannungsanstiegen zu schützen.
VORSICHT
1
2
DEUTSCH
15
ANHANG
INSTANDHALTUNG
ANZEIGEN DES BENUTZERHANDBUCHS AUF DER CD-ROM
Um das Benutzerhandbuch auf der CD-ROM anzeigen zu können, muss auf Ihrem Computer Acrobat Reader von
Adobe installiert sein. Der Ordner "ACRORD" auf der CD-ROM enthält das erforderliche Installationsprogramm.
Wenn Sie diese Programme installieren möchten, wählen Sie unter "Arbeitsplatz" "LG" "ACRORD"
doppelklicken auf Ihre Sprache.
AAnnzzeeiiggeenn ddeess BBeennuuttzzeerrhhaannddbbuucchhss::
Die entsprechenden Dateien befinden sich auf der beiliegenden CD-ROM. Legen Sie die beiliegende CD-ROM
in das CD-ROM-Laufwerk Ihres Computers ein. Nach einer kurzen Zeit wird die Webseite der CD-ROM
automatisch geöffnet. Wird die Webseite nicht automatisch angezeigt, öffnen Sie die entsprechende Datei direkt.
Öffnen Sie hierfür unter “Arbeitsplatz" den Ordner “LG" und dann die Datei “index.htm" (nur für Windows).
Page 42

DDeerr BBeettrriieebb iisstt nniicchhtt wwiiee ssoonnsstt mmöögglliicchh..
DDiiee FFeerrnnbbeeddiieennuunngg
ffuunnkkttiioonniieerrtt nniicchhtt..
DDaass GGeerräätt ww iirrdd
pp llööttzzlliicc hh
aabbggeesscchhaalltt eett..
■
Prüfen Sie, ob sich zwischen dem Produkt und der Fernbedienung ein Hindernis
befindet, das das Signal der Fernbedienung beeinträchtigt.
■
Sind die Batterien richtig eingelegt (+ zu +, - zu -)?
■
Ist der korrekte Betriebsmodus eingestellt: TV, VCR usw.?
■
Legen Sie neue Batterien ein.
■
Ist der Timer für die Ausschaltfunktion eingestellt?
■
Überprüfen Sie die Steuerungseinstellungen der Stromversorgung. Die
Stromversorgung ist unterbrochen.
■
Keine Übertragung bei aktivierter automatischer Abschaltung.
DDiiee VViiddeeooffuunnkkttiioonn ffuunnkkttiioonniieerrtt nniicchhtt..
KKeeiinn BBiilldd && kkeeiinn TToonn
KKeeiinnee//sscchhlleecchhttee
FFaarrbbeenn ooddeerr
sscchhlleecchhtteess BBiilldd
SScchhlleecchhtteerr EEmmppffaa nngg
aauuff eeiinniiggeenn KKaannäälleenn
LLii nniieenn ooddeerr SSttrreeiiffeenn
iimm BBiilldd
HHoorriizzoonnttaallee//vveerr--ttiikkaallee
BBaallkkeenn ooddeerr zziitttteerrnnddeess
BBiilldd
DDaass BBiilldd wwiirrdd nnaacchh
ddeemm EEiinnsscchhaalltteenn nnuurr
llaannggssaamm aannggeezzeeiiggtt..
■
Prüfen Sie, ob das Gerät eingeschaltet ist.
■
Versuchen Sie einen anderen Kanal. Das Problem kann mit der Übertragung
zusammenhängen.
■
Ist das Stromkabel mit der Steckdose verbunden?
■
Prüfen Sie die Antennenausrichtung und/oder -position.
■
Prüfen Sie die Steckdose, mit der das Gerät verbunden ist. Stecken Sie hierfür ein
anderes Gerät an.
■
Das ist normal, da das Bild während des Einschaltvorgangs gedämpft wird.
Wenden Sie sich an den Service, falls das Bild auch nach fünf Minuten noch nicht
angezeigt wird.
■
Stellen Sie die Farbe über die Menüoptionen
■
Sorgen Sie für einen ausreichenden Abstand zwischen dem Produkt und dem
Videorekorder.
■
Versuchen Sie einen anderen Kanal. Das Problem kann mit der Übertragung
zusammenhängen.
■
Sind die Videokabel korrekt angeschlossen?
■
Aktivieren Sie eine beliebige Funktion, um die Helligkeit des Bildes wiederherzustellen.
■
Suchen Sie nach einer lokalen Störquelle (z. B. ein elektrisches Gerät oder
Werkzeug).
■
Stations- oder Kabelprobleme. Wechseln Sie zu einer anderen Station.
■
Das Signal der Station ist zu schwach. Richten Sie die Antenne neu aus, um eine
schwächere Station empfangen zu können.
■
Suchen Sie nach möglichen Störquellen.
■
Überprüfen Sie die Antenne (Ausrichtung ändern).
DEUTSCH
16
FEHLERBEHEBUNG
ANHANG
Page 43

■
Drücken Sie die Taste VOL +/-.
■
Der Ton ist stumm geschaltet? Drücken Sie die Taste MUTE (Stumm).
■
Versuchen Sie einen anderen Kanal. Das Problem kann mit der Über-tragung
zusammenhängen.
■
Sind die Audiokabel korrekt angeschlossen?
■
Stellen Sie die Balance über die Menüoptionen ein.
■
Eine Änderung der Umgebungsfeuchtigkeit bzw. -temperatur kann beim Einund Auschalten des Geräts zu ungewöhnlichen Geräuschen führen. Dies deutet
nicht auf eine Fehlfunktion des Geräts hin.
BBiilldd OOKK && kkeeiinn TToonn
UUnnggeewwööhhnnlliicchhee
GGeerrääuusscchhee aauuss ddeemm
IInnnneerreenn ddeess GGeerräättss
KKeeiinnee AAuussggaabbee üübbeerr
eeiinneenn ddeerr LLaauuttsspprreecchheerr
EEss ggiibbtt eeiinn PPrroobblleemm iimm PPCC--MMoodduuss.. ((DDiiee AAnnggaabbeenn ggeelltteenn nnuurr ffüürr ddeenn AAnnsscchhlluussss aann eeiinneenn PPCC..))
■
Passen Sie die Auflösung sowie die horizontale bzw. die vertikale Frequenz an.
■
Prüfen Sie die Eingangsquelle.
■
Führen Sie die automatische Konfiguration durch oder stellen Sie die Uhr, die
Phase oder die H/V-Position ein.
■
Prüfen Sie das Signalkabel.
■
Installieren Sie die Grafikkarte des PC neu.
DDaass SSiiggnnaall lliieeggtt
aauußßeerrhhaallbb ddeess
BBeerreeiicchhss..
DDiiee BBiillddffaarrbbee iisstt
nniicchhtt ssttaa bb iill ooddeerr eeiinn--
ffaarrbbiigg??
VVeerrttiikkaalleerr BBaallkkeenn ooddeerr
SSttrreeiiffeenn aauuff ddeemm
HHiinntteerrggrruunndd && hhoorrii--
zzoonnttaalleess RRaauusscchheenn &&
ffaallsscchhee PPoossiittiioonniieerruunngg
DDiiee AAuuddiiooffuunnkkttiioonn ffuunnkkttiioonniieerrtt nniicchhtt..
DEUTSCH
17
Gewicht
■
Diese Angaben können ohne Ankündigung bei Qualitätsverbesserungen geändert werden.
MODELLE
Gewicht
inklusive Standfuß
exklusive Standfuß
10,1kg / 22,3 lbs
9,1kg / 20,1 lbs
13,9 kg / 30,7 lbs
11,3 kg / 24,9 lbs
20,0 kg / 44,1 lbs
16,3 kg / 35,9 lbs
Gewicht
inklusive Standfuß
exklusive Standfuß
MODELLE
26LC41
*
26LC41-ZA
32LC41*/32LC43
*
32LC44
*
32LC41-ZA/32LC43-ZE
32LC43-ZA/32L C44-ZB
37LC41*/37LC43
*
37LC41-ZA
37LC43-ZA
42LC41*/42LC43
*
42LC41-ZA
42LC43-ZA
24,5 kg / 54,0 lbs
20 kg / 44,1 lbs
26LC5
*
26LC51-ZA
26LC51C-ZA
32LC5
*
32LC51-ZA/32LC52-ZC
32LC52C-ZC
32LC53-ZA/32LC54-ZD
37LC5
*
37LC51-ZA
37LC53-ZA
42LC5
*
42LC51-ZA
42LC53-ZA
42LC54-ZD
10,4kg / 22,9 lbs
9,0kg / 19,9 lbs
13,7kg / 30,2 lbs
11,2kg / 24,7 lbs
20,0 kg / 44,1 lbs
16,0 kg / 35,3 lbs
24,9 kg / 54,9 lbs
20,4 kg / 45,0 lbs
MODELLE
26LC42
*
26LC42-ZC
32LC42
*
32LC42-ZC
37LC42
*
37LC42-ZC
42LC42
*
42LC42-ZC
Gewicht
inklusive Standfuß
exklusive Standfuß
9,62kg / 21,2 lbs
8,62kg / 19,0 lbs
14,4kg / 31,8 lbs
11,74kg / 25,9 lbs
20,0 kg / 44,1 lbs
16,3 kg / 36,0 lbs
24,5 kg / 54,0 lbs
20 kg / 44,1 lbs
MODELLE
Gewicht
inklusive Standfuß
exklusive Standfuß
42PC5
*
42PC51-ZB
42PC52-ZD
50PC5
*
50PC51-ZB
50PC52-ZD
26LC3
*
26LC3RA-ZA
28,0 kg / 61,7 lbs
24,6kg / 54,2 lbs
39,3 kg / 86,6 lbs
34,6kg / 76,2 lbs
12,4 kg / 27,3 lbs
11,5 kg / 25,3 lbs
28,0 kg / 61,7 lbs
24,6kg / 54,2 lbs
42PC5RV
*
42PC5RV -ZD
42PC5RVC-ZD
Page 44

Page 45

Le mode d’emploi complet, qui contient la description des fonctions avancées
de ces téléviseurs LG, se trouve sur le CD-ROM en version électronique.
Pour le lire, vous devez ouvrir les fichiers sélectionnés à l'aide d'un ordinateur
muni d’un lecteur de CD-ROM.
TV LCD
TV Plasma
GUIDE DE L’UTILISATEUR
MODÈLES DE TV LCD
26LC4
*
32LC4
*
37LC4
*
42LC4
*
26LC3
*
MODÈLES DE TV Plasma
42PC5
*
42PC5RV
*
50PC5
*
Lire attentivement ce manuel avant de procéder à l’utilisation de
votre ensemble.
Vous pourrez aussi vous y référer pour tous les réglages futurs.
Notez le numéro de série et le numéro du modèle, qui figurent
sur la plaque signalétique fixée à l’arrière du poste. Votre
revendeur vous les demandera pour le service après vente.
26LC5*
32LC5*
37LC5*
42LC5*
Page 46

Page 47

FRANÇAIS
1
Consignes de sécurité
• Veuillez lire attentivement les mesures de sécurité ci-après avant d’utiliser cet appareil.
• Les illustrations de ce manuel sont données à titre d’exemple et peuvent donc ne pas correspondre à votre appareil.
Si vous ne tenez pas compte des messages d’avertissement, vous vous exposez à des blessures graves, à un accident,
voire à un danger de mort.
Si vous ne tenez pas compte des messages de précaution, vous vous exposez à des blessures légères ou vous risquez
d’endommager l’appareil.
Précautions lors de l'installation de l’appareil
Évitez d’installer l’appareil près d’une source de chaleur
(convecteurs etc.)
- Vous pourriez provoquer une décharge électrique, un
incendie, le dysfonctionnement ou la déformation de l’appareil.
Si vous constatez que votre appareil dégage une odeur ou de la
fumée ou s’il produit des bruits étranges, éteignez-le, débranchez
le cordon d’alimentation et contactez le service technique.
- Si vous continuez d'utiliser l'appareil sans prendre les mesures
nécessaires, vous pouvez provoquer une décharge électrique ou un
incendie.
N’utilisez pas cet appareil dans un endroit humide ou susceptible d’être humide, comme une salle de bain.
- Vous risqueriez de provoquer un incendie ou de recevoir une
décharge électrique.
Veillez à installer l’appareil sur un endroit plat et
stable afin qu'il ne puisse pas tomber.
- Si c’était le cas, vous risqueriez de vous blesser ou d'en-
dommager l'appareil.
Évitez d’exposer l’appareil à la lumière directe du
soleil.
- Vous risqueriez d’endommager l’appareil.
N'installez pas l’appareil dans un endroit clos, comme
une étagère ou dans une bibliothèque.
- Votre appareil doit être correctement ventilé.
Précautions concernant l'alimentation
Assurez-vous de brancher l'appareil sur une prise reliée à
la terre.
-Dans le cas contraire, vous risqueriez de vous électrocuter ou de
vous blesser.
Ne touchez jamais la prise d’alimentation avec les mains
humides. De plus, si la broche est humide ou couverte de
poussière, séchez complètement la prise d'alimentation
ou dépoussiérez-la.
-
Dans le cas contraire, l’excès d’humidité pourrait provoquer une
électrocution.
En cas d’orage, débranchez le cordon d'alimentation ou
le câble de signal.
- Vous risqueriez sinon de vous électrocuter ou de déclencher un
incendie.
Ne malmenez pas le cordon d’alimentation et évitez de l'enrouler, de le tordre, de le coincer dans une porte ou de
marcher dessus.
Maintenez en bon état les prises et les prises secteur et
veillez à ce que le câble ne se torde pas à l’endroit où il se
connecte à l’appareil.
Précautions à prendre si vous déplacer l’appareil
Veillez à ce que l’appareil ne subisse aucun choc lors
du déplacement.
- Vous risqueriez sinon de vous électrocuter ou d'endommager l'appareil.
Pour déplacer l'appareil, placez-le à la verticale et
tenez-le fermement avec les deux mains.
- Si vous laissez tomber l'appareil, le choc peut provoquer
une décharge électrique ou un incendie. Faites appel au
service technique pour la réparation.
Assurez-vous que l'appareil est hors tension.
Veillez à retirez tous les câbles avant de déplacer l’appareil.
- Vous risqueriez sinon de vous électrocuter ou d'endommager l'appareil.
Précautions à prendre pour utiliser l’appareil
N’essayez pas de démonter, de réparer ou de modifier l’appareil vous-même.
- Vous risqueriez de provoquer une décharge électrique ou un
incendie.
- Faites appel au service technique pour toute révision, calibrage ou
réparation.
Afin de réduire les risques d’incendie ou de décharge
électrique, n’exposez pas cet appareil à l’humidité ou à la
pluie.
Évitez d’exposer l’appareil aux projections ou aux fuites
d'eau et ne placez aucun objet rempli d'eau (vase) sur
l’appareil.
Toute révision doit être effectuée par du personnel qualifié Une intervention est nécessaire lorsque l'appareil a
été endommagé, c'est-à-dire si le cordon ou la prise d'alimentation ont été endommagés, si de l’eau ou des
objets sont tombés dans l'appareil, si l'appareil a été
exposé à la pluie ou à l'humidité, s'il ne fonctionne pas
normalement ou s'il a reçu un choc.
Page 48

FRANÇAIS
2
COMMANDES DU PANNEAU AVANT
■
Le schéma ci-dessous est une représentation simplifiée du panneau avant. Le matériel représenté peut être
quelque peu différent de votre téléviseur.
■
Si votre produit est entouré d’un film de protection, enlevez-le et nettoyez le produit avec un chiffon de polissage.
Touches PROGRAMME
Touches VOLUME
Touche MENU
Touche OK
(VALIDATION)
Touche INPUT
(Mode)
MARCHE/ARRET
PR
VOL
OK
MENU
INPUT
Touches PROGRAMME
Touches VOLUME
Touche OK (VALIDATION)
Touche MENU
Touche INPUT (Mode)
MARCHE/ARRET
PRÉPARATION
VOYANT DE MISE SOUS TENSION/STANDBY (VEILLE)
• S’éclaire en rouge lorsque le
téléviseur est en mode veille.
• S’éclaire en vert lorsque le moniteur est sous tension.
Récepteur de la télécommande
PR
VOL
OK
MENU
INPUT
/I
Page 49

FRANÇAIS
3
INFORMATIONS SUR LE PANNEAU ARRIÈRE
■
Le schéma ci-dessous est une représentation simplifiée du panneau arrière. Le matériel représenté peut être
quelque peu différent de votre téléviseur.
Entrée HDMI
Connectez le signal HDMI à la borne HDMI IN. Vous
pouvez également connecter le signal DVI (VIDEO) au
port HDMI/DVI à l’aide du câble DVI à HDMI.
Entrée RGB/Audio
Raccordez la prise de sortie du moniteur d'un ordinateur ou d'un téléviseur numérique (Audio uniquement)
au port d'entrée approprié.
Entrée Component
Connectez votre télécommande câblée à ce port.
Sortie Variable Audio
Raccordez un amplificateur externe ou un caisson de
graves à votre système son surround.
Péritel euroconnecteur (AV1/AV2)
Raccordez l’entrée ou la sortie de la prise Péritel d’un
périphérique externe à ces prises.
Entrée antenne
Connectez des signaux numériques en liaison radio à
cette prise.
Prise du cordon d’alimentation
Ce téléviseur fonctionne en alimentation en alternatif
(CA). La tension est indiquée à la section
Spécifications. Ne jamais faire fonctionner le téléviseur
en courant continu (CC).
Entrée S-Video
Raccordez la sortie S-Video d’un périphérique S-
VIDEO.
Prises d’entrée Audio/Vidéo
Raccordez la sortie audio/vidéo d’un périphérique
externe à ces prises.
Port d'entrée RS-232C (CONTRÔLE & SERVICE)
Raccordez le port de série des périphériques de
contrôle à la prise RS-232C.
1
2
3
4
5
6
7
8
9
10
AV IN 3V IN 3
L/L/MONOMONO
R
AUDIOAUDIO
VIDEOVIDEO
S-VIDEOS-VIDEO
AV IN 3
L/MONO
R
AUDIO
VIDEO
S-VIDEO
12
VARIABLE
AUDIO OUT
RGB IN
COMPONENT IN
AUDIO
VIDEO
AV 1 AV 2
ANTENNA
IN
HDMI/DVI IN HDMI IN
AV IN 3
L/MONO
R
AUDIO
VIDEO
S-VIDEO
12
VARIABLE
AUDIO OUT
RGB IN
COMPONENT IN
AUDIO
VIDEO
AV 1 AV 2
ANTENNA
IN
HDMI/DVI IN HDMI IN
AV IN 3
L/MONO
R
AUDIO
VIDEO
S-VIDEO
1 2
VARIABLEARIABLE
AUDIO OUTAUDIO OUT
RGB
(PC)
RGB INRGB IN
COMPONENT INCOMPONENT IN
AUDIOAUDIO
VIDEOVIDEO
AV 1V 1 AV 2V 2
ANTENNAANTENNA
IN IN
AUDIO
(RGB/DVI)
HDMI/DVI INHDMI/DVI IN HDMI INHDMI IN
1
2
8
9
3
7
4 6
5
VARIABLE
AUDIO OUT
RGB IN
O
O
AV 1
AV 2
ANTENNA
IN
HDMI/DVI IN
HDMI IN
1
2
3 4 6
5
10
AV IN 3V IN 3
VIDEOVIDEO
S-VIDEOS-VIDEO
L/MONOMONO
R
AUDIOAUDIO
V 2
ARIABLE
AUDIO OUT
VIDEO
AUDIO
COMPONENT
AV IN 3
L/MONO
R
AUDIO
VIDEO
RGB IN
S-VIDEO
V IN 3
L/
MONO
AUDIO
VIDEO
S-VIDEO
3 4 6
7
5
1
2
8
9
AUDIO
(RGB/DVI)
RGB
(PC)
AV 1 AV 2V 2
ANTENNA
IN
VARIABLE ARIABLE
AUDIO OUTAUDIO OUT
VIDEOVIDEO
AUDIOAUDIO
COMPONENTCOMPONENT IN
AV IN 3
L/MONO
R
AUDIO
VIDEO
HDMI/DVI IN HDMI IN
1 2
RGB INRGB IN
S-VIDEO
RS-232C IN
(CONTROL & SERVICE)
3 4 6
5
1
2
10
VARIABLE
RGB IN
RGB
AUDIO
(PC)
(RGB/DVI)
AUDIO OUT
HDMI/DVI IN HDMI IN
1 2
COMPONENT
IN
AUDIO
VIDEO
AV 1 AV 2
ANTENNA
IN
AV IN 3
S-VIDEO
R
AUDIO
MONO
L/
VIDEO
HDMI/DVI IN
HDMI IN
1 2
VIDE
AUDI
AV 1
RGB IN
RGB
(PC)
VARIABLE
AUDIO OUT
AUDIO
(RGB/DVI)
RS-232C IN
AV 2
(CONTROL & SERVICE)
ANTENNA
IN
Page 50

FRANÇAIS
4
INSTALLATION DU SOCLE (Modèles de téléviseurs LCD de 26, 32 et 37 pouces uniquement)
PRÉPARATION
1
2
3
Placez le téléviseur écran face au sol sur une
surface protégée afin de ne pas endommager
l’écran.
Assemblez le socle sur le téléviseur comme
indiqué dans le schéma.
Insérez 4 boulons dans les orifices prévus à cet
effet situés à l’arrière du téléviseur.
Page 51

FRANÇAIS
5
FIXATION MURALE DU TÉLÉVISEUR
MODÈLES DE TV Plasma MODÈLES DE TV LCD
2
1
■
Cette fonction n'est pas disponible pour tous les modèles.
■
Afin d’éviter les accidents et les dégâts causés par la chute du téléviseur, installer celui-ci assez près du mur
pour qu’il ne tombe pas lorsqu’il est poussé vers l’arrière et suivre les instructions illustrées ci-dessous
montrant comment le fixer au mur pour éviter les chutes en avant. Veiller à ce que les enfants ne se suspendent pas au téléviseur et ne tentent pas de monter dessus.
REMARQUE
!
GG
Retirer la corde avant de déplacer l’appareil.
GG
Utiliser un support ou un meuble assez grand et solide pour la taille et le poids de l’appareil.
GG
Pour utiliser l’appareil en toute sécurité, veiller à ce le support fixé au mur soit de la même hauteur que l’appareil.
2
3
1
1
2
Utilisez les boulons à œil ou les supports/boulons du téléviseur pour fixer l’appareil au mur, comme indiqué
dans l’illustration ci-dessous. (Si avant d’insérer les boulons de l'appareil, ceux-ci sont déjà placés dans la
position des boulons à œil, déserrez-les.)
* Insérez les boulons à œil ou les supports/boulons du téléviseur, puis serrez-les solidement dans les orifices supérieurs.
Fixez les supports muraux à l’aide des boulons (non fournis avec l’appareil, vendus séparément). Ajustez la
hauteur du support fixé au mur.
3
Utiliser une corde solide (non fournie avec l’appareil, à acheter séparément) pour attacher l’appareil.
Pour plus de sécurité, la corde doit être à l’horizontale entre le mur et l’appareil.
Page 52

FRANÇAIS
6
PRÉPARATION
■
Vous pouvez installer ce téléviseur sur le mur, sur un bureau, etc.
■
Le téléviseur est conçu pour être installé à l’horizontale.
INSTALLATION DU SOCLE
Afin de permettre une aération suffisante, l’espace minimum requis est de 10 cm de chaque côté et derrière le
mur.
4 pouces
4 pouces
4 pouces
4 pouces
Alimentation
Disjoncteur
MISE À LA TERRE
Assurez-vous de raccorder ce téléviseur à la terre afin d’éviter les chocs électriques. Si la mise à la terre
n’est pas possible, demandez à un électricien qualifié d’installer un disjoncteur indépendant. N’essayez pas
de mettre cet appareil à la terre en le raccordant à des câbles téléphoniques, à un paratonnerre ou à des
tuyaux de gaz.
Page 53

FRANÇAIS
7
MONTAGE AU MUR : INSTALLATION HORIZONTALE
Afin de permettre une aération suffisante, l’espace minimum requis est de 10 cm de chaque côté et derrière le mur. Vous trouverez les instructions détaillées de l'installation chez votre revendeur ; reportezvous également au Guide de configuration et d’installation de l’interface de montage au mur.
4 pouces
4 pouces
4 pouces
4 pouces
4 pouces
Page 54

FRANÇAIS
8
UTILISATION DU TÉLÉVISEUR / COMMANDE DES PROGRAMMES
FONCTIONS DES TOUCHES DE LA TÉLÉCOMMANDE
Lorsque vous utilisez la télécommande, dirigez-la vers le capteur de la télécommande du téléviseur.
OK
INPUT MODE
TVTV
DVD
RATIO
EXIT
VOL
UPDATE
INDEX
PR
SLEEP
LIST
Q.VIEW
I/II
MENU
SIZE
VCR
POWER
123
456
789
*
0
FAV
REVEAL
?
TEXT
SIMPLINK
INPUT
MUTE
TIME
HOLD
POWER
TV INPUT
INPUT
Permet de mettre l ’appareil sous tension lorsqu ’il est en mode
veille et de le mettre hors tension pour passer en mode veille.
Cette touche permet de revenir au mode TV à partir de n’importe quel mode. Permet de mettre l ’appareil sous tension
lorsqu ’il est en mode veille.
Si vous appuyez une fois sur cette touche,le mode OSD s'affichera à l ’écran comme indiqué sur le sché ma cicontre.
Appuyez sur les touches
DD/ EE
puis sur la touche OK pour
sélectionner la source d ’entrée de votre choix(TV, AV1 , AV2,
AV3, Component , RGB PC, HDMI1 ou HDMI2).
RATIO(FORMAT)
Réglage de la
luminosité
Permet de sélectionner le format d'image de votre choix.
Permet de régler la luminosité de l'écran.
Si vous souhaitez rétablir les paramètres de luminosité par
défaut,changez la source du mode.
SIMPLINK
SLEEP
I/II
TOUCHES
COLORÉES
affiche une liste des périphériques audio/vidéo connectés au
téléviseur. Lorsque vous appuyez sur cette touche, le menu Simplink
s'affiche à l'écran.
Permet d ’activer la mise en veille.
Permet de sélectionner la sortie du son.
Ces touches sont utilisées pour le télétexte (uniquement pour les
modèles
TTÉÉLLÉÉTTEEXXTT
) ou pour
ll’’ÉÉddiittiioonn ddeess pprrooggrraammmmeess..
TOUCHES
VCR/DVD
Commande certains magnétoscopes ou lecteurs DVD lorsque
vous avez déjà sélectionné la touche de mode DVD ou magnétoscope.
Pour commander les périphériques audio/vidéo connect és, appuyez
sur les touches
DD
//
EE
//
FF
//
GG
,
OOKK
; vous pouvez également utilis-
er les touches de lecture, d'arrêt, de pause, de recherche
rapide vers l'arrière, de recherche rapide vers l'avant et de recherche
de chapitre.
(La touche ne permet pas d'effectuer ces opérations)
EXIT (SORTIE)
LIST
MENU (MENU)
Q.VIEW
*
Efface tous les affichages à l ’écran et retourne au mode
de visionnage du téléviseur à partir de n ’importe quel
menu.
Affiche la liste des programmes.
Permet de sélectionner un menu.
Permet de revenir au programme visionné précédemment.
Aucune fonction
Page 55

FRANÇAIS
9
Insertion des piles
• Ouvrez le capot du compartiment à piles à l’arrière de la télécommande.
• Utilisez deux piles alcalines de 1,5V de type AA. Ne mélangez
pas une pile neuve avec une pile usagée.
OK
INPUT
MODE
TVTV
DVD
RATIO
EXIT
VOL
UPDATE
INDEX
PR
SLEEP
LIST
Q.VIEW
I/II
MENU
SIZE
VCR
POWER
123
456
789
*
0
FAV
REVEAL
?
TEXT
SIMPLINK
INPUT
MUTE
TIME
HOLD
1
1
1
MODE(MODE)
Permet de sélectionner les modes de fonctionnement à distance.
Touches du
TÉLÉTEXTE
Ces touches sont utilisées pour le télétexte.
Pour de plus amples détails, veuillez vous reporter à la
section ‘Télétexte’.
TOUCHES CEN-
TRALES (haut/bas/
gauche/droite)
OK
Ces touches vous permettent de naviguer à travers les
menus à l’écran et de régler les paramètres système à
votre convenance.
Valide votre sélection ou affiche le mode en cours.
VOLUME
DD /EE
FAV
MUTE (SOURDINE)
PR (PRO-
GRAMME)
DD /EE
Touches
numériques : de
0 à 9
Permet de régler le volume.
Permet d’afficher vos chaînes préférées.
Permet de couper ou de remettre le son.
Permet de sélectionner un programme.
Permettent de sélectionner un programme.
Permettent de sélectionner des éléments numérotés dans
un menu.
Page 56

FRANÇAIS
10
UTILISATION DU TÉLÉVISEUR / COMMANDE DES PROGRAMMES
AV IN 3
L/MONO
R
AUDIO
VIDEO
S-VIDEO
AV IN 3
L/MONO
R
AUDIO
VIDEO
S-VIDEO
AV IN 3
L/MONO
R
AUDIO
VIDEO
S-VIDEO
AV IN 3
L/MONO
R
AUDIO
VIDEO
S-VIDEO
Logements collectifs/Appartements
(Raccordement à la prise d’antenne murale)
Logements individuels/Villas
(Raccordement à la prise murale pour
l’antenne extérieure)
Antenne
extérieure
Prise d’antenne
murale
Connecteur coaxial pour
fréquences radioélectriques (75 ohm)
UHF
AAmmpplliiffiiccaatteeuu
rr ddee ssiiggnnaauuxx
VHF
■
Pour recevoir une image de meilleure qualité dans les zones où les signaux se reçoivent mal, installez sur l’antenne un amplificateur de signaux comme indiqué sur le schéma de droite.
■
Pour acheminer le signal dans deux branchements de télévision, veuillez utiliser un diviseur.
RACCORDEMENT À UNE ANTENNE
■
Afin d’obtenir la meilleure qualité d’image, réglez la direction de
l’antenne.
■
Le câble et le convertisseur d’antenne ne sont pas fournis.
■
Ne jamais brancher le cordon d'alimentation avant d'avoir terminé de raccorder tous les équipements pour ne pas
endommager l'appareil.
ANTENNA
IN
ANTENNA
IN
Page 57

FRANÇAIS
11
Appuyez sur la touche
VVOOLL ++//--
pour régler le volume.
Si vous souhaitez couper le son, appuyez sur la touche
MMUUTTEE
.
Vous pouvez annuler cette fonction en appuyant sur les touches
MMUUTTEE
,
VVOOLL ++//--
ou
II //IIII
.
SÉLECTION DES PROGRAMMES
MISE SOUS TENSION DU TÉLÉVISEUR
OK
INPUT MODE
TVTV
DVD
RATIO
EXIT
VOL
UPDATE
INDEX
PR
SLEEP
LIST
Q.VIEW
I/II
MENU
SIZE
VCR
POWER
123
456
789
*
0
FAV
REVEAL
?
TEXT
SIMPLINK
INPUT
MUTE
TIME
HOLD
Pour pouvoir utiliser toutes les fonctions du téléviseur, vous devez mettre celuici sous tension.
Vous devez tout d’abord raccorder correctement le cordon d’alimentation. Le téléviseur se met alors en mode de veille.
■
Pour allumer le téléviseur lorsque celui-ci est en mode de veille, appuyez
sur la touche ,
IINNPPUUTT ouPPRR
DD // EE
du téléviseur, ou appuyez sur
PPOO WWEE RR, TT VV, II NNPPUUTT, PPRR ++//--
ou sur les touches
nnuumméérriiqquueess ((00~99 ))
de la télécommande.
1
RÉGLAGE DU VOLUME
Appuyez sur la touche
PPRR ++//--
ou sur les touches NUMÉRIQUES pour
sélectionner un numéro de programme.
2
3
1
1
Page 58

FRANÇAIS
12
UTILISATION DU TÉLÉVISEUR / COMMANDE DES PROGRAMMES
Appuyez sur la touche
DD
//
EE
// F//
G, puis sur la touche
OO KK
pour sélectionner
la langue de votre choix.
Appuyez sur la touche
DD
//
EE
// F//
G, puis sur la touche OK pour sélectionner
votre pays.
Appuyez plusieurs fois sur la touche
MMEENNUU
et la touche
DD // EE
pour sélec-
tionner le menu
Option.
Appuyer sur le bouton GGet sur le bouton
DD // EE
pour sélectionner la
Langue (Language). Le menu peut être affiché à l’écran en mode de langue
désirée.
Appuyer sur le bouton
GG
et sur le bouton
DD // EE
pour sélectionner la Pay.
Appuyez sur la touche
GG
, puis utilisez la touche
DD
//
EE
pour sélectionner
la langue ou le pays de votre choix.
Appuyez plusieurs fois sur la touche
OO KK
.
Appuyez sur la touche
EEXXIITT
pour revenir sur l’image normale du téléviseur.
1
2
3
4
5
CCeettttee ffoonnccttiioonn nn''eesstt ppaass ddiisspp oonniibbllee ddaannss ttoouuss lleess ppaayyss..
Le menu du guide d'installation s'affiche sur l'écran du téléviseur lorsque vous
mettez celui-ci sous tension pour la première fois.
1
2
** SSii vvoouuss ssoouuhhaaiitteezz mmooddiiffiieerr llaa llaanngguuee oouu llee ppaayyss sséélleeccttiioonnnnéé
REMARQUE
!
GG
Si vous ne terminez pas la configuration du
GGuuiiddee dd’’IInnssttaallllaattiioonn
en
appuyant sur la touche
EEXXIITT
ou bien avant que l’OSD (Affichage Écran) ne
s’éteigne, le guide réapparaîtra lors du rallumage de l’appareil.
GG
Si vous sélectionnez le mauvais pays, il se peut que le télétexte n’apparaisse pas correctement à l’écran ou que certains problèmes surgissent lors
de l’utilisation du télétexte.
LANGUE DU MENU À L'ÉCRAN/ SÉLECTION DU PAYS
OK
INPUT MODE
TVTV
DVD
RATIO
EXIT
VOL
UPDATE
INDEX
PR
SLEEP
LIST
Q.VIEW
I/II
MENU
SIZE
VCR
POWER
123
456
789
*
0
FAV
REVEAL
?
TEXT
SIMPLINK
INPUT
MUTE
TIME
HOLD
Page 59

FRANÇAIS
13
REMARQUE
!
a. La fonction OSD (Menu à l’écran) vous permet de régler le menu de l’écran à votre convenance car cette
fonction est pourvue d’une présentation graphique.
b. Il est possible que l’OSD (Menu à l’écran) de ce Mode d’emploi soit différent de celui de votre téléviseur ;
il est effectivement donné à titre d'exemple pour faciliter la configuration du téléviseur.
c. En mode Télétexte, les menus ne sont pas disponible.
MMeennuu CCoonnffiigguurr
MMeennuu IImmaaggee
MMeennuu AAuuddii oo
MMeennuu HHeeuurree
MMeennuu OOppttiioonn
Langue(Language)
Pays
SIMPLINK
Blocage touches
Méthode ISM
Mode éco.
Option
Horloge
Heure arrêt
Heure marche
Mise en veille
Arrêt auto.
Heure
Préréglages d’image
Temp. de couleur
XD
Avancé
Format de l'image
Réglage usine
Luminosite
XD Démo
Image
Recherche auto
Recherche man.
Edition programmes
Chaînes préférées
Config
Préréglages du son
Volume auto
Balance 0
Haut-parleurs TV
SON
*
MODÈLES DE TV Plasma
uniquement
SÉLECTION ET RÉGLAGE DES MENUS À L’ÉCRAN
Appuyez plusieurs fois sur la touche
MMEENNUU
et la touche
DD/ EE
, pour obtenir l’affichage de chaque menu.
Appuyer sur le bouton
GG
et sur le bouton
DD/ EE
pour sélectionner une option de menu.
Changer le paramétrage d'une option dans le sous-menu ou le menu déroulant avec le bouton
FF/ GG
.
Vous pouvez vous déplacer vers le menu supérieur en appuyant sur la touche
OO KK
ou sur la touche
MMEENNUU
.
Il est possible que l’affichage à l’écran de votre téléviseur soit différent de celui indiqué dans les schémas de
ce manuel.
Les exemples de l’affichage à l’écran sont ceux des modéles de t éléviseur Plasma.
1
2
3
* Cette fonction n'est pas
disponible dans tous les
pays.
Page 60

FRANÇAIS
14
UTILISATION DU TÉLÉVISEUR / COMMANDE DES PROGRAMMES
1
Recherche auto
Système
Mémoire
Recherche
Système G
DE F G
OK MENU
2
Config
Recherche auto
Recherche man.
Edition programmes
Chaînes préférées
Validation
Recherche auto G
DE F G
OK MENU
3 4 5 6
7
8
Recherche auto
C 05 BG
5 35%
MENU Stop
BG
I
DK
L
Appuyez plusieurs fois sur la touche
MMEENNUU
et la touche
DD
//
EE
pour
sélectionner le menu
Config.
Appuyer sur la touche
GG
et la touche
DD
//
EE
pour sélectionner la
Recherche auto .
Appuyez sur la touche
GG
, puis utilisez les touches
DD
//
EE
pour sélec-
tionner
Système.
Appuyez sur les touches
DD
//
EE
pour sélectionner un menu du système TV ;
BG : PAL B/G, SECAM B/G (Europe/Europe de l'Est/Asie/
Nouvelle-Zélande/Moyen-Orient/Afrique/Australie)
I : PAL I/II (Royaume-Uni/Irlande/Hong Kong/Afrique du Sud)
DK : PAL D/K, SECAM D/K (Europe de l'Est/Chine/Afrique/CEI)
L : SECAM L/L’ (France)
M : (LES Etats-Unis / La Corée / Philippines)
(en option)
Sélectionnez Mémoire avec la touche
DD
//
EE
.
Appuyez sur les touches
FF
//
GG
ou sur les touches NUMÉRIQUES pour
sélectionner le numéro de chaîne de départ. Si vous utilisez les touches NUMÉRIQUES, tout numéro inférieur à 10 doit être précédé du
chiffre “
0”; par ex. : “05” pour 5.
Sélectionnez
Recherche avec la touche
DD
//
EE
.
Appuyez sur la touche
GG
pour commencer la syntonisation automatique.
Toutes les chaînes qui peuvent être reçues sont mises en mémoire. Pour les chaînes
qui reçoivent les informations VPS (Video Programme Service), PDC (Programme
Delivery Control), Télétexte, le nom de la chaîne est mémorisé. Si aucun nom de
chaîne peut être associé à une chaîne, le numéro de canal est attributé et mémorisé
sous la forme
C(V/UHF 01-69) ou S(Câble 01-47), suivi d’un numéro.
Pour arrêter la syntonisation automatique, appuyez sur la touche
MMEENNUU
.
En fin de programmation automatique, le mode Edition programmes
apparaît à l’écran. Pour éditer le programme mémorisé, reportez-vous
à la section ‘Edition des programmes’.
Appuyez sur la touche
EEXXIITT
pour revenir au visionnage du téléviseur.
1
2
3
4
5
6
7
8
9
Votre téléviseur peut mémoriser jusqu’a 100 chaînes, sous forme de numéros
(de 0 à 99). Une fois les chaînes programmées, vous pouvez les visionner l’une
après l’autre en utilisant la touche PR +/- ou les touches NUMEROTEES.
Vous avez la possibilité d’effectuer la programmation en mode automatique ou
en mode manuel.
Cette méthode permet de mémoriser tous les programmes qui peuvent être
reçus. Nous vous recommandons d’utiliser la programmation automatique lors
de l’installation du téléviseur.
MÉMORISATION DES CHAÎNES
OK
EXIT
VOL PR
LIST
Q.VIEW
MENU
*
FAV
MUTE
Recherche auto
Recherche man.
Edition programmes
Chaînes préférées
Config
Page 61

FRANÇAIS
15
ANNEXE
ENTRETIEN
PPoouurr vviissuuaalliisseerr llee mmooddee dd''eemmppllooii ssuurr llee CCDD--RROOMM
Vous pouvez éviter les dysfonctionnement prématurés. Un nettoyage régulier permet d’accroître la durée de
vie utile de votre téléviseur. Assurez-vous de mettre votre téléviseur hors tension et de débrancher le cordon
d’alimentation avant de procéder au nettoyage.
Nettoyage de l’écran
Pour dépoussiérer correctement votre écran, procédez comme suit. Humidifiez un chiffon doux avec un
mélange d'eau tiède et d'adoucisseur (ou liquide vaisselle). Essorez le chiffon jusqu’à ce qu’il soit presque
sec, puis frottez l’écran délicatement.
Assurez-vous de retirer l’excès d'eau sur l'écran et laissez sécher à l'air libre avant de remettre votre
téléviseur sous tension.
Nettoyage de la carcasse
■
Pour retirer la poussière ou les saletés, nettoyez la carcasse avec un chiffon non pelucheux doux et sec.
■
N’utilisez pas de chiffon humide.
Absence prolongée
En cas d’inutilisation prolongée de votre téléviseur (par exemple si vous partez en vacances),nous
vous conseillons de débrancher le cordon d’alimentation afin de ne pas endommager votre
téléviseur en cas d’orage ou de surcharges électriques.
ATTENTION
1
2
Pour visualiser le mode d’emploi sur le CD-ROM, vous devez installer Adobe Acrobat Reader sur votre ordina-teur.
Le dossier “ACRORD” dans le CD-ROM contient les programmes d’installation néces-saires. Si vous souhaitez
installer ces programmes, sélectionnez "Poste de travail" ,ouvrez "LG" "ACRORD" , puis doublecliquez sur votre langue.
PPoouurr vviissuuaalliisseerr llee mmooddee dd’’eemmppllooii..
Les fichiers du mode d’emploi se trouvent dans le CD-Rom fourni. Insérez le CD-ROM dans le lecteur de CDROM de votre ordinateur. Patientez quelques instants. La page Web du CD-ROM s’ouvre alors automatiquement.
Si la page Web ne s’ouvre pas automatiquement, ouvrez directement le fichier du mode d’emploi (pour Windows
uniquement). Dans “Poste de travail”, ouvrez “LG”, puis ouvrez le fichier « index.htm ».
Page 62

FRANÇAIS
16
DÉPANNAGE
ANNEXE
LL’’ooppéérraattiioonn nnee ffoonnccttiioonnnnee ppaass nnoorrmmaalleemmeenntt..
MMaauuvvaaiiss ffoonn ccttiioonn--
nneemmeenntt ddee llaa ttéélléé--
ccoommmmaa nnddee
LL’’ aappppaarreeiill ss’’éétteeiinntt
ssoouuddaa iinneemmeenntt
■
Vérifiez qu’aucun obstacle n’empêche la transmission du signal de la télécommande vers le moniteur.
■
Vérifiez que la polarité des piles est correcte (+ sur +, - sur -)
■
Vérifiez que le mode de fonctionnement à distance est correct : TV, VCR etc.
■
Remplacez les piles.
■
Le mode veille est peut-être activé.
■
Vérifiez les réglages de mise sous/hors tension. L’alimentation a été interrompue.
■
Aucune station d’émission n’est syntonisée avec le mode de mise en veille activé.
MMaauuvvaaiiss ffoonnccttiioonnnneemmeenntt ddee llaa ffoonnccttiioonn vviiddééoo..
AAbbsseennccee dd’’iimmaa ggee eett
dd ee ssoonn
LL''iimmaa ggee eett lleess
ccoouulleeuurrss ssoonntt mmaauu--
vvaa iisseess
MMaauuvvaaiissee rréécceeppttiioonn
ddee cceerrttaaiinneess cchhaaîînneess
LL’’ iimmaaggee aappppaarraaîîtt aavveecc
ddeess rraaiieess oouu ddeess
llii ggnneess
BBaarrrreess vveerrttiiccaalleess//hhoorrii--
zzoonnttaalleess oouu ttrreemmbbllee--
mmeenntt ddee ll’’iimmaaggee
LL’’ iimmaaggee aappppaarraaîîtt
lleenn tteemmeenntt aapprrèèss aavvooiirr
aalllluumméé ll’’aappppaa rreeiill
■
Vérifiez que l’appareil est allumé.
■
Essayez de passer sur une autre chaîne. Il s’agit peut-être d’un problème d’émission.
■
Vérifiez que le cordon d’alimentation est correctement branché sur la prise secteur.
■
Vérifiez la direction et/ou l’emplacement de l’antenne.
■
Vérifiez la prise secteur en y branchant un autre appareil.
■
Il est normal que l’image apparaisse lentement lorsque l'appareil s'allume. Si
aucune image n'apparaît au delà de cinq minutes, contactez le service technique.
■
Réglez la Couleur à l'aide des options du menu.
■
Assurez-vous que l'appareil et le magnétoscope sont suffisamment espacés l’un de l’autre.
■
Essayez de passer sur une autre chaîne. Il s’agit peut-être d’un problème d’émission.
■
Assurez-vous que les câbles du magnétoscope sont correctement installés.
■
Activez n’importe qu’elle fonction pour restaurer la luminosité de l'image.
■
Décelez une possible interférence avec un appareil ou un outil électrique.
■
Il se peut que la station d’émission ait des problèmes, syntonisez sur une autre chaîne.
■
Le signal émis par la station d’émission est faible; changez la direction de l’antenne pour recevoir un signal.
■
Détectez les sources de possibles interférences.
■
Vérifiez l’antenne (changez la direction de l’antenne).
Page 63

FRANÇAIS
17
■
Appuyez sur la touche
VVOOLL ++//--
(ou
VVoolluu mmee
).
■
Le son est-il activé? Appuyez sur la touche
MMUUTTEE
.
■
Essayez de passer sur une autre chaîne. Il s’agit peut-être d’un problème d’émission.
■
Assurez-vous que les câbles audio sont correctement installés.
■
Réglez la Balance à l'aide des options du menu.
■
L’appareil émet un bruit particulier lorsque vous l'activez et le désactivez. Ce
bruit est dû au changement de température ou du taux d’humidité et n’est en
aucun cas le signe d’un dysfonctionnement de l’appareil.
IImmaaggee nnoorrmmaallee mmaaiiss
aabbsseennccee ddee ssoonn
BBrruuiitt ppaarrttiiccuulliieerr
pprroovveennaann tt ddee ll’’aapp--
pp aarreeii ll
AAbbsseennccee ddee ssoonn ssuurr
uunn ddeess hhaauuttppaarrlleeuurrss
IIll eexxiissttee uunn pprroobbllèèmmee eenn mmooddee PPCC.. ((SS’’aapppplliiqquuee sseeuulleemmeenntt aauu mmooddee PPCC))
■
Ajustez la résolution, la fréquence de lignes ou la fréquence du balayage vertical.
■
Vérifiez la source d’entrée.
■
Activez la configuration automatique ou ajustez l’horloge, la phase, ou la position H/V.
■
Vérifiez le câble du signal.
■
Réinstallez la carte vidéo du PC.
LLee ssiiggnnaall eesstt hhoorrss ddee
llaa ggaammmmee..
LLaa ccoouulleeuurr ddee ll’’ééccrraann
nn’’eesstt pp aass ssttaabbllee oouu
ddeevviieenntt mmoonnoocchhrroommee
BBaarrrreess vveerrttiicc aalleess oouu
rraaiieess àà ll’’aarrrriièèrree--
ppllaann,, bbrruuiitt hhoorriizzoonn--
ttaall,, ppoossii ttiioonn iinnccoorr--
rr eeccttee
MMaauuvvaaiiss ffoonnccttiioonnnneemmeenntt ddee llaa ffoonnccttiioonn aauuddiioo..
POIDS
■
Afin d’améliorer la qualité de ce produit, les spécifications ci-dessus sont sujettes à des modifications sans préavis.
MODÈLES
Poids
avec le socle
sans le socle
10,1kg / 22,3 lbs
9,1kg / 20,1 lbs
13,9 kg / 30,7 lbs
11,3 kg / 24,9 lbs
20,0 kg / 44,1 lbs
16,3 kg / 35,9 lbs
Poids
avec le socle
sans le socle
MODÈLES
26LC41
*
26LC41-ZA
32LC41*/32LC43
*
32LC44
*
32LC41-ZA/3 2LC43-ZE
32LC43-ZA/32L C44-ZB
37LC41*/37LC43
*
37LC41-ZA
37LC43-ZA
42LC41*/42LC43
*
42LC41-ZA
42LC43-ZA
24,5 kg / 54,0 lbs
20 kg / 44,1 lbs
26LC5
*
26LC51-ZA
26LC51C-ZA
32LC5
*
32LC51-ZA/32LC52-ZC
32LC52C-ZC
32LC53-ZA/32LC54-ZD
37LC5
*
37LC51-ZA
37LC53-ZA
42LC5
*
42LC51-ZA
42LC53-ZA
42LC54-ZD
10,4kg / 22,9 lbs
9,0kg / 19,9 lbs
13,7kg / 30,2 lbs
11,2kg / 24,7 lbs
20,0 kg / 44,1 lbs
16,0 kg / 35,3 lbs
24,9 kg / 54,9 lbs
20,4 kg / 45,0 lbs
MODÈLES
26LC42
*
26LC42-ZC
32LC42
*
32LC42-ZC
37LC42
*
37LC42-ZC
42LC42
*
42LC42-ZC
Poids
avec le socle
sans le socle
9,62kg / 21,2 lbs
8,62kg / 19,0 lbs
14,4kg / 31,8 lbs
11,74kg / 25,9 lbs
20,0 kg / 44,1 lbs
16,3 kg / 36,0 lbs
24,5 kg / 54,0 lbs
20 kg / 44,1 lbs
MODÈLES
Poids
avec le socle
sans le socle
42PC5
*
42PC51-ZB
42PC52-ZD
50PC5
*
50PC51-ZB
50PC52-ZD
26LC3
*
26LC3RA-ZA
28,0 kg / 61,7 lbs
24,6kg / 54,2 lbs
39,3 kg / 86,6 lbs
34,6kg / 76,2 lbs
12,4 kg / 27,3 lbs
11,5 kg / 25,3 lbs
28,0 kg / 61,7 lbs
24,6kg / 54,2 lbs
42PC5RV
*
42PC5RV -ZD
42PC5RVC-ZD
Page 64

Page 65

La versione estesa del manuale dell'utente che presenta le caratteristiche avanzate degli impianti TV LG si trova sul CD-ROM in formato elettronico.
Per la lettura è necessario aprire i file selezionati utilizzando un Personal
Computer (PC) dotato di unità CD-ROM.
Si prega di leggere con attenzione questo manuale prima di
usare l'apparecchio
Solo così si potrà ottenere il funzionamento ottimale dell’apparecchio e mantenerne inalterate nel tempo le caratteristiche
e l’affidabilità originali.
Raccomandiamo inoltre di conservare questo manuale in previsione di eventuali consultazioni future.
In qualsiasi caso di dubbio potrete interpellare il vostro abituale rivenditore di prodotti LG, facendo riferimento al modello
ed al numero di matricola.
TV LCD
TV AL PLASMA
IISSTTRRUUZZIIOONNII PPEERR LL’’UUSSOO
MODELLI DI TV LCD
26LC4
*
32LC4
*
37LC4
*
42LC4
*
26LC3
*
MODELLI DI TV AL PLASMA
42PC5
*
42PC5RV
*
50PC5
*
26LC5*
32LC5*
37LC5*
42LC5*
Dichiarazione di conformità
La società LG Electronics Italia S.p.A. dichiara
che il televisore a colori LG 26LC3RAZA/26LC41-ZA / 32LC41-ZA/ 32LC43-ZA/
32LC43-ZE/ 32LC44-ZB/ 37LC41-ZA/
37LC43-ZA/ 42LC41-ZA/ 42LC43-ZA/
26LC51-ZA/ 26LC51C-ZA/ 32LC51-ZA/
32LC53-ZA/ 32LC52-ZC/ 32LC52C-ZC/
32LC54-ZD/ 37LC51-ZA/ 37LC53-ZA/
42LC51-ZA/ 42LC53-ZA/ 42LC54-ZD/
26LC42-ZC/ 32LC42-ZC/ 37LC42-ZC/
42LC42-ZC/ 42PC51-ZB/ 42PC52-ZD/
42PC5RV-ZD/ 42PC5RVC-ZD/ 50PC51-ZB/
50PC52-ZD è costruito in conformità alle prescrizioni del D.M. n°548 del 28/8/95, pubblicato sulla G.U. n°301 del 28/12/95 ed in particolare è conforme a quanto indicato nell’art.
2, comma 1 dello stesso decreto.
Questo apparecchio è fabbricato nel rispetto
delle disposizioni di cui al D.M. 26/03/92 ed
in particolare è conforme alle prescrizioni del
Art. 1 dello stesso decreto ministeriale.
Page 66

Page 67

ITALIANO
1
ISTRUZIONI DI SICUREZZA
• Leggere le precauzioni di sicurezza con attenzione prima di utilizzare il prodotto.
• In questo manuale, le illustrazioni potrebbero essere leggermente diverse dal prodotto acquistato perché sono a puro scopo
indicativo di supporto alle istruzioni.
Non prendendo in considerazione il messaggio d’avvertimento, si possono riportare gravi lesioni o può sussistere il
pericolo di incidenti o di morte.
Non osservando il messaggio d’attenzione, è possibile riportare lesioni leggere o provocare danni al prodotto.
Precauzioni per l’installazione del prodotto
AVVERTENZA
AVVERTENZA
ATTENZIONE
Restare lontani da fonti di calore come ad es. termoconvettori elettrici.
- Si possono verificare scosse elettriche, incendi, malfunzionamenti
o deformazioni.
Se si avverte un odore di fumo o altri odori oppure si sente
uno strano rumore, scollegare il cavo d'alimentazione e rivolgersi al servizio assistenza.
- Se si continua ad utilizzare il prodotto senza adottare misure
adeguate, si possono verificare scosse elettriche o incendi.
Non utilizzare il prodotto in un luogo umido come il bagno
o qualsiasi altro ambiente in cui sia eventualmente esposto
all'umidità.
- In questo caso si potrebbero provocare scosse elettriche.
Installare il prodotto in una posizione piana e stabile impedendo eventuali cadute del prodotto.
- Se il prodotto subisce una caduta, si potrebbero riportare lesioni
o il prodotto potrebbe rompersi.
Non esporre il prodotto alla luce diretta del sole.
- Il prodotto potrebbe riportare eventuali danni.
Non collocare il prodotto in una posizione incassata come ad es. una libreria o uno scaffale.
- Ventilazione necessaria.
Precauzioni relative all’alimentazione elettrica
Accertarsi di collegare il cavo d'alimentazione alla corrente
collegata a massa.
- Si potrebbero subire scosse elettriche o riportare lesioni.
Non toccare la presa dell’alimentazione con le mani
bagnate. Inoltre, se lo spinotto del cavo è bagnato o
impolverato, asciugarlo tutto e rimuovere la polvere.
- Si potrebbero subire scosse elettriche a causa di un’ec-
cessiva umidità.
Durante tempeste con tuoni e fulmini, scollegare il cavo
d’alimentazione o il cavo del segnale.
- Si potrebbero subire scosse elettriche o si possono sviluppare
incendi.
Proteggere il cavo d’alimentazione da un impiego improprio, fisico o meccanico, come ad es. torcendolo, annodandolo, serrandolo, intrappolandolo fra le porte o
calpestandolo.
Prestare una particolare attenzione alle spine, alle prese a
muro e al punto in cui il cavo fuoriesce dall’apparecchio.
Precauzioni per la movimentazione del prodotto
Non sottoporre il prodotto ad urti durante la movimentazione.
- Si potrebbero subire scosse elettriche o il prodotto può
riportare danni.
Fare in modo che la parte frontale sia rivolta in avanti trattenendola con entrambe le mani per muoverla.
- Facendo cadere il prodotto, quest’ultimo può provocare
scosse elettriche o incendi. Rivolgersi al centro d’assistenza tecnica per effettuare le riparazioni del caso.
Accertarsi di aver spento il prodotto.
Accertarsi di rimuovere tutti i cavi prima di movimentare il prodotto.
- Si potrebbero subire scosse elettriche o il prodotto può
riportare danni.
Precauzioni per l’impiego del prodotto
Non smontare, riparare o modificare il prodotto a propria
discrezione.
- Si possono verificare casi di incendi, scosse elettriche.
- Rivolgersi al centro d’assistenza tecnica per effettuare il controllo, la taratura o le riparazioni del caso.
Per ridurre il pericolo di incendio e di scosse elettriche,
non esporre l’apparecchio a pioggia ed umidità.
L’apparecchio non dovrebbe essere esposto a gocciolii o
a schizzi e non si consiglia di non posare nessun oggetto
riempito con sostanze liquide, come ad es. vasi, sull’apparecchio.
Affidare tutte le operazioni di manutenzione al personale
qualificato dell’assistenza tecnica. La manutenzione necessaria una volta che l’apparecchio è stato danneggiato in
qualsiasi modo, come ad es. danni al cavo o alla spina d’alimentazione elettrica, liquidi o oggetti caduti accidentalmente all’interno dell’apparecchio, esposizione a pioggia
o umidità, funzionamento non regolare o cadute.
AVVERTENZA
AVVERTENZA
ATTENZIONE
ATTENZIONE
ATTENZIONE
ATTENZIONE
AVVERTENZA
Page 68

ITALIANO
2
CONTROLLI DEL PANNELLO FRONTALE
■
Si tratta di una rappresentazione semplificata del pannello frontale. In questa rappresentazione ci possono
essere eventuali differenze rispetto alla TV fornita.
■
Se il vostro prodotto è fornito di pellicola protettiva, rimuovere la pellicola e pulire il prodotto con un panno
per lucidare.
Pulsanti PROGRAMMA
Pulsanti VOLUME
Pulsanti MENU
Pulsanti OK
Pulsanti INPUT
Pulsanti POWER
PR
VOL
OK
MENU
INPUT
Pulsanti PROGRAMMA
Pulsanti VOLUME
Pulsanti OK
Pulsanti MENU
Pulsanti INPUT
Pulsanti POWER
PREPARAZIONE
Spia alimentazione/standby
• diventa di colore rosso
modalità standby.
• diventa di colore verde quan-
do si attiva l’apparecchio.
Sensore telecomando
PR
VOL
OK
MENU
INPUT
/I
Page 69

ITALIANO
3
INFORMAZIONI SUL PANNELLO POSTERIORE
■
Rappresentazione semplificata del pannello posteriore. In questa rappresentazione ci possono
essere eventuali differenze rispetto alla TV fornita.
Ingresso HDMI
Collegare un segnale HDMI a HDMI IN.
In alternativa collegare il segnale DVI (VIDEO) alla
porta HDMI/DVI con il cavo DVI a HDMI.
Ingresso RGB/Audio
Collegare l'uscita del monitor da un PC alla porta
d'ingresso adeguata.
Ingresso Component
Collegare un dispositivo video/audio Component
a questi jack.
Uscita audio variabile
Collegare un amplificatore esterno o aggiungere
un subwoofer al sistema audio surround.
Presa Euro Scart (AV1/AV2)
Collegare l'ingresso o l'uscita della presa scart
proveniente da un dispositivo esterno a questi
jack.
Ingresso antenna
Collegare i segnali del digitale terrestre a questo
jack.
Presa del cavo di alimentazione
La TV funziona con l'alimentazione elettrica AC.
La tensione è indicata nella pagina relativa alle
Specifiche. Non tentare di attivare la TV utilizzando un'alimentazione elettrica DC.
Ingresso S-Video
Collegare l'uscita S-Video da un dispositivo SVIDEO.
Ingresso Audio/Video
Collegare l'uscita audio/video da un dispositivo
esterno a questi jack.
PORTA D'INGRESSO RS-232C (CONTROL
LO/SERVIZIO)
Collegare la porta seriale del dispositivo di con
trollo al jack RS-232C.
1
2
3
4
5
6
7
8
9
10
AV IN 3V IN 3
L/L/MONOMONO
R
AUDIOAUDIO
VIDEOVIDEO
S-VIDEOS-VIDEO
AV IN 3
L/MONO
R
AUDIO
VIDEO
S-VIDEO
12
VARIABLE
AUDIO OUT
RGB IN
COMPONENT IN
AUDIO
VIDEO
AV 1 AV 2
ANTENNA
IN
HDMI/DVI IN HDMI IN
AV IN 3
L/MONO
R
AUDIO
VIDEO
S-VIDEO
12
VARIABLE
AUDIO OUT
RGB IN
COMPONENT IN
AUDIO
VIDEO
AV 1 AV 2
ANTENNA
IN
HDMI/DVI IN HDMI IN
AV IN 3
L/MONO
R
AUDIO
VIDEO
S-VIDEO
1 2
VARIABLEARIABLE
AUDIO OUTAUDIO OUT
RGB
(PC)
RGB INRGB IN
COMPONENT INCOMPONENT IN
AUDIOAUDIO
VIDEOVIDEO
AV 1V 1 AV 2V 2
ANTENNAANTENNA
IN IN
AUDIO
(RGB/DVI)
HDMI/DVI INHDMI/DVI IN HDMI INHDMI IN
1
2
8
9
3
7
4 6
5
VARIABLE
AUDIO OUT
RGB IN
O
O
AV 1
AV 2
ANTENNA
IN
HDMI/DVI IN
HDMI IN
1
2
3 4 6
5
10
AV IN 3V IN 3
VIDEOVIDEO
S-VIDEOS-VIDEO
L/MONOMONO
R
AUDIOAUDIO
V 2
ARIABLE
AUDIO OUT
VIDEO
AUDIO
COMPONENT
AV IN 3
L/MONO
R
AUDIO
VIDEO
RGB IN
S-VIDEO
V IN 3
L/
MONO
AUDIO
VIDEO
S-VIDEO
3 4 6
7
5
1
2
8
9
AUDIO
(RGB/DVI)
RGB
(PC)
AV 1 AV 2V 2
ANTENNA
IN
VARIABLE ARIABLE
AUDIO OUTAUDIO OUT
VIDEOVIDEO
AUDIOAUDIO
COMPONENTCOMPONENT IN
AV IN 3
L/MONO
R
AUDIO
VIDEO
HDMI/DVI IN HDMI IN
1 2
RGB INRGB IN
S-VIDEO
RS-232C IN
(CONTROL & SERVICE)
3 4 6
5
1
2
10
VARIABLE
RGB IN
RGB
AUDIO
(PC)
(RGB/DVI)
AUDIO OUT
HDMI/DVI IN HDMI IN
1 2
COMPONENT
IN
AUDIO
VIDEO
AV 1 AV 2
ANTENNA
IN
AV IN 3
S-VIDEO
R
AUDIO
MONO
L/
VIDEO
HDMI/DVI IN
HDMI IN
1 2
VIDE
AUDI
RGB IN
RGB
(PC)
VARIABLE
AUDIO OUT
AV 1
AUDIO
(RGB/DVI)
RS-232C IN
AV 2
(CONTROL & SERVICE)
ANTENNA
IN
Page 70

ITALIANO
4
ESTENSIONE DELLA BASE DEL CAVALLETTO (Solo i modelli di TV LCD da 26'', 32'', 37'')
PREPARAZIONE
1
2
3
Disporre con attenzione il prodotto con lo schermo rivolto verso il basso su una superficie
imbottita che protegga il prodotto e lo schermo
da eventuali danni.
Montare il cavalletto del prodotto con il prodotto come mostrato in figura.
Montare i 4 bulloni con forza nella parte posteriore del prodotto nei fori disponibili.
Page 71

ITALIANO
5
APPLICARE LA TV AD UNA PARETE
MODELLI DI TV AL PLASMA MODELLI DI TV AL LCD
2
1
■
Questa caratteristica non è disponibile su tutti i modelli.
■
Installare vicino alla parete in modo tale che il prodotto non cada quando viene premuto all'indietro.
■
Le istruzioni riportate di seguito indicano un metodo sicuro per l'installazione del prodotto che deve essere
fissato evitando che il prodotto cada quando viene spostato in avanti. Si impedirà al prodotto di cadere in
avanti provocando lesioni alle persone e si eviterà inoltre che il prodotto provochi eventuali danni cadendo.
Accertarsi che i bambini non si arrampichino sul prodotto o si appendano a quest'ultimo.
NOTA
!
GG
Quando si sposta il prodotto in un altro punto, slacciare innanzitutto le funi.
GG
Utilizzare un supporto per il prodotto o un alloggiamento che sia sufficientemente grande e robusto per
le dimensioni ed il peso del prodotto.
GG
Per impiegare il prodotto in modo sicuro accertarsi del fatto che l'altezza della staffa che montata alla
parete sia la stessa del prodotto.
2
3
1
1
2
Utilizzare gli occhielli o le staffe / i bulloni TV per fissare il prodotto alla parete come mostrato nella figura.
(se il prodotto presenta i bulloni nella posizione degli occhielli prima di inserire gli occhielli, svitare i bulloni).
* inserire gli occhielli o le staffe / i bulloni della TV e stringerli a fondo nei fori in alto.
Assicurare alla parete le staffe a muro con i bulloni (non forniti come componenti del prodotto e da
acquistare a parte). Fare combaciare l'altezza della staffa montata a muro.
3
Utilizzare una fune resistente (non fornito come componente del prodotto, è necessario acquistarlo a parte)
per legare il prodotto. È più sicuro annodare la fune in modo che si trovi in posizione orizzontale tra la parete e
il prodotto.
Page 72

ITALIANO
6
PREPARAZIONE
■
È possibile installare la TV in diversi modi come ad es. ad una parete o su una scrivania, ecc.
■
La TV è progettata per un montaggio orizzontale.
INSTALLAZIONE SU UNA SCRIVANIA
Per garantire un'adeguata ventilazione, disporre uno spazio libero di 4" su ogni lato e da eventuali pareti.
4 pollici
4 pollici
4 pollici
4 pollici
Alimentazio
ne elettrica
Interruttore di
corto circuiti
MESSA A TERRA
Accertarsi di collegare il filo di terra per impedire eventuali scosse elettriche. Se non è possibile attuare i
sistemi di messa a terra, fare installare ad un elettricista qualificato un interruttore separato. Non tentare di
mettere a terra l'unità collegandola ai cavi telefonici, agli spinotti d'accensione o ai tubi del gas.
Page 73

ITALIANO
7
MONTAGGIO A PARETE: INSTALLAZIONE ORIZZONTALE
Per garantire un'adeguata ventilazione, disporre uno spazio libero di 4" su ogni lato e da eventuali pareti. Le
istruzioni per l'installazione in dettaglio sono fornite presso il rivenditore, consultare la guida opzionale per
l'installazione della staffa da montaggio a parete reclin-abile e per la configurazione.
4 pollici
4 pollici
4 pollici
4 pollici
4 pollici
Page 74

ITALIANO
8
GUARDARE LA TV / CONTROLLO PROGRAMMI
CONTROLLI DEL TELECOMANDO
Quando si utilizza il telecomando, puntarlo verso il sensore del telecomando presente sul televisore.
OK
INPUT MODE
TVTV
DVD
RATIO
EXIT
VOL
UPDATE
INDEX
PR
SLEEP
LIST
Q.VIEW
I/II
MENU
SIZE
VCR
POWER
123
456
789
*
0
FAV
REVEAL
?
TEXT
SIMPLINK
INPUT
MUTE
TIME
HOLD
POWER
TV INPUT
INPUT
Per accendere il televisore quando è in "stanby"e riportarlo alla funzione di attesa.
Ritorna alla visualizzazione TV da qualsiasi modalità.
Accende il set dalla funzione di standby.
Se si preme il pulsante una volta, viene visualizzato l''OSD
della sorgente d'ingresso come riportato in figura. Premere il
pulsante
D / E, quindi il pulsante
OOKK
per selezionare la sorgente d'ingresso (TV, AV1 , AV2, AV3, Component , RGB
PC, HDMI1 o HDMI2).
RATIO(RAPPORTO
LARGHEZZA-ALTEZZA)
Regolazione
luminosit
Seleziona il formato dell ’immagine desiderato.
regola la luminosità dello schermo.
Ripristina la luminosità delle impostazioni di default modificando la sorgente della modalità.
SIMPLINK
SLEEP
I/II
PULSANTI
COLORATI
visualizza un elenco di dispositivi AV collegati alla TV.
Quando si seleziona questo pulsante, il menu Simplink
viene visualizzato su schermo.
Per regolare lo spegnimento automatico.
Per selezionare l ’uscita audio.
Questi pulsanti sono impiegati per il teletext.(solo per
modelli con TELETEXT)o Sistemazione programmi.
Pulsanti di con-
trollo VCR/DVD
Controlla alcuni videoregistratori o lettori DVD un volta
selezionato il pulsante della modalit DVD o VCR.
Controllare i dispositivi AV collegati premendo i pulsanti
DD
//
EE
//
FF
//
GG
,
OOKK
e i pulsanti per la riproduzione,
l'arresto, la pausa, il riavvolgimento veloce, l'avanzamento
veloce ed il salto dei capitoli.
(Il pulsante non offre queste funzioni)
EXIT
LIST
MENU
Q.VIEW
*
Schiarire sull ’immagine dello schermo e tornare alla visual
izzazione del TV visualizzandolo da qualsiasi menù.
Per far apparire sullo schermo la tavola dei programmi.
Per selezionare un menù.
Per tornare al programma precedente.
Nessuna funzione
Page 75

ITALIANO
9
TA S T I
DELTLV
Inserimento delle pile
■
Aprire il coperchietto del vano batterie sul retro del teleco-mando.
■
Inserire due batterie AA da 1.5V osservando la polarità corretta (+
con +, - con -). Non usare bat-terie vecchie e nuove allo stesso
tempo.
■
Chiudere il coperchietto.
OK
INPUT
MODE
TVTV
DVD
RATIO
EXIT
VOL
UPDATE
INDEX
PR
SLEEP
LIST
Q.VIEW
I/II
MENU
SIZE
VCR
POWER
123
456
789
*
0
FAV
REVEAL
?
TEXT
SIMPLINK
INPUT
MUTE
TIME
HOLD
1
1
1
MODE
Seleziona le modalità operative del telecomando.
Questi tasti vengono utilizzati per il televideo.
Per maggiori dettagli vedere il paragrafo riguardante il
televideo.
THUMBSTICK
(Su/Giù/Sinistra)
OK
Consente di navigare i menu visualizzati sullo schermo e di
regolare le impostazioni di sistema in base alle proprie esigenze.
Per far accettare le vostre selezioni o far apparire sullo
schermo il modo corrente.
VOLUME + /-
FAV
MUTE
Programme
+ / -
Pulsanti
numerici 0-9
Per regolare il volume.
Visualizza il programma preferito selezionato
Per attivare e disattivare l ’audio.
Seleziona un programma.
Seleziona un programma.
Seleziona gli elementi numerati in un menu.
Page 76

ITALIANO
10
GUARDARE LA TV / CONTROLLO PROGRAMMI
AV IN 3
L/MONO
R
AUDIO
VIDEO
S-VIDEO
AV IN 3
L/MONO
R
AUDIO
VIDEO
S-VIDEO
AV IN 3
L/MONO
R
AUDIO
VIDEO
S-VIDEO
AV IN 3
L/MONO
R
AUDIO
VIDEO
S-VIDEO
Abitazioni / Appartamenti plurifamiliari
(Collegamento all’antenna centralizzata)
Abitazioni / case monofamiliari
(collegamento con antenna esterna)
Antenna
esterna
(VHF, UHF)
Presa
antenna
centralizzata
Cavo coassiale RF (75 ohm)
Antenna
UHF
AAmmpplliiffiiccaa
ttoorree ddeell
sseeggnnaallee
VHF
■
Nelle zone con una scarsa ricezione del segnale installare un amplificare del segnale per l’antenna, come mostrato a destra, per ottenere una migliore qualità delle immagini.
■
Se il segnale deve essere suddiviso tra due televisori, utiliz-zare uno sdoppiatore del segnale dell’antenna per
stabilire il collegamento.
COLLEGAMENTO ANTENNA
■
Per ottenere una qualità ottimale delle immagini, regolare l’orientamento dell’antenna.
■
Non sono forniti il cavo e il convertire dell’antenna.
■
Per impedire di causare danni al dispositivo, non collegare mai eventuali cavi di alimentazione fino a quando non
è stato completato il collegamento di tutti i dispositivi.
ANTENNA
IN
ANTENNA
IN
Page 77

ITALIANO
11
Premere il pulsante
VVOOLL ++//--
per regolare il volume.
Se si desidera disattivare l'audio, premere il pulsante
MMUUTTEE
.
È possibile annullare questa funzione premendo il pulsante
MMUUTTEE, VVOOLL
++//-- o II//IIII
button.
SELEZIONE DEL PROGRAMMA
ACCENSIONE DELLA TV
OK
INPUT MODE
TVTV
DVD
RATIO
EXIT
VOL
UPDATE
INDEX
PR
SLEEP
LIST
Q.VIEW
I/II
MENU
SIZE
VCR
POWER
123
456
789
*
0
FAV
REVEAL
?
TEXT
SIMPLINK
INPUT
MUTE
TIME
HOLD
Una volta accesa la TV, è possibile utilizzare le sue caratteristiche.
Collegare innanzitutto il cavo d’alimentazione elettrica in modo corretto.
questo punto la TV passa alla modalità standby.
■
Nella modalità standby premere il pulsante ,
IINNPPUUTT,PPRR
DD
//
EE
sulla TV o premere il pulsante
PPOO WWEERR, TTVV, IINNPPUUTT, PPRR ++//--
, un pul-
sante numerico (0~9) sul telecomando per accendere la TV.
1
REGOLAZIONE DEL VOLUME
Premere il pulsante
PPRR ++//--
o i pulsanti numerici per selezionare il
numero di un programma.
2
3
1
1
Page 78

ITALIANO
12
GUARDARE LA TV / CONTROLLO PROGRAMMI
SELEZIONE DELLA LINGUA DEI MENU / DEL PAESE A SCHERMO
QQuueessttaa ffuunnzziioonnaalliittàà nnoonn èè ddiissppoonniibbiillee iinn ttuuttttii ii ppaaeessii..
Premere il pulsante
DD
//
EE
// F//
G, quindi premere il pulsante OK per
selezionare la lingua desiderata
Premere il pulsante
DD
//
EE
// F//
G, quindi premere il pulsante OK per
selezionare il paese desiderato.
Premete il tasto
MMEENNUU
e quindi il tasto
DD
//
EE
per selezionare il menù
Opzione.
Premete il tasto GGe premete i tasti
DD
//
EE
per selezionare
Lingua(Language) . Il menù può essere richiamato sullo schermo nella
lingua desiderata.
O, Premete il tasto
GG
e premete i tasti
DD
//
EE
per selezionare Paese.
Premere il pulsante
GG
, quindi utilizzare il pulsante
DD
//
EE
per selezionare
la lingua o il paese desiderati.
Premete il tasto
OOKK ..
Premete il tasto EXIT per tornare ai normali programmi TV.
1
2
3
4
5
La guida all'installazione viene visualizzata sullo schermo del televisore quando si effettua la
prima accensione.
1
2
** SSee ssii ddeessiiddeerraa mmooddiiffiiccaarree llaa sseelleezziioonnee ddeellllaa lliinngguuaa // ddeell ppaaeessee
NOTA
!
GG
Se non si chiude la
GGuuiiddaa aallll’’iinnssttaall llaazziioonn ee
premendo il tasto
EEXXIITT
o il timeout della visualizzazione OSD (On Screen Display), riapparirà
ripetutamente all’accensione dell’unità.
GG
Se si seleziona in codice paese sbagliato, il televideo potrebbe non
essere mostrato e non funzionare correttamente.
OK
INPUT MODE
TVTV
DVD
RATIO
EXIT
VOL
UPDATE
INDEX
PR
SLEEP
LIST
Q.VIEW
I/II
MENU
SIZE
VCR
POWER
123
456
789
*
0
FAV
REVEAL
?
TEXT
SIMPLINK
INPUT
MUTE
TIME
HOLD
Page 79

ITALIANO
13
SELEZIONE E REGOLAZIONE DEI MENU VISUALIZZATI
Premi il tasto MENU e poi il tasto
DD/ EE
sul Display di ogni menu.
Premete il tasto
GG
e quindi i tasti
DD/ EE
per selezionare una voce del menù.
Cambiate la regolazione di una voce in un sottomenù o in un menù a tendina per mezzo dei tasti
F / G.
Potete spostarvi al menù di livello più alto per mezzo del tasto OK o MENU.
Il menu OSD (On Screen Display) della TV potrebbe risultare leggermente diverso da quello rappresentato
nel manuale.
Il menu OSD utilizza principalmente immagini per i modelli di TV al plasma.
1
2
3
NOTA
!
a. La funzione OSD (On Screen Display [in visualizzazione su schermo]) consente di regolare lo stato
dello schermo in modo adeguato offrendo una visualizzazione grafica.
b. In questo manuale, l'OSD (On Screen Display [in visualizzazione su schermo]) potrebbe essere diver-
so da quello del televisore dato che si tratta di un semplice esempio mirato a semplificare il funzionamento del televisore.
c. Con la funzione televideo, i menù non appaiono sullo schermo.
MMeennùù CCoonnffiigg..
MMeennùù IImmmmaaggiinnee
MMeennùù AAuu ddiioo
MMeennùù TTeemmppoo
MMeennùù OOppzziioonnee
Lingua(Language)
Paese
SIMPLINK
Blocco tasti
Metodo ISM
Basso consumo
Opzione
reg. Clock
Spegnimento
Accensione
Time sleep
Auto sleep
Tempo
Modalità immagini
Temperatura colore
XD
Avanzato
Rapp. d'aspetto
Reset immagini
Schermo
XD Demo
Immagine
Sintonizz. autom.
Sintonizz. manuale
Set up programmi
Programma favorito
Config.
Modalità audio
Volume automatico
Bilanc. 0
Casse del TV
Audio
* Solo MODELLI DI TV AL
PLASMA
* Questa funzionalità non è
disponibile in tutti i paesi.
Page 80

ITALIANO
14
GUARDARE LA TV / CONTROLLO PROGRAMMI
SINTONIZZAZIONE AUTOMATICA DEI PROGRAMMI
OK
EXIT
VOL PR
LIST
Q.VIEW
MENU
*
FAV
1
Sintonizz. autom.
Sintonizz. manuale
Set up programmi
Programma favorito
Config.
Sintonizz. Autom.
Sistema
Memorizza dal prog
Ricerca
Sistema G
DE F G
OK MENU
2
Config.
Sintonizz. autom.
Sintonizz. manuale
Set up programmi
Programma favorito
Selezione
Sintonizz. autom. G
DE F G
OK MENU
3 4 5 6
7
8
Sintonizz. autom.
C 05 BG
5 35%
MENU Stop
BG
I
DK
L
Premete il tasto
MMEENNUU
e quindi utilizzate il tasto
DD
//
EE
per selezionare il menù
Config.
Premete il tasto
GG
e quindi il tasto
DD
//
EE
per selezionare
Sintonizz. autom.
.
Premete i tasti
GG
per selezionare
DD
//
EE
Sistema
.
Premere il pulsante
DD
//
EE
per selezionare un menu del sistema TV:
BG : PALB/G, SECAM B/G (Europa/Europa Orientale/Asia/Nuova
Zelanda/Medio Oriente/ Africa/Australia)
I : PALI/II (GB/Irlanda/Hong Kong/Sud Africa)
DK : PALD/K, SECAM D/K (Europa Orientale/Cina/Africa/CIS)
L: SECAM L/L’(Francia)
M : (USA / Korea / Philippines)
(opzione)
Premete il tasto
DD
//
EE
per selezionare
Memorizza dal prog
.
Premere il pulsante
FF
//
GG
o i pulsanti numerici per
selezionare il numero iniziale della programmazione. Se si
utilizzano i pulsanti numerici, gli even-tuali numeri inferiori a
10 devono essere inseriti anteponendo il numero ‘
0
’ad es.
‘
05
’ per indicare 5.
Premete il tasto
DD
//
EE
per selezionare
Ricerca
.
Premere il pulsante
GG
per iniziare la sintonizzazione automatica.
Vengono memorizzate tutte le stazioni ricevute. Il nome della
stazione viene memorizzato per quelle stazioni che trasmettono
VPS (Servizio Programmi Video), PDC (Controllo programmi d’invio) o dati di TELEVIDEO. Se a una stazione non può venire assegnato un nome, viene assegnato un numero di canale e memorizzato
preceduto da
C (V/UHF 01-69) o S (Canali via cavo 01-47).
Per arrestare la sintonizzazione automatica, premere il pulsante
MMEENNUU
.
Quando la programmazione automatica è completata, il menù di
riordino dei programmi appare sullo schermo. Vedere la sezione
Riordino dei Programma per riordinare i programmi emorizzati.
Premete il tasto EXIT per tornare ai normali programmi TV.
1
2
3
4
5
6
7
8
9
E’possibile sintonizzare fino a 100 canali e memorizzarli con numeri
da 0 a 99. Una volta memorizzati, potete utilizzare i tasti PR+/- o
quelli NUMERICI per effettuare la scansione delle stazioni da voi
programmate.
Le stazioni possono venire sintonizzate utilizzando la funzione automatica o quella manuale.
Con questo metodo vengono memorizzate tutte le stazioni ricevute.
Vi consigliamo di utilizzare la programmazione automatica quando
installate questo Display al Plasma.
Page 81

ITALIANO
15
ANNEXE
Visualizzazione della guida dell'utente sul CD-ROM
MANUTENZIONE
È possibile evitare eventuali malfunzionamenti anticipatamente. La pulizia accurata e regolare può aumentare
la durata della nuova TV. Accertarsi di spegnere l'impianto e di scollegare il cavo prima di iniziare qualsiasi
operazione di pulizia.
Pulizia dello schermo
Di seguito viene riportato un metodo per rimuovere la polvere dallo schermo. Inumidire un panno morbido
con una miscela di acqua tiepida ed un po' di ammorbidente per tessuti o di detergente per piatti. Strizzare
il panno fino a quando non è quasi asciutto, quindi utilizzarlo per pulire lo schermo.
Accertarsi che l'acqua in eccesso non sia presente sullo schermo, quindi lasciare asciugare prima di accendere la TV.
Pulizia del telaio
■
Per rimuovere lo sporco o la polvere, pulire il telaio con un panno morbido, asciutto, privo di sfilacciature.
■
Accertarsi di non utilizzare panni bagnati.
Assenza prolungata
Se si prevede di lasciare la TV inutilizzata per un periodo prolungato di tempo (come ad es. le vacanze),
scollegare il cavo di alimentazione elettrica è una buona idea per proteggersi da eventuali danni derivanti
da fulmini e sovratensioni elettriche.
ATTENZIONE
1
2
Per visualizzare la guida dell'utente su CD-ROM, Adobe Acrobat Reader deve essere installato
sul PC. La cartella "ACRORD" presente sul CD-ROM contiene i programmi d'in-stallazione.
Se si desidera installare questi programmi, accedere alle "Risorse del computer" Aprire "LG" Aprire
"ACRORD" fare doppio clic sulla lingua desiderata.
Per visualizzare la guida dell'utente, i file della guida sono inclusi nel CD-ROM fornito in dotazione. Caricare il
CD-ROM fornito nella periferica CD-ROM del PC. Dopo alcuni istanti è possibile accedere alla pagina del CDROM in modo automatico. Se la pagina non viene visualizzata in modo automatico, aprire direttamente il file della
guida dell'utente. (Solo per Windows) Accedere alle "Risorse del computer" Aprire "LG" Aprire il file
"index.htm".
Page 82

ITALIANO
16
RICERCA DEI GUASTI
ANNEXE
IIll ffuunnzziioonnaammeennttoo nnoonn èè nnoorrmmaallee..
IIll tteell eeccoommaannddoo
nnoonnffuunnzziioonnaa..
LL’’ aalliimmeennttaazziioonnee ssii
dd iissaattttiivvaa
iimmpp rr oovvvviissaa mmeennttee
■
Verificare la presenza di eventuali oggetti tra il prodotto e il telecomando che costituiscano un ostacolo.
■
Le batterie sono installate con la polarità corretta (+ su +, - su -)?
■
Correggere l’impostazione della modalità di funzionamento del telecomando: TV,
VCR ecc.?
■
Installare batterie nuove.
■
È impostato il timer della modalità sleep?
■
Controllare le impostazioni di controllo dell'alimentazione. Alimentazione interrotta.
■
Nessuna trasmissione sulla stazione sintonizzata con Auto off attivato.
LLaa ffuunnzziioonnee vviiddeeoo nnoonn ffuunnzziioonnaa..
NNeessssuunn aa iimmmmaaggiinnee ee
nneessssuunn ssuuoonnoo
CCoolloorrii aasssseennttii oo
iinn ssuuffffiicciieennttii oo
iimmmmaaggiinnii ddiiffeettttoo ssee
RRiicceezz iioonnee
iinnssuuffffiicciieennttee ppeerr
aallccuunnii ccaannaallii
LLii nneeee oo ssttrriissccee nneellllee
iimmmmaaggiinnii
BBaarrrree
oorriizzzzoonnttaallii//vveerrttiiccaallii oo
iimmmmaaggiinnii ccoonn ttrreemmoolliioo
LL’’iimmmmaaggiinnee vviieennee
vviissuuaalliizzzzaattaa lleennttaammeennttee
ddooppoo ll’’aacccceennssiioonnee
■
Verificare che il prodotto sia acceso.
■
Provare un altro canale. Il problema potrebbe essere dovuto alla trasmissione.
■
Il cavo d’alimentazione è inserito nella presa di corrente a muro?
■
Controllare l’orientamento e/o la posizione dell’antenna.
■
Testare la presa di corrente a muro, inserire un altro cavo d’alimentazione del
prodotto nella presa in cui è stato inserito il cavo d’alimentazione del prodotto.
■
Si tratta di un processo normale, l’immagine viene smorzata durante il processo di
avvio del prodotto. Contattare il centro d’assistenza se le immagini non vengono
visualizzate dopo cinque minuti.
■
Regolare il Colore nell'opzione del menu.
■
Mantenere una distanza sufficiente tra il prodotto e il VCR.
■
Provare un altro canale. Il problema potrebbe essere dovuto alla trasmissione.
■
I cavi video sono installati correttamente?
■
Attivare una funzione per ripristinare la luminosità delle immagini.
■
Controllare la presenza di interferenze locali come ad es. apparecchi elettrici o
strumenti d'alimentazione.
■
La stazione o il prodotto del cavo con problemi, sintonizzarsi su un’altra stazione.
■
Il segnale della stazione è debole, orientare nuovamente l'antenna per ricevere le
stazioni più deboli.
■
Verificare la presenza di fonti di possibile interferenza.
■
Controllare l’antenna (modificare l’orientamento dell’antenna).
Page 83

ITALIANO
17
■
Premere il tasto
VVOO LL ++//-- o ((VVoolluummee))
.
■
Sound azzerato? Premere il pulsante
MMUUTTEE
.
■
Provare un altro canale. Il problema potrebbe essere dovuto alla trasmissione.
■
I cavi audio sono installati correttamente?
■
Regolare il bilanciamento nell’opzione del menu.
■
Un cambiamento dell'umidità ambiente o della temperatura potrebbe provocare un rumore insolito quando il prodotto viene acceso o spento e non rappresen ta un difetto del prodotto.
IImmmmaaggiinnii pprreesseennttii mmaa
nneessssuunn ssuuoonnoo
SSuu oonnii ssttrraannii ddaall--
ll’’iitteerrnnoo ddeell pprrooddoottttoo
NNeessssuunn ssuu oonnoo dd aa uunnoo
ddeeii ddiiffffuussoorrii
SSii èè vveerriiffiiccaattoo uunn pprroobblleemmaa nneellllaa mmooddaalliittàà PPCC.. ((AApppplliiccaattoo ssoolloo aallllaa mmooddaalliittàà PPCC))
■
Regolare la risoluzione, la frequenza orizzontale o la frequenza verticale.
■
Verificare la fonte dell’ingresso.
■
Impostare la configurazione automatica o regolare l’orologio, la fase o la
posizione O/V.
■
Controllare il cavo del segnale.
■
Reinstallare la scheda video del PC.
IIll sseeggnn aallee èè ffuuoorrii
pp oo rr ttaa ttaa ..
IIll ccoolloorree ddeelllloo
sscchheerrmmoo nnoonn èè ssttaa
bbiillee oo mmoonnooccoolloorree
BBaarrrree vveerrttiiccaallii oo
ssttrriissccee ssuulllloo ssffoonnddoo
ee rruummoorree oorriizzzzoonnttaallee
ee ppoossiizziioonnee eerrrraattaa
LLaa ffuunnzziioonnee aauuddiioo nnoonn ffuunnzziioonnaa..
Page 84

18
ITALIANO
SPECIFICHE DEL PRODOTTO
■
Le specifiche precedentemente indicate possono essere soggette ad eventuali modifiche senza preavviso allo
scopo di apportare miglioramenti qualitativi.
676,6 x 531,0x 221,0 mm
26,6 x 20,9 x 8,7 pollici
676,6 x 478,7 x 84,0 mm
26,6 x 18,9 x 3,3 pollici
10,4kg / 22,9 lbs
9,0kg / 19,9 lbs
AC100-240V~50/60Hz 1,3A
130 W
806,6 x 606,5 x 249 mm
31,8 x 23,9 x 9,8 pollici
806,6 x 552,3 x 79 mm
31,8 x 21,8x 3,1 pollici
13,7kg / 30,2 lbs
11,2kg / 24,7 lbs
AC100-240V~50/60Hz 1,5A
150 W
927 x 692,8x 280,5mm
36,5x 27,3 x 11,1 pollici
927 x 630 x 88,0mm
36,5x 24,8 x 3,5 pollici
20,0 kg / 44,1 lbs
16,0 kg / 35,3 lbs
AC100-240V~50/60Hz 1,8A
17 0 W
1033,4 x 750,0 x 287,6 mm
40,7x 29,5 x 11,3 pollici
1033,4 x 686,8 x 88,5mm
40,7 x 27,0x 3,5 pollici
24,9 kg / 54,9 lbs
20,4 kg / 45,0 lbs
AC100-240V~50/60Hz 2,2A
200W
MODELLI
Dimensioni
(Larghezza x Altezza x
Profondità
Peso
Temperatura operativa
Umidità operativa
Temperatura di conservazione
Umidità di conservazione
Condizioni ambientali
Requisiti di alimentazione
Consumo elettrico
Sistema televisivo
Copertura programma
Impedenza antenna esterna
PAL/SECAM B/G/D/K, PAL I/II, SECAM L/L’
VHF: E2
~ E12, UHF: E21 ~ E69, CATV: S1 ~ S20, HYPER: S21 ~ S47
75 Ω
0 ~ 40°C / 32 ~ 104°F
Inferiore all' 80%
-20 ~ 60°C / -4 ~ 140°F
Inferiore all' 85%
Cavalletto incluso
Cavalletto escluso
Cavalletto incluso
Cavalletto escluso
Dimensioni
(Larghezza x Altezza x
Profondità
Peso
Requisiti di alimentazione
Consumo elettrico
Cavalletto incluso
Cavalletto escluso
Cavalletto incluso
Cavalletto escluso
676,4 x 529,2x 221,0 mm
26,6 x 20,8 x 8,7 pollici
676,4 x 474,3 x 85,0 mm
26,6 x 18,7 x 3,3 pollici
10,1kg / 22,3 lbs
9,1kg / 20,1 lbs
AC100-240V~50/60Hz 1,3A
130 W
806,4 x 606,1 x 249,0 mm
31,8 x 23,9 x 9,8 pollici
806,4 x 548,4 x 80,5 mm
31,8 x 21,6x 3,1 pollici
13,9 kg / 30,7 lbs
11,3 kg / 24,9 lbs
AC100-240V~50/60Hz 1,5A
150 W
926,6 x 697,6x 280,4mm
36,5x 27,5 x 11,0 pollici
926,6 x 635,6 x 88,0mm
36,5x 25,0 x 3,5 pollici
20,0 kg / 44,1 lbs
16,3 kg / 35,9 lbs
AC100-240V~50/60Hz 1,8A
17 0 W
1032,7 x 750,0 x 287,6 mm
40,7x 29,5 x 11,3 pollici
1032,7 x 685,5 x 88,5 mm
40,7 x 27,0 x 3,5 pollici
24,5 kg / 54,0 lbs
20 kg / 44,1 lbs
AC100-240V~50/60Hz 2,2A
200W
MODELLI
26LC41
*
26LC41-ZA
32LC41*/32LC43
*
32LC44
*
32LC41-ZA/3 2LC43-ZE
32LC43-ZA/32L C44-ZB
37LC41*/37LC43
*
37LC41-ZA
37LC43-ZA
42LC41*/42LC43
*
42LC41-ZA
42LC43-ZA
26LC5
*
26LC51-ZA
26LC51C-ZA
32LC5
*
32LC51-ZA/32LC52-ZC
32LC52C-ZC
32LC53-ZA/32LC54-ZD
37LC5
*
37LC51-ZA
37LC53-ZA
42LC5
*
42LC51-ZA
42LC53-ZA
42LC54-ZD
Page 85

19
ITALIANO
■
Le specifiche precedentemente indicate possono essere soggette ad eventuali modifiche senza preavviso allo scopo di apportare
miglioramenti qualitativi.
676,4 x 529,2x 228,9 mm
26,6 x 20,9 x 9,0
pollici
676,4 x 474,3 x 85,0 mm
26,6 x 18,7 x 3,4
pollici
9,62kg / 21,2 lbs
8,62kg / 19,0 lbs
AC100-240V~50/60Hz 1,3A
130 W
806,8 x 605,6 x 260,5 mm
31,8 x 23,9 x 10,3
pollici
806,8 x 605,5 x 79,0 mm
31,8 x 23,9x 3,1
pollici
14,4kg / 31,8 lbs
11,74kg / 25,9 lbs
AC100-240V~50/60Hz 1,5A
150 W
926,6 x 697,6x 280,4mm
36,5x 27,5 x 11,1
pollici
926,6 x 635,6 x 88,0mm
36,5x 25,0 x 3,5
pollici
20,0 kg / 44,1 lbs
16,3 kg / 36,0 lbs
AC100-240V~50/60Hz 1,8A
17 0 W
1032,7 x 750,0 x 300,2 mm
40,7x 29,6 x 11,8
pollici
1032,7 x 685,5 x 88,5mm
40,7 x 27,0x 3,5
pollici
24,5 kg / 54,0 lbs
20 kg / 44,1 lbs
AC100-240V~50/60Hz 2,2A
200W
MODELLI
Dimensioni
(Larghezza x Altezza x
Profondità
Peso
Temperatura operativa
Umidità operativa
Temperatura di conservazione
Umidità di conservazione
Condizioni ambientali
Requisiti di alimentazione
Consumo elettrico
Sistema televisivo
Copertura programma
Impedenza antenna esterna
PAL/SECAM B/G/D/K, PAL I/II, SECAM L/L’
VHF: E2
~ E12, UHF: E21 ~ E69, CATV: S1 ~ S20, HYPER: S21 ~ S47
75 Ω
0 ~ 40°C / 32 ~ 104°F
Inferiore all' 80%
-20 ~ 60°C / -4 ~ 140°F
Inferiore all' 85%
Cavalletto incluso
Cavalletto escluso
Cavalletto incluso
Cavalletto escluso
Dimensioni
(Larghezza x Altezza x
Profondità
Peso
Requisiti di alimentazione
Consumo elettrico
Cavalletto incluso
Cavalletto escluso
Cavalletto incluso
Cavalletto escluso
26LC42
*
26LC42-ZC
32LC42
*
32LC42-ZC
37LC42
*
37LC42-ZC
42LC42
*
42LC42-ZC
MODELLI
1048,0 x 766,0 x 310,0 mm
41,3 x 30,2 x 12,2 pollici
1048,0 x 713,0 x 83,5 mm
41,3 x 28,1 x 3,3 pollici
28,0 kg / 61,7 lbs
24,6kg / 54,2 lbs
AC100-240V~50/60Hz 3,5A
310 W
1242,0 x 887,6 x 370,0mm
48,9 x 34,9 x 14,6 pollici
1242,0 x 827,2 x 88,0 mm
48,9 x 32,6 x 3,5 pollici
39,3 kg / 86,6 lbs
34,6kg / 76,2 lbs
AC100-240V~50/60Hz 5,0A
450 W
42PC5
*
42PC51-ZB
42PC52-ZD
50PC5
*
50PC51-ZB
50PC52-ZD
680,0 x 550,0 x 235,0 mm
26,8 x 21,7 x 9,3 pollici
680,0x 436,6 x 119 , 4 m m
26,8 x 17,2 x 4,7 pollici
12,4 kg / 27,3 lbs
11,5 kg / 25,3 lbs
AC100-240V~50/60Hz 1,3A
130 W
26LC3
*
26LC3RA-ZA
1048,0 x 766,0 x 310,0 mm
41,3 x 30,2 x 12,2 pollici
1048,0 x 713,0 x 83,5 mm
41,3 x 28,1 x 3,3 pollici
28,0 kg / 61,7 lbs
24,6kg / 54,2 lbs
AC100-240V~50/60Hz 3A
260W
42PC5RV
*
42PC5RV -ZD
42PC5RVC-ZD
Page 86

Page 87

En el CD-ROM se incluye una versión electrónica del manual del propietario
ampliado con funciones avanzadas de los televisores LG.
Para poder leerlo debe abrir dichos archivos desde un ordenador personal (PC)
equipado con unidad de CD-ROM.
LLeeaa aatteennttaammeennttee eessttee mmaannuuaall aanntteess ddee hhaacceerr ffuunn--
cciioonnaarr ssuu aappaarraattoo..
Consérvelo para futuras consultas.
Registre el número de modelo y el número de serie del aparato.
Consulte la etiqueta adherida en la cubierta posterior y proporcione
dicha información a su proveedor cuando necesite asistencia técnica.
TELEVISOR LCD
TELEVISOR
DE PLASMA
MANUAL DEL USUARIO
MODELOS DE
TELEVISORES LCD
26LC4
*
32LC4
*
37LC4
*
42LC4
*
26LC3
*
MODELOS DE TELEVISORES DE PLASMA
42PC5
*
42PC5RV
*
50PC5
*
26LC5*
32LC5*
37LC5*
42LC5*
Page 88

Page 89

1
ESPAÑOL
INSTRUCCIONES DE SEGURIDAD
• Lea estas precauciones de seguridad atentamente antes de utilizar el producto.
• En este manual, es posible que las ilustraciones no coincidan exactamente con la apariencia real del producto, ya que se incluyen simplemente como ejemplo para ilustrar las instrucciones.
Si hace caso omiso a los mensajes de advertencia, corre el riesgo sufrir daños graves, tener un accidente o incluso morir.
Si hace caso omiso a los mensajes de precaución, corre el riesgo de sufrir daños leves o dañar el producto.
Precauciones que se deben tomar al instalar el producto
Mantenga el producto alejado de fuentes de calor como
calefactores eléctricos.
- Podría producirse una descarga, un incendio, un error de funcionamiento o alguna deformación en el producto.
Si percibe olor a humo o a otras sustancias o si escucha
ruidos extraños, desenchufe el cable de alimentación y
póngase en contacto con el centro de asistencia.
-
Si sigue utilizando el aparato sin tomar las medidas adecuadas, existe el
riesgo de producirse una descarga eléctrica o un incendio.
No utilice este producto en lugares con humedad, como un
cuarto de baño, o en cualquier otro lugar en el que pueda
mojarse.
- Si lo hace, podría provocar un incendio o una descarga eléctrica.
Instale el producto en un lugar liso y estable para
que no haya riesgo de caídas.
- Si se cae el producto, podría provocar daños personales
o romperse.
Mantenga el producto alejado de la luz directa del
sol.
- El producto podría dañarse.
No coloque el producto en una instalación empotrada, como una estantería o baldas.
- El producto necesita tener ventilación.
Precauciones relativas a la fuente de alimentación
Verifique que el cable de alimentación está conectado a
una toma de tierra.
- Si no lo hace, podría sufrir daños o electrocutarse.
No toque el enchufe si tiene las manos mojadas.
Además, si la clavija del cable está mojada o cubierta
de polvo, séquela completamente o límpiela.
- De no hacerlo, podría electrocutarse por exceso de
humedad.
En caso de tormentas o tormentas eléctricas, desenchufe el cable de alimentación o el cable de señal.
- Si no lo hace, podría electrocutarse o provocar un incen-
dio.
vite la manipulación del cable de alimentación: no lo
doble, enrosque ni pellizque. Impida que quede atrapado
en una puerta al cerrarla y no lo pise.
Preste especial atención a los enchufes, las tomas de
pared y el punto en que el cable se conecta a este aparato.
Precauciones que se deben tomar al mover el producto
No golpee el aparato mientras lo mueve.
- Si lo hace, podría electrocutarse o dañar el producto.
Oriente la cara frontal del panel hacia arriba y cójalo con las dos manos para moverlo.
- Si se cae el producto, podría producirse una descarga
eléctrica o un incendio. Póngase en contacto con el
centro de asistencia para la reparación.
Verifique que ha apagado el producto.
Compruebe también que todos los cables están
desconectados antes de mover el producto.
- Si no lo hace, podría electrocutarse o dañar el producto.
Precauciones que se deben tomar al utilizar el producto
No desmonte, repare ni manipule el producto por
decisión propia.
- Podría producirse un accidente, una descarga eléctrica o un
incendio.
- Póngase en contacto con el centro de asistencia para realizar
comprobaciones, calibraciones o reparaciones.
Para reducir el riesgo de incendio o descarga eléctrica, no
exponga este aparato al agua de lluvia ni a la humedad.
Asimismo, no debe exponer el producto a goteos o
salpicaduras. No coloque objetos llenos de líquido (como
floreros) cerca del aparato.
Póngase en contacto con técnicos cualificados si necesita
manipular el aparato. La manipulación es necesaria si el
aparato ha sufrido algún tipo de daño, como por ejemplo
la avería del cable de alimentación o de alguna toma, la
caída de líquidos u objetos en el aparato, la exposición del
producto a la lluvia o a la humedad, algún error de funcionamiento o una caída accidental.
Page 90

2
ESPAÑOL
CONTROLES DEL PANEL FRONTAL
■
A continuación se muestra una representación simplificada del panel frontal. Su aspecto puede diferir
ligeramente de la apariencia real del televisor.
■
Si el producto dispone de una película protectora, retírela y seguidamente limpie la unidad con un paño
adecuado.
Botones de los
PROGRAMAS
Botones de VOLUMEN
Botón MENU
Botón OK
Botón INPUT
Botón de encendido y
apagado
PR
VOL
OK
MENU
INPUT
Botones de los
PROGRAMAS
Botones de VOLUMEN
Botón OK
Botón MENU
Botón INPUT
Botón de encendido y
apagado
PREPARATIVOS
Indicador de encendido/en
espera
• Cuando está en modo de
espera se ilumina en rojo.
• Cuando está encendido, se
ilumina en verde.
Sensor del mando a distancia
PR
VOL
OK
MENU
INPUT
/I
Page 91

3
ESPAÑOL
INFORMACIÓN DEL PANEL POSTERIOR
■
A continuación se muestra una representación simplificada del panel posterior. Su aspecto puede diferir ligeramente de la apariencia real del televisor.
Entrada HDMI
Conecte una señal HDMI a HDMI IN.
O la señal DVI (VIDEO) al puerto HDMI/DVI con
un cable DVI a HDMI.
Entrada RGB/Audio
Conecte la salida del monitor de un PC al puerto
de entrada correspondiente.
Entrada Component
Conecte un dispositivo de componente de
vídeo/audio a estas tomas.
Salida de audio variable
Conecte un amplificador externo o añada un subwoofer al sistema de sonido envolvente.
Toma de euroconector (AV1/AV2)
Conecte la entrada o la salida de la toma de euroconector desde un dispositivo externo a estas
tomas.
Entrada de antena
Conecte señales aéreas a esta toma.
Toma para cable de alimentación
Este televisor funciona con corriente alterna. El
voltaje se indica en la página Especificaciones. No
intente nunca utilizar el televisor con corriente
continua.
Entrada S-Video
Conecte la señal S-Video desde un dispositivo S-VIDEO.
Entrada Audio/Video
Conecte la salida de audio/vídeo desde un dis-
positivo externo a estas tomas.
Puerto de entrada RS-232C (CONTROL/SERVICIO)
Conecte el puerto serie de los dispositivos de
control a la toma RS-232C.
1
2
3
4
5
6
7
8
9
10
AV IN 3V IN 3
L/L/MONOMONO
R
AUDIOAUDIO
VIDEOVIDEO
S-VIDEOS-VIDEO
AV IN 3
L/MONO
R
AUDIO
VIDEO
S-VIDEO
12
VARIABLE
AUDIO OUT
RGB IN
COMPONENT IN
AUDIO
VIDEO
AV 1 AV 2
ANTENNA
IN
HDMI/DVI IN HDMI IN
AV IN 3
L/MONO
R
AUDIO
VIDEO
S-VIDEO
12
VARIABLE
AUDIO OUT
RGB IN
COMPONENT IN
AUDIO
VIDEO
AV 1 AV 2
ANTENNA
IN
HDMI/DVI IN HDMI IN
AV IN 3
L/MONO
R
AUDIO
VIDEO
S-VIDEO
1 2
VARIABLEARIABLE
AUDIO OUTAUDIO OUT
RGB
(PC)
RGB INRGB IN
COMPONENT INCOMPONENT IN
AUDIOAUDIO
VIDEOVIDEO
AV 1V 1 AV 2V 2
ANTENNAANTENNA
IN IN
AUDIO
(RGB/DVI)
HDMI/DVI INHDMI/DVI IN HDMI INHDMI IN
1
2
8
9
3
7
4 6
5
VARIABLE
AUDIO OUT
RGB IN
O
O
AV 1
AV 2
ANTENNA
IN
HDMI/DVI IN
HDMI IN
1
2
3 4 6
5
10
AV IN 3V IN 3
VIDEOVIDEO
S-VIDEOS-VIDEO
L/MONOMONO
R
AUDIOAUDIO
V 2
ARIABLE
AUDIO OUT
VIDEO
AUDIO
COMPONENT
AV IN 3
L/MONO
R
AUDIO
VIDEO
RGB IN
S-VIDEO
V IN 3
L/
MONO
AUDIO
VIDEO
S-VIDEO
3 4 6
7
5
1
2
8
9
AUDIO
(RGB/DVI)
RGB
(PC)
AV 1 AV 2V 2
ANTENNA
IN
VARIABLE ARIABLE
AUDIO OUTAUDIO OUT
VIDEOVIDEO
AUDIOAUDIO
COMPONENTCOMPONENT IN
AV IN 3
L/MONO
R
AUDIO
VIDEO
HDMI/DVI IN HDMI IN
1 2
RGB INRGB IN
S-VIDEO
RS-232C IN
(CONTRO
L & SERVICE)
3 4 6
5
1
2
10
AV IN 3
S-VIDEO
R
AUDIO
MONO
L/
VIDEO
VARIABLE
RGB IN
RGB
AUDIO
(PC)
(RGB/DVI)
AUDIO OUT
HDMI/DVI IN HDMI IN
1 2
COMPONENT
IN
AUDIO
VIDEO
AV 1 AV 2
ANTENNA
IN
HDMI/DVI IN
HDMI IN
1 2
VIDE
AUDI
RGB IN
RGB
(PC)
VARIABLE
AUDIO OUT
AUDIO
(RGB/DVI)
AV 1
AV 2
ANTENNA
IN
RS-232C IN
(CONTROL & SERVICE)
Page 92

4
ESPAÑOL
INSTALACIÓN CON PIE (Sólo modelos de TV LCD de 26, 32, 37 pulgadas)
PREPARATIVOS
1
2
3
Coloque con cuidado el producto apoyado
sobre la pantalla en una superficie blanda que lo
proteja frente a posibles daños.
Monte el pie del producto tal como se indica.
Fije correctamente los 4 pernos en los orificios
de la parte posterior del producto.
Page 93

5
ESPAÑOL
FIJACIÓN DEL TV A UNA PARED
MODELOS DE TELEVISORES DE PLASMA MODELOS DE TELEVISORES DE LCD
2
1
■
Esta función no está disponible en todos los modelos.
■
Colóquelo cerca de la pared para que el producto no se caiga si se le empuja hacia atrás.
■
Las instrucciones que se muestran abajo son una manera más segura de colocar el producto, que consiste en fijarlo a la pared de manera que el producto no se caiga cuando se tire de él hacia adelante.
Evitará que el producto se caiga hacia delante y dañe a alguien. También evitará que el producto se
dañe a causa de una caída. Asegúrese por favor de que los niños no trepen o se cuelguen del producto.
NOTA
!
GG
Cuando mueva el producto a otro lugar desate la cuerda primero.
GG
Utilice un pequeño armario o receptáculo de suficiente tamaño y resistencia para el tamaño y peso del
producto.
GG
Para usar el producto de manera segura confirme que la altura de la abrazadera montada sobre la pared
es igual a la del producto.
2
3
1
1
2
Utilice los pernos de anilla o las abrazaderas/pernos del televisor para fijar el producto en la pared tal como se indica en la
imagen.
(Si el producto ya tiene los pernos colocados en la posición de los pernos de anilla antes de instalarlos, afloje los pernos.)
* Inserte los pernos de anilla o las abrazaderas/pernos del televisor y fíjelos correctamente en los agujeros superiores.
Fije las abrazaderas de pared con los pernos (no se suministran con el producto; se venden por separado) en la pared.
Haga coincidir la altura de la abrazadera que está montada en la pared.
3
Use una cuerda robusta (no se facilitan como partes del producto, se deben adquirir de manera
separada) para atar el producto. Es más seguro atar la cuerda de manera que quede horizontal
entre la pared y el producto.
Page 94

6
PREPARATIVOS
ESPAÑOL
■
Es posible instalar el televisor de varias formas: en la pared, sobre un mueble, etc.
■
El televisor está diseñado para un montaje vertical.
INSTALACIÓN EN PIE SOBRE ESCRITORIO
Para una ventilación adecuada, deje un hueco de 4 pulgadas a cada lado de la unidad y entre la unidad y la pared.
4 pulgadas
4 pulgadas
4 pulgadas
4 pulgadas
Fuente de alimentación
Interruptor de cortocircuito
TOMA DE TIERRA
Verifique la conexión del cable de toma de tierra para evitar posibles descargas eléctricas. Si no consigue verificar la conexión de tierra, póngase en contacto con un electricista para que instale un interruptor independiente. No intente llevar la unidad a tierra conectándola a cables de teléfono, de luz o a
tuberías de gas.
Page 95

7
ESPAÑOL
MONTAJE EN PARED: INSTALACIÓN HORIZONTAL
Para una ventilación adecuada, deje un hueco de 4 pulgadas a cada lado de la unidad y entre la unidad y la
pared. Si desea obtener instrucciones de instalación detalladas facilitadas por el distribuidor, consulte el manual
de configuración e instalación en pared opcional con abrazaderas.
4 pulgadas
4 pulgadas
4 pulgadas
4 pulgadas
4 pulgadas
Page 96

8
ESPAÑOL
CONTROL DE RECEPCIÓN DE TV/PROGRAMAS
FUNCIONES DE LAS TECLAS DEL MANDO A DISTANCIA
Cuando utilice el mando a distancia, oriéntelo hacia el televisor.
OK
INPUT MODE
TVTV
DVD
RATIO
EXIT
VOL
UPDATE
INDEX
PR
SLEEP
LIST
Q.VIEW
I/II
MENU
SIZE
VCR
POWER
123
456
789
*
0
FAV
REVEAL
?
TEXT
SIMPLINK
INPUT
MUTE
TIME
HOLD
POWER
(Encendido)
TV INPUT
INPUT
(MODO)
Enciende la unidad (On) desde el modo de espera o la
apaga (Off) parapasar al modo des espera.
Vuelve a TV desde cualquier modo.
Permite conectar el televisor desde el modo en espera.
Si pulsa este botón una vez, la fuente de entrada OSD
aparecerá en pantalla tal como se muestra. Pulse el botón
DD/ EE
y, después, el botón OK para seleccionar la fuente
de entrada que desee (TV, AV1 , AV2, AV3, Component ,
RGB PC, HDMI1 o HDMI2).
RATIO(RELACIÓN)
Ajuste de la
luminosidad
Selecciona el formato de imagen que desee.
Ajusta la luminosidad de la pantalla.
Al cambiar la fuente del modo, vuelve a los valores de
luminosidad de fábrica.
SIMPLINK
SLEEP
I/II
BOTONES DE
COLORES
Accede a una lista de dispositivos AV conectados al TV.
Si se pulsa varias veces este botón, el menú Simplink
aparece en la pantalla .
Ajusta el temporizador.
Selecciona la salida de sonido.
Estos botones se utilizan para el teletexto. (sólo para
modelos con
TTEELLEETTEEXXTTOO
) o
EEddiicciióónn ddee pprrooggrraammaass
.
Botones de
control
VCR/DVD
Controla algunas grabadoras de vídeo y reproductores de
DVD si se ha seleccionado previamente con el botón de
modo DVD o VCR.
Puede controlar los dispositivos AV conectados pulsando
los botones
DD
//
EE
//
FF
//
GG
,
OO KK
y los botones de
reproducción, parada, pausa, retroceso y avance rápido y
selección de capítulos.
(El bot ón no proporciona estas funciones)
EXIT
LIST
MENU
Q.VIEW
*
Borra todos los mensajes de visualización en pantalla y
vuelve a la función de TV desde cualquier menú.
muestra la tabla de programas.
Selecciona un menú.
Vuelve al programa visto anteriormente.
Sin función
Page 97

9
ESPAÑOL
Instalación de las pilas
■
Abra la tapa del compartimento de las pilas situada en la parte posterior e introduzca las pulas con la polaridad correcta (+ con +, with -).
■
Inserte dos pilas AA de 1,5 V. No mezcla pilas antiguas y nuevas.
■
Cierre la tapa.
OK
INPUT
MODE
TVTV
DVD
RATIO
EXIT
VOL
UPDATE
INDEX
PR
SLEEP
LIST
Q.VIEW
I/II
MENU
SIZE
VCR
POWER
123
456
789
*
0
FAV
REVEAL
?
TEXT
SIMPLINK
INPUT
MUTE
TIME
HOLD
1
1
1
MODE
Selecciona los modos de funcionamiento del mando a distancia
TELETEXT
Estos botones se utilizan para el teletexto.
Para obtener más información, consulte el apartado
“Teletexto”.
TECLAS CENTRALES
(Arriba/Abajo/Izquierd
/Derecha)
OK
Permite desplazarse por los menús en pantalla y ajustar la
configuración del sistema según sus preferencias.
Acepta la selección o muestra el modo actual.
Volumen arriba
/abajo
FAV
MUTE
Programas
arriba/abajo
Botones
numéricos 0-9
Ajusta el volumen.
Muestra el programa favorito seleccionado
Activa y desactiva el sonido.
Selecciona un programa.
Selecciona un programa.
Selecciona los elementos numerados de un menú.
Page 98

10
ESPAÑOL
CONTROL DE RECEPCIÓN DE TV/PROGRAMAS
AV IN 3
L/MONO
R
AUDIO
VIDEO
S-VIDEO
AV IN 3
L/MONO
R
AUDIO
VIDEO
S-VIDEO
AV IN 3
L/MONO
R
AUDIO
VIDEO
S-VIDEO
AV IN 3
L/MONO
R
AUDIO
VIDEO
S-VIDEO
Viviendas/apartamentos multifamiliares
(Conectar a una toma de pared de antena)
Viviendas/casas unifamiliares
(Conectar a una toma de pared para la
antena exterior)
Antena
exterior
(VHF, UHF)
Toma de
pared de
antena
Cable coaxial de radiofrecuencia
(75 ohmios)
Antena
UHF
AAmmpplliiffiiccaaddoo
rr ddee sseeññaall
VHF
■
En zonas con poca señal, para obtener una mejor calidad de imagen, instale un amplificador de señal en la
antena, tal como se muestra a la derecha.
■
Si es preciso dividir la señal para dos TV, utilice un divisor de señal para la conexión.
CONEXIÓN DE LA ANTENA
■
Para obtener una calidad de imagen óptima, ajuste la orientación
de la antena.
■
La unidad no se suministra con cable de antena ni conversor.
■
Para evitar daños en el equipo, nunca conecte ningún cable de alimentación hasta que no haya terminado
de conectar todo el equipo.
ANTENNA
IN
ANTENNA
IN
Page 99

11
Pulse el botón
VVOO LL ++//--
para ajustar el volumen.
Si quiere silenciar el sonido, pulse el botón
MMUUTTEE
.
Si quiere cancelar esta función, pulse el botón
MMUUTTEE, VVOO LL ++//--oII //IIII
.
SELECCIÓN DE PROGRAMAS
ENCENDIDO DEL TELEVISOR
OK
INPUT MODE
TVTV
DVD
RATIO
EXIT
VOL
UPDATE
INDEX
PR
SLEEP
LIST
Q.VIEW
I/II
MENU
SIZE
VCR
POWER
123
456
789
*
0
FAV
REVEAL
?
TEXT
SIMPLINK
INPUT
MUTE
TIME
HOLD
Para poder utilizar todas sus funciones, el televisor debe estar encendido.
En primer lugar, conecte correctamente el cable de alimentación.
En ese momento, el televisor pasará al modo de espera.
■
Para encender el televisor desde el modo de espera, pulse los botones
,
IINNPPUUTT,PPRR
DD // EE
del televisor o pulse
PPOOWWEERR, TTVV, IINNPPUUTT, PPRR
++//--, tteeccllaass nnuumméérriiccaass((00~99))
del mando a distancia: el televisor se
encenderá.
1
AJUSTE DEL VOLUMEN
Pulse el botón
PPRR ++//--
o los botones numéricos para seleccionar un
número de canal.
2
3
1
1
ESPAÑOL
Page 100

12
CONTROL DE RECEPCIÓN DE TV/PROGRAMAS
IDIOMA DEL MENÚ DE VISUALIZACIÓN EN PANTALLA/
SELECCIÓN DE PAÍS
EEssttaa ffuunncciióónn nnoo eessttáá ddiissppoonniibbllee eenn ttooddooss llooss ppaaíísseess..
Pulse el botón
DD // EE// F//
G y, a continuación, el botón
OO KK
para selec-
cionar el idioma que desee.
Pulse el botón
DD // EE // F//
G y, a continuación, el botón
OO KK
para selec-
cionar el país.
Pulse el botón
MMEENNUU
y, a continuación, el botón
DD // EE
para selec-
cionar el menú de
Opción.
Pulse el botón
GG
y entonces el botón
DD // EE
para seleccionar Idioma
(Language). El menú puede aparecer en la pantalla en idioma inglés,
alemán, francés, italiano, u español.
Pulse el botón
GG
y entonces el botón
DD // EE
para seleccionar País.
Pulse el botón
GG
y, a continuación, utilice el botón
DD
//
EE
para selec-
cionar el idioma o el país que desee.
Pulse el botón
OOKK
.
Pulse el botón
EEXXIITT
para volver a la pantalla normal del televisor.
1
2
3
4
5
El menú de la guía de instalación aparece en la pantalla del televisor al encenderlo por primera vez.
1
2
** SSii ddeesseeaa mmooddiiffiiccaarr llaa sseelleecccciióónn ddee iiddiioommaa//ppaaííss
NOTA
!
GG
Si no finaliza el proceso indicado en la
GGuuííaa ddee iinnssttaallaacciióónn
presionan-
do el botón
EEXXIITT
o el tiempo agotado de la OSD (visualización en pan-
talla), ésta aparecerá repetidamente cuando el equipo esté encendido.
GG
Si selecciona el país equivocado, el teletexto podría no aparecer correctamente en pantalla, y experimentaría el mismo problema durante el
funcionamiento del teletexto.
OK
INPUT MODE
TVTV
DVD
RATIO
EXIT
VOL
UPDATE
INDEX
PR
SLEEP
LIST
Q.VIEW
I/II
MENU
SIZE
VCR
POWER
123
456
789
*
0
FAV
REVEAL
?
TEXT
SIMPLINK
INPUT
MUTE
TIME
HOLD
ESPAÑOL
 Loading...