

Page 1
Checked
Mira.woo
Feb/26/2014
Printing specification
Signature
MMM/DD/YYYY
Drawn Approved
Yuri.hong Jongok.kim
Feb/26/2014 Feb/26/2014
1. Model Description
:Model name :Brand name :Part number
65UB980T-TA LG MFL68140504
:2nd, 3rd Suffix :Product name (Revision number)
AU/TR 65UB980T (1404-REV03)
2. Printing Specification
1. Trim size (Format) : 148 mm x 210 mm (A5)
2. Printing colors
• Cover : 1 Color (Black)
• Inside : 1 Color (Black)
3. Stock (Paper)
• Cover :
Uncoated, wood-free paper 60 g/㎡
• Inside : Uncoated, wood-free paper 60 g/㎡
4. Bindery : Saddle stitching
5. Language : IN, ENG (2)
6. Number of pages : 88
“This part contains Eco-hazardous substances (Pb, Cd, Hg, Cr6+, PBB, PBDE, etc.) within LG standard level,
N
Details should be followed Eco-SCM management standard[LG(56)-A-2524].
O
Especially, Part should be followed and controlled the following specification.
T
(1) Eco-hazardous substances test report should be submitted when Part certification test and First Mass Production.
E
(2) Especially, Don’t use or contain lead(Pb) and cadmium(Cd) in ink.
3. Origin Notification
LGEAK :
LGEAZ :
LGEEG :
LGEIL :
LGEIN :
LGEAS :
Printed in Kazakhstan
Printed in Brazil
Printed in Egypt
Printed in India
Printed in Indonesia
Printed in Algeria
4. Changes
10
9
8
7
6
5
4
LGEKR :
LGEMA :
LGEMX :
LGEND :
LGERA :
Printed in Korea
Printed in Poland
Printed in Mexico
Printed in China
Printed in Russia
LGERS :
LGESY :
LGETH :
LGEVN :
LGEWR :
Printed in Mexico
Printed in China
Printed in Thailand
Printed in Vietnam
Printed in Poland
Apr/10/2014 yuri.hong EKLE400928 [55/65UB95**-T] To add UB9500 series on the manual
3
Apr/03/2014 yuri.hong EKLE400363 [79/84UB9800-TA] Manual Revision for quality improvement
2
Mar/14/2014 yuri.hong EKLE301404 [65UB980T-TA] To add sentence about USB3.0 compatibility
1
Rev. Number MMM/DD/YYYY Signature ECO Number Change Contents
Page 2
Pagination sheet
Part number
Total pages
:
MFL68140504
:
88 pages
Front
(IN)
P/No. 2 … … … 42 blank
Front
(Eng)
P/No. 2 … … … 42 blank
Back
Back
Page 3
BUKU PANDUAN
*
*
TV LED
* Pernyataan
TV LED LG menggunakan layar
LCD dengan lampu latar LED.
Klik! Panduan Pengguna
Baca panduan ini dengan baik sebelum mengoperasikan TV
Simpanlah sebagai pegangan selanjutnya.
49UB85**
55UB85**
60UB85**
65UB93**
55UB95**
65UB95**
*MFL6814050*
65UB98**
79UB98**
84UB98**
98UB98**
49UC97**
55UC97**
65UC97**
P/NO : MFL68140504 (140-REV03)
105UC9*
www.lg.com
Dicetak di Indonesia
Page 4
DAFTAR ISI
2
DAFTAR ISI
3 LISENSI
33
REMOTE KONTROL
3 DOKUMENTASI BEBAS
PERANGKAT LUNAK
3 PENGATURAN PERANGKAT
KONTROL EKSTERNAL
4 PETUNJUK KEAMANAN
10 Menonton Gambar 3D (Hanya model TV 3D)
11 CARA PEMASANGAN PRODUK
11 PERSIAPAN DAN PERAKITAN
11
Membuka
15
Dijual Terpisah
16
Bagian dan Tombol
18
- Menggunakan tombol joystick
19
Mengangkat dan Memindahkan TV
20
Merakit TV
20
- Memasang Dudukan
22
Memasang TV pada Meja
23
Memasang TV pada Dinding
25
Merapikan Kabel
25
Menggunakan Kamera Integral
26
- Pengaturan Kamera Integral
26
- Bagian-bagian Kamera Integral
26
- Memeriksa Jangkauan Kamera
27
MENGHUBUNGKAN PERANGKAT
27
Menghubungkan Antena
28
Menghubungkan HDMI
29
Menghubungkan DVI ke HDMI
29
Menghubungkan Komponen
30
Menghubungkan Komposit
30
Menghubungkan Audio
30
- Menghubungkan Digital Audio Optik
31
Menghubungkan Headphone
31
Menghubungkan USB
32
Menghubungkan MHL
34
FUNGSI REMOTE KONTROL AJAIB
35
Registrasi Remote Ajaib
35
Cara Menggunakan Remote Ajaib
36
Himbauan Ketika Menggunakan
Remote Kontrol Ajaib
36
MENGGUNAKAN PANDUAN
PENGGUNA
37
PERAWATAN
37
Membersihkan TV Anda
37
- Layar, Bingkai, Penutup dan Dudukan
37
- Kabel Daya
37
PENYELESAIAN MASALAH
38
INFORMASI LINGKUNGAN
38
WEEE
39
SPESIFIKASI
PERINGATAN
Jika pesan ini Anda hiraukan, maka me
y
mungkinkan untuk terjadi hal-hal yang dapat
menyebabkan cedera atau kematian.
PERHATIAN
Jika pesan ini Anda hiraukan, anda dapat
y
saja mengalami cedera atau menyebabkan
kerusakan produk.
CATATAN
Catatan ini dapat membantu Anda mengerti
y
produk dan menggunakan produk dengan aman.
Silahkan baca catatan ini dengan baik sebelum
menggunakan produk.
Page 5
LISENSI / DOKUMENTASI BEBAS PERANGKAT LUNAK / PENGATURAN PERANGKAT
KONTROL EKSTERNAL
LISENSI
Lisensi yang mendukung tiap model dapat berbeda. Untuk keterangan lisensi lebih rinci, kunjungi
www.lg.com
DOKUMENTASI BEBAS PERANGKAT LUNAK
Untuk mendapatkan lisensi bebas di bawah GPL, LGPL, MPL dan lisensi bebas lainnya, yang termasuk dalam produk ini, silahkan kunjungi http://opensource.lge.com
Selain itu untuk kode lisensi, semua persyaratan lisensi yang dimaksud , peraturan garansi dan
pernyataan hak cipta tersedia untuk di-unduh.
LG Electronics juga akan memberikan kode lisensi bebas dalam CD-ROM Anda, dengan biaya yang
dikenakan untuk proses pendistribusian (seperti biaya dari media, penanganan dan pengiriman), kirimkan email ke opensource@lge.com. Tawaran ini berlaku selama tiga (3) tahun dari tanggal di mana
Anda membeli produk.
PENGATURAN PERANGKAT KONTROL EKSTERNAL
Untuk informasi lengkap mengenai Pengaturan Perangkat Kontrol Eksternal, kunjungi visit www.lg.com.
3
Page 6

PETUNJUK KEAMANAN
4
PETUNJUK KEAMANAN
Bacalah petunjuk keamanan ini dengan teliti sebelum menggunakan produk
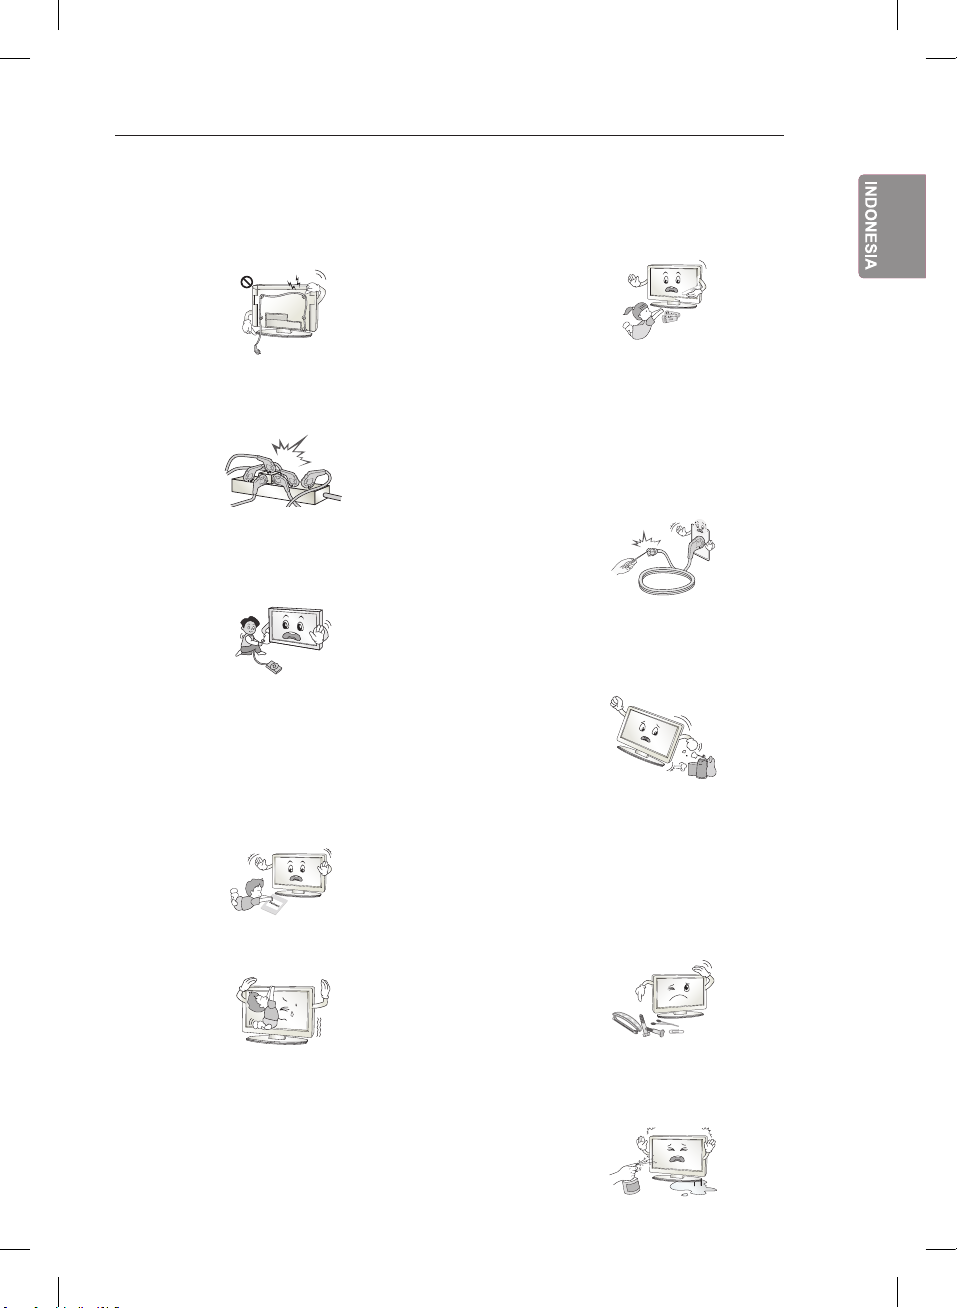
PERINGATAN
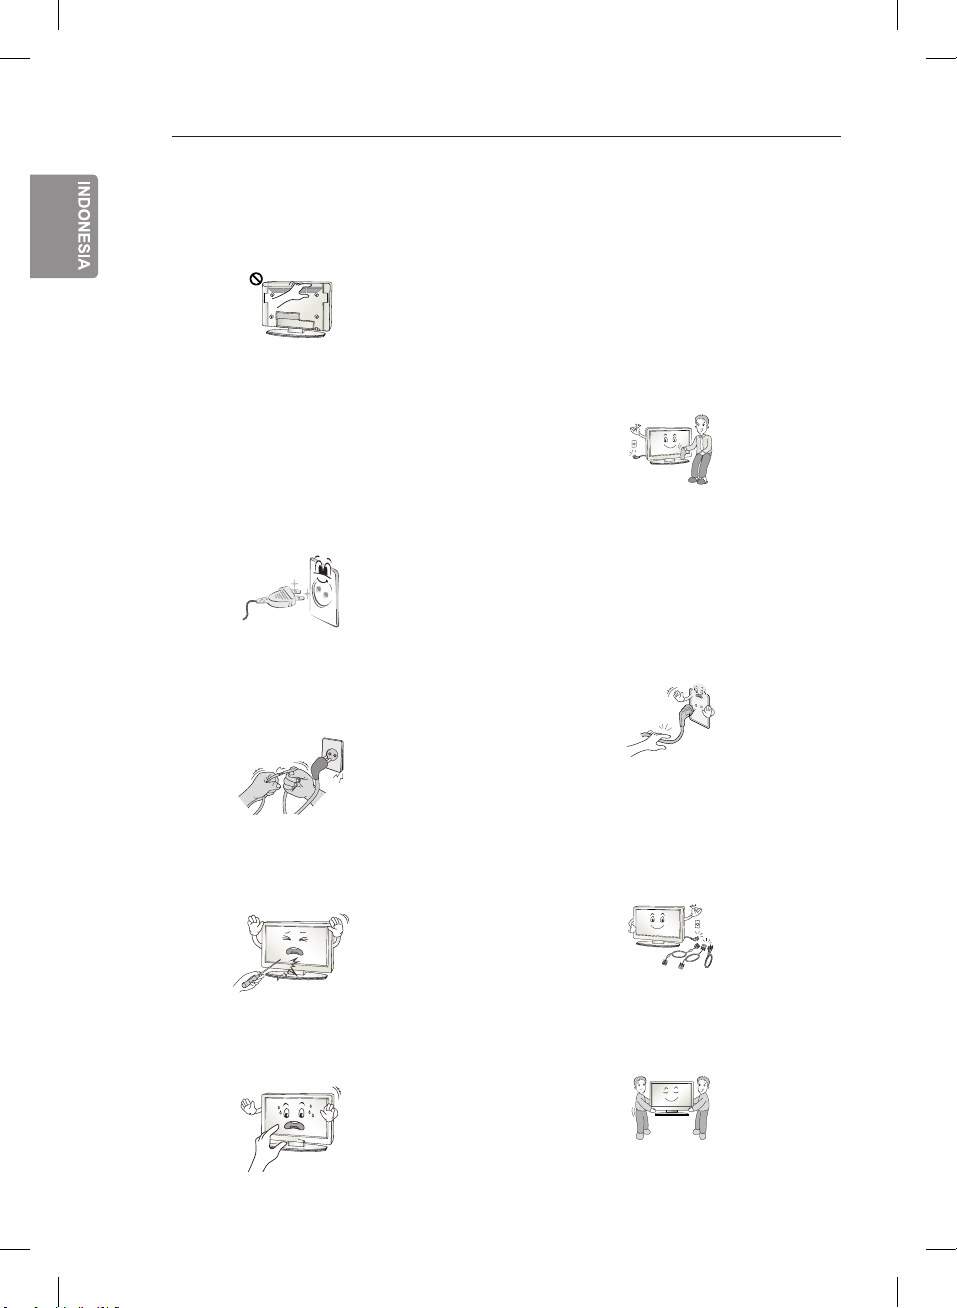
Jangan menempatkan TV dan remote
kontrol di lingkungan berikut:
- Lokasi yang terkena sinar matahari langsung
-Daerah dengan kelembabanyang tinggi
seperti kamar mandi
-Dekat dengan sumber panas seperti kompor
dan perangkat lain yang menghasilkan
-Dekat dengan dapur atau area
lembab dimana dapat dengan mudah
terkena uap atau minyak
-Daerah yang terkena hujan atau angin
-Dekat wadah air seperti vas
Karena, hal ini dapat menyebabkan kebakaran,
sengatan listrik, kerusakan atau cacat produk.
Jangan menempatkan produkditempat yang
mungkin terkena debu.
Hal ini dapat menyebabkanbahaya kebakaran.
Pastikan kabel daya sudahterhubung pada
soket yang sudah dihubungkan pada ground.
(Kecuali untuk perangkat yang tidak ada
groundnya.) Anda dapat tersengat listrik
atau cedera.
Tancapkan kabel daya dengan benar.
Jika kabel daya tidak benar, api dapat keluar.
Pastikan kabel daya tidak kontak langsung
dengan benda panas seperti pemanas.
Hal ini dapat menyebabkan kebakaran atau
bahaya sengatan listrik
Steker listrik berguna saat menghubungkan
TV/melepaskan perangkat listrik utama AC.
Steker ini harus tetap siap terpasang dan
beroperasi ketika TV sedang digunakan.
Jangan menyentuh kabel daya saat tangan
basah. Jika ujung steker basah atau penuh
debu, keringkan dengan sempurna dan
bersihkan debu dari steker. Anda bisa
tersengat listrik akibat kondisi basah.
Jangan menempatkan objek yang berat, atau
atau produk itu sendiri, diatas kabel daya.
Hal ini dapat menyebabkan kebakaran atau
sengatan listrik.
Tekuk kabel antena antara di dalam dan
di luar gedung untuk mencegah air hujan
masuk kedalam.
Hal ini dapat menyebabkan kerusakan pada
produk danbisa memberikan sengatan listrik.
Page 7
Saat memasang TV di dinding pastikan kabel
dan kabel sinyal tidak tergantung di belakang
dan kabel sinyal tidak tergantungdi belakang
TV. Ini dapat menyebabkan kebakaran dan
sengatan listrik.
Jangan mencolokkan beberapa perangkat
listrik terlalu banyakke dalam satu stopkontak
listrik. Hal ini dapat menimbulkan api akibat
kelebihan panas (over-heating).
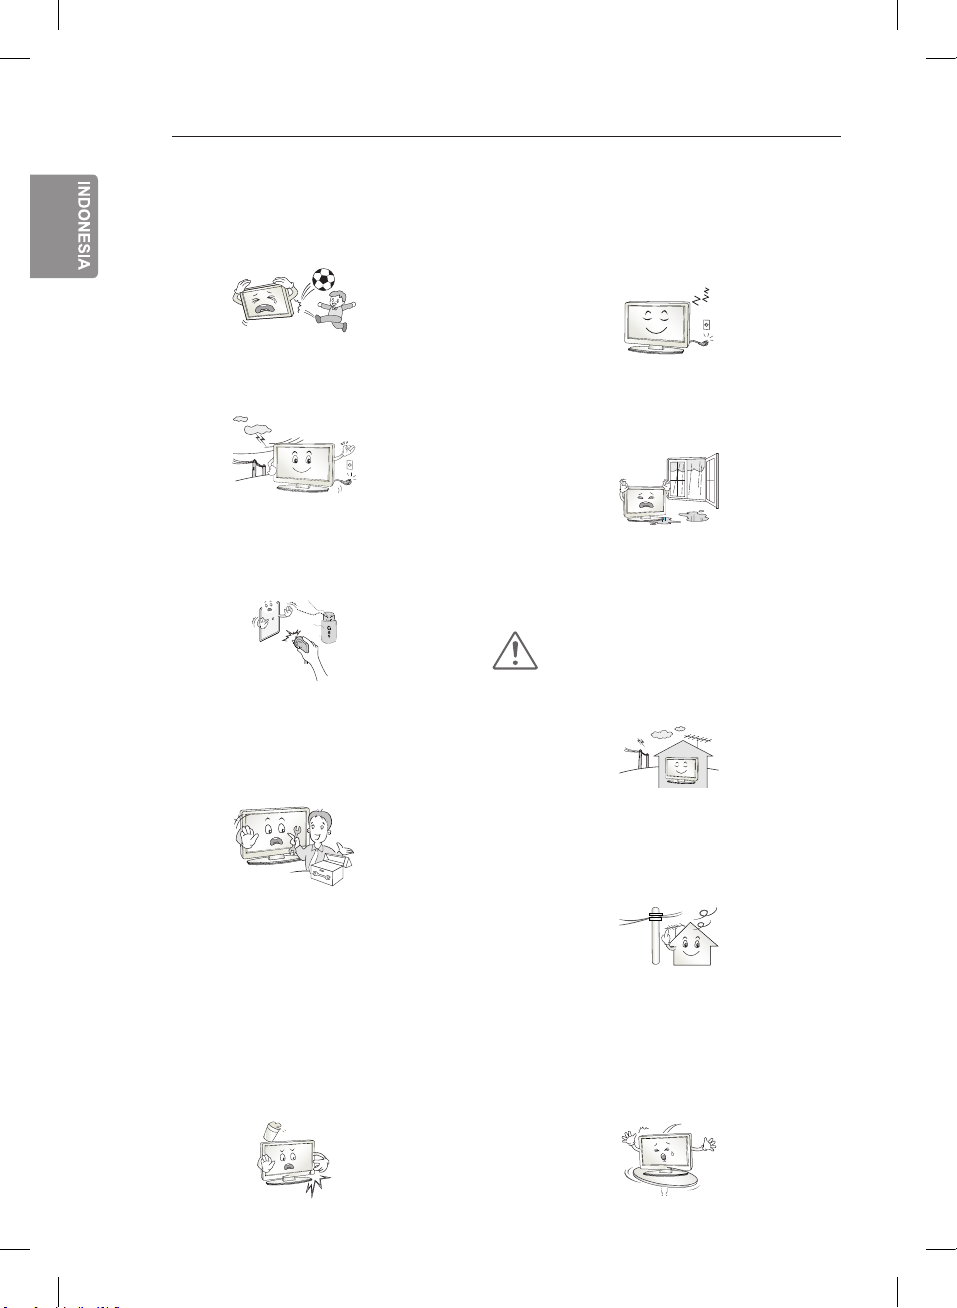
Jangan membenturkan atau menjatuhkan
produk saat menghubungkan perangkat
eksternal. Hal ini dapat mengakibatkan
cedera atau kerusakan pada produk.
Jauhkan kemasan sterofoam atau plastik
kemasan bagianluar dari jangkauan anak-anak
Bahan sterofoam merupakan material berbahaya
jika tertelan.Jika tertelan karena kesalahan,
paksakan pasien untuk memuntahkannya dan
kunjungi rumah sakit terdekat. Selain itu,
kemasan plastik dapat menyebabkan sesak
napas.
Jangan biarkan anak-anak Anda menaiki
atau bergelantungan pada TV. TV mungkin
akan jatuh, yang dapat menyebabkan cedera.
PETUNJUK KEAMANAN
Buanglah baterai yang sudah tidak digunakan
dengan hati-hati untuk melindungi anak
menelannya. Jika mereka memakannya,
bawalah ke dokter segera.
Jangan memasukkan benda logam/konduktor
(seperti sumpit logam, alat potong, obeng)
ke salah satu ujung kabel daya dan menghubungkan soket dinding ke input terminal
di dinding. Selain itu, jangan sentuh kabel
daya setelah masuk ke terminal dinding.
Anda mungkin akan tersengat listrik.
(Tergantung model).
Jangan meletakkan atau menyimpan zat-zat
yang mudah terbakar dekat produk. Hal ini
dapat menimbulkan bahaya ledakan atau
kebakaran karena kecerobohan penanganan
dari bahan yang mudah terbakar.
Jangan menjatuhkan benda logam seperti
koin, pin rambut, sumpit atau kawat ke dalam
produk, atau benda-benda yang mudah terbakar
seperti kertas dan sejenisnya. Anak-anak harus
mendapat perhatian khusus. Sengatan listrik,
kebakaran atau cedera dapat terjadi. Jika objek
yang asing jatuh ke dalam produk cabut kabel
listrik dan hubungi pusat layanan.
5
ENG
Jangan semprotkan air diatas produk atau
mengosoknya dengan bahan yang mudah
terbakar (tiner atau bensin).Kebakaran atau
kecelakaan bisa terjadi.
Page 8
PETUNJUK KEAMANAN
6
ENG
Jangan biarkan produk terguncang atau benda
y
jatuh mengenai produk, dan jangan membenturkan sesuatu ke layar. Anda mungkin bisa
terluka atau dapat merusak produk.
Jangan pernah menyentuh produk atau antena
y
selama ada sambaran petir atau badai Anda
mungkin akan tersengat listrik.
Jangan pernah menyentuh stopkontak di dinding
y
ketika ada kebocoran gas, bukalah ventilasi.
Hal ini dapat menyebabkan kebakaran akibat
percikan api.
Jangan membongkar pasang atau mereparasi
y
produk sendiri. Dapat menyebabkan korsleting
atau kebakaran. Hubungi pusat layanan untuk
pengecekan, kalibrasi atau reparasi.
Jika Anda berniat untuk tidak menggunakan
y
produk dalam waktu yang lama, cabutlah kabel
daya dari produk. Debu yang menutupi produk
dapat menyebabkan kebakaran, atau isolasi
yang rusak dapat menyebabkan kebocoran
listrik, sengatan listrik atau api.
Jauhkan produk dari tetesan air atau percikan
y
dan benda yang berisi air, seperti vas,
jangan menempatkannyadiatas produk.
Jangan pasang produk pada tembok jika ada
y
kemungkinan terkena embun atau minyak.
hal tersebut dapat merusak produk atau menyebabkan terjatuh.
PERHATIAN
Pasanglah produk dimana tidak terjadi
y
gelombang radio
Jika salah satu dari yang berikut
y
ini terjadi, segera cabut produk dan
hubungi pusat layanan di daerah Anda.
Produk terjatuh, terguncang atau
-
atau tertimpa benda lain
Produk rusak
-
Benda asing masuk ke dalam produk
-
Ada asap yang keluar dari produk atau
-
tercium bau aneh
Hal ini dapat mengakibatkan kebakaran atau
sengatan listrik .
Harus ada jarak yang cukup antara antena
y
luar dan kabel listrik agar tidak bersentuhan
bahkan ketika antena jatuh.Hal ini dapat
menyebabkan sengatan listrik.
Jangan pasang produk di tempat seperti
y
rak-rak yang tidak stabil atau permukaan
miring. Hindari juga tempat-tempat di mana
ada getaran atau tempat yang tidak dapat
menahan berat produk. Hal ini dapat
menyebabkan produk terjatuh atau terbalik,
yang mungkin menyebabkan cedera atau
kerusakan pada produk
Page 9
PETUNJUK KEAMANAN
7
Jika Anda memasang produk pada dudukan,
y
Anda perlu mengambil tindakan untuk mencegah produk terbalik. Karena produk
mungkin bisa terjatuh, yang dapat menyebabkan cedera
Jika Anda berniat memasang produk
y
di dinding, gunakan braket dengan standarisasi
VESA(opsional) di bagian belakang produk.
Saat Anda memasang TV menggunakan
braket penyangga dinding(opsional), pastikan
memasangnya dengan hati-hati agar tidak terjatuh.
Gunakan aksesoris yang direkomendasikan /
y
ditentukan oleh pabrik
Saat memasang antena, konsultasikan dengan
y
petugas servis. Jika tidak, mungkin dapat
menyebabkan bahaya kebakaran dan
sengatan listrik.
Kami merekomendasikan jarak menonton TV
y
setidaknya 2 sampai 7 kali ukuran diagonal
layar. Jika Anda menonton TV dalam jangka
waktu lama, dapat menyebabkan penglihatan
kabur.
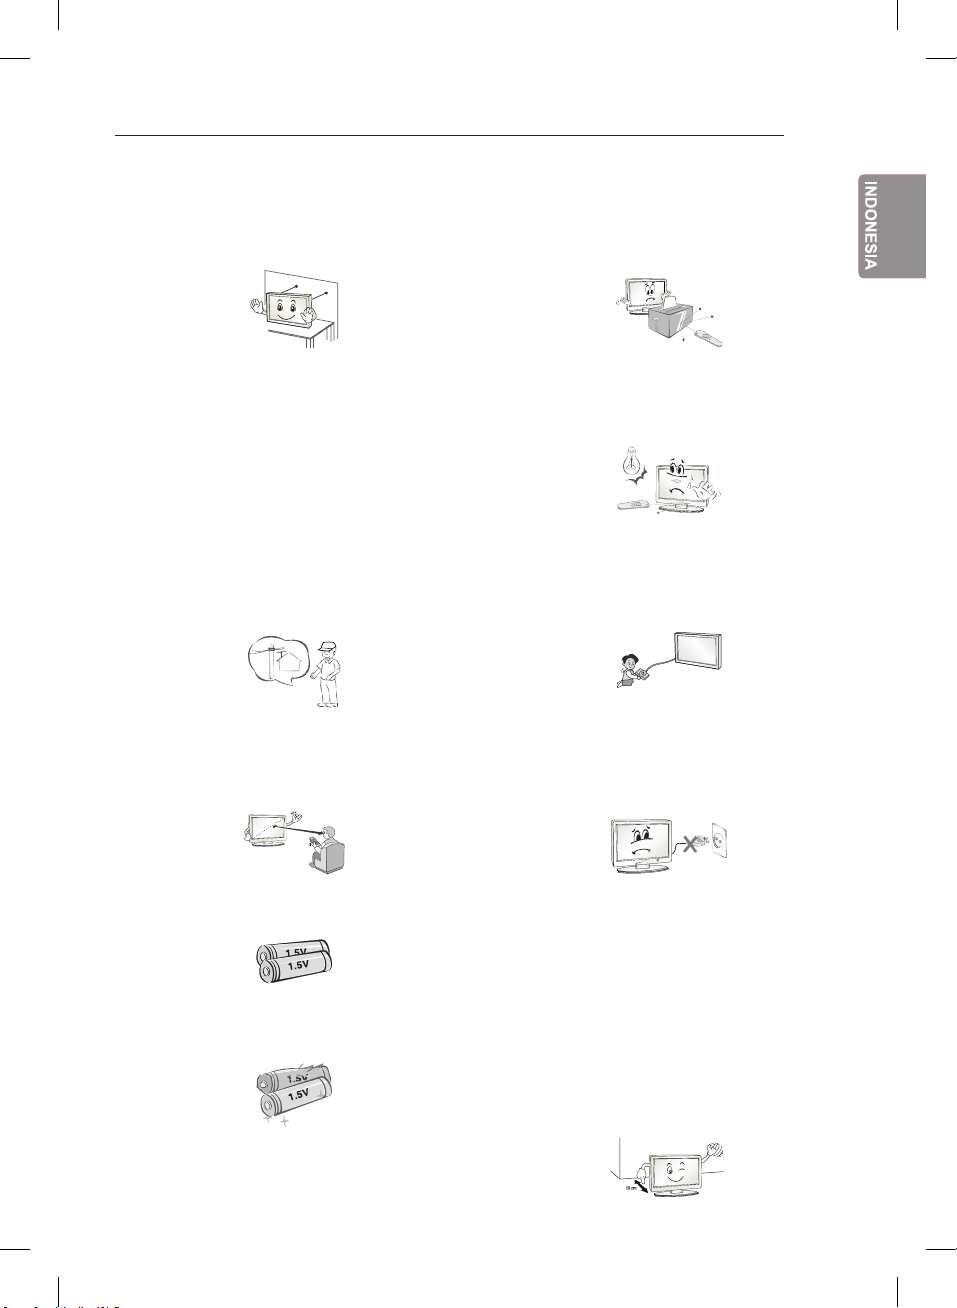
Jangan meletakan baterai non-rechargeable
y
di perangkat pengisian.
Pastikan tidak ada benda antara remote
y
kontrol dan sensor.
Sinyal dari remote kontrol mungkin akan
y
terganggu oleh cahaya matahari atau cahaya
kuat lainnya. Dalam kasus ini, gelapkan
ruang Anda.
Saat menghubungkan perangkat eksternal
y
seperti video game,pastikan kabel yang
terhubung cukup panjang.
Jika tidak, produk mungkin bisa terjatuh,
yang mungkin menyebabkan cedera atau
kerusakan produk.
Jangan mematikan/menyalakan TV dengan
y
dengan langsung mencabut atau mencolokkan kabel daya ke terminal dinding. (Jangan
gunakan kabel daya untuk mematikan/menya
lakan TV). Hal ini dapat menyebabkan kerusakan produk atau menimbulkan sengatan listrik.
ENG
Gunakan baterai tipe tertentu yang sesuai.
y
Jika tidak, dapat menyebabkan kerusakan
pada remote kontrol.
Jangan campur baterai lama dengan baterai
y
baru. Hal ini bisa menyebabkan baterai
menjadi terlalu panas dan bocor.
Baterai tidak boleh terkena panas berlebihan,
y
jauhkan dari sinar matahari langsung,
perapian terbuka dan pemanas listrik
Ikuti petunjuk pemasangan dibawah ini untuk
y
mencegah produk dari kelebihan panas
(overheating).
- Jarak antara produk dan dinding harus lebih
dari 10 cm.
- Jangan memasang produk ditempat yang
tidak ada ventilasinya (misal, pada rak
buku atau di dalam lemari).
- Jangan memasang produk diatas karpet.
atau busa
- Pastikan ventilasi udara tidak tertutup
taplak meja atau tirai.
Karena, dapat menyebabkan kebakaran.
cm.
Page 10
PETUNJUK KEAMANAN
8
ENG
Jangan menyentuh lubang ventilasi saat TV
y
dihidupkan. Lubang ventilasi mungkin
sangat panas. Hal ini tidak berpengaruh pada
pengoperasian atau tampilan TV.
Periksa kabel secara berkala, jika kelihatan
y
rusak atau kurang bagus, cabutlah, hentikan
penggunaan, dan ganti dengan yang baru,
yang sama persis, yang tersedia di tempat
layanan resmi.
Cegahlah penumpukan debu pada area
y
terminal daya.
Hal ini dapat menyebabkan kebakaran.
Cegah kabel daya dari kerusakan secara fisik
y
atau mekanik, seperti terpuntir,tertekuk, tergencet,
terjepit pintu, atau terinjak. Perhatikan pada
bagian colokan terminal dinding, dan bagian
dimana kabel terhubung pada produk.
y
Saat membersihkan produk an komponennya,
cabut kabel daya, dan gunakan kain lembut
untuk membersihkan. Jangan terlalu keras,
dapat menyebabkan goresan, atau luntur.
Jangan menyemprotkan air, atau menggunakan lap basah. Jangan pernah menggunakan
pembersih kaca, mobil, pengkilap, abrasif atau
wax, bensin, alkohol dsb., dapat menyebabkan
kerusakan produk atau panel layar. Juga
dapat menyebabkan kebakaran, kejutan listrik
atau kerusakan produk (perubahan,
bentuk, korosi, atau pecah).
Selama TV terhubung dengan terminal
y
daya AC, daya tidak akan terputus meski
Anda telah mematikan TV pada tombol
dayanya.
Saat mencabut kabel, genggam kepala
y
kabel dan cabut kabel dengan memegang
kepala kabel Jangan mencabut dengan
memegang kabel daya, kabel daya yang
terputus, dapat menyebabkan kebakaran.
Jangan menekan panel layar dengan tangan
y
atau benda tajam lain, seperti kuku, pensil atau
pena, dapat menyebabkan goresan pada layar.
Jangan menekan atau menahan dengan jari-jari
y
Anda terlalu lama. Hal tersebut apat menyebabkan distorsi/kerusakan sementara atau permanen
pada layar.
y
Saat memindahkan TV, pastikan Anda
mematikan daya terlebih dahulu. Kemudian, cabut kabel daya, kabel antena,
dan semua kabel yang terhubung.
Jika tidak, dapat merusak TV atau kabel
daya, yang menyebabkan kebakaran
atau kejutan listrik.
Saat memindahkan atau mengeluarkan
y
TV dari kotak, mintalah bantuan, karena
TV sangat berat.
Jika tidak, dapat terjatuh menyebabkan
luka atau kecelakaan.
Page 11
PETUNJUK KEAMANAN
9
Hubungi pusat layanan setahun sekali
y
untuk membersihkan bagian dalam TV.
Debu yang mengumpul, dapat menye-
babkan kerusakan mekanis.
y
Percayakan segala bentuk perbaikan, kepada petugas layanan resmi. Perbaikan
diperlukan saat perangkat mengalami
kerusakan, seperti kabel daya atau terminal
daya rusak,cairan atau benda masuk ke
dalam perangkat, perangkat terkena hujan
atau embun, perangkat tidak berfungsi
secara normal, atau karena terjatuh.
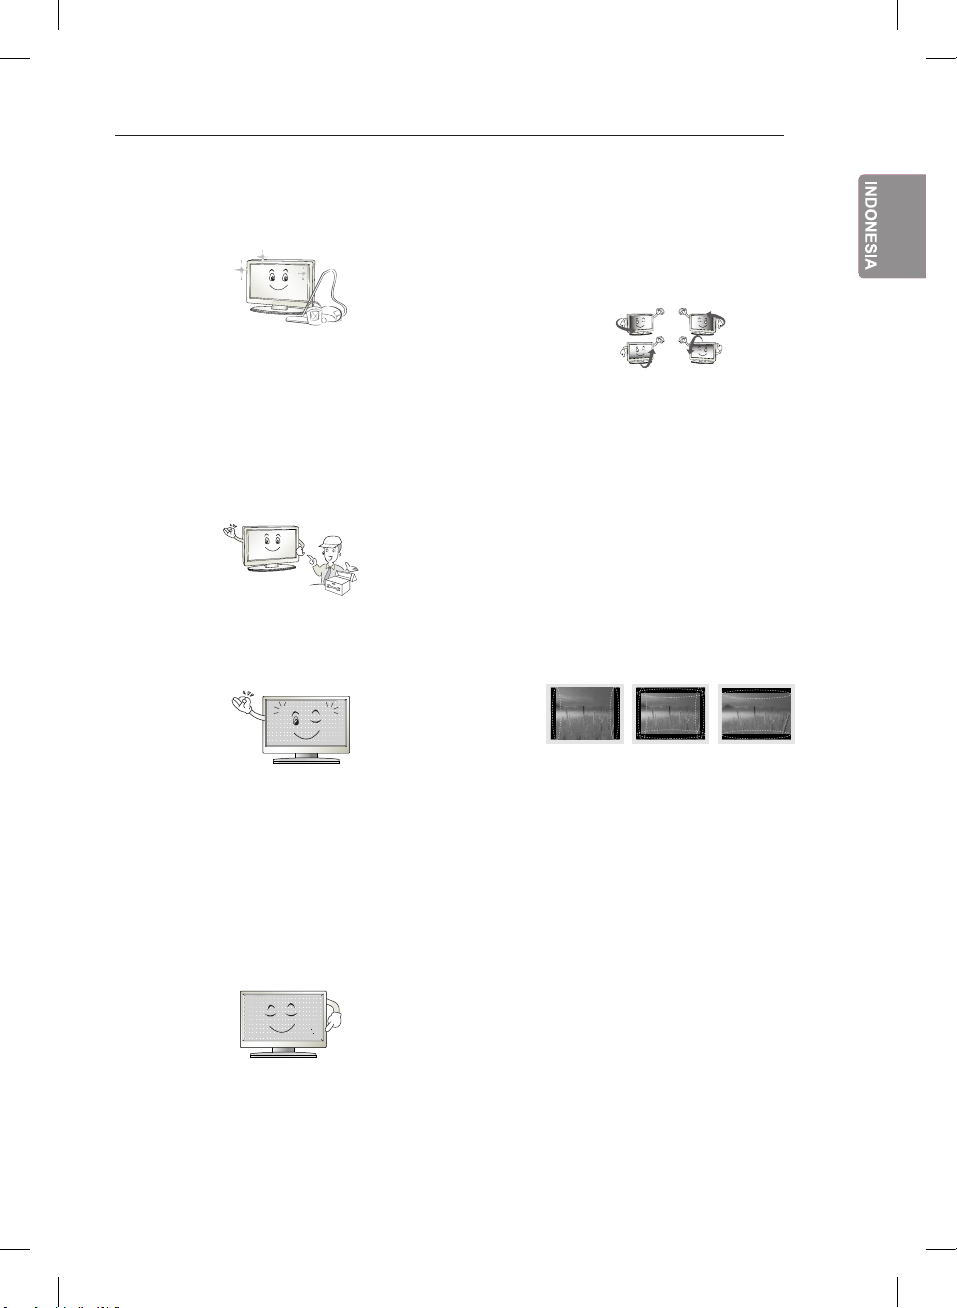
Jika TV terasa dingin saat disentuh, akan
y
terdapat sedikit “flicker” saat TV dihidupkan.
Hal ini normal, tidak ada kerusakan
pada TV.
Anda mungkin menemukan perbedaan
y
kecerahan dan warna pada panel, tergantung posisi layar pandang(kiri/kanan/atas/
bawah).
Fenomena ini terjadi karena karakteristik
panel. Tidak berhubungan dengan kemampuan produk, dan bukan merupakan kerusakan.
Gambar diam (misal, logo stasiun penyiaran,
y
menu layar (OSD), tampilan video game)
yang dibiarkan terlalu lama, dapat menyebabkan kerusakan layar, meninggalkan
bekas gambar, yang dikenal dengan gambar
sisa. Gambar sisa ini tidak dijamin dalam
garansi. Cegah tampilan gambar diam pada
televisi Anda dalam waktu lama (2 jam atau
lebih untuk LCD, 1 jam atau lebih untuk
Plasma).
Selain itu, jika Anda menonton TV pada rasio
4:3 terlalu lama, gambar sisa dapat terjadi
pada pinggiran panel.
Fenomena ini juga terjadi pada produk pihak
ketiga lainnya,tidak dapa
pengembalian biaya.
t ditukar atau
ENG
Panel layar adalah produk teknologi tinggi
y
dengan resolusi dua hingga enam juta piksel.
Anda mungkin melihat titik hitam kecil
dan/atau berwarna(merah, biru atau hijau)
dengan ukuran 1 ppm pada panel. Hal ini
tidak menunjukkan kerusakan fungsi dan
tidak mempengaruhi tampilan dan kemampuan produk. Fenomena ini juga terjadi
pada produk pihak ketiga lainnyadan tidak
dapat ditukar atau pengembalian biaya.
y
Suara yang muncul
Suara "Retakan" : Suara retakan yang
muncul saat menonton atau mematikan TV
diakibatkan oleh kontraksi panas plastik
karena temperatur dan kelembaban. Suara
ini biasa terjadi pada produk yang memerlukan perubahan bentuk panas.
Sirkuit elektrik berdengung/panel bergetar:
adalah tingkatanrendah suara yang dihasilkan dari perubahan cepat pada sirkuit elektrik,
yang mensuplai arus untukmengoperasikan
produk. Hal ini bervariasi, tergantung jenis
produk.
Suara yang muncul ini tidak mempengaruhi
tampilan dan kemampuan produk.
Page 12
PETUNJUK KEAMANAN
10
Menonton Gambar 3D
ENG
(Hanya model TV 3D)
PERINGATAN
Kondisi Menonton
Waktu Menonton
y
-
Ketika menonton konten 3D, beristirahatlah
selama 5 - 15 menit tiap satu jam. Menonton
konten 3D dalam waktu yang lama dapat
menyebabkan sakit kepala, pening, mata lelah
ataupun tegang.
Bagi Pengguna yang Mengalami Penyakit
Kronis atau Sensitif Terhadap Cahaya
y
Beberapa penguna mungkin mengalami gejala
tidak normal saat terkena kilatan cahaya atau
efek tertentu dari konten 3D.
Jangan menonton video 3D saat Anda mual,
y
hamil dan atau memiliki penyakit kronis, seperti
epilepsi, gangguan jantung, penyakit tekanan
darah, dan lain-lain.
Konten 3D tidak disarankan bagi mereka yang
y
menderita stereo blindness atau stereo anomaly
(mata terganggu karena silau). Gambar akan
nampak berbayang atau penglihatan yang tidak
nyaman.
Jika Anda penderita strabismus (juling),
y
amblyopia (penglihatan lemah) atau astigmatism
(silindris), Anda mungkin kesulitan menikmati
kedalaman 3D, mudah lelah atau gambar berbayang. Disarankan untuk lebih banyak beristirahat saat menonton 3D, dibandingkan orang
dewasa pada umumnya.
y
Jika kemampuan penglihatan mata kiri dan
kanan Anda berbeda, periksa dan perbaiki
terlebih dahulu sebelum menonton konten 3D.
Gejala yang mengharuskan menghentikan atau
menghindari dari menonton konten 3D
y
Jangan menonton konten 3D jika Anda merasa
lelah karena kurang tidur, kebanyakan kerja
atau mabuk.
Jika terjadi gejala berikut, hentikan penggunaan/
y
menonton konten 3D, dan beristirahatlah
hingga gejala menghilang.
- Konsultasi dengan dokter Anda jika gejala
tersebuttidak hilang. Gejala tersebut antara
lain sakit kepala,bola mata sakit, kelelahan,
mual, jantung berdebar,penglihatan kabur,
tidak nyaman, berbayang, dan sejenisnya.
PERHATIAN
Kondisi Menonton
Jarak Menonton
y
Jagalah jarak, setidaknya dua kali panjang
-
diagonal layar, saat menonton konten 3D.
jika anda merasatidak nyaman saat menonton konten 3D, mundur menjauh dari TV.
Umur
y
Balita/Anak-anak
Penggunakaan konten 3D tidak diperboleh-
kan untuk anak-anak dibawah 5 tahun.
-
Anak-anak dibawah 10 tahun mungkin akan
bertindak terlalu aktif saat menonton konten
3D (misal: mencoba menyentuh layar, atau
melompat). Maka diperlukan perhatian khusus
saat mereka menonton konten 3D
-
Anak-anak memiliki kemampuan melihat
lebih tinggi terhadap tampilan 3D dibandingkan orang dewasa, karena jarak antar
mata mereka lebihpendek daripada orang
dewasa. Sehingga mereka akan lebih dapat
melihat efek 3D dibanding orang dewasa
untuk gambar 3D yang sama.
Remaja
y
-
Remaja dibawah 19 tahun mungkin sensitif
terhadap rangsangan cahaya dari konten
3D. Himbau mereka untuk tidak menonton
konten 3D terlalu lama saat mereka lelah.
Orang Tua
y
-
Kemampuan melihat efek 3D pada Orang
tua mungkin berkurang dibanding anak muda.
Janganduduk terlalu dekat dari jarak yang
disarankan.
Perhatian saat menggunakan kacamata 3d
Pastikan menggunakan kacamata 3D LG. Jika
y
tidak, anda mungkin tidak dapat melihat konten 3D.
Jangan gunakan kacamata 3D sebagai kacamata
y
biasa, pelindung matahari, atau kacamata
pengaman.
Menggunakan kacamata 3D modifikasi mungkin
y
dapat menyebabkan mata tegang atau kerusakan gambar.
y
Jangan menyimpan kacamata 3D pada suhu
yang terlalu tinggi atau rendah. Dapat menyebabkan perubahan bentuk.
Kacamata 3D rapuh dan mudah tergores.
y
Gunakan dengan hati-hati, gunakan kain bersih
untuk membersihkan lensanya. Jangan tekan/
gores lensa kacamata 3Ddengan benda tajam,
jangan membersihkannyamenggunakan bahan
kimia.
Page 13
CARA PEMASANGAN PRODUK / PERISAPAN DAN PERAKITAN
11
CATATAN
Gambar yang ditampilkan mungkin berbeda dari TV Anda.
y
OSD TV Anda (On Screen Display) mungkin sedikit berbeda dari yang ditampilkan di manual ini.
y
Menu-menu yang tersedia dan pilihan mungkin berbeda dari sumber masukan atau model
y
produk yang Anda gunakan.
Fitur-fitur baru mungkin ditambahkan ke TV ini sebagai perkembangan dimasa yang akan datang.
y
TV dapat diatur ke mode standby sesuai keinginan untuk mengurangi konsumsi daya dan TV
y
harus dimatikan jika sewaktu-waktu tidak ditonton, hal ini akan mengurangi konsumsi energi.
Konsumsi energi yang digunakan dapat berkurang secara signifikan jika tingkat kecerahan
y
gambar dikurangi, dan ini akan menghemat biaya.
CARA PEMASANGAN PRODUK
1 Buka kemasan dan pastikan semua aksesoris sudah tersedia didalamnya.
2 Pasang dudukan ke TV Anda.
3 Hubungkan perangkat eksternal ke TV Anda.
4 Pastikan hubungan jaringan telah tersedia.
Anda dapat menggunakan fungsi jaringan TV hanya saat hubungan jaringan telah dibuat.
* Jika TV dinyalakan untuk pertama kali setelah dikirim dari pabrik, proses inisialisasi TV
mungkin akan memakan waktu hingga 1 menit.
PERSIAPAN DAN PERAKITAN
Membuka
Periksa box produk Anda untuk item-item berikut. Jika ada aksesoris yang hilang, hubungi penyalur
lokal dimana Anda membeli produk ini. Ilustrasi pada panduan ini mungkin sedikit berbeda dengan
item dan produk Anda yang sebenarnya.
ENG
PERHATIAN
Jangan menggunakan item bajakan untuk memastikan keselamatan dan masa guna produk.
y
y Segala kerusakan dan kecelakaan yang diakibatkan dari item bajakan tidak digaransi oleh pabrik
y Beberapa model sudah tertempel film tipis pada layar dan ini tidak perlu dilepaskan.
Page 14
ENG
PERSIAPAN DAN PERAKITAN
12
ENERGY
SAVING
1 2 3
4 5 6
7 809
LIST
MENU
BACK
AV MODE
INPUT
TV
FLASHBK
MARK
FAV
P
A
G
3D
CHVOL
E
MUTE
INFO
Q.MENU
ENTER
EXIT
L/R SELECT
FREEZE
RATIO
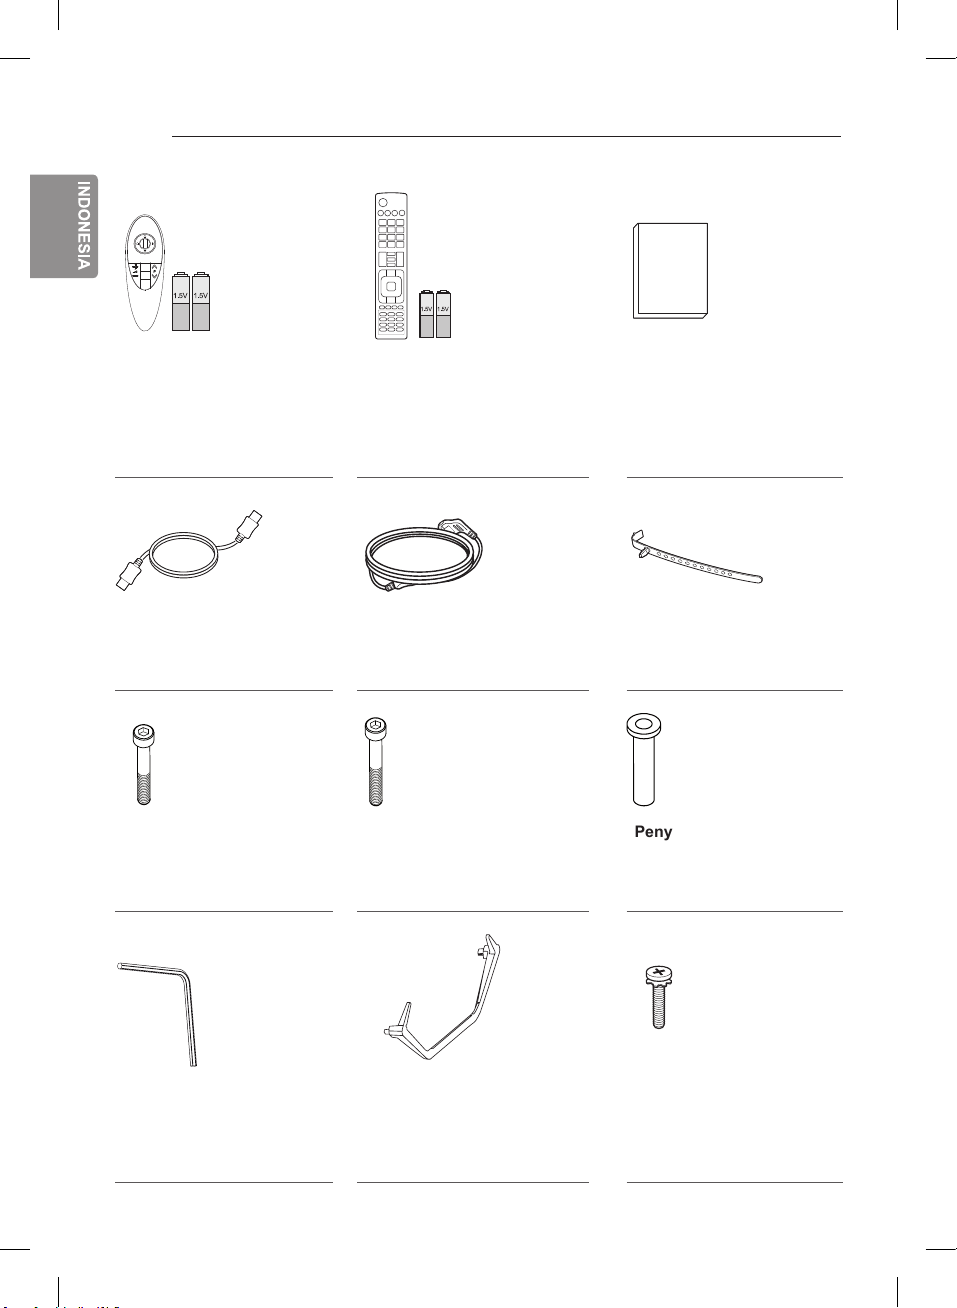
Remote Kontrol Ajaib, Baterai
(AA)
(Hanya UB85**, UB93**,
UB95**, UB98**,
UC97**,UC9*)
(Lihat h.34)
Kabel HDMI
(Tergantung model)
(Lihat h.28)
Sekrup Dudukan
4EA, M6 X L45
(Hanya 65UB98**)
(Lihat h.21)
Remote Kontrol, Baterai
(AAA)
Remote kontrol hanya
tersedia untuk negara tertentu.
(Tergantung model)
(Lihat h.33)
Kabel Daya
(Tergantung model)
Sekrup Dudukan
4EA, M6 x L50
(Hanya 79/84UB98**)
(Lihat h.21)
Buku panduan
Pengikat Kabel
(Tergantung model)
(Lihat h.25)
Penyangga Insulasi
4EA
(Hanya 84UB98**)
(Lihat h.21)
Kunci Pas
(Hanya UB98**)
(Lihat h.21)
Dudukan Penyangga
(Hanya UB98**)
(Lihat h.21)
Sekrup Dudukan
8EA, M4 X L20
(Hanya UB85**, UB93**,
UB95**)
(Lihat h.20)
Page 15

PERSIAPAN DAN PERAKITAN
13
ENG
Badan Penyangga /
Dudukan Penyangga
(Hanya UB85**, UB93**,
UB95**)
(Lihat h.20)
Pengatur Kabel
2EA
(Hanya UB85**, UB93**,
UB95**)
(Lihat h.25)
Tag On
Tag on
Kabel Gender Komponen
(Lihat h.29)
Kacamata sinema 3D
Jumlah kacamata 3D
dapat berbeda, tergantung
pada model atau negara.
(Hanya UB85**, UB95**,
UB98**, UC97**,UC9*)
Kabel Gender Komposit
(Lihat h.29, 30)
Inti Ferrite
(Tergantung model)
(Lihat h.14)
Page 16
<
<
PERSIAPAN DAN PERAKITAN
14
ENG
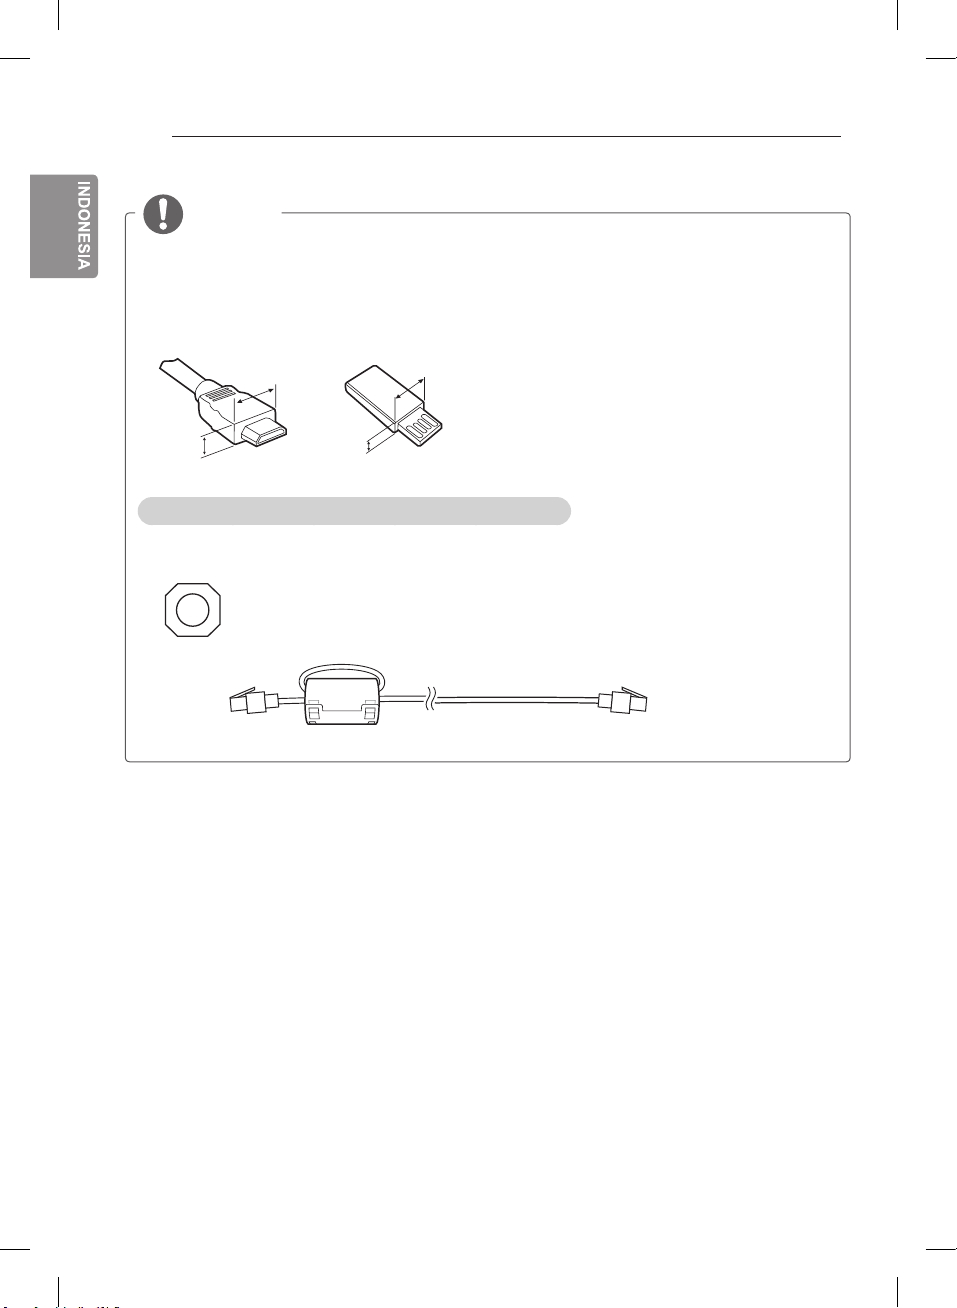
CATATAN
Item-item yang disediakan bersama produk Anda bervariasi tergantung pada model.
y
Spesifikasi produk atau isi pada manual ini bisa berubah tanpa pemberitahuan untuk
y
meningkatkan fungsi produk.
Untuk koneksi yang optimal, kabel HDMI dan perangkat USB harus memiliki tebal kurang dari
y
10 mm dan lebar kurang dari 18 mm. Gunakan kabel tambahan yang mendukung USB 2.0 jika
kabel USB ataumemori stik USB tidak sesuai dengan terminal USB TV Anda.
B
A
B
*A
10 mm
=
18 mm
*B
A
=
Cara penggunaan Inti ferrite (Tergantung model)
Gunakan inti ferrite untuk mengurangi pengaruh elektromagnetik pada kabel LAN. Lilitkan kabel
y
LAN sekali pada inti ferritee. Posisikan inti ferrite dekat dengan TV.
[Gambar PotonganInti Ferrite]
[ke TV] [ke perangkat eksternal]
Page 17
PERSIAPAN DAN PERAKITAN
15
Dijual Terpisah
Item yang dijual terpisah ini dapat diganti atau dimodifikasi tanpa pemberitahuan, untuk peningkatan
kualitas. Hubungi penyalur(dealer) Anda untuk membeli item ini.
Perangkat ini hanya bekerja dengan model yang sesuai.
ENG
AG-F***DP
Kacamata Dual play
AN-VC5**
Kamera video call Perangkat audio LG
Kompabilitas
AG-F***DP
Kacamata Dual play
AG-F***
Kacamata sinema 3D
AN-MR500
Remote ajaib
AN-VC5**
Kamera video call
Perangkat Audio LG
Tag on
Desain atau model dapat diganti tergantung pada peningkatan kualitas produk, pertimbangan
atau kebijakan perusahaan.
AG-F***
Kacamata sinema 3D
UB93**
• • •
• •
• • •
• • •
UB85**
UB95**
UC97**
• •
• •
AN-MR500
Remote ajaib
Tag on
UB98**
UC9*
Page 18
PERSIAPAN DAN PERAKITAN
16
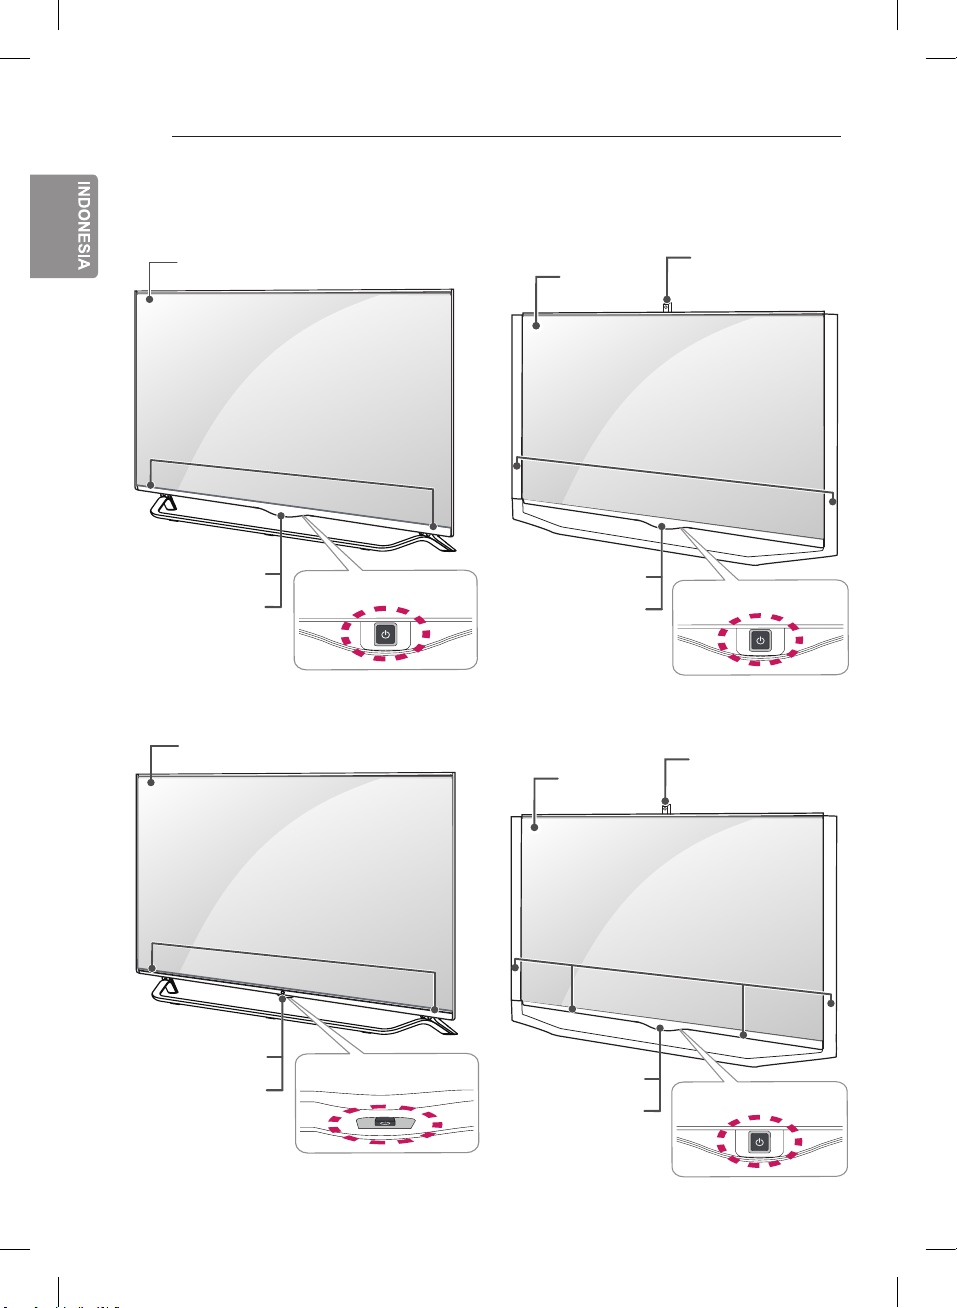
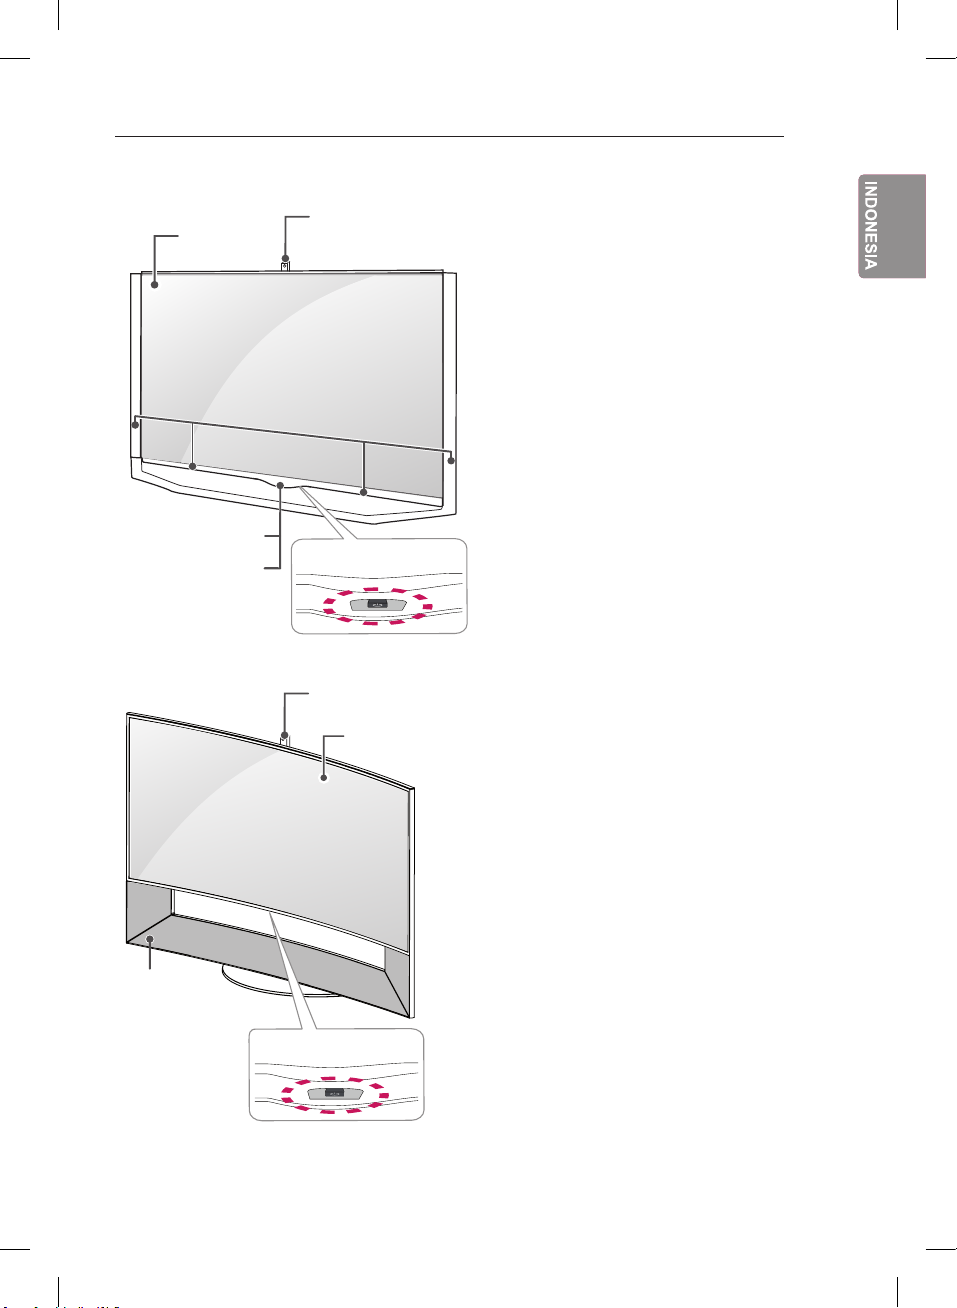
Bagian dan Tombol
ENG
Tipe A : UB85**
Layar
Tipe C : 65UB98* *
Kamera integral
Layar
Sensor remote kontrol
dan Sensor Cerdas
Indikator Daya
Tipe B : UB93**, UB95**
Layar
Speaker
1
Speaker
Tombol Joystick
Sensor remote kontrol
2
dan Sensor Cerdas
Lampu logo LG
Tipe D : 79UB98*
Layar
Speaker
1
*
Speaker
Tombol Joystick
Kamera integral
2
Sensor remote kontrol
dan Sensor Cerdas
Lampu logo LG
1
Tombol Joystick
3
Sensor remote kontrol
dan Sensor Cerdas
Lampu logo LG
1
Tombol Joystick
2
Page 19
PERSIAPAN DAN PERAKITAN
17
Tipe E : 84UB98*
*
Layar
Sensor remote kontrol
dan Sensor Cerdas
Lampu logo LG
Tipe F : UC9*
Speaker
1
Kamera integral
Tombol Joystick
Kamera integral
Layar
ENG
2
Speaker
Tombol Joystick
3
1 Sensor Cerdas - Mengatur kualitas gambar dan kecerahan sesuai kondisi ruangan/lingkungan.
2 Tombol Joystick - Tombol ini terletak dibelakang layar TV.
3 Tombol Joystick - Tombol ini terletak dibawah layar TV.
Page 20
PERSIAPAN DAN PERAKITAN
18
ENG
CATATAN
Anda dapat mengatur mati atau menyala nya lampu Logo LG dan indikator daya melalui UMUM
y
pada menu utama.
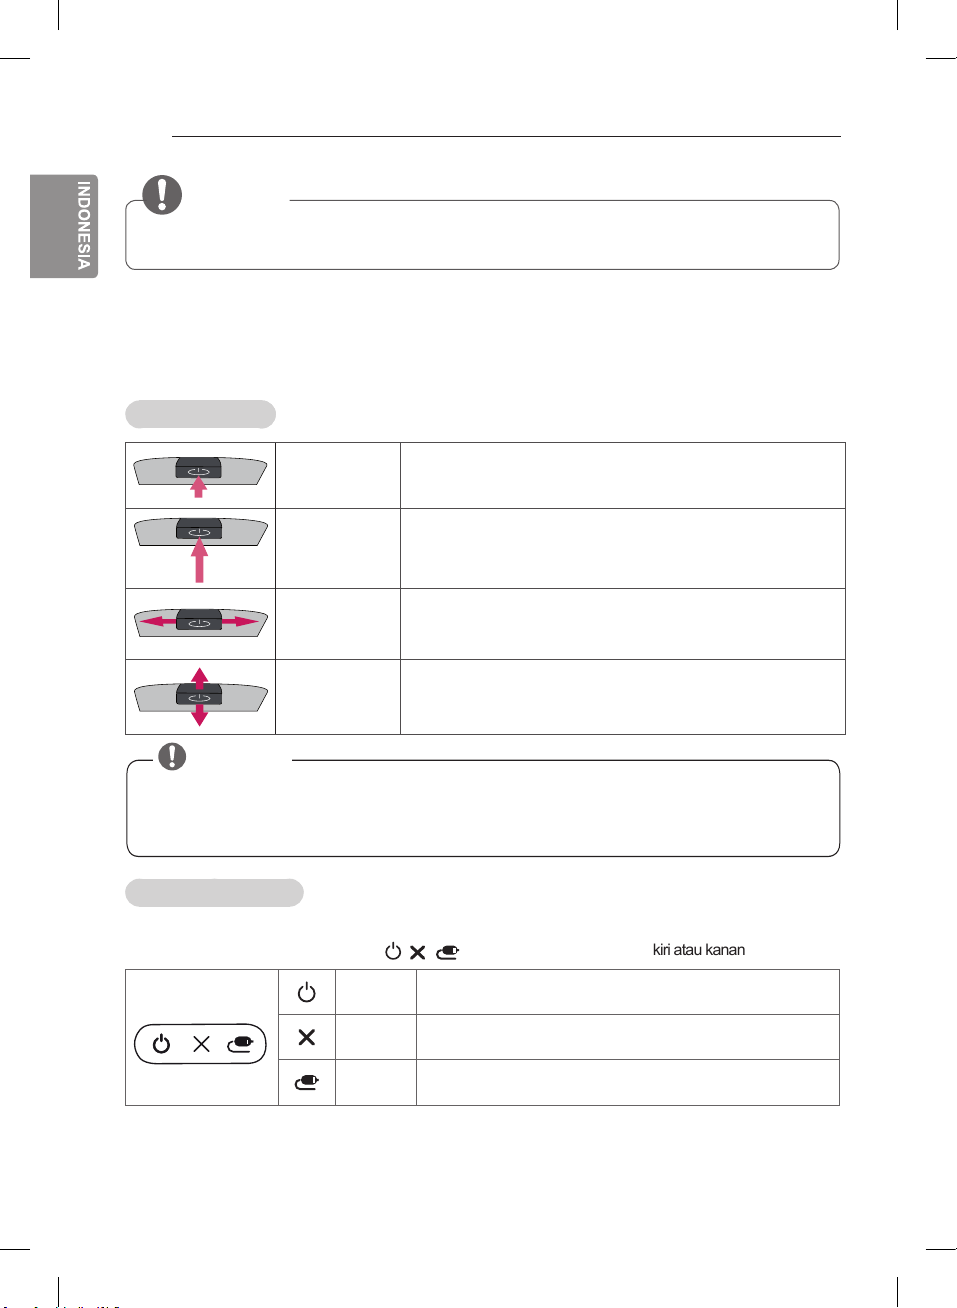
Menggunakan tombol joystick
Anda dapat mengoperasikan TV dengan menekan tombol atau memindahkan joystick ke kiri, kanan,
atas, atau bawah
Fungsi Dasar
Mengaktifkan
Daya
Menonaktifkan
Daya
Mengontrol
Volume
Mengontrol
Program
Saat TV dinonaktifkan, tempatkan jari Anda pada
tombol joystick dan tekan sekali dan lepaskan.
Saat TV diaktifkan, tempatkan jari Anda pada tombol
joystick dan tekan sekali beberapa detik dan lepaskan
Jika Anda menempatkan jari Anda diatas tombol
joystick dan mengerakkannya ke kiri dan kanan, Anda
dapat menyesuaikan tingkat volume yang Anda inginkan
Jika Anda menempatkan jari Anda diatas tombol joystick
dan mengerakkannya ke atas dan bawah, Anda dapat
memilih program tersimpan yang Anda inginkan.
CATATAN
Jika Anda menempatkan jari Anda diatas tombol joystick dan menekannya ke depan/belakang,
y
kiri atau kanan, berhati-hatilah untuk tidak menekan tombol joystick terlalu keras. Jika Anda terlalu keras menekan tombol joystick pertama kali, Anda tidak dapat mengatur volume dan
menyimpan program.
Menyesuaikan Menu
Saat TV diaktifkan, tekan tombol joystick pertama kali.
Anda dapat menyesuaikan item menu
TV Mati
Tutup
Daftar
Masukan
(
, , )
gerakkan tombol joystick ke kiri atau kanan.
Menonaktifkan daya.
Membersihkan tampilan pada layar dan kembali ke
menonton TV.
Mengganti sumber masukkan.
Page 21
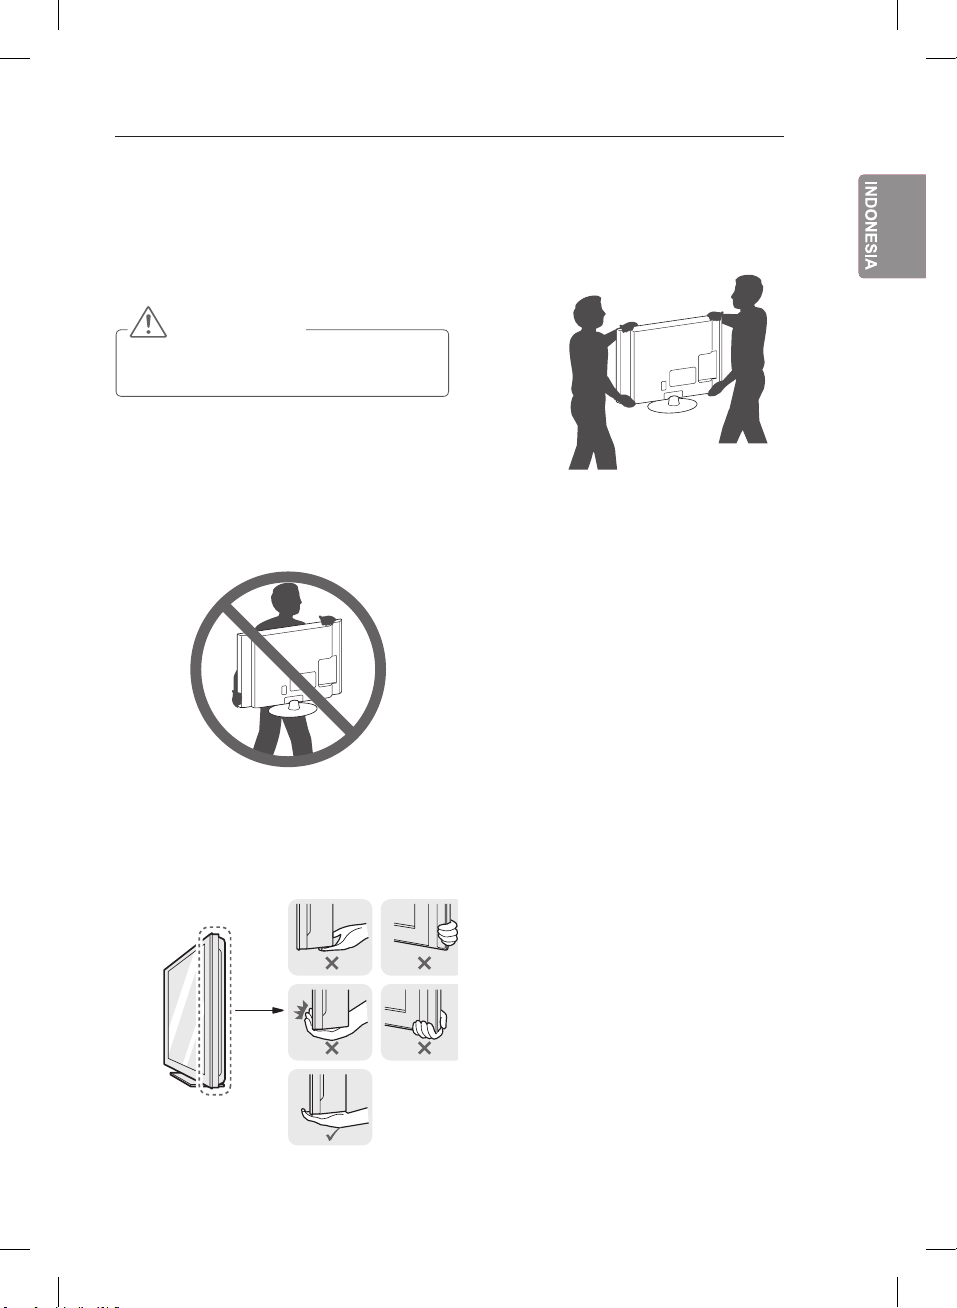
Mengangkat dan Memindahkan TV
Saat mengangkat atau memindahkan TV, baca hal
berikut untuk mencegah TV tergores atau rusak
dan untuk keamanan yang sesuai dengan jenis dan
ukurannya.
PERHATIAN
Jangan menekan layar terlalu lama,
y
dapat menyebabkan kerusakan layar
Disarankan untuk memindahkan TV dengan
y
menggunakan kotak atau packing pembungkus
seperti kondisi awal saat membeli TV ini
Sebelum memindahkan atau mengangkat TV,
y
cabut kabel daya dan semua kabel.
Saat memegang TV, posisikan layar membe-
y
lakangi Anda, untuk mencegah kerusakan.
PERSIAPAN DAN PERAKITAN
Saat memindahkan TV ukuran besar, harus
y
dilakukan setidaknya oleh 2 orang.
Saat memindahkan TV dengan tangan,
y
pegang TV seperti ilustrasi berikut.
Saat memindahkan TV, jangan diguncang atau
y
tergetar secara berlebihan.
Saat memindahkan TV, jaga TV tetap tegak
y
keatas, jangan dibalik atau dimiringkan ke kiri
atau ke kanan.
Jangan menekan terlalu berlebihan dapat
y
menyebabkan bingkai renggang/bengkok yang
dapat merusak layar.
Saat membawa TV, berhati-hati untuk tidak
y
merusak tombol joystick.
19
ENG
Pegang bingkai atas dan bawah TV dengan erat.
y
Pastikan tidak menyentuh bagian transparan,
area speaker atau grill speaker.
Page 22

1
2
PERSIAPAN DAN PERAKITAN
20
Merakit TV
ENG
Gambar mungkin berbeda dengan TV anda.
Memasang Dudukan
UB85**, UB93**, UB95**
1
Badan Penyangga (L)
Badan Penyangga (R)
Dudukan Penyangga
M4 x L20
4EA
2
12Pasang dudukan ke TV cocokkan dengan lubang
pengunci atas pada bagian belakang TV.
Pasang dudukan ke TV cocokkan dengan
konektor bawah pada bagian belakang TV.
3
CATATAN
Pastikan
y
(L), (R), sudah sesuai posisi masing-masing.
pemasangan badan penyangga
M4 x L20
4EA
Page 23
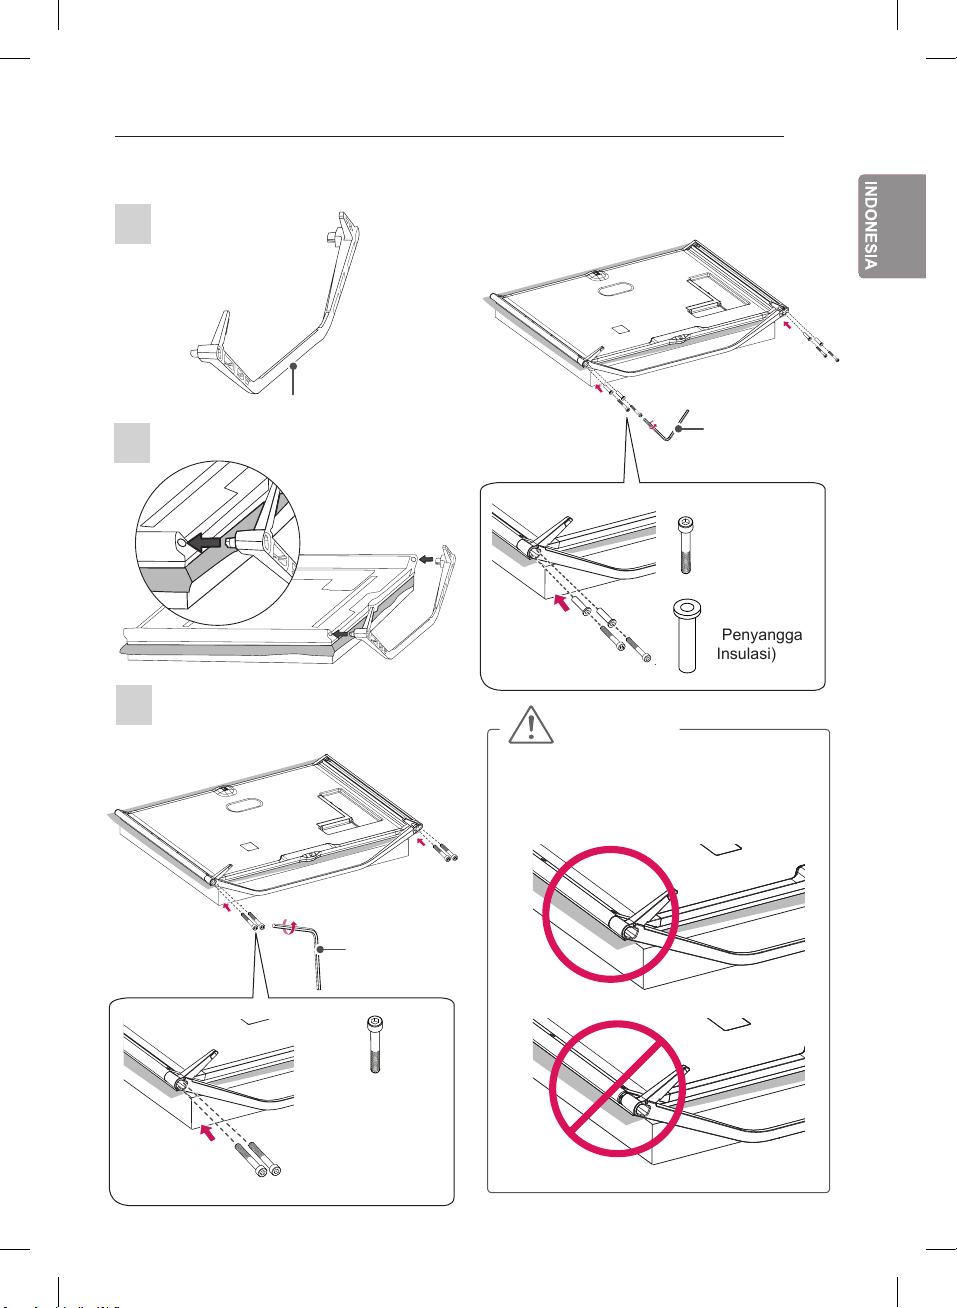
UB98*
2
1
PERSIAPAN DAN PERAKITAN
*
(Hanya 84UB98**)
21
ENG
Dudukan Penyangga
2
3
(Hanya 65/79UB98**)
1
2
Kunci Pas
1
Kunci Pas
2
4EA
M6 x L50
1
4EA
(Penyangga
Insulasi)
PERHATIAN
Pastikan untuk mengencangkan sekrup
y
dengan baik. (Jika pemasangan sekrup
tidak cukup kencang, TV dapat miring
ke depan saat dipasang.)
4EA
(Hanya 65UB98**)
1
M6 x L45
(Hanya 79UB98**)
M6 x L50
Page 24
PERSIAPAN DAN PERAKITAN
22
ENG
PERHATIAN
y Saat memasang penyangga pada TV,
letakkan layar menghadap bawah, pada
permukaan yang halus dan rata untuk
melindungi layar tergores
y
Pastikan untuk mengencangkan sekrup dengan
baik. (Jika pemasangan sekrup tidak cukup
kencang, TV dapat miring ke depan saat
dipasang). Jangan mengencangkan sekrup
terlalu kencang karena dapat merusak alur
pada sekrup yang menyebabkan sekrup
kendur.
CATATAN
y
Lepas dudukan sebelum memasang TV
pada penyangga dinding dengan melakukan
kebalikan dari proses pemasangan dudukan.
Memasang TV pada Meja
1 Angkat dan atur TV ke posisi yang sesuai
pada meja.
- Beri jarak 10 cm (minimal) dari dinding
untuk ventilasi yang baik.
10 cm
10 cm
10 cm
2 Hubungkan kabel daya pada colokan dinding.
10 cm
10 cm
PERHATIAN
Jangan letakkan TV dekat atau pada sumber
y
panas, dapat menyebabkan kebakaran atau
kerusakan yang lain
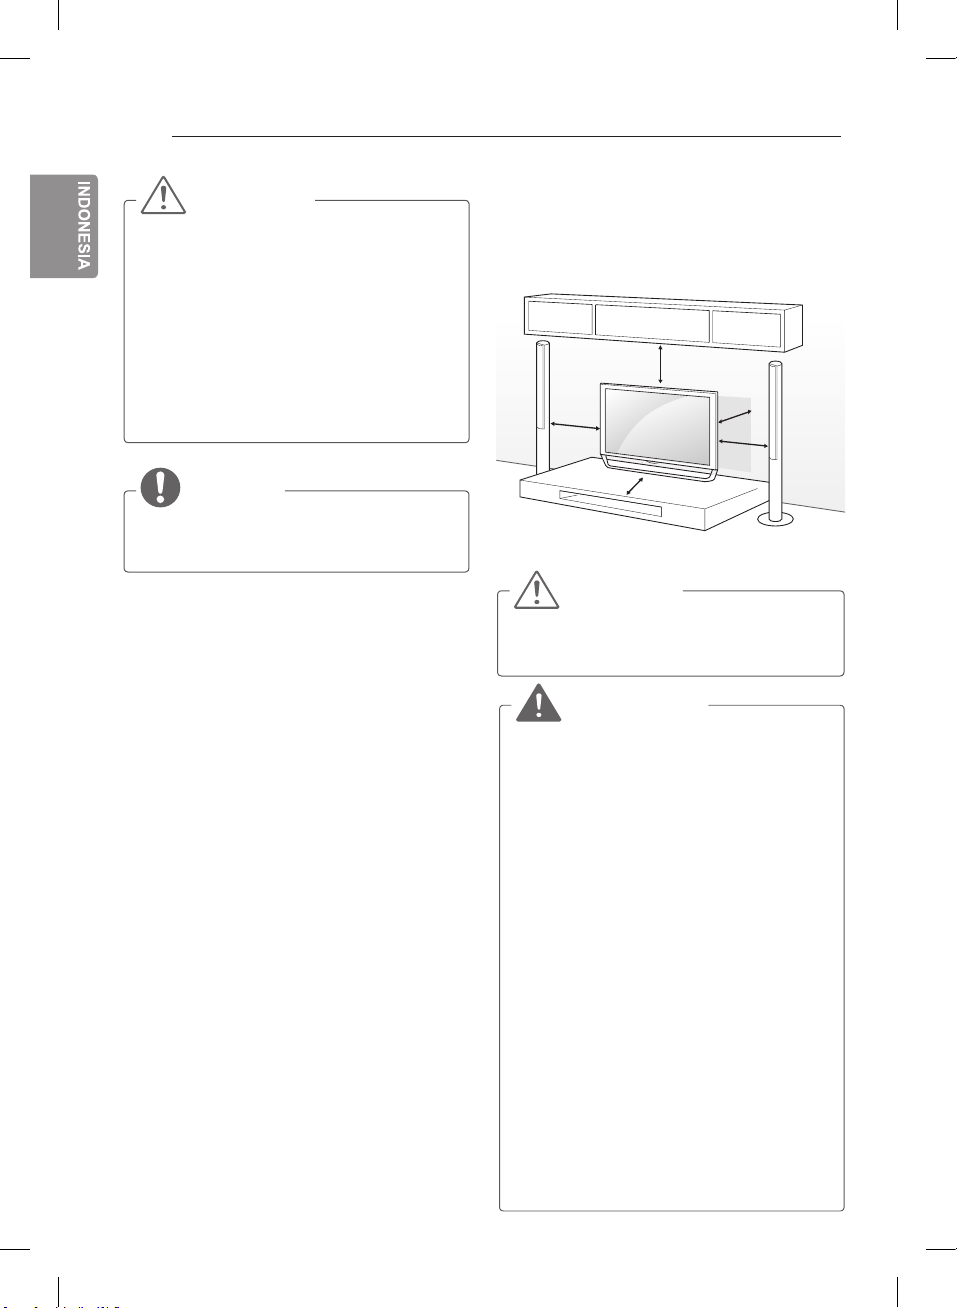
PERINGATAN
Jika Televisi tidak diletakkan pada tempat
y
yang cukup stabil, maka dapat menimbulkan
potensi bahaya akibat TV terjatuh. Cedera
yg terjadi, khusus nya pada anak - anak
dapat dihindari dengan langkah pencegahan
sebagai berikut:
» Menggunakan kabinet atau dudukan yang
sesuai dengan rekomendasi produsen televisi.
» Hanya menggunakan furnitur yang dapat
dengan aman menahan televisi.
» Pastikan televisi tidak berada pada posisi
menggantung di tepi furnitur penyangga/
dudukan.
» Tidak meletakkan televisi pada furnitur yang
tinggi (misal nya, lemari atau rak buku) tanpa
mengamankan furnitur dan televisi pada
sesuatu yang kuat untuk menahan dari
terjatuh.
» Tidak meletakkan televisi diatas kain atau
material lain, yang diletakkan diantara
televisi dengan furnitur penyangga.
» Mengajarkan anak-anak akan bahaya
memanjat furnitur untuk memainkan
televisi dan pengontrol nya.
Page 25
PERSIAPAN DAN PERAKITAN
23
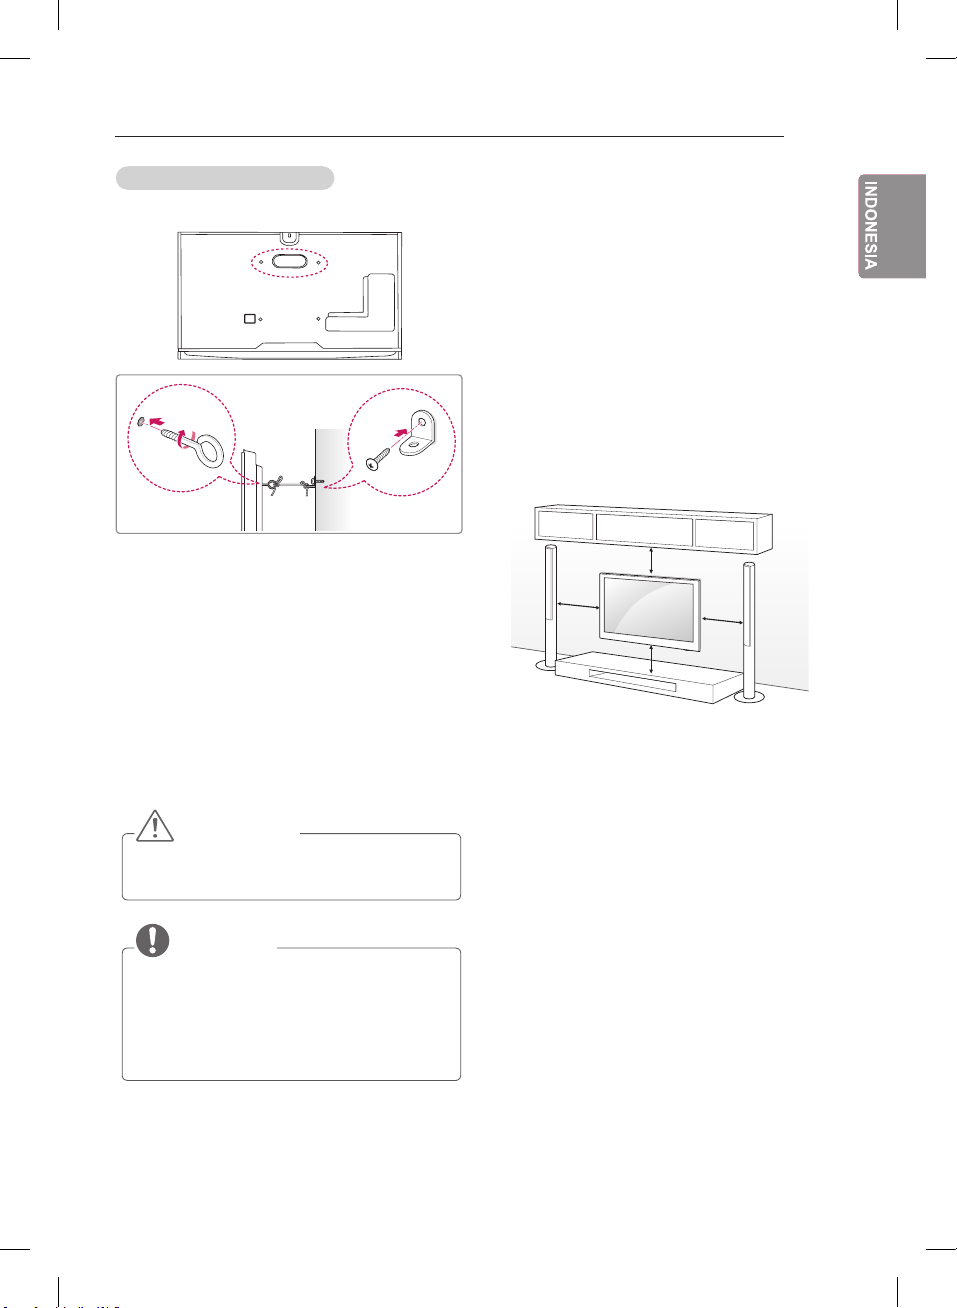
Pengamanan TV di Dinding
(Fitur ini hanya terdapat pada model tertentu.)
1 Masukkan dan kencangkan baut-mata, atau
braket TV dan bautnya pada bagian belakang TV
- Jika terdapat baut pada posisi untuk baut
mata, lepaskan terlebih dahulu.
Pasang braket dinding dan bautnya pada
2
dinding.
Sesuaikan posisi dari braket dinding dan
baut-mata pada belakang TV.
3
Hubungkan baut-mata dan braket dinding
menggunakan tali yang kokoh.
Pastikan tali pada posisi tegak lurus dengan
permukaan dinding.
Memasang TV pada Dinding
Pasangkan braket penyangga dinding (opsional)
di bagian belakang TV dengan hati-hati dan pasang
braket penyangga diding pada dinding yang kuat,
tegak lurus dengan lantai. Saat memasang TV di
material dinding yang lain, harap hubungi orang
yang berpengalaman.
LG menyarankan pemasangan TV di dinding
dilakukan oleh orang yang profesional.
Saat anda tidak menggunakan braket penyangga
dinding LG, harap gunakan braket penyangga
dinding dimana perangkat dapat terpasang dengan
aman ke tembok, dengan cukup jarak yang memungkinkan untuk konektifitas dengan perangkat
lain.
10 cm
10 cm
10 cm
10 cm
ENG
PERHATIAN
Pastikan anak-anak tidak memanjat atau
y
bergantungan pada TV.
CATATAN
Gunakan dinding yang yang cukup besar
y
dan kuat untuk memasang TV dengan aman
Braket, baut dan tali tidak disediakan.
y
Anda dapat memperoleh aksesoris tambahan
dari dealer terdekat.
Page 26

PERSIAPAN DAN PERAKITAN
24
Pastikan untuk menggunakan sekrup dan braket
ENG
penyangga dinding yang memenuhi standar VESA.
Ukuran standar perlengkapan braket terlihat
seperti tabel berikut.
Dijual Terpisah (Braket Penyangga Dinding)
A
B
Model
VESA (A x B)
Standar
sekrup
Jumlah
sekrup
Braket
Penyangga
Model
VESA (A x B)
Standar
sekrup
Jumlah
sekrup
Braket
Penyangga
LSW440B
LSW640B
49/55UB85**
55UB95**
400 x 400 400 x 400
M6 M6
4 4
LSW440B
MSW240
79/84UB98**
600 x 400
M8
4
LSW640B
Braket Penyangga
65UB93**
65UB95**
65UB98**
LSW440B
PERHATIAN
Cabut daya terlebih dahulu sebelum me-
y
mindahkan atau memasang TV.Jika tidak,
dapat terjadi kejutan listrik.
Jika Anda memasang TV pada langit-langit
y
atau dinding miring, TV dapat terjatuh dan
melukai. Gunakan braket penyangga resmi
LG dan hubungi penyalur lokal atau orang
yang berpengalaman(profesional).
Jangan memasang sekrup terlalu kencang
y
dapat menyebabkan kerusakan pada TV dan
membatalkan garansi.
y
Gunakan sekrup dan braket penyangga yang
memenuhi standar VESA. Segala kerusakan
yang diakibatkan penggunaan asesoris yang
tidak sesuai, tidak digaransi oleh pabrik.
CATATAN
Gunakan sekrup yang tercantum pada
y
spesifikasi standar VESA.
y Paket penyangga dinding terdiri dari panduan
nstalasi dan bagian-bagian yang dibutuhkan.
y Braket penyangga dinding tidak disediakan.
Anda dapat memperoleh aksesoris tambahan
dari dealer terdekat.
y Panjang sekrup mungkin berbeda, tergantung
penyangga dinding. Pastikan menggunakan
panjang yang sesuai.
y Untuk informasi lebih lengkap, lihat panduan
yang disertakan pada braket penyangga.
MSW240B
Page 27
PERSIAPAN DAN PERAKITAN
25
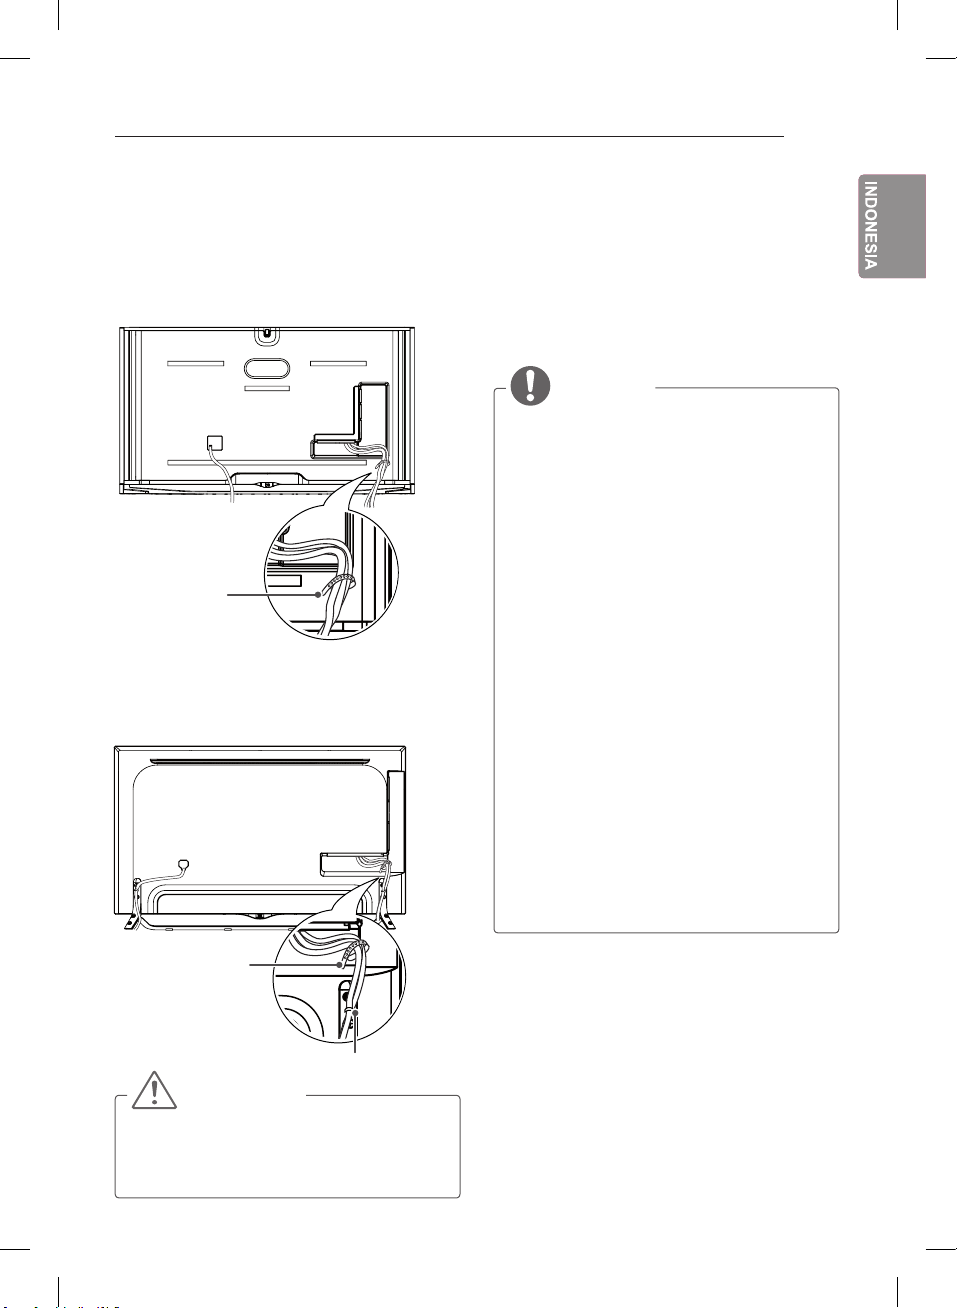
Merapikan Kabel
Gambar yang ditampilkan mungkin berbeda.
(Hanya UB98**)
1 Gabung dan ikat kabel menggunakan
Pengikat Kabel.
Pengikat Kabel
(Hanya UB85**, UB93**, UB95**)
1 Gabung dan ikat kabel menggunakan
Pengikat Kabel.
2 Pasang Pengatur Kabel dengan benar ke TV.
Menggunakan Kamera Integral
(Hanya UB98**, UC9*)
Anda dapat melakukan panggilan video Skype
atau menggunakan fungsi pengenal gerakan
dengan kamera yang integral pada TV.
TV ini tidak mendukung penggunaan kamera
eksternal.
CATATAN
Sebelum menggunakan kamera integral,
y
anda harus paham bahwa anda bertanggung jawab sepenuhnya atas penggunaan
atau penyalah gunaan kamera sesuai hukum
nasional yang berlaku termasuk hukum kriminal..
Hukum yg berlaku meliputi hukum Perlin-
y
dungan Informasi Pribadi yang mengatur
proses dan perpindahan data pribadi dan
hukum yang mengatur pengawasan dengan
kamera dilingkungan kerja atau tempat umum
Saat menggunakan kamera, hindari situasi
yang asusila, ilegal, atau bertentangan,
y
dengan moral.
selain di area atau acara publik, mungkin
hanya diperbolehkan untuk memfoto
Kami sarankan untuk menghindari situasisituasi berikut:
(1) Menggunakan kamera di tempat-tempat
yang tidak diperbolehkan ada kamera seperti
WC, ruang ganti, kamar pas dan area
keamanan.
(2) Menggunakan kamera hingga menyebabkan pelanggaran hak privasi.
(3) Menggunakan kamera hingga menyebabkan pelanggaran terhadap hukumhukum yang berlaku.
ENG
Pengikat Kabel
Pengatur Kabel
PERHATIAN
Jangan memindahkan TV dengan me-
y
ngangkat Pengikat Kabel & Penahan Kabel
Daya, Pengikat Kabel dapat putus, menyebabkan goresan dan kerusakan pada TV.
Page 28

PERSIAPAN DAN PERAKITAN
26
Pengaturan Kamera Integral
ENG
1 Dorong tuas geser pada bagian belakang TV
ke atas.
Pengatur
sudut
CATATAN
Lepaskan lapisan pelindung sebelum
y
menggunakan kamera.
3 Tekan kamera ke arah bawah jika
tidak digunakan.
Tuas Geser
Bagian-bagian Kamera Integral
Lensa kamera
Mikrofon
Lapisan Pelindung
Mikrofon
Anda dapat mengatur sudut dari kamera meng-
2
gunakan pengatur sudut pada bagian belakang
dari kamera.
<Tampilan Samping>
7˚
5˚
Tuas Lensa
5˚
7˚
Memeriksa Jangkauan Kamera
12Tekan tombol (Home) pada remote
kontrol untuk mengakses menu Home.
Pilih CAMERA dan tekan tombol
Roda(OK).
CATATAN
Jarak optimal dari kamera untuk menggu-
y
nakan fungsi pengenal gerakan berada di
jarak antara 1.5 dan 4.5 m.
Page 29

MENGHUBUNGKAN PERANGKAT
27
MENGHUBUNGKAN
PERANGKAT
Dibagian MENGHUBUNGKAN PERANGKAT
ini menggunakan diagram model 65UB980T .
Menghubungkan berbagai perangkat ke TV dan
mengganti mode masukan untuk memilih perangkat.
Untuk informasi rinci koneksi perangkat eksternal
lihat panduan yang disertakan pada perangkat
tersebut.
Perangkat eksternal seperti: penerima HD,
pemutar DVD, VCR, Sistem Audio, USB, PC,
Perangkat Permainan, dan perangkat yang
lainnya.
CATATAN
Menghubungkan perangkat eksternal
y
mungkin berbeda dari setiap model.
Saat menghubungkan perangkat eksternal,
y
tidak harus sesuai urutan terminal pada TV.
Jika Anda merekam program TV pada
y
perekam DVD atau VCR, pastikan untuk
menghubungkan kabel sinyal input ke TV
melalui perekam DVD atau VCR. Untuk
lihat panduan yang disediakan oleh
perangkat yang terhubung.
Ikuti petunjuk operasi yang disediakan pada
y
perangkat eksternal tersebut.
Jika menghubungkan perangkat permainan
y
ke TV, gunakan kabel yang disediakan oleh
perangkat permainan.
Pada mode PC, mungkin ada derau yang
y
terkait dengan resolusi, pola vertikal, kontras
atau kecerahan Jika derau terjadi, ubah
output PC ke resolusi lainnya, atur ulang
tingkatan ke tingkat lain atau atur kecerahan
dan kontras pada menu GAMBAR sampai
gambar bersih.
Pada mode PC, pengaturan beberapa
y
resolusi mungkin tidak bekerja dengan baik
tergantung pada kartu grafis.
Jika konten ULTRA HD diputar di PC anda,
y
video atau audio mungkin dapat seringkali
terganggu tergantung pada performa PC
anda.
Menghubungkan Antena
ENG
Hubungkan TV ke soket antena dinding dengan
menggunakan kabel RF (75 Ω).
(*Tidak disediakan)
CATATAN
y Gunakan pemisah sinyal jika mengguna-
kan 2 TV atau lebih.
y Jika kualitas gambar tidak bagus pasang
penguat sinyal dengan benar untuk memperbaiki kualitas gambar.
y Jika kualitas gambar tidak bagus, dengan
antena sudah terhubung, aturlah arah
antena ke arah lain.
y Kabel antena dan konverter tidak disedia-
kan bersama produk.
y Audio DTV yang didukung: MPEG, Dolby
Digital, Dolby Digital Plus, HE-AAC.
Page 30

MENGHUBUNGKAN PERANGKAT
28
Menghubungkan HDMI
ENG
Menghubungkan sinyal audio dan video dari
PC anda ke TV. Hubungkan PC dengan TV
menggunakan kabel HDMI seperti terlihat
pada ilustrasi beriku.
Pilih salah satu terminal input HDMI untuk menghubungkan. Tidak masalah gunakan yang mana
saja.
DVD / Blu-Ray / Kotak HD
Kabel / HD STB / PC
(*Tidak Disediakan- Tergantung model)
ARC (Audio Return Channel)
Perangkat audio eksternal yang mendukung
y
SIMPLINK dan ARC harus terhubung menggunakan terminal input HDMI (4K@60Hz)/
DVI IN 2 (ARC).
Saat menghubungkan dengan kabel HDMI
y
kecepatan tinggi, perangkat audio eksternal
yang mendukung output ARC optik SPDIF
tanpa tambahan kabel audio optik dan
mendukung fungsi SIMPLINK.
HDMI
1) Spesifikasi HDMI dapat berbeda di masingmasing terminal masukan, jadi pastikan anda
mengecek spesifikasi perangkat terlebih dahulu
sebelum menghubungkan.)
2) Hubungi layanan pelanggan untuk informasi lebih
lanjut mengenai spesifikasi HDMI masing-masing
terminal
Format 4K@50/60Hz yang didukung
Kedalaman Warna/
Chroma Sampling
8bit 10bit 12bit
YCbCr
YCbCr
4:2:0
YCBCr 4:2:2
1
4:4:4
RGB
1
4:4:4
YCbCr 4:2:0
1
- -
- -
1
Resolusi
3840 x 2160p
4096 x 2160p
Frame
rate(Hz)
50.00
59.94
60.00
1 : Hanya didukung pada terminal HDMI3
CATATAN
Disarankan untuk menghubungkan TV
y
dengan koneksi HDMI untuk kualitas
gambar terbaik.
y Gunakan kabel HDMI™ kecepatan tinggi
terbaru dengan fungsi CEC (Customer
Electronics Control) .
y Kabel HDMI™ dengan kecepatan tinggi
telah diuji untuk membawa sinyal HD
hingga1080p dan lebihtinggi
y Mendukung format Audio HDMI : Dolby
Digital, DTS, PCM (Hingga 192 KHz,
32 KHz/44.1 KHz/48 KHz/88 KHz/96
KHz/176 KHz/192 KHz).
Saat anda menggunakan kabel HDMI
y
(HDMI port3), direkomendasikan agar
menggunakan kabel yang sudah disediakan.
Jika anda menggunakan kabel HDMI di
pasaran, gunakan kabel HDMI berkecepatan
tinggi (3m atau lebih)
(Tergantung model)
Page 31

MENGHUBUNGKAN PERANGKAT
29
Menghubungkan DVI ke HDMI
Menghubungkan sinyal video digital dari perangkat eksternal ke TV menggunakan kabel
DVI-HDMI seperti terlihat pada ilustrasi berikut.
Untuk menghubungkan sinyal audio, gunakan
kabel audio.
Pilih salah satu terminal input HDMI untuk
menghubungkan. Tidak masalah gunakan
yang mana saja.
(*Tidak
Disediakan)
Menghubungkan Komponen
Mengirimkan video analog dan sinyal audio dari
perangkat eksternal ke TV. Hubungkan perangkat
eksternal dan TV dengan kabel Komponen seperti
yang ditunjukkan pada ilustrasi berikut.
IN
COMPONENT
VIDEO
KUNING
(Gunakan kabel gender
Komposit yang disediakan.)
PUTIH PUTIH
KUNING
AV
AUDIO
B
R
Y P
P
HIJAU
(Gunakan kabel gender
Komponen yang
disediakan.)
MERAH
MERAH MERAH
BIRU
HIJAU HIJAU
ENG
AUDIO OUT
DVI OUT
DVD / Blu-Ray / Kotak HD Kabel / PC / HD STB
CATATAN
y
Mode DOS mungkin tidak berfungsi tergantung dari video card jika Anda menggunakan kabel HDMI ke DVI.
Saat menggunakan kabel DVI-HDMI,
y
hanya mendukung Single Link.
(*Tidak Disediakan)
DVD / Blu-Ray /
Kotak HD Kabel
CATATAN
Jika kabel terpasang tidak benar, mungkin akan
y
PUTIH
L R
AUDIO
MERAH
menyebabkan gambar muncul dalam hitam
dan putih atau dengan warna yang "rusak".
MERAH
BIRU
MERAH
VIDEO
BIRU
HIJAU
Page 32

MENGHUBUNGKAN PERANGKAT
30
Menghubungkan Komposit
ENG
Mengirimkan sinyal audio dan video analog dari
perangkat eksternal ke TV. Hubungkan perangkat
eksternal dan TV menggunakan kabel Komposit
seperti yang ditunjukkan pada ilustrasi berikut.
IN
COMPONENT
COMPONENT
AUDIOAVP
VIDEO
KUNING
(Gunakan kabel gender
Komposit yang disediakan
KUNING
R
PUTIH
PB
B
Y
Y P
MERAH MERAH MERAH
Menghubungkan Audio
Anda dapat menggunakan sistem audio eksternal
untuk menggantikan speaker TV yang telah ada.
Menghubungkan Digital Audio Optik
Menghubungkan sinyal audio digital dari TV ke
perangkat eksternal. Hubungkan perangkat eksternal dan TV menggunakan kabel audio optik
seperti terlihat pada ilustrasi berikut.
VIDEO
VCR / DVD / Blu-Ray /
Kotak HD Kabel
PUTIH PUTIH
KUNING
(*Tidak Disediakan)
KUNING
( )
MONO
L R
AUDIO
(*Tidak Disediakan)
OPTICAL
Sistem Audio Digital
CATATAN
y
Jangan mengintip ke dalam terminal output
optical. Sinar lasernya dapat merusak
pengelihatan anda.
y
Audio dengan fungsi ACP (Audio Copy
Protection) mungkin akan memblokir digital
audio output.
AUDIO IN
Page 33

MENGHUBUNGKAN PERANGKAT
31
Menghubungkan Headphone
Mengirimkan sinyal headphone dari TV ke perangkat
eksternal. Hubungkan perangkat eksternal headphone dengan TV seperti yang ditampilkan pada
gambar.
(*Tidak Disediakan)
CATATAN
Menu AUDIO akan menghilang saat meng-
y
gunakan headphone.
Keluaran OPTICAL DIGITAL AUDIO tidak
y
berfungsi saat headphone terhubung.
Impedansi Headphone: 16 Ω
y
Keluaran suara Maks pada headphone:
y
0.627 mW hingga 1.334 mW
Ukuran jack Headphone: 0.35 cm
y
Menghubungkan USB
Menghubungkan perangkat USB seperti USB
flash memory, hard drive eksternal atau USB
card reader ke TV dan mengakses menu
Smart Share untuk menggunakan file
multimedia.
HDD
(*Tidak Disediakan)
HUB
(*Tidak Disediakan)
CATATAN
Beberapa USB Hub mungkin tidak berfungsi.
y
Jika perangkat USB tidak terdeteksi saat dihubungkan pada USB hub, hubungkan USB
langsung ke terminal USB pada TV.
y Hubungkan USB anda dengan sumber daya
eksternal jika dibutuhkan.
Koneksi melalui USB 3.0 :
y
»
Beberapa perangkat USB mungkin
tidak berfungsi jika tidak memenuhi
standar USB 3.0. Jika terjadi demikian
hubungkan melalui terminal USB IN 2
atau USB IN 3.
USB
(*Tidak Disediakan)
ENG
Page 34

MENGHUBUNGKAN PERANGKAT
32
Menghubungkan MHL
ENG
Mobile High-definition Link (MHL) adalah koneksi
untuk mentransmisikan sinyal audio-visual digital
dari ponsel ke TV.
Kabel MHL Pasif
(*Tidak Disediakan)
Telepon Selular
CATATAN
Hubungkan ponsel ke terminal HDMI
y
(4K@60Hz)/DVI IN 4 (MHL) untuk melihat
tampilan layar ponsel di TV.
Kabel MHL Pasif diperlukan untuk
y
menghubungkan TV dan telepon seluler.
Hanya untuk ponsel dengan fungsi MHL.
y
Beberapa aplikasi dapat dijalankan
y
menggunakan remote kontrol.
Untuk beberapa telepon selular yang men-
y
dukung MHL, Anda dapat mengkontrol
dengan remote kontrol ajaib.
Lepaskan kabel pasif MHL dari TV saat:
y
» Fungsi MHL dinonaktifkan.
» Perangkat ponsel anda sudah terisi
penuh(daya) pada mode standby.
Page 35

REMOTE KONTROL
1 2 3
4
5 6
7 809
P
A
G
E
INPUT
FAV
MUTE
GUIDE
Q.VIEW
EXIT
OK
MY APPS
LIVE TV
REC
TEXT
T.OPT
SUBTITLE
SLEEP
AD/
BACK
Q.MENU
RECENT
*
TV/RAD
1
2
3
33
REMOTE KONTROL
Deskripsi pada manual ini berdasarkan pada tombol-tombol yang terdapat pada
remote kontrol. Baca panduan ini dengan baik dan gunakan TV dengan benar.
Untuk mengganti baterai buka penutupnya, dan pasangkan baterai (1.5 V AAA)
sesuai tanda dan yang terdapat pada tempat baterai, kemudian tutup
kembali. Untuk melepas baterai lakukan langkah kebalikan.
PERHATIAN
Jangan mencampur baterai lama dengan yang baru, hal ini dapat merusak remote kontrol.
y
y Untuk TV Analog dan di beberapa negara, beberapa tombol remote kontrol mungkin tidak berfungsi.
y Di negara-negara tertentu remote kontrol tidak disertakan dalam paket penjualan.
Pastikan untuk mengarahkan remote kontrol ke sensor remote kontrol pada TV.
(Tergantung model)
(DAYA)
INPUT
SETTINGS
1
INFO
Menghidupkan atau mematikan TV.
Mengganti sumber masukan(input).
Mengakses menu utama.
Menampilkan informasi layar dan program yang sedang dilihat.
(Tergantung model)
1
RATIO
Q. MENU
(Panduan Pengguna)
Tombol Angka
GUIDE
Merubah ukuran gambar. (Tergantung model)
Mengakses menu cepat (Q.Menu).
Melihat Panduan Pengguna.
Memasukkan Angka.
Menampilkan jadwal program.
Q.VIEW Kembali ke program yang ditonton sebelumnya.
FAV
2
2
Mengatur tingkat suara.
Mengakses daftar program favorit Anda.
Untuk Menonton video 3D. (hanya mode 3D) (Tergantung model)
INFO
Menampilkan informasi layar dan program yang sedang dilihat.
(Tergantung model)
MUTE
ꕌPꕍ
Mematikan semua suara.
Memilih program atau saluran yang tersimpan.
PAGE
Pindah ke layar sebelumnya atau sesudahnya.
RECENT Menampilkan riwayat sebelumnya.
SMART
Mengakses menu Smart Home.
MY APPS Menampilkan daftar Aplikasi.
Tombol Navigasi (Atas/Bawah/Kiri/Kanan) Memilih menu atau pilihan menu.
OK
Memilih menu atau pilihan menu dan mengkonfirmasikan pilihan anda.
BACK
LIVE MENU
EXIT
Tombol Berwarna
( :
3
Tombol Teletext
SLEEP
LIVE TV
Tombol Kontrol
Kembali ke level sebelumnya.
Menampilkan daftar Rekomendasi, Program, Pencarian dan Rekaman.
Menghilangkan semua tampilan pada layar dan kembali ke tontonan TV.
Mengakses fungsi khusus pada beberapa menu.
Merah,: Hijau,: Kuning: Biru
Mengatur pewaktu tidur.
Tombol ini digunakan untuk teletext.
)
Kembali ke TV LIVE.
( )
Mengkontrol konten Premium, Time Machine atau menu
SmartShare atau perangkat SIMPLINK yang kompatibel (USB atau SIMPLINK atau Time Machine).
REC Memulai rekaman dan menampilkan menu record.
(Hanya model yang mendukung Time Machine)
SUBTITLE
AD/
Memilih subjudul pada mode digital.
Dengan menekan tombol AD, fungsi Deskripsi Audio akan diaktifkan.
(Tergantung model)
TV/RAD
Memilih program Radio, TV, atau DTV.
ENG
Page 36

FUNGSI REMOTE KONTROL AJAIB
34
FUNGSI REMOTE KONTROL AJAIB
ENG
Saat pesan “Baterai Remote Kontrol Ajaib Habis. Ganti Baterai.” ditampilkan,
gantilah baterainya.
Untuk mengganti baterai, buka penutup baterai, ganti baterai (1.5 V AA) sesuaikan
dan dengan petunjuk yang terdapat pada tempat baterai, dan tutup kembali.
Pastikan untuk mengarahkan remote kontrol pada sensor remote kontrol pada TV.
Untuk melepas baterai lakukan langkah kebalikan.
PERHATIAN
Jangan mencampur baterai lama dengan yang baru, hal ini dapat merusak remote kontrol.
y
Untuk TV Analog dan di beberapa negara, beberapa tombol remote kontrol mungkin tidak berfungsi.
y
(Hanya UB85**, UB93**, UB95**, UB98**, UC97**,UC9*)
(DAYA)
Menyalakan atau mematikan TV.
Tombol Navigasi
Tekan tombol atas, bawah, kiri atau
kanan untuk memilih menu. Jika anda
beroperasi seperti remote kontrol
goyangkan Remote Ajaib ke kiri
dan memilih menu menggunakan
Tombol ini mengakses fungsi khusus
(atas/bawah/kiri/kanan)
tekan tombol
saat pointer sedang digunakan,
pointer akan menghilang dari
layar dan Remote Ajaib akan
biasa. Untuk menampilkan
kembali pointer pada layar,
Tekan bagian tengah tombol
Roda untuk memilih menu.
Anda dapat mengganti program
(
Mengatur tingkat volume
, , atau
dan kanan.
Roda(OK)
tombol Roda.
Tombol Berwarna
di beberapa menu.
: merah, : Hijau,
: Kuning, : Biru)
suara.
(BACK)
Kembali ke level sebelumnya
atau Q.View (pada Live TV).
(Smarthome)
Mengakses menu Smart Home.
(KELUAR ke LIVE)
Berpindah antar siaran
(antena) dan berbagai masukan.
(Pengenal Suara)
(Tergantung model)
P
Memilih program atau saluran
yang telah disimpan.
Menampilkan Layar Remote.
* Mengakses menu Kontrol
Universal. (Tergantung model)
* Tekan dan tahan tombol
akan menampilkan
menu untuk memilih perangkat
eksternal yang sudah terhubung
ke TV.
Gunakan untuk melihat video 3D.
(Hanya model 3D)
(MUTE)
ematikan semua suara.
* Dengan menekan dan menahan
tombol , fungsi deskripsi audio
akan diaktifkan.
(Hanya untuk Thailand)
Page 37

HOME
HOME
FUNGSI REMOTE KONTROL AJAIB
35
Pengenal suara (Tergantung model)
Koneksi jaringan dibutuhkan untuk menggunakan fungsi pengenal suara.
1 Tekan tombol pengenal suara.
2 Bicaralah saat tampilan window suara
muncul pada sisi kiri layar TV.
Pengenalan suara dapat gagal saat anda
•
berbicara terlalu cepat atau lambat..
Gunakan remote kontrol ajaib dalam jarak
•
tidak lebih dari 10 cm dari wajah anda.
Kecepatan pengenalan suara bervariasi
•
tergantung pada karakter pengguna
(suara, pengucapan, intonasi dan kecepatan bicara) dan keadaan lingkungan
(kebisingan dan volume TV).
Registrasi Remote Ajaib
Cara registrasi Remote Ajaib
Registrasikan Remote Ajaib ke TV
terlebih dahulu sebelum digunakan.
(Roda)
1 Pasang baterai pada Remote
Ajaib dan nyalakan TV.
2 Arahkan Remote Ajaib ke TV anda
dan tekan tombol Roda(OK)
pada remote kontrol.
*
Jika registrasi gagal, ulang
kembali setelah TV dimatikan
dan dinyalakan kembali.
Cara Menggunakan Remote Ajaib
Gerakkan Remote Ajaib secara
y
perlahan ke kiri dan ke kanan
atau tekan tombol (home),
, tombol untuk
memunculkan pointer
pada layar.
(Di beberapa model TV,
Pointer akan muncul saat
anda menggerakkan tombol
Roda)
Jika pointer tidak digunakan
y
dalam periode tertentu atau
Remote Ajaib diletakkan pada
permukaan datar, pointer akan
menghilang.
Jika respon pointer tidak lan-
y
car, anda dapat me-reset
pointer dengan menggerakkannya ke bagian sudut pada
layar.
Remote Ajaib menghabiskan
y
baterai lebih cepat dibandingkan remote normal dikarenakan
beberapa fitur yang berbeda.
ENG
Cara menghapus registrasi Remote Ajaib
Tekan tombol (BACK) dan
(BACK)
(Home)
(Smarthome) secara bersamaan
selama sekitar 5 detik, untuk menghapus registrasi Remote Ajaib
dengan TV anda.
*
Tekan dan tahan tombol
(EXIT ke LIVE) untuk membatalkan sekaligus mengulang
registrasi Remote Ajaib.
Page 38

FUNGSI REMOTE KONTROL AJAIB / MENGGUNAKAN PANDUAN PENGGUNA
36
Himbauan Ketika Menggunakan
ENG
Remote Kontrol Ajaib
Gunakan Remote Kontrol Ajaib dalam jarak
y
komunikasi maksimal (10 m).
Penggunaan Remote Kontrol Ajaib melewati
jarak ini, atau terdapat benda yang mengha
langi, menyebabkan kegagalan komunikasi.
Kegagalan komunikasi juga dapat terjadi
y
karena pengaruh perangkat sekitar. Perangkat
elektrik seperti oven microwave atau produk
LAN nirkabel dapat menyebabkan gangguan,
karena menggunakan pita frekuensi (2.4 GHz),
sama seperti yang digunakan Remote Kontrol
Ajaib.
Remote Ajaib dapat rusak atau tidak
y
berfungsi dengan baik jika terjatuh
atau terkena benturan keras.
Berhati-hatilah untuk tidak bump furnitur
y
atau orang lain saat menggunakan
Remote Ajaib.
Produsen dan pemasang tidak menyedia-
y
kan layanan terkait keselamatan manusia
berkenaan dengan kemungkinan gangguan
gelombang listrik yang ditimbulkan oleh
perangkat nirkabel.
Direkomendasikan untuk meletakkan Access
y
Point (AP) lebih dari jarak 1 m dari TV.
Jika AP terpasang pada jarak kurang dari 1m,
Remote Ajaib mungkin tidak bekerja dengan
baik akibat adanya interfensi frekuensi.
MENGGUNAKAN PANDUAN
PENGGUNA
Panduan pengguna memungkinkan Anda untuk
lebih mudah mengakses detil informasi TV.
1 Tekan tombol
menu Home.
BACK
HOME
2
Pilih Panduan Pengguna dan tekan
Roda
P
MY APPS
(OK)
(Home)
untuk mengakses
CATATAN
Anda juga dapat mengakses Panduan
y
Pengguna dengan menekan tombol
Guide) pada remote kontrol.
(Tergantung model)
(User
Page 39

PERAWATAN / PENYELESAIAN MASALAH
37
PERAWATAN
Membersihkan TV Anda
Bersihkan TV Anda secara teratur untuk menjaga performa terbaik dan memperpanjang usia.
PERHATIAN
Matikan daya, cabut kabel daya dan semua kabel terlebih dahulu sebelum membersihkan.
y
y Jika TV tidak digunakan untuk waktu yang lama, cabut kabel daya dari terminal dinding untuk
mencegah kemungkinan kerusakan akibat petir atau atau kenaikan tegangan.
Layar, Bingkai, Penutup dan Dudukan
y Untuk menghilangkan kotoran ringan atau debu, usap permukaan TV dengan kain yang kering,
bersih dan lembut.
y Untuk menghilangkan kotoran yang lebih besar usap permukaan TV dengan kain lembut yang
dibasahi terlebih dahulu dengan air bersih hingga lembab atau sabun dengan kandungan deterjen
ringan yang diencerkan. Kemudian usap segera menggunakan kain kering.
PERHATIAN
Hindari menyentuh layar setiap saat, karena ini dapat menyebabkan kerusakan pada layar
y
y
Jangan mendorong, menggosok, atau memukul permukaan layar dengan kuku jari Anda atau
objek yang tajam, hal ini dapat mengakibatkan goresan dan kerusakan gambar.
y Jangan menggunakan bahan kimia, hal ini dapat merusak produk.
y Jangan menyemprotkan cairan pada permukaan TV. Jika air masuk ke dalam TV, dapat
menyebabkan kebakaran, kejutan listrik atau kerusakan.
Kabel Daya
Bersihkan kotoran atau debu yang menumpuk pada kabel daya secara berkala.
ENG
PENYELESAIAN MASALAH
Masalah Penyelesaian
Periksa sensor remote kontrol pada TV, ulangi sekali lagi.
TV tidak dapat
dikontrol dengan
remote kontrol.
Tidak ada gambar
dan tidak ada suara
TV tiba-tiba mati
Saat menghubungkan ke PC (HDMI
DVI), Tidak ada
sinyal’ atau muncul
‘Invalid Format’
y
y Periksa apakah ada benda yang menghalangi sensor dan Remote Kontrol
y Periksa apakah baterai masih berfungsi dan benar posisinya ( ke ,
ke )
y Periksa apakah TV telah dihidupkan
y Periksa apakah kabel daya telah dihubungkan ke terminal daya.
y Periksa apakah ada masalah pada terminal daya, dengan mencoba produk lain.
y Periksa pengaturan kontrol daya. Daya mungkin terputus.
y Periksa apakah fitur Pewaktu Mati atau Pengatur Mati Otomatis diaktifkan.
y Jika tidak ada sinyal saat TV dihidupkan, TV akan secara otomatis mati
setelah 15 menit dalam keadaan tersebut.
y Matikan dan hidupkankan TV dengan menggunakan remote kontrol.
y Ulangi menghubungkan kabel HDMI.
y Nyalakan ulang (Restart) PC dengan keadaan TV hidup (on).
Page 40

INFORMASI LINGKUNGAN
38
INFORMASI LINGKUNGAN
ENG
(Hanya India)
WEEE
Pembuangan peralatan Anda yang sudah lama
1. Ketika ada simbol tempat sampah disilang tertera pada produk, itu berarti bahwa
produk itu tercakup oleh aturan e-waste (Manajemen dan Penanganan), 2011.
2. Semua produk kelistrikan dan elektronik harus dibuang secara terpisah dari aliran
limbah kotamelalui fasilitas yang ditunjuk oleh pemerintah atau pihak berwenang
setempat.
lingkungan dan kesehatan manusia.
4. Untuk informasi lebih jelas tentang pembuangan alat lama Anda, hubungi kantor layanan pembuangan
limbah dikota Anda atau toko dimana Anda membeli produk.
5. Produk ini tidak mengandung zat-zat berbahaya yang ditentukan dalam peraturan 13 (1) dan (2)
dari e-waste (Manajemen dan Penanganan), 2011.
3. Membuang alat lama Anda akan membantu mencegah timbulnya hal negatif untuk
Page 41

SPESIFIKASI
39
SPESIFIKASI
(Hanya UB98**, UC9*)
Spesifikasi Modul Nirkabel (LGSWF41)
Standar IEEE 802.11a/b/g/n/ac
2400 hingga 2483.5MHz
Jangkauan Frekuensi
Daya Keluaran(Maks.)
Karena pita saluran pada tiap negara mungkin berbeda, Pengguna tidak dapat mengganti atau
y
mengatur frekuensi pengoperasian, produk ini diatur sesuai tabel frekuensi regional.
Perangkat ini harus terpasang dan dioperasikan dengan jarak minimum 20 cm antara perangkat
y
dengan anda. Pernyataan ini merupakan pernyataan umum menyangkut pertimbangan dari
lingkungan pengguna.
5150 hingga 5250 MHz
5725 hingga 5850 MHz(Selain EU)
802.11a: 14.5 dBm
802.11b: 16 dBm
802.11g: 13.5 dBm
802.11n - 2.4GHz: 14 dBm
802.11n - 5GHz: 15.5 dBm
802.11ac - 5GHz : 16 dBm
ENG
Spesifikasi modul Bluetooth module (BM-LDS401)
Standar Versi Bluetooth 3.0
Jangkauan Frekuensi 2400 hingga 2483.5MHz
Daya Keluaran(Maks.) 10dBm atau Lebih rendah
Page 42

SPESIFIKASI
40
(Hanya UB85**, UB93**, UB95**, UC97**)
ENG
LAN Nirkabel Bluetooth
Standar IEEE 802.11a/b/g/n Standar Versi Bluetooth 3.0
Spesifikasi Modul Nirkabel (LGSBW41)
Jangkauan
Frekuensi
Daya Keluaran
(Maks.)
Karena pita saluran pada tiap negara mungkin berbeda, Pengguna tidak dapat mengganti atau
y
mengatur frekuensi pengoperasian, produk ini diatur sesuai tabel frekuensi regional.
Perangkat ini harus terpasang dan dioperasikan dengan jarak minimum 20 cm antara perangkat
y
dengan anda. Pernyataan ini merupakan pernyataan umum menyangkut pertimbangan dari
lingkungan pengguna.
2400 hingga 2483.5 MHz
5150 hingga 5250 MHz
5725 to 5850 MHz (selain EU)
802.11a: 13 dBm
802.11b: 15 dBm
802.11g: 14 dBm
802.11n - 2.4GHz: 16 dBm
802.11n - 5GHz: 16 dBm
Jangkauan
Frekuensi
Daya Keluaran
(Maks.)
2400 hingga 2483.5 MHz
10 dBm atau lebih
rendah
Page 43

SPESIFIKASI
41
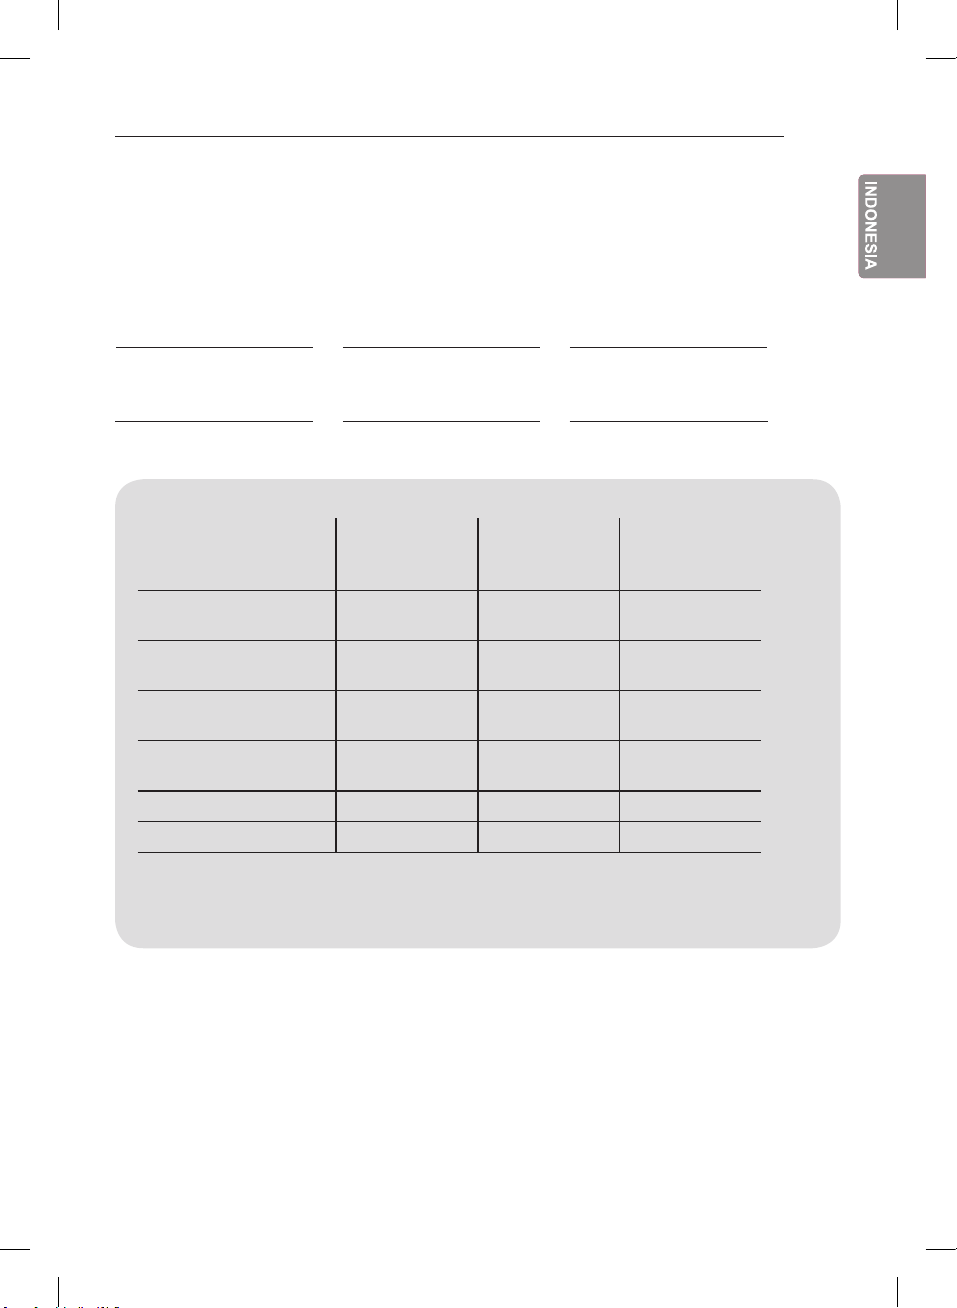
Spesifikasi produk ini mungkin berubah tanpa pemberitahuan sebelumnya untuk meningkatkan fungsi produk.
Untuk Tegangan dan Konsumsi daya , lihat label yang menempel pada produk.
49UB85** 55UB85** 60UB85**
MODEL
Dimensi
(P x T x L)
Berat
Dengan Dudukan (mm)
Tanpa Dudukan(mm)
Dengan Dudukan (kg)
Tanpa Dudukan (kg)
Kebutuhan Daya
49UB850T-TA
49UB859Y-TA
55UB850T-TA
55UB859Y-TA
60UB850T-TA
60UB850Y-TA
1093 x 689 x 242 1233 x 766 x 260 1333 x 786 x 275
1093 x 646 x 38.2 1233 x 727 x 37.8 1333 x 784 x 37.8
18.2 21.2 23.2
17.5 20.5 22.5
AC 100-240 V~ 50 / 60 Hz AC 100-240 V~ 50 / 60 Hz AC 100-240 V~ 50 / 60 Hz
65UB93** 55UB95** 65UB95**
MODEL
Dimensi
(P x T x L)
Berat
Dengan Dudukan (mm)
Tanpa Dudukan(mm)
Dengan Dudukan (kg)
Tanpa Dudukan (kg)
Kebutuhan Daya
65UB930T-TA
65UB930Y-TA
55UB950T-TA
55UB959Y-TA
65UB950T-TA
65UB959Y-TA
1452 x 914 x 300 1232 x 782 x 260 1452 x 914 x 300
1452 x 858 x 37 1232 x 734 x 37.0 1452 x 858 x 37
34.8 23.8 34.8
33.7 23.1 33.7
AC 100-240 V~ 50 / 60 Hz AC 100-240 V~ 50 / 60 Hz AC 100-240 V~ 50 / 60 Hz
65UB98** 79UB98** 84UB98**
ENG
MODEL
Dimensi
(P x T x L)
Berat
Dengan Dudukan (mm)
Tanpa Dudukan(mm)
Dengan Dudukan (kg)
Tanpa Dudukan (kg)
Kebutuhan Daya
MODEL
Dimensi
(P x T x L)
Berat
Dengan Dudukan (mm
Tanpa Dudukan(mm
Dengan Dudukan (kg)
Tanpa Dudukan (kg)
Kebutuhan Daya
65UB980T-TA
65UB980Y-TA
65UB980T-TB
65UB980Y-TB
79UB980T-TA
79UB980Y-TA
79UB980T-TB
79UB980Y-TB
84UB980T-TA
84UB989Y-TA
84UB980T-TB
84UB989Y-TB
1560 x 884 x 264 1874 x 1075 x 330.6 2024 x 1172 x 342
1560 x 832 x 75 1874 x 1014 x 86.8 2024 x 1113 x 85.8
39.9 60.6 77.7
37.6 57.1 73.7
AC 100-240 V~ 50 / 60 Hz AC 100-240 V~ 50 / 60 Hz AC 100-240 V~ 50 / 60 Hz
98UB98** 49UC97** 55UC97**
98UB980T-TA
98UB980Y-TA
98UB980T-TB
49UC970T-TA
49UC970Y-TA
55UC970T-TA
55UC970Y-TA
98UB980Y-TB
)
2054 x 1172 x 342 1172 x 757 x 315 1232 x 782 x 260
)
2054 x 1113 x 85.8 1172 x 701 x 56.0 1232 x 734 x 37.0
80 24.9 23.8
78.7 23.3 23.1
AC 100-240 V~ 50 / 60 Hz AC 100-240 V~ 50 / 60 Hz AC 100-240 V~ 50 / 60 Hz
Page 44

42
SPESIFIKASI
MODEL
ENG
Dimensi
(P x T x L)
Berat
Kebutuhan Daya
Kondisi Lingkungan
Sistem Televisi DVB-T(*DVB-T/T2)
Cakupan Program VHF, UHF
Jumlah maksimum program
yang dapat disimpan
Dengan Dudukan (mm
Tanpa Dudukan(mm
Dengan Dudukan (kg)
Tanpa Dudukan (kg)
Suhu Operasi
Kelembaban Operasi
Suhu Penyimpanan
Kelembaban Penyimpanan
65UC97** 79UC97** 105UC9*
65UC970T-TA 79UC970T-TA 105UC9T-TA
1560 x 884 x 264 1874 x 1075 x 330.6 2254 x 1272 x 352
1560 x 832 x 75 1874 x 1014 x 86.8 2254 x 1213 x 90
AC 100-240 V~ 50 / 60 Hz AC 100-240 V~ 50 / 60 Hz AC 100-240 V~ 50 / 60 Hz
39.9 60.6 91
37.6 57.1 85.7
0 °C hingga 40 °C
Kurang dari 80 %
-20 °C hingga 60 °C
Kurang dari 85 %
TV Digital TV Analog
(Tergantung negara)(Tergantung negara)
PAL B/B, PAL B/G, PAL D/K, PAL-I
SECAM B/G, SECAM D/K
NTSC-M
VHF, UHF, CATV
DVB-T/T2 & TV Analog : 1,500
Impedansi Antena Luar
* : Hanya model DVB-T2.
75 Ω
CATATAN
Data video yang dibuat dari beberapa encoder mungkin tidak dapat diputar.
y
TV ULTRA HD LG mungkin tidak kompatibel dengan beberapa konten codec tipe HEVC.
y
File video dengan format selain dari yang tertera pada tabel diatas mungkin tidak dapat diputar.
y
Pemutaran file video pada perangkat USB yang tidak berkecepatan tinggi mungkin tidak bekerja
y
dengan baik.
Beberapa subjudul dengan format tertentu mungkin tidak dapat ditampilkan dengan baik.
y
File video dan subjudul harus berada di folder yang sama. Agar video dan subjudul dapat
y
ditampilkan dengan baik, nama file video dan subjudul harus sama.
Hanya mendukung pemutaran melalui USB.
y
Page 45

Page 46

Page 47

OWNER’S MANUAL
*
LED TV
* Disclaimer
LG LED TV applies LCD screen
with LED backlights.
Click! User Guide
Please read this manual carefully before operating
your set and retain it for future reference.
49UB85**
55UB85**
60UB85**
65UB93**
55UB95**
65UB95**
65UB98**
79UB98**
84UB98**
98UB98**
49UC97**
55UC97**
65UC97**
105UC9*
Page 48

TABLE OF CONTENTS
2
ENGLISH
TABLE OF CONTENTS
ENG
3 LICENSES
3 OPEN SOURCE SOFTWARE
NOTICE
3 EXTERNAL CONTROL DEVICE
SETUP
4 SAFETY INSTRUCTIONS
10 Viewing 3D Imaging
(Only 3D models)
11 INSTALLATION PROCEDURE
11 ASSEMBLING AND PREPARING
11 Unpacking
15 Separate purchase
16 Parts and buttons
18 - Using the joystick button
19 Lifting and moving the TV
20 Setting up the TV
20 - Attaching the stand
22 Mounting on a table
23 Mounting on a wall
25 Tidying cables
25 Using Built-in Camera
26 - Preparing Built-in Camera
26 - Name of Parts of Built-in Camera
26 - Checking the Camera’s Shooting
Range
27 MAKING CONNECTIONS
27 Antenna connection
28 HDMI connection
29 DVI to HDMI connection
29 Component connection
30 Composite connection
30 Audio connection
30 - Digital optical audio connection
31 Headphone connection
31 USB connection
32 MHL connection
33 REMOTE CONTROL
34 MAGIC REMOTE FUNCTIONS
35 Registering Magic Remote
35 How to use Magic Remote
36 Precautions to Take when Using the
Magic Remote
36 USING THE USER GUIDE
37 MAINTENANCE
37 Cleaning your TV
37 - Screen, frame, cabinet and stand
37 - Power cord
37 TROUBLESHOOTING
38 ENVIRONMENTAL INFORMATION
38 WEEE
39 SPECIFICATIONS
WARNING
If you ignore the warning message, you
y
may be seriously injured or there is a
possibility of accident or death.
CAUTION
If you ignore the caution message, you
y
may be slightly injured or the product may
be damaged.
NOTE
The note helps you understand and use
y
the product safely. Please read the note
carefully before using the product.
Page 49

LICENSES / OPEN SOURCE SOFTWARE NOTICE / EXTERNAL CONTROL DEVICE SETUP
3
LICENSES
Supported licenses may differ by model. For more information about licenses, visit www.lg.com.
OPEN SOURCE SOFTWARE NOTICE
To obtain the source code under GPL, LGPL, MPL and other open source licenses, that is contained
in this product, please visit http://opensource.lge.com.
In addition to the source code, all referred license terms, warranty disclaimers and copyright notices
are available for download.
LG Electronics will also provide open source code to you on CD-ROM for a charge covering the cost
of performing such distribution (such as the cost of media, shipping and handling) upon email request
to opensource@lge.com. This offer is valid for three (3) years from the date on which you purchased
the product.
EXTERNAL CONTROL DEVICE SETUP
To obtain the external control device setup information, please visit www.lg.com.
ENGENGLISH
Page 50

SAFETY INSTRUCTIONS
4
ENGLISH
SAFETY INSTRUCTIONS
ENG
Please read these safety precautions carefully before using the product.
WARNING
Make sure to connect Mains cable to
Do not place the TV and/or remote control
y
in the following environments:
- A location exposed to direct sunlight
- An area with high humidity such as a
bathroom
- Near any heat source such as stoves
and other devices that produce heat
- Near kitchen counters or humidifiers
where they can easily be exposed to
steam or oil
- An area exposed to rain or wind
- Near containers of water such as vases
Otherwise, this may result in fire, electric
shock, malfunction or product deformation.
Do not place the product where it might be
y
exposed to dust.
This may cause a fire hazard.
y
compliant AC mains socket with Grounded
earth pin. (Except for devices which
are not grounded on earth.) Otherwise
possibility you may be electrocuted or
injured.
Insert power cable plug completely into
y
wall socket otherwise if not secured
completely into socket, fire ignition may
break out.
Ensure the power cord does not come into
y
contact with hot objects such as a heater.
This may cause a fire or an electric shock
hazard.
Mains Plug is the TV connecting/
y
disconnecting device to AC mains electric
supply. This plug must remain readily
attached and operable when TV is in use.
Do not touch the power plug with wet
y
hands. Additionally, if the cord pin is wet
or covered with dust, dry the power plug
completely or wipe dust off.
You may be electrocuted due to excess
moisture.
Do not place a heavy object, or the
y
product itself, on power cables.
Otherwise, this may result in fire or electric
shock.
Bend antenna cable between inside and
y
outside building to prevent rain from
flowing in.
This may cause water damaged inside the
Product and could give an electric shock.
Page 51

When mounting TV onto wall make sure to
Desiccant
y
neatly install and isolate cabling from rear
of TV as to not create possibility of electric
shock /fire hazard.
Do not plug too many electrical devices
y
into a single multiple electrical outlet.
Otherwise, this may result in fire due to
over-heating.
Do not drop the product or let it fall over
y
when connecting external devices.
Otherwise, this may result in injury or
damage to the product.
SAFETY INSTRUCTIONS
Do not insert any metal objects/conductors
y
(like a metal chopstick/cutlery/screwdriver)
between power cable plug and input Wall
Socket while it is connected to the input
terminal on the wall. Additionally, do not
touch the power cable right after plugging
into the wall input terminal. You may be
electrocuted. (Depending on model)
Do not put or store inflammable
y
substances near the product. There is a
danger of combustion/explosion or fire due
to careless handling of the inflammable
substances.
5
ENGENGLISH
Keep the anti-moisture packing material or
y
vinyl packing out of the reach of children.
Anti-moisture material is harmful if
swallowed. If swallowed by mistake, force
the patient to vomit and visit the nearest
hospital. Additionally, vinyl packing can
cause suffocation. Keep it out of the reach
of children.
Do not let your children climb or cling onto
y
Do not drop metallic objects such as
y
coins, hair pins, chopsticks or wire into
the product, or inflammable objects such
as paper and matches. Children must
pay particular attention. Electrical shock,
fire or injury can occur. If a foreign object
is dropped into the product, unplug the
power cord and contact the service centre.
the TV. Otherwise, the TV may fall over,
which may cause serious injury.
Do not spray water on the product or
y
scrub with an inflammable substance
(thinner or benzene). Fire or electric shock
accident can occur.
Dispose of used batteries carefully
y
to ensure that a small child does not
consume them. Please seek DoctorMedical Attention immediately if child
consumes batteries.
Page 52

6
y
ENGLISH
ENG
y
y
y
SAFETY INSTRUCTIONS
Do not allow any impact, shock or any
objects to fall into the unit, and do not
drop anything onto the screen.
You may be injured or the product can be
damaged.
Never touch this product or antenna
during a thunder or lighting storm.
You may be electrocuted.
Never touch the wall outlet when there is
leakage of gas, open the windows and
ventilate.
It may cause a fire or a burn by a spark.
Do not disassemble, repair or modify the
product at your own discretion.
Fire or electric shock accident can occur.
Contact the service centre for check,
calibration or repair.
Unplug the TV from AC mains wall socket if you
y
do not intend to use the TV for a long period of
time. Accumulated dust can cause fire hazard
and insulation deterioration can cause electric
leakage/shock/fire.
Apparatus shall not be exposed to dripping
y
or splashing and no objects filled with liquids,
such as vases, shall be placed on the
apparatus.
Do not install this product on a wall if it could
y
be exposed to oil or oil mist.
This may damage the product and cause it to
fall.
CAUTION
Install the product where no radio wave occurs.
y
There should be enough distance between an
y
outside antenna and power lines to keep the
former from touching the latter even when the
antenna falls.
This may cause an electric shock.
If any of the following occur, unplug the product
y
immediately and contact your local service
centre.
- The product has been impacted by shock
- The product has been damaged
- Foreign objects have entered the product
- The product produced smoke or a strange
smell
This may result in fire or electric shock.
Do not install the product on places such
y
as unstable shelves or inclined surfaces.
Also avoid places where there is vibration or
where the product cannot be fully supported.
Otherwise, the product may fall or flip over,
which may cause injury or damage to the
product.
Page 53

SAFETY INSTRUCTIONS
7
If you install the TV on a stand, you need
y
to take actions to prevent the product from
overturning. Otherwise, the product may
fall over, which may cause injury.
If you intend to mount the product to a
y
wall, attach VESA standard mounting
interface (optional parts) to the back of the
product. When you install the set to use
the wall mounting bracket (optional parts),
fix it carefully so as not to drop.
Only use the attachments / accessories
y
specified by the manufacturer.
When installing the antenna, consult with a
y
qualified service technician. If not installed
by a qualified technician, this may create
a fire hazard or an electric shock hazard.
We recommend that you maintain a
y
distance of at least 2 to 7 times the
diagonal screen size when watching TV.
If you watch TV for a long period of time,
this may cause blurred vision.
Do not place non-rechargeable batteries
y
in charging device.
Make sure there are no objects between
y
the remote control and its sensor.
Signal from Remote Control can be
y
interrupted due to external/internal lighting
eg Sunlight, fluorescent lighting.If this
occurs turn off lighting or darken viewing
area.
When connecting external devices such
y
as video game consoles, make sure the
connecting cables are long enough.
Otherwise, the product may fall over,
which may cause injury or damage the
product.
Do not turn the product On/Off by
y
plugging-in or unplugging the power plug
to the wall outlet. (Do not use the power
plug for switch.)
It may cause mechanical failure or could
give an electric shock.
ENGENGLISH
Only use the specified type of battery.
y
This could cause damage to the remote
control.
Do not mix new batteries with old
y
batteries. This may cause the batteries to
overheat and leak.
Batteries should not be exposed to
y
excessive heat. For example, keep away
from direct Sunlight, open fireplace and
electric heaters.
Please follow the installation instructions
y
below to prevent the product from
overheating.
- The distance between the product and
the wall should be more than 10 cm.
- Do not install the product in a place with
no ventilation (e.g., on a bookshelf or in
a cupboard).
- Do not install the product on a carpet or
cushion.
- Make sure the air vent is not blocked by
a tablecloth or curtain.
Otherwise, this may result in fire.
Page 54

SAFETY INSTRUCTIONS
8
y
ENGLISH
ENG
y
y
y
Take care not to touch the ventilation
openings when watching the TV for long
periods as the ventilation openings may
become hot. This does not affect the
operation or performance of the product.
Periodically examine the cord of your
appliance, and if its appearance indicates
damage or deterioration, unplug it,
discontinue use of the appliance, and
have the cord replaced with an exact
replacement part by an authorized
servicer.
Prevent dust collecting on the power plug
pins or outlet.
This may cause a fire hazard.
Protect the power cord from physical or
mechanical abuse, such as being twisted,
kinked, pinched, closed in a door, or
walked upon. Pay particular attention to
plugs, wall outlets, and the point where
the cord exits the appliance.
When cleaning the product and its
y
components, unplug the power first
and wipe it with a soft cloth. Applying
excessive force may cause scratches or
discolouration. Do not spray with water
or wipe with a wet cloth. Never use glass
cleaner, car or industrial shiner, abrasives
or wax, benzene, alcohol etc., which can
damage the product and its panel.
Otherwise, this may result in fire, electric
shock or product damage (deformation,
corrosion or breakage).
As long as this unit is connected to the AC
y
wall outlet, it is not disconnected from the
AC power source even if you turn off this
unit by SWITCH.
When unplugging the cable, grab the plug
y
and unplug it, by pulling at the plug. Don’t
pull at the cord to unplug the power cord
from the power board, as this could be
hazardous.
Do not press strongly upon the panel with
y
a hand or sharp object such as nail, pencil
or pen, or make a scratch on it, as it may
cause damage to screen.
Avoid touching the screen or holding your
y
finger(s) against it for long periods of time.
Doing so may produce some temporary or
permanent distortion/damage to screen.
When moving the product, make sure
y
you turn the power off first. Then, unplug
the power cables, antenna cables and all
connecting cables.
The TV set or power cord may be
damaged, which may create a fire hazard
or cause electric shock.
When moving or unpacking the product,
y
work in pairs because the product is
heavy.
Otherwise, this may result in injury.
Page 55

SAFETY INSTRUCTIONS
9
Contact the service centre once a year to
y
clean the internal parts of the product.
Accumulated dust can cause mechanical
failure.
Refer all servicing to qualified service
y
personnel. Servicing is required when
the apparatus has been damaged in any
way, such as power supply cord or plug
is damaged, liquid has been spilled or
objects have fallen into the apparatus, the
apparatus has been exposed to rain or
moisture, does not operate normally, or
has been dropped.
If the product feels cold to the touch, there
y
may be a small “flicker” when it is turned
on. This is normal, there is nothing wrong
with product.
You may find different brightness and
y
colour of the panel depending on your
viewing position(left/right/top/down).
This phenomenon occurs due to the
characteristic of the panel. It is not related
with the product performance, and it is not
malfunction.
Displaying a still image (e.g., broadcasting
y
channel logo, on-screen menu, scene from
a video game) for a prolonged time may
cause damage to the screen, resulting
in retention of the image, which is known
as image sticking. The warranty does not
cover the product for image sticking.
Avoid displaying a fixed image on your
television’s screen for a prolonged period
(2 or more hours for LCD, 1 or more hours
for Plasma).
Also, if you watch the TV at a ratio of 4:3
for a long time, image sticking may occur
on the borders of the panel.
This phenomenon also occurs in thirdparty products and is not subject to
exchange or refund.
ENGENGLISH
The panel is a high technology display
y
product with resolution of two million to six
million pixels. You may see tiny black dots
and/or brightly coloured dots (red, blue or
green) at a size of 1 ppm on the panel.
This does not indicate a malfunction and
does not affect the performance and
reliability of the product.
This phenomenon also occurs in thirdparty products and is not subject to
exchange or refund.
Generated Sound
y
“Cracking” noise: A cracking noise that occurs
when watching or turning off the TV is generated
by plastic thermal contraction due to temperature and humidity. This noise is common for
products where thermal deformation is required.
Electrical circuit humming/panel buzzing:
A low level noise is generated from a highspeed switching circuit, which supplies a large
amount of current to operate a product. It varies
depend-ing on the product.
This generated sound does not affect the
performance and reliability of the product.
Page 56

SAFETY INSTRUCTIONS
10
ENGLISH
Viewing 3D Imaging
ENG
(Only 3D models)
WARNING
Viewing Environment
Viewing Time
y
- When watching 3D contents, take 5 - 15
minute breaks every hour. Viewing 3D
contents for a long period of time may
cause headache, dizziness, fatigue or
eye strain.
Those that have a photosensitive
seizure or chronic illness
Some users may experience a seizure or
y
other abnormal symptoms when they are
exposed to a ashing light or particular
pattern from 3D contents.
Do not watch 3D videos if you feel nausea,
y
are pregnant and/ or have a chronic illness
such as epilepsy, cardiac disorder, or blood
pressure disease, etc.
3D Contents are not recommended to those
y
who suffer from stereo blindness or stereo
anomaly. Double images or discomfort in
viewing may be experienced.
If you have strabismus (cross-eyed),
y
amblyopia (weak eyesight) or astigmatism,
you may have trouble sensing depth and
easily feel fatigue due to double images. It
is advised to take frequent breaks than the
average adult.
If your eyesight varies between your right
y
and left eye, revise your eyesight prior to
watching 3D contents.
CAUTION
Viewing Environment
Viewing Distance
y
- Maintain a distance of at least twice the
screen diagonal length when watching
3D contents. If you feel discomfort in
viewing 3D contents, move further away
from the TV.
Viewing Age
Infants/Children
y
- Usage/ Viewing 3D contents for children
under the age of 5 are prohibited.
- Children under the age of 10 may
overreact and become overly excited
because their vision is in development
(for example: trying to touch the
screen or trying to jump into it. Special
monitoring and extra attention is
required for children watching 3D
contents.
- Children have greater binocular
disparity of 3D presentations than adults
because the distance between the eyes
is shorter than one of adults. Therefore
they will perceive more stereoscopic
depth compared to adults for the same
3D image.
Teenagers
y
- Teenagers under the age of 19 may
react with sensitivity due to stimulation
from light in 3D contents. Advise them
to refrain from watching 3D contens for
a long time when they are tired.
Elderly
y
- The elderly may perceive less 3D
effect compared to the youth. Do not sit
closer to the TV than the recommended
distance.
Symptoms which require discontinuation
or refraining from watching 3D contents
Do not watch 3D contents when you feel
y
fatigue from lack of sleep, overwork or
drinking.
When these symptoms are experienced,
y
stop using/watching 3D contents and get
enough rest until the symptom subsides.
- Consult your doctor when the symptoms
persist. Symptoms may include
headache, eyeball pain, dizziness,
nausea, palpitation, blurriness,
discomfort, double image, visual
inconvenience or fatigue.
Cautions when using the 3D glasses
Make sure to use LG 3D glasses. Otherwise,
y
you may not be able to view 3D videos
properly.
Do not use 3D glasses instead of your
y
normal glasses, sunglasses or protective
goggles.
Using modied 3D glasses may cause eye
y
strain or image distortion.
Do not keep your 3D glasses in extremely
y
high or low temperatures. It will cause
deformation.
The 3D glasses are fragile and are easy
y
to be scratched. Always use a soft, clean
piece of cloth when wiping the lenses. Do
not scratch the lenses of the 3D glasses
with sharp objects or clean/wipe them with
chemicals.
Page 57

INSTALLATION PROCEDURE / ASSEMBLING AND PREPARING
11
NOTE
Image shown may differ from your TV.
y
Your TV’s OSD (On Screen Display) may differ slightly from that shown in this manual.
y
The available menus and options may differ from the input source or product model that you are
y
using.
New features may be added to this TV in the future.
y
The TV can be placed in standby mode in order to reduce the power consumption. And the TV
y
should be turned off if it will not be watched for some time, as this will reduce energy consumption.
The energy consumed during use can be signicantly reduced if the level of brightness of the
y
picture is reduced, and this will reduce the overall running cost.
INSTALLATION PROCEDURE
1 Open the package and make sure all the accessories are included.
2 Attach the stand to the TV set.
3 Connect an external device to the TV set.
4 Make sure the network connection is available.
You can use the TV network functions only when the network connection is made.
* If the TV is turned on for the first time after it was shipped from the factory, initialization of the TV
may take up to one minute.
ASSEMBLING AND PREPARING
Unpacking
Check your product box for the following items. If there are any missing accessories, contact the local
dealer where you purchased your product. The illustrations in this manual may differ from the actual
product and item.
ENGENGLISH
CAUTION
Do not use any unapproved items to ensure the safety and product life span.
y
Any damages or injuries by using unapproved items are not covered by the manufacturer’s
y
warranty.
Some models have a thin lm attached on to the screen and this must not be removed.
y
Page 58

ASSEMBLING AND PREPARING
12
ENGLISH
ENG
Magic remote, Batteries
(AA)
(Only UB85**, UB93**,
UB95**, UB98**,
UC97**,UC9*)
(See p.34)
HDMI Cable
(Depending on model)
(See p.28)
AV MODE
INPUT
ENERGY
TV
SAVING
1 2 3
4 5 6
7 809
FLASHBK
LIST
MARK
FAV
P
A
G
3D
CHVOL
E
MUTE
INFO
MENU
Q.MENU
ENTER
EXIT
BACK
L/R SELECT
FREEZE
RATIO
Remote control, Batteries
(AAA)
The remote control will not be
included for all sales market.
(Depending on model)
(See p.33)
Power Cord
(Depending on model)
Owner’s manual
Cable holder
(Depending on model)
(See p.25)
Stand Screws
4EA, M6 X L45
(Only 65UB98**)
(See p.21)
Wrench
(Only UB98**)
(See p.21)
Stand Screws
4EA, M6 x L50
(Only 79/84UB98**)
(See p.21)
Stand Base
(Only UB98**)
(See p.21)
Insulation Holders
4EA
(Only 84UB98**)
(See p.21)
Stand Screws
8EA, M4 X L20
(Only UB85**, UB93**,
UB95**)
(See p.20)
Page 59

ASSEMBLING AND PREPARING
13
ENGENGLISH
Stand Body / Stand Base
(Only UB85**, UB93**,
UB95**)
(See p.20)
Cable Managements
2EA
(Only UB85**, UB93**,
UB95**)
(See p.25)
Tag On
Tag on
Component gender cable
(See p.29)
Cinema 3D Glasses
The number of 3D glasses
may differ depending on the
model or country.
(Only UB85**, UB95**,
UB98**, UC97**,UC9*)
Composite gender cable
(See p.29, 30)
Ferrite core
(Depending on model)
(See p.14)
Page 60

14
<
<
ENGLISH
ENG
ASSEMBLING AND PREPARING
NOTE
The items supplied with your product may vary depending on the model.
y
Product specications or contents of this manual may be changed without prior notice due to
y
upgrade of product functions.
For an optimal connection, HDMI cables and USB devices should have bezels less than 10 mm
y
thick and 18 mm width. Use an extension cable that supports USB 2.0 if the USB cable or USB
memory stick does not t into your TV’s USB port.
B
A
B
*A
10 mm
=
18 mm
*B
=
A
How to use the ferrite core (Depending on model)
Use the ferrite core to reduce the electromagnetic interference in the LAN cable. Wind the LAN
y
cable once on the ferrite core. Place the ferrite core close to the TV.
[Cross Section of Ferrite Core]
[to the TV] [to an External device]
Page 61

ASSEMBLING AND PREPARING
15
Separate purchase
Separate purchase items can be changed or modified for quality improvement without any notification.
Contact your dealer to buy these items.
These devices only work with certain models.
ENGENGLISH
AG-F***DP
Dual Play Glasses
AN-VC5**
Video Call Camera
Compatibility
AG-F***DP
Dual Play Glasses
AG-F***
Cinema 3D Glasses
AN-MR500
Magic Remote
AN-VC5**
Video Call Camera
LG Audio Device
Tag on
The model name or design may be changed depending on the upgrade of product functions,
manufacturer’s circumstances or policies.
AG-F***
Cinema 3D Glasses
LG Audio Device
UB93**
• • •
• •
• • •
• • •
UB85**
UB95**
UC97**
• •
• •
AN-MR500
Magic Remote
Tag on
UB98**
UC9*
Page 62

ASSEMBLING AND PREPARING
16
ENGLISH
Parts and buttons
ENG
A Type : UB85**
Screen
C Type : 65UB98**
Built-in Camera
Screen
Speakers
Remote control and
Intelligent1 sensors
Power Indicator
B Type : UB93**, UB95**
Screen
Speakers
Joystick Button
Remote control and
2
Intelligent1 sensors
D Type : 79UB98*
LG Logo light
Screen
Speakers
*
Speakers
Joystick Button
Built-in Camera
2
Remote control and
Intelligent1 sensors
LG Logo light
Joystick Button
3
Remote control and
Intelligent1 sensors
LG Logo light
Joystick Button
2
Page 63

ASSEMBLING AND PREPARING
17
E Type : 84UB98*
Screen
Remote control and
Intelligent1 sensors
LG Logo light
F Type : UC9*
*
Speakers
Built-in Camera
Joystick Button
Built-in Camera
Screen
ENGENGLISH
3
Speakers
Joystick Button
1
Intelligent sensor - Adjusts the image quality and brightness based on the surrounding environment.
2
Joystick Button - This button is located behind the TV screen.
3
Joystick Button - This button is located below the TV screen.
3
Page 64

ASSEMBLING AND PREPARING
18
ENGLISH
ENG
NOTE
You can set the LG Logo Light or power indicator light to on or off by selecting GENERAL in the
y
main menus.
Using the joystick button
You can operate the TV by pressing the button or moving the joystick left, right, up, or down.
Basic Functions
Power On
Power Off
Volume Control
Programmes
Control
When the TV is turned off, place your finger on the joystick
button and press it once and release it.
When the TV is turned on, place your finger on the joystick
button and press it once for a few seconds and release it.
If you place your finger over the joystick button and move it
left or right, you can adjust the volume level you want.
If you place your finger over the joystick button and move it
up or down, you can scrolls through the saved programmes
you want.
NOTE
yWhen your nger is over the joystick button and you are sliding nger forward/back ,left or
right, be careful not to press down to hard on joystick . If you press down hard on joystick
button rst then the adjustment of Volume level and programme scroll action will not operate.
Adjusting the Menu
When the TV is turned on, press the joystick button one time.
You can adjust the Menu items
(
, ,
TV OFF
CLOSE Clears on-screen displays and returns to TV viewing.
INPUT
moving the joystick button left or right.
)
Turns the power off.
Changes the input source.
Page 65

Lifting and moving the TV
Please note the following advice to prevent the
TV from being scratched or damaged and for
safe transportation regardless of its type and
size.
CAUTION
Avoid touching the screen at all times, as
y
this may result in damage to the screen.
It is recommended to mVove the TV in the
y
box or packing material that the TV originally
came in.
Before moving or lifting the TV, disconnect
y
the power cord and all cables.
When holding the TV, the screen should face
y
away from you to avoid damage.
ASSEMBLING AND PREPARING
When transporting a large TV, there should
y
be at least 2 people.
When transporting the TV by hand, hold the
y
TV as shown in the following illustration.
When transporting the TV, do not expose the
y
TV to jolts or excessive vibration.
When transporting the TV, keep the TV
y
upright, never turn the TV on its side or tilt
towards the left or right.
Do not apply excessive pressure to cause
y
exing /bending of frame chassis as it may
damage screen.
When handling the TV, be careful not to
y
damage the protruding joystick button.
19
ENGENGLISH
Hold the top and bottom of the TV frame
y
rmly. Make sure not to hold the transparent
part, speaker, or speaker grill area.
Page 66

ASSEMBLING AND PREPARING
1
2
20
Setting up the TV
ENGLISH
ENG
Image shown may differ from your TV.
Attaching the stand
UB85**, UB93**, UB95**
1
Stand Body (L)
Stand Body (R)
Stand Base
M4 x L20
4EA
2
1 Attach the stand to the TV using the upper
mounting hole on the back of the TV.
2 Attach the stand to the TV using the lower
connection on the back of the TV.
3
NOTE
Be sure to check the Stand Body (L), (R),
y
when installing on the stand base.
M4 x L20
4EA
Page 67

UB98*
2
1
ASSEMBLING AND PREPARING
*
(Only 84UB98**)
21
ENGENGLISH
2
3
(Only 65/79UB98**)
1
Stand Base
2
Wrench
1
Wrench
2
4EA
M6 x L50
1
4EA
(Insulation
Holders)
CAUTION
Make sure that the screws are
y
fastened completely. (If they are not
fastened securely enough, the TV
may tilt forward after being installed.)
4EA
(Only 65UB98**)
1
M6 x L45
(Only 79UB98**)
M6 x L50
Page 68

ASSEMBLING AND PREPARING
22
ENGLISH
ENG
CAUTION
When attaching the stand to the TV
y
set, place the screen facing down on a
cushioned table or at surface to protect the
screen from scratches.
Make sure that the screws are fastened
y
completely. (If they are not fastened
securely enough, the TV may tilt forward
after being installed.)
Do not fasten the screws with excessive
force otherwise they may be worn out and
become loose.
NOTE
Remove the stand before installing the TV
y
on a wall mount by performing the stand
attachment in reverse.
Mounting on a table
1 Lift and tilt the TV into its upright position on a
table.
- Leave a 10 cm (minimum) space from
the wall for proper ventilation.
10 cm
10 cm
10 cm
2 Connect the power cord to a wall outlet.
CAUTION
Do not place the TV near or on sources
y
of heat, as this may result in re or other
damage.
WARNING
If a television is not positioned in a
y
sufciently stable location, it can be
potentially hazardous due to falling. Many
injuries, particularly to children, can be
avoided by taking simple precautions such
as:
»
Using cabinets or stands
recommended by the manufacturer
of the television.
»
Only using furniture that can safely
support the television.
»
Ensuring the television is not
overhanging the edge of the
supporting furniture.
»
Not placing the television on tall
furniture (for example, cupboards or
bookcases) without anchoring both
the furniture and the television to a
suitable support.
»
Not standing the televisions on cloth
or other materials placed between
the television and supporting
furniture.
»
Educating children about the dangers
of climbing on furniture to reach the
television or its controls.
10 cm
10 cm
Page 69

ASSEMBLING AND PREPARING
23
Securing the TV to a wall
(This feature is not available for all models.)
1 Insert and tighten the eye-bolts, or TV
brackets and bolts on the back of the TV.
- If there are bolts inserted at the eyebolts position, remove the bolts first.
2 Mount the wall brackets with the bolts to the
wall.
Match the location of the wall bracket and the
eye-bolts on the rear of the TV.
3 Connect the eye-bolts and wall brackets
tightly with a sturdy rope.
Make sure to keep the rope horizontal with
the at surface.
Mounting on a wall
ENGENGLISH
Attach an optional wall mount bracket at the rear
of the TV carefully and install the wall mount
bracket on a solid wall perpendicular to the
floor. When you attach the TV to other building
materials, please contact qualified personnel.
LG recommends that wall mounting be
performed by a qualified professional installer.
We recommend the use of LG’s wall mount
bracket.
When you do not use LG’s wall mount bracket,
please use a wall mount bracket where the device
is adequately secured to the wall with enough
space to allow connectivity to external devices.
10 cm
10 cm
10 cm
10 cm
CAUTION
Make sure that children do not climb on or
y
hang on the TV.
NOTE
Use a platform or cabinet that is strong and
y
large enough to support the TV securely.
Brackets, bolts and ropes are not provided.
y
You can obtain additional accessories from
your local dealer.
Page 70

ASSEMBLING AND PREPARING
24
ENGLISH
Make sure to use screws and wall mount
ENG
bracket that meet the VESA standard. Standard
dimensions for the wall mount kits are described
in the following table.
Separate purchase(Wall Mounting Bracket)
A
B
Model
VESA (A x B) 400 x 400 400 x 400
Standard
screw
Number of
screws
Wall mount
bracket
Model
VESA (A x B)
Standard
screw
Number of
screws
Wall mount
bracket
LSW440B
LSW640B
49/55UB85**
55UB95**
M6 M6
4 4
LSW440B
MSW240
79/84UB98**
600 x 400
M8
4
LSW640B
Wall mount bracket
65UB93**
65UB95**
65UB98**
LSW440B
CAUTION
Disconnect the power rst, and then move or
y
install the TV. Otherwise electric shock may
occur.
If you install the TV on a ceiling or slanted
y
wall, it may fall and result in severe injury.
Use an authorised LG wall mount and contact
the local dealer or qualied personnel.
Do not over tighten the screws as this may
y
cause damage to the TV and void your
warranty.
Use the screws and wall mounts that meet the
y
VESA standard. Any damages or injuries by
misuse or using an improper accessory are
not covered by the manufacturer’s warranty.
NOTE
Use the screws that are listed on the VESA
y
standard screw specications.
The wall mount kit includes an installation
y
manual and necessary parts.
The wall mount bracket is not provided.
y
You can obtain additional accessories from
your local dealer.
The length of screws may differ depending
y
on the wall mount. Make sure to use the
proper length.
For more information, refer to the manual
y
supplied with the wall mount.
MSW240
Page 71

ASSEMBLING AND PREPARING
25
Tidying cables
Image shown may differ from your TV.
(Only UB98**)
1 Gather and bind the cables with the Cable
Holder.
Cable Holder
(Only UB85**, UB93**, UB95**)
1 Gather and bind the cables with the cable
holder.
2 Fix the Cable Management rmly to the TV.
Using Built-in Camera
(Only UB98**, UC9*)
You can make a Skype video call or use the
motion recognition function using the built-in
camera of the TV.
This TV does not support the use of an external
camera.
NOTE
Before using the built-in camera, you must
y
recognize the fact that you are legally
responsible for the use or misuse of the
camera by the relevant national laws
including the criminal law.
The relevant laws include the Personal
y
Information Protection law which regulates
the processing and transferring of personal
information and the law which regulates the
monitoring by camera in a workplace and
other places.
When using the built-in camera, avoid
y
questionable, illegal, or immoral situations.
Other than at public places or events,
consent to be photographed may be
required. We suggest avoiding the following
situations:
(1) Using the camera in areas where the
use of camera is generally prohibited such
as restroom, locker room, tting room and
security area.
(2) Using the camera while causing the
infringement of privacy.
(3) Using the camera while causing the
violation of the relevant regulations or laws.
ENGENGLISH
Cable Holder
Cable management
CAUTION
Do not move the TV by holding the cable
y
holder, as the cable holder may break, and
injuries and damage to the TV may occur.
Page 72

ASSEMBLING AND PREPARING
26
ENGLISH
Preparing Built-in Camera
ENG
1 Pull up the slide at the back of the TV.
Angle Adjustment
Lever
NOTE
Remove the protective film before using
y
the built-in camera.
Slide
3 Push down the built-in camera when you are
not using it.
Name of Parts of Built-in Camera
Protective film
Camera Lens
Microphone
Microphone
2 You can adjust the angle of the camera with
the angle adjustment lever on the back of the
built-in camera.
<Side View>
7˚
5˚
Lever Lens
5˚
7˚
Checking the Camera’s Shooting
Range
1 Press the
Home menu.
2 Select
Wheel(OK) button.
(Home)
Camera
and then press the
button to access the
NOTE
The optimal distance from the camera
y
to use the motion recognition function is
between 1.5 m and 4.5 m.
Page 73

MAKING CONNECTIONS
27
MAKING CONNECTIONS
This section on MAKING CONNECTIONS
mainly uses diagrams for the 65UB980T models.
Connect various external devices to the TV
and switch input modes to select an external
device. For more information of external device’s
connection, refer to the manual provided with
each device.
Available external devices are: HD receivers,
DVD players, VCRs, audio systems, USB
storage devices, PC, gaming devices, and other
external devices.
NOTE
The external device connection may differ
y
from the model.
Connect external devices to the TV
y
regardless of the order of the TV port.
If you record a TV programme on a DVD
y
recorder or VCR, make sure to connect the
TV signal input cable to the TV through a
DVD recorder or VCR. For more information
of recording, refer to the manual provided
with the connected device.
Refer to the external equipment’s manual
y
for operating instructions.
If you connect a gaming device to the TV,
y
use the cable supplied with the gaming
device.
In PC mode, there may be noise associated
y
with the resolution, vertical pattern, contrast
or brightness. If noise is present, change
the PC output to another resolution, change
the refresh rate to another rate or adjust the
brightness and contrast on the PICTURE
menu until the picture is clear.
In PC mode, some resolution settings
y
may not work properly depending on the
graphics card.
If ULTRA HD content is played on your
y
PC, video or audio may become disrupted
intermittently depending on your PC’s
performance.
Antenna connection
Connect the TV to a wall antenna socket with an
RF cable (75 Ω).
(*Not Provided)
NOTE
Use a signal splitter to use more than 2 TVs.
y
If the image quality is poor, install a signal
y
amplier properly to improve the image
quality.
If the image quality is poor with an antenna
y
connected, try to realign the antenna in the
correct direction.
An antenna cable and converter are not
y
supplied.
Supported DTV Audio: MPEG, Dolby Digital,
y
Dolby Digital Plus, HE-AAC.
ENGENGLISH
Page 74

MAKING CONNECTIONS
28
HDMI connection
ENGLISH
ENG
Transmits the digital video and audio signals
from an external device to the TV. Connect the
external device and the TV with the HDMI cable
as shown.
Choose any HDMI input port to connect. It does
not matter which port you use.
DVD / Blu-Ray /
HD Cable Box / HD STB / PC
HDMI
(*Not Provided- Depending on model)
ARC (Audio Return Channel)
An external audio device that supports
y
SIMPLINK and ARC must be connected
using HDMI(4K@60Hz)/DVI IN 2 (ARC)
port.
When connected with a high-speed
y
HDMI cable, the external audio device
that supports ARC outputs optical SPDIF
without additional optical audio cable and
supports the SIMPLINK function.
1) HDMI specifications may be different for each
input port, so make sure to check the device
specifications before connecting.
2) Contact customer service for more information
on the HDMI specifications of each input port.
4K@50/60Hz Support Format
Colour Depth/Chroma
Sampling
8bit 10bit 12bit
YCbCr
YCbCr
4:2:0
YCBCr 4:2:2
1
4:4:4
RGB
1
4:4:4
YCbCr 4:2:0
1
- -
- -
1
Resolution
3840 x 2160p
4096 x 2160p
Frame
rate(Hz)
50.00
59.94
60.00
1 : Only Supported at HDMI3 Port
NOTE
It is recommended to use the TV with the
y
HDMI connection for the best image quality.
Use the latest High Speed HDMI™ Cable
y
with CEC (Customer Electronics Control)
function.
High Speed HDMI™ Cables are tested to
y
carry an HD signal up to 1080p and higher.
Supported HDMI Audio format : Dolby
y
Digital, DTS, PCM (Up to 192 KHz, 32
KHz/44.1 KHz/48 KHz/88 KHz/96 KHz/176
KHz/192 KHz)
When you use an HDMI cable(HDMI port3),
y
it is recommended that you use the cable
provided. If you use a regular HDMI cable,
use a high-speed HDMI cable (3m or less).
(Depending on model)
Page 75

MAKING CONNECTIONS
29
DVI to HDMI connection
Transmits the digital video signal from an
external device to the TV. Connect the external
device and the TV with the DVI-HDMI cable as
shown. To transmit an audio signal, connect an
audio cable.
Choose any HDMI input port to connect. It does
not matter which port you use.
YELLOW
(*Not Provided)
Component connection
Transmits analog video and audio signals
from an external device to the TV. Connect the
external device and the TV with a component
cable as shown.
IN
COMPONENT
VIDEO
(Use the composite
gender cable
provided.)
WHITE WHITE
YELLOW
AV
AUDIO
B
R
YP
P
GREENYELLOW
(Use the component
gender cable provided.)
RED
RED RED
BLUE
ENGENGLISH
GREEN GREEN
AUDIO OUT
DVI OUT
DVD / Blu-Ray / HD Cable Box / PC / HD STB
NOTE
Depending on the graphics card, DOS mode
y
may not work if a HDMI to DVI Cable is in
use.
When using the HDMI/DVI cable, Single link
y
is only supported.
RED
(*Not Provided)
DVD / Blu-Ray /
HD Cable Box
WHITE
L R
AUDIO
RED
RED
VIDEO
BLUE
NOTE
If cables are not installed correctly, it could
y
cause this image to display in black and
white or with distorted colours.
BLUE
GREEN
Page 76

MAKING CONNECTIONS
30
Composite connection
ENGLISH
ENG
Transmits analog video and audio signals
from an external device to the TV. Connect the
external device and the TV with the composite
cable as shown.
IN
COMPONENT
COMPONENT
AUDIOAVP
VIDEO
(Use the composite
YELLOW
R
gender cable provided.)
YELLOW
WHITE
Audio connection
You may use an optional external audio system
instead of the built-in speaker.
Digital optical audio connection
Transmits a digital audio signal from the TV
to an external device. Connect the external
device and the TV with the optical audio cable
as shown.
Y
PB
YP
B
RED RED RED
VIDEO
VCR / DVD / Blu-Ray /
HD Cable Box
YELLOW
YELLOW
( )
MONO
L R
WHITE WHITE
(*Not Provided)
AUDIO
(*Not Provided)
OPTICAL
Digital Audio System
NOTE
Do not look into the optical output port.
y
Looking at the laser beam may damage
your vision.
Audio with ACP (Audio Copy Protection)
y
function may block digital audio output.
AUDIO IN
Page 77

MAKING CONNECTIONS
31
Headphone connection
Transmits the headphone signal from the TV to
an external device. Connect the external device
and the TV with the headphone as shown.
(*Not Provided)
NOTE
AUDIO menu items are disabled when
y
connecting a headphone.
OPTICAL DIGITAL AUDIO OUT is not
y
available when connecting a headphone.
Headphone impedance: 16 Ω
y
Max audio output of headphone: 0.627
y
mW to 1.334 mW
Headphone jack size: 0.35 cm
y
USB connection
Connect a USB storage device such as a USB
flash memory, external hard drive, or a USB
memory card reader to the TV and access the
SmartShare menu to use various multimedia
files.
HDD
(*Not Provided)
HUB
(*Not Provided)
NOTE
Some USB Hubs may not work. If a USB
y
device connected using a USB Hub is not
detected, connect it to the USB port on the
TV directly.
Connect the external power source if your
y
USB is needed.
Connecting via USB 3.0 :
y
»
Some USB device may not work if it
does not meet USB 3.0 standard. In
case, connect it to USB IN 2 or USB IN 3
port.
USB
(*Not Provided)
ENGENGLISH
Page 78

MAKING CONNECTIONS
32
ENGLISH
MHL connection
ENG
Mobile High-definition Link (MHL) is an interface
for transmitting digital audiovisual signals from
mobile phones to television sets.
MHL passive cable
(*Not Provided)
Mobile phone
NOTE
Connect the mobile phone to the
y
HDMI(4K@60Hz)/DVI IN 4 (MHL) port to
view the phone screen on the TV.
The MHL passive cable is needed to
y
connect the TV and a mobile phone.
This only works for the MHL-enabled
y
phone.
Some applications can be operated by the
y
remote control.
For some mobile phones supporting MHL,
y
you can control with the magic remote .
Remove the MHL passive cable from the
y
TV when:
»
the MHL function is disabled
»
your mobile device is fully charged
in standby mode
Page 79

REMOTE CONTROL
1 2 3
4
5 6
7 809
P
A
G
E
INPUT
FAV
MUTE
GUIDE
Q.VIEW
EXIT
OK
MY APPS
LIVE TV
REC
TEXT
T.OPT
SUBTITLE
SLEEP
AD/
BACK
Q.MENU
RECENT
*
TV/RAD
1
2
1
1
2
2
3
3
33
REMOTE CONTROL
The descriptions in this manual are based on the buttons on the remote control.
Please read this manual carefully and use the TV correctly. To replace batteries, open
the battery cover, replace batteries (1.5 V AAA) matching the and ends to the label
inside the compartment, and close the battery cover.
To remove the batteries, perform the installation actions in reverse.
CAUTION
Do not mix old and new batteries, as this may damage the remote control.
y
In Analogue TV and some countries, some remote control buttons may not work.
y
The remote control will not be included for all sales market.
y
Make sure to point the remote control toward the remote control sensor on the TV.
(Depending on model)
(POWER)
INPUT
SETTINGS Accesses the main menus.
INFO
(Depending on model)
RATIO
Q. MENU Accesses the quick menus.
(User Guide)
Number buttons Enters numbers.
GUIDE Shows programme guide.
Q.VIEW Returns to the previously viewed programme.
FAV
INFO
(Depending on model)
MUTE
ꕌPꕍ
PAGE
RECENT
SMART
MY APPS
Navigation buttons (up/down/left/right)
OK
BACK
LIVE MENU Shows the list of Recommended, Programmes, Search and Recorded.
EXIT Clears on-screen displays and returns to TV viewing.
Coloured buttons These access special functions in some menus.
(
TELETEXT BUTTONS
SLEEP Sets the sleep timer.
LIVE TV Returns to LIVE TV.
Control buttons ( ) Controls the Premium contents, Time
Machine or SmartShare menus or the SIMPLINK compatible devices (USB
or SIMPLINK or Time Machine).
REC
(Only Time Machine supported model)
SUBTITLE Recalls your preferred subtitle in digital mode.
AD/* By pressing the AD button, audio descriptions function will be
enabled.(Depending on model)
TV/RAD Selects Radio, TV and DTV programme.
Turns the TV on or off.
Changes the input source.
Views the information of the current programme and screen.
Resizes an image. (Depending on model)
Sees user-guide.
Adjusts the volume level.
Accesses your favourite programme list.
Used for viewing 3D video. (Only 3D models) (Depending on model)
Views the information of the current programme and screen.
Mutes all sounds.
Scrolls through the saved programmes.
Moves to the previous or next screen.
Shows the previous history.
Accesses the Home menus.
Shows the list of Apps.
Scrolls through menus or options
Selects menus or options and confirms your input.
Returns to the previous level.
: Red, : Green, : Yellow, : Blue)
These buttons are used for teletext.
Starts to record and displays record menu.
ENGENGLISH
.
Page 80

MAGIC REMOTE FUNCTIONS
1
34
ENGLISH
MAGIC REMOTE FUNCTIONS
ENG
When the message “Magic Remote battery is low. Change the battery.” is
displayed, replace the battery. To replace batteries, open the battery cover,
replace batteries (1.5 V AA) matching and ends to the label inside the
compartment, and close the battery cover. Be sure to point the remote control
toward the remote control sensor on the TV.
To remove the batteries, perform the installation actions in reverse.
CAUTION
Do not mix old and new batteries, as this may damage the remote control.
y
In Analogue TV and some countries, some remote control buttons may not work.
y
(Only UB85**, UB93**, UB95**, UB98**, UC97**,UC9*)
(POWER)
Turns the TV on or off.
Navigation buttons
Press the up, down, left or right
If you press
while the pointer is in use, the
pointer will disappear from the
screen and Magic Remote will
operate like a general remote
control. To display the pointer on the
screen again, shake Magic Remote
(up/down/left/right)
button to scroll the menu.
, , or buttons
to the left and right.
(BACK)
Returns to the previous level.
(Home)
Accesses the Home menu.
(Exit to LIVE)
Switches among broadcast
(antenna) and various inputs.
(Voice recognition)
(Depending on model)
P
Scrolls through the saved
programmes.
Press the centre of the Wheel
button to select a menu.
You can change programmes
and scroll the menu by using the
These access special functions
(
Adjusts the volume level.
Wheel(OK)
Wheel button.
Coloured buttons
in some menus.
: Red, : Green,
: Yellow, : Blue)
Displays the Screen Remote.
* Accesses the Universal Control
Menu. (Depending on model)
* Pressing and holding the
button will display a menu to
select an external device that is
connected to the TV.
Used for viewing 3D video.
(Only 3D models)
(MUTE)
Mutes all sounds.
*By pressing and holding the
button, audio descriptions
function will be enabled.
(Only Thailand)
Page 81

MAGIC REMOTE FUNCTIONS
HOME
HOME
35
Voice recognition (Depending on model)
Network connection is required to use the
voice recognition function.
1 Press the Voice recognition button.
2 Speak when the voice display window
appears on the left of the TV screen.
• The voice recognition may fail when you
speak too fast or too slow.
• Use the Magic remote no further than 10
cm from your face.
• The recognition rate may vary depending
on the user’s characteristics (voice,
pronunciation, intonation and speed) and
the environment (noise and TV volume).
Registering Magic Remote
How to register the Magic Remote
To use the Magic Remote, first pair
it with your TV.
(Wheel)
1 Put batteries into the Magic
Remote and turn the TV on.
2 Point the Magic Remote at your
TV and press the
Wheel (OK)
on the remote
control.
* If the TV fails to register the
Magic Remote, try again
after turning the TV off and
back on.
How to use Magic Remote
Shake the Magic Remote
y
slightly to the right and left
or press
, buttons to make the
pointer appear on the
screen.
(In some TV models,
the pointer will appear
when you turn the Wheel
button.)
If the pointer has not been
y
used for a certain period
of time or Magic Remote
is placed on a flat surface,
then the pointer will
disappear.
If the pointer is not
y
responding smoothly, you
can reset the pointer by
moving it to the edge of
the screen.
The Magic Remote
y
depletes batteries faster
than a normal remote due
to the additional features.
(Home),
ENGENGLISH
How to deregister the Magic Remote
(BACK)
Press the (
Home) buttons at the same
(
BACK) and
time, for five seconds, to unpair the
Magic Remote with your TV.
(Home)
* Pressing and holding the
(Exit to LIVE)
button will let
you cancel and re-register Magic
Remote at once.
Page 82

MAGIC REMOTE FUNCTIONS / USING THE USER GUIDE
HOME
36
ENGLISH
Precautions to Take when Using
ENG
the Magic Remote
Use the Magic Remote within the
y
maximum communication distance (10
m). Using the Magic Remote beyond this
distance, or with an object obstructing it,
may cause a communication failure.
A communication failure may occur due
y
to nearby devices. Electrical devices such
as a microwave oven or wireless LAN
product may cause interference, as these
use the same bandwidth (2.4 GHz) as the
Magic Remote.
The Magic Remote may be damaged
y
or may malfunction if it is dropped or
receives a heavy impact.
Take care not to bump into nearby
y
furniture or other people when using the
Magic Remote .
Manufacturer and installer cannot provide
y
service related to human safety as the
applicable wireless device has possibility
of electric wave interference.
It is recommended that an Access Point
y
(AP) be located more than 1 m away from
the TV. If the AP is installed closer than 1
m, the Magic Remote may not perform as
expected due to frequency interference.
USING THE USER GUIDE
User Guide allows you to more easily access the
detailed TV information.
1 Press the (
Home menu.
2 Select User Guide and press the
Wheel(OK) button.
Home) button to access the
NOTE
You can also access the User Guide by
y
pressing
control. (Depending on model)
(User Guide) in the remote
Page 83

MAINTENANCE / TROUBLESHOOTING
37
MAINTENANCE
Cleaning your TV
Clean your TV regularly to keep the best performance and to extend the product lifespan.
CAUTION
Make sure to turn the power off and disconnect the power cord and all other cables rst.
y
When the TV is left unattended and unused for a long time, disconnect the power cord from the
y
wall outlet to prevent possible damage from lightning or power surges.
Screen, frame, cabinet and stand
To remove dust or light dirt, wipe the surface with a dry, clean, and soft cloth.
y
To remove major dirt, wipe the surface with a soft cloth dampened in clean water or a diluted mild
y
detergent. Then wipe immediately with a dry cloth.
CAUTION
Avoid touching the screen at all times, as this may result in damage to the screen.
y
Do not push, rub, or hit the screen surface with your ngernail or a sharp object, as this may result
y
in scratches and image distortions.
Do not use any chemicals as this may damage the product.
y
Do not spray liquid onto the surface. If water enters the TV, it may result in re, electric shock, or
y
malfunction.
Power cord
Remove the accumulated dust or dirt on the power cord regularly.
ENGENGLISH
TROUBLESHOOTING
Problem Solution
Check the remote control sensor on the product and try again.
Cannot control the TV with
the remote control.
No image display and no
sound is produced.
The TV turns off suddenly.
When connecting to the PC
(HDMI DVI), ‘No signal’ or
‘Invalid Format’ is displayed.
y
Check if there are any obstacles between the product and the remote.
y
Check if the batteries are still working and properly installed
y
(
Check if the product is turned on.
y
Check if the power cord is connected to a wall outlet.
y
Check if there is a problem in the wall outlet by connecting other
y
products.
Check the power control settings. The power supply may be
y
interrupted.
Check if the Sleep Timer / Timer Power Off is activated in the
y
TIMERS settings.
If there is no signal while the TV is on, the TV will turn off
y
automatically after 15 minutes of inactivity.
Turn the TV off/on using the remote control.
y
Reconnect the HDMI cable.
y
Restart the PC with the TV on.
y
to , to ).
Page 84

ENVIRONMENTAL INFORMATION
38
ENGLISH
ENVIRONMENTAL INFORMATION
ENG
(Only India)
WEEE
Disposal of your old appliance
1. When this crossed-out wheeled bin symbol is attached to a product it means the
product is covered by the e-waste (Management and Handling) Rules, 2011.
2. All electrical and electronic products should be disposed of separately from
the municipal waste stream via designated collection facilities appointed by the
government or the local authorities.
3. The correct disposal of your old appliance will help prevent potential negative
4. For more detailed information about disposal of your old appliance, please contact your city office,
waste disposal service or the shop where you purchased the product.
5. This product does not contain any of the hazardous substances as specified in the rule 13 (1) and (2)
of the e-waste (Management and Handling) Rules, 2011.
consequences for the environment and human health.
Page 85

SPECIFICATIONS
39
SPECIFICATIONS
(Only UB98**, UC9*)
Wireless module(LGSWF41)Specifications
Standard IEEE 802.11a/b/g/n/ac
2400 to 2483.5MHz
Frequency Range
Output Power (Max.)
Because band channel used by the country could be different, the user can not change or
y
adjust the operating frequency and this product is set for the regional frequency table.
This device should be installed and operated with minimum distance 20 cm between the
y
device and your body. And this phrase is for the general statement for consideration of user
environment.
5150 to 5250 MHz
5725 to 5850 MHz(for Non EU)
802.11a: 14.5 dBm
802.11b: 16 dBm
802.11g: 13.5 dBm
802.11n - 2.4GHz: 14 dBm
802.11n - 5GHz: 15.5 dBm
802.11ac - 5GHz : 16 dBm
ENGENGLISH
Bluetooth module (BM-LDS401) specifications
Standard Bluetooth Version 3.0
Frequency Range 2400 to 2483.5MHz
Output Power (Max.) 10dBm or Lower
Page 86

SPECIFICATIONS
40
(Only UB85**, UB93**, UB95**, UC97**)
ENGLISH
ENG
Wireless LAN Bluetooth
Standard IEEE 802.11a/b/g/n Standard Bluetooth Version 3.0
2400 to 2483.5MHz
Frequency ragne
Output
power(Max.)
Because band channel used by the country could be different, the user can not change or
y
adjust the operating frequency and this product is set for the regional frequency table.
This device should be installed and operated with minimum distance 20 cm between the
y
device and your body. And this phrase is for the general statement for consideration of user
environment.
5150 to 5250 MHz
5725 to 5850 MHz (for Non EU)
802.11a: 13 dBm
802.11b: 15 dBm
802.11g: 14 dBm
802.11n - 2.4GHz: 16 dBm
802.11n - 5GHz: 16 dBm
Wireless module(LGSBW41)Specifications
Frequency ragne 2400 to 2483.5MHz
Output
power(Max.)
10dBm or Lower
Page 87

SPECIFICATIONS
Product specifications may be changed without prior notice due to upgrade of product functions.
For the power supply and power consumption, refer to the label attached to the product.
49UB85** 55UB85** 60UB85**
MODELS
Dimensions
(W x H x D)
Weight With stand (kg)
Power requirement
MODELS
Dimensions
(W x H x D)
Weight With stand (kg)
Power requirement
With stand (mm)
Without stand(mm)
Without stand (kg)
With stand (mm)
Without stand(mm)
Without stand (kg)
49UB850T-TA
49UB859Y-TA
1093 x 689 x 242 1233 x 766 x 260 1333 x 786 x 275
1093 x 646 x 38.2 1233 x 727 x 37.8 1333 x 784 x 37.8
18.2 21.2 23.2
17.5 20.5 22.5
AC 100-240 V~ 50 / 60 Hz AC 100-240 V~ 50 / 60 Hz AC 100-240 V~ 50 / 60 Hz
65UB93** 55UB95** 65UB95**
65UB930T-TA
65UB930Y-TA
1452 x 914 x 300 1232 x 782 x 260 1452 x 914 x 300
1452 x 858 x 37 1232 x 734 x 37.0 1452 x 858 x 37
34.8 23.8 34.8
33.7 23.1 33.7
AC 100-240 V~ 50 / 60 Hz AC 100-240 V~ 50 / 60 Hz AC 100-240 V~ 50 / 60 Hz
65UB98** 79UB98** 84UB98**
55UB850T-TA
55UB859Y-TA
55UB950T-TA
55UB959Y-TA
60UB850T-TA
60UB850Y-TA
65UB950T-TA
65UB959Y-TA
41
ENGENGLISH
MODELS
Dimensions
(W x H x D)
Weight With stand (kg)
Power requirement
MODELS
Dimensions
(W x H x D)
Weight With stand (kg)
Power requirement
With stand (mm)
Without stand(mm)
Without stand (kg)
With stand (mm)
Without stand(mm)
Without stand (kg)
65UB980T-TA
65UB980Y-TA
65UB980T-TB
65UB980Y-TB
1560 x 884 x 264 1874 x 1075 x 330.6 2024 x 1172 x 342
1560 x 832 x 75 1874 x 1014 x 86.8 2024 x 1113 x 85.8
39.9 60.6 77.7
37.6 57.1 73.7
AC 100-240 V~ 50 / 60 Hz AC 100-240 V~ 50 / 60 Hz AC 100-240 V~ 50 / 60 Hz
98UB98** 49UC97** 55UC97**
98UB980T-TA
98UB980Y-TA
98UB980T-TB
98UB980Y-TB
2054 x 1172 x 342 1172 x 757 x 315 1232 x 782 x 260
2054 x 1113 x 85.8 1172 x 701 x 56.0 1232 x 734 x 37.0
80 24.9 23.8
78.7 23.3 23.1
AC 100-240 V~ 50 / 60 Hz AC 100-240 V~ 50 / 60 Hz AC 100-240 V~ 50 / 60 Hz
79UB980T-TA
79UB980Y-TA
79UB980T-TB
79UB980Y-TB
49UC970T-TA
49UC970Y-TA
84UB980T-TA
84UB989Y-TA
84UB980T-TB
84UB989Y-TB
55UC970T-TA
55UC970Y-TA
Page 88

SPECIFICATIONS
42
ENGLISH
MODELS
ENG
Dimensions
(W x H x D)
Weight
Power requirement
Environment
condition
Television System DVB-T(*DVB-T/T2)
Programme Coverage VHF, UHF
Maximum number of
storable programmes
External Antenna
Impedance
* : Only DVB-T2 support models.
With stand (mm)
Without stand(mm)
With stand (kg)
Without stand (kg)
Operating Temperature 0 °C to 40 °C
Operating Humidity Less than 80 %
Storage Temperature -20 °C to 60 °C
Storage Humidity Less than 85 %
65UC97** 79UC97** 105UC9*
65UC970T-TA 79UC970T-TA 105UC9T-TA
1560 x 884 x 264 1874 x 1075 x 330.6 2254 x 1272 x 352
1560 x 832 x 75 1874 x 1014 x 86.8 2254 x 1213 x 90
AC 100-240 V~ 50 / 60 Hz AC 100-240 V~ 50 / 60 Hz AC 100-240 V~ 50 / 60 Hz
(Depending on Country)
39.9 60.6 91
37.6 57.1 85.7
Digital TV
PAL B/B, PAL B/G, PAL D/K, PAL-I
DVB-T/T2 & Analogue TV : 1,500
75 Ω
Analogue TV
(Depending on Country)
SECAM B/G, SECAM D/K
NTSC-M
VHF, UHF, CATV
NOTE
Video les created by some encoders may not be played back.
y
LG ULTRA HD TV may not be compatible with certain types of HEVC codec contents.
y
Video les in formats other than the ones specied here may not be played back.
y
Playback of video les stored on the USB device that do not support High Speed, may not work
y
properly.
Some subtitles created by users may not work properly.
y
The video and subtitle les should be placed in the same folder. For subtitles to display correctly,
y
the video and subtitle les must have the same name.
It supports the playback through USB only.
y
Page 89

Page 90

PT. LG ELECTRONICS INDONESIA
Kawasan Industri MM2100 Blok G
Cikarang Barat, Bekasi, Jawa Barat 17520
INDONESIA
PETUNJUK PENGGUNAAN (MANUAL) DAN KARTU JAMINAN/GARANSI PURNA JUAL
DALAM BAHASA INDONESIA BAGI PRODUK TELEMATIKA DAN ELEKTRONIKA
NOMOR :
TANDA PENDAF TARAN
Catat nomor model dan nomor seri TV.
Mengacu pada label di penutup belakang dan
Informasikan pada dealer Anda apabila memerlukan
jasa pelayanan.
MODEL
SERIAL
(Hanya DTV)
 Loading...