

Page 1

Order Number
: GETEC-C1-12-005
FCC Part 15 subpart B
Test Report Number
: GETEC-E3-12-004 Page 1 / 1
APPENDIX G
: USER’S MANUAL
EUT Type: LED LCD TV/Monitor
FCC ID.: BEJ55LMG620UG
Page 2

OWNER’S MANUAL
GOOGLE TV
Please read this manual carefully before operating the
set and retain it for future reference.
LMG620 series
P/NO : SAC35474201 (1112-REV00)
www.lg.com
Page 3

ENGLISH
ENG
TABLE OF CONTENTS
2
Table of Contents
4 BEFORE USE
4 LICENSES
5 IMPORTANT SAFETY INSTRUCTIONS
10 Viewing 3D Imaging (For 3D models)
12 Unpacking
14 Optional Extras
15 Parts and buttons
16 Magic Remote Control Functions
18 - Registering the Remote Control
18 - Precautions to Take when Using the
Remote Control
19 INSTALLATION
19 Lifting and moving the TV
20 Setting up the TV
20 - Attaching the stand
22 - Mounting on a table
23 - Mounting on a wall
24 - Tidying cables
25 Connecting to an antenna or cable
25 - Connecting an antenna or basic cable
25 - Connecting a cable box
26 CONNECTIONS
26 Connecting to an antenna or cable
27 Connection Overview
28 Connecting to a HD receiver, DVD, or
VCR player
28 - HDMI Connection
29 - DVI to HDMI Connection
30 - Component Connection
31 - Composite Connection
32 Connecting to a PC
32 - HDMI Connection, DVI to HDMI Con-
nection or RGB Connection
34 Connecting to an Audio System
34 - Digital Optical Audio Connection
35 Connecting to a USB
36 USING (BASIC)
36 Turning the TV on for the first time
36 Setting the Mode
37 Accessing Home Menu
38 Setting up channels
39 Checking current program info
40 Adjusting aspect ratio
41 Using the input list
42 Using the customer support
42 - Testing the Picture / Sound
42 - Using the product or service
information
43 APPLICATIONS
43 Google Chrome
43 - Getting started
43 - Browser windows
44 - Bookmarks
44 - Safety and security settings
44 - Advanced settings
45 Android Market
45 - Getting Started
45 - How to download or remove apps
46 - Charges
47 - Returning apps
48 Live TV
48 - Picture in Picture
49 3D World
49 - When watching 3D imaging
49 - When using 3D Glasses
49 - Viewing 3D Imaging
50 - Setting 3D Imaging
Page 4

TABLE OF CONTENTS
3
51 Media Player
51 - Options
52 Netflix
52 Photos
53 Search
53 TV & Movies
54 YouTube
55 SETTINGS
55 The Main Menus
56 - Network
56 - Video input
57 - Picture & sound
57 - ATSC
57 - Input List
58 - Picture
59 - Audio
59 - 3D Setting
59 - Search
59 - Applications
60 - Language & input devices
60 - Accounts & sync
60 - Privacy & safety
61 - Storage
61 - Date, time & location
62 - Safety(Lock)
62 - Accessibility
63 - About
63 - Option
63 - Customer Support
64 APPENDIX
64 Updating the TV Firmware
65 Cleaning Your TV
65 - Screen, frame, cabinet and stand
65 - Power cord
65 Preventing “Image burn” or “Burn-in” on
your TV screen
66 IR Blaster Guide
67 - IR Code list
103 Troubleshooting
106 Specifications
109 Open Source Software Notice
110 Privacy Notice for the Google TV
111 Google TV Safety
ENGLISH
ENG
Page 5

Before Use
4
BEFORE USE
LICENSES
Supported licenses may differ by model. For more information about licenses, visit www.lg.com.
Manufactured under license from Dolby Laboratories. “Dolby” and the double-D
symbol are trademarks of Dolby Laboratories.
HDMI, the HDMI logo and High-Definition Multimedia Interface are trademarks or
registered trademarks of HDMI Licensing LLC.
ENGLISH
ENG
NOTE
Image shown may differ from your TV.
y
Your TV's OSD (On Screen Display) may differ slightly from that shown in this manual.
y
Page 6
Before Use
IMPORTANT SAFETY INSTRUCTIONS
Always comply with the following precautions to avoid dangerous situations and ensure peak performance
of your product.
Read these instructions.
Keep these instructions.
Heed all warnings.
Follow all instructions.
5
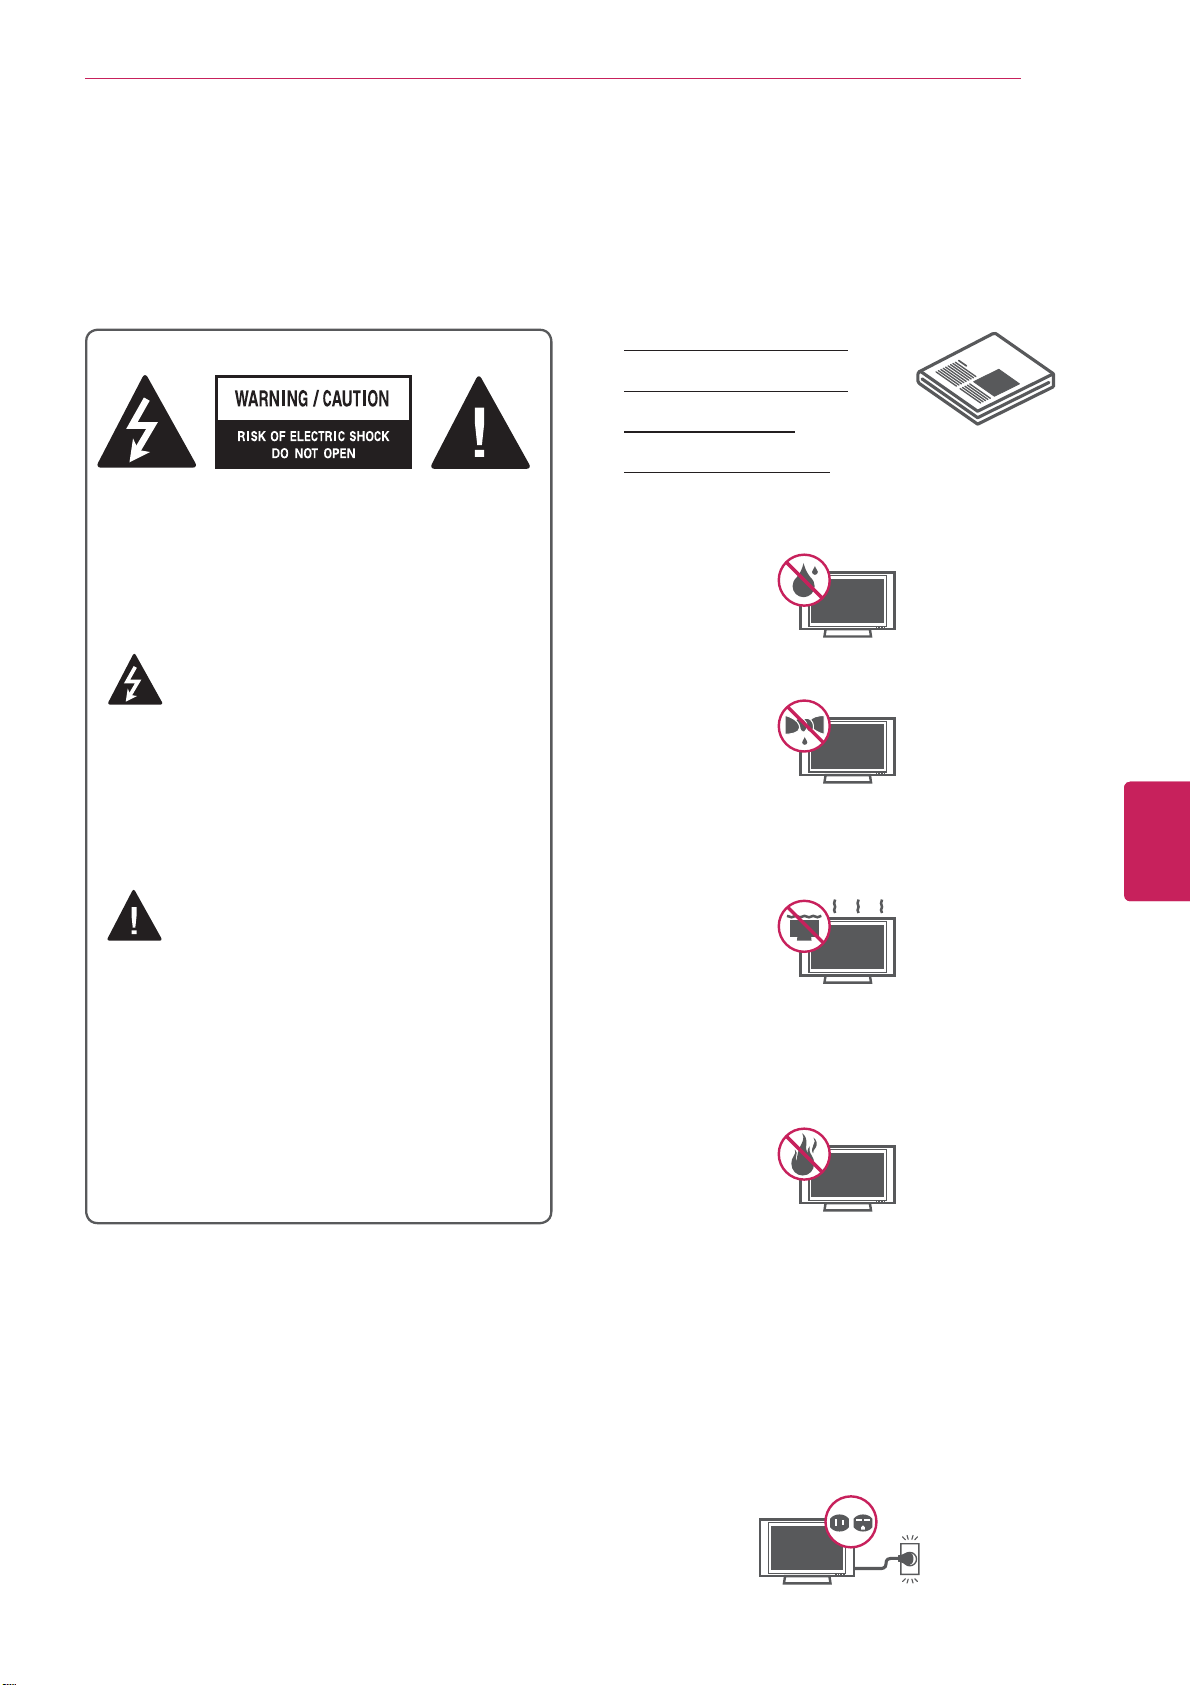
TO REDUCE THE RISK OF ELECTRIC
SHOCK DO NOT REMOVE COVER (OR
BACK). NO USER SERVICEABLE PARTS
INSIDE. REFER TO QUALIFIED SERVICE
PERSONNEL.
The lightning flash with arrowhead
symbol, within an equilateral triangle,
is intended to alert the user to the
presence of uninsulated “dangerous voltage”
within the product’s enclosure that may be
of sufficient magnitude to constitute a risk of
electric shock to persons.
The exclamation point within an
equilateral triangle is intended to alert
the user to the presence of important
operating and maintenance (servicing)
instructions in the literature accompanying
the appliance.
WARNING/CAUTION
Do not use this apparatus near water.
y
Clean only with a dry cloth.
y
Do not block any ventilation openings. Install
y
in accordance with the manufacturer’s
instructions.
Do not install near any heat sources such
y
as radiators, heat registers, stoves, or other
apparatus (including amplifiers) that produce
heat.
ENGLISH
ENG
- TO REDUCE THE RISK OF FIRE AND
ELECTRIC SHOCK, DO NOT EXPOSE THIS
PRODUCT TO RAIN OR MOISTURE.
Do not defeat the safety purpose of the
y
polarized or grounding-type plug. A polarized
plug has two blades with one wider than the
other. A grounding type plug has two blades
and a third grounding prong. The wide blade
or the third prong are provided for your safety.
If the provided plug does not fit into your
outlet, consult an electrician for replacement
of the obsolete outlet (Can differ by country).
Page 7
6
Before Use
ENGLISH
ENG
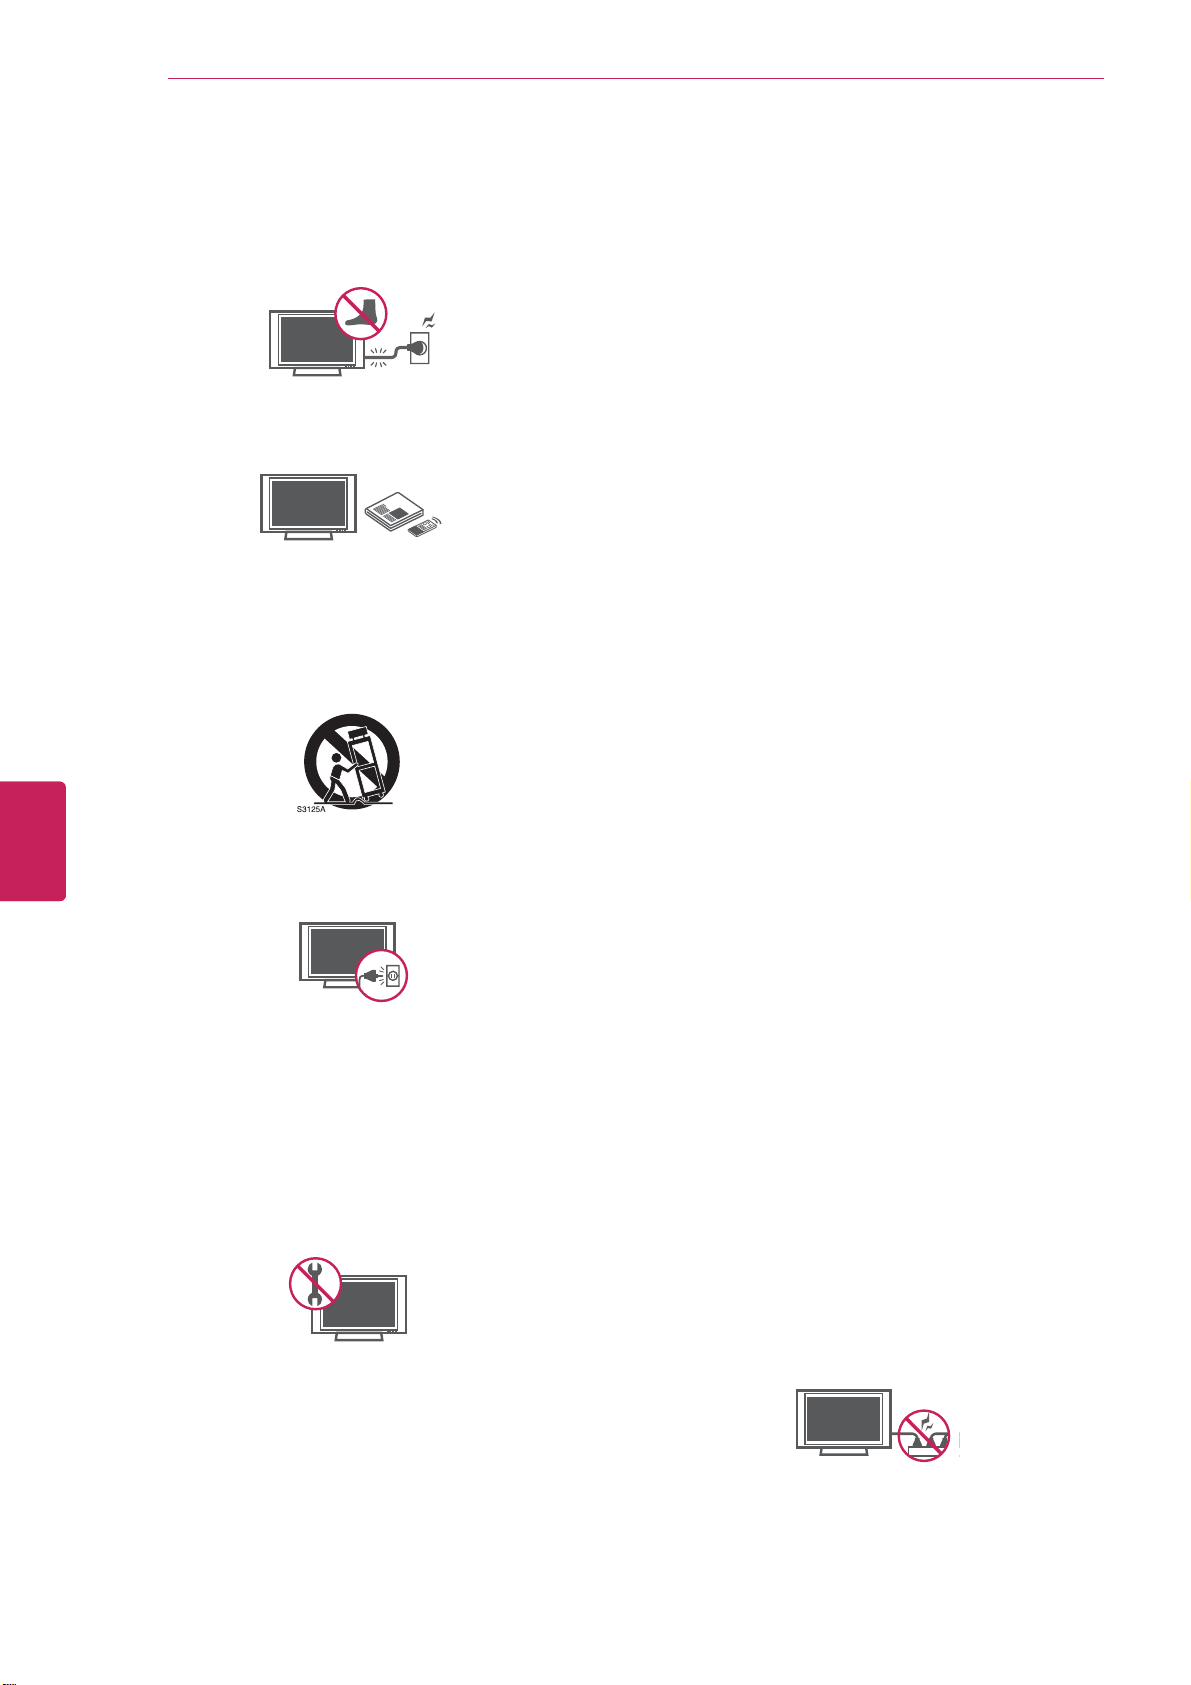
Protect the power cord from being walked on
y
or pinched particularly at plugs, convenience
receptacles, and the point where they exit
from the apparatus.
Only use attachments/accessories specified
y
by the manufacturer.
Use only with a cart, stand, tripod, bracket,
y
or table specified by the manufacturer, or
sold with the apparatus. When a cart is used,
use caution when moving the cart/apparatus
combination to avoid injury from tip-over.
Unplug this apparatus during lightning
y
storms or when unused for long periods of
time.
Refer all servicing to qualified service
y
personnel. Servicing is required when
the apparatus has been damaged in any
way, such as power-supply cord or plug is
damaged, liquid has been spilled or objects
have fallen into the apparatus, the apparatus
has been exposed to rain or moisture, does
not operate normally, or has been dropped.
Never touch this apparatus or antenna during
y
a thunder or lightning storm.
Do not allow an impact shock or any objects
y
to fall into the product, and do not drop
anything onto the screen.
Keep the packing anti-moisture material or
y
vinyl packing out of the reach of children.
Anti-moisture material is harmful if
swallowed. If swallowed by mistake, force
the patient to vomit and visit the nearest
hospital. Additionally, vinyl packing can
cause suffocation. Keep it out of the reach of
children.
CAUTION concerning the Power Cord
y
(Can differ by country):
It is recommended that appliances be
placed upon a dedicated circuit; that is, a
single outlet circuit which powers only that
appliance and has no additional outlets or
branch circuits. Check the specification page
of this owner’s manual to be certain. Do not
connect too many appliances to the same
AC power outlet as this could result in fire or
electric shock. Do not overload wall outlets.
Overloaded wall outlets, loose or damaged
wall outlets, extension cords, frayed power
cords, or damaged or cracked wire insulation
are dangerous. Any of these conditions could
result in electric shock or fire. Periodically
examine the cord of your appliance, and
if its appearance indicates damage or
deterioration, unplug it, discontinue use of
the appliance, and have the cord replaced
with an exact replacement part by an
authorized service. Protect the power cord
from physical or mechanical abuse, such as
being twisted, kinked, pinched, closed in a
door, or walked upon. Pay particular attention
to plugs, wall outlets, and the point where
the cord exits the appliance. Do not move
the TV with the power cord plugged in. Do
not use a damaged or loose power cord. Be
sure do grasp the plug when unplugging the
power cord. Do not pull on the power cord
to unplug the TV.
When mounting a TV on the wall, make sure
y
not to install the TV by hanging the power
and signal cables on the back of the TV.
Do not stick metal objects or any other
y
conductive material into the power cord. Do
not touch the end of the power cord while it
is plugged in.
Page 8
Before Use
7
Warning
y
- To reduce the risk of fire or
electrical shock, do not expose this product
to rain, moisture or other liquids. Do not
touch the TV with wet hands. Do not install
this product near flammable objects such
as gasoline or candles, or expose the TV to
direct air conditioning.
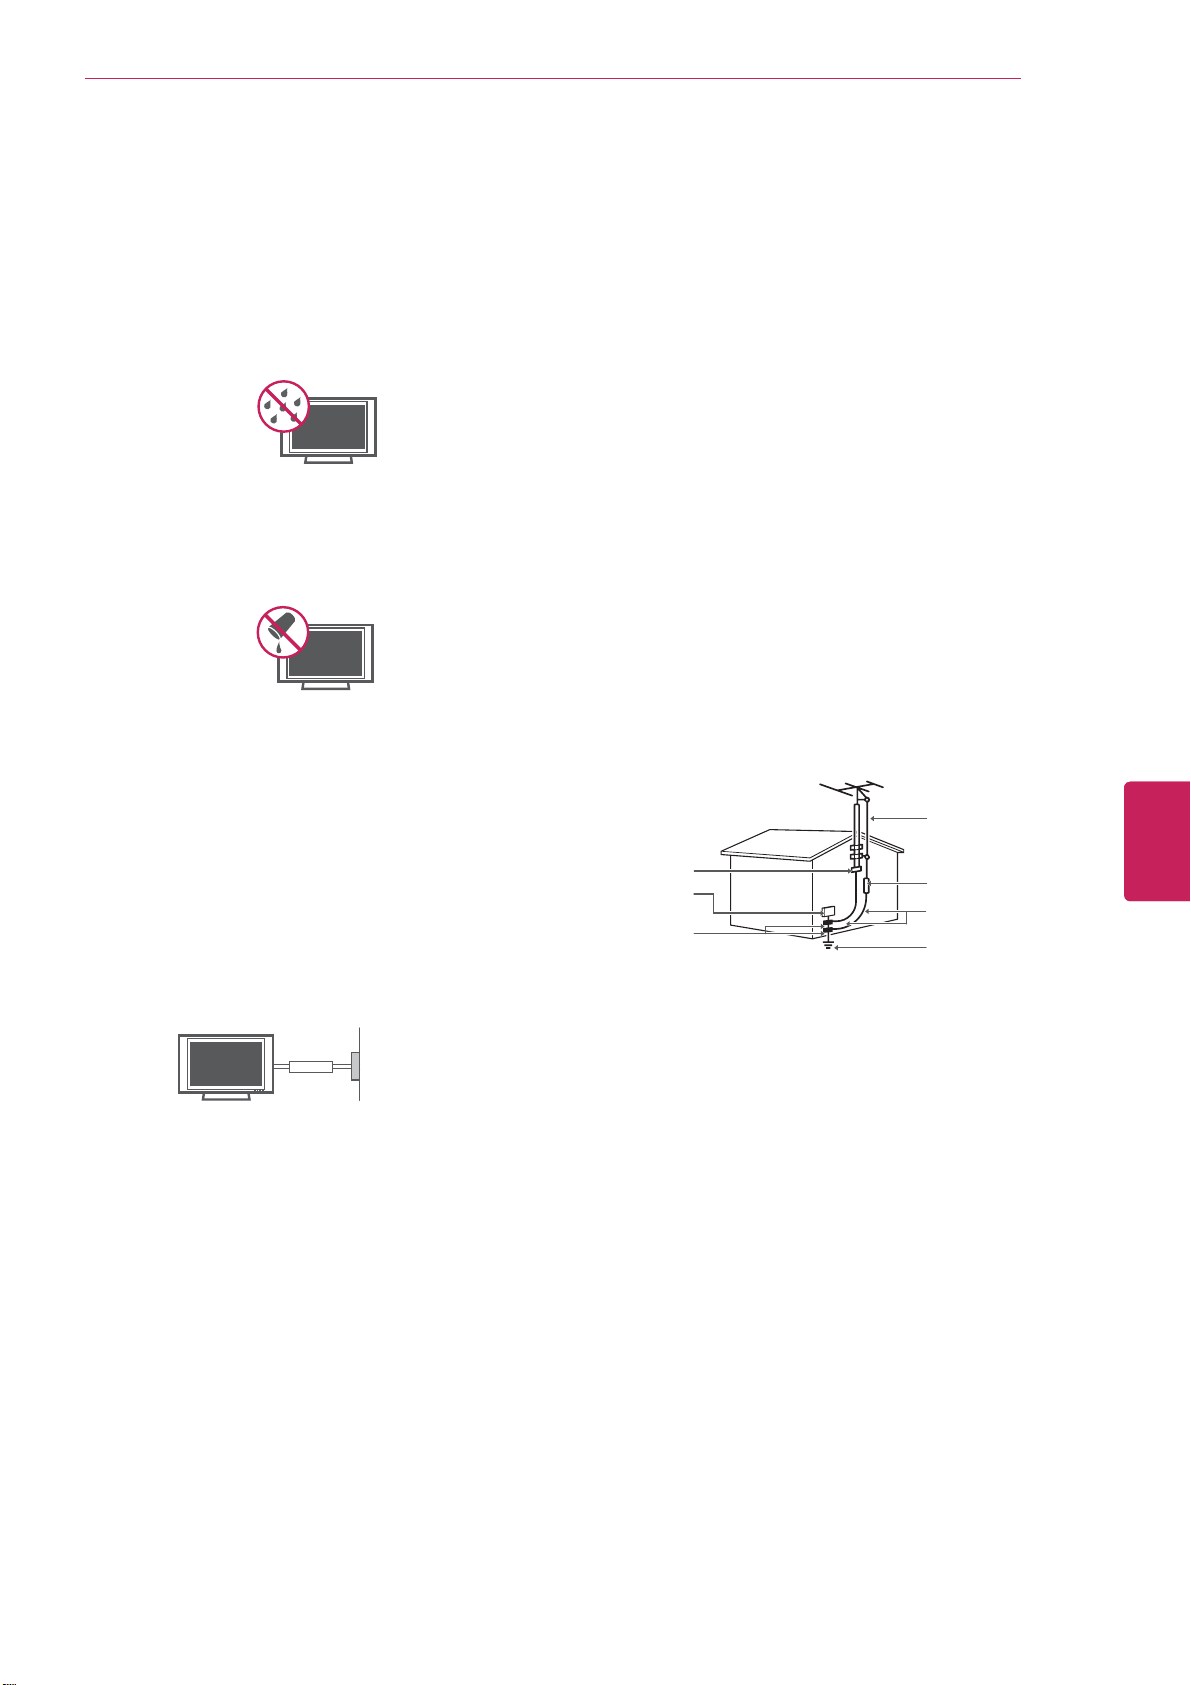
Do not expose to dripping or splashing and
y
do not place objects filled with liquids, such
as vases, cups, etc. on or over the apparatus
(e.g. on shelves above the unit).
Grounding
y
(Except for devices which are not grounded.)
Ensure that you connect the earth ground
wire to prevent possible electric shock
(i.e. a TV with a three-prong grounded AC
plug must be connected to a three-prong
grounded AC outlet). If grounding methods
are not possible, have a qualified electrician
install a separate circuit breaker. Do not try to
ground the unit by connecting it to telephone
wires, lightening rods, or gas pipes.
ANTENNAS Outdoor antenna grounding
y
(Can differ by country):
If an outdoor antenna is installed, follow
the precautions below. An outdoor antenna
system should not be located in the vicinity
of overhead power lines or other electric light
or power circuits, or where it can come in
contact with such power lines or circuits as
death or serious injury can occur. Be sure the
antenna system is grounded so as to provide
some protection against voltage surges
and built-up static charges. Section 810 of
the National Electrical Code (NEC) in the
U.S.A. provides information with respect to
proper grounding of the mast and supporting
structure, grounding of the lead-in wire to
an antenna discharge unit, size of grounding
conductors, location of antenna discharge
unit, connection to grounding electrodes and
requirements for the grounding electrode.
Antenna grounding according to the National
Electrical Code, ANSI/NFPA 70
Antenna Lead in Wire
Ground Clamp
Electric Service
Equipment
Ground Clamp
NEC: National Electrical Code
Antenna Discharge Unit
(NEC Section 810-20)
Grounding Conductor
(NEC Section 810-21)
Power Service Grounding
Electrode System
(NEC Art 250, Part H)
ENGLISH
ENG
Power Supply
Short-circuit Breaker
DISCONNECTING DEVICE FROM THE MAIN
y
POWER
The power outlet must remain readily
accessed in the event the device needs to
be unplugged.
As long as this unit is connected to the AC
y
wall outlet, it is not disconnected from the
AC power source even if the unit is turned
off.
Do not attempt to modify this product in any
y
way without written authorization from LG
Electronics. Unauthorized modification could
void the user’s authority to operate this
product.
Cleaning
y
When cleaning, unplug the power cord and
wipe gently with a soft cloth to prevent
scratching. Do not spray water or other
liquids directly on the TV as electric shock
may occur. Do not clean with chemicals
such as alcohol, thinners or benzine.
Moving
y
Make sure the product is turned off,
unplugged and all cables have been
removed. It may take 2 or more people to
carry larger TVs. Do not press or put stress
on the front panel of the TV.
Ventilation
y
Install your TV where there is proper
ventilation. Do not install in a confined
space such as a bookcase. Do not cover the
product with cloth or other materials while
plugged. Do not install in excessively dusty
places.
Page 9

8
Before Use
ENGLISH
ENG
If you smell smoke or other odors coming
y
from the TV, unplug the power cord and
contact an authorized service center.
Do not press strongly upon the panel with
y
your hand or a sharp object such as a nail,
pencil or pen, or make a scratch on it.
Keep the product away from direct sunlight.
y
Dot Defect
y
The Plasma or LCD panel is a high
technology product with resolution of two
million to six million pixels. In a very few
cases, you could see fine dots on the screen
while you’re viewing the TV. Those dots
are deactivated pixels and do not affect the
performance and reliability of the TV.
Generated Sound
y
“Cracking” noise: A cracking noise that
occurs when watching or turning off the TV
is generated by plastic thermal contraction
due to temperature and humidity. This noise
is common for products where thermal
deformation is required.
Electrical circuit humming/panel buzzing: A
low level noise is generated from a highspeed switching circuit, which supplies a
large amount of current to operate a product.
It varies depending on the product.
This generated sound does not affect the
performance and reliability of the product.
DISPOSAL (Hg lamp only used in LCD TVs)
The fluorescent lamp used in this product contains
a small amount of mercury. Do not dispose of this
product with general household waste. Disposal of
this product must be carried out in accordance to
the regulations of your local authority.
NOTE TO CABLE/TV INSTALLER
This reminder is provided to call the CATV system
installer’s attention to Article 820-40 of the
National Electric Code (U.S.A.). The code provides
guidelines for proper grounding and, in particular,
specifies that the cable ground shall be connected
to the grounding system of the building, as close
to the point of the cable entry as practical.
Take care not to touch the ventilation
y
openings. When watching the TV for a long
period, the ventilation openings may become
hot. This does not affect the performance of
the product or cause defects in the product.
If the TV feels cold to the touch, there may
y
be a small “flicker” when it is turned on. This
is normal, there is nothing wrong with TV.
Some minute dot defects may be visible on
the screen, appearing as tiny red, green, or
blue spots. However, they have no adverse
effect on the TV’s performance. Avoid
touching the LCD screen or holding your
finger(s) against it for long periods of time.
Doing so may produce some temporary
distortion effects on the screen.
Page 10

FCC NOTICE
This equipment has been tested and found to
comply with the limits for a Class B digital device,
pursuant to Part 15 of the FCC Rules. These limits
are designed to provide reasonable protection
against harmful interference in a residential
installation. This equipment generates, uses
and can radiate radio frequency energy and, if
not installed and used in accordance with the
instructions, may cause harmful interference
to radio communications. However, there is no
guarantee that interference will not occur in a
particular installation. If this equipment does
cause harmful interference to radio or television
reception, which can be determined by turning the
equipment off and on, the user is encouraged to
try to correct the interference by one or more of
the following measures:
Before Use
9
- Reorient or relocate the receiving antenna.
- Increase the separation between the
equipment and the receiver.
- Connect the equipment to an outlet on
a circuit different from that to which the
receiver is connected.
- Consult the dealer or an experienced radio/TV
technician for help.
This device complies with part 15 of the FCC
Rules. Operation is subject to the following two
conditions: (1) this device may not cause harmful
interference and (2) this device must accept any
interference received, including interference that
may cause undesired operation of the device.
Any changes or modifications in construction of
this device which are not expressly approved by
the party responsible for compliance could void
the user’s authority to operate the equipment.
NOTE TO CABLE/TV INSTALLER
ENGLISH
ENG
This reminder is provided to call the CATV system
installer’s attention to Article 820-40 of the
National Electric Code (U.S.A.). The code provides
guidelines for proper grounding and, in particular,
specifies that the cable ground shall be connected
to the grounding system of the building, as close
to the point of the cable entry as practical.
Page 11

Before Use
10
Viewing 3D Imaging (For 3D models)
WARNING
Viewing Environment
Viewing Hour
y
When watching 3D videos, take a 5 - 15 minute break every hour. Watching TV for a long time may
cause headache, dizziness, fatigue or eye strain.
Viewing Age
Infants/Children
y
- Prohibit children under the age of 5 from watching or using 3D videos.
- Children under the age of 10 may react overly excited, for example, trying to touch the screen or
jumping into it because their vision is in development. Extra special monitoring is required for children
watching 3D videos.
ENGLISH
ENG
- For children, the distance between eyes is shorter than one of adults, so they have greater binocular
disparity of 3D presentations than adults, perceiving more stereoscopic depth even for the same 3D
image.
Teenagers
y
Teenagers under the age of 19 may be stimulated to light coming from 3D videos. Advise them not to
watch 3D videos for a long time when they are tired.
Elderly
y
The elderly may perceive less of a 3D effect than the youth. Do not sit closer to the TV than the
recommended distance.
Those who have a photosensitive seizure or chronic illness
Some users may experience a seizure or other abnormal symptoms when they are exposed to a
y
flashing light or particular pattern from 3D videos.
Do not watch 3D videos if you have a chronic illness (epilepsy, cardiac disorder, or blood pressure
y
disease, etc.); if you often feel nausea; or if you are pregnant.
If you suffer from stereo blindness or stereo anomaly, it is not recommended to watch 3D videos. You
y
may experience double images or discomfort in viewing.
If you have squint, amblyopia (weak eyesight) or astigmatism, you may have a trouble sensing depth
y
and easily feel fatigue due to double images. It is advised to take a break more often than general
adults do.
If you have different eyesight between your right and left eyes, revise your eyesi[ght first before
y
watching 3D videos.
Symptoms requiring to refrain from or stop watching 3D videos
Symptoms requiring to refrain from or stop watching 3D videos
y
Do not watch 3D videos when you feel fatigue due to lack of sleep, overwork or drinking.
If you experience those symptoms, stop using/watching 3D videos and rest until the symptom
disappear.
- Headache, eyeball pain, dizziness, nausea, palpitation, blurriness, discomfort, double image, visual
inconvenience or fatigue
If your symptoms persist, please consult your doctor.
Page 12

Before Use
CAUTION
Viewing Environment
Viewing Distance
y
Maintain a distance of at least twice the screen diagonal length when watching 3D videos. If you feel
uncomfortable viewing 3D videos, move farther away from the TV.
Viewing Position (Only for SG Mode)
y
You should also be able to see the centre of the screen at eye level with the head looking straight up.
Otherwise, you may not able to view 3D videos properly.
Viewing Environment
y
- Before watching 3D videos, adjust first the viewing level, brightness, focus, and sound to ensure
comfortable viewing.
- Proper lighting and ventilation also help you watch TV comfortably.
Cautions when using the 3D glasses
11
Make sure to use LG 3D glasses. Otherwise, you may not able to view 3D videos properly.
y
Do not use the 3D glasses instead of your normal glasses, sunglasses or protective goggles.
y
Using modified 3D glasses may cause eye strain or image distortion.
y
Do not keep your 3D glasses in extremely high or low temperatures to prevent them from
y
deformation.
The 3D glasses are fragile, and easy to scratch. Always use a soft, clean piece of cloth when wiping
y
the lenses. Do not scratch the lenses of the 3D glasses with sharp objects or wipe them with any
chemicals.
When watching 3D videos under fluorescent lighting or with three wave length lamps, you may see
y
the screen blinking. In this case, turn the light off or turn it down. (Only for SG mode)
Put other electronic or communication devices away from the TV or turn them off. Interference may
y
occur, which prevents the 3D function from working properly. (Only for SG mode)
If you watch TV lying down, 3D images become to look dark or invisible. (Only for SG mode)
y
ENGLISH
ENG
Page 13
Before Use
12
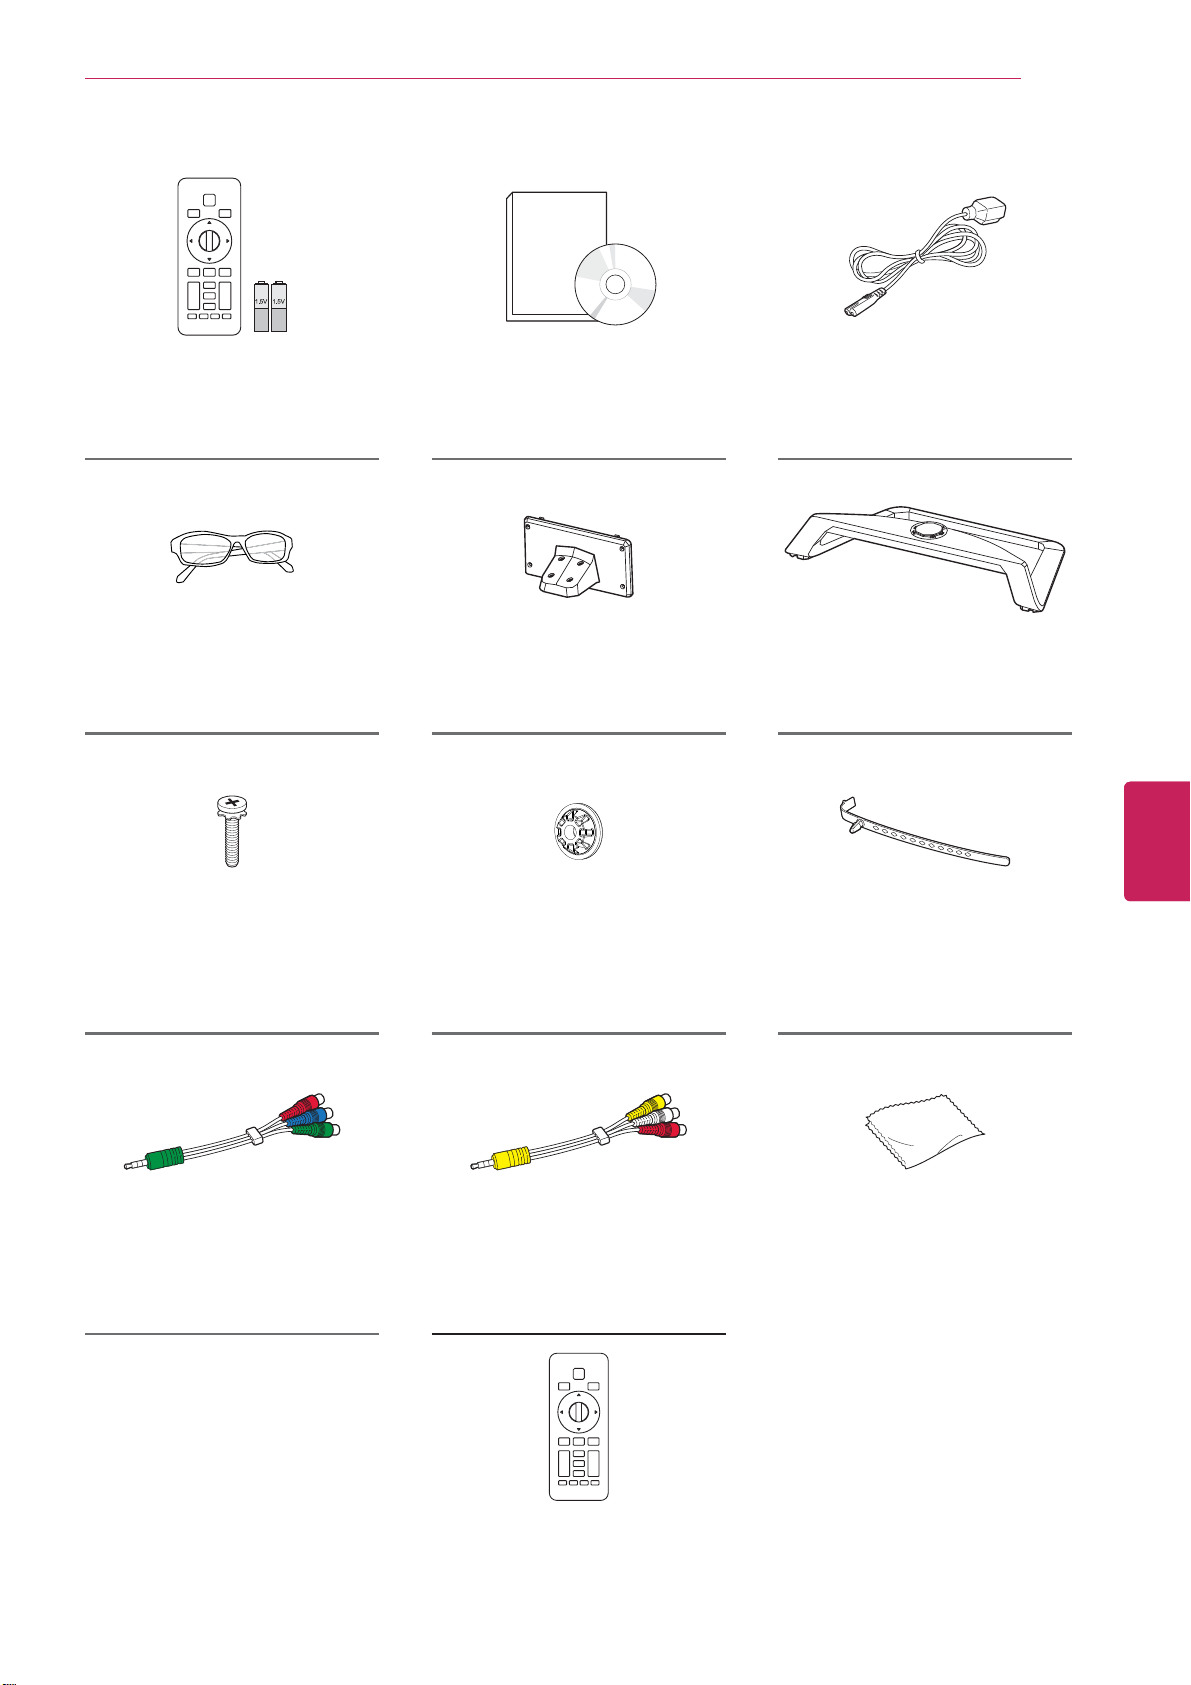
Unpacking
Check your product box for the following items. If there are any missing accessories, contact the local
dealer where you purchased your product. The illustrations in this manual may differ from the actual
product and item.
NOTE
The items supplied with your product may vary depending on the model.
y
Product specifications or contents of this manual may be changed without prior notice due to
y
upgrade of product functions.
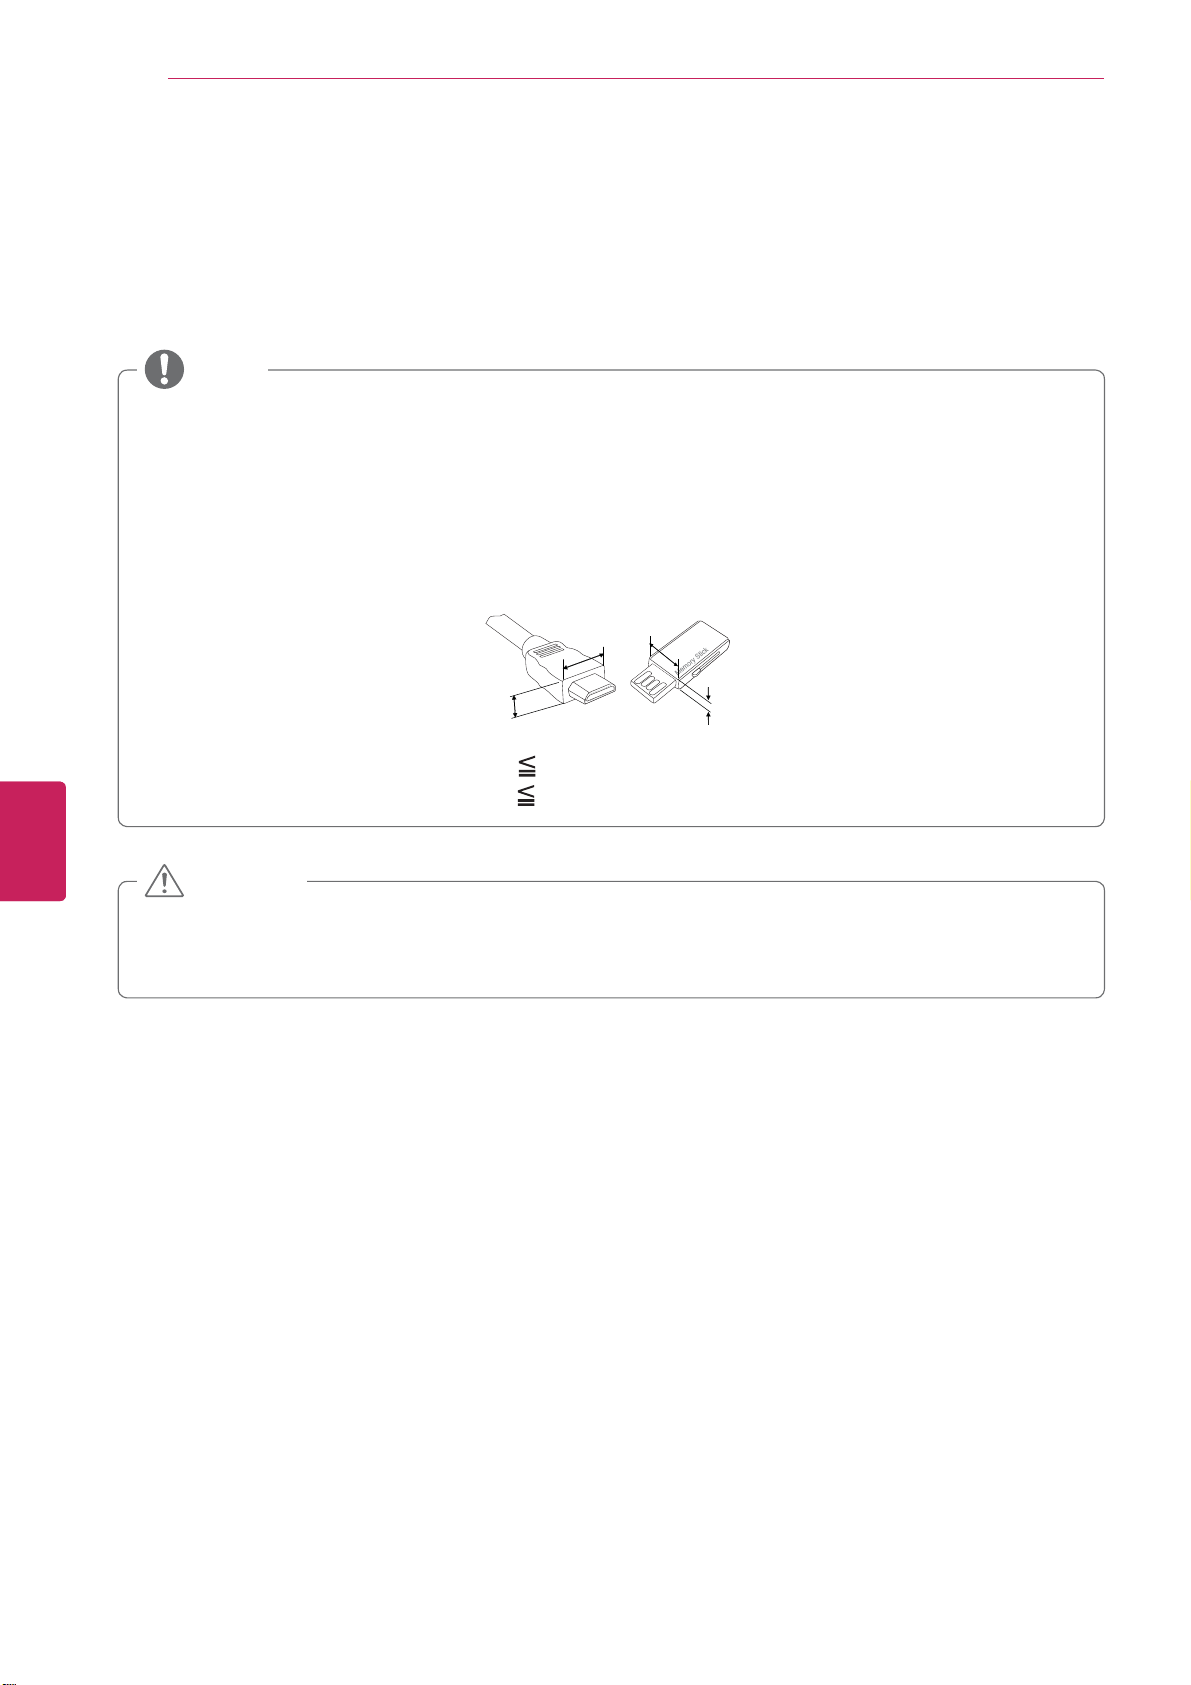
For an optimal connection, HDMI cables and USB devices should have bezels less than 10 mm (0.39
y
inches) thick and 18 mm (0.7 inches) width.
Use an extension cable that supports USB 2.0 if the USB cable or USB memory stick does not fit
y
into your TV's USB port.
ENGLISH
ENG
B
A
B
A
*A 10 mm (0.39 inches)
*B
18 mm (0.7 inches)
CAUTION
Do not use any unapproved items to ensure the safety and product life span.
y
Any damages or injuries by using unapproved items are not covered by the warranty.
y
In case of some model, the thin film on screen is a part of TV, So don’t take it off.
y
Page 14
Before Use
13
QWERTY Remote Control,
Batteries (AA)
(See p.16)
Cinema 3D Glasses
3 Box(6 EA)
Stand Screws
M4 x 16
8 EA,
(See p.17)
Owner’s manual,
CD manual
Stand Body
(See p.17)
Wall mount inner spacers
4 E
Power Cord
Stand Base
(See p.17)
ENGLISH
ENG
Cable holder
(See p.16)
Component video cable
(See p.20, 21)
IR Blaster cable
(See p. 66)
Composite video cable
(See p.21)
AN-MR300Q
QWERTY Remote Control
Polishing cloth
Use this to remove dust
from the cabinet.
Page 15

Before Use
14
Optional Extras
Optional extras can be changed or modified for quality improvement without any notification.
Contact your dealer for buying these items.
These devices only work with certain models.
AG-F3**
Cinema 3D Glasses
The model name
or design may be
changed manufacturer’s
circumstances or policies.
ENGLISH
ENG
Page 16
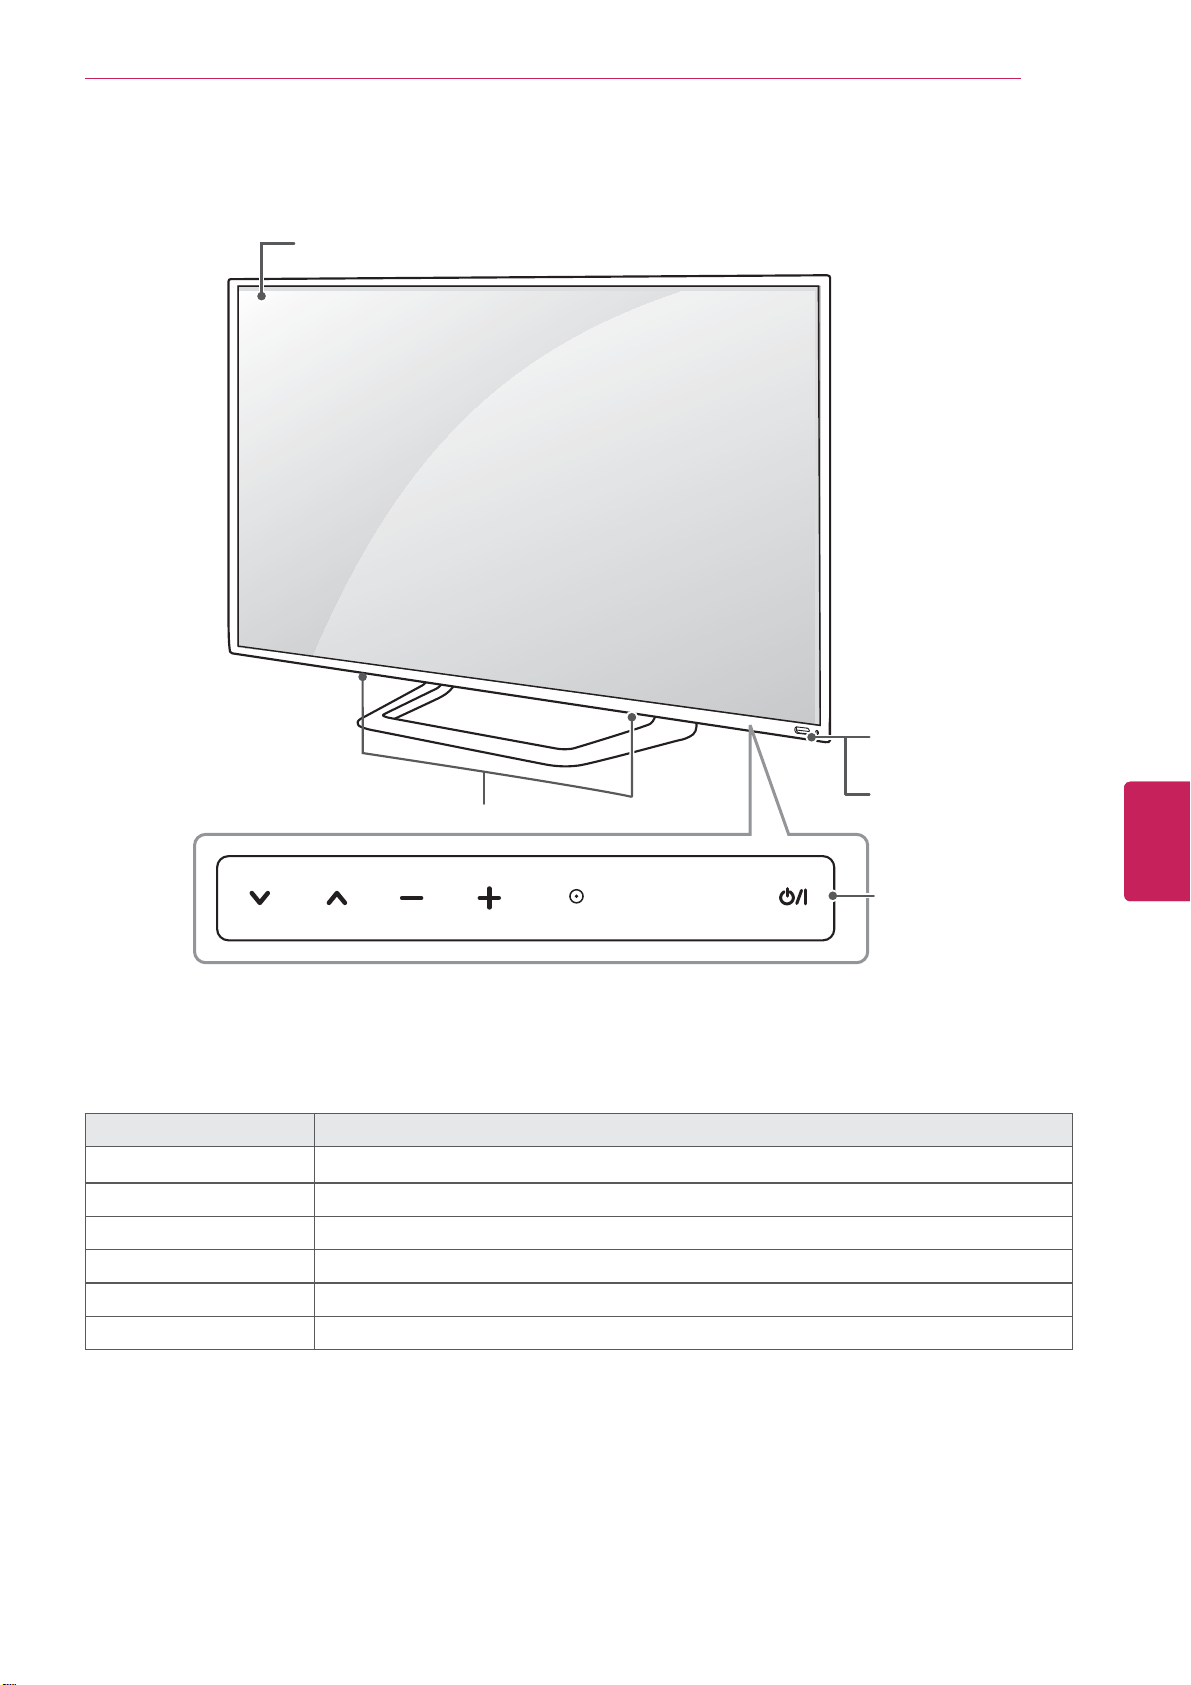
Parts and buttons
Screen
Before Use
15
Speakers
SETTINGS
Button Description
/
I
INPUT Changes the input source.
SETTINGS Accesses the main menus, or saves your input and exits the menus.
ٜ
OK
- + Adjusts the volume level.
v ^
Turns the power on or off.
Selects the highlighted menu option or confirms an input.
Scrolls through the saved channels.
INPUTOK
Remote control and
intelligent
1
sensors
Power indicator
Touch buttons
2
ENGLISH
ENG
1 Intelligent sensor - Adjusts the image quality and brightness based on the surrounding environment.
2 All of the buttons are touch sensitive and can be operated through simple touch with your finger.
Page 17
Before Use
16
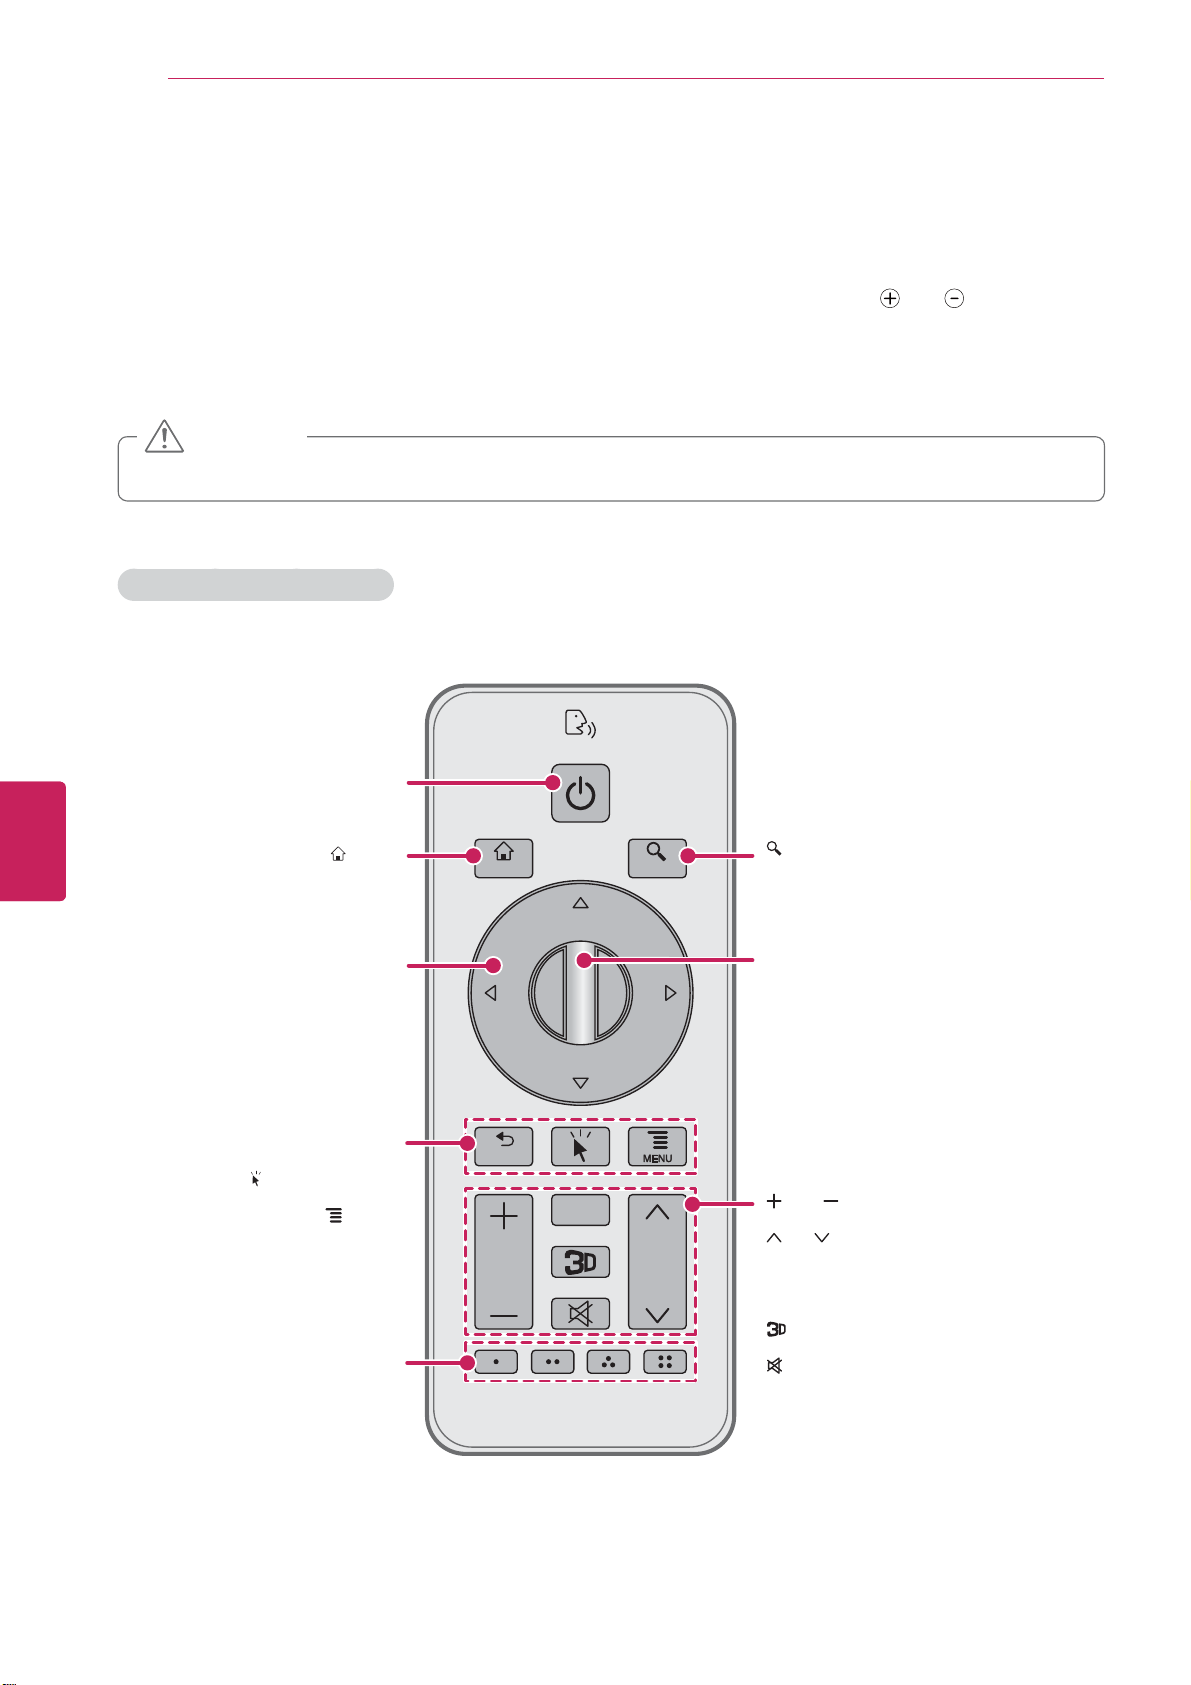
Magic Remote Control Functions
When the message “Remote control battery is low. Change the battery.” is displayed, replace the
batteries.
To replace batteries, open the battery cover, replace batteries (1.5 V AA) matching
label inside the compartment, and close the battery cover.
Be sure to point the remote control at the remote control sensor on the TV.
To remove the batteries, perform the installation actions in reverse.
CAUTION
Do not mix old and new batteries, as this may damage the remote control.
y
Make sure to point the remote control at the remote control sensor on the TV.
Remote Control Side - Front
and ends to the
ENGLISH
ENG
Turns the TV on or off.
Accesses the Home menu.
Moves to previous or superior step.
Activates the pointer
Calls option pop-up for activating app.
(red, green, yellow, blue)
Uses for external device.
ꔰ(POWER)
HOME
Navigation Buttons
(up/down/left/right)
Moves focus
ᰳ
BACK
(Pointer wake-up)
MENU
Color buttons
HOME
BACK
VOL
GUIDE
SEARCH
CH
SEARCH
Calls quick search bar, or be used on
specific app.
OK
Selects item by pushing key.
Wheel
Page up/down or CH +/- by spining the wheel.
(In home screen, move page horizontally)
VOL
Adjusts the volume level.
CH
Changes TV channels.
GUIDE
Calls EPG on connected set-top box
(available only on TV player)
Changes 3D-2D mode.
(MUTE)
Mutes all sounds.
Page 18
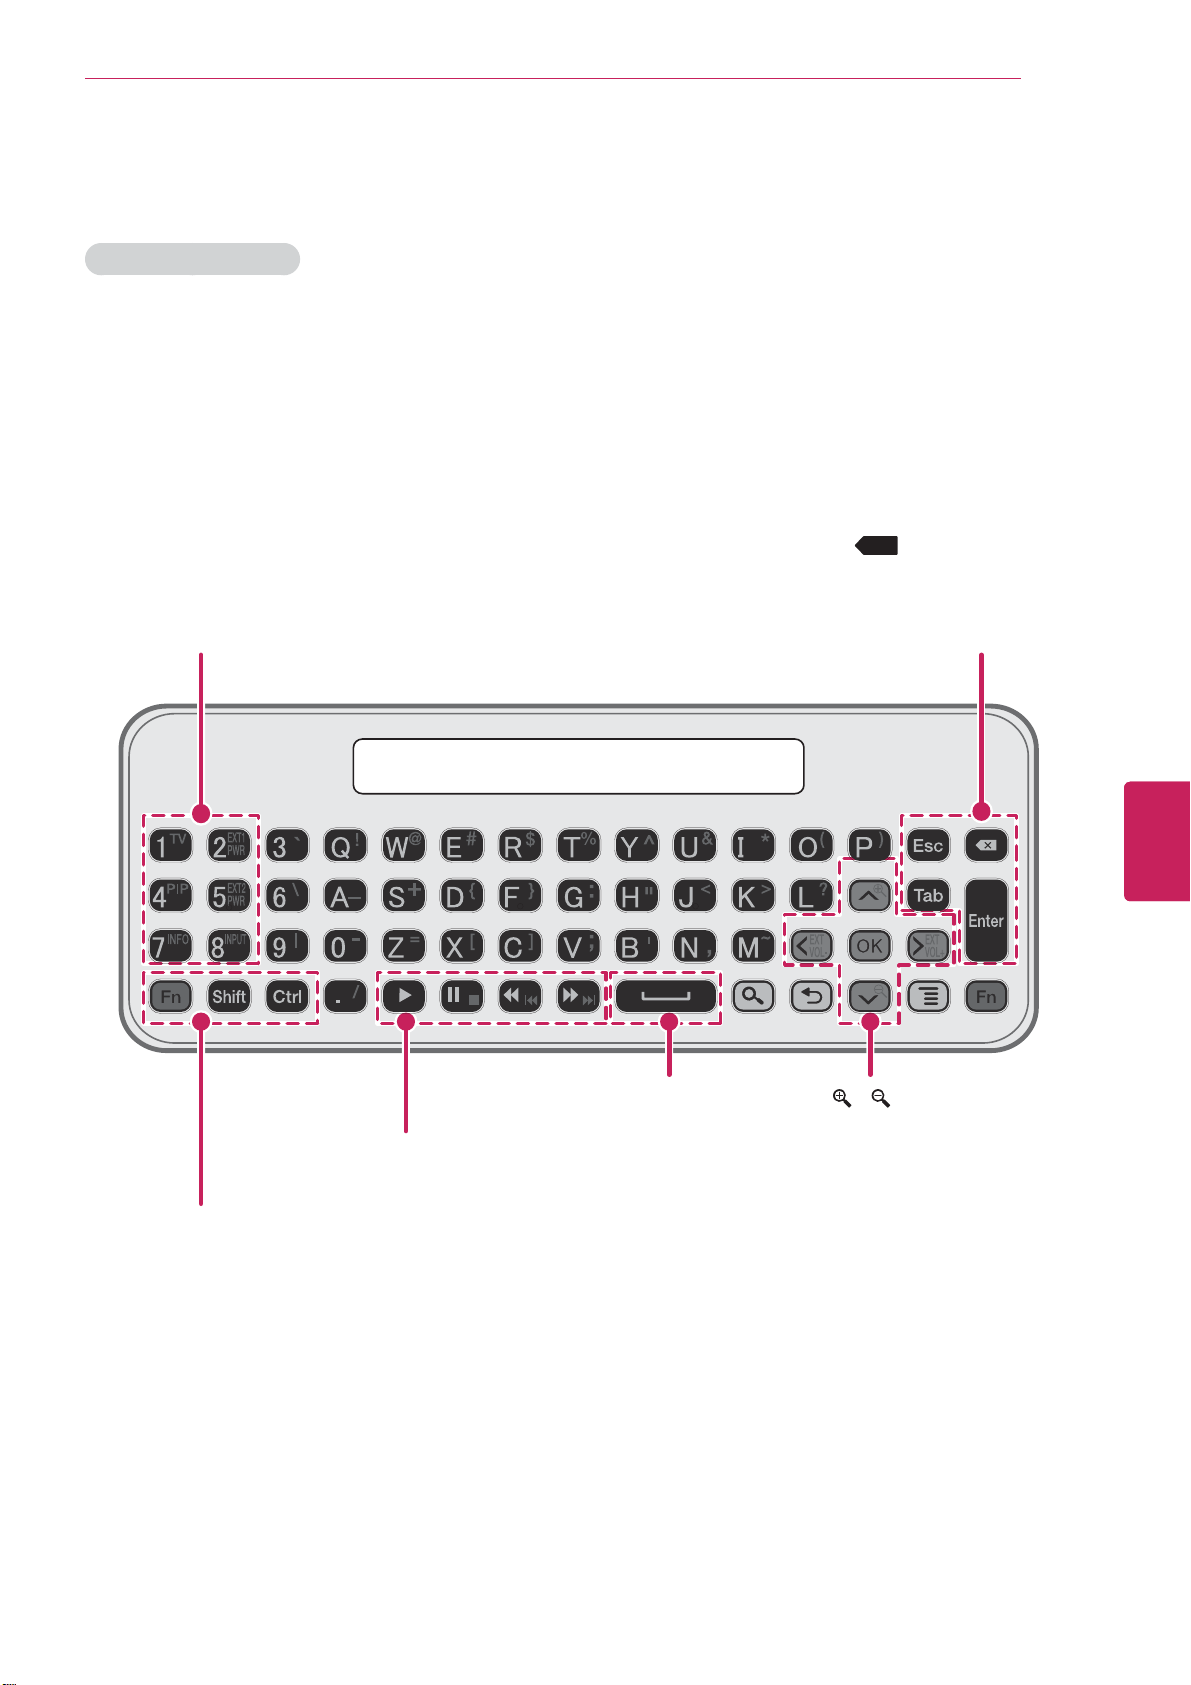
QWERTY Side - Back
TV (FN+1)
Activate TV player app
PIP (FN+4)
Activate/Deactivate PIP
INFO (FN+7)
Show channel information(available only on TV player)
EXT1 PWR (FN+2)
Turn on/off external device 1
(see ‘IR blaster’ UX document for detail)
EXT 2 PWR (FN+5)
Turn on/off external device 2
INPUT (FN+8)
Show external input list
Before Use
ESC
Cancel state or command
Tab
Move focus to next depth or step
(Backspace)
X
Deletes the preceding character
and moves the cursor one position backwards
Enter
Finish text input
17
Spacebar
Enter the space
Trick play keys
(play, pause, stop, scan –/+, skip -/+)
Combination key with other keys
Fn
Combination key with other keys
Shift
Combination key with alphabet keys;input upper case
Ctrl
Combination key with other keys
ENGLISH
ENG
/ (FN+G/ FN+P
Zoom in/out
EXT VOL -/+ (FN+< / FN+>)
Volume up/down of audio receiver
*
Search, Back, Menu, OK
: Operate as same keys on R side
Page 19
18
Before Use
ENGLISH
ENG
Registering the Remote Control
The Remote Control operates by pairing with your
TV.
Once you purchased the TV, please register the
Remote Control as follows;
How to register the Remote Control
To register the remote control, press
the (Pointer wake-up) button on the
remote control while aiming it at your
TV.
How to Re-register the Remote Control after
Registration Failure
Reset the remote control by pressing
and holding the
seconds. (Once the reset is complete,
the light on the Pointer blinks.) Then
repeat the above procedure to register
the remote control.
ᰳ
BACK
button for 3
Precautions to Take when Using
the Remote Control
Use the remote control within the maximum
y
communication distance (XX m, XXft). Using
the remote control beyond this distance, or
with an object obstructing it, may cause a
communication failure.
A communication failure may occur due to
y
nearby devices. Electrical devices such as
a microwave oven or wireless LAN product
may cause interference, as these use the
same bandwidth (2.4 GHz) as the Remote
Control.
The Remote Control may be damaged or
y
may malfunction if it is dropped or receives a
heavy impact.
Manufacturer and installer cannot provide
y
service related to human safety as the
applicable wireless device has possibility of
electric wave interference.
It is recommended that an Access Point (AP)
y
be located more than XX m (XX ft) away from
the TV. If the AP is installed closer than XX m
(XX ft), the Remote Control may not perform
as expected due to frequency interference.
Page 20
INSTALLATION
Lifting and moving the TV
When moving or lifting the TV, read the following
to prevent the TV from being scratched or
damaged and for safe transportation regardless of
its type and size.
Installation
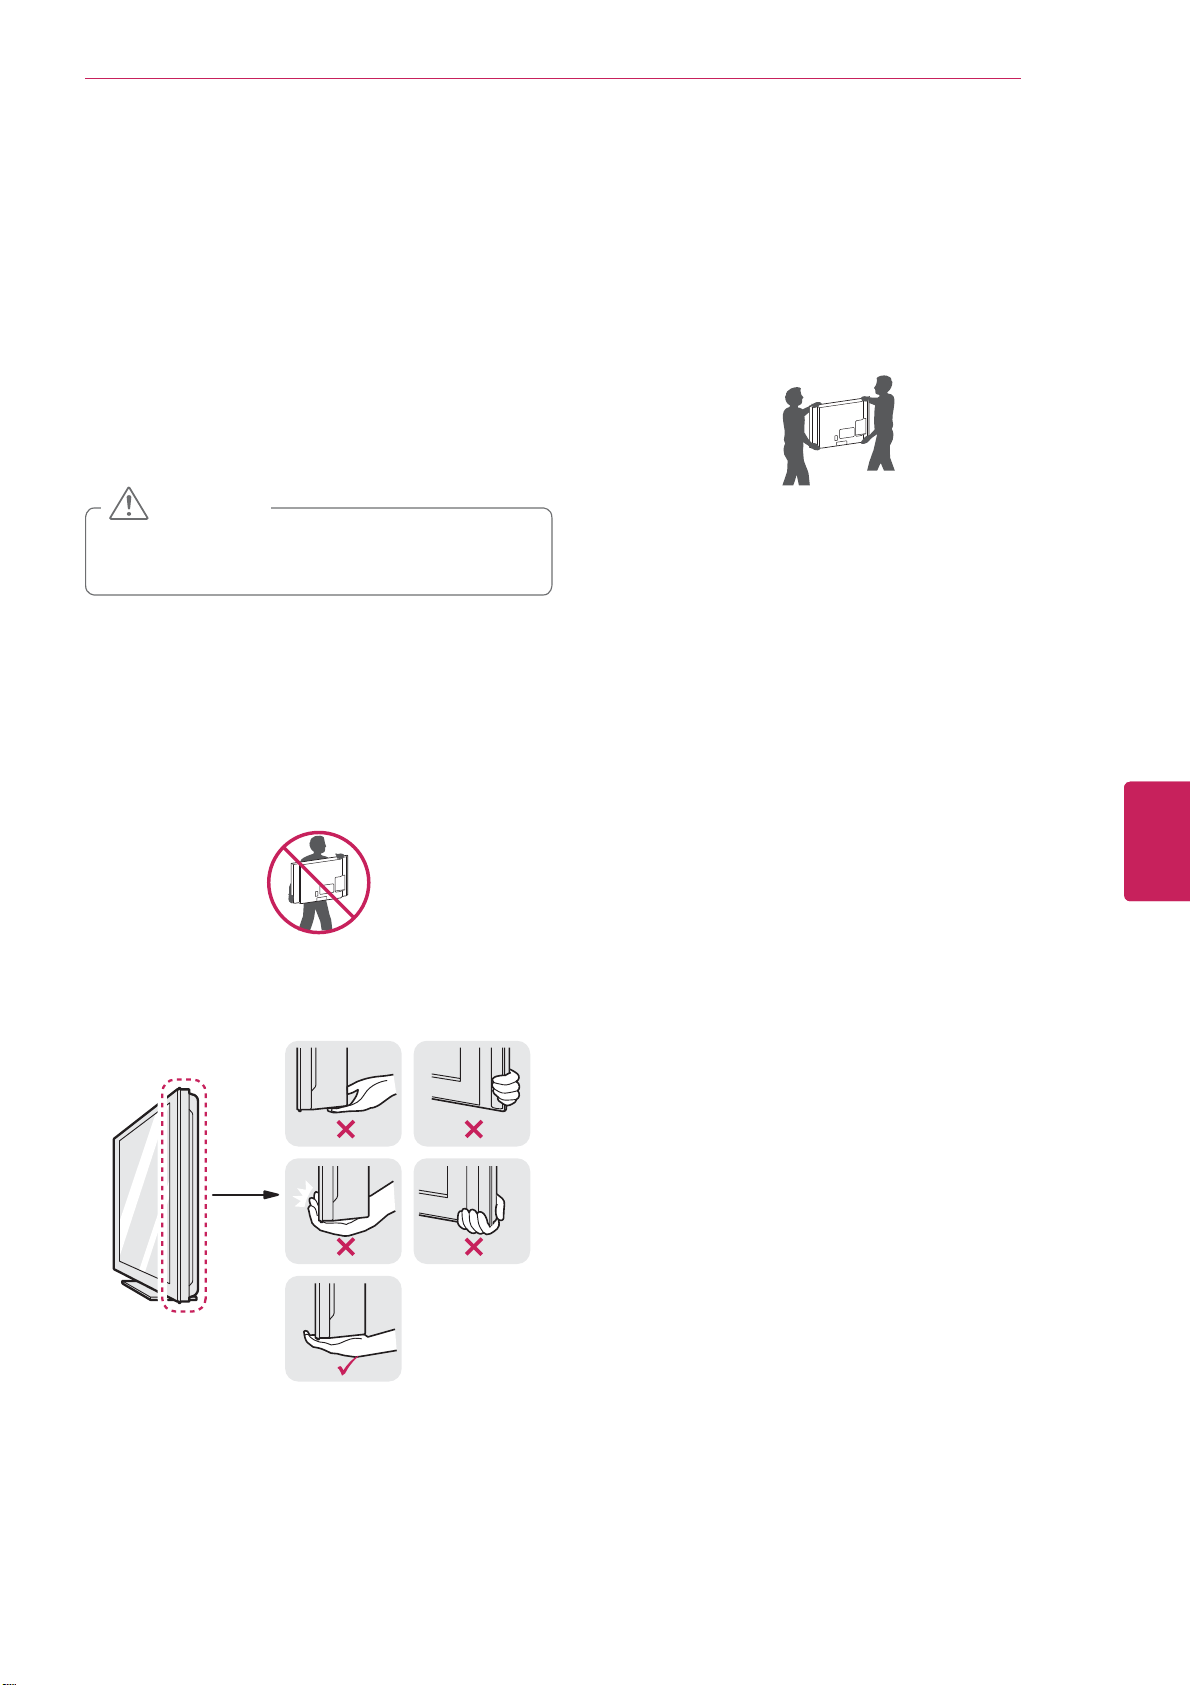
When transporting a large TV, there should
y
be at least 2 people.
When transporting the TV by hand, hold the
y
TV as shown in the following illustration.
19
CAUTION
Avoid touching the screen at all times, as
y
this may result in damage to the screen.
It is recommended to move the TV in the
y
box or packing material that the TV originally
came in.
Before moving or lifting the TV, disconnect
y
the power cord and all cables.
When holding the TV, the screen should face
y
away from you to avoid damage.
Hold the top and bottom of the TV frame
y
firmly. Make sure not to hold the transparent
part, speaker, or speaker grill area.
When transporting the TV, do not expose the
y
TV to jolts or excessive vibration.
When transporting the TV, keep the TV
y
upright, never turn the TV on its side or tilt
towards the left or right.
ENGLISH
ENG
Page 21
Installation
20
Setting up the TV
Put your TV on a pedestal stand and mount the TV on a table or wall.
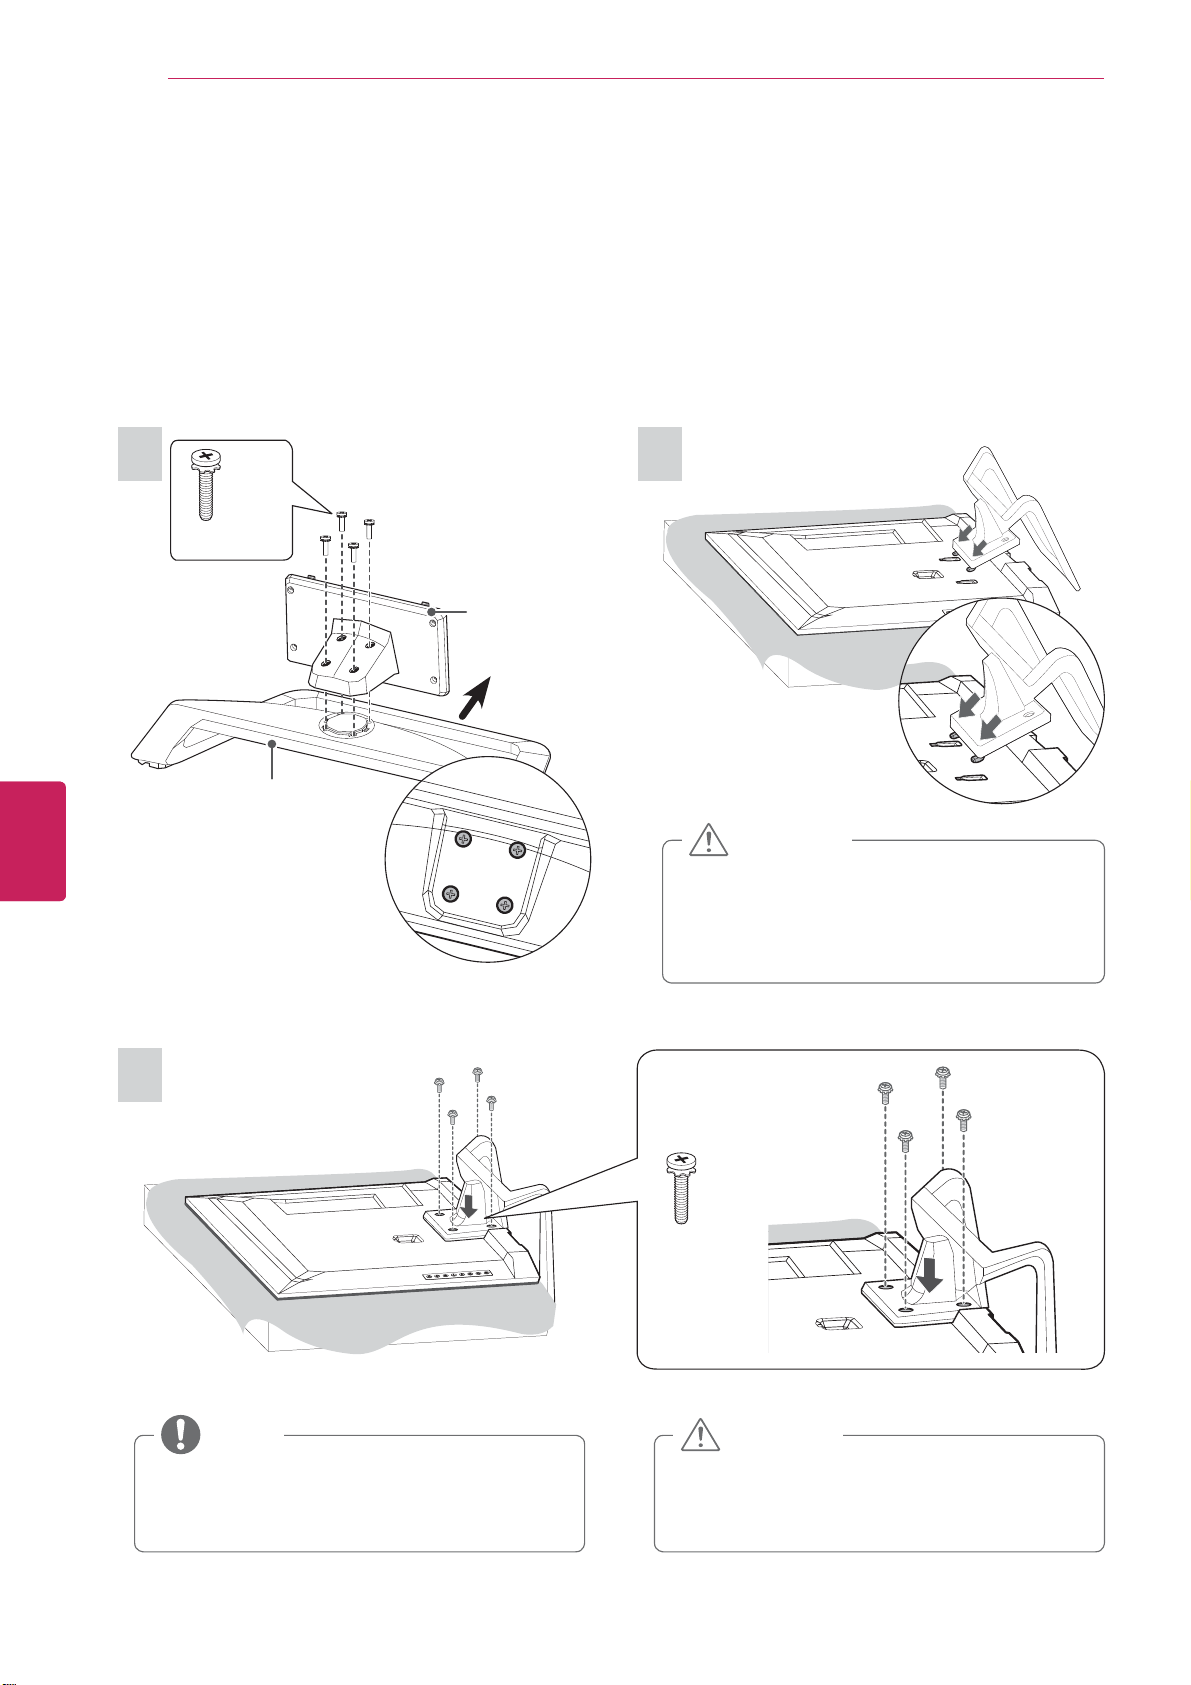
Attaching the stand
If you are not mounting the TV to a wall, use the following instructions to attach the stand.
ENGLISH
ENG
1
4 EA
M4 x 20
Stand Base
Stand Body
Front
Top View
2
CAUTION
When attaching the stand to the TV
y
set, place the screen facing down on a
cushioned table or flat surface to protect
the screen from scratches.
3
NOTE
Remove the stand before installing the TV
y
on a wall mount by performing the stand
attachment in reverse.
4 EA
M4 x 20
CAUTION
Tighten the screws firmly to prevent
y
the TV from tilting forward. Do not over
tighten.
Page 22
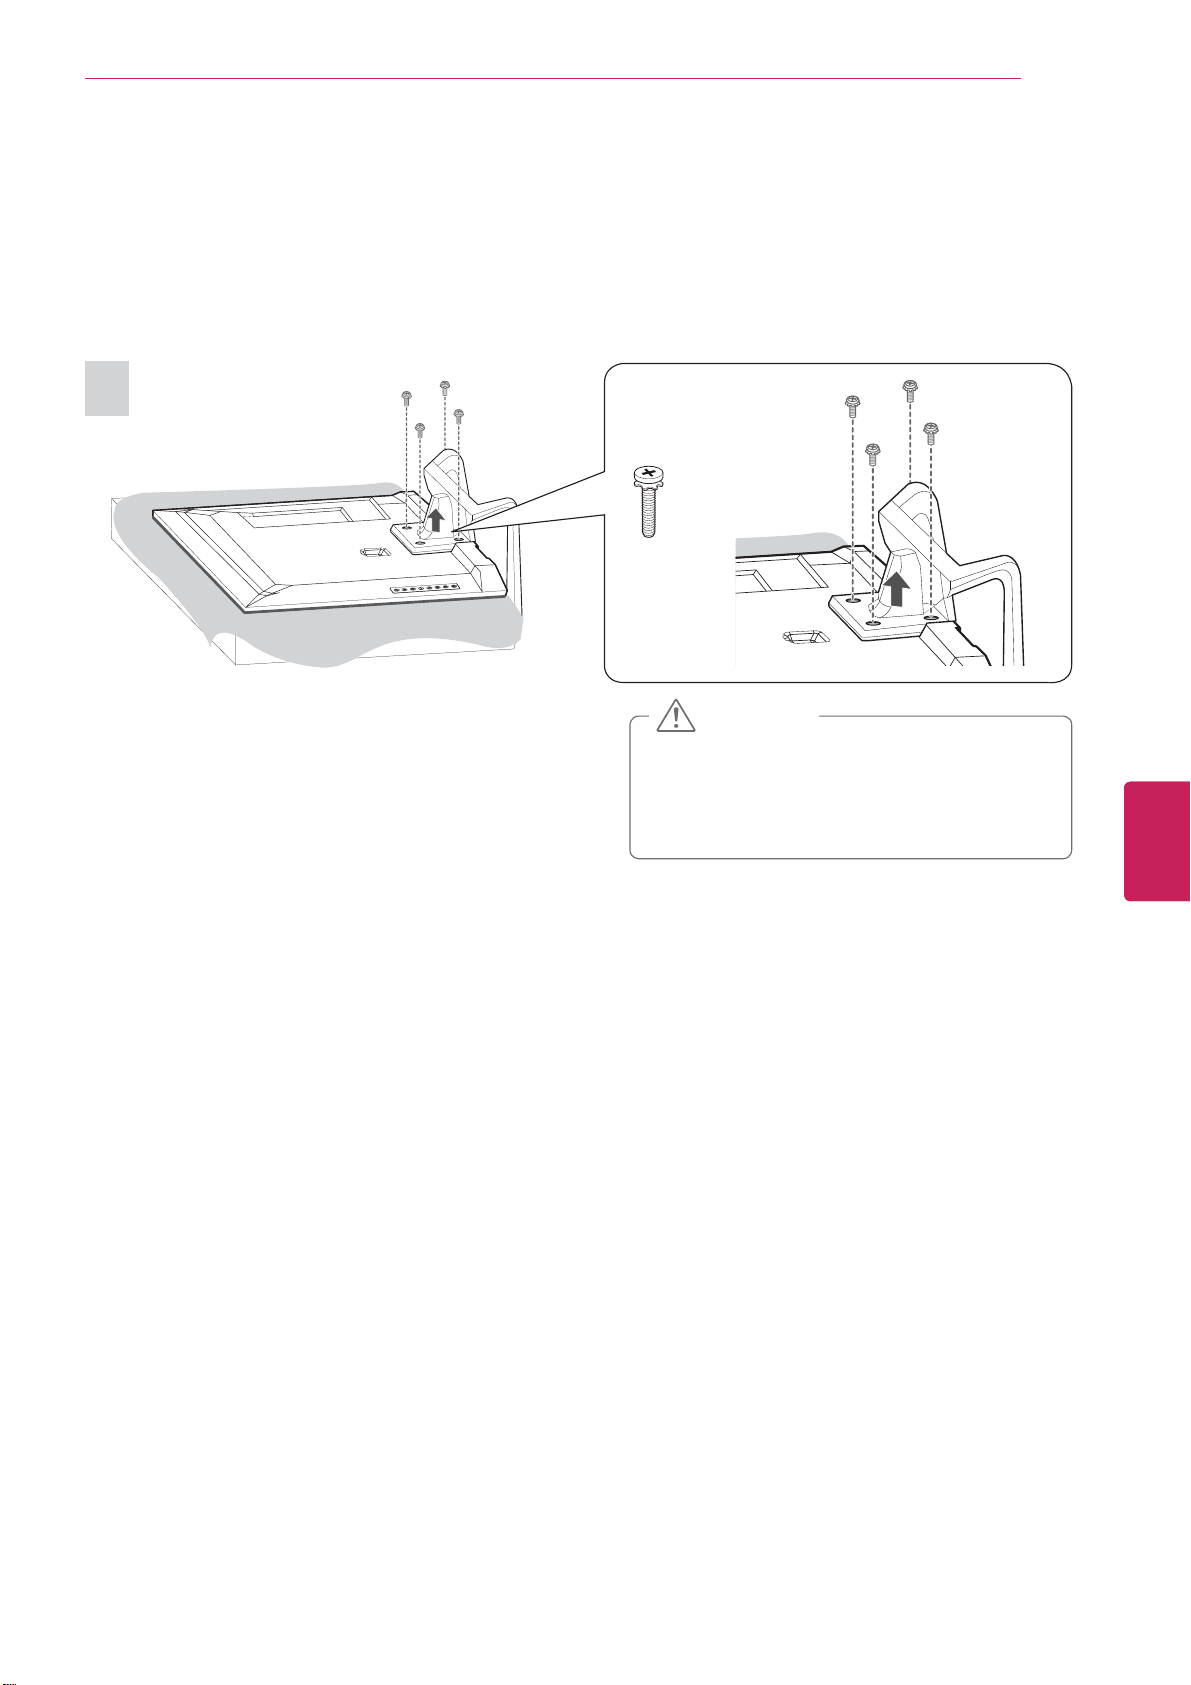
To detach the stand,
1
4 EA
M4 x 20
Installation
21
CAUTION
When attaching the stand to the TV
y
set, place the screen facing down on a
cushioned table or flat surface to protect
the screen from scratches.
ENGLISH
ENG
Page 23
22
Installation
ENGLISH
ENG
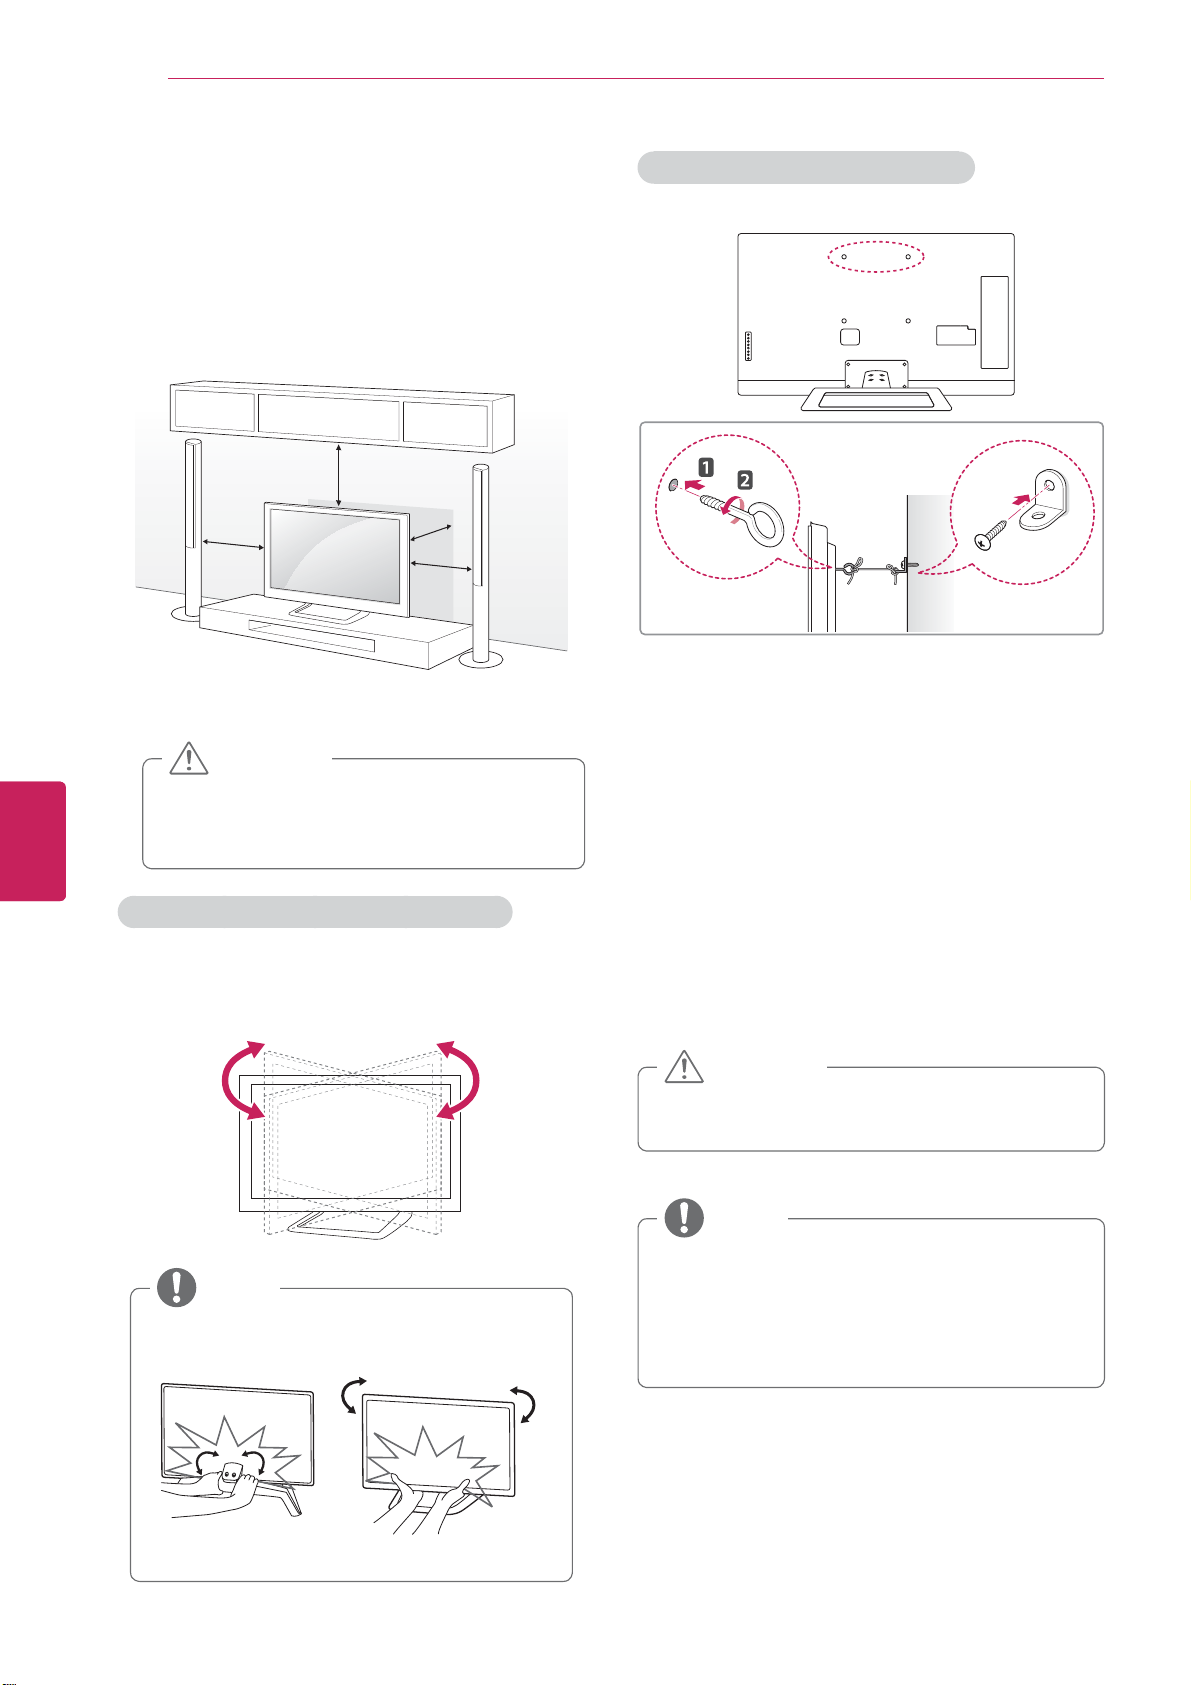
Mounting on a table
Lift and tilt the TV into its upright position on a
1
table.
- Leave a 10 cm (4 inch) (minimum) space from
the wall for proper ventilation.
10 cm (4 inches)
10 cm
Connect the power cord to a wall outlet.
2
CAUTION
Do not place the TV near or on sources
y
of heat, as this may result in fire or other
damage.
10 cm
10 cm
Securing the TV to a wall (optional)
Insert and tighten the eye-bolts, or TV brackets
1
and bolts on the back of the TV.
- If there are bolts inserted at the eye-bolts
position, remove the bolts first.
Mount the wall brackets with the bolts to the
2
wall.
Match the location of the wall bracket and the
eye-bolts on the rear of the TV.
Adjusting the angle of the TV to suit view
Swivel 10±2 degrees to the left or right and adjust
the angle of the TV to suit your view.
10±2˚10±2˚
NOTE
When adjusting the angle of the TV,
y
watch out for your fingers.
Connect the eye-bolts and wall brackets tightly
3
with a sturdy rope.
Make sure to keep the rope horizontal with the
flat surface.
CAUTION
Make sure that children do not climb on or
y
hang on the TV.
NOTE
Use a platform or cabinet that is strong and
y
large enough to support the TV securely.
Brackets, bolts and ropes are optional. You
y
can obtain additional accessories from your
local dealer.
FrontRear
Page 24
Installation
23
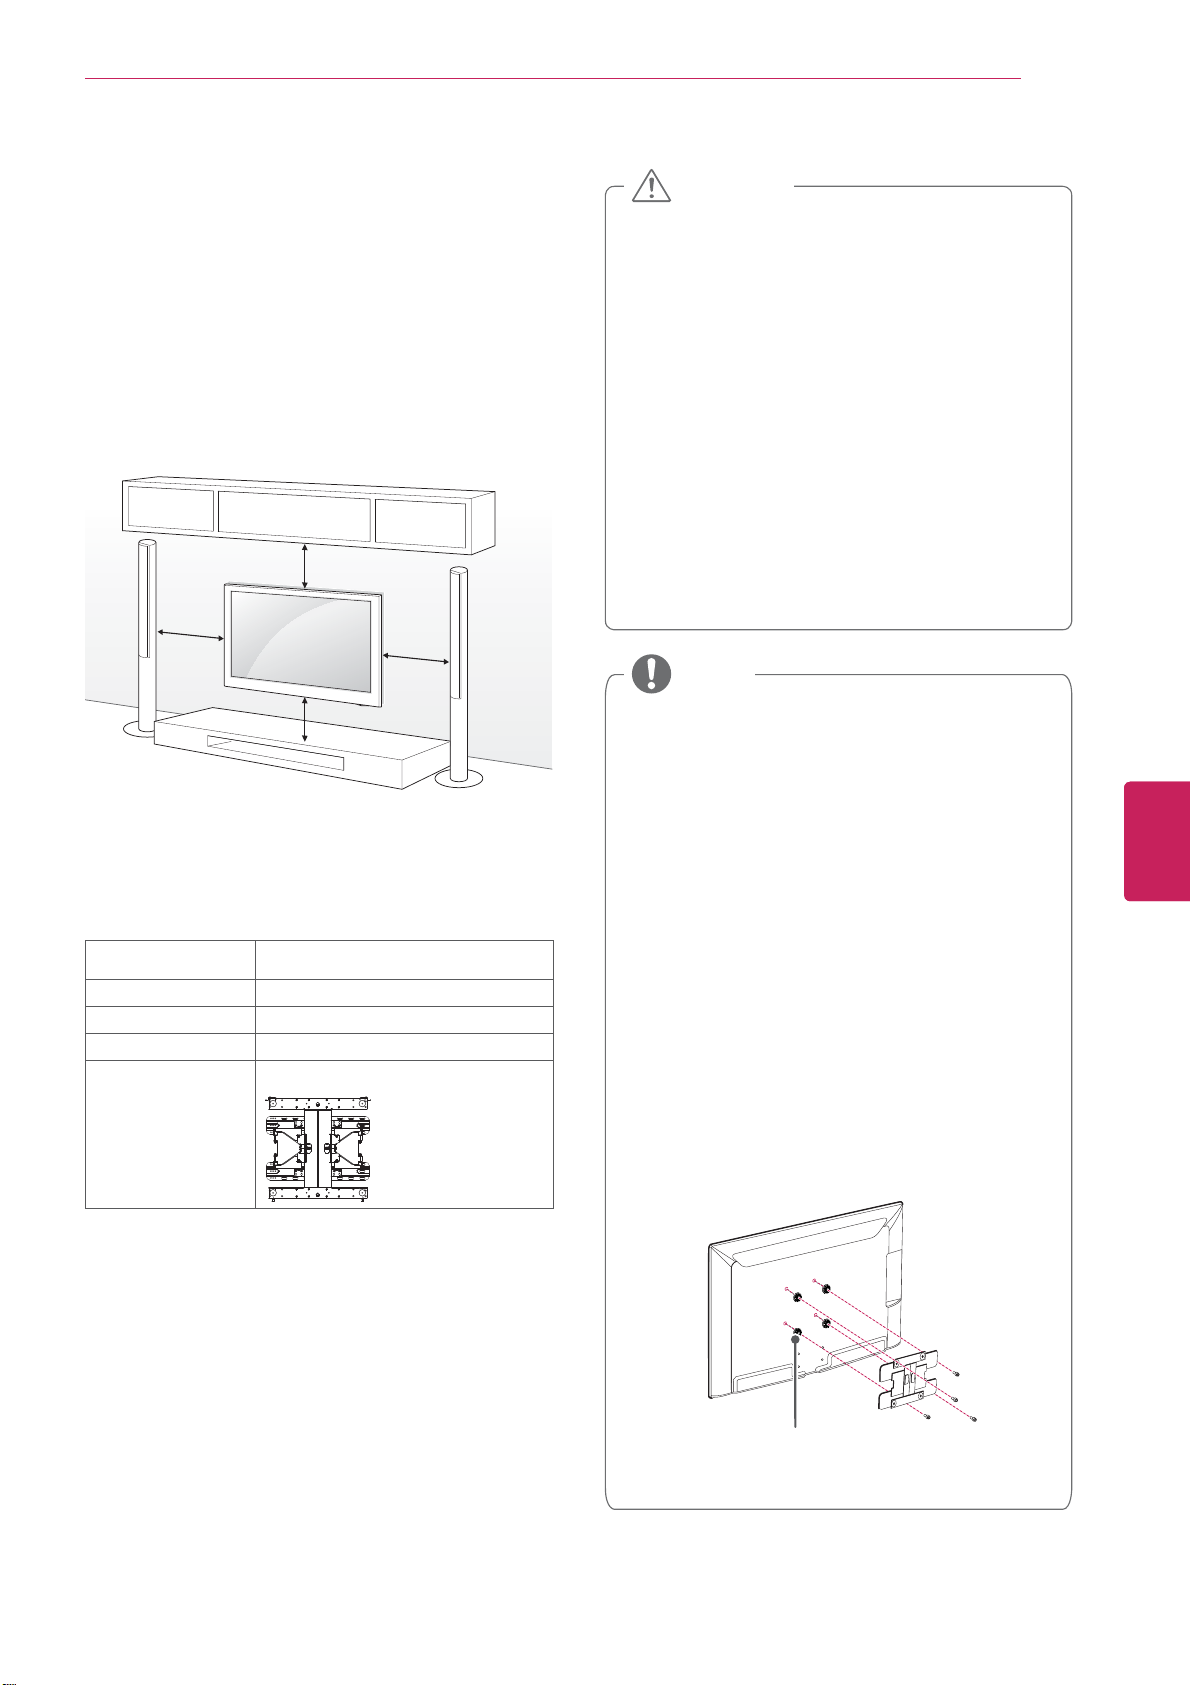
Mounting on a wall
Attach an optional wall mount bracket at the rear
of the TV carefully and install the wall mount
bracket on a solid wall perpendicular to the
floor. When you attach the TV to other building
materials, please contact qualified personnel.
We recommend that you use an LG brand wall
mount when mounting the TV to a wall.
10 cm (4 inches)
10 cm
10 cm
10 cm
Make sure to use screws and wall mounts that
meet the VESA standard. Standard dimensions for
the wall mount kits are described in the following
table.
Model 47/55LMG620
VESA 400 x 400
Standard screw M6
Number of screws 4
Wall mount bracket
(optional)
LSW400BX, LSW400BXG
CAUTION
Disconnect the power first, and then move
y
or install the TV. Otherwise electric shock
may occur.
If you install the TV on a ceiling or slanted
y
wall, it may fall and result in severe injury.
Use an authorized LG wall mount and
contact the local dealer or qualified
personnel.
Do not over tighten the screws as this may
y
cause damage to the TV and void your
warranty.
Use the screws and wall mounts that meet
y
the VESA standard. Any damages or injuries
by misuse or using an improper accessory
are not covered by the warranty.
NOTE
Use the screws that are listed on the VESA
y
standard screw specifications.
The wall mount kit includes an installation
y
manual and necessary parts.
The wall mount bracket is optional. You can
y
obtain additional accessories from your local
dealer.
The length of screws may differ depending
y
on the wall mount. Make sure to use the
proper length.
For more information, refer to the manual
y
supplied with the wall mount.
When attaching a third-party wall mounting
y
bracket to the TV, insert the wall mount
inner spacers into the TV wall mount holes
to move your TV in vertical angle. Please
make sure not to use the spacers for LG
wall mounting bracket.
ENGLISH
ENG
Wall Mount Inner Spacer
Page 25
Installation
24
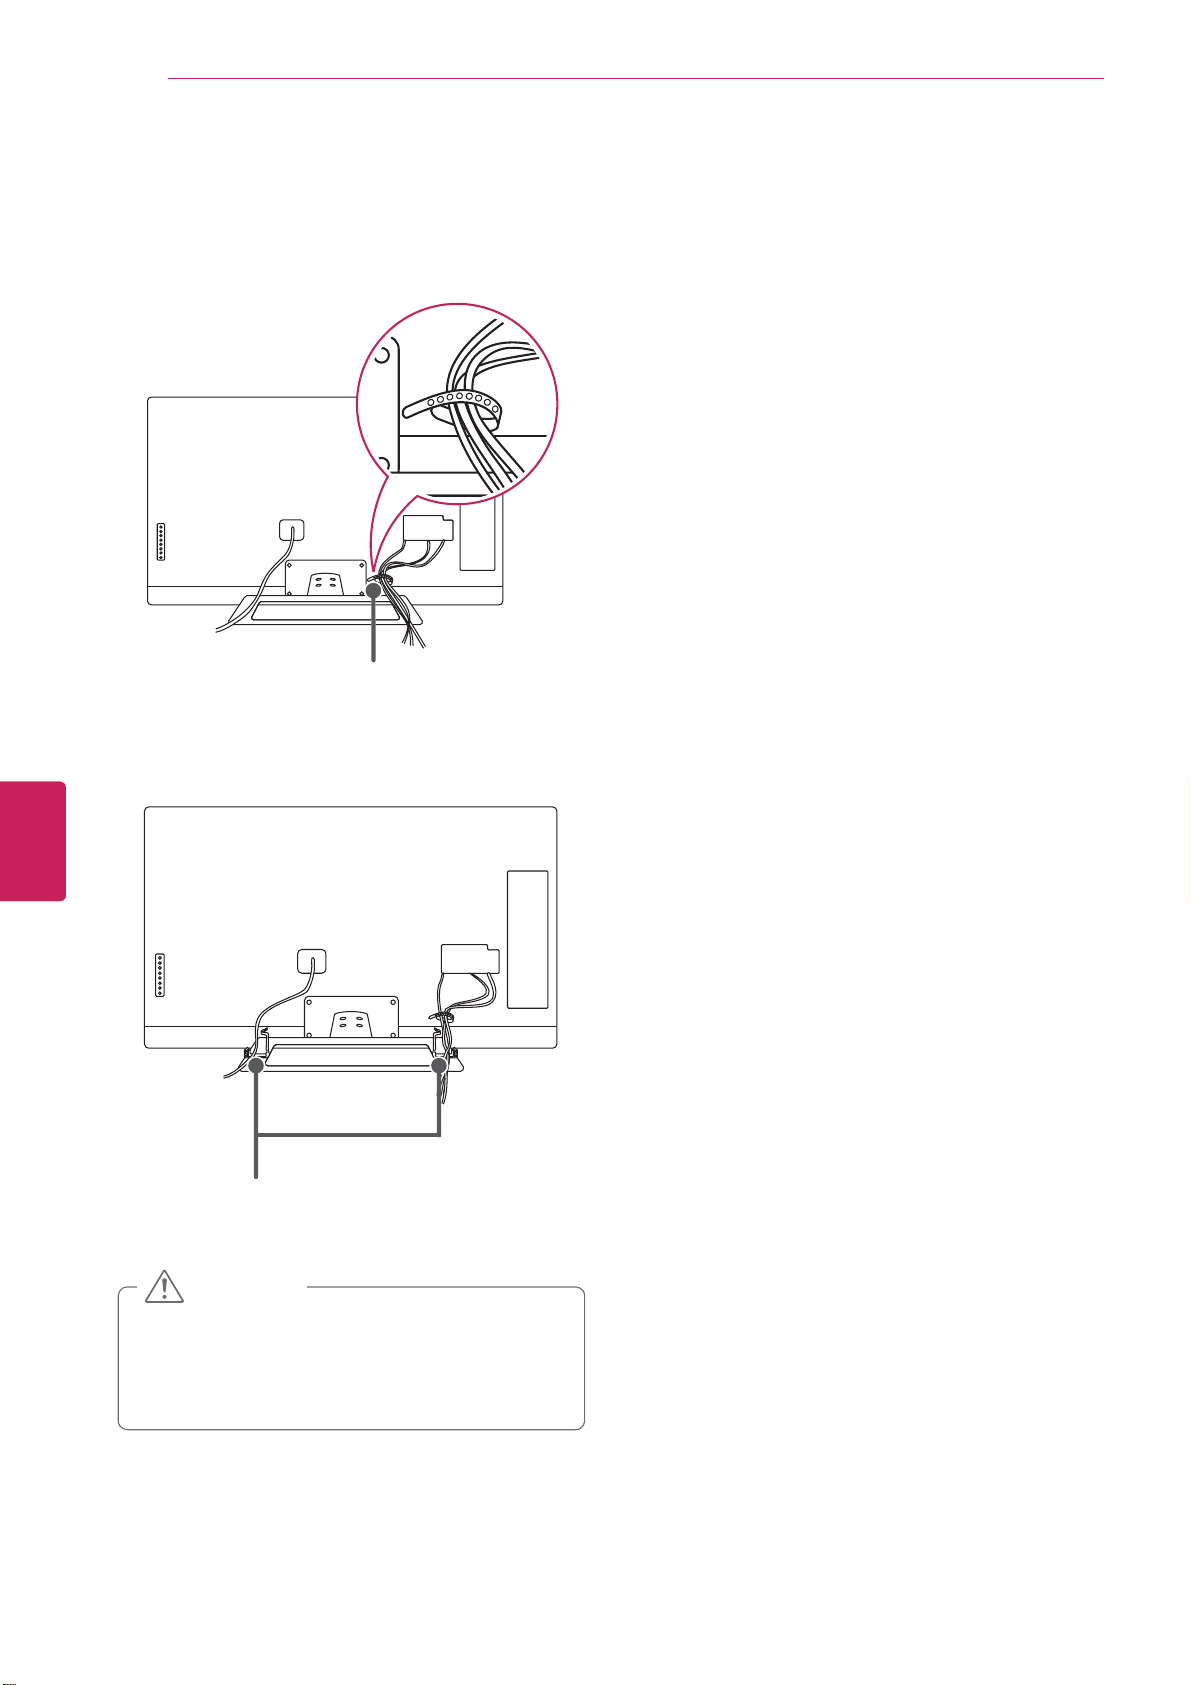
Tidying cables
Gather and bind the cables with the cable
1
holder.
ENGLISH
ENG
Cable holder
Fix the cable management clip firmly to the TV.
2
Cable management clip
CAUTION
Do not move the TV by holding the cable
y
holder and power cord holder, as the cable
holders may break, and injuries and damage
to the TV may occur.
Page 26
Installation
25
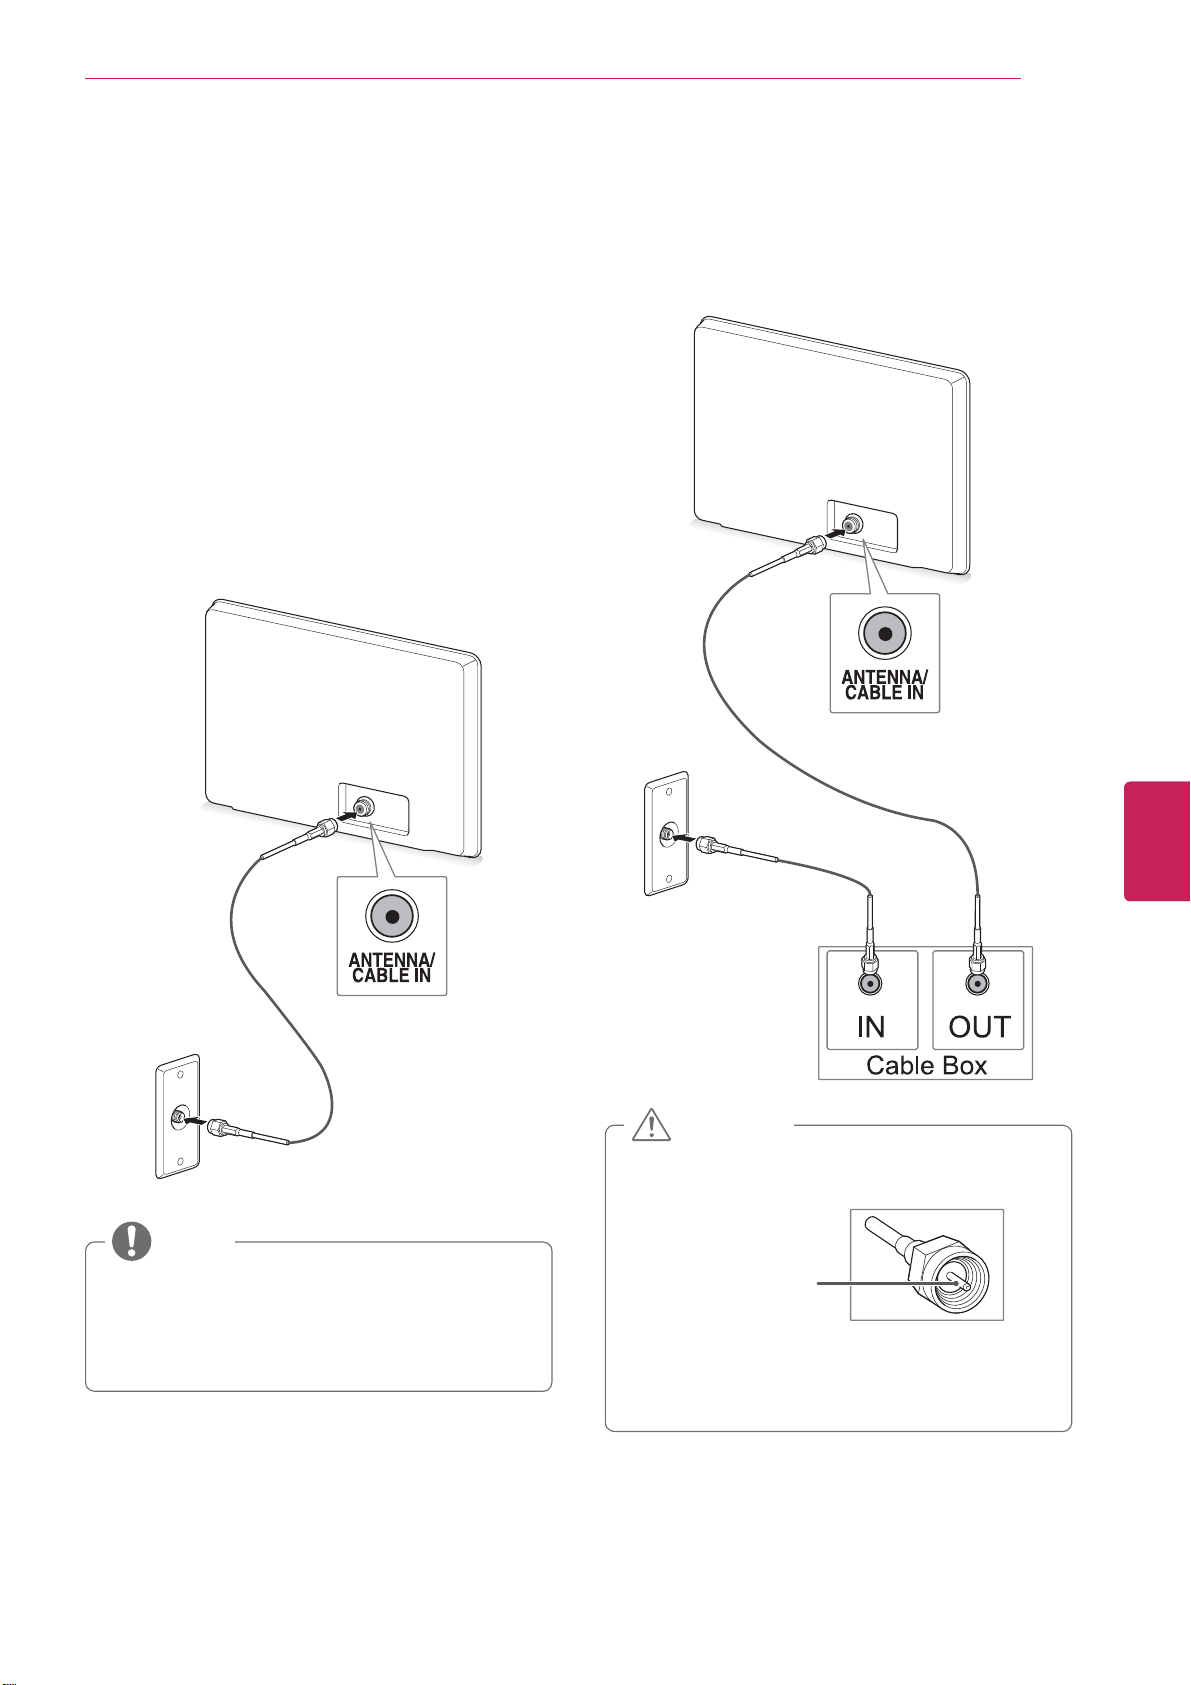
Connecting to an antenna or
cable
Connect an antenna, cable, or cable box to watch
TV while referring to the following. The illustrations
may differ from the actual items and a RF cable is
optional.
Connecting an antenna or basic
cable
Connect the TV to a wall antenna socket with an
RF cable (75 :).
Connecting a cable box
Connect the TV to a cable box and the cable box
to a wall antenna socket with 2 RF cables (75 Ω).
NOTE
Use a signal splitter to use more than 2 TVs.
y
Visit http://lgknowledgebase.com for more
y
information about the antenna and cable
connection. Search for antenna.
CAUTION
Make sure not to bend the copper wire of
y
the RF cable.
Copper wire
Complete all connections between devices,
y
and then connect the power cord to the
power outlet to prevent damage to your TV.
ENGLISH
ENG
Page 27
Connections
26
CONNECTIONS
Connect various external devices to the TV and switch input modes to select an external device. For more
information on an external device’s connection, refer to the manual provided with each device.
Available external devices are: HD receivers, DVD players, VCRs, audio systems, USB storage devices, PC,
gaming devices, and other external devices.
NOTE
If you record a TV program on a DVD recorder or VCR, make sure to connect the TV signal input
y
cable to the TV through a DVD recorder or VCR. For more information on recording, refer to the
manual provided with the connected device.
The external device connection may differ from the model.
y
Connect external devices to the TV regardless of the order of the TV port.
y
If you connect a gaming device to the TV, use the cable supplied with the gaming device.
y
Refer to the external equipment’s manual for operating instructions.
y
ENGLISH
ENG
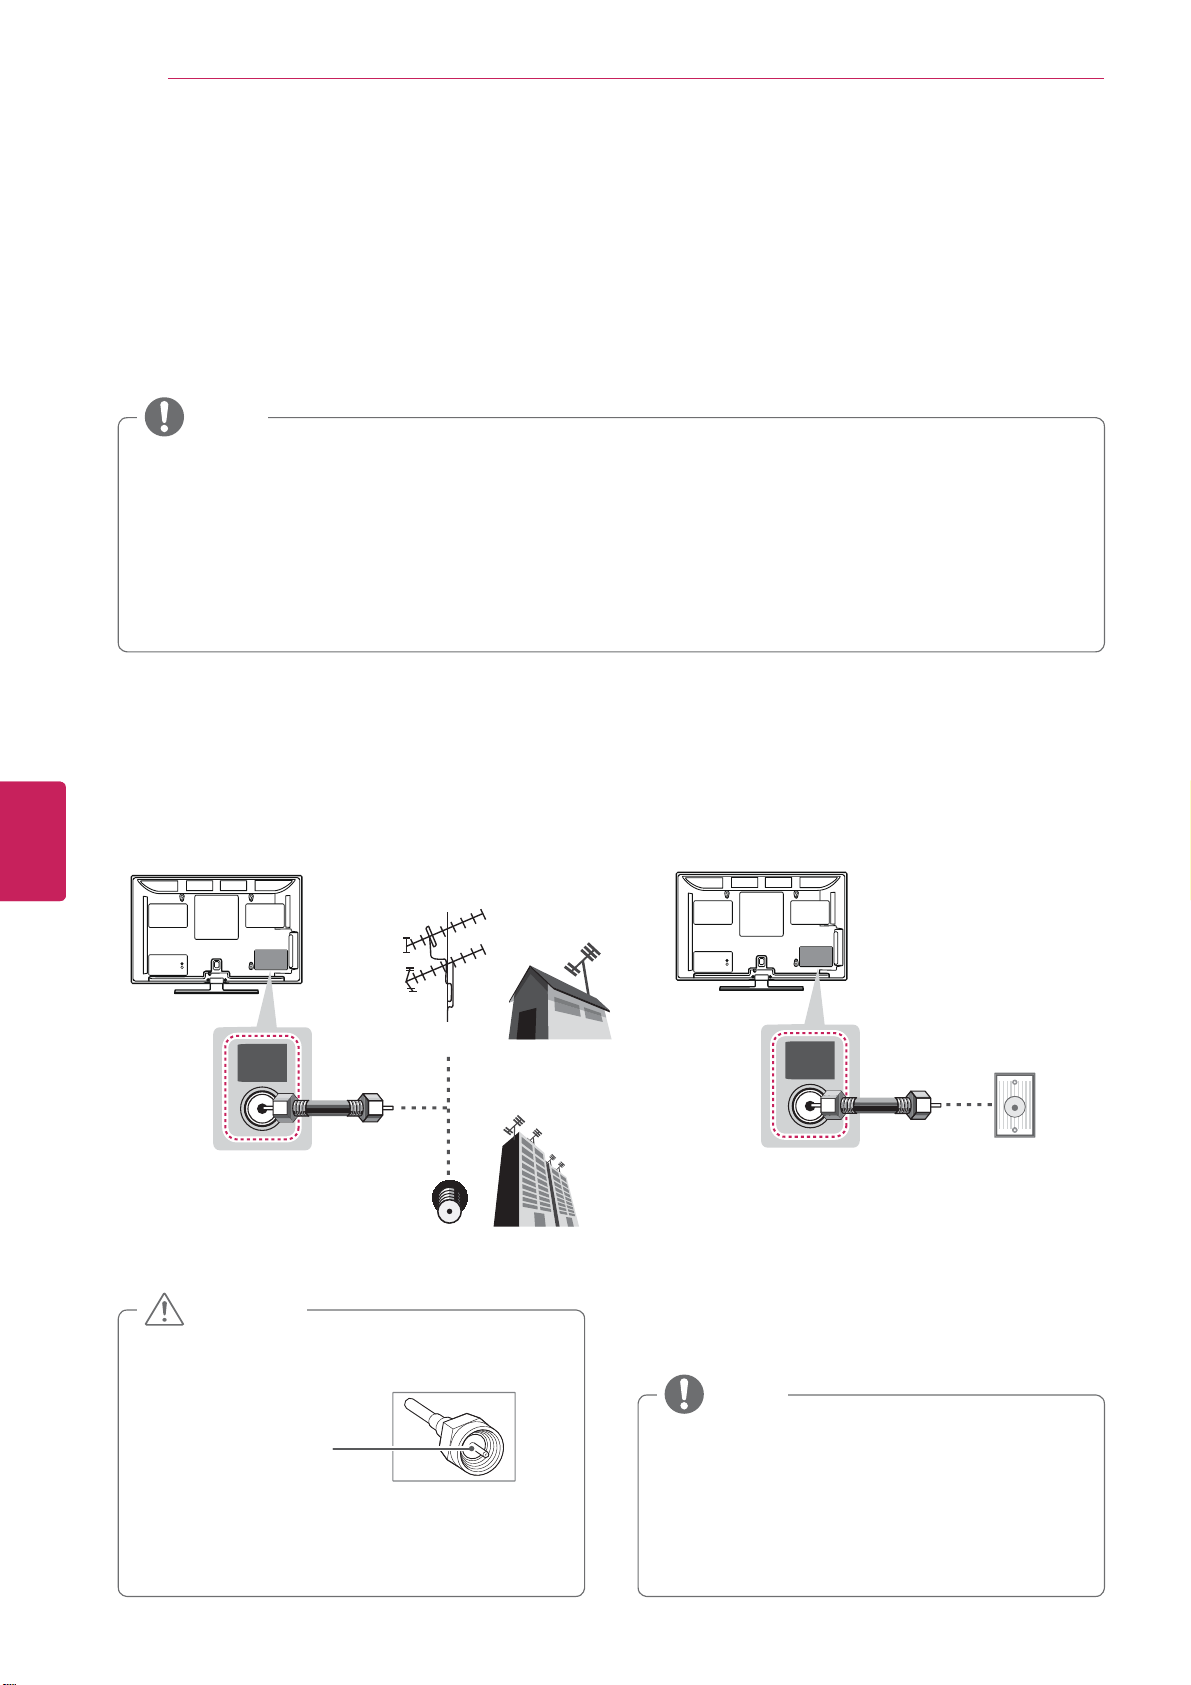
Connecting to an antenna or cable
Connect an antenna, cable, or cable box to watch TV while referring to the following. The illustrations may
differ from the actual items and a RF cable is optional.
VHF Antenna
UHF Antenna
ANTENNA
IN
Antenna
Coaxial (75Ω)
Terminal
or
CABLE
IN
Wall Jack
Coaxial (75Ω)
CAUTION
Make sure not to bend the copper wire of
y
the RF cable.
Copper wire
Complete all connections between devices,
y
and then connect the power cord to the
power outlet to prevent damage to your TV.
NOTE
To improve the picture quality in a poor
y
signal area, please purchase a signal
amplifier and install properly.
Use a signal splitter to use more than 2 TVs.
y
If the antenna is not installed properly,
y
contact your dealer for assistance.
Page 28
Connections
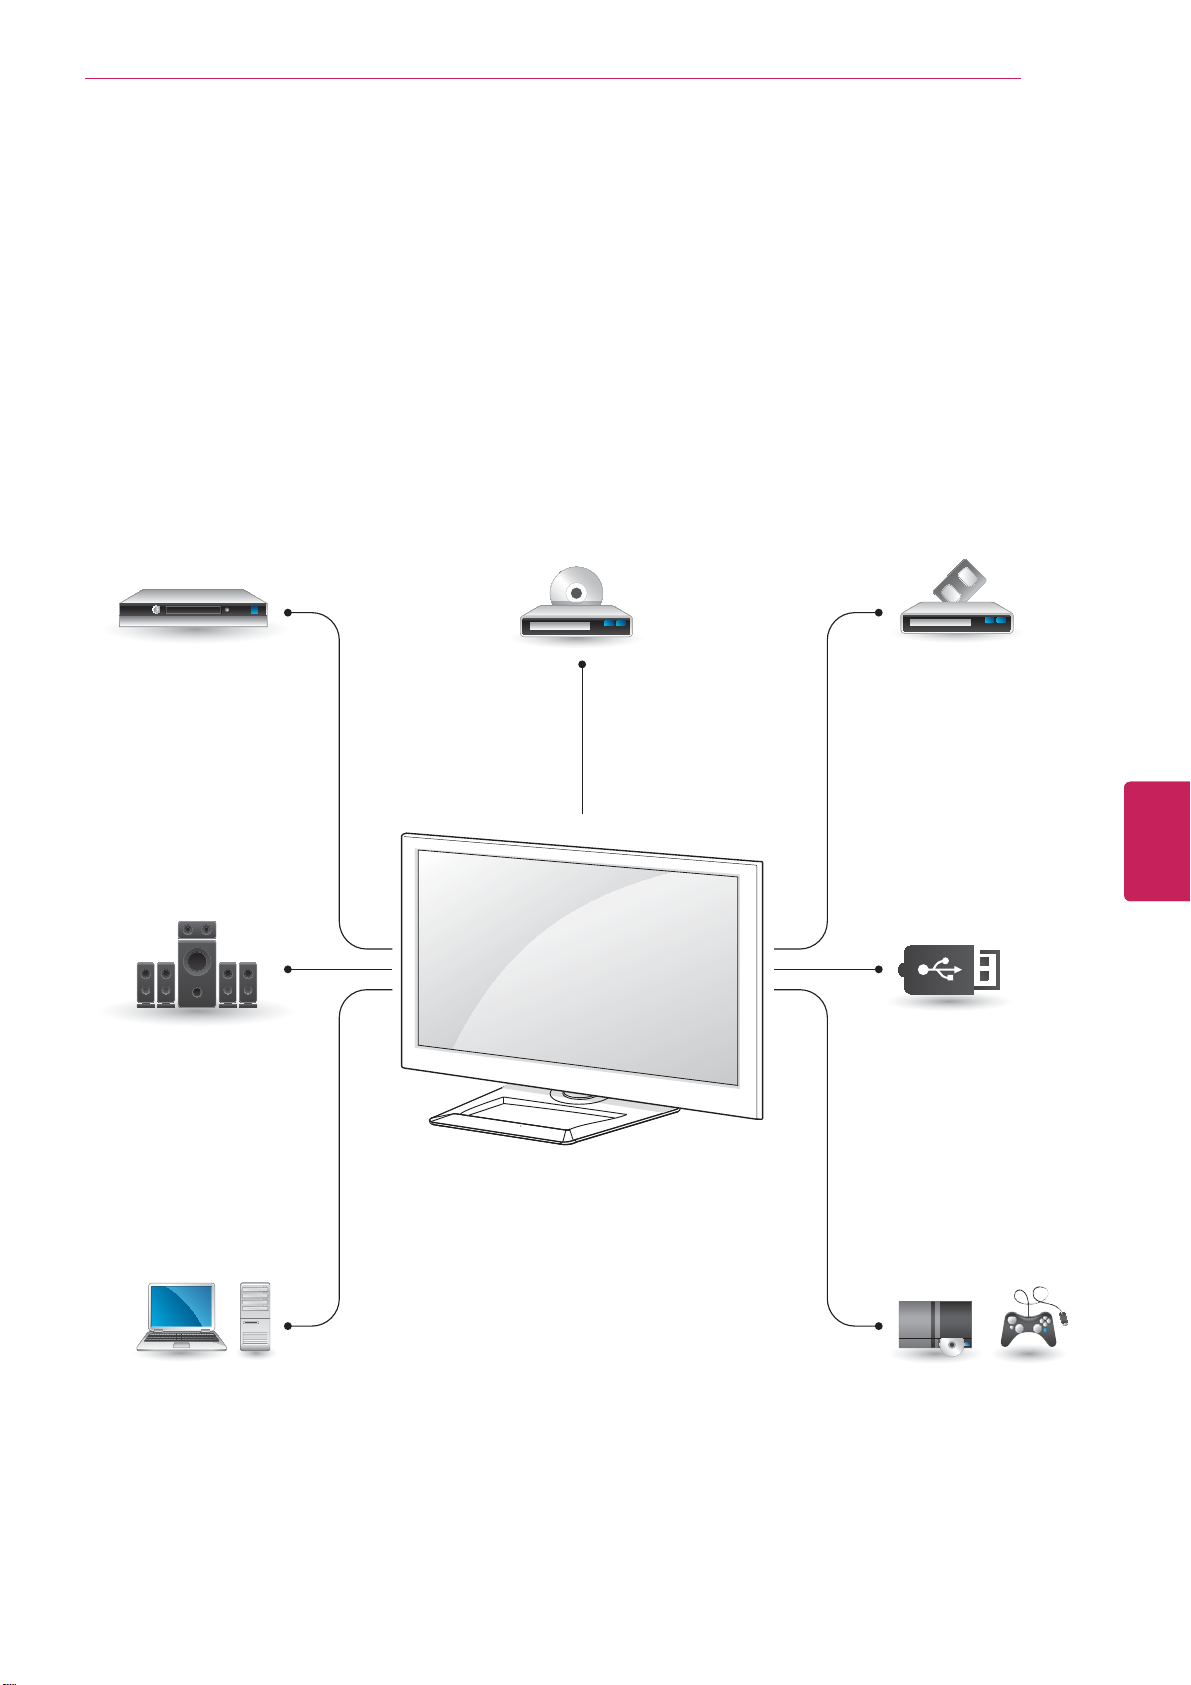
Connection Overview
Connect various external devices to the ports on the TV back panel.
Find an external device you want to connect to your TV as shown on the following illustration.
1
Check the connection type of the external device.
2
Go to the appropriate illustration and check the connection details.
3
HD Receiver DVD VCR
27
Speaker
PC
ENGLISH
ENG
USB
Gaming device
Page 29
Connections
28
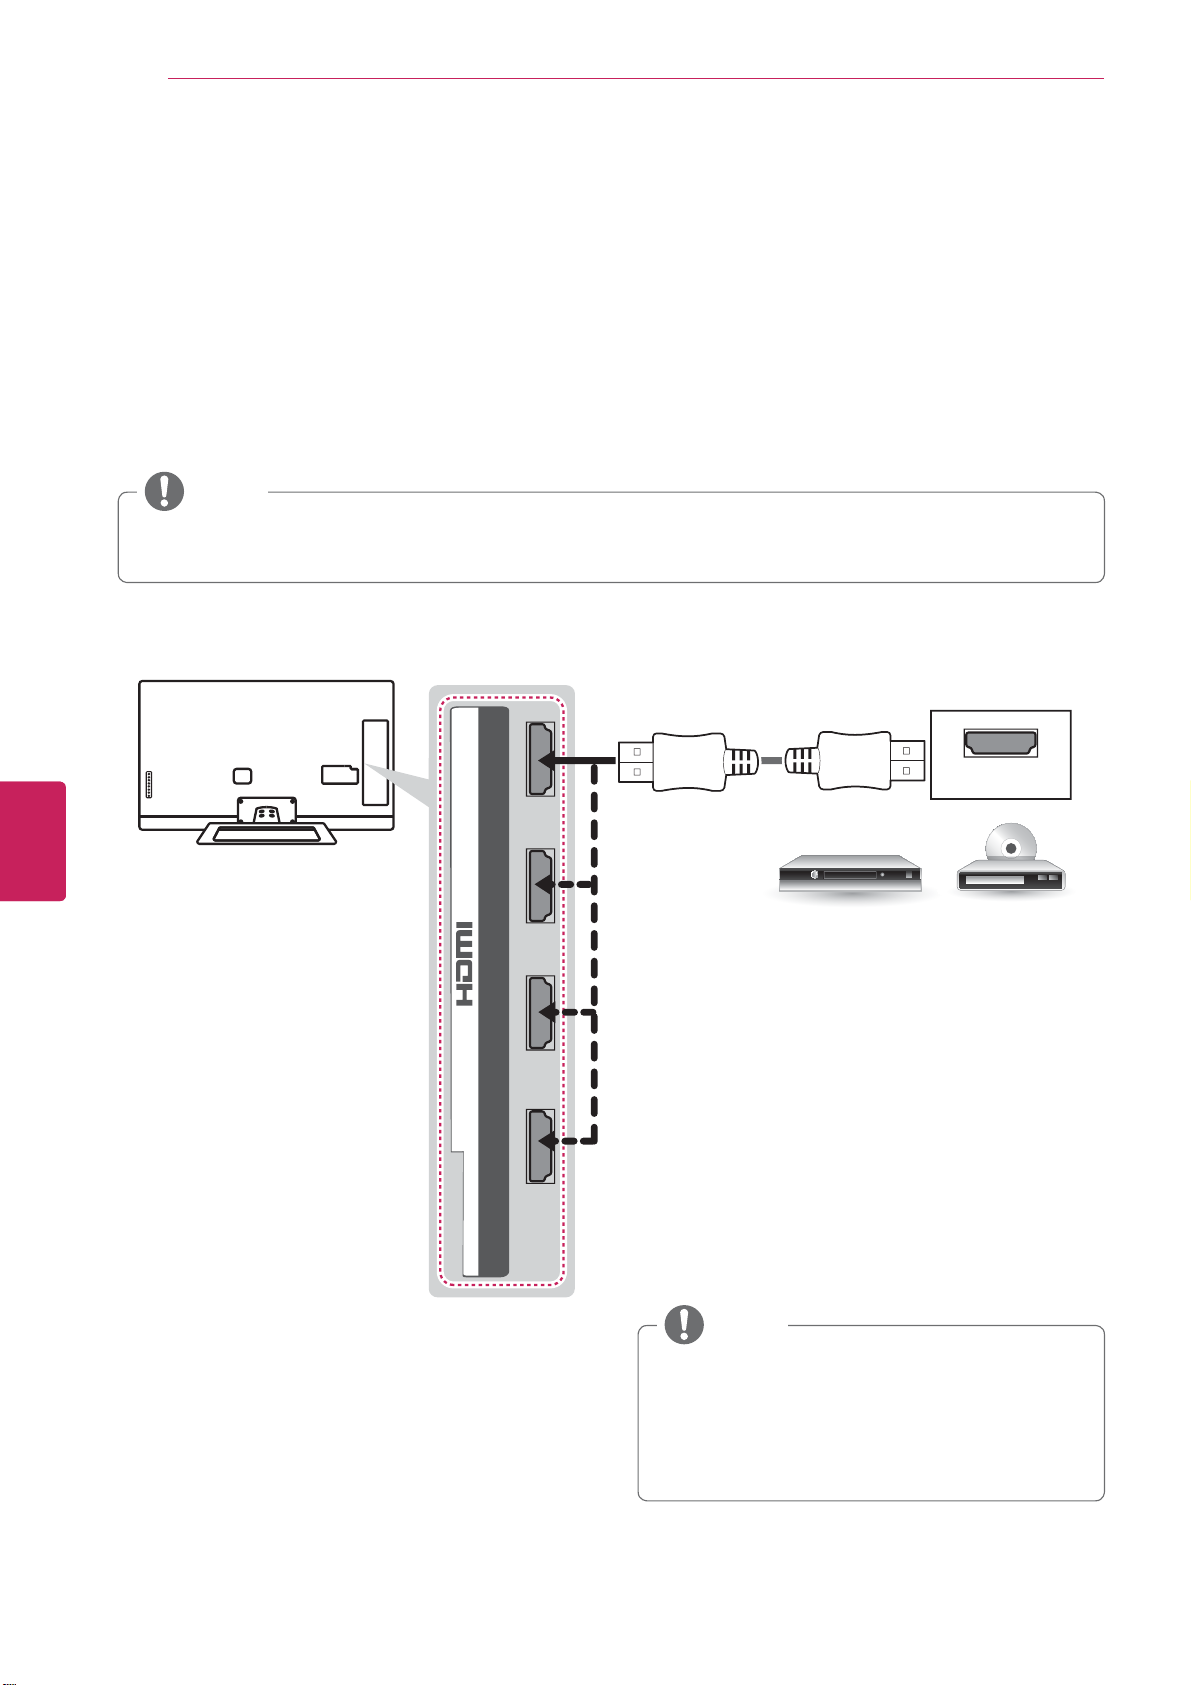
Connecting to a HD receiver, DVD, or VCR player
Connect a HD receiver, DVD, or VCR player to the TV and select an appropriate input mode.
HDMI Connection
HDMI is the best way to connect a device.
Transmits the digital video and audio signals from an external device to the TV. Connect the external device
and the TV with the HDMI cable as shown in the following illustration.
NOTE
Use the latest High Speed HDMI™ Cable with CEC (Customer Electronics Control) function.
y
High Speed HDMI™ Cables are tested to carry an HD signal up to 1080p and higher.
y
Choose any HDMI input port to connect.
It does not matter which port you use.
ENGLISH
ENG
4
/ DVI IN
2 3 1
HDMI
(*Not Provided)
DVD/ Blu-Ray / HD Cable Box / HD STB
NOTE
DTV Audio Supported Codec: MPEG, Dolby
y
Digital
HDMI Audio Supporeted Format: Dolby
y
Digital, PCM (Up to 192 KHz, 32k/44.1k/48k
/88k/96k/176k/192k) -> Not supported DTS.
Page 30
Connections
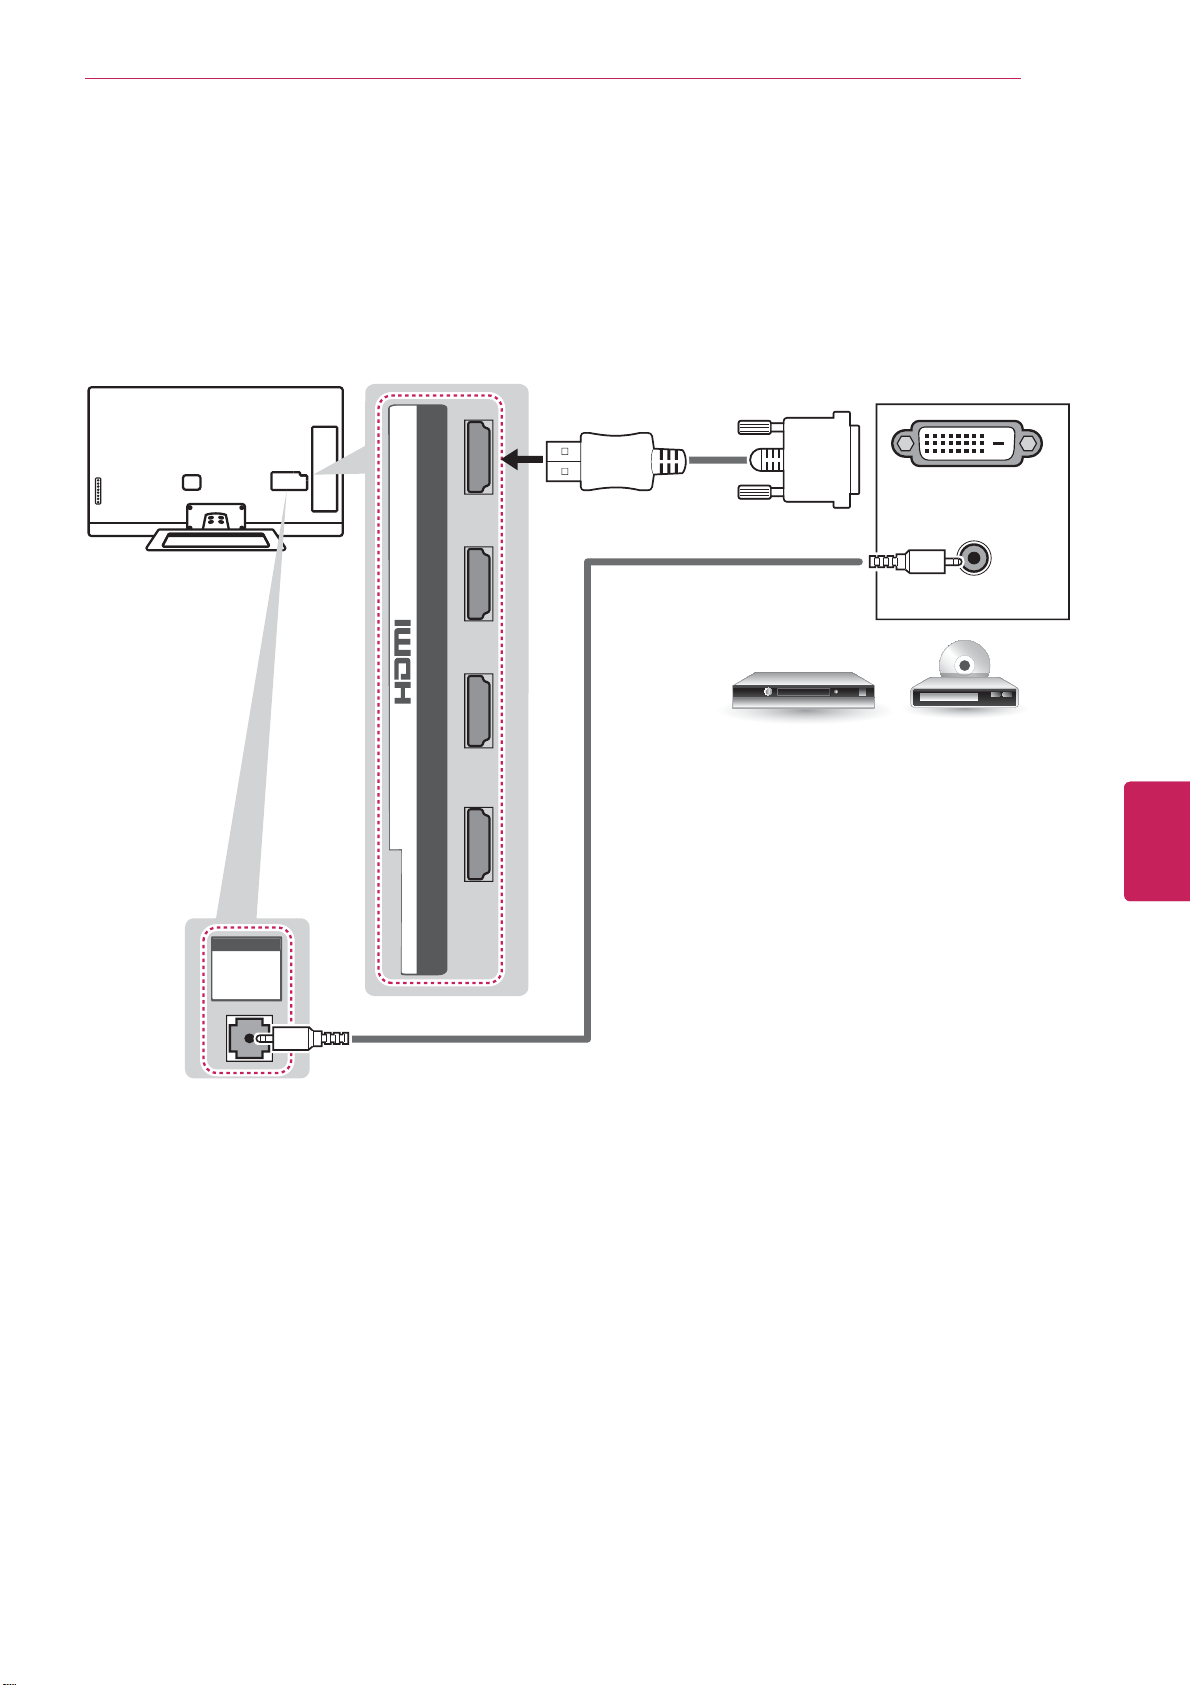
29
DVI to HDMI Connection
Transmits the digital video signal from an external device to the TV. Connect the external device and the
TV with the DVI-HDMI cable as shown in the following illustration. To transmit an audio signal, connect an
audio cable.
4
DVI OUT
(*Not Provided)
(RGB/HDMI-PC)
(RGB/HDMI-PC)
AUDIO
AUDIO
/ DVI IN
2 3 1
(*Not Provided)
DVD/ Blu-Ray / HD Cable Box
AUDIO OUT
ENGLISH
ENG
Page 31

Connections
30
Component Connection
Transmits the analog video and audio signals from an external device to the TV. Connect the external
device and the TV with the component cable as shown in the following illustration.
NOTE
If cables are installed incorrectly, it could cause the image to display in black and white or with
y
distorted color.
Check to ensure each cable is matched with the corresponding color connection.
y
ENGLISH
ENG
VIDEO AUDIOYPBP
YELLOW
AV
WHITE
WHITE
IN
COMPONENT
R
GREENYELLOW
(Use the component video cable provided.)(Use the composite video cable provided.)
RED
RED
RED
RED
BLUE
BLUE
GREEN
GREEN
(*Not Provided)
DVD/ Blu-Ray / HD Cable Box
WHITE
RED
LR
AUDIO
RED
VIDEO
(*Not Provided)
GREEN
BLUE
Page 32

Connections
Composite Connection
Transmits the analog video and audio signals from an external device to the TV. Connect the external
device and the TV with the composite cable as shown in the following illustration.
NOTE
If you have a mono VCR, connect the audio cable from the VCR to the AUDIO L/MONO jack of the
y
TV.
31
IN
AV
VIDEO AUDIOYPBP
YELLOW
(Use the composite video cable provided.)
YELLOW
YELLOW
WHITE
WHITE
COMPONENT
R
ENGLISH
ENG
RED
RED
(*Not Provided)
YELLOW
VIDEO
WHITE
( )
MONO
AUDIOLR
RED
VCR / DVD/ Blu-Ray / HD Cable Box
Page 33

Connections
32
Connecting to a PC
NOTE
It is recommended to use the TV with the HDMI connection for the best image quality.
y
Depending on the graphics card, DOS mode may not work if a HDMI to DVI Cable is in use.
y
In PC mode, there may be noise associated with the resolution, vertical pattern, contrast or
y
brightness. If noise is present, change the PC output to another resolution, change the refresh rate
to another rate or adjust the brightness and contrast on the PICTURE menu until the picture is clear.
The synchronization input form for Horizontal and Vertical frequencies is separate.
y
Depending on the graphics card, some resolution settings may not allow the image to be positioned
y
on the screen properly.
HDMI Connection, DVI to HDMI Connection or RGB Connection
ENGLISH
ENG
Choose method A, B, or C to make connection.
Method A: HDMI Connection
Choose any HDMI input port to connect.
It does not matter which port you use.
4
HDMI
(*Not Provided)
/ DVI IN
SF
2 3 1
Page 34

Method B: DVI to HDMI Connection
4
Connections
33
(RGB/HDMI-PC)
(RGB/HDMI-PC)
AUDIO
AUDIO
(*Not Provided)
Method C: RGB Connection
/ DVI IN
(*Not Provided)
AUDIO OUT
PC
DVI OUT
ENGLISH
ENG
(PC)
(PC)
RGB
RGB
(*Not Provided)
RGB OUT (PC)
(RGB/HDMI-PC)
(RGB/HDMI-PC)
AUDIO
AUDIO
(*Not Provided)
AUDIO OUT
PC
Page 35

Connections
34
Connecting to an Audio System
Use an optional external audio system instead of the built-in speaker.
NOTE
If you use an optional external audio device instead of the built-in speaker, set the TV speaker
y
feature to off.
Digital Optical Audio Connection
Transmits the digital audio signal from the TV to an external device. Connect the external device and the
TV with the optical audio cable as shown in the following illustration.
ENGLISH
ENG
OUT
OPTICAL
DIGITAL
AUDIO
OPTICAL
AUDIO IN
(*Not Provided)
Digital Audio System
Page 36

Connections
Connecting to a USB
Connect a USB storage device such as a USB flash memory, external hard drive, or a USB memory card
reader to the TV and access the My media menu to use various multimedia files.
(*Not Provided)
USB
3
35
USBHDD IN USB Apps
USB IN
2
1
ENGLISH
ENG
Page 37

36
Using (Basic)
ENGLISH
ENG
USING (BASIC)
Turning the TV on for the first
time
When you turn the TV on for the first time, the
Initial setting screen appears. Customize the basic
settings.
Connect the power cord to a power outlet.
1
In Standby mode, press the power button on
2
the remote control to turn the TV on
The Initial setting screen appears if you turn
the TV on for the first time.
Follow the on-screen instructions to customize
3
your TV settings according to your preferences.
Register
Registering Magic
Remote Comtrol
Ø
Connect to the Internet
Connecting to the Internet
.
Setting the Mode
Press
1
Go to
2
Setting
Select
3
in-home, select
to access the Home menu.
Home
All Apps
.
Store Demo
>
Settings
for in-store diaplay. For use
Home Use
>
.
Option
>
Mode
Ø
Google Account
Signing to the your Google
Account
Ø
Enter ZIP code
Checking usage statistics
and crash reports
Ø
Set up TV service
Setting up your TV service
Ø
Help make Google TV
better
When the basic settings are completed,
4
select
Finish
.
Setting up your TV and AV
Receiver control
NOTE
If you do not complete the Initial setting,
y
it will appear whenever the TV turns on.
To turn the TV off, press the power button.
5
Page 38

Accessing Home Menu
Using (Basic)
37
Press
1
Press the Navigation buttons to scroll to one of the following menus and press
2
Press the Navigation buttons to scroll to the setting or option you want and press
3
When you are finished, press
4
to access the Home menu.
Home
EXIT
.
1
2
3
4
5
ENTER
ENTER
.
.
6
7
ENGLISH
ENG
Option Description
1
2
3
4
5
6
7
8
Current watching channel screen
Channel description
Input List
Settings
Current Page
Current Time
Home Dashboard
Launcher Bar
8
Page 39

Using (Basic)
38
Setting up channels
Storing channels
To store channels automatically,
Press
1
Go to
2
Tuning
to access the Home menu.
Home
All Apps
.
>
Settings > ATSC
>
Auto
NOTE
If the TV scans a blocked channel, you will
y
be prompted to enter your password to
keep the channel scanned.
You can store up to 1000 channels. The
y
number of channels that you can store
differs depending on the broadcasting signal
environment.
The channels are stored in the order of
y
TV, Cable DTV
and
Cable TV
.
DTV
,
ENGLISH
ENG
Select
3
The TV scans and saves available channels
automatically.
When you return to the previous menu, press
4
BACK
To store channels manually,
Press
1
Go to
2
Tuning
Scroll through the channel types, and then add
3
or delete channels.
When you return to the previous menu, press
4
BACK
to start automatic tuning.
Start
.
to access the Home menu.
Home
All Apps
.
.
>
Settings > ATSC
>
Manual
Page 40

Checking current program info
Using (Basic)
39
Press
to view the information of the currently program while you are watching.
INFO
The following information appears at the bottom of the screen.
Channel information Program title Current time
᯦'79/*+'
/LYH(GHQVL
7KLVLVWKH/LYH(GHQVVHJPHQW
ۻ
ᯙ
ۻ
ۻ
ۿ
End timeStart time
Progress bar
۽1H[Wᯐ&K&KDQJHᯙ:DWFK :HG)HE
ᯢ03$$3*0XOWLOLQJXDO᯿&DSWLRQᰇL
ENGLISH
ENG
Multilingual
Dolby Digital
Dolby Digital
Plus
Caption
Aspect ratio
Resolution
Icon Description
᯿
ᰆ
ᰇ
L
S
S
L
S
The program contains two or more audio language services. You can change the
audio language using the quick menu.
The program contains a Dolby Digital audio signal in TV and HDMI input sources.
The program contains a Dolby Digital Plus audio signal in TV and HDMI input
sources.
The program contains one or more language caption services. You can select a
closed caption you want by using the quick menu.
The original aspect ratio of the video is 4:3.
The original aspect ratio of the video is 16:9 (wide).
The video resolution is 720 x 480i.
The video resolution is 720 x 480p.
The video resolution is 1280 x 720p.
The video resolution is 1920 x 1080i.
The video resolution is 1920 x 1080p.
V-Chip
ᯢ
The program contains Lock information.
Page 41

Using (Basic)
40
Adjusting aspect ratio
Resize an image to view its optimal size while you
are watching TV.
: Resizes images to the previous standard
4:3
-
4:3.
ENGLISH
ENG
Press
1
Go to
2
Press the Navigation buttons to scroll to
3
Aspect Ratio
Select a display method.
4
to access the Home menu.
Home
All Apps
>
Settings
and press
>
Wheel
Picture
.
.
NOTE
The available ratio varies depending on the
y
input source.
- The input sources: HDMI-PC and RGB-PC
support 4:3 and 16:9.
- The input sources: HDMI-PC 1920 X 1080
supports all of the aspect ratios.
-
: Resizes images to fit the screen width.
16:9
Cinema Zoom
-
cinemascope ratio, 2.35:1.
To change the ratio of the cinema zoom,
y
press < or > and its range is from 1 to 16.
To move the zoom focus up or down,
y
press ^ or v.
: Formats an image to the
NOTE
If you enlarge or reduce an image, the
y
image may be distorted.
Original
-
signal it will automatically change to the picture
format broadcast.
: When your TV receives a wide screen
Original
Page 42

Using (Basic)
41
Using the input list
Selecting an input source
Press
1
- The connected device displays on each input
source.
You can also access the input source list
y
by selecting
menu.
Press the Navigation buttons to scroll to one of
2
the input sources and press OK.
Input source Description
TV Watch TV over the air, cable, and
AV Watch video from a VCR or other
COMPONENT Watch video from a DVD or other
RGB-PC Use the TV as a computer monitor.
HDMI Watch video from a HTS or other
to access the input sources.
INPUT
NOTE
Input List
digital cable broadcast.
external devices.
external devices, or through a digital
set-top box.
high definition devices.
in the
Settings
Editing input name
Edit the input name so that you can easily identify
a device connected to each input source.
Press
1
Go to
2
Input Name
Input
3
When you return to the previous menu,
4
New Input Name
press
to access the Home menu.
Home
All Apps
.
ᰳ
(BACK)
>
Settings
.
>
and select
Input List >Edit
.
Set
ENGLISH
ENG
Page 43

Using (Basic)
42
Using the customer support
Testing the Picture / Sound
To execute picture and sound tests.
ENGLISH
ENG
Press
1
Go to
2
>
Picture Test
If you have any problem, select OK. LG
3
customer service center and poduct
information appears. Contact LG cutomer
service center for help.
When you are finished, select
4
When you return to the previous menu,
press ᰳ
to access the Home menu.
Home
All Apps
(BACK)
>
Settings
or
Sound Test
.
>
Customer Support
.
.
Close
Using the product or service
information
To check the product or service information
Press
1
Go to
2
>
Product/Service Info
to access the Home menu.
Home
All Apps
>
Settings
>
Customer Support
You can check the various Product/Service
3
infomation based on your model.
When you are finished, select
4
When you return to the previous menu,
press ᰳ
(BACK)
.
Close
.
Page 44

Applications
43
APPLICATIONS
Google Chrome
Getting started
Select the Google Chrome in
1
, or simply by typing a URL or search
Apps
query directly into the search bar. Use the
Search
While using Google Chrome,
2
press the
browser windows, bookmarks, viewing history,
and more. Select
browser settings.
key to open the search bar.
key to manage your
Menu
Settings
to configure your
Browser windows
To open a new window,
y
press the
then select
on your controller.
To view all open windows,
y
press the
You can have 3 open Chrome windows at
one time.
To reload a browser window,
y
press the
press
New window
Ctrl + R
key, select
Menu
or press
key and select
Menu
key and then
Menu
on your controller.
Home
Windows
Ctrl + T
Windows
Reload
or in
All
,
or
Google Chrome shortcuts
Ctrl + R Reloads the current tab
Ctrl +
Ctrl +
Ctrl + 0 Resets zoom level to 100%
Ctrl + T Opens a new tab
Ctrl + Shift
+ T
Ctrl + W Closes the current tab
.
Ctrl + D Add to Bookmarks or Home Screen.
Ctrl + F Opens the find on page bar
Space bar Scrolls down the current web page
Browsing history
To access your Google Chrome browsing
y
history, press the
History
history
To clear all browsing data, including clearing
y
your cache, history and cookie data, press
the
Incognito Browsing
If you don't want your website visits to be
recorded in your browser history, you can browse
in incognito mode. To open a new incognito
window, press the
then select
Shift + T
Zooms in
Zooms out
Opens a new tab in an incognito window
key and select
Menu
. To clear your history, select
.
on your controller.
key and select
Menu
New incognito window
Menu
key, select
Settings
or press
Clear
.
Windows
Ctrl +
ENGLISH
ENG
,
Page 45

44
Applications
ENGLISH
ENG
Bookmarks
Bookmarking allows you to save websites without
having to remember URLs. Your web bookmarks
are located within your Google Chrome browser
for easy access while you’re surfing the web.
To Bookmark a Webpage:
Open Google Chrome.
1
Navigate to the webpage you want to
2
bookmark.
Press the
3
press the
From the following menu, select
4
bookmarks or Add to home screen
name your bookmark on the next screen.
Select OK to save changes.
5
To Access your Bookmarks:
Open Google Chrome.
1
Long-press (press and hold) the
2
press the
To Delete a Bookmark:
key on your controller, or
Star
key then select
Menu
key and select
Menu
.
Save
Add to
. You can
key, or
Star
Bookmarks
Safety and security settings
Lock Google Chrome
Lock Google Chrome by setting a PIN password to
open the application. Press the
select
Chrome lock settings
Settings
. Under
Privacy & safety
.
Menu
NOTE
Locking Google Chrome will also lock the
y
Android Market with the same PIN.
Enable SafeSearch:
Enabling SafeSearch on Google Chrome is a little
bit different from enabling it for Google TV Search.
To enable SafeSearch for in-browser searches,
press the
http://www.google.com/preferences
preferred option under SafeSeach Filtering. Visit
this article for more information about SafeSearch
on Google.
Search
key and enter
Advanced settings
.
Press the
Advanced settings
options, including:
, select
Menu
to configure several advanced
Settings
, then
key and
, select
. Select your
Open your bookmarks using the steps above.
1
Navigate to the bookmark you’d like to delete,
2
then long-press (press and hold) the
key on your remote.
OK
Select
3
Delete bookmark
.
Enter
or
Personal Stuff
y
Passwords
From autofill
Under the Hood
y
Privacy
Web Content
Security
User Agent
Page 46

Applications
45
Android Market
Getting Started
The Android Market offers easy access to Android
applications available on Google TV. These have
been created by developers all around the world,
and have been rated by your fellow users.
Google Accounts and the Android Market
The first time you open the Market, you’ll be
prompted to select your Google Account. This
will be the default Google Account for Market
purchases and downloads.
All items downloaded to your Google TV will be
accessible under
and select
Account was used to download them.
All Apps
All Apps
How to download or remove apps
(press the
), regardless of which Google
Home
key
NOTE
You may be asked to sign in to your Google
y
Checkout account if it's the first time you're
purchasing from the Android Market.
Sign in and select
y
want to proceed.
Removing Applications
On your Android device, open the Market app
1
and select
screen. (On some devices, press
then select
Select the item you'd like to uninstall.
2
On the application home screen, select the
3
"
Uninstall
My apps
My apps
" button.
Purchase now
from the Market home
)
if you
Menu
NOTE
You will be able to return to
y
time to reinstall a purchased application that
you've previously removed.
My apps
at any
and
ENGLISH
ENG
Downloading Apps
Free Apps
Navigate to an item you want to install and
1
select it. The item details screen will appear
and you can read more about the item and its
developer.
If you want to install the item, select the
2
INSTALL
Select
3
the app, the item will start downloading
immediately.
Paid Apps
Navigate to an item you want to install and
1
select it. The item details screen will appear
and you can read more about the item and its
developer.
If you want to install the item, select the
2
button.
. Allow access appears.
to accept the permissions for
Install
BUY
Press
3
the app.
Continue
to accept the permissions for
Page 47

Applications
46
Charges
When to Expect Charges
Once you place an order, charges generally post
to your credit/debit card within a few days. Check
your receipt in the
your account to see if your card has been charged
or the exact date your credit/debit card was
charged for your purchase.
Please note, if you cancelled your order within the
first 15 minutes, rest assured that your credit/debit
card has not been charged. Any line items on your
statement are only authorizations.
Purchase History
section of
ENGLISH
ENG
Charges and Cancelled Orders
If you believe you were charged for an order
you cancelled, please verify that your order was
cancelled in your Google Checkout account.
Here's how:
Sign in to your account at https://checkout.
1
google.com/.
On the
2
Order
you'd like to review.
If your order has been cancelled, the order
3
details should read
cancelled
Purchase History
next to the order containing the item
.
page, click
Your order has been
View
NOTE
If your order has been cancelled, the
y
pending amount that you've noticed on
your credit/debit card statement is only an
authorization, not an actual charge.
If your order details do not reflect
y
cancellation, or if you're waiting for a
refund, learn more about cancelling your
order directly through the seller.
Page 48

Applications
47
Returning apps
Refund Policy
You have
to return an application purchased through Android
Market for a full refund. You may only return
a given application once; if you subsequently
purchase the same app again, you may not return
it a second time.
How to return an app within the 15 minute return period:
Launch Android Market on your device
1
Select
2
Select the app you'd like to return
3
15 minutes
Menu
NOTE
If the 15 minute refund window has not yet
y
passed, the app is eligible for return and
will have two buttons saying “Open” or
“Refund”
from the time of download
>
My Apps
After the 15 minute return period:
If you're unsatisfied with an application after the 15
minute return period has expired, we recommend
contacting the developer directly.
You may find developers' contact information
here:
.Go to Android Market and select the app in
1
question.
.On the app's description page, scroll down to
2
the “Developer” section
.One of the following contact options will be
3
provided: an email address, a phone number,
or a website.
ENGLISH
ENG
Select the
4
Refund
option
NOTE
The Refund button will now say “Uninstall.”
y
Press “Uninstall” to remove the app from
your device and initiate the refund.
After the 15 minute return period has
y
expired, the Refund option will not be
available. Selecting the “Uninstall” button at
this point will simply remove the application
from your device.
Page 49

Applications
48
Live TV
Google TV works with your existing cable or
satellite TV service to help you find what you want
to watch through search and to bring you access
to the full internet to find great web content.
To Watch Live TV:
Press the TV key on your controller,
1
Press the
2
navigate to TV.
To Save a TV Channel to your Favorites:
key on your controller and
Home
or
Picture in Picture
Picture in Picture allows you to watch a live TV
feed while simultaneously using other features on
your Google TV. Surf the web, browse pictures,
or play a game without missing a second of your
favorite TV program.
When watching live TV, press the
Picture
window, then press
access other features and apps. To return to
viewing live TV in full screen, press the
in Picture
key to minimize the TV feed to a smaller
key again.
Home
or
Picture in
Search
to
Picture
ENGLISH
ENG
Press the
1
to favorites, or
Long-press the
2
channel
Choose the channel you wish to add, then
3
press the
To Access your Saved Favorites:
Press the
1
select
Long-press the
2
Press the
3
channels.
.
Enter or OK
View favorite channels
key and select
Star
key and select
Star
key on your controller.
key on your controller and
Star
key, or
Star
key and select Favorite
Menu
Add channel
, or
Add
Open a Picture in Picture TV feed from another app
While using another app, long-press (press and
1
hold) the
Select TV.
2
Picture in Picture Settings
To edit your settings,
1
click on the
your TV or
Long press (press and hold) the
2
Picture
To exit settings, press
3
TV and DVR shortcuts
Picture in Picture
Picture in Picture
key.
Back
or
key
Esc
window on
Picture in
.
Tab Recalls the previous channel
Menu + G Opens the TV guide
Menu + L Returns to live TV from DVR content
Menu + D Opens the DVR menu
Menu + I Shows information for the current show
Ctrl + D Bookmark channel, share, or record
program
Page 50

3D World
This TV can display in 3D via 3D broadcasting or
when the TV is connected to a compatible device,
such as a Blu-ray 3D Player. The viewer must
wear compatible 3D glasses in order to see these
images in 3D format.
When watching 3D imaging
To watch the TV in 3D, you must put on your
y
3D glasses. For best results, you should wear
LG Brand 3D glasses. The 3D imaging may not
display properly when using another brand of 3D
glasses. Please see the 3D glasses manual for
instructions on how to use the 3D glasses.
Applications
A communication failure may occur if the
y
glasses are near electronic devices that use the
same bandwidth (2.4 GHz), such as a microwave
oven or wireless LAN product.
Viewing 3D Imaging
Play the video produced in 3D.
1
Press 3D to watch 3D imaging.
2
Wear the 3D glasses.
3
Press the Navigation buttons to scroll the OK
4
and press
Press the Navigation buttons to select the
5
shape and press
ENTER
.
ENTER
.
49
When watching 2D images, it is recommended
y
to take off the 3D glasses. If you watch 2D
images with the 3D glasses on, you may see
distorted images.
We recommend that you maintain a distance of
y
at least twice the screen diagonal length when
watching 3D videos.
NOTE
If 3D TV broadcast standard changes in the
y
future and it is not supported by this TV set,
you may need a separate device, such as a
set-top-box.
When using 3D Glasses
Do not use the 3D glasses to replace your
y
corrective glasses, sunglasses or protective
goggles.
Do not store the 3D glasses in hot or cold
y
locations.
Do not drop objects onto the 3D glasses. Do not
y
drop or bend the glasses.
Since the lenses of the 3D glasses are easily
y
scratched, make sure to clean only with a soft
cloth. Shake off any dust before using the cloth
since the glasses are easily scratched.
2D » 3D
Side by Side
Top & Bottom
Checker Board
Frame
Sequential
Press 3D button to
6
3D -> 2D
3D Off
2D -> 3D
Cancel
Changed from 2D imaging to
3D imaging.
2D-to-3D converted videos
may appear less realistic than
titles originally produced as 3D
videos.
2D Off
Displays images in 2D without
any 3D effects.
Displays images in original format.
Displays images in 3D.
Close the pop-up window.
or
3D Off
.
ENGLISH
ENG
Page 51

50
Applications
ENGLISH
ENG
Setting 3D Imaging
Press the
1
3D OPTION
imaging.
A pop-up window will appear.
Press the Navigation buttons to scroll to one of
2
the following options and press
3D Mode Setting
Cuts off the outer edges of the
3D Picture Size
3D Picture
Correction
3D Depth
3D Viewpoint
3D Picture
Balance
3D
Optimization
picture and stretch it to fit the full
screen in 3D mode.
Select
Select the screen with 3D video with
better visibility.
Adjusts the stereoscopic effect of the
3D image converted from 2D image.
Moves the 3D image to front and
back to adjust the 3D perspective
view.
Adjusts the color and brightness
difference between the right and left
sides of the picture in 3D mode.
Optimizes the 3D image screen for
the viewing environment.
while viewing 3D
Left/Right
or
Right/Left
ENTER
.
.
Set Video.
Allows you to change Video settings (Refer to
"Picture" on p.57).
Set Audio.
Allows you to change Audio settings (Refer to
"Audio" on p.59).
CAUTION
Some menus may not work while viewing
y
3D imaging.
The 3D imaging is disabled automatically
y
when switching input source or DTV
channel.
The screen may not be displayed properly if
y
you view 2D images in 3D imaging mode.
3D effect can be seen when 3D Mode
y
is selected appropriately for the 3D input
signal supplied to the TV.
For *mpo files (3D camera files), the 3D
y
imaging mode is enabled automatically.
NOTE
If viewing 3D imaging, “Power indicator” is
y
turned off automatically.
You can only choose "
y
the
AV MODE
Energy Saving is disabled while playing in
y
button on the remote control.
3D.
Home menu is not available while playing in
y
3D.
You cannot enter the Home menu while
y
watching 3D imaging.
Off
or
Cinema
" with
Page 52

Applications
51
Media Player
Play back audio/video/image files.
Insert a USB device containing files into the
1
USB jack.
Go to
2
Select a file from the list and press OK.
3
Keys available during playback
All Apps
Starts or re-starts playback (video/music
playback). Starts Slideshow or starts moving
a panoramic photo (photo playback)..
Pauses or re-starts playback (video/music
playback) /Slideshow (photo playback).
Pauses or re-starts movement of a
panoramic photo (photo playback).
Stops playback and returns to the file list
(video/music playback). Stops Slideshow
or Image viewer, and returns to the file list
(photo playback).
Fast rewinds/Fast forwards the title/track.
The search speed changes each time you
press the button during playback.
Skips to the previous/next title (video
playback)/track (music playback)/file (photo
playback).
>
Media Player
.
Options
Various settings and playback operations are
available by pressing
The available items differ depending on the
situation.
Photo playback
Slide
show
Rotate
Slide
show
setting
You can start (Play Slideshow) or pause
(Pause Slideshow) a slideshow.
You can rotate photo files counterclockwise
(Left) or clockwise (Right) by 90 degrees.
You can adjust the speed or random play of
the slide show.
MENU
during playback.
ENGLISH
ENG
NOTE
USB devices must be less than 2TB.
y
Connection via a USB-hub is not supported.
y
Page 53

52
Applications
ENGLISH
ENG
Netflix
Sign in to your Netflix® account to browse by
genre, search for titles, manage your Instant
Queue and review Netflix® recommendations all
from your Google TV. If you do not have a Netflix®
account, you will need to create a new account to
use this feature.
For more information, visit www.Netflix.com.
Watch TV shows and movies online or by
streaming them from Netflix.
Photos
Browse photos on a photo sharing website, such
as Picasa. You can also browse photos in the
connected USB devices.
To View Albums from Local Media
Insert your USB device into the USB slot on
1
your TV.
In the
2
Select your USB device and you will then be
3
To Link your Picasa Album:
While in the
1
Photos
the left navigation bar.
able to navigate through the folders on your
device.
key on remote control or select
left navigation.
app, navigate to
Photos
app, press the
Local media
Menu
Options
on the
on
Select
2
account that you want to link to the
app.
If your Google account is not listed, select
3
Account
new account or Sign-In to an existing account.
Settings
where you will be asked to Create a
. Check the box next to the
Photos
New
Page 54

Applications
53
Search
Press the
1
control. The
where you are on your Google TV, and
searches across all applications, bookmarks,
TV content, web video, and web pages.
When you enter a search query, a drop-down
2
list will display a selection of results.
Navigate search results using the directional
3
arrow keys, then press
option. You can also enter a URL into Google
TV search to navigate directly to a website.
To customize Search Results
It’s easy to configure your Google TV search
experience to include results from TV & Movies,
Apps, Podcasts, and more.
Press the
1
select the
Select
2
customize what appears when you search.
Search
Search
Settings
Search
key on your remote
Search
, then
key works no matter
to select an
Enter
key, type ‘Settings,’ and
application.
Searchable items
to
TV & Movies
TV & Movies is the simplest way to find shows
and movies to watch instantly. In addition to
live TV, you can browse and search for video on
demand options, and filter results by price (paid
vs. all) and streaming quality (HD vs. all).
NOTE
TV & Movies provides:
Access to content from your Netflix
y
subscription
Access to web video content from 100+
y
web domains
Access to VOD rentals on Amazon and
y
YouTube
To access TV & Movies:
Press the
1
Movies
Once in
2
bar to filter by
.
TV & Movies
key and select
Home
, use the left navigation
On TV, Shows
and
TV &
Movies
ENGLISH
ENG
SafeSearch
Use SafeSearch to block adult content from
appearing in search results.
Press the
1
select the
Select
2
and select
Privacy & safety
Search
Settings
SafeSearch
key, type ‘Settings,’ and
application.
, navigate to
.
Safety
To filter available TV & Movies:
: Use the top toolbar to filter live TV
On TV
y
listings by time and quality (HD or HD & SD)
Shows
y
by price (free or free & paid) and quality
Movies
y
by price and quality
,
: Use the top toolbar to filter shows
: Use the top toolbar to filter movies
Page 55

Applications
54
YouTube
Full-length feature films from many major
Hollywood studios are now available for rent on
YouTube. Discover a universe of related remixes,
clips, and behind the scenes footage with YouTube
Movie Extras. On Google TV, navigate to YouTube.
com/Movies to browse and search for movies, and
rent titles using your Google Account.
Google TV offers two different YouTube
experiences:
The YouTube on TV app, an Android-based
y
app that makes it easy to find and watch
content on YouTube.
Through
y
browser to access the desktop YouTube
experience you’re used to.
YouTube.com
: Use the Chrome
ENGLISH
ENG
NOTE
YouTube Movies (video-on-demand rentals)
y
are currently only available through the
YouTube.com experience.
Browse movies and shows in TV & Movies
y
or at YouTube.com/movies. To learn more
about Google TV’s video on demand
options, please visit the Video on Demand
article.
Page 56

SETTINGS
The Main Menus
Settings
55
You can review or edit your TV settings by typing
in
All Apps
. Add Settings as a shortcut to your Home Bar by pressing the
Settings
into the Search bar or by navigating to
key, then
Home
selecting Customize home items and adding/replacing a current shortcut with the
You will be able to review or update the TV settings including:
Network
Video input
Picture & sound
ATSC
Input List
Picture
Audio
3D Setting
Search
Applications
Manages Internet connection.
Sets up TV service provider.
Adjusts resolution, screen size, sound effects.
Sets the channel.
Views the input sources with their labels.
Adjusts resolution, screen size.
Adjusts the sound quality, effect, or volume level.
Sets up 3D mode.
Manages searchable items, clear shortcuts.
Manages applications and development options.
Settings
Settings
key,
Menu
shortcut.
ENGLISH
ENG
Language & input devices
Account & sync
Privacy & safety
Storage
Date, time & location
Safety(Lock)
Accessibility
About
Option
Customer Support
Manages system language, input devices, IP remotes.
Manages accounts and sata sync.
Manages privacy, safety and lock settings.
Unmounts USB storage, view available storage.
Sets date, time, time zone and formats.
Locks or unlocks channels and programs.
Manages accessibility options
System information
Manages system option.
Checks the customer information.
Page 57

Settings
56
Network
Manages Internet connection.
Ethernet You can check the status of the wired network connection.
Wi-Fi You can select an available Wi-Fi network from the list of Wi-Fi networks found in your
area or set up a new Wi-Fi network.
Status You can check the network information, such as IP address, Ethernet MAC address, and
Wi-Fi MAC address.
Video input
Edit configured devices
You can select the device to control or to set as the tuner.
ENGLISH
ENG
Select available source
To add a device, select it from the list. You can add a device you want to control using the IR Blaster.
Page 58

Settings
Picture & sound
Adjusts resolution, screen size, sound effects.
Picture
Resolution Selects output resolution
Picture size Maximizes your screen area.
Screen saver Adjusts the screen saver timeout.
Screen off timeout Sets the time to turn off the TV automatically. To use this function, you should set the
current time and date in advance.
Sound
Volume Adjusts the volume level.
Sound effects Set the sound effects enabled or disabled.
Notification sounds Select
Text-to-speech Sets the time to turn off the TV automatically. To use this function, you should set the
current time and date in advance.
if you want to silence the notification sounds.
Silent
57
ATSC
The available settings are described in the following.
Auto Tuning Tunes and stores all available channels through antennas or cable inputs.
Manual Tuning Tunes and stores the channels you want manually.
Input List
Views the input sources with their labels. You can select a input source.
ENGLISH
ENG
Page 59

Settings
58
Picture
The available network settings are described in the following.
Energy Saving Reduces the power consumption by adjusting the screen brightness.
Picture Mode Selects one of the preset image or customizes options in each mode for the best TV screen
performance. You are also able to customize advanced options of each mode. The available preset
picture modes vary depending on the TV.
NOTE
If you select
y
Intelligent Sensor
automatically.
- Backlight Adjusts the brightness of the screen by controlling the LCD backlight. If you decrease the brightness
level, the screen becomes darker and the power consumption will be reduced without any video
signal loss.
NOTE
If you use the “
y
Energy saving
, the Energy saving feature will switch to
-
Off, Minimum, Medium
”, Backlight will be available.
Auto
ENGLISH
ENG
- Contrast Increases or decreases the gradient of the video signal. You may use Contrast when the bright part
of the picture is saturated.
- Brightness Adjusts the base level of the signal in the picture.
- Sharpness Adjusts the level of sharpness in the edges between the light and dark areas of the picture. The
lower the level, the softer the image.
- Color Adjusts intensity of all colors.
- Tint Adjusts the balance between red and green levels.
- Color
Temperature
Advanced
Control
Picture Reset Restores the options of each mode to the factory default.
Aspect Ratio Changes the image size to view images at its optimal size.
SCREEN
(RGB-PC)
Picture Wizard Adjusts the image quality and calibrates the screen. The customized options will be saved as
Set to warm to enhance hotter colors such as red, or set to cool to enhance cooler colors such as
blue.
Customizes the advanced options.
Customizes the PC display options.
Resolution Selects a proper resolution.
Auto Configure Sets the TV to optimize the options automatically for the TV display.
Position Locates the image at the proper position.
Size Adjusts the image size.
Phase Eliminates horizontal streaking.
Reset Restores the options to the default setting.
Expert1
in the
Picture Mode
.
NOTE
If you use
y
To reset changes made by
y
Mode
Picture Wizard
is on
Expert1
.
, the
Energy Saving
Picture Wizard
feature will turn off automatically.
, operate
Picture Reset
when
Picture
Page 60

Audio
Sound Mode Sets the sound mode.
User EQ Setting User Equalizer.
Volume Mode Select Auto Volume mode or Volume level.
Sound Optimizer Optimizing the sound to Normal, Wall Mount Type or Stand Type.
Virtual Surround Selects Virtual Surround mode.
Clear Voice Sets the clear voice mode.
AV Sync Synchronize AV, TV Speaker or SPDIF.
Sound Setting Sets the sound balance, TV speaker enable or Digital sound out format.
3D Setting
3D-On-Start-Setting
3D Mode
3D Depth Adjusts the stereoscopic effect of the 3D image converted from a 2D image.
3D Viewpoint Moves the 3D image to the front and back to adjust the 3D perspective view.
3D Color Correction
3D Sound Zooming
Normal Image View
3D Image Correction Select
Left/Right
or
Right/Left
. Select the screen with 3D video with better visibility.
Settings
59
ENGLISH
ENG
Search
Manages searchable items, clear shortcuts
Searchable items Chooses applications to search.
Clear shortcuts Clears shortcuts to recently chosen search suggestions.
Applications
Manage applications and development options.
Manage applications Manages and remove installed applications.
Running services Views and control currently running services.
Development Set options for application development
Page 61

Settings
60
Language & input devices
Manage system language, input devices, IP remotes
Manage IP remotes Connect and disconnect IP remotes.
Chrome to TV Push links to this device from Google Chrome.
Pointer speed Adjusts mouse and trackpad speed.
Select language Selects a language
Current keyboard Configures current keyboard
Configure input methods Configures input methods.
Accounts & sync
Manages accounts and data sync.
ENGLISH
ENG
General sync settings
Background data Applications can sync, send and receive data at anytime.
Auto-sync Applications sync data automatically.
Manage accounts
You can clear the saved password or remove accout.
Add account Adds a new account.
Privacy & safety
Manages privacy, safety and lock settings.
Personal data
Reporting Automatically send Google TV usage statistics and crash reports to Google.
Factory data reset Erases all data on device.
Video history Enable history of video watching such as TV channels.
Clear video history Erases the video history.
Safety
SafeSearch Block adult content from appearing in search results.
Application lock Require PIN to use Google Chrome & Market.
Backup and restore
Back up my data Back up application data and other settings to Google servers.
Page 62

Backup account Sets the backup account.
Automatic restore If you reinstall an anpplication, restore backer up settings or other data.
Storage
Unmount USB storage, view available storage.
Internal memory
Total Views the total internal memory size.
Available Views the available memory size.
External access via FTP
Enable FTP access Sets the FTP server to be disabled.
Settings
61
Media storage
Views the connected storage devices.
Date, time & location
Sets the date, time, time zone and formats.
Date & time
Automatic Uses network provided time.
Set date Sets the date manually.
Set time Sets the time manually.
Select time zone Sets the time zone.
Use 24-hour format Selects the 24-hour format.
Select date format Selects the date format.
Timer
ENGLISH
ENG
Off Time Sets the Off Time.
On Time Sets the On Time.
Sleep Timer Sets the Sleep timer.
Auto Off Sets the Auto Off mode.
Location
Select country Select your country.
Set location Set the your location by ZIP code.
Page 63

Settings
62
Safety(Lock)
To access this setting, you need to enter the password.
Set Password
Set Password You can set new password
Parental Service
Lock System Check the Lock system to set the lock system.
Block Channel You can choose Block Channel Lock.
Movie Rating You can choose Movie Rating Lock.
TV Rating-Children You can choose TV Children Rating Lock
TV Rating-General You can choose TV General Rating Lock.
Downloadable Rating You can choose DRRT Rating Lock.
Input Block You can set input block.
ENGLISH
ENG
Accessibility
Manages accessibility options. Check the box to enable accessibility.
Accessibility services
TalkBack Check the box to provide audible explanations for Google TV features.
Accessibility scripts
Download accessibility
scripts
Allows applications to download accessibility scripts from Google.
Page 64

About
Views the system information.
System updates Updates the system.
System tutorial Learn about the key features of Google TV.
Model number Views the model number.
Firmware version Views the firmware version.
Build number Views the build number.
Legal information
Open source licenses Views the open source licenses.
Google legal Views the Google legal information.
Settings
63
Option
AV Receiver Sets the IR Blaster mode. Universal remote control setting enables user to control
multiple devices with a single remote controller.
Initial Setting Fatory reset. All user settings and channel settings will be reset.
Audio Language Sets the audio language.
Caption Sets the caption.
Standby Light Sets the standby light.
Pointer Alignment Sets the pointer alignment.
Mode Setting Sets the TV to Home use or Store demo.
Customer Support
Picture Test Testing your TV screen.
Sound Test Testing your TV sound system.
Product/ Service Info Views your product and service information.
ENGLISH
ENG
Page 65

64
Appendix
ENGLISH
ENG
APPENDIX
Updating the TV Firmware
Download and install the latest firmware through
DTV signal to enhance or change the product
function, or add new features.
To check the current firmware version or update
the firmware,
Press
1
Press the
2
Press the Navigation buttons to scroll to
3
SETTINGS
Red
Support
Software Update
The current firmware version displays.
OTA (Over-The-Air): When software update is
on, the TV will automatically check for software
updates. A pop-up window will appear on the
screen when an update is available.
.
Software Update On
to access the main menu.
button to scroll
and press OK.
ؒ&XUUHQW9HUVLRQ
Close
Customer
NOTE
If you change the channel during the
y
firmware update through OTA, the update
is stoped.
The process resumes when you go back to
y
the original channel. The update continues
even when the power is switched off using
the remote control. The system operates
normally once the update is complete.
You can check the software update status
y
in the Software Update menu or from the
update information displayed under the
channel banner.
When the update is complete, the TV will
4
automatically restart in 5 seconds.
You may need to reset some
PICTURE
, or
AUDIO
menus.
SETUP
,
NOTE
You cannot downgrade back to an older
y
firmware version.
The period of time for the firmware update
y
may be different depending on the firmware
size and DTV signal strength.
Page 66

Appendix
65
Cleaning Your TV
CAUTION
Make sure to turn the power off and
y
disconnect the power cord and all other
cables first.
When the TV is left unattended and unused
y
for a long time, disconnect the power cord
from the wall outlet to prevent possible
damage from lightning or power surges.
Screen, frame, cabinet and stand
To remove dust or light dirt, wipe the surface with
a dry, clean, and soft cloth.
To remove major dirt, wipe the surface with a
soft cloth dampened in clean water or a diluted
mild detergent. Then wipe immediately with a dry
cloth.
CAUTION
Do not push, rub, or hit the surface with
y
your fingernail or a sharp object, as this may
result in scratches on the screen and image
distortions.
Do not use any chemicals, such as waxes,
y
benzene, alcohol, thinners, insecticides,
air fresheners, lubricants, as these may
damage the screen’s finish and cause
discoloration.
Do not spray liquid onto the surface. If
y
water enters the TV, it may result in fire,
electric shock, or malfunction.
Preventing “Image burn” or
“Burn-in” on your TV screen
If a fixed image displays on the TV screen for
y
a long period of time, it will be imprinted and
become a permanent disfigurement on the
screen. This is “image burn” or “burn-in” and
not covered by the warranty.
If the aspect ratio of the TV is set to 4:3 for a
y
long period of time, image burn may occur on
the letterboxed area of the screen.
Avoid displaying a fixed image on the TV screen
y
for a long period of time (1 or more hours for the
Plasma TV) to prevent image burn.
ENGLISH
ENG
Power cord
Remove the accumulated dust or dirt on the
power cord regularly.
Page 67

66
Appendix
IR Blaster Guide
Universal remote control setting enables user
to control multiple devices with a single remote
controller. In order to continue the setting,
please check, if IR Blaster and other devices are
connected with TV properly.
When AV receiver is connected:
When set-top box is connected:
Connect the IR Blaster Cable to the TV. Place
1
the transmitter in front of the AV receiver.
Go to
2
Select a device and
3
Select the device style and manufacturer of
4
Select
5
If your ZIP code is not correct, change the ZIP
6
Select
7
Home > All Apps > Settings > Video
input > Add device manually
Next
is displayed.
the selected device.
Send Powerkey
code is not matched, select
the corresponding code.
code by selecting
. Your device is registered.
Next
Change ZIP code
.
. The TV signal playing
to test the code. If the
Next Code
to find
.
ENGLISH
ENG
Connect the IR Blaster Cable to the TV. Place
1
the transmitter in front of the AV receiver.
Go to
2
Select a device and
3
Select the device style and manufacturer of
4
Select
5
Select
6
Home > All Apps > Settings > Video
input > Add device manually
Next
is displayed.
the selected device.
Send Powerkey
code is not matched, select
the corresponding code.
. Your device is registered.
Next
.
. The TV signal playing
to test the code. If the
Next Code
to find
Page 68

Appendix
IR Code list
AUDIO
Manufacturer & Brand Supported models Code_Number
ADCOM GSA-700,GSP-560 082
GFP-710,715,750,Pre-502 092
GTP-450,502,506,550,600,740,830
225
GFB-800,GTP-500_II,RC-800 161
269
67
GFR-700,700HD,GTP-870HD,880 356
AIWA 018
RC-T770F 104
RC-TN4000EX 202
CX-NDV526,NSX-990,999,AV90,AVF99,V90 203
RC-T500EX,TN270EX,TN330,TN5200EXU,XRDV526,H330MD
AV-DV75U,RC-8AR03 213
RC-T800F 211
RC-T779 188
AKAI RC-A905 189
ANTHEM AVM_2MAIN 335
AVM_20MAIN,30MAIN,40MAIN,50MAIN,50V
MAIN
STATEMENT_D1MAIN,D2MAIN
337
ENGLISH
ENG
ARAGON STAGE_ONE1 687
ARCAM ALPGA_10DAVE,AMP-AV50,CR-30,TunerA8 141
AR32,65,70,75,80,90,AVR100,C30,31,P1,P35,
P90,P90/3
AV8,9[ZONE1-SYS16]
AVP700[ZONE1,2-SYS16]
AVR250[ZONE1,2-SYS16]
AVR280[ZONE1,2-SYS16]
AVR300,350[ZONE1,2-SYS16]
077
Page 69

68
Appendix
ATLANTIC_
TECHNOLOGY
AUDIO_FILE 071
B_&_K 3090,4090,HT_Products(1),REF-20,30,ST1400-II096
P-2000 342
AVP1000,1030,2000,2030,3000,3090,4000,40
90
AVR101,202,305,307,317,505,505_
S2,507,507_S2,515,517
Reference10,20,20+,21,30,31,50,50_S2,51
AVP1000,1030,2000,2030,3000,3090,4000,40
90[ZONE_B]
AVR101,202,305,307,317,505,505_
S2,507,507_S2,515,517[ZONE_B]
Audio_Products(2),PT3,5[ZONE_B]
Reference10,20,20+,21,30,31,50,50_S2,51,5_
S2[ZONE_B]
097
ENGLISH
ENG
BOSE RC-SC-6 070
ACOUSTIC_WAVE 224
BOSTON_ACOUSTICS AVP-7,AVR-7120 447
CAMBRIGE_AUDIO AZUR_640R 684
CARVER RH-DD51(2) 006 077
PRE-CT-26V,RH-20(1),RH-88B(1) 492
RH-20(2),RH-88B(2) 028
061
071
CM-1090,CT-17,6,HR-722,752,875,RH17,75,TX-8,8R
RH-DD51(1) 013
201
214
226
185
CR-27V,RH-27v 284
CARY_AUDIO_DESIGN CINEMA6 378
CITATION 5.0,500(5.0AV) 148
CLARION 026
Page 70

DENON RC-136 109
215
T-270,380RD,TU-1500RD 230
RC-122 234
DRA-295,395,685 330
Appendix
69
270LII,AMP-AVC-A1,A10SE,CA1,KVACA10SE,POA-5200,TU-580RD,S10
AVC-A10,A1D,A1SE,A1SR
AVR1083,1507,1800,1802,2400,2800,2803,3802
DRA-297,37,397,697CI,697CIHD[MAIN] 679
AVR-1609,1610,1709,1909,1910,2309CI,2809
CI,4810,589,689,789,889,989[SIRIUS]
DIGITAL_PROJECTION TITAN_1080p 660
DVICO TVIX_HD_M-4000,4100,5000,5100,6500A,7000A570
TVIX_HD_PVR_M-4010,TVIX_HD_TUNER_
T-430,431
TVIX_PVR_M-4110,4130,5010,5110,5130
ELAN HDR-2000 057
340
569
774
ENGLISH
ENG
290
ENLIGHTENED_AUDIO 099
098
ESCIENT DVDM-100[ID#1],FIREBALL_AVX-
211,331,552[ID#1]
FIREBALL_DVDM_FB1,FIREBALL_
E-120,2,40[ID#1],FIREBALL_E2_FB1
FIREBALL_FP-1[ID#1],FIREBALL_MP100,150,200[ID#1]
FIREBALL_MX111,311,531,752[ID#1],FIREBALL_SE-80,SED1,ZP-1[ID#1]
VISION_VC-1[R1],VISION_VS-100,600[R1]
FISHER REM-380 214
FLEXTRONICS CINEMA8 378
451
182
Page 71

Appendix
70
FOSGATE_AUDIONICS MODEL3 148
FAP_T1 342
HARMAN_KARDON 148
ENGLISH
ENG
AVR_4000,45RDS,110,25,3,30,HARMAN2,HK
3385,3485,HK-3250,RRV-101,102
AVR-75(1),85(1) 118
AVR_120,125,130,135,140,144,145,146,147,2
00,210,220,225,235,240,245,247
AVR_300,300RDS,310,325,330,335,340,347,4
30,435,445,500,500EU,500RDS
AVR_510,520,525,630,645,7300,745,7000,700
0RDS,7200,7500,8000
CP_15,25,35,40,45,55,60,DPR_1001,1005,200
5,HS_100
HITACHI RB-V5 020
INTEGRA 275
233
077
028
318
017
046
108
080
209
381
JAMO DMR40,45,70 399
JCPENNEY JCP1 216
JVC RM-SR818U,SR884U,RX-884VBK,905VTN 163
RM-SR515,RX-515V 191
UX-A4 114
RX-1028,5000VBK,6000VBK,6010VBK,6020VB
K,6500VBK,7000VBK7010VBK
RX-7020VBK,778V,8000VBK,8010VBK,8020VB
K,884,9000VBK,9010,9010VBK
RX-DP10VBK,DP15B,DP9VBK
279
RM-RK32 291
Page 72

KENWOOD 026
066
KR-V6050,KRX-1000,RC-120,R0600 145
RC-F4 192
Appendix
71
FISHER2,KR-V8090,V888D,V999D,KRFV5030D,V5050D,RC-R0905,R0907,SEA-950S
VR-1060,1090,209,309,507
RC-W0501 280
UD-351M 374
KLEGG M6_501 686
KLH R5000 331
KLIPSCH STAGE_ONE(1) 687
KOSS 216
KRELL KRC-2,PRE-KRC3 072
HTS-7.1,S-1000,SHOWCASE 384
EVOLUTION_ONE(1),TWO(1) 672
LEXICON DC-1(1),MC-1 120
CP-3-1,2 235
182
005
ENGLISH
ENG
236
237
MC-8(MAIN),RV-8(MAIN) 357
MC-12(MAIN) 360
LG 008
002
LINN AV5103,KAIRM,KUDOS,WAKONDA 124
CLASSIK_MOVIE,MOVIE_Di 377
LUXMAN RRV-371 009
R-341 139
052
165
115
RTP-117 004
Page 73

Appendix
72
MAGNAVOX 086
MARANTZ D-870,RC-2000,RC-600-AV,RC-73SR 006
AV-500 028
RC-4000-SR 063
RC-1132 265
164
152
077
031
040
185
186
ENGLISH
ENG
289
SR6300,6400,7400,8400 492
SR5005[MAIN] 712
719
MCINTOSH C100,15,38,39,41,42,712,CR12,MHT100,MX-
132,MX118,PRE-Tune-MX-130
HR35 286
C1000,2300,500 311
MERIDIAN 500SERIES,501,501V,502,504,507,551,
561,562V3,565_PRE-AMP,568,558,PRE565,TunePRE-504
601_PRE-AMP 012
200SERIES 013
G_SERIES,G01,02,51,61,68,91 628
MITSUBISHI 242
M-VR400,600 204
238
100
MONDIAL AMPHITHEATER1 157
28K 158
ACT-3 042
DIA-150 043
RH-11 081
112
MYRYAD MDP500 077
Page 74

NAD 450,AMP-C340 186
705,C422,Tuner-C-420 113
NAKAMICHI AV-1RC,2 040
RE-1RC,2RC,3RC,RECEIVER2 244
245
RM-1m 172
AV-10,1s,8,RE-10 183
287
NEC AR-300 176
NILES A4.6CI,ZR-4630,-8630AV 403
ONKYO TX-DS575,DS575X,DS676,DS757X,DS777 275
RC-199M 017
Appendix
73
DTR-7.1,TS-DS676B,TS-SV828THX 046
108
TX-DS747[TUNER],DS838[TUNER],DS939[TUN
ER]
RC-313S 209
OPTIMUS 026
OUTLAW MODEL950 342
PANASONIC 032
RAK-SC509W 195
SC-HT820V[AMP&DVD] 626
080
381
041
219
177
292
ENGLISH
ENG
PARASOUND R-1,U/RC-1500 129
R-2,U/RC-1500 130
AVC-1800,R-15,R-15ADVANCED,U/RC-1500 132
AVC-2500U 261
294
295
C1/C2 333
T3 334
Page 75

Appendix
74
PHILIPS FA360 249
FR-930,FR975 063
250
ENGLISH
ENG
PIONEER CV-VSX159,Elite-VSX-07TX,37TX,VSX-
308,36TX,37TX,906RDS,D308,D458
AXD-1394 044
XC-L11,L77 168
NS-1,XR-P150 116
CV-VSX097,VSX-D3S 035
VSX-1014TX,1015TX,194TX,415,515-K,516K,52TX,815,816-K,9100TX,915,D814,D914
PROCEED PAV/PDSD 144
RCA RV-3793 010
014
039
069
063
198
480
268
048
117
5-4030 156
RS-AVC50 067
288
REALISTIC 019
073
075
095
ROTEL RR-922,RT-940,940AX,990,RTC-940AX,RX-950 074
AMP-RA-1060,1070,932,PRE-RC-1070,RA985,985BX,RC-972,995,RDP-980,RR-930
RSP-1066,966,976,985,RSX1050,1055,1065,965,965A,972,975,RTC965,970,RX-950AX,975
RR-907 085
083
SAMSUNG 016
Page 76

SANSUI 040
048
MICRO200,MS-6901,7766 110
063
RS-1560 065
RZ-6100AV 228
SANYO RB-D10 214
SCOTT 019
SHARP 026
094
175
SHERWOOD 024
Appendix
75
R-945 102
R-325,525,725,RM-RV-60,RV-6010R 106
P-965(RNC-510),R-865(RNC-510),R-963,R965(RNC-510)
R-765,903,RD-8105,8108,8601 370
447
ENGLISH
ENG
Page 77

76
Appendix
ENGLISH
ENG
SONY DDS8943,8949,HT-
5500,5500D,550D,DDW750,HTDD840,DW840,DW8401
STR-DE685,DE695,DE697,DE698,DE885,DE89
5,DE897,DE985,DE995,DG600,DR898,K840,K
840P
RM-S102,S241,S441,U421,U54,U541,STD905,STR-DB1070,TA-D905
RM-E7(2),RM-P341,P351,P501,U241,TA-V909 247
STR-D1011,D1015,D611,D965,DA50ES,DE325
,DE345,DE525,DE545,DE715,DE835
RM-P1 248
STR-DB925,DB930 166
RM-E800,EP9,SDP-EP9ES 101
RM-PP402 184
RM-J55 218
RM-SG9AV 271
STR-DA2400ES[MAIN],DA3300ES[MAIN],DA3
400ES[MAIN],DA4300ES[MAIN],DA4400ES[M
AIN]
001
018
560
STR-DA5300ES[MAIN],DA5400ES[MAIN],DA6
400ES[MAIN]
CAV-CVS12ES[ALL_ZONES] 612
SOUNDESIGN 036
SUNFIRE Theater_Grand_III,IV(ZONE1) 344
Theater_Grand_III,IV(ZONE2) 345
182
TEAC 005
019
049
040
AG-D9100,D9260,UR-407 212
RC-660 217
Page 78

TECHNICS RAK-SA609MH,SA-AX6,AX7,SU-A700MK3 122
176
193
219
178
RAK-SA501P1,SA-GX130,SD-S3300 177
EUR643853,RAK-SA122MH,SA614MH 200
Appendix
77
SA--TX50,SA-DX930,DX950,EX-300,GX550,SHCH950,ST-GT550,K55
THETA_DIGITAL CASA_NOVA,CASABLANCA,CASABLANCA_II 136
TOSHIBA 060
CT-821(2) 087
CT-812(1) 198
SE-R0022 278
257
262
ENGLISH
ENG
Page 79

Appendix
78
YAMAHA 026
DSP-A990,VP37310 253
ENGLISH
ENG
AX-596,DSP-A5,RX-V396RDS,VM70290,VP497
30,VR09410,VS71360,90590
RS-AVC50,AVX100 067
AVS700,VID5400 173
AX-380,892,DSP-A505A,A592,A595,A595A,AX
620,HTR-5150,5250,5280,5460,5490
R-V1103,V1105,V902,RAV-110,130,150,RS7,TX-350,492RDS,590,592RDS,670RDS,950
RX-3000,V1000,V1200,V2090,V2092,V2095,V2
200,V3000,V495,V495RDS,V592,V595A,V595R
DS
RX-V596,V596RDS,V620RDS,V690,V692,V793,
V795,V795A,V800,V992,V995
SYS4 232
RAV7 089
RAV6 274
169
205
264
HTR-6040,RX-V361[MAIN-ID1],RX-V461[MAINID1]
YHT-280[MAIN],YHT-580[MAIN],YHT680[MAIN],YHT-685[MAIN],YHT-780[MAIN]
RX-397,497,RX-797[MAIN] 717
YSP-1100[STANDARD] 644
RX-V1065[MAIN],RX-V2065[MAIN],RXV465[MAIN],RX-V565[MAIN],RXV665[MAIN],RX-V765[MAIN]
RX-A1000[MAIN],RX-A2000[MAIN],RXA700[MAIN],RX-A800[MAIN],RX-V667[MAIN]
ZENITH Z712B 143
715
695
738
756
210
Page 80

CABLE Set-top Box
Appendix
79
Manufacturer &
Brand
CISCO/SA EXPLORERSeries 001
PIONEER VOYAGERSeries 001
Supported models Code_Number
8300,8540HD,8550HD,8552HDC,8
560HDC,8640HD,8640HDC,8642H
DC,8652HDC
003
8550/8590,8590/8540 041
8540,8570,8590 042
045
8500 046
OCAPMODELS 123
DIGITALTRANSPORTADAPTER50
BR-360
001 177
ENGLISH
ENG
103
BC4100,4200 034
BA4600,5000,6000,BC5400 051
063
076
BR-95A 105
DTVSeries
PACE DC501P,DC511P,DC550P,DC551P 001
TDC460NF,TDC575D_
VEGAS,TDC577X_VEGAS
TDC775D_TAHOE,TDC778X_
TAHOE,TDC779X_TAHOE
TDC850,TDC850NF,TDC758D_
SUMMIT,TDC787X_ASPEN
SAMSUNG SMT-3090HD,3270HD,SMT-
3260HD
002
005
001
030
Page 81

80
Appendix
MOTOROLA DCH70,100,200,3200,3416,6200,6
416
DCT700,2500,3080,3400,6200,620
8,6400,6412,6416
DCX3200,3400
QIP2500,2708,6200,6416,7100,72
16
RG3000 112
OCAPMODELS 120
BELGACOM IPP430MC 171
CABLEVISION 001
CE-LABS HD100QA 164
DIGEO 2056-MSX 153
DIGITAL_
STREAM
DUNE SMARTB1,BE,D1,H1,HE,ME 184
DCS1000 180
002
ENGLISH
ENG
MINI,ULTRA 185
DSTV DSTV[PVR1] 182
DSTV[PVR2] 183
EVOLUTION
-FTA
FOXTEL DIGITAL,IQ,IQ2 172
GENERAL
-INSTRUMENT
HAMLIN 049
X0-01 158
005
DL4,DQNV/DRX 103
DPBB,DPV/DP/DQN
DRZ
STARGATE 104
3000R
CR6000,6600 050
CR6800,CR-83 055
HITACHI 055
103
HOMECAST NC3000C01 176
Page 82

JERROLD 003
004
005
008
009
010
069
DL4,DQNV/DRX 103
DPBB,DPV/DP/DQN
DRZ
MAGNAVOX 010
012
Appendix
81
MEMOREX 052
MOXI MOXIMEDIACENTER 111
2065-MSX 153 252
NBOX ADB-5720SX 181
ABD5720SX 186
NFUSION NOVA,NUVENIOHD,NUVENIOSDP
HOENIX,SOLARIS
PANASONIC 140,170,175 044
110,120,130,150 047
PHILIPS 006
PULSAR 052
192
012
013
020
085
ENGLISH
ENG
RCA 047
REGAL 049
050
REGENCY ALLMODELS 057
SKY SKYHD 204
SONY DHG-M55CV 108
SPRUCER 047
SUDDENLINK DC730 179
Page 83

Appendix
82
TELNET RC-RW100 354
ENGLISH
ENG
THOMPSON DCI1011GEM,DCI1011GEM1,DCI1
04ICS
TILEVISION TV19,26 187
TIVO SERIES1 790
HD,HR10-250,SERIES2,3 817
HD,SERIES2,3_ID#1 821
HD,SERIES2,3_ID#2 822
HD,SERIES2,3_ID#3 823
HD,SERIES2,3_ID#4 824
HD,SERIES2,3_ID#5 825
HD,SERIES2,3_ID#6 826
HD,SERIES2,3_ID#7 827
HD,SERIES2,3_ID#8 828
PREMIERE 821 822 823 824 825 826 827 828
TOCOM 5503VIP,5507 039
188
040
056
TOSHIBA 052
VERIZON DCT6416 002
FIOSTV 121
VIEWSTAR 012
015
ZENITH 052
PM,ZTAC/PM 060
MN2500 093
100
Page 84

IPTV Set-top Box
Manufacturer & Brand Supported models Code Number
ADB ADBSeries 254 255
ADB5810WX 315
ADB5810W 259 163
AMINO AmiNETSeries 249
A125,A130,A530 256 257
A110 260 261
AT&T U-VERSE 148
CISCO RNG200 313
IPNSeries 148
Appendix
83
CIS330,CIS430 316
COMCAST RNG200 313
DREAM DM7020S 159
ENTONE URCPLUS 155
AMULET,HydraHD 258
MINERVA MINERVASOLUTIONS 178
MOTOROLA U-VERSE 253
VIPSeries
MYRIO EvoSeries 254 255
NOWTV NOWTV 314
PAGE DTASeries 313
VERIZON FIOSTV 002
SCIENTIFICATLANTA IPNSeries 148
WEGENER SMD515 250
ENGLISH
ENG
Page 85

Appendix
84
Satellite Set-top Box
ENGLISH
ENG
Manufacturer &
Brand
CABLEVISION 148
DIRECTV D10,
H10,H20,H21
HR20,HR21
R15
SAT-GO
HDVR2,HR10-250_ID#1,2 221
HDVR2,HR10-250_ID#3 223
HDVR2,HR10-250_ID#4 224
Supported models Code Number
D10200,
D10300,
D11,
D12
173
HDVR2,HR10-250_ID#5 225
HDVR2,HR10-250_ID#6 226
HDVR2,HR10-250_ID#7 227
HDVR2,HR10-250_ID#8 228
DISH DISH1
11,30
1,311,
322,3
51,41
1,501,
508,7
21,81
1
DVR508,510,522,625,
721,921,942
MODEL6000
VIP211,222,612,
622DVR,722DVR
122
ID#2 167
ID#3 168
ID#4 184
Page 86

CABLEVISION ID#5 185
ID#6 186
ID#7 187
ID#8 188
Appendix
85
ECHOSTAR DISH111,301,311,322,351,411,
501,508,721,811
DVR508, 510, 522, 625, 721,
921, 942
MODEL6000
VIP211, 222,612, 622DVR,
722DVR
ECHOSTAR3100, 4100, 6131,
9241, 9242
ID#2 167
ID#3 168
ID#4 184
ID#5 185
ID#6 186
122
ENGLISH
ENG
ID#7 187
ID#8 188
EXPRESSVU 122
167
GE GRD122GW, GRD33G2A,
GRD33G3A
GENERAL_
INSTRUMENT
GOI 122
HITACHI 001
HTS 122
4D-TV 148
HDS100R,HDS210R 154
151
116
167
167
HUGHES GENERICID1 001
HIRD-4532PLATINUM
Page 87

Appendix
86
HUGHES HIRD-D45,E86
HIRD-E11 154
ENGLISH
ENG
HIRD-B1, B3, B4, C2, D01, D11,
D2, E25, E45, E61
MOSTMODELS 001 154
JVC TU-6000, DP301, PVR508,
PVR721, PVR921
LG LSS-3200A 170
DiercTV_H23 173
MAGNAVOX 136
MEMOREX 136
MITSUBISHI SR-HD400,HD500,
SD100,SD200,SD50
MOTOROLA DSR209,
DSR505HD,DVR530HD
NEXT_LEVEL 148
PANASONIC TU1RD10,TU1RD20 142
001 154
122
167
001 154
148
TU-HDS20,HDS20B 160
TZ-DBS01,DRD100
PAYSAT 136
PHILIPS DSHD800R 001 154
136
DIGITURK 156
DSX3150,DSX5150R,DSX5250R/
I,DSX5350R
DSX5353C,R,X,
DSX5375,DSX5500,DSX5540
WIZJATV
DiercTV_R16,HR23 173
PROSCAN 116
PRD8630A,B,PSHD-105 151
RADIOSHACK 148
Page 88

Appendix
87
RCA DRD202RD,221RD,222RA,222
RD,223RD,225RD,420RE,
DRD430RG,431RG,440RE,450
G,450RG,451RG,460RE,480RE,
485RG,486RG
RCA DS2122RD,503MLB,515MLB
DTC-100
DXD402RA,DXD506DD
DRD102RW,203RW,301RA,302
RA,303RA,403RA,502RB
DRD503RB,505RB,515RB,523R
B,703RA,705RB
SAMSUNG 123
SIR-TS160 163
SIR-TS360 169
SIR-S300W,S310W 175
116
151
SONY RM-Y182 115
SAS-A3,A4,AD3
SAT-A1,A2,A3,A4,A5,A50,A55,
A65,A65A,AD4,AT4
SAT-B1,B2,B3,B4,B50,B55,B65,
B65A,BS3
SAT-HD100,HD300
STARCHOICE 148
TIVO SERIES1 790
HD,HR10-250,SERIES2,3 817
HD,SERIES2,3_ID#1 821
HD,SERIES2,3_ID#2 822
HD,SERIES2,3_ID#3 823
HD,SERIES2,3_ID#4 824
HD,SERIES2,3_ID#5 825
ENGLISH
ENG
HD,SERIES2,3_ID#6 826
HD,SERIES2,3_ID#7 827
HD,SERIES2,3_ID#8 828
PREMIERE 821 822 823 824 825 826 827 828
Page 89

Appendix
88
TOSHIBA DST-3000 001 154
TSR-101 127
DST-3100 157
UNIDEN UDS100 136
VOOM 148
ZENITH DTV1080 159
HD-SAT520
ENGLISH
ENG
Page 90

Appendix
DVD
Manufacturer & Brand Supported models Code_Number
ACCURIAN 003
268
ADCOM GCV-850, 870 157
ADVENT 005
AIWA VX-F20DV1 146
89
AKAI LC-T2701TD, LCT2701AD, LCT3701AD,
LCT3701AD-II
ALLEGRO 091
ALPINE 098
AMW 006
ANTHEM BLX-200 361
APEX_DIGITAL AD-1500, 1600, 1700M, 600A 087
AD-703 111
ARCAM BDP100, DiVA_DV78, DV79, DV135, 137, 139, 88,
FMJ_DV27A, 29
ASPIRE_DIGITAL 008
AUDIOVOX 003
281
007
115
122
009
ENGLISH
ENG
010
014
015
149
FPE1506DV, FPE1906DV 284
BEL_CANTO_DESIGN 016
BLAUPUNKT 111
BROKSONIC 130
BUFFALO 264
CALIFORNIA_AUDIO_
LABS
CL-20, CL20&CL25 021
CL-2500, CL2500DVD 124
Page 91

Appendix
90
CAMBRIDGE_AUDIO DVD79, 85, 86, 87, 89, 99 323
AZUR_540D 333
AZUR650BD 360
CARY_AUDIO_DESIGN DVD-6, 7 174
DVD-8 266
CENTRIOS 019
CINEVISION 091
CITIZEN 020
COBY DVD-514 260
CYBERHOME DVR_1200, 1600 271
DAEWOO 8000K 132
ENGLISH
ENG
DENON DVD-1000, 1500, 1800, 2800, 2800_MK_II_N,
4800, 9000, DVM-1800, 1805, 3700, RC-540
DVD-1200, 1710, 1910, 2200, 2900, 2910, 3800,
3910, 555, 556, 5900, 5910, 5910CI, 755, 756, 910,
955
DVM-4800
DVD-1600, 800 138
DBP-2010, 2010CI, 4010UDCI, 1610, 1800, DVD1800BD, 2500BTCI, 3800BDCI, A1UD, AIUDCI
S-5BD 358
DIAMOND_VISION 037
DISNEY 040
DURABRAND 091
080
173
329
038
039
096
DCC0903D 143
DVD_2000 017
DYNEX DX-UPDVD2 349
EMERSON 091
CETD204 143
ENTERPRISE 074
ESA 022
EC520E, EC720E 143
FISHER 147
Page 92

FUNAI SRTD219 143
GATEWAY AR-230 222
GE 1105P 027
GO_VIDEO DVR-4000, 4300, 4400 137
DV1000, 1130, 1140, 2140, 3140 091
R6540 220
R6640 221
R6740, R6750 222
GPX 044
045
GRADIENTE 021
GREENHILL 111
Appendix
91
GRUNDIG 083
HARMAN_KARDON DVD_5 084
DVD_22, 25, 27, 30, 31, 37, 38, 47, 48, 50 140
HITACHI DV-P315U, RM500 101
HITEKER 087
ILO DVDR04 268
INITIAL 111
INSIGNIA IS-TV040921 143
NS-20CLTV 292
IS-TV040918 297
091
096
NS-WBRDVD 349
INTEGRA DPS-5.3 142
DPC-5.1, 6.1, 7.4, 7.5, 7.7, 7.9, 8.5, DPS-5.2, 5.4,
5.5, 6.5, 7.2, 7.3, 9.1
180
ENGLISH
ENG
DPS-10.5, 5.9, 6.7, 6.9, RDV1.1 280
273
DBS-30.1, 30.2, 50.2, 6.9(RC-730DV), 6.9(RC749DV)
JATON 046
JBL 084
JSI 047
338
Page 93

Appendix
92
JVC RM-SXV525J, SV-S40BK 012
XV-30SL, 421BK, 501BK, 521BK, 523GD, 525BK,
555BK, D701, D701BK, D723GD
XV-F80, F80BK, F85GD, FA900BK, FA902SL,
FA90BK, FA95GD, M50BK, M555BK
XV-N222, N222S, N310B, N312S, N320B, N322,
N322S, N330B, N332S, N340B, N342S, N40BK,
N410B
XV-N420, N420B, N422S, N44SL, N510B, N512S,
N55SL, NA70BK, NA7SL, NP10S, NP15L
XV-S300BK, S400BK, S402BK, S45GD, S500BK,
S502SL, S60BK, S65, S65GD, S75GF
XV-SA600BK, SA60SL, SA70, SA70BK, SA75GD
JWIN 048
ENGLISH
ENG
050
KAWASAKI 149
KENWOOD DV-505 151
KISS DP-558 279
KLH KF-8000A 135
KONKA 051
052
054
055
KOSS 047
058
059
KREISEN 060
KRELL DVD_STANDARD, SHOWCASE 104
LASONIC 061
062
LEXICON RT-10, 20 148
Page 94

Appendix
93
LG DN191H, DN788, DN798, DR1F9H, DV7711,
7821, DVB418, DVD-3200E, LDA-511, LDX-514,
LGDVB418
LRA-516, LRY-517, RC199H, V782NWK, VK661WK
BD-300, 390, 550, 570, 590, BH100, 200, BX580,
DR781T, DR787T, LXV-6846, RC797T
LHB953, LHB977 350
LITEON LVD-2001 264
LVW-5001, 5005 265
LVW-1101, 1105, 1107 268
LOEWE 063
MAGNAVOX 066
N9353, ZC320MW8, ZC352MW8 096
17MD288V/17, 26MD255V/17 282
19MDTR20, 27MDTR20 143
091
057
074
002
ENGLISH
ENG
MALATA DVDN996 267
MARANTZ 066
BD5004, 7003, 7004, 8002, UD5005, 7006, 8004,
9004
MCINTOSH MP831, 841, 842, MVP831, 842/841 125
MEMOREX 040
MVD-2025 163
MERIDIAN 596, 598, 800, 861 153
MICROSOFT 027
MINTEK DVD-1600, PORTBLE_DVD 111
DTV-173, 233, 263, 323, 370 282
MITSUBISHI DD-3000, 4000, 4020, 4030, 5000, 6000, 6020,
6030, 6040, 6050, 7040, 8020, 8030, 8040, 8050
332
096
206
017
MYRYAD MDV200, Z120 102
M_SERIES 134
Page 95

Appendix
94
NAD T550 088
M56, T557, T577, T587 353
NAKAMICHI DVD-10, 10S 103
NESA 111
NEUNEO 067
NEXXTECH 068
NORCENT 005
006
007
069
071
072
ENGLISH
ENG
073
ONKYO DV-C501, C503, C600, S525, S535, S939, Intergra-
DFS5, INTEGRAM_DPS5, RC-335C, RC-388DV
DR-90, DV-353, C601, CP500, CP701, CP702,
CP706, CP802, L5, M301
DV-S555, S901, SP300, SP303, SP303E, SP500,
SP502, SP502E
BD-SP308, SP807, SP808, DV-BD606, DVD-BD507 338
OPPO OPDV971H 266
BDP-80, 83, 93, 95 341
OPTIMUS 023
ORION 130
ORITRON 058
076
141
180
273
Page 96

PANASONIC PV-DM2799 144
Appendix
95
PV-D4733S, 4734S, 4742, 4743, 4743S, 4744,
4744S, 4745, 4745S, 4752, 4752S, 4762, 4763S,
DV4752
DMP-BD10, BD10AK, BD30 285
DVD-CV36, 36U, 51, 51U, RP56, RP56U, RP82,
RV21U, RV26, RV26U
DVD-RV31, RV31UK, RV31US, RV31USK, RV41U,
S1S, DVDA112, DVDA115, DVDA120
DVD-CP67, 71, 72, CV52P, H2000D, RP91,
RP91DN, RV10, RV10U, RV20, RV20U
DVD-RV30, RV30U, RV30UK, RV30US, RV60,
RV60U, RV65, RV65U, RV80, RV80U, XP30
DMP-BD35, 45, 55, 60, 601, 601K, 605, 605K, 60K,
65, 655, 70V, 80, 80K, 85, T100, T110, T210, T350
SA-PT660, 754, SC-PT660, 754 347
PARASOUND D3, MODEL_D200 245
PHILIPS DVD622, 702, 711AT, 751AT, 763SA, 781CH, 782,
941AT, 951, 951AT, 953, 962SA, 972, Q50, 727
150
138
021
346
066
ENGLISH
ENG
DVP637, 642
DVP3040, 5140, 5960 276
DVDR3475/37 317
BDP5005, 5010, 5012 344
PHILIPS_MAGNAVOX 141
066
PIONEER CU-DV001, DV-05, 3020, 333, 340, 341, 343, 353,
37, 38A, 434, 440, 444, 626D, 656A, C36, C505,
C525, C603
DV-F07, DV09, DVL-91, 919, Elite-DV37, PDV-10,
LC10
DV-C503 131
BDP-94HD, HD1 304
BDP-05FD, 09FD, 120, 23FD, 320, 51FD 337
BDP-31FD, 330, 33FD 354
023
099
Page 97

Appendix
96
POLAROID DHM-0100, DHX1-1000A, DVP-110M 233
FXM-1911C 284
FDM-0700A, 0715, 1000A, 1015, FDX-0700T 295
TDM-1311 297
POLK_AUDIO 141
PRESIDIAN 003
PRIMA 005
PRIMARE DVD26, 30 193
V10, 20, 25 194
PRINCETON 078
066
096
ENGLISH
ENG
PROSCAN 027
RCA DRC220N, 300N, 350N, 480N, 500N, DRS550N,
700N
RC5215P, 5220P, 5225P, 5240P, 5255P, 527P,
5400P, 5910, 5910P, 5915P, 6001P
DRC200N 307
RIO 091
RJTECH RJ-1500DVXII 269
ROTEL RDV-1093 204
SAMPO 081
027
082
085
Page 98

Appendix
97
SAMSUNG DVD-511, 611, 612, 709, 711, 739, 811, 812, 818,
819, 839, 909, C600, C601, C621, C700
DVD-M101, M201, M301, N2000, N501, P230,
P231, P331, P401, P421, P721M, S221, S222,
S320, S321
CSN2077DV, CXM2785TP 165
DVD-P701, V2000, V2500 137
DVD-V3500, V3650, V3800, V4600, V4700, V4800,
V5500, V5650, V5650B
DVD-V6700, V8500, V8600, V8650, V9500, V9650,
V9700, V9800
BD-C5500, C6500, C7500, D5300, D5500, D5700,
D6500, D6700, D7500
BD-P1000, D1200, D1400, P1500, P1580, P1590,
P1595, P1600, P1620, P1650, P2500, P3600,
P4600, UP5000
DVD-R130, R135, R155, R157, R160 301
070
159
275
SANSUI VRDVD4000, 4005 154
SANYO DWM-370 147
SEARS 130
SENSORY_SCIENCE SR674 222
SHARP DV-710U, DV-S1U 094
SHERWOOD SD-860, 871 245
BDP-5003 345
SHINSONIC 033
SONIC_BLUE 091
ENGLISH
ENG
Page 99

98
Appendix
ENGLISH
ENG
SONY DVD-NC600, DVP-D116A, NC555ES, NC625,
NC665, NC675P/B, NC685V, NC800H, NC80V,
NC85H, NC875
DVP-NS400D, NS41P, NS501PS, NS50P, NS55P,
NS575P, NS57P
DVP-NS700H, NS700P, NS70H, NS71HP, NS725,
NS75H, NS77H, NS90V, NS9100ES, NS975V, S36,
S360
DVP-550, C600D, C650D, C660, C660D, C670,
F21, F41MS, PQ1
DVP-NC615, NC655P, NS300, NS315, NS415,
NS715P, NS755V
DVP-S500D, S530D, S550S, S600D, S7700,
S9000ES, RMT-D102A, D104A
SLV-D100, D300P, D350P, D360P, D370P, D550P,
D560P
RDR-GX7 191
BDP-BX1, BX2, N460, S1, S1000ES, S2000ES,
S300, S301, S350, S360, S500, S5000ES, S550,
S560
001
033
145
286
RDR-GX300(1), HX715(1), HX900(1) 241
RDR-GX300(2), HX715(2), HX900(2) 242
RDR-GX300(3), HX715(3), HX900(3) 243
BDP-CX7000ES, CX960, S7000ES 340
DVP-NS710H 343
BDV-E300, E500W, T10, HCD-E300, T10 351
SPECTRONIQ PD-3000HD 310
SUNGALE 090
223
SUPERSCAN 19TVD3S, 19TVD4S 143
SVA 092
093
Page 100

Appendix
99
SYLVANIA 6509DD, 6513DD, 6513DE, 6513DF, 6513VD,
6519DB, 6519DD, 6519VD, 6520FDD, 6520FDE,
6520FDF
6615LDF, 6615LDG, 6620LDF, 6620LDG,
6620LDT, 6719, 6719DC, 6719DD, 6719DDS,
6719DE, 6719DES, 6719DF
6720, 6720FDD, 6720FED, 6720FDF, 6720FDFA,
6724DF, 6724FDF, 6727, 6727DC, 6727DD,
6727DE
C6513DD, C6513DE, C6519DD, C6520FDE
RSEC520E, RSEC720E, SRCD223, SRCD223B,
SRCD227, SRCD227B, SRCD420P, SRCD427P
SRTD219, SRTD309, SRTD313, SRTD319,
SRTD413, SRTD420, SSC509D, SSC719C,
SSC727C, SSL15D5
SYMPHONIC CSC520DE, CSTL20D5, CSF719, RSMGD134,
RSMSD513E, RSMSD520FE
SC513DF, SC519DD, SC520FDF, SC720FDF,
SC724DF, SC724FDF, SRTD219, STL20D5, WF719
TAG_MCLAREN DVD32FLR, DVD32R 156
143
143
ENGLISH
ENG
TATUNG 102
TEAC 023
DV-H350 270
TECHNICS 138
TECHWOOD 088
THETA_DIGITAL 023
THOMPSON 027
 Loading...