

Page 1

Packing
list
Contents
-------------------------------------------------
A1
Monitor
Important
On
Safety
On
Installation
On
Cleaning
On
Repacking
Installation
Swivel
Power
Using
Video
Operating
How
to
Adjusting
Features
Green
and
Plug
Technical
----------------------------------------------
----------------------------------------------
Power
----------------------------------------
-------------------------------------
-----------------------------------
Cord
---------------------------
Registration
Precautions
-----------------------------------------------------
-------------------------------------------------
Instructions
--------------------------------------------------
Base
Cord
the
--------------------------------------------------
Right
Cable---------------------------------------------------
----------------------------------------------
(FAQ)
-------------------------------------
----------------------------------
------------------------------------
----------------------------------
Instructions
adjustasetting
the
picture
---------------------------------------------------------
monitor
-----------------------------------------------
play
Support
A2
A3
A3
A4
A4
A4
A5
A5
A5
A6
A6
A7
A8
A9
A10
A10
A11
A12
Service
Appendix
Appendix
PACKING
The
product
1.
Monitor
2.
Owner's
3.
Power
4.
Swivel
-----------------------------------------------------------
--
A
Specifications------------------------------
--
B
Factory
Preset
Timing
Table
---------
LIST
package
Manual
Cord
Base
should
Refertothe
(
include
"Using
A1
the
the
right
following
power
items:
cord"
A14-A15
statement
A13
A15
)
Page 2

Monitor
The
model
These
should
numbers
permanent
Registration
and
serial
are
record
requested
record
unique
of
your
numbers
to
information
purchase.
this
are
unit
found
and
here
Staple
on
the
rear
not
availabletoothers.
and
retain
this
your
receipt
here.
of
guide
this
unit.
You
as a
DateofPurchase
Dealer
Dealer
Dealer
Model
Serial
Notice
All
strictly
Trademark
LG
IBM
International
Purchased
Address
Phone
No.
No.
reserved.
rights
prohibited
isatrademark
is
a
registered
Warning
expose
Avertissement
Cela
this
peut
Acknowledgments
:
entrainer
From
No.
Reproduction
without
of
trademark
Business
To
reduce
appliance
:
Ne
the
written
LG
Electronics
and
Machines
the
to
pas
un
incendie
Corporation.
riskoffireorelectric
rainormoisture.
placer
:_____________________________
:_____________________________
:_____________________________
:_____________________________
:_____________________________
:_____________________________
in
any
permission
Inc.
VGA
manner,
isatrademark
in
of
whole
LG
Electronics
shock,
cet
ou
appareil
une
dans
decharge
un
endroit
electrique.
in
or
of
do
not
part,
Inc.
humide.
is
A2
Page 3

Important
This
unit
personal
shock
incorporated
installation,
instructions
ON
safety,
or
Safety
Precautions
has
been
fire
hazard.
in
this
use,
marked
engineered
but
improper
monitor,
and
directly
use can
In
order
observe
servicing.
on
your
and
not
Also
monitor.
manufactured
result
to
defeat
the
following
follow
in
potential
basic
all
to
assure
the
safeguards
rules
warnings
your
electrical
for
and
its
Use
another
national
Operate
only
the
power
standards
the
specifications
sure
what
type
dealer.
your
Overloaded
frayed
fire
hazard.
Do
not
!
There
!
There
is
!
Contact
To
Avoid
!
Do
secured.
!
Use
!
Do
deep
power
Open
OFF.
not
not
AC
Call
are
are
your
Personal
place
only
try
pile
power
cord,
if
monitor
of
this
of
power
outlets
cords
your
the
Monitor
no
user
Dangerous
dealerifthe
the
a
stand
to
rollastand
carpets.
cord
make
not
being
only
manual
supply
and
and
broken
service
serviceable
High
Injury
monitor
recommended
supplied
sure
provided
from
or
you
extension
plugs.
technician
Voltages
monitor
:
on
a
with
small
with
thatitis
by
a
power
listed
on
have
They
for
components
is
sloping
the
by
casters
the
unit.
certified
the
supplier.
source
the monitor.
in
your
cords
are
may
replacement.
inside.
inside,
not
even
operating
shelf
unless
manufacturer.
across
In
case
the
by
indicated
If
you
home,
consult
dangerous.
in
result
when
properly.
properly
thresholds
you
applicable
in
are
with
So
a
shock
the
power
or
use
the
not
are
or
To
Prevent
!
Always
!
short
house.
Keep
cabinet
FireorHazards:
turn
the
of
period
children
time.
from
openings.
monitor
Never
OFF
if
leave
droppingorpushing
Some
internal
A3
you
leave
the
parts
the
monitor
objects
carry
room
ON
when
into
hazardous
for
the
more
than
leaving
monitor's
voltages.
a
the
Page 4

!
Do
not
monitor.
!
Duringalightning
unattended
outlet.
!
Do
not
picture
allow
the
use
sink,
bring
this
On
Installation
Do
not
not
place
Do
not
kitchen
the
add
accessories
foranextended
magnetic
tube.
anything
monitor
monitor
laundry
to
where
tub,
near
storm
rest
in
that
devices
upon
the
water
a
wet
have
or
when
period
such
or
power
such
basement,
roll
cord
not
been
the
monitor
of
time,
unplug
as
magnets
over
the
is
subjecttodamage.
as
near
a
bathtub,
or
near
designed
it
or
power
a
swimming
is
to
from
motors
cord,
washbowl,
for
be
the
near
and
this
left
wall
do
pool.
Monitors
the
release
blocked,
hazard.
!
Block
sofa,
!
Place
is
provided.
!
Cover
!
Place
On
Cleaning
!
Unplug
!
Use
on
the
On
Repacking
!
Do
an
ideal
unittoanother
are
provided
of
heat
built-up
Therefore,
the
bottom
etc.
rug,
the
monitor
the
openings
the
monitor
the
a
slightly
picture
not
throw
container
heat
NEVER:
monitor
damp
tube
away
location,
with
ventilation
generated
can
ventilation
in
a
built-in
with
near
or
before
(not
because
the
carton
in
which
repack
during
cause
failures
slots
enclosure
clothorother
over
a
radiatororheat
cleaning
cloth.
wet)
overspray
and
to
transport
itinits
openings
operation.
which
by
placing
unless
material.
the
faceofthe
Do
not
may
packing
the
original
in
the
If
these
may
the
monitor
proper
source.
use
an
cause
materials.
unit.
When
material.
cabinet
openings
result
on
ventilation
picture
aerosol
electrical
They
shipping
to
allow
are
in
a
fire
a
bed,
tube.
directly
shock.
make
the
A4
Page 5

INSTALLATION
INSTRUCTIONS
Swivel
To
attach
?
Carefully
?
Locate
?
Insert
swivel
?
To
then
remove
push
Base
the
swivel
turn
the
cavitiesatthe
the
pegs
base
forward
the swivel
it
out.
Figure
the
on
1
base
to
monitor
on
bottom
the swivel
until
the swivel
base,
Installing
the
monitor,
its
side
or
frontofthe monitor.
base
base
hold
the
and
Removing
upside
into
bottom
do
these
locks
the
the
following:
down.
cavities.
in
of
Swivel
(see
place.
the
Base
figure1)
Push
swivel
the
base,
Power
Power
1.
2.
Make
area.
This
either
Cord
Source:
sure
monitor
100/120V
the
hasauniversal
adjustmentisrequired.
3.
Connect
then
cord
outlet
supplied
plug
may
socket
the
be
with
power
the
other
connected
on
your
power
your
AC
cord
end
monitor.
cordisthe
power
or
220/240V
)
into
your
into
a
to
eitherawall
PC,
depending
A5
correct
monitor's
3-pin
supply
AC
AC
on
type
that
voltage
power
power
power
the
that
required
allows
area.
input
outlet.
outletorthe
of
type
in
your
operation
No
user
(
socket,
The
power
power
power
cord
in
and
Page 6
Using
The
accessory
wallet
plug
The
voltage
Supplied
computer:
AWG,
terminates
CEE-22
on
type
female
the
with
type
male
connector
Right
with
Please
with
Power
power
NEMA
for
rating
units
intended
use
SJT
or
a
grounding
configuration.
body,
configuration.
the
SVT
cord
5-15
a
Cord:
power
cord
three
rated
for
style
for
type
The
the
Northern
and
cord
shall
connection
set
consisting
conductors
attachment
other
10A,
250V,
is
end
American
UL
listed
be
125
to
power
ofaminimum
flexible
plug,
terminates
having
and
volts
AC.
outlet
cord.
rated
withamolded-
standard
region
CSA
of
One
10A,
is
the
labeled.
personal
No.
18
end
250V,
CEE-22
Video
cable
Connecting
cable.
video
figure
Plug
port
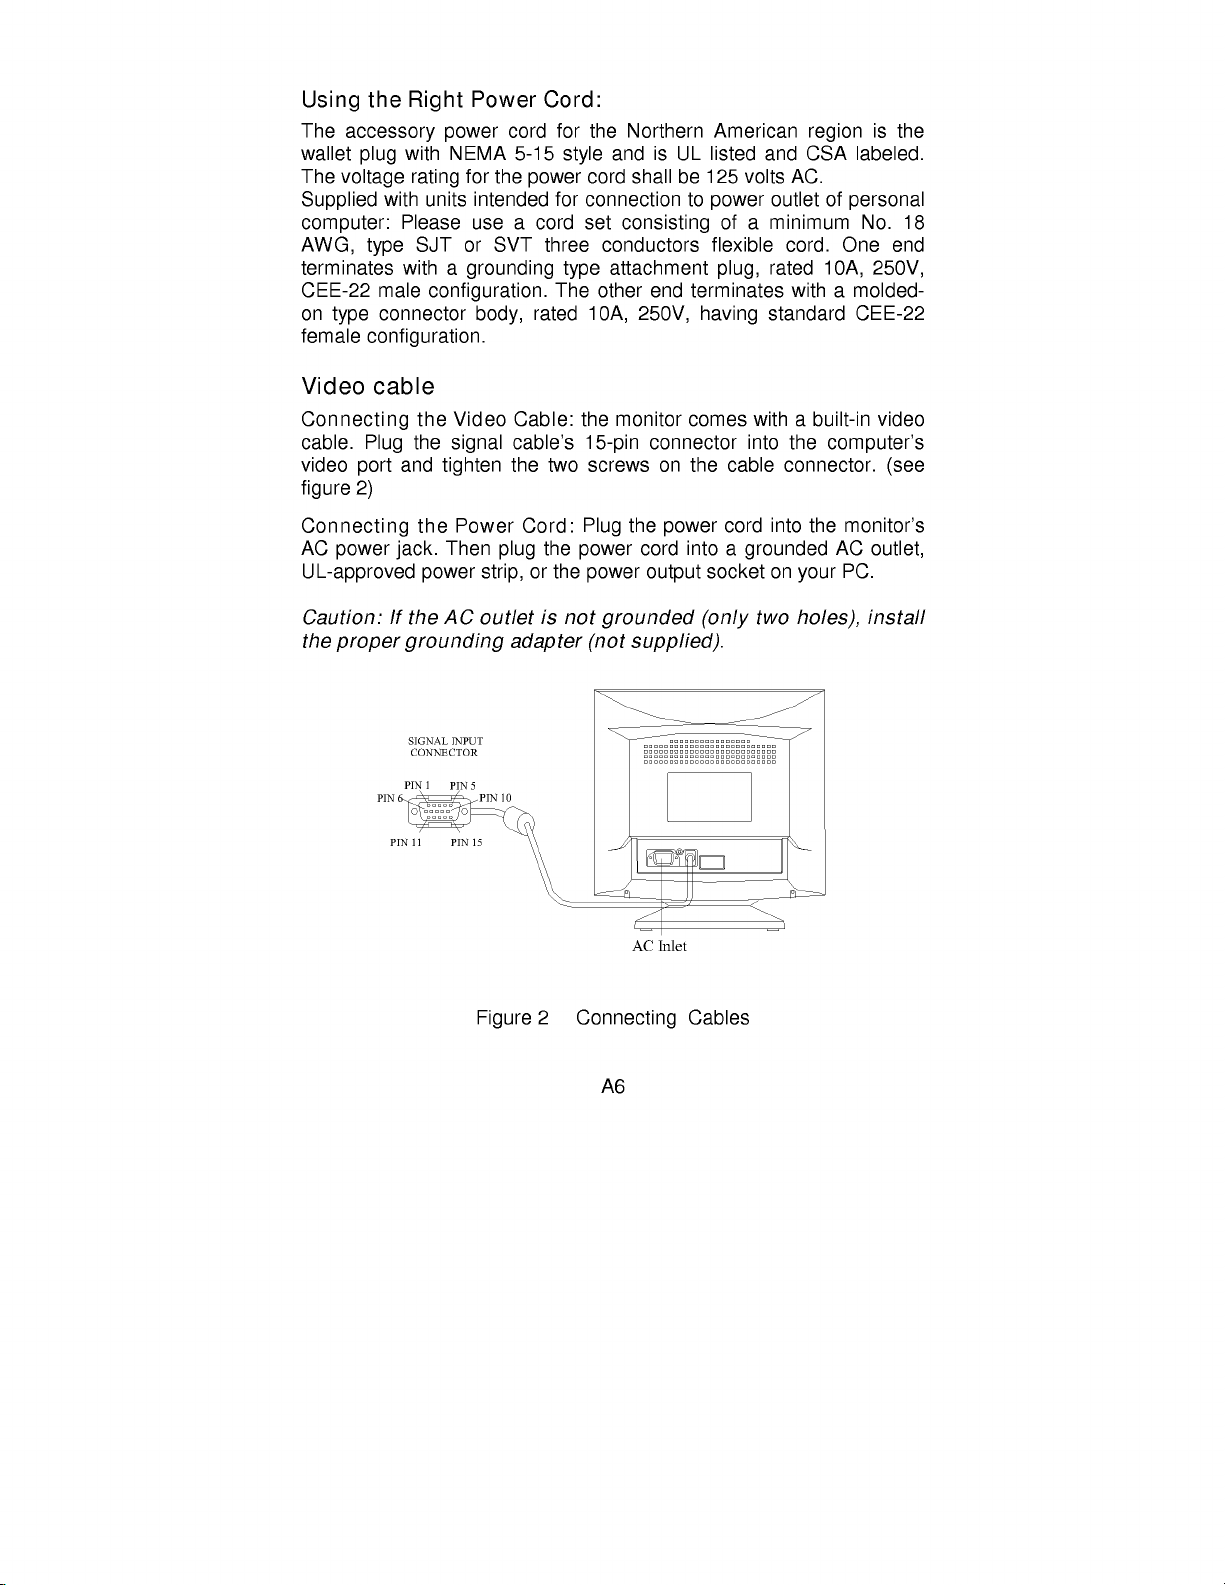
2)
Connecting
AC
power
UL-approved
Caution:
the
proper
the
the
and
tighten
the
jack.
power
If
the
grounding
Video
signal
Power
Then
AC
Cable:
cable's
the
plug
strip,
outlet
adapter
Cord:
or
is
two
the
the
the
15-pin
screws
Plug
power
power
not
monitor
the
grounded
(not
supplied).
connector
on
power
cord
output
comes
the
into
(only
withabuilt-in
into
cable
cord
a
grounded
socket
two
the
connector.
into
the
on
your
holes),
video
computer's
(see
monitor's
AC
outlet,
PC.
install
Figure
2
Connecting
Cables
A6
Page 7

OPERATING
INSTRUCTIONS
General
The
power
switch
power
located
settings,
?
The
?
Connect
?
To
turn
The
?
Your
a
picture
Instructions
switch
to
at
the
base
the
picture
cord
power
the
the
indicator
power
monitor
within
is
turn
should
video
monitor
features
seconds
Figure
located
the
of
can
cable
monitor
the
be
on,
will
3
at
monitor
adjusted
be
connected.
from
press
light
a
unique
after
External
front
panel
on
or
off.
(See
Figure
to
your
the
monitor
the
POWER
up.
switch
quick
the
monitorisswitched
Control
of
the monitor.
The
other
3).Bychanging
personal
to
the
switch
system
Knob
control
preferences.
video
card.
to
ON
which
on.
6
7
8
9
10
11
12
13
1
2
3
4
5
Press
knobs
these
position.
provides
the
are
EXTERNAL
Switch:
1.
Power
2.
LED
3.
Up
4.
Down
5.
Function
Key
On/Off
Key
CONTROLS
Switch
Key
6.
7.
8.
9.
10.
Functions:
Contrast
Brightness
H-Size
H-Center
V-Size
A7
11.
12.
13.
12+13.
V-Center
Pincushion
Trapezoid
Rotation
Page 8
Notes
?
Do
not
radiators
excessive
?
Save
the
come
?
For
maximum
originally
?
To
keep
cloth.
dampened
solvents
these
unplug
How
to
1.
Press
the
Press
this
2.
When
has
been
3.
When
image.
4.
Press
simultaneously,
horizontal
install
the
monitor
or
air
ducts,
orina
dustormechanical
original
in
handy
shipping
if
you
ever
protection,
at
monitor
stains
as
the
looking
a
mild
thinner,
the
before
factory.
packed
the
Stubborn
such
will
damage
the
monitor
with
adjustasetting
the
knob,
knob
press
selected.
function
the
"FUNC"
position.
the
green
again,
"FUNC"
has
key
then
the
key,
been
until
press
in
a
location
place
vibrationorshock.
carton
have
to
repackage
new,
be
may
detergent
benzene,
cabinet.
cleaning
LED
lights
LED
green
the
LED
selected,
the
LEDs
or
Down
Up
near
subject
and
packing
ship
your
your
periodically
removed
solution.
or
As
a
safety
it.
and
the
power
disappears
will
flashtoindicate
press
of
pincushion
keytoadjust
heat
sources
to
direct
materials,
monitor.
monitor
cleanitwithasoft
with
a
Never
abrasive
cleaners,
precaution,
is
ON.
and
the
power
or
to
and
the
such
sunlight,
as
they
as
cloth
use
is
the
function
adjust
trapezoid
picture
as
will
it
was
lightly
strong
since
always
OFF.
picture
flash
tilt
or
to
A8
Page 9

Adjusting
The
description
the
picture
for
function
control
LEDS
10.
1.
2.
3.
4.
5.
6.
7.
8.
9.
+
CONTRAST
BRIGHTNESS
H-SIZE
H-CENTER
V-SIZE
V-CENTER
PINCUSHION
TRAPEZOID
ROTATION
RECALL
NOTE:
Focus
setting
is
brightnesstohigher
at
presets
luminance.
Adjust
Adjust
Adjust
Adjust
Adjust
Adjust
Adjust
Adjust
Adjust
To
recall
condition
the
picture
the
picture
the
picture's
the
horizontal
the
picture's
the
vertical
the
pincushion
the
picture's
the
picture
original
contrast.
brightness.
position
tilttohorizontal
factory
and
you
horizontal
position
vertical
of
and
barrel.
trapezoid
preset
can
size.
of
size.
the
distortion.
mode.
adjust
the
picture.
picture.
position.
the
A9
Page 10
FEATURES
Green
?
The
VESA
Green
your
To
activate
In
Windows
the
screen
1.
Right
2.
Click
Green
of
Monitor."Ifthere
support
monitor,
In
3.
the
boxes,
next
4.
You
enters
?
The
diode
Mode
On*
Stand-by
Suspend
Off
monitor
monitor
DPMS
monitor
clickonthe
on
PC.
this
saver
PC,
Green
so
has
standard.
This
will
feature
95,
setting
the tab
there
you
this
"Energy
Standby
to
each
one.
can
specify
standby
power-saving
on
(LED)
Cable
Attached
Attached
Attached
Attached
a
power
This
feature
turn
it
off
in
Windows
feature
of
the
desktop
that
says
will
beasection
isn'tasection
Monitor.
will
The
have
Saving
and
Shut
the
amount
mode
or
shuts
mode
the
front
panel:
Signal
H-Sync V-Sync
Yes Yes
No
Yes
No No
saving
feature
is
similar
instead
can
display
and
Screen
to
turn
Features
off.Toactivate
can
be
choose
monitor
of
off.
be
Yes
No
to
of
95:
activated
properties.
Saver.
entitled
like
it
off
inactive
Video
Active
Blank
Blank
Blank
function
will
only
a
screen
activating
Properties.
If
"Energy
then
that,
will
behave
manually
of
Monitor"
either
time before
indicated
Indicator
Green
Orange
Orange
Orange
that
work
the
and
your
by
conforms
saver,
screen
customized
system
Saving
your
just
to
save
sections
one,
the
Power
to
if
your
PC
except
saver.
under
supports
Features
PC
does
likeanormal
energy.
are
click
the
monitor
your
light-emitting
Consumption
≤
W
85
≤
W
15
≤
W
15
≤
W
8
the
is
that
not
two
box
a
A10
Page 11
THIS
THERE
MONITOR
This
Video
States
Confederation
conserve
is
this
OFF
INPUT
no
monitor,
MONITOR
IS
SIGNAL.
monitor
Electronics
Environmental
electrical
video-input
mode.
consumption.
restored
similar
The
the
Plug
to
display
mouse.
and
and
a
TO
NO
meets
WILL
VIDEO
OPERATE
Standards
the
APPEAR
INPUT
Power
Protection
Employees
energy
signal
following
This
After
the
displayisautomatically
"Screen
is
restored
a
reduces
the
Saver"
by
present.
time-out
video
feature
by
pressingakey
play
PROPERLY,
Management
Association
NUTEK
(
reducing
When
period
the
input
TO
SIGNAL.
Agency
).
power
monitor's
signal
except
BE
NON-FUNCTIONAL
IN
ORDER
THERE
This
standards
(VESA)
(EPA)
feature
MUST
and/or
and
consumption
there
isnovideo
will
automatically
internal
is
restored,
redrawn.
the
on
The
displayiscompletely
the
keyboard,orclicking
FOR
BE
A
as
set
the
the
is
designed
when
input
switch
power
full
appearance
THIS
VIDEO
by
United
Swedish
there
signals
to
supply
power
IF
the
to
an
is
is
off.
Plug&Play
This
monitor
the
VESA
system
communicate
communication
The
that
bidirectional
request
Video
1.
Red
2.
Green
3.
Blue
4.
Ground
DDC
of
DDC1
continuously
EDID
Cable
DDC1/2B
is
equipped
STANDARD.
its
identity
additional
channel
isaunidirectional
data
information
Pin
5.
Ground
6.
R-Ground
7.
G-Ground
8.
B-Ground
with
and,
information
is
transmits
channel
Assignments:
Feature
VESA
It
depending
defined
data
EDID
based
over
9.
NC
10.
Ground
11.
Monitor
12.
DDC-Serial
the
A11
allows
in
channel
on
DDC2B
DDC1/2B
the
on
about
its
two
levels,
from
information.
the
I²C
channel.
Ground
Data
capabilities
monitor
the
level
display
DDC1
the
The
to
capabilities.
display
protocol.
13.
H-sync
14.V-sync/*VCLK
15.
DDC-Serial
*
FOR
according
inform
of
and
DDC2B
The
DDC
DDC
DDC2B.
to
host
the
the
used,
is
Clock
to
host
The
host
a
can
Page 12
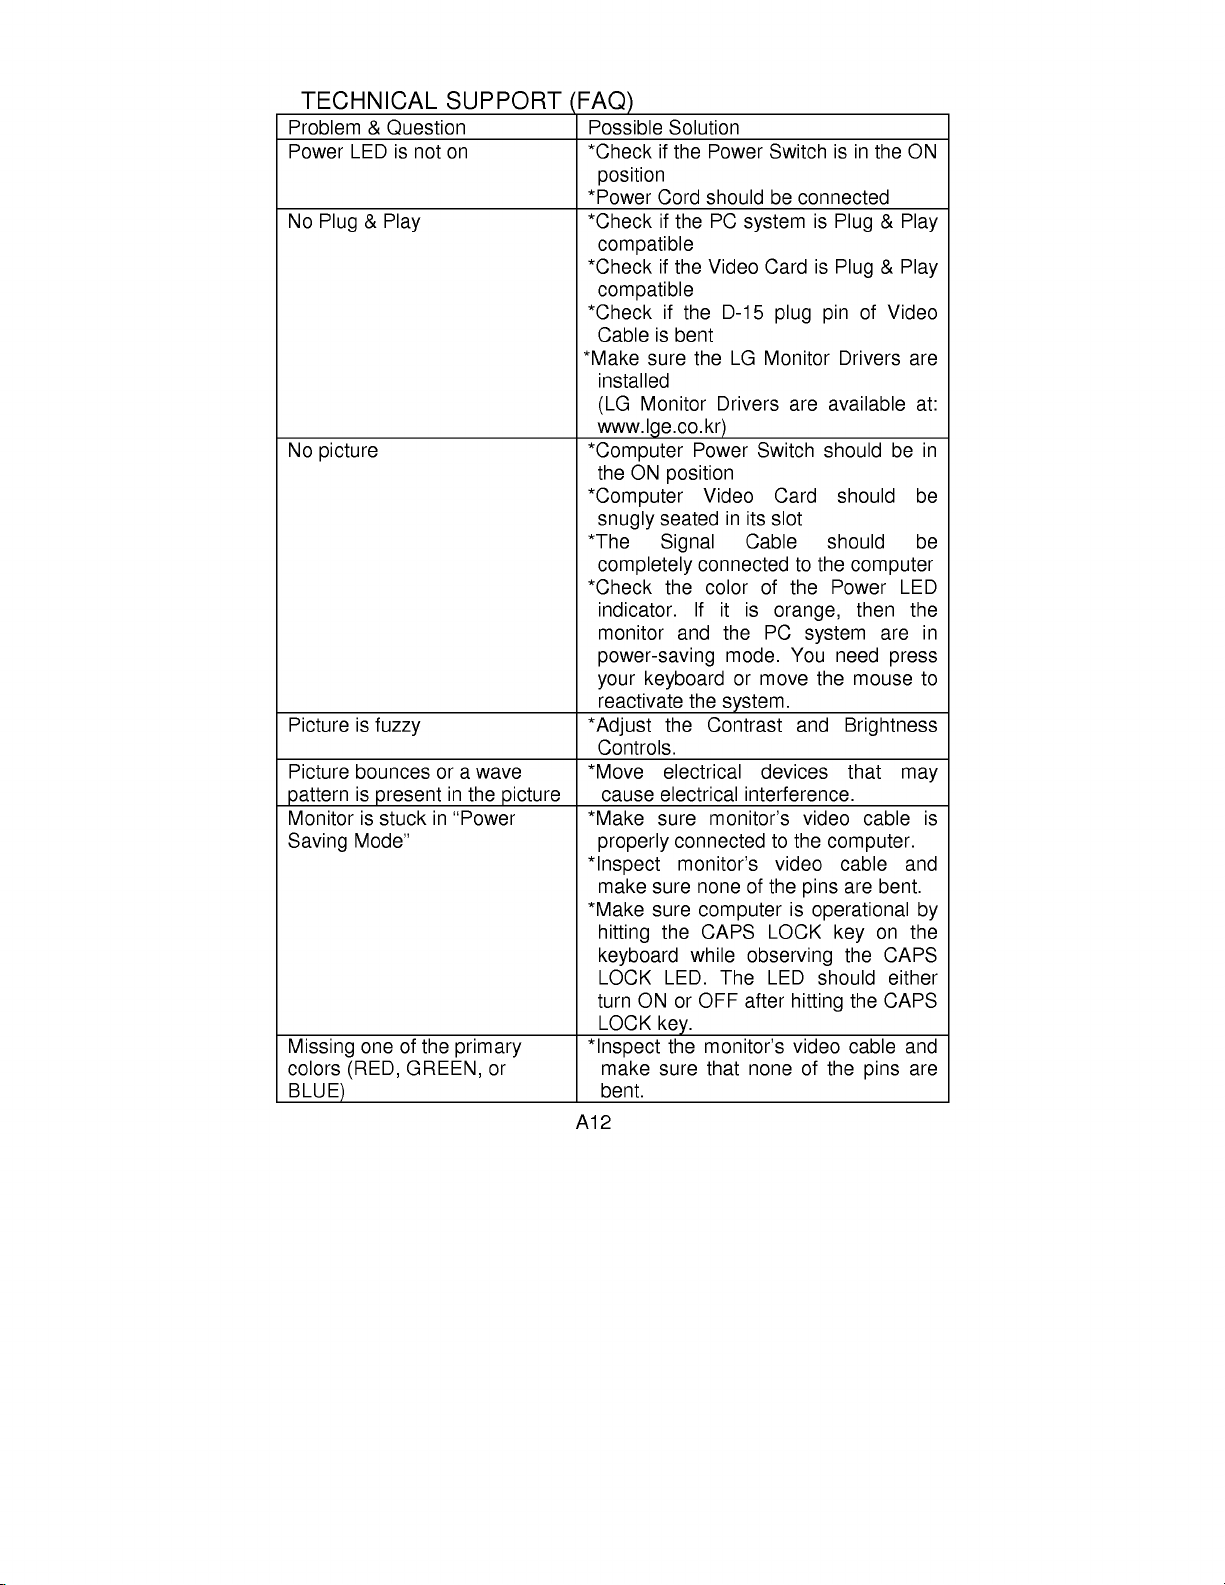
TECHNICAL
Problem
Power
No
No
Picture
Picture
&
Question
LED
Plug&Play
picture
is
fuzzy
bounces
patternispresent
Monitorisstuckin"Power
Saving
Missing
colors
Mode"
one
(RED,
is
not
of
the
GREEN,
SUPPORT
on
orawave
in
the
primary
BLUE)
picture
or
(FAQ)
Possible
*Check
position
*Power
*Check
compatible
*Check
compatible
*Check
Cable
is
*Make
A12
sure
installed
Monitor
(LG
www.lge.co.kr)
*Computer
the
ON
*Computer
snugly
*The
completely
*Check
indicator.
monitor
power-saving
your
keyboard
reactivate
*Adjust
Controls.
*Move
cause
*Make
sure
properly
*Inspect
make
sure
*Make
sure
hitting
keyboard
LOCK
turn
ON
LOCK
*Inspect
make
bent.
Solution
if
the
Power
Cord
should
if
the
PC
if
the
Video
if
the
bent
the
Power
position
Video
seated
Signal
connected
the
color
If
and
the
the
Contrast
electrical
electrical
monitor's
connected
monitor's
none
computer
the
CAPS
while
LED.
or
OFF
key.
the
monitor's
sure
that
Switch
system
Card
D-15
LG
Monitor
Drivers
Switch
in
its
Cable
of
it
is
the
PC
mode.
or
move
system.
devices
interference.
of
the
LOCK
observing
LED
The
after
none
be
connected
is
is
plug
are
Card
slot
to
the
the
orange,
system
You
the
and
video cable
to
the
video
pins
is
operational
should
hitting
video
of
isinthe
Plug&Play
Plug&Play
of
pin
should
Video
Drivers
available
be
should
should
computer
Power
then
are
need
press
mouse
Brightness
that
computer.
cable
are
bent.
on
key
the
CAPS
either
the
CAPS
cable
the
pins
ON
are
at:
in
be
be
LED
the
in
to
may
is
and
by
the
and
are
Page 13

Service
Unplug
service
!
The
!
Liquid
!
The
!
The
instructions.
operating
may
qualified
!
The
!
The
!
Snapping
while
make
changing
Do
not
removing
hazards.
the
monitor
personnel
power
has
monitor
monitor
result
technician
monitor
monitor
the
occasional
video
attempt
covers
Refer
from
the
wall
:
when
cord
or
been
instructions.
in
or
monitor
to
all
plugisdamaged
been
not
only
to
been
is
operating.
sounds
the
expose
into
exposed
operate
those
An
and
restore
dropped
from
monitor
you
spilled
has
does
Adjust
damage
has
exhibitsadistinct
popping
modes.
service
may
servicingtoqualified
outlet
and
refer
or
rain
normally
controls
adjustment
requires
monitor
the
cabinet
frayed.
or
water.
following
that
to
the monitor.
to
improper
often
the
or
changeinperformance.
the
when
monitor
Itisnormal
being
is
turned
continuous
yourself,asopening
to
dangerous
service
personnel.
servicingtoqualified
the
operating
work
damaged.
or
frequent
monitors
or
off,
or
other
in
controls
by
when
are
of
extensive
normal
has
for
some
on
voltage
covered
other
operation.
been
or
or
the
a
to
A13
Page 14
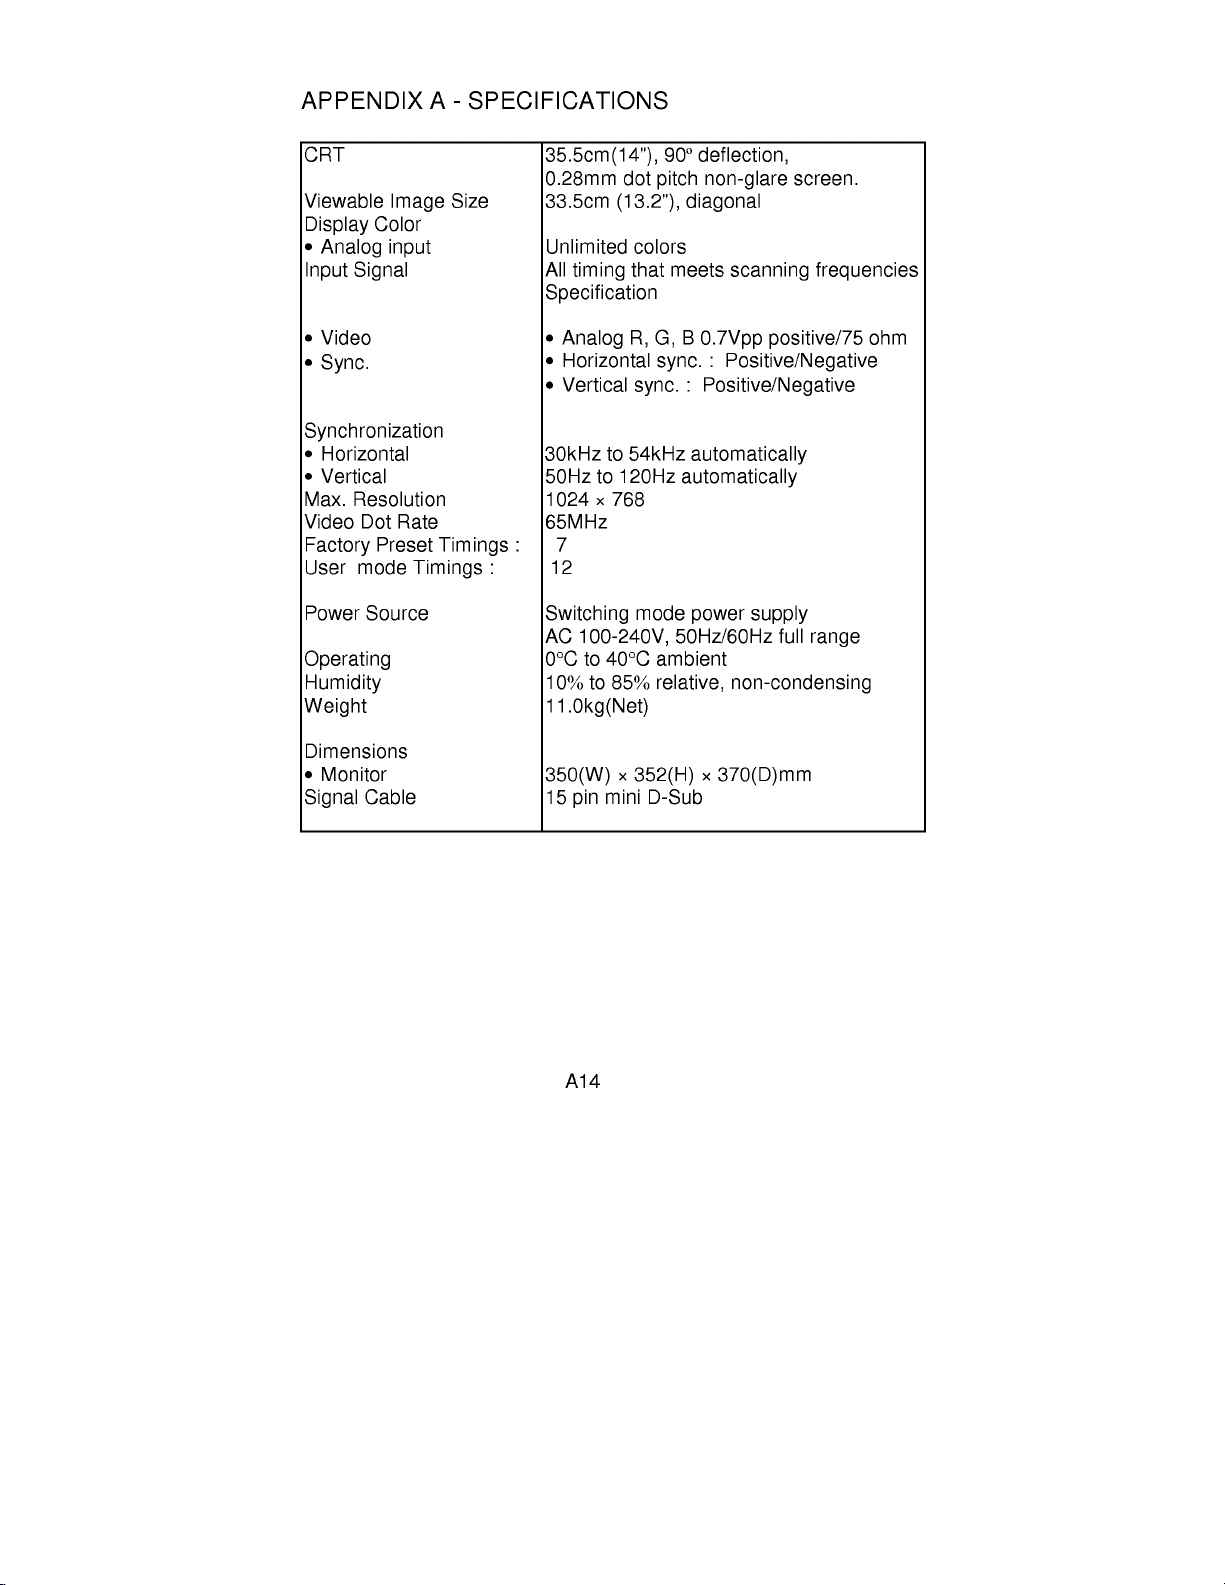
APPENDIX
-
A
SPECIFICATIONS
CRT
Viewable
Display
?
Analog
Input
?
Video
?
Sync.
Synchronization
?
Horizontal
?
Vertical
Max.
Video
Factory
User
Power
Image
Color
input
Signal
Resolution
Dot
Rate
Preset
mode
Timings
Source
Operating
Humidity
Weight
Size
Timings
35.5cm(14"),
33.5cm
All
30kHz
:
:
AC
0.28mm
dot
(13.2"),
Unlimited
timing
colors
that
Specification
?
Analog
?
Horizontal
?
Vertical
50Hz
1024×768
65MHz
7
12
Switching
0 Cto40 C
10
R,
sync.
to
54kHz
to
120Hz
mode
100-240V,
to
85
G,
11.0kg(Net)
90
deflection,
pitch
non-glare
diagonal
meets
scanning
B
0.7Vpp
:
sync.
Positive/Negative
:
Positive/Negative
automatically
automatically
power
50Hz/60Hz
ambient
relative,
supply
non-condensing
screen.
frequencies
positive/75
full
range
ohm
Dimensions
?
Monitor
Signal
Cable
350(W)×352(H)×370(D)mm
A14
pin
mini
D-Sub
15
Page 15

External
Switch
Controls:
?
Power
?
Up/Down
?
Function
On/Off
Key
Key
switch
Functions
Plug&Play
Power
Power
Preset
management
consumption
display
Regulations
APPENDIX
STANDARD
IBM
area
--
B
FACTORY
RESOLUTION
720x400
?
Contrast
?
Brightness
?
H-Size
?
H-Center
?
V-Size
?
V-Center
?
Pincushion
?
Trapezoid
?
Rotation
DDC1/2B
EPA
VESA
,
85
Watts
250mm
UL,
CSA,
MPR
II
PRESET
HORIZONTAL
FREQUENCY
31.47kHz
×
Max.
187mm
FDA,
DPMS
FCC,
TIMING
TUV/GS,
TABLE
VERTICAL
FREQUENCY
CE,
70Hz
VGA
VESA/75
VESA/85
VESA/75
VESA/85
VESA/60
640x480
640x480
640x480
800x600
800x600
1024x768
31.47kHz
37.5kHz
43.3kHz
46.875kHz
53.67kHz
48.36kHz
A15
60Hz
75Hz
85Hz
75Hz
85Hz
60Hz
 Loading...