

Page 1

PLASMA MONITOR
SERVICE MANUAL
CAUTION
BEFORE SERVICING THE CHASSIS,
READ THE SAFETY PRECAUTIONS IN THIS MANUAL.
CHASSIS : RF-052A
MODEL : 42PM1M/MA
42PM1M/MA-ZA
website:http://biz.LGservice.com
e-mail:http://www.LGEservice.com/techsup.html
Page 2

- 2 -
CONTENTS
SAFETY PRECAUTIONS ....................................................................................3
DESCRIPTION OF CONTROLS..........................................................................4
SPECIFICATIONS................................................................................................8
ADJUSTMENT INSTRUCTIONS .......................................................................10
TROUBLE SHOOTING GUIDE..........................................................................15
PRINTED CIRCUIT BOARD ..............................................................................24
BLOCK DIAGRAM.............................................................................................26
EXPLODED VIEW..............................................................................................28
EXPLODED VIEW PARTS LIST........................................................................29
REPLACEMENT PARTS LIST...........................................................................30
SCHEMATIC DIAGRAM.........................................................................................
Page 3
- 3 -
SAFETY PRECAUTIONS
Many electrical and mechanical parts in this chassis have special safety-related characteristics. These parts are identified by in
the Schematic Diagram and Replacement Parts List.
It is essential that these special safety parts should be replaced with the same components as recommended in this manual to
prevent X-RADIATION, Shock, Fire, or other Hazards.
Do not modify the original design without permission of manufacturer.
General Guidance
An isolation Transformer should always be used during
the servicing of a receiver whose chassis is not isolated from
the AC power line. Use a transformer of adequate power rating
as this protects the technician from accidents resulting in
personal injury from electrical shocks.
It will also protect the receiver and it's components from being
damaged by accidental shorts of the circuitry that may be
inadvertently introduced during the service operation.
If any fuse (or Fusible Resistor) in this monitor is blown, replace
it with the specified.
When replacing a high wattage resistor (Oxide Metal Film
Resistor, over 1W), keep the resistor 10mm away from PCB.
Keep wires away from high voltage or high temperature parts.
Due to high vacuum and large surface area of picture tube,
extreme care should be used in handling the Picture Tube.
Do not lift the Picture tube by it's Neck.
Leakage Current Cold Check(Antenna Cold Check)
With the instrument AC plug removed from AC source,
connect an electrical jumper across the two AC plug prongs.
Place the AC switch in the on position, connect one lead of
ohm-meter to the AC plug prongs tied together and touch other
ohm-meter lead in turn to each exposed metallic parts such as
antenna terminals, phone jacks, etc.
If the exposed metallic part has a return path to the chassis, the
measured resistance should be between 1MΩ and 5.2MΩ.
When the exposed metal has no return path to the chassis the
reading must be infinite.
An other abnormality exists that must be corrected before the
receiver is returned to the customer.
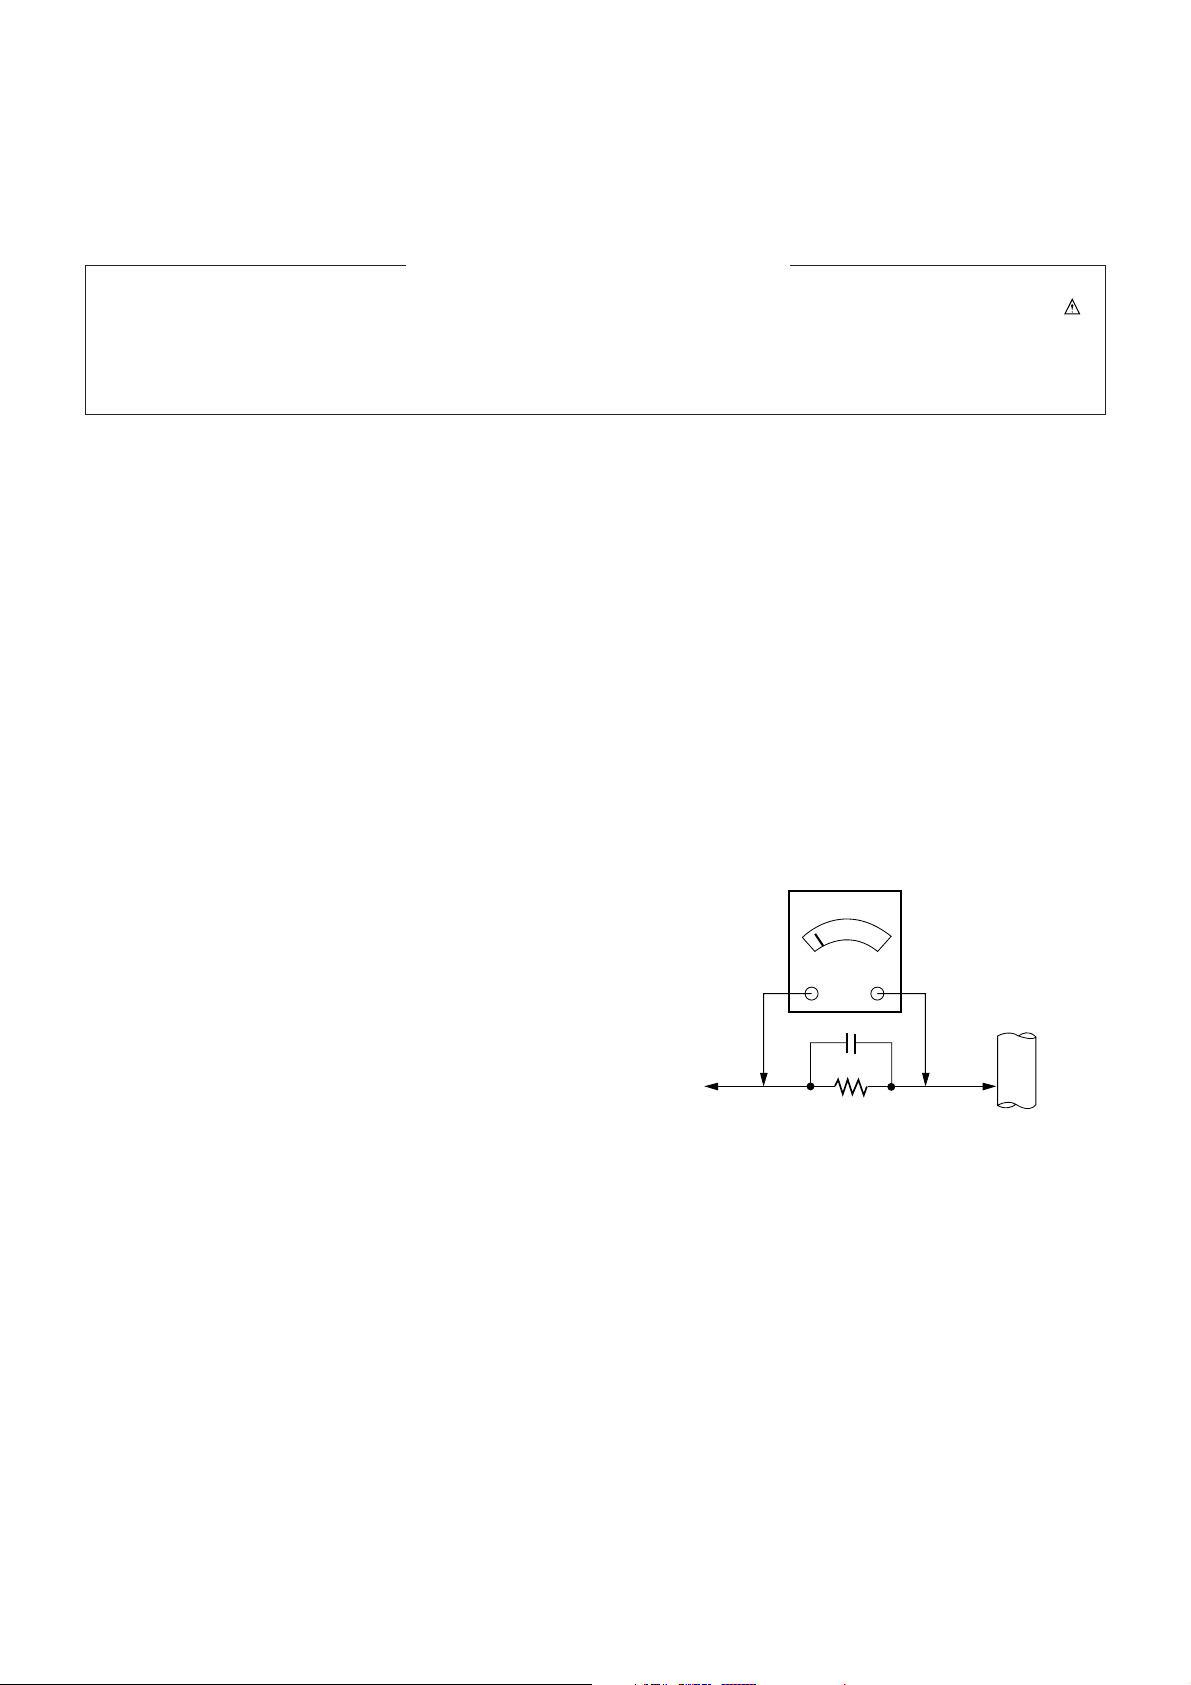
Leakage Current Hot Check (See below Figure)
Plug the AC cord directly into the AC outlet.
Do not use a line Isolation Transformer during this check.
Connect 1.5K/10watt resistor in parallel with a 0.15uF capacitor
between a known good earth ground (Water Pipe, Conduit, etc.)
and the exposed metallic parts.
Measure the AC voltage across the resistor using AC
voltmeter with 1000 ohms/volt or more sensitivity.
Reverse plug the AC cord into the AC outlet and repeat AC
voltage measurements for each exposed metallic part. Any
voltage measured must not exceed 0.75 volt RMS which is
corresponds to 0.5mA.
In case any measurement is out of the limits specified, there is
possibility of shock hazard and the set must be checked and
repaired before it is returned to the customer.
Leakage Current Hot Check circuit
1.5 Kohm/10W
To Instrument’s
exposed
METALLIC PARTS
Good Earth Ground
such as WATER PIPE,
CONDUIT etc.
AC Volt-meter
IMPORTANT SAFETY NOTICE
0.15uF
Page 4
POWERMUTE
INPUT
MULTIMEDIA
ARC
MENU
VOL
OK
1 2 3
4 5 6
7
PSM
SSM
8 9
0
VOL
SPLIT ZOOM
SLEEP
REVEAL
MODE
MIXSIZE
UPDATE
TIME
Q.VIEW
HOLD
INDEX
?
i
I/II
TEXT/
LIST/
MULTIMEDIA
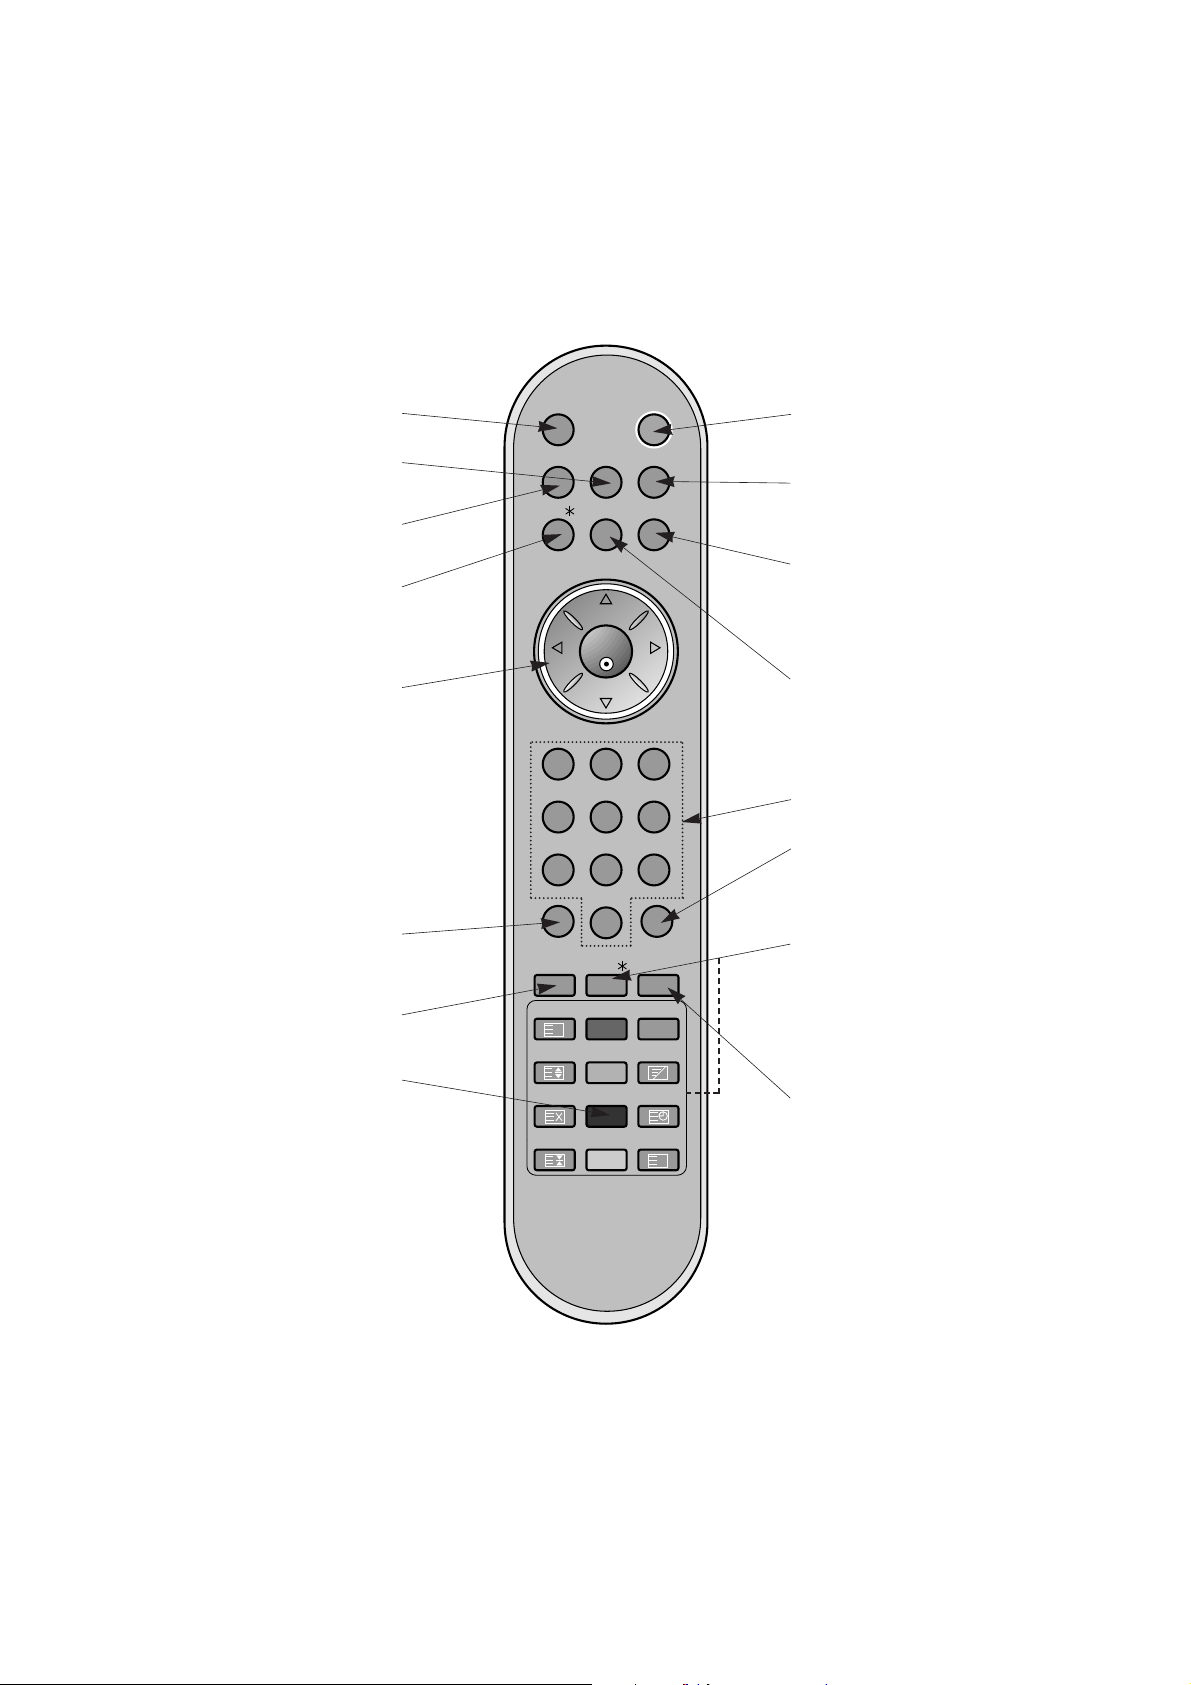
selects the Component, RGB or DVI
modes.
POWER
switches the set on from standby or
off to standby.
ARC
changes the picture format.
MENU
displays on screen menus one by one.
exits the current menu.
memorizes menu changes.
SSM
to select the sound appropriate to
your viewing programme character.
NUMBER buttons
SLEEP
sets the sleep timer.
I/II (option)
selects the language during dual language broadcast.
selects the sound output.
TEXT/*(option)
These buttons are used for teletext.
For further details, see the ‘Teletext’
section.
COLOURED BUTTONS :
These buttons are used for teletext.
LIST (option)
displays the programme table.
INPUT
MUTE
switches the sound on or off.
DD/ EE
Selects a menu option.
FF/ GG
(Volume Up/Down)
Increases/decreases sound level.
Adjusts menu settings.
OK
accepts your selection or displays the
current mode.
PSM
adjusts the factory preset picture
according to the room.
SPLIT ZOOM
enlarge the screen with regular
ration.
Q.VIEW (option)
Returns to the previously viewed
programme.
Note : This function works only when
Favourite prog.
is set to
Off
.
Otherwise each press of this button
will select a stored favorite
programme.
- 4 -
DESCRIPTION OF CONTROLS
Page 5
- 5 -
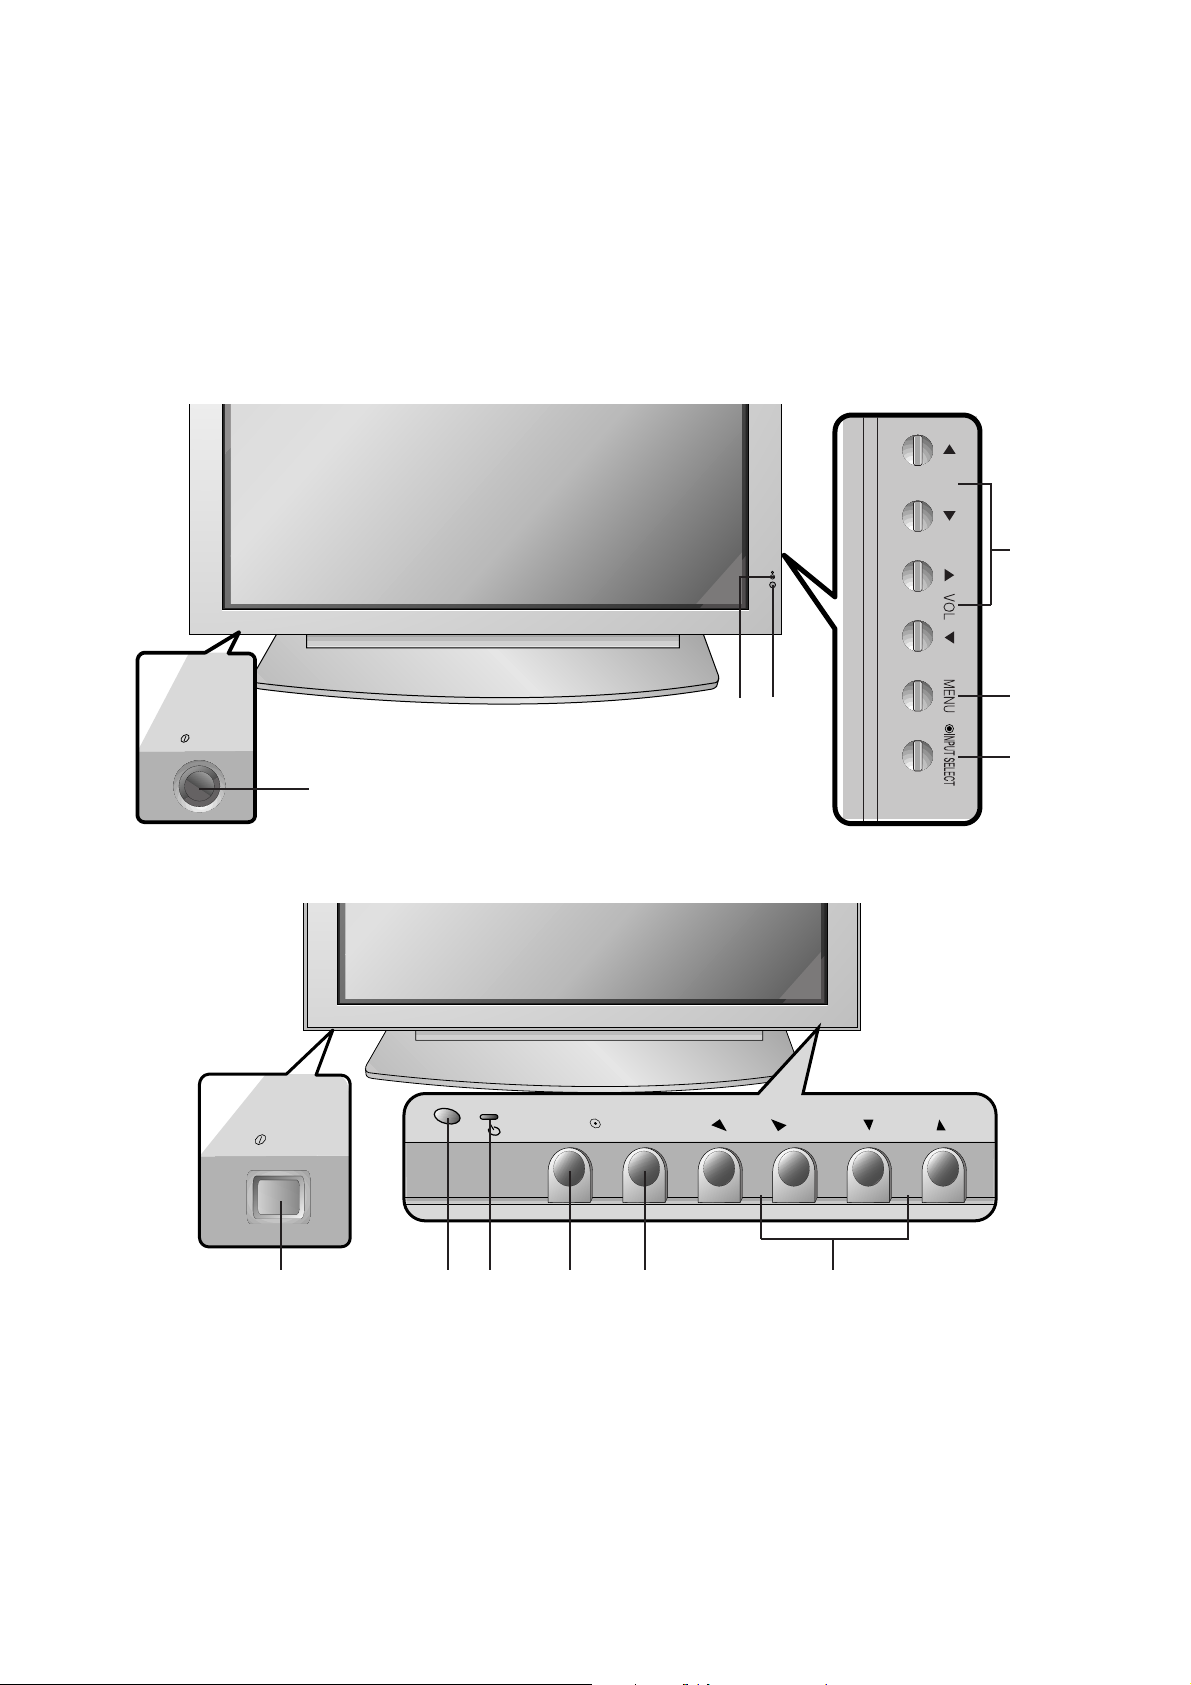
<Front Panel Controls>
or
ON/OFF
VOL
MENU
INPUT SELECT
ON/OFF
1. Main Power Button
2. Remote Control Sensor
3. Power Standby Indicator
Illuminates red in standby mode, Illuminates green when the
set is turned on
4. INPUT SELECT Button
5. MENU
Displays on screen menus one by one.
Exits the current menu.
Memorizes menu changes.
6.
DD/ EE
Selects a menu option.
FF/ GG
(Volume Up/Down)
Increases/decreases sound level.
Adjusts menu settings.
1
2 3 4 5 6
1
4
5
6
3
2
Page 6
- 6 -
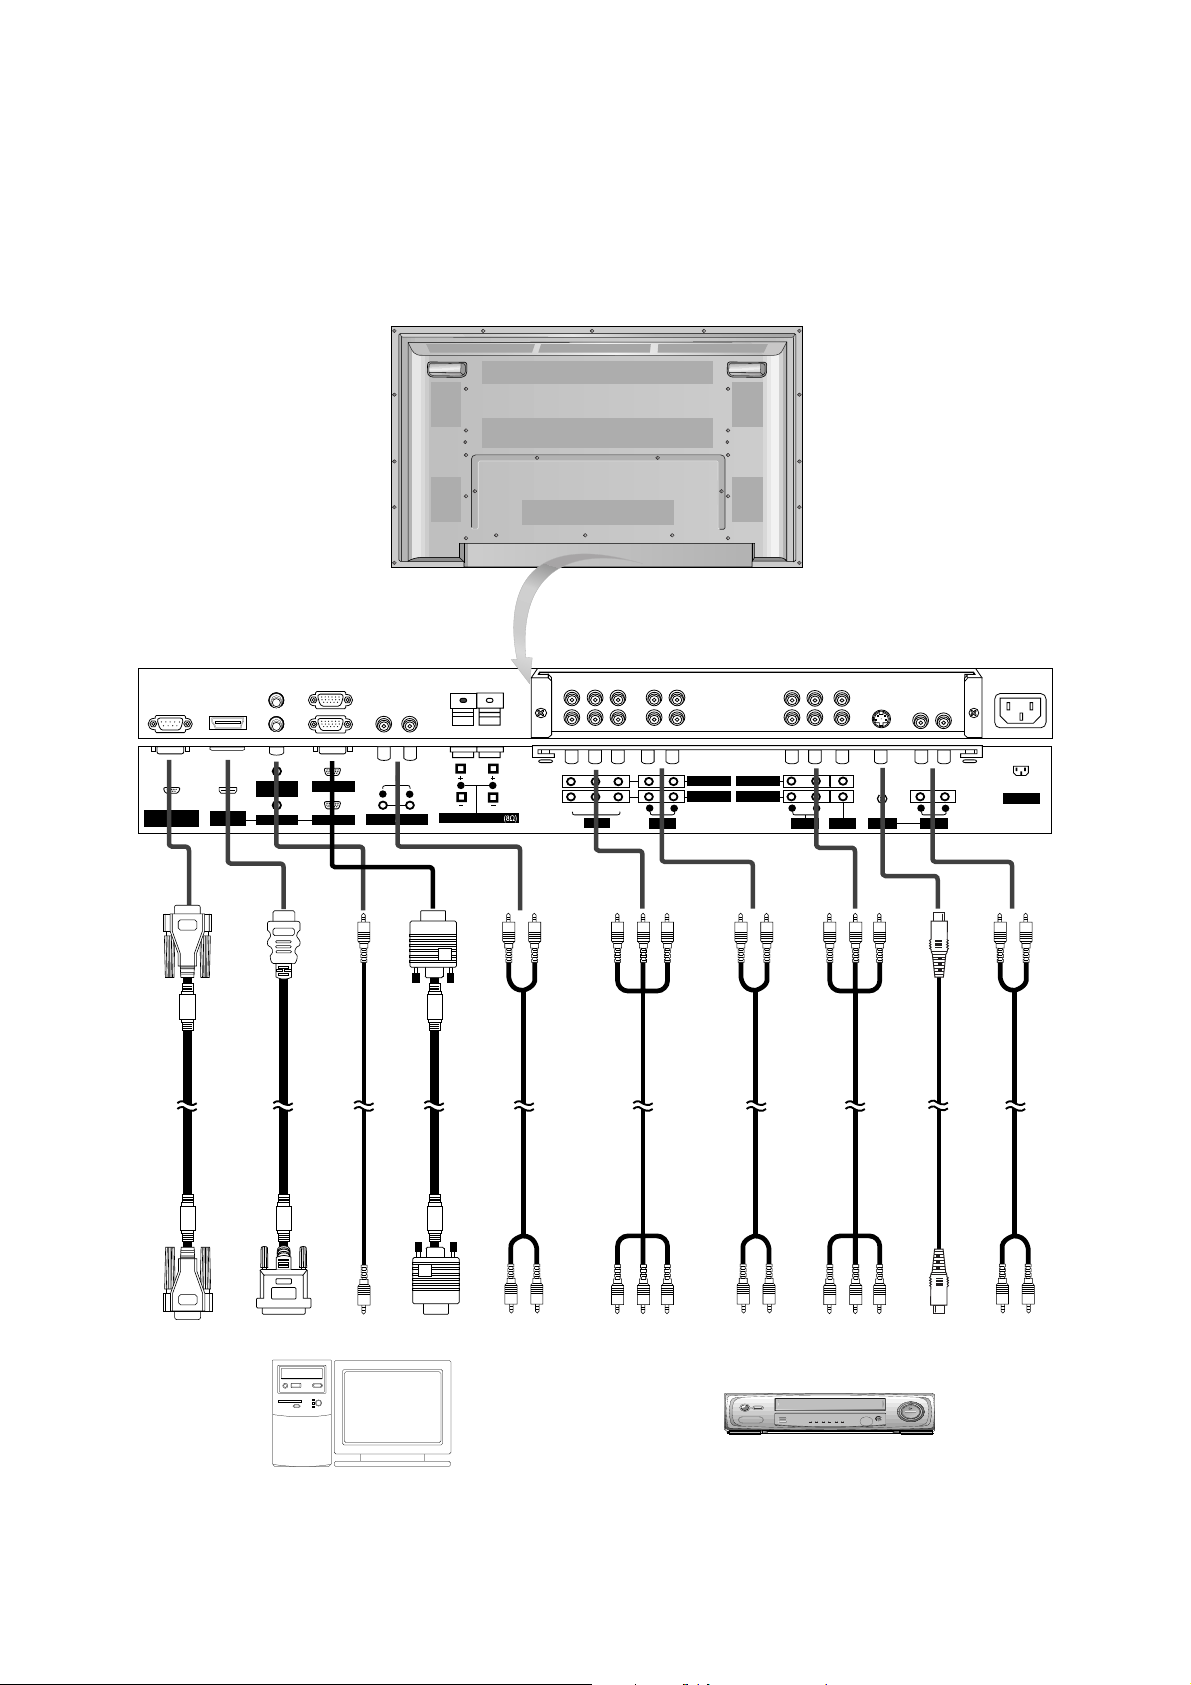
<Back Panel>
AC INPUT
AUDIO INPUT RGB INPUT
RGB OUTPUT
RS-232C INPUT
(CONTROL/SERVICE)
REMOTE
CONTROL
S-VIDEO
YPBP
R
VIDEO
R
L
VARIABLE AUDIO OUT
AUDIO
R
L
EXTERNAL SPEAKER
HDMI/
DVI(VIDEO)
R
L
AUDIO
R
L
AUDIO
R
L
AUDIO VIDEO
COMPONENT INPUT 2
COMPONENT INPUT 1
MONITOR OUPUT
A/V INPUT
(MONO) (MONO)
Connection to PC
Connection to AV equipment
Page 7
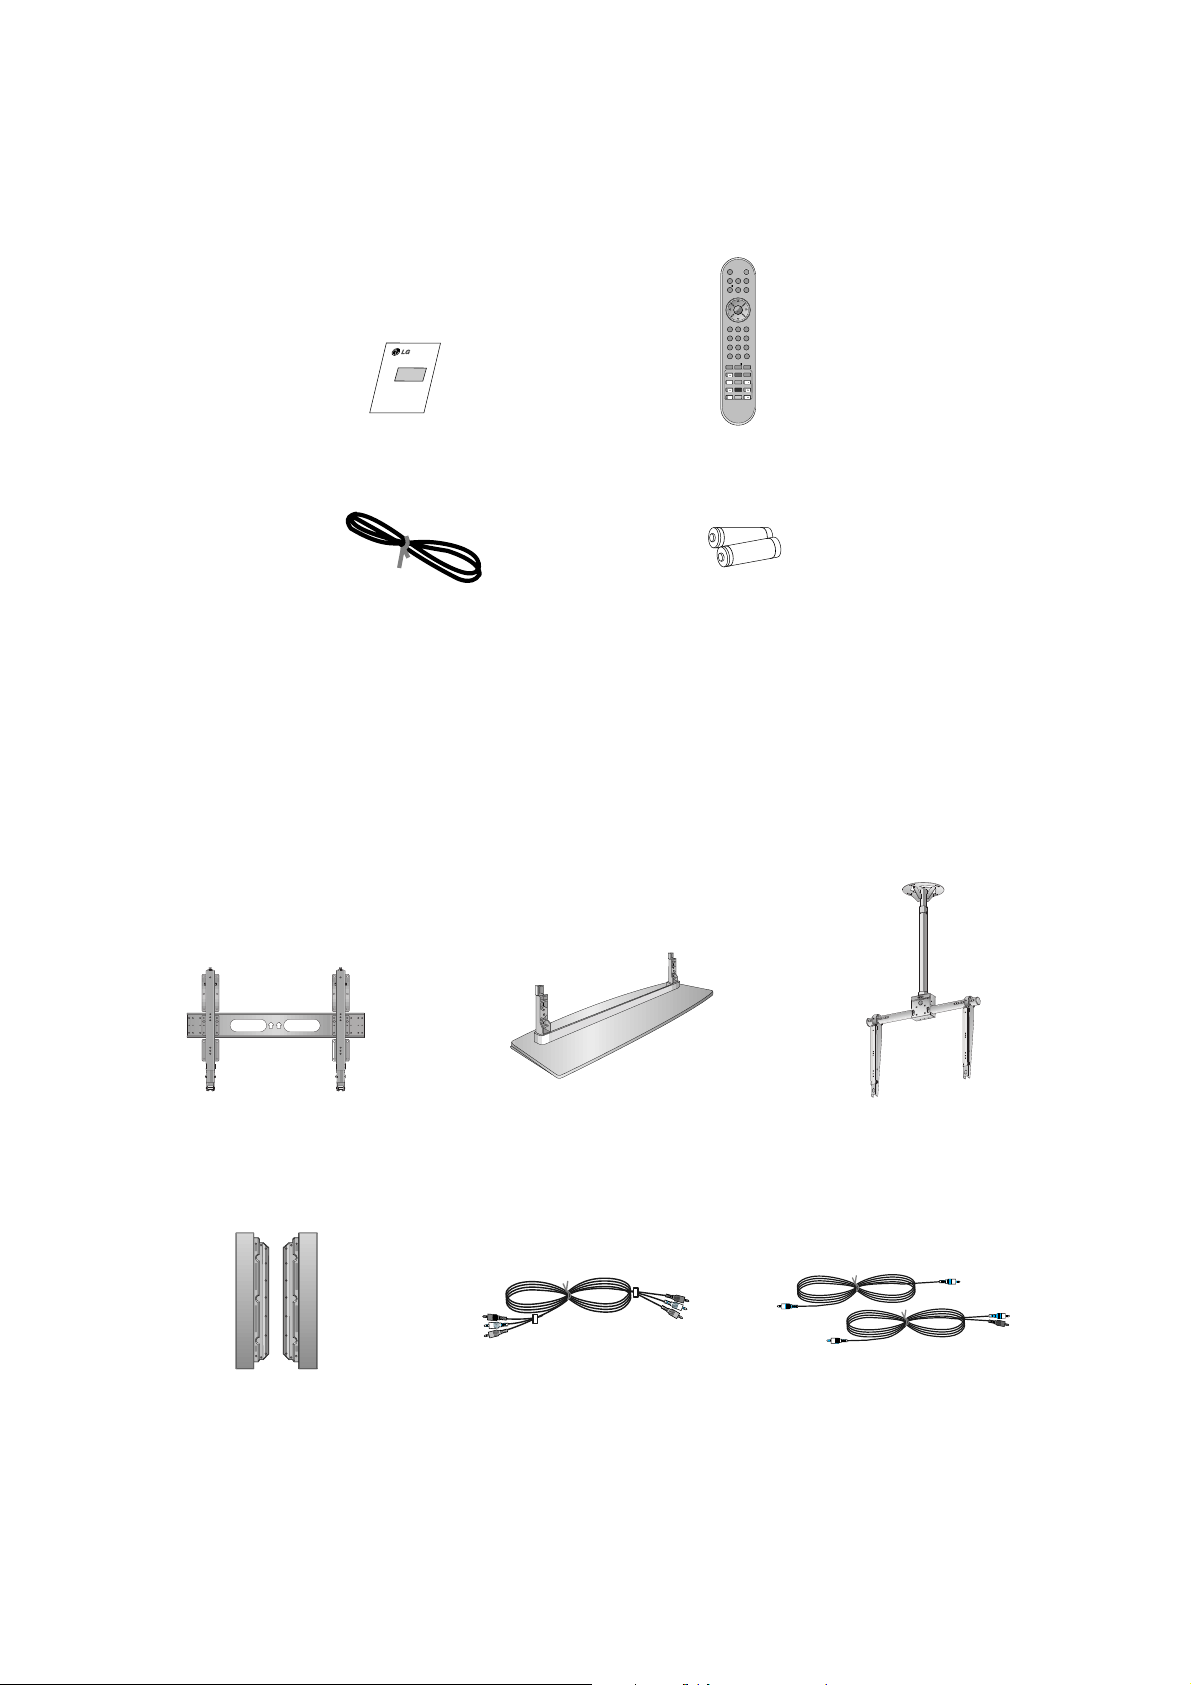
- 7 -
AS mark
LG TV
Owner’s Manual
1.5V
1.5V
Alkaline batteries
Power Cord
POWERMUTE
INPUT
MULTIMEDIA
ARC
MENU
VOL
OK
1 2 3
4 5 6
7
PSM
SSM
8 9
0
VOL
SPLIT ZOOM
SLEEP
REVEAL
MODE
MIXSIZE
UPDATE
TIME
Q.VIEW
HOLD
INDEX
?
i
I/II
TEXT/
LIST/
Remote Control handset
- Optional extras can be changed or modified for quality improvement without any notification new optional extras can be
added.
- Contract your dealer for buying these items.
Optional Extras
Tilt wall mounting bracket
404250 40 42 50
Video cables
Audio cables
Ceiling mounting bracket
40
42
50
42
40
Desktop stand
Speakers
Page 8
SPECIFICATIONS
NOTE : Specifications and others are subject to change without notice for improvement
.
- 8 -
V Application Range
This spec is applied to the PDP TV used RF-052A Chassis.
V Specification
Each part is tested as below without special appointment.
1) Temperature : 25±5°C (77±9°F), CST : 40±5
2) Relative Humidity: 65
±10%
3) Power Voltage: Standard Input voltage (100-240V~, 50/60Hz)
* Standard Voltage of each product is marked by models.
4) Specification and performance of each parts are followed each drawing and specification by part number in accordance with BOM.
5)
The receiver must be operated for about 20 minutes prior to the adjustment
.
V Test Method
1) Performance : LGE TV test method followed.
2) Demanded other specification
Safety: IEC60065
EMI : CISPR13
V General Specification
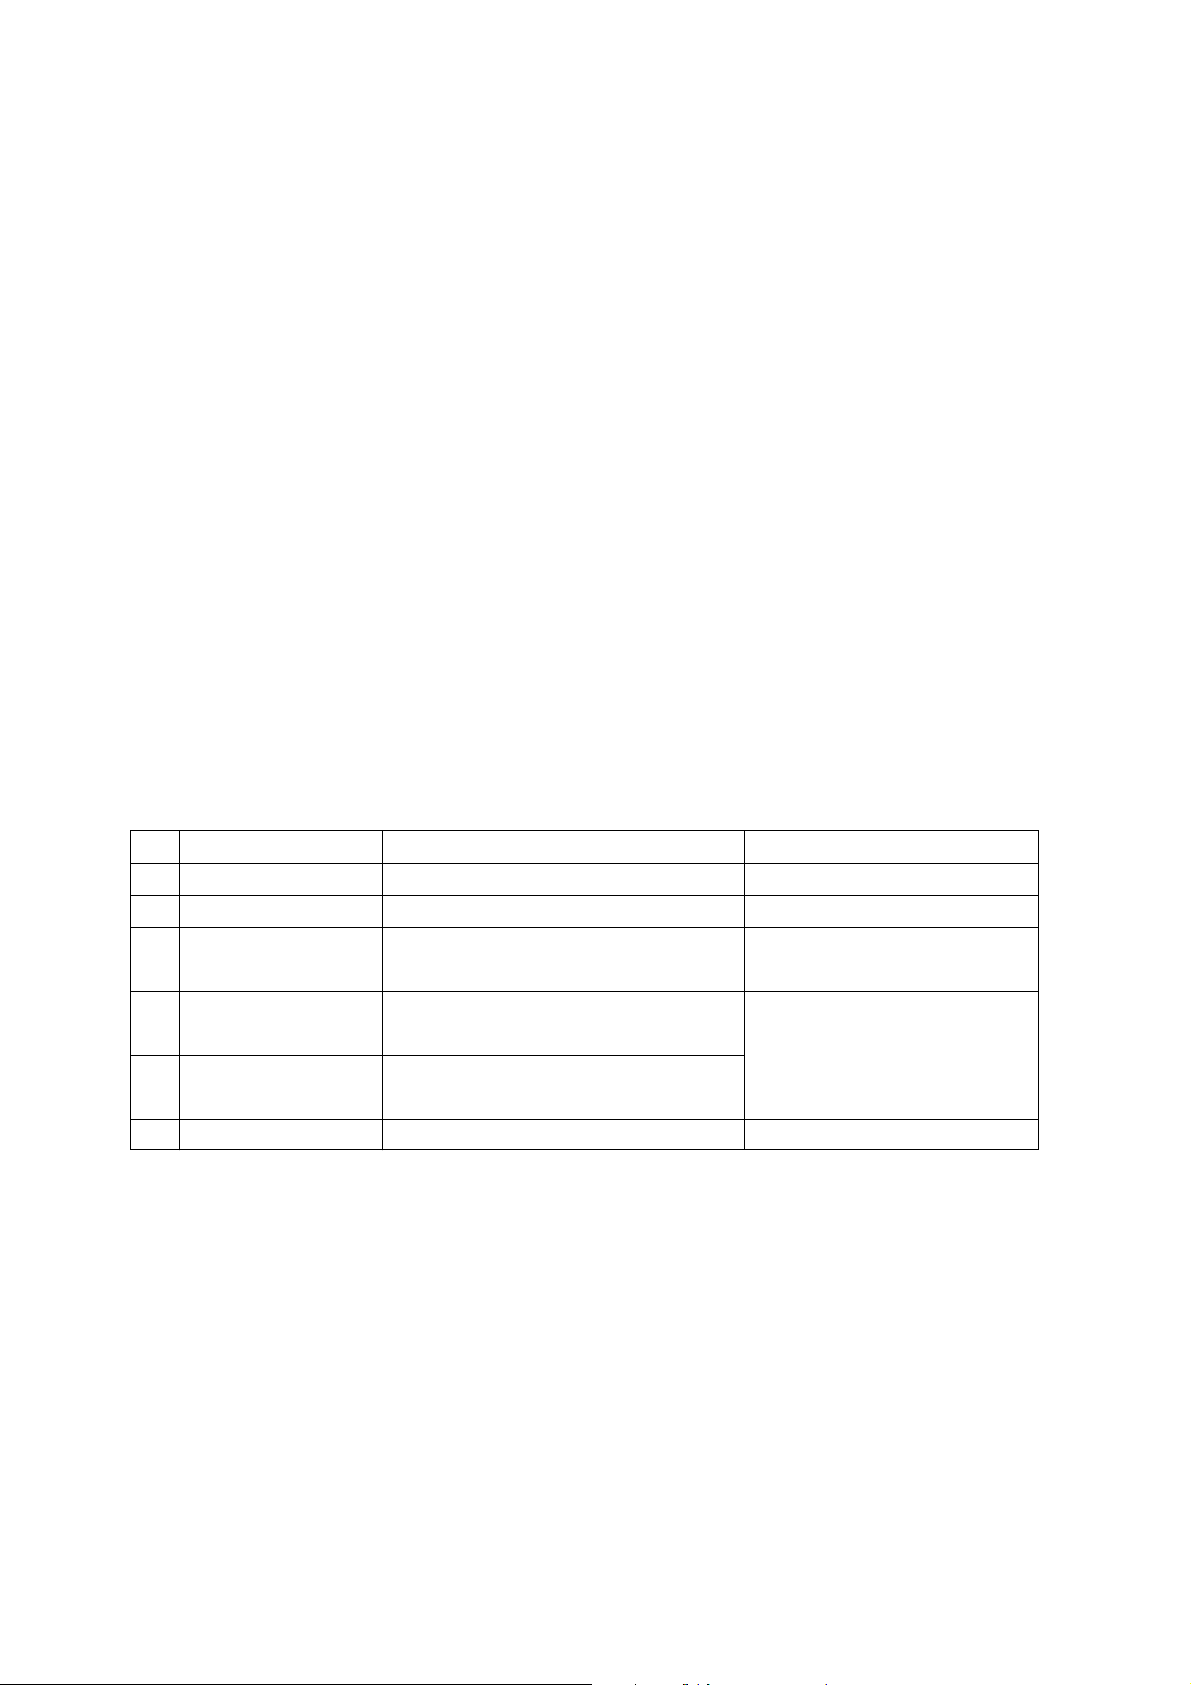
1. Module Specification
Remark
PDP
LGE SPEC
Maker : SONY/ LGIT/ Sanken
Specification
42 inch wide Color Display Module
16:9
PDP42X3xxxx,
RGB Closed Type
1) Temp : 0~40 deg
2) Humidity : 0~85%
1) Temp : -20~60 deg
2) Humidity : 0~85%
100-240V~, 50/60Hz
No
1
2
3
4
5
6
Item
Display Screen Device
Aspect Ratio
PDP Module
Operating Environment
Storage Environment
Input Voltage
Page 9
2. Model Specification
- 9 -
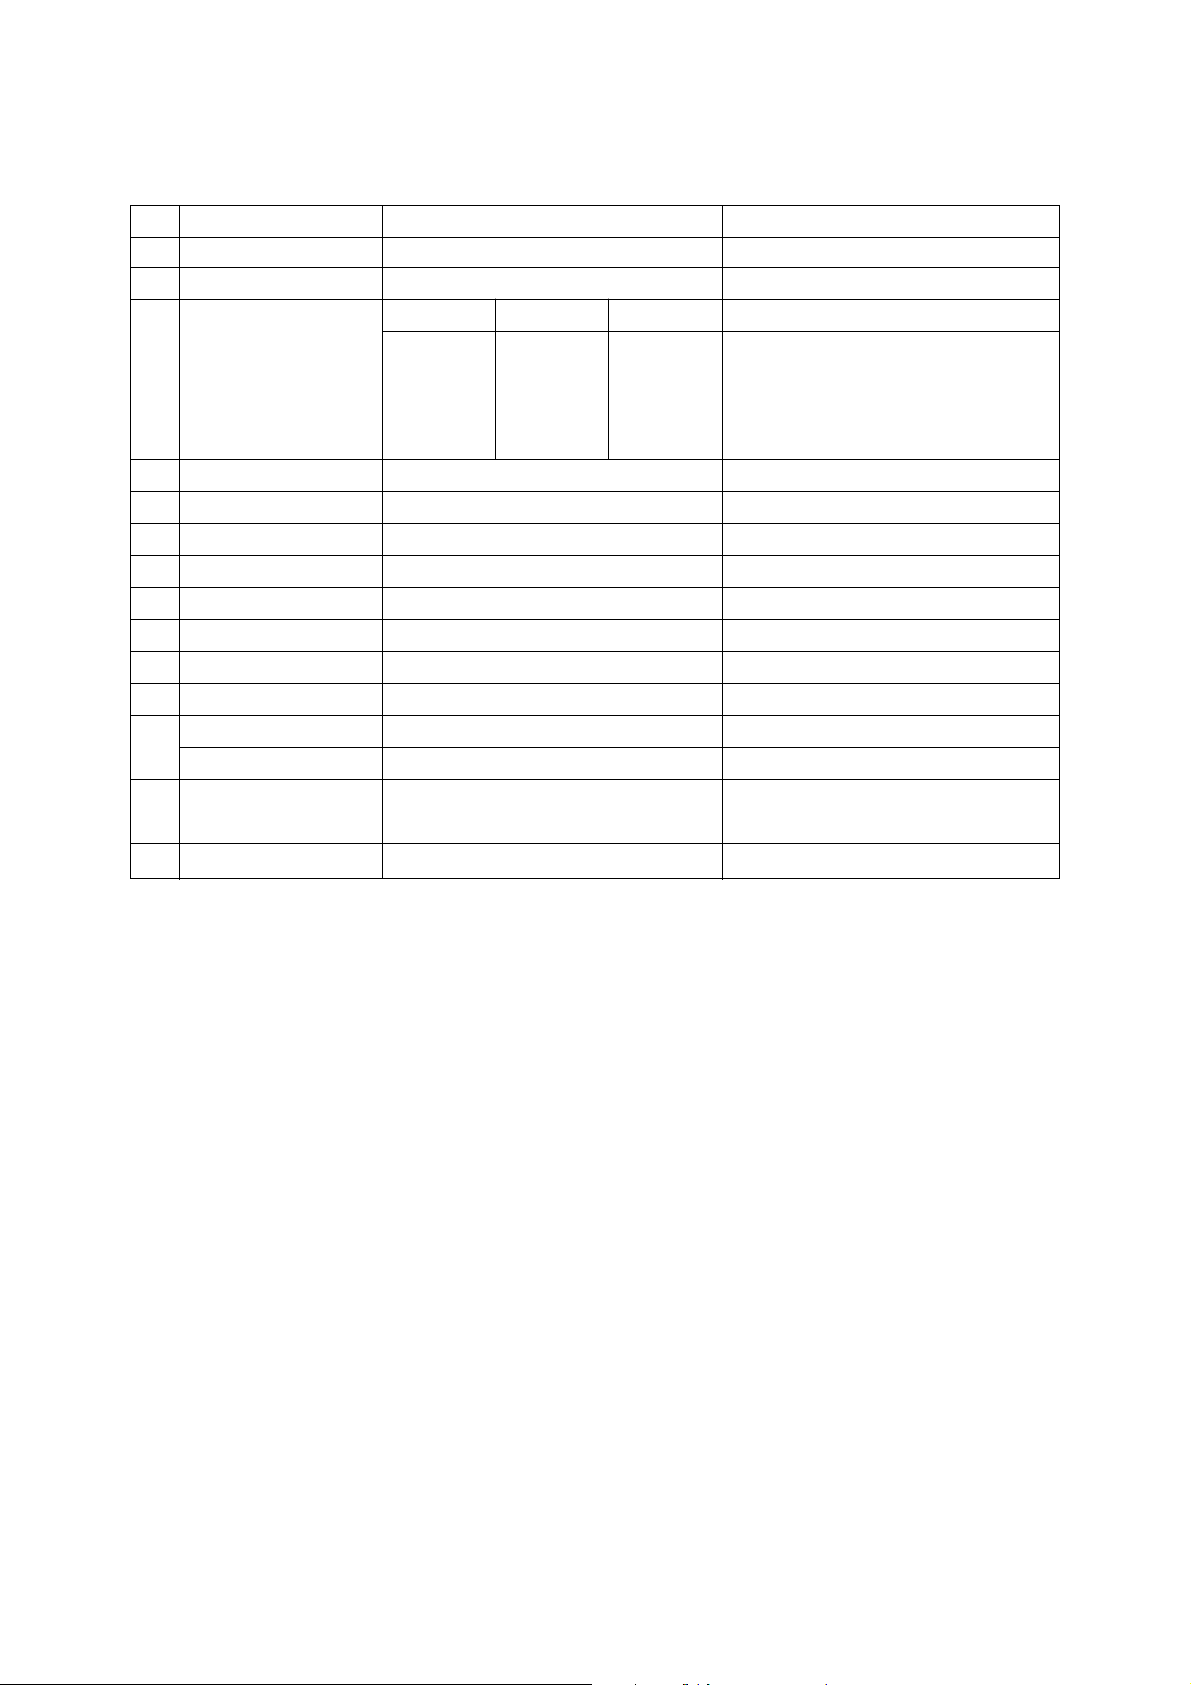
Item
Market
Broadcasting system
Available Channel
Receiving system
Video Input (1EA)
SCART (2EA)
S-Video Input (1EA)
Component Input (1EA)
RGB Input
RGB Output
HDMI Input
Audio Input (3EA)
Audio Input (1EA)
Audio Output (2EA)
Wired Control
No
1
2
3
4
5
6
7
8
9
10
11
12
13
14
Specification
EU
PAL B/G/I/D/K, SECAM L/L’
BAND PAL NTSC
VHF E2~E12 2~13
UHF E21~E69 14~69
CATV S1~S20 1~125
HYPER S1~S41
Upper Heterodyne
PAL, SECAM, NTSC
PAL, SECAM
PAL, SECAM, NTSC
Y/Cb/Cr, Y/Pb/Pr
RGB-PC, RGB-DTV
RGB-PC, RGB-DTV
HDMI-PC, HDMI-DTV
PC Audio, Component (1EA), AV(1EA)
PC Audio
Variable Audio out (1EA)
External audio out (1EA)
Discrete IR
Remark
Except 42PM1MB, 50PM1MB, 42PM3MVB
Except 42PM1MB, 50PM1MB, 42PM3MVB
Except 42PM1MB, 50PM1MB, 42PM3MVB
42PM1M/MA, 50PM1M/MA, 42PM3MV/MVA
42PM1MB, 50PM1MB, 42PM3MVB
Page 10
- 10 -
ADJUSTMENT INSTRUCTIONS
1. Application Object
These instructions is applied all of the PDP TV, RF-052A
Chassis.
2. Specification
(1) Because this is not a hot chassis, it is not necessary to use
an isolation transformer. However, the use of isolation
transformer will help protect test instrument.
(2) Adjustment must be done in the correct order.
(3) The adjustment must be performed in the circumstance of
25±5°C of temperature and 65±10% of relative humidity if
there is no specific designation.
(4) The input voltage of the receiver must keep 100-220V,
50/60Hz.
(5) The receiver must be operated for about 15 minutes prior
to the adjustment.
O After RGB Full white HEAT-RUN Mode, the receiver must
be operated prior to adjustment.
O Enter into HEAT-RUN MODE
1) Press the POWER ON KEY on R/C for adjustment.
2) OSD display and screen display 100% full White pattern.
[ Set is activated HEAT-RUN without signal generator in
this mode.
[ Single color pattern(RED/BLUE/GREEN) of HEAT-RUN
mode uses to check PANEL.
Caution) If you turn on a still screen more than 20 minutes,
(Especially digital pattern, cross hatch pattern) after
image may be occur in the black level part of the screen.
3. Channel memory
3-1. Setting up the LGIDS
1) Install the LGIDS. (idsinst.exe)
2) After installation, restart your PC.
3) Extract [files.zip] to folder [c:\LGIDS\files].
4) Start LGIDS.
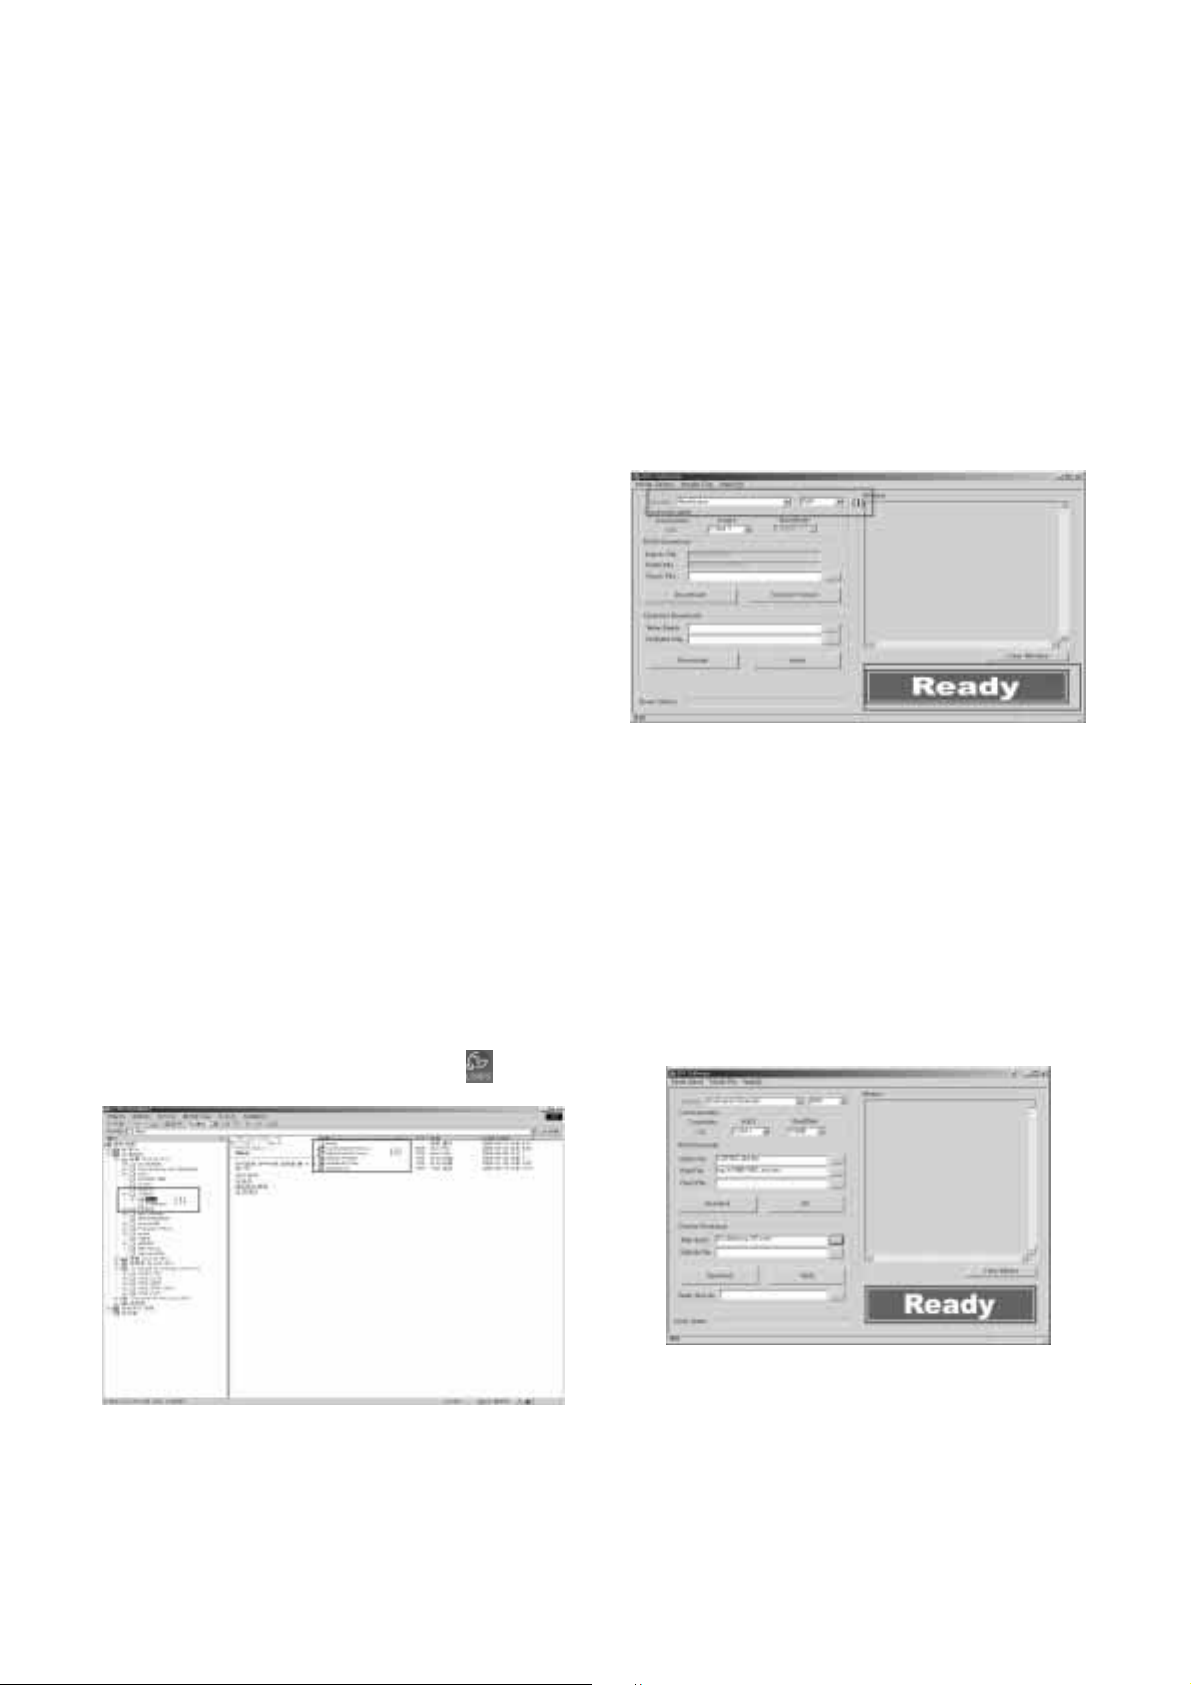
3-2. Channel memory Method
1) Select “PDP” and “Hurricane” on Model dialog. And check
your connection in Communication dialog. (If your
connection is ‘NG’, then set your PORT(COM1,2,3,...)
correctly.)
2) Connect RS-232C cable and turn on the power.
(If your connection has completed, you can see “Ready”.)
[ If your set is not an end products but only a board, you
have to make your board to Stand-by state (LED_R). And
you have to Download in Stand_by power state.
3) Select proper CH_memory file(*.nvm) for each model at
[NVRAM Download]
$ [Write Batch]
Next, select proper binary file(*.bin) including the CH
information for each model at [NVRAM File].
4) Click the [Download] button.
It means the completion of the CH memory download if all
items show ‘OK’ and Status is changed by ‘PASS’ at the
lower right corner of the window.
5) If you want to check whether the CH information is
memorized correctly or not, click the [Verify] button.
And then compare NVRAM File(*.bin) with the CH
information downloaded.
(Fig. 1)
(Fig. 2-1)
(Fig. 2-2)
Page 11
- 11 -
4. POWER PCB Assy Voltage
Adjustments
(Va, Vs Voltage Adjustments)
4-1. Test Equipment :D.M.M. 1EA
4-2.Connection Diagram for Measuring
: refer to fig.3
4-3. Adjustment Method
[P/No 3501V00221A B/D]
(1) Va Adjustment
1) After receiving 100% Full White Pattern, HEAT RUN.
2) Connect + terminal of D.M.M to Va pin of P805, connect
- terminal to GND pin of P805.
3) After turning RV601, voltage of D.M.M adjustment as
same as Va voltage which on label of panel right/top.
(Deviation; ±0.5V)
(2) Vs Adjustment
1) Connect + terminal of D.M.M to Vs pin of P805, connect
– terminal to GND pin of P805.
2) After turning RV401, voltage of D.M.M adjustment as
same as Va voltage which on label of panel right/top.
(Deviation; ±0.5V)
5. EDID (The Extended Display
Identification Data)/ DDC (Display
Data Channel) download
5-1. Required Test Equipment
1) Adjusting PC with S/W for writing EDID Data.(S/W : EDID
TESTER Ver.2.5)
2) A Jig for EDID Download
3) Cable : Serial(9Pin or USB) to D-sub 15Pin cable, D-sub
15Pin cable, DVI to HDMI cable
5-2. Setting of device
5-3. Preparation for Adjustment
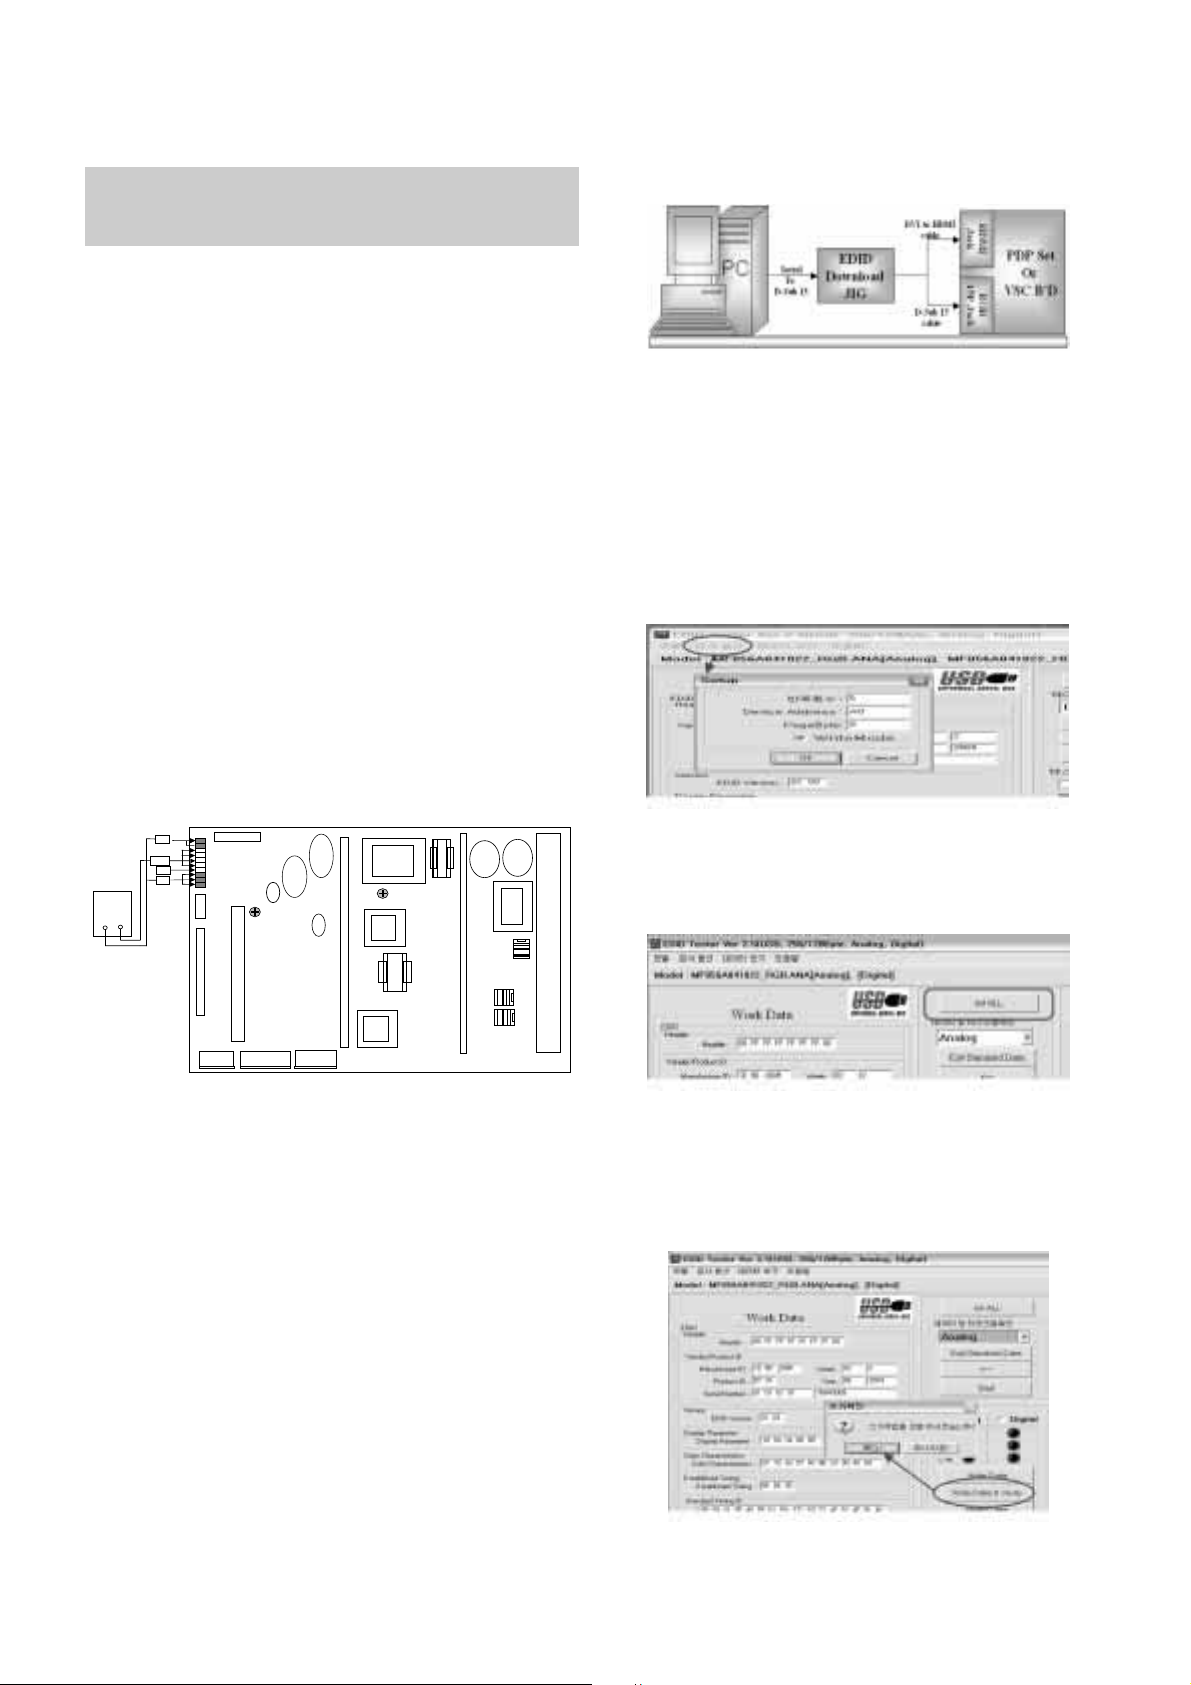
1) As above Fig. 5, Connect the Set, EDID Download Jig, PC
& Cable.
2) Turn on the PC & EDID Download Jig. And Execute the
S/W : EDID TESTER Ver,2.5
3) Set up S/W option
Repeat Number : 5
Device Address : A0
PageByte : 8
4) Power on the Set
5-4. Sequence of Adjustment
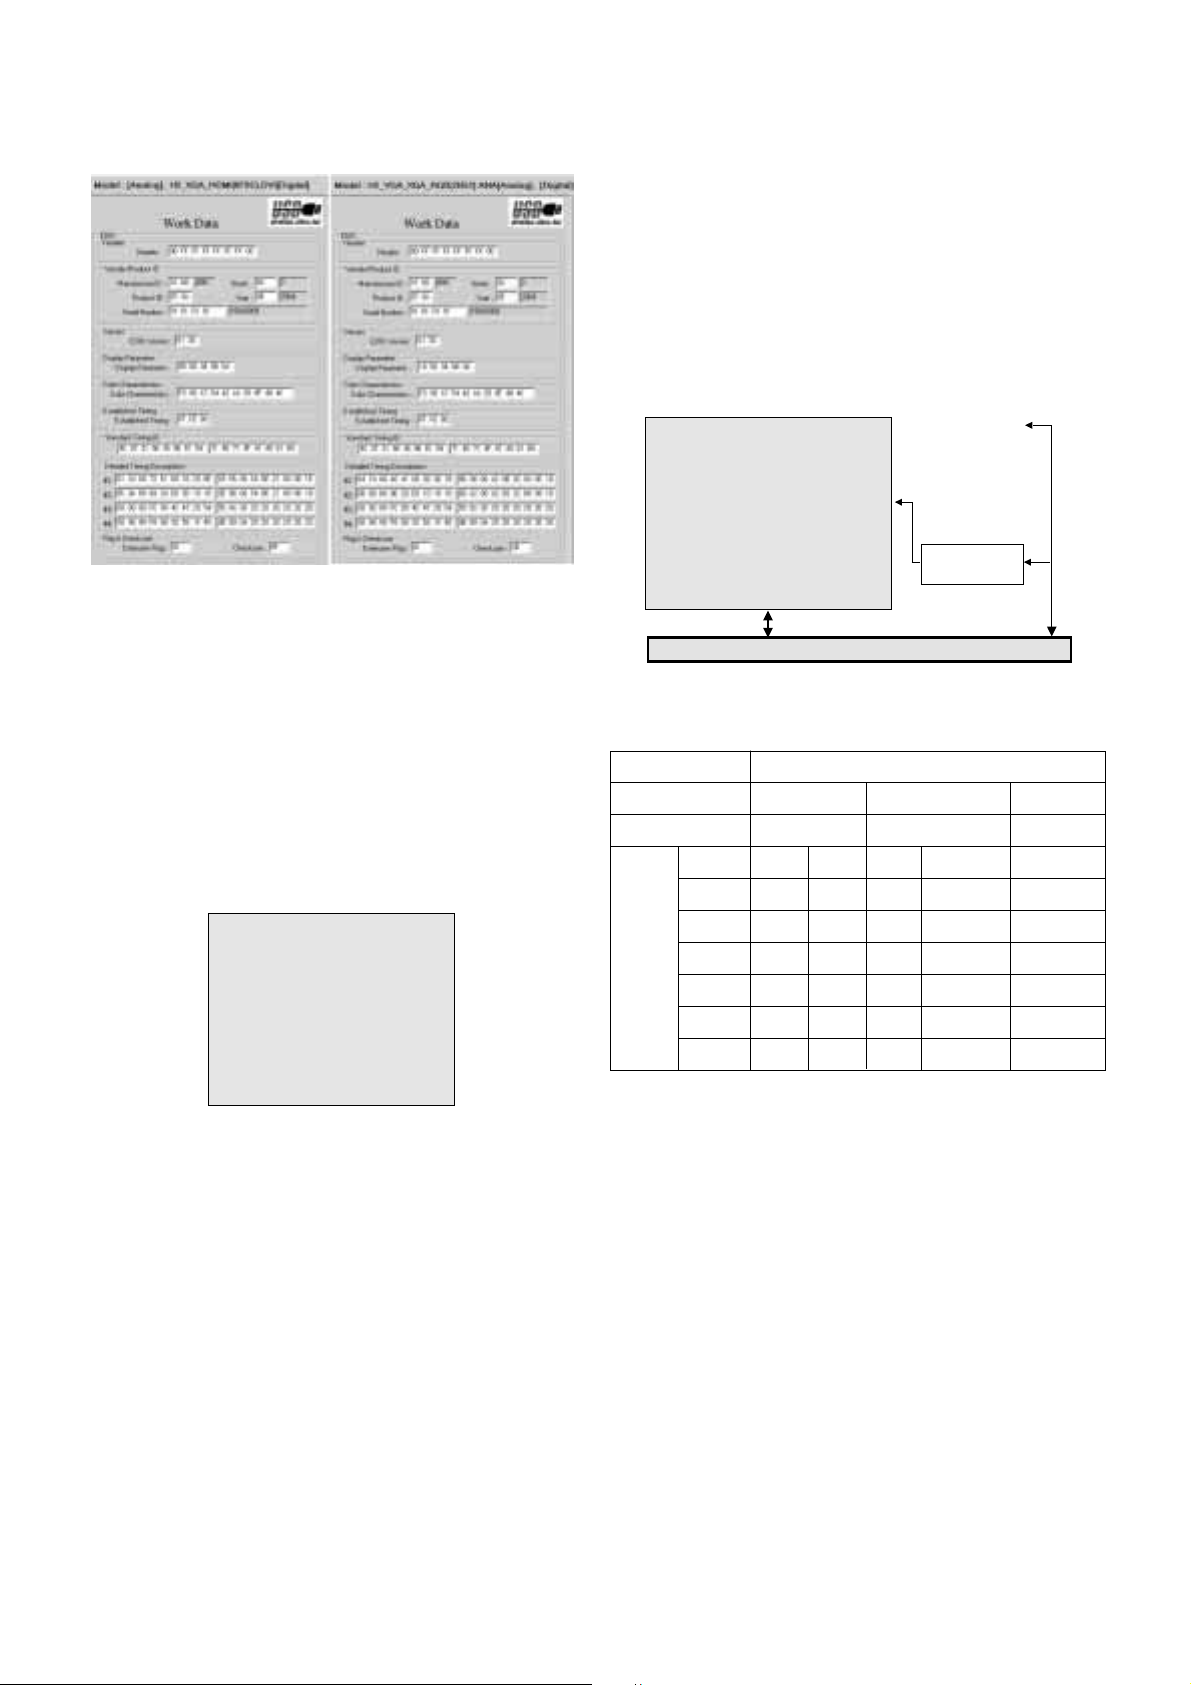
(1) DDC data of Analog-RGB
1) Init the data
2) Load the EDID data.(Open File)
[Analog-RGB : MF056A_RGB.ANA]
[digital(HDMI) : MF056A_DMI.DVI]
3) Set the S/W as below.
4) Push the “Write Data & Verify”button. And confirm “Yes”.
5) If the writing is finished, you will see the “OK” message.
Each PCB assembly must be checked by check JIG set.
(Because power PCB Assembly damages to PDP Module,
especially be careful)
Va ADJ
RV601
P806
P805
P807
Va
GND
NC
VS
DMM
+ -
P804
P801
P802
Vs ADJ
RV401
P803
(Fig. 3) Connection diagram of power adjustment for measuring
(Fig. 4) Connection Diagram of DDC download
Page 12
- 12 -
6. Auto AV(CVBS) Color Balance
6-1. Requirement
- This AV color balance adjustment should be performed
before white Balance Adjustment
6-2. Required Equipment
1) Remote controller for adjustment
2) AV Pattern Generator
: 802F Pattern Generator, Master(MSPG-925FA), etc
(Which has PAL Composite Video format output with
standard(1.0 Vpp) Vertical 100% Color Bar Pattern as Fig6)
6-3. Method of Auto AV(CVBS) Color Balance
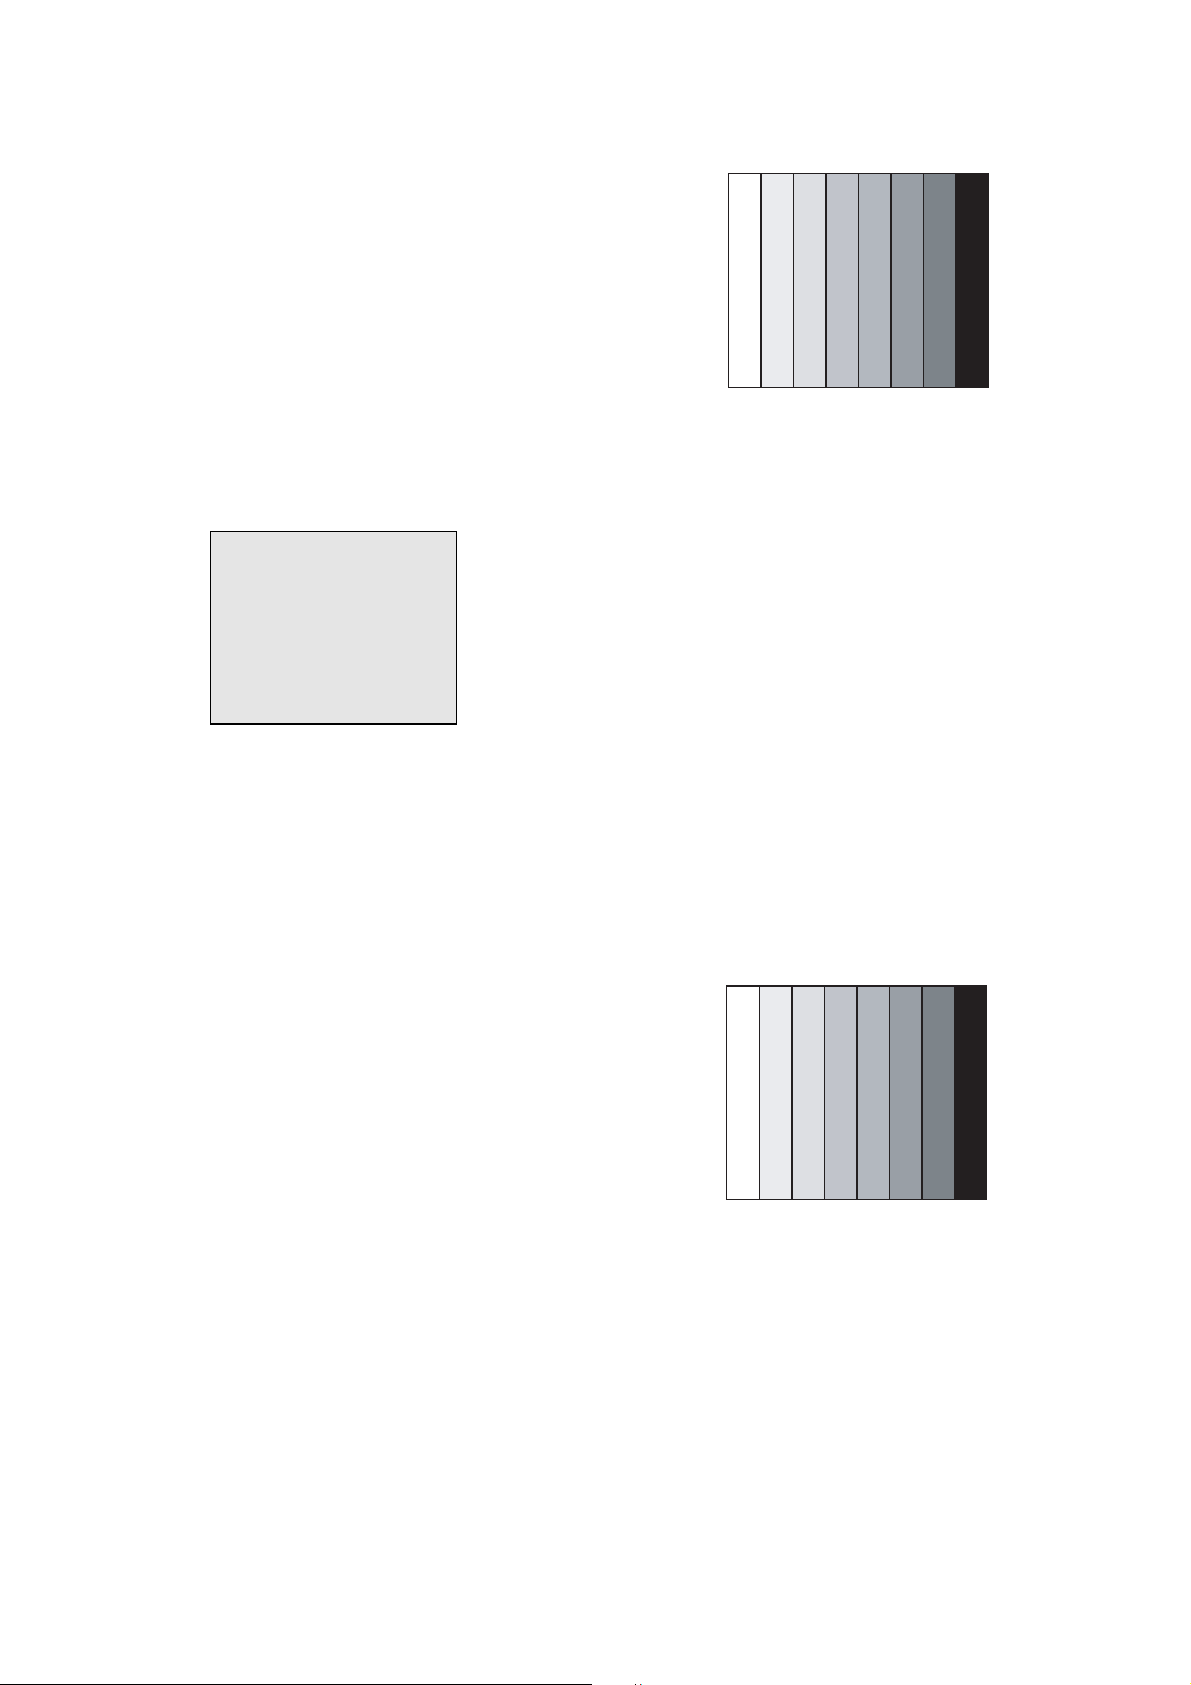
1) Input the PAL Composite Video (Fig6. 100% Color Bar
Pattern) into video input.
(RCA : AV1, SCART : AV3 Input, PAL : 50Hz, NTSC : 60Hz)
2) Set the PSM to Standard mode in Picture menu.
3) Press INSTAR key on R/C for adjustment.
4) Press the
G(Vol. +) key operate to set, then it becomes
automatically.
5) Auto-RGB OK means completed adjustment.
7. Adjustment of White Balance
7-1. Required Equipment
1) Remote controller for adjustment
2) Color Analyzer (CA-100 or same product)
3) Auto W/B adjustment instrument(only for Auto adjustment)
4) AV Pattern Generator
7-2. Connecting diagram of equipment for
measuring (For Auto Adjustment)
W Auto adjustment Map(RS-232C)
7-3. Adjustment of White Balance
(For Manual adjustment)
O Operate the zero-calibration of the CA-100, then stick
sensor to PDP module surface when you adjust.
O For manual adjustment, it is also possible by the following
sequence.
1) Select white pattern of heat-run mode by pressing power
on key on remote control for adjustment then operate heat
run more than 15 minutes.
2) As below Fig.8, Supply 216Level (85 IRE) full screen
pattern to Video input.
(RCA : AV1, SCART, AV3 Input, PAL : 50Hz, NTSC: 60Hz)
3) Press the TV/AV KEY on R/C for converting input mode.
4) Set the PSM to Standard mode in Picture menu.
5) Enter the White Balance adjustment mode by pressing the
INSTART key twice(White Balance) on R/C.
(Fig. 6) Auto AV(CVBS) Color Balance Test Pattern
216 Level (85 IRE)
Type
Baud Rate
115200
Index
R Gain
G Gain
B Gain
R Offset
G Offset
B Offset
Data bit
8
Cmd1 Cmd2
j a
j b
j c
j d
j e
j f
Stop bit
1
Parity
NONE
RF-052A/B/C
Protocol
Setting
Data Min Value
00(00)
00(00)
00(00)
00(00)
00(00)
00(00)
Max Value
255(FF)
255(FF)
255(FF)
255(FF)
255(FF)
255(FF)
(Fig. 7) Connection Diagram of Auto W/B Adjustment
MSPG-2100 /
MSTG-5200
216 Level (85 IRE)
COLOR
ANALYZER
TYPE ; CA-100
CVBS
signal
input
RS-232C Serial Communication
(Fig.5) EDID DATA
Page 13
- 13 -
6) Stick sensor to center of the screen and select each items
(Red/Green/Blue Gain and offset) using
D / E(CH +/-) key
on R/C.
7) Adjust Only High Light with R Gain/ B Gain using
F / G
(VOL+/-) key on R/C.
8) Adjust it until color coordination becomes as below.
(Initially, R/G/B gain and R/G/B offset values are fixed
Red Gain : 82, Green Gain : 80, Blue Gain : 86
Red Offset : 7D, Green Offset : 7E, Blue Offset : 80)
(High Light G Gain : 7A // Low Light R Offset : 7F, G Offset
7E, B Offset 80 is Fixed)
Bright : High Light : 80 ± 20cd
Color-Coordinate : High Light : X : 0.285 ± 0.003
Y : 0.295 ± 0.003
Color Temperature : 9,300°K ± 500°K
9) When adjustment is completed, Exit adjustment mode using
EXIT key on R/C
8. Auto Component Color Balance
[Requirement]
It is very import to use correct adjustment pattern like fig.9
V Within the pattern, color sequence should be aligned
: W-Y-C-G-M-R-BLUE-BLACK
(If color sequence is reversed(Black -> ... > White), reverse
the pattern with REV key, when using Master pattern
generator like MSPG-925)
V If Minimum Black Level and/or Maximum White Level is not
correct, Do select 100% Color Bar Pattern.
8-1. Required Test Equipment
1) Remote controller for adjustment
2) 802F Pattern Generator
(Which has 720p Ypbpr output & PC 1024x768 60Hz with
Standard(0.7Vpp) Vertical 100% Color Bar Pattern as Fig.9)
8-2. Method of auto component color balance
1) Input the Component 720p 100% Color Bar signal into
Component1 or Component2.
2) Set the PSM to Standard mode in Picture menu.
3) Press INSTART key on R/C for adjustment.
4) Press the
G(Vol. +) key operate To set, then it becomes
automatically.
5) Auto-RGB OK means complete adjustment
9. Auto RGB Color Balance
[Requirement]
It is very import to use correct adjustment pattern like fig.9
V Within the pattern, color sequence should be aligned
: W-Y-C-G-M-R-BLUE-BLACK
(If color sequence is reversed(Black -> ... > White), reverse
the pattern with REV key, when using Master pattern
generator like MSPG-925)
V If Minimum Black Level and/or Maximum White Level is not
correct, Do select 100% Color Bar Pattern.
9-1. Required Test Equipment
1) Remote controller for adjustment
2) 802F Pattern Generator
(Which has VGA 60Hz PC Format output with standard
(0.7Vpp) Vertical 16 Gray Scale pattern as Fig.10)
9-2. Method of Auto RGB Color Balance
1) Input the PC 1024x768 60Hz 100%Color bar into RGB.
2) Set the PSM to Standard mode in Picture menu.
3) Press ADJ key on R/C for adjustment.
4) Press the
G(Vol. +) key operate To set, then it becomes
automatically.
5) Auto-RGB OK means completed adjustment.
(Fig. 10) Auto RGB Color Balance Test Pattern
(Fig. 9) Auto Component Color Balance Test Pattern
(Fig. 8) Pattern for Adjustment of White Balance
216 Level (85 IRE)
Page 14
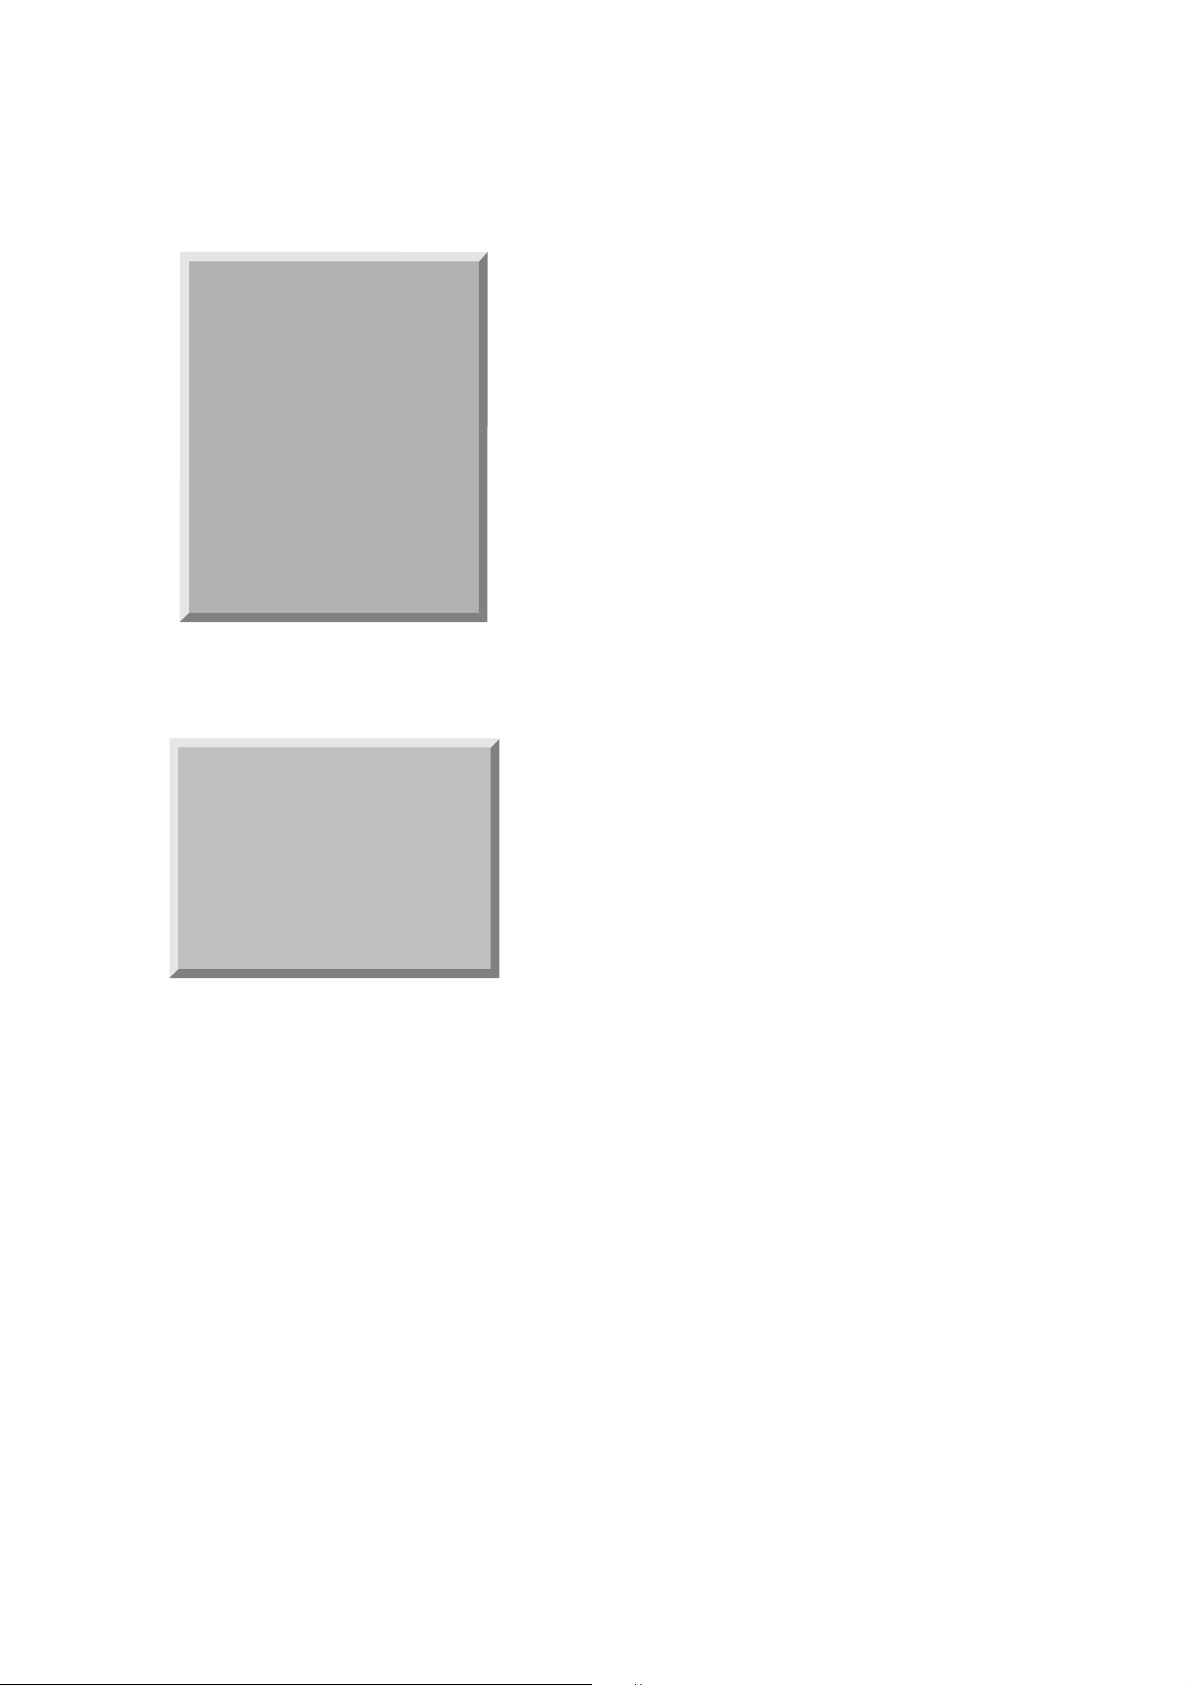
10. Default value in adjustment mode
10-1. Auto Color Balance (Component/RGB)
10-2. White Balance
- 14 -
(Fig. 12) Default Value on OSD
(Fig. 11) Default Value on OSD
Auto Color Balance(HEX)
Auto-RGB G To Set
Source Cortez
Red Offset1 22
Green Offset1 24
Blue Offset1 23
Red Offset2 45
Green Offset2 43
Blue Offset2 37
Red Gain 014
Green Gain 031
Blue Gain 011
Reset G To Set
White Balance(Hex)
Red Gain 82
Red Offset 80
Green Gain 86
Green Offset 7D
Blue Gain 7E
Blue Offset 80
Reset G To Set
Page 15
- 15 -
TROUBLE SHOOTING GUIDE
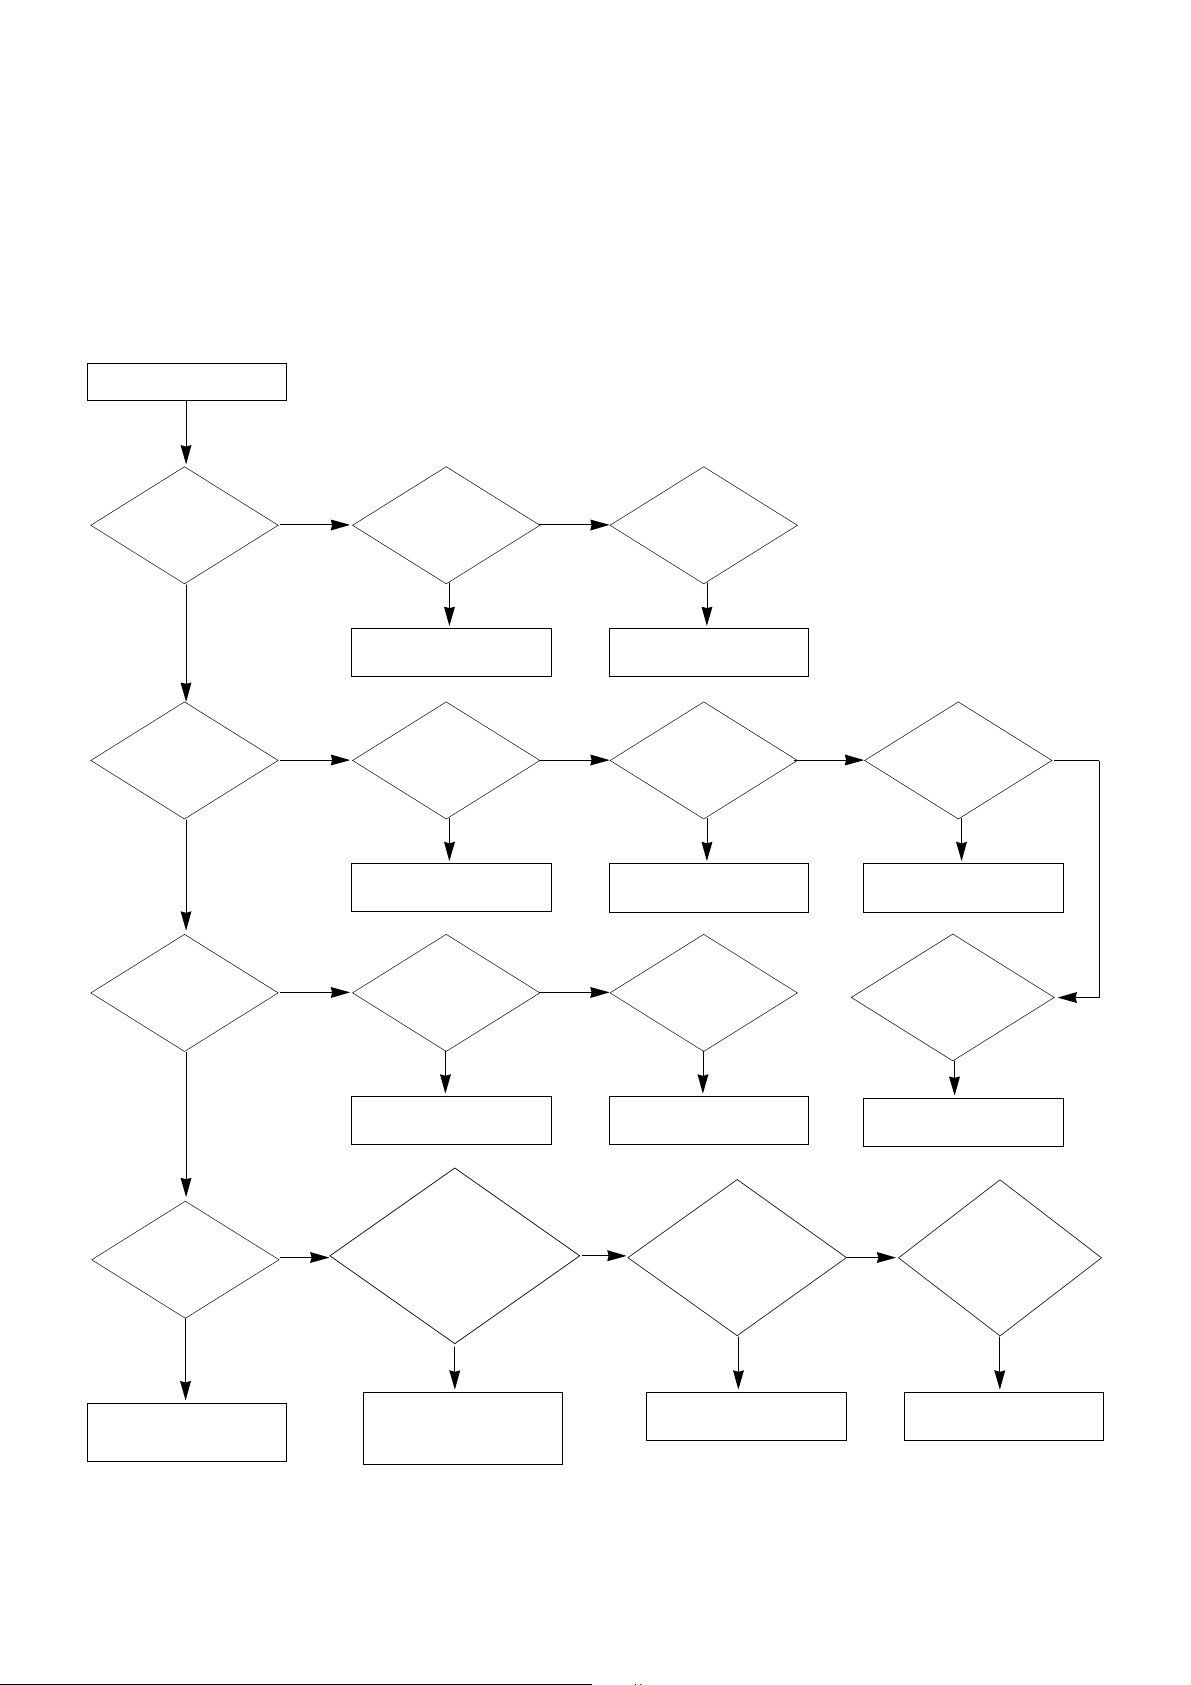
1. Power Board
1-1. The whole flowchart which it follows in voltage output state
Start check
Manufacture enterprise
meaning of a passage
1. Check the Power Off
condition.
Doesn't the
screen whole come
out?
Is it identical
with Power Off
condition?
Yes
Yes
No
No
No
No
No
2. Check the Interface
signal condition.
Is the Interface
signal operated?
Yes
3. Check the St-by 5V
signal circuit.
Doesn't the
low pressure output
come out?
Doesn't the
St-by 5V signal
come out?
Yes
Yes
No
4. Check the 5V Monitor
signal circuit.
Doesn't the
5V Monitor signal
come out?
Yes
7. Check the VSC Vs-ON
signal
Doesn't the
high tension output
come out?
Doesn't the
VSC signal Vs-ON
come out?
Yes
Yes
Does
high tension
output voltage Drop
occur?
When the
Y B/D Module
input connector is
removed, does output
voltage drop
occur?
When the
Y, Z B/D Module
input connector is remove,
does Power Board high tension
output voltage Drop
occur?
Yes No No
9. Check the Power
Board Output high
tension circuit
Yes
10. Check the Z B/D
Module output circuit
Yes
When the
Z B/D Module
input connector is
removed, does output
voltage Drop
occurs?
11. Check the Y B/D
Module output circuit
Yes
No
8. Check the Vs, Va
voltage output circuit.
Doesn't the
Vs, Va voltage output
come out?
Yes
No
No
5. Check the VSC RL-ON
signal.
Doesn't the
VSC signal RL-ON
come out?
Yes
6. Check the VSC low
pressure output
Doesn't the
VSC low pressure
output come out?
Yes
Page 16
- 16 -
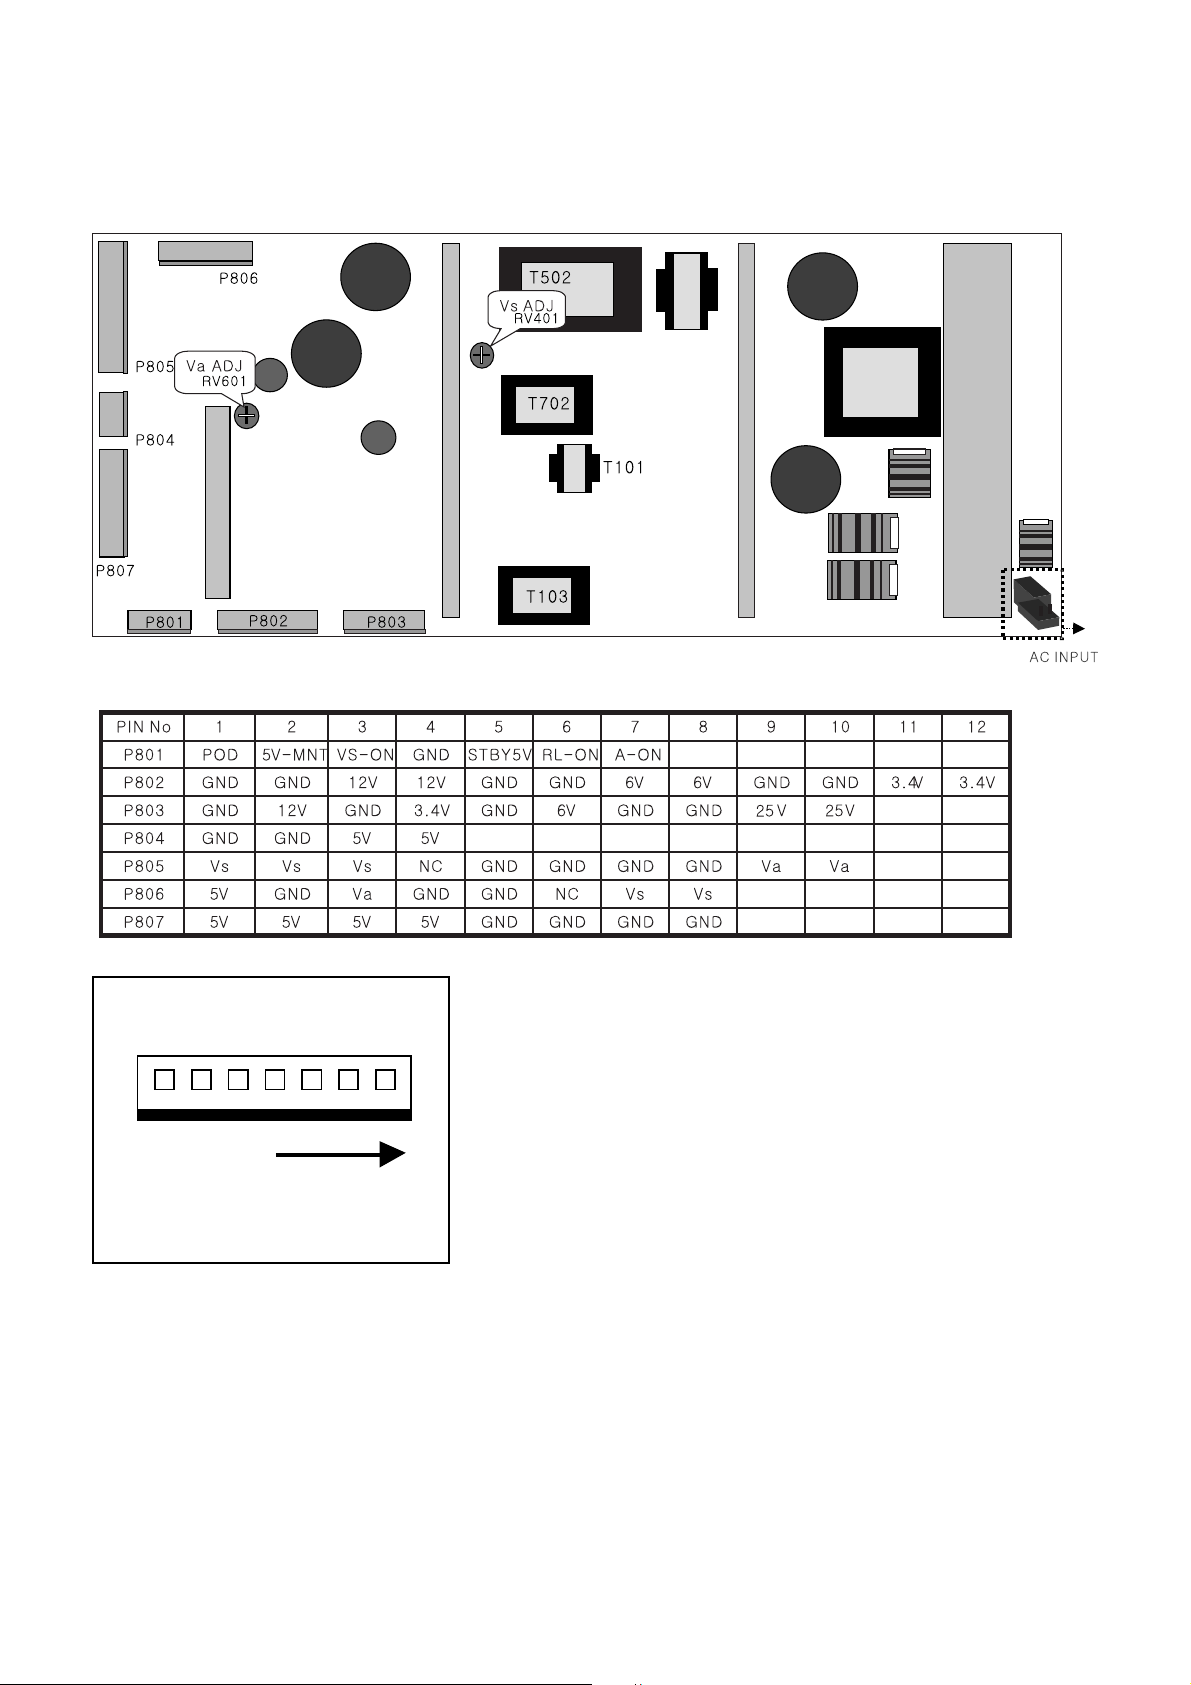
1-2. Sony Power Board Structure
1 2 3
T502: Vs Trans
T702: Va Trans
T101: St-by Trans
T103: Low Voltage Trans
Page 17
- 17 -
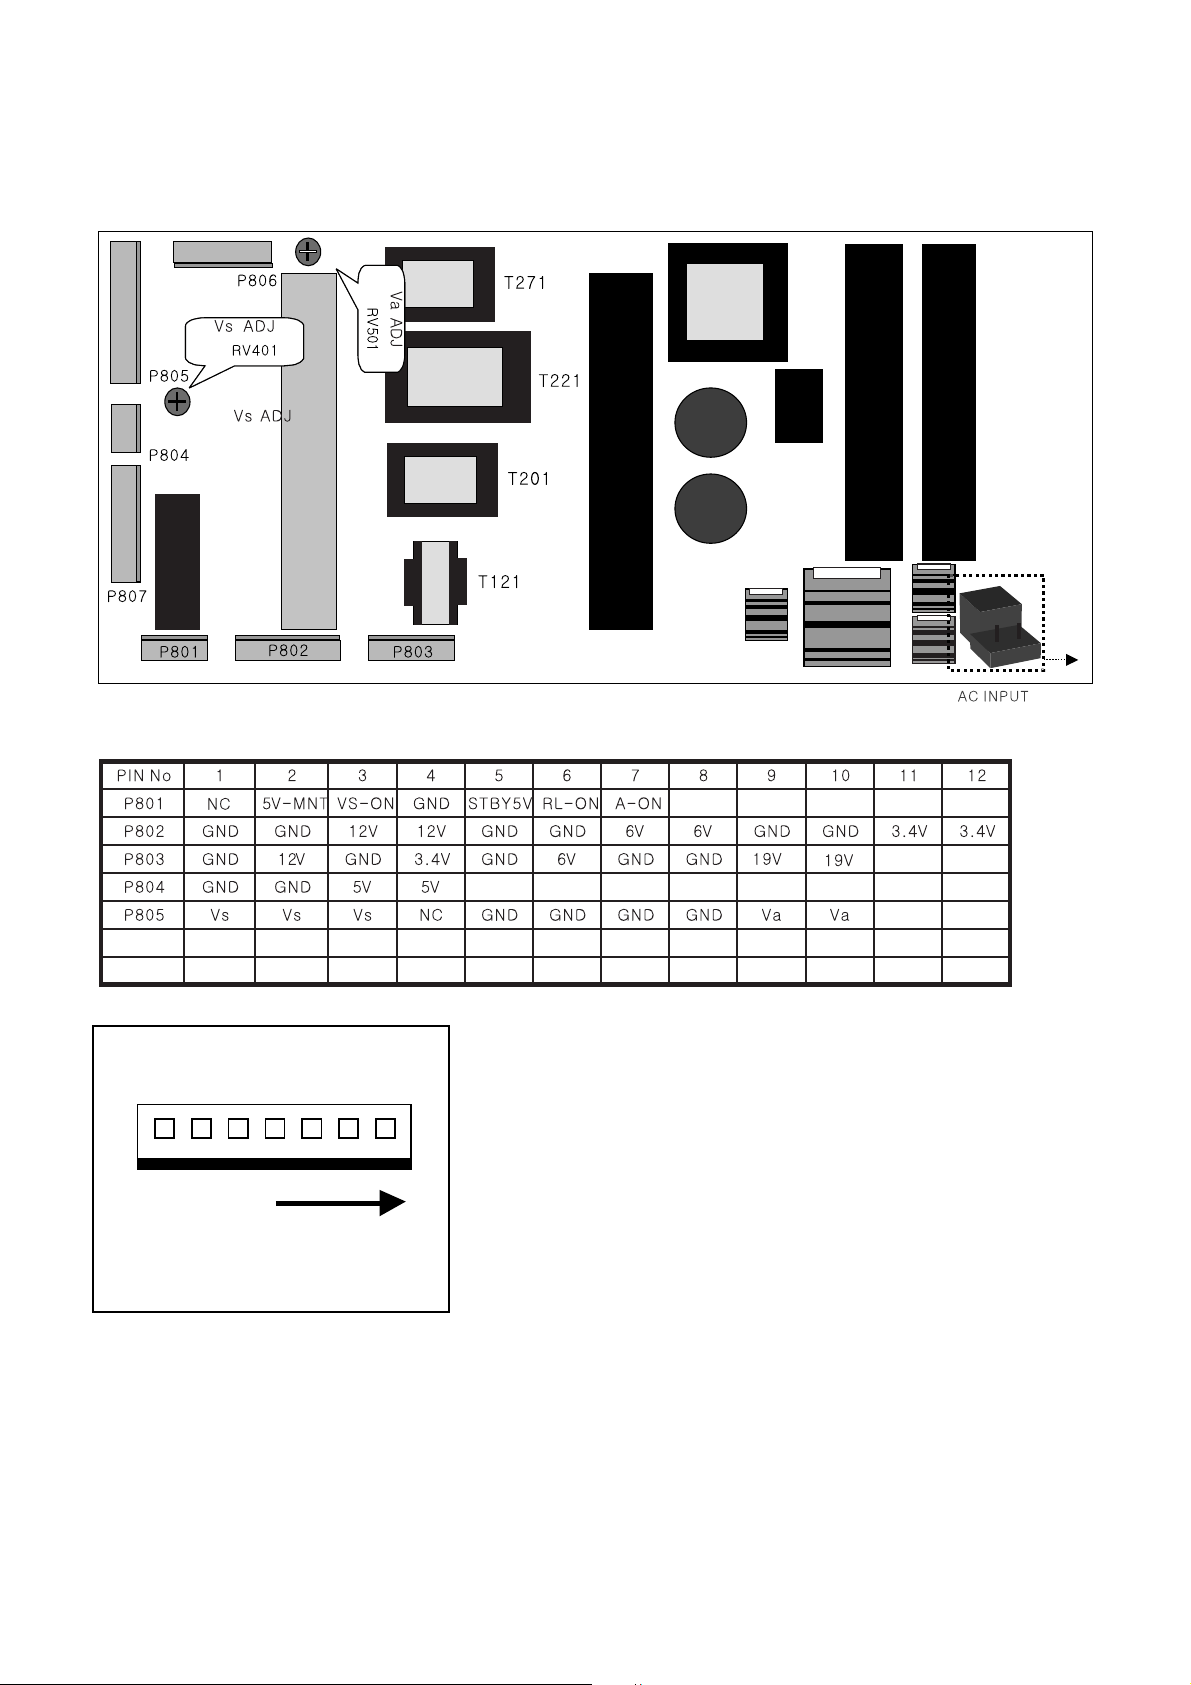
1-3. Sanken, LGIT Power Board Structure
1 2 3
T221: Vs Trans
T271: Va Trans
T121: St-by Trans
T201: Low Voltage Trans
Page 18
- 18 -
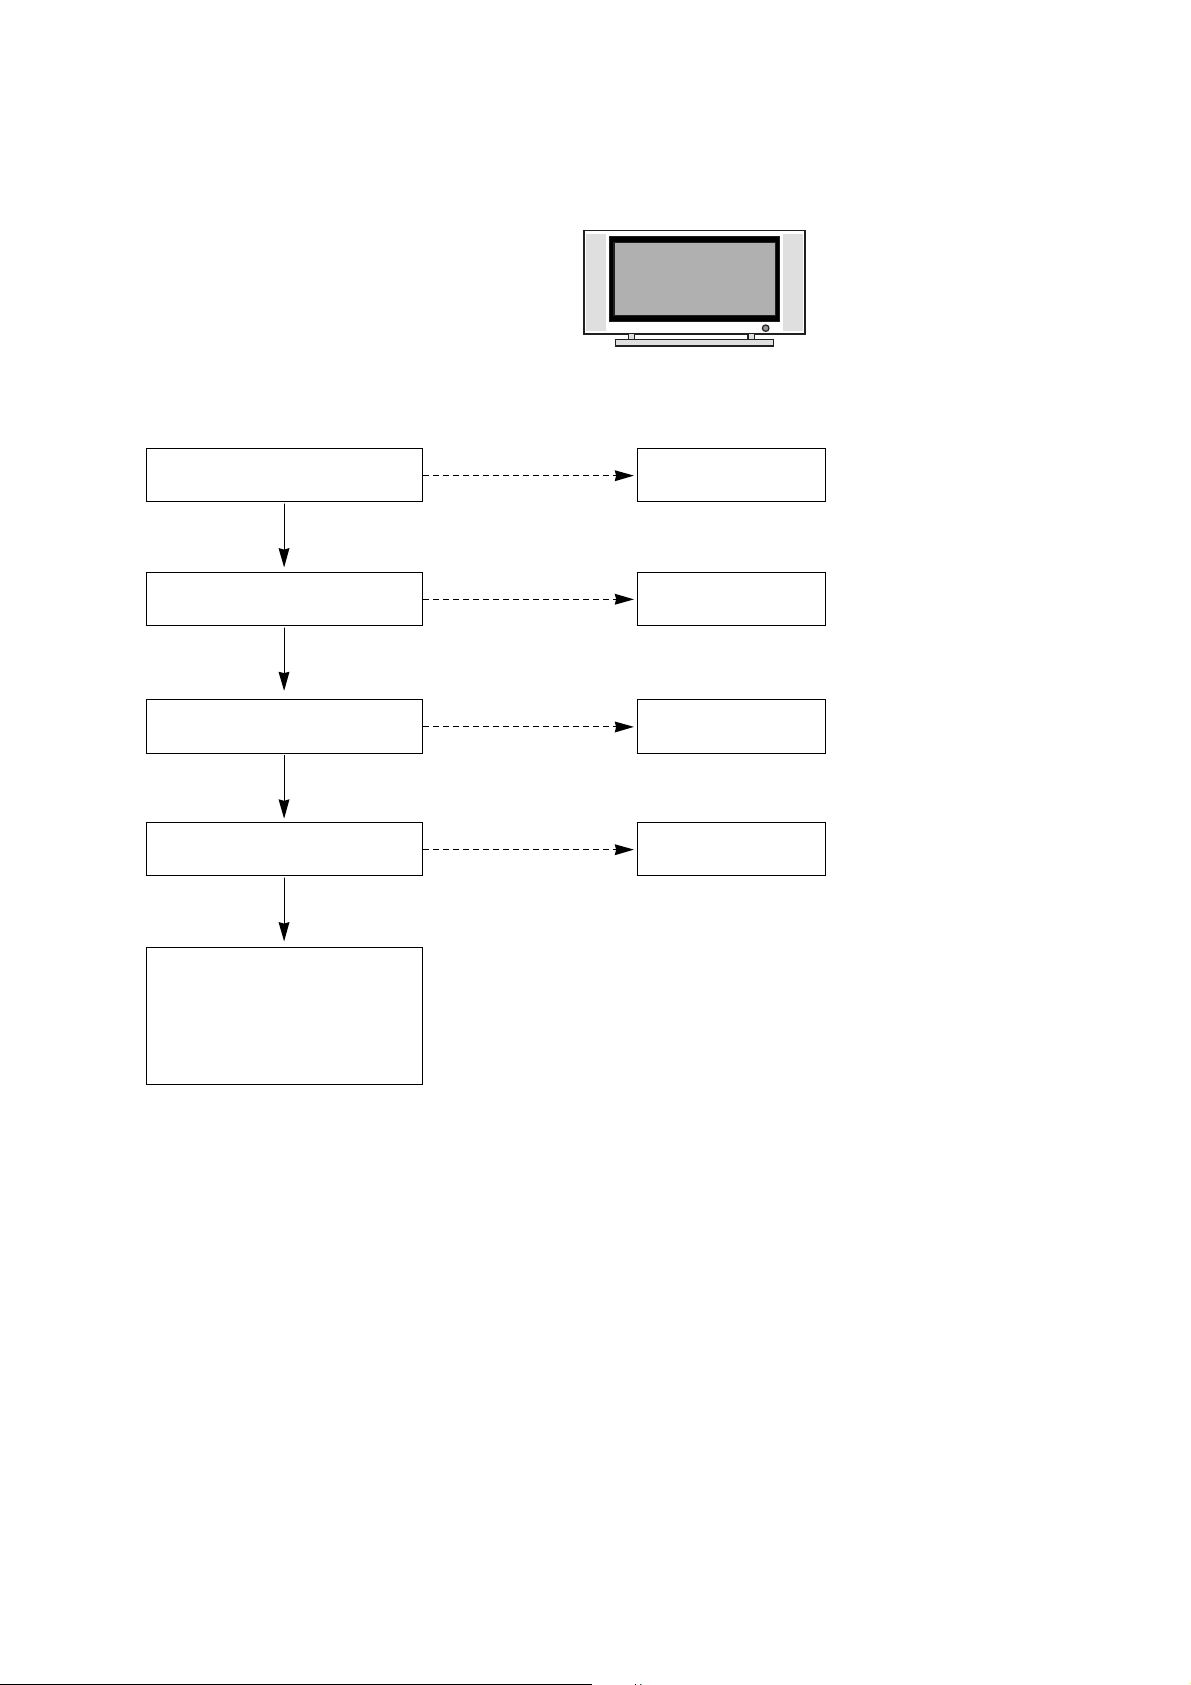
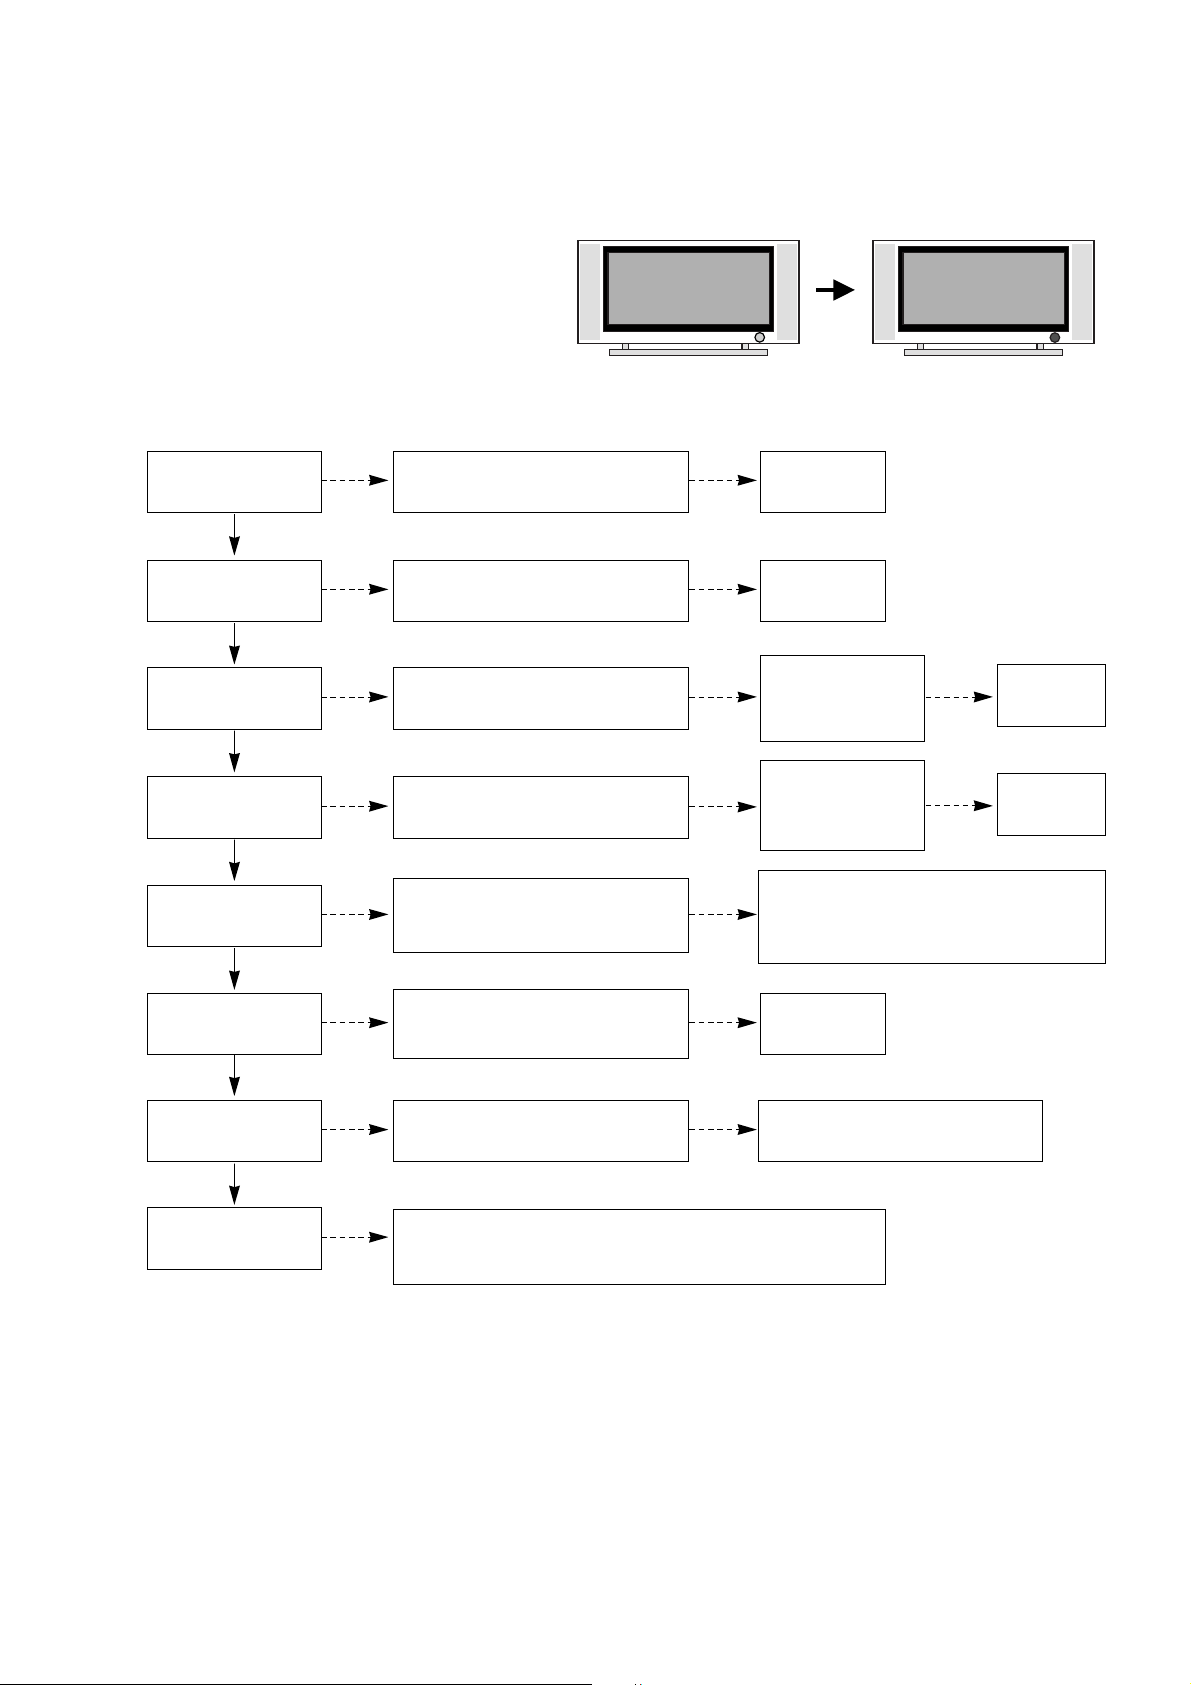
2. No Power
(1) Symptom
Ø Does’t minute discharge at module.
Ø Non does not come in into the front LED.
(2) Check following
Is plug in power cord? Plug in power cord.
Yes
No
Is the Line Filter and Power
Board Cable connected?
Connect the Cable.
Yes
No
Is the Fuse(F101) on
Power Board normal?
Replace the Fuse.
Yes
No
Is the Power Board and 7P of
VSC Board Cable connected?
Connect the Cable.
Yes
No
After the cable connect is removed
to Power Board(except the CN101
connection cable), the AC voltage
marking is authorized on manual.
When ST-BY 5V is not operated,
replace Power Board.
Page 19
- 19 -
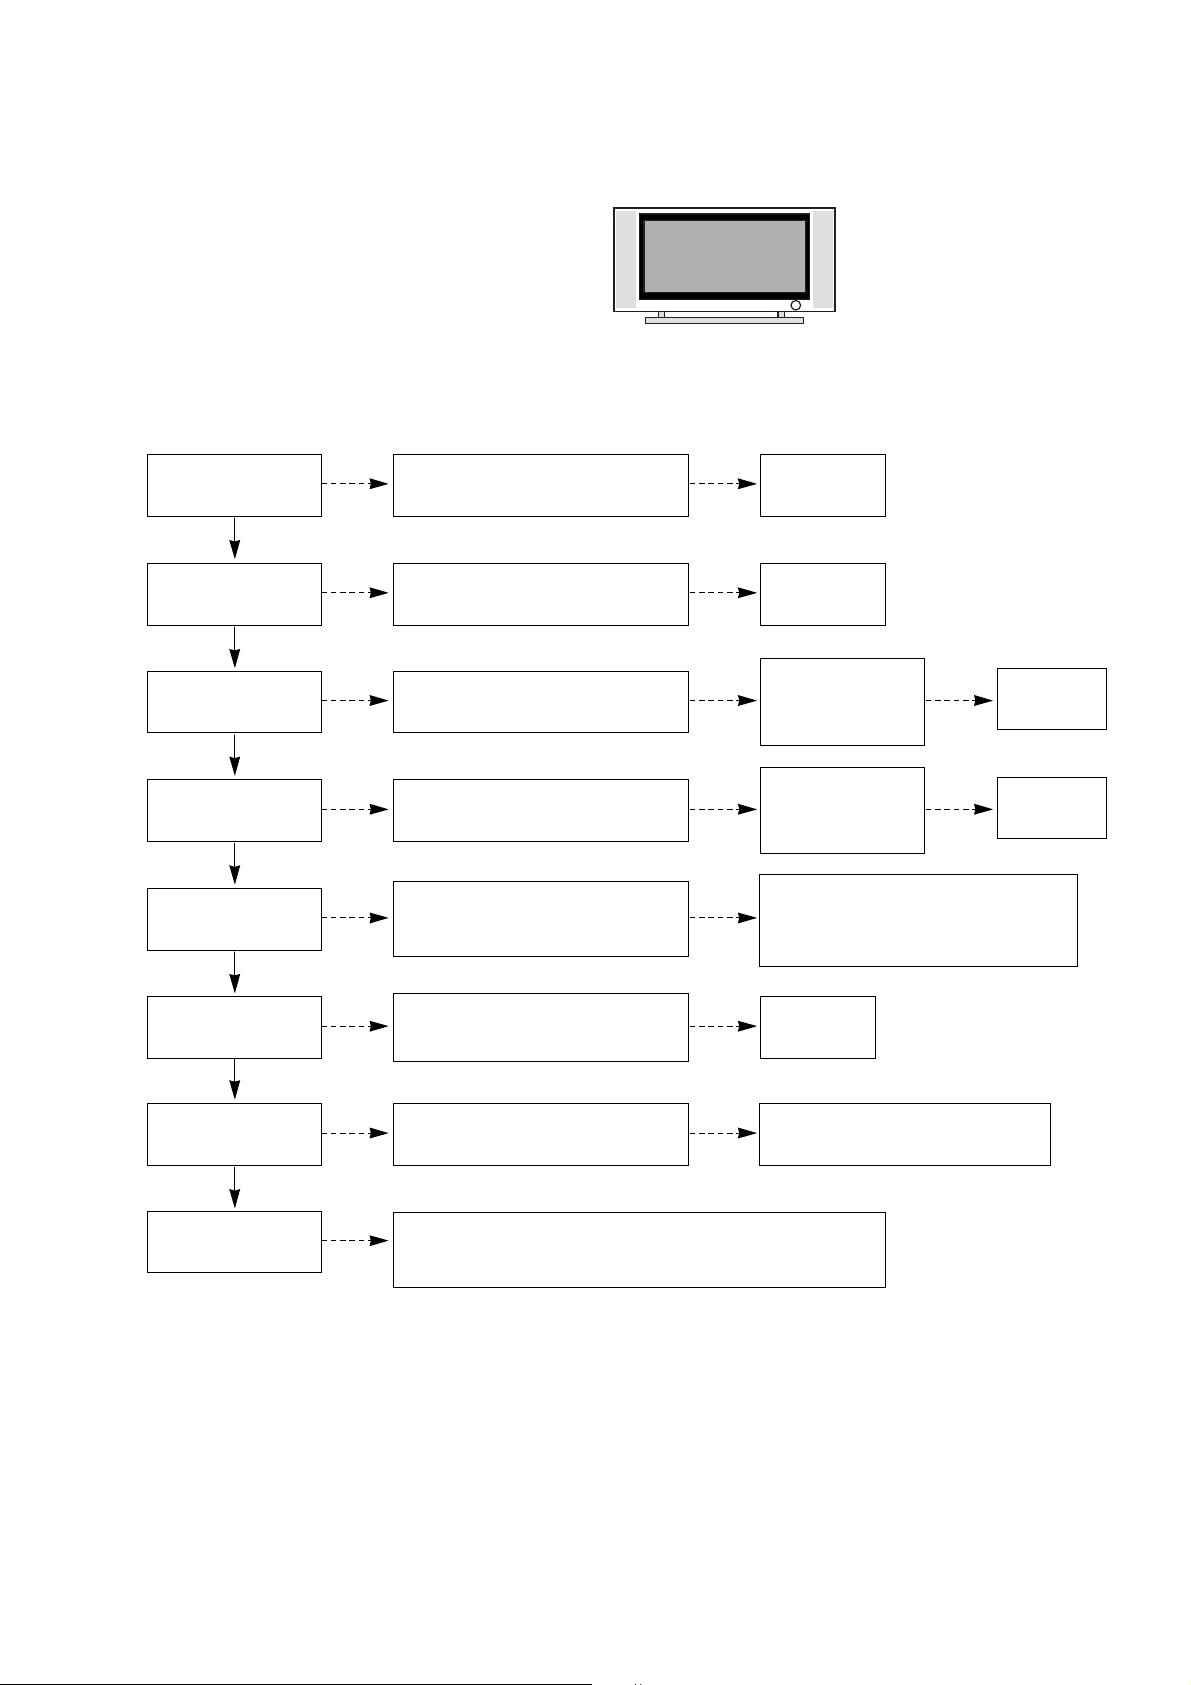
3. Protect Mode
(1) Symptom
Ø After once shining, it does not discharge minutely
from module
Ø The Rely falls(The sound is audible “click”)
Ø It is converted with the color where the front LED
is red from green.
(2) Check following
Is the Power Board
normal ?
Replace Power
Board.
Is output the normality Low/High
voltage except Stand-by 5V?
Yes
No
No
Is the each connector
normal?
Replace the
connector.
Replace
Y-Board.
After connecting well each connector,
the normality it operates?
Yes
No
No
Is the Ctrl Board
normal?
Replace
X-Board.
Is the output voltage normal after
remove P1, 2, 4, 9, 10 connector of
Ctrl-B/D?
Yes
No
Yes
Is the Y-Board
normal?
Is the output voltage
normal after remove
P5, P6 connector of
Y-B/D?
Is the Fuse(FS2) on Y-B/D normal?
(In case of open is replace)
Yes
No
Yes Yes
Replace
Z-Board.
Is the Z-Board
normal?
Is the output voltage
normal after remove
P1 connector of Z-
B/D?
Is the Fuse (FS1, FS2) on Z-B/D
normal? (In case of open is replace)
Yes
No
Yes
Is the X- Board
normal?
Is the output voltage normal after
remove P1, 2, 3, 4, 5 connector of
X-B/D?
After remove P1, P2, P3 output voltage
normality: Replace Right X-B/D
After remove P4, P5 output voltage
normality: Replace Left X-B/D
Yes
No
Yes
Is the
VSC Board normal?
Is the output voltage normal after
remove P1001, P1100?
After crisis COF of each board, check the normality operates.
If in case normality operates, correspondence COF Fail is
replace the module.
After remove P1001, 1100 normal
operation: Replace VSC Board
Yes
No
Is the COF of X, Y, Z
normal ?
No
Yes
Yes
Page 20
- 20 -
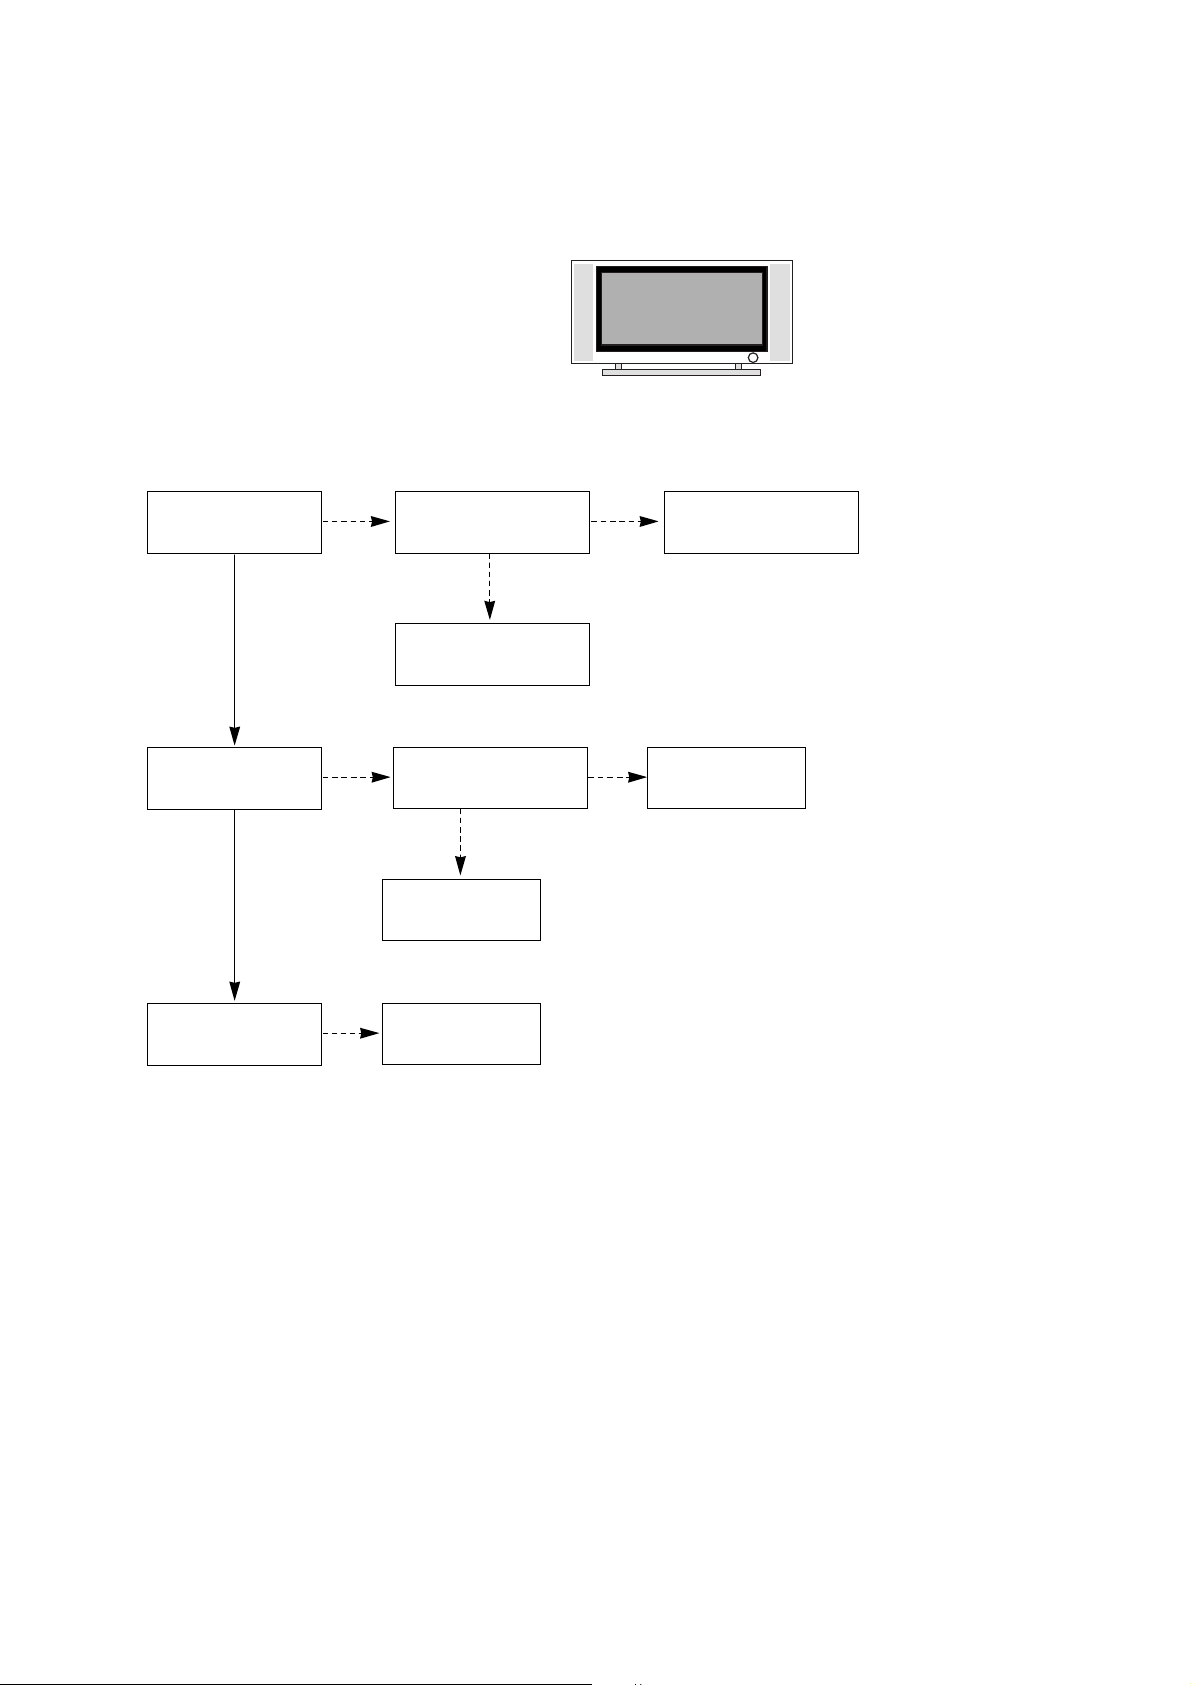
4. No Raster
(1) Symptom
Ø Does’t minute discharge at module.
Ø It maintains the condition where the front LED is green.
(2) Check following
Is the Power Board
normal?
Replace the
Power Board.
Is output the normality Low/High
voltage except Stand-by 5V?
Yes
No
No
Is the each connector
normal?
Replace the
connector.
Replace
Y-Board.
After connecting well each connector,
the normality it operates?
Yes
No
No
Is the
Ctrl Board normal?
Replace
X-Board.
Is the output voltage normal after
remove P1, 2, 4, 9, 10 connector of
Ctrl-B/D?
Yes
No
Yes
Is the Y-Board
normal?
Is the output voltage
normal after remove
P5, P6 connector of
Y-B/D?
Is the Fuse(FS2) normal on Y-B/D?
(In case of open is replace)
Yes
No
Yes Yes
Replace
Z-Board.
Is the
Z- Board normal?
Is normal the output
voltage after remove
P1 connector of
Z-B/D?
Is the Fuse(FS1, FS2) normal on
Z-B/D? (In case of open is replace)
Yes
No
Yes
Is the
X- Board normal?
Is the output voltage normal after
remove P1, 2, 3, 4, 5 connector of
X-B/D?
After remove P1, P2, P3 output voltage
normality: Replace Right X-B/D
After remove P4, P5 output voltage
normality: Replace the Left X-B/D
Yes
No
Yes
Is the
VSC Board normal?
Is the output voltage normal after
remove P1001, P1100?
After crisis COF of each board, check the normality operates.
If in case normality operates, correspondence COF Fail is
replace the module.
After remove P1001, P1100 normal
operation: Replace the VSC Board
Yes
No
Is the COF of X, Y, Z
normal?
No
Yes
Yes
Page 21
- 21 -
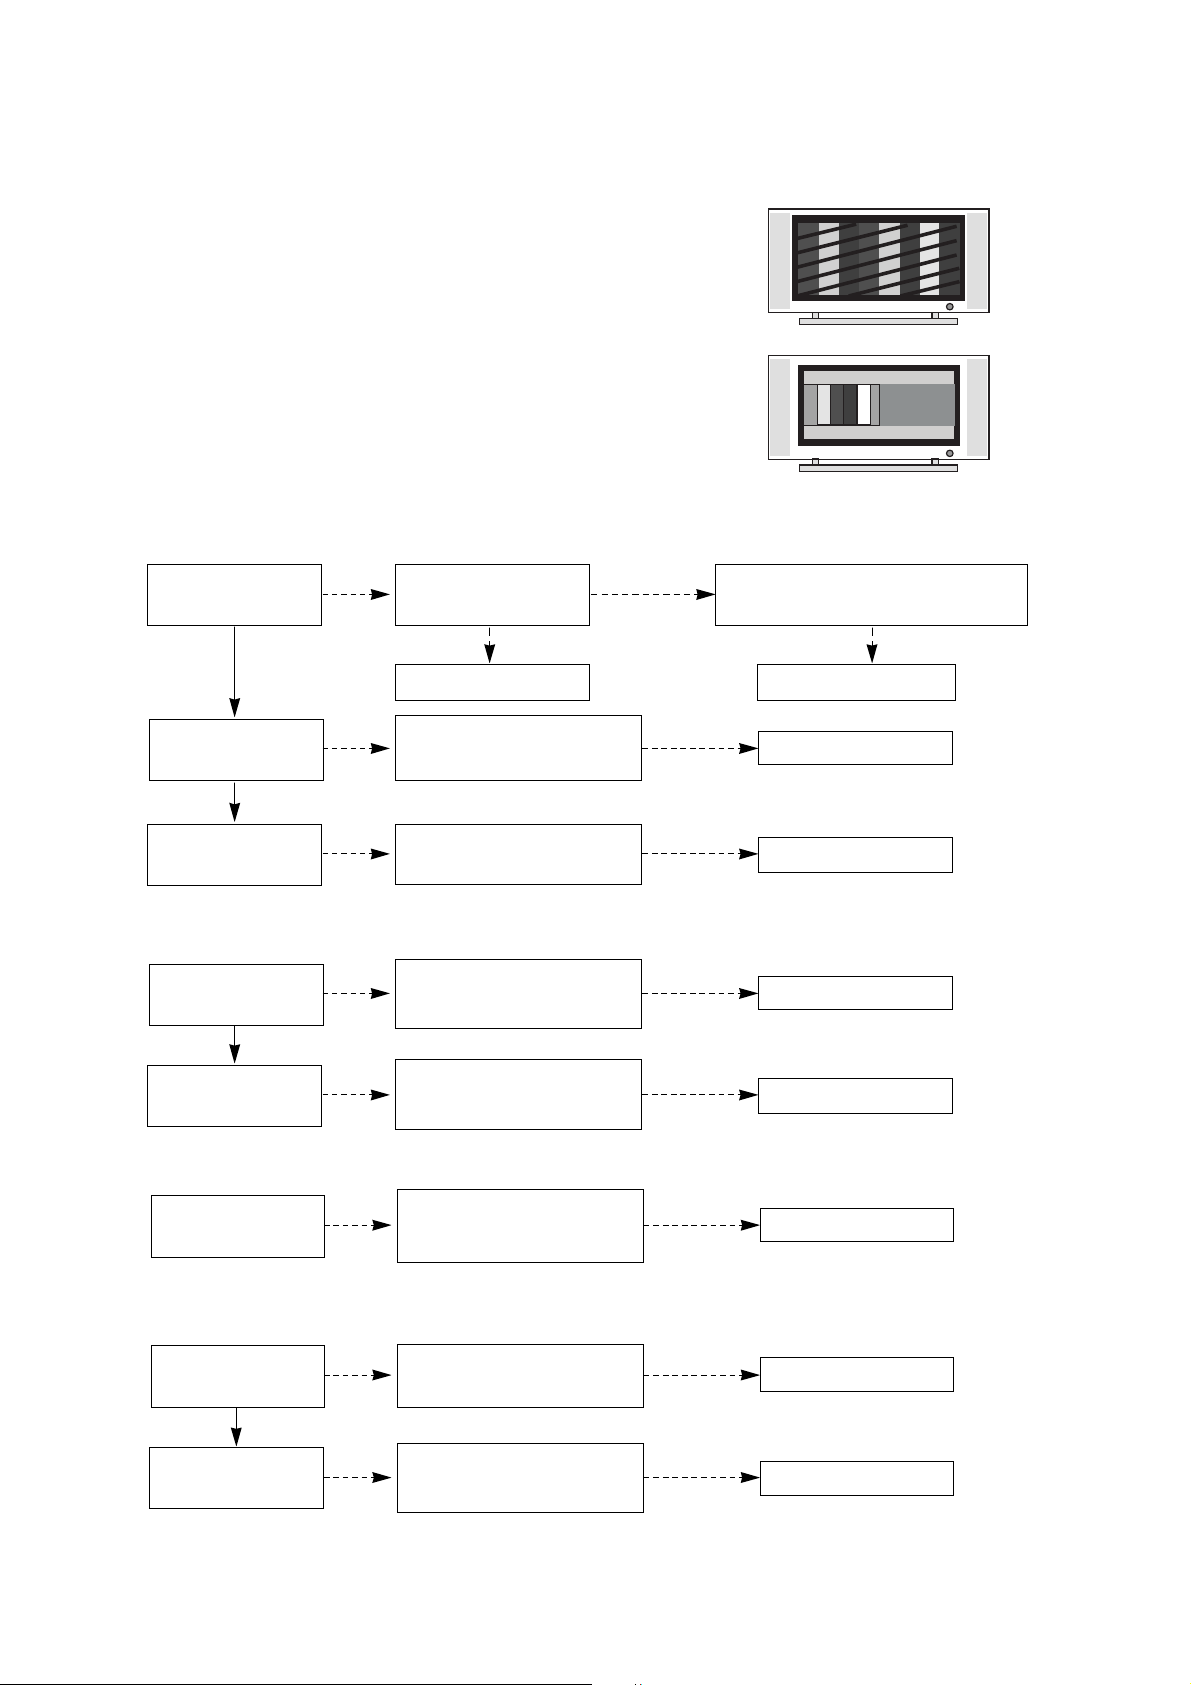
5. In case of occurring strange screen into specific mode
5-1. In case the OSD does not displayed
(1) Symptom
Ø LED is green
Ø The minute discharged continuously becomes
accomplished from module
(2) Check following
Is the LVDS cable
normal ?
Is the VSC Board
normal?
Is the LVDS cable
connected well?
Cable inserts well.
Yes
No
No
Yes
Does the FIL8532 IC
(IC800) Operates ?
Replace FIL8532
IC(IC800).
No
Is the Ctrl Board of
Module normal?
Replace Ctrl B/D.
No
No
Yes
Replace VSC B/D
Replace the cable.
Yes
Page 22
- 22 -
5-2. In case of does’t display the screen into specific mode
(1) Symptom
Ø The screen does not become the display from specific input mode
(RF, AV, Component, RGB, DVI).
(2) Check following
Ø Check the all input mode should become normality display
.
Ø Check the Video(Main)/Data(Sub), Video(Main)/Video(Sub) should become
normality display from the PIP mode or DW mode. (Re-Check it Swap)
(3) In case of becomes unusual display from RF mode
(4) In the case of becomes unusual display from RF, AV mode
(5) In the case of becomes unusual display from Component, RGB mode
(6) In the case of becomes unusual display from HDMI mode
Is the Tuner normal?
Is the CXA2069Q
normal?
Is the Tuner Cable
connected well?
Cable inserts well.
Yes
No
No
Yes
Is the FIL8532
normal?
Replace the Tuner
No
Is the Input voltage, IIC Communication
and CVBS output normal?
Yes
Is the Input voltage, IIC
Communication and HV sync
normal?
No
Replace the IC
No
Is normal the Input voltage, IIC
Communication and HV sync?
No
Replace the IC
No
Is the CXA2069Q
normal?
Yes
Is the FIL8532
normal?
Is the Input voltage, IIC
Communication and HV sync
normal?
No
Replace the IC
No
Is the Input voltage, IIC
Communication and HV sync
normal?
No
Replace the IC
No
Is the FIL8532
normal?
Is the Input voltage, IIC
Communication and HV sync
normal?
No
Replace the IC
No
Is the Sil9011
normal?
Yes
Is the FIL8532
normal?
Is the Input voltage, IIC
Communication and HV sync
normal?
No
Replace the IC
No
Is the Input voltage, IIC
Communication and HV sync
normal?
No
Replace the IC
No
Page 23
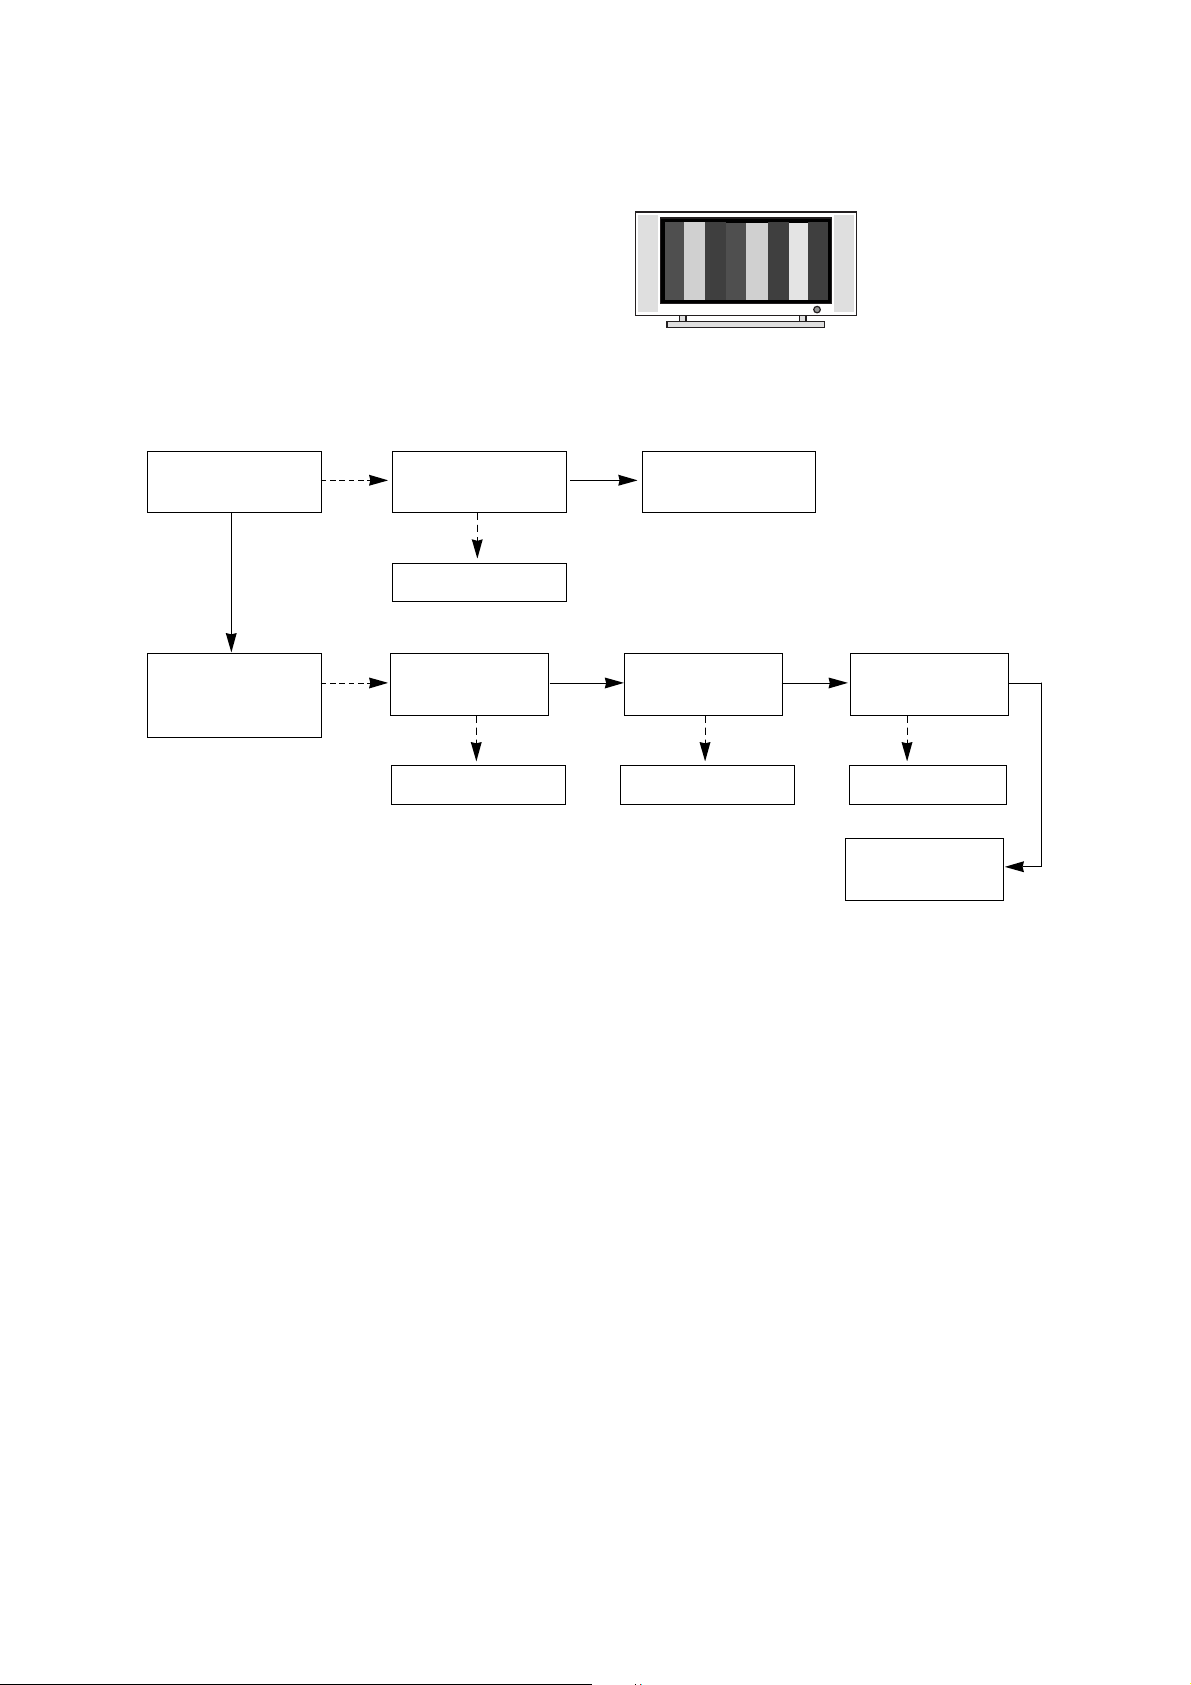
- 23 -
6. In case of no sound
(1) Symptom
Ø LED is green
Ø Screen display but sound is not output
(2) Check following
Is the SPK cable
normal?
Is the SPK cable
connected well?
Cable inserts well.
No
No
Replace IC400
No
Replace IC401
No
Replace SPK cable
Yes
Yes
Is the RF/ AV/
Component/ RGB/
HDMI sound normal?
No
Does IC400
Operates ?
Does IC401
Operates ?
Replace IC402
No
Does IC402
Operates ?
Replace
VSC B/D
Yes Yes
Page 24
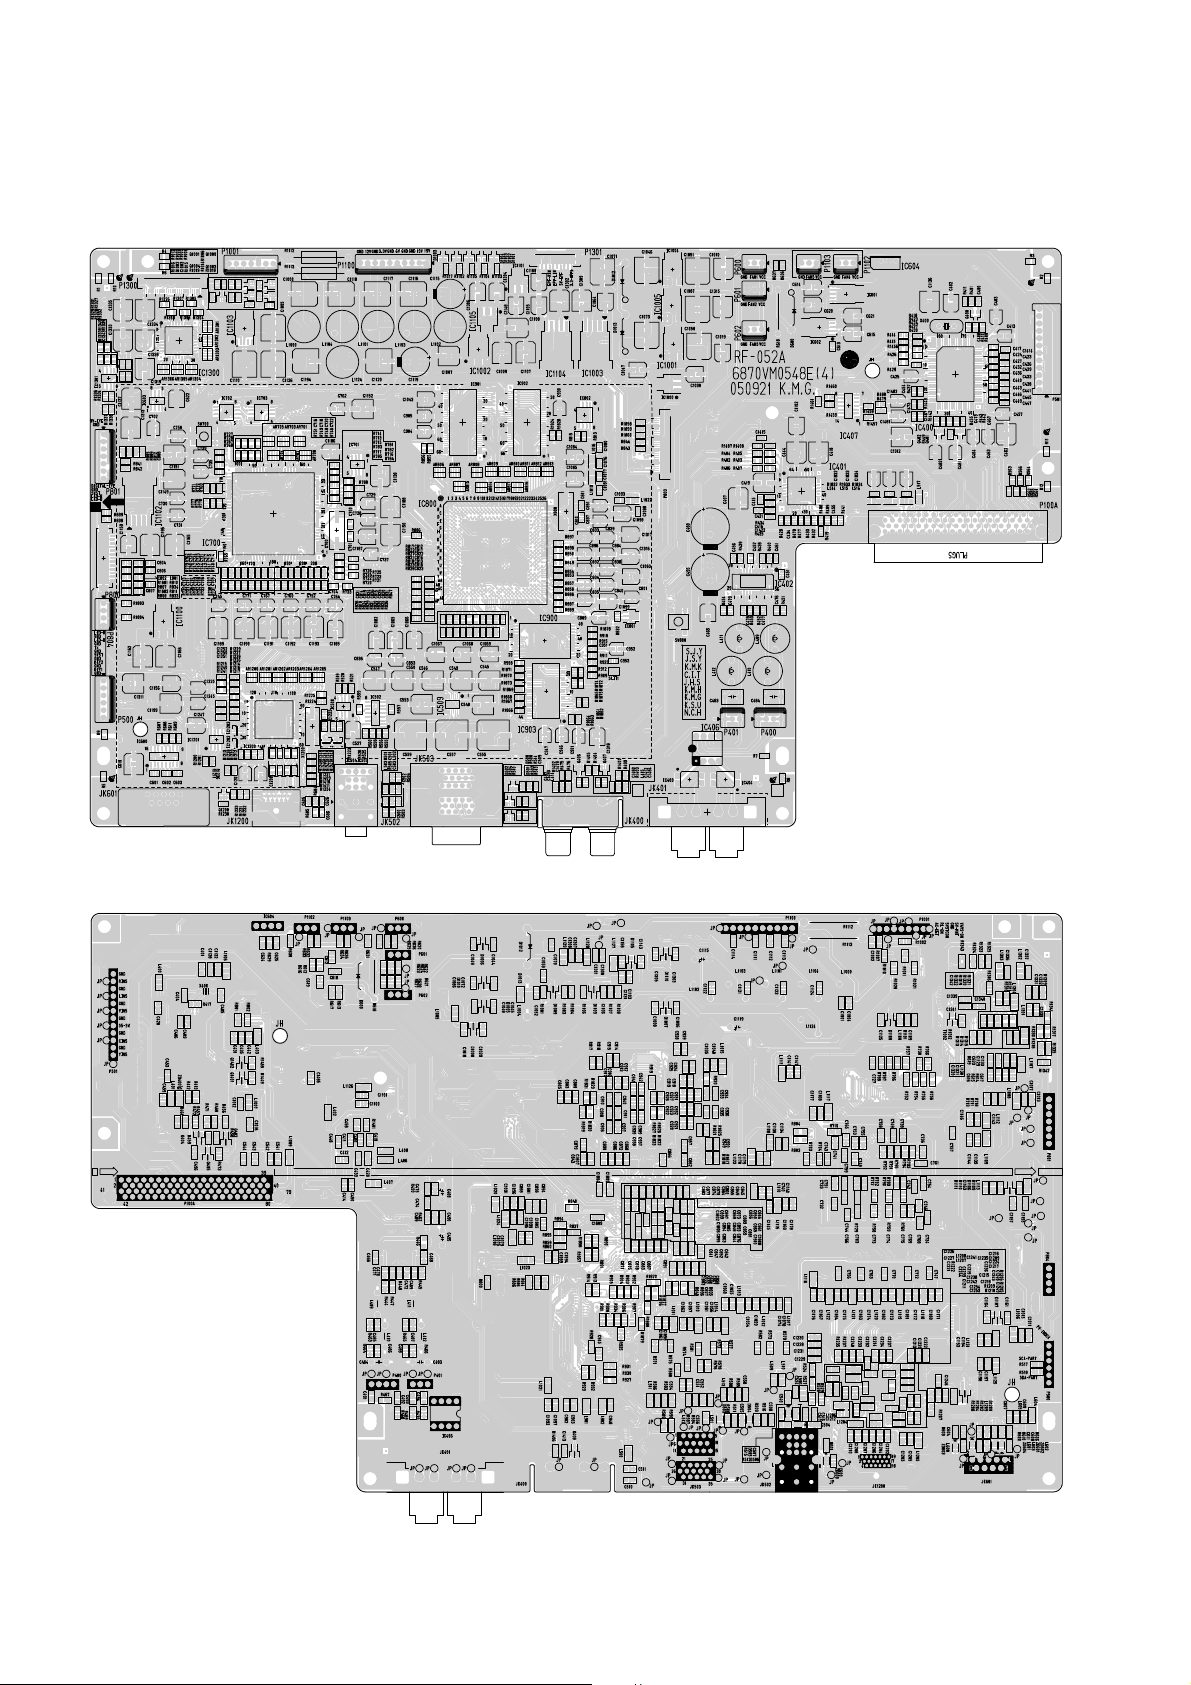
PRINTED CIRCUIT BOARD
- 24 -
MAIN(TOP)
MAIN(BOTTOM)
Page 25
- 25 -
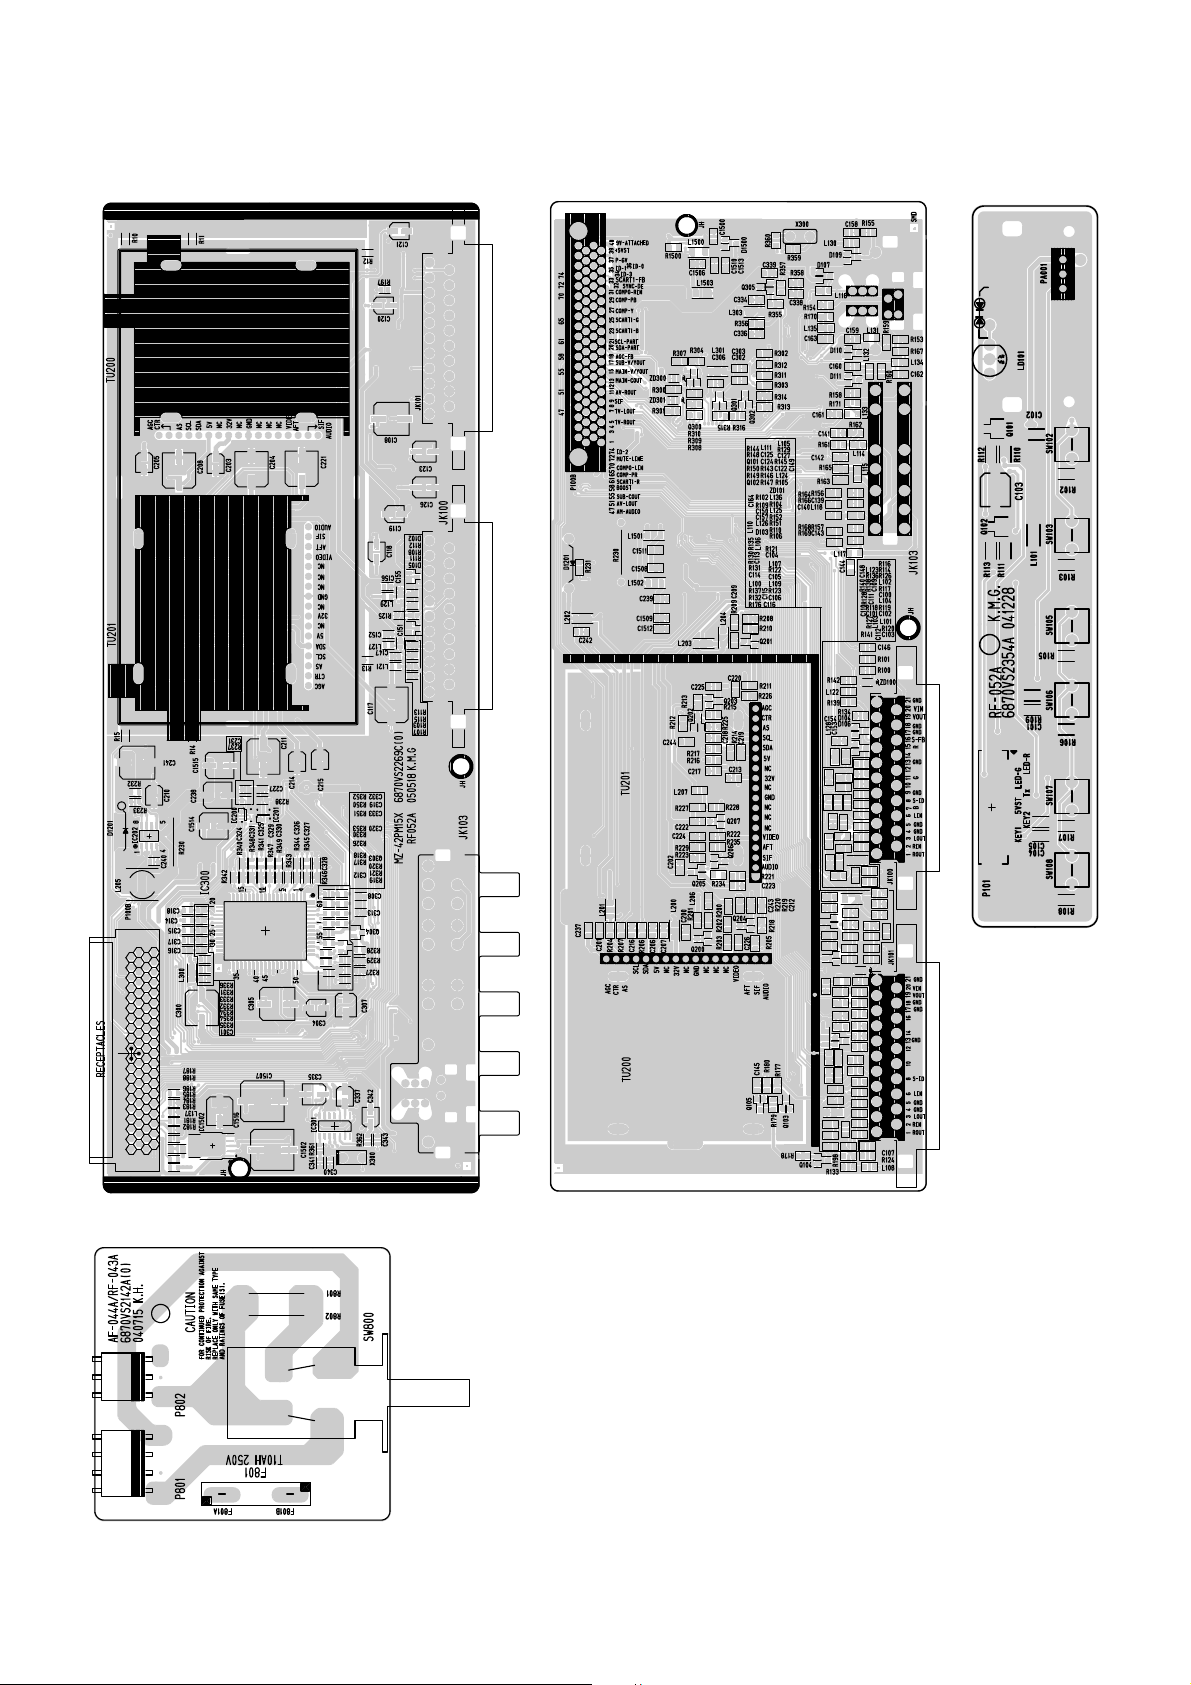
RCA(TOP) RCA(BOTTOM) CONTROL
POWER SWITCH
Page 26
- 26 -
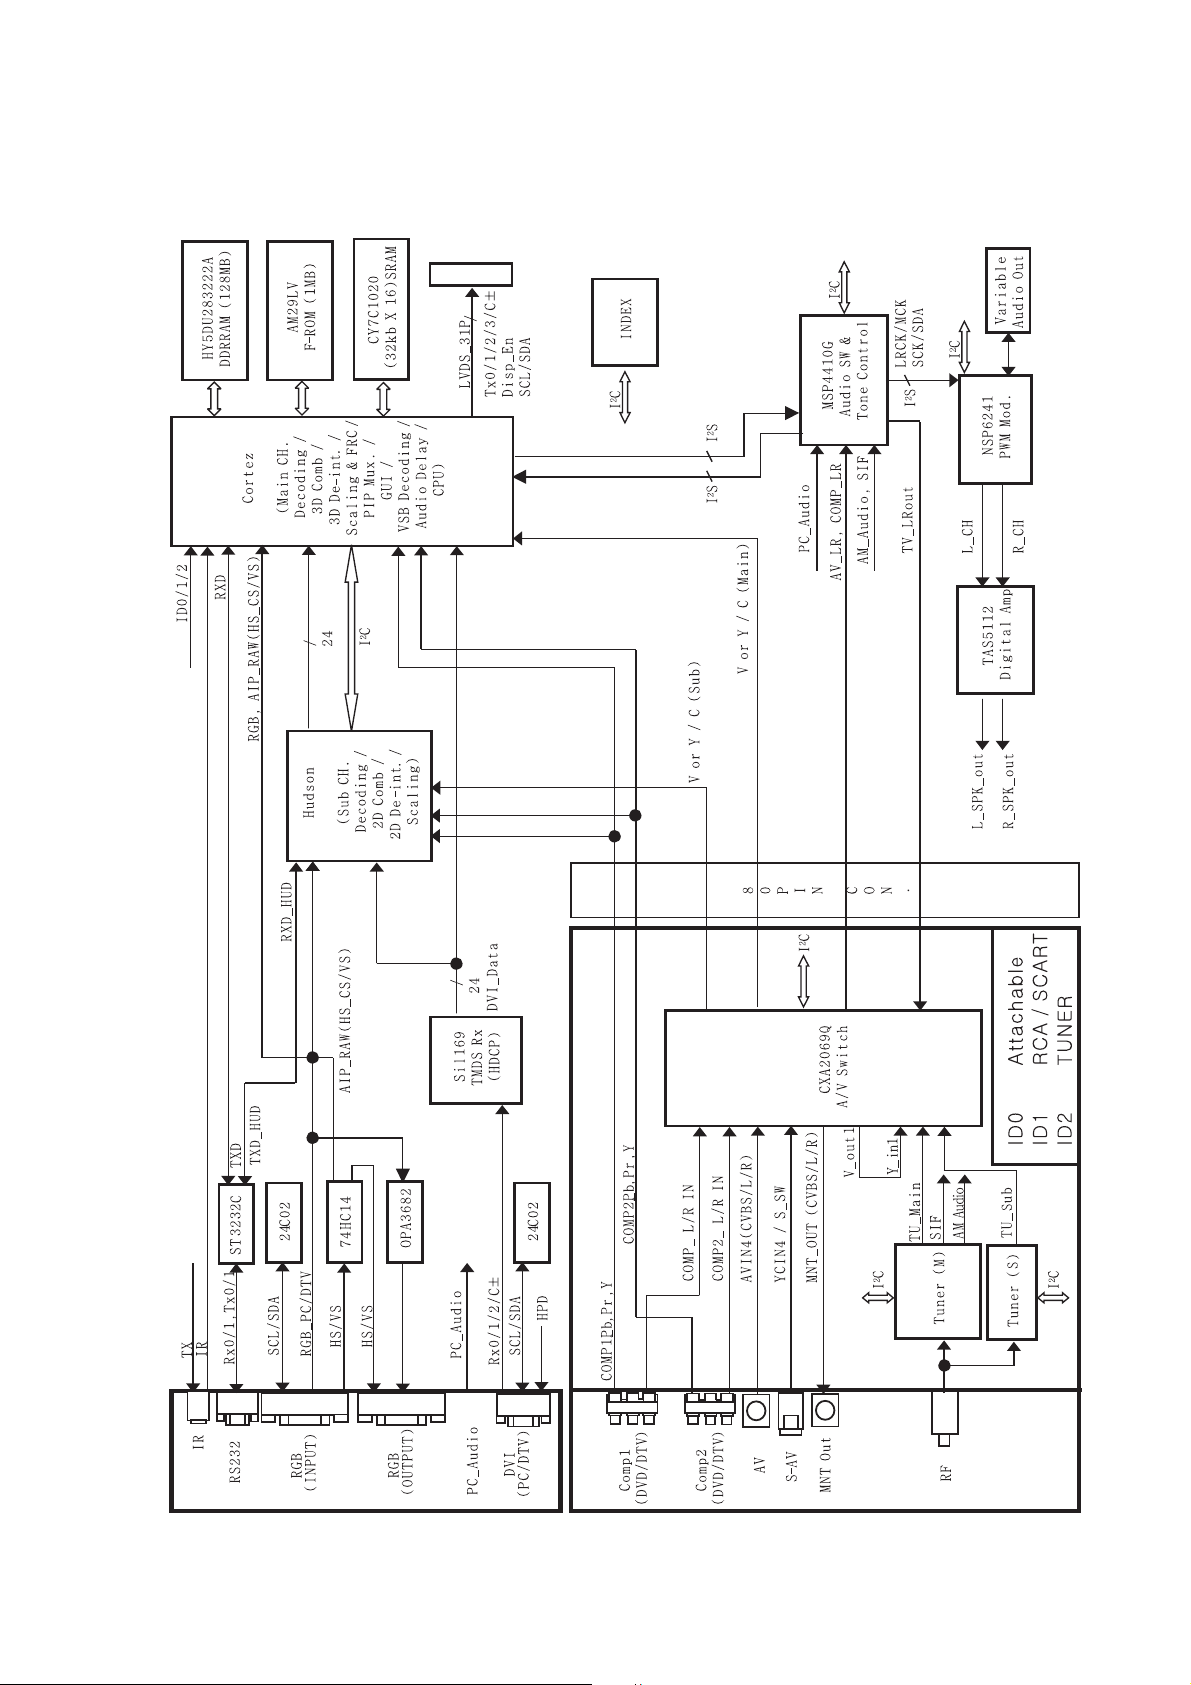
BLOCK DIAGRAM
Cable
RCA Block Diagram
Page 27
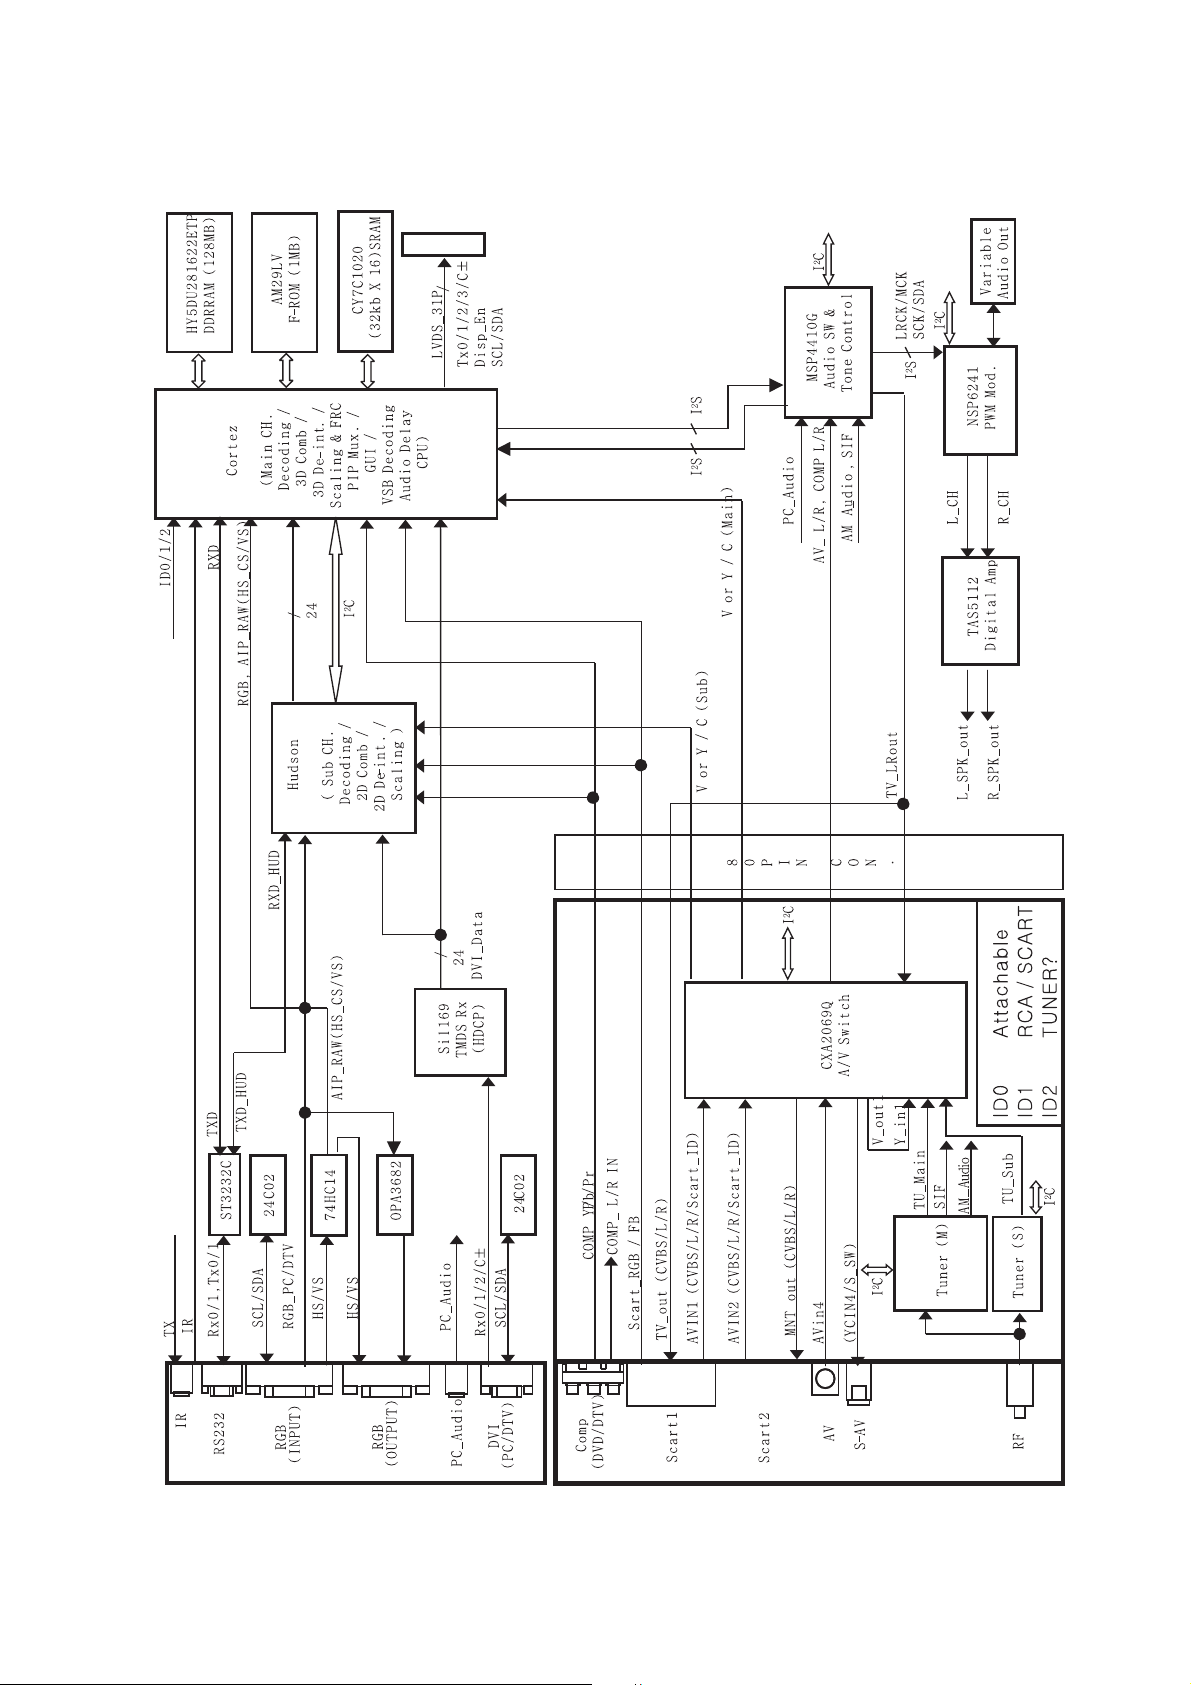
- 27 -
Scart Block Diagram
Cable
Page 28
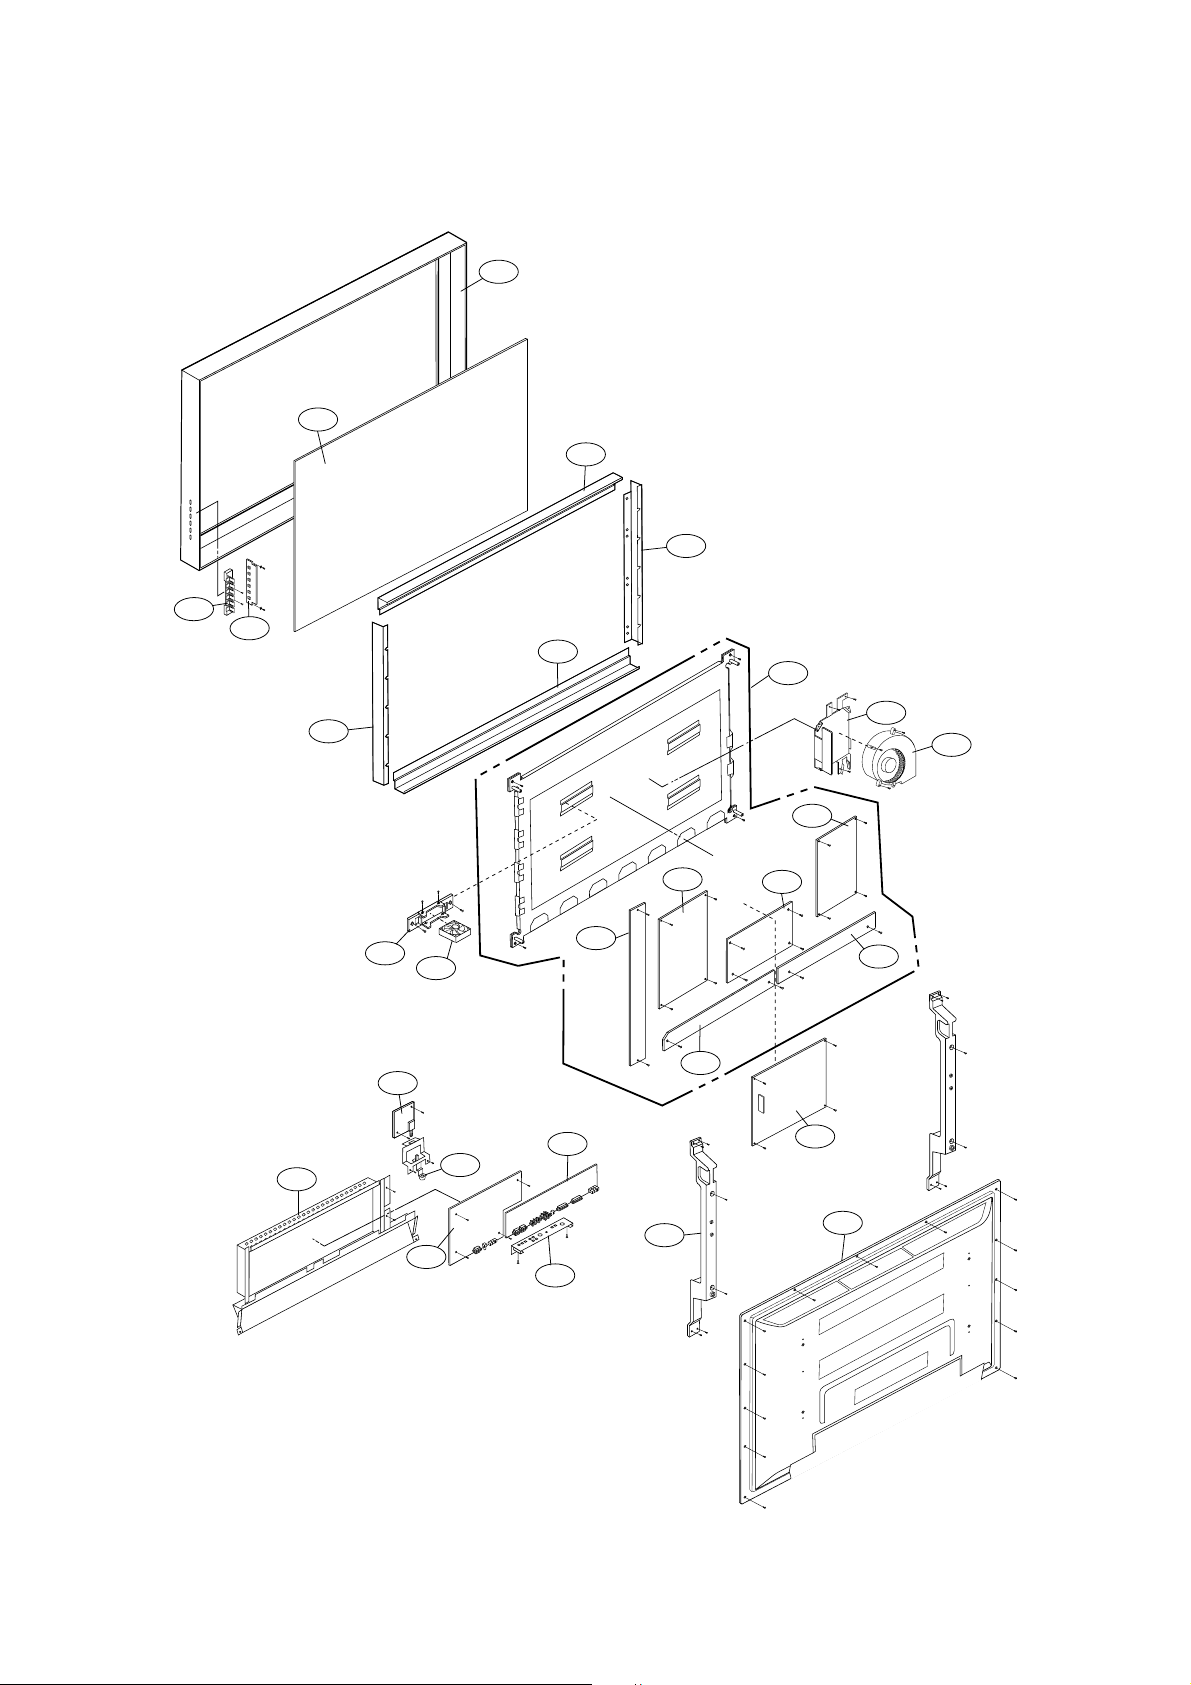
- 28 -
EXPLODED VIEW
305
310
530
300
202
205
206
200
203
201
204
580
501
520
540
541
301
302
304
303
103
104
560
561
400
410
102
101
Page 29
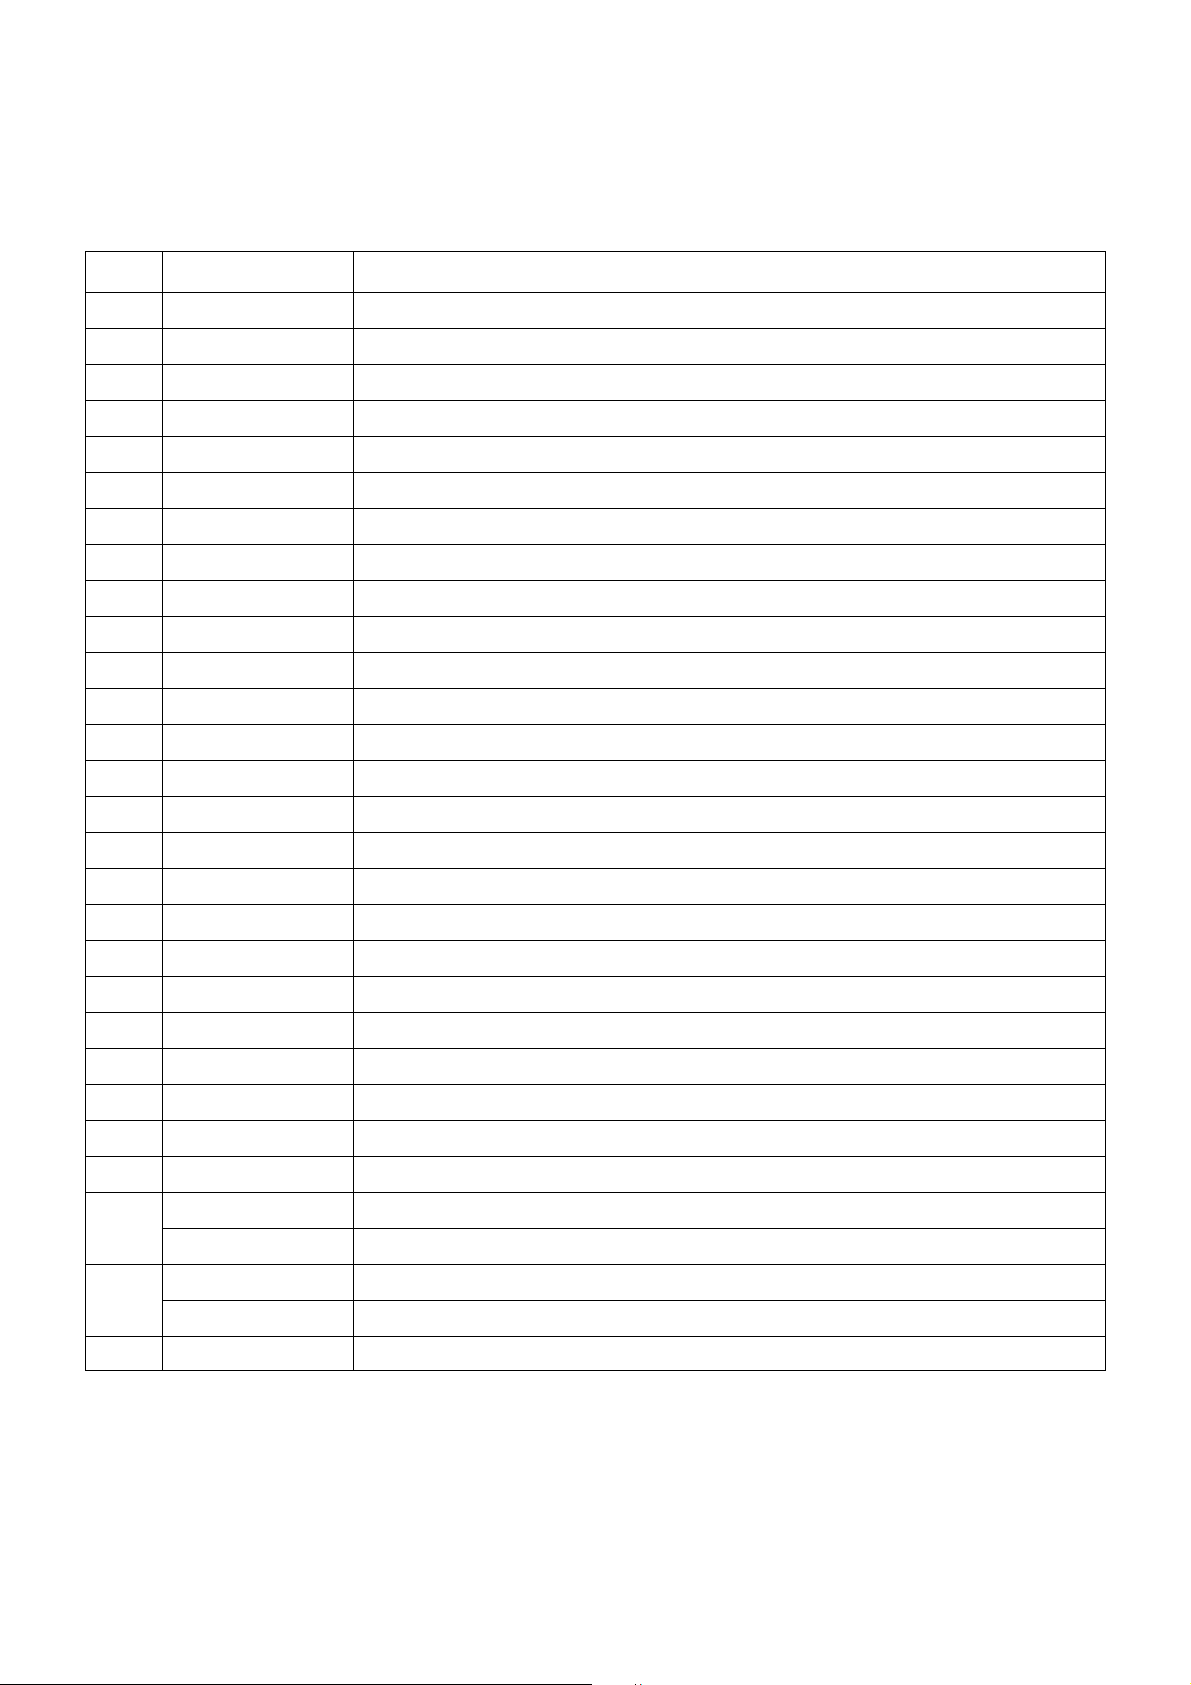
- 29 -
101 5900V06008B FAN, G6015S12B2-RG DONGYANG 60*60*15 7V 1900RPM 6/12V L=500MM
102 4980V00D43B SUPPORTER, FAN SECC(EGI) MZ-42PM10 PRESS
103 5900V12006C FAN, B1232S12B2-AA DONGYANG 120*120*32 12V 7.8CFM 950RPM DC9-14V LG CONNECTOR
104 4980V00E47A SUPPORTER, FAN SECC(EGI) SUPP.BLOWER FAN
200 6348Q-E123P PDP, 42” 1024*768 PDP42X30000.ADLGB
201 6871QCH077A PWB(PCB) ASSEMBLY,DISPLAY CTRL ASSY HAND INSERT 42”HD 42X3 CTRL ASSY HAND
202 6871QDH117A PWB(PCB) ASSEMBLY,DISPLAY YDRV ASSY HAND INSERT 42”HD 42X3 YDRV HAND INSERT
203 6871QLH059A PWB(PCB) ASSEMBLY,DISPLAY XRLT ASSY HAND INSERT 42”HD 42X3 XRLT ASSY HAND
204 6871QRH068A PWB(PCB) ASSEMBLY,DISPLAY XRRT ASSY HAND INSERT 42”HD 42X3 XRRT ASSY
205 6871QYH053B PWB(PCB) ASSEMBLY,DISPLAY YSUS ASSY HAND INSERT 42”HD 42X3 VER.B
206 6871QZH056B PWB(PCB) ASSEMBLY,DISPLAY ZSUS ASSY HAND INSERT 42”HD 42X3 VER.B
300 3091V00731V CABINET ASSEMBLY, MU-42PM12X RF043E 2TONE SKD
301 4980V00C59H SUPPORTER, ASSY AL SUPP. FILTER TOP APPLY 42PM10 AL SKD
302 4980V00C59F SUPPORTER, ASSY AL SUPP. FILTER BOT APPLY 42PM10 AL SKD
303 4980V00C61L SUPPORTER, ASSY AL SUPP. FILTER LEFT APLLY TO 42PM10 AL SKD
304 4980V00C61J SUPPORTER, ASSY AL SUPP. FILTER RIGHT APLLY TO 42PM10 SKD
305 3790V00709C FILTER(MECH), RT-42PX10 LGM42-09 MITSUI 42” ETCHING MESH GLASS FILTER
310 5020V01004C BUTTON, CONTROL 42PM10 6KEY
400 3809V00504B BACK COVER ASSEMBLY, MZ-42PM10 C/SKD
410 4980V00C62B SUPPORTER, ASSY ZDC SUPP. MODULE VERTICAL C/SKD
501 3301V00043J PLATE ASSEMBLY, ASSY 3301V00042E PLATE VSC ASSY MT-42PM15X SKD
520 6871VMMF67B PWB(PCB) ASSEMBLY,MAIN M.I RF052A 42PM1M-ZA 42X3 FOR DMS
530 6871VSMS54A PWB(PCB) ASSEMBLY,SUB CONT RF052A H2 MT-42PM15X
540 6871VSMABFA PWB(PCB) ASSEMBLY,SUB PSW RF043A MAILBU
541 5020V01009A BUTTON, POWER MZ-42PM10 ABS, AF-303S 1KEY
560 6871VSMAJJA PWB(PCB) ASSEMBLY,SUB RF052A H2 MONITOR SCART ATTACHABLE 1 TUNER
6871VSMAMMA PWB(PCB) ASSEMBLY,SU RF052A H2 MONITOR SCART ATTACHABLE NO TUNER
561 4980900211C SUPPORTER, AV INTERFACE EGI E TYPE 118A PRESS
4980900258H SUPPORTE, AV INTERFACE EGI ATTACHABLE CORE K
580 3501V00220A POWER SUPPLY ASSEMBLY, HURRICANE2 FREE VOLTAGE SANKEN 42” PSU
EXPLODED VIEW PARTS LIST
No. Part No. Descriptions
Page 30
MIC39100 MICREL 3P SOT223 R/TP
BA033FP-E2 ROHM 3P-SOP,TO252-3
KA7809R, FAIRCHILD 2P D-PAK, R/TP
SC156515M-1.8TR SEMTECH 5P/TO-263-5
BA033FP-E2 ROHM 3P-SOP,TO252-3
BA033FP-E2 ROHM 3P-SOP,TO252-3 R/TP
MIC39100 MICREL 3P SOT223 R/TP
KIA78R05F KEC 5PIN DPAK R/TP 1A,5V
SC156515M-1.8TR SEMTECH 5P/TO-263-5
SII9011CLU(PB FREE) SILICON IMAGE 128P
AT24C02N-10SI-2.7 ATMEL 8P SOIC R/TP
KIA78R05F KEC 5PIN DPAK R/TP 1A,5V
MC34063ADR2G ON SEMI SO-8P R/TP
CXA2069Q QFP64 BK I2C BUS AV S/W
LA7217M MFP14 TP SYNC SEPARATOR
MSP4410K MICRONAS 80P/PQFP
NSP-2100A,LF NEOFIDELITY TQFP 64P
TAS5122DCARG4,LF 56P/TSSOP R/TP
74HC14D 14SOP TP SHITTER TRIGGER
AT24C02N-10SI-2.7 ATMEL 8P SOIC
74HC14D 14SOP TP SHITTER TRIGGER
OPA3692IDBQ BUR BROWN 16PIN SSOP
ICL3232CBNZ INTERSIL 16P/SOP R/TP
KIA78R09F KEC 5PIN DPAK R/TP 1A,9V
KIA78R09F KEC 5PIN DPAK R/TP 1A,9V
LM75CIMX-3 8P/SOP R/TP
PQ12RD21 4SIP ST REGULATOR FLI8532BD-LF GENESIS 416P/PBGA
24LC256-I/SM 8P,SOP TP 256K
K4D261638F-LC50,LF TSOPII 66P
K4D261638F-LC50,LF TSOPII 66P
BSS83 TP PHILIPS N-CHANNEL S/W TR
BSS83 TP PHILIPS N-CHANNEL S/W TR
BSS83 TP PHILIPS N-CHANNEL S/W TR
BSS83 TP PHILIPS N-CHANNEL S/W TR
BSS83 TP PHILIPS N-CHANNEL S/W TR
BSS83 TP PHILIPS N-CHANNEL S/W TR
CHIP 2SC3875S(ALY) BK KEC
CHIP 2SC3875S(ALY) BK KEC
CHIP 2SC3875S(ALY) BK KEC
CHIP 2SC3875S(ALY) BK KEC
CHIP 2SC3875S(ALY) BK KEC
CHIP 2SC3875S(ALY) BK KEC
CHIP 2SC3875S(ALY) BK KEC
CHIP 2SC3875S(ALY) BK KEC
CHIP 2SC3875S(ALY) BK KEC
CHIP 2SC3875S(ALY) BK KEC
CHIP 2SC3875S(ALY) BK KEC
KRA102S R/TP KEC SOT23 CHIP TR
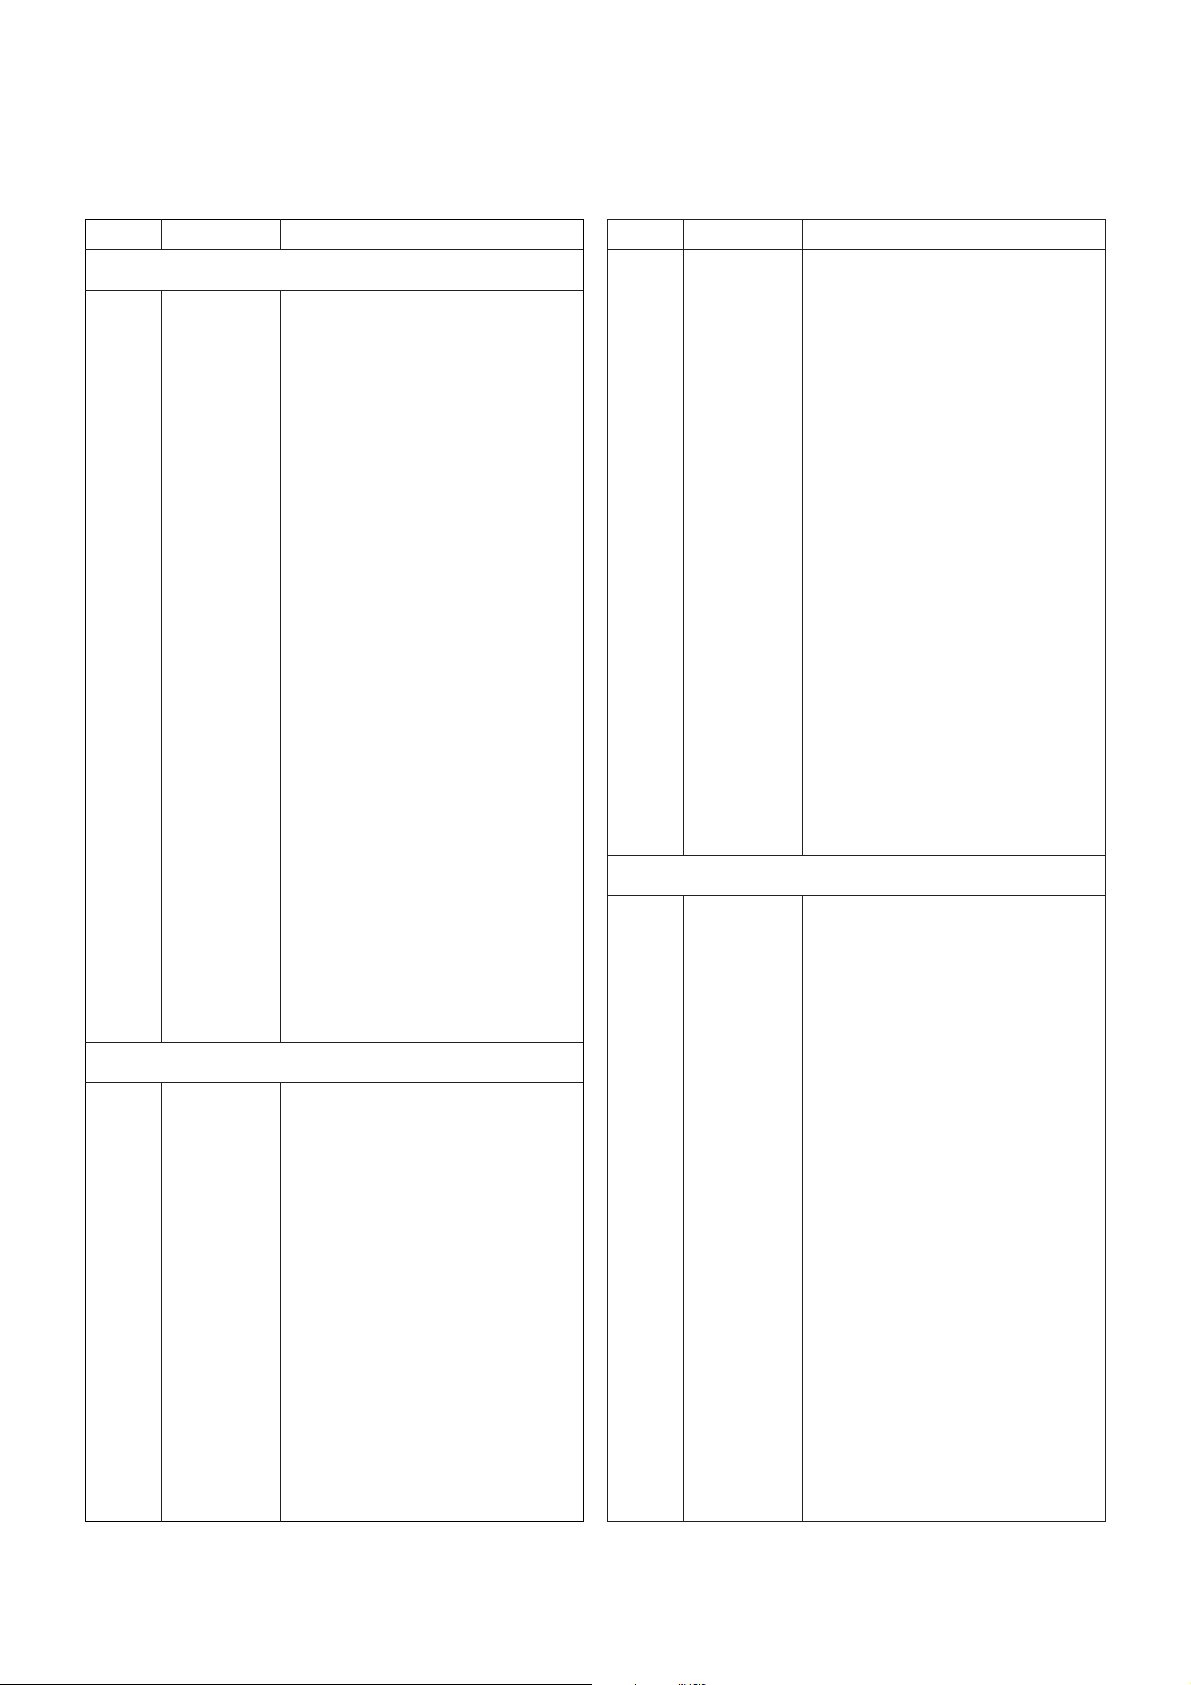
REPLACEMENT PARTS LIST
LOCA. NO PART NO DESCRIPTION
Q1200
Q1401
Q1402
Q201
Q202
Q203
Q204
Q205
Q206
Q207
Q300
Q301
Q302
Q303
Q304
Q305
Q400
Q401
Q402
Q403
Q404
Q405
Q406
Q407
Q408
D1005
D1006
D1007
D1008
D1009
D1010
D1012
D1013
D102
D103
D104
D105
D106
D1100
D1105
D1109
D1200
D1201
D1500
D500
D501
D502
D504
D505
D506
D600
0TR387500AA
0TR387500AA
0TR387500AA
0TR387500AA
0TR387500AA
0TR150400BA
0TR150400BA
0TR387500AA
0TR150400BA
0TR150400BA
0TR387500AA
0TR387500AA
0TR387500AA
0TR387500AA
0TR387500AA
0TR150400BA
0TR387500AA
0TR387500AA
0TR387500AA
0TR387500AA
0TR387500AA
0TR102008AA
0TR387500AA
0TR387500AA
0TR102008AA
0DD226239AA
0DD226239AA
0DD226239AA
0DD226239AA
0DD226239AA
0DD226239AA
0DD200009AF
0DD200009AF
0DD226239AA
0DD226239AA
0DD226239AA
0DD226239AA
0DD226239AA
0DD226239AA
0DD226239AA
0DD226239AA
0DD184009AA
0DS113379BA
0DD226239AA
0DD226239AA
0DD226239AA
0DD226239AA
0DR050008AA
0DR050008AA
0DR050008AA
0DD100009AM
CHIP 2SC3875S(ALY) BK KEC
CHIP 2SC3875S(ALY) BK KEC
CHIP 2SC3875S(ALY) BK KEC
CHIP 2SC3875S(ALY) BK KEC
CHIP 2SC3875S(ALY) BK KEC
CHIP 2SA1504S(ASY) BK KEC
CHIP 2SA1504S(ASY) BK KEC
CHIP 2SC3875S(ALY) BK KEC
CHIP 2SA1504S(ASY) BK KEC
CHIP 2SA1504S(ASY) BK KEC
CHIP 2SC3875S(ALY) BK KEC
CHIP 2SC3875S(ALY) BK KEC
CHIP 2SC3875S(ALY) BK KEC
CHIP 2SC3875S(ALY) BK KEC
CHIP 2SC3875S(ALY) BK KEC
CHIP 2SA1504S(ASY) BK KEC
CHIP 2SC3875S(ALY) BK KEC
CHIP 2SC3875S(ALY) BK KEC
CHIP 2SC3875S(ALY) BK KEC
CHIP 2SC3875S(ALY) BK KEC
CHIP 2SC3875S(ALY) BK KEC
KRA102S R/TP KEC SOT23 CHIP TR
CHIP 2SC3875S(ALY) BK KEC
CHIP 2SC3875S(ALY) BK KEC
KRA102S R/TP KEC SOT23 CHIP TR
KDS226 TP KEC
KDS226 TP KEC
KDS226 TP KEC
KDS226 TP KEC
KDS226 TP KEC
KDS226 TP KEC
RU2M V(1) TP R-TMD 400V 1.1A 20A 0.4US
RU2M V(1) TP R-TMD 400V 1.1A 20A 0.4US
KDS226 TP KEC
KDS226 TP KEC
KDS226 TP KEC
KDS226 TP KEC
KDS226 TP KEC
KDS226 TP KEC
KDS226 TP KEC
KDS226 TP KEC
KDS184 TP KEC - 85V - 300MA
1SS133 T-72 TP ROHM KOREA DO34 90V
KDS226 TP KEC
KDS226 TP KEC
KDS226 TP KEC
KDS226 TP KEC
SD05.TC R/TP SEMTECH SOD323 5V 5A 15A
SD05.TC R/TP SEMTECH SOD323 5V 5A 15A
SD05.TC R/TP SEMTECH SOD323 5V 5A 15A
EU1ZV(1) TP E/EO-TMD 200V 0.25A 15A
LOCA. NO PART NO DESCRIPTION
IC1000
IC1001
IC1002
IC1003
IC1004
IC1005
IC1101
IC1103
IC1104
IC1200
IC1201
IC1502
IC202
IC300
IC301
IC400
IC401
IC402
IC407
IC500
IC502
IC509
IC600
IC601
IC602
IC603
IC604
IC800
IC802
IC901
IC902
IC1202
IC1203
IC200
IC201
IC503
IC504
Q1000
Q1001
Q1002
Q1003
Q1004
Q101
Q101
Q102
Q102
Q103
Q104
Q105
0IPRPML001A
0IMCRRH001A
0IMCRFA010A
0IPMG00027A
0IMCRRH001A
0IMCRRH001A
0IPRPML001A
0IPMGKE030A
0IPMG00027A
0IPRPS5005A
0IMMRAL014B
0IPMGKE030A
0IPMGON013B
0ISO206900A
0ISA721700C
0IMCRMN028B
0ILNR00015A
0IMCRTI028C
0IPH741400E
0IMMRAL014B
0IPH741400E
0IPRPBB005A
0IPRP00009A
0IPMGKE032A
0IPMGKE032A
0IPRPNS054A
0ISH122100B
0IMCR02005A
0IMP242560A
0IMMR00002A
0IMMR00002A
0TR830009BA
0TR830009BA
0TR830009BA
0TR830009BA
0TR830009BA
0TR830009BA
0TR387500AA
0TR387500AA
0TR387500AA
0TR387500AA
0TR387500AA
0TR387500AA
0TR387500AA
0TR387500AA
0TR387500AA
0TR387500AA
0TR387500AA
0TR102008AA
IC
TRANSISTOR
- 30 -
DIODE
Page 31
- 31 -
LOCA. NO PART NO DESCRIPTION
ZD100
ZD101
ZD300
ZD301
ZD400
ZD600
C1000
C1005
C1007
C1009
C1010
C1019
C103
C1030
C1043
C1046
C1047
C1050
C1051
C1064
C1065
C1066
C1067
C1068
C1069
C1071
C1073
C108
C1082
C1083
C1084
C1085
C1087
C1098
C1099
C1102
C1105
C1107
C1108
C1110
C1115
C1116
C1117
C1118
C1119
C1120
C1126
C1136
C1137
C1138
0DR050008AA
0DR050008AA
0DR050008AA
0DR050008AA
0DZRM00248A
0DR050008AA
0CE477SF6DC
0CE477SF6DC
0CE107SF6DC
0CE107SF6DC
0CE107SF6DC
0CE476SF6DC
0CE476SF6DC
0CE476SF6DC
0CE476SF6DC
0CE477SF6DC
0CE476SF6DC
0CE477SF6DC
0CE477SF6DC
0CE476SF6DC
0CE476SF6DC
0CE476SF6DC
0CE476SF6DC
0CE476SF6DC
0CE476SF6DC
0CE477SF6DC
0CE477SF6DC
0CE477SF6DC
0CE476SF6DC
0CE476SF6DC
0CE476SF6DC
0CE476SF6DC
0CE477SF6DC
0CE476SF6DC
0CE476SF6DC
0CE476SF6DC
0CE476SF6DC
0CE107SF6DC
0CE107SF6DC
0CE477SF6DC
0CE477DJ618
0CE477SF6DC
0CE227VF6DC
0CE477SF6DC
0CE477DJ618
0CE227VF6DC
0CE477SF6DC
0CE107SF6DC
0CE107SF6DC
0CE107SF6DC
SD05.TC R/TP SEMTECH SOD323 5V 5A 15A
SD05.TC R/TP SEMTECH SOD323 5V 5A 15A
SD05.TC R/TP SEMTECH SOD323 5V 5A 15A
SD05.TC R/TP SEMTECH SOD323 5V 5A 15A
RLZ8.2B-TE11 ROHM R/TP LLDS(LL-34)
SD05.TC R/TP SEMTECH SOD323 5V 5A 15A
470UF MVG 16V 20% R/TP(SMD) SMD
470UF MVG 16V 20% R/TP(SMD) SMD
100UF MVG 16V 20% SMD R/TP
100UF MVG 16V 20% SMD R/TP
100UF MVG 16V 20% SMD R/TP
47UF MVG 16V 20% SMD R/TP
47UF MVG 16V 20% SMD R/TP
47UF MVG 16V 20% SMD R/TP
47UF MVG 16V 20% SMD R/TP
470UF MVG 16V 20% R/TP(SMD) SMD
47UF MVG 16V 20% SMD R/TP
470UF MVG 16V 20% R/TP(SMD) SMD
470UF MVG 16V 20% R/TP(SMD) SMD
47UF MVG 16V 20% SMD R/TP
47UF MVG 16V 20% SMD R/TP
47UF MVG 16V 20% SMD R/TP
47UF MVG 16V 20% SMD R/TP
47UF MVG 16V 20% SMD R/TP
47UF MVG 16V 20% SMD R/TP
470UF MVG 16V 20% R/TP(SMD) SMD
470UF MVG 16V 20% R/TP(SMD) SMD
470UF MVG 16V 20% R/TP(SMD) SMD
47UF MVG 16V 20% SMD R/TP
47UF MVG 16V 20% SMD R/TP
47UF MVG 16V 20% SMD R/TP
47UF MVG 16V 20% SMD R/TP
470UF MVG 16V 20% R/TP(SMD) SMD
47UF MVG 16V 20% SMD R/TP
47UF MVG 16V 20% SMD R/TP
47UF MVG 16V 20% SMD R/TP
47UF MVG 16V 20% SMD R/TP
100UF MVG 16V 20% SMD R/TP
100UF MVG 16V 20% SMD R/TP
470UF MVG 16V 20% R/TP(SMD) SMD
470UF STD 35V 20% FL TP 5
470UF MVG 16V 20% R/TP(SMD) SMD
220UF MV 16V 20% R/TP(SMD) SMD
470UF MVG 16V 20% R/TP(SMD) SMD
470UF STD 35V 20% FL TP 5
220UF MV 16V 20% R/TP(SMD) SMD
470UF MVG 16V 20% R/TP(SMD) SMD
100UF MVG 16V 20% SMD R/TP
100UF MVG 16V 20% SMD R/TP
100UF MVG 16V 20% SMD R/TP
LOCA. NO PART NO DESCRIPTION
C1148
C1156
C1160
C1162
C1166
C117
C118
C119
C1194
C1199
C120
C1200
C1201
C121
C1225
C123
C1230
C1231
C1245
C1247
C126
C1311
C1312
C1313
C1315
C1316
C1317
C1318
C1481
C1482
C1502
C1507
C1514
C1515
C1516
C1832
C1833
C1834
C204
C210
C211
C214
C215
C215
C221
C238
C241
C300
C304
C305
C307
C315
0CE476SF6DC
0CE476SF6DC
0CE476SF6DC
0CE107SF6DC
0CE107SF6DC
0CE477SF6DC
0CE106SF6DC
0CE106SF6DC
0CE477SF6DC
0CE107SF6DC
0CE106SF6DC
0CE106SF6DC
0CE106SF6DC
0CE106SF6DC
0CE106SF6DC
0CE476SF6DC
0CK105DF64A
0CK105DF64A
0CE106SF6DC
0CE476SF6DC
0CE476SF6DC
0CE107SF6DC
0CE107SF6DC
0CE107SF6DC
0CE107SF6DC
0CE476SF6DC
0CE476SF6DC
0CE476SF6DC
0CE475SK6DC
0CE475SK6DC
0CE477VF6DC
0CE477VF6DC
0CE107SF6DC
0CE107SF6DC
0CE107SF6DC
0CE106SF6DC
0CE106SF6DC
0CE106SF6DC
0CE477SF6DC
0CE475SK6DC
0CE477SF6DC
0CE106SF6DC
0CE105SK6DC
0CE475SK6DC
0CE477SF6DC
0CE107SF6DC
0CE476SK6D8
0CE227VF6DC
0CE226SF6DC
0CE227VF6DC
0CE476SF6DC
0CK225DFK4A
47UF MVG 16V 20% SMD R/TP
47UF MVG 16V 20% SMD R/TP
47UF MVG 16V 20% SMD R/TP
100UF MVG 16V 20% SMD R/TP
100UF MVG 16V 20% SMD R/TP
470UF MVG 16V 20% R/TP(SMD) SMD
10UF MVG 16V 20% R/TP(SMD) SMD
10UF MVG 16V 20% R/TP(SMD) SMD
470UF MVG 16V 20% R/TP(SMD) SMD
100UF MVG 16V 20% SMD R/TP
10UF MVG 16V 20% R/TP(SMD) SMD
10UF MVG 16V 20% R/TP(SMD) SMD
10UF MVG 16V 20% R/TP(SMD) SMD
10UF MVG 16V 20% R/TP(SMD) SMD
10UF MVG 16V 20% R/TP(SMD) SMD
47UF MVG 16V 20% SMD R/TP
1UF 2012 16V 20% F(Y5V) R/TP
1UF 2012 16V 20% F(Y5V) R/TP
10UF MVG 16V 20% R/TP(SMD) SMD
47UF MVG 16V 20% SMD R/TP
47UF MVG 16V 20% SMD R/TP
100UF MVG 16V 20% SMD R/TP
100UF MVG 16V 20% SMD R/TP
100UF MVG 16V 20% SMD R/TP
100UF MVG 16V 20% SMD R/TP
47UF MVG 16V 20% SMD R/TP
47UF MVG 16V 20% SMD R/TP
47UF MVG 16V 20% SMD R/TP
4.7UF MVG 50V 20% SMD R/TP
4.7UF MVG 50V 20% SMD R/TP
470UF MV 16V 20% R/TP(SMD) SMD
470UF MV 16V 20% R/TP(SMD) SMD
100UF MVG 16V 20% SMD R/TP
100UF MVG 16V 20% SMD R/TP
100UF MVG 16V 20% SMD R/TP
10UF MVG 16V 20% R/TP(SMD) SMD
10UF MVG 16V 20% R/TP(SMD) SMD
10UF MVG 16V 20% R/TP(SMD) SMD
470UF MVG 16V 20% R/TP(SMD) SMD
4.7UF MVG 50V 20% SMD R/TP
470UF MVG 16V 20% R/TP(SMD) SMD
10UF MVG 16V 20% R/TP(SMD) SMD
1UF MVG 50V 20% SMD R/TP
4.7UF MVG 50V 20% SMD R/TP
470UF MVG 16V 20% R/TP(SMD) SMD
100UF MVG 16V 20% SMD R/TP
47UF MVG,MC 50V 20% SMD TAPPING
220UF MV 16V 20% R/TP(SMD) SMD
22UF MVG 16V 20% SMD R/TP
220UF MV 16V 20% R/TP(SMD) SMD
47UF MVG 16V 20% SMD R/TP
2.2UF 2012 16V 20%,-20% F(Y5V) R/TP
For Capacitor & Resistors,
the charactors at 2nd and 3rd
digit in the P/No. means as
follows;
CC, CX, CK, CN : Ceramic
CQ : Polyestor
CE : Electrolytic
RD : Carbon Film
RS : Metal Oxide Film
RN : Metal Film
RF : Fusible
CAPACITOR
Page 32
- 32 -
LOCA. NO PART NO DESCRIPTION
C318
C320
C328
C330
C335
C337
C342
C402
C403
C407
C413
C418
C419
C421
C425
C444
C451
C456
C457
C462
C463
C464
C465
C480
C481
C482
C483
C484
C495
C527
C545
C546
C547
C548
C549
C550
C553
C555
C557
C559
C610
C614
C615
C620
C621
C622
C832
C833
C834
C835
C836
C837
0CK225DFK4A
0CK225DFK4A
0CK225DFK4A
0CK225DFK4A
0CE476SF6DC
0CE105SK6DC
0CE105SK6DC
0CE476SF6DC
0CE106SF6DC
0CE107SF6DC
0CE335VK6DC
0CE107SF6DC
0CE107SF6DC
0CK105DF64A
0CE226SF6DC
0CE107SF6DC
0CK105DF64A
0CK105DF64A
0CE335VK6DC
0CE107SF6DC
0CE106SF6DC
0CE106SF6DC
0CE106SK6DC
0CE108DJ618
0CE475SK6DC
0CE475SK6DC
0CF4741L438
0CF4741L438
0CE108DJ618
0CE476SF6DC
0CE107SF6DC
0CE107SF6DC
0CE107SF6DC
0CE107SF6DC
0CE107SF6DC
0CE107SF6DC
0CE107SF6DC
0CE477VF6DC
0CE477VF6DC
0CE477VF6DC
0CE107SF6DC
0CE476SF6DC
0CE476SF6DC
0CE476SF6DC
0CE476SF6DC
0CE476SF6DC
0CE226SF6DC
0CE226SF6DC
0CE226SF6DC
0CE226SF6DC
0CE226SF6DC
0CE226SF6DC
2.2UF 2012 16V 20%,-20% F(Y5V) R/TP
2.2UF 2012 16V 20%,-20% F(Y5V) R/TP
2.2UF 2012 16V 20%,-20% F(Y5V) R/TP
2.2UF 2012 16V 20%,-20% F(Y5V) R/TP
47UF MVG 16V 20% SMD R/TP
1UF MVG 50V 20% SMD R/TP
1UF MVG 50V 20% SMD R/TP
47UF MVG 16V 20% SMD R/TP
10UF MVG 16V 20% R/TP(SMD) SMD
100UF MVG 16V 20% SMD R/TP
3.3UF MV 50V 20% R/TP(SMD) SMD
100UF MVG 16V 20% SMD R/TP
100UF MVG 16V 20% SMD R/TP
1UF 2012 16V 20% F(Y5V) R/TP
22UF MVG 16V 20% SMD R/TP
100UF MVG 16V 20% SMD R/TP
1UF 2012 16V 20% F(Y5V) R/TP
1UF 2012 16V 20% F(Y5V) R/TP
3.3UF MV 50V 20% R/TP(SMD) SMD
100UF MVG 16V 20% SMD R/TP
10UF MVG 16V 20% R/TP(SMD) SMD
10UF MVG 16V 20% R/TP(SMD) SMD
10UF MVG 50V 20% SMD R/TP
1000UF STD 35V 20% FL TP 5
4.7UF MVG 50V 20% SMD R/TP
4.7UF MVG 50V 20% SMD R/TP
0.47UF D 63V 5% TP 5 M/PE NI
0.47UF D 63V 5% TP 5 M/PE NI
1000UF STD 35V 20% FL TP 5
47UF MVG 16V 20% SMD R/TP
100UF MVG 16V 20% SMD R/TP
100UF MVG 16V 20% SMD R/TP
100UF MVG 16V 20% SMD R/TP
100UF MVG 16V 20% SMD R/TP
100UF MVG 16V 20% SMD R/TP
100UF MVG 16V 20% SMD R/TP
100UF MVG 16V 20% SMD R/TP
470UF MV 16V 20% R/TP(SMD) SMD
470UF MV 16V 20% R/TP(SMD) SMD
470UF MV 16V 20% R/TP(SMD) SMD
100UF MVG 16V 20% SMD R/TP
47UF MVG 16V 20% SMD R/TP
47UF MVG 16V 20% SMD R/TP
47UF MVG 16V 20% SMD R/TP
47UF MVG 16V 20% SMD R/TP
47UF MVG 16V 20% SMD R/TP
22UF MVG 16V 20% SMD R/TP
22UF MVG 16V 20% SMD R/TP
22UF MVG 16V 20% SMD R/TP
22UF MVG 16V 20% SMD R/TP
22UF MVG 16V 20% SMD R/TP
22UF MVG 16V 20% SMD R/TP
LOCA. NO PART NO DESCRIPTION
C838
C839
C840
C851
C853
C884
C896
C901
C904
C905
C930
C946
C947
C952
L1000
L1101
L1102
L1103
L1104
L1124
L409
L410
L411
L412
C1
C2
C3
C4
C5
C6
C7
JK401
JK503
JK601
P1001
P100A
P100B
P101
P1100
P1102
P400
P401
P600
P800
P801
P802
P803
0CE226SF6DC
0CE226SF6DC
0CE226SF6DC
0CE226SF6DC
0CE226SF6DC
0CE226SF6DC
0CE226SF6DC
0CE226SF6DC
0CE226SF6DC
0CE226SF6DC
0CE226SF6DC
0CE226SF6DC
0CE226SF6DC
0CE226SF6DC
6140VB0004B
6140VB0004B
6140VB0004B
6140VB0004B
6140VB0004B
6140VB0004B
6140VB0032A
6140VB0032A
6140VB0032A
6140VB0032A
6631V00020F
6631V00045K
6631V12047L
6631V25083E
6631V39013N
6631V39018B
6631V39021H
385-173B
6630G70021A
6630VGA004B
366-921F
6630VL01280
6630VL01380
6602T12002M
366-921J
366-932B
366-932C
366-932B
366-932B
6602T12006M
6630VM01604
6630VM01702
6602T12007D
22UF MVG 16V 20% SMD R/TP
22UF MVG 16V 20% SMD R/TP
22UF MVG 16V 20% SMD R/TP
22UF MVG 16V 20% SMD R/TP
22UF MVG 16V 20% SMD R/TP
22UF MVG 16V 20% SMD R/TP
22UF MVG 16V 20% SMD R/TP
22UF MVG 16V 20% SMD R/TP
22UF MVG 16V 20% SMD R/TP
22UF MVG 16V 20% SMD R/TP
22UF MVG 16V 20% SMD R/TP
22UF MVG 16V 20% SMD R/TP
22UF MVG 16V 20% SMD R/TP
22UF MVG 16V 20% SMD R/TP
26UH 1UEWPHY 22.5TURN YL-9N 0.4
26UH 1UEWPHY 22.5TURN YL-9N 0.4
26UH 1UEWPHY 22.5TURN YL-9N 0.4
26UH 1UEWPHY 22.5TURN YL-9N 0.4
26UH 1UEWPHY 22.5TURN YL-9N 0.4
26UH 1UEWPHY 22.5TURN YL-9N 0.4
DBF-1015A 15.5UH 10PIE DIGITAL AUDIO
DBF-1015A 15.5UH 10PIE DIGITAL AUDIO
DBF-1015A 15.5UH 10PIE DIGITAL AUDIO
DBF-1015A 15.5UH 10PIE DIGITAL AUDIO
3P 3.96MM 250MM H-W UL1672 AWG18
10P 2.5MM 550MM H-H UL1007AWG24
13P 1.25MM 700MM H-H UL1061AWG28
7P 2.5MM 300MM H-H UL1007 AWG24
8P 3.96MM 900MM H-H UL1617AWG22
9P 3.96MM 300MM H-H UL1007AWG18
4P 3.96MM 450MM H-H UL1672AWG18
VER TYPE . 4 . 2LINE 4P A+B
DV11251-PV8-PF FOXCONN 30P 2.54MM
69107-0921 MOLEX 9P 2.77MM
GIL-G-07P LGC 7PIN 2.54MM STICK
2-557100-1 AMP 80P 2.54MM PLUG
2-557101-1 AMP 80P 2.54MM RECEPTACLE
53261-1390 MOLEX 13P 1.25MM R/A SMD
GIL-G-10P LGC 10PIN 2.54MM STICK
IL-G-03P LGC 2.5MM S/T STICK
IL-G-04P LGC 2.5MM S/T STICK
IL-G-03P LGC 2.5MM S/T STICK
IL-G-03P LGC 2.5MM S/T STICK
53398-1390 MOLEX 13P 1.25MM S/T SMD
YW396 4P 3.96MM ANGLE, MN-60PZ12
YW396 2P 3.96MM (ANGLE TYPE)
GT121-31P-TD LGC 31P 1.25MM DUAL S/T
For Capacitor & Resistors,
the charactors at 2nd and 3rd
digit in the P/No. means as
follows;
CC, CX, CK, CN : Ceramic
CQ : Polyestor
CE : Electrolytic
RD : Carbon Film
RS : Metal Oxide Film
RN : Metal Film
RF : Fusible
COIL
CONNECTOR
Page 33
- 33 -
LOCA. NO PART NO DESCRIPTION
AR1200
AR1201
AR1202
AR1203
AR1204
AR1205
R230
R618
R801
R802
D1003
D1101
D1102
D1103
D1104
LD101
SW102
SW103
SW105
SW106
SW107
SW108
SW800
SW800
IC403
IC404
IC406
L100
L1004
L1005
L1006
L1007
L1008
L1009
L101
L1010
L1011
L1012
L1013
L1014
L1015
L1016
L1017
L1018
0RRZVTA001D
0RRZVTA001D
0RRZVTA001D
0RRZVTA001D
0RRZVTA001D
0RRZVTA001D
0RD0331H609
0RD0152H609
0RKZVTA001L
0RKZVTA001L
0DL233309AC
0DL233309AC
0DL233309AC
0DL233309AC
0DL233309AC
0DL200000CA
140-313B
140-313B
140-313B
140-313B
140-313B
140-313B
6600VM2006A
6600VR1004A
6200VJS001B
6200VJS001B
6200VJS001A
6200J000013
6200J000013
6200J000013
6200J000013
6200J000013
6200J000013
6200J000013
6200J000013
6200J000013
6200J000013
6200J000013
6200J000013
6200J000013
6200J000013
6200J000013
6200J000013
6200J000013
22 OHM 1 / 16 W 1608 5% R/TP 4P E24
22 OHM 1 / 16 W 1608 5% R/TP 4P E24
22 OHM 1 / 16 W 1608 5% R/TP 4P E24
22 OHM 1 / 16 W 1608 5% R/TP 4P E24
22 OHM 1 / 16 W 1608 5% R/TP 4P E24
22 OHM 1 / 16 W 1608 5% R/TP 4P E24
3.3 OHM 1/2 W 5.00% TA52
15 OHM 1/2 W 5.00% TA52
1.0M OHM 1/2 W 5% TA52 UL PILKOR
1.0M OHM 1/2 W 5% TA52 UL PILKOR
SAM2333 TP GREEN:10MCD, RED:6MCD
SAM2333 TP GREEN:10MCD, RED:6MCD
SAM2333 TP GREEN:10MCD, RED:6MCD
SAM2333 TP GREEN:10MCD, RED:6MCD
SAM2333 TP GREEN:10MCD, RED:6MCD
SAM5670(DL-2LRG) BK Y-GREEN -
2LEAD 160G(TA) 5V 0.001A HORIZONTAL .G
2LEAD 160G(TA) 5V 0.001A HORIZONTAL .G
2LEAD 160G(TA) 5V 0.001A HORIZONTAL .G
2LEAD 160G(TA) 5V 0.001A HORIZONTAL .G
2LEAD 160G(TA) 5V 0.001A HORIZONTAL .G
2LEAD 160G(TA) 5V 0.001A HORIZONTAL .G
SDDF3PATP011 250V 4A HORIZONTAL .G
SKHMPW 5P J-ALPS .V .A HORIZONTAL .G
ZJYS51R5-2PL(T) TDK R/TP 50VOLT 2A
ZJYS51R5-2PL(T) TDK R/TP 50VOLT 2A
ZJY51R5-4P TDK DIP DC 50VOLT 2A
MLB-321611-0500P-N2 R/TP 500 OHM
MLB-321611-0500P-N2 R/TP 500 OHM
MLB-321611-0500P-N2 R/TP 500 OHM
MLB-321611-0500P-N2 R/TP 500 OHM
MLB-321611-0500P-N2 R/TP 500 OHM
MLB-321611-0500P-N2 R/TP 500 OHM
MLB-321611-0500P-N2 R/TP 500 OHM
MLB-321611-0500P-N2 R/TP 500 OHM
MLB-321611-0500P-N2 R/TP 500 OHM
MLB-321611-0500P-N2 R/TP 500 OHM
MLB-321611-0500P-N2 R/TP 500 OHM
MLB-321611-0500P-N2 R/TP 500 OHM
MLB-321611-0500P-N2 R/TP 500 OHM
MLB-321611-0500P-N2 R/TP 500 OHM
MLB-321611-0500P-N2 R/TP 500 OHM
MLB-321611-0500P-N2 R/TP 500 OHM
MLB-321611-0500P-N2 R/TP 500 OHM
LOCA. NO PART NO DESCRIPTION
L1019
L1020
L1021
L1022
L1023
L1024
L110
L1106
L1107
L1108
L111
L1125
L1126
L1127
L1131
L114
L115
L116
L1204
L1205
L1206
L1207
L1208
L1209
L130
L131
L132
L134
L135
L137
L1501
L1502
L1503
L202
L203
L204
L300
L301
L400
L401
L402
L403
L406
L407
L408
L500
L501
L502
L503
L506
L514
L515
6200J000013
6200J000013
6200J000013
6200J000013
6200J000013
6200J000013
6200J000013
6200J000013
6200J000013
6200J000013
6200J000013
6200J000013
6200J000013
6200J000013
6200J000013
6200JB8010L
6200JB8010L
6200JB8010L
6200J000013
6200J000013
6200J000013
6200J000013
6200J000013
6200J000013
6210VC0005A
6210VC0005A
6210VC0005A
6200JB8010L
6200JB8010L
6200J000013
6200J000013
6200J000013
6200J000013
6200J000013
6200J000013
6200J000013
6200J000013
6200J000013
6200J000013
6200J000013
6200J000013
6200J000013
6200J000013
6200J000013
6200J000013
6200J000013
6210VC0005A
6200JB8010L
6200JB8010L
6200J000013
6200J000013
6200J000013
MLB-321611-0500P-N2 R/TP 500 OHM
MLB-321611-0500P-N2 R/TP 500 OHM
MLB-321611-0500P-N2 R/TP 500 OHM
MLB-321611-0500P-N2 R/TP 500 OHM
MLB-321611-0500P-N2 R/TP 500 OHM
MLB-321611-0500P-N2 R/TP 500 OHM
MLB-321611-0500P-N2 R/TP 500 OHM
MLB-321611-0500P-N2 R/TP 500 OHM
MLB-321611-0500P-N2 R/TP 500 OHM
MLB-321611-0500P-N2 R/TP 500 OHM
MLB-321611-0500P-N2 R/TP 500 OHM
MLB-321611-0500P-N2 R/TP 500 OHM
MLB-321611-0500P-N2 R/TP 500 OHM
MLB-321611-0500P-N2 R/TP 500 OHM
MLB-321611-0500P-N2 R/TP 500 OHM
MLB-201209-1000L-N2 R/TP 1000OHM
MLB-201209-1000L-N2 R/TP 1000OHM
MLB-201209-1000L-N2 R/TP 1000OHM
MLB-321611-0500P-N2 R/TP 500 OHM
MLB-321611-0500P-N2 R/TP 500 OHM
MLB-321611-0500P-N2 R/TP 500 OHM
MLB-321611-0500P-N2 R/TP 500 OHM
MLB-321611-0500P-N2 R/TP 500 OHM
MLB-321611-0500P-N2 R/TP 500 OHM
BK2125 HS 750 2X1.25X0.85MM R/TP
BK2125 HS 750 2X1.25X0.85MM R/TP
BK2125 HS 750 2X1.25X0.85MM R/TP
MLB-201209-1000L-N2 R/TP 1000OHM
MLB-201209-1000L-N2 R/TP 1000OHM
MLB-321611-0500P-N2 R/TP 500 OHM
MLB-321611-0500P-N2 R/TP 500 OHM
MLB-321611-0500P-N2 R/TP 500 OHM
MLB-321611-0500P-N2 R/TP 500 OHM
MLB-321611-0500P-N2 R/TP 500 OHM
MLB-321611-0500P-N2 R/TP 500 OHM
MLB-321611-0500P-N2 R/TP 500 OHM
MLB-321611-0500P-N2 R/TP 500 OHM
MLB-321611-0500P-N2 R/TP 500 OHM
MLB-321611-0500P-N2 R/TP 500 OHM
MLB-321611-0500P-N2 R/TP 500 OHM
MLB-321611-0500P-N2 R/TP 500 OHM
MLB-321611-0500P-N2 R/TP 500 OHM
MLB-321611-0500P-N2 R/TP 500 OHM
MLB-321611-0500P-N2 R/TP 500 OHM
MLB-321611-0500P-N2 R/TP 500 OHM
MLB-321611-0500P-N2 R/TP 500 OHM
BK2125 HS 750 2X1.25X0.85MM R/TP
MLB-201209-1000L-N2 R/TP 1000OHM
MLB-201209-1000L-N2 R/TP 1000OHM
MLB-321611-0500P-N2 R/TP 500 OHM
MLB-321611-0500P-N2 R/TP 500 OHM
MLB-321611-0500P-N2 R/TP 500 OHM
For Capacitor & Resistors,
the charactors at 2nd and 3rd
digit in the P/No. means as
follows;
CC, CX, CK, CN : Ceramic
CQ : Polyestor
CE : Electrolytic
RD : Carbon Film
RS : Metal Oxide Film
RN : Metal Film
RF : Fusible
SWITCH
FILTER & CRYSTAL
LED
RESISTOR
Page 34
- 34 -
LOCA. NO PART NO DESCRIPTION
L516
L517
L604
L901
L902
X1200
X300
X400
X800
JK100
JK101
JK103
JK1200
JK400
JK502
A1
A2
A3
CA1
CA2
F801
IC900
PA101
TU201
6200J000013
6200J000013
6200J000013
6200J000013
6200J000013
6212AB2845A
166-E02F
156-A02M
6212AB2844A
6612M00001A
6612M00001A
6612J00057A
6612B00015A
6612JH003CA
6612F00006F
38289U0516J
6710T00017N
64109EP003A
68509A0002A
6850J00005C
0FS1002B53K
692791149AB
6712000002B
6700MF0012C
MLB-321611-0500P-N2 R/TP 500 OHM
MLB-321611-0500P-N2 R/TP 500 OHM
MLB-321611-0500P-N2 R/TP 500 OHM
MLB-321611-0500P-N2 R/TP 500 OHM
MLB-321611-0500P-N2 R/TP 500 OHM
RESONATOR,CRYSTALABLS-27.000MHZ
RESONATOR,CERAMICCSBLA500KECZF09-B0
RESONATOR,CRYSTALHC49U 18.432MHZ
RESONATOR,CRYSTAL ABLS-19.6608MHZ
UPJ-R1-023 UGCOM 21PIN W/SHLD
UPJ-R1-023 UGCOM 21PIN W/SHLD
UJB-08-01A UGCOM 8P RCA+1P S-JACK
DC1R019NDA JAE 1.0MM,19PIN,HDMI JACK
PPJ137A PARK ELEC. AUDIO L-MONO JACK
KJA-PH-3-0064 KSD 3.5PHI 14P DUALJACK
MANUAL, USER 16 LANGUAGES 017M/N-TX
REMOTE CONTROLLER, RF052A 60PZ9M-TA EU
POWER CORD, SP-023+IS-14 I-SHENG
CABLE,COAXIAL 150MM KCA-NS-0-0053
CABLE,DVI LVDS UL20276 AWG30 600MM
FUSE, 10000MA 250 V 5.2X20
SOFT WARE, 3.21V BAEC 1024X768
REMOTE CONTROLLER RECEIVER,KSM-603SM12E-1
TUNER, TAFM-W103P LGIT MULTI FS
LOCA. NO PART NO DESCRIPTION
ACCESSORIES
MISCELLANEOUS
JACK
Page 35
Page 36
Page 37
Page 38
Page 39

Feb., 2006
Printed in KoreaP/NO : 3828VD0223W
 Loading...