

LG 42LG6100 User Manual
User’s Guide Specification
User’s Guide Specification
담 당 관리자
Model Description
1.
MODEL
SUFFIX
2.
32/37/42/47LG6000-ZA
EU
BRAND
Product Name
Printing Specification
LG
32/37/42/47LG6000-ZA
1. Trim Size (Format) : 185mm x 260 mm
2. Printing Colors
• Cover : 1 COLOR (BLACK)
• Inside : 1 COLOR (BLACK)
3. Stock (Paper)
• Cover : Coated paper, S/W 150 g/㎡
• Inside : Uncoated paper , 백상지 60 g/㎡
4. Printing Method : Off-set
5. Bindery : Perfect bind
6. Language : EN/GE/FR/IT/SP/PO/NE/GR/HU/PL/CZ/SK/RO/BU/
SW/NO/DA/FI/ES/LAT/LITH /SV/SER/CRO/TUR (25)
7. Number of pages : 404
JMJ
08.01.19
Part No.
KIM JONG OK
08.01.19
MFL41425803
(0804-REV03)
“This part contain Eco-hazardous substances (Pb, Cd, Hg, Cr6+, PBB, PBDE, etc.) within LG standard level,
N
O
T
E
S
Details should be followed Eco-SCM management standard[LG(56)-A-2524].
Especially, Part should be followed and controlled the following specification.
(1)Eco-hazardous substances test report should be submitted
when Part certification test and First Mass Production.
(2) Especially, Don’t use or contain lead(Pb) and cadmium(Cd) in ink.
Special Instructions3.
(1) Origin Notification
* LGEIN : Printed in Indonesia * LGEWA : Printed in U.K.
* LGESP : Printed in Brazil * LGEMX : Printed in Mexico
* LGEND : Printed in China * LGEIL : Printed in India
* LGEMA : Printed in Poland
4.
Changes
10
9
8
7
6
5
4
Apr.11.08 Jeon Mi Jeong S8-16567
3
Feb.29.08 Jeon Mi Jeong S8-11666
2
1
Feb.14.08 Jeon Mi Jeong S8-09690 Updated the contents of “Select mode”.
REV.
MM/DD/YY
NO.
SIGNATURE
CHANGE NO.
1. Added the Language(SER,CRO,TUR).2. Changed the bolts for stand assembly
Added the contents of “Schemi elettrici e norme di taratura
disponibili nel CD ROM ” on Italy cover .
CHANGE CONTENTS
Pagination sheet
Pagination sheet
P/NO. MFL41425803
Total pages : 404 pages
Front cover
<EN>
P/no.
Front cover
<GE>
Front cover
<FR>
Front cover
<IT>
Front cover
<SP>
Uk ONLY
2
2
2
2
…..
…..
…..
…..
….. …..
….. ….. ….. 15
….. ….. …..
….. …..
16
…..
15
15
Back cover
Back cover
Back cover
Back cover
Back cover
Front cover
<PO>
Front cover
<NE>
Front cover
<GR>
Front cover
<HU>
2
2
2
2
2
…..
…..
…..
…..
…..
….. ….. …..
….. ….. …..
….. ….. …..
….. ….. …..
….. ….. …..
15
Back cover
15
Back cover
15
Back cover
15
Back cover
15
Front cover
<PL>
Back cover
2
…..
…..
….. …..
15

Pagination sheet
Pagination sheet
P/NO. MFL41425803
Total pages : 404 pages
Front cover
<CZ>
Front cover
<SK>
Front cover
<RO>
Front cover
<BU>
Front cover
<SW>
Back cover
2
2
2
2
…..
…..
…..
…..
….. ….. …..
….. ….. …..
….. ….. …..
….. ….. …..
15
Back cover
15
Back cover
15
Back cover
15
Back cover
Front cover
<NO>
Front cover
<DA>
Front cover
<FI>
Front cover
<EST>
2
2
2
2
2
…..
…..
…..
…..
…..
….. ….. …..
….. ….. …..
….. ….. …..
….. ….. …..
….. ….. …..
15
Back cover
15
Back cover
15
Back cover
15
Back cover
15
Front cover
<LITH>
Back cover
2
…..
….. ….. …..
15
Pagination sheet
Pagination sheet
P/NO. MFL41425803
Total pages 404pages
Front cover
<LA>
Front cover
<SV>
Front cover
<SER>
Front cover
<CRO>
Front cover
<TUR>
Back cover
2
2
2
2
2
…..
…..
…..
…..
…..
….. ….. …..
….. ….. …..
….. ….. …..
….. ….. …..
….. ….. ….. …..
15
Back cover
15
Back cover
15
Back cover
15
----
Back cover
17
An extended Owner’s Manual that contains information on the advanced features of these LG TV sets is
located on the CD- ROM provided in an electronic
version.
To read these files, you will need to use a Personal
Computer (PC) equipped with a CD- ROM drive.
PP//NNOO:: MMFFLL4411442255880033((00 880044--RREEVV0033))
PPrriinntteedd iinn KKoorreeaa
Please read this manual carefully before operating
your TV.
Retain it for future reference.
Record model number and serial number of the TV.
Refer to the label on the back cover and quote this
information.
To your dealer when requiring service.
OWNER’S MANUAL
LCD TV
LCD TV MODELS
3322LLGG6600
****
3377LLGG6600
****
4422LLGG6600
****
4422LLGG6611
****
4477LLGG6600
****
Trade Mark of the DVB Digital Video
Broadcasting Project (1991 to 1996)
IIDD NN uummbbee rr ((ss ))::
5102: 32LG6000
5103: 37LG6000
5104: 42LG6000
5484: 42 LG6100
5105: 47LG6000
2
ENGLISH
Connecting your Unit
* To connect an additional equipment, see the
EExxtteerrnnaall eeqquuiippmmeenntt SSeettuupp
section in CD Manual.
■
Here shown may be somewhat different from your set.
. . . . . . . . . . . . . . . . . . . . . . . . . . . . . . . . . . . . . . . . . . . . . . . . . .
VCR Connection
2
DVD/STB
2
Antenna Connection
1
Power Cord
3
3
ENGLISH
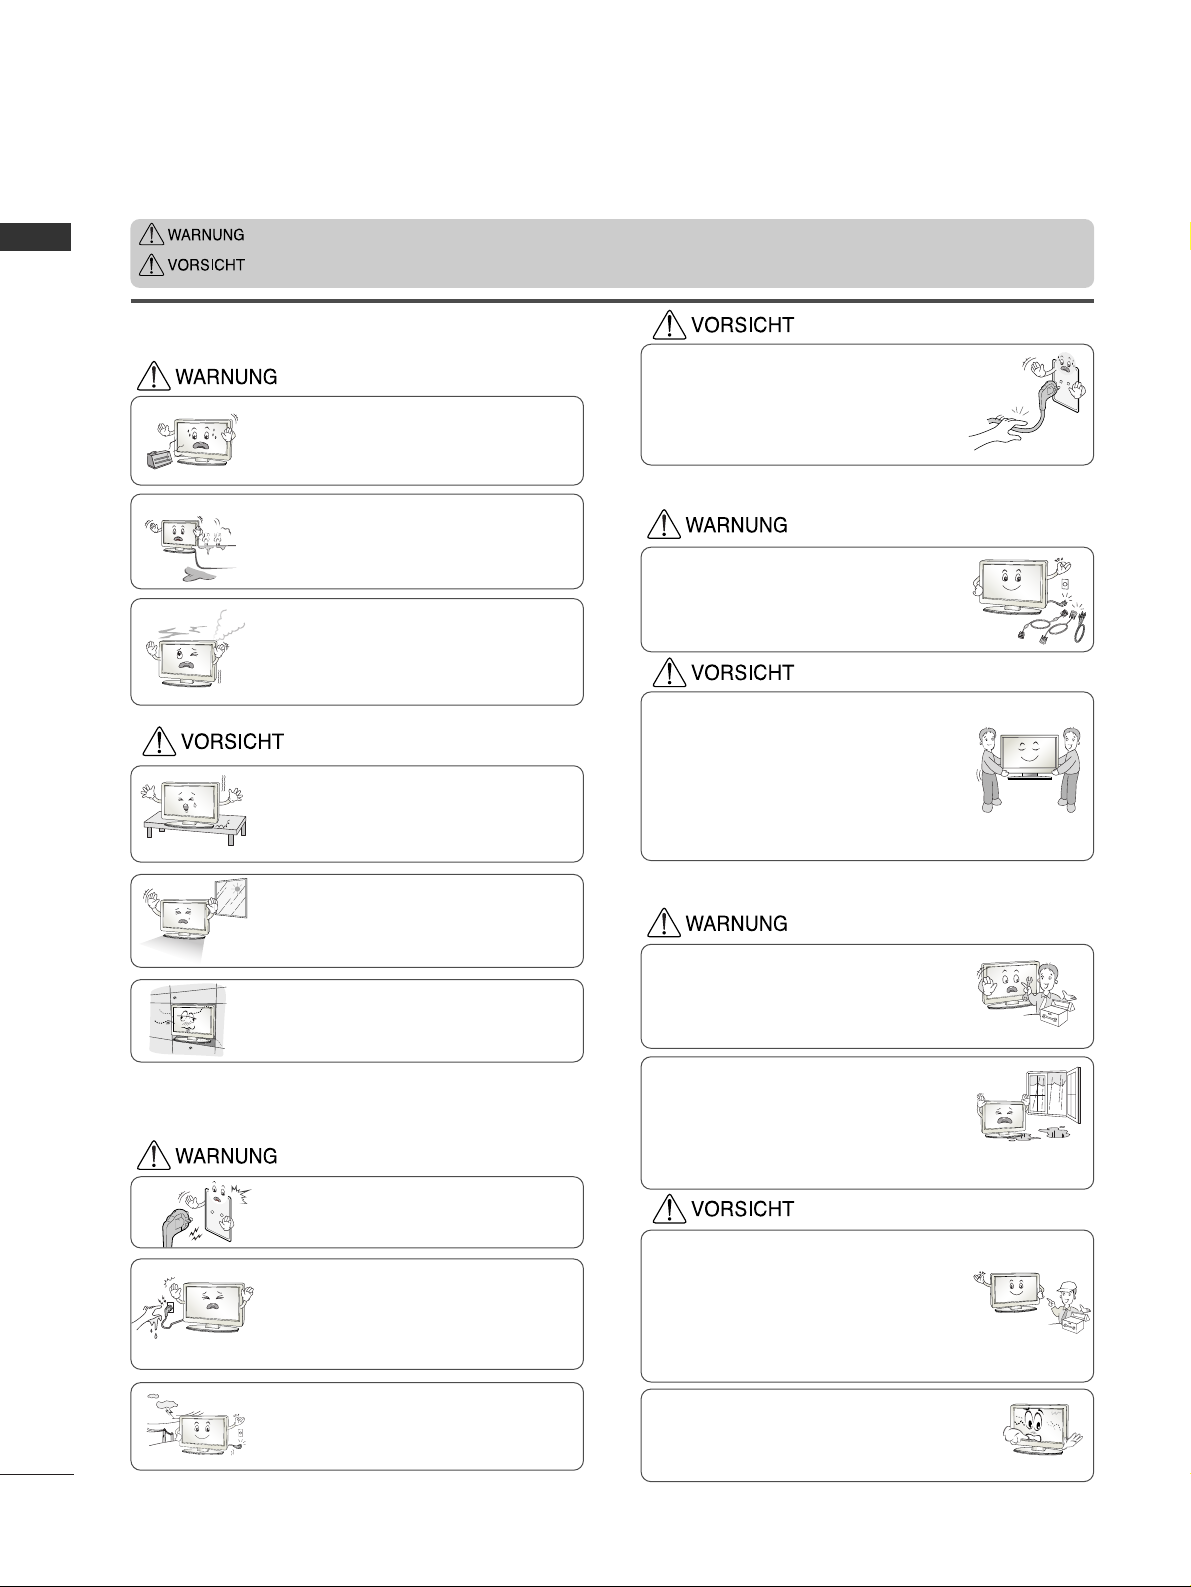
SAFETY INSTRUCTIONS
• Please read these safety precautions carefully before using the product.
• In this manual, the illustration may be somewhat different from your product because it is just example to help the instruction.
If you ignore the warning message, you may be seriously injured or there is a possibility of accident or death.
If you ignore the caution message, you may be slightly injured or the product may be damaged.
PPrreeccaauuttiioonn iinn IInnssttaalllliinngg tthhee PPrroodduucctt
WARNING
WARNING
CAUTION
Keep away from heat sources like electrical heaters.
- Electrical shock, fire, malfunction or deformation may occur.
If you can smell smoke or other odors or hear a strange
sound unplug the power cord and contact the service
center.
- If you continue to use without taking proper measures, electrical shock or fire can occur.
Do not use the product in damp place such as a bathroom or any place where it is likely to get wet.
- This may cause a fire or could give an electric shock.
Install the product on a flat and stable place that
has no risk of dropping the product.
- If the product is dropped, you may be injured or the
product may be broken.
Keep the product away from direct sunlight.
- The product can be damaged.
Do not place the product in a built-in installation
such as bookcase or rack.
- Ventilation required.
EElleeccttrriiccaall PPoowweerr RReellaatteedd PPrreeccaauuttiioonnss
Make sure to connect the power cable to the grounded current.
- You may be electrocuted or injured.
Do not touch the power plug with wet hands.
Additionally, it the cord pin is wet or covered with
dust, dry the power plug completely or wipe dust off.
- You may be electrocuted due to excess moisture.
During a thunder or lightning storm, unplug the
power cable or signal cable.
- You may be electrocuted or a fire can break out.
Protect the power cord from physical or mechanical
abuse, such as being twisted, kinked, pinched, closed in
a door, or walked upon. Pay particular attention to plugs,
wall outlets, and the point where the cord exits the
appliance.
PPrreeccaauuttiioonnss iinn MMoovviinngg tthhee PPrroodduucctt
Do not shock the product when moving it.
- You may be electrocuted or the product can be damaged.
Make the panel face forward and hold it with both
hands to move.
- If you drop the product, the damaged product can
cause electric shock or fire. Contact with the service
center for repair.
Make sure to turn off the product.
Make sure to remove all cables before moving the
product.
- You may be electrocuted or the product can be damaged.
PPrreeccaauuttiioonnss iinn UUssiinngg tthhee PPrroodduucctt
Do not disassemble, repair or modify the product at
your own discretion.
- Fire or electric shock accident can occur.
- Contact the service center for check, calibration or
repair.
To reduce the risk of fire or electric shock, do not
expose this apparatus to rain or moisture.
Apparatus shall not be exposed to dripping or
splashing and no objects filled with liquids, such as
vases, shall be placed on the apparatus.
Refer all servicing to qualified service personnel.
Servicing is required when the apparatus has been
damaged in any way, such as power supply cord or plug
is damaged, liquid has been spilled or objects have
fallen into the apparatus, the apparatus has been
exposed to rain or moisture, does not operate normally, or has been dropped.
WARNING
WARNING
CAUTION
CAUTION
CAUTION
CAUTION
WARNING
Do not keep a still image on the screen for an extended period (e.g. by pausing a video) as the fixed image may remain
visible on the screen. This is know as image burn. Image burn
is not covered under the manufacturer’s warranty.
4
ENGLISH
PREPARATION
After removing the protection paper from the protection cover, adhere it to the TV as shown.
FRONT PANEL CONTROLS
■
Image shown may differ from your TV
■
If your TV has a protection film attached, remove the film and then wipe the product with a polishing cloth.
P
OK
MENU
INPUT
P
PROGRAMME
VOLUME
OK
MENU
INPUT
■
Image shown may differ from your TV.
When installing the wall-mounted unit, use the
protection cover for desk-type stand installation.
NOT USING THE DESK-TYPE STAND
P
POWER
Remote Control Sensor
Power/Standby Indicator
• Illuminates red in standby mode.
• Illuminates White when the TV is switched on.
Note: You can adjust
PPooww eerr IInnddiiccaattoorr
in the OPTION menu.
Intelligent Sensor
Adjusts picture according to the surrounding
conditions

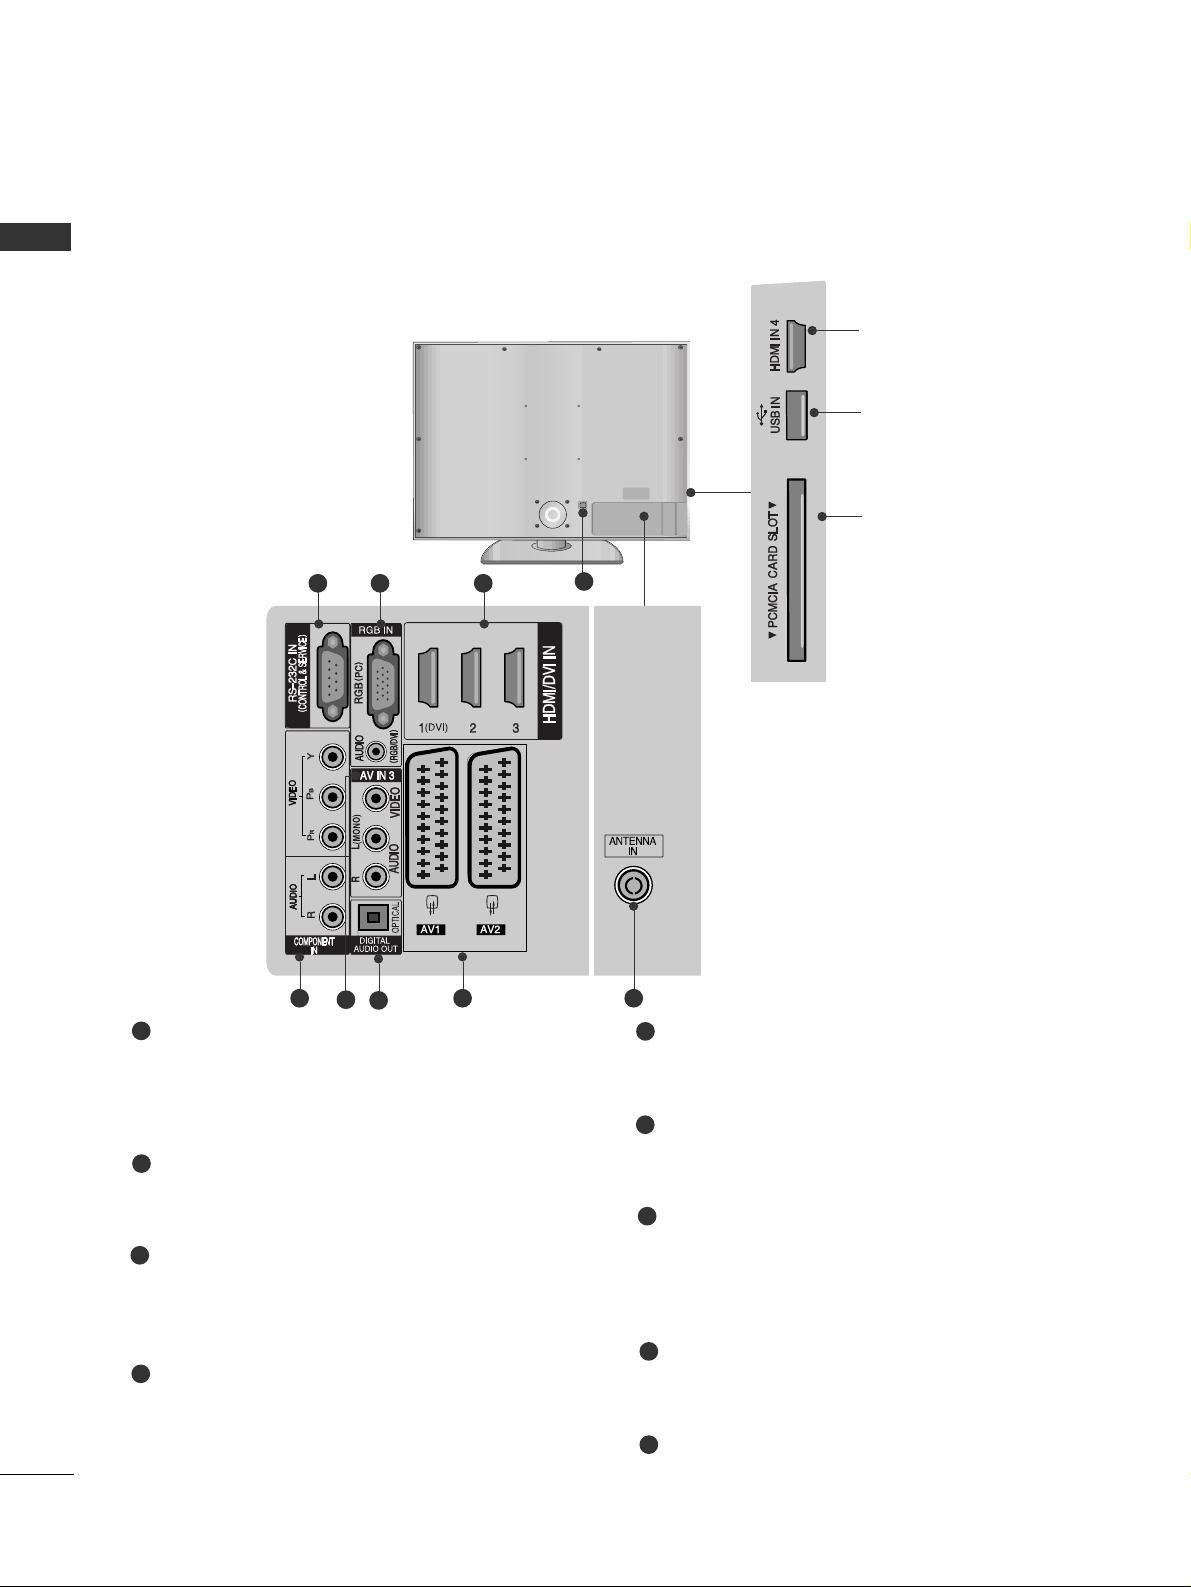
BACK PANEL INFORMATION
A
Image shown may differ from your TV.
5
ENGLISH
Power Cord Socket
This TV operates on an AC power. The voltage is
indicated on the Specifications page. Never
attempt to operate the TV on DC power.
RS-232C IN (CONTROL & SERVICE) PORT
Connect to the RS-232C port on a PC.
RGB Input
Connect the output from a PC.
RGB/DVI Audio Input
Connect the audio from a PC or DTV.
HDMI Input
Connect a HDMI signal to HDMI IN.
Or DVI(VIDEO)signal to HDMI/DVI port with DVI
to HDMI cable.
Component Input
Connect a component video/audio device to
these jacks.
Audio/Video Input
Connect audio/video output from an external
device to these jacks.
OPTICAL DIGITAL AUDIO OUT
Connect digital audio from various types of equipment.
Note: In standby mode, these ports do not work.
Euro Scart Socket (AV1/AV2)
Connect scart socket input or output from an
external device to these jacks
Antenna Input
Connect RF antenna to this jack.
1
2
3
4
6
7
8
9
1
5
432
HDMI Input
Connect a HDMI signal to
HDMI IN.
USB Input
PCMCIA (Personal
Computer Memory Card
International Association)
Card Slot
(This feature is not available in all countries.)
5
7
8 9
6

6
PREPARATION
ENGLISH
STAND INSTALLATION
(32/37/42LG60**, 42LG61
**
Only
)
1 3
4
Carefully place the TV screen side down on a
cushioned surface to protect the screen from
damage.
2
Assemble the parts of the
SS ttaanndd BB ooddyy
with
CCoovveerr BB aassee
of the TV.
Assemble the TV as shown.
Fix the 4 bolts securely using the holes in the
back of the TV.
Stand Body
Cover Base
32LG60
**
37LG60
**
Stand Body
Cover Base
42LG60**, 42LG61
**
■
Image shown may differ from your TV
When assembling the desk type stand, check whether the bolt is fully tightened. (If not tightened fully, the product can
tilt forward after the product installation.) If you tighten the bolt with excessive force, the bolt can deviate from abrasion
of the tightening part of the bolt.
7
ENGLISH
PLEASE SET IT UP CAREFULLY SO
THE PRODUCT DOESN’T FALL OVER.
A
You should purchase necessary components to fix the TV
to the wall on the market.
A
Position the TV close to the wall to avoid the possibility
of it falling when pushed.
A
The instructions shown below are a safer way to set up
the TV, which is to fix it to the wall, avoiding the possibility of it falling forwards if pulled. This will prevent the
TV from falling forward and causing injury. This will also
prevent the TV from damage. Ensure that children do
not climb or hang from the TV.
NOTE
!
G
When moving the TV undo the cords first.
G
Use a platform or cabinet strong and large enough
to support the size and weight of the TV.
G
To use the TV safely make sure that the height of the
bracket on the wall and on the TV is the same.
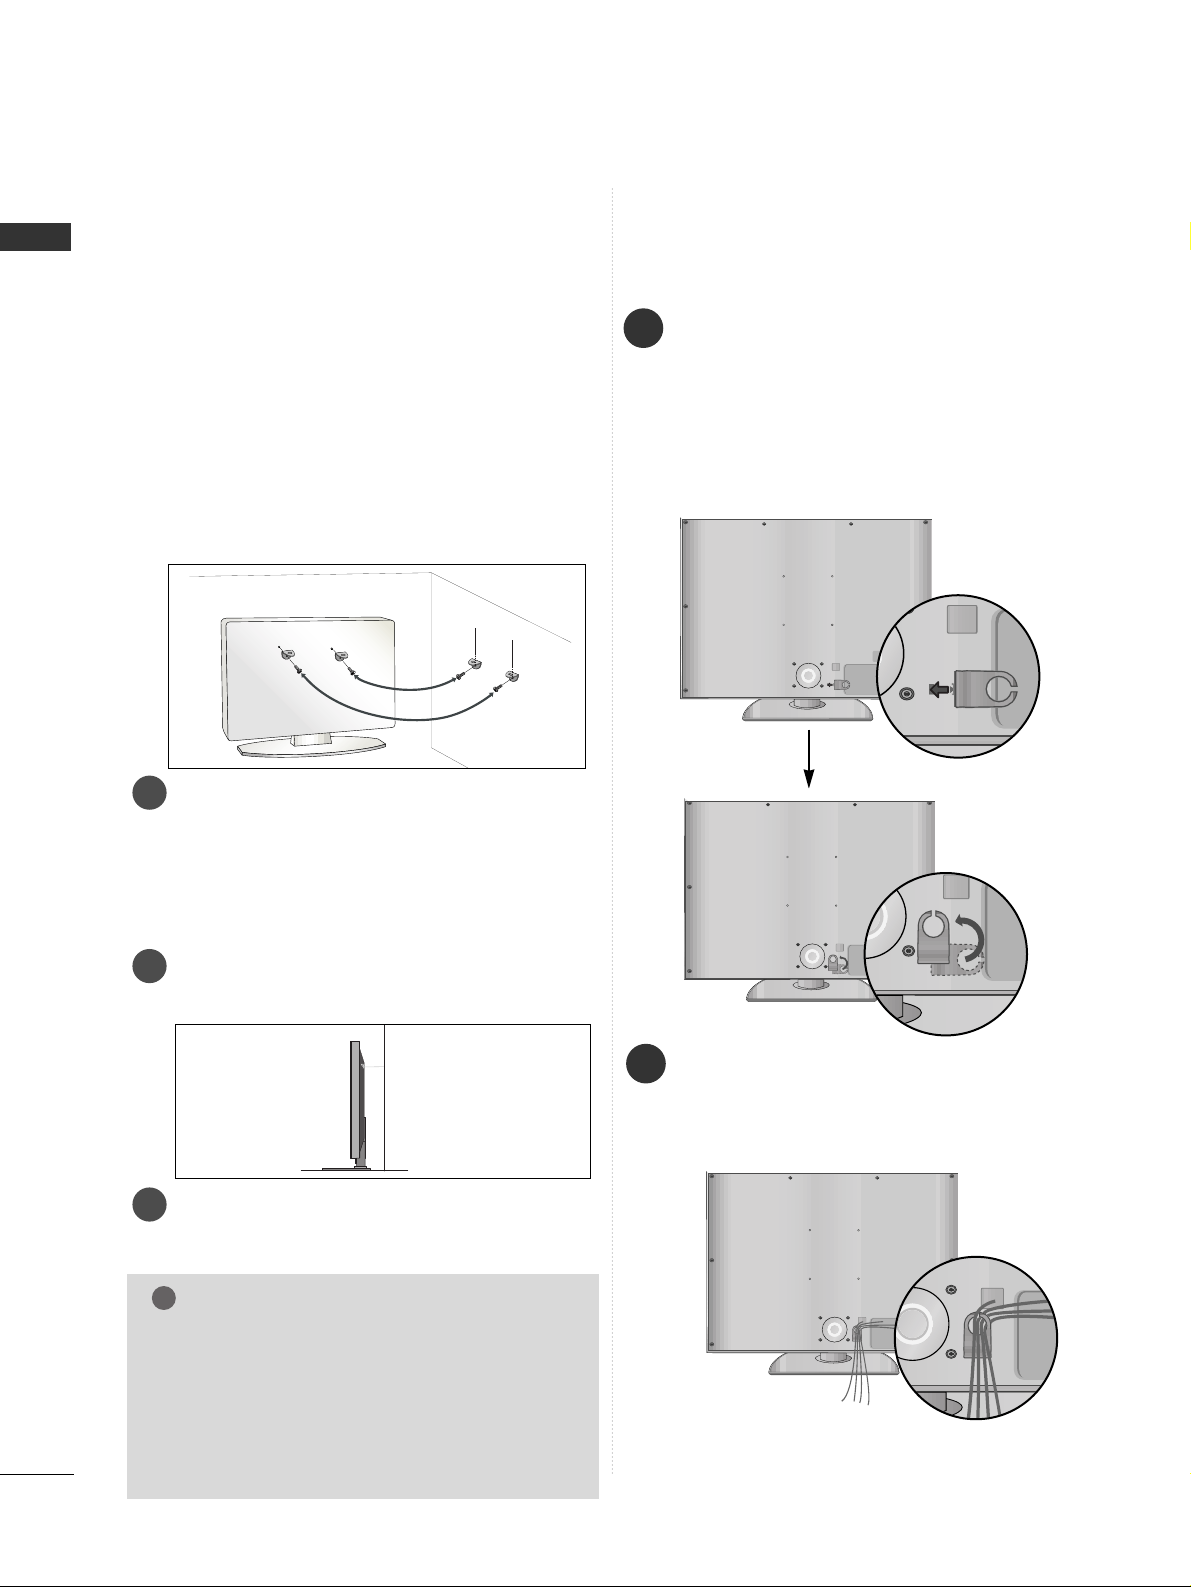
3
1
2
Use the eye-bolts or TV brackets/bolts to fix the
product to the wall as shown in the picture.
(If your TV has bolts in the eyebolts, loosen then
bolts.)
* Insert the eye-bolts or TV brackets/bolts and tight-
en them securely in the upper holes.
Secure the wall brackets with the bolts on the wall.
Match the height of the bracket that is mounted on
the wall.
3
Use a sturdy rope to tie the product. It is safer to
tie the rope so it becomes horizontal between the
wall and the product.
2
1
Connect the cables as necessary.
To connect additional equipment, see the
EExxtteerrnnaall eeqquuiippmmeenntt SSeettuupp
section.
1
2
Align the hole with the tab on the
CCAA BBLLEE
MMAANNAAGGEEMMEENNTT CCLLIIPP
.
Turn the
CCAABBLLEE MMAANNAAGGEEMMEENNTT CCLLIIPP
as shown.
Note that excessive force might cause damage to
the product when using Cable Management clip.
BACK COVER FOR WIRE
ARRANGEMENT
■
Image shown may differ from your TV.
8
PREPARATION
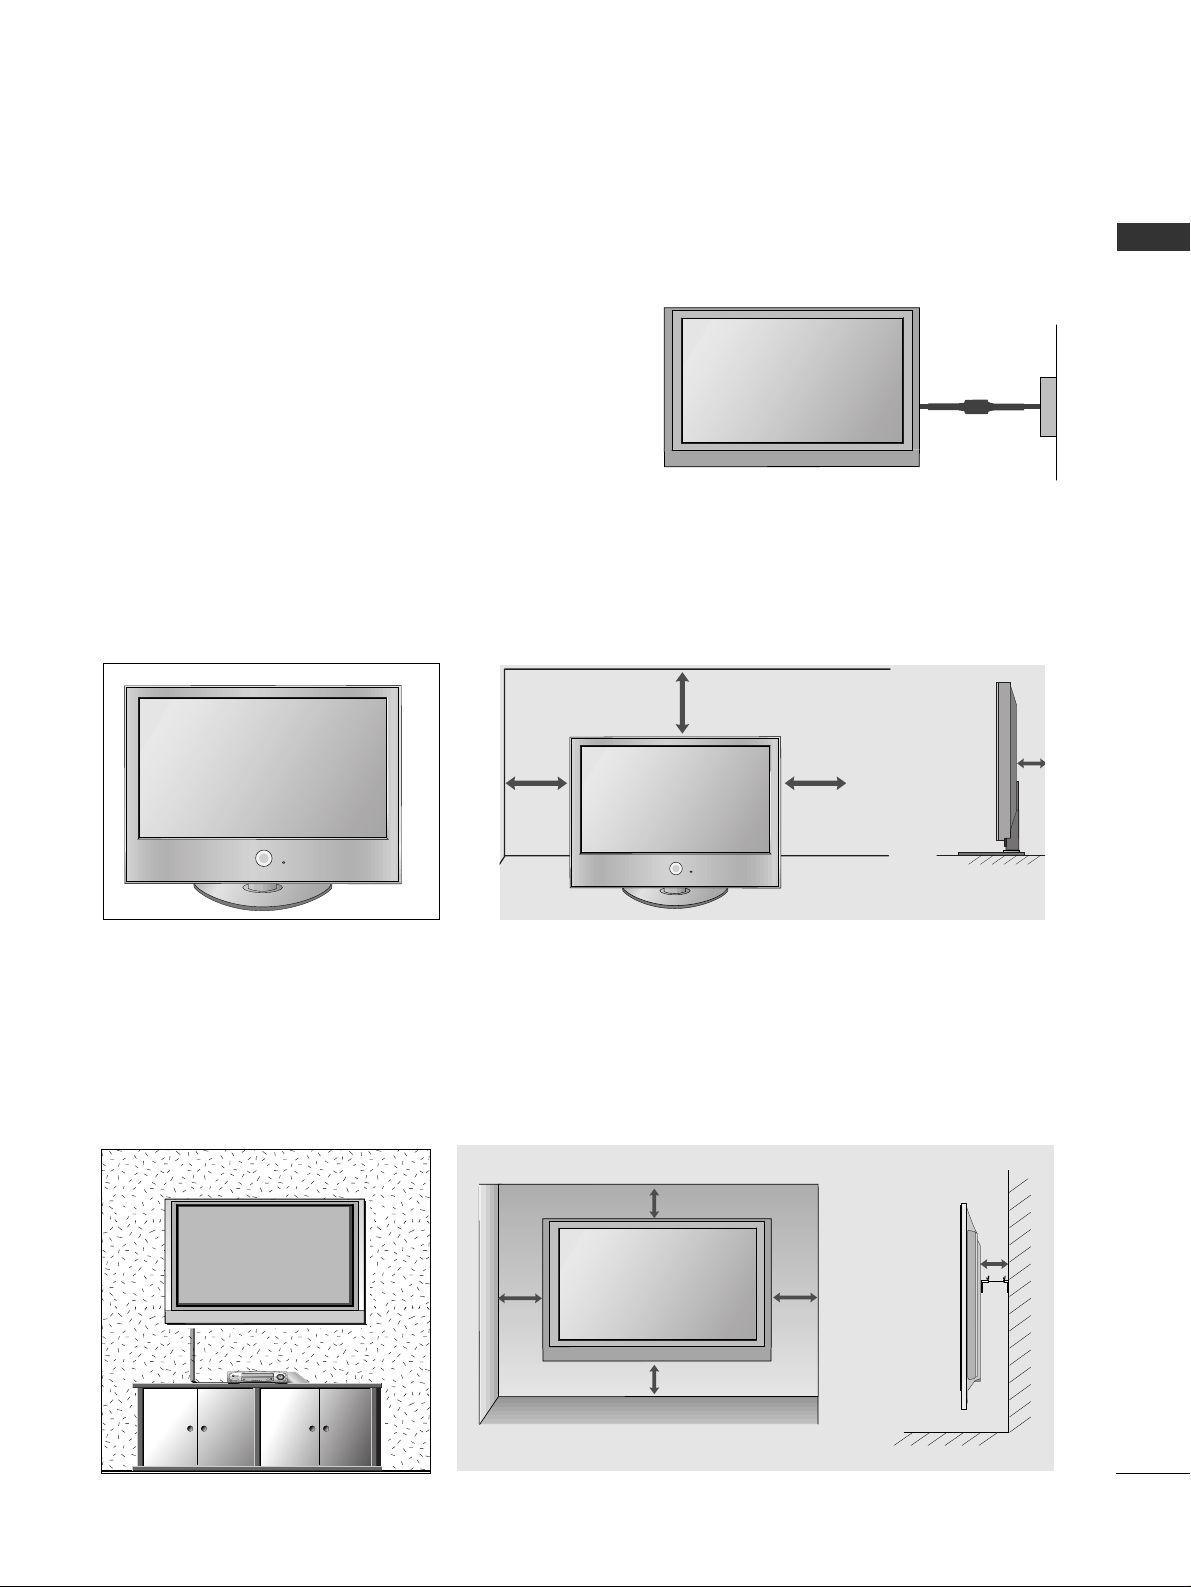
ENGLISH
A
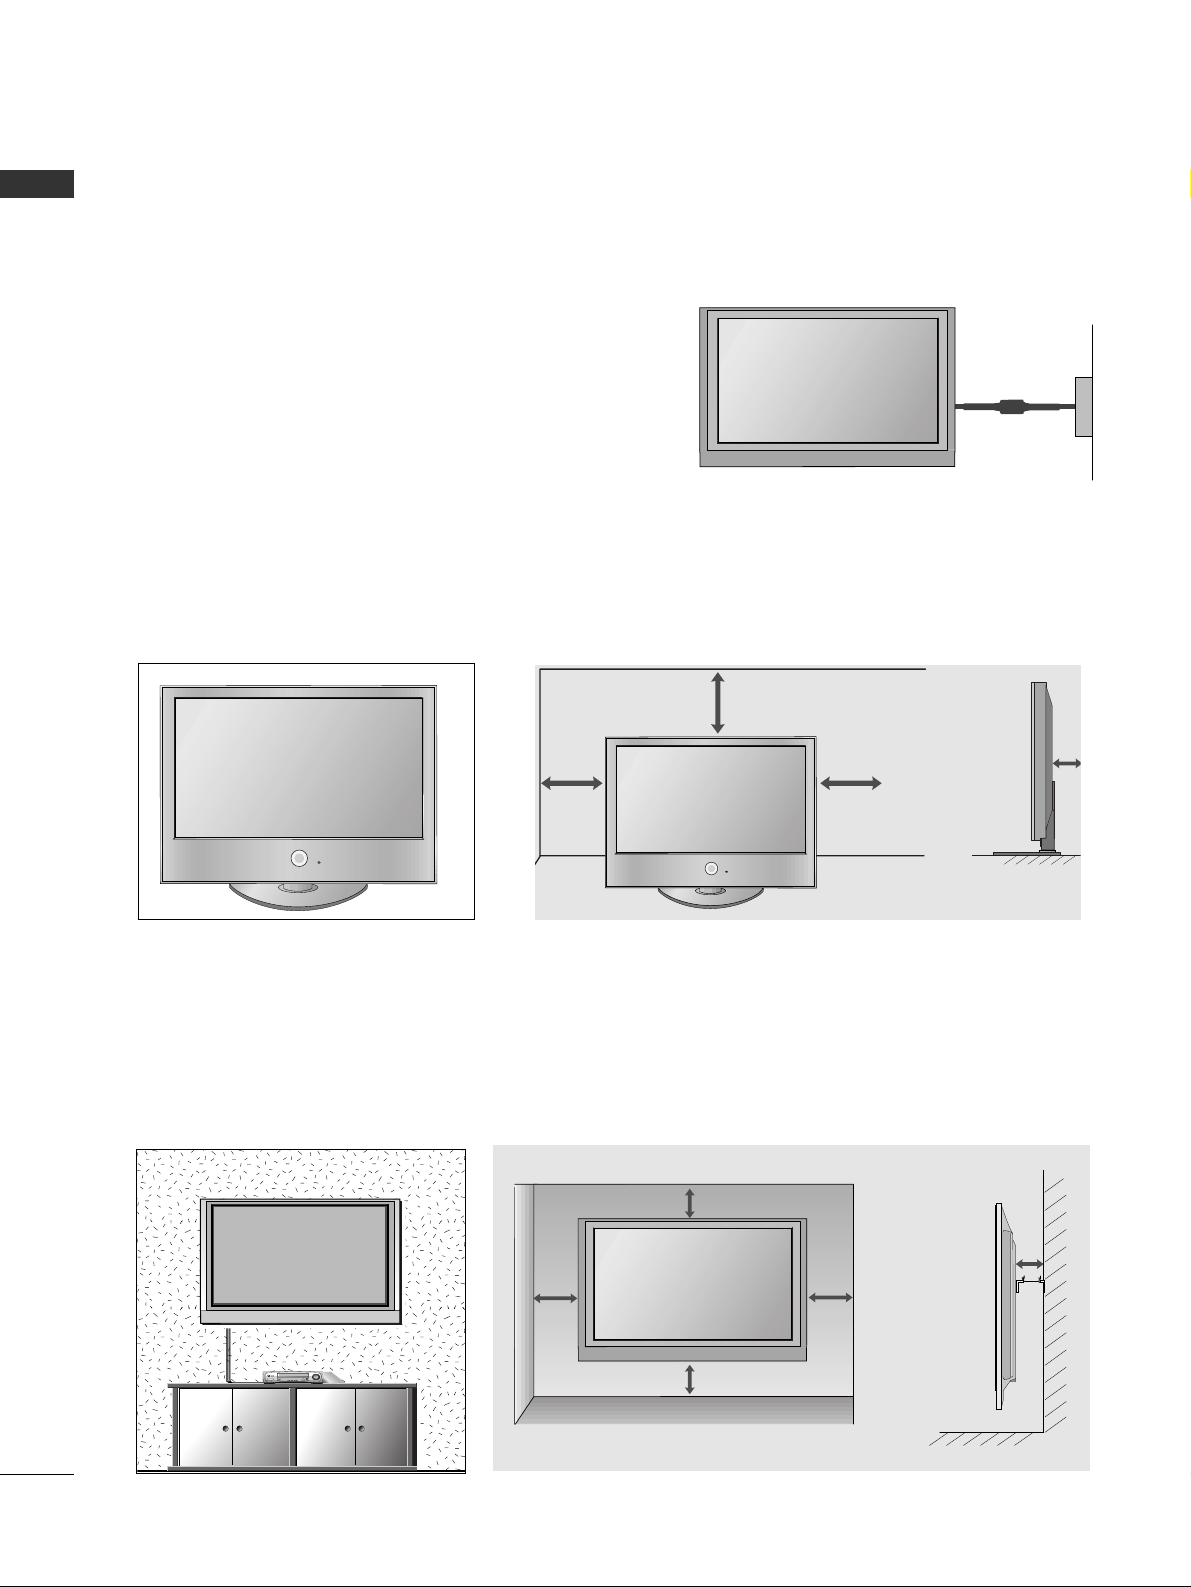
The TV can be installed in various ways such as on a wall, or on a desktop etc.
A
The TV is designed to be mounted horizontally.
Power Supply
Circuit breaker
EARTHING
Ensure that you connect the earth wire to prevent possible
electric shock. If grounding methods are not possible, have a
qualified electrician install a separate circuit breaker.
Do not try to earth the TV by connecting it to telephone
wires, lightening rods or gas pipes (comma incorrect).
DESKTOP PEDESTAL INSTALLATION
P
For adequate ventilation allow a clearance of 4” (10cm) all around the TV.
4 inches
4 inches 4 inches
4 inches
WALL MOUNT: HORIZONTAL INSTALLATION
For adequate ventilation allow a clearance of 4” (10cm) all around the TV. We recommend that you use a wall
mount-ing bracket of LG brand when mounting the TV to a wall.
4 inches
4 inches
4 inches
4 inches
4 inches
9
ENGLISH
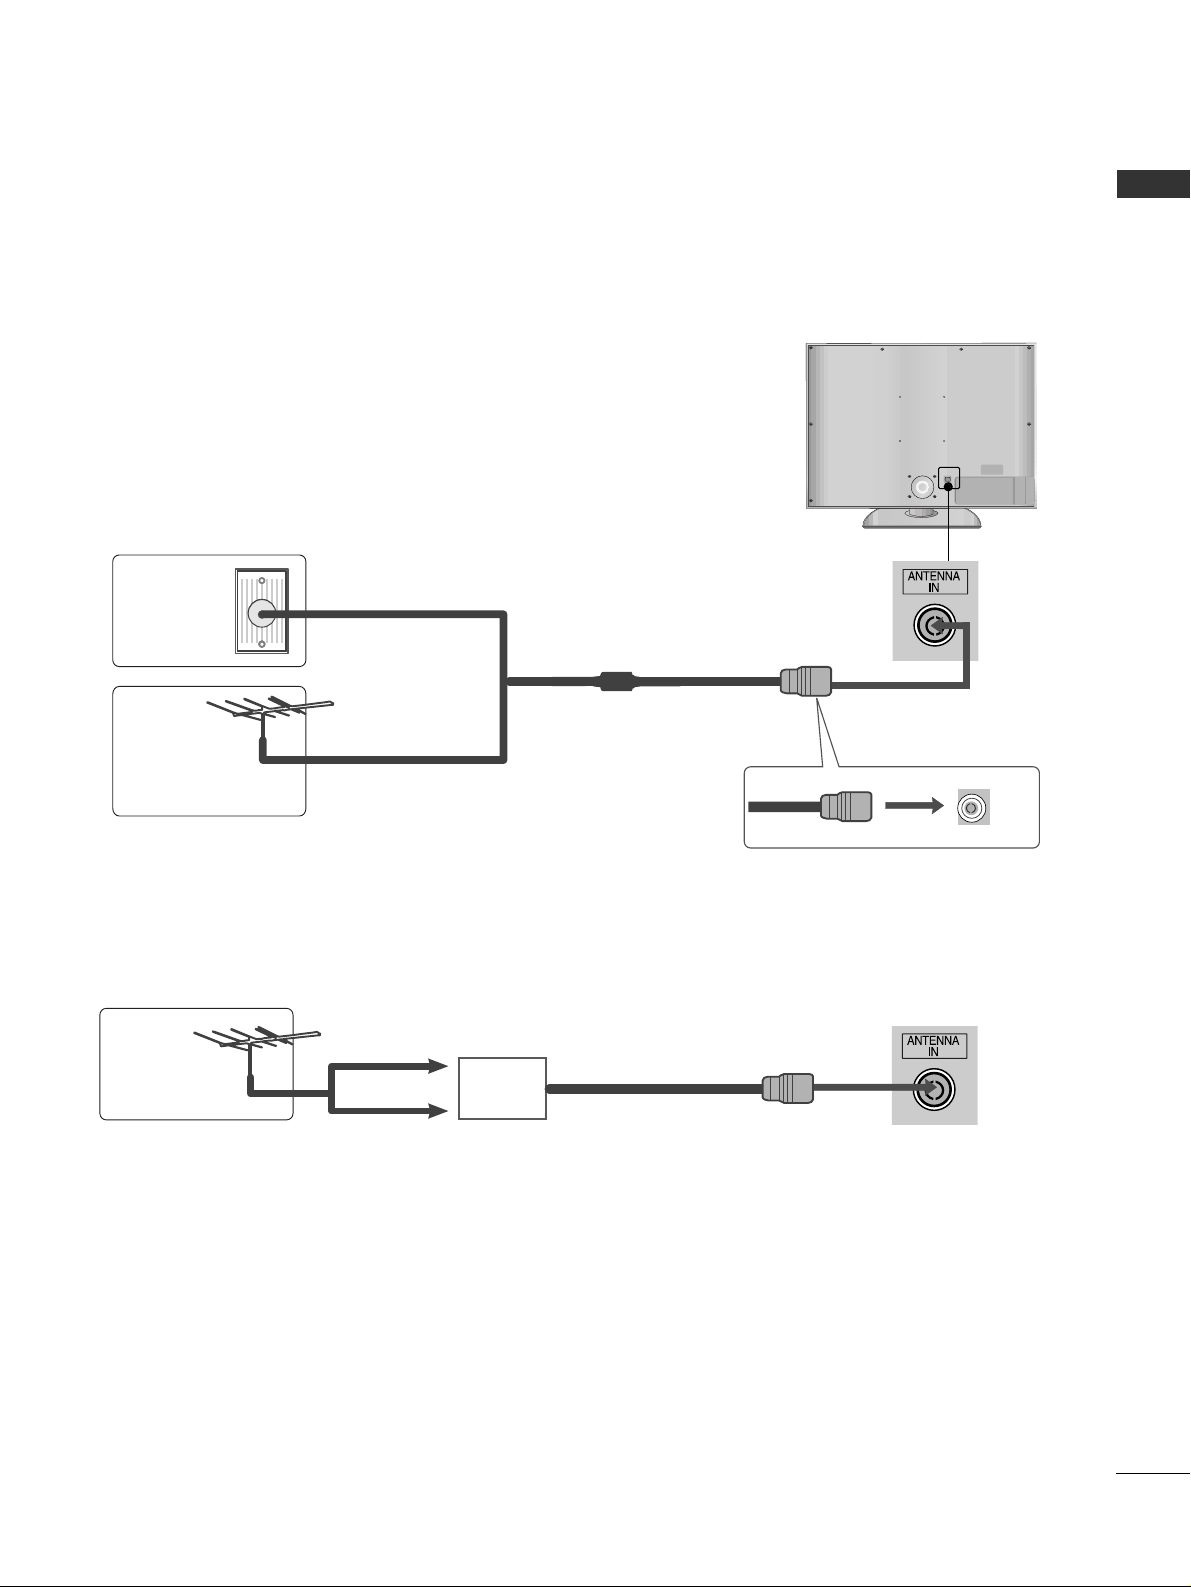
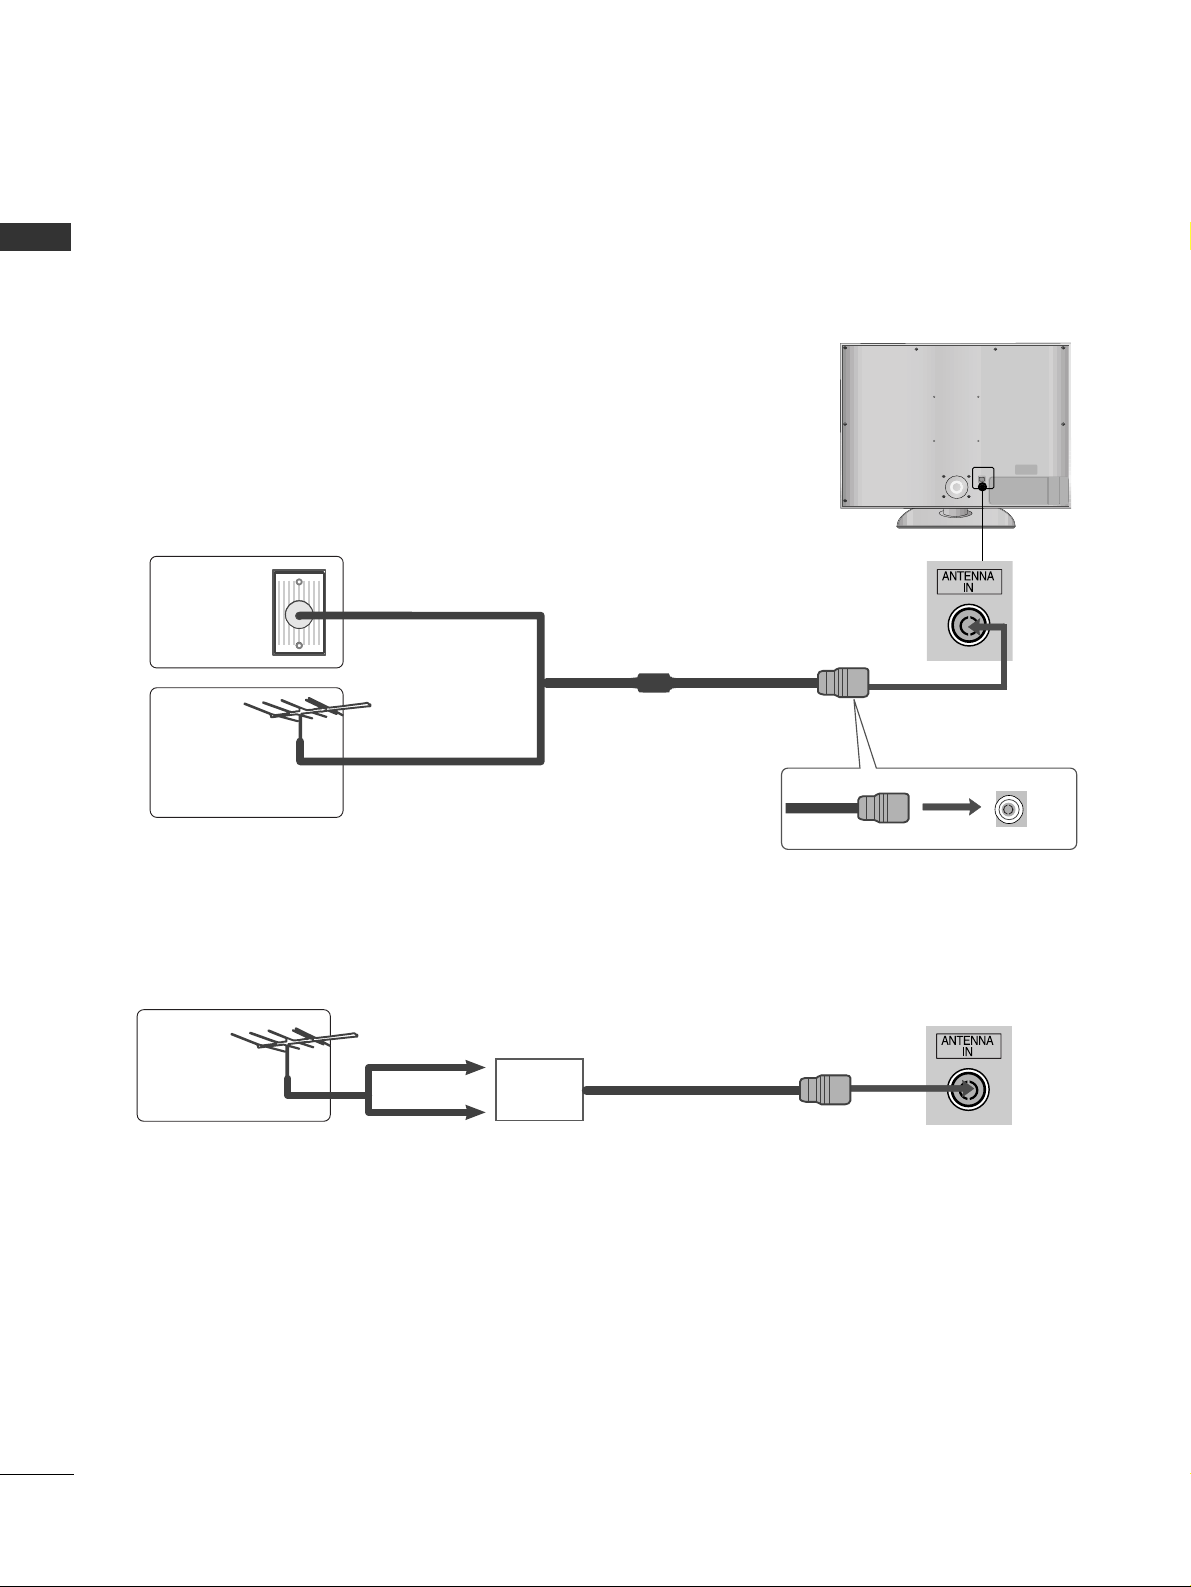
Multi-family Dwellings/Apartments
(Connect to wall antenna socket)
Single-family Dwellings /Houses
(Connect to wall jack for outdoor antenna)
Outdoor
Antenna
(VHF, UHF)
Wall
Antenna
Socket
RF Coaxial Wire (75 ohm)
Antenna
UHF
Signal
Amplifier
VHF
■
In poor signal areas, to achieve better picture quality it may be necessary to install a signal amplifier to the
antenna as shown above.
■
If signal needs to be split for two TVs,use an antenna signal splitter for connection.
ANTENNA CONNECTION
■
For optimum picture quality, adjust antenna direction.
■
An antenna cable and converter are not supplied.
■
To prevent damage do not connect to the mains outlet until all connections are made between the devices.

10
WATCHING TV /PROGRAMME CONTROL
ENGLISH
REMOTE CONTROL KEY FUNCTIONS
When using the remote control, aim it at the remote control sensor on the TV.
Installing Batteries
■
Open the battery compartment cover on the back and install the batteries
matching correct polarity (+with +,-with -).
■
Install two 1.5V AAA batteries. Do not mix old or used batteries with new ones.
■
Close cover.
POWER
Switches the TV on from standby or
off to standby.
INPUT
External input mode rotate in regular
sequence.
Switches the TV on from standby.
THUMBSTICK
(Up/Down/LeftRight)
Allows you to navigate the on-screen
menus and adjust the system settings
to your preference.
OK
Accepts your selection or displays the
current mode.
GUIDE
Shows programme schedule.
Programme UP/DOWN
Selects a programme.
MODE
Selects the remote operating modes.
Q. MENU
Select the desired quick menu source.
(Aspect Ratio, Backlight, Clear Voice,
Picture Mode, Sound Mode, Audio,
Sleep Timer, USB Eject.)
MENU
Selects a menu.
Clears all on-screen displays and
returns to TV viewing from any menu.
VOLUME UP /DOWN
Adjusts the volume.
Q.VIEW
Returns to the previously viewed programme.

11
ENGLISH
Select your country.
2
OK
ON-SCREEN MENU LANGUAGE / COUNTRY SELECTION
The installation guide menu appears on the TV screen when it is switched on for the first time.
** IIff yyoouu wwaanntt ttoo cchhaannggee LLaanngguuaaggee// CCoouunnttrryy sseelleeccttiioonn
NOTE
!
GG
If you do not finish the set-up
IInnssttaallllaattiioonn GGuuiiddee
by pressing
RREE TTUURRNN
or if you time out on the
OSD (On Screen Display) the installation menu will continuously appear until the set up is completed
whenever the TV is switched on
GG
If you select the wrong local country, teletext may not appear correctly on the screen and some problems
may occur during teletext operation.
GG
The CI (Common Interface) function may not be applied based on country broadcasting circumstances.
GG
DTV mode control buttons may not function based on country broadcasting circumstances.
GG
In country that Digital broadcasting regulation isn’t fixed, some DTV function may not work depending
on digital broadcasting circumstances.
S
elect your desired language.
1
OK
Select
OOPPTTIIOONN
.
Select
MMeennuu LLaanngguuaaggee
or
CCoouunnttrryy
.
1
2
MENU
OK
3
Select your desired language or
country.
4
Save.
OK
OK
TURNING ON THE TV
Firstly, connect the power cord correctly.
At this stage, the TV switches to standby mode.
In standby mode to turn TV on, press the
rr
/ I, INPUT or P
D E
(or P ) button on the TV or
press the POWER, INPUT, P or NUMBER button on the remote control and the TV will switch on.
2
1
Initializing se
tup
Note:
a. It will automatically disappear after approx. 40 seconds unless a button is pressed.
b. Press the RETURN button to change the current OSD to the previous OSD.
c. For those countries without confirmed DTV broadcasting standards, some DTV features might not work,
depending on the DTV broadcasting environment.
d "Home” mode is the optimal setting for home environments, and is the TV's default mode.
e. "In Store" mode is the optimal setting for store environments. If a user modifies image quality data, “In
Store” mode initializes the product to the image quality set by us after a certain period of time.
f. The mode (Home, In Store) can be changed by executing Factory Reset in the OPTION menu.
If the OSD (On Screen Display) is displayed on the screen after turning on the TV, you can adjust the
LLaanngguuaagg ee, SS eelleecctt MMooddee, CCoouunnttrryy, TTiimmee ZZoonn ee, AAuuttoo pprrooggrraa mmmmee ttuunniinngg
.
- When your TV is turned on, you will be able to use its features.

12
WATCHING TV /PROGRAMME CONTROL
ENGLISH
ON SCREEN MENUS SELECTION AND ADJUSTMENT
Your TV's OSD (On Screen Display) may differ slightly from that shown in this manual.
OK
Move
Auto Tuning
Manual Tuning
Programme Edit
Booster : On
Software Update : On
Diagnostics
CI Information
SETUP
SETUP
OPTION
PICTURE
LOCK
AUDIO
INPUT
TIME
USB
OK
Move
Aspect Ratio : 16:9
Picture Mode : Standard
• Backlight 80
• Contrast 90
• Brightness 50
• Sharpness 60
• Colour 60
• Tint 0
PICTURE
E
OK
Move
Auto Volume : Off
Clear Voice : On
Balance 0
Sound Mode : Standard
•
SRS TruSurround XT
: On
• 80Hz 0
• 220Hz 0
• 470Hz 0
AUDIO
E
LR
-+
-+
-+
OK
Move
Clock
Off Time : Off
On Time : Off
Sleep Timer : Off
Auto Sleep : Off
Time Zone : Canary GMT
TIME
OK
Move
Photo List
Music List
USB
OK
Move
Antenna
AV1
AV2
AV3
Component
RGB
HDMI1
HDMI2
INPUT
E
OK
Move
Lock System : Off
Set Password
Block Programme
Parental Guidance : Off
LOCK
OK
Move
Menu Language : English
Audio Language : English
Subtitle Language : English
Hard of Hearing( )
: Off
Country : UK
Input Label
SIMPLINK : On
Key Lock : Off
OPTION
E
NOTE
!
G
It is possible to use
TTrruuMMoottiioonn,TTrruuMMoottiioonn DDeemmoo
in
44 22//4477LL GG6600
** **
,
44 22LLGG6611
****
models only.
G
It is not possible to use
CCII IInnffoo rrmmaattiioonn
and
BBoooosstteerr
in Analogue mode.
Display each menu.
Select a menu item.
Move to the pop up menu.
1
MENU
3
2
OK
OK
RG
• Press the
MMEENNUU
button to return to normal TV viewing.
• Press the
RREETTUURRNN
button to move to the previous menu screen.

13
ENGLISH
AUTO PROGRAMME TUNING
Use this to automatically find and store all available programmes.
When you start auto programming, all previously stored service information will be deleted.
Select SETUP.
Select Auto Tuning.
Select Yes.
Run Auto tuning.
1
MENU
3
2
OK
OK
4
OK
WHEN CONNECTING THE USB DEVICE
When you connect a USB device, this screen is displayed, automatically.
In USB device, you can not add a new folder or delete the existing folder.
OK
Move
Auto Tuning
Manual Tuning
Programme Edit
Booster : On
Software Update : On
Diagnostics
CI Information
SETUP
Auto Tuning
OK
Move
Auto Tuning
Manual Tuning
Programme Edit
Booster : On
Software Update : Onf
Diagnostics
CI Information
SETUP
Auto Tuning
All service-information will be updated.
Continue?
SECAM L Search
Yes No
• Use NUMBER buttons to input a 4-digit pass-
word in
LLoo cckk SS yysstteemm‘OOnn
’.
•
If you wish to keep on auto tuning select
YYEESS
using the button. Then, press the OK button. Otherwise select
NN OO
.
Connect the USB device to the
UUSSBB IINN
jacks on the side of TV.
3
Select
PPHHOOTT OO LLIISSTT orMMUUSSIICC LLII SSTT
1
USB memory stick
2
OK
When removing the USB device
Select
UUSSBB EEjjeecctt
.
Select the USB EJECT menu before removing the
USB device.
1
Q. MENU
2
OK
• It doesn’t support USB HDD
• This TV Supports on JPEG and MP3.
14
APPENDIX
ENGLISH
MAINTENANCE
TO VIEW THE USER'S GUIDE ON THE CD-ROM
Early malfunctions can be prevented. Careful and regular cleaning can prolong the life of your new TV.
Caution: Be sure to switch the power off and unplug the power cord before you begin any cleaning.
Cleaning the Screen
A good way to keep the dust off your screen for a while is to wet a soft cloth in a mixture of lukewarm water
and a little fabric softener or dish washing detergent. Wring the cloth until it is almost dry, and then use it
to wipe the screen.
Ensure there is no excess water on the screen. Allow any water or dampness to evaporate before switching on.
Cleaning the Cabinet
A
To remove dirt or dust, wipe the cabinet with a soft, dry, lint-free cloth.
A
Do not to use a wet cloth.
Extended Absence
G
If you expect to leave your TV dormant for prolonged periods (such as a holiday), unplug the power
cord to protect against possible damage from lightning or power surges.
CAUTION
1
2
To view the User's guide on the CD-ROM, Adobe Acrobat Reader must be installed on your PC.
The "ACRORD" folder on the CD-ROM contains the installation program for Acrobat Reader.
If you want to install Acrobat Reader, Open "My Computer" Open the folder "LG" Open the folder "ACRORD"
double-click your language.
TToo vviieeww tthhee UUsseerr''ss gguuiiddee
The User's guide files are included in the supplied CD-ROM.
Load the supplied CD-ROM into the CD-ROM drive of your PC.
After a while, the web page of the CD-ROM will open automatically.(Windows users only)
If the web page does not appear automatically, open the User's guide file directly.
Open "My computer" Open the folder "LG" Double click the "index.htm" file.
21.2 kg / 46.3 lbs
18.1 kg / 39.9 lbs
24.1 kg / 53.1 lbs
20.4 kg / 44.9 lbs
with stand
without stand
37LG60
**
37LG6000-ZA
14.4 kg / 31.7 lbs
12.2 kg / 26.9 lbs
32LG60
**
32LG6000-ZA
42LG60
**
42LG6000-ZA
MODELS
21.3 kg / 47 lbs
18 kg / 39.7 lbs
32.8 kg / 73.3 lbs
27.2 kg / 59.9 lbs
Weight
with stand
without stand
Weight
42LG61
**
42LG6100-ZB
47LG60
**
47LG6000-ZA
MODELS
WEIGHT
■
The specifications shown above may be changed without prior notice for quality improvement.

15
ENGLISH
TROUBLESHOOTING
TThhee TTVV ddooeess nnoott ooppeerraattee pprrooppeerrllyy..
The remote control
does not work
Power is suddenly
turned off
A
Check to see if there is any object between the TV and the remote control causing
an obstruction. Ensure you are pointing the remote control directly at the TV.
A
Ensure that the batteries are installed with correct polarity (+ to +, - to -).
A
Ensure that the correct remote operating mode is set : TV, STB etc.
A
Install new batteries.
A
Is the sleep timer set?
A
Check the power control settings. Has the Power supply been interrupted.
A
Is Auto sleep activated on this station?
No picture & No sound
No or poor colour
or poor picture
Poor reception on
some channels
Lines or streaks
in pictures
No picture
when connecting HDMI
Horizontal/vertical bars
or picture shaking
Picture appears slowly
after switching on
A
Check whether the TV is switched on.
A
Try another channel. The problem may be with the broadcast.
A
Is the power cord inserted correctly into the mains?
A
Check your antenna direction and/or location.
A
Test the mains outlet by plugging another TV into the same outlet.
A
This is normal, the image is muted during the TV startup process. Please contact
your service centre, if the picture has not appeared after five minutes.
A
Adjust Colour in menu option.
A
Allow a sufficient distance between the TV and the VCR.
A
Try another channel. The problem may be with the broadcast.
A
Are the video cables installed properly?
A
Activate any function to restore the brightness of the picture.
A
Check for local interference such as an electrical appliance or power tool.
A
Station or cable channel experiencing problems, tune to another station.
A
Station signal is weak, reposition the antenna to receive weaker stations.
A
Check for sources of possible interference.
A
Check antenna (Change the position of the antenna).
A
Check HDMI cable over version 1.3.
If the HDMI cables don’t support HDMI version 1.3, it can cause flickers or no
screen display. In this case use the latest cables that support HDMI version 1.3.
TThhee vviiddeeoo ffuunnccttiioonn ddooeess nnoott wwoorrkk..

16
ENGLISH
TThheerree iiss aa pprroobblleemm iinn PPCC mmooddee.. ((OOnnllyy PPCC mmooddee aapppplliieedd))
A
Adjust resolution, horizontal frequency, or vertical frequency.
A
Check the input source.
A
Use Auto configure or adjust clock, phase, or H/V position. (Option)
A
Check the signal cable.
A
Reinstall the PC video card.
The signal is out of range
(Invalid format)
Screen colour is unstable
or single colour
Vertical bar or stripe on
background &
Horizontal Noise &
Incorrect position
TThhee aauuddiioo ffuunnccttiioonn ddooeess nnoott wwoorrkk..
A
Press the
++ or--
button.
A
Sound muted? Press MUTE button.
A
Try another channel. The problem may be with the broadcast.
A
Are the audio cables installed properly?
A
Adjust
BBaallaannccee
in menu option.
A
A change in ambient humidity or temperature may result in an unusual noise
when the TV is switched on or off and does not indicate a fault with the TV.
A
Check HDMI cable over version 1.3.
A
Check USB cable over version 2.0.
Picture OK & No sound
Unusual sound from
inside the TV
No sound when
connecting HDMI
or USB
No output from one
of the speakers
*This feature is not available for all models.
17
ENGLISH
(UK only)

BBeeddiieennuunnggssaannlleeiittuunngg
LCD TV
LCD TV-MODELLE
3322LLGG6600
****
3377LLGG6600
****
4422LLGG6600
****
4422LLGG6611
****
4477LLGG6600
****
Ein ausführlicheres Benutzerhandbuch mit erweiterten Funktionen dieser LG TV-Geräte befindet sich
auf der CD-ROM.
Um es lesen zu können, müssen Sie die Dateien auf
einem Personal Computer (PC) mit CD-ROMLaufwerk öffnen.
Bitte lesen Sie vor Gebrauch des Gerätes diese
Anleitung aufmerksam durch.
Bewahren Sie die Anleitung für spätere Fragen sorgfältig
auf. Tragen Sie Modell- und Seriennummer des Gerätes
hier ein.
Sie finden die Angaben auf dem Typenschild an der
Rückwand des Gerätes. Teilen Sie Ihrem Kundendienst
die Nummern mit, wenn Sie Hilfe benötigen.
• Lesen Sie diese Sicherheitsmaßnahmen vor der ersten Verwendung des Produkts sorgfältig durch.
• Die Abbildungen in diesem Handbuch können vom tatsächlichen Aussehen Ihres Produkts abweichen, da sie lediglich
zur Verdeutlichung der Bestimmungen dienen.
Wenn Sie eine Warnmeldung ignorieren, kann es zu ernsthaften Verletzungen oder zu Unfällen und Todesfällen kommen.
Wenn Sie eine zur Vorsicht mahnende Meldung ignorieren, kann es zu leichten Verletzungen kommen oder das
Produkt kann beschädigt werden.
Vorsichtsmaßnahme bei der Installation des
Produkts
Halten Sie sich von Wärmequellen wie elektrischen
Heizungen fern.
- Es kann zu Stromschlägen, Feuer, Fehlfunktionen oder
Deformationen kommen.
Wenn es nach Rauch riecht, andere Gerüche wahrzunehmen
oder merkwürdige Geräusche zu hören sind, unterbrechen Sie
die Stromversorgung und kontaktieren Sie den Service.
- Wenn Sie weiterarbeiten, ohne die erforderlichen Maßnahmen zu tre-
ffen, kann es zu Stromschlägen oder Feuer kommen.
Verwenden Sie das Produkt nicht an feuchten Orten (z. B.
Badezimmer) oder an Stellen, an denen es nass werden
könnte.
- Dadurch kann es zu Bränden oder zu Stromschlägen kommen.
Installieren Sie das Produkt auf einer ebenen und sta-
bilen Fläche, damit das Produkt nicht herunterfallen
kann.
- Falls das Produkt zu Boden fällt, könnten Sie verletzt oder das
Produkt könnte beschädigt werden.
Setzen Sie das Produkt nicht direktem Sonnenlicht
aus.
- Das Produkt könnte beschädigt werden.
Stellen Sie das Produkt nicht an Orten wie in
Bücherregalen oder Racks auf.
- Das Produkt muss gut belüftet sein.
Strombezogene Sicherheitsmaßnahmen
Vergewissern Sie sich, dass das Stromkabel an den
Erdungsstrom angeschlossen ist.
- Ansonsten könnten Sie einen Stromschlag erleiden oder verletzt
werden.
Berühren Sie den Netzstecker nicht mit nassen Händen. Falls
der Kontakt nass oder mit Staub bedeckt ist, trocknen Sie den
Netzstecker vollständig oder reinigen Sie ihn von Staub.
- Ansonsten könnten Sie durch Restfeuchtigkeit einen Stromschlag
erleiden.
Stecken Sie bei Gewittern das Strom- bzw. das
Signalkabel aus.
- Ansonsten könnten Sie einen Stromschlag erleiden oder
es könnte ein Feuer ausbrechen.
Schützen Sie das Stromkabel vor physikalischer oder
mechanischer Beeinträchtigung (Verdrehen, Knicken,
Einklemmen oder Darauftreten).
Achten Sie hierbei besonders auf Stecker, Steckdosen
und diejenigen Stellen, an denen das Kabel aus dem
Gerät herausführt.
Vorsichtsmaßnahme beim Bewegen des Produkts
Vermeiden Sie Erschütterungen beim Bewegen des
Produkts.
- Ansonsten könnten Sie einen Stromschlag erleiden oder das
Produkt könnte beschädigt werden.
Achten Sie darauf, dass der Monitor nach vorne zeigt und
halten Sie ihn zum Bewegen mit beiden Händen fest.
- Wenn Sie das Produkt fallen lassen, könnten Sie durch das
beschädigte Gerät einen Stromschlag erleiden oder es könnte
ein Brand verursacht werden. Wenden Sie sich bezüglich
Reparaturen an den Service.
Vergewissern Sie sich, dass das Produkt ausgeschaltet ist.
Vergewissern Sie sich, dass alle Kabel entfernt wurden,
bevor das Produkt bewegt wird.
- Ansonsten könnten Sie einen Stromschlag erleiden oder
das Produkt könnte beschädigt werden.
Vorsichtsmaßnahme beim Verwenden des Produkts
Demontieren Sie das Produkt nicht und führen Sie
Reparaturen und Änderungen nicht selbst durch.
- Feuer und Stromschläge können die Folge sein.
- Wenden Sie sich an den Service, wenn das Gerät überprüft,
kalibriert oder repariert werden soll.
Um das Brand- oder Stromschlagrisiko zu senken, darf das
Gerät nicht Regen oder Feuchtigkeit ausgesetzt werden.
Das Gerät darf nicht tropfendem oder spritzendem Wasser
ausgesetzt sein und es sollten keine mit Flüssigkeiten gefüllten Behälter (z. B. Vasen) auf dem Gerät abgestellt werden.
Überlassen Sie alle Servicearbeiten qualifizierten
Servicemitarbeitern. Servicearbeiten sind erforderlich, wenn
das Gerät in irgendeiner Form beschädigt wurde (z. B.:
Netzkabel oder -stecker ist beschädigt, Flüssigkeiten oder
Objekte sind in das Geräteinnere gelangt, Gerät war Regen
oder Feuchtigkeit ausgesetzt, normale Funktionsweise ist
gestört, Gerät wurde fallengelassen).
Ein Standbild (z. B. beim Anhalten des Videofilmes) sollte nicht
über einen längeren Zeitraum auf dem Bildschirm angezeigt
werden, da das Bild auf dem Bildschirm dauerhaft verbleiben
könnte. Dieser Effekt wird als Einbrennen bezeichnet.
Eingebrannte Bilder werden nicht von der Garantie abgedeckt.
DEUTSCH
2
SICHERHEITSBESTIMMUNGEN
DEUTSCH
Ziehen Sie die Schutzaufkleber von der Trägerfolie ab
und bringen Sie den Aufkleber wie gezeigt am
Fernseher an.
3
VORBEREITUNG
FRONTKONSOLE
P
OK
MENU
INPUT
P
PROGRAMME
(Einschalten)
VOLUME(Lautstärke)
OK
MENU
INPUT
■
Die Ausführung des Fernsehers kann von den
Abbildungen abweichen.
Nutzen Sie bei der Wandmontage des Gerätes die
Schutzabdeckung zur Standfußmontage.
FALLS KEIN TISCH-STANDFUSS VERWENDET WIRD
P
POWER(Einschalten)
Sensor für die Fernbedienung
Power/Standby-Anzeige
• Leuchtet im Standby-Modus rot.
• leuchtet bei eingeschaltetem Fernsehgerät weiß.
Hinweis: Die Betriebsanzeige kann im Einstellungsmenü eingestellt werden.
Intelligenter Sensor
Passt das Bild den äußeren Bedingungen an.
■
Die Ausführung des Fernsehers kann von den Abbildungen abweichen.
■
Falls das Gerät mit einer Schutzfolie überzogen ist, ziehen Sie die Folie ab und wischen Sie das Gerät mit einem
Poliertuch ab.
Anschlussbuchse für Stromkabel
Dieses Fernsehgerät ist auf den Betrieb mit
Wechselstrom ausgelegt.Die Spannung finden Sie
auf der Seite „Spezifikationen “.Versuchen Sie
niemals,das Gerät mit Gleichstrom zu betreiben.
RS-232C-Eingang (STEUERUNG&WARTUNG)
Für den Anschluss des seriellen Ports der
Steuergeräte an die RS-232C-Buchse.
RGB-Eingang
Anschluss eines Ausgangskabels vom PC.
RGB/DVI-Audio-Eingang
Anschluss eines Audiokabels vom PC oder DTV.
HDMI-Eingang
Schließen Sie ein HDMI-Signal an HDMI IN an.
Oder schließen Sie ein DVI-(VIDEO)-Signal über
ein DVI-zu-HDMI-Kabel an den HDMI/DVI-ingang
an.
Komponent-Eingang
Für den Anschluss eines Komponent-Video oder
Audio-Geräts.
Audio/Video-Eingang
Für den Anschluss von Audio- oder VideoAusgangssignalen von externen Geräten
OPTICAL DIGITAL AUDIO OUT
Anschluss für Digitalaudio von unterschiedlichen
Gerätearten.
Hinweis: Diese Anschlüsse funktionieren nicht im
Standbymodus.
Euro-Scart-Anschluss (AV1/AV2)
Für den Anschluss von Scart-Eingangs-und
Ausgangssignalen von externen Geräten.
Antenneneingang
Anschluss einer HF-Antenne.
1
2
3
4
6
7
8
9
1
5
432
HDMI-Eingang
Schließen Sie ein HDMISignal an HDMI IN an.
USB-Eingang
PCMCIA (Personal
Computer Memory Card
International Association)Kartenschlitz.
(Diese Funktion ist in einigen
Ländern nicht verfügbar.)
5
7
8 9
6
DEUTSCH
4
INFORMATIONEN ZUR RÜCKSEITE
VORBEREITUNG
A
Die Ausführung des Fernsehers kann von den Abbildungen abweichen.

Standkörper
Bodenblende
32LG60
**
37LG60
**
DEUTSCH
5
GRUNDANSCHLUSS
(nur 32/37/42LG60** , 42LG61**)
1 3
4
Legen Sie das Fernsehgerät mit der
Bildschirmseite nach unten auf eine gepolsterte
Oberfläche, um den Bildschirm vor
Beschädigungen zu schützen.
2
Befestigen Sie die Standfußverbindung am
Fernsehgerät.
Befestigen Sie das Fernsehgerät wie in der
Abbildung gezeigt.
Befestigen Sie die vier Schrauben fest in den Öffnungen auf der Rückseite des Fernsehgerätes.
Standkörper
Bodenblende
42LG60**, 42LG61
**
A
Die Ausführung des Fernsehers kann von den Abbildungen abweichen.
Stellen Sie beim Zusammenbau des Tischstandfußes sicher, ob alle Schrauben festgezogen wurden. (Bei losen
Schrauben könnte das Gerät nach dem Aufstellen nach vorn kippen.) Beim Festziehen der Schrauben mit zu hohem
Kraftaufwand kann die Schraube durch zu starke Reibung an den Verbindungspunkten beschädigt werden.
DEUTSCH
6
VORBEREITUNG
DAS GERÄT MUSS SICHER MONTIERT WERDEN, SO DASS ES NICHT
UMFALLEN KANN.
HINWEIS
!
GG
Lösen Sie die Schnüre,bevor Sie das Produkt versetzen
GG
Verwenden Sie eine Haltevorrichtung oder einen
Schrank,der nach Größe und Stabilität für die Größe
und das Gewicht des Produkts geeignet ist.
GG
Für eine sichere Verwendung des Produkts sollten sich
die Halterungen an der Wand auf gleicher Höhe mit
jenen am Fernsehgerät befinden.
3
1
2
Verwenden Sie die Ringschrauben oder TV-Halterungen und Schrauben,um das Produkt wie in der Abbildung dargestellt an
der Wand anzubringen.
(Falls sich bereits Schrauben in den Ringschrauben befinden, entfernen Sie diese.)
* Setzen Sie die Ringschrauben oder TV-Halterungen und Schrauben ein und ziehen Sie sie in den oberen Bohrungen fest.
Befestigen Sie die Wandhalterungen mit den Schrauben (nicht in
der Lieferung enthalten)an der Wand. Achten Sie auf die Höhe
der Halterungen an der Wand.
3
Verwenden Sie eine feste Schnur,um das Produkt festzubinden.
Die Schnur sollte für eine möglichst sichere Anbringung horizontal zwischen Wand und Produkt ausgerichtet sein.
2
1
Schließen Sie die erforderlichen Kabel an.
Hinweise zum Anschluss weiterer Geräte finden
Sie im Kapitel Anschluss von Zusatzgeräten.
1
2
Setzen Sie den Stift an der
KKAABBEELLHHAALL--
TTEERRUUNNGG
in die Öffnung.
Drehen Sie die
KKAABBEELLHHAALLTTEERRUUNNGG
wie
gezeigt nach oben.
Um Schäden am Gerät zu vermeiden, sollte keine
übermäßige Kraft beim Anbringen der
Kabelhalterung aufgewendet werden. Die
Kabelhalterung vorsichtig anbringen.
HINTERE ABDECKUNG FÜR
KABELANORDNUNG
■
Image shown may differ from your TV.
A
Die erforderlichen Bauteile zur Montage der Fernsehgerätes an
der Wand erhalten Sie im Handel.
A
Der Fernseher sollte möglichst nahe an der Wand montiert
werden, um ein Herunterfallen beim Anstoßen des Gerätes zu
vermeiden.
A
Die folgenden Anleitungen dienen zur sicheren Montage des
Fernsehers an der Wand und können ein Herunterfallen nach
vorn beim Ziehen am Fernseher vermeiden. Auf diese Weise
können ein mögliches Herunterfallen sowie Verletzungen vermieden werden. Zusätzlich wird das Fernsehgerät vor
Beschädigungen geschützt. Achten Sie darauf, dass sich Kinder
nicht an den Fernseher hängen oder daran hochklettern.
DEUTSCH
7
A
Das Fernsehgerät kann auf unterschiedliche Arten installiert werden,z.B.an der Wand oder auf einem
Schreibtisch.
A
Das Gerät ist auf den Betrieb in horizontaler Position ausgelegt.
Stromanschluss
Short-circuit
Breaker
ERDUNG
Achten Sie darauf,den Erdungsleiter anzuschließen,um
Stromschläge zu vermeiden.Wenn keine Erdung möglich ist,
lassen Sie einen Elektriker einen separaten
Sicherungsautomaten installieren.Versuchen Sie nicht,das
Gerät durch den Anschluss an Telefonleitungen,Blitzableiter
oder Gasleitungen zu erden.
AUFSTELLEN MIT EINEM TISCHSTANDFUß
P
Lassen Sie für ausreichende Lüftung an jeder Seite und zur Wand einen Abstand von ca.10 cm.
10 c m
10 cm 10 cm
10 c m
WANDMONTAGE: HORIZONTALE LAGE
Lassen Sie für ausreichende Lüftung an jeder Seite und zur Wand einen Abstand von ca.10 cm. Zur Montage
des Fernsehgerätes an der Wand empfehlen wir eine Wandhalterung des Herstellers LG.
10 c m
10 c m
10 c m
10 c m
10 c m
DEUTSCH
8
VORBEREITUNG
ANTENNENANSCHLUSS
■
Justieren Sie die Antennenausrichtung für optimale Bildqualität.
■
Antennenkabel und Wandler werden nicht mitgeliefert.
■
Wandantennenbuchse oder Außenantenne ohne Kabelboxanschluss Justieren Sie die Antennenausrichtung bei
Bedarf für optimale Bildqualität.
Mehrfamilienhäuser
(An Antennenbuchse anschließen)
Einfamilienhäuser
(An Wandanschluss der Außenantenne anschließen)
Außenantenne
Antenne
nbuchse
in der
Wand
Koaxialkabel (75 Ohm)
Antenne
UHF
Signalve
rstärker
VHF
■
Um bei schlechtem Empfang eine bessere Bildqualität zu erhalten,bringen Sie einen Signalverstärker an der
Antenne an (siehe rechts).
■
Wenn das Signal für zwei TV-Geräte verwendet werden soll,verwenden Sie eine Signalweiche für den Anschluss.
 Loading...