

Page 1

LCD TV
PLASMA TV
OWNER’S MANUAL
42LB7DF
47LB7DF
32LG50D
37 LG 50 D
42LG50D
47LG 50 D
52LG50FD
42LG70YD
47LG70YD
52LG70YD
Please read this manual carefully before operating your set
and retain it for future reference.
Write the model number and serial number from the label
on the back cabinet on the front or back of this manual.
42PG60D
50PG60D
50PG70FD
60PG70FD
42PG30D
50PG30D
SAC
serviço de atendimento
ao consumidor
4004 5400 Capitais e Regiões Metropolitanas
0800 707 5454 Demais localidades
WWW.LGE.COM.BR
EM CASO DE DÚVIDA, CONSULTE NOSSO SAC
P/NO : MFL41469203 (0805-REV02)
Page 2

Page 3

SAFETY INSTRUCTIONS
IMPORTANT SAFETY INSTRUCTIONS
Important safety instructions shall be provided with each apparatus. This information shall be given in a
separate booklet or sheet, or be located before any operating instructions in an instruction for installation
for use and supplied with the apparatus.
This information shall be given in a language acceptable to the country where the apparatus is intended to
be used.
The important safety instructions shall be entitled “Important Safety Instructions”. The following safety
instructions shall be included where applicable, and, when used, shall be verbatim as follows. Additional
safety information may be included by adding statements after the end of the following safety instruction
list. At the manufacturer’s option, a picture or drawing that illustrates the intent of a specific safety instruction
may be placed immediately adjacent to that safety instruction :
Read these instructions.
Keep these instructions.
Heed all warnings.
Follow all instructions.
Do not use this apparatus near water.
1
Clean only with dry cloth.
2
Do not block any ventilation openings. Install in
3
accordance with the manufacturer’s instructions.
Do not install near any heat sources such as
4
radiators, heat registers, stoves, or other apparatus
(including amplifiers)that produce heat.
Do not defeat the safety purpose of the
5
polarized or grounding-type plug. A polarized
plug has two blades with one wider than the
other. A grounding type plug has two blades
and a third grounding prong, The wide blade
or the third prong are provided for your safety.
If the provided plug does not fit into your
outlet, consult an electrician for replacement
of the obsolete outlet.
1
Page 4

SAFETY INSTRUCTIONS
Protect the power cord from being walked on
6
or pinched particularly at plugs, convenience
receptacles, and the point where they exit
from the apparatus.
Only use attachments/accessories specified
7
by the manufacturer.
Unplug this apparatus when unused for long
8
periods of time.
Use only with the cart, stand, tripod, bracket,
9
or table specified by the manufacturer, or sold
with the apparatus. When a cart is used, use
caution when moving the cart/apparatus
combination to avoid injury from tip-over.
Never touch this apparatus or antenna during
10
a thunder or lighting storm.
Do not allow a impact shock or any objects to
11
fall into the product, and do not drop onto the
screen with something. (You may be injured or
the product can be damaged.)
Refer all servicing to qualified service personnel.
12
Servicing is required when the apparatus has
been damaged in any way, such as power-supply
cord or plug is damaged, liquid has been
spilled or objects have fallen into the apparatus,
the apparatus has exposed to rain or moisture,
does not operate normally, or has been
dropped.
2
Page 5

CAUTION concerning the Power Cord :
Owner Manual
13
Most appliances recommend they be placed
upon a dedicated circuit; that is, a single outlet
circuit which powers only that appliance and
has no additional outlets or branch circuits.
Check the specification page of this owner's
manual to be certain.
Do not overload wall outlets. Overloaded wall
outlets, loose or damaged wall outlets, extension
cords, frayed power cords, or damaged or
cracked wire insulation are dangerous. Any of
these conditions could result in electric shock
or fire. Periodically examine the cord of your
appliance, and if its appearance indicates
damage or deterioration, unplug it, discontinue
use of the appliance, and have the cord
replaced with an exact replacement part by
an authorized servicer. Protect the power cord
from physical or mechanical abuse, such as
being twisted, kinked, pinched, closed in a
door, or walked upon. Pay particular attention
to plugs, wall outlets, and the point where
the cord exits the appliance.
Wet Location Marking : Apparatus shall not
15
be exposed to dripping or splashing and no
objects filled with liquids, such as vases, shall
be placed on or over apparatus.
GROUNDING
16
Ensure that you connect the earth ground
wire to prevent possible electric shock. If
grounding methods are not possible, have a
qualified electrician install a separate circuit
breaker.
Do not try to ground the unit by connecting
it to telephone wires, lightening rods, or gas
pipes.
Power Supply
Short-circuit
Breaker
Outdoor Use Marking :
14
WARNING - To Reduce The Risk Of Fire Or
Electric Shock, Do Not Expose This Appliance
To Rain Or Moisture
DISCONNECTING DEVICE FROM MAINS
17
Main plug is the disconnecting device. The
plug must remain readily operable.
When mounting a TV it on the wall, make
18
sure not to install TV by hanging power and
signal cables on the back of the TV.
- It may cause fire, electric shock.
Keep the product away from direct sunlight.
19
- The product can be damaged.
3
Page 6

CONTENTS
SAFETY INSTRUCTIONS
. . . . . . . . . . . . . . . . . . . . . . . . .
1
FEATURES OF THIS TV . . . . . . . . . . . . . . . . . . . . . . . . . . . . . 6
PREPARATION
Accessories . . . . . . . . . . . . . . . . . . . . . . . . . . . . . . . . . . . . . . . . . . . . . . . . . . . . . . 7
Front Panel Information
. . . . . . . . . . . . . . . . . . . . . . . . . . . . . . . . . . . . . 8
Back Panel Information . . . . . . . . . . . . . . . . . . . . . . . . . . . . . . . . . . . . . 11
Stand Installation
Protection Cover
Swivel Stand
. . . . . . . . . . . . . . . . . . . . . . . . . . . . . . . . . . . . . . . . . . . . 15
. . . . . . . . . . . . . . . . . . . . . . . . . . . . . . . . . . . . . . . . . . . . . 17
. . . . . . . . . . . . . . . . . . . . . . . . . . . . . . . . . . . . . . . . . . . . . . . . . . . . 17
Attaching the TV to a Desk . . . . . . . . . . . . . . . . . . . . . . . . . . . . . . 17
Cable Management
. . . . . . . . . . . . . . . . . . . . . . . . . . . . . . . . . . . . . . . . . . 18
Securing the TV to the wall fall over. . . . . . . . . . . . . . . . . . 20
Desktop Pedestal Installation . . . . . . . . . . . . . . . . . . . . . . . . . . . 21
Wall Mount: Horizontal installation
. . . . . . . . . . . . . . . . . . . 21
Antenna or Cable Connection . . . . . . . . . . . . . . . . . . . . . . . . . . 22
EXTERNAL EQUIPMENT SETUP
HD Receiver Setup
DVD Setup
VCR Setup
. . . . . . . . . . . . . . . . . . . . . . . . . . . . . . . . . . . . . . . . . . . . . . . . . . . . . 26
. . . . . . . . . . . . . . . . . . . . . . . . . . . . . . . . . . . . . . . . . . . . . . . . . . . . . 29
. . . . . . . . . . . . . . . . . . . . . . . . . . . . . . . . . . . . . . . . .
Other A/V Source Setup . . . . . . . . . . . . . . . . . . . . . . . . . . . . . . . . . 31
PC Setup
USB Connection
Audio Out Connection
. . . . . . . . . . . . . . . . . . . . . . . . . . . . . . . . . . . . . . . . . . . . . . . . . . . . . . . . 32
. . . . . . . . . . . . . . . . . . . . . . . . . . . . . . . . . . . . . . . . . . . . 38
. . . . . . . . . . . . . . . . . . . . . . . . . . . . . . . . . . . 39
23
WATCHING TV / CHANNEL CONTROL
Remote Control Functions . . . . . . . . . . . . . . . . . . . . . . . . . . . . . . . 40
Turning On The TV . . . . . . . . . . . . . . . . . . . . . . . . . . . . . . . . . . . . . . . . . 42
Channel Selection
Volume Adjustment . . . . . . . . . . . . . . . . . . . . . . . . . . . . . . . . . . . . . . . . . 42
Quick Menu
Initial Setting
On-Screen Menus Selection
Channel Setup
- Auto Scan (Auto Tuning)
- Add / Delete Channel (Manual Tuning)
. . . . . . . . . . . . . . . . . . . . . . . . . . . . . . . . . . . . . . . . . . . 42
. . . . . . . . . . . . . . . . . . . . . . . . . . . . . . . . . . . . . . . . . . . . . . . . . . . . 43
. . . . . . . . . . . . . . . . . . . . . . . . . . . . . . . . . . . . . . . . . . . . . . . . . . 44
. . . . . . . . . . . . . . . . . . . . . . . . . . . . 46
. . . . . . . . . . . . . . . . . . . . . . . . . . . . . . . 47
. . . . . . . . . . 48
- Channel Editing
Scan Option
System Color
Input List
SIMPLINK
Input Label
. . . . . . . . . . . . . . . . . . . . . . . . . . . . . . . . . . . . . . . . . . . . 49
. . . . . . . . . . . . . . . . . . . . . . . . . . . . . . . . . . . . . . . . . . . . . . . . . . . 50
. . . . . . . . . . . . . . . . . . . . . . . . . . . . . . . . . . . . . . . . . . . . . . . . . . 51
. . . . . . . . . . . . . . . . . . . . . . . . . . . . . . . . . . . . . . . . . . . . . . . . . . . . . . . . 52
. . . . . . . . . . . . . . . . . . . . . . . . . . . . . . . . . . . . . . . . . . . . . . . . . . . . . . . 53
. . . . . . . . . . . . . . . . . . . . . . . . . . . . . . . . . . . . . . . . . . . . . . . . . . . . . 56
AV Mode . . . . . . . . . . . . . . . . . . . . . . . . . . . . . . . . . . . . . . . . . . . . . . . . . . . . . . . . 57
EPG . . . . . . . . . . . . . . . . . . . . . . . . . . . . . . . . . . . . . . . . . . . . . . . . . . . . . . . . . . . . . . . . 58
Schedule List
. . . . . . . . . . . . . . . . . . . . . . . . . . . . . . . . . . . . . . . . . . . . . . . . . . 60
USB
To Use the USB Device . . . . . . . . . . . . . . . . . . . . . . . . . . . . . . . . . . . 61
Photo List
Music List
. . . . . . . . . . . . . . . . . . . . . . . . . . . . . . . . . . . . . . . . . . . . . . . . . . . . . . . 62
. . . . . . . . . . . . . . . . . . . . . . . . . . . . . . . . . . . . . . . . . . . . . . . . . . . . . . . 66
PICTURE CONTROL
Picture Size (Aspect Ratio) Control
Preset Picture Settings
- Picture Mode - Preset
- Color Tone - Preset
. . . . . . . . . . . . . . . . . . . . . . . . . . . . . . . 71
. . . . . . . . . . . . . . . . . . . . . . . . . . . . . . . . . . . 72
Manual Picture Adjustment
- Picture Mode - User Mode
- Picture Mode - Expert Control
Picture Improvement Technology
Advanced Control - Real Cinema/Film Mode
Advanced Control - Black (Darkness) Level
Advanced Control - Eye Care
Advanced Control - Trumotion
TruMotion Demo
Picture Reset
Power Indicator
. . . . . . . . . . . . . . . . . . . . . . . . . . . . . . . . . . . . . . . . . . . . 80
................................................................................................................... 81
. . . . . . . . . . . . . . . . . . . . . . . . . . . . . . . . . . . . . . . . . . . . . . 82
Image Sticking Minimization (ISM) Method
Power Saving Picture Mode
. . . . . . . . . . . . . . . . . . 69
. . . . . . . . . . . . . . . . . . . . . . . . . . . . 73
. . . . . . . . . . . . . . . . . . . 74
. . . . . . . . . . . . . . . . . . . . . 75
. . . . . 76
. . . . . . . 77
. . . . . . . . . . . . . . . . . . . . . . . . . . . 78
. . . . . . . . . . . . . . . . . . . . . . . . . 79
. . . . . . . 83
. . . . . . . . . . . . . . . . . . . . . . . . . . . . . . 84
4
Page 7

SOUND & LANGUAGE CONTROL
APPENDIX
Auto Volume Leveler (Auto Volume)
Preset Sound Setting (Sound Mode)
. . . . . . . . . . . . . . . . . 85
. . . . . . . . . . . . . . . . 86
Sound Setting Adjustment (User Mode)
Clear Voice
Balance
TV Speakers On/Off Setup
Stereo/SAP Broadcasts Setup
Audio Reset
Audio Language
. . . . . . . . . . . . . . . . . . . . . . . . . . . . . . . . . . . . . . . . . . . . . . . . . . . . . 88
. . . . . . . . . . . . . . . . . . . . . . . . . . . . . . . . . . . . . . . . . . . . . . . . . . . . . . . . . . 89
. . . . . . . . . . . . . . . . . . . . . . . . . . . . . . 90
. . . . . . . . . . . . . . . . . . . . . . . . . . 91
. . . . . . . . . . . . . . . . . . . . . . . . . . . . . . . . . . . . . . . . . . . . . . . . . . . 92
. . . . . . . . . . . . . . . . . . . . . . . . . . . . . . . . . . . . . . . . . . . . . . 93
On-Screen Menus Language Selection
Caption Mode
. . . . . . . . . . . . . . . . . . . . . . . . . . . . . . . . . . . . . . . . . . . . . . . 95
TIME SETTING
Clock Setup
- Auto Clock Setup
- Manual Clock Setup
Auto On/Off Time Setting
Sleep Timer Setting
Auto Shut-off Setting
. . . . . . . . . . . . . . . . . . . . . . . . . . . . . . . . . . . . 96
. . . . . . . . . . . . . . . . . . . . . . . . . . . . . . . . . 97
. . . . . . . . . . . . . . . . . . . . . . . . . . . . . . 98
. . . . . . . . . . . . . . . . . . . . . . . . . . . . . . . . . . . . . . . . . 99
. . . . . . . . . . . . . . . . . . . . . . . . . . . . . . . . . . . . . 10 0
. . . . . . . . . . . 87
. . . . . . . . . . . . . 94
Troubleshooting . . . . . . . . . . . . . . . . . . . . . . . . . . . . . . . . . . . . . . . . . . . . 10 8
Maintenance
Product Specifications
Programming the Remote Control
. . . . . . . . . . . . . . . . . . . . . . . . . . . . . . . . . . . . . . . . . . . . . . . . . 10 9
. . . . . . . . . . . . . . . . . . . . . . . . . . . . . . . . . . . . 110
. . . . . . . . . . . . . . . . . . 114
IR Codes . . . . . . . . . . . . . . . . . . . . . . . . . . . . . . . . . . . . . . . . . . . . . . . . . . . . . .116
External Control Through RS-232C
Open Source Software Notice
. . . . . . . . . . . . . . . . .118
. . . . . . . . . . . . . . . . . . . . . . . . .12 5
PARENTAL CONTROL / RATINGS
Set Password & Lock System . . . . . . . . . . . . . . . . . . . . . . . . . . 10 1
Block Channel . . . . . . . . . . . . . . . . . . . . . . . . . . . . . . . . . . . . . . . . . . . . . . 10 4
Rating (Movie Rating)
External Input Blocking
Key Lock
. . . . . . . . . . . . . . . . . . . . . . . . . . . . . . . . . . . . . . . . . . . . . . . . . . . . . . . 107
. . . . . . . . . . . . . . . . . . . . . . . . . . . . . . . . . . . . 10 5
. . . . . . . . . . . . . . . . . . . . . . . . . . . . . . . . . . 10 6
5
Page 8

FEATURE OF THIS TV
is a trademark of SRS Labs, Inc.
TruSurround XT technology is incorporated under
license from SRS Labs, Inc.
LG TV with this logo displays Full HD (high-definition)
1080p native resolution by receiving and processing a
Full HD 1080p signal.
This TV can play MP3 music files and display JPEG
images from a USB flash device.
With HDMI CEC support, this TV can control connected SIMPLINK devices via the TV’s remote control.
This TV has 3 HDMI ports. HDMI is a single cable
connection that provides the highest quality images
and sound.
HDMITM, the HDMI logo and High-Definition
Multimedia Interface are trademarks or registered
trademarks of HDMI Licensing."
Manufactured under license from Dolby Laboratories.
“
Dolby
“and the double-D symbol are trademarks of
Dolby Laboratories.
High-definition television. High-resolution digital
television broadcast and playback system composed
of roughly a million or more pixels, 16:9 aspect-ratio
screens, and HE-AAC digital audio. A subset of digital television, HDTV formats include 1080i and 720p
resolutions.
LG's own special digital image generator, consisting of
a full digital image processor, six different main picture
quality factors.
LG TV with this logo has ambient light sensor that
adjusts the picture to fit room atmosphere.
FOR LCD TV
■
If the TV feels cold to the touch, there may be a small “flicker” when it is turned on. This is normal, there is
nothing wrong with TV.
■
Some minute dot defects may be visible on the screen, appearing as tiny red, green, or blue spots. However, they
have no adverse effect on the monitor's performance.
■
Avoid touching the LCD screen or holding your finger(s) against it for long periods of time. Doing so may produce
some temporary distortion effects on the screen.
On Disposal
a. The fluorescent lamp used in this product contains a small amount of mercury.
b. Do not dispose of this product with general household waste.
c. Disposal of this product must be carried out in accordance to the regulations of your local authority.
6
Page 9

PREPARATION
Owner's Manual
INFO
M
U
T
E
R
E
TU
R
N
AV MODE
FA
V
T
V
I
N
P
U
T
P
O
W
E
R
Q
.
M
E
N
U
M
E
N
U
E
N
T
E
R
V
O
L
C
H
123
456
78
0
9
Q
.
V
I
E
W
G
U
I
D
E
P
A
G
E
D
V
D
V
C
R
i
M
A
R
K
Ensure that the following accessories are included with your TV. If an accessory is missing, please contact the
dealer where you purchased the product.
PREPARATION
Owner’s Manual
Power Cord
FFoorr PPllaassmmaa TTVV mm ooddeellss
Protection cover
(Refer to p.17)
(This accessories can be differ-
ent from the figures shown here
depending on your models.)
FFoorr LLCCDD TTVV mmooddeellss
Only 42/47LB7DF
Batteries
Polishing Cloth
(This feature is not available
for all models.)
x 1
(42PG30*, 42PG60*)
x 2
(50PG30*)
Cable Holder
Remote Control
* Only wipe spots on the exterior with the polishing cloth.
* Do not wipe roughly when removing stain. Please be cautions of that
excessive pressure may cause scratch or discoloration.
(Only 42PG30*,
(Only 42/50PG30*)
(Only 42PG60*)
42PG60*)
x 4
(Only 50PG60*, 50/60PG70** )
Bolts for stand
assembly
(Refer to P.15)
Cable Management Clip
Cable Management Clip
Only 32/37/42/47/52LG50**, 42/47/52LG70**
(Except 47LG50**)
x 4 x 4
Bolts for
stand assembly
(Refer to P.16)
USB Extension Cable
or
Protection cover
(Refer to p.17)
(This accessories can be differ-
ent from the figures shown here
depending on your models.)
(Only 32LG50*, 42LG70**)
Screw for
stand fixing
(Refer to P.17)
7
Page 10

PREPARATION
CH
VOL
MENU
INPUT
ENTER
FRONT PANEL INFORMATION
■
Image shown may differ from your TV.
■
PREPARATION
NOTE: If your TV has a protection tape attached, remove the tape.
And then wipe the TV with a cloth (If a polishing cloth is included with your TV, use it).
Plasma TV Models
Remote Control Sensor
POWER Button
Power/Standby Indicator
Illuminates red in standby mode.
Illuminates green when the set is
switched on.
8
INPUT
Button
MENU
Button
ENTER
Button
VOLUME (-,+)
Buttons
CHANNEL (
Buttons
EE, DD
)
Page 11

CHCH
VOLVOL
ENTERENTER
MENUMENU
INPUTINPUT
CH
VOL
ENTER
MENU
INPUT
LCD TV Models : 42/47LB7DF
Remote Control Sensor
Power/Standby Indicator
Illuminates red in standby mode.
Illuminates green when the set is
switched on.
PREPARATION
CHANNEL (DD,EE)Buttons
VOLUME (FF, GG) Buttons
ENTER Button
MENU Button
INPUT Button
POWER Button
9
Page 12

PREPARATION
PREPARATION
LCD TV Models : 32/37/42/47/52LG50
Intelligent Sensor
Adjusts picture according to the surrounding conditions
Power/Standby Indicator
Illuminates red in standby mode.
Illuminates blue when the set is switched on.
(Can be adjusted
OPTION menu.)
Remote Control Sensor
POWER Button
PPoowweerr IInndd iiccaatt oorr
**
in the
CH
VOL
ENTER
MENU
INPUT
CHANNEL ( , )
Buttons
VOLUME (-,+)
Buttons
ENTER Button
MENU Button
INPUT Button
10
LCD TV Models :
Intelligent Sensor
Adjusts picture according to the surrounding
conditions
POWER Button
42/47/52LG70**
Power/Standby Indicator
Illuminates red in standby mode.
Illuminates blue when the set is switched on.
(Can be adjusted using
Option menu.)
the
Remote Control Sensor
PPoowweerr IInnddiicc aatt oorr
CH
VOL
ENTER
in
MENU
INPUT
CHANNEL ( , )
Buttons
VOLUME (+, -)
Buttons
ENTER Button
MENU Button
INPUT Button
Page 13
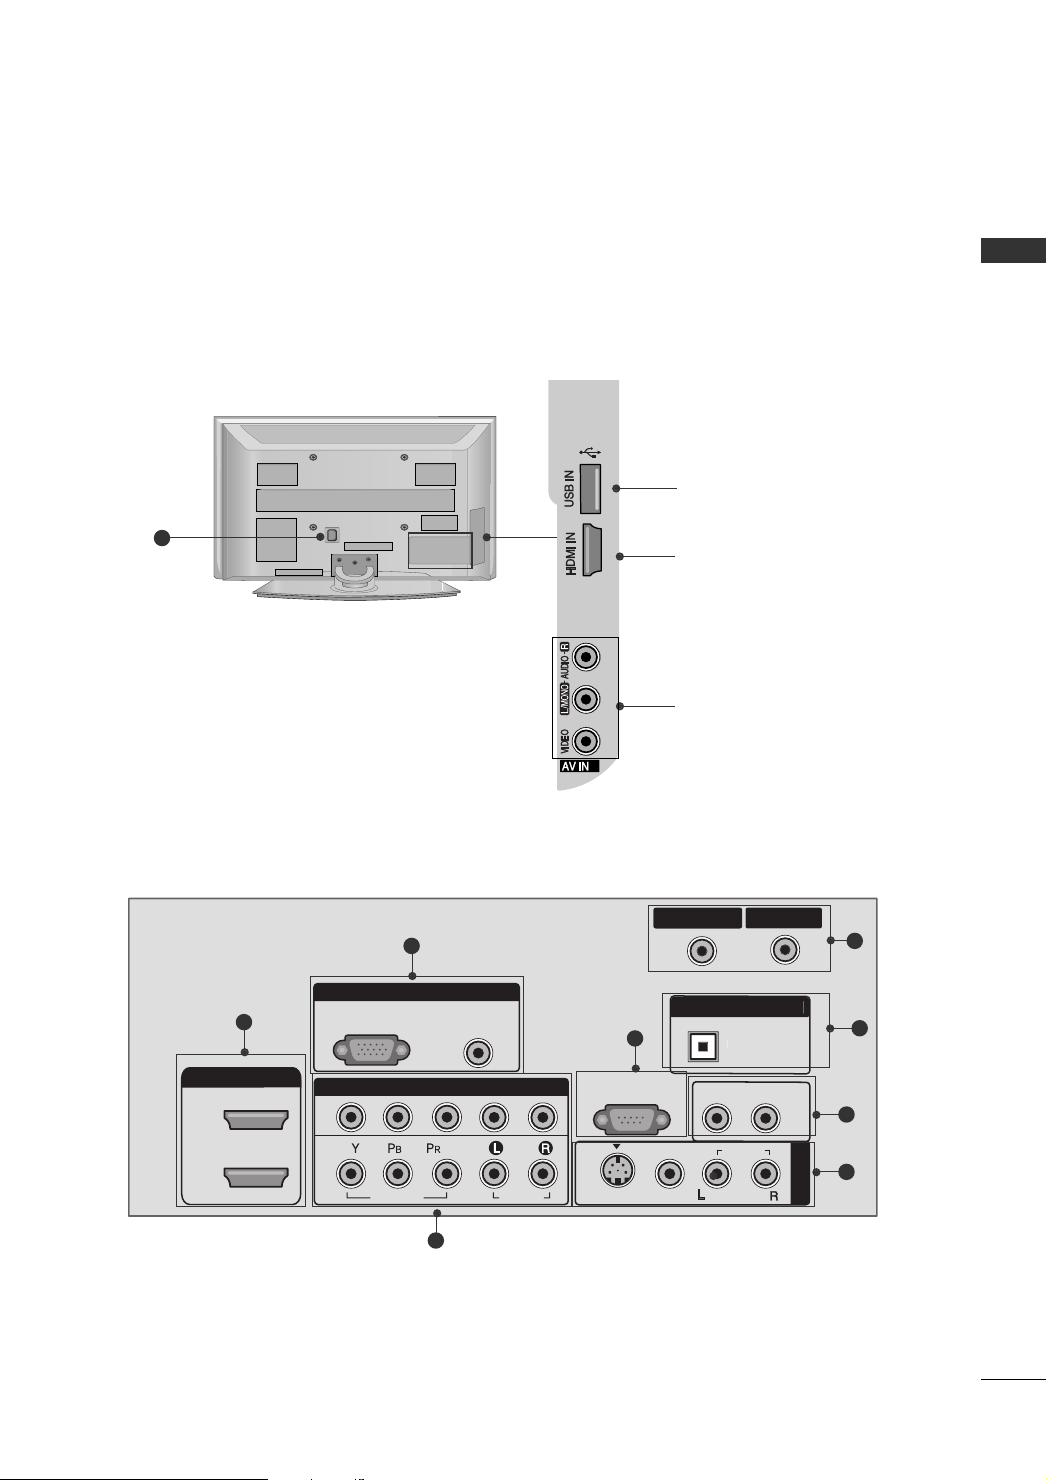
BACK PANEL INFORMATION
L
T
N
■
Here shown may be somewhat different from your TV.
Plasma TV Models
10
PREPARATION
USB Input
3
2
HDMI Input
Connect a HDMI signal to
HDMI IN.
AUDIO/VIDEO Input
Connect audio/video output from an external device
to these jacks.
CABLE I
6
7
8
9
AV IN 1
1
HDMI/DVI IN
2
1
RGB(PC)
2
1
3
RGB IN
AUDIO
(RGB/DVI)
COMPONENT IN
VIDEO
2
AUDIO
DIGITAL AUDIO OU
5
RS-232C IN
(CONTROL & SERVICE)
S-VIDEO
VIDEO
OPTICA
AUDIO OUT
AUDIO
(
)
MONO
11
Page 14
PREPARATION
R
RGB IN
COMPONENT IN
AUDIO
(RGB/DVI)
RGB(PC)
1
2
RS-232C IN
(CONTROL & SERVICE)
VIDEO
AUDIO
VIDEO
L
MONO
( )
AUDIO
S-VIDEO
T
AV IN 1
HDMI/DVI IN
1
2
3
AV OUT
AUDIO OUT
USB IN
N
AV IN 2
L/ MONO
R
AUDIO
VIDEO
S-VIDEO
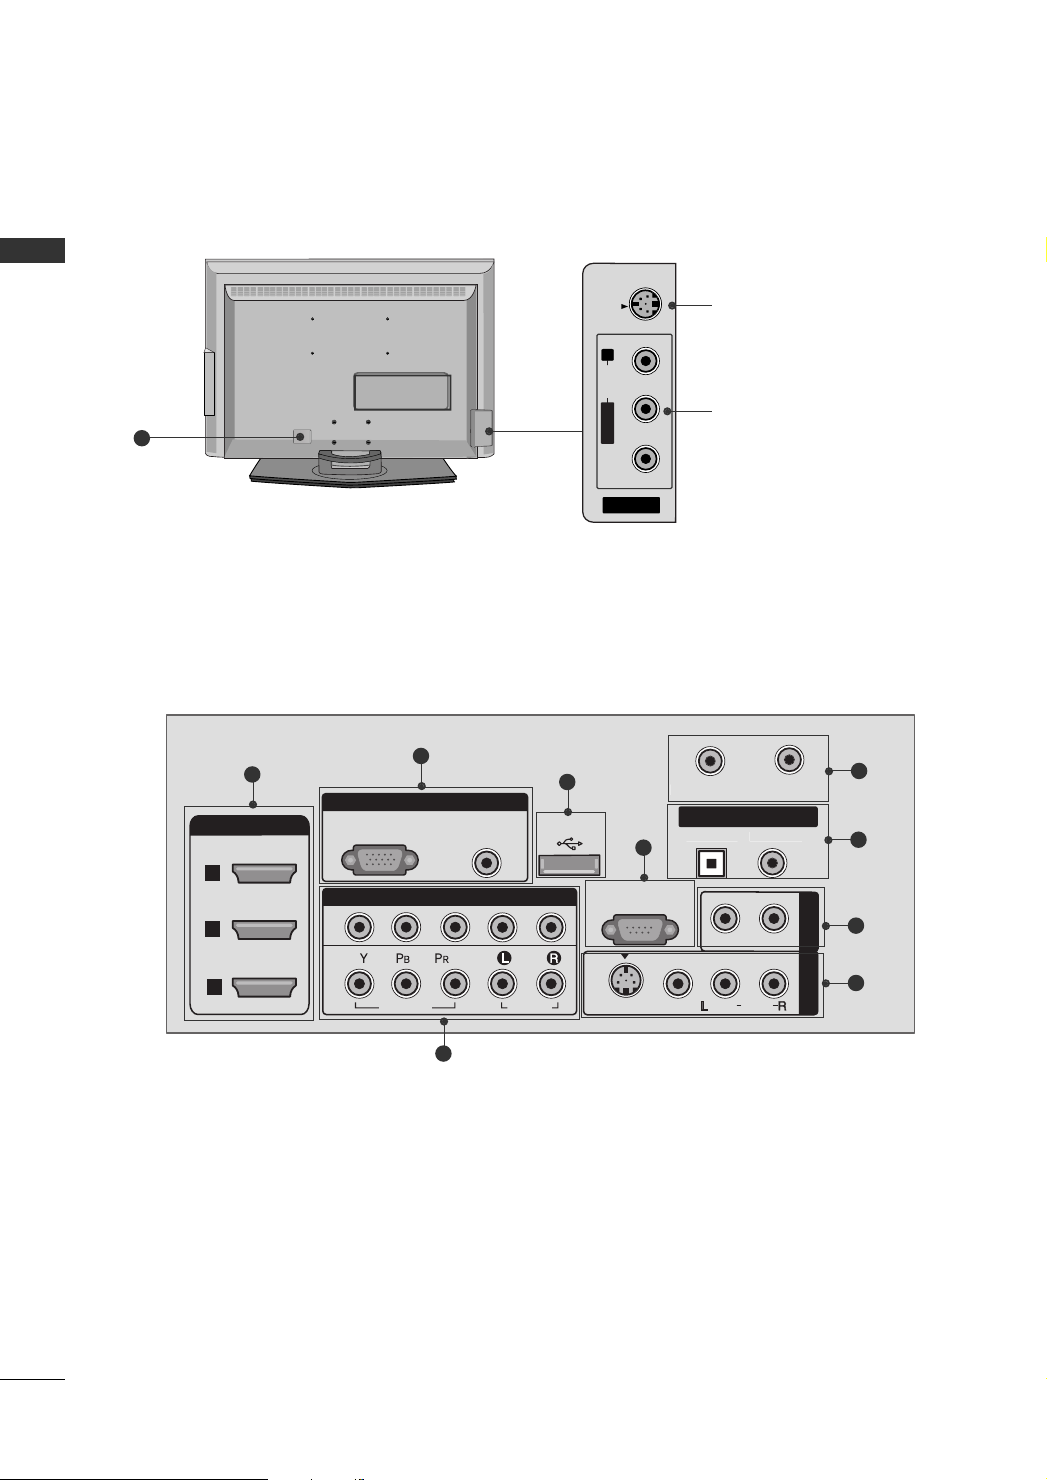
LCD TV Models : 42/47LB7DF
PREPARATION
10
S-VIDEO Input
Connect S-Video out
from an S-VIDEO device.
AUDIO/VIDEO Input
Connect audio/video
output from an external
device to these jacks.
12
1
3
4
CABLE I
6
DIGITAL AUDIO OU
2
OPTICALCOAXIA
5
7
8
9
Page 15

AV IN 2
L/ MONO
R
AUDIO
HDMI IN 3
VIDEO
S-VIDEO
AV IN 2
L/L/MONOMONO
R
AUDIOAUDIO
HDMI IN 3HDMI IN 3
VIDEOVIDEO
LCD TV Models : 32/37/42/47/52LG50
10
42/47/52LG70**
**,
USB Input
HDMI Input
Connect a HDMI signal
to HDMI IN.
AUDIO/VIDEO Input
Connect audio/video
output from an external
device to these jacks.
PREPARATION
1
HDMI/DVI IN
2
1
2
1
3
RGB IN
RGB(PC)
VIDEO
COMPONENT IN
2
AUDIO
(RGB/DVI)
AUDIO
ANTENNA IN
DIGITAL AUDIO OUT
OPTICAL COAXIAL
5
RS-232C IN
(CONTROL & SERVICE)
AV IN 1
S-VIDEO
VIDEO
7
AUDIO OUT
(
)
MONO
AUDIO
6
CABLE IN
8
9
13
Page 16

PREPARATION
PREPARATION
1
HDMI/DVI IN
Connect a HDMI signal to 1, 2 (or 3).
Or DVI (VIDEO) signal to the 1, 2 or 3 port with a
DVI to HDMI cable.
2
COMPONENT IN
Connect a component video/audio device to these
jacks.
3
RGB (PC)
Connect the output from a PC.
AUDIO (RGB/DVI)
Connect the audio from a PC or DTV.
4
USB INPUT
5
RS-232C IN (CONTROL & SERVICE) PORT
Connect to the RS-232C port on a PC.
6
ANTENNA IN/CABLE IN
Connect over-the air signals to this jack.
Connect cable signals to this jack.
7
DIGITAL AUDIO OUT ( or DIGITAL AUDIO OUT
COAXIAL)
Connect digital audio to various types of equipment.
Note: In standby mode, these ports do not work.
AUDIO OUT
8
Connect analog audio to various types of equipment.
9
AV (Audio/Video) IN 1
Connect audio/video output from an external
device to these jacks.
S-VIDEO
Connect S-Video out from an S-VIDEO device.
Power Cord Socket
10
For operation with AC power.
Caution: Never attempt to operate the TV on DC
power.
14
Page 17

STAND INSTALLATION
!
■
Image shown may differ from your TV
PREPARATION
Plasma TV Models :
Carefully place the TV screen side down on a
1
cushioned surface to protect the screen from
damage.
Assemble the TV as shown.
2
Fix the 4 bolts securely using the holes in the
3
back of the TV.
Only 42PG60*, 42PG30*
NOTE
When assembling the desk type stand, check whether the bolt is fully tightened. (If not tightened
GG
fully, the product can tilt forward after the product installation). If you tighten the bolt with excessive
force, the bolt can deviate from abrasion of the tightening part of the bolt.
15
Page 18

PREPARATION
!
PREPARATION
LCD TV Models : 32/37/42/52LG50
Carefully place the TV screen side down on a
1 3
cushioned surface to protect the screen from
damage.
Assemble the parts of the
2
CC oovvee rr BBaa ssee
the
of the TV.
SS ttaa nn dd BBoo ddyy
**,
with
42/47/52LG70**
Assemble the TV as shown.
Fix the 4 bolts securely using the holes in the
4
back of the TV.
SS TTAANNDD BBOODD YY
CC OOVVEERR BBAASSEE
NOTE
When assembling the desk type stand, check whether the bolt is fully tightened. (If not tightened
GG
fully, the product can tilt forward after the product installation). If you tighten the bolt with excessive
force, the bolt can deviate from abrasion of the tightening part of the bolt.
16
Page 19

PROTECTION COVER ( Except 42/47LB7DF)
■
Image shown may differ from your TV.
After removing the stand, install the included
Press the
PPRROOTTEECCTTII OONN CCOOVVEERR
into the TV until you hear it click.
pp rroo tteeccttiioonn cc oovvee rr
over the hole for the stand.
PREPARATION
Plasma TV Models
Detech the protection cover after pressing the
left/right buttons.
LCD TV Model
SWIVEL STAND ( Except 42/47LB7DF)
After installing the TV, you can adjust the TV set manually to the left or right direction by 20 degrees to suit
your viewing position.
ATTACHING THE TV TO A DESK (Only 32LG50*, 42LG70**)
If you wish to attach the TV to a desk, it must be securely fastened to the desk using a metal screw (as shown
below). Failure to securely attach the TV may result in the TV falling: which may cause damage to the TV and
serious personal injury.
Stand
1-Screw
(provided as parts of the product)
Desk
17
Page 20

PREPARATION
!
CABLE MANAGEMENT
■
Here shown may be somewhat different from your TV.
PREPARATION
Plasma TV Models
42PG60*, 42/50PG30*
Connect the cables as necessary.
1
To connect additional equipment, see the
EXTERNAL EQUIPMENT SETUP section.
Install the CABLE MANAGEMENT CLIP as
2
shown.
If your TV has CABLE HOLDER, fix it as
shown and bundle the cables.
42PG60*
CABLE HOLDER
50PG30*
42PG30*
50PG60*, 50/60PG70**
Connect the cables as necessary.
1
To connect additional equipment, see the
EXTERNAL EQUIPMENT SETUP section.
Install the CABLE MANAGEMENT CLIP as
2
shown.
CABLE MANAGEMENT CLIP
CABLE MANAGEMENT CLIP
CABLE MANAGEMENT CLIP
How to remove the
CABLE MANAGEMENT CLIP
Hold the CABLE MANAGEMENT CLIP with
GG
both hands and pull it upward.
* For the 42PG60* model: First, press the cable man-
agement. Hold the CABLE MANAGEMENT CLIP with
both hands and pull it upword.
How to remove the
CABLE MANAGEMENT CLIP
Hold the CABLE MANAGEMENT CLIP with
GG
both hands and pull it upward.
Separate CABLE MANAGEMENT CLIP
from TV by pressing two latches.
NOTE
Do not hold the CABLE MANAGEMENT CLIP when moving the TV.
GG
- If the TV is dropped, you may be injured or the product may be broken.
18
Page 21

LCD TV Models
42/47LB7DF
Connect the cables as necessary.
1
To connect additional equipment, see the
EXTERNAL EQUIPMENT SETUP section.
2
Install the
as shown.
CCAABBLLEE MMAANNAAGGEEMMEENNTT CCLLIIPP
32/37/42/47/52LG50
Connect the cables as necessary.
1
To connect additional equipment, see the
EXTERNAL EQUIPMENT SETUP section.
Install the CABLE MANAGEMENT CLIP as
2
shown.
42/47/52LG70**
**,
PREPARATION
CABLE MANAGEMENT CLIP
How to remove the
CABLE MANAGEMENT CLIP
Hold the
GG
with both hands and pull it backward.
CC AA BB LL EE MMAANNAAGGEEMMEENN TT CC LLII PP
CABLE MANAGEMENT CLIP
Put the cables inside the CABLE MANAGEMENT
3
CLIP and snap it closed.
19
Page 22

PREPARATION
!
SECURING THE TV TO THE WALL FALL OVER.
PREPARATION
This feature is not available for all models.
Here shown may be somewhat different from your TV.
■
Position the TV close to the wall to avoid the possibility of it falling when pushed.
■
The instructions shown below are a safer way to set up the TV, which is to fix it to the wall, avoiding the
possibility of it falling forwards if pulled. This will prevent the TV from falling forward and causing injury.
This will also prevent the TV from damage. Ensure that children do not climb or hang from the TV.
■
You should purchase necessary components to prevent TV from falling off of the stand.
■
Insert the eye-bolts (or TV brackets and bolts) to tighten the product to the wall as shown in the picture.
*If your product has the bolts in the eye-bolts position before inserting the eye-bolts, loosen the bolts.
Secure the wall brackets with the bolts (not provided as parts of the product, must purchase separately) to
the wall. Match the height of the bracket that is mounted on the wall to the holes in the product.
Ensure the eye-bolts or brackets are tightened securely.
■
Use a sturdy rope (not provided as parts of the product, must purchase separately) to tie the product. It is safer to tie the rope so it
becomes horizontal between the wall and the product.
NOTE
When moving the TV undo the cords first.
G
Use a platform or cabinet strong and large enough to support the size and weight of the TV.
G
To use the TV safely make sure that the height of the bracket on the wall and on the TV is the same.
G
20
Page 23

■
This part mainly use picture for Plasma TV model.
DESKTOP PEDESTAL INSTALLATION
For adequate ventilation allow a clearance of 4” (10cm) all around the TV.
4 inches
4 inches
CAUTION
4 inches
Ensure adequate ventilation by following the clearance recommendations.
GG
Do not mount near or above any type of heat source.
GG
4 inches
WALL MOUNT: HORIZONTAL INSTALLATION
For adequate ventilation allow a clearance of 4” (10cm) all around the TV. Detailed installation
instructions are available from your dealer, see the optional Tilt Wall Mounting Bracket Installation
and Setup Guide.
PREPARATION
4 inches
4 inches
4 inches
4 inches
4 inches
21
Page 24

!
CABLE IN
N
CABLE IN
PREPARATION
■
To prevent damage do not connect to the power outlet until all connections are made between the devices.
ANTENNA OR CABLE CONNECTION
■
Here shown may be somewhat different from your TV.
PREPARATION
1. Antenna (Analog or Digital)
Wall Antenna Socket or Outdoor Antenna without a Cable Box Connections.
For optimum picture quality, adjust antenna direction if needed.
Wall
Multi-family Dwellings/Apartments
(Connect to wall antenna socket)
Antenna
Socket
Outdoor
RF Coaxial Wire (75 ohm)
Antenna
(VHF, UHF)
Single-family Dwellings /Houses
(Connect to wall jack for outdoor antenna)
2. Cable
Cable TV
Wall Jack
RF Coaxial Wire (75 ohm)
ii..ee))
PP llaa ss mmaa TTVV
MMoo dd eell ss
Copper Wire
Be careful not to bend the copper wire
when connecting the antenna.
CABLE I
ii..ee))
PP llaa ss mmaa TTVV
MMoo dd eell ss
22
UHF
Antenna
VHF
■
To improve the picture quality in a poor signal area, please purchase a signal amplifier and install properly.
■
If the antenna needs to be split for two TV’s, install a 2-Way Signal Splitter.
■
If the antenna is not installed properly, contact your dealer for assistance.
The TV will let you know when the analog, cable, and digital channel scans are complete.
NOTE
GG
Signal
Amplifier
ii..ee))
PP llaa ss mmaa TTVV
MMoo dd eell ss
Page 25

EXTERNAL EQUIPMENT SETUP
RGB IN
AUDIO
(RGB/DVI)
RGB(PC)
RS
(CONTR
( )
S-VIDEO
COMPONENT IN
1
2
VIDEO
AUDIO
Y L RPB PR
■
To prevent the equipment damage, never plug in any power cords until you have finished connecting all equipment.
■
This part of EXTERNAL EQUIPMENT SETUP mainly use picture for Plasma TV model.
HD RECEIVER SETUP
This TV can receive Digital Over-the-air/Cable signals without an external digital set-top box. However, if you do
receive digital signals from a digital set-top box or other digital external device, refer to the figure as shown below.
Component Connection
1. How to connect
)
Connect the video outputs (Y, PB, PR
1
top box to the
CC OO MMPPOONNEENNTT IINN VVII DD EE OO 11
the TV. Match the jack colors (Y = green, P
R = red).
P
Connect the audio output of the digital set-top box to
2
CC OO MMPPOONNEENNTT IINN AAUUDDIIOO 11
the
of the digital set
jacks on
B = blue, and
jacks on the TV.
EXTERNAL EQIPMENT SETUP
2. How to use
■
Turn on the digital set-top box.
(
Refer to the owner’s manual for the digital set-top box.
■
■
Supported Resolutions
Signal
480i
480p
720 p
10 8 0 i
1080p
CC oomm pp oonneenntt 11
Select
II NN PP UUTT
the
If connected to
CC oomm ppoonneenntt 22
Component 1, 2
input source on the TV with using
button on the remote control.
CC OO MMPPOONNEE NN TT IINN22
input source on the TV.
HDMI1, 2 or 3
Yes
Yes
Yes
Yes
Yes
No
Yes
Yes
Yes
Yes
input, select
)
Y, CB/PB, CR/PR
Resolution
720 x 480i
720 x 480p
128 0 x 7 2 0 p
1920 x 108 0 i
1920 x 1080p
1
2
Horizontal Vertical
Frequency(KHz)Frequency(Hz
15.73 59.94
15.73 60.00
31.47 59.94
31.47 60.00
44.96 59.94
45.00 60.00
33.72 59.94
33.75 60.00
26.97 23.94
27.00 24.00
33.71 29.97
33.75 30.00
67. 432 59.939
67.50 60.00
56.25 50.00
28.125 25.00
)
23
Page 26

EXTERNAL EQUIPMENT SETUP
RGB IN
COMPONENT IN
AUDIO
(RGB/D
RGB(PC)
1
2
VIDEO
( )
HDMI/DVI IN
1
2
HDMI-DTV OUTPUT
HDMI Connection
EXTERNAL EQIPMENT SETUP
1. How to connect
Connect the digital set-top box to
1
22
HHDDMMII IINN 33
or
No separated audio connection is necessary.
2
HDMI supports both audio and video.
2. How to use
■
Turn on the digital set-top box.
(
Refer to the owner’s manual for the digital set-top box.
■
HHDDMMII11,HHDDMMII22orHHDDMMII33
Select
with using the
IINNPPUUTT
HHDDMMII//DDVVII IINN 11
jack on the TV.
input source on the TV
button on the remote control.
,
)
HDMI-DTV mode
Resolution
1
Horizontal Vertical
Frequency(KHz)Frequency(Hz
)
24
720 x 480p
128 0 x 7 20 p
1920 x 108 0 i
1920 x 108 0 p
31.47 60.00
31.47 59.94
44.96 59.94
45.00 60.00
33.72 59.94
33.75 60.00
26.97 23.94
27.00 24.00
33.71 29.97
33.75 30.00
67.432 59.939
67.50 60.00
56.25 50.00
28.125 25.00
Page 27

DVI to HDMI Connection
( )
COMPONENT IN
AV IN 1
1
2
RS-232C IN
(CONTROL & SERVICE)
VIDEO
AUDIO
AUDIO OUT
OPTICAL
VIDEO
MONO
( )
AUDIO
S-VIDEO
HDMI/DVI IN
1
2
RGB IN
AUDIO
(RGB/DVI)
L R
DVI-DTV OUTPUT
RGB(PC)
DIGITAL AUDIO OUT
N
CABLE I
2
1
EXTERNAL EQIPMENT SETUP
1. How to connect
1
2
2. How to use
■
Turn on the digital set-top box. (Refer to the owner’s manual for the digital set-top box.
■
Select
remote control.
Connect the DVI output of the digital set-top box to the
Connect the audio output of the digital set-top box to the
HHDDMMII11,HHDDMMII22orHHDDMMII33
input source on the TV with using the
HHDDMMII //DDVVII IINN11, 22
AAUUDDIIOO ((RRGGBB//DDVVII
IINNPPUUTT
HHDDMMII IINN33
or
))
jack on the TV.
)
button on the
jack on the TV.
25
Page 28

EXTERNAL EQUIPMENT SETUP
RGB IN
AUDIO
(RGB/DVI)
RGB(PC)
R
(CONT
( )
S-VIDEO
COMPONENT IN
1
2
VIDEO
AUDIO
Y L RPB PR
DVD SETUP
Component Connection
1. How to connect
EXTERNAL EQIPMENT SETUP
Connect the video outputs (Y, PB, PR
1
CC OO MMPPOONNEENNTT IINN VVII DD EE OO11
Match the jack colors (Y = green, P
Connect the audio outputs of the DVD to the
2
CC OO MMPPOONNEENNTT IINN AAUUDDIIOO 11
2. How to use
■
Turn on the DVD player, insert a DVD.
■
■
■
Component Input ports
Connect a DVD player to the component input ports as shown below.
CC oomm pp oonneenntt 11
Select
II NN PP UUTT
the
If connected to
CC oomm ppoonneenntt 22
button on the remote control.
CC OO MMPPOONNEENNTT IINN 22
input source on the TV.
Refer to the DVD player's manual for operating instructions.
)
of the DVD to the
jacks on the TV.
B = blue, and PR = red
jacks on the TV.
input source on the TV with using
input, select
)
.
1 2
26
Component ports on the TV
Video output ports
on DVD player
YPB PR
B
Y
Y
Y
Y
P
B-Y
Cb
Pb
R-Y
P
R
Cr
Pr
Page 29

S-Video Connection
( )
RS-232C IN
(CONTROL & SERVICE)
AUDIO
AUDIO OUT
OPTICAL
MONO
( )
AUDIO
S-VIDEO
AV IN 1
VIDEO
L R
S-VIDEO
AUDIO
DIGITAL AUDIO OUT
ANTENNA IN
CABLE IN
1. How to connect
Connect the S-VIDEO output of the DVD to the
1
SS -- VV II DD EE OO
input on the TV.
EXTERNAL EQIPMENT SETUP
Connect the audio outputs of the DVD to the
2
input jacks on the TV.
2. How to use
■
Turn on the DVD player, insert a DVD.
■
■
■
AAVV 11
Select
button on the remote control.
If connected to
input source on the TV with using the
AAVV IINN 22
, select
AAVV 22
input source.
Refer to the DVD player's manual for operating instructions.
AAUU DD IIOO
II NN PP UUTT
1
2
27
Page 30

EXTERNAL EQUIPMENT SETUP
COMPONEN
A
(R
RGB(PC)
1
2
VIDEO
( )
HDMI/DVI IN
1
2
HDMI-DVD OUTPUT
HDMI Connection
EXTERNAL EQIPMENT SETUP
1. How to connect
Connect the HDMI output of the DVD to the
1
HHDDMMII //DDVV II IINN 11, 22
No separated audio connection is necessary.
2
HDMI supports both audio and video.
2. How to use
■
■
HHDDMMII11,HHDDMMII22
Select
with using the
II NN PP UUTT
Refer to the DVD player's manual for operating instructions.
HHDDMMII IINN 33
,or
, or
HHDDMMII33
jack on the TV.
input source on the TV
button on the remote control.
1
28
Page 31
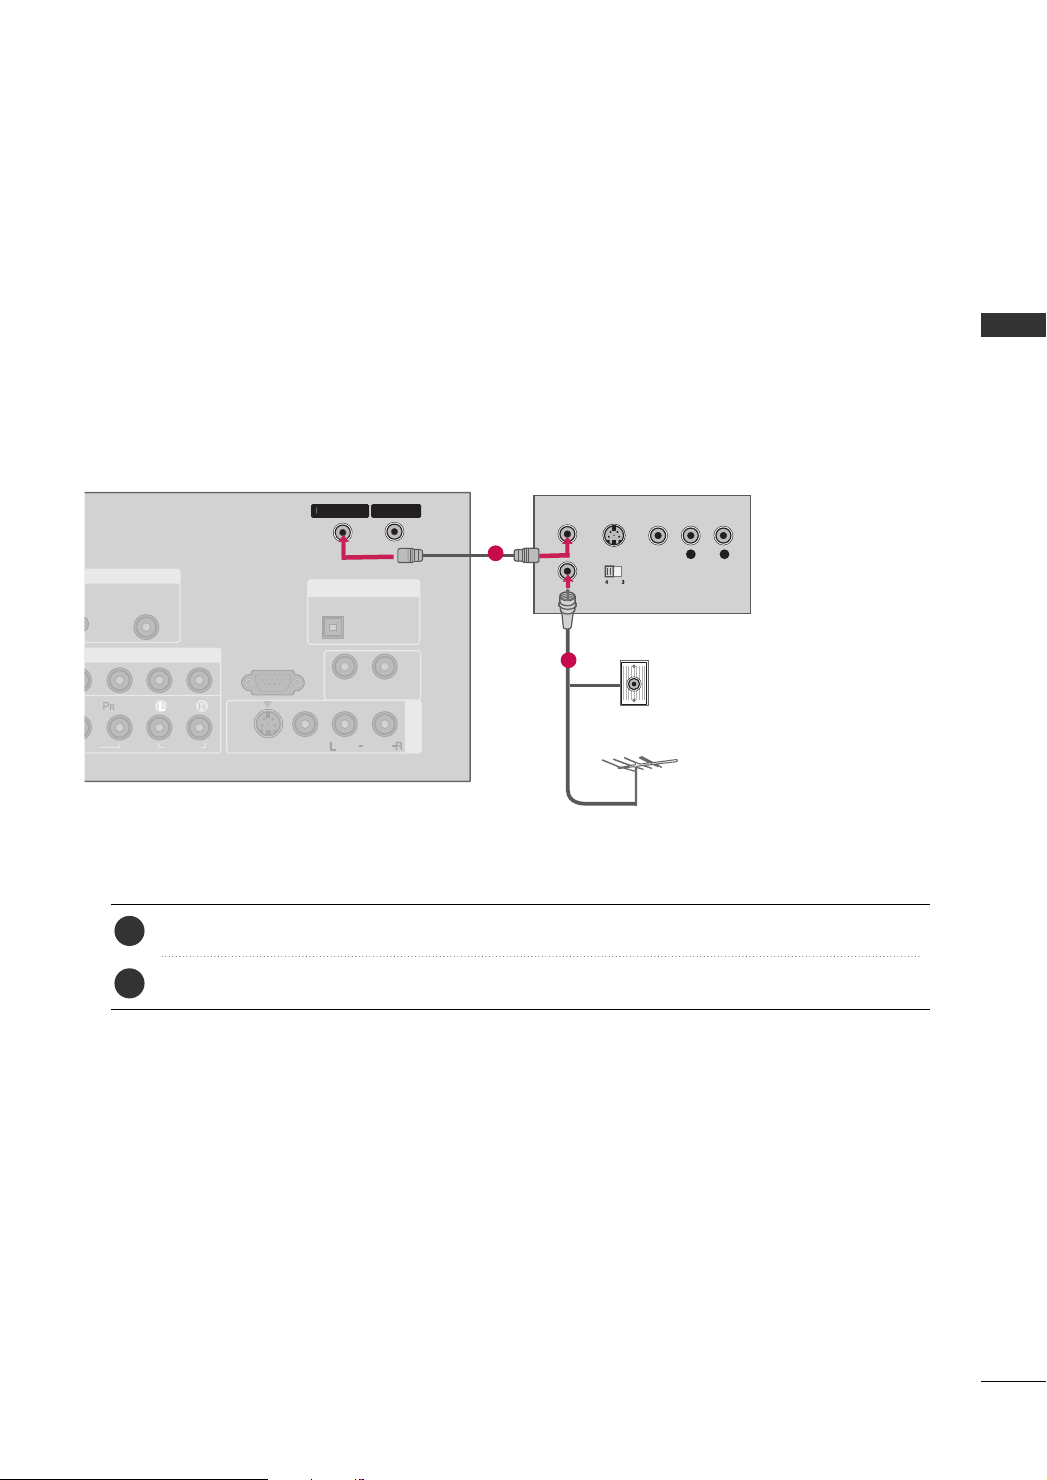
VCR SETUP
L R
S-VIDEO VIDEO
OUTPUT
SWITCH
ANT IN
ANT OUT
AV IN 1
AUDIO
(RGB/DVI)
RS-232C IN
(CONTROL & SERVICE)
AUDIO
AUDIO OUT
OPTICAL
VIDEO
MONO
( )
AUDIO
( )
DIGITAL AUDIO OUT
S-VIDEO
N
■
To avoid picture noise (interference), leave an adequate distance between the VCR and TV.
■
Use the ISM feature in the Option menu to avoid having a fixed image remain on the screen for a long period
(Only
of time
may remain visible on the screen. This phenomenon is common to all TVs and is not covered by warranty.
Antenna Connection
Plasma TV model). If the 4:3 picture format is used; the fixed images on the sides of the screen
CABLE I
1
Wall Jack
2
Antenna
EXTERNAL EQIPMENT SETUP
1. How to connect
Connect the RF antenna out socket of the VCR to the
1
Connect the antenna cable to the RF antenna in socket of the VCR.
2
2. How to use
■
Set VCR output switch to 3 or 4 and then tune TV to the same channel number.
■
Insert a video tape into the VCR and press PLAY on the VCR. (Refer to the VCR owner’s manual.
AANNTTEENNNNAA IINN
socket on the TV.
)
29
Page 32
EXTERNAL EQUIPMENT SETUP
!
!
RS-232C IN
(CONTROL & SERVICE)
AUDIO
AUDIO OUT
OPTICAL
AV IN 1
VIDEO
MONO
( )
AUDIO
S-VIDEO
N
L R
S-VIDEO VIDEO
OUTPUT
SWITCH
ANT IN
ANT OUT
( )
(
)
B/DVI)
RS-232C IN
(CONTROL & SERVICE)
AUDIO
AUDIO OUT
OPTICAL
AV IN 1
VIDEO
MONO
( )
AUDIO
S-VIDEO
DIGITAL AUDIO OUT
L R
S-VIDEO VIDEO
OUTPUT
SWITCH
ANT IN
ANT OUT
CABLE IN
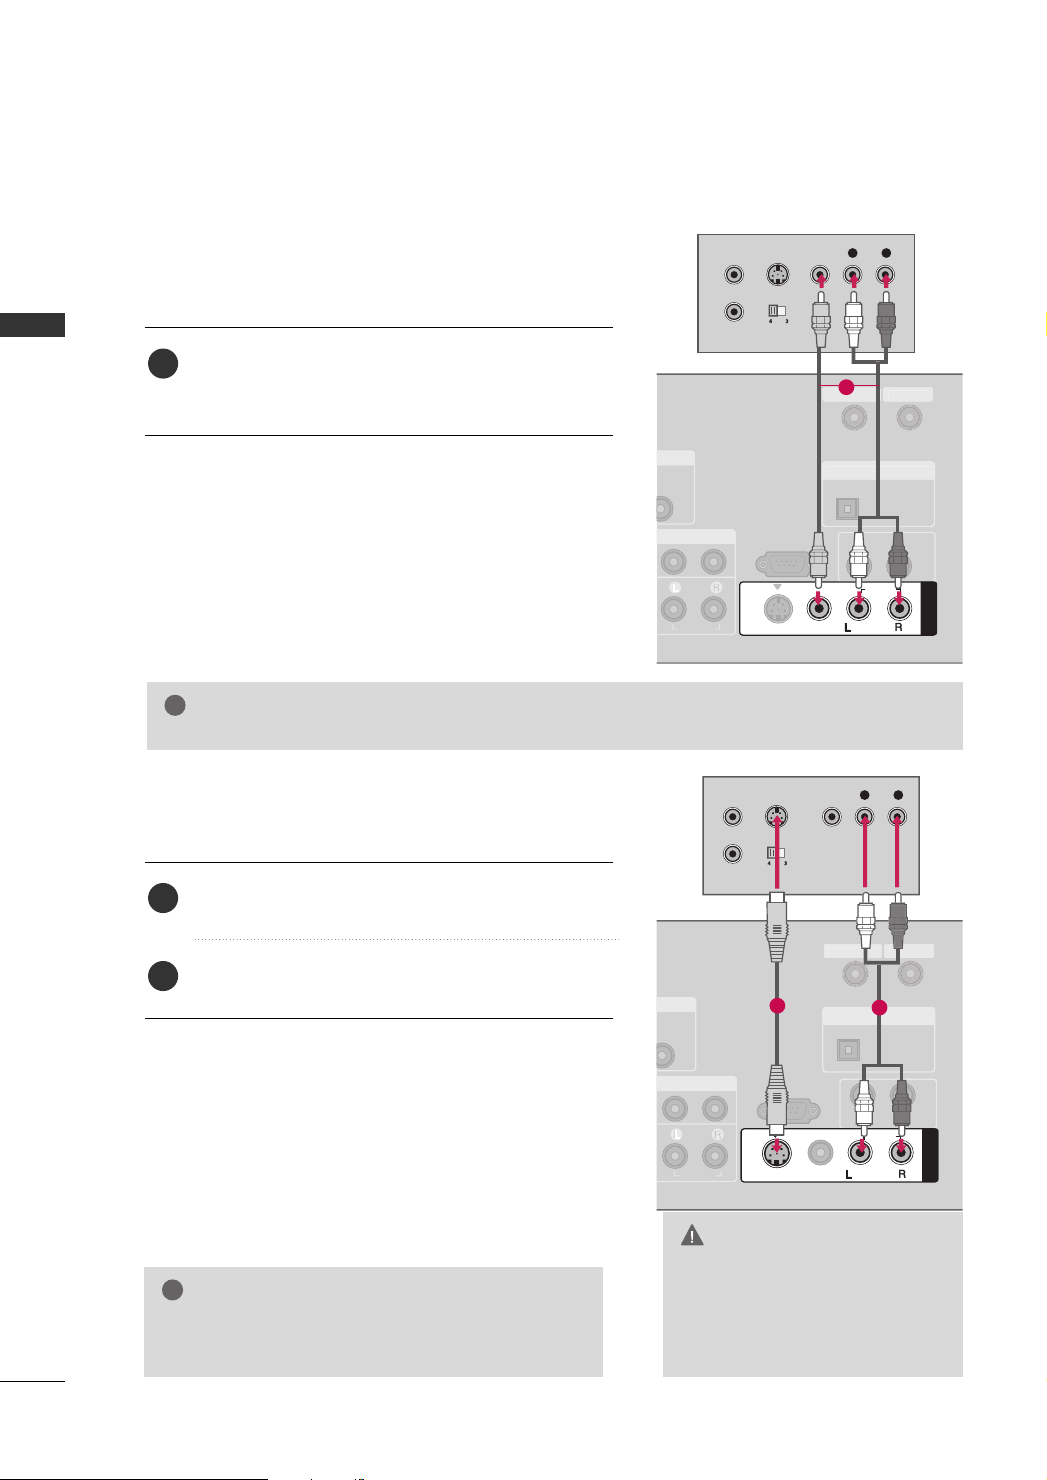
Composite (RCA) Connection
1. How to connect
EXTERNAL EQIPMENT SETUP
Connect the
1
VCR. Match the jack colors (Video = yellow, Audio Left
AAUU DD IIOO/VVII DDEEOO
= white, and Audio Right = red)
2. How to use
■
Insert a video tape into the VCR and press PLAY on the
VCR. (Refer to the VCR owner’s manual.
■
Select
AAVV 11
input source on the TV with using the
button on the remote control.
■
If connected to
AAVV IINN 22
TV.
If you have a mono VCR, connect the audio cable from the VCR to the
NOTE
GG
LL // MMOO NN OO
S-Video Connection
1. How to connect
Connect the S-VIDEO output of the VCR to the
1
SS -- VV IIDDEEOO
input on the TV.
AAVV 22
, select
jack of the TV.
jacks between TV and
)
II NN PP UUTT
input source on the
1
AAUU DD IIOO
CABLE I
30
2. How to use
Connect the audio outputs of the VCR to the
2
input jacks on the TV.
■
Insert a video tape into the VCR and press PLAY on the VCR.
(
Refer to the VCR owner’s manual.
■
Select
AAVV 11
input source on the TV with using the
)
AAUU DD IIOO
II NN PP UUTT
button on the remote control.
■
If connected to
NOTE
S-Video provides better quality than composite. Use
GG
it when available.
AAVV IINN 22
, select
AAVV 22
input source.
1
2
CAUTION
Do not connect to both Video
GG
and S-Video at the same time. In
the event that you connect both
Video and the S-Video cables,
only the S-Video will work.
Page 33
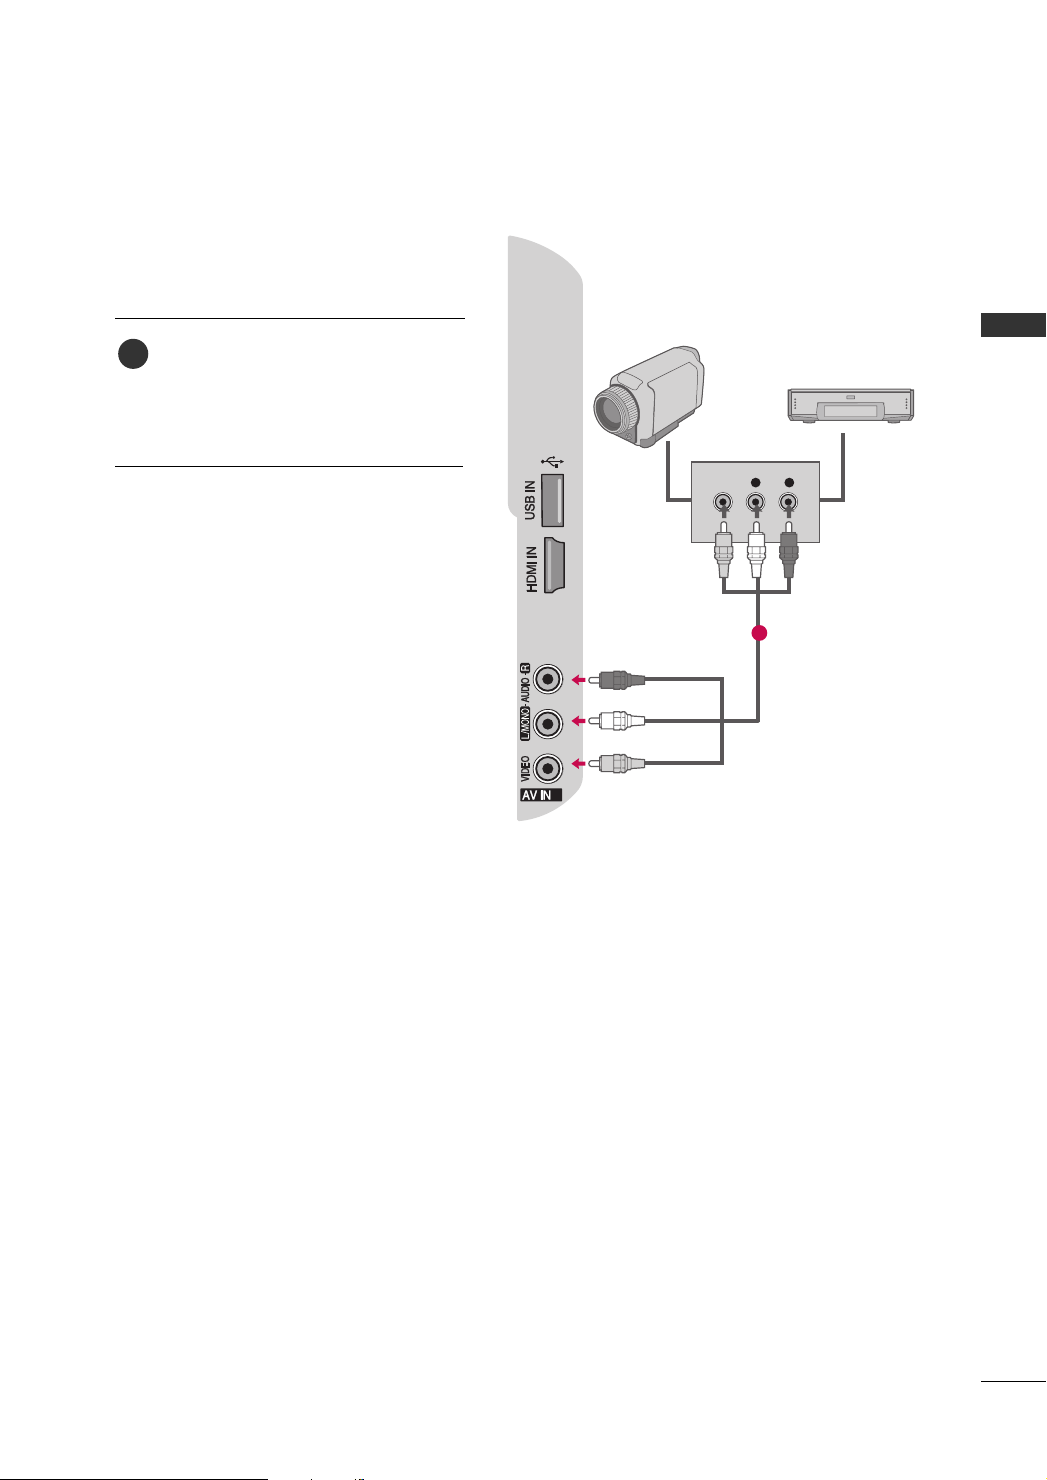
OTHER A/V SOURCE SETUP
1. How to connect
Connect the
1
between TV and external equipment.
Match the jack colors
(
Video = yellow, Audio Left = white, and
Audio Right = red
2. How to use
■
Select
II NN PP UUTT
the
AAVV 22
AAUUDDIIOO/VVIIDDEEOO
jacks
.
)
input source on the TV with using
button on the remote control.
Camcorder
Video Game Set
L R
VIDEO
3
EXTERNAL EQIPMENT SETUP
■
If connected to
AAVV IINN 11
input, select
AAVV 11
input source on the TV.
■
Operate the corresponding external equipment.
1
2
31
Page 34
EXTERNAL EQUIPMENT SETUP
/DVI IN
COMPONENT IN
1
2
(CO
VIDEO
AUDIO
( )
S-VIDEO
RGB IN
AUDIO
(RGB/DVI)
RGB(PC)
RGB OUTPUT AUDIO
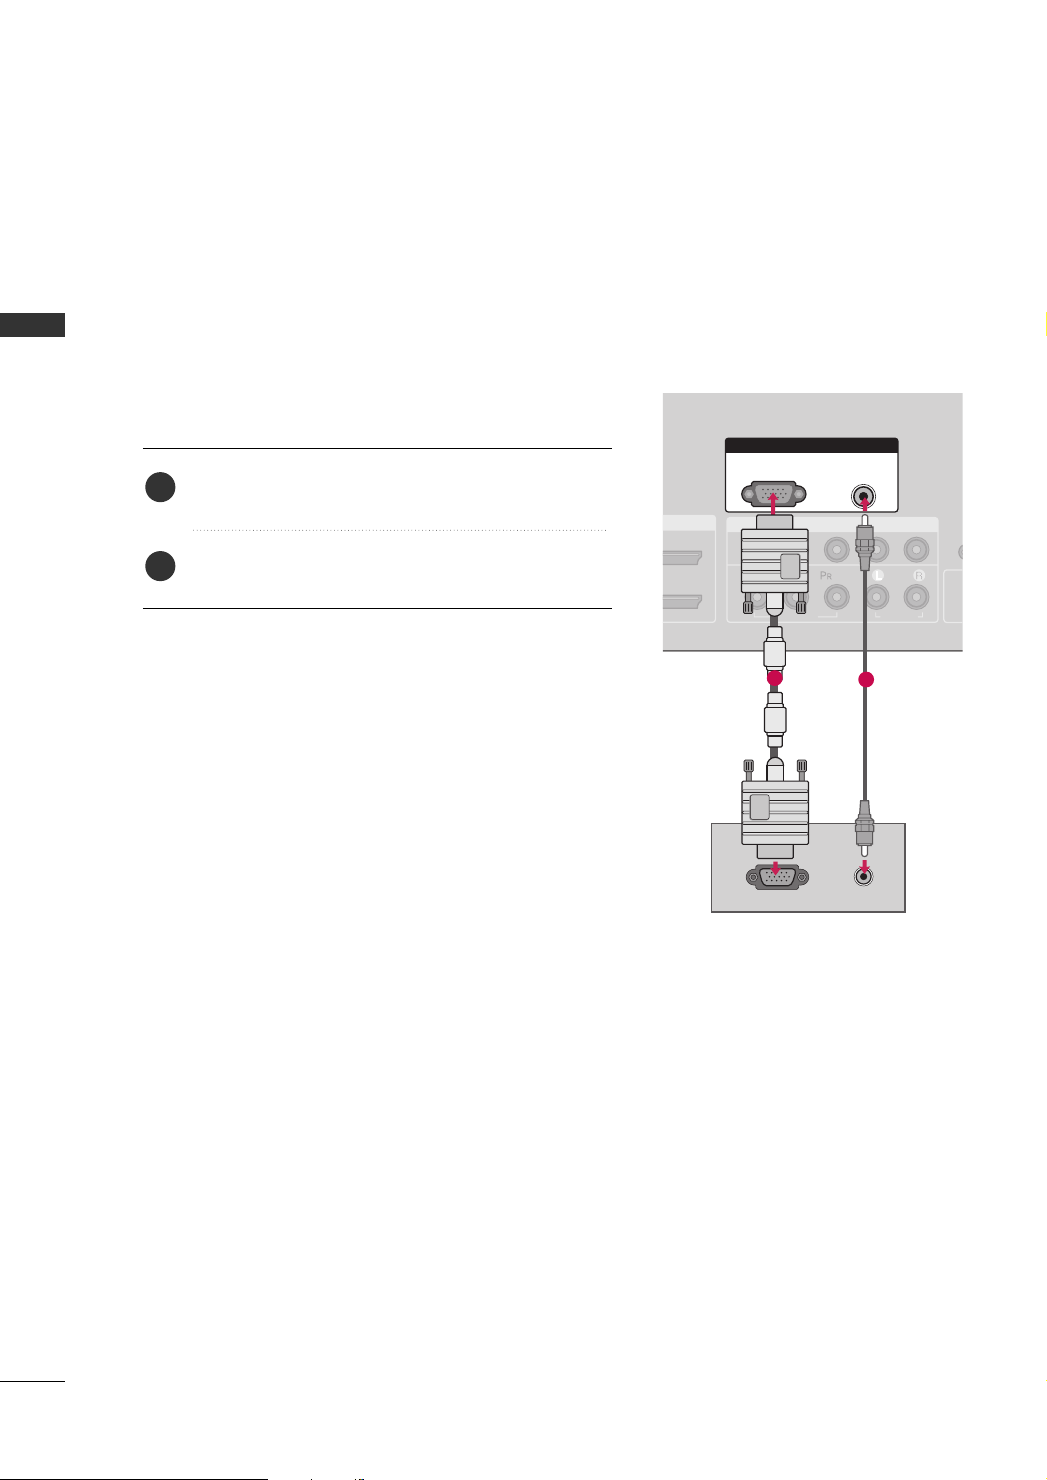
PC SETUP
This TV provides Plug and Play capability, meaning that the PC adjusts automatically to the TV's settings.
EXTERNAL EQIPMENT SETUP
VGA (D-Sub 15 pin) Connection
1. How to connect
Connect the VGA output of the PC to the
1
jack on the TV.
Connect the PC audio output to the
2
((
RRGG BB // DD VVII
))
jack on the TV.
2. How to use
■
Turn on the PC and the TV.
■
Select
II NN PP UUTT
RRGG BB --PPCC
input source on the TV with using the
button on the remote control.
RR GG BB ((PP CC
AAUU DD IIOO
))
1
2
32
Page 35
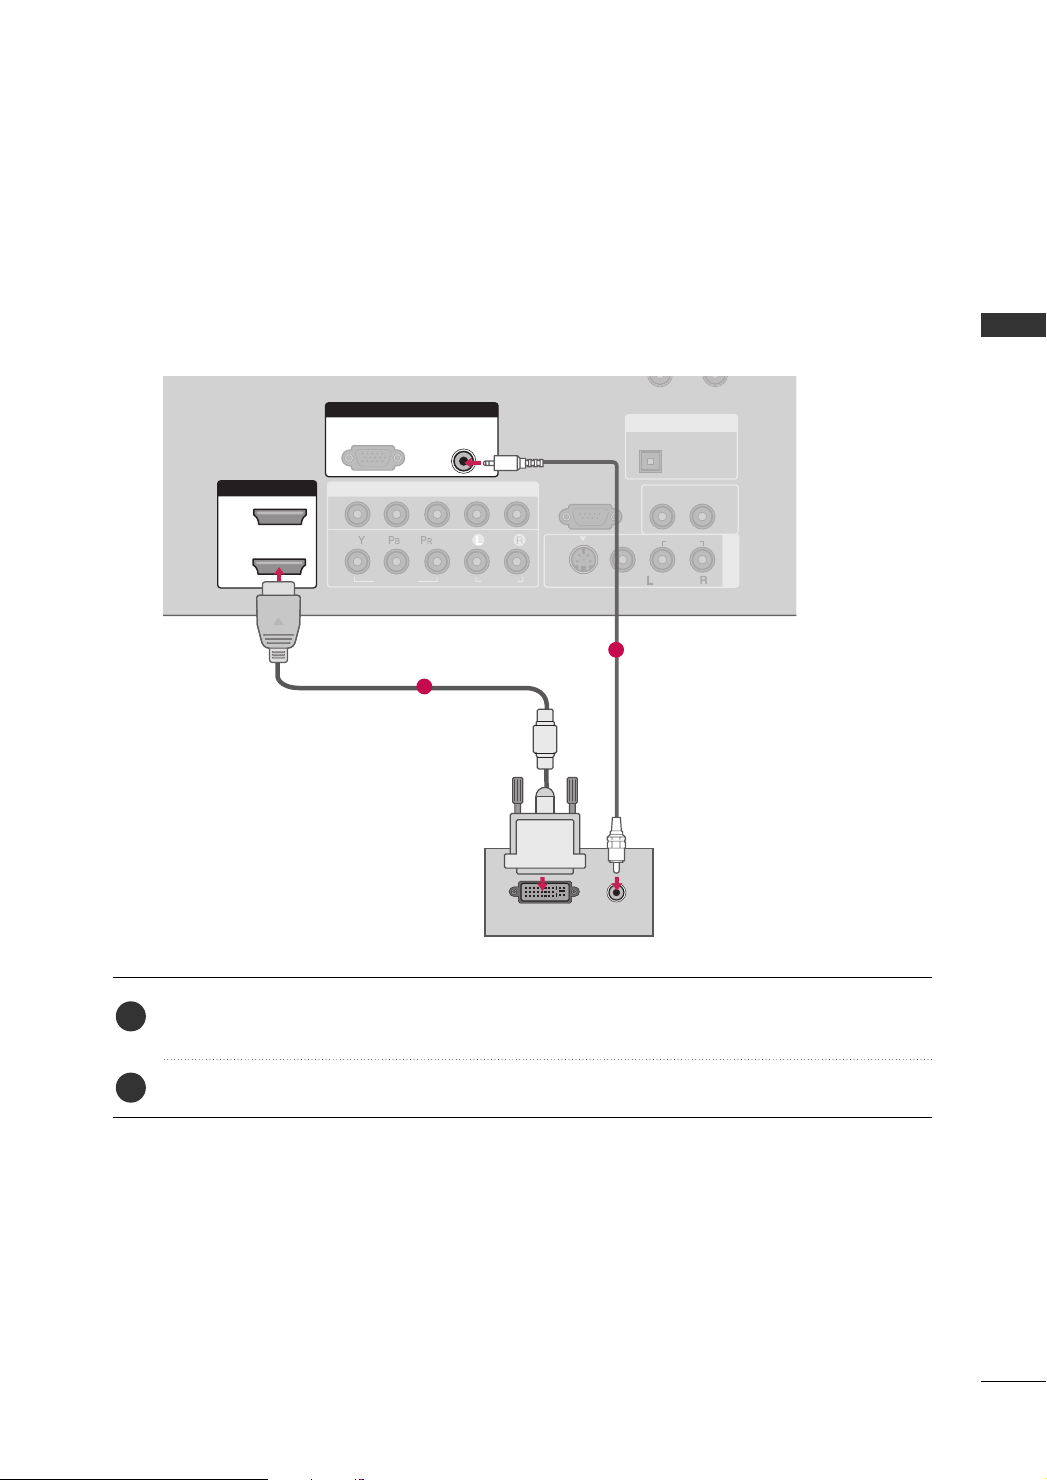
DVI to HDMI Connection
( )
COMPONENT IN
AV IN 1
1
2
RS-232C IN
(CONTROL & SERVICE)
VIDEO
AUDIO
AUDIO OUT
OPTICAL
VIDEO
MONO
( )
AUDIO
S-VIDEO
HDMI/DVI IN
1
2
RGB IN
AUDIO
(RGB/DVI)
DVI-PC OUTPUT
RGB(PC)
DIGITAL AUDIO OUT
AUDIO
EXTERNAL EQIPMENT SETUP
2
1
1. How to connect
Connect the DVI output of the PC to the
1
2
Connect the PC audio output to the
2. How to use
■
Turn on the PC and the TV.
■
HHDDMMII11,HHDDMMII22orHHDDMMII33
Select
control.
HHDDMMII//DDVVII IINN11, 22
AAUUDDIIOO ((RRGGBB//DDVVII
))
input source on the TV with using the
HHDDMMII IINN 33
or
jack on the TV.
II NN PP UUTT
jack on the TV.
button on the remote
33
Page 36
EXTERNAL EQUIPMENT SETUP
!
!
NOTES
Depending on the graphics card, DOS mode may
GG
not work if a HDMI to DVI Cable is in use.
There may be noise associated with the resolution,
GG
EXTERNAL EQIPMENT SETUP
vertical pattern, contrast or brightness in PC mode.
If noise is present, change the PC output to another resolution, change the refresh rate to another
rate or adjust the brightness and contrast on the
PICTURE menu until the picture is clear.
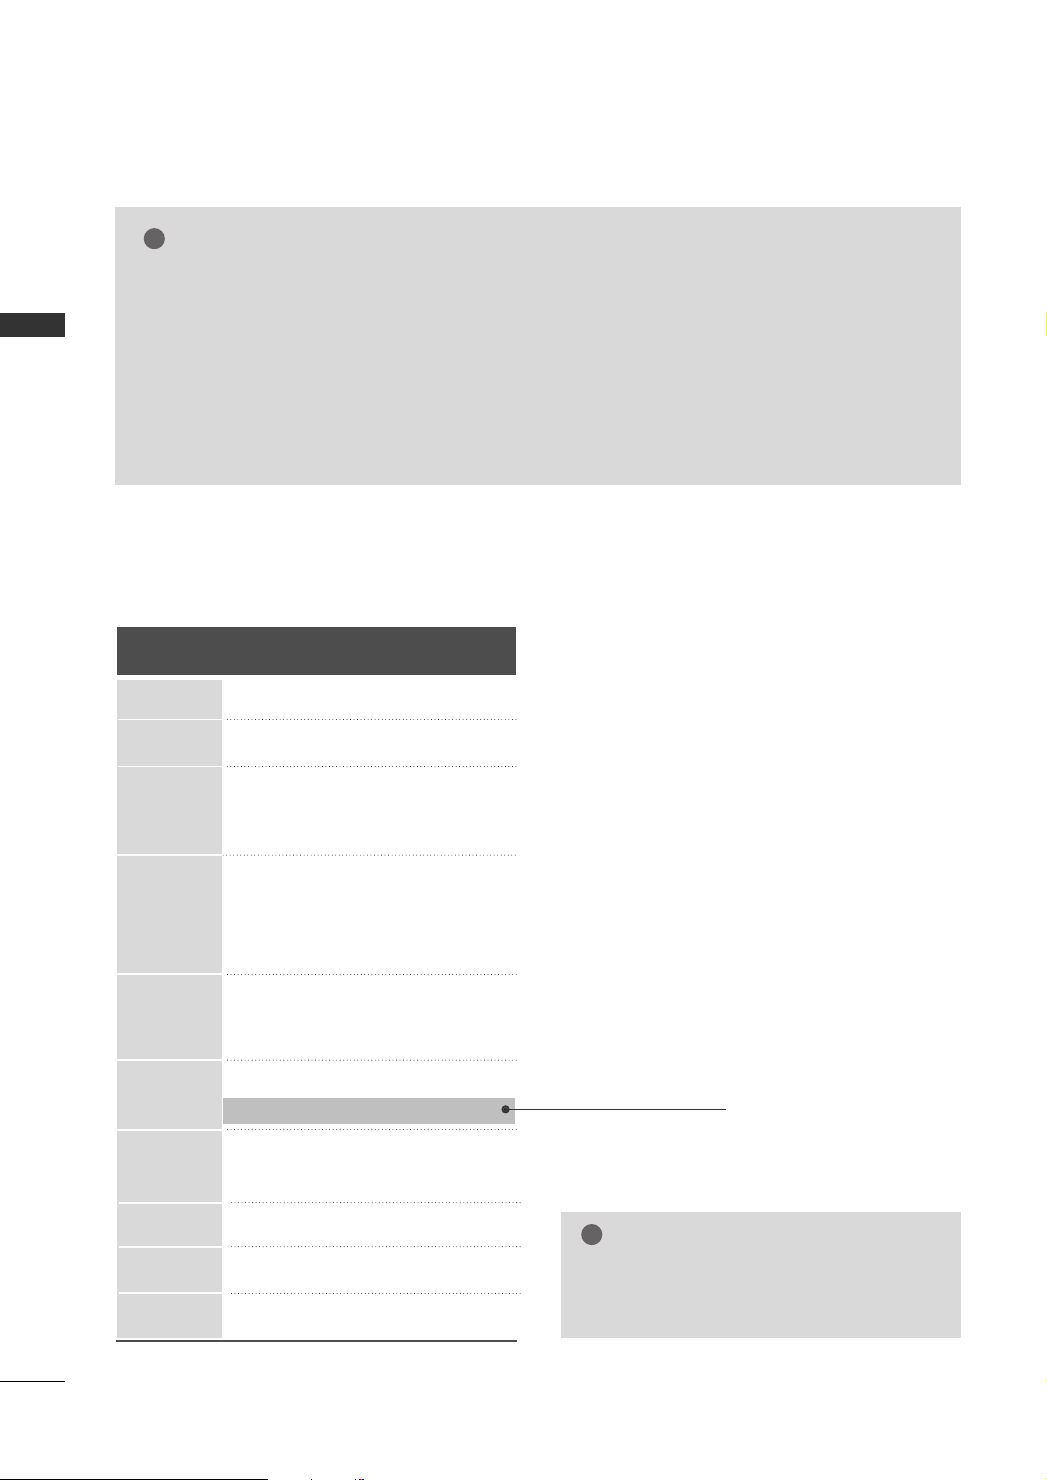
Supported Display Specifications
RGB-PC, HDMI-PC
Avoid keeping a fixed image on the screen for a
GG
long period of time. The fixed image could become
permanently imprinted on the screen.
Resolution
640x350
720x400
640x480
800x600
1024x768
1280x768
1280x1024
Horizontal Vertical
Frequency(KHz)Frequency(Hz
31.468 70.09
31.469 70.08
31.469 59.94
37. 500 75.00
37.861 72.80
35.156 56.25
37.879 60.31
46 .875 75 .00
48.077 72.18
48.363 60.00
56.476 70.06
60.023 75.02
47. 776 59.87
60.289 74.893
63.981 60.02
79.976 75.025
)
* RGB-PC mode only
1360x768
1600x1200
1920x1080
47.712 60.015
75.00 60.00
67.50 60.00
NOTE
Depending on the graphics card, some
GG
resolutions may not be positioned on the
screen properly.
34
Page 37
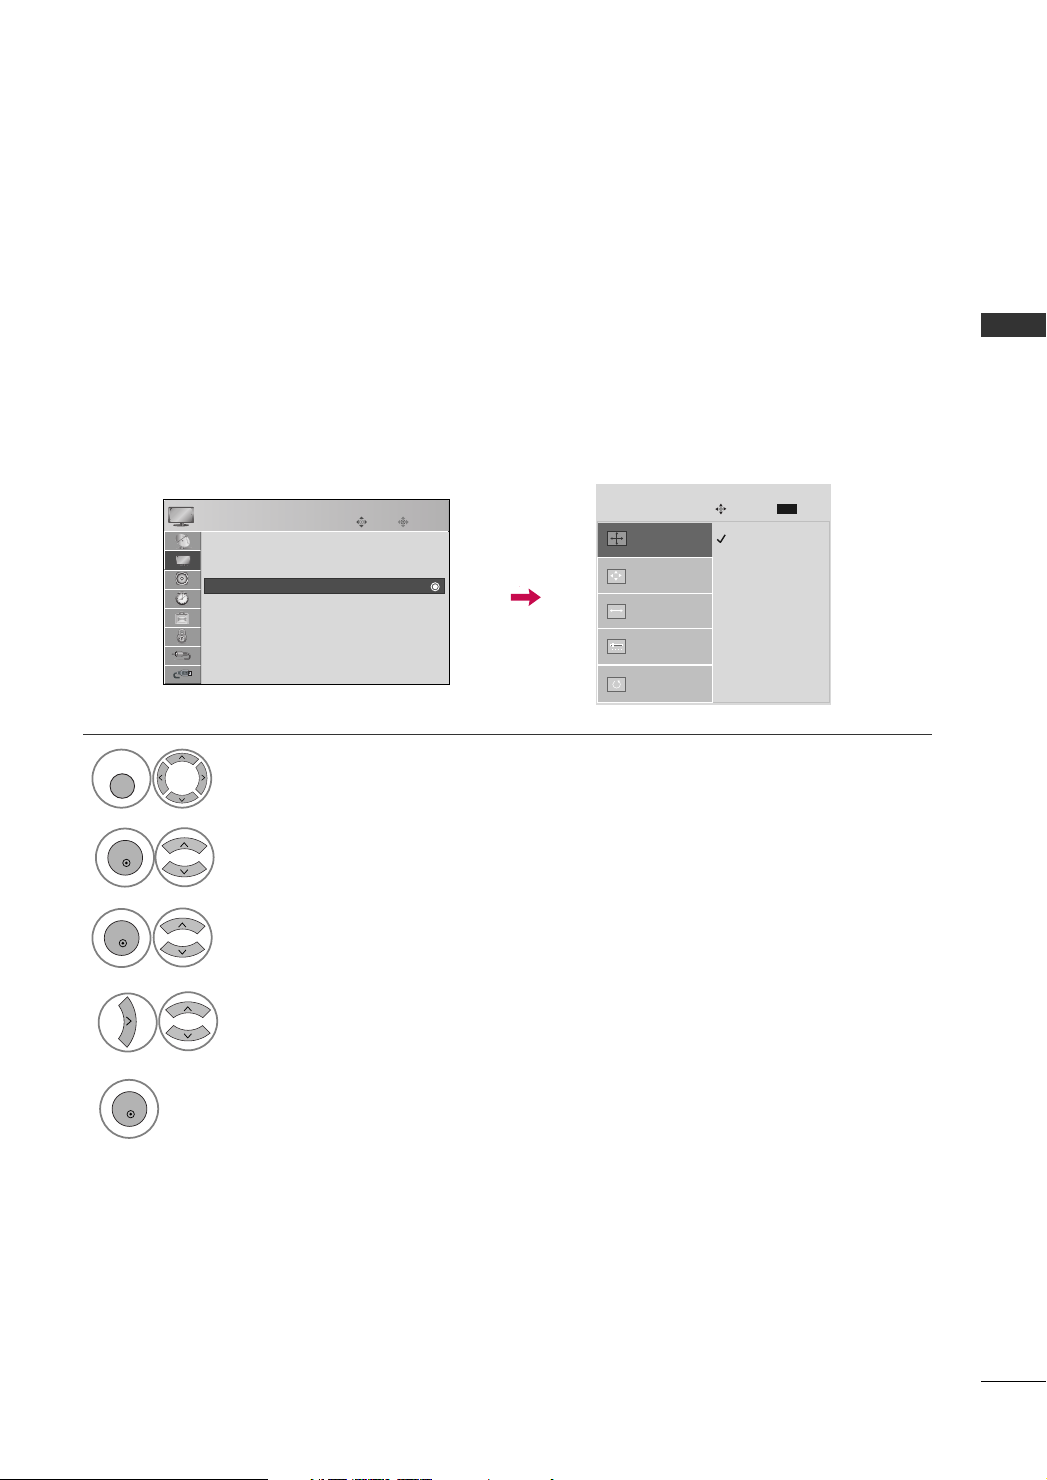
Screen Setup for PC mode
MENU
ENTER
ENTER
ENTER
Selecting Resolution
You can choose the resolution in RGB-PC mode.
The position, phase, and other settings can also be adjusted.
PICTURE
Screen (RGB-PC)
Screen (RGB-PC)
• Advanced Control
• Picture Reset
Move
E
Enter
1
PPII CCTTUURR EE
Select
.
2
SS cc rreeee nn (( RR GGBB-- PP CC))
Select
.
SCREEN
Resolution
Position
Size
Phase
Reset
G
Move
1024 x 768
1280 x 768
1360 x 768
MENU
EXTERNAL EQIPMENT SETUP
Prev.
3
4
5
RRee ssooll uu ttiioonn
Select
.
Select the desired resolution.
35
Page 38
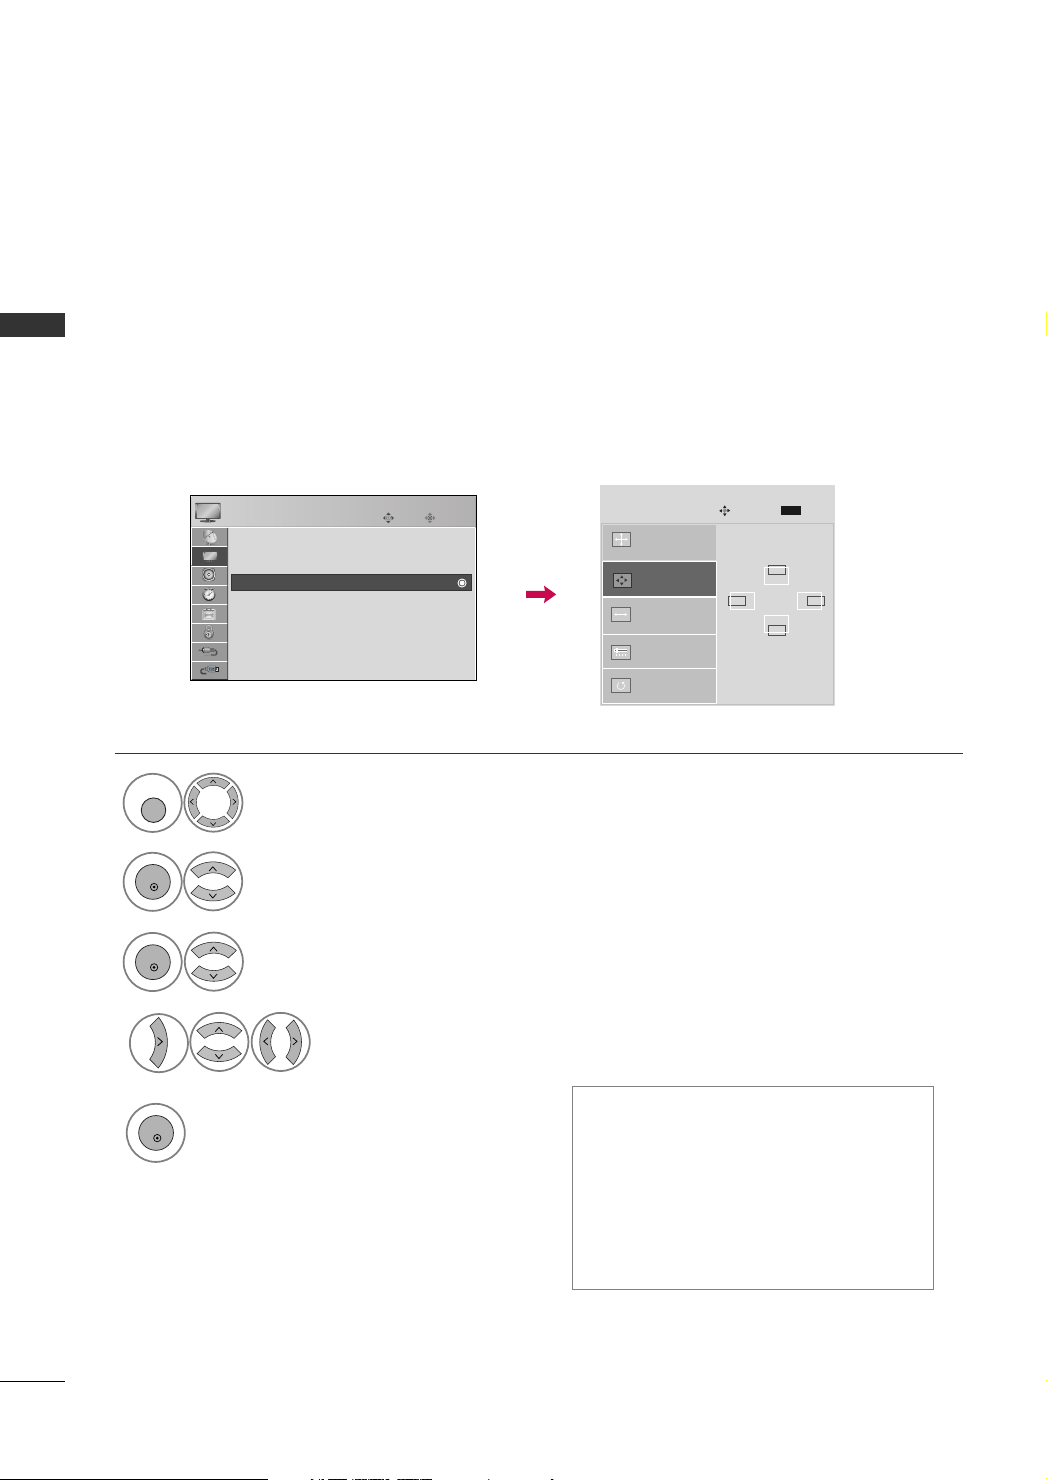
EXTERNAL EQUIPMENT SETUP
MENU
ENTER
ENTER
ENTER
Adjustment for screen Position, Size, Phase
If the picture is not clear after auto adjustment and especially if characters are still trembling, adjust the picture
EXTERNAL EQIPMENT SETUP
phase manually.
This feature operates only in RGB-PC mode.
1
2
3
4
PICTURE
Screen (RGB-PC)
Screen (RGB-PC)
Select
Select
Select
Move
E
• Advanced Control
• Picture Reset
PPII CCTTUURR EE
SS cc rreeee nn (( RR GGBB-- PP CC))
PPoo ss iittiioonn, SS ii zzee
Enter
.
.
PPhhaa ssee
or
Make appropriate adjustments.
SCREEN
Resolution
Position
Size
Phase
Reset
Move
G
Prev.
MENU
D
GF
E
.
36
5
PPoossiittiioonn
SSiizzee
PPhhaassee
This function is to adjust picture to
left/right and up/down as you prefer.
This function is to minimize any vertical
bars or stripes visible on the screen background. And the horizontal screen size
will also change.
This function allows you to remove any
horizontal noise and clear or sharpen the
image of characters.
Page 39
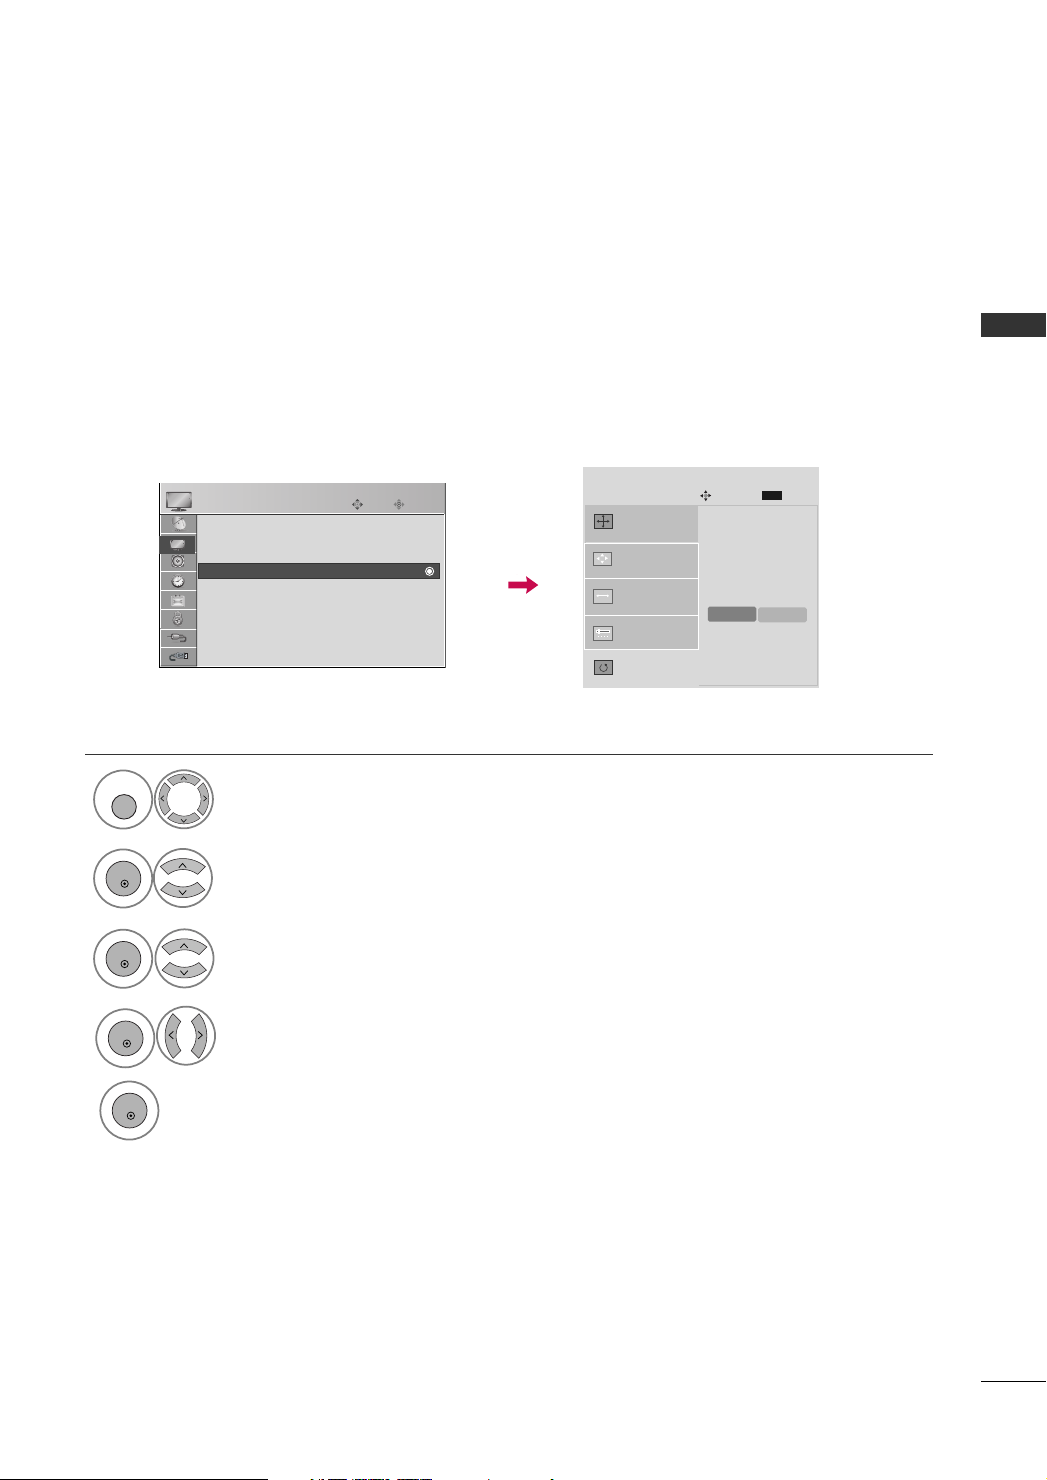
MENU
Screen Reset (Reset to original factory values)
ENTER
ENTER
ENTER
ENTER
Returns to the default settings Resolution, Position, Size and Phase at the factory.
This feature operates only in RGB-PC mode.
PICTURE
Screen (RGB-PC)
Screen (RGB-PC)
E
• Advanced Control
• Picture Reset
Move
Enter
SCREEN
Resolution
Position
Size
Phase
Move
Yes
To Set
MENU
EXTERNAL EQIPMENT SETUP
Prev.
No
4
1
2
3
5
PPII CCTTUURR EE
Select
SS cc rreeee nn (( RR GGBB-- PP CC))
Select
RRee sseett
Select
YYeess
Select
.
Reset
G
.
.
.
37
Page 40
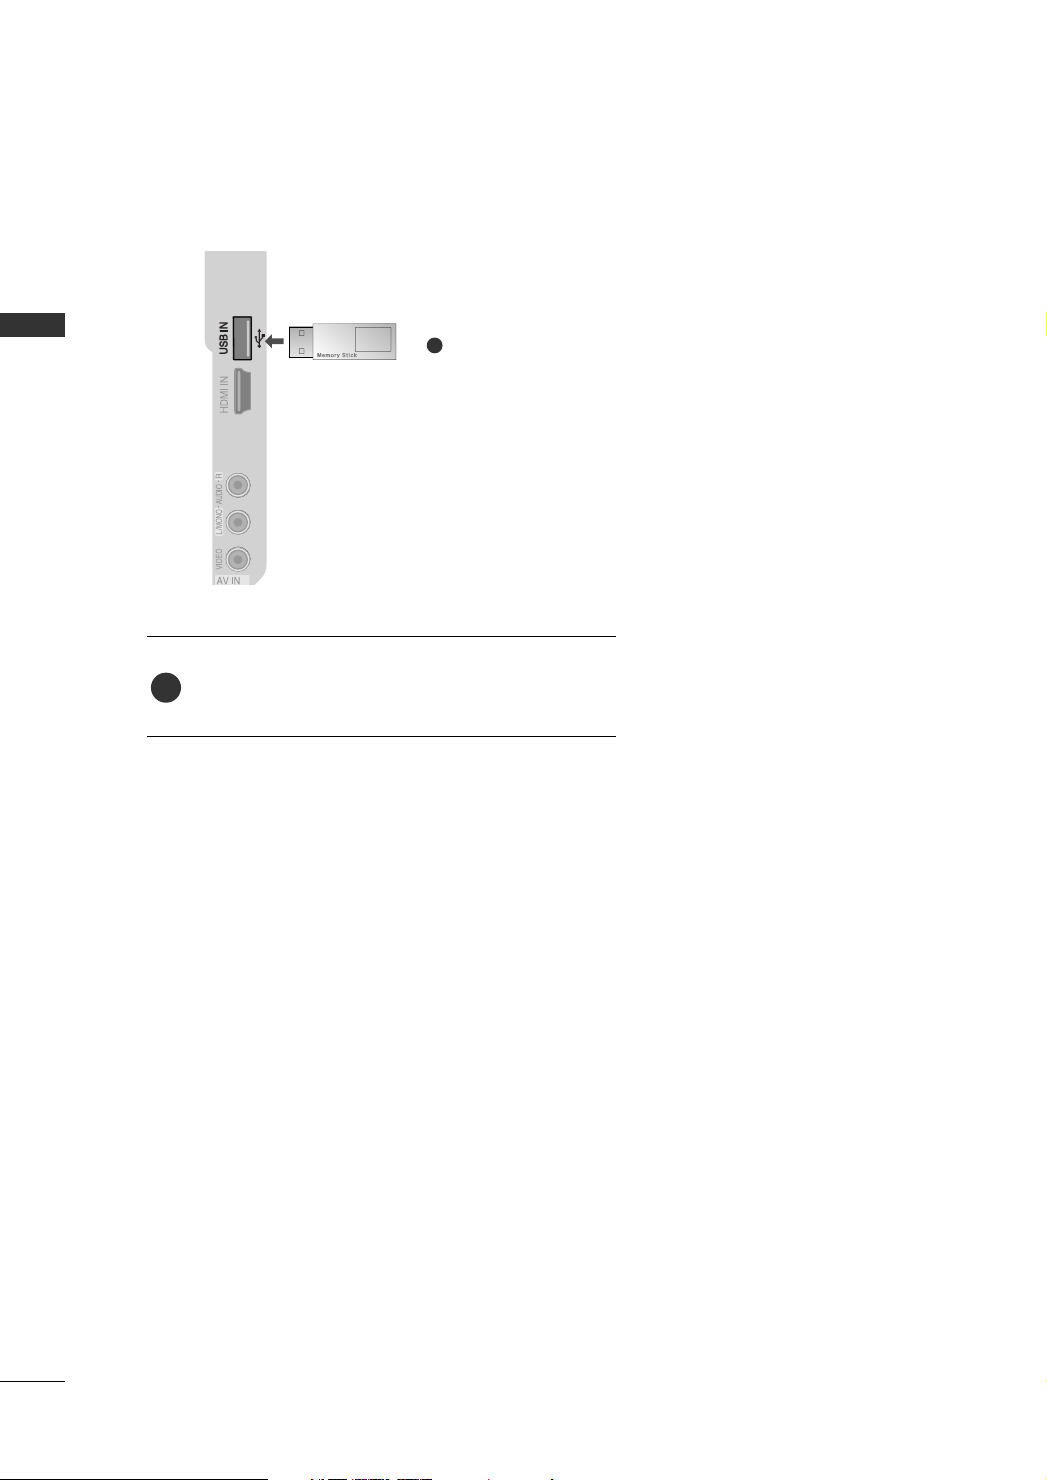
EXTERNAL EQUIPMENT SETUP
2
3
USB CONNECTION
EXTERNAL EQIPMENT SETUP
1. How to connect
Connect the USB device to the
1
of TV(or on the back of TV).
2. How to use
■
After connecting the
function. (
pp..6611
GG
UUSSBB IINN
)
1
UUSSBB IINN
jack, you use the USB
jack on the side
38
Page 41
AUDIO OUT CONNECTION
!
AV IN 1
RS-232C IN
OPTICAL
VIDEO
MONO
( )
AUDIO
S-VIDEO
DIGITAL AUDIO OUT
AUDIO OUT
L R
AUDIO
( )
AV IN 1
RS-232C IN
(CONTROL & SERVICE)
AUDIO OUT
VIDEO
MONO
( )
AUDIO
S-VIDEO
L
T
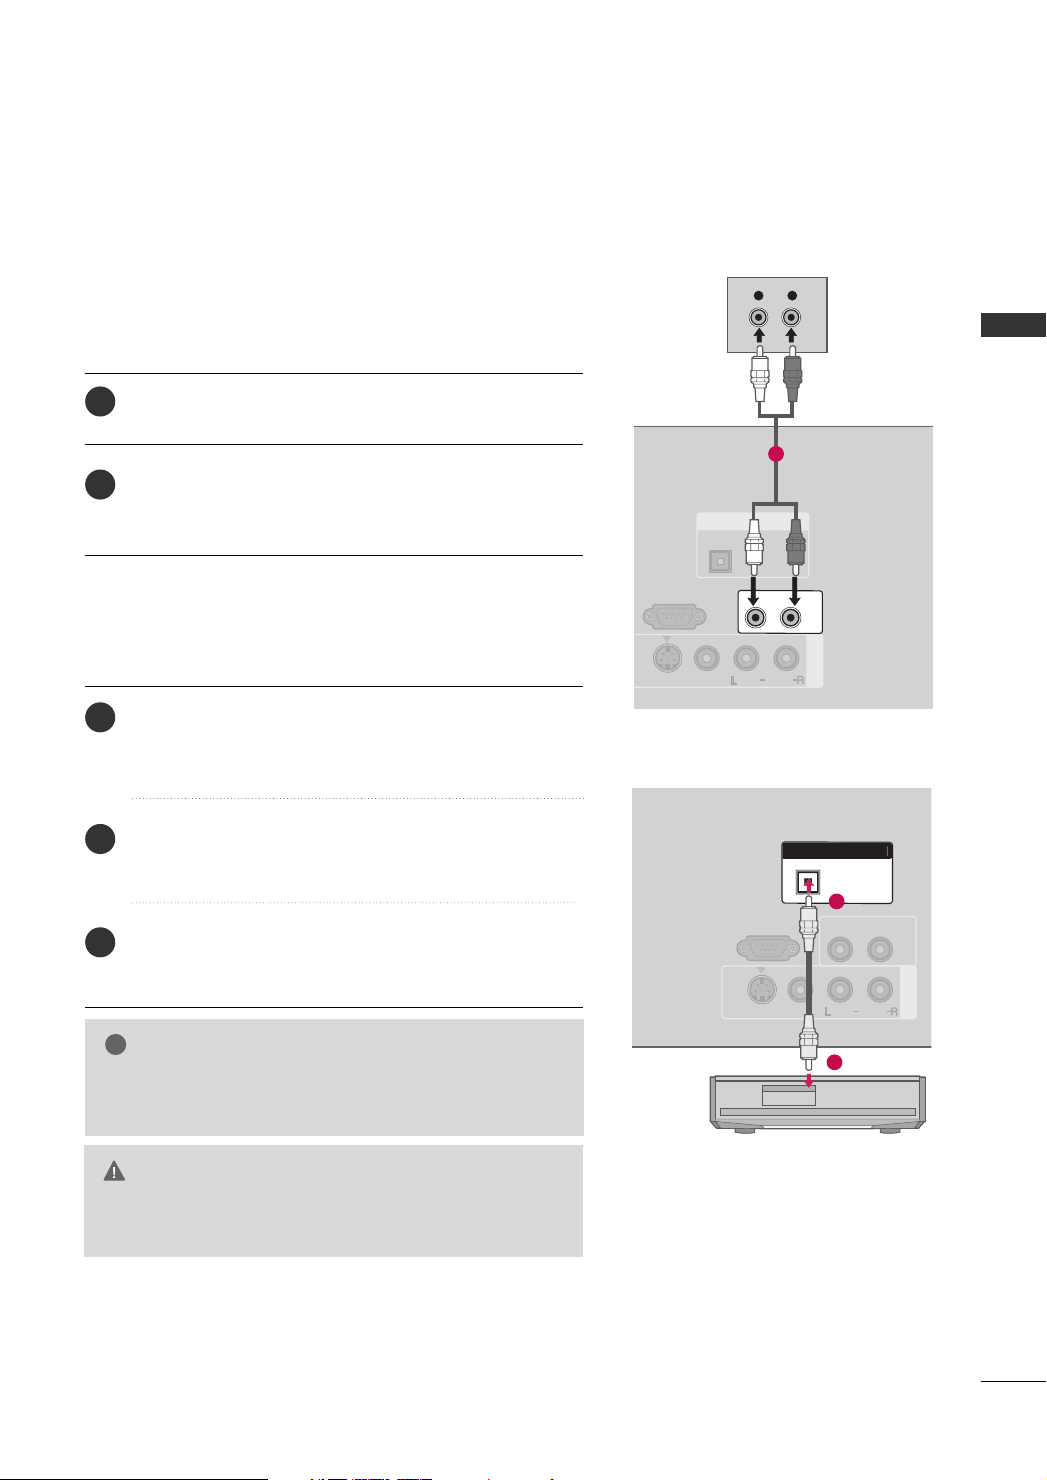
Send the TV’s audio to external audio equipment via the Digital Audio Output (Optical)port.
Analog
1. How to connect
Connect audio outputs to the TV’s
1
Set the “TV Speaker option - Off” in the AUDIO menu.
2
See the external audio equipment instruction manual
for operation.
AAUUDDIIOO OOUUTT
Digital
1. How to connect
Connect one end of the optical or coaxial cable to the
1
2
OOPPTTII CCAALL
TV’s
DDIIGGIITTAALL AAUUDDIIOO OOUUTT
port of
CCOOAAXXIIAALL
or
(Except plasma TV models)
.
Connect the other end of the optical or coaxial cable to
the digital audio input on the audio equipment.
EXTERNAL EQIPMENT SETUP
jacks.
1
DIGITAL AUDIO OU
OPTICA
1
Set the “TV Speaker option - Off” in the AUDIO menu.
3
See the external audio equipment instruction manual for
operation.
NOTE
When connecting with external audio equipments, such as ampli-
GG
fiers or speakers, you can turn the TV speakers off in the
menu.
CAUTION
Do not look into the optical output port. Looking at the
GG
laser beam may damage your vision.
2
39
Page 42
WATCHING TV / CHANNEL CONTROL
INFO
MUTE
RETURN
AV MODE
FAV
Q. MENU
MENU
ENTER
VOL
CH
123
456
7809
Q.VIEW
GUIDE
P
A
G
E
i
MARK
TV
INPUT
POWER
DVD
VCR
RATIO
POWER
INPUT
PICTURE
SOUND
REMOTE CONTROL KEY FUNCTIONS
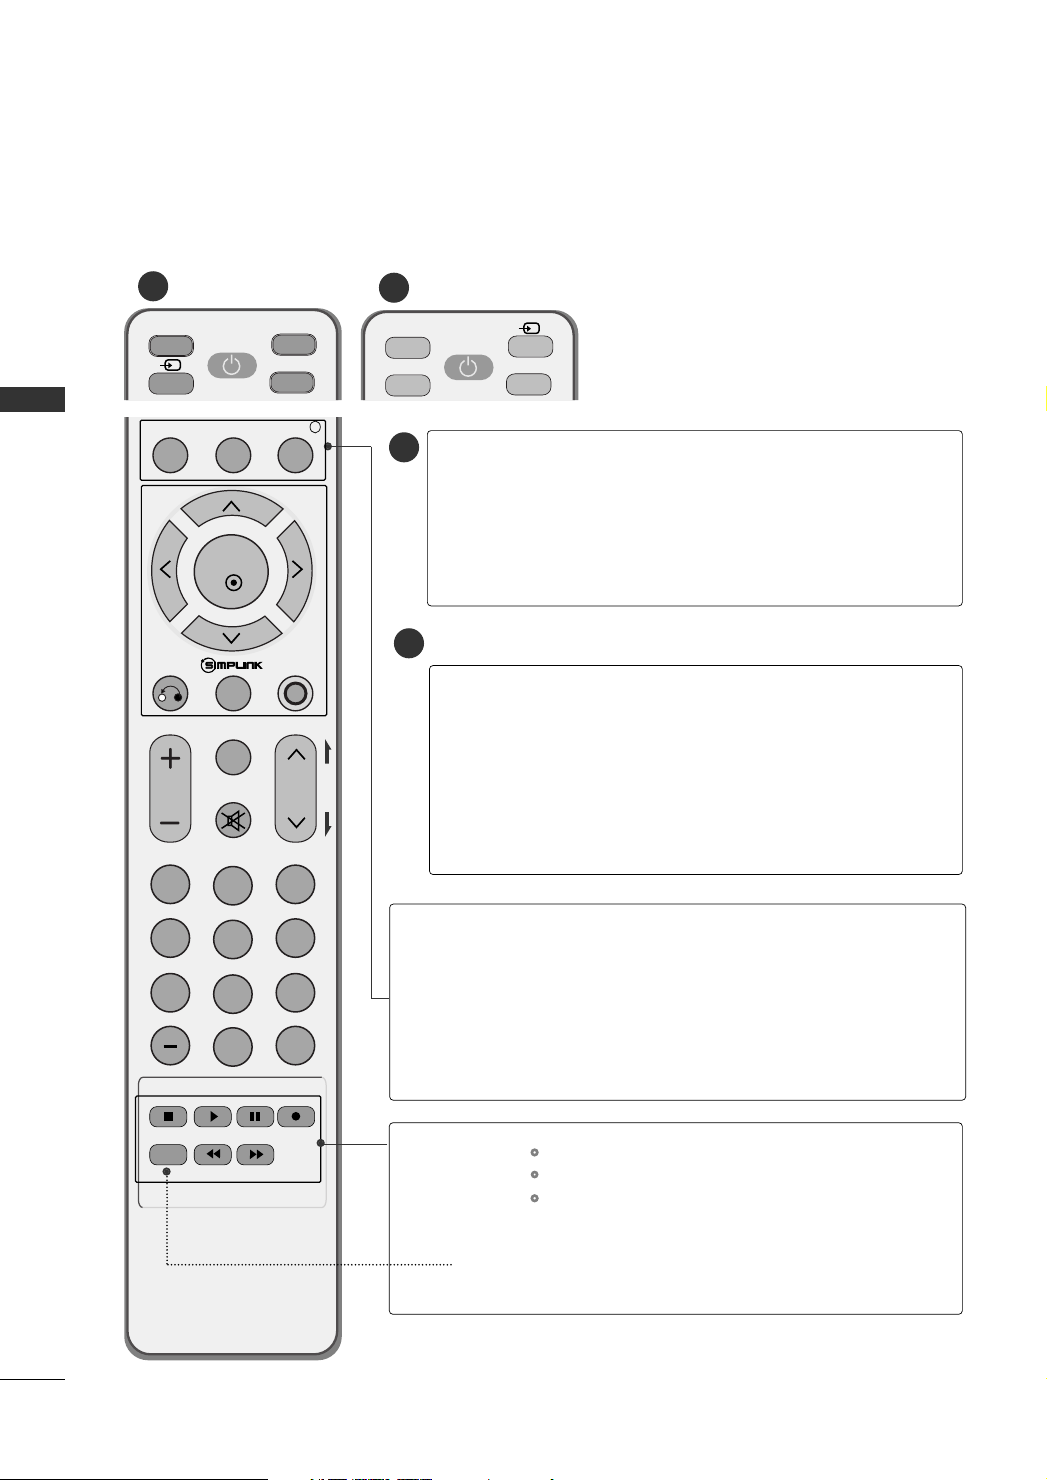
When using the remote control, aim it at the remote control sensor on the TV.
WATCHING TV / CHANNEL CONTROL
1
(Only 42/50PG30*)
2
TV/DVD/VCR
1
POWER
Select the remote operating mode: TV, DVD, or VCR.
Turns your TV or any other programmed equipment
on or off, depending on the mode.
INPUT
(Only 42/50PG30*)
2
SOUND
INPUT
PICTURE
Q. MENU
External input modes rotate in regular sequence.
RATIO
Change the aspect ratio.
GG
pp..6699
Select the appropriate type of sound for
type of program.
GG
pp..8866
External input modes rotate in regular sequence.
Adjust the factory preset picture depend
on the viewing environment.
GG
Select the desired quick menu source.
pp..7711
pp..4433
GG
40
MENU
INFO
VCR/DVD, USB,
SIMPLINK
Control buttons
GUIDE
Displays the main menu.
Clear all on-screen displays and return to TV viewing from
any menu.
Shows the present screen information.
Control video cassette recorders or DVD players.
Control USB menu (PHOTO LIST and MUSIC LIST.)
Control the SIMPLINK compatible devices.
Shows program schedule.
pp..5588
GG
Page 43
INFO
MUTE
RETURN
AV MODE
FAV
Q. MENU
MENU
ENTER
VOL
CH
123
456
7809
Q.VIEW
GUIDE
P
A
G
E
i
MARK
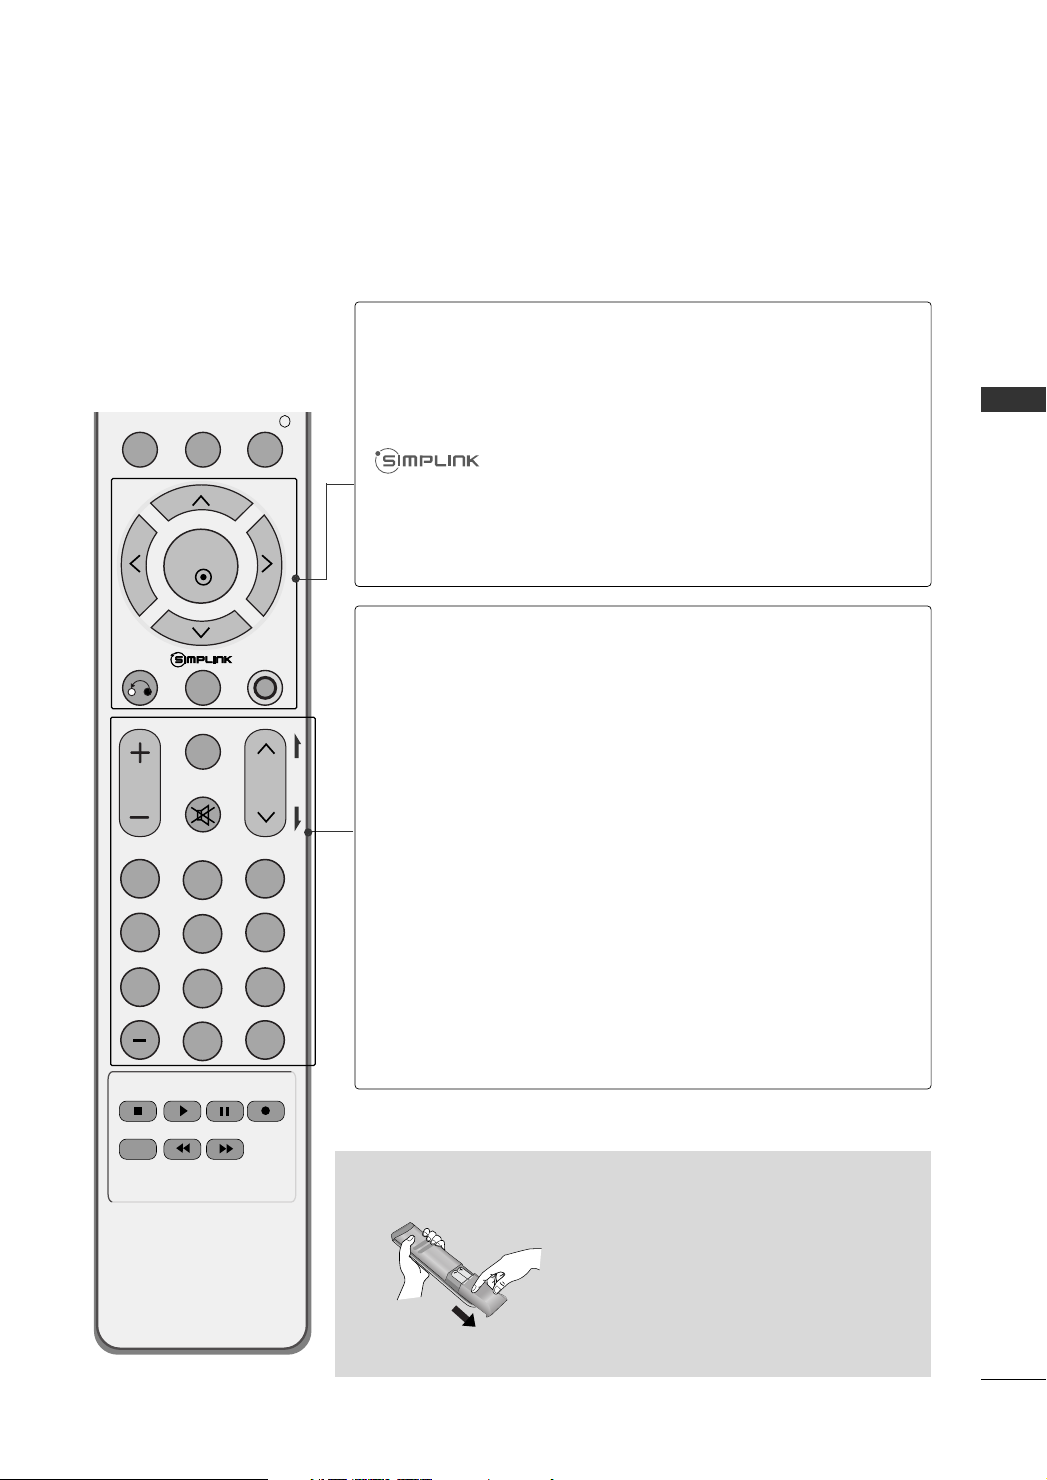
THUMBSTICK
(Up/Down/Left
Right/ENTER)
RETURN
Navigate the on-screen menus and adjust the system
settings to your preference.
Allows the user to move return one step in an interactive
application or other user interaction function.
See a list of AV devices connected to TV.
When you toggle this button, the Simplink menu appears
at the screen.
pp..5533
GG
WATCHING TV / CHANNEL CONTROL
AV MODE
It helps you select and set images and sounds when connecting AV devices.
pp..5577
GG
VOLUME UP
/DOWN
UP/DOWN
UP/DOWN
0~9 number
button
— (DASH)
Increase/decrease in the sound level.
Select and release functions in the USB menu.
MARK
FAV
Scroll through the programmed favorite channels.
MUTE
Switches the sound on or off.
CH
Select available channels.
Move from one full set of screen information to the next
PAG E
pp..4422
GG
one.
Selects a channel.
Selects numbered items in a menu.
Used to enter a program number for multiple
pp..6633
GG
pp..4499
GG
program channels such as 2-1, 2-2, etc.
Q.VIEW
Tune to the last channel viewed.
Installing Batteries
■
Open the battery compartment cover on the
back and install the batteries matching correct polarity (+with +,-with -).
■
Install two 1.5V AAA batteries. Do not mix
old or used batteries with new ones.
■
Close cover.
41
Page 44
WATCHING TV / CHANNEL CONTROL
!
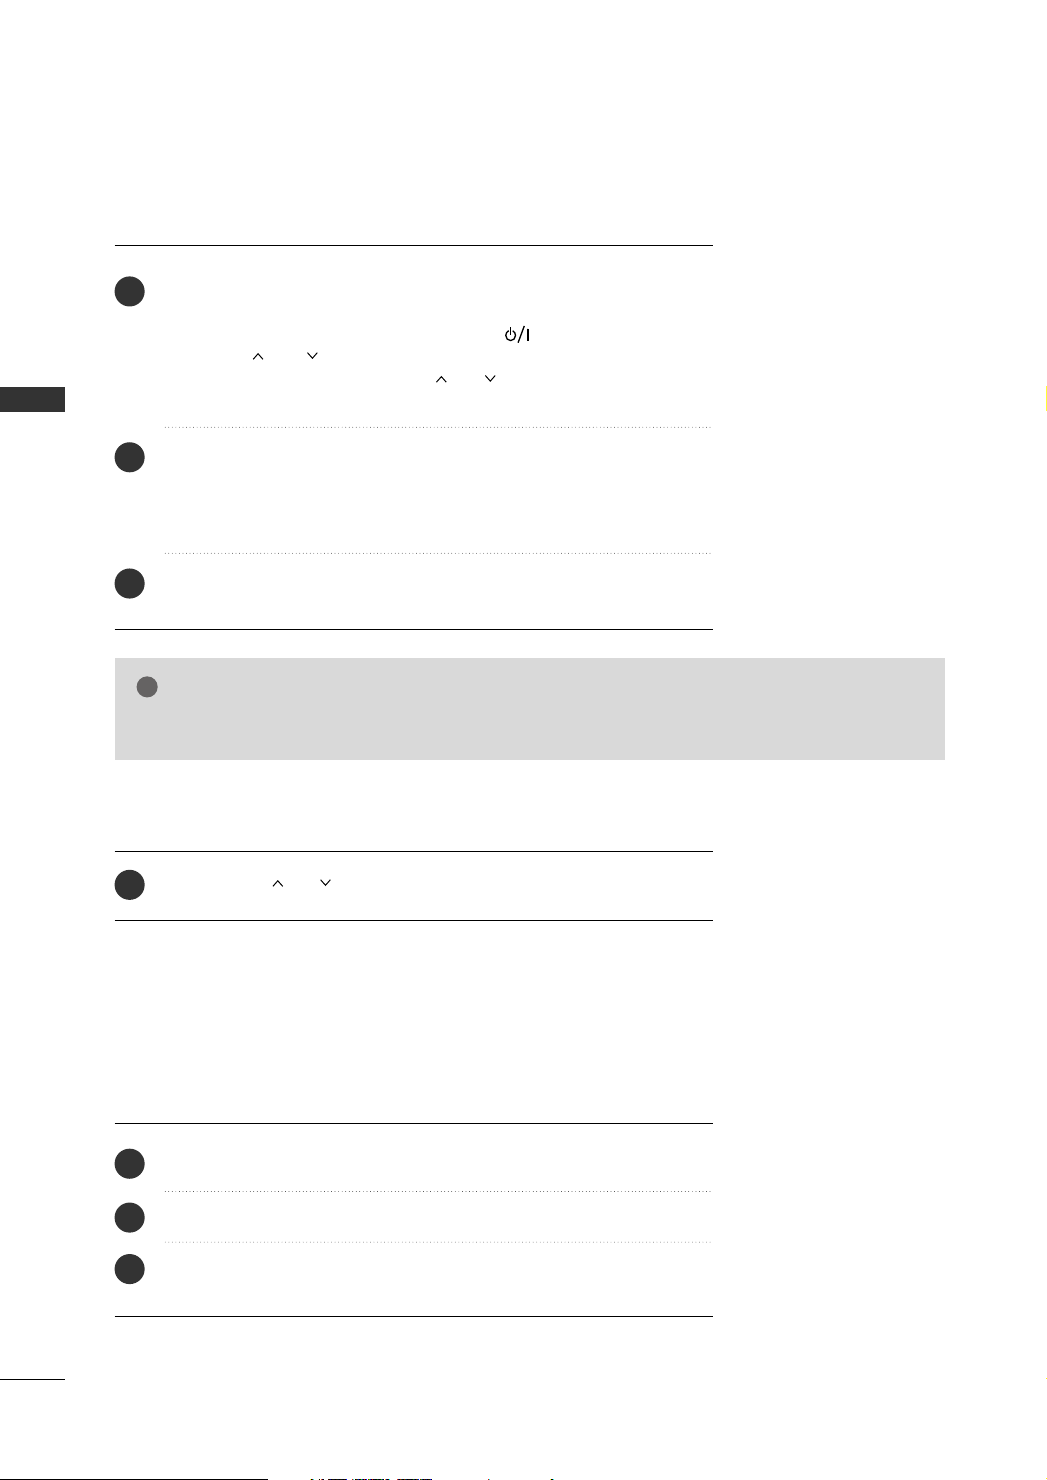
TURNING ON THE TV
First, connect power cord correctly.
1
At this moment, the TV switches to standby mode.
WATCHING TV / CHANNEL CONTROL
■
In standby mode to turn TV on, press the ,
CCHH ((
or
press the
the remote control.
Select the viewing source by using the
2
trol.
■
This TV is programmed to remember which power state it was last set to,
even if the power cord is out.
PPOOWWEERR, IINNPPUUTT, CCHH ((
))
or
button on the TV or
or )),
IINNPPUUTT
IINNPPUUTT,CCHH ((
NNuummbbeerr ((00~99))
button on the remote con-
or
DD
EE
button on
))
When finished using the TV, press the
3
trol. The TV reverts to standby mode.
PPOOWWEERR
button on the remote con-
NOTE
GG
If you intend to be away on vacation, disconnect the power plug from the wall power outlet.
CHANNEL SELECTION
1
Press the
CCHH ((
or )), or
NNUUMMBBEERR
buttons to select a channel number.
VOLUME ADJUSTMENT
Adjust the volume to suit your personal preference.
Press the
1
If you want to switch the sound off, press the
2
You can cancel the Mute function by pressing the
3
button.
VVOOLL ((++
--))
or
button to adjust the volume.
MMUUTTEE
MMUUTTEE
button.
or
VVOOLL ((++
or
--))
42
Page 45
QUICK MENU
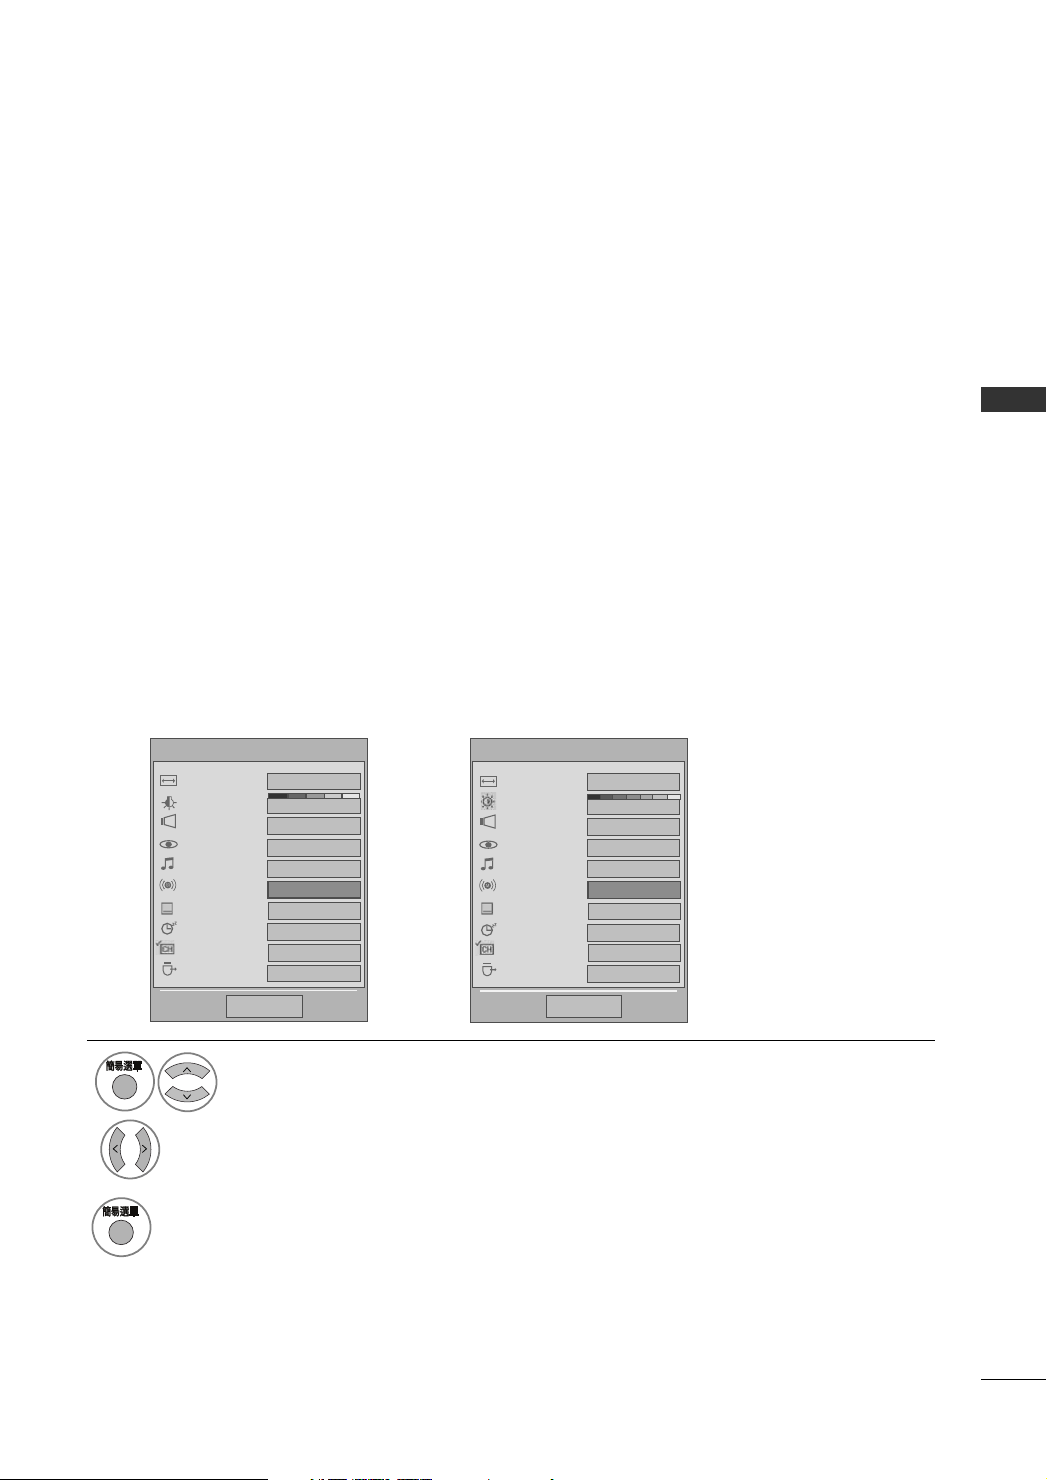
Your TV's OSD (On Screen Display) may differ slightly from what is shown in this
manual.
Q.Menu (Quick Menu) is a menu of features which users might use frequently.
AAssppeecc tt RRaattiioo
•
PPoowweerr SS aavviinn gg
•
consumption of the set.
BBaa cc kk lliigghhtt
•
brightness of the screen.
CC lleeaa rr VV ooiiccee
•
human voices sound better.
PPii cc ttuu rree MMooddee
•
ment.
SS oouunndd MM oodd ee
•
MM uu llttii AAuuddiioo// SS AA PP
•
guage (Digital signal).
CC aapptt iioo nn
•
SS lleeee pp TTiimmeerr
•
AAdd dd CC hhaannnneell
•
UUSSBB EEjjeecc tt
•
:
Selects your desired picture format.
(only Plasma TV Models)
: Adjusts screen brightness to reduce the power
(only LCD TV Models):Adjust the brightness of LCD panel to control the
:
By differentiating the human sound range from others, it helps make
:
Selects the factory preset picture depend on the viewing environ-
Selects the factory preset sound for type of program.
:
:
Selects MTS sound (Analog signal) or changes the audio lan-
:
Select a closed caption. (Analog signal)
:
Select the amount of time before your TV turns off automatically.
:
Sets the channel add or delete.
Select “USB Eject” in order to eject USB device.
:
Plasma TV Models LCD TV Models
WATCHING TV / CHANNEL CONTROL
3
1
2
Q-Menu
Aspect Ratio
Power Saving
Clear Voice
Picture Mode
Sound Mode
SAP
Caption
Sleep Timer
Add Channel
USB Eject
Close
16:9
0
on
Standard
Standard
Mono
FF
MONO
---
Off
---
Eject
GG
Display each menu.
Make appropriate adjustments.
Return to TV viewing.
Q-Menu
Aspect Ratio
Backlight
Clear Voice
Picture Mode
Sound Mode
SAP
Caption
Sleep Timer
Add Channel
USB Eject
Close
16:9
0
on
Standard
Standard
Mono
FF
MONO
---
Off
---
Eject
GG
43
Page 46
WATCHING TV / CHANNEL CONTROL
ENTER
ENTER
INITIAL SETTING
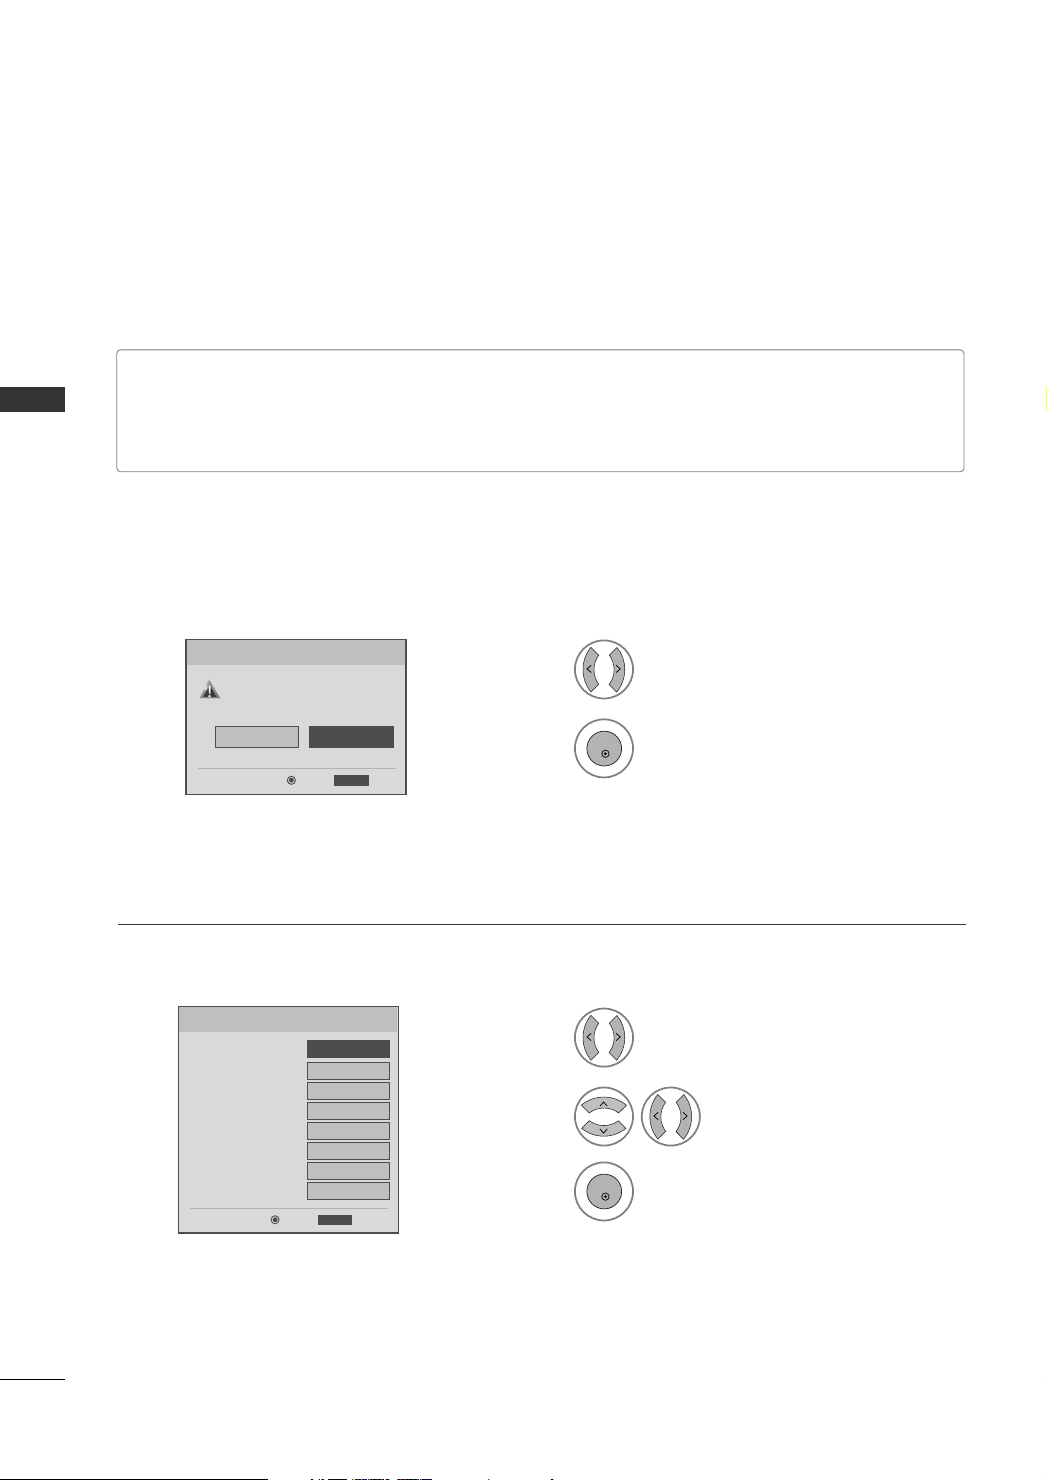
This Function guides the user to easily set the essential items for viewing the TV for the first time when purchasing the TV. If will be displayed on the screen when turning the TV on for the first time. It can also be activated from the user menus.
■
WATCHING TV / CHANNEL CONTROL
IInn--SStt oorree MMoodd ee
: Picture mode is set to “
inspecting the TV, but the TV will automatically return to the picture quality set this company after some
minutes.
■
HHoo mmee MMoo ddee
: Picture mode is set to “
Step1. Mode setting
VViivv iidd
”. Customers can adjust the “Picture Mode” manually while
VViivv iidd
” and user can change it to whatever they wish.
Step1. Mode Setting
Selecting the environment.
Choose the setting mode you want.
In-Store
Step2. Time setting
Step2. Time Setting
Current Time Setting
Time Zone
Daylight Saving
FF
Year
Month
Date
Hour
Minute
Brasilia
RETURN
Home
RETURN
Auto
2007
11
15
5 PM
52
Auto
1
HHoomm ee
Select
Mode.
2
ExitEnter
1
AAuuttoo
GG
Select
MM aannuu aall
or
.
2
Select desired time option.
3
ExitEnter
44
Page 47
ENTER
ENTER
Step3. Option setting
MENU
ENTER
ENTER
!
Step3. Option Setting
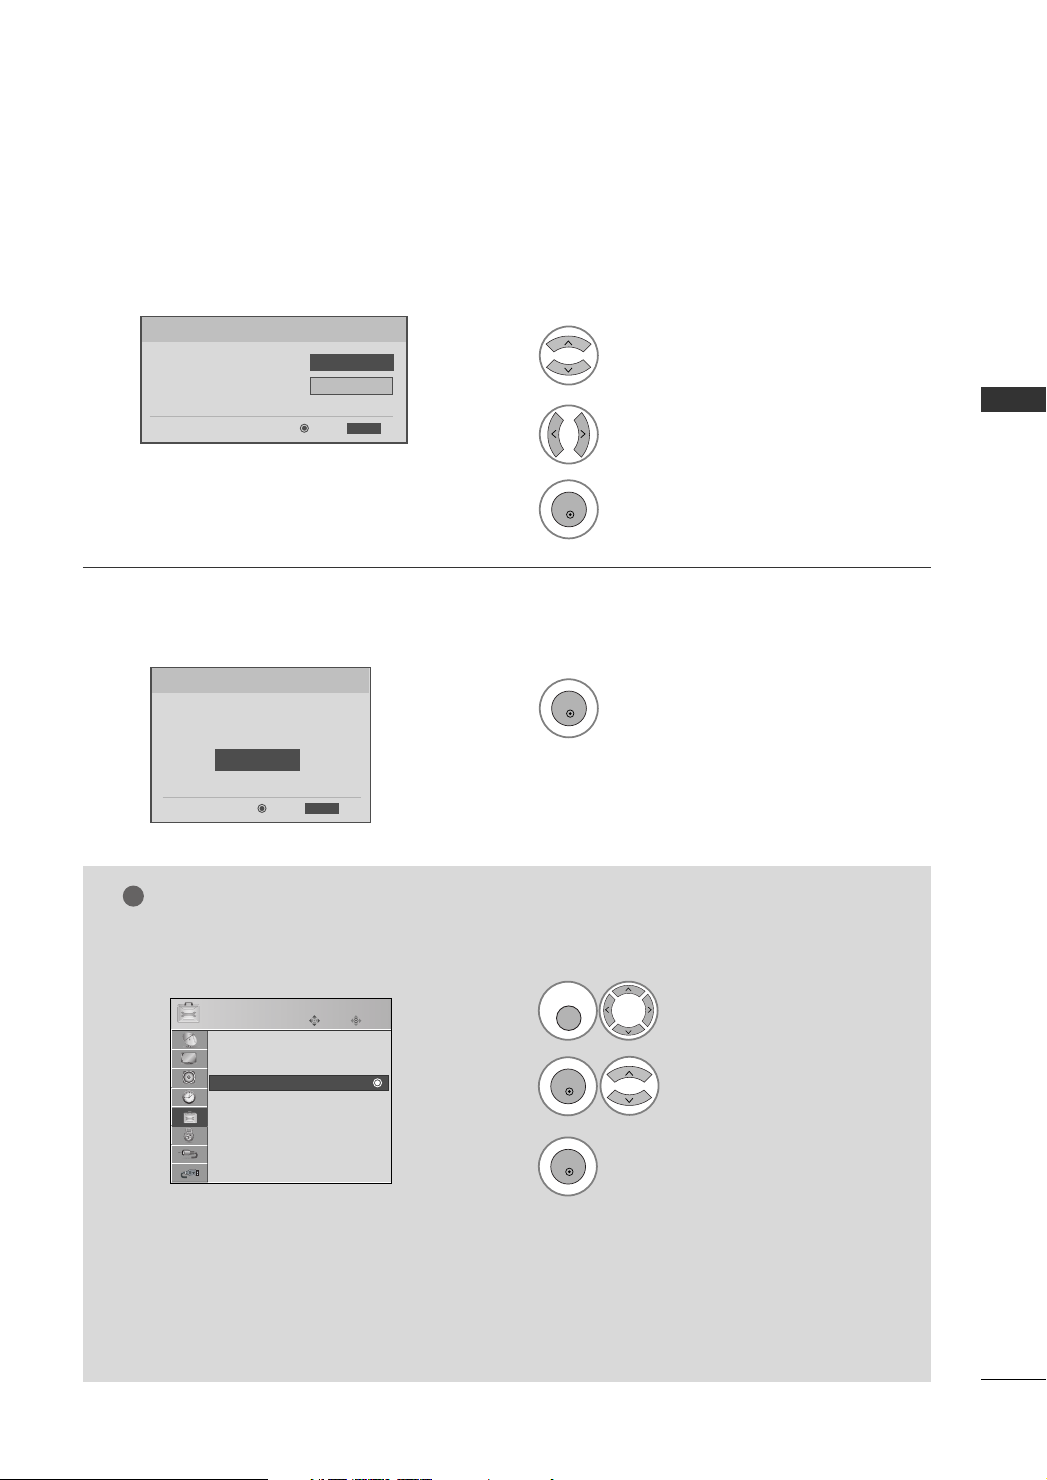
1. OSD Language Setting
2. Audio Language Setting
Step4. Auto Tuning
Step4. Auto Tuning
Auto Tuning can change channel map.
Do you want to start Auto Tuning?
Enter
Enter
NOTE
■
You can also adjust
FF
English(Inglés)
Portuguese
RETURN
RETURN
Exit
GG
ExitEnter
II nniittiiaall SSeettttii nn gg
in the
OO PP TTII OO NN
1
2
3
1
menu.
OOSSDD LL aanngguuaa gg ee SS eettttiinn gg
Select
AAuudd iioo LLaa nngguuaaggee SSeettttiinngg
Select your desired language.
AAuuttoo TT uunnii nn gg
Start
.
or
.
WATCHING TV / CHANNEL CONTROL
1
OPTION
Set ID : 1
Power Indicator
Initial Setting
Initial Setting
E
Move
Enter
2
Select
II nniittiiaall SSeettttii nn gg
Select
.
.
OOPPTTII OONN
3
The default selection is Home. We recommend setting the TV to Home mode for the best picture in your home
GG
environment.
In-store mode is only intended for use in retail environments. Customers can adjust the “Picture Mode” manually
GG
while inspecting the TV, but the TV will automatically return to preset in-store mode after some minutes.
The “In-Store Mode” is selected when it is exhibited at the shop. Even if you adjust the picture mode to the
GG
desired one, when it elapses a certain time, it will be automatically initialized (Vivid). When you use it at home,
select the “Home Mode”.
45
Page 48
WATCHING TV / CHANNEL CONTROL
MENU
ENTER
ENTER
MENU
ON-SCREEN MENUS SELECTION
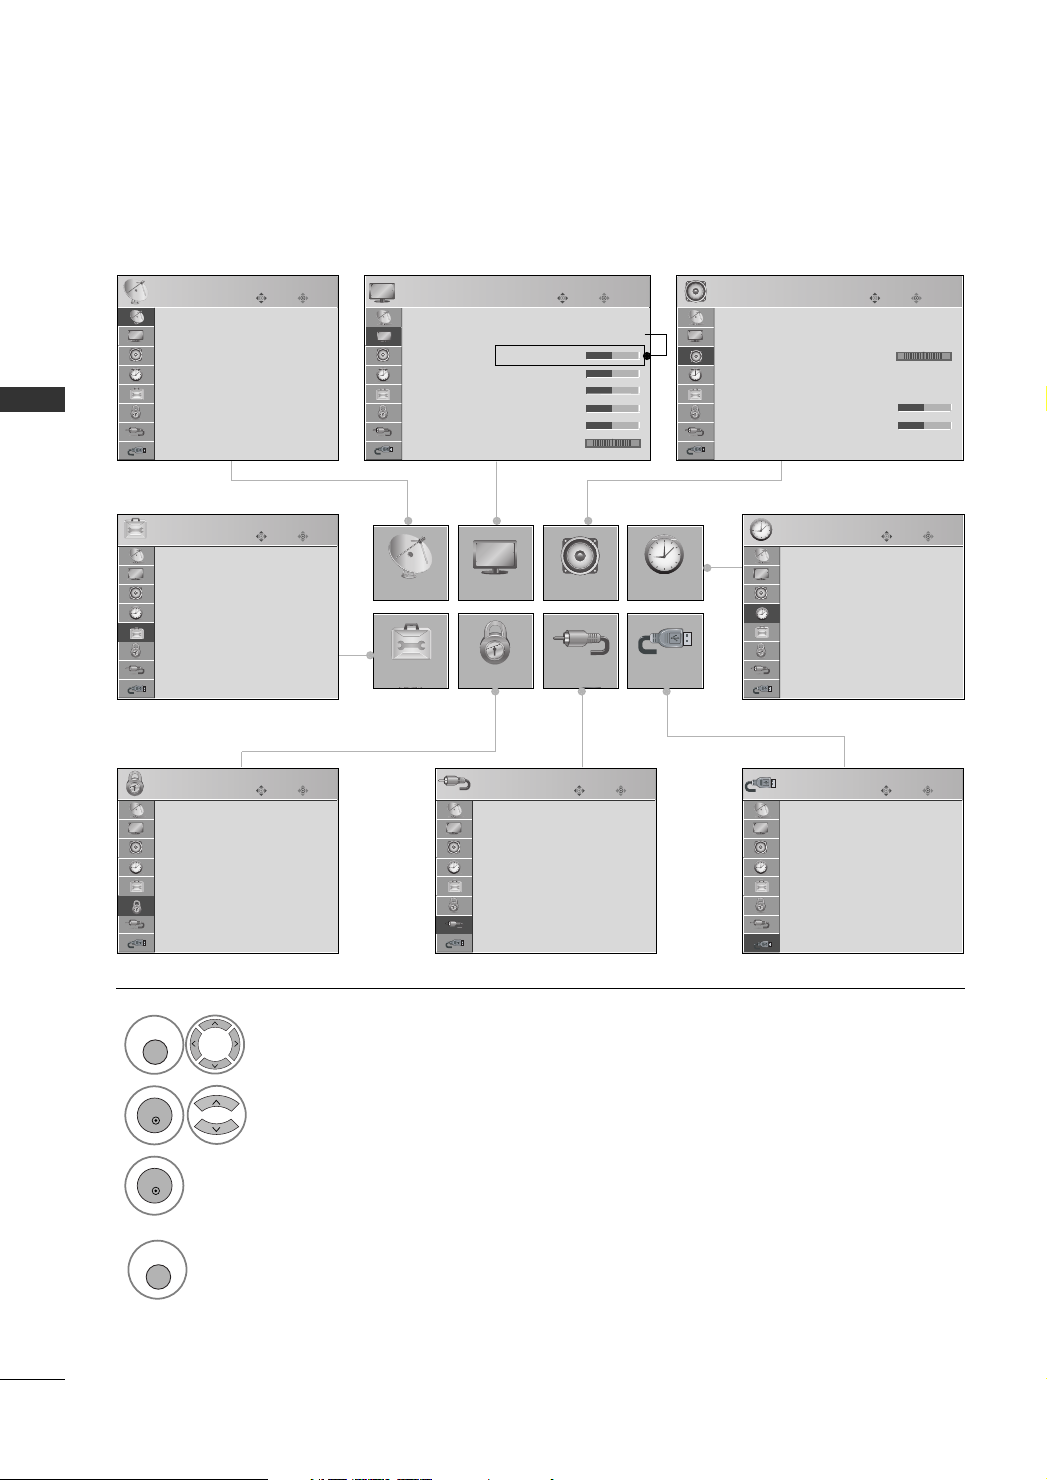
Your TV's OSD (On Screen Display) may differ slightly from that shown in this manual.
WATCHING TV / CHANNEL CONTROL
SETUP
Auto Tuning
Manual Tuning
Channel Edit
Scan Option : Primary Channel
System Color : Multi
OPTION
Language : English
Input Label
Schedule List
SIMPLINK : On
Key Lock : Off
Caption : Off
ISM Method : Normal
Power Saving : Level 0
■
II SS MM MM eetthhoodd
the Plasma TV models.
■
PPoo ww eerr IInn ddii ccaattoorr
PPoo ww eerr SSaa vv iinn gg
and
is used only the 32/37/42/47/52LG50** models.
LOCK
Lock System : Off
Set Password
Block Channel
Rating
Input Block
E
Move
Move
is used only
Move
Enter
Enter
Enter
PICTURE
Aspect Ratio : 16:9
Picture Mode : Standard
SETUP
OPTION
PICTURE
LOCK
INPUT
Antenna
Cable
AV1
AV2
Component1
Component2
RGB-PC
HDMI1
Only LCD TV models
• Backlight 50
• Contrast 50
• Brightness 50
• Sharpness 50
• Color 50
• Tint 0
E
AUDIO
E
Move
Enter
RG
INPUT
Move
Enter
TIME
USB
AUDIO
Auto Volume : Off
Clear Voice : On
Balance 0
Sound Mode : Standard
• SRS TruSurround XT : On
• Treble 0
• Bass 0
• Reset
E
TIME
Clock : Nov/27/2007 02:15 AM
Off Time : Off
On Time : Off
Sleep Timer : Off
Auto Sleep : Off
USB
Photo List
Music List
Move
Enter
LR
Move
Enter
Move
Enter
46
1
2
3
4
Display each menu.
Select a menu item.
Enter to the pop up menu.
Return to TV viewing.
Page 49
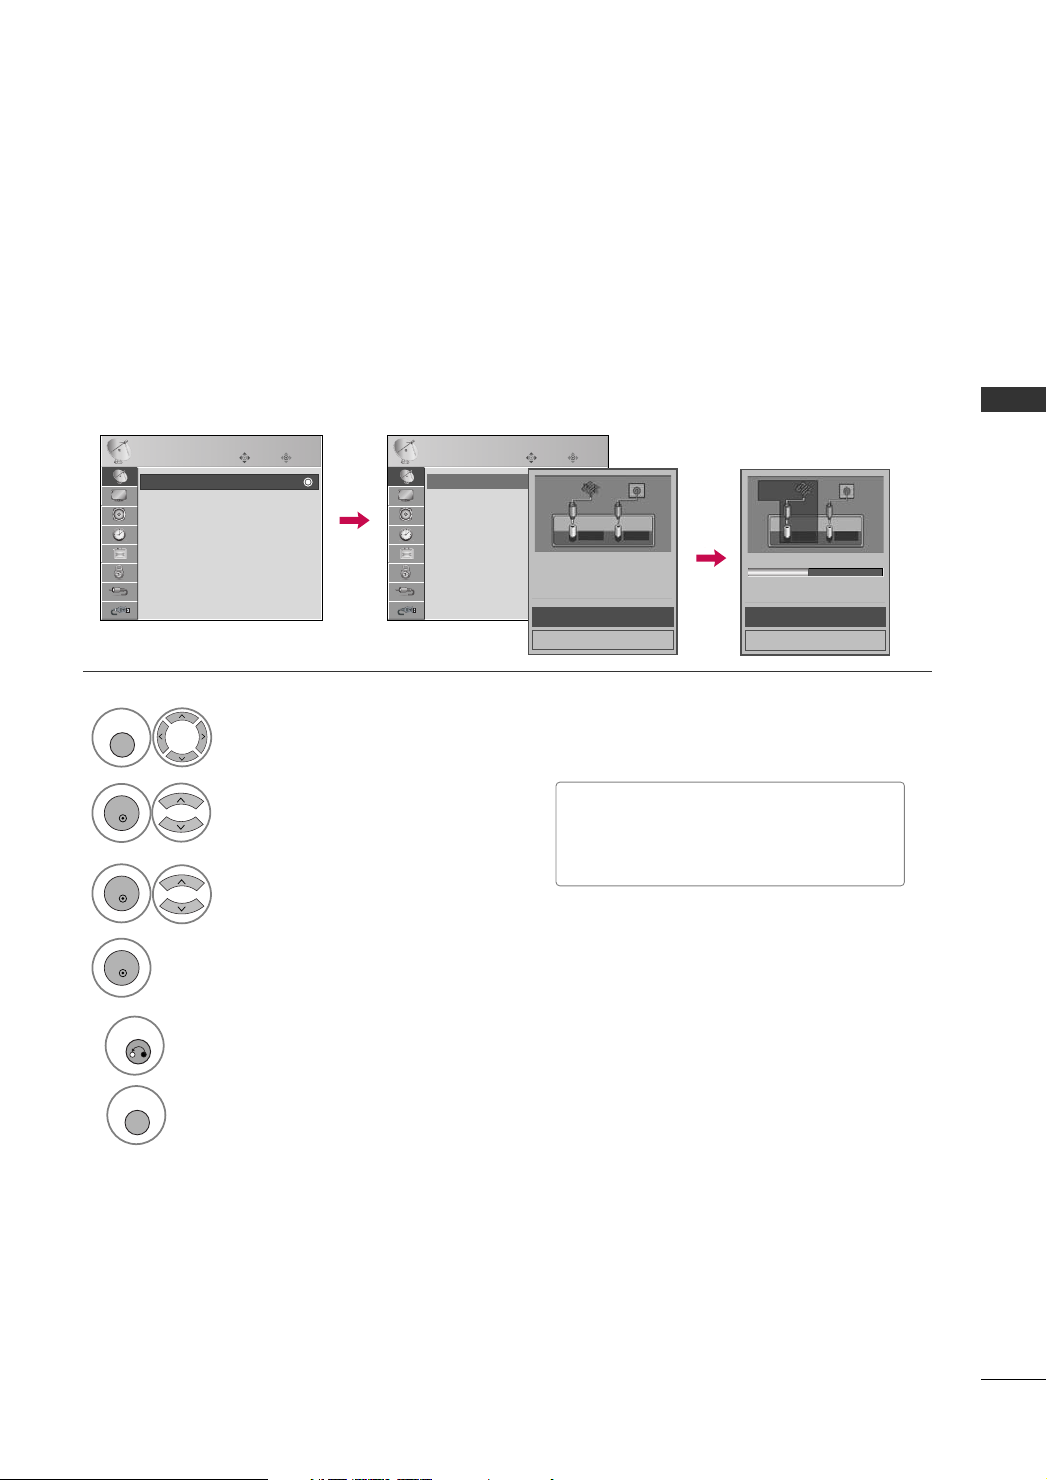
CHANNEL SETUP
MENU
ENTER
ENTER
ENTER
RETURN
MENU
Auto Scan (Auto Tuning)
Automatically finds all channels available through antenna or cable inputs, and stores them in memory on the
channel list.
Run Auto Tuning again after any Antenna/Cable connection changes.
SETUP
Auto Tuning
Auto Tuning
Manual Tuning
Channel Edit
Scan Option : Primary Channel
System Color : Multi
1
Move
Select
Enter
SS EETTUU PP
SETUP
Auto Tuning
Auto Tuning
Manual Tuning
Channel Edit
Scan Option : Primary Channel
System Color : Multi
.
Move
Enter
ANTENA
ANTENNA
Press ‘Yes’ button to begin
auto tuning.
CABO
CABLE
Yes
No
ANTENA
ANTENNA CABLE
Processing auto tuning...
DTV Ch.23
Found Channel(s): 16
Next(TV)
Close
CABO
WATCHING TV / CHANNEL CONTROL
2
3
4
5
AAuuttoo TT uunnii nn gg
Select
YY ee ss
AAuuttoo ttuunnii nn gg
Run
Select
.
.
Return to the previous menu.
Return to TV viewing.
■
.
A password is required to gain access to
Auto Tuning menu if the Lock System is
turned on.
47
Page 50
WATCHING TV / CHANNEL CONTROL
MENU
ENTER
ENTER
ENTER
ENTER
RETURN
MENU
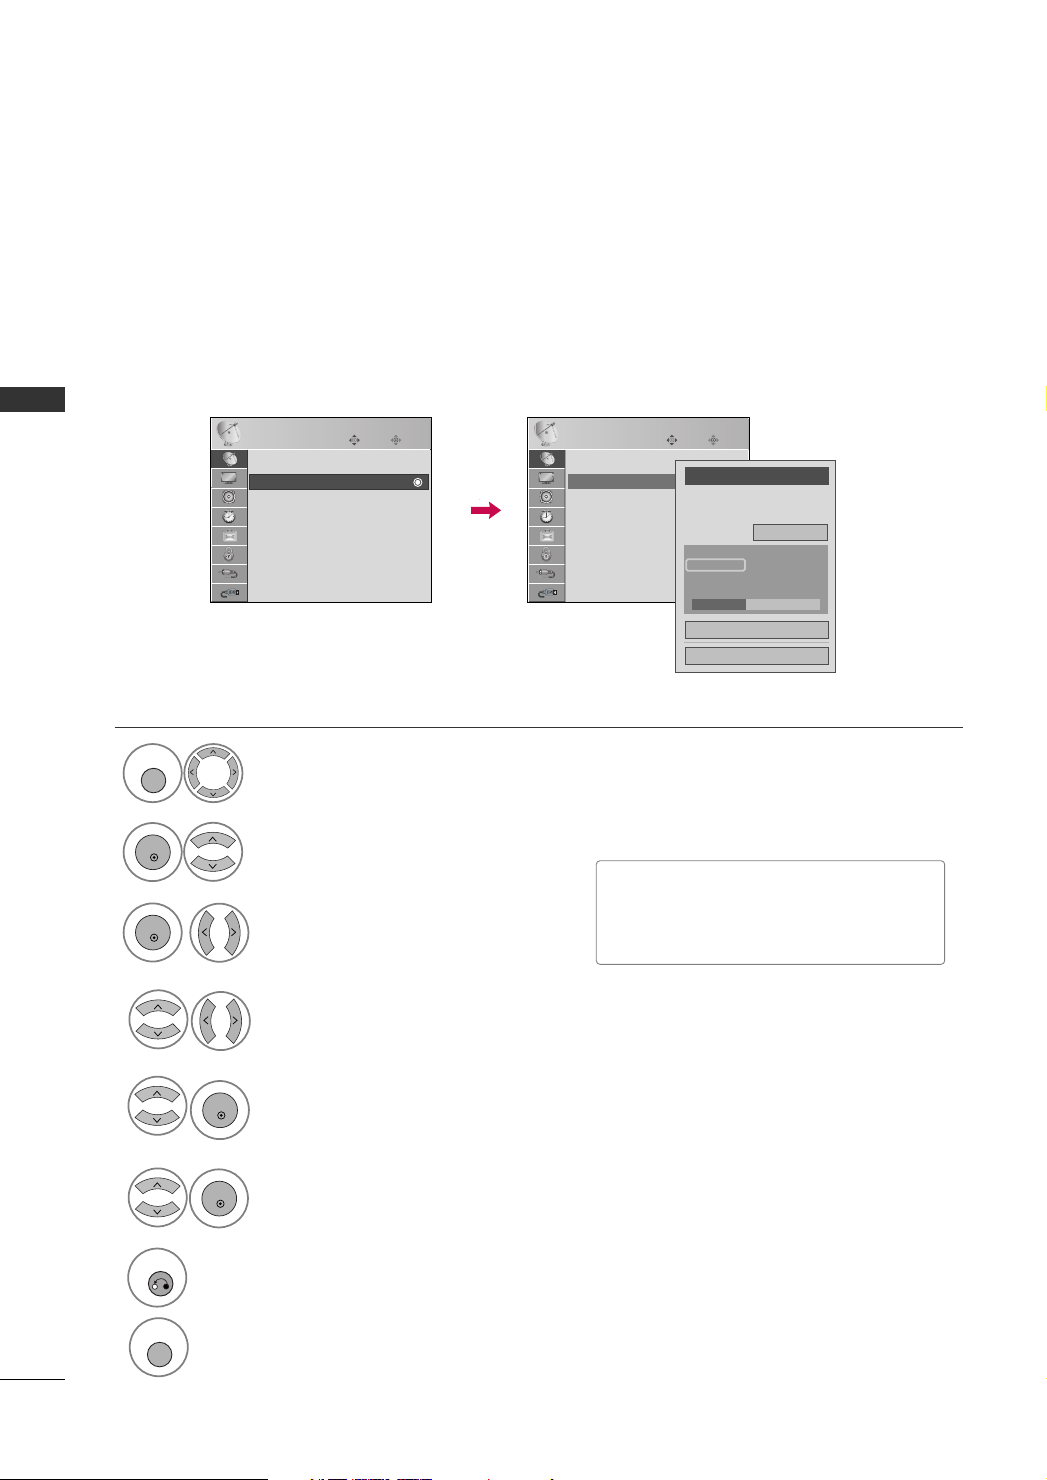
Add/Delete Channel (Manual Tuning)
If selecting DTV input signal, you can view the on-screen signal strength monitor to see the quality of the signal being received.
WATCHING TV / CHANNEL CONTROL
1
2
3
4
SETUP
Auto Tuning
Manual Tuning
Manual Tuning
Channel Edit
Scan Option : Primary Channel
System Color : Multi
Select
Select
Select
Move
Enter
SS EETTUU PP
.
MM aannuuaa ll TT uunnii nn gg
TT VV, DDTT VV
, and
Select channel you want to add
or delete.
.
CC AA TTVV
SETUP
Auto Tuning
Manual Tuning
Manual Tuning
Channel Edit
Scan Option : Primary Channel
System Color : Multi
■
Move
Enter
FF
DTV
Select channel type and
RF-channel number.
Channel
DTV 2-1
CH BLOCKED
Bad Normal Good
Delete
Close
GG
30
A password is required to gain access to
Auto Tuning menu if the Lock System is
.
turned on.
48
5
6
7
Select
Select
AAdddd
CC lloo ssee
DDee lleettee
or
button to confirm it.
Return to the previous menu.
Return to TV viewing.
.
Page 51
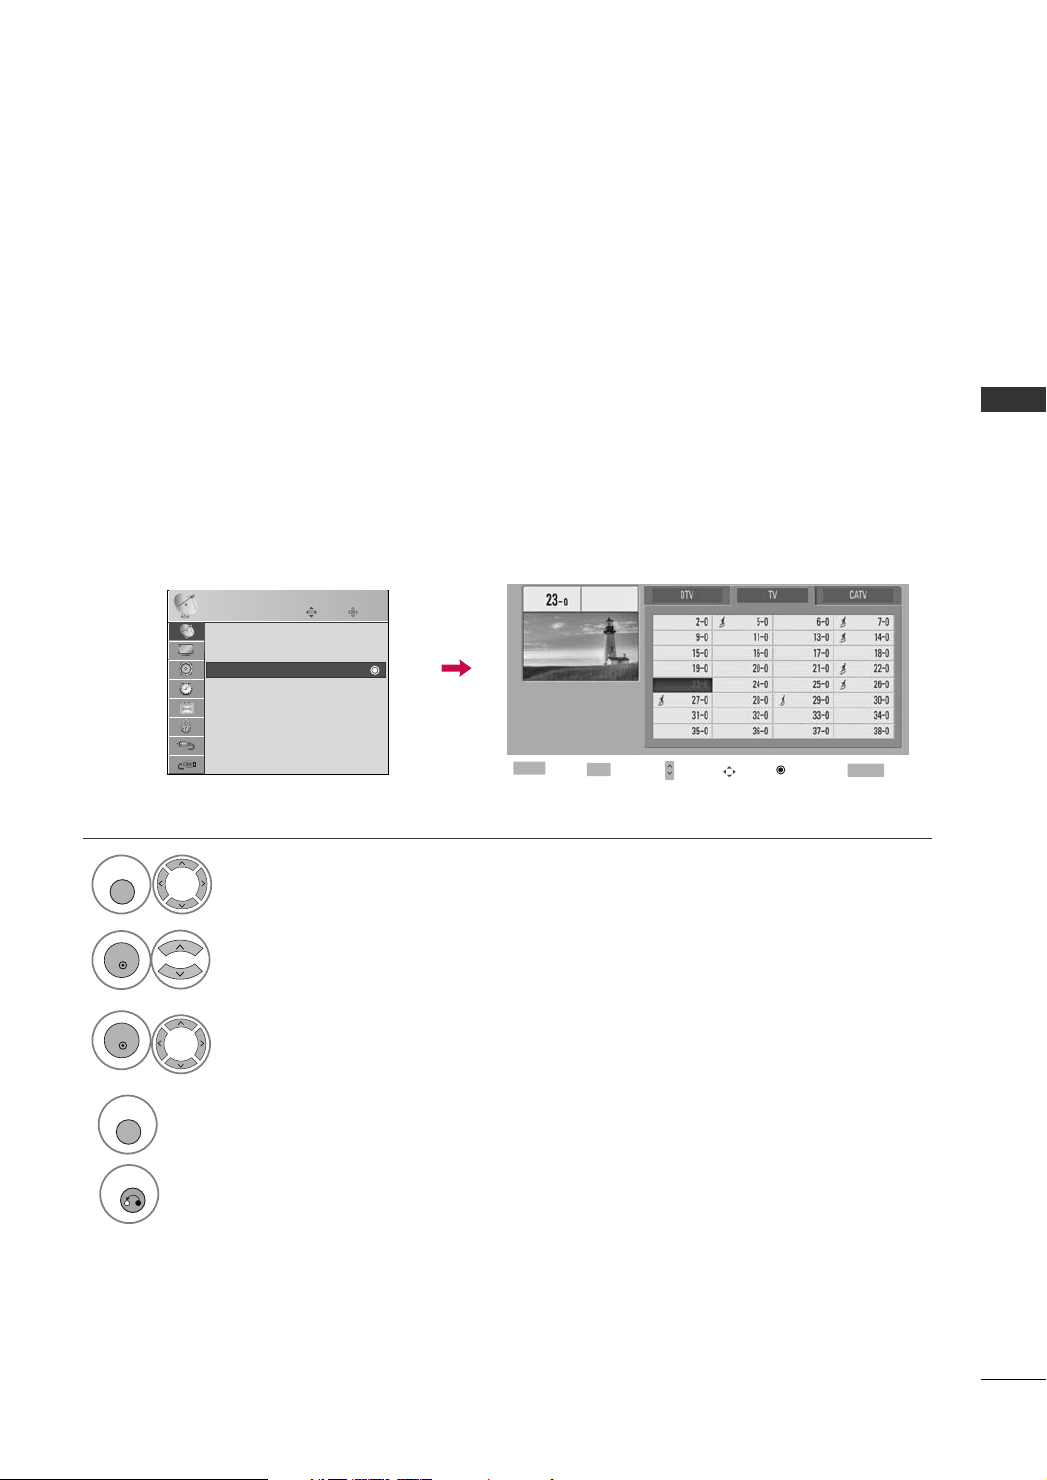
Channel Editing
MENU
ENTER
ENTER
MENU
RETURN
From the default channel list created from the Auto Tuning channel search, you can create two different types
of channel lists in memory: “custom list” and “favorite channel list”.
A custom list can be created by toggling each channel on or off with ENTER button. The channels in the Custom
List are displayed in black and the channels deleted from the Custom List are displayed in gray.
Once a channel is highlighted you can add or delete the channel by referring to the small window at the topright corner of the screen.
You can create your own Favorite List. Use the
ed and then add or delete the channel to/from your Favorite List.
FF AA VV
button on the remote control when a channel is highlight-
WATCHING TV / CHANNEL CONTROL
1
2
3
4
SETUP
Auto Tuning
Manual Tuning
Channel Edit
Scan Option : Primary Channel
System Color : Multi
Select
Select
Move
Enter
SS EETTUU PP
.
CC hh aannnneell EEdd iitt
Select a channel.
Return to the previous menu.
Return to TV viewing.
Previous
MENU
Favorite
FAV
CH
Move Page
Navigate
Add/Delete
RETURN
Exit
.
49
Page 52
WATCHING TV / CHANNEL CONTROL
MENU
ENTER
ENTER
ENTER
CH
RETURN
MENU
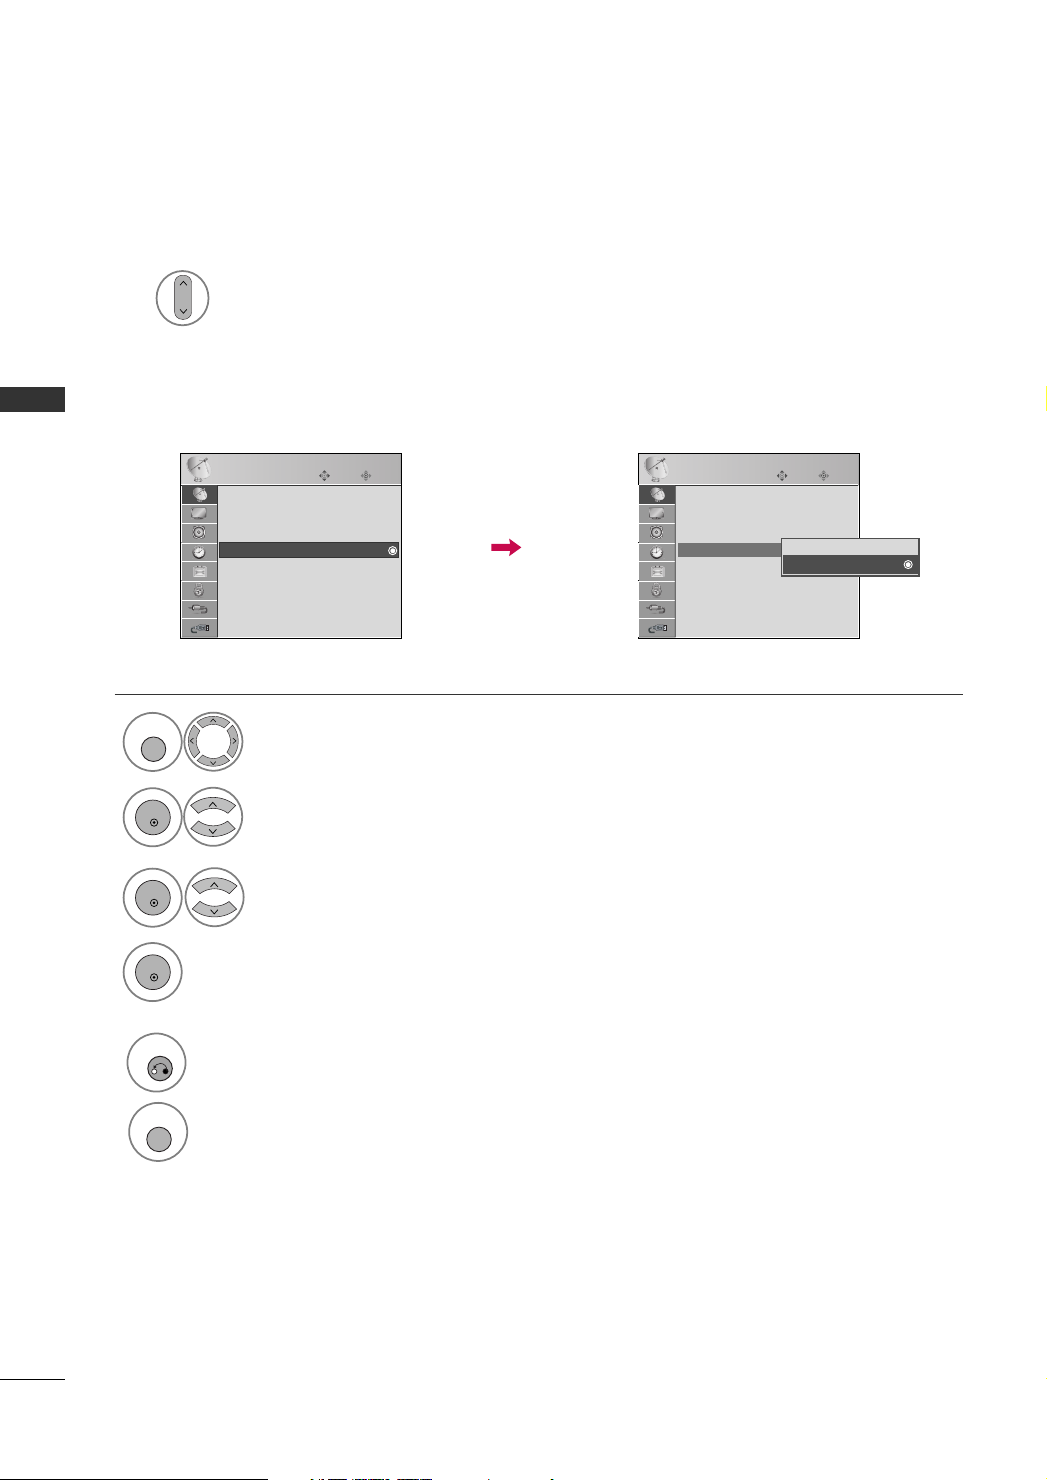
SCAN OPTION
Whether to search all channels or the first channel of virtual channels is switched with
the when one or more virtual channels exist at one physical channel.
WATCHING TV / CHANNEL CONTROL
PPrriimm aarryy CC hh aannnneell
AAllll CC hh aannnnee ll
: Scan full channel.
SETUP
Auto Tuning
Manual Tuning
Channel Edit
Scan Option : Primary Channel
Scan Option : Primary Channel
System Color : Multi
1
2
3
: Only scan the first channel of virtual channels.
Move
Enter
SS EETTUU PP
Select
Select
Select
.
SS cc aann OOpp ttiioonn
.
PPrriimm aarryy CC hh aannnneell orAAllll CC hh aannnnee ll
.
SETUP
Auto Tuning
Manual Tuning
Channel Edit
Scan Option : Primary Channel
Booster : On
System Color : Multi
Move
Primary Channel
All Channel
All Channel
Enter
50
4
5
Return to the previous menu.
Return to TV viewing.
Page 53
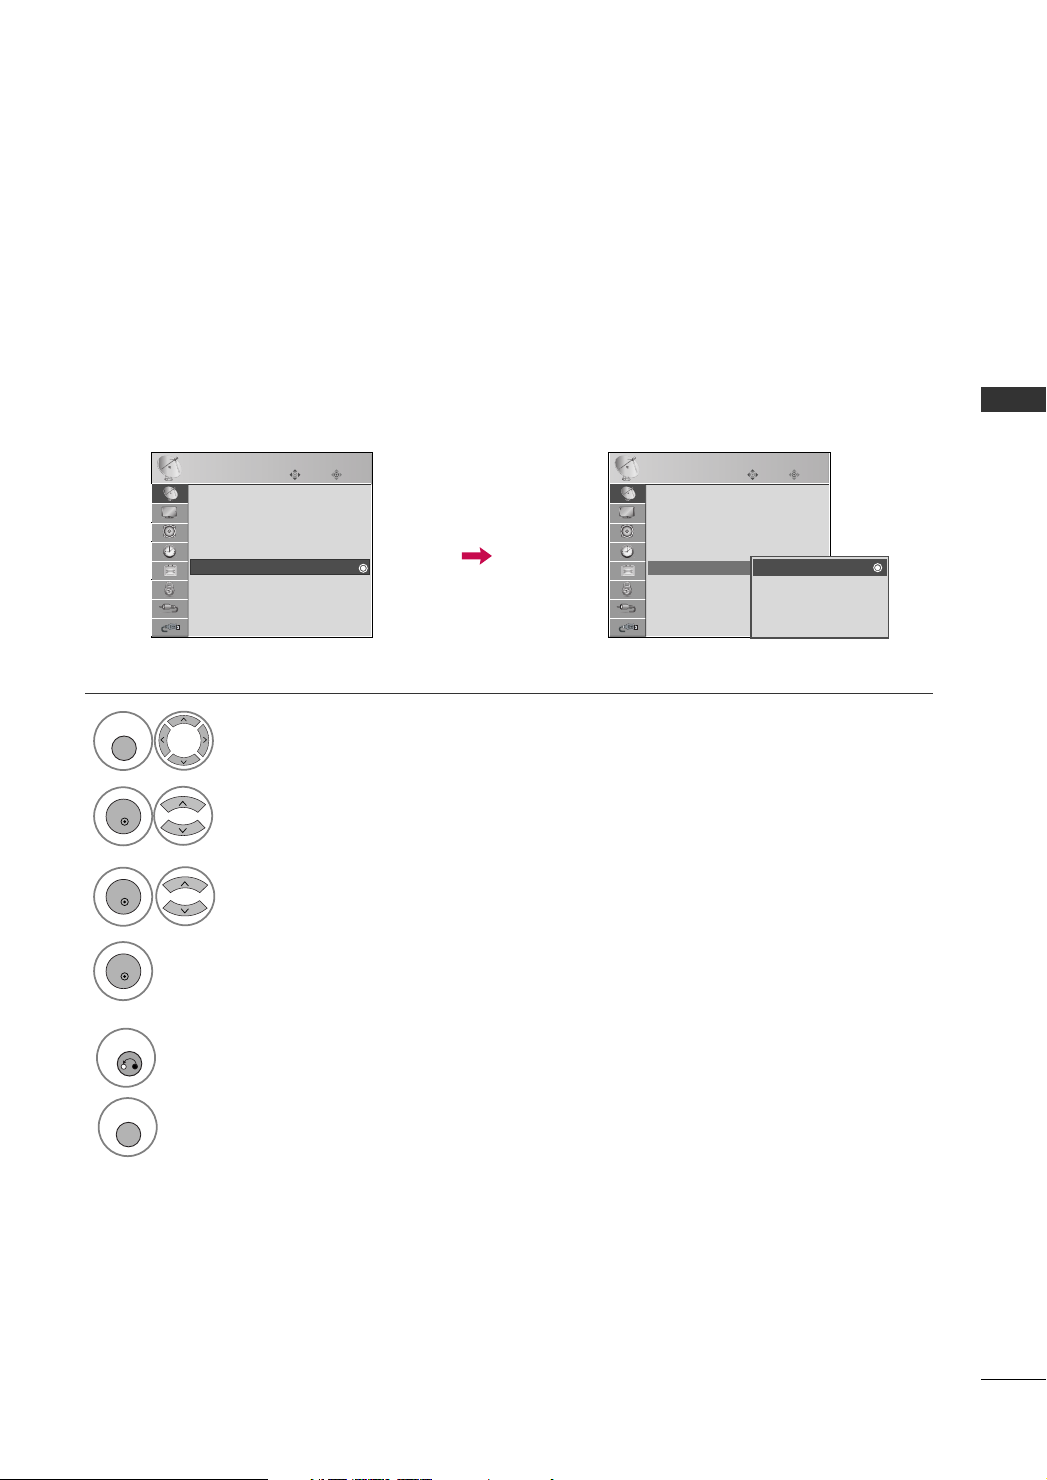
SYSTEM COLOR
MENU
ENTER
ENTER
ENTER
RETURN
MENU
This function set color suited the each signal .
MM uu llttii
: Automatically, set the PAL-M/N or NTSC.
WATCHING TV / CHANNEL CONTROL
5
1
2
3
4
SETUP
Auto Tuning
Manual Tuning
Channel Edit
Scan Option : Primary Channel
System Color : Multi
System Color : Multi
Select
Select
Select
Move
Enter
SS EETTUU PP
.
SS yysstteemm CC oolloorr
MM uu llttii,PPAALL--MM, PPAALL--NN
Return to the previous menu.
SETUP
Auto Tuning
Manual Tuning
Channel Edit
Scan Option : Primary Channel
System Color : Multi
System Color : Multi
Move
Multi
PAL-M
PAL-N
NTSC
Enter
.
NNTTSSCC
or
.
Return to TV viewing.
51
Page 54
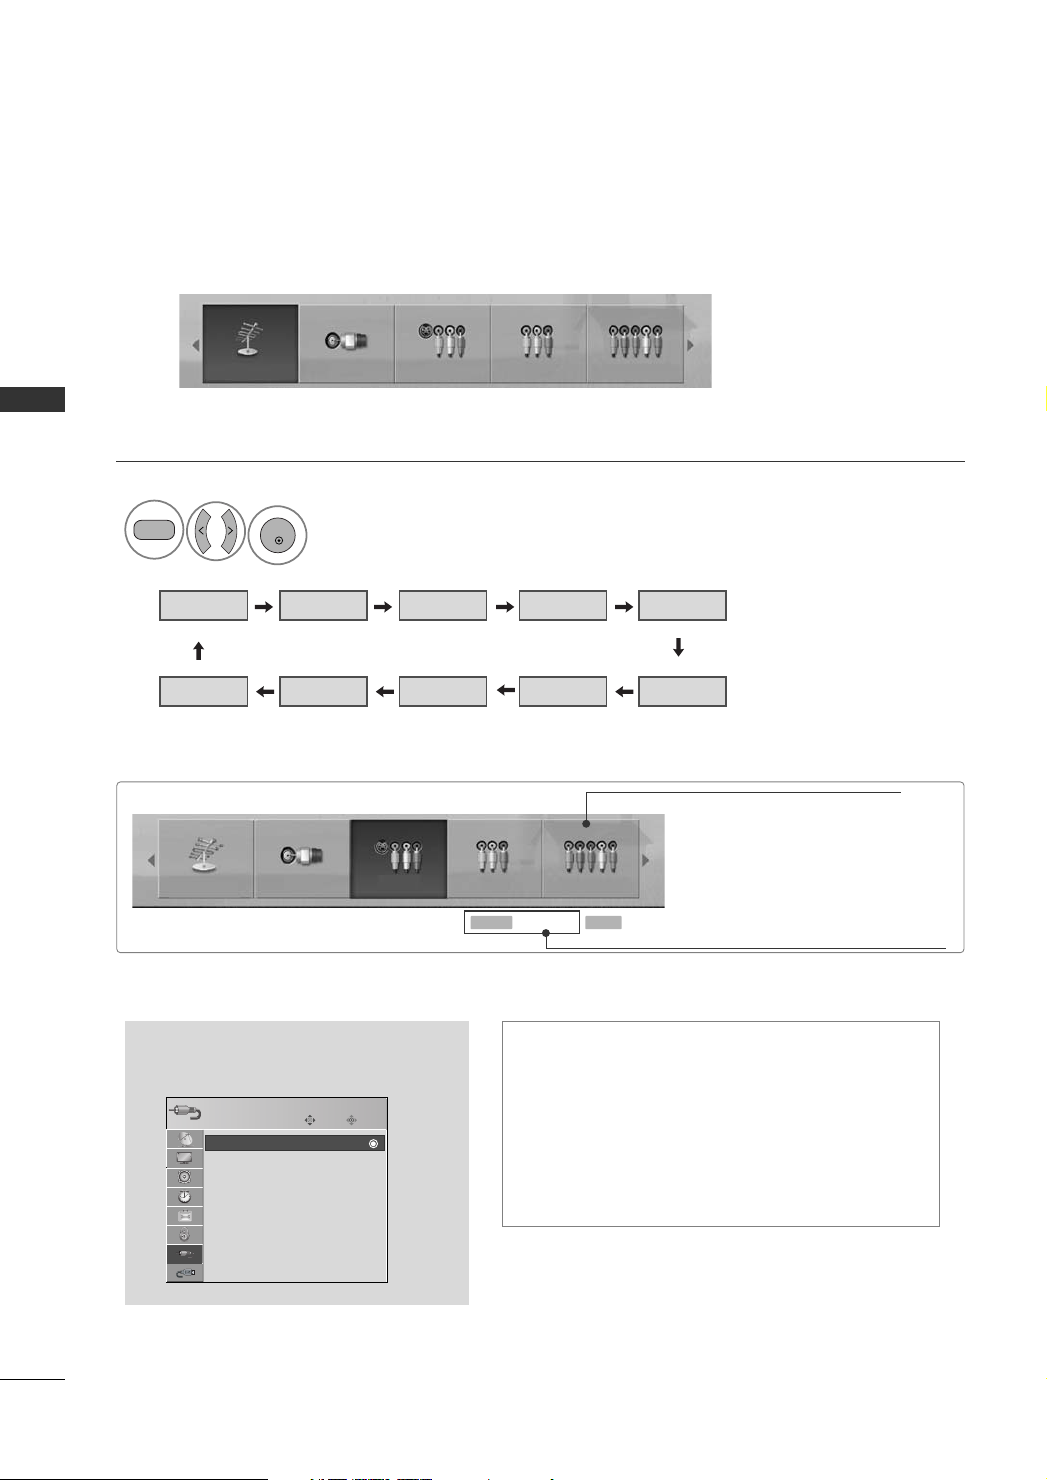
WATCHING TV / CHANNEL CONTROL
INPUT
ENTER
INPUT LIST
Only these input signals which are connected to a TV can be activated and selected.
Antenna Cable AV1 AV2 Component1
WATCHING TV / CHANNEL CONTROL
1
Select the desired input source.
Antenna Cable AV1 AV2
HDMI3 HDMI2 HDMI1 RGB-PC
ie)
Antenna Cable AV1 AV2 Component1
Q MENU
■
You can also select the desired input
INPUT
Antenna
Antenna
Cable
AV1
AV2
Component1
Component2
RGB-PC
HDMI1
IINNPPUUTT
E
menu.
Move
Enter
source in the
Component1
Component2
Disconnected input is inactivated.
Select a desired input source (except
AAnn tt ee nn nnaa, CC aa bb ll ee
Input Label
AAnntteennnnaa
CCaabbllee
AAVV 11--22
RETURN
: Select it to watch over-the-air broadcasts.
: Select it to watch cable.
: Select them to watch a VCR or other external
your desired Input Label with using Q
Exit
MENU button.
GG
equipment.
CCoommppoonneenntt 11--22
: Select them to watch DVD or a
Digital set-top box.
RRGGBB--PPCC
: Select it to view PC input.
HHDDMMII11--33
: Select them to watch high definition devices.
). Then, you can select
pp..5566
52
Page 55
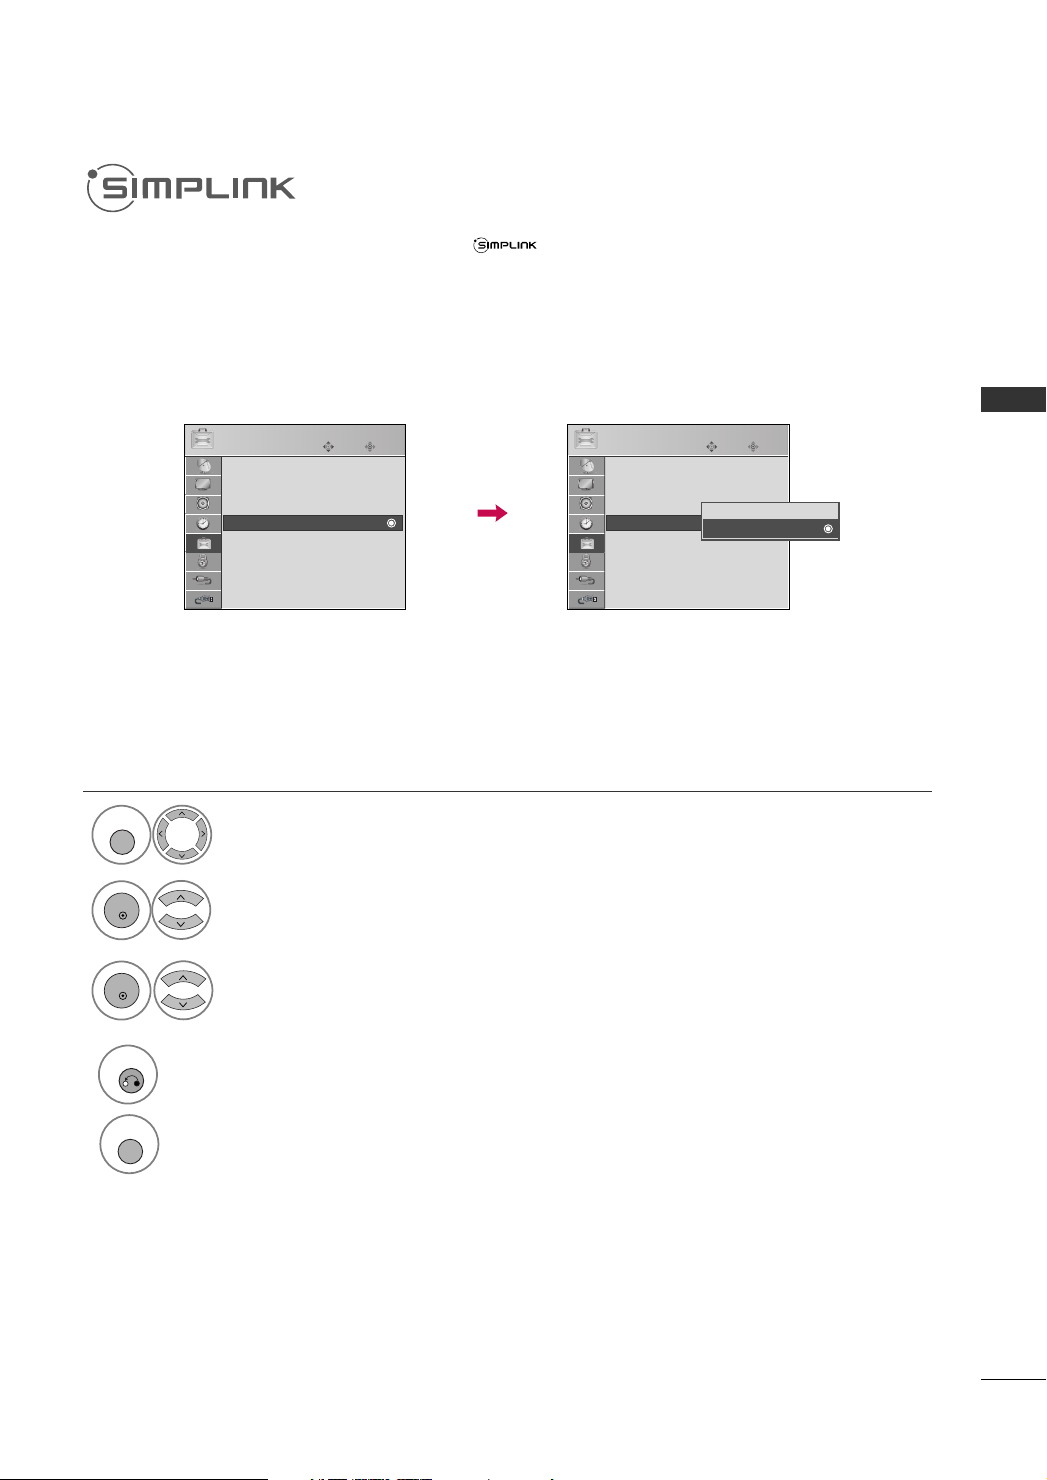
This function operates only with devices with the logo.
MENU
ENTER
ENTER
RETURN
MENU
This TV might not function when using it with other products with HDMI-CEC function.
This allows you to control and play other AV devices connected with HDMI cable without additional cables and
settings.
OPTION
Language : English
Input Label
Schedule List
SIMPLINK : On
SIMPLINK : On
Key Lock : Off
Caption : Off
ISM Method : Normal
Power Saving : Level 0
Move
E
Enter
OPTION
Language : English
Input Label
Schedule List
SIMPLINK : On
SIMPLINK : On
Key Lock : Off
Caption : Off
ISM Method : Normal
Power Saving : Level 0
Move
Enter
Off
On
On
E
1
OOPP TT IIOO NN
Select
.
WATCHING TV / CHANNEL CONTROL
2
3
4
SS IIMMPPLL IINNKK
Select
Select
OOnn orOOffff
.
.
Return to the previous menu.
Return to TV viewing.
53
Page 56
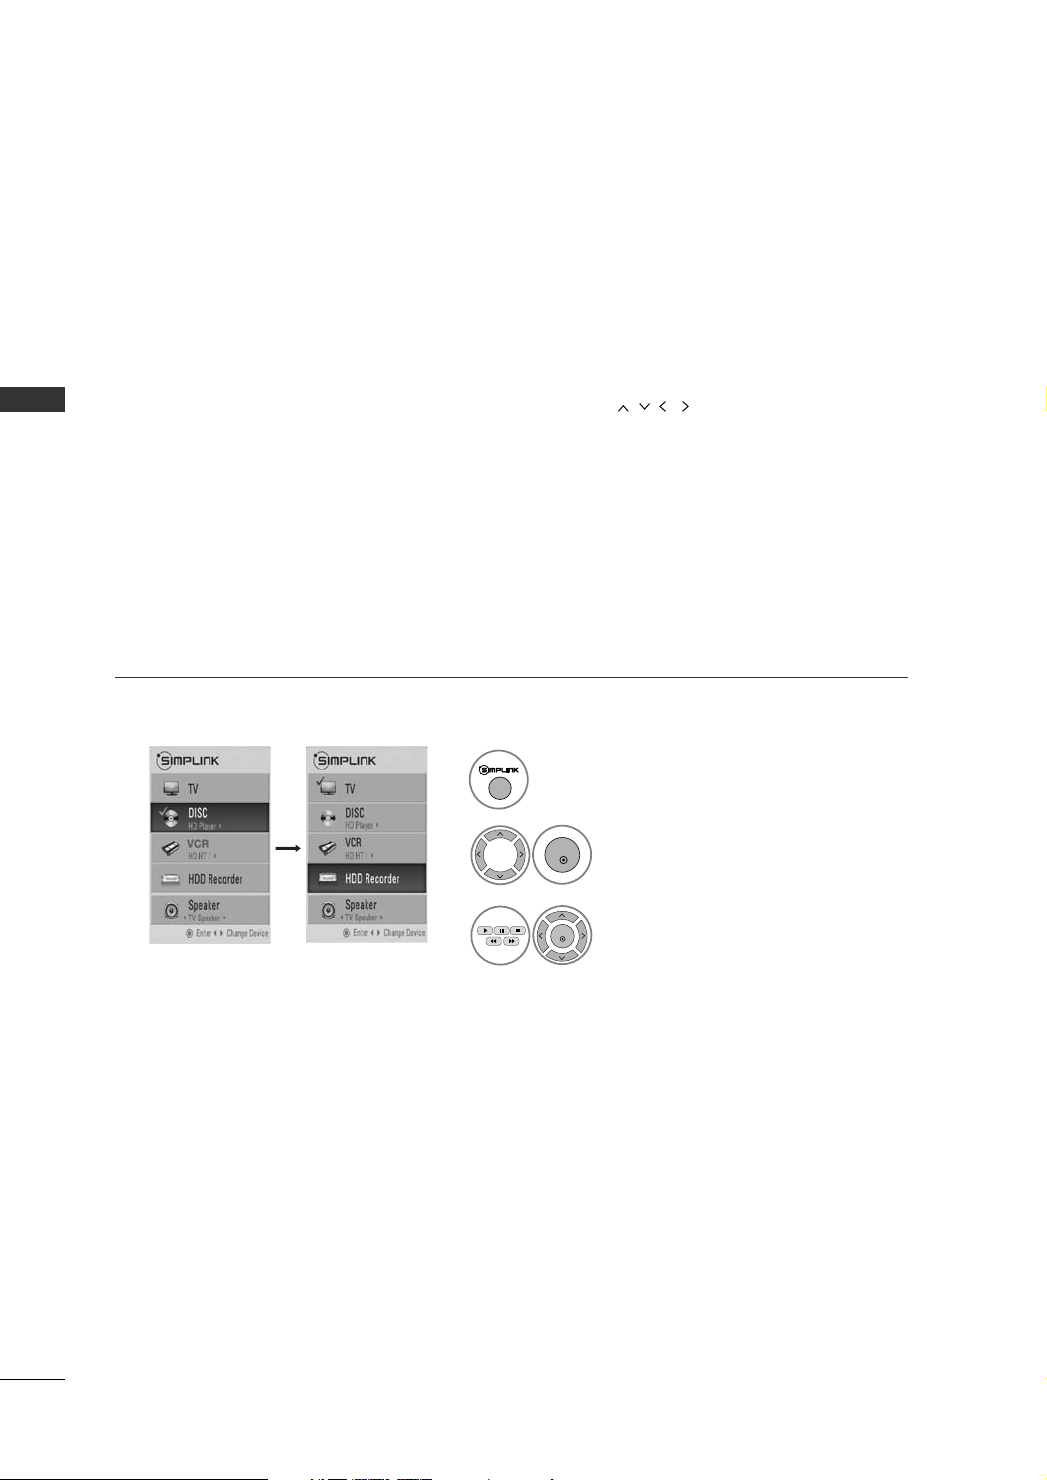
WATCHING TV / CHANNEL CONTROL
ENTER
ENTER
SimpLink Functions
■
WATCHING TV / CHANNEL CONTROL
DDiirreecctt PPllaayy::
media without additional settings.
■
SS eellee cc tt AAVV ddee vv iicc ee::
■
DDiiss cc ppllaayybbaacckk::
and GGbuttons.
FF
■
PPooww eerr ooffff aallll ddeevvii cceess::
option only applied when the devices are stoped.)
■
SS wwiittcc hh aauuddii oo--oouutt::
(A device, which is connected to TV through HDMI cable but does not support SimpLink, does
not provide this function)
Note: To operate SIMPLINK, the HDMI cable should be used.
After connecting AV devices to TV, you can directly control the devices and play
Enables you to select one of AV devices connected to TV and play it.
Control connected AV devices by pressing the ,
When you power off the TV, all connected devices are turned off. (This
Offers an easy way to switch audio-out.
ENTER, G, A,
ll ll
,
1
2
3
Press the
SS IIMMPPLLII NN KK
button.
Select the desired device.
Control connected AV devices.
54
Page 57
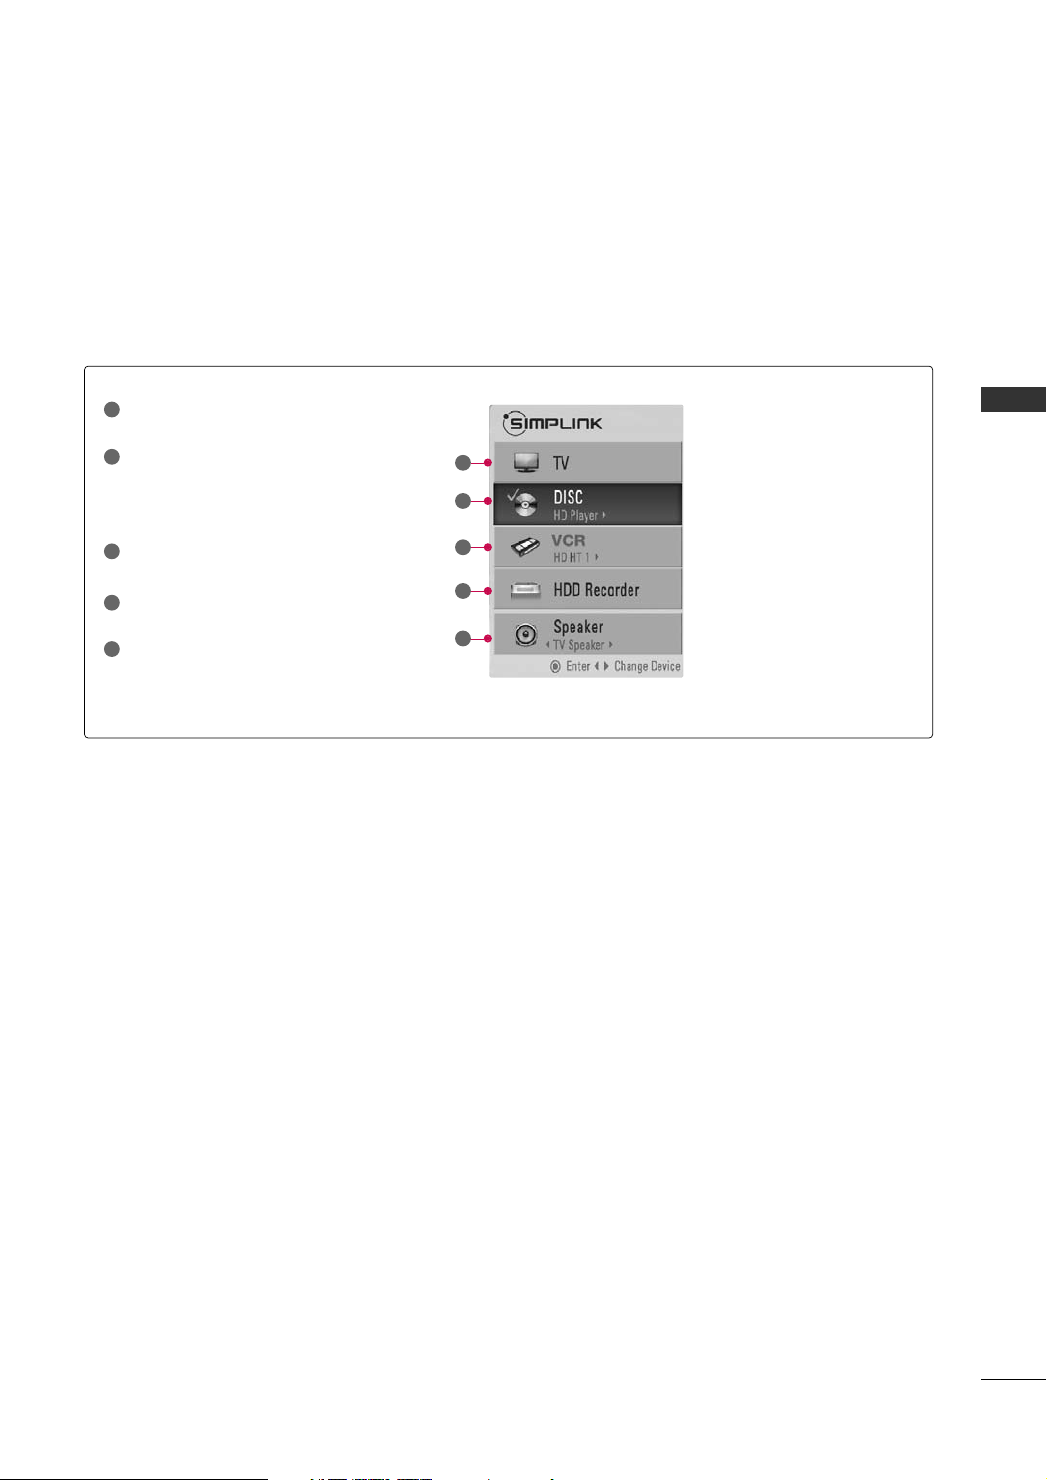
SimpLink Menu
TTVV vviieewwiinngg
1
channel regardless of the current mode.
2
DDII SSCC ppll aayy bbaa cckk
When multiple discs are available, the titles
of discs are conveniently displayed at the
bottom of the screen.
3
VVCC RR ppllaayybb aacckk
nected VCR.
HHDDDD RReecc oorrddiinn ggss ppllaayybbaacckk
4
control recordings stored in HDD.
5
AAuudd iioo OOuutt tt oo HHTT ss ppee aakkeerr//AAuuddiioo
Ouutt tt oo TTVV
O
speaker for Audio Out.
: Switch to the previous TV
: Select and play discs.
: Play and control the con-
: Select HT speaker or TV
: Play and
WATCHING TV / CHANNEL CONTROL
1
2
3
4
5
Selected Device
GG
When no device is connected
GG
(displayed in gray)
When a device is connected
GG
(displayed in bright color)
55
Page 58
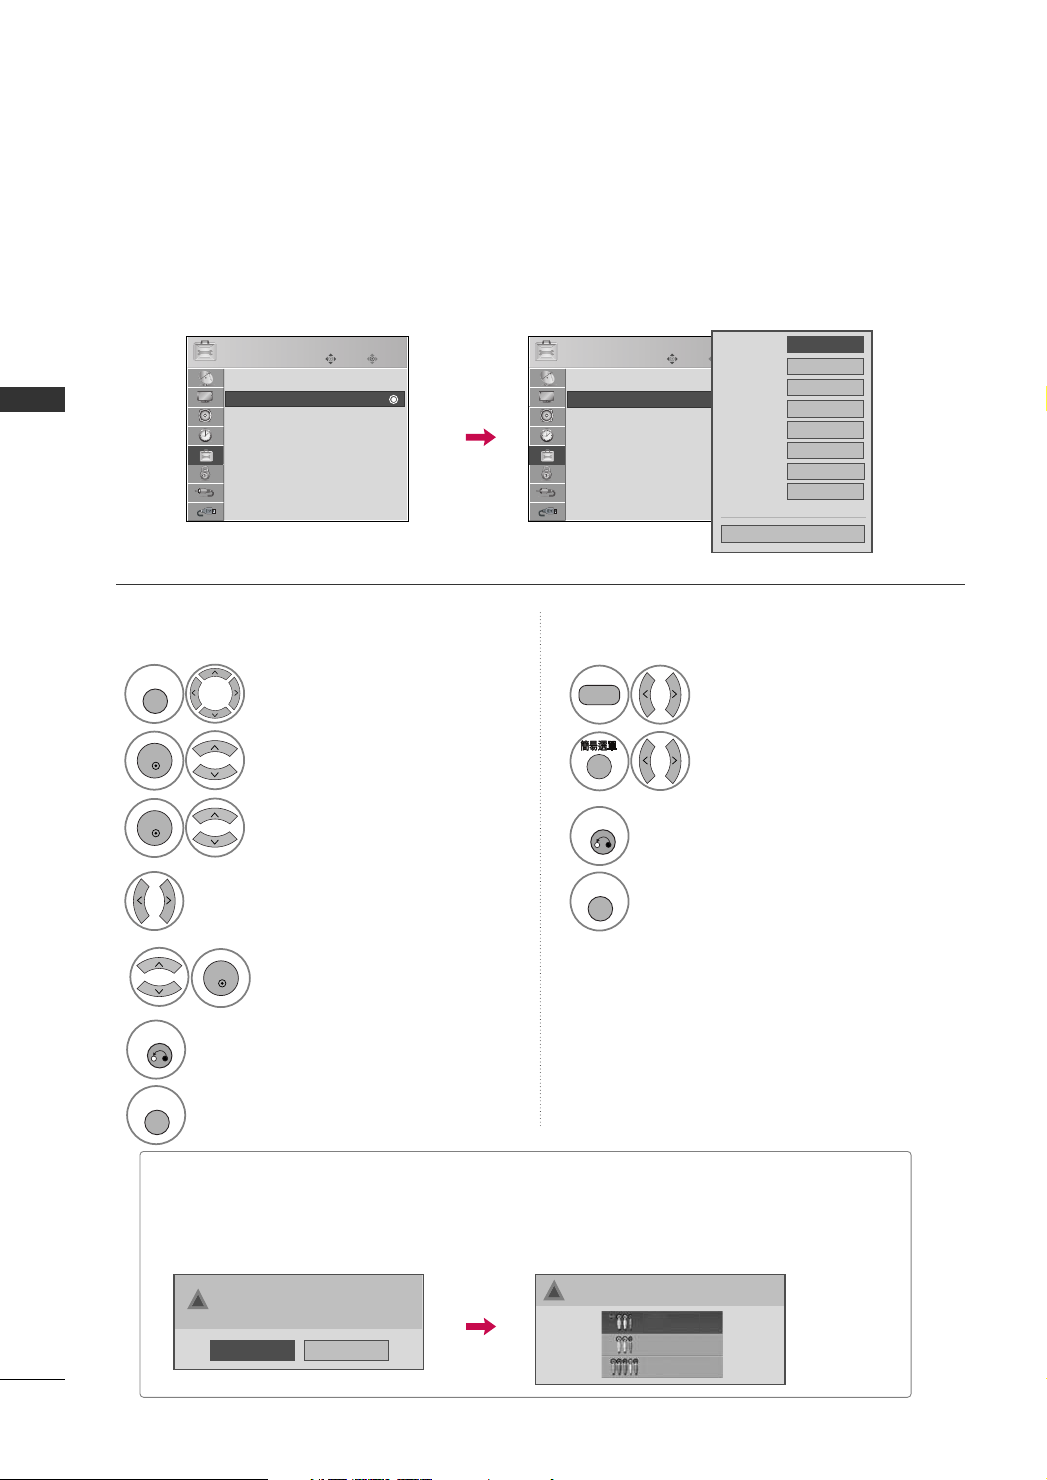
WATCHING TV / CHANNEL CONTROL
MENU
ENTER
ENTER
RETURN
MENU
INPUT
RETURN
MENU
ENTER
INPUT LABEL
You can set a label to each input source when it's not in use.
Available label: VCR -> DVD -> Set Top Box -> Satellite -> Cable Box -> Game -> PC -> HD-DVD ->
Blu-ray.
WATCHING TV / CHANNEL CONTROL
OPTION
Language : English
Input Label
Input Label
Schedule List
SIMPLINK : On
Key Lock : Off
Caption : Off
ISM Method : Normal
Power Saving : Level 0
Move
Enter
E
With using OPTION menu
1
2
3
4
Select the label.
OOPPTTII OONN
Select
II nn ppuutt LLaa bbee ll
Select
Select the source.
.
AV1
OPTION
Language : English
Input Label
Input Label
Schedule List
SIMPLINK : On
Key Lock : Off
Caption : Off
ISM Method : Normal
Power Saving : Level 0
Move
OK
AV2
Component1
Component2
RGB-PC
HDMI1
HDMI2
HDMI3
E
Close
With using INPUT button
1
Select the source.
.
2
Select the label.
3
Return to the previous menu.
Return to TV viewing.
56
5
CC lloo ssee
Select
button to confirm it.
6
Return to the previous menu.
Return to TV viewing.
■
When new external deviece is connected, this popup menu is displayed automatically.
If selecting
■
But, when selecting “
!
YYee ss
, you can select input source that you want to appreciate.
SS IIMMPPLLII NN KK- OO nn
New external device is connected.
Do you want to enjoy this?
Yes
No
” in HDMI mode, this popup menu is may not displayed.
Select input source that you want to appreciate.
!
AV1
AV2
Component1
Page 59
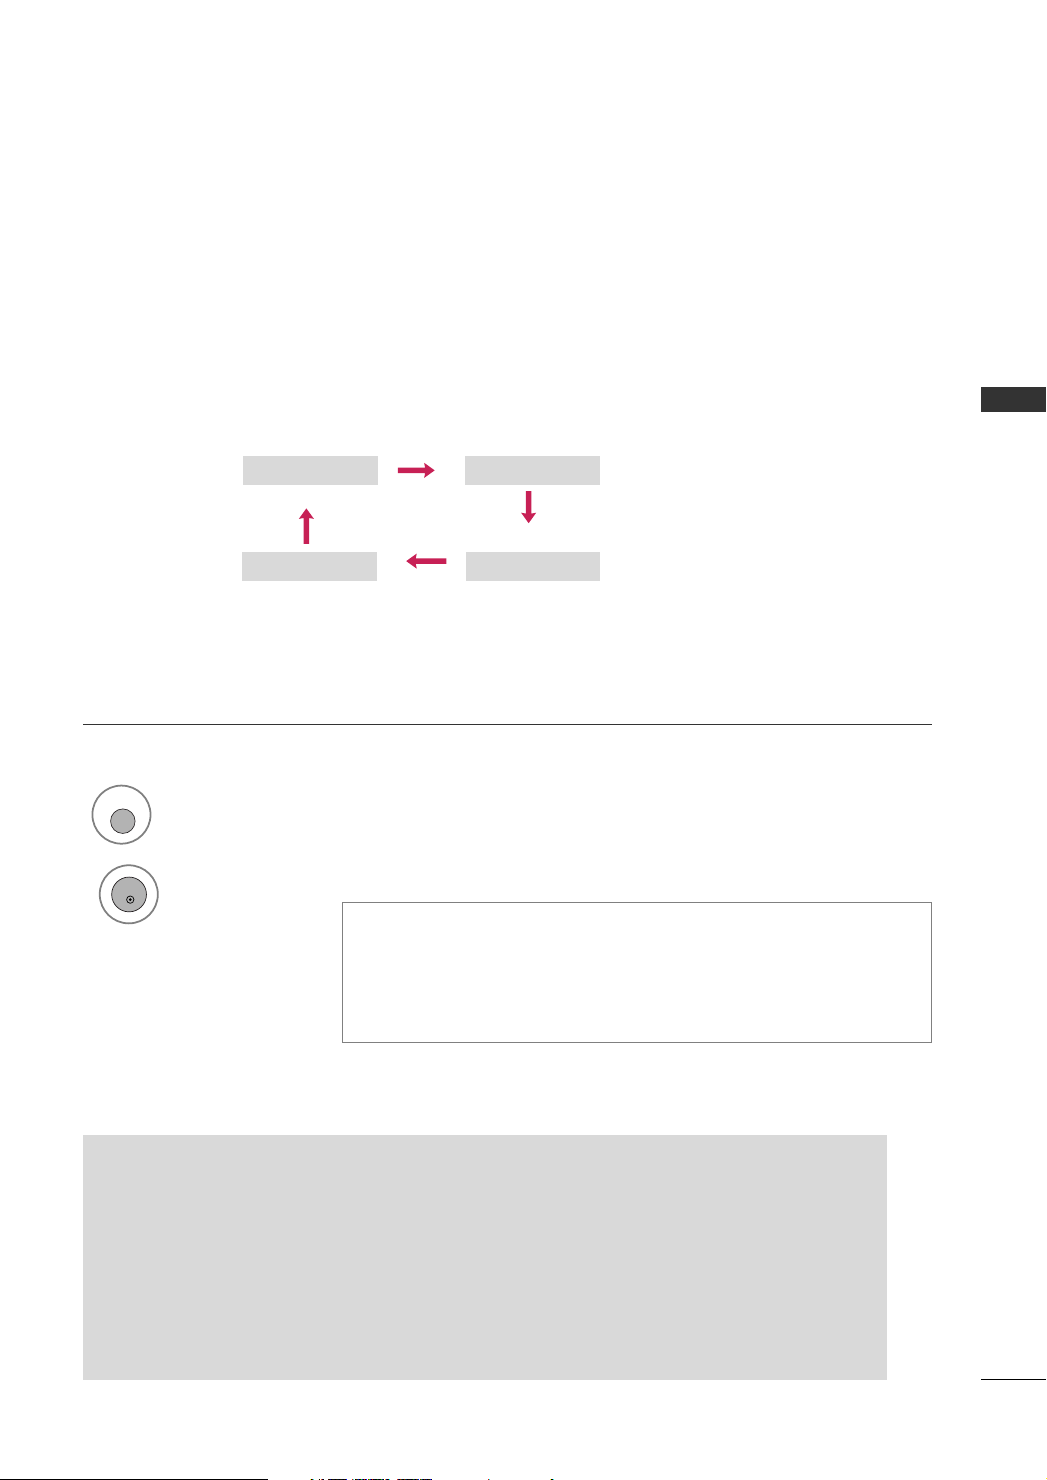
AV MODE
AV MODE
ENTER
As pressing the AV MODE button to change the THX Cinema, Sport and Game at the same
time, you can see the optimal images and sounds.
It gives the viewing environment (Picture Quality + Sound Quality) optimized for the consumers.
Off THX Cinema
Game Sport
WATCHING TV / CHANNEL CONTROL
1
Press the
AAVV MMOODDEE
button repeatedly to select the desired source.
2
• If you select THX Cinema in AV mode, THX Cinema will be selected
both for Picture Mode and Sound Mode in PICTURE menu and AUDIO
menu respectively.
• If you select “Off” in AV mode, the picture mode and sound mode
which you initially set will be selected.
TTHHXX CC iinn ee mm aa::
GG
home. You can watch any movie with the best quality without any user’s adjustment.
The optimized quality can be presented at the ‘THX Cinema’ mode when it is watched at the dark
environment as possible.
When the ‘THX Cinema’ mode is set at the HD level (720p/1080i/1080p) video, the ‘Screen size’
is changed to the ‘Just Scan’. (GGp.70)
The ‘THX(Tomlinson Holman's Experiment) is the certified sound and display standard of the THX
Co. found by George Lucas, the director of the movie ‘Star Wars’, and Tomlinson Holman. This
product attained the THX display certification for the first time in Korea, which guarantees the
video quality higher than the display standard specification at the hardware and the software.
It is the movie quality mode for watching a movie just like at the theater even at
57
Page 60
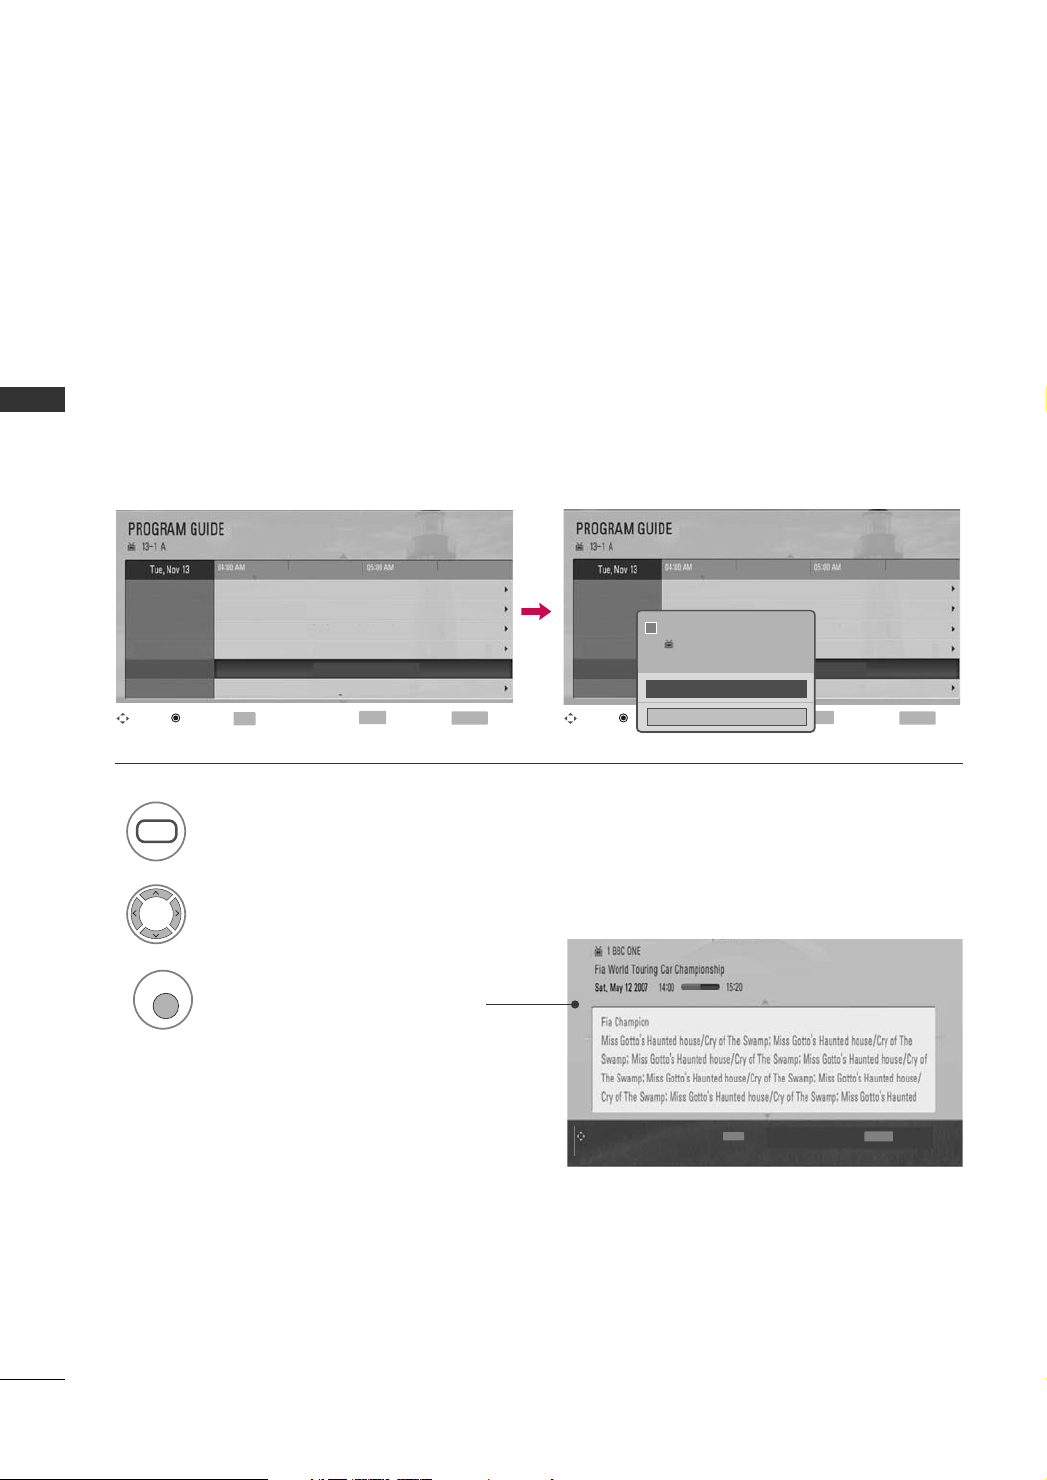
WATCHING TV / CHANNEL CONTROL
GUIDE
INFO
EPG (ELECTRONIC PROGRAM GUIDE)
(IN DIGITAL MODE)
This system has an Electronic Program Guide (EPG) to help your navigation through all the possible viewing
options.
The EPG supplies information such as program listings, start and end times for all available services. In addition,
detailed information about the program is often available in the EPG (the availability and amount of these program details will vary, depending on the particular broadcaster).
WATCHING TV / CHANNEL CONTROL
This function can be used only when the EPG information is broadcast by broadcasting companies
The EPG displays the program details for next 8 days.
Nov 29 2007 09:47 AM
Tela Quente
ii
5-1 Globo HD
Mon, Nov 29 09:50AM ~10:30AM
Go to this CH.
CH. Change
INFO
Information
Cancel
Kungskonsumente
No Information
TV2: Farmen
No Information
Tela Quente
GUIDE
Date
FF GG
1-1
2-1
3-1
5-1
9-2
11-1
Navigate
YLE TV1
YLE TV2
TV..
YLE FST
CNN
YLE24
CH. Change
Nov 29 2007 09:47 AM
FF GG
Information
INFO
Kungskonsumente
No Information
TV2: Farmen
No Information
Tela Quente
Now & Next
GUIDE
Date
RETURN
1-1
YLE TV1
2-1
YLE TV2
3-1
TV..
5-1
YLE FST
9-2
CNN
11-1
YLE24
Exit
Navigate
1
Display the
PPRROOGGRR AA MM GGUU IIDD EE
.
2
Select the desired program.
3
Display the detailed information.
Now & Next
RETURN
Exit
58
NNaavviiggaattee
II NN FFOO
GGrriiddee GGuuiiddee
RREETTUURRNN
EExxii tt
Page 61
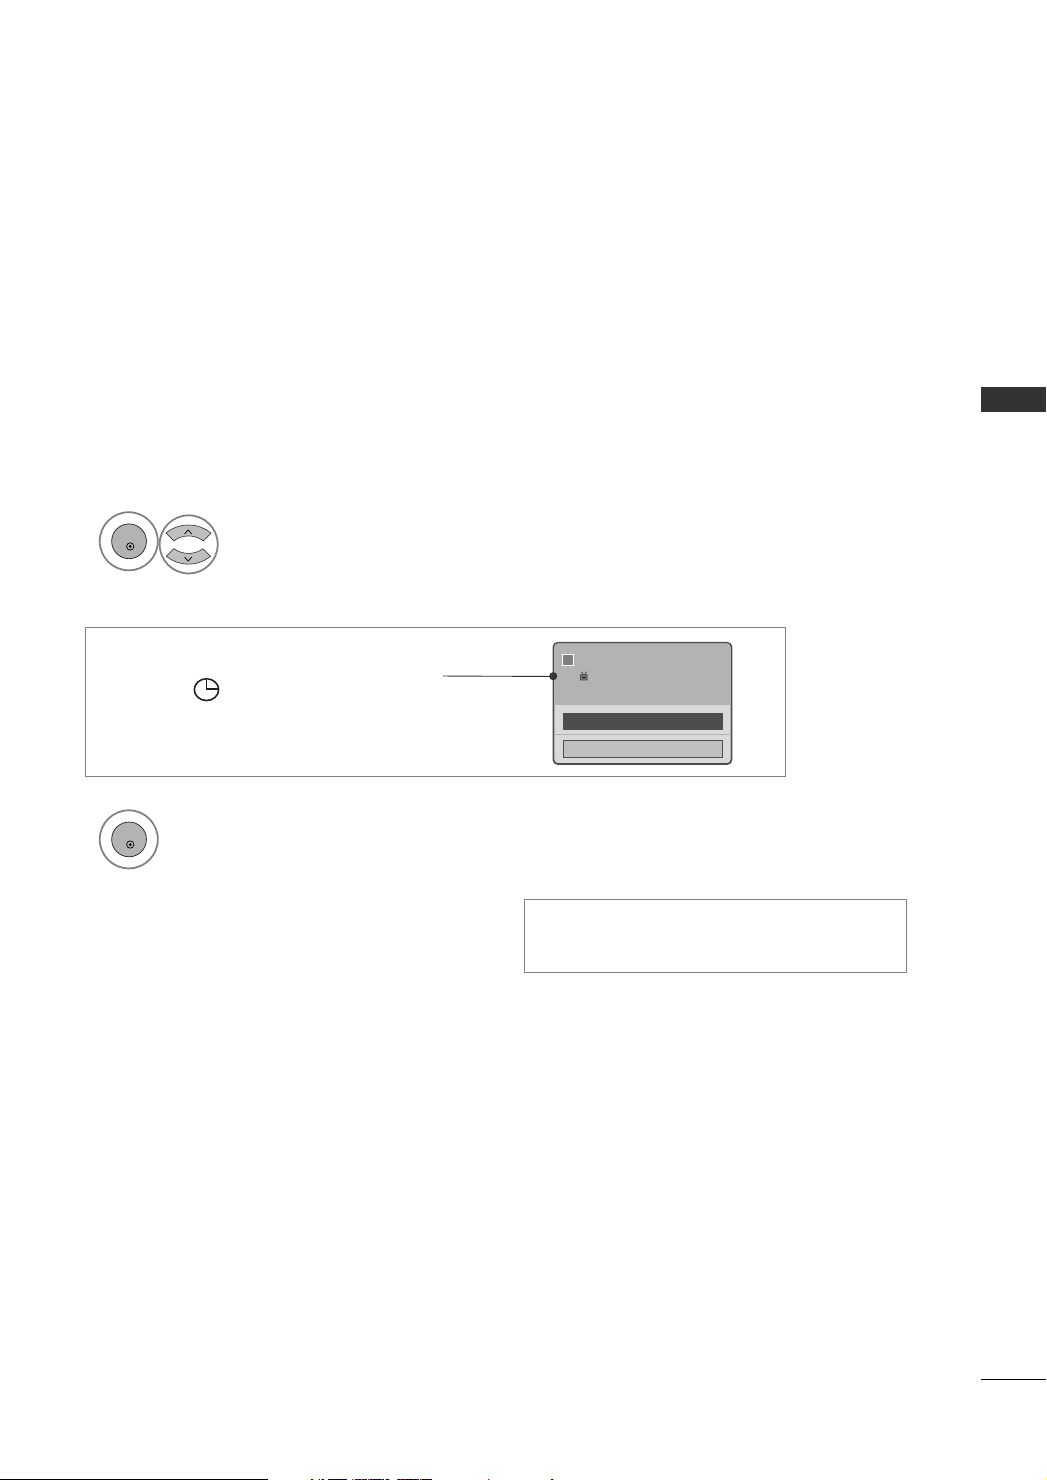
WATCHING TV / CHANNEL CONTROL
ENTER
ENTER
4
Select the
If you select next program, it can be reserved to
view and the is marked at the selected
program.
5
Move to the selected corrent broadcast program.
GGoo tt oo tthhii ss CC HH
.
Tela Quente
ii
5-1 Globo HD
Mon, Nov 30 09:50AM ~10:30AM
Schedule
Cancel
• If you press
screen, switch the
GGUU IIDDEE
NNOO WW/NNEEXXTT
button, again on the EPG
guide mode.
59
Page 62
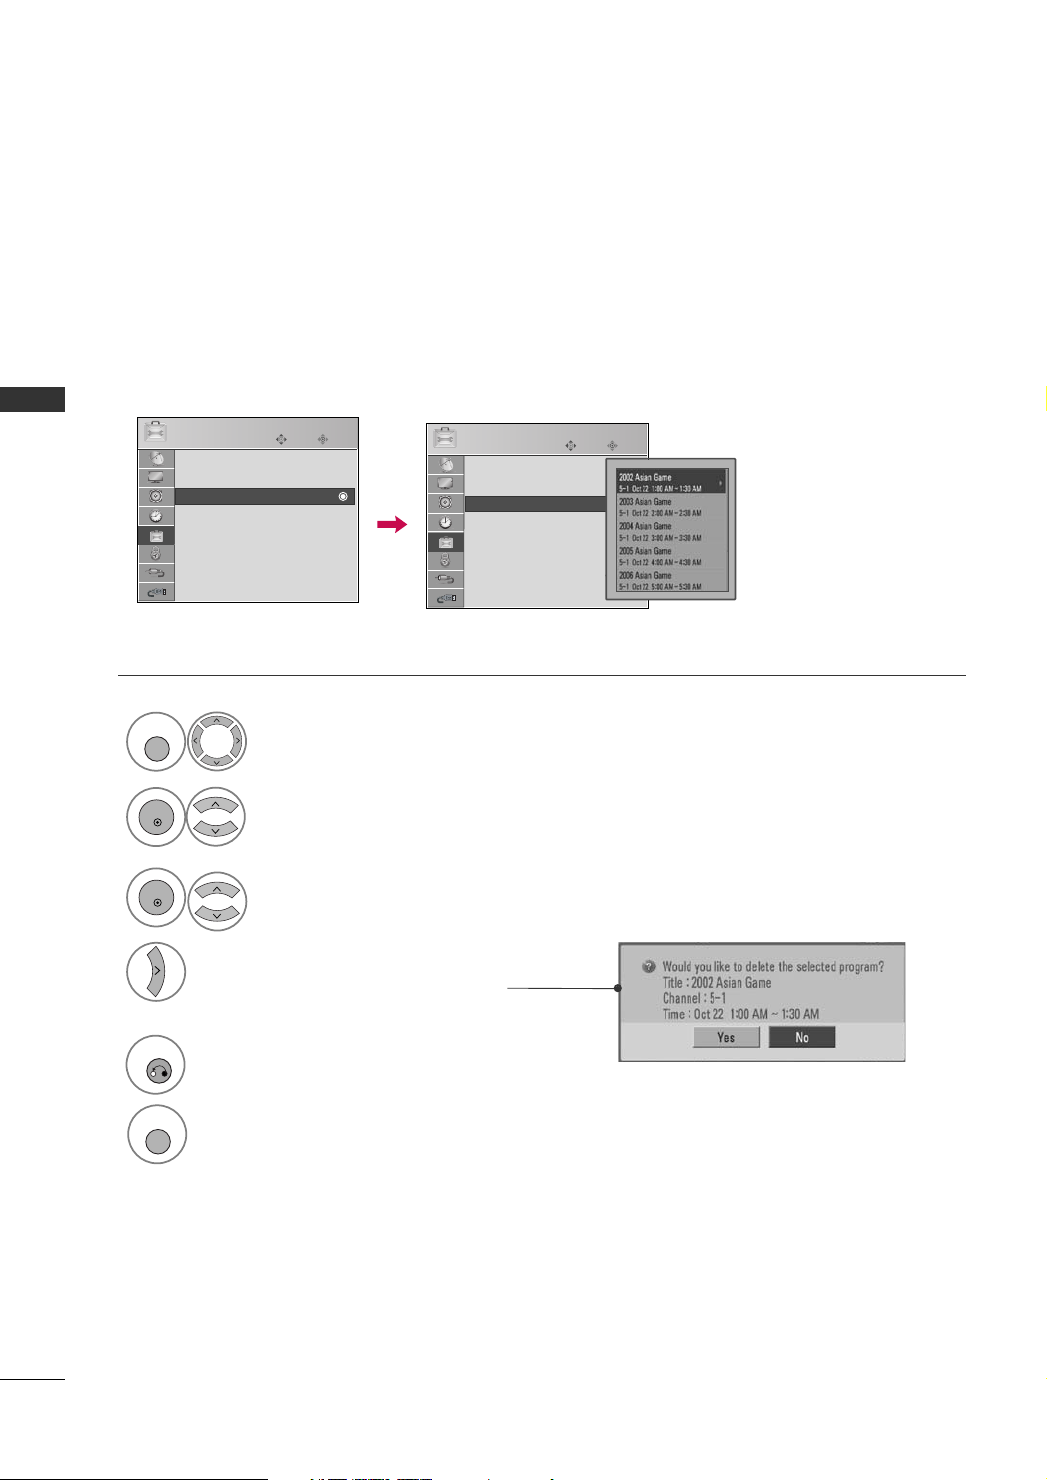
WATCHING TV / CHANNEL CONTROL
MENU
ENTER
ENTER
RETURN
MENU
SCHEDULE LIST
Reserved program displays a list of previously registered in EPG.
WATCHING TV / CHANNEL CONTROL
OPTION
Language : English
Input Label
Schedule List
Schedule List
SIMPLINK : On
Key Lock : Off
Caption : Off
ISM Method : Normal
Power Saving : Level 0
1
2
3
4
Move
Enter
E
OOPPTTII OONN
Select
SS cc hh eedd uu llee LLiiss tt
Select
OPTION
Language : English
Input Label
Schedule List
SIMPLINK : On
Key Lock : Off
Caption : Off
ISM Method : Normal
Power Saving : Level 0
.
.
Select the desired reserved program.
You can see the program information
or cancel the reservation.
Schedule List
Move
Enter
E
60
5
Return to the previous menu.
Return to TV viewing.
Page 63
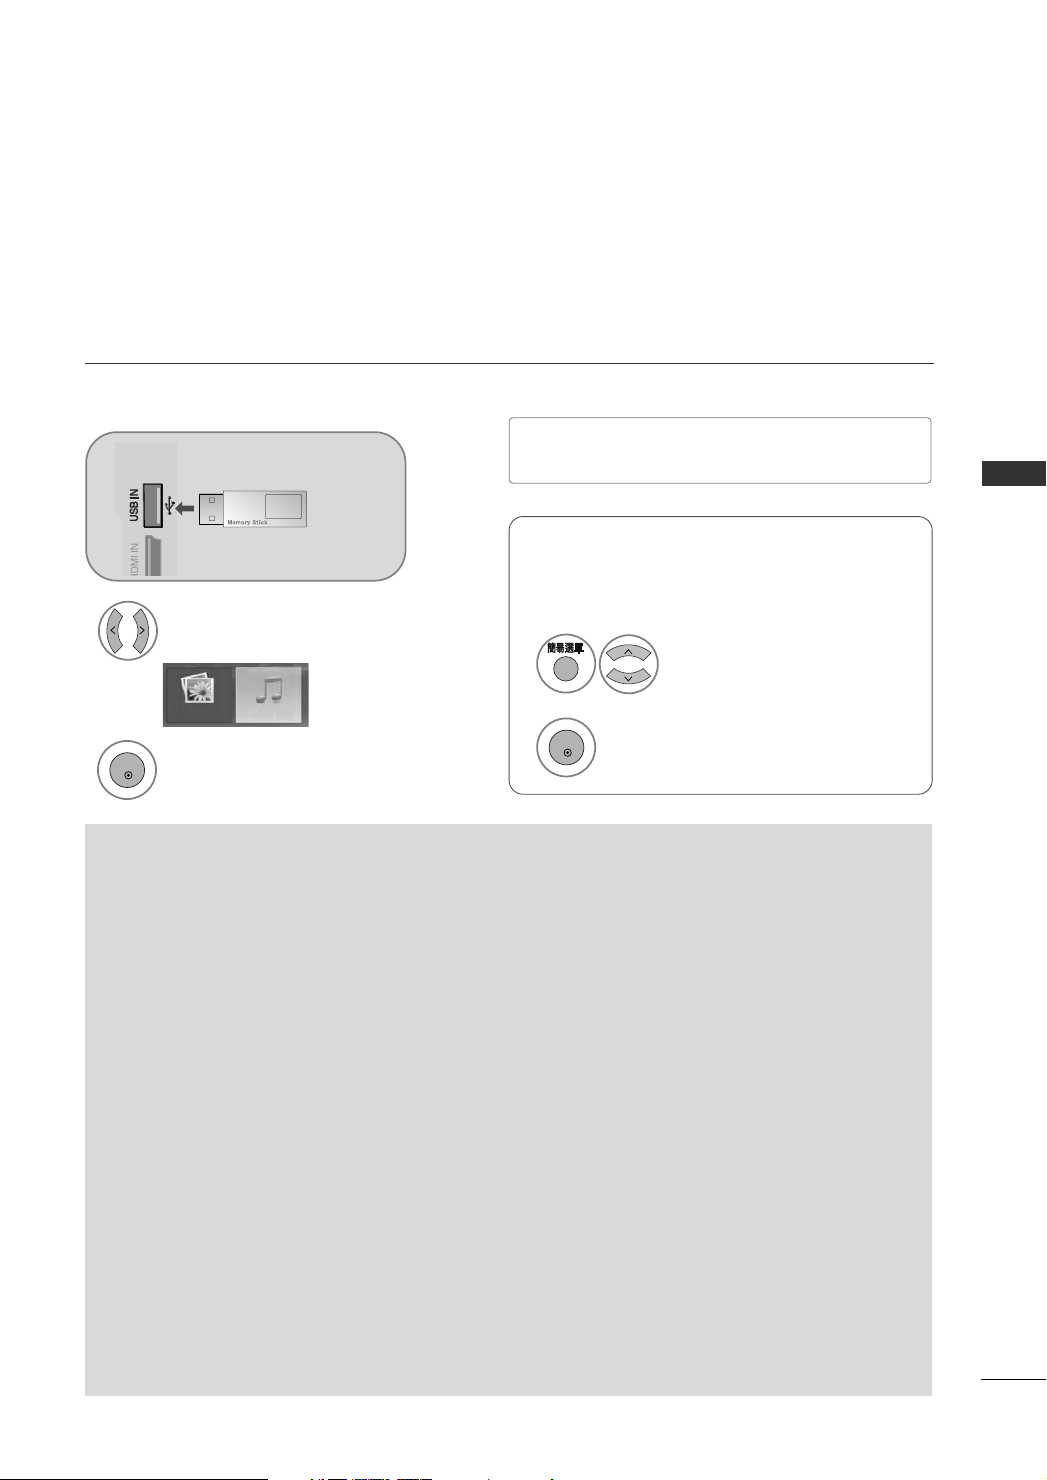
USB
3
ENTER
ENTER
TO USE THE USB DEVICE
Image shown may differ from your TV.
When connecting the USB device
When you connect a USB device, this screen is displayed, automatically.
In USB device, you can not add a new folder or delete the existing folder.
Connect the USB device to the
1
UUSSBB IINN
jacks
on the side of TV(or on the back of TV).
■
It doesn’t support USB HDD
■
This TV Supports on JPG and MP3.
When removing the USB device
Select the USB EJECT menu before removing the
USB device.
2
PPHHOOTTOO LL IISS TT orMM UUSS IICC LLII SS TT..
Select
PHOTO LIST MUSIC LIST
1
2
Select
UUSSBB EEjjeecctt
.
3
Precautions when using the USB device
Only a USB storage device is recognizable.
GG
If the USB storage device is connected through a USB hub, the device is not recognizable.
GG
A USB storage device using an automatic recognition program may not be recognized.
GG
A USB storage device which uses its own driver may not be recognized.
GG
The recognition speed of a USB storage device may depend on each device.
GG
Please do not turn off the TV or unplug the USB device when the connected USB storage device is working.
GG
When such device is suddenly separated or unplugged, the stored files or the USB storage device may be damaged.
Please do not connect the USB storage device which was artificially maneuvered on the PC. The device may
GG
cause the product to malfunction or fail to be played. Never forget to use only a USB storage device which has
normal music files or image files.
Please use only a USB storage device which was formatted as a FAT32 file system provided with the Windows
GG
operating system. In case of a storage device formatted as a different utility program which is not supported by
Windows, it may not be recognized.
Please connect power to a USB storage device which requires an external power supply. If not, the device may
GG
not be recognized.
Please connect a USB storage device with cable is offered by USB maker. If connected with cable is not offered
GG
by USB maker or an excessively long cable, the device may not be recognized.
Some USB storage devices may not be supported or operated smoothly.
GG
If the name of a folder or file is too long, it will not be displayed or recognized.
GG
Please backup the important file because a data of USB device may be damaged. Data management is con-
GG
sumer's responsibility and in consequence the manufactures does not cover the product bearing data damage.
USB
61
Page 64
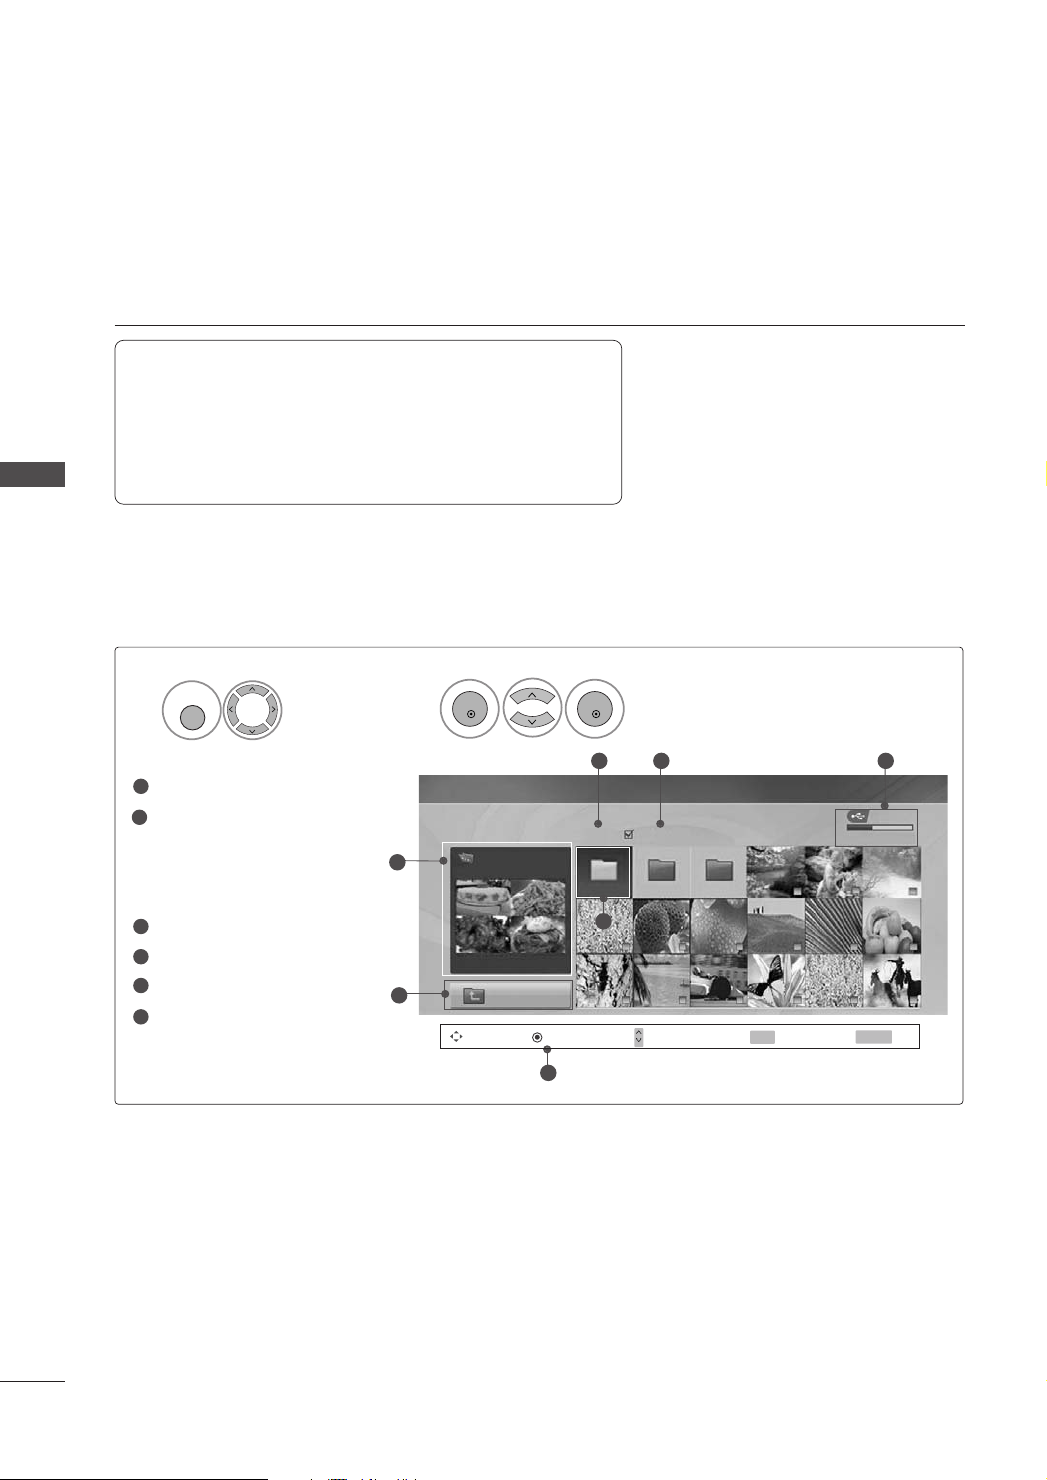
USB
MENU
ENTER
ENTER
USB
PHOTO LIST
You can view .JPG files from USB storage devices.
The On Screen Display on your model may be slightly different. Images are an example to assist with the TV
operation.
Supported photo file: *.JPG
Baseline: width<=15360, height<=8640
• You can play JPEG files only.
• Only baseline scan is supported among JPEG.
• Non-supported files are displayed in the form of icon.
Screen Components
1
Select
1
Moves to upper level file
2
Preview: display the
thumbnail/folder name of
the photo at the selected
folder
3
Current page/Total pages
4
Total number of marked photos
5
Usable USB memory
6
Corresponding buttons on
the remote control
UUSSBB
2
PPhhoottoo LLiisstt
.
2
1
PHOTO LIST
OST
My Father
1366x768, 125KB
Upper
Navigate PopUp Menu Move Page Mark Exit
Page 2/3
My Father
6
Select
3 4 5
No Marked
Star
Mulan
1
CH
.
USB Device
Free Space 150MB
FAV
RETURN
62
Page 65
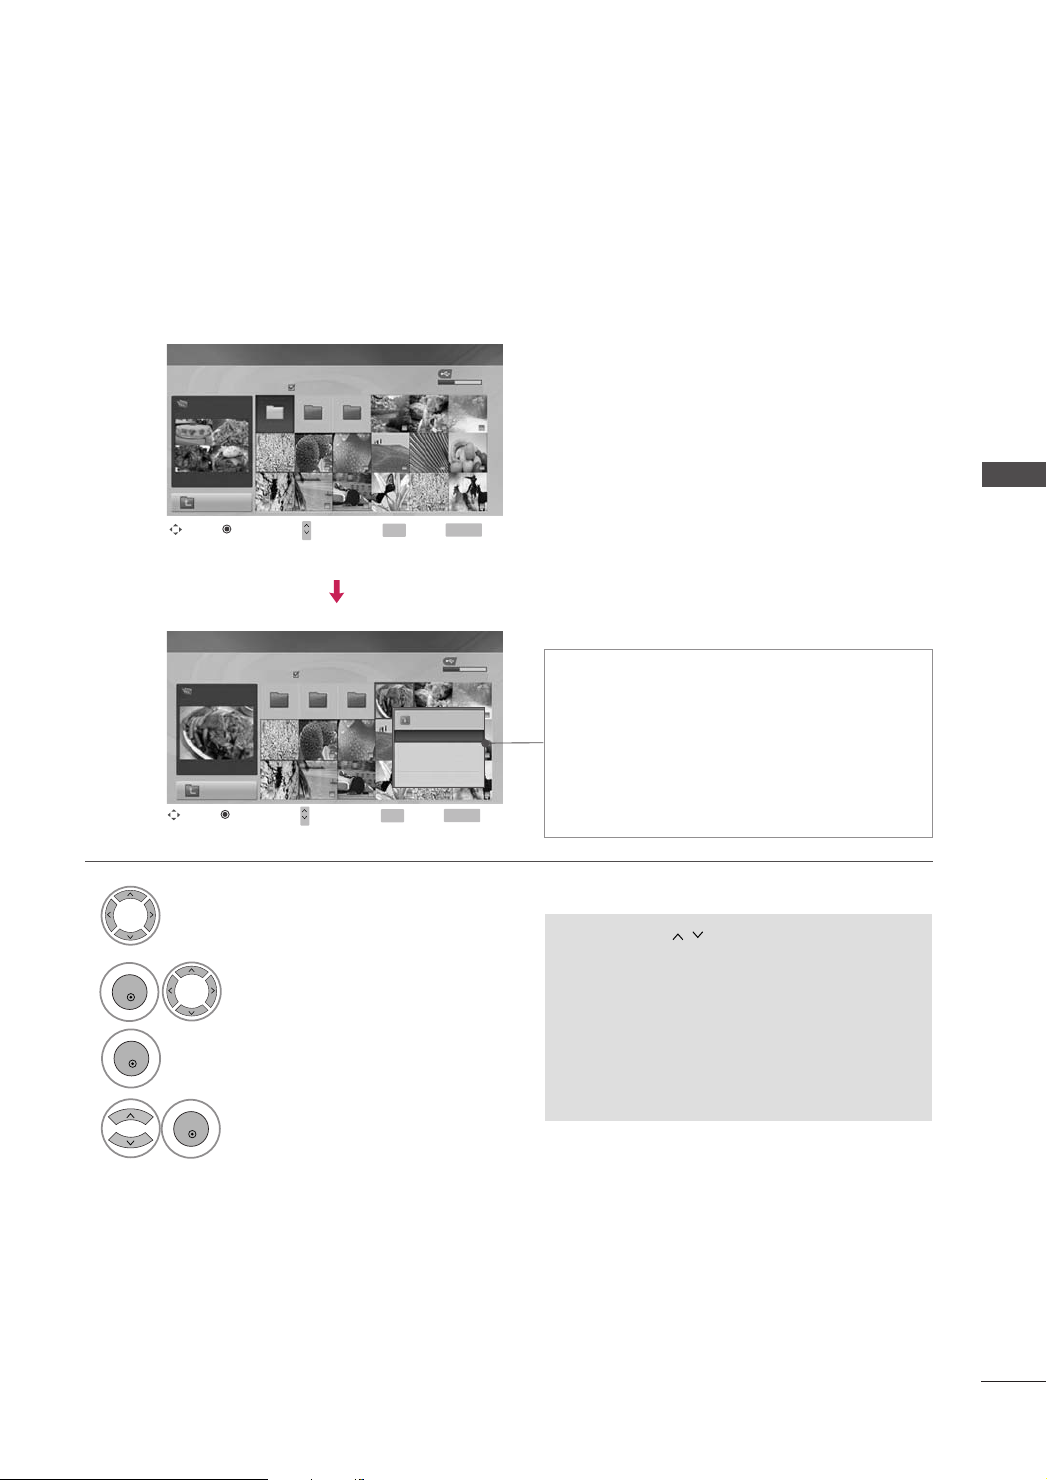
Photo Selection and PopUp Menu
ENTER
ENTER
ENTER
1
2
3
4
PHOTO LIST
OST
My Father
1366x768, 125KB
Navigate Move Page Mark Exit
PHOTO LIST
GanSik
1366x768, 125KB
Navigate Move Page Mark Exit
OST
Upper
Upper
Page 2/3
My Father Mulan Star
PopUp Menu
CH
Page 2/3
OST Photo X.Box
PopUp Menu
CH
No Marked
No Marked
FAV
FAV
View
Mark All
Delete
Cancel
Free Space 150MB
RETURN
Free Space 150MB
1366x768, 125KB
RETURN
Select the target folder or drive.
Select the desired photos.
Show the PopUp menu.
Select the desired PopUp menu.
USB Device
USB Device
When you select a file (not folder), this PopUp
menu is displayed.
VViieeww
: Display the selected item.
GG
MMaarrkk AAllll
GG
UUnnmmaarrkk AAllll
GG
DDeelleettee
GG
CCaanncceell
GG
• Use the
: Mark all photos on the screen.
: Deselect all marked photos.
: Delete the selected photo item.
: Close the pop-up menu.
CC HH
button to navigate in the
thumbnail photo page.
• Use the
MMAARRKK
button to mark or unmark a
photo. When one or more photos are marked,
you can view individual photos or a slide show
of the marked photos. If no photos are marked,
you can view all photos individually or all photos in the folder in a slide show.
USB
63
Page 66
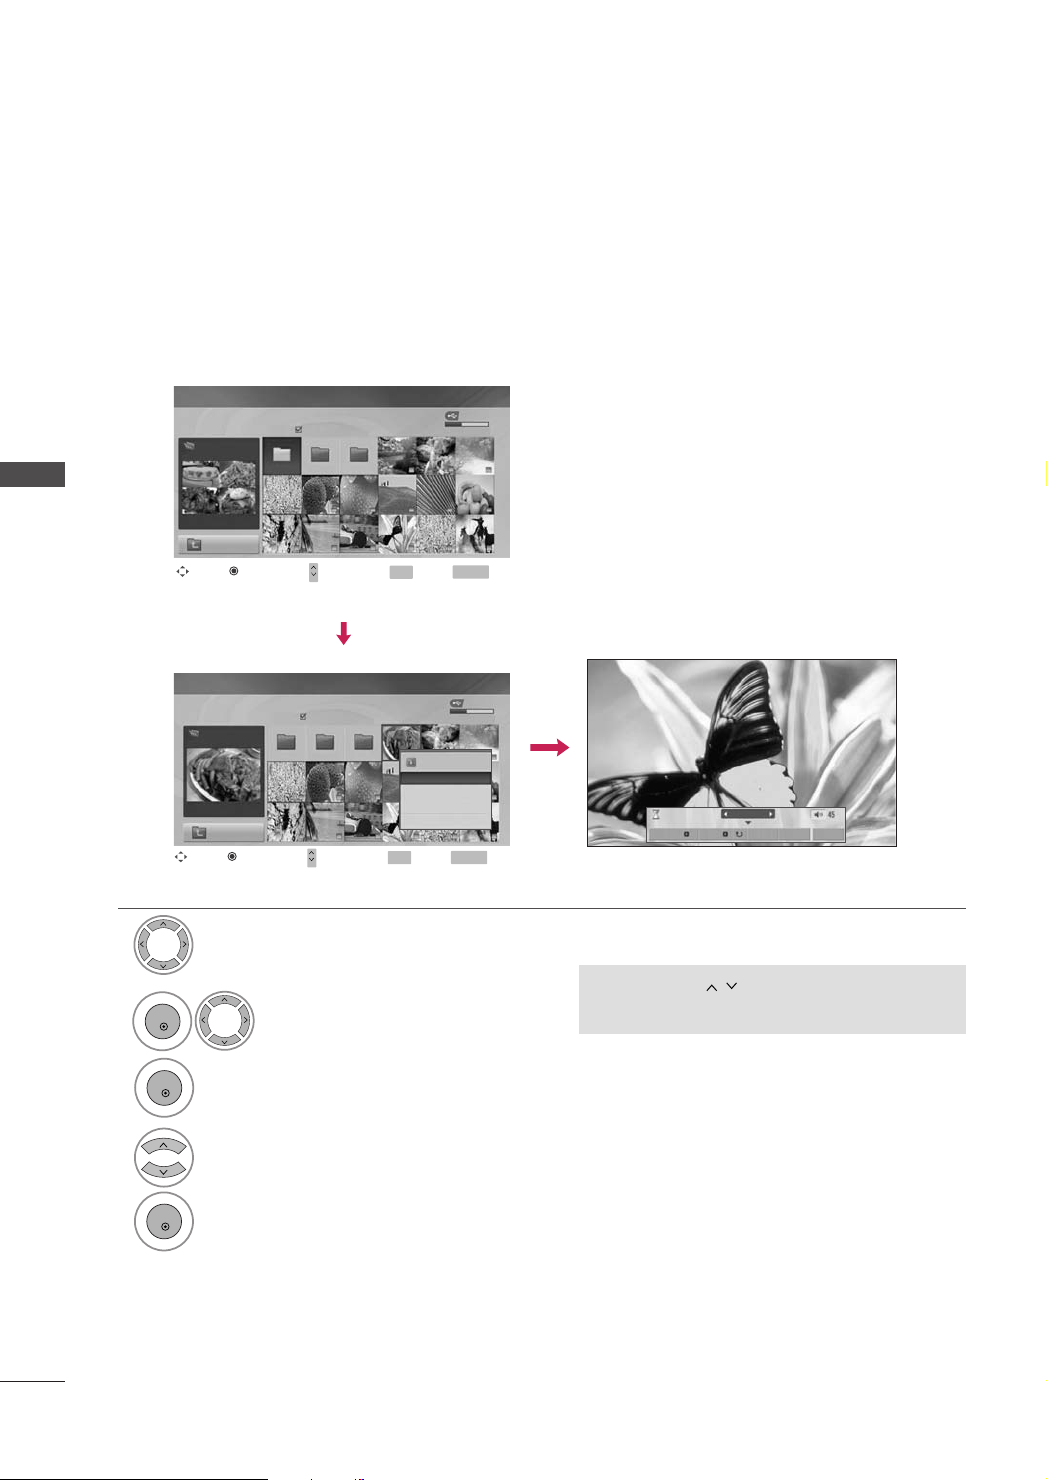
USB
ENTER
ENTER
ENTER
Full Screen Menu
You can change the Photo List view so that it fills the screen. More operations are available in full
screen mode.
USB
1
2
1366x768, 125KB
View
Mark All
Delete
Cancel
USB Device
Free Space 150MB
RETURN
USB Device
Free Space 150MB
RETURN
PHOTO LIST
OST
My Father
1366x768, 125KB
Navigate Move Page Mark Exit
PHOTO LIST
OST
GanSik
1366x768, 125KB
Navigate Move Page Mark Exit
Upper
Upper
PopUp Menu
Page 2/3
My Father Mulan Star
PopUp Menu
CH
Page 2/3
OST Photo X.Box
CH
No Marked
FAV
No Marked
FAV
Select the target folder or drive.
Select the desired photos.
1/17
BGM Delete Option Hide
Slideshow
The aspect ratio of a photo may change the size of
the photo displayed on the screen in full size.
• Use the
CC HH
button to navigation in the
photo page.
64
3
4
5
Show the PopUp menu.
VViieeww
Select
The selected photo is displayed in
full size.
Page 67
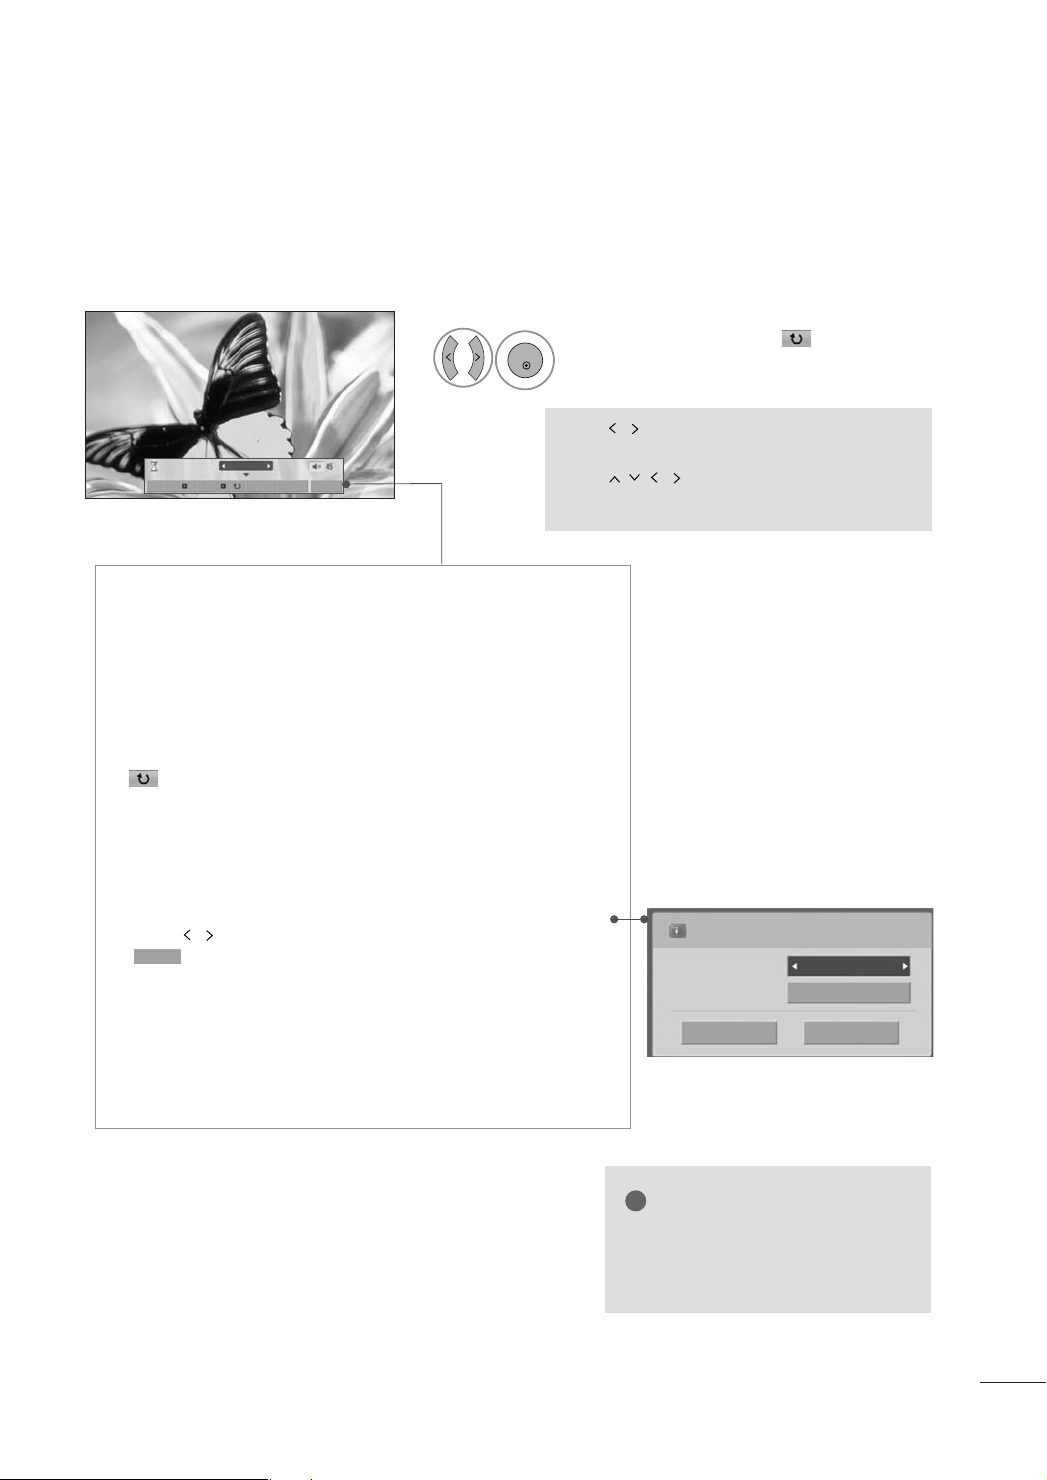
Slideshow BGM Dele te Option Hide
ENTER
!
1/17
6
Select the
SSlliiddeesshhooww , BBGGMM
DDee lleettee,OOppttiioonn
or
HHiiddee
((RRoottaattee))
,
,
.
• Use button to select the previous or
next photo.
• Use button to select and control
the menu on the full-sized screen.
SS lliiddee ss hh ooww
GG
: Selected photos are displayed during the slide show.
If no photo is selected, all photos in the current folder are displayed
during slide show.
■
Set the time interval of the slide show in
BB GG MM
GG
GG
GG
GG
GG
: Listen to music while viewing photos in full size.
■
Set the BGM device and album in
(( RRoo ttaa ttee))
■
Rotates the photo 90° clockwise.
DDee lleettee
OOpp ttiioonn
■
Use button and
Enter
■
You cannot change
HHiidd ee
: Hide the menu on the full-sized screen.
■
To see the menu again on the full-sized screen, press
: Rotate photos.
: Delete photos.
: Set values for
and press
EEnntteerr
SS lliiddee SS ppee eedd
EEnntteerr
button to set values. Then go to
to save the settings.
MM uu ssiicc FFooll ddee rr
OOpp tt iioo nn
OOpp tt iioo nn
and
.
.
MM uu ssiicc FFooll ddee rr
while BGM is playing.
.
EEnntteerr
button to display.
FF GG
Press
slides.
Slide Speed
Music Folder
Enter
to set the time interval between
Fast
Music
Cancel
NOTE
This TV wil be able to decode most
GG
JPEG images saved using the
Progressive option.
65
Page 68
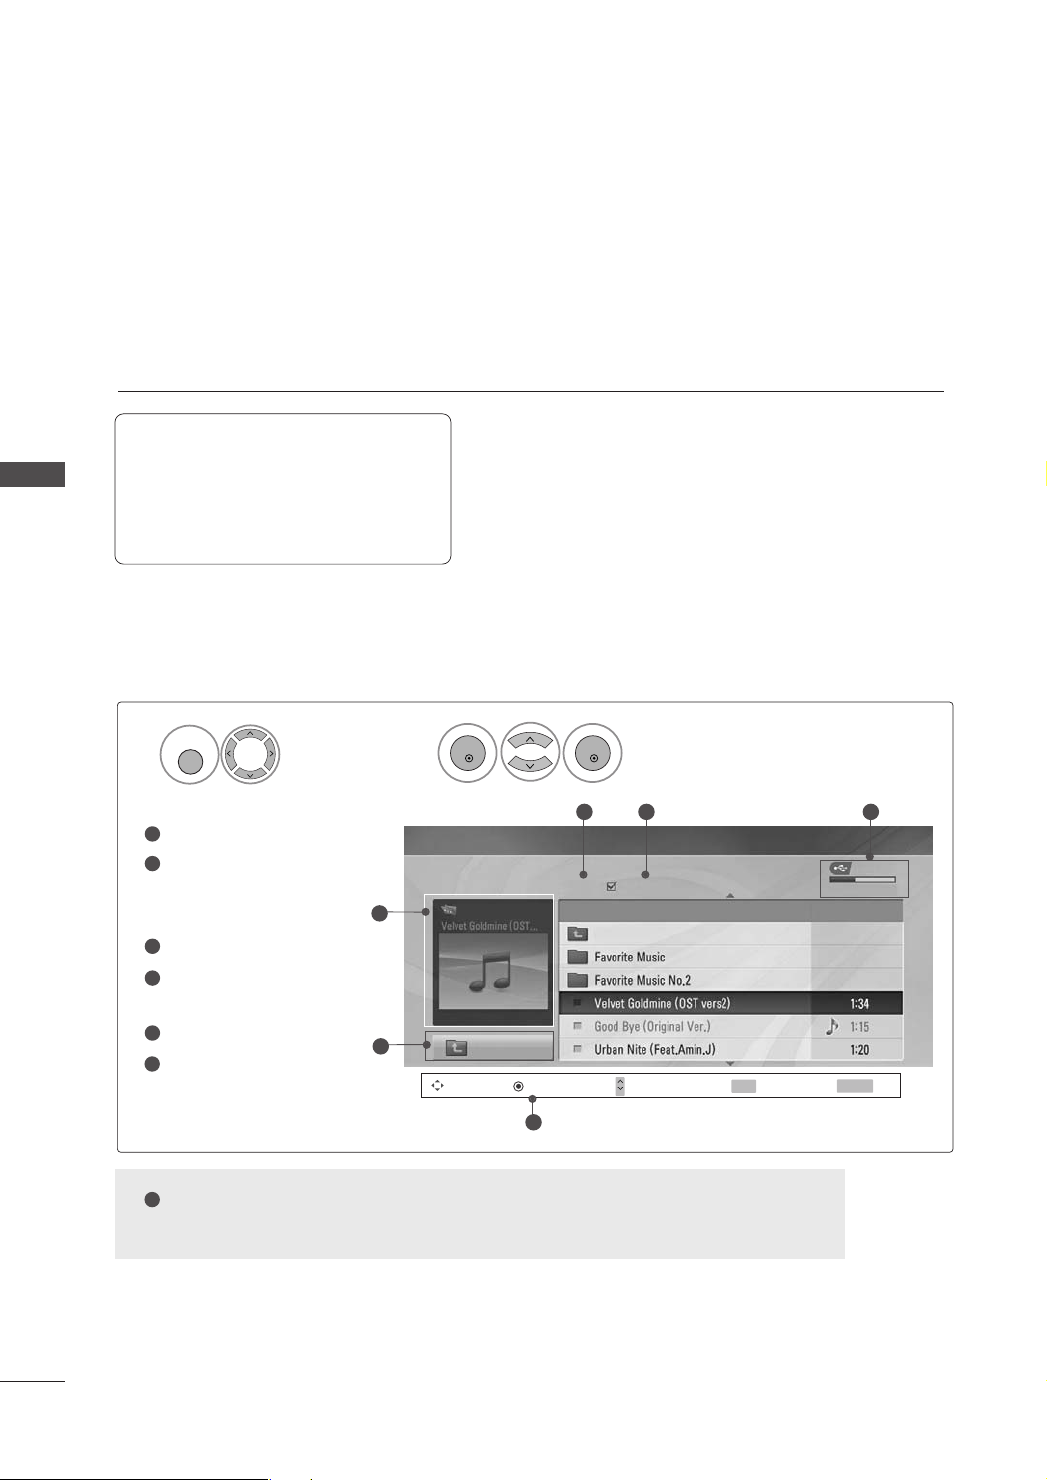
USB
MENU
ENTER
ENTER
USB
MUSIC LIST
Purchased music files(*.MP3) may contain copyright restrictions. Playback of these files may not be supported by this model.
You can use the Music List menu to play MP3 files form a USB storage device.
The On Screen Display on your model may be slightly different. Images are an example to assist with the TV
operation.
Supported music file: *.MP3
Bitrate range 40Kbps ~ 320Kbps
•Sampling rate
MPEG1 : 32000, 44100, 48000Hz
MPEG2 : 16000, 24000, 22050Hz
Screen Components
1
1
UUSSBB
Select
1
Moves to upper level file
2
Preview: If any album jacket
for the file exists, this jacket is displayed.
3
Currrent page/Total pages
4
Total number of marked
musics
5
Usable USB memory
6
Corresponding buttons on
the remote control
2
While the music file is being played, the information section does not show the
selected file, but the playing file name and the play time information at the bottom.
.
2
1
2
Select
3 4 5
MUSIC LIST
Music
1:340, 120KB
Upper
Navigate PopUp Menu Move Page Mark Exit
Page 2/3
6
Upper
CH
CH
No Marked
MMuussiicc LLiisstt
Title
Mark
.
USB Device
Free Space 150MB
Play Time
FAV
RETURN
66
Page 69
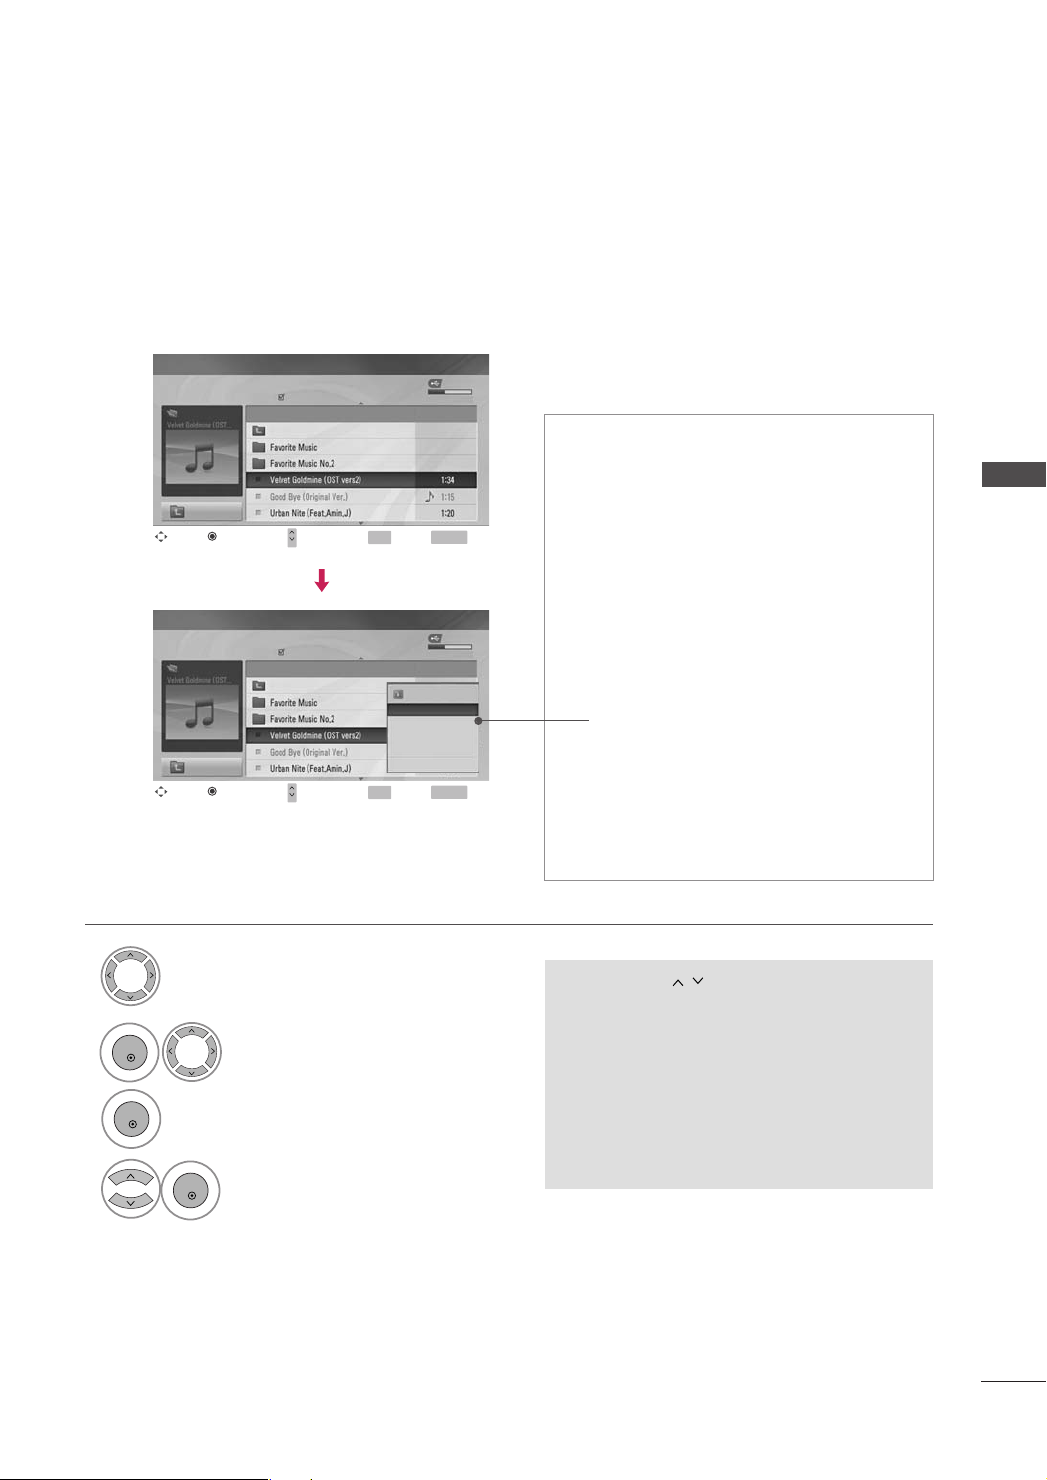
Music Selection and PopUp Menu
ENTER
ENTER
ENTER
As shown , up to 6 music titles are listed per page.
1
2
3
4
MUSIC LIST
Music
1:340, 120KB
Upper
Navigate Move Page Mark Exit
PopUp Menu
MUSIC LIST
Music
1:340, 120KB
Upper
Navigate Move Page Mark Exit
PopUp Menu
No Marked
Page 2/3
Title Play Time
Up Folder
CH
No Marked
Page 2/3
Title Play Time
Up Folder
CH
FAV
FAV
USB Device
Free Space 150MB
RETURN
USB Device
Free Space 150MB
4395KB
1Kbps
Play
Play with Photo
Mark All
Delete
Cancel
RETURN
Select the target folder or drive.
Select the desired musics.
show the PopUp menu.
Select the desired PopUp menu.
PPll aa yy
GG
(During stop) : Play the selected musics.
Once a music finishes playing, the next selected one will be played. When there are no
selected musics to play, the next one in the
current folder will be played. If you go to a different folder and press the
EENNTTEE RR
button, the
current music in playback will stop.
PPll aayy MMaarrkk eedd
GG
: Play the selected musics.
Once a music finishes playing, the next selected one will be played automatically.
SS ttoo pp PP llaayy
GG
(During playback) : Stop the play-
ing musics.
PPll aayy wwiitt hh PP hh oott oo
GG
: Start playing the selected
musics and then move to the Photo List.
MM aarrkk AAll ll
GG
UUnnmm aarrkk AAll ll
GG
DDeelleettee
GG
CC aanncceell
GG
• Use the
: Mark all musics in the folder.
: Deselect all marked musics.
: Delete the selected musics.
: Close the pop-up menu.
CC HH
button to navigation in the
music list.
MM AA RRKK
• Use
button to mark or unmark a music
file. If no music is marked, all the music in the
folder will be played in sequence. When one or
more music files are marked, the marked music
files will be played in sequence. If you want to
listen to only one song repeatedly, just mark
that one file and play.
USB
67
Page 70
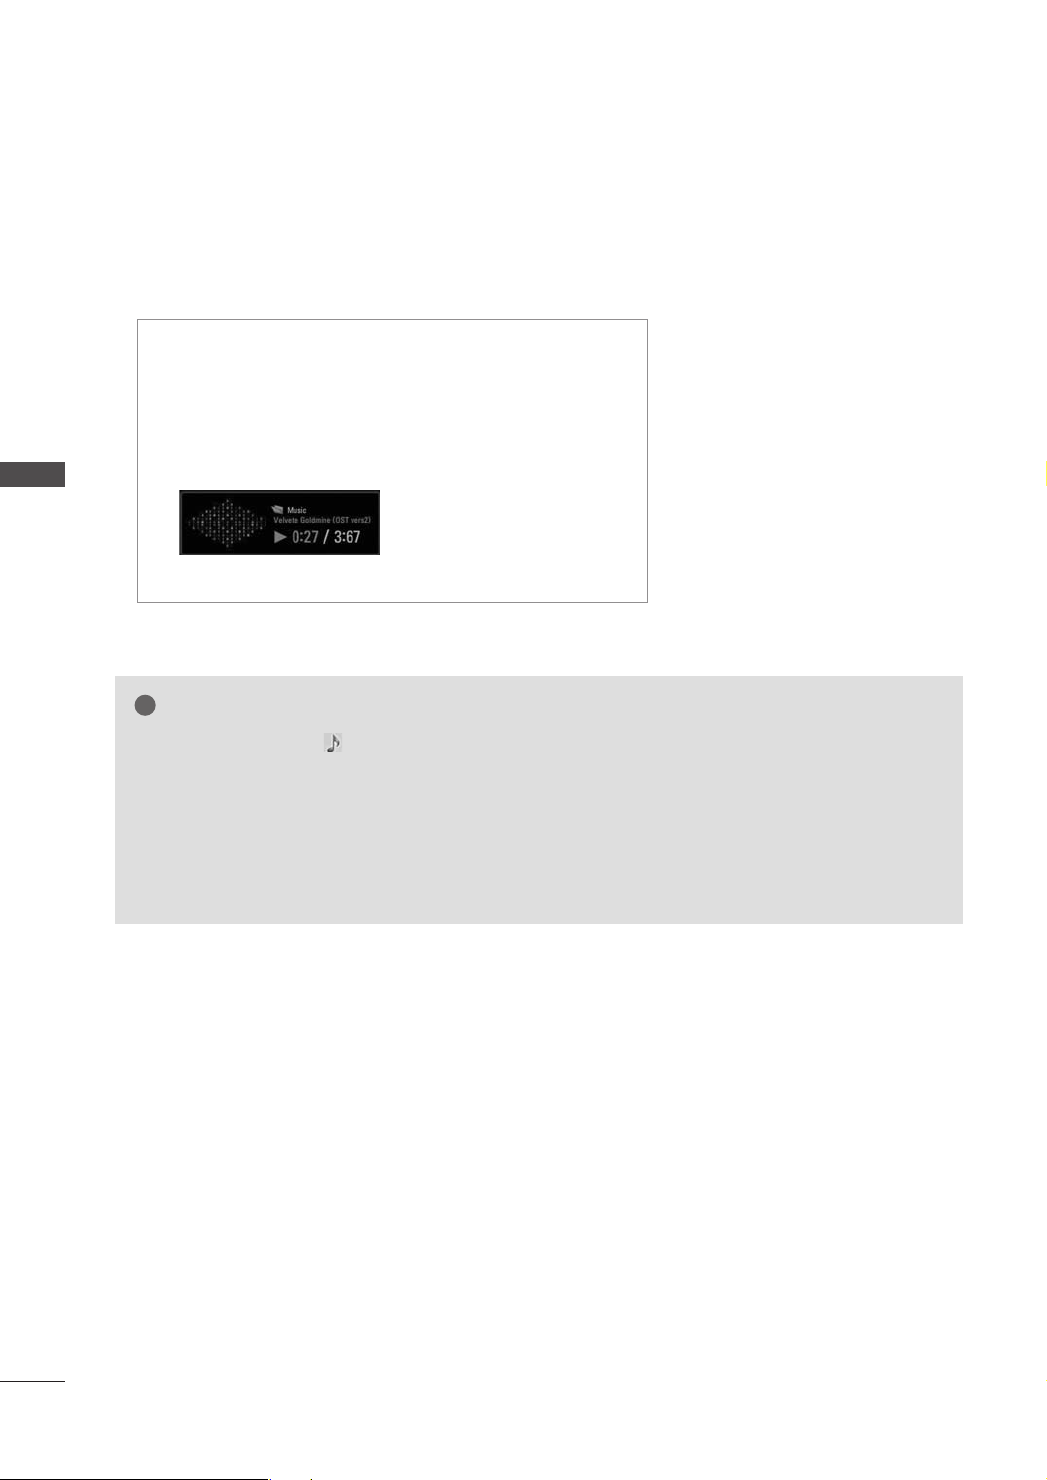
USB
!
USB
■
The play information box (as shown below) will automatically
move across the screen when there is no user input to prevent a fixed image remaining on the screen for a extended
period of time.
NOTE
When music is playing, is displayed in front of the music play time.
GG
A damaged or corrupted music file that does not play displays 00:00 as the play time.
GG
Music files with copy-protection will not play.
GG
EENNTT EE RR
GG
GG
Press
The
PPLL AAYY
, AAbutton to stop the screen saver.
((
GG
))
PPaa uu ssee((II II
,
))
AA
or
FF
,
,
GG
buttons on the remote control are also available in this mode.
68
Page 71
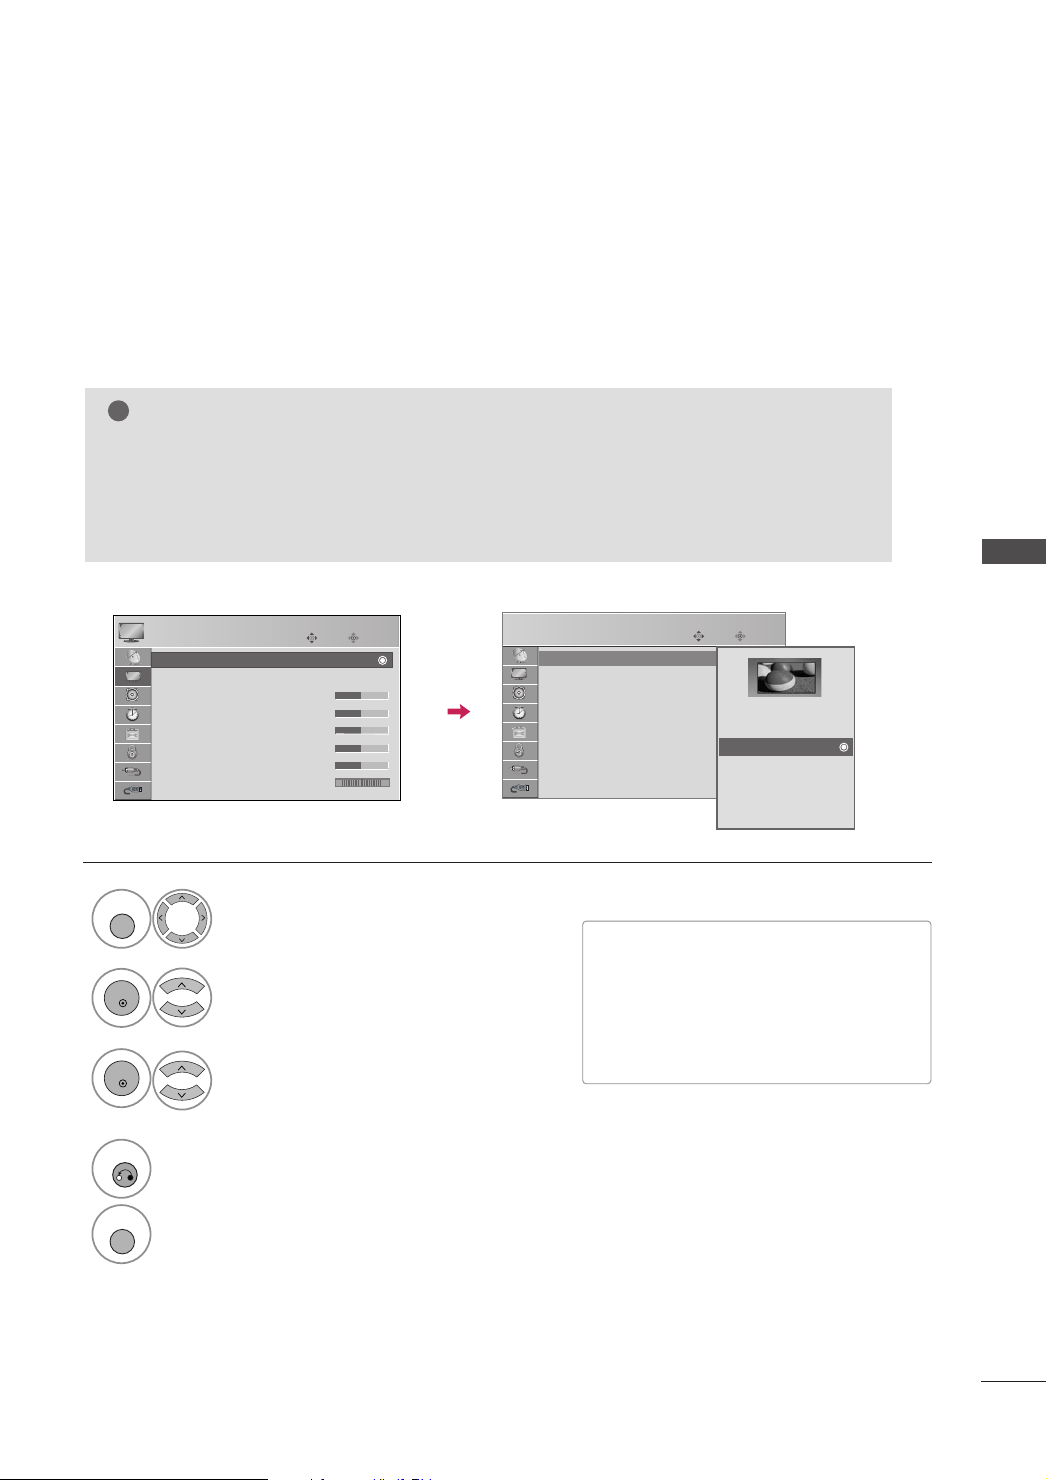
PICTURE CONTROL
!
MENU
ENTER
ENTER
RETURN
MENU
PICTURE SIZE (ASPECT RATIO) CONTROL
This feature lets you choose the way an analog picture with a 4:3 aspect
ratio is displayed on your TV.
■
RGB-PC input source use 4:3 or 16:9 aspect ratio.
NOTE (Only plasma TV models)
If a fixed image is displayed on the screen for a long time, the image could become imprinted on the
GG
screen and remain visible.
This phenomenon is common to all manufacturers and is not covered by warranty. Although, after
watching video that did not fill the screen, any after-image from the black bars will normally dissipate
after a few minutes.
PICTURE CONTROL
1
2
3
4
PICTURE
Aspect Ratio : 16:9
Aspect Ratio : 16:9
Picture Mode : Standard
• Backlight 50
• Contrast 50
• Brightness 50
• Sharpness 50
• Color 50
• Tint 0
E
Select
Select
Move
RG
PPII CCTTUURR EE
AAssppeecctt RR aattiioo
Select the desired picture format.
Return to the previous menu.
Enter
PICTURE
Aspect Ratio : 16:9
Picture Mode : Standard
• Backlight 50
• Contrast 50
• Brightness 50
• Sharpness 50
• Color 50
• Tint 0
Move
Enter
Set By Program
4:3
16:9
Zoom1
RG
E
Zoom2
Zoom3
Just Scan
.
■
You can also adjust
QQ --MMee nnuu
the
.
AAssppeecctt RR aattiioo
in
.
■
Press the
RRAATTIIOO
button repeatedly to
select the desired picture format. (Only
42/50PG30* )
Return to TV viewing
69
Page 72
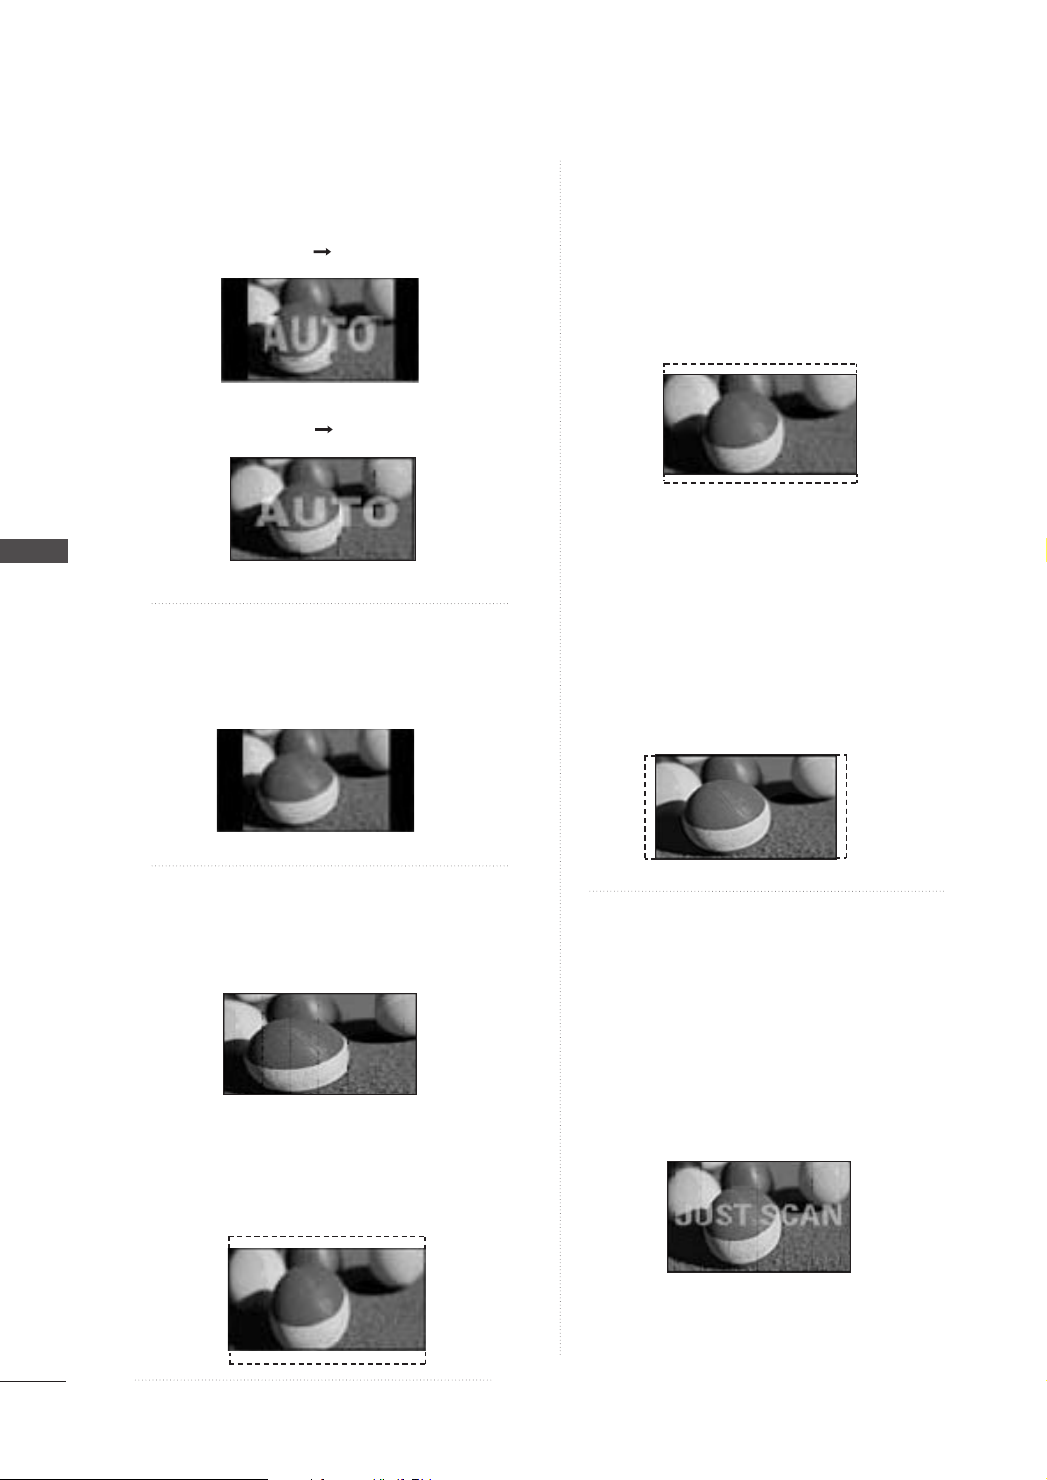
PICTURE CONTROL
Set by program
Selects the proper picture proportion to match
the source’s image.
(4:3 4:3)
(16:9 16:9)
Zoom 2
Choose Zoom 2 when you want the picture to be
altered, both vertically extended and cropped.
The picture taking a halfway trade off between
alteration and screen coverage.
PICTURE CONTROL
4:3
Choose 4:3 when you want to view a picture
with an original 4:3 aspect ratio.
16:9
Adjust the picture horizontally, in a linear proportion to fill the entire screen.
Zoom 1
Choose Zoom 1 when you want to view the picture without any alteration. However, the top and
bottom portions of the picture will be cropped.
Zoom 3
With this function, when the SD screen is sent to
the HD with black at the left side and the right
side, this screen can be extended to be fully displayed with no black area.
It is enabled only at the DTV HD broadcasting. (It
is the reference for displaying ‘HD’ at the channel
banner if the height is greater than 480.)
Just Scan
Following selection will lead to you view the picture of best quality without loss of original picture in high resolution image.
Notes: If there are noise in original picture, you
can see the noise at the edge.
JJ uuss tt SS cc aa nn
DTV/Component(720p/1080i/1080p),
HDMI-DTV, DVI-DTV input source.
operates only in
70
Page 73
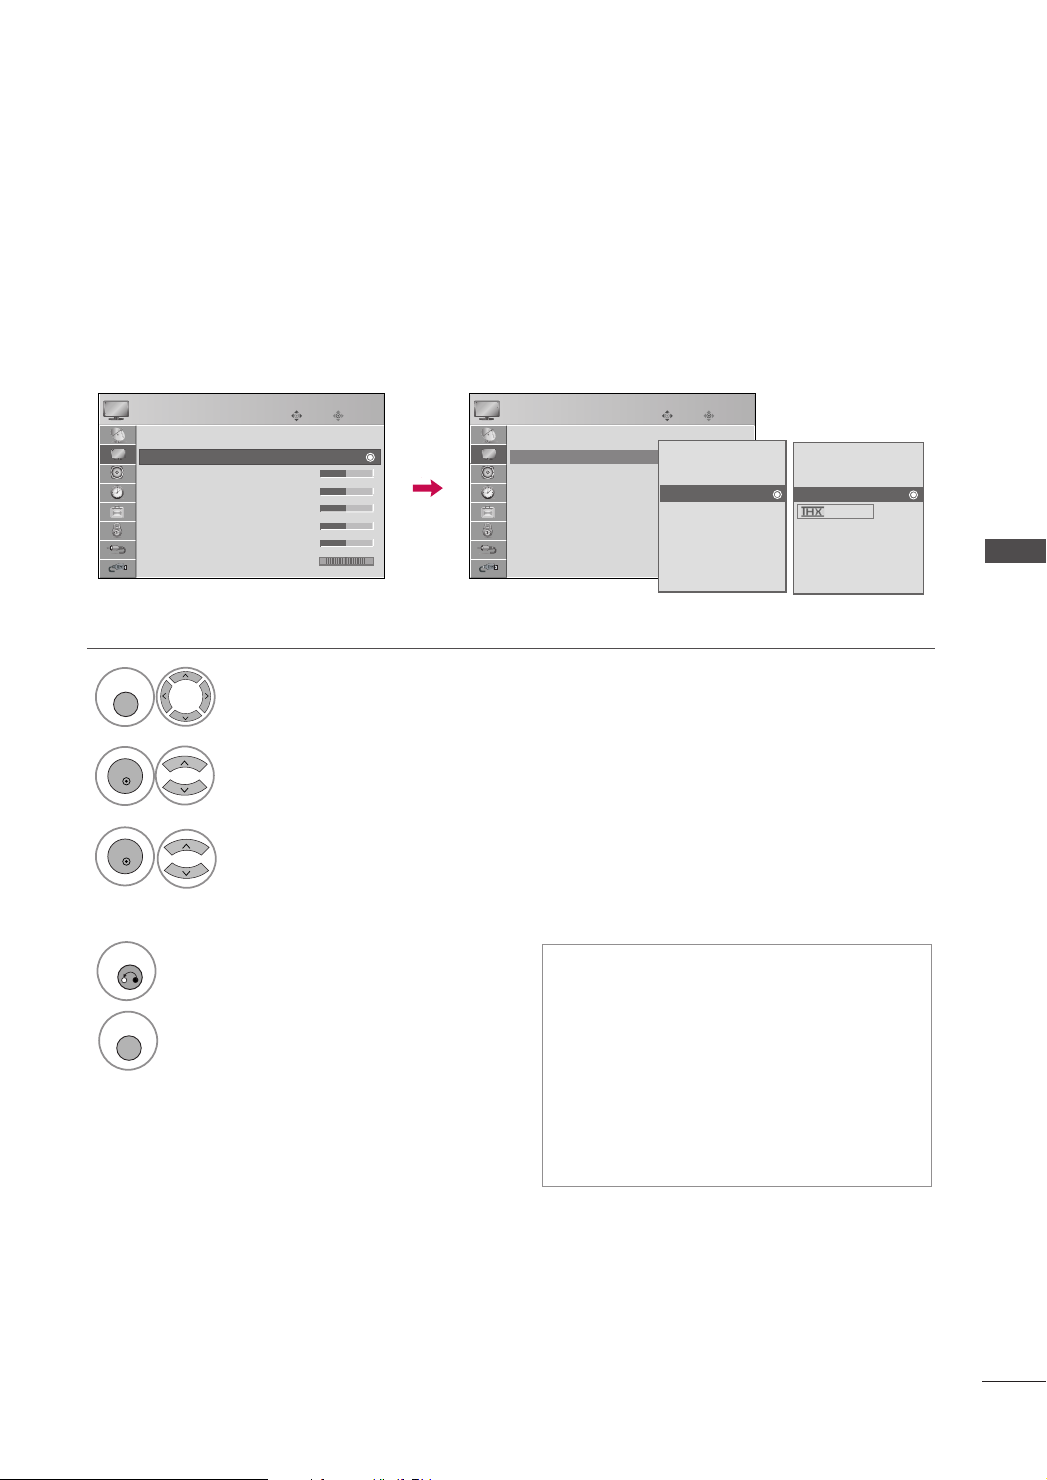
PRESET PICTURE SETTINGS
MENU
ENTER
ENTER
RETURN
MENU
Picture Mode-Preset
There are factory presets for picture settings available in the user menus. You can use a preset,
change each setting manually, or let the Intelligent Sensor.
PICTURE
Aspect Ratio : 16:9
Picture Mode : Standard
Picture Mode : Standard
1
2
3
4
Move
Enter
• Backlight 80
• Contrast 70
• Brightness 50
• Sharpness 60
• Color 60
• Tint 0
E
Select
Select
Select
RG
PP IICCTTUURREE
.
PP iicc ttuu rree MM ooddee
IInntt ee lllliiggeenntt SSeennssoorr
32/37/42/47/52LG50**),
SS ttaanndd aa rrdd, CC iinnee mm aa((oo rr TT HH XX
CC iinn ee mm aa)), SS ppoo rrtt
or
Return to the previous menu.
Return to TV viewing.
GGa
.
ammee
(Only
VViivv iidd
.
,
E
Move
Enter
Intelligent Sensor
Vivid
Standard
Standard
Cinema
Sport
Game
Expert1
Expert2
IInnttee llll iiggeenntt SS eennssoorr
Vivid
Standard
Standard
Sport
Game
Expert1
Expert2
(Only 50/60PG70FD)
PICTURE
Aspect Ratio : 16:9
Picture Mode : Standard
Picture Mode : Standard
• Backlight 50
• Contrast 50
• Brightness 50
• Sharpness 50
• Color 50
• Tint 0
■
When selecting
(Only 32/37/42/47/52LG50**), the most suit-
able picture is automatically adjusted according
to the surrounding conditions.
■
You can also adjust
MMeennuu
.
■
Press the
PPIICCTTUURREE
PPii cc ttuurree MM oodd ee
button repeatedly to select
the picture appearance setup option. (Only
42/50PG30* )
Cinema
in the
PICTURE CONTROL
QQ..
71
Page 74
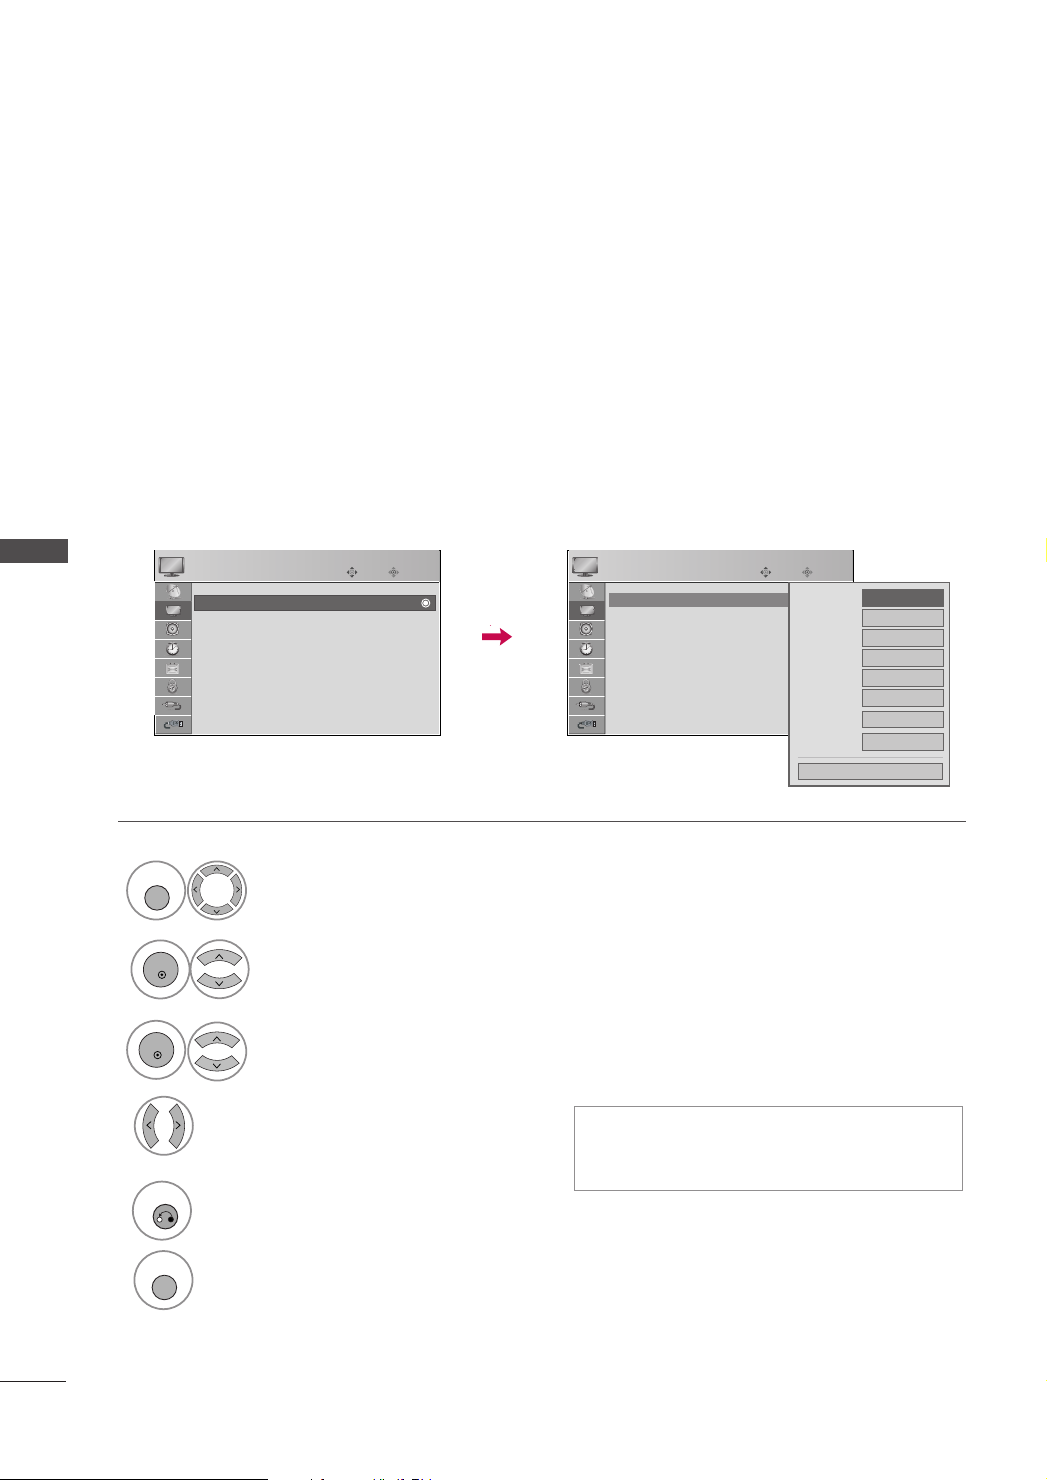
PICTURE CONTROL
MENU
ENTER
ENTER
RETURN
MENU
Color Tone-Preset (Warm/Medium/Cool)
Choose one of three automatic color adjustments. Set to warm to enhance hotter colors such as red, or set to
cool to see less intense colors with more blue.
PICTURE CONTROL
5
1
2
3
4
PICTURE
Screen(RGB-PC)
Select
• Advanced Control
• Advanced Control
• Reset
Select
Select
Select
CC oo ooll, MM eedd iiuumm
Move
EE
PP IICCTTUURREE
AAddvvaanncc ee dd CCoo nn ttrrooll
CC oo lloorr TTee mm ppeerr aatt uu rree
Return to the previous menu.
, or
Enter
.
WWaa rrmm
PICTURE
Screen(RGB-PC)
• Advanced Control
• Advanced Control
• Reset
Move
Enter
Color Temperature
Fresh Contrast
Fresh Color
Noise Reduction
Gamma
Black Level
Eye Care
Real Cinema
FF
Close
Medium
On
On
Low
Medium
Low
Off
Off
GG
.
.
.
■
CC oo lloorr TT ee mm ppeerr aattuurree
can be adjusted at each
video mode except ‘THX Cinema’ by the above
method.
72
Return to TV viewing.
Page 75
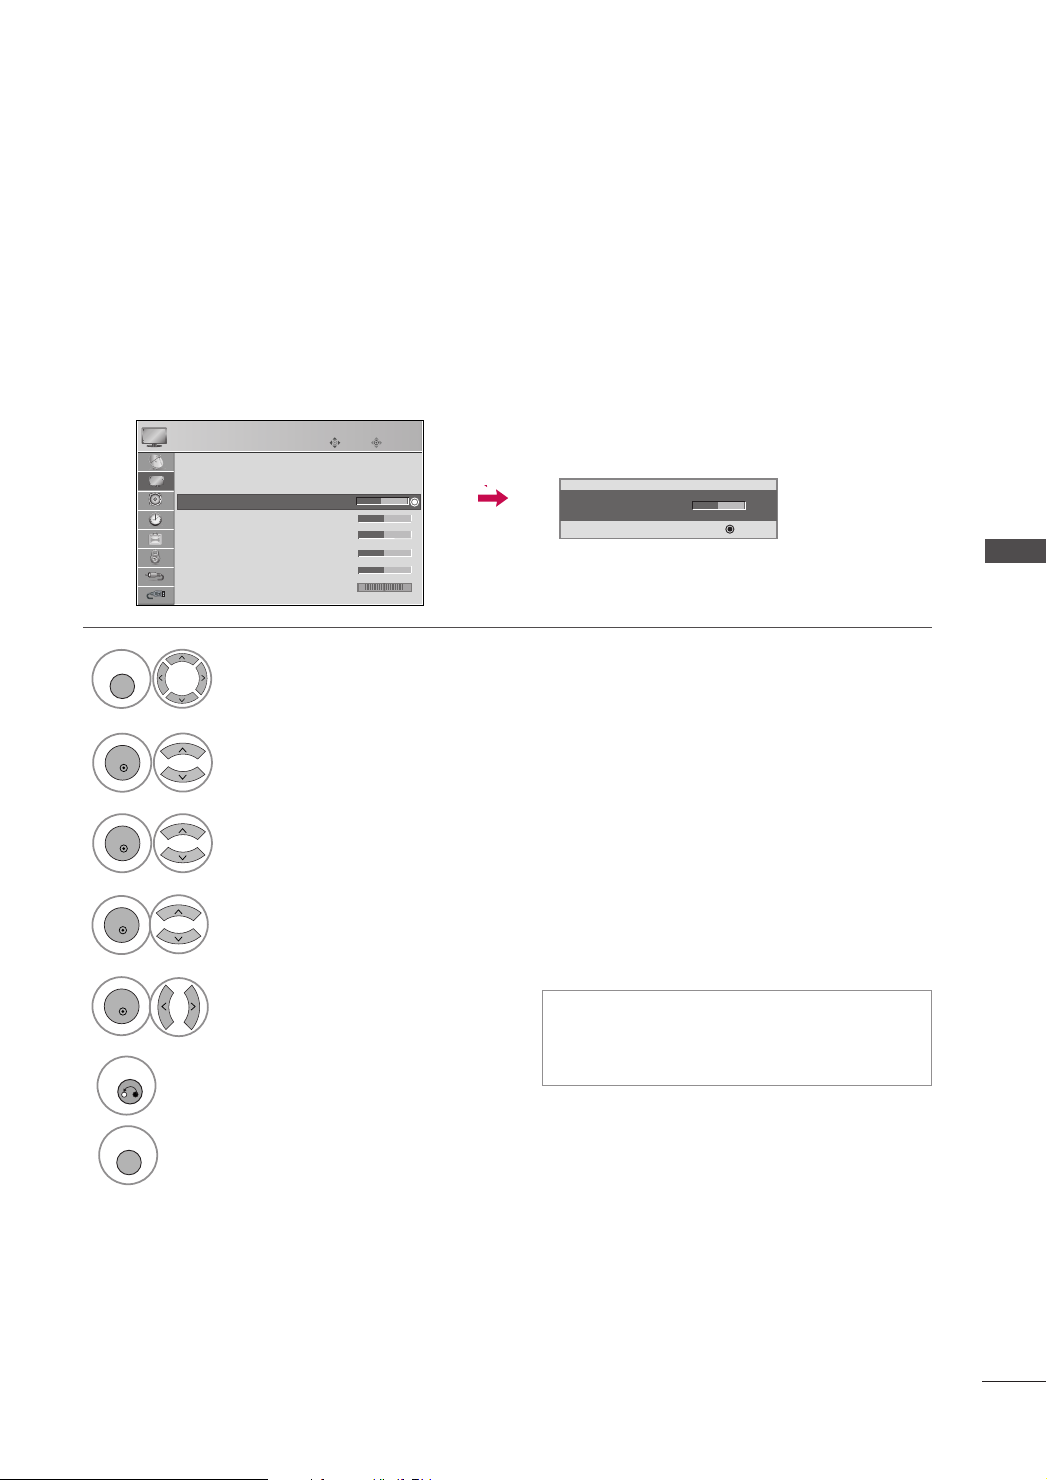
MANUAL PICTURE ADJUSTMENT
MENU
ENTER
ENTER
RETURN
MENU
ENTER
ENTER
Picture Mode-User Mode
Adjust the picture appearance to suit your preference and viewing situations.
This feature is disable in “
PP iicc ttuurree MMoo ddee-- IInnttee lllliiggeenn tt SS ee nn ss oorr
”.
1
2
3
4
5
6
PICTURE
Aspect Ratio : 16:9
Picture Mode : Standard
• Backlight 80
• Backlight 60
• Contrast 70
• Brightness 50
• Sharpness 60
• Color 60
• Tint 0
Select
PPii cc ttuurree MM oodd ee
Select
VViivviidd,SS ttaanndd aarrdd, CC iinn eemm aa(( oorr TTHHXX CC iinnee mm aa )), SS ppoorrtt
Select
GGaa mmee
or
Select
Move
E
PPII CCTTUURR EE
.
BBaa cc kk llii gghhtt
RG
.
(Only LCD TV models),
SS hh aa rrpp nn eessss, CC oolloo rr
Make appropriate adjustments.
Return to the previous menu.
Enter
.
or
TTiinn tt
EE
• Backlight 60
EE
EE
EE
Enter
PICTURE CONTROL
,
CC oonnttrraa sstt, BBrriigghhttnn ee ssss
.
■
CC oonnttrraa sstt, BBrriigghhttnn ee ssss, SS hh aa rrpp nn eessss, CC oolloo rr
TTiinn tt
or
can be adjusted at each video mode
except ‘THX Cinema’ by the above method.
,
Return to TV viewing.
73
Page 76
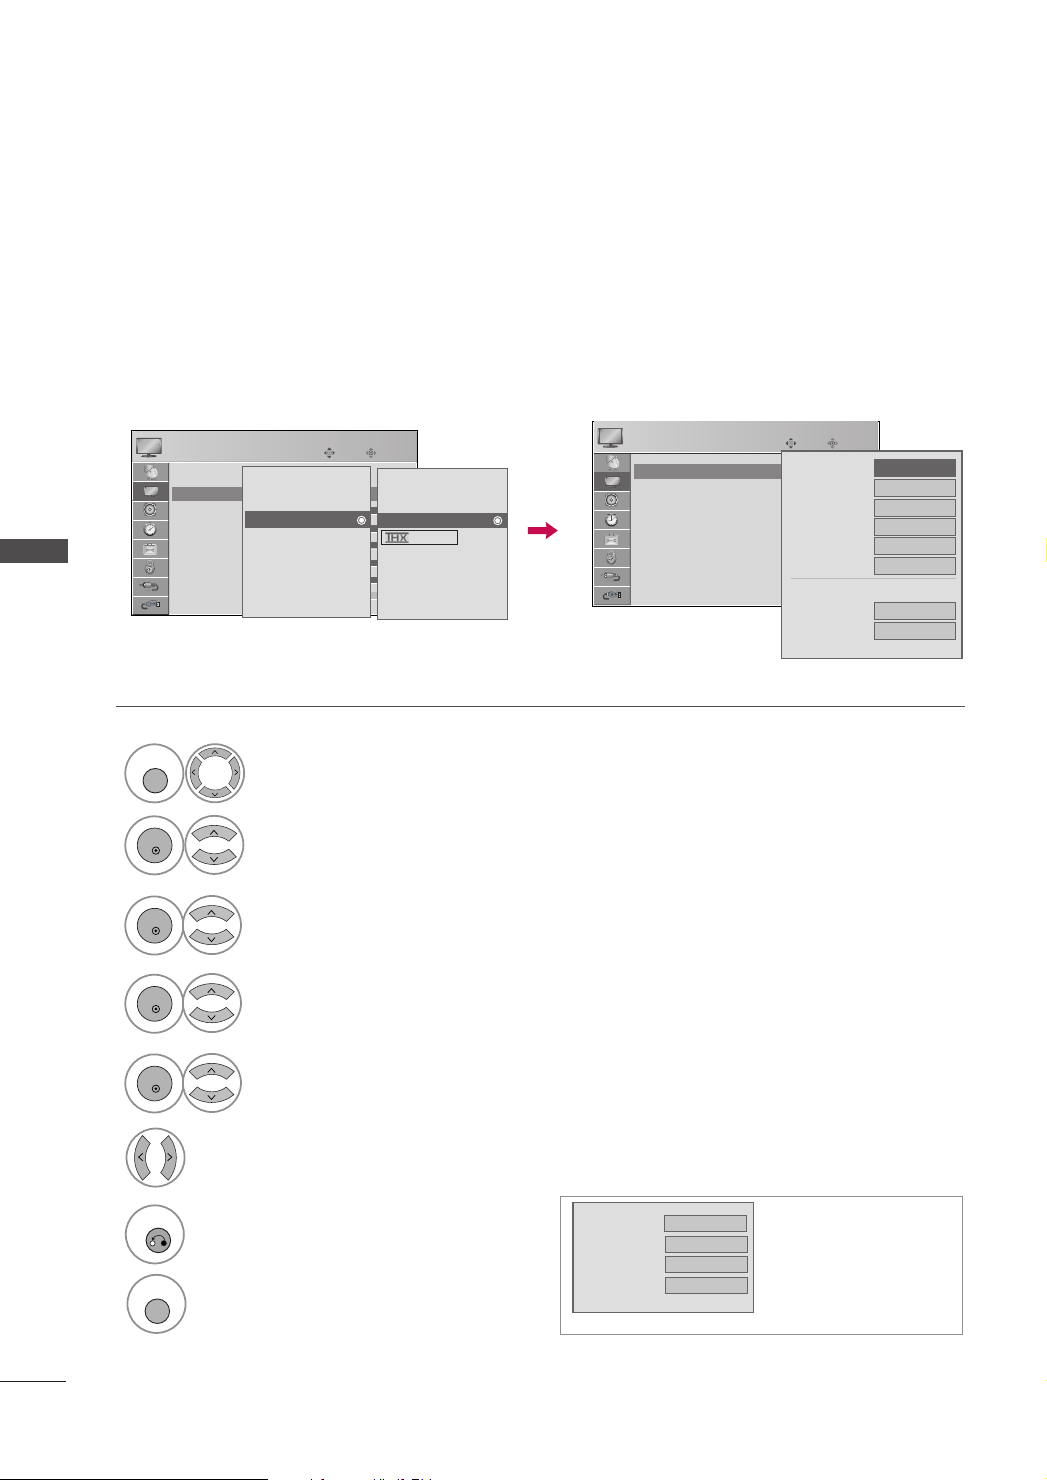
PICTURE CONTROL
MENU
ENTER
ENTER
ENTER
ENTER
RETURN
MENU
Picture Mode-Expert Control
PICTURE CONTROL
By segmenting categories,
EExx ppee rrtt11
and
EExx ppee rrtt22
fit, offering the optimal picture quality for users.
PICTURE
Aspect Ratio : 16:9
Picture Mode : Standard
Picture Mode : Standard
Intelligent Sensor
Vivid
• Backlight 80
Standard
Standard
• Contrast 70
Cinema
• Brightness 50
Sport
• Sharpness 60
Game
• Color 60
Expert1
• Tint 0
Expert2
Move
Enter
Vivid
Standard
Standard
Cinema
Sport
Game
Expert1
E
Expert2
(Only 50/60PG70FD)
1
PPII CCTTUURR EE
Select
.
2
PPii cc ttuurree MM oodd ee
Select
.
provide more categories which users can set as they see
Move
PICTURE
Screen(RGB-PC)
E
• Expert Control
• Expert Control
• Reset
Enter
Fresh Contrast
Noise Reduction
Gamma
Black Level
Real Cinema
Color Standard
White Balance
• Red Contrast
• Green Contrast
FF
Off
Off
Medium
High
Off
SD
128
128
E
GG
74
3
4
5
6
7
EExxppeerrtt 11
Select
EExxppeerrtt CCoo nn ttrroo ll
Select
or
Select your desired menu option.
Make appropriate adjustments.
Return to the previous menu.
Return to TV viewing.
EExxppeerrtt 22
.
.
■
White Balance
• Method
• Red Contrast
• Green Contrast
Medium
2 Points
128
128
E
OOnnllyy 5500//6600 PPGG7700****,,
44 22 // 44 77 // 55 22 LL GG 77 00 ** **
mmoodd ee llss
Page 77
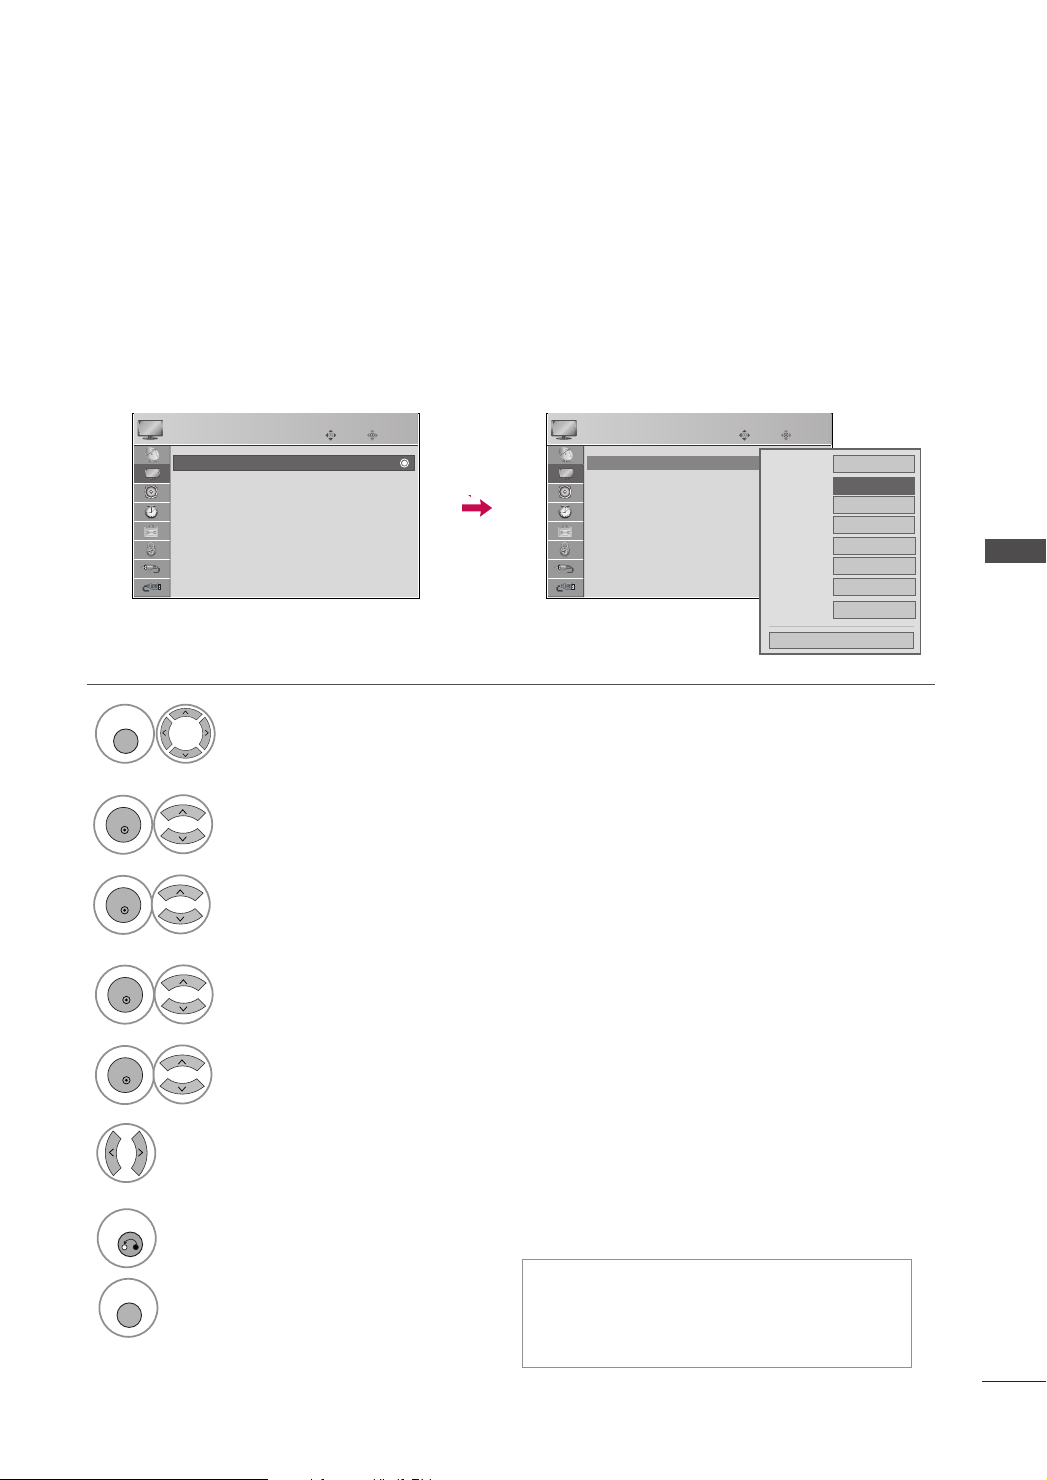
PICTURE IMPROVEMENT TECHNOLOGY
MENU
ENTER
ENTER
RETURN
MENU
ENTER
ENTER
Fresh Contrast: Optimizes the contrast automatically according to the brightness of the reflection.
Fresh Color: Adjusts the color of the reflection automatically to reproduce as close as possible natural colors.
Noise Reduction: Removes interference up to the point where it does not damage the original picture.
Gamma: High gamma values display whitish images and low gamma values display high contrast images.
2
3
1
4
PICTURE
Screen(RGB-PC)
Move
EE
• Advanced Control
• Advanced Control
• Reset
PPII CCTTUURR EE
Select
PPii cc ttuurree MM oodd ee
Select
EExxppeerrtt 11
Select
AAdd vv aanncc eedd CC oonnttrrooll
Select
Enter
.
EExxppeerrtt 22
or
.
.
.
PICTURE
Screen(RGB-PC)
• Advanced Control
• Advanced Control
• Reset
Move
Enter
Colo r Temperature
Fresh Contrast
Fresh Color
Noise Reduction
Gamma
Black Level
Eye Care
Real Cinema
FF
Close
Medium
On
On
Low
Medium
Low
Off
Off
GG
PICTURE CONTROL
7
5
6
FFrreess hh CCoo nn ttrraa sstt,,FFrreess hh CC oolloo rr
Select
Select your desired Source.
Return to the previous menu.
Return to TV viewing.
NNooiissee RRee dduu cc ttiioonn orGG aa mm mm aa
,,
■
FFrree sshh CCoonn ttrraass tt,,FFrree ss hh CCoolloo rr
RR eedduucc ttiioonn orGG aa mm mm aa
.
,,
can be adjusted at each
video mode except ‘THX Cinema’ by the above
method.
NN oo ii ssee
75
Page 78
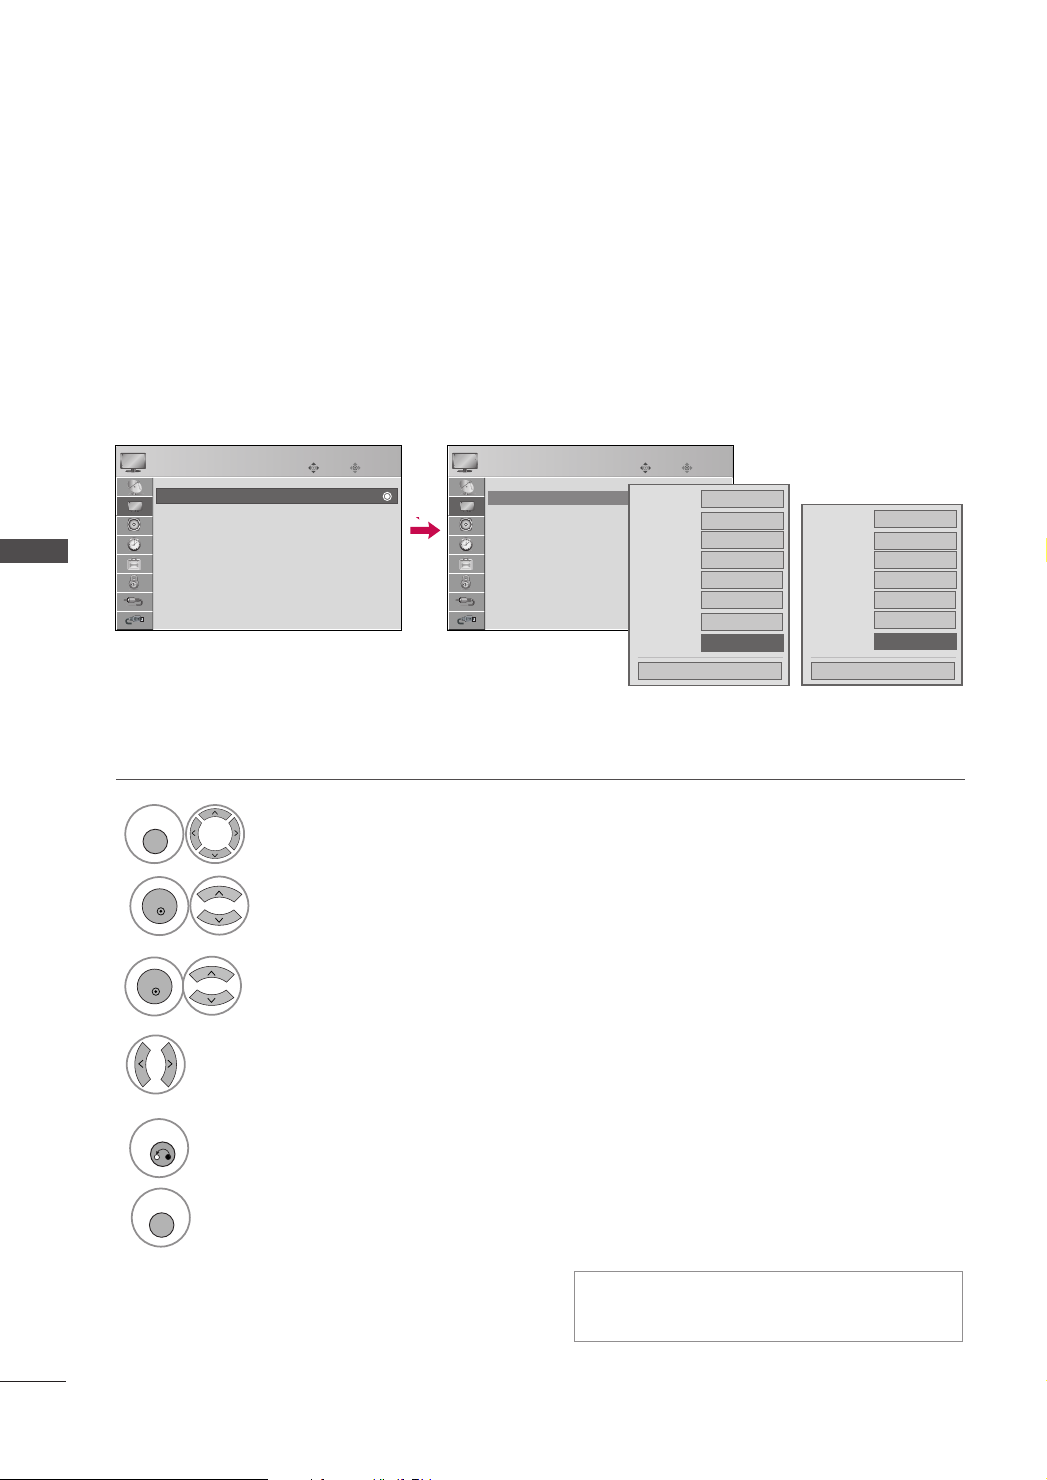
PICTURE CONTROL
MENU
ENTER
ENTER
RETURN
MENU
ADVANCED CONTROL - REAL CINEMA / FILM MODE
Set up the TV for the best picture appearance for viewing movies.
When you operate Real Cinema/Film Mode (3:2 Pull-Down Mode or Cinema Correction Mode), the TV will
adjust 24 fps video from movies to 30 fps video for display.
It’s not available to use this function in RGB-PC .
PICTURE CONTROL
1
2
3
4
PICTURE
Screen(RGB-PC)
Move
EE
• Advanced Control
• Advanced Control
• Reset
Select
Select
Select
FFiillmm MMoodd ee
OO nn
Select
Enter
PPII CCTTUURR EE
.
AAdd vv aanncc eedd CC oonnttrrooll
RR eeaall CC iinnee mm aa
(Only LCD TV models) or
(Only Plasma TV models).
OO ff ff
or
.
PICTURE
Screen(RGB-PC)
.
• Advanced Control
• Advanced Control
• Reset
Color Temperature
Fresh Contrast
Fresh Color
Noise Reduction
Gamma
Black Level
Eye Care
Real Cinema
Move
Enter
FF
Close
For LCD TV
Medium
On
On
Low
Medium
Low
Off
Off
GG
Color Temperature
Fresh Contrast
Fresh Color
Noise Reduction
Gamma
Black Level
Film Mode
For Plasma TV
FF
Close
Medium
On
On
Low
Medium
Low
Off
GG
76
5
Return to the previous menu.
Return to TV viewing.
■
FFiillmm MM ooddee
can be adjusted at each video mode
except ‘THX Cinema’ by the above method.
Page 79
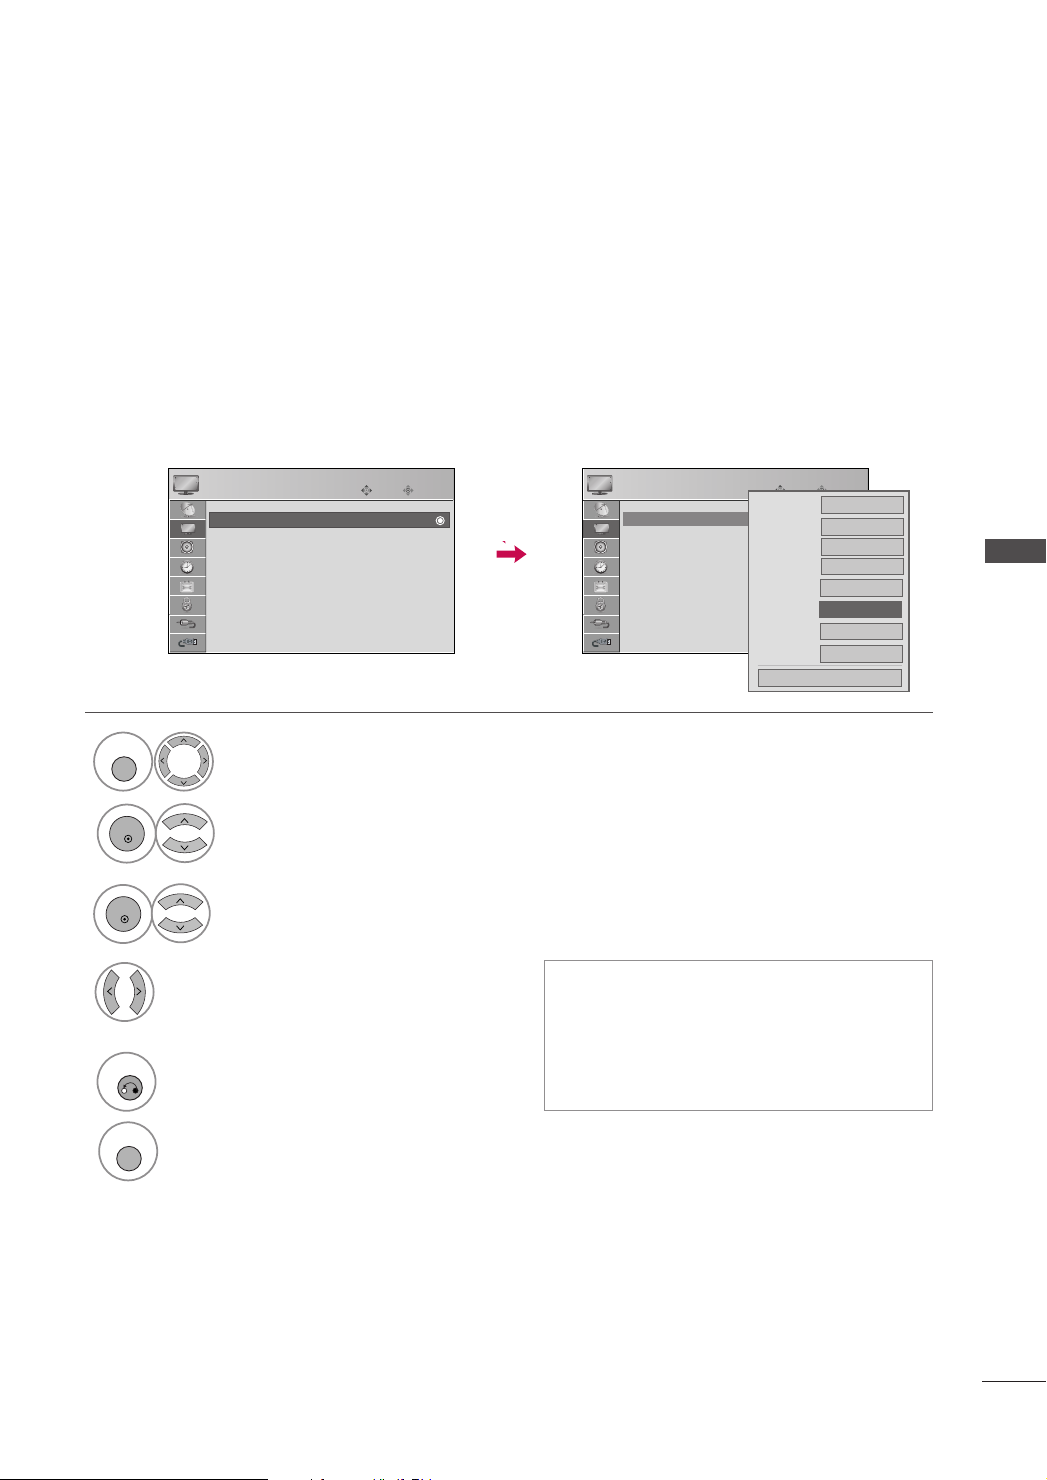
ADVANCED CONTROL - BLACK(DARKNESS) LEVEL
MENU
ENTER
ENTER
RETURN
MENU
Adjusting the contrast and the brightness of the screen using the black level of the screen.
It’s not available to use this function in DTV or RGB-PC .
1
2
3
4
5
Select
PICTURE
Screen(RGB-PC)
Select
Select
Select
LL oo ww
or
EE
• Advanced Control
• Advanced Control
• Reset
PPII CCTTUURR EE
AAdd vv aanncc eedd CC oonnttrrooll
BB llaa cc kk LLee vv eell
HH iigg hh
.
Return to the previous menu.
.
Move
.
Enter
PICTURE
Screen(RGB-PC)
• Advanced Control
• Advanced Control
• Reset
Move
Color Temperature
Fresh Contrast
Fresh Color
Noise Reduction
Gamma
Black Level
Eye Care
Real Cinema
FF
Close
Enter
Medium
Medium
On
On
Low
Low
Off
Off
PICTURE CONTROL
GG
.
LL oo ww
::
•
•
The reflection of the screen gets darker.
HH iigghh
::
The reflection of the screen gets
brighter.
■
BB llaa cc kk LL eevv eell
can be adjusted at each video
mode except ‘THX Cinema’ by the above
method.
Return to TV viewing.
77
Page 80
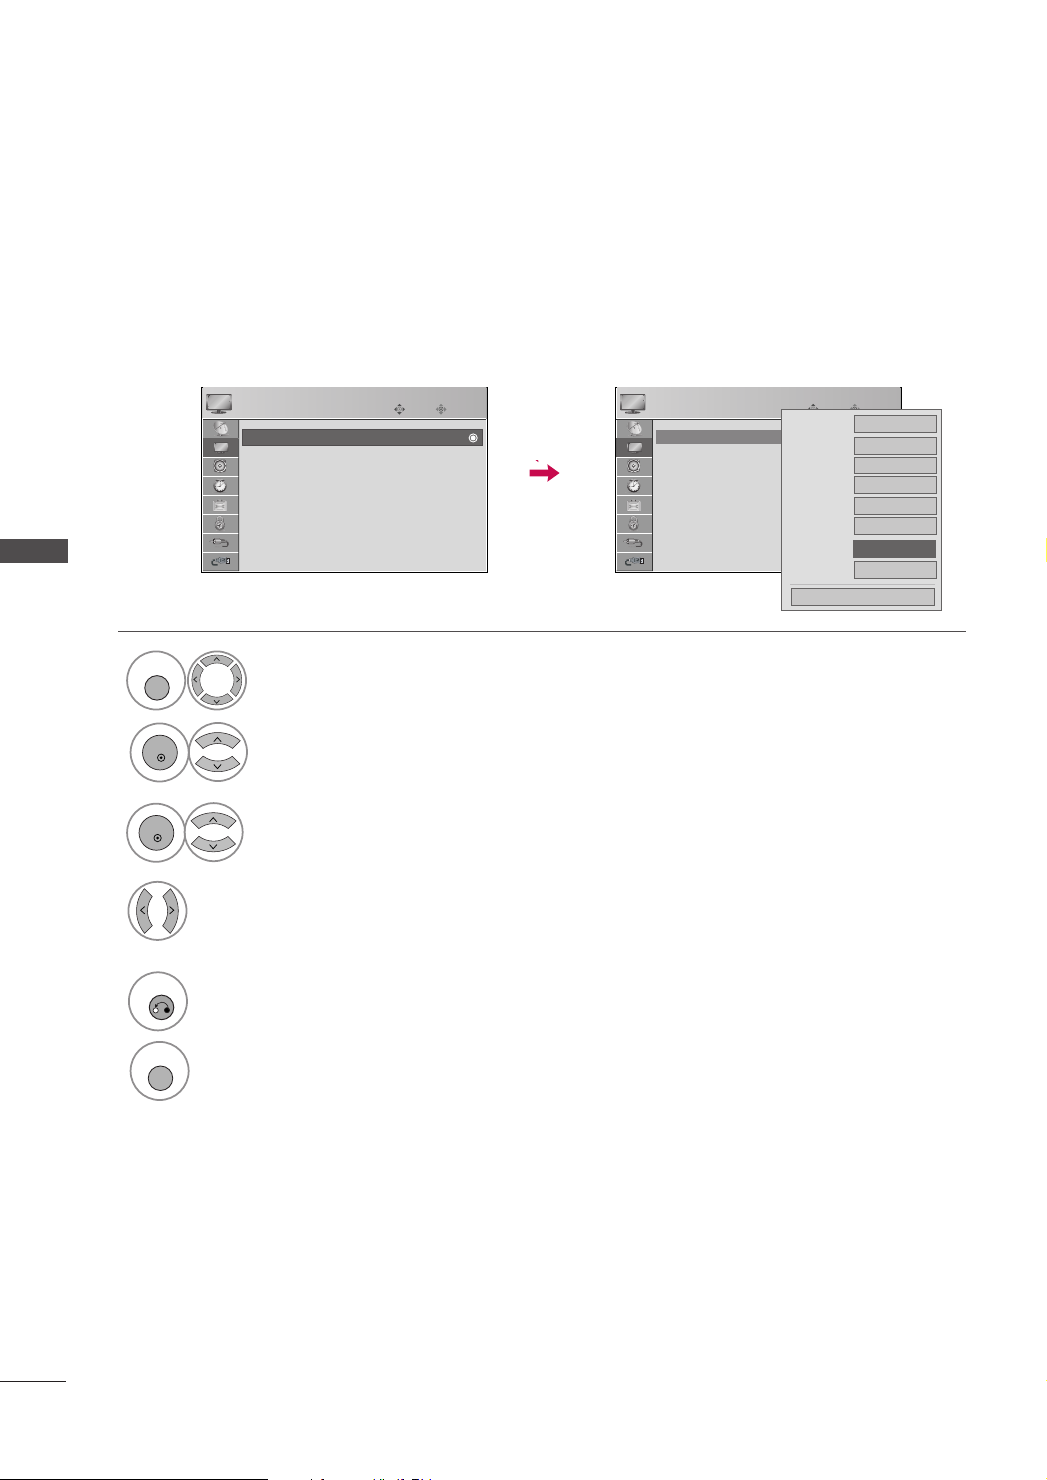
PICTURE CONTROL
MENU
ENTER
ENTER
RETURN
MENU
PICTURE CONTROL
ADVANCED CONTROL - EYE CARE
- Only LCD TV models
The Eye Care limits the brightness of the LCD.
It reduces the eye dazzling by lowering the backlight voltage to decrease the brightness if the APL(Average
Picture Level) is too high.
When selecting Picture Mode (Standard, Game and Sport), you can operate this function.
PICTURE
Screen(RGB-PC)
Move
EE
• Advanced Control
• Advanced Control
• Reset
Enter
PICTURE
Screen(RGB-PC)
• Advanced Control
• Advanced Control
• Reset
Move
Color Temperature
Fresh Contrast
Fresh Color
Noise Reduction
Gamma
Black Level
Eye Care
Real Cinema
FF
Close
Enter
Medium
On
On
Low
Medium
Low
Off
Off
1
PPII CCTTUURR EE
Select
.
2
AAdd vv aanncc eedd CC oonnttrrooll
Select
.
GG
5
3
4
EEyy ee CC aarree
Select
OO nn
Select
or
OO ffff
.
Return to the previous menu.
Return to TV viewing.
.
78
Page 81
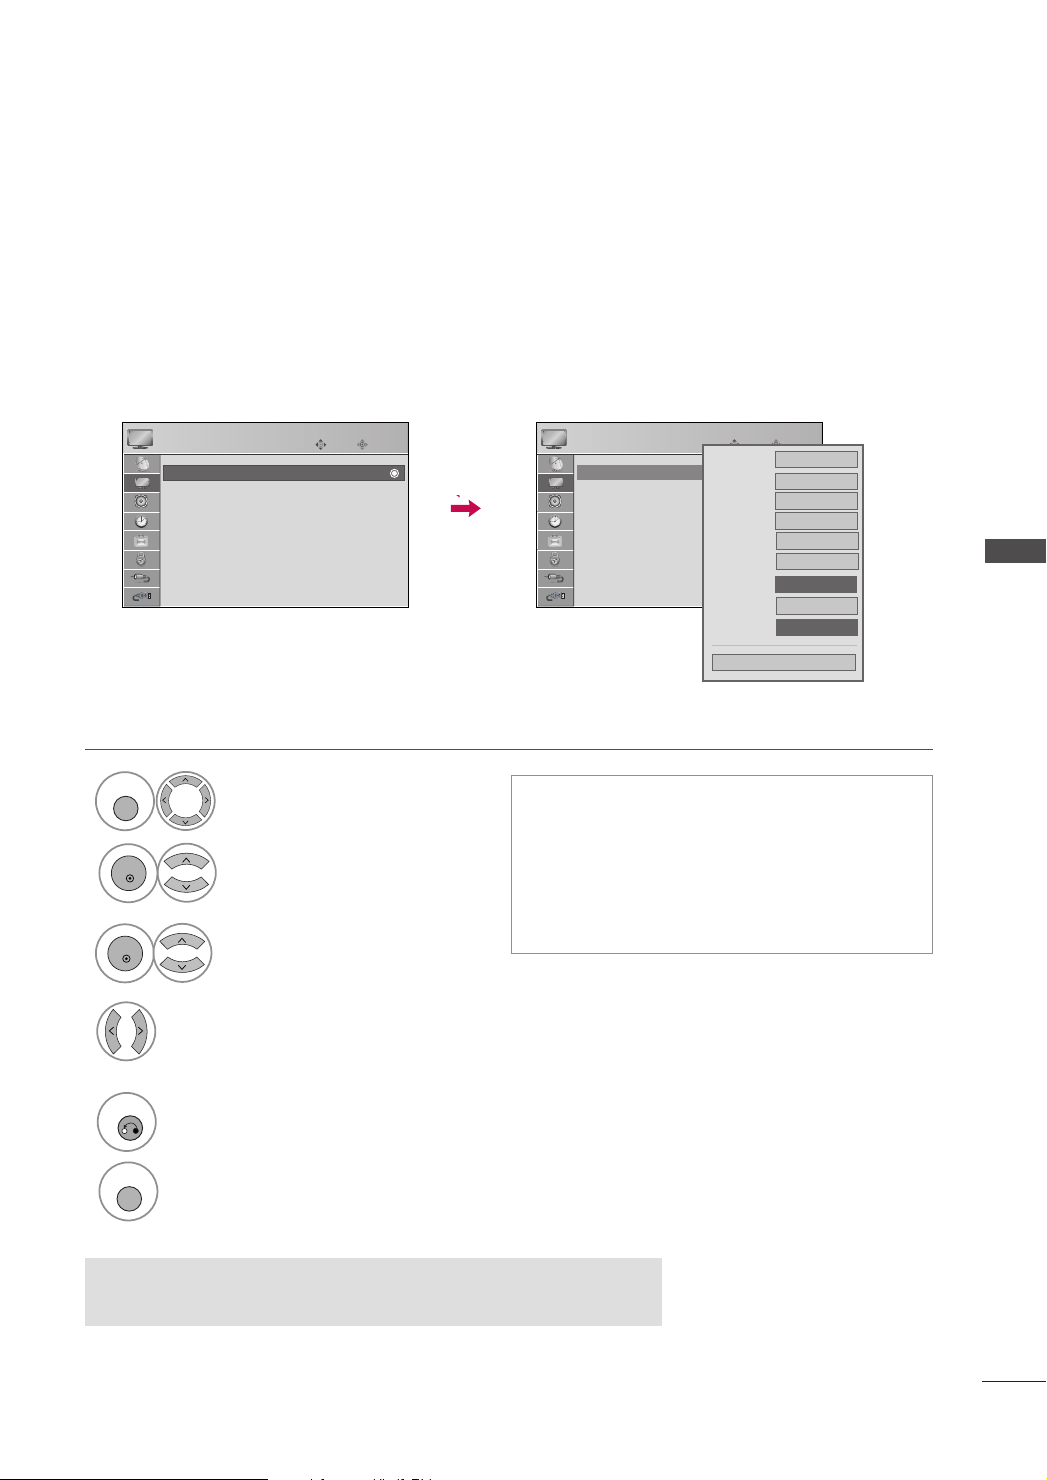
ADVANCED CONTROL - TRUMOTION
MENU
ENTER
ENTER
RETURN
MENU
42/47/52LG70**)
(Only
It is used for the best picture quality without any motion blur or judder when you enter a quick image or Film
Source.
This feature is disable in RGB-PC,HDMI-PC mode.
1
2
3
4
PICTURE
Screen(RGB-PC)
OO ff ff, LL oo ww
Select
Move
EE
• Advanced Control
• Advanced Control
• Reset
PPII CCTTUURR EE
Select
Enter
.
PICTURE
Screen(RGB-PC)
• High
Provides smoother picture movement.
• Low
Provides smooth picture movement. Use this set-
AAdd vv aanncc eedd CC oonnttrrooll
Select
.
ting for standard use.
• Off
Use this setting when "High" and "Low" setting
result in noise.
TT rruuMMoottiioo nn
Select
or
HHiigghh
.
.
Color Temperature
• Advanced Control
• Advanced Control
Fresh Contrast
• Reset
Fresh Color
Noise Reduction
Gamma
Black Level
Eye Care
Real Cinema
TruMotion
Move
Close
Enter
FF
FF
Medium
On
On
Low
Medium
Low
Off
Off
High
GG
GG
PICTURE CONTROL
5
Return to the previous menu.
Return to TV viewing.
• If you enable "TruMotion", noise may appear on the screen.
• If this occurs, set "TruMotion" to "Off".
79
Page 82
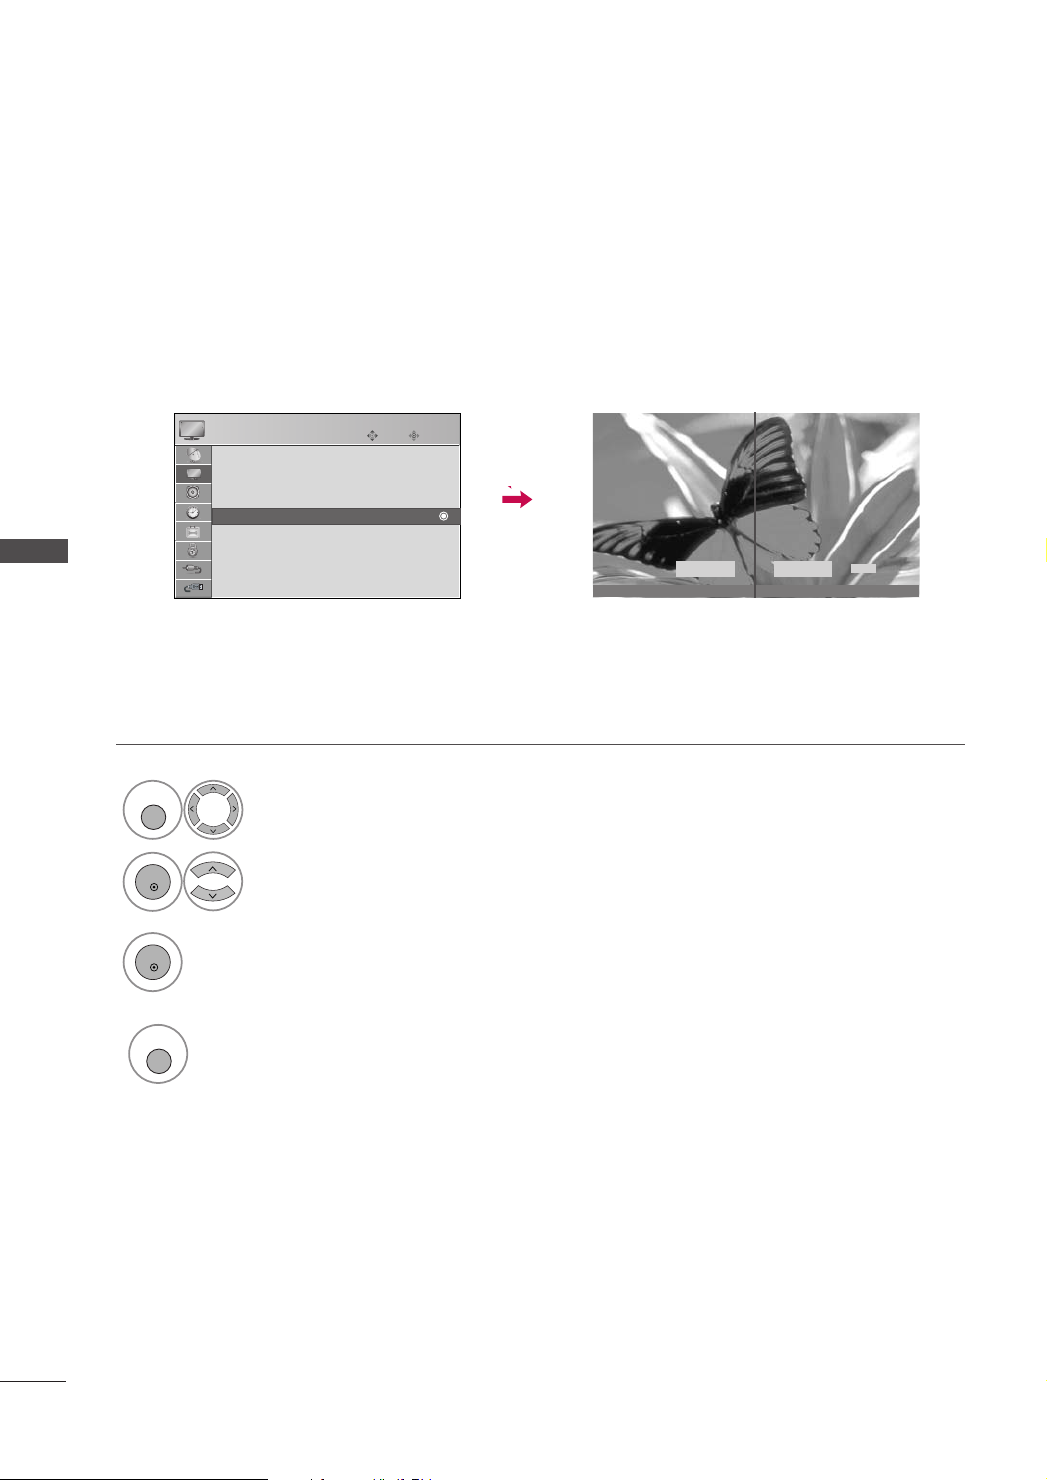
PICTURE CONTROL
MENU
ENTER
ENTER
MENU
TRUMOTION DEMO
(Only
42/47/52LG70**)
Use it to see the difference between TruMotion Demo on and TruMotion Demo off.
It’s not available to use this function in RGB[PC], HDMI[PC] mode.
PICTURE CONTROL
1
2
3
PICTURE
Screen(RGB-PC)
TruMotion Demo
TruMotion Demo
Display
E
• Advanced Control
• Reset
PPII CCTTUURR EE
Select
TTrruu MMoo ttiioonn DDee mmoo ..
Select
TTrruu MMoott iioo nn OOnn
Move
Enter
.
TTrruu MMoo ttiioonn OO ffff ..
or
On
TruMotion
LG’s Advanced TruMotion 100Hz technology provides ima LG’s Advanced TruMotion 100Hz technology provides im
TruMotion
RETURN
Off
Exit
80
4
TTrruu MMoo ttiioo nn DDeemm oo
Stop
.
Page 83
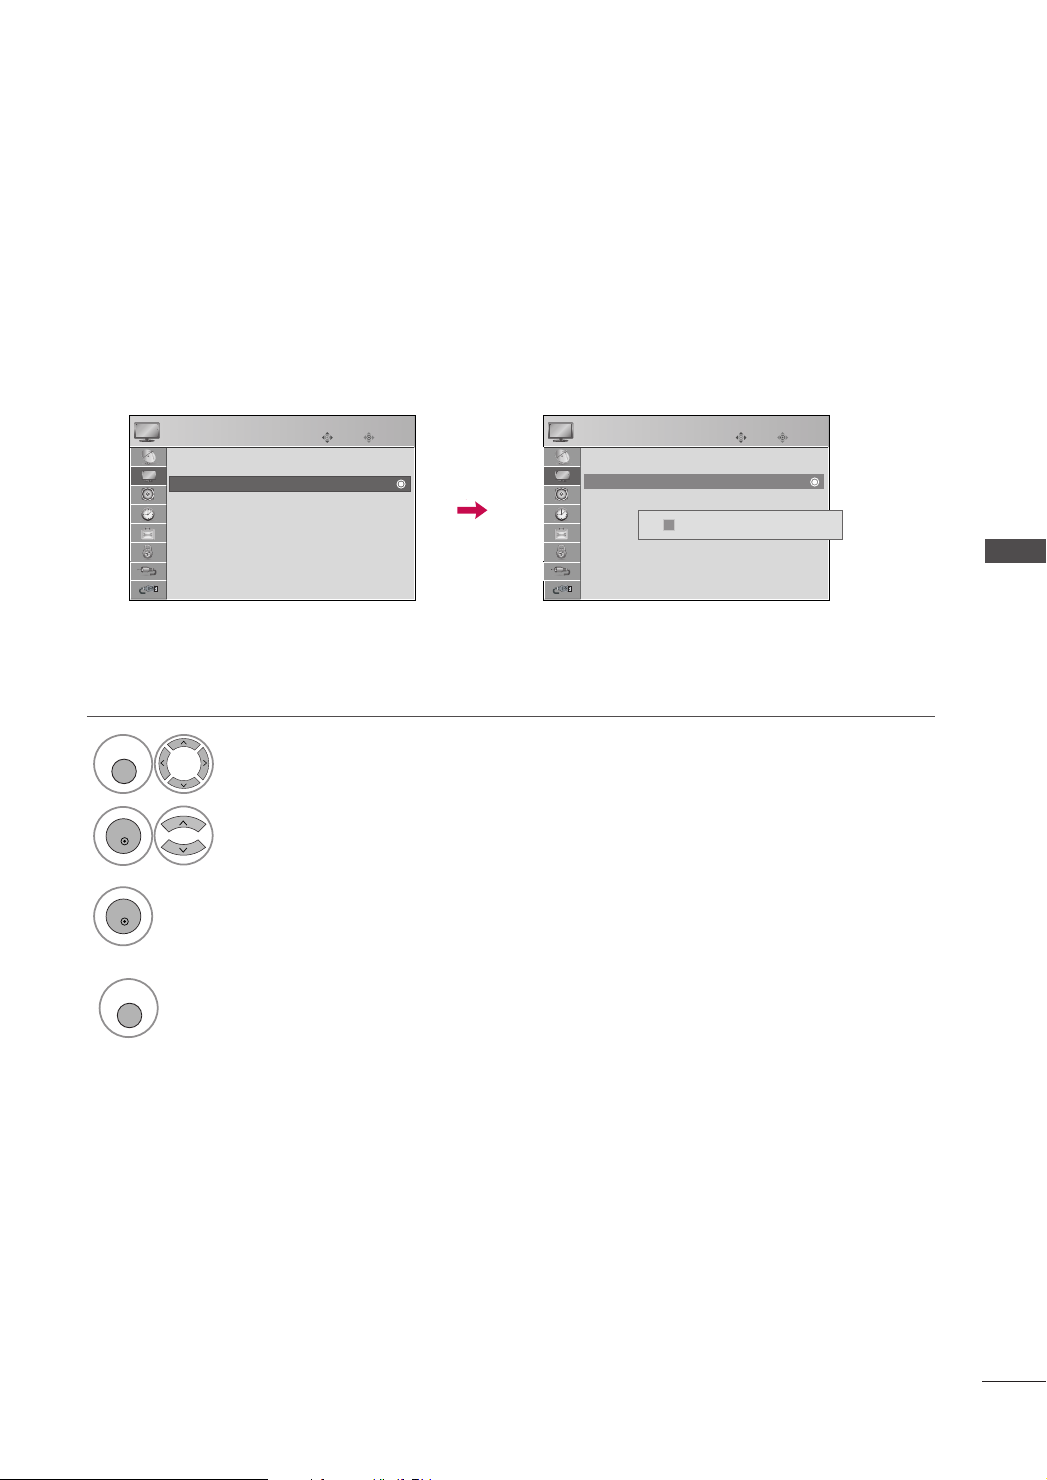
PICTURE RESET
MENU
ENTER
ENTER
MENU
Use to quickly reset selected Picture menu options to their original factory preset values.
In THX Cinema mode, this function is disabled.
1
2
3
4
PICTURE
Screen(RGB-PC)
• Advanced Control
• Reset
• Reset
Select
Select
Move
EE
PPII CCTTUURR EE
RR eess ee tt
.
Initialize the adjusted value.
Return to TV viewing.
.
Enter
PICTURE
Screen(RGB-PC)
Move
Enter
• Advanced Control
• Reset
• Reset
ii
Resetting video configuration...
PICTURE CONTROL
81
Page 84
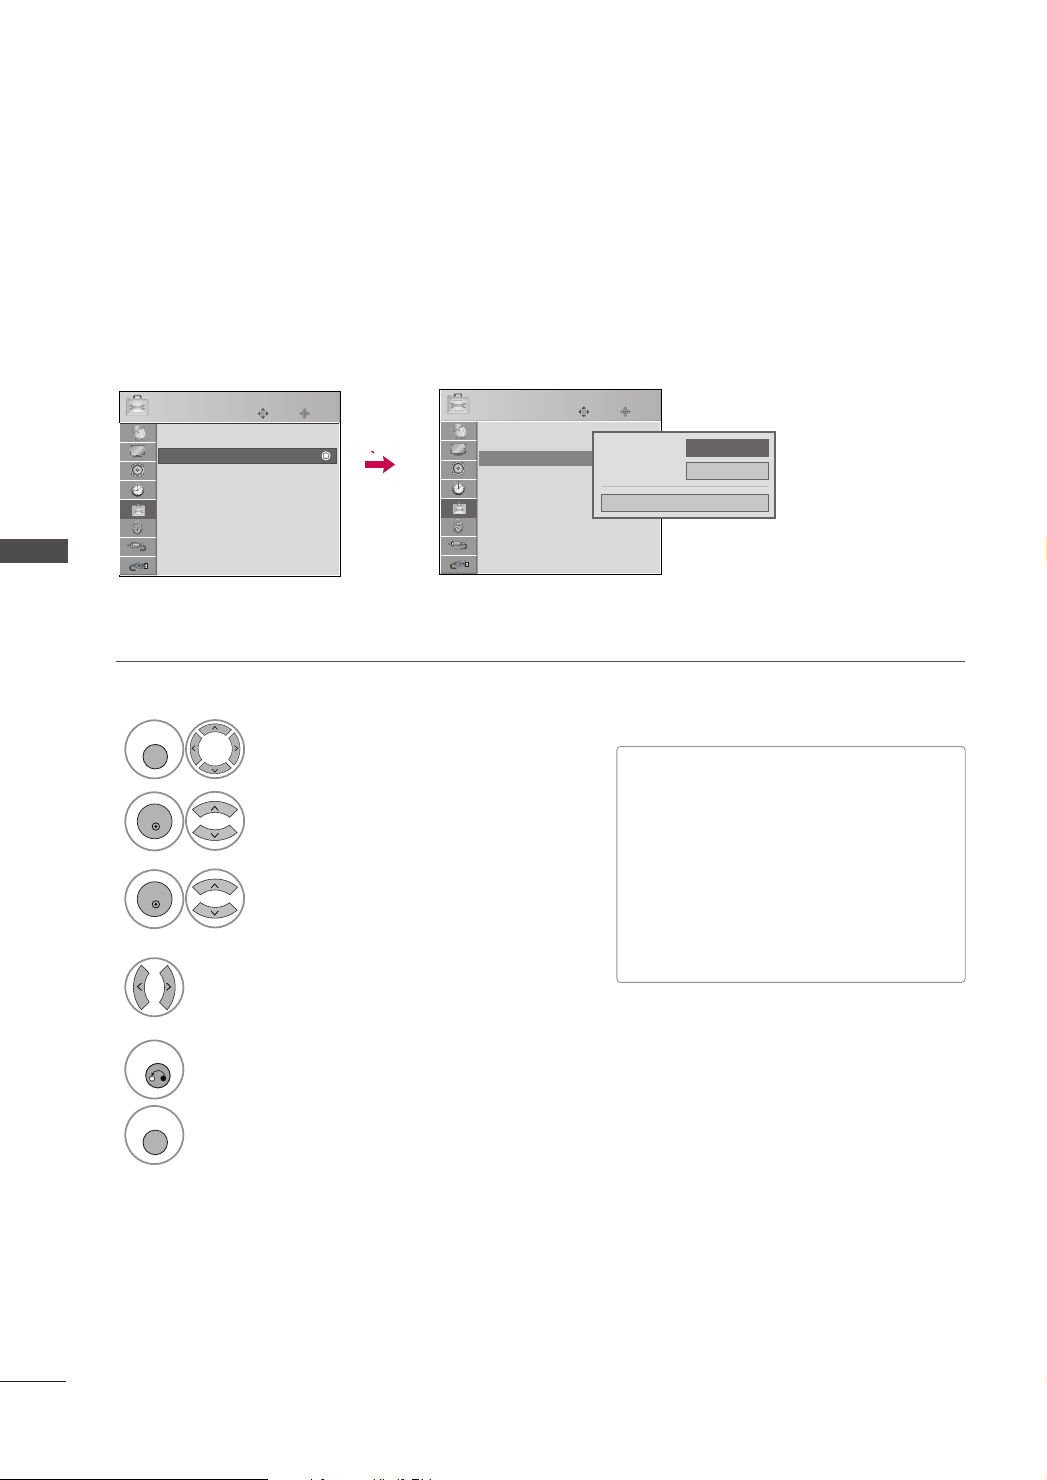
PICTURE CONTROL
MENU
ENTER
ENTER
RETURN
MENU
PICTURE CONTROL
POWER INDICATOR -
Only 32/37/42/47/52LG50**
It helps you adjust the brightness of moving LED and sound when power is turned on.
OPTION
Set ID : 1
Power Indicator
Power Indicator
Initial Setting
E
Move
Enter
OPTION
Set ID : 1
Power Indicator
Power Indicator
Initial Setting
E
Move
Enter
Standby Light
Power Light
Close
FF
On
GG
On
1
OOPPTTII OONN
2
3
4
Select
PPoowweerr II nn ddiiccaa ttoorr
Select
SS ttaa nn ddbb yy LL iigghhtt
Select
PPoowweerr LLiigg hh tt
Select your desired options.
.
■
SS ttaannddbbyy LL iigghhtt
Power Button LED will turn red in Stand
.
By mode.
■
PPoowweerr LL iigghhtt
: If you select “On”, the
screen will turn on and the brightness will
or
.
go down 50%.
If you switch off, Blue LED
(32/37/42/47/52LG50**) will gradually
dim out and Red LED will turn on.
: If you select “On”, the
82
5
Return to the previous menu.
Return to TV viewing
Page 85
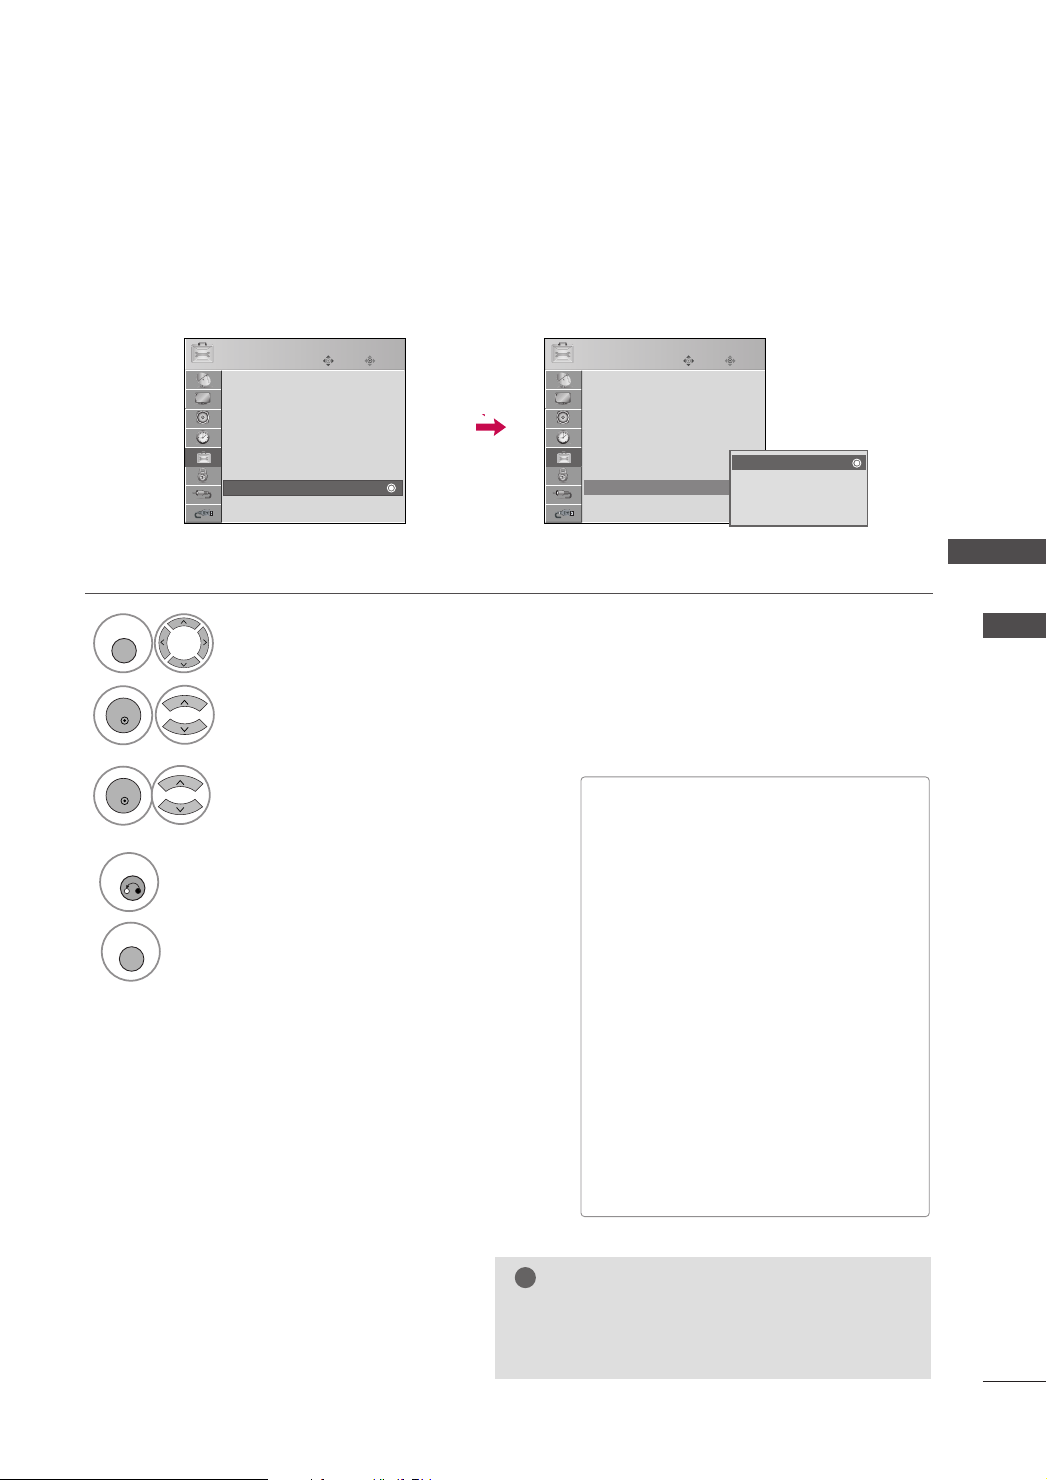
IMAGE STICKING MINIMIZATION (ISM) METHOD -
MENU
ENTER
ENTER
RETURN
MENU
!
Only Plasma TV
A frozen still picture from a PC/video game displayed on the screen for prolonged periods will result in a ghost
image. Use our unique method to minimize any fixed image on the screen.
1
2
3
4
OPTION
Language : English
Input Label
Schedule List
SIMPLINK : On
Key Lock : Off
Caption : Off
ISM Method : Normal
ISM Method : Normal
Power Saving : Level 0
Select
Select
Select
WWhhii ttee wwaa ss hh ..
or
Move
Enter
E
OOPPTTII OONN
.
II SSMM MM ee tthhoo dd
NNoo rrmm aall,, OOrrbbiitteerr,, IInn vv eerrssiioonn
Return to the previous menu.
Return to TV viewing.
OPTION
Language : English
Input Label
Schedule List
SIMPLINK : On
Key Lock : Off
Caption : Off
ISM Method : Normal
ISM Method : Normal
Power Saving : Level 0
Move
Enter
Normal
Normal
Orbiter
Inversion
E
White wash
PICTURE CONTROL
.
■
NNoo rrmm aa ll
problem, ISM is not necessary - set to
Normal.
■
OO rrbbiittee rr
ghost images. However, it is best not to
allow any fixed image to remain on the
screen. To avoid a ghost image on the
screen, the image will move every 2 minutes.
■
II nn vv ee rrss iioo nn
invert the plasma display panel color
every 30 minutes.
■
WWhhiittee WWaa sshh
ghost images from the screen. Use sparingly. Watch the TV normally for a while
before using this feature to see if the
ghost image disappears on its own.
: If image sticking is never a
: Orbiter may help prevent
: Inversion will automatically
: White Wash removes
SOUND
& LAN-
GUAGE
NOTE
An excessive ghosted image may be impossible to
GG
clear entirely with White Wash. To return to normal viewing, press the any button.
83
Page 86
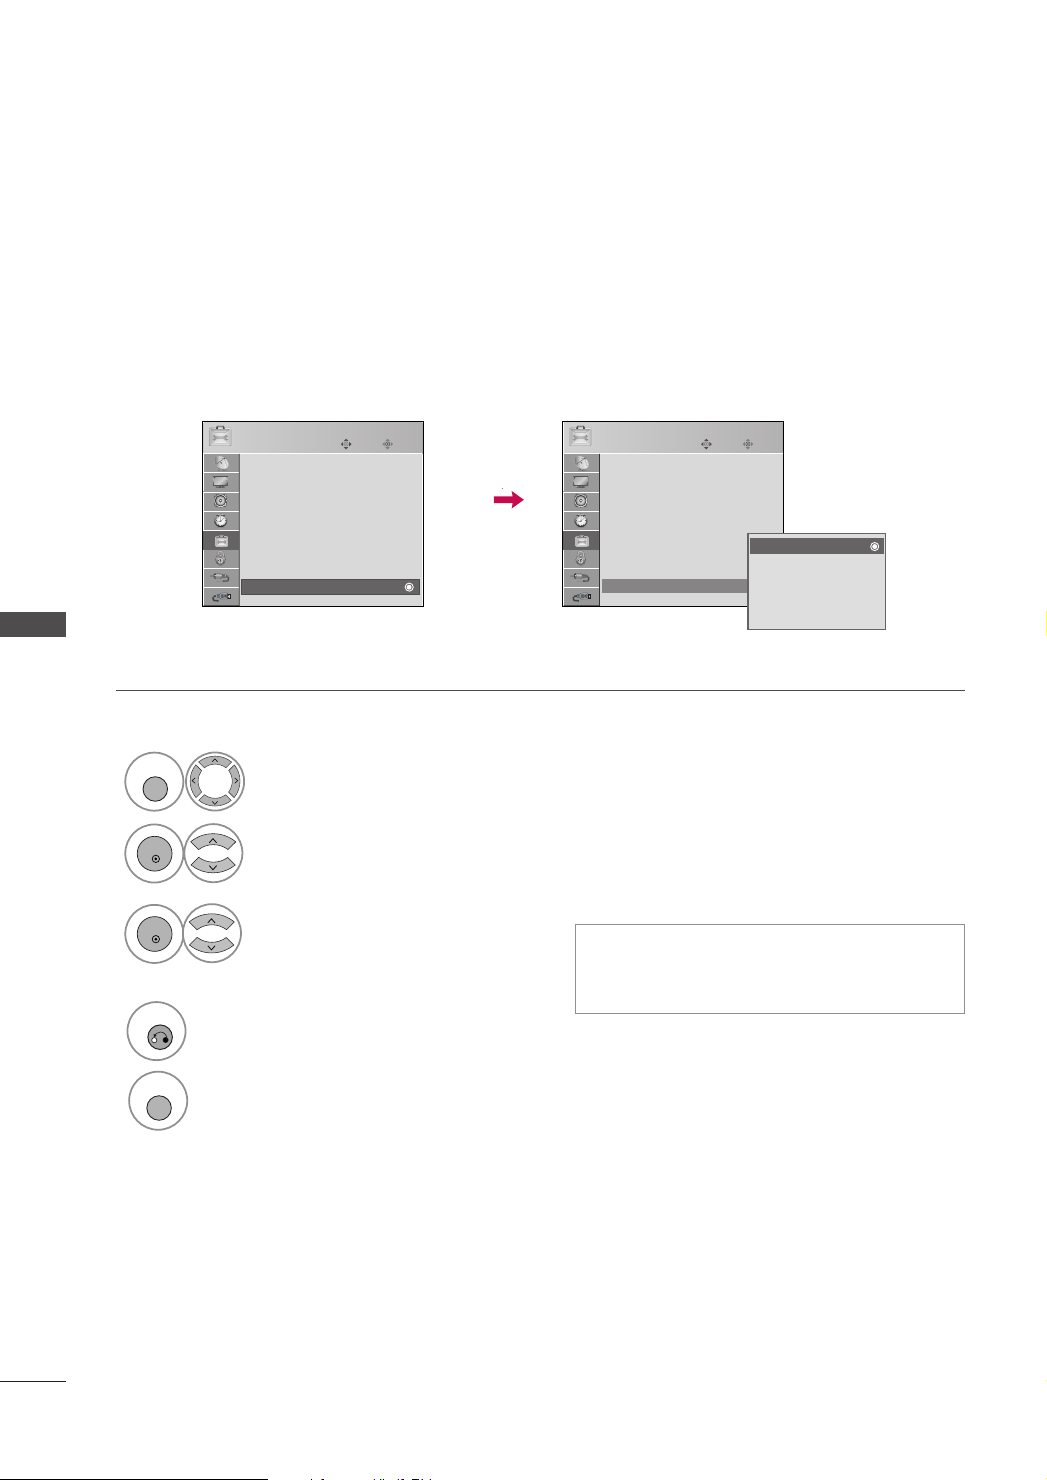
MENU
ENTER
ENTER
RETURN
MENU
PICTURE CONTROL
SOUND & LANGUAGE CONTROL
SOUND & LANGUAGE CONTROL
POWER SAVING PICTURE MODE -
Only Plasma TV
This function allows you to reduce the power consumption of the set.
OPTION
Language : English
Input Label
Schedule List
SIMPLINK : On
Key Lock : Off
Caption : Off
ISM Method : Normal
Power Saving : Level 0
Power Saving : Level 0
Move
Enter
E
OPTION
Language : English
Input Label
Schedule List
SIMPLINK : On
Key Lock : Off
Caption : Off
ISM Method : Normal
Power Saving : Level 0
Power Saving : Level 0
1
OOPPTTII OONN
Select
.
Move
Enter
Level 0
Level 0
Level 1
Level 2
E
Level 3
Level 4
2
3
4
PPoowweerr SSaa vviinn gg
Select
LL eevvee ll 00,, LL eevveell 11,, LL eevveell 22,,
Select
LL eevvee ll 33 orLL eevvee ll 44
.
Return to the previous menu.
Return to TV viewing.
.
■
Level 0 = Level 1 > Level 2 > Level 3 > Level 4
■
You can also adjust
MMee nnuu
.
PPoowweerr SSaa vv iinn gg
in the
QQ ..
84
Page 87
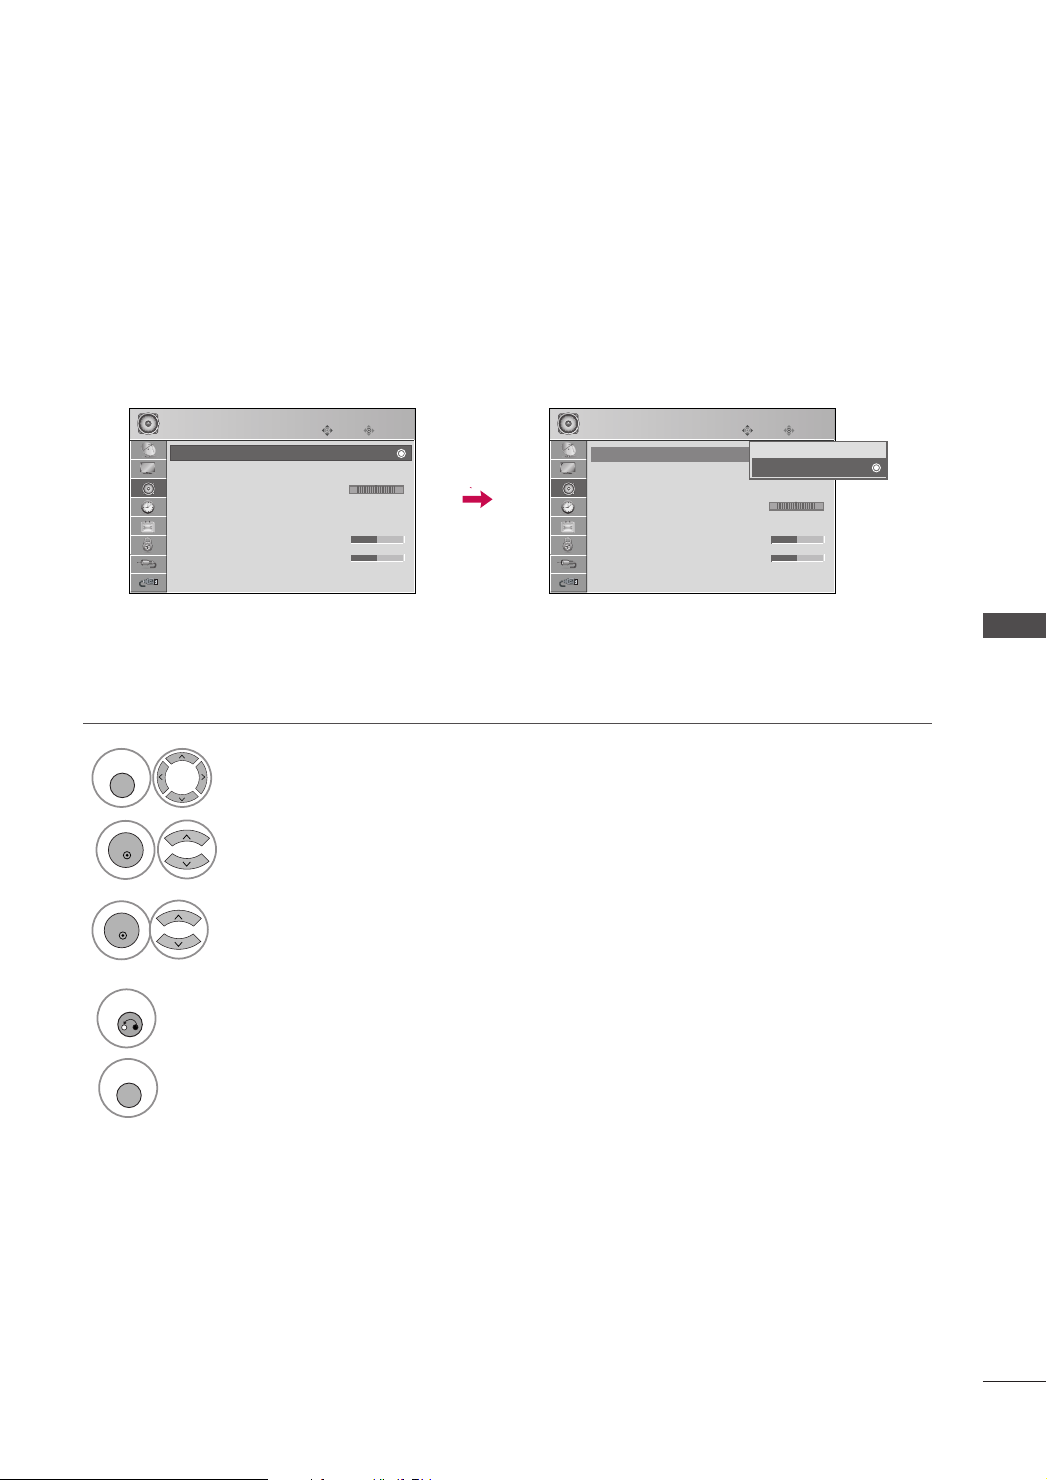
SOUND & LANGUAGE CONTROL
MENU
ENTER
ENTER
RETURN
MENU
AUTO VOLUME LEVELER
(AUTO VOLUME)
Auto Volume makes sure that the volume level remains consistent whether you are watching a commercial or a
regular TV program.
1
AUDIO
Auto Volume : Off
Auto Volume : Off
Clear Voice : On
Balance 0
Sound Mode : Standard
• SRS TruSurround XT : On
• Treble 0
• Bass 0
• Reset
E
AAUU DD IIOO
Select
Move
Enter
LR
.
AUDIO
Auto Volume : Off
Auto Volume : Off
Clear Voice : On
Balance 0
Sound Mode : Standard
• SRS TruSurround XT : On
• Treble 0
• Bass 0
• Reset
Move
Enter
Off
On
On
LR
E
SOUND & LANGUAGE CONTROL
2
3
4
AAuuttoo VVoo lluu mm ee
Select
OO nn
Select
or
OO ff ff
.
Return to the previous menu.
Return to TV viewing.
.
85
Page 88
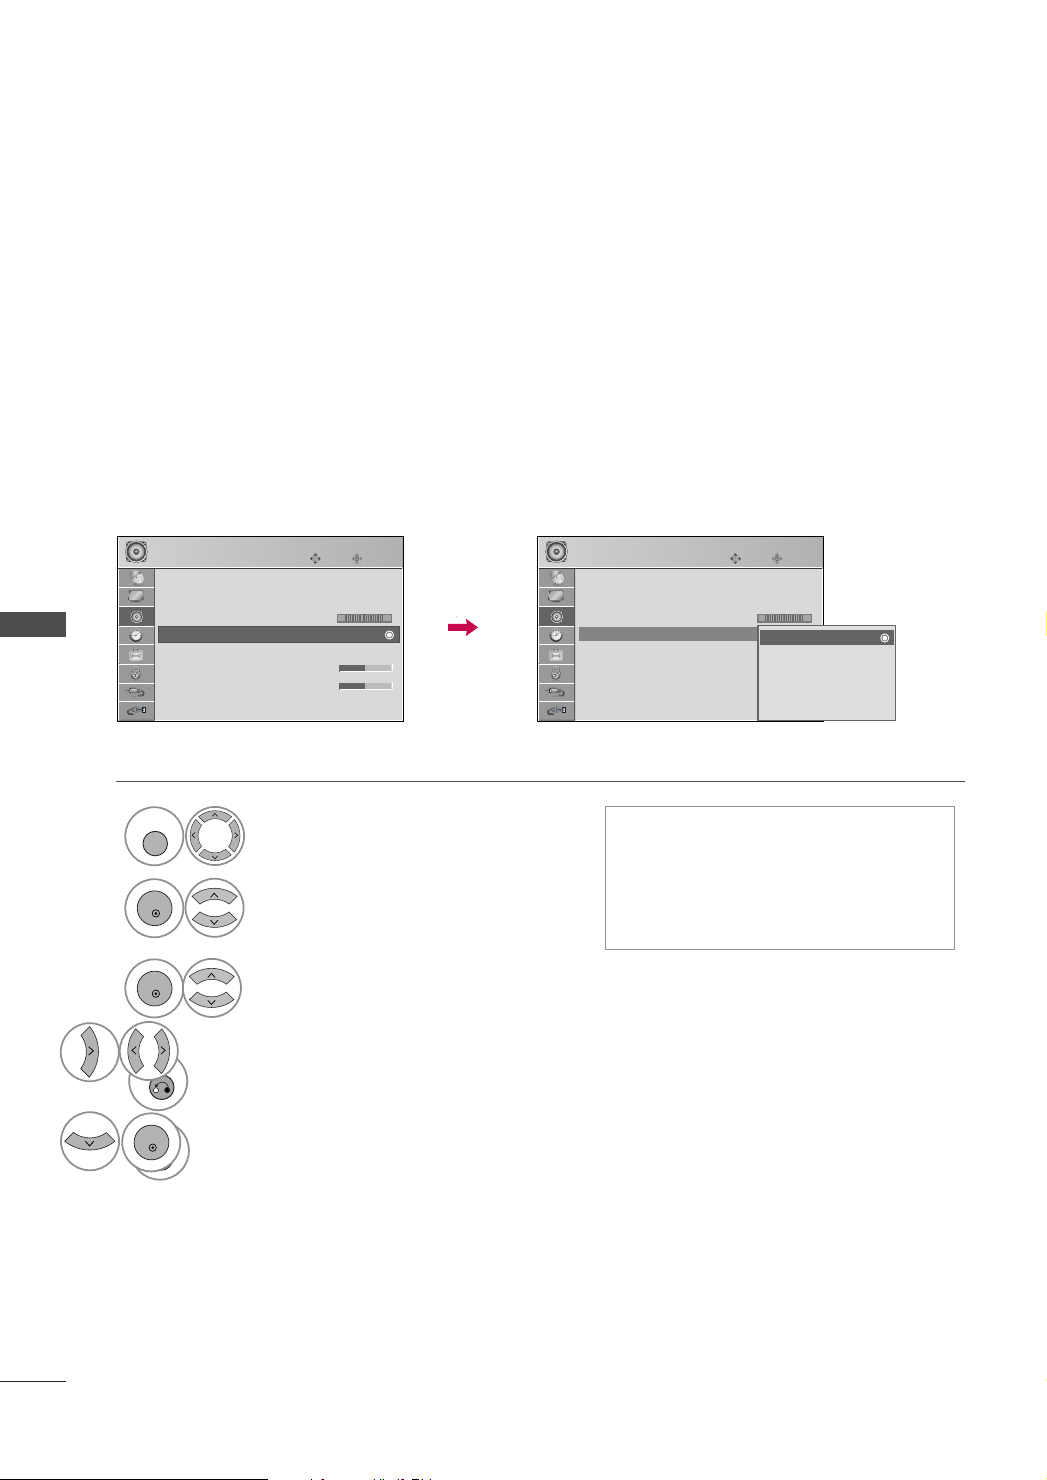
SOUND & LANGUAGE CONTROL
MENU
ENTER
ENTER
RETURN
MENU
ENTER
PRESET SOUND SETTINGS (SOUND MODE)
Sound Mode lets you enjoy the best sound without any special adjustment because the TV sets the appropriate sound options based on the program content.
SS ttaanndd aa rrdd, MM uu ss ii cc, CC iinn ee mmaa, SS ppoo rrtt
adjustable.
and
GGaa mm ee
are preset for good sound quality at the factory and are not
SOUND & LANGUAGE CONTROL
3
4
AUDIO
Auto Volume : Off
Clear Voice : On
Balance 0
Sound Mode Standard
Sound Mode : Standard
1
2
3
4
Make appropriate adjustments.
SS RRSS TTrruuSSuurrrroouunndd XX TT ::
(
Return to the previous menu.
Select
Return to TV viewing.
Move
LR
• SRS TruSurround XT : On
• Treble 0
• Bass 0
• Reset
E
AAUU DD IIOO
Select
SS oouunndd MM oodd ee
Select
SS ttaa nnddaarrdd,, MM uu ss iicc ,, CCiinnee mmaa ,, SS ppoorrtt
Select
CC lloo ssee
to confirm it.
Enter
.
.
Select
OO ff ff
or
OO nn
AUDIO
Auto Volume : Off
Clear Voice : On
Balance 0
Sound Mode : Standard
Sound Mode : Standard
■
You can also adjust
the
■
Press the
select the appropriate sound setup.
(Only 42/50PG30* )
GGaa mm ee
or
.)
Move
LR
Standard
• SRS TruSurround XT : On
• Treble 0
• Bass 0
• Reset
E
QQ.. MMeennuu
SSOOUUNNDD
Standard
Music
Cinema
Sport
Game
.
button repeatedly to
.
Enter
SS oouunndd MM oodd ee
in
86
Page 89
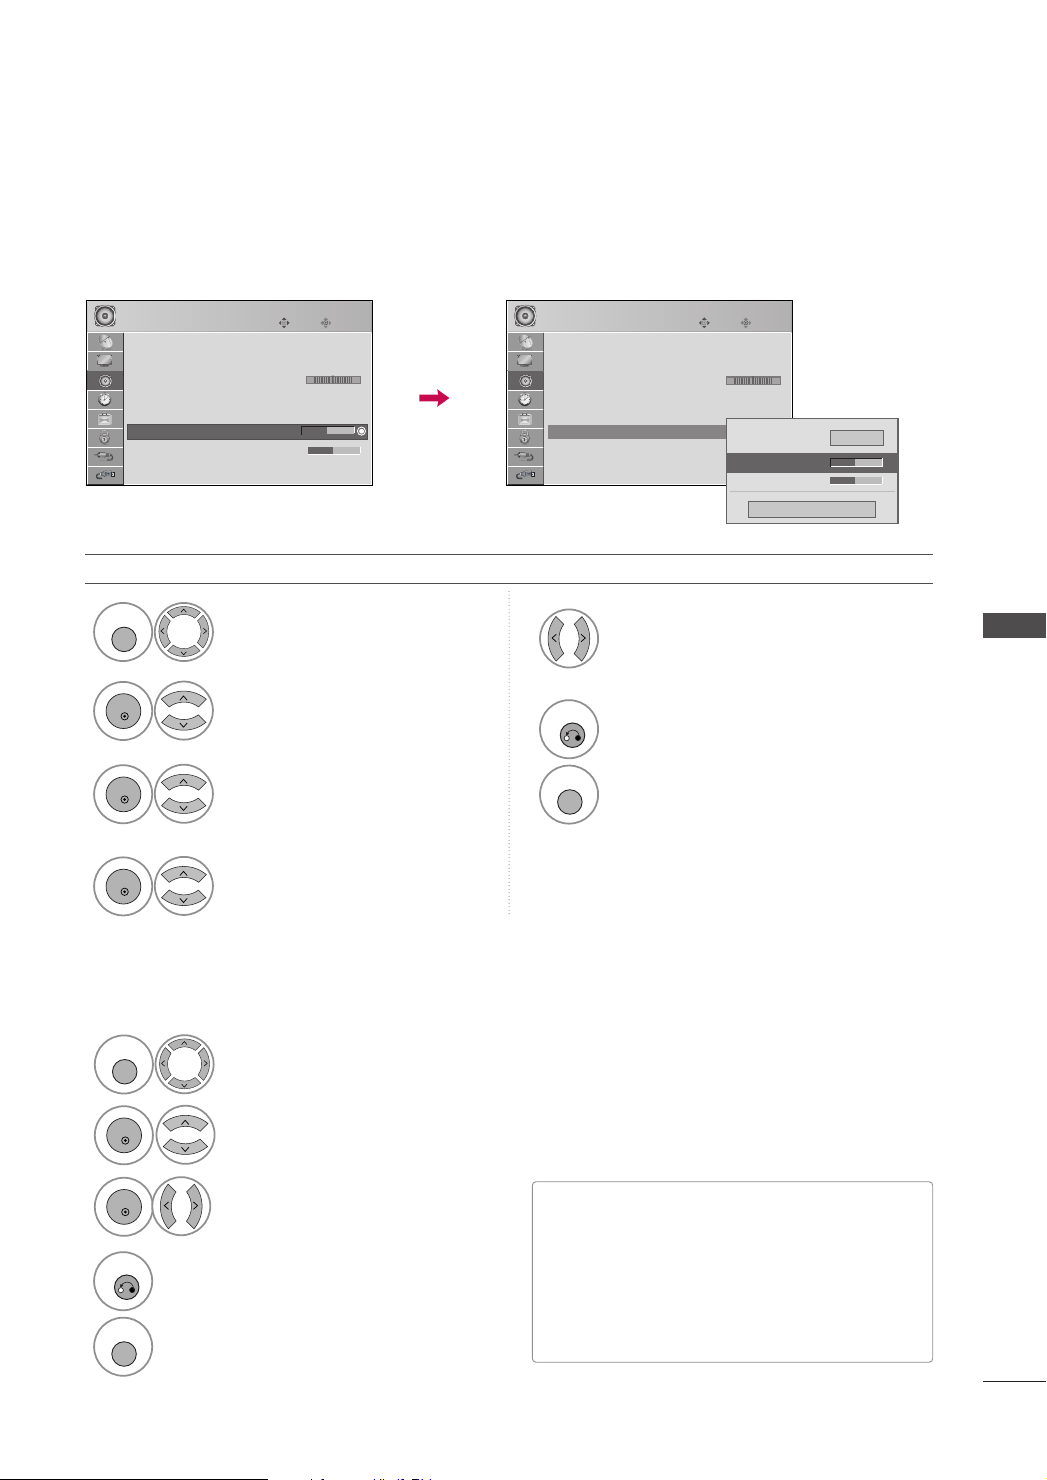
SOUND SETTING ADJUSTMENT (USER MODE)
MENU
ENTER
ENTER
ENTER
MENU
ENTER
ENTER
RETURN
MENU
RETURN
MENU
Adjust the sound to suit your taste and room situations.
AUDIO
Auto Volume : Off
Clear Voice : On
Balance 0
Sound Mode : Standard
1
2
3
4
Move
LR
• SRS TruSurround XT : On
• Treble 50
• Treble 0
• Bass 50
• Reset
E
AAUU DD IIOO
Select
SS oouunndd MM oodd ee
Select
SS ttaa nn ddaa rrdd, MM uu ssiicc
Select
CC iinnee mmaa, SS pp oorrtt
TTrreebbllee
Select
Enter
.
or
, or
BB aass ss
.
GGaa mm ee
.
AUDIO
Auto Volume : Off
Clear Voice : On
Balance 0
Sound Mode : Standard
• SRS TruSurround XT : On
• Treble 50
• Treble 0
• Bass 50
• Reset
Move
Enter
LR
Close
Off
EE
EE
SRS TruSurround XT
E
Treble 50
Bass 50
5
Make appropriate adjustments.
SOUND & LANGUAGE CONTROL
6
Return to the previous menu.
,
.
Return to TV viewing
SRS TRUSURROUND XT
1
2
3
4
Return to the previous menu.
Return to TV viewing
AAUU DD IIOO
Select
SS RRSS TT rruuSSuurrrroo uu nndd XXTT
Select
OO nn
Select
or
.
OO ff ff
.
■
SS RRSS TT rruuSS uu rrrroouunn dd XXTT
: Takes advantage of
any multi-channel format without needing to
add extra speakers or equipment. Dialog clarity,
bass enrichment, and the addition of stereo
audio enhancement produces an immersive
sound experience from standard stereo material.
87
Page 90
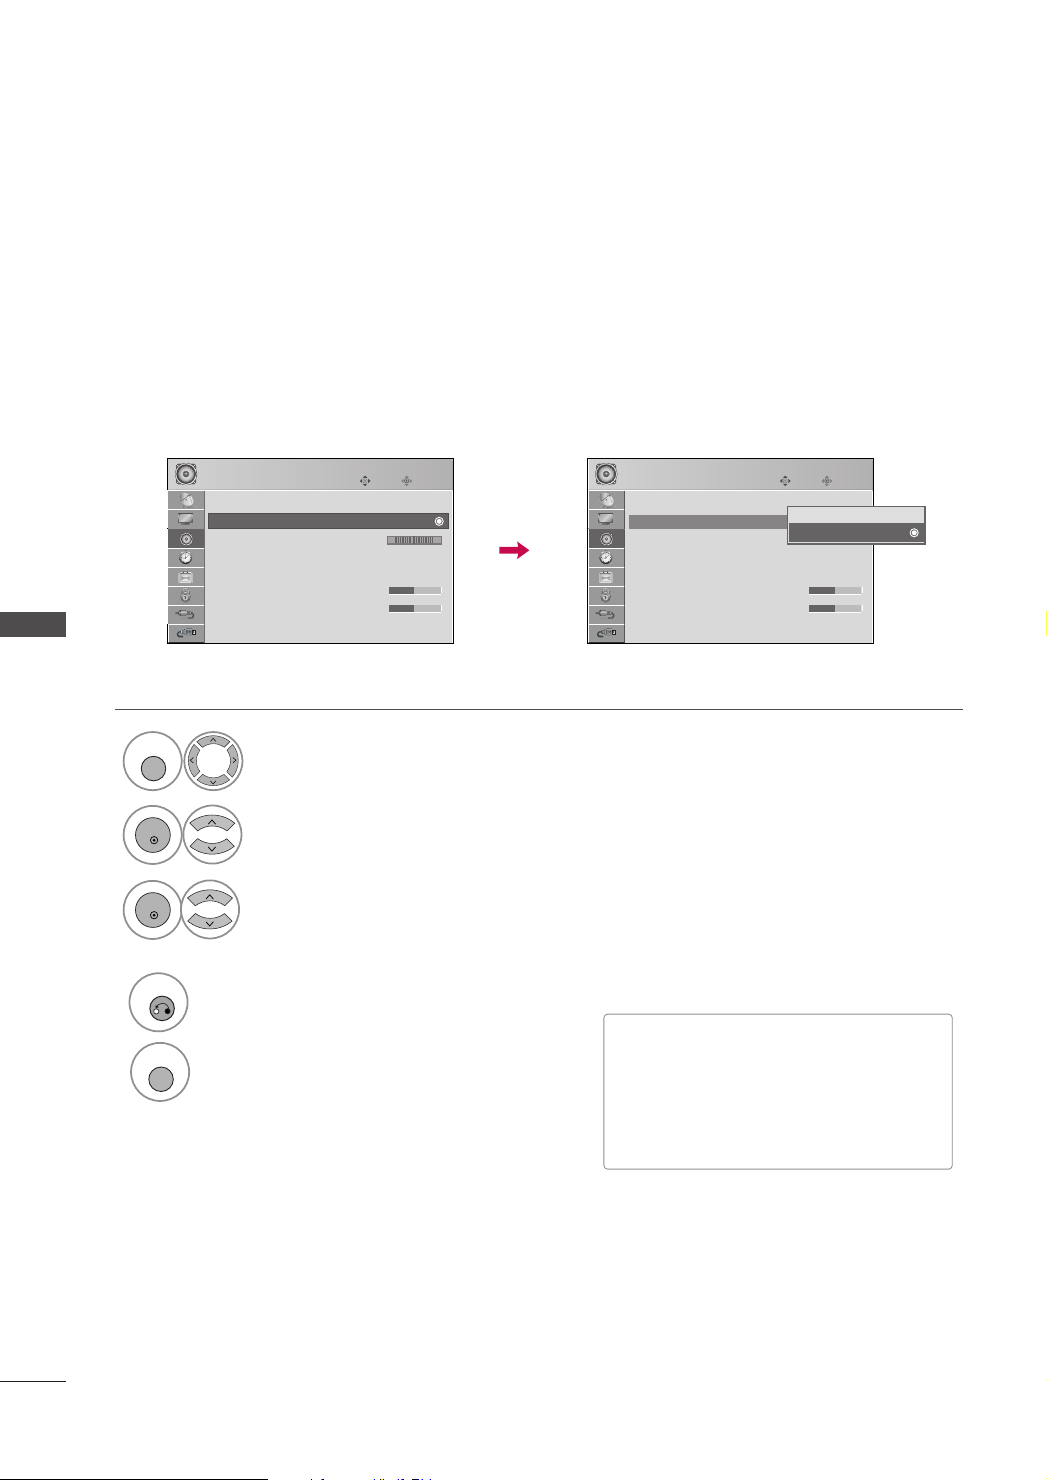
SOUND & LANGUAGE CONTROL
MENU
ENTER
ENTER
RETURN
MENU
CLEAR VOICE
By differentiating the human sound range from others, it improves the sound quality of voices.
SOUND & LANGUAGE CONTROL
1
2
3
4
AUDIO
Auto Volume : Off
Clear Voice : Off
Clear Voice : On
Balance 0
Sound Mode : Standard
• SRS TruSurround XT : On
• Treble 0
• Bass 0
• Reset
Select
Select
Select
Move
LR
E
AAUU DD IIOO
.
CC lleeaa rr VV ooiiccee
OO nn
OO ff ff
or
.
Return to the previous menu.
Return to TV viewing.
Enter
AUDIO
Auto Volume : Off
Clear Voice : On
Clear Voice : Off
Balance 0
Sound Mode : Standard
• SRS TruSurround XT : On
• Treble 0
• Bass 0
• Reset
Move
Enter
Off
On
On
LR
E
.
■
If you select “
TTrruuSSuurrrroo uu nn dd XXTT
CC lleeaa rr VV ooiicc ee --OOnn
feature will not
”,
SS RR SS
work.
■
You can also adjust
QQ --MMee nnuu
menu.
CC lleeaa rr VVoo iicc ee
in the
88
Page 91
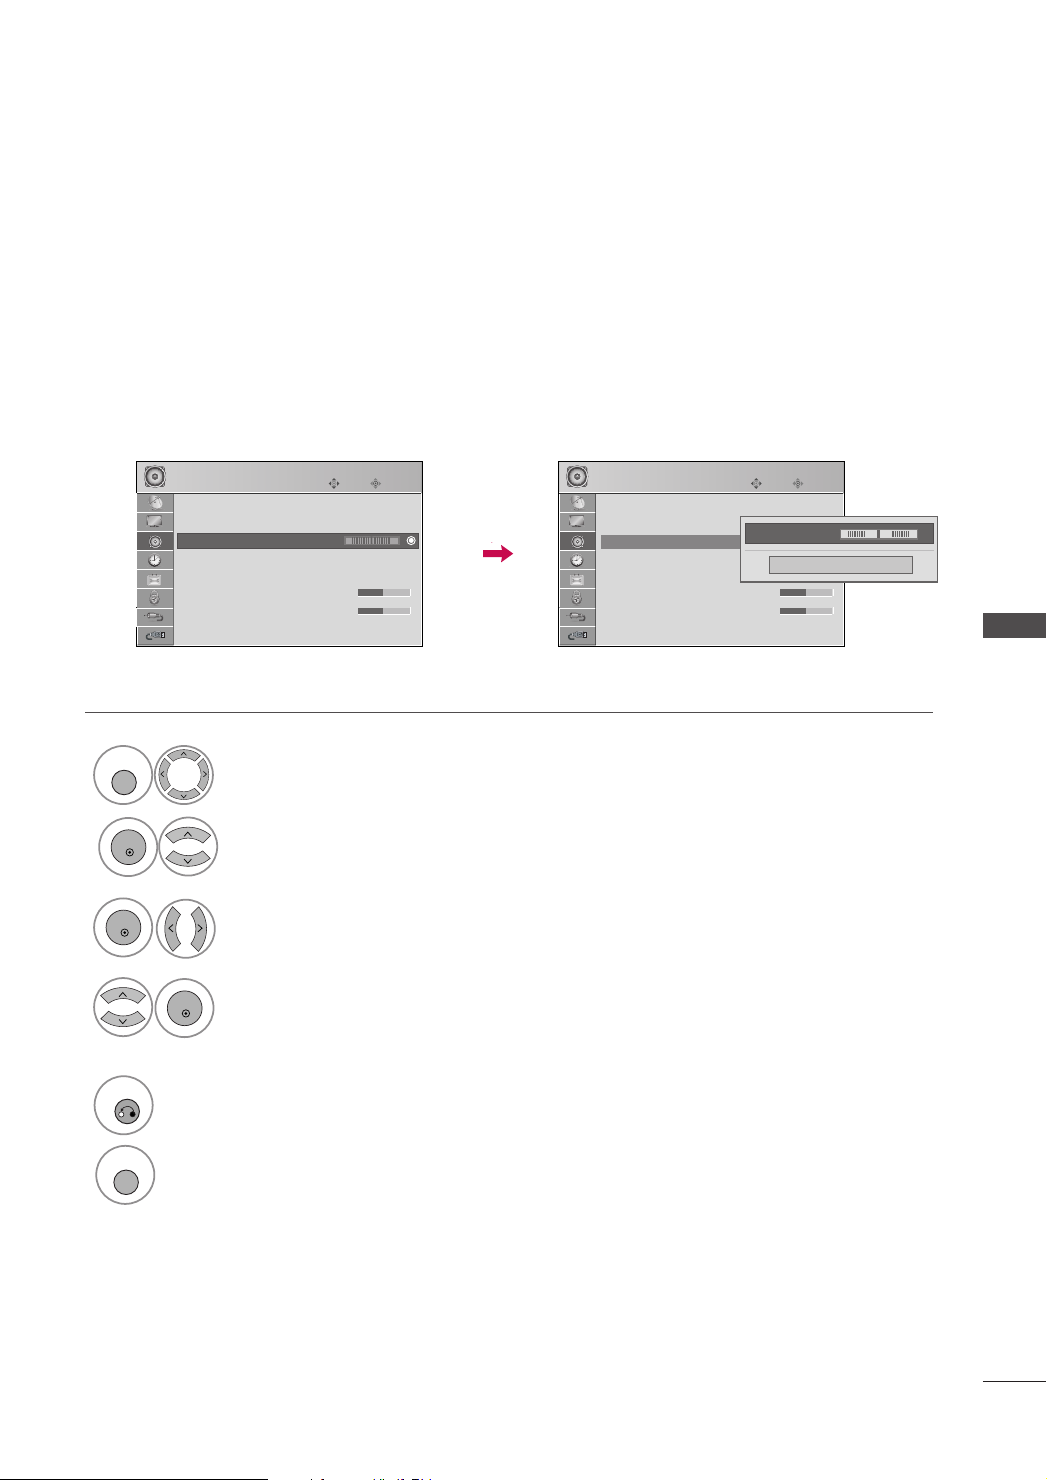
BALANCE
MENU
ENTER
ENTER
ENTER
RETURN
MENU
Adjust the left/right sound of speaker to suit your taste and room situations.
1
2
3
4
AUDIO
Auto Volume : Off
Clear Voice : On
Balance 0
Balance 0
Sound Mode : Standard
• SRS TruSurround XT : On
• Treble 0
• Bass 0
• Reset
E
AAUU DD IIOO
Select
BBaa llaa nn cc ee
Select
Make appropriate adjustments.
CC lloo ssee
Select
Move
Enter
LR
.
.
to confirm it.
AUDIO
Auto Volume : Off
Clear Voice : On
Balance 0
Balance 0
Sound Mode : Standard
• SRS TruSurround XT : On
• Treble 0
• Bass 0
• Reset
E
Move
Enter
Balance 0
LR
LR
LR
FF GG
Close
SOUND & LANGUAGE CONTROL
5
Return to the previous menu.
Return to TV viewing.
89
Page 92
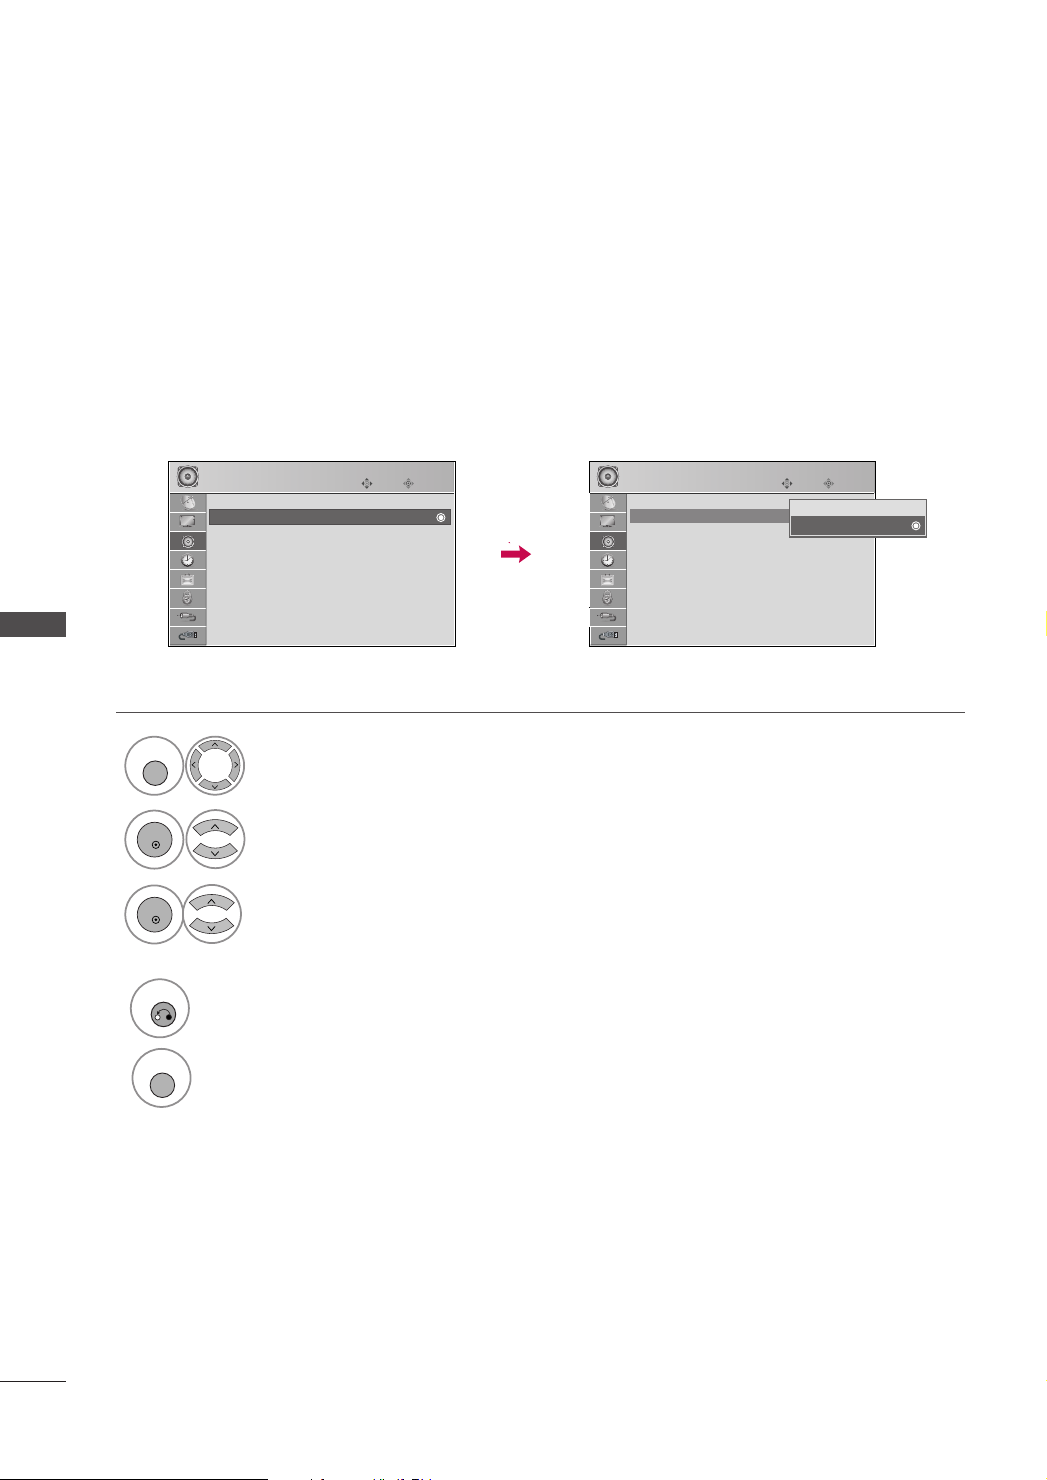
SOUND & LANGUAGE CONTROL
MENU
ENTER
ENTER
RETURN
MENU
TV SPEAKERS ON/ OFF SETUP
Turn the TV speakers off if using external audio equipment.
Feature turns the TV Speakers option On or Off.
SOUND & LANGUAGE CONTROL
1
2
3
4
AUDIO
TV Speaker : Off
Select
Select
Select
Move
E
AAUU DD IIOO
.
TTVV SSpp eeaa kk eerr
OO nn
OO ff ff
or
.
Return to the previous menu.
Enter
AUDIO
TV Speaker : Off
Move
Off
On
Enter
On
E
.
90
Return to TV viewing.
Page 93
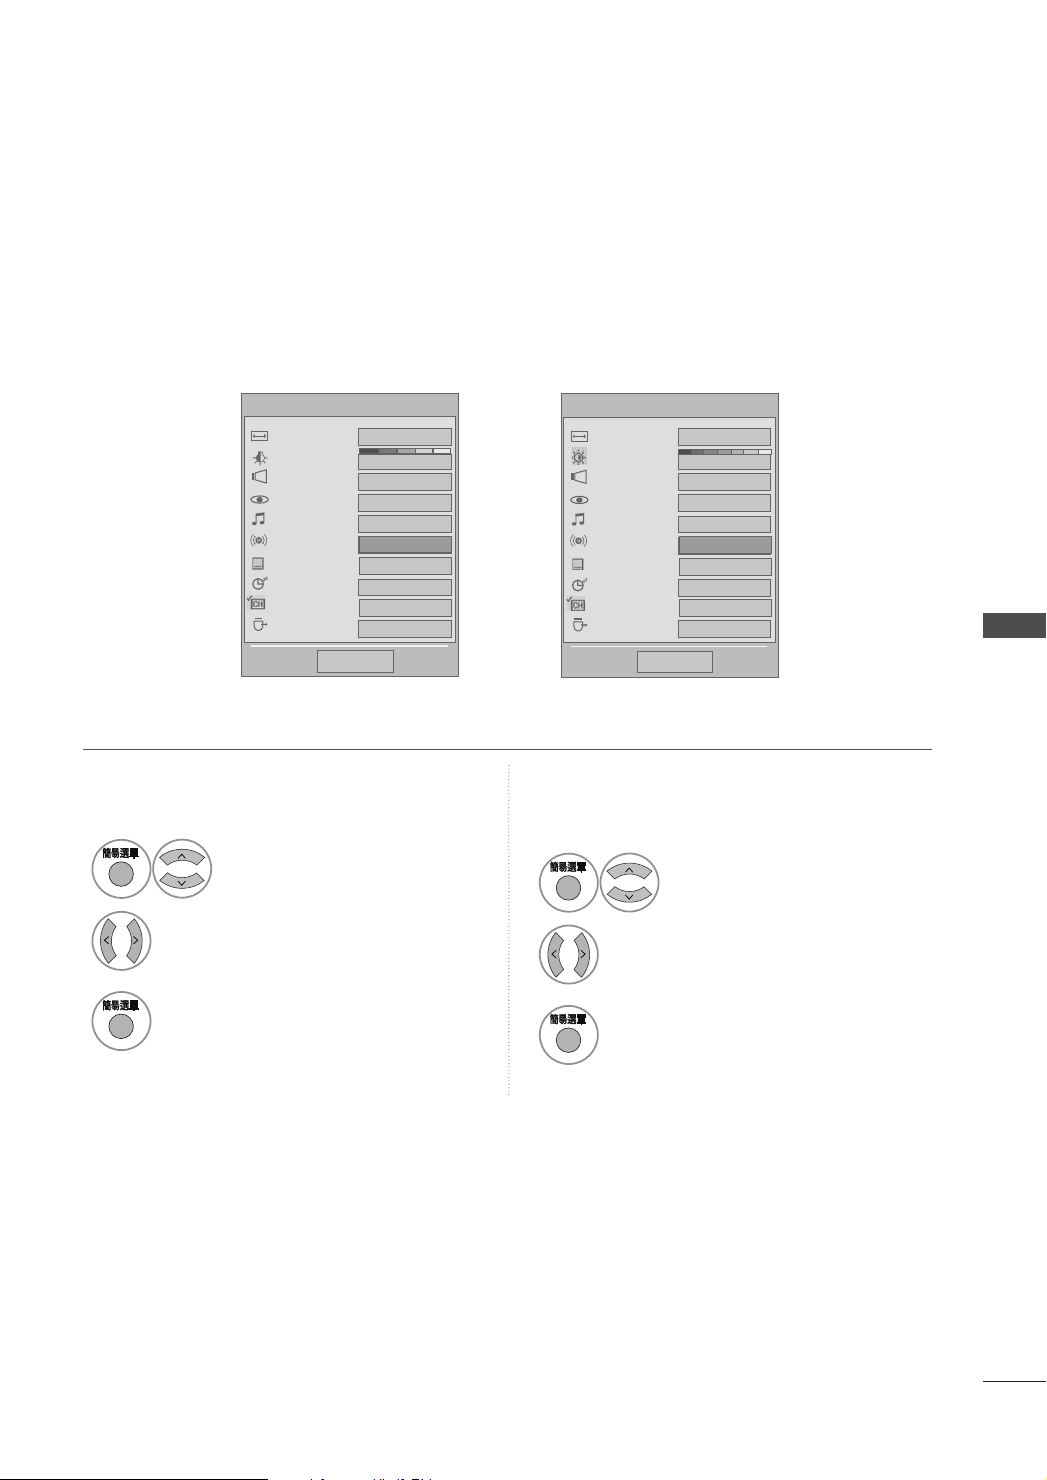
STEREO/SAP BROADCASTS SETUP
For Analog only: This TV can receive MTS stereo programs and any SAP (Secondary Audio Program) that
accompanies the stereo program if the station transmits an additional sound signal. Mono sound is automatically used if the broadcast is only in Mono.
Plasma TV Models LCD TV Models
Q-Menu
Aspect Ratio
Power Saving
Clear Voice
Picture Mode
Sound Mode
SAP
Caption
Sleep Timer
Add Channel
USB Eject
Close
16:9
0
on
Standard
Standard
Mono
FF
MONO
---
Off
---
Eject
GG
Q-Menu
Aspect Ratio
Backlight
Clear Voice
Picture Mode
Sound Mode
SAP
Caption
Sleep Timer
Add Channel
USB Eject
Analog TV Digital TV
1
2
Select
SS AAPP
Select
.
MM oonn oo, SS tt eerreeoo
, or
SS AAPP
.
1
2
Select other languages.
Close
Select
16:9
0
on
Standard
Standard
Mono
FF
GG
MONO
---
Off
---
Eject
MM uu lltt ii AAuudd iioo
SOUND & LANGUAGE CONTROL
.
3
Return to TV viewing
3
Return to TV viewing
91
Page 94
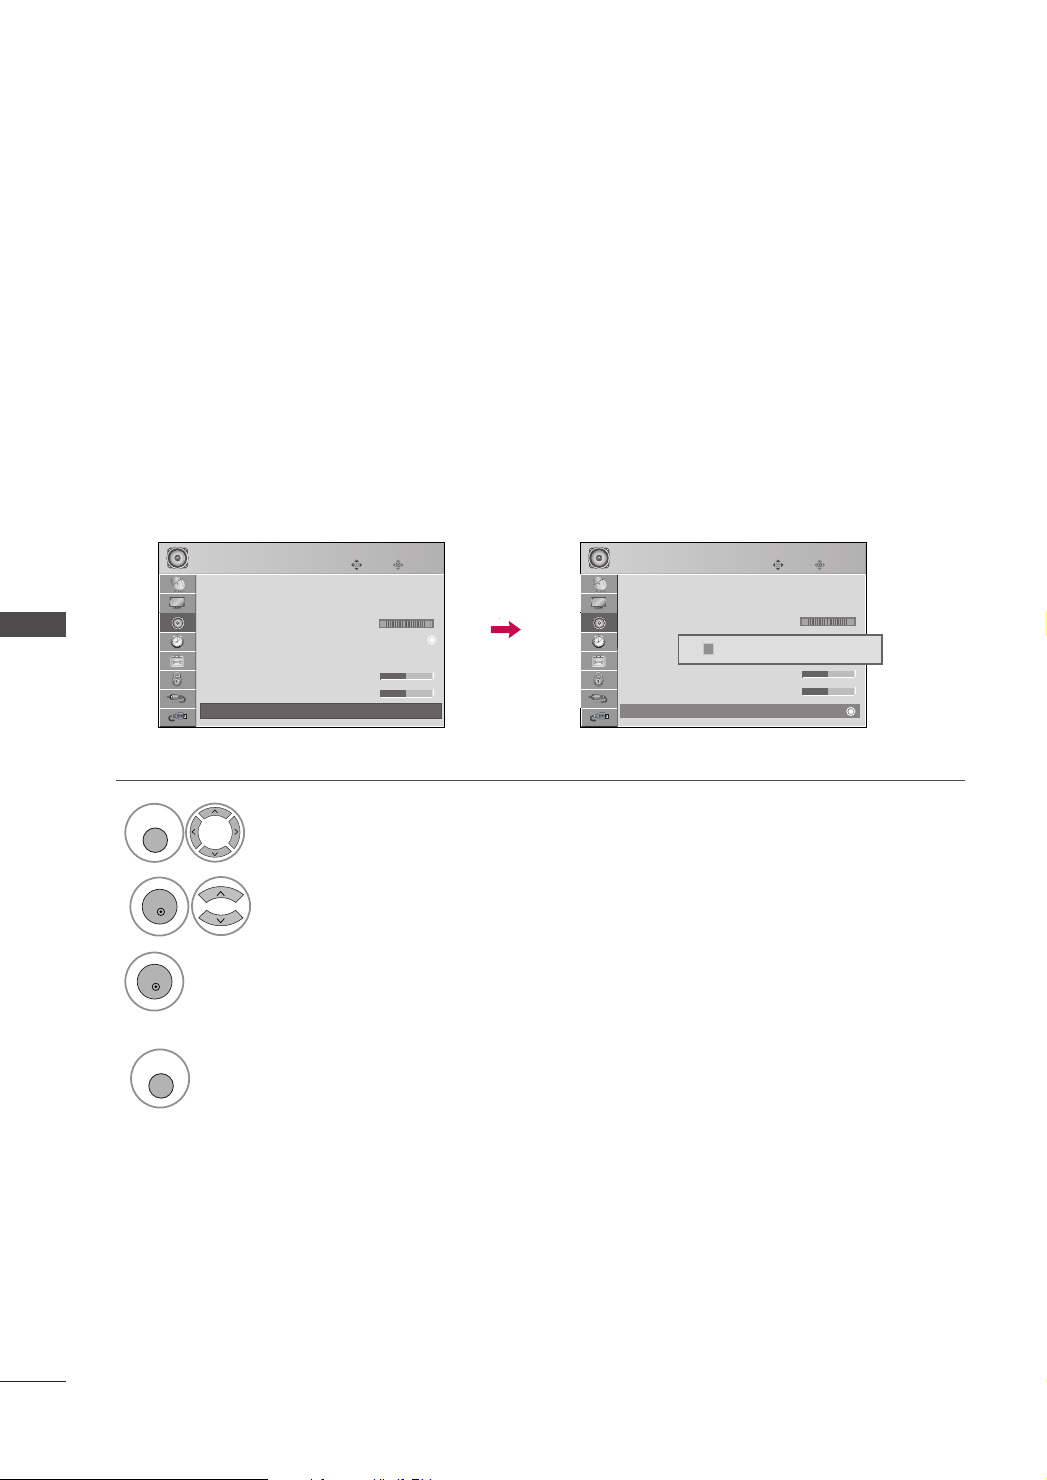
SOUND & LANGUAGE CONTROL
MENU
ENTER
ENTER
MENU
AUDIO RESET
Returns to the default factory setting for Sound Mode, Auto Volume and Balance.
SOUND & LANGUAGE CONTROL
1
2
3
4
E
AAUU DD IIOO
RR eess ee tt
Move
.
AUDIO
Auto Volume : Off
Clear Voice : On
Balance 0
Sound Mode : Standard
• SRS TruSurround XT : On
• Treble 0
• Bass 0
• Reset
• Reset
Select
Select
Initialize the adjusted value.
Return to TV viewing.
Enter
LR
.
AUDIO
Auto Volume : Off
Clear Voice : On
Balance 0
Sound Mode : Standard
ii
Resetting audio configuration...
• SRS TruSurround XT : On
• Treble 0
• Bass 0
• Reset
• Reset
E
Move
Enter
LR
92
Page 95
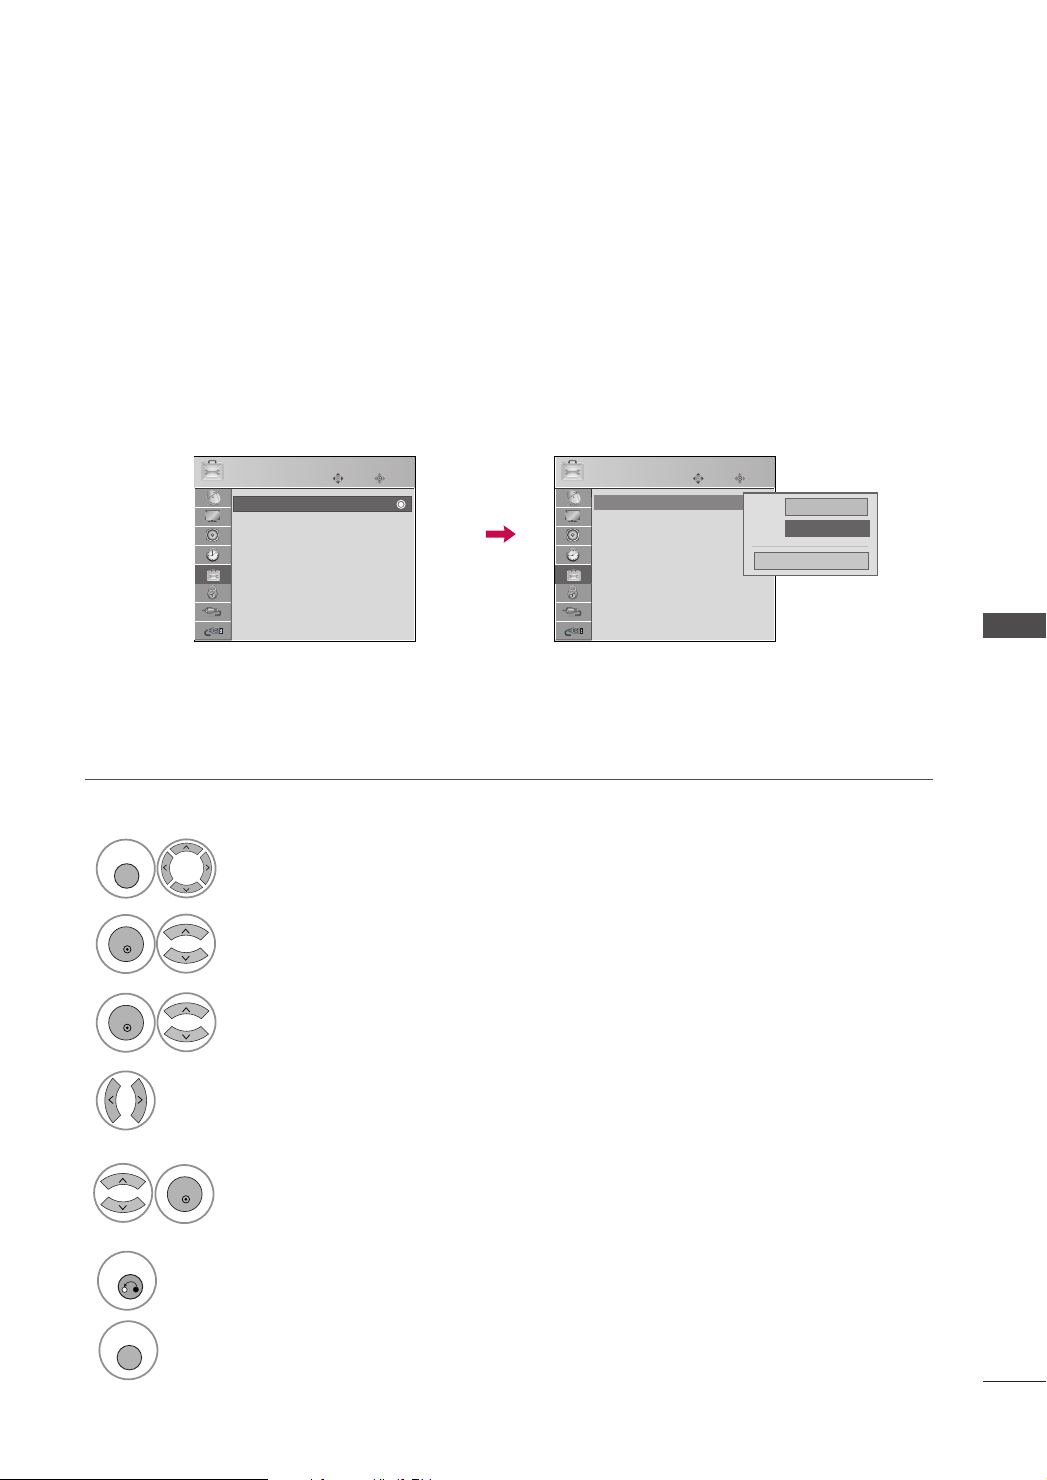
AUDIO LANGUAGE
MENU
ENTER
ENTER
ENTER
RETURN
MENU
Other languages may be available if a digital signal is provided by the broadcasting station.
This feature operates only in DTV mode.
1
2
3
OPTION
Language : English
Language :English
Input Label
Schedule List
SIMPLINK : On
Key Lock : Off
Caption : Off
ISM Method : Normal
Power Saving : Level 0
Select
LLaanngg uuaa ggee
Select
Select
Move
E
OOPPTTII OONN
AA uu dd iioo
.
Enter
OPTION
Language : English
Language :English
Input Label
Schedule List
SIMPLINK : On
Key Lock : Off
Caption : Off
ISM Method : Normal
Power Saving : Level 0
Move
Enter
Menu
English(Inglês)
Audio
FF
E
Close
English
GG
SOUND & LANGUAGE CONTROL
.
.
5
4
6
EEnngglliisshh, SS pp aanniiss hh
Select :
CC lloo ssee
Select
to confirm it.
Return to the previous menu.
Return to TV viewing.
PPoorrttuugguueess ee
, or
.
93
Page 96
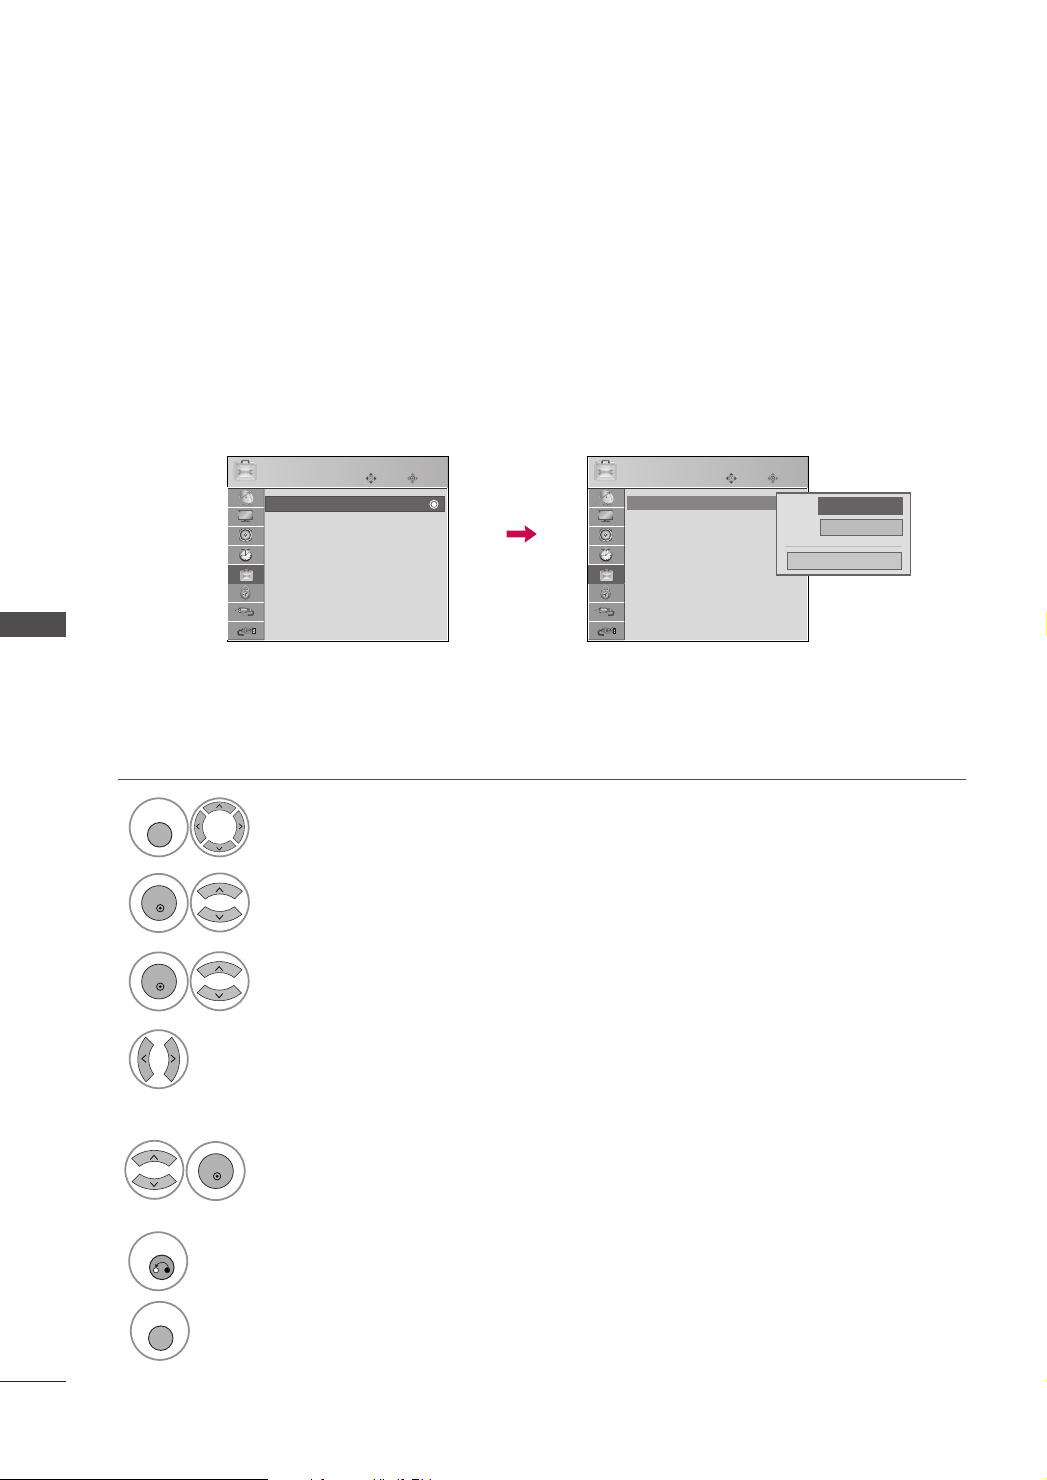
SOUND & LANGUAGE CONTROL
MENU
ENTER
ENTER
ENTER
RETURN
MENU
ON-SCREEN MENUS LANGUAGE SELECTION
The menus can be shown on the screen in the selected language. First select your language.
SOUND & LANGUAGE CONTROL
1
2
3
4
OPTION
Language : English
Language :English
Input Label
Schedule List
SIMPLINK : On
Key Lock : Off
Caption : Off
ISM Method : Normal
Power Saving : Level 0
Select
Select
Select
Move
E
OOPPTTII OONN
LLaanngg uuaa ggee
MMee nnuu
.
Enter
.
.
Desired language.
From this point on, the on-screen menus will be shown
in the selected language.
OPTION
Language : English
Language :English
Input Label
Schedule List
SIMPLINK : On
Key Lock : Off
Caption : Off
ISM Method : Normal
Power Saving : Level 0
Move
E
Enter
Menu
Audio
FF
English(Inglês)
English
Close
GG
94
5
6
CC lloo ssee
Select
to confirm it.
Return to the previous menu.
Return to TV viewing.
Page 97
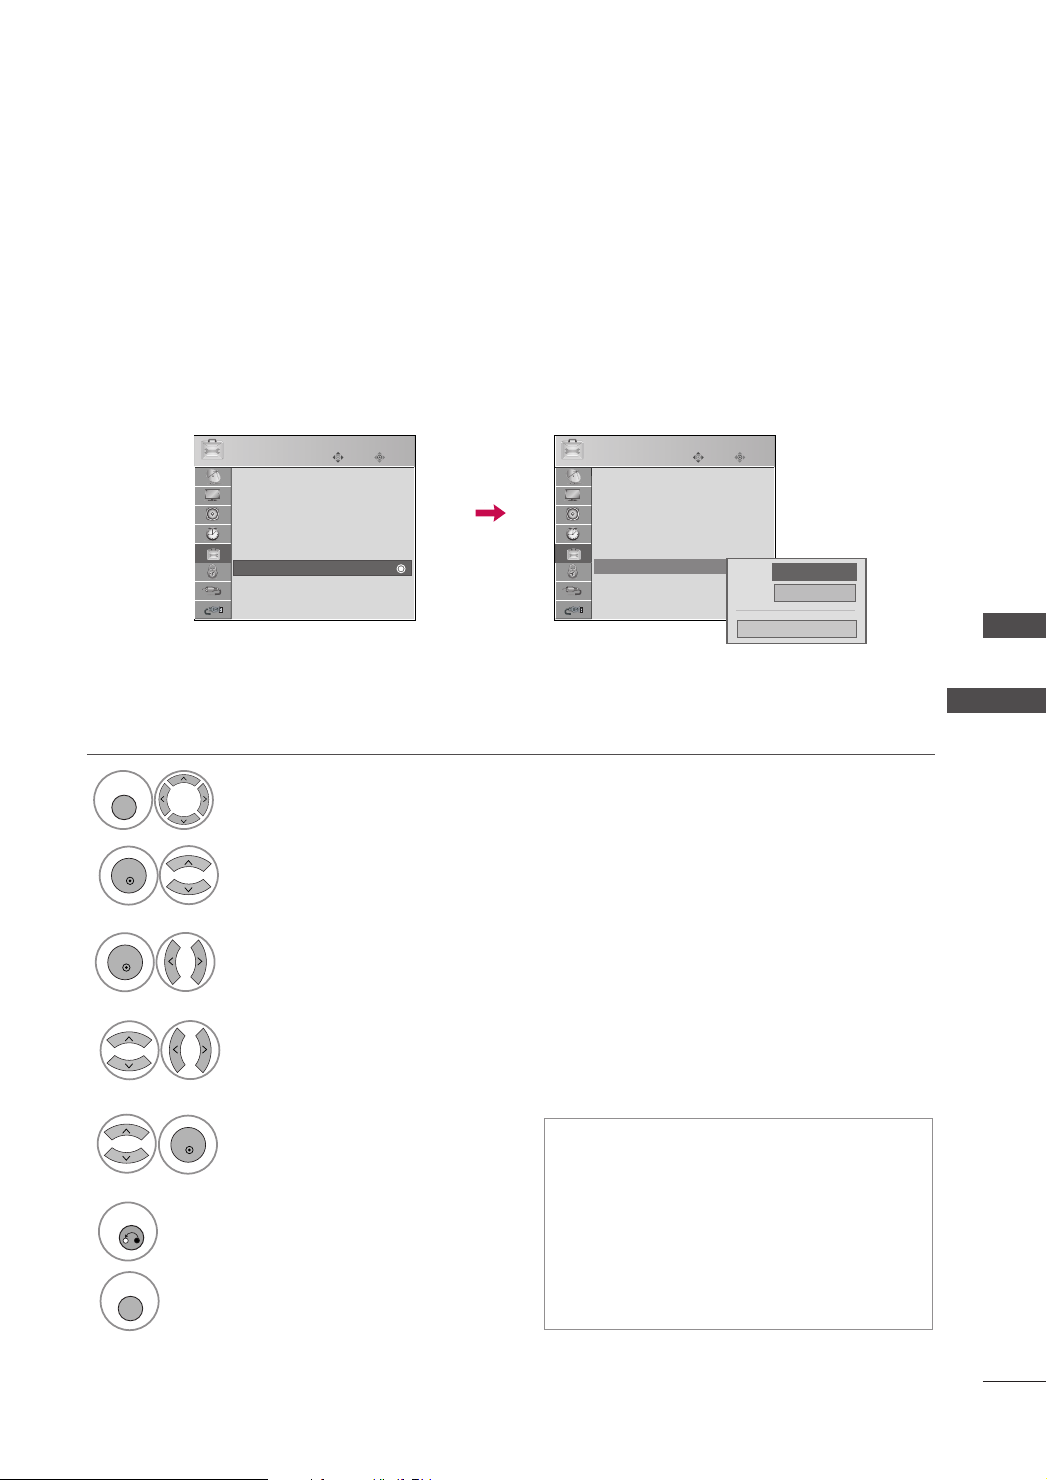
MENU
ENTER
ENTER
CAPTION MODE
RETURN
MENU
ENTER
Analog Broadcasting System Captions
Select a caption mode for displaying captioning information if provided on a program. Analog caption
displays information at any position on the screen and is usually the program's dialog. Caption/Text, if
provided by the broadcaster, would be available for analog channels on the Antenna/Cable. This TV is
programmed to memoririze the caption/text mode which was last set when you turn the power off. This
function is only available when
CC aa ppttiioonn
Mode is set
OO nn
.
1
2
3
3
OPTION
Language : English
Input Label
Schedule List
SIMPLINK : On
Key Lock : Off
Caption : Off
Caption : Off
ISM Method : Normal
Power Saving : Level 0
Select
CC aapptt iioo nn
Select
Select
Select
Move
E E
OOPPTTII OONN
.
MM oodd ee OOnn
MM oodd ee11,MM oodd ee22,TTee xx tt11
Enter
OPTION
Language : English
Input Label
Schedule List
SIMPLINK : On
Key Lock : Off
Caption :Off
Caption : Off
ISM Method : Normal
Power Saving : Level 0
Move
Enter
Mode
Analog
FF
Close
On
Mode 2
GG
SOUND & LANGUAGE CONTROL
.
.
TTee xx tt22..
or
6
5
CC lloo ssee
Select
to confirm it.
Return to the previous menu.
Return to TV viewing.
■
MM ooddee
The term for the words that scroll across the bottom of the TV screen; usually the audio portion of
the program provided for the hearing impaired.
■
TTEEXXTT
The term for the words that appear in a large
black frame and almost cover the entire screen;
usually messages provided by the broadcaster.
95
Page 98
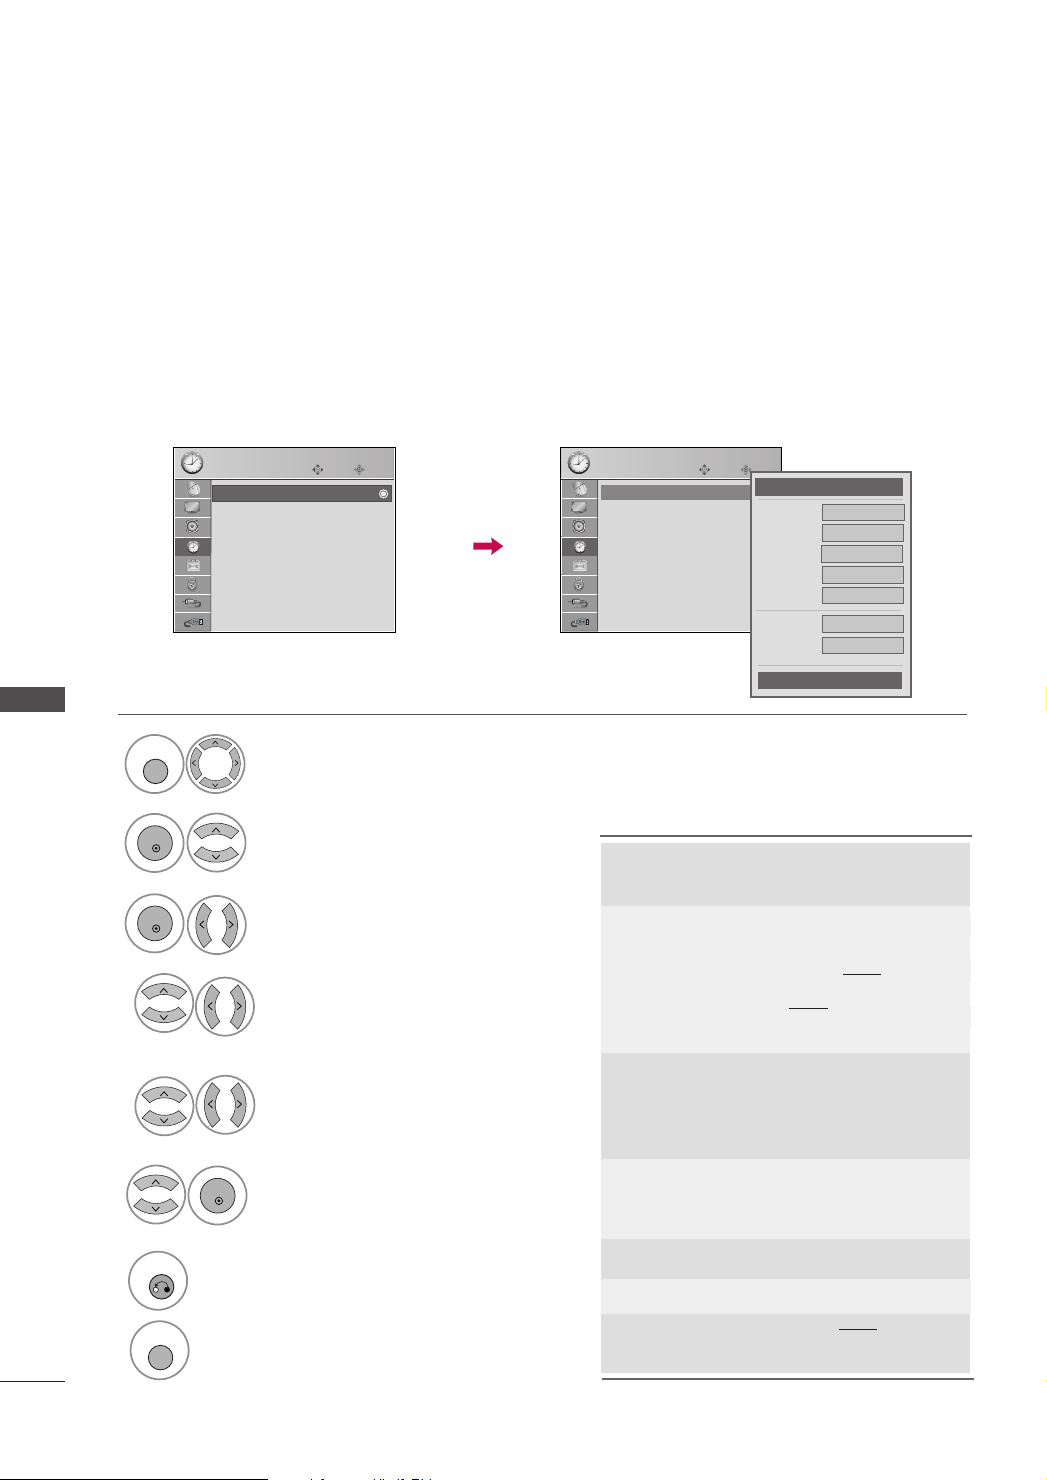
TIME SETTING
MENU
ENTER
ENTER
ENTER
RETURN
MENU
TIME SETTING
CLOCK SETTING
Auto Clock Setup
The time is set automatically from a digital channel signal.
The digital channel signal includes information for the current time provided by the
broadcasting station.
Set the clock manually if the current time is set incorrectly by the auto clock function.
TIME SETTING
1
2
3
4
5
6
7
Select
Select
Select
Move
TTII MM EE
CC lloo cc kk
AAuuttoo
Enter
.
.
.
TIME
Clock : Nov/27/2007 02:15 AM
C lo c k : Nov/27/2007 02:15 AM
Off Time : Off
On Time : Off
Sleep Timer : Off
Auto Sleep : Off
Select your viewing area time zone:
BBrraassiilliiaa, FF ..NN oorroonn hh aa, NNoorrddeess ttee, NNoorrtt ee
MM ..GG rroo ss ssoo, AAcc rree
AA uu tt oo, OO ff ff, OO nn
Select
AAMM((wweesstt))
or
whether or not your viewing area observes
Daylight Saving time).
CC lloo ssee
Select
to confirm it.
Return to the previous menu.
Return to TV viewing.
.
(depending on
TIME
C lo c k : Nov/27/2007 02:15 AM
Clock : Nov/27/2007 02:15 AM
Off Time : Off
On Time : Off
Sleep Timer : Off
Auto Sleep : Off
Fernando de
Noronha
Northeast
,
Brasilia
North
Mato Grosso
Acre
Amazonas
(extreme
West)
IIssllaannddss::
Rocas, Penedos de São Pedro e São Paulo,
Fernando de Noronha.
SSttaa tteess::
AL, Bahia-BA, Ceará-CE, Maranhão-MA,
Paraíba-PB, Piauí-PI, Rio Grande do NorteRN, Sergipe-SE, Pará-PA (
Marabá, Serra Norte, São Félix do ≈ingú),
Pernambuco-PE(
Santo Antão, Caruaru, Arcoverde,
Caranhuns).
SSttaa tteess::
Catarina-SC, Paraná-PR, São Paulo-SP, Rio de
Janeiro-RJ, Minas Gerais-MG, Espírito SantoES, Goiás-GO.
BB rraassíí llii aa-- DD FF (( BBrraazzii llii aann CCaapp ii tt aall))
SSttaa tteess::
Manaus, Floriano Peixoto), Pará-PA(Altamira,
Obidos, Prainha, Oriximina, Santarém),
Rondônia-RO, Roraima-RR.
SSttaattee ss::
SSttaa tteess::
SSttaa tteess::
Norte, Boca do Maoco, Benjamin Constant,
Eirunepe, Envira, lpixuna).
Move
Enter
FF
Year
Month
Date
Hour
Minute
Time Zone
Daylight
Saving
Trindade, Martin Vaz, Atol das
Amapá-AP, Tocantins-TO, Alagoas-
Rio Grande do Sul-RS, Santa
Amazonas-AM(Boca de Acre, Jutaí,
Mato Gross-MT, Mato Gross do Sul-MS
Acre-AC
Amazonas-AM (
Auto
Close
cciittii ee ss
: Recife, Vitória de
2007
11
14
1AM
04
Brasilia
Auto
cciittii ee ss
cciittii ee ss
GG
: Belém,
: Atalaia do
96
Page 99
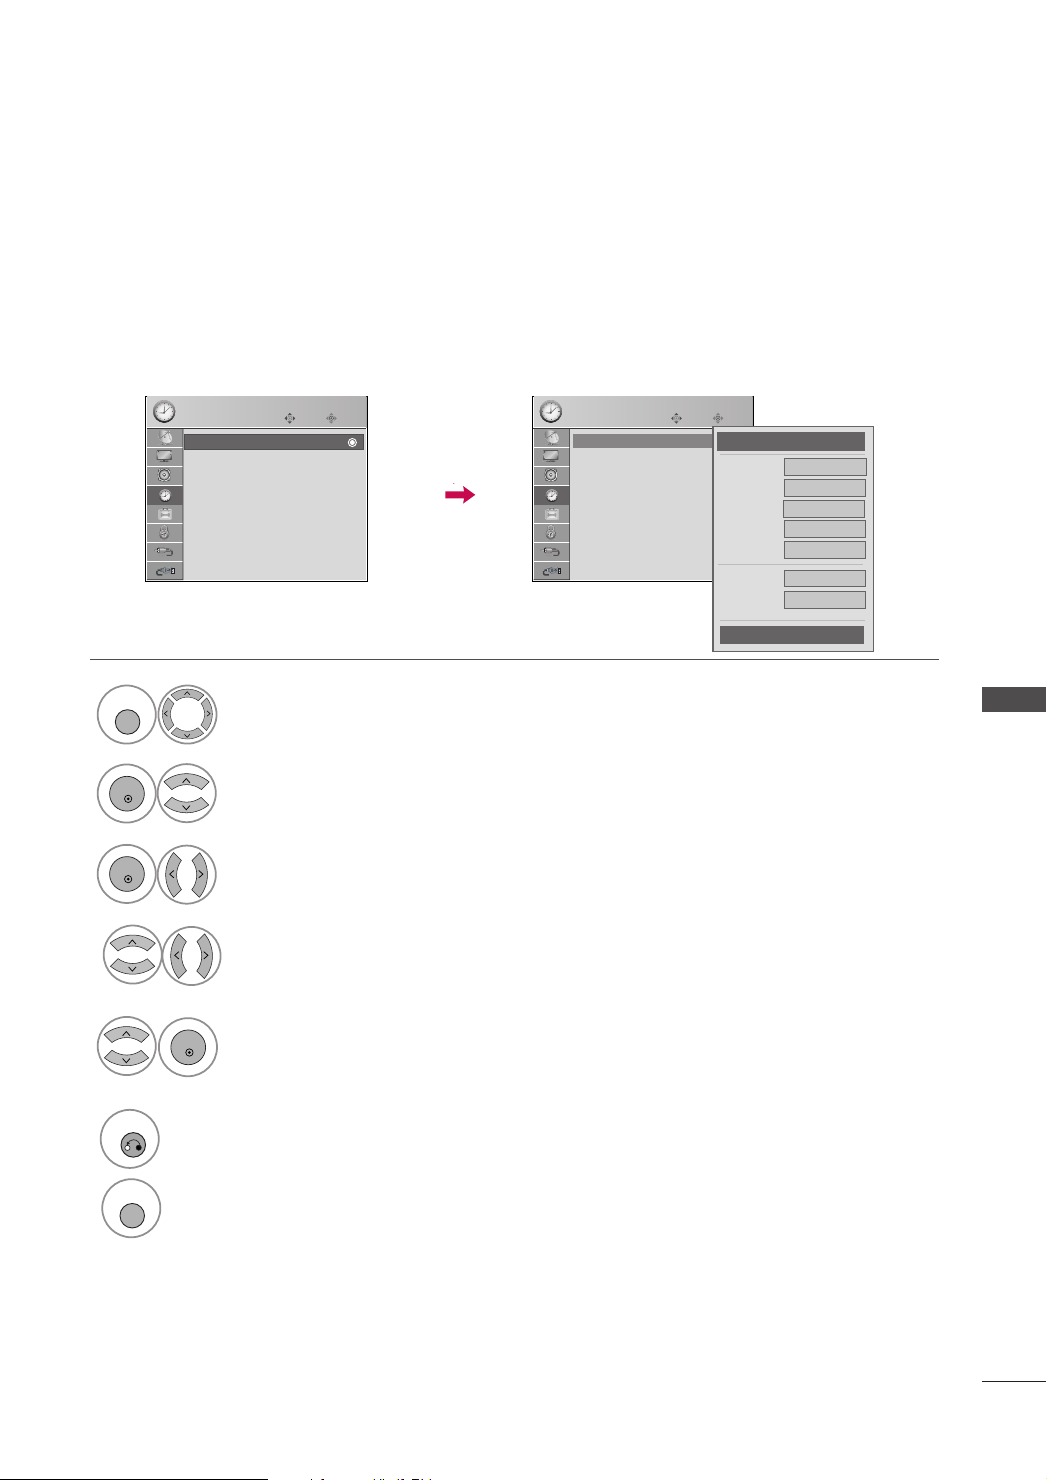
MENU
ENTER
ENTER
Manual Clock Setup
ENTER
RETURN
MENU
If the current time setting is wrong, reset the clock manually.
1
2
3
4
Select
Select
Select
Move
Enter
TTII MM EE
CC lloo cc kk
MM aannuuaa ll
.
.
.
TIME
Clock : Nov/27/2007 02:15 AM
C lo c k : Nov/27/2007 02:15 AM
Off Time : Off
On Time : Off
Sleep Timer : Off
Auto Sleep : Off
Select the Year, Month, Date, Hour, or Minute
options
TIME
C lo c k : Nov/27/2007 02:15 AM
Clock : Nov/27/2007 02:15 AM
Off Time : Off
On Time : Off
Sleep Timer : Off
Auto Sleep : Off
Move
Enter
FF
Year
Month
Date
Hour
Minute
Time Zone
Daylight
Saving
Manual
Close
GG
2007
11
14
1AM
04
Brasilia
Auto
TIME SETTING
6
5
CC lloo ssee
Select
to confirm it.
Return to the previous menu.
Return to TV viewing.
97
Page 100
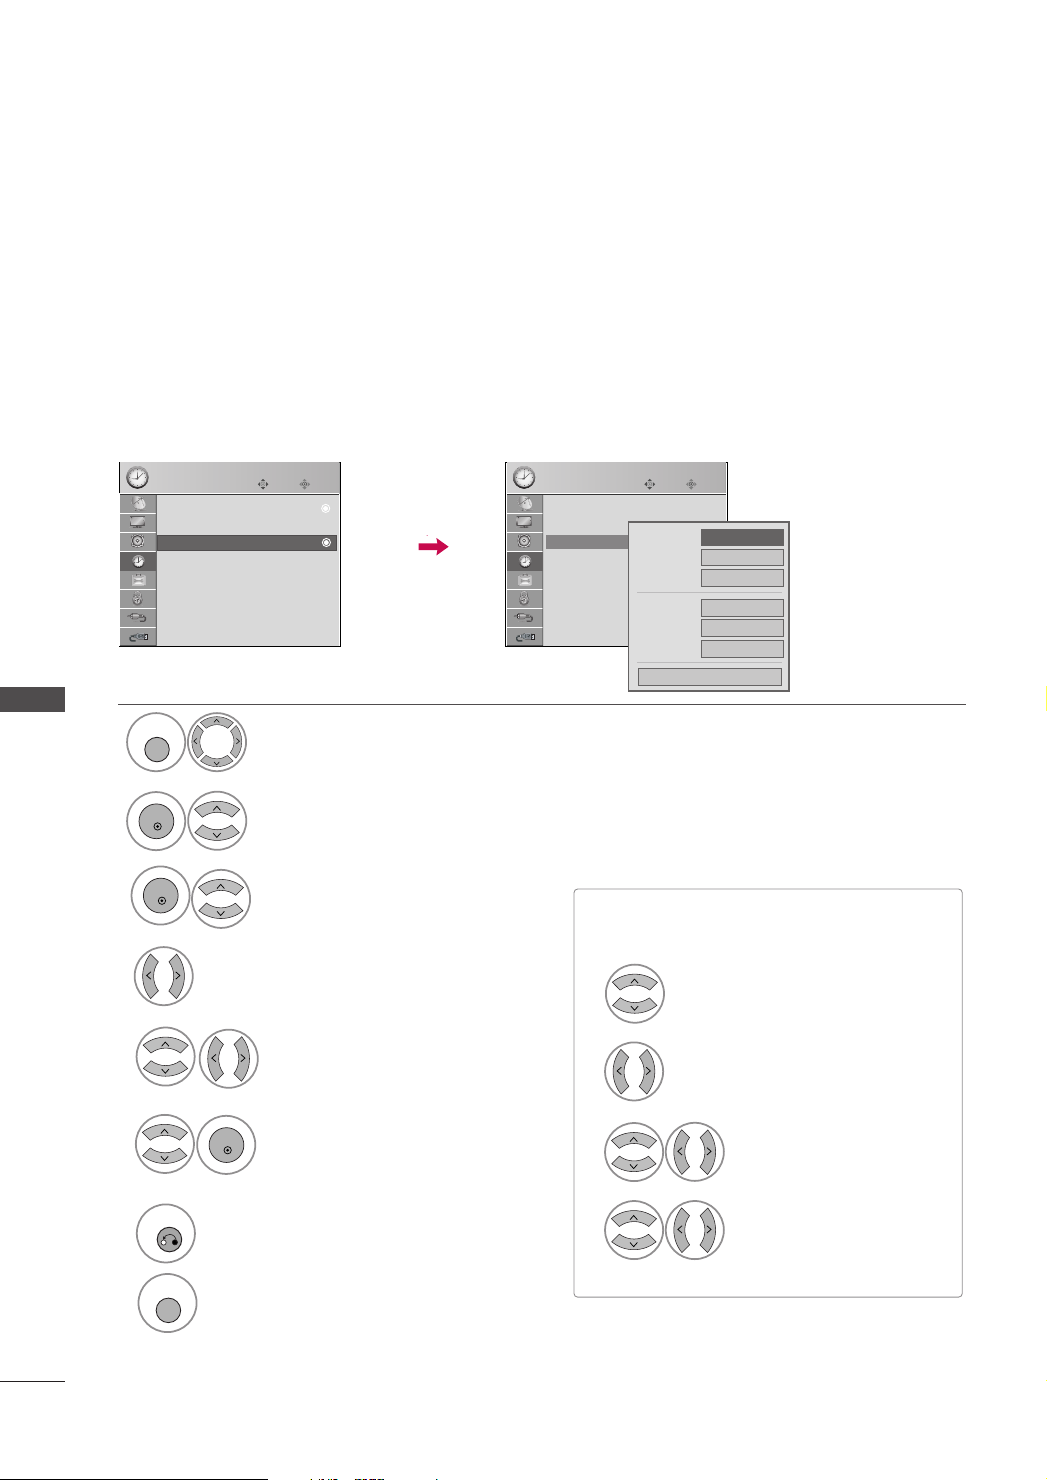
TIME SETTING
MENU
ENTER
ENTER
ENTER
RETURN
MENU
AUTO ON/OFF TIME SETTING
This function operates only if the current time has been set.
OOffff TT iimm ee
The
function overrides the
The TV must be in standby mode for the
If you do not press any button within 2 hours after the TV turns on with the
will automatically revert to standby mode.
OOnn TTii mm ee
OOnn TTii mm ee
function if they are both set to the same time.
to work.
OOnn TTii mm ee
function, the TV
TIME
C lo ck : Nov/27/2007 02:15 AM
Off Time : Off
On Time : Off
On Time : Off
Sleep Timer : Off
Auto Sleep : Off
TIME SETTING
1
2
3
4
5
Move
Enter
TTII MM EE
Select
OOffff TTii mm ee
Select
RRee ppee aa tt
Select
OO ff ff
Select
FFrrii
,
OO nnccee, EEvv eerryyddaayy, MMoonn
,
MMoonn ~SSaa tt, WW eeee kkeenndd
Set the hour and minutes.
.
or
.
OOnn TTiimmee
SS uunndd aayy
or
TIME
Clock : Nov/27/2007 02:15 AM
Off Time : Off
On Time : Off
On Time : Off
Sleep Timer : Off
Auto Sleep : Off
Move
Repeat
Hour
Minute
Input
Channel
Volume
Enter
Close
FF
Once
00
TV
TV2
30
GG
0
.
■
To cancel
■
Only for On Time function
~
.
1
2
OOnn// OOffff TT iimm ee
II nn ppuu tt
Select
TTVV, AAVV11--22, CCoommppoo nneenntt11--22
Select
RRGG BB --PPCC
function, select
.
HHDD MMII 11--33
or
OO ff ff
.
,
.
98
6
7
CC lloo ssee
Select
to confirm it.
Return to the previous menu.
Return to TV viewing.
3
4
When Selecting
TT VV
:
set the channel at turn-on.
Adjust to sound level at
turn-on.
 Loading...