

Page 1

OWNER’S MANUAL
LCD TV / LED LCD TV
Please read this manual carefully before operating
your set and retain it for future reference.
CS41**
LS310*
LS311*
LS315*
LS33**
LS30**
P/NO : MFL67452103 (1211-REV04)
Printed in Korea
www.lg.com
Page 2
TABLE OF CONTENTS
2
ENGLISH
ENG
TABLE OF CONTENTS
2 TABLE OF CONTENTS
3 LICENSES
3 OPEN SOURCE SOFTWARE NOTICE
4 SAFETY INSTRUCTIONS
10 INSTALLATION PROCEDURE
10 ASSEMBLING AND PREPARING
10 Unpacking
15 Parts and buttons
16 Lifting and moving the TV
17 Setting up the TV
21 Mounting on a table
23 Mounting on a wall
24 Tidying cables
24 Not using the Desk-Type Stand
25 MAKING CONNECTIONS
25 Antenna connection
26 Adapter connection
26 HDMI connection
27 Component connection
27 Composite connection
28 USB connection
28 Audio System connection
28 - External Stereo Connection
29 REMOTE CONTROL
30 WATCHING TV
30 Turning the TV on for the first time
30 Watching TV
30 Managing programmes
30 - Automatically setting up programme
31 - Manually setting up programme
32 - Editing your programme list
32 - Selecting a programme on the programme
list
32 - Using favourite programmes
33 Using additional options
33 - Adjusting aspect ratio
34 - Using the input list
35 ENTERTAINMENT
35 Connecting USB storage devices
36 Browsing files
37 Viewing photos
38 Listening to music
40 CUSTOMIZING TV SETTING
40 Accessing main menus
40 Customizing Settings
40 - SETUP Settings
41 - PICTURE Settings
43 - AUDIO Settings
45 - TIME Settings
45 - OPTION Settings
46 TELETEXT
46 Switch On/Off
46 Simple Text
46 - Page selection
46 - Programming a colour button in LIST
mode
46 Fastext
46 - Page selection
47 Special Teletext Function
48 MAINTENANCE
48 Cleaning your TV
48 - Screen, frame, cabinet and stand
48 - Power cord
48 TROUBLESHOOTING
50 SPECIFICATIONS
WARNING
If you ignore the warning message, you may
be seriously injured or there is a possibility
of accident or death.
CAUTION
If you ignore the caution message, you may
be slightly injured or the product may be
damaged.
NOTE
The note helps you understand and use
the product safely. Please read the note
carefully before using the product.
Page 3
LICENSES / OPEN SOURCE SOFTWARE NOTICE
3
LICENSES
Supported licenses may differ by model. For more information about licenses, visit www.lg.com.
HDMI, the HDMI logo and High-Definition Multimedia Interface are trademarks or
registered trademarks of HDMI Licensing LLC.
ENGENGLISH
OPEN SOURCE SOFTWARE NOTICE
To obtain the source code under GPL, LGPL, MPL and other open source licenses, that is contained in this
product, please visit http://opensource.lge.com .
In addition to the source code, all referred license terms, warranty disclaimers and copyright notices are
available for download.
LG Electronics will also provide open source code to you on CD-ROM for a charge covering the cost of
performing such distribution (such as the cost of media, shipping and handling) upon email request to
[email protected]. This offer is valid for three (3) years from the date on which you purchased the
product.
Page 4
SAFETY INSTRUCTIONS
4
ENGLISH
ENG
SAFETY INSTRUCTIONS
Please read these safety precautions carefully before using the product.
WARNING
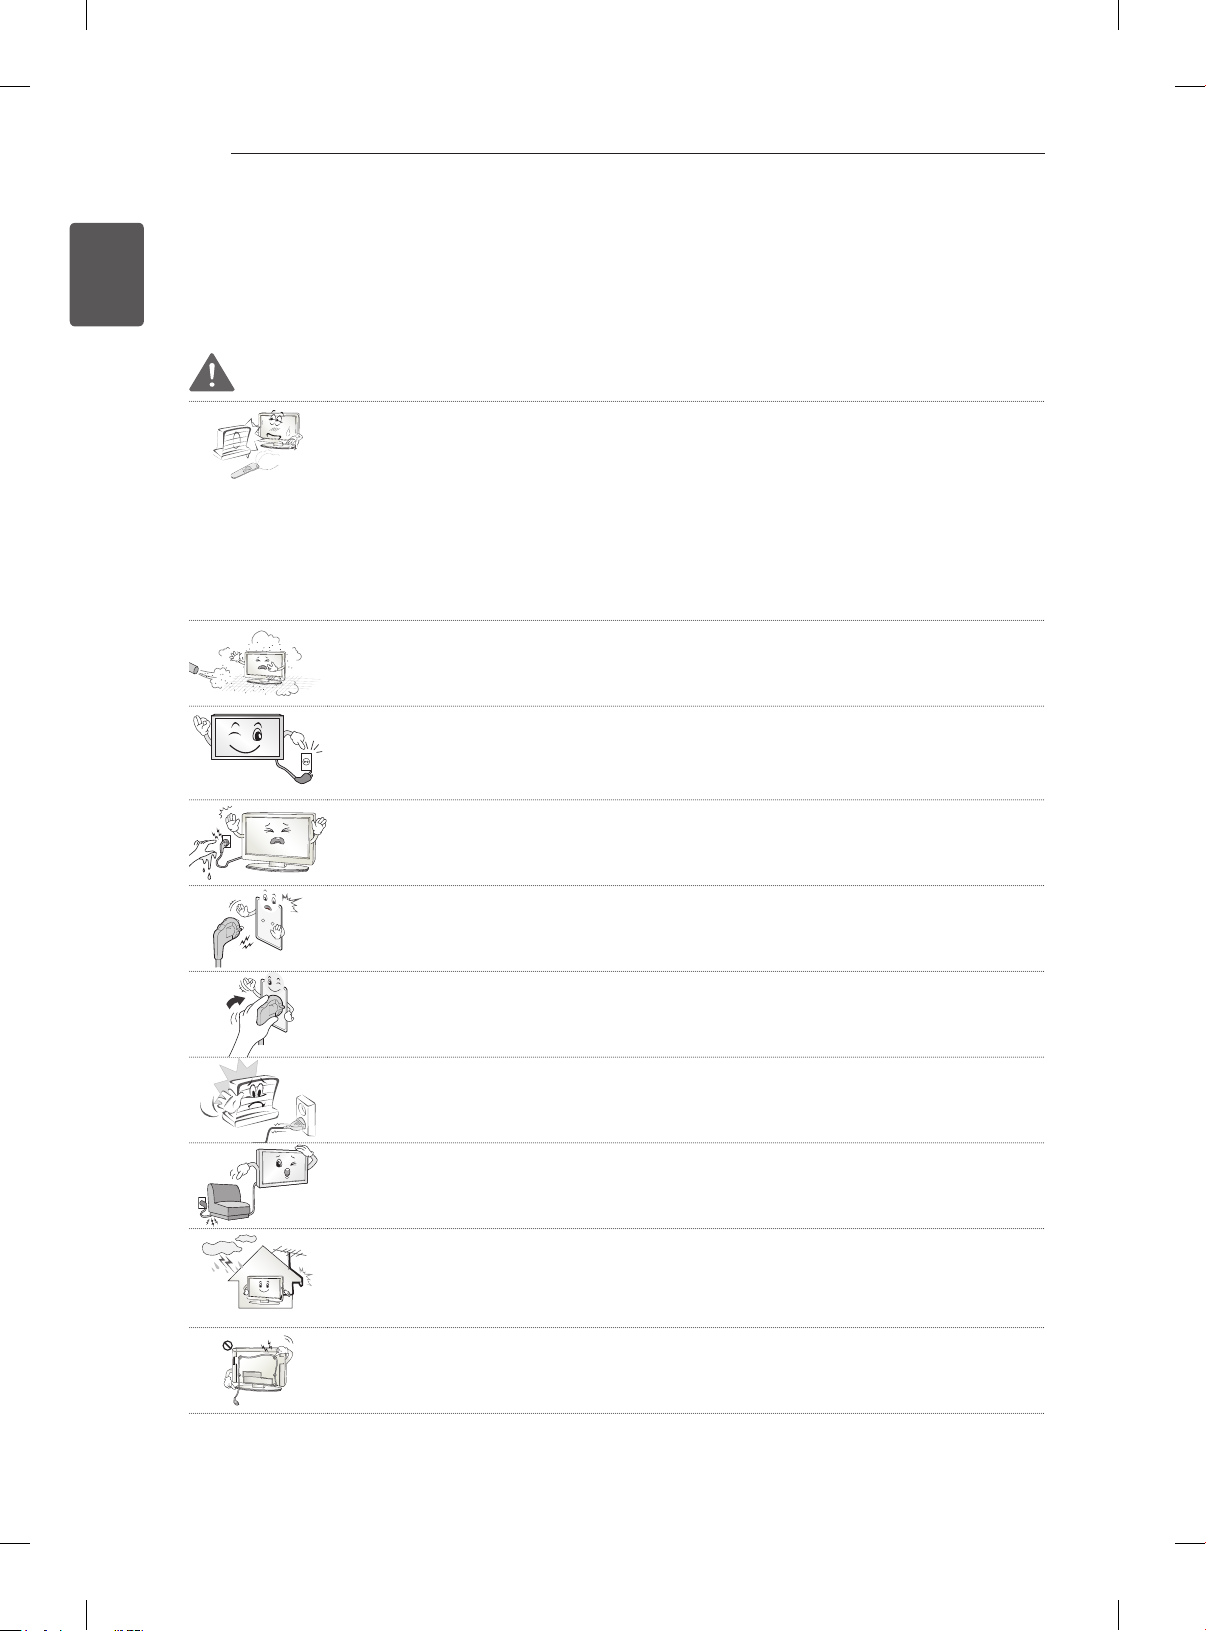
Do not place the TV and remote control in the following environments:
- A location exposed to direct sunlight
- An area with high humidity such as a bathroom
- Near any heat source such as stoves and other devices that produce heat
- Near kitchen counters or humidifiers where they can easily be exposed to steam
or oil
- An area exposed to rain or wind
- Near containers of water such as vases
Otherwise, this may result in fire, electric shock, malfunction or product deformation.
Do not place the product where it might be exposed to dust.
This may cause a fire hazard.
Mains plug is the disconnecting device. The plug must remain readily operable.
Do not touch the power plug with wet hands. Additionally, if the cord pin is wet or
covered with dust, dry the power plug completely or wipe dust off.
You may be electrocuted due to excess moisture.
Make sure to connect the power cable to the grounded current. (Except for devices
which are not grounded.)
You may be electrocuted or injured.
Fix the power cable completely.
If the power cable is not fixed completely, a fire can break out.
Ensure the power cord does not come into contact with hot objects such as a
heater.
This may cause a fire or an electric shock hazard.
Do not place a heavy object, or the product itself, on power cables.
Otherwise, this may result in fire or electric shock.
Bend antenna cable between inside and outside building to prevent rain from
flowing in.
This may cause water damaged inside the Product and could give an electric
shock.
When mounting a TV it on the wall, make sure not to install TV by hanging power
and signal cables on the back of the TV.
It may cause fire, electric shock.
Page 5
SAFETY INSTRUCTIONS
Desiccant
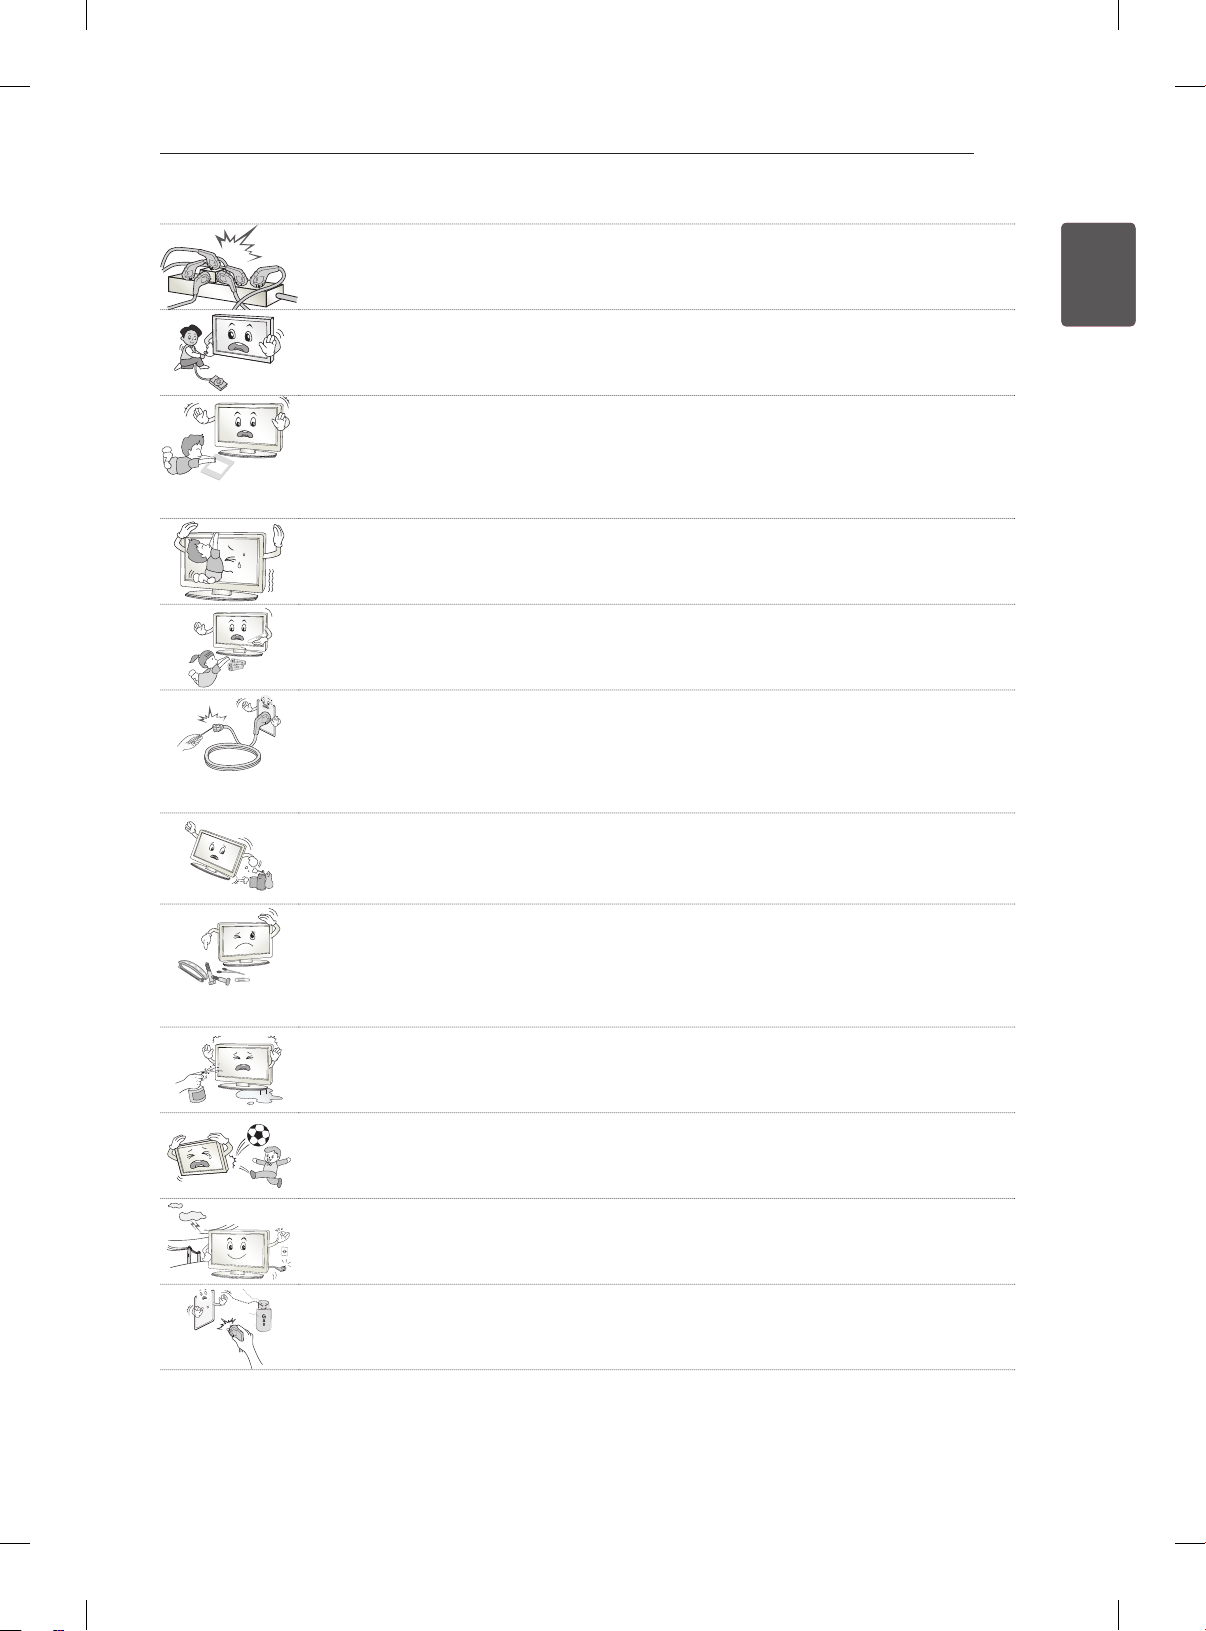
Do not plug too many electrical devices into a single multiple electrical outlet.
Otherwise, this may result in fire due to over-heating.
Do not drop the product or let it fall over when connecting external devices.
Otherwise, this may result in injury or damage to the product.
Keep the packing anti-moisture material or vinyl packing out of the reach of
children.
Anti-moisture material is harmful if swallowed. If swallowed by mistake, force the
patient to vomit and visit the nearest hospital. Additionally, vinyl packing can cause
suffocation. Keep it out of the reach of children.
Do not let your children climb or cling onto the TV.
Otherwise, the TV may fall over, which may cause serious injury.
Dispose of used batteries carefully to protect a child from eating them.
Please seek Doctor- Medical Attention immediately if child consumes batteries.
Do not insert any metal objects/conductors (like a metal chopstick/cutlery
screwdriver) between power cable plug and input Wall Socket while it is connected
to the input terminal on the wall. Additionally, do not touch the power cable right
after plugging into the wall input terminal.
You may be electrocuted.(Depending on model)
Do not put or store inammable substances near the product. There is a danger
of combustion/explosion or re due to careless handling of the inammable
substances.
5
ENGENGLISH
Do not drop metallic objects such as coins, hair pins, chopsticks or wire into the
product, or inflammable objects such as paper and matches. Children must pay
particular attention.
Electrical shock, fire or injury can occur. If a foreign object is dropped into the
product, unplug the power cord and contact the service centre.
Do not spray water on the product or scrub with an inflammable substance (thinner
or benzene). Fire or electric shock accident can occur.
Do not allow a impact shock or any objects to fall into the product, and do not drop
onto the screen with something.
You may be injured or the product can be damaged.
Never touch this product or antenna during a thunder or lighting storm.
You may be electrocuted.
Never touch the wall outlet when there is leakage of gas, open the windows and
ventilate.
It may cause a fire or a burn by a spark.
Page 6
SAFETY INSTRUCTIONS
6
ENGLISH
ENG
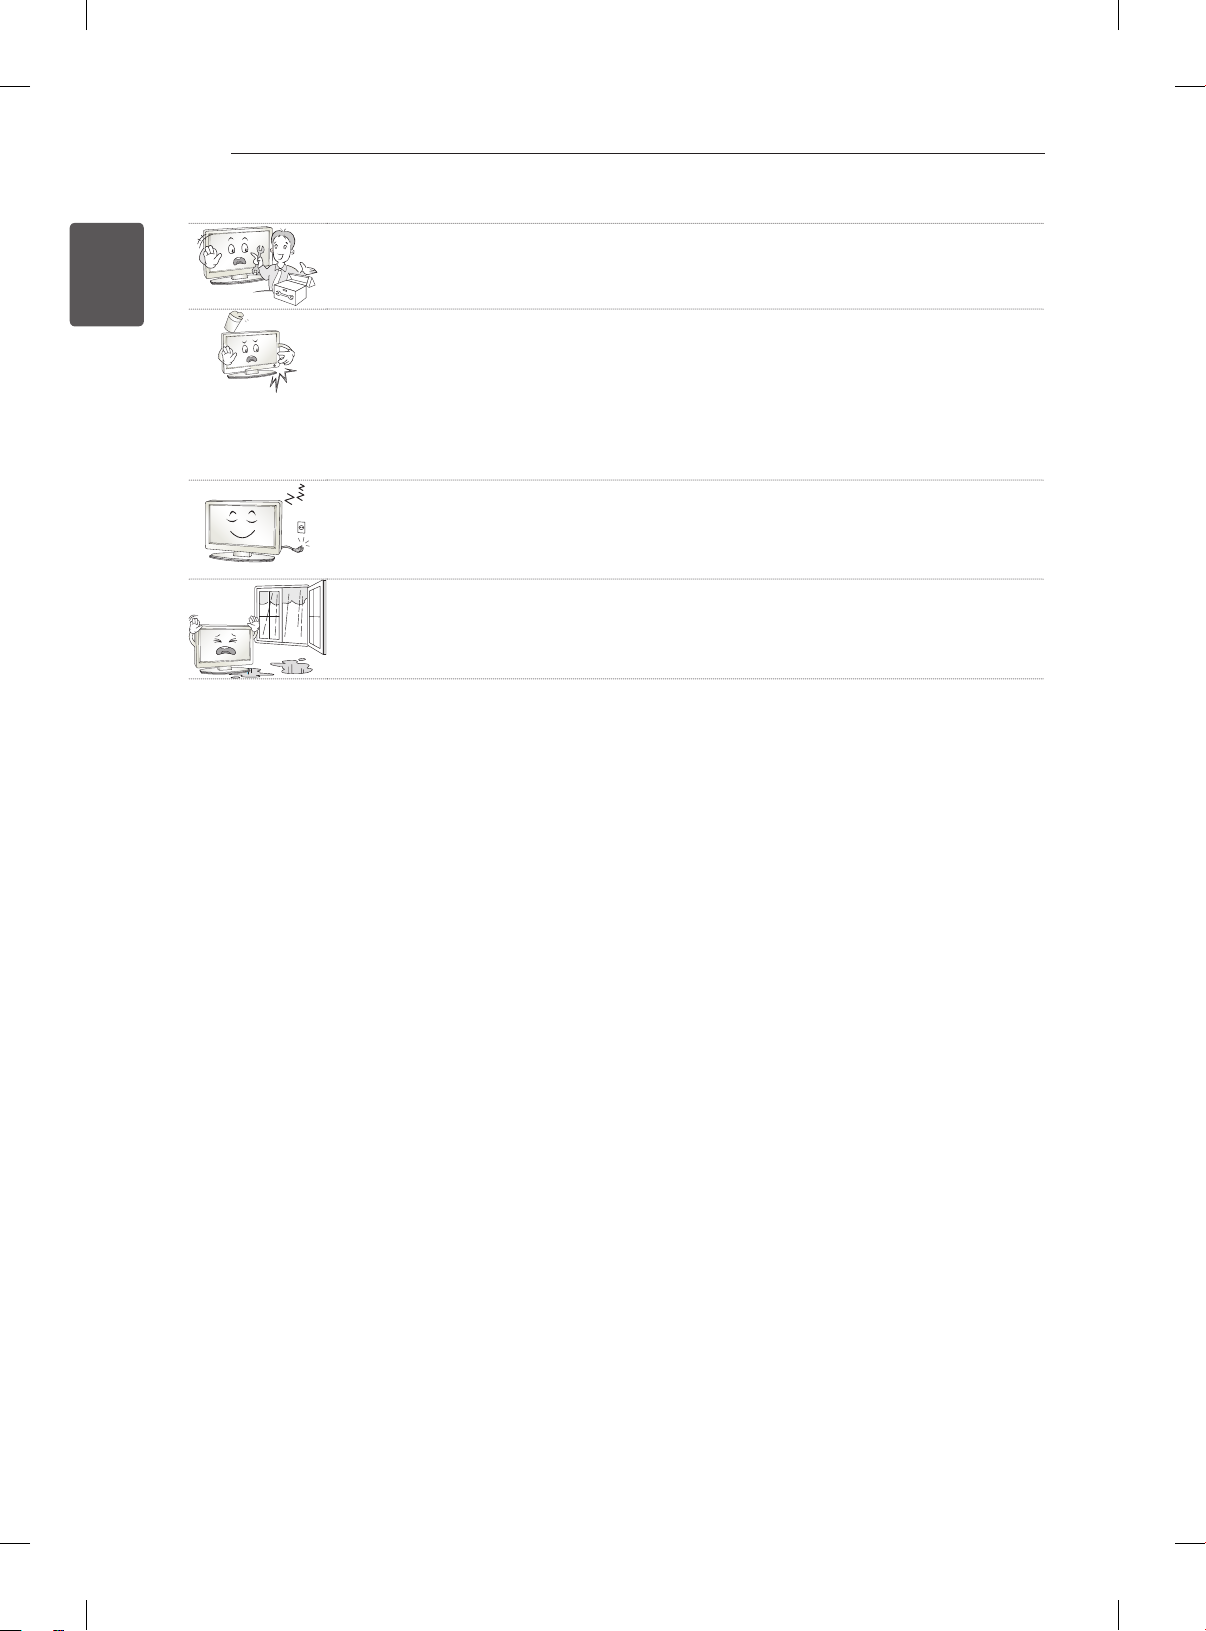
Do not disassemble, repair or modify the product at your own discretion.
Fire or electric shock accident can occur.
Contact the service center for check, calibration or repair.
If any of the following occur, unplug the product immediately and contact your local
service centre.
- The product has been impacted by shock
- The product has been damaged
- Foreign objects have entered the product
- The product produced smoke or a strange smell
This may result in fire or electric shock.
If you don’t intend to use the product for a long time, unplug the power cable from
the product.
Covering dust can cause a fire, or insulation deterioration can cause electric
leakage, electric shock or fire.
Apparatus shall not be exposed to dripping or splashing and no objects filled with
liquids, such as vases, shall be placed on the apparatus.
Page 7
SAFETY INSTRUCTIONS
7
CAUTION
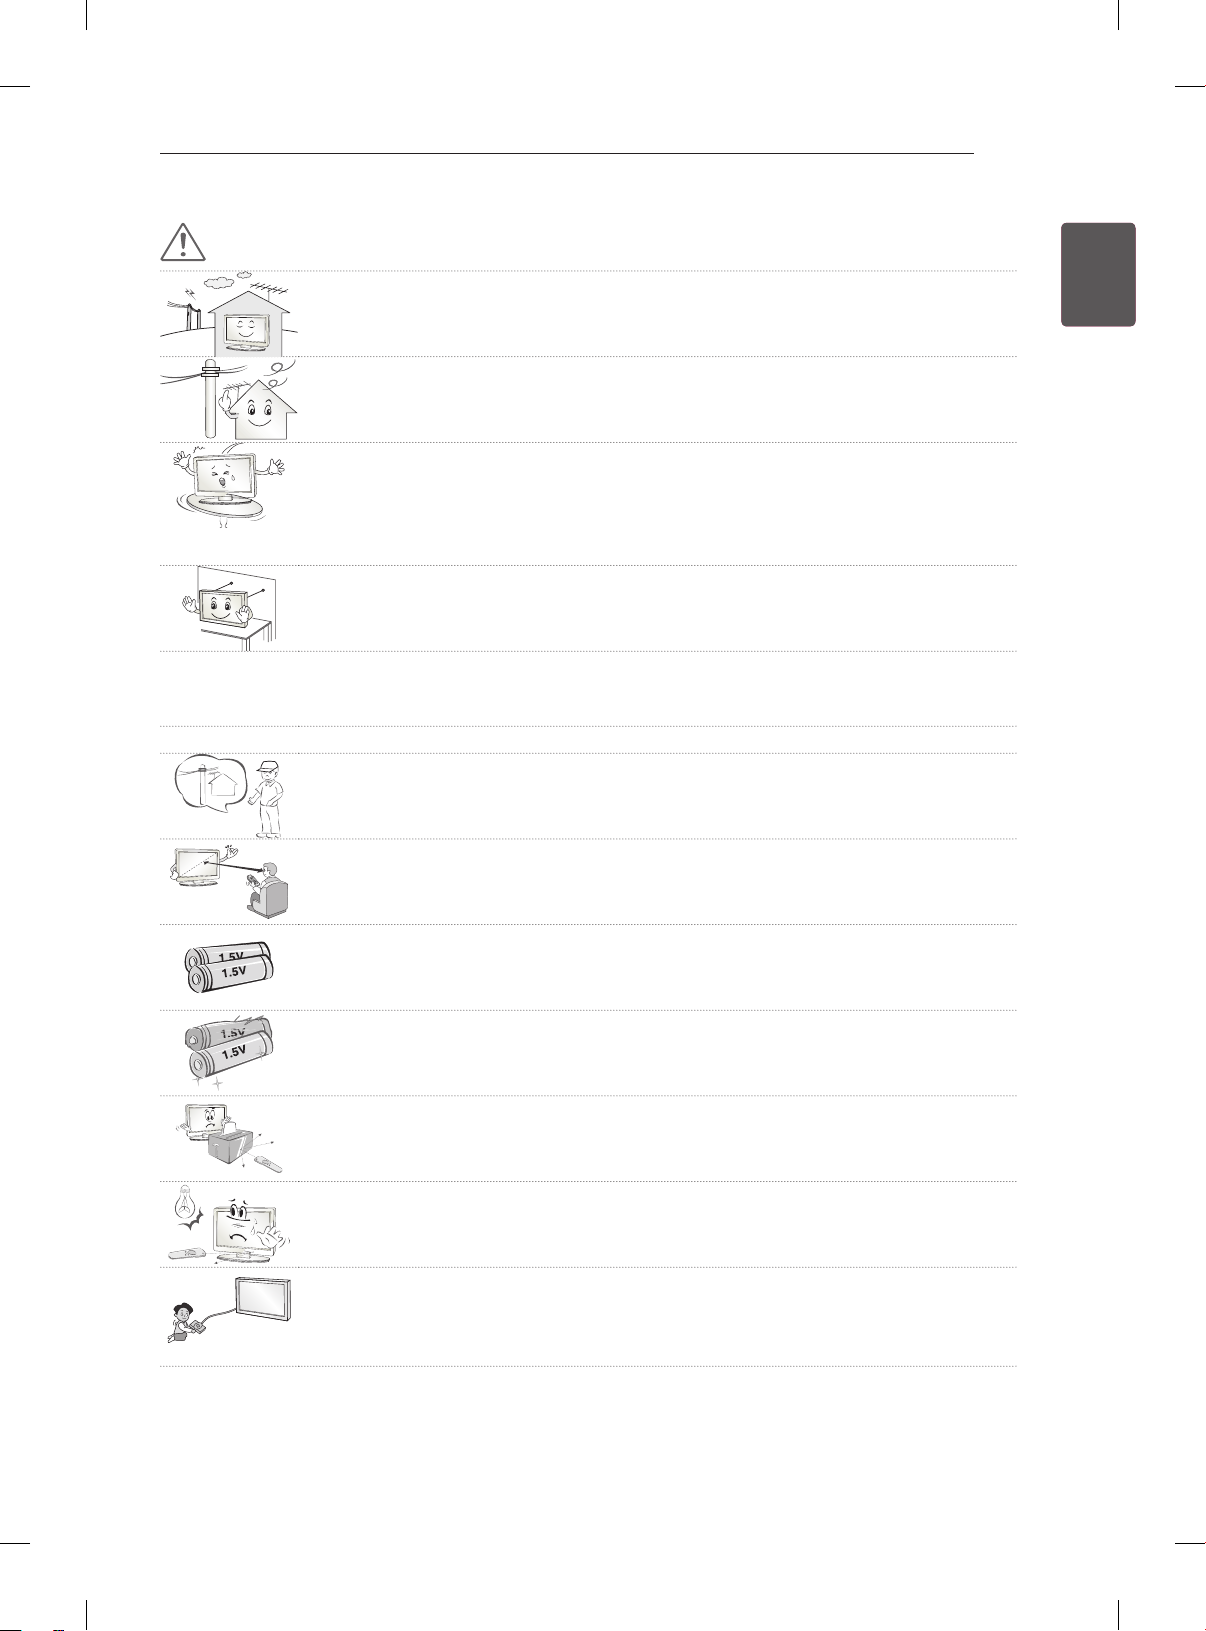
Install the product where no radio wave occurs.
There should be enough distance between an outside antenna and power lines to
keep the former from touching the latter even when the antenna falls.
This may cause an electric shock.
Do not install the product on places such as unstable shelves or inclined surfaces.
Also avoid places where there is vibration or where the product cannot be fully
supported.
Otherwise, the product may fall or flip over, which may cause injury or damage to
the product.
If you install the TV on a stand, you need to take actions to prevent the product
from overturning. Otherwise, the product may fall over, which may cause injury.
If you intend to mount the product to a wall, attach VESA standard mounting interface (optional
parts) to the back of the product. When you install the set to use the wall mounting bracket (optional
parts), fix it carefully so as not to drop.
Only use the attachments / accessories specified by the manufacturer.
When installing the antenna, consult a qualified service man.
This may create a fire hazard or an electric shock hazard.
ENGENGLISH
We recommend that you maintain a distance of at least 2 to 7 times the diagonal
screen size when watching TV.
If you watch TV for a long period of time, this may cause blurred vision.
Only use the specified type of battery.
This could cause damage to the remote control.
Do not mix new batteries with old batteries.
This may cause the batteries to overheat and leak.
Make sure there are no objects between the remote control and its sensor.
Signal from the remote control may be disturbed by sun light or other strong light.
In this case, darken the room.
When connecting external devices such as video game consoles, make sure the
connecting cables are long enough.
Otherwise, the product may fall over, which may cause injury or damage the
product.
Page 8
SAFETY INSTRUCTIONS
8
ENGLISH
ENG
Do not turn the product On/Off by plugging-in or unplugging the power plug to the
wall outlet. (Do not use the power plug for switch.)
It may cause mechanical failure or could give an electric shock.
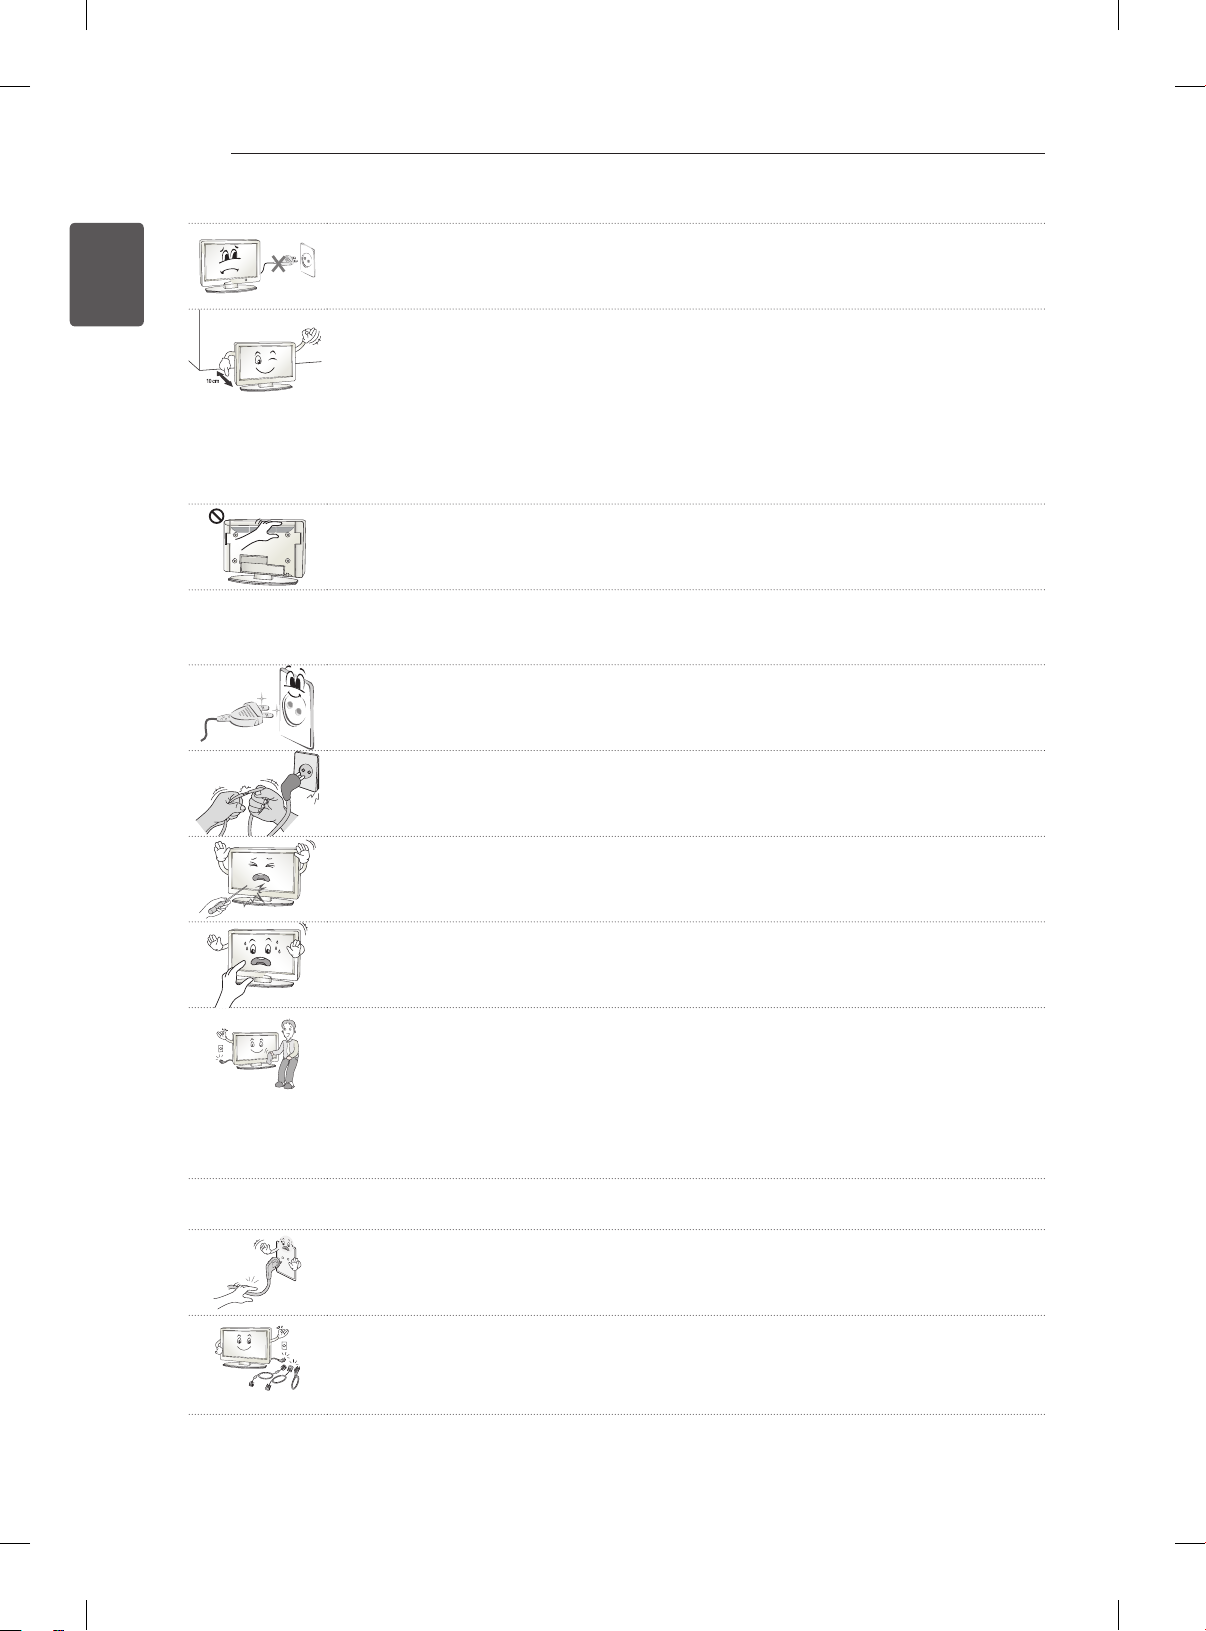
Please follow the installation instructions below to prevent the product from
overheating.
- The distance between the product and the wall should be more than 10 cm.
- Do not install the product in a place with no ventilation (e.g., on a bookshelf or in
a cupboard).
- Do not install the product on a carpet or cushion.
- Make sure the air vent is not blocked by a tablecloth or curtain.
Otherwise, this may result in fire.
Take care not to touch the ventilation openings when watching the TV for long
periods as the ventilation openings may become hot. This does not affect the
operation or performance of the product.
Periodically examine the cord of your appliance, and if its appearance indicates damage or
deterioration, unplug it, discontinue use of the appliance, and have the cord replaced with an exact
replacement part by an authorized servicer.
Prevent dust collecting on the power plug pins or outlet.
This may cause a fire hazard.
Protect the power cord from physical or mechanical abuse, such as being twisted,
kinked, pinched, closed in a door, or walked upon. Pay particular attention to plugs,
wall outlets, and the point where the cord exits the appliance.
Do not press strongly upon the panel with a hand or sharp object such as nail,
pencil or pen, or make a scratch on it.
Avoid touching the screen or holding your finger(s) against it for long periods of
time. Doing so may produce some temporary distortion effects on the screen.
When cleaning the product and its components, unplug the power first and wipe it
with a soft cloth. Applying excessive force may cause scratches or discolouration.
Do not spray with water or wipe with a wet cloth. Never use glass cleaner, car or
industrial shiner, abrasives or wax, benzene, alcohol etc., which can damage the
product and its panel.
Otherwise, this may result in fire, electric shock or product damage (deformation,
corrosion or breakage).
As long as this unit is connected to the AC wall outlet, it is not disconnected from the AC power
source even if you turn off this unit by SWITCH.
When unplugging the cable, grab the plug and unplug it.
If the wires inside the power cable are disconnected, this may cause fire.
When moving the product, make sure you turn the power off first. Then, unplug the
power cables, antenna cables and all connecting cables.
The TV set or power cord may be damaged, which may create a fire hazard or
cause electric shock.
Page 9
SAFETY INSTRUCTIONS
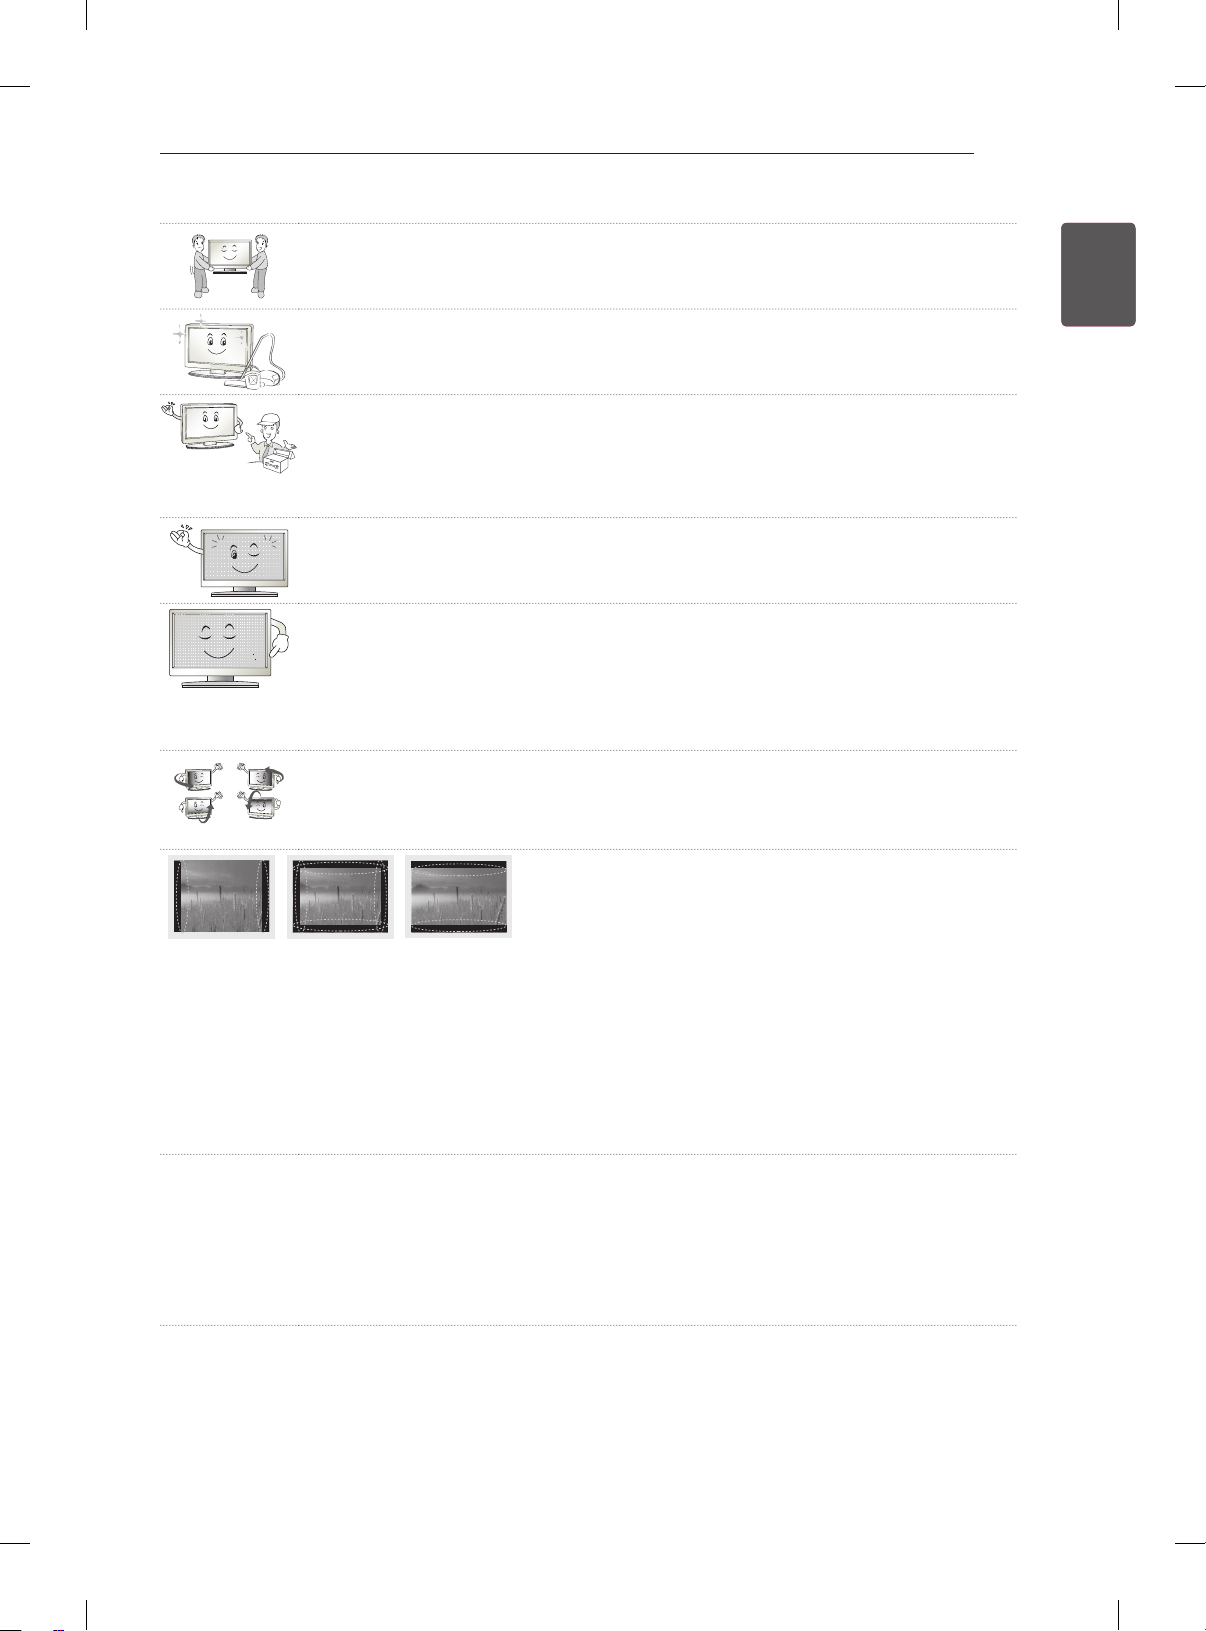
When moving or unpacking the product, work in pairs because the product is
heavy.
Otherwise, this may result in injury.
Contact the service center once a year to clean the internal parts of the product.
Accumulated dust can cause mechanical failure.
Refer all servicing to qualified service personnel. Servicing is required when the
apparatus has been damaged in any way, such as power supply cord or plug is
damaged, liquid has been spilled or objects have fallen into the apparatus, the
apparatus has been exposed to rain or moisture, does not operate normally, or has
been dropped.
If the product feels cold to the touch, there may be a small “flicker” when it is turned
on. This is normal, there is nothing wrong with product.
The panel is a high technology display product with resolution of two million to six
million pixels. You may see tiny black dots and/or brightly coloured dots (red, blue
or green) at a size of 1 ppm on the panel. This does not indicate a malfunction and
does not affect the performance and reliability of the product.
This phenomenon also occurs in third-party products and is not subject to
exchange or refund.
You may find different brightness and colour of the panel depending on your
viewing position(left/right/top/down).
This phenomenon occurs due to the characteristic of the panel. It is not related with
the product performance, and it is not malfunction.
9
ENGENGLISH
Displaying a still image (e.g., broadcasting channel logo, on-screen menu, scene from a video
game) for a prolonged time may cause damage to the screen, resulting in retention of the image,
which is known as image sticking. The warranty does not cover the product for image sticking.
Avoid displaying a fixed image on your television’s screen for a prolonged period (2 or more hours
for LCD, 1 or more hours for Plasma).
Also, if you watch the TV at a ratio of 4:3 for a long time, image sticking may occur on the borders of
the panel.
This phenomenon also occurs in third-party products and is not subject to exchange or refund.
Generated Sound
“Cracking” noise: A cracking noise that occurs when watching or turning off the TV is generated by
plastic thermal contraction due to tempera-ture and humidity. This noise is common for products
where thermal deformation is required. Electrical circuit humming/panel buzzing: A low level noise is
generated from a high-speed switching circuit, which supplies a large amount of current to operate a
product. It varies depend-ing on the product.
This generated sound does not affect the performance and reliability of the product.
Page 10
INSTALLATION PROCEDURE / ASSEMBLING AND PREPARING
<
<
10
ENGLISH
ENG
NOTE
Image shown may differ from your TV.
Your TV’s OSD (On Screen Display) may differ slightly from that shown in this manual.
The available menus and options may differ from the input source or product model that you are
using.
New features may be added to this TV in the future.
The TV can be placed in standby mode in order to reduce the power consumption. And the TV should
be turned off if it will not be watched for some time, as this will reduce energy consumption.
The energy consumed during use can be significantly reduced if the level of brightness of the picture
is reduced, and this will reduce the overall running cost.
INSTALLATION PROCEDURE
1 Open the package and make sure all the accessories are included.
2 Attach the stand to the TV set.
3 Connect an external device to the TV set.
ASSEMBLING AND PREPARING
Unpacking
Check your product box for the following items. If there are any missing accessories, contact the local
dealer where you purchased your product. The illustrations in this manual may differ from the actual
product and item.
CAUTION
Do not use any unapproved items to ensure the safety and product life span.
Any damages or injuries by using unapproved items are not covered by the
Some models have a thin film attached on to the screen and this must not be removed.
manufacturer’s warranty.
WARNING
You need to enable easy access for connecting and disconnecting electric cables fed from the mains.
NOTE
The items supplied with your product may vary depending on the model.
Product specifications or contents of this manual may be changed without prior notice due to upgrade
of product functions.
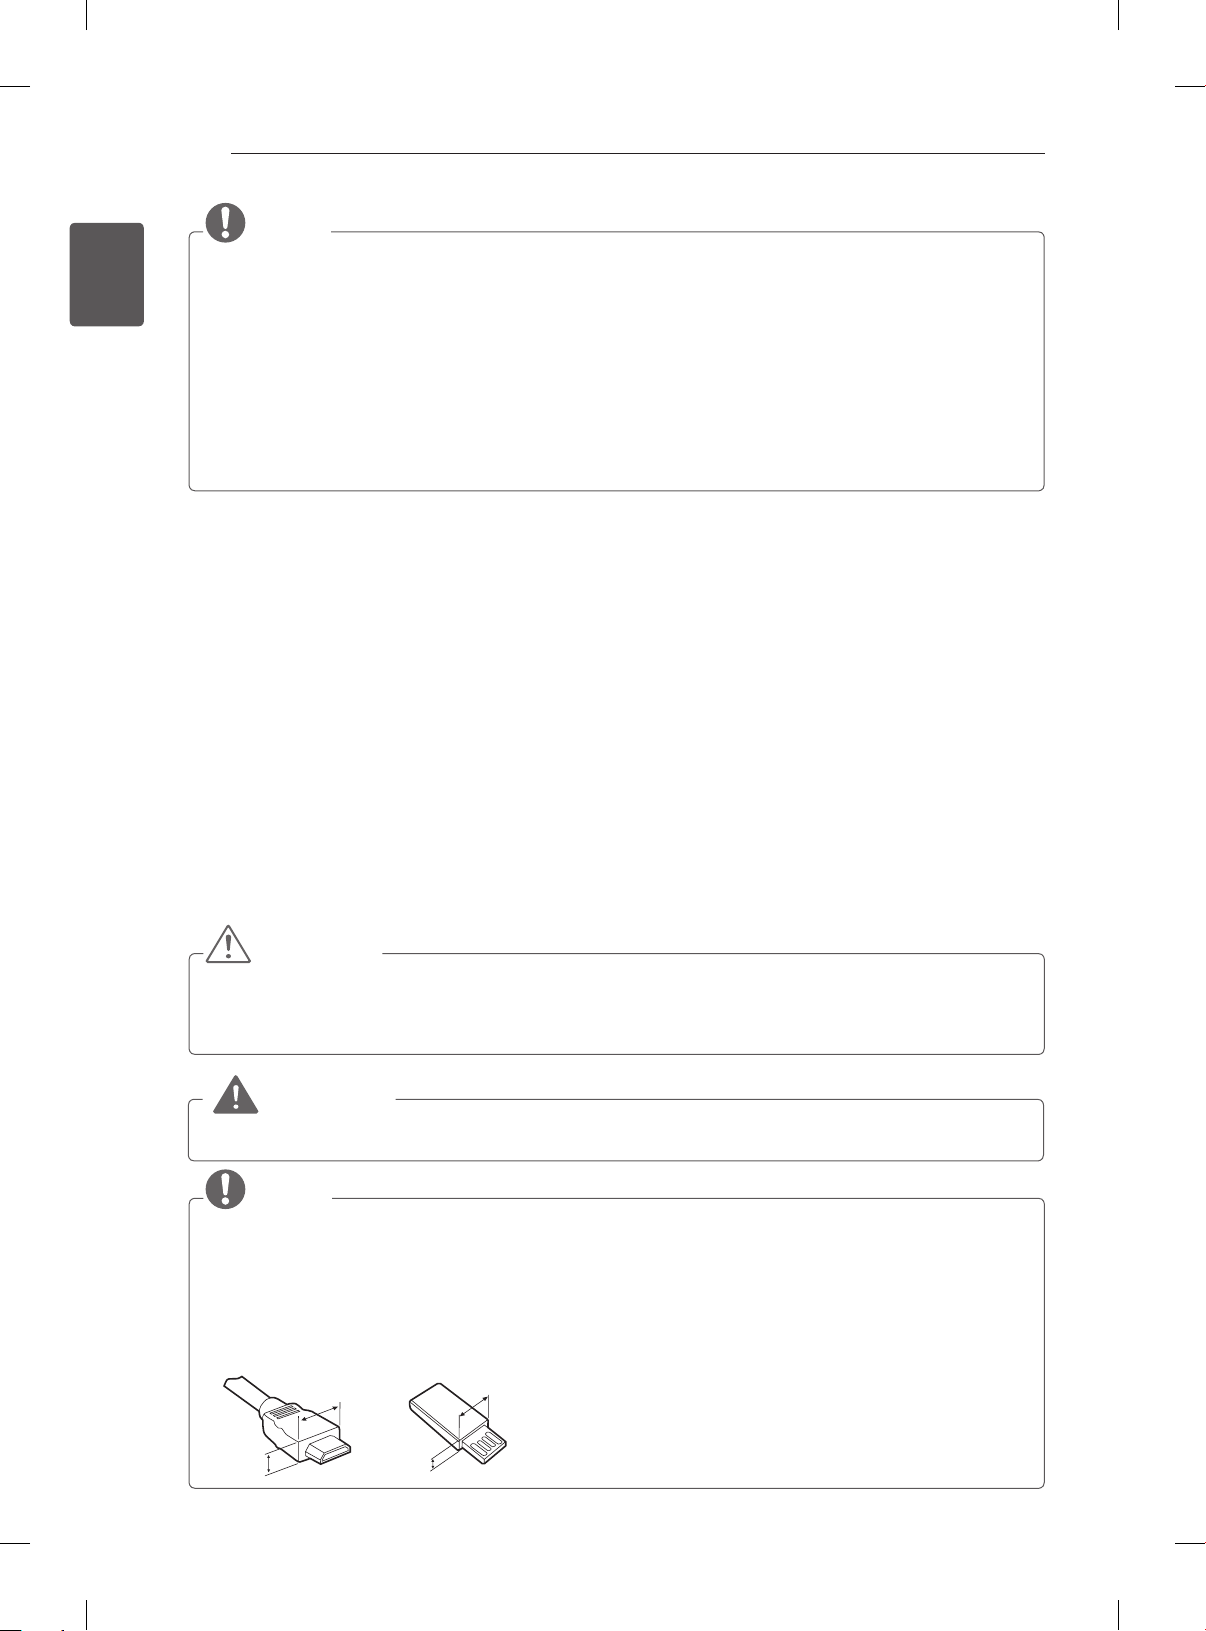
For an optimal connection, HDMI cables and USB devices should have bezels less than 10 mm thick
and 18 mm width. Use an extension cable that supports USB 2.0 if the USB cable or USB memory
stick does not fit into your TV’s USB port.
B
A
B
*A
10 mm
=
*B
A
18 mm
=
Page 11
ASSEMBLING AND PREPARING
11
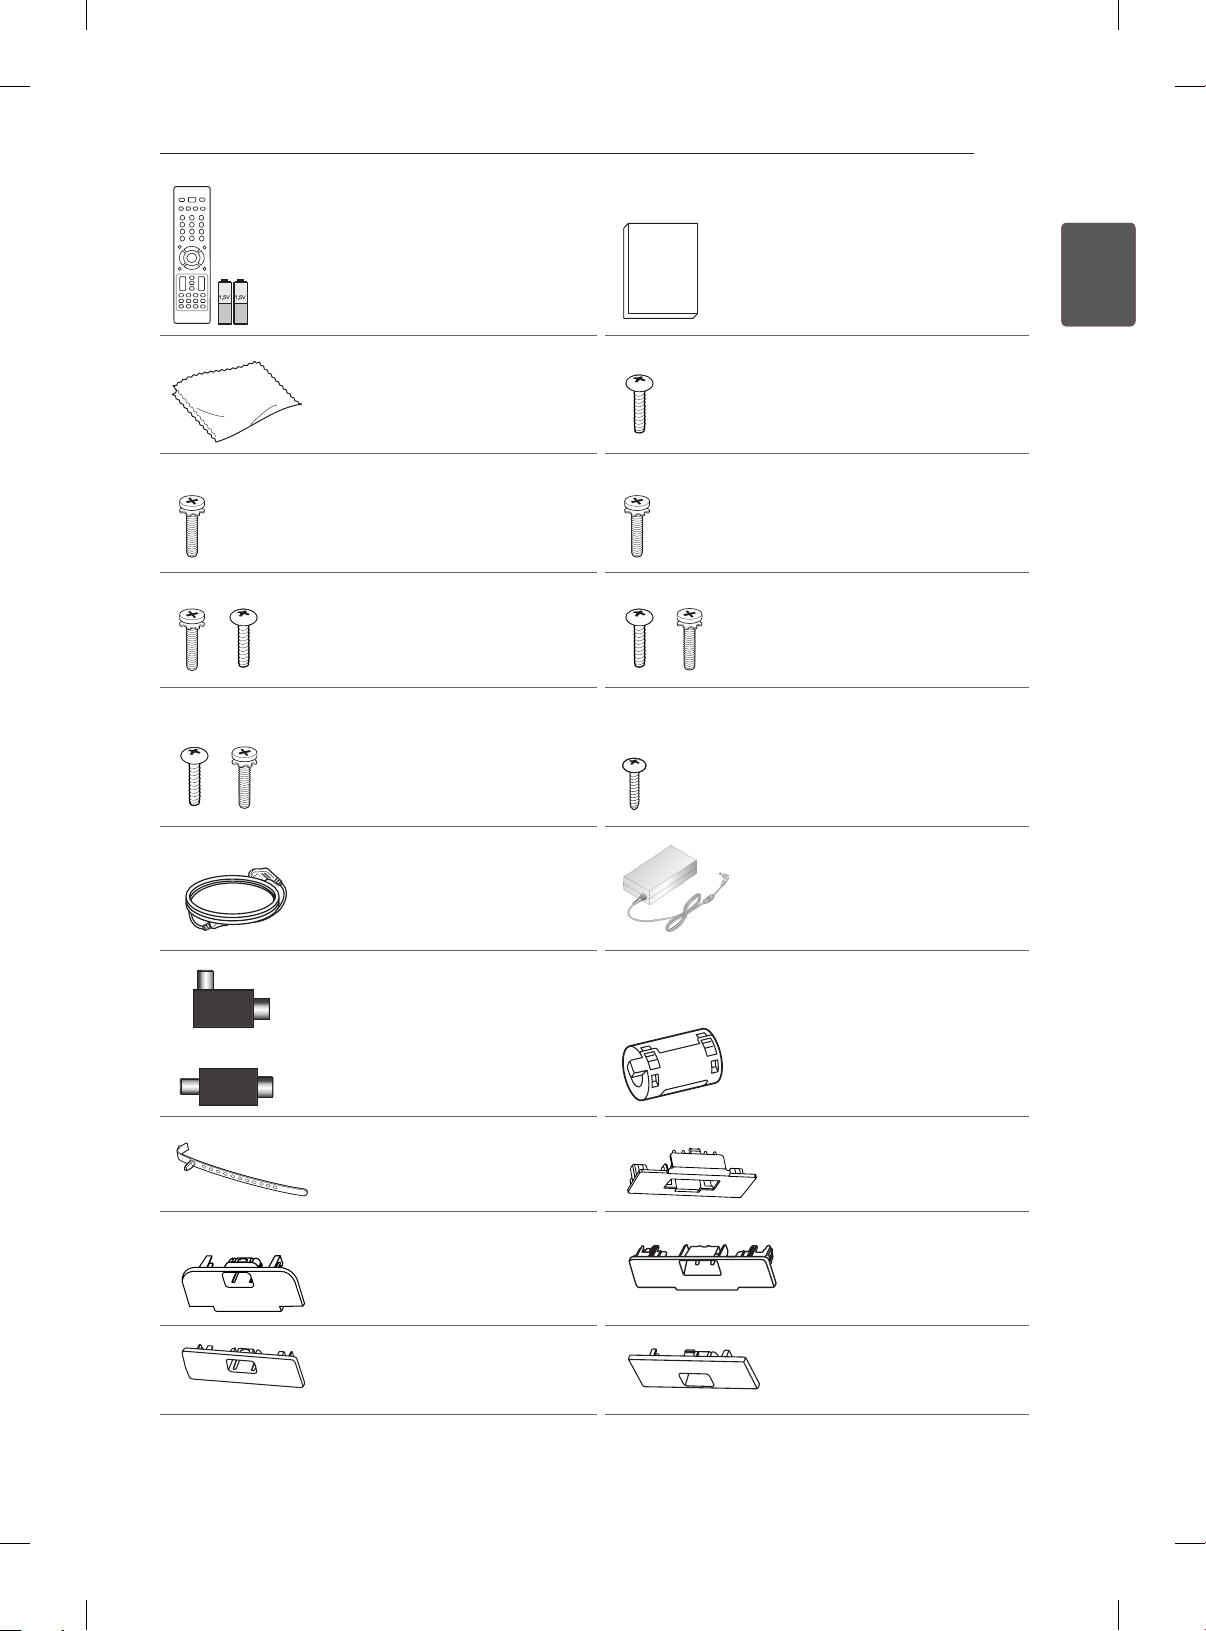
Remote control and
batteries (AAA)
( See p. 29 See p. 29) Owner’s manual
Screw for assembly
Polishing cloth
(Depending on model)
Use this to remove dust
from the cabinet.
Screw for assembly
8EA, M4 x 20
(Only 26/32/42CS41**,
32/42LS310*, 32/42LS311*)
( See p. 18)
Screw for assembly
4EA, M4 x 14
4EA, P4 x 16
(Only 32LS33**, 42LS315*)
( See p. 17, 20)
Screw for assembly
2EA, P4 x 16
4EA, M4 x 20
(Only 32LS315*)
( See p. 19)
2EA, P4 x 16
(Only 22CS41**,
19/22LS33**)
( See p. 17, 19)
Screw for assembly
2EA, M4 x 14
(Only 26LS33**)
( See p. 17)
Screw for assembly
4EA, P4 x 16
4EA, M4 x 20
(Only 32LS30**)
( See p. 20)
Screw for fixing
(Only 26/32/42CS41**,
32/42LS310*, 32/42LS311*
32LS33**,32/42LS315*,
32LS30**)
( See p. 21) See p. 21))
ENGENGLISH
or
Power Cord
Isolator
(Depending on model)
( See p. 13)
Cable holder
(Depending on model)
( See p. 24)
Protection cover
(Only 32CS41**, 32LS310*,
32LS311*)
( See p. 24)
Protection cover
(Only 32LS30**)
( See p. 24)
Adapter
(Only 19/22/26LS33**)
( See p. 26)
Ferrite core
(Depending on model)
( See p. 13)
Protection cover
(Only 26CS41**)
( See p. 24)
Protection cover
(Only 42CS41**,
42LS310*, 42LS311*)
( See p. 24)
Protection cover
(Only 32LS315*)
( See p. 24)
Page 12
ENGLISH
ENG
ASSEMBLING AND PREPARING
12
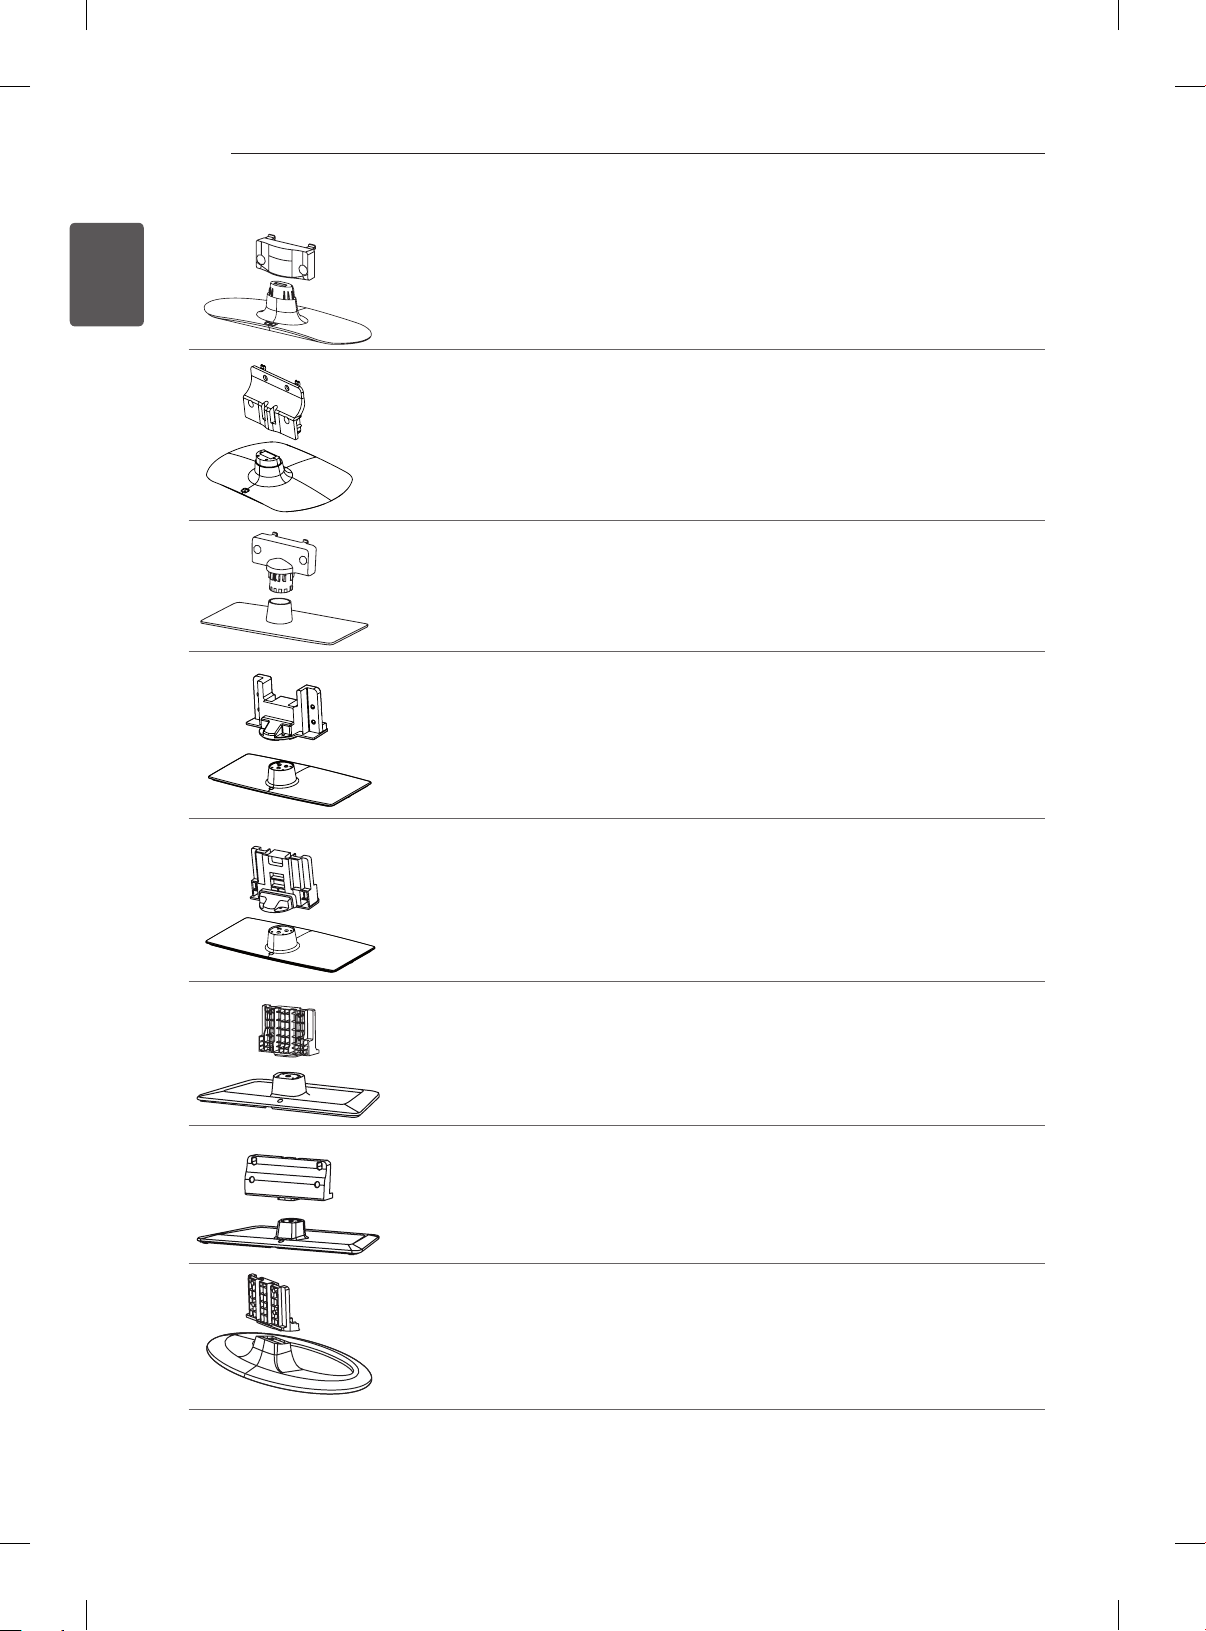
Stand Body / Stand Base
(Only 19/22/26LS33**)
( See p. 17)
Stand Body / Stand Base
(Only 32LS33**)
( See p. 17)
Stand Body / Stand Base
(Only 22CS41**)
( See p. 19)
Stand Body / Stand Base
(Only 26CS41**)
( See p. 18)
Stand Body / Stand Base
(Only 32/42LS310*, 32/42LS311*, 32/42CS41**)
( See p. 18)
Stand Body / Stand Base
(Only 32LS315*)
( See p. 19)
Stand Body / Stand Base
(Only 42LS315*)
( See p. 20)
Stand Body / Stand Base
(Only 32LS30**)
( See p. 20)
Page 13
ASSEMBLING AND PREPARING
13
NOTE
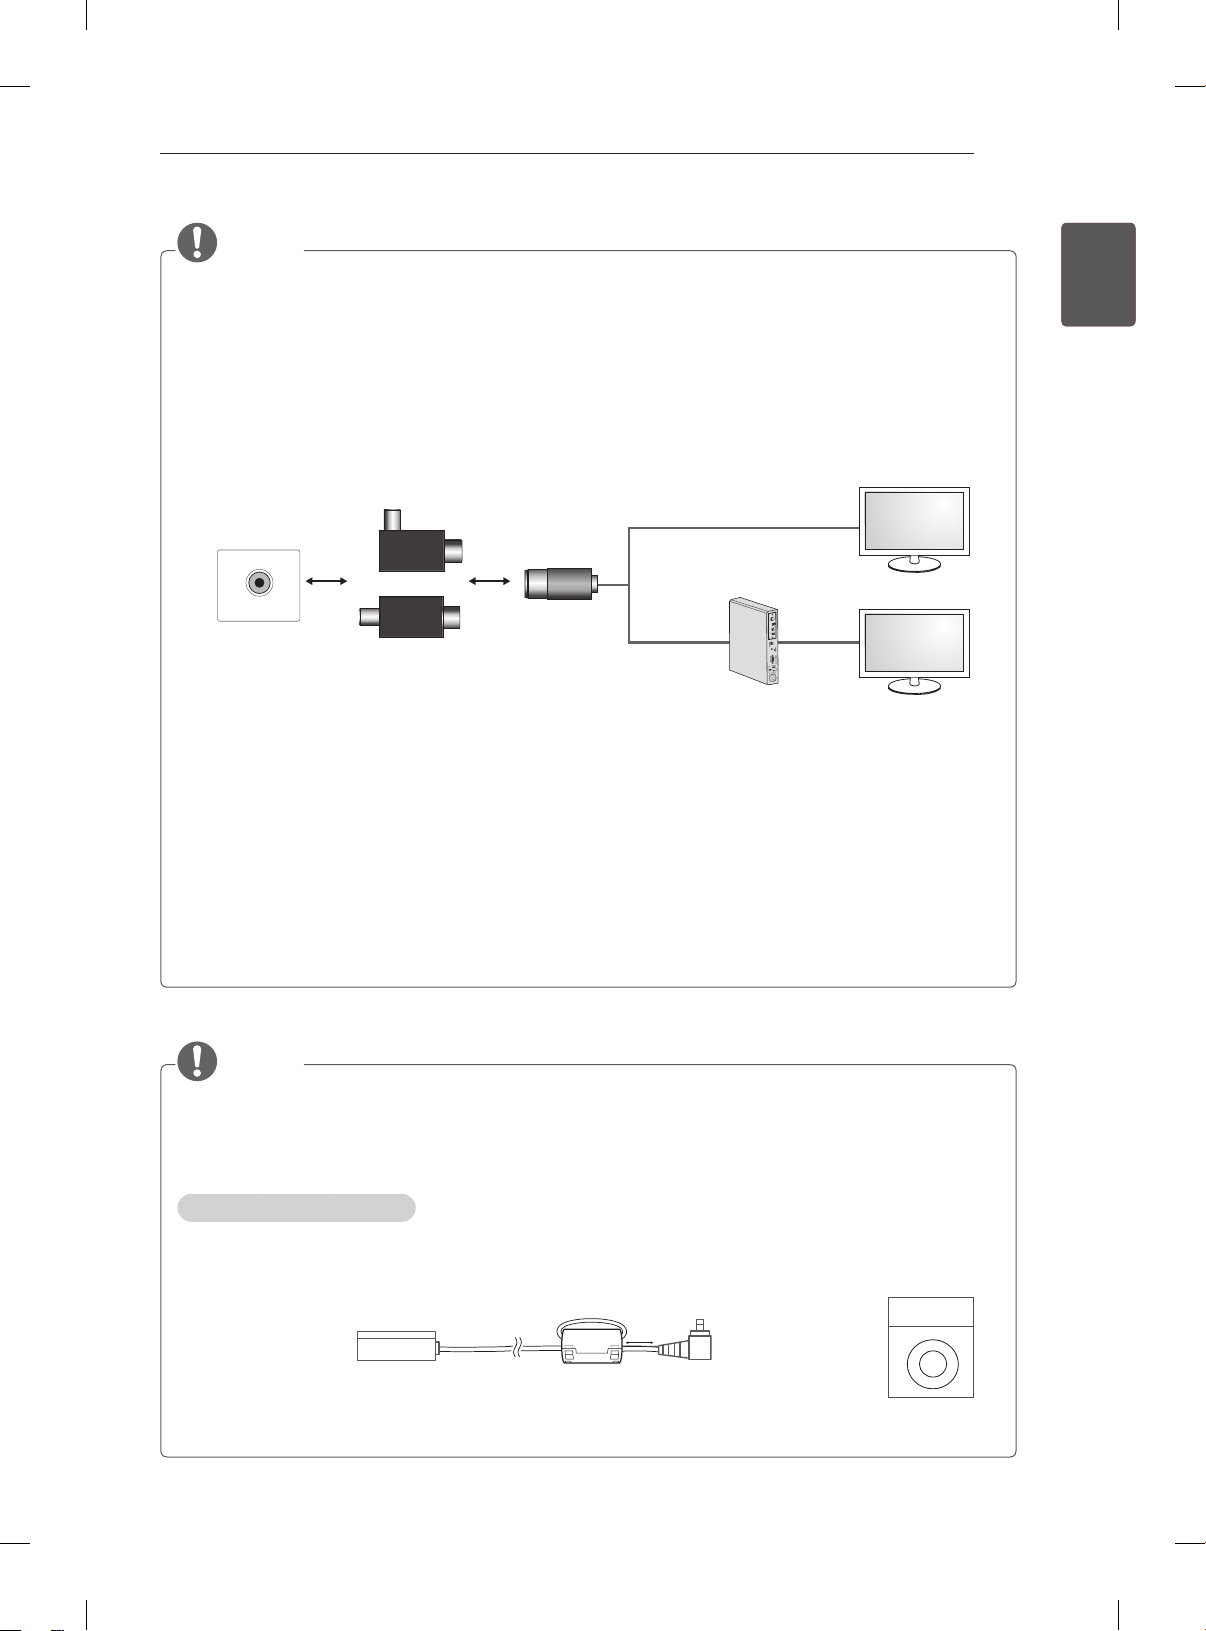
Antenna Isolator Installation Guide
- Use this to install TV in a place where there is a voltage difference between TV Set and GND of
antenna signal.
»If there is a voltage difference between TV Set and GND of antenna signal, the antenna contact
might be heated and excessive heat might cause an accident.
- You can improve the safety when watching TV by efficiently removing power voltage from TV antenna. It is recommended to mount the isolator to the wall. If it cannot be mounted to the wall, mount it
on the TV. Avoid disconnecting the antenna Isolator after installation.
- Before starting, be sure that the TV antenna is connected.
Wall
ANTENNA/
CABLE IN
Cable / Antenna
Connect one end of the isolator to cable/antenna jack and the other to TV set or set-top box.
“Equipment connected to the protective earthing of the building installation through the mains
connection or through other equipment with a connection to protective earthing - and to a cable
distribution system using coaxial cable, may in some circumstances create a re hazard. Connection
to a cable distribution system has therefore to be provided through a device providing electrical
isolation below a certain frequency range (galvanic isolator, see EN 60728-11)”
or
Isolator
1. Connect to TV.
2. Connect to Set-Top box.
ENGENGLISH
When applying the RF Isolator, a slight loss of signal sensitivity can occur.
NOTE
The items supplied with your product may vary depending on the model.
Product specifications or contents of this manual may be changed without prior notice due to upgrade
of product functions.
How to use the ferrite core
A ferrite core is used to reduce electromagnetic waves when the power cord is connected to the power
outlet. Put the ferrite core on the power cord as shown in the figure below by splitting it apart. It is
better to place the ferrite core as close to the TV and the power plug as possible.
(Gray)
[to a wall plug] [to the TV]
[Figure]
[Cross Section of
Ferrite Core]
Page 14
ENGLISH
ENG
ASSEMBLING AND PREPARING
14
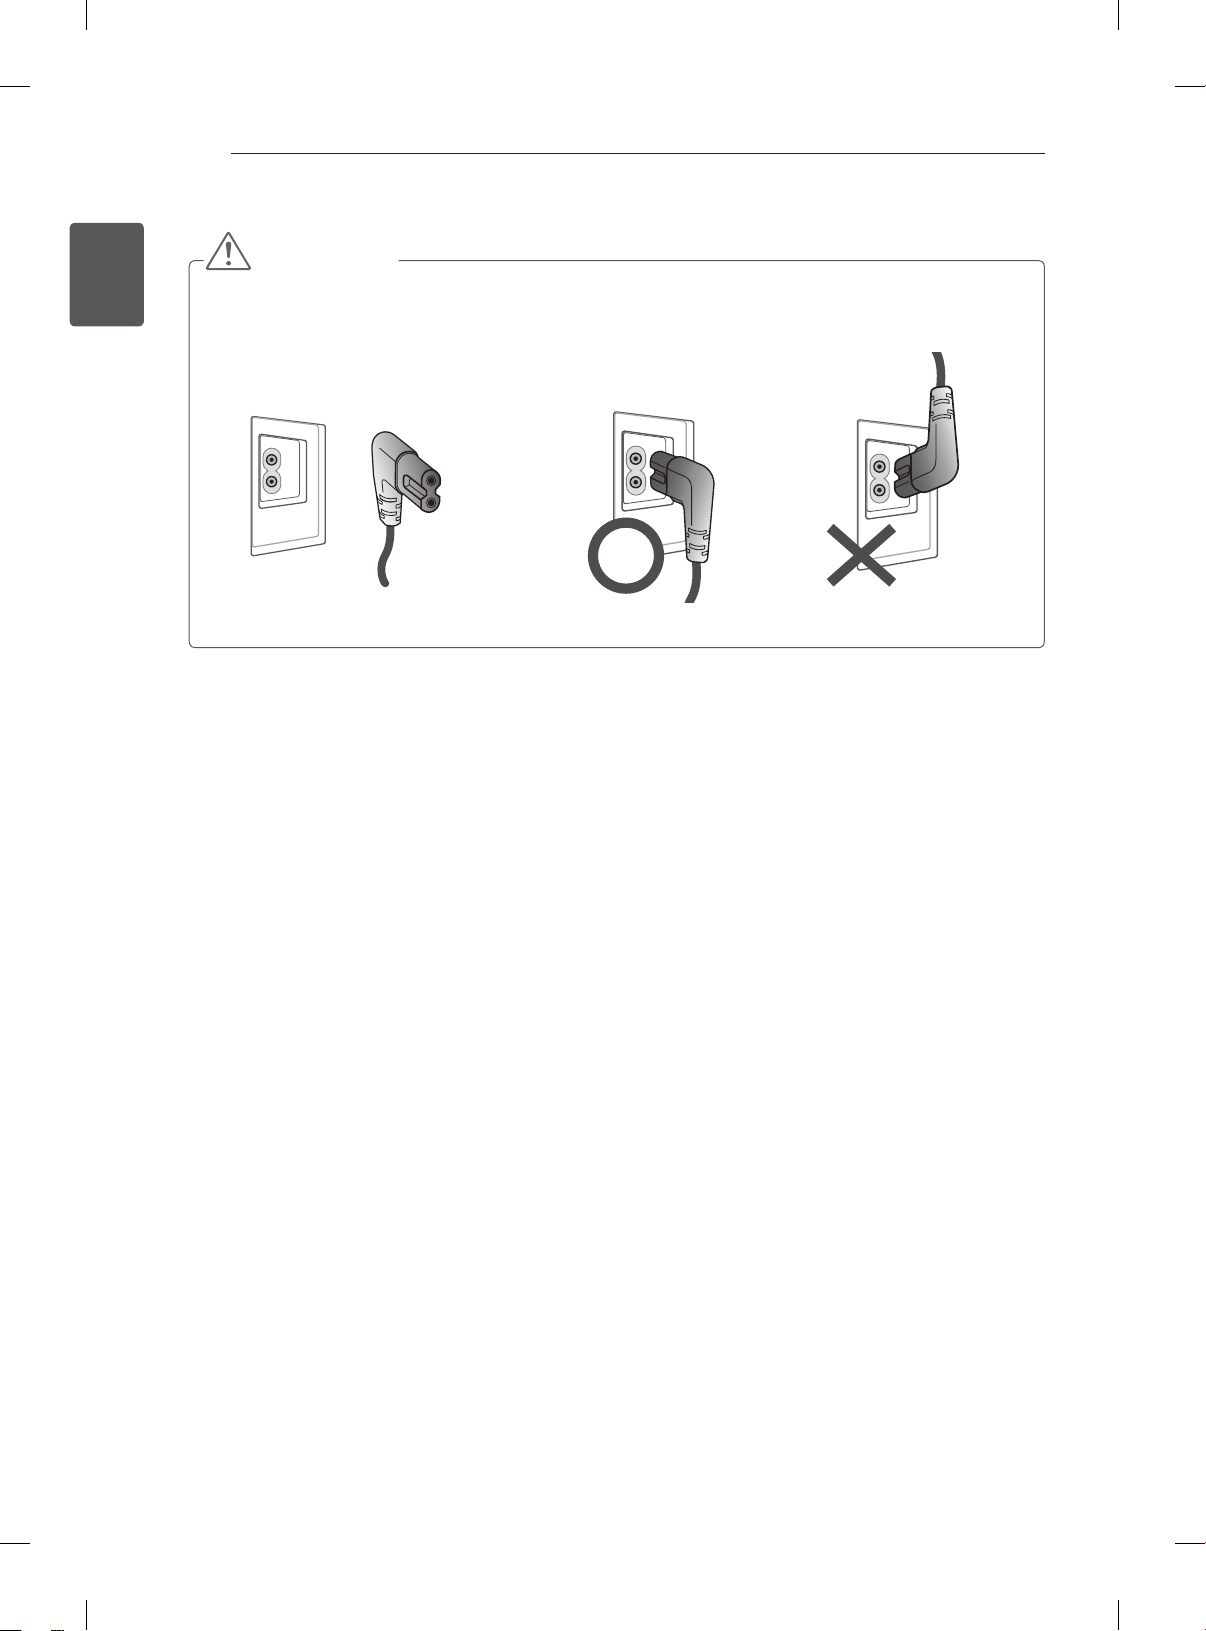
CAUTION
Power Cord Installation Guide
- If the power cord provided with TV looks like the below picture, please ensure that it is inserted in
the right direction.
TV Power Cord Correct Wrong
Page 15
ASSEMBLING AND PREPARING
INPUT
OK
SETTINGS
H
H
H
OK
INPUT
SETTINGS
SETTINGS
INPUT
OK
SETTINGS
INPUT
OK
15
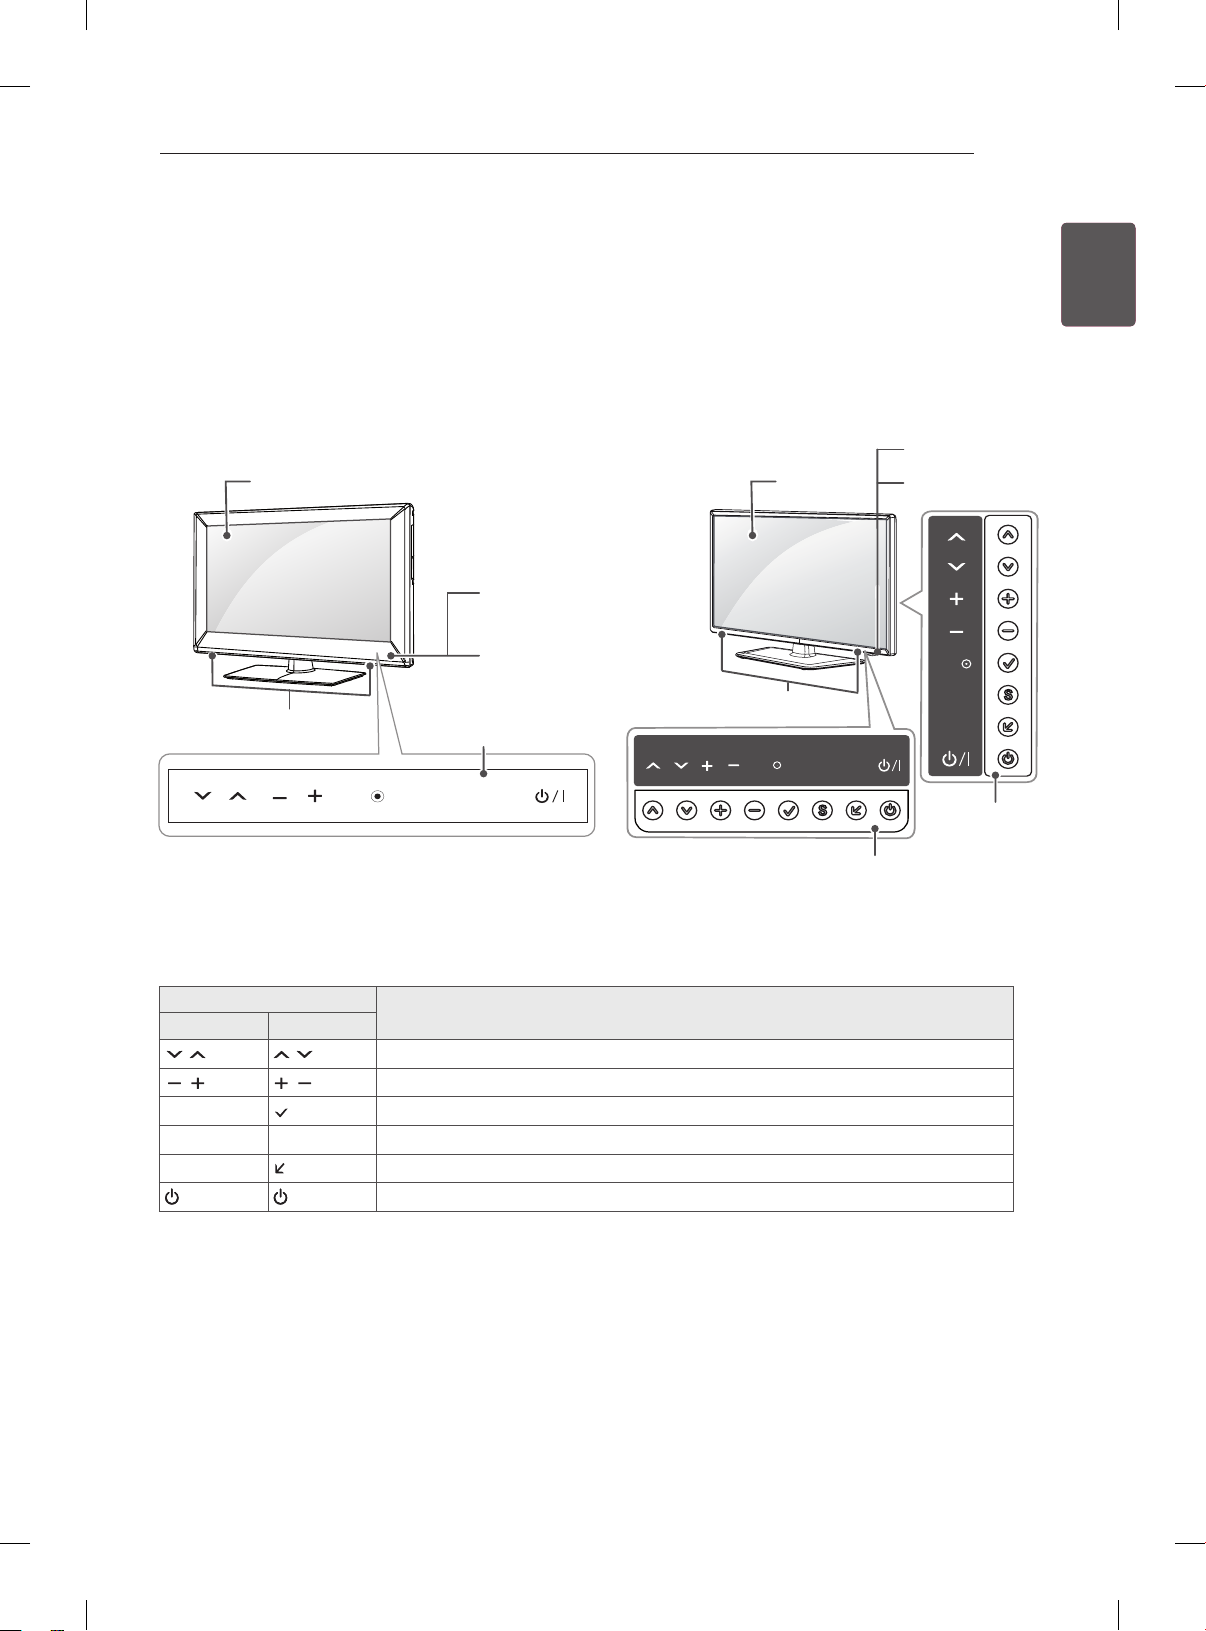
Parts and buttons
A type : 22/26/32/42CS41**,
19/22/26/32LS33**, 32/42LS310*,
32/42LS311*
Screen
Speakers
Remote control
sensor
Power
indicator
Touch buttons
B type : 32/42LS315*, 32LS30**
Screen
Speakers
ENGENGLISH
Remote control
sensor
Power indicator
buttons(Only
32/42LS315*)
buttons(Only 32LS30**)
Button
A type
1
B type
Description
Scrolls through the saved programmes.
Adjusts the volume level.
ꔉ
OK
SETTINGS S
INPUT
/ I
Selects the highlighted menu option or confirms an input.
Accesses the main menu, or saves your input and exits the menus.
Changes the input source.
Turns the power on or off.
1 A type buttons are touch sensitive and can be operated through simple touch with your nger.
Page 16
ASSEMBLING AND PREPARING
16
ENGLISH
ENG
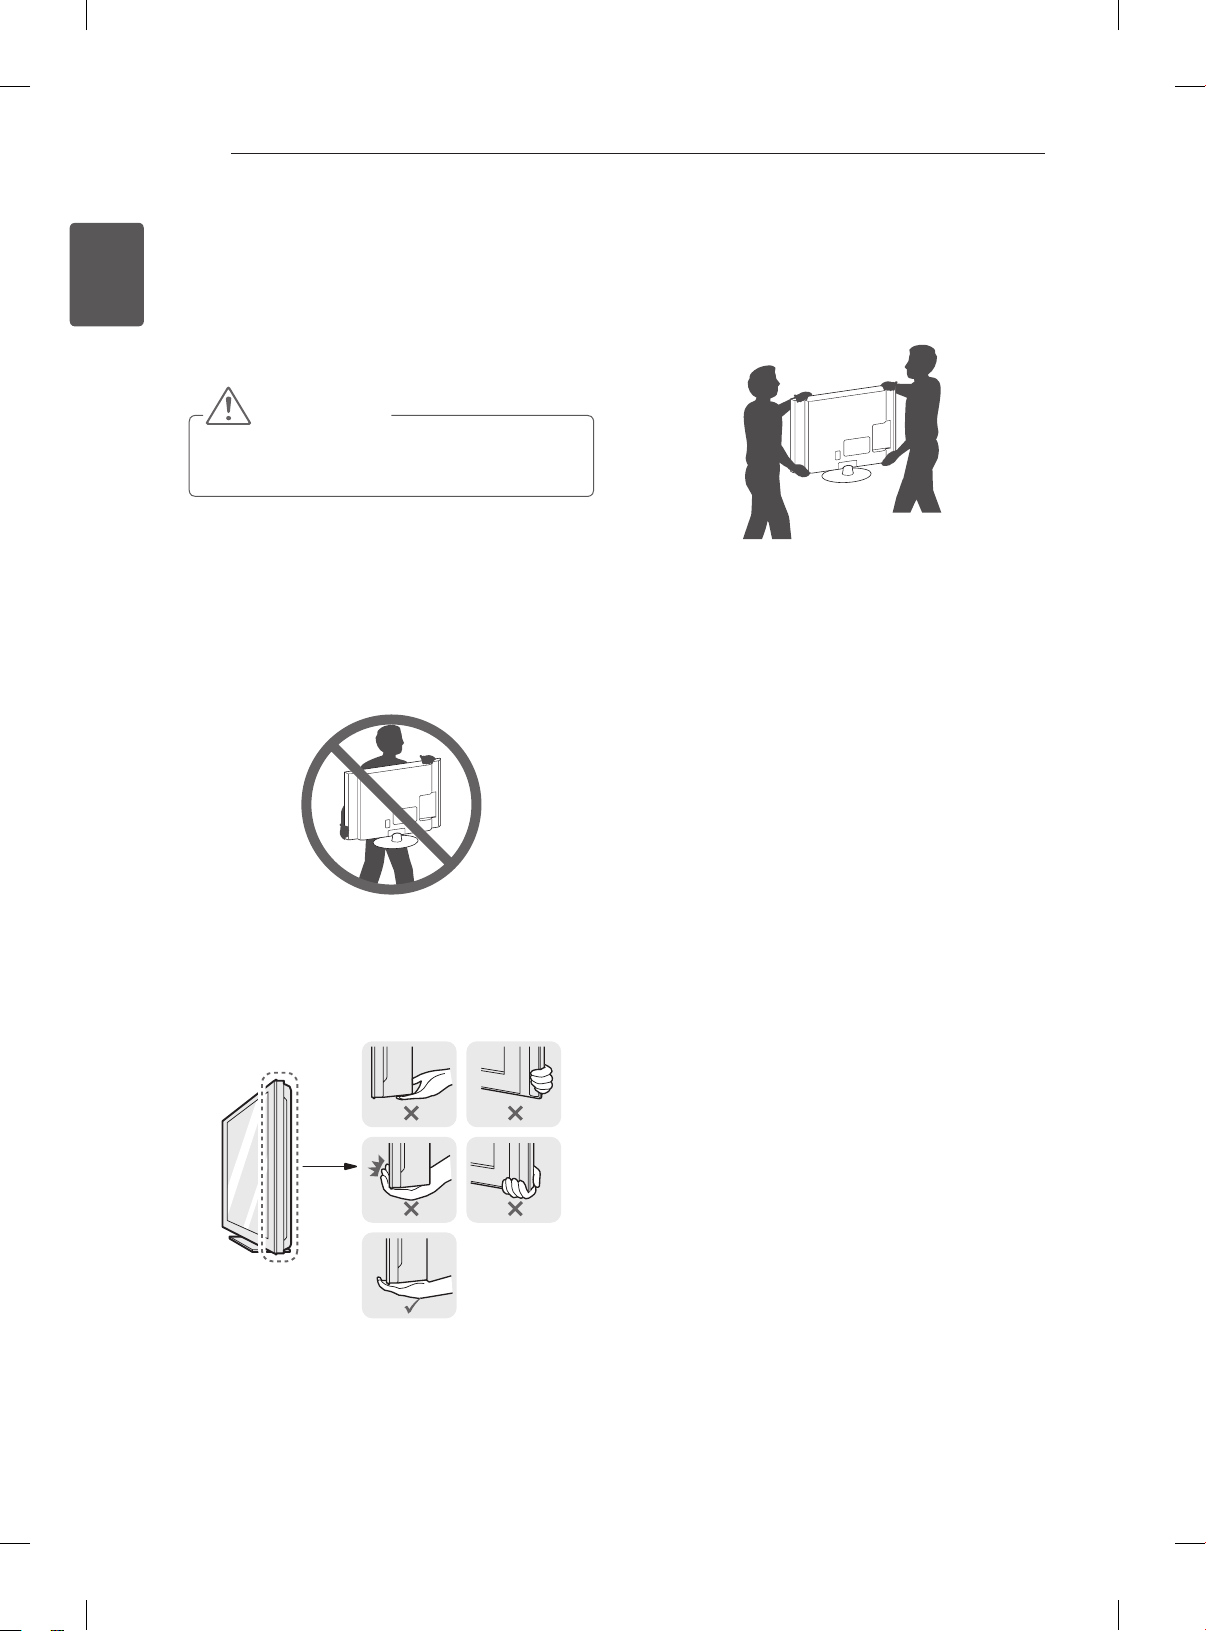
Lifting and moving the TV
When moving or lifting the TV, read the following to
prevent the TV from being scratched or damaged
and for safe transportation regardless of its type
and size.
CAUTION
Avoid touching the screen at all times, as
this may result in damage to the screen.
It is recommended to move the TV in the box
or packing material that the TV originally came
in.
Before moving or lifting the TV, disconnect the
power cord and all cables.
When holding the TV, the screen should face
away from you to avoid damage.
When transporting a large TV, there should be
at least 2 people.
When transporting the TV by hand, hold the TV
as shown in the following illustration.
When transporting the TV, do not expose the
TV to jolts or excessive vibration.
When transporting the TV, keep the TV upright,
never turn the TV on its side or tilt towards the
left or right.
Hold the top and bottom of the TV frame rmly.
Make sure not to hold the transparent part,
speaker, or speaker grill area.
Page 17

ASSEMBLING AND PREPARING
Screw(Stand+Head)
M4 x 14
17
Setting up the TV
Image shown may differ from your TV.
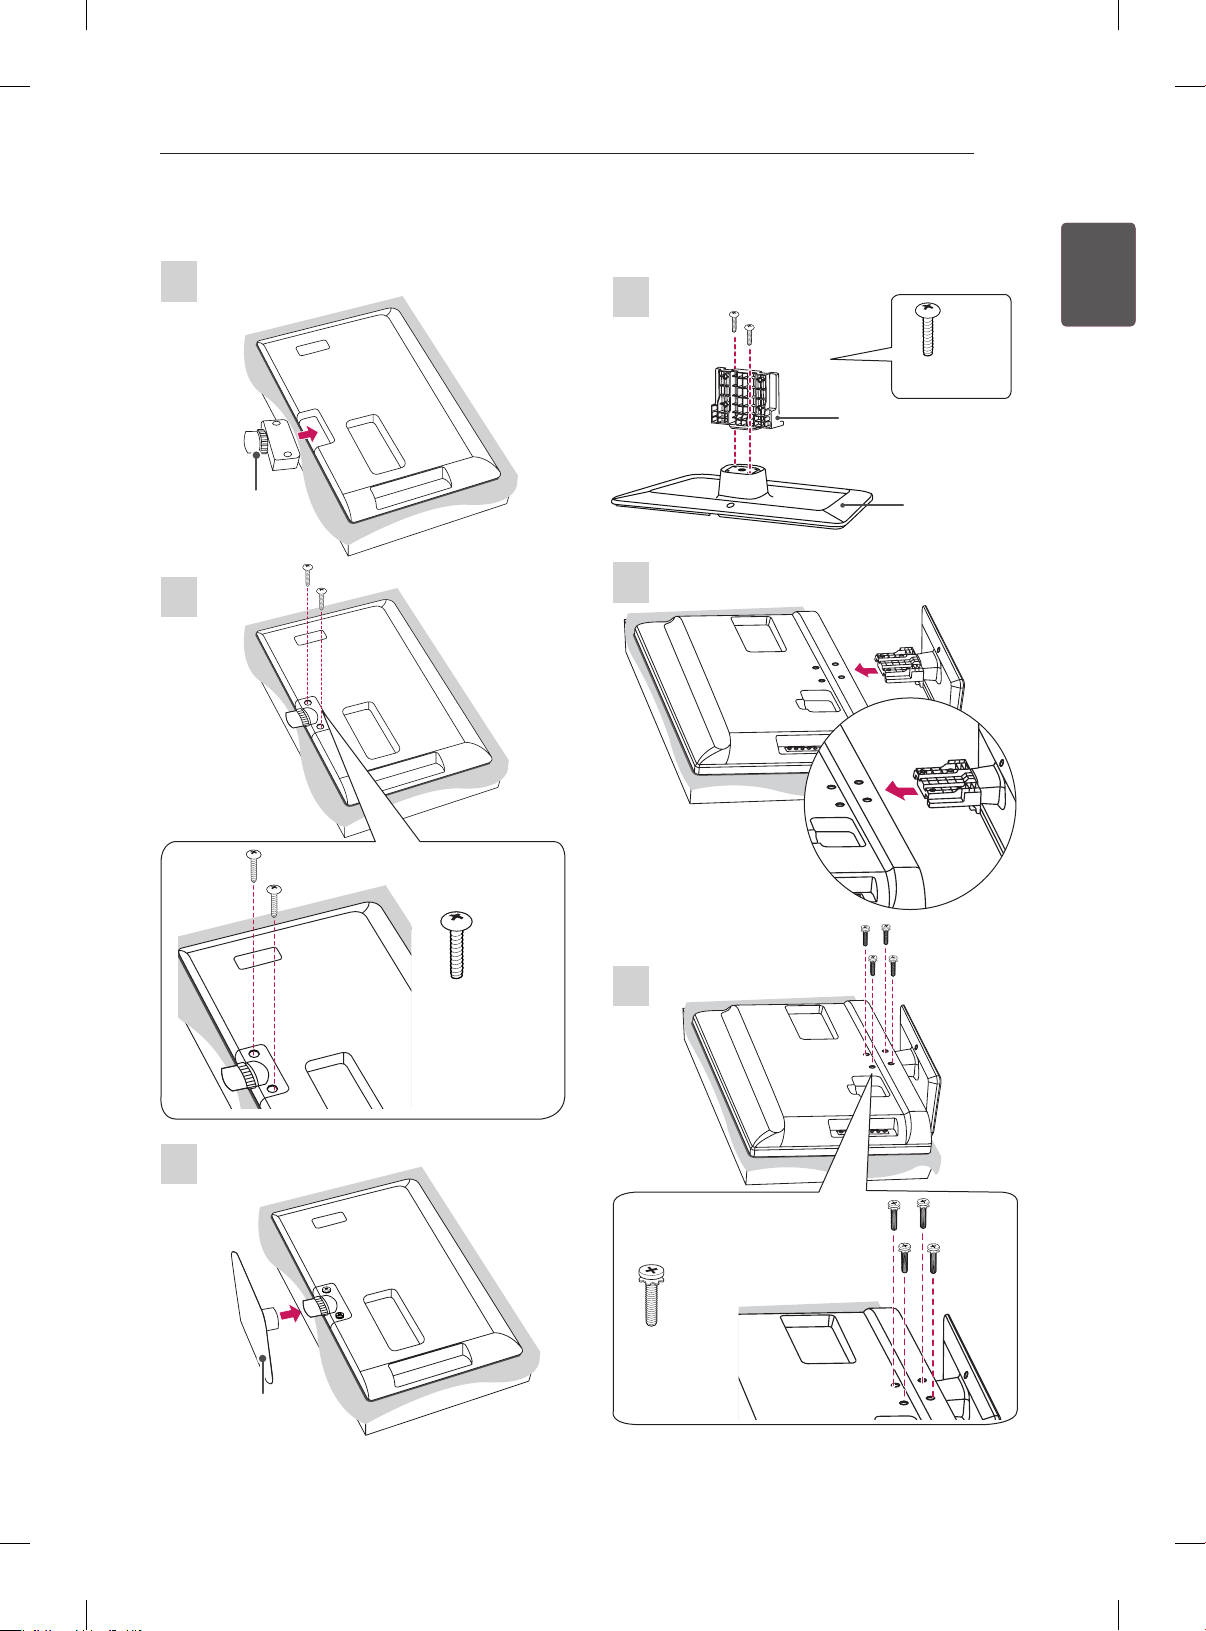
19/22/26LS33**
Stand Body
1
Stand Base
2
32LS33**
1
2
ENGENGLISH
4EA
P4 x 16
Stand Body
Stand Base
3
Model 19/22LS33** 26LS33**
Standard screw P4 x 16 M4 x 14
Number of screws 2EA 2EA
3
4EA
M4 x 14
Page 18
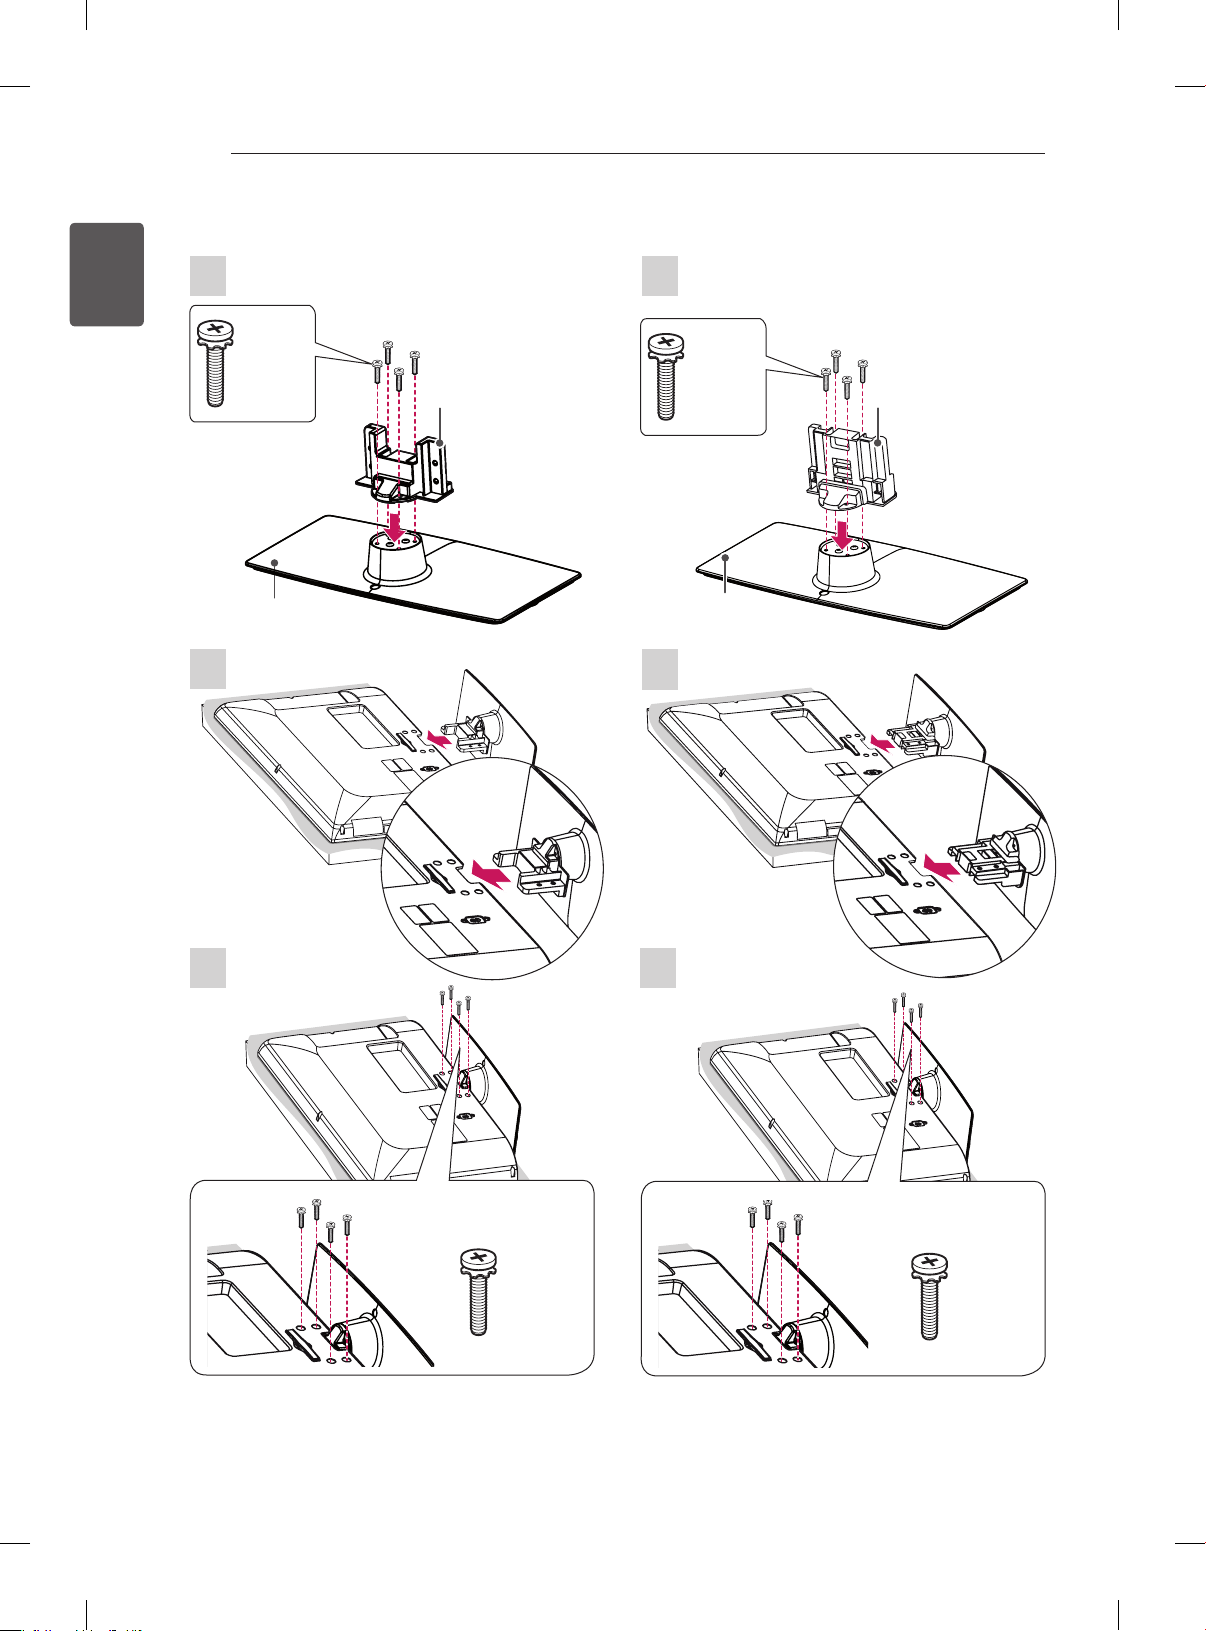
ASSEMBLING AND PREPARING
18
ENGLISH
ENG
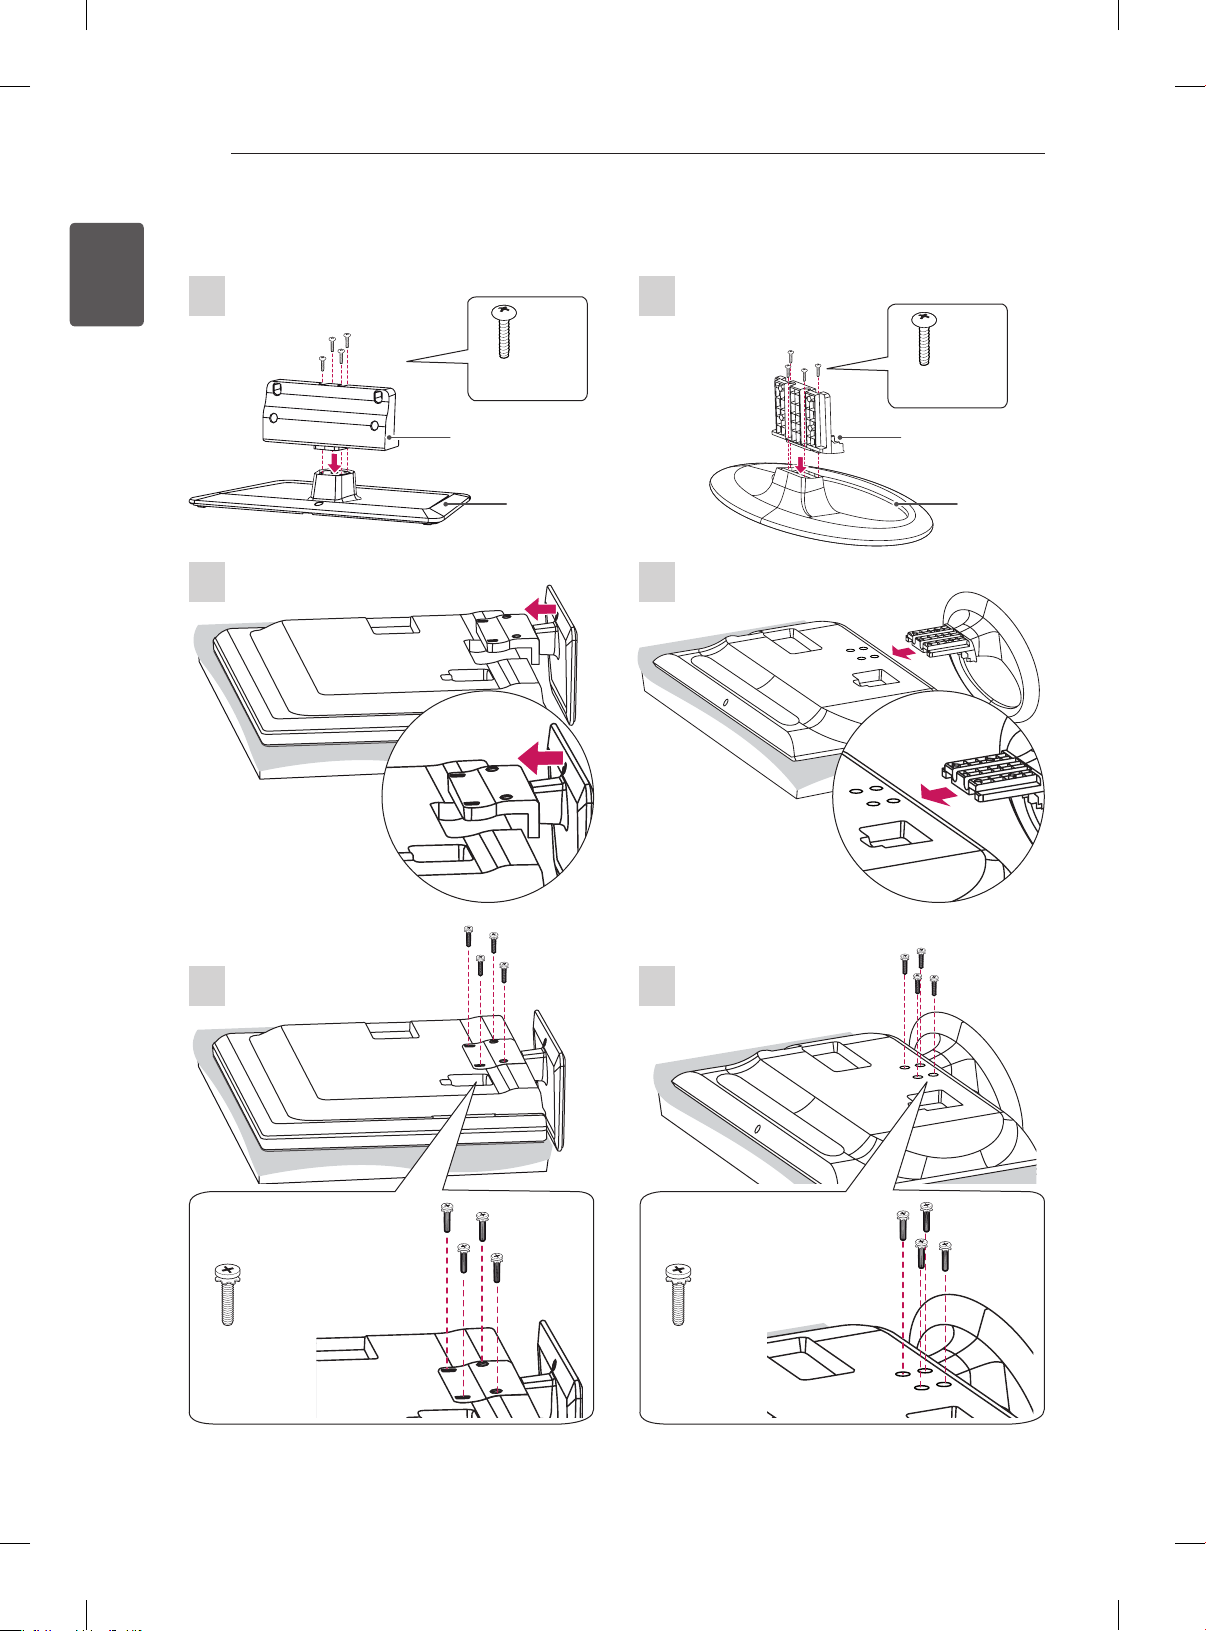
26CS41**
1
4EA
M4 x 20
Stand Base
2
Stand Body
32/42CS41**, 32/42LS310*, 32/42LS311*
1
4EA
M4 x 20
Stand Base
Stand Body
2
3
4EA
M4 x 20
3
4EA
M4 x 20
Page 19
ASSEMBLING AND PREPARING
19
22CS41**
1
Stand Body
2
32LS315*
ENGENGLISH
1
2EA
P4 x 16
Stand Body
Stand Base
2
3
2EA
P4 x 16
3
4EA
M4 x 20
Stand Base
Page 20
ASSEMBLING AND PREPARING
20
ENGLISH
ENG
42LS315*
1
2
P4 x 16
Stand Body
Stand Base
4EA
32LS30**
1
4EA
P4 x 16
Stand Body
Stand Base
2
3
M4 x 14
4EA
3
4EA
M4 x 20
Page 21
CAUTION
When attaching the stand to the TV
set, place the screen facing down on a
cushioned table or flat surface to protect the
screen from scratches.
Make sure that the screws are inserted
correctly and fastened securely. (If they are
not fastened securely enough, the TV may
tilt forward after being installed.)
Do not use too much force and over tighten
the screws; otherwise screw may be
damaged and not tighten correctly.
ASSEMBLING AND PREPARING
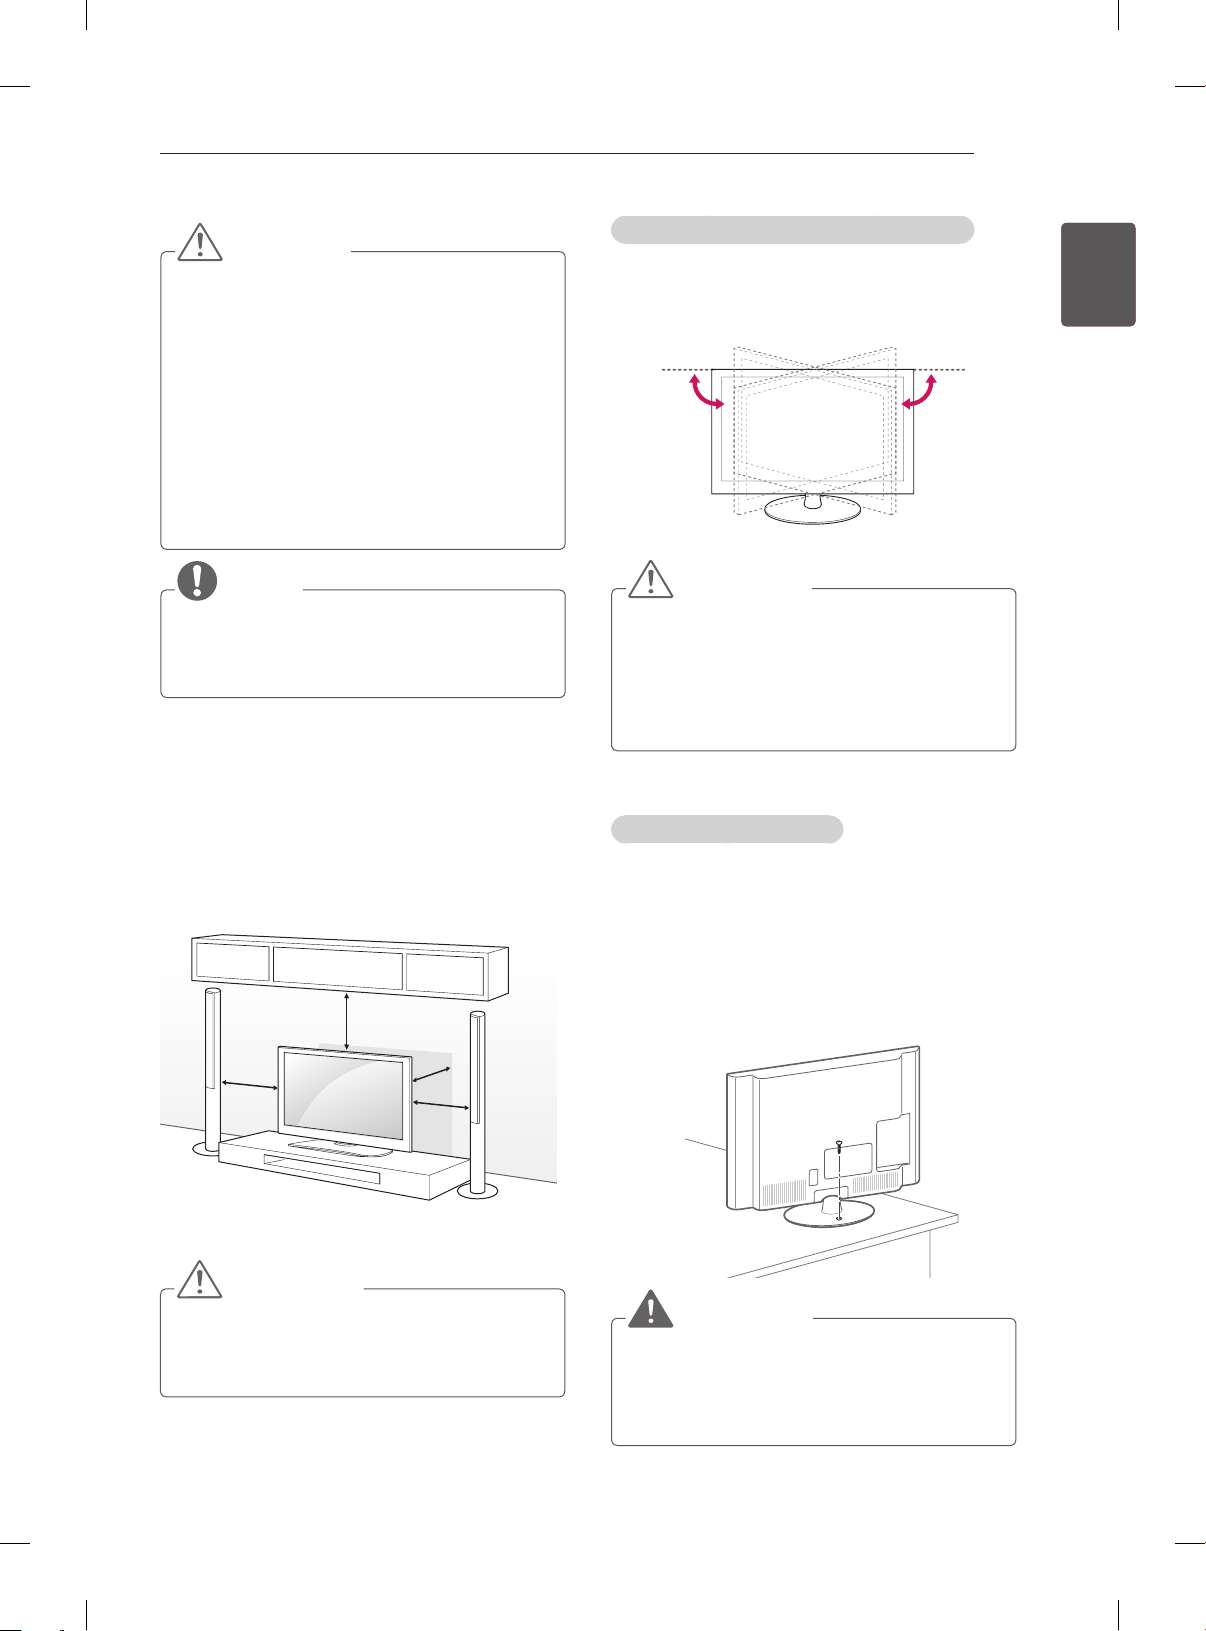
Adjusting the angle of the TV to suit view
(Only 32/42CS41**, 32/42LS310*, 32/42LS311*)
Swivel 20 degrees to the left or right and adjust the
angle of the TV to suit your view.
20˚ 20˚
21
ENGENGLISH
NOTE
Remove the stand before installing the TV
on a wall mount by performing the stand
attachment in reverse.
Mounting on a table
1 Lift and tilt the TV into its upright position on a
table.
- Leave a 10 cm (minimum) space from the
wall for proper ventilation.
10 cm
10 cm
10 cm
10 cm
CAUTION
When adjusting the angle of the product,
watch out for your fingers.
»
Personal injury may occur if hands or fingers
are pinched. If the product is tilted too much, it
may fall, causing damage or injury.
Securing the TV to a table
(Only 32/42LS310*, 32/42LS311*,
26/32/42CS41**, 32LS33**,32/42LS315*,
32LS30** )
Fix the TV to a table to prevent from tilting forward,
damage, and potential injury.
To secure the TV to a table, insert and tighten the
supplied screw on the rear of the stand.
2 Connect the power cord to a wall outlet.
CAUTION
Do not place the TV near or on sources
of heat, as this may result in fire or other
damage.
WARNING
To prevent TV from falling over, the TV
should be securely attached to the floor/
wall per installation instructions. Tipping,
shaking, or rocking the TV may cause injury.
Page 22
ASSEMBLING AND PREPARING
22
ENGLISH
ENG
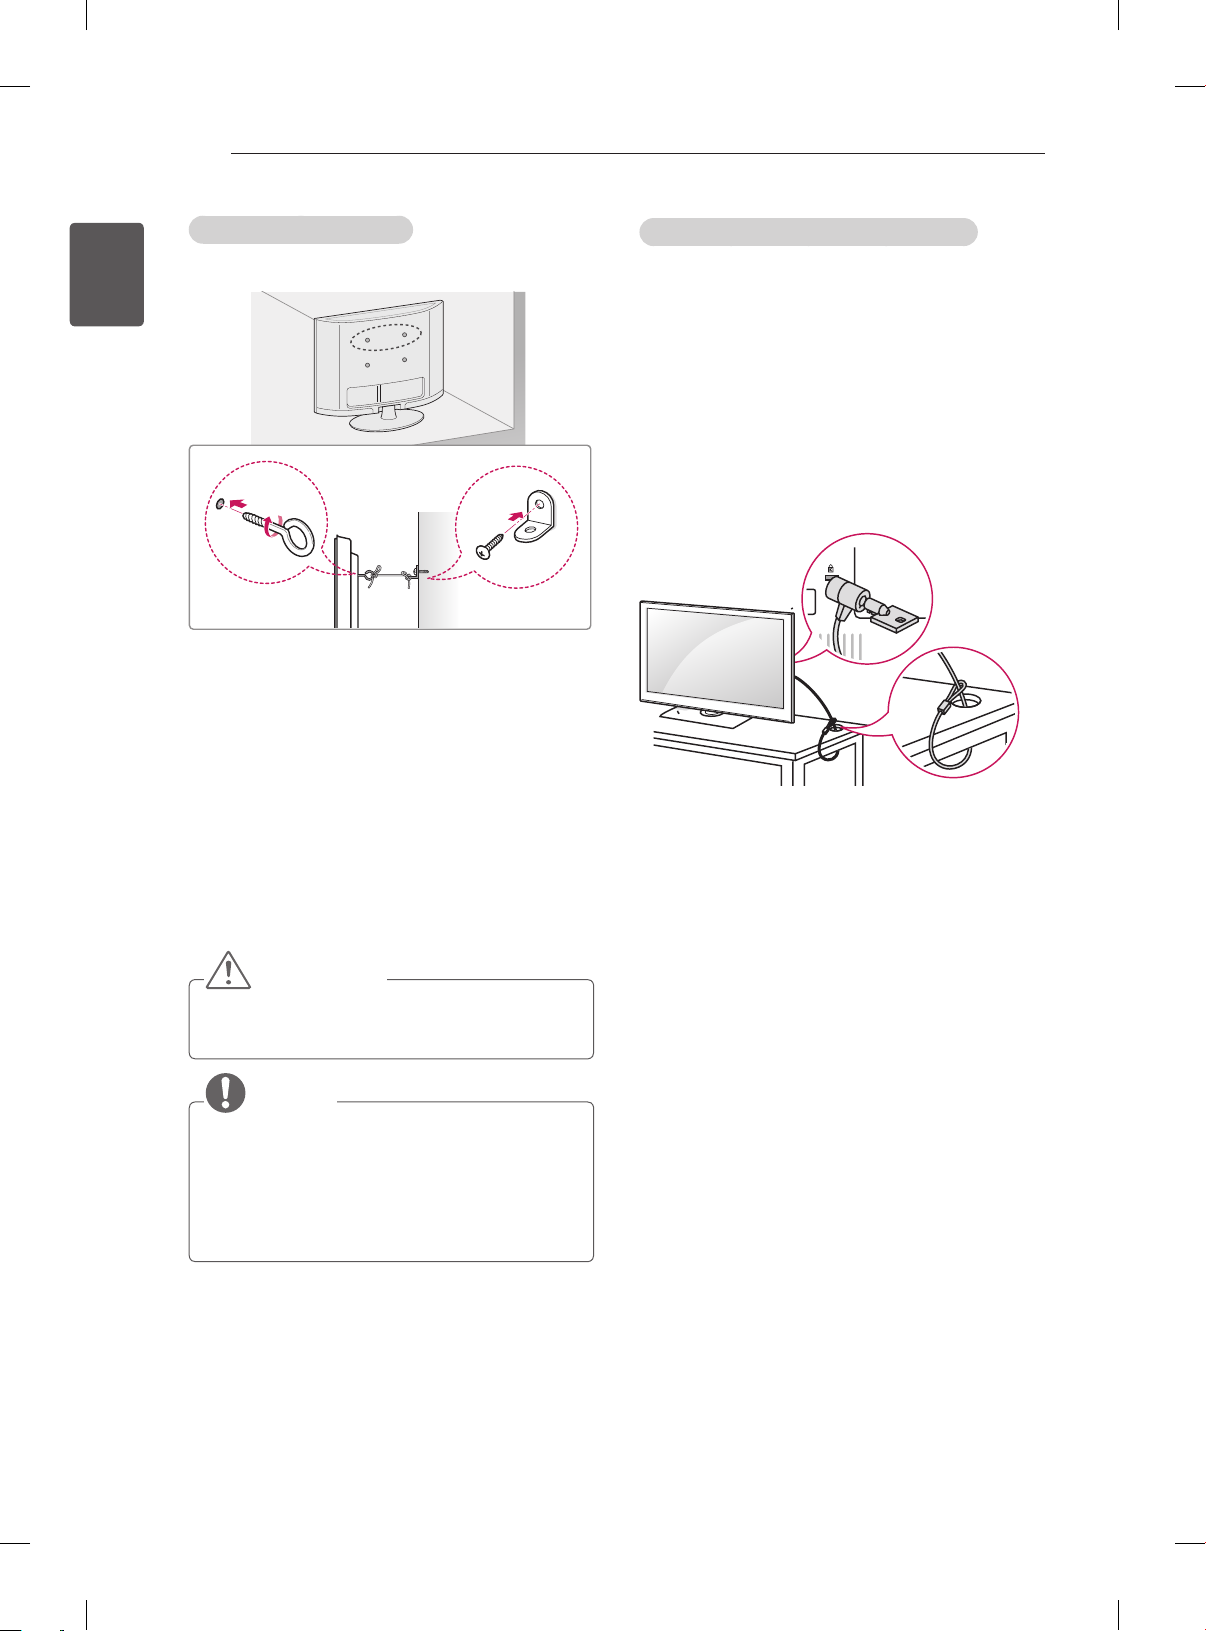
Securing the TV to a wall
(This feature is not available for all models.)
1 Insert and tighten the eye-bolts, or TV brackets
and bolts on the back of the TV.
- If there are bolts inserted at the eye-bolts
position, remove the bolts first.
2 Mount the wall brackets with the bolts to the
wall.
Match the location of the wall bracket and the
eye-bolts on the rear of the TV.
3 Connect the eye-bolts and wall brackets tightly
with a sturdy rope.
Make sure to keep the rope horizontal with the
at surface.
Using the Kensington security system
(Depending on model)
The Kensington security system connector is
located at the rear of the TV. For more information
of installation and using, refer to the manual
provided with the Kensington security system or
visit http://www.kensington.com.
Connect the Kensington security system cable
between the TV and a table.
CAUTION
Make sure that children do not climb on or
hang on the TV.
NOTE
Use a platform or cabinet that is strong and
large enough to support the TV securely.
Brackets, bolts and ropes are not provided.
You can obtain additional accessories from
your local dealer.
Page 23
ASSEMBLING AND PREPARING
23
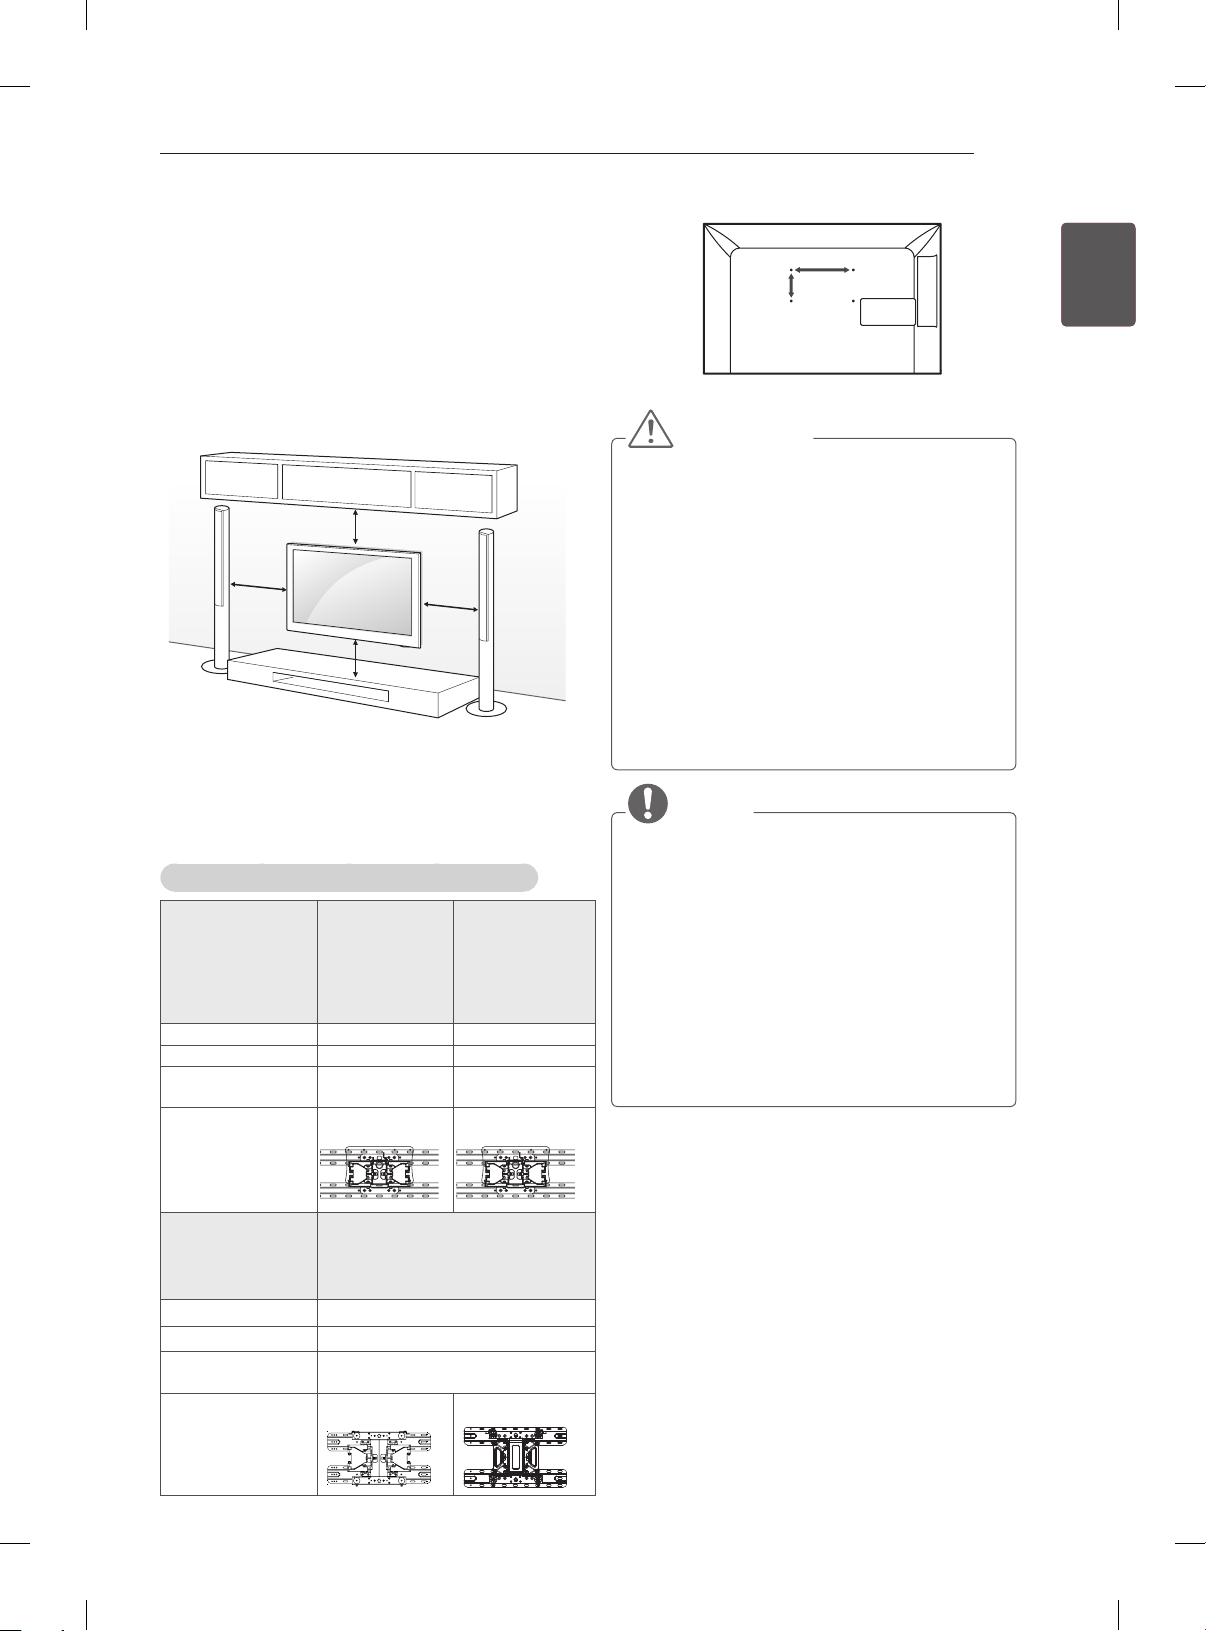
Mounting on a wall
Attach an optional wall mount bracket at the rear
of the TV carefully and install the wall mount
bracket on a solid wall perpendicular to the
oor. When you attach the TV to other building
materials, please contact qualied personnel.
LG recommends that wall mounting be performed
by a qualied professional installer.
10 cm
10 cm
10 cm
10 cm
Make sure to use screws and wall mount bracket
that meet the VESA standard. Standard
dimensions for the wall mount kits are described in
the following table.
Separate purchase(Wall Mounting Bracket)
Model 22CS41**
19/22/26LS33**
VESA (A x B) 100 x 100 200 x 100
Standard screw M4 M4
Number of
screws
Wall mount
bracket
4 4
LSW100B LSW100B
32LS310*
32LS311*
26/32CS41**
32LS33**
32LS315*
32LS30**
A
B
CAUTION
Disconnect the power first, and then move or
install the TV. Otherwise electric shock may
occur.
If you install the TV on a ceiling or slanted
wall, it may fall and result in severe injury.
Use an authorized LG wall mount and contact
the local dealer or qualified personnel.
Do not over tighten the screws as this may
cause damage to the TV and void your
warranty.
Use the screws and wall mounts that meet
the VESA standard. Any damages or injuries
by misuse or using an improper accessory
are not covered by the manufacturer’s
warranty.
NOTE
Use the screws that are listed on the VESA
standard screw specifications.
The wall mount kit includes an installation
manual and necessary parts.
The wall mount bracket is not provided. You
can obtain additional accessories from your
local dealer.
The length of screws may differ depending
on the wall mount. Make sure to use the
proper length.
For more information, refer to the manual
supplied with the wall mount.
ENGENGLISH
Model
VESA (A x B)
Standard screw
Number of
screws
Wall mount
bracket
42LS310*
42LS311*
42CS41**
42LS315*
200 x 200
M6
4
LSW200BX LSW220BX
Page 24
ASSEMBLING AND PREPARING
24
ENGLISH
ENG
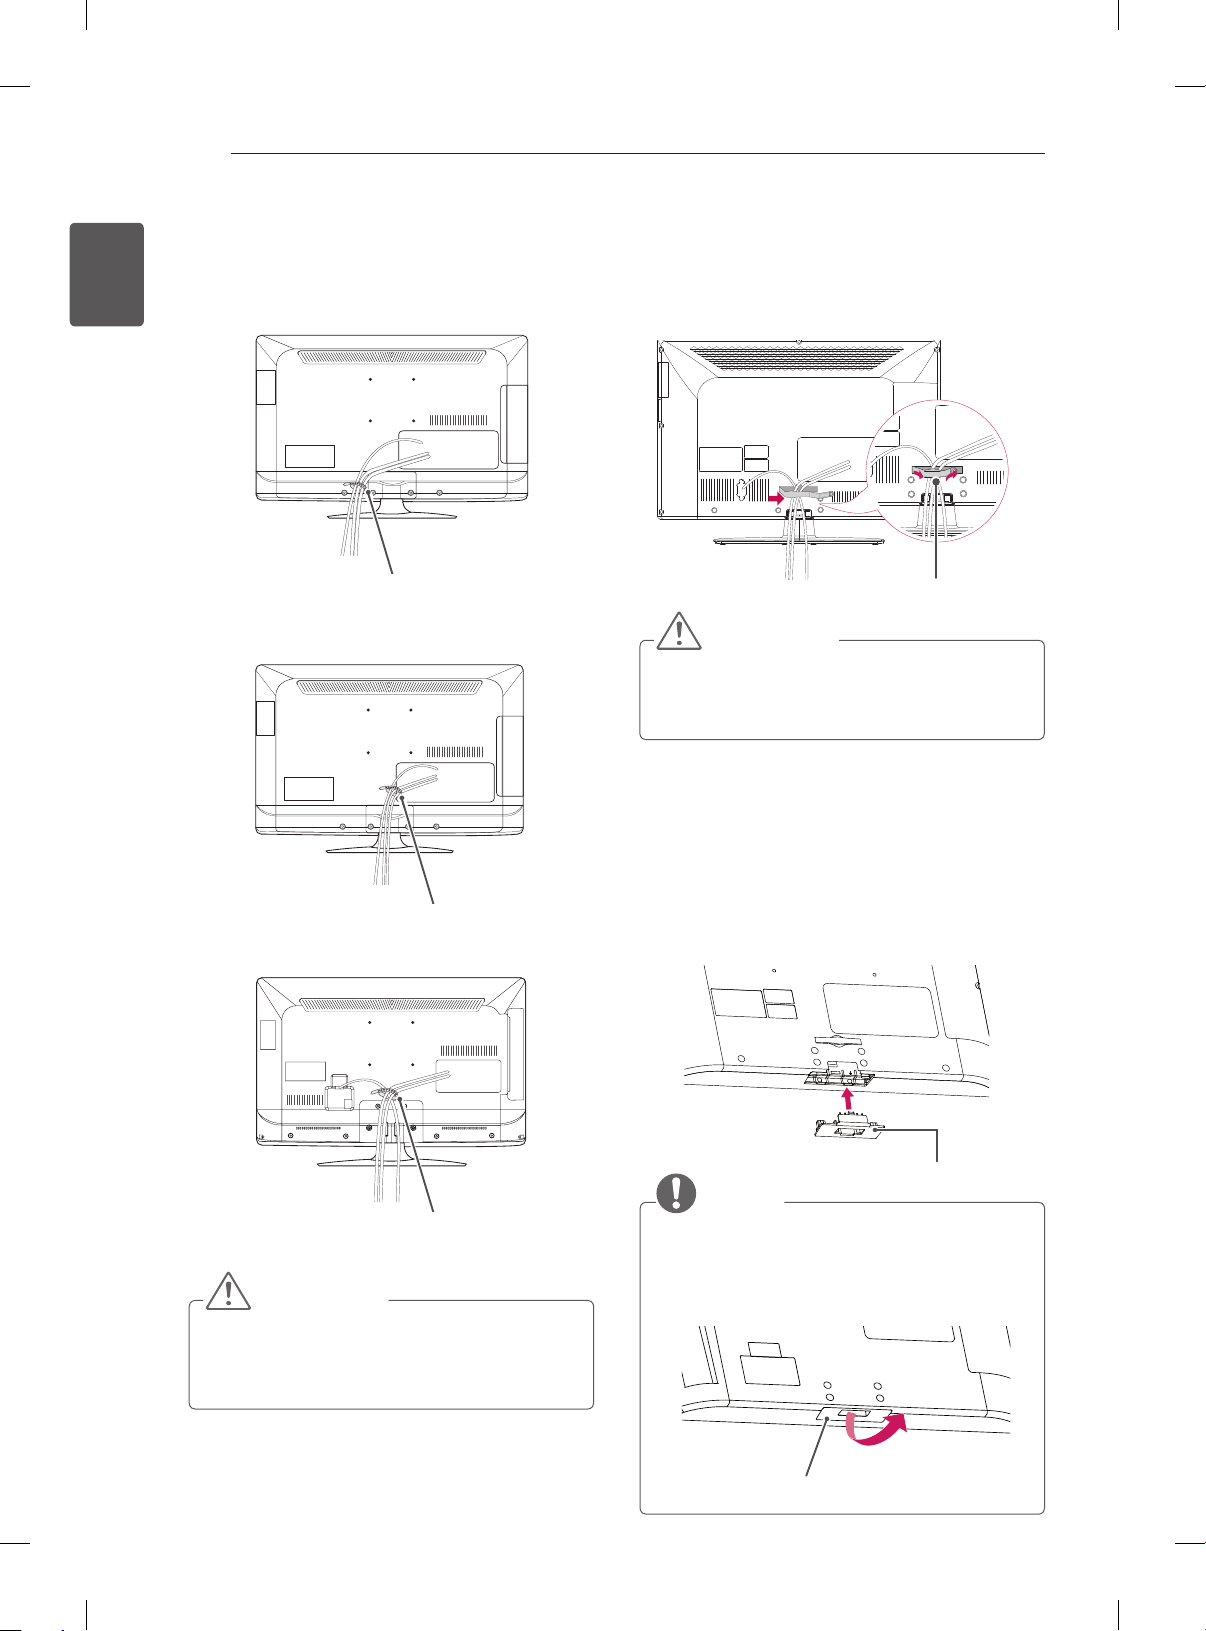
Tidying cables
Gather and bind the cables with the Cable Holder.
(Only19LS33**)
Cable Holder
(Only 22/26LS33**)
(Only 26/32/42CS41**, 32/42LS310*,
32/42LS311*)
1 Gather and bind the cables with the Cable
Management.
2 Fix the cable management rmly to the TV.
Cable Management
CAUTION
Do not move the TV by holding the cable
management, as the cable management may break,
and injuries and damage to the TV may occur.
Not using the Desk-Type Stand
Cable Holder
(Only 32LS33**, 32/42LS315*, 32LS30**)
Cable Holder
CAUTION
Do not move the TV by holding the cable
holder, as the cable holders may break, and
injuries and damage to the TV may occur.
(Only 26/32/42CS41**, 32/42LS310*, 32/42LS311*,
32LS315*, 32LS30**)
• When installing the wall mounting bracket, use the
Protection cover. This will protect the opening
from accumulating dust and dirt.
Push the supplied protection cover into the opening at
the bottom of the TV until it locks in place.
Protection cover
NOTE
(Only 32LS315*)
When removing Protection Cover from
bottom of TV insert your ngers into hole of
cover hold rmly and pull upwards towards
you to remove.
Protection cover
Page 25
MAKING CONNECTIONS
25
MAKING
CONNECTIONS
This section on MAKING CONNECTIONS
mainly uses diagrams for the CS41** models.
Connect various external devices to the TV
and switch input modes to select an external
device. For more information of external device’s
connection, refer to the manual provided with each
device.
Available external devices are: HD receivers,
DVD players, VCRs, audio systems, USB storage
devices, gaming devices, and other external
devices.
NOTE
The external device connection may differ
from the model.
Connect external devices to the TV
regardless of the order of the TV port.
If you record a TV program on a DVD
recorder or VCR, make sure to connect the
TV signal input cable to the TV through a
DVD recorder or VCR. For more information
of recording, refer to the manual provided
with the connected device.
Refer to the external equipment’s manual for
operating instructions.
If you connect a gaming device to the TV,
use the cable supplied with the gaming
device.
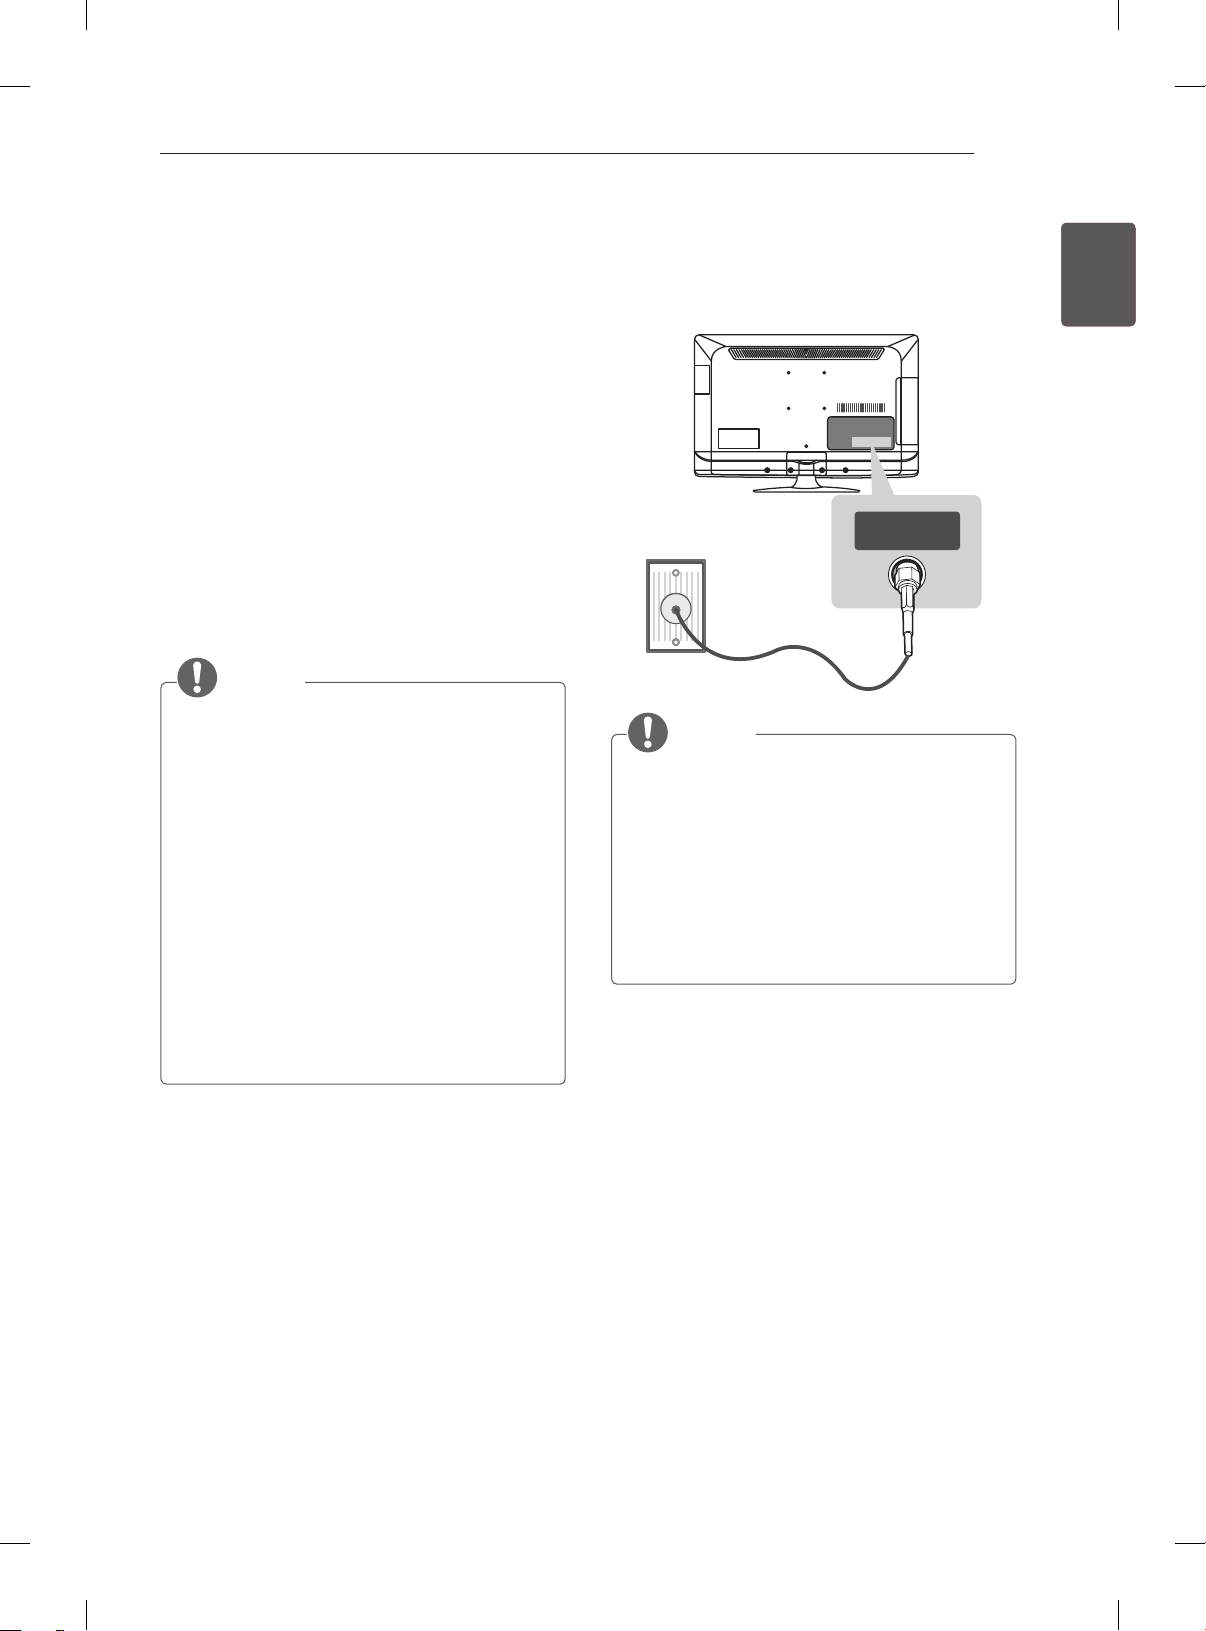
Antenna connection
Connect the TV to a wall antenna socket with an
RF cable (75 Ω).
ANTENNA IN
NOTE
Use a signal splitter to use more than 2 TVs.
If the image quality is poor, install a signal
amplifier properly to improve the image
quality.
If the image quality is poor with an antenna
connected, try to realign the antenna in the
correct direction.
An antenna cable and converter are not
supplied.
ENGENGLISH
Page 26
MAKING CONNECTIONS
26
ENGLISH
ENG
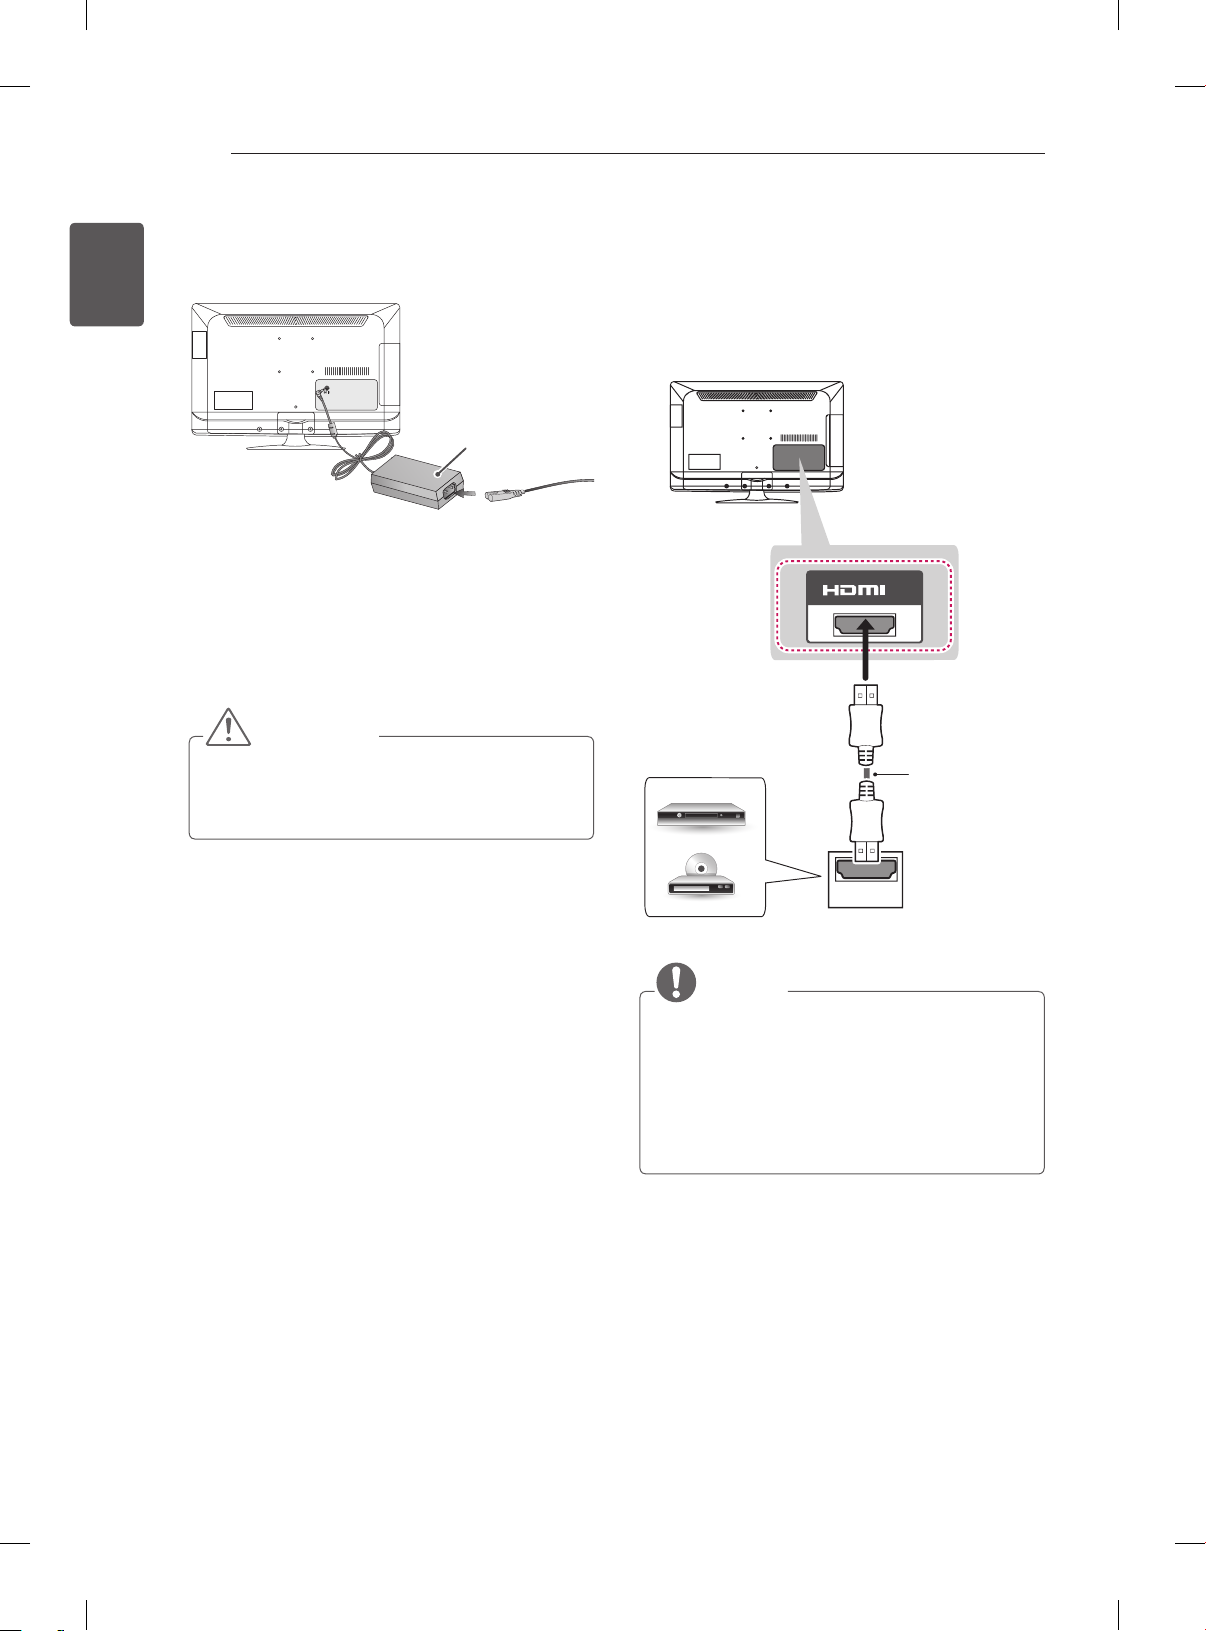
Adapter connection
(Only 19/22/26LS33**)
DC IN
DC Adapter
1 Connect the antenna cable to the antenna
input port on the TV.
2 Connect the DC adapter plug to the power
input jack on the TV.
3 Connect the power cord to the DC adapter rst,
then plug the power cord into the wall power
outlet.
CAUTION
Please be sure to connect the TV to the DC
power adapter before connecting the TV’s
power plug to a wall power outlet.
HDMI connection
Transmits the digital video and audio signals from
an external device to the TV. Connect the external
device and the TV with the HDMI cable as shown.
IN
DVD/ Blu-Ray /
HD Cable Box
/ HD STB
(*Not Provided)
HDMI
NOTE
It is recommended to use the TV with the
HDMI connection for the best image quality.
High Speed HDMI™ Cables are tested to
carry an HD signal up to 1080p and higher.
Supported HDMI Audio format : PCM
(32k/44.1k/48k, DTS Not supported.)
Page 27
MAKING CONNECTIONS
COMPO
T
IN
V
O
P
B
A
O
27
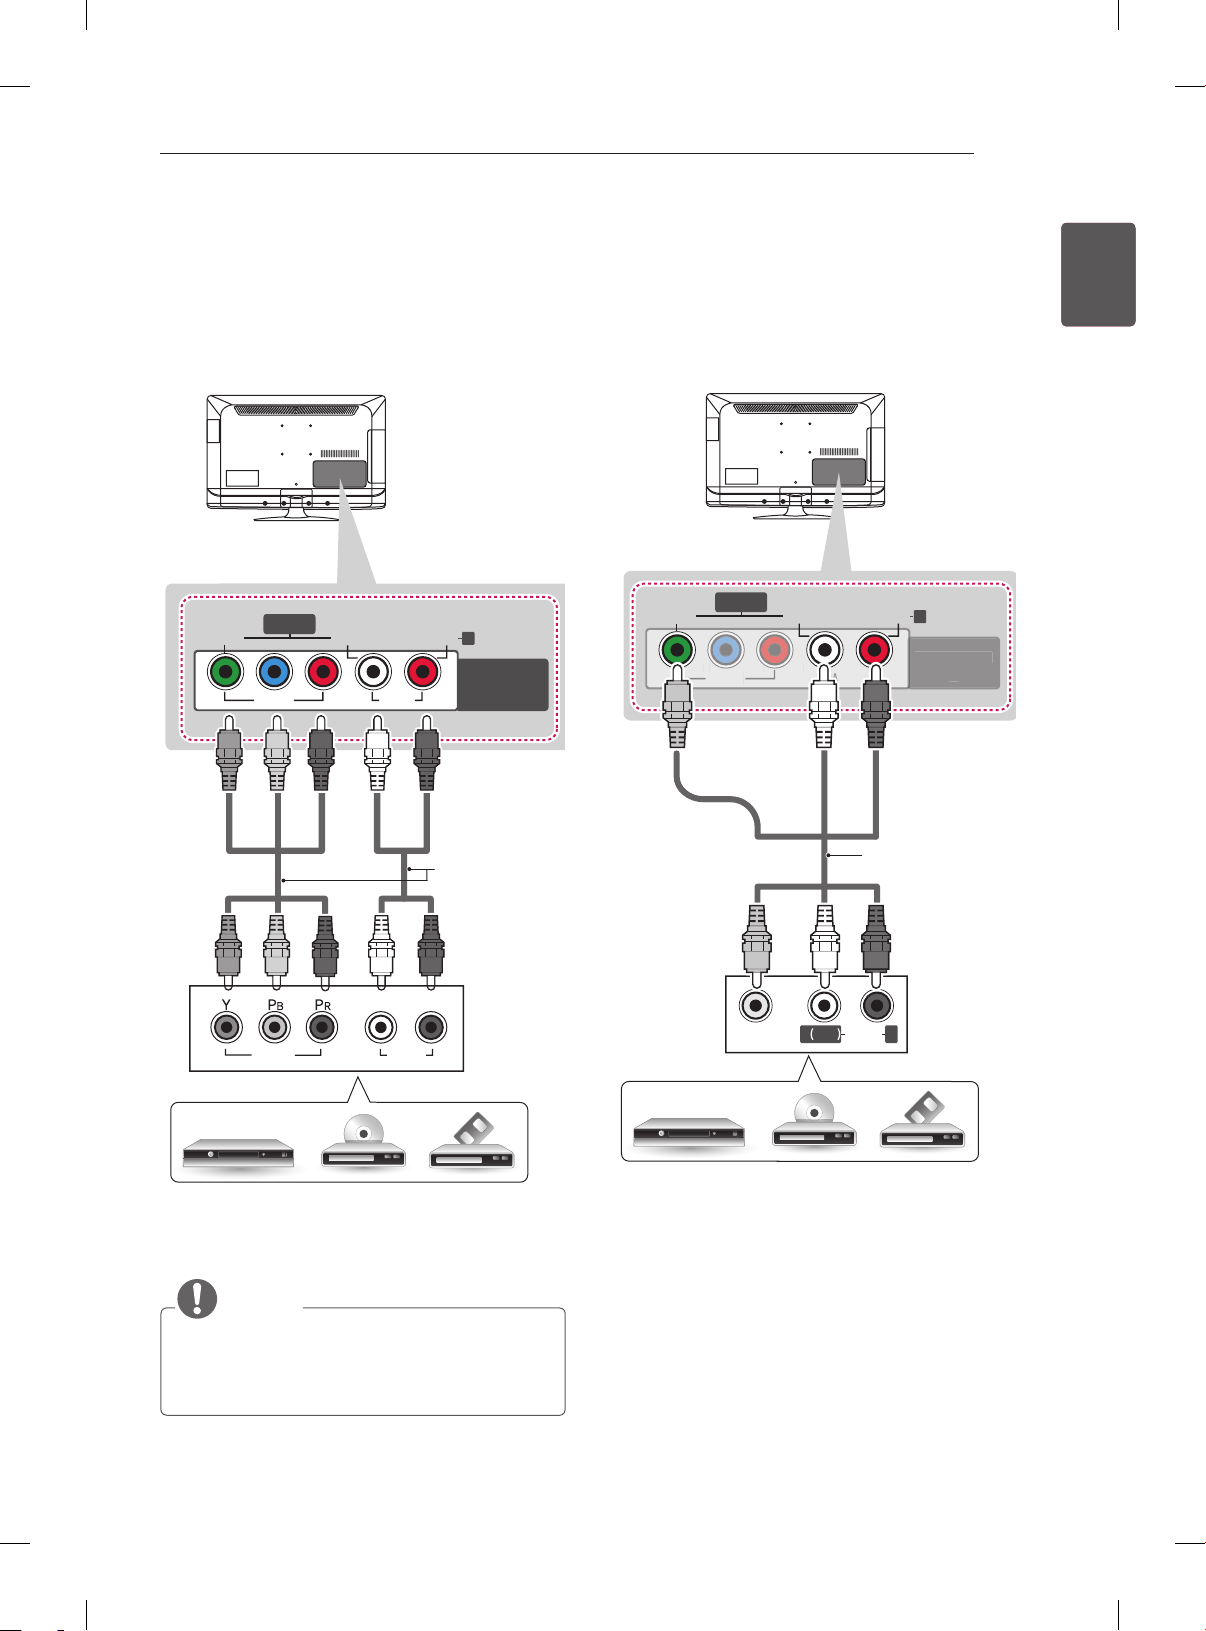
Component connection
Transmits analog video and audio signals from an
external device to the TV. Connect the external
device and the TV with a component cable as
shown.
VIDEO
Y L RP
GREEN
AV IN
B
VIDEO
BLUE
P
R
L/MONO
AUDIO
RED
WHITE
R
AUDIO
COMPONENT
RED
IN
Composite connection
Transmits analog video and audio signals from an
external device to the TV. Connect the external
device and the TV with th e composite cable as
shown.
VIDEO
AV IN
IDE
YELLOW
L/MONO
UDI
WHITE
AUDIO
RED
R
NEN
ENGENGLISH
(*Not Provided)
RED
BLUE
GREEN
L R
VIDEO
DVD / Blu-Ray / HD Cable Box
AUDIO
WHITE
RED
NOTE
If cables are not installed correctly, it could
cause this image to display in black and
white or with distorted colours.
(*Not Provided)
RED
( )
MONO
WHITE
AUDIOL R
YELLOW
VIDEO
VCR / DVD / Blu-Ray / HD Cable Box
Page 28
MAKING CONNECTIONS
IN
N
28
ENGLISH
ENG
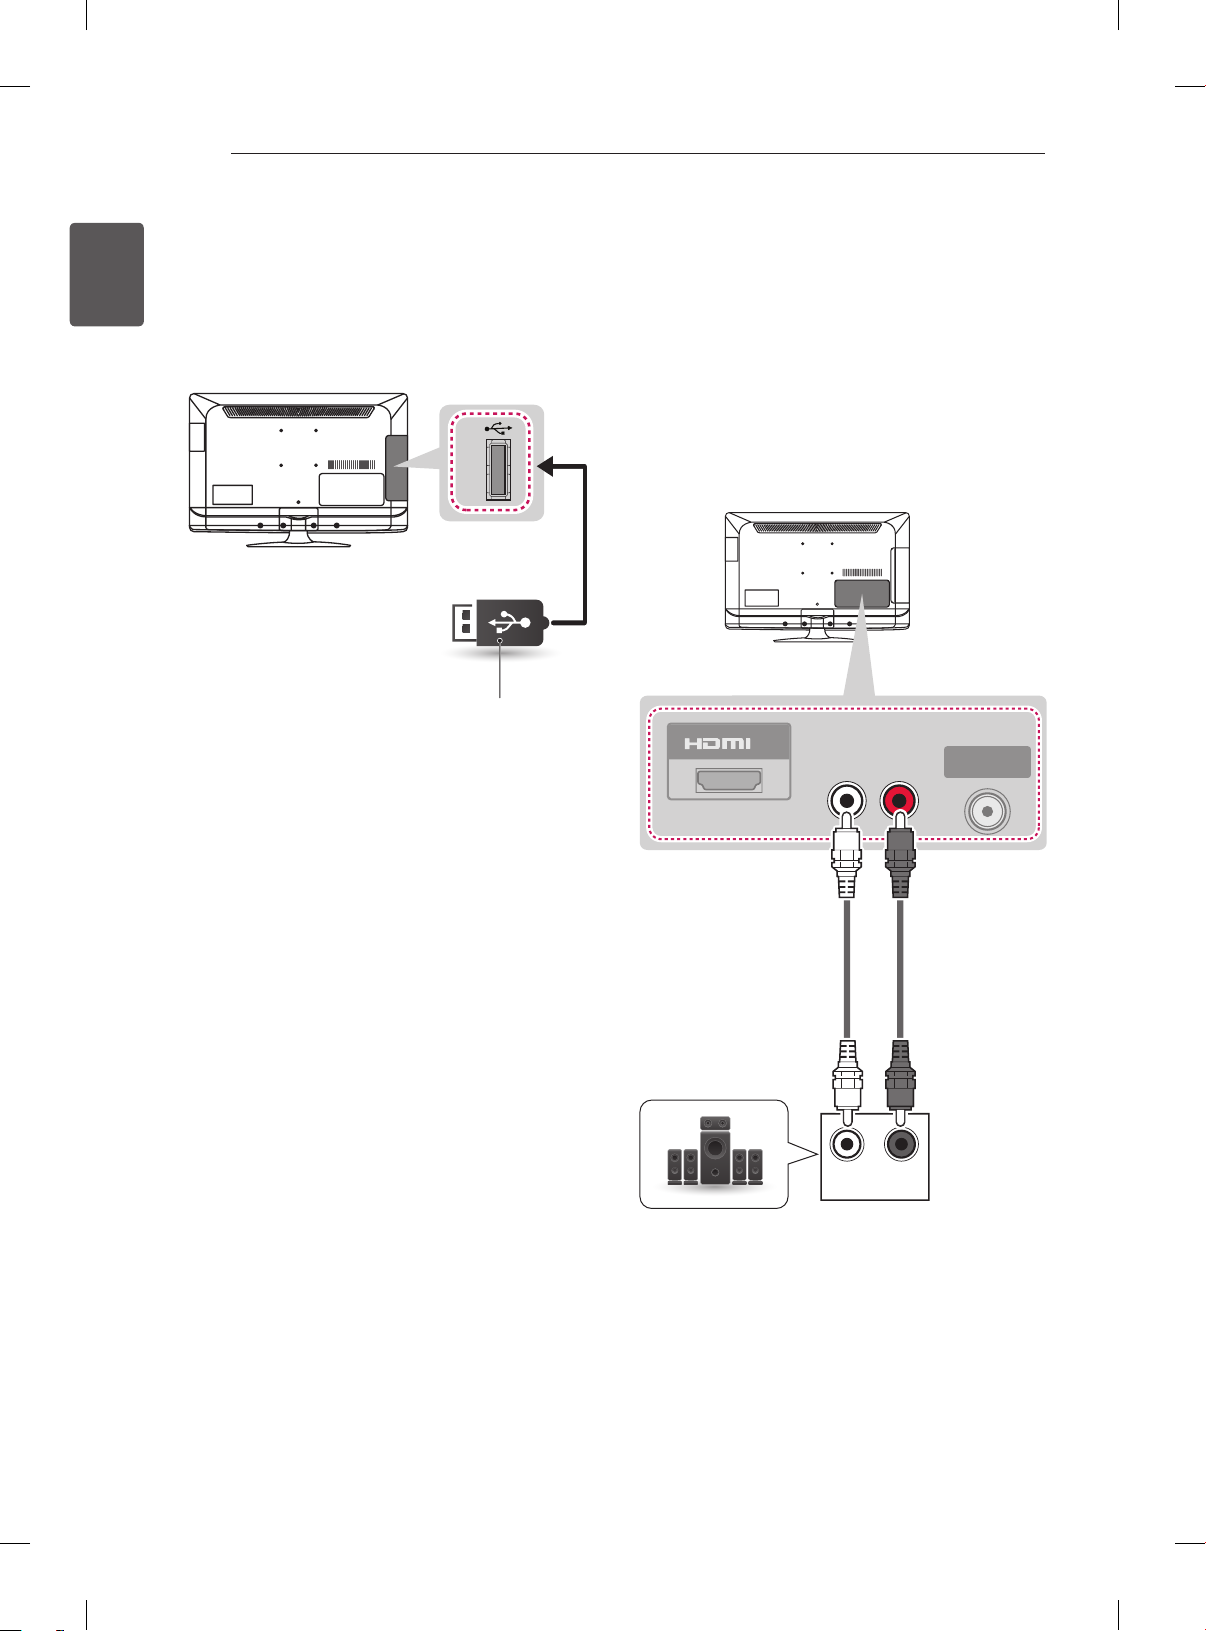
USB connection
Connect a USB storage device such as a USB
ash memory or a USB memory card reader to the
TV.
USB IN
USB
(*Not Provided)
Audio System connection
Use an external audio system instead of the builtin speaker.
External Stereo Connection
Use to connect to an external amplier, or
surround sound system.
L-AUDIO OUT-R
ANTENNA I
L R
AUDIO IN
External Stereo
Page 29
REMOTE CONTROL
LIST
Q.VIEW
TV
RATIO
SETTINGS
PSM SSM
FAV
MUTE
P
A
G
E
INDEXTEXT
HOLD TIME REVEAL UPDATE
P
EXIT
ꕀ ꔽ
ꔻ
ꔾ
ꔼ
29
REMOTE CONTROL
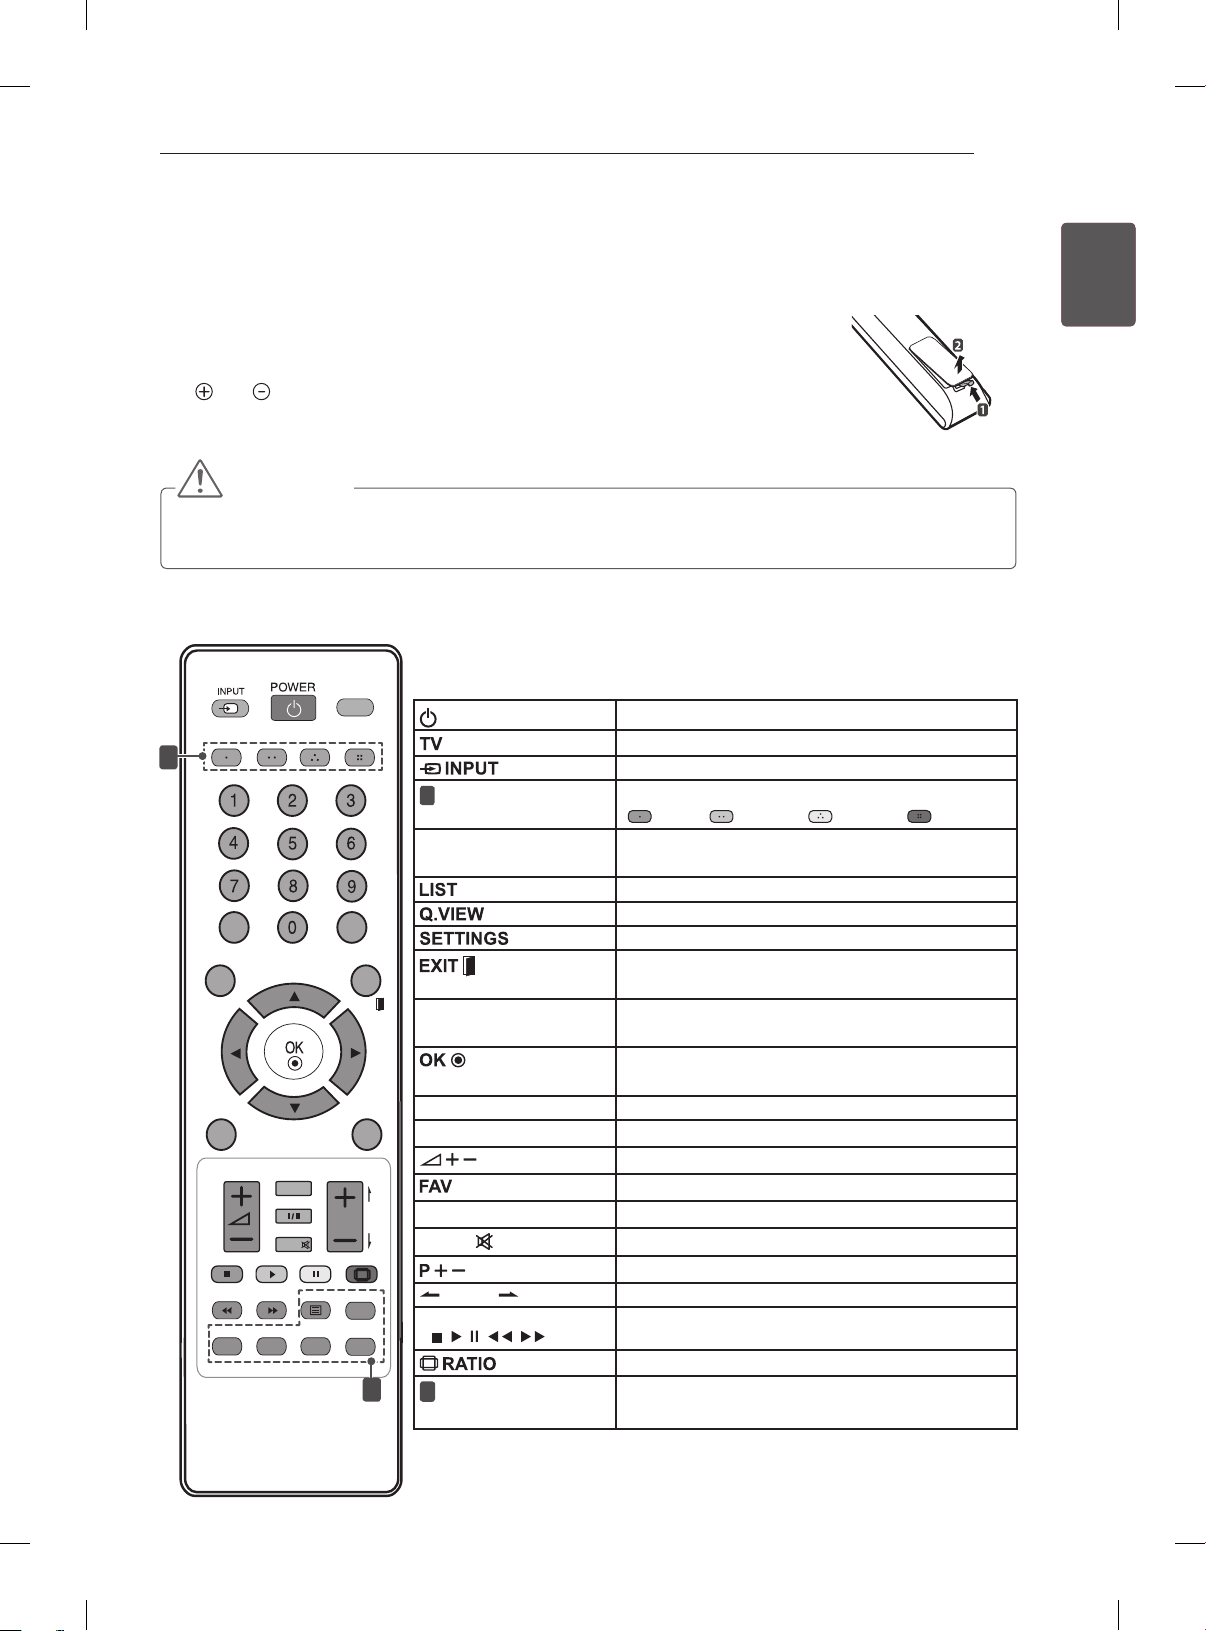
The descriptions in this manual are based on the buttons on the remote control.
Please read this manual carefully and use the TV correctly.
To replace batteries, open the battery cover, replace batteries (1.5 V AAA) matching
the and ends to the label inside the compartment, and close the battery cover.
To remove the batteries, perform the installation actions in reverse.
CAUTION
Do not mix old and new batteries, as this may damage the remote control.
In Analogue TV and some countries, some remote control buttons may not work.
Make sure to point the remote control toward the remote control sensor on the TV.
Turns the TV on or off.
Returns to the TV viewing from any mode.
These access special functions in some menus.
( : Red, : Green, : Yellow, : Blue)
Selects numbered items in a menu.
Accesses the saved programme list.
Returns to the previously viewed programme.
Accesses the main menus.
Clears all on-screen displays and return to TV
viewing.
Scrolls through menus or options.
Selects menus or options and conrms your
input.
Accesses your favourite programme list.
Mutes all sounds.
Moves to the previous or next screen.
Controls the USB menus.
Resizes an image.
These buttons are used for teletext.
For further details, see the ‘Teletext’ section.
1
(POWER)
Changes the input source.
1
Coloured buttons
0 to 9 number buttons Selects a programme.
Navigation buttons
(up/down/left/right)
PSM Recalls your preferred picture setting.
SSM Recalls your preferred sound setting.
Adjusts the volume level.
I/II Selects the sound output.
MUTE
Scrolls through the saved programmes.
PAGE
Control buttons
(
2
2
, , , , )
TELETEXT
BUTTONS
ENGENGLISH
Page 30
WATCHING TV
30
ENGLISH
ENG
WATCHING TV
Turning the TV on for the
rst time
When you turn the TV on for the rst time, the
Initial setting screen appears. Select a language
and customize the basic settings.
1 Connect the power cord to a power outlet.
2 In Standby mode, press (POWER) to turn
the TV on.
The Initial setting screen appears if you turn
the TV on for the rst time.
NOTE
You can also access Factory Reset by
accessing Option menu.
3 Follow the on-screen instructions to customize
your TV settings according to your preferences.
Language Selects a language to
4 When the basic settings are complete,
press OK.
If you do not complete the Initial setting, it
will appear whenever the TV turns on.
Disconnect the power cord from the power
outlet when you do not use the TV for a long
period of time.
Auto Tuning Scans and saves available
NOTE
display.
programmes automatically.
Watching TV
1 In Standby mode, press (POWER) to turn
the TV on.
2 Press INPUT and select TV.
3 To turn the TV off, press (POWER).
The TV switches to Standby mode.
Managing programmes
Automatically setting up
programme
Use this to automatically nd and store all
available programmes.
1 Press SETTINGS and the Navigation buttons
to scroll to SETUP.
2 Press the Navigation buttons to scroll to
Auto Tuning.
3 Select To Set and press the Navigation buttons
to scroll to System. Select your desired
system.
4 Press the Navigation buttons to scroll to
Storage From and select the initial programme
number.
5 Press the Navigation buttons to scroll to
Search and select To Start to begin auto
tuning.
The TV scans and saves available programmes
automatically.
6 When you return to the previous menu, press
SETTINGS.
5 To turn the TV off, press (POWER).
Page 31
WATCHING TV
31
Manually setting up programme
Manual Tuning lets you manually tune and arrange
the stations in whatever order you desire.
1 Press SETTINGS and the Navigation buttons
to scroll to SETUP.
2 Press the Navigation buttons to scroll to
Manual Tuning.
3 Press the Navigation buttons to scroll to
Storage.
4 Press the Navigation buttons or Number
buttons to select the desired programme
number.
5 Press the Navigation buttons to scroll to
System.
6 Press the Navigation buttons to scroll to
TV System.
7 Press the Navigation buttons to scroll to
Band.
8 Press the Navigation buttons to scroll to
V/UHF or Cable.
9 Press the Navigation buttons to scroll to
Channel.
Press the Navigation buttons and then select
the desired programme number with the
Navigation buttons or Number buttons.
10 Press the Navigation buttons to scroll to
Search.
11 Press the Navigation buttons to scroll and start
Searching.
12 Press the OK to store it.
13 When you return to the previous menu, press
SETTINGS.
NOTE
To store another programme, repeat steps 3
to 11.
Assigning a station name
ENGENGLISH
You can assign a station name with five characters
to each programme number.
1 Press SETTINGS and the Navigation buttons
to scroll to SETUP.
2 Press the Navigation buttons to scroll to
Manual Tuning.
3 Press the Navigation buttons to scroll to
Name.
4 Press the Navigation buttons to scroll to select
the position and make your choice of the
second character, and so on. You can use an
the alphabet A to Z, the number 0 to 9, +/ -, and
blank and press OK.
5 Press the OK to store it.
6 When you return to the previous menu, press
SETTINGS.
Fine Tuning
Normally ne tuning is only necessary if reception
is poor.
1 Press SETTINGS and the Navigation buttons
to scroll to SETUP.
2 Press the Navigation buttons to scroll to
Manual Tuning.
3 Press the Navigation buttons to scroll to
Fine.
4 Press the Navigation buttons to ne tune for
the best picture and sound.
5 Press the OK to store it.
6 When you return to the previous menu, press
SETTINGS.
Page 32
WATCHING TV
32
ENGLISH
ENG
Editing your programme list
When a programme number is skipped, it means
that you will be unable to select it using P + -
button during TV viewing.
If you wish to select the skipped programme,
directly enter the programme number with the
NUMBER buttons or select it in the Programme
edit menu.
This function enables you to skip the stored
programmes.
1 Press SETTINGS and the Navigation buttons
to scroll to SETUP.
2 Press the Navigation buttons to scroll to
Programme Edit.
3 Select To Set and edit programmes using the
following buttons.
Button Description
Deletes a programme.
Press the Red button twice. The
Red button
Green button
Blue button
4 When you return to the previous menu, press
SETTINGS.
selected programme is deleted,
all the following programmes are
shifted up one position.
Moves a programme.
Press the Green button again to
release this function.
Selects a programme number to
be skipped. Press the Blue button
again to release the skipped programme.
Selecting a programme on the
programme list
1 Press LIST to access the programme list.
2 Press the Navigation buttons to select to
desired programme and press OK.
3 When you return to the previous menu, press
LIST.
NOTE
You may find some blue programmes. They
have been set up to be skipped by auto
programming or in the programme edit
mode.
Some programmes with the channel number
shown in the programme list indicate there
is no station name assigned.
Using favourite programmes
Add the programmes that you watch frequently to
the favourite list.
1 Press SETTINGS and the Navigation buttons
to scroll to SETUP.
2 Press the Navigation buttons to scroll to
Favourite Programme.
3 Press the Navigation buttons and the Number
buttons to select to the desired programme.
4 To store another programme, repeat steps 3.
You can store up to 8 programmes.
5 When you return to the previous menu, press
SETTINGS.
NOTE
Press Yellow button to access directly to
the stored Favourite Programme. Press
the Yellow button again to shift the stored
Favourite Programme.
Page 33
Using additional options
Adjusting aspect ratio
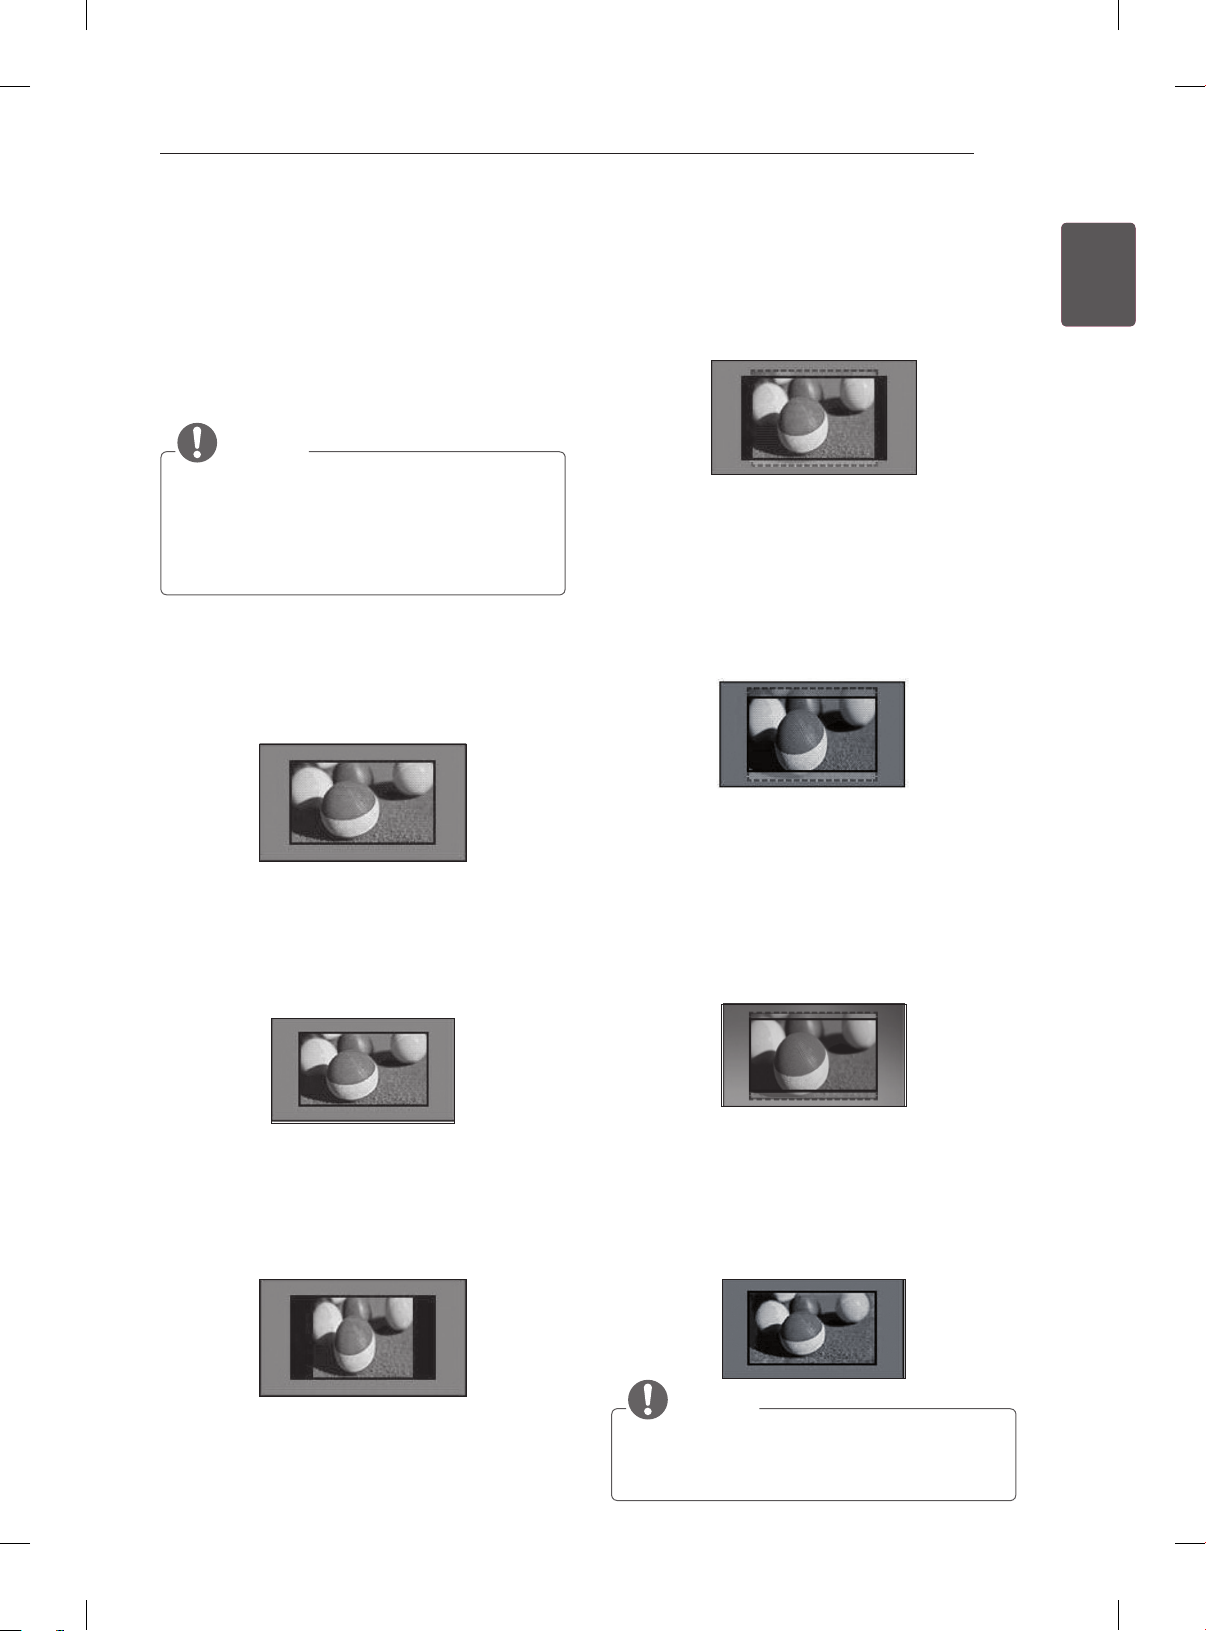
Resize an image to view at its optimal size by
pressing RATIO while you are watching TV.
NOTE
You can also change the image size by
accessing Aspect Ratio in the PICTURE
menus.
You can adjust the enlarge proportion using
the Navigation buttons.
- 16:9: Resizes images to fit the screen width.
(This function works in RF/AV/Component/
HDMI/USB Mode.)
WATCHING TV
14:9 : You can view a picture format of 14:9
-
or a general TV programme in the 14:9 mode.
The 14:9 screen is viewed in the same way as
in 4:3, but is moved to the up and down.
(This function works in RF/AV Mode.)
33
- Zoom 1 : The following selection will allow you
to view the picture without any alteration, while
filling the entire screen. However, the top and
bottom of the picture will be cropped.
(This function works in RF/AV Mode.)
ENGENGLISH
Original: When your TV receives a wide
-
screen signal it will automatically change to the
picture format broadcasted.
(This function works in RF/AV Mode.)
- 4:3: Resizes images to the previous standard
4:3.
(This function works in RF/AV/Component/
HDMI Mode.)
Zoom 2 : Choose Zoom 2 when you wish the
-
picture to be altered, both horizontally extended
and vertically cropped. The picture adopting
a compromise between alteration and screen
coverage.
(This function works in RF/AV Mode.)
Just Scan: Displays video images in the origi-
-
nal size without removing parts of the edge of
the image.
This function works in Component/HDMI
(
(720P/1080i/1080p) Mode.)
NOTE
If you enlarge or reduce an image, the
image may be distorted.
Page 34
WATCHING TV
34
ENGLISH
ENG
Using the input list
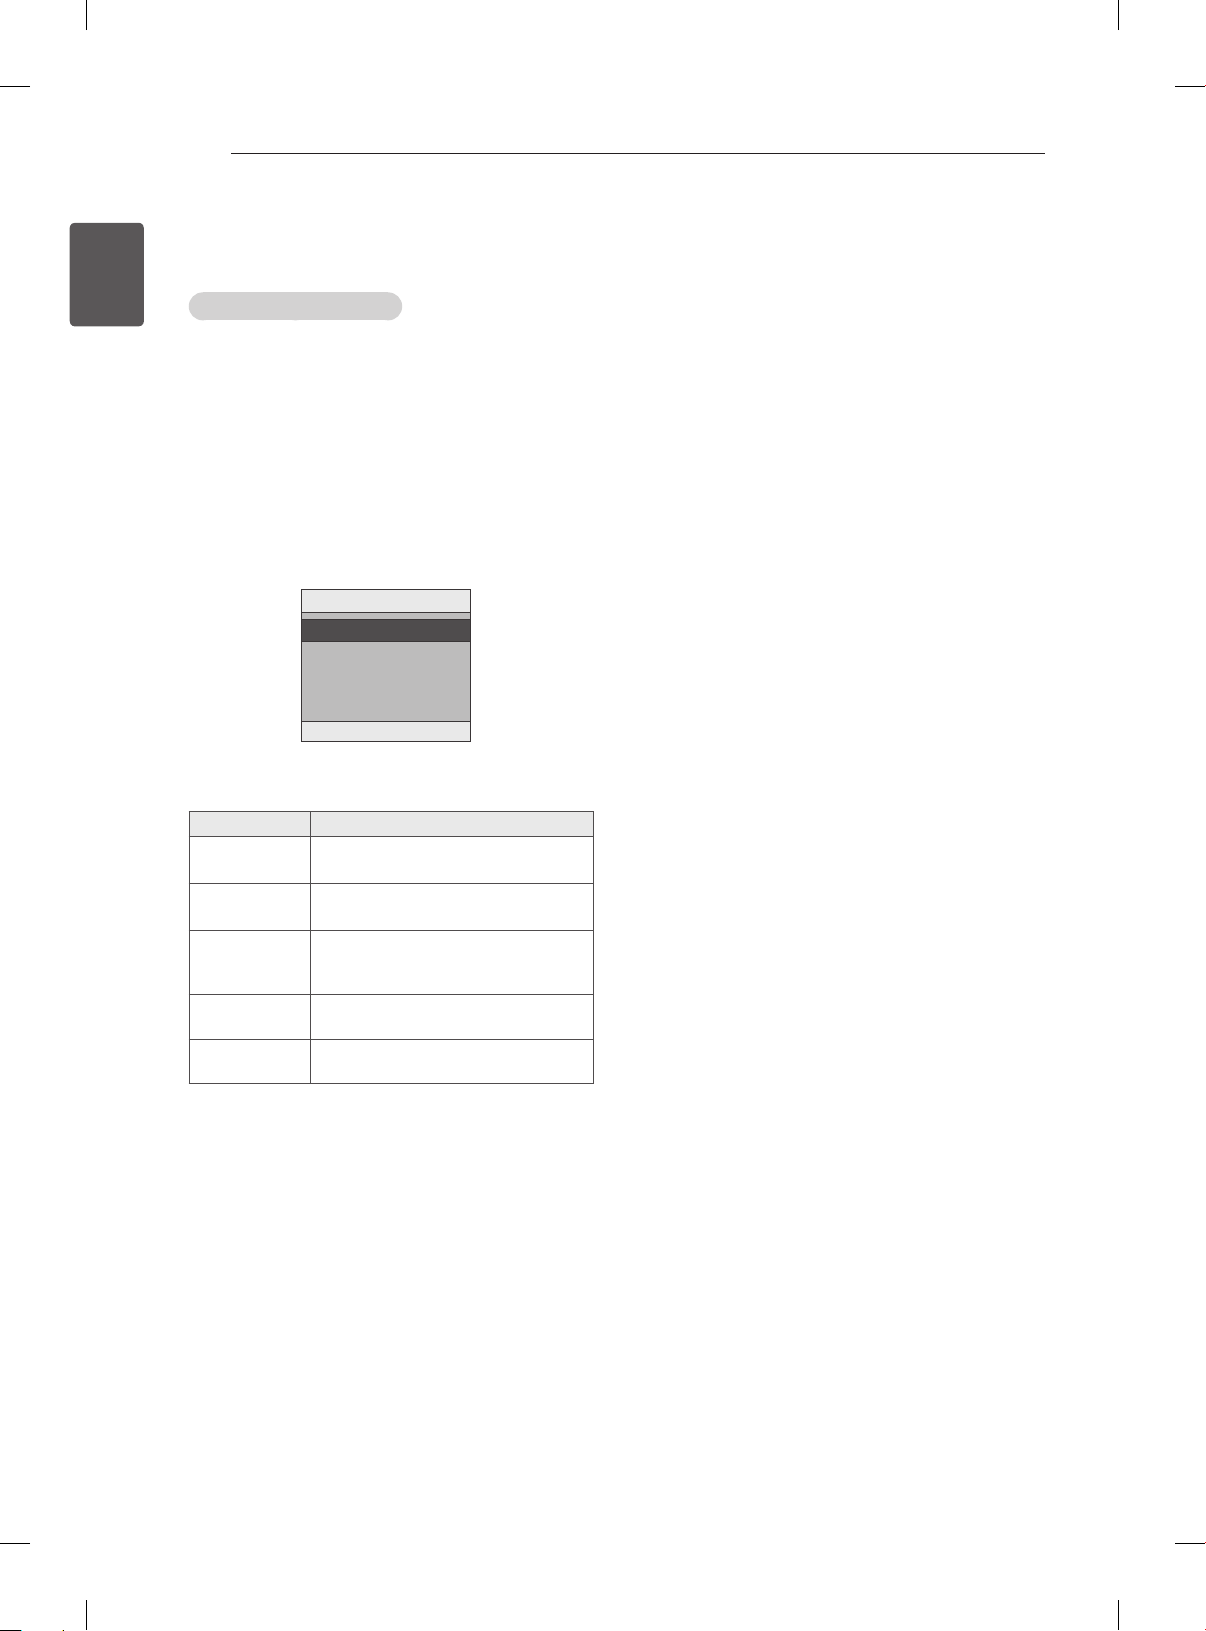
Selecting an input source
1 Press INPUT to access the input sources.
- The connected device displays on each input
source.
Press the Navigation buttons or input button
2
to scroll to one of the input sources and press
OK.
Image shown may differ from your TV.
Input
TV
AV
Component
HDMI
USB
OK
m
Input source Description
TV Watch TV over the air and digital
cable broadcast.
AV Watch video from a VCR or other
external devices.
Component Select it when using the DVD or
the Digital set-top box depends
on connector.
HDMI Watch video from a HTS or other
high definition devices.
USB Select it when using USB de-
pends on connector.
Page 35
ENTERTAINMENT
35
ENTERTAINMENT
(Depending on model)
Image shown may differ from your TV.
Connecting USB storage
devices
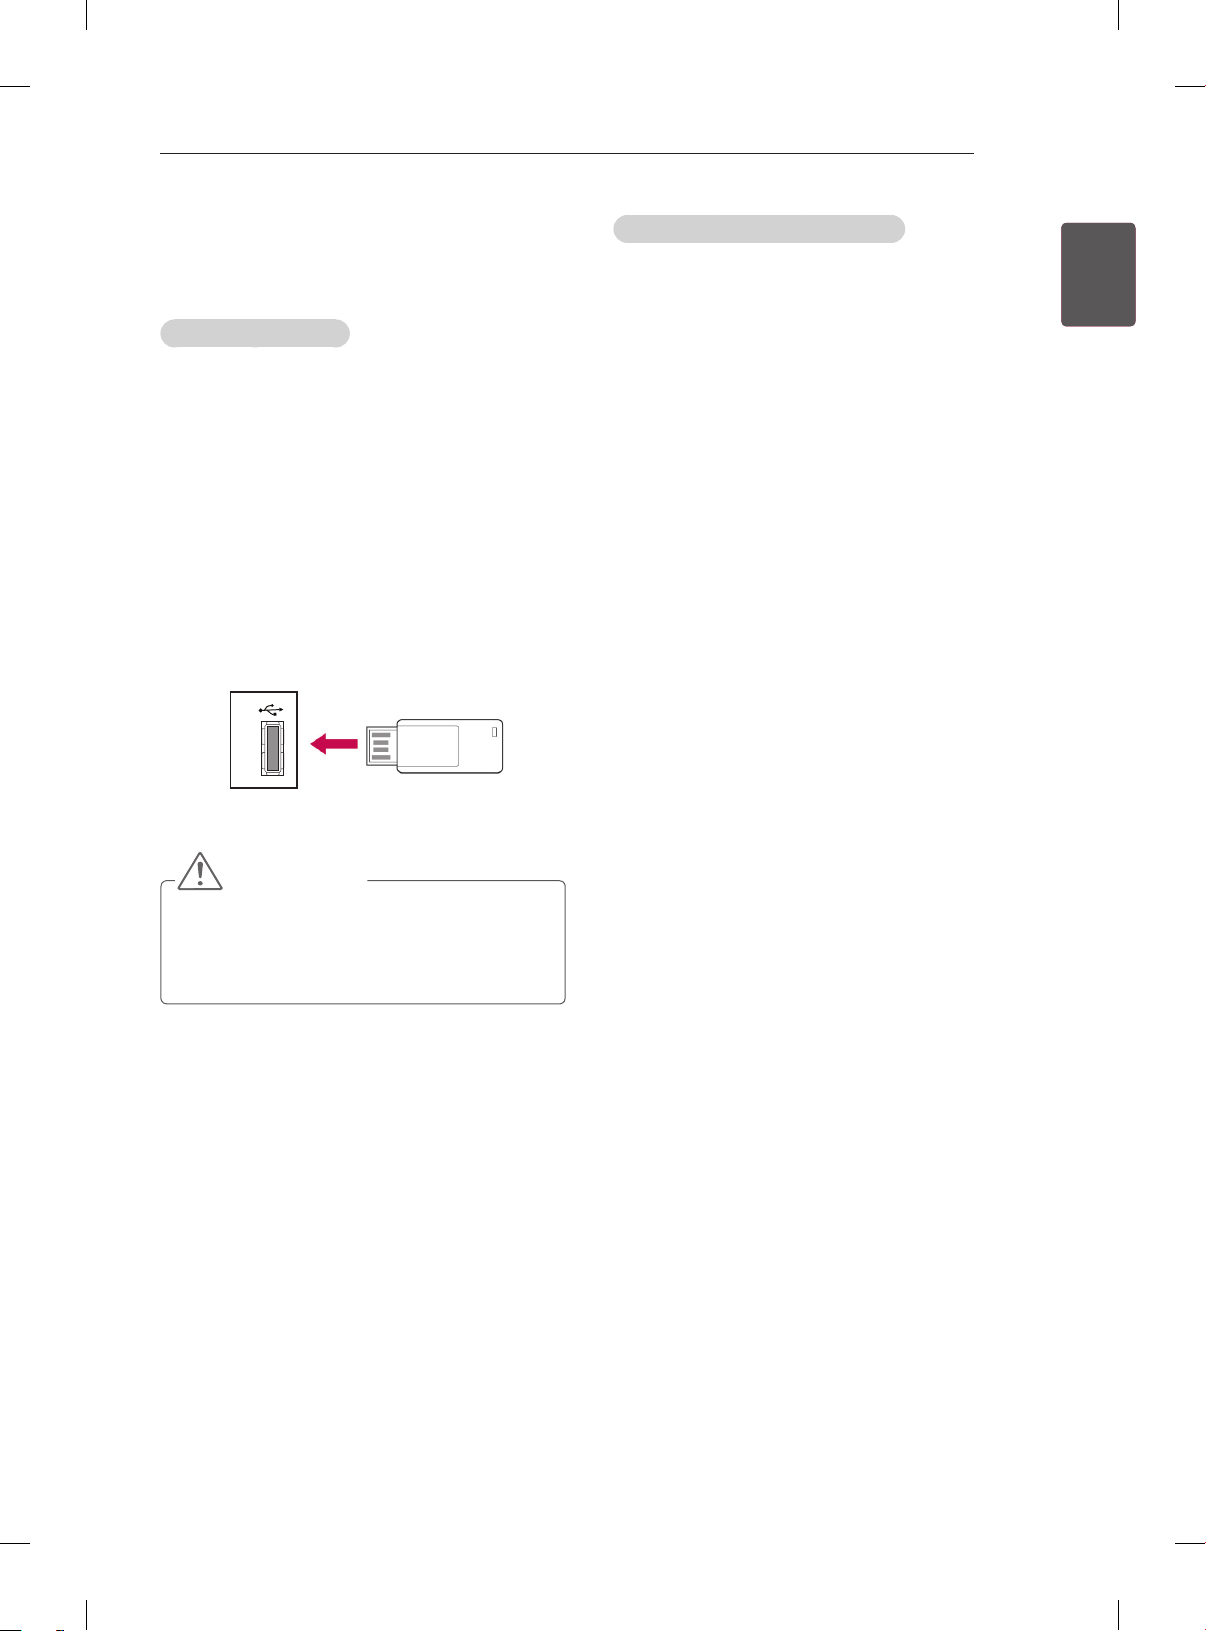
Connect USB storage devices such as a USB
ash memory to the TV and use multimedia
features (See “Browsing les” on page 36).
Connect a USB ash memory or USB memory
card reader to the TV as shown on the following
illustration.
USB IN
CAUTION
Back up your files saved on a USB storage
device frequently, as you may lose or
damage the files and this may be not
covered by the manufacturer’s warranty.
Tips for using USB storage devices
Only a USB storage device is recognizable.
If the USB storage device is connected through
a USB hub, the device is not recognizable.
A USB storage device using an automatic
recognition programme may not be recognized.
A USB storage device which uses its own
driver may not be recognized.
The recognition speed of a USB storage device
may depend on each device.
Please do not turn off the TV or unplug
the USB device when the connected USB
storage device is working. When such device
is suddenly separated or unplugged, the
stored les or the USB storage device may be
damaged.
Please do not connect the USB storage
device which was articially manoeuvred on
the PC. The device may cause the product to
malfunction or fail to be played. Never forget
to use only a USB storage device which has
normal music les, image les.
Please use only a USB storage device which
was formatted as a FAT16 or FAT32 le
system.
Please connect a USB storage device with the
cable offered by the device maker.
Some USB storage devices may not be
supported or operated smoothly.
Be sure to back up important les since data
stored in a USB memory device may be
damaged. We will not be responsible for any
data loss.
If a USB memory device is connected to a USB
multi-card reader, its volume data may not be
detected.
If the USB memory device does not work
properly, disconnect and reconnect it.
How fast a USB memory device is detected
differs from device to device.
The recommended capacity is 32 GB or less
for USB memory.
Any device with more than the recommended
capacity may not work properly.
USB storage devices below USB 2.0 are
supported as well. But they may not work
properly in the movie list.
Maximum of 999 folders or les can be
recognized under one folder.
If there are a lot of folders or les all within one
folder, the device may not be able to access
these properly.
ENGENGLISH
Page 36
ENTERTAINMENT
36
ENGLISH
ENG
Browsing les
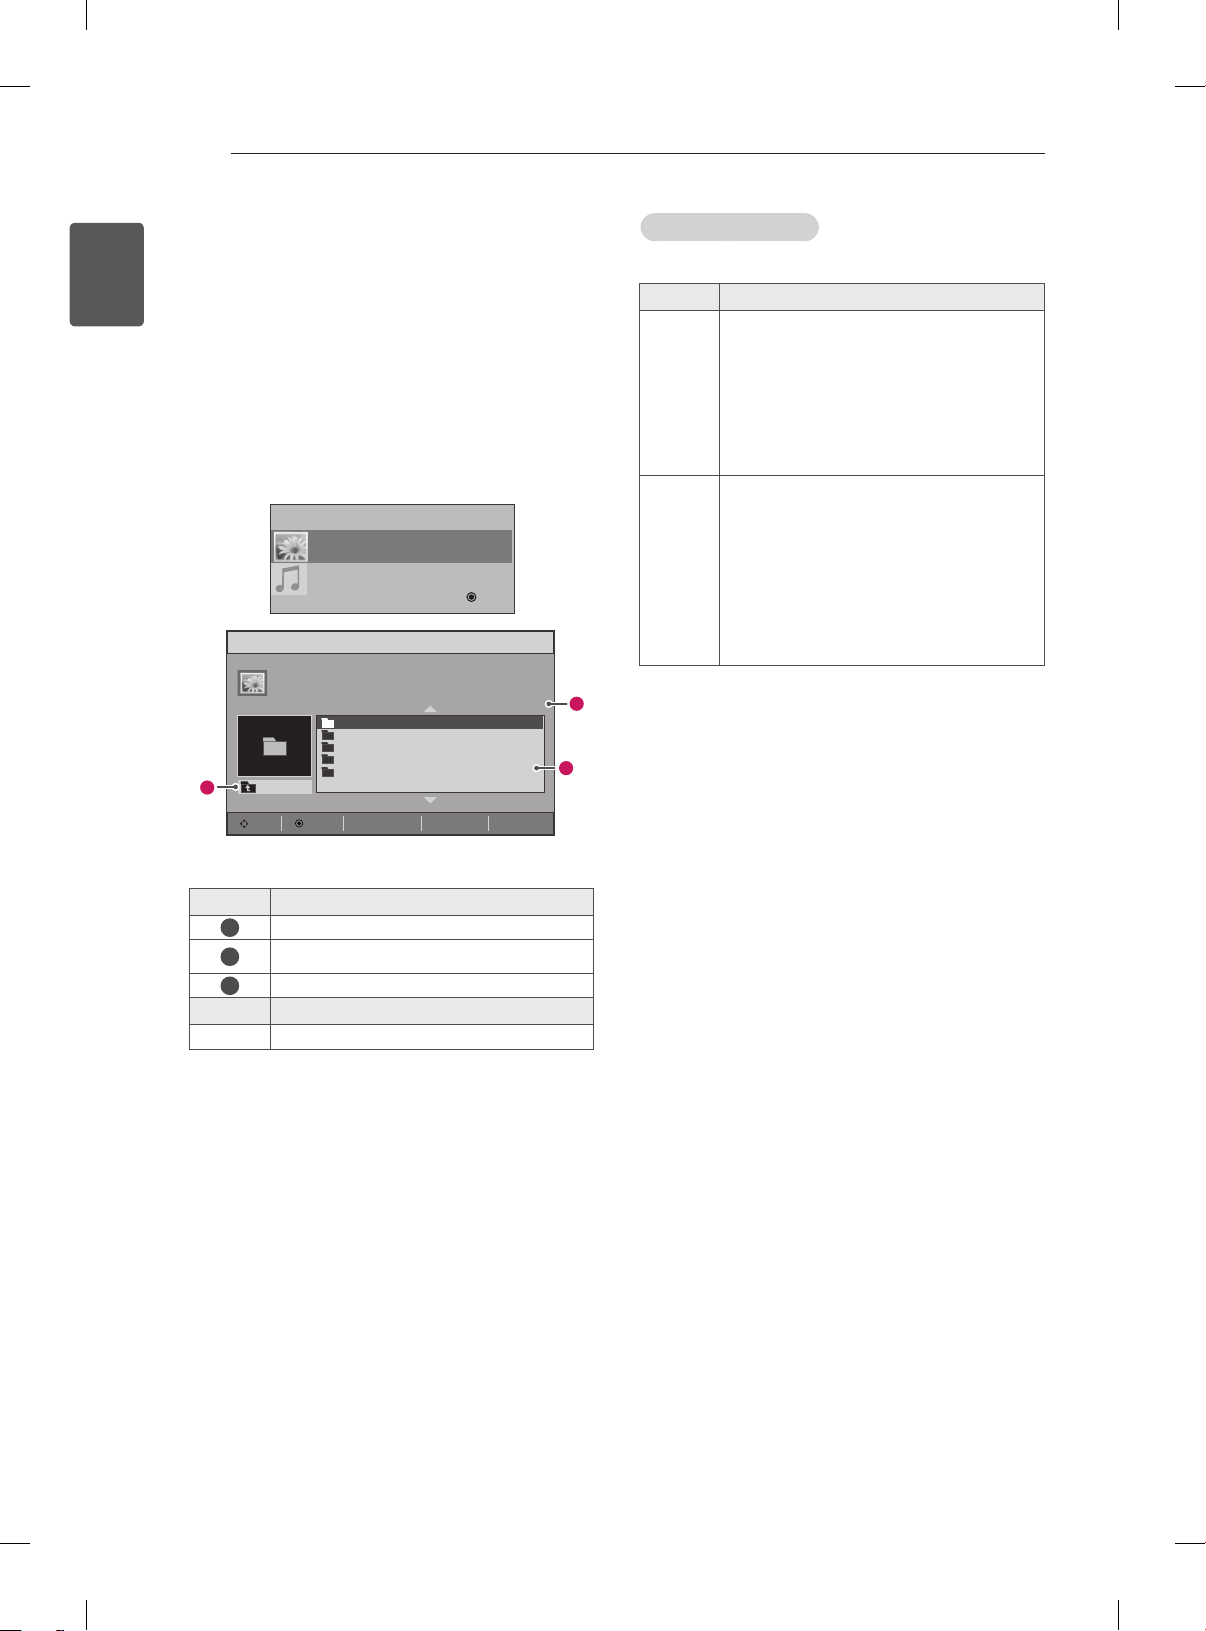
Access the photo or music lists and browse les.
1 Connect a USB storage device.
2 Press INPUT button to scroll to Input menus.
3 Press the Navigation buttons to scroll to USB
and press OK.
4 Press the Navigation buttons to scroll to Photo
List or Music List and press OK.
USB
Photo List
UP Folder
1
Move Option Page Change
Photo List
Music List
OK
Page 1/1
001
002
003
004
005
ꔵ
ꘂ
MarkꕯExit
2
3
Supported file format
Type Supported file format
Photo JPEG
Baseline : 64 x 64 to 8192 x 8192
Progressive : 64 x 64 to 1024 x 768
You can play JPEG files only.
Non-supported files are displayed
in the form of predefined icon.
Music MP3
Bit rate 32kbps to 320kbps
Sampling rate MPEG1 Layer3 : 32
kHz, 44.1 kHz, 48 kHz
Sampling rate MPEG2 Layer3 : 16
kHz, 22.05 kHz, 24 kHz
Sampling rate MPEG2.5 Layer3 : 8
kHz, 11.025 kHz, 12 kHz
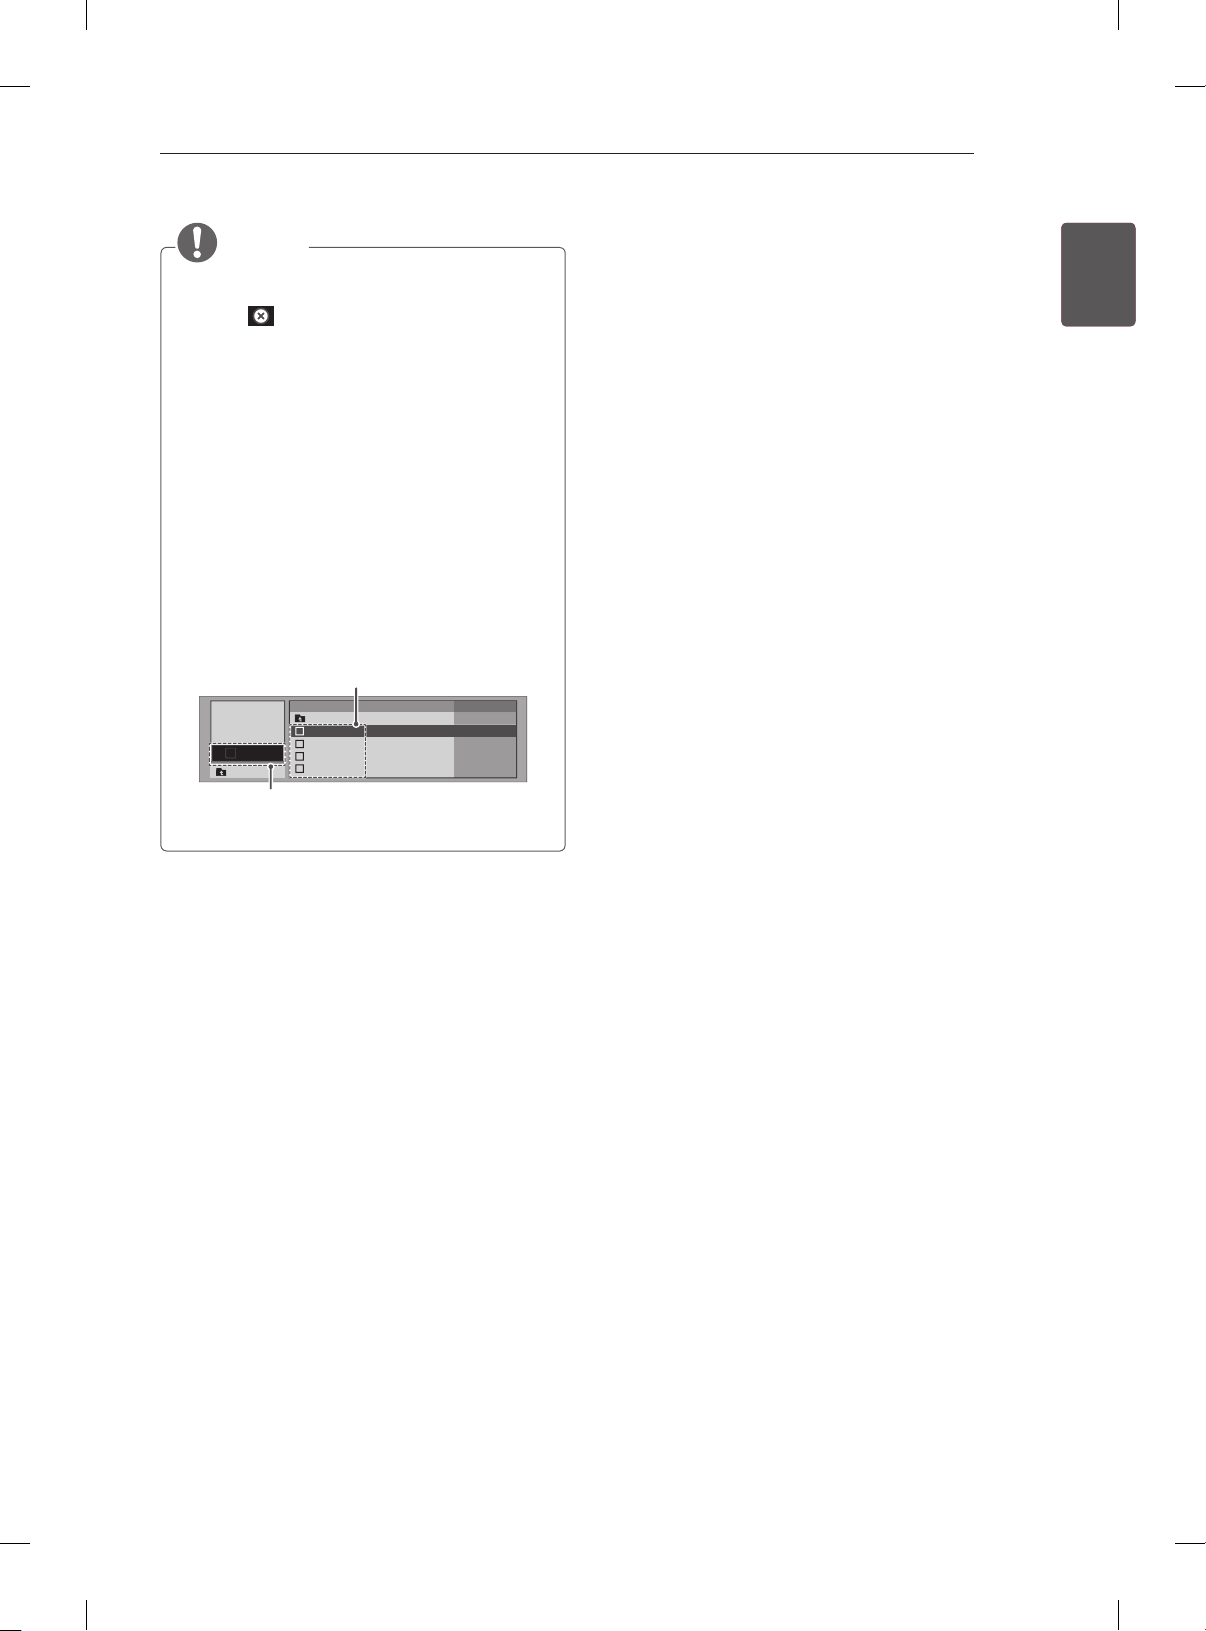
No. Description
Moves to upper level folder
1
Current page/Total pages
2
Contents under the current folder
3
Button Description
ꘂ
Marks or Unmarks each file.
Page 37
ENTERTAINMENT
37
Viewing photos
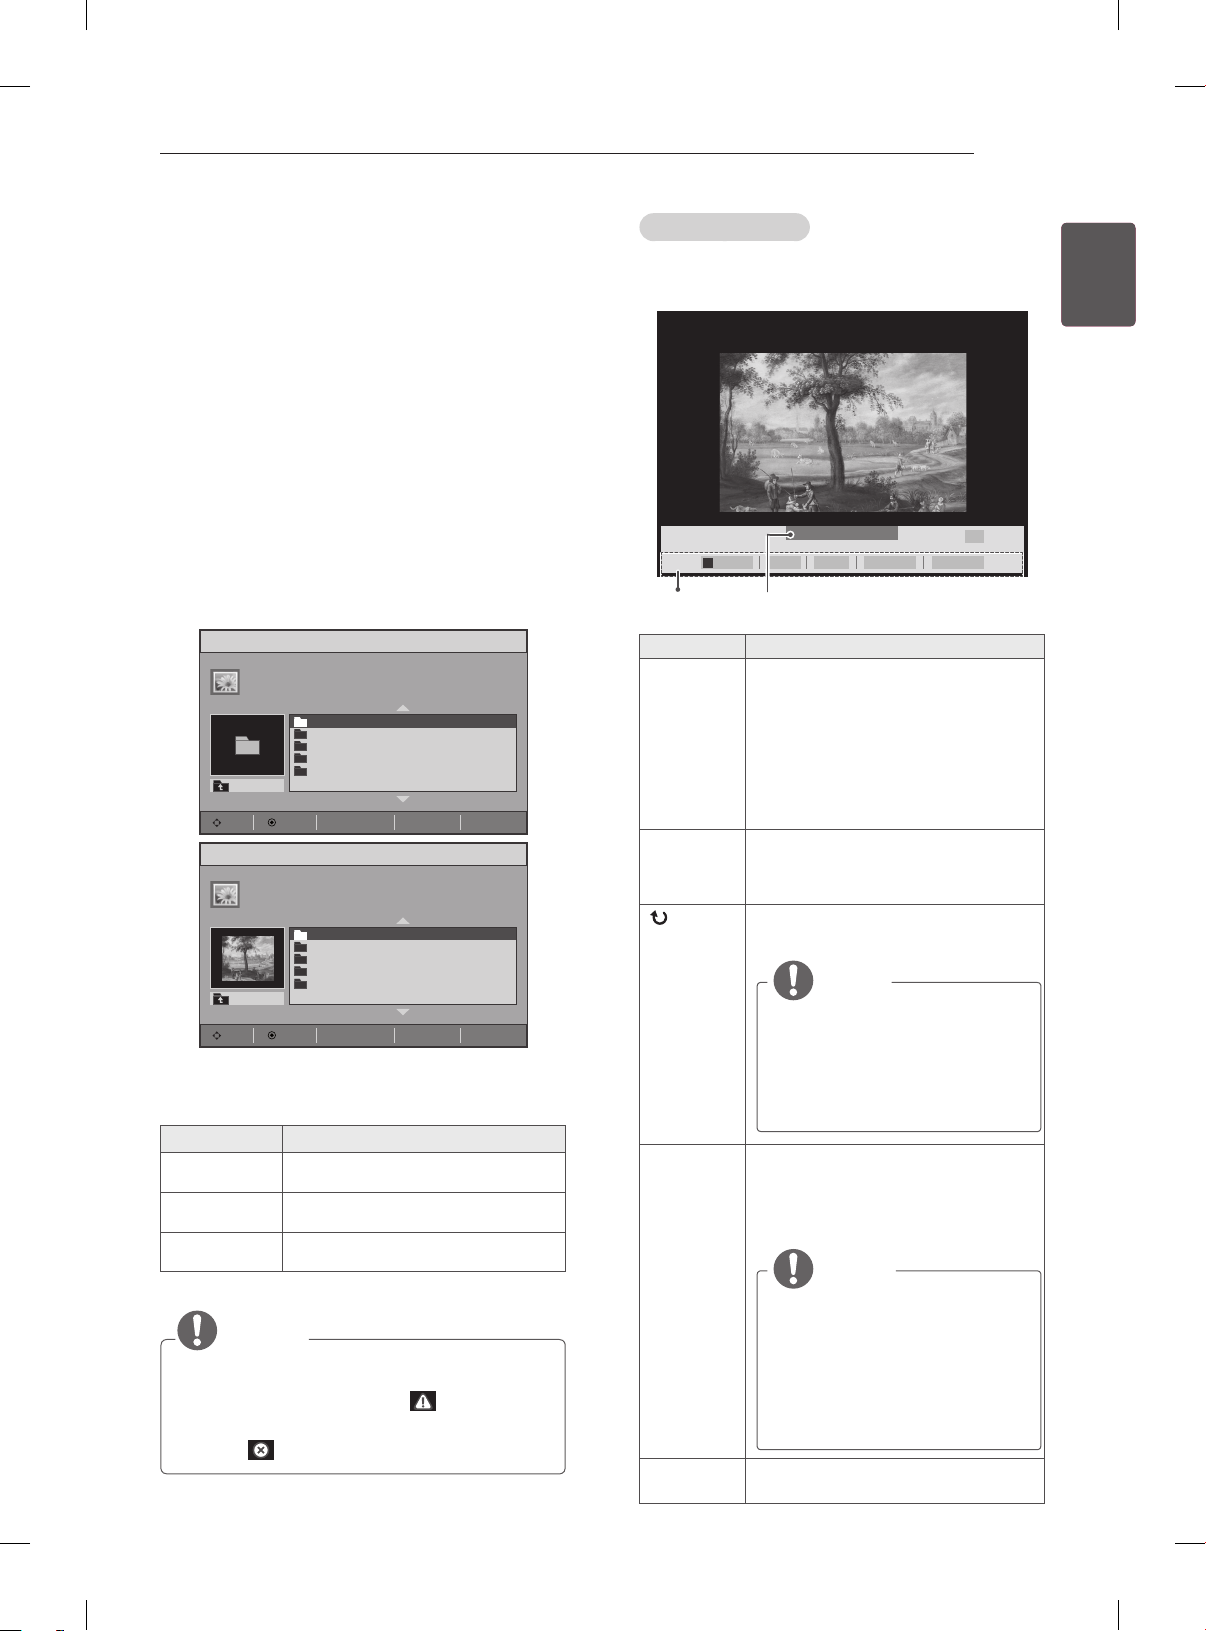
View image les saved in a USB storage device.
The displays on the screen may differ from the
model.
1 Press INPUT button to access the Input
menus.
2 Press the Navigation buttons to scroll to USB
and press OK.
3 Press the Navigation buttons to scroll to Photo
List and press OK.
4 Press the Navigation buttons to scroll to a
folder you want and press OK.
5 Press the Navigation buttons to scroll to a le
you want and press OK.
Photo List
UP Folder
Move Option Page Change
Photo List
UP Folder
Move Option Page Change
001
002
003
004
005
ꔵ
001
002
003
004
005
ꔵ
ꘂ
MarkꕯExit
ꘂ
MarkꕯExit
6 View photos.
Menu Description
View Marked Display the selected photo file.
Mark All Mark all photo files on the screen.
Unmark All Deselect all marked photo files.
NOTE
Non-supported files are displayed the
preview image by icon only .
Abnormal files are displayed in the form of
bitmap .
Page 1/1
Page 1/1
Using photo options
Use the following options while viewing photos.
►
Options
◄ 001 / 005 ►
►
Option CloseBGMSlideshow
꘤
Number of selected photos
ꔆ
06
Option Description
Slideshow Starts or stops a slideshow with
selected photos.
If there are no selected photos, all
photos saved in the current folder
display during a slideshow.
To set a slideshow speed, select
Option.
BGM Turns the background music on or
off. To set the background music
folder, select Option.
(Rotate)
Rotates photos clockwise (90°,
180°, 270°, 360°).
NOTE
The supported photo size is
limited. You cannot rotate a
photo if the resolution of the
rotated width is larger than
the supported resolution
size.
Option
Slide Speed: Selects a slideshow
speed (Fast, Medium, Slow).
BGM: Selects a music folder for
the background music.
NOTE
You cannot change the
music folder while the
background music is playing.
You can only select the MP3
folder saved on the device
that currently displays the
photo.
Close
The option bar at the bottom of the
screen disappears.
ENGENGLISH
Page 38
ENTERTAINMENT
38
ENGLISH
ENG
Listening to music
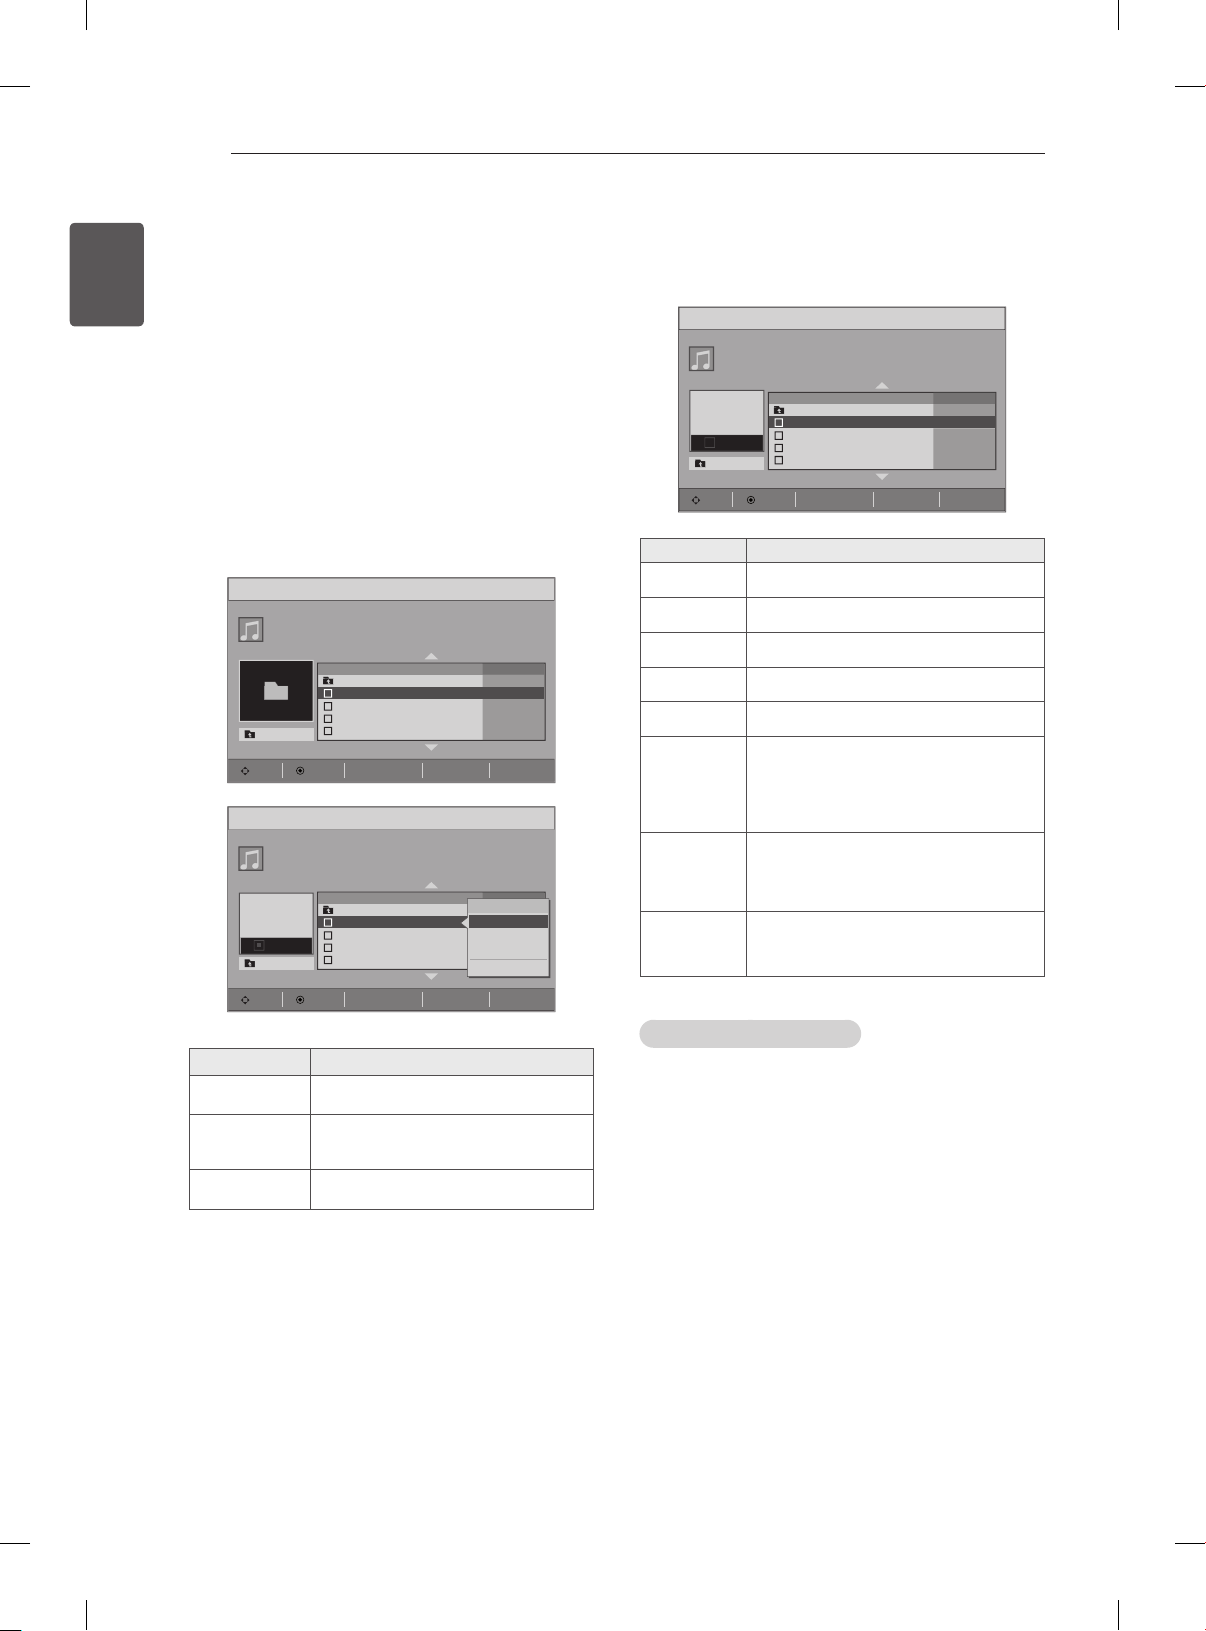
1 Press INPUT button to access the Input
menus.
2 Press the Navigation buttons to scroll to USB
and press OK.
3 Press the Navigation buttons to scroll to Music
List and press OK.
4 Press the Navigation buttons to scroll to a
folder you want and press OK.
5 Press the Navigation buttons to scroll to a le
you want and press OK.
Menu
Play
BGM
Mark All
Close
Page 1/1
Duration
0 : 00
0 : 00
0 : 00
0 : 00
Page 1/1
Duration
0 : 00
0 : 00
0 : 00
0 : 00
Music List
UP Folder
Move
Music List
ꕞ
0: 00
/0: 00
UP Folder
Move
Title
UP Folder
001.mp3
002.mp3
003.mp3
004.mp3
ꔵ
Option Page Change
Title
UP Folder
001.mp3
002.mp3
003.mp3
004.mp3
ꔵ
Option Page Change
ꘂ
MarkꕯExit
ꘂ
MarkꕯExit
6 Play music.
7 Control playback by using the following buttons.
Music List
ꕞ
0: 00
►
/4: 06
UP Folder
Move
Title
UP Folder
001.mp3
002.mp3
003.mp3
004.mp3
ꔵ
Option Page Change
ꘂ
MarkꕯExit
Duration
3 : 12
♪
3 : 12
3 : 12
3 : 12
Page 1/1
Button Description
r
s
t
w
v
v or w
Stops playback
Plays a music file
Pauses or resumes playback
Skips to the next file
Skips to the previous file
When playing,
When you press the v button, the
previous music file will be played.
When you press the w button, the
next music file will be played.
When you press the EXIT button,
EXIT
only the music will be stopped and
the player will not return to normal
TV viewing.
When using the ꕌorꕍ button during
ꕌ or ꕍ
playback a cursor indicating the position can be played.
Menu Description
Play Plays a music file.
Start playing the selected music
BGM
files and then move to the Photo
List.
Mark All Mark all music files on the screen.
Tips for playing music files
This unit cannot support the ID3 Tag
embedded MP3 files.
Page 39
ENTERTAINMENT
39
NOTE
Abnormal files are displayed in the form of
bitmap
A damaged or corrupted music does not play
but displays 00:00 in playtime.
A music downloaded from a paid service with
copyright protection does not start but displays inappropriate information in playtime.
If you press OK button, screen saver is
stopped.
The PLAY(
buttons on the remote control are also available in this mode.
You can use the
next music and the
previous music.
.
s), Pause(t), r , w, v
w button to select the
v button to select the
file name
Title
ꕞ
0: 00
►
/4: 06
UP Folder
Time elapsed
UP Folder
001.mp3
002.mp3
003.mp3
004.mp3
Duration
3 : 12
♪
3 : 12
3 : 12
3 : 12
ENGENGLISH
Page 40
CUSTOMIZING TV SETTING
40
ENGLISH
ENG
CUSTOMIZING TV SETTING
Image shown may differ from your TV.
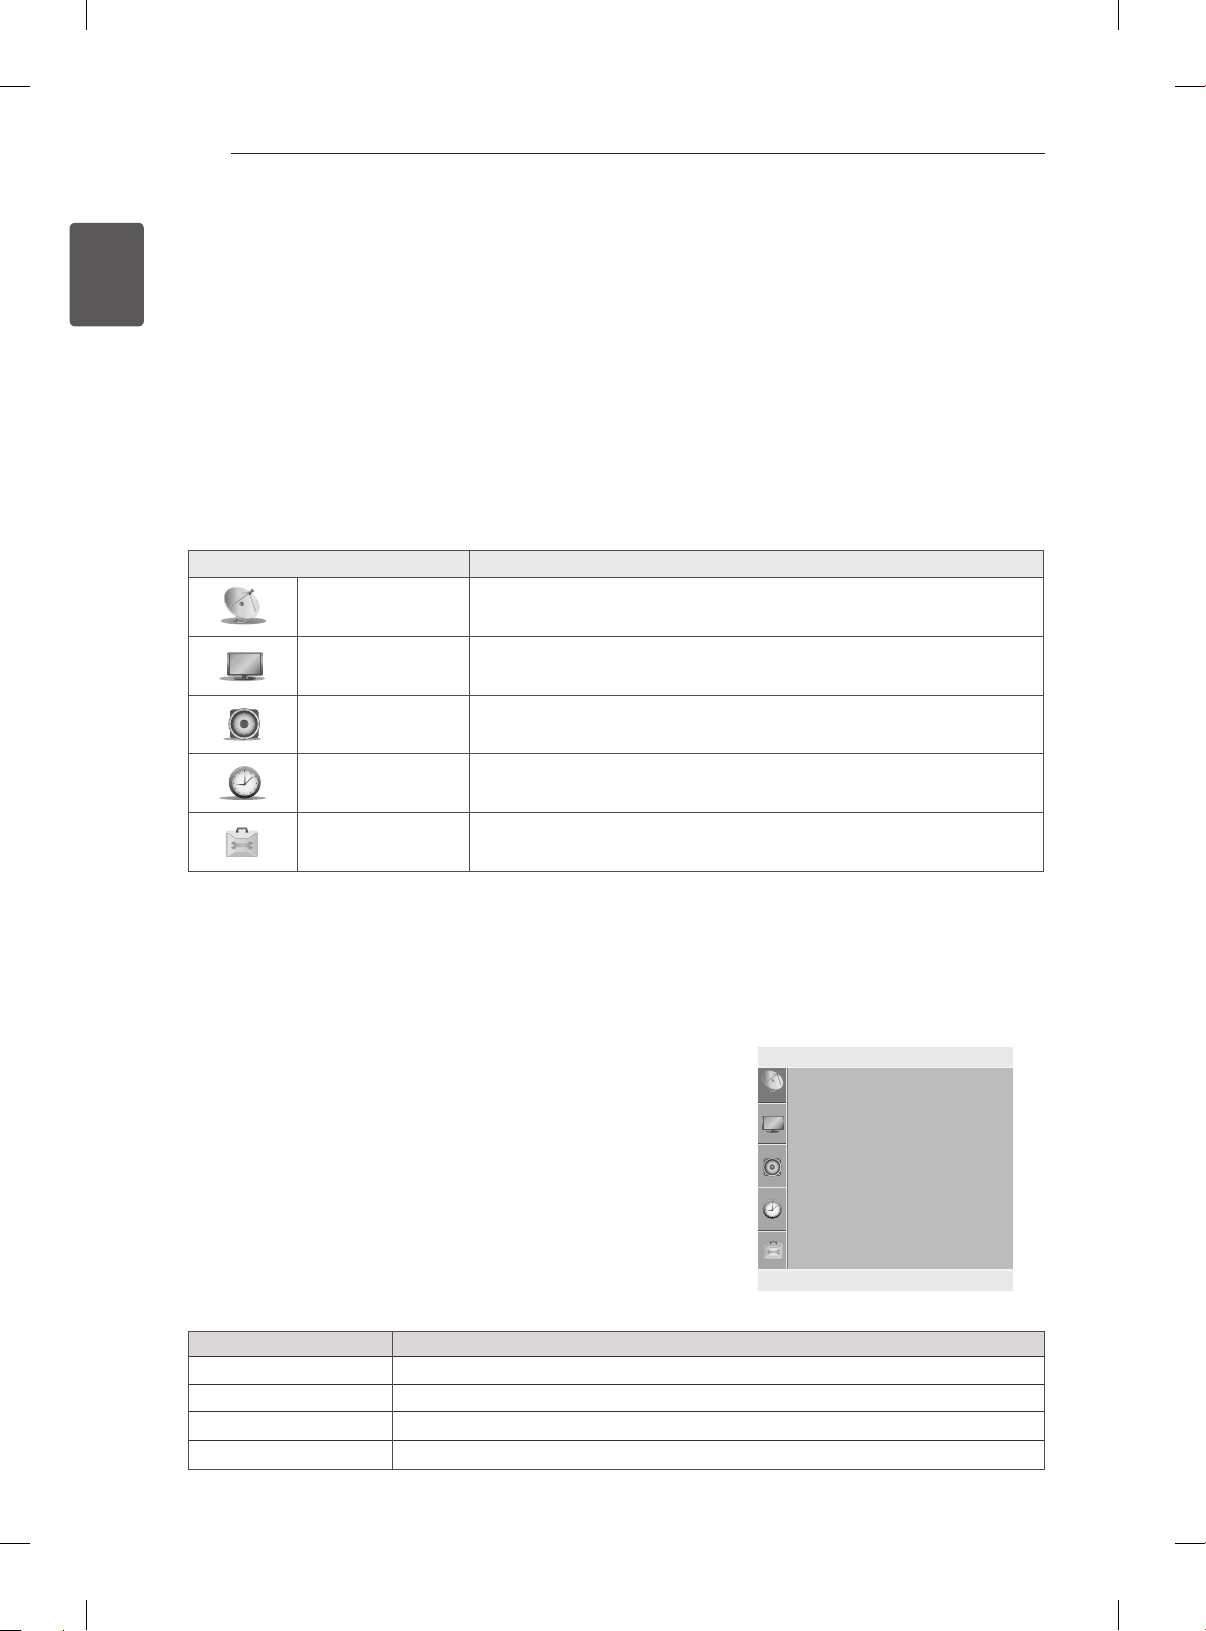
Accessing main menus
1 Press SETTINGS to access the main menus.
2 Press the Navigation buttons to scroll to one of the following menus and press OK.
3 Press Navigation buttons to scroll to the setting or option you want and press OK.
4 When you are nished, press EXIT.
Menu Description
SETUP Sets up and edit programmes.
PICTURE Adjusts the image size, quality, or effect.
AUDIO Adjusts the sound quality, effect, or volume level.
TIME Sets the time, date, or timer feature.
OPTION Customizes the general settings.
Customizing Settings
Image shown may differ from your TV.
SETUP Settings
1 Press SETTINGS and the Navigation buttons to scroll to
Setup.
2 Press the Navigation buttons to scroll to the setting or option
you want and press OK.
3 When you return to the previous menu, press SETTINGS.
The available programme settings are described in the following:
Setting Description
Auto Tuning Tunes and stores all available programmes through antennas inputs ( See p. 30).
Manual Tuning Tunes and stores the programmes you want manually ( See p. 31).
Programme Edit Edits programmes ( See p. 32).
Favourite Programme Selects your favourite programmes directly( See p. 32).
Setup
Auto Tuning
Manual Tuning
Programme Edit
Favourite Programme
◄
OK Settings
m
Page 41
CUSTOMIZING TV SETTING
Image shown may differ from your TV.
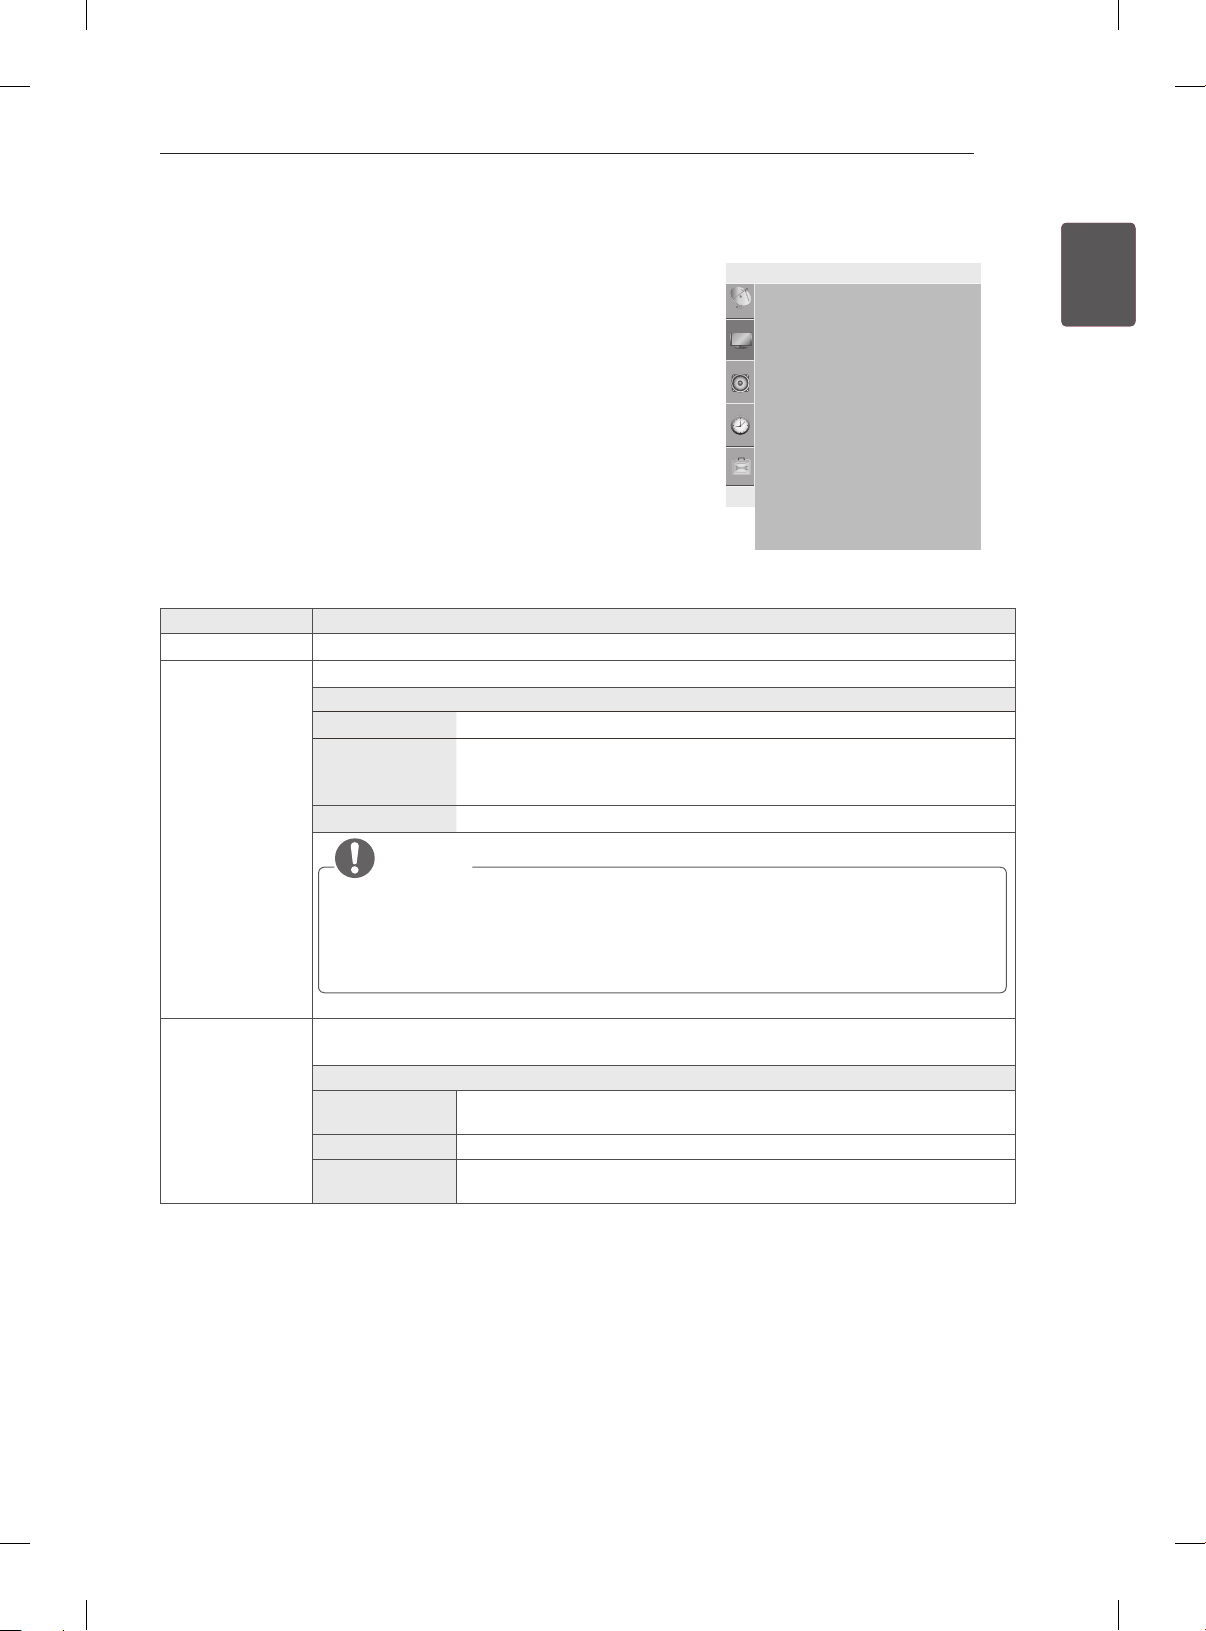
PICTURE Settings
1 Press SETTINGS and the Navigation buttons to scroll to
Picture.
2 Press the Navigation buttons to scroll to the setting or option
you want and press OK.
3 When you return to the previous menu, press SETTINGS.
Picture
Aspect Ratio
Energy Saving
Picture Mode
• Backlight 100
• Contrast 100
• Brightness 50
• Sharpness 70
• Colour 70
• Tint 0
mv◄s OK MENU
• Advanced
• Picture Reset
The available picture settings are described in the following.
Setting Description
Aspect Ratio Changes the image size to view images at its optimal size ( See p. 33).
Energy Saving Reduces the power consumption by adjusting the screen brightness.
Option
Off The Energy Saving is off
Minimum/
Selects the brightness level.
Medium/
Maximum
Screen off The screen turns off in 3 seconds.
41
ENGENGLISH
NOTE
When you select Screen Off, the screen will be turned off in 3 seconds and
Screen Off will start.
If you adjust “Energy Saving- Minimum, Medium, Maximum”, Backlight feature
will not work.
Picture Mode Selects one of the preset image or customizes options in each mode for the best TV
screen performance. You are also able to customize advanced options of each mode.
Mode
Vivid Adjusts the video image for the retail environment by enhancing the
contrast, brightness, colour, and sharpness.
Standard Adjusts the image for the normal environment.
Cinema Optimizes the video images for a cinematic look to enjoy movies as if
you are in a movie theatre.
Page 42
CUSTOMIZING TV SETTING
42
ENGLISH
ENG
Basic image options
Setting Description
Backlight Adjusts the brightness of the screen by controlling the LCD backlight. If you
decrease the brightness level, the screen becomes darker and the power
consumption will be reduced without any video signal loss.
Contrast Increases or decreases the gradient of the video signal. You may use Contrast
when the bright part of the picture is saturated.
Brightness Adjusts the base level of the signal in the picture.
Sharpness Adjusts the level of crispness in the edges between the light and dark areas of the
picture. The lower the level, the softer the image.
Colour Adjusts intensity of all colours.
Tint Adjusts the balance between red and green levels.
Advanced Customizes the advanced options.
Picture Reset Restores the options of each mode to the factory default.
Advanced image options (Depending on model)
Setting Description
Dynamic Contrast Adjusts the contrast to keep it at the best level according to the brightness of the
screen. The picture is improved by making bright parts brighter and dark parts
darker.
Dynamic Colour Adjusts screen colours so that they look livelier, richer and clearer. This feature
enhances hue, saturation and luminance so that red, blue and green white look
more vivid.
Noise Reduction Reduces screen noise without compromising video quality.
Black Level Sets black level of the screen to proper level. This function is available in the
following modes: RF, AV or HDMI.
»
Low: The reflection of the screen gets darker.
»
High: The reflection of the screen gets brighter.
Film Mode Makes video clips recorded in film look more natural.
This feature operates only in RF or AV mode 480i/576i.
Colour
Temperature
Choose one of three automatic colour adjustments. Set to warm to enhance hotter
colours such as red, or set to cool to see less intense colours with more blue.
You can control red, green, blue to adjust colour details.
Page 43
CUSTOMIZING TV SETTING
Image shown may differ from your TV.
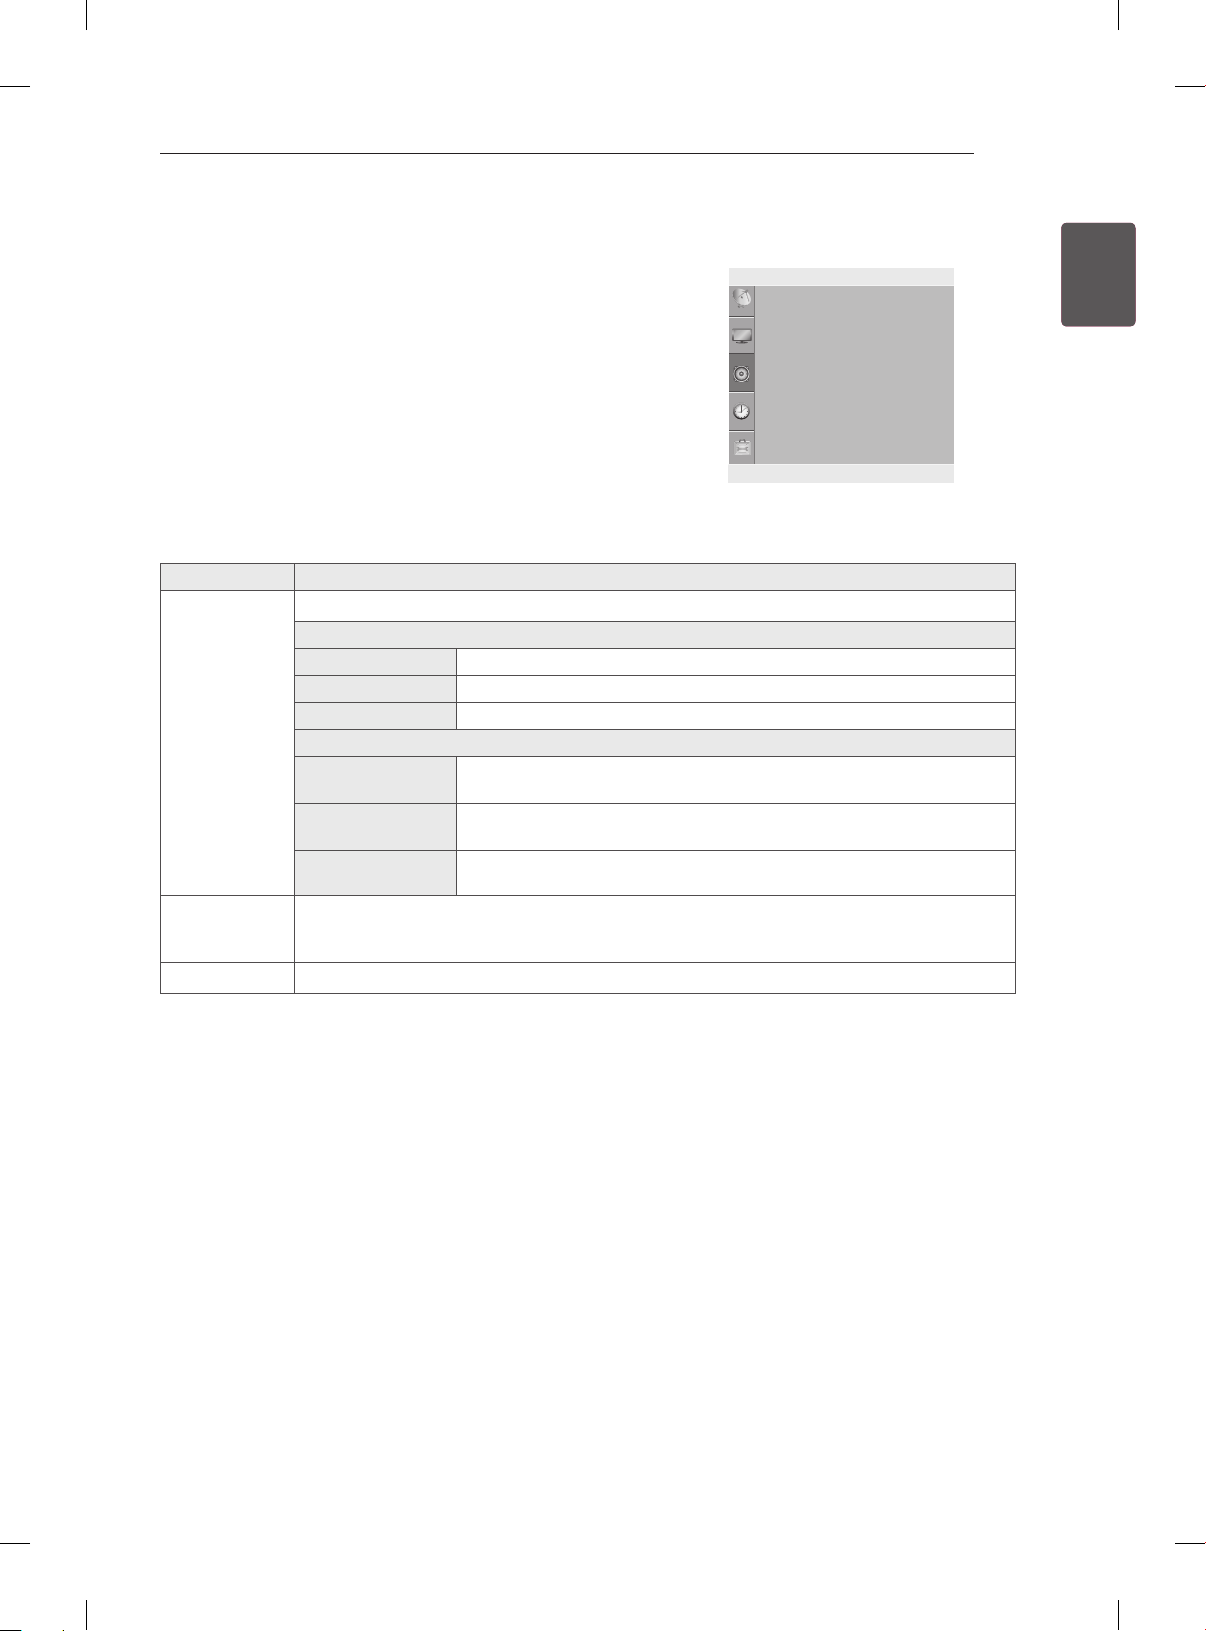
AUDIO Settings
1 Press SETTINGS and the Navigation buttons to scroll to
Audio.
2 Press the Navigation buttons to scroll to the setting or
option you want and press OK.
3 When you return to the previous menu, press SETTINGS.
Audio
Sound Mode
• Treble 50
• Bass 50
• Reset
Auto Volume
Balance 0
◄
OK Settings
m
The available audio settings are described in the following.
Setting Description
Sound Mode Selects one of the preset sound modes or customizes options in each mode.
Mode
Standard Select when you want standard-quality sound.
Music Select when you listen to music.
Cinema Select when you watch movies.
Option
Treble Controls the dominant sounds in the output. When you turn up the
treble, it will increase the output to the higher frequency range.
Bass Controls the softer sounds in the output. When you turn up the bass,
it will increase the output to the lower frequency range.
Reset Resets the sound mode to the default setting.
43
ENGENGLISH
Auto Volume Activates the Auto Volume feature to keep the volume level consistent whenever you
change channels. The volume level may not be consistent due to different signal
conditions of broadcasting stations.
Balance Adjust balance between the left and right speakers according to your room environment.
Page 44
CUSTOMIZING TV SETTING
44
ENGLISH
ENG
This feature may not be applied based on country broadcasting circumstance.
Stereo/Dual Reception
When a programme is selected, the sound information for the station appears with the programme
number and station name.
1 Press I/II button to select the Multi Audio menu.
Broadcast On Screen Display
Mono
Stereo
Dual
NICAM NICAM
Mono sound selection
If the stereo signal is weak in stereo reception, you can switch to mono. In mono reception, the clarity of
sound is improved.
Language selection for dual language broadcast
If a programme can be received in two languages (dual language), you can switch to DUAL I,
DUAL II or DUAL I+II.
DUAL I Sends the primary broadcast language to the loudspeakers.
DUAL I I Sends the secondary broadcast language to the loudspeakers.
DUAL I+I I Sends a separate language to each loudspeaker.
MONO
STEREO
DUAL I , DUAL II , DUAL I + II
Nicam Reception
If the TV is equipped with a receiver for NICAM reception, high quality NICAM (Near Instantaneous
Companding Audio Multiplex) digital sound can be received.
Sound output can be selected according to the type of broadcast received.
1 When NICAM mono is received, you can select NICAM MONO or FM MONO.
2 When NICAM stereo is received, you can select NICAM STEREO or FM MONO.
If the stereo signal is weak, switch to FM MONO.
3 When NICAM dual is received, you can select NICAM DUAL I, NICAM DUAL II or NICAM DUAL I+II or
FM MONO.
Speaker Sound Output Selection
In AV, Component, HDMI mode, you can select output sound for the left and right loudspeakers.
Select the sound output.
L+R: Audio signal from audio L input is sent to the left loudspeaker and audio signal from audio R input is
sent to the right loudspeaker.
L+L: Audio signal from audio L input is sent to left and right loudspeakers.
R+R: Audio signal from audio R input is sent to left and right loudspeakers.
Page 45
CUSTOMIZING TV SETTING
Image shown may differ from your TV.
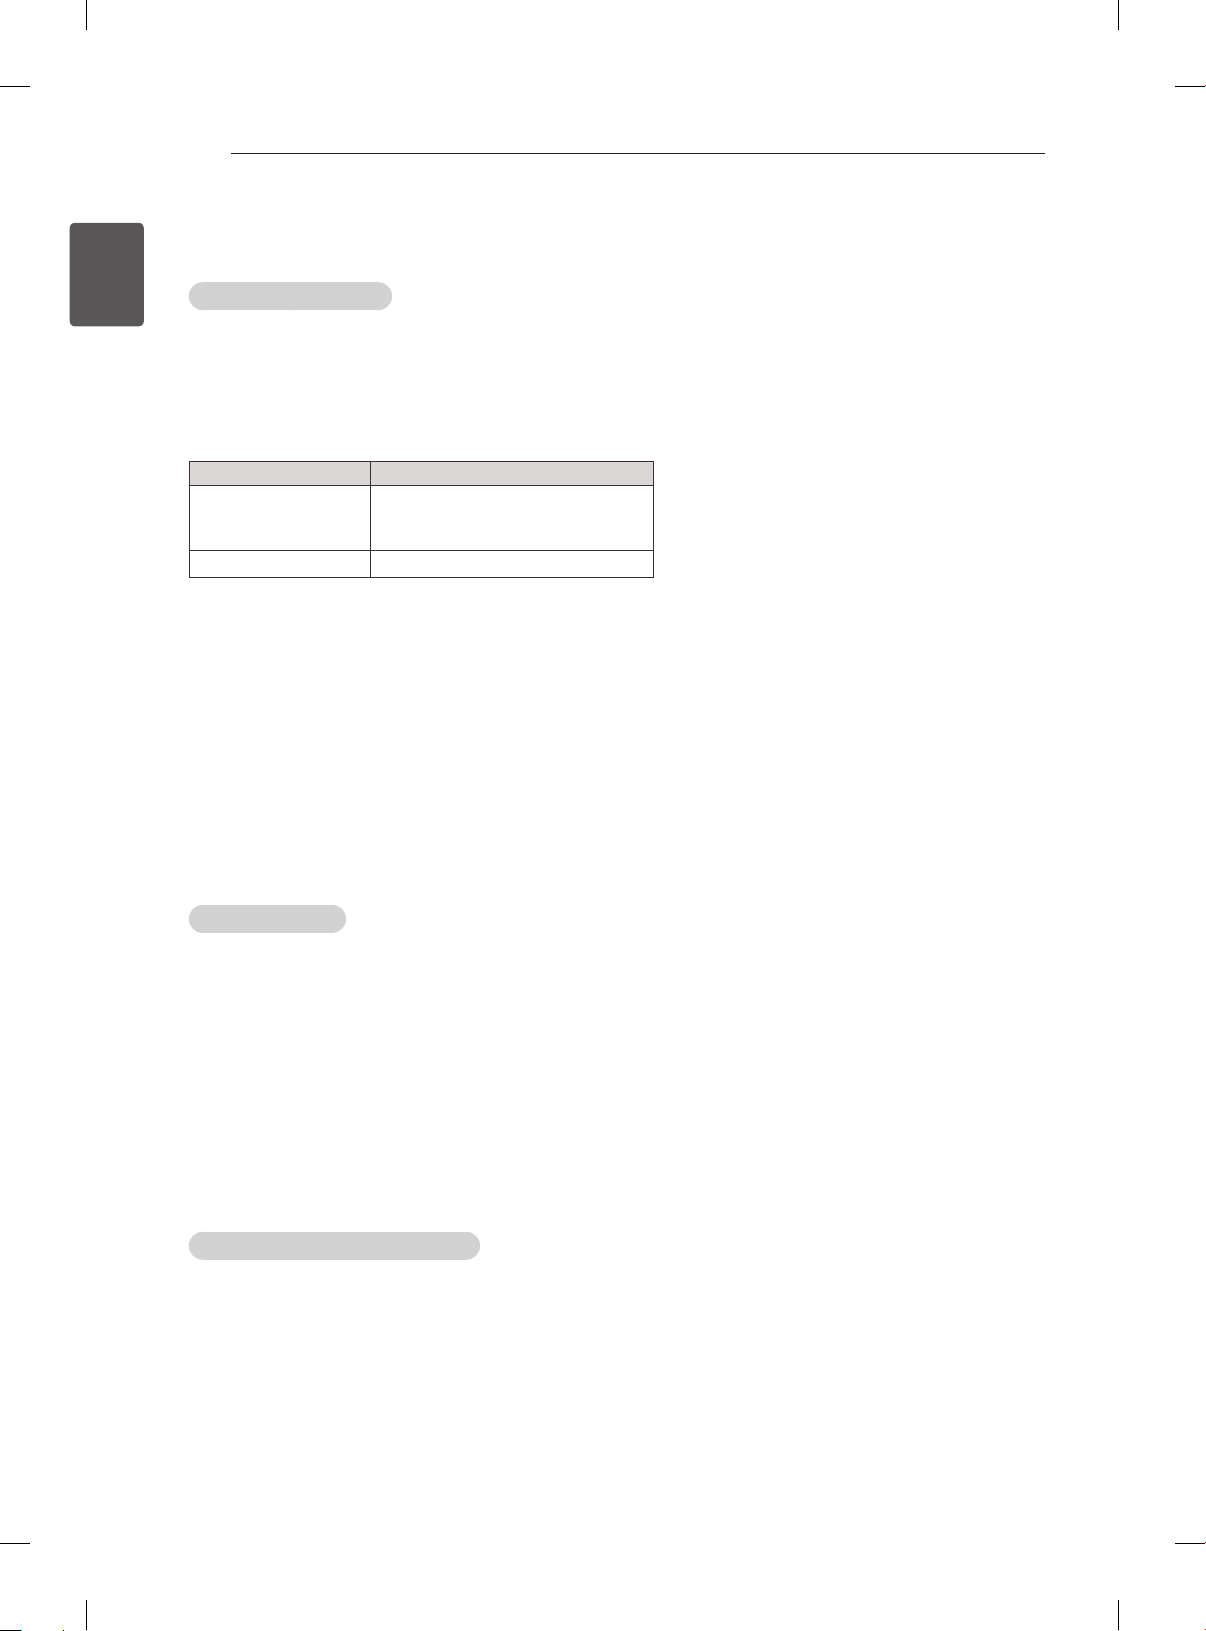
TIME Settings
1 Press SETTINGS and the Navigation buttons to scroll to
Time.
2 Press the Navigation buttons to scroll to the setting or option
you want and press OK.
3 When you return to the previous menu, press SETTINGS.
Time
Clock
Off Time
On Time
Sleep Timer
◄
OK Settings
m
The available time settings are described in the following
Setting Description
Clock Sets the time.
Off Time/On Time Sets the time to turn on or off the TV automatically. To use this function, you should
set the current time and date in advance.
NOTE
If you do not press any button within 2 hours after the TV turns on by the
On Time feature, the TV enters the Standby mode automatically.
If you set both Off time and On time features to the same time, the Off time
feature overrides the On time feature.
45
ENGENGLISH
Sleep Timer Sets the length of time until the TV to turns off. When you turn the TV off and turn it
on again, the Sleep timer feature will be set to off.
Image shown may differ from your TV.
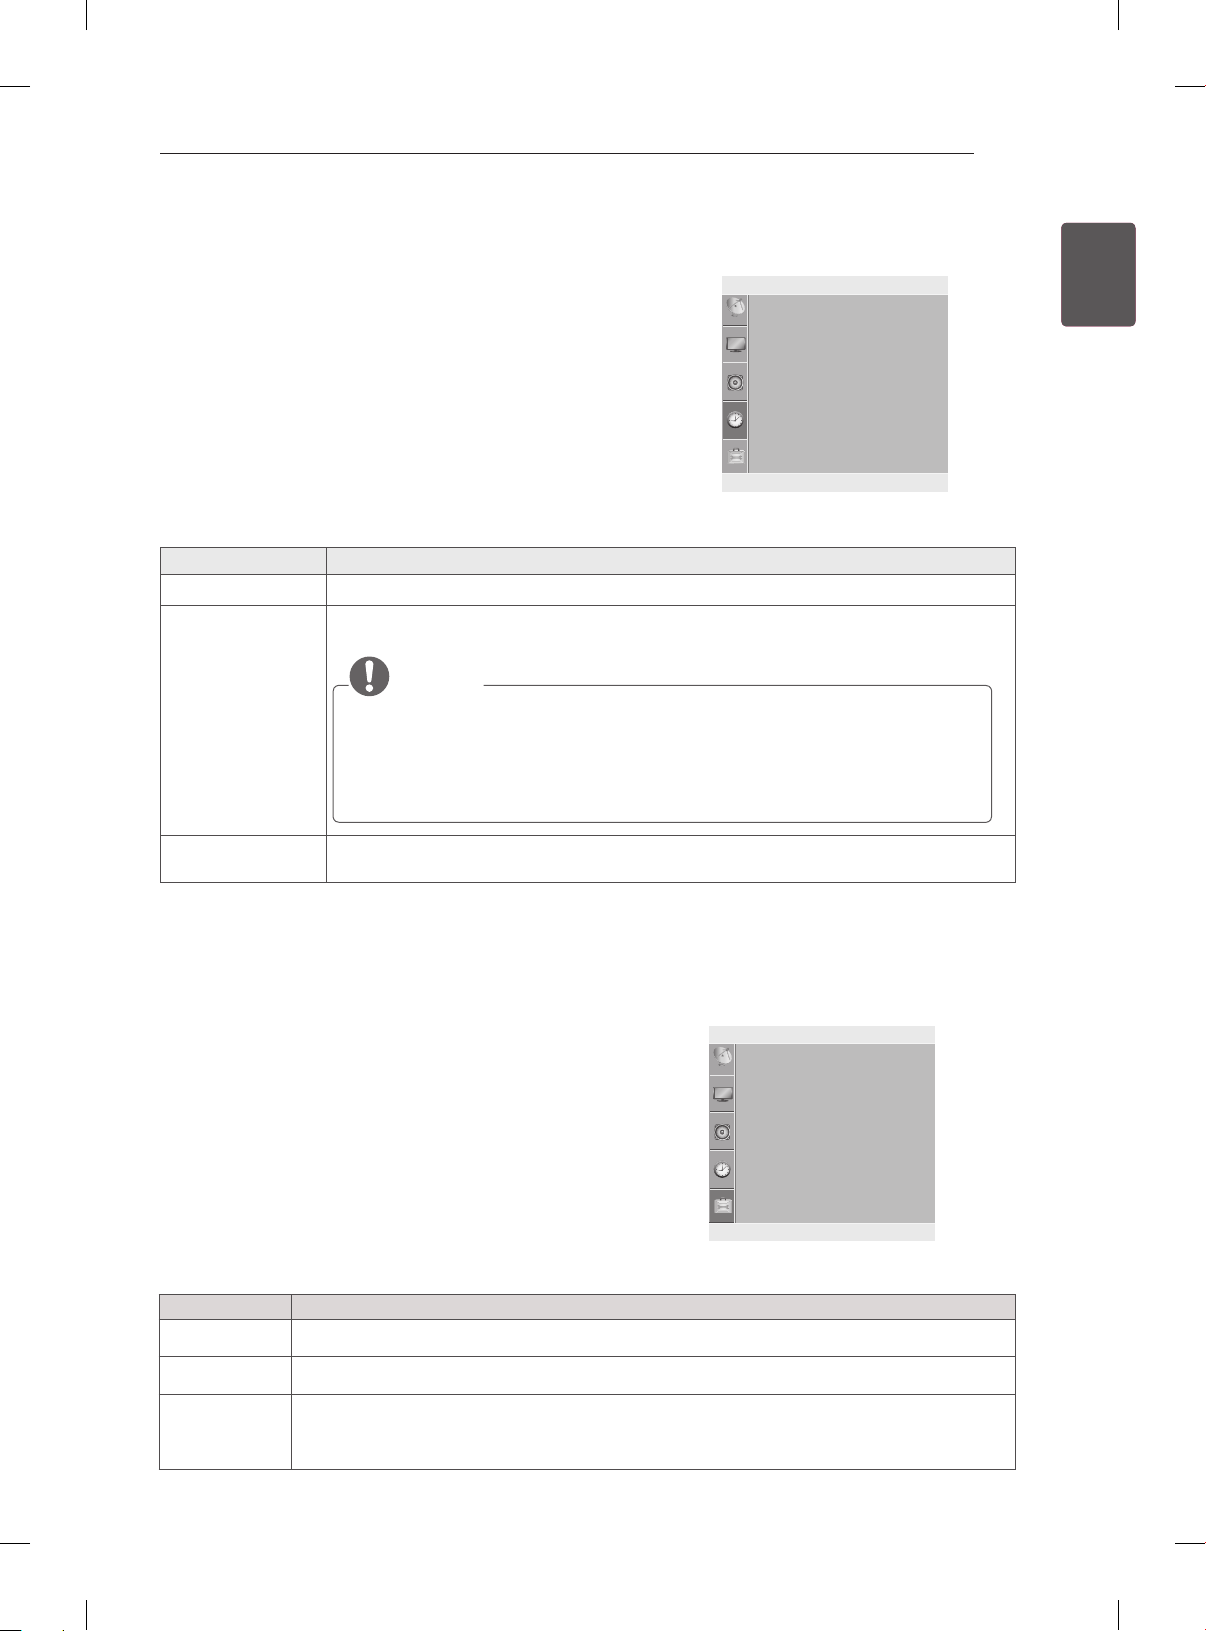
OPTION Settings
1 Press SETTINGS and the Navigation buttons to scroll to
Option.
2 Press the Navigation buttons to scroll to the setting or option
you want and press OK.
3 When you return to the previous menu, press SETTINGS.
The available general settings are described in the following:
Setting Description
Language Selects a language for the display.
Key Lock Activates or deactivates the lock system.
Factory Reset Resets the TV to factory default and erases all stored programmes.
Customizes the TV settings to suit your preference. The factory reset screen will appear
when you turn on the TV for the first time.
Option
Language
Key Lock
Factory Reset
◄
OK Settings
m
Page 46

46
TELETEXT
ENGLISH
ENG
TELETEXT
This feature is not available in all countries.
Teletext is a free service broadcast by most TV
stations which gives up-to-theminute information
on news, weather, television programmes, share
prices and many other topics.
The teletext decoder of this TV can support
the SIMPLE and FASTEXT systems. SIMPLE
(standard teletext) consists of a number of
pages which are selected by directly entering
the corresponding page number. FASTEXT are
more modern methods allowing quick and easy
selection of teletext information.
Switch On/Off
Press the TEXT button to switch to teletext. The
initial page or last page viewed appears on the
screen.
Two page numbers, TV station name, date and
time are displayed on the screen headline. The
rst page number indicates your selection, while
the second shows the current page displayed.
Press the TEXT button to switch off teletext. The
previous mode reappears.
Programming a colour button in
LIST mode
If the TV is in SIMPLE text or FASTEXT mode,
press the ꔻ button to switch to LIST mode.
Four teletext page numbers of your choice can
be colour coded and easily selected by pressing
the corresponding coloured button on the remote
control handset.
1 Press a coloured button.
2 Using the Number buttons, select the page you
wish to programme.
3 Press the OK button. The selected page is
stored as the selected page number, blinking
once to conrm this. From now on, you can
select this page with the same coloured button.
4 The three other coloured buttons are
programmed in this way.
Fastext
The teletext pages are colour coded along the bottom of the screen and are selected by pressing the
corresponding coloured button.
Page selection
Simple Text
Page selection
1 Enter the desired page number as a three digit
number with the NUMBER buttons. If during
selection you press a wrong number, you must
complete the three digit number and then reenter the correct page number.
2 The P + - button can be used to select the
preceding or following page.
1 Press the ꔻ button to select the index page.
2 You can select the pages which are colour
coded along the bottom line with corresponding
coloured buttons.
3 AS with SIMPLE teletext mode, you can select
a page by entering its three digit page number
with the Number buttons in FASTEXT mode.
4 The P + - button can be used to select the
preceding or following page.
Page 47

TELETEXT
47
Special Teletext Function
ꔻ Index
Select the each index page.
ꔾ Time
When viewing a TV programme, select this
menu to display the time at the top right hand
corner of the screen.
In the teletext mode, press this button to select
a sub page number. The sub page number is
displayed at the bottom of the screen. To hold
or change the sub page, press the Red/Green,
∧∨ or NUMBER buttons.
ꕀ Hold
Stops the automatic page change which will
occur if a teletext page consists of 2 or more
sub pages.
The number of sub pages and the sub page
displayed is, usually, shown on the screen
below the time. When this menu is selected the
stop symbol is displayed at the top left-hand
corner of the screen and the automatic page
change is inactive.
ENGENGLISH
ꔽ Reveal
Select this menu to display concealed
information, such as solutions to riddles or
puzzles.
ꔼ Update
Displays the TV picture on the screen while
waiting for a new teletext page. The display will
appear at the top left hand corner of the screen.
When the updated page is available then
display will change to the page number. Select
this menu again to view the updated teletext
page.
Page 48
MAINTENANCE / TROUBLESHOOTING
48
ENGLISH
ENG
MAINTENANCE
Cleaning your TV
Clean your TV regularly to keep the best performance and to extend the product lifespan.
CAUTION
Make sure to turn the power off and disconnect the power cord and all other cables first.
When the TV is left unattended and unused for a long time, disconnect the power cord from the wall
outlet to prevent possible damage from lightning or power surges.
Screen, frame, cabinet and stand
To remove dust or light dirt, wipe the surface with a dry, clean, and soft cloth.
To remove major dirt, wipe the surface with a soft cloth dampened in clean water or a diluted mild
detergent. Then wipe immediately with a dry cloth.
CAUTION
Avoid touching the screen at all times, as this may result in damage to the screen.
Do not push, rub, or hit the screen surface with your fingernail or a sharp object, as this may result in
scratches and image distortions.
Do not use any chemicals as this may damage the product.
Do not spray liquid onto the surface. If water enters the TV, it may result in fire, electric shock, or
malfunction.
Power cord
Remove the accumulated dust or dirt on the power cord regularly.
TROUBLESHOOTING
Problem Solution
Cannot control the
TV with the remote
control.
No image display
and no sound is
produced.
The TV turns off
suddenly.
Check the remote control sensor on the product and try again.
Check if there is any obstacle between the product and the remote control.
Check if the batteries are still working and properly installed ( to , to ).
Check if the product is turned on.
Check if the power cord is connected to a wall outlet.
Check if there is a problem in the wall outlet by connecting other products.
Check the power control settings. The power supply may be interrupted.
Check if the Auto sleep feature is activated in the Time settings.
If there is no signal while the TV is on, the TV will turn off automatically after
15 minutes of inactivity.
Page 49
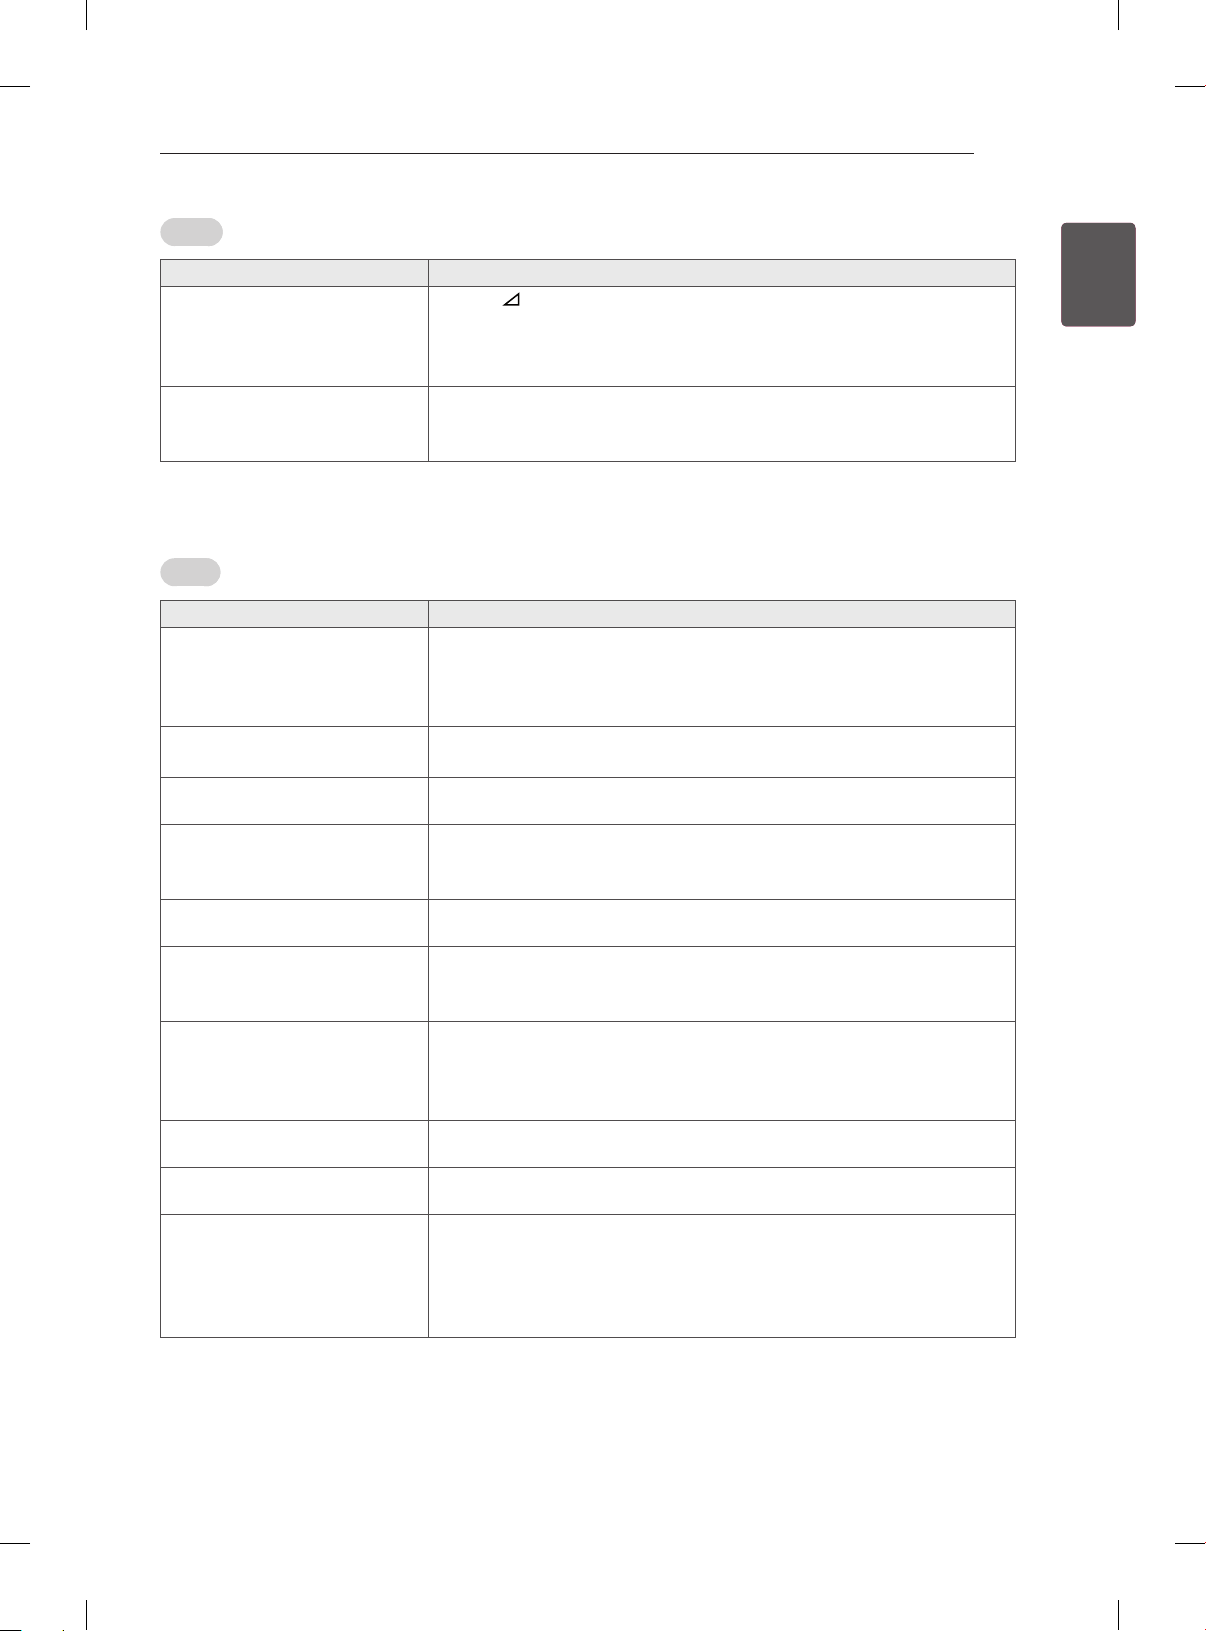
TROUBLESHOOTING
49
Audio
Problem Solution
No sound is produced while
images are displaying.
One of the speakers produce
noises or does not produce
sound.
Video
Problem Solution
An image displays in black
and white or the colour quality
is poor.
Horizontal or vertical bars
appears or images blur
Lines or streaks appear on
images
Afterimages (ghosts) appear
when the product turns off
The power is on but the screen
appears extremely dark.
“No Signal” appears on the
screen.
The display offset is wrong.
Thin lines appear in the
background of the screen.
Horizontal noises appear or
characters blur.
The reception on some
channels is poor
Press + or - button.
Check if the sound is muted by pressing MUTE.
Scroll to other channels. There may a problem with the broadcast.
Check if the audio cables are connected properly.
A change in ambient humidity or temperature may result in an unusual
noise when the product turns on or off.
There is no problem with your product.
Adjust the colour setting in the PICTURE menu.
Keep a sufficient distance between this product and other electronic
products.
Scroll to other channels. There may a problem with the broadcast.
Check if there are local interferences such as an electrical appliance
or power tool.
Check the antenna or aim the antenna to the proper direction.
Pixels may have been damaged from a fixed image displayed for
a long time (image burn). Use a screen saver to prevent the pixel
damage on the screen.
Adjust the brightness and contrast in the PICTURE menu.
Check if the signal cable is connected between the TV and products
properly.
Check the selected input source by pressing INPUT.
Adjust the position setting in the PICTURE menu.
Check if the video card resolution and frequency are supported by
the product. If the frequency is out of range, set to the recommended
resolution using the display settings on the external device.
Check the video cable connections.
Adjust the Phase setting in the PICTURE menu.
Scroll to other channels. There may a problem with the broadcast.
The station signal may be weak. Aim the antenna to the proper
direction.
Check if there is local interference such as an electrical appliance or
power tool.
ENGENGLISH
Page 50
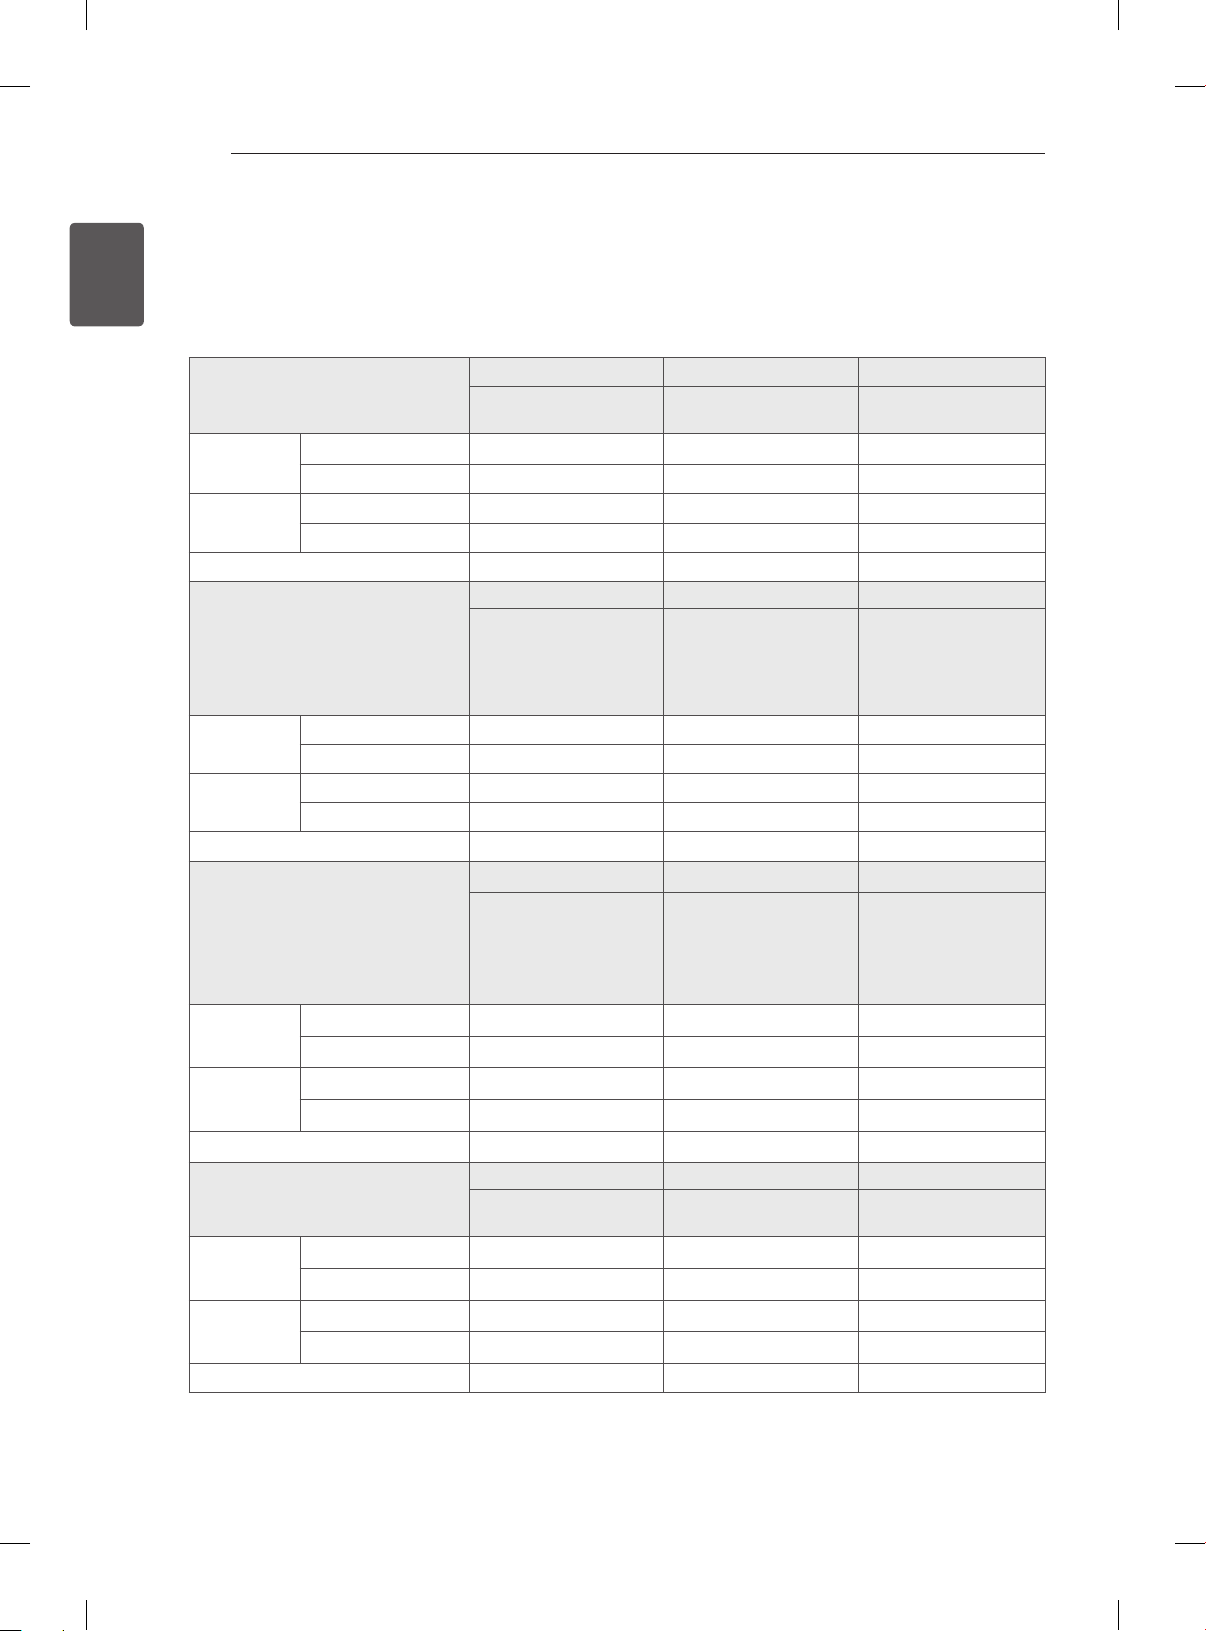
SPECIFICATIONS
50
ENGLISH
ENG
SPECIFICATIONS
Product specifications may be changed without prior notice due to upgrade of product functions.
For the power supply and power consumption, refer to the label attached to the product.
19LS33** 22LS33** 26LS33**
MODELS
Dimensions
(W x H x D)
Weight With stand (kg)
Power requirement
MODELS
Dimensions
(W x H x D)
Weight With stand (kg)
Power requirement
MODELS
Dimensions
(W x H x D)
Weight With stand (kg)
Power requirement
MODELS
Dimensions
(W x H x D)
Weight With stand (kg)
Power requirement
With stand (mm)
Without stand(
Without stand (kg)
With stand (mm)
Without stand(
Without stand (kg)
With stand (mm)
Without stand(
Without stand (kg)
With stand (mm)
Without stand(
Without stand (kg)
19LS3300-TA
19LS330Y-TA
451.0 x 334.0 x 140.0 523.0 x 376.0 x 140.0 627.0 x 442.0 x 162.0
451.0 x 296.0 x 31.5 523.0 x 339.0 x 31.6 627.0 x 402.0 x 30.1
mm)
2.8 3.5 5.0
2.6 3.2 4.7
DC 19V, 1.1A DC 24V, 1.4A
32LS33** 22CS41** 26CS41**
32LS3300-TA
32LS330Y-TA
755.0 x 530.0 x 239.0
755.0 x 479.0 x 45.8
mm)
8.5
7.7
AC 100-240 V~ 50 / 60 Hz AC 100-240 V~ 50 / 60 Hz AC 100-240 V~ 50 / 60 Hz
32CS41** 42CS41** 32LS310*
32CS410-TB
32CS410Y-TB
32CS411-TA
32CS411Y-TA
32CS412-TD
794.0 x 565.0 x 207.0
794.0 x 504.0 x 73.5
mm)
9.0
8.0
AC 100-240 V~ 50 / 60 Hz
42LS310* 32LS311* 42LS311*
42LS3100-TA
42LS310Y-TA
1018.0 x 696.0 x 261.0
mm) 1018.0 x 629.0 x 76.5
14.7
13.1
AC 100-240 V~ 50 / 60 Hz AC 100-240 V~ 50 / 60 Hz AC 100-240 V~ 50 / 60 Hz
22LS3300-TA
22LS330Y-TA
22CS410-TB
22CS410Y-TB
22CS411-TA
22CS411Y-TA
22CS412-TD
539.0 x 400.0 x 165.0 663.0 x 483.0 x 197.0
539.0 x 345.0 x 56.8 663.0 x 424.0 x 72.8
4.2 7.4
3.9 6.6
42CS410-TB
42CS410Y-TB
42CS411-TA
42CS411Y-TA
42CS412-TD
1017.0 x 695.0 x 261.0 795.0 x 566.0 x 207.0
1017.0 x 629.0 x 76.5 795.0 x 504.0 x 73.5
15.1 9.1
13.5 8.1
AC 100-240 V~ 50 / 60 Hz AC 100-240 V~ 50 / 60 Hz
32LS3110-TB
32LS311Y-TB
795.0 x 566.0 x 207.0
795.0 x 504.0 x 73.5
9.1
8.1
26LS3300-TA
26LS330Y-TA
DC 24V, 1.8A
26CS410-TB
26CS410Y-TB
26CS411-TA
26CS411Y-TA
26CS412-TD
32LS3100-TA
32LS310Y-TA
42LS3110-TB
42LS311Y-TB
1018.0 x 696.0 x 261.0
1018.0 x 629.0 x 76.5
14.7
13.1
Page 51
SPECIFICATIONS
51
MODELS
Dimensions
(W x H x D)
Weight With stand (kg)
Power requirement
With stand (mm)
Without stand(
Without stand (kg)
32LS315* 42LS315* 32LS30**
32LS3150-TA
32LS315Y-TA
738.0 x 501.0 x 185.0 972.0 x 635.0 x 212.0 846.0 x 519.0 x 227.5
738.0 x 438.0 x 86.0 972.0 x 571.0 x 86.0 846.0 x 459.0 x 77.9
mm)
7.5 11.8 8.5
6.9 10.7 7.3
AC 100-240 V~ 50 / 60 Hz AC 100-240 V~ 50 / 60 Hz AC 100-240 V~ 50 / 60 Hz
42LS3150-TA
42LS315Y-TA
32LS3000-TA
32LS301C-TA
ENGENGLISH
Page 52
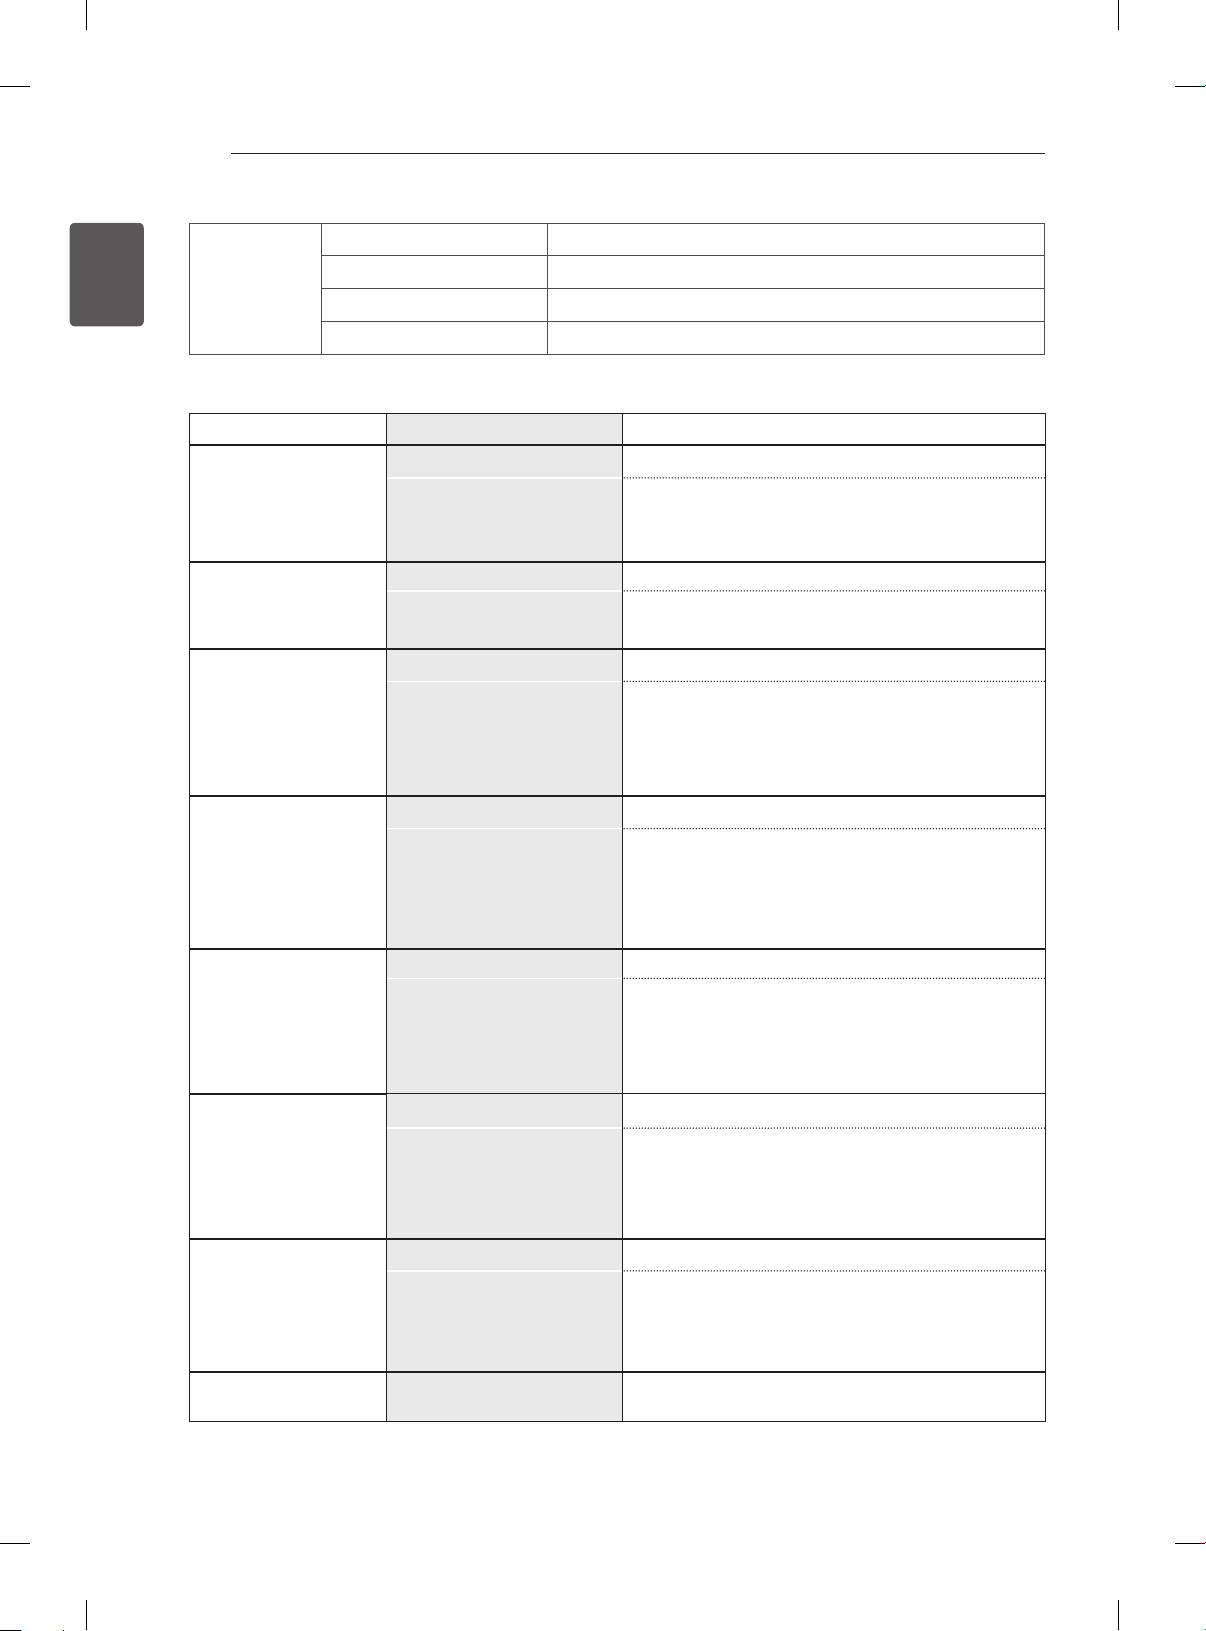
SPECIFICATIONS
52
ENGLISH
ENG
Environment
condition
New Zealand,
Singapore
Australia Television System PAL B/B
Indonesia, Israel,
Myanmar, Sri Lanka
Operating Temperature 0 °C to 40 °C
Operating Humidity Less than 80 %
Storage Temperature -20 °C to 60 °C
Storage Humidity Less than 85 %
Television System PAL/SECAM-B/G/D/K
Programme Coverage
Programme Coverage B/B : VHF/UHF 0 to 75, CATV : 2 to 44
Television System PAL/SECAM-B/G/D/K
Programme Coverage
Analogue TV
BG : VHF/UHF 1 to 69, CATV 01 to 47
I : VHF/UHF 1 to 69, CATV 01 to 47
DK : VHF/UHF 1 to 69, CATV 01 to 47
BG : VHF/UHF 1 to 69, CATV 01 to 47
I : VHF/UHF 1 to 69, CATV 01 to 47
DK : VHF/UHF 1 to 69, CATV 01 to 47
M : VHF/UHF 2 to 78, CATV 01 to 71
, PAL-I
, PAL-I, NTSC-M
South Africa
Vietnam, Malaysia
Iran, Algeria, Tunisia,
Digital model
Analogue model,
India, Thailand, --
Television System PAL/SECAM-B/G/D/K
BG : VHF/UHF 1 to 69, CATV 01 to 47
Programme Coverage
Television System PAL/SECAM-B/G/D/K
Programme Coverage
Television System PAL/SECAM-B/G/D/K
Programme Coverage
Television System PAL/SECAM-B/G/D/K
Programme Coverage
External Antenna
Impedance
I : VHF/UHF 1 to 69, CATV 01 to 47
DK : VHF/UHF 1 to 69, CATV 01 to 47
M : VHF/UHF 2 to 78, CATV 01 to 71
BG : VHF/UHF 1 to 69, CATV 01 to 47
I : VHF/UHF 1 to 69, CATV 01 to 47
DK : VHF/UHF 1 to 69, CATV 01 to 47
M : VHF/UHF 2 to 78, CATV 01 to 71
BG : VHF/UHF 1 to 69, CATV 01 to 47
I : VHF/UHF 1 to 69, CATV 01 to 47
DK : VHF/UHF 1 to 69, CATV 01 to 47
M : VHF/UHF 2 to 78, CATV 01 to 71
BG : VHF/UHF 1 to 69, CATV 01 to 47
I : VHF/UHF 1 to 69, CATV 01 to 47
DK : VHF/UHF 1 to 69, CATV 01 to 47
M : VHF/UHF 2 to 78, CATV 01 to 71
75 Ω
, PAL-I, NTSC-M
, PAL-I, NTSC-M
, PAL-I, NTSC-M
, PAL-I, NTSC-M
Page 53
HDMI-DTV supported mode
Resolution Horizontal
Frequency
(kHz)
Vertical
Frequency
(Hz)
SPECIFICATIONS
53
ENGENGLISH
720x480
720x576
1280x720
1920x1080
31.469
31.5
59.94
60
31.25 50
37.5
44.96
45
33.72
33.75
28.125
26.97
27
33.716
33.75
56.25
67.43
67.5
50
59.94
60
59.94
60
50
23.97
24
29.976
30.00
50
59.94
60
Component port connecting information
Component ports on the TV Y P
Video output ports on DVD
player
Y P
Y B-Y R-Y
B
B
Y Cb Cr
Y Pb Pr
P
R
P
R
Signal Component
480i/576i O
480p/576p O
720p/1080i O
1080p O
(50 Hz / 60 Hz only)
Page 54
Record the model number and serial number of
the TV.
Refer to the label on the back cover and quote
this information to your dealer when requiring any
service.
MODEL
SERIAL
(Only DTV)
 Loading...