

Page 1

Printed in China www.lg.com
ENGLISH
LG 306G
Guía del Usuario
User Guide
LG 306G
ESPAÑOL
MFL68006601 (1.0) www.lg.com
Page 2

Page 3

Congratulations on your purchase of the advanced and
compact LG306G phone by LG, designed to operate with the
latest digital mobile communication technology.
Some of the contents in this manual may differ from your phone
depending on the software of the phone or your service provider.
Copyright ©2013 LG Electronics, Inc.
All rights reserved. LG and the LG
logo are registered trademarks of LG
Group and its related entities. All other
trademarks are the property of their
respective owners.
Page 4

Contents
Getting to know your phone ........... 4
Device components...........................4
Installing the SIM Card and
Battery ...................................................6
Charging your phone ......................10
Installing a memory card ................ 11
Icon Glossary ..................................... 13
Connecting to Networks and
Devices ............................................15
Connect to Wi-Fi .............................. 15
Connecting to Bluetooth Devices 16
General Functions ...........................17
Making a Call ......................................17
Answering a Call ...............................18
Adjusting the Volume .....................18
Setting Profiles .................................. 19
Entering Text ..................................... 20
Prepaid ...........................................25
Add Airtime ...................................... 25
Buy Airtime ....................................... 25
My Phone Number ......................... 25
My Airtime Info ................................ 25
Airtime Display ................................. 25
2
Serial Number .................................. 26
SIM Number ..................................... 26
Code Entry Mode ............................ 26
In-Call Menu .................................. 27
During a Call ..................................... 27
Your Home Screen .........................29
Home Screen .................................... 31
Contacts .........................................35
Contact List .......................................35
Add New ............................................ 35
Groups ................................................ 36
Speed Dial ..........................................37
Messages ........................................39
Create Message ...............................39
Inbox ...................................................43
Drafts...................................................44
Outbox ................................................44
Message Settings............................45
Email ................................................... 47
Multimedia .....................................50
Games & Apps ................................50
Facebook............................................50
Page 5

Camera ...............................................50
Music Player ...................................55
Music Player ...................................... 55
Utilities............................................60
Audio ..................................................60
Pictures...............................................60
Video ...................................................60
Voice Recorder .................................. 61
Calendar .............................................62
Notepad .............................................63
Tasks.................................................... 64
Stopwatch .......................................... 65
Calculator ........................................... 66
Tip Calculator ...................................66
Unit Converter .................................. 66
Alarm ...................................................67
File Manager ..................................... 68
Browser ...........................................70
Settings .......................................... 72
Display ................................................ 72
Phone...................................................73
Call ........................................................76
Touch ...................................................77
Accessibility ....................................77
Sound Settings ................................ 78
Bluetooth ...........................................80
Accessories ....................................84
For Your Safety ...............................85
3
Page 6
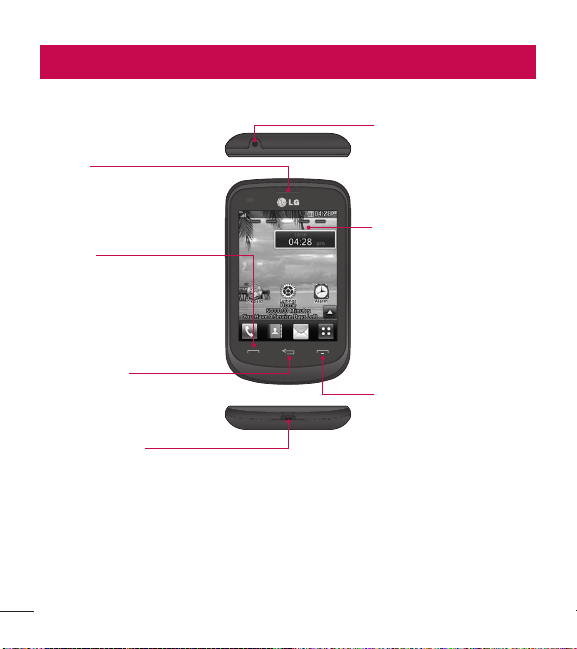
Getting to know your phone
Device components
Earpiece
Lets you hear the caller and
automated prompts.
Send Key
Touch this key in standby
mode to quickly access the
most recent missed, dialed
and received
calls.
Clear/Back Key
Allows you to return to the
previous screen and delete
any text you have entered.
Charger/USB Port
4
3.5mm Headset Jack
Home Screen
Displays phone status icons,
menu items, web items,
web information, pictures
and more in full color. You
can select menu items by
touching the corresponding
icons on the touchpad.
End Key
Ends or rejects a call. Touch
once to return to the Home
screen from any other
screen.
Page 7
Volume Keys
• On the Home screen: Allows
you to set the Ringtone volume.
Hold the Volume Down Key to
toggle the Vibration Mode On
and Off.
• During a call: Allows you to
change the Earpiece volume.
• When playing music: Allows you
to change the music volume.
Camera Lens
Power/Lock Key
• Powers your phone on/off by
pressing and holding the key.
• Turns your screen on and off
and locks it.
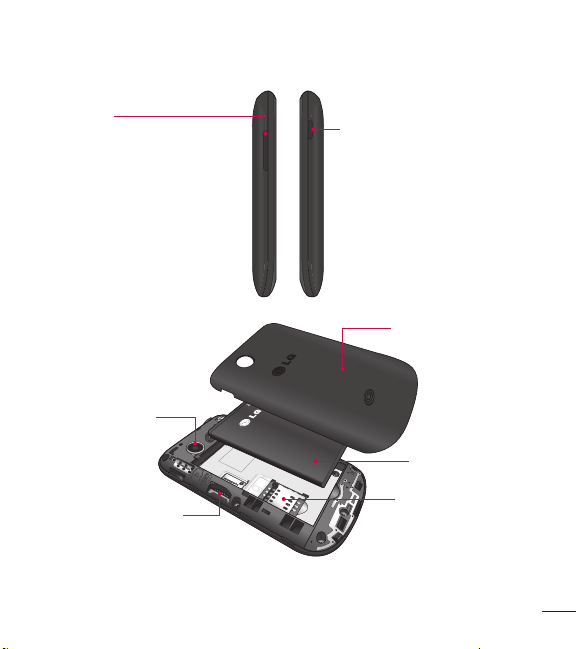
Back Cover
Battery
microSD™ Card Slot
SIM Card Slot
5
Page 8

Getting to know your phone
Installing the SIM Card and Battery
Remove the back cover
Hold the phone on your hand firmly. With the other hand, lift the back
cover using the fingertip cutout located at the bottom of the cover to
remove it.
6
Page 9
Remove the battery
Use the fingertip cutout at the bottom of the battery compartment to lift
the battery out.
7
Page 10
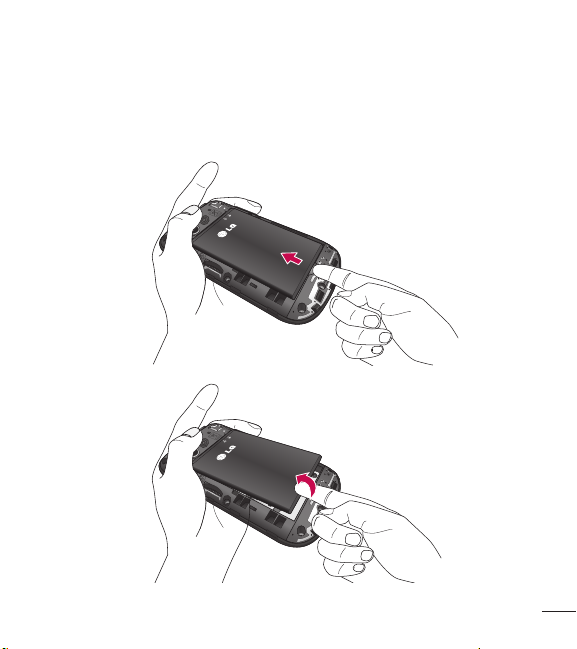
Getting to know your phone
WARNING
Do not remove the battery when the phone is switched on, as this may
damage the phone.
Install the SIM card
Slide the SIM card into the SIM card slot. Make sure that the gold contact
area on the card is facing downward. To remove the SIM card, pull it
gently in the opposite direction.
8
Page 11

Install the battery
Insert the top of the battery first into the top edge of the battery
compartment. Ensure that the battery contacts align with the terminals on
the phone. Press the bottom of the battery down until it clicks into place.
Install the back cover
Align the back cover over the battery compartment and press it down
until it clicks into place.
9
Page 12
Getting to know your phone
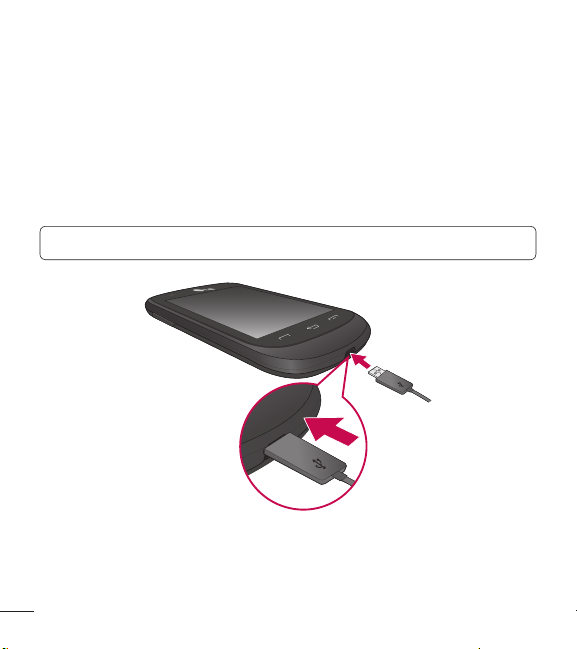
Charging your phone
Locate the Charger/USB Port at the bottom of your phone. Insert the
charger connector to the phone (ensure that the USB icon on the
connector is facing up) and then plug the other end into the wall socket.
Your phone will need to be charged until you receive a ‘Battery Full’
notification.
Important! You should insert the battery before charging.
10
Page 13

NOTE: Always unplug the charger from the wall socket after the phone is
fully charged to save unnecessary power consumption of the charger.
WARNING
Use of unauthorized accessories could damage your phone and void
your warranty.
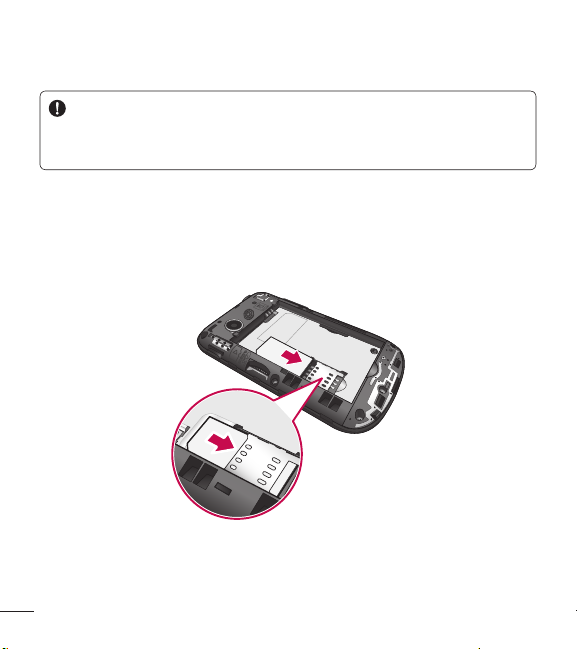
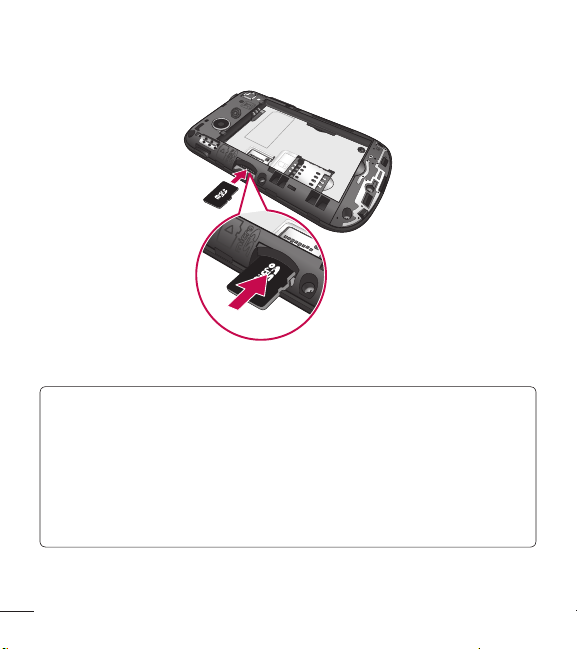
Installing a memory card
You can expand the available memory space on your phone by using a
microSD™ memory card. Your phone supports up to a 32 GB microSD™
memory card.
Note: A 4 GB microSDTM memory card is included with your phone.
1. Remove the back cover and locate the microSDTM card slot.
2. Gently insert the microSDTM card with the gold contact area facing
downwards.
11
Page 14
Getting to know your phone
3. Replace the back cover.
NOTE: If your memory card has existing content it will automatically
be filed in the correct folder. For example, videos will be accessible
from the Videos folder. If your memory card has protected content (i.e.
content such as songs or graphics with Digital Rights Management
copywriting loaded from another device), they will not be accessible.
You may need to reformat the memory card prior to using it with this
device.
12
Page 15
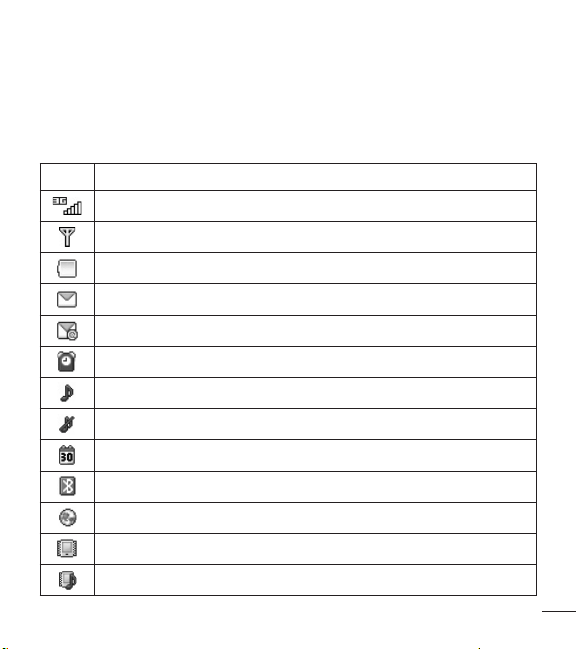
Icon Glossary
The table below describes various display indicators or icons that appear
on the phone’s display screen.
Icon Description
Network signal strength (number of bars will vary)
No network signal
Battery empty
New text message
New email
An alarm is set
Ring profile in use
Silent profile in use
Calendar event with Alarm is set
Bluetooth is active
The browser is active
Vibration mode
Ring after Vibration mode
13
Page 16
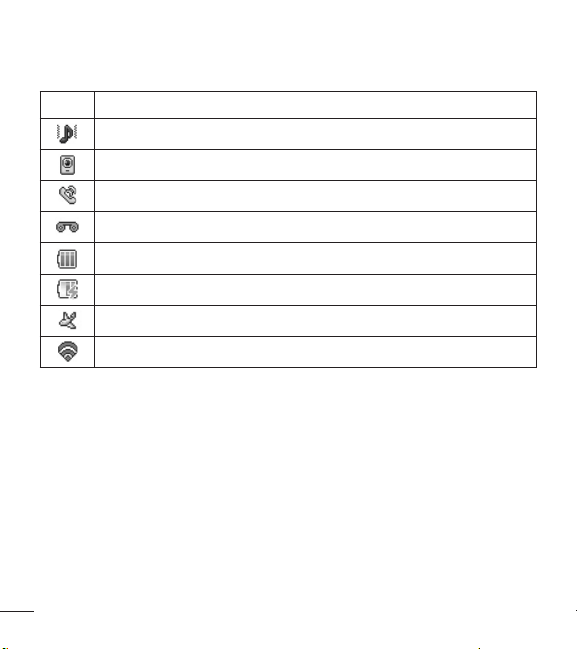
Getting to know your phone
Icon Description
Ring and Vibration mode
Speakerphone
Call in Progress
Voicemail
Battery Full
Battery Charging
Airplane Mode
Wi-Fi is connected
14
Page 17
Connecting to Networks and Devices
With Wi-Fi, you can use high-speed Internet access within the coverage
of the wireless access point (AP).
Enjoy wireless Internet using Wi-Fi, without extra charges.
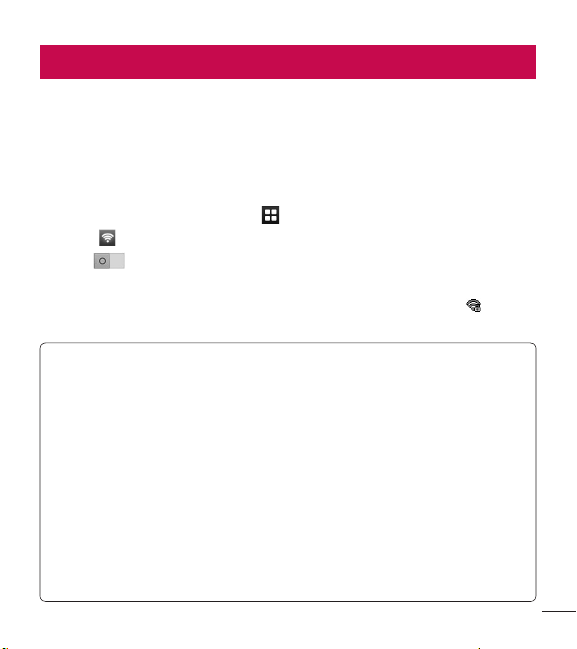
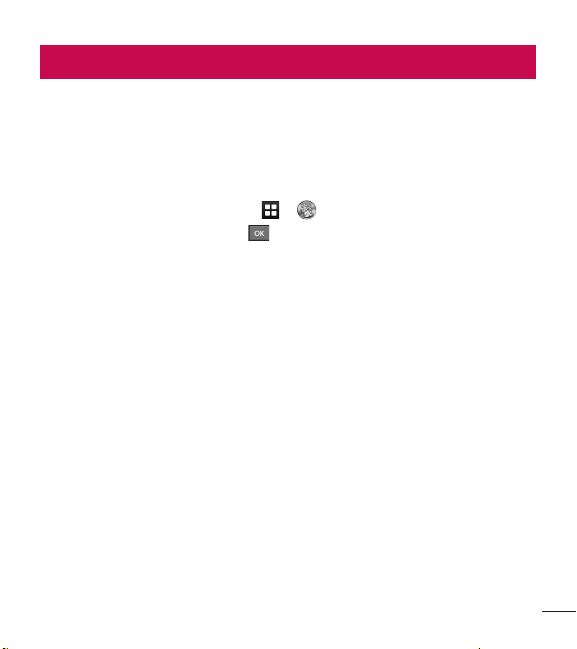
Connect to Wi-Fi
1. From the Home screen, touch , then swipe the screen to the left and
touch .
2. Drag to the right to turn on Wi-Fi to connect to available Wi-Fi
networks.
3. Choose the Wi-Fi network you want to connect to. If you see , you
need to enter a password to connect.
NOTE
• If you are outside the Wi-Fi coverage area and choose 3G
connection, additional charges may apply.
• If your phone goes into sleep mode when connected to Wi-Fi, the
Wi-Fi connection is automatically disabled.
• In this case, if your phone has access to 3G data, it may connect to
the 3G network automatically and additional charges may apply.
• Your phone supports WEP, WPA/WPA2-PSK security.
• If your Wi-Fi service provider or network administrator sets encryption
for network security, enter the key into the pop-up window. If
encryption is not set, this pop-up window is not shown. Obtain the
key from your Wi-Fi service provider or network administrator.
15
Page 18

Connecting to Networks and Devices
Connecting to Bluetooth Devices
To turn Bluetooth on or off
1. From the Home screen, touch , then swipe the screen to the left and
touch .
2. Drag to the right or left to turn the function on or off.
Pairing with a Bluetooth device
1. Access the Bluetooth menu and turn the Bluetooth function on.
2. Touch Search New Device.
3. Touch the device you want to pair with.
4. Depending on the type of device you will have to enter a passcode,
verify matching passcodes, or the device will pair automatically.
Changing your phone’s name
1. Access the Bluetooth menu and turn the Bluetooth function on.
2. Touch My Bluetooth Info, then touch My Device Name.
3. Enter the desired name and touch Set.
Making your phone visible to other devices
1. Access the Bluetooth menu and turn the Bluetooth function on.
2. Touch My Bluetooth Info, then touch My Device Visibility.
3. Set the desired option.
16
Page 19
General Functions
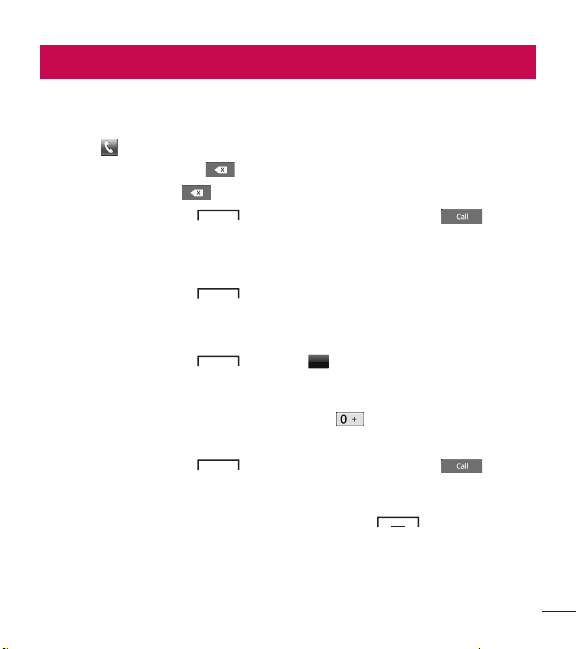
Making a Call
1. Make sure your phone is powered on.
2. Touch and enter a phone number using the dial pad. Toedit a
number, simply touch to erase one digit at a time.
Ƭ Touch and hold to erase the entire number.
3. Touch the Send Key to call the number. Or touch on the
touch pad.
Dialing a Number from your Recent Calls
1. Touch the Send Key and the most recent missed, dialed and
received phone calls will be displayed.
2. Select the desired number.
3. Touch the Send Key or touch
Making International Calls
1. When using the dial pad, touch and hold .
2. Enter the country code, area code and the phone number.
3. Touch the Send Key to call the number. Or touch .
Ending a Call
When you have finished a call, touch the End Key .
Call Back
.
17
Page 20
General Functions
Making a Call from the Contacts
You can store frequently called names and phone numbers in the SIM
card as well as in your Contacts.
You can dial a number by simply selecting a name in the Contacts List
and touching the Send Key .
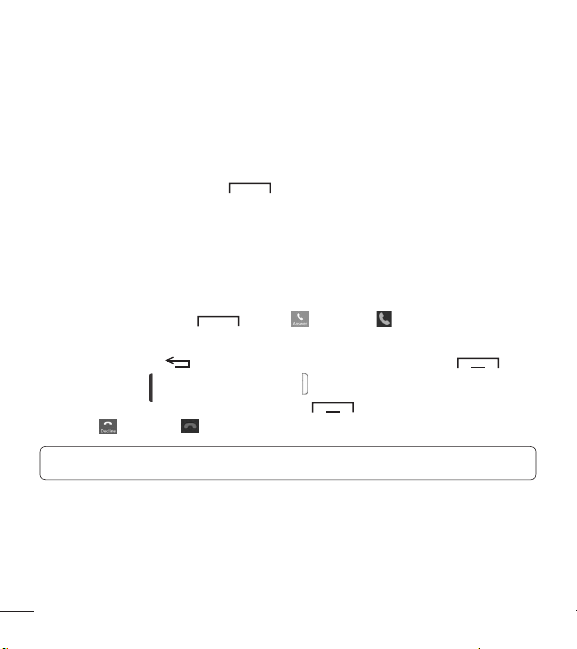
Answering a Call
When you receive a call, the phone rings and the phone icon appears on
the screen. If the caller can be identified, the caller’s phone number (or
name if stored in your Contacts) is displayed.
1. Touch the Send Key , touch , or swipe in any direction.
If Any Key has been set as the Answer Mode, you can also use the
Clear/Back Key to answer a call. However, the End Key ,
Volume Keys and Power/Lock Key cannot be used to answer a call.
2. End the call by touching the End Key . To decline a call, you can
touch or swipe in any direction.
NOTE: You can answer a call while using other functions or features.
Adjusting the Volume
If you want to adjust the earpiece volume during a call, use the Volume
Keys of the phone. From the Home screen, you can adjust the ring
volume using the Volume Keys.
18
Page 21
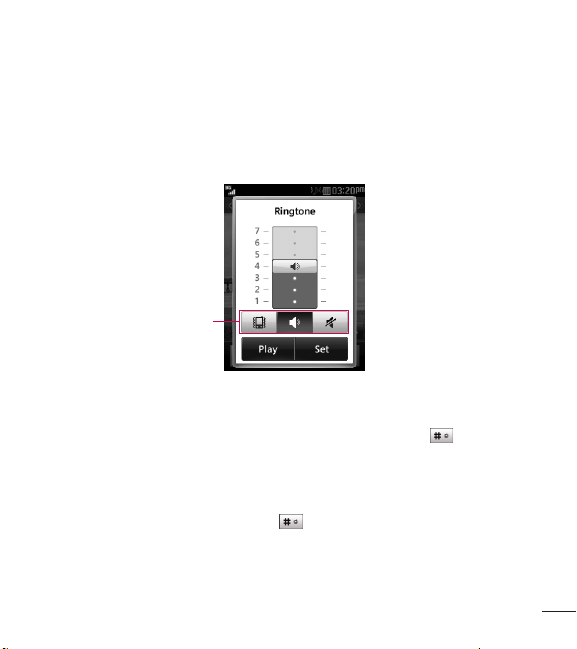
Setting Profiles
Press either of the Volume Keys to set a sound profile. You can adjust the
ringtone volume from the Ringtone section and set your ringtone profile
to Ring, Vibrate All, or Silent All.
Profiles
Vibration Mode (Quick)
Vibration Mode can be activated by touching and holding on the dial
pad. You can also set Vibration Mode by pressing and holding the Volume
Down Key from the Home screen.
The phone will display ‘Vibrating Mode On’. If you would like to turn
Vibration mode off, touch and hold again or press and hold the
Volume Down Key.
19
Page 22

General Functions
Signal Strength
If you are inside a building, being near a window may give you better
reception. You can see the strength of your signal by the signal indicator
on your phone’s display screen.
Entering Text
You can enter alphanumeric characters by using the phone’s touch pad.
The following text input modes are available on the phone.
Changing Between Letters and Symbols/Numbers Mode
You can change the text input mode by touching and on the
keyboard.
Letters Mode
This mode allows you to enter letters by touching the key labeled with
the required letter until the letter is displayed, depending on your input
method settings. To change the input method, touch , then select
Input Method and choose from Keyboard or Keypad.
Symbols/Numbers Mode
This mode allows you to enter symbols and numbers. To change to
symbols/numbers mode in a text entry field, touch .
20
Page 23

Using the T9 Predictive Text Input Mode
The T9 predictive text input mode allows you to enter words easily with
a minimum number of key presses. As you touch each key, the phone
begins to display the characters that it thinks you are typing based on a
built-in dictionary. As new letters are added, the word changes to reflect
the most likely candidate from the dictionary.
1. When you are in the T9 predictive text input mode, begin entering a
word using the keypad. Touch one key per letter.
Ƭ To enable the T9 predictive text input mode, touch > Text Entry
Settings > Show Next Word.
Ƭ The word changes as letters are typed- ignore what is displayed on
the screen until the word is typed completely.
Ƭ If the word is still incorrect after typing completely, touch to see
the available options. Then select the word you want.
(To display the word candidates, first you need to select the
Show Candidate option. Touch > Text Entry Settings > Show
Candidate.)
Ƭ If the desired word is missing from the word choices list, add it by
touching and selecting to enter the new word. Then
touch Save to save the word into the built-in dictionary.
2. Enter the whole word before editing or deleting any letters.
3. Complete each word with a space by touching .
21
Page 24

General Functions
To delete letters, touch . Touch and hold to erase the entire text
entry.
NOTE: Touching the End Key will save your unsaved message in
the Drafts folder.
Using the ABC Mode
Use the touch pad keys to enter your text.
1. Touch the touch key labeled with the required letter, depending on your
input method settings. To change the input method, touch , then
select Input Method and choose from Keyboard or Keypad.
Ƭ Using the Keypad, touch the desired letter until the letter is
displayed.
Ƭ Using the Keyboard, hold the phone horizontally and touch the
desired letters.
2. To insert a space, touch . To delete letters, touch . Touch
and hold to erase the entire text entry.
NOTE: Refer to the table below for more information on the characters
available using the Keypad input method.
22
Page 25

Available characters using Keypad
Key
1 . , ‘ @ ? ! - : / 1 . , ‘ @ ? ! - : / 1
2 A B C 2 a b c 2
3 D E F 3 d e f 3
4 G H I 4 g h i 4
5 J K L 5 j k l 5
6 M N O 6 m n o 6
7 P Q R S 7 p q r s 7
8 T U V 8 t u v 8
9 W X Y Z 9 w x y z 9
0 Space Key, 0 (Long press) Space Key, 0 (Long press)
Characters in order displayed
Upper Case Lower Case
23
Page 26

General Functions
My Dictionary
The My Dictionary feature allows the user to add any unique or personal
words to the standard language database. My Dictionary can be selected
by touching and selecting Text Entry Settings. Within the My
Dictionary function, the user can add, modify, delete or reset personal
words.
NOTE: You can select a different language from the same Options
menu. By default, entry modes are set to off.
24
Page 27
Prepaid
For prepaid services, this menu provides shortcut access to the following
items among others:
Add Airtime
Allows you to add airtime.
1. From the Home screen, touch > .
2. Enter airtime PIN and touch .
3. Read the displayed message, then select Yes or No.
Buy Airtime
You can choose 4 types of Airtime.
My Phone Number
Allows you to view the device’s phone number.
My Airtime (Balance) Info
Allows you to check your minutes, messages, data, and service end date.
Airtime Display
Allows you to select if you want to display the Balance and/or Service End
Date on the Home screen.
25
Page 28

Prepaid
Serial Number
Serial Number simply displays the information of your phone’s IMEI.
SIM Number
This menu simply displays the information of your phone’s Sim Number.
Code Entry Mode
Code Entry Mode will allow the phone to accept TracFone-related codes
in order to add units, modify specific data and troubleshoot the phone.
In using the Code Entry Mode, you can’t receive incoming calls or use
events alert.
26
Page 29

In-Call Menu
Your phone provides a number of control functions that you can use
during a call. To access these functions during a call, touch .
During a Call
Making a Second Call
You can select a number you wish to dial, to make a second call.
Dialpad
Touch
or
Touch
Swapping Between Two Calls
Once the second call has been dialed (and answered), you can switch
between the two on-going calls.
Touch the Send Key or touch .
Answering an Incoming Call
To answer an incoming call when the handset is ringing, simply touch the
Send Key or touch . The handset is also able to warn you of
an incoming call while you are already on a call. Two tones will sound in
the earpiece, and the display will show that a second call is waiting. This
feature, known as Call Waiting, is only available if your network supports it.
If Call Waiting is turned on, you can put the first call on hold and answer
the second call by touching the Send Key .
, enter the second phone number and touch .
Contacts
to select a contact from your Contacts list and then touch .
27
Page 30

In-Call Menu
Rejecting an Incoming Call
You can reject an incoming call without answering by simply touching the
End Key or touching .
Muting the Microphone
You can mute the microphone during a call by touching . The
handset can be unmuted by touching again. When the handset is
muted, the caller cannot hear you, but you can still hear the caller.
Using the Speakerphone
You can use the integrated Speakerphone during a call by touching .
The loudspeaker is automatically deactivated when you end the call.
WARNING
Due to increased volume levels, do not place the phone near your ear
while the speakerphone is enabled.
28
Page 31

Your Home Screen
From the Home screen, you can access all menu options, make a quick
call and view the status of your phone - as well as many other things.
Touch Screen Tips
Ƭ The Home screen is also a great place to get accustomed to the touch
screen.
Ƭ To select an item, touch the icon accurately.
Ƭ To scroll through lists, touch the last item visible and slide your finger
up the screen. The list will move up so more items are visible.
Ƭ There’s no need to press hard, the touchscreen is sensitive enough to
pick up on a light yet firm touch.
Ƭ Use the tip of your finger to touch the desired option. Do not use your
fingernail.
Ƭ When the screen light is off, press the Power/Lock Key on the
top side once to turn it on.
Ƭ Don’t cover the phone with a case or cover as the touch screen will not
work with any material covering it.
29
Page 32

Your Home Screen
The Quick Keys
The Quick Keys on your Home screen provide easy, one-touch access to
your most used functions.
Touch to bring up the dial
pad to make a call. Enter the
number and touch or
touch the Send Key .
Touch to open your contacts
and search for the number
you want to call. You can also
create new contacts and edit
existing ones.
Touch to access the Messages
menu. From here you can view
and create messages.
Touch to open the main menu.
Swipe the screen to the left or
right to view additional options.
30
Quick Keys
Page 33

Home Screen
Your phone provides five Home screen panels. To view the Home screen
panels, just swipe the screen from left to right and vice versa.
Widget
You can use Widgets and even add them to your Home screen for a
personalized feel.
1. Touch at the bottom right corner of the Home screen to view the
available options.
2. Touch the Widget button.
3. Drag a widget from the widget panel to the screen. Touch to close
the widget panel.
Ƭ You can play songs, add memos, check the calendar, play a slide show,
set an alarm, set second city or add calendar events directly from the
Home screen using the available widgets.
Widget panel
31
Page 34

Your Home Screen
Favorite Contacts
Allows you to easily contact your friends and family by displaying your
favorite contacts on the Home screen.
1. Touch at the bottom right corner of the Home screen, then touch
the Contact button.
2. Touch the contacts you want to add, then touch
favorite contacts.
32
Add
to register your
Page 35

Ƭ If you want to delete a contact from this screen, touch .
3. Touch to finish editing the Contacts on this screen.
Ƭ To access your Contacts, simply touch their corresponding icon. Touch
to call, to send a message and to edit contact information.
Shortcuts
Add your favorite menus on the Home screen.
1. Touch at the bottom right corner of the Home screen, then touch
the Shortcut button.
33
Page 36

Your Home Screen
2. Touch next to the desired shortcut to add it to the Home screen.
Ƭ If you want to delete a shortcut, touch .
3. Touch to finish editing the shortcuts on this screen.
34
Page 37

Contacts
From the Home screen, touch to open your Contacts list.
Contact List
This menu allows you to save and manage contact information. You can
add a new address or search saved contacts by name. To search for a
contact, touch and enter the contact’s name. If you enter ‘At’, it will
show all contacts that contain those letters in their names.
Ƭ : Search a contact.
Ƭ : Allows you to quickly jump to a contact name starting with a
specific letter.
Add New
This option allows you to add a new contact. You can enter contact
information, including name, phone numbers, email addresses, group
information, pictures, ringtone, memo and etc.
Touch here to go back
to previous screen.
Touch here to add a
photo
Touch here to save.
35
Page 38

Contacts
1. From the Home screen, touch and touch Add New.
2. Touch to set a Picture ID for a contact by using a saved picture
or taking a new picture. Choose from No Picture, Pictures or Tak e
New Picture. After you take a new picture, touch to set it as the
Contact Picture ID.
Ƭ Enter the first name, last name or both.
Ƭ Enter a phone number. Touch so you can set that number as a
Speed Dial. For more information, see the “Speed Dial” section.
Ƭ Enter an email address.
Ƭ Select a Group for the contact.
Ƭ Set the ringtone for the contact or leave it as the default ringtone.
Ƭ Add a memo if necessary.
Ƭ Choose whether to save the contact to Phone or SIM Card memory.
3. Touch Save to save the contact.
Groups
This menu allows you to manage group information. You can also
configure a ringtone for phone group except SIM group so that the group
ringtone sounds when a call from a specific contact address within that
group is received and there is no ringtone configured for the specific
contact address.
1. From the Home screen, touch and touch .
2. A drop-down menu will appear. Touch Groups.
36
Page 39

3. Touch New Group to create a new group. Or touch an existing group,
then touch Add Member to add contacts to that group.
Speed Dial
You can assign a frequently-called contact to a speed dial list. You can
select a number from 2to 9 as a speed dial.
1. From the Home screen, touch .
2. Touch > Speed Dial.
3. Touch the desired Speed Dial location from 2 through 9 and select the
contact.
Ƭ Your Voicemail is already set to speed dial 1. This is a default setting
and cannot be changed.
Ƭ To call an assigned speed dial number, touch from the Home
screen. Then touch and hold the assigned number; the call will be
placed to the assigned number automatically.
To see your Speed Dial entries:
1. From the Home screen, touch and touch .
2. A drop-down menu will appear. Touch Speed Dial.
37
Page 40

Contacts
SIM Management
This menu allows you to copy contacts from your SIM card to your
handset. If a name is duplicated during the copying operation, the
information is also duplicated.
You can also copy entries from the SIM card to the phone memory and
vice versa (not all the data will be copied).
From this menu, you are also able to delete entries in the SIM card.
1. From the Home screen, touch and touch .
2. A drop-down menu will appear. Touch SIM Management.
3. Choose from the following options: Copy Contacts to SIM, Copy
Contacts From SIM, and Delete Contacts From SIM.
WARNING
Changing your phone number can cause usability problems.
38
Page 41

Messages
This section includes functions related to text (SMS, Short Message
Service) and multimedia (MMS, Multimedia Message Service) messages,
Voicemail as well as the network’s service messages.
Create Message
1. From the Home screen, touch .
2. Touch .
Editing a message
The following options are available when editing a message.
Ƭ Symbol: You can insert symbols ranging from punctuation to
emoticons. Touch twice to select the symbols you want. You can
touch and to scroll through the various pages of symbols.
Inserting Multimedia Files
Inserting multimedia files in outgoing messages is easy. While editing a
message, touch and select an option from below:
Ƭ Picture: Allows you to insert a picture.
Ƭ Audio: Allows you to insert audio files.
Ƭ Video: Allows you to insert video clips.
Ƭ Slide: Allows you to insert another slide.
Ƭ Take New Picture: Allows you to insert a new image taken from the
camera.
39
Page 42

Messages
Ƭ Record New Audio: Allows you to record a new audio clip.
• Recording mode: MMS mode will limit the recording length so that it
can be sent by MMS. General mode will record as long as memory
is available.
• Quality: Allows you to select between Normal, Economy or Fine.
• Storage: Allows you to save the recording to External memory or
Phone memory.
Ƭ Record New Video: Allows you to record a new video.
Ƭ More: Allows you to insert Template, vCard, vCalendar, vNote, vTask or
Contact.
NOTE: vCard, vCalendar, vNote, vTask and Contact are created
by Contacts, Calendar, Notepad and Tasks functions. Go to the
corresponding sections for more detailed information.
Using Options
While entering a text message, touch to use the options below.
• Input Method: Allows you to select between Keypad and Keyboard.
• Text Entry Settings
– Languages: Allows you to set the text entry language to English or
Español.
– Show/Hide Candidate: Allows you to display suggested words when
using T9 mode.
40
Page 43

– Show/Hide Next Word: Allows the phone to predict what the next
word you will enter is using previously entered words.
– My Dictionary: Allows you to add, edit, and delete words from your
personalized dictionary.
• Copy & Paste: Allows you to copy and paste text.
• Cancel Message: Allows you to exit the message without saving it.
If you complete input a message, touch button. Then, touch to
choose an option from below.
• Save to Drafts: Saves the selected message to Drafts.
• Cancel Message: Allows you to exit the message without saving it.
Sending a Message
After completing a message, touch Send To to select recipients.
• Select the recipient(s). Touch to choose an option from below.
– Enter Number: Allows you to enter a phone number.
– Enter Email: Allows you to enter an Email address instead of a phone
number.
– Enter Recipient: Allows you to enter recipients.
– Caller Groups: Allows you to add contact groups.
– Recent Recipients: Choose a contact from recent messages.
– Recent Calls: Choose a contact from recent calls.
– Delivery Options: Allows you to set Add Cc and Add Bcc.
41
Page 44

Messages
– Save to Drafts: Saves the message to Drafts.
– Cancel Message: Allows you to cancel the message.
Message folders
The folder structure on your phone was designed to be fast and easy to
use.
Ƭ Inbox: All the messsages you receive are placed into your Inbox.
Ƭ Drafts: If you don’t have time to finish writing a message, you can save
it as a draft.
Ƭ Outbox: All currently sending and sent messages are placed into your
Outbox.
NOTE: If you see the message “Message box full. Delete old
messages.”, then you should delete some messages from your Inbox.
42
Page 45

Inbox
You will be notified when you receive a message. They will be stored in the
Inbox. Each message can be identified by icons. Touch for the options
below.
Ƭ Delete: Allows you to delete messages.
Ƭ Sort By: You can sort all messages by Date, From, Read/Unread and
Subject.
Ƭ Message Settings: Allows you to set messaging settings.
Ƭ Delete All Read Msg: Allows you to delete all read messages.
The following view modes are available for your Inbox.
Standard View
Allows you to view messages individually. When viewing a message, the
following options are available in standard view after touching :
Ƭ Add to Contacts: You can save the sender’s phone number in the
Contact List.
Ƭ Select Slide: If the multimedia message has more than one slide, you
can select and move to the desired slide.
Ƭ Extract Data: You can make a voice call or send a message. You can
save the number as a new contact or update an existing one.
Ƭ View Attachment: Allows you to view the message’s attachments.
43
Page 46

Messages
Ƭ Copy to SIM/Phone: Allows you to copy the message to the SIM card
or the phone.
Ƭ Move to SIM/Phone: Allows you to move the message to the SIM card
or the phone.
Ƭ Message Details: You can view information about received messages;
message Type, Subject, Sender’s address, and message Time.
Drafts
You can view the messages saved as drafts. To see the Drafts folder, touch
from the Home screen, then touch and touch Drafts from the
drop-down menu.
Outbox
The Outbox is a place where you can find your sent messages. To see the
Outbox folder, touch from the Home screen, then touch and
touch Outbox from the drop-down menu.
When you touch the Send Key you can make a call to the number
of the recipient number of the selected message.
If a message is not successfully sent, you will receive a Message Sending
Failure notification on the screen. In order to send the message that has
failed, you must touch
44
Resend
to resend the message.
Page 47

The Outbox will display all failed, sent and pending messages in the order
in which they are sent. Touch to use the options below.
Ƭ Delete: Deletes the selected message.
Ƭ Sort by: Sorts by Date, To and Subject.
Ƭ Message Settings: Allows you to set messaging settings.
Ƭ Delete All: Delete all messages.
The following options are available when you select a message in Outbox
and touch .
Ƭ View Status: Shows the message status.
Ƭ Edit: Allows you to edit the message.
Ƭ Copy to SIM/Phone: Allows you to copy the message to the SIM card
or the phone.
Ƭ Move to SIM/Phone: Allows you to move the message to the SIM card
or the phone.
Ƭ Select Slide: If the multimedia message has more than one slide, you
can select and move to the desired slide.
Ƭ View Attachment: To view the message attachment.
Ƭ Message Details: Allows you to view the message information.
Message Settings
To configure Messaging settings, touch from the Home screen, touch
, then select Message Settings for the following options.
45
Page 48

Messages
Message Alert
You can set the Sounds, Volume, Alert Type, and Alert Interval.
Save To
Choose a default save location between Phone and SIM Card.
Signature
This feature allows you to create your signature.
Text Message
Ƭ Text Templates
There are 6 predefined messages in the list. You can view and edit the
template messages or create new ones. These templates allow you to
quickly respond to messages. To edit an existing Template, touch it (to
open) then touch the text.
The following options are available when you touch .
– Delete: Allows you to delete the selected template message.
– Delete All: Deletes all text message templates in the folder.
Ƭ Message Center Number: The details for the Message Center are pre-
loaded onto your phone and should not be changed.
Ƭ Insert Signature: Allows you to choose if you want to include the
signature you created in your messages.
46
Page 49

Multimedia Message
Ƭ Multimedia Templates: Multimedia templates are available and can be
created here.
Voicemail Number
This menu allows you to set the voicemail center number if this feature is
supported by your service provider.
Service Message
You can set the Service option to determine whether or not you will
receive service messages.
Email
Email allows you to access your Yahoo! Mail, AOL Mail, AIM Mail, Windows
Live Hotmail, Gmail and other provider accounts on your phone. So now
you can quickly and easily check your email while you are away from your
computer.
To Set Up Email
Ƭ Open Email: From the Home screen, touch , and touch .
Ƭ Sign In
1. Touch the Email Address field, then type in your existing email
address and touch OK.
2. Touch the Password field, enter your password, then touch OK.
3. Touch Save.
47
Page 50

Messages
Sending an email using your account
To send/receive an email, you should set up an email account.
1. From the Home screen, touch , then touch and choose the
account you want to use.
2. Touch New Email to create a new email.
3. Enter the recipient’s address in the To field and enter a subject in the
Subject field.
4. Enter your message and touch OK.
5. Touch Send to send the email.
Retrieving your email
1. From the Home screen, touch , then touch .
2. Touch the account you want to use.
3. Touch Inbox.
4. Touch and touch Update to connect to your email account and
retrieve your new messages.
Message folders
From the Home screen, touch , then touch .
The account’s folders will be displayed.
Ƭ New Email: Create a new message.
Ƭ Inbox: All the e-mails you receive are placed into your Inbox. From here
you can reply, forward and more.
48
Page 51

Ƭ Drafts: If you don’t have time to finish writing a e-mail, you can save
what you have written so far in here.
Ƭ Outbox: This is a temporary storage folder while e-mail are being sent
or stores the messages that failed to send.
Ƭ Sentbox: Copies of all the e-mail you send are kept into your Sentbox
folder.
Ƭ Trash: The e-mail you delete are placed into your Trash.
Changing your email settings
1. From the Home screen, touch , then touch .
2. Touch , then touch Email Settings to configure the following settings.
Ƭ Email Accounts: Allows you to add or delete accounts and edit account
server information.
Ƭ Default Email: Choose which account to compose e-mail by default.
Ƭ Show Predictive Address List: Choose whether or not to be shown your
contacts when entering recipients.
Ƭ New Email Notification: Choose whether or not to be alerted to new
emails.
Ƭ Signature: Create an email signature and turn this feature on and off.
49
Page 52

Multimedia
Games & Apps
Allows you to download and play Java games and applications to your
enjoyment.
To access Games & Apps from the Home screen, touch and then .
Facebook
Allows you to access Facebook and keep in touch with family and friends.
To access Facebook from the Home screen, touch and then .
Camera
From the Home screen, touch and then to access the Camera
function.
Take Photo
Using the camera module in your phone, you can take pictures of people
or events while on the move. Additionally, you can send photos to other
people in a picture message.
1. Open the Camera and center the subject in the viewfinder.
2. Touch to take the picture.
50
Page 53

Getting to know the viewfinder
Zoom: Allows you to zoom in and out.
Exit: Touch here to exit camera mode.
Camera mode: Indicates that camera mode is selected.
Image size: Indicates the current image size.
Video camera mode: Toggle between camera
and video camera mode.
Capture: Take the picture.
Album: Allows you to view the previously
taken image. If no pictures have been taken
previously, the Pictures album will be displayed.
Settings: Touch this icon to open the settings menu. See the Settings Menu
section on page 52 for details.
Brightness: Allows you to adjust the brightness level for the picture.
Image Size: Allows you to change the resolution of the image.
NOTE: To remove the options from the screen, or display them, simply
touch the viewfinder.
51
Page 54

Multimedia
Settings Menu
Ƭ White Balance: Choose between Auto, Daylight, Cloudy, Illuminate and
Indoors.
Ƭ Night Mode: Allows you to set night mode On and Off.
Ƭ Shot Mode: Choose between Normal and Continuous Shot. This is
great for taking photos of moving objects or at sporting events.
Ƭ Color Effects: Choose between Color, Mono, Sepia, Negative, and Blue.
Ƭ Timer: Set the timer to Off, 3 Seconds, 5 Seconds, or 10 Seconds.
Ƭ View Mode: Choose between Full Image and Full Screen.
Ƭ Image Review: Choose if you want to display the image immediately
after taking it.
Ƭ Shutter Tones: Allows you to select between 3 different tones or turn it off.
Ƭ Primary Storage: Choose to save a photo to Phone Memory or Memory
Card.
Ƭ Reset Settings: Allows you to set to the default settings.
NOTE: You can adjust the zoom scale by moving the slider. The
maximum zoom levels depend on the resolution as follows.
Resolution Zoom scale
2M (1600x1200) Level 1
1M (1280x960) Level 1
VGA (640x480) Level 1 ~ Level 10
QVGA (320x240) Level 1 ~ Level 10
52
Page 55

Record Video
When recording video, you have many of the same Settings options as
with taking a photo.
1. Open the Video Camera and center the subject in the viewfinder.
2. Touch to start recording the video.
3. To pause the video, touch . To stop the recording, touch .
Getting to know the viewfinder
Zoom: Allows you to zoom in and out.
Exit: Touch here to exit video camera mode.
Video mode: Indicates that video camera mode is selected.
Video Size: Indicates the current video size.
Camera mode: Toggle between video camera
and camera mode.
Record: Starts recording the video.
Album: Allows you to view the previously
recorded video. If no videos have been recorded
previously, the Video album will be displayed.
Settings: Touch this icon to open the settings menu. See the Settings Menu
section on page 54 for details.
Brightness: Allows you to adjust the brightness level for the video.
Duration: Allows you to select one of the recording duration presets between
Normal and MMS.
53
Page 56

Multimedia
Settings Menu
Ƭ White Balance: Choose between Auto, Daylight, Cloudy, Illuminate and
Indoors.
Ƭ Color Effects: Choose between Color, Mono, Sepia, Negative and Blue.
Ƭ Video Size: Sets the size of video to QVGA (320x240) and QCIF
(176x144). The selected size appears on the viewfinder screen.
Ƭ Primary Storage: Choose to save a video clip to Phone Memory or
Memory Card.
Ƭ Recording Tones: Set Recording Tones On or Off.
Ƭ Reset Settings: Allows you to set to the default settings.
NOTE: You adjust the zoom scale by moving the slider. The maximum
zoom levels depend on the resolution as follows.
Resolution Zoom scale
QVGA (320x240) Level 1 ~ Level 10
QCIF (176x144) Level 1 ~ Level 10
54
Page 57

Music Player
Music Player
To launch Music Player while in the Home screen, touch , and select
.
Ƭ Now Playing: Shows the currently playing screen.
Ƭ All Songs: Allows you to view all the songs in your music library.
Ƭ Playlists: Allows you to view and create your own playlists.
Ƭ Artist: Allows you to view the list of artists of all the songs in your
music library.
Ƭ Album: Allows you to view the list of albums of all the songs in your
music library.
Ƭ Genre: Allows you to view the list of genres of all the songs in your
music library.
Ƭ Favorites: Shows the music list set as your favorite music.
Ƭ Shuffle: Allows you to play all the songs in your music library with
shuffle.
NOTE: Copyrights of music files may be protected by copyright
and intellectual property laws. Please ensure that you adhere to the
applicable Terms of Use of materials laws prior to downloading or
copying files.
55
Page 58

Music Player
Playing Music
To listen to music in your phone or the external memory, follow these
quick easy steps:
1. From the Home screen, touch , then open the Music Player by
touching .
2. You can select from All Songs, Playlists, Artist, Album, Genre,
Favorites, and Shuffle to play your music. The Now Playing button will
only be available when music is playing.
3. Touch the song you wish to play.
Repeat
Favorite
Volume
Ƭ Touch to pause the selected song. While playing, touch to
adjust the volume. Touch and to skip to the next song or
previous song.
Ƭ Touch to minimize the Music Player and access other phone
functions while music is playing.
56
Minimize
Shuffle
Playlist
Page 59

NOTE: Files under 300kb may not be displayed in this function and
may be categorized as Ringtones.
Adding music to your phone
Music files can be added to your phone by using one or more of the
following methods:
Ƭ Download ringtones over the network directly to your device via the Buy
Ringtones link in the Audio menu.
Ƭ From your existing digital media collection on your PC via Windows
Explorer.
Purchasing and downloading ringtones directly to your phone
1. From the Home screen, touch , and then to access the Audio
menu.
2. Select Buy Ringtone.
NOTE: Some sites are data intensive (i.e. previews via streaming) so the
user should be enrolled in an unlimited data plan before using these
services to avoid per-use data charges. Additional charges may apply
when downloading music, ringtones etc.
57
Page 60

Music Player
Drag and drop music using your phone as a mass storage device
1. Make sure the microSD™ card is inserted properly into the phone.
2. Connect the phone to a PC using a USB data cable.
3. Your computer will detect and install the phone automatically.
4. Touch OK when the prompted on the device and access My Computer
on the PC.
5. The phone’s memory card will be listed under “Removable Disk” in the
same location as an optical drive.
NOTE: The PC will automatically assign a drive letter.
6. Browse in a new window for desired music files.
7. Drag and drop the desired music content from the PC window to the
“Removable Disk” window.
8. Touch Exit on the phone and disconnect the USB cable.
58
Page 61

Deleting Music Files
The following are the three options available to delete music from your
phone:
– Delete a file using Mass Storage.
– Delete a file by directly inserting the microSD™ external memory onto
the PC.
– Delete a file using delete function on the phone.
NOTE: If you delete a playlist from the phone, the songs in the playlist
will not be removed and remain in All Songs folder.
Be aware that all of the existing data will be erased on microSD™ card if
you use the below process.
– Use the Reset Memory Card function in the Settings menu ( > >
Phone > Reset Settings > Master Clear > Memory Card).
– Format external memory using Mass Storage.
59
Page 62

Utilities
Audio
From the Home screen, touch and then to access the Audio menu.
Ƭ Buy Ringtones: Allows you to buy ringtones for your phone.
Ƭ Voice Recorder: Allows you to record your own audio.
Ƭ A list of your audio files is listed.
Pictures
From the Home screen, touch and then to access the Pictures
menu.
Ƭ Buy Graphics: Allows you to buy graphics for your phone.
Ƭ Take Picture: Starts up the camera and allows you to take pictures.
Ƭ A list of your image files is listed.
Video
From the Home screen, touch and then to access the Video menu.
Ƭ Record Video: Starts up the video camera and allows you to record
videos.
Ƭ A list of your video files is listed.
NOTE:
DRM sometimes restricts some functions, such as sending to
others.
60
Page 63

Voice Recorder
Use the Voice Recorder to record voice memos or other sounds.
From the Home screen, touch and then to access the Voice
Recorder.
Ƭ Settings
– Recording Mode: MMS mode shortens the time so that the recording
can fit in an MMS message and General mode provides longer
recording time.
– Quality: You can assign the default quality to the Normal, Economy
or Fine.
– Storage: Allows you to save the recording to External memory or
Phone memory.
61
Page 64

Utilities
Recording a voice memo
Ƭ Touch
Ƭ Touch to pause recording. To continue recording, touch
Ƭ To stop recording, touch . The recording will be saved
automatically.
Ƭ To start a new recording, touch .
Ƭ To play the recording, touch .
Ƭ To send the recording by Message or Bluetooth, touch or .
Ƭ To delete the recording, touch , then touch Yes to confirm.
Calendar
When you enter this menu, a calendar will be displayed. The blue square
cursor is used to locate a particular day. The day highlighted in green
indicates today’s date. Days highlighted in yellow indicate that events exist
on those days. The phone will sound an alarm tone if it has been set for a
specific schedule item.
62
REC
to start recording.
Resume
.
Page 65

From the Home screen, touch , then touch to access the Calendar.
The following options are available when you open the Calendar function
and touch .
Ƭ New Schedule: Allows you to add a new schedule on the date you
select.
Ƭ Search: Allows you to search the saved schedule(s).
Ƭ Set Holiday: Allows you to set your personal holiday for the selected
date.
Ƭ View All: Allows you to view all saved schedules.
Ƭ Week View: Allows you to change Calendar view mode from Month
View to Week View and vice versa.
Ƭ Go to Date: Allows you to jump to a specific date.
Ƭ Selective Delete: Allows you to delete Old Schedules or All Schedules
selectively.
Ƭ Settings: Allows you set Default View and Weekly Begin day.
Notepad
You can create up to a maximum of 30 memos.
1. From the Home screen, touch , then touch to access the
Notepad.
2. To create a new note, touch New Note, enter the memo and touch
to save.
63
Page 66

Utilities
Tasks
This feature allows you to save and manage a task.
To add a New Task
1. From the Home screen, touch , then touch to access Tasks.
2. Touch New Task.
3. Enter the Due Date, Note and Priority for the new Task.
4. Touch Save to save the Task item.
The following options are available by touching in the main Tasks
menu:
Ƭ New Task: Allows you to create a new task.
Ƭ Delete: Allows you to delete any tasks created.
Ƭ Delete All: Allows you to delete all tasks.
Ƭ Send Task Via: Allows you to send tasks via Multimedia Message, Email
and Bluetooth.
Ƭ Sort By: Allows you to sort tasks by Date, Status, and Priority.
Ƭ View Calendar: Allows you to view the Calendar.
64
Page 67

Stopwatch
This menu allows you to record the elapsed time of an event. The
duration of an individual lap time (up to 99 times) and the total time can
also be displayed.
Ƭ New Time
1. From the Home screen, touch > or > > to
access the Stopwatch.
2. Select New Time.
3. To start timing, touch
The running time is displayed as HH.MM.SS.hh (hours, minutes,
seconds, hundredths of a second).
4. During the timing, you can record an individual lap time by touching
Lap
. Up to 99 lap times can be recorded.
5. You can stop timing by touching
Resume
.
6. To reset the stop watch, touch
Ƭ Saved Times: You can see the saved recorded times.
Ƭ Show Last: Displays the last time taken with the Stopwatch.
Start
.
Stop
or restart by touching
Reset
.
65
Page 68

Utilities
Calculator
The calculator function allows you to calculate simple mathematical
equations.
To access the Calculator
1. From the Home screen, touch , then touch to access the
Calculator.
Tip Calculator
This feature allows you to quickly and easily calculate the tip amount
based on the total bill as well as the split of the total bill based on the
number of people.
To access Tip Calculator
1. From the Home screen, touch , then touch to access the Tip
Calculator.
2. Enter the Total Bill ($), Tip (%), and Split quantities.
3. The Tip ($) and You Owe ($) fields will be automatically calculated.
Unit Converter
This function converts any measurement into a unit you want.
There are 6 types of units that can be converted: Area, Length, Weight,
Temperature, Volume and Velocity.
66
Page 69

To access Unit Converter
1. From the Home screen, touch , then touch to access the Unit
Converter.
2. Touch Area at the top of the screen and select an option from the
drop-down menu.
3. Choose the known unit and enter the quantity.
4. The quantities below will automatically be calculated.
Alarm
The alarm function allows you to set up multiple separate alarms. You can
set the time, repetition interval and desired alarm tone.
To set a New Alarm
1. From the Home screen, touch , then touch to access the Alarm.
2. Select New Alarm.
3. Configure the following settings:
Ƭ Time: Input your desired alarm time by specifying the hour and
minutes. If the time is in the 12 hour format, you have to select either
am
or pm by touching it. You can also choose a predefined amount of
time (15Minutes Later, 30Minutes Later, 45Minutes Later, 1Hour
Later, Off).
Ƭ Repeat: Select the desired repeat mode from Once, Daily, Mon ~ Fri,
Sat ~ Sun, Select Weekday, and Except Holiday.
67
Page 70

Utilities
Ƭ Alarm Tone: Select the desired alarm tone to use for the set alarm.
Ƭ Alarm Volume: Allows you to adjust the alarm volume.
Ƭ Alarm Type: Select the desired alarm type. Choose from Sound,
Vibration, Sound and Vibration, and Vibration after Sound.
Ƭ Memo: Enter the alarm name.
Ƭ Snooze Interval: You can set the snooze interval at 5Minutes,
15Minutes, 30 Minutes, 45Minutes, 1Hour, or Off.
4. Touch Save to save your alarm.
Quick alarm
In the Alarm menu, touch Quick Alarm to set a Quick Alarm.
1. Drag the bar from left to right to set the time; 60 minutes is maximum
set value.
2. Scroll down to configure the options Alarm Tone, Alarm Volume, Alarm
Type, Memo and Snooze Interval.
3. Touch Save to save the alarm.
File Manager
From the Home screen, touch , then touch to access the File
Manager.
This allows you to view all types of contents files in the internal phone
memory and the external memory card.
68
Page 71

Touch for the following options:
Ƭ Send Via: Send the selected file via Message, Email, or Bluetooth.
Ƭ Delete: Allows you to delete the selected file.
Ƭ Move: Allows you to move selected files to the Phone Memory or
Memory Card.
Ƭ Copy: Allows you to copy selected files to the Phone Memory or
Memory Card.
Ƭ New Folder: Allows you to create a new folder manually.
Ƭ Sort By: Allows you to sort the folders by name, date, and type.
Ƭ Delete All: Allows you to delete all files and folders.
Ƭ Rename: Allows you to edit the name of the selected file.
NOTE: Limits - System files/folders cannot be listed.
69
Page 72

Browser
This application connects you to the Internet. Browser is one of the
services provided by TracFone and it gives you access to all the cool
things you can do with your wireless phone.
NOTE: Check the availability of data services, pricing and tariffs with
your network operator and/or the service provider whose service you
wish to use. Service providers will also give you instructions on how
to use their services. Please contact your service provider to open an
Internet account.
Launch the Browser
To launch the Browser from the Home screen, touch , then touch .
Once connected, the homepage is displayed.
To exit the browser at any time, touch the End Key .
Menus for the Browser
You can surf the Internet using either the phone keys or the Browser tool
bar.
Using the Browser Menu
Online menu
Once you are connected to the Internet, the following menu options are
available when you touch :
Ƭ Home: Moves to the initial homepage.
70
Page 73

Ƭ Windows: You can have several browser windows to navigate different
web pages at the same time.
Ƭ Enter URL: Connects to a specific URL.
Ƭ Bookmarks: You can add or save the current page to Bookmark or view
the list saved under Bookmark.
Ƭ Landscape View: Allows you to view broad web pages easily in
landscape view.
Ƭ View Full Screen: View the current page in full screen.
Ƭ Search Text: Allows you to find text in the current page.
Ƭ Recent Pages: Allows you to see a list of recently visited web pages.
Ƭ Send URL: Allows the current page URL via message to another
person.
Ƭ Settings: Allow you to set options such as Cache, Cookie and other
Browser Settings.
Ƭ Browser Help: Opens Help Overview to help make your browsing
experience easier.
Ƭ Exit: Exits the browser.
71
Page 74

Settings
Display
From the Home screen, touch , , and then Display to access the
Display settings menu.
Wallpapers
This menu allows you to set a picture or color as your background. You
may also choose to have no background wallpaper.
Fonts
You can configure the font size and color of the numbers which appear in
the Dialing screen when you make a call. You can also set the font size for
menus and lists.
Brightness
You can set the brightness of the display screen.
Backlight Timer
Use this to set the duration of the touch screen backlight and keypad.
Transition Effect
If you set the transition effect, you can see the display change effect.
NOTE: When you set the Settings > Accessibility > Menu Readout on,
then transition effect doesn’t work.
72
Page 75

Phone
From the Home screen, touch , , and then Phone to access the
Phone settings menu.
Languages
You can change the language for the display text on your phone. This
change will also affect the Language Input mode.
Auto Screen Lock
This allows you to set the amount of time before your screen locks
automatically.
Pattern Lock
If you choose pattern lock, you have to draw pattern twice to confirm.
Next, enter the security code.
Set Airplane Mode
This allows you to use only the phone’s features that do not require the
use of the wireless network when you are in an airplane or in places where
the wireless network is prohibited. If you set the Airplane mode,
you will be prompted to confirm your selection. After you confirm it by
touching , the Airplane mode icon will be displayed on the screen
instead of the network signal icon.
73
Page 76

Settings
Ƭ ON: You cannot make (or receive) any calls, including emergency
calls or use other features that require network coverage.
Ƭ OFF: Deactivates Airplane mode and re-establishes your wireless
connections.
Security
Various codes and passwords are used to protect the features and
settings of your phone. They are described in the following sections.
Ƭ Phone Lock: You can use a security code to avoid unauthorized use
of the phone. If you set phone lock to When Power On, the phone will
request a security code whenever you switch the phone on. If you set
the phone lock to Lock Phone Now, your phone will lock immediately.
Ƭ Change Codes: The Change Codes menu allows you to change your
current security code to a new one. You must enter the current security
code before you can specify a new one.
Memory
This menu allows you to view your memory information.
Ƭ Used Space: Displays the memory space used for Phone Common,
Memory Card, Phone Reserved and SIM Card.
Ƭ Set Storage Default: Allows you to set the storage default locations for
various types of features.
74
Page 77

Reset Settings
This function allows you to restore factory settings. To do this, you need
the security code.
Ƭ Master Reset: Restores the settings (e.g.: Audio, Display, Language,
Bluetooth Settings) stored in the phone memory to default values.
Ƭ Master Clear: Deletes downloaded or user created contents (e.g.:
images, videos) from the phone and the external memory card.
Phone
– Deletes all downloaded or user images, videos and sounds from the
phone memory.
– Deletes personal information stored in the phone memory (e.g.:
address book, messages, tasks, alarm, Calendar schedules) to default
values.
Memory Card: Deletes all contents from the external memory card.
Phone Information
This menu is used to view My Numbers, Manufacturer, Model Name,
Device ID, Hardware Version, Software Version and Language.
75
Page 78

Settings
Call
From the Home screen, touch , , and then Call to access the Call
settings menu.
Send My Number
This network service allows you to set your phone number to be displayed
(On) or hidden (Off) from the person you are calling. You can select Set
by Network if you prefer to have different settings for different service
providers.
Answer Mode
This allows you to determine how to answer the phone.
Ƭ Any Key: You can answer an incoming call by also using the Clear/Back
Key . However, the End Key , Volume Keys and Power/Lock
Key cannot be used to answer a call.
Ƭ Send Key Only: You can only answer an incoming call by touching the
Send Key .
Call Duration
You can check Last Call, Received Calls, Dialed Calls and All Calls.
TTY
A TTY (also known as a TDD or Text Telephone) is a telecommunications
phone that allows people who are deaf, hard of hearing, or who have
speech or language disabilities, to communicate by telephone. Select
from TTY Full, TTY Talk, TTY Hear, and TTY Off.
76
Page 79

Ƭ TTY Full
Enables all TTY settings.
Ƭ TTY Talk
Enables VCO (Voice Carry Over).
Ƭ TTY Hear
Enables HCO (Hearing Carry Over).
Ƭ TTY Off
Disables all TTY settings
Touch
From the Home screen, touch , , then touch Touch to access the
Touch settings menu.
You can customize the Touch settings by setting the Touch Sound option.
When you activate the Touch Sound option, you can choose your desired
sound type and adjust its volume.
Accessibility
This menu allows you to manage accessibility options.
Ƭ Menu Readout: If you activate this menu, selected menus will be read
out loud.
Ƭ Dial Readout: If you activate this menu, the numbers you dial will be
read out loud.
77
Page 80

Settings
Ƭ Large Text: If you activate this menu, a larger text font size will be
displayed for menus.
Ƭ Invert Color: If you activate this menu, the phone’s screen color will be
inverted.
Ƭ Mono Sound: If you activate this menu, your phone’s sound type
changes to mono tone.
Ƭ TT Y: Please refer to page 76 for more information.
Ƭ Voice Command: This menu allows you to adjust various settings for
Voice Command.
Sound Settings
From the Home screen, touch , and then to access the Sound
Settings menu.
Ringtone
This menu allows you to adjust various settings for your ringtone.
Ƭ Sounds: Allows you to choose your ringtone. You can preview each
ringtone before setting it.
Ƭ Volume: Allows you to adjust your ringtone volume.
Ƭ Alert Type: Supports 3 ring alert types: Ring, Ring and Vibration, and
Ring after Vibration.
78
Page 81

Message Tone
This menu allows you to adjust various settings for your message tone.
Ƭ Sounds: Allows you to choose your message tone. You can preview
each message tone before setting it.
Ƭ Volume: Allows you to adjust your new message alert tone volume.
Ƭ Alert Type: Supports 4 message alert types: Ring, Ring & Vibrate,
Vibrate, and Silent.
Ƭ Alert Interval: Supports 5 message alert interval: Once, Every 2 Min.,
Every 5 Min., Every 10 Min. and Every 15 Min.
NOTE: Full length music tracks cannot be set as either ringtones or
message tones.
Alert Tone
This menu allows you to adjust various settings for your alert tone.
Ƭ Sounds: Allows you to select a set an alert tone. Supports 2 alert tone
types: Alert Tone 1 and Alert Tone 2.
Ƭ Volume: Allows you to adjust your alert tone volume.
Ƭ Alert Type: You can select to set Alert Tones to Ring or Silent.
Dial Readout
Slide to the right to activate the dial readout function. When
activated, the digits you enter when using the dial pad will be read out
loud.
79
Page 82

Settings
Keypad Tone
This menu option allows you to select a tone that the phone sounds when
a key is pressed.
Ƭ Sounds: Allows you to select a set a keypad tone. Supports 3 keypad
tone types: Tone 1, Tone 2 and Tone 3.
Ƭ Volume: Allows you to adjust your keypad tone volume.
Multimedia
This menu allows you to adjust your multimedia volume.
Call
This menu allows you to adjust your call volume.
Bluetooth
From the Home screen, touch and to access the Bluetooth function
settings menu.
Your phone has built-in Bluetooth® wireless technology, which makes it
possible for you to connect your phone wirelessly to other Bluetooth®
devices such as a hands-free device, PC, PDA, a remote screen or other
phones. The devices registered in your phone can only be connected one
at a time.
You can have a conversation via a cordless Bluetooth® hands-free phone
or browse the Internet, wirelessly connected, via a mobile phone.
80
Page 83

You can also exchange, for example, business cards, calendar items and
pictures.
Music playing is supported through a Bluetooth® headset.
Hands-free profile
This icon appears when the hands-free profile is used between
the hands-free device. This allows you to call using a Bluetooth®
connection.
A2DP profile
This icon appears when the A2DP profile is used between the stereo
headset device and the phone. This allows you to listen to an audio
clip. A2DP is the Advanced Audio Distribution Profile, which provides
support for streaming either mono or stereo audio using Bluetooth®.
Hands-free + A2DP profile
This icon appears when both profiles of the hands-free and the A2DP
are used between the compatible device and the phone. This allows
you to call and listen to an audio clip using a Bluetooth® connection.
Object Push Profile
This icon appears when you send one file(mp3, avi, jpg etc.) to other
device.
When using each device, see the user manual that comes with the device.
81
Page 84

Settings
NOTE: We recommend that your phone and the Bluetooth® device you
are communicating with should be no more than 10 meters apart. The
connection may be improved if there are no solid objects between your
phone and the other Bluetooth® device.
Ƭ Bluetooth: This menu allows you to turn Bluetooth on and off.
Ƭ Search New Device: This function allows you to search for and add new
devices.
Ƭ My Devices: Allows you to view the list of all devices that are paired with
your phone.
Ƭ My Bluetooth Info: Allows you to view information about your device’s
Bluetooth profile.
– My Device Visibility: Allows you to set your device to visible so that
other Bluetooth devices can find it. Choose from My handset hidden
and Visible for 3 Min.
– My Device Name: Allows you to change the phone’s name so other
Bluetooth devices trying to pair with you can easily find it.
– Supported Services: Shows you all Bluetooth services that the phone
supports.
– My Bluetooth Address: Shows you the Bluetooth address of your
device.
82
Page 85

To pair with another device
1. From the Home screen, touch and then .
2. Make sure Bluetooth is on and touch Search New Device to search for
the device you wish to pair.
3. If you want to stop searching, touch
Cancel
.
4. All of the devices found are displayed.
5. Touch the desired device. Depending on the type of device you will
have to enter a passcode, verify matching passcodes, or the device will
pair automatically. If you would like to search again, touch
Refresh
.
83
Page 86

Accessories
There are a variety of accessories available for your mobile phone, some
of which may be sold separately. You can select these options according
to your personal communication requirements. Consult your local dealer
for availability.
Travel
Adapter
This adapter
allows you to
charge the
battery.
Battery
Standard
battery is
available.
NOTE:
Ƭ Always use genuine LG accessories. Failure to do this may invalidate
your warranty.
Ƭ Accessories may be different in different regions; please check with
our regional service company or agent for further enquiries.
84
USB cable
This cable
allows you to
charge the
battery.
microSDTM
Memory Card
4 GB
microSDTM
memory card
provided.
Page 87

Safety
WARNING: This product contains
chemicals known to the State of California
to cause cancer and birth defects or other
reproductive harm.
Wash hands after handling.
Part 15.19 statement
This device complies with part 15 of FCC
rules. Operation is subject to the following
two conditions:
(1) This device may not cause harmful
interference, and (2) this device must
accept any interference received, including
interference that causes undesired operation.
Bodily Contact During Operation
This device was tested for typical use with
the back of the phone kept 0.59 inches
(1.5 cm) from the body. To comply with FCC
RF exposure requirements, a minimum
separation distance of 0.59 inches (1.5 cm)
must be maintained between the user’s
body and the back of the phone. Third-party
belt-clips, holsters, and similar accessories
containing metallic components may not
be used. Avoid the use of accessories
that cannot maintain 0.59 inches (1.5 cm)
distance between the user’s body and the
back of the phone and have not been tested
for compliance with FCC RF exposure limits.
Consumer Information About
Radio Frequency Emissions
Your wireless phone, which contains a
radio transmitter and receiver, emits radio
frequency energy during use. The following
consumer information addresses commonly
asked questions about the health effects of
wireless phones.
Are wireless phones safe?
Scientific research on the subject of
wireless phones and radio frequency (“RF”)
energy has been conducted worldwide for
many years, and continues. In the United
States, the Food and Drug Administration
(“FDA”) and the Federal Communications
Commission (“FCC”) set policies and
procedures for wireless phones. The FDA
issued a website publication on health issues
related to cell phone usage where it states,
“The scientific community at large …believes
that the weight of scientific evidence does
not show an association between exposure
to radiofrequency (RF) from cell phones and
adverse health outcomes. Still the scientific
community does recommend conducting
additional research to address gaps in
knowledge. That research is being conducted
around the world and FDA continues to
monitor developments in this field. You can
access the joint FDA/FCC website at http://
www.fda.gov (under “c”in the subject index,
select Cell Phones > Research). You can
also contact the FDA toll-free at (888) 4636332 or (888) INFO-FDA. In June 2000,
1
Page 88

the FDA entered into a cooperative research
and development agreement through
which additional scientific research is being
conducted. The FCC issued its own website
publication stating that “there is no scientific
evidence that proves that wireless phone
usage can lead to cancer or a variety of other
problems, including headaches, dizziness
or memory loss.”This publication is available
at http://www.fcc.gov/cgb/ cellular.html or
through the FCC at (888) 225-5322 or
(888) CALL-FCC.
What does “SAR” mean?
In 1996, the FCC, working with the FDA, the
U.S. Environmental Protection Agency, and
other agencies, established RF exposure
safety guidelines for wireless phones in
the United States. Before a wireless phone
model is available for sale to the public, it
must be tested by the manufacturer and
certified to the FCC that it does not exceed
limits established by the FCC. One of these
limits is expressed as a Specific Absorption
Rate, or “SAR.” SAR is a measure of the
rate of absorption of RF energy in the body.
Tests for SAR are conducted with the phone
transmitting at its highest power level in all
tested frequency bands. Since 1996, the
FCC has required that the SAR of handheld
wireless phones not exceed 1.6 watts per
kilogram, averaged over one gram of tissue.
Although the SAR is determined at the
highest power level, the actual SAR value of
a wireless phone while operating can be less
than the reported SAR value. This is because
the SAR value may vary from call to call,
depending on factors such as proximity to
2
a cell site, the proximity of the phone to the
body while in use, and the use of hands-free
devices. For more information about SARs,
see the FCC’s OET Bulletins 56 and 65 at
http://www.fcc.gov/Bureaus/Engineering_
Technology/Doc uments/bulletins or visit
the Cellular Telecommunications Industry
Association website at http://www.ctia.org/
consumer_info/index.cfm/AID/10371 . You
may also wish to contact the manufacturer
of your phone.
Can I minimize my RF exposure?
If you are concerned about RF, there
are several simple steps you can take to
minimize your RF exposure. You can, of
course, reduce your talk time. You can place
more distance between your body and the
source of the RF, as the exposure level drops
off dramatically with distance. The FDA/FCC
website states that “hands-free kits can be
used with wireless phones for convenience
and comfort. These systems reduce the
absorption of RF energy in the head because
the phone, which is the source of the RF
emissions, will not be placed against the
head. On the other hand, if the phone is
mounted against the waist or other part of
the body during use, then that part of the
body will absorb more RF energy. Wireless
phones marketed in the U.S. are required
to meet safety requirements regardless of
whether they are used against the head
or against the body. Either configuration
should result in compliance with the safety
limit.”Also, if you use your wireless phone
while in a car, you can use a phone with an
antenna on the outside of the vehicle. You
Page 89

should also read and follow your wireless
phone manufacturer’s instructions for the
safe operation of your phone.
Do wireless phones pose any
special risks to children?
The FDA/FCC website states that “the
scientific evidence does not show a danger
to users of wireless communication devices,
including children.”The FDA/FCC website
further states that “some groups sponsored
by other national governments have advised
that children be discouraged from using
wireless phones at all”. For example, the
Stewart Report from the United Kingdom
[“UK”] made such a recommendation in
December 2000. In this report a group of
independent experts noted that no evidence
exists that using a cell phone causes brain
tumors or other ill effects. [The UK’s]
recommendation to limit cell phone use by
children was strictly precautionary; it was not
based on scientific evidence that any health
hazard exists. A copy of the UK’s leaflet is
available at http://www.dh.gov.uk (search
“mobile”), or you can write to: NRPB, Chilton,
Didcot, Oxon OX11 ORQ, United Kingdom.
Copies of the UK’s annual reports on mobile
phones and RF are available online at www.
iegmp.org.uk and http://www.hpa.org.uk/
radiation/ (search “mobile”). Parents who
wish to reduce their children’s RF exposure
may choose to restrict their children’s wireless
phone use.
Where can I get further
information about RF emissions?
For further information, see the following
additional resources (websites current as of
April 2005):
U.S. Food and Drug Administration
FDA Consumer magazine NovemberDecember 2000 Telephone: (888) INFOFDA http://www.fda.gov (Under “c”in
the subject index, select Cell Phones >
Research.)
U.S. Federal Communications
Commission
445 12th Street, S.W. Washington, D.C.
20554 Telephone: (888) 225-5322 http://
www.fcc.gov/oet/rfsafety
Independent Expert Group on
Mobile Phones
http://www.iegmp.org.uk
Royal Society of Canada Expert
Panels on Potential Health Risks
of Radio Frequency Fields from
Wireless Telecommunication
Devices
283 Sparks Street Ottawa, Ontario K1R 7X9
Canada Telephone: (613) 991-6990 http://
www.rsc.ca/index.php?page=Expert_Panels_
RF &Lang_id=120
3
Page 90

World Health Organization
Avenue Appia 20
1211 Geneva 27
Switzerland
Telephone: 011 41 22 791 21 11
http://www.who.int/mediacentre/factsheets/
fs193/en/
International Commission on NonIonizing
Radiation Protection c/o Bundesamt fur
Strahlenschutz
Ingolstaedter Landstr. 1
85764 Oberschleissheim
Germany
Telephone: 011 49 1888 333 2156
http://www.icnirp.de
American National Standards
Institute
1819 L Street, N.W., 6th Floor
Washington, D.C. 20036
Telephone: (202) 293-8020
http://www.ansi.org
National Council on Radiation
Protection and Measurements
7910 Woodmont Avenue, Suite 800
Bethesda, MD 20814-3095
Telephone: (301) 657-2652
http://www.ncrponline.org
4
Engineering in Medicine and
Biology Society, Committee on
Man and Radiation (COMAR)
of the Institute of Electrical and
Electronics Engineers
http://ewh.ieee.org/soc/embs/comar/
Consumer Information on SAR
(Specific Absorption Rate)
This model phone meets the Government’s
requirements for exposure to radio waves.
Your wireless phone is a radio transmitter and
receiver. It is designed and manufactured not
to exceed the emission limits for exposure
to radiofrequency (RF) energy set by the
Federal Communications Commission (FCC)
of the U.S. Government. These FCC exposure
limits are derived from the recommendations
of two expert organizations, the National
Counsel on Radiation Protection and
Measurement (NCRP) and the Institute of
Electrical and Electronics Engineers (IEEE).
In both cases, the recommendations were
developed by scientific and engineering
experts drawn from industry, government,
and academia after extensive reviews of the
scientific literature related to the biological
effects of RF energy.
The exposure limit for wireless mobile phones
employs a unit of measurement known as
the Specific Absorption Rate, or SAR. The
SAR is a measure of the rate of absorption of
RF energy by the human body expressed in
units of watts per kilogram (W/kg). The FCC
requires wireless phones to comply with a
safety limit of 1.6 watts per kilogram (1.6 W/
Page 91

kg). The FCC exposure limit incorporates a
substantial margin of safety to give additional
protection to the public and to account for
any variations in measurements.
Tests for SAR are conducted using standard
operating positions specified by the FCC with
the phone transmitting at its highest certified
power level in all tested frequency bands.
Although SAR is determined at the highest
certified power level, the actual SAR level of
the phone while operating can be well below
the maximum value. Because the phone is
designed to operate at multiple power levels
to use only the power required to reach the
network, in general, the closer you are to a
wireless base station antenna, the lower the
power output.
Before a phone model is available for sale
to the public, it must be tested and certified
to the FCC that it does not exceed the limit
established by the government adopted
requirement for safe exposure. The tests are
performed in positions and locations (e.g., at
the ear and worn on the body) as required by
the FCC for each model.
The FCC has granted an Equipment
Authorization for this model phone with
all reported SAR levels evaluated as in
compliance with the FCC RF emission
guidelines.
The highest SAR value for this model phone
when tested for use at the ear is 1.12 W/kg
and when worn on the body, as described in
this user’s manual, is 0.94 W/kg. While there
may be differences between SAR levels of
various phones and at various positions, they
all meet the government requirement for
safe exposure.
SAR information on this model phone is on
file with the FCC and can be found under
the Display Grant section of http://www.fcc.
gov/oet/ea/fccid/ after searching on FCC ID
ZNF306G.
To find information that pertains to a
particular model phone, this site uses the
phone FCC ID number which is usually
printed somewhere on the case of the
phone. Sometimes it may be necessary to
remove the battery pack to find the number.
Once you have the FCC ID number for a
particular phone, follow the instructions on
the website and it should provide values for
typical or maximum SAR for a particular
phone.
Additional information on Specific
Absorption Rates (SAR) can be found on
the Cellular Telecommunications Industry
Association (CTIA) website at http://www.
ctia.org/
*In the United States and Canada, the SAR
limit for mobile phones used by the public
is 1.6 watts/kg (W/kg) averaged over one
gram of tissue. The standard incorporates a
substantial margin of safety to give additional
protection for the public and to account for
any variations in measurements.
5
Page 92

Part 15.105 statement
This equipment has been tested and found
to comply with the limits for a class B digital
device, pursuant to Part 15 of the FCC
rules. These limits are designed to provide
reasonable protection against harmful
interference in a residential installation.
This equipment generates, uses, and can
radiate radio frequency energy and, if not
installed and used in accordance with the
instructions, may cause harmful interference
to radio communications. However, there is
no guarantee that interference will not occur
in a particular installation. If this equipment
does cause harmful interference or television
reception, which can be determined by
turning the equipment off and on, the user is
encouraged to try to correct the interference
by one or more of the following measures:
- Reorient or relocate the receiving antenna.
- Increase the separation between the
equipment and receiver.
- Connect the equipment into an outlet on
a circuit different from that to which the
receiver is connected.
- Consult the dealer or an experienced radio/
TV technician for help.
* Service not available everywhere.
* Information subject to change.
Part 15.21 statement
Changes or modifications that are not
expressly approved by the manufacturer
could void the user’s authority to operate the
equipment.
6
Battery information and care
Always unplug the charger from the wall
socket after the phone is fully charged to
save unnecessary power consumption of the
charger.
 Loading...