

Page 1

ENGLISH
OWNER’S MANUAL
LED TV*
* LG LED TV applies LCD screen with LED backlights.
Please read this manual carefully before operating your TV and retain
it for future reference.
29MA73D
29MA73V
www.lg.com
Page 2

TABLE OF CONTENTS
2
ENGLISH
TABLE OF CONTENTS
3 LICENSES
4 INSTALLATION PROCEDURE
5 ASSEMBLING AND PREPARING
5 Unpacking
8 Parts and buttons
10 Lifting and moving the TV
11 Setting up the TV
11 - Attaching the Stand
13 - Mounting on a table
13 - Tidying cables
15 - Detaching the Stand
16 - Mounting on a wall
18 WATCHING TV
18 Turning the TV on for the first time
20 TV display (5:9 OSD)
20 - Programme Guide
21 PIP function
38 REMOTE CONTROL
40 INSTALLING SCREEN SPLIT
41 CUSTOMIZING SETTINGS
41 Accessing the Main Menus
41 - TV, Component, AV
46 - DVI, HDMI1, HDMI2/MHL, DisplayPort
53 USING THE USER GUIDE
53 Accessing the On-Screen User Guide
54 MAINTENANCE
54 Cleaning Your TV
54 Screen and frame
54 Cabinet and stand
54 Power cord
55 Preventing “Image burn” or “Burn-in” on
your TV screen
23 MAKING CONNECTIONS
23 Connecting an antenna
24 Satellite connection
25 Connecting to a HD receiver, DVD Player,
VCR or Gaming device
25 - HDMI connection
26 - DVI-D connection
27 - Component connection
28 - Composite Connection
29 - Euro Scart connection
30 Headphone connection
31 Connecting a USB Device
32 Smartphone (MHL) connection
33 Connecting to a wired network
34 Connecting to a PC
35 - HDMI connection
36 - DVI-D connection
37 - Display Port connection
56 TROUBLESHOOTING
56 General
57 SPECIFICATIONS
Page 3

LICENSES
3
LICENSES
Supported licenses may differ by model. For more information of the licenses, visit www.lg.com.
Manufactured under license from Dolby Laboratories. Dolby and the
double-D symbol are trademarks of Dolby Laboratories.
The terms HDMI and HDMI High-Definition Multimedia Interface, and the
HDMI logo are trademarks or registered trademarks of HDMI Licensing LLC
in the United States and other countries.
ABOUT DIVX VIDEO: DivX® is a digital video format created by DivX, LLC, a
subsidiary of Rovi Corporation. This is an official DivX Certified® device that
plays DivX video. Visit divx.com for more information and software tools to
convert your files into DivX videos.
ABOUT DIVX VIDEO-ON-DEMAND: This DivX Certified® device must be
registered in order to play purchased DivX Video-on-Demand (VOD) movies.
To obtain your registration code, locate the DivX VOD section in your device
setup menu. Go to vod.divx.com for more information on how to complete
your registration.
ENGLISH
DivX Certified® to play DivX® video up to HD 1080p, including premium
content.
DivX®, DivX Certified® and associated logos are trademarks of Rovi
Corporation or its subsidiaries and are used under license.
Covered by one or more of the following U.S. patents: 7,295,673; 7,460,668;
7,515,710; 7,519,274
VESA, VESA logo, Display Port Compliance Logo and Display Port Compliance
Logo for dual-mode source are all registered trademarks of the Video Electronics
Standards Association.
Page 4

INSTALLATION PROCEDURE
4
ENGLISH
INSTALLATION PROCEDURE
1
2
3
Open the package and make sure all the accessories are included.
Attach the stand to the TV.
Connect an external device to the TV.
NOTE
Image shown may differ from your TV.
Your TV’s OSD (On Screen Display) may differ slightly from that shown in this manual.
The available menus and options may differ from the input source or product model that you are
using.
New features may be added to this TV in the future.
Page 5
ASSEMBLING AND PREPARING
5
ASSEMBLING AND PREPARING
Unpacking
Check your product box for the following items. If there are any missing accessories, contact the local
dealer where you purchased your product. The illustrations in this manual may differ from the actual
product and accessories.
NOTE
The accessories supplied with your product may vary depending on the model.
Product specifications or contents in this manual may be changed without prior notice due to
upgrade of product functions.
CAUTION
Do not use any pirated items to ensure the safety and product life span.
Any damages or injuries by using unapproved or counterfeit parts or accessories are not covered
by the warranty.
NOTE
The items supplied with your product may vary depending on the model.
Product specifications or contents of this manual may be changed without prior notice due to
upgrade of product functions.
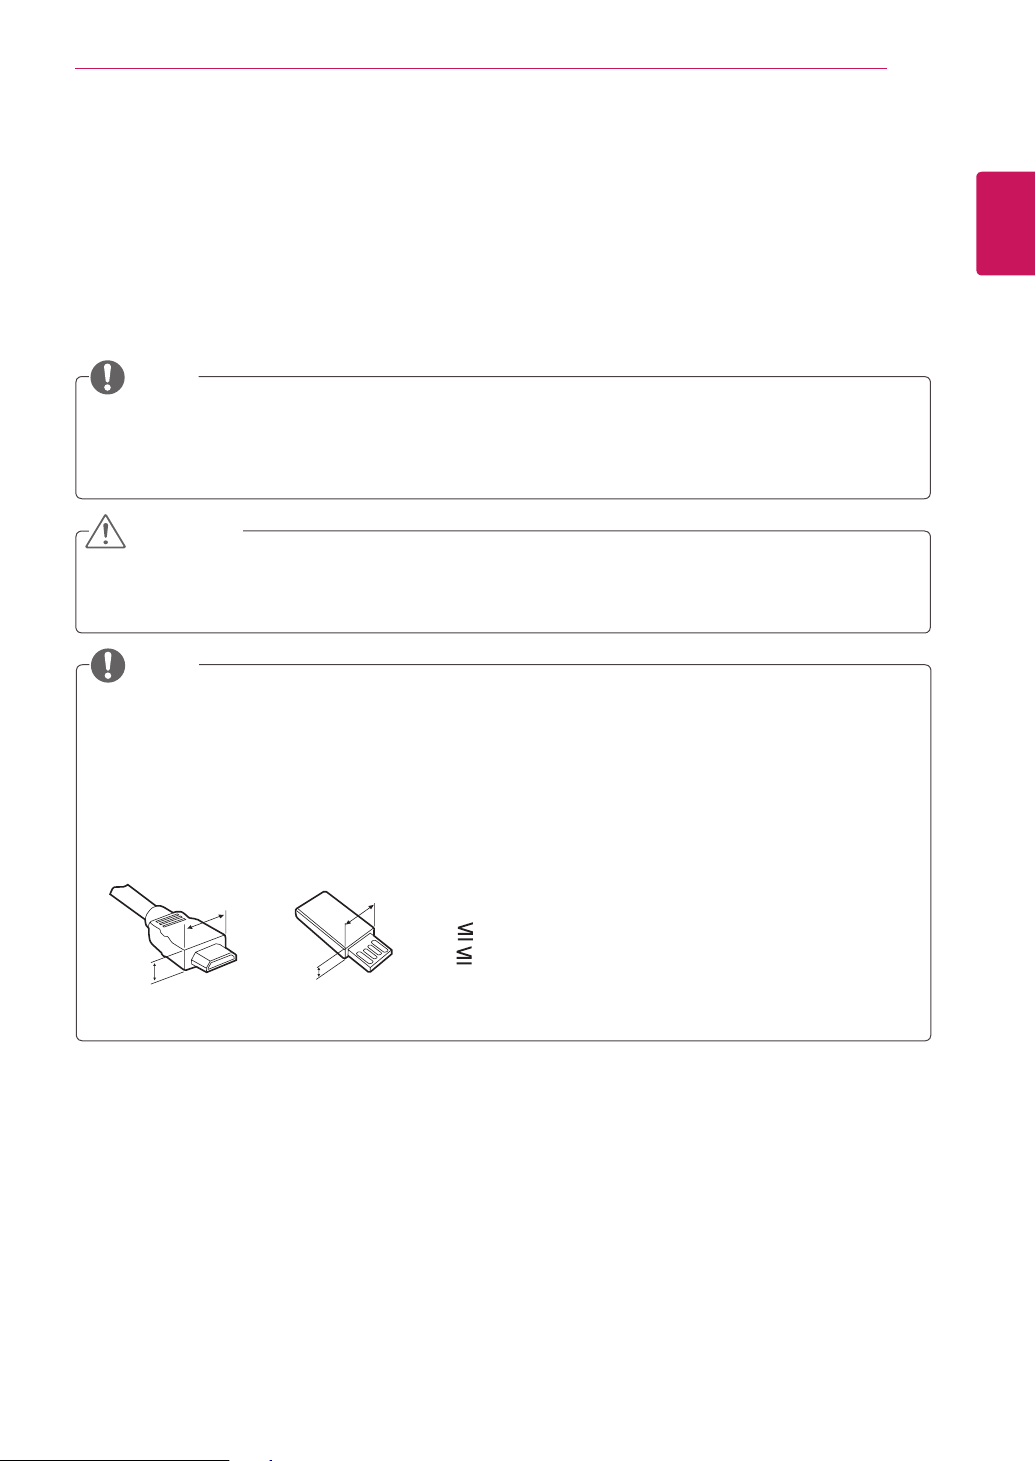
For an optimal connection, HDMI cables and USB devices should have bezels less than 10 mm thick
and 18 mm width. Use an extension cable that supports USB 2.0 if the USB cable or USB memory
stick does not fit into your TV’s USB port.
ENGLISH
B
A
B
*A 10 mm
*B
A
18 mm
Page 6
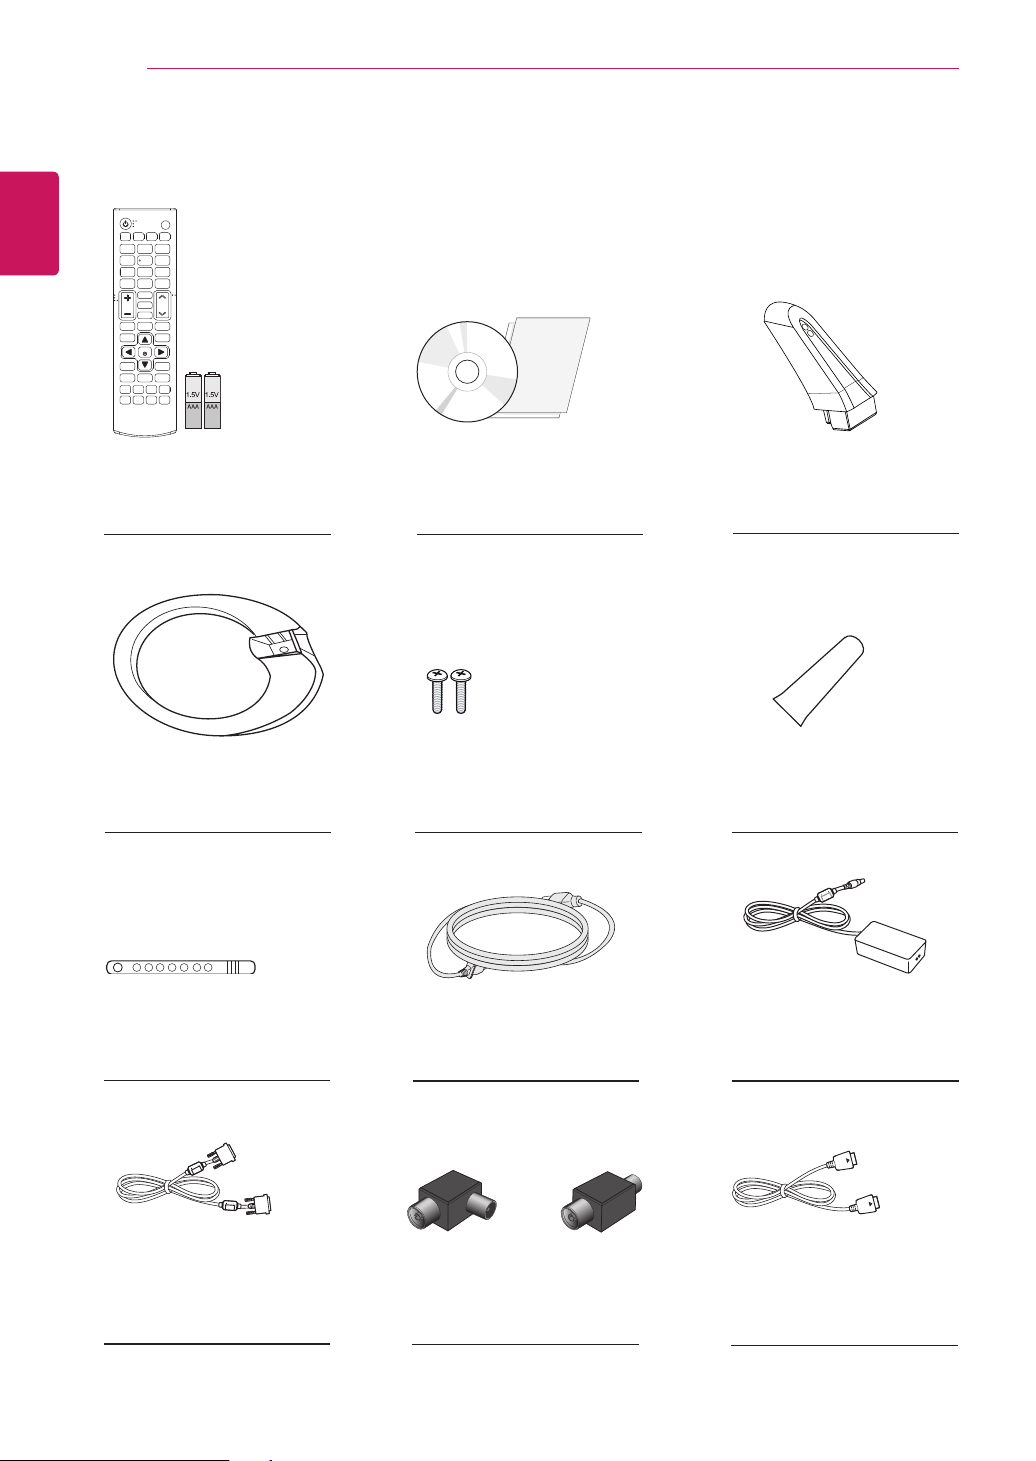
6
ENGLISH
ASSEMBLING AND PREPARING
Remote Control
Batteries (AAA)
(See p.38, See p.39)
Stand Base
(See p.11, See p.15)
Cable Tie
CD (Owner's Manual)
Cards
Screw 2 ea Stand Screw cover
(See p.11, See p.15) (See p.11, See p.15)
Power Cord
Stand Body
(See p.11, See p.15)
AC-DC Adapter
(See p.13)
DVI-D cable
(See p.26, See p.36)
(See p.13) (See p.13)
or
Isolator
(Depending on the country)
DisplayPort cable
(Depending on the country)
(See p.37)
Page 7
ASSEMBLING AND PREPARING
NOTE
Antenna Isolator Installation Guide
- Use this to install TV in a place where there is a voltage difference between TV Set and GND
of antenna signal.
»If there is a voltage difference between TV Set and GND of antenna signal, the antenna
contact might be heated and excessive heat might cause an accident.
- You can improve the safety when watching TV by efficiently removing power voltage from TV
antenna. It is recommended to mount the isolator to the wall. If it cannot be mounted to the
wall, mount it on the TV. Avoid disconnecting the antenna Isolator after installation.
- Before starting, be sure that the TV antenna is connected.
7
ENGLISH
Wall
1. Connect to TV.
ANTENNA/
CABLE IN
Cable / Antenna
or
Isolator
2. Connect to Set-Top box.
Connect one end of the isolator to cable/antenna jack and the other to TV set or set-top box.
“Equipment connected to the protective earthing of the building installation through the mains
connection or through other equipment with a connection to protective earthing - and to a
cable distribution system using coaxial cable, may in some circumstances create a fire hazard.
Connection to a cable distribution system has therefore to be provided through a device providing
electrical isolation below a certain frequency range (galvanic isolator, see EN 60728-11)”
When applying the RF Isolator, a slight loss of signal sensitivity can occur.
Page 8
8
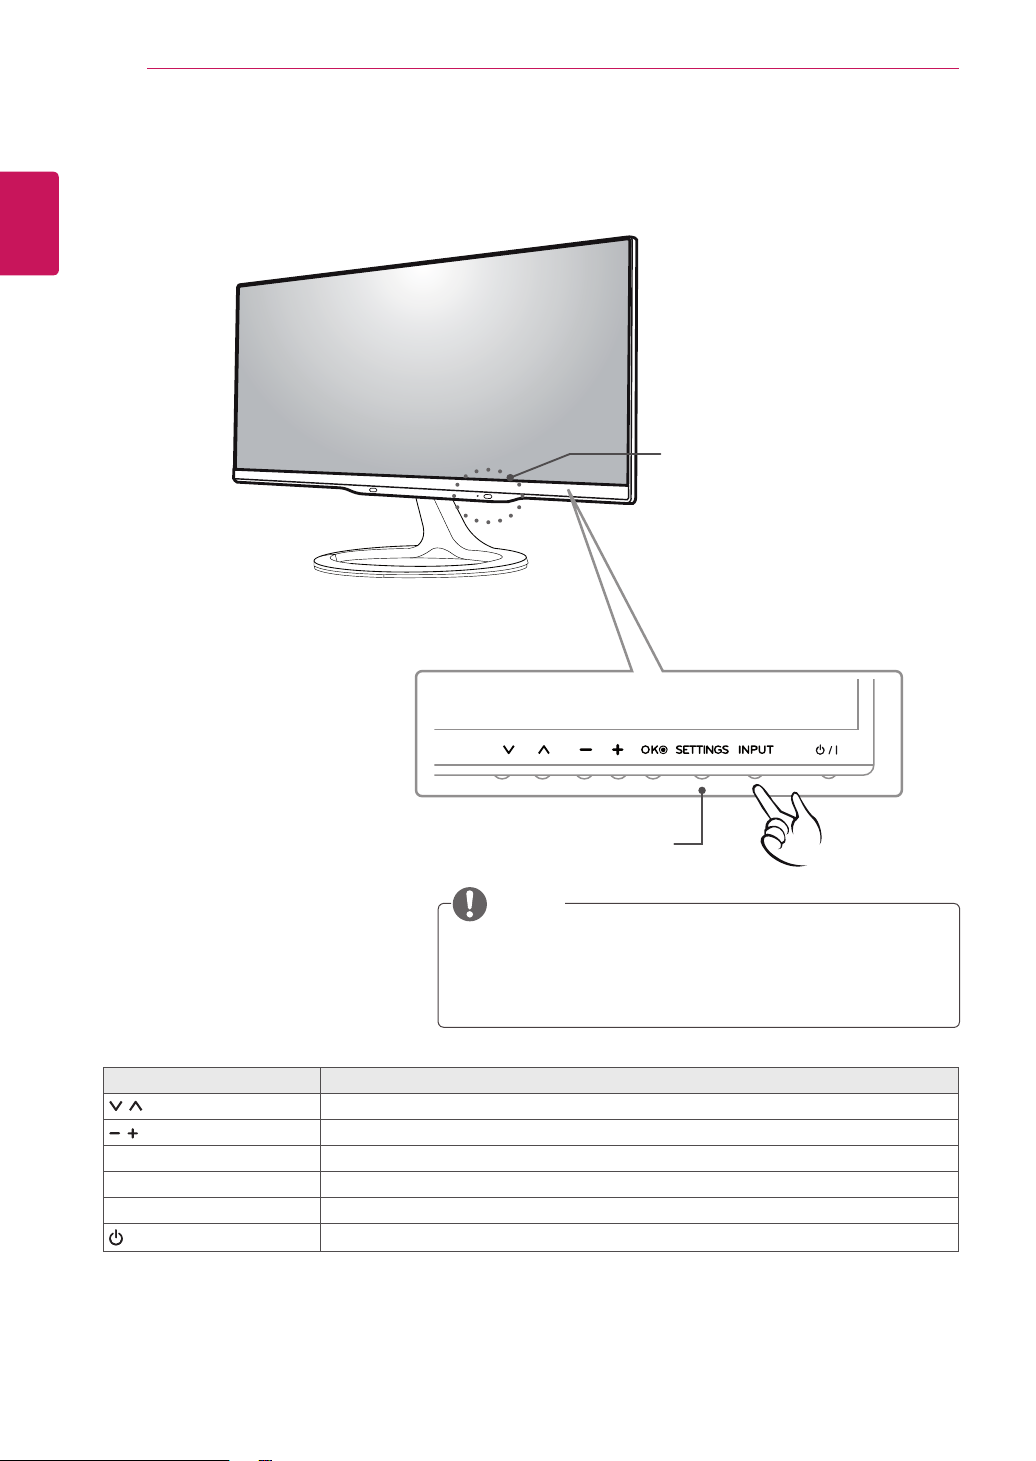
Parts and buttons
ENGLISH
ASSEMBLING AND PREPARING
Remote Control Sensor
Standby Light
Lighting On :
When Power is turned off
Lighting Off :
When Power is turned on
Touch Buttons
NOTE
All of the buttons are touch sensitive and can be operated
through simple touch with your finger.
Power and control touch button are located on the bottom.
Touch button Description
Scrolls through the saved programmes.
Adjusts the volume level.
OK Selects the highlighted menu option or confirms an input.
SETTINGS Accesses the main menus, or saves your input and exits the menus.
INPUT Changes the input source.
/ I
Turns the power on or off.
Page 9
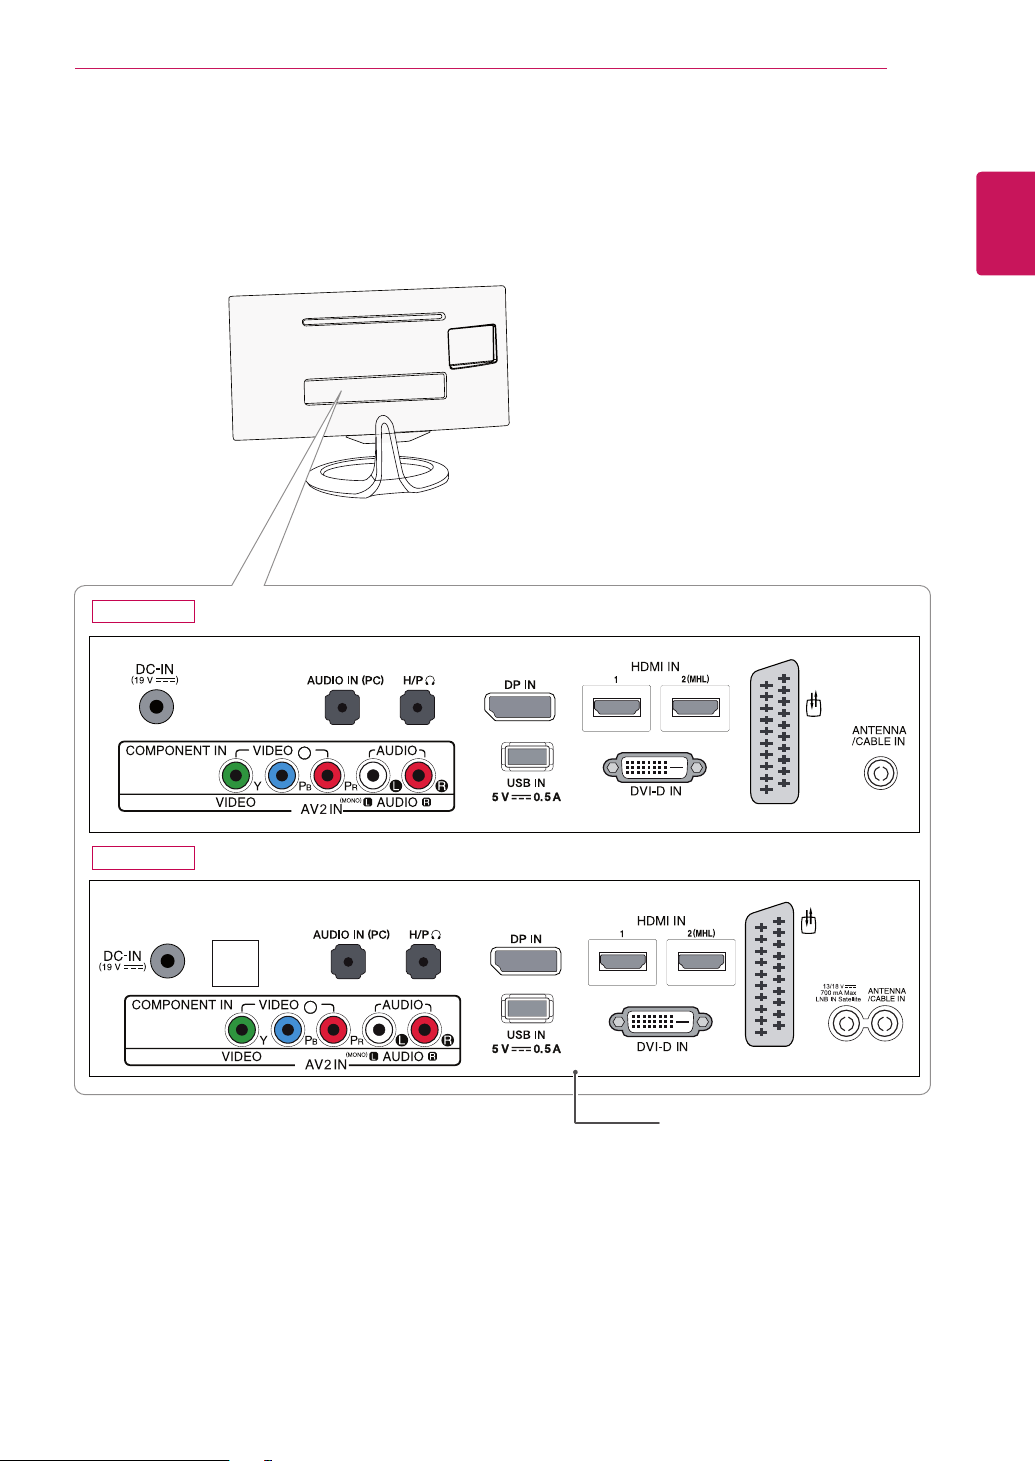
29MA73D
ASSEMBLING AND PREPARING
9
ENGLISH
29MA73V
AV 1
LAN
AV 1
Connection panel (See p.23)
Page 10
10
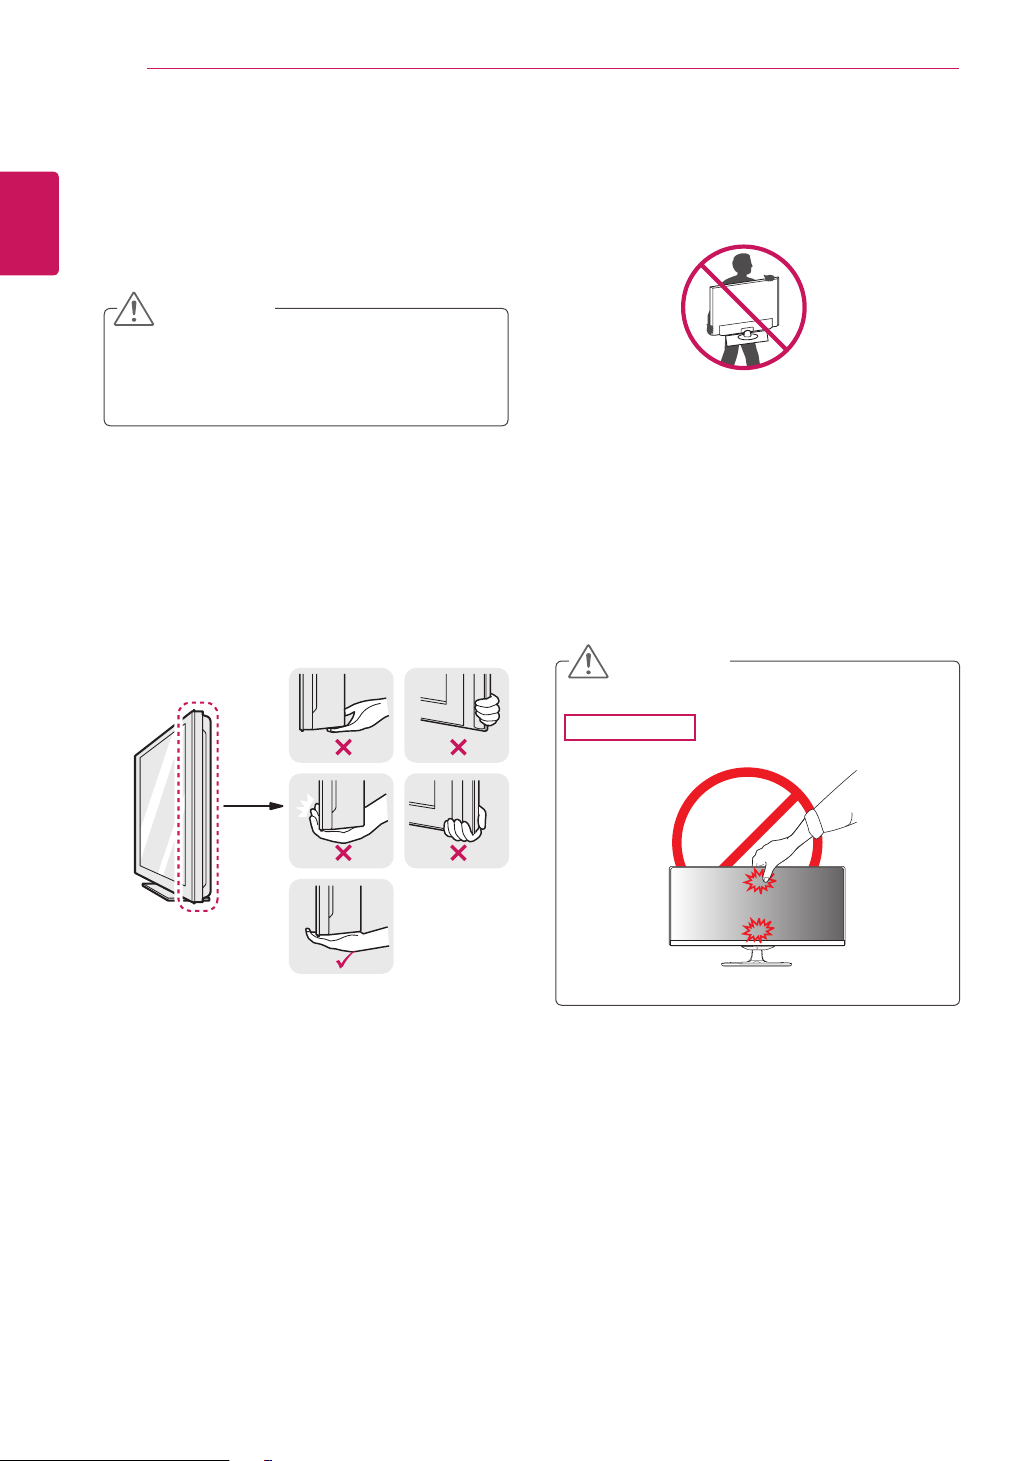
Lifting and moving the TV
ENGLISH
When moving or lifting the TV, read the following
to prevent the TV from being scratched or
damaged and for save transportation regardless of
its type and size.
ASSEMBLING AND PREPARING
CAUTION
Avoid touching the screen at all times, as
this may result in damage to the screen or
some of the pixels used to create images.
It is recommended to move the TV in the
box or packing material that the TV originally
came in.
Before moving or lifting the TV, disconnect
the power cord and all cables.
Hold the top and bottom of the TV frame
firmly. Make sure not to hold the transparent
part, speaker, or speaker grill area.
When holding the TV, the screen should face
away from you to prevent the screen from
scratches.
When transporting the TV, do not expose the
TV to jolts or excessive vibration.
When transporting the TV, keep the TV
upright, never turn the TV on its side, or tilt
towards the left or right.
CAUTION
29MA73
Page 11
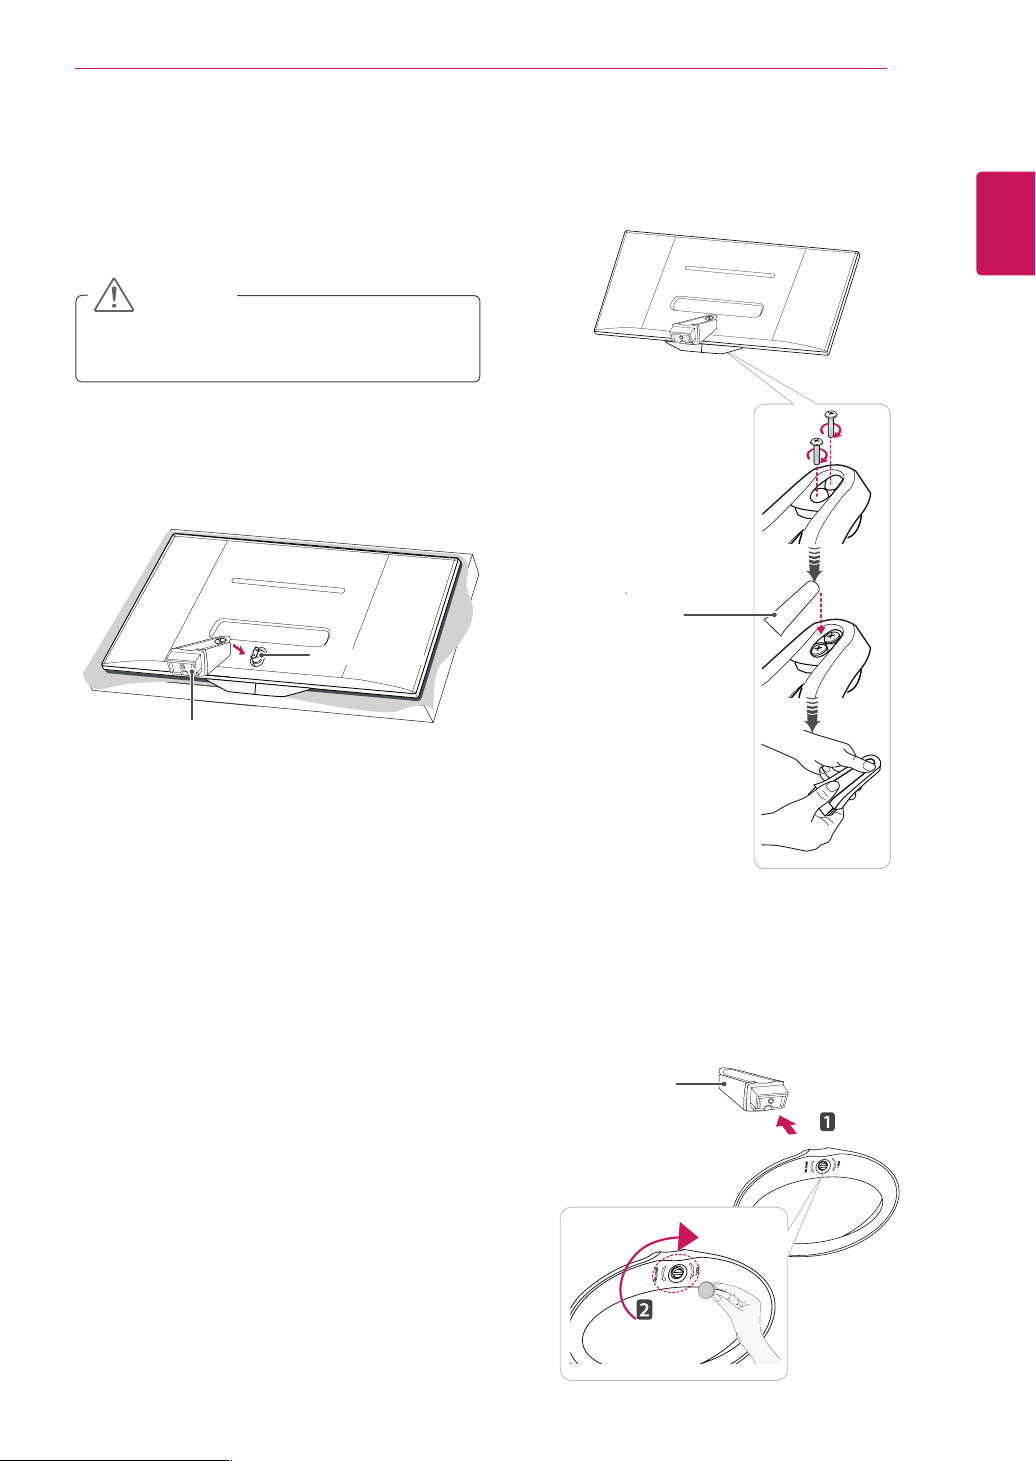
Setting up the TV
Attaching the Stand
Place the screen face down.
1
CAUTION
To protect the screen from scratches, cover
the surface with a soft cloth.
Check the orientation (front and rear) of the
2
stand base and mount the Stand Body to the
stand hinge as shown in the figure.
Stand Hinge
ASSEMBLING AND PREPARING
Fix two screws into the back of the stand base
3
and close the screw cover.
Stand Screw
Cover
11
ENGLISH
Stand Body
Attach the Stand Base from the Stand Body by
4
turning the screw to the right with a Coin.
Stand Base
Page 12
ASSEMBLING AND PREPARING
12
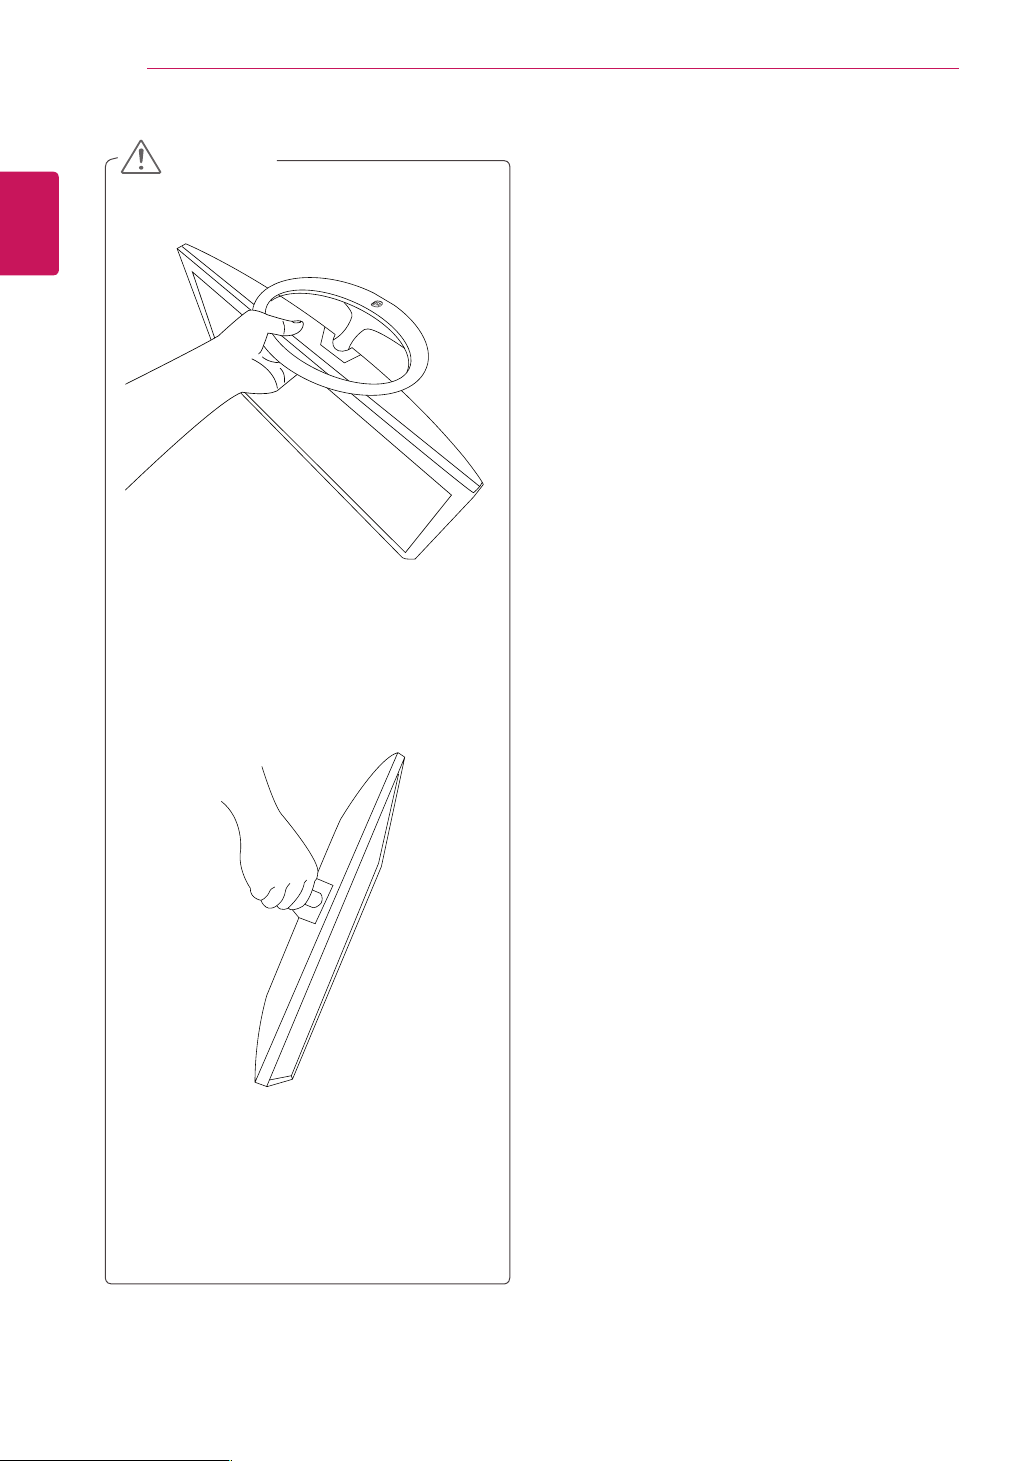
ENGLISH
CAUTION
Do not carry the monitor upside-down
as this may cause it to fall off its stand,
resulting in damage or injury.
The illustration shows a general example of
installation and may look different from the
actual product.
Do not carry the monitor upside-down by
holding the stand body as this may cause it
to fall off, resulting in damage or injury.
The illustration shows a general example of
installation and may look different from the
actual product.
Page 13

ASSEMBLING AND PREPARING
13
Mounting on a table
Lift and tilt the TV into its upright position on a
1
table.
Leave a 10 cm (4 inches) (minimum) space
from the wall for proper ventilation.
10 cm
10 cm
10 cm
10 cm
CAUTION
ENGLISH
Disconnect the power cord first, and then move
or install the TV. Otherwise electric shock may
occur.
Tidying cables
Gather and bind the cables with the supplied
cable tie.
Connect the AC-DC Adapter and Power Cord
2
to a wall outlet.
CAUTION
Do not place the TV near or on sources of
heat, as this may result in fire or other damage.
NOTE
Tilt from -5 to +20 degrees up or down to
adjust the angle of the TV to suit your view.
-5 20
Front Rear
Page 14
ASSEMBLING AND PREPARING
-520
-520
-5 20
:
-5 20
:
-5 20
:
14
ENGLISH
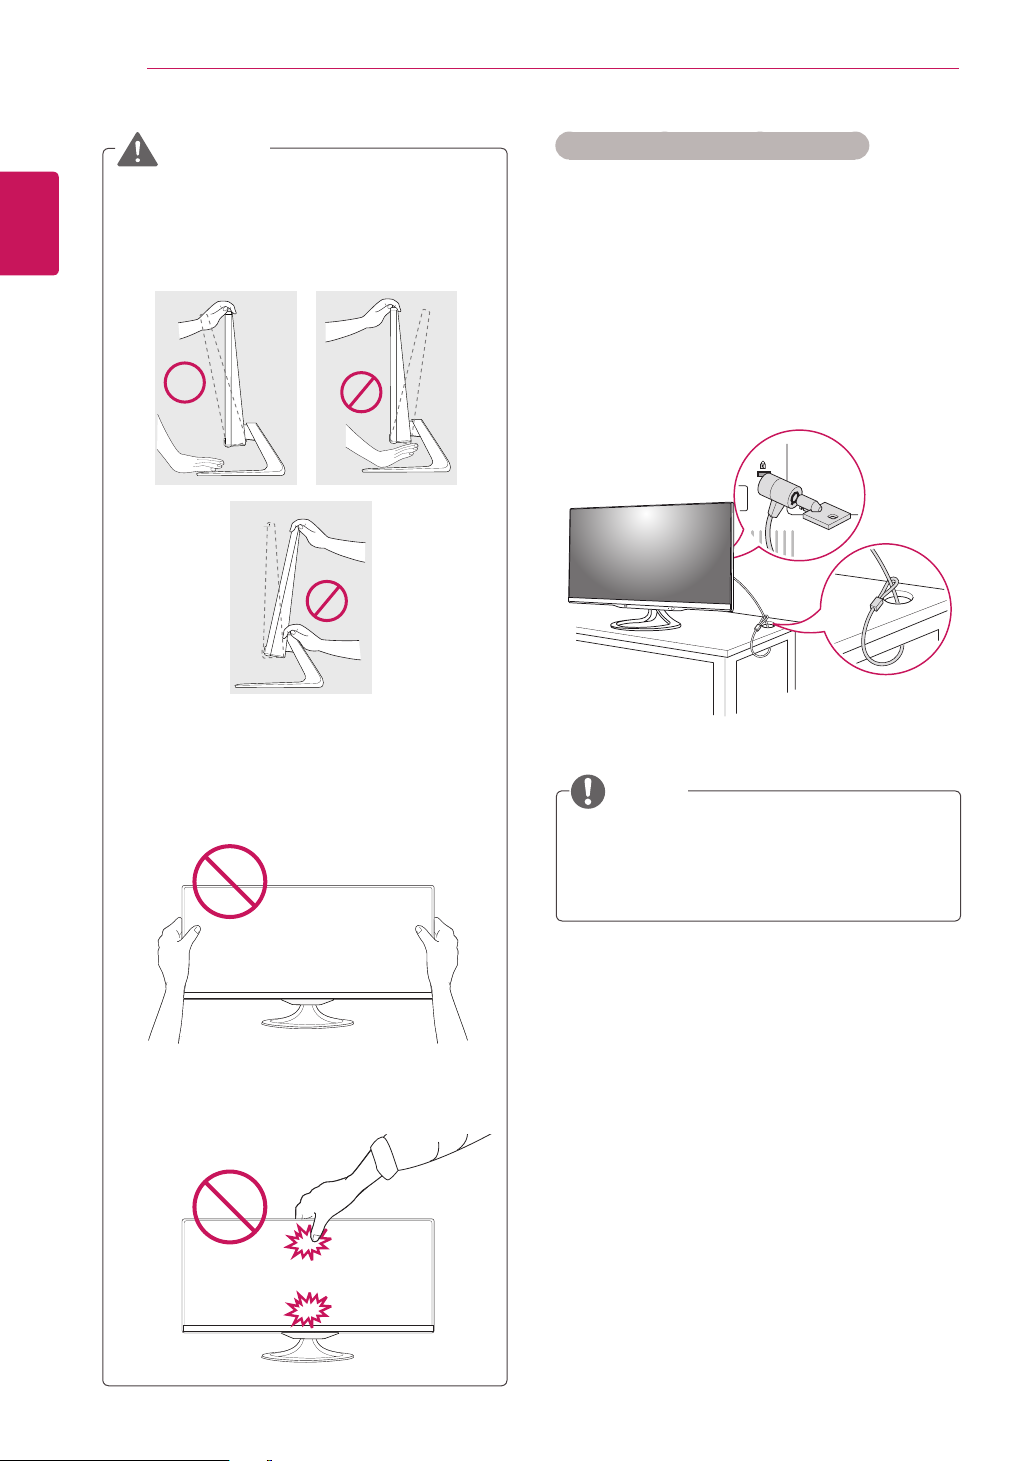
WARNING
When you adjust the angle, do not hold
the buttom of the TV frame as shown on
the following illustration, as may injure your
fingers.
Using the Kensington security system
The Kensington security system connector is
located at the back of the TV. For more information
of installation and using, refer to the manual
supplied with the Kensington security system or
visit
http://www.kensington.com
.
Connect the Kensington security system cable
between the TV and a table.
Be careful not to touch or press the screen
area when adjusting the angle of the TV.
Be careful not to press the screen with your
fingers or palm.
NOTE
The Kensington security system is optional.
You can obtain additional accessories from
most electronics stores.
Page 15
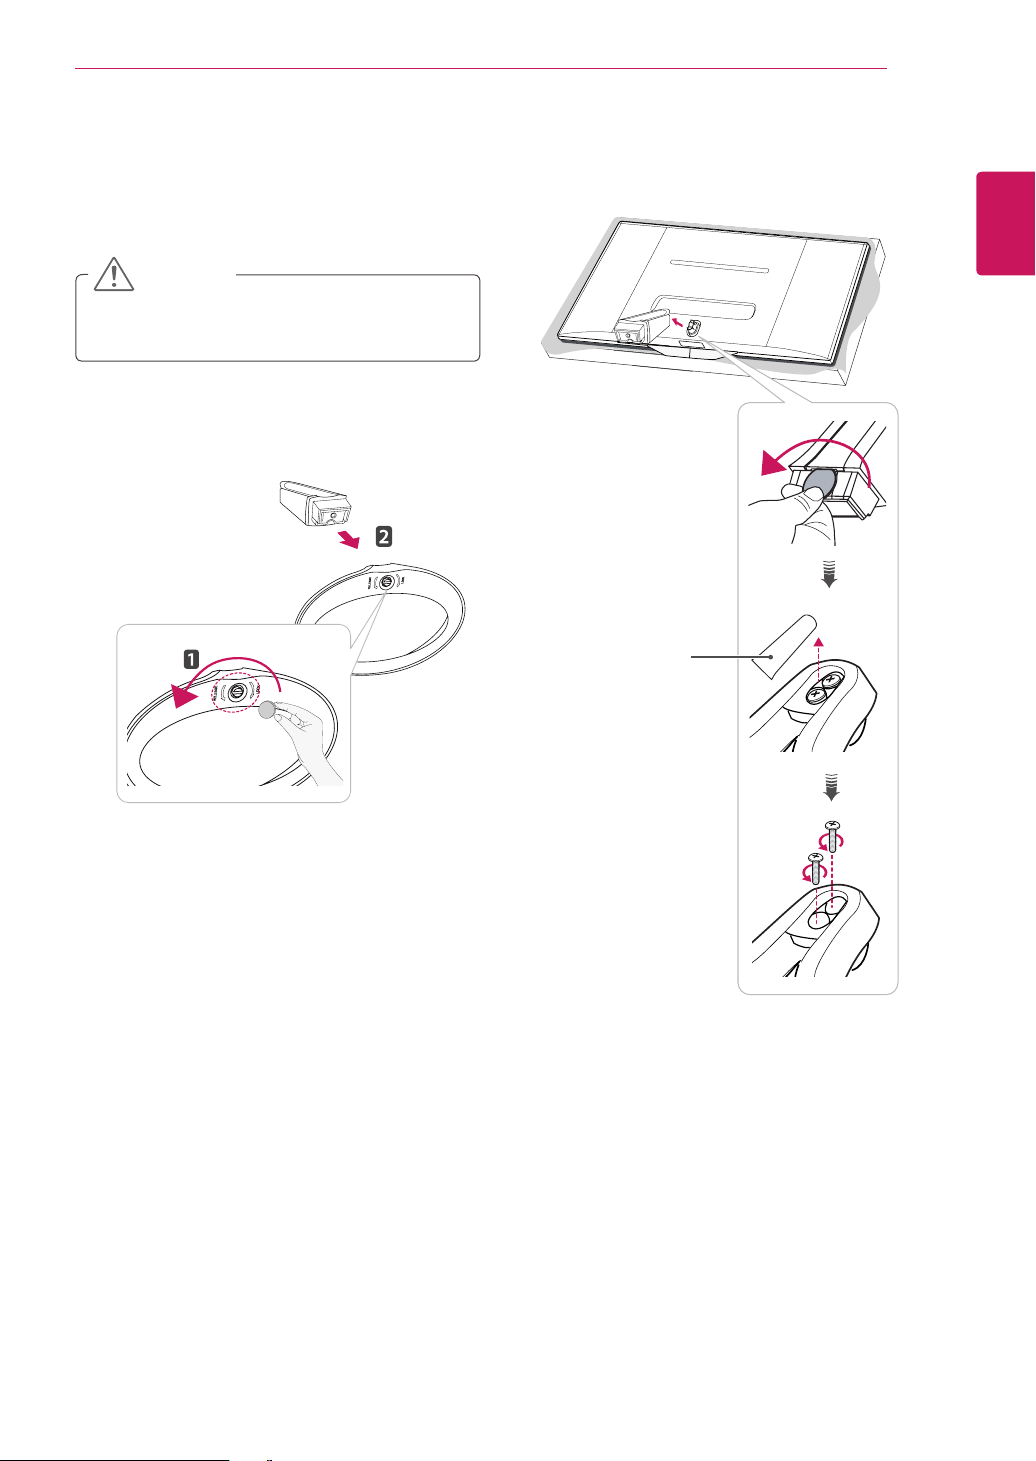
Detaching the Stand
Place the screen face down.
1
CAUTION
To protect the screen from scratches, cover
the surface with a soft cloth.
Turn the screw to the left, and then pull out the
2
Stand Base from the Stand Body.
ASSEMBLING AND PREPARING
Open the screw cover on the back of the stand
3
body and use a screw driver to remove the two
screws.
15
ENGLISH
Stand Screw
Cover
Page 16

16
A
B
Mounting on a wall
ENGLISH
For proper ventilation, allow a clearance of 10
cm on each side and from the wall. Detailed
installation instructions are available from your
dealer, see the optional Tilt Wall Mounting Bracket
Installation and Setup Guide.
ASSEMBLING AND PREPARING
10 cm
Please use VESA standard as below.
5
784.8 mm (30.9 inch) and under
* Wall Mount Pad Thickness : 2.6 mm
* Screw : Φ 4.0 mm x Pitch 0.7 mm x
Length 10 mm
787.4 mm (31.0 inch) and above
* Please use VESA standard wall mount pad
and screws.
VESA (A x B) 100 x 100
Standard screw M4
Number of screws 4
Wall mount bracket
(optional)
RW120
10 cm
10 cm
If you intend to mount the TV to a wall, attach Wall
mounting interface (optional parts) to the back of
the TV.
When you install the TV using the wall mounting
interface (optional parts), attach it carefully so it
will not drop.
Please, Use the screw and wall mount interface
1
in accordance with VESA Standards.
If you use screw longer than standard, the TV
2
might be damaged internally.
If you use improper screw, the product might
3
be damaged and drop from mounted position.
In this case, LG Electronics is not responsible
for it.
VESA compatible only with respect to screw
4
mounting interface dimensions and mounting
screw specifications.
10 cm
VESA (A x B)
Page 17
CAUTION
Disconnect the power cord first, and then
move or install the TV. Otherwise electric
shock may occur.
If you install the TV on a ceiling or slanted
wall, it may fall and result in severe injury.
Use an authorized LG wall mount and
contact the local dealer or qualified
personnel.
Do not over tighten the screws as this may
cause damage to the TV and void your
warranty.
Use the screws and wall mounts that meet
the VESA standard. Any damages or injuries
by misuse or using an improper accessory
are not covered by the warranty.
ASSEMBLING AND PREPARING
17
ENGLISH
NOTE
Use the screws that are listed on the VESA
standard screw specifications.
The wall mount kit includes an installation
manual and necessary parts.
The wall mount bracket is optional. You can
obtain additional accessories from your local
dealer.
The length of screws may differ depending
on the wall mount. Be sure to use the proper
length.
For more information, refer to the instructions
supplied with the wall mount.
Page 18
WATCHING TV
18
ENGLISH
WATCHING TV
Turning the TV on for the first time
When you access the TV for the first time, the initial setting screen appears. Select a language and
customize the basic settings.
1
2
3
4
Connect the power cord to a power outlet.
Press on the TV or power button on the remote control to turn the TV on.
The Standby Light is turned off.
NOTE
When the TV is in Power saving mode, the Standby Light turns amber.
The initial setting screen appears if you access the TV for the first time.
NOTE
If you do not operate the TV within 40 seconds when the setting menu screen appears, the setting
menus will disappear.
Follow the on-screen instructions to customize your TV according to your preferences.
Language
Mode Setting
Power Indicator
Country
Time Zone
Set Password
Network Setting
Auto Tuning
Selects a language for the display.
Selects Home Use for the home environment.
Selects the Standby Light. If you select On, the TV turns on the Standby Light in
the front panel when the TV is off.
Selects a country to display.
Selects the time zone and daylight saving.
(When Russia is selected for Country)
Set the password.
(When France/Italy is selected for Country)
(If there is LAN port) selects Network Setting to display.
(Only UK, **MA73V models)
Scans and saves available programmes automatically.
Page 19

WATCHING TV
NOTE
For those countries without confirmed DTV broadcasting standards, some DTV features might not
work, depending on the DTV broadcasting environment.
To display images in the best quality for your home environment, select Home Use mode.
Store Demo mode is suitable for the retail environment.
If you select Store Demo mode, the previously customized settings will switch to the default
settings of Store Demo mode in 5 minutes.
When the basic settings are complete, press OK.
5
NOTE
If you do not complete the initial setting, it will appear whenever you access the TV.
To turn the TV off, press on the TV.
6
The Standby Light is turned on.
19
ENGLISH
CAUTION
Disconnect the power cord from the power outlet when you do not use the TV for a long period of
time.
NOTE
You can also switch the TV from PC mode to TV mode, press TV/PC.
You can also access Initial Setting by accessing OPTION in the main menus.
Page 20

20
TV display (5:9 OSD)
ENGLISH
Programme Guide
Press the INFO button on the remote control while you are watching TV.
- On the right-hand side (5:9 OSD) of the TV screen, the details of channel you are
- For analogue TV, the message "No program information" is displayed.
- Only digital TV channels are searched and displayed. If there is no channel available,
WATCHING TV
currently watching and the channel organization information are displayed.
the message "No program information" is displayed.
PIP SETTINGS
①
57
②
⑤
⑥
⑦
1. 1.
⑧
1. 1.
1. 1.
1. 1.
1. 1.
④
4DIFEVMF 0UIFSDIBOOFMT
%
J
"
#
$
%
&
: .PWF : 0, "MM
▶
◀
③
8BUDI
.0/0
⑨
⑩
NO. Description
①
Displays the programme you are currently watching.
②
Displays the broadcasting type of the channel you are currently watching.
③
Displays the broadcasting type icon.
(e.g., HD, Dolly, Digital, etc.)
④
Displays the current date and time.
⑤
Displays the current channel or the entire programme list.
⑥
Broadcasting type icon area
⑦
Displays the name of programme you are currently watching.
⑧
Displays the running time of the programme.
- Displays the progress including start and end times of the programme.
⑨
Displays the available functions.
- If the channel you are currently watching is focused, the Watch function is displayed.
- If the channel you are not currently watching is focused, the Schedule function is displayed.
⑩
Displays the program guide for all channels.
Page 21

PIP SETTINGS
PIP function
Press the PIP button on the remote control while you are watching DVI, HDMI1,2, PisplayPort
PIP Preview
WATCHING TV
5$7,2
21
ENGLISH
DVI
PIP 4VC
57
◀▶: .PWF OK : 4FMFDU
While watching PIP, press the PIP Settings button on the remote control to display the Sub Menu.
PIP Preview
①
PIP 4FUUJOH
②
1*14VC 1PTJUJPO
"VJEP
%JTQMBZ1PSU
#BDL
3BUJP
TV
..
&YJU
: &YJU
DVI
TV
4J[F
5SBOTQBSFODZ
&YJU
③
◀▶: .PWF OK : 4FMFDU
: &YJU
Page 22

WATCHING TV
22
ENGLISH
NO. Description
①
Displays the configured OSD icon and its name.
②
PIP Sub
Selects an option for PIP Sub. (See the PIP Map below.)
PIP Map PIP Sub
current
input
DVI HDMI1 HDMI2/
DVI X X X O O
HDMI1 X X X O O
HDMI2/
MHL
DisplayPort O O O X O
TV X X X X X
X X X O O
MHL
Sets the position of the PIP Sub window. (top left, top right, bottom left or bottom right
Position
corner)
*This function is disabled when the size is set to [Balanced].
Size Sets the size of the PIP Sub window. (Small / Medium / Large / Balanced)
Selects the audio input.
Audio
*Only the items that are available under the current combination are enabled (PIP Main/PIP
Sub or Audio in).
Ratio
Sets the aspect ratio of PIP Sub.
*This function is disabled when Size is set to [Balanced].
Sets the opacity of PIP.
Transparency
(OFF/25%/50%/75%)
*This function is disabled when Size is set to [Balanced].
③
Exit button
- Exits the OSD menu.
DisplayPort TV
Page 23

MAKING CONNECTIONS
23
MAKING CONNECTIONS
Connect various external devices to the TV and switch input modes to select an external device. For more
information about an external device’s connection, refer to the manual supplied with each device.
Available external devices are: HD receivers, DVD players, VCRs, audio systems, USB storage devices, PC,
camcorders or cameras, gaming devices, and other external devices.
NOTE
If you record a TV program on a DVD recorder or VCR, make sure to connect the TV signal input
cable to the TV through a DVD recorder or VCR. For more information about recording, refer to the
manual supplied with the connected device.
The external device connection may differ from the model.
Connect external devices to the TV regardless of the order of the TV port.
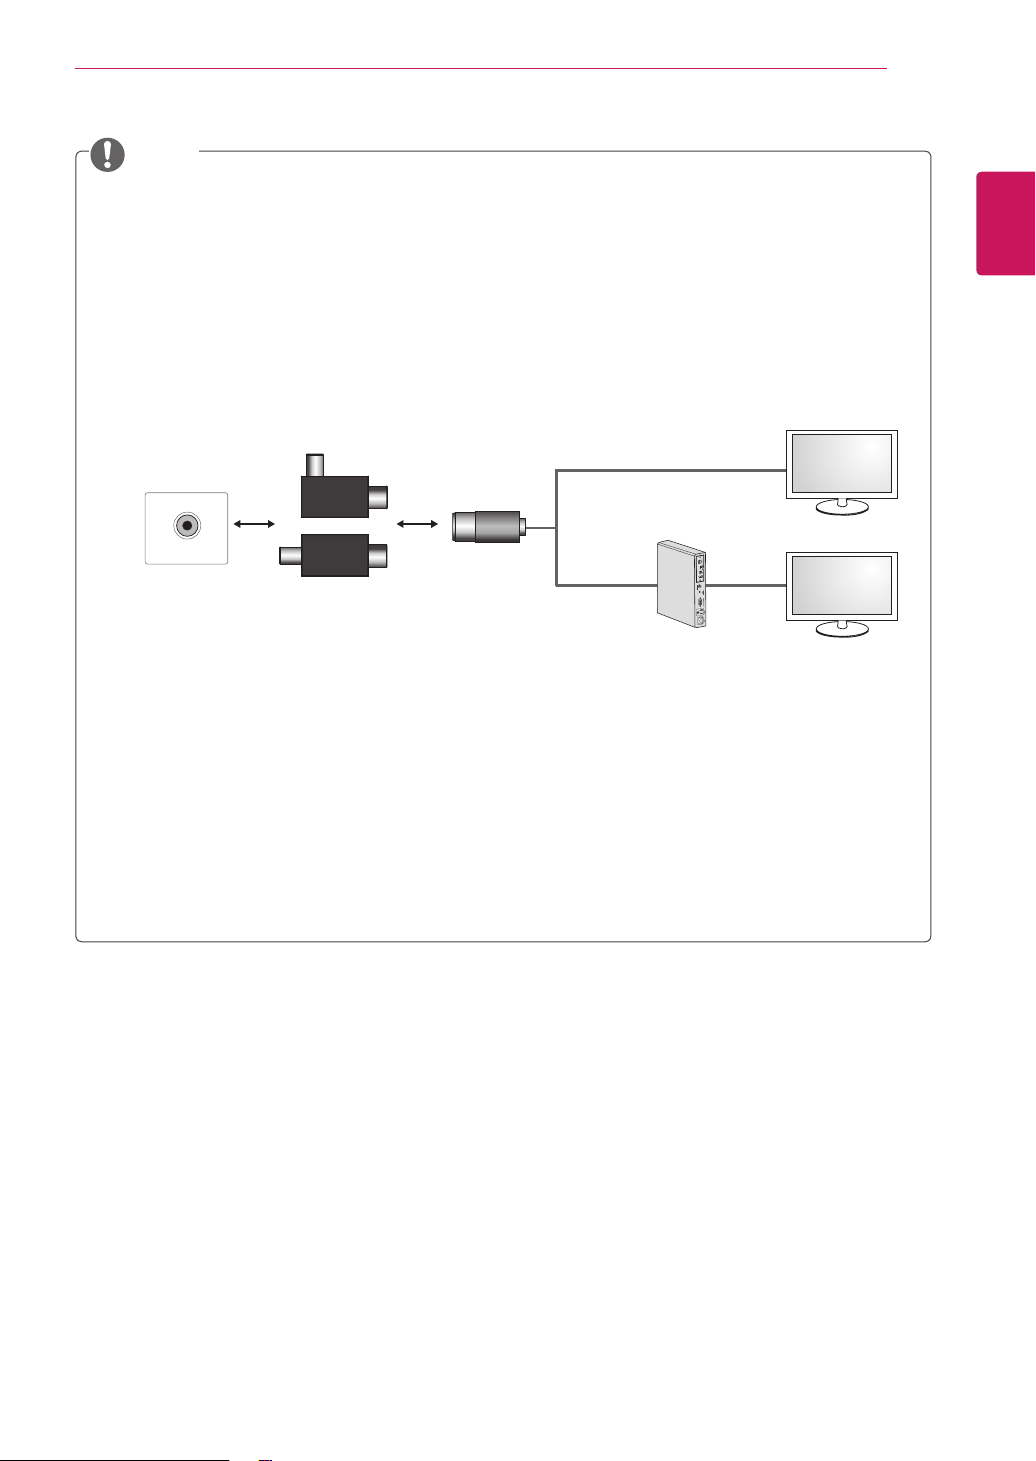
Connecting an antenna
Connect an antenna, cable or cable box to watch TV referring to the following. The illustrations may differ
from the actual accessories and an RF cable is optional.
Connect the TV to a wall antenna socket with an RF cable (75 Ω).
ENGLISH
Wall Antenna Socket
NOTE
Use a signal splitter to use more than 2 TVs.
If the image quality is poor, install a signal
amplifier properly to improve the image
quality.
If the image quality is poor with an antenna
connected, aim the antenna to the proper
direction.
Visit
http://AntennaWeb.org
information about the antenna and cable
connection.
for more
(Not Provided)
CAUTION
Make sure not to bend the copper wire of
the RF cable.
Copper wire
Complete all connections instructions
between devices, and then connect the
power cord to the power outlet to prevent
damages to your TV.
Outdoor Antenna
VHF Antenna
UHF Antenna
Page 24

24
Satellite connection
ENGLISH
**MA73V models
Connect the TV to a satellite dish to a satellite socket with a satellite RF cable (75 Ω).
MAKING CONNECTIONS
(Not Provided)
Page 25

MAKING CONNECTIONS
25
Connecting to a HD receiver, DVD Player, VCR or Gaming device
Connect a HD receiver, DVD Player, VCRor Gaming device to the TV and select an appropriate input mode.
HDMI connection
HDMI is the best way to connect a device.
Transmits the digital video and audio signals from an external device to the TV. Connect the external device
and the TV with the HDMI cable as shown on the following illustration.
NOTE
HDMI cable to the HDMI input and a digital broadcast receiver, connect the HDMI output. Video, with
sound output.
Press the INPUT button on the remote control to select either HDMI1 or HDMI2/MHL.
Dolby Digital and DTS are not supported. If no sound is coming out, set the audio output of the
connected device to PCM.
ENGLISH
(Not Provided)
DVD / Blu-Ray / HD Cable Box /
HD STB / Gaming device
Choose any HDMI input port to connect.
It does not matter which port you use.
Page 26

26
HDMI
᯦ಆ
2(
MHL
)
DVI-D connection
ENGLISH
Transmits the digital video signal from an external device to the TV. Connect the external device and the
TV with an DVI-D dual cable as shown in the following illustration. To transmit an audio signal, connect an
optional audio cable.
MAKING CONNECTIONS
NOTE
Please use the DVI-D dual cable provided.
If you do not use DVI-D dual cable, this may result in distortion on the screen.
If you do not use an optional external speaker, connect the external device to the TV with an optional
audio cable.
Connect the signal input cable and tighten it by turning the screws clockwise.
Press the INPUT button on the remote control to select DVI.
(Not Provided)
DVD / Blu-Ray / HD Cable Box /
HD STB / Gaming device
Page 27

MAKING CONNECTIONS
Component connection
Transmits the analog video and audio signals from an external device to the TV. Connect the external
device and the TV with the component cable as shown on the following illustration. To display images by
using progressive scan, make sure to use a component cable.
NOTE
If cables are installed incorrectly, it could case the image to display in black and white or with distorted
color.
Check to ensure each cable is matched with the corresponding color connection.
Press the INPUT button on the remote control to select Component.
27
ENGLISH
(Not Provided)
(Not Provided)
DVD / Blu-Ray / HD Cable Box /
HD STB / Gaming device
Page 28

28
Composite Connection
ENGLISH
Transmits the analog video and audio signals from an external device to the TV. Connect the external
device and the TV with the composite cable as shown on the following illustration.
MAKING CONNECTIONS
NOTE
Check to ensure each cable is matched with the corresponding color connection.
Press the INPUT button on the remote control to select AV.
(Not Provided)
DVD / Blu-Ray / HD Cable Box /
HD STB / Gaming device
Page 29

MAKING CONNECTIONS
Euro Scart connection
Transmits the video and audio signals from an external device to the TV. Connect the external device
and the TV with the Euro Scart cable as shown on the following illustration. To display images by using
progressive scan, make sure to use the Euro Scart cable.
29
ENGLISH
Output Type
Current
input mode
Digital TV Digital TV
Analogue TV Analogue TV
Component, AV, HDMI Analogue TV
1 TV Out : Outputs Analogue TV or Digital TV signals.
AV1 (TV Out1)
NOTE
Any Euro scart cable used must be signal shielded.
(Not Provided)
DVD / Blu-Ray / HD Cable Box
AV 1
Page 30

30
Headphone connection
ENGLISH
Transmits the headphone signal from the TV to an external device. Connect the TV with the headphone as
shown on the following illustration.
MAKING CONNECTIONS
NOTE
AUDIO menu items are disabled when connecting a headphone.
Headphone impedance: 16
Max audio output of headphone: 2.5 mW to 5.5 mW
Headphone jack size: 0.35 cm
(Not Provided)
Headphone
Page 31

MAKING CONNECTIONS
Connecting a USB Device
Connect a USB storage device such as s USB flash memory, external hard drive, MP3 player or a USB
memory card reader to the TV and access the MY MEDIA to use various multimedia files.
NOTE
It may not work when USB 3.0 devices are connected.
31
ENGLISH
or
(Not Provided)
USB
Page 32

32
Smartphone (MHL) connection
ENGLISH
Mobile High-definition Link (MHL) is an interface that allows you to play video and audio from your
smartphone on the monitor by connecting the monitor to your smartphone. Connect the smartphone to the
HDMI2/MHL port of the monitor using the supplied MHL signal cable and switch the input by pressing the
input button on the monitor.
MAKING CONNECTIONS
NOTE
This function only works for smartphones that support MHL.
- There may be compatibility issues with other mobile phones.
Use of the MHL remote control is not supported during the PIP operation.
(Not Provided)
Mobile phone
Page 33

MAKING CONNECTIONS
Connecting to a wired network
Only UK, **MA73V models
Connect the TV to a local area network (LAN) via the LAN port as shown on the following illustration
and set up the network settings. After making a physical connection, a small number of home networks
may require the TV network settings to be adjusted. For most home networks, the TV will connect to
automatically without any adjustments.
For detail information, contact your internet provider or router manual.
CAUTION
Do not connect a modular phone cable to the LAN port.
Since there are various connection methods, please follow the specifications of your
telecommunication carrier or internet service provider.
33
ENGLISH
LAN
(Not Provided)
1 2 3 4
LAN
NOTE
[**MA73V Model]
UK: LAN port is available. (The LAN port is added to support HD MHEG.)
Other areas: LAN port is not available.
Page 34

34
Connecting to a PC
ENGLISH
Your TV supports the Plug & Play* feature.
* Plug & Play: The function when a PC recognizes a connected device and requires no driver to be installed.
MAKING CONNECTIONS
NOTE
It is recommended to use an TV with the HDMI connection for the best image quality.
If you do not use an optional external speaker, connect the PC to the TV with the optional audio
cable.
If you turn the TV on when the set is cold, the screen may flicker. This is normal.
Some red, green, or blue spots may appear on the screen. This is normal.
Connect the signal input cable and tighten it by turning the screws clockwise.
Do not press the screen with your finger for a long time as this may result in temporary distortion on
the screen.
Avoid displaying a fixed image on the screen for a long period of time to prevent image burn. Use a
screensaver if possible.
When connecting the power cord to the outlet, use a grounded (3-hole) multi-socket or a grounded
power outlet.
To comply with the standard specifications of the product, make sure to use a shielded interface
cable made with a ferrite core for DVI-D and DVI-to-HDMI cables.
Page 35

MAKING CONNECTIONS
HDMI connection
Transmits the digital video and audio signals from your PC to the TV. Connect the PC and the TV with an
HDMI cable as shown in the following illustrations.
NOTE
Use a High Speed HDMI™ cable.
Please check your PC settings if you cannot hear any sound in HDMI mode.
Press the INPUT button on the remote control to select either HDMI1 or HDMI2/MHL.
Using a DVI to HDMI cable may cause compatibility issues.
HDMI PC may cause device compatibility issues.
Dolby Digital and DTS are not supported. If no sound is coming out, set the audio output of the
connected device to PCM.
35
ENGLISH
(Not Provided)
Choose any HDMI input port to connect.
It does not matter which port you use.
PC
Page 36

36
᯦ಆ
2(
MHL
)
DVI-D connection
ENGLISH
Transmits the digital video signal from your PC to the TV. Connect the PC and an TV with an DVI-D dual
cable as shown the following illustrations. To transmit an audio signal, connect an optional audio cable.
MAKING CONNECTIONS
NOTE
Please use the DVI-D dual cable provided.
If you do not use DVI-D dual cable, this may result in distortion on the screen.
If you do not use an optional external speaker, connect the PC to the TV with the optional audio cable.
Using a DVI to HDMI cable may cause compatibility issues.
Connect the signal input cable and tighten it by turning the screws clockwise.
Press the INPUT button on the remote control to select to DVI.
(Not Provided)
PC
Page 37

MAKING CONNECTIONS
37
Display Port connection
Transmits the digital video and audio signals from your PC to the TV. Connect your PC to the TV using the
display port cable as illustrated below.
NOTE
Sound may not hear depending on the DP version of your PC.
Dolby Digital and DTS are not supported. If no sound is coming out, set the audio output of the
connected device to PCM.
Press the INPUT button on the remote control to select DisplayPort.
Using a DP-to-HDMI or DP-to-DVI cable may cause compatibility issues.
HDMI signals are not converted to DP signals.
If you use a DP-to-HDMI cable, you can watch your media on a PC or other device with DP
output by using the HDMI or DVI input port.
ENGLISH
%1065
(Not Provided)
(Depending on the country)
PC
Page 38

REMOTE CONTROL
38
ENGLISH
REMOTE CONTROL
The descriptions in this manual are based on the buttons of the remote control. Please read this manual
carefully and use the TV correctly.
To replace batteries, open the battery cover, replace batteries (1.5 V AAA) matching and ends to the
label inside the compartment, and close the battery cover.
To remove the batteries, perform the installation actions in reverse.
Make sure to point the remote control to the remote control sensor on the TV.
Image shown may differ from your TV.
CAUTION
Do not mix old and new batteries, as this may
damage the remote control.
(POWER)
Turns the TV on or off.
CAUTION
Remote control
signal receiver
Make sure to point the
remote control at the sensor
on the TV.
TV/RAD
Selects Radio, TV and DTV
programme.
SUBTITLE
Recalls your preferred subtitle
in digital mode.
Number buttons
Enters numbers.
LIST
Accesses the saved
programme list.
+
Adjusts the volume level.
-
INPUT
Changes the input source.
AD
Switches the Audio
Description On or Off.
TV/PC
Selects TV or PC mode.
Q.VIEW
Returns to the previously
viewed programme.
P
Selects a programme.
PAGE
Moves to the previous or next
screen.
FAV
Accesses your favourite
programme list.
GUIDE
Shows programme guide.
MUTE
Mutes all sounds.
Page 39

SETTINGS
Accesses the main menu.
PIP SETTINGS
PIP Displays the Menu screen
for the PIP mode.
Navigation buttons
Scrolls through menus or
options.
OK
Selects menus or options and
confirms your input.
BACK
Returns to the previous level.
RATIO
Adjusts the ratio.
PIP SIZE
Changes the size of the sub
screen in the PIP mode.
PIP
Turns the PIP mode on or off.
PIP SETTINGS
5$7,2
PIP SIZE
REMOTE CONTROL
39
Teletext buttons
These buttons are used for
teletext.
ⓘ
INFO
Views the information of the
currently program and the
screen.
Q.MENU
Accesses the quick menus.
EXIT
Clears all on-screen displays
and return to TV viewing.
Control buttons
Controls the MY
MEDIA menus(USB).
ENGLISH
Colored buttons
These access special
functions in some menus.
Backlight
Adjusts the brightness of
the screen by controlling the
screen backlight.
Page 40

INSTALLING SCREEN SPLIT
40
ENGLISH
INSTALLING SCREEN SPLIT
Insert the the owner's manual CD included in the product package into your PC's CD driver and install the
screen split.
1
2
Check "I accept the terms of the agreement"
on the License Agreement screen and then
click the [Next] button.
Select the program that you want to install.
NOTE
If you run Screen Split, the Screen Split icon [
] appears in the system tray at the right bottom
of the PC screen.
Right-click the Screen Split icon and select a
layout you want.
Page 41

CUSTOMIZING SETTINGS
41
CUSTOMIZING SETTINGS
Accessing the Main Menus
The menus displayed on the TV screen may vary depending on the selected input mode.
TV, Component, AV
Press SETTINGS to access the main menus.
1
Press the Navigation buttons to scroll to one of the following menus and press OK.
2
Press the Navigation buttons to scroll to the setting or option you want and press OK.
3
When you are finished, press EXIT.
4
When you return to the previous menu, press BACK.
PICTURE
AUDIO Adjusts the sound quality, effect or volume level.
SETUP Sets up and edit programmes.
TIME Sets the time, date or Timer feature.
Adjusts the image size, quality or effect.
ENGLISH
LOCK Locks or unlocks channels and programs.
OPTION Customizes the general settings.
INPUT
NETWORK Sets the network. (Apply: UK country **MA73V models)
MY MEDIA Using integrated media feature.
Views the input sources with their labels. (Except: UK country **MA73V models)
Press RED button to access the Customer Support menus.
Press OK( ) to set your picture settings.
Customer Support
Customer Support
Using Customer Support feature.
Software Update
Picture Test
Sound Test
Signal Test
Product/Service Info.
Network Test (Apply: UK country **MA73V models)
User Guide
Exit
Page 42

42
ENGLISH
To adjust Aspect Ratio
CUSTOMIZING SETTINGS
PICTURE
PICTURE
SETTINGS> PICTURE>
Aspect Ratio
16:9 Resizes the image ratio to fit 16:9 screen.
21:9 Resizes the image ratio to fit 21:9 screen.
Just Scan Displays video images in the original size without removing parts of the edge of the image.
Full Wide When TV receives the wide screen signal, it will let you adjust the picture horizontally or
4:3 Resizes the image ratio to fit 4:3 screen.
14:9 You can view a picture format of 14:9 or a general TV programme in the 14:9 mode. The
Zoom Resizes the image to fit the screen width. The top and bottom parts of the image may be
Cinema Zoom 1
In DTV, Component, HDMI, and DVI (over 720p) mode, Just Scan is available.
vertically, in a linear proportion,to fill the entire screen fully. 4:3 and 14:9 video is supported
in full screen without any video distortion through DTV input.
14:9 screen is viewed in the same way as in 4:3, but is moved up or down.
cut off.
Formats an image to the cinemascope ratio (2.35:1) and zooms in on the ratio.
Description
To select Picture Mode
SETTINGS> PICTURE>
Picture Mode
Select the picture mode optimized for the viewing environment or the program.
Depending on input signal, available range of picture modes may differ.
ꕋ
Expert mode is for picture tuning professionals to control and fine-tune using a specific image. For normal images,
the effects may not be drastic.
Vivid / Standard /
Cinema / Game
Eco The Energy Saver feature changes settings on the TV to reduce power consumption.
ꕋ
Expert 1
ꕋ
Expert 2
Select a Picture Mode of your choice.
Menu for adjusting picture quality that allows experts and amateurs to enjoy the best TV
viewing. This menu for adjustment is provided for ISF-certified picture tuning professionals.
(ISF logo can only be used on ISF-certified TVs.)
ISFccc: Imaging Science Foundation Certified Calibration Control
Description
To fine-tune picture mode
SETTINGS> PICTURE> Picture
Mode> Backlight / Contrast /
Brightness / Sharpness / Color /
Tint / Color Temp.
First select a Picture Mode of your choice.
Depending on the input signal or other picture settings, the range of detailed items for adjustment may differ.
Backlight Adjusts the screen brightness by changing the brightness of the panel.
Contrast
Brightness
Sharpness Adjusts the sharpness of the screen.
Color Adjusts the color depth of the screen.
Tint Adjusts the gamma, color temperature and color of the screen.
Color Temp. Adjusts the overall tint of the picture.
Adjusts the color contrast and brightness of the screen.
In Expert mode, you can fine-tune the picture using the Gamma or Method
options.
Description
Page 43

CUSTOMIZING SETTINGS
To set Expert Control
SETTINGS> PICTURE>
Picture Mode> Advanced
Control / Expert Control
For each picture mode, screen can be calibrated; or for a special screen, picture settings can be adjusted.
Select the desired Picture Mode. Depending on input signal or other picture settings, the range of detailed items for
adjustment may differ.
Dynamic Contrast Adjusts the contrast to the optimal level according to the image’s brightness.
Dynamic Color Adjusts colors to make the image appear in more natural colors.
Skin Color Skin color spectrum can be separately set to implement the skin color defined by the user.
Grass Color Natural color spectrum (meadows, hills, etc.) can be separately set.
Sky Color Sky color is set separately.
Gamma Sets the gradation curve according to the output of picture signal in relation to the input
SETTINGS> PICTURE>
Picture Mode>Expert
Control
Dynamic Contrast Adjusts the contrast to the optimal level according to the image’s brightness.
Color Gamut Selects the range of colors that can be expressed.
Edge Enhancer Shows clearer and distinctive yet natural edges of the video.
Expert Pattern Patterns used for expert adjustment.
Color Filter Filters a specific color spectrum in RGB colors to fine-tune color saturation and hue
Color Temperature Adjusts the overall tone of the screen as desired. In Expert mode, detailed fine-tuning can
Color Management
System
signal.
accurately.
be set via Gamma method, etc.
This system is used by experts to adjust color with a test pattern. They can select from six
color areas (Red/ Green/Blue/Cyan/Magenta/Yellow) without affecting other colors. For
normal images, adjustments may not result in noticeable color changes.
Description
Description
43
ENGLISH
To set Picture Option
SETTINGS> PICTURE>
Picture Mode>
Picture
Description
Option
Adjusts detailed setting for images.
Noise Reduction Reduces screen noise in the video.
MPEG Noise Reduction Eliminates noise generated while creating digital picture signals.
Black Level Adjusts the screen’s brightness and contrast to fit them to the input picture’s black level by
Real Cinema Helps maintain the optimal state of the screen.
Motion Eye Care Saves power consumption by adjusting the brightness corresponding to the movement of
using the blackness (black level) of the screen.
the image on the screen.
To set Picture Reset
SETTINGS> PICTURE>
Picture Mode>
Picture
Description
Reset
Initializes picture settings that the user customizes.
Each picture mode is reset. Select the desired picture mode to reset.
Page 44

44
ENGLISH
To use Sound Mode
To adjust User Setting function
To set various sound options
To use Virtual Surround feature
CUSTOMIZING SETTINGS
AUDIO
SETTINGS> AUDIO>
Sound Mode
Adjusts TV audio to an optimal level based on a selected sound mode.
Standard Suitable for all types of video.
Music / Cinema / Sport /
Game
SETTINGS> AUDIO>
Sound Mode> User
Setting
Adjusts the volume to a level of your choice using the User EQ.
Reset Resets voice options that the user has changed.
SETTINGS> AUDIO>
Virtual Surround
LG’s proprietary audio processing technology allows 5.1ch-like surround sound from two speakers.
When Clear Voice II is set to On, Virtual Surround cannot be selected.
Sets audio optimized for a specific genre.
Description
Description
Description
AUDIO
To adjust Clear Voice ll function
SETTINGS> AUDIO>
Clear Voice ll
Boosts voice clarity from the TV.
Description
To set Auto Volume
SETTINGS> AUDIO>
Auto Volume
Sets Auto Volume to ON and volume output from channel to channel is automatically adjusted for convenient TV
watching when clicking through different channels.
Description
To set sound out
SETTINGS> AUDIO>
Sound Out
TV Speaker Sound is output through the TV speaker.
Headphone Sound is output through the headphone connected to the earphone/headphone port.
Description
To set AV Sync
SETTINGS> AUDIO> AV
Sync. Adjust
Synchronizes unmatched video and audio. Select AV Sync. Adjust to On to synchronize audio output (TV speaker) with
the video.
Description
To adjust audio balance
SETTINGS> AUDIO>
Balance
Adjusts left/right audio balance.
Description
Page 45

CUSTOMIZING SETTINGS
To use Sound Optimizer function
SETTINGS> AUDIO>
Sound Optimizer
Allows optimized sound for individual TV installation.
Normal General sound mode.
Wall Mount Type Optimizes sound for a wall-mounted TV.
Stand Type Optimizes sound for a stand-mounted TV.
Description
LOCK
LOCK
To set the password
SETTINGS> LOCK>
Set Password
Set or change the TV password.
The initial password is set as [0000].
Description
To lock the system
SETTINGS> LOCK>
Lock System
Permits only specific programs by blocking channels.
At first, select Lock System to ON.
Block Programme Blocks programmes with content inappropriate for children. Programmes can be selected
but the screen is blank and the audio is muted. To watch a locked programme, enter the
password.
Parental Guidance This function operates according to information from the broadcaster. Therefore if the signal
has incorrect information, this function does not operate. Prevents children from watching
certain adult TV programmes according to the ratings limit set. Enter a password to watch a
blocked programme. Ratings differ by country.
Description
45
ENGLISH
To use Key Lock
SETTINGS> LOCK>
Key Lock
Locks control buttons on the TV.
Key Lock function remains intact even in case of power outage or when the power cord is removed from the wall
socket.
Key Lock function can only be set by remote control, and not by the button on the TV.
Even with Key Lock ON, TV’s buttons can turn on the power.
Description
Page 46

46
DVI, HDMI1, HDMI2/MHL, DisplayPort
ENGLISH
1
2
3
4
Brightness
CUSTOMIZING SETTINGS
Press SETTINGS to access the main menus.
Press the Navigation buttons to scroll to one of the following menus and press OK.
Press the Navigation buttons to scroll to the setting or option you want and press OK.
When you are finished, press EXIT.
When you return to the previous menu, press BACK.
100 70 DVI Wide
Contrast Input Ratio Func. PIP
All
Picture Color Settings Reset Exit
Each option is described below.
Menu Description
Brightness
Contrast
Input Selects the current input mode.
Ratio Adjusts the screen ratio.
Func.
PIP Displays the screens of two input modes on one monitor.
Picture Adjusts the sharpness, black level, and response time of the screen.
Color Adjusts the gamma, color temperature and color balance of the screen.
Settings Sets the Language, PC/AV mode, Main Audio, Standby Light, DP 1.2 and Key Lock.
Reset Resets to the default settings as of the day of purchase.
Exit Exits the OSD menu.
Adjusts the brightness and contrast of the screen.
Adjusts SES and picture mode.
Page 47

CUSTOMIZING SETTINGS
Ratio Settings
Press SETTINGS to access the main menus.
1
Press the Navigation buttons to scroll to one of the following menus and press OK.
2
Press the Navigation buttons to scroll to the setting or option you want and press
3
OK.
When you are finished, press EXIT.
4
When you return to the previous menu, press BACK.
Sub Menu
Wide Original 1:1Cinema1 Cinema2 Back Exit
Each option is described below.
47
ENGLISH
Ratio
Menu > Ratio Description
Wide Displays the video in wide-screen, regardless of the video signal input.
Cinema1 Enlarges the screen with an aspect ratio of 21:9. (at 1080p)
Cinema2 Enlarges the screen with an aspect ratio of 21:9 including the black box area at the bottom for
Original Displays a video according to the input video signal aspect ratio.
1:1
Back
Exit
subtitles. (at 1080p)
The aspect ratio is not adjusted from the original.
Moves to the previous OSD screen.
Exits the OSD menu.
NOTE
The display may look the same for Wide, Original and 1:1 options at the recommended resolution
(2560 x 1080).
The ratio is disabled in the interlaced signal.
Page 48

48
ENGLISH
1
2
3
4
Sub Menu
Each option is described below.
CUSTOMIZING SETTINGS
Func. Settings
Press SETTINGS to access the main menus.
Press the Navigation buttons to scroll to one of the following menus and press OK.
Press the Navigation buttons to scroll to the setting or option you want and press OK.
When you are finished, press EXIT.
When you return to the previous menu, press BACK.
Off Custom
SES Picture
Back Exit
Mode
Func.
Menu > Func. Description
SES
(Super Energy
Saving)
Picture Mode Changes depending on the value of PC/AV Mode in Menu > Settings.
Back Moves to the previous OSD screen.
Exit Exits the OSD menu.
On Enables the SES function, which allows you to save energy according to the SES
efficiency level.
Off Disables the SES function.
PC Mode
Custom Allows the user to adjust each element. The color mode of the main menu can be
adjusted.
Text Optimizes the screen for document processing.
Photo Optimizes the screen to view photos.
Cinema Optimizes the screen to improve the visual effects of a video.
Game Optimizes the screen for gameplay.
AV Mode
Custom Allows the user to adjust each element. The color mode of the main menu can be
adjusted.
Standard Optimizes the screen to display normal picture quality.
VIVID 1 Optimizes the screen for vivid visual effects.
VIVID 2 Optimizes the screen for more vivid visual effects.
Cinema Optimizes the screen to improve the visual effects of a video.
Page 49

CUSTOMIZING SETTINGS
PIP settings
Press SETTINGS to access the main menus.
1
Press the Navigation buttons to scroll to one of the following menus and press OK.
2
Press the Navigation buttons to scroll to the setting or option you want and press OK.
3
When you are finished, press EXIT.
4
PIP Preview
49
ENGLISH
PIP
Each option is described below.
Selects an option for PIP Sub. (See the PIP Map below.)
PIP Map PIP Sub
PIP Sub
current
input
DVI
PIP 4VC
57
%JTQMBZ1PSU
#BDL
◀▶: .PWF OK : 4FMFDU
DVI HDMI1 HDMI2/
DVI X X X O O
HDMI1 X X X O O
HDMI2/
MHL
DisplayPort O O O X O
TV X X X X X
X X X O O
MHL
DisplayPort TV
TV
..
&YJU
: &YJU
Page 50

50
ENGLISH
1
2
3
4
Sub Menu
CUSTOMIZING SETTINGS
Picture
Press SETTINGS to access the main menus.
Press the Navigation buttons to scroll to one of the following menus and press OK.
Press the Navigation buttons to scroll to the setting or option you want and press OK.
When you are finished, press EXIT.
When you return to the previous menu, press BACK.
Picture
Low5 Middle
Sharpness Black Level Response Time
Picture
Reset Back Exit
Each option is described below.
Menu > Picture Description
Sharpness Adjusts the sharpness of the screen.
Black Level Sets the offset level (for HDMI only).
Response Time Sets a response time for displayed pictures based on the speed of the screen. For a normal
Reset Resets the Picture function to the default settings.
Back Moves to the previous OSD screen.
Exit Exits the OSD menu.
Offset: as a reference for a video signal, this is the darkest color the monitor can display.
High The picture of the screen gets brighter.
Low The picture of the screen gets darker.
environment, it is recommended that you use Normal. For a fast-moving picture, it is
recommended that you use High.
Setting to High may cause image sticking.
High Sets the response time to High.
Middle Sets the response time to Middle.
Low Sets the response time to Low.
Page 51

CUSTOMIZING SETTINGS
Color
Press SETTINGS to access the main menus.
1
Press the Navigation buttons to scroll to one of the following menus and press OK.
2
Press the Navigation buttons to scroll to the setting or option you want and press OK.
3
When you are finished, press EXIT.
4
When you return to the previous menu, press BACK.
Sub Menu
51
ENGLISH
Color
Color
Reset Back Exit
Gamma
CustomGamma 1 50 50 50
Color Temp
Red Green Blue
Six Color
Each option is described below.
Menu > Color Description
Gamma Custom gamma setting: When using the gamma 0, gamma 1, and gamma 2 monitor settings, higher
Color Temp Selects the factory default picture color.
Red / Green /
Blue
Six Color Meets the user requirements for colors through adjusting the color and saturation of the six colors (red,
Reset Returns the color settings to the default settings.
Back Moves to the previous OSD screen.
Exit Exits the OSD menu.
gamma settings mean a brighter image is displayed and vice versa.
Warm: Sets the screen color to a reddish tone.
Medium: Sets the screen color between a red and blue tone.
Cool: Sets the screen color to a bluish tone.
Custom You can customize the picture color.
You can customize the picture color using Red, Green, and Blue colors.
green, blue, cyan, magenta, yellow) and saving the settings.
Hue Adjusts tone of the screen.
Saturation Adjusts the saturation of the screen colors. The lower the value, less saturated and
bright the colors become. The higher the value, the more saturated and dark the colors
become.
Page 52

52
ENGLISH
1
2
3
4
Sub Menu
CUSTOMIZING SETTINGS
Settings
Press SETTINGS to access the main menus.
Press the Navigation buttons to scroll to one of the following menus and press OK.
Press the Navigation buttons to scroll to the setting or option you want and press OK.
When you are finished, press EXIT.
When you return to the previous menu, press BACK.
Settings
Language
AV On OFF OFF
PC/AV Mode
DP
Main Audio
Stanby
Light
DP1.2
Key Lock
Off
Back Exit
Each option is described below.
Menu > Settings Description
Language Sets the menu screen to the desired language.
PC/AV Mode Enabled in HDMI mode only.
Main Audio The sound coming through the Audio In port of the digital input signal (HDMI, HDMI2/MHL,
Stanby Light Turns the power indicator on the front side of the monitor on/off.
DP1.2
(DisplayPort1.2)
Key Lock Prevents incorrect key input.
Back Moves to the previous OSD screen.
Exit Exits the OSD menu.
Display Port) can be heard through the monitor's speakers.
On The Stanby Light is automatically turned on.
Off The Stanby Light is turned off.
Activates or deactivates DisplayPort 1.2.
NOTE
Make sure to activate or deactivate according to the DisplayPort version supported by the
graphics card. Set it to off if it is not compatible with the graphics card.
On DisplayPort 1.2 is activated.
Off DisplayPort 1.2 is deactivated.
On Key input is disabled.
Off Key input is enabled.
Page 53

USING THE USER GUIDE
53
USING THE USER GUIDE
NOTE
This function is available only in TV, AV or
Component input mode.
Accessing the On-Screen User Guide
Press SETTINGS to access the main menus.
1
Press the RED button to access the Customer
2
Support menus.
Press the Navigation button to scroll to User
3
Guide and press OK.
Press the Navigation buttons to scroll to the
4
option you want and press OK.
When you are finished, press EXIT.
5
When you return to the previous menu, press
BACK.
Image shown may differ from your TV.
User Guide
3
2
To set time options
To set language
CHANNEL Setting
PICTURE, SOUND Setting
OPTION
Advanced Function
Information
To set caption
To set other options
1
Allows to select the category you want.
1
2
Allows to select the item you want.
You can use ꕌ/ꕍto move between pages.
3
Allows to browse the description of the
function you want from the index.
User Guide
PROGRAMME Setting
PICTURE, SOUND Setting
OPTION
Advanced Function
Information
1
OPTION > To set language
SETTINGS OPTION Language
You can select the language of the menu displayed on the screen and the
digital sound broadcasting.
Menu Language : Selects a language for the display text.
Audio Language [In Digital Mode Only] : Select the desired language
when watching digital broadcasting containg several
voice languages.
Subtitle Language [In Digital Mode Only] : Use the Subtitle function when
two or more subtitle languages are broadcast.
✎ If subtitle data in a selected language is not
broadcast, the default language subtitle will
be displayed.
Zoom In
2
Close
ENGLISH
SETTINGS OPTION Language
You can select the language of the menu displayed on the screen and the
digital sound broadcasting.
Menu Language : Selects a language for the display text.
Audio Language [In Digital Mode Only] : elect the desired language
Subtitle Language [In Digital Mode Only] : Use the Subtitle function when
1
Shows the description of the selected menu.
when watching digital broadcasting containg several
voice languages.
two or more subtitle languages are broadcast.
✎ If subtitle data in a selected language is not broad-
cast, the default language subtitle will be displayed.
2
Zoom Out
Close
You can use ꕌ/ꕍto move between pages.
2
Zooms in or out the screen.
Page 54

MAINTENANCE
54
ENGLISH
MAINTENANCE
Cleaning Your TV
Clean your TV regularly to keep the best performance and to extend the product's lifespan.
Screen and frame
To remove dust, wipe the surface with a dry and soft cloth.
To remove major dirt, wipe the surface with a soft cloth dampened in clean water or a diluted mild
detergent. Then wipe immediately with a clean and dry cloth.
CAUTION
Make sure to turn the power off and disconnect the power cord and all other cables first.
When the TV is left unattended and unused for a long time, disconnect the power cord from the wall
outlet to prevent possible damage from lightning or power surges.
CAUTION
Do not push, rub, or hit the surface with your fingernail or a sharp object, as this may result in
scratches on the screen and image distortions.
Do not use any chemicals, such as waxes, benzene, alcohol, thinners, insecticides, air fresheners,
lubricants, as these may damage the screen’s finish and cause discolorations.
Cabinet and stand
To remove dust, wipe the cabinet with a dry and soft cloth.
To remove major dirt, wipe the cabinet with a soft cloth dampened in a clean water or water containing a
small amount of mild detergent.
CAUTION
Do not spray liquid onto the surface. If water enters the TV, it may result in fire, electric shock, or
malfunction.
Do not use any chemicals as this may deteriorate the surface.
Power cord
Remove the accumulated dust or dirt on the power cord regularly.
Page 55

MAINTENANCE
Preventing “Image burn” or “Burn-in” on your TV screen
If a fixed image displays on the TV screen for a long period of time, it will be imprinted and become
a permanent disfigurement on the screen. This is “image burn” or “burn-in” and not covered by the
warranty.
If the aspect ratio of the TV is set to 4:3 for a long period of time, image burn may occur on the
letterboxed area of the screen.
Avoid displaying a fixed image on the TV screen for a long period of time (2 or more hours for LCD)
to prevent image burn.
55
ENGLISH
Page 56

TROUBLESHOOTING
56
TROUBLE SHOOTING
ENGLISH
Nothing is displayed on the screen.
Is the monitor's power cord plugged
in?
Is the power indicator on?
Is the power indicator displaying
red?
Is the power indicator blinking?
Check if the power cord is correctly plugged in to the power outlet.
Check the power cable connection and press the power button.
Check that the connected input is enabled (Menu - Input).
If the monitor is in power-saving mode, move the mouse or press any
key on the keyboard to switch the display on.
Check if the computer is turned on.
Is the "OUT OF RANGE" message
displayed?
This occurs when signals transferred from the PC (video card) are out
of the horizontal or vertical frequency range of the monitor. Please
see the "Product Specification" section of this manual to set the
appropriate frequency.
Is the "CHECK SIGNAL
CONNECTION" message is
displayed?
The "OSD LOCKED" message is displayed.
Are some functions unavailable
when pressing the Menu button?
The screen retains an image.
Does image sticking occur even
when the monitor is turned off?
This is displayed when the signal cable between the PC and the
monitor is missing or disconnected. Check the cable and reconnect.
The OSD is locked. Go to Menu > Settings and set "OSD Lock" to
Unlock.
Displaying a still image for a prolonged time may cause damage to
the screen, resulting in the retention of the image.
Use a screen saver to protect the screen when using the monitor for a
prolonged period of time.
NOTE
Vertical Frequency: In order to display an image, the screen must be refreshed dozens of times per
second like a fluorescent lamp.
The number of times the screen is refreshed per second is called vertical frequency or refresh rate
and is represented by Hz.
Horizontal Frequency: The time it takes to display one horizontal line is called the horizontal cycle.
The number of horizontal lines displayed in one second can be calculated by dividing one by the
horizontal cycle. This is called horizontal frequency and is represented by kHz.
NOTE
Check if the video card's resolution or frequency is within the range allowed by the monitor and set to
the recommended (optimal) resolution in Control Panel > Display > Settings.
Failing to set the video card to the recommended (optimal) resolution may result in blurred text, a
dimmed screen, a truncated display area or misalignment of the display.
The configuration procedure may differ depending on your computer and/or operating system. Also,
some video cards may not support certain resolutions. If this is the case, contact the manufacturer of
the computer or video card for assistance.
Some video cards may not support the 2560x1080 resolution.
If the resolution cannot be displayed, contact the manufacturer of your video card.
The display color is abnormal.
Does the display appear discolored
(16 color)?
Does the display color appear
unstable or in monochrome?
Are there spots on the screen?
Set the color to 24 bit (true color) or higher. In Windows, go to Control
Panel > Display > Settings > Color Quality.
Check if the signal cable is connected properly. Reconnect the cable
or reinsert the PC's video card.
When using the monitor, pixilated spots (red, green, blue, white or
black) may appear on the screen. This is normal for the LCD screen. It
is not an error nor is it related to the monitor's performance.
Page 57

SPECIFICATIONS
57
SPECIFICATIONS
Satellite Digital TV
Television system DVB-T/T2
DVB-C
DVB-S/S2
Programme coverage VHF, UHF
C-Band, Ku-Band
Maximum number of
storable programmes
1 Only DVB-T2 support models
2 Except for Nordic countries (Denmark, Finland, Norway and Sweden)
Panel Screen Type 730 mm Wide (29 inch)
Video Signal Max. Resolution 2560 × 1080 @ 60 Hz
Input Connector 29MA73D
Power Rated Voltage 19 V ______ A
AC/DC Adapter Manufacturer : LG Innotek, Model : PSAB-L206A
Tilt Tilt Range -5 to 20°
Dimensions (Width x Depth x Height)
Weight
Environmental
conditions
6,000 1,500
Pixel Pitch 0.2628 mm (H) x 0.2628 mm (V)
Recommended Resolution 2560 × 1080 @ 60 Hz
Horizontal Frequency 30 kHz to 90 kHz
Vertical Frequency 56 Hz to 75 Hz
Synchronization Type Digital
Power Consumption On Mode : 52 W (typ.)
Operating Temperature
Operating Humidity
Storage Temperature
Storage Humidity
1
Digital TV Analogue TV
DVB-T
DVB-C
VHF, UHF VHF: E2 to E12, UHF : E21 to E69,
Visible diagonal size : 730 mm
TV, PC Audio In, Component, AV1(SCART), AV2(CVBS),
HDMI*2, USB, DP, DVI-D, PCMCIA
29MA73V
TV, PC Audio In, Component, AV(CVBS), HDMI*2, USB,
DP, DVI-D, LAN(Only UK)
Off Mode 0.5 W
Manufacturer : APD, Model : DA-65F19
With Stand
699.7 mm x 197.2 mm x 404.5 mm
6.0 kg
Without Stand
699.7 mm x 68.5 mm x 327.5 mm
5.4 kg
10 °C to 35 °C
20 % to 80 %
-10 °C to 60 °C
5 % to 90 %
PAL/SECAM B/G/D/K,
PAL I/I’, SECAM L/L’
CATV: S1 to S21, HYPER: S21 to S47
2
ENGLISH
Product specifications shown above may be changed without prior notice due to upgrade of product
functions.
Page 58

SPECIFICATIONS
58
ENGLISH
DVI-D / HDMI / DisplayPort(PC) supported mode
Resolution
720 x 400 31.468 70.080
640 x 480 31.469 59.940
640 x 480 37.500 75.000
800 x 600 37.879 60.317
800 x 600 46.875 75.000
1024 x 768 48.363 60.004
1024 x 768 60.023 75.029
1152 x 864 67.500 75.000
1280 x 720 45.000 60.000
1280 x 1024 63.981 60.020
1280 x 1024 79.976 75.025
1600 x 900 60.000 60.000
1680 x 1050 65.290 59.954
1920 x 1080 67.500 60.000
2560 x 1080 66.700 60.000
Horizontal
Frequency(kHz)
Vertical
Frequency(Hz)
NOTE
The recommended resolution is
2560x1080/60Hz. However, it may not be
supported depending on your PC or AV
model.
HDMI / MHL(VIDEO) supported mode
Resolution
720 x 480 31.500 60.000
720 x 576 31.250 50.000
1280 x 720 37.500 50.000
1280 x 720 45.000 60.000
1920 x 1080 33.750 60.000
1920 x 1080 28.125 50.000
1920 x 1080 27.000 24.000
1920 x 1080 33.750 30.000
1920 x 1080 56.250 50.000
1920 x 1080 67.500 60.000
Horizontal
Frequency(kHz)
Vertical
Frequency(Hz)
Component supported mode
Resolution
720 x 480 15.730 59.940
720 x 480 15.750 60.000
720 x 576 15.625 50.000
720 x 480 31.470 59.940
720 x 480 31.500 60.000
720 x 576 31.250 50.000
1280 x 720 44.960 59.940
1280 x 720 45.000 60.000
1280 x 720 37.500 50.000
1920 x 1080 33.720 59.940
1920 x 1080 33.750 60.000
1920 x 1080 28.125 50.000
1920 x 1080 56.250 50.000
1920 x 1080 67.432 59.940
1920 x 1080 67.500 60.000
Horizontal
Frequency(kHz)
Vertical
Frequency(Hz)
Component port connecting information
Component ports on the
TV
Video output ports
on DVD player
Y P
Y P
Y B-Y R-Y
Y Cb Cr
Y Pb Pr
B
B
NOTE
Avoid keeping a fixed image on the set’s screen
for prolonged periods of time. The fixed image
may become permanently imprinted on the
screen. Use a screen saver when possible.
There may be interference relating to resolution,
vertical pattern, contrast or brightness in
PC mode. Change the PC mode to another
resolution or change the refresh rate to another
rate or adjust the brightness and contrast on
the menu until the picture is clear. If the refresh
rate of the PC graphic card can not be changed,
change the PC graphic card or consult the
manufacturer of the PC graphic card.
The synchronization input waveform for
Horizontal and Vertical frequencies are separate.
Connect the audio cable from the PC to the
Audio input on the TV.
If using a sound card, adjust PC sound as
required.
P
R
P
R
Page 59

Make sure to read the Safety Precautions
before using the product.
Keep the Owner’s Manual (CD) in an
accessible place for future reference.
The model and serial number of the TV is
located on the back and one side of the
TV. Record it below should you ever need
service.
MODEL
SERIAL
To obtain the source code under GPL, LGPL,
MPL and other open source licenses, that is
contained in this product, please visit http://
opensource.lge.com.
In addition to the source code, all referred
license terms, warranty disclaimers and
copyright notices are available for download.
LG Electronics will also provide open source
code to you on CD-ROM for a charge covering
the cost of performing such distribution (such
as the cost of media, shipping and handling)
upon email request to opensource@lge.com.
This offer is valid for three (3) years from the
date on which you purchased the product.
 Loading...