

Page 1
ENGLISH
OWNER’S MANUAL
LED TV*
* LG LED TV applies LCD screen with LED backlights.
Please read this manual carefully before operating the your TV and
retain it for future reference.
28LN500B
www.lg.com
Page 2

TABLE OF CONTENTS
2
ENGLISH
TABLE OF CONTENTS
3 LICENSES
4 INSTALLATION PROCEDURE
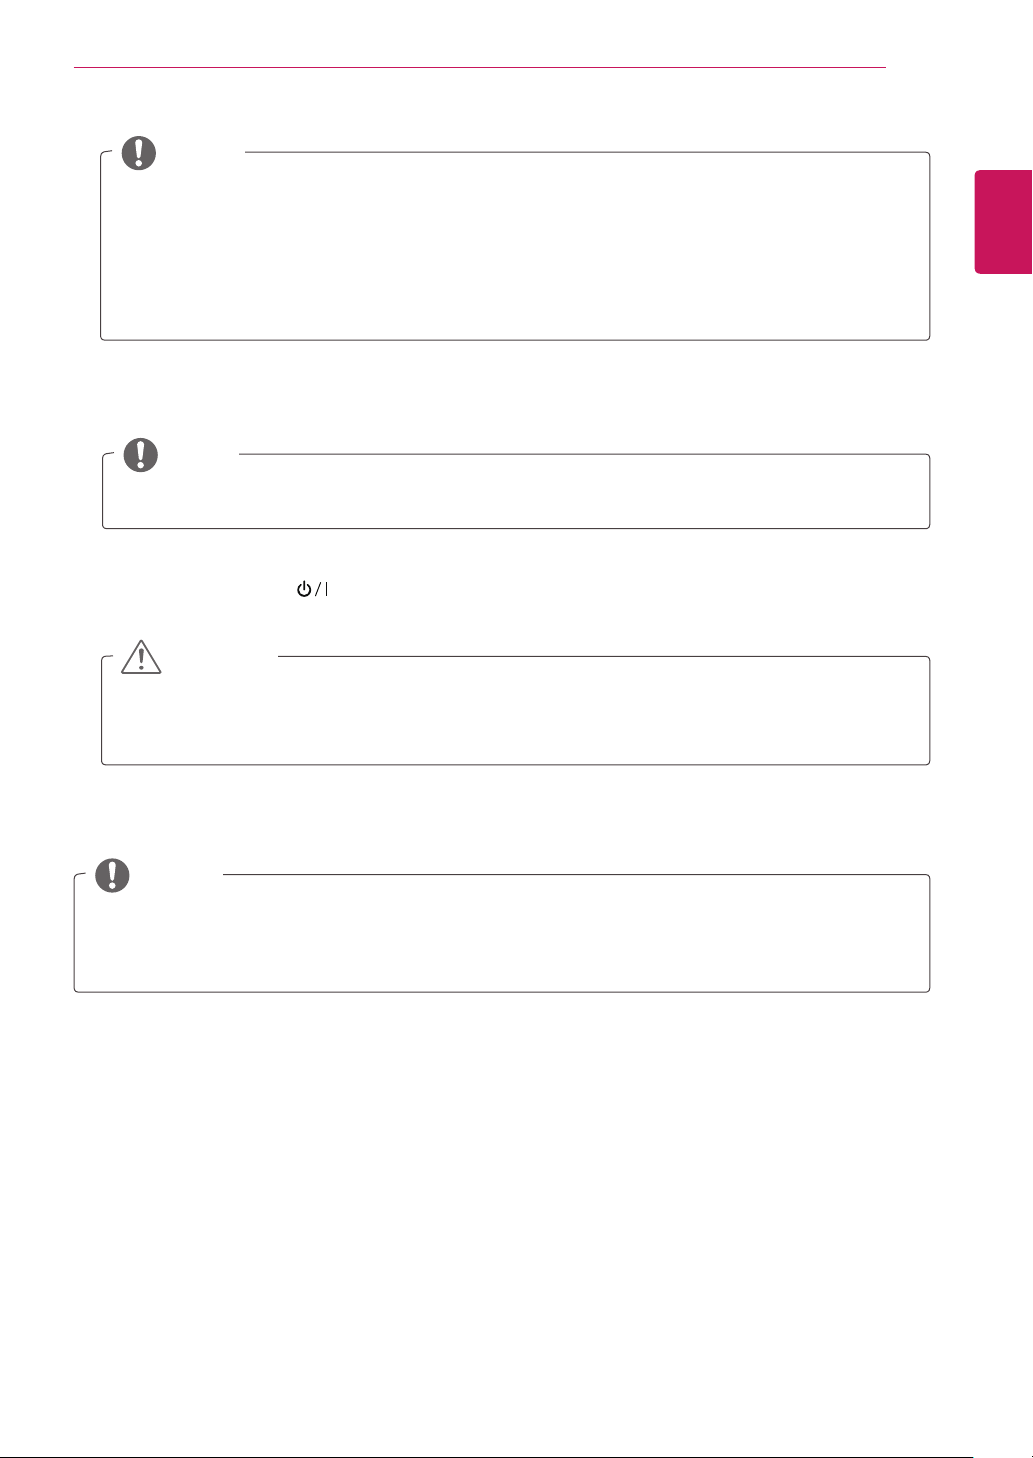
5 ASSEMBLING AND PREPARING
5 Unpacking
7 Parts and buttons
9 Lifting and moving the TV
10 Setting up the TV
10 - Attaching the Stand Base
10 - Detaching the Stand Base
12 - Mounting on a table
13 - Tidying cables
13 - Using the Kensington security system
14 - Mounting on a wall
16 WATCHING TV
16 Turning the TV on for the first time
28 REMOTE CONTROL
30 CUSTOMIZING SETTINGS
30 Accessing the Main Menus
31 USING THE USER GUIDE
31 Accessing the On-Screen User Guide
31 - Using the TV menu
31 - Using the Remote Control
32 MAINTENANCE
32 Cleaning Your TV
32 Screen and frame
32 Cabinet and stand
32 Power cord
33 Preventing “Image burn” or “Burn-in” on
your TV screen
18 MAKING CONNECTIONS
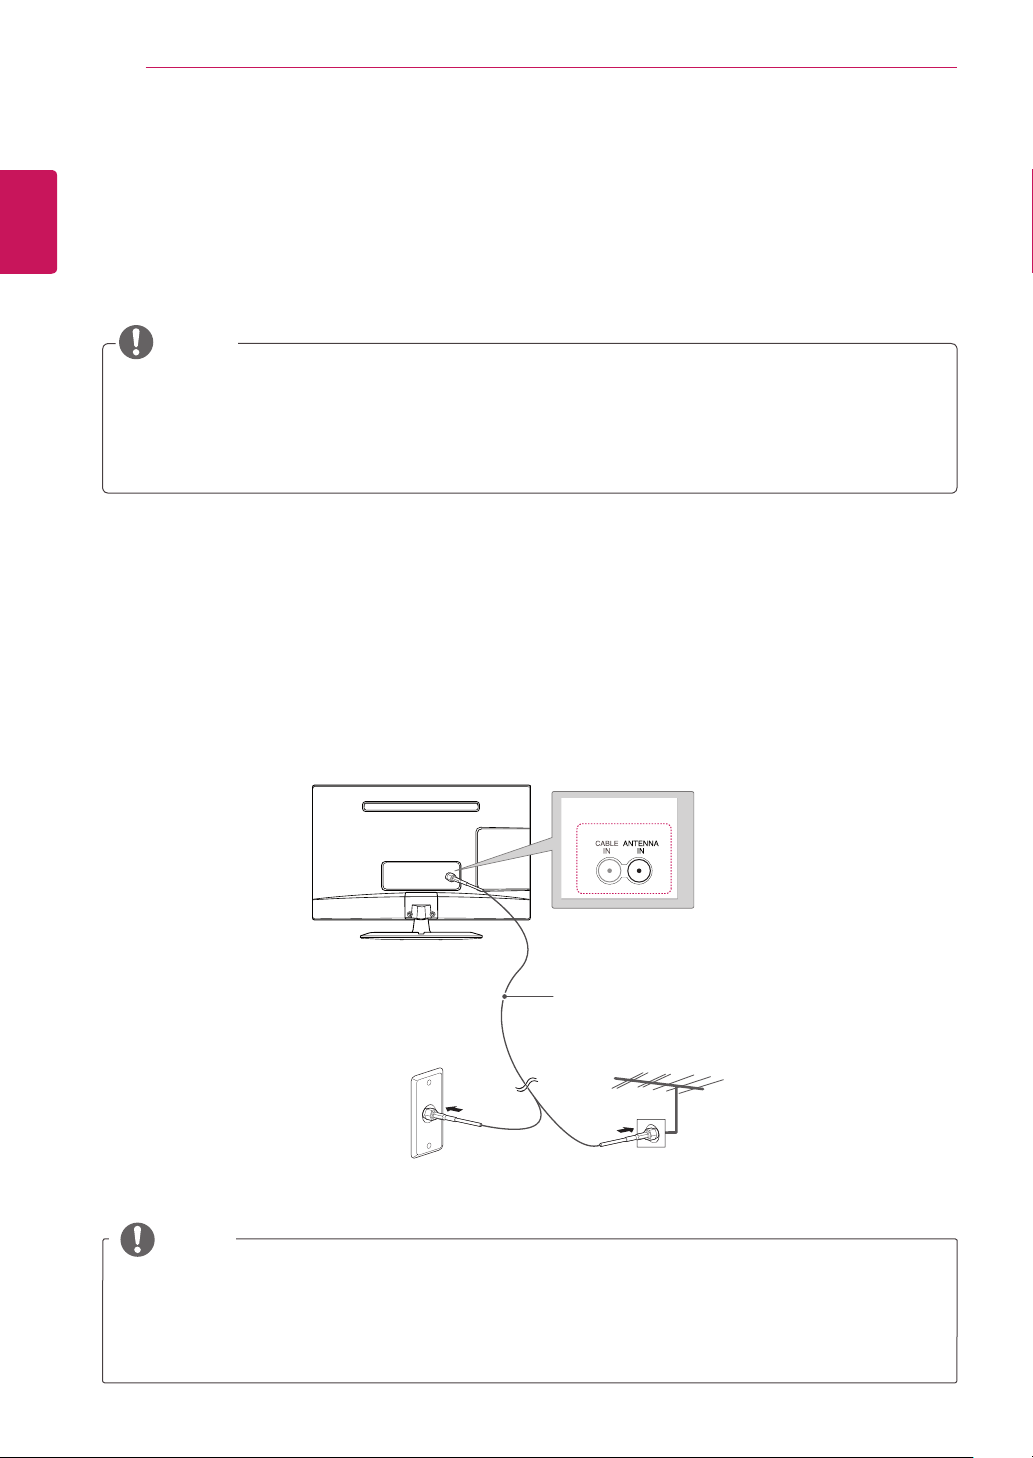
18 Connecting an antenna
18 - Connecting an antenna or basic cable
19 - Connecting with a cable box
20 Connecting to a HD receiver, DVD Player,
VCR or Gaming device
20 - HDMI Connection
21 - HDMI to DVI Connection
22 - Component Connection
23 - Composite Connection
24 Connecting a USB Device
25 Connecting to a PC
26 - HDMI connection
27 - HDMI to DVI connection
34 TROUBLESHOOTING
34 General
35 SPECIFICATIONS
Page 3

LICENSES
3
LICENSES
Supported licenses may differ by model. For more information of the licenses, visit www.lg.com.
Manufactured under license from Dolby Laboratories. Dolby and the
double-D symbol are trademarks of Dolby Laboratories.
The terms HDMI and HDMI High-Definition Multimedia Interface, and the
HDMI logo are trademarks or registered trademarks of HDMI Licensing LLC
in the United States and other countries.
ABOUT DIVX VIDEO: DivX® is a digital video format created by DivX, LLC, a
subsidiary of Rovi Corporation. This is an official DivX Certified® device that
plays DivX video. Visit divx.com for more information and software tools to
convert your files into DivX videos.
ABOUT DIVX VIDEO-ON-DEMAND: This DivX Certified® device must be
registered in order to play purchased DivX Video-on-Demand (VOD) movies.
To obtain your registration code, locate the DivX VOD section in your device
setup menu. Go to vod.divx.com for more information on how to complete
your registration.
ENGLISH
DivX Certified® to play DivX® video up to HD 1080p, including premium
content.
DivX®, DivX Certified® and associated logos are trademarks of Rovi
Corporation or its subsidiaries and are used under license.
Covered by one or more of the following U.S. patents: 7,295,673; 7,460,668;
7,515,710; 7,519,274
Page 4
INSTALLATION PROCEDURE
4
ENGLISH
INSTALLATION PROCEDURE
1
2
3
Open the package and make sure all the accessories are included.
Attach the stand to the TV.
Connect an external device to the TV.
NOTE
Image shown may differ from your TV.
y
Your TV’s OSD (On Screen Display) may differ slightly from that shown in this manual.
y
The available menus and options may differ from the input source or product model that you are
y
using.
New features may be added to this TV in the future.
y
Page 5
ASSEMBLING AND PREPARING
5
ASSEMBLING AND PREPARING
Unpacking
Check your product box for the following items. If there are any missing accessories, contact the local
dealer where you purchased your product. The illustrations in this manual may differ from the actual
product and accessories.
NOTE
The accessories supplied with your product may vary depending on the model.
y
Product specifications or contents in this manual may be changed without prior notice due to
y
upgrade of product functions.
CAUTION
Do not use any pirated items to ensure the safety and product life span.
y
Any damages or injuries by using unapproved or counterfeit parts or accessories are not covered
y
by the warranty.
NOTE
The items supplied with your product may vary depending on the model.
y
Product specifications or contents of this manual may be changed without prior notice due to
y
upgrade of product functions.
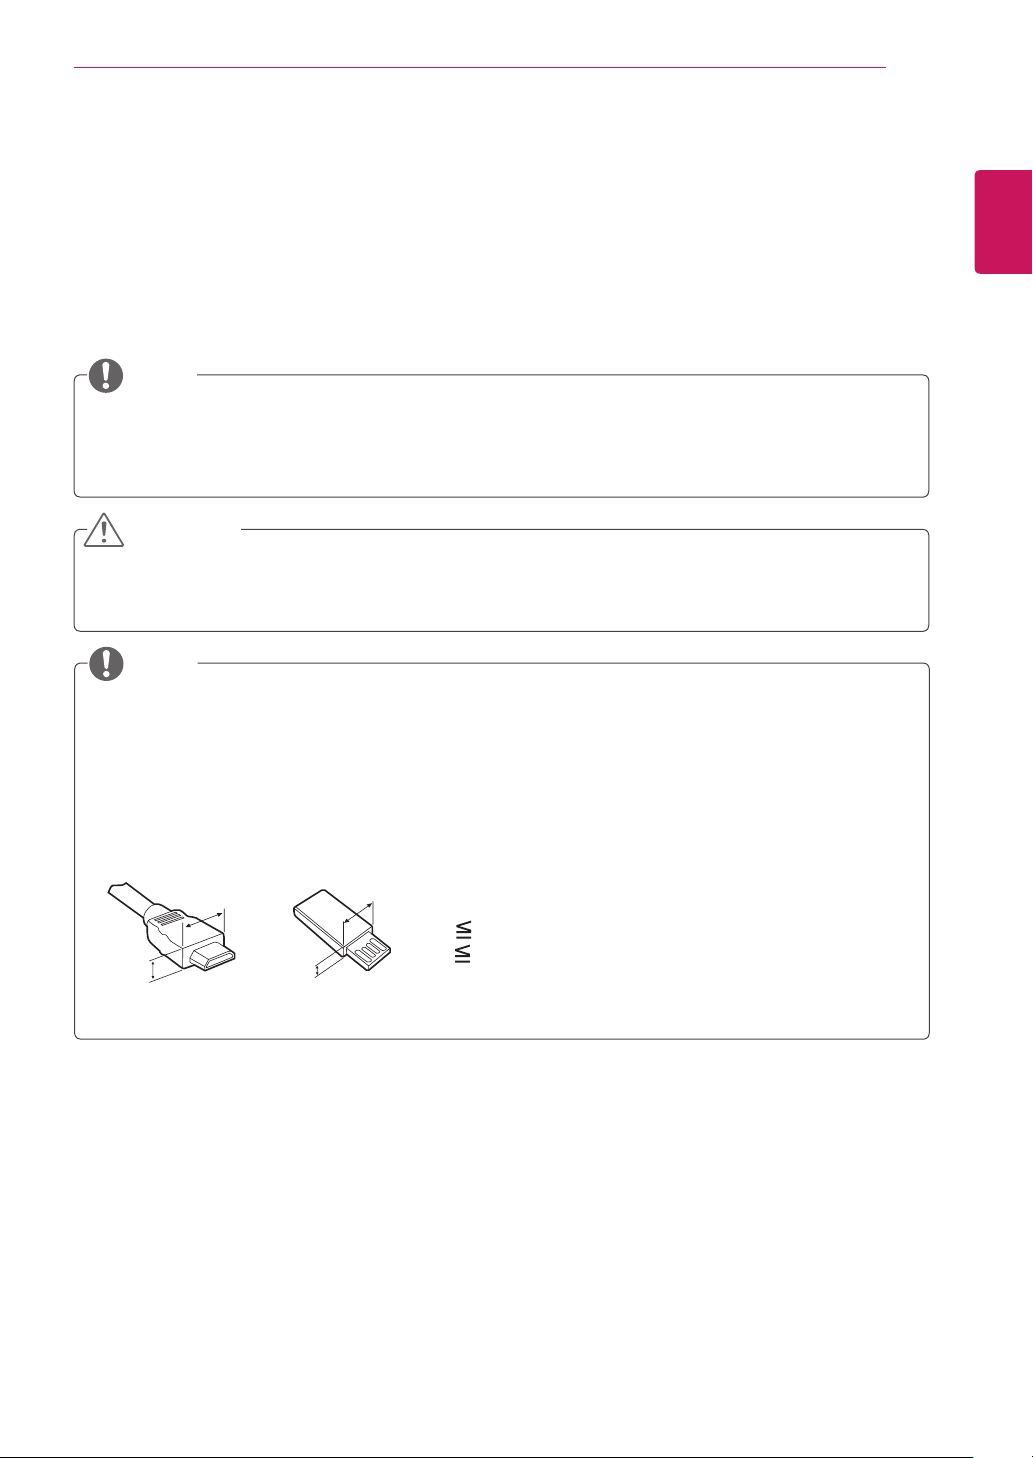
For an optimal connection, HDMI cables and USB devices should have bezels less than 10 mm thick
y
and 18 mm width. Use an extension cable that supports USB 2.0 if the USB cable or USB memory
stick does not fit into your TV’s USB port.
ENGLISH
B
A
B
*A 10 mm
*B
A
18 mm
Page 6
6
ENGLISH
ASSEMBLING AND PREPARING
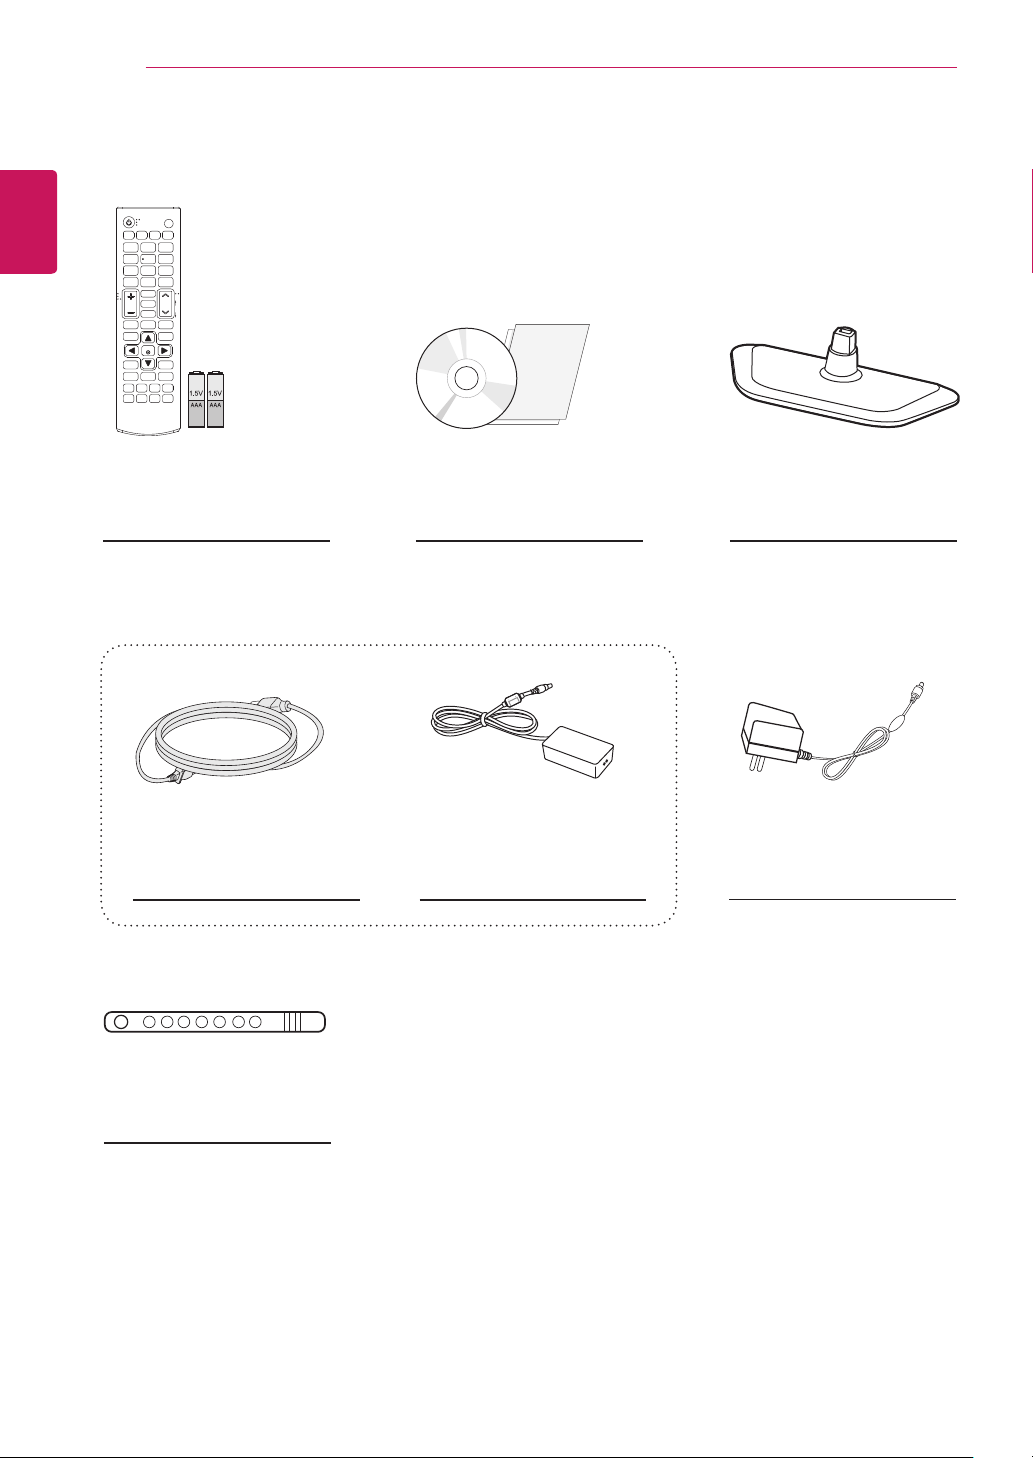
Remote Control
Batteries (AAA)
(See p.28, See p.29)
Power Cord AC-DC Adapter
CD (Owner's Manual)
Cards
( Depending on the country )
Stand Base
(See p.10)
or
AC-DC Adapter
( Depending on the country )
(See p.12)(See p.12) (See p.12)
Cable Tie
(See p.13)
Page 7
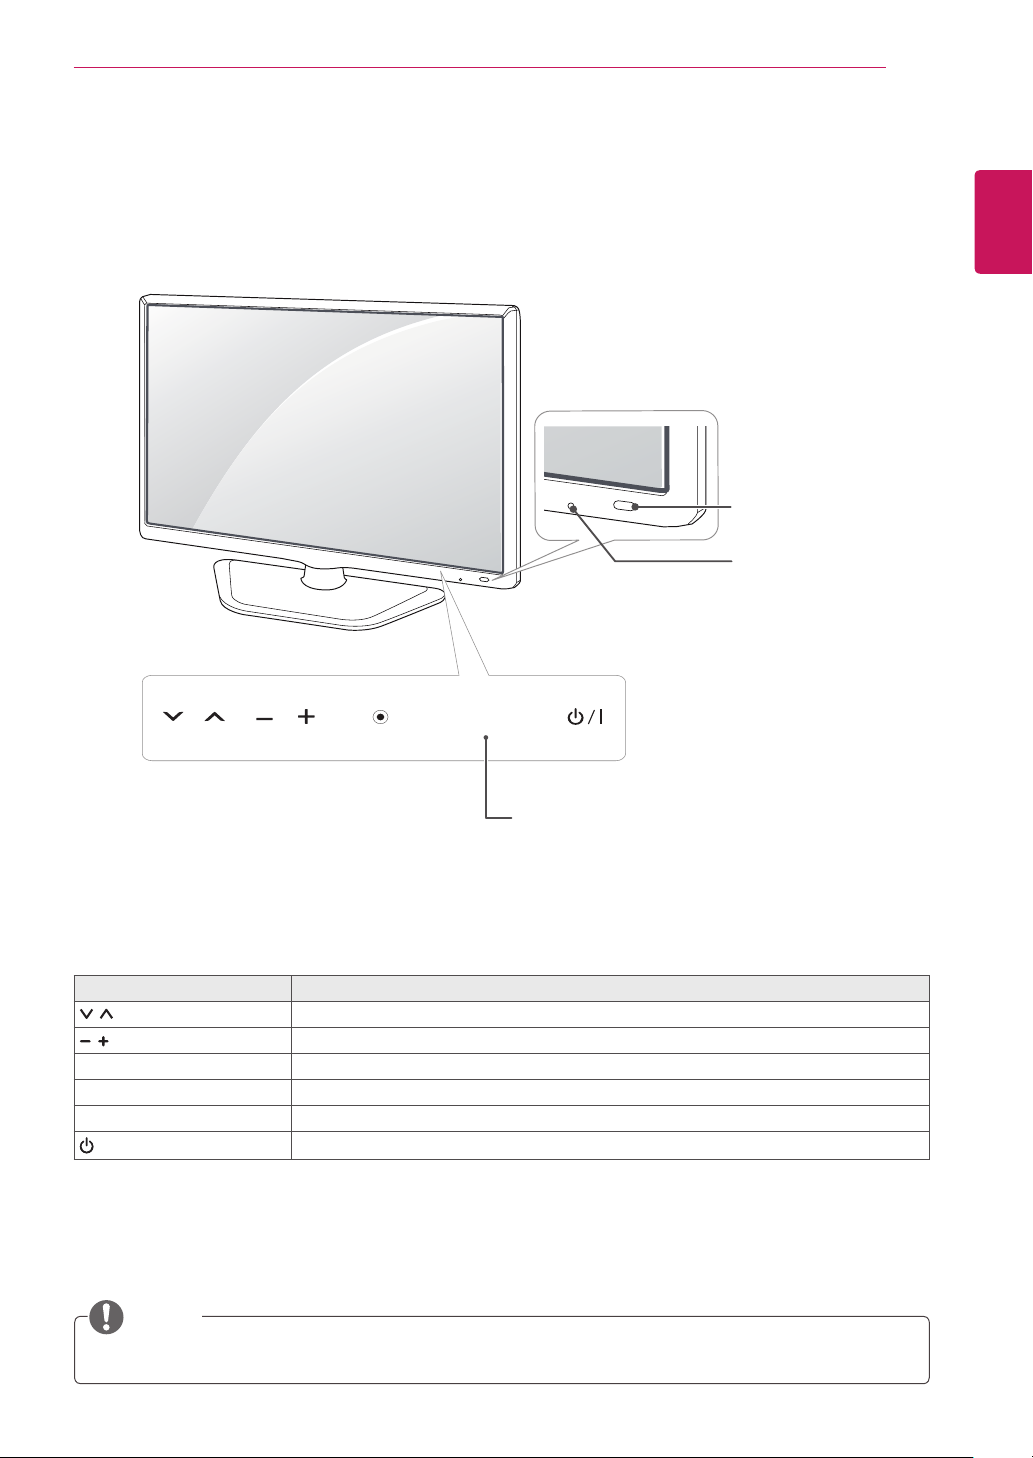
Parts and buttons
ASSEMBLING AND PREPARING
Remote Control Sensor
Standby Light
Lighting On:
y
When Power is turned off
Lighting Off:
y
When Power is turned on
7
ENGLISH
OK
SETTINGS
INPUT
Touch Buttons
Touch buttons Description
Scrolls through the saved channels.
Adjusts the volume level.
OK Selects the highlighted menu option or confirms an input.
SETTINGS Accesses the main menus, or saves your input and exits the menus.
INPUT Changes the input source.
/ I
Turns the power on or off.
NOTE
All of the buttons are touch sensitive and can be operated through simple touch with your finger.
Page 8
8
ENGLISH
ASSEMBLING AND PREPARING
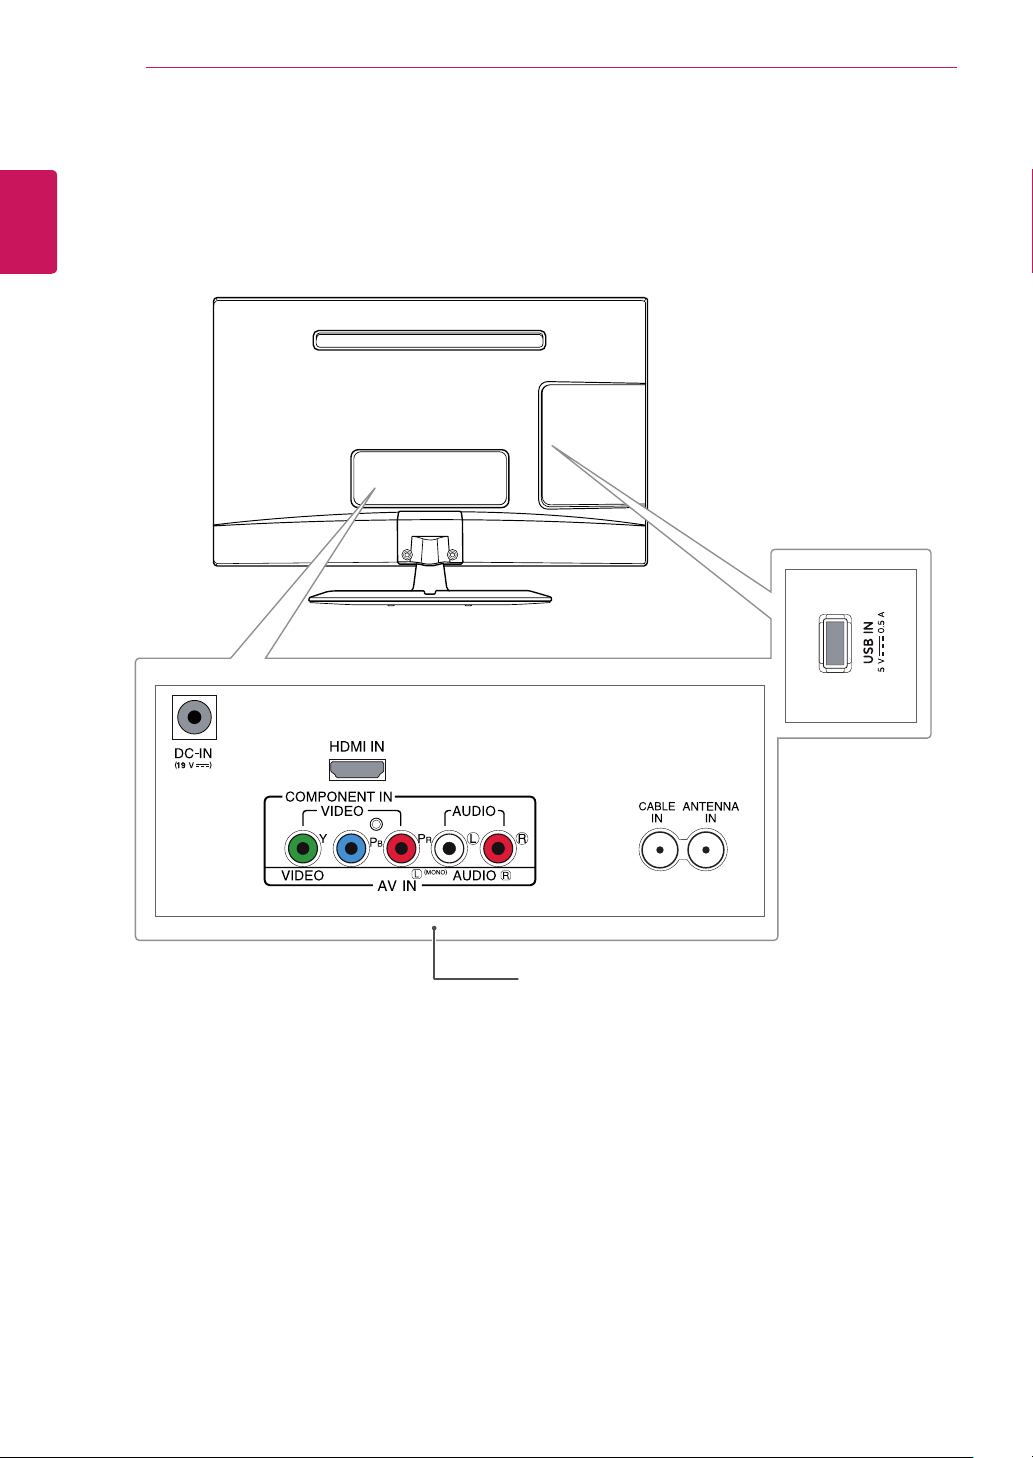
Connection panel (See p.18)
Page 9
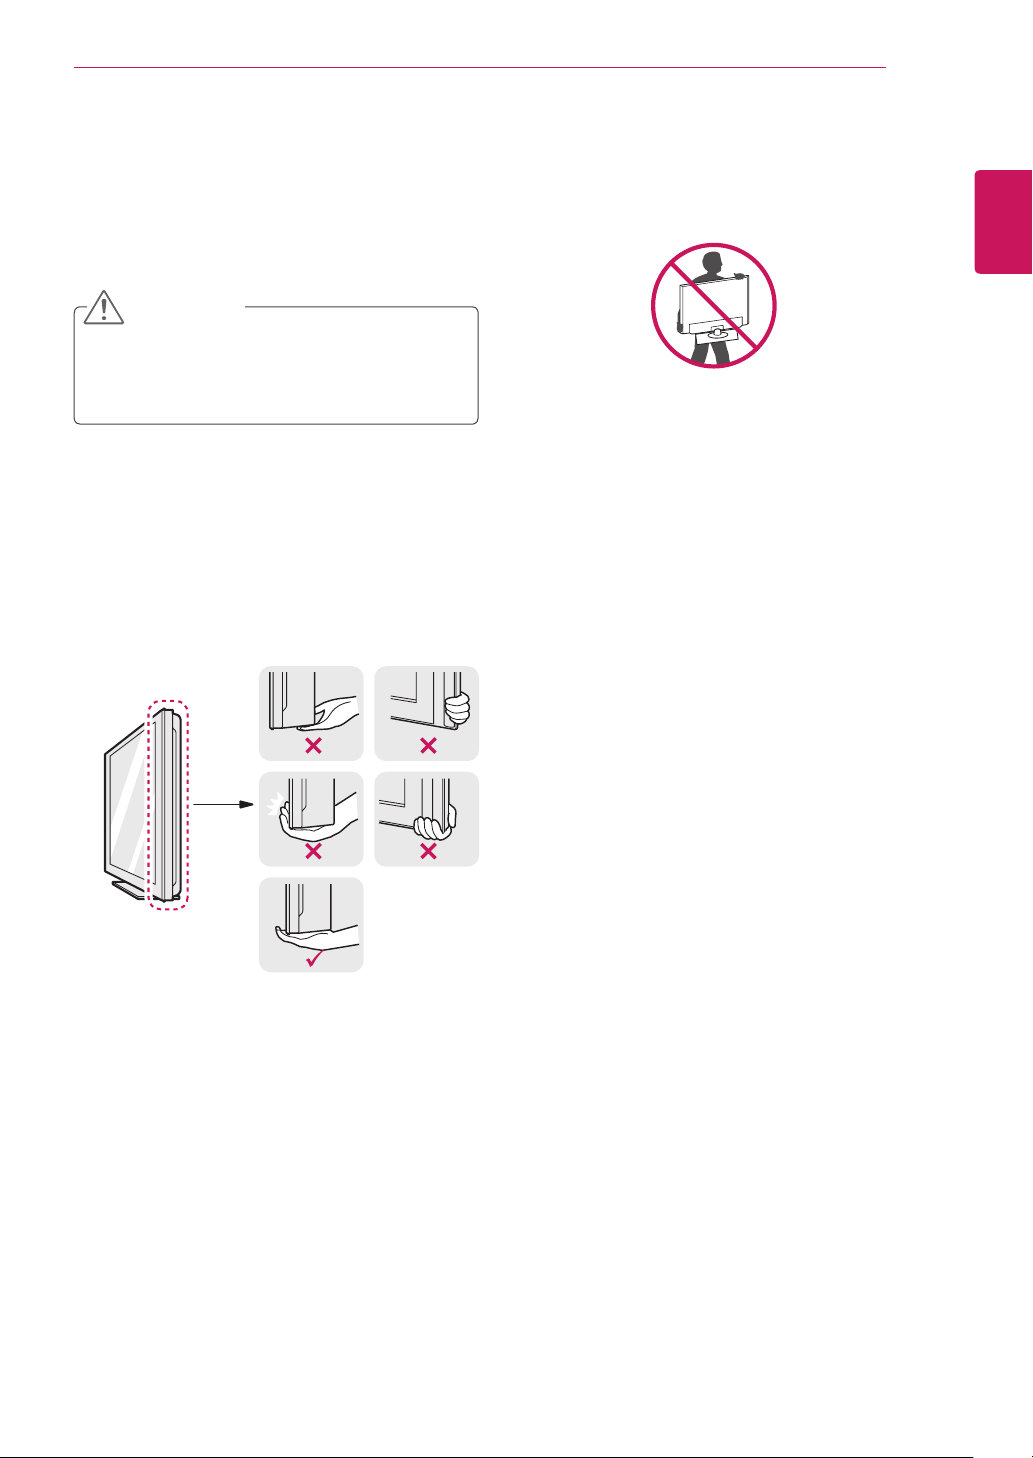
Lifting and moving the TV
When moving or lifting the TV, read the following
to prevent the TV from being scratched or
damaged and for save transportation regardless of
its type and size.
CAUTION
Avoid touching the screen at all times, as
this may result in damage to the screen or
some of the pixels used to create images.
It is recommended to move the TV in the
y
box or packing material that the TV originally
came in.
Before moving or lifting the TV, disconnect
y
the power cord and all cables.
Hold the top and bottom of the TV frame
y
firmly. Make sure not to hold the transparent
part, speaker, or speaker grill area.
ASSEMBLING AND PREPARING
When holding the TV, the screen should face
y
away from you to prevent the screen from
scratches.
When transporting the TV, do not expose the
y
TV to jolts or excessive vibration.
When transporting the TV, keep the TV
y
upright, never turn the TV on its side, or tilt
towards the left or right.
9
ENGLISH
Page 10
10
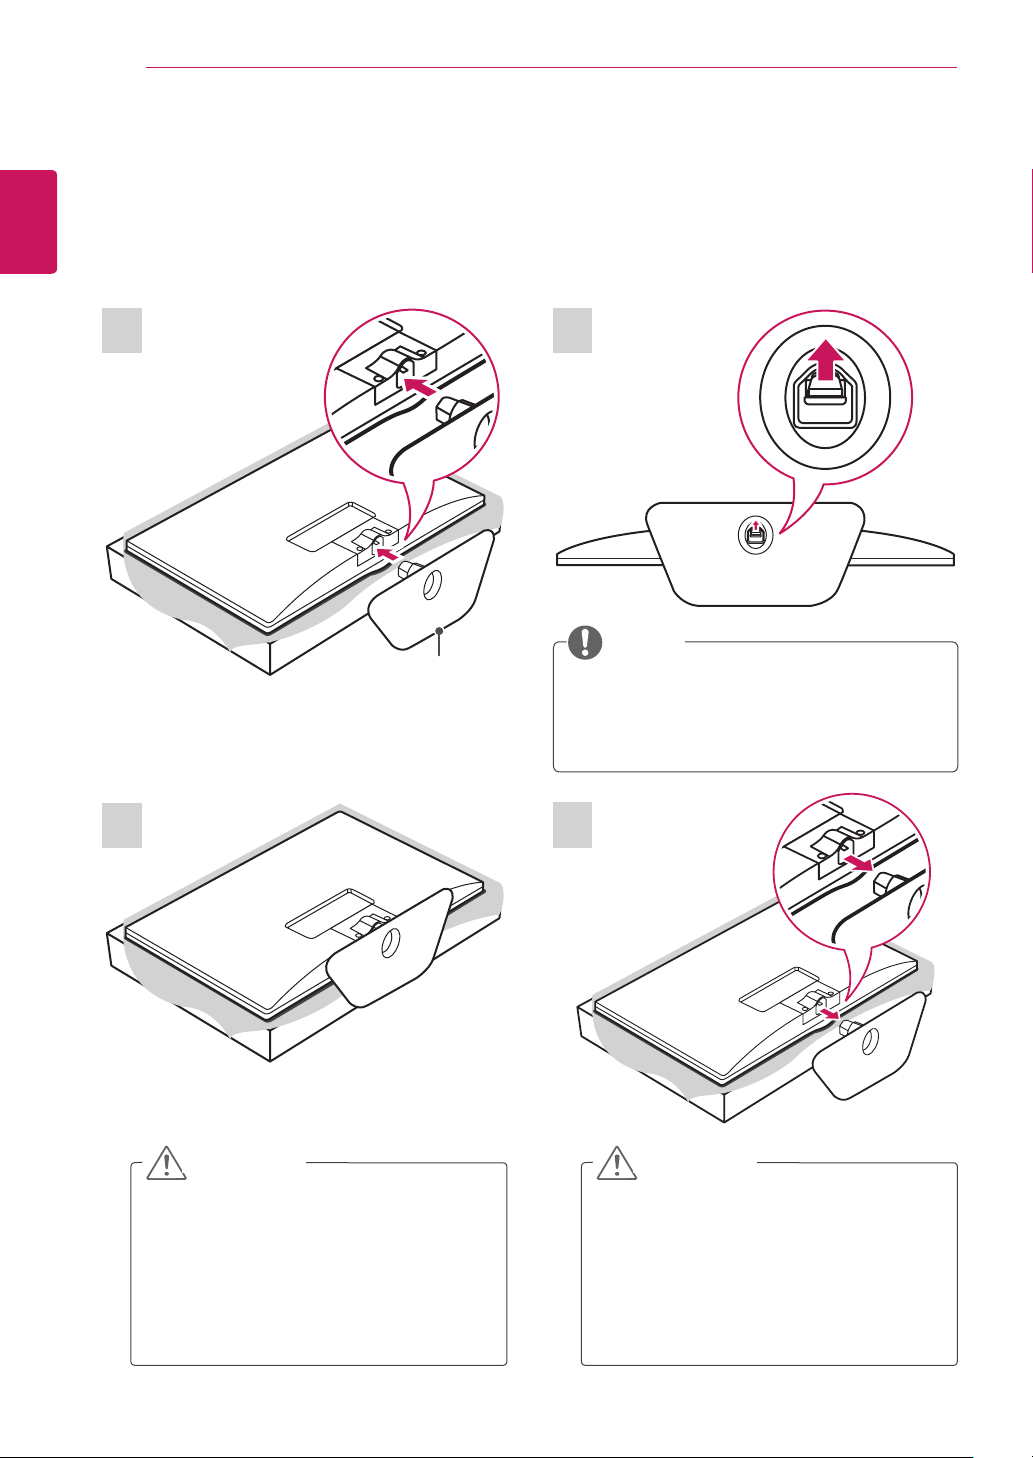
Setting up the TV
ENGLISH
Image shown may differ from your TV.
Attaching the Stand Base Detaching the Stand Base
ASSEMBLING AND PREPARING
2
1
1
NOTE
Stand Base
When Detaching the stand from TV, Detach the
stand with lifting up the lever in the direction of
the arrow.
2
CAUTION
Lay a foam mat or soft protective cloth
y
on the surface to protect the screen from
damage.
When attaching the stand to the TV,
y
place the screen facing down on a
cushioned table or flat surface to protect
the screen from scratches.
CAUTION
Lay a foam mat or soft protective cloth
y
on the surface to protect the screen from
damage.
When attaching the stand to the TV,
y
place the screen facing down on a
cushioned table or flat surface to protect
the screen from scratches.
Page 11
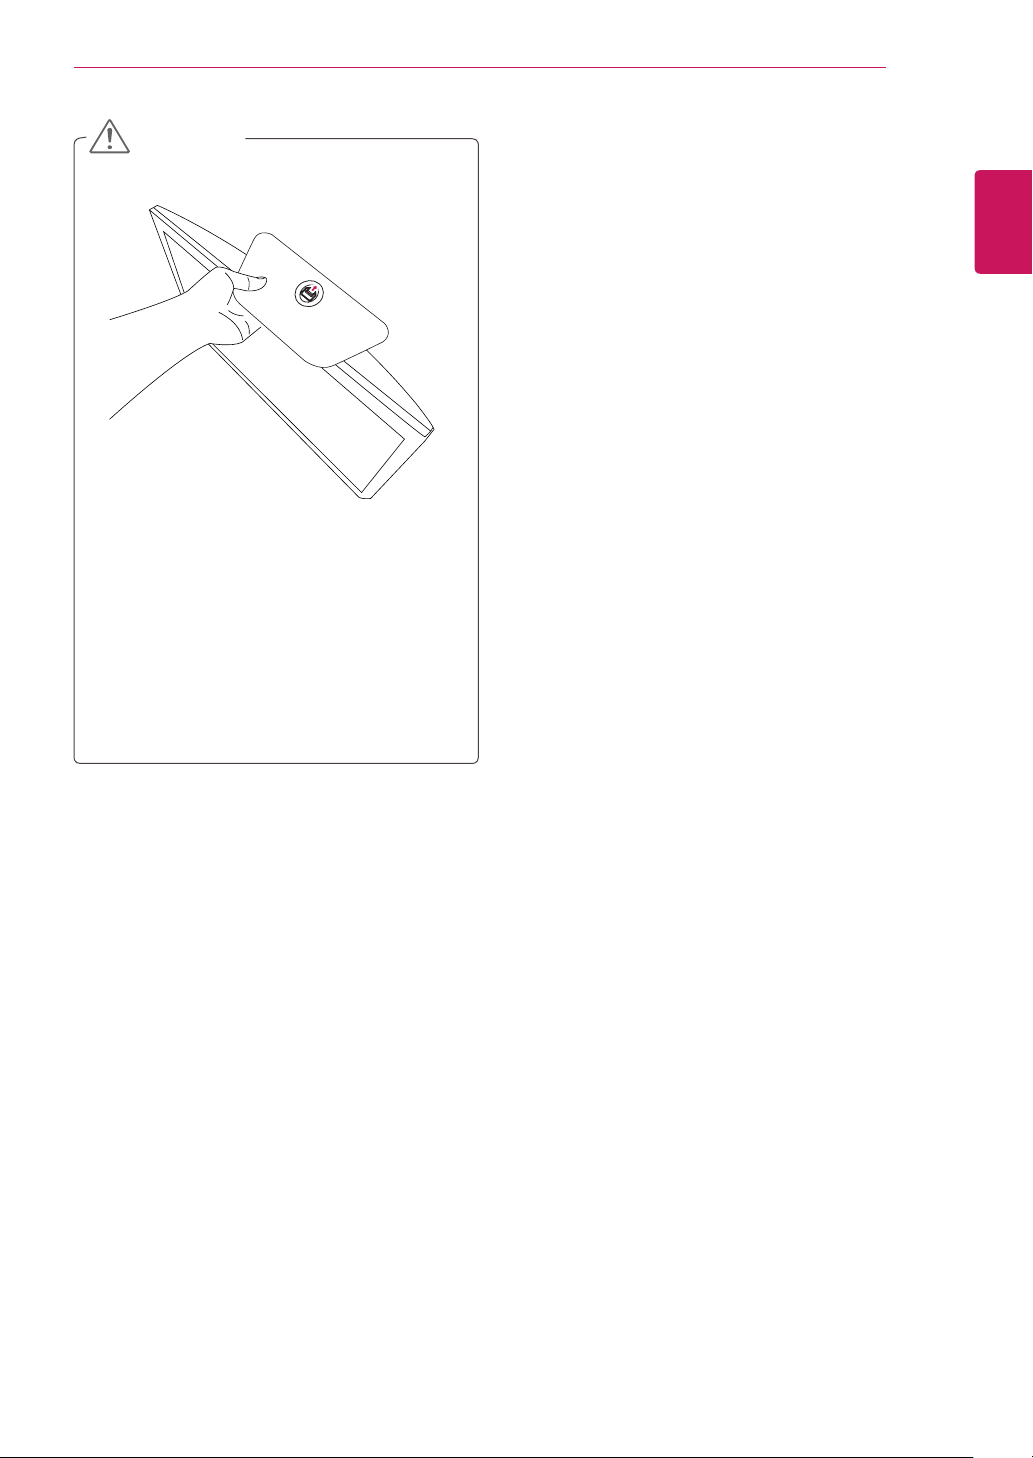
CAUTION
Do not carry the monitor upside-down
y
as this may cause it to fall off its stand,
resulting in damage or injury.
The illustration shows a general example of
y
installation and may look different from the
actual product.
ASSEMBLING AND PREPARING
11
ENGLISH
Page 12
12
Mounting on a table
ENGLISH
1
ASSEMBLING AND PREPARING
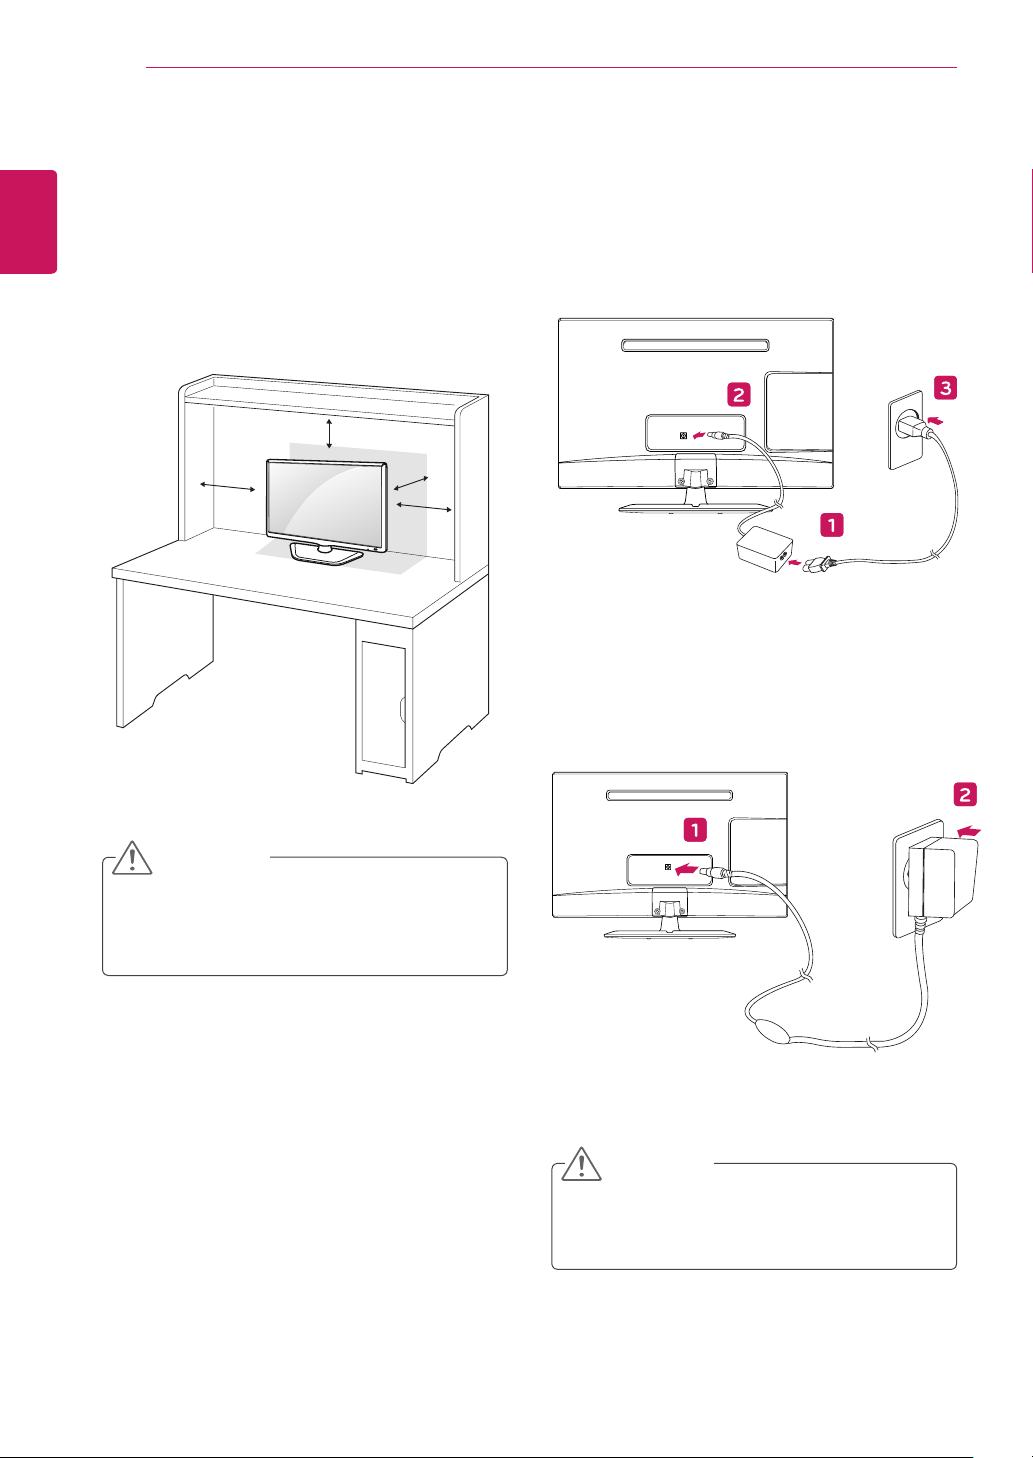
Lift and tilt the TV into its upright position on a
table.
Leave a 10 cm (4 inches) (minimum) space
from the wall for proper ventilation.
10 cm
10 cm
Connect the AC-DC Adapter and Power Cord
2
to a wall outlet.
10 cm
10 cm
CAUTION
Disconnect the power cord first, and then move
or install the TV. Otherwise electric shock may
occur.
or
CAUTION
Do not place the TV near or on sources of
heat, as this may result in fire or other damage.
Page 13
ASSEMBLING AND PREPARING
13
Tidying cables
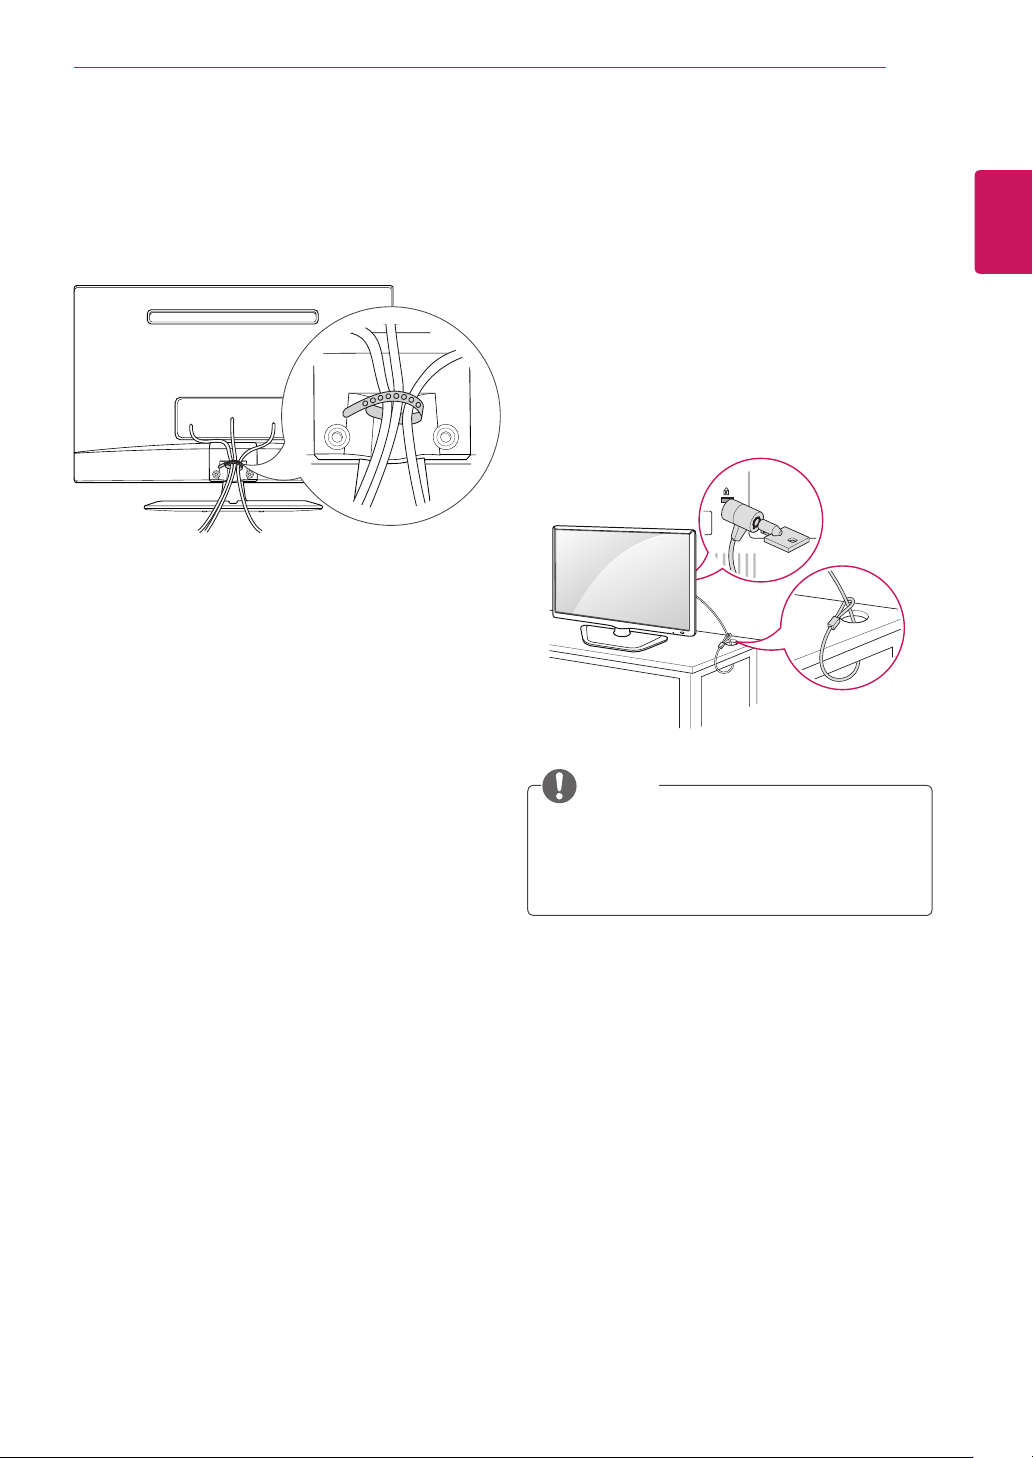
Gather and bind the cables with the supplied
cable tie.
Using the Kensington security
system
The Kensington security system connector is
located at the back of the TV. For more information
of installation and using, refer to the manual
supplied with the Kensington security system or
visit
http://www.kensington.com
Connect the Kensington security system cable
between the TV and a table.
.
ENGLISH
NOTE
The Kensington security system is optional.
You can obtain additional accessories from
most electronics stores.
Page 14
14
A
B
Mounting on a wall
ENGLISH
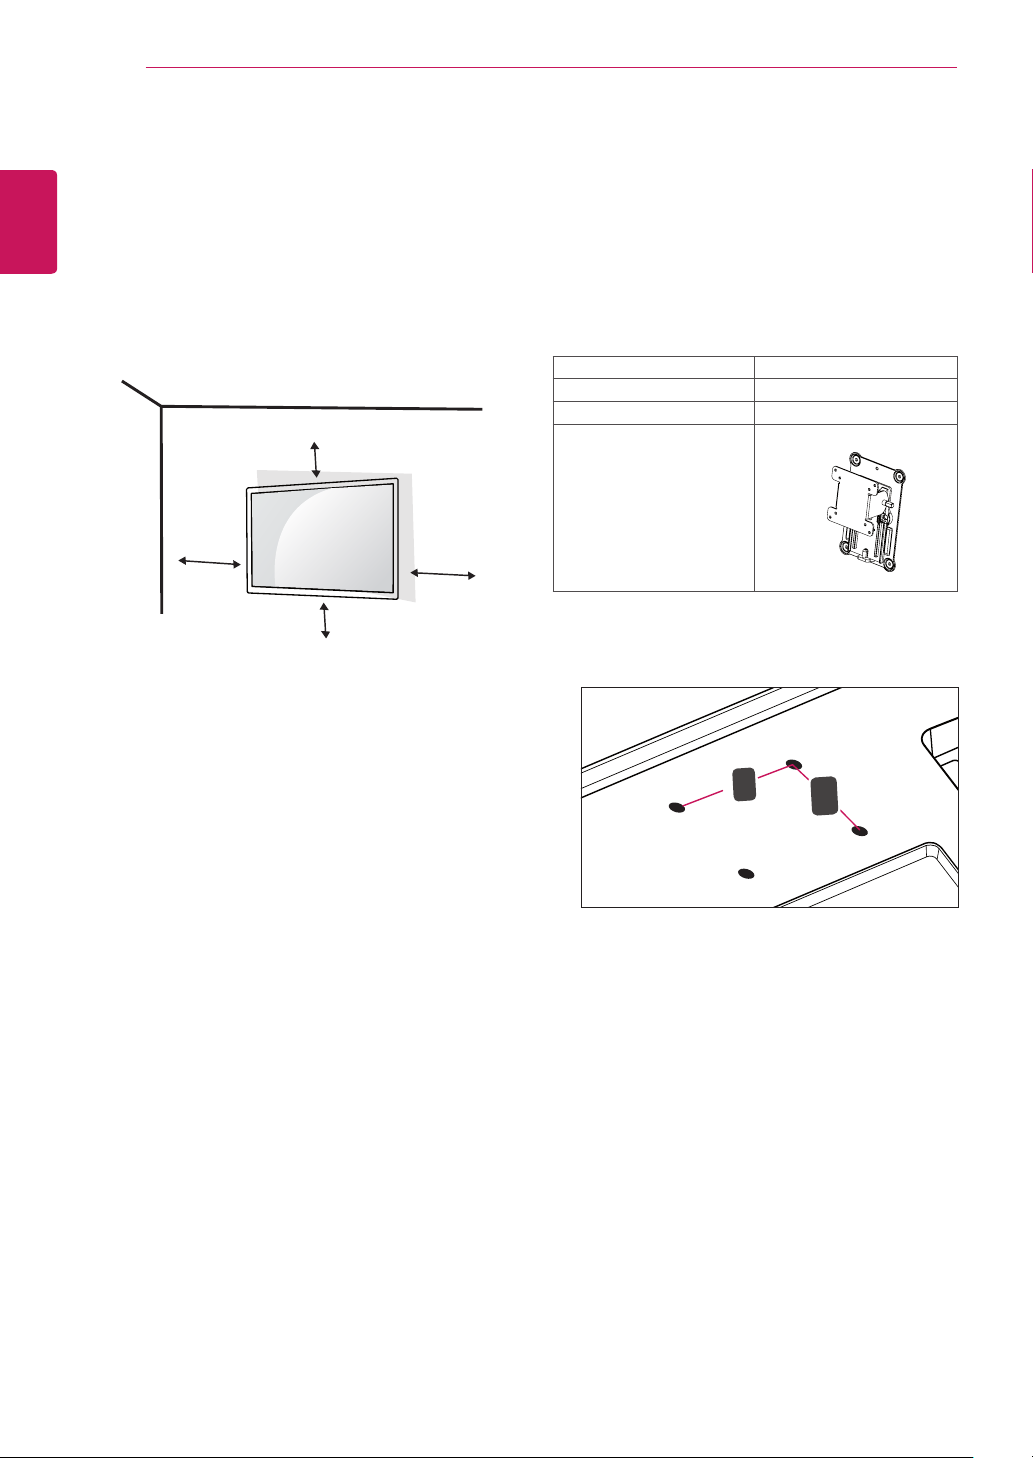
For proper ventilation, allow a clearance of 10
cm on each side and from the wall. Detailed
installation instructions are available from your
dealer, see the optional Tilt Wall Mounting Bracket
Installation and Setup Guide.
ASSEMBLING AND PREPARING
10 cm
Please use VESA standard as below.
5
784.8 mm (30.9 inch) and under
y
* Wall Mount Pad Thickness : 2.6 mm
* Screw : Φ 4.0 mm x Pitch 0.7 mm x
Length 10 mm
787.4 mm (31.0 inch) and above
y
* Please use VESA standard wall mount pad
and screws.
VESA (A x B) 100 x 100
Standard screw M4
Number of screws 4
Wall mount bracket
(optional)
RW120
10 cm
10 cm
If you intend to mount the TV to a wall, attach Wall
mounting interface (optional parts) to the back of
the TV.
When you install the TV using the wall mounting
interface (optional parts), attach it carefully so it
will not drop.
Please, Use the screw and wall mount interface
1
in accordance with VESA Standards.
If you use screw longer than standard, the TV
2
might be damaged internally.
If you use improper screw, the product might
3
be damaged and drop from mounted position.
In this case, LG Electronics is not responsible
for it.
10 cm
VESA (A x B)
y
VESA compatible only with respect to screw
4
mounting interface dimensions and mounting
screw specifications.
Page 15
CAUTION
Disconnect the power cord first, and then
y
move or install the TV. Otherwise electric
shock may occur.
If you install the TV on a ceiling or slanted
y
wall, it may fall and result in severe injury.
Use an authorized LG wall mount and
y
contact the local dealer or qualified
personnel.
Do not over tighten the screws as this may
y
cause damage to the TV and void your
warranty.
Use the screws and wall mounts that meet
y
the VESA standard. Any damages or injuries
by misuse or using an improper accessory
are not covered by the warranty.
ASSEMBLING AND PREPARING
15
ENGLISH
NOTE
Use the screws that are listed on the VESA
y
standard screw specifications.
The wall mount kit includes an installation
y
manual and necessary parts.
The wall mount bracket is optional. You can
y
obtain additional accessories from your local
dealer.
The length of screws may differ depending
y
on the wall mount. Be sure to use the proper
length.
For more information, refer to the instructions
y
supplied with the wall mount.
Page 16
WATCHING TV
16
ENGLISH
WATCHING TV
Turning the TV on for the first time
When you access the TV for the first time, the initial setting screen appears. Select a language and
customize the basic settings.
1
2
3
4
Connect the power cord to a power outlet.
Press on the TV or power button on the remote control to turn the TV on.
The Standby Light is turned off.
NOTE
When the TV is in Power saving mode, the Standby Light turns amber.
The initial setting screen appears if you access the TV for the first time.
NOTE
If you do not operate the TV within 40 seconds when the setting menu screen appears, the setting
menus will disappear.
Follow the on-screen instructions to customize your TV according to your preferences.
Language
Mode Setting
Power Indicator
Time Zone
User Guide and Tips for
FAQ Utilization
Auto Tuning
Selects a language for the display.
Selects Home Use for the home environment.
Selects the Standby Light. If you select On, the TV turns on the Standby Light in
the front panel when the TV is off.
Selects the time zone and daylight saving.
Shows how to use User Guide and FAQ.
Scans and saves available programs automatically.
Page 17
WATCHING TV
NOTE
For those countries without confirmed DTV broadcasting standards, some DTV features might not
y
work, depending on the DTV broadcasting environment.
To display images in the best quality for your home environment, select Home Use mode.
y
Store Demo mode is suitable for the retail environment.
y
If you select Store Demo mode, the previously customized settings will switch to the default
y
settings of Store Demo mode in 5 minutes.
When the basic settings are complete, press OK.
5
NOTE
If you do not complete the initial setting, it will appear whenever you access the TV.
To turn the TV off, press on the TV.
6
The Standby Light is turned on.
17
ENGLISH
CAUTION
Disconnect the power cord from the power outlet when you do not use the TV for a long period of
time.
NOTE
You can also switch the TV from PC mode to TV mode, press TV/PC.
y
You can also access Factory Reset by accessing OPTION in the main menus.
y
Page 18
MAKING CONNECTIONS
18
ENGLISH
MAKING CONNECTIONS
Connect various external devices to the TV and switch input modes to select an external device. For more
information about an external device’s connection, refer to the manual supplied with each device.
Available external devices are: HD receivers, DVD players, VCRs, audio systems, USB storage devices, PC,
camcorders or cameras, gaming devices, and other external devices.
Connecting an antenna
Connect an antenna, cable or cable box to watch TV referring to the following. The illustrations may differ
from the actual accessories and an RF cable is optional.
Connecting an antenna or basic cable
Connect the TV to a wall antenna socket with an RF cable (75 Ω).
NOTE
If you record a TV program on a DVD recorder or VCR, make sure to connect the TV signal input
y
cable to the TV through a DVD recorder or VCR. For more information about recording, refer to the
manual supplied with the connected device.
The external device connection may differ from the model.
y
Connect external devices to the TV regardless of the order of the TV port.
y
(Not Provided)
Wall Antenna Socket
Outdoor Antenna
NOTE
Use a signal splitter to use more than 2 TVs.
y
If the image quality is poor, install a signal amplifier properly to improve the image quality.
y
If the image quality is poor with an antenna connected, aim the antenna to the proper direction.
y
Visit
http://AntennaWeb.org
y
for more information about the antenna and cable connection.
Page 19
MAKING CONNECTIONS
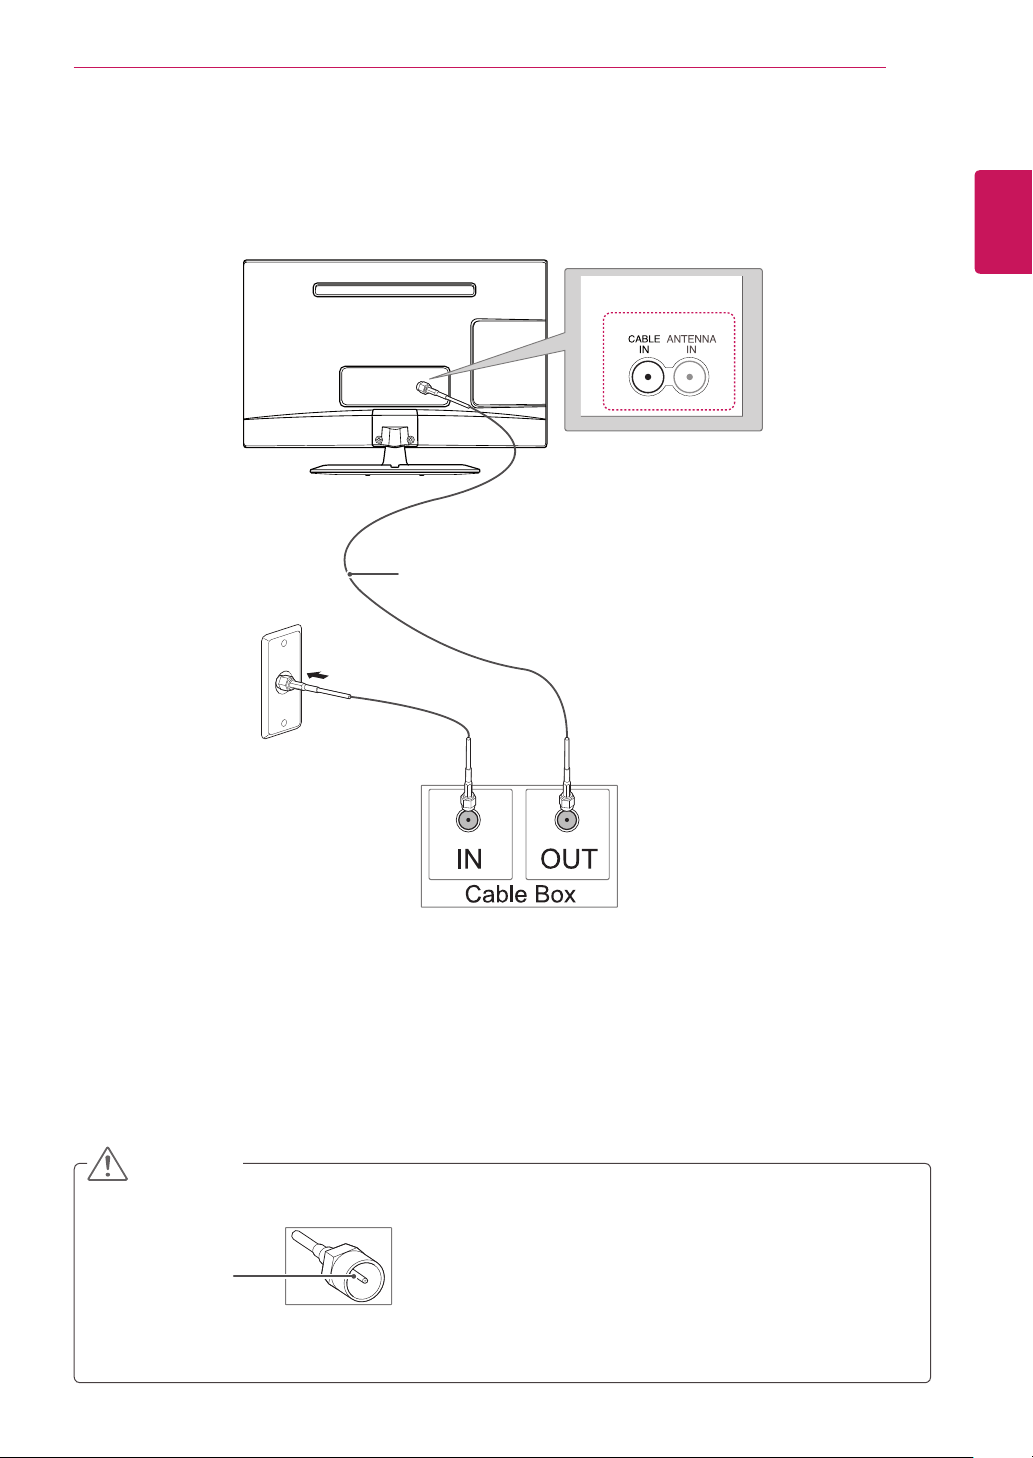
Connecting with a cable box
Connect the TV to a cable box and the cable box to a wall antenna socket with 2 RF cables (75 Ω).
(Not Provided)
19
ENGLISH
CAUTION
Make sure not to bend the copper wire of the RF cable.
y
Copper wire
Complete all connections instructions between devices, and then connect the power cord to the
y
power outlet to prevent damages to your TV.
Page 20
20
Connecting to a HD receiver, DVD Player, VCR or Gaming device
ENGLISH
Connect a HD receiver, DVD Player, VCR or Gaming device to the TV and select an appropriate input mode.
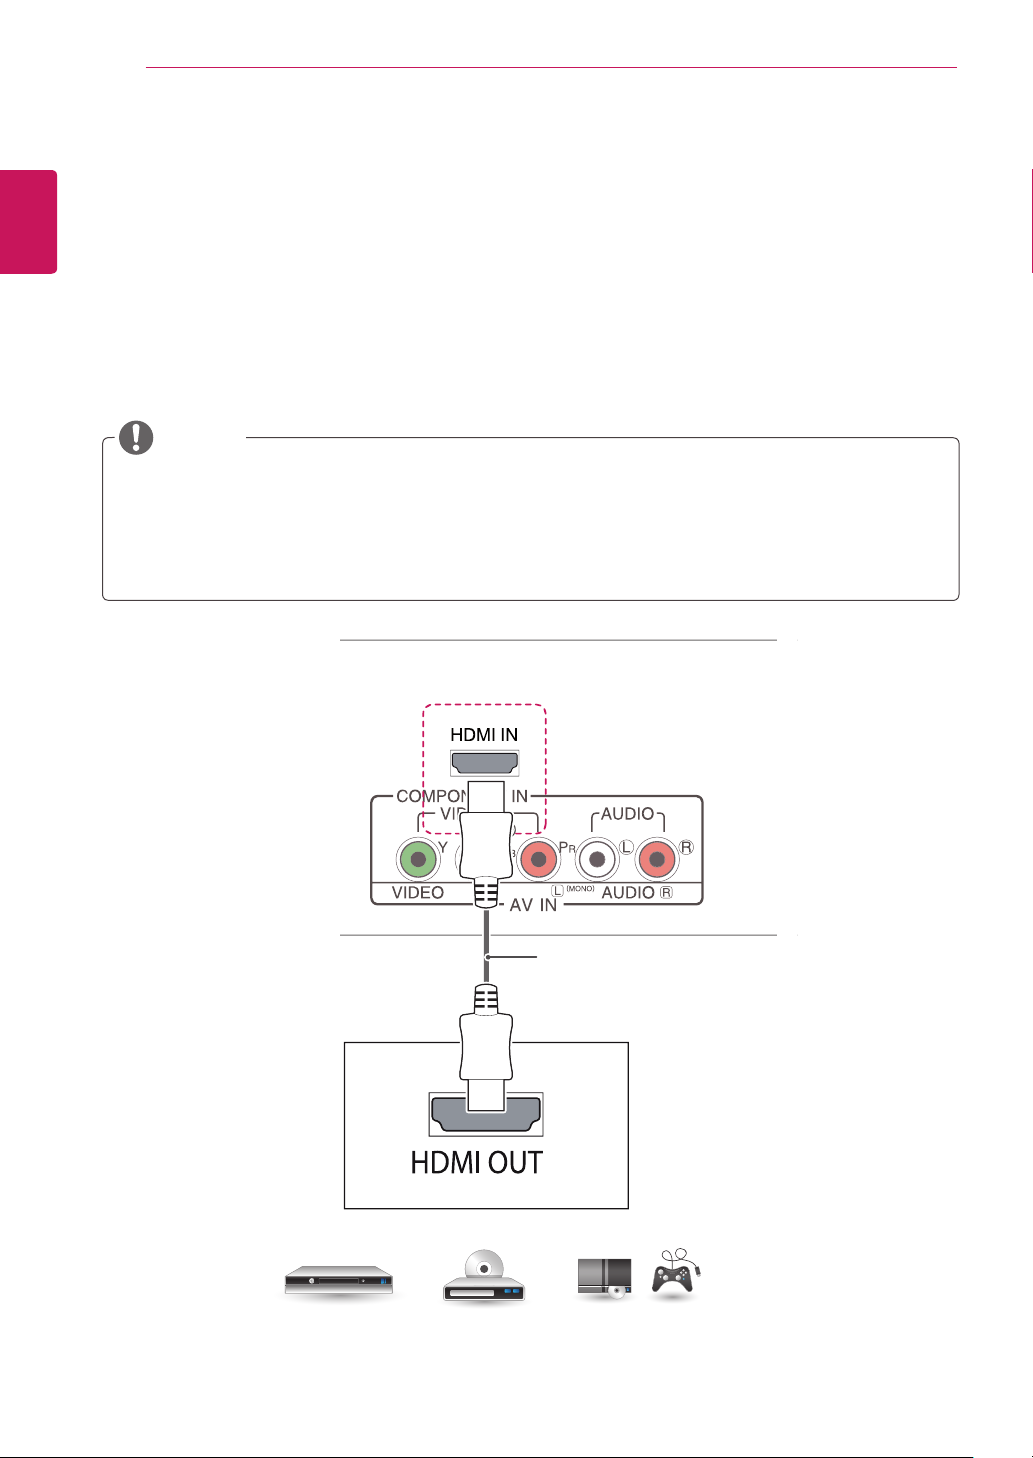
HDMI Connection
HDMI is the best way to connect a device.
Transmits the digital video and audio signals from an external device to the TV. Connect the external device
and the TV with an HDMI cable as shown on the following illustration.
MAKING CONNECTIONS
NOTE
Use a High Speed HDMI™ Cable.
y
High Speed HDMI™ Cables are tested to carry an HD signal up to 1080p and higher.
y
Supported HDMI Audio format: Dolby Digital, PCM (Up to 192 KHz, 32 KHz / 44.1 KHz / 48 KHz /
y
88 KHz / 96 KHz / 176 KHz / 192k, DTS Not supported.)
(Not Provided)
DVD / Blu-Ray / HD Cable Box /
HD STB / Gaming device
Page 21
MAKING CONNECTIONS
21
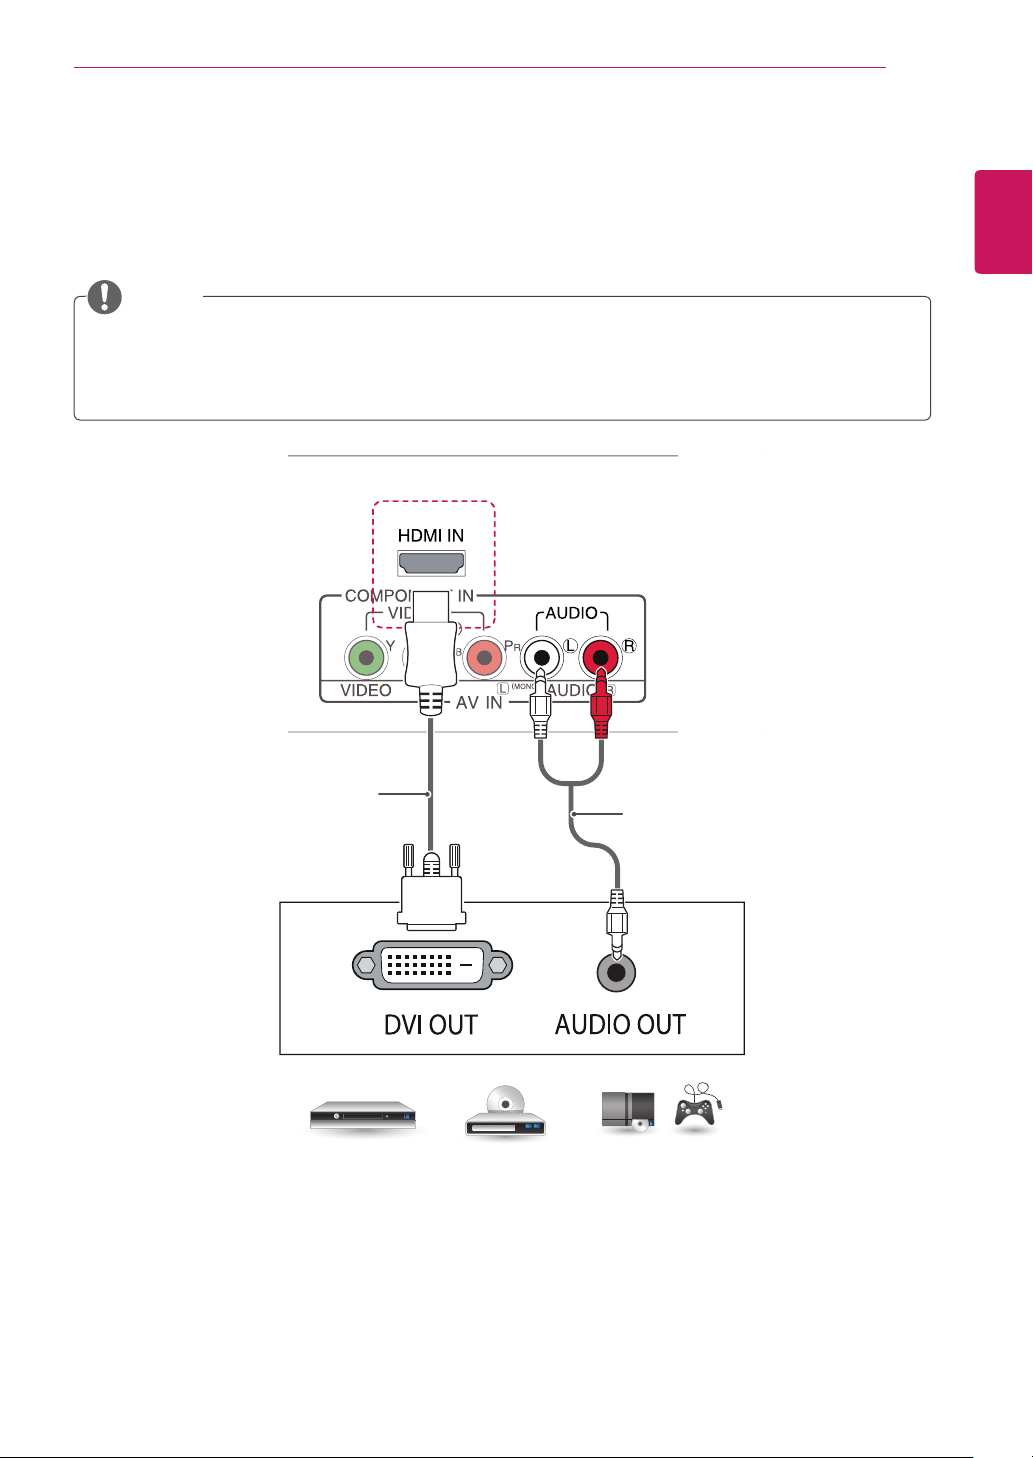
HDMI to DVI Connection
Transmits the digital video signal from an external device to the TV. Connect the external device and the
TV with an HDMI to DVI cable as shown in the following illustration. To transmit an audio signal, connect an
optional audio cable.
NOTE
If you do not use an optional external speaker, connect the external device to the TV with an optional
y
audio cable.
When using the HDMI/DVI cable, only Single link is supported.
y
ENGLISH
(Not Provided)
(Not Provided)
DVD / Blu-Ray / HD Cable Box /
HD STB / Gaming device
Page 22
22
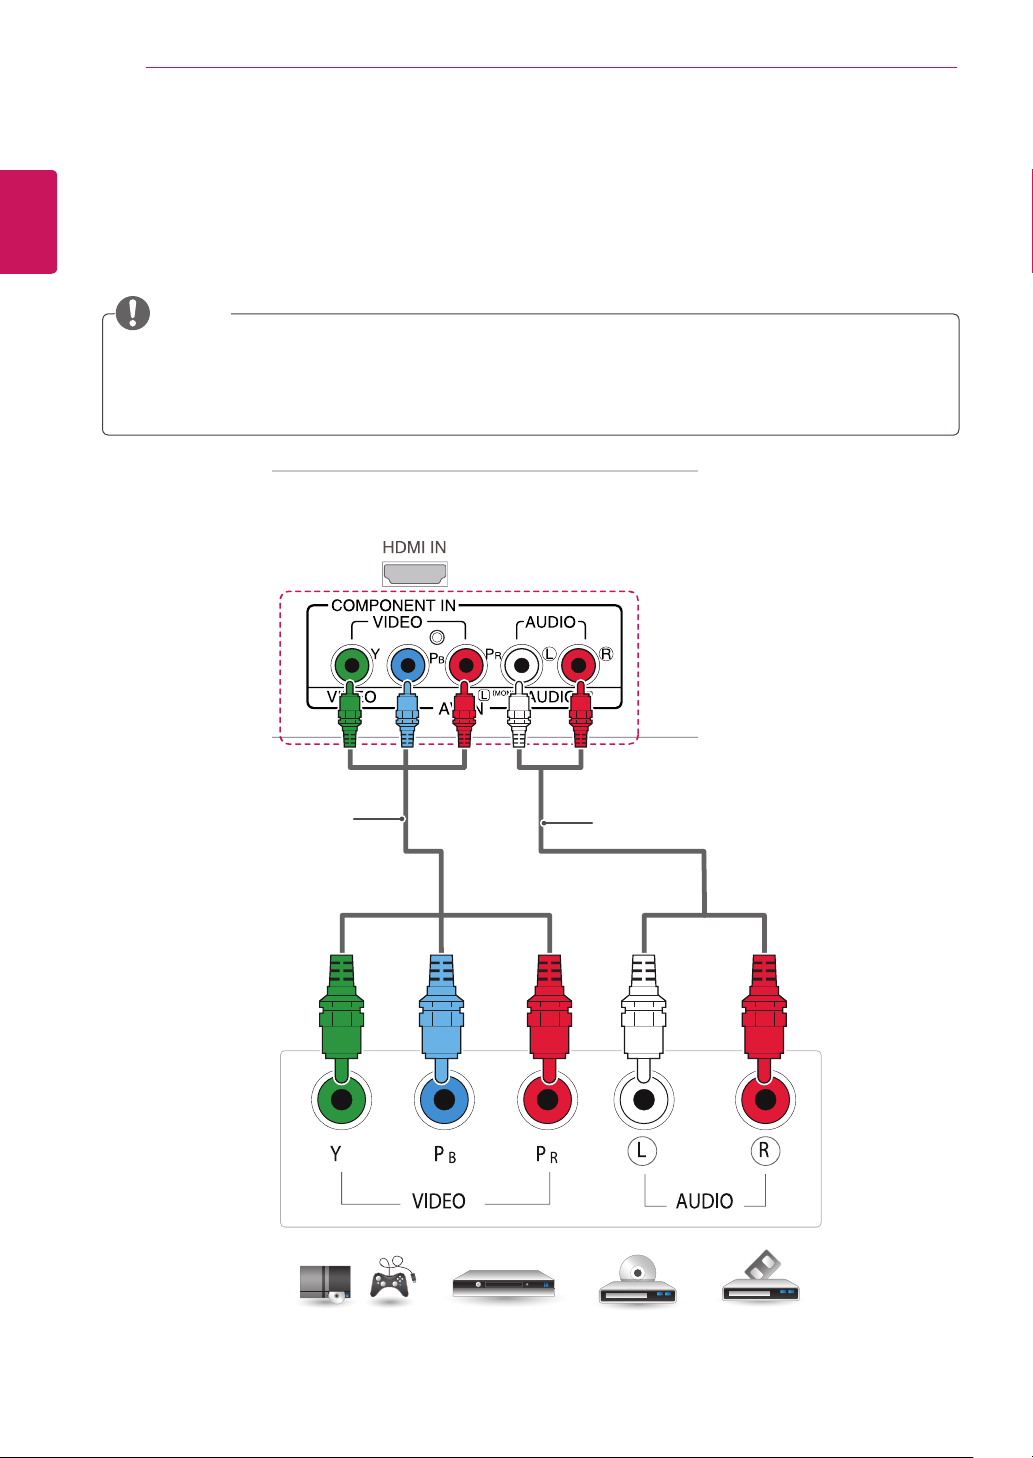
Component Connection
ENGLISH
Transmits the analog video and audio signals from an external device to the TV. Connect the external device
and the TV with the component cable as shown on the following illustration. Component connections
support HD, but some devices will not output HD on Component (due to copyright issues).
MAKING CONNECTIONS
NOTE
If cables are installed incorrectly, it could case the image to display in black and white or with distorted
y
color.
Check to ensure each cable is matched with the corresponding color connection.
y
(Not Provided)
(Not Provided)
DVD / Blu-Ray / HD Cable Box /
HD STB / Gaming device
Page 23
MAKING CONNECTIONS
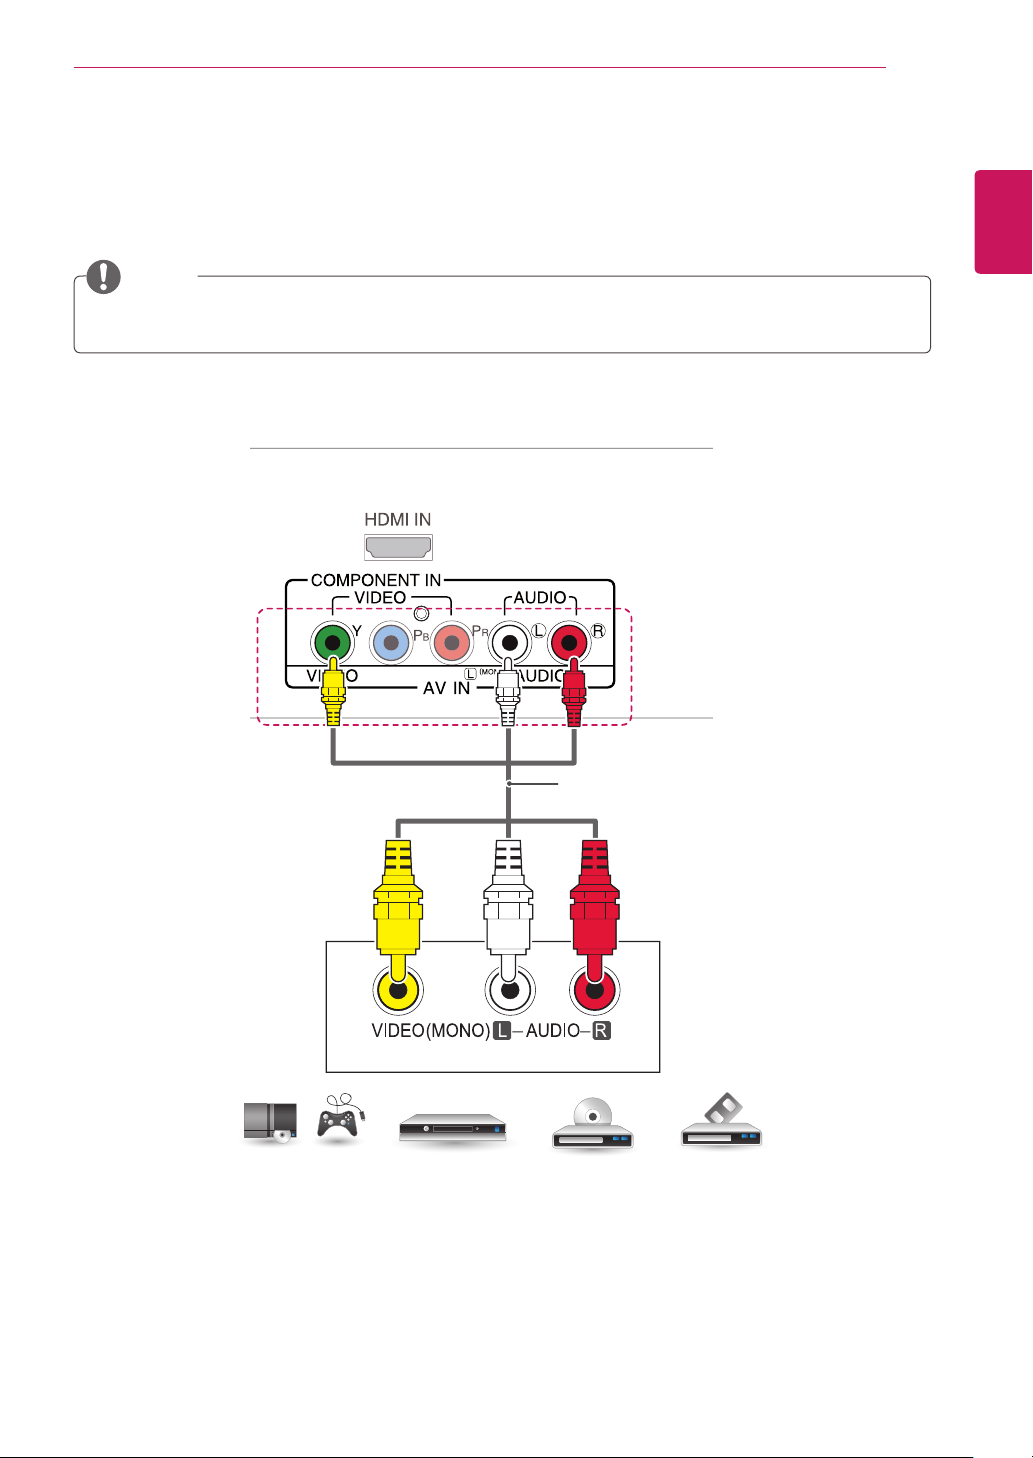
Composite Connection
Transmits the analog video and audio signals from an external device to the TV. Connect the external
device and the TV with the composite cable as shown on the following illustration.
NOTE
Check to ensure each cable is matched with the corresponding color connection.
23
ENGLISH
(Not Provided)
DVD / Blu-Ray / HD Cable Box /
HD STB / Gaming device
Page 24
24
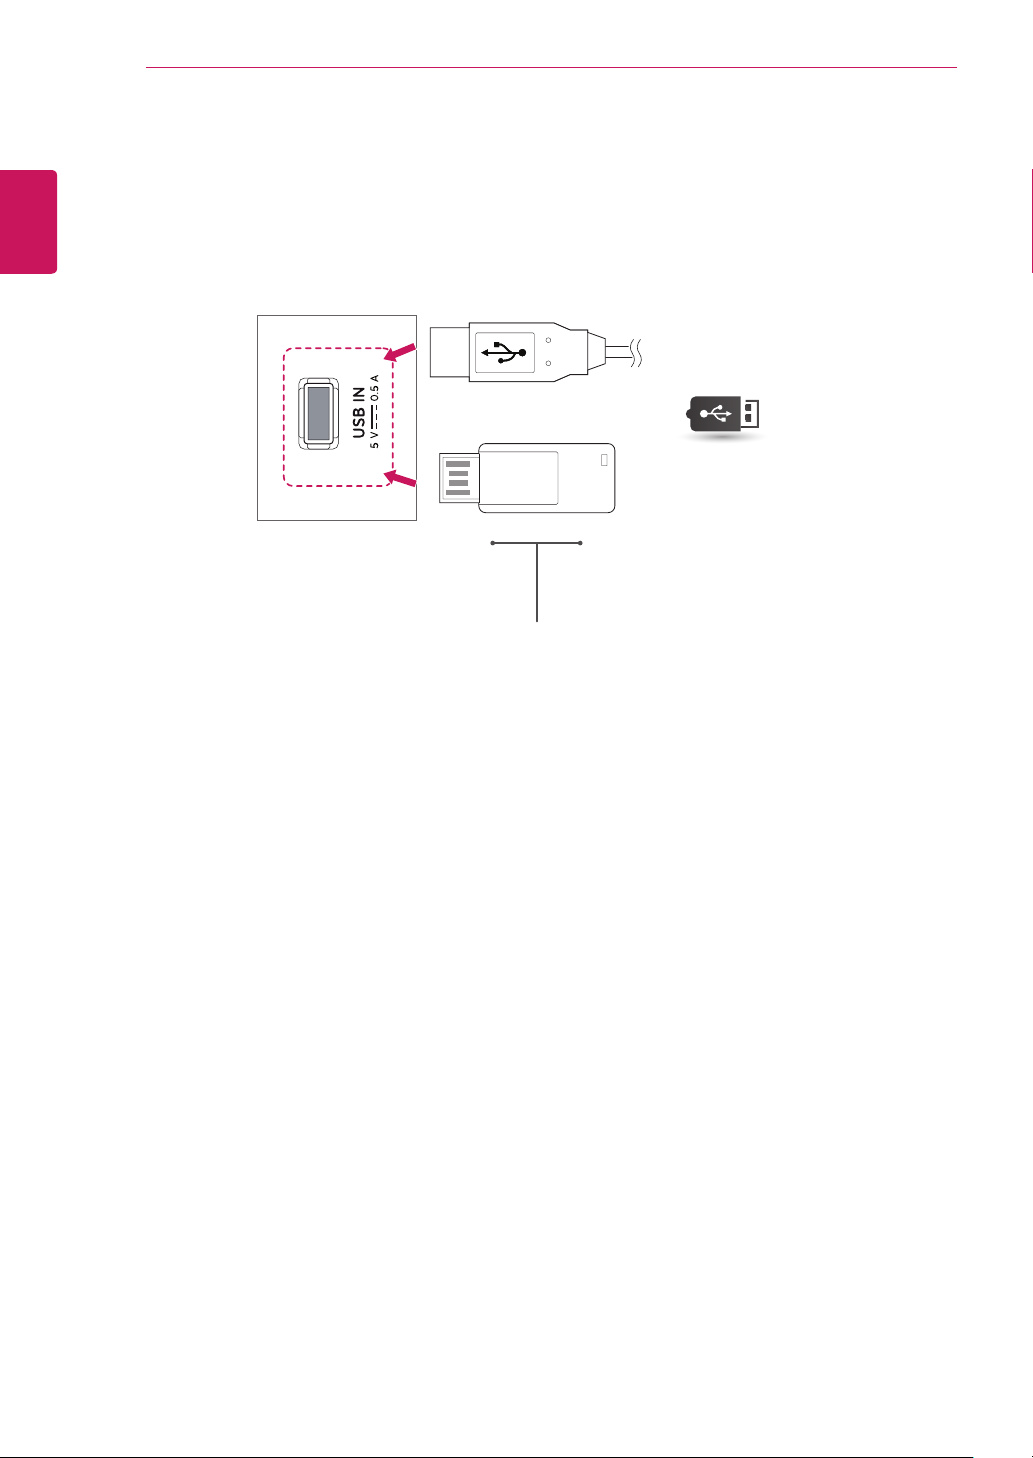
Connecting a USB Device
ENGLISH
Connect a USB storage device such as s USB flash memory, external hard drive, MP3 player or a USB
memory card reader to the TV and access the USB menu to use various multimedia files.
MAKING CONNECTIONS
or
USB
(Not Provided)
Page 25
MAKING CONNECTIONS
25
Connecting to a PC
Your TV supports the Plug & Play* feature and has the built-in speakers with Virtual Surround that
reproduces sound clearly and rich bass.
* Plug & Play: The function when a PC recognizes a connected device and requires no driver to be installed.
NOTE
It is recommended to use the TV with an HDMI connection for the best image quality.
y
If you do not use an optional external speaker, connect the PC to the TV with the optional audio
y
cable.
If you turn the TV on when the set is cold, the screen may flicker. This is normal.
y
Some red, green, or blue spots may appear on the screen. This is normal.
y
Connect the signal input cable and tighten it by turning the screws clockwise.
y
Do not press the screen with your finger for a long time as this may result in temporary distortion on
y
the screen.
Avoid displaying a fixed image on the screen for a long period of time to prevent image burn. Use a
y
screensaver if possible.
When using the HDMI/DVI cable, only Single link is supported.
y
ENGLISH
NOTE
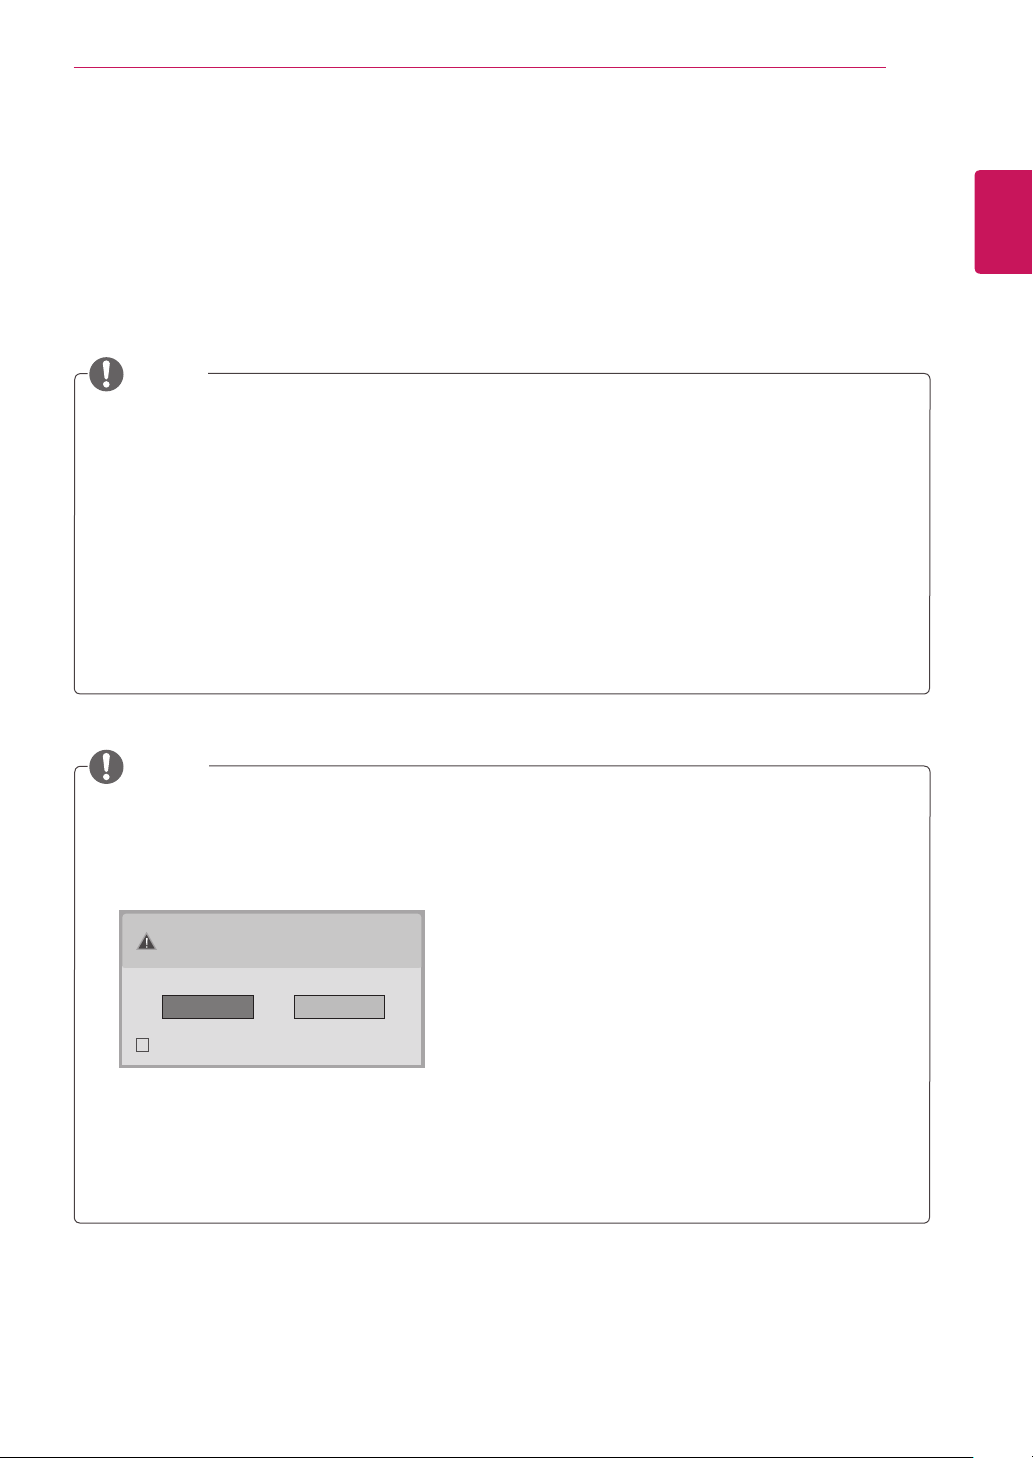
If you want to use HDMI-PC mode, you must set the input label to PC mode.
y
The OSD (On Screen Display) is displayed on the screen as shown below.
y
» When turning the product on in HDMI input.
» When switching to HDMI input.
Is the input connected to your PC?
Yes No
Do not show message again.
If you select "Yes" the size and image quality are optimised for your PC.
y
If you select "No" the size and image quality are optimised for the AV device (DVD player, set-top
y
box, gaming device).
If you select "Do not show message again" this message does not appear until the TV is reset. You
y
can change the set value in SETTINGS INPUT Input Label.
Page 26
26
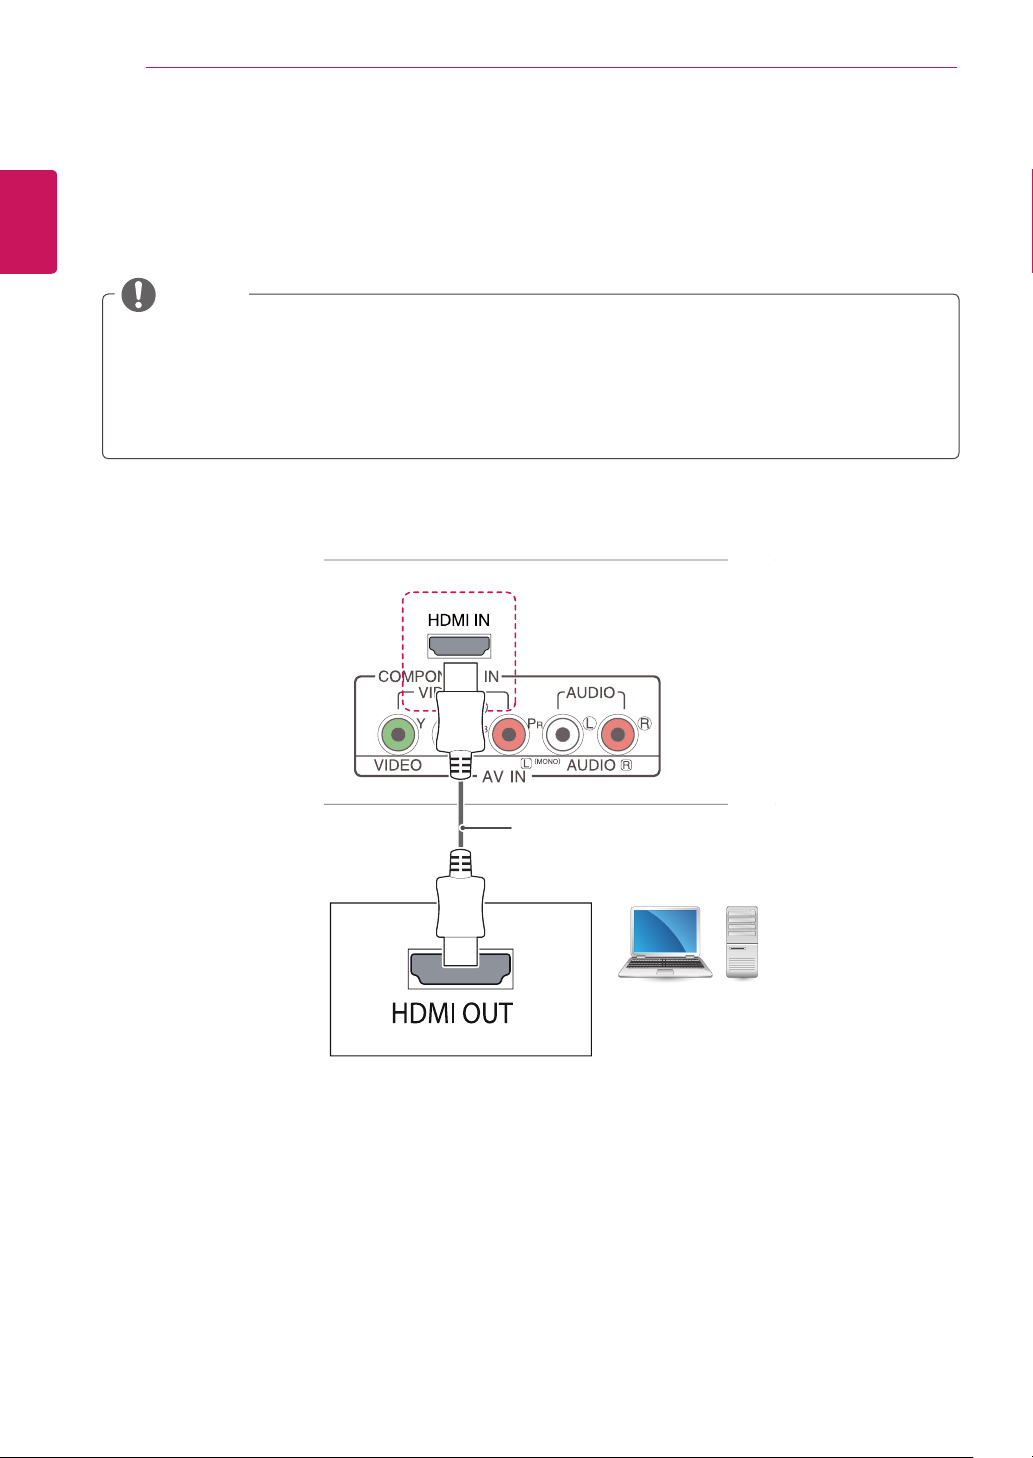
HDMI connection
ENGLISH
Transmits the digital video and audio signals from your PC to the TV. Connect the PC and the TV with an
HDMI cable as shown in the following illustrations. You should change the input label on the TV's HDMI port
(this can be done in the input menu).
MAKING CONNECTIONS
NOTE
Use a High Speed HDMI™ Cable.
y
High Speed HDMI™ Cables are tested to carry an HD signal up to 1080p and higher.
y
If you want to use HDMI-PC mode, you must set the input label to PC or DVI mode.
y
Supported HDMI Audio format: Dolby Digital, PCM (Up to 192 KHz, 32 KHz / 44.1 KHz / 48 KHz /
y
88 KHz / 96 KHz / 176 KHz / 192 KHz, DTS Not supported.)
(Not Provided)
PC
Page 27
MAKING CONNECTIONS
27
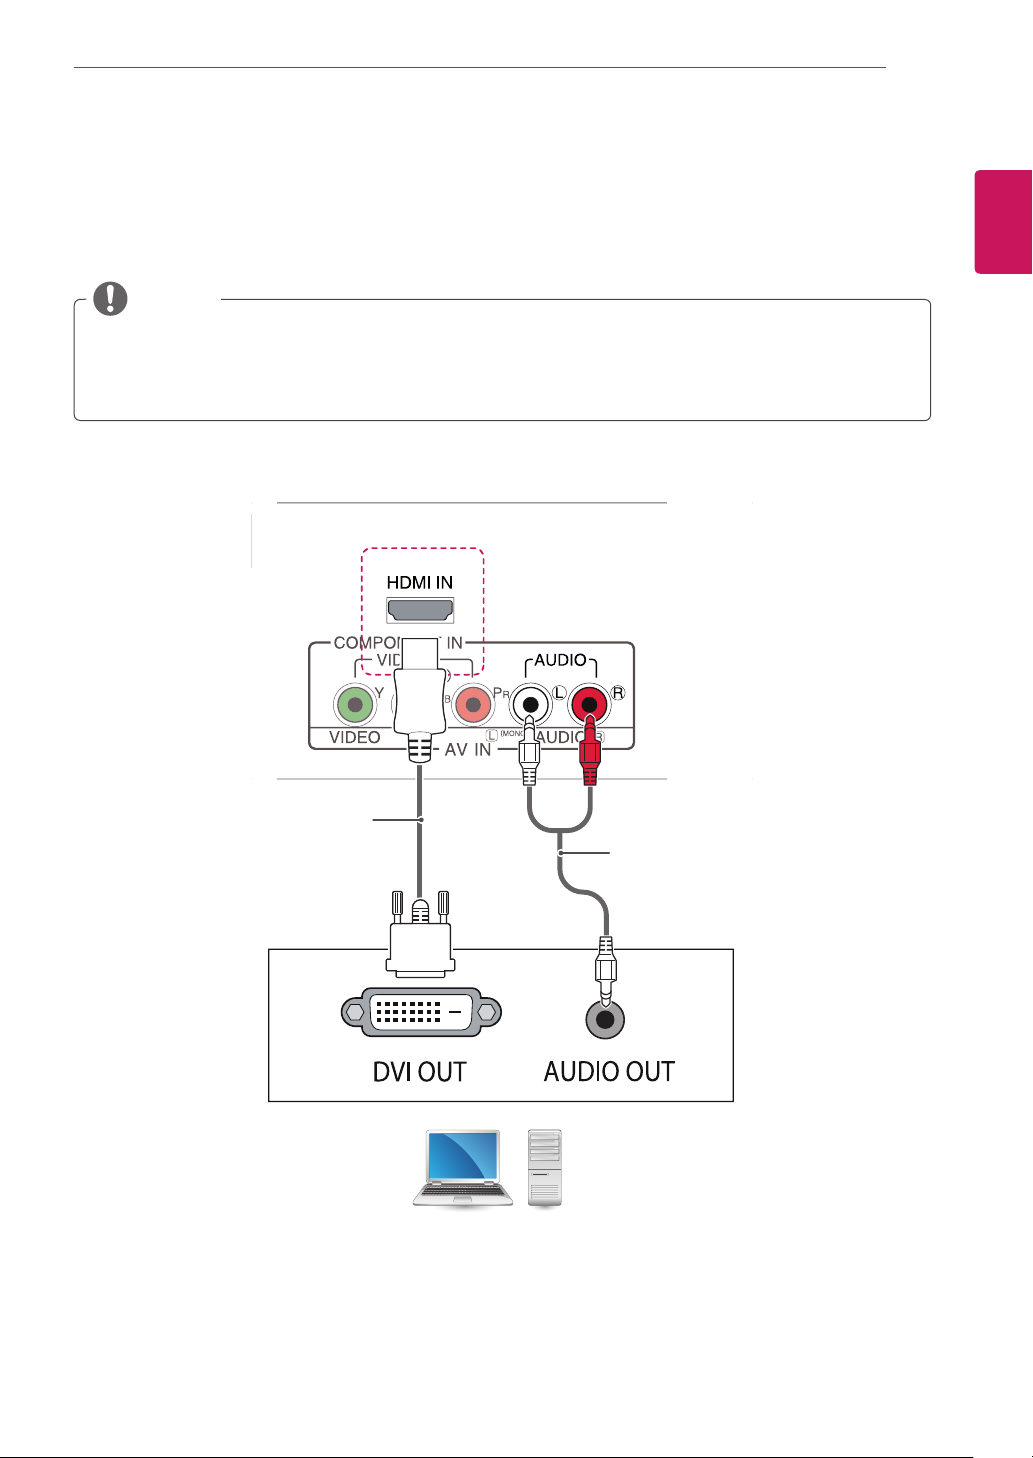
HDMI to DVI connection
Transmits the digital video signal from your PC to the TV. Connect the PC and the TV with an HDMI to DVI
cable as shown the following illustrations. To transmit an audio signal, connect an optional audio cable.
NOTE
If you want to use HDMI-PC mode, you must set the input label to DVI mode.
y
If you do not use an optional external speaker, connect the PC to the TV with the optional audio cable.
y
When using the HDMI/DVI cable, only Single link is supported.
y
ENGLISH
(Not Provided)
(Not Provided)
PC
Page 28
REMOTE CONTROL
28
ENGLISH
REMOTE CONTROL
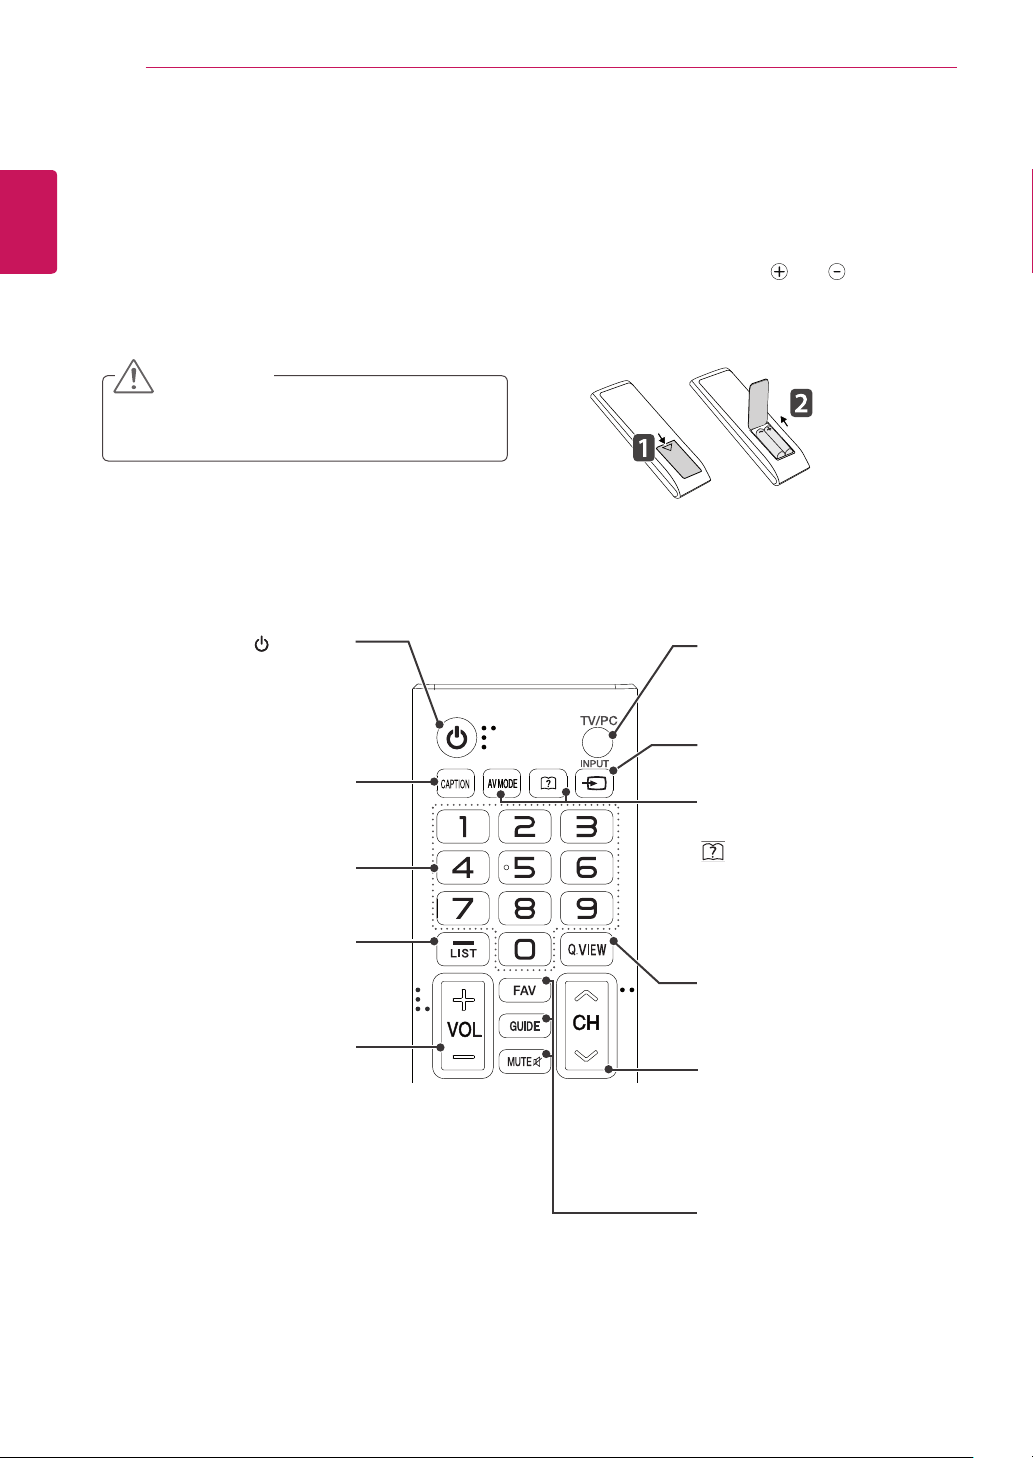
The descriptions in this manual are based on the buttons of the remote control. Please read this manual
carefully and use the TV correctly.
To replace batteries, open the battery cover, replace batteries (1.5 V AAA) matching
label inside the compartment, and close the battery cover.
To remove the batteries, perform the installation actions in reverse.
Make sure to point the remote control to the remote control sensor on the TV.
Image shown may differ from your TV.
CAUTION
Do not mix old and new batteries, as this may
damage the remote control.
(POWER)
Turns the TV on or off.
and ends to the
TV/PC
Selects TV or PC mode.
CAPTION
On or Off.
Number buttons
Enters numbers.
LIST
Displays the channel table.
VOL
Adjusts the volume level.
PAGE
INPUT
Selects the input mode.
AV MODE
Selects an AV Mode.
(User Guide)
Accesses the User Guide menu.
Q.VIEW
Alternates between the two last
channels selected (pressing
repeatedly).
CH
Selects a channel.
PAGE
Moves to the previous or next
screen.
FAV
Accesses your favorite channel list.
GUIDE
Displays the program event
according to time scheduler.
MUTE
Mutes all sounds.
Page 29
REMOTE CONTROL
29
ENGLISH
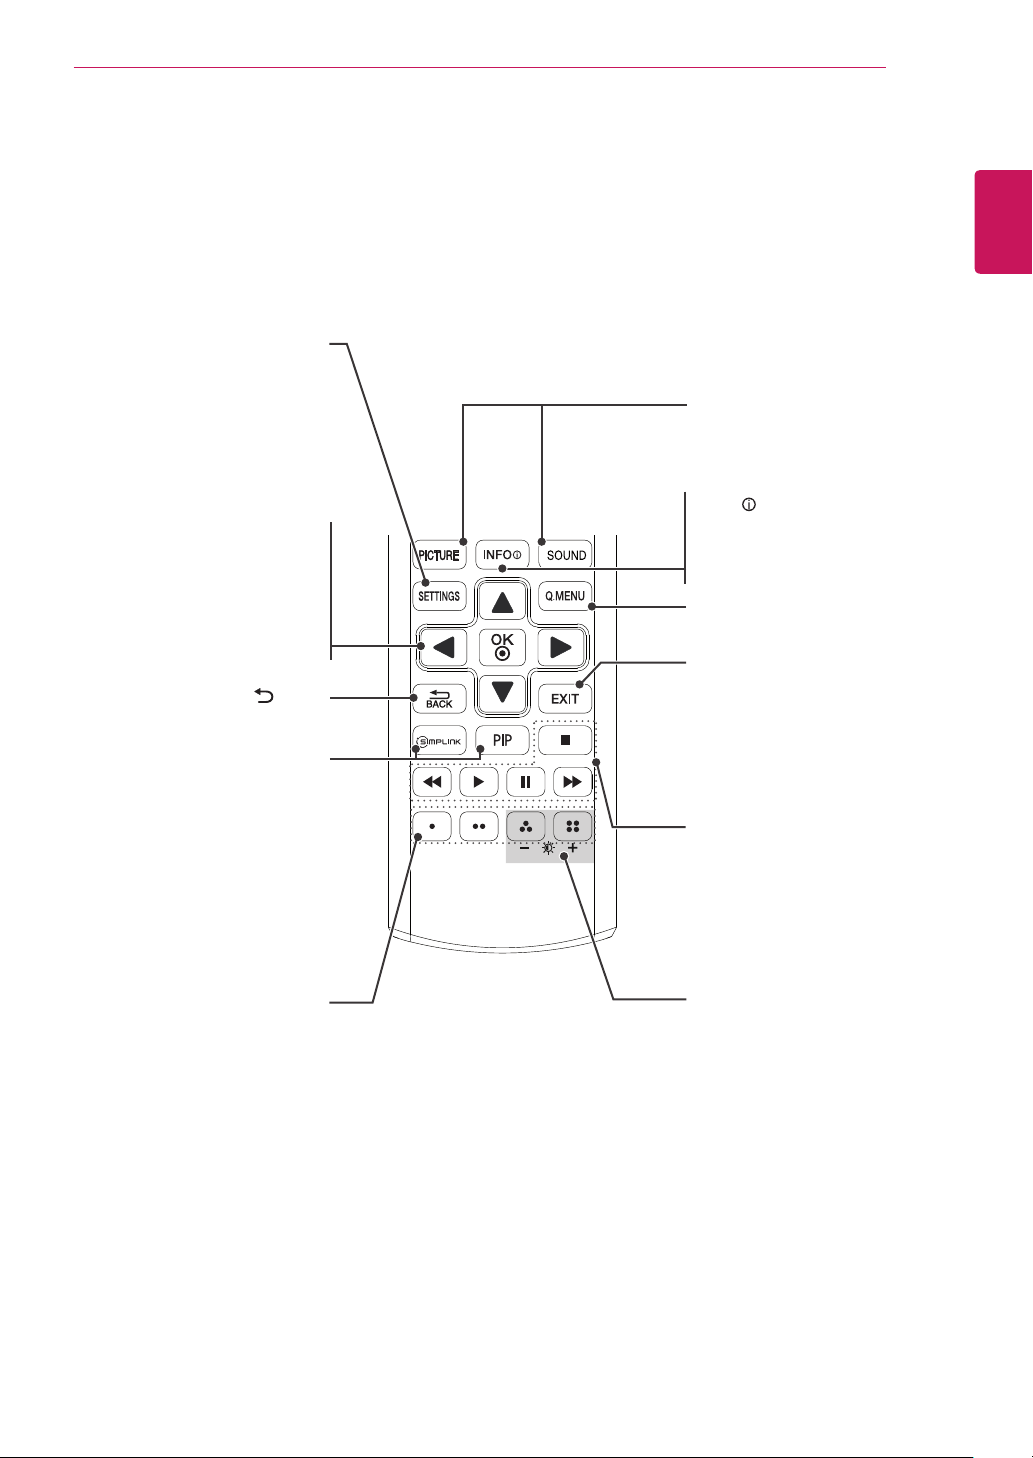
Accesses the main menu.
SETTINGS
Navigation buttons
Scrolls through menus or
options.
OK
Selects menus or options and
confirms your input.
BACK
Returns to the previous level.
SIMPLINK
Accesses the AV devices
connected with the HDMI cable
through HDMI-CEC. Opens the
SIMPLINK menu.
PIP
Turns the PIP mode on or off.
PICTURE Mode
Changes the image mode.
SOUND
Changes the sound mode.
INFO
Views the information of the
currently program and the
screen.
Q.MENU
Accesses the quick menus.
EXIT
Clears all on-screen displays
and returns to TV viewing from
any menu.
Control buttons
Controls the MY MEDIA
menus, or the SIMPLINK
compatible devices
(USB,SIMPLINK).
Colored buttons
These access special
functions in some menus.
Backlight
Adjusts the brightness of
the screen by controlling the
screen backlight.
Page 30
CUSTOMIZING SETTINGS
30
ENGLISH
CUSTOMIZING SETTINGS
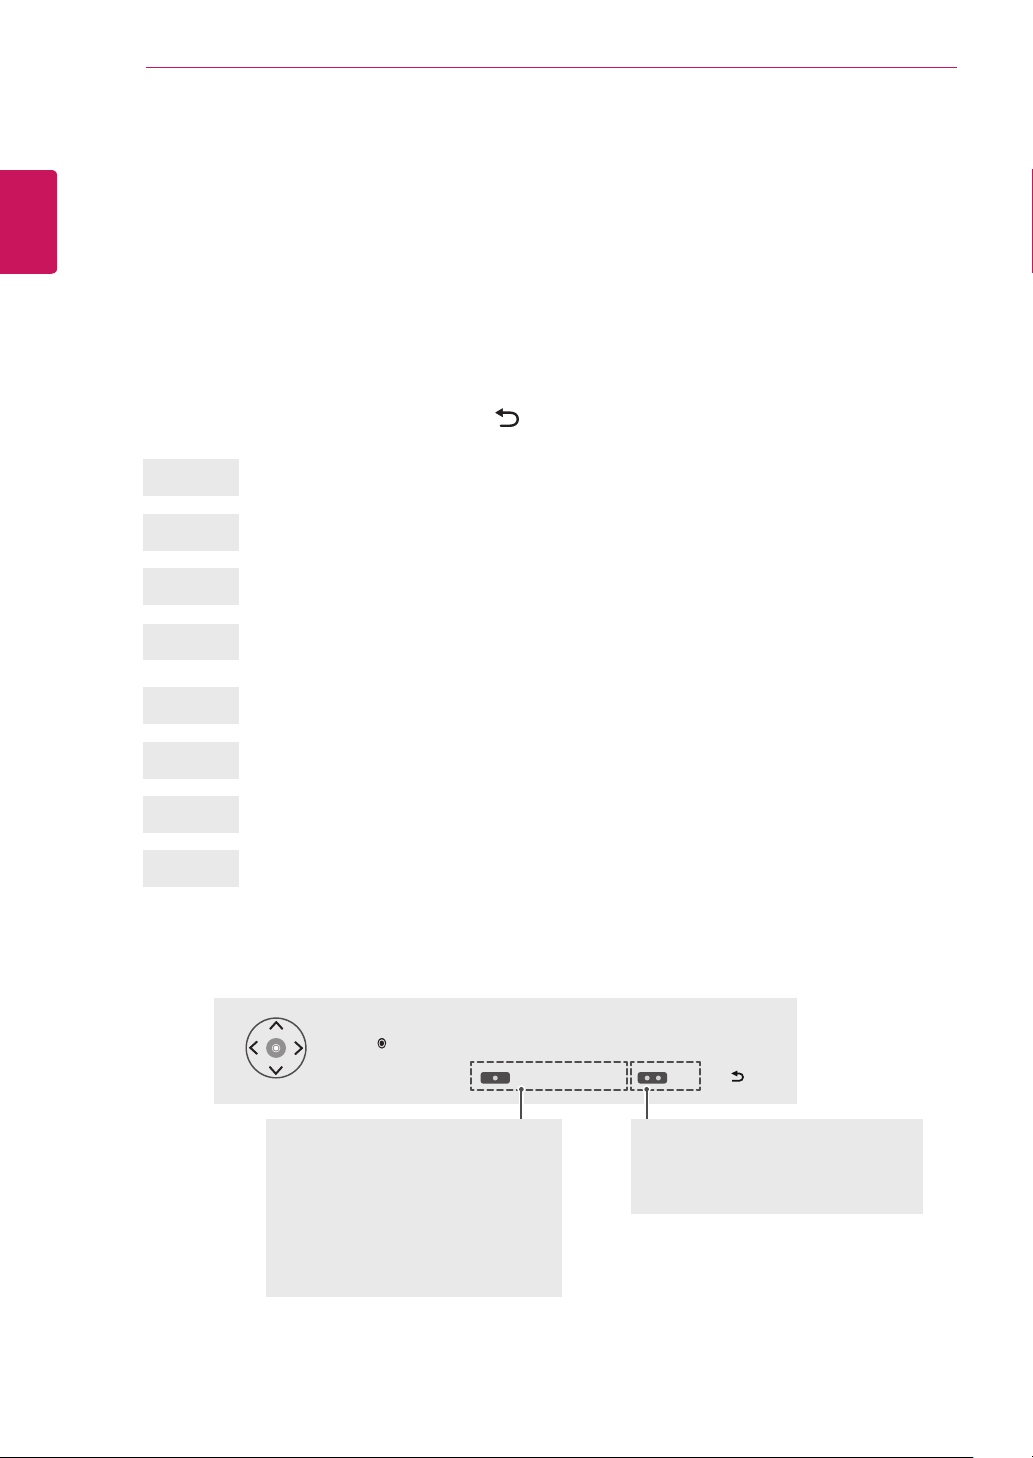
Accessing the Main Menus
1
2
3
4
Press SETTINGS to access the main menus.
Press the Navigation buttons to scroll to one of the following menus and press OK.
Press the Navigation buttons to scroll to the setting or option you want and press OK.
When you are finished, press EXIT.
When you return to the previous menu, press
PICTURE
AUDIO
CHANNEL
TIME
LOCK
Adjusts the image size, quality or effect.
Adjusts the sound quality, effect or volume level.
Sets up and edit channels.
Sets the time, date or Timer feature.
Locks or unlocks channels and programs.
BACK.
OPTION
INPUT
MY MEDIA
Customizes the general settings.
Views the input sources with their labels.
Using integrated media feature.
Press RED button to access the Customer Support menus.
y
Press GREEN Button to access the FAQ menus.
y
Press OK( ) to set your option settings.
Customer Support FAQ
Customer Support
Using Customer Support feature.
Software Update
y
Picture Test
y
Sound Test
y
Product/Service Info.
y
User Guide
y
FAQ
Shows answers to frequently asked
questions about TV viewing and sets
the related menus.
Exit
Page 31
USING THE USER GUIDE
31
USING THE USER GUIDE
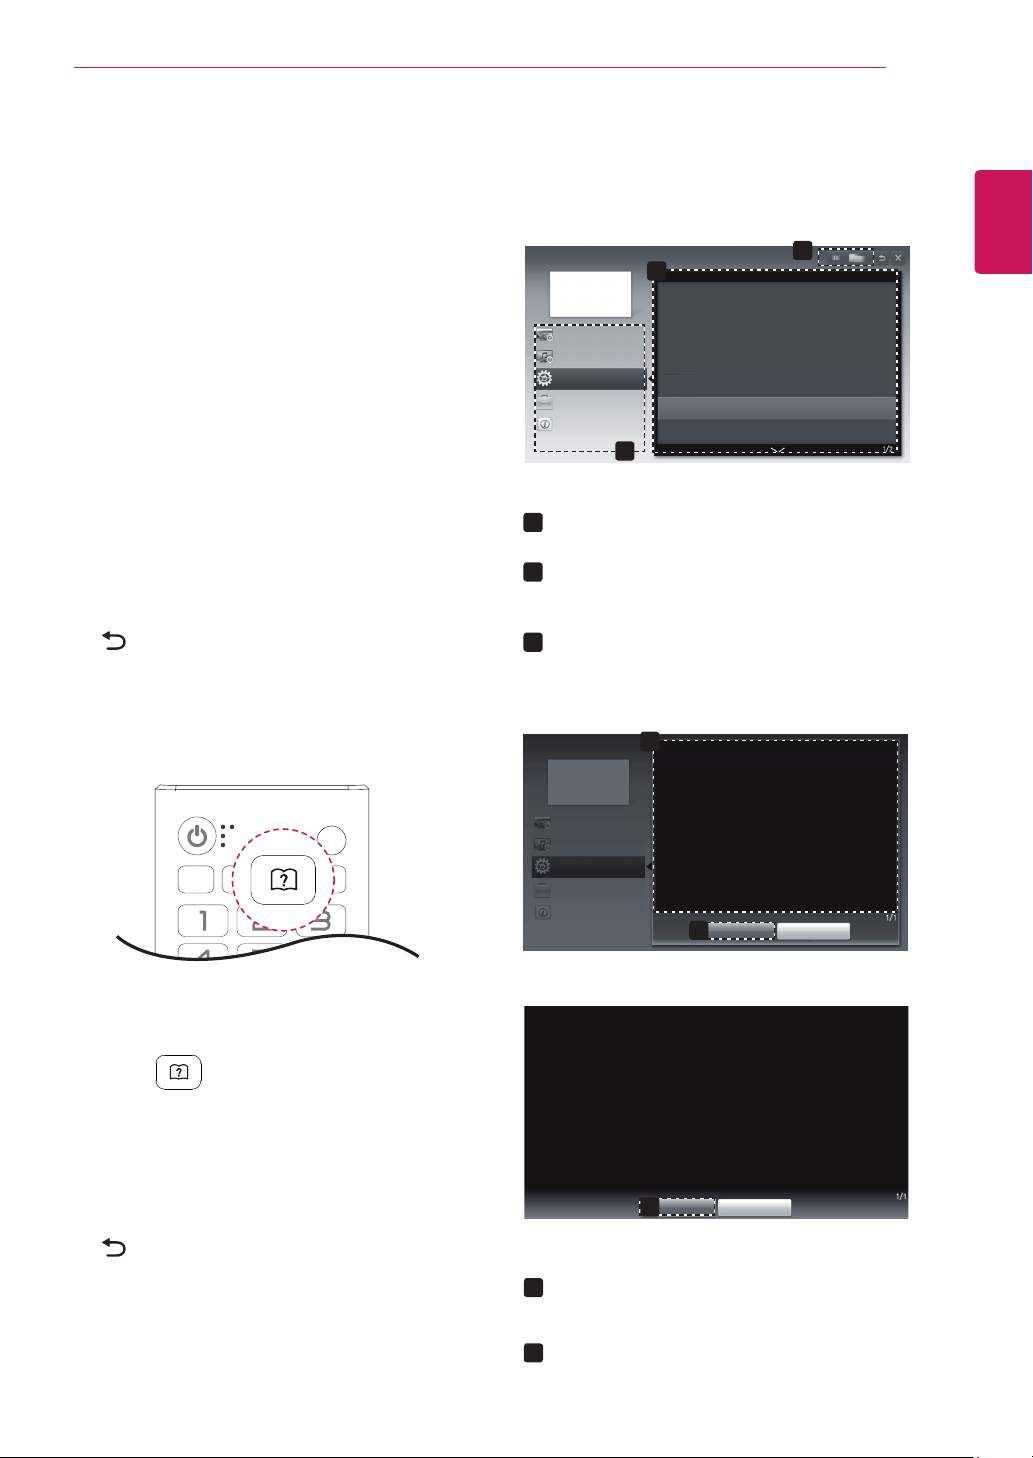
Accessing the On-Screen
User Guide
Using the TV menu
Press SETTINGS to access the main menus.
1
Press the RED button to access the Customer
2
Support menus.
Press the Navigation button to scroll to User
3
Guide and press OK.
Press the Navigation buttons to scroll to the
4
option you want and press OK.
When you are finished, press EXIT.
5
When you return to the previous menu, press
BACK.
Using the Remote Control
Image shown may differ from your TV.
y
User Guide
3
2
To use input device
CHANNEL Setting
PICTURE, SOUND Setting
OPTION
Advanced Function
Information
To set ODC(Over Driving Circuit)
To use PIP(Picture In Picture)
To set time options
To set TV lock options
To set language
To set caption
1
Allows to select the category you want.
1
Allows to select the item you want.
2
You can use ꔌ/ꔍ to move between pages.
Allows to browse the description of the
3
function you want from the index.
User Guide
CHANNEL Setting
PICTURE, SOUND Setting
OPTION
Advanced Function
Information
1
OPTION > To set language
SETTING OPTION Language
You can select the language of the menu displayed on the screen and digital
sound broadcasting.
y
Menu Language : Selects a screen menu language.
y
Audio Language [In Digital Mode Only] : Select the desired language when
watching digital broadcasting containg several voice languages.
Zoom In
2
Close
ENGLISH
Press (User Guide) to access the User
1
Guide.
Press the Navigation buttons to scroll to the
2
option you want and press OK.
When you are finished, press EXIT.
3
When you return to the previous menu, press
BACK.
SETTING OPTION Language
You can select the language of the menu displayed on the screen and digital
sound broadcasting.
y
Menu Language : Selects a screen menu language.
y
Audio Language [In Digital Mode Only] : Select the desired language when
watching digital broadcasting containg several voice languages.
Zoom Out
2
1
Shows the description of the selected menu.
Close
You can use ꔌ/ꔍ to move between pages.
2
Zooms in or out the screen.
Page 32
MAINTENANCE
32
ENGLISH
MAINTENANCE
Cleaning Your TV
Clean your TV regularly to keep the best performance and to extend the product's lifespan.
Screen and frame
To remove dust, wipe the surface with a dry and soft cloth.
To remove major dirt, wipe the surface with a soft cloth dampened in clean water or a diluted mild
detergent. Then wipe immediately with a clean and dry cloth.
CAUTION
Make sure to turn the power off and disconnect the power cord and all other cables first.
y
When the TV is left unattended and unused for a long time, disconnect the power cord from the wall
y
outlet to prevent possible damage from lightning or power surges.
CAUTION
Do not push, rub, or hit the surface with your fingernail or a sharp object, as this may result in
y
scratches on the screen and image distortions.
Do not use any chemicals, such as waxes, benzene, alcohol, thinners, insecticides, air fresheners,
y
lubricants, as these may damage the screen’s finish and cause discolorations.
Cabinet and stand
To remove dust, wipe the cabinet with a dry and soft cloth.
To remove major dirt, wipe the cabinet with a soft cloth dampened in a clean water or water containing a
small amount of mild detergent.
CAUTION
Do not spray liquid onto the surface. If water enters the TV, it may result in fire, electric shock, or
y
malfunction.
Do not use any chemicals as this may deteriorate the surface.
y
Power cord
Remove the accumulated dust or dirt on the power cord regularly.
Page 33

MAINTENANCE
Preventing “Image burn” or “Burn-in” on your TV screen
If a fixed image displays on the TV screen for a long period of time, it will be imprinted and become
y
a permanent disfigurement on the screen. This is “image burn” or “burn-in” and not covered by the
warranty.
If the aspect ratio of the TV is set to 4:3 for a long period of time, image burn may occur on the
y
letterboxed area of the screen.
Avoid displaying a fixed image on the TV screen for a long period of time (2 or more hours for LCD)
y
to prevent image burn.
33
ENGLISH
Page 34
TROUBLESHOOTING
34
ENGLISH
TROUBLESHOOTING
General
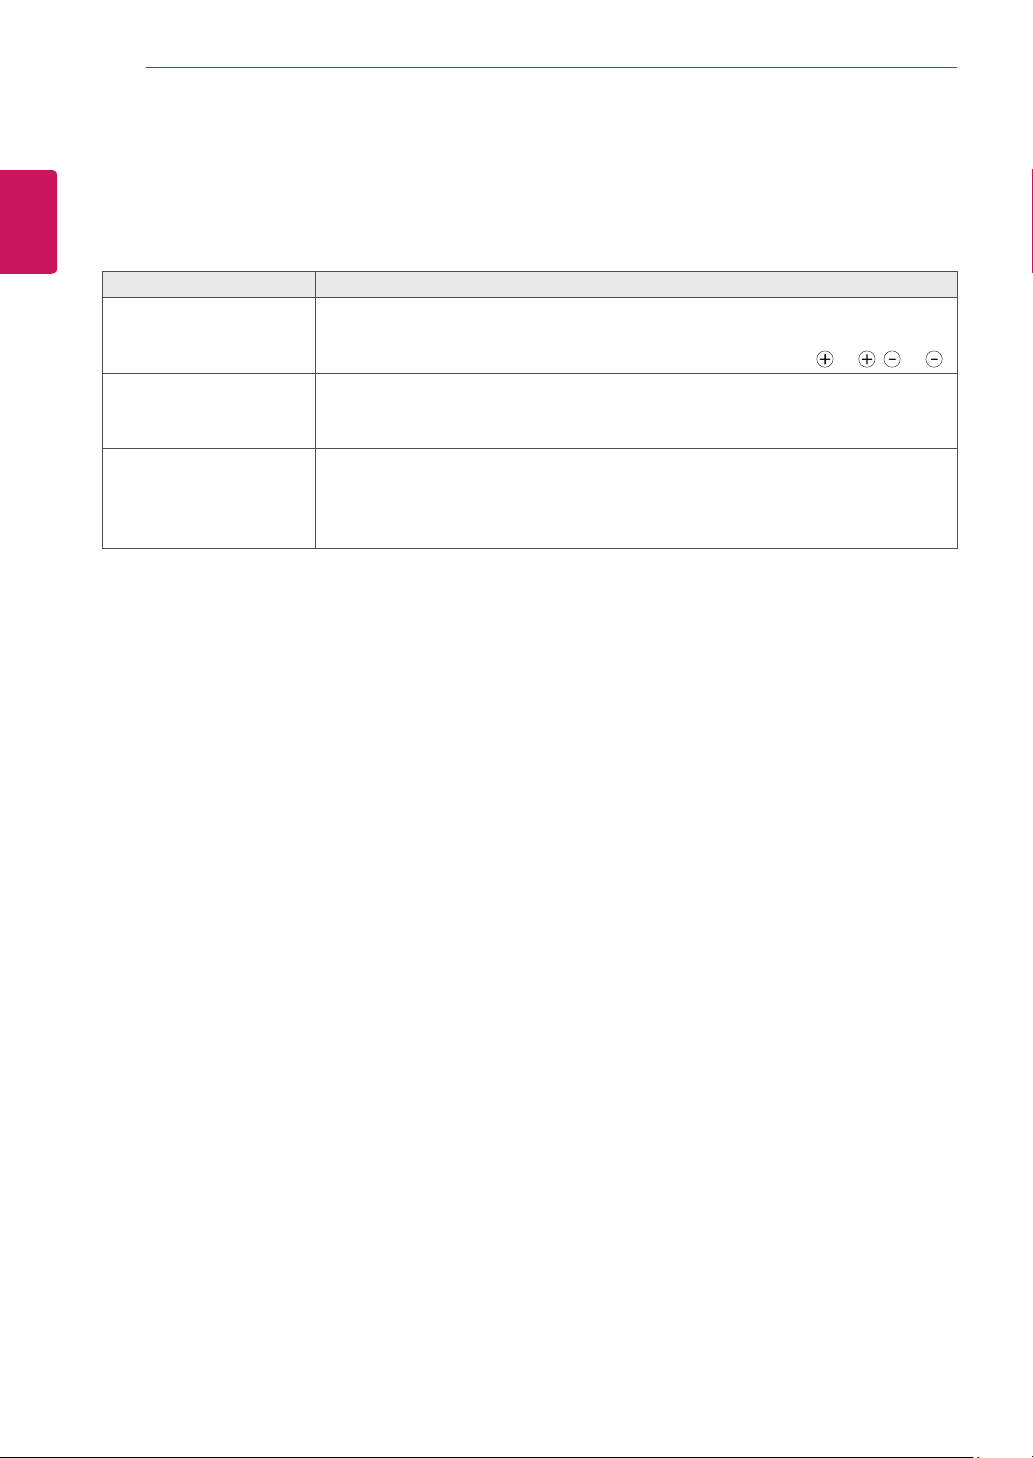
Problem Resolution
Cannot control the TV with
the remote control.
No image display and no
sound is produced.
The TV turns off suddenly.
yCheck the remote control sensor on the product and try again.
yCheck if there is any obstacle between the product and the remote control.
yCheck if the batteries are still working and properly installed (
yCheck if the product is turned on.
yCheck if the power cord is connected to a wall outlet.
yCheck if there is a problem in the wall outlet by connecting other products.
yCheck the power control settings. The power supply may be interrupted.
yCheck if the Auto sleep feature is activated in the Time settings.
yIf there is no signal while the TV is on, the TV will turn off automatically after
15 minutes of inactivity.
to , to ).
Page 35
SPECIFICATIONS
35
SPECIFICATIONS
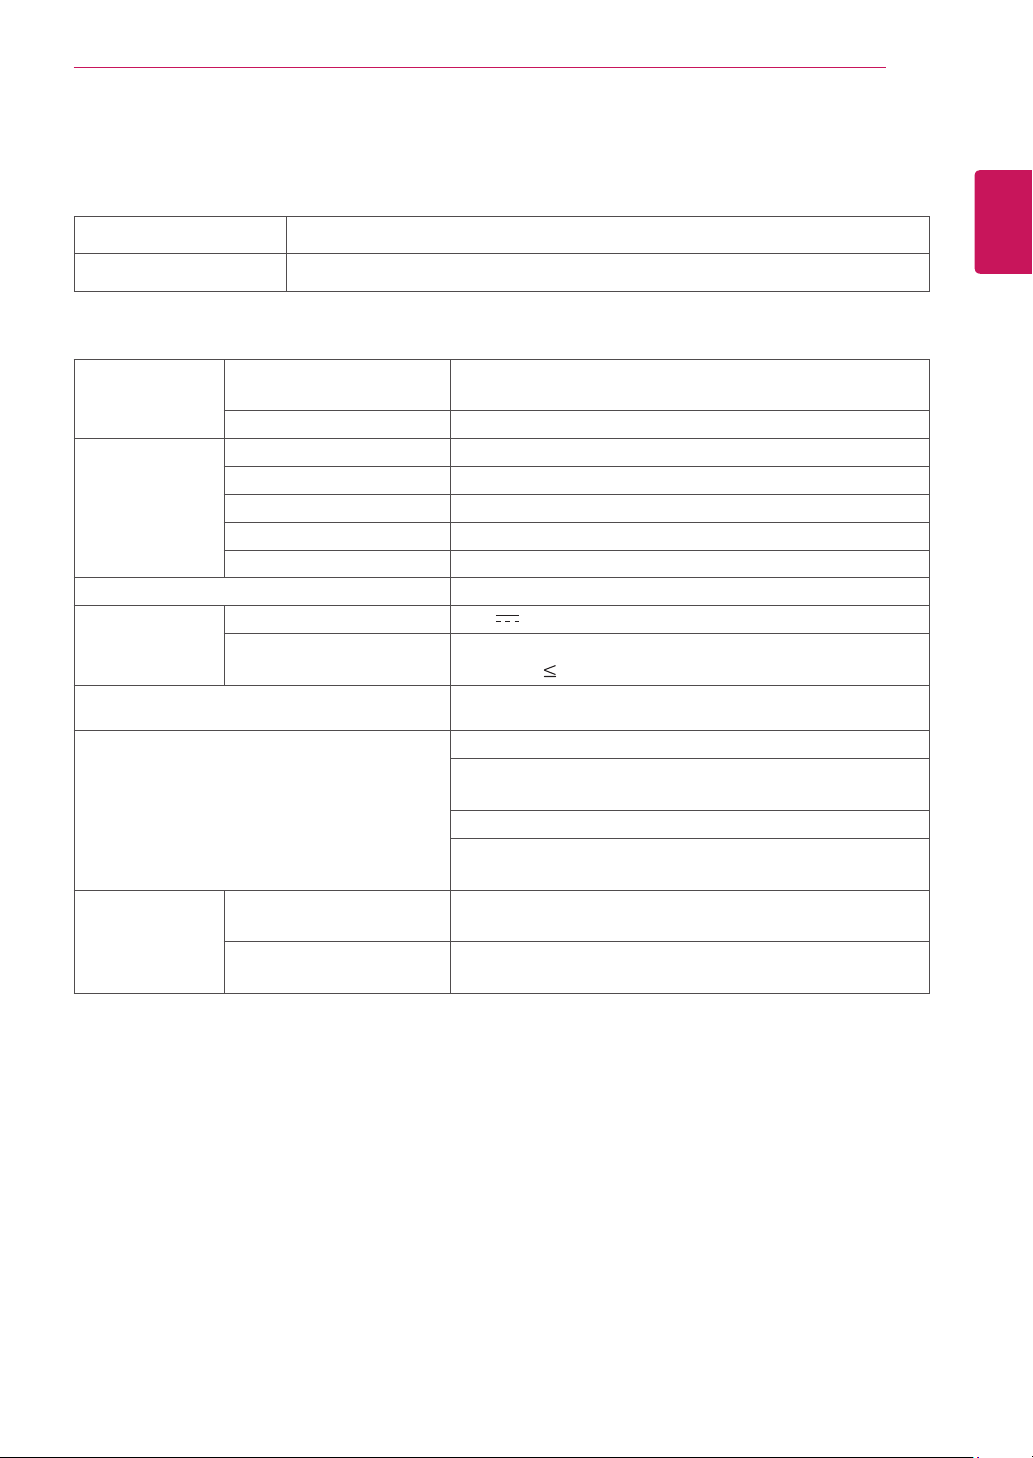
Television System NTSC, PAL-M/N, SBTVD
Program Coverage VHF 2-13, UHF 14-69, CATV 1-135
Panel Screen Type 700 mm Wide (28 inch)
Visible diagonal size : 700 mm
Pixel Pitch 0.445 mm (H) x 0.449 mm (V)
Video Signal Max. Resolution 1366 × 768 @ 60 Hz
Recommended Resolution 1366 × 768 @ 60 Hz
Horizontal Frequency 30 kHz to 61 kHz
Vertical Frequency 56 Hz to 75 Hz
Synchronization Type Digital
Input Connector TV, Component, AV(CVBS), HDMI, USB
Power Rated Voltage 19 V
Power Consumption On Mode : 29 W (typ.)
Off Mode
AC/DC Adapter
Dimensions (Width x Depth x Height)
Weight
Environmental
conditions
Operating Temperature
Operating Humidity
Storage Temperature
Storage Humidity
Manufacturer: Lien Chang, Model:LCAP16B-B, LCAP25B
Manufacturer: LG Innotek, Model: PSAB-L205F, PSAB-L204B
With Stand
645.3 mm x 182.1 mm x 447.9 mm
5.13 kg
Without Stand
645.3 mm x 78.7 mm x 401.6 mm
4.7 kg
10 °C to 35 °C
20 % to 80 %
-10 °C to 60 °C
5 % to 90 %
2.0 A
0.4 W
ENGLISH
Product specifications shown above may be changed without prior notice due to upgrade of product
functions.
Page 36
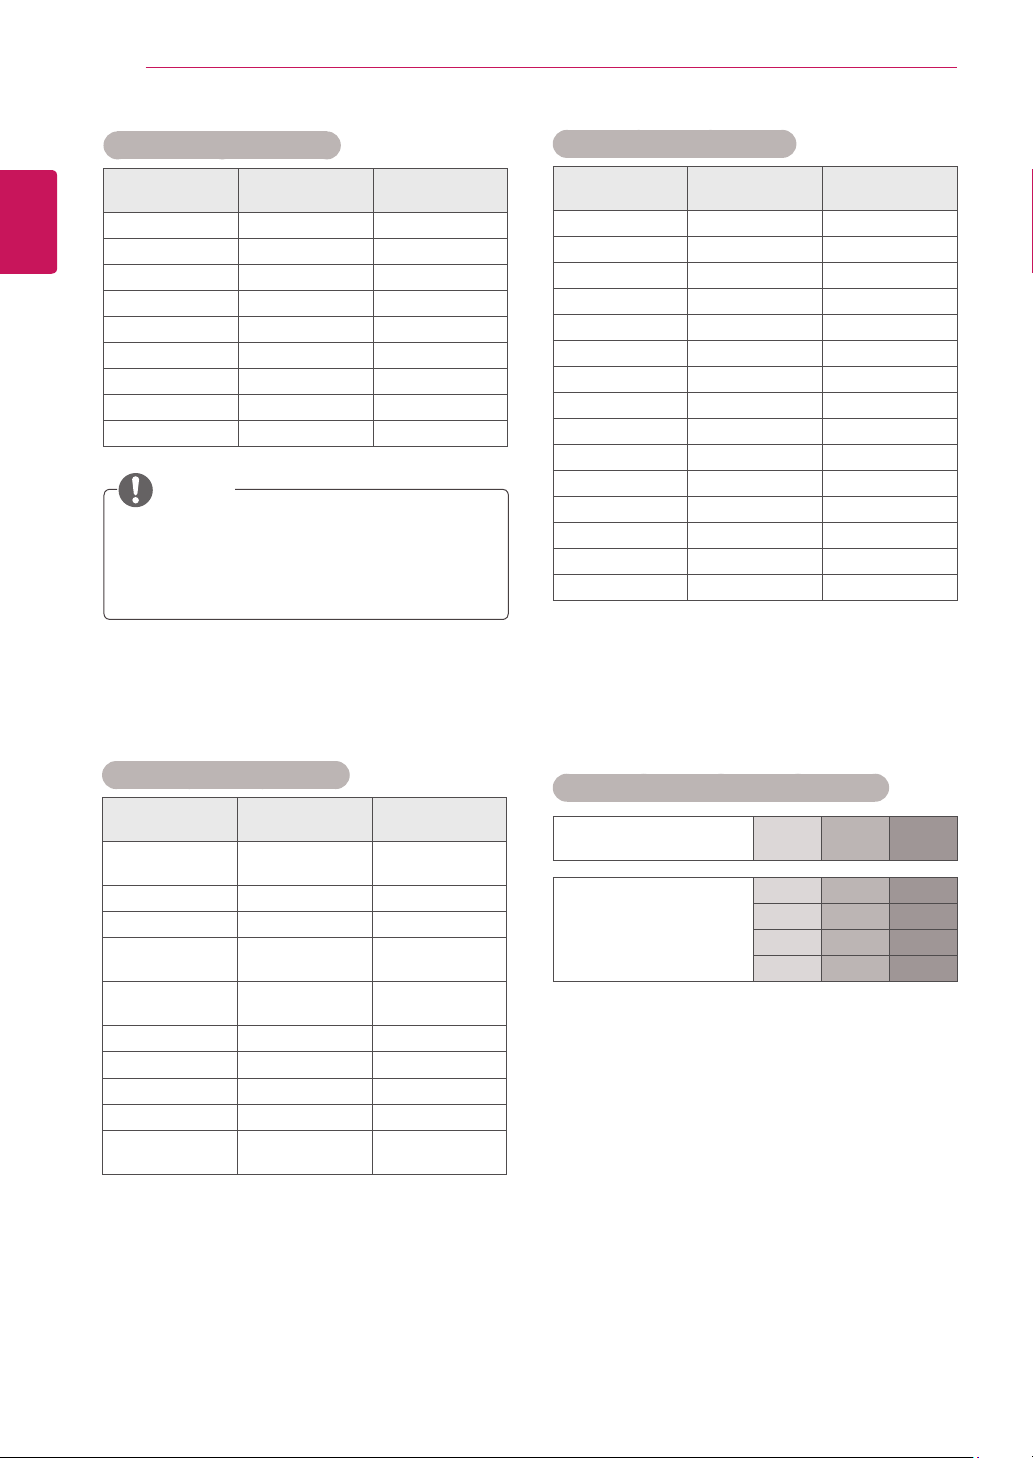
SPECIFICATIONS
36
ENGLISH
HDMI (PC) supported mode
Resolution
720 x 400 31.468 70.080
640 x 480 31.469 59.940
640 x 480 37.500 75.000
800 x 600 37.879 60.317
800 x 600 46.875 75.000
1024 x 768 48.363 60.004
1024 x 768 60.023 75.029
1280 x 800 49.702 59.810
1366 x 768 47.717 59.790
Horizontal
Frequency(kHz)
Vertical
Frequency(Hz)
NOTE
The optimal display resolution is 1366 x 768 @
60 Hz. The optimal timing is vertical frequency
60Hz in each mode.
Component supported mode
Resolution
720 x 480 15.730 59.940
720 x 480 15.750 60.000
720 x 576 15.625 50.000
720 x 480 31.470 59.940
720 x 480 31.500 60.000
720 x 576 31.250 50.000
1280 x 720 44.960 59.940
1280 x 720 45.000 60.000
1280 x 720 37.500 50.000
1920 x 1080 33.720 59.940
1920 x 1080 33.750 60.000
1920 x 1080 28.125 50.000
1920 x 1080 56.250 50.000
1920 x 1080 67.432 59.940
1920 x 1080 67.500 60.000
Horizontal
Frequency(kHz)
Vertical
Frequency(Hz)
HDMI (DTV) supported mode
Resolution
720 x 480 31.469
720 x 576 31.250 50.000
1280 x 720 37.500 50.000
1280 x 720 44.960
1920 x 1080 33.720
1920 x 1080 28.125 50.000
1920 x 1080 27.000 24.000
1920 x 1080 33.750 30.000
1920 x 1080 56.250 50.000
1920 x 1080 67.430
Horizontal
Frequency(kHz)
31.500
45.000
33.750
67.500
Vertical
Frequency(Hz)
59.940
60.000
59.940
60.000
59.940
60.000
59.940
60.000
Component port connecting information
Component ports on the
TV
Video output ports
on DVD player
Y P
Y P
Y B-Y R-Y
Y Cb Cr
Y Pb Pr
B
B
P
R
P
R
Page 37
SPECIFICATIONS
37
NOTE
Avoid keeping a fixed image on the set’s screen for prolonged periods of time. The fixed image may
y
become permanently imprinted on the screen. Use a screen saver when possible.
There may be interference relating to resolution, vertical pattern, contrast or brightness in PC mode.
y
Change the PC mode to another resolution or change the refresh rate to another rate or adjust the
brightness and contrast on the menu until the picture is clear. If the refresh rate of the PC graphic
card can not be changed, change the PC graphic card or consult the manufacturer of the PC graphic
card.
The synchronization input waveform for Horizontal and Vertical frequencies are separate.
y
Connect the audio cable from the PC to the Audio input on the TV. (Audio cables are not included
y
with the TV).
If using a sound card, adjust PC sound as required.
y
DOS mode may not work depending on the video card if you use an HDMI to DVI cable.
y
ENGLISH
Page 38
Make sure to read the Safety Precautions
before using the product.
Keep the Owner’s Manual (CD) in an
accessible place for future reference.
The model and serial number of the TV is
located on the back and one side of the
TV. Record it below should you ever need
service.
MODEL
SERIAL
To obtain the source code under GPL, LGPL,
MPL and other open source licenses, that is
contained in this product, please visit http://
opensource.lge.com.
In addition to the source code, all referred
license terms, warranty disclaimers and
copyright notices are available for download.
LG Electronics will also provide open source
code to you on CD-ROM for a charge covering
the cost of performing such distribution (such
as the cost of media, shipping and handling)
upon email request to [email protected].
This offer is valid for three (3) years from the
date on which you purchased the product.
 Loading...