

Page 1
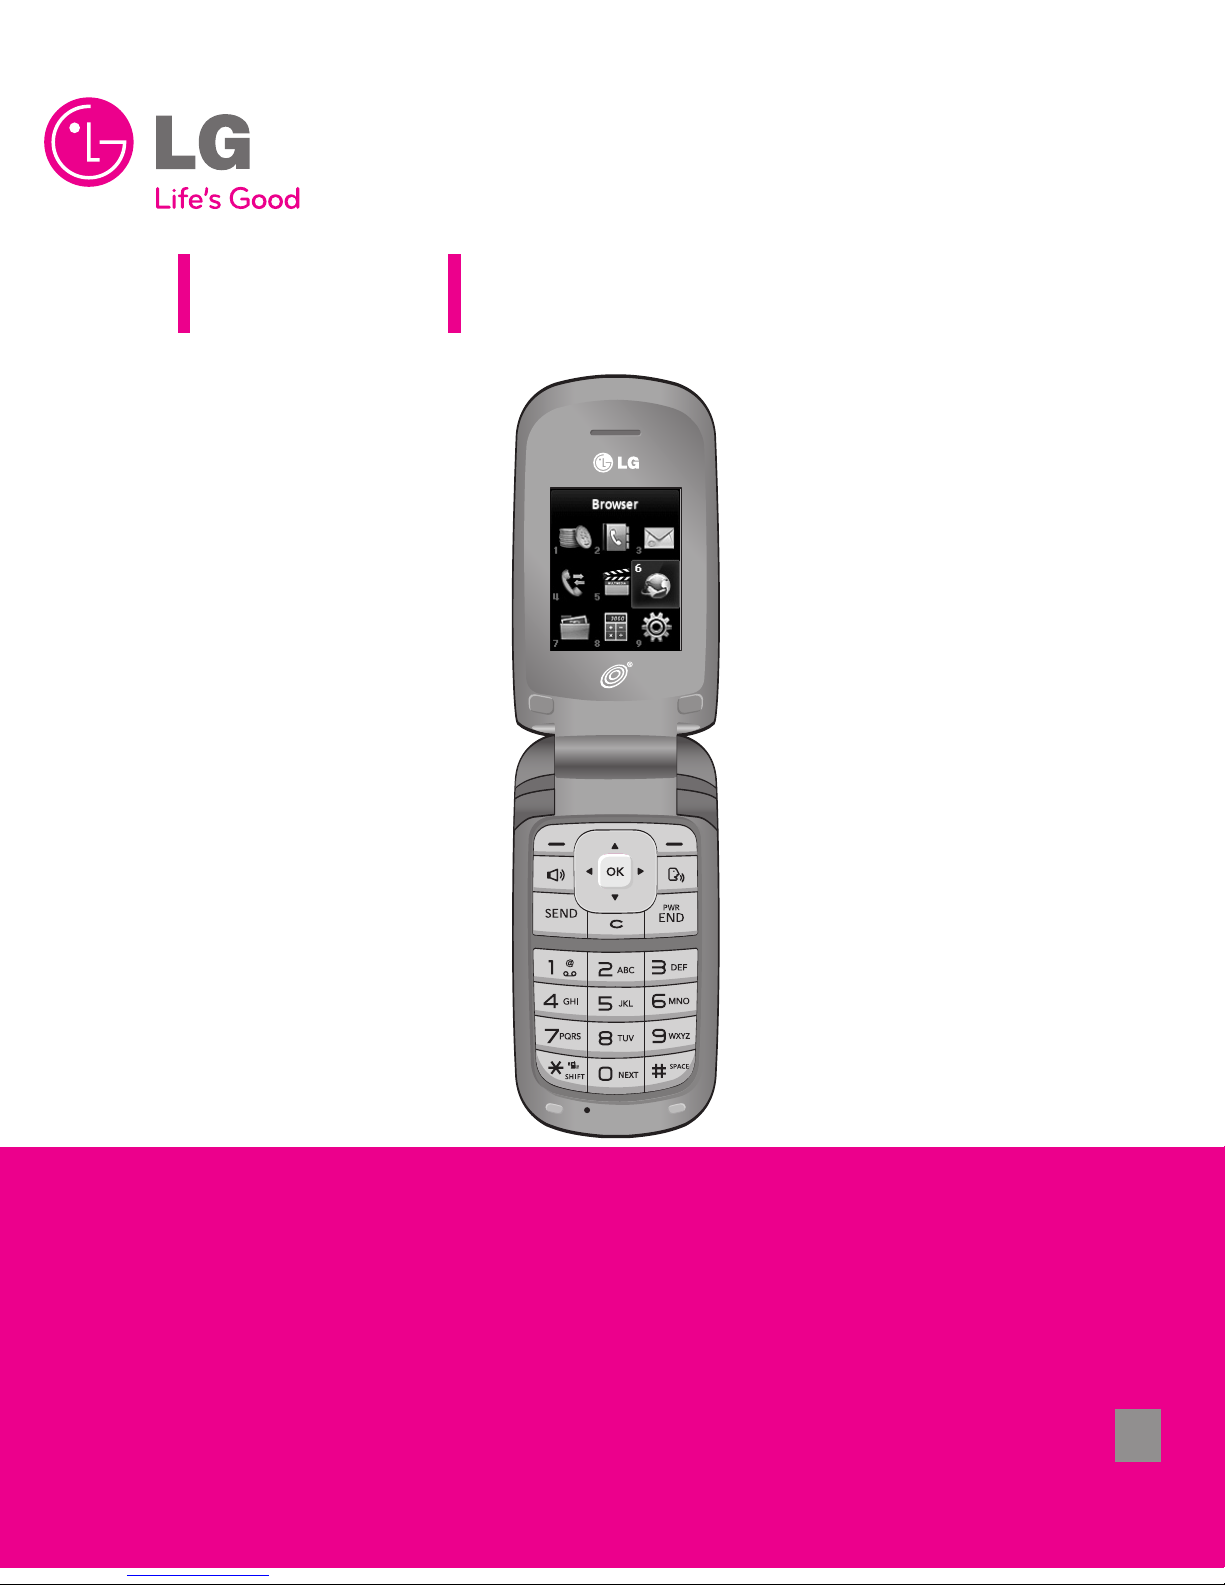
LG 231C
Quick Start Guide
• Depending on the software installed or your service provider or
country, some of the descriptions in this guide may not match your
phone exactly.
• Depending on your country, your phone and accessories may appear
different from the picture in this guide.
Bluetooth QD ID: B015489 P/N: MMBB0390801(1.0) H
Printed in Korea
Page 2
Installing the Battery
To install the battery, align the battery contacts with the terminals in
the battery compartment. Press the battery down until it clicks into
place. Then replace the battery cover on the back of your phone.
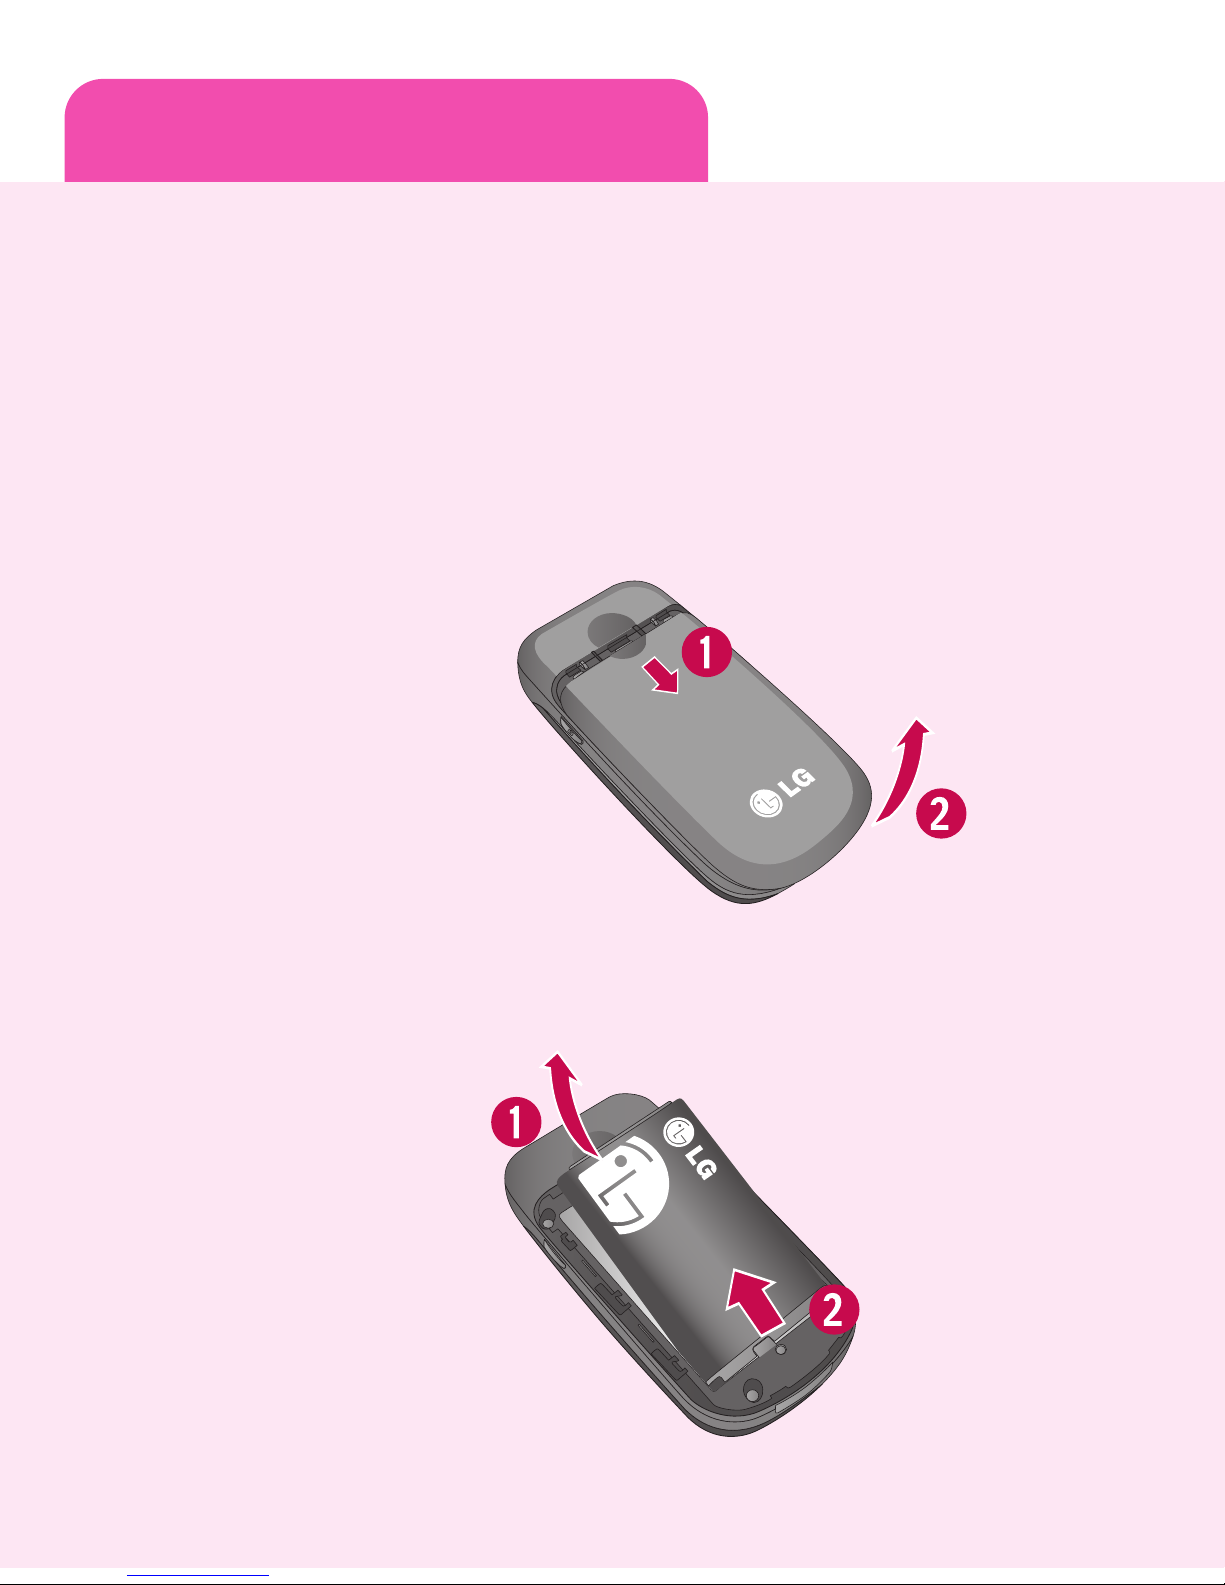
Removing the Battery
1. With your phone turned off, slide the battery cover towards the bottom
of the phone (1) and lift off to remove it (2).
2. Lift the battery up (1) and away (2) from the phone, as shown below.
L
i
t h i
u
m
I
o n
B
a
t t
e
r
y
3
.
7
V
Page 3
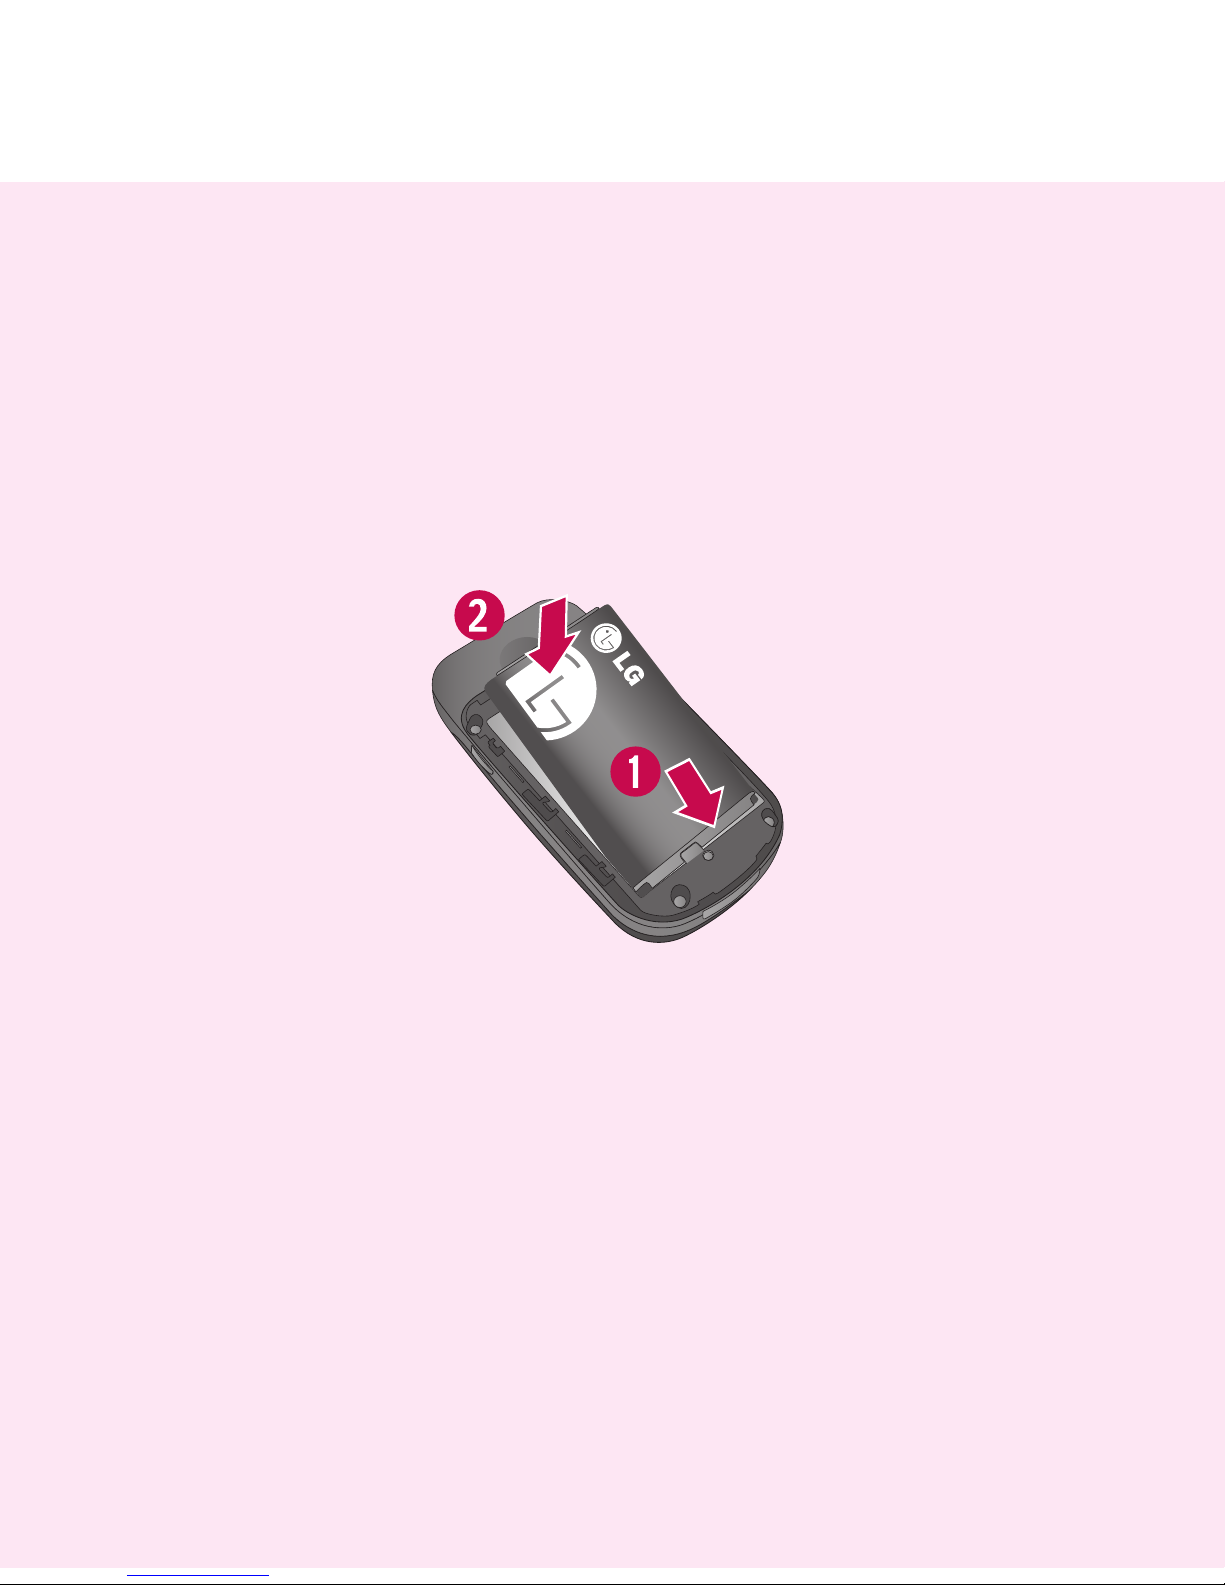
Reinstalling the Battery
1. To reinstall the battery, align the battery contacts (1) with the
terminals in the battery compartment. Press the battery down until it
clicks into place (2).
2. With the battery in position in the phone, replace the battery cover
on the back of your phone.
L
i
t
h
i
u
m
I
o n
B
a
t t
e
r
y
3
.
7
V
Page 4
Charging the Battery
Your phone is powered by a rechargeable Li-ion battery. Use the wall charger
to charge the battery. Please remember to use only LG approved batteries
and chargers.
Note: You must fully charge the battery before using your phone for the first time.
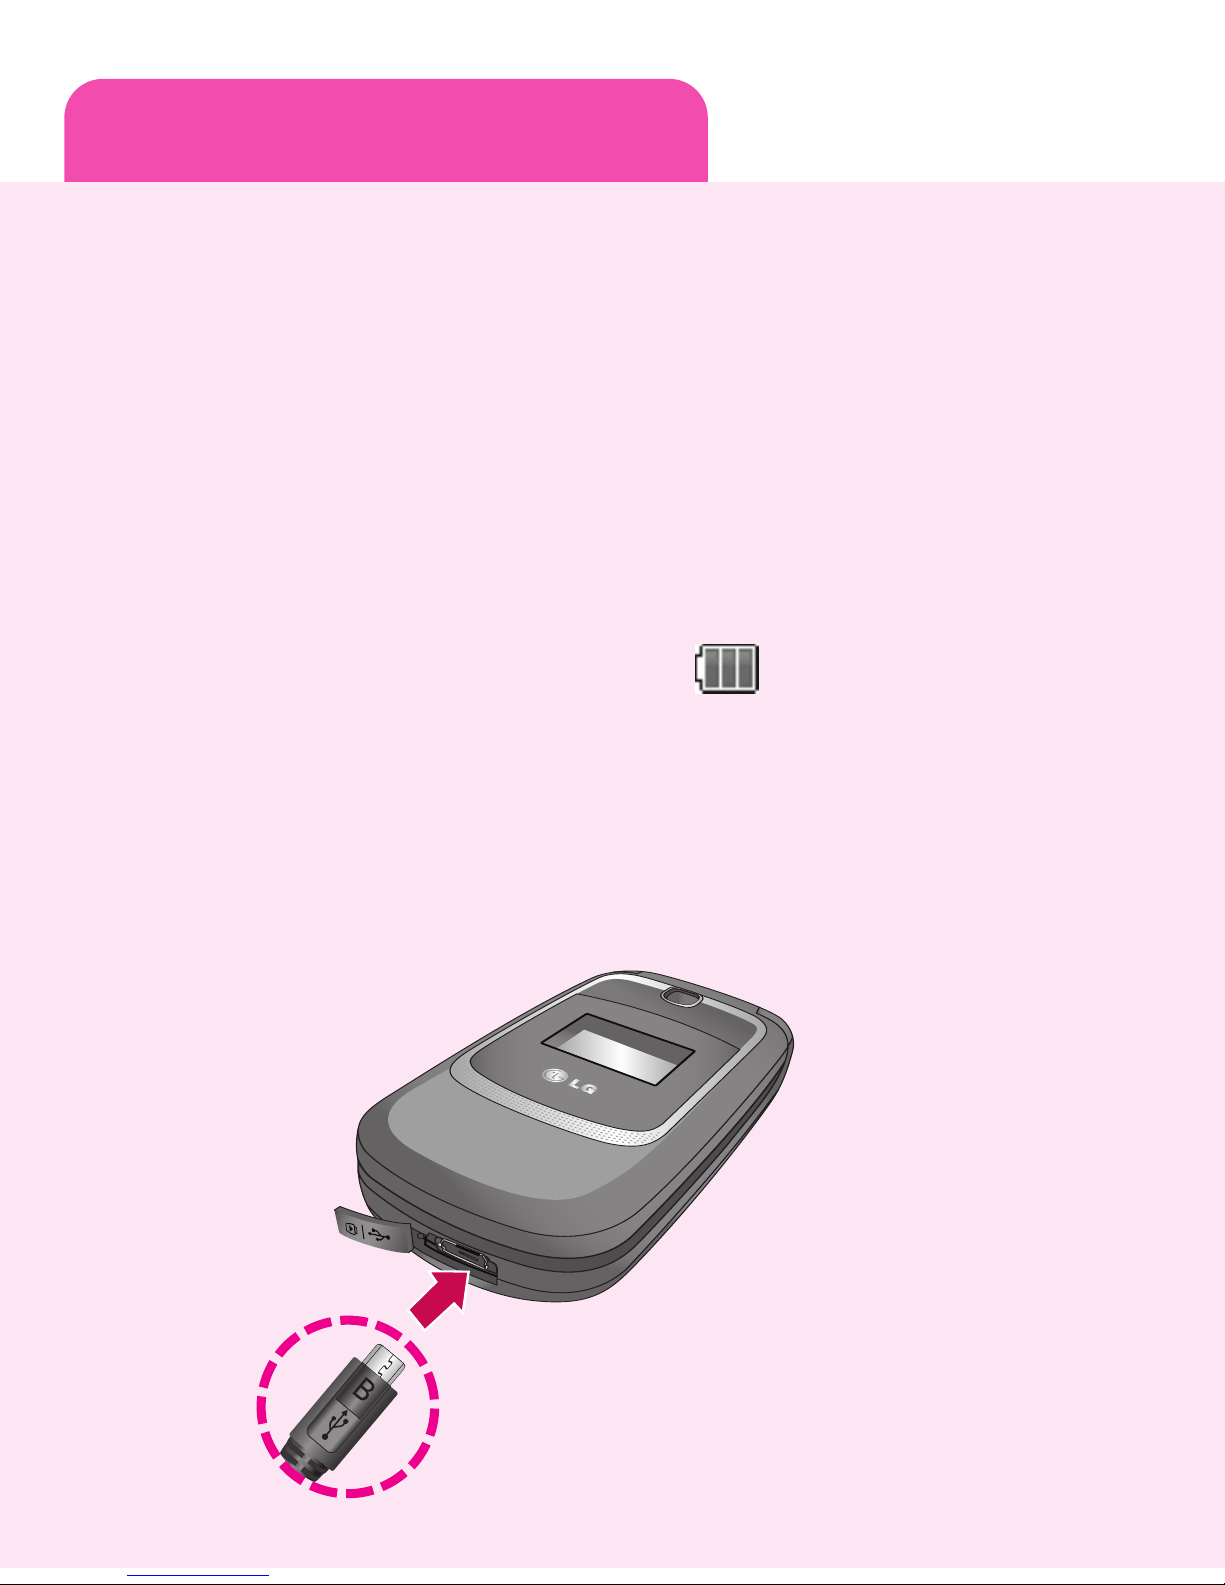
1. Open the cover of the accessory port on the bottom part of the phone
and plug the wall charger connector into the jack. Be sure to orient the
connector as shown in the image below to avoid damaging your phone.
2. Plug the charger into a standard AC wall outlet.
3. When the phone is completely charged( ), unplug the charger from
the wall outlet.
4. Remove the charger from the phone by gently pulling out the connector.
Replace the plastic cover over the open jack.
Important: Do not remove the battery from the phone while charging and make sure the
wall charger is disconnected from the phone before removing the battery.
Please make sure that the 'B' side of the connector is
facing up before inserting the charger or a USB cable
into your phone's Charger/Accessory Port.
Page 5
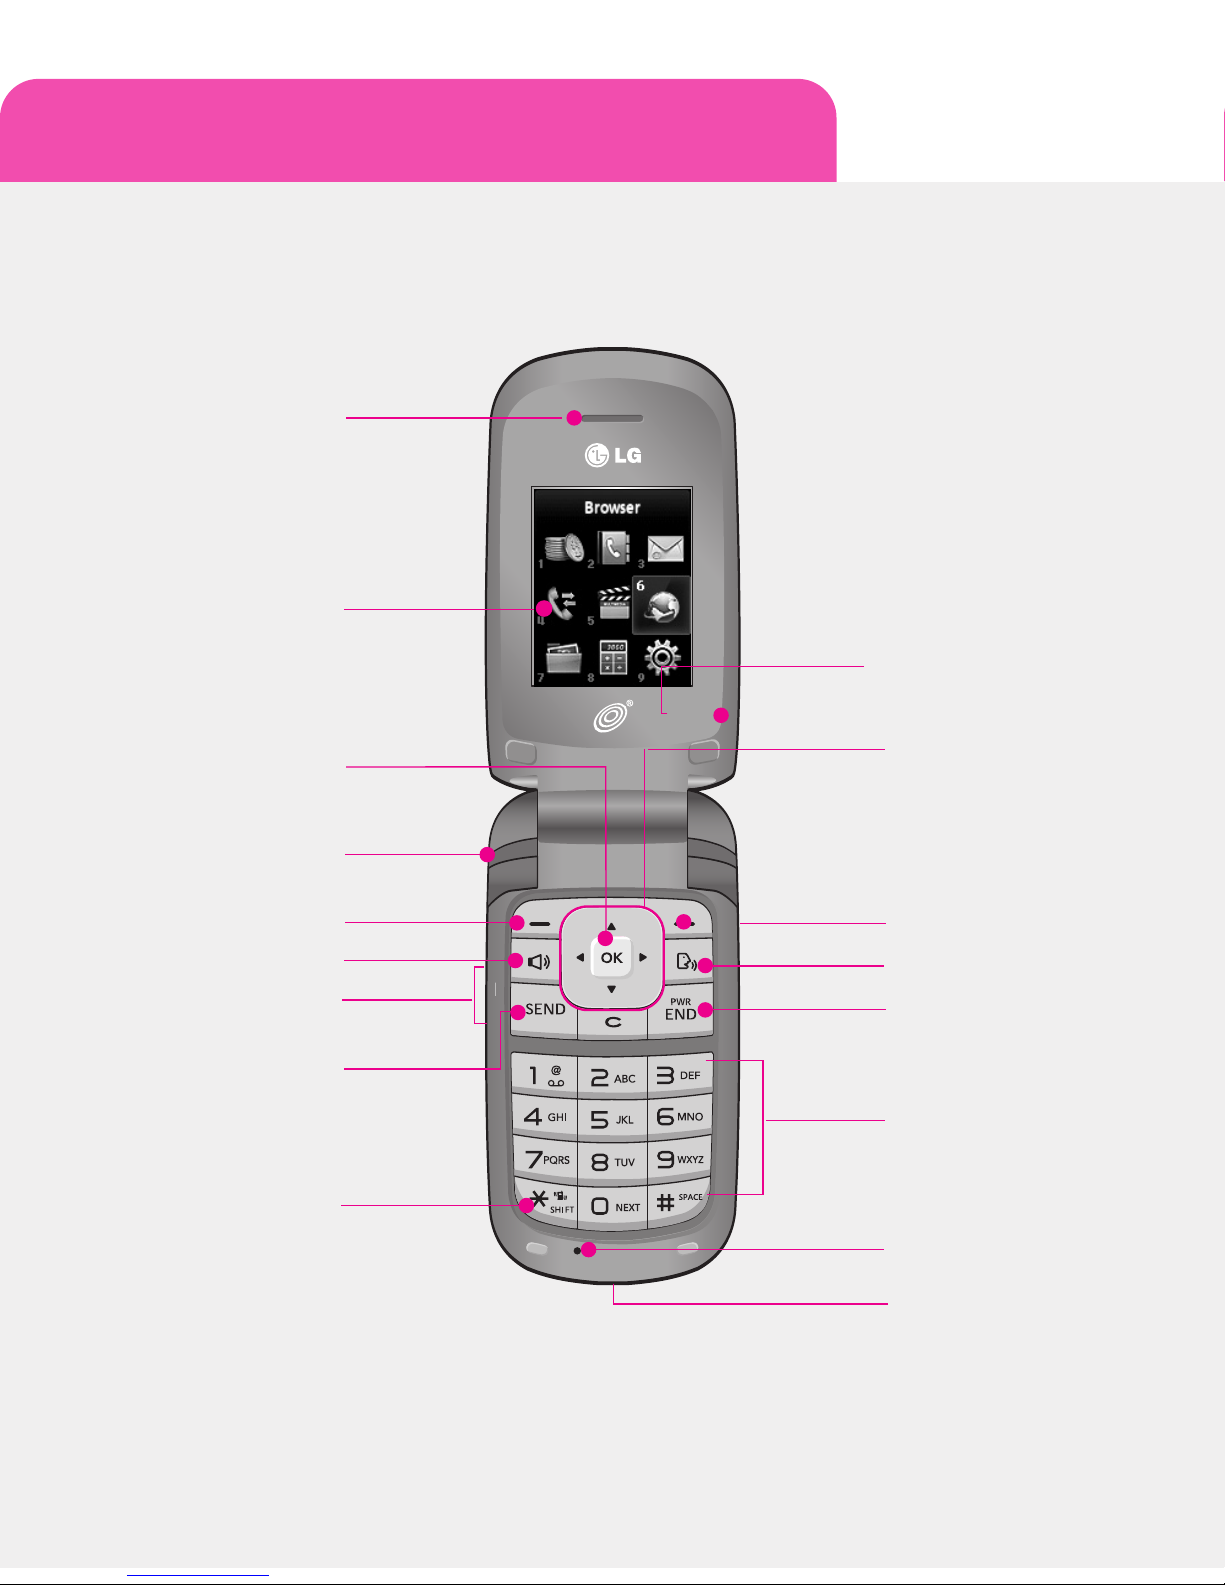
Phone layout and key functions
Earpiece
Navigation Keys
END/PWR Key
SEND Key
Left Soft Key
Speakerphone Key
Volume Keys
LCD Screen
2.5 mm Headset Jack
Normal/Vibrate Only
Mode Key
Right Soft Key
Camera Key
Voice Command Key
Alphanumeric
Keypad
Microphone
Charger/
Accessory Port
OK Key
Page 6
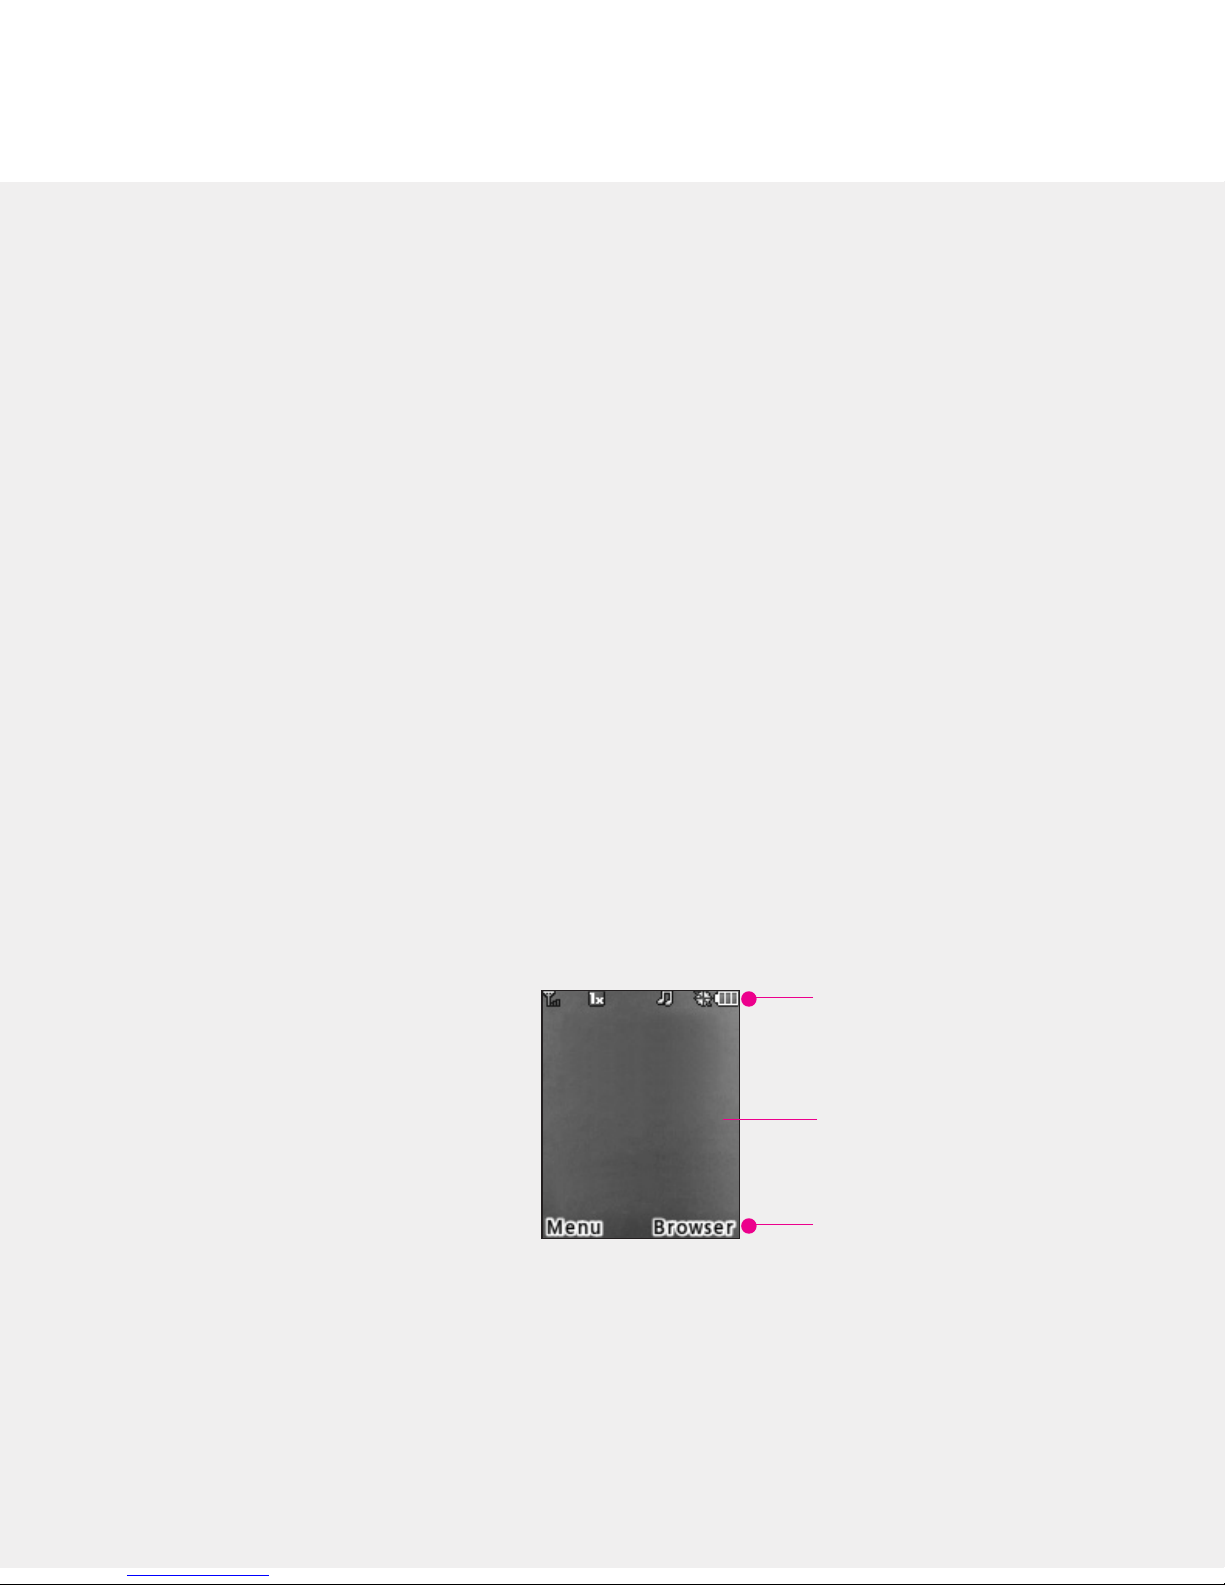
Phone features include:
• Large, easy-to-read, LCD screen with status icons.
• Messaging, voice mail, and caller ID.
• 24-key keypad.
• Speakerphone feature.
• Menu-driven interface with prompts for easy operation and configuration.
• Any key answer, auto answer, auto retry, one-touch and speed dialing with
99 memory locations.
• Bilingual (English and Spanish) capabilities.
• Internal Antenna.
Your phone is in standby
mode when you are not on
a call or using a menu. You
must be in standby mode
to enter a phone number
to dial.
Display
Status icons
Main display area
Soft key options
Page 7
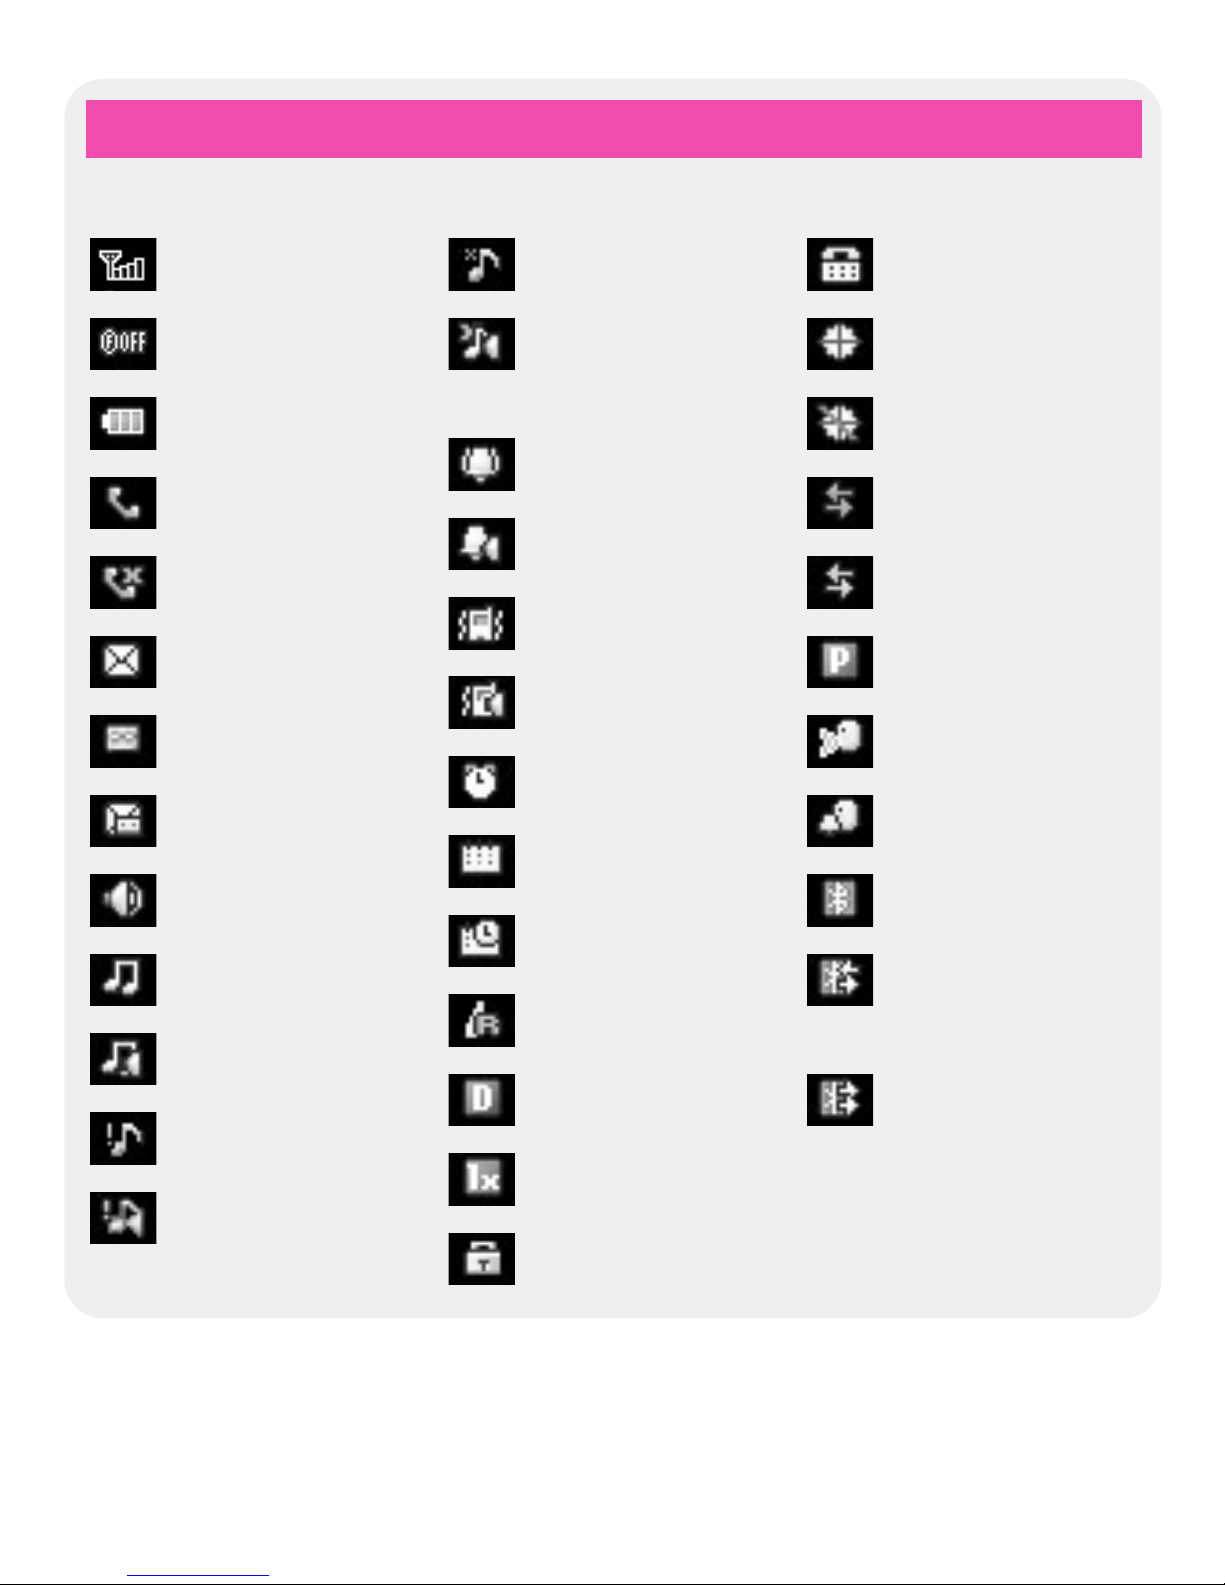
Your phone displays the following status icons on the top of the screen:
Signal Strength
Airplane Mode
Battery Strength
In Call State
No Service
New Message
New Voicemails
Msg & Voicemail
Speaker Phone
Ring
Ring & Speaker
1 Beep
1 Beep &
Speaker
Silence All
Silence All &
Speaker
Alarm Only
Alarm & Speaker
Vibrate Only
Vibrate
& Speaker
Alarm
Calendar
Alarm & Calendar
Roaming
Digital
1X
SSL
TTY
Location On
E911 Only
Active Data
Dormant Data
Voice Privacy
Announce
Announce + Ring
Bluetooth On
Device
Connected
Shown to All
IIccoonn DDeessccrriippttiioon
n
Page 8
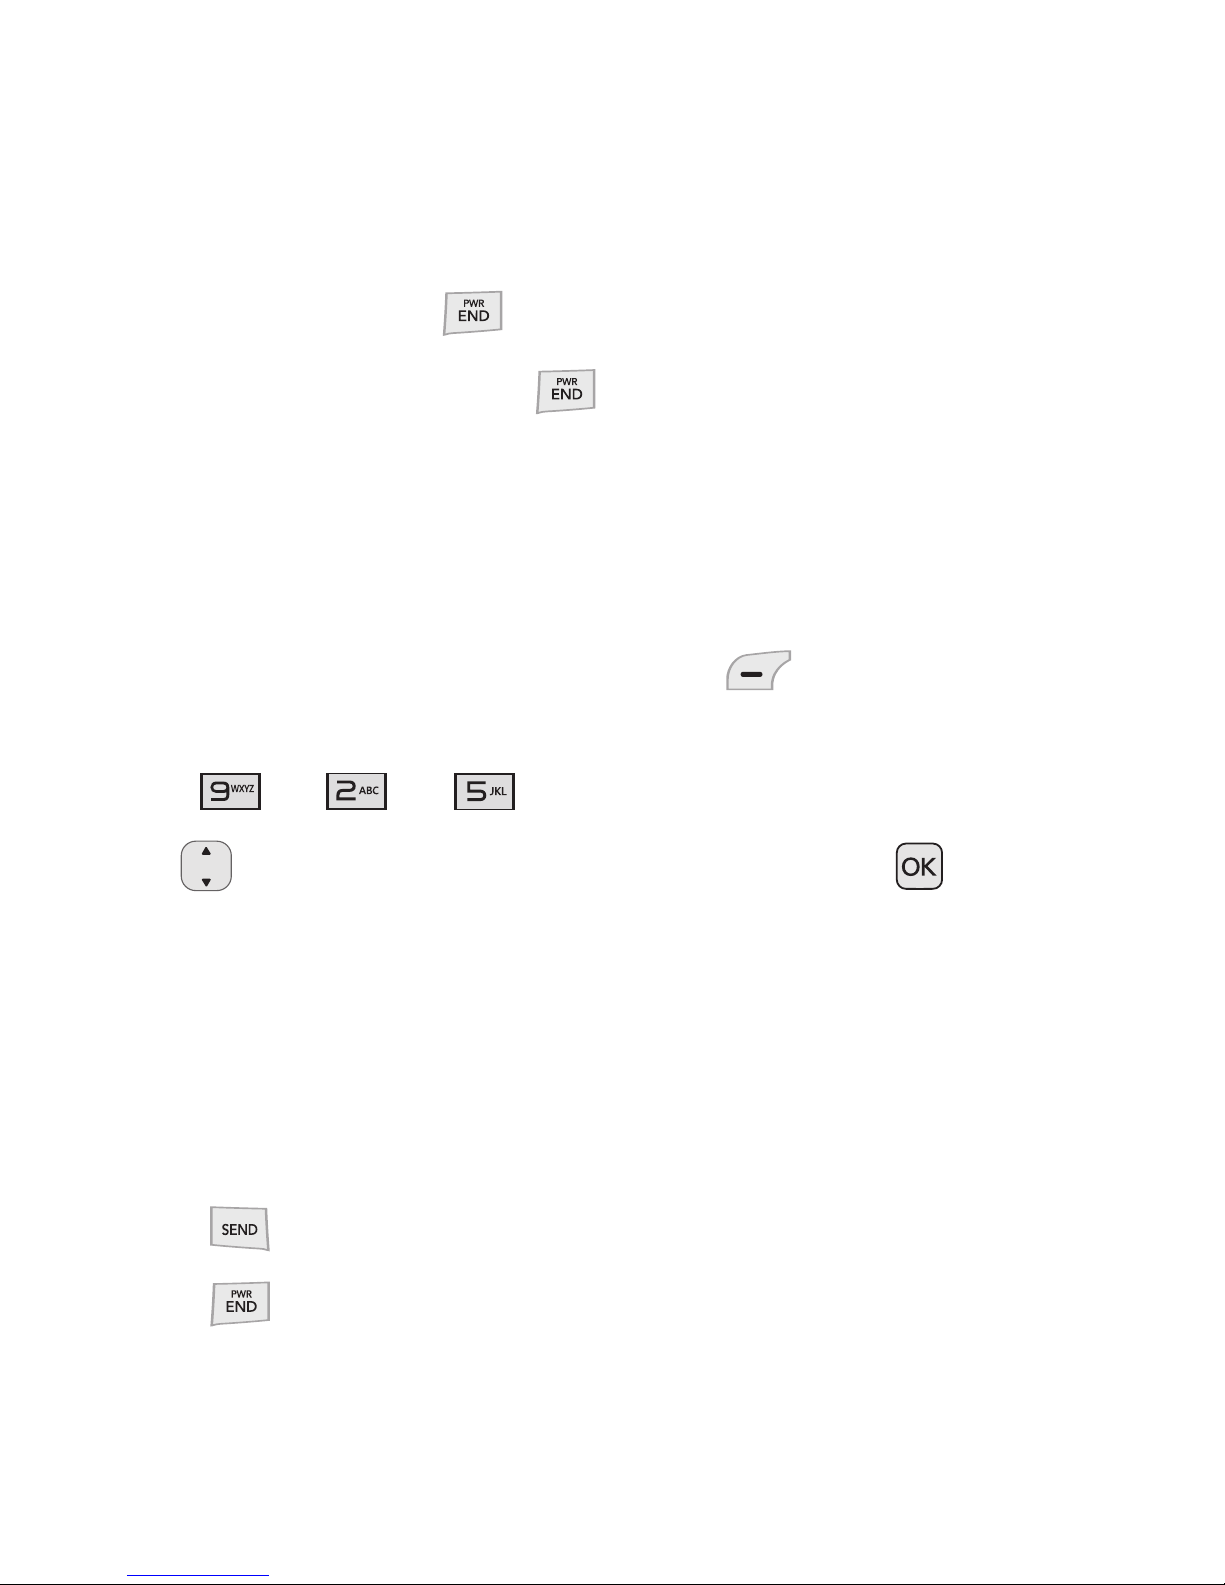
Turning the Phone On or Off
1. To turn on, install a charged battery.
2. Then press and hold until the LCD screen lights up.
3. To turn off, press and hold until the display turns off.
Changing the display language
Allows you to use the bilingual feature according to your preference.
Choose between English and Spanish.
1. In standby mode, press the Left Soft Key
Menu to access the
Main menu.
2. Press
gg.
3. Use to highlight
English or Spanish, then press .
Making Calls
1. Make sure the phone is turned on.
2. Enter the phone number (include the area code if needed) using the
alphanumeric keypad.
3. Press to dial.
4. Press to end the call.
Page 9
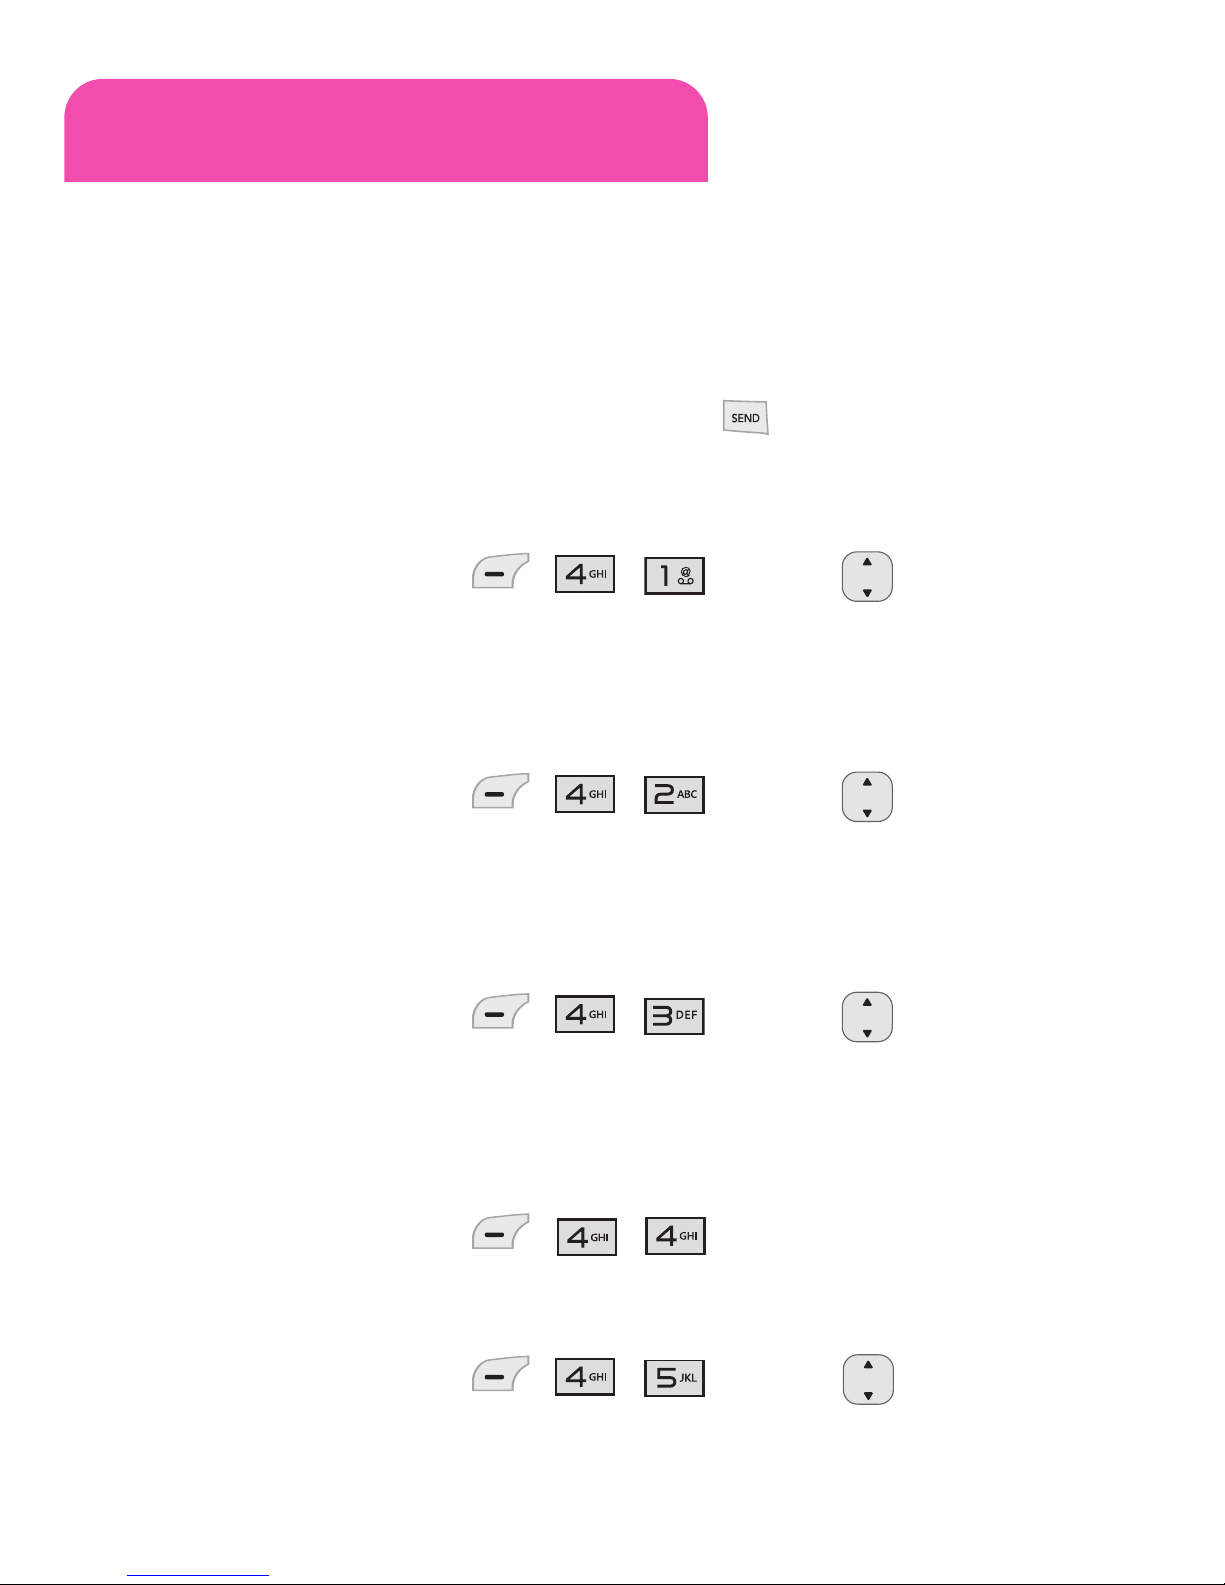
Recent Calls
The Recent Calls menu displays a list of the last phone numbers or
Contacts entries for calls missed, received, or dialed. It is continually
updated as new numbers are added to the beginning of the list and the
oldest entries are removed from the bottom of the list.
Note: To view a quick list of all your recent calls, press the key while in standby mode.
1. Missed Calls : Allows you to view the list of the most recent missed
calls; up to 40 entries.
Press the Left Soft Key
, , g Use to highlight an
entry.
2. Received Calls : Allows you to view the list of the most recent received
calls; up to 40 entries.
Press the Left Soft Key
, , g Use to highlight an
entry.
3. Dialed Calls : Allows you to view the list of the most recent dialed
calls; up to 40 entries.
Press the Left Soft Key
, , g Use to highlight an
entry.
4. All Calls : Allows you to view the list of the most recent missed,
received and dialed calls; up to 120 entries.
Press the Left Soft Key
, ,
5. Call Timer : Allows you to view the duration of the calls, by type.
Press the Left Soft Key
,
,
g Use to highlight one
of the call types (below).
Last Call/ Home Calls/ Roam Calls/ All Calls
Page 10
Sound
Options to customize your phone's sounds:
Ringers
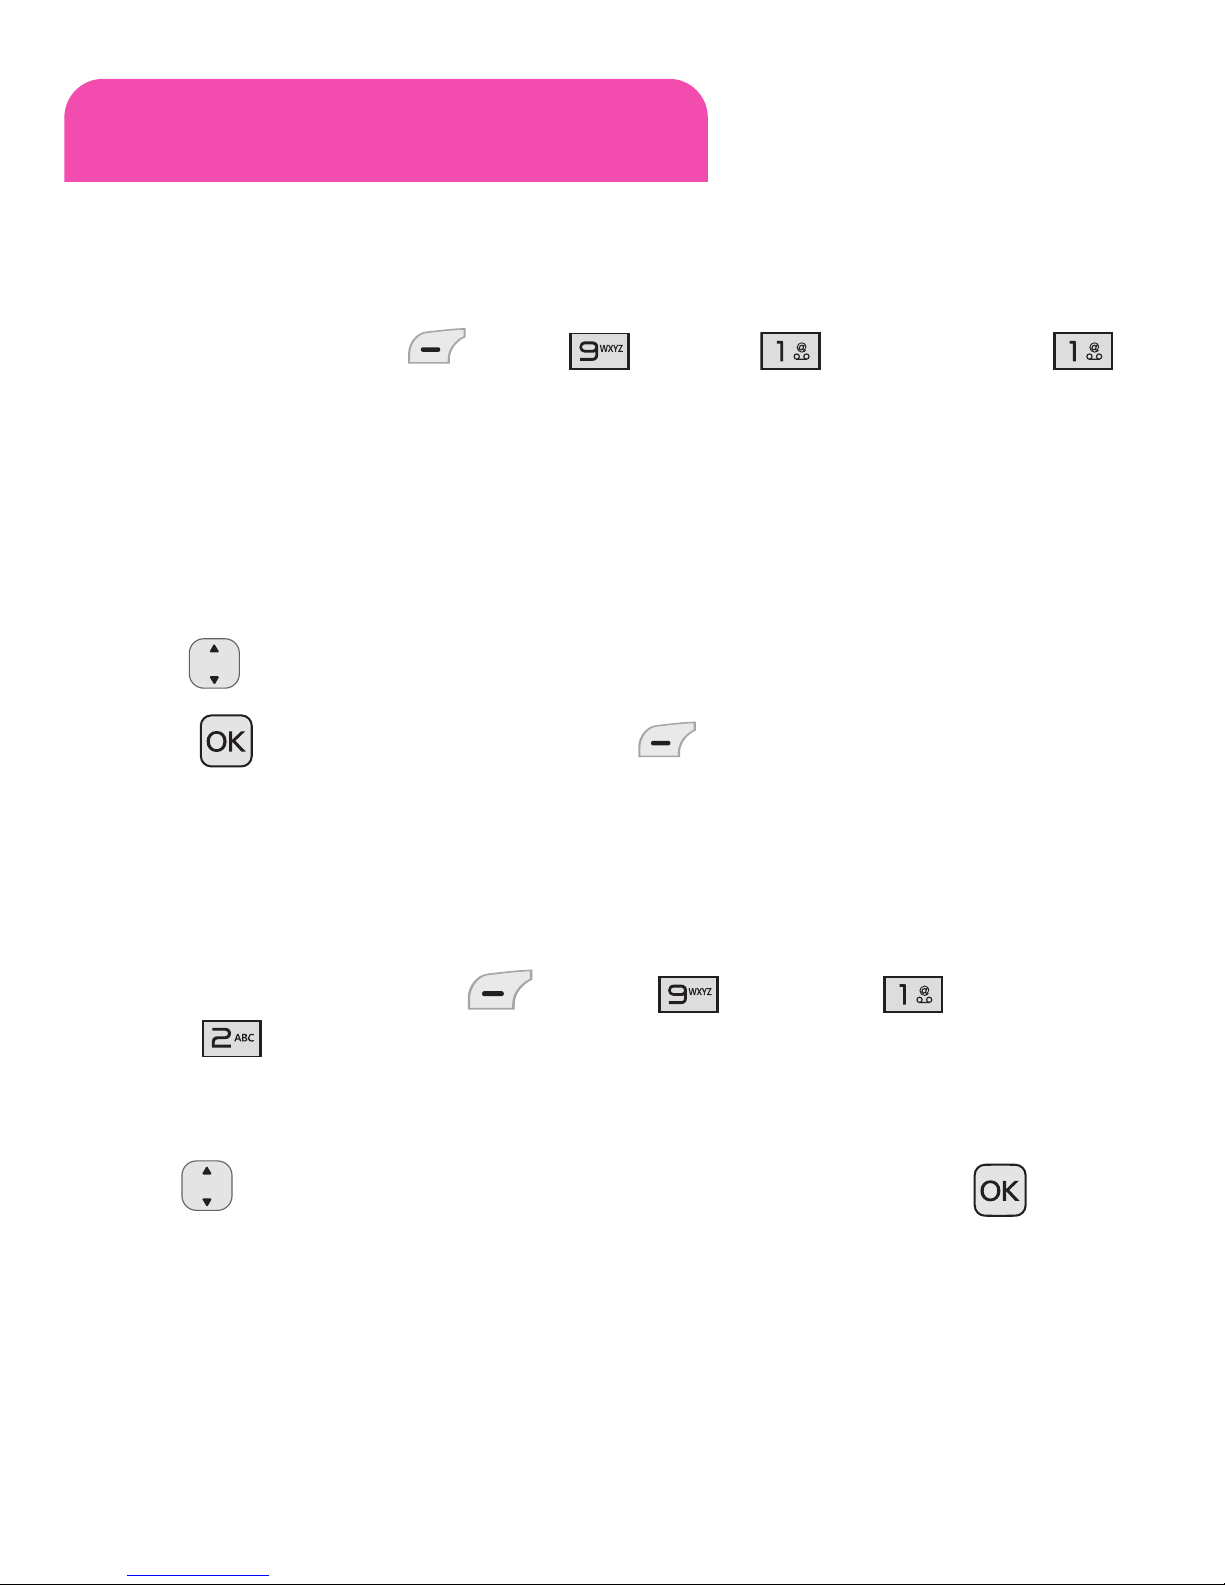
1. Press the Left Soft Key Menu, Settings, Sound, and then
Ringers.
2. Select All Calls/ Caller ID/ No Caller ID/ Restricted Calls/ Buy
Ringtones*.
3. Select My Audios/ Default/ Buy Ringtones*.
4. Use to highlight the ringtone.
5. Press Play to play the ringtone or Set to set the ringtone to your
phone.
*Selecting Buy Ringtones will direct you to the ringtones download site.
Volume
1. Press the Left Soft Key Menu, Settings, Sound, and
then
Volume.
2. Select
Master Volume/ Keypad/ Earpiece/ Speaker.
3. Use to adjust the volume of the function, then press to save
the setting.
Page 11
Using the menus
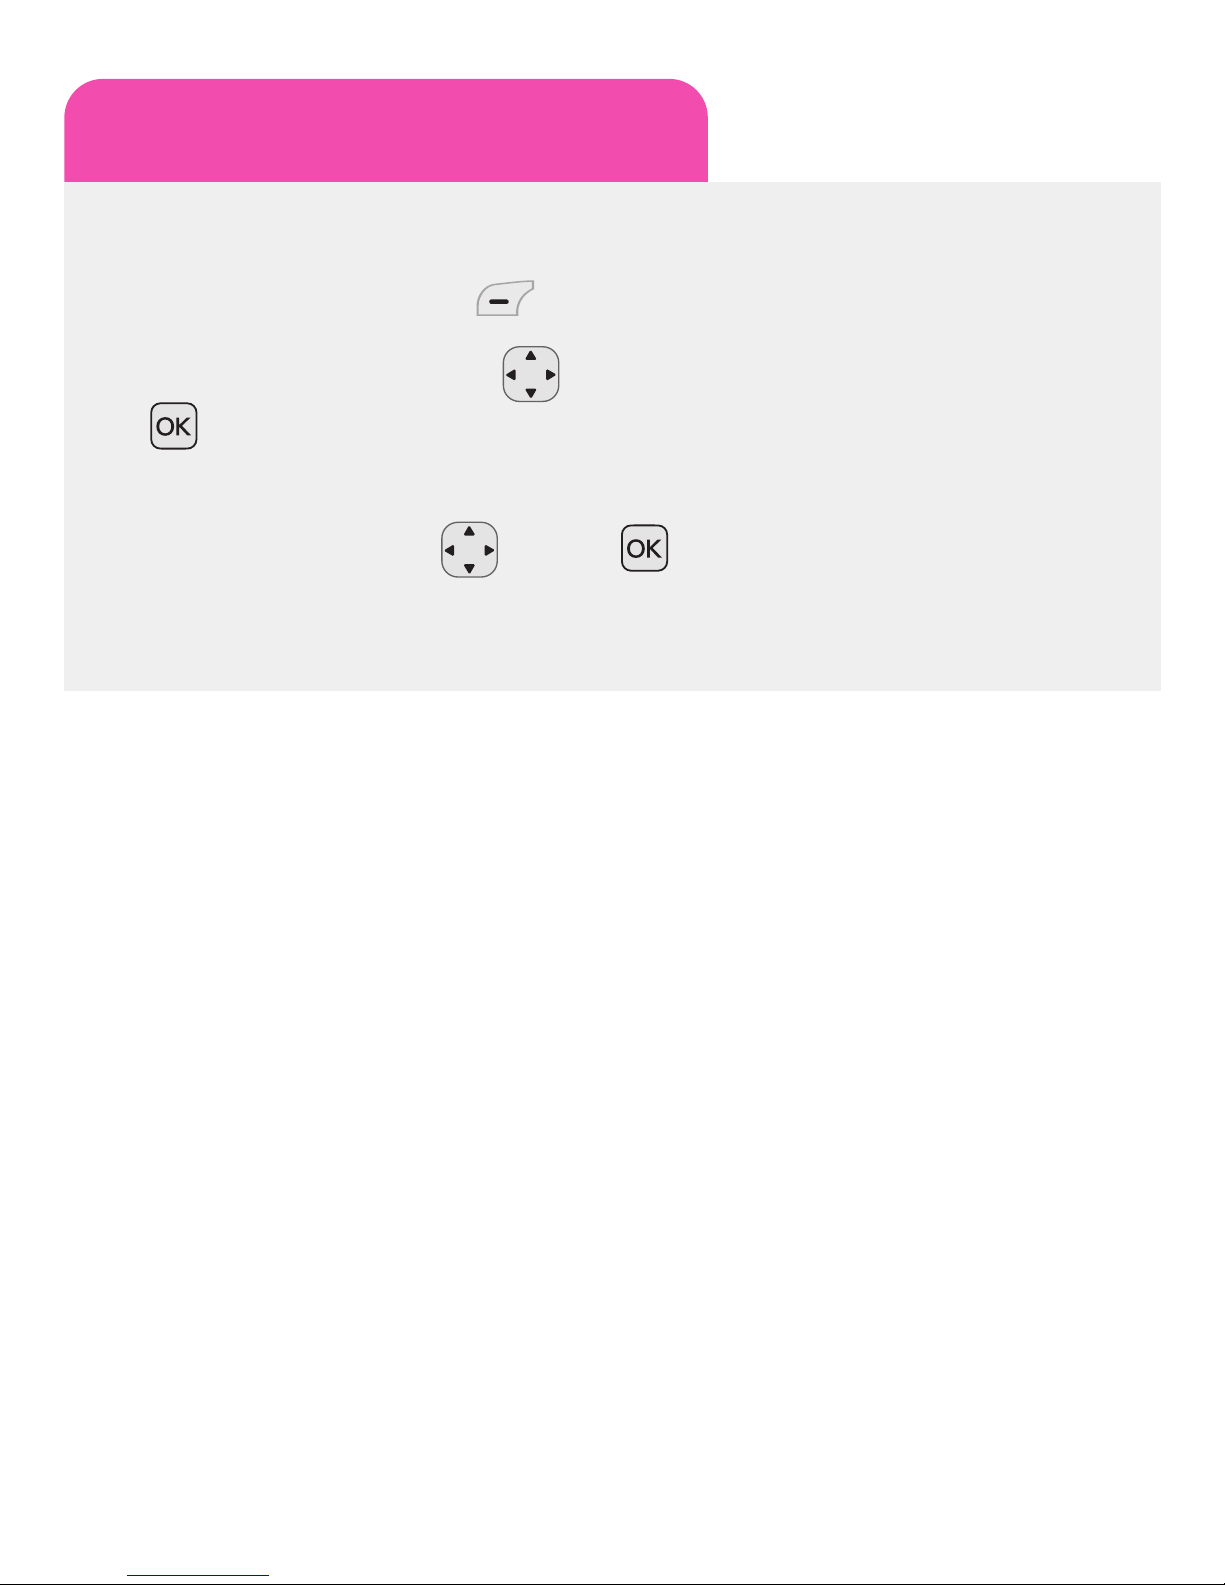
To navigate, or select, the menus or features:
1. Press the Left Soft Key
Menu
to access the Main menu.
2. Use the Navigation Keys to reach a desired menu and then press
.
3. If the menu contains any submenus, locate the one you want by using
the Navigation Keys . Press to enter the submenu.
If the selected menu contains additional submenus, repeat this step.
Page 12

Menu map
1. Prepaid
For more information
about the Prepaid menu,
please refer to the Quick
Activation Guide.
2. Contacts
2.1 New Contact
2.2 Contact List
2.3 Groups
2.4 Speed Dials
2.5 My Name Card
3. Messages
3.1 New Text Message
3.2 New Picture Message
3.3 Inbox
3.4 Sent
3.5 Drafts
3.6 Voicemail
3.7 Templates
3.8 Settings
3.9 Delete All
4. Recent Calls
4.1 Missed Calls
4.2 Received Calls
4.3 Dialed Calls
4.4 All Calls
4.5 Call Timer
5. Multimedia
5.1 Take Photo
5.2 Record Voice
6. Browser
6.1 Start Browser
7. My Folder
7. 1 Images
7.2 Audios
8. Tools
8.1 Voice Command
8.2 Alarm Clock
8.3 Calendar
8.4 Ez Tip Calc
8.5 Notepad
8.6 Calculator
8.7 World Clock
8.8 Stopwatch
8.9 Unit Converter
9. Settings
9.1 Sound
9.2 Display
9.3 Security
9.4 Call Settings
9.5 Bluetooth
9.6 System
9.7 Phone Memory
9.8 Phone Info
Page 13

*Many of the features and services described are network dependent and may require
additional subscription and/or usage charges. Not all features are available for purchase or
use in all areas. Other conditions and restrictions may apply. See carrier for more
information.
© 2010 LG Electronics, Inc.
Page 14
Entering text
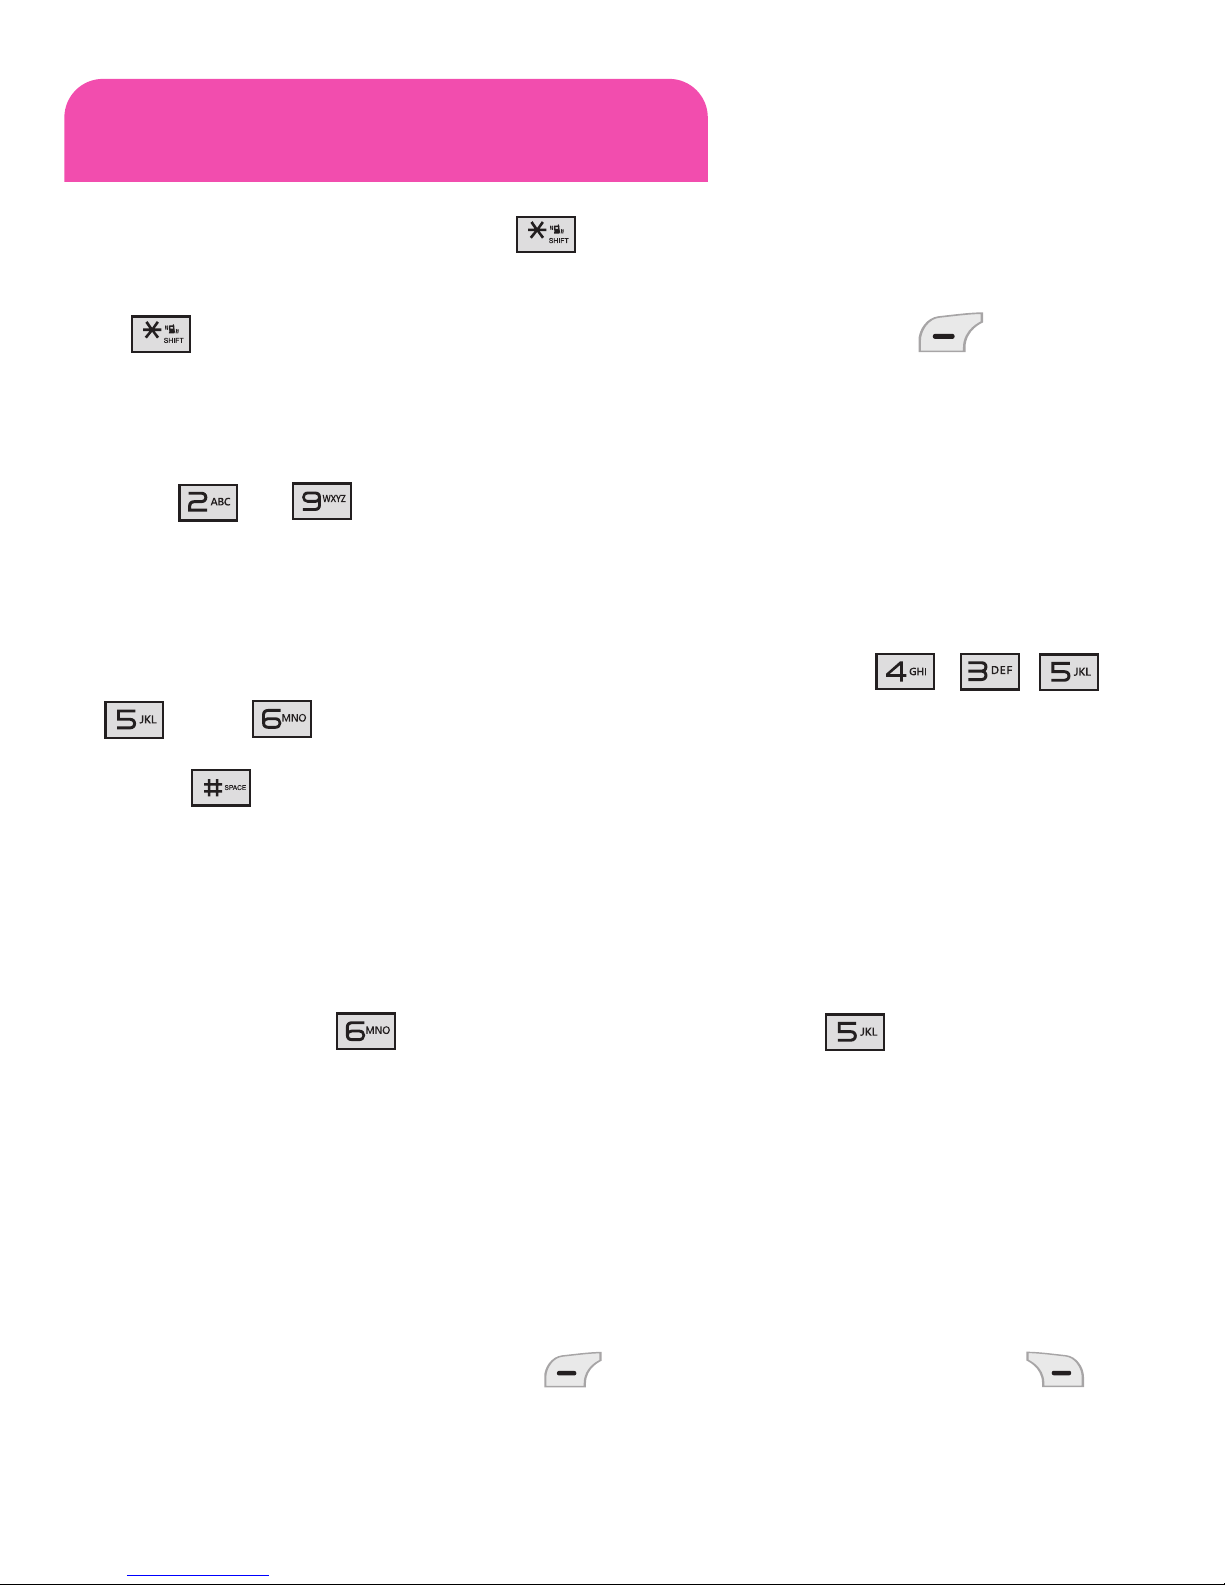
In a text input field, press the key to toggle between capitalization
modes. To switch between
T9Word, 12 3 and ABC modes, press and hold
the key. To access Symbols, press the Left Soft Key and select
Symbols.
Using T9Word mode
1. Press to to start entering a word. Press each key once for one letter.
The word you are entering appears on the display. Options may change with
each keypress.
For example: To enter “Hello” in T9Word mode, press , , ,
, and .
2. Press to insert a space and enter the next word.
Using ABC mode
Press the keys labeled with the letter you want once for the first letter, twice
for the second letter, and so on.
For example, press three times to enter “O” and two times to enter
“K”.
Using 123 mode
Press the keys that correspond with the digits you want to enter.
Using Symbols mode
Press the keys that correspond with the symbol you want.
You can press the Left Soft Key
Prev or the Right Soft Key
Next to display more symbols.
Page 15
Tips for entering text
• To move the cursor, press the .
• To delete characters one by one, press . To delete all of the characters
at once, press and hold .
• To insert a space between characters, press .
• To enter punctuation in
T9Word mode or ABC mode, press .
Sending an SMS message
Allows you to send text and e-mail messages.
1. Press the Left Soft Key
Menu, Messages, and New
Text Message
.
2. Enter the recipient's address.
3. Press to access the text field.
4. Type your message.
5. Press
Send.
A confirmation message is displayed.
Page 16
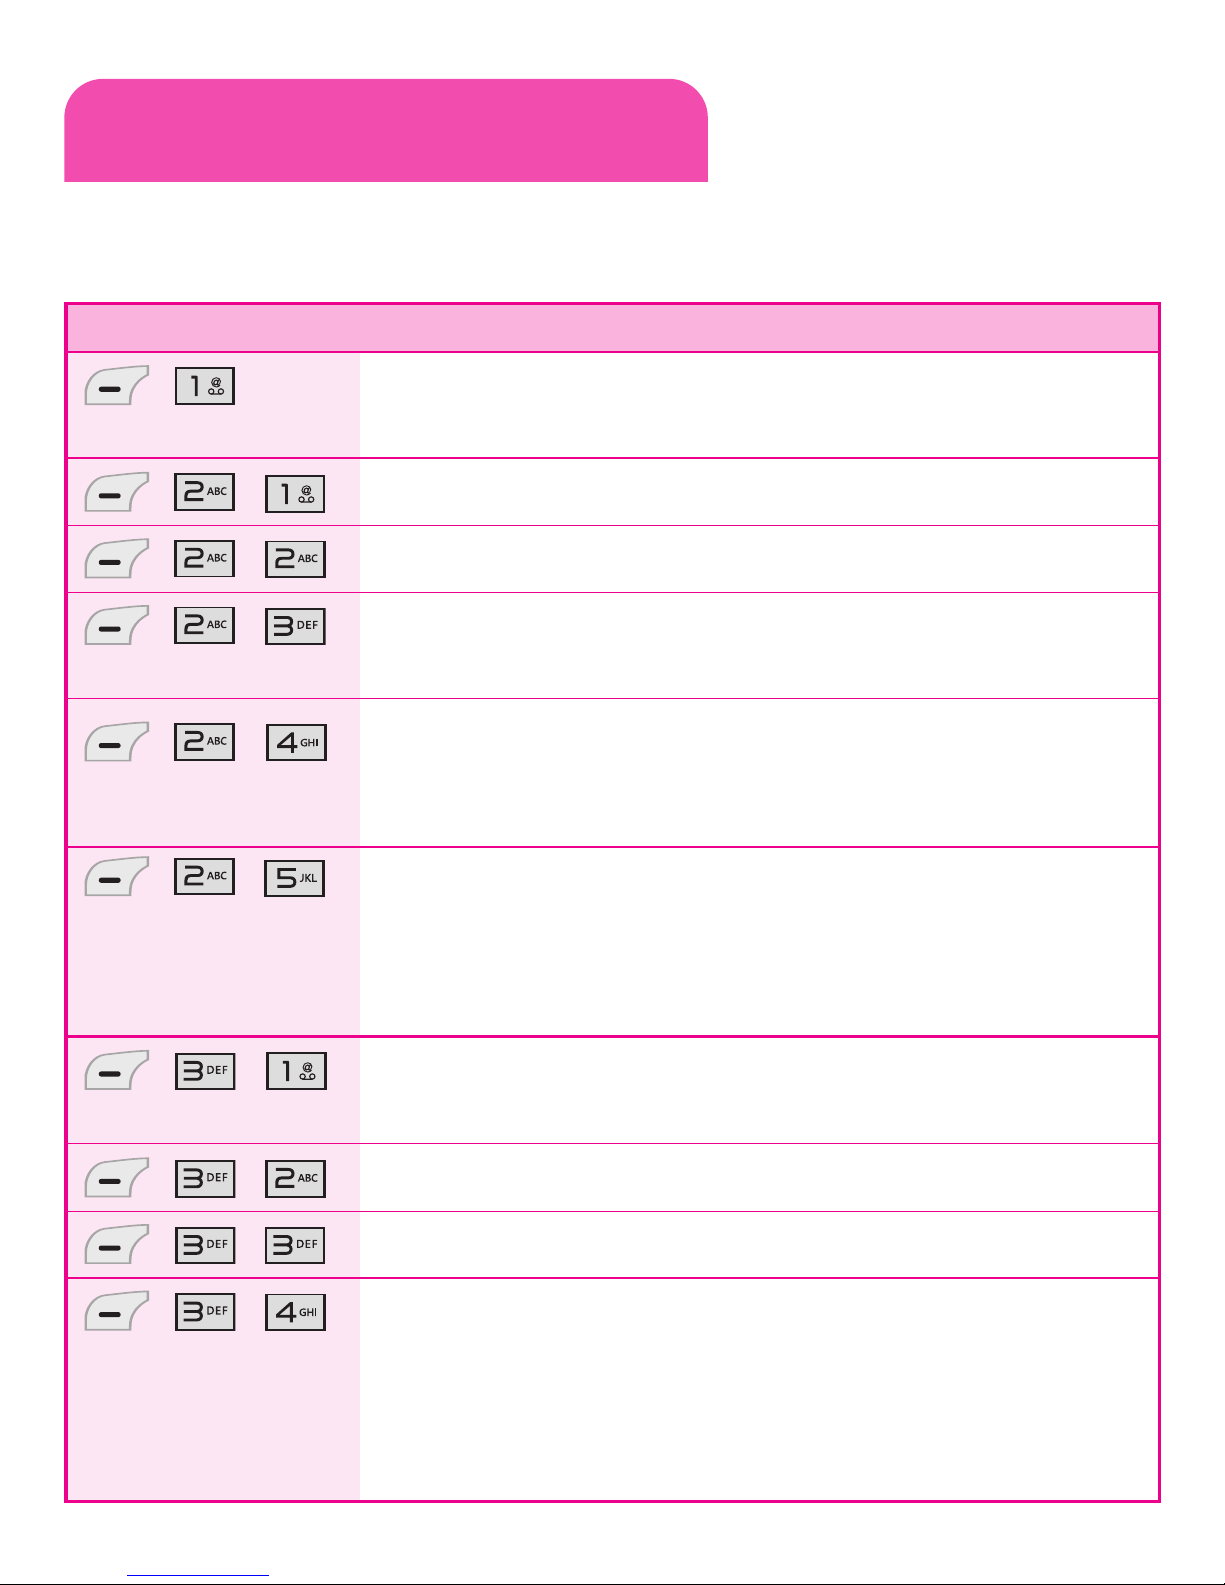
Quick feature reference
This section provides instructions on how to access the different features
on your phone.
Menu Description
,
For more information about the Prepaid menu, please refer
to the Quick Activation Guide.
, ,
New Contact allows you to add a new contact to your Contact List.
, , Contact List you to view your saved contacts.
, ,
Groups allows you to view your grouped Contacts, add a new
group, change the name of a group, or delete a whole group.
, , Speed Dials allows you to view your Speed Dials list,
designate new Speed Dials, or remove Speed Dial
designations entered in your Contacts.
, , My Name Card allows you to view, enter and edit more of
your personal Contact information, including name and
phone numbers. You can also send this Name Card to
another handset via Bluetooth.
, , New Text Message allows you to send text and e-mail
messages.
, ,
New Picture Message allows you to send multimedia messages.
, , Inbox allows you to view your received messages.
, , Sent allows you to view your sent messages. Up to 100 (50
SMS + 50 MMS) sent messages can be stored in the Sent
folder. Access the Sent folder to view contents of sent
messages and verify whether the transmission was successful
or not.
Page 17
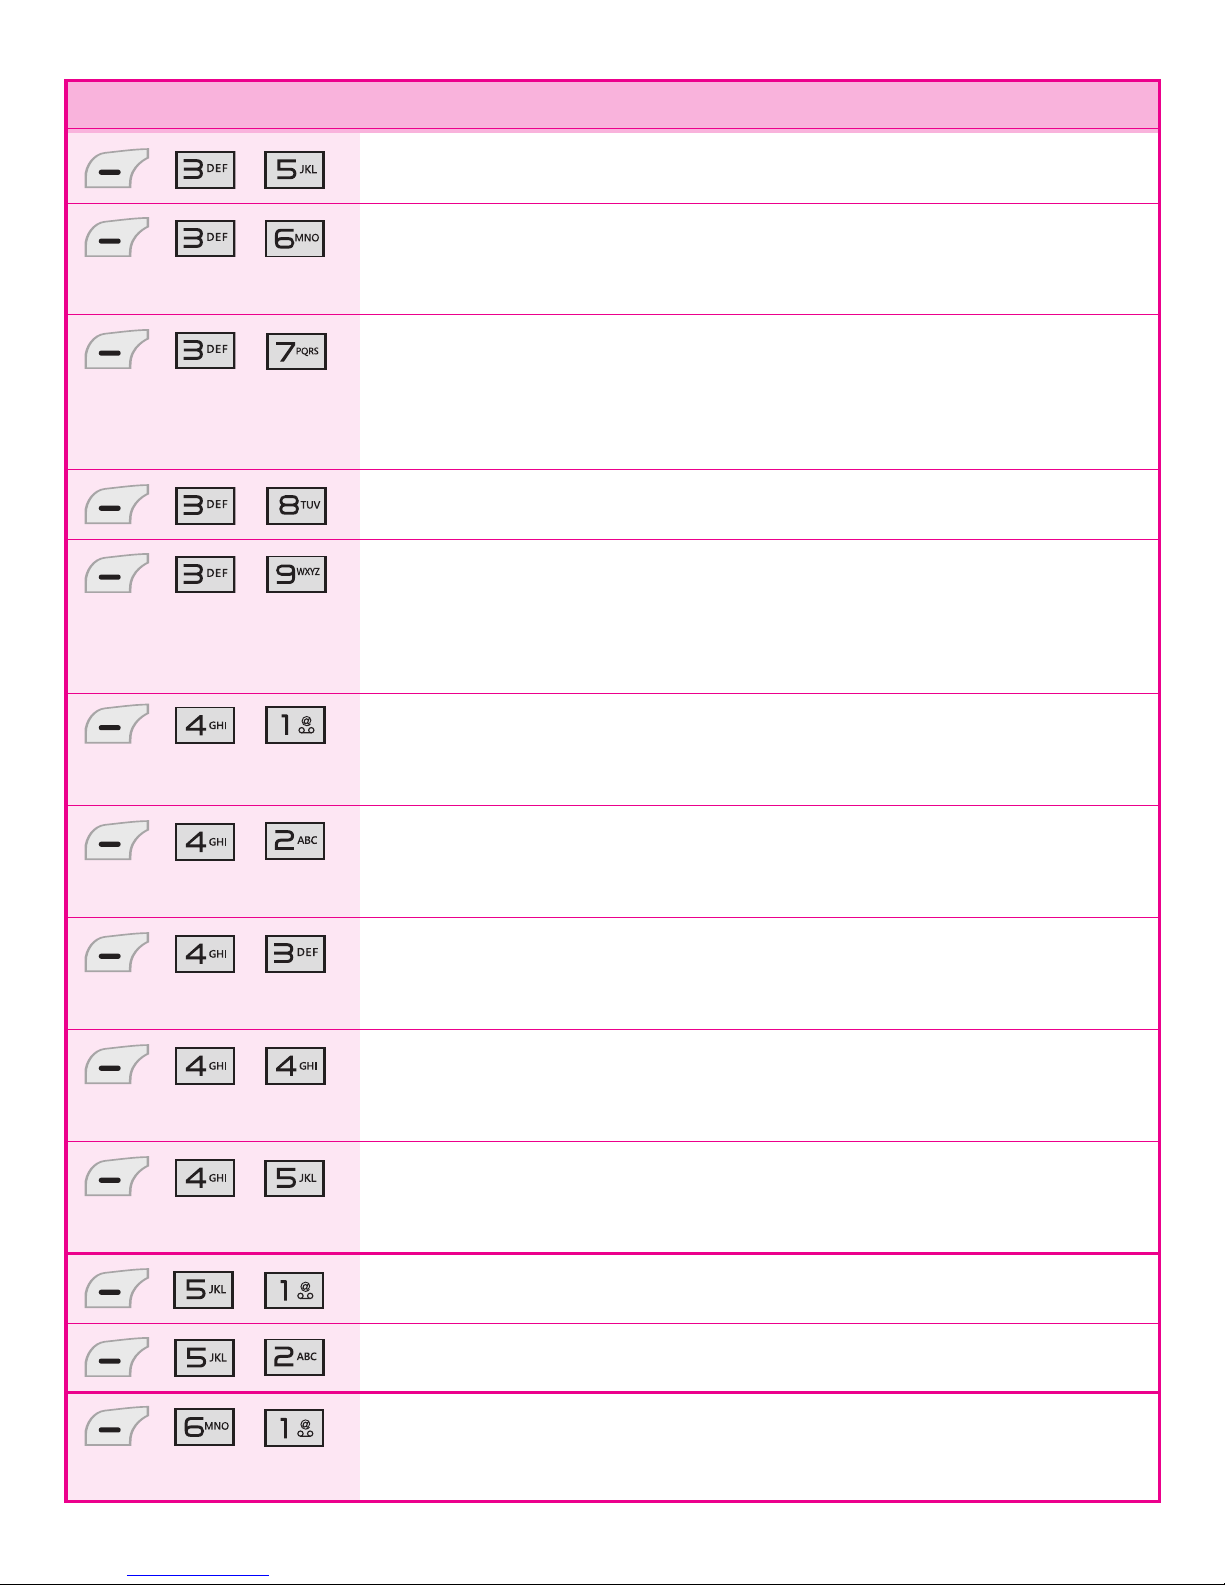
Menu Description
, , Drafts allows you to view the saved (message) Drafts.
, , Voicemail allows you to view how many new voicemails you
have and to access your voicemail box.
, , Templates allows you to display, edit, and add text templates.
These text templates allow you to reduce manual text input
into messages.
, , Settings allows you to configure settings for Messaging.
, ,
Delete All allows you to erase the messages stored in your
Inbox, Sent, or Drafts message folders. You can also erase all
messages at the same time.
, , Missed Calls allows you to view the list of the most recent
missed calls; up to 40 entries.
, , Received Calls allows you to view the list of the most recent
received calls; up to 40 entries.
, , Dialed Calls allows you to view the list of the most recent
dialed calls; up to 40 entries.
, , All Calls allows you to view the list of the most recent
missed, received and dialed calls; up to 120 entries.
, , Call Timer allows you to view the duration of calls by call
type.
, , Take Photo allows you to take a picture.
, , Record Voice allows you to record short voice messages.
, , Start Browser starts the Web Browser and allows you to view
Internet content.
Page 18
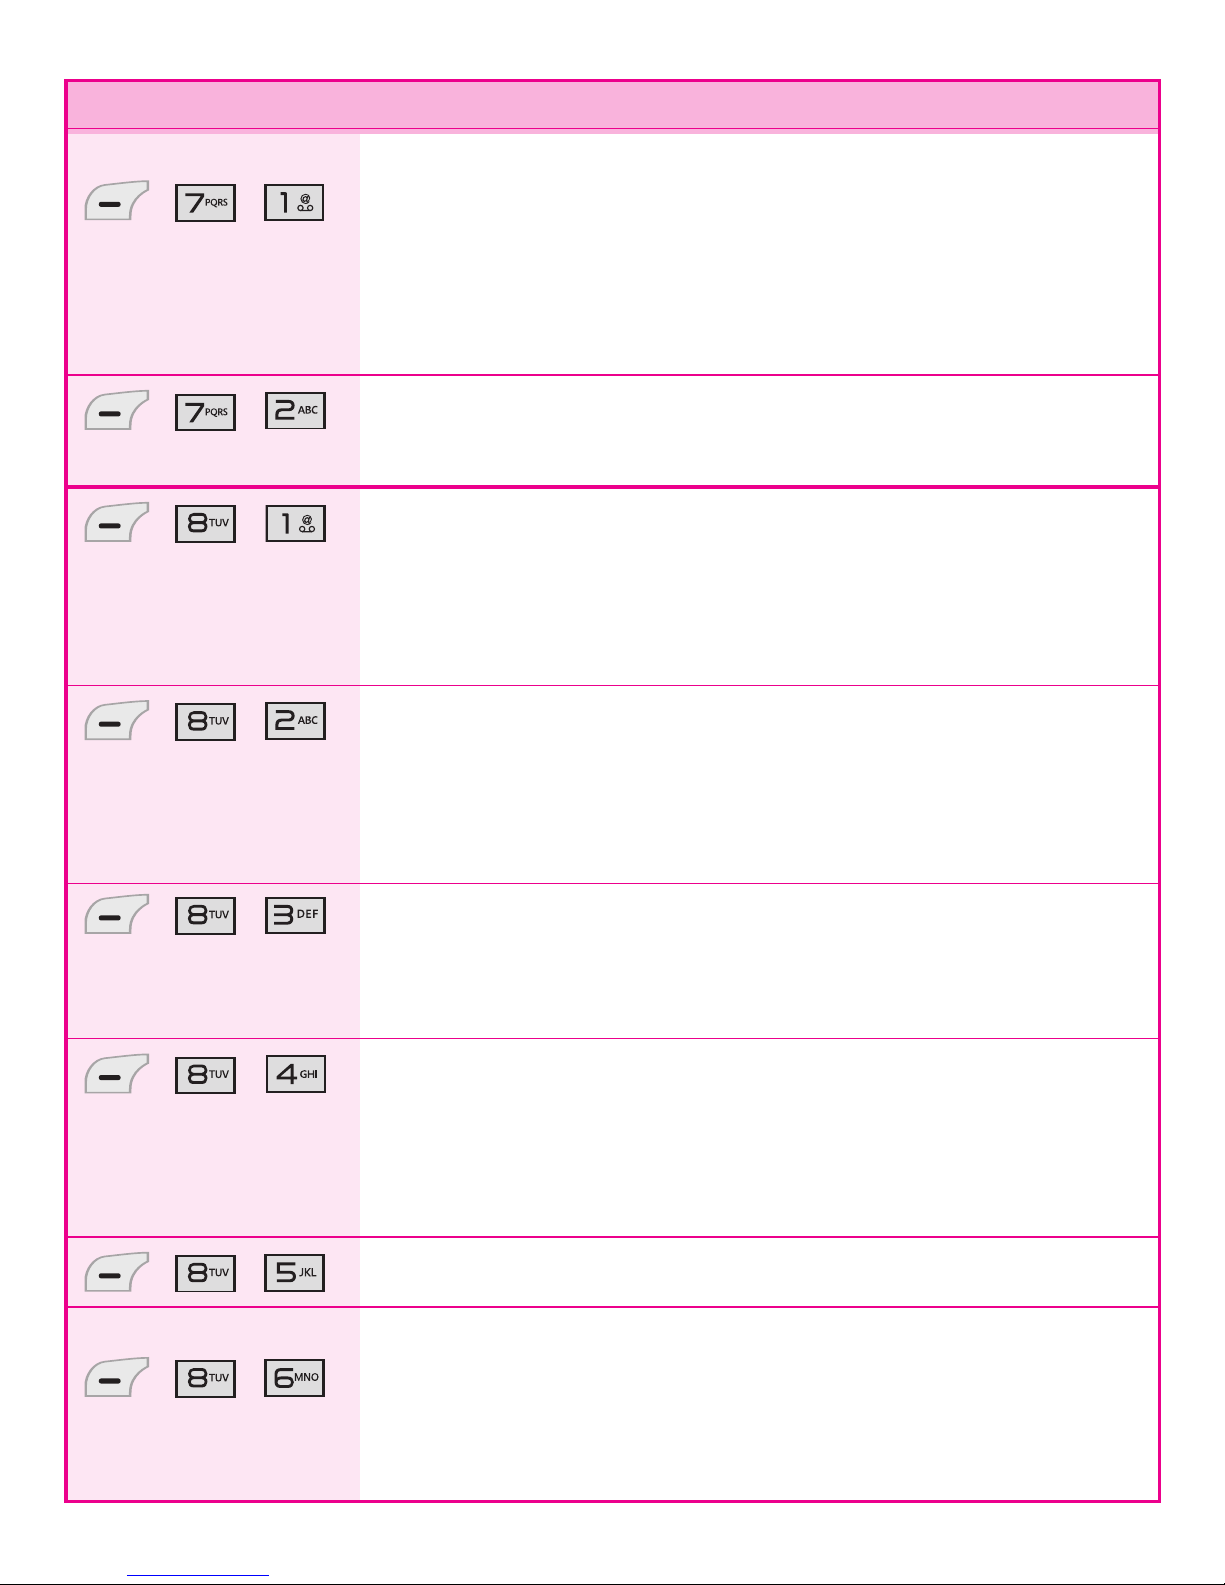
Menu Description
, , Images allows you to view your saved images, some of which
can be set as your phone's Main Screen or Front Screen
wallpaper or as a Picture ID.
, , Audios allows you to access saved audio clips and record
new ones.
, , Voice Command allows you to access the Voice Command
menu. Voice Command allows you to access several features
using voice prompts. This menu can useful for those who are
driving or who may be blind.
, , Alarm Clock allows you to set up to five alarms. At the alarm
time, any set alarm will sound (depending on your Master
Volume settings) the tone of your choice and an alarm
message will be displayed on the LCD screen.
, , Calendar allows you to access your Calendar appointments.
Simply enter your appointments in the Calendar and your
phone can alert you with a reminder.
, , Ez Tip Calc allows you to quickly and easily estimate the tip
and total amount of a bill by inputting the bill amount before
tip, the tip percentage, and dividing it by the number of
people paying.
, , Notepad allows you to add, read, edit, and erase notes.
, , Calculator allows you to perform simple mathematical
calculations.
Page 19
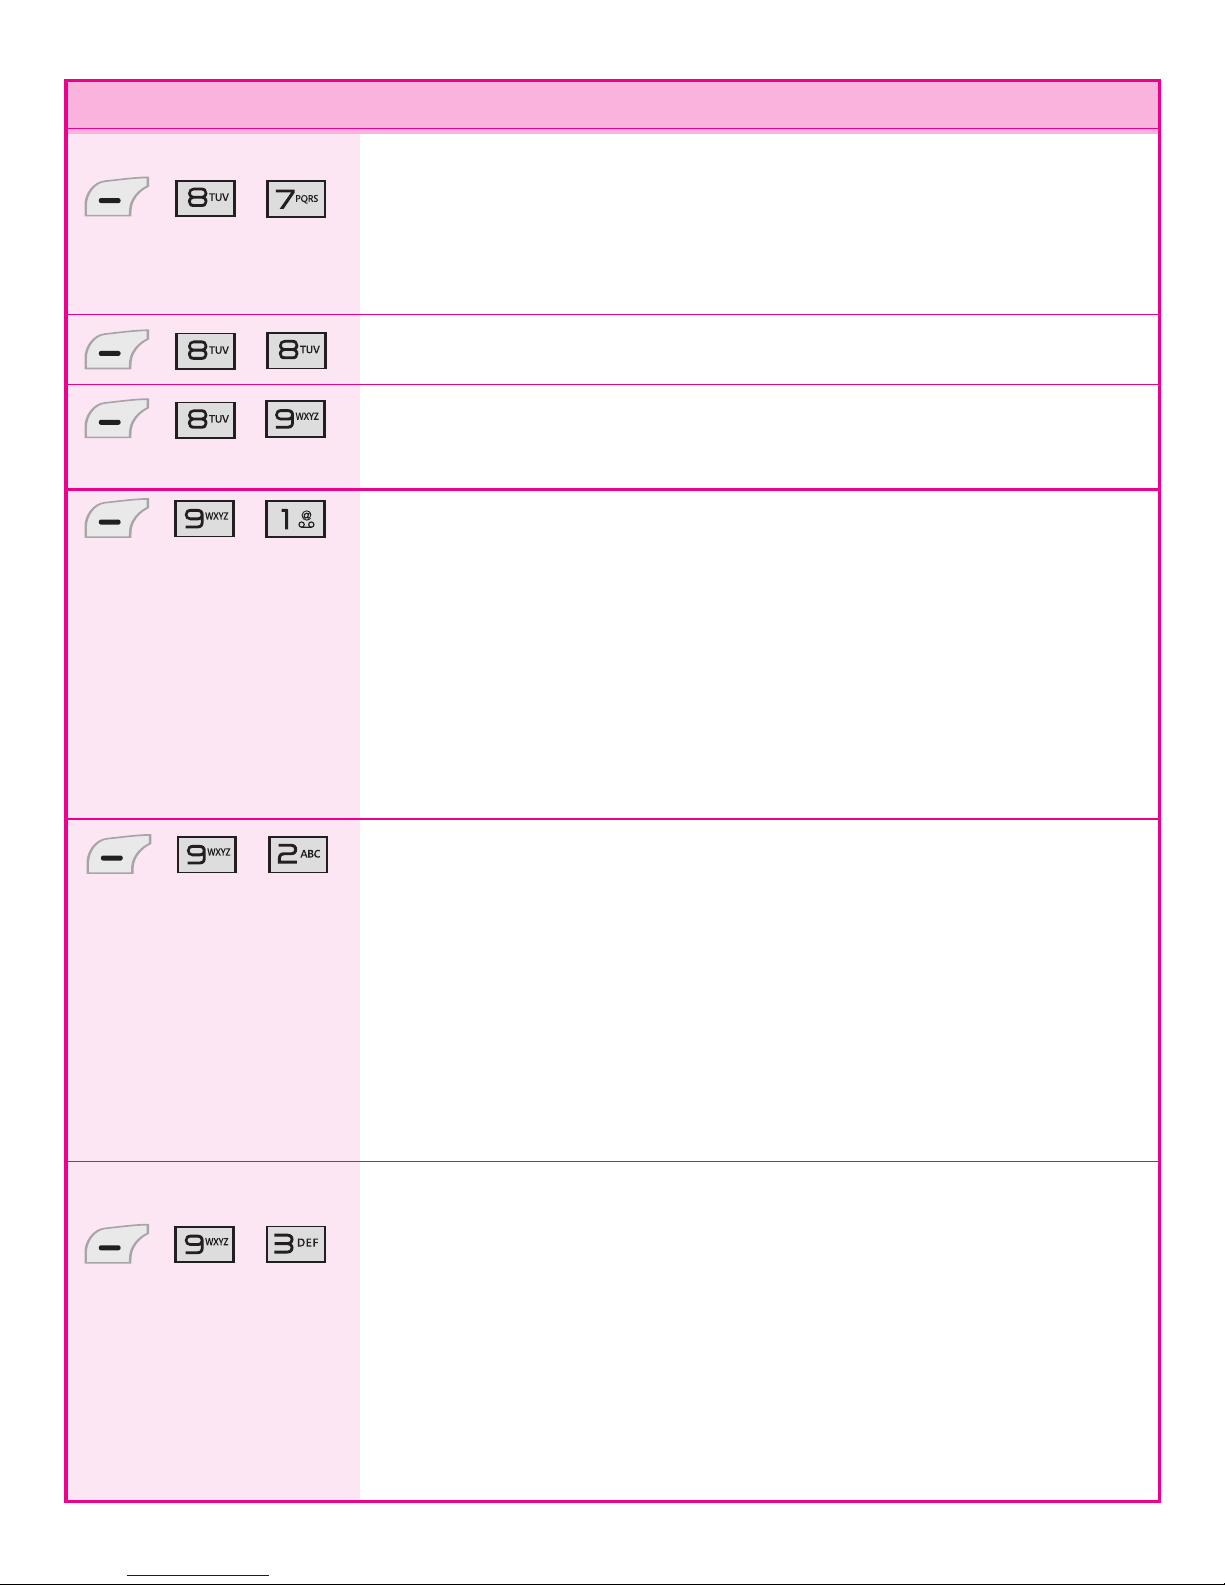
Menu Description
, , World Clock allows you to determine the current time in
another time zone or city.
, , Stopwatch allows you to use your phone as a stopwatch.
, ,
Unit Converter allows you to convert units of Area, Length,
Temperature, Mass, Volume and Velocity.
, ,
Sound allows you to customize the sounds for the options
below:
1.1 Ringers 1.2 Volume
1.3 Message Alerts 1.4 Alert Type
1.5 Service Alerts 1.6 Power On/Off Tone
1.7 Flip Tone 1.8 Emergency Tone
, , Display allows you to customize the display for the options
below:
2.1 Wallpaper 2.2 Banner
2.3 Backlight 2.4 Menu Style
2.5 Languages 2.6 Clocks & Calendar
2.7 Font Settings 2.8 Name Match for Dialing
, , The Security menu allows you to secure the phone. To
access this menu, you will need the Lock Code. Usually, it is
the last 4 digits of your phone number.
3.1 Lock Phone 3.2 Change Lock Code
3.3 Reset Default
Page 20
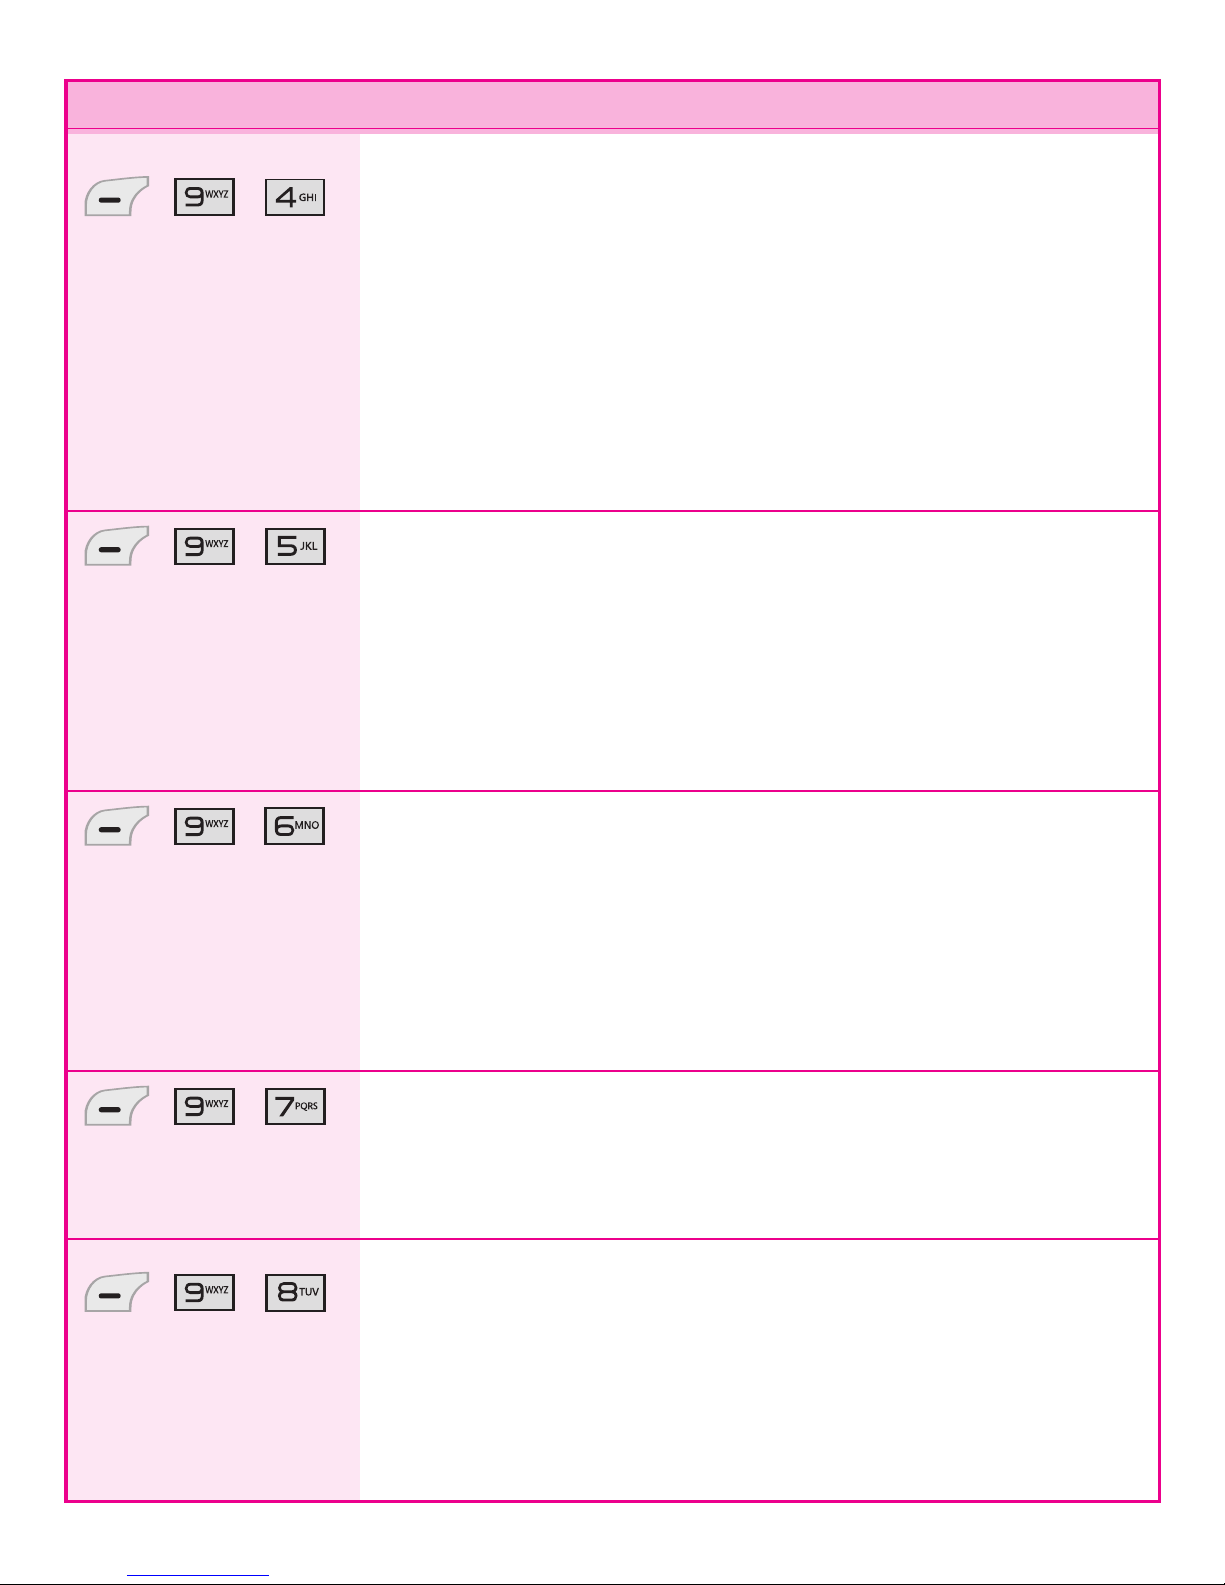
Menu Description
, , The Call Settings menu allows you to designate how the
phone handles both incoming and outgoing calls.
4.1 Answer Options 4.2 Auto Retry
4.3 One-Touch Dial 4.4 Voice Privacy
4.5 Voice Clarity 4.6 Airplane Mode
4.7 TTY Mode
, , Bluetooth menu allows you to configure and use the
Bluetooth
®
functionality on your phone.
5.1 Paired Devices 5.2 Power
5.3 My Visibility 5.4 My Bluetooth Name
5.5 My Bluetooth Info
, , The System menu allows you to designate specific system
network settings.
6.1 Network
6.1.1 System Select 6.1.2 Serving System
6.2 Location
, , The Phone Memory menu allows you to check out the
memory status of your phone.
7. 1 Reserved Memory 7.2 Multimedia
, ,
The Phone Info menu provides you with specific information
pertaining to your phone model.
8.1 My Number 8.2 ESN/MEID
8.3 Icon Glossary 8.4 Version
Page 21

TIA Safety Information
The following is the complete TIA Safety Information for wireless handheld phones.
Antenna Care
Use only the supplied or an approved replacement antenna. Unauthorized antennas,
modifications, or attachments could damage the phone and may violate FCC
regulations.
Phone Operation
NORMAL POSITION: Hold the phone as you would any other telephone with the
antenna pointed up and over your shoulder.
Tips on Efficient Operation
For your phone to operate most efficiently:
Don’t touch the antenna unnecessarily when the phone is in use. Contact with the
antenna affects call quality and may cause the phone to operate at a higher power
level than otherwise needed.
Driving
Check the laws and regulations on the use of wireless phones in the areas where you
drive and always obey them. Also, if using your phone while driving, please observe the
following:
●
Give full attention to driving -- driving safely is your first responsibility;
●
Use hands-free operation, if available;
●
Pull off the road and park before making or answering a call if driving conditions or
the law require it.
Electronic Devices
Most modern electronic equipment is shielded from RF signals. However, certain
electronic equipment may not be shielded against the RF signals from your wireless
phone.
Page 22

Pacemakers
The Health Industry Manufacturers Association recommends that a minimum
separation of six (6) inches be maintained between a handheld wireless phone and a
pacemaker to avoid potential interference with the pacemaker. These
recommendations are consistent with the independent research by and
recommendations of Wireless Technology Research.
Persons with pacemakers:
●
Should ALWAYS keep the phone more than six (6) inches from their pacemaker when
the phone is turned ON;
●
Should not carry the phone in a breast pocket;
●
Should use the ear opposite the pacemaker to minimize the potential for
interference;
●
Should turn the phone OFF immediately if there is any reason to suspect that
interference is taking place.
Hearing Aids
Some digital wireless phones may interfere with some hearing aids. In the event of such
interference, you may want to consult your service provider (or call the customer
service line to discuss alternatives).
Page 23

Consumer Information on SAR
This phone model meets the government’s requirements for exposure to radio waves.
Your wireless phone is a radio transmitter and receiver. It is designed and manufactured
not to exceed the emission limits for exposure to Radio Frequency (RF) energy set by
the Federal Communications Commission of the U.S. Government. These limits are part
of comprehensive guidelines and establish permitted levels of RF energy for the general
population. The guidelines are based on standards that were developed by independent
scientific organizations through periodic and thorough evaluation of scientific studies.
The standards include a substantial safety margin designed to assure the safety of all
persons, regardless of age and health.
The exposure standard for wireless mobile phones employs a unit of measurement
known as the Specific Absorption Rate, or SAR. The SAR limit set by the FCC is 1.6
W/kg. Tests for SAR are conducted using standard operating positions specified by the
FCC with the phone transmitting at its highest certified power level in all tested
frequency bands. Although SAR is determined at the highest certified power level, the
actual SAR level of the phone while operating can be well below the maximum value.
Because the phone is designed to operate at multiple power levels to use only the
power required to reach the network, in general, the closer you are to a wireless base
station antenna, the lower the power output.
Before a phone model is available for sale to the public, it must be tested and certified
to the FCC that it does not exceed the limit established by the government-adopted
requirement for safe exposure. The tests are performed in positions and locations (e.g.,
at the ear and worn on the body) as required by the FCC for each model.
Page 24

The highest SAR value for this model phone when tested for use at the ear is 1.20
W/kg and when worn on the body, as described in this user guide, is 0.41 W/kg (bodyworn measurements differ among phone models, depending upon available accessories
and FCC requirements). While there may be differences between SAR levels of various
phones and at various positions, they all meet the government requirement for safe
exposure.
The FCC has granted an Equipment Authorization for this model phone with all
reported SAR levels evaluated as in compliance with the FCC RF emission guidelines.
SAR information on this model phone is on file with the FCC and can be found under
the Display Grant section of http://www.fcc.gov/oet/fccid after searching on FCC ID
BEJLG231C. Additional information on Specific Absorption Rates (SAR) can be found
on the Cellular Telecommunications Industry Association (CTIA) website at
http://www.ctia.org.
* In the United States and Canada, the SAR limit for mobile phones used by the public
is 1.6 watts/kg (W/kg) averaged over one gram of tissue. The standard incorporates a
substantial margin of safety to give additional protection for the public and to account
for any variations in measurements.
 Loading...