


OWNER’S MANUAL
MEDICAL MONITOR
Please read this manual carefully before operating your set and retain it for future reference.
21HK512D
*MFL71428802*
(1906-REV00)
www.lg.com
Copyright © 2019 LG Electronics Inc. All Rights Reserved.

CONTENTS
ENGLISH
ON CLEANING --------------------------------------------2
ASSEMBLY AND PREPARING --------------------------3
INITIAL INSTALLATION --------------------------------6
ON CLEANING
Recommended Cleaning Chemicals
• Isopropanol 70 %
• Ethanol 70 %
• Cidex® OPA
• 0.9 % NaCl solution
USER SETTINGS ---------------------------------------- 11
TROUBLESHOOTING ---------------------------------- 16
PRODUCT SPECIFICATION --------------------------- 17
2
How to Use Cleaner (When the screen has dust)
• Prior to cleaning, turn off the monitor and remove the power cable.
• Soak a soft cloth in a recommended cleaner, then lightly rub the screen with no more than 1 N of force.
• The cleaner could cause serious damage if it leaks inside the monitor while cleaning.
• The display could be damaged, so only clean the parts of the monitor other than the screen's LCD panel.
• Do not use benzene, thinner, acids or alkaline cleaners or other such solvents.
• Cleaning guidelines for displays must only be carried out by medical professionals (doctors or nurses) and
must not be handled by patients.

ASSEMBLY AND PREPARING
Product Composition
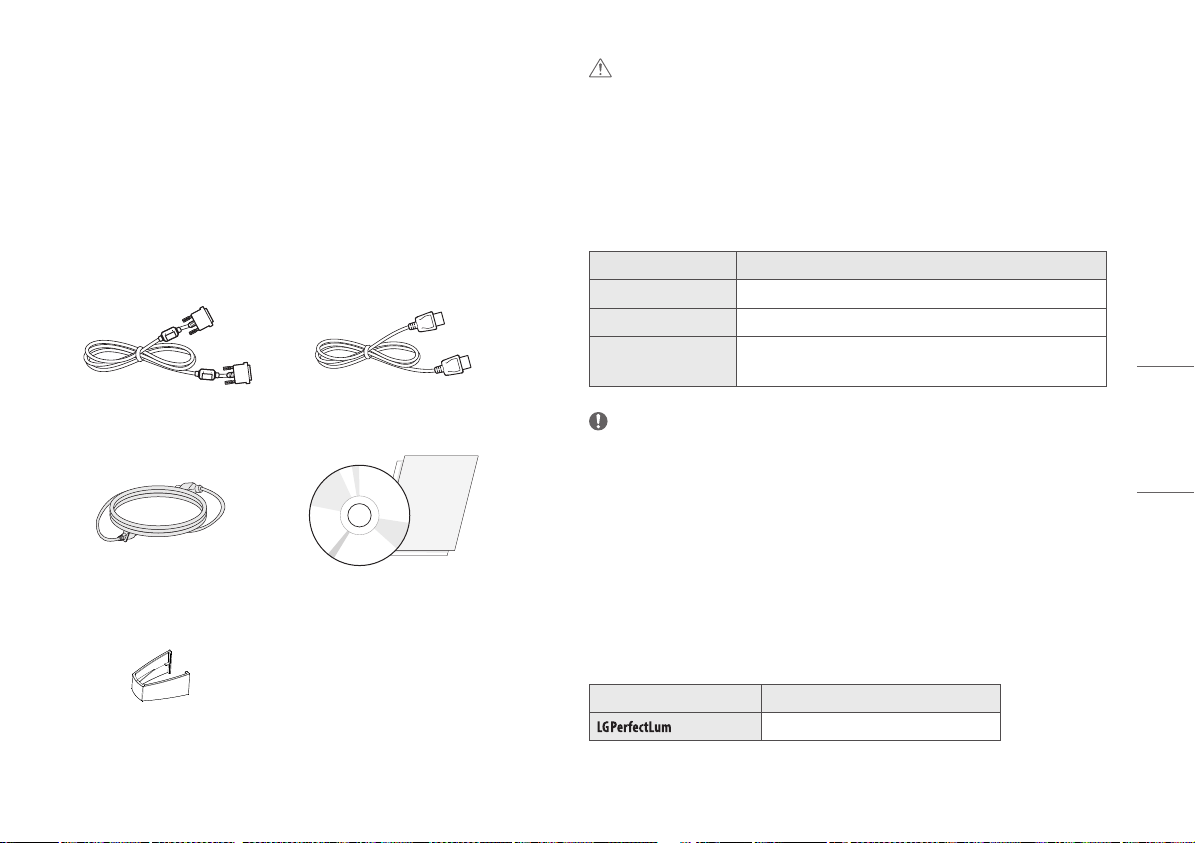
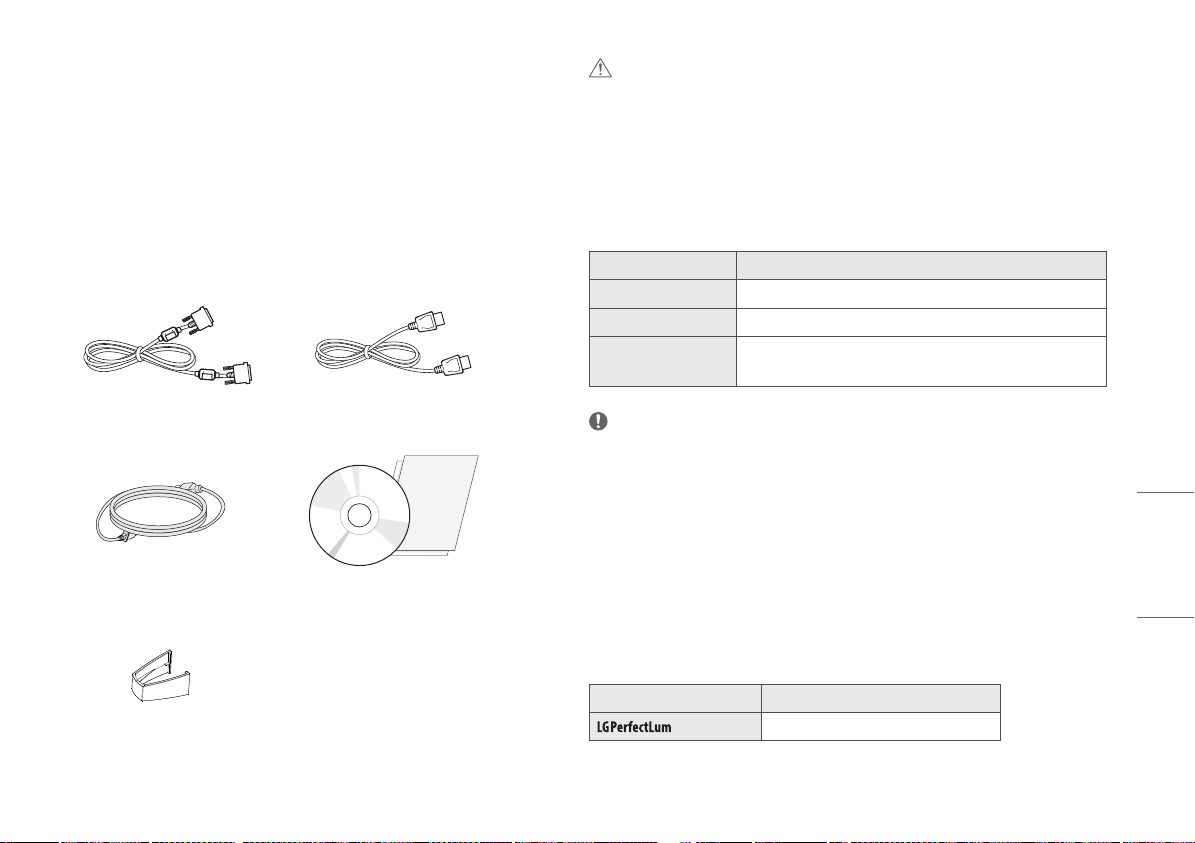
Please check whether all the components are included in the box before using the product. If there are any
missing components, contact the retailer where you purchased the product.
Note that the product and related components may look different from those shown here.
CAUTION
• Always use genuine LG components to ensure safety and product performance.
• The product warranty will not cover damage or injury caused by the use of unauthorized components.
• It is recommend that use the supplied components.
• If you use generic cables not certified by LG, the screen may not display or there may be image noises.
• Always use authorized components from the table of accessories shown below. Unauthorized components
can cause damage and malfunction to the product.
Component Standard
DisplayPort Cable UL, Impedance 100 ohm
DVI-D Cable UL, Impedance 100 ohm
Power Cord US – Approved US safety regulation
Others – Approved country safety regulation
ENGLISH
DVI-D Cable DisplayPort Cable
Power Cord
Cable holder
CD/Owner's Manual/Regulatory
Manual/Cards
NOTE
• The components may look different from those illustrated here.
• Without prior notice, all product information and specifications contained in this manual are subject to
change to improve the performance of the product.
• To purchase optional accessories, visit an electronics store or an online shopping site, or contact the retailer
from which you purchased the product.
• The power cord provided may differ depending upon the region.
Supported Software
Check the software supported by your product and refer to the manuals on the CD enclosed in the product
package.
Software Installation Priority
Recommended
• Required and Recommended: You can download and install the latest version from the enclosed CD or from
the LGE website (www.lg.com).
3

Product and Button Description
Power LED Indicator
ENGLISH
Front View
Power LED
Indicator
APRX. Sensor
Auto
Luminance
Stability Sensor
Calibration Sensor
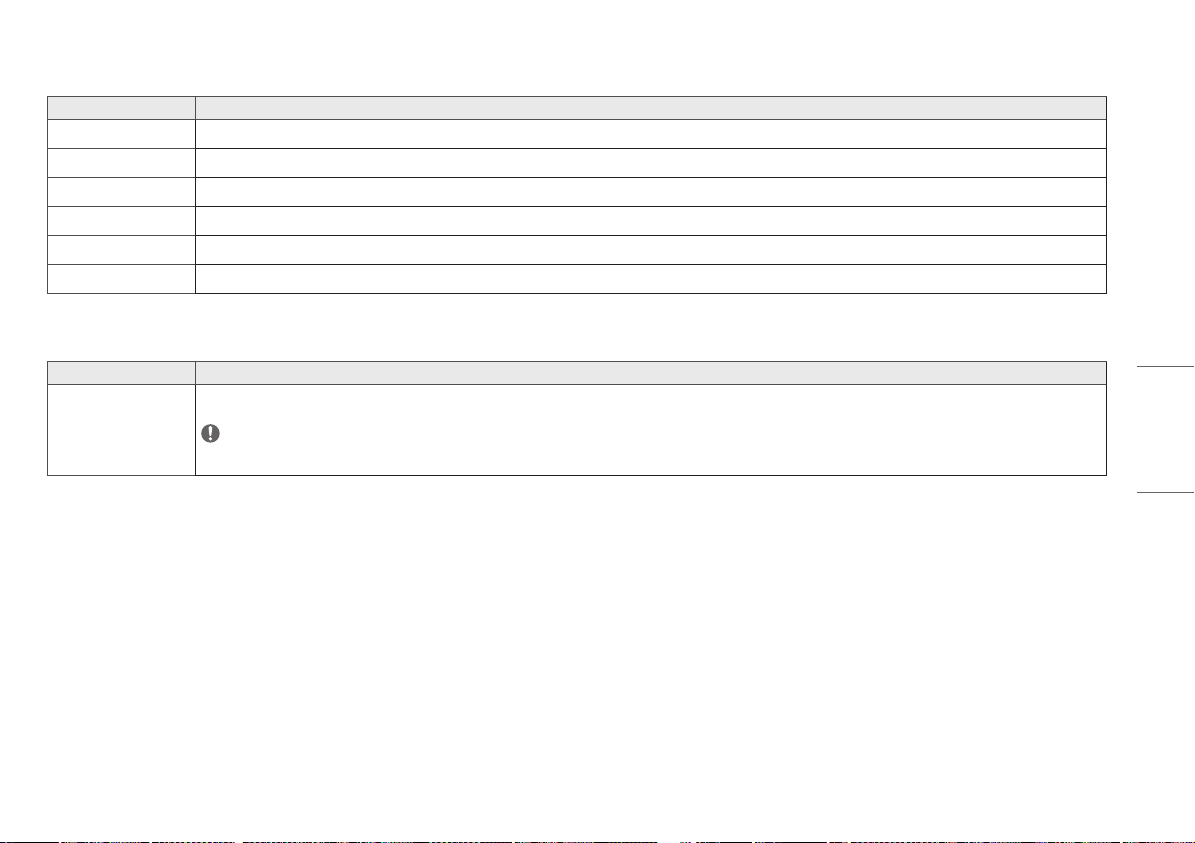
LED Status Operation Description
Green Normal operation
Orange No signal/Power saving
Light Orange Power saving when people leave
LED off Power off
NOTE
• Under normal operation, Power LED Indicator will be off after 20 seconds in order not to affect the image
reading quality in dark room.
• To bring back the Power LED Indicator, press the OSD Control Knob or switch display condition.
4

Rear View
6
7
1
3
2
4
5
8
ENGLISH
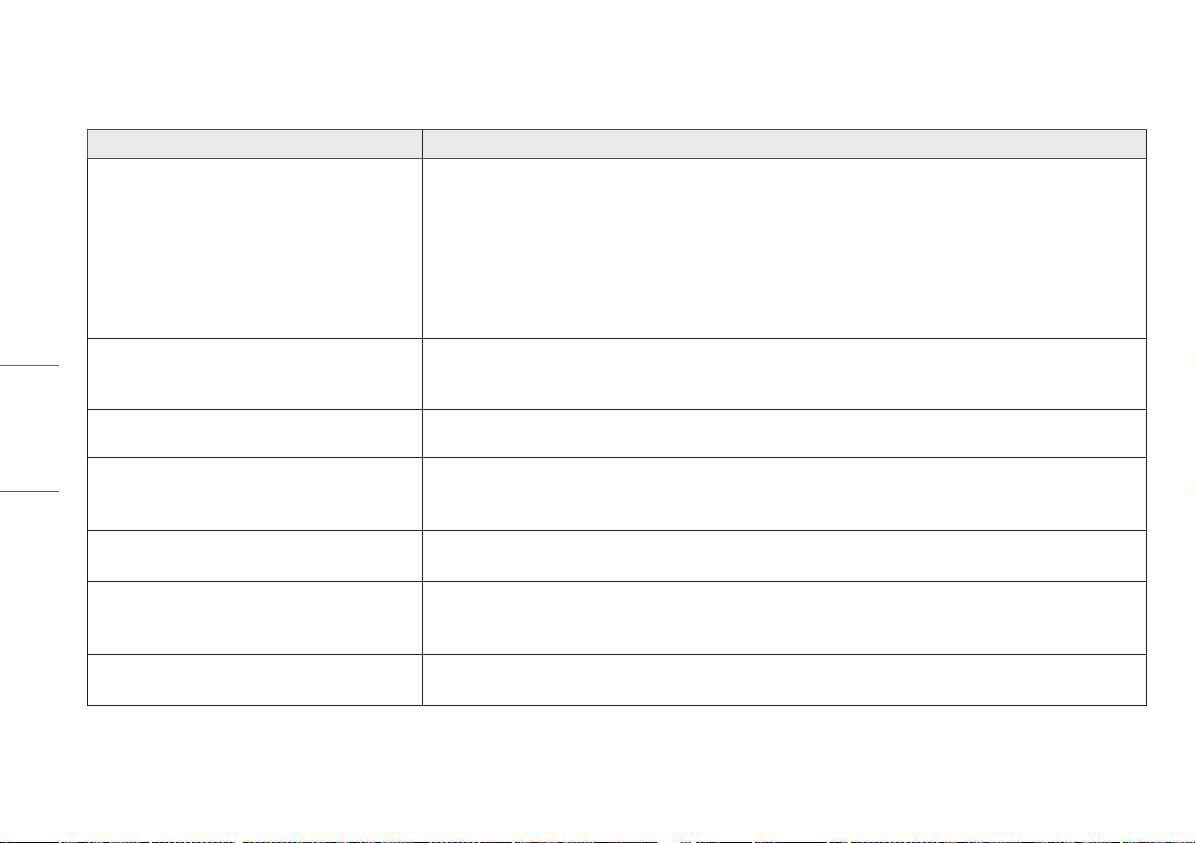
USB IN 1 USB IN 2 USB UP USB (MSD) LAN DP IN DVI-D IN
1
2
3
4
/ /
- One upstream two downstream ports.
- Peripheral USB device connection.
- USB A.
- Save test or calibration report to an external storage device, it is compatible with FAT32 only.
(For technician use only)
- RJ45.
- For sending calibration report to a target PC and synchronize with time server. (For technician
use only)
- Display Port 20 pin.
- Digital Connection.
AC INPUT ON / OFF
5
- Dual-Link DVI-D.
- Digital Connection.
6
- AC power input.
- For operation with AC power.
7
Equipotential terminal
- Connect to other equipment’s potential equalization conductor.
8
(AC switch)
- For operation with AC power.
5

Stand View
INITIAL INSTALLATION
ENGLISH
429.3
100
247.9
100
18
Unit: mm
To attach the LCD monitor to your system, follow these instructions
1 Turn off the power of your computer.
2 For connecting the PC: Connect the DVI-D cables or DisplayPort cables to the connector of the display card
in your system. Tighten all screws.
3 Connect the DVI-D cables or DisplayPort cables to the connector on the back of the monitor.
4 Connect one end of the power cord to the monitor and the other end to the power outlet.
5 The AC switch on the back of the monitor must be turned on. Then turn on the monitor with the OSD
Control Knob.
6 For further adjustments, refer to the OSD section of this manual.
NOTE
• Incorrect cable connections may result in irregular operation, damage display quality / components of LCD
module and/or shorten the module’s life.
• Please refer to Caution of "Assembly And Preparing" section for proper selection of your Power cord.
• The AC switch is a real on/off switch. If this switch is on the Off position, the monitor cannot be turned on by
using the OSD Control Knob.
• If you have any questions, please refer to the " Troubleshooting" section of this manual.
6

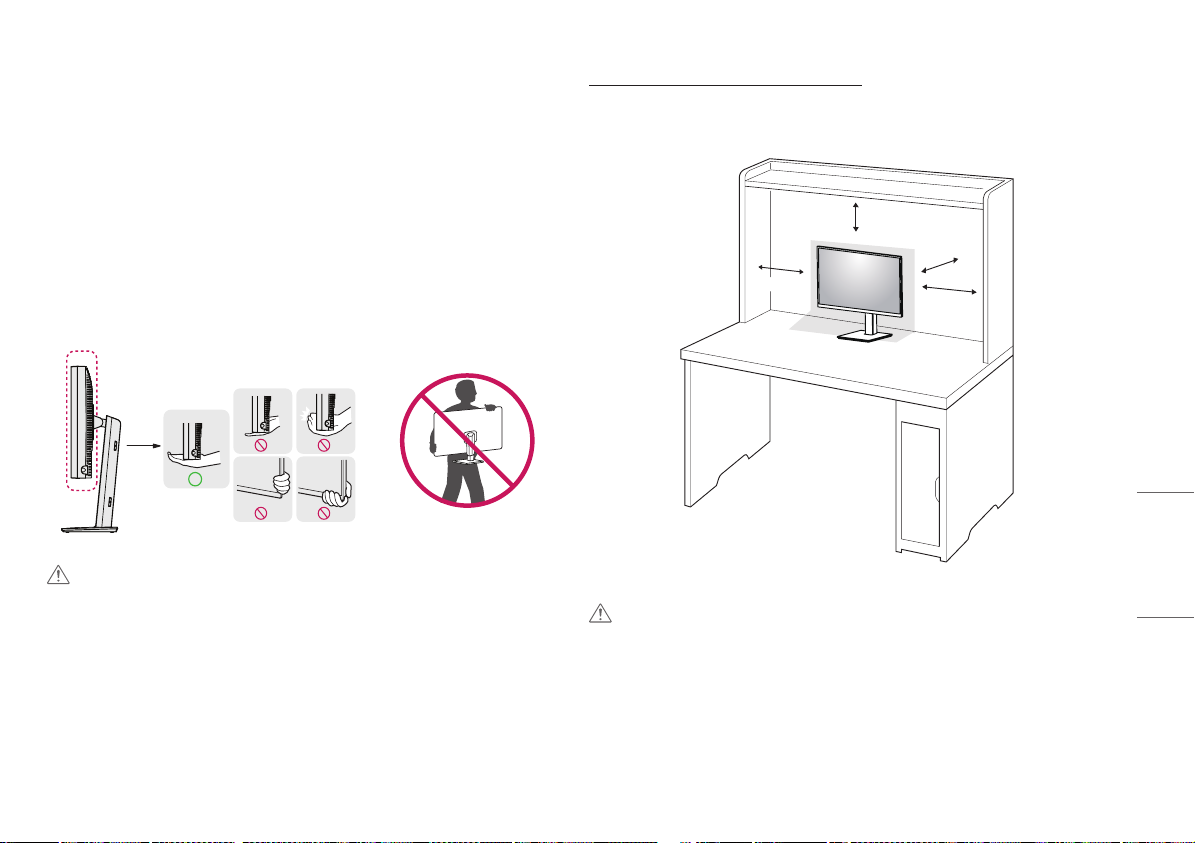
Moving and Lifting the Monitor
When moving or lifting the monitor, follow these instructions to prevent the monitor from being scratched or
damaged and to ensure safe transportation, regardless of its shape or size.
• Place the monitor in the original box or packing material before attempting to move it.
• Before moving or lifting the monitor, disconnect the power cord and all other cables.
• Hold the bottom and side of the monitor frame firmly. Do not hold the panel itself.
• When holding the monitor, the screen should face away from you to prevent it from being scratched.
• When transporting the monitor, do not expose the monitor to shock or excessive vibration.
• When moving the monitor, keep it upright and never turn the monitor on its side or tilt it sideways.
CAUTION
• Avoid touching the monitor screen as much as possible.
- This may result in damage to the screen or some of the pixels used to create images.
• If you use the monitor panel without the stand base, its OSD Control Knob may cause the monitor to become
unstable and fall, resulting in damage to the monitor or human injury. In addition, this may cause the OSD
Control Knob to malfunction.
Installing on a Table
• Lift the monitor and place it on the table in an upright position. Place the monitor at least 100mm away
from the wall to ensure sufficient ventilation.
ENGLISH
100 mm
100 mm
100 mm
100 mm
CAUTION
• Unplug the power cord before moving or installing the monitor. There is risk of electric shock.
• Make sure to use the power cord that is provided in the product package and connect it to a grounded power
outlet.
• If you need another power cord, please contact your local dealer or the nearest retail store.
7

Adjusting the Stand Height
1 Place the monitor mounted on the stand base in an upright position.
2 Handle the monitor with both hands for safety.
ENGLISH
Max. 150.0 mm
WARNING
• When adjusting the screen height, do not place your hand on the stand body to avoid injury to your fingers.
Adjusting the Angle
1 Place the monitor mounted on the stand base in an upright position.
2 Adjust the angle of the screen.
The angle of the screen can be adjusted forward or backward from -5° to 25° for a comfortable viewing
experience.
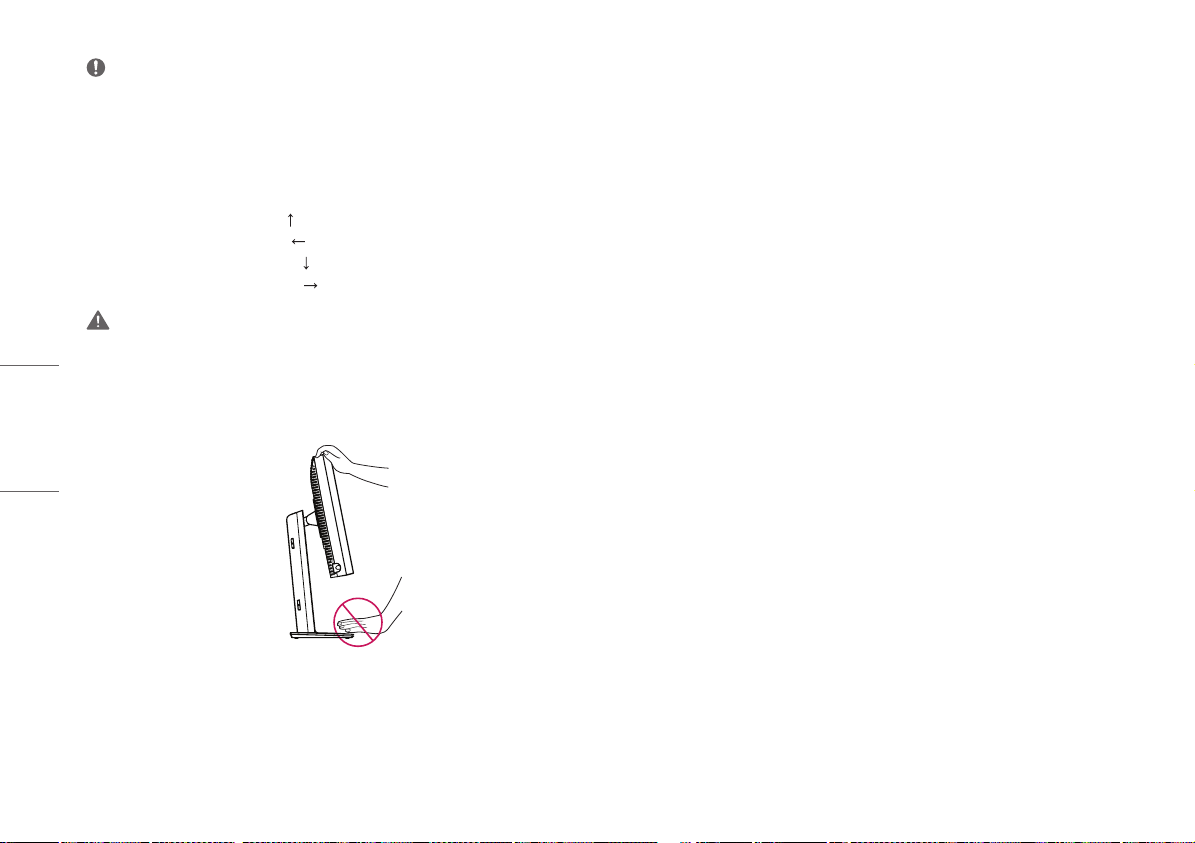
WARNING
• To avoid injury to the fingers when adjusting the screen, do not hold the lower part of the monitor’s frame as
illustrated below.
• Be careful not to touch or press the screen area when adjusting the angle of the monitor.
Swivel stand
Swivel 45 degrees and adjust the angle of the Monitor set to suit your view.
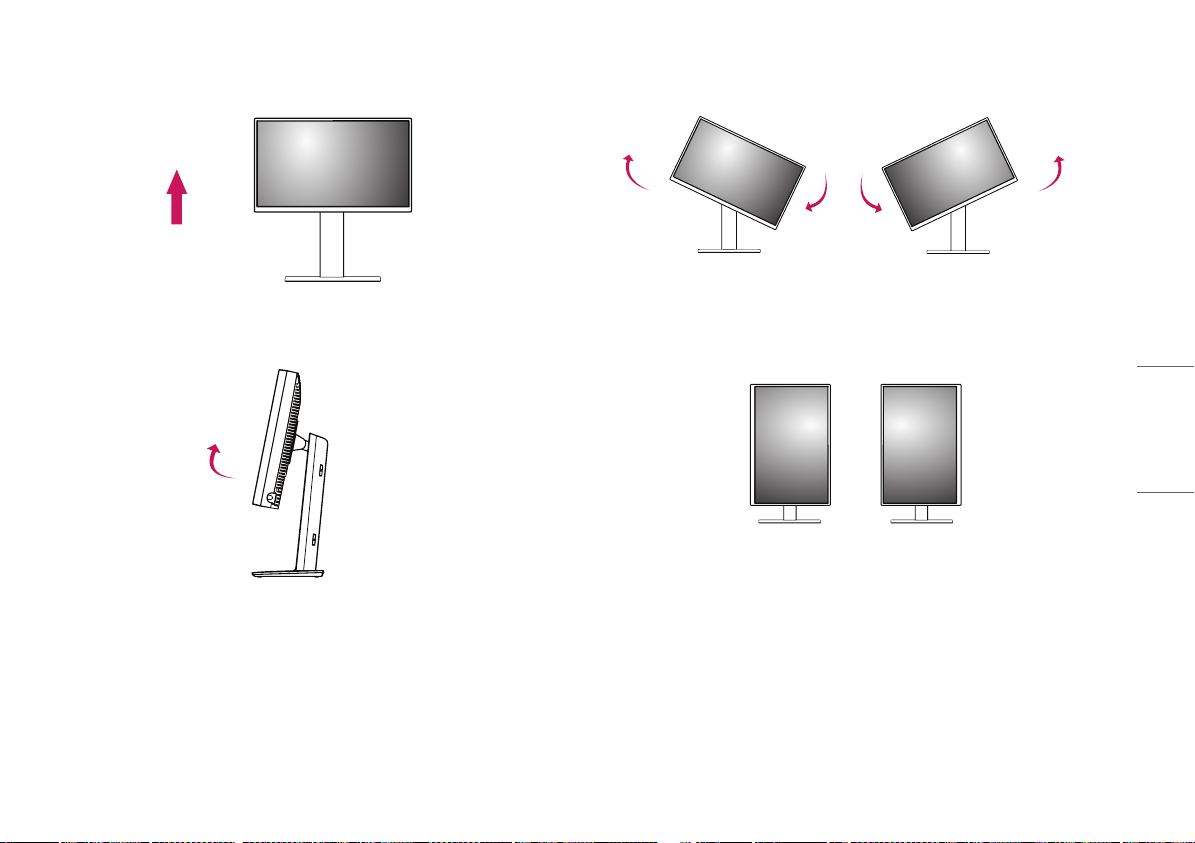
Pivot Feature
The pivot feature allows the monitor to rotate 90 degrees clockwise or counter-clockwise.
Head
Stand
WARNING
• To avoid scratching the stand base, do not use excessive force or speed when rotating the monitor using the
pivot feature, and make sure that the stand does not make contact with the monitor.
8

1 Raise the monitor up to the maximum height.
3 Rotate the monitor clockwise or counter-clockwise as shown in the figure.
ENGLISH
2 Adjust the angle of the monitor in the direction of the arrow as shown in the figure.
4 Complete the installation by rotating the monitor 90° as shown in the figure.
9

ENGLISH
NOTE
• Auto Pivot feature of the display is not supported.
• The screen can be rotated easily using the screen pivot shortcut key provided with your Windows operating
system. Note that some Windows versions and some graphics card drivers may use different settings for the
screen pivot key or may not support the pivot key at all.
• Windows operating system screen pivot shortcut key.
- 0°: Ctrl + Alt + keyboard up key ( )
- 90°: Ctrl + Alt + keyboard left key ( )
- 180°: Ctrl + Alt + keyboard down key ( )
- 270°: Ctrl + Alt + keyboard right key ( )
WARNING
• Take care when rotating the monitor if the cable is connected.
• To avoid injury to your fingers, do not put them between the screen and the stand base when turning the
monitor's screen.
10

USER SETTINGS
Menu Settings
OSD Control Knob
The OSD Control Knob is a multi-functional device located behind the Power LED Indicator on the right side of
the front bezel. It has three movements-rotate upward, rotate downward and press inward as a button.
Power On/Off Press the OSD Control Knob to power the unit on from the off stage
(the LED is off). To turn the power off, press the OSD Control Knob
and hold for at least 3 second until the LED turns off.
ENGLISH
OSD Control Knob
Your LCD monitor allows you to easily adjust the characteristics of the image being displayed. All of these
adjustments are made using the OSD Control Knob on the monitor. While you use this OSD Control Knob, an OSD
shows you their changes.
The applicable setting options are as shown below.
[Input] [Picture] [Gamma] [Info]
[OSD] [General] [Exit]
NOTE
• Your monitor’s OSD (On Screen Display) may differ slightly from that shown in this manual.
OSD Control While the monitor is on (green LED and image on the screen),
Pressing on the Control Knob activates the OSD. While the OSD menu
is active, use the three way movements of the Control Knob.
Rotate Downward Move Up/Right, Increase, Larger, More
Rotate Upward Move Down/Left, Decrease, Smaller, Less
OSD Control Knob
Press
Execute, Do, Save
11

ENGLISH
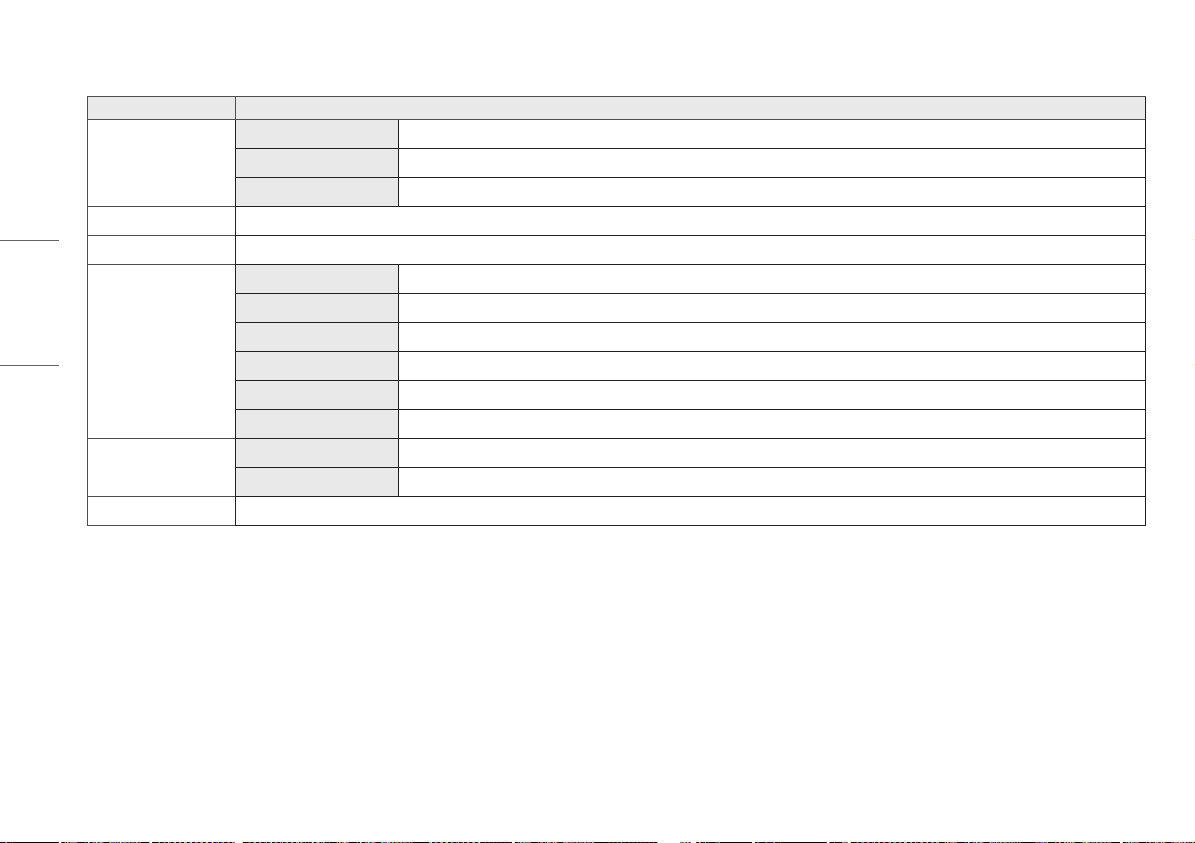
[Input]
[Input] Description
[DVI] Set current input to DVI.
[DISPLAYPORT] Set current input to Displayport.
[Picture]
[Picture] Description
[ALS]
(Auto Luminance Stability)
[Brightness]
[Contrast]
[Color Temp] [6500K] Set Color temp to 6500K.
[Range] User define the ALS value.
[300] Adjust brightness to 300 cd/m2 (±10%).
[400] Adjust brightness to 400 cd/m2 (±10%).
[500] Adjust brightness to 500 cd/m2 (±10%).
[600] Adjust brightness to 600 cd/m2 (±10%).
[Off] Stop [ALS] and enable [Brightness].
[Auto] Auto select [ALS] according ambient light detected by Ambient sensor.
Adjust the backlight of the full screen by the range from 0 to 100.
Adjust the contrast for the display image by the range from 0 to 100.
[7500K] Set Color temp to 7500K.
[9300K] Set Color temp to 9300K.
[Mono] Set Color temp to monochrome.
12

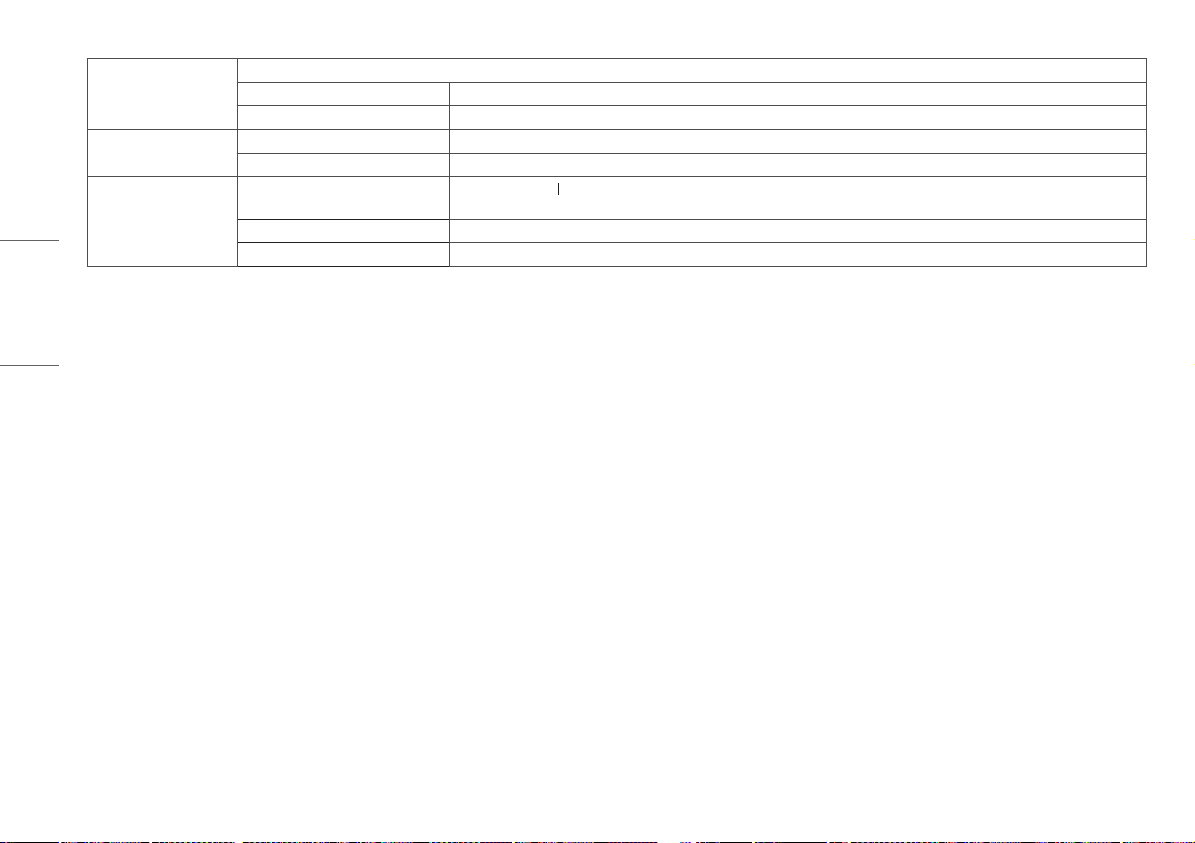
[Gamma]
[Gamma] Description
[Gamma 1.8]
[Gamma 2.0]
[Gamma 2.2]
[Gamma DICOM]
[Gamma User]
[Light Box]
Set Gamma curve to curve 1.8.
Set Gamma curve to curve 2.0.
Set Gamma curve to curve 2.2.
Set Gamma curve for medical standard. (DIN6868-157)
Set Gamma curve for user mode.
Full screen in white.
[Info]
[Info] Description
System Information
Show Model name/Firmware Version/GPU Version/Monitor SN/H-Freq./V-Freq./Life Time/IP/ALS(LUX).
NOTE
• Information of LUX is only for reference. For quality assurance test, please use standard equipment.
ENGLISH
13

ENGLISH
[OSD]
[OSD] Description
[Rotation]
[Language]
[OSD Position]
[OSD Timer]
[OSD Lock]
[OSD Transparency]
[Landscape] Set OSD Menu in landscape.
[Portrait] Set OSD Menu in portrait.
[Auto] Set OSD form by G-sensor.
Sets the menu screen to the desired language.
Set horizontal and vertical position of OSD Menu.
[10 sec.] Set OSD display time around 10 seconds.
[20 sec.] Set OSD display time around 20 seconds.
[30 sec.] Set OSD display time around 30 seconds.
[45 sec.] Set OSD display time around 45 seconds.
[60 sec.] Set OSD display time around 60 seconds.
[120 sec.] Set OSD display time around 120 seconds.
[Yes] Select [Yes] to enable lock.
[No] Long press OSD Control Knob in lock.
Set transparency of OSD Menu.
14

[General]
[General] Description
[All Reset]
[APRX. Sensor]
[Zoom Up]
[Self Calibration]
[Cal. Date:]
[Yes] Reset all display and OSD setting to default value.
[No] Exit this page.
[Off ] Disable [APRX. Sensor] function.
[On] S et [APRX. Sensor] close the panel power when user isn’t in front of monitor.
[Auto] Save the P-distance and enable [APRX. Sensor] on. The arrow mark will point to [On].
[Original] Keep image in normal resolution.
[Full] Scale up the resolution to 2048 x 1536.
[2X Scale] Scale up the specific part of image.
[Yes] Enable monitor test luminance and calibrate DICOM with color temperature according to OSD setting.
[No] Exit this page.
NOTE
• Show [Cal. Date:] in which [Self Calibration] is done. The [Cal. Date:] will be based on the date that is shown in the OSD menu, it can be synced to the real time/date via internet (RJ45). Please
connect the monitor with internet before AC On if user want to get real time/date when doing [Self Calibration].
ENGLISH
15

TROUBLESHOOTING
ENGLISH
Problem Check to see
Nothing is displayed on the screen • The signal cable should be completely connected to the display card/computer.
• The display card should be completely seated in its slot.
• Check the AC switch. Should be in the On position.
• OSD Control Knob and computer power switch should be in the On position.
• Check to make sure that a supported mode has been selected on the display card or system being used. (Please consult display card or system manual
to change graphics mode)
• Check the monitor and your display card with respect to compatibility and recommended settings.
• Check the signal cable connector for bent or pushed-in pins.
Image persistence (Image Sticking) • Image persistence is when a residual or ghost image of a previous image remains visible on the screen. To alleviate image persistence, turn off the
monitor for as long as the previous image was displayed.
• Try not to operate the LCD with a fixed image on the screen for more than thirty minutes.
The screen has defective pixels • The screen has defective pixels (e.g. slightly light or dark). This is due to the characteristics of the panel itself and not the LCD product.
Image is unstable, unfocused or swimming is apparent • Signal cable should be completely attached to the computer.
• Check the monitor and your display card with respect to compatibility and recommended signal timings.
• If your text is garbled, change the video mode to non-interlace and use 50Hz refresh rate.
OSD is not sized properly • Use the OSD Image Adjust controls to increase or decrease the coarse total.
• Check to make sure that a supported mode has been selected on the display card or system being used.
Is the [No Signal] message displayed? • Signal cable should be completely attached to the computer.
• Make certain the computer is not in a power-saving mode. (Touch the keyboard or mouse)
• If no video is present on the screen, turn the Power button off and on again.
LED on monitor is not lit (No Green or Light Orange can be seen) • Power Switch should be in the On position and power cord should be connected.
• Check the power cable should be connected surely. Press the OSD Control Knob or switch display condition with source or resolution.
16

PRODUCT SPECIFICATION
The product specifications are subject to change without prior notice for product improvements.
“ ~ ” refers to alternating current (AC), “ ” refers to direct current (DC).
LCD Screen Type TFT (Thin Film Transistor)
LCD (Liquid Crystal Display) Screen
Pixel Pitch 0.2115 mm x 0.2115 mm
Resolution Max Resolution
Recommended Resolution
Video Signal Horizontal Frequency 63 kHz - 96 kHz
Vertical Frequency 50 Hz - 75 Hz
Input Connector Equipotential terminal
Power Source Power Rating 100 - 240 V~ 50/60 Hz, 1.2 - 0.5 A
Power consumption Max. 85 W *
Environmental Conditions Operating Conditions Temperature 0 °C to 40 °C
Storing Conditions Temperature -20 °C to 60 °C
2048 x 1536 @ 60 Hz
Humidity 0 % to 80 %
Pressure 540 hPa to 1060 hPa
Humidity 0 % to 80 %
Pressure 500 hPa to 1060 hPa
ENGLISH
17

Dimensions (mm) Monitor Size (Width x Height x Depth)
With Stand 377 x 606 x 248.2
Without Stand 377 x 473 x 89.6
ENGLISH
Weight (kg) With Stand 9.8
Without Stand 7.0
Medical Specifications Classification by protection type against
Electric Shock
Mode of operation
Environment of Use
* The Operating Mode of Power Consumption is measured with LGE test standard. (Full White pattern, Maximum resolution)
* The Power Consumption level can be different by operating condition and monitor setting.
Class equipment
Continuous Operation
This equipment is not suitable for use in the presence of flammable anesthetic or oxygen.
18

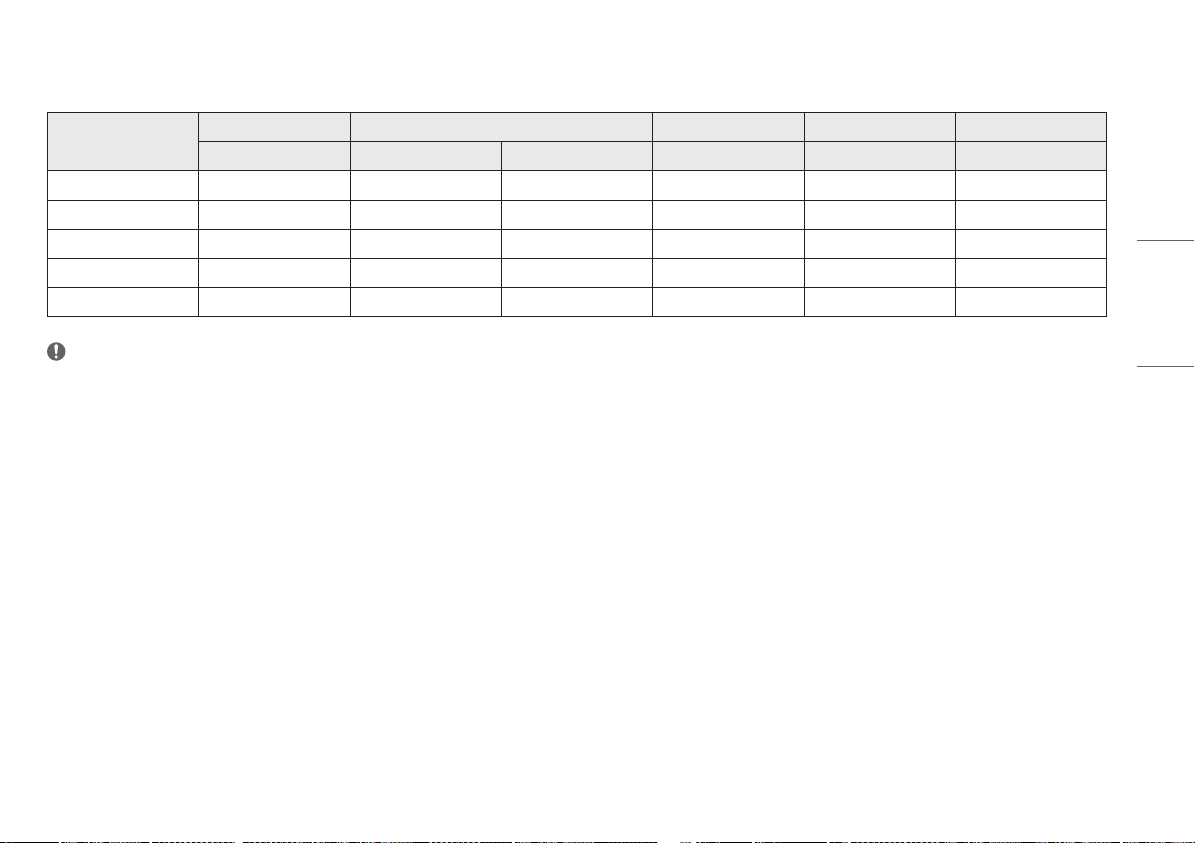
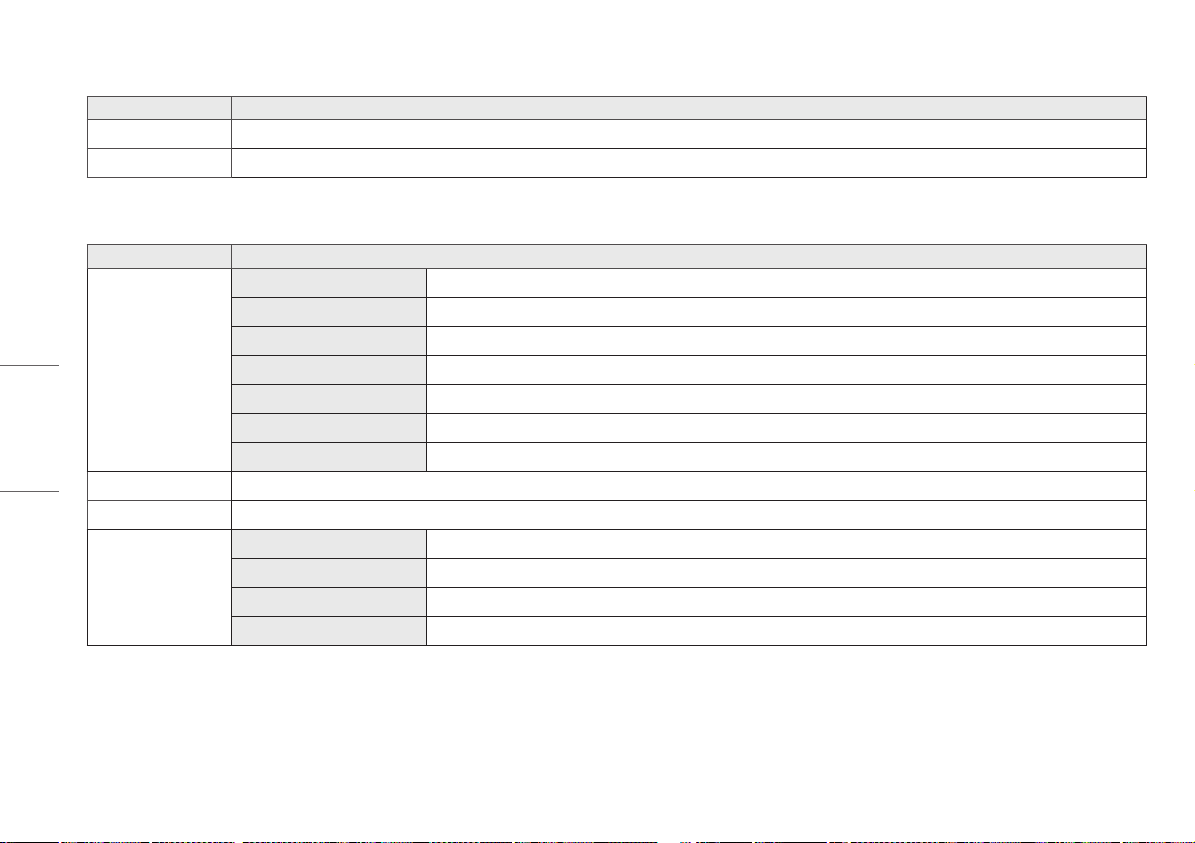
Display Mode
Pixel Format
1280 x 1024 108 63.96 60.0 VESA V V
1600 x 1200 162 75.00 60.0 VESA V V
1920 x 1080 148.5 67.50 60.0 VESA V V
1920 x 1200 193.6 74.60 60.0 VESA V V
2048 x 1536 260 96.71 60.0 - V V
Pixel Frequency Frequency Standard Input 1 Input 2
CLK (MHz) H (kHz) V (Hz) Type DVI-D DP
NOTE
• Modes not listed in the table may not be supported. For optimal resolution, we recommend you to choose a mode listed in the above table.
ENGLISH
19

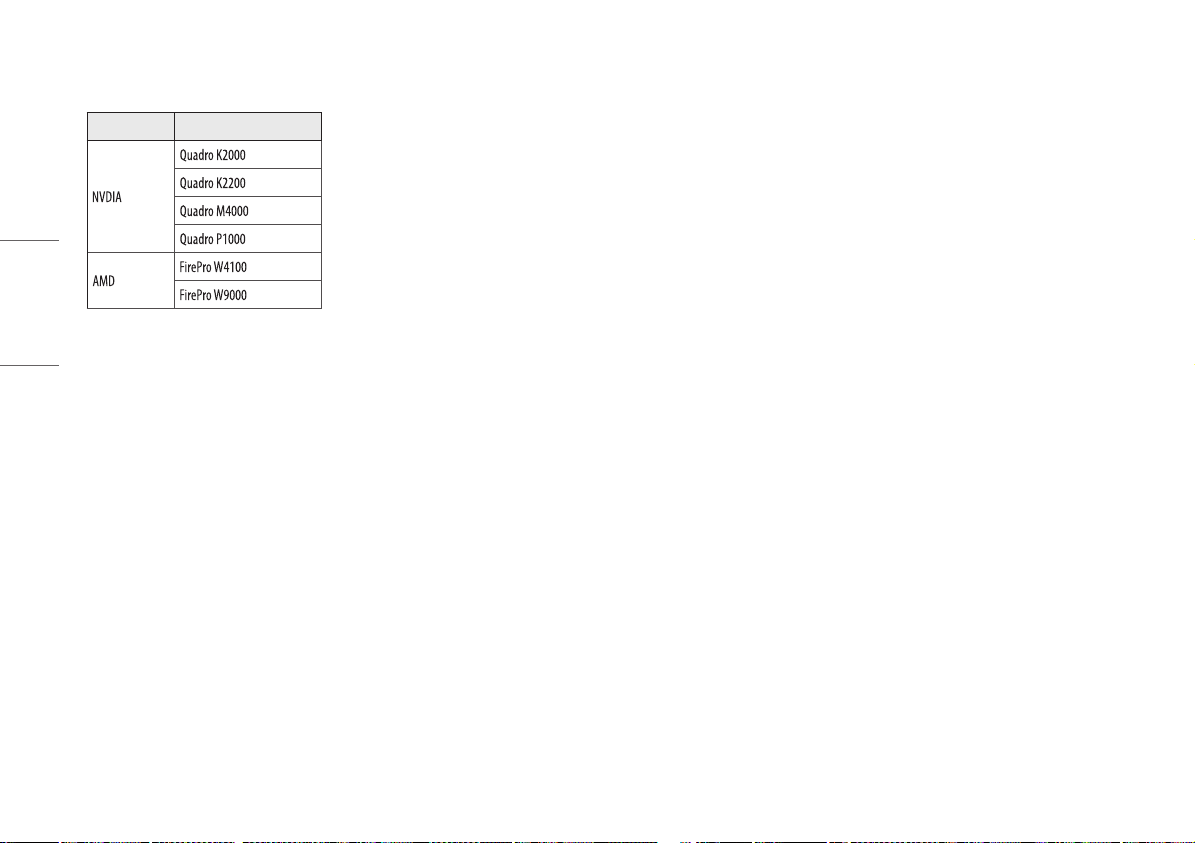
Supported Graphic Card List
ENGLISH
Vendor Graphic Card
Manufacturer
Manufacturer: DIVA Laboratories, Ltd.
Address: 9F, No.351, Sec.2, Zhongshan Road, Zhonghe District, New Taipei City, 235 Taiwan
Tel: 886-2-22268631
Fax: 886-2-22262423
http://www.diva.com.tw
Technical
Manufacturer: DIVA Laboratories, Ltd.
Address: 9F, No.351, Sec.2, Zhongshan Road, Zhonghe District, New Taipei City, 235 Taiwan
Tel: 886-2-22268631
Fax: 886-2-22262423
http://www.diva.com.tw
20

ENGLISH
21

The model and serial number of the product are located on the back and on one side of the product. Record
them below in case you ever need service.
Model
Serial No.
WARNING: This equipment is compliant with Class A of CISPR 32. In a residential environment this equipment
may cause radio interference.

MANUEL D'UTILISATION
MONITEUR MÉDICAL
Veuillez lire attentivement ce manuel avant de mettre en service votre appareil et conservez-le afin de pouvoir vous y référer ultérieurement.
21HK512D
Copyright © 2019 LG Electronics Inc. Tous droits réservés.
www.lg.com

SOMMAIRE
NETTOYAGE
NETTOYAGE -----------------------------------------------2
ASSEMBLAGE ET PRÉPARATION ---------------------3
PREMIÈRE INSTALLATION-----------------------------6
FRANÇAIS
PARAMÈTRES UTILISATEUR ------------------------11
RÉSOLUTION DES PROBLÈMES--------------------- 16
CARACTÉRISTIQUES DU PRODUIT -----------------17
Produits chimiques de nettoyage recommandés
• Isopropanol à 70 %
• Éthanol à 70 %
®
• Cidex
OPA
• Solution saline à 0,9 %
Méthode d'utilisation d'un nettoyant (quand l'écran
est poussiéreux)
• Avant de commencer le nettoyage, éteignez le moniteur et débranchez le câble d'alimentation.
• Trempez un chiffon doux dans un nettoyant recommandé, puis frottez doucement l'écran avec une force de
1N au maximum.
• Le nettoyant peut provoquer de graves dommages s'il pénètre dans le moniteur durant le nettoyage.
• Comme cela pourrait endommager l'affichage, nettoyez uniquement les parties du moniteur qui ne forment
pas le panneau LCD de l'écran.
• N'utilisez pas de diluants, de benzène, de nettoyants acides ou alcalins, ou d'autres solvants de ce type.
• La procédure de nettoyage pour les écrans ne doit être réalisée que par des professionnels de santé (médecins
ou infirmières) et non par les patients.
2

ASSEMBLAGE ET PRÉPARATION
Composition du produit
Veuillez vérifier que tous les éléments sont bien présents dans l'emballage avant d'utiliser le produit. S'il
manque des éléments, contactez le revendeur auprès duquel vous avez acheté le produit.
Notez bien que le produit et les éléments qui l'accompagnent peuvent avoir un aspect différent de ceux de
l'illustration.
Câble DVI-D Câble DisplayPort
Cordon d'alimentation
CD/Manuel d'utilisation/Manuel des
réglementations/Cartes
AVERTISSEMENT
• Veillez à toujours utiliser des composants de la marque LG afin d'assurer la sécurité et les performances du
produit.
• La garantie du produit ne couvre pas les dommages ou les blessures causés par l'utilisation de composants
non certifiés.
• Nous vous recommandons d'utiliser les composants fournis.
• Si vous utilisez des câbles génériques non certifiés par LG, l'écran risque de ne rien afficher ou de subir des
bruits de l'image.
• Utilisez toujours les composants autorisés qui sont présentés dans le tableau des accessoires ci-dessous. Les
composants non autorisés peuvent causer des dommages au produit et entraîner son dysfonctionnement.
Composant Standard
Câble DisplayPort UL, impédance de 100ohms
Câble DVI-D UL, impédance de 100ohms
Cordon d'alimentation États-Unis - Règlementations de sécurité américaines approuvées
Autres : réglementation concernant la sécurité approuvée dans les pays
REMARQUE
• Les composants peuvent différer de l'illustration.
• Les informations et spécifications contenues dans ce manuel peuvent être modifiées sans préavis, dans le but
d'améliorer les performances du produit.
• Pour l'achat d'accessoires en option, adressez-vous à un magasin de matériel électronique, rendez-vous sur
un site d'achat en ligne ou contactez le revendeur auprès duquel vous avez acheté ce produit.
• Le cordon d'alimentation fourni peut différer selon les régions.
Logiciels pris en charge
Vérifiez le logiciel pris en charge par votre produit et reportez-vous aux manuels sur CD fourni avec le produit.
FRANÇAIS
Support de câble
Logiciels Niveau de priorité de l'installation
Recommandé
• Requis et recommandé : Vous pouvez télécharger et installer la dernière version à partir du CD fourni ou
depuis le site Web LGE (www.lg.com).
3

Description du produit et des boutons
Voyant LED d'alimentation
FRANÇAIS
Vue de face
Voyant LED
d'alimentation
Détecteur de
présence
Capteur de
stabilité de
luminance
automatique
Capteur d'étalonnage
Statut LED Description du fonctionnement
Ver t Fonctionnement normal
Orange Pas de signal/Économie d'énergie
Orange clair Économie d'énergie en l'absence de
personnes
Voyant LED éteint Hors tension
REMARQUE
• En fonctionnement normal, le voyant LED d'alimentation s'éteint au bout de 20secondes afin de ne pas
altérer la qualité de lecture de l'image dans les pièces sombres.
• Pour rallumer le voyant LED d'alimentation, appuyez sur le bouton de commande OSD ou modifiez la
condition d'affichage.
4

Vue arrière
6
7
1
3
2
4
5
8
USB IN 1 USB IN 2 USB UP USB (MSD) LAN DP IN DVI-D IN
1
2
3
4
/ /
- Un port amont et deux ports aval.
- Connexion d'appareils USB périphériques.
- USB A.
- Enregistrez le rapport de test ou d'étalonnage sur un périphérique de stockage externe.
L'appareil est uniquement compatible avec le format FAT32. (Réservé aux techniciens)
- RJ45
- Pour l'envoi du rapport d'étalonnage à un PC cible et la synchronisation avec le serveur de
temps. (Réservé aux techniciens)
- DisplayPort 20broches.
- Connexion numérique.
AC INPUT ON / OFF
5
- DVI-D Dual-Link.
- Connexion numérique.
6
- Entrée d'alimentation CA.
- Fonctionnement avec du courant alternatif.
7
Terminal équipotentiel
- Connexion au conducteur d'équipotentialité d'autres équipements.
8
(Interrupteur CA)
- Fonctionnement avec du courant alternatif.
FRANÇAIS
5

Vue du support
PREMIÈRE INSTALLATION
FRANÇAIS
429,3
100
247,9
100
18
Unité: mm
Pour connecter le moniteur LCD à votre système, suivez ces instructions
1 Éteignez votre ordinateur.
2 Branchement du PC: Branchez les câbles DisplayPort ou DVI-D au connecteur de la carte graphique de
votre système. Serrez toutes les vis.
3 Branchez les câbles DisplayPort ou DVI-D au connecteur situé à l'arrière du moniteur.
4 Branchez une extrémité du cordon d'alimentation au moniteur et l'autre extrémité sur la prise de courant.
5 L'interrupteur CA situé à l'arrière du moniteur doit être actionné. Ensuite, allumez le moniteur à l'aide du
bouton de commande OSD.
6 Si vous souhaitez effectuer d'autres réglages, reportez-vous à la section OSD de ce manuel.
REMARQUE
• Une mauvaise connexion des câbles peut entraîner des irrégularités de fonctionnement, compromettre la
qualité d'affichage, endommager les composants du module LCD et/ou raccourcir la durée de vie du module.
• Veuillez vous reporter à l'avertissement de la section «Assemblage et préparation» pour choisir correctement
votre cordon d'alimentation.
• L'interrupteur CA est un véritable commutateur marche/arrêt. S'il est en position d'arrêt, le moniteur ne peut
pas être allumé à l'aide du bouton de commande OSD.
• Si vous avez des questions, veuillez vous reporter à la section «Résolution des problèmes» de ce manuel.
6

Déplacer et soulever le moniteur
Si vous souhaitez déplacer ou soulever le moniteur, suivez ces instructions pour éviter de le rayer ou de
l'endommager afin d'assurer un déplacement sans danger, quelle que soit sa forme ou sa taille.
• Il est recommandé d'installer le moniteur dans sa boîte ou son emballage d'origine avant d'essayer de le
déplacer.
• Avant de déplacer ou de soulever le moniteur, débranchez le cordon d'alimentation et tous les autres câbles.
• Maintenez fermement le moniteur par le bas et le côté du cadre. Ne maintenez pas le panneau directement.
• Lorsque vous tenez le moniteur, orientez l'écran à l'opposé de vous pour éviter de le rayer.
• Lorsque vous transportez le moniteur, ne l'exposez pas à des secousses ou à des vibrations excessives.
• Lorsque vous déplacez le moniteur, maintenez-le à la verticale, ne le tournez jamais latéralement et ne
l'inclinez pas sur le côté.
AVERTISSEMENT
• Évitez autant que possible de toucher l'écran du moniteur.
- Vous risqueriez d'endommager l'écran ou certains pixels qui permettent de composer l'image.
• Si vous utilisez le panneau du moniteur sans la base du support, le bouton de commande OSD pourrait
rendre le moniteur instable ou le faire tomber, ce qui pourrait endommager le moniteur ou vous blesser. Cela
pourrait également entraîner des dysfonctionnements du bouton de commande OSD.
Installation sur un bureau
• Soulevez le moniteur et placez-le sur le bureau en position verticale. Laissez une distance d'au moins 100mm
entre le moniteur et le mur pour assurer une ventilation correcte.
100 mm
100 mm
FRANÇAIS
100 mm
100 mm
AVERTISSEMENT
• Débranchez toujours le cordon d'alimentation avant de déplacer ou d'installer le moniteur. Le non-respect de
cette consigne peut provoquer une électrocution.
• Assurez-vous d'utiliser le cordon d'alimentation fourni avec le produit et de le connecter sur une prise murale
mise à la terre.
• Si vous avez besoin d'un nouveau cordon d'alimentation, contactez votre revendeur local ou le distributeur
le plus proche.
7

Réglage de la hauteur du support
1 Placez le moniteur monté sur la base du support en position verticale.
2 Tenez fermement le moniteur à deux mains et réglez la hauteur.
150,0 mm max.
FRANÇAIS
AVERTISSEMENT
• Lors du réglage de la hauteur de l'écran, ne posez pas votre main sur le socle afin d'éviter de vous blesser aux
doigts.
Réglage de l'inclinaison
1 Placez le moniteur monté sur la base du support en position verticale.
2 Modifiez l'inclinaison de l'écran.
L'inclinaison de l'écran peut être modifiée de -5° à 25° vers l'avant ou l'arrière pour bénéficier d'un confort
visuel optimal.
AVERTISSEMENT
• Pour éviter de vous blesser les doigts lors du réglage de l'inclinaison de l'écran, ne posez pas votre main sur la
partie inférieure du cadre du moniteur, comme le montre l'illustration ci-dessous.
• Veillez à ne pas poser les doigts ou appuyer sur la surface de l'écran lorsque vous modifiez l'inclinaison du
moniteur.
Support orientable
Pivotez le moniteur de 45degrés et ajustez son inclinaison selon vos préférences.
Fonction de rotation
La fonction de rotation permet de pivoter le moniteur de 90 degrés dans le sens des aiguilles d'une montre ou
dans le sens inverse.
Têt e
Support
AVERTISSEMENT
• Pour éviter d'abîmer la base du support, n'exercez pas une force ou une vitesse excessive lors de la rotation du
moniteur à l'aide de la fonction de rotation, et assurez-vous que le support est hors de portée du moniteur.
8

1 Levez le moniteur à sa hauteur maximale.
3 Faites pivoter le moniteur dans le sens horaire ou anti-horaire, comme indiqué sur l'illustration.
FRANÇAIS
2 Ajustez l'angle du moniteur dans la direction de la flèche, comme indiqué sur l'illustration ci-dessous.
4 Terminez l'installation en faisant pivoter le moniteur de 90 ° comme indiqué sur l'illustration ci-dessous.
9

FRANÇAIS
REMARQUE
• La fonction de rotation automatique du moniteur n'est pas disponible.
• Un raccourci clavier Windows vous permet de faire pivoter facilement l'affichage de l'écran. Certaines versions
de Windows et certains pilotes de carte graphique peuvent utiliser des paramètres différents pour la touche
de rotation de l'affichage ou ne pas prendre en charge la touche de rotation.
• Raccourci clavier Windows pour la rotation de l'affichage de l'écran.
- 0 °: Ctrl+Alt+Flèche vers le haut ( )
- 90 °: Ctrl+Alt+Flèche vers la gauche ( )
- 180 °: Ctrl+Alt+Flèche vers le bas ( )
- 270 °: Ctrl+Alt+Flèche vers la droite ( )
AVERTISSEMENT
• Redoublez d'attention lors de la rotation si le câble du moniteur est branché.
• Afin d'éviter de vous blesser aux doigts, ne les placez pas entre l'écran et la base du support lorsque vous
faites pivoter l'écran du moniteur.
10

PARAMÈTRES UTILISATEUR
Paramètres du menu
Bouton de commande OSD
Votre moniteur LCD vous permet de modifier facilement les caractéristiques de l'image qui est affichée. Le
bouton de commande OSD permet d'effectuer tous ces réglages sur le moniteur. Lorsque vous l'utilisez, les
modifications s'affichent dans un menu OSD.
Les options de paramétrage applicables sont indiquées ci-dessous.
[Input] [Picture] [Gamma] [Info]
[OSD] [General] [Exit]
Bouton de commande OSD
Le bouton de commande OSD est un dispositif multifonctionnel situé derrière le voyant LED d'alimentation sur
la droite du cadre avant. Troismouvements sont possibles: la rotation vers le haut, la rotation vers le bas et la
pression comme sur un bouton.
Allumer/Éteindre Appuyez sur le bouton de commande OSD pour allumer l'appareil
Commande OSD Lorsque le moniteur est allumé (voyant vert et image à l'écran),
depuis le mode arrêt (le voyant LED est éteint). Pour couper
l'alimentation, appuyez sur le bouton de commande OSD et
maintenez-le enfoncé pendant au moins 3secondes jusqu'à ce que
le voyant LED s'éteigne.
appuyez sur le bouton de commande pour activer le menu OSD.
Lorsque le menu OSD est actif, utilisez les troismouvements du
bouton de commande.
Rotation vers
le bas
Rotation vers le
haut
Pression du
Bouton de
commande OSD
Déplacer vers le haut/la droite, Augmenter,
Plus grand, Plus
Déplacer vers le bas/la gauche, Diminuer,
Plus petit, Moins
Exécuter, Procéder, Enregistrer
FRANÇAIS
REMARQUE
• L'affichage à l'écran de votre moniteur peut être légèrement différent de ce qui est indiqué sur ce manuel.
11

[Input]
[Input] Description
[DVI] Définir DVI comme source d'entrée actuelle.
[DISPLAYPORT] Définir DisplayPort comme source d'entrée actuelle.
[Picture]
FRANÇAIS
12
[Picture] Description
[ALS]
(Stabilité de luminance
automatique)
[Luminosité]
[Contraste]
[COULEUR] [6500K] Définir Températ. sur 6 500K.
[CHOIX] L'utilisateur définit la valeur ALS.
[300] Ajuster la luminosité à 300cd/m2 (±10%).
[400] Ajuster la luminosité à 400cd/m2 (±10%).
[500] Ajuster la luminosité à 500cd/m2 (±10%).
[600] Ajuster la luminosité à 600cd/m2 (±10%).
[DESACTIVE] Désactiver [ALS] et activer [Luminosité].
[AUTO ] Choisir automatiquement [ALS] en fonction de la luminosité ambiante détectée par le capteur d'éclairage ambiant.
Ajuster le rétroéclairage du plein écran de 0 à 100.
Ajuster le contraste de l'image affichée de 0 à 100.
[7500K] Définir Températ. sur 7 500K.
[9300K] Définir Températ. sur 9 300K.
[Mono] Définir Températ. sur monochrome.

[Gamma]
[Gamma] Description
[Gamma 1.8]
[Gamma 2.0]
[Gamma 2.2]
[Gamma DICOM]
[Gamma User]
[Light Box]
Définir la courbe Gamma sur 1,8.
Définir la courbe Gamma sur 2,0.
Définir la courbe Gamma sur 2,2.
Définir la courbe Gamma sur la norme médicale. (DIN6868-157)
Définir la courbe Gamma sur le mode utilisateur.
Plein écran blanc.
[Info]
[Info] Description
Informations sur le système
Afficher: Nom du modèle/Version du micrologiciel/Version du processeur graphique/Moniteur SN/H-Freq./V-Freq./Life Time/IP/ALS(LUX).
REMARQUE
• Les informations en matière de LUX sont uniquement à titre de référence. Veuillez utiliser des équipements standard pour effectuer le test d'assurance qualité.
FRANÇAIS
13
FRANÇAIS
[OSD]
[OSD] Description
[Rotation]
[Langage]
[POSITION OSD]
[Minuteur OSD]
[VEROUILLAGE OSD]
[Transparence OSD]
[Paysage] Configurer le menu OSD en mode Paysage.
[Portrait] Configurer le menu OSD en mode Portrait.
[Auto] Configurer le formulaire OSD avec l'accéléromètre.
Permet de définir la langue d'affichage du menu.
Configurer la position horizontale et verticale du menu OSD.
[10 sec.] Définir la durée d'affichage OSD à environ 10secondes.
[20 sec.] Définir la durée d'affichage OSD à environ 20secondes.
[30 sec.] Définir la durée d'affichage OSD à environ 30secondes.
[45 sec.] Définir la durée d'affichage OSD à environ 45secondes.
[60 sec.] Définir la durée d'affichage OSD à environ 60secondes.
[120 sec.] Définir la durée d'affichage OSD à environ 120secondes.
[OUI] Sélectionner [OUI] pour activer le verrouillage.
[NON] Appuyer longuement sur le bouton de commande OSD lorsqu'il est verrouillé.
Configurer la transparence du menu OSD.
14

[General]
[General] Description
[Réinitialisation]
[Détect Prés.]
[Zoom]
[AUTO Calibration]
[Calibrage:]
[OUI] Réinitialiser tous les paramètres d'affichage et OSD sur les valeurs par défaut.
[NON] Quitter cette page.
[DESACTIVE] Désactiver la fonction [Détect Prés.].
[ACTIVE] Définir la fonction [Détect Prés.] de sorte que l'alimentation du panneau soit coupée lorsque l'utilisateur n'est pas devant le moniteur.
[AUTO ] Enregistrer la distanceP et activer la fonction [Détect Prés.]. La flèche pointe vers [ACTIVE].
[Original] Conserver l'image en résolution normale.
[Ecran mx] Augmenter la résolution jusqu'à 2048 x 1536.
[Taille X2] Agrandir une partie spécifique de l'image.
[OUI] Activer le test de luminance du moniteur et calibrer DICOM avec la température des couleurs selon les paramètres OSD.
[NON] Quitter cette page.
REMARQUE
• Afficher la date [Calibrage:] à laquelle [AUTO Calibration] est effectué. [Calibrage:] sera basée sur la date affichée dans le menu OSD. Elle peut être synchronisée avec l'heure/la date réelle par
Internet (RJ45). Veuillez connecter le moniteur à Internet avant d'allumer le dispositif si l'utilisateur souhaite avoir la date/l'heure réelle lors de l'exécution de [AUTO Calibration].
FRANÇAIS
15

RÉSOLUTION DES PROBLÈMES
Problème Vérifications à effectuer
Rien n'est affiché à l'écran • Le câble de signal doit être parfaitement connecté à la carte graphique/à l'ordinateur.
FRANÇAIS
Persistance d'image (rémanence de l'image) • La persistance d'image survient lorsque la trace résiduelle ou fantôme d'une image précédente reste visible à l'écran. Pour atténuer la persistance
L'écran présente des pixels défectueux • L'écran présente des pixels défectueux (par ex. légèrement plus clairs ou plus sombres). Cela est dû aux caractéristiques du panneau et non du produit
L'image est instable, floue ou elle tremble • Le câble de signal doit être parfaitement connecté à l'ordinateur.
OSD n'est pas dimensionné correctement • Utilisez les commandes de réglage d'image OSD afin d'augmenter ou de diminuer la valeur totale approximative.
Le message [Pas de signal] s'affiche-t-il ? • Le câble de signal doit être parfaitement connecté à l'ordinateur.
Le voyant LED du moniteur n'est pas allumée (pas de couleur verte ou
orange clair visible)
• La carte graphique doit être bien en place dans son emplacement.
• Contrôlez l'interrupteur CA. Il doit être en position marche.
• Le bouton de commande OSD et l'interrupteur d'alimentation de l'ordinateur doivent être en position marche.
• Assurez-vous qu'un mode qui est pris en charge a été sélectionné sur la carte graphique ou sur le système utilisé. (Veuillez consulter le manuel de la
carte graphique ou du système pour changer de mode graphique.)
• Contrôlez la compatibilité et les paramètres recommandés du moniteur et de votre carte graphique.
• Vérifiez que les broches du connecteur du câble de signal ne sont pas pliées ni enfoncées.
d'image, éteignez le moniteur aussi longtemps que l'image précédente avait été affichée.
• Essayez de ne pas laisser une image fixe affichée sur le moniteur LCD pendant plus de trenteminutes.
LCD.
• Contrôlez la compatibilité et la synchronisation de signal recommandés pour le moniteur et votre carte graphique.
• Si votre texte est brouillé, définissez le mode vidéo en mode non entrelacé et utilisez un taux de rafraîchissement de 50Hz.
• Assurez-vous qu'un mode qui est pris en charge a été sélectionné sur la carte graphique ou sur le système utilisé.
• Assurez-vous que l'ordinateur n'est pas en mode d'économie d'énergie. (Touchez le clavier ou la souris.)
• Si aucune vidéo ne s'affiche à l'écran, désactivez puis activez à nouveau le bouton d'alimentation.
• L'interrupteur d'alimentation doit être en position Marche et le cordon d'alimentation doit être connecté.
• Vérifiez que le câble d'alimentation est bien connecté. Appuyez sur le bouton de commande OSD ou modifiez la condition d'affichage pour la source ou
la résolution.
16

CARACTÉRISTIQUES DU PRODUIT
Ces spécifications sont sujettes à modification sans préavis à des fins d'amélioration du produit.
«~» fait référence au courant alternatif (CA) et « » fait référence au courant continu (CC).
Écran LCD Type TFT (Thin Film Transistor)
Affichage LCD (Ecran à cristaux liquides)
Distance entre pixels 0,2115 mm x 0,2115 mm
Résolution Résolution max.
Résolution recommandée
Signal vidéo Fréquence horizontale 63 kHz - 96 kHz
Fréquence verticale 50 Hz - 75 Hz
Connecteur d'entrée Terminal équipotentiel
Sources d'alimentation Type d'alimentation 100~240V ~ 50/60 Hz, 1,2 - 0,5 A
Consommation électrique 85 W max. *
Conditions
environnementales
Conditions de fonctionnement Température de 0 °C à 40 °C
Stockage Température de -20 °C à 60 °C
2048x1536 à 60Hz
Humidité de 0% à 80%
Pression de 540hPa à 1 060hPa
Humidité de 0% à 80%
Pression de 500hPa à 1 060hPa
FRANÇAIS
17
Dimensions (mm) Dimensions du moniteur (largeur x hauteur x profondeur)
Avec support 377 x 606 x 248,2
Sans support 377 x 473 x 89,6
Poids (kg) Avec support 9,8
Sans support 7,0
Spécifications médicales Classification par type de protection contre
FRANÇAIS
* Le mode de fonctionnement de la consommation électrique est mesuré selon la norme de test LG. (Modèle blanc complet, résolution maximale)
* Le niveau de consommation électrique peut varier en fonction de l'état de fonctionnement et des réglages du moniteur.
les électrocutions
Mode de fonctionnement
Environnement d'utilisation
Équipement de classe
Fonctionnement continu
Cet équipement n'est pas adapté à une utilisation en présence d'anesthésiques inflammables ou d'oxygène.
18
Mode d'affichage
Format de pixel
1280 x 1024 108 63,96 60,0 VESA V V
1600 x 1200 162 75,00 60,0 VESA V V
1920 x 1080 148,5 67,50 60,0 VESA V V
1920 x 1200 193,6 74,60 60,0 VESA V V
2048 x 1536 260 96,71 60,0 - V V
Fréquence de pixel Fréquence Standard Source d'entrée1 Source d'entrée2
CLK (MHz) H (kHz) V (Hz) Type DVI-D DP
REMARQUE
• Il est possible que les modes qui ne sont pas répertoriés dans le tableau ne soient pas pris en charge. Pour une résolution optimale, nous vous recommandons de choisir un mode repris dans le tableau ci-dessus.
FRANÇAIS
19
Liste des cartes graphiques prises en charge
Fournisseur Carte graphique
FRANÇAIS
Fabricant
Fabricant: DIVA Laboratories, Ltd.
Adresse: 9F, No.351, Sec.2, Zhongshan Road, Zhonghe District, New Taipei City, 235 Taiwan
Tél: 886-2-22268631
Fax: 886-2-22262423
http://www.diva.com.tw
Expertise technique
Fabricant: DIVA Laboratories, Ltd.
Adresse: 9F, No.351, Sec.2, Zhongshan Road, Zhonghe District, New Taipei City, 235 Taiwan
Tél: 886-2-22268631
Fax: 886-2-22262423
http://www.diva.com.tw
20

FRANÇAIS
21

Le nom du modèle et le numéro de série sont indiqués à l'arrière et sur le côté du produit. Inscrivez-les ci-dessous
pour référence ultérieure.
Modèle
N° de série
AVERTISSEMENT: Cet équipement est conforme à la norme CISPR 32 Catégorie A. Dans un environnement
résidentiel, cet équipement peut causer des interférences radio.

BENUTZERHANDBUCH
MEDIZINISCHER MONITOR
Lesen Sie dieses Handbuch aufmerksam durch, bevor Sie Ihr Gerät zum ersten Mal verwenden, und bewahren Sie es zur späteren Verwendung auf.
21HK512D
Copyright © 2019 LG Electronics Inc. Alle Rechte vorbehalten.
www.lg.com

INHALTSVERZEICHNIS
REINIGUNG
REINIGUNG -----------------------------------------------2
MONTAGE UND VORBEREITUNG ---------------------3
ERSTINSTALLATION ------------------------------------6
BENUTZEREINSTELLUNGEN ------------------------11
FEHLERBEHEBUNG -----------------------------------16
DEUTSCH
TECHNISCHE DATEN ---------------------------------- 17
Empfohlene Reinigungschemikalien
• Isopropanol 70 %
• Ethanol 70 %
®
• Cidex
OPA
• 0,9 % NaCl-Lösung
Verwendung des Reinigungsgeräts (wenn der
Bildschirm verstaubt ist)
• Schalten Sie vor der Reinigung den Monitor aus und entfernen Sie das Netzkabel.
• Tränken Sie ein weiches Tuch in das empfohlene Lösungsmittel und wischen Sie nicht stärker als mit 1 N über
den Bildschirm.
• Das Reinigungsmittel könnte ernsthafte Schäden verursachen, wenn es beim Reinigen in den Monitor
gelangt.
• Da die Anzeige könnte beschädigt werden könnte, sollten Sie nicht die LCD-Anzeige des Monitors damit
reinigen.
• Verwenden Sie kein Benzol, Verdünnungsmittel, Säuren oder alkaline Reinigungsmittel oder ähnliche
Lösungsmittel.
• Reinigungsarbeiten an Anzeigen dürfen nur von medizinischem Fachpersonal (Ärzten und Krankenpflegern)
durchgeführt werden, nicht von Patienten.
2
MONTAGE UND VORBEREITUNG
Packungsumfang
Prüfen Sie, ob alle Komponenten enthalten sind, bevor Sie das Produkt verwenden. Sollten Komponenten
fehlen, wenden Sie sich an den Händler, bei dem Sie das Produkt gekauft haben.
Beachten Sie, dass das Produkt und die zugehörigen Komponenten möglicherweise von den folgenden
Abbildungen abweichen können.
DVI-D-Kabel DisplayPort-Kabel
Netzkabel
CD/Benutzerhandbuch/Handbuch zu
gesetzlichen Bestimmungen/Karten
VORSICHT
• Um die Sicherheit und Leistung des Produkts sicherzustellen, verwenden Sie nur Originalteile.
• Durch nachgemachte Produkte verursachte Beschädigungen werden nicht von der Garantie abgedeckt.
• Es wird empfohlen, die mitgelieferten Zubehörteile zu verwenden.
• Wenn Sie Kabel verwenden, die nicht von LG zertifiziert wurden, zeigt der Bildschirm eventuell nichts oder
Bildrauschen an.
• Verwenden Sie stets zulässige Bauteile aus der folgenden Zubehörtabelle. Unzulässige Bauteile können zu
Schäden und Fehlfunktionen am Produkt führen.
Komponente Standard
DisplayPort-Kabel UL, Impedanz 100 Ohm
DVI-D-Kabel UL, Impedanz 100 Ohm
Netzkabel US – Zulässige US-Sicherheitsvorschriften
Andere– Genehmigter Sicherheitsstandard eines Landes
DEUTSCH
HINWEIS
• Die Komponenten können von den hier aufgeführten Abbildungen abweichen.
• Die in dieser Bedienungsanleitung veröffentlichten Produktinformationen und technischen Daten können im
Rahmen von Produktverbesserungen ohne vorherige Ankündigung geändert werden.
• Die optionalen Zubehörteile können Sie in einem Elektronikfachgeschäft, in einem Online-Shop oder bei dem
Einzelhändler, bei dem Sie das Produkt gekauft haben, erwerben.
• Das im Lieferumfang enthaltene Netzkabel kann je nach Region abweichen.
Unterstützte Software
Prüfen Sie, welche Software von Ihrem Produkt unterstützt werden, und prüfen Sie die Handbücher auf der
beigelegten CD.
Kabelhalter
Software Installationspriorität
Empfohlen
• Erforderlich und empfohlen: Sie können die neueste Version von der beigelegten CD oder von der LGE Website
(www.lg.com) herunterladen und installieren.
3

Beschreibung des Produkts und seiner Tasten
LED Betriebsanzeige
DEUTSCH
Vorderansicht
LED
Betriebsanzeige
APRX. Sensor
Auto
Luminance
Stability-Sensor
Kalibrierungssensor
LED-Status Betriebsbeschreibung
Grün Normaler Betrieb
Orange Kein Signal/Stromsparen
Hell-Orange Stromsparen, wenn die Leute den
Arbeitsplatz verlassen
LED Aus Ausschalten
HINWEIS
• Bei normalem Betrieb geht die LED Betriebsanzeige nach 20 Sekunden aus, um die Bildlesequalität in
dunklen Räumen nicht zu beeinflussen.
• Um die LED Betriebsanzeige wieder einzuschalten, drücken Sie den OSD-Steuerknauf oder schalten Sie die
Anzeigebedingungen um.
4

Rückansicht
6
7
1
3
2
4
5
8
USB IN 1 USB IN 2 USB UP USB (MSD) LAN DP IN DVI-D IN
1
2
3
4
/ /
- Ein vorgelagerter, zwei nachgelagerte Anschlüsse.
- Peripherie-USB-Geräteanschluss
- USB A.
- Speichertest oder Kalibrierungsbericht für ein externes Speichermedium, es ist nur mit FAT32
kompatibel. (Nur für Techniker)
- RJ45.
- Zum Versenden von Kalibrierungsberichten an einen Ziel-PC und zur Synchronisation mit dem
Zeit-Server. (Nur für Techniker)
- DisplayPort 20 Pin.
- Digitale Verbindung.
AC INPUT ON / OFF
5
- Dual-Link DVI-D.
- Digitale Verbindung.
6
- AC Leistungseingang.
- Für den Betrieb mit AC-Strom.
7
Potentialausgleichsklemme
- Anschluss an potentielle Equalizer-Leitungen von anderen Geräten.
8
(AC-Schalter)
- Für den Betrieb mit AC-Strom.
DEUTSCH
5

Stand-Ansicht
ERSTINSTALLATION
DEUTSCH
429,3
100
247,9
100
Einheit: mm
18
Gehen Sie wie folgt vor, um einen LCD-Monitor an Ihr System anzuschließen
1 Schalten Sie Ihren Computer ab.
2 Den PC anschließen: Schließen Sie die DVI-D-Kabel oder die Kabel des DisplayPorts an den Anschluss der
Anzeigenkarte Ihres Systems an. Ziehen Sie alle Schrauben fest.
3 Schließen Sie die Kabel des DVI-D oder des DisplayPorts an den Anschluss auf der Rückseite des Monitors
an.
4 Schließen Sie ein Ende des Stromkabels an den Monitor, und das andere Ende an die Steckdose an.
5 Der AC-Schalter an der Rückseite des Monitors muss eingeschaltet werden. Schalten Sie den Monitor dann
mit dem OSD-Steuerknauf an.
6 Weitere Einstellungsmöglichkeiten finden Sie im OSD-Abschnitt dieses Handbuchs.
HINWEIS
• Falsche Kabelanschlüsse können zu unregelmäßigem Betrieb führen, die Anzeigequalität oder die Bauteile
des LCD-Moduls beschädigen und/oder die Lebensdauer des Produkts verkürzen.
• Bitte lesen Sie sich den Abschnitt „Vorsicht“ im Kapitel „Montage Und Vorbereitung“ durch, um das richtige
Netzkabel auszuwählen.
• Der AC-Schalter ist ein tatsächlicher Ein/Ausschalter. Wenn sich dieser Schalter in der Aus-Position befindet,
kann der Monitor nicht über den OSD-Steuerknauf eingeschaltet werden.
• Falls Sie Fragen haben, lesen Sie bitte den Abschnitt „Fehlerbehebung“ in diesem Handbuch durch.
6

Bewegen und Anheben des Monitors
Gehen Sie nach den folgenden Anweisungen vor, wenn Sie den Monitor bewegen oder anheben, um Kratzer
oder Beschädigungen am Monitor zu vermeiden und um unabhängig von Form und Größe einen sicheren
Transport zu gewährleisten.
• Es wird empfohlen, den Monitor in den Originalkarton oder die Originalverpackung zu stellen und dann zu
bewegen.
• Trennen Sie das Netzkabel und alle weiteren Kabel, bevor Sie den Monitor bewegen oder anheben.
• Halten Sie den Monitor unten und an der Seite am Rahmen gut fest. Halten Sie nicht den Bildschirm selbst
fest.
• Halten Sie den Monitor so, dass der Bildschirm von Ihnen abgewendet ist, um ein Verkratzen des Bildschirms
zu verhindern.
• Setzen Sie den Monitor während des Transports keinen ruckartigen Bewegungen oder starken
Erschütterungen aus.
• Halten Sie den Monitor beim Bewegen aufrecht, drehen Sie ihn niemals auf die Seite, und kippen Sie ihn
nicht seitwärts.
Installation auf einem Tisch
• Heben Sie den Monitor an, und stellen Sie ihn aufrecht auf den Tisch. Achten Sie auf einen Abstand von
mindestens 100mm zur Wand, um eine ausreichende Belüftung zu gewährleisten.
100 mm
100 mm
100 mm
100 mm
DEUTSCH
VORSICHT
• Vermeiden Sie es nach Möglichkeit, den Bildschirm des Monitors zu berühren.
- Dies kann zu Schäden am Bildschirm oder an den Pixeln führen, aus denen die Bilder erzeugt werden.
• Wenn Sie den Monitor ohne Standfußsockel verwenden, kann der Monitor bei Betätigung des OSD-
Steuerknauf wackeln und umkippen. Dies kann zu Schäden am Monitor und zu Verletzungen führen. Zudem
kann dies dazu führen, dass der OSD-Steuerknauf kaputt geht.
VORSICHT
• Trennen Sie die Netzverbindung, bevor Sie den Monitor bewegen oder aufbauen. Es besteht die Gefahr eines
Stromschlags.
• Verwenden Sie ausschließlich das mitgelieferte Stromkabel, und schließen Sie es an eine geerdete Steckdose
an.
• Wenn Sie ein weiteres Stromkabel benötigen, wenden Sie sich an Ihren Elektrohändler.
7

Anpassen der Standhöhe
1 Stellen Sie den an der Ständerplatte montierten Monitor aufrecht auf.
2 Halten Sie den Monitor sicher mit beiden Händen fest, und passen Sie die Höhe an.
Max. 150,0 mm
Schwenkfuß
Drehen Sie Ihren Monitor um bis zu 45 Grad, um den Winkel auf Ihren Blickwinkel einzustellen.
WARNUNG
DEUTSCH
• Legen Sie Ihre Hand beim Anpassen der Bildschirmhöhe nicht auf den Standkörper, um Verletzungen an den
Fingern zu vermeiden.
Drehfunktion
Mit der Drehfunktion lässt sich der Monitor um 90 Grad im oder gegen den Uhrzeigersinn drehen.
Anpassen des Winkels
1 Stellen Sie den an der Ständerplatte montierten Monitor aufrecht auf.
2 Passen Sie den Winkel des Bildschirms an.
Die Neigung des Bildschirms kann um bis zu -5 ° nach vorne und um bis zu 25 ° nach hinten eingestellt werden,
um ein angenehmes Betrachten zu gewährleisten.
WARNUNG
• Um beim Anpassen des Bildschirms Verletzungen an den Fingern zu vermeiden, halten Sie den unteren Teil
des Monitors nicht wie nachfolgend gezeigt.
• Achten Sie darauf, den Bildschirmbereich nicht zu berühren oder darauf zu drücken, wenn Sie die Neigeung
des Monitors anpassen.
WARNUNG
• Um Kratzer am Standfuß zu vermeiden, achten Sie darauf, dass Sie den Monitor nicht zu kräftig oder zu
schnell drehen und darauf, dass der Standfuß nicht in Kontakt mit dem Monitor kommt.
Oberseite
Standfuß
8
1 Heben Sie den Monitor so weit wie möglich an.
3 Drehen Sie den Monitor, wie in der Abbildung gezeigt, im Uhrzeigersinn oder gegen den Uhrzeigersinn.
2 Richten Sie den Monitorwinkel in Pfeilrichtung wie in der Abbildung dargestellt aus.
4 Schließen Sie die Installation ab, indem Sie den Monitor wie in der Abbildung dargestellt um 90 ° drehen.
DEUTSCH
9
DEUTSCH
HINWEIS
• Eine automatische Drehfunktion des Displays wird nicht unterstützt.
• Der Bildschirm kann durch das entsprechende im Windows-Betriebssystem enthaltene Tastenkürzel zum
Drehen des Bildschirms leicht gedreht werden. Beachten Sie, dass einige Versionen von Windows und einige
Grafikkartentreiber möglicherweise andere Einstellungen für das Tastenkürzel zum Drehen des Bildschirms
verwenden oder es gar nicht unterstützen.
• Windows-Tastenkürzel zum Drehen des Bildschirms.
- 0 °: Strg + Alt + Pfeiltaste nach oben ( )
- 90 °: Strg+ Alt+ Pfeiltaste nach links ( )
- 180 °: Strg+ Alt+ Pfeiltaste nach unten ( )
- 270 °: Strg+ Alt+ Pfeiltaste nach rechts ( )
WARNUNG
• Gehen Sie beim Drehen des Monitors mit Vorsicht vor, wenn das Kabel bereits angeschlossen ist.
• Um Verletzungen an den Fingern zu vermeiden, stecken Sie sie nicht zwischen den Monitor und den
Standfuß, wenn Sie den Bildschirm des Monitors drehen.
10

BENUTZEREINSTELLUNGEN
Menüeinstellungen
OSD-Steuerknauf
Der OSD-Steuerknauf ist ein Multifunktionsgerät, dass sich hinter der LED Betriebsanzeige auf der rechten Seite
der Frontblende befindet. Es gibt drei Bewegungsrichtungen: nach oben drehen, nach unten drehen und wie
einen Knopf nach innen drücken.
Ein-/Ausschalten Drücken Sie den OSD-Steuerknauf, um das Gerät einzuschalten
(wenn die LED aus ist). Um den Strom auszuschalten, drücken Sie
den OSD-Steuerknauf 3 Sekunden lang, bis die LED ausgeht.
OSD-Steuerknauf
Ihr LCD-Monitor ermöglicht es Ihnen die Merkmale des angezeigten Bildes ganz einfach einzustellen. Sämtliche
dieser Einstellungen können über den OSD-Steuerknauf am Monitor vorgenommen werden. Wenn Sie diesen
OSD-Steuerknauf verwenden, zeigt Ihnen ein OSD die Änderungen an.
Die zulässigen Einstellungsmöglichkeiten sehen Sie unten.
[Input] [Picture] [Gamma] [Info]
[OSD] [General] [Exit]
HINWEIS
• Das OSD-Menü (On Screen Display) Ihres Monitors kann sich leicht von dem in diesem Handbuch
beschriebenen Menü unterscheiden.
OSD-Steuerung Wenn der Monitor grün ist (grüne LED und Bild auf dem Bildschirm),
aktiviert ein Druck auf den Steuergriff das OSD. Wenn das OSDMenü aktiv ist, verwenden Sie die drei Bewegungsrichtungen des
Steuergriffs.
Nach unten
drehen
Nach oben drehen Nach unten/links bewegen, verkleinern,
OSD-Steuerknauf
drücken
Nach oben/rechts bewegen, erhöhen,
größer, mehr
kleiner, weniger
Ausführen, Tun, Speichern
DEUTSCH
11
DEUTSCH
[Input]
[Input] Beschreibung
[DVI] Stromeingang auf DVI einstellen.
[DISPLAYPORT] Stromeingang auf Displayport einstellen.
[Picture]
[Picture] Beschreibung
[ALS]
(Auto Luminance Stability)
[Helligkeit]
[Kontrast]
[FARBTEMP] [6500K] Farbtemperatur auf 6.500K einstellen.
[Umfang] Der Nutzer legt den ALS-Wert fest.
[300] Stellen Sie die Helligkeit auf 300 cd/m2 (±10 %) ein.
[400] Stellen Sie die Helligkeit auf 400 cd/m2 (±10 %) ein.
[500] Stellen Sie die Helligkeit auf 500 cd/m2 (±10 %) ein.
[600] Stellen Sie die Helligkeit auf 600 cd/m2 (±10 %) ein.
[Aus] [ALS] anhalten und [Helligkeit] aktivieren.
[AUTO ] Automatische Auswahl des [ALS] entsprechend der Umgebungshelligkeit, die vom Umgebungssensor gemessen wird.
Stellen Sie die Hintergrundbeleuchtung des Vollbildschirms zwischen 0 und 100 ein.
Stellen Sie den Kontrast des Vollbildschirms zwischen 0 und 100 ein.
[7500K] Farbtemperatur auf 7.500K einstellen.
[9300K] Farbtemperatur auf 9.300K einstellen.
[Graustufe] Farbtemperatur auf monochrom einstellen.
12
[Gamma]
[Gamma] Beschreibung
[Gamma 1.8]
[Gamma 2.0]
[Gamma 2.2]
[Gamma DICOM]
[Gamma User]
[Light Box]
Stellen Sie die Gamma-Kurve auf Kurve 1,8.
Stellen Sie die Gamma-Kurve auf Kurve 2,0.
Stellen Sie die Gamma-Kurve auf Kurve 2,2.
Stellen Sie die Gamma-Kurve auf medizinische Standards ein. (DIN6868-157)
Stellen Sie die Gamma-Kurve auf den Benutzermodus ein.
Vollbildschirm in weiß.
[Info]
[Info] Beschreibung
Systeminformationen
Zeige Modellnamen/Firmware-Version/GPU-Version/Monitor SN/H-Frequ./V-Frequ./Lebensdauer/IP/ALS (LUX).
HINWEIS
• Die LUX-Informationen sind nur zur Referenz. Verwenden Sie für Qualitätsprüfungen die Standardgeräte.
DEUTSCH
13

DEUTSCH
[OSD]
[OSD] Beschreibung
[Rotation]
[Sprache]
[OSD POSITION]
[OSD Timer]
[OSD LOCK]
[OSD Transparenz]
[Horizont] OSD-Menü in Landschaft einstellen.
[Portrait] OSD-Menü in Portrait einstellen.
[Auto] OSD-Formular von G-Sensor einstellen.
Zum Festlegen der Sprache des OSD-Menüs.
Horizontale und vertikale Position des OSD-Menüs einstellen.
[10 sek] OSD-Anzeigedauer auf etwa 10 Sekunden einstellen.
[20 sek] OSD-Anzeigedauer auf etwa 20 Sekunden einstellen.
[30 sek] OSD-Anzeigedauer auf etwa 30 Sekunden einstellen.
[45 sek] OSD-Anzeigedauer auf etwa 45 Sekunden einstellen.
[60 sek] OSD-Anzeigedauer auf etwa 60 Sekunden einstellen.
[120 sek] OSD-Anzeigedauer auf etwa 120 Sekunden einstellen.
[JA] Drücken Sie auf [JA], um die Verriegelung zu aktivieren.
[NEIN] Drücken Sie längere Zeit auf den OSD-Steuerknauf in der Verriegelung.
Transparenz des OSD-Menüs einstellen.
14

[General]
[General] Beschreibung
[Alles zurücksetzen]
[AnwesenSensor]
[Zoom UP]
[Kalibrierung]
[Kal. Dat.:]
[JA] Alle Anzeigen und OSD-Einstellungen auf den Standardwert einstellen.
[NEIN] Diese Seite verlassen.
[Aus] Deaktiviere [AnwesenSensor]-Funktion.
[AN] Stellen Sie den [AnwesenSensor] so ein, dass die Stromzufuhr zum Display unterbrochen wird, wenn der Benutzer sich nicht vor dem Monitor aufhält.
[AUTO ] Den P-Abstand speichern und [AnwesenSensor] aktivieren. Die Pfeilmarkierung zeigt auf [AN].
[Original] Lassen Sie das Bild in normaler Auflösung.
[Vollbild] Verbessern Sie die Auflösung auf 2048 x 1536.
[2X] Verbessern Sie den entsprechenden Teil des Bildes.
[JA] Aktivieren Sie die Monitor-Testbeleuchtung und kalibrieren Sie DICOM mit der Farbtemperatur entsprechend den OSD-Einstellungen.
[NEIN] Diese Seite verlassen.
HINWEIS
• Zeige das [Kal. Dat.:] an dem die [Kalibrierung] durchgeführt wurde. Das [Kal. Dat.:] basiert auf dem im OSD-Menü angezeigten Datum. Es kann über das Internet (RJ45) mit der echten Zeit/
dem echten Datum synchronisiert werden. Verbinden Sie den Monitor vor dem Einschalten mit dem Internet wenn Sie bei der [Kalibrierung] die Echtzeit/Datum erhalten möchten.
DEUTSCH
15
FEHLERBEHEBUNG
Auf dem Bildschirm wird nichts angezeigt • Das Signalkabel sollte vollständig an die Anzeigekarte/den Computer angeschlossen sein.
Bildschatten (eingebranntes Bild) • Bildschatten sind Rückstände von zuvor angezeigten Bildern. Um Bildschatten zu verhindern, schalten Sie den Monitor so lange ab, wie die Bilder zuvor
DEUTSCH
Der Bildschirm verfügt über defekte Pixel • D er Bildschirm verfügt über defekte Pixel (z. B. etwas heller oder dunkler). Dies ist auf die Merkmale der Tafel selbst zurückzuführen, nicht auf das
Das Bild ist instabil, nicht scharf oder verschwommen • Das Signalkabel sollte vollständig vom Computer getrennt werden.
OSD ist nicht ordentlich bemessen • Nutzen Sie die OSD-Bildeinstellungen, um die Grobkörnigkeit zu verstärken oder abzuschwächen.
Wird die Meldung [Kein Signal] angezeigt? • Das Signalkabel sollte vollständig vom Computer getrennt werden.
Die LED-Anzeige am Monitor ist nicht an (kein grünes oder hellorangenes Licht)
Problem Markieren um es einzusehen
• Die Anzeigekarte sollte vollständig im Steckplatz stecken.
• Überprüfen Sie den AC-Schalter. Er sollte eingeschaltet sein.
• Der OSD-Steuerknauf und der Einschalter des Computers sollten eingeschaltet sein.
• Überprüfen Sie, ob der unterstützte Modus auf der Anzeigekarte oder im verwendeten System ausgewählt wurde. (Verwenden Sie die Anzeigekarte
oder das Systemhandbuch, um den Grafikmodus zu ändern)
• Überprüfen Sie den Monitor und Ihre Anzeigekarte auf Kompatibilität und empfohlene Einstellungen.
• Überprüfen Sie den Anschluss des Signalkabels auf verbogene oder eingedrückte Pins.
angezeigt waren.
• Lassen Sie keine Standbilder länger als 30 Minuten auf dem LCD-Bildschirm stehen.
LCD-Produkt.
• Überprüfen Sie den Monitor und Ihre Anzeigekarte auf Kompatibilität und empfohlenes Signal-Timing.
• Falls Ihr Text verschwommen erscheint, ändern Sie den Videomodus auf Non-Interlace und verwenden Sie eine Aufbaurate von 50 Hz.
• Überprüfen Sie, ob der unterstützte Modus auf der Anzeigekarte oder im verwendeten System ausgewählt wurde.
• Achten Sie darauf, dass der Computer sich nicht im Energiesparmodus befindet. (Berühren Sie die Tastatur oder die Maus)
• Falls kein Video auf dem Bildschirm angezeigt wird, schalten Sie den Strom aus und wieder ein.
• Der Stromschalter sollte eingeschaltet sein und das Netzkabel sollte angeschlossen sein.
• Überprüfen Sie, ob das Netzkabel ordentlich angeschlossen ist. Drücken Sie den OSD-Steuerknauf oder ändern Sie die Quelle oder die Auflösung.
16
TECHNISCHE DATEN
Die Produktspezifikationen können zwecks Produktverbesserung ohne Vorankündigung geändert werden.
"~" steht für Wechselstrom (AC), und “ ” bezieht sich auf Gleichstrom (DC).
LCD-Bildschirm Typ TFT (Thin Film Transistor)
LCD-Bildschirm (Liquid Crystal Display, Flüssigkristallanzeige)
Pixelabstand 0,2115 mm x 0,2115 mm
Auflösung Max. Auflösung
Empfohlene Auflösung
Videosignal Horizontale Frequenz 63 kHz - 96 kHz
Vertikale Frequenz 50 Hz - 75 H z
Eingangsanschluss Potentialausgleichsklemme
Stromquellen Nennleistung 100 - 240 V~ 50/60 Hz, 1,2 - 0,5 A
Stromverbrauch Max. 85 W *
Umgebungsbedingungen Betriebsbedingungen Temperatur 0 °C bis 40 °C
Lagerbedingungen Temperatur -20 °C bis 60 °C
2048x1536 bei 60Hz
Luftfeuchtigkeit 0 % bis 80 %
Druck 540hPa bis 1.060hPa
Luftfeuchtigkeit 0 % bis 80 %
Druck 500hPa bis 1.060hPa
DEUTSCH
17

Abmessungen (mm) Monitorgröße (BreitexHöhexTiefe)
Mit Fuß 377 x 606 x 248,2
Ohne Fuß 377 x 473 x 89,6
Gewicht (kg) Mit Fuß 9,8
Ohne Fuß 7,0
Medizinische Spezifikationen Klassifizierung nach S chutzart gegen
elektrischen Schlag
Betriebsmodus
Verwendungsumgebung
* Der Betriebsmodus des Stromverbrauchs wird mithilfe des LGE-Teststandards gemessen. (Vollständig weißer Bildschirm, Maximale Auflösung)
* Die Höhe des Stromverbrauchs kann je nach Betriebsbedingungen oder Monitoreinstellungen variieren.
DEUTSCH
Gerät der Schutzklasse
Dauerbetrieb
Dies Gerät ist nicht geeignet für die Verwendung in der Umgebung von entflammbaren Anästhetika oder Sauerstoff.
18

Display-Modus
Pixelformat
1280 x 1024 108 63,96 60,0 VESA V V
1600 x 1200 162 75,00 60,0 VESA V V
1920 x 1080 148,5 67,50 60,0 VESA V V
1920 x 1200 193,6 74,60 60,0 VESA V V
2048 x 1536 260 96,71 60,0 - V V
Pixelfrequenz Frequenz Standard Eingang 1 Eingang 2
CLK (MHz) H (kHz) V (Hz) Ty p DVI-D DP
HINWEIS
• Modi, die nicht in der Tabelle aufgeführt sind, werden ggf. nicht unterstützt. Für die optimale Auflösung empfehlen wir Ihnen einen Modus zu verwenden, der in der obigen Tabelle aufgeführt ist.
DEUTSCH
19

Liste unterstützter Grafikkarten
Händler Grafikkarten
Hersteller
DEUTSCH
Hersteller: DIVA Laboratories, Ltd.
Adresse: 9F, Nr.351, Sec.2, Zhongshan Road, Zhonghe District, New Taipei City, 235 Taiwan
Tel: 886-2-22268631
Fax: 886-2-22262423
http://www.diva.com.tw
Technisch
Hersteller: DIVA Laboratories, Ltd.
Adresse: 9F, Nr.351, Sec.2, Zhongshan Road, Zhonghe District, New Taipei City, 235 Taiwan
Tel: 886-2-22268631
Fax: 886-2-22262423
http://www.diva.com.tw
20

21
DEUTSCH

Das Modell und die Seriennummer des Geräts befinden sich auf der Rückseite und auf einer Seite des Geräts. Bitte
notieren Sie diese Nummern für den Fall eines Garantieanspruchs.
Modell
Seriennummer
WARNUNG: Dieses Gerät entspricht Klasse A gemäß CISPR 32. Im häuslichen Umfeld kann dieses Produkt
Störungen des Funkempfangs hervorrufen.

MANUAL DE USUARIO
MONITOR MÉDICO
Antes de utilizar el equipo, lea este manual con atención y consérvelo para consultarlo cuando lo necesite.
21HK512D
Copyright © 2019 LG Electronics Inc. Reservados todos los derechos.
www.lg.com

CONTENIDO
SOBRE LIMPIEZA
SOBRE LIMPIEZA ----------------------------------------2
MONTAJE Y PREPARACIÓN ----------------------------3
INSTALACIÓN INICIAL ----------------------------------6
CONFIGURACIÓN DE USUARIO --------------------- 11
SOLUCIÓN DE PROBLEMAS -------------------------16
ESPECIFICACIONES DEL PRODUCTO --------------17
ESPAÑOL
Productos químicos recomendados para la limpieza
• Isopropanol 70 %
• Etanol 70 %
®
• Cidex
OPA
• 0,9 % de solución NaCl
Cómo utilizar el limpiador (cuando la pantalla tiene
polvo)
• Antes de la limpieza, apague el monitor y extraiga el cable de alimentación.
• Moje un paño suave en un detergente recomendado y después frote ligeramente la pantalla aplicando un
máximo de 1 N de fuerza.
• El detergente puede provocar graves daños si se cuela en el interior del monitor durante la limpieza.
• La pantalla puede dañarse, de modo que limpie solamente las piezas del monitor que no sean el panel LCD
de la pantalla.
• No utilice benceno, disolvente, ácidos, detergentes alcalinos u otros productos similares.
• Las instrucciones de limpieza de las pantallas deben llevarse a cabo por profesionales sanitarios (médicos o
enfermeras), no por pacientes.
2
MONTAJE Y PREPARACIÓN
Composición del producto
Compruebe que todos los componentes se encuentren incluidos en la caja antes de utilizar el producto. En caso
de que falte algún componente, póngase en contacto con la tienda donde adquirió el producto.
Tenga en cuenta que el producto y los componentes relacionados pueden tener un aspecto distinto al de los que
se muestran en este manual.
PRECAUCIÓN
• Use siempre componentes originales para garantizar su seguridad y un rendimiento óptimo del producto.
• La garantía del producto no cubre los daños o lesiones causados por el uso de elementos falsificados.
• Se recomienda utilizar los componentes suministrados.
• Si utiliza cables genéricos que no estén certificados por LG, es posible que no vea la pantalla o que la imagen
tenga ruido.
• Utilice siempre componentes autorizados de la tabla de accesorios que se muestra a continuación. Los
componentes no autorizados pueden causar daños y fallos de funcionamiento al producto.
Componente Standard
Cable DisplayPort UL, Impedancia 100 ohmios
Cable DVI-D UL, Impedancia 100 ohmios
Cable de alimentación EE. UU.: Regulación de seguridad de EE. UU. aprobada
Otros: normativa de seguridad aprobada del país
Cable DVI-D Cable DisplayPort
Cable de alimentación
Organizador de cables
CD / Manual del usuario / Manual de
regulación / Tarjetas
NOTA
• Los componentes pueden tener un aspecto distinto al de los que se muestran en este manual.
• Toda la información y las especificaciones del producto que se detallan en este manual pueden modificarse
sin previo aviso con el fin de mejorar el rendimiento del producto.
• Para adquirir accesorios opcionales, diríjase a una tienda de electrónica o a un sitio de compra en línea.
También puede ponerse en contacto con el distribuidor donde haya adquirido el producto.
• El cable de alimentación suministrado puede variar en función de la región.
Software compatible
Compruebe el software compatible con su producto y consulte los manuales en el CD incluido en el paquete del
producto.
Software Prioridad de instalación
Recomendado
• Obligatorio y recomendado: Puede descargar e instalar la versión más reciente desde el CD incluido o desde el
sitio web de LGE (www.lg.com).
ESPAÑOL
3

Descripción de botones y productos
Indicador de luz LED
ESPAÑOL
Vista frontal
Indicador de
luz LED
Sensor Aprox
Sensor de
estabilidad de
luminosidad
automática
Sensor de calibración
Estado LED Descripción de funcionamiento
Verde Funcionamiento normal
Naranja Sin señal / Ahorro de energía
Naranja claro Ahorro de energía cuando la gente se va
LED apagado Monitor apagado
NOTA
• En funcionamiento normal, el indicador de luz LED se apagará pasados 20 segundos para no afectar a la
calidad de lectura de imágenes en la habitación oscura.
• Para volver a encender el indicador de luz LED, pulse el selector de control de OSD o cambie el estado de
visualización.
4

Vista trasera
6
7
1
3
2
4
5
8
USB IN 1 USB IN 2 USB UP USB (MSD) LAN DP IN DVI-D IN
1
2
3
4
/ /
- Un puerto ascendente y dos puertos descendentes.
- Conexión de dispositivo USB periférico.
- USB A.
- Guardar la prueba o el informe de calibración en un dispositivo de almacenamiento externo,
solo es compatible con FAT32. (S olo para el uso de un técnico)
- RJ45.
- Para enviar el informe de calibración a un PC de destino y sincronizar con el servidor de hora.
(Solo para el uso de un técnico)
- Display Port 20 clavijas.
- Conexión digital.
AC INPUT ON / OFF
5
- Dual-Link DVI-D.
- Conexión digital.
6
- Entrada de alimentación de CA.
- Para el funcionamiento con alimentación de CA.
7
Terminal equipotencial
- Conecte al conductor de compensación potencial de otro equipo.
8
(Interruptor de CA)
- Para el funcionamiento con alimentación de CA.
ESPAÑOL
5

Vista vertical
INSTALACIÓN INICIAL
ESPAÑOL
429,3
100
247,9
100
Unidad: mm
18
Para instalar el monitor LCD en su sistema, siga estas instrucciones
1 Apague su ordenador.
2 Para conectar al PC: Conecte los cables DVI-D o DisplayPort en el conector de la tarjeta gráfica de su
sistema. Apriete todos los tornillos.
3 Conecte los cables DVI-D o DisplayPort en el conector de la parte trasera del monitor.
4 Conecte un extremo del cable de alimentación al monitor y el otro extremo a la toma de corriente.
5 El interruptor de CA de la parte trasera del monitor debe encenderse. A continuación, encienda el monitor
con el selector de control de OSD.
6 Para más ajustes, consulte la sección de OSD de este manual.
NOTA
• Una conexión de los cables incorrecta puede provocar un funcionamiento irregular, dañar la calidad de
visualización o en los componentes del módulo LCD o acortar la vida útil del módulo.
• Consulte el título Precaución de la sección «Montaje y preparación» para seleccionar correctamente su cable
de alimentación.
• El interruptor de CA es un interruptor de encendido / apagado real. Si este interruptor se encuentra en la
posición de apagado, el monitor no se puede encender utilizando el selector de control de OSD.
• Si tiene alguna pregunta, consulte la sección «Solución de problemas» de este manual.
6
Transporte y elevación del monitor
Antes de levantar o mover el monitor, siga estas instrucciones para evitar rayar o dañar el monitor, y
transportarlo de manera segura, independientemente del tamaño y forma que tenga.
• Se recomienda colocar el monitor en su caja o envolverlo con el material de embalaje original antes de
intentar moverlo.
• Antes de levantar o mover el monitor, desenchufe el cable de alimentación y los demás cables.
• Sujete con firmeza la parte inferior y el lateral del marco del monitor. No lo sostenga por el panel.
• Al sostener el monitor, la pantalla debería orientarse hacia el lado contrario al que se encuentra usted para
evitar rayarla.
• Al transportar el monitor, no lo exponga a sacudidas ni a una vibración excesiva.
• Al transportar el monitor, manténgalo en vertical, nunca lo gire hacia uno de sus lados ni lo incline
lateralmente.
PRECAUCIÓN
• En la medida de lo posible, procure no tocar la pantalla del monitor.
- Podría dañar la pantalla o algunos de los píxeles empleados para crear las imágenes.
• Si utiliza el panel del monitor sin la base del soporte, su selector de control de OSD podría provocar que
el monitor se vuelva inestable y caiga, lo que podría producir lesiones a personas o daños en el monitor.
Además, esto podría causar un mal funcionamiento del selector de control de OSD.
Instalación encima de una mesa
• Levante el monitor y colóquelo encima de una mesa en posición vertical. Instálelo a una distancia mínima de
100mm de la pared para permitir una ventilación adecuada.
100 mm
100 mm
100 mm
100 mm
ESPAÑOL
PRECAUCIÓN
• Desenchufe el cable de alimentación antes de mover o instalar el monitor. Existe riesgo de descarga eléctrica.
• Asegúrese de utilizar el cable de alimentación que se incluye con el producto y conéctelo a una toma de pared
con conexión a tierra.
• Si necesita otro cable de alimentación, póngase en contacto con el distribuidor local o con la tienda minorista
más cercana.
7

Ajuste de la altura del soporte
1 Coloque el monitor montado sobre la base del soporte en posición vertical.
2 Sujete el monitor firmemente con ambas manos.
150,0 mm máximo
ADVERTENCIA
• Al ajustar la altura de la pantalla, no coloque la mano en el cuerpo del soporte para evitar lesiones en los
dedos.
Ajuste del ángulo
1 Coloque el monitor montado sobre la base del soporte en posición vertical.
2 Ajuste el ángulo de la pantalla.
El ángulo de la pantalla se puede ajustar hacia delante y atrás entre -5 ° y 25 ° para que la visualización sea más
ESPAÑOL
cómoda.
ADVERTENCIA
• Para evitar que se produzcan lesiones en los dedos al ajustar la pantalla, no sujete la parte inferior del marco
del monitor como se muestra a continuación.
• Tenga cuidado de no tocar ni presionar el área de la pantalla al ajustar el ángulo del monitor.
Soporte de giro
Gire 45 grados y ajuste el ángulo del conjunto de Monitor para adaptarlo a su vista.
Función de giro
La función de giro permite al monitor girar 90 grados en el sentido de las agujas del reloj o al revés.
Cabezal
Soporte
ADVERTENCIA
• Para evitar los arañazos en la base del soporte, no utilice demasiada fuerza o velocidad al girar el monitor con
la función de giro, y asegúrese de que la base no roce el monitor.
8

1 Levante el monitor hasta la altura máxima.
3 Rotar el monitor hacia la izquierda o hacia la derecha según se muestra en la imagen.
2 Ajuste el ángulo del monitor en la dirección de la flecha, como se muestra en la imagen.
4 Para completar la instalación, gire el monitor 90 ° como se muestra en la figura.
ESPAÑOL
9

ESPAÑOL
NOTA
• No ofrece la función de giro automático de la pantalla.
• La pantalla puede girarse fácilmente con la tecla de acceso rápido al giro que ofrece el sistema operativo
Windows. Tenga en cuenta que algunas versiones de Windows y algunos controladores de tarjetas gráficas
pueden ofrecer distintas configuraciones para la tecla de acceso rápido al giro o incluso no ofrecerla.
• Tecla de acceso rápido al giro de pantalla del sistema operativo Windows.
- 0 °: Ctrl + Alt + tecla hacia arriba del teclado ( )
- 90 °: Ctrl + Alt + tecla izquierda del teclado ( )
- 180 °: Ctrl + Alt + tecla hacia abajo del teclado ( )
- 270 °: Ctrl + Alt + tecla derecha del teclado ( )
ADVERTENCIA
• Tenga cuidado al girar el monitor si el cable está conectado.
• Para evitar lesiones a sus dedos, no los ponga entre la pantalla y la base del soporte al girar la pantalla del
monitor.
10

CONFIGURACIÓN DE USUARIO
Configuración de menú
Selector de control de OSD
El selector de control de OSD es un dispositivo multifuncional situado detrás del indicador de luz LED en la
parte derecha del engaste frontal. Tiene tres movimientos: rotar hacia arriba, rotar hacia abajo y pulsar como
un botón.
Encendido / apagado Pulse el selector de control de OSD para encender el equipo
cuando está apagado (con el LED apagado). Para apagar el equipo,
mantenga pulsado el selector de control de OSD durante al menos 3
segundos hasta que el LED se apague.
Selector de control de OSD
Su monitor LCD le permite ajustar fácilmente las características de la imagen que se está mostrando. Todos estos
ajustes se llevan a cabo utilizando el selector de control de OSD del monitor. Mientras utiliza este selector de
control de OSD, un OSD le muestra sus cambios.
A continuación se muestran las opciones de configuración aplicables.
[Input] [Picture] [Gamma] [Info]
[OSD] [General] [Exit]
NOTA
• Es posible que el menú en pantalla (OSD) del monitor no coincida exactamente con el de las imágenes
incluidas en este manual.
Control de OSD Con el monitor encendido (LED verde e imagen en la pantalla),
al pulsar el Selector de control se activa el OSD. Con el menú OSD
activo, utilice los tres movimientos posibles del Selector de control.
Rotar hacia abajo Mover hacia arriba / hacia la derecha,
Rotar hacia arriba Mover hacia abajo / hacia la izquierda, más
Pulsar el Selector
de control de OSD
aumentar, más grande, más
pequeño, menos
Ejecutar, hacer, guardar
ESPAÑOL
11

ESPAÑOL
[Input]
[Input] Descripción
[DVI] Ajustar la entrada actual como DVI.
[DISPLAYPORT] Ajustar la entrada actual como Displayport.
[Picture]
[Picture] Descripción
[ALS]
(Estabilidad de luminosidad
automática, ALS)
[Brillo]
[Contraste]
[COLOR] [6500K] Ajustar la Temperatura de color a 6500K.
[GAMA] El usuario define el valor ALS.
[300] Ajustar el brillo a 300 cd/m2 (±10 %).
[400] Ajustar el brillo a 400 cd/m2 (±10 %).
[500] Ajustar el brillo a 500 cd/m2 (±10 %).
[600] Ajustar el brillo a 600 cd/m2 (±10 %).
[APAGADO] Detener [ALS] y activar [Brillo].
[AUTO ] Seleccionar automáticamente [ALS] según la luz ambiental detectada por el Sensor de luz ambiental.
Ajustar la luz de fondo de la pantalla completa en un rango de 0 a 100.
Ajustar el contraste de la imagen mostrada en un rango de 0 a 100.
[7500K] Ajustar la Temperatura de color a 7500K.
[9300K] Ajustar la Temperatura de color a 9300K.
[Mono] Ajustar la Temperatura de color en monocromo.
12

[Gamma]
[Gamma] Descripción
[Gamma 1.8]
[Gamma 2.0]
[Gamma 2.2]
[Gamma DICOM]
[Gamma USUARIO]
[Caja de Luz]
Ajustar la Curva de gamma en curva 1,8.
Ajustar la Curva de gamma en curva 2,0.
Ajustar la Curva de gamma en curva 2,2.
Ajustar la Curva de gamma al estándar médico. (DIN6868-157)
Ajustar la Curva de gamma para el modo de usuario.
Pantalla completa en blanco.
[Info]
[Info] Descripción
Información del sistema
Mostrar Nombre del modelo / Versión de firmware / Versión de GPU / Número de serie del monitor / H-Frec. / V-Frec. / Vida útil / IP / ALS (LUX).
NOTA
• La información de LUX es solo como referencia. Para realizar una prueba de garantía de calidad, utilice un equipo homologado.
ESPAÑOL
13

ESPAÑOL
[OSD]
[OSD] Descripción
[Rotación]
[Idioma]
[Posición OSD]
[Temporizador]
[BLOQUEO DEL OSD]
[OPACIDAD OSD]
[Hz] Ajustar el menú OSD en apaisado.
[Ver] Ajustar el menú OSD en retrato.
[Auto] Ajustar el formulario OSD mediante G-sensor.
Permite visualizar la pantalla del menú en el idioma deseado.
Ajustar la posición horizontal y vertical del menú OSD.
[10 seg.] Ajustar el tiempo de visualización del OSD en unos 10 segundos.
[20 seg.] Ajustar el tiempo de visualización del OSD en unos 20 segundos.
[30 seg.] Ajustar el tiempo de visualización del OSD en unos 30 segundos.
[45 seg.] Ajustar el tiempo de visualización del OSD en unos 45 segundos.
[60 seg.] Ajustar el tiempo de visualización del OSD en unos 60 segundos.
[120 seg.] Ajustar el tiempo de visualización del OSD en unos 120 segundos.
[SI] Seleccione [SI] para activar el bloqueo.
[NO] Mantenga pulsado el selector de control de OSD bloqueado.
Ajustar transparencia del menú OSD.
14

[General]
[General] Descripción
[Reinicio Completo]
[Sensor Aprox]
[Zoom]
[AUTOCALIBRACIÓN]
[Fecha / Calendario]
[SI] Restablecer todos los ajustes de pantalla y OSD a sus valores predeterminados.
[NO] Salir de esta página.
[APAGADO] D esactive la función [Sensor Aprox].
[ENCENDIDO] La configuración de [Sensor Aprox] apaga el panel cuando no hay un usuario frente al monitor.
[AUTO ] Guarda la distancia P y activa [Sensor Aprox]. La marca de la flecha señalará a [ENCENDIDO].
[Original] Mantener la imagen en resolución normal.
[Completo] Ampliar la resolución hasta 2048 x 1536.
[Escala 2X] Ampliar una parte específica de la imagen.
[SI] Permite al monitor probar la luminosidad y calibrar DICOM con una temperatura de color de conformidad con el ajuste del OSD.
[NO] Salir de esta página.
NOTA
• Mostrar [Fecha / Calendario] en la que se ha llevado a cabo la [AUTOCALIBRACIÓN]. La [Fecha / Calendario] estará basada en la fecha que se muestra en el menú OSD, puede sincronizarse
con la hora y la fecha reales por internet (RJ45). Conecte el monitor a internet antes de encender la corriente(alimentación) si desea obtener la hora y la fecha reales cuando se realice la
[AUTOCALIBRACIÓN].
ESPAÑOL
15
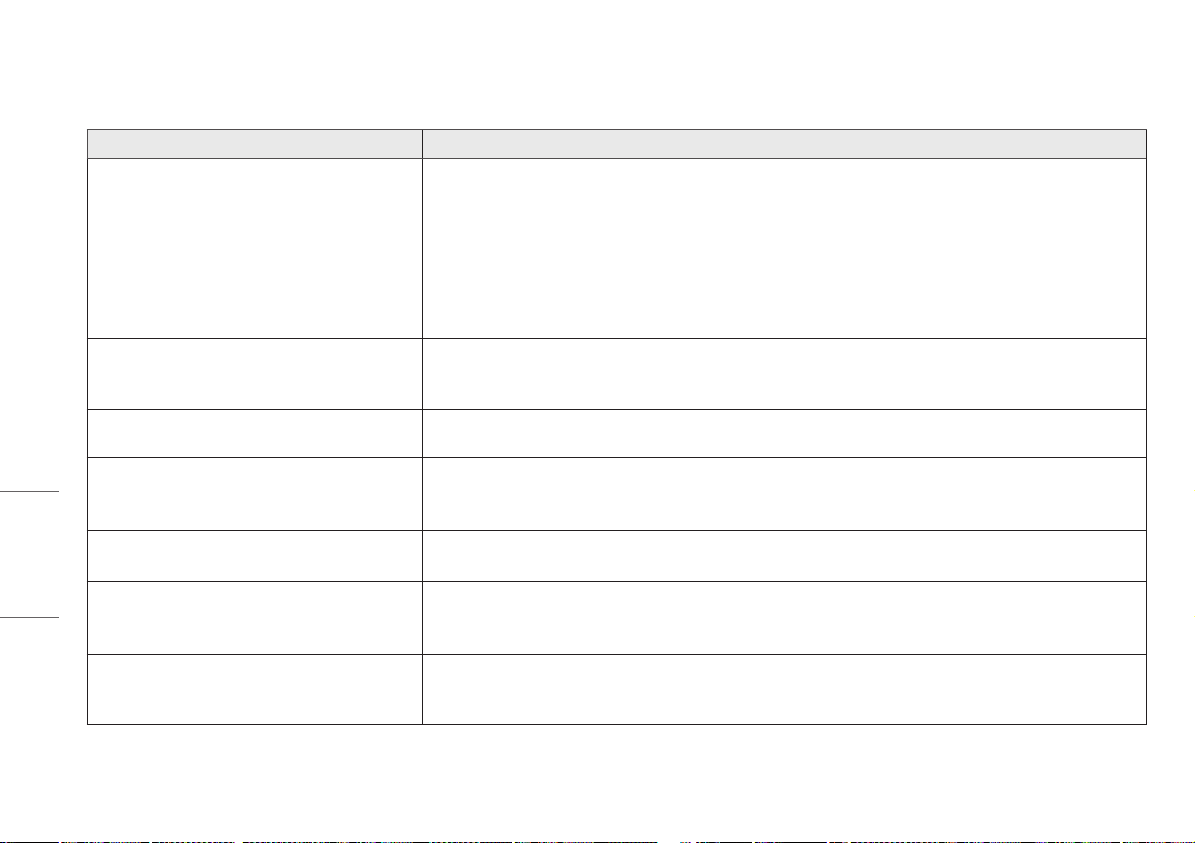
SOLUCIÓN DE PROBLEMAS
Problema Comprobar para ver
No se muestra nada en la pantalla • El cable de señal debe estar completamente conectado a la tarjeta gráfica o al ordenador.
Persistencia de imagen (adherencia de imagen) • La persistencia de imagen se produce cuando una imagen residual, o imagen fantasma de una imagen previa permanece visible en la pantalla. Para
La pantalla tiene píxeles defectuosos • La pantalla tiene píxeles defectuosos (por ejemplo, ligeramente brillantes u oscuros). Esto se debe a las características del propio panel y no al producto
La imagen es inestable, está desenfocada o aparecen ondas • El cable de señal debe estar completamente conectado al ordenador.
ESPAÑOL
OSD no tiene un tamaño adecuado • Utilice los controles de ajuste de imagen de OSD para aumentar o reducir el total bruto.
¿Se muestra el mensaje [SIN SENAL]? • El cable de señal debe estar completamente conectado al ordenador.
El LED del monitor no está encendido (no se ve de color Verde o
Naranja claro)
• La tarjeta gráfica debe estar completamente introducida en su ranura.
• Compruebe el interruptor de CA. Debe estar en la posición de encendido.
• El selector de control de OSD y el interruptor del ordenador deben estar en la posición de encendido.
• Asegúrese de que se ha seleccionado un modo compatible en la tarjeta gráfica o en el sistema que se está utilizando. (Consulte el manual de la tarjeta
gráfica o del sistema para cambiar el modo de los gráficos)
• Compruebe la compatibilidad y los ajustes recomendados del monitor y de su tarjeta gráfica.
• Compruebe que el conector del cable de señal no tenga clavijas dobladas o hundidas.
mitigar la persistencia de imagen, apague el monitor durante un tiempo similar al que estuvo mostrándose la imagen anterior.
• Intente no utilizar la pantalla LCD con una imagen fija en la pantalla durante más de treinta minutos.
LCD.
• Compruebe la compatibilidad y las sincronizaciones de señal recomendadas del monitor y de su tarjeta de visualización.
• Si el texto es ilegible, cambie el modo de vídeo a no entrelazado y utilice un tasa de actualización de 50 Hz.
• Asegúrese de que se ha seleccionado un modo compatible en la tarjeta gráfica o en el sistema que se está utilizando.
• Asegúrese de que el ordenador no está en modo de ahorro de energía (toque el teclado o el ratón).
• Si no hay ningún vídeo presente en la pantalla, apague el botón de encendido y vuelva a encenderlo.
• El interruptor de alimentación debe estar en la posición de encendido y el cable de alimentación debe estar conectado.
• Compruebe que el cable de alimentación esté bien conectado. Pulse el selector de control de OSD o cambie el estado de visualización de la fuente o la
resolución.
16
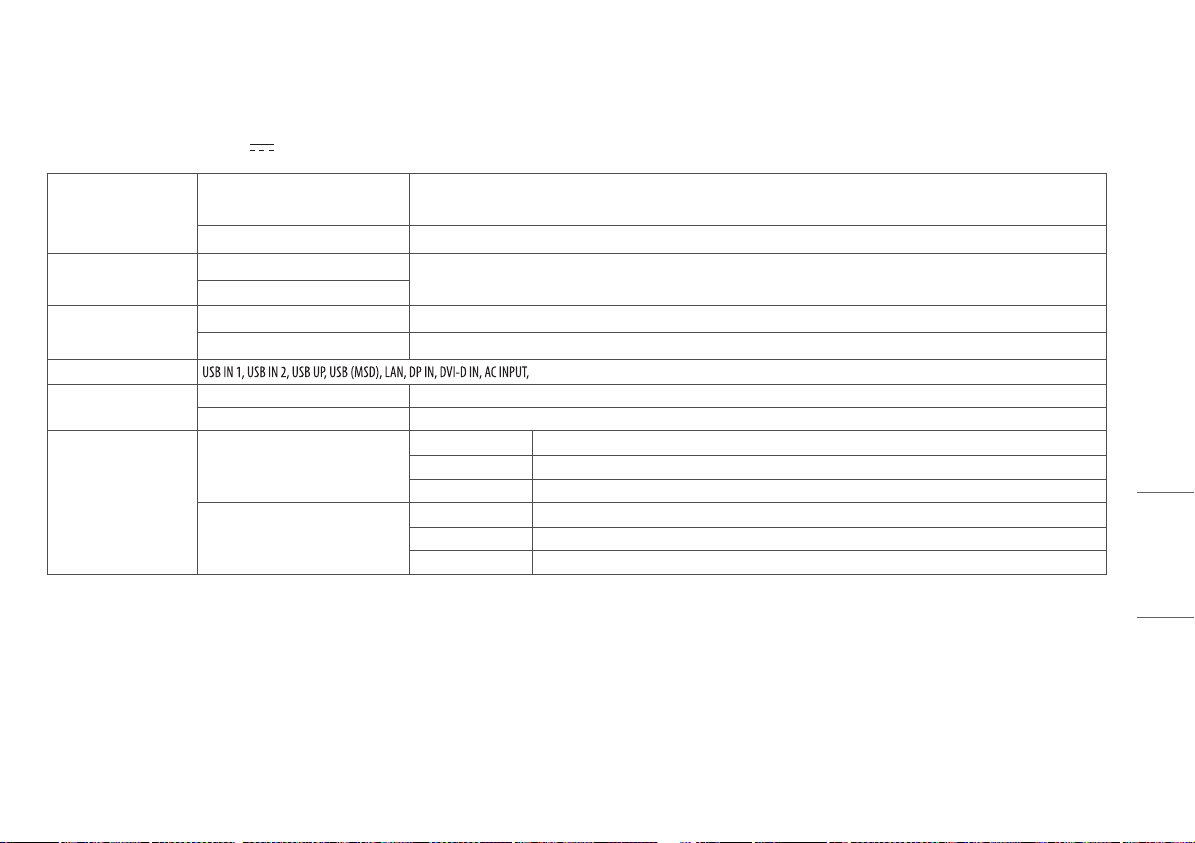
ESPECIFICACIONES DEL PRODUCTO
Las especificaciones del producto pueden cambiar sin previo aviso para mejorar el producto.
“ ~ ” se refiere a la corriente alterna (CA) y “ ” se refiere a la corriente continua (CC).
Pantalla LCD Tipo TFT (transistor de película delgada)
Pantalla LCD (pantalla de cristal líquido)
Pixel Gap 0,2115 mm x 0,2115 mm
Resolución Máxima resolución
Resolución recomendada
Señal de vídeo Frecuencia horizontal 63 kHz - 96 kHz
Frecuencia vertical 50 Hz - 75 Hz
Conector de entrada Terminal equipotencial
Fuentes de alimentación Clasificación de potencia 100-240 V ~ 50/60Hz, 1,2 - 0,5 A
Consumo de energía Máx. 85 W *
Condiciones ambientales Condiciones de funcionamiento Temperatura entre 0 °C y 40 °C
En almacenamiento Temperatura entre -20 °C y 60 °C
2048 x 1536 a 60 Hz
Humedad entre el 0 % y el 80 %
Presión entre 540 hPa y 1060 hPa
Humedad entre el 0 % y el 80 %
Presión entre 500 hPa y 1060 hPa
ESPAÑOL
17
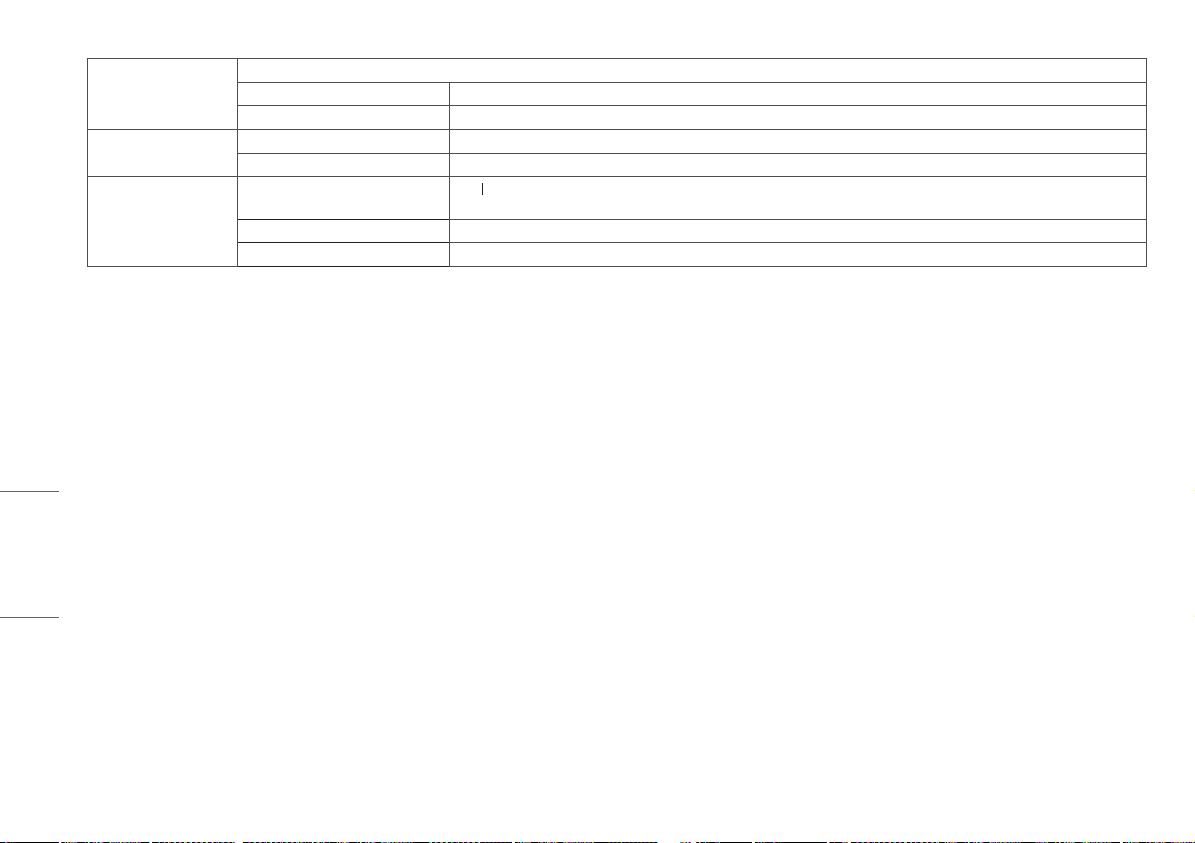
Dimensiones (mm) Tamaño del monitor (anchura x altura x profundidad)
Soporte incluido 377 x 606 x 248,2
Soporte no incluido 377 x 473 x 89,6
Peso (kg) Sopor te incluido 9,8
Soporte no incluido 7,0
Especificaciones médicas Clasificación por tipo de protección contra
descargas eléctricas
Modo de funcionamiento
Entorno de uso
* El Modo de funcionamiento de Consumo de energía se mide con los estándares de prueba de LGE. (Patrón blanco completo, resolución máxima)
* El nivel de Consumo de energía puede ser diferente en función del estado de funcionamiento y la configuración del monitor.
ESPAÑOL
Clase equipo
Funcionamiento continuo
Este equipo no es apropiado para utilizarse en presencia de mezclas anestésicas inflamables u oxígeno.
18

Modo de visualización
Formato de píxel
1280 x 1024 108 63,96 60,0 VESA V V
1600 x 1200 162 75,00 60,0 VESA V V
1920 x 1080 148,5 67,50 60,0 VESA V V
1920 x 1200 193,6 74,60 60,0 VESA V V
2048 x 1536 260 96,71 60,0 - V V
Frecuencia de píxeles Frecuencia Standard Entrada 1 Entrada 2
CLK (MHz) H (kHz) V (Hz) Tipo DVI-D DP
NOTA
• Los modos no enumerados en la tabla pueden no ser compatibles. Para una resolución óptima, recomendamos seleccionar un modo enumerado en la tabla anterior.
ESPAÑOL
19

Lista de tarjetas gráficas compatibles
Proveedor Tarjeta gráfica
Fabricante
Fabricante: DIVA Laboratories, Ltd.
Direccion: 9F, N.º 351, Sec. 2, calle Zhongshan, distrito Zhonghe, Nuevo Taipéi, 235 Taiwán
Tel: 886-2-22268631
Fax: 886-2-22262423
http://www.diva.com.tw
ESPAÑOL
Datos técnicos
Fabricante: DIVA Laboratories, Ltd.
Direccion: 9F, N.º 351, Sec. 2, calle Zhongshan, distrito Zhonghe, Nuevo Taipéi, 235 Taiwán
Tel: 886-2-22268631
Fax: 886-2-22262423
http://www.diva.com.tw
20

ESPAÑOL
21

El número de serie y el modelo del producto están situados en la parte posterior y en un lateral del mismo.
Anótelos por si alguna vez necesita asistencia.
Modelo
N.º de serie
ADVERTENCIA: Este equipo cumple los requisitos de la Clase A de CISPR 32. En un entorno residencial, este equipo
puede causar interferencias de radio.
 Loading...