

LG 21FX5RLX User Manual

Colour Television
OWNER’S MANUAL
Please read this manual carefully before operating your set.
Retain it for future reference.
Record model number and serial number of the set.
See the label attached on the back cover and quote this information to your dealer when you require service.
Model number :
Serial number :
BZ03

Contents
Installation 3
Location and function of controls 4
Remote control handset
Battery installation
Front panel / Side panel
Basic operation 8
On and off / Programme selection
Volume adjustment / Quick view
Mute function
On screen language selection (option)
On screen menus 9
Menu selection
Setting up TV stations 10
Auto programme tuning
Manual programme tuning / Fine Tuning
Programme edit / Favourite programme
Calling the programme table
Picture adjustment 16
PSM (Picture Status Memory) /
XD
Eye (option) / Picture adjustment
Sound adjustment 18
SSM (Sound Status Memory)
Turbo sound selection
Sound adjustment / X-WAVE (Wireless Sound) (option)
Sound output selection / Stereo/Dual reception
NICAM reception (option)
Time setting 21
Setting the clock / Setting the On/Off timer
Auto sleep
Other functions 22
TV and AV modes / Auto AV switching (option)
Child lock / Degaussing
Games (option) /
Sleep timer
PIP operation (option) 25
On and off / Input mode selection for sub picture
Swapping between main and sub pictures
Programme selection for sub picture
Sub picture size / Sub picture freeze
Sub picture position change
Teletext (option) 26
Switch on/off
SIMPLE text / TOP text (option)
FASTEXT / Special teletext functions
Connection of external equipment 29
Aerial socket
Audio/Video in/out sockets (option)
Euro scart socket(option)
Component in sockets (option)
Troubleshooting check list 31
2

Installation
3
Power
This set operates on an AC mains supply, the voltage is as indicated on the label on the back cover. Never apply DC power to the set.
In the event of thunderstorms or powercuts, please pull out the aerial and mains plugs.
Warning
To prevent fire or shock hazard, do not expose the set to rain or
moisture.
Do not place anything containing liquid on top of the set, this may
cause a fire or could give an electric shock.
Service
Never remove the back cover of the set as this can expose you to
very high voltage and other hazards. If the set does not operate
properly, unplug it and call your dealer.
Aerial
Connect the aerial cable to the socket marked on the back
cover. For the best reception an outdoor aerial should be used.
Location
Position your set so that no bright light or sunlight falls directly onto
the screen. Care should be taken not to expose the set to any
unnecessary vibration, moisture, dust or heat. Also ensure that the
set is placed in a position to allow a free flow of air. Do not cover
the ventilation openings on the back cover.
Location and function of controls
4
All the functions can be controlled with the remote control handset.
Some functions can also be adjusted with the buttons on the front
panel of the set.
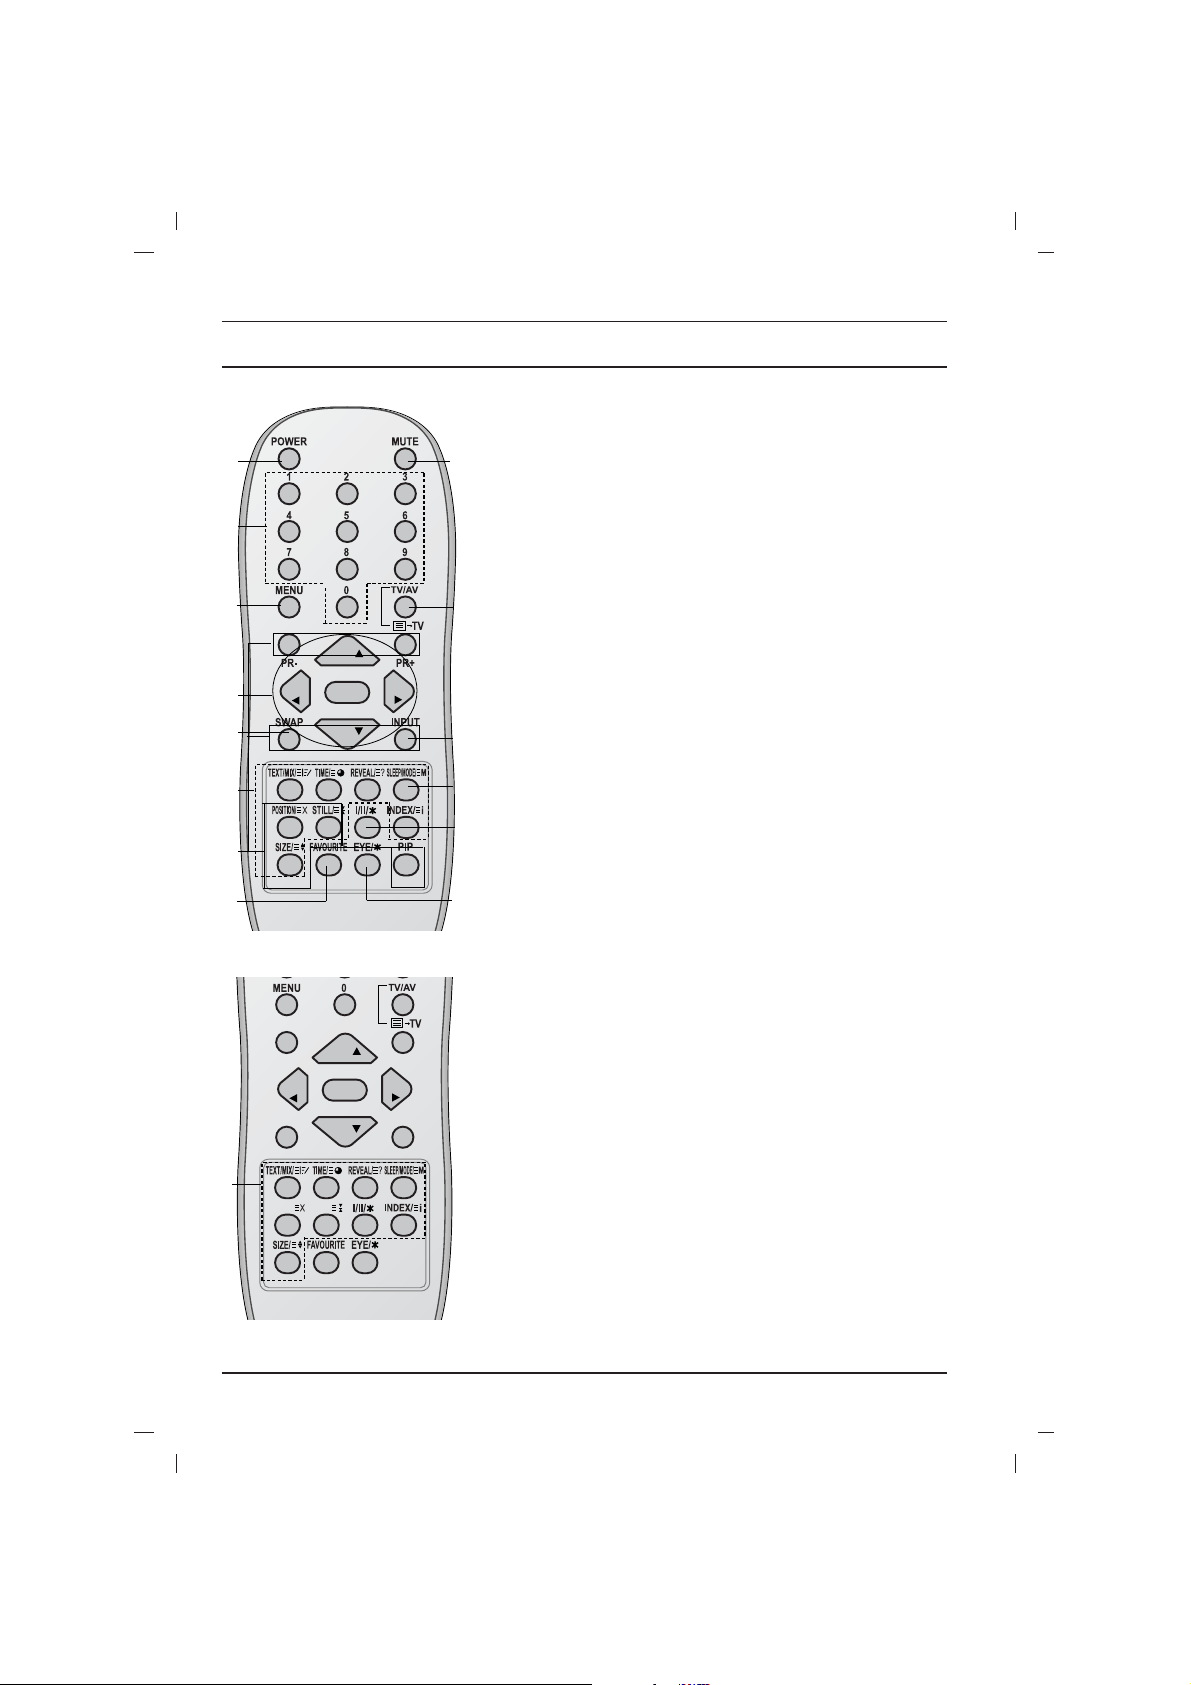
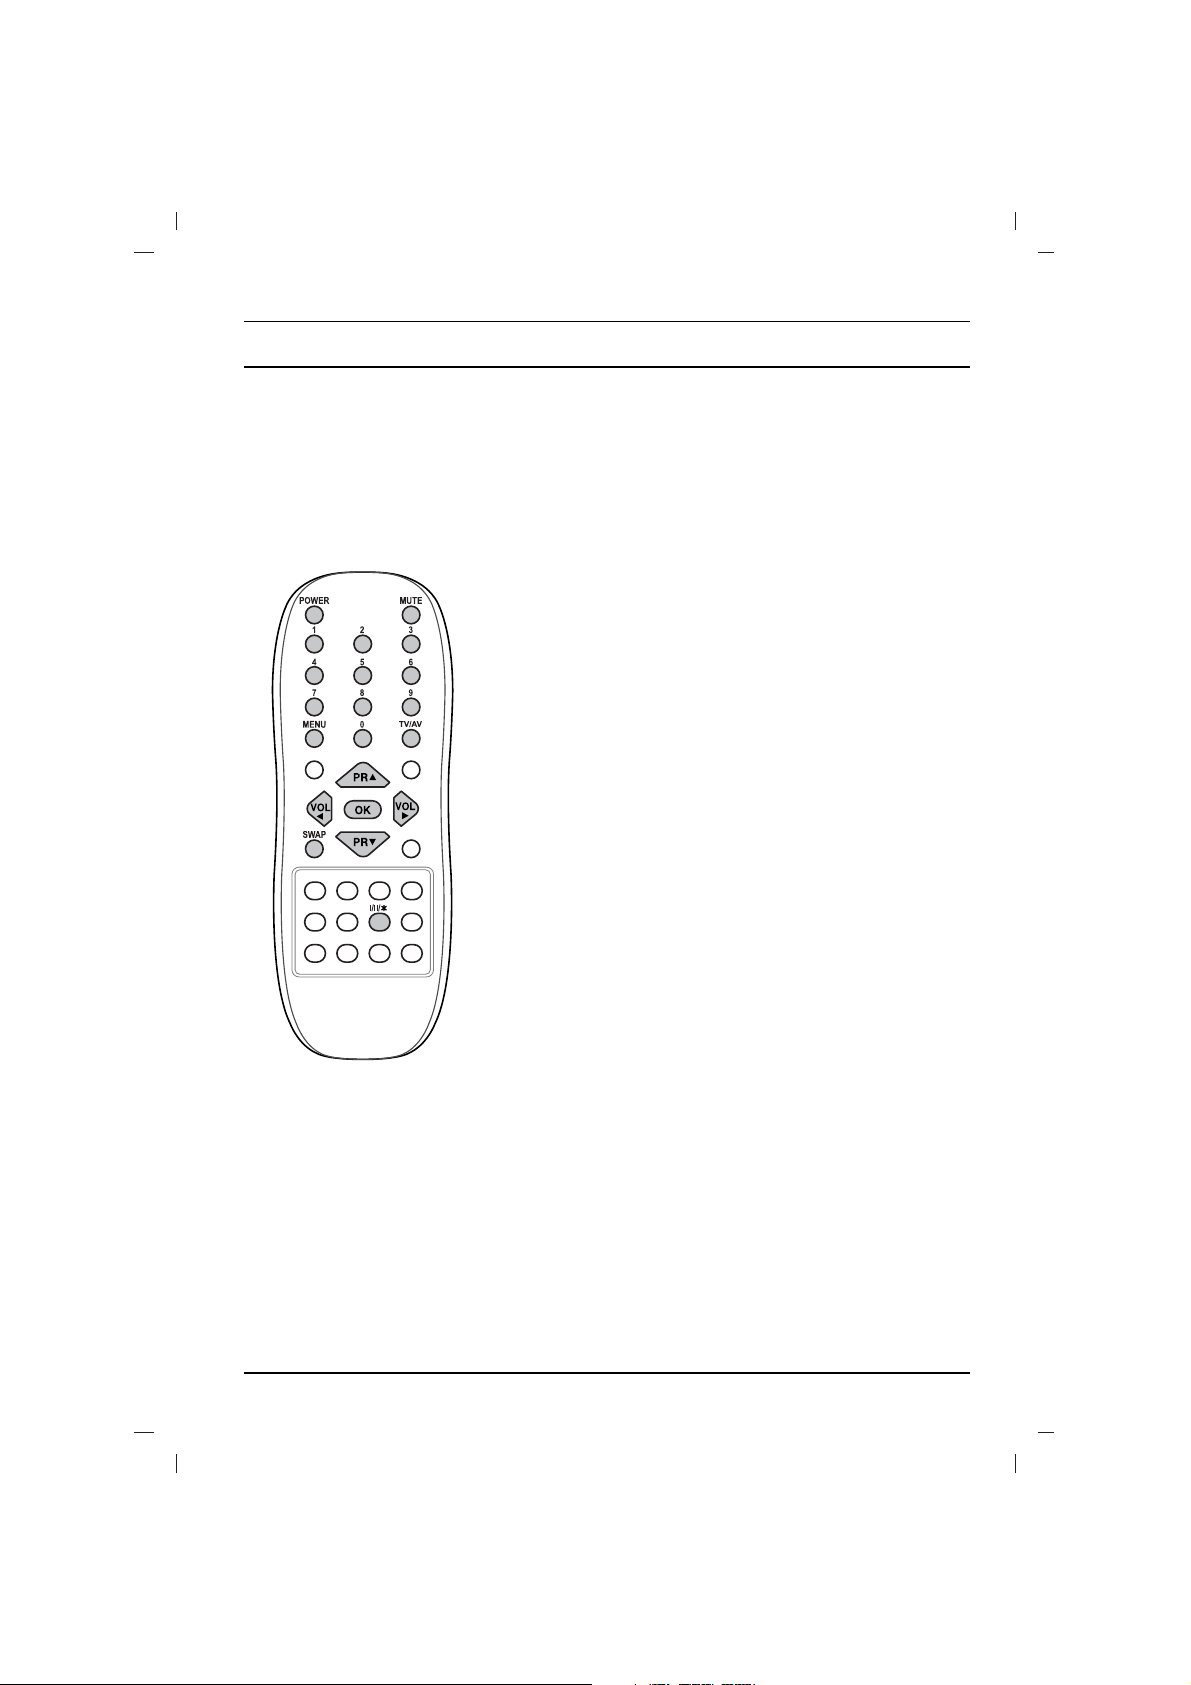
Remote control handset
Before you use the remote control handset, please install the batteries. See the next page.
1. POWER
switches the set on from standby or off to standby.
2. NUMBER BUTTONS
Switches the set on from standby or directly select a number.
3. MENU
selects a menu.
4.
DD / EE
(Programme Up/Down)
selects a programme or a menu item.
switches the set on from standby.
scans programmes automatically.
FF / GG
(Volume Up/Down)
adjusts the volume.
adjusts menu settings.
OK
accepts your selection or displays the current mode.
5. TELETEXT BUTTONS (option)
These buttons are used for teletext.
For further details, see the ‘Teletext’ section.
6.
SLEEP
sets the sleep timer.
7. PIP BUTTONS (option)
PIP
switches the sub picture on or off.
PR +/-
selects a programme for the sub picture.
SWAP
alternates between main and sub picture.
INPUT
selects the input mode for the sub picture.
SIZE
adjusts the sub picture size.
STILL
freezes motion of the sub picture.
POSITION
relocates the sub picture in clockwise direction.
(With TELETEXT / PIP)
PR
PR
OK
VOL
VOL
1
2
3
4
6
5
13
7
8
10
11
12
14
PR
PR
OK
VOL
VOL
Q.VIEW LIST
UPDATE/
HOLD/
(With TELETEXT / Without PIP)
5
9
Location and function of controls
5
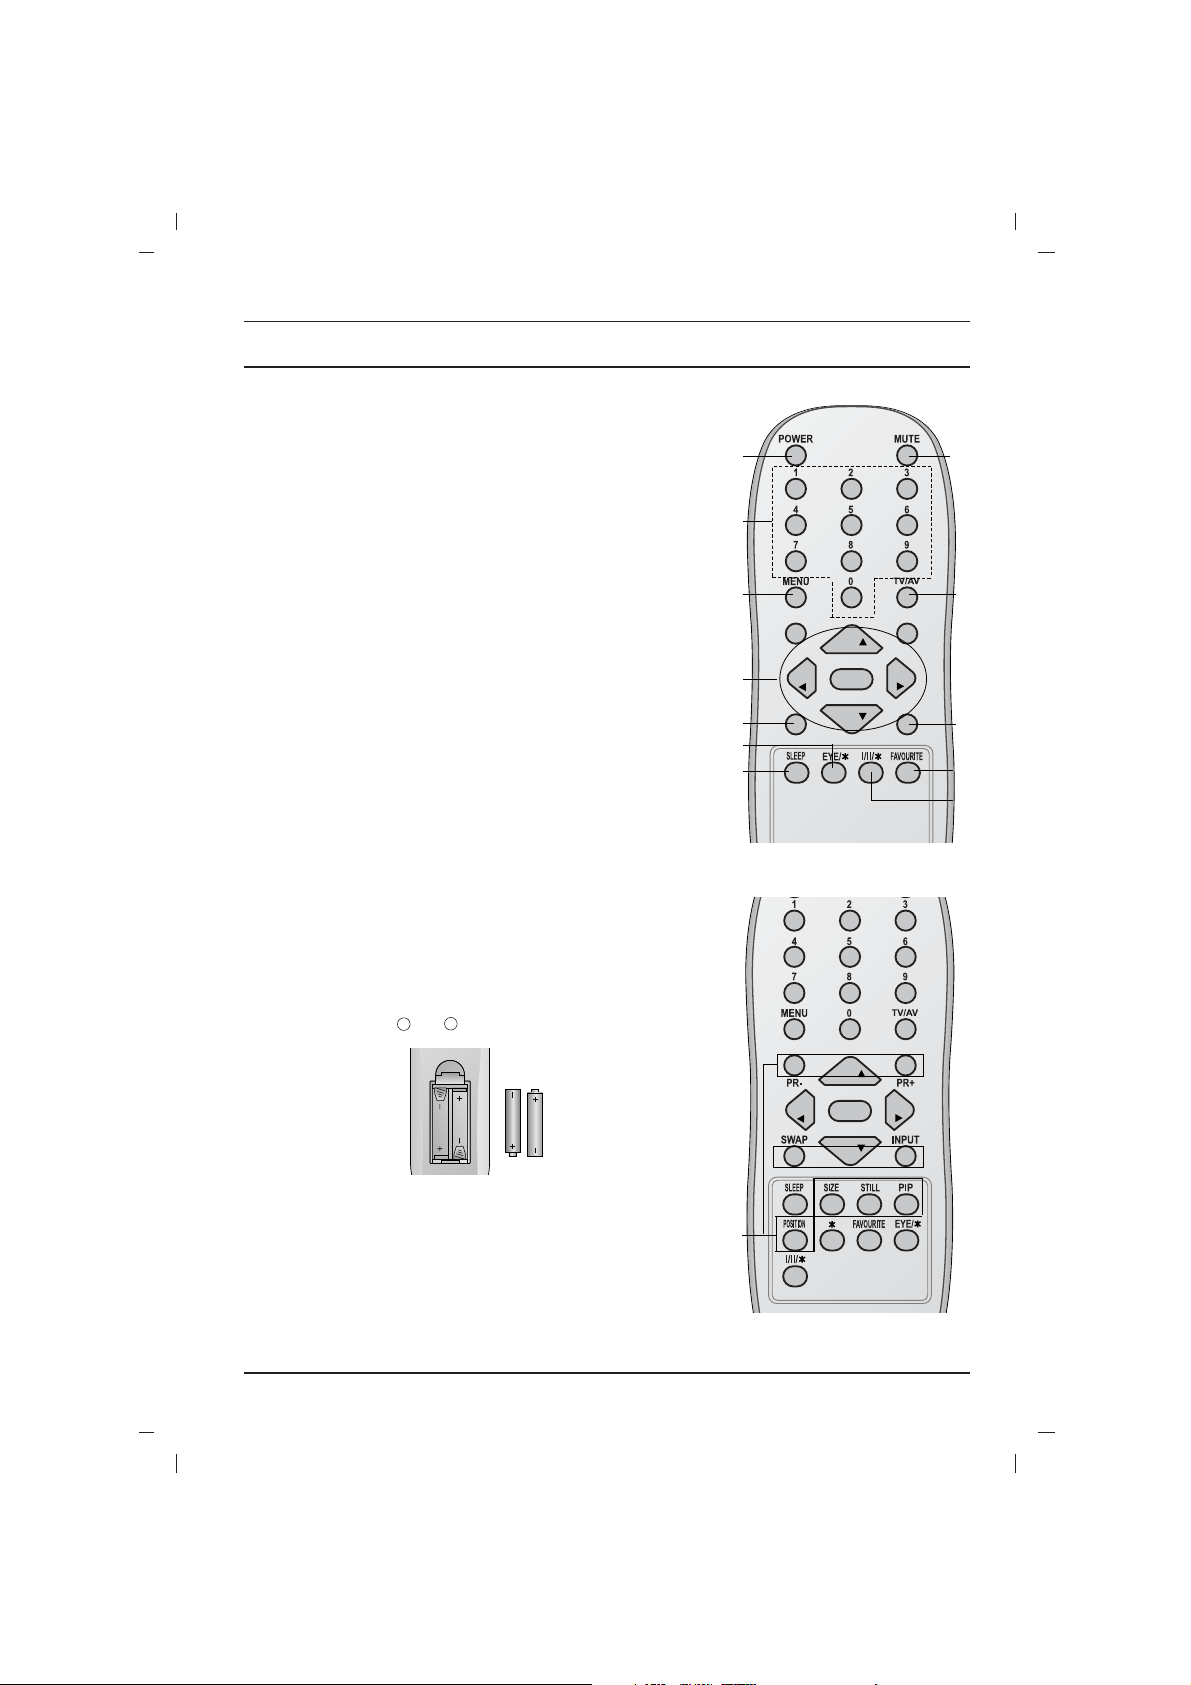
8. FAVOURITE
selects a favorite programme.
9.
EYE/*(option)
switches the eye function on or off.
10. MUTE
switches the sound on or off.
11. TV/AV
selects TV or AV mode.
switches the set on from standby.
exits the Teletext mode
(option)
.
12.
I/II/
*
selects the language during dual language broadcast.
selects the sound output (option).
13. Q.VIEW (or SWAP)
returns to the previously viewed programme.
14.
LIST (or INPUT)
displays the programme table.
*
: No function
COLOURED BUTTONS : These buttons are used for teletext (only
TELETEXT models) or programme edit.
Battery installation
The remote control handset is powered by two AAA type batteries.
To load the batteries, turn the remote control handset over and
open the battery compartment. Install two batteries as indicated by
the polarity symbols ( and ) marked inside the compartment.
Note : To avoid damage from possible battery leakage, remove the
batteries if you do not plan to use the remote control handset for an
extended period of time.
+
-
(Without TELETEXT / PIP)
PR
PR
OK
VOL
VOL
(With PIP / Without TELETEXT)
PR
PR
OK
VOL
VOL
Q.VIEW LIST
1
2
3
4
13
6
9
10
11
8
14
7
12
6
Location and function of controls
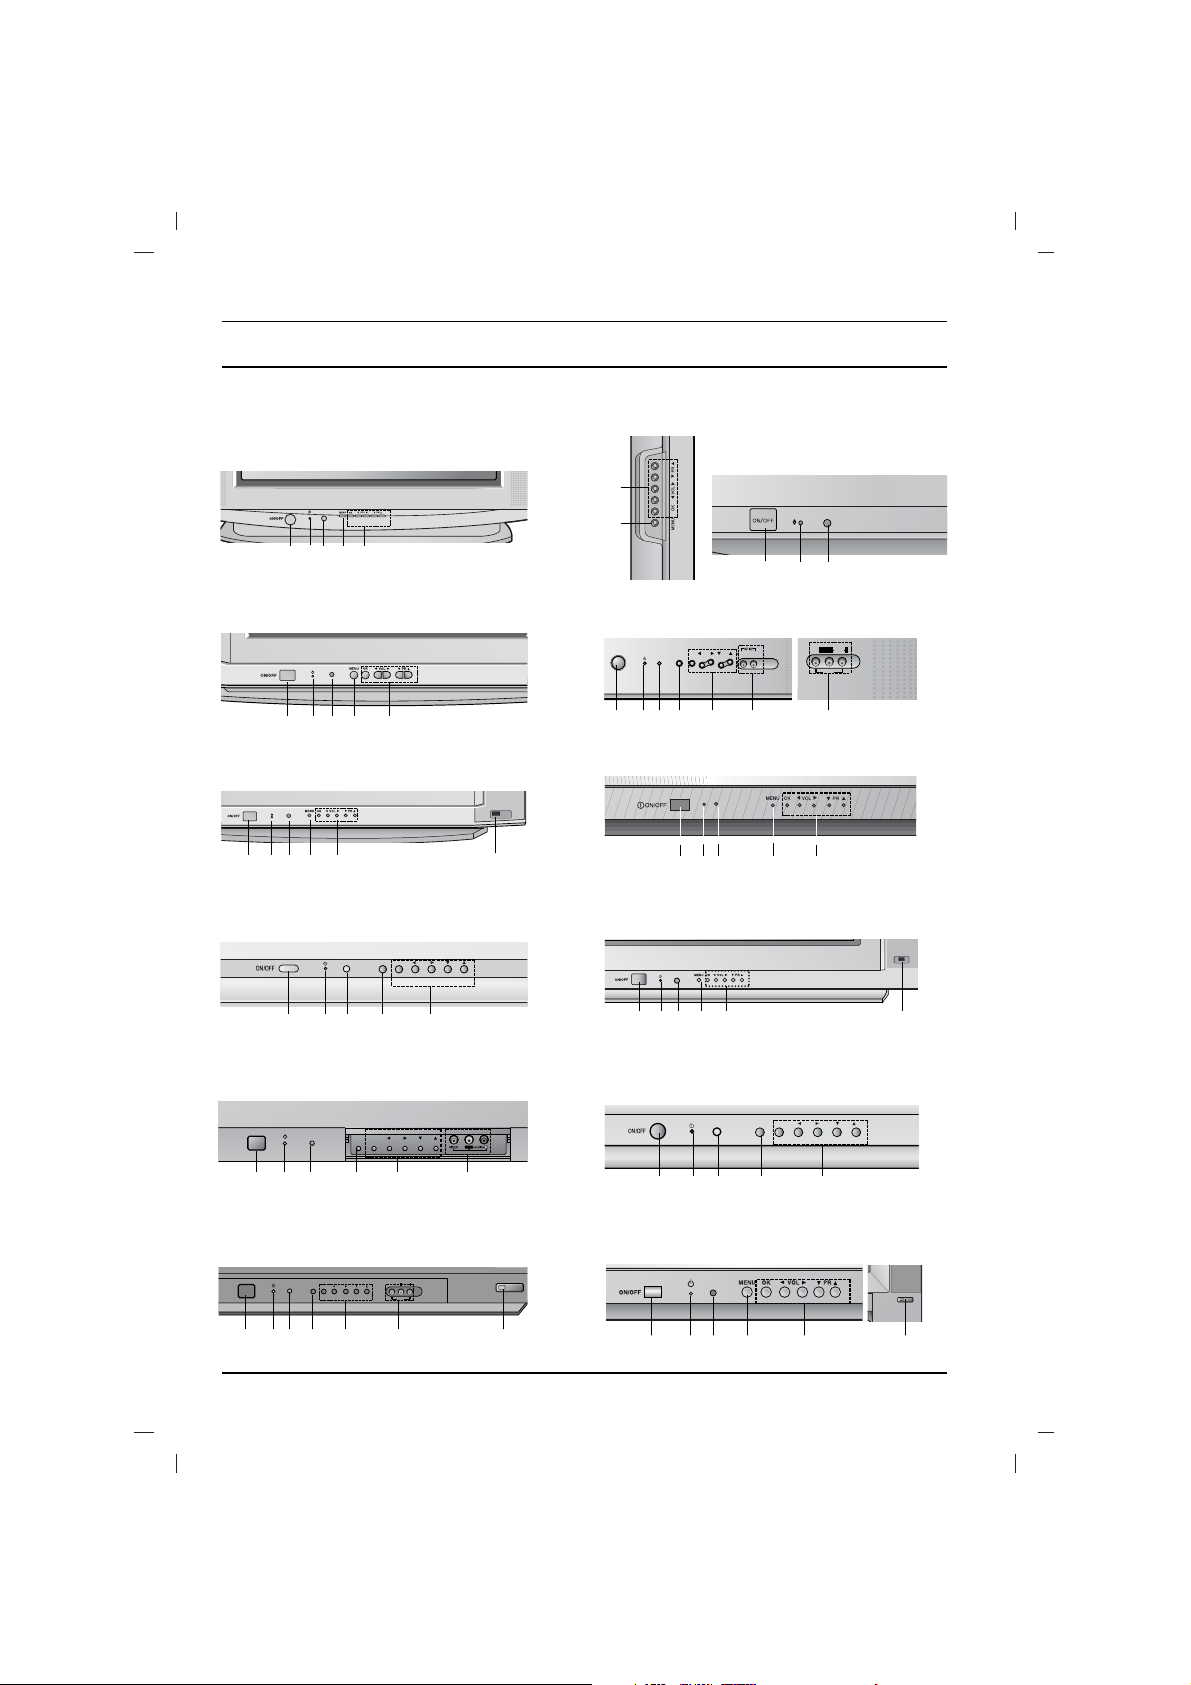
Front panel
21FS4 series
1 2 3 4
5
21FE6 series
1
2
3
5
4
1 2 3 4 75
21FX4 series
21FD7 series
1 2 3
21FS2 series
1 2 3 4 5
21FD1/4 series
MENU OK
VOL
PR
1 2 3 4 5
21FX5 series
2 3 54
1
7
21FC1 series
MENU
OK
VOL
PR
1 2 3 4 5
4
5
21FB9 series
1 2 3 4 5
7
21FB3 series
1 2 3 4 65 6
ON/OFF
MENU
OK
VOL PR
VIDEO
AUDIO
L
R
AV IN2
21FB5 series
2 3 4 5
1
7
6
21FA3 series
ON/OFF
MENU OK VOL PR
L/MONO
AV IN2
1
3 4
5
6
2
ON/OFF
MENU OK
VOL PR
VIDEO AUDIO
VIDEO AUDIO
L/MONO
AV IN2
R
Location and function of controls
7
1. MAIN POWER (ON/OFF)
switches the set on or off.
2. POWER/STANDBY INDICATOR
illuminates brightly when the set is in standby
mode.
dims when the set is switched on.
3. REMOTE CONTROL SENSOR
Note : Only use the supplied remote control
handset. (When you use others, they won’t be
able to function.)
4. MENU
(option)
selects a menu.
5. OK
(option)
accepts your selection or displays the current
mode.
FF / GG
(Volume Up/Down)
(option)
adjusts the volume.
adjusts menu settings.
DD / EE
(Programme Up/Down)
(option)
selects a programme or a menu item.
switches the set on from standby.
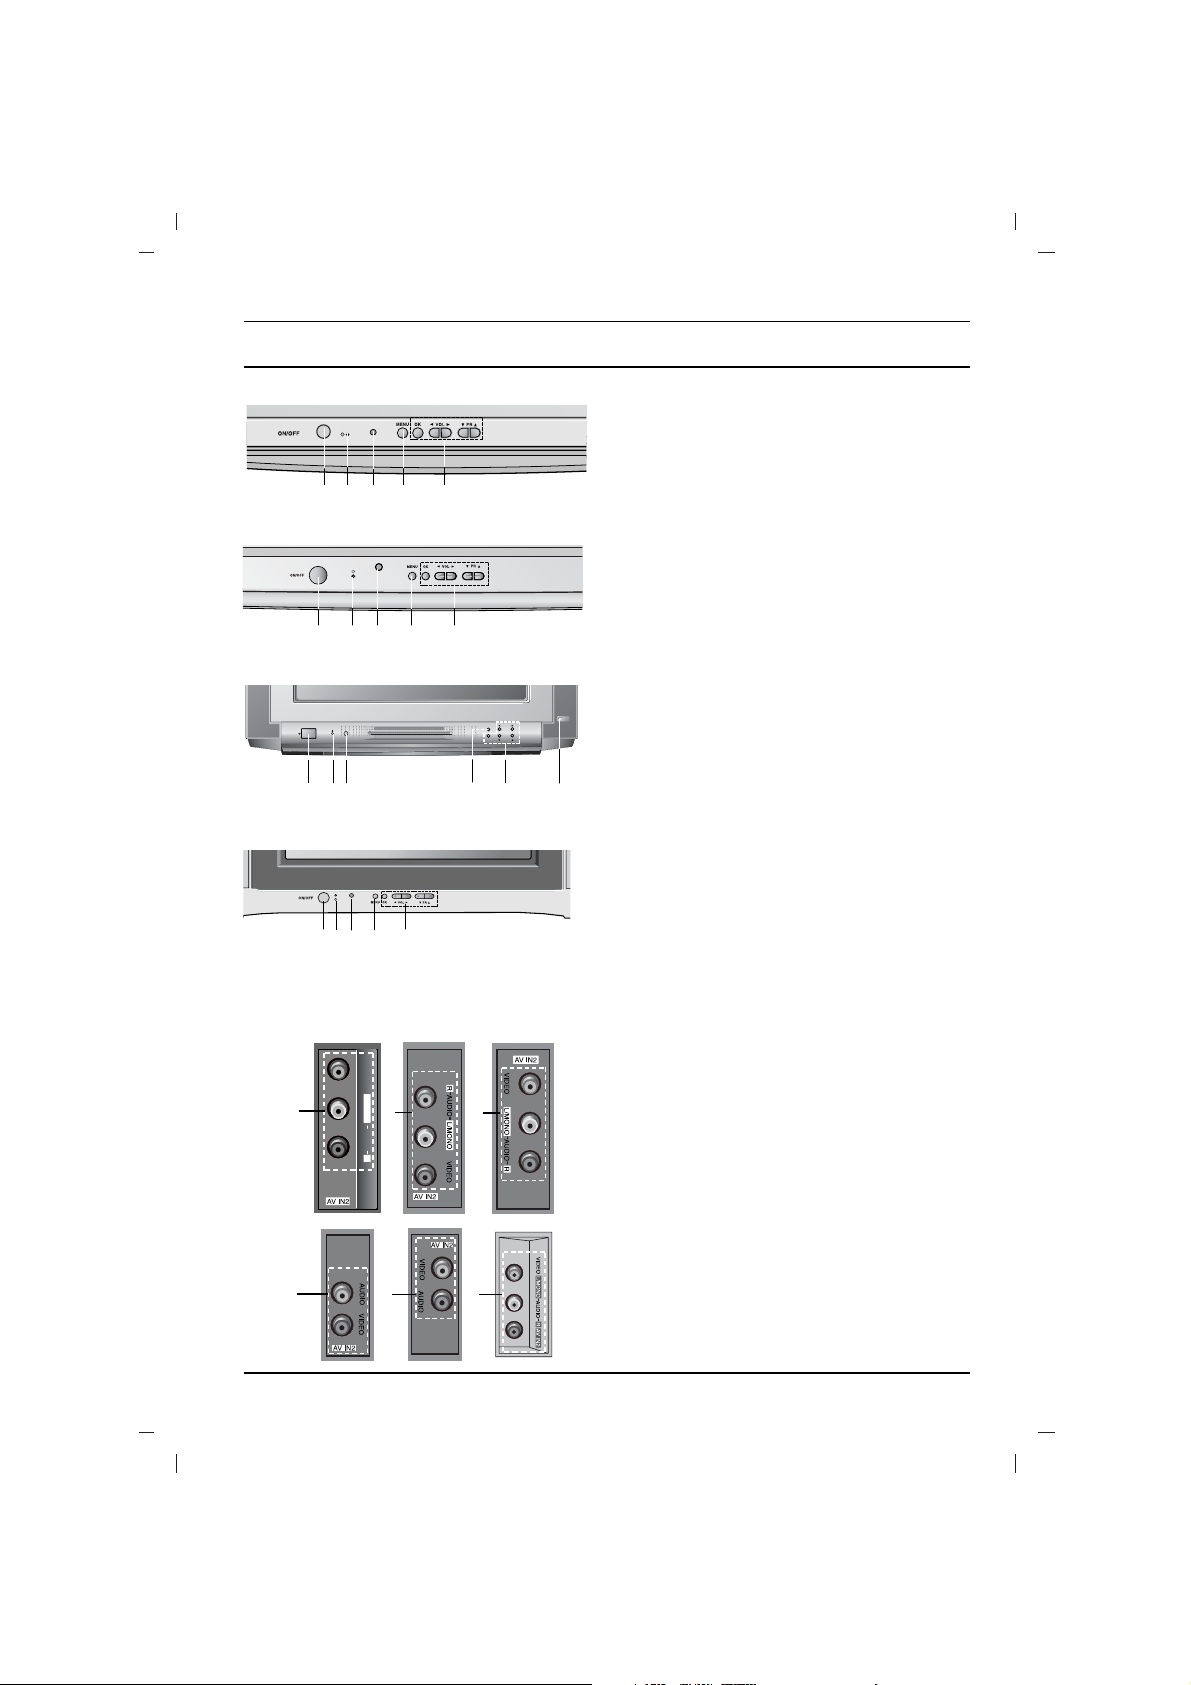
6. AUDIO (or AUDIO-L/R)/VIDEO IN SOCKETS
(AV IN2) (option)
Connect the audio/video out sockets of external
equipment to these sockets.
7. EYE (option)
adjusts picture according to the surrounding
conditions.
Note : Shown is a simplified representation of front
or side panel. What is shown here may be
somewhat different from your set.
21CC2 series
1
2
3
5
4
Side panel
6
6
21FS6 series
1
2
3
5
4
MENU
VOL
OK
PR
POWER
15Q9 series
1
2
3
5
4
6
6
6 6
7
1
2 3
4
5
21FU2 series
VIDEO
L/MONO
RAUDIO
Basic operation
8
On and off
1. Press the main power button to switch the set on.
2. If the set is in standby mode, press the POWER,
DD / EE
, TV/AV
or NUMBER buttons on the remote control handset to switch it
on fully.
3. Press the POWER button on the remote control handset.
The set reverts to standby mode.
4. Press the main power button again to switch the set off.
Note : If, while the set is switched on, the mains plug is disconnected the set will switch to standby or power on when the mains
plug is replaced in the mains power socket.
Programme selection
You can select a programme number with the
DD / EE
or NUMBER
buttons.
Volume adjustment
Press the
FF / GG
button to adjust the volume.
Q.VIEW (or SWAP)
Press the Q.View (or SWAP) button to view the last programme
you were watching.
Mute function
Press the MUTE button. The sound is switched off and the display
W
appears.
You can cancel it by pressing the MUTE,
FF / GG
, I/II/*(option), button.
On screen language selection (option)
The menu can be displayed on the screen in desired language.
First select your language.
1. Press the MENU button and then
DD / EE
button to select the
Special menu.
2. Press the GGbutton to select Language.
3. Press the GGbutton and then
DD / EE
button to select your desired
language.
All the on screen displays will appear in the selected language.
Press the OK or
FF
button to select the Special menu.
4. Repeatedly press the MENU button to return to normal TV
viewing.
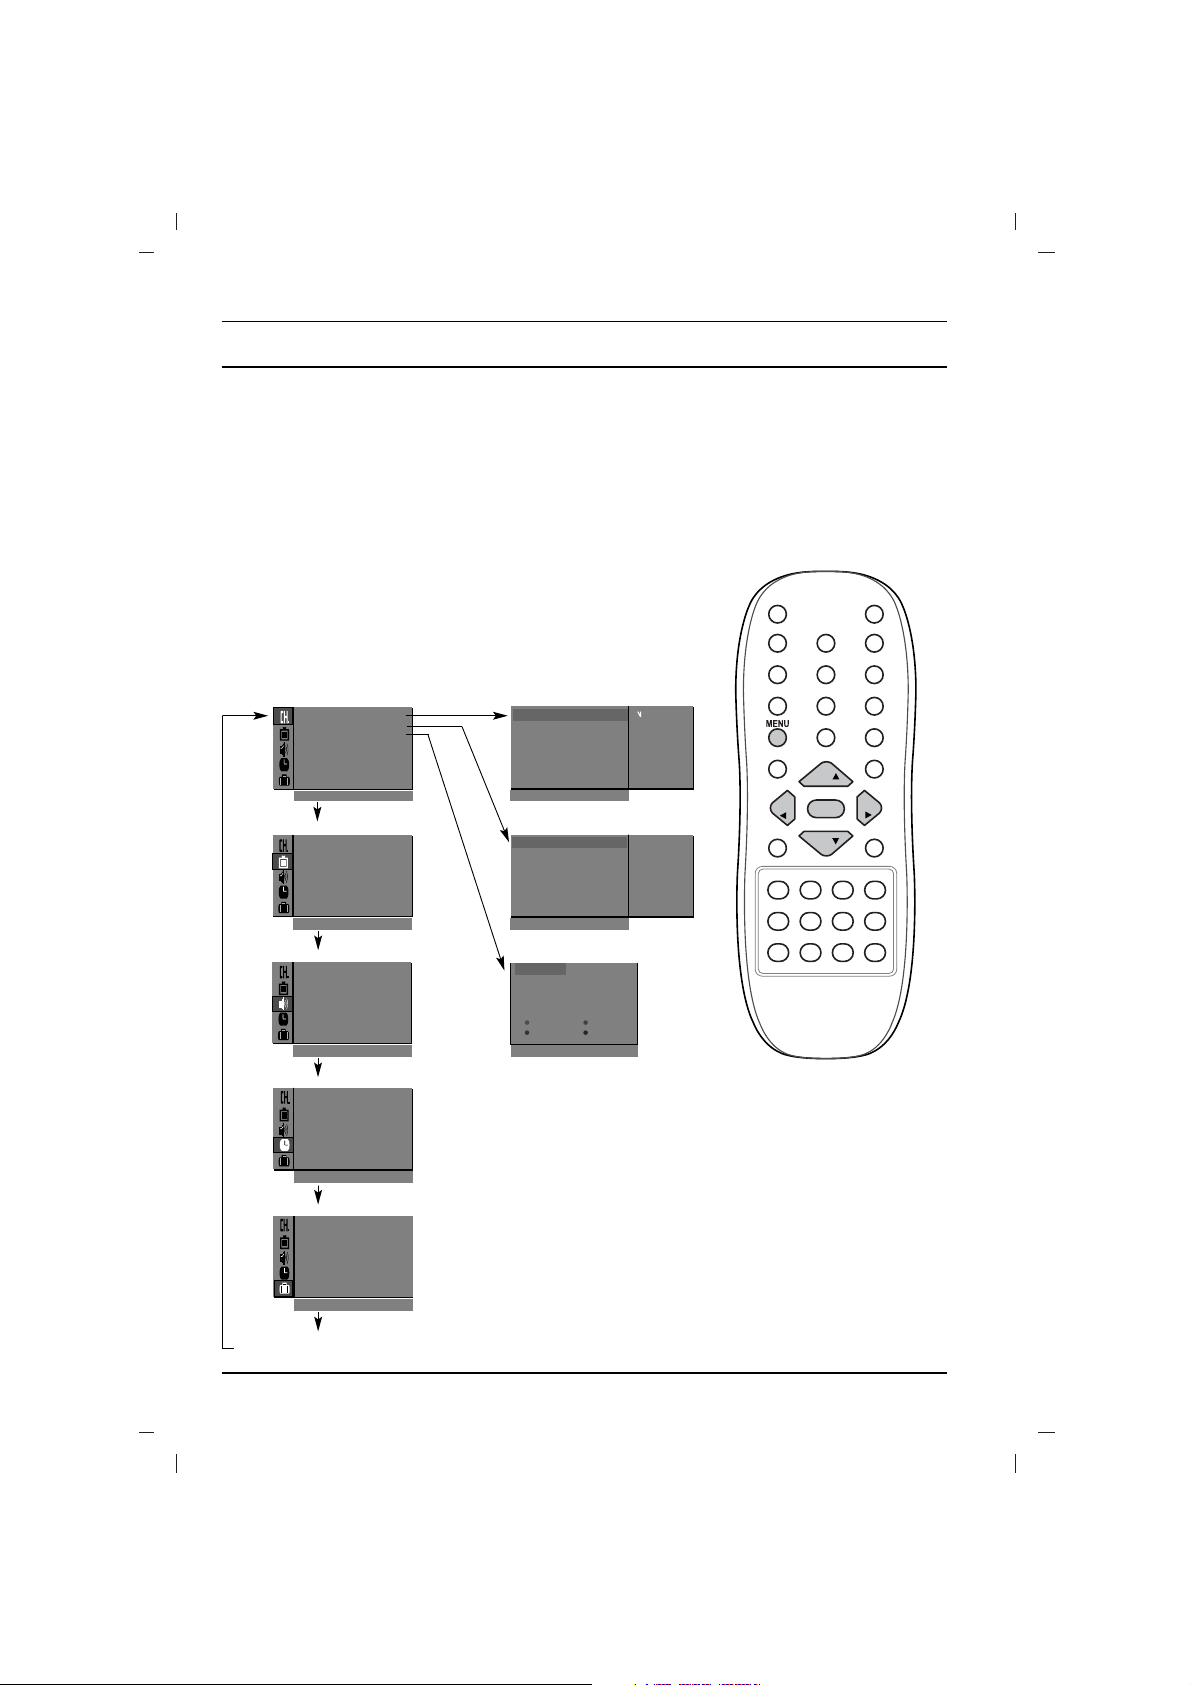
The dialogue between you and your set takes place on screen with
an operator menu. The buttons required for the operating steps are
also displayed.
Menu selection
1. Press the MENU button and then
DD / EE
button to display each
menu.
2. Press the
GG
button and then
DD / EE
button to select a menu item.
3. Press the
GG
button to display the sub menu or the pull-down
menu.
4. Change the setting of an item in the sub or pull-down menu with
the
FF / GG
or
DD / EE
.
You can move to the higher level menu with the OK or
FF
but-
ton and to move to the lower level menu press the
GG
button.
Note :
a. In the teletext mode, menus are not displayed.
b. In some models, the
Normal search will not display, only the
Start will display in the Auto programme menu.
c. In some models Game, Booster or Degauss will not display.
d. In some models, the Language, X-WAVE will not display.
On screen menus
9
TV programme
Auto
O
programme {
ManualOprogramme {
Program meOedit {
FavouriteOprogramme
{
()O}{OOKOMENU
System {
StorageO from {
NormalO search {
0OOARO1DOOO5OOSO69
O1OOCO03OOO6OOSO17
O2OOCO12OOO7OOSO22
O3OOSO66OOO8OOCO09
O4OOSO67OOO9OOCO11
DeleteOOOOCopy
MoveOOOOOOSkip
O0OOCO03
Picture menu
Station menu
PSM {
XD {
Contrast {
Brightness {
Colour {
Sharpness {
()O}{OOKOMENU
Sound menu
()O}{OOKOMENU
Special menu
()O}{OOKOMENU
Time menu
()O}{OOKOMENU
()O}{OOKOMENU
Storage {
System {
Channel {
Fine {
Search {
Name {
()O}{OOKOMENU
()}{OOKOMENU
System {
Storage {
Station
Picture
Sound
Time
Special
Auto programme
Manual programme
Programme edit
BG
I
DK
L
2
SSM {
Turbo oSound {
AVL {
Balance {
X-WAVE {
Clock {
Offotime {
Onotime {
Autoosleep {
Language {
Input {
Childolock {
Degauss {
Game {
VOL
PR
VOL
OK
PR
10
Setting up TV stations
Up to 100 TV stations can be stored by programme numbers (0 to 99).
Once you have preset the stations, you will be able to use the
DD / EE
or NUMBER buttons to scan the stations you programmed.
Stations can be tuned using automatic or manual modes.
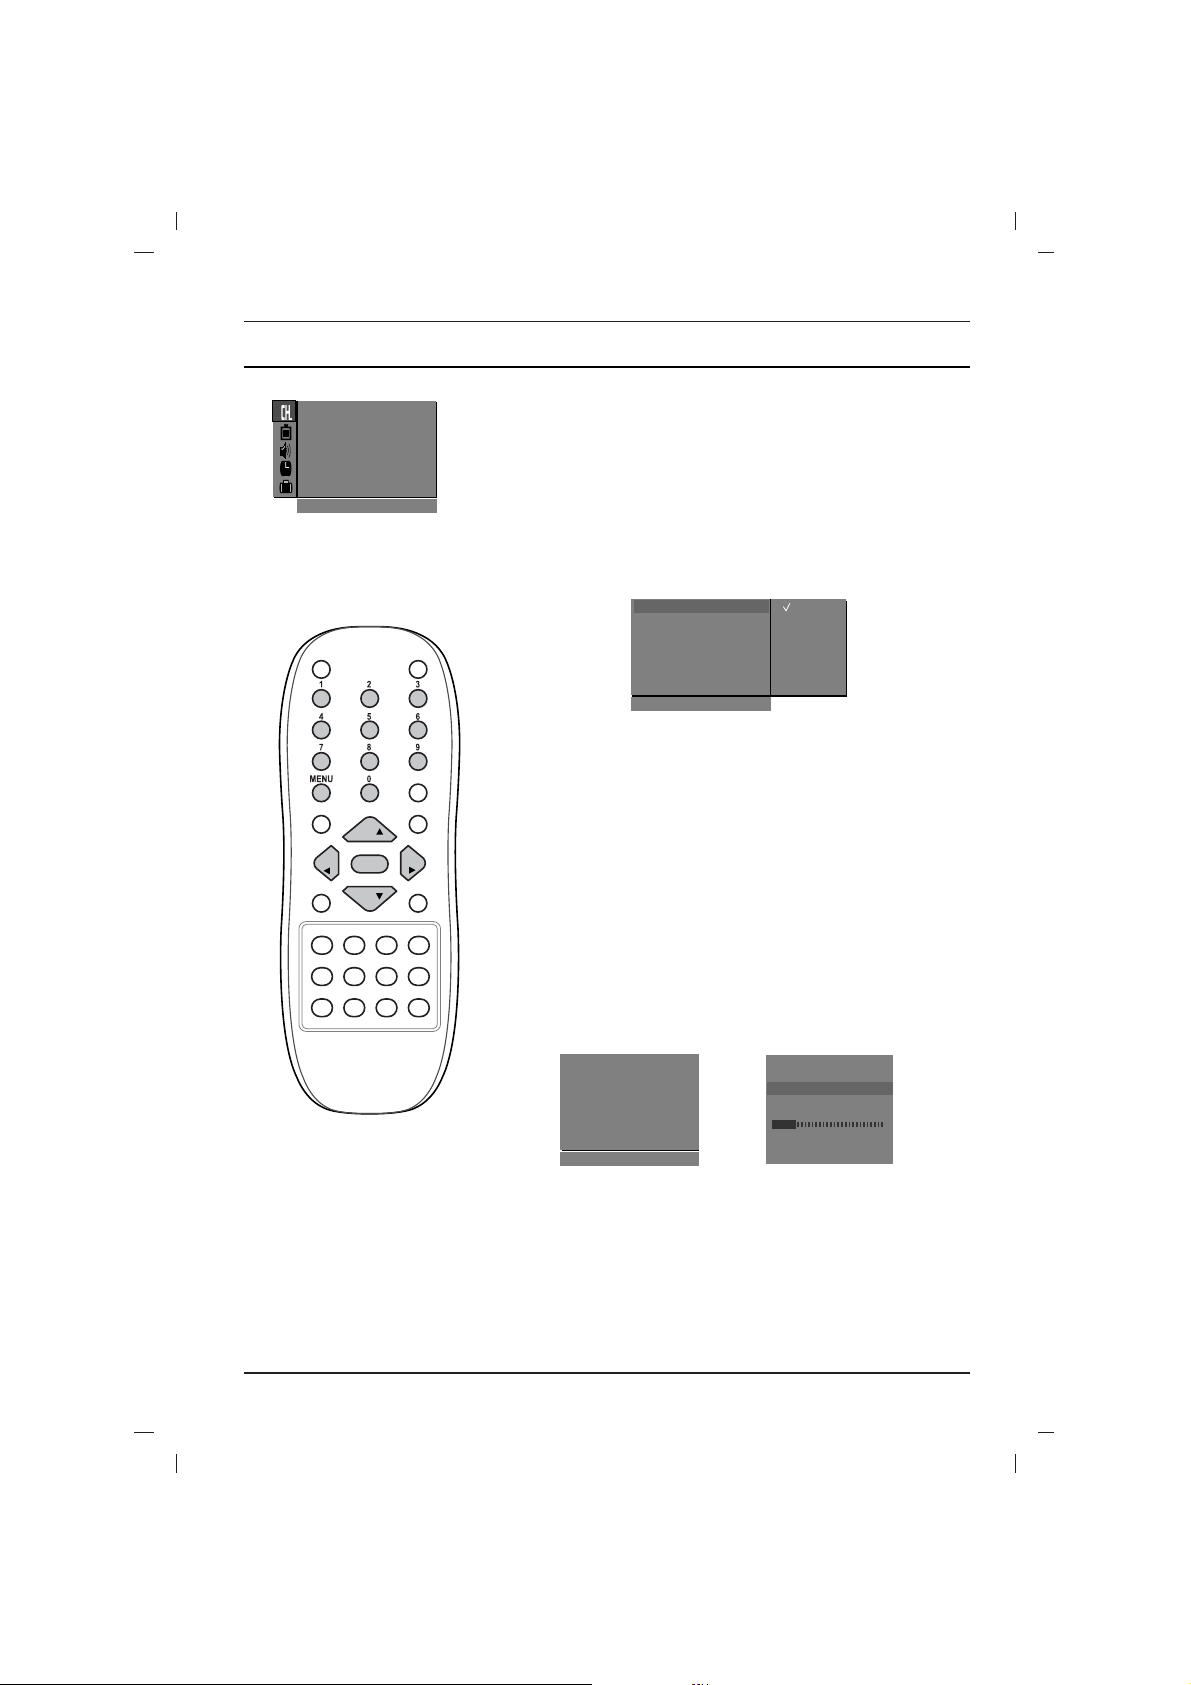
Auto programme tuning
All stations that can be received are stored by this method. It is recommended that you use auto programme during installation of this set.
1. Press the MENU button to select the Station menu.
2. Press the
GG
button and then
DD / EE
button to select Auto pro-
gramme
.
3. Press the GGbutton to display the Auto programme menu.
4. Press the GGbutton. Select a TV system with the
DD / EE
button
on the System pull-down menu;
BG : PAL B/G, SECAM B/G (Europe/East Europe)
I : PAL I/II (U.K./Ireland)
DK : PAL D/K, SECAM D/K (East Europe)
L : SECAM L/L’ (France)
5. Press the
FF
button.
6. Press the
DD / EE
button to select Storage from.
7. Press the GGbutton. Select the beginning programme number
with the
FF / GG
button or NUMBER buttons on the Storage
from
pull-down menu. Any number under 10 is entered with a
numeric ‘0’ in front of it, i.e. ‘05’ for 5.
8. Press the OK button.
9. Press the
DD / EE
button to select Normal. search.
Option: In some models, you can only select Start.
Note :
If the programmed station has poor quality and sound, select
the system again in the
Manual programme menu.
10. Press the
GG
button to begin auto programming.
All receivable stations are stored. The station name is stored for
stations which broadcast VPS (Video Programme Service),
PDC (Programme Delivery Control) or TELETEXT data. If no
station name can be assigned to a station, the channel number
is assigned and stored as C (V/UHF 01-69) or S (Cable 01-47),
followed by a number.
To stop auto programming, press the MENU button.
When auto programming is completed, the
Programme edit
menu appears on the screen. See the ‘Programme edit’ section
to edit the stored programme.
11. Repeatedly press the MENU button to return to normal TV viewing.
PR
PR
OK
VOL
VOL
Auto
O
programme {
Manual
O
programme {
Program me
O
edit {
FavouriteOprogramme {
()O}{OOKOMENU
System
{
StorageOfrom
{
NormalOsearch
{
BG
I
DK
L
()O}{OOKOMENU
Station
Auto programme
System {
System
{
StorageOfrom
{
NormalOsearch
{
MENU
Auto programme
MENU
OOCO01O(BG)
736%
Normal search
 Loading...