

LG 29FU8 series, 29FD7 series, 29FD5 series, 21FD5 SERIES, 21FC8 series Owner's Manual
...
OWNER'S MANUAL
Colour Television
information to your dealer when you require service.
See the label attached on the back cover and quote this
Record model number and serial number of the set.
Retain it for future reference.
Please read this manual carefully before operating your set.
P/NO : 3828VA0464A(VERSION 08)
Chassis MC-049A/B/C:

Contents
2
Important Precautions 3
Safety/Installation
Location and function of controls 5
Remote control handset
Front panel
Basic operation
8
On and off / Programme selection
Volume adjustment / Quick view
Mute function / Auto Demonstration
On screen language selection (option)
On screen menus 9
Menu selection
Setting up TV stations 10
Auto programme tuning / Auto programme scan/
Manual programme tuning / Fine Tuning / Assigning a station name /
Booster (Option) Programme edit / Deleting a programme /
Copying programme/Moving a programme/ Skipping a programme number /
Favourite programme/Calling the programme/
Selecting a programme in the programme table/
Paging through programme table
Picture adjustment 15
Picture adjustment / Eye (option) / Picture format
Turbo picture selection (option)
Sound adjustment 17
Sound adjustment / Woofer volume (option) / FM Transmitter (option)
Turbo sound selection (option) / Stereo / Dual reception (option)
NICAM reception (option) / Sound output selection
Timing setting 19
Time setting / On/off time / off time / On time
On programme number / Auto sleep
Other functions 20
On screen language selection (option) / TV and AV modes /
Auto AV switching (option) / Child lock / Blue back / Tilt (option) /
Degaussing (option) / Sleep timer (option) / LG game (option) / LG Reach (option) /
Jumble numbers (option) / Brainvita (option) / Jumble character (option) /
Space fighter (option) / Remote control for above game (option) /
Game Pack (option) / Remote control for game (option)
PIP operation (option) 24
On and off / Input mode selection for sub picture
Swapping between main and sub pictures
Programme selection for sub pictures (option)
Sub picture size / Sub picture freeze
Sub picture position change / 9 or 4 sub picture
Connection of external equipment 25
Aerial socket / Audio / Video in/out sockets (option)
Euro scart socket (option)
S-Video / Audio in sockets S-AV (option)
Component in sockets (option)
Headphone socket (option)
Troubleshooting check list 27

3
Important Precautions
This unit has been engineered and manufactured to assure your personal safety, however
improper use may result in potential electrical shock or fire hazards. In order to allow the proper
operation of all safeguards incorporated in this TV set, observe the following basic rules for its
installation, use and servicing. Keep it in an accessible place for future reference.
On Safety
Do not Open the TV set
There are no user serviceable components inside.
There are Dangerous High Voltages inside, even when the power is OFF.
Contact your dealer if the TV is not operating properly.
To Avoid Personal Injury :
Do not place the TV set on a sloping shelf unless properly secured.
Use only fixed wooden stand. The TV shall be positioned 5cm behind the front
edge of an open fronted with 1cm free space along the sides top and 5cm
depth behind the TV.
Do not try to roll a stand with small casters across thresholds or deep pile
carpets.
To Prevent Fire or Hazards:
Always turn the TV set OFF if you leave the room for more than a short period
of time. Never leave the TV set ON when leaving the house.
Keep children from dropping or pushing objects into the TV cabinet
openings. Some internal parts carry hazardous voltages.
Do not add accessories that have not been designed for this TV set.
During a lighting storm or when the TV set is to be left unattended for an
extended period of time, unplug it from the wall outlet and extreme socket.
Do not bring magnetic devices such as magnets or motors near the picture tube.
Operate the TV set only from a power source indicated in the specifications of this manual or
listed on the TV set. If you are not sure what type of power supply you have in your home,
consult with your dealer.
Overloaded AC outlets and extension cords are dangerous. So are frayed power cords and
broken plugs. They may result in a shock or fire hazard. Call your service technician for
replacement.
The power supply cord is used as the main disconnect device. Ensure that the socket-outlet
is easily accessible after installation.
Hands must be dry when holding the power plug to avoid an electric shock.
Do not damage the power cord by disassembling, bending, pulling or heating up,
it can cause
fire or electric shock.
Make sure to completely insert the power plug. Insecure connections can cause fire.
Important Precautions
Power
This set operates on an AC mains supply, the voltage is as indicated on the label on the back
cover. Never apply DC power to the set. In the event of thunderstorms or powercuts, please
Service
pull out the aerial and mains plugs.
Aerial
Location
Connect the aerial cable to the socket marked 75 on the back cover. For the best reception
an outdoor aerial should be used.
The ventilation should not be impeded by covering the ventilation openings with items such as
No naked flame source such as lighted candles should be placed on the TV.
Never place the TV set in a built-in enclosure unless proper ventilation is provided.
Never place the TV set near or over a radiator or heat source.
Position your set so that no bright light or sunlight falls directly onto the screen.
newspaper, table cloths, curtains, etc.
On Installation
Do not allow anything to rest upon or roll over the power cord, and do not place the TV set
where the power cord is subject to damage.
Do not attempt to service the TV set yourself, as opening or removing covers may expose
you to dangerous voltage or other hazards. Refer all servicing to qualified service personnel.
Do not use this TV near water such as near bathtub, washbowl, kitchen sink, laundary tub,
in a wet basement, or near a swimming pool.
TV set are provided with ventilation openings in the cabinet to allow the release of heat
generated during operation. If these openings are blocked, built-up heat can cause failures
which may result in a fire hazard. There fore,
On Cleaning
On Repacking
Unplug the TV set before cleaning the face of the TV screen.
Do not throw away the carton and packing materials. They make an ideal container in which to
Use a slightly damp (not wet) cloth. Do not use an aerosol directly on the TV screen because
transport the unit. When shipping the unit to another location, repack it in its original material.
overspray may cause electric shock.
Caution:
Please do not use stabilizer with TV set as this set has inbuilt voltage
stabilizer. Use of Inferior quality stabilizer may damage the set.
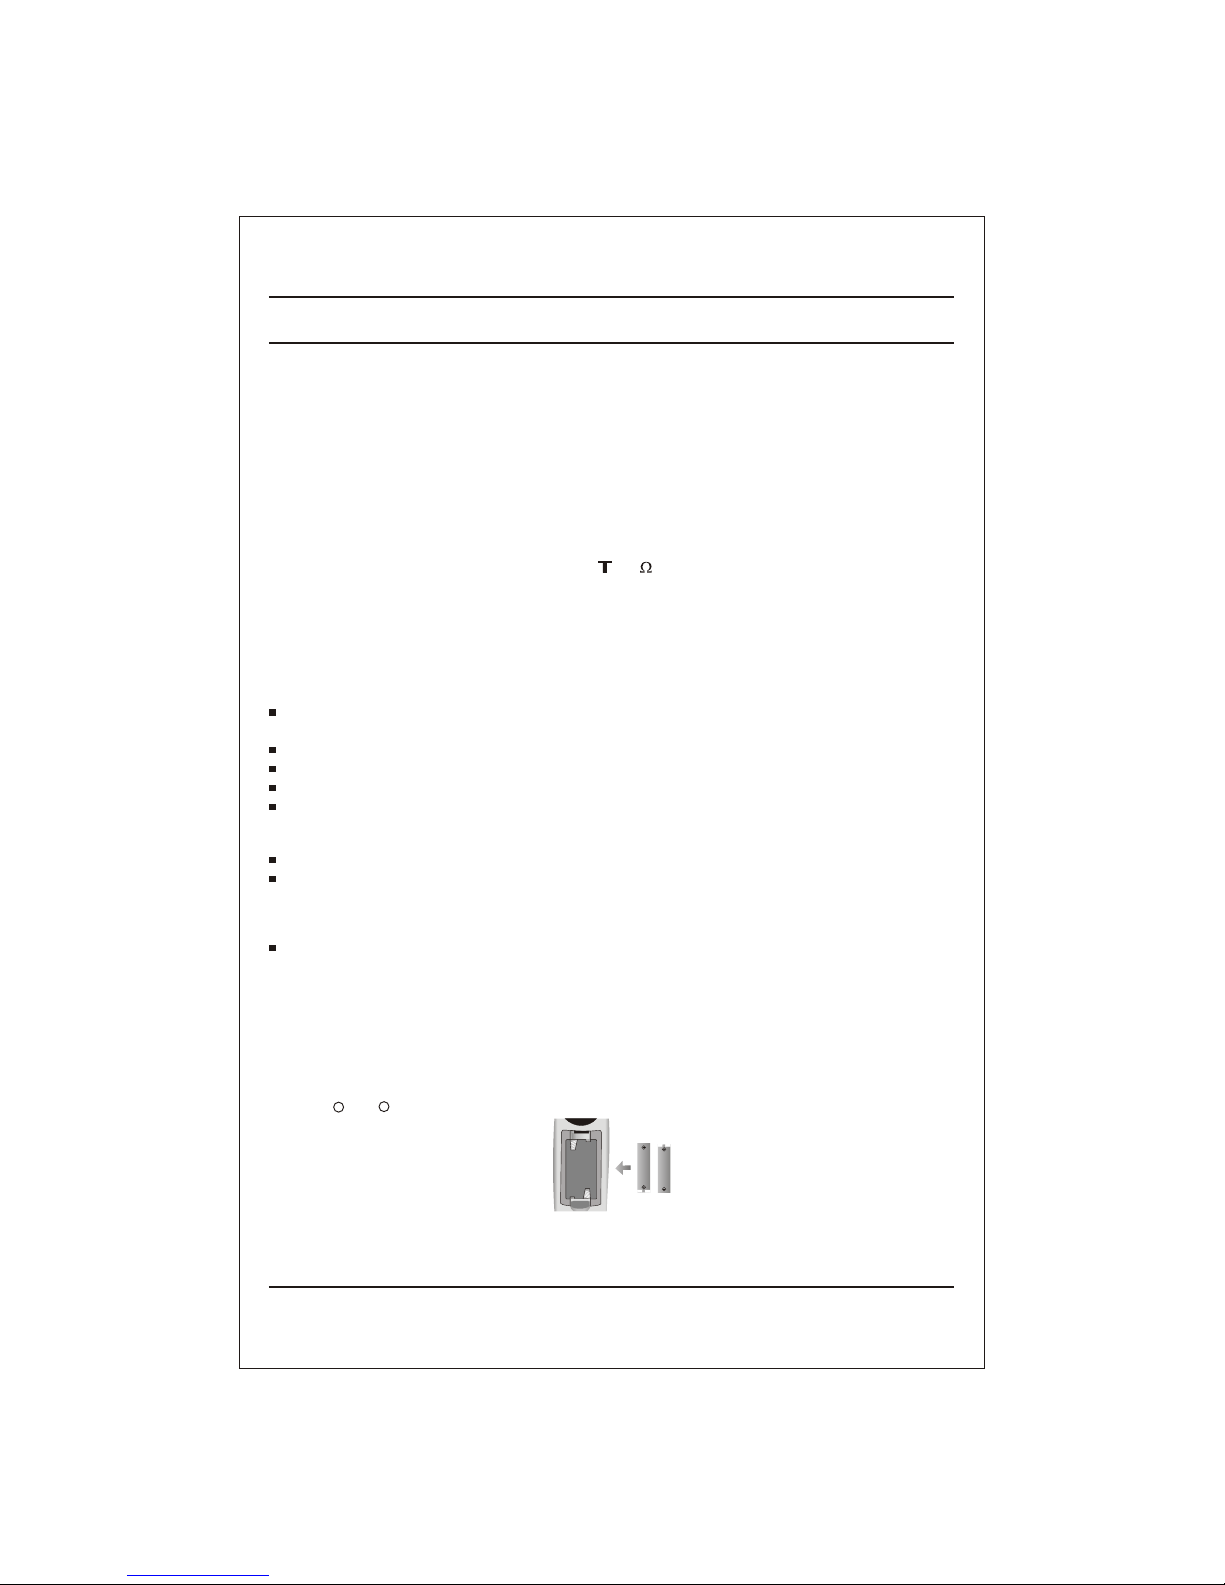
Battery installation
The remote control handset is powered by two AA/AAA type batteries. To load the batteries, turn the remote
control handset over and open the battery compartment. Install two batteries as indicated by the polarity
symbols ( + and - ) marked inside the compartment.
Note: To avoid damage from possible battery leakage, remove the batteries if you do not plan to use the
remote control handset for an external period of time.
4

All the functions can be controlled with the remote control handset.
Some functions can also be adjusted with the buttons on the front
panel of the set.
Remote control handset
Before you use the remote control handset, please install the
batteries. See on the page No4.
1. POWER
switches the set On from standby or Off to standby.
2. NUMBER BUTTONS
switches the set On from standby or directly select a number.
3. ARC (Aspect Ratio Control)
Changes the picture format.
4. TURBO PICTURE / SOUND BUTTON
selects Turbo picture / sound.
5. / (Programme Up/Down)
selects a programme or a menu item.
switches the set On from standby.
scans programmes automatically.
/ (Volume Up/Down)
adjusts the volume.
adjusts menu settings.
6. VCR BUTTONS (option)
control a LG video cassette recorder.
7. SSM (Sound Status Memory)
recalls your preferred sound setting.
8. I/II (option)
selects the language during dual language broadcast (option).
selects the sound output.
9. PSM (Picture Status Memory)
recalls your preferred picture setting.
10. MUTE
switches the sound On or Off.
11. TV/AV
selects TV or AV mode.
switches the set On from standby.
12. MENU
selects a menu.
EYE/
Location and function of controls
5
POWER
MUTE
TV/AV ARC
SOUND
PICTURE
MENU
OK
T U R B O
REW
PLAY
FF
P/STILL
STOP
REC
I/II SSM LIST
PSM
SLEEP
Q.VIEW
1 2
3
4
5
6
7
8 09
10
11
12
13
14
15
16
17
18
SIZE
POSITION
9/4 PIP
PR- PR+ SWAP
INPUT
STILL
1
2
3
4
6
7
8
9
PR
VOL VOL
5
PR
19
(Without TELETEXT / With PIP)
FAVOURITE

VOL
VOL
VOL
SOUND
Q-VIEW
FAVOURITE
ARC/*
PICTURE
TURBO
l/ll
LIST
PSM
7
8
SSM
0
5
6
9
4
1
POWER
2
3
VOL
PR
PR
MUTE
OK
SLEEP
MENU
TV/AV
EYE/
*
1
2
3
10
11
12
5
13
Location and function of controls
6
13. OK
accepts your selection or display the current mode.
14. LIST
displays programme table.
15. EYE/ (option)
switch the eye function On or Off.
16. SLEEP
sets the sleep timer.
17. Q. VIEW
returns to the previously view programme.
18. PIP BUTTON (option)
for single tuner PIP models, the sub picture in RF mode will be
same as main picture.
PIP
switches the sub picture.
PR +/-
select a programme for the sub picture.
SWAP
alternates between main and sub picture.
SIZE
adjust the sub picture size.
STILL
freeze motion of the sub picture.
POSITION
relocates the sub picture in clockwise direction.
9/4 PIP
switches On or Off the 9 or 4 sub picture.
INPUT
press the input button to select the mode of sub picture.
19. FAVOURITE
pressing each time this button will select a stored favourite
programme.
COLOURED BUTTONS
These button are used for teletext (only TELETEXT models) or
programme edit.
Remarks :
1. Some keys in remote can be non-functional, these keys are use in
other models.
2. Keys marked * are non functional.
(Without TELETEXT/ PIP)Without
15
19
9
16
7
4
8
14
17

21FD5 SERIES
10
5
2
PR
6
VOL
Location and function of controls
1. MAIN POWER
switches the set On or Off.
2. POWER/STANDBY INDICATOR
illuminates brightly when the set is in
standby mode.
dims when the set is switched On.
3. MENU
selects a menu.
4. OK
accepts your selection or displays the
current mode.
5 (Programme Up/Down)
selects a programme or a menu item.
switches the set on from standby.
(Volume Down/Up)
adjusts the volume.
adjusts menu settings.
6. REMOTE CONTROL SENSOR
Note : Only use the supplied remote
control handset. (When you use other,
they'll be not able to function).
7. HEADPHONE SOCKET (option)
Connect the headphone plug to this
socket.
8. AUDIO/VIDEO IN SOCKETS (AV2/AV3)
(Option)
Connect the audio/video out sockets of
External equipment to these sockets.
9. S-VIDEO/AUDIO IN SOCKETS (S-AV)
(option)
Connect the video out socket of an S
VIDEO VCR to the S-VIDEO socket.
Connect the audio out sockets of the
S-VIDEO VCR to the audio sockets as
in AV3.
10. EYE (option)
adjusts picture according to the Surrounding conditions.
Note : Do not place any heavy objects on
the TV set.
FRONT PANEL / SIDE PANEL
Shown below is a simplified representation of front or side panel, here shown may be somewhat different from your set.
ON/OFF
MENU
OK
VOL
PR
1 2 3 46 5
21/29FC8 series
10
S VIDEO
L/MONOVIDEO
AUDIO
R
8
7
AV3
9
MENU
OK
ON/OFF
1
3
4
S VIDEO
L/MONOVIDEO
AUDIO
R
AV3
8
9
7
LVIDEO
AUDIO
R
AV2
8
7
3
MENU
OK
ON/OFF
1
4
21FE4 series
5 2
10
PR
6
VOL
7
8
7
8
3
5
4
7
S VIDEO
L/MONOVIDEO
AUDIO
R
8
7
AV3
9
6
10
21
3
4
5
29FD7 series /29FU8
S VIDEO
L/MONOVIDEO
AUDIO
R
8
7
AV3
9
ON/OFF
MENU
OK VOL
PR
1 2 3 4 56
10
MENU
OK
ON/OFF
1
3
4
29FD5 series
5 2
106
PR
VOL
S VIDEO
L/MONOVIDEO
AUDIO
R
AV3
8
9
7
1
2
6
10
21FD7 series
2
6
10
21FU8 series
3
4
5
1

Basic operation
On and Off
1. Press the main power button to switch the set On.
2. If the set is in standby mode press the POWER, , TV/AV or
NUMBER buttons on the remote control handset to switch it On
fully.
3. Press the POWER button on the remote control handset.
The set reverts to standby mode.
4. Press the main power button again to switch the set Off.
Programme selection
You can select a programme number with the or NUMBER
buttons.
Volume adjustment
Press the button to adjust the volume.
Quick view
Press the Q.VIEW button to view the last programme you were
watching.
Press the MUTE button. The sound is switched Off. You can cancel it
by pressing the MUTE, , SSM, TURBO SOUND.
Auto Demonstration
To review all the menus programmed in the set, press the OK button
of the front panel control for about 10 seconds. To stop auto
demonstration, press any button of the front panel control or
POWER button of the remote control.
On screen language selection (option)
The menu can be displayed on the screen in desired language. First
select your language.
1. Press the MENU button and then button to select the
Special menu.
2. Press the button twice and then the button to select
Language.
3. Press the OK button.
All the on screen displays will appear in the selected language
4. Repeatedly press the MENU or button to return to normal TV
viewing.
8
Mute function
VOL
VOL
SOUND
Q-VIEW
FAVOURITE
ARC/*
PICTURE
TURBO
l/ll
LIST
PSM
7
8
SSM
0
5
6
9
4
1
POWER
2
3
VOL
PR
PR
MUTE
OK
TV/AV
SLEEP
MENU
EYE/
*

9
On screen menus
The dialogue between you and your set takes place on screen with
an operator menu. The buttons required for the operating steps are
also displayed.
Menu selection
1. Press the MENU button and then button to display each
menu.
2. Press the button and then button to select a menu item.
The selected menu item changes from white to blue.
3. Press the button to change the setting of a menu item or OK
button to display the sub menu.
Note :
a. In the teletext mode menus are not displayed.
b. In some models, the Normal /Turbo search will not display,
only the Start will display in the Auto Programme menu.
c. In some models, Tilt, Game, FM transmitter, Booster, DBS,
Woofer volume or Colour degauss will not display.
d. In some models, the Language will not display.
e) In some models, FM Transmitter will be displayed as X-wave.
VOL
VOL
SOUND
Q-VIEW
FAVOURITE
ARC/*
TV/AV
PICTURE
TURBO
l/ll
LIST
SLEEP
PSM
7
MENU
8
SSM
0
5
6
9
4
1
POWER
2
3
VOL
EYE/
*
PR
PR
MUTE
OK
Picture
Sound
Time
Special
Programme
O.5 1.5 10
KHz
5.0 O.1
OR
 Loading...