

Page 1
rev 1, 08-2010
Thank you for choosing the LFO-expander to expand the possibilities of your
synthesizer.
Connections
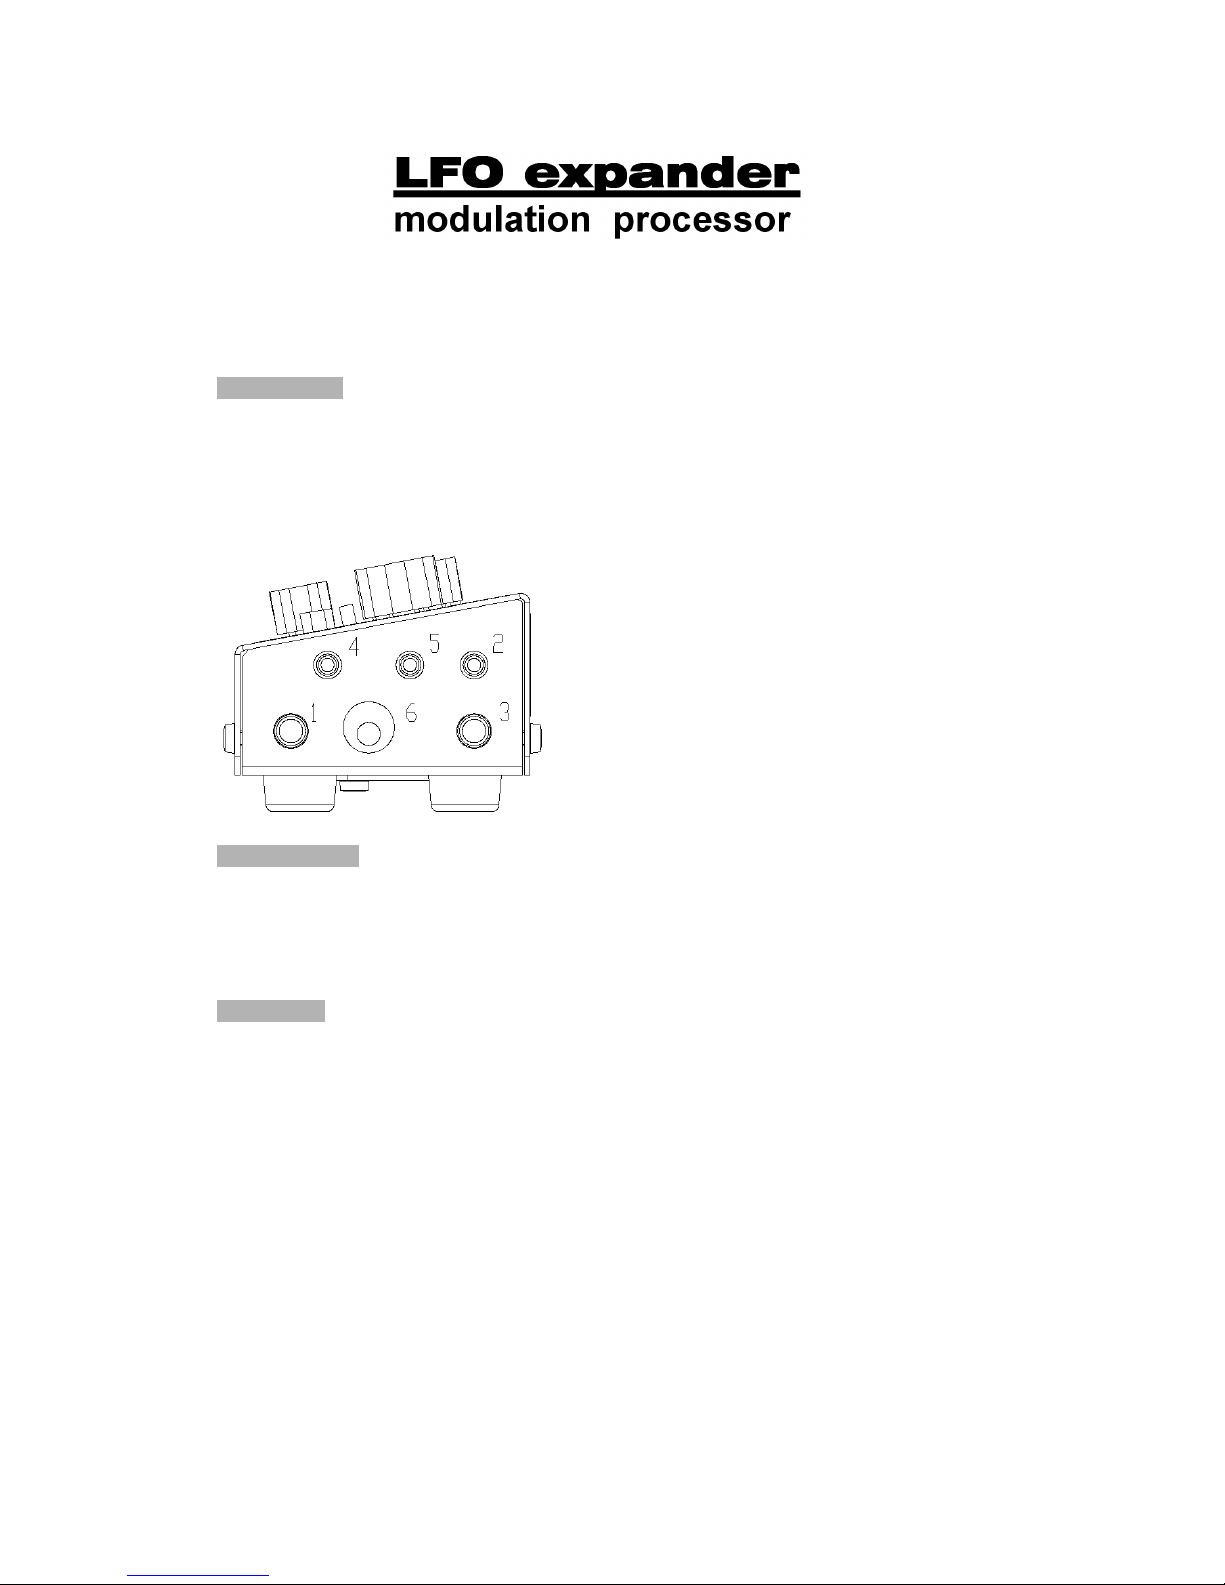
All connections are made on the right side. For your convenience, the main out is
presented as a standard jack (6,3mm) and minijack (3,5 mm) output. Please use
only one of them.
Picture 1: Right-side view
1 Pedal-in or CV-in :jack
6,3mm (TS or TRS)
2 Main out: mini-jack (TS)
3 Main out: jack (TS)
4 CV-in: mini-jack (TS)
5 CV-out: mini-jack (TS)
6 DC input (12V DC)
Note:
TS = Tip – Sleeve
TRS = Tip – Ring - Sleeve
CV = Control Voltage
Power Supply
The LFO-expander runs on 2 9V batteries (not included) or on an external DC-power
transformer (not included). When using a DC transformer, the batteries will be
automatically disconnected. Use a 12V transformer, 250mA or more. GND on the
outside, +12V on the center. Inverting the power will cause no harm. Connector
type: ø6,3mm x ø2,1mm
Foot pedal
The foot pedal can be an active pedal (containing a battery itself) with TS-jack or the
pedal can be a passive pedal (adjustable resistor) with TRS-jack. We recommend a
moog EP2 expression pedal or any pedal with the same specifications. A resistance of
50 k-Ohms works very well for the LFO-expander.
Page 2
(Re)placing batteries
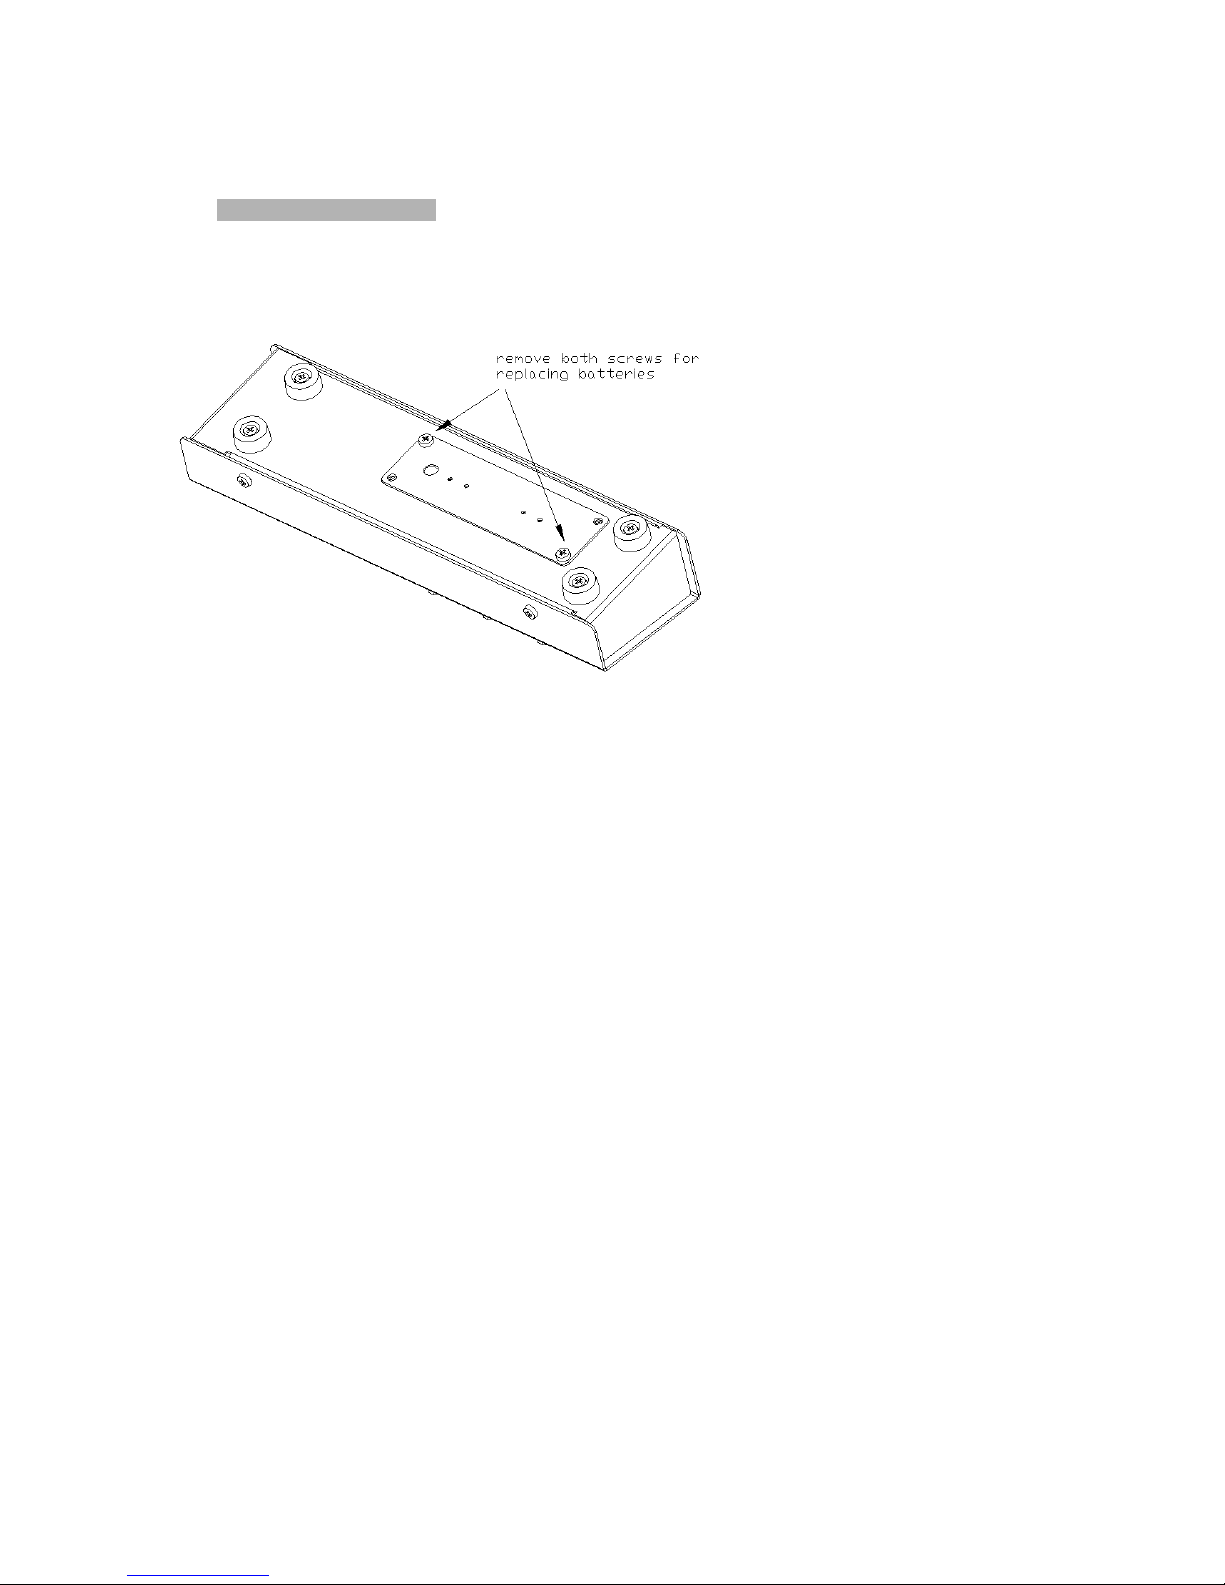
Picture 2: battery-replacement
Unscrew the 2 bolts as
indicated in picture 2. Place
2 9V batteries inside the
battery-clamps and connect
each of them to one of the
leads. Be careful: don’t pull
the leads. When replacing
the battery-cover make
sure both batteries fit inside
the hole of the housing.
Tighten the 2 screws.
When no batteries are
installed, connect both
connectors inside each
other so their metal parts
won’t cause short-circuit
inside the unit.
When batteries are running low of power, LFO frequency will decrease and the unit
will perform not as it should be.
Page 3

General description
The LFO-expander generates an LFO-signal, a sweep signal and can be used to
attenuate a CV-signal. The LFO-signal and sweep-signal can be modulated by a footpedal, Control Voltage (say from a modular synth), or by hand.
All connections are made on the right side of the LFO-expander. Thanks to that, the
expander can be placed just above the keyboard of a minimoog or ARP2600.
LFO
The LFO-circuit generates a rectangular or triangle shaped signal that can be used to
modulate pitch (vibrato), filter (wah-wah), amplitude (tremolo) or other destinations
on your synth, depending on the possibilities of your synth.
The LFO has an adjustable depth and speed that can be set with the controls on the
top-panel.
When applying a signal to the PEDAL IN / CV IN input, or by manually turning the
MANUAL knob, both the speed and depth of the LFO signal can be influenced at the
same time (!) at independent levels.
Sweep
The sweep-circuit generates a positive or negative voltage, depending on the
position of its control-knob. This voltage can be influenced by a signal coming from
the PEDAL IN / CV IN input or by manually turning the MANUAL knob.
The range of the sweep-voltage can be selected and you can mix it with the LFOsignal.
Additional CV
The additional CV-function makes it possible to connect any synth that has CV-in and
CV-out jacks (for controlling the pitch of the synthesizer’s oscillators), and add a
real-time controllable LFO or bend to that synthesizer.
Inside the LFO-expander there’s a trimmer to adjust the amount of key-CV when the
switch is in “mix” mode. Before shipping the unit this trimmer was set to a 1:1 ratio
while the unit was connected to an ARP2600. If your synth’s pitch doesn’t track 1:1
when it’s key-CV is processed by the LFO-expander you’ll have to open the LFOexpander by unscrewing all 7 knobs (allan key), remove the 4 screws that hold the
housing and adjust the trimmer with a small screwdriver for a 1:1 ratio.
The additional CV-circuit is also handy to process a CV from your modular synth with
a knob that’s just in front of you. Set the switch to the right to activate this function.
Page 4
Description of controls
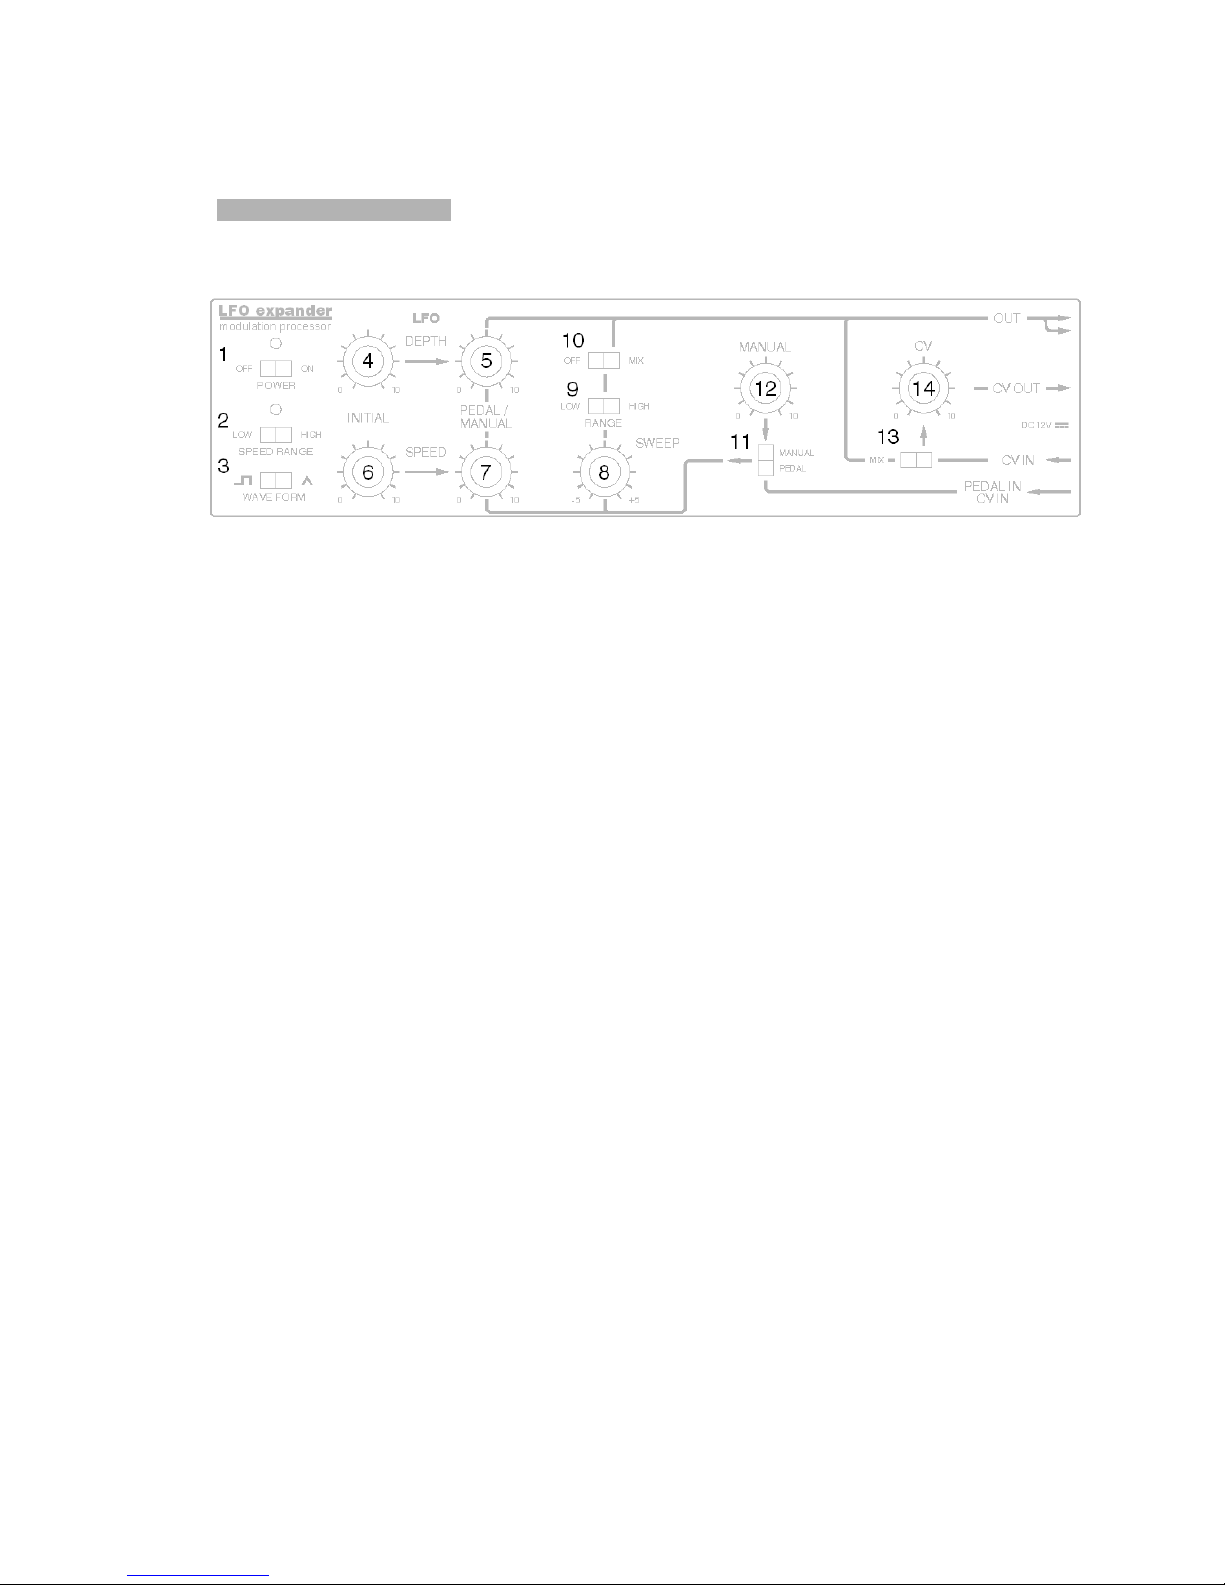
Picture 3: description of controls
1 power-switch. Led above switch will light when on.
2 speed range switch. Switches from low-speed to high speed. LED above
switch will flash indicating LFO-speed.
3 Waveform switch. Switches between rectangular and triangle wave shape
for LFO signal.
4 Initial depth of LFO. This knob controls the portion of the depth of the LFO
that will not be influenced by the signal from the pedal-in jack or manual
knob (12).
5 Controllable depth of LFO. This knob determines how much effect the
signal from the pedal-in jack or manual button has on the depth of the
LFO.
6 Initial speed of LFO. This knob controls the portion of the speed of the LFO
that will not be influenced by the signal from the pedal-in jack or manual
knob (12).
7 Controllable speed of LFO. This knob determines how much effect the
signal from the pedal-in jack or manual button has on the speed of the
LFO.
8 Sweep. This knob controls the amount of CV that will be generated when
you control the foot-pedal or manual button (12). The CV can be negative
(counter clockwise) or positive (clockwise).
9 This button changes the output of the sweep. Usually, set to low for pitch-
control, set to high for filter-control.
10 Sweep-mix. When turned off, the sweep CV will not be fed to the main
out. When set to mix the sweep-CV will be added to the LFO-signal.
11 Manual/pedal switch. This switch determines whether the manual-knob
(12) or foot-pedal will control the LFO and sweep signals.
12 Manual knob. When button 11 is set to “manual”, this knob controls the
controllable portion of the LFO-depth and speed and controls the sweepsignal.
13 CV-mix. This button determines whether a signal applied to the CV-in will
be routed to the CV-knob (14) or will be mixed 1:1 with the LFO- and
Sweep signals.
14 CV knob. This knobs controls the attenuation of the CV-signal when button
13 is set to right. The CV-signal will then be routed to the independent CV
out.
Page 5
Connection examples
The next diagrams offer some examples for connecting the LFO-expander to
synthesizers. In general, the LFO-expander can be used on almost every analog
synthesizer having CV IN and CV OUT. In general, the CV-IN jack of a synthesizer is
internally connected to it’s CV OUT. By inserting a jack into the CV IN, this internal
connection will be broken. Now, when you feed the synths’s CV OUT to the LFOexpander, it will come back to the synth including the LFO or sweep (bend) signals.
On many synthesizers, the CV IN is routed to the filter-circuit as well (just like the
synth’s internal keyboard CV is) so the filter cut-off frequency is influenced by the
output of the LFO-expander as well. On some synths, this key tracking can be set on
or off.
Some additional information:
On the Moog model D minimoog, there is no CV out. However, there is
an “OSC IN” jack. External signals routed to this “OSC IN” jack are
mixed with the minimoog’s own keyboard CV.
On the Yamaha CS80, external signals are reversed in polarity. So set
the sweep-knob to the left (negative side) to bend the pitch higher or
the filter brighter.
On the Yamaha CS50 and CS60, direct currents are filtered out from
the external signal. This means pitch bending and very slow LFO’s
applied to the CS50 or CS60 will lead to unexpected results. Normal
LFO-frequencies will not be a problem.
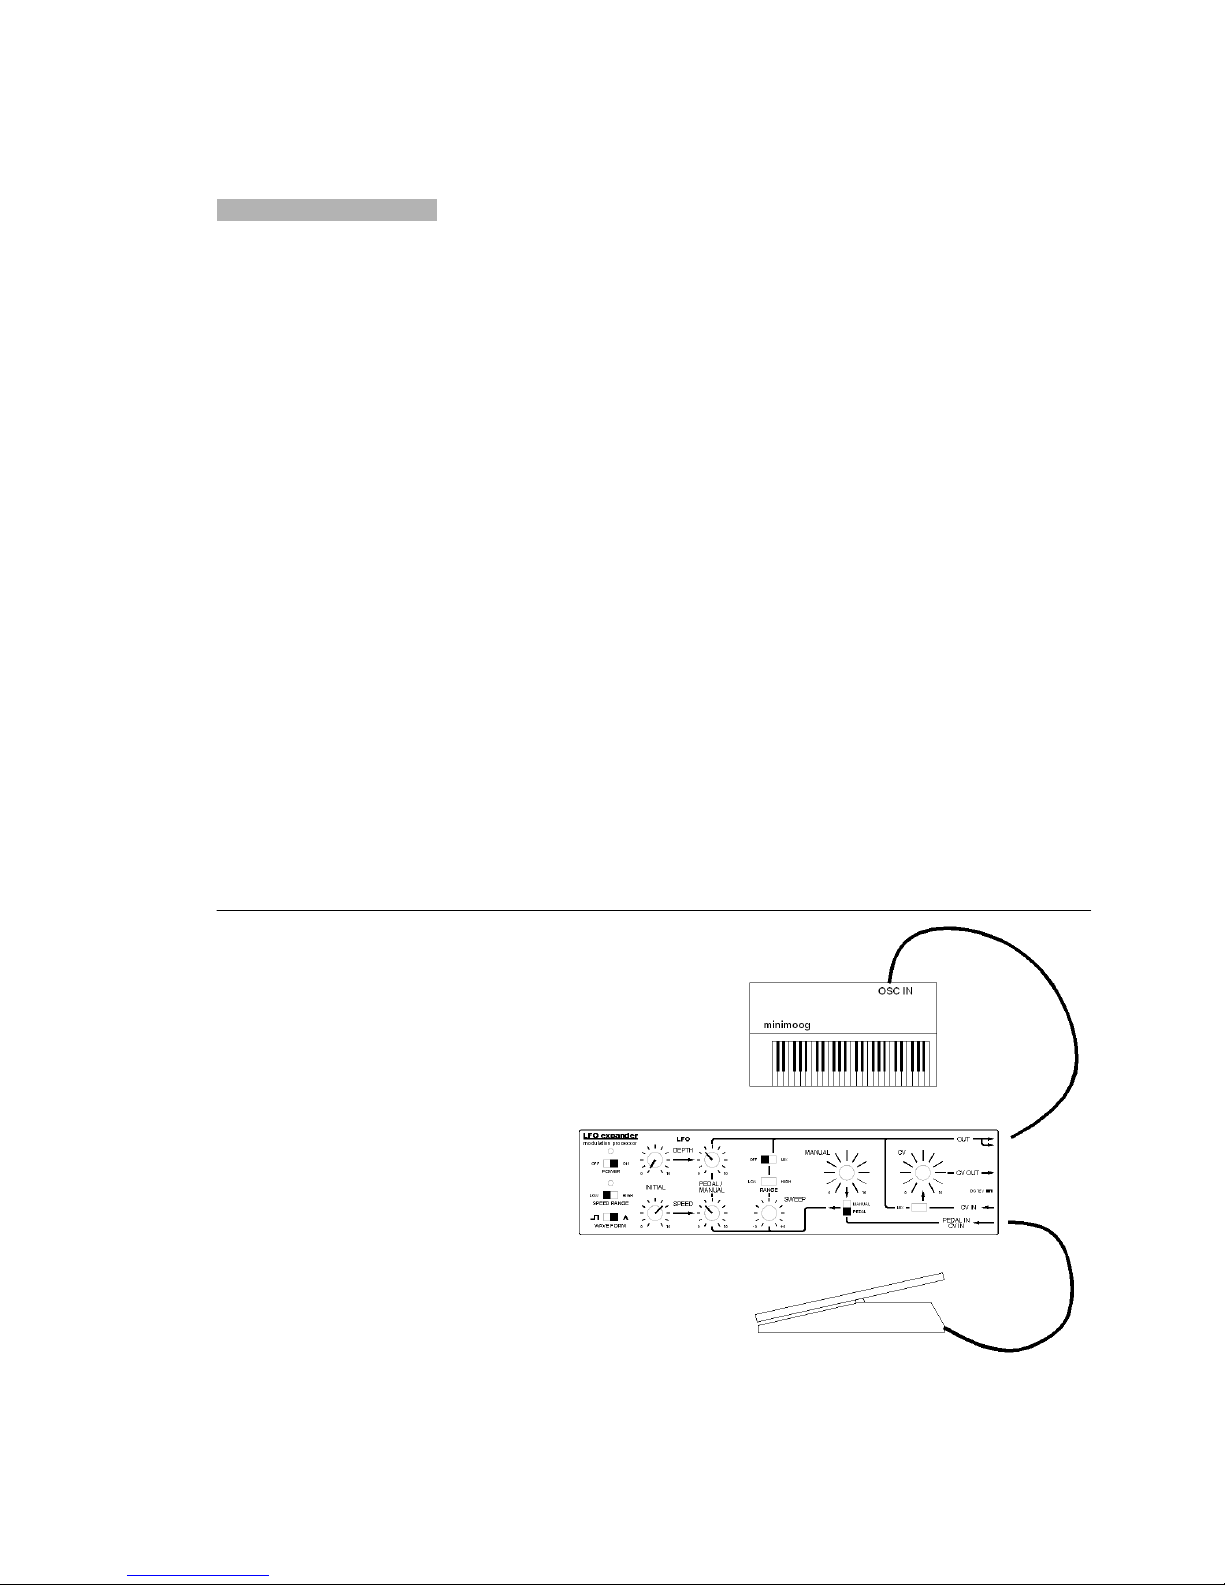
Example 1: Vibrato on model D minimoog.
Connect the foot pedal and
minimoog as shown in the
diagram. Set the controls as
shown. Play the keyboard of the
minimoog and use the foot pedal to
control LFO speed and depth.
Page 6
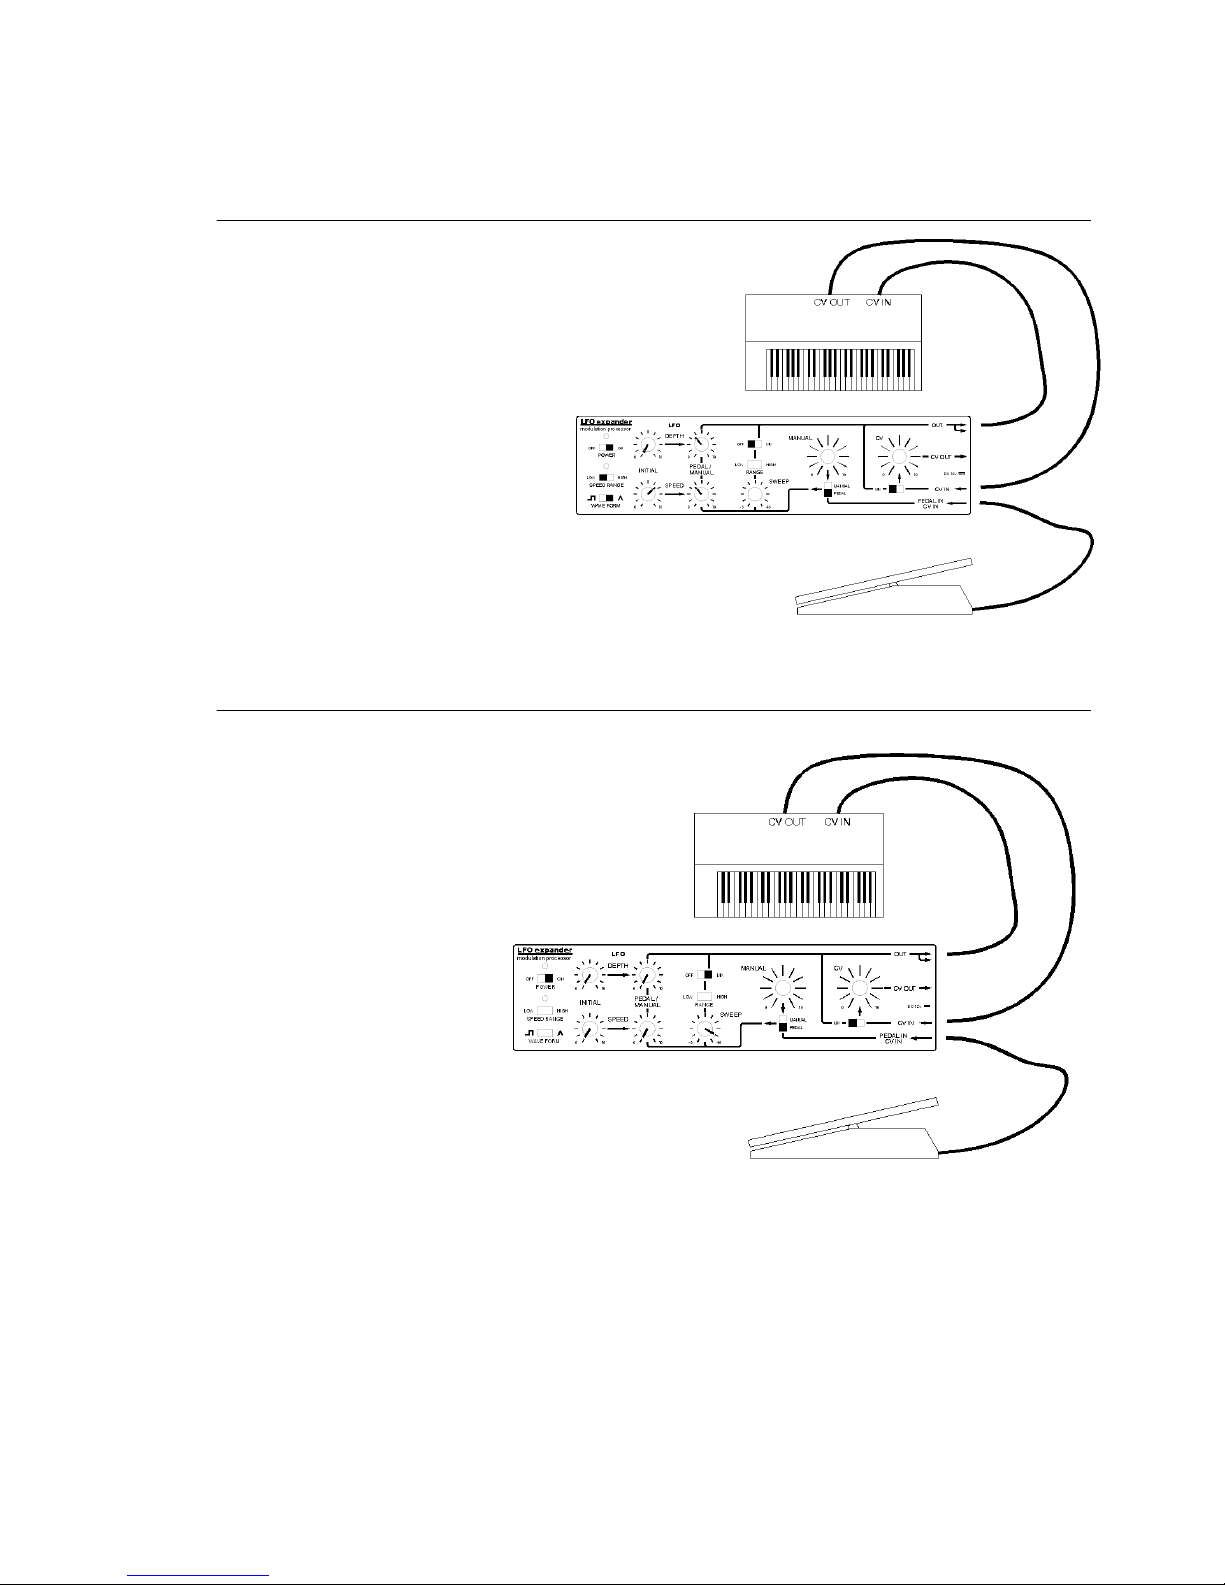
Example 2: Vibrato on monosynth with CV-in / CV-out
Connect the foot pedal as shown.
Connect the synth’s KEY CV OUT to
the CV IN of the LFO-expander.
Connect the main OUT to the
synth’s CV IN. Play the keyboard of
your synth and use the foot pedal
to control LFO speed and depth.
Example 3: Pitch-bends on monosynth with CV-in / CV-out
Connections are like
example 2. Turn the LFOcontrols fully counter
clockwise and set SWEEP
switch to “mix”. The SWEEP
knob and RANGE switch can
be set to determine the
range of the sweep.
Remember, the SWEEP
knob can be set to positive
(upward) or negative
(downward) bends.
Note:
Make the connections as
shown in example 1 and set
the controls as shown over
here to make pitch bends
on the minimoog.
Page 7
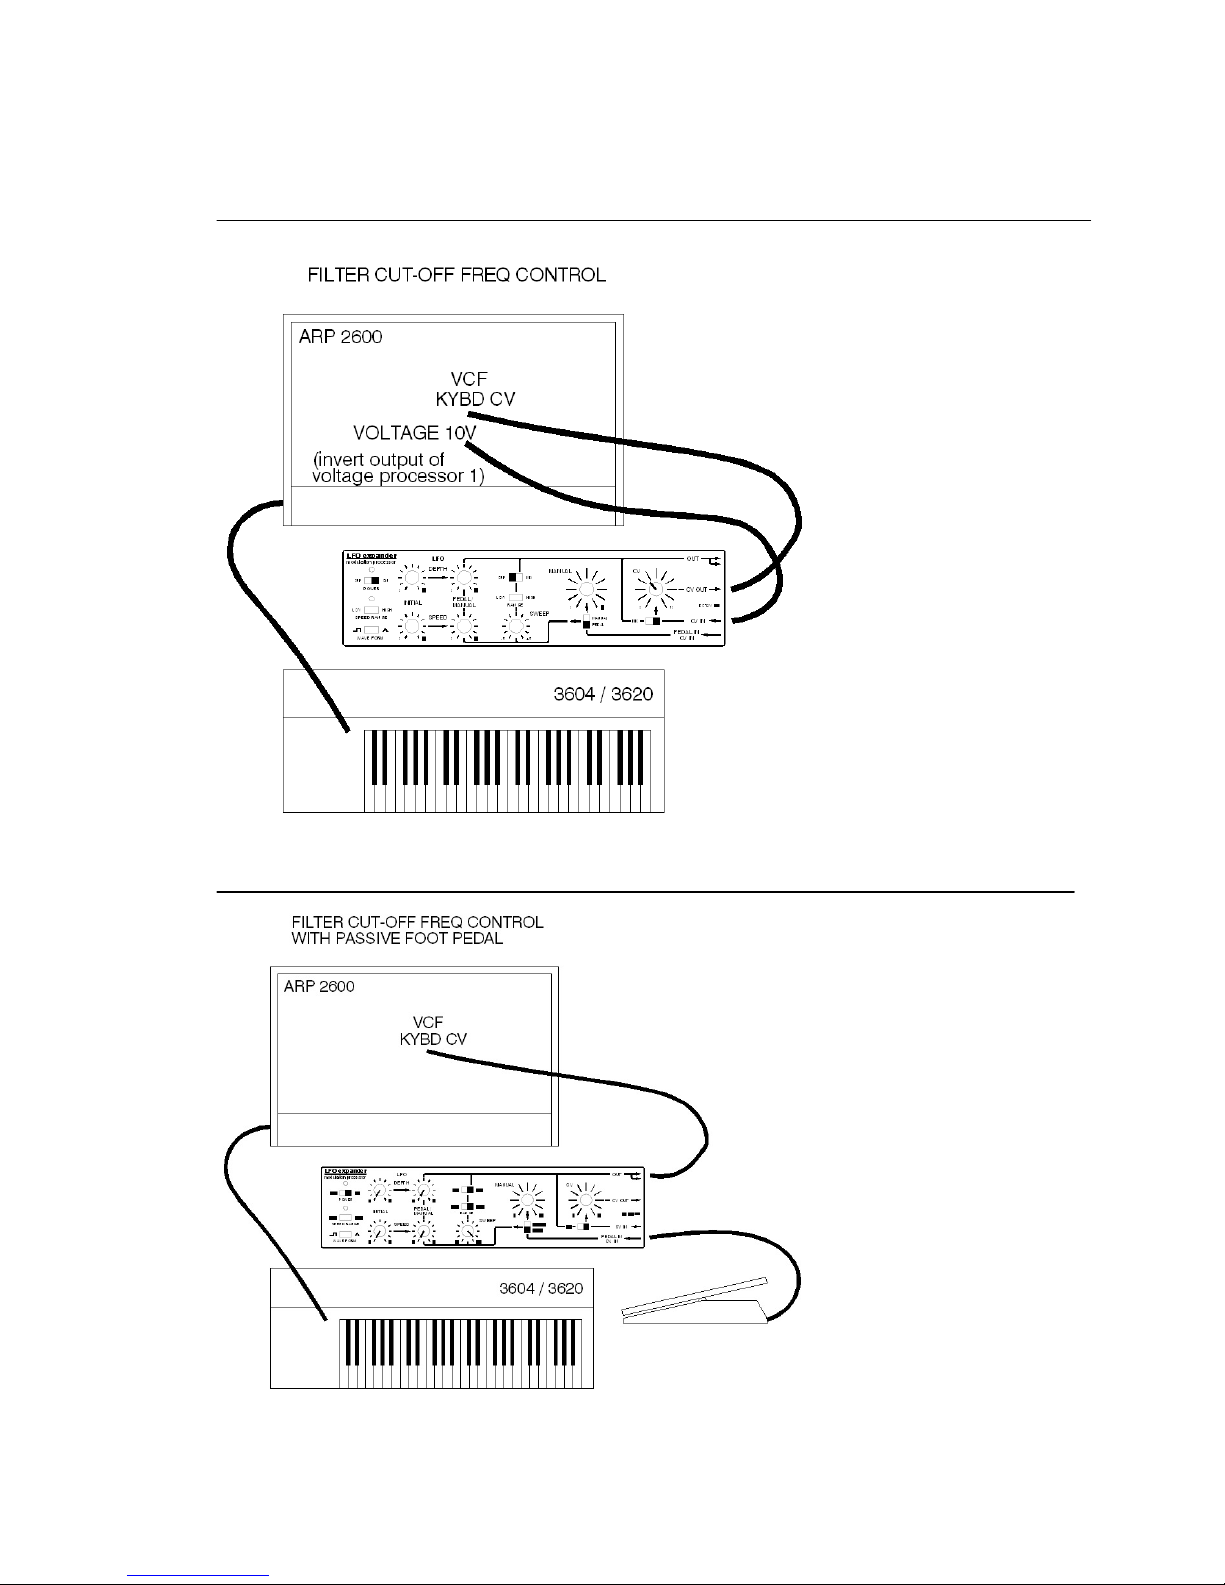
Example 4: Filter cut-off frequency control on ARP 2600
Connect patch
cords as shown.
Use invert output
of voltage
processor 1 and
move that slider
fully to the right.
Play the keyboard
of the ARP 2600
and turn the CVknob to create
filter sweeps.
Example 5: ARP2600 filter cut-off controlled by passive foot pedal
Connect patch
cords as shown.
Play the keyboard
of the ARP 2600
and use the
passive foot pedal
to sweep the filter
cut-off frequency.
Or:
Switch to “manual”
and use the
“manual” knob
instead of the foot
pedal
Page 8
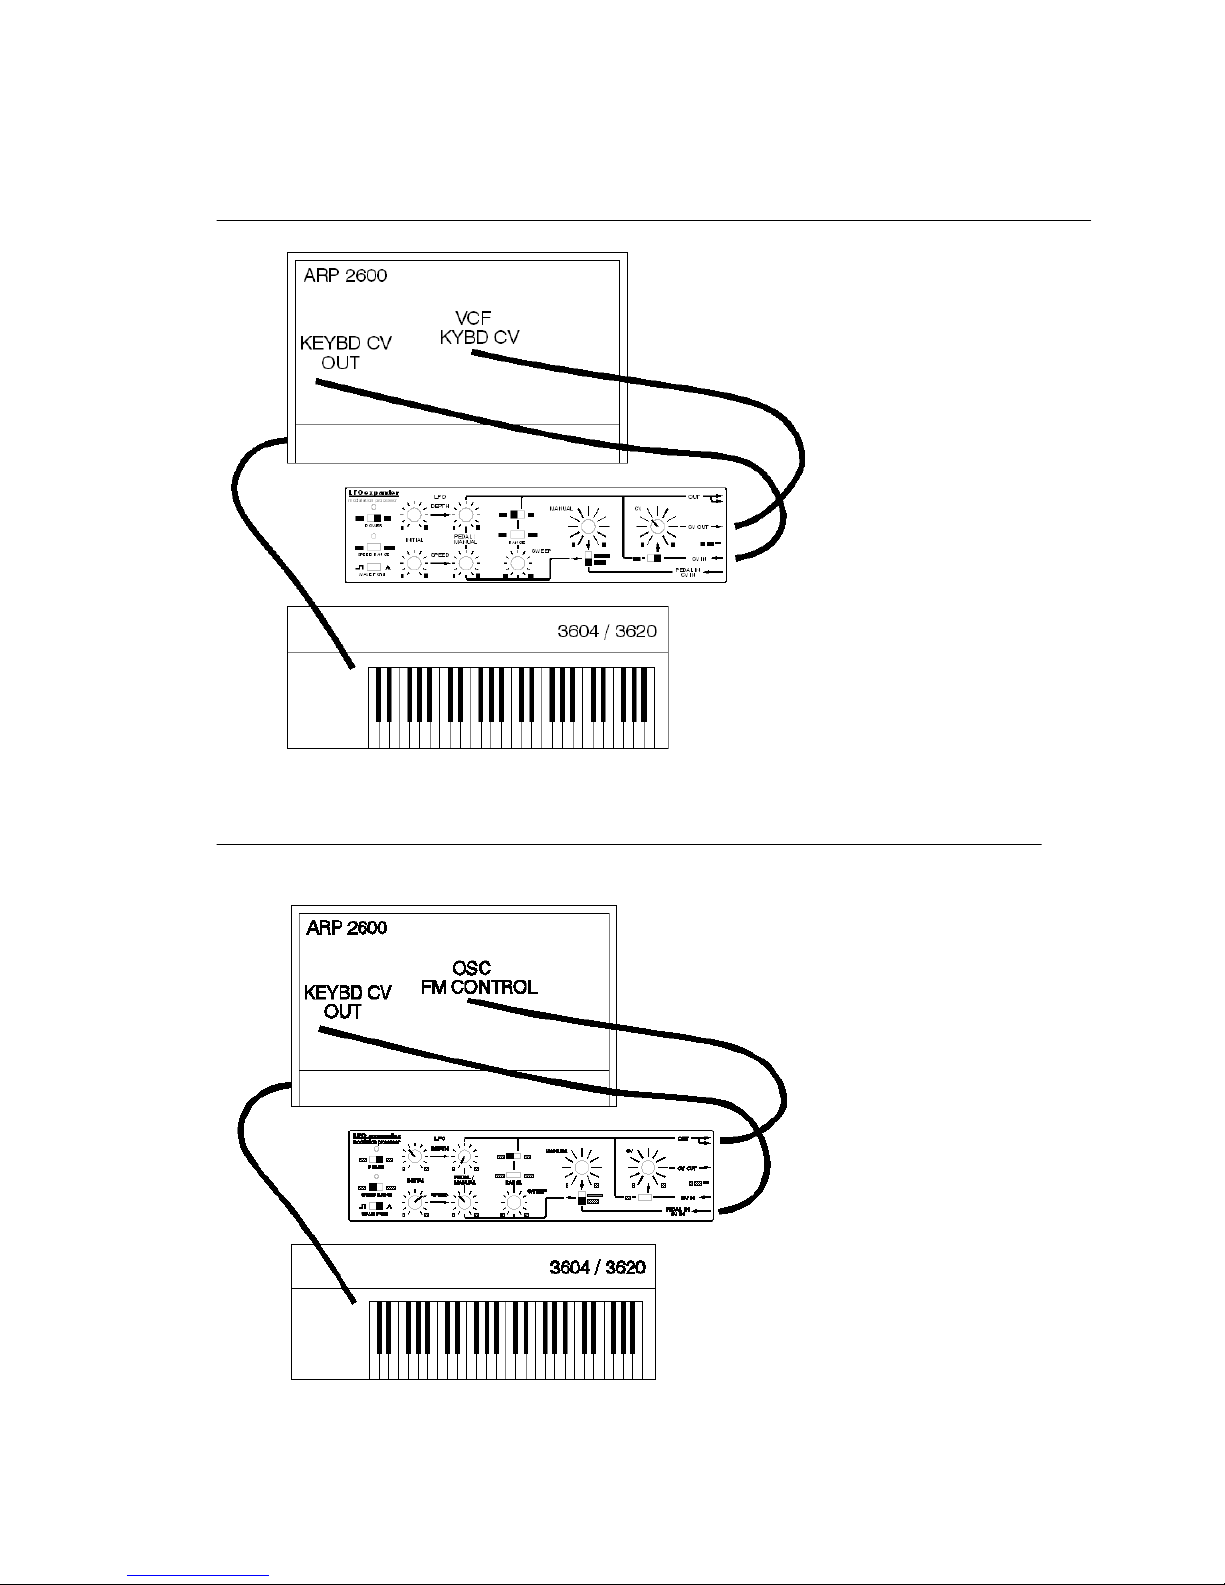
Example 6: Variable filter cut-off keyboard tracking on ARP 2600
Connect patch
cords as shown.
Play the keyboard
of the ARP 2600
and turn the CVknob to control the
amount of filter
keyboard tracking.
Example 7: LFO speed keyboard-tracking on ARP 2600
Connect patch cords
as shown. Do not
use oscillators KYBD
CV but one of the
other osc inputs.
Play the keyboard of
the ARP 2600 and
notice LFO speed will
increase when
playing higher keys.
Note: use the 2600’s
multiples to control 2
or 3 oscillators at the
same time.
Page 9
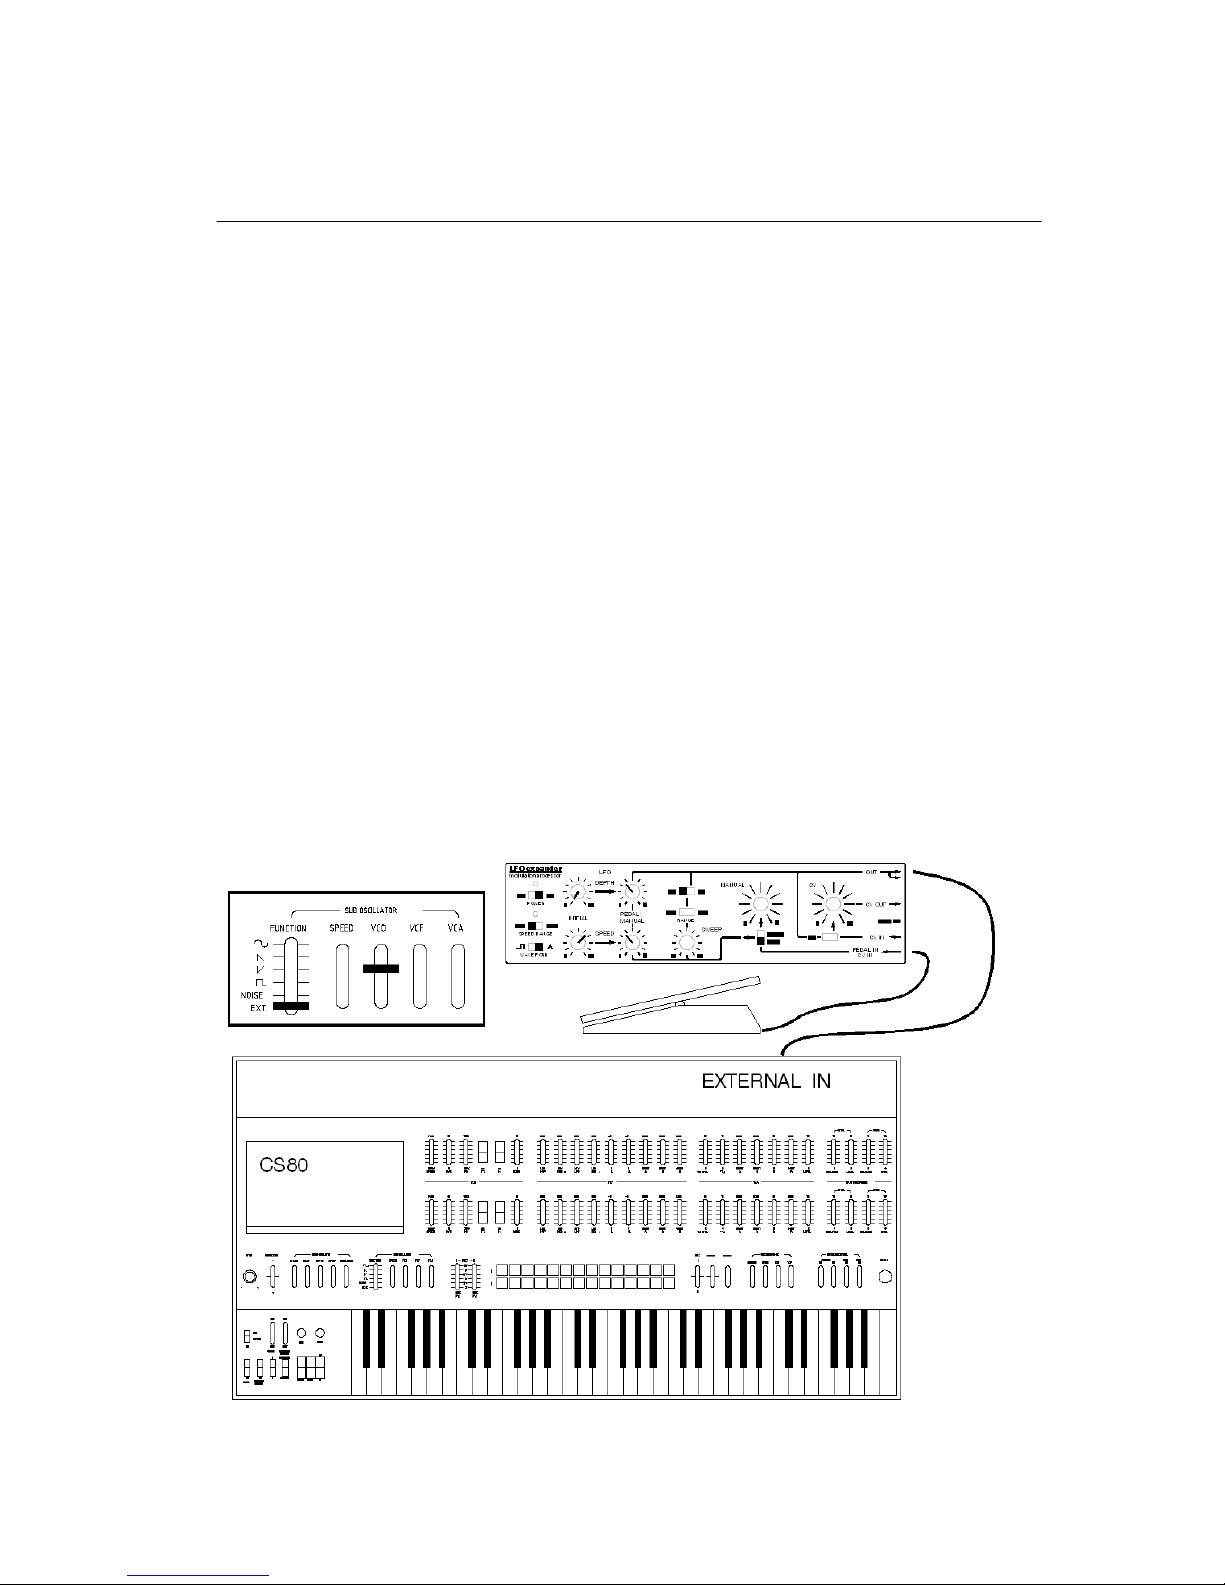
Example 8: Vibrato on Yamaha CS80
Connect the foot pedal as shown. Connect LFO-expander’s main out to “external in”
of CS80. Set “external level” halfway. Set CS80’s Sub Oscillator function to “EXT.”
and adjust VCO slider as shown in detail. Use the foot pedal to control vibrato.
Now, you can apply vibrato (and change it’s speed) by foot-pedal while
independently applying other effects (such as VCF-control) by using the keyboards
poly-aftertouch. Besides the action of the foot pedal, poly aftertouch can still control
the depth for the modulation of vco’s, filter and amplification.
You can also use the “SWEEP” function to make pitch bends or filtersweeps.
Since the CS80’s internal LFO (named sub oscillator) is disconnected from the
internal signal source (because the function-lever is set to “ext”), the two “speed”
levers just above the keyboard are not functioning anymore. However, the “touch
control” levers for brilliance and level on both voice-channels ( and memory-banks)
are still active and can be used to create effects with poly-aftertouch.
Note:
the range of vibrato and pitch bends is limited by the CS80. Maximum is about 3 to 4
semitones up and down. When applying higher levels to the CS, the signal will be
clipped, resulting in strange, unnatural (but interesting) waveforms.
Note:
the signal applied to the “EXTERNAL IN” of the CS80 is inverted. Set the SWEEPknob on the LFO-expander to negative values to create upward bends while pressing
the foot pedal.
Note:
on the CS50 and CS60, pitch bends will not work correctly because constant–level or
slow changing signals are filtered by the CS50 and CS60.
Page 10
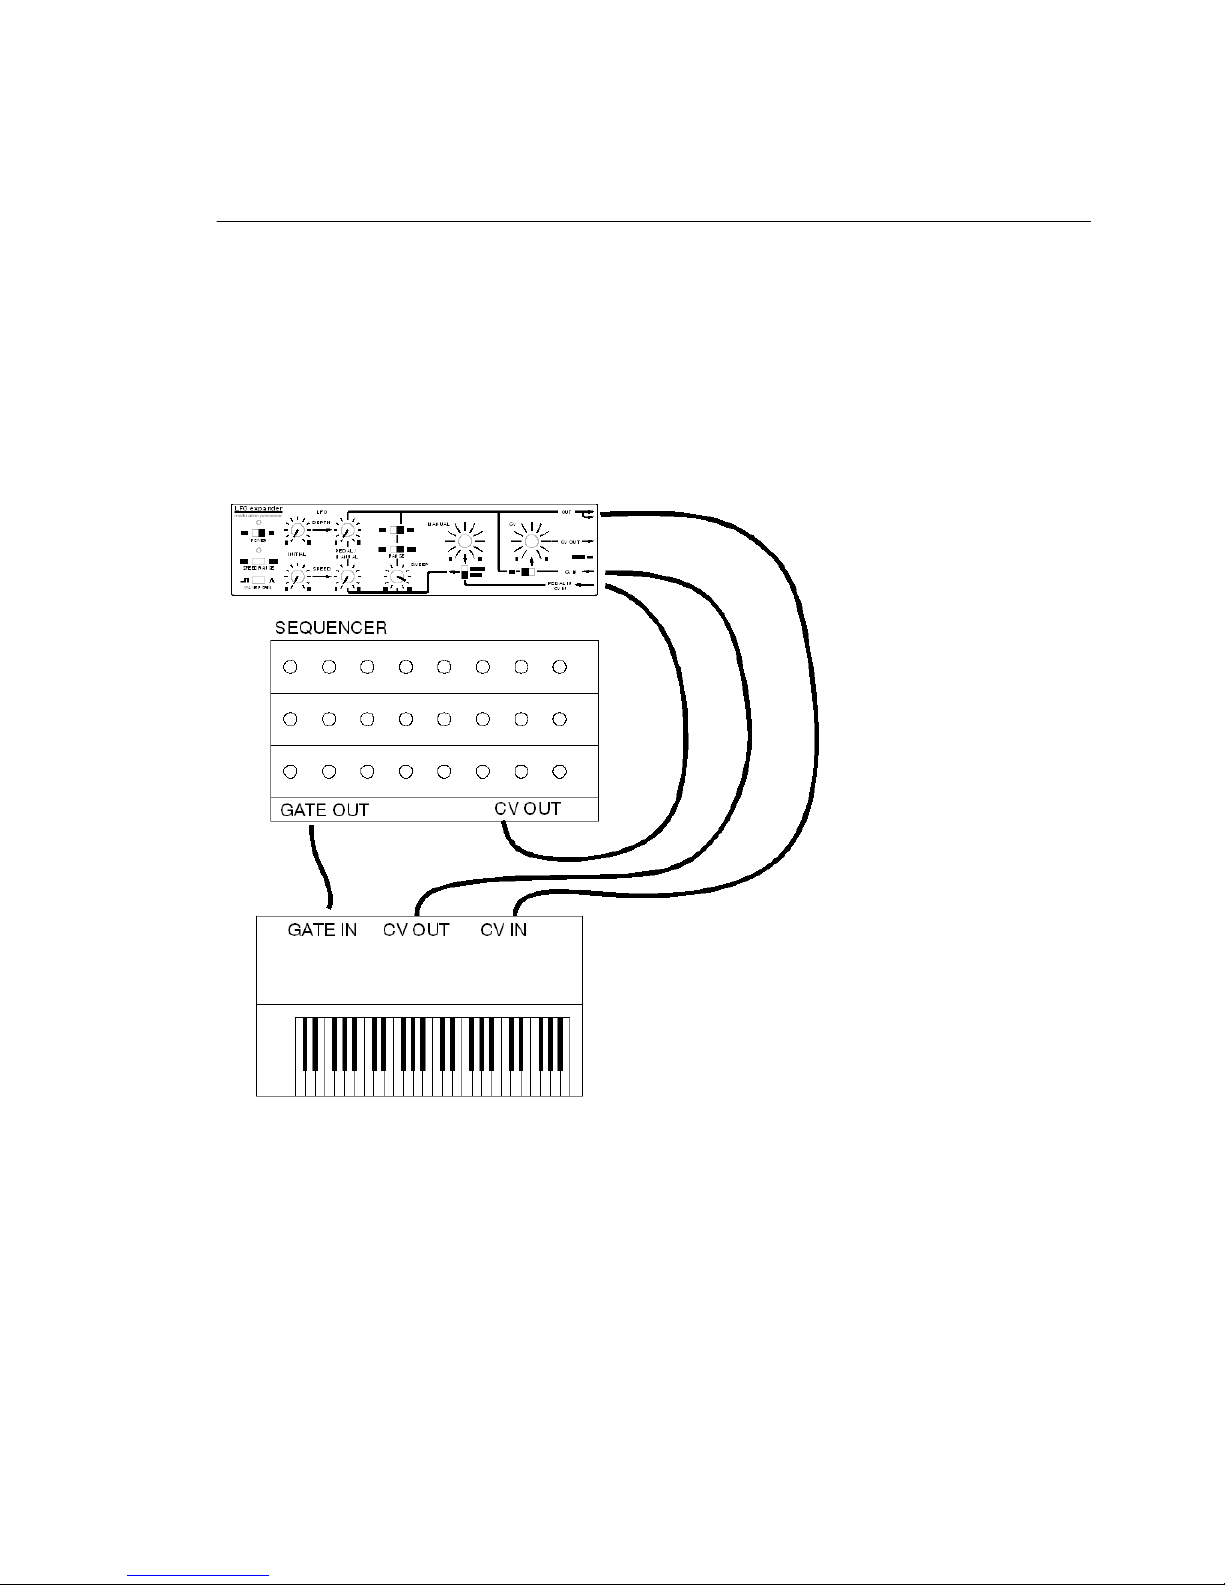
Example 9: Real-time pitch-transposing of sequence
In this example, the LFO-expander’s functionality to mix 2 CV’s is demonstrated. By
adding a keyboard CV to a sequencer CV, real-time transposing of the sequence is
possible by pressing keys on the keyboard while the sequencer is running. In this
example, the synth’s keyboard CV OUT is routed to the LFO-expander’s 1:1 CV
circuit. De sequencer’s CV OUT is connected to the LFO-expander’s PEDAL IN / CV IN
and routed to the SWEEP-circuit. Now, carefully adjust the SWEEP-knob to obtain a
1:1 amplification of the sequencer’s CV out (set SWEEP RANGE to “high”).
Connect the main OUT of the LFO-expander to the CV IN of your synthesizer.
Connect the GATE OUT of the sequencer to the GATE IN of your synthesizer.
Note:
You can set the
LFO-controls to
add vibrato to the
sequence and
free the internal
LFO of your synth
for other
purposes.
Page 11

other ideas
ARP2600:
Use the LFO-expander’s triangle wave to modulate osc2 Pulse Width (PWM).
Use the EXTERNAL VIBRATO IN on your 3620 keyboard to apply LFO or pitch bends
to all oscillators.
Use a passive foot pedal to control any input on your 2600 (by using the sweep
function).
(semi) modular synthesizer:
Use the output of an envelope to shape the amplitude and speed of the LFO.
Reverse the output of an envelope via the negative sweep function.
Minimoog:
You can now use oscillator 3 as a sound source and use the LFO-expander for
modulations (pitch, filter, volume).
Passive foot pedal:
If you own a passive foot-pedal (like most pedals are) but your equipment demands
an active pedal (a pedal that creates a voltage) you can use the LFO-expander to
convert your passive pedal into an active pedal (by using the sweep-function).
Midi:
Use a midi to CV converter to control LFO speed and depth over midi.
General:
Use the LFO-expander as a second LFO source. For example, use the LFO expander
as shown in example 2 for vibrato and use the synth’s internal LFO for filter
modulation (wah-wah) or auto-key-triggering.
For latest info, please visit www.lfo-expander.com
 Loading...