

Page 1
1
Page 2

INFORMATION
For more information on Lezyne products, visit: http://lezyne.com
WEEE NOTICE & PRODUCT DISPOSAL:
The symbol of the crossed waste container means that, in accordance with2002/96/EC
Waste Electrical and Electronic Equipment Directive (WEEE),once the product reaches
the end of its lifecycle, in the European Union it is subject to special waste disposal. In
addition to the present device, this rule is also applied to all items carrying such a symbol.
Do not dispose of these products as undifferentiated urban waste but put away for material
differentiated recycling.
CE RF Compliance—Meets the EU Requirements:
The equipment complies with the RF Exposure Requirement 1999/519/EC, Council
Recommendation of 12 July 1999 on the limitation of exposure of the general public to
electromagnetic fields (0–300 GHz). Changes or modifications to this product not authorized
by the manufacturer could void the EMC compliance and negate your authority to
operate the product. This product has demonstrated EMC compliance under conditions
that included the use of compliant peripheral devices and shielded cables between system
components. It is important that you use compliant peripheral devices and shielded
cables between system components to reduce the possibility of causing interference to
radios, televisions, and other electronic devices. We, hereby, declare that this cellular,
Wi-Fi radio is in compliance with the essential requirements and other relevant provisions
of Directive 1999/5/EC. Products with CE marking comply with the EMC Directive
(2004/108/EC) and the Low Voltage Directive (2006/95/EC) issued by the Commission of
the European Community. Compliance with these directives implies conformity to the
following European Norms (in parentheses are the equivalent international standards).
FCC & IC User Warning Notice:
Any changes or modifications not expressly approved by the party responsible for compliance
could void your authority to operate the equipment.
NOTE:
This equipment has been tested and found to comply with the limits for a Class B digital
device, pursuant to part 15 of the FCC Rules. These limits are designed to provide reasonable
protection against harmful interference in a residential installation. This equipment
generates, uses and can radiate radio frequency energy and, if not installed and used in
accordance with the instructions, may cause harmful interference to radio communications.
However, there is no guarantee that interference will not occur in a particular
installation. If this equipment does cause harmful interference to radio or television
reception, which can be determined by turning the equipment off and on, the user is
encouraged to try to correct the interference by one or more of the following measures:
—Reorient or relocate the receiving antenna.
—Increase the separation between the equipment and receiver.
—Connect the equipment into an outlet on a circuit different from that to which the
receiver is connected.
—Consult the dealer or an experienced radio/TV technician for help.
Labeling Requirement Notice:
Any Changes or modifications not expressly approved by the grantee of this device could void
the users authority to operate the equipment
This device complies with Part 15 of the FCC Rules and Industry Canada license-exempt
RSS standard(s). Operation is subject to the following two conditions: (1) this device
may not cause harmful interference, and (2) this device must accept any interference recieved,
including interference that may cause undesired operation of the device.
FCC:
This Transmitter must not be co‐located or operating in conjunction with any
other antenna or transmitter.
RF Exposure Warning:
This equipment complies with FCC RF radiation exposure limits set forth for an
uncontrolled environment. The equipment must not be co-located or operating in conjunction
with any other antenna or transmitter
Canada, Industry Canada (IC) Notices:
This device complies with Canada licence-exempt RSS standard(s).
Operation is subject to the following two conditions: (1) this device may not cause interference
and (2) this device must accept any interference, including interference that may cause
undesired operation of the device.
Canada, avis d’Industry Canada (IC)
Cet appareil est confrome avec Industrie Canada exceptes de licence RSS stadard(s). Son
fonctionnement est soumis aux deux conditions suivantes: (1) cet appareil ne doit pas causer
d’interference et (2) cet appareil doit accepter toute interfence, notamment les interferences qui
peuvent affecter son fonctionnment.
Radio Frequency (RF) Exposure Information
The radiated output power of the Wireless Device is below the Industry Canada (IC) radio
frequency exposure limits. The Wireless Device should be used in such a manner such that the
potential for human contact during normal operation is minimized.
This Device has also been evaluated and shown compliant with IC RF Exposure limits under
portable exposure conditions. (antennas are less than 20cm of person’s body)
Informations concernant l’exposition aux frequences radio (RF)
La puissance de sortie emise par l’appareil de sans fil est inferieure a la limite d’exposition aux
frequences radio d’industry Canada (IC) Utilisez l’appareil de sans fil de facon a minimiser les
contacts humains lors du fonctionnement normal.
Ce peripherique a egalement ete evalue et demontre confrome aux limites d’exposition aux RF
d’IC dans des conditions d’exposition a des appareils portables. (les antennes sont moins de
20cm du corps d’une personne)
Lezyne is a trademark of Lezyne USA, Inc. and registered both in the United States and
internationally Any unauthorized use is expressly prohibited
Bluetooth ®is a trademark of Bluetooth SIG, Inc,
ANT+™ is a trademark of Dynastream Innovations, Inc.
The term Strava, the Strava logos and product and service names are the exclusive trademarks
of, and are owned by, Strava Inc
Shimano ™is a trademark of Shimano Inc
2
Page 3

WARRANTY
Lezyne GPS devices carry a one (1) year warranty from the original purchase date to the original owner (proof of purchase is required.) This warranty covers materials and manufacturing defects
on the GPS housing, electronics, and the mounting bracket supplied. Issues not covered by the warranty include normal wear and tear, consumable parts, such as batteries, unless product
damage has occurred due to defect in material or manufacturing, improper installation, attempting to access electronics, modifying electronics, damage or failure due to accident, misuse, abuse,
or neglect.
Because of possible user resealing error of the USB port, this product is not warrantied against water in the housing from improper sealing or any resulting damage. Please review and follow the
instructions carefully when sealing the USB port.
This product is intended to be used only as an activity tracker and must not be used for any purpose requiring precise measurement of direction, distance, location or topography. Lezyne makes
no warranty as to the accuracy or completeness of map data in this product.
In no event shall Lezyne be liable for incidental or consequential damages for any traffic fines or citations, relating to or resulting from the use of this product or any of its parts. Lezyne assumes
no liability for any accident, injury, death, loss, or other claim related to or resulting from the use of this product.
3
IMPORTANT
Do not become distracted by the device—always operate vehicles in a safe manner. Lezyne USA, Inc. does not accept any liability for injuries or other damages resulting
from
the use of this product in any circumstances.
DO NOT SUBMERGE UNDER WATER
Lezyne GPS devices are water resistant under normal conditions, but are not waterproof. If moisture gets inside device body, air-out until completely dry.
DO NOT ATTEMPT TO REMOVE ELECTRONICS
Doing so will void warranty.
Do not operate or store outside of temperature range (-20–60° C). Battery life may be affected at temperature extremes.
Location and surroundings may affect GPS signal. For best results, use the device outdoors with an unobstructed
view of the sky. It may take up to 60 seconds to acquire GPS signals.
This GPS device is not a calibrated measuring tool. It should not be used for surveying
purposes. GPS based elevation measurements may vary. Calorie readings are an estimation
for reference only.
CA PROPOSITION 65 WARNING:
This product may contain chemicals known to the State of California to cause cancer and birth defects or other reproductive harm (California law requires this warning to be given to customers in
the State of California). For more info: www.lezyne.com/prop65
Page 4
4
TABLE OF CONTENTS
• Getting Started (Page 5)
– Modes
– Buttons
– Screen Icons
– Charging GPS
– Installing GPS
– Turning on GPS
– GPS Satellite Signal
– Starting a Ride
– Ending a Ride
– Uploading a Ride to your Computer
• Time Set up (Page14)
– Time Format
– Time Zone*
– Daylight Saving*
– 2nd Time Zone
• Screen Set up (Page 16)
– Layout
– Fields
– Unit Format
– Brightness (Backlight)
• Personal Set up (Page 20)
– Sport Type
– Language*
– Age*
– Weight*
– Height*
– Gender*
• Phone Pairing (Page 22)
– Pairing to the Phone
– Notification Set up
– Navigation
– Mapping
– Strava Live Segments
– Lezyne Track
• Sensor Pairing (Page 29)
– Heart Rate Monitor Set up
– Speed Monitor Set up
– Cadence Monitor Set up
– Power Monitor Set up
– Shifting Set up
• Bike Set up (Page.31)
– Wheel Circumference
– Bike Weight
• Auto Set up (Page.32)
– Scroll
– Pause
– Lap
– Light (Backlight)
• Alerts Set up (Page 34)
– Calories
– Sitting Time
– Step Goals
– Vibrator
– Ride Distance
– Ride Time
– Run Distance
– Run Time
• Records (Page 30)
– Erase All
– Erase Oldest
– Memory
– Reset Trip 1
– Reset Trip 2
– Reset Odo (Odometer)
• Info (Page 43)
– Device
– Firmware
– GPS
– Sats
• Specifications (Page 47)
• Data Metrics Explained (Page 47)
• Troubleshooting (Page 49)
– Updating Software
– Support
– Resetting the Device
Page 5
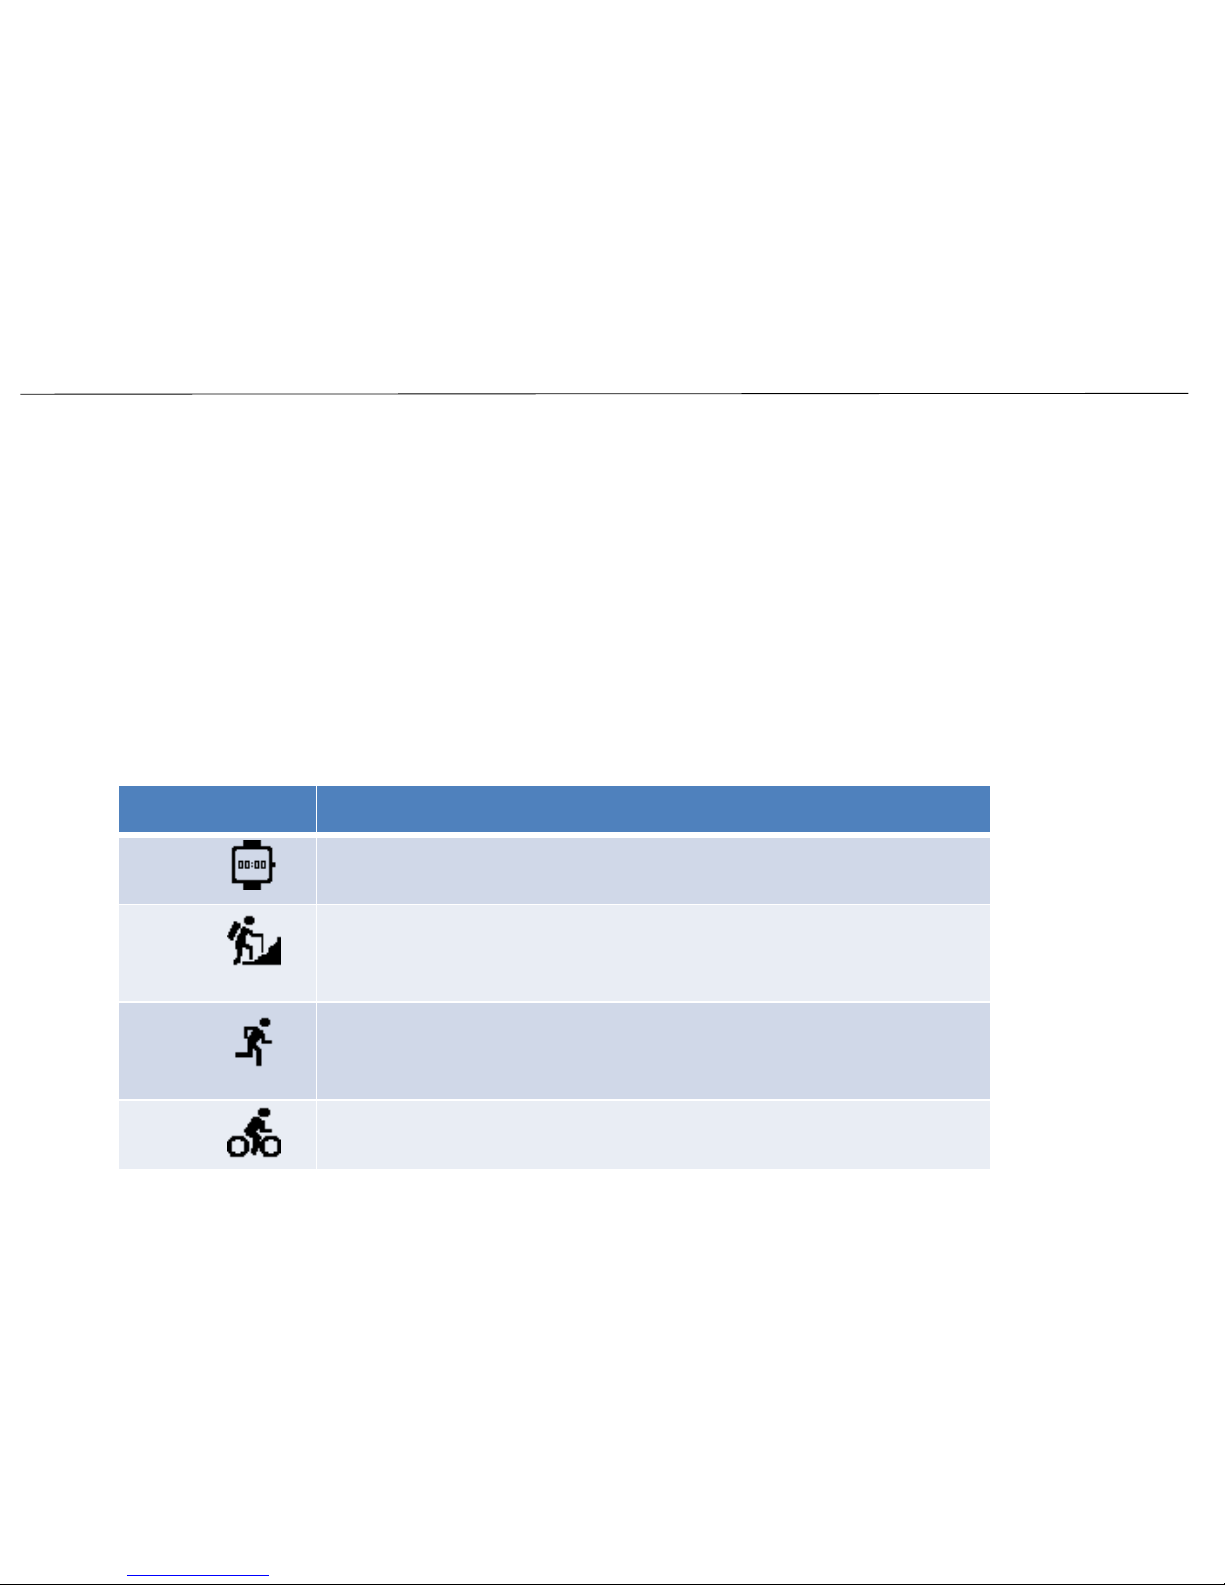
Modes
Features
Lifestyle
Watch, Steps, Movement, Temperature , Phone Status,
Notifications
(Calls, Texts, Emails)
Hiking
Elevation, Ascent, Descent, Heart Rate, Avg. HR, Max HR, Distance,
Temperature, Time, Trip Recording,
Lezyne Track, Breadcrumb
Map, Navigation, Notifications,
Strava Live Segments
Running
Pace, Average Pace, Max Pace,
Heart Rate, Average HR, Max HR,
Distance, Temperature, Time, Trip Recording, Lezyne Track,
Breadcrumb Map, Navigation, Notifications,
Strava Live Segments
Biking
Up to 5 customizable pages (See Pg. 18)
, Breadcrumb Map,
Navigation, Lezyne Track, Notifications,
Strava Live Segments
GETTING STARTED
Modes
5
The Lezyne GPS Watch is not only a great cycling device for recording speed,
distance and sensor information; it can also be used as a watch to track steps
and running /hiking activities.
Lifestyle, Hiking, Running Modes have preset data pages for popular metrics
used during those activities.
Lifestyle mode is best for a long battery life and to track daily steps.
Each Mode has its own menu set. This is to control their specific layouts and
open up features only available in specific modes. Personal information,
Time, and Phone features are the same in all modes and only need to be
setup once.
Page 6
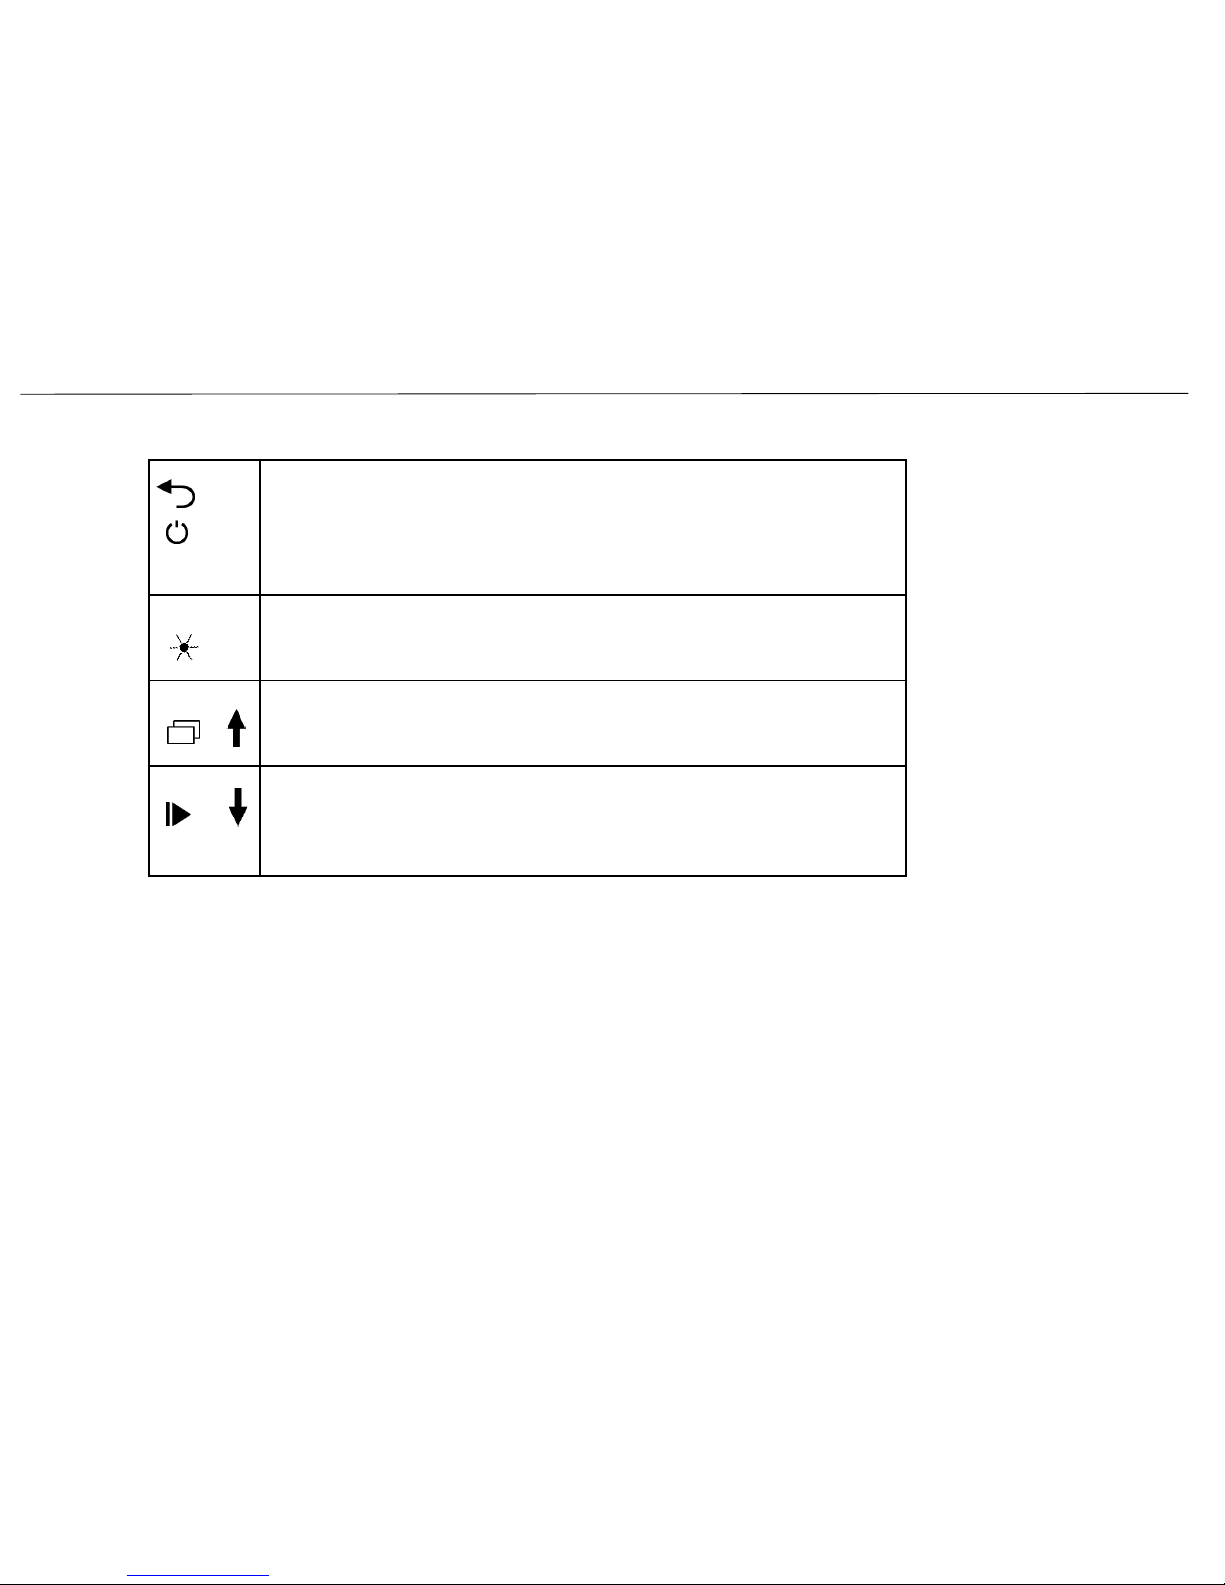
• Hold for 2 seconds to turn device ON.
• Hold for 2 seconds to switch between Lifestyle, Biking, Hiking, and
Running Modes or to turn OFF.
• Press to scroll left through the data pages.
• Press for back function in device menu.
ENTER • Press to Enter a selection in the device menu.
• Press to turn backlight ON/OFF.
• During navigation, hold for 2 seconds to Reroute.
MENU • Press to scroll right through the data pages.
• Hold for 2 seconds to access the Device Menu.
• Press to move Up in the device menu.
LAP • Press to start a ride/activity.
• During a ride/activity, press to start a new Lap.
• Hold for 2 seconds to pause or end a ride/activity.
• Press to move Down in the device menu.
GETTING STARTED
Buttons
7
Page 7
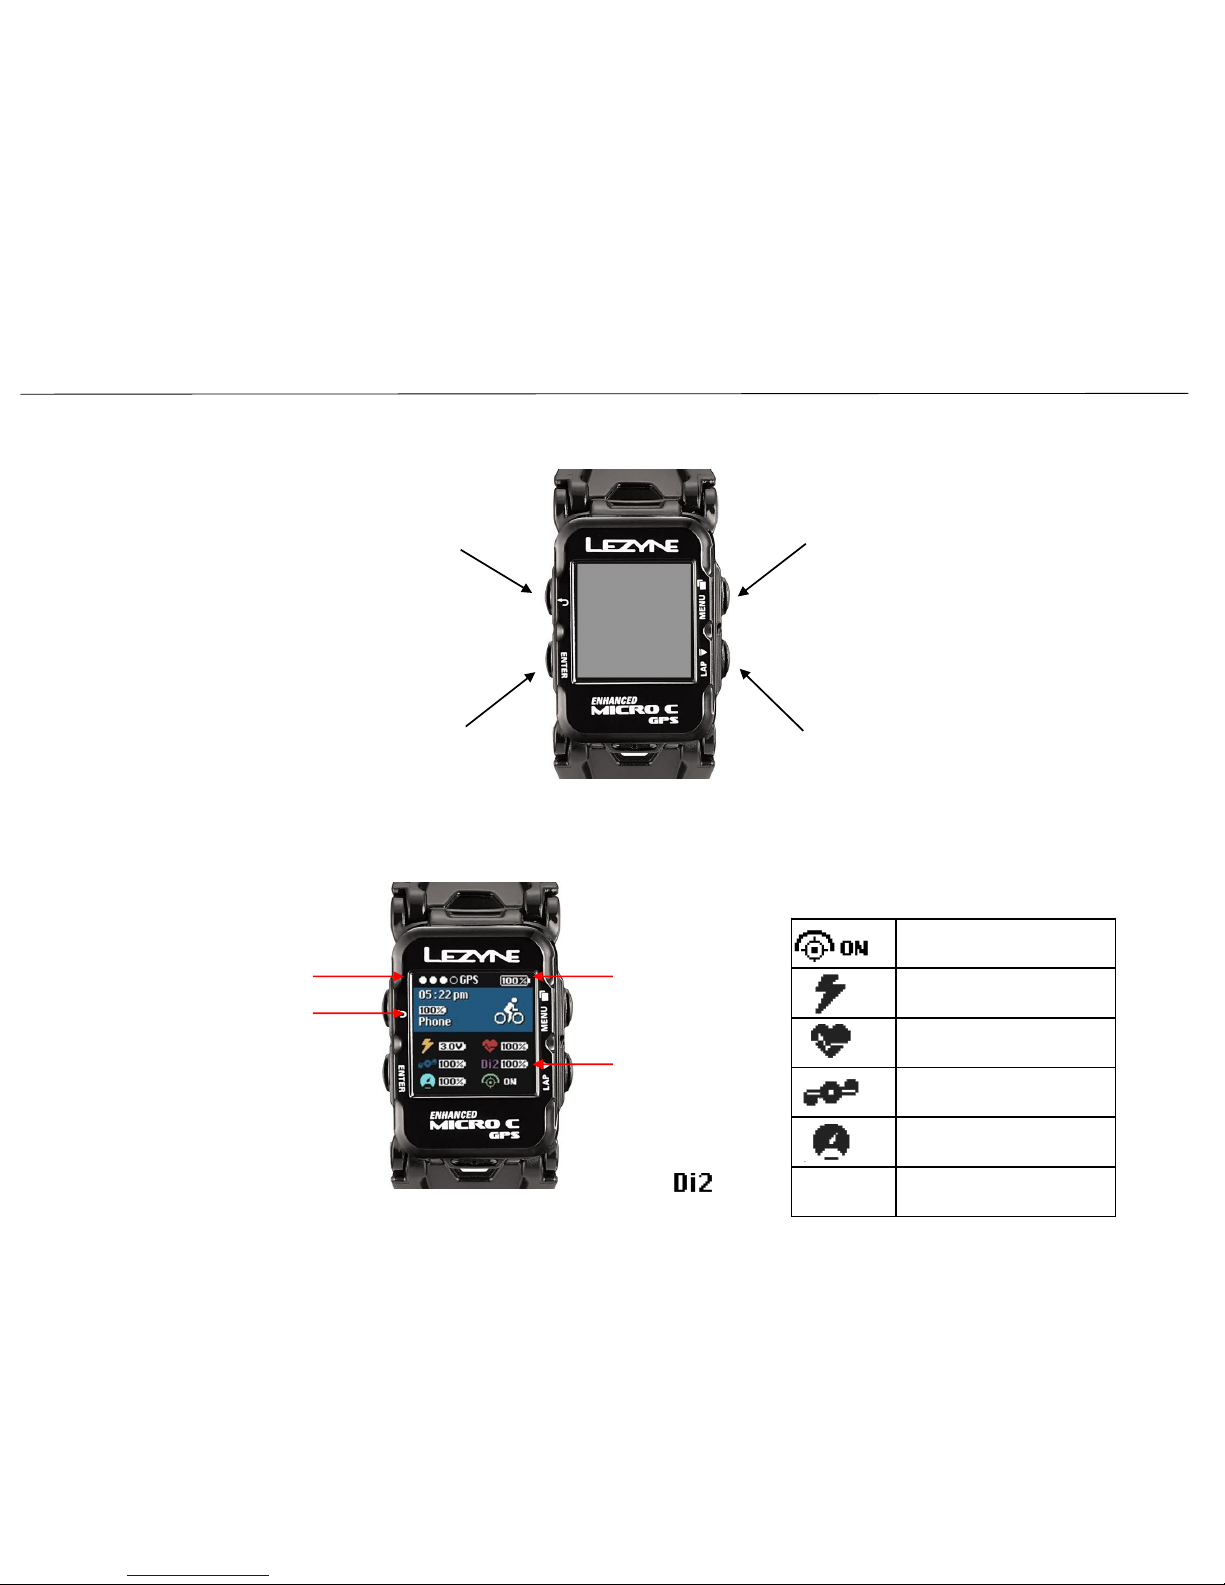
Lezyne
Track
Power Sensor
Heart Rate Sensor
Cadence Sensor
Speed Sensor
Di2 / Etap
Shifting Sensor
GETTING STARTED
8
*Hold for 2 seconds
Select
Backlight
Force Navigation Reroute*
Enter Menu*
Scroll Up
Start Ride / Start new Lap
Pause / End Ride*
Scroll Down
Button Functions
Screen Icons
GPS Status Battery Status
Turn On*
Turn Off / Switch Activity Mode*
Scroll Left
Back / Return Function
Phone Connection
Sensor Status
Page 8
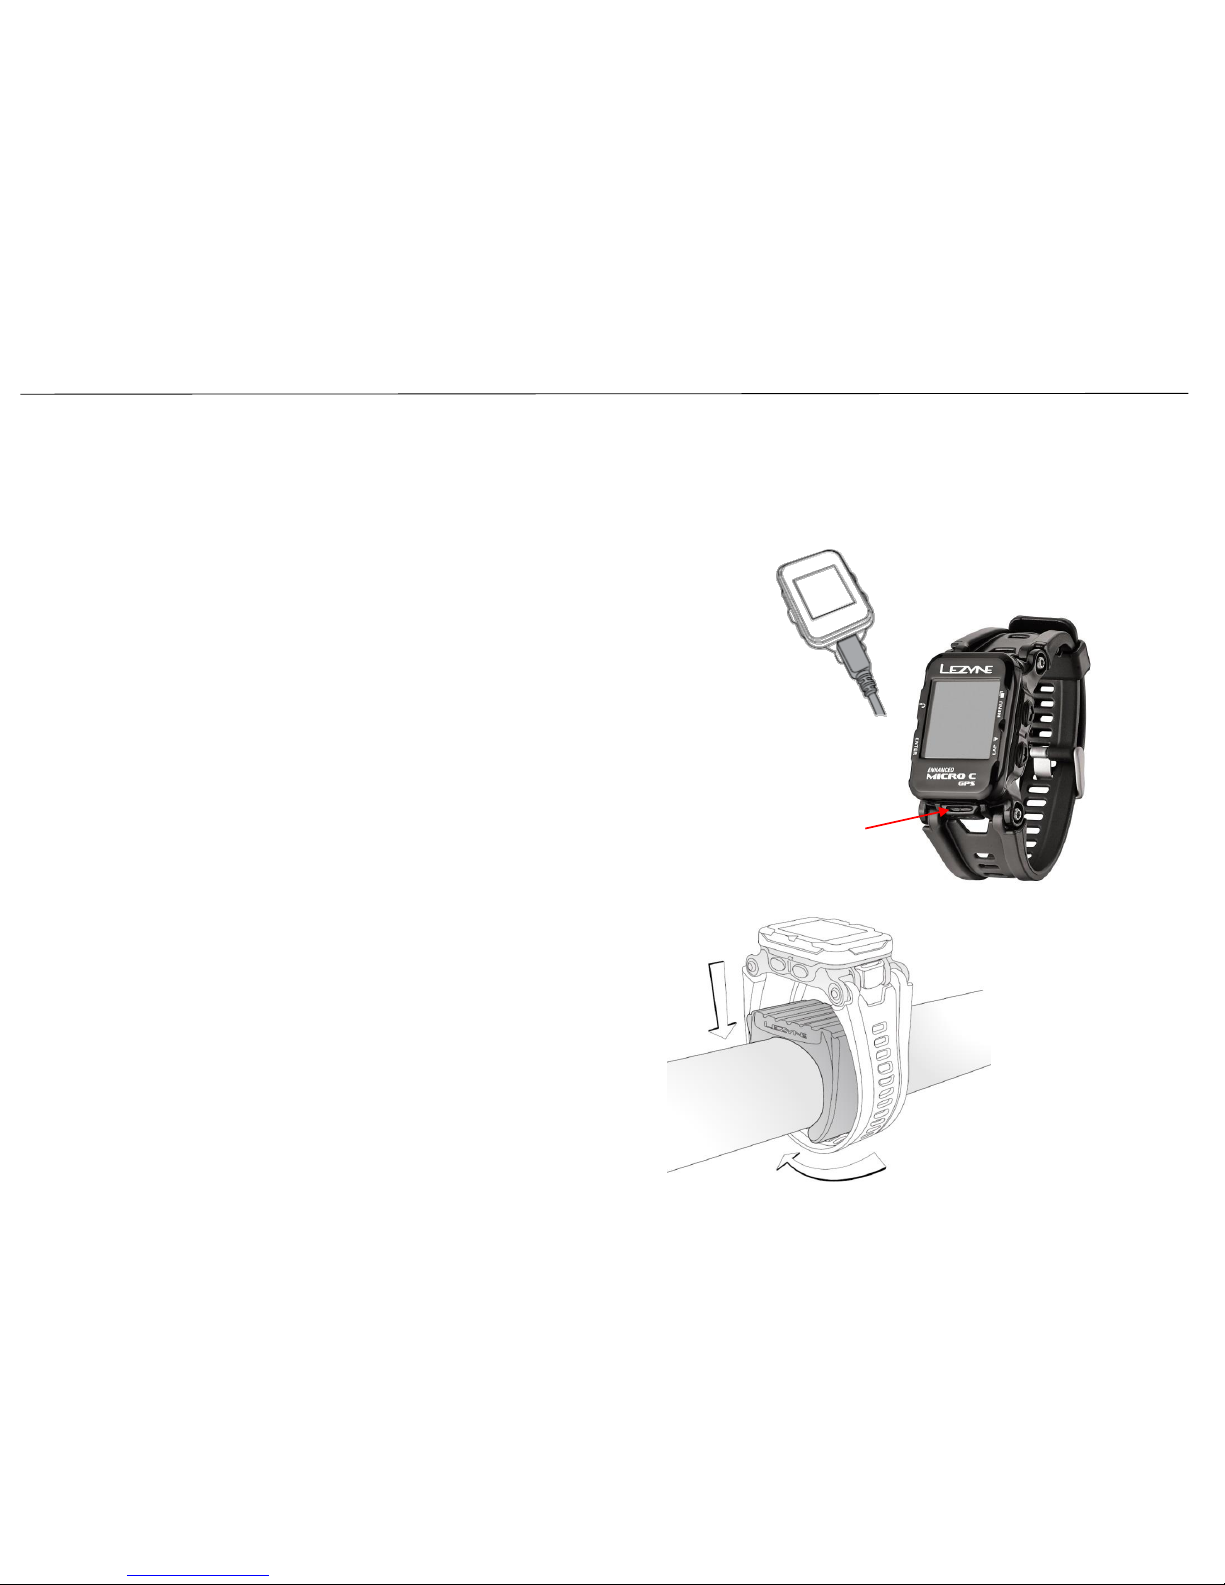
Before using your Lezyne GPS watch for the first time, fully charge the battery.
It is also recommended to visit lezyne.com/gpsroot, setup a free account and
update your GPS device to the latest firmware.
1. Remove exterior moisture.
2. Open USB cover.
3. Connect micro USB cable and device to powered USB port.
For best results, use the supplied Lezyne cable.
If your device does not display the charging symbol when plugged in, selected
USB port may not be powered – try another USB port.
IMPORTANT: ALWAYS SEAL THE USB COVER AFTER CHARGING!
Open USB cover for charging
GETTING STARTED
Charging
Handlebar Mount:
1. Slip included rubber mount onto handlebar
2. Strap GPS watch securely around rubber mount
for a secure fit.
Mounting
9
Page 9
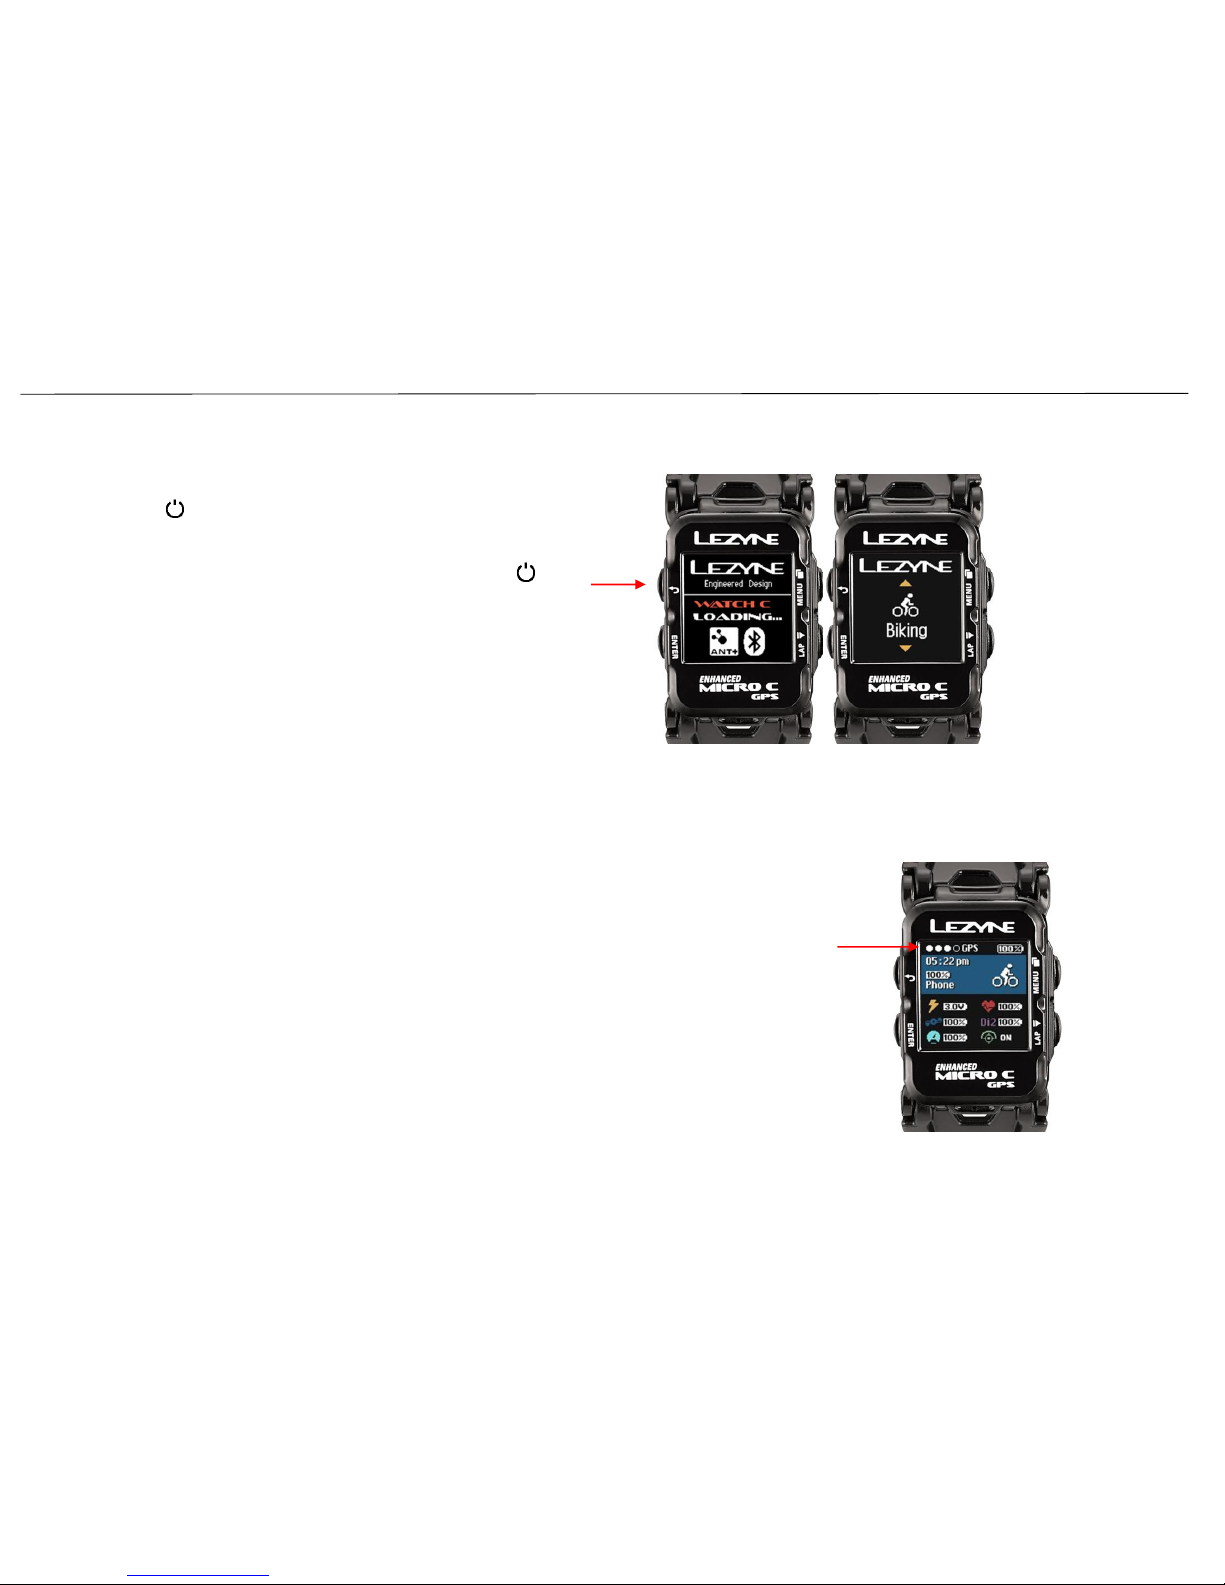
Turn on your GPS and switch between Modes by holding the
left button.
You can choose the Modes
- Lifestyle
- Hiking
- Running
- Biking
Turning on the GPS
Press and hold for 2
seconds to turn on
GPS Satellite Signal
Before a recorded activity can start there must be status of a GPS signal present.
This can take 30 to 90 seconds. For best results:
1. Go outside to open clear area.
2. Place the GPS device so it’s not obstructed to the sky.
3. Wait for the GPS status dots to fill in.
*a pop up notice will appear if you
try to start a ride before a GPS signal is acquired.
GPS Signal
GETTING STARTED
10
Page 10

Enter the Pause Menu by holding the bottom right button for 2 seconds. To
continue recording, select the option RESUME by pressing the left button ENTER. Or,
scroll through other options by pressing the top or bottom right buttons and select to
SAVE or DISCARD your activity or view the MAIN MENU.
Starting an Activity
Press to start
recording a ride
1. At least 1 GPS status dots will fill solid
when ready.
2. Start recording by pressing the
bottom right button.
3. Activity data is recorded when the
timer is running.
4. Press the top right button or top
left button to scroll through the
data pages.
Press and hold to
end ride
Ending an Activity
GETTING STARTED
11
Page 11
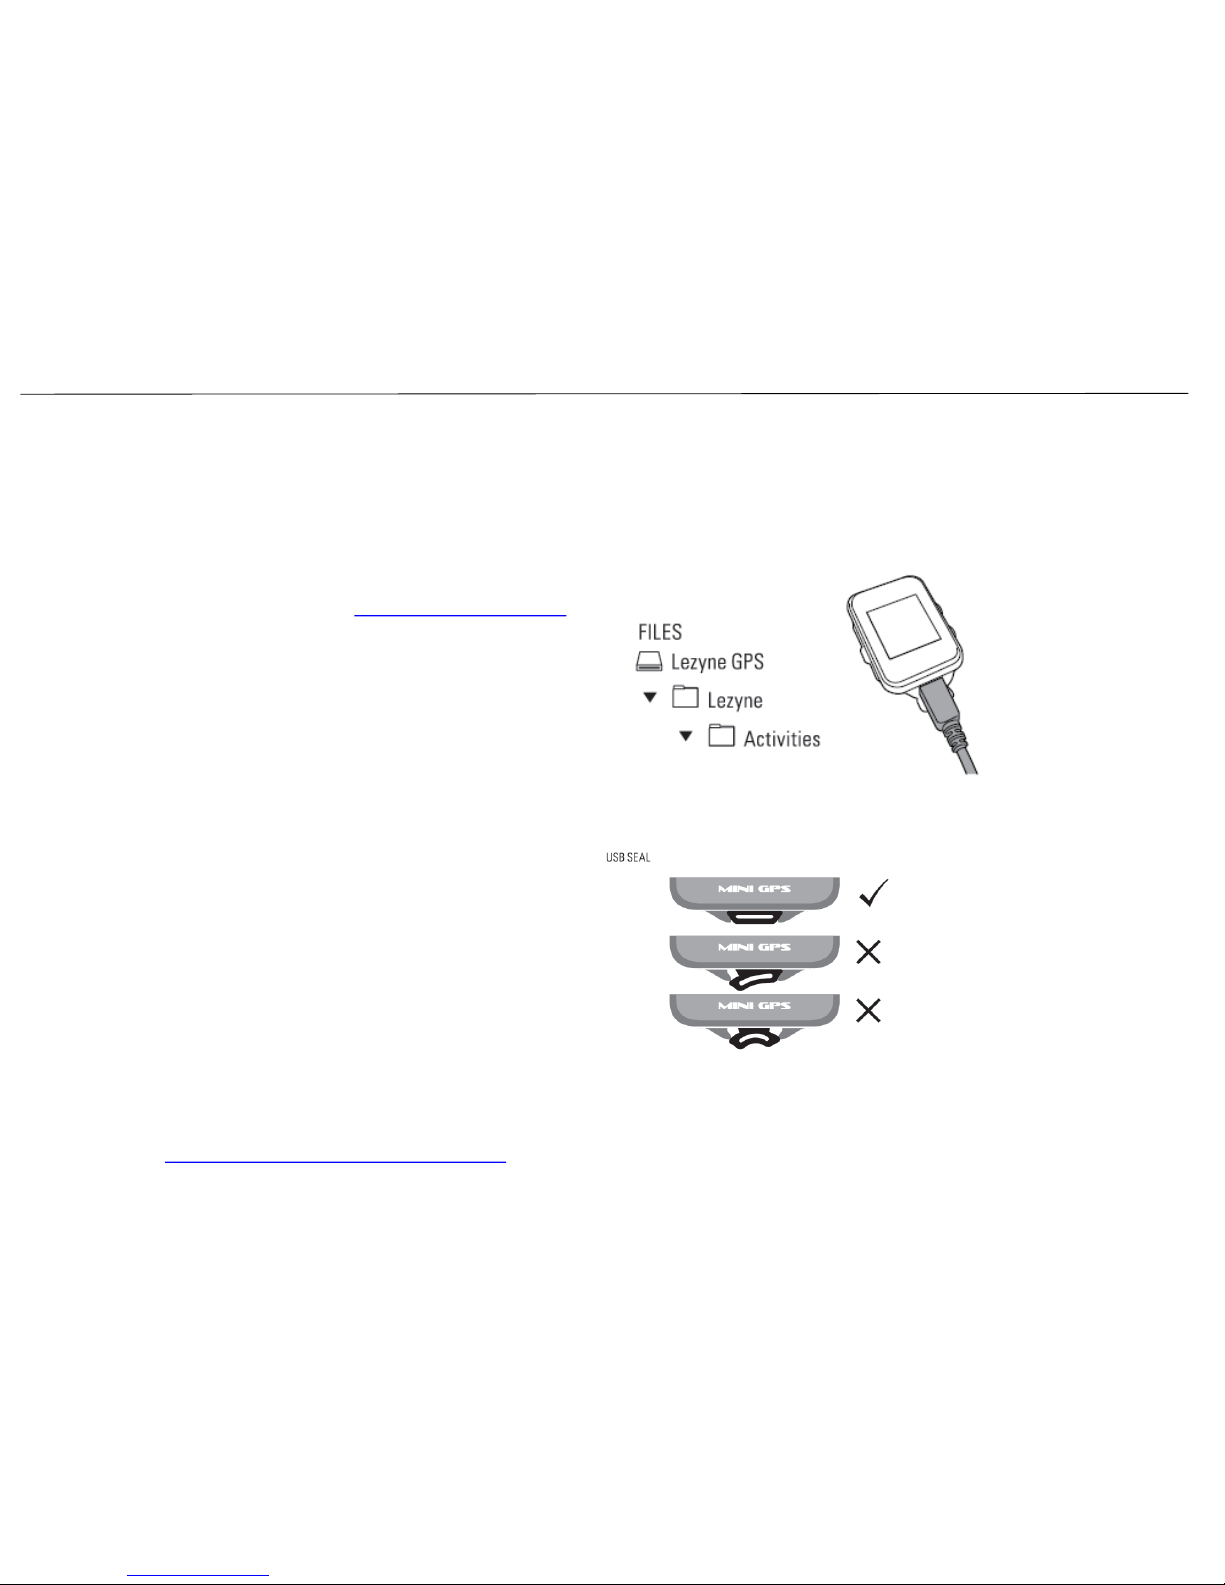
Uploading a Ride to a computer
1. Open USB port seal
2. Connect your GPS Watch to a computer via the supplied Micro USB cable.
3. The watch will read like a USB drive with included folders
4. Within the Lezyne GPS folder find your .Fit ride files in the Activities folder to
upload and share at www.lezyne.com/gpsroot
GETTING STARTED
USB Seal
It’s important to re-install the USB seal between the two seal locks to maintain a
good seal against the weather and a high level
of water resistance.
GPS Device updates
Software updates for your GPS device can be found at
http://www.lezyne.com/support-gps.php
12
Page 12
13
Menu Screen
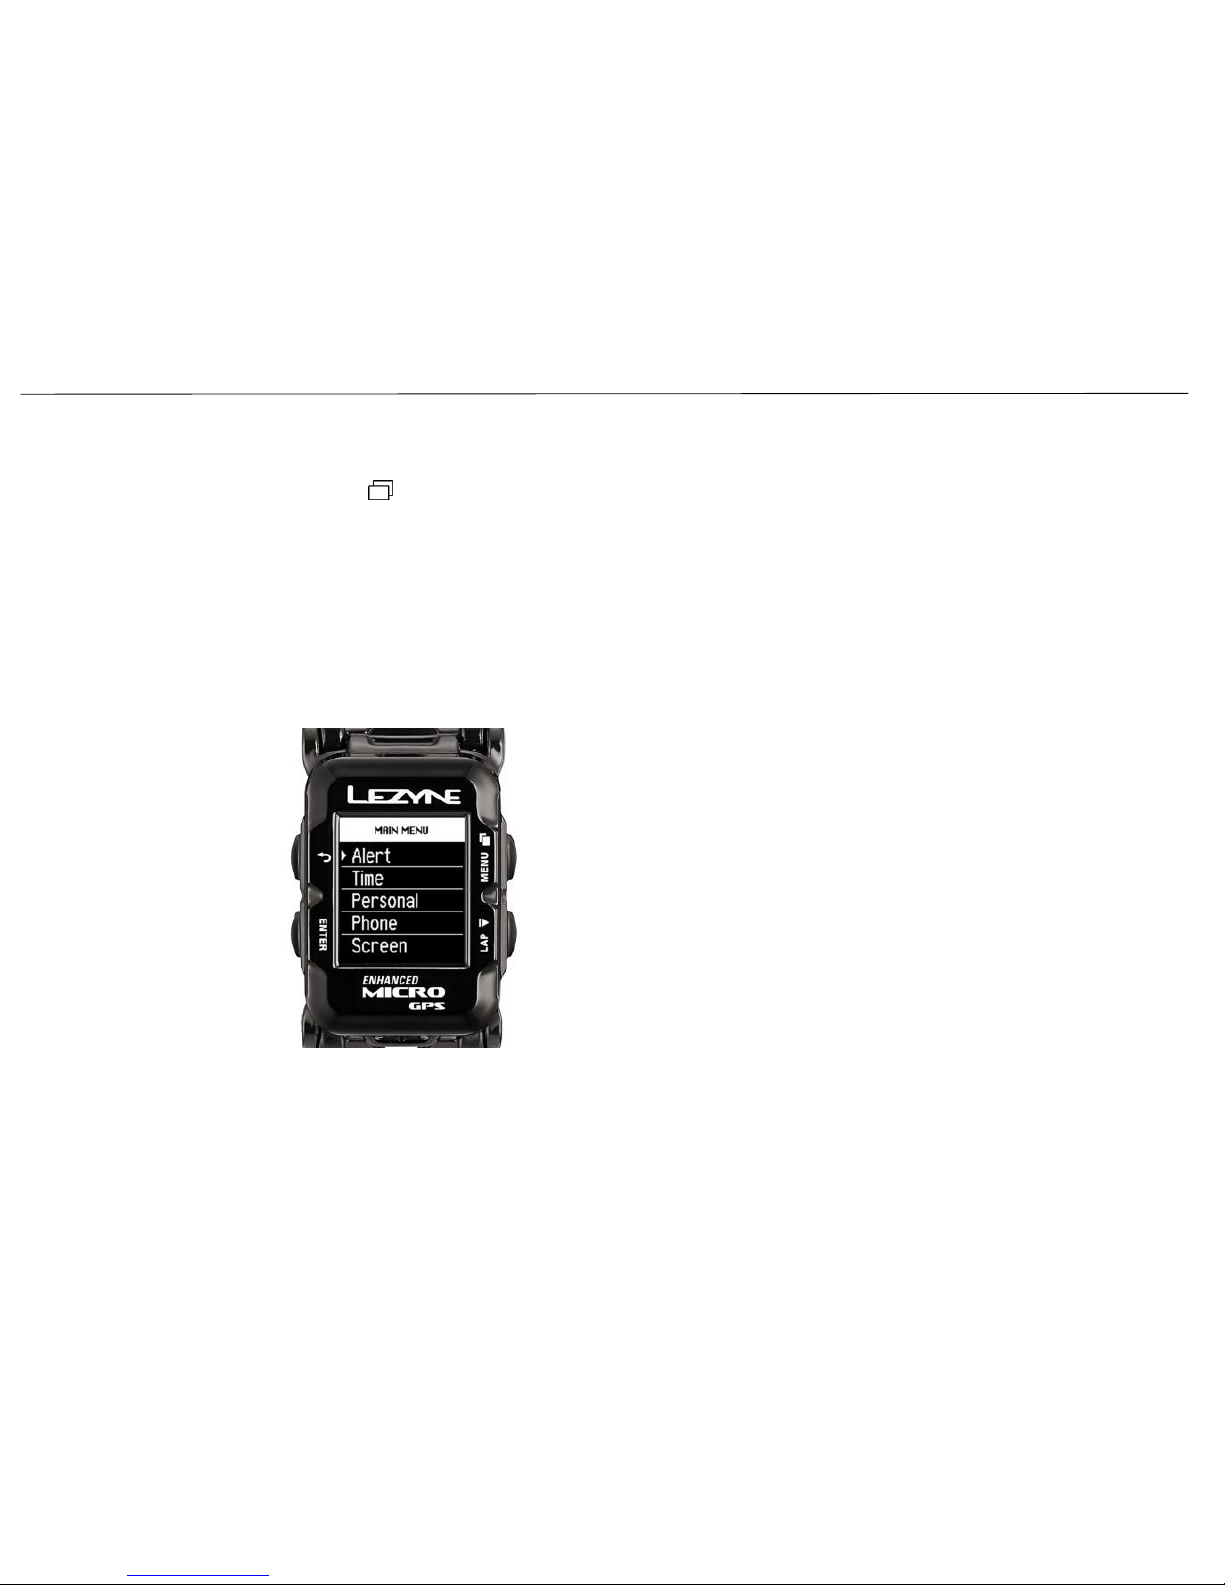
Hold the top right button for two seconds to enter the device MENU.
Menu options include*:
• Alert
• Auto
• Bike
• Personal
• Records
• Phone
• Navigation
• Sensors
• Screen
• Time
• Info
• Strava
*Some Menu options will not be available in all activity modes.
GETTING STARTED
Page 13

Time Zone
14
Time Format
TIME SETUP
Daylight Savings
Time Format adjusts time display from 12hr to
24hr format. Press ENTER and use the right
buttons to scroll for 12hr or 24hr. Press ENTER to
make the selection.
Time Zone adjusts time based on your closest
location. Press ENTER and use the right buttons to
scroll. Press ENTER to make the selection.
Daylight Savings adjusts time accordingly if it applies
to your location. Press ENTER and use the right
buttons to scroll. Press ENTER to make the selection.
Page 14
Time Zone
15
2nd Time Lifestyle Mode Only
TIME SETUP
Daylight Savings
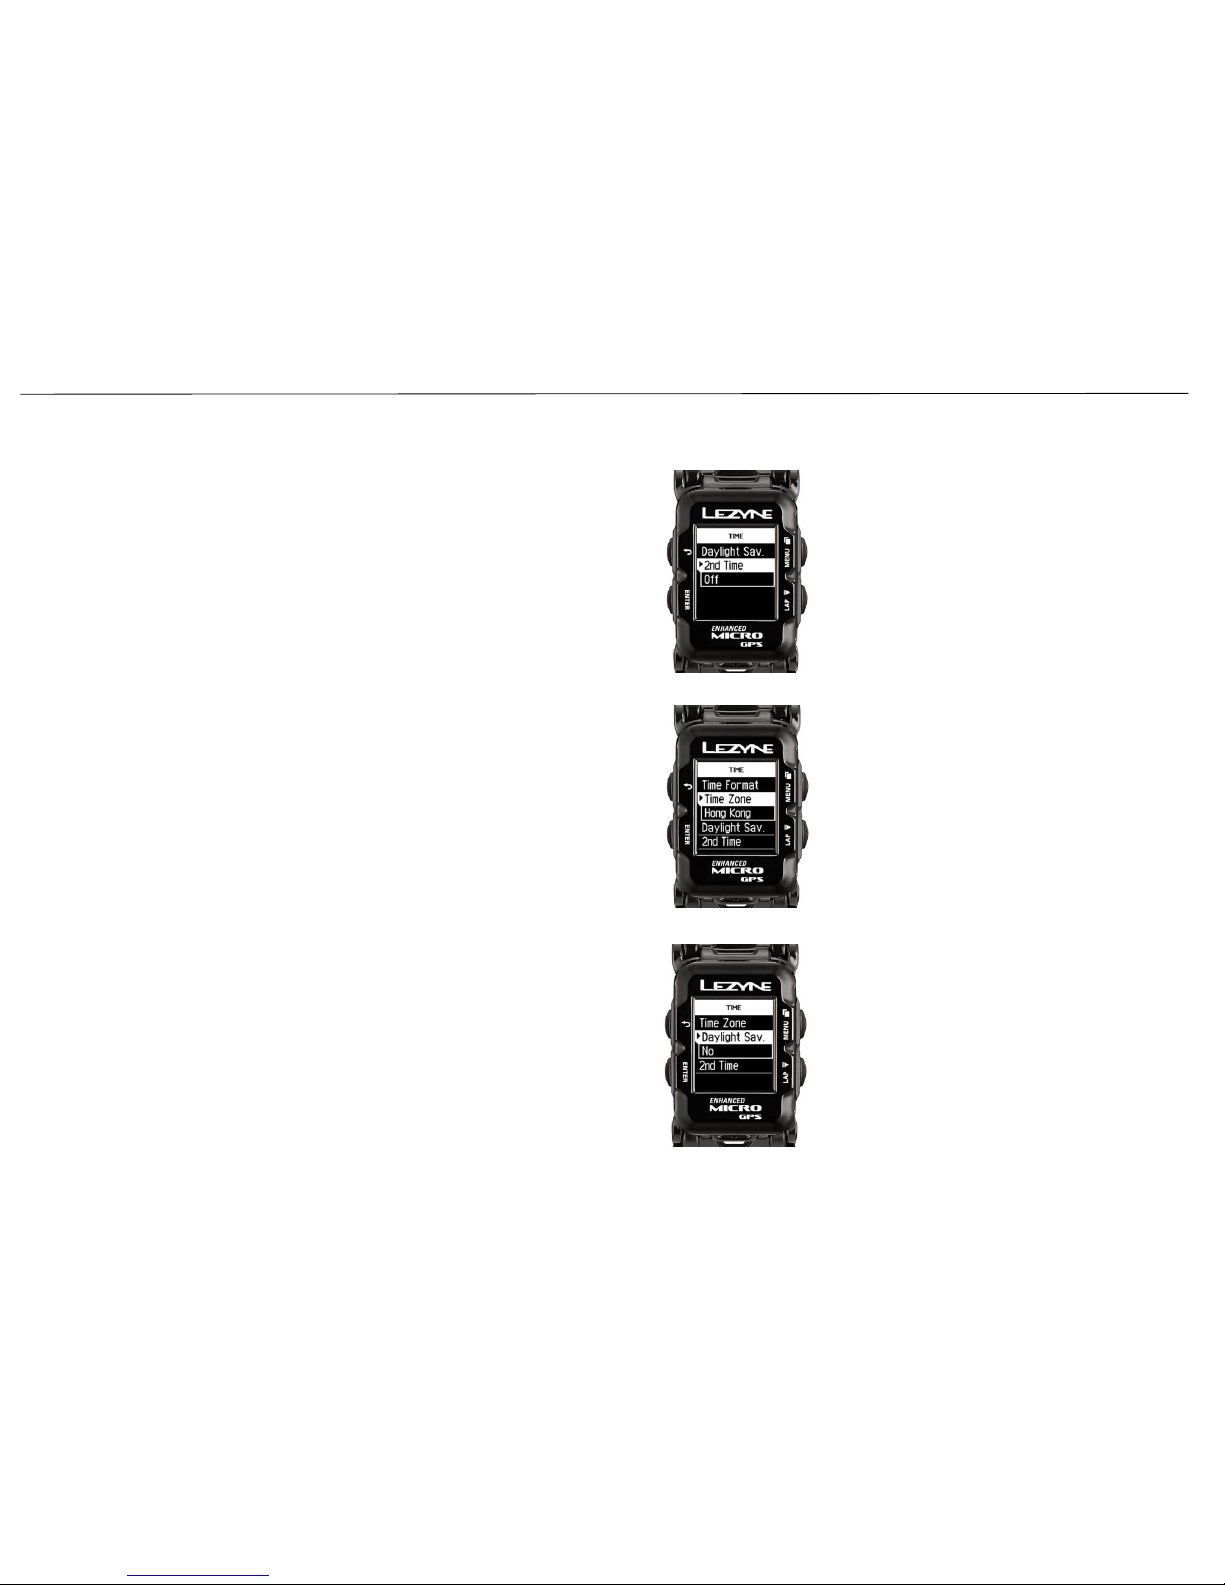
2nd Time allows you to add another time zone.
Turn this on and follow the same time setup steps
on the previous page. Press ENTER and use the
right buttons to scroll.
Time Zone adjusts time based on your closest
location. Press ENTER and use the right buttons to
scroll. Press ENTER to make the selection.
Daylight Savings adjusts time accordingly if it applies
to your location. Press ENTER and use the right
buttons to scroll. Press ENTER to make the selection.
Page 15
Screen Display
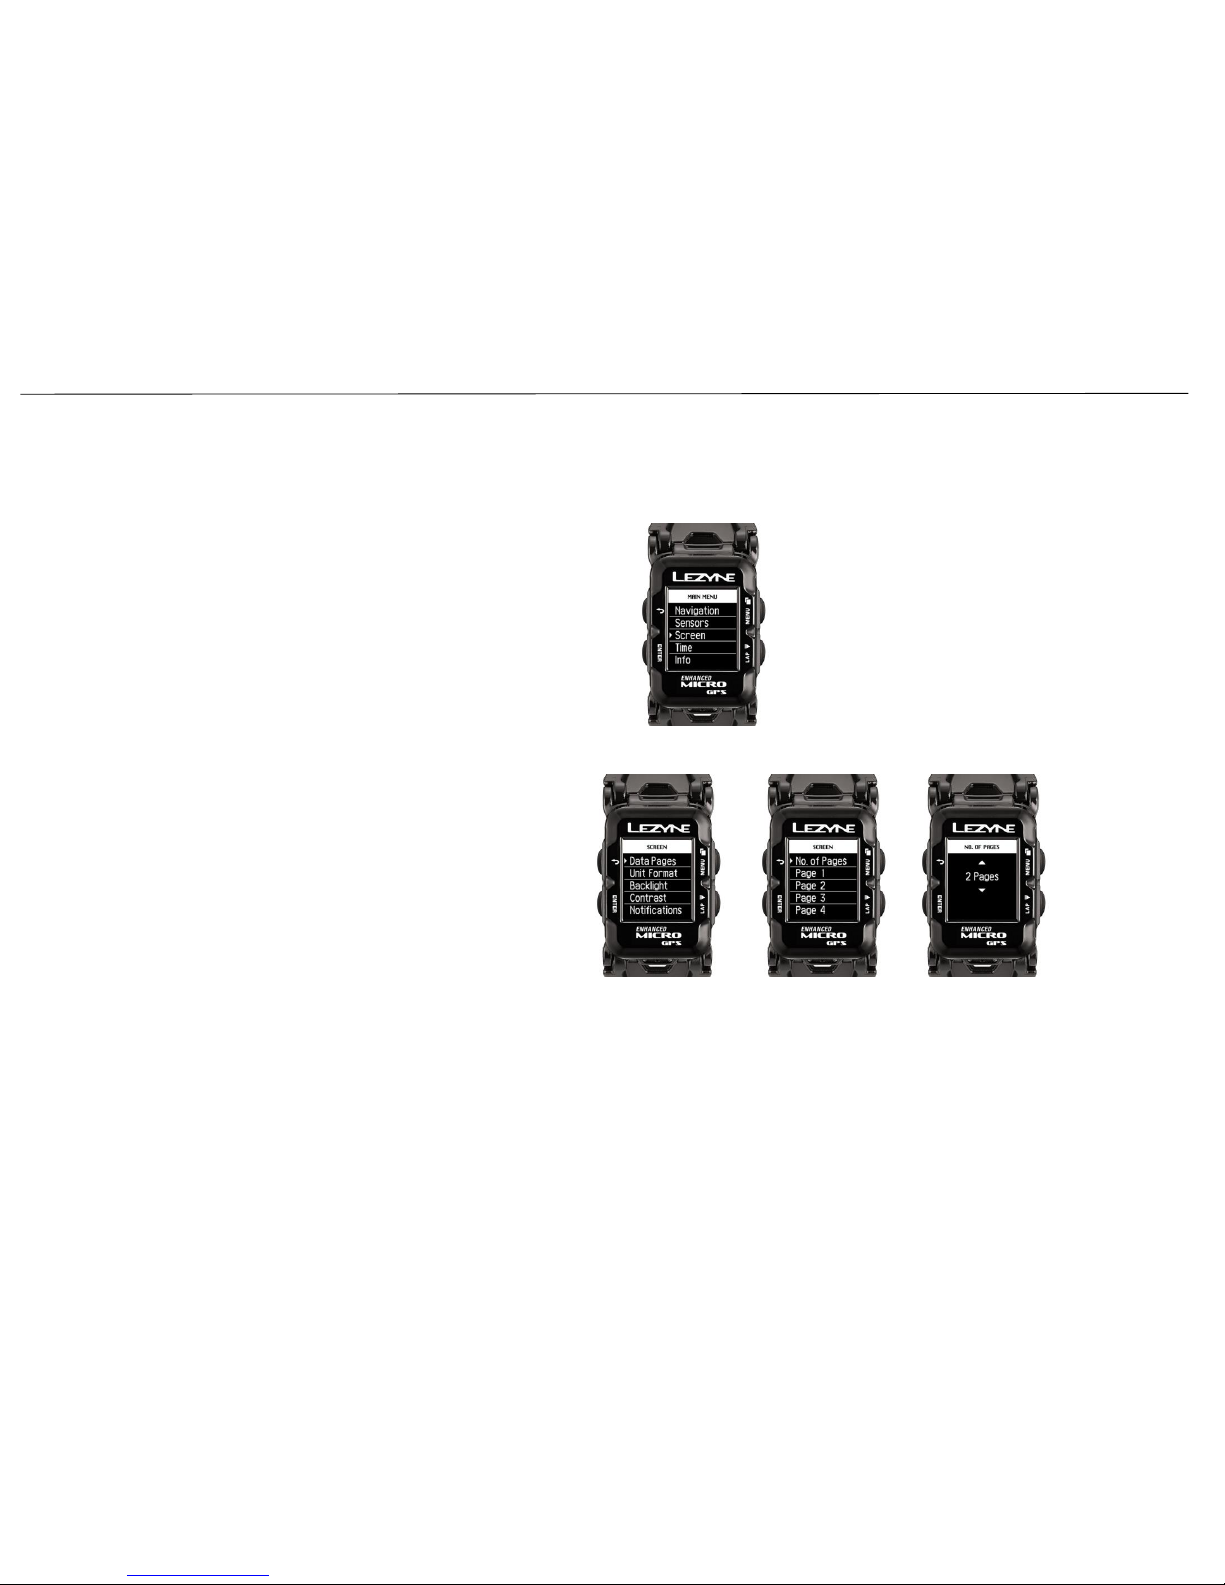
Up to 5 data pages can be customized to show different data fields.
To access the Screen menu:
1. Hold the top-right Menu button for 2 seconds.
2. Scroll to Screen and press Enter.
3. Here you can customize your pages and data fields.
16
Data Pages
Number of Data Pages:
1. In the Screen Menu press the ENTER button
to select Data Pages.
2. Press ENTER again to select No. of Pages.
3. Use 2 right button to scroll up or down
between 1 to 5 pages and click enter to select.
SCREEN SETUP
Page 16
Page Customization
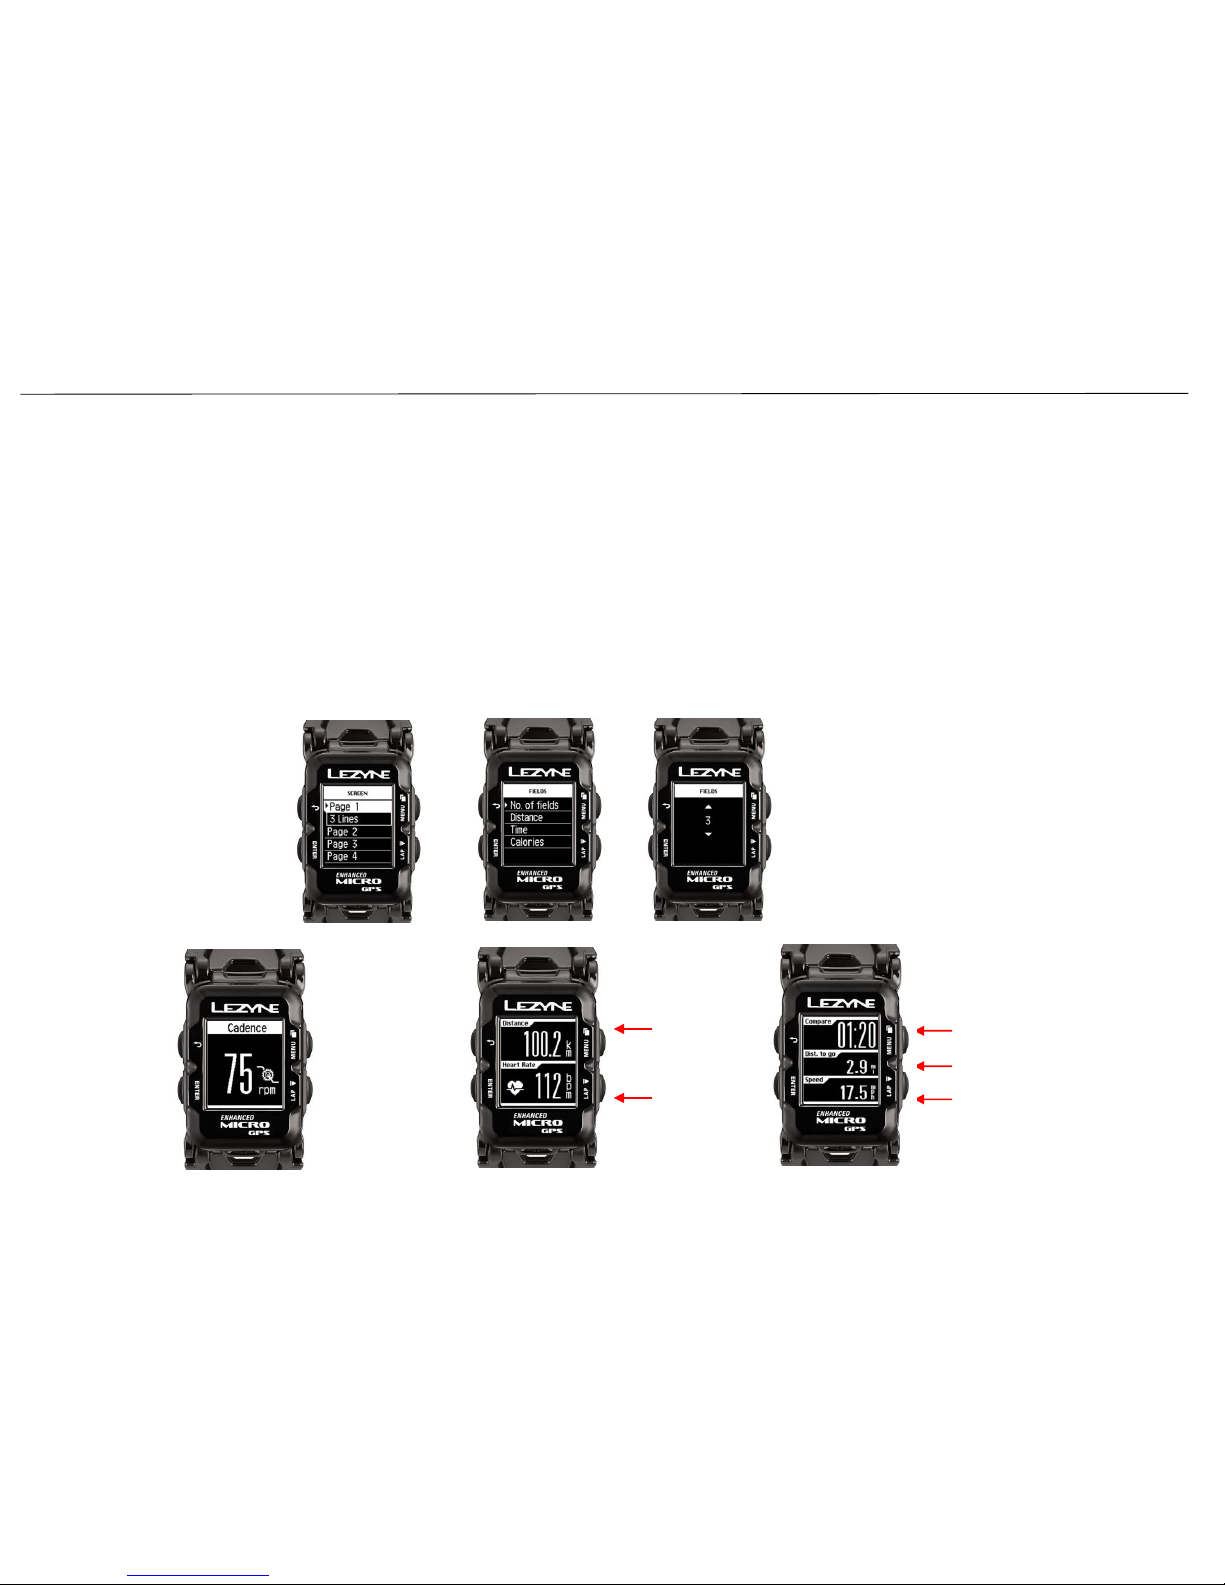
There are three display options for each page.
• 1 Line of Data
• 2 Lines of Data
• 3 Lines of Data
To change the layout of a page:
1. After selecting No. of Pages, scroll up or down to the page number you want to
customize and press the left ENTER button.
2. Select No. of fields and use the right button to scroll between 1 to 3 data lines.
3. Press ENTER to select.
SCREEN SETUP
2 Lines of Data
3 Lines of Data
17
Line 1
Line 2
Line 1
Line 2
Line 3
1 Lines of Data
Page 17
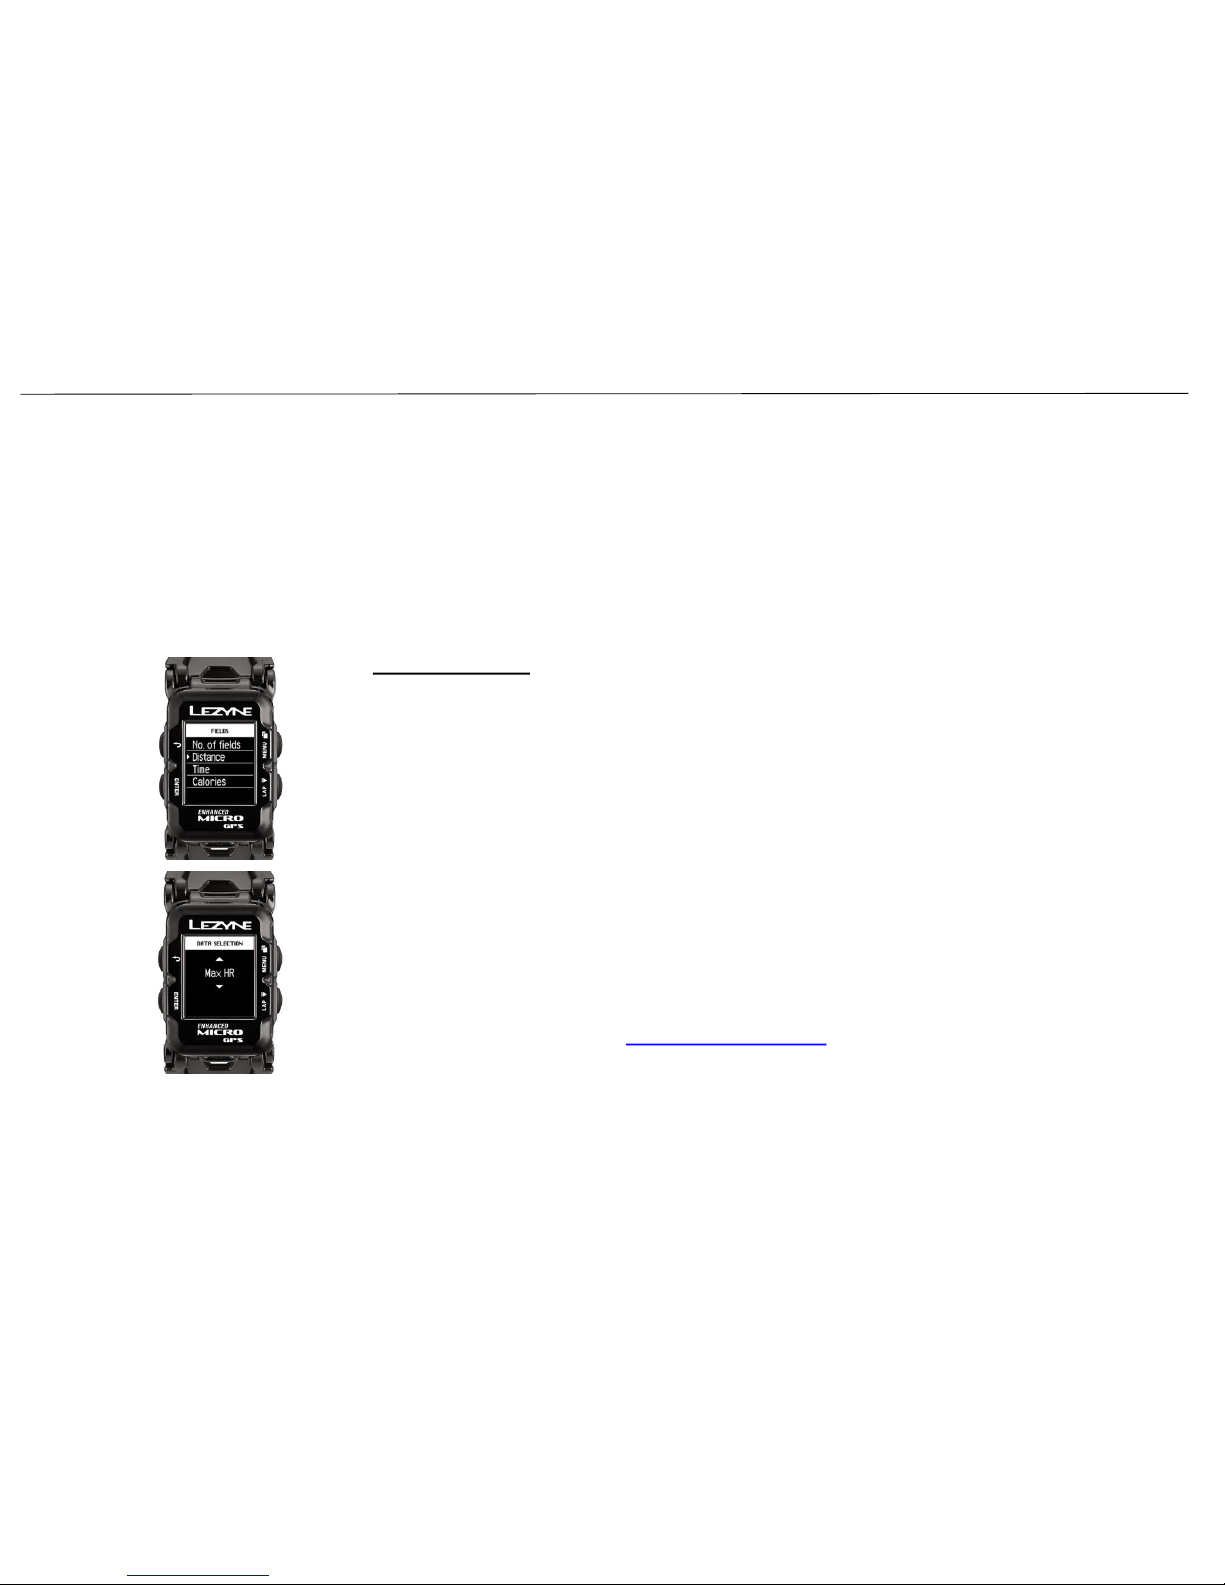
Data Selection Customization
In the Fields Menu you can choose what data metrics to display for each data line.
Scroll Up or Down to the field you want to change and press ENTER.
Scroll Up or Down through the data metrics and press enter on preferred metric.
*Running and Hiking modes Do Not display every data option*
SCREEN SETUP
18
Data Field Options
Distance
Speed
Avg Speed
Max Speed
Trip 1
Trip 2
Odometer
Time
Clock
Elevation
Ascent
Descent
Temperature
Calories
Heart Rate*
Avg Heart Rate*
Max Heart Rate*
Cadence*
Avg Cadence*
Power*
Avg Power*
3s Power*
10s Power*
Power Balance*
L/R Smoothness*
L/R Torque Efficiency*
Lap Distance
Lap Speed
Lap Power*
Lap Heart Rate*
Lap Cadence*
Lap Time
Di2 Shifting**
eTap Shifting*
*Separate ANT+ or Bluetooth device required to see these metrics
**Special Shimano D-Fly adapter required for Di2 Systems
Data Definitions Found Here
Page 18
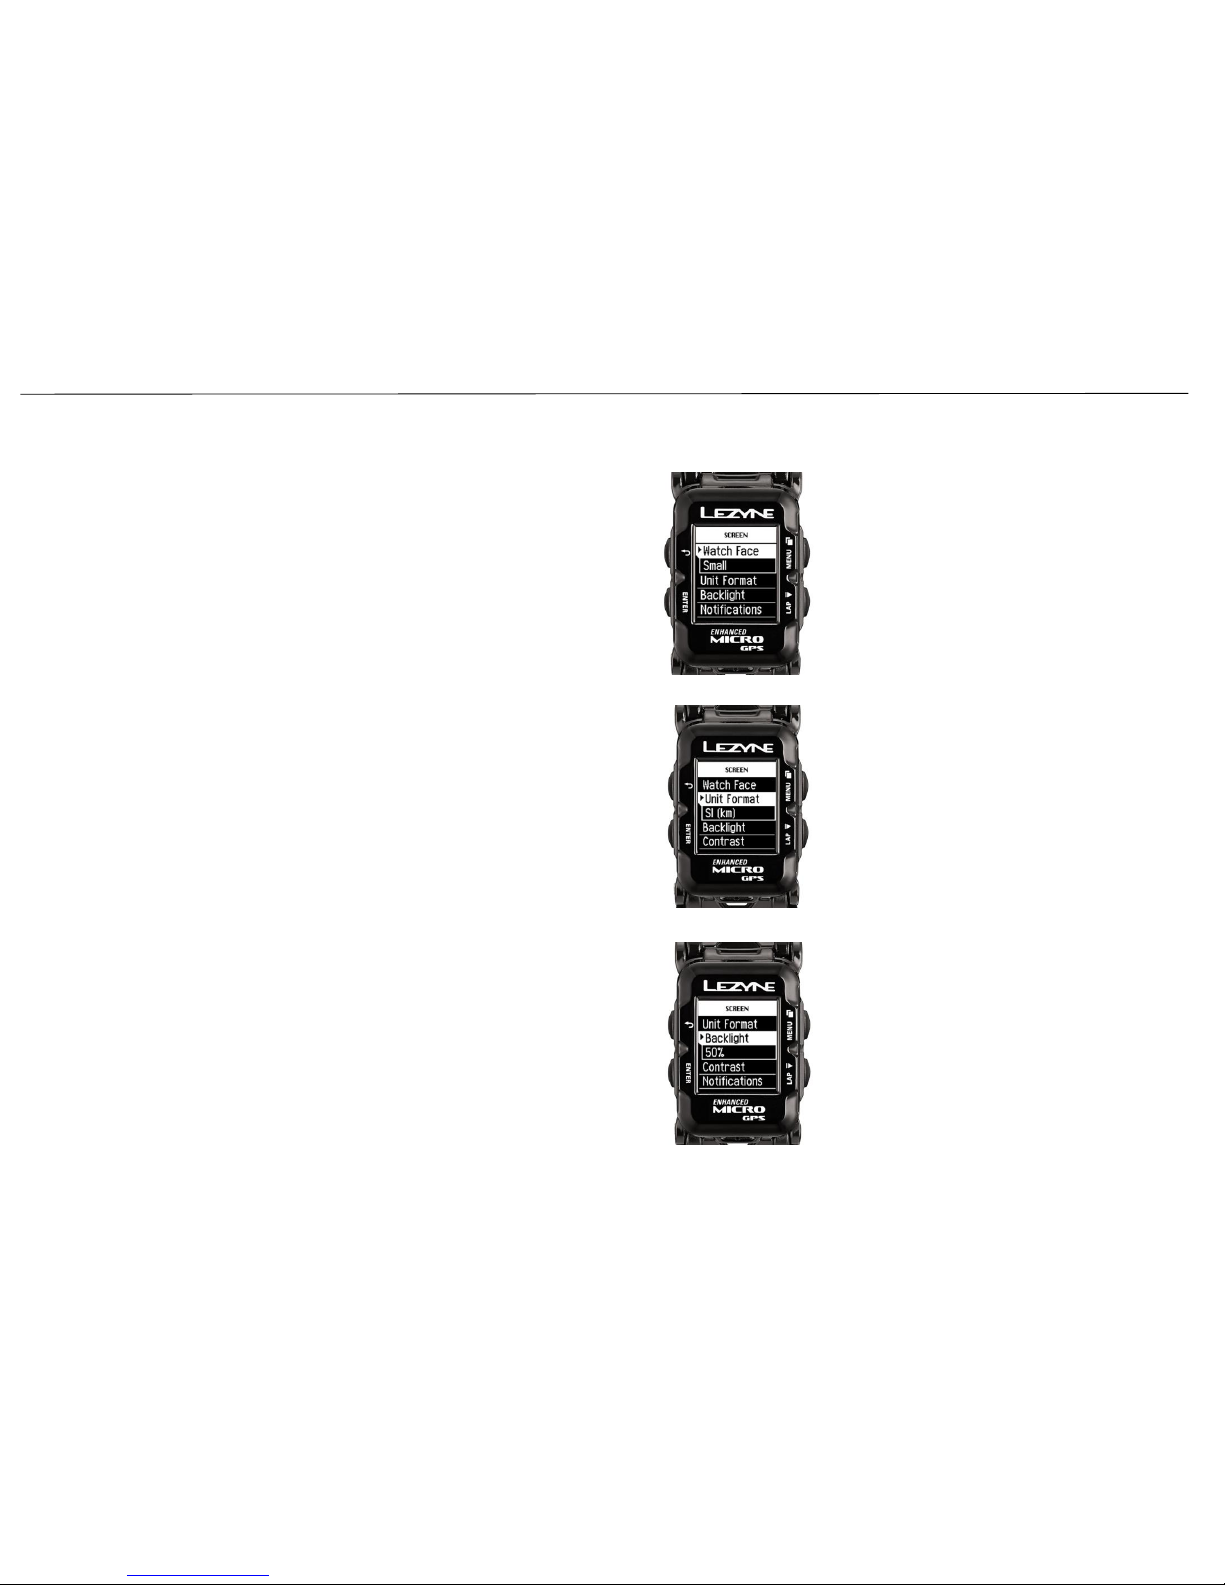
Unit Format Display
19
Watch Face Display Lifestyle Mode Only
SCREEN SETUP
Backlight
Change the main Watch Face clock numbers to
Option 1 or Option 2. Press ENTER and scroll up or
down, press ENTER to select the setting.
In Unit Format you can choose between Miles or
Kilometers.
Press ENTER and scroll up or down, press ENTER to
select the setting.
In Backlight you can adjust the brightness percentage.
Press ENTER and use the right buttons to INCREASE or
DECREASE. Use the ENTER button to make the select.
When done press the BACK button.
Page 19
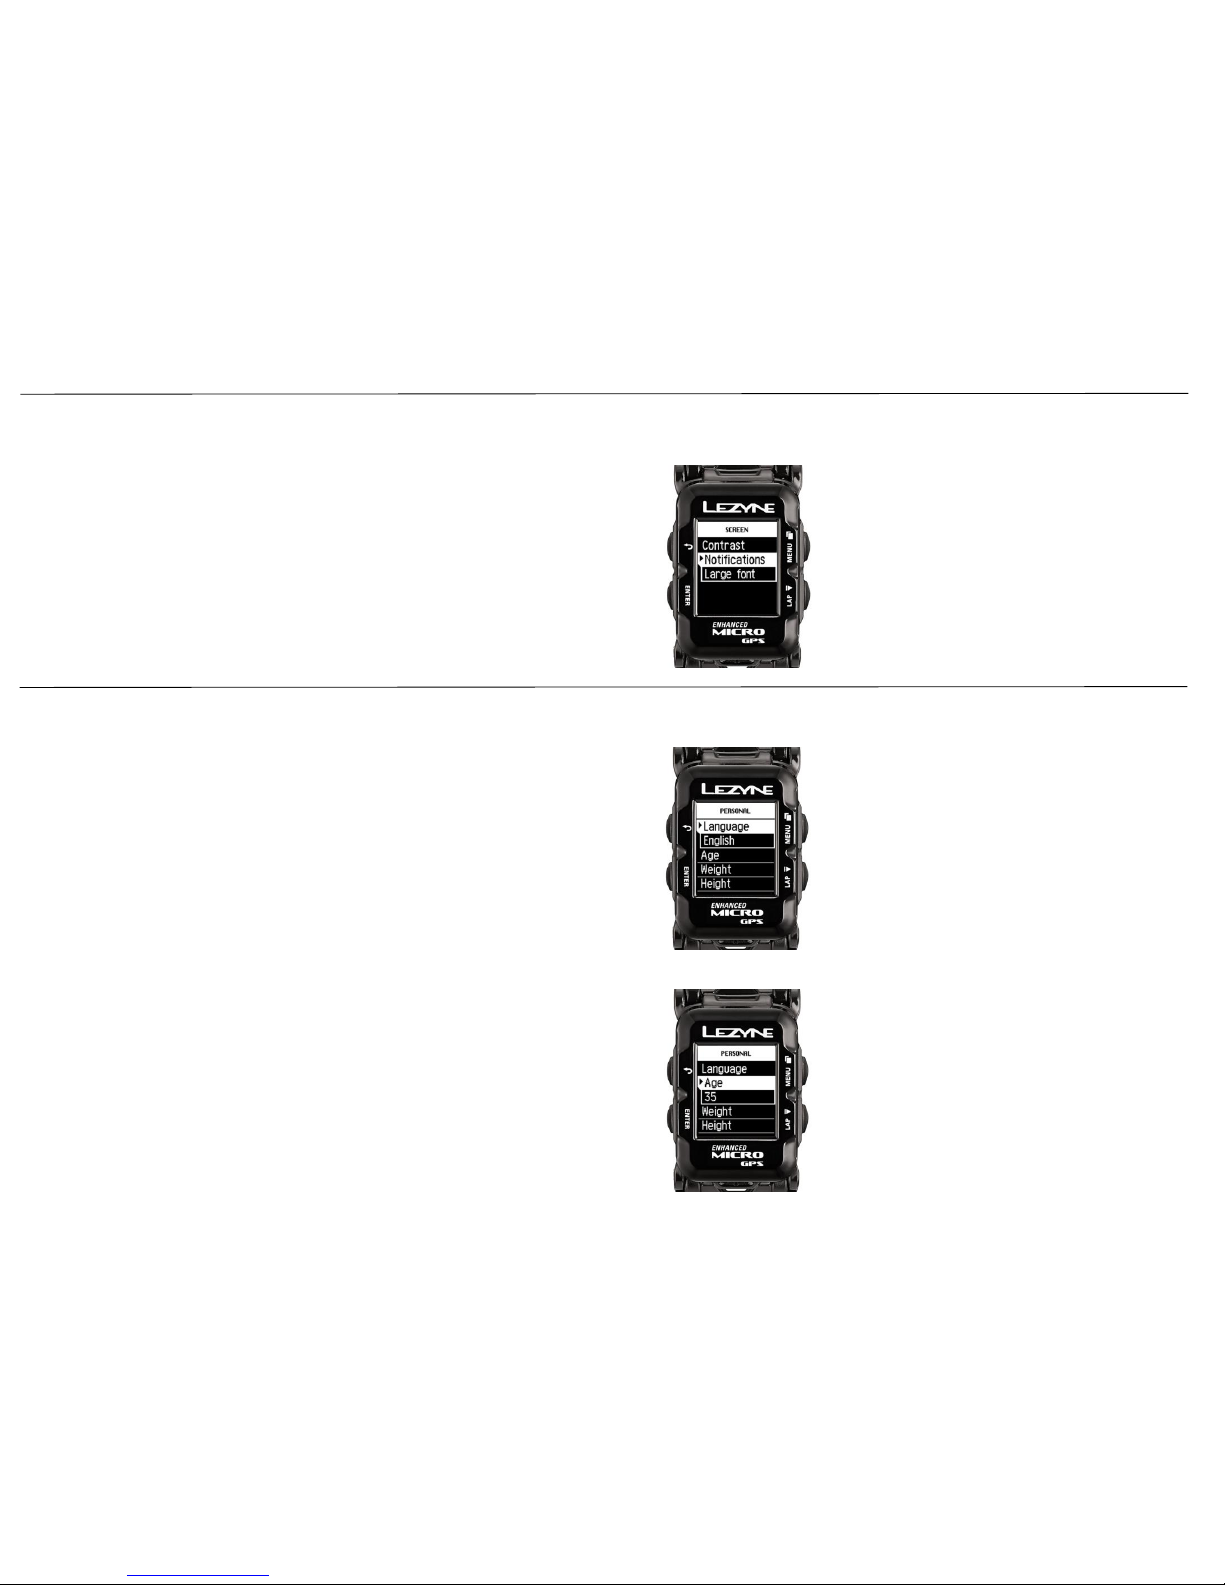
PERSONAL SETUP
Language Setting
Sets your desired language.
Press ENTER and use the right buttons to scroll. Press
ENTER to make the selection
20
Age Setting
Setting your age assists in calorie calculations.
Press ENTER and use the right buttons to select INCREASE
or DECREASE. Use the ENTER button to select age. When
done press the BACK button.
Notification Display
SCREEN SETUP
In Notifications you can choose what font size is
used to displayed phone notifications. Press ENTER
and use the right buttons to scroll between large
or small font. Use the ENTER button to select, use
the BACK button to exit.
Page 20
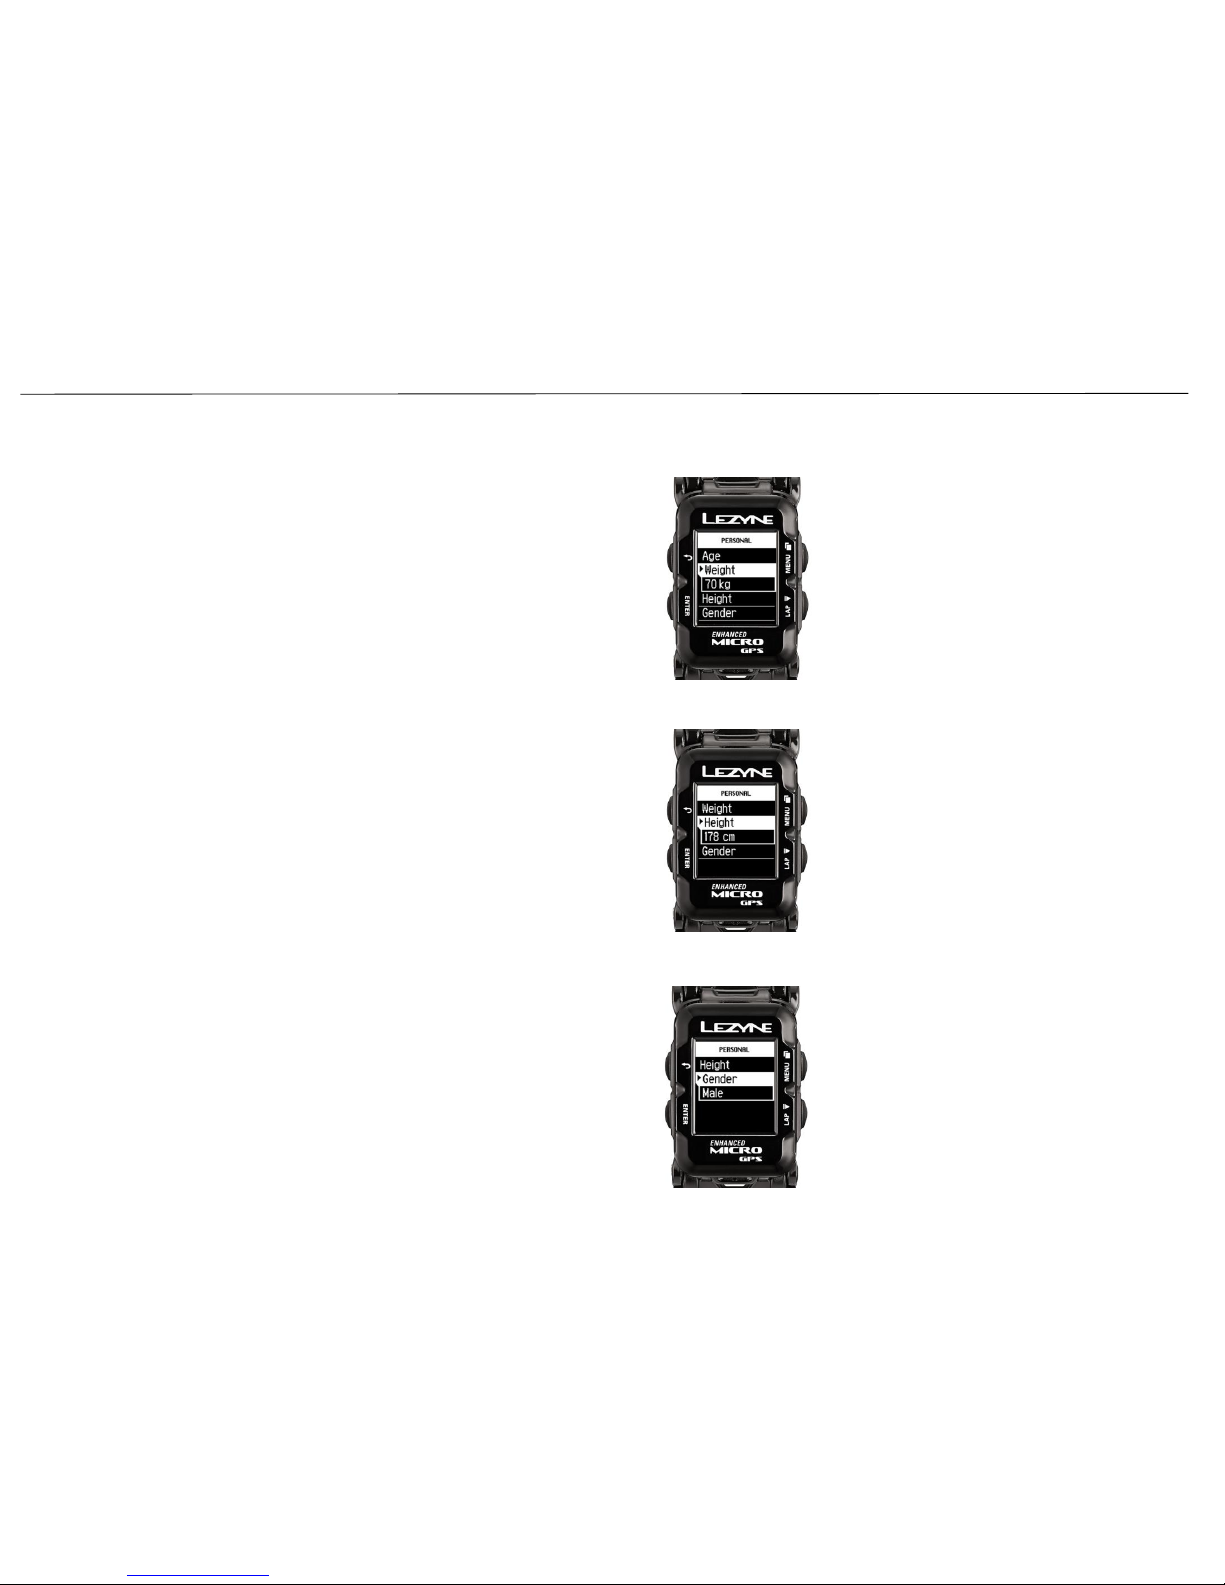
PERSONAL SETUP
21
Height Setting
Setting your Height assists in calorie calculations.
Press ENTER and use the right buttons to INCREASE or
DECREASE. Use the ENTER button to make the
selection. When done press the BACK button.
Gender Setting
Setting your gender assists in calorie calculations.
Set your gender to Male or Female.
Press ENTER and use the right buttons to scroll. Press
ENTER to make the selection
Weight Setting
Setting your weight assists in calorie calculations.
Press ENTER and use the right buttons to INCREASE or
DECREASE. Use the ENTER button to make the selection.
When done press the BACK button.
Page 21
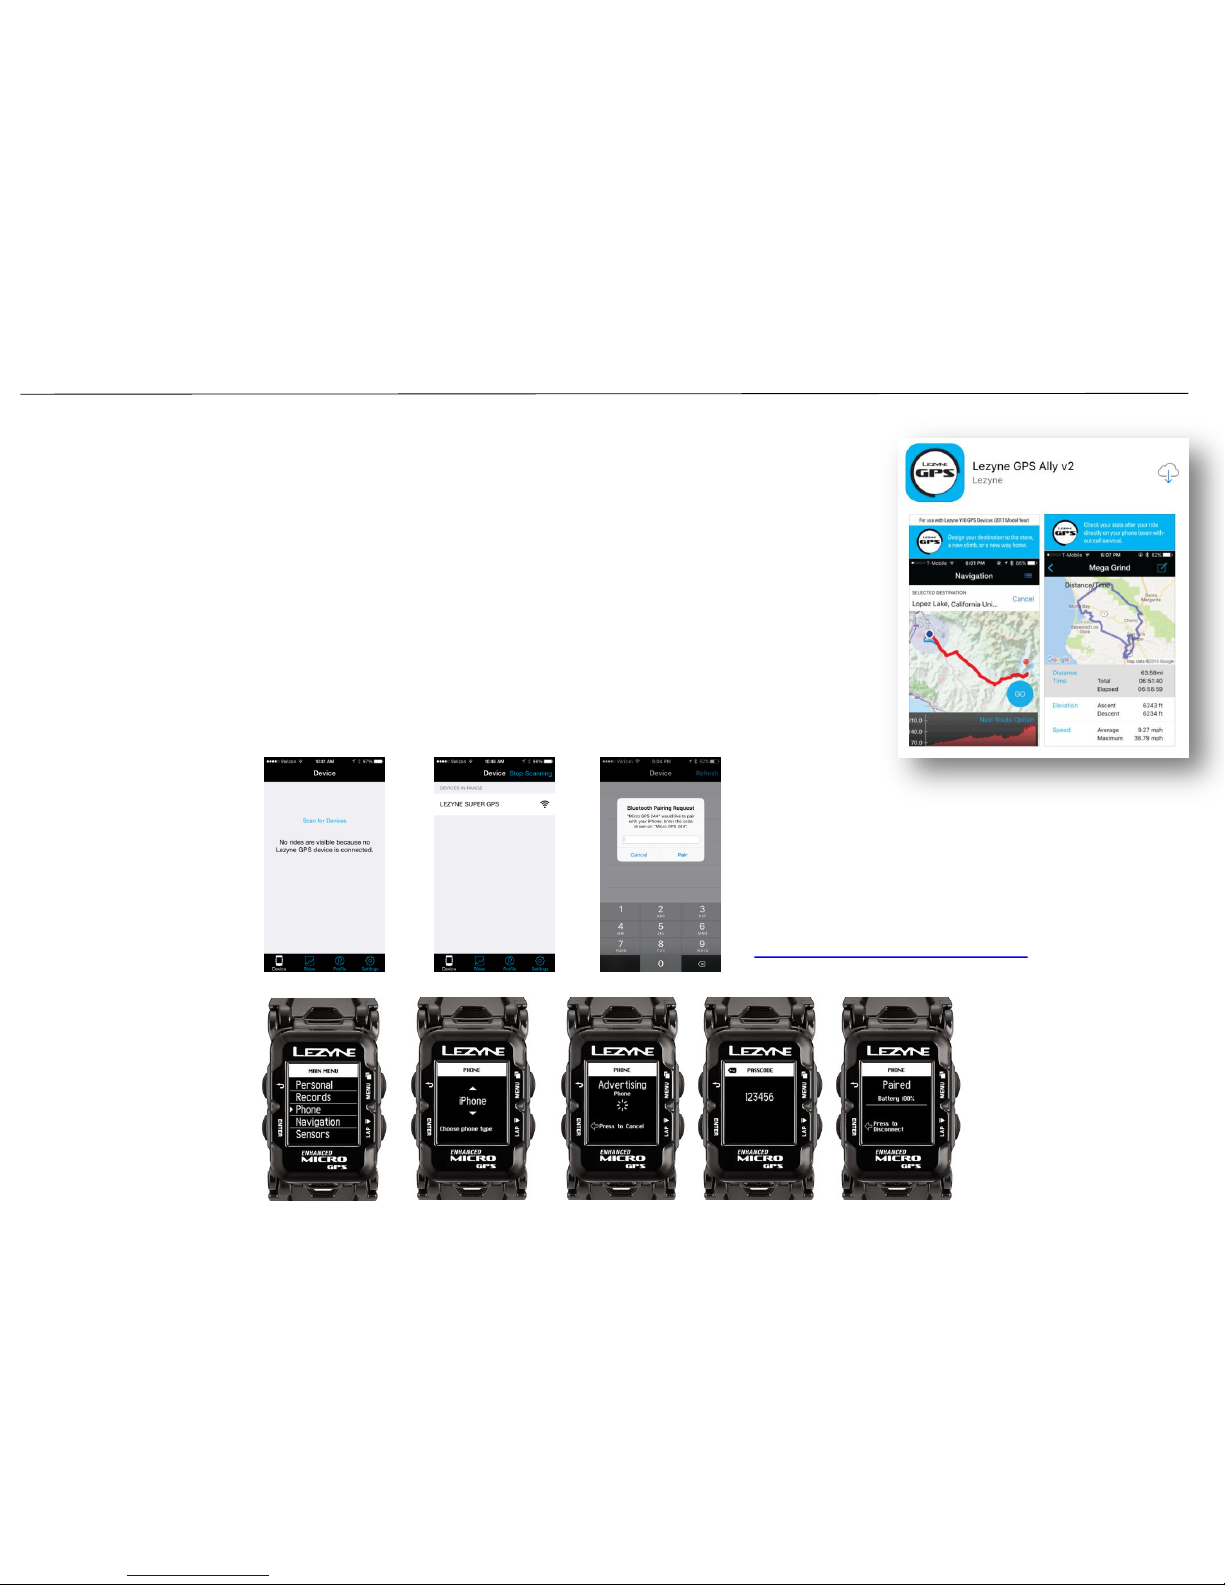
Pairing to a SmartPhone
1. Download the free Lezyne GPS Ally v2 App to your smartphone.
• Use Google Play for Android or App Store for iPhone
2. Open up the app to the Device tab and tap Scan for Device
3. On your Lezyne GPS device go into the Main Menu, scroll to Phone and press ENTER.
4. In Phone, select either iPhone or Android using the right buttons and press ENTER.
This will start the search for the phone.
5. The GPS Ally App will show the Lezyne device you are looking to pair. Select the device
and you will be prompted to enter a code from the device to pair with the app.
PHONE PAIRING
22
*Click to watch the Pairing video.
Page 22
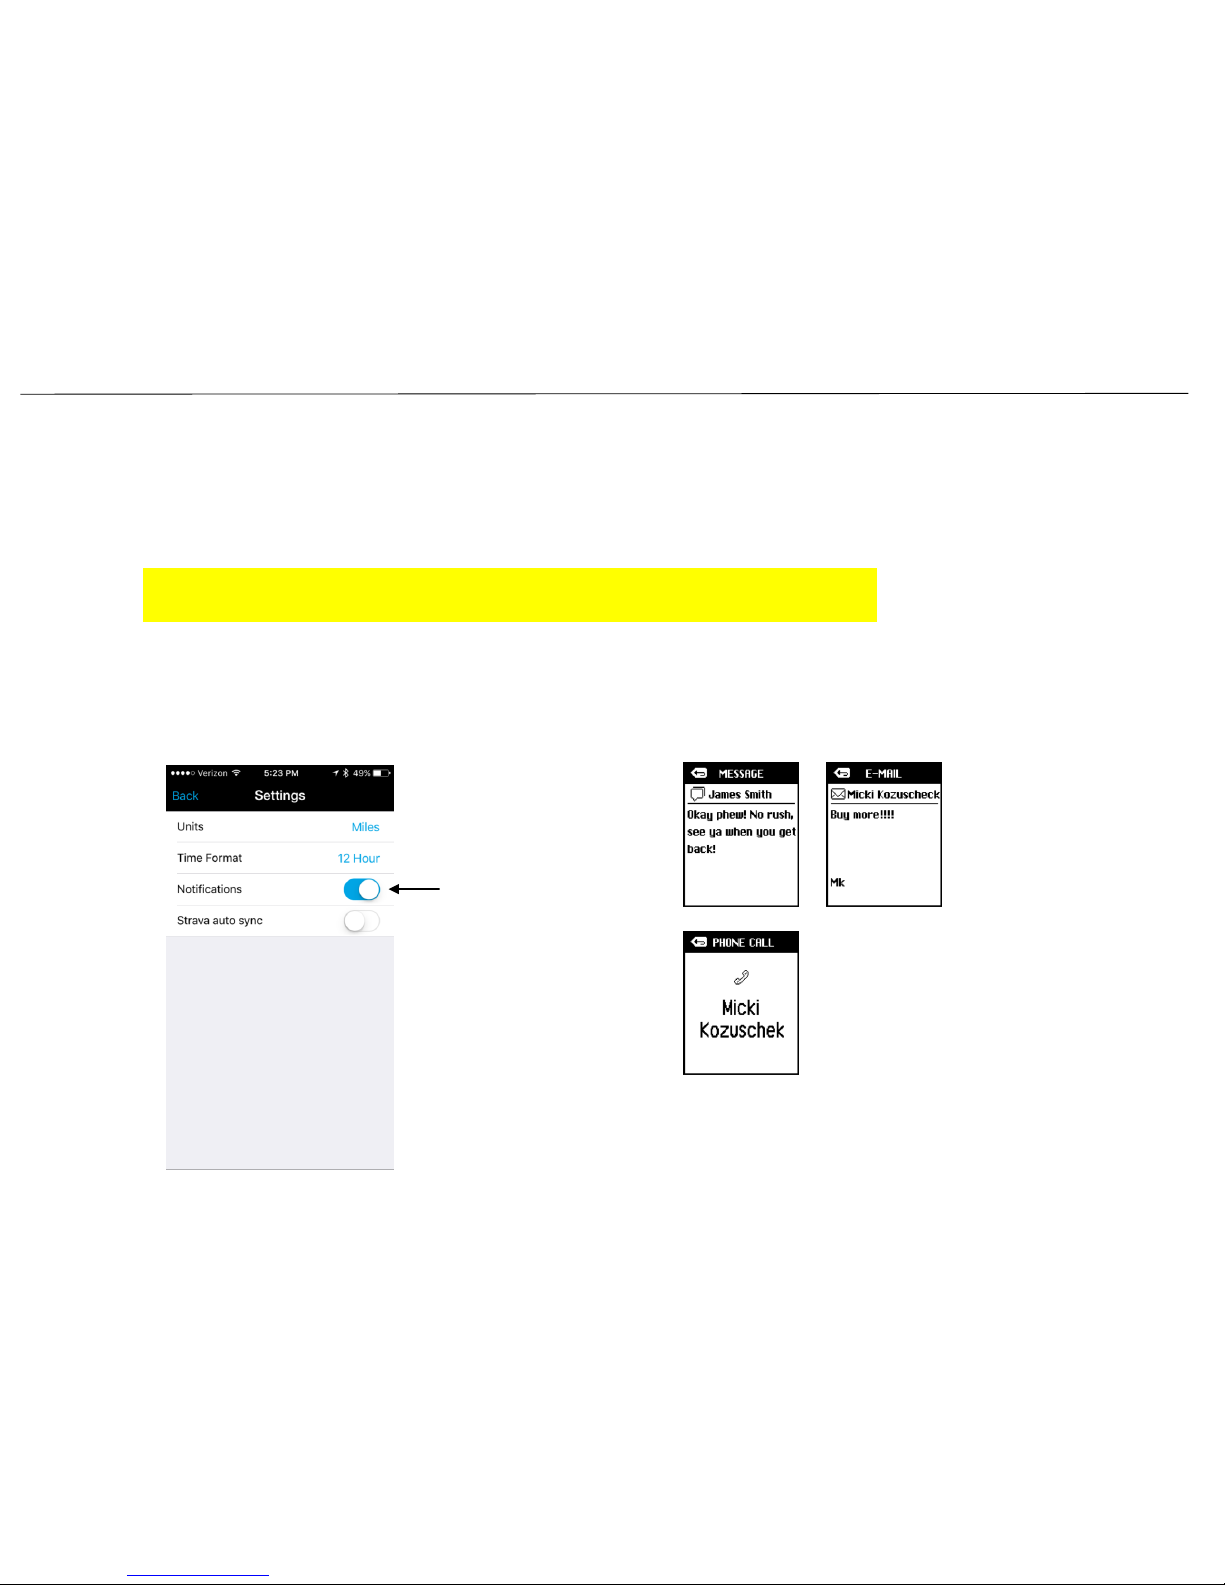
Notifications Setup
When the Lezyne GPS Watch is paired with the Lezyne Ally v2 App they can display
Text, Email, and Call Notifications.
* To enable this feature you must first make sure your phone notifications are turned
on for Text and Email. See your phone’s manufacturer instructions for details.
1. In Lezyne GPS Ally App, go to the More tab.
2. Tap App Settings and toggle the button next to Notifications to ON.
PHONE PAIRING
23
Notifications Setting
Page 23
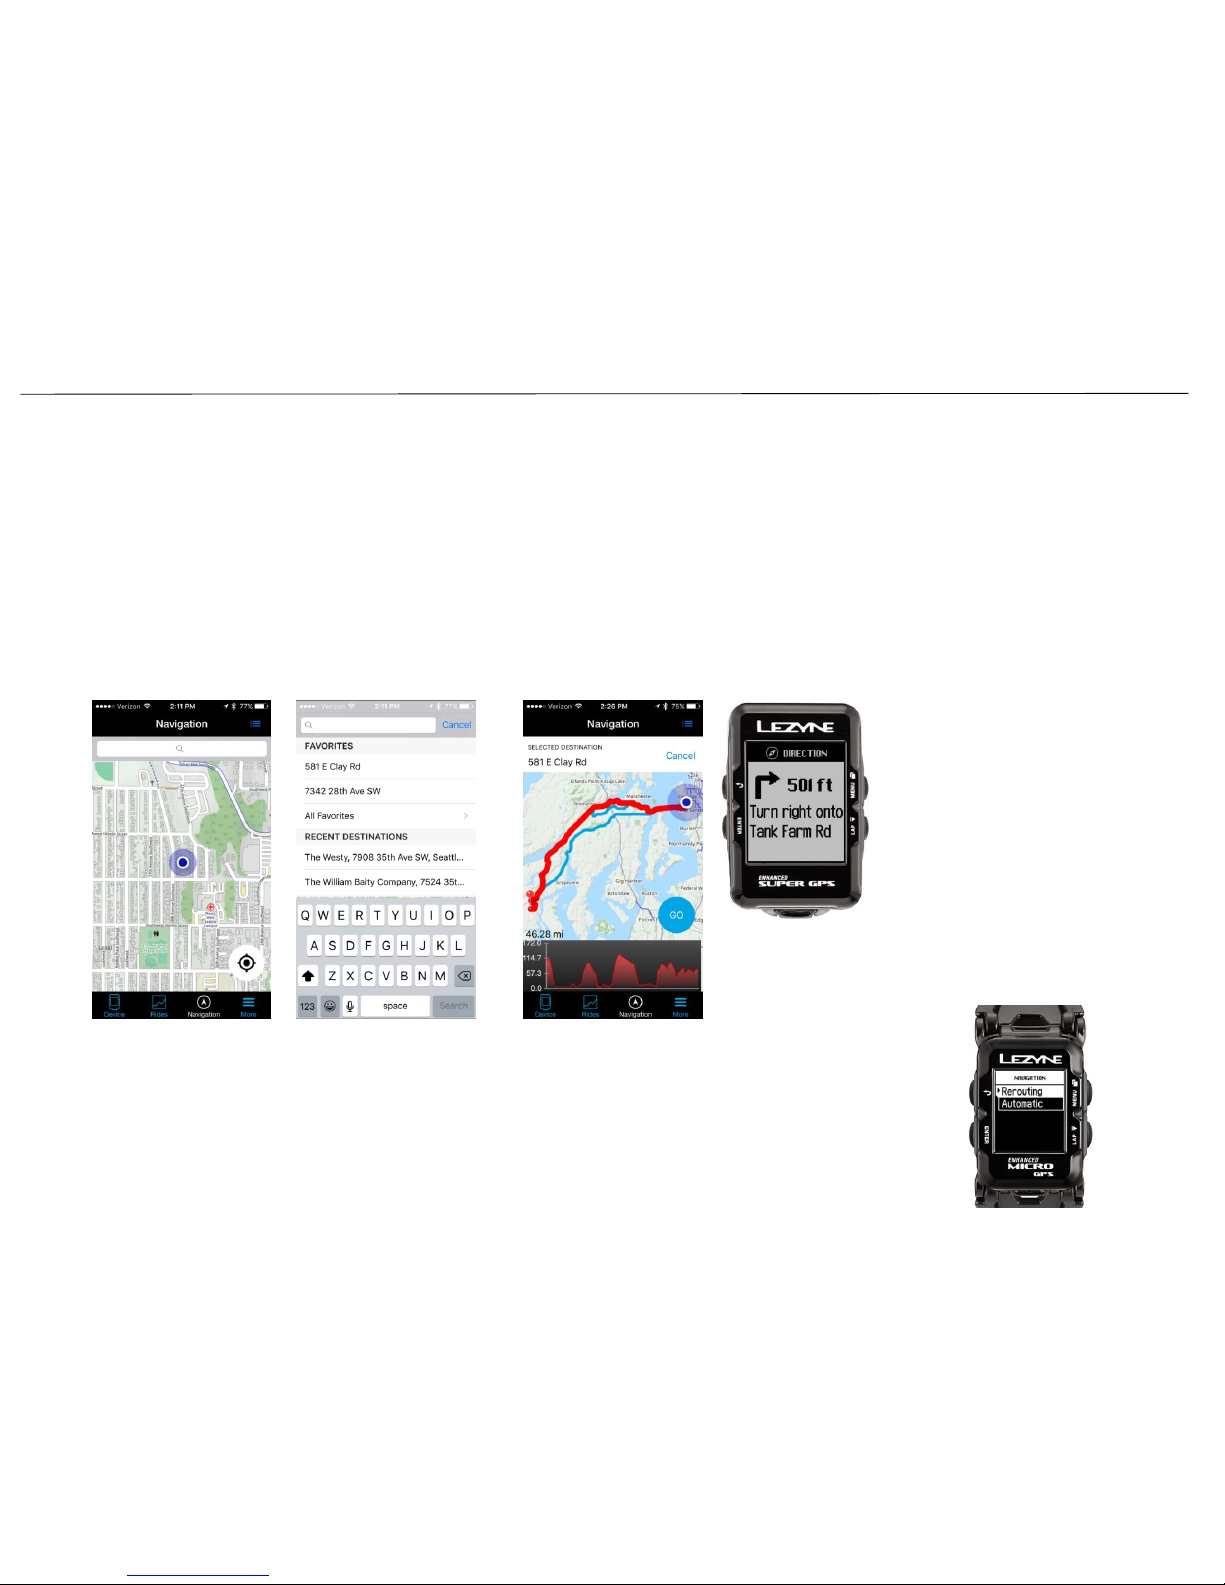
When the Lezyne GPS Watch is paired with the Lezyne Ally v2 App you can get Turn-byTurn directions.
In the Lezyne Ally App, on the Navigation tab, you can search by:
• Tapping the map on the location you’d like directions to.
• Typing in an address.
• Searching by name or keyword.
Once the location is determined, tap GO, and directions will be pushed to the device.
Navigation Setup
NAVIGATION
24
Rerouting: If your Smartphone has service it can reroute
you during navigation. This can be turned on or off.
1. In the Main Menu select Navigation.
2. Select Rerouting and scroll to Automatic or Manual
and hit Enter. Use the Back button to exit.
*If you choose manual, you can force a reroute by
holding now Enter for 2 seconds during navigation.
Page 24
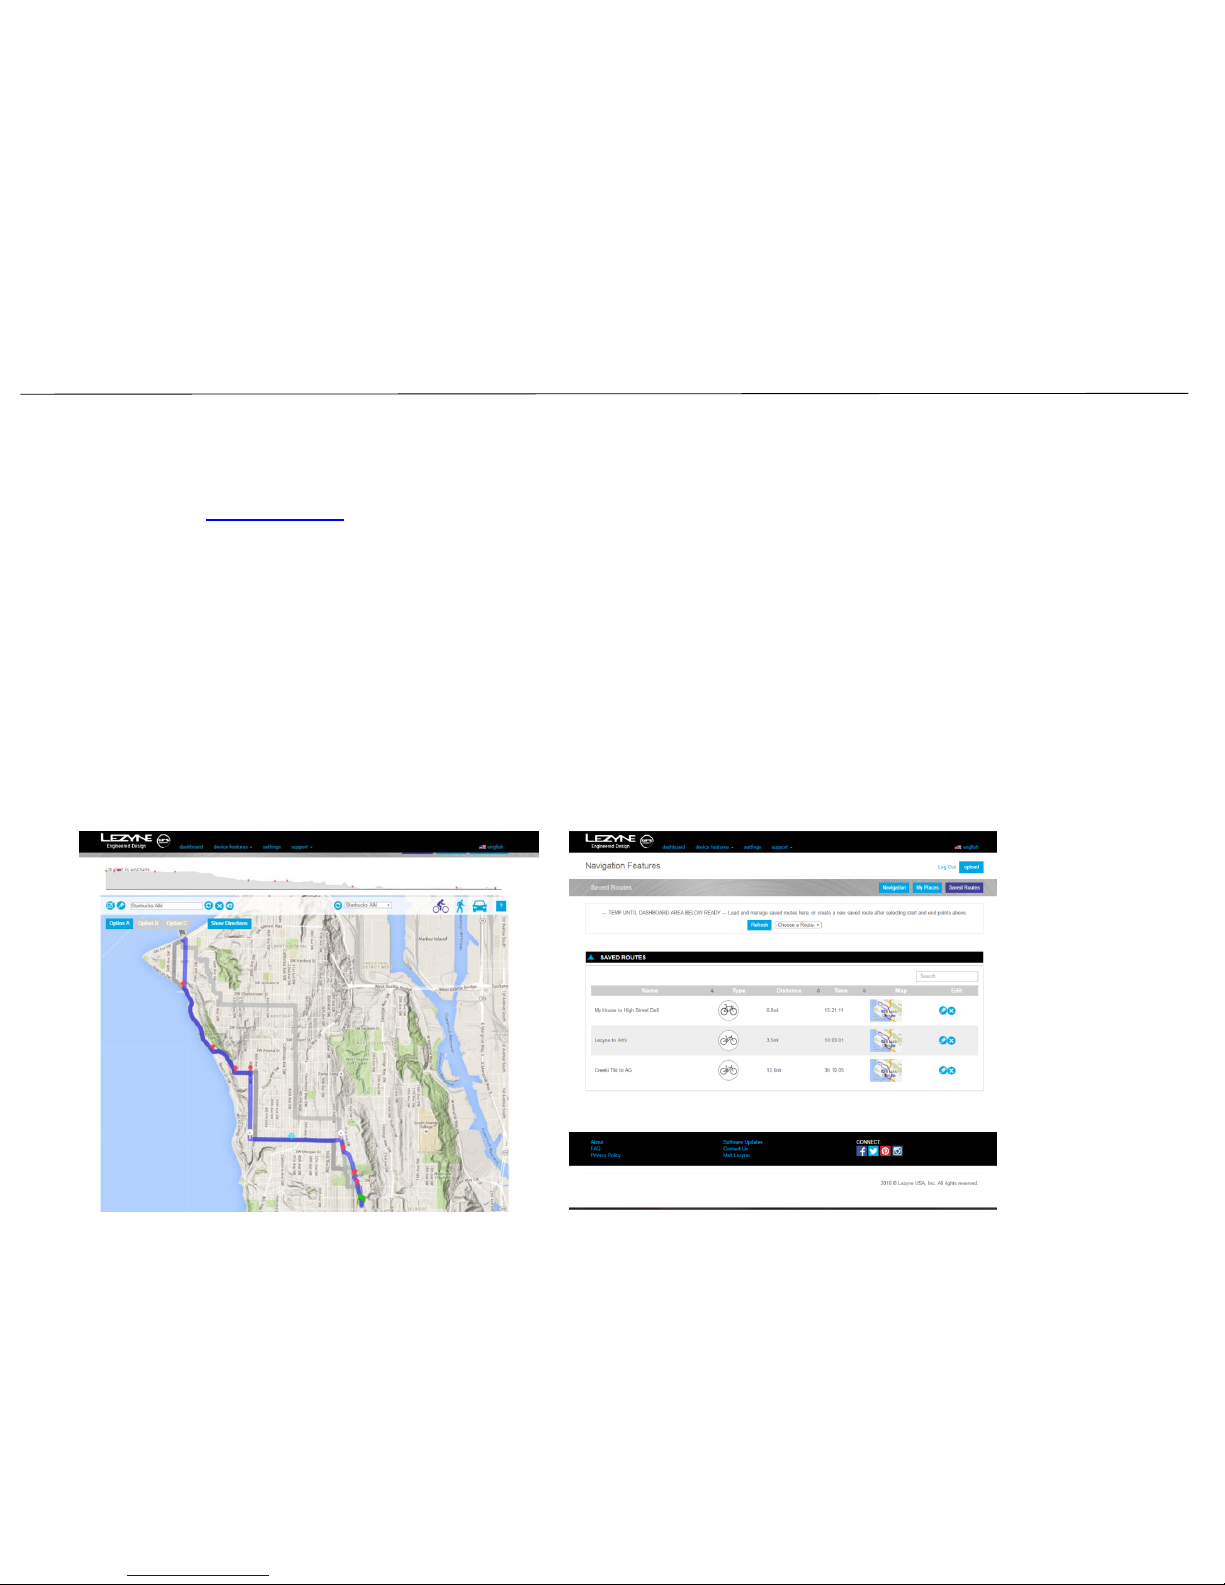
In the Lezyne GPS Root website under Device Features you can create custom Routes.
Go to Lezyne GPS Root.
Saved Routes can be accessed from the Lezyne Ally v2 App and pushed to your GPS
Watch for Turn-by-Turn directions.
1. Use the interactive map to search for and select a Start and Finishing point.
2. Click Calculate Route for route options and then name it and save it.
3. Go to Saved Routes to edit existing routes.
4. Add Way Points when route building or editing for a more specific route or loop.
5. Once saved, import it into your Ally v2 App under the pull-down menu in the
Navigation tab and hit Go.
Route Building
NAVIGATION
25
Page 25
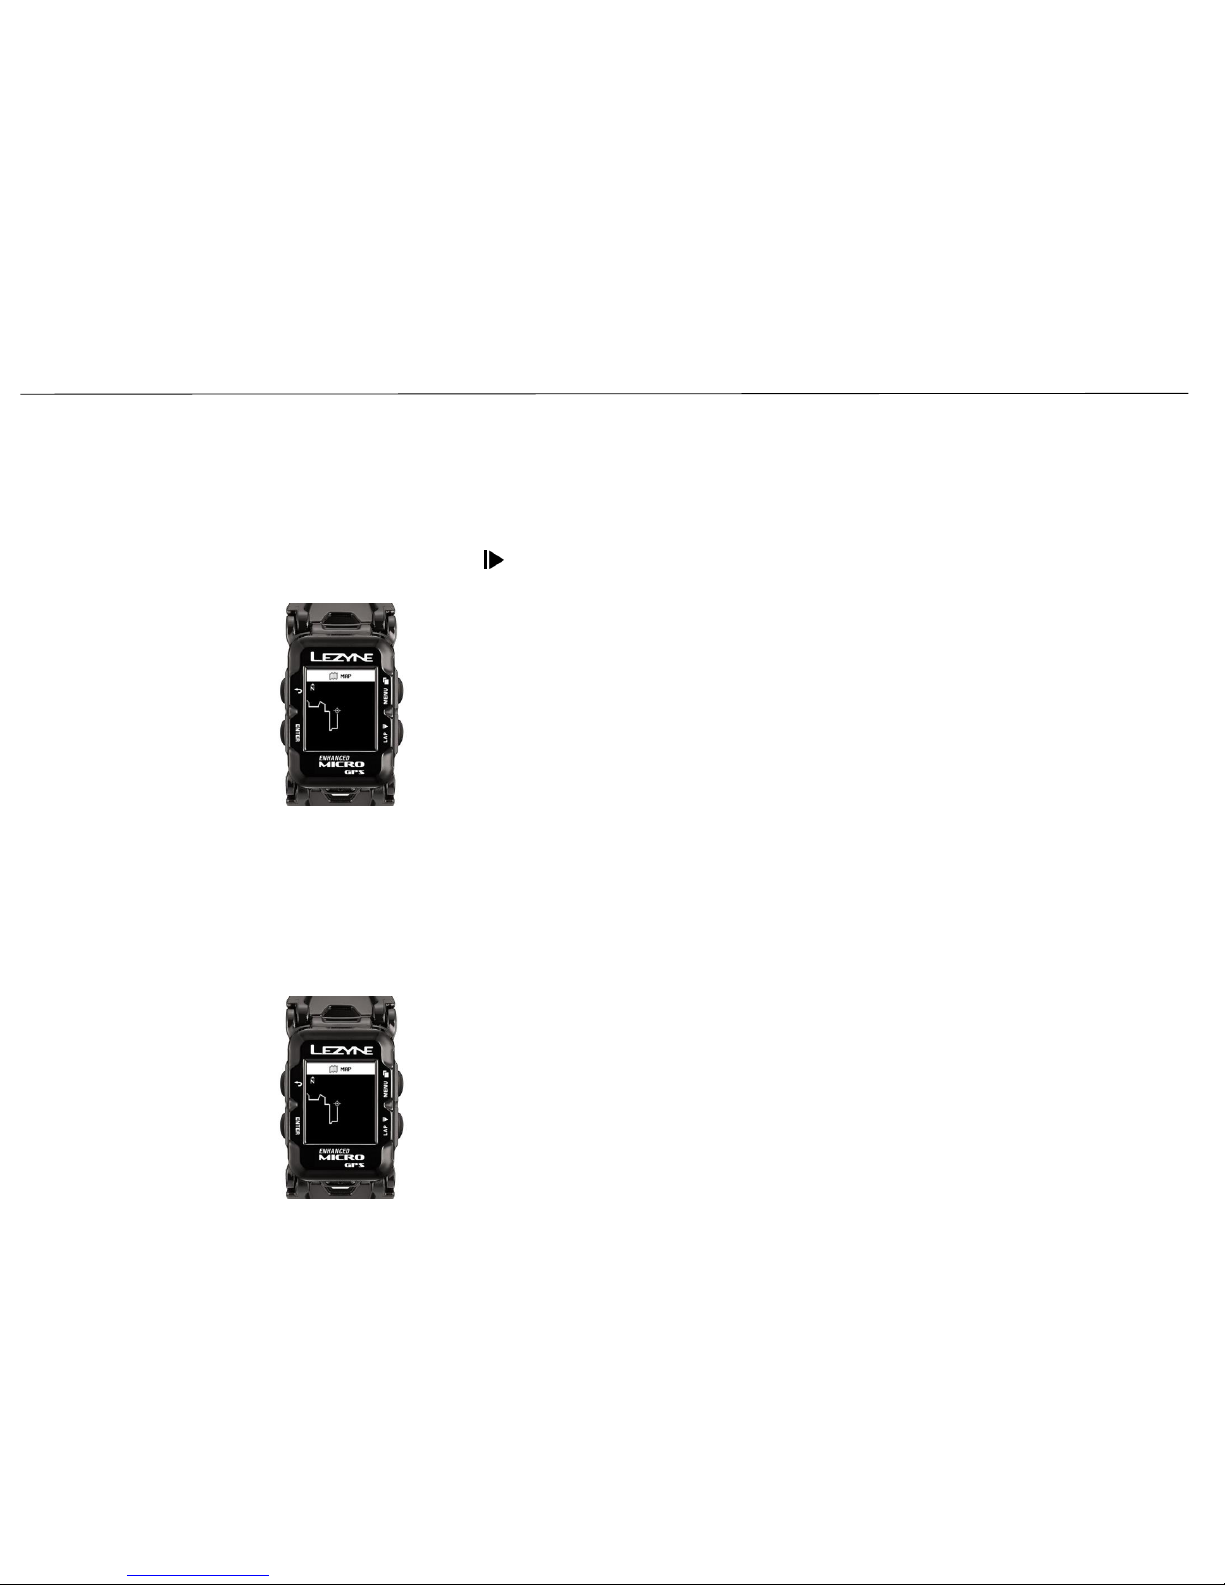
After starting a ride with your Lezyne GPS Watch a Breadcrumb Map page will display
where you have ridden. This helps give an idea of where you have been and can help
assist navigating back to your starting point.
1. Press the lower right record button and the breadcrumb map will begin to
record.
Breadcrumb Mapping
MAPPING
26
Route Mapping
When Navigation is being used, a Route Map will display showing the start, finish,
and your real time location on that route.
Page 26
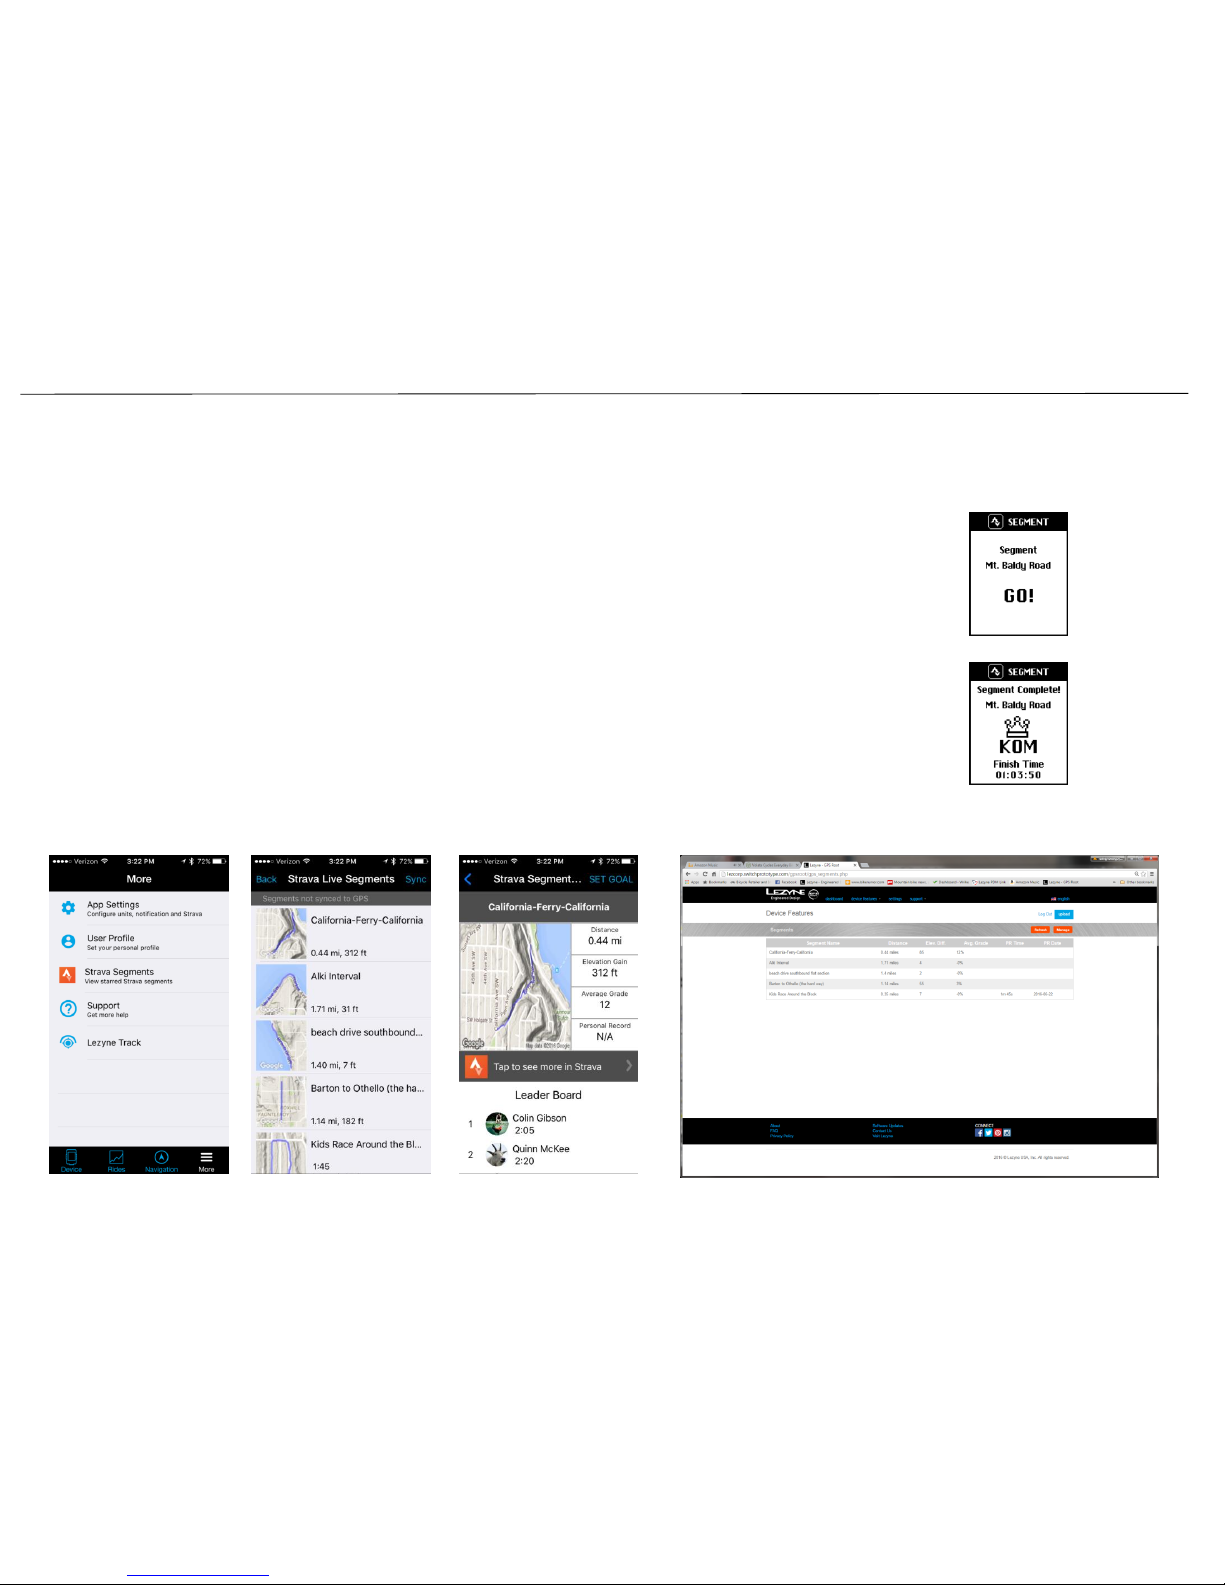
In the Lezyne GPS Root website or in the Lezyne Ally v2 App you can connect profiles with
Strava to sync rides.
While in the GPS Root or your Ally App you can manually sync rides to Strava or set Auto Sync in
the App Settings tab.
If you are a Strava Premium member, you can sync starred Strava segments to your device to use
the Strava Live Segments feature. This notifies you of when a segment starts and finishes and
displays real-time segment data.
*All Strava Segments are managed on the Strava Site and only synced with Lezyne GPS Root and
Ally App.
1. Star your favorite segments on the Strava website or within their App.
2. Open the Lezyne Ally App.
3. Tap the More Tab, and tap Strava Segments. Connect your profiles if not yet connected.
4. Make sure you are paired to your Lezyne GPS Watch.
5. Tap Sync and the Segments will be pushed to your Lezyne GPS device.
Strava Setup
STRAVA
27
Page 27
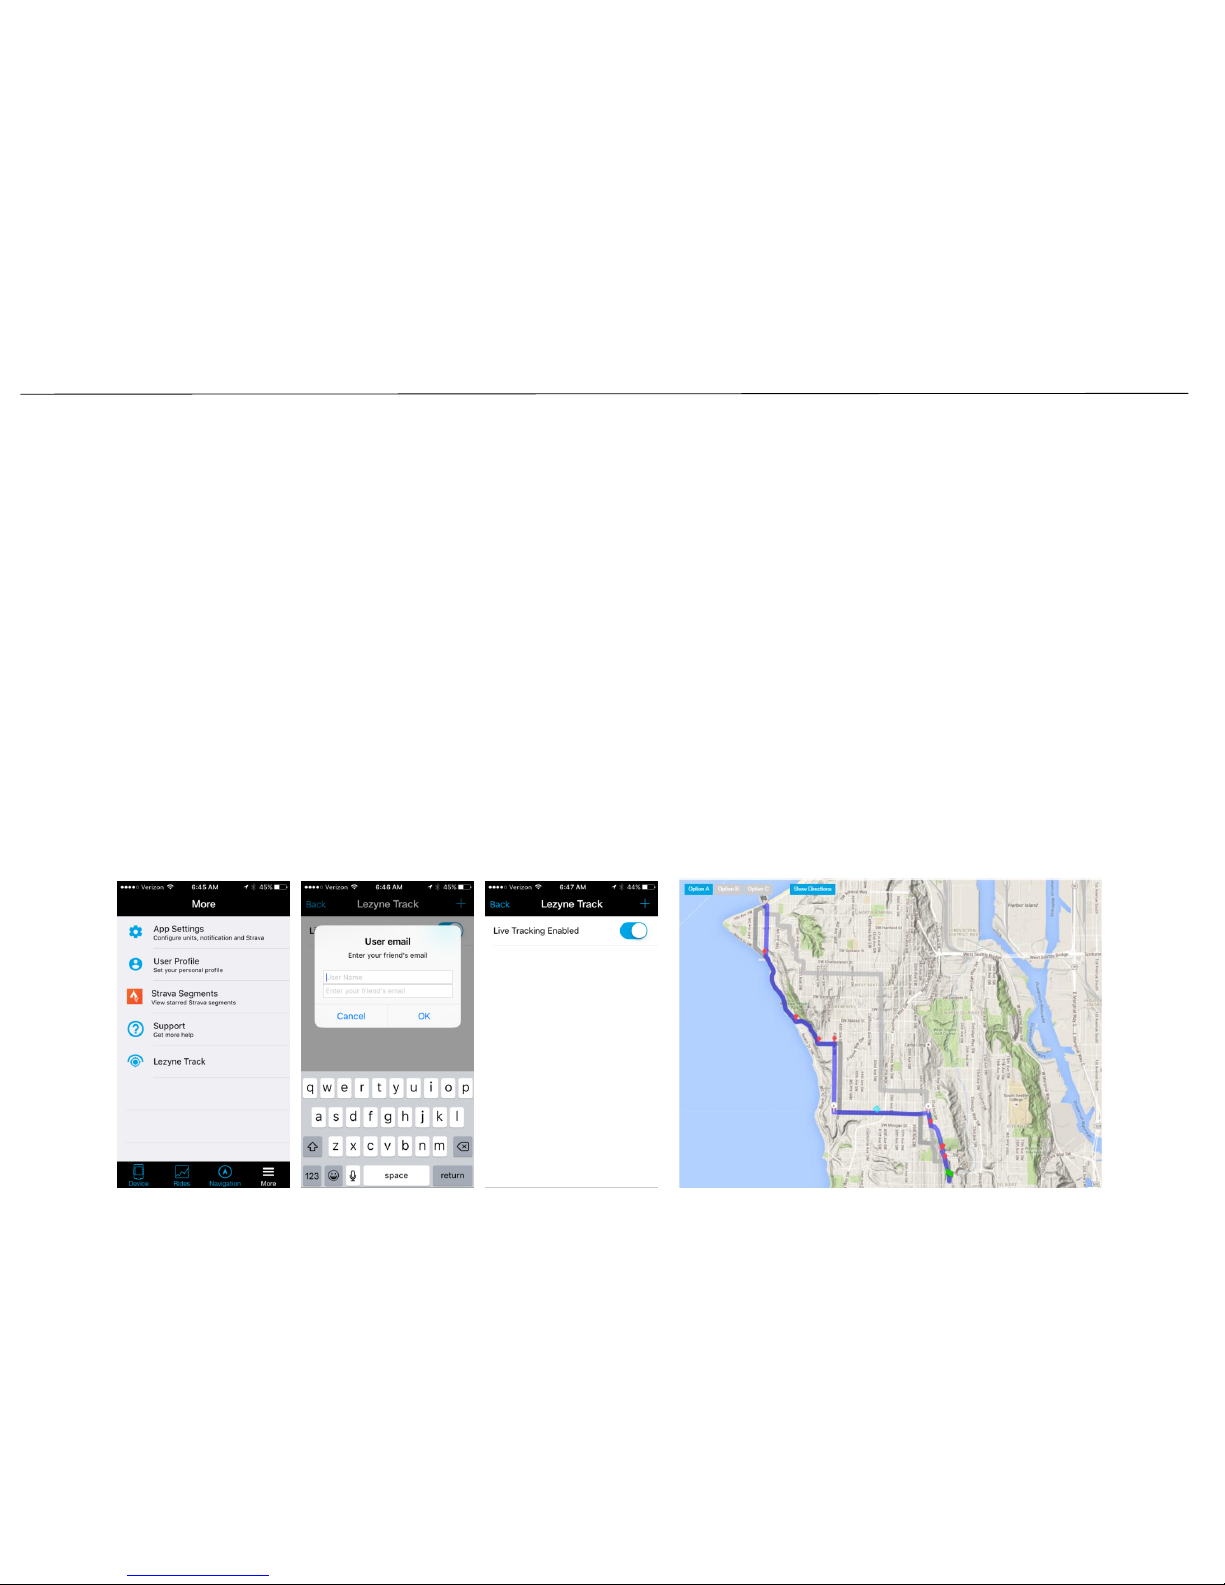
Lezyne Track is a way to share your ride information in real-time with friends, family,
or whoever you decide to include. They will be emailed a link that will send them to a
map showing your:
• Location
• Speed
• Distance
• And any sensor information that you are connected to
All you need is their email address to create a contact list and when you hit record on
the GPS Watch a message will be sent letting them know you’re out on a ride.
1. Go to the Lezyne Ally v2 App on your smartphone.
2. Tap the More Tab and find Lezyne Track.
3. Turn on Lezyne Track.
4. Type in or search through your contacts to add people to your share list.
5. Once you hit record on your Lezyne GPS a notice will be sent to the people in your
contact list
Lezyne Track Setup
LEZYNE TRACK
28
Dillon@Lezyne
Page 28
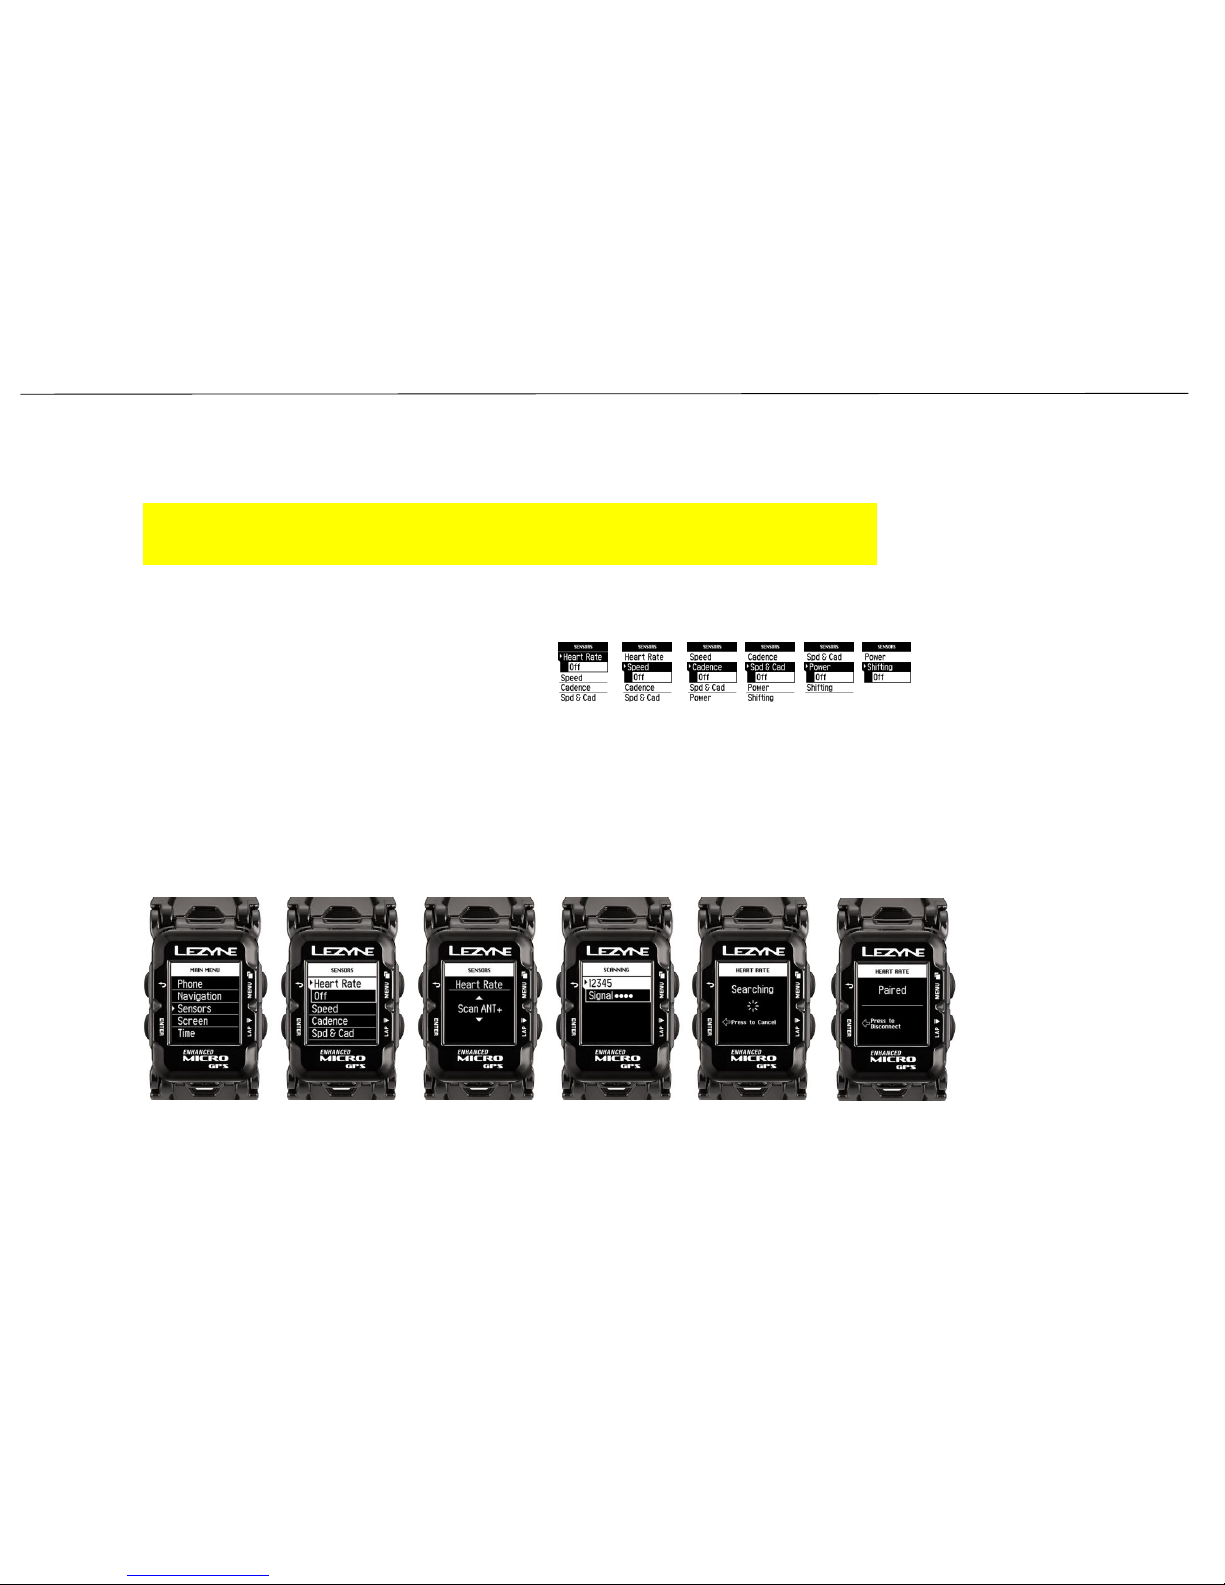
* Before pairing to a new sensor, see the manufacturer’s instruction manual on how to
pair and calibrate with a new device.
1. In the Main Menu scroll to Sensors and press ENTER. Scroll to the sensor type you
want to pair with and press ENTER.
2. Depending on your device type select either BTLE or ANT+
3. When the sensor appears, click enter to begin pairing.
*This can take up to a couple of minutes. Also, make sure the sensor is “awake.”
Once paired the GPS watch will read Paired, and the icon will show on the Home screen
Sensor Setup
SENSOR PAIRING
29
• Heart Rate
• Speed
• Cadence
• Speed & Cadence
• Power
• Shifting
**Special Shimano D-Fly adapter required for Di2 Systems to display shift information
Page 29
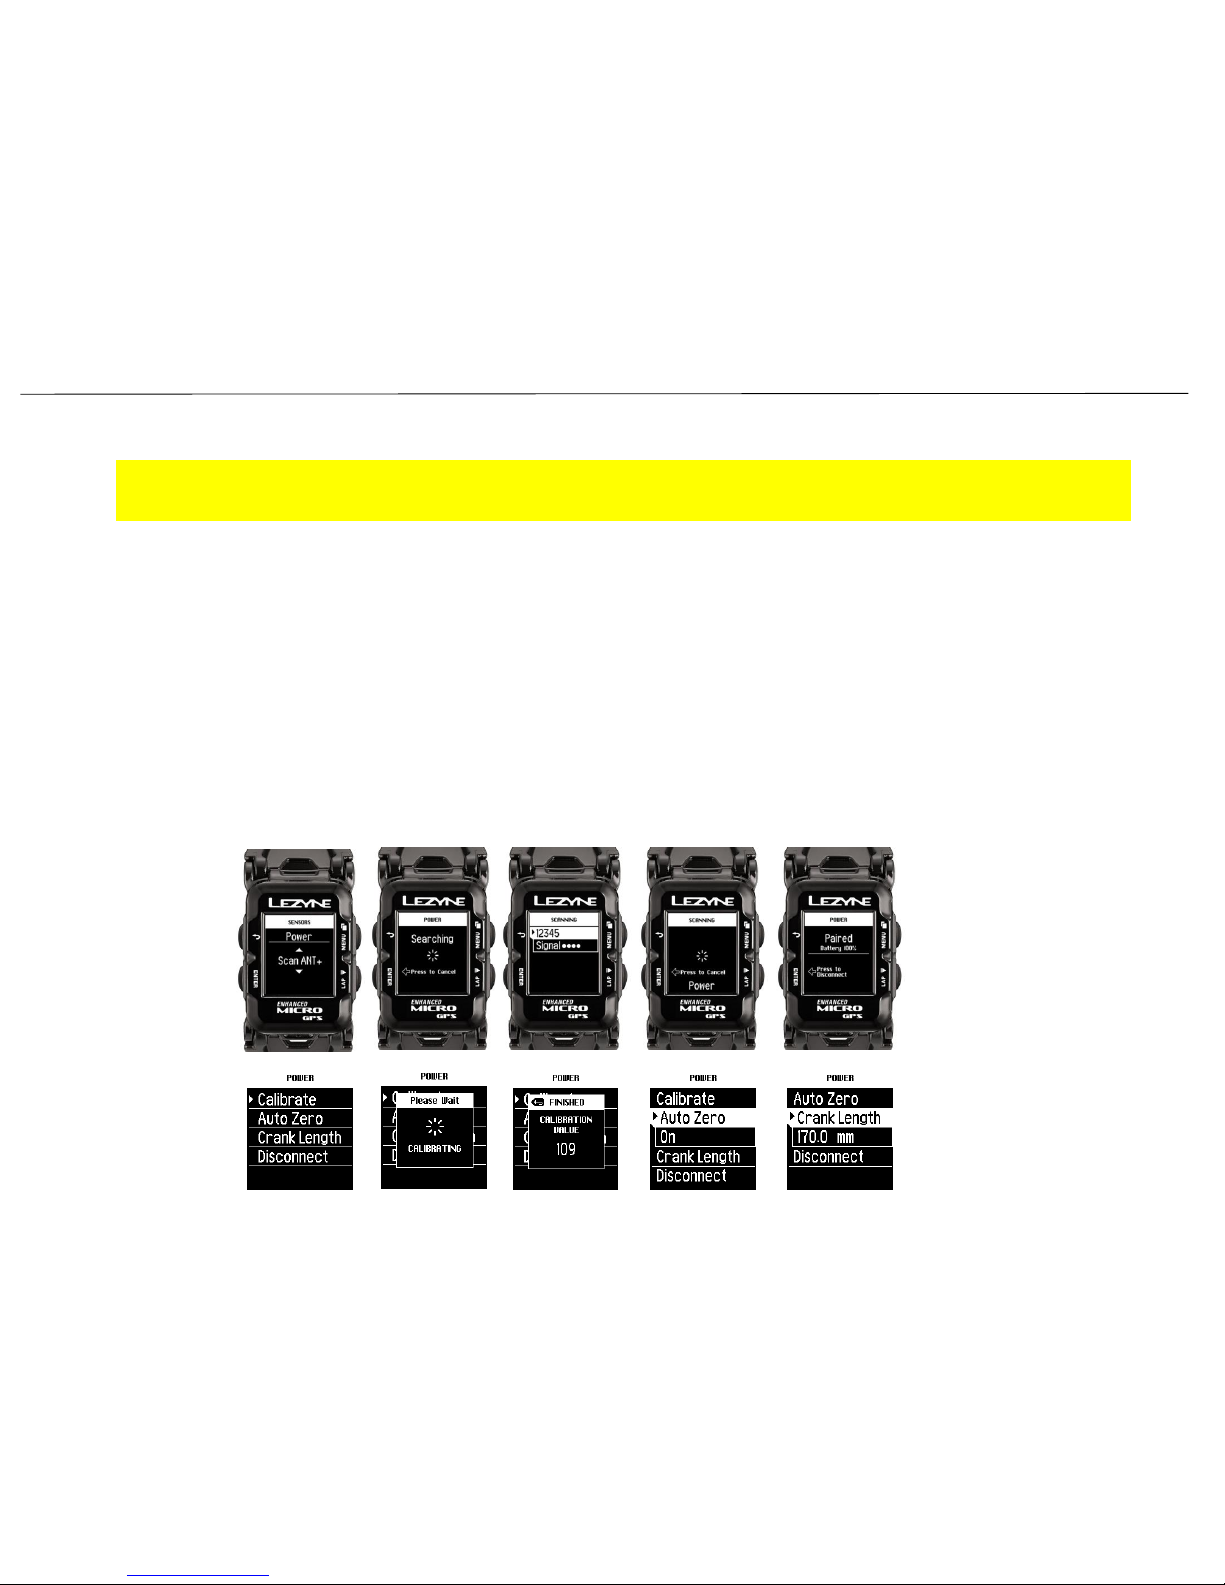
* Before you pair your Power monitor, see the manufacturer’s instruction manual on how to set up, pair and calibrate the
meter with devices.
1. In the Sensors menu scroll to Power and press ENTER.
2. Select Scan BLTE or Scan Ant+ depending on the sensor’s pairing protocol. Your GPS Watch will then start searching for
Power sensor within range. *This can take a couple minutes. Make sure you Power Meter is “awake” or “activated” by
riding your bike.
2. Select the sensor you are trying to pair. *If multiple sensors appear, look for your sensor’s ID number. When complete
the GPS watch will read Paired.
3. Once paired you can:
- Calibrate
- Auto Zero *(ANT+ versions only)
- Set Crank Arm length
*See manufacturer’s instructions on how to Calibrate and Auto Zero. Also note: You must connect to Ant+ for Left/Right
power data.
Power Meter Setup
SENSOR PAIRING
30
Page 30
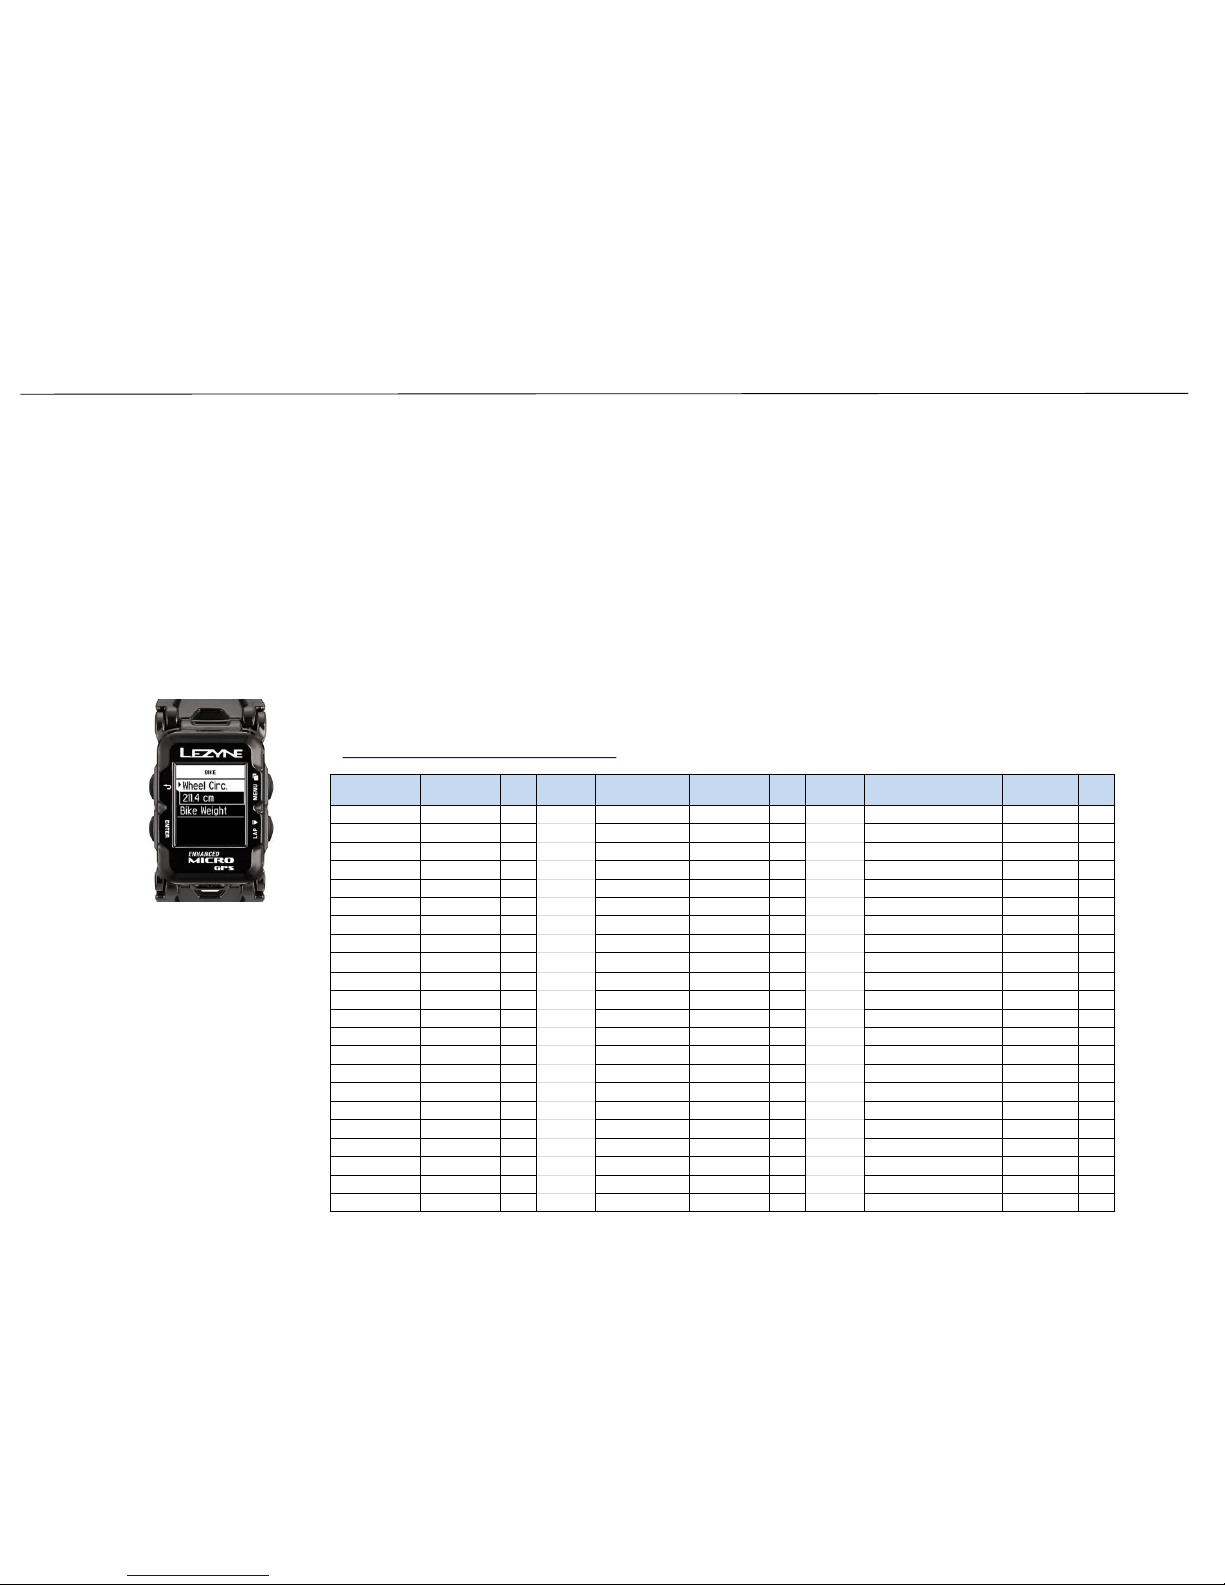
Wheel Circ (Circumference) Setup
BIKE SETUP
Setting your Wheel Circumference calibrates a paired Speed Sensor to accurately display your speed.
This is also needed if using a speed sensor with an indoor trainer.
*A paired Speed Sensor will take over the speed and distance recording instead of using the GPS signal.
In the Main Menu, select Bike and press Enter. Use the right buttons to INCREASE or DECREASE wheel
circumference. Use the ENTER button to select the size. When done select the BACK button to exit.
31
Wheel Size and Circumference
The wheel size can be found on the side of the tire. This is not an exact list but a general guide. A more
specific wheel calculator can be found online. Or you can manually measure wheel circumference.
http://www.bikecalc.com/wheel_size_math
Wheel Tire CM Wheel Tire CM Wheel Tire CM
700c/29er 20 mm
208.0 650b/27.5 2.125 inch 217.4 26inch mtb 2.10 inch 209.1
700c/29er 23 mm
209.9 650b/27.5 2.20 inch 218.6 26inch mtb 2.125 inch 209.5
700c/29er 25 mm
211.1 650b/27.5 2.25 inch 219.4 26inch mtb 2.20 inch 210.7
700c/29er 28 mm
213.0 650b/27.5 2.30 inch 220.2 26inch mtb 2.25 inch 211.5
650b/27.5 20 mm 196.0 650b/27.5 2.35 inch 221.0 26inch mtb 2.30 inch 212.3
650b/27.5 23 mm 197.9 650b/27.5 2.40 inch 221.6 26inch mtb 2.35 inch 213.1
650b/27.5 25 mm 199.2 650c 20 mm 192.0 26inch mtb 2.40 inch 213.7
650b/27.5 28 mm 201.1 650c 23 mm 193.8 20inch Recumbent 20 mm 154.3
650b/27.5 32 mm 203.6 650c 25 mm 195.1 20inch Recumbent 23 mm 156.1
650b/27.5 35 mm 205.5 650c 28 mm 197.0 20inch Recumbent 25 mm 157.4
650b/27.5 38 mm 207.3 26inch mtb 35 mm 197.6 20inch Recumbent 28 mm 159.3
650b/27.5 44 mm 211.1 26inch mtb 38 mm 199.5 20inch Recumbent 32 mm 161.8
650b/27.5 50 mm 214.9 26inch mtb 44 mm 203.3 20inch Recumbent 35 mm 163.7
650b/27.5 56 mm 218.7 26inch mtb 50 mm 207.0 20inch Recumbent 1.00 inch 157.6
650b/27.5 1.00 inch 199.4 26inch mtb 56 mm 210.8 20inch Recumbent 1.25 inch 161.6
650b/27.5 1.25 inch 203.4 26inch mtb 1.00 inch 191.6 20inch Recumbent 1.5 inch 165.6
650b/27.5 1.5 inch 207.4 26inch mtb 1.25 inch 195.6 20inch Recumbent 1.75 inch 169.6
650b/27.5 1.75 inch 211.4 26inch mtb 1.5 inch 199.6 20inch Recumbent 1.90 inch 172.0
650b/27.5 1.90 inch 213.8 26inch mtb 1.75 inch 203.5 20inch Recumbent 1.95 inch 172.8
650b/27.5 1.95 inch 214.6 26inch mtb 1.90 inch 205.9 20inch Recumbent 2.00 inch 173.6
650b/27.5 2.00 inch 215.4 26inch mtb 1.95 inch 206.7
650b/27.5 2.10 inch 217.0 26inch mtb 2.00 inch 207.5
Page 31
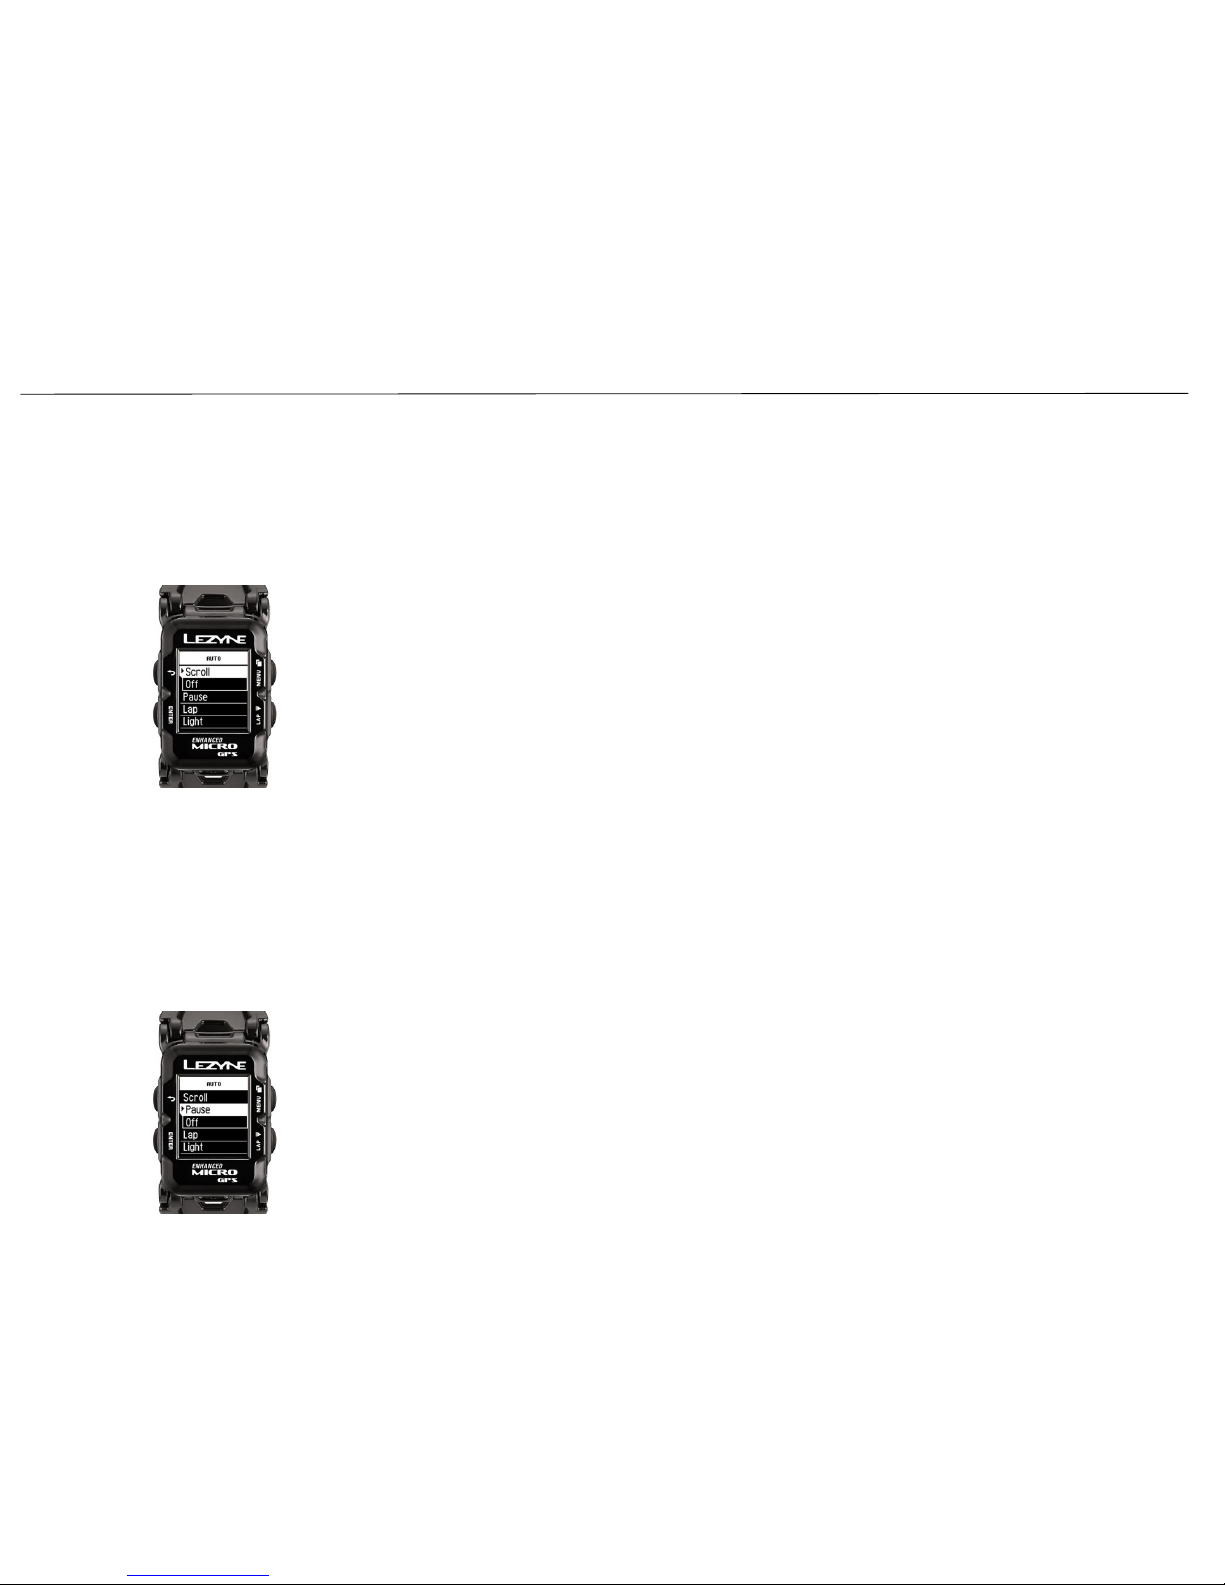
Start/Stop (Pause) Setting
AUTO/PRESET NOTIFICATION SET UP
Scroll Setting
Auto Scroll pages on the device while recording.
In the Main Menu, select Auto. Press ENTER and use the right buttons to select
On or Off. Press ENTER to make the selection.
The Auto Pause setting is an automatic Start/Stop feature that controls recording of the
ride if you stop for a period of time. It will start back up once you begin to move.
In the Main Menu, select Auto. Press ENTER and use the right buttons to select On or
Off. Press ENTER to make the selection.
32
Page 32
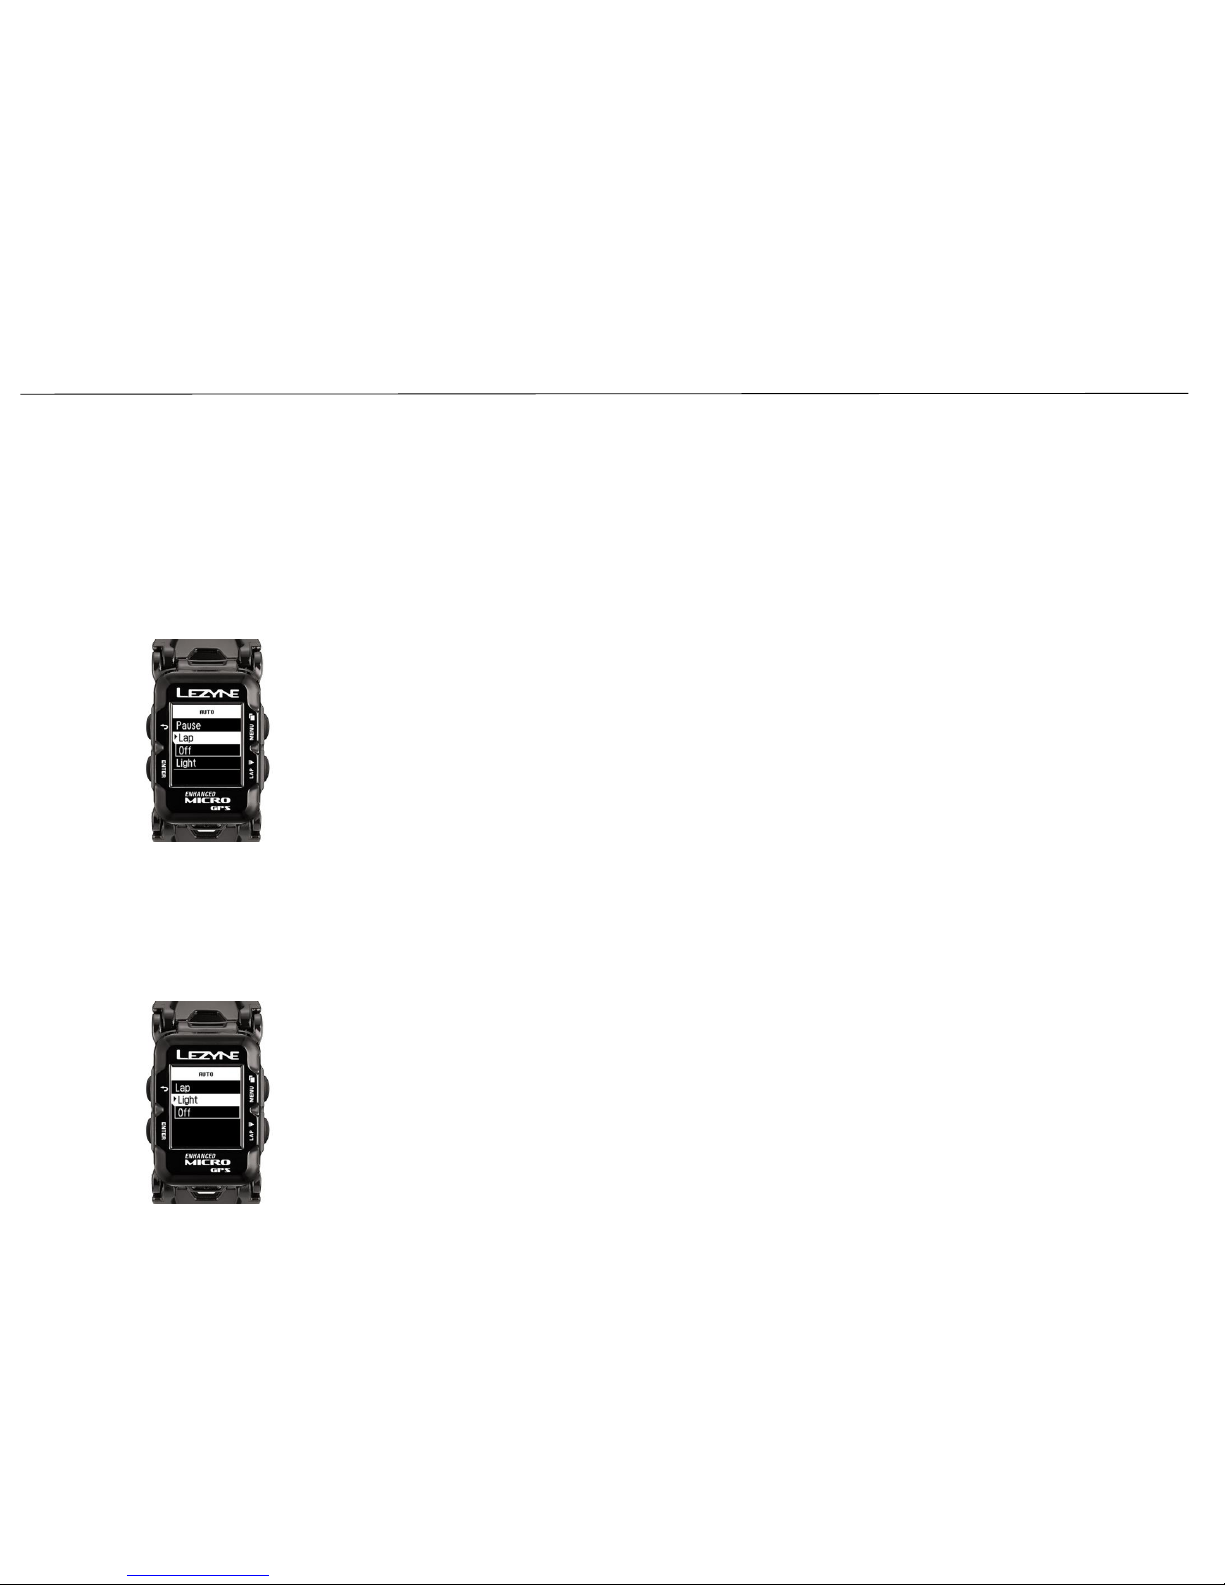
Light Setting
AUTO/PRESET NOTIFICATION SET UP
Lap Preset Notification Setup
Lap preset allows you set a notification pop up based on Time or Distance goals and
stores the data in your .fit file.
In the Main Menu, select Auto. Press ENTER and use the right buttons to select
Time or Distance. Press ENTER to make the selection. Press ENTER and use the right
buttons to INCREASE or DECREASE. When done press the ENTER button. To reset,
select Off and repeat the steps.
The Light setting automatically turns the backlight on whenever a button is pressed.
In the Main Menu, select Auto. Press ENTER and use the right buttons to select On or
Off. Press ENTER to make the selection.
33
Page 33
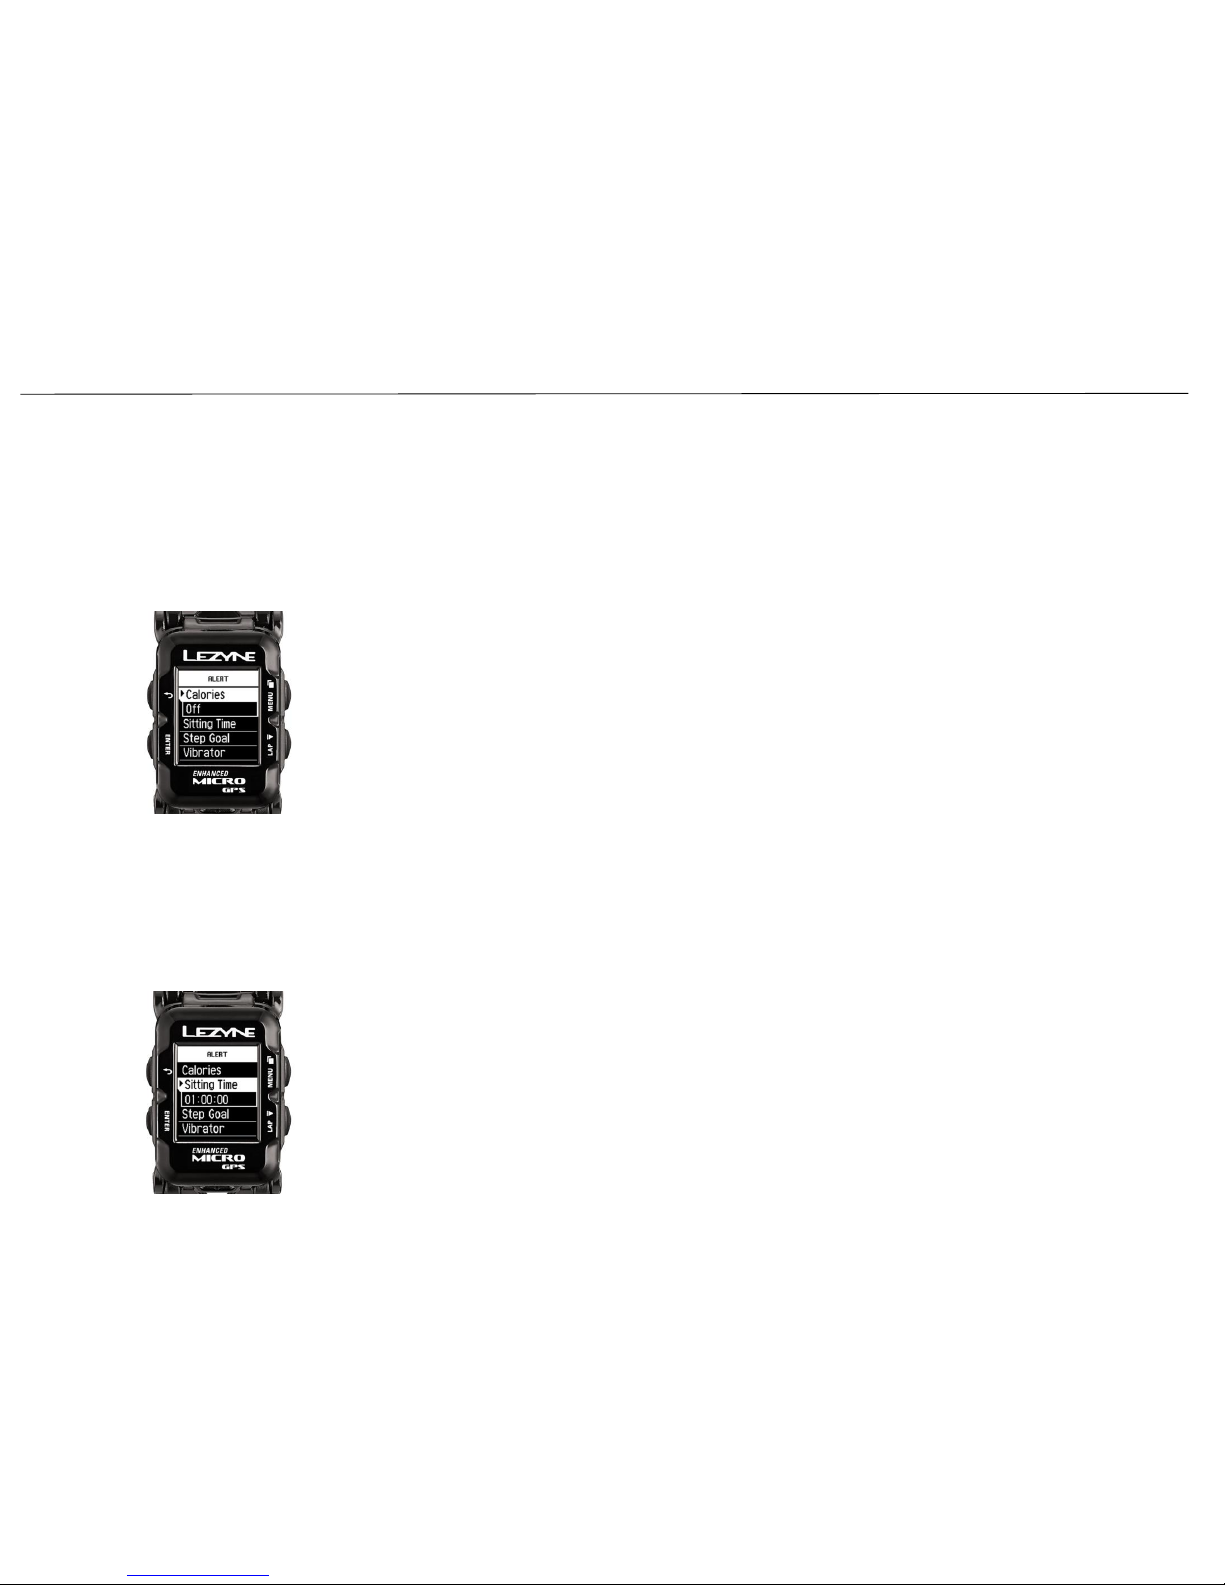
Calories Alert
Set up an Alert for when you reach a burned Calories Goal
1. When in the Main Menu scroll to Alerts and select
Calories and press the left ENTER button.
2. Scroll up or down to set the desired goal.
34
Sitting Time Alert Lifestyle Mode Only
Set a Sitting Time Alert to notify you to get up and move!
1. In the Alert Menu, select Sitting Time. Use the two
right button to scroll up or down and press enter to
select your preffered Sitting Time alert.
ALERT SETUP
Page 34
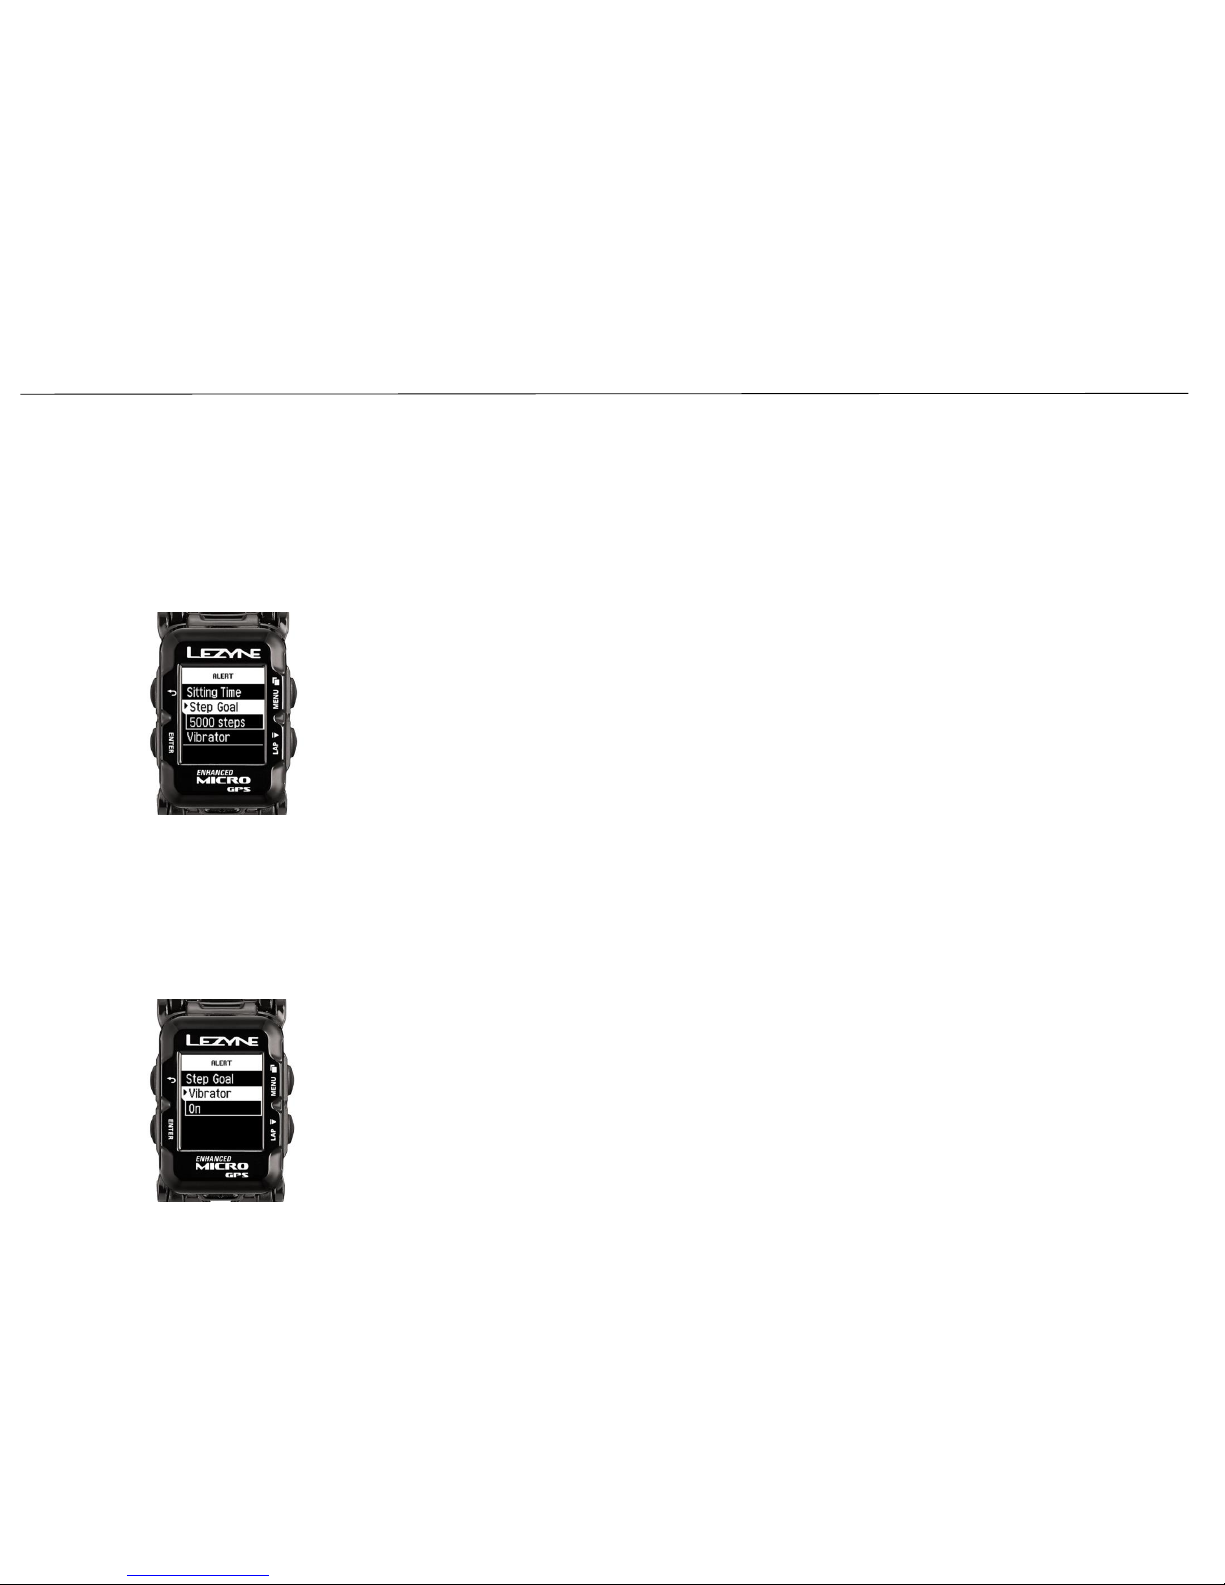
Vibrator Alert
Set up a Vibration indication for the Alerts
1. In the Alert Menu, select Vibrator. Use the two right button to to On or
Off and press Enter to select.
35
Step Goal Alert Lifestyle Mode Only
ALERT SETUP
Set an Alert to notify you for a Step Goal you want to hit.
1. In the Alert Menu, select Step Goal. Use the two right
button to scroll up or down and press enter to select
your preferred Step Goal alert.
Page 35
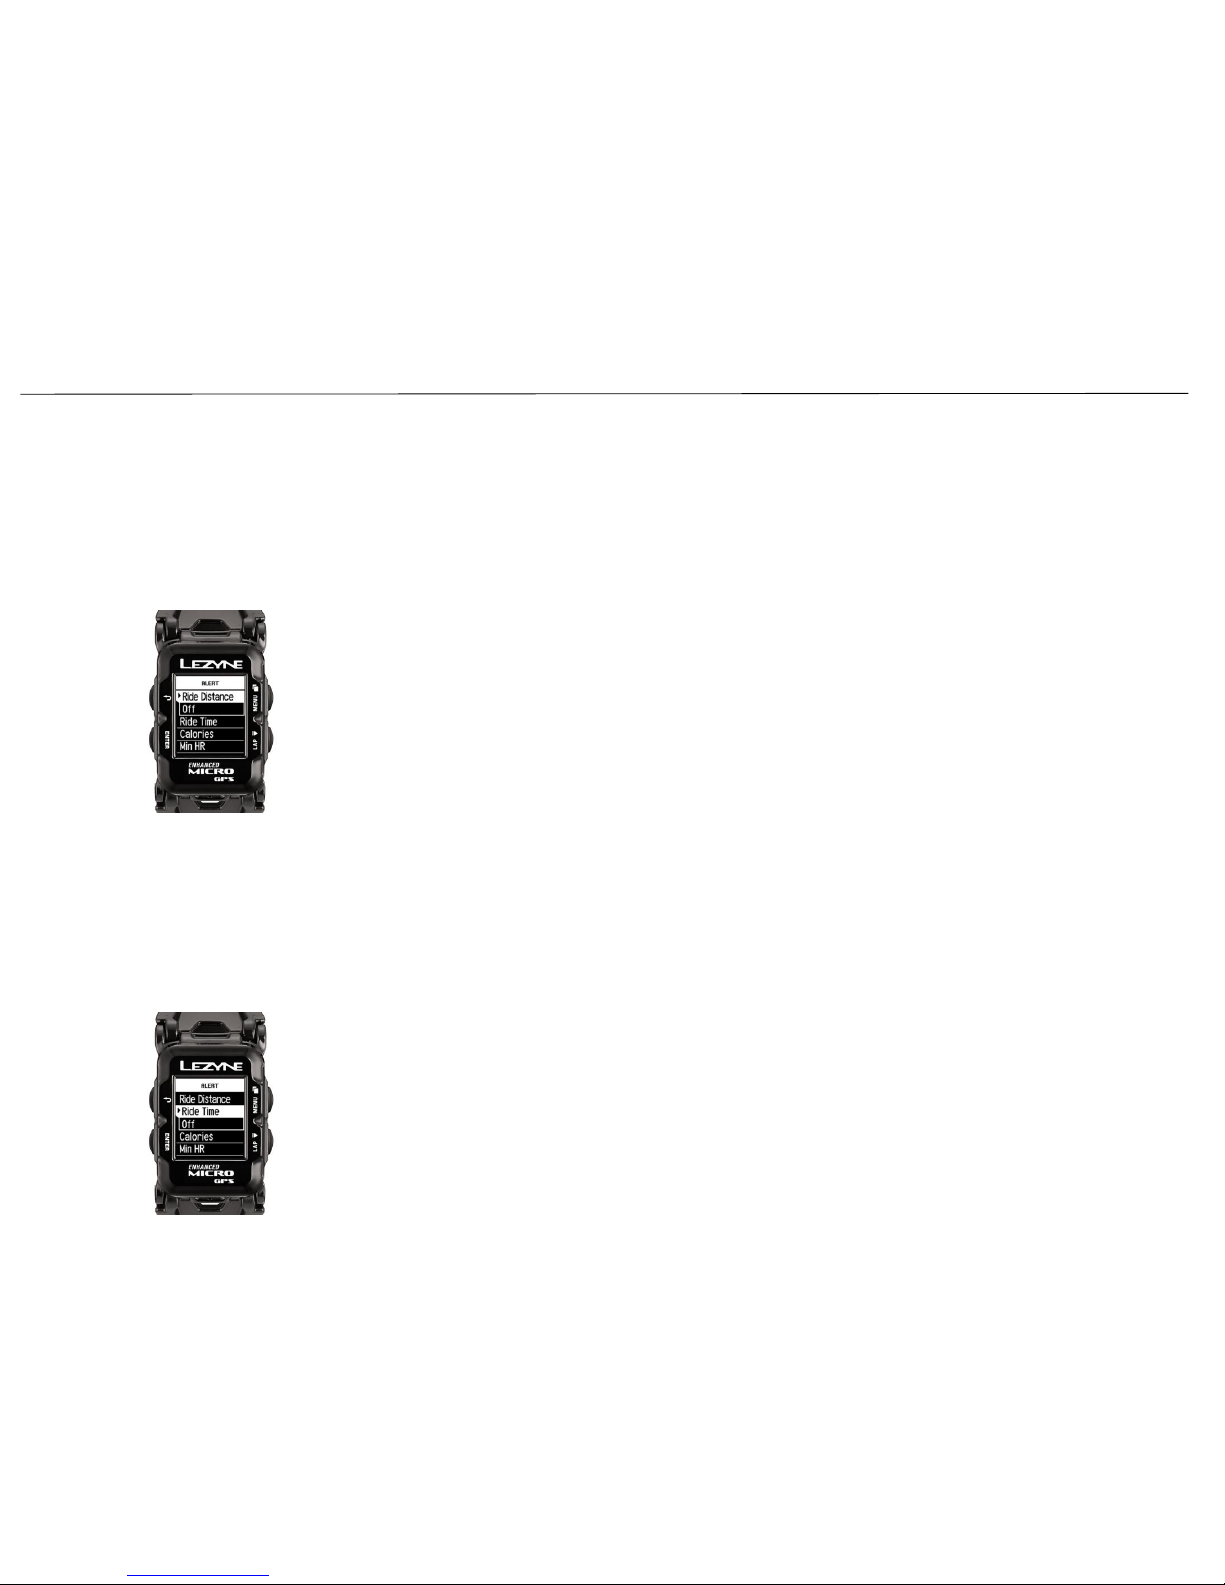
Time Alert Setup
ALERT SETUP
Distance Alert Setup
Distance alert gives you a pop up alert when you complete a set RIDE or RUN
distance goal.
In the Alert Menu, select Distance. Use the two right button to Increase or
Decrease distance. Press enter to select your preferred Distance alert.
Time alert gives you a pop up alert when you complete a set a RIDE or RUN goal for
an amount of time. In the Alert Menu, select Time. Use the two right button to
Increase or Decrease time. Press enter to select your preferred Time alert.
36
Page 36
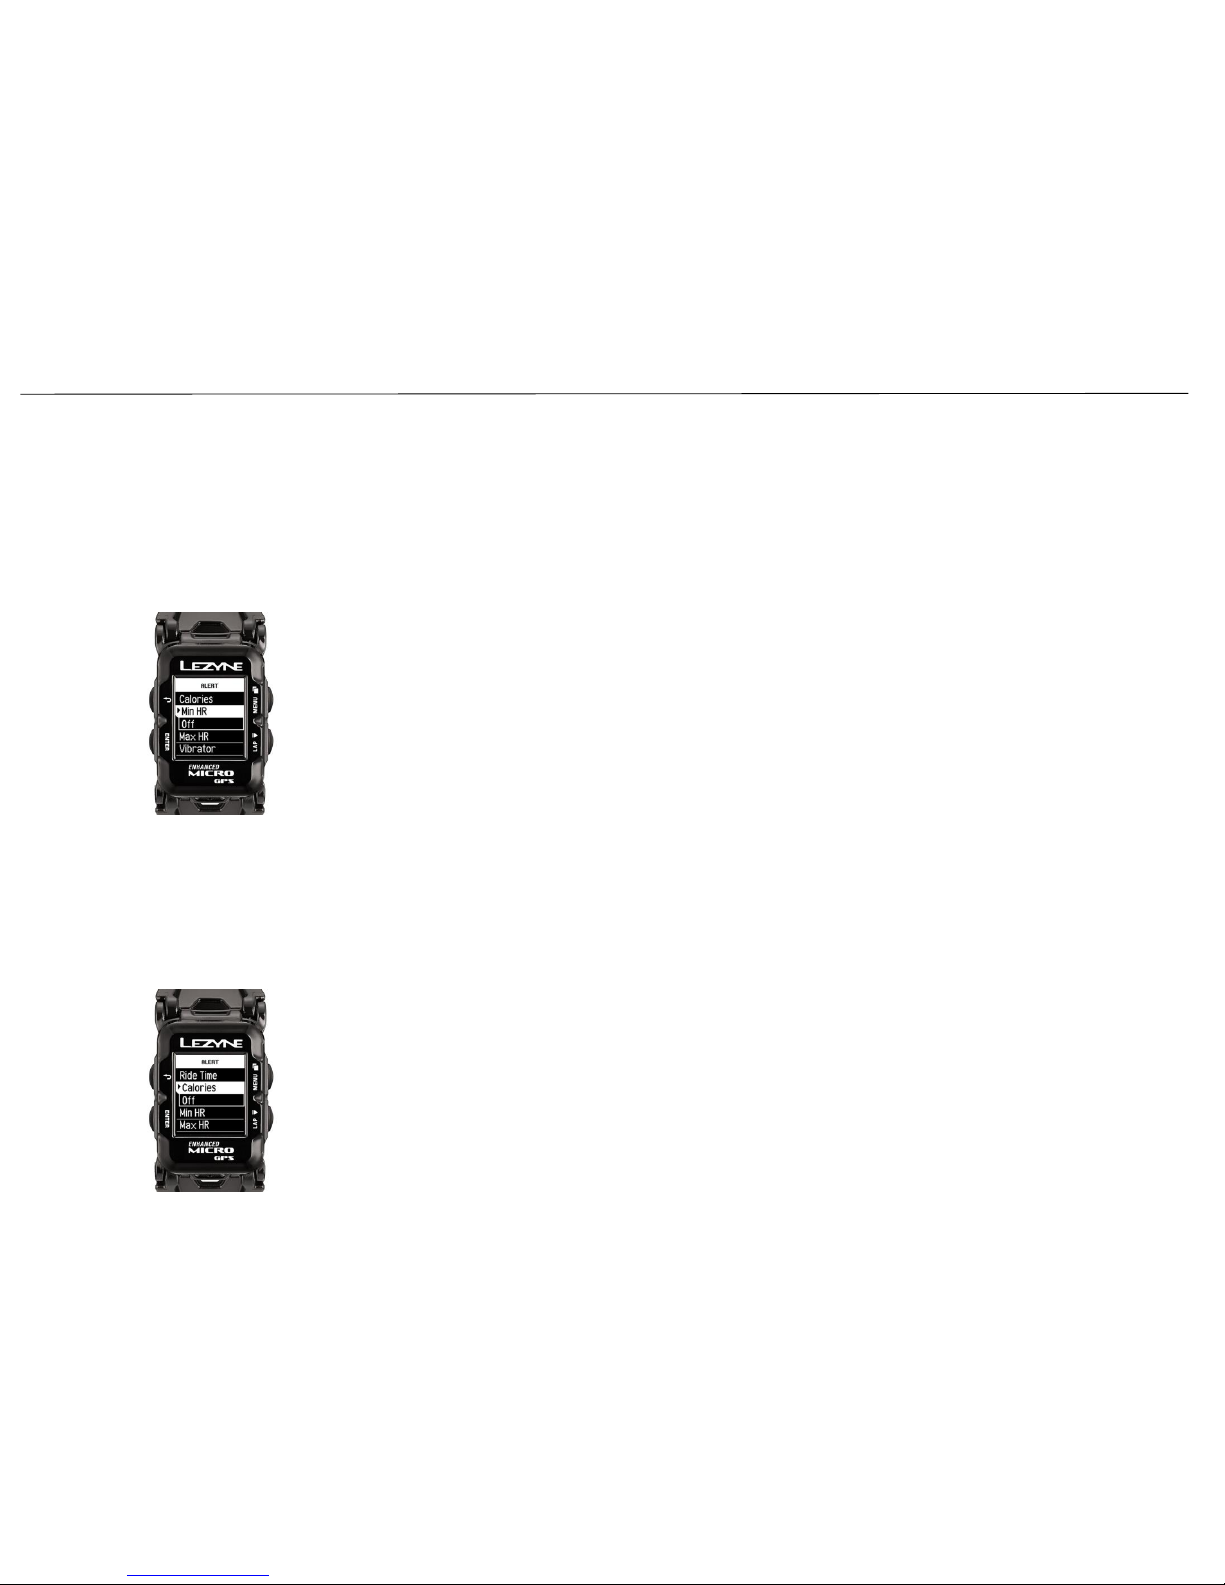
ALERT SETUP
Calories Alert Setup
Calories alert gives you a pop up alert when you complete a set goal. In the Alert
Menu, select Calories. Use the two right button to Increase or Decrease calories.
Press enter to select your preferred Calories alert. To reset, select Off and repeat the
steps for set up.
38
Minimum HR (Heart Rate) Alert Setup
Minimum Heart Rate alert gives you a pop up alert when you drop below a set
Heart Rate. In the Alert Menu, select Min HR. Use the two right button to
Increase or Decrease min. Heart Rate. Press enter to select your preferred min.
Hear Rate alert. To reset, select Off and repeat the steps for set up.
Page 37
ALERT SETUP
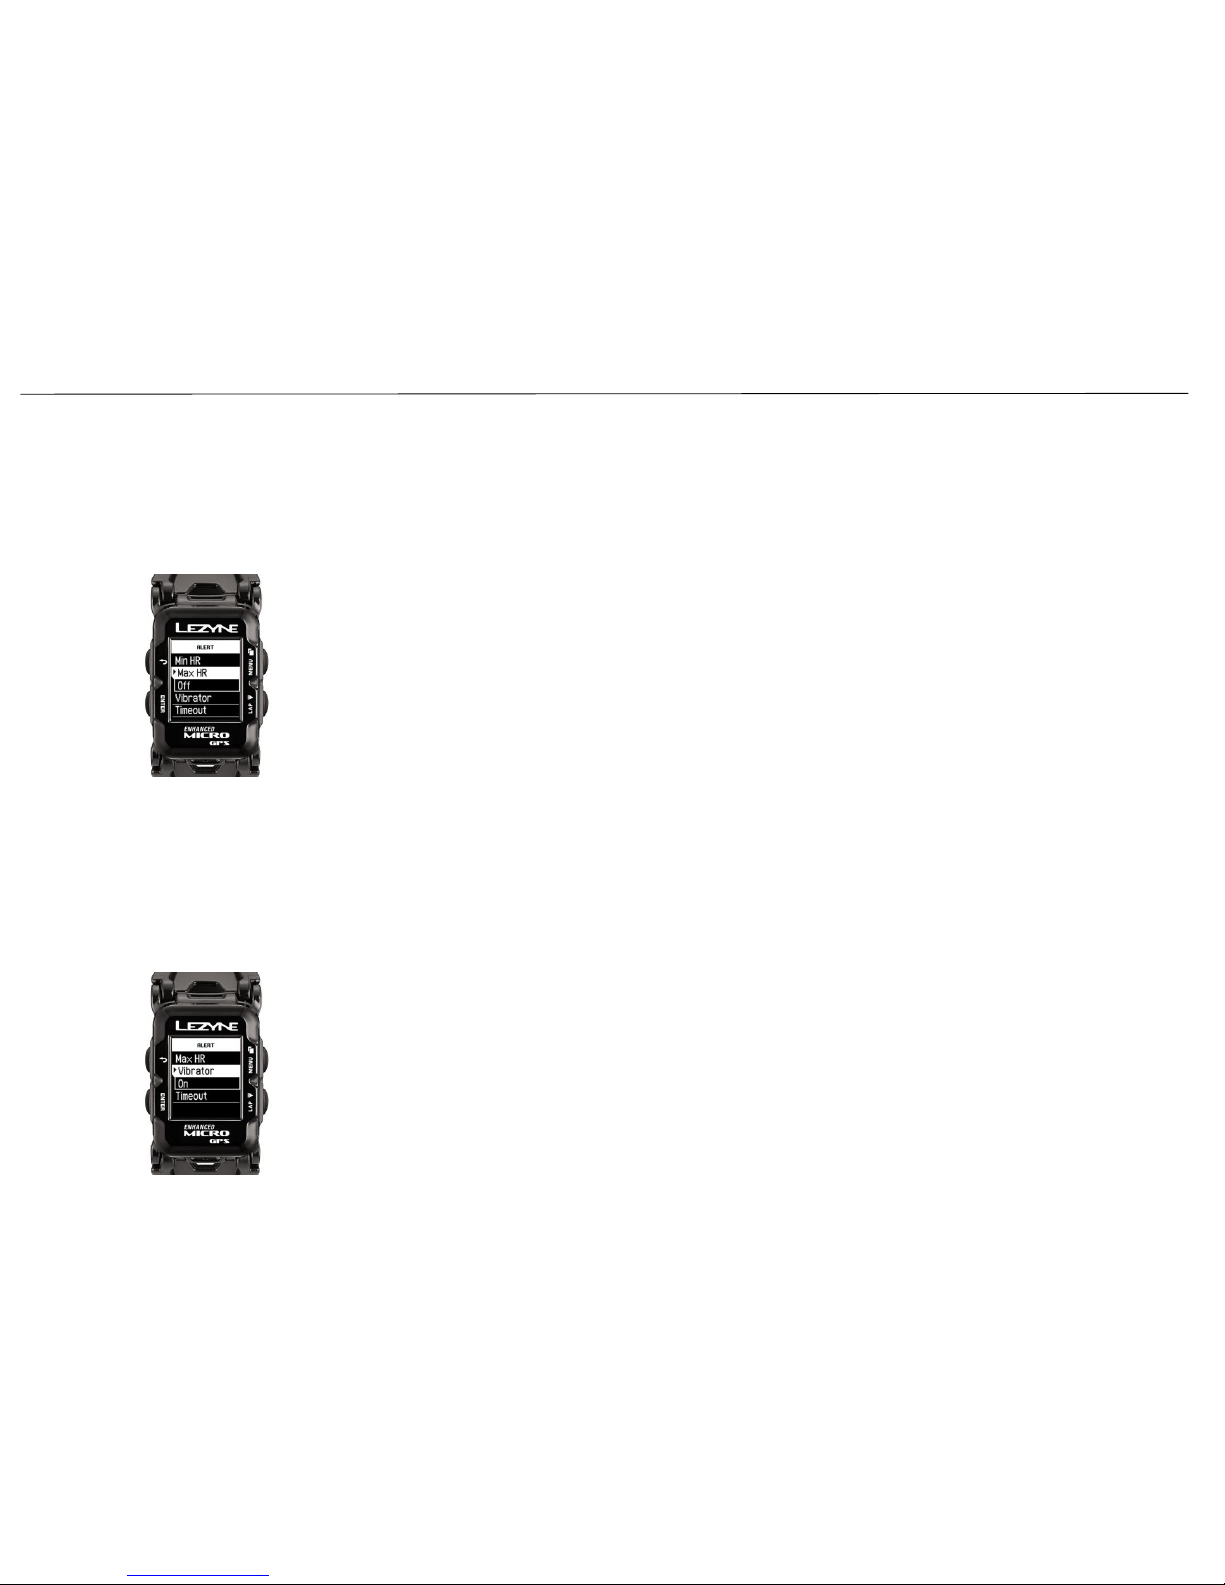
Maximum HR (Heart Rate) Alert Setup
39
Vibrator Setup
Maximum Heart Rate alert gives you a pop up alert when you above a set Heart Rate. In the Alert
Menu, select Max HR. Use the two right button to Increase or Decrease max Heart Rate. Press enter
to select your preferred max Hear Rate alert. To reset, select Off and repeat the steps for set up.
The Vibrator setting turns it on when ever a button is pressed or an Alert comes through.
Press ENTER and use the right buttons to select On or Off. Press ENTER to make the
selection
Page 38
RECORDS
40
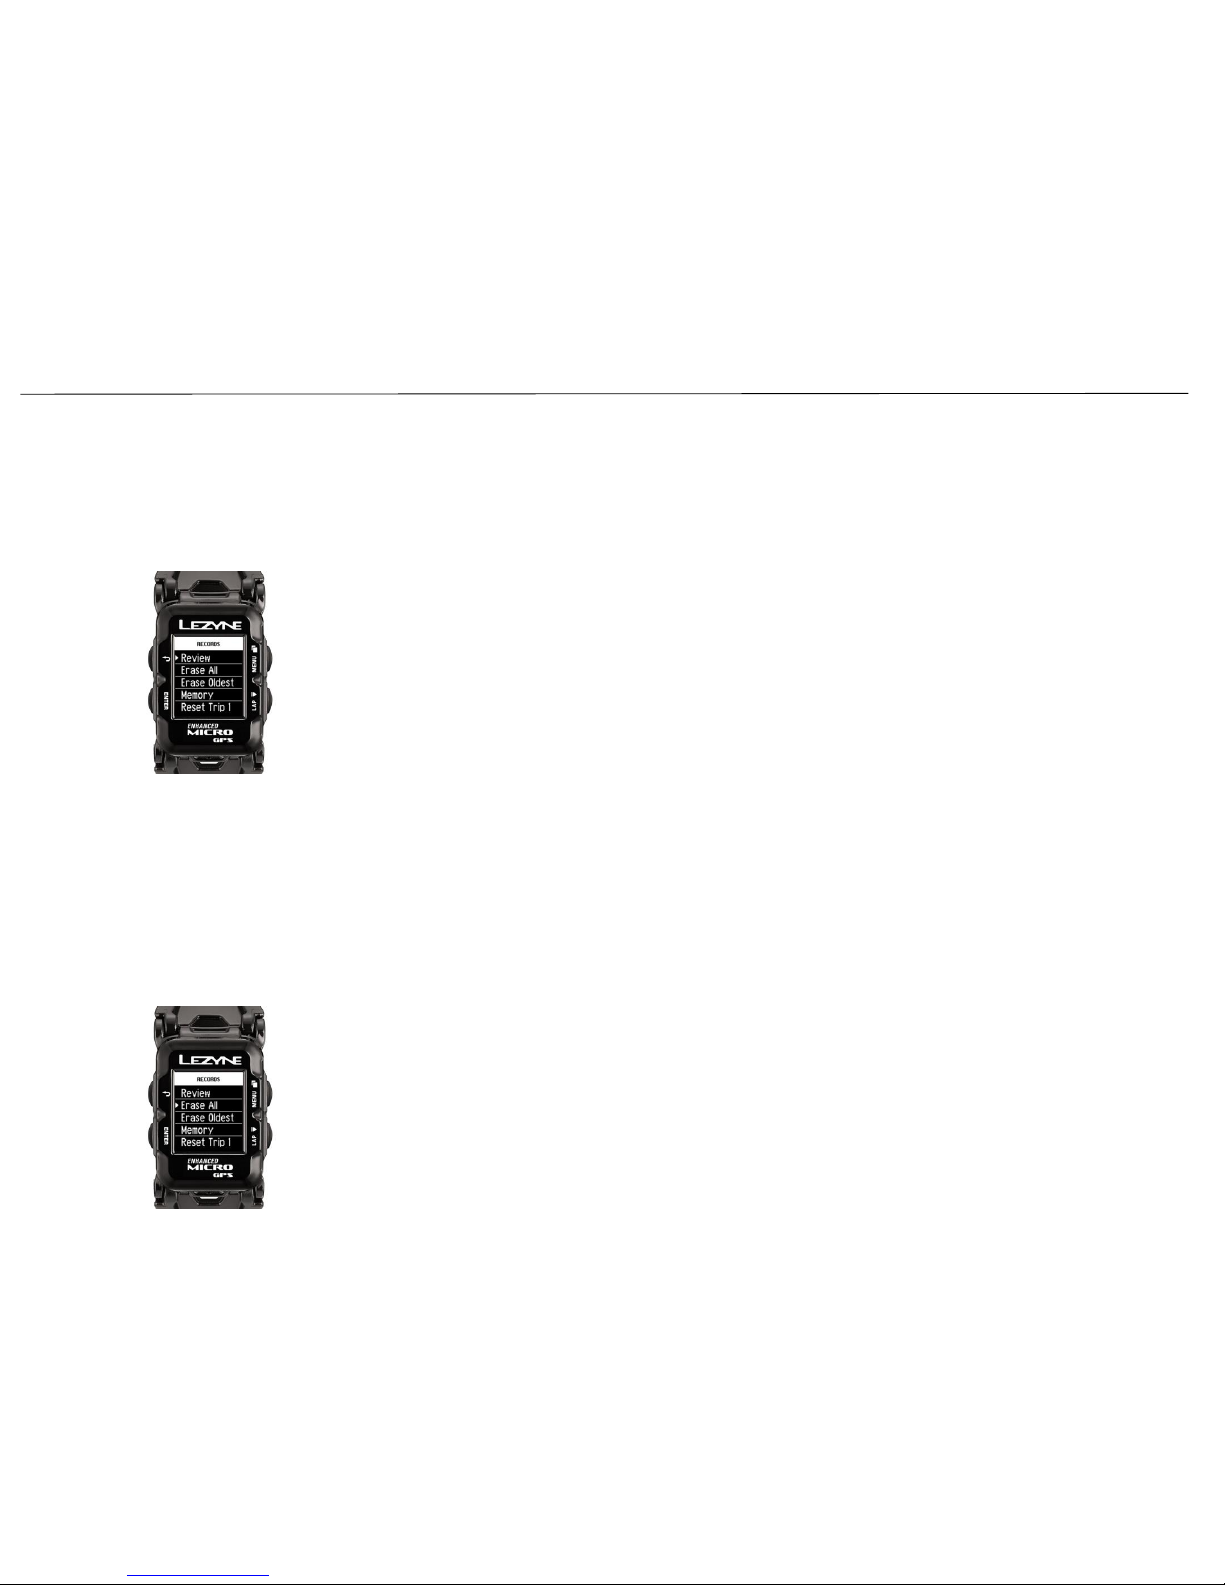
Erase All
Erase All will delete all rides recorded and stored on the device.
In the Main Menu select Records. Press ENTER on Erase All and use the right
buttons to select Yes or No. Press ENTER to make the selection.
Review
Review lets you see the metric details of stored rides on the device.
In the Main Menu select Records. Press ENTER and use the right
buttons to select the ride you want to see by day and time. Press
ENTER to make the selection.
Page 39
RECORDS
41
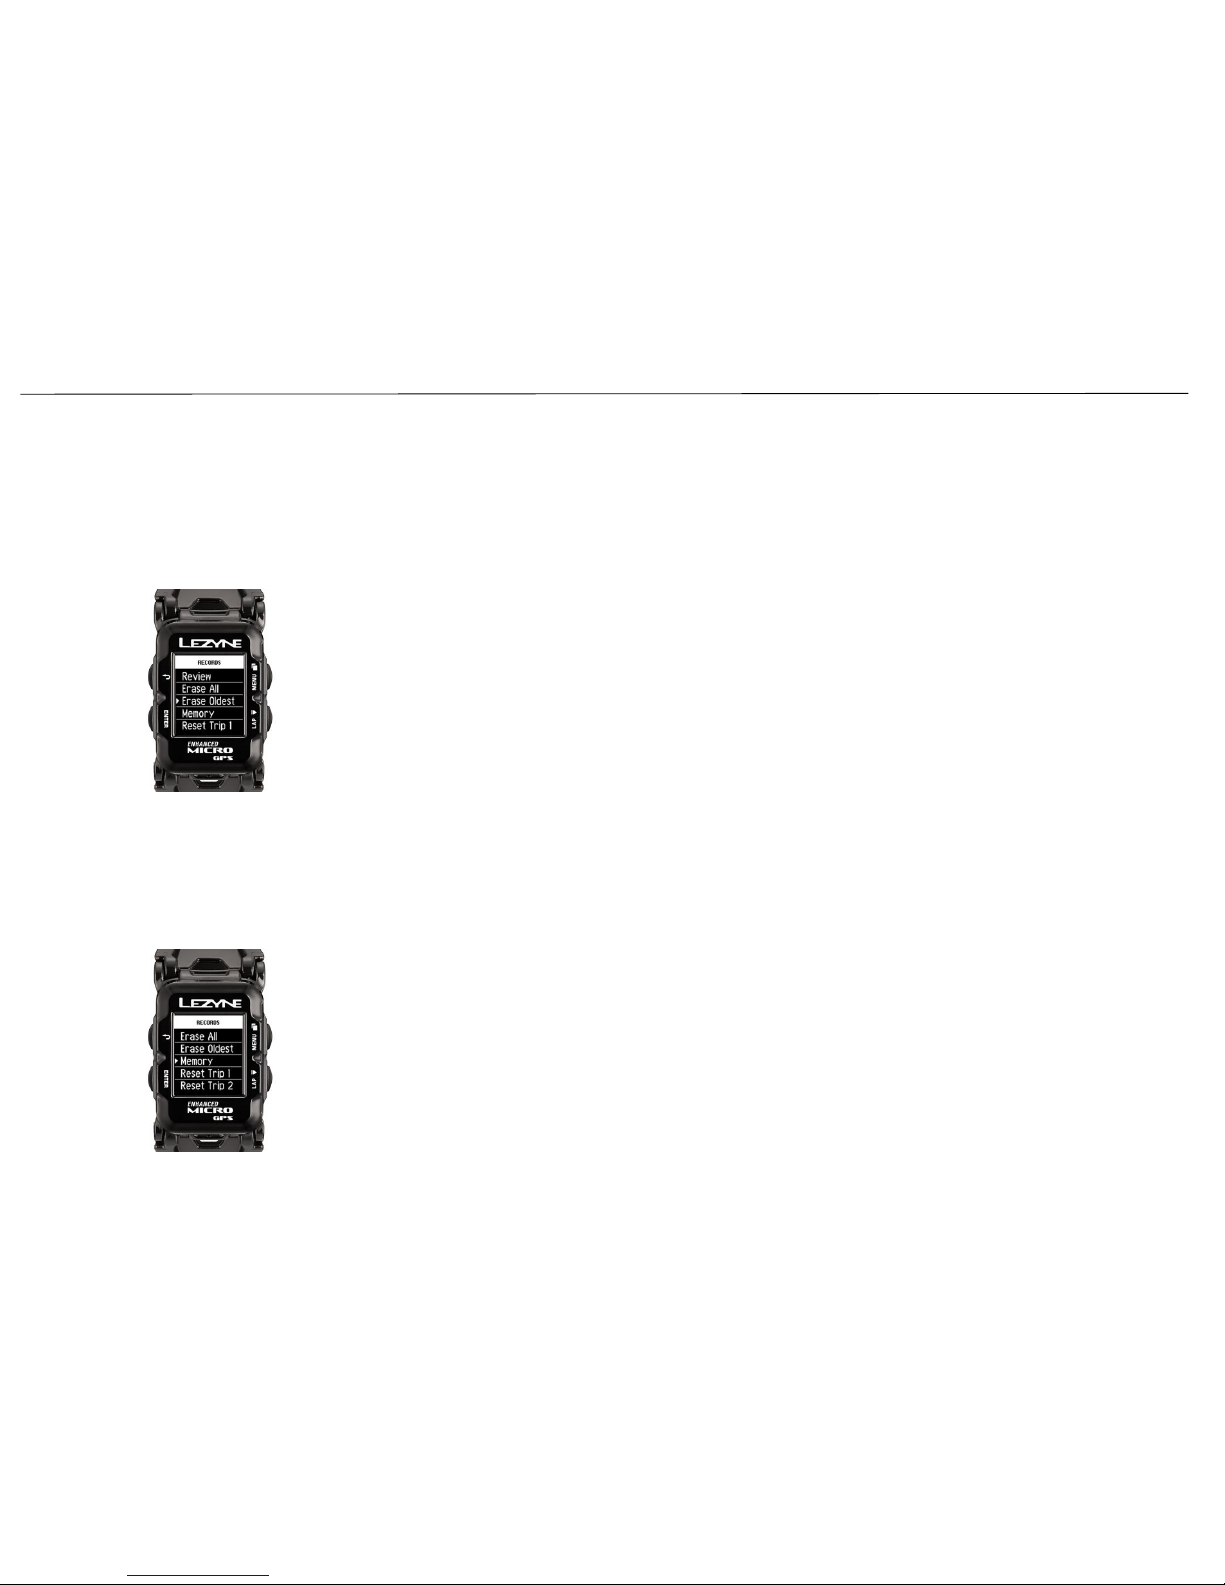
Erase Oldest
Erase Oldest will delete the oldest ride recorded and stored on the device. This
is for when you need more device memory and know the oldest file is not
important but want to keep other rides.
In the Main Menu select Records. Press ENTER on Erase Oldest and use the right
buttons to select Yes or No. Press ENTER to make the selection.
Memory
This lets you know how many hours of recording time you have remaining.
Page 40
RECORDS
42
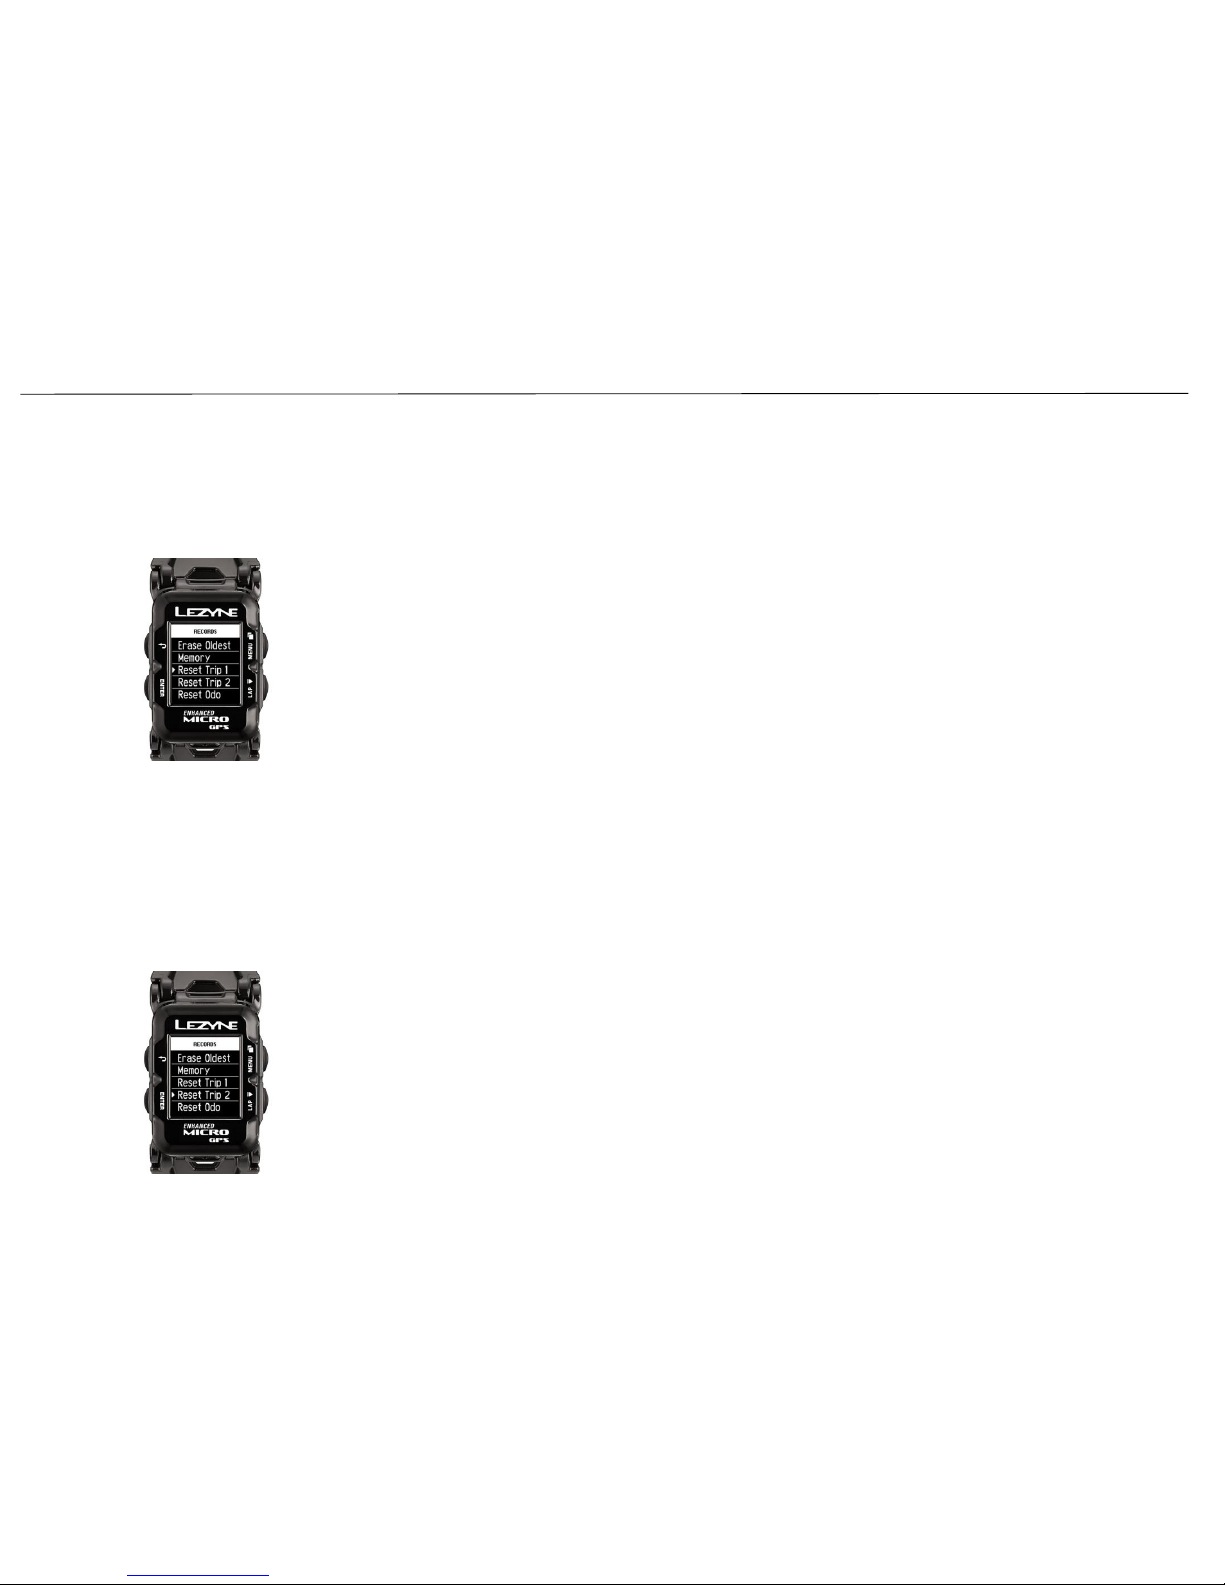
Reset Trip 2
This allows you to delete the recorded distance in Trip 2.
In the Main Menu select Records. Press ENTER on Reset Trip 2 and use the right
buttons to select Yes or No. Press ENTER to make the selection.
Reset Trip 1
This allows you to delete the recorded distance in Trip 1.
In the Main Menu select Records. Press ENTER on Reset Trip 1 and use the right
buttons to select Yes or No. Press ENTER to make the selection.
Page 41
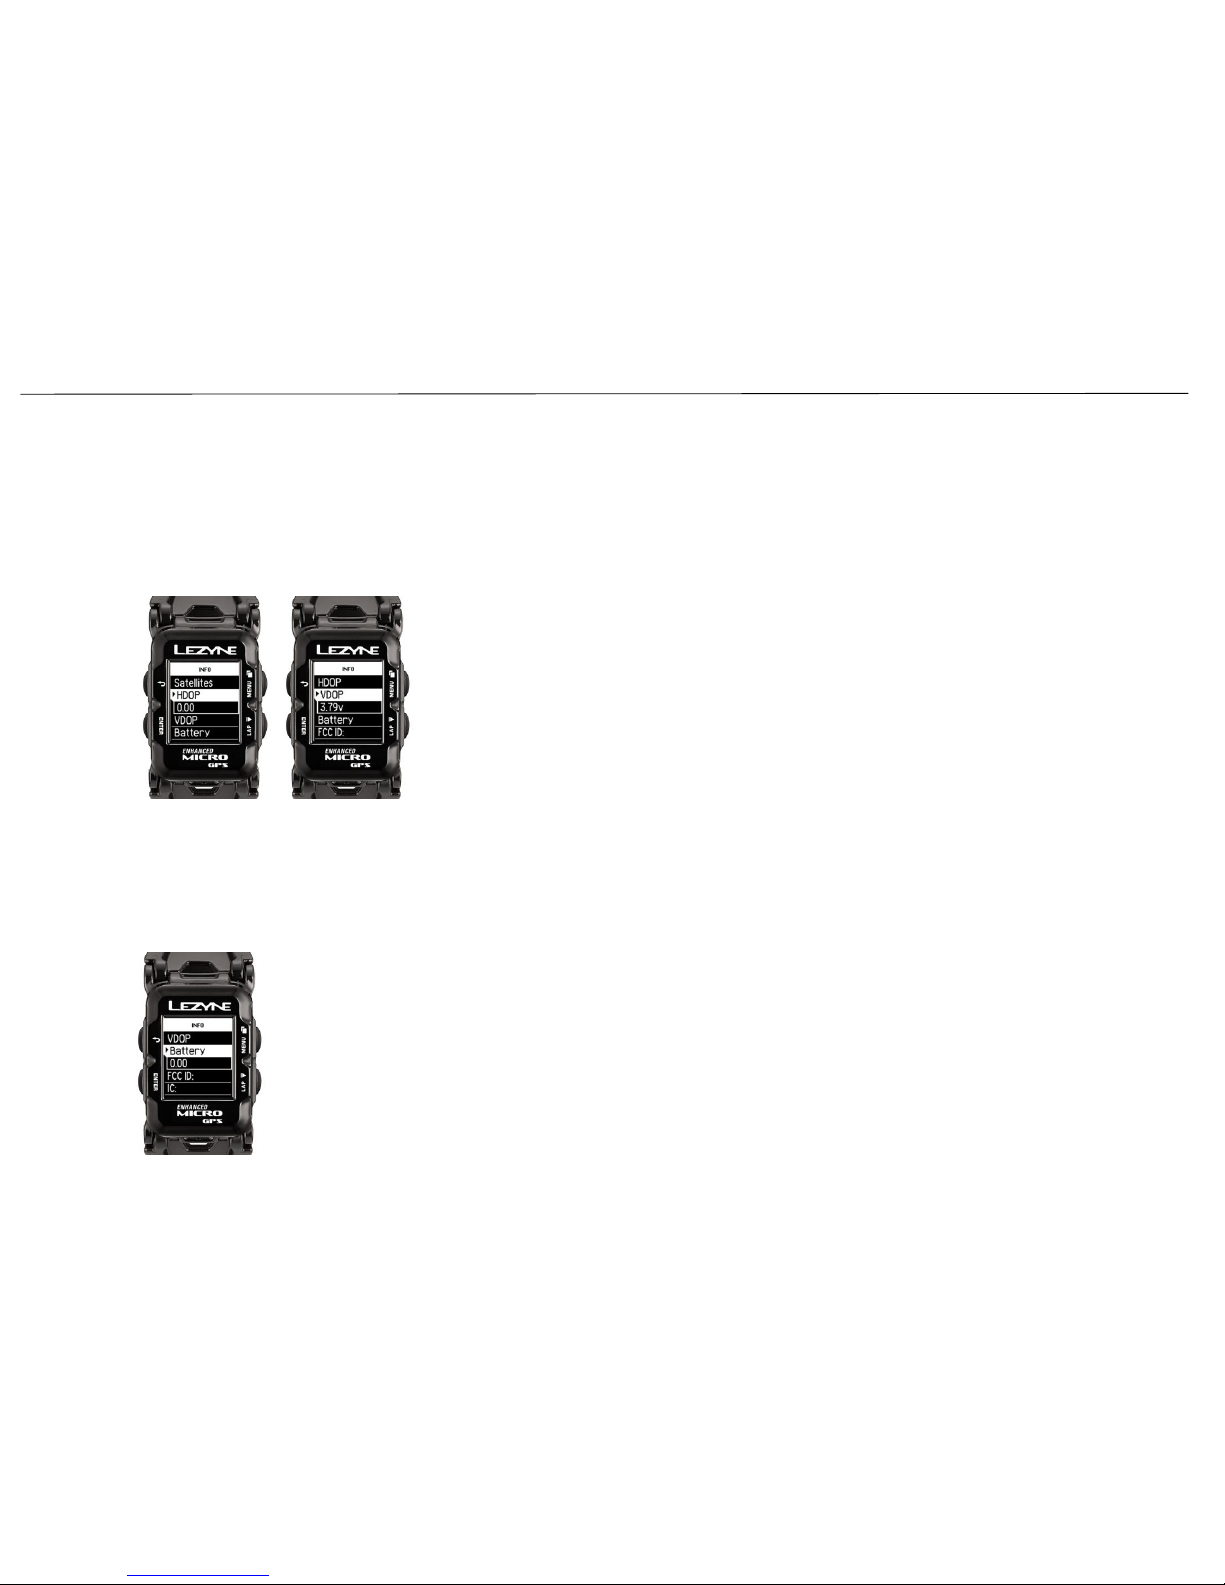
INFO
Device
43
Firmware
This indicates the device type.
The numbers in Firmware indicates which version is currently
being used on the device.
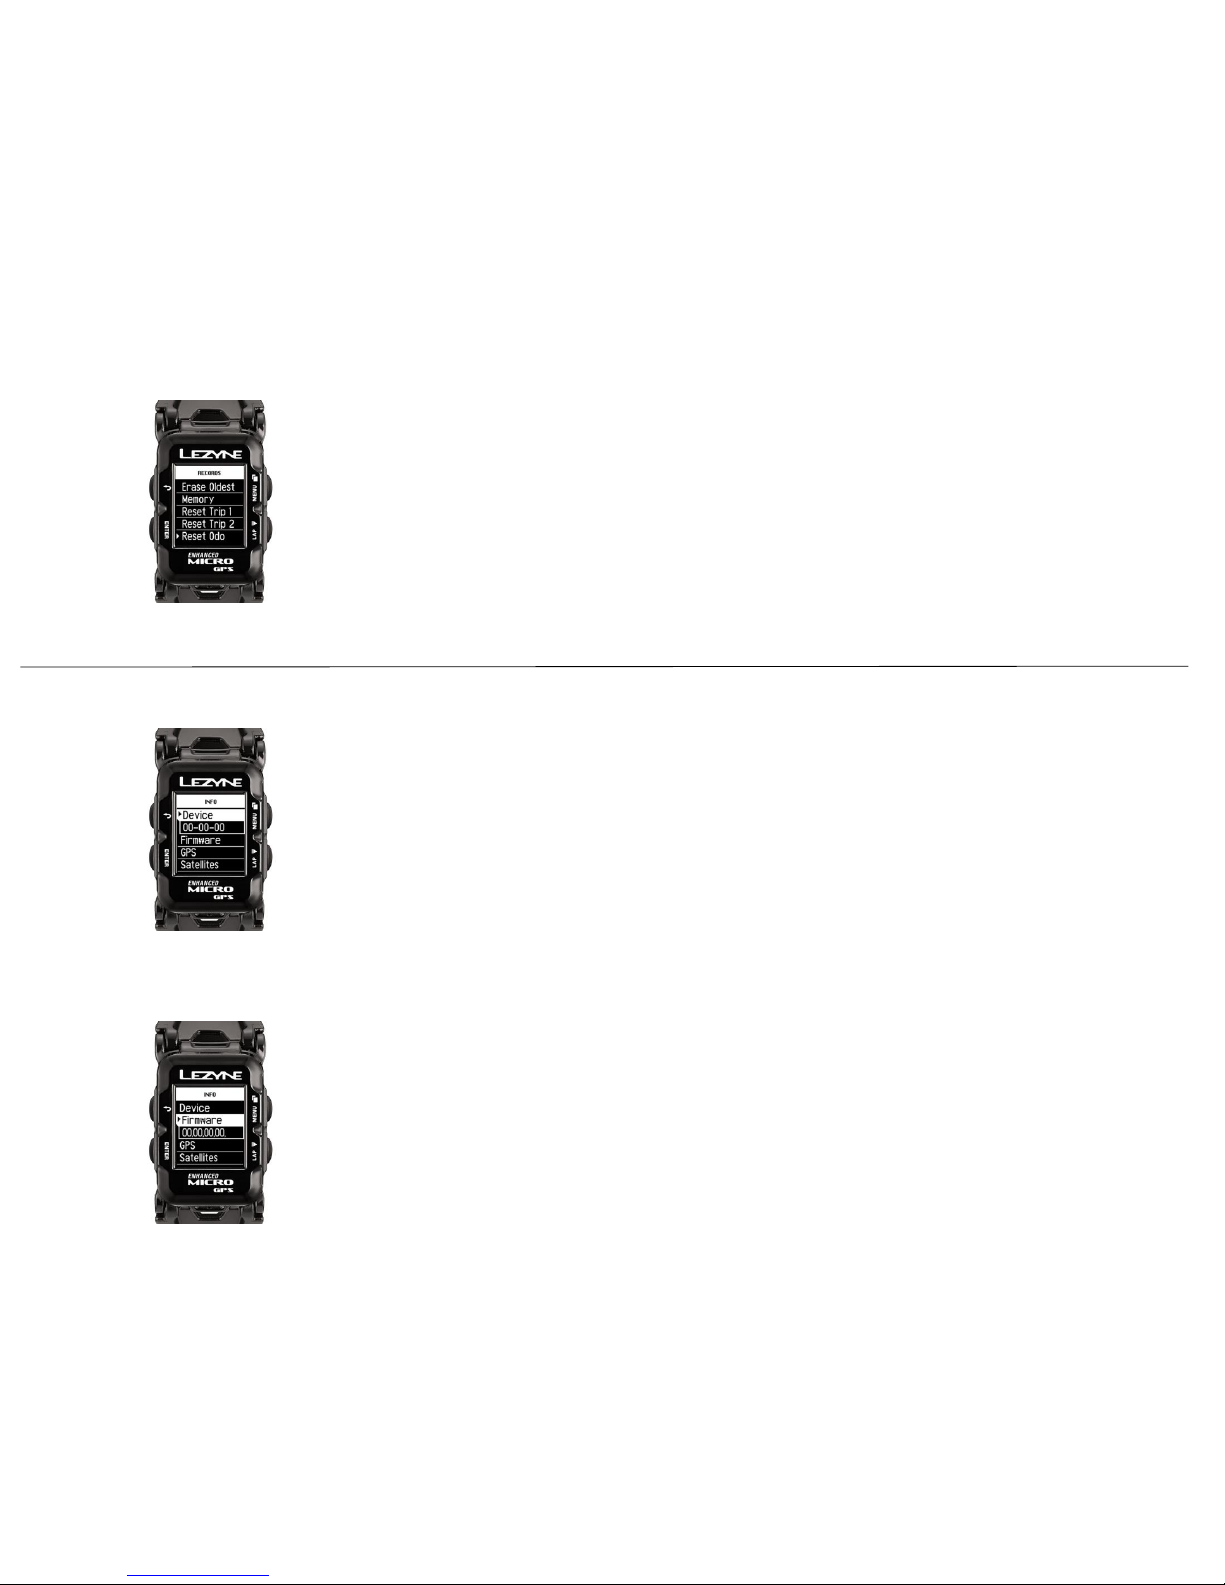
Reset Odo (Odometer)
This allows you to delete the accumulated distance
on the Odometer.
In the Main Menu select Records. Press ENTER on
Reset Odo and use the right buttons to select Yes or
No. Press ENTER to make the selection.
Page 42
INFO
45
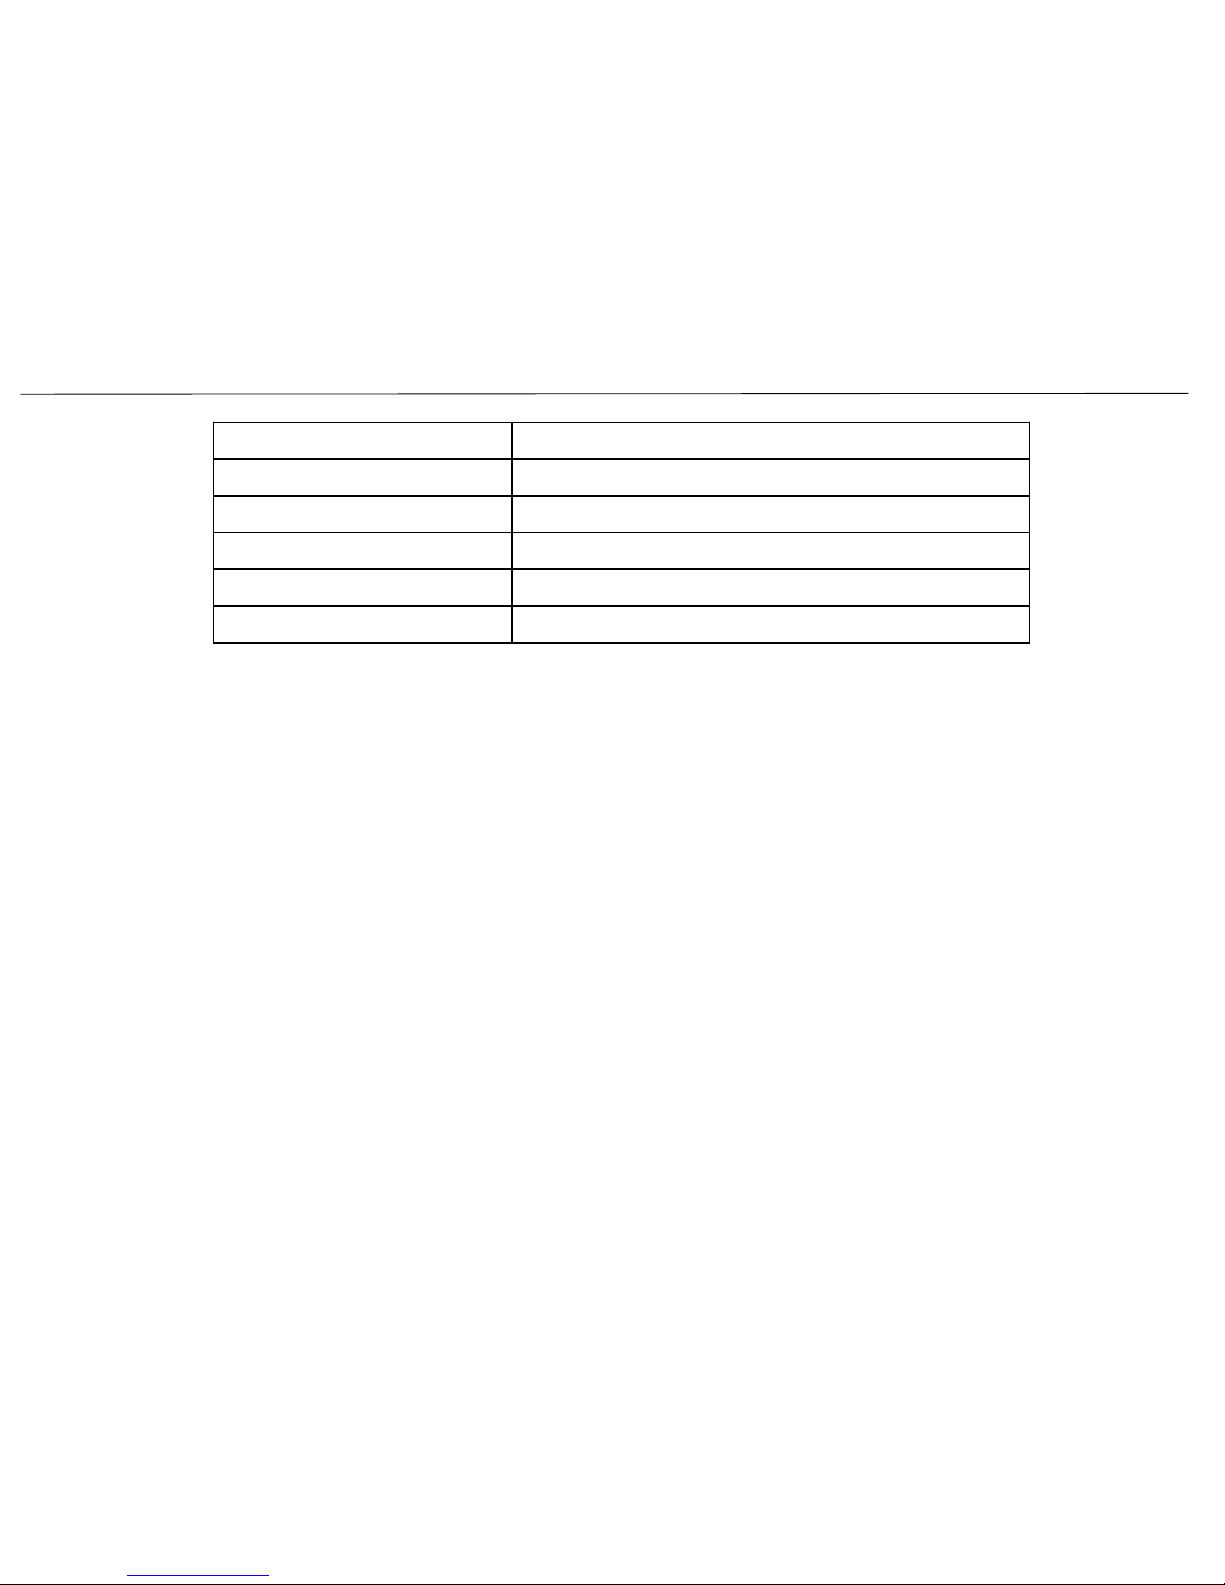
HDOP, VDOP
This is the quality of the GPS data.
HDOP: Horizontal Dilution of Precession.
VDOP: Vertical Dilution of Precession.
Battery
The current battery voltage.
Page 43

INFO
46
FCC ID
FCC certification number for the device
IC
Industry Canada certification number
RCM
The three existing compliance marks (C-Tick, A-Tick and RCM) are being
consolidated into a single compliance mark—the RCM
Bluetooth LE
Software version of Bluetooth LE
ANT+™
Software version of ANT+™
Page 44
SPECIFICATIONS
47
Battery Type Rechargeable Lithium polymer, 900 mAhr
Battery Life Up to 22hrs
Memory Size Up to 200hrs (Power GPS) Up to 400hrs (Super GPS)
Operating Temperature Range -20⁰C to 60⁰C (-4⁰F to 140⁰F)
Charging Temperature Range 0⁰C to 45⁰C (32⁰F to 113⁰F)
Water Rating IPX7 (Tested in water at 1 meter for 30 mins.)*
*USB Plug Must Be Sealed Securely.
Page 45

Ascent: The total measurement of elevation gained during
current activity.
Auto Scroll: The device automatically scrolls through data
pages every 10 seconds.
Auto Start/Stop: During an activity this will automatically
pause a recording when no movement is detected and will
automatically resume recording once movements starts.
Breadcrumb Map: Graphical display element that keeps track
of where you have been.
*Cadence: Current crank arm revolutions per minute.
*Avg Cadence: The average crank arm revolutions per minute
Calories Alert: A pop up notification when you hit a set
calorie goal
Calories: The amount of calories burned during a current
activity. This estimation is calculated based on your personal
settings.
Clock: The current time of day
Descent: The total measurement of elevation lost during
current activity.
Distance: The distance of the current activity.
Distance Alert: A pop up notification when you hit a set
distance goal.
Elevation: Your current measurement of distance above sea
level.
*Heart Rate - Avg HR: The average heart rate during a current
activity.
*Heart Rate - Max HR: The maximum heart registered during
an activity.
*Heart Rate: Your heart rate in beats per minute (bpm)
Lap Preset: An automatic notification to mark a lap based on
a preset distance or time.
Odometer: The accumulated distance of all recorded
activities.
Pace: Consistent and continuous speed in walking or running
*Power - 10s Power: A 10 second average output of watts
*Power - 3s Power: A 3 second average output of watts
*Power - L/R % Smoothness: The measure of how smooth
power is being applied during a full pedal revolution.
*Power - L/R % Tq Effectiveness: The measure of how
effective power is being distributed through a full pedal
revolution.
*Power Balance: The balance of power between left/right
*Power: The output of watts recorded by a power meter.
**Shifting: Display on screen gear indication via ANT+ shifting
profiles or Shimano Di2 profile
Sitting Time: A set amount of time you are stationary
Speed - Avg Speed: The average speed during an activity.
Speed - Max Speed: The maximum speed during an activity.
Speed: The current rate of speed.
Temperature: The current outside measurement of heat or
coldness.
Time Alert: A pop up notification when you hit a set time
goal.
Time: The accumulated time of an activity.
Trip 1: The distance of a trip. The accumulated distance of all
recorded activities for Trip 1.
Trip 2: The distance of a trip. The accumulated distance of all
recorded activities for Trip 2.
DATA METRICS EXPLAINED
48
*Separate ANT+ or Bluetooth device required to see these metrics
**Special Shimano D-Fly adapter required for Di2 Systems
Page 46

TROUBLESHOOTING
49
Software updates/manuals can be found at http://www.lezyne.com/support-downloads.php
1. Connect your device to your computer with the supplied USB cable
2. Go to the GPS Root website Download page and choose the software update that works with your GPS Watch
3. Allow the program to download and run on your computer
4. Follow the on screen instructions and do not disconnect your computer until the update is complete
*In the Info Menu of the GPS Watch look for Firmware to see its current version.
Updating Software
Support
How to videos, manuals , FAQ can be found on the Support tab at http://www.lezyne.com/support-downloads.php
• Videos describing and explaining the device
• FAQ – Frequently Asked Questions related to the device
• Downloads – manuals and software updates
• Contact US
Force Shutdown
If the device stops responding you can simply force it to turn off.
*Force shutdown may delete settings and files.
• Hold ENTER and MENU for 25 seconds
• The device will shut off
• Hold for 2 seconds to turn device back on
2015 © Lezyne USA, Inc. All rights reserved
 Loading...