

Page 1
Physik
9/95-Ba/Ne-
Chemie ⋅ Biologie
Technik
LEYBOLD DIDACTIC GMBH
3
9
4
1
5
11
10
6
8
2
666413
Die CPS-Dosiereinrichtung dient der Dosierung von Flüssigkeiten über ein Magn etventil, entweder manuell o der pe r Computer, z.B. zur pH-Wert-Regelung bei Fermentationen oder Titrationen. Die Dosiereinrichtung eignet sich zum Einbau in einen
CPS-Profilrahmen.
7
1 Sicherheitshinweise
Gebrauchsanweisung 666 413
Instruction Sheet
CPS-Dosiereinrichtung
CPS-metering unit
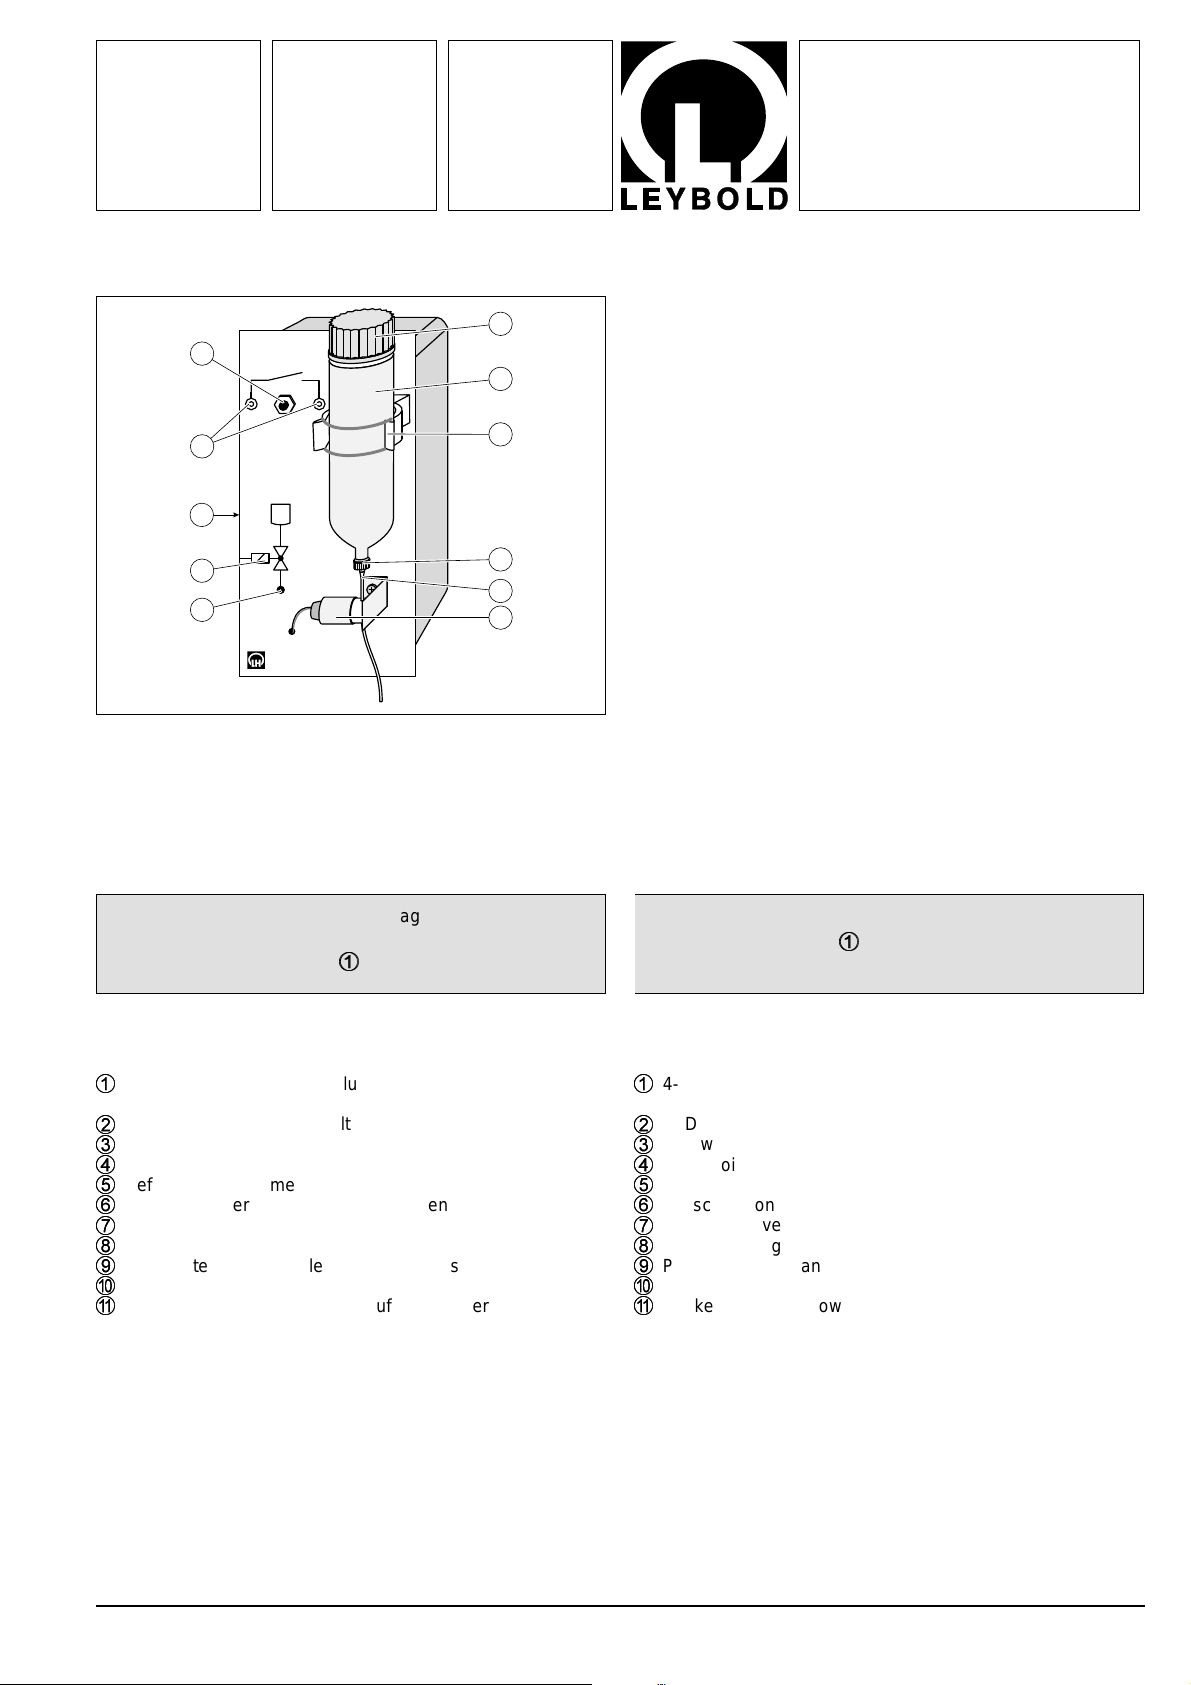
Fig. 1
The CPS-metering unit meters liquids via a solenoid valve,
either manua lly or computer-contr olled, e.g. for pH-value
control in fermentation experiments or titrations. The metering
unit is suitable for mounting in a CPS-panel frame.
1 Safety notes
Vorsicht beim Experimentieren mit aggressiven Flüssigkeiten.
Max. Spannung an Buchsen 11: 30 V, 1A
2 Beschreibung, Lieferumfang
Dosiereinrichtung auf Experimentierplatte, bestehend aus:
4-mm-Buchsen zum Anschluß eines externen Taktgebers
11
(z.B. Relaisausgang des CASSY-Interfaces)
LED zur Anzeige des Schaltzustands
22
Schraubdeckel
33
Vorratsgefäß
44
Befestigungsklammer
55
GL-Schraubverbindung zum Magnetventil
66
Magnetventil
77
Silikonschlauch
88
Handtaster zur manuellen Betätigung des Ventils
99
Schaltbild
AA
Buchse für Steckernetzgerät (auf der Geräterückseite)
BB
2.1 Technische Daten
Betriebsspannung: 12 V AC/580 mA über Steckerne tzgerät
Abmessungen 150 x 297 x 175 mm
Gewicht: 1,1 kg
(230 V)
Use caution when experimenting with aggressive liquids.
Max. voltage at sockets 11: 30 V, 1A
2 Description, scope of supply
Metering unit on chemistry panel, consisting of:
4-mm sockets for connecting an external timing device
11
(e.g. relay output of CASSY interface)
LED for indicating switching state
22
Screw cover
33
Reservoir
44
Clamp
55
GL-screw connection for solenoid valve
66
Solenoid valve
77
Silicone tubing
88
Pushbutton for manually actuating the valve
99
Circuit diagram
AA
Socket for plug-in power supply (on rear of unit)
BB
2.1 Technical data
Operating voltage: 12 V AC/580 mA via plug-in power supply
Dimensions: 150 x 297 x 175 mm
Weight: 1.1 kg
(230 V)
Page 2

3 Bedienung
3Operation
3.1 Montage
CPS-Profilrahmen montieren, dann CPS-Dosiereinrichtung von
der Rückseite des Profilrahmens in die obere Profilschiene einführen und nach oben schieben (ca. 1 cm); anschließend in die
untere Profilschiene einführen und nach unten schieben (ca.
1 cm). Ausbau der CPS-Dosiereinrichtung aus dem Profilrahmen in umgekehrter Reihenfolge: Nach oben bis zum Anschlag
schieben; dann nach hinten aus der oberen Profilschiene herausnehmen.
3.2 Inbetriebnahme
Experimentierplatte so im Versuchsaufbau anbringen, daß sich
die über dem Gefäß befindet, in das die Flüssigkeit zudosiert
werden soll. Klinkenstecker des Steckernetzgeräts in die Buchse B auf der Geräterückseite stecken. Silikonschlauch mit dem
darunterbefindlichen Gerät verbinden (z. B. Bioreaktor
[666 410]). Vorratsgefäß 4 mit der zuzugebenden Flüssigkeit
füllen. Steckernetzgerät in die Steckdose (230 V) stecken.
Bei manuellem Betrieb:
Durch Druck auf den Taster 9 das Magnetventil 7 öffnen. Die
grüne LED 2 leuchtet. Soviel Flüssigkeit wie gewünscht zudosieren. Magnetventil 7 durch Loslassen des Tasters
schließen.
Bei externem Betrieb:
Zur automatischen Steuerung der Dosiereinrichtung wird das
Programm: "Universelle Meßwerterfassung" (525 031) eingesetzt. Zur Benutzung des Programms bitte die zugehörige Anleitung beachten.
Relaisausgang des CASSY-Interfaces (z. B. CASSYpack-P
728 307 bzw. CASSYpack-E 524 007 oder CASSY-C-Modul
667 817) mit 4-mm-Experimentierkabeln mit den beiden Buchsen 1 verbinden. Die gewünschte zu regelnde Größe (z.B. pHWert) mit entsprechendem Meßsystem und Sensor erfassen
(z. B. pH-Box (524 035) und pH-Elektrode (667 424)). Den gewünschten pH-Wert durch Eingabe in das Programm vorgeben
(Relais - Einstellungen). Nach Meßbeginn wird über die Software der Ist-Wert des pH-Wertes mit dem eingegebenen SollWert verglichen und das Dosierventil solange geöffnet, bzw.
geschlossen bis Ist-Wert und Soll-Wert gleich sind.
Nach Gebrauch Vorratsgefäß und Schlauch entleeren und mit
Wasser reinigen.
9
3.1 Setup
Assemble the CPS-panel frame, then insert the CPS-metering
unit in the top profile rail of the panel frame from the rear and
slide it upwards (approx. 1 cm); next, insert i t in the lower p rofile
rail and slide it downward (approx. 1 cm). Remove the CPSmetering unit from the panel frame in reverse order: slide the
panel up until it stops, then remo ve it from the top profile rail
from the rear.
3.2 Putting into operation.
Set up the chemistry p anel in th e experi ment se tup so that the
metering unit is above the vessel into which the liquid is to be
metered. Insert the jack plug of the plug-in power supply in
socket B on the rear of the unit. Attach the silicone tubing to the
device positioned below (e.g. biological reactor [666 410]). Fill
reservoir 4 with the desired liquid. P lug the plug-in power
supply into the mains socket (230 V).
Manual operation:
Open solenoid valve 7 by pressing pushbutton 9. The green
LED 2 lights up. Meter the desired liquid quantity. Close the
solenoid valve 7 by releasing pushbutton 9.
External operation:
The software "Universal Data Acquisition" (525 032) is used to
control the metering unit. For information on using this software,
please refer to the corresponding manual and the on-line help.
Connect the relay output of the CASSY interface (e.g.
CA SS Ypack-P 728 307 or CASSYpack-E 524 007 or CASSY-C
module 667 817) with the two sockets 1 using 4-mm connecting leads. Record the variable to be controlled (e.g.
pH value) using an appropriate measuring system and sensor
(e.g. pH-box (524 035) and pH-electrode (667 424)). Set the
desired pH value by entering the corresponding value in the
software (relay settings). After the start of measurement, the
software compares the actual pH value with the pH value you
set, and the solenoid valve is opened or closed until the actual
and set values are identical.
Drain the reservoir and tubing and clean them with water after
each use.
LEYBOLD DIDACTIC GMBH ⋅ Leyboldstrasse 1 ⋅ D-50354 Hürth ⋅ Phone (02233) 604-0 ⋅ Telefax (02233) 604-222 ⋅ Telex 17 223 332 LHP CGN D
© by Leybold Didactic GmbH, Printed in the F eder al Re pu bl ic of G er m any
Technical alterations reserved
 Loading...