

Page 1

Special Service Campaign (SSC) and
Limited Service Campaign (LSC)
General Procedures
April 2005
Page 2

General Procedures for Lexus SSCs and LSCs
PREPARING FOR AN SSC/LSC
Overview.............................................................................................................. 3
Customer Notification .......................................................................................... 3
SSC/LSC and Customer Satisfaction.................................................................. 3
Identifying Affected Vehicles................................................................................ 3
Manpower and Facility Requirements.................................................................. 4
Tools and Equipment........................................................................................... 4
Technical Training ............................................................................................... 4
Parts .................................................................................................................... 5
DMS Systems...................................................................................................... 5
Planning Your Communication Strategy.......................................................... 5
Calls to Your Customers.................................................................................. 5
Calls from Your Customers.............................................................................. 5
Calls from the Media........................................................................................ 6
IMPLEMENTING AN SSC/LSC
Car Rental and Service Loaners...................................................................... 6
Remote Area Service Plan .............................................................................. 6
The Service Write-Up ...................................................................................... 7
Preparing for Delivery after SSC/LSC Completion.......................................... 8
Delivery of the Vehicle after SSC/LSC Completion......................................... 8
Follow-Up......................................................................................................... 8
Work Order Closing/Claim Submission ........................................................... 8
Recap of Claim Submission and General
Provisions of an SSC/LSC........................................................................... 9
Claiming Reimbursement for Special Services................................................ 9
Claim Preparation Instructions......................................................................... 10
PREPARING FOR AN SSC/LSC
2
Page 3

General Procedures for Lexus SSCs and LSCs
Overview
This handbook contains the general procedures dealers
should follow for each and every Special Service
Campaign (SSC) or Limited Service Campaign (LSC)
Lexus initiates. Campaign-specific details will be
included in the dealer notification package sent to each
dealer at the launch of a campaign.
Customer Notification
The customer notification schedule and sample letter
will be included in the dealer notification package sent
to each dealer at the launch of a campaign.
SSC/LSC and Customer
Satisfaction
Each Special Service Campaign or Limited Service
Campaign provides us with an opportunity to
demonstrate the Lexus commitment to total customer
satisfaction. Lexus requests that dealers use the
fundamental principals embodied in the Lexus
Covenant when servicing these owners and their
vehicles. By implementing new campaigns in an
organized and efficient manner, we can nurture our ongoing relationships with these customers and
strengthen these associations. Throughout each
campaign, we need to let our customers know that we
are genuinely interested in resolving the matter in a
timely fashion with as little inconvenience to them as
possible.
Identifying
Affected Vehicles
Specific vehicle model, model year and VIN range
Manpower and Facility
Requirements
applications will be included with the campaign-specific
dealer notification package sent to all dealers at the
launch of a campaign.
Always consult Dealer Daily or TIS to confirm eligibility
and to assure the SSC/LSC is applicable. This will verify
the vehicle is involved and has not already been
completed by another dealer. TMS warranty will not
reimburse dealers for repairs conducted on vehicles
that are not affected.
3
Page 4

General Procedures for Lexus SSCs and LSCs
Your dealership must plan carefully to accommodate
the additional service volume generated as a result of
an SSC/LSC. In reviewing your dealership’s manpower
and facility requirements for a campaign, there are
several items you need to consider.
• Do you need to develop ways to increase your
service capacity?
• Do you need to hire additional support staff for pickup/delivery, car washes and fuel tank fill-ups?
You will need to hold a meeting with all dealership
associates to discuss:
¾ Importance of Lexus customer care for each
SSC/LSC customer.
¾ Various procedures such as phone inquiries, pick up
and delivery, loaners, etc.
¾ Campaign specifics including your dealership’s
assigned quantity, completion objectives, and
technical details.
We recommend that one person at your dealership be
designated as the campaign coordinator.
Your District Service and Parts Manager will meet with
you to answer your questions and monitor the progress
of each SSC/LSC.
Tools and Equipment
Each dealer notification package will include
information on the tools and equipment required to
perform the campaign repairs.
Technical Training
Lexus suggests that all service department staff who
will be directly involved in completing a repair or
supporting an SSC/LSC should review the repair
procedures in the dealer notification package to prepare
for a campaign.
Parts
Each dealer notification package will contain specific
part number information and order procedures. Your
4
Page 5

General Procedures for Lexus SSCs and LSCs
dealership is requested to order only those parts
needed to repair vehicles with service
appointments. Individual dealer tracking will be done
and irregularities in quantity ordering will be passed on
to Lexus Area Offices for follow-up and correction.
Lexus will ensure there will be sufficient inventory to
accommodate an SSC/LSC but there will be only
enough supply to cover the affected vehicle population.
Please only order based upon true demand.
DMS Systems
Labor operation codes will be transmitted to your
dealership. (See dealer notification package for specific
campaign opcode and labor hour information). DMS
dealer files are automatically updated and no further
action should be required.
Planning Your
Communication Strategy
It is important that you develop a strategy to
communicate effectively. Each dealer notification
package will contain a series of Questions and Answers
(Q&A) that can be used when explaining an SSC/LSC.
Calls to Your Customers
• Customers involved in the SSC/LSC
⇒ Each affected vehicle owner will receive a
notification letter. Please let them that the
campaign is being undertaken by Lexus to keep
their confidence in the Lexus brand.
• Customers not involved in the SSC/LSC
⇒ Assure any customers with vehicles outside of
the involved VIN ranges that this repair is not
needed.
Calls from Your
Customers
It is important to institute a system to respond to
customers calling for more information regarding an
SSC/LSC. We recommend designating an individual to
answer these inquiries to ensure that callers get
accurate, consistent information.
5
Page 6

General Procedures for Lexus SSCs and LSCs
Calls from the Media
We ask that you refer any calls from the media or
government agencies directly to Lexus headquarters in
Torrance, California. The contact at Lexus is:
Bill Ussery, Lexus Public Relations Manager
IMPLEMENTING
AN SSC/LSC
Car Rental and
Service Loaners
One of the ways we can demonstrate that Lexus cares
is by honoring loaner car requests with the best loaner
available for those customers unable or unwilling to wait
for this repair.
Lexus Customer Convenience System (LCCS)
Officially enrolled LCCS vehicles may be claimed at a
rate of $44.00 per day. (Lexus vehicles only)
Lexus Dealer Fleet (Lexus vehicles only)
A rate of $44.00 per day may be claimed if using this
option. Be sure to follow customer supplied insurance
guidelines.
The motivating factor for any of these options is the
customer’s convenience and consideration. Again
please provide the best available vehicle. If
extraordinary customer requests are made, please
contact your DSPM. In addition, loaner car requests
that exceed one day must carry proper DSPM
authorization.
Remote Area
Service Plan
“Remote” is defined as those distances where a
customer is 100 or more miles from the nearest Lexus
dealership. Your DSPM will work with you to develop
and authorize an action plan.
Guidelines to be used in performing remote repairs are:
6
Page 7

General Procedures for Lexus SSCs and LSCs
• If the customer is within 100 miles of the nearest
Lexus dealership, the closest Lexus dealership will
perform the repair provided that prior authorization
for related expenses has been approved by the
DSPM.
• If the customer is more than 100 miles from the
nearest Lexus dealership, Lexus area associates or,
Lexus national associates may perform the repair.
Dealerships may also make these repairs but only
with the authorization of the Area Coordinator (most
likely the F.T.S.).
• Each situation will be handled on a case-by-case
basis.
• Lexus will only pay for authorized costs that have
been approved by DSPM or area offices.
• Alternatives include pick-up and redelivery of
remotely located vehicles.
The Service Write-Up
Listed below are some general guidelines to use when
the customer arrives at your dealership for an
SSC/LSC:
• Explain how long the repair will take. Inform the
customer that the special services (refueling, car
wash) will require additional time at your dealership.
• Explain the type of repair involved.
• If the customer does not have an SSC/LSC notice:
¾ Check the VIN against the national Service
History File or TIS to see if the vehicle has been
previously repaired under the Campaign.
¾ Check the left front door hinge post for an
SSC/LSC completion label.
¾ If the vehicle falls outside of the above
guidelines, explain that the vehicle does not
require the Campaign repairs.
¾ If the vehicle is eligible, explain the SSC/LSC
repair procedure to the customer.
• If the customer has an appointment, pull the work
order; otherwise, create a work order reflecting the
need to complete the campaign.
• Issue the work order to the technician and include
job instructions for the SSC/LSC.
7
Page 8

General Procedures for Lexus SSCs and LSCs
Preparing for the
Delivery after SSC/LSC
Completion
• Wash/clean the vehicle inside and out.
• Fill the gas tank with the specified unleaded fuel
• Notify customer of completion and arrange for re-
delivery or return of rental vehicle.
Delivery of the Vehicle
After SSC/LSC
Completion
The delivery of the vehicle is a very important part of
ensuring a high level of customer satisfaction. Explain
all SSC/LSC repairs to the customer and apologize for
any inconveniences. Thank the customer for his or her
time and their continuing patronage.
Follow-Up
Complete 100% after-service follow-up is critical to
ensure complete customer satisfaction with the repairs
performed and the service provided.
Work Order Closing/
Claim Submission
Each SSC/LSC dealer notification package will include
information that explains the policies and procedures
for preparation and submission of a warranty claim for
reimbursement of a repair performed under the
SSC/LSC.
NOTE: Lexus warranty will only accept one claim per
vehicle under the terms of an SSC/LSC. Please
ensure that your dealership checks the National
History File to see if the vehicle has been repaired
under an SSC/LSC prior to servicing the vehicle.
Recap of Claim
Submission and General
Provisions of an SSC/LSC
• Lexus will pay for gas tank fill-up (actual cost)
• Lexus will pay for washing the vehicle (not to
exceed $20 per vehicle)
8
Page 9

General Procedures for Lexus SSCs and LSCs
• Lexus will provide a loaner vehicle if required
(DSPM authorization required for more than one
day)
• Lexus will pay for costs associated with remote
repairs if required
• Lexus will pay for remote pick-up and delivery if
required (DSPM authorization only)
Claiming Reimbursement
for Special Services
You must use sublet to claim any special services
required in conjunction with an SSC/LSC repair.
• Issue “TW” (Tow Vehicle)
¾ Applicable if the nature of the SSC/LSC requires
the vehicle to be towed to the dealership
¾ Claim actual receipt amount as a sublet
• Issue “RT” (Rental)
¾ Applicable to every vehicle if required
¾ The loaner vehicle reimbursement rate cap is
one day per repair unless otherwise authorized
by DSPM
• Issue “GA” (Gas Tank Fill-Up)
¾ Applicable to every vehicle
¾ Claim actual fill-up amount
• Issue “CW” (Car Wash/Administrative Time)
¾ Applicable to every vehicle
¾ Amount not to exceed $20.00 per vehicle
• Issue “DE” (Pick-Up and Delivery/Remote Repairs)
¾ Applicable only under special circumstances
(e.g. more than 100 miles from the nearest
Lexus dealership)
¾ Claim actual dealer cost
¾ F.T.S/C.S.O.M. authorization is required for this
expense
• Issue “DE” (Pick-Up and Delivery/Remote
Repairs)
¾ Applicable at dealer discretion
9
Page 10

General Procedures for Lexus SSCs and LSCs
¾ Claim actual dealer cost
Claim Preparation
Instructions
NOTE: Each sublet must be a separate entry with:
• Unique invoice number
• Description
• Sublet Type
• Dollar Amount
10
Page 11

ES 300
Air Conditioning Expansion
Valve Replacement
Special Service Campaign PL1
Page 12

Table of Contents
OVERVIEW 1. . . . . . . . . . . . . . . . . . . . . . . . . . . . . . . . . . . . . . . . . . . . . . . . . . . . . . . . . . . . . . . . . . . .
PREPARING FOR THE SSC
IMPLEMENTING THE SSC
Determining Demand 2. . . . . . . . . . . . . . . . . . . . . . . . . . . . . . . . . . . . . . . . . . . . . . . . . . . . . . . . .
Manpower & Facility Requirements 2. . . . . . . . . . . . . . . . . . . . . . . . . . . . . . . . . . . . . . . . . . . . .
Tools & Equipment 3. . . . . . . . . . . . . . . . . . . . . . . . . . . . . . . . . . . . . . . . . . . . . . . . . . . . . . . . . . .
Technical Training 4. . . . . . . . . . . . . . . . . . . . . . . . . . . . . . . . . . . . . . . . . . . . . . . . . . . . . . . . . . . .
Parts Availability 5. . . . . . . . . . . . . . . . . . . . . . . . . . . . . . . . . . . . . . . . . . . . . . . . . . . . . . . . . . . . .
Creating Menu Codes 6. . . . . . . . . . . . . . . . . . . . . . . . . . . . . . . . . . . . . . . . . . . . . . . . . . . . . . . .
Planning Your Communication Strategy 9. . . . . . . . . . . . . . . . . . . . . . . . . . . . . . . . . . . . . . . . .
Calls from the Media 11. . . . . . . . . . . . . . . . . . . . . . . . . . . . . . . . . . . . . . . . . . . . . . . . . . . . . . . .
Service Loaners 12. . . . . . . . . . . . . . . . . . . . . . . . . . . . . . . . . . . . . . . . . . . . . . . . . . . . . . . . . . . .
Contacting Customers 12. . . . . . . . . . . . . . . . . . . . . . . . . . . . . . . . . . . . . . . . . . . . . . . . . . . . . . .
Remote Area Service Plan 13. . . . . . . . . . . . . . . . . . . . . . . . . . . . . . . . . . . . . . . . . . . . . . . . . . .
Write–Up 15. . . . . . . . . . . . . . . . . . . . . . . . . . . . . . . . . . . . . . . . . . . . . . . . . . . . . . . . . . . . . . . . . .
Work Order Entry 15. . . . . . . . . . . . . . . . . . . . . . . . . . . . . . . . . . . . . . . . . . . . . . . . . . . . . . . . . . .
Preparing for Delivery After the SSC Completion 16. . . . . . . . . . . . . . . . . . . . . . . . . . . . . . . .
Delivery After the SSC Completion 16. . . . . . . . . . . . . . . . . . . . . . . . . . . . . . . . . . . . . . . . . . . .
Follow–Up 16. . . . . . . . . . . . . . . . . . . . . . . . . . . . . . . . . . . . . . . . . . . . . . . . . . . . . . . . . . . . . . . . .
Work Order Closing/Claim Submission 17. . . . . . . . . . . . . . . . . . . . . . . . . . . . . . . . . . . . . . . . .
Claiming Reimbursement for Special Services 18. . . . . . . . . . . . . . . . . . . . . . . . . . . . . . . . . .
TDN Claim Preparation Instructions 18. . . . . . . . . . . . . . . . . . . . . . . . . . . . . . . . . . . . . . . . . . .
Invoicing 19. . . . . . . . . . . . . . . . . . . . . . . . . . . . . . . . . . . . . . . . . . . . . . . . . . . . . . . . . . . . . . . . . . .
Paper Claim Submission 26. . . . . . . . . . . . . . . . . . . . . . . . . . . . . . . . . . . . . . . . . . . . . . . . . . . . .
Sample Customer Letter 34. . . . . . . . . . . . . . . . . . . . . . . . . . . . . . . . . . . . . . . . . . . . . . . . . . . . .
TECHNICAL INSTRUCTIONS 35. . . . . . . . . . . . . . . . . . . . . . . . . . . . . . . . . . . . . . . . . . . . . . . . . .
Page 13

Lexus ES 300
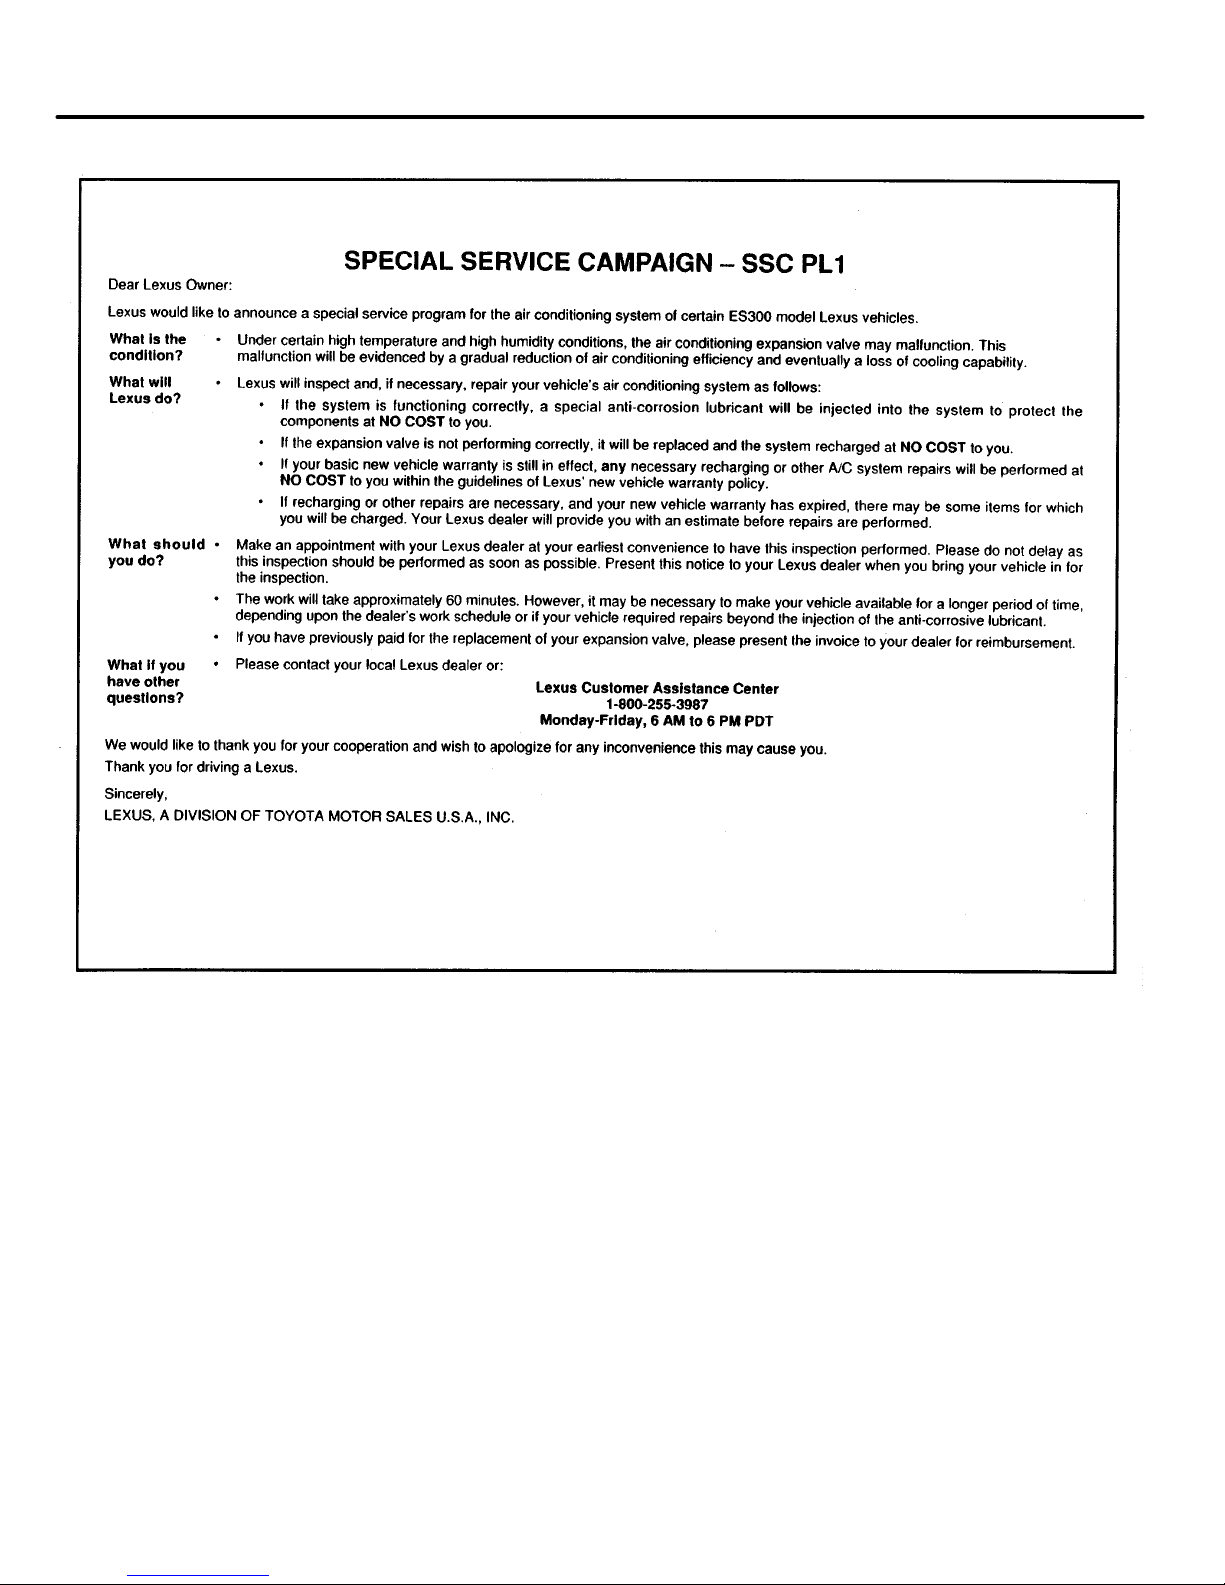
Customer Notification Notification letters will be sent to vehicle owners beginning June 1, 1993. A
Overview Lexus will be initiating a Special Service Campaign (“SSC” PL–1) for
certain 1992 and 1993 ES 300 vehicles. This booklet provides all the
details necessary to plan and implement the SSC at your dealership. The
key points of this Special Service Campaign are summarized below.
Condition Under certain conditions, particularly in high temperature and high humidity
areas, the air conditioning expansion valve in certain ES 300 vehicles may
malfunction. As a result, there will be a gradual reduction of air
conditioning efficiency and eventual loss of cabin cooling capability. The
vehicle should operate normally in all other respects.
Repair This campaign involves the inspection of the air conditioning system and
injection of an anti–corrosion lubricant (Toyota ND6–AC Refrigerant Oil)
OR, if necessary, replacement of the air conditioning expansion valve.
copy of the letter can be found on page 34 of this booklet. You will be
provided with a list of owners/vehicles so that you may begin contacting
your customers as soon as you are prepared.
Vehicles Involved Approximately 41,480 1992 and 1993 ES 300 vehicles are involved.
Toyota will be conducting a concurrent campaign involving the same parts
and repair procedures. Lexus dealers cannot submit claims directly for
repairing Toyota vehicles.
The SSC and Throughout this Special Service Campaign, please make every effort to
Customer Satisfaction ensure a positive experience for each and every Lexus owner. This
situation affords us all an opportunity to further demonstrate Lexus’
commitment to customer satisfaction in the “Lexus Cares” tradition.
1
Page 14

Lexus ES 300
Determine Your Demand Qualified vehicles are limited to the VIN range shown below. No other
vehicles before or after this range are to be repaired under the provisions
of this SSC.
Model Model Year VDS Involved VIN Range
ES 300 92-93 VK13T 0001001–0129016
NOTE: Canadian vehicles falling within this VIN range
qualify under the same guidelines.
The enclosed SSC Summary Report lists vehicles sold by your
dealership.
From the list, determine the actual number of customers who should
come back into your dealership for the Special Service Campaign.
Manpower and Facility It is estimated that approximately 60% of the vehicles involved will need
Requirements only to have the special anti–corrosion lubricant injected. This will take
about 1/2 hour. The remaining 40% of the vehicles will need to have the
expansion valve and possibly the liquid tube replaced, which takes
approximately two hours. This works out to an average repair time of one
hour per affected vehicle.
It is critical that every effort be made to minimize the impact this activity will
have on your other service customers. Based upon your projections of the
number of customers who may have the SSC performed in your service
department, you need to take the following actions to ensure adequate
capacity:
Determine if you have sufficient manpower and facility space to
process the number of vehicles in your area.
Determine if you need to provide extended service hours, a second
shift and/or Saturday appointments to accommodate the number of
vehicles to be serviced.
2
Page 15
Special Service Campaign
Determine if you need to hire additional technicians either full
or part time.
NOTE: Technicians must be “MACS” or “ASE” certified to
perform the A/C type repairs in this campaign.
Determine if you require additional equipment to service your
customers’ needs by repairing vehicles simultaneously.
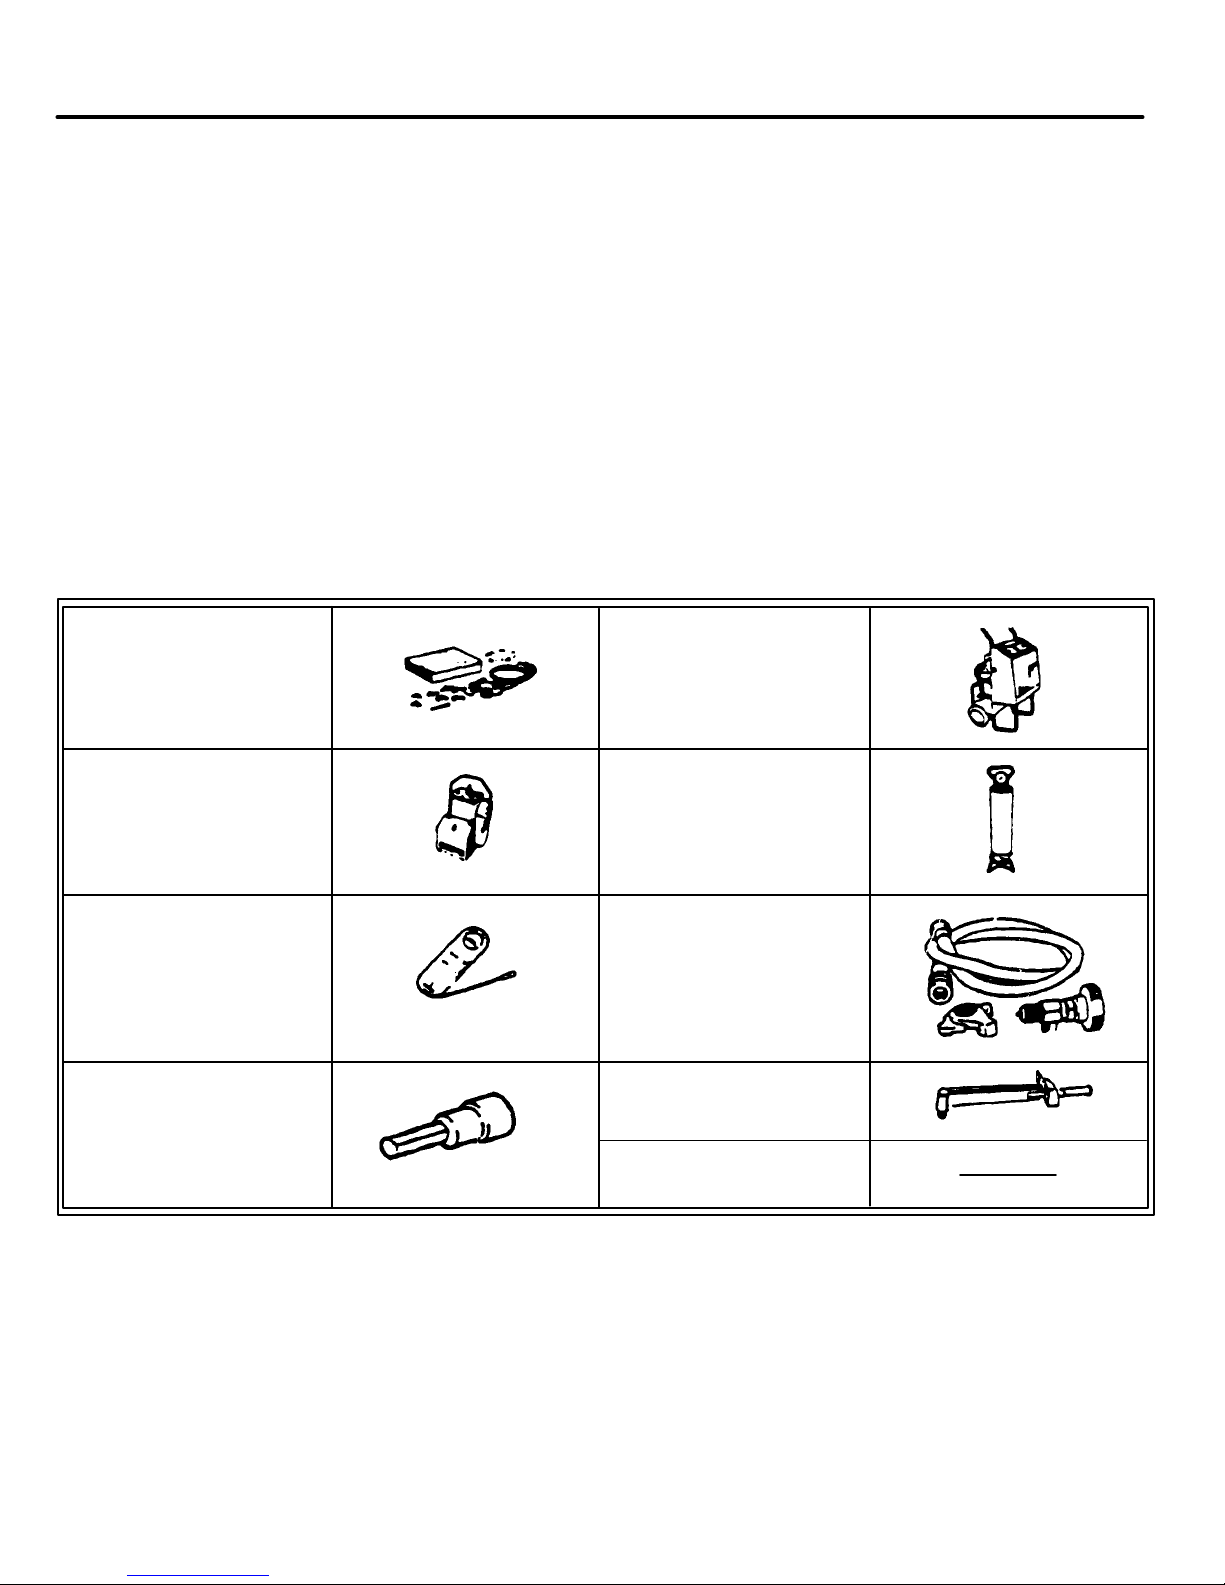
Tools and Equipment Refer to the following list to determine if you have the proper tools and
equipment necessary to perform all aspects of the service. Ensure all
coolant recovery and recharge equipment has been tested recently and is
in excellent working order. The demand on this equipment will be
substantial.
Air Conditioning Refrigerant
Service Tool Set Recovery Machine
Vacuum Pump Charging
Assembly Cylinder
Gas Leak AC Oil
Detector Assembly Injector Kit
(TOY219721)
Socket Hexagon Torque Wrench
Wrench 5 mm
Standard Tools
Stop valves must be used to meet your local state regulations.
NOTE: Special Service Tool Part No. TOY219721 (AC Oil Injection Kit)
has recently been shipped to your dealership, free of charge.
Additional tool kits can be ordered through Owatonna Tool Co.
(OTC) for $28.91 each.
3
Page 16
Lexus ES 300
Technical Training Your dealership was sent a video tape copy of repair
procedures and instructions for training and future
reference along with this booklet.
We also recommend that key customer contact personnel
such as the Sales Manager and General Manager view this
tape to better understand the nature of this Special Service
Campaign.
We recommend that one person be designated as the campaign
coordinator. All inquiries about this campaign should be directed
to this person to avoid dissemination of incorrect or inappropriate
information.
Required Parts
(a) Anti–Corrosion Lubricant (Supplied only in packages of 12 cans/package).
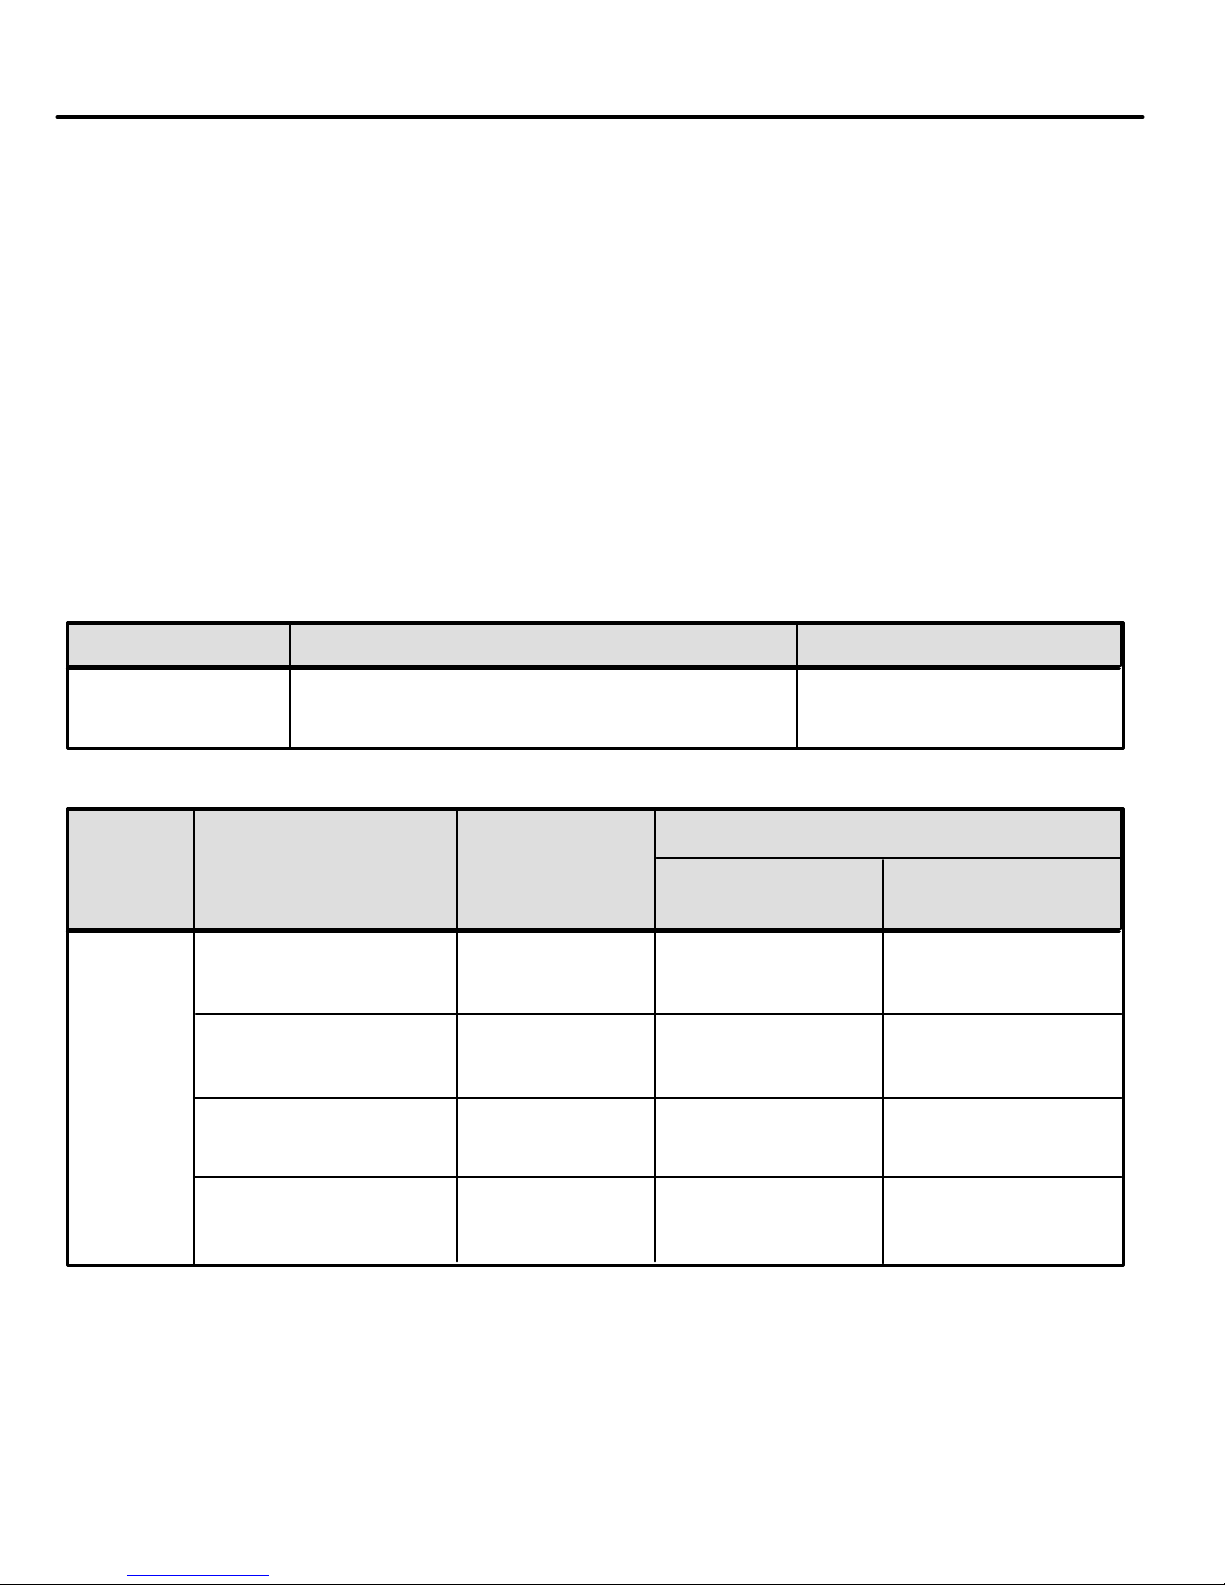
Part Number Part Name Qty Per Vehicle
00263–09106 Toyota ND6 AC Refrigerant Oil One Can
Charge
(b) Expansion Valve, Liquid and Suction Tube, and O–rings
Qty./Vehicle
Model Part Name Part No.
With Tube Without Tube
Replacement Replacement
Cooler Expansion 88515– 1 1
Valve 33010
ES 300 Liquid Pipe Sub– 88706– 1 0
VK13T Assy. 33020
O–Ring–Large 90099– 2* 4
14045
O–Ring–Small 90099– 0* 2
14044
* Two each of large and small O–rings are provided with liquid tube.
4
Page 17
Special Service Campaign
Parts Availability/Ordering Sufficient supplies of all SSC parts will initially be sent to you
by including those part numbers on your Dealer Stocking
Guide at the appropriate time.
As used or obligated from your D.S.G., the automatic
replenishment system will generate timely reorder quantities
to your facing Parts Distribution Center (P.D.C.). This should
ensure continuous supply of parts inventory into your dealership.
You are encouraged to order only those quantities of parts that
you have service appointments for. Individual dealer tracking will
be made and irregularities in quantity ordering will be passed on
to the Lexus Area Offices for their follow–up.
An electronic mail message will be sent to all Lexus dealers
indicating quantities and D.S.G. installation dates as roll out
commences.
5
Page 18
Lexus ES 300
TDN System The following steps must be taken to prepare your TDN system
Menu Option SC–2
for processing the SSC claims.
Labor Operation codes were transmitted to your dealership.
If you have not received these call the TDN hotline.
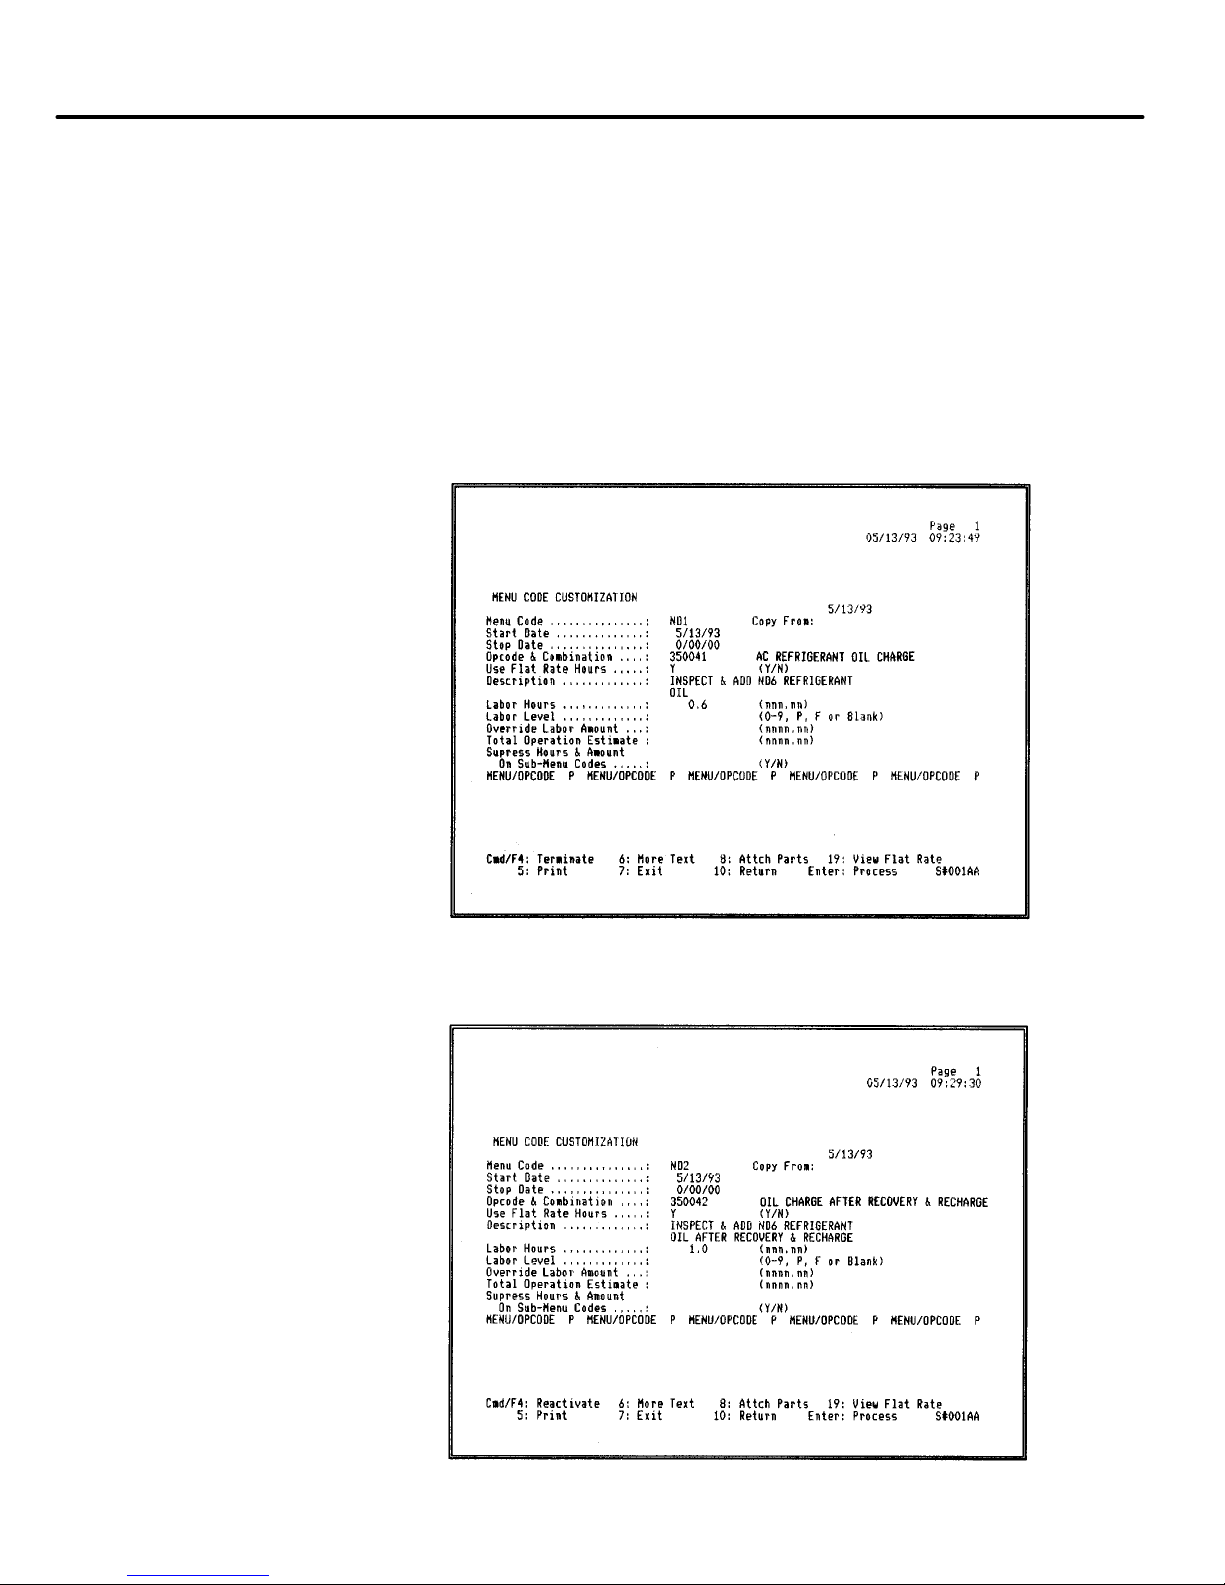
Create menu codes using the new labor operation codes
established for this SSC.
Menu Code ND1
Labor Op. Code: 350041
Menu Code ND2
Labor Op. Code: 350042
6
Page 19
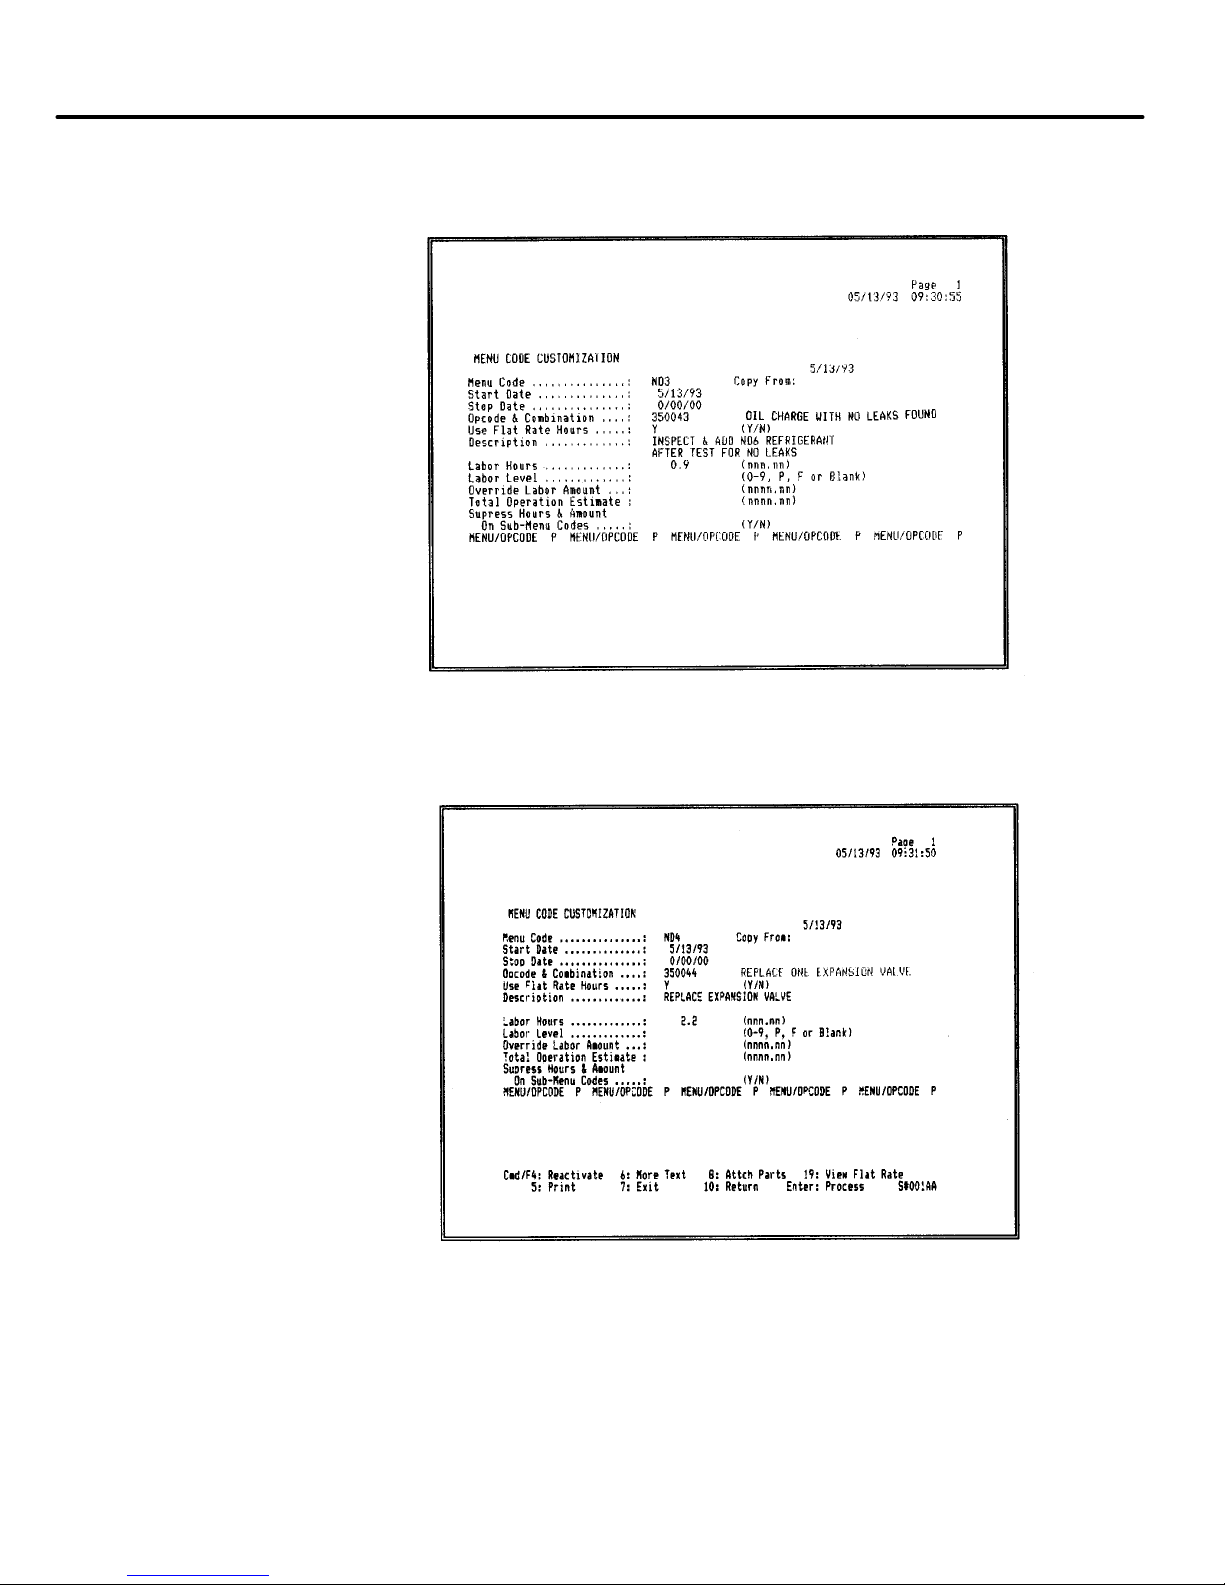
Special Service Campaign
Menu Code ND3
Labor Op. Code: 350043
Menu Code ND4
Labor Op. Code: 350044
7
Page 20
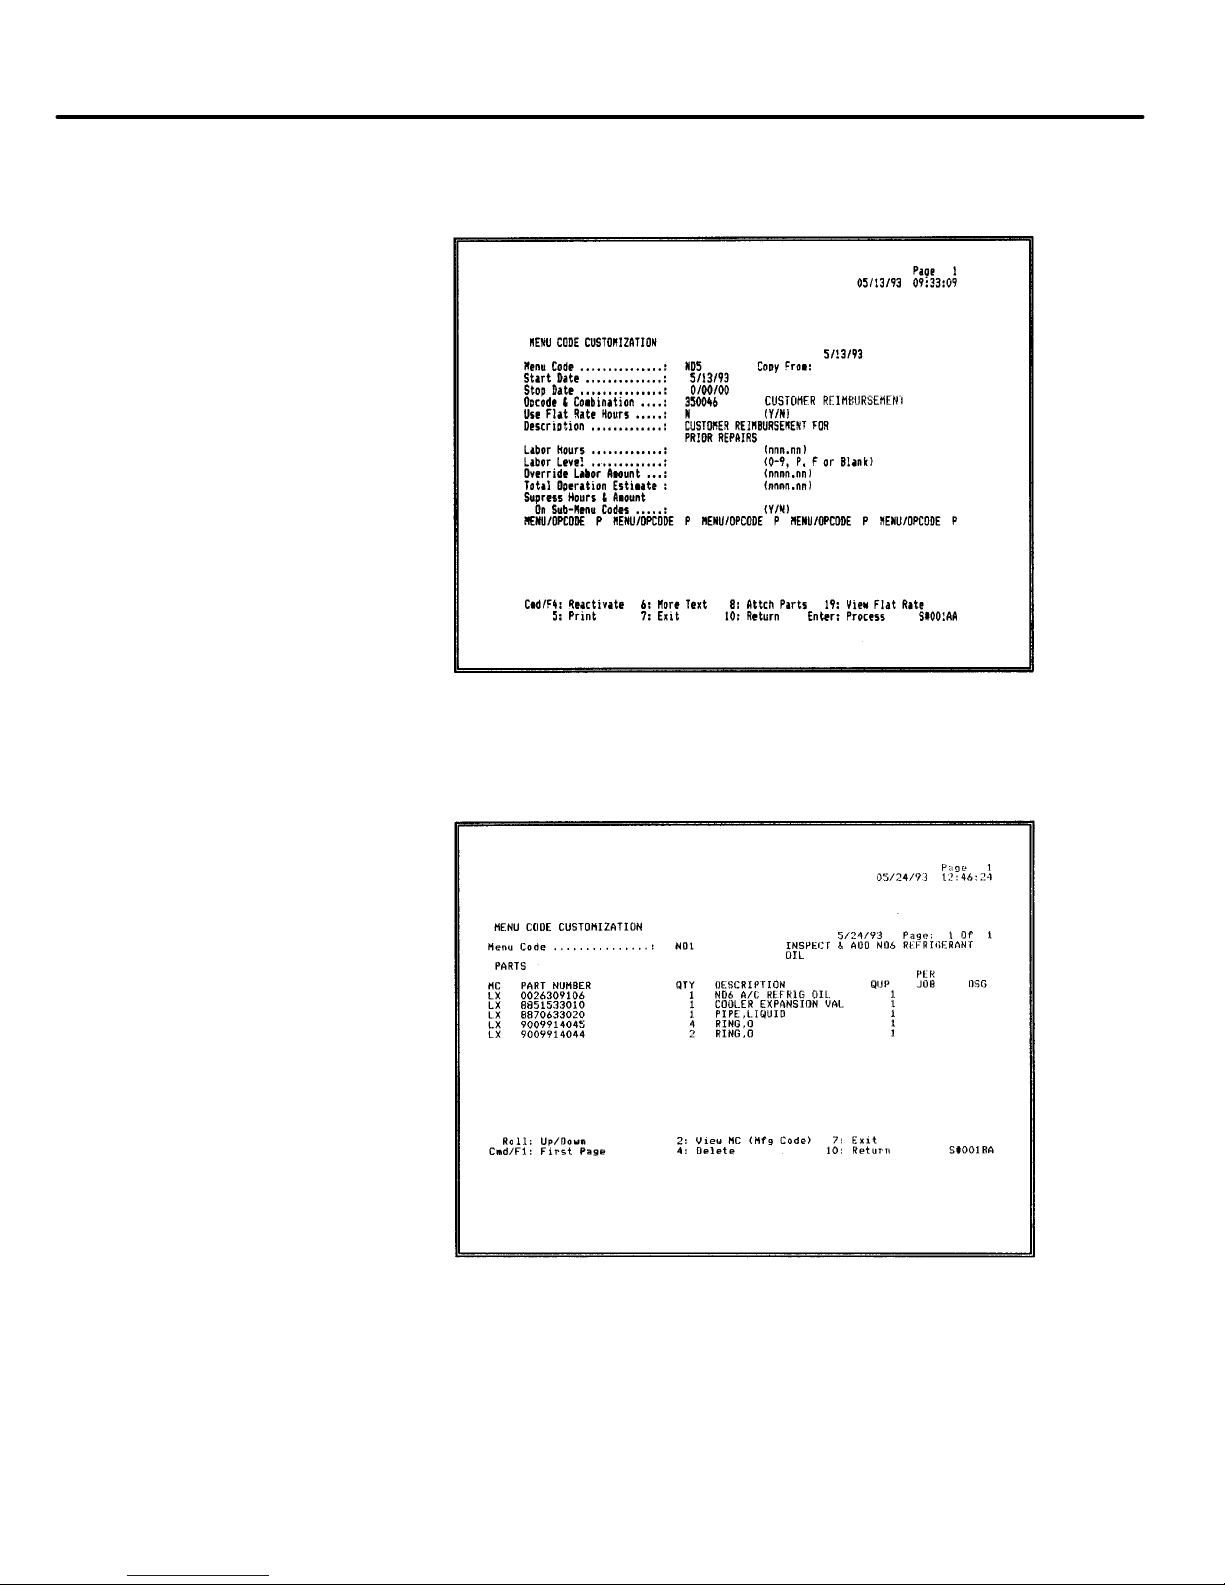
Lexus ES 300
Menu Code ND5
Labor Op. Code: 350046
Menu Option SC–8
Attach part numbers to Menu Code ND1
8
Page 21

Special Service Campaign
Planning Your It is important that you develop a communication strategy to
Communication Strategy communicate effectively. The following are some general
statements that can be used when explaining the Special Service
Campaign to customers.
1. Affected Vehicles
Q1. Which models are affected?
A1. The affected model is the 1992 & 1993 Lexus ES 300.
Q2. How many vehicles are involved?
A2. Approximately 41,480 vehicles in the U.S.
Q3. Is this a world–wide campaign?
A3. No. The expansion valve malfunction occurs only under
certain conditions, particularly high temperatures and
humidity. The areas with the right combination of these
conditions is limited to the U.S., mainly the Southern areas.
2. Condition
Q1. What is the function of the expansion valve?
A1. The expansion valve controls the volume of liquid
refrigerant which flows into the evaporator and is converted
into a gaseous state.
Q2. What is the condition?
A2. Under conditions of high temperature and high humidity, a
chemical reaction of the refrigerant may cause gradual
corrosion within the expansion valve causing it to malfunction.
Q3. How will this malfunction affect the air conditioning system?
A3. The malfunction will be evidenced by a gradual reduction in
the efficiency of the air conditioning system and eventual
loss of cabin cooling capability.
Q4. How was this condition discovered?
A4. Last summer Toyota Motor Corporation received a report
from the U.S. and immediately began an investigation.
9
Page 22

Lexus ES 300
Q5. Does this condition affect the safety of the vehicle?
A5. No. This condition does not affect safety.
Q6. What effect does this condition have on the environment?
A6. The amount and possibility of refrigerant being released into the
environment are negligible, but due to Lexus’ concern for the
environment, we have taken steps to eliminate even the slightest
possibility.
3. Remedy
Q1. How has the condition been remedied?
A1. The expansion valve has been modified to include a special
surface treatment.
Q2. What will Lexus do in the marketplace?
A2. To prevent the chemical reaction from occurring, a protectant
will be injected with lubricant and refrigerant into the A/C
system. If the chemical reaction has already occurred, the
expansion valve will be replaced with a new one.
Q3. Why aren’t expansion valves replaced on all affected
vehicles?
A3. The protectant will stop the chemical reaction from occurring
and therefore, it is unnecessary to replace the existing
expansion valve.
Q4. How long will this procedure take?
A4. Approximately 1/2 hour for injection of the protectant OR
approximately 2 hours for replacement of the expansion
valve.
Q5. What should owners do?
A5. When Lexus has completed the necessary preparations,
owners will be notified by first class mail and requested to
bring their vehicle into the local Lexus dealer to conduct this
campaign.
10
Page 23

Special Service Campaign
You will have two general types of communications with customers
concerning this Special Service Campaign:
Outbound Calls
These are customers that your dealership will be calling.
These will include:
ES 300 owners involved in the SSC.
You may want to use the list provided in this package to
begin calling your customers as soon as your preparations
are completed.
ES 300 owners not involved.
You may want to call these customers as well to address any
concerns that they might have. You can use your TDN system
to run a report of all ES 300’s sold at your dealership that are
outside the campaign parameters.
Inbound Calls
It is important to institute a system to respond to customers calling
your dealership for more information regarding the SSC. We
recommend designating an individual or certain individuals to
answer these inquiries to assure that callers get accurate and
consistent information.
Calls from the Media We ask that you refer any
directly to Lexus headquarters in Torrance. The contact person is:
Art Garner, Lexus Public Relations Manager
(310) 781–3282
calls from the media or government agencies
11
Page 24

Lexus ES 300
Service Loaners Ease of servicing is a critical aspect of the customer’s perception
as to how well the SSC is handled. It is extremely important that
every effort be made to conduct the SSC with minimal inconvenience
to the customer.
After determining the number of vehicles per day you will be
scheduling, verify that you have an adequate supply of service
loaners available for customers.
Because of the relatively short amount of time it takes to complete
the service you may want to develop a while–you–wait program.
Items needed would include:
Sufficient supply of parts
A dedicated work area, properly equipped
Dedicated technicians who are properly trained and certified
It is important to recognize that customers must know how long they
will be required to wait. Every effort must be made to have the vehicle
finished when promised.
Consider a pick–up and delivery service at customer’s home or
place of business.
Contacting Customers Check the service history of each customer before you contact
them to see if any other routine maintenance or services need to
be performed at the same time. This will help minimize a customer’s
perception of being inconvenienced.
Begin contacting the customers on your SSC lists to schedule
appointments and reserve parts using the TDN system.
Make sure you schedule appointments to coincide with the receipt
of all necessary parts.
Be sure to have the information provided on page 9 so that you
are able to respond to any questions the owner might have.
12
Page 25

Special Service Campaign
Remote Area Service Plan Your DSPM will work with you to develop an action plan.
Alternatives include:
Pick–up and re–delivery of remotely located vehicles
Performing repairs in a location other than a Lexus dealership
Each situation will be handled on a case–by–case basis.
Lexus will pay for certain related costs. DSPM or area
office authorization is required.
13
Page 26
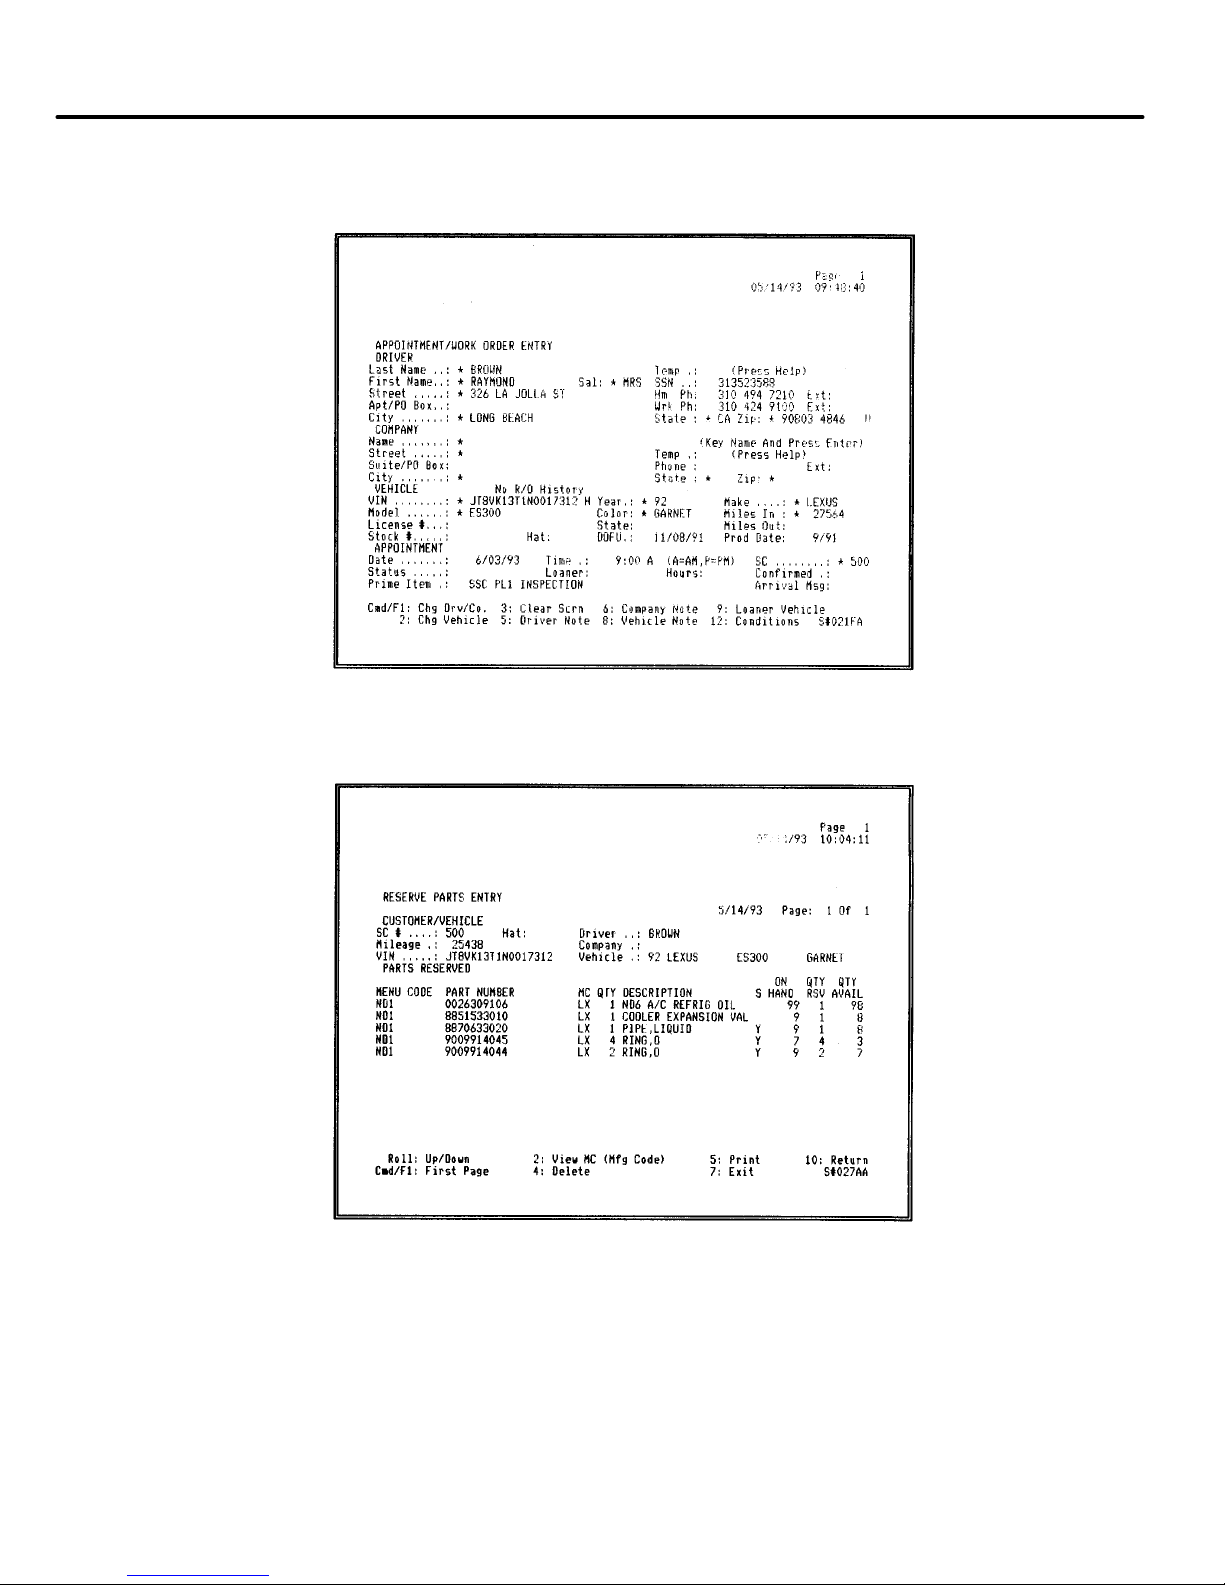
Lexus ES 300
SI–1
CREATE APPOINTMENT
SI–1
CMD 23
RESERVE PARTS
14
Page 27
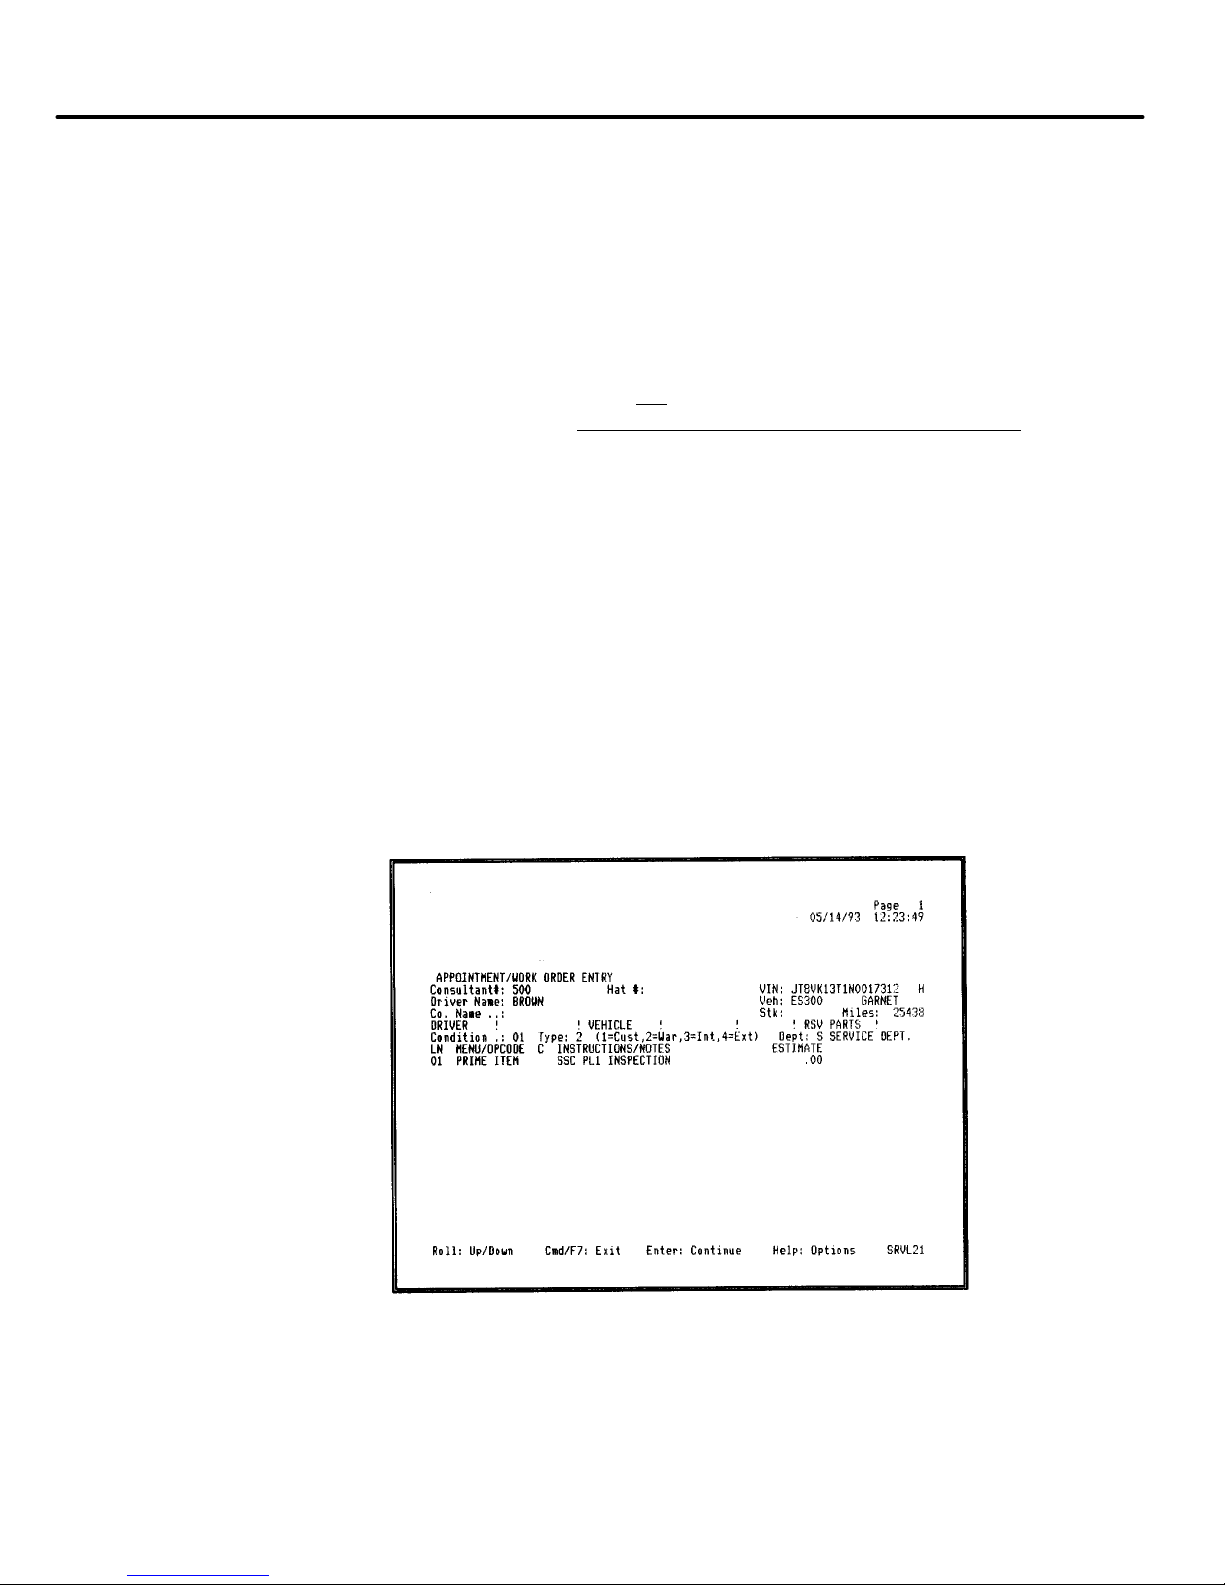
Special Service Campaign
The Write–Up Listed below are some general guidelines to use when the customer
arrives at your dealership for the Special Service Campaign:
Explain that in about half the cases the repairs will only take about 1/2
hour. And in the other half of the cases, when the expansion valve
must be replaced, the repairs will take about 2 hours.
Explain the types of repairs involved.
SI–2
If the customer does not
Check the left front door hinge post near the door check for an
have an SSC notice:
SSC completion label or the National History File to see if the
vehicle has been previously repaired or inspected under this
campaign.
If there is no label, check the VIN against the SSC list.
If the vehicle is eligible, explain the campaign, the procedure and
the amount of time needed for the inspection/repair to the
customer.
Input the usual necessary information into the TDN system to create a
work order (VIN, mileage, etc.).
Issue the work order to the technician, and include job instructions for
the SSC.
WORK ORDER ENTRY
15
Page 28

Lexus ES 300
Preparing for the Wash/clean each vehicle inside and out.
Delivery After SSC
Completion Fill the gas tank with premium unleaded fuel. This cost will
be charged as an SSC expense.
Notify customer of completion.
Delivery of the Vehicle After The methods used to re–deliver the vehicle after performing the SSC are
SSC Completion an important factor in achieving high levels of customer satisfaction in this
activity.
Thoroughly explain to the customer all SSC and any other work
performed.
Explain any additional work and/or charges if other services were
performed.
Thank each customer.
NOTE: The costs of car washes and loaners/pick–up and delivery in
your normal servicing area (100 miles) are not reimbursable
under this campaign.
Follow–Up 100% after–service follow–up is critical to the overall success of the
program.
16
Page 29

Special Service Campaign
Work Order Closing/Claim The following information explains the policies and procedures for
Submission preparation and submission of a warranty claim for reimbursement of an
inspection or repair performed under SSC PL–1.
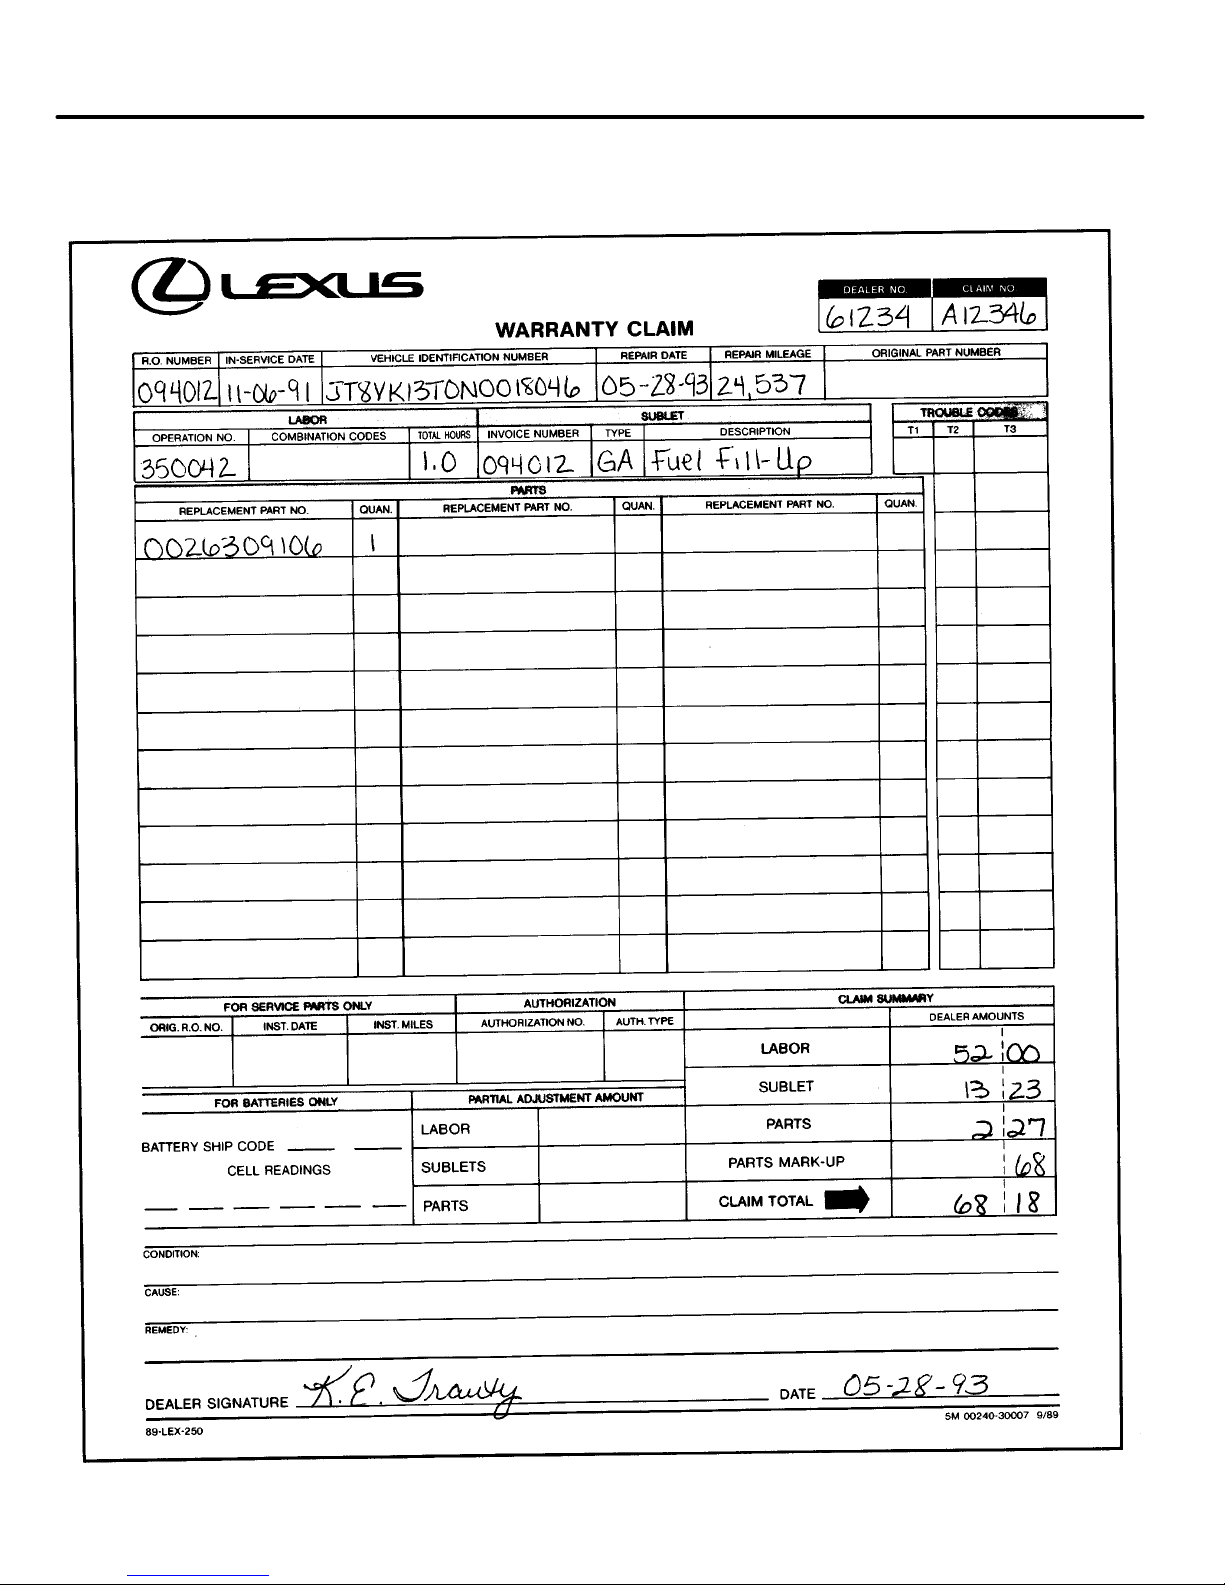
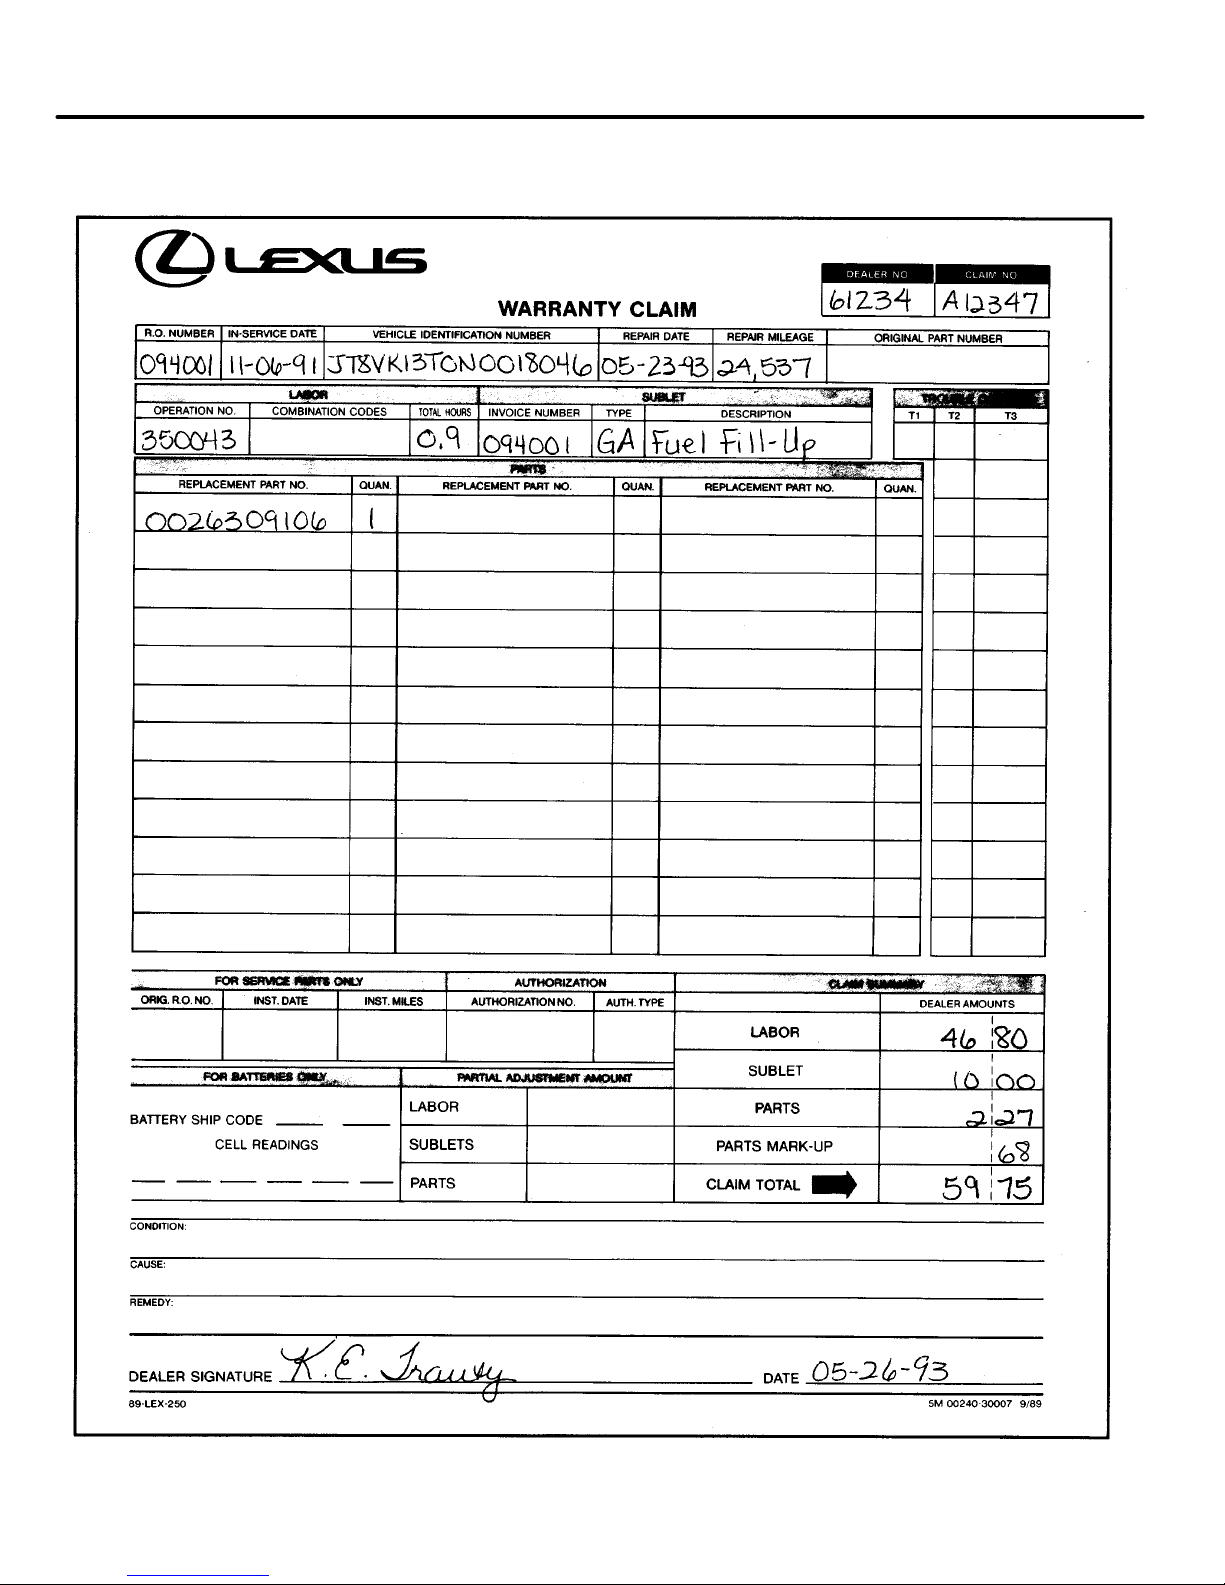
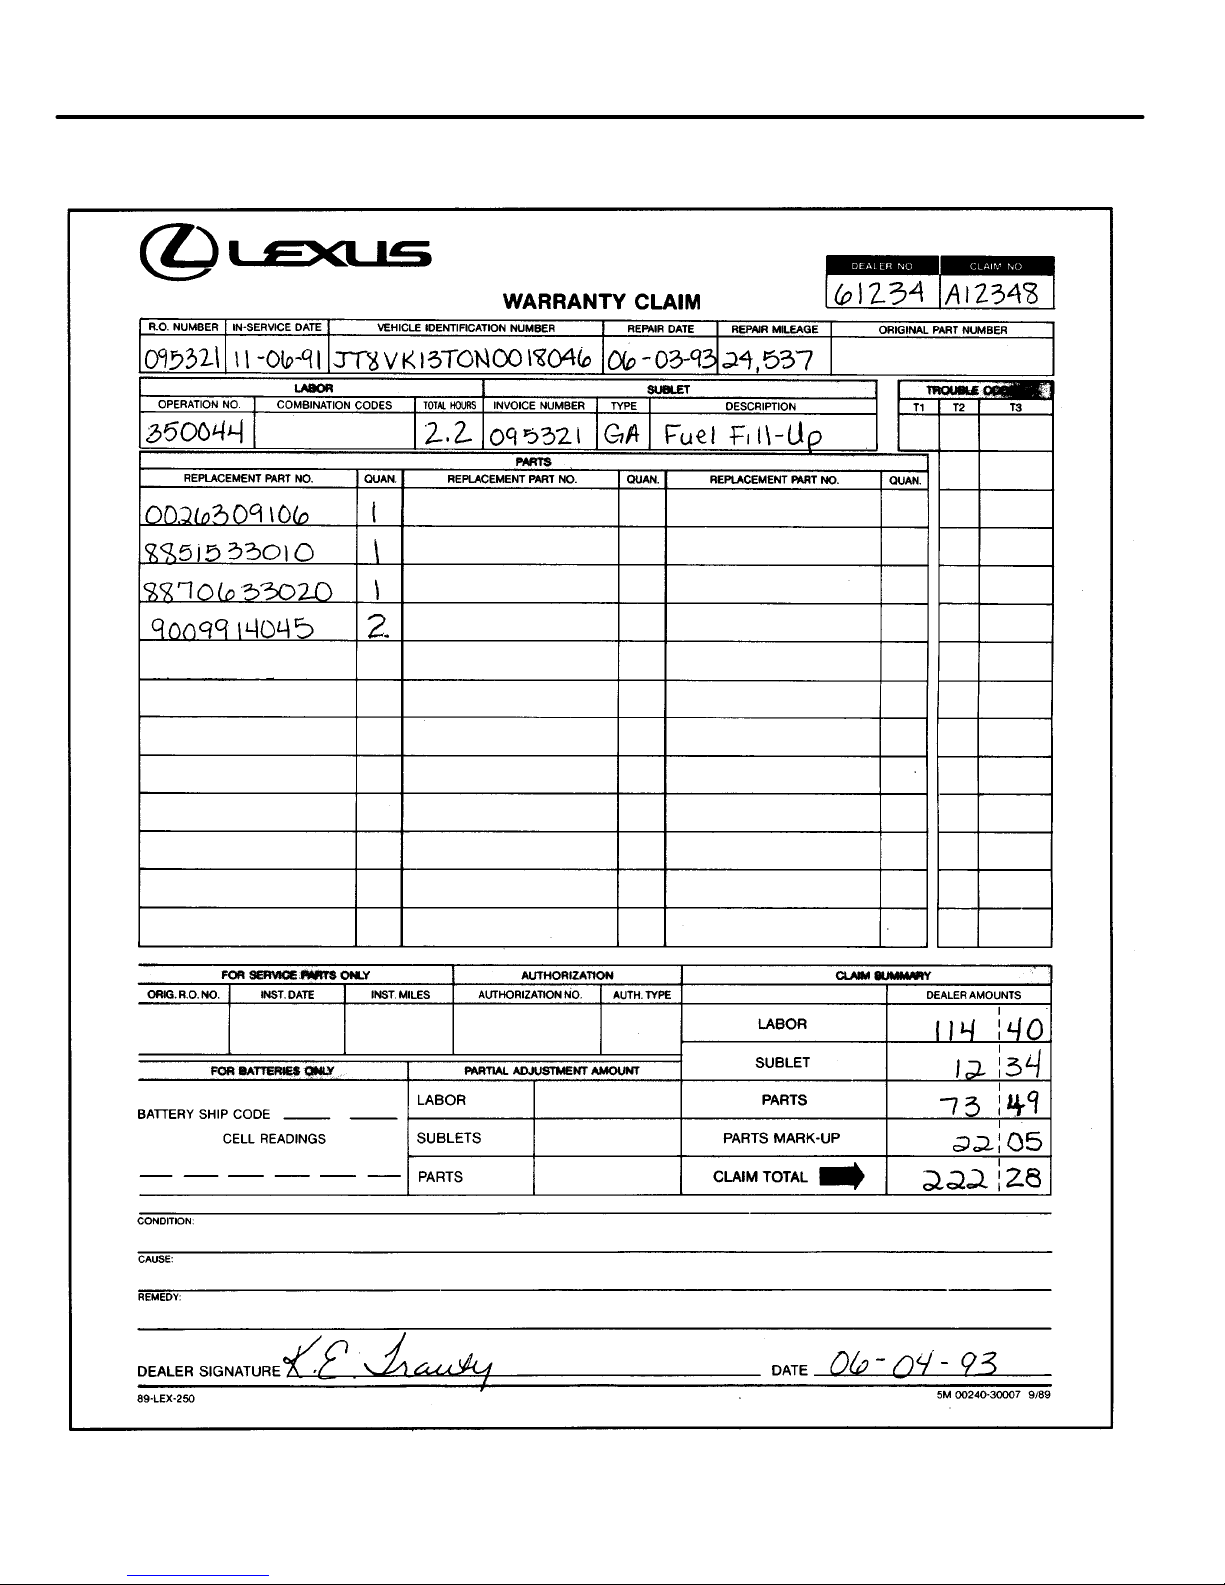
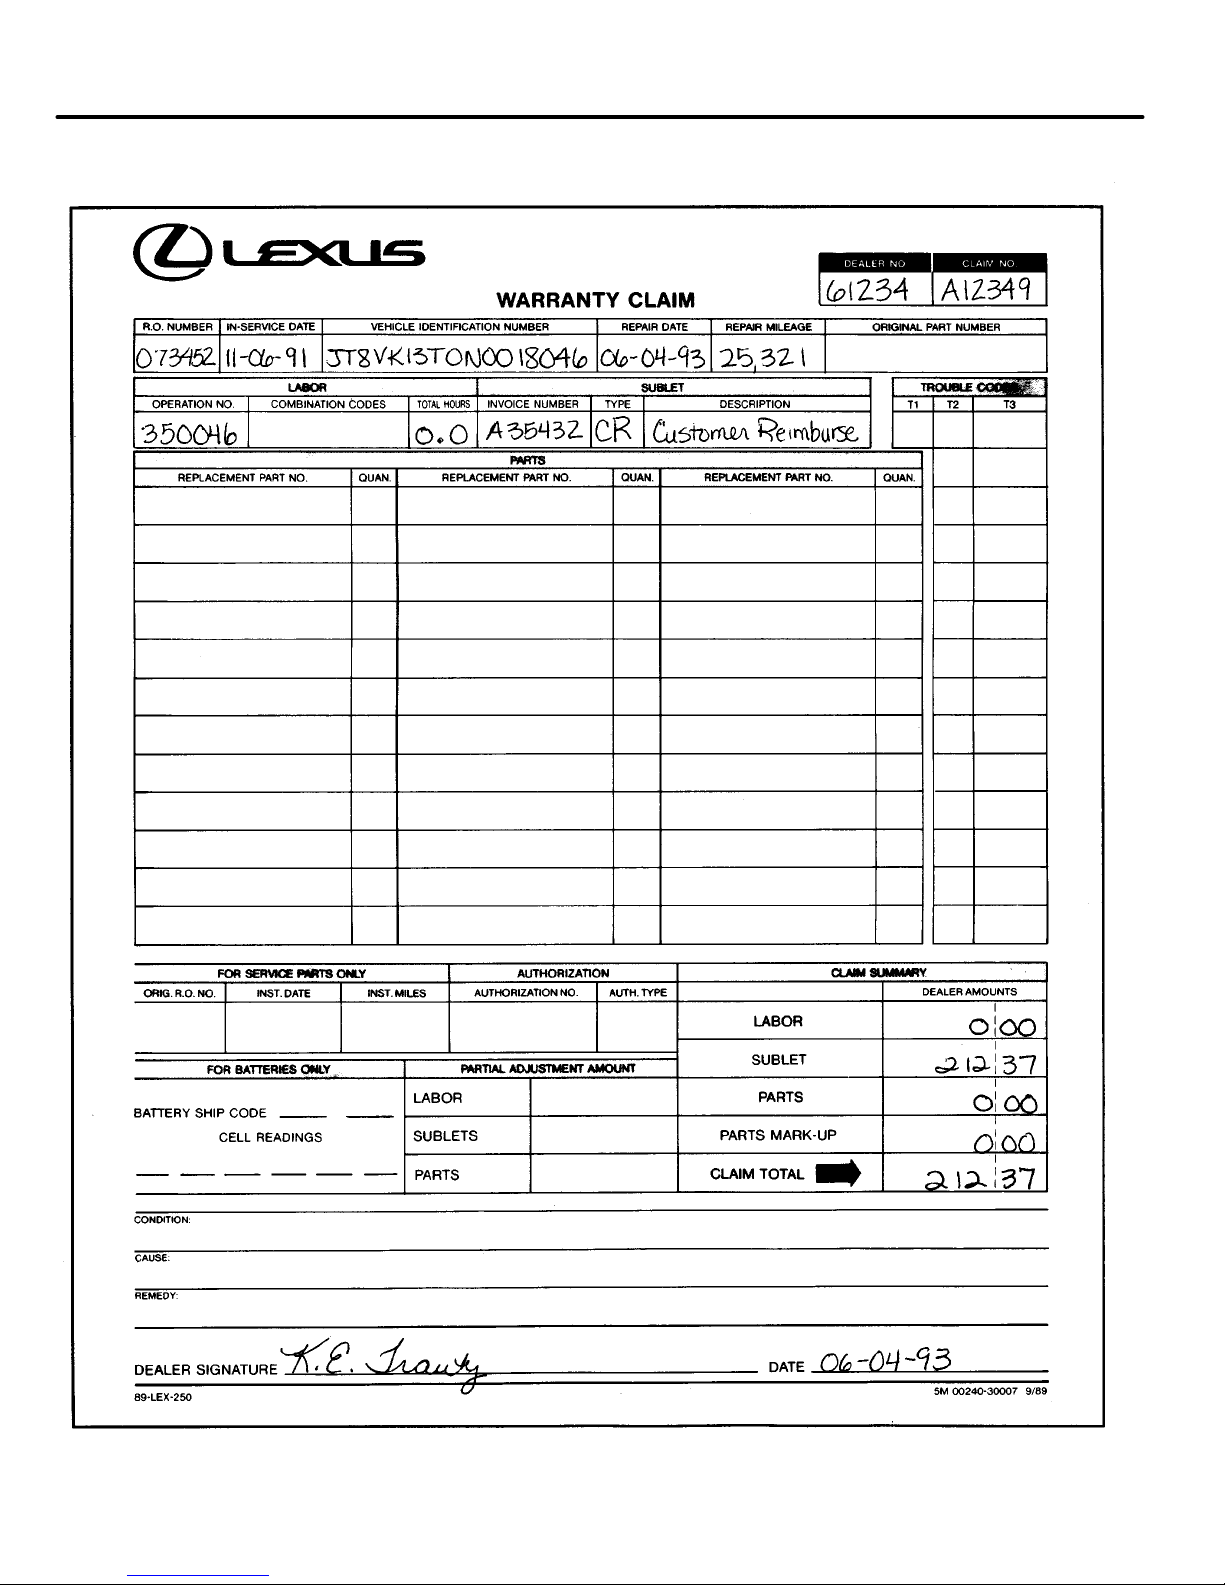
Operation Code Description Labor Hours
350041 Add “Toyota ND6 AC 0.6 hr./vehicle
refrigerant oil charge” with
protector only.
350042 Add “Toyota ND6 AC 1.0 hr./vehicle
refrigerant oil charge” after
recovery and recharge of
refrigerant
350043 Add “Toyota ND6 AC 0.9 hr./vehicle
refrigerant oil charge” after
confirming no leaks of gas
at the drain hose.
350044 Replacement of expansion 2.2 hr./vehicle
valve including liquid tube
(if required).
350046 Customer reimbursement for
previous repairs.
NOTE: Lexus Warranty will only accept one claim per
vehicle under the terms of this Special Service
Campaign. Please ensure that the claim for your
dealer is submitted under the correct operation code
at the time of submission. Also, please ensure that
your dealership checks the National History File to
see if the vehicle has been repaired or inspected
under this campaign prior to servicing the vehicle.
Recap of Claims Submission Only one of the five labor operation codes can be used per
& General Provisions vehicle claim.
of the SSC
Lexus will pay for gas tank fill–up.
Lexus will pay for costs associated with remote repairs,
remote pick–up and delivery and loaner cars, with DSPM
authorization only.
17
Page 30

Lexus ES 300
ClaimingReimbursem entfor You must use a sublet to claim any special services required in conjunction
Special Services with the special service campaign repair.
‘GA’ (Gas Tank Fill–up)
Applicable to every vehicle.
‘RT’ (Rental Car)
Applicable only under extenuating circumstances.
Must be authorized by a DSPM.
‘DE’ (Pick–up and Delivery)
Applicable only under special circumstances (e.g., more than 100
miles from nearest Lexus dealer).
Claimed at actual dealer cost.
DSPM authorization is always required for this expense.
‘ZZ’ (Remote Repair)
Applicable only under special circumstances (e.g., 200+ miles from
nearest Lexus dealer which requires using an alternate repair
facility).
Claimed at actual dealer cost.
DSPM authorization is always required for this expense.
NOTE: Each sublet must be a separate entry with:
Unique Invoice Number
Description
Sublet Type
$ Amount
TDN Claim Preparation In Repair Order Management select claim type ‘SC’ (Special Service
Instructions Campaign) unless the dealer is requesting reimbursement for a remote
repair or pick–up and delivery of the customer’s vehicle. If you are
claiming for remote repair or pick–up and delivery of a customer’s
vehicle you must
use ‘RG’ (Regular) claim type. Refer to the TDN
section of this manual (page 19) for examples of claim preparation via
TDN.
18
Page 31
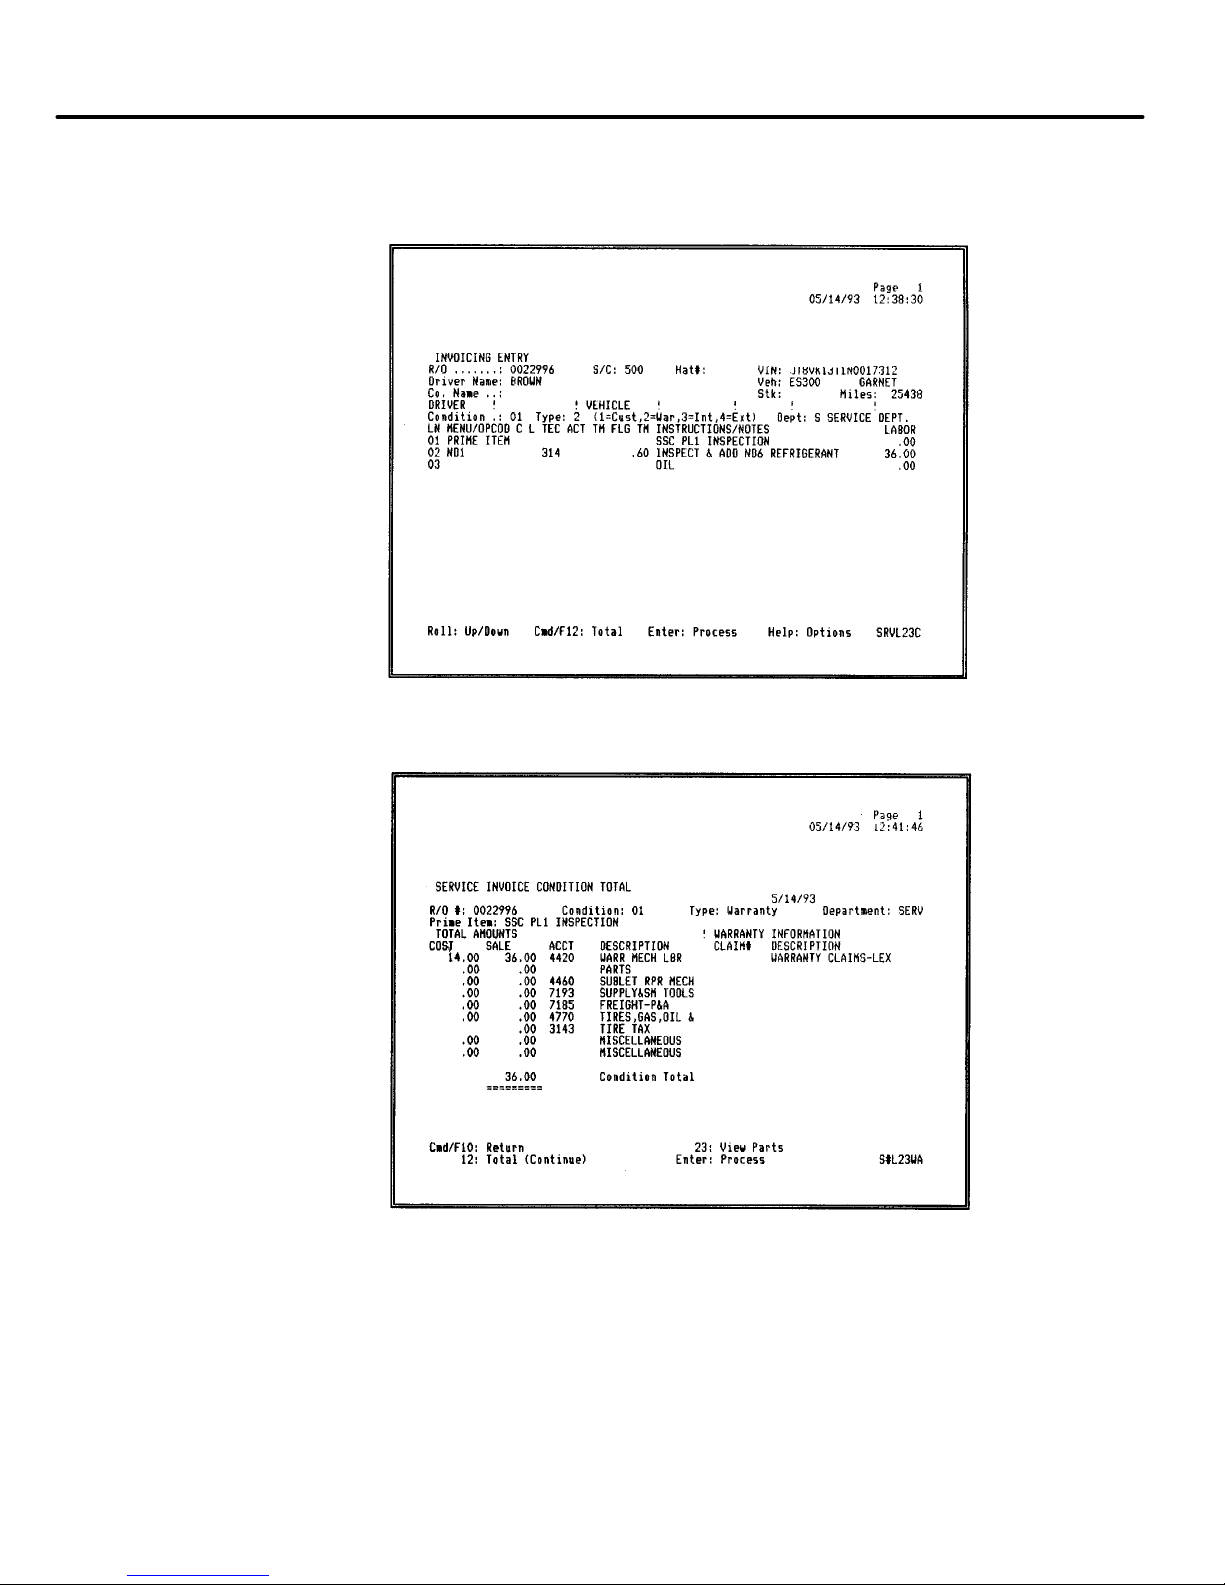
Special Service Campaign
Create Invoice
SI–3
INVOICING – Inspection Only Example
Condition Total
SI–3
CMD–12
19
Page 32
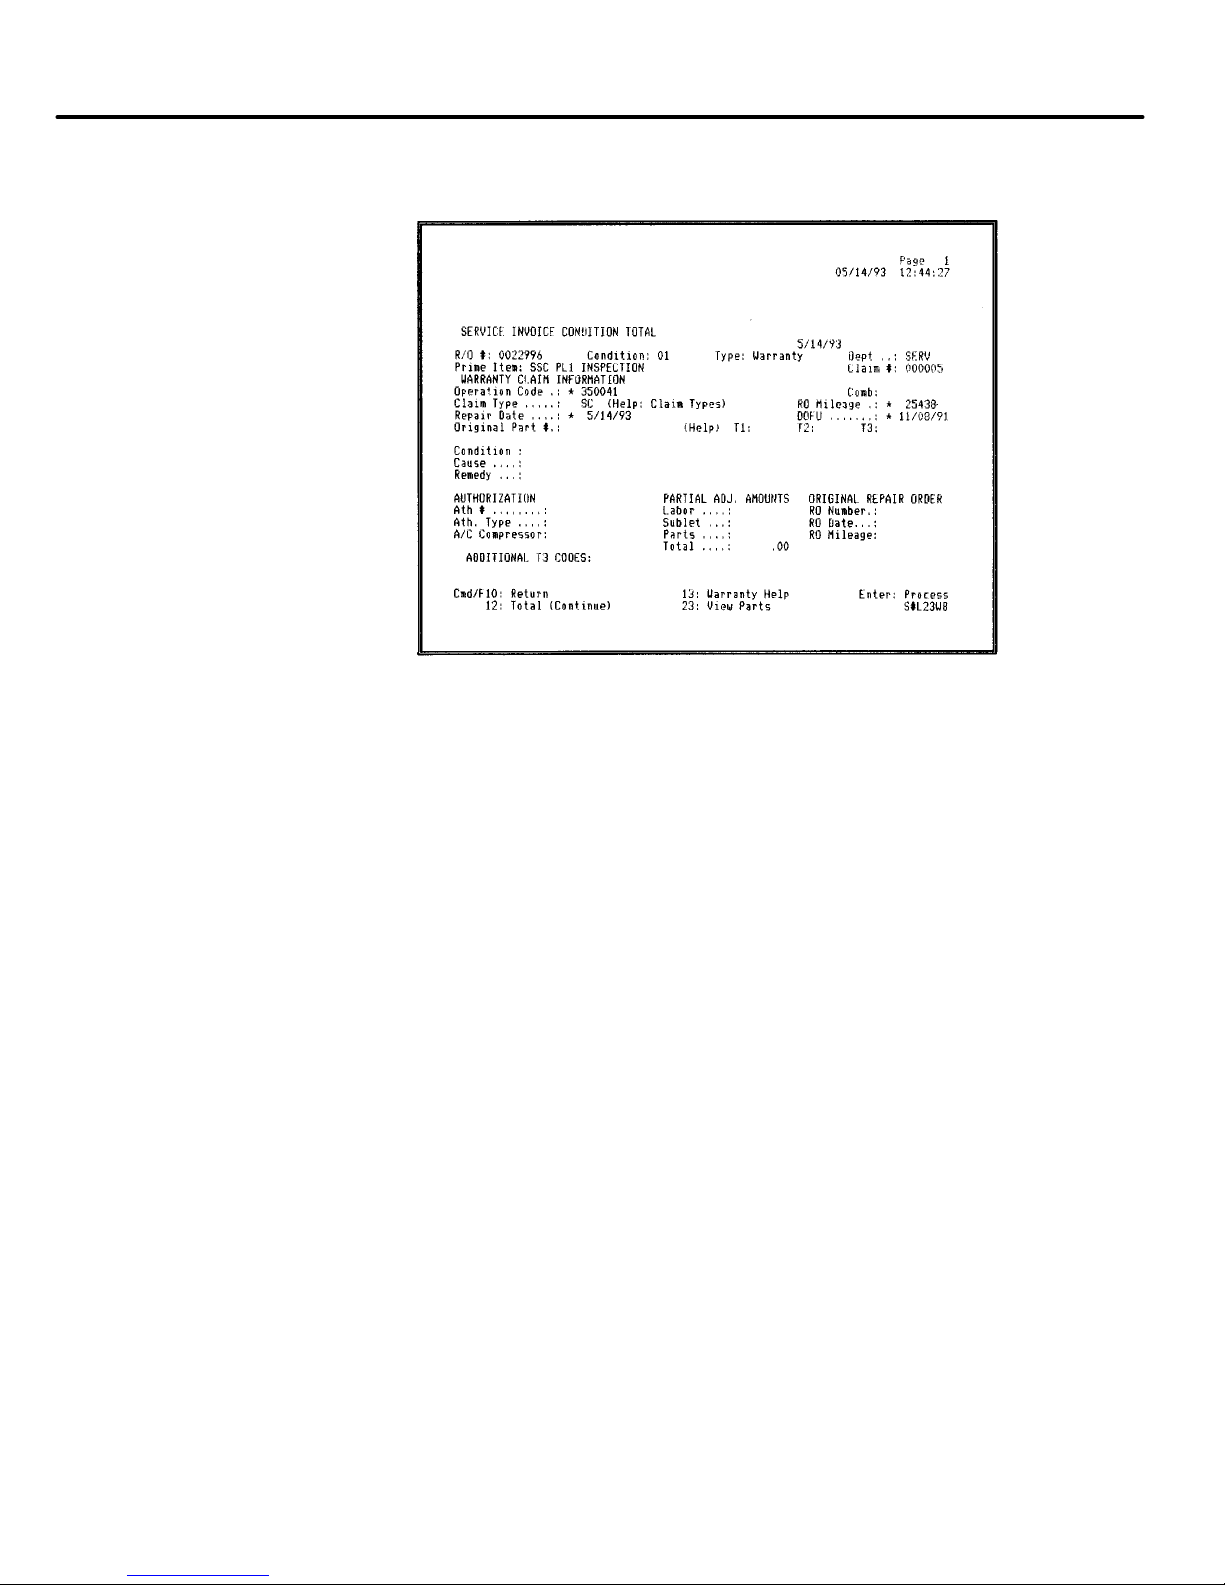
Lexus ES 300
Claim Information
SI–3
CMD–12
INVOICING – Inspection Only Example
20
Page 33
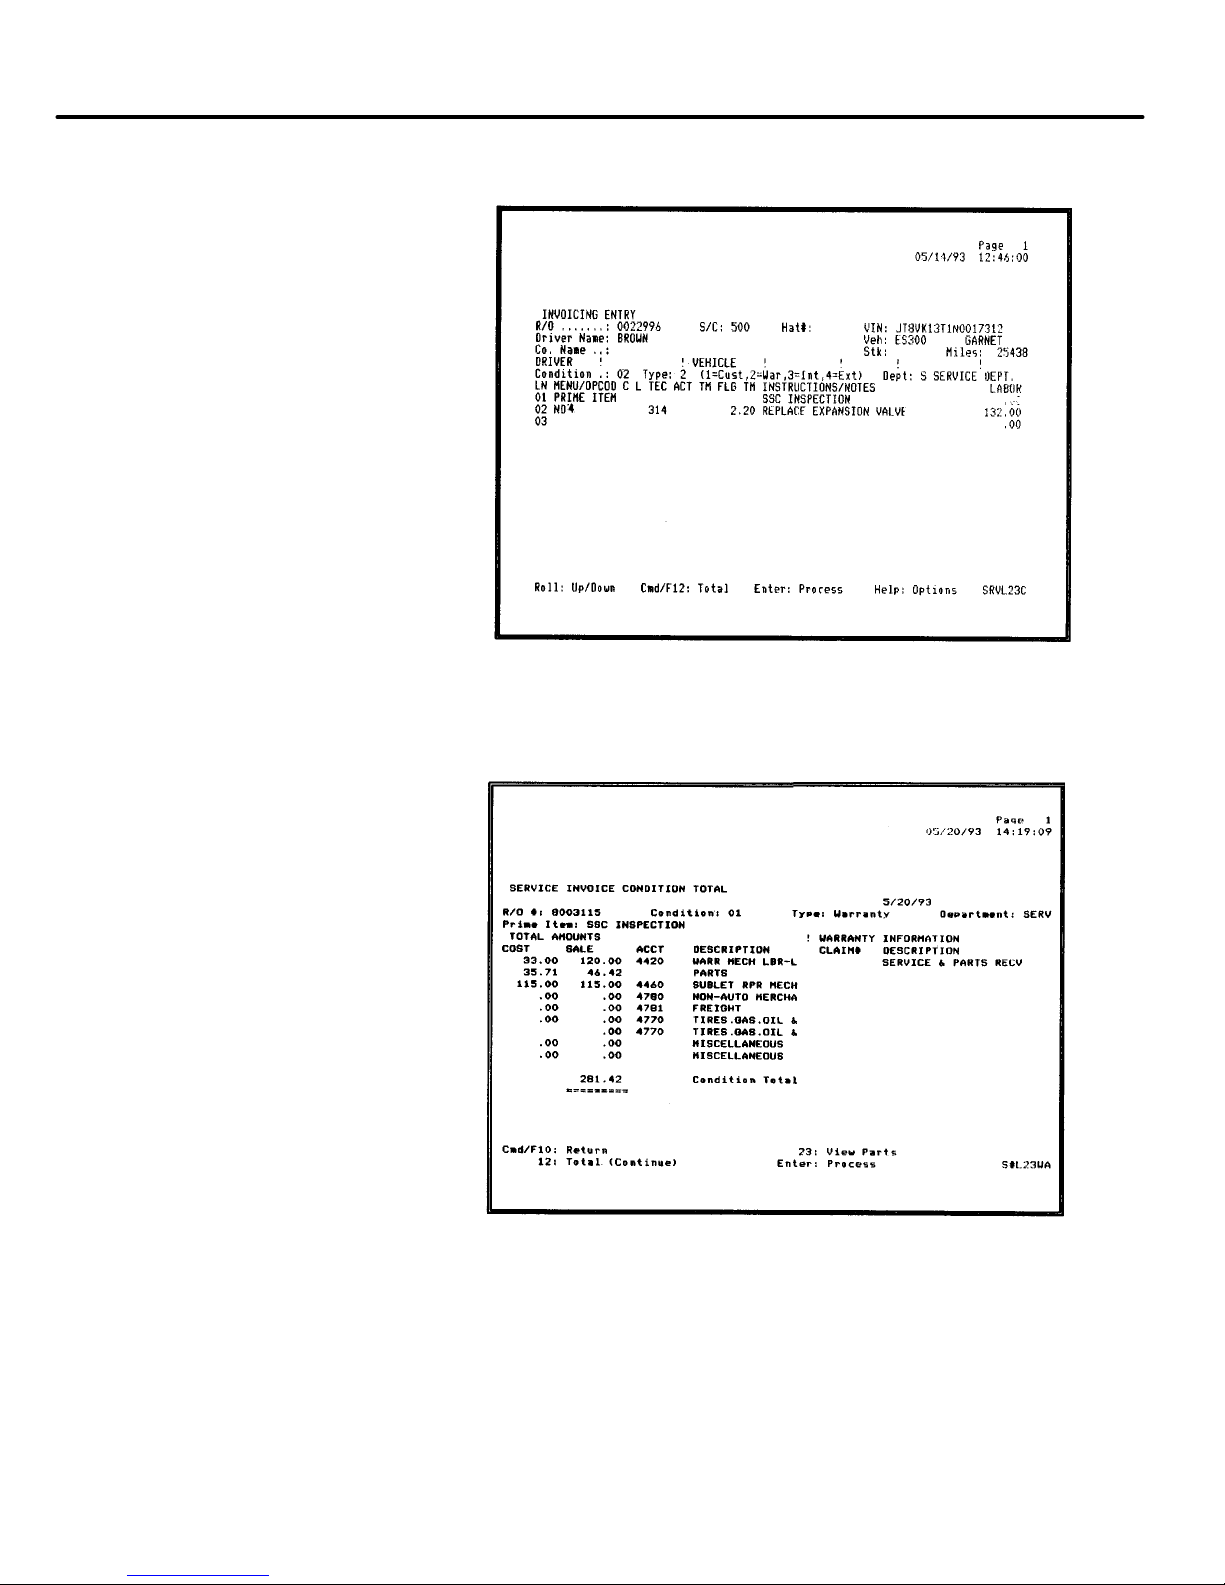
Special Service Campaign
Create Invoice
SI-3
INVOICING–Expansion Valve Replacement
Condition Total
SI-3
CMD-12
Attach reserved parts
21
Page 34
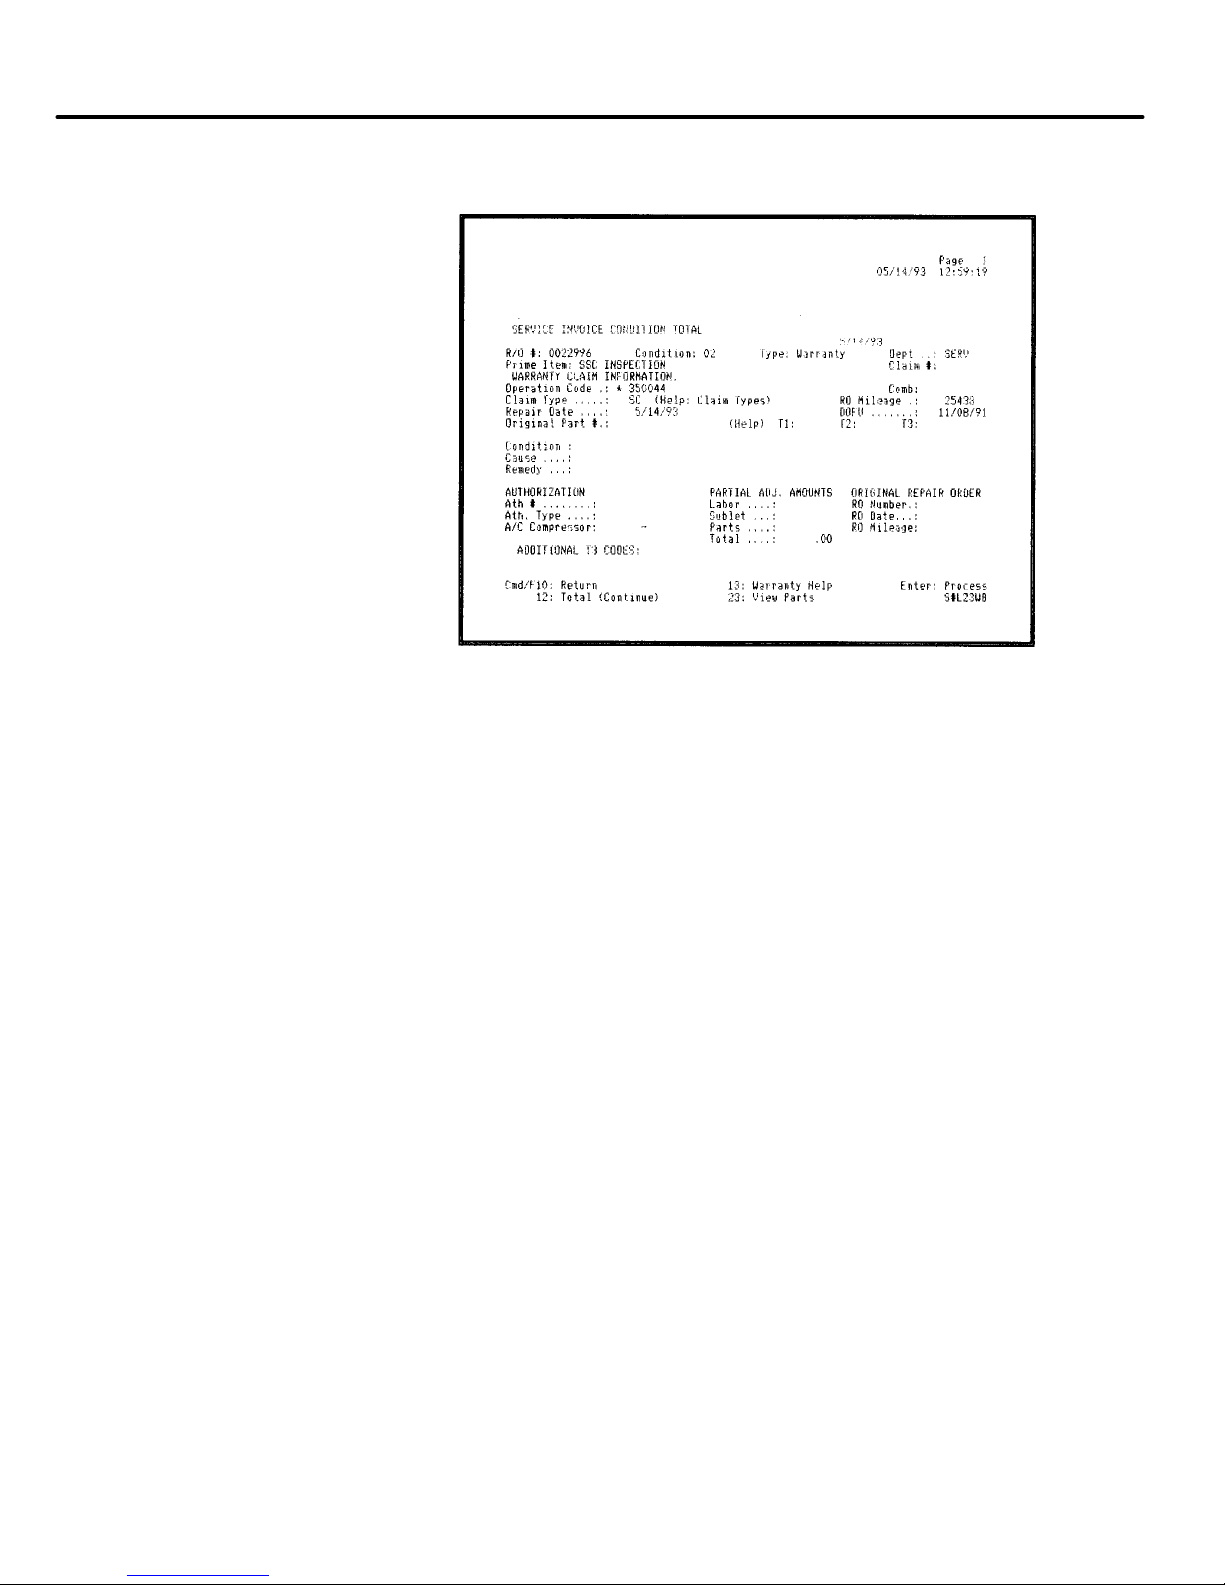
Lexus ES 300
Claim Information
SI-3
CMD-12
INVOICING–Expansion Valve Replacement
Example
22
Page 35
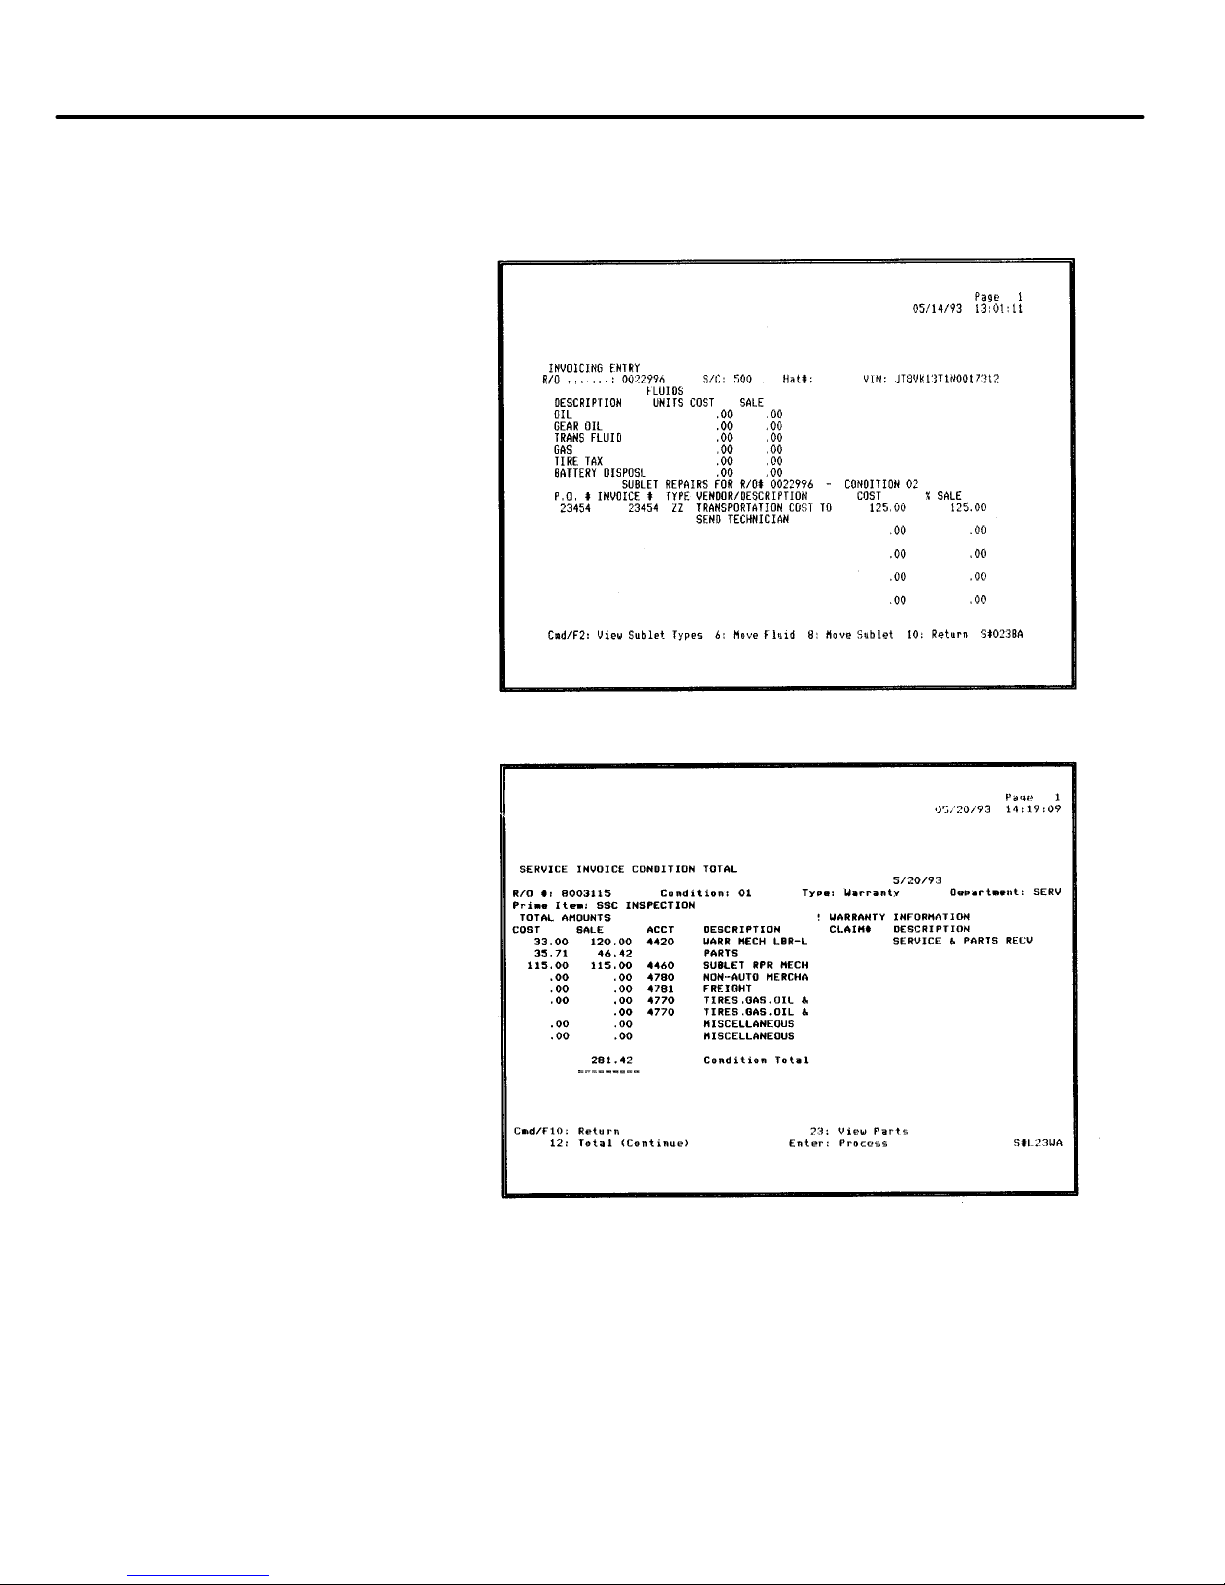
Special Service Campaign
SI-3
CMD-22
SUBLET INFORMATION–Example of
Transportation Costs to Make Remote Repairs
Condition Total
SI-3
CMD-12
23
Page 36
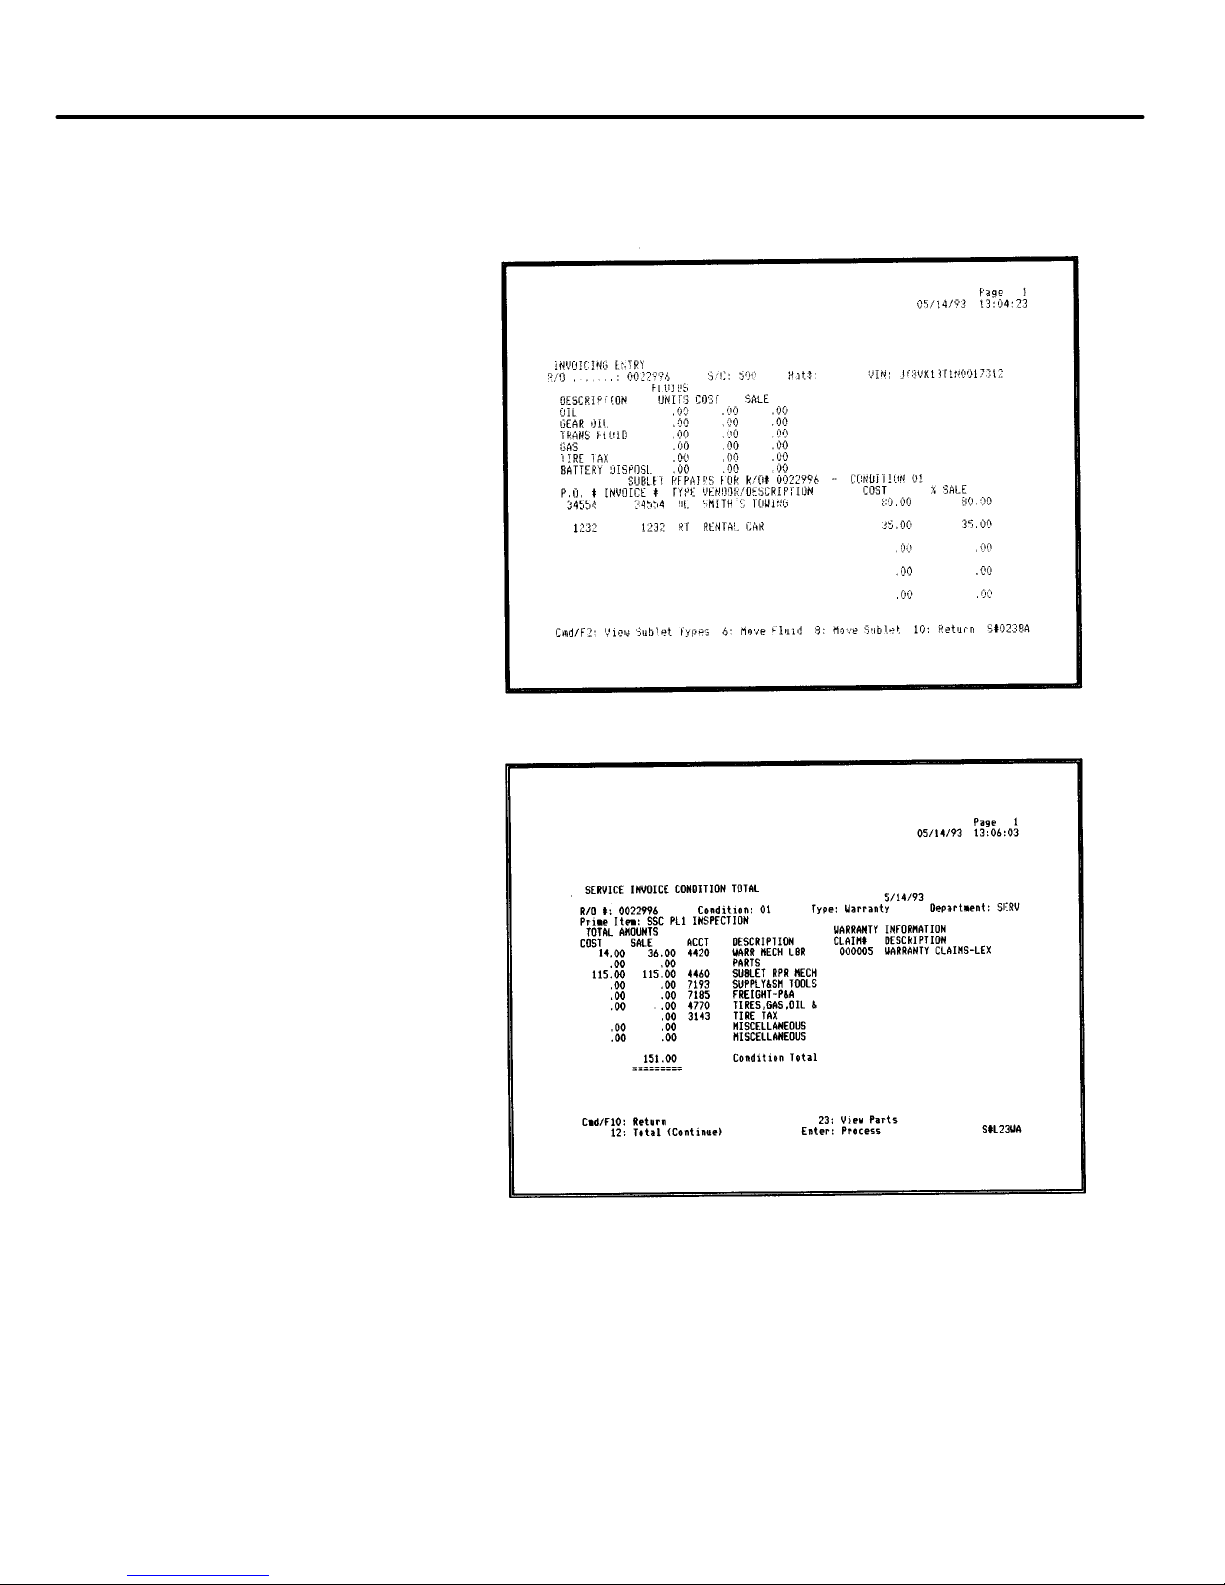
Lexus ES 300
SI-3
CMD-22
SUBLET INFORMATION–Example of Costs to
Transport Vehicle to Dealership
Condition Total
SI-3
CMD-12
24
Page 37
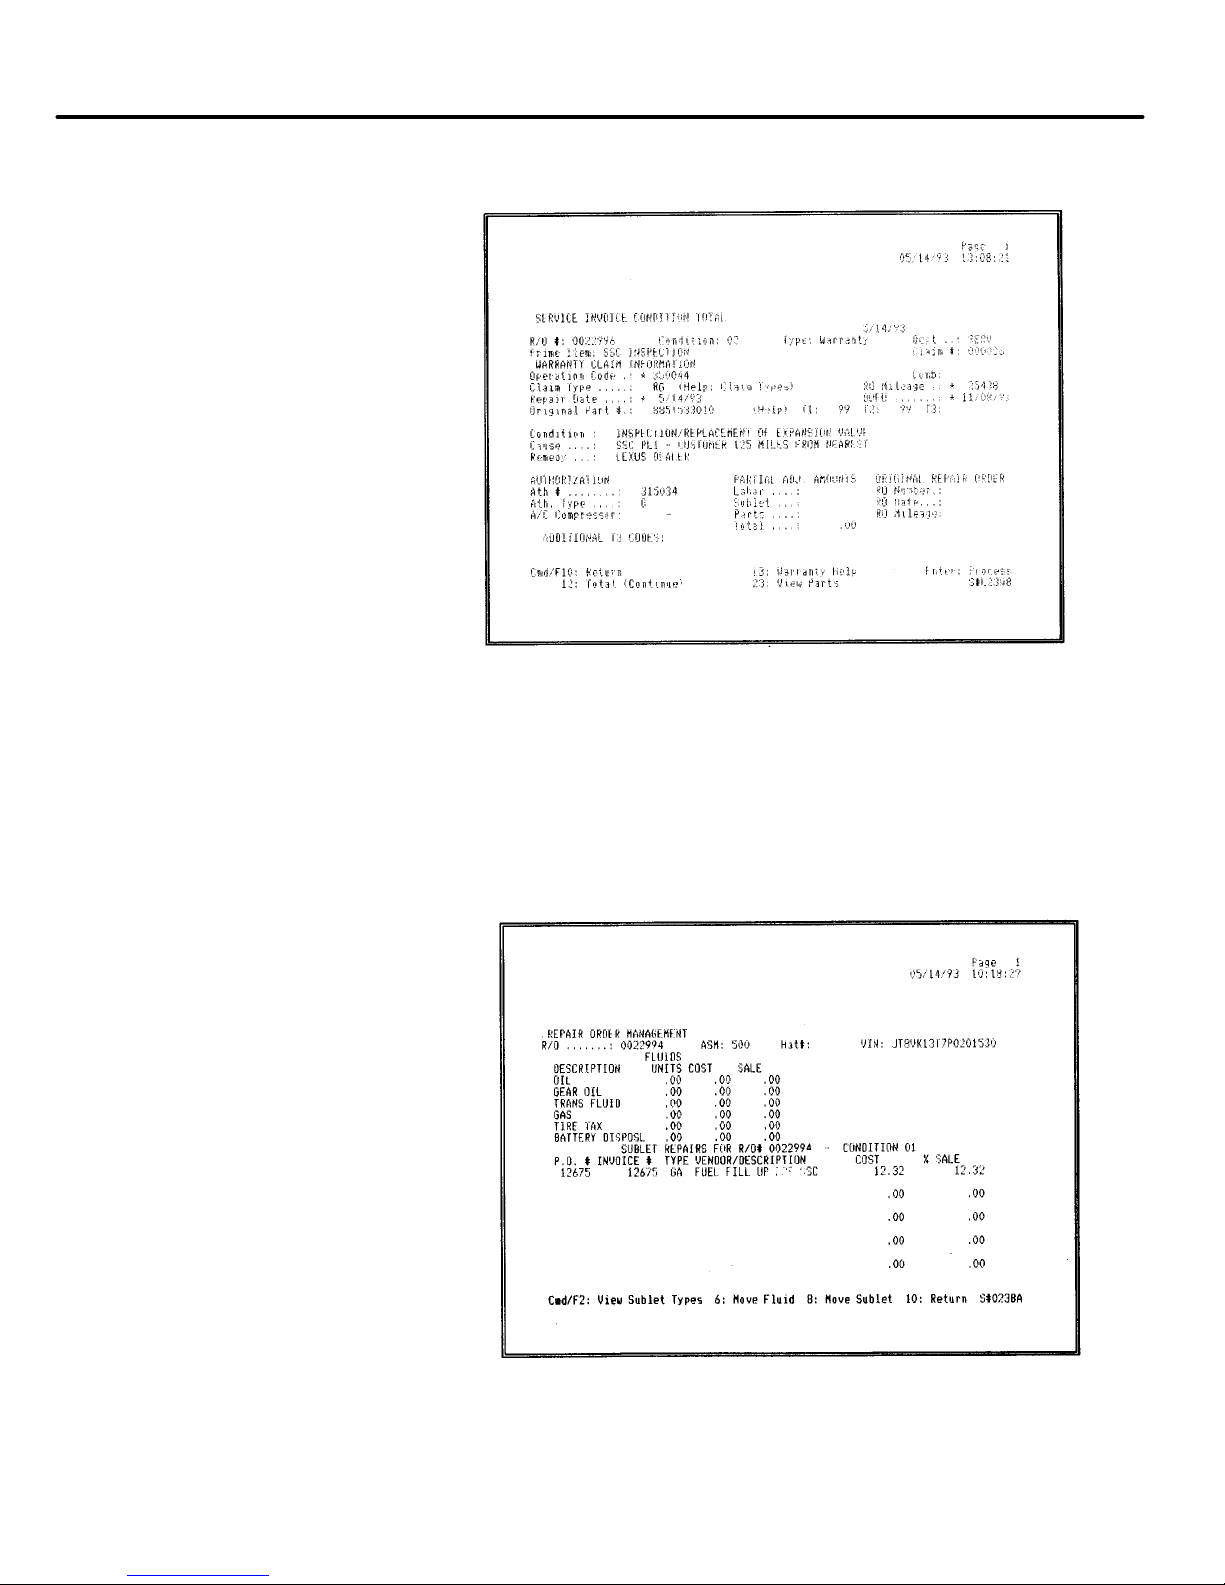
Special Service Campaign
WARRANTY INFORMATION SCREEN
CW1
CMD-22
NOTE: Authorization required for expenses
incurred for remote service or pickup
and delivery in remote locations.
REPAIR ORDER MANAGEMENT–Adding
Fuel Costs
25
Page 38

Lexus ES 300
Paper Claim Submission Please use the following instructions in the event that a paper
claim must be submitted. The following claim instructions
list required information field by field corresponding to the format
of the Lexus Warranty Paper Claim Form. If information is not
required for SSC claim submission it will be noted.
Dealer Number: Enter the 5–digit number assigned to your
dealership by Lexus.
Claim Number: Enter the 6–digit claim number that your
dealership has assigned to the claim. The claim number must
be unique and must begin with the letter “A” and be followed by
numeric characters.
Repair Order Number: Enter the repair order number from
the invoice created at the time of the repair.
In–Service Date: Enter the date the vehicle was first put into
service (enter in MM–DD–YY format).
Vehicle Identification Number: Enter the complete 17–digit
VIN number from the vehicle that was repaired.
Repair Date: Enter the date the vehicle was repaired
(MM–DD–YY format).
Repair Miles: Enter the vehicle mileage at the time of repair
(do not enter tenths of miles).
Original Part Number: Not required on an SSC claim.
Operation Code: Enter the 6–digit operation code that indicates
which SSC inspection or inspection/replacement was performed.
Combination Code: Not allowed with the SSC repairs.
Total Hours: Enter the total labor hours allowed for the SSC
inspection or inspection/replacement that was performed.
Sublet Invoice Number: Enter only if a special service was
provided to the customer as per the guidelines on the previous
pages of this manual.
26
Page 39

Special Service Campaign
Sublet Type: Enter the 2–digit sublet type–code only if a special
service was provided to the customer as per the guidelines on
the previous pages of this manual.
Sublet Description: Enter a brief description of the sublet only if a
special service was provided to the customer as per the guidelines
on the previous pages of this manual.
T–1 Code: Not required for an SSC claim.
T–2 Code: Not required for an SSC claim.
T–3 Codes: Not used for an SSC claim.
Replacement Part Number: Enter any parts replaced as per the
SSC repair guidelines. Refer to the previous warranty instructions
for a list of appropriate replacement parts by operation code.
Replacement Parts Quantity: Enter the number of each part replaced.
Original R.O./Installed Date/Installed Miles: Not required for an SSC
claim.
Authorization Number: Enter an authorization number if
authorization is required as per the guidelines on the previous
pages of this manual.
Authorization Type: Enter authorization type “G” only if an authorization
number has also been entered and is required as per the guidelines
on the previous pages of this manual.
Labor Amount: Enter the total dollar amount to be claimed for the
labor portion of the repair. This figure is calculated as the dealers
authorized warranty labor rate multiplied by the allowable labor hours
for the repair performed.
Sublet Amount: Enter the total dollar amount to be claimed for sublet.
Parts Amount: Enter the total dollar amount to be claimed for any
replacement part. This figure is calculated as the total dealer cost
of all parts replaced.
27
Page 40

Lexus ES 300
Parts Mark–up: Enter the total dollar amount to be claimed for
parts mark–up. This figure is calculated as the total parts amount
claimed multiplied by 30% if 1992 vehicle and 45% if 1993 vehicle.
Claim Total: Enter the total amount to be claimed for the repair.
This figure is calculated as the total of labor, sublet, parts and parts
mark–up.
Battery Ship Code/Cell Readings: Not used at this time.
Partial Adj. Labor/Sublet/Parts: Not used for SSC claims.
Condition/Cause/Remedy: Enter a description of the repair and
the conditions requiring use of the “Pick–up and Delivery” or “Remote
Repair” special services. If a C/C/R is entered, something must be
written in all three lines of the field.
28
Page 41
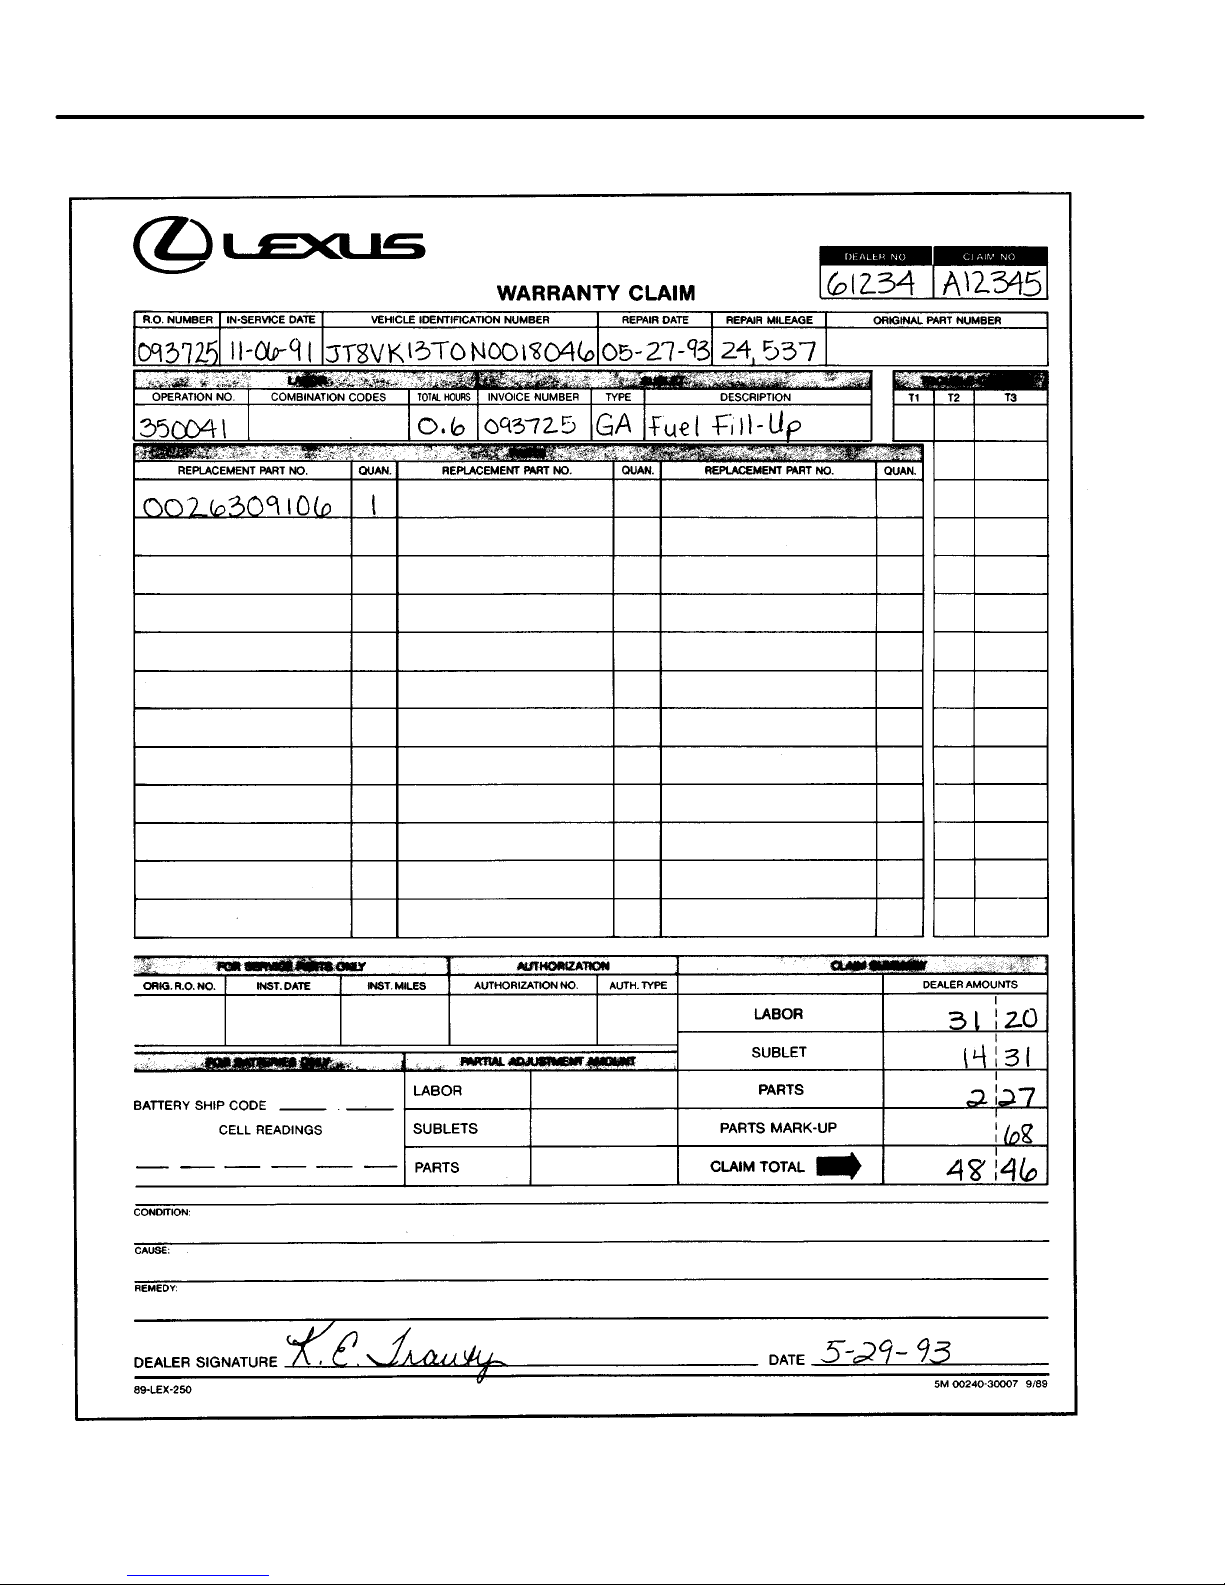
Special Service Campaign
Add “Toyota ND6 AC refrigerant oil charge” with protector only.
29
Page 42
Lexus ES 300
Add “Toyota ND6 AC refrigerant oil charge” after recovery and recharge
or refrigerant.
30
Page 43
Special Service Campaign
Add “Toyota ND6 AC refrigerant oil charge” after confirming no leaks of gas at the
drain hose.
31
Page 44
Lexus ES 300
Replacement of expansion valve including liquid tube (if required).
32
Page 45
Special Service Campaign
Customer reimbursement for previous repairs.
33
Page 46
Lexus ES 300
34
Page 47

Lexus ES 300 – Special Service Campaign
Technical Instructions
Table of Contents
VIN LOCATION 37. . . . . . . . . . . . . . . . . . . . . . . . . . . . . . . . . .
SIGHT GLASS INSPECTION OF REFRIGERANT
VOLUME 39. . . . . . . . . . . . . . . . . . . . . . . . . . . . . . . . . . . . . . .
PROCEDURE FOR CASE A 41. . . . . . . . . . . . . . . . . . . . . .
Performance Testing the A/C System 47. . . . . . . . . . .
SSC Completion Label Installation 48. . . . . . . . . . . . . .
DRAIN HOSE LEAK INSPECTION 49. . . . . . . . . . . . . . . . .
PROCEDURE FOR CASE B 50. . . . . . . . . . . . . . . . . . . . . .
Performance Testing the A/C System 52. . . . . . . . . . .
SSC Completion Label Installation 53. . . . . . . . . . . . . .
PROCEDURE FOR CASE C 54. . . . . . . . . . . . . . . . . . . . . .
Evacuation, Recharge, and Re–inspection 60. . . . . . .
Performance Testing the A/C System 61. . . . . . . . . . .
SSC Completion Label Installation 62. . . . . . . . . . . . . .
ES 300 A/C SYSTEM SPECIFICATIONS 63. . . . . . . . . . .
35
Page 48
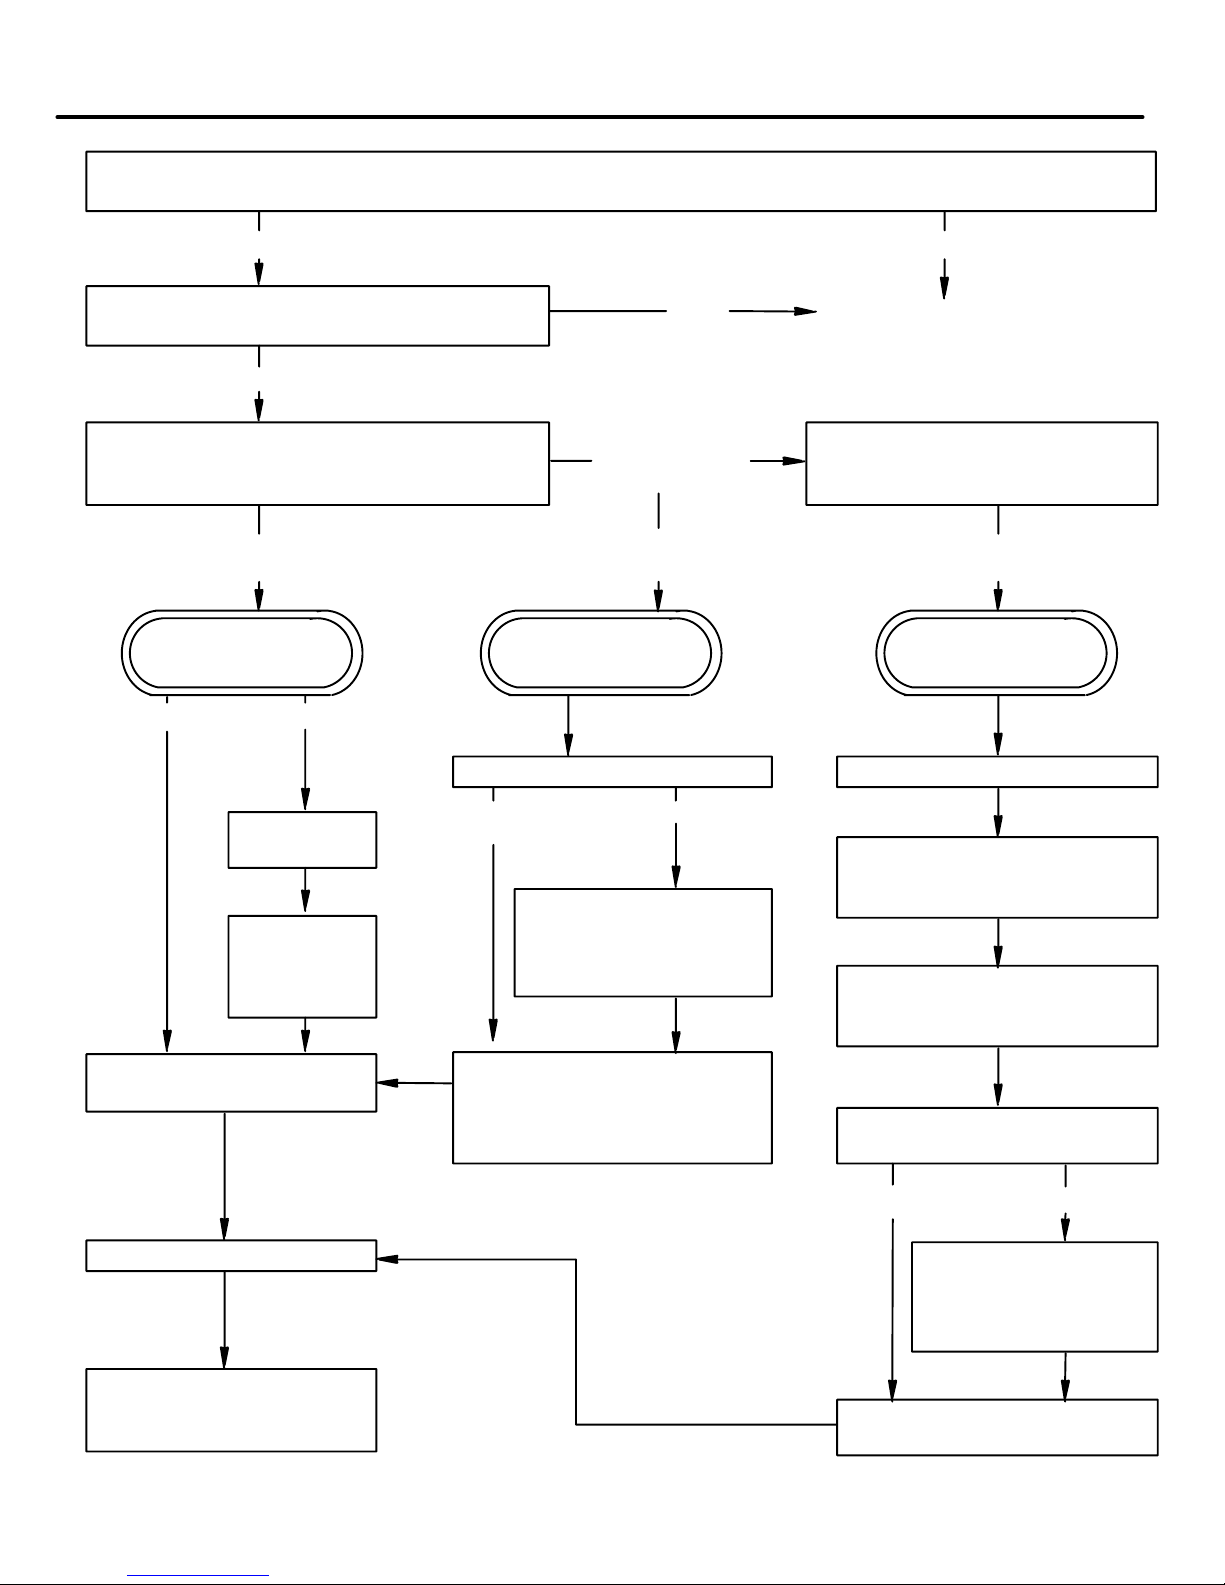
Inspection and Repair Procedures Flow Chart
Check the vehicle identification number (VIN) and compare to chart on page 2 to see if vehicle is
involved in this SSC.
YES NO
Check for SSC completion label affixed to
the left hinge door post near the door check.
YES
No action required.
NO
Check the amount of refrigerant in sight Partially charge with refrigerant
glass based on inspection conditions (NO MORE THAN 1 POUND)
applicable to the specific model. Check gas leakage at drain hose.
EMPTY OR
INSUFFICIENT
NO LEAK FOUND LEAK FOUND
PROPER OR EXCESSIVE AT DRAIN HOSE AT DRAIN HOSE
CASE A CASE B CASE C
SEE page 41 See page 50 See page 54
PROPER EXCESSIVE
Check other locations. Recover the refrigerant.
Recover the
refrigerant. Replace the expansion valve
Recharge Warranty or charge
specified at customer’s
amount of expense.* Partially charge with
refrigerant. refrigerant (NO MORE
FOUND
Repair under Lexus valve and liquid tube.
LEAK FOUNDNO LEAK
or, if applicable, expansion
THAN 1 POUND).
Add Toyota ND6 AC Recharge specified amount of
Refrigerant Oil Charge. refrigerant under Lexus
Check at A/C operation. Repair under Lexus
Affix SSC completion label
to the left hinge door post Charge to specified amount
near the door check. of refrigerant.
* See original for footnote text.
36
Warranty or charge at Check gas leakage at
customer ’s expense.* drain hose.
NO LEAK LEAK FOUND
FOUND
Warranty or charge
at customer’s
expense.*
Page 49
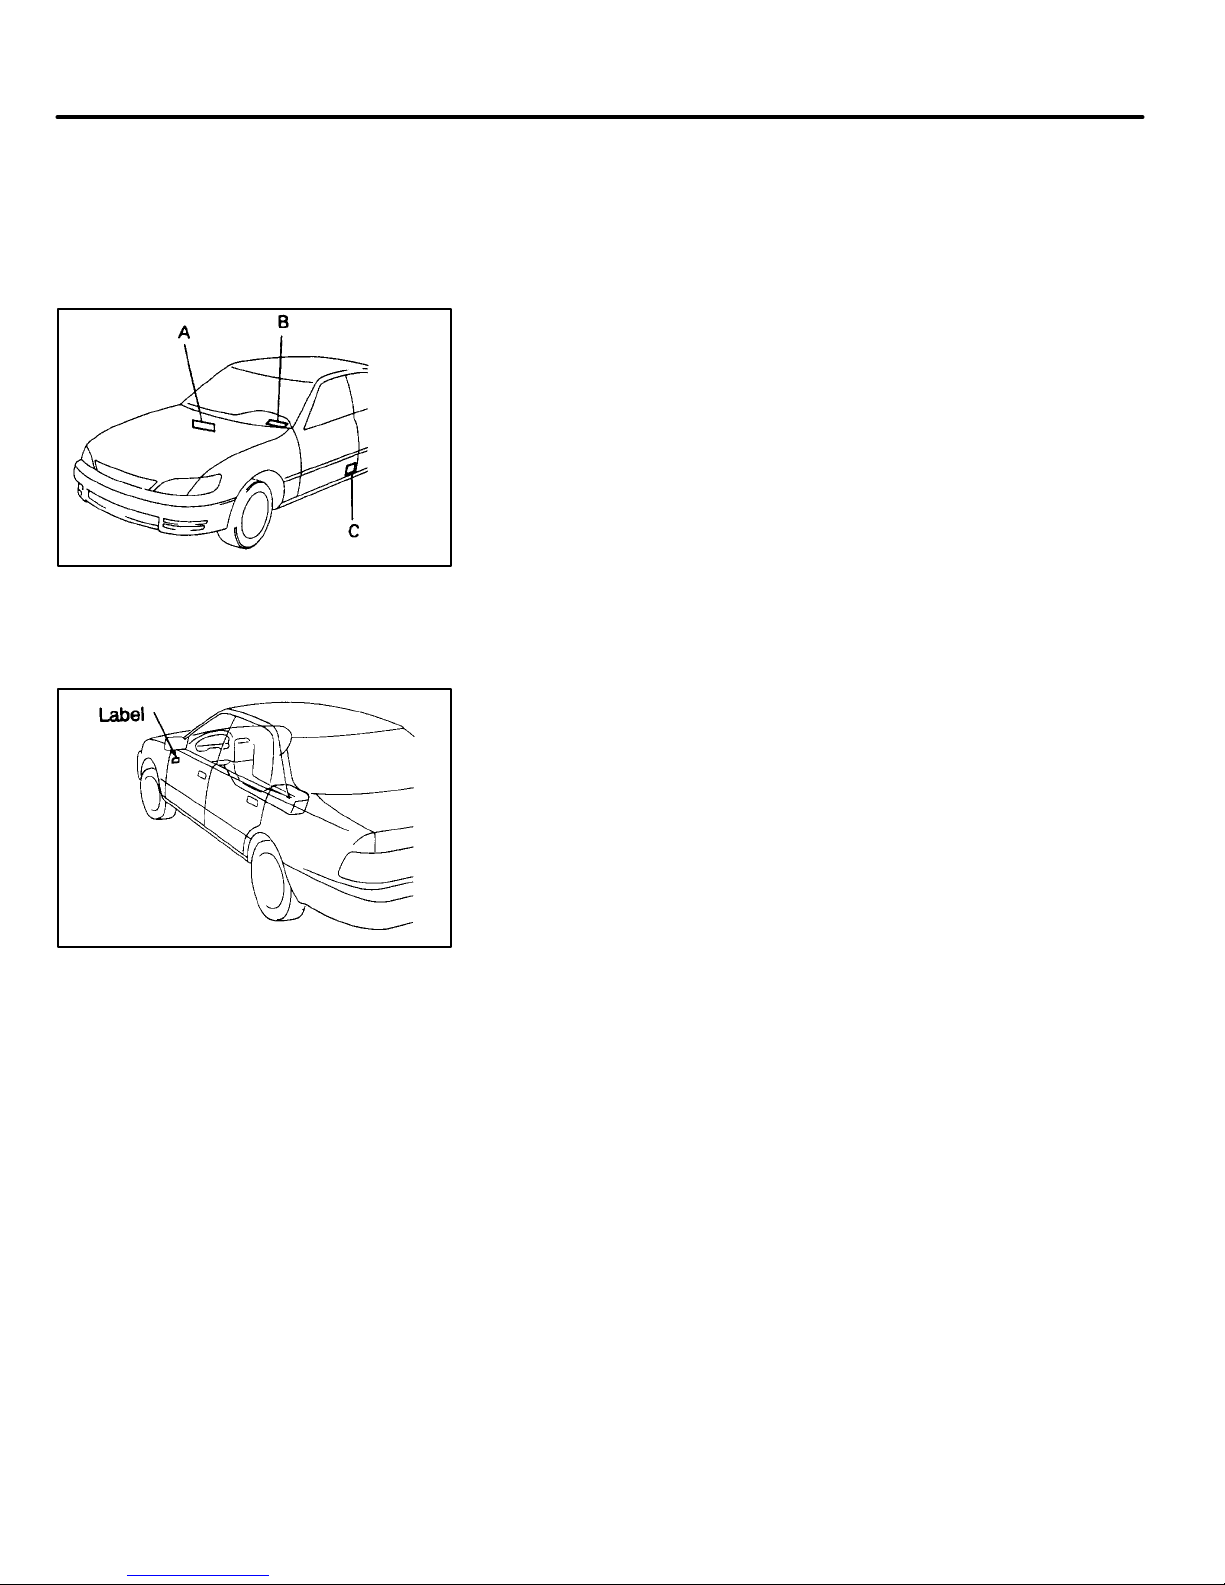
VIN Location
NOTE: The technician must be MACS or ASE
refrigerant recovery certified to perform the procedures
in this booklet.
Determine if special service applies to vehicle as follows:
1. Check the Vehicle Identification Number (VIN).
(a) Locate one of the Vehicle Identification Number
(VIN) plates.
(b) Are the last seven digits within the following range:
0001001 – 0129016?
NO: Assure customer that the A/C on their ES 300
is okay. No further action is necessary.
YES: Check for a SSC–PL1 Completion Label affixed
to the left door hinge post near the door check.
2. Is an SSC PL1 Completion Label present?
YES: Special Service has already been performed.
No further action is necessary.
NO: Continue with the special service procedure by
inspecting the A/C Sight Glass (below).
37
Page 50
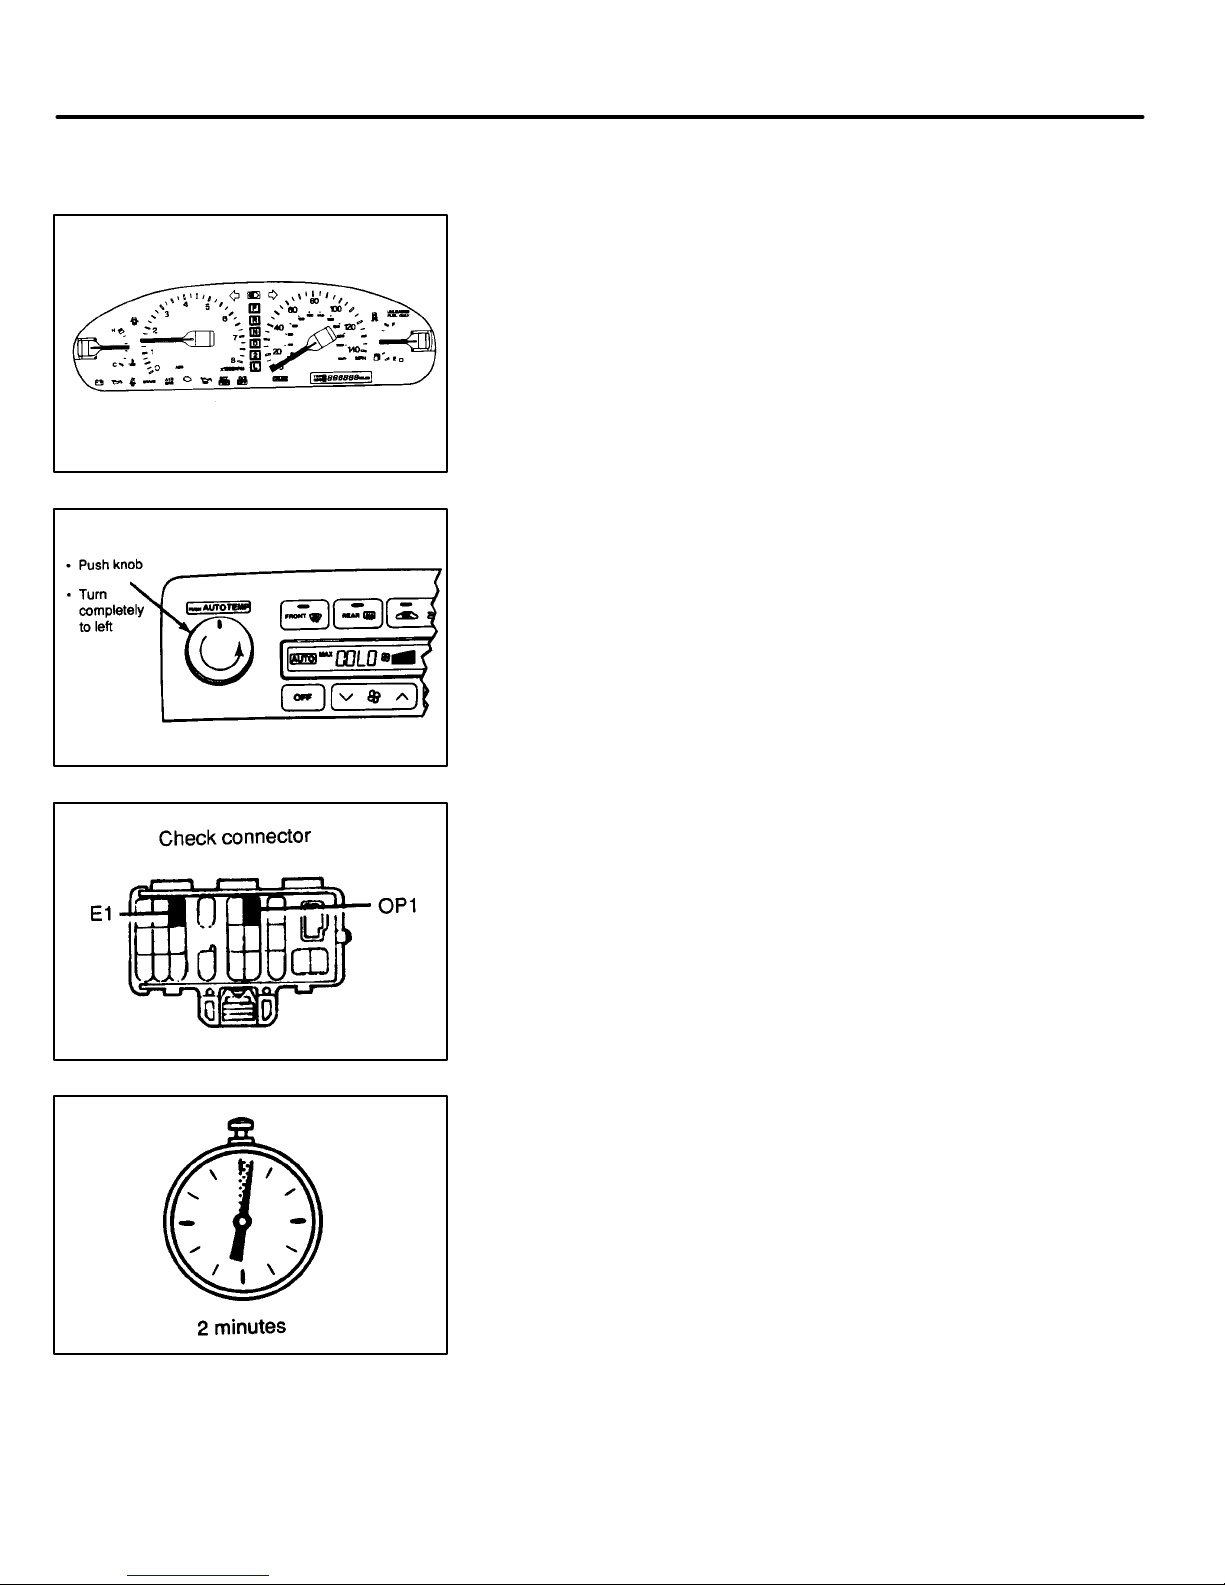
Sight Glass Inspection of Refrigerant Volume
Inspect A/C Sight Glass as follows:
1. Start the engine and maintain 1500 RPM.
2. Set the A/C controls to AUTO – MAX COOL.
3. Open all vehicle doors.
4. At the Under Hood Diagnostic Connector jump OP1
to E1 to maintain a stable fan speed.
5. Run the engine at 1500 RPM with the doors open
for at least 2 minutes to stabilize the A/C system.
NOTE: Every A/C sight glass shows air bubbles both
immediately after starting and after switching from one
condition to another. So, it is necessary to wait 2 minutes
after any A/C operating condition has changed.
38
Page 51
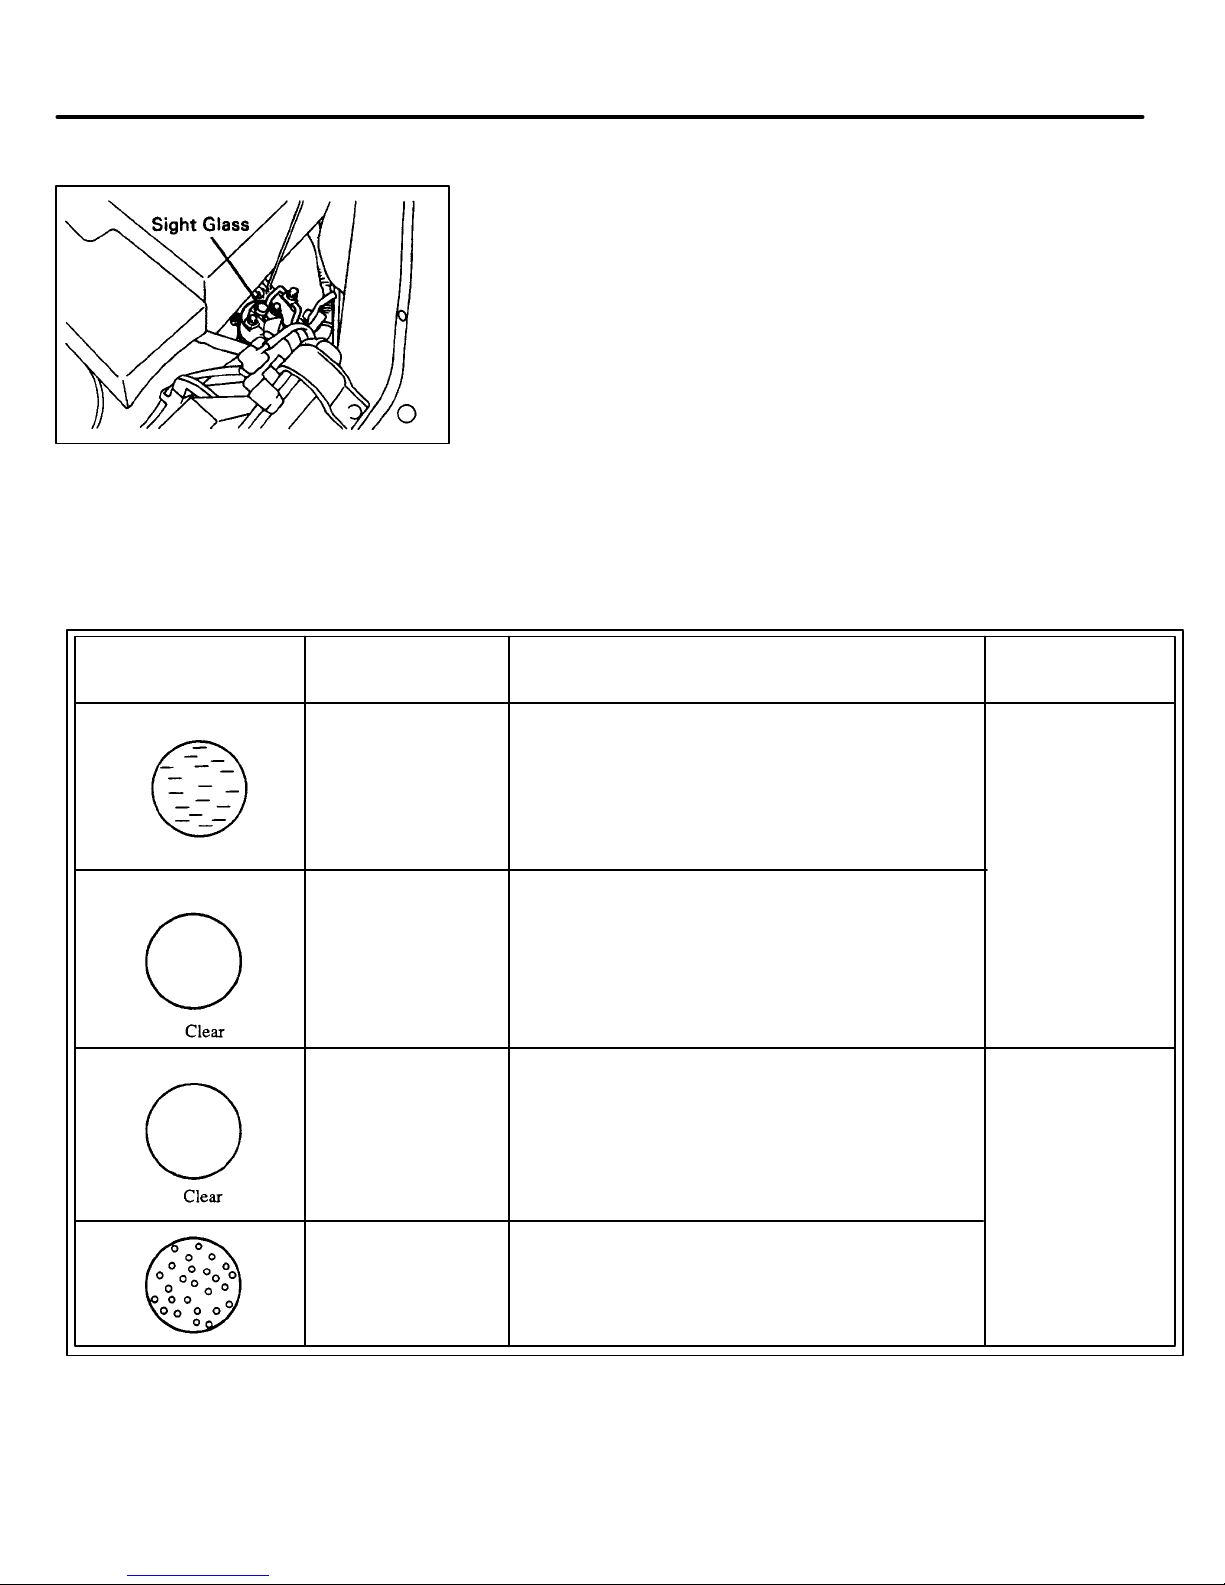
Sight Glass Inspection of Refrigerant Volume
6. While continuing to run the engine at 1500 RPM, check
the sight glass. Compare the sight glass on the vehicle
to the ones shown in the Refrigerant Volume Inspection
Table (below).
REFRIGERANT VOLUME INSPECTION TABLE
Conditions in Refrigerant Symptom Service
sight glass Volume Procedure
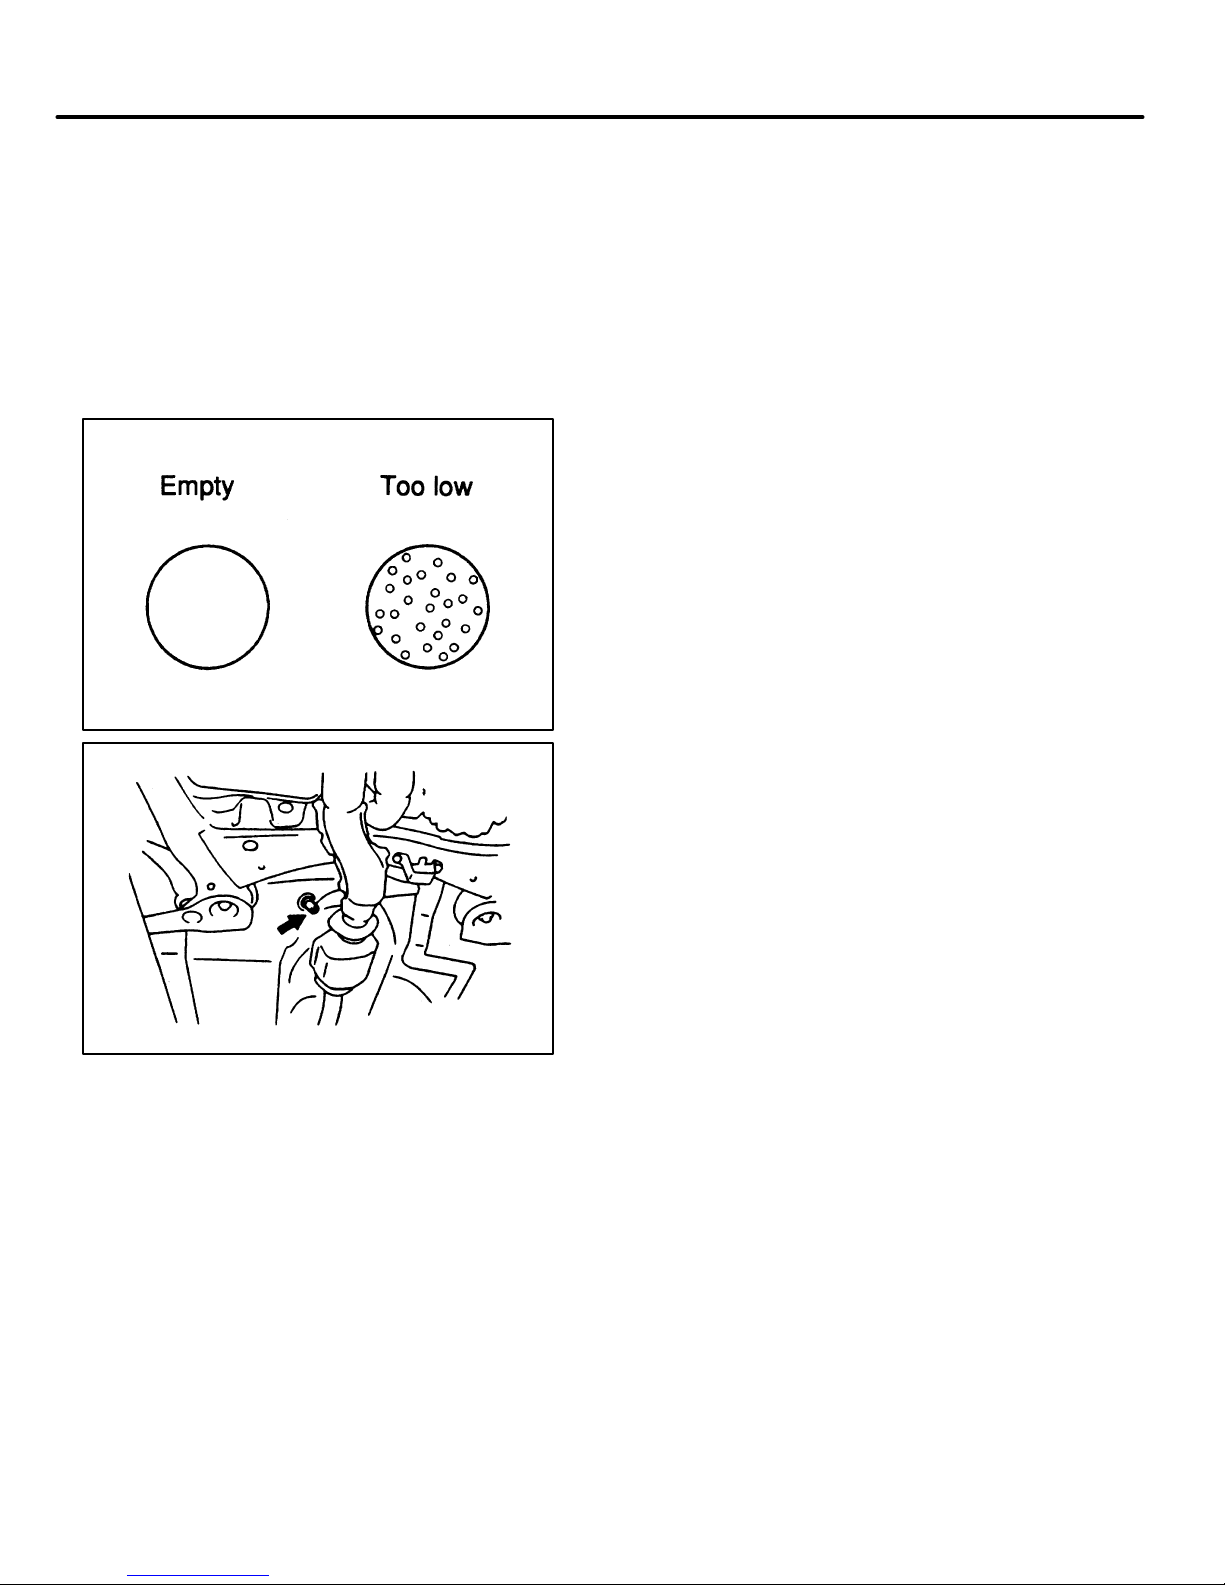
Correct With the compressor operating, the refri– Proceed to
gerant flow in the sight glass will be trans– Case A
parent with no air bubbles and a clear (See Page 41)
indication of fluid moving through the
system.
Too High With the compressor operating, the sight
glass will be clear with no indication of
refrigerant flow because it is so full that fluid
flow cannot be detected.
Empty With the compressor not operating, the sight Proceed with
glass is again clear with no fluid flow. A/C Drain
Hose Leak
Check
(See Page 49)
Too Low With the compressor operating, bubbles will
be seen continuously in the sight glass.
39
Page 52
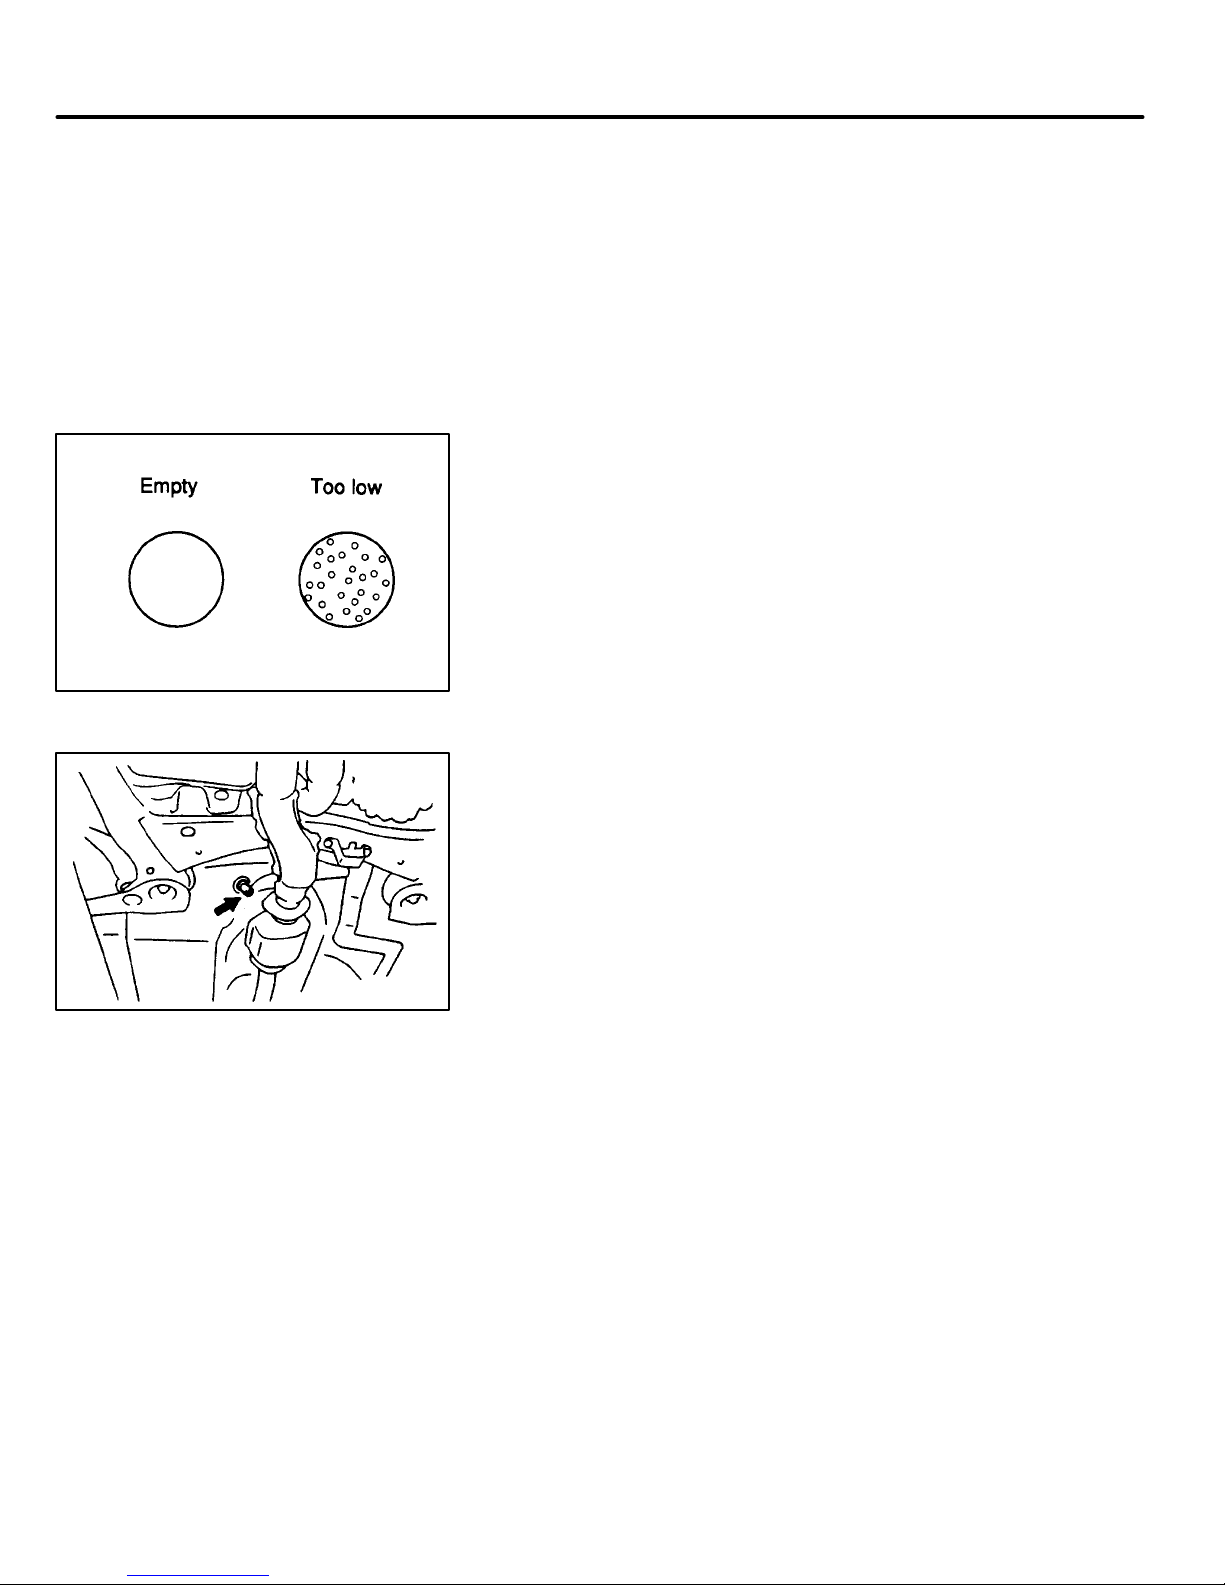
Drain Hose Leak Inspection
Proceed with the drain hose leak inspection if the sight
glass inspection (see page 39) indicated that the
refrigerant volume is low or empty.
Equipment needed for this procedure:
(a) A/C gas leak detector
(b) Refrigerant
(c) Charging tools and equipment
1. Ensure the A/C system is at least partially charged:
(a) Is the A/C system partially charged or empty?
Yes: Partially charged–Perform the Drain Hose Leak
Inspection Procedure (below).
No: Empty–Add no more than 450 g (1 lb.)
refrigerant and perform the Drain Hose Leak
Inspection Procedure (below).
2. Perform Drain Hose Leak Inspection:
(a) Use an A/C gas leak detector to determine if
refrigerant gas is leaking from the A/C drain hose.
Gas NOT present at the drain hose: Follow Procedure for
Case B, page 50.
Gas IS present at the drain hose: Follow Procedure for
Case C, page 54.
40
Page 53

Procedure for Case A
SPECIAL SERVICE IF REFRIGERANT VOLUME IS
PROPER OR EXCESSIVE
Depending on the refrigerant volume indicated by inspecting
the sight glass, proceed as follows:
Refrigerant Volume Correct: Proceed to “Addition of
Toyota ND6AC Refrigerant Oil Charge” (below).
Refrigerant Volume Too High: Take the following
actions:
1. Recover refrigerant (following procedures in the
equipment and service manuals).
2. Recharge with correct amount of refrigerant:
950 g + 50 g (33.51 oz + 1.8 oz, 2.1 lb + 0.1 lb)
3. Proceed to “Addition of Toyota ND6AC
Refrigerant Oil Charge” (below).
ADDITION OF TOYOTA ND6AC REFRIGERANT
OIL CHARGE
NOTE: Before starting this operation, please read and
observe all cautions and warnings on the refrigerant oil
charge can.
Equipment needed for this operation:
(a) One can of Toyota ND6AC Refrigerant Oil Charge
(Part No. 00263–09106)
(b) AC R–12 vacuum pump
(c) AC Oil Injection Kit (Supplied to dealer). Special
Service Tool Part No. TOY219721.
(d) Shop towel
41
Page 54
Procedure for Case A
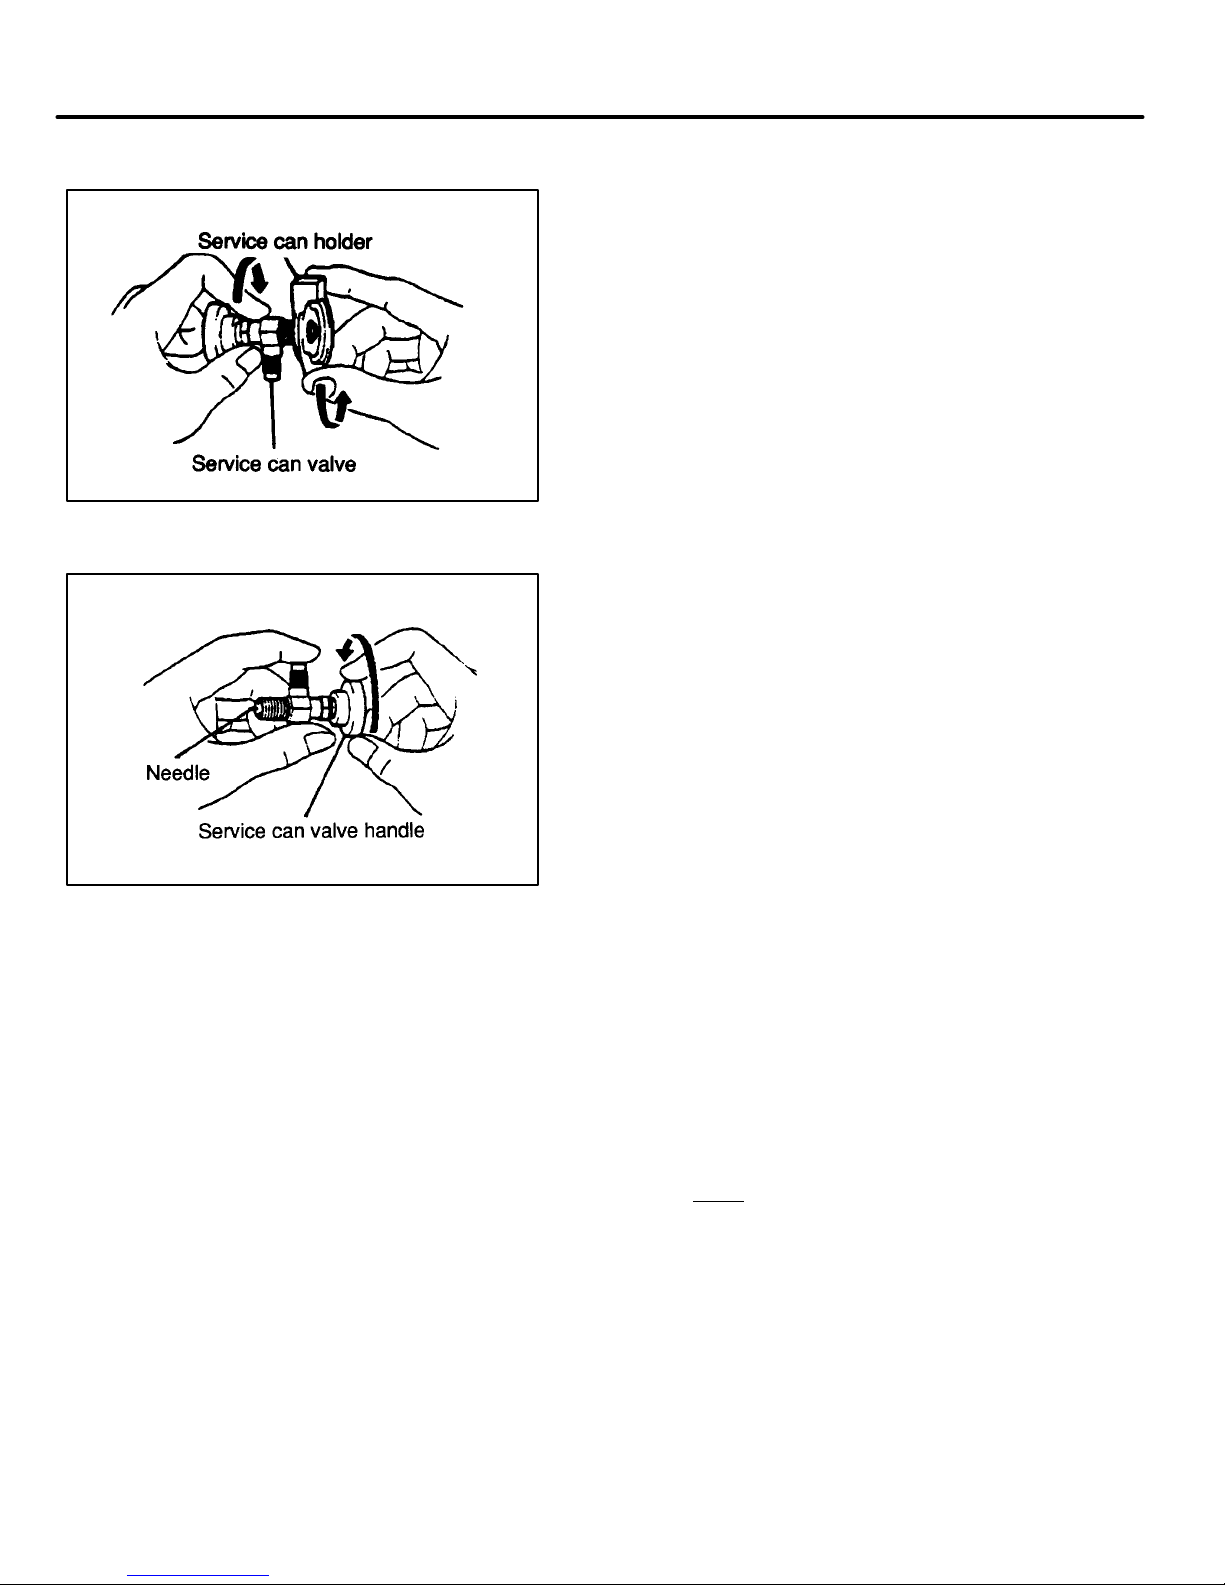
SERVICE TOOL CHECK
Perform the service tool check as follows:
1. Verify the operation of the Special Service Tool.
(a) Turn the service can valve counterclockwise.
(b) Remove the service can valve from the service
can holder.
2. Turn the service can valve handle clockwise until it
is fully seated. Make sure that the valve puncture
needle protrudes fully.
NOTE: When you perform the AC refrigerant oil
injection for the first time, or if the oil injection service
can valve and holder assembly from the Special
Service Tool has been accidentally opened to the
atmosphere, it must be evacuated first.
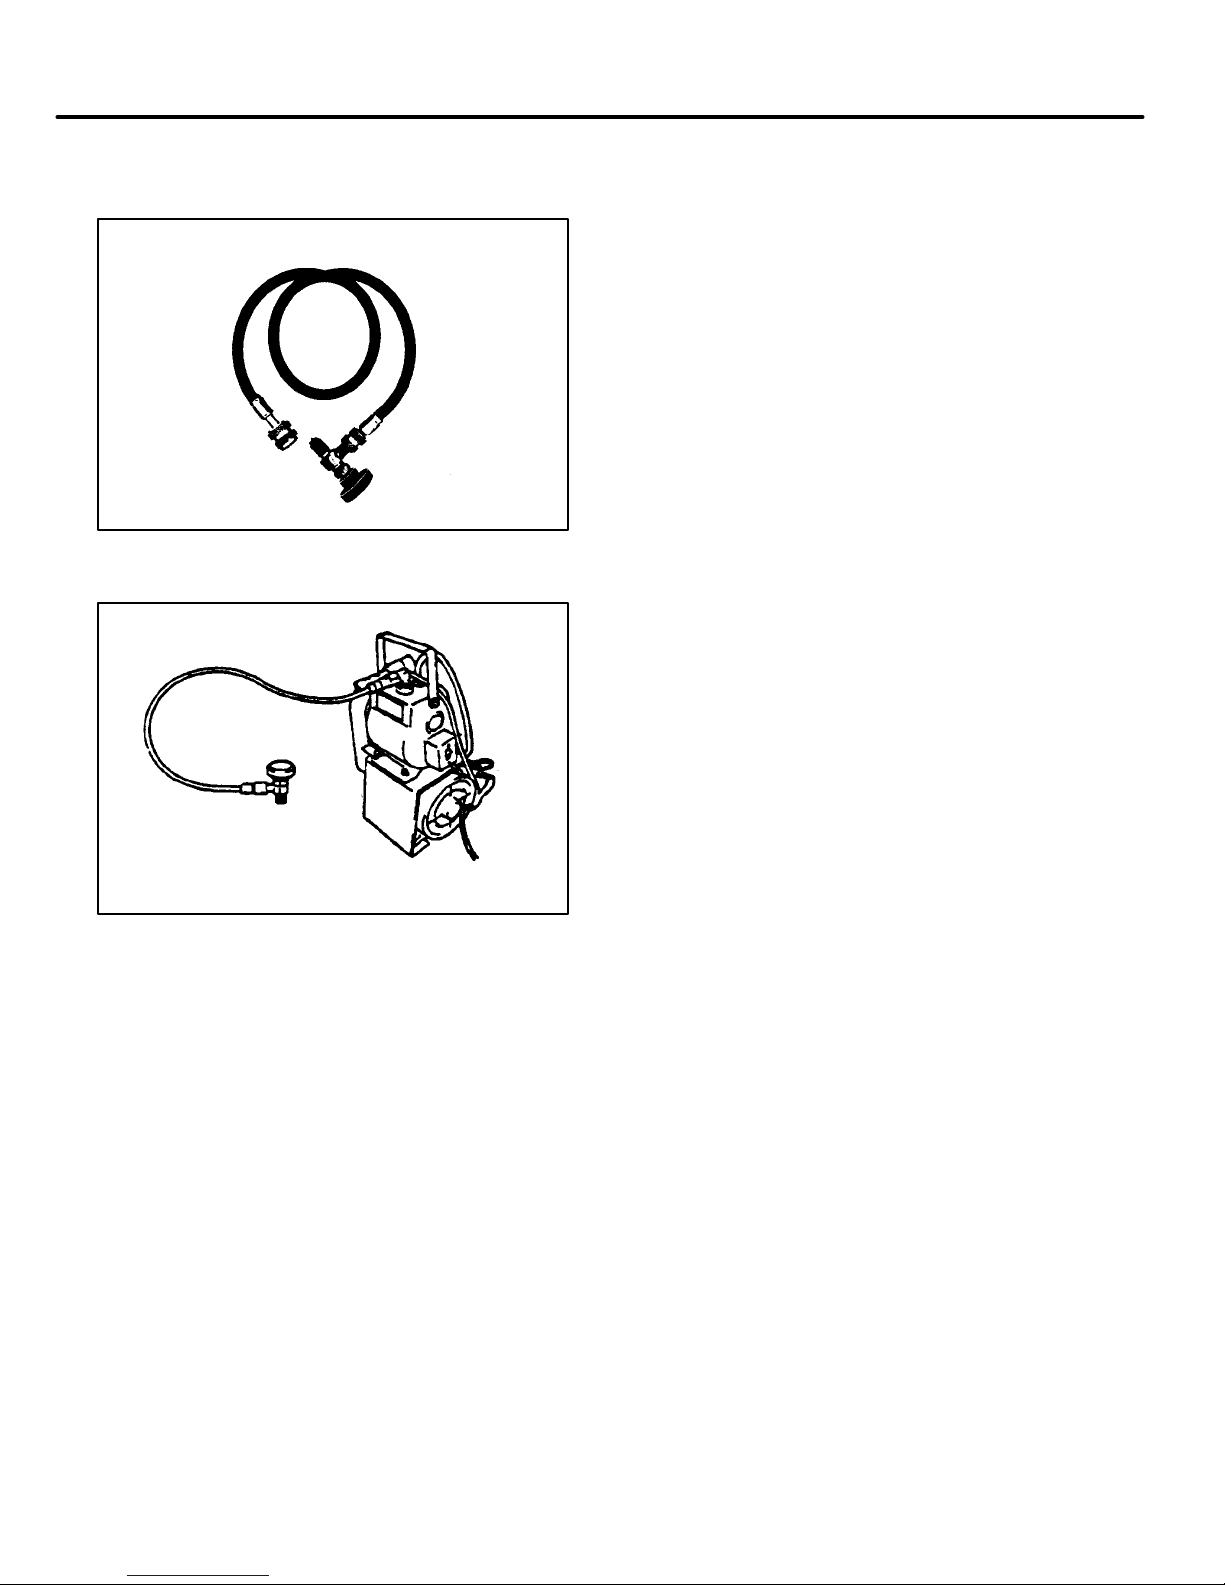
SERVICE TOOL EVACUATION PROCEDURE
Evacuate the service tool as follows:
1. Check that the vacuum pump fitting has a Shrader
valve. If the vacuum pump does not have a Shrader
valve, use an adapter hose that does.
NOTE: In this procedure, you are to install the hose
with the small
opposite of the normal setup).
end attached to the valve (this is
42
Page 55
Procedure for Case A
2. To evacuate the service can valve and hose
assembly, first attach smaller end of hose
(without check valve) onto the service can
valve.
3. Next, attach the larger hose end with check
valve to the Shrader valve on the vacuum
pump.
NOTE: Make sure all hose connections are tight.
4. Start the vacuum pump and allow it to run for
approximately 2 minutes or until the vacuum
gauge on the vacuum pump shows no more
movement.
5. Quickly remove the hose connection from
the vacuum pump BEFORE switching
off the pump to keep air from entering the
hose.
NOTE: If you turn off the vacuum pump before
disconnecting the hose, the hose will be
contaminated with a i r and you will have to repeat
the evacuation procedure.
43
Page 56
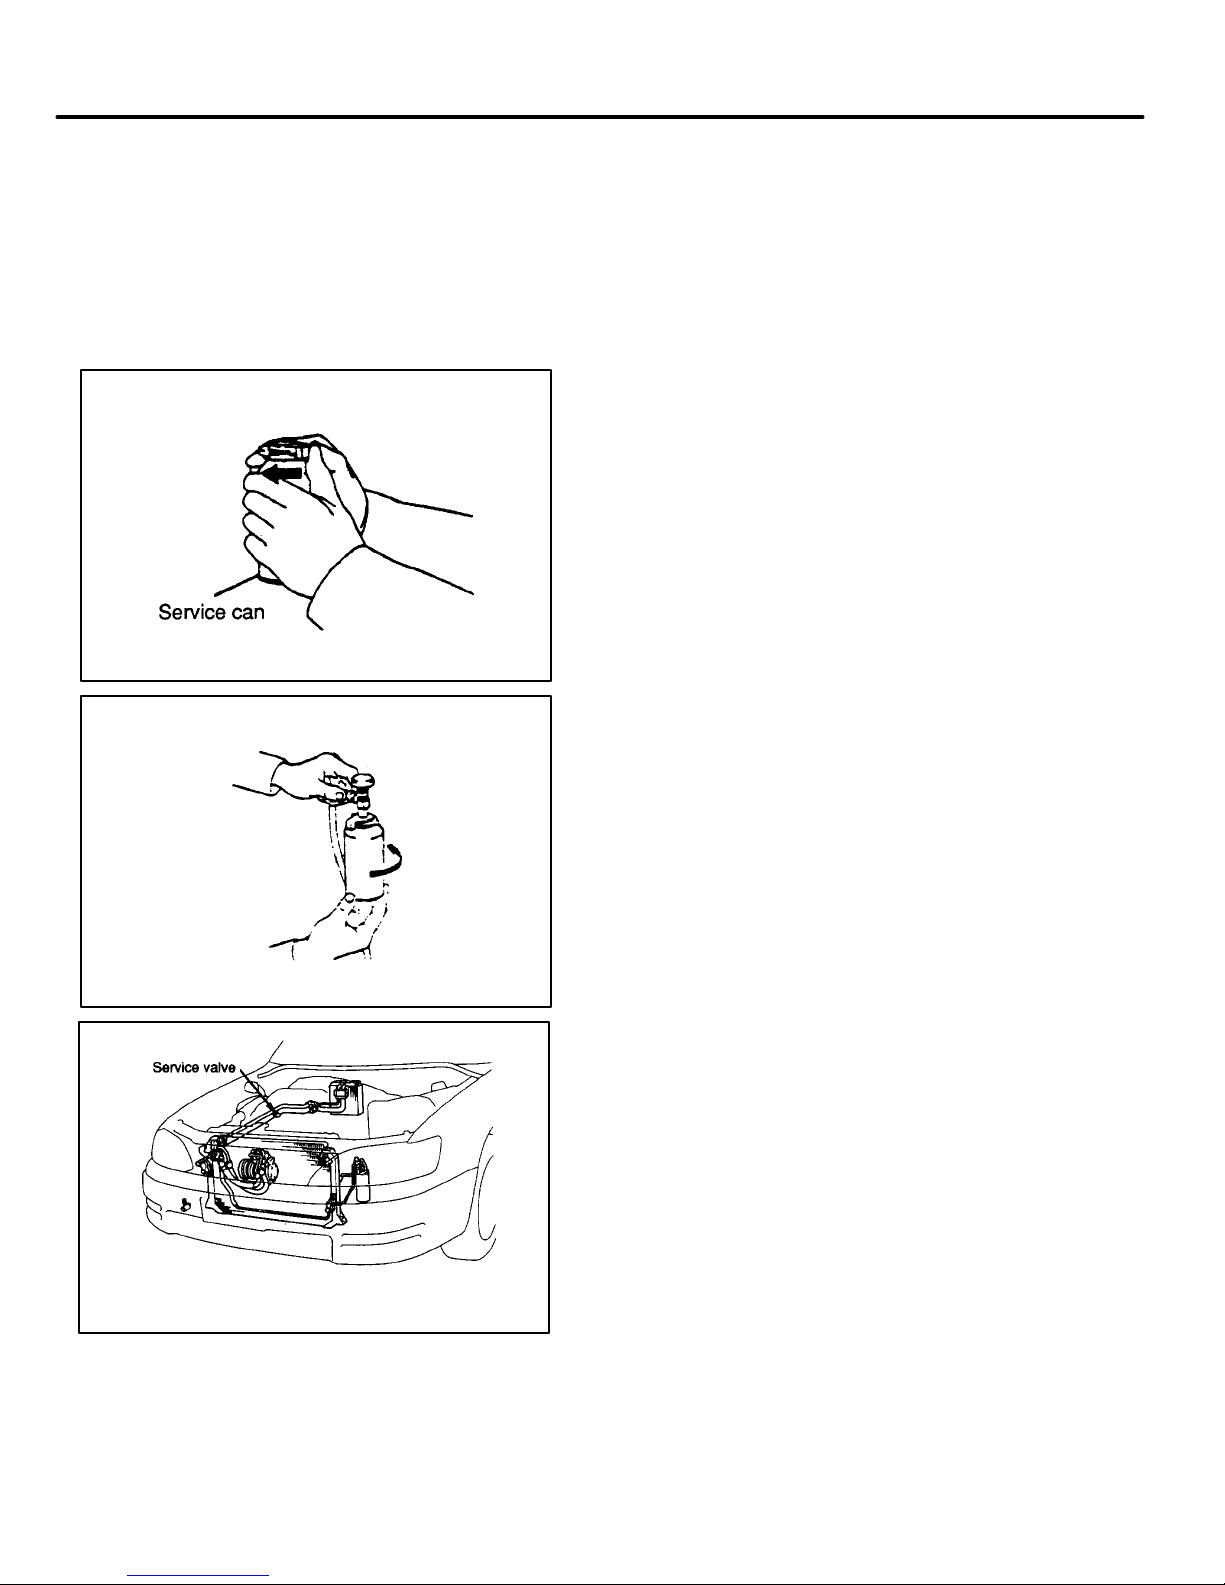
Procedure for Case A
SPECIAL OIL INJECTION SERVICE:
Proceed with the following Special Oil Injector Service only af t e r you have checked the operation of the
Special Service Tool and evacuated the service
valve and hose assembly (if required).
1. Install the service can holder on the ND6AC
refrigerant oil charge can.
2. With the service can valve still closed,
quickly spin the oil charge can (and holder)
clockwise to the service can valve as far as
it will go.
NOTE: Be sure to turn the service can valve
quickly onto the service can holder until it seats
snugly against the refrigerant oil can. This
will prevent refrigerant from escaping to the
atmosphere when the valve needle punctures
the top of the can.
3. Remove the cap from the low pressure
charge valve on the vehicle. Attach the larger
end of the hose to the low pressure charging
valve (service valve).
NOTE: Use a shop towel when doing this to
shield your hands from any refrigerant that may
escape from the A/C system.
44
Page 57
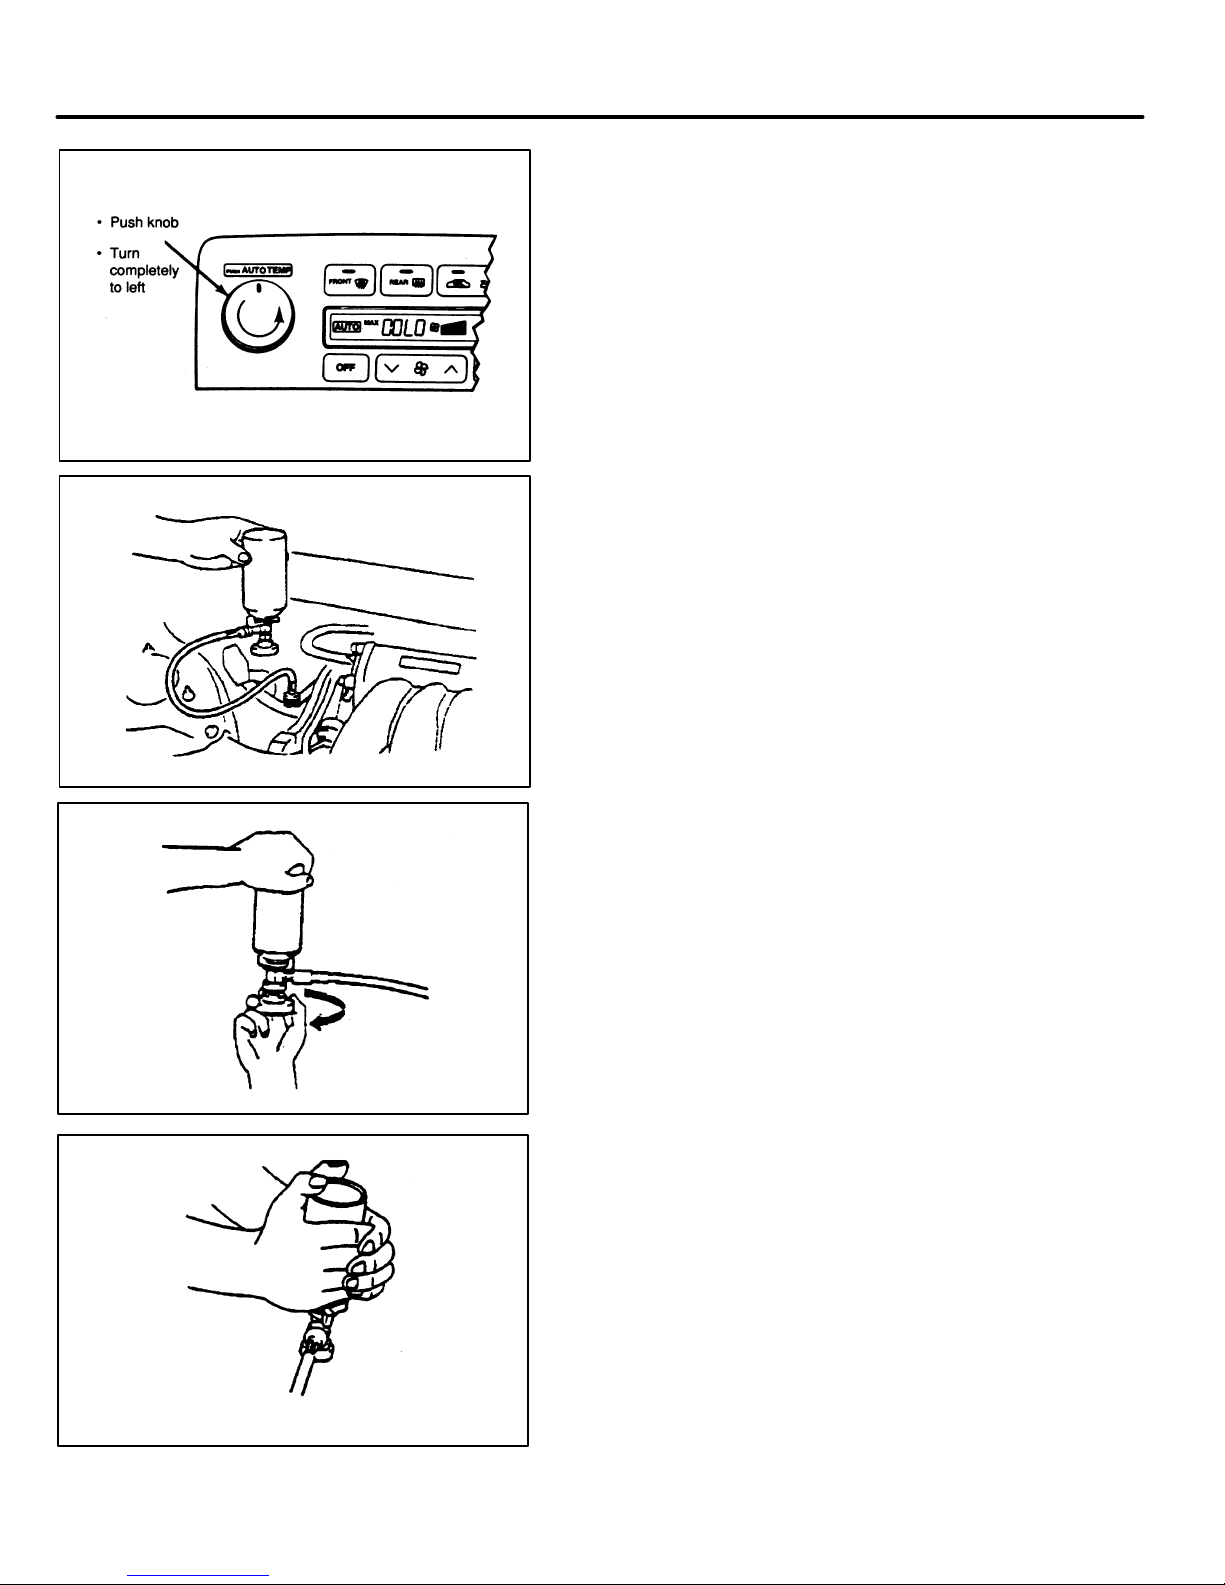
Procedure for Case A
4. Run the engine at approximately 1,500 RPM
and set the A/C control to AUTO––MAX
COOL.
5. Turn the refrigerant oil charge can upside
down to make sure all of the oil is forced into
the system by gas pressure.
6. Open the service can valve.
7. Warm the refrigerant oil charge can with your
hands or a warm towel. (This will allow the
refrigerant oil charge to empty more easily.)
45
Page 58
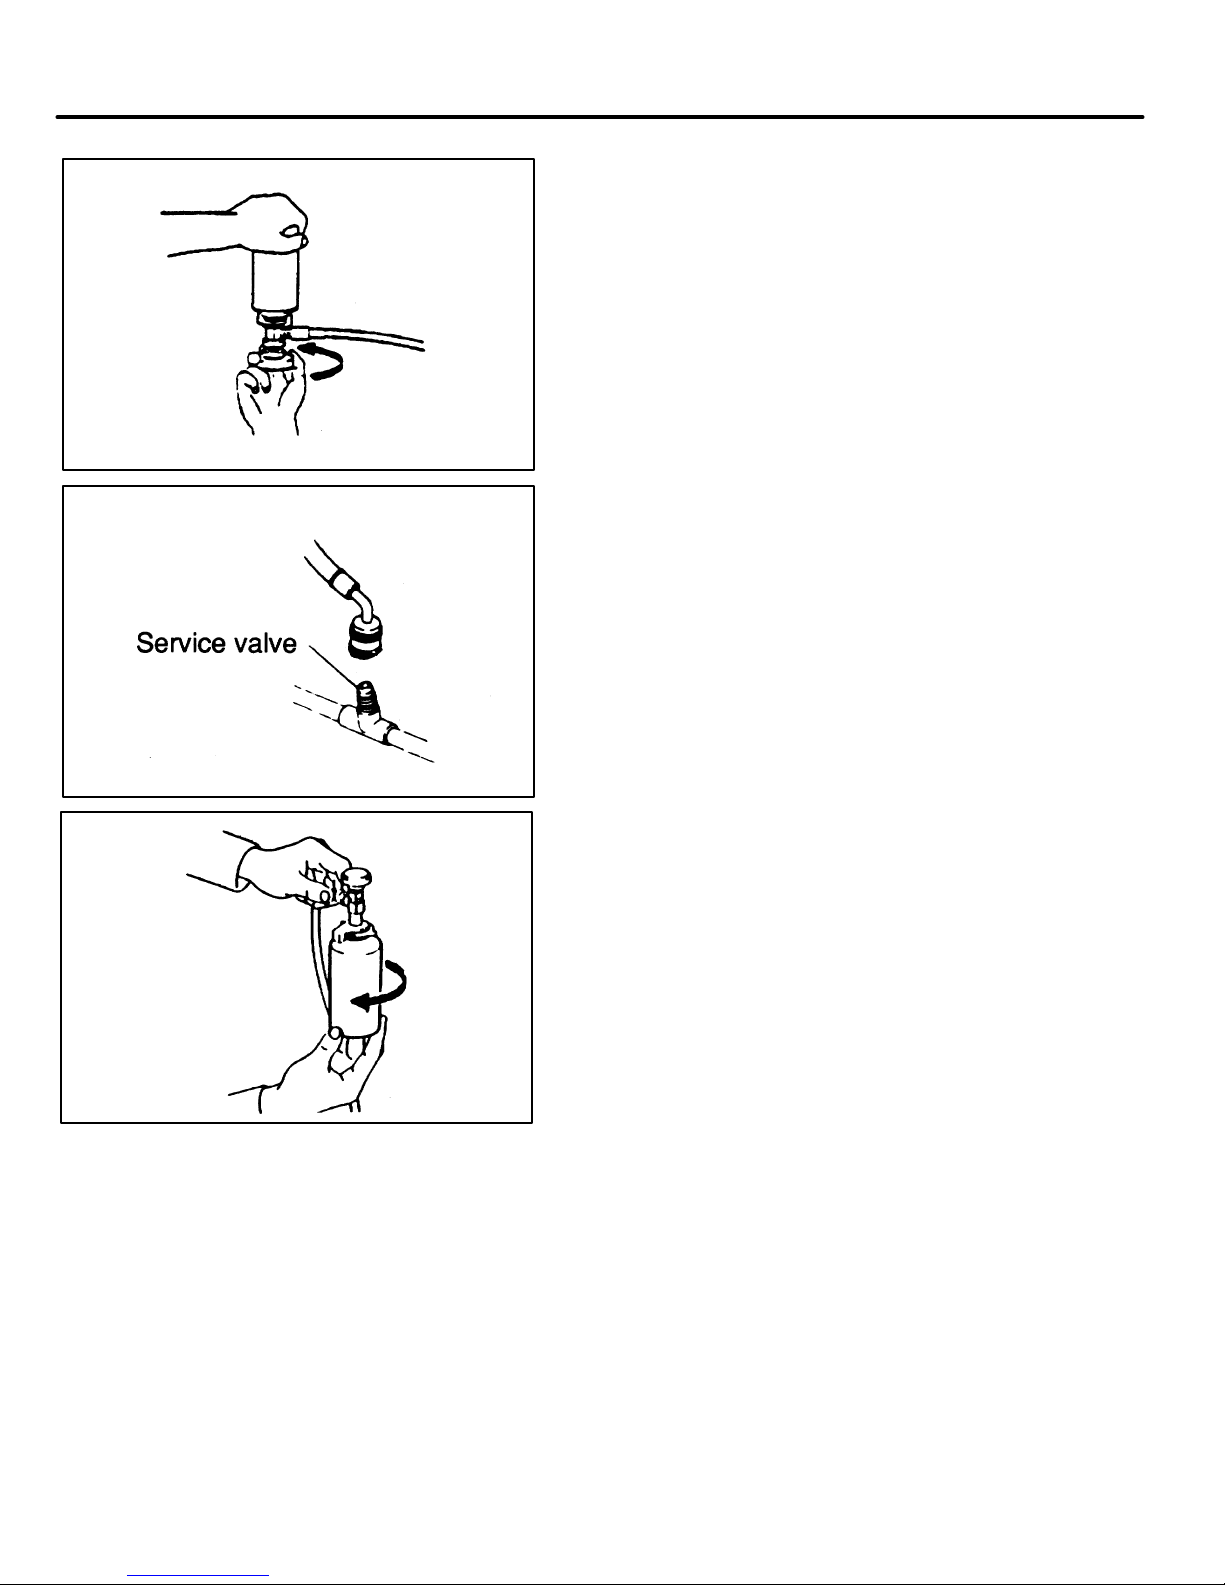
Procedure for Case A
8. When charging is complete, close the
service can valve fully.
9. Stop the engine and disconnect the
charging hose from the vehicle’s low
pressure charging valve (service valve).
10. Remove the service can valve from the
service can holder and the refrigerant oil
charge can.
11. Remove the service can holder from the
refrigerant oil charge can by moving the lever
counterclockwise.
CAUTION: Do not open the service can valve
between services. If the valve is opened, you will
have to evacuate the service can valve and hose
again.
46
Page 59
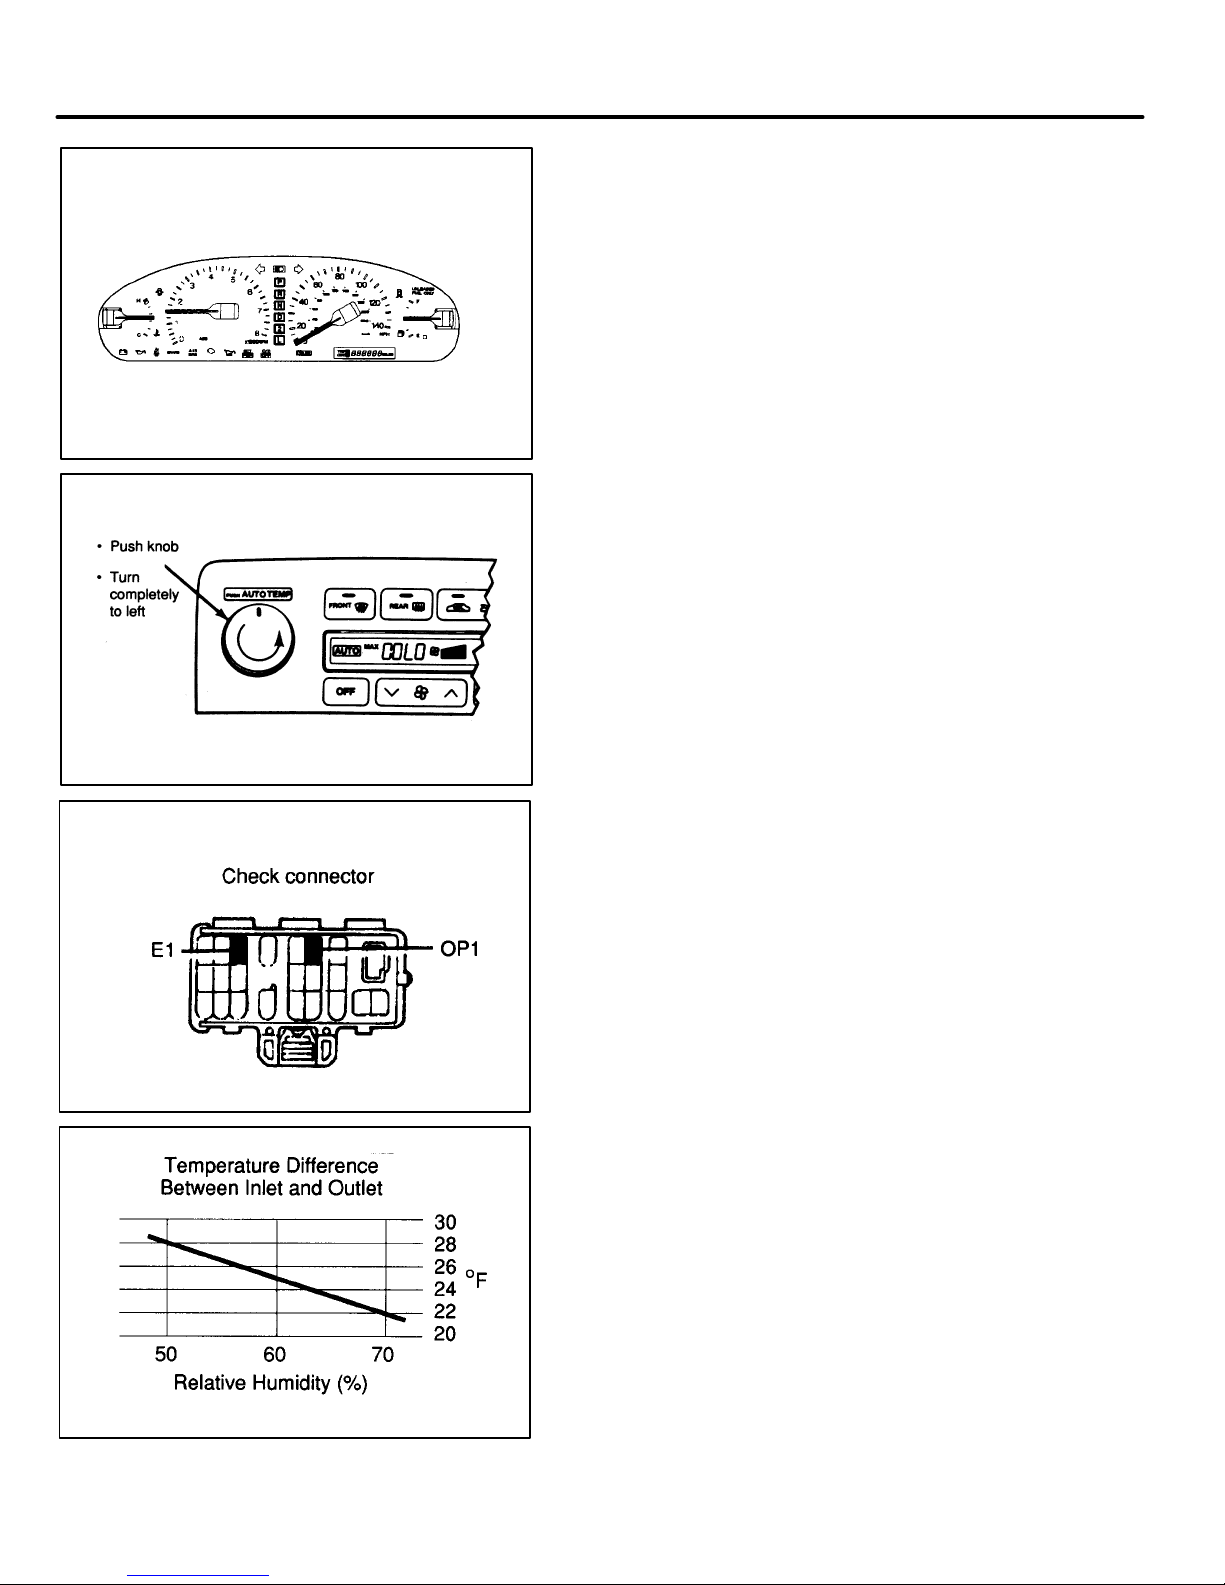
Performance Testing the A/C System
Proceed with Performance T esting the A/C System after
completing the Special Oil Injection Service.
1. Start the engine and maintain 1,500 RPM.
2. Set the A/C to AUTO –– MAX COOL.
3. Fully open all doors.
4. At the Under Hood Diagnostic Connector jump
OP1 to E1 to maintain a stable fan speed.
5. Position one thermo meter in the center duct and
one thermometer near the A/C inlet. (NOT laying
on the carpet.)
6. After 5 minutes of operation compare the
difference between the inlet temperature and the
center duct temperature to the Performance
Test Chart. System performance is acceptable if
temperature difference is greater than the
specified minimum (as shown).
47
Page 60
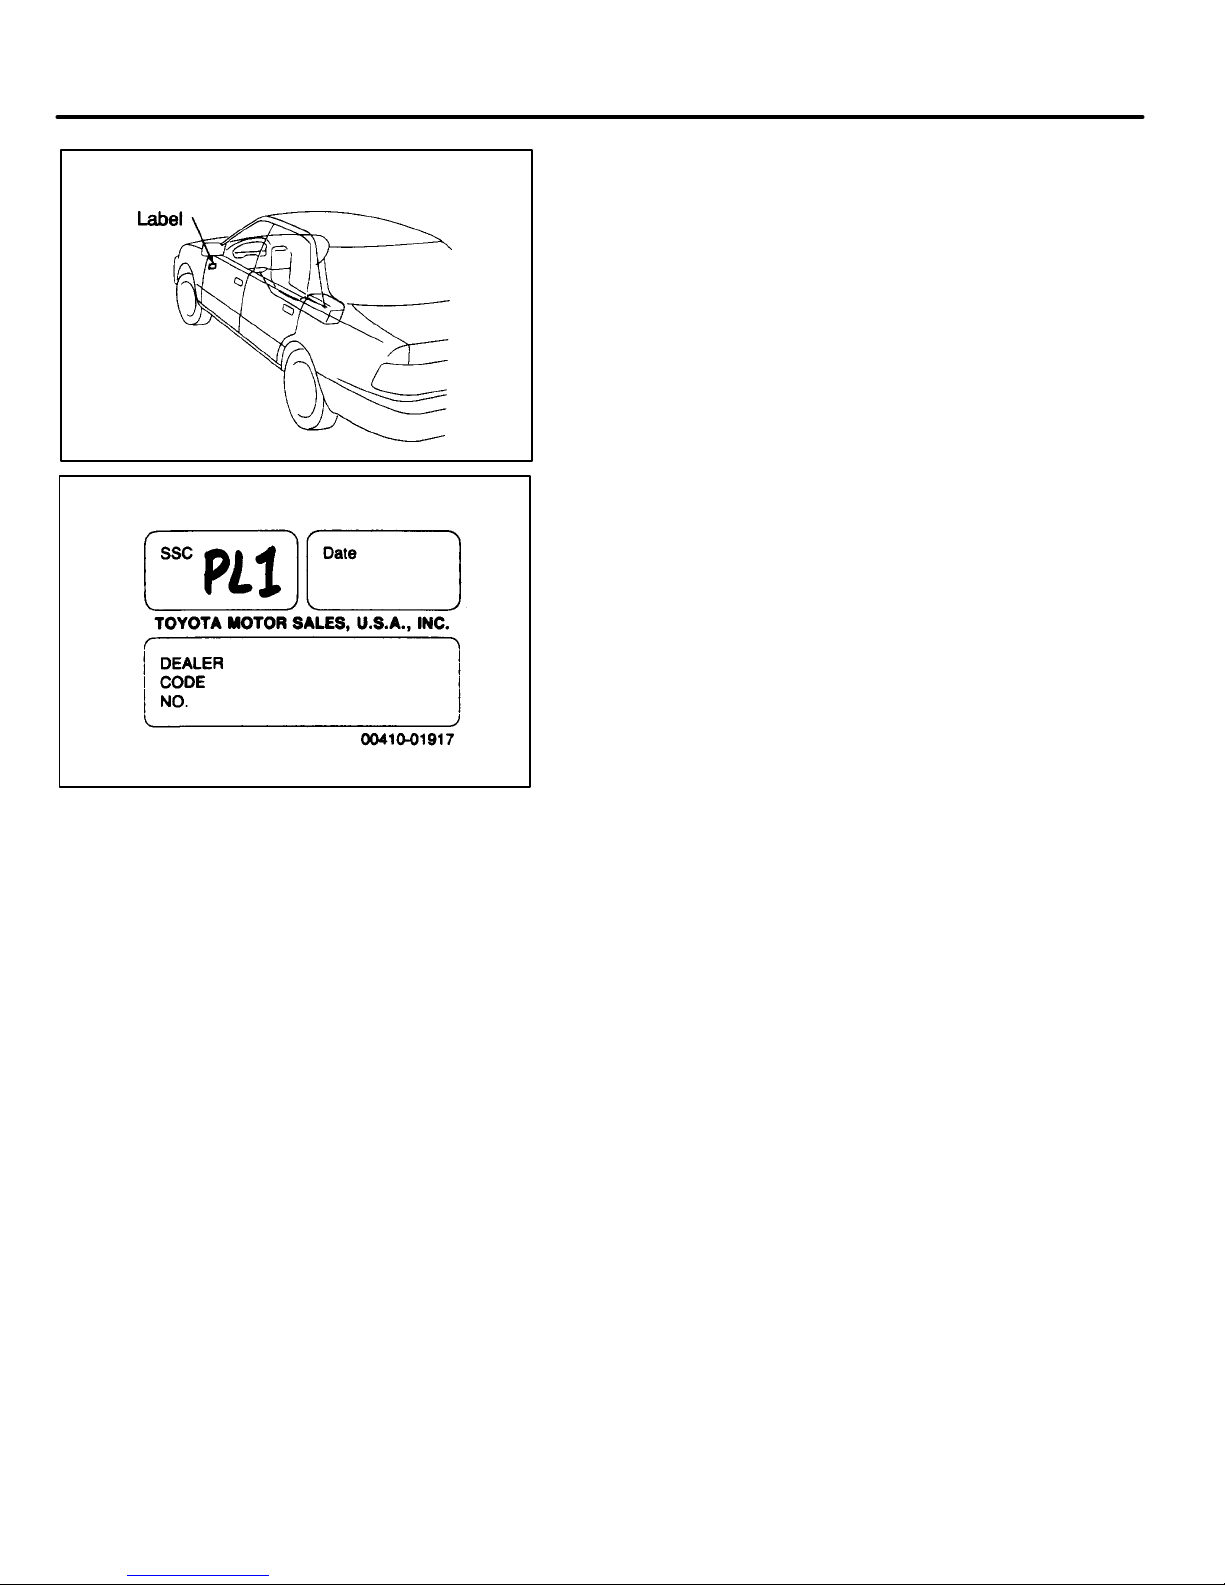
SSC Completion Label Installation
1. After completing the special service and
successfully performance testing the A/C
system, affix an SSC completion label to the
left front door hinge post near the door
check.
NOTE: An SSC completion label is enclosed in
the owner’s letter. Additional labels, in sheets of
50 (P/N 00410–01917) can be ordered through
the non–parts system on a 1459 order form or
through the TDN system.
2. Fill out the label.
48
Page 61
Drain Hose Leak Inspection
Proceed with the drain hose leak inspection if the
sight glass inspection (see page 39) indicated
that the refrigerant volume is low or empty.
Equipment needed for this procedure:
(a) A/C gas leak detector
(b) Refrigerant
(c) Charging tools and equipment
1. Ensure the A/C system is at least partially
charged:
(a) Is the A/C system partially
charged or empty?
YES: Partially charged – Perform the Drain
Hose Leak Inspection Procedure
(below).
NO: Empty – Add no more than 450 g
(1 lb) of refrigerant and perform the
Drain Hose Leak Inspection
Procedure (below).
2. Perform Drain Hose Leak Inspection:
(a) Use an A/C gas leak detector to
determine if refrigerant gas is
leaking from the A/C drain hose.
Gas NOT present at the drain hose – Follow
Procedure for Case B, page 50.
Gas IS present at the drain hose – Follow
Procedure for Case C, page 54.
49
Page 62
Procedure for Case B
GAS LEAK INSPECTION FOR LOCATIONS
OTHER THAN DRAIN HOSE
Equipment needed for this procedure:
(a) A/C gas leak detector
NOTE: Before proceeding verify that the
customer has given prior consent and under-
stands that the A/C fault is not part of the
special service. Repairs are either:
(a) Covered by Lexus Basic Warranty
Policy
(b) Charged to customer
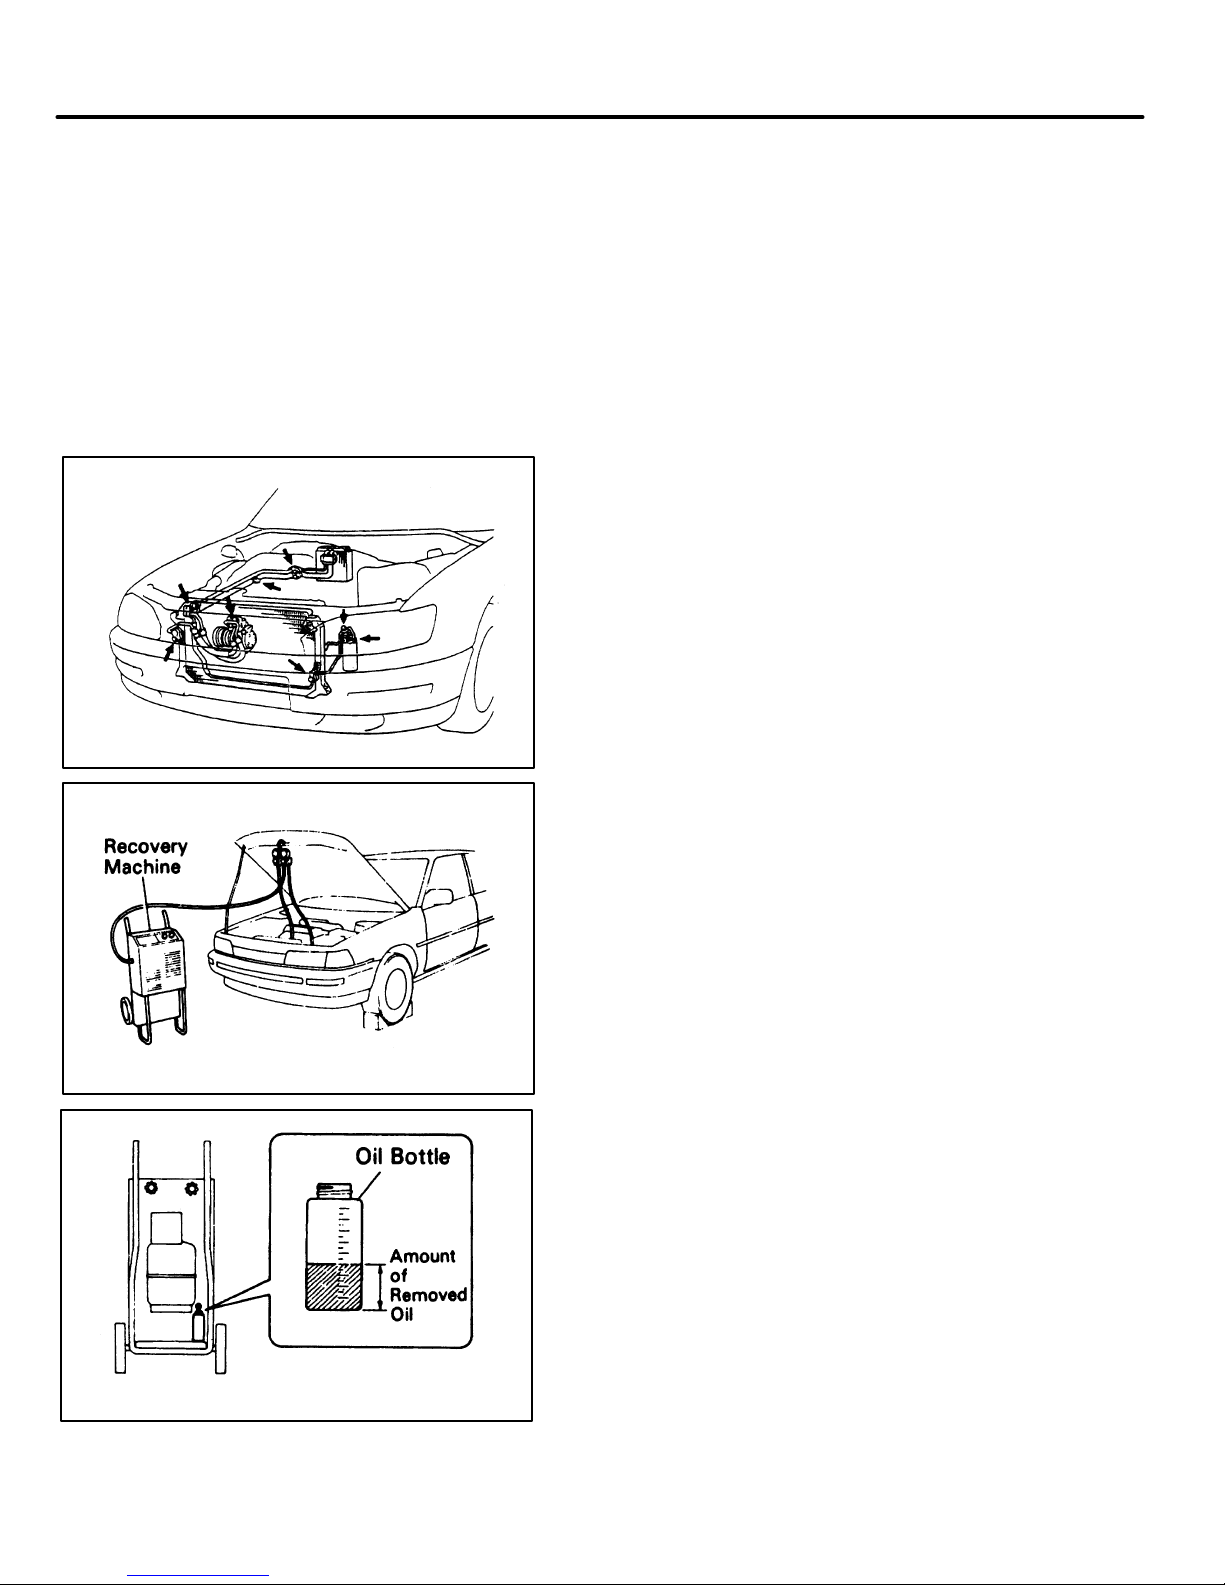
1. Use a leak detector to determine whether
the gas is leaking from the locations
shown by the arrows.
Leak Found:
(a) Recover the refrigerant following
cautions and procedures in the
appropriate service equipment and
manuals.
NOTE: When refrigerant is recovered, compressor oil is recovered with the refrigerant. When
recharging a system that has been evacuated,
DO NOT reuse the old compressor oil. Measure
the amount of compressor oil removed and add
the same amount of NEW Toyota ND Oil 6 Compressor Oil (Part No. 88899–28040) into the system.
50
Page 63
Procedure for Case B
(b) Complete the repair following procedures in the
appropriate service manual.
(c) Evacuate for 10 minutes.
(d) Check for air tightness for 5 minutes.
(e) Partially recharge system.
(f) Re–check for leaks using a gas leak detector.
(g) Fully re–charge system.
(h) Follow “Addition of Toyota ND6AC Refrigerant Oil
Charge Procedure” as shown on page 41 of this
booklet.
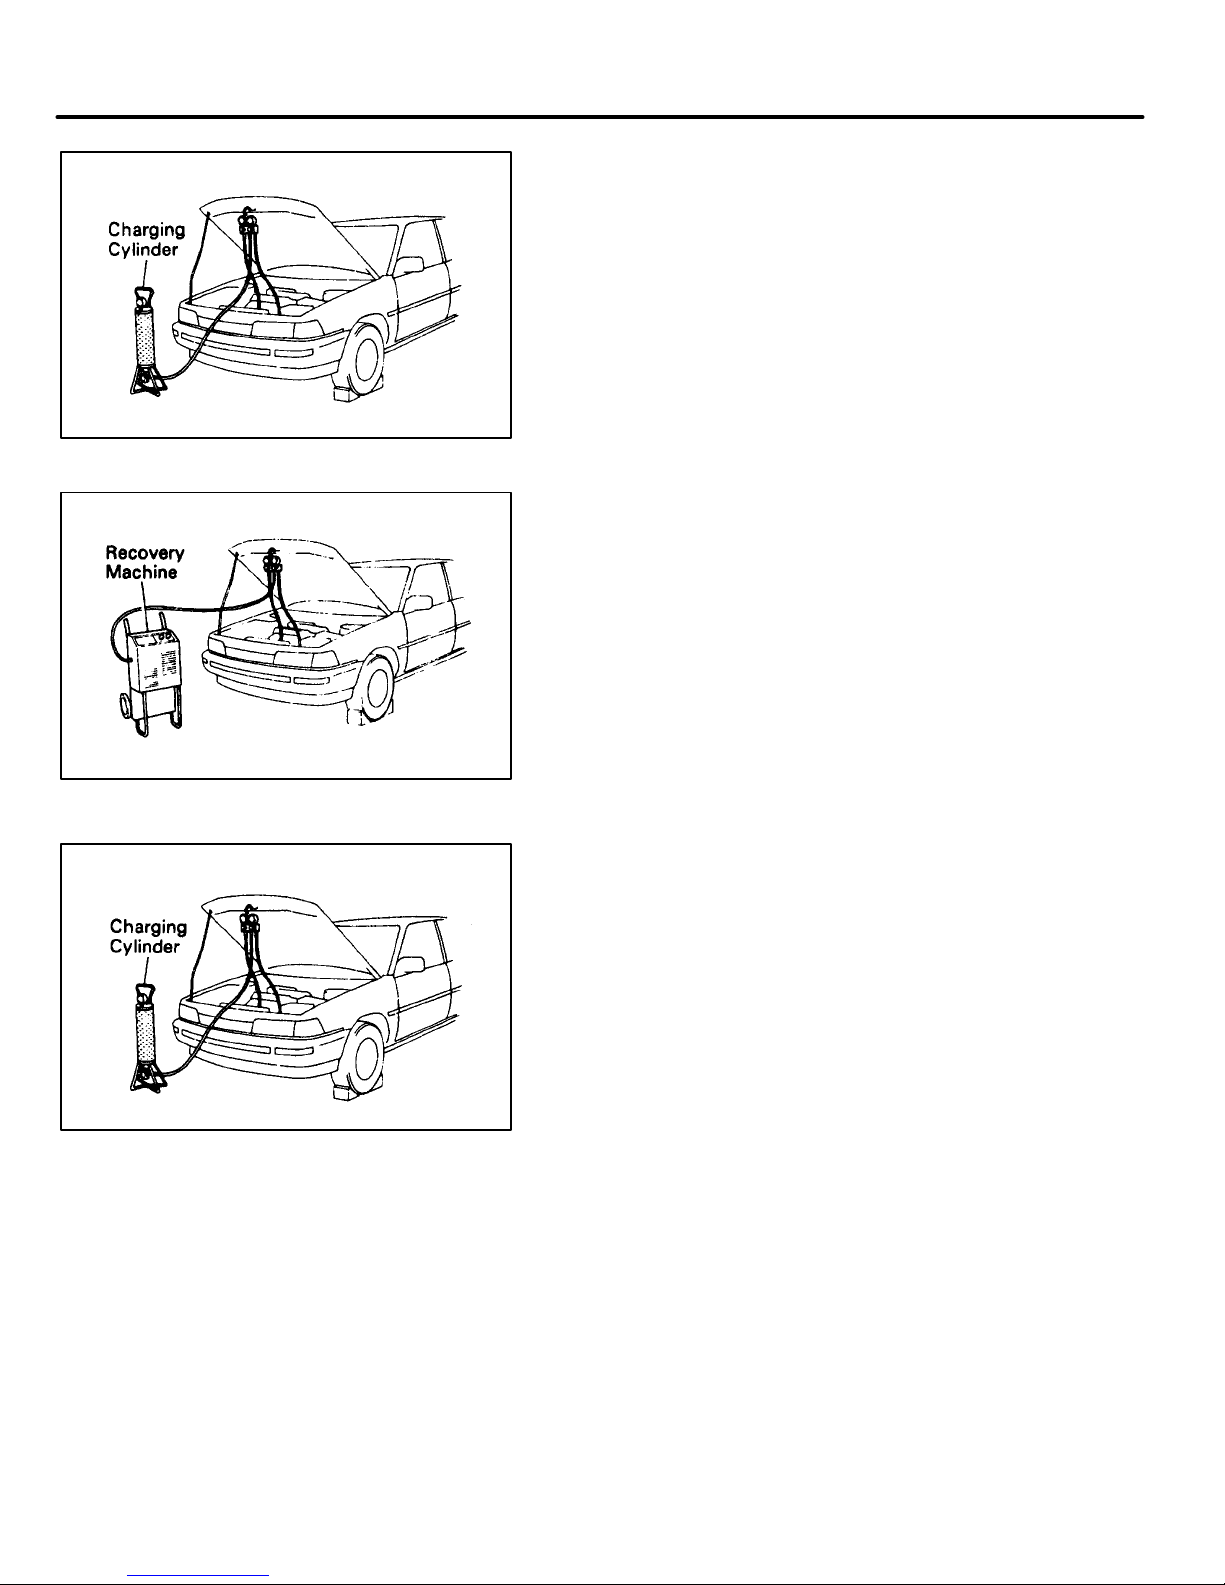
No Leak Found:
(a) Recover the refrigerant following cautions and
procedures in the appropriate service equipment
and manuals.
NOTE: When refrigerant is recovered, compressor oil is
recovered with the refrigerant. When recharging a
system that has been evacuated, DO NOT reuse the
old compressor oil. Measure the amount of compressor
oil removed and add the same amount of NEW Toyota
ND Oil 6 Compressor Oil (Part No. 88899–28040) into
the system.
(b) Fully recharge the system.
(c) Follow “Addition of Toyota ND6AC Refrigerant Oil
Charge Procedure” as shown on page 41 of this
booklet.
After the system has been fully recharged and no leaks
are detected, conduct a Performance Test of the A/C
System (page 52).
51
Page 64
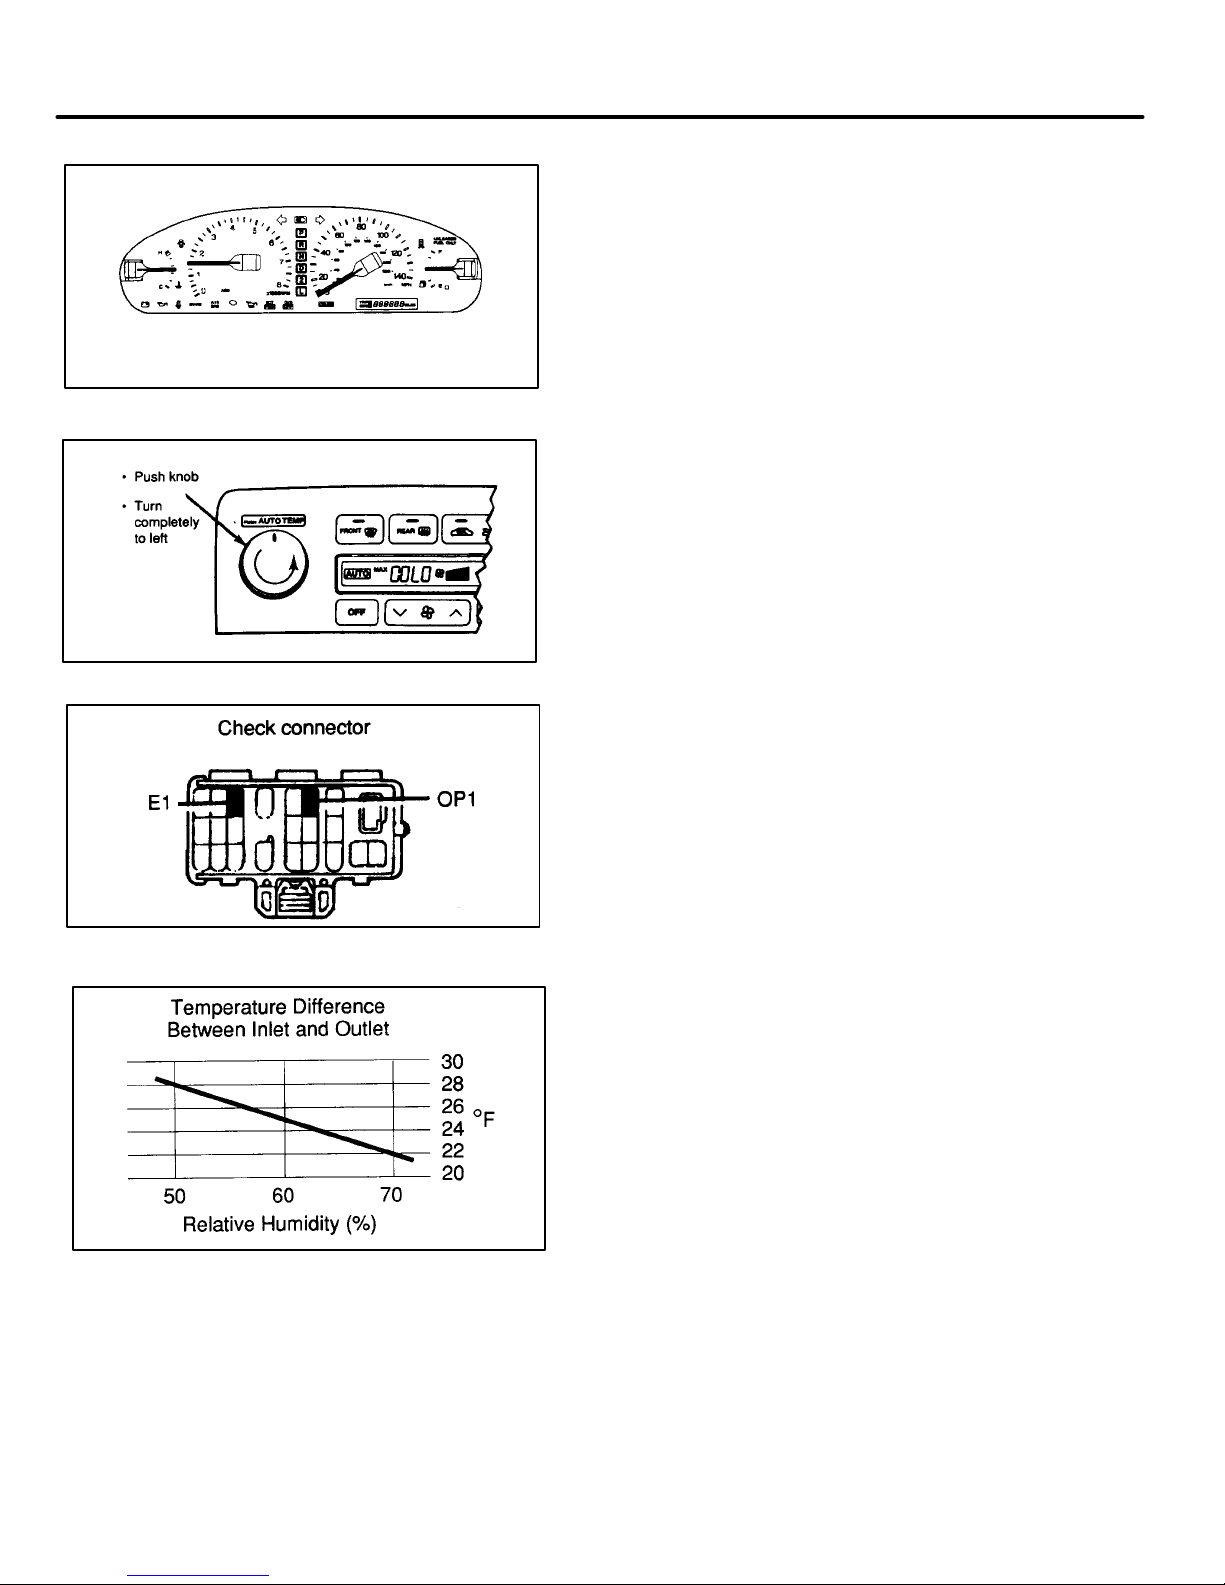
Performance Testing the A/C System
Proceed with Performance Testing the A/C System
after completing the Special Oil Injection Service.
1. Start the engine and maintain 1,500 RPM.
2. Set the A/C to AUTO –– MAX COOL.
3. Fully open all doors.
4. At the Under Hood Diagnostic Connector jump
OP1 to E1 to maintain a stable fan speed.
5. Position one thermometer in the center duct
and one thermometer near the A/C inlet. (NOT
laying on the carpet.)
6. After 5 minutes of operation compare the
difference between the inlet temperature and
the center duct temperature to the Performance
Test Chart. System performance is acceptable if
temperature difference is greater than the
specified minimum (as shown).
52
Page 65
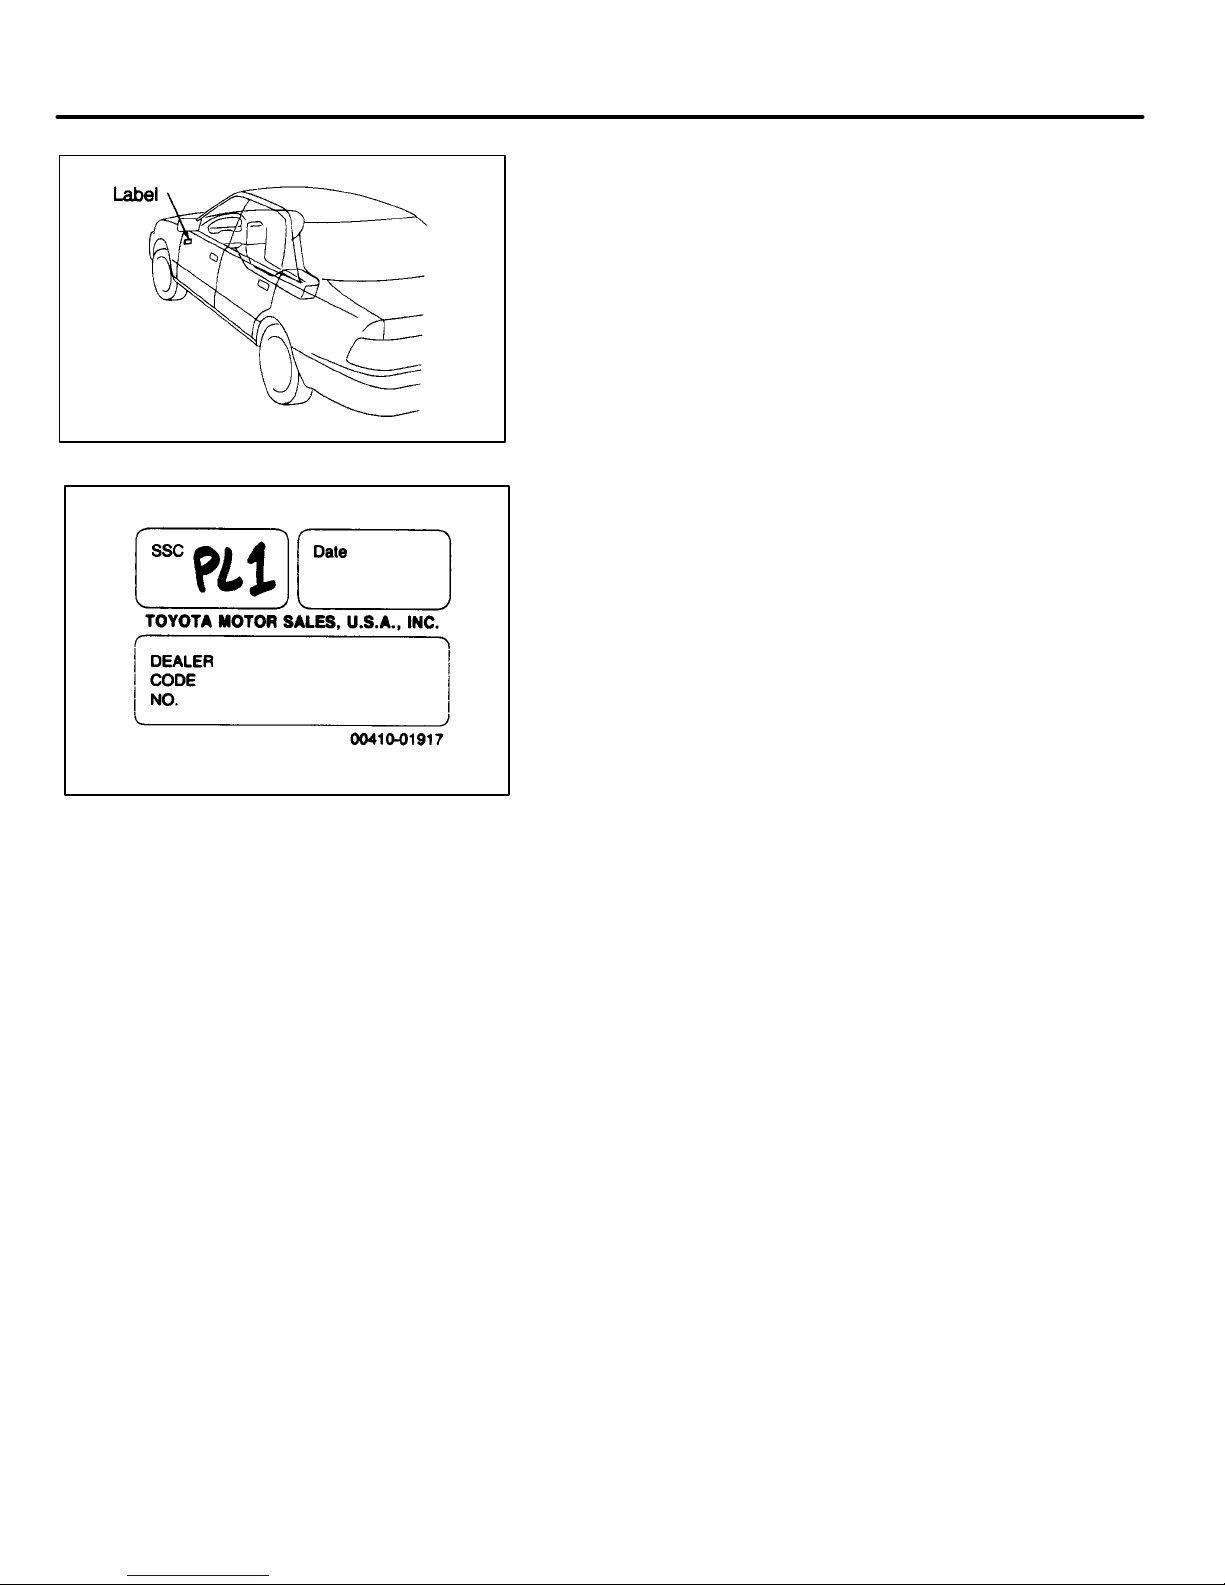
SSC Completion Label Installation
1. After completing the special service and
successfully performance testing the A/C
system, affix an SSC completion label to the left
front door hinge post near the door check.
NOTE: An SSC completion label is enclosed in the
owner ’s letter. Additional labels, in sheets of 50 (P/N
00410–01917) can be ordered through the non–parts
system on a 1459 order form or through the TDN
system.
2. Fill out the label.
53
Page 66
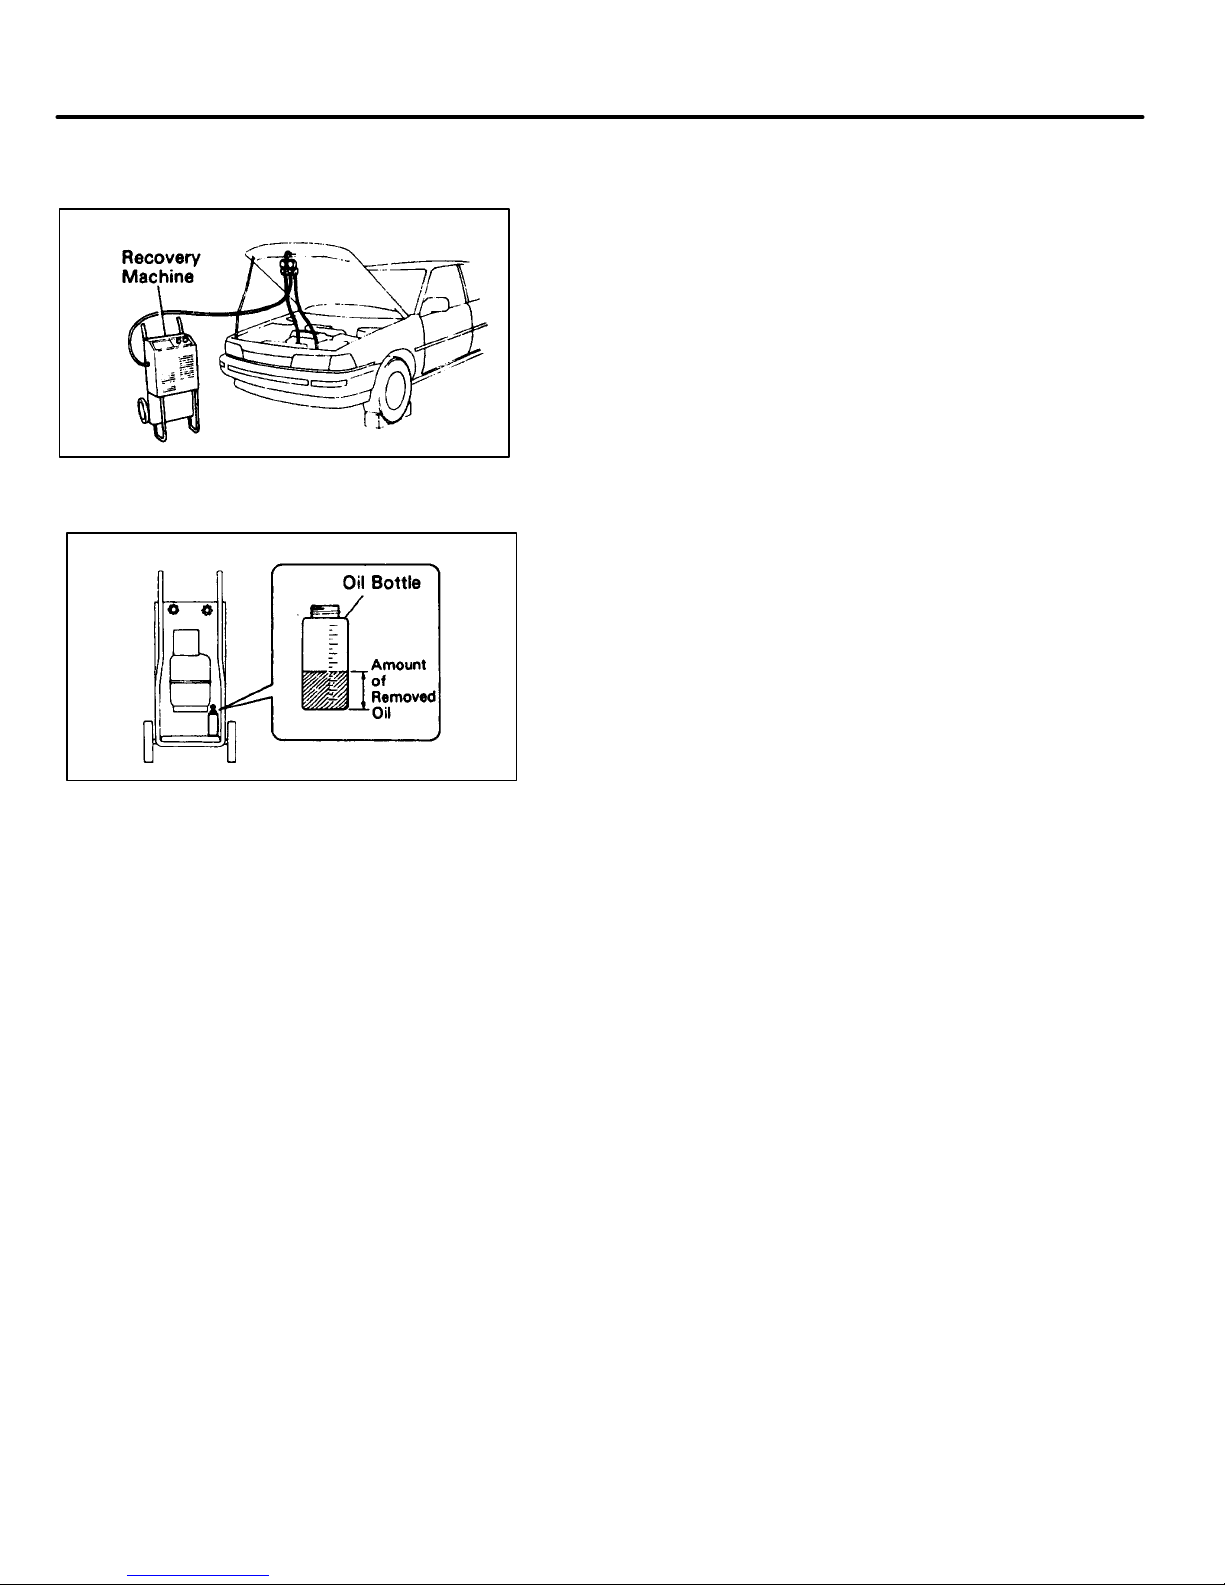
Procedure for Case C
SPECIAL SERVICE IF REFRIGERANT VOLUME IS
LOW OR EMPTY
NOTE: Before replacing parts recover the refrigerant.
Always use a recovery machine when recovering the
refrigerant. (Follow equipment instructions and
precautions.)
NOTE: When refrigerant is recovered, compressor oil is
recovered with the refrigerant. When recharging a
system that has been evacuated, DO NOT reuse the old
compressor oil. Measure the amount of compressor oil
removed and add the same amount of NEW Toyota ND
Oil 6 Compressor Oil (Part No. 88899–28040) into the
system.
EXPANSION VALVE AND LIQUID AND SUCTION
TUBES INSPECTION
1. Obtain the audio system security code (if the
customer has one).
NOTE: With the ignition off, the red LED on the radio will
flash if the audio system has a code.
2. Clear audio system security code.
3. Record on the back of the RO the 6 AM and 12 FM
preset radio stations.
4. Disconnect the negative terminal of the battery.
54
Page 67
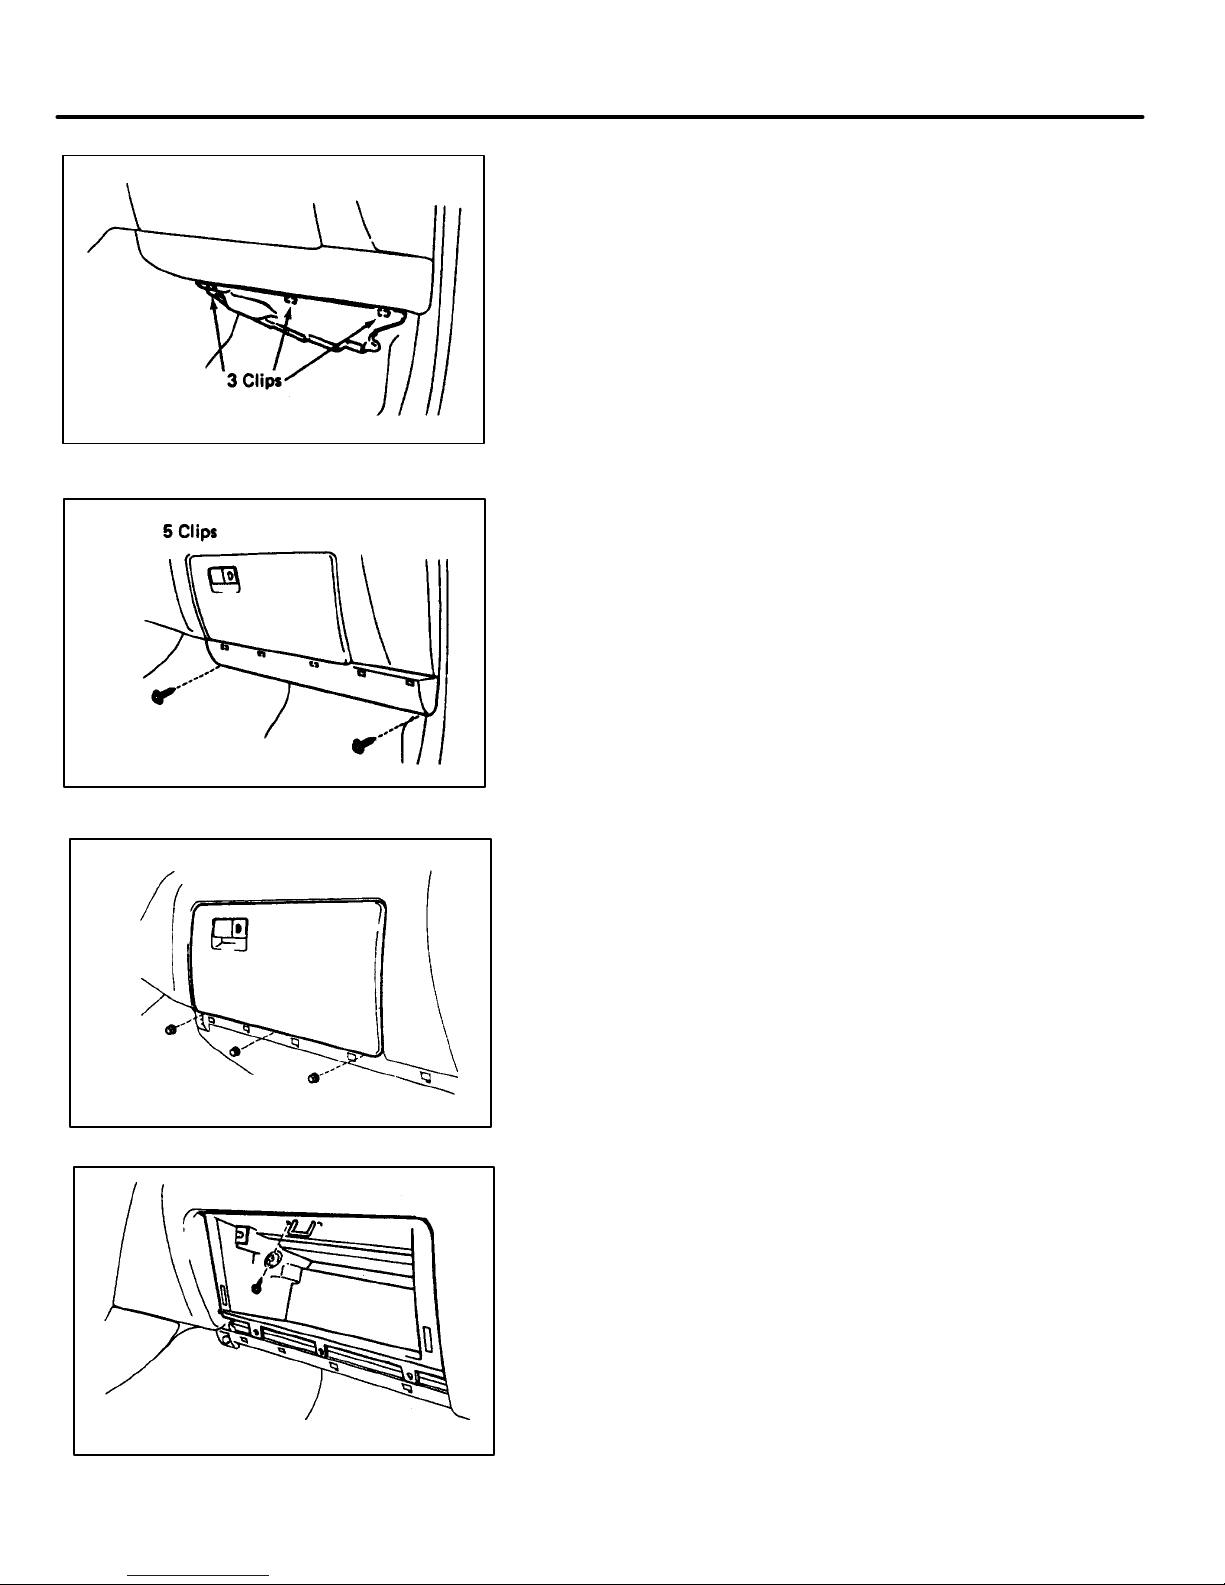
Procedure for Case C
5. Pull off the Under Cover No. 2.
NOTE: The cover is held in place by three clips.
6. Remove the instrument lower panel No. 2:
(a) Remove two screws.
(b) Pull off the lower panel. (Held in place with
five clips.)
7. Remove the glove compartment door:
(a) Disconnect the damper ring from the door
check arm.
(b) Remove three nuts.
(c) Remove the door.
8. Remove the glove compartment:
(a) Remove the screw.
(b) Pull out the glove compartment.
55
Page 68
Procedure for Case C
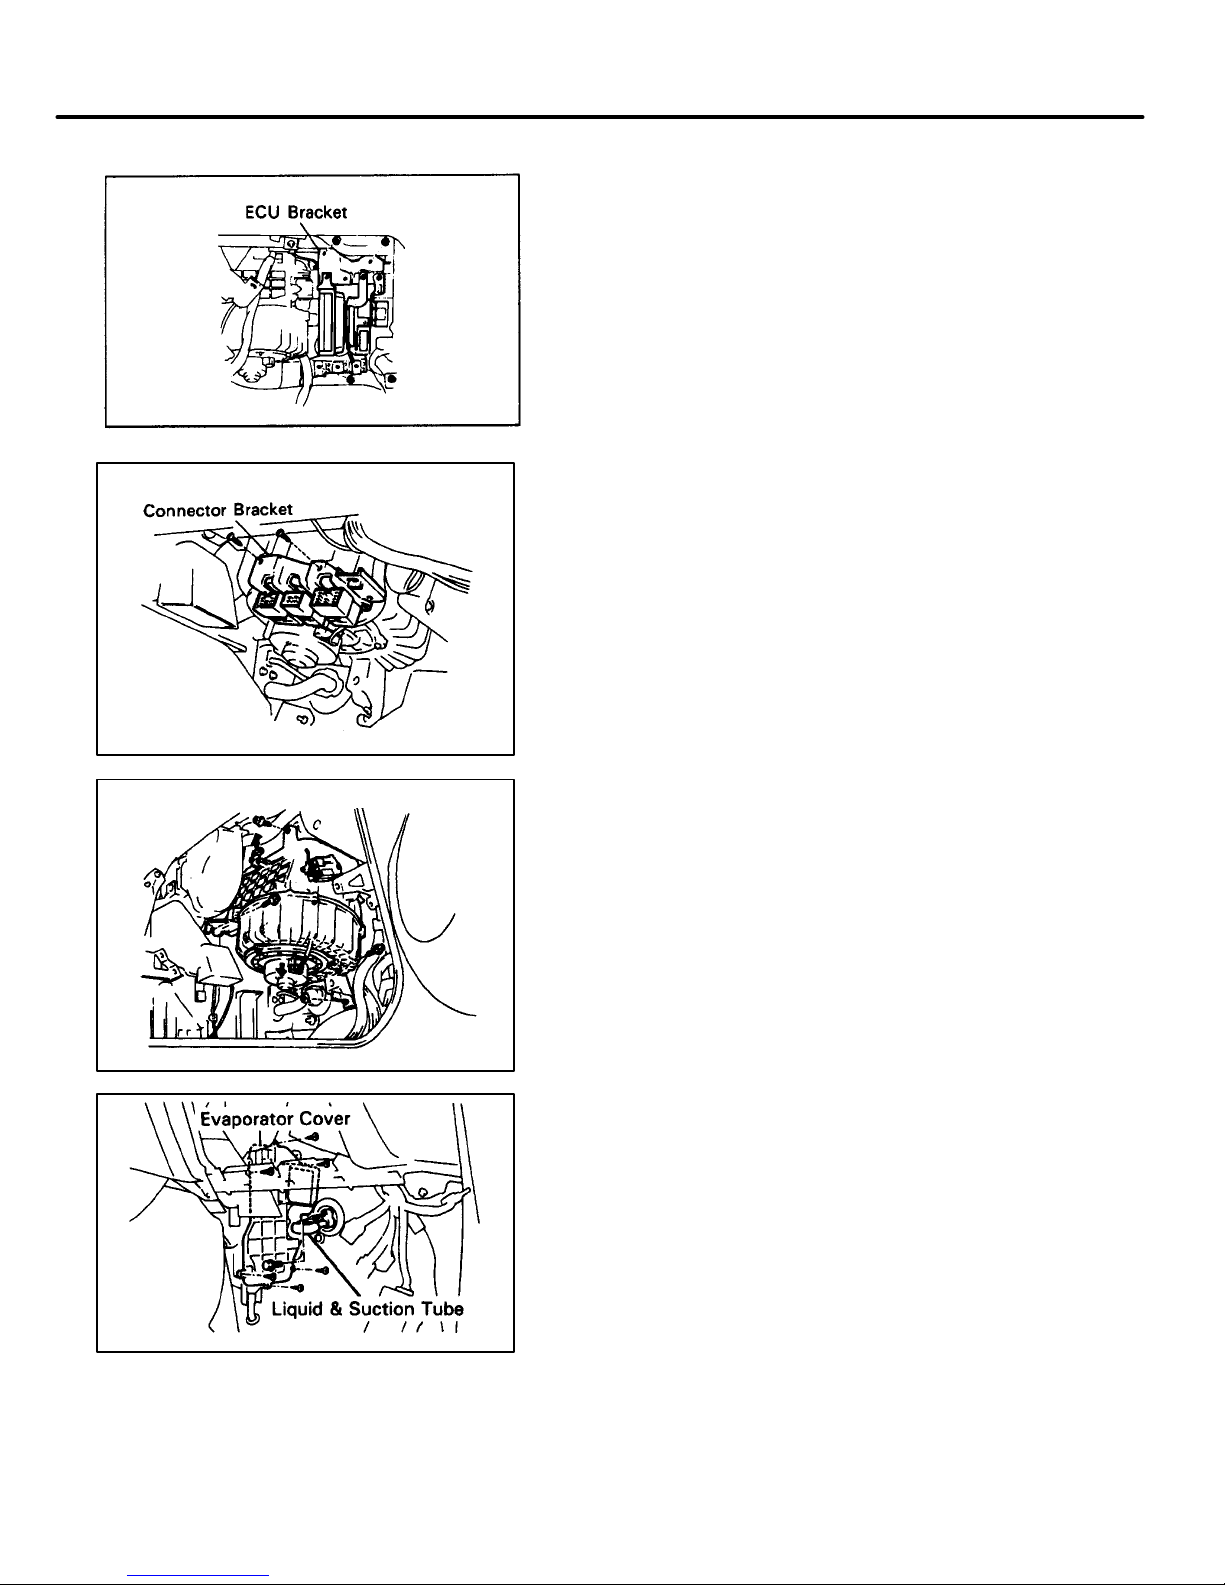
9. Remove the engine ECU and ECU bracket:
(a) Disconnect the connectors from the engine ECU.
(b) Remove the nut on top of the ECU bracket and
the bolt in the far back.
(c) Remove the ECU and ECU bracket as one
assembly.
10. Remove the connector bracket:
(a) Disconnect the connector from the connector
bracket.
(b) Remove the two screws and the bracket.
56
11. Remove the blower unit:
(a) Disconnect the connectors from the blower unit.
(b) Remove the three screws and one nut, and
blower unit.
12. Remove the evaporator cover:
(a) Remove two bolts for the liquid and suction
tubes.
(b) Remove eight screws and evaporator cover.
Page 69
Proceudre for Case C
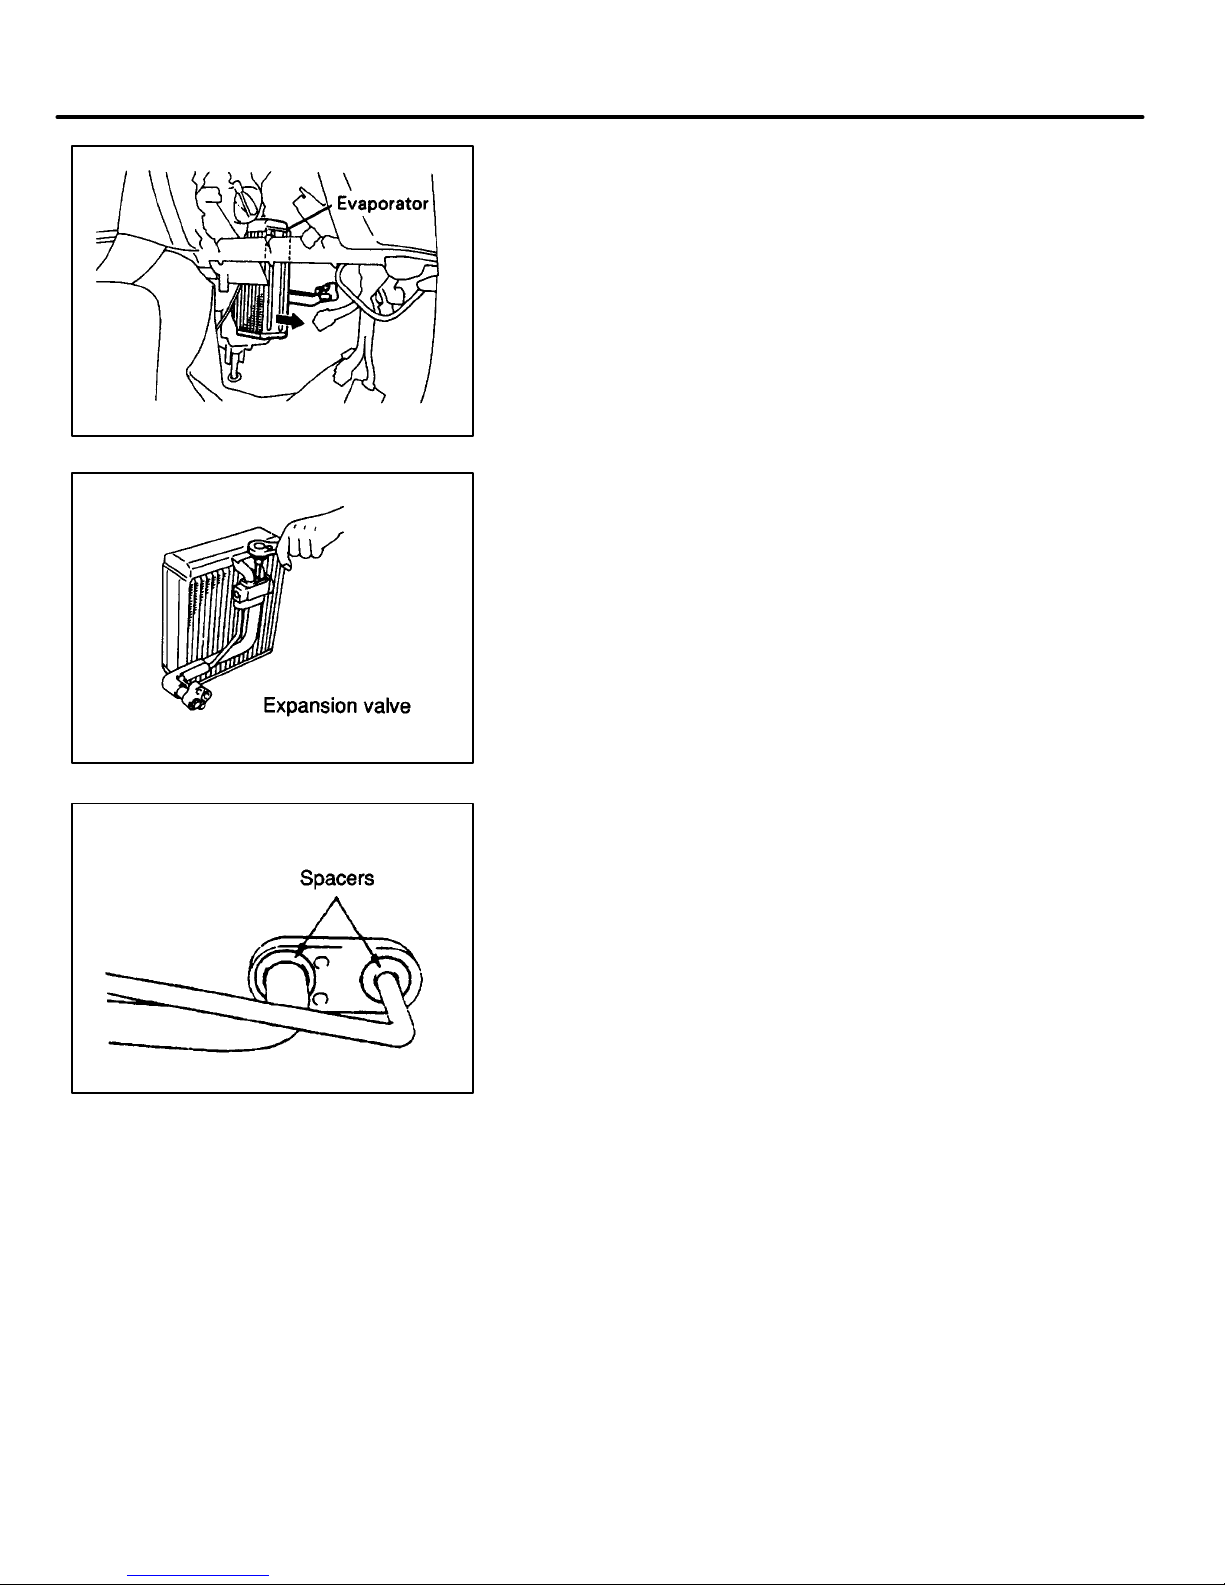
13. Remove the evaporator:
(a) Pull out the evaporator.
14. Remove the expansion valve and the liquid and
suction tubes:
(a) Remove the 2 bolts using a hexagon wrench.
(b) Remove the expansion valve from the
evaporator.
15. Inspect the liquid and suction tubes to determine if the spacers are gold colored (made of
zinc–plated steel).
IF the spacers are gold colored, replace the tubes.
IF the spacers are NOT gold covered, DO NOT
replace the tubes.
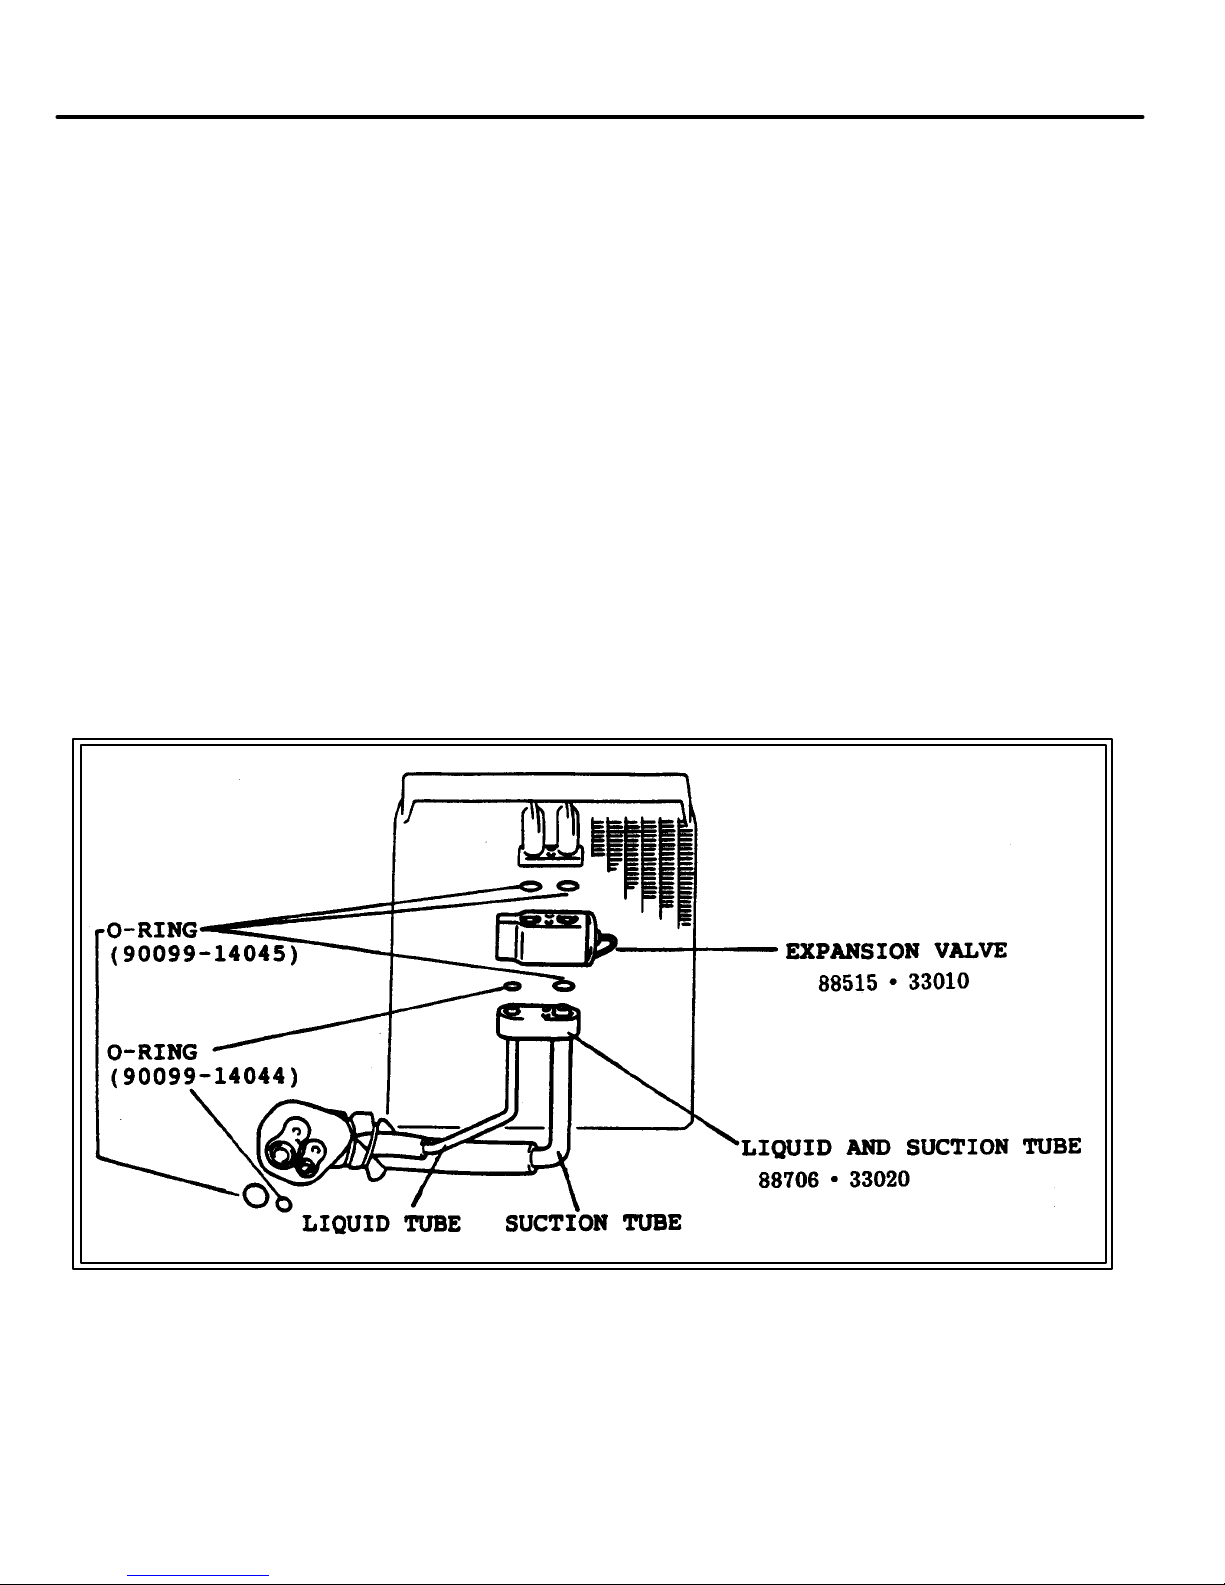
NOTE: Replace all o–rings with new ones. Large
o–ring Part # 90099–14045 Small o–ring Part
# 90099–14044
(a) 2 o–rings (1 large and 1 small) between the
expansion valve and the evaporator.
(b) 2 o–rings (1 large and 1 small) between the
expansion valve and the liquid and suction tubes.
(c) 2 o–rings (1 large and 1 small) where the liquid
and suction tubes join the vehicle tubes at the
engine wall.
NOTE: 2 large and 2 small o–rings come with Part
# 88706–33020 tube.
57
Page 70
Procedure for Case C
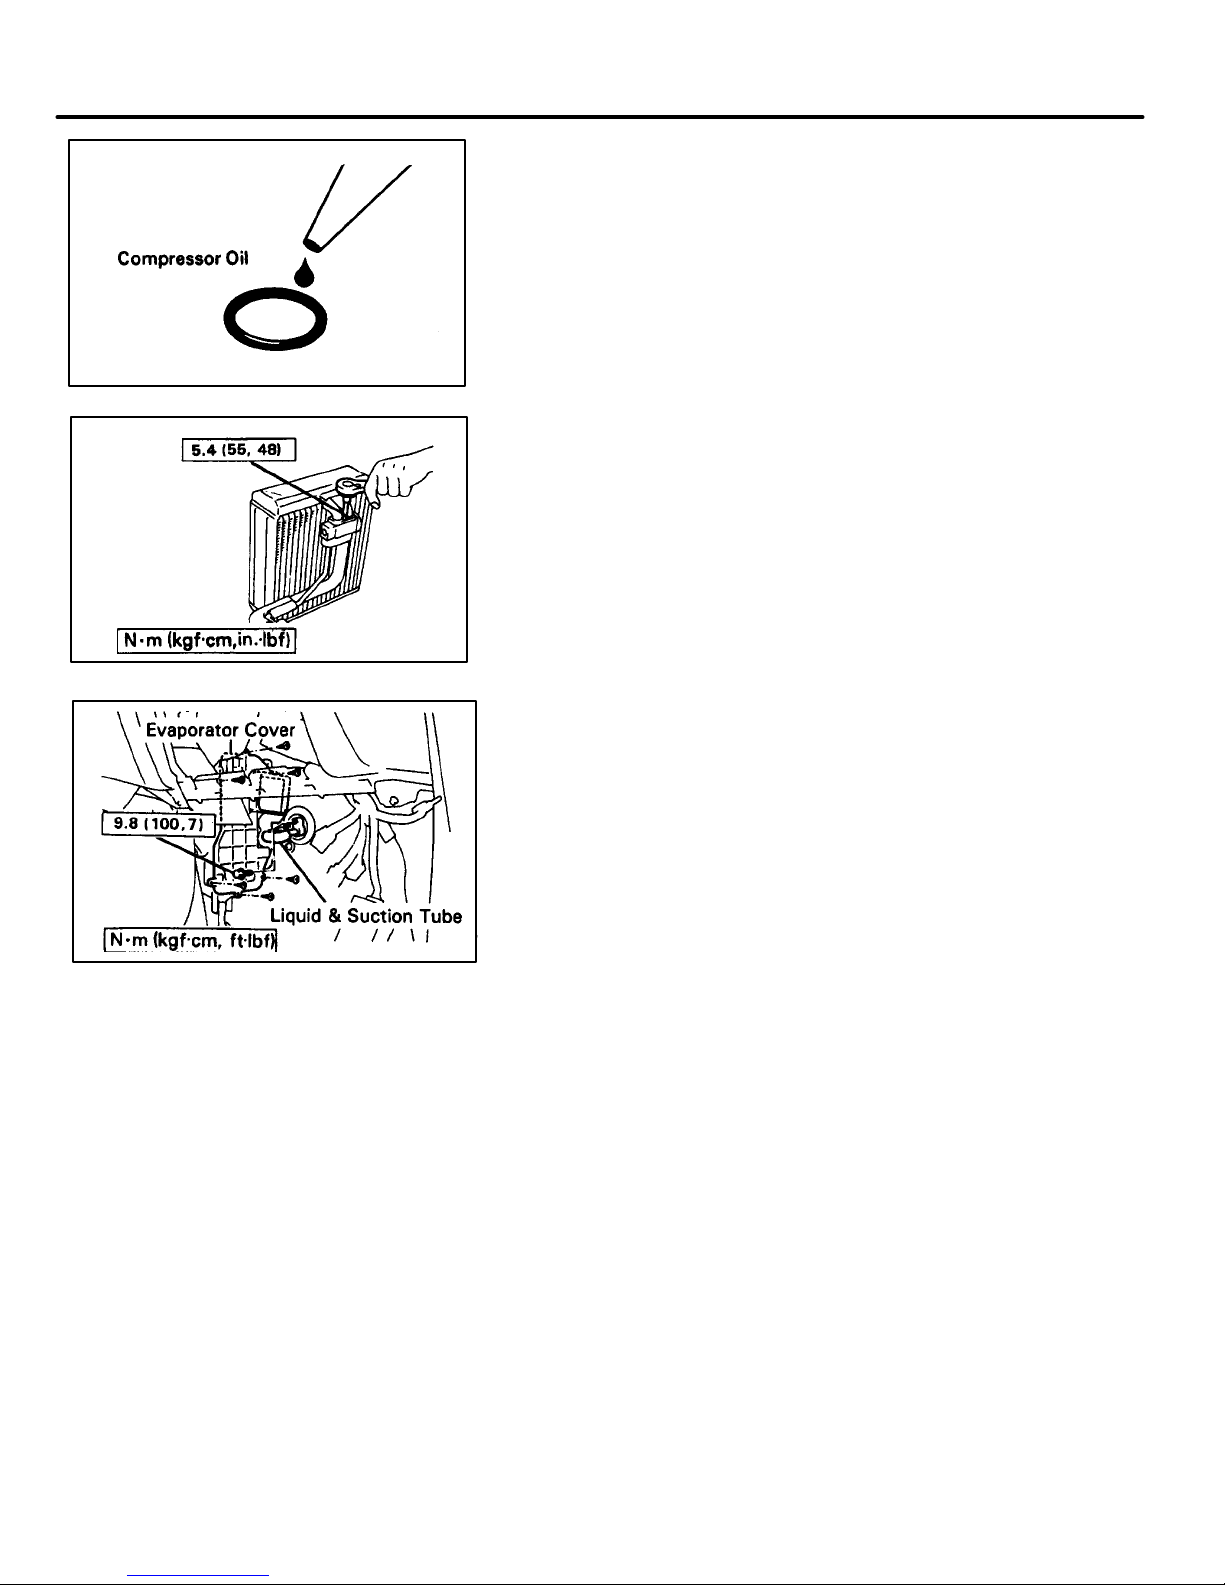
16. Apply a few drops of compressor oil to o–ring
fittings for easy tightening and to prevent
leaking of refrigerant gas.
17. Install a new expansion valve with tubes that
do not have gold–colored spacers. Tighten to
specified torque.
Torque: 5.4 N–m (55 kg–cm, 48 in–lb)
18. Reinstall the evaporator and cover. Tighten
liquid and suction tubes to specified torque.
Torque: 8.8 N–m (100 kg–cm, 7 ft–lb)
19. Reinstall the blower unit.
20. Reinstall the connector bracket.
21. Reinstall ECU and ECU bracket.
22. Reinstall glove compartment and glove
compartment door.
23. Reinstall instrument lower panel.
24. Reinstall under cover No. 2.
58
Page 71

Procedure for Case C
25. Reconnect negative battery terminal.
26. Reset customer preset radio stations.
27. Reset the clock to the correct time.
28. Reset audio system security code to same code
that you entered in step 1. DO NOT ENTER A
CODE IF CUSTOMER HAD NO CODE.
59
Page 72
Evacuation, Recharge, and Re–inspection
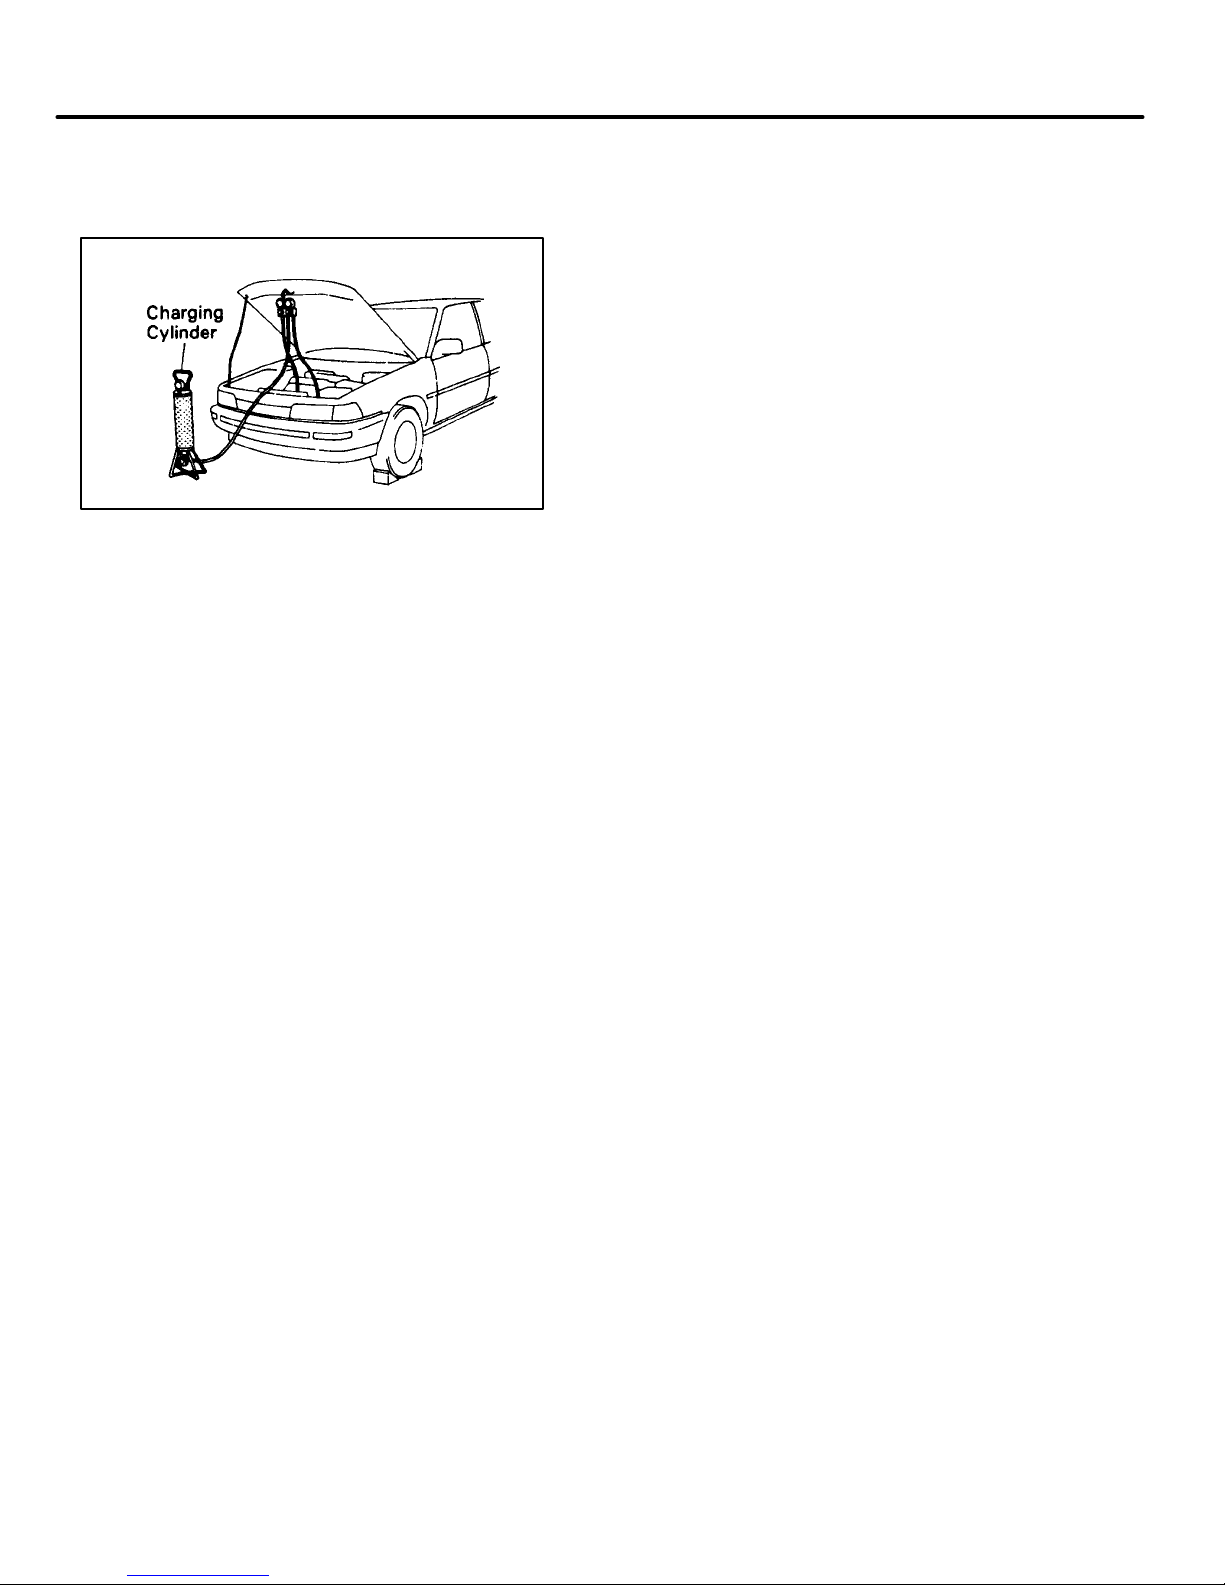
After completing the repair, perform the following
procedures:
1. Evacuate A/C system for 10 minutes.
2. Check for air tightness for 5 minutes.
3. Partially recharge system.
4. Re–check for leaks using a gas leak
detector.
RE–INSPECTION RESULT AND ACTION
Leak Found:
(a) Recover refrigerant.
(b) Repair leaks, evacuate, and recharge.
(c) Re–inspect for leaks.
NOTE: Leaks are either:
(a) Covered by Lexus Basic Warranty Policy.
(b) Charged at customer ’s expense (ensure
customer gives approval before repair).
No Leak Found:
(a) Continue to charge the A/C system until full.
(b) Re–check for leaks using a gas leak detector. (If
leaks are found repeat the Evacuation, Recharge,
and Re–inspection procedure.)
(c) Repeat A/C System Performance Test (below).
60
Page 73
Performance Testing the A/C System
Proceed with Performance Testing the A/C System
after completing the repair and recharging the system.
1. Start the engine and maintain 1,500 RPM.
2. Set the A/C to AUTO –– MAX COOL.
3. Fully open all doors.
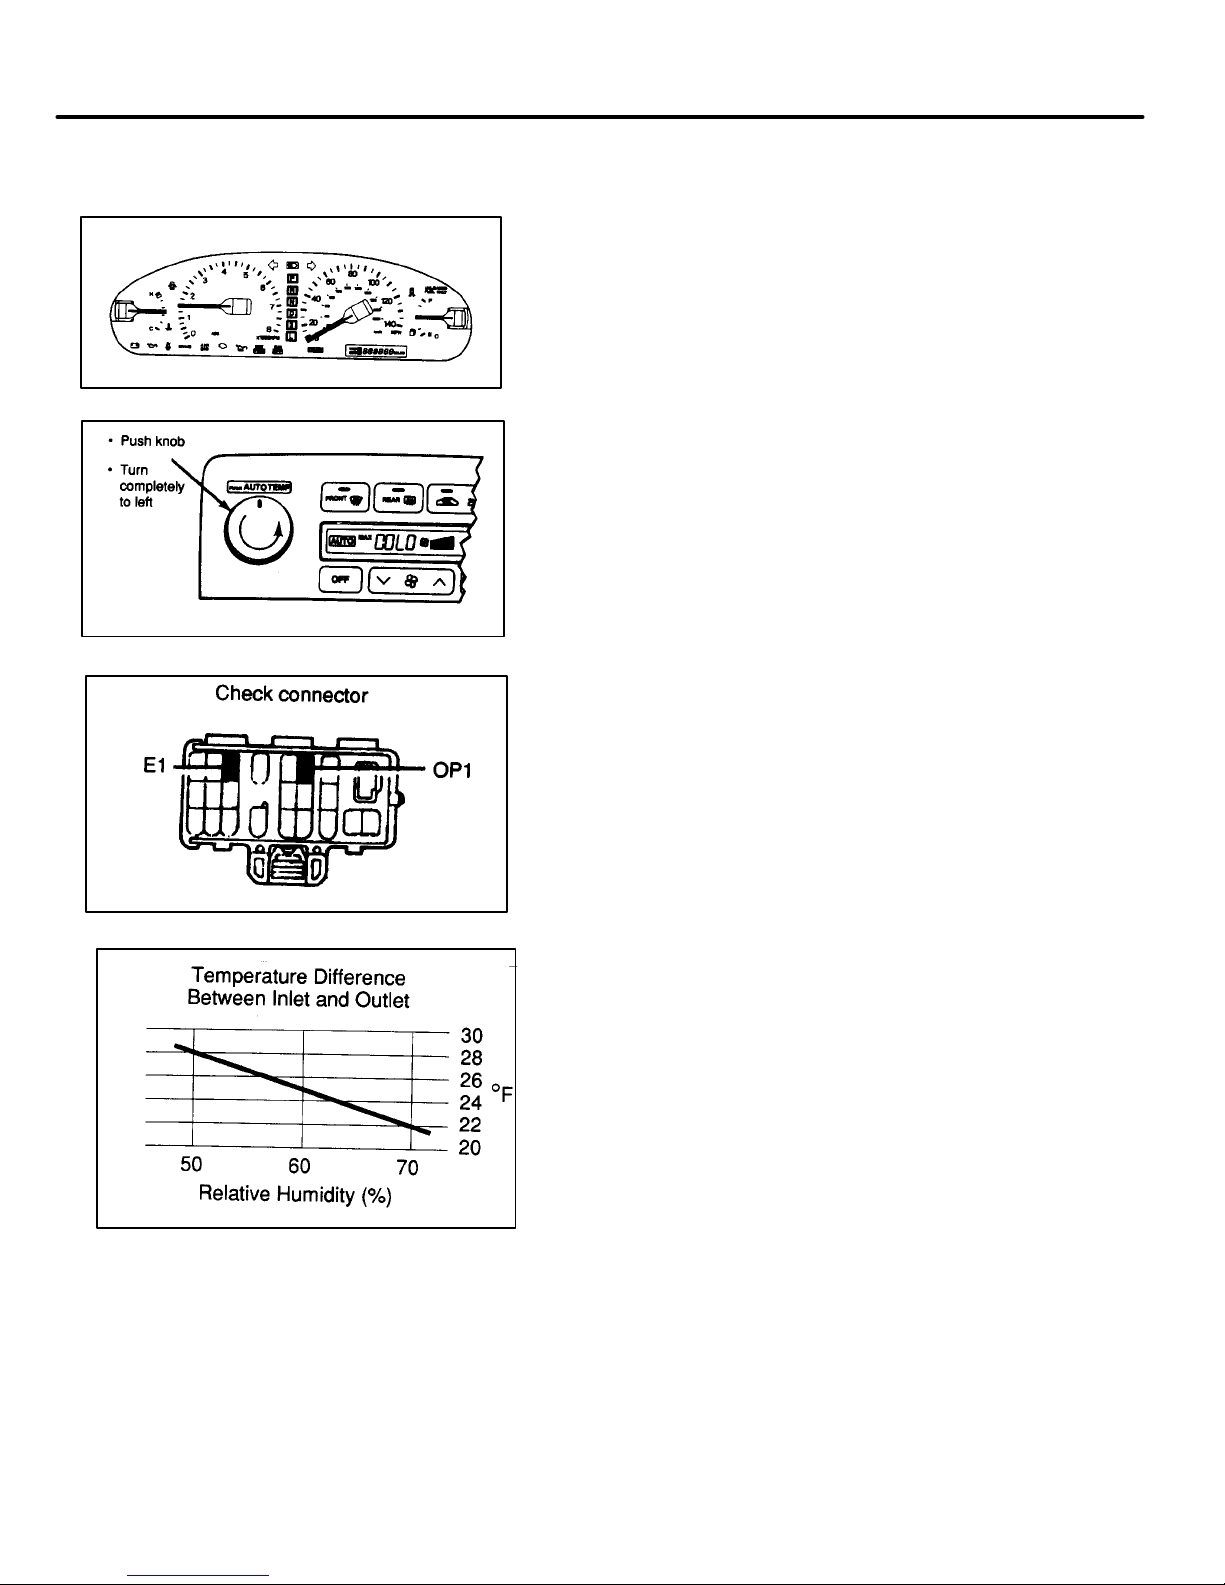
4. At the Under Hood Diagnostic Connector jump
OP1 to E1 to maintain a stable fan speed.
5. Position one thermometer in the center duct and
one thermometer near the A/C inlet. (NOT laying
on the carpet.)
6. After 5 minutes of operation compare the
difference between the inlet temperature and the
center duct temperature to the Performance Test
Chart. System performance is acceptable if
temperature difference is greater than the
specified minimum (as shown).
61
Page 74
SSC Completion Label Installation
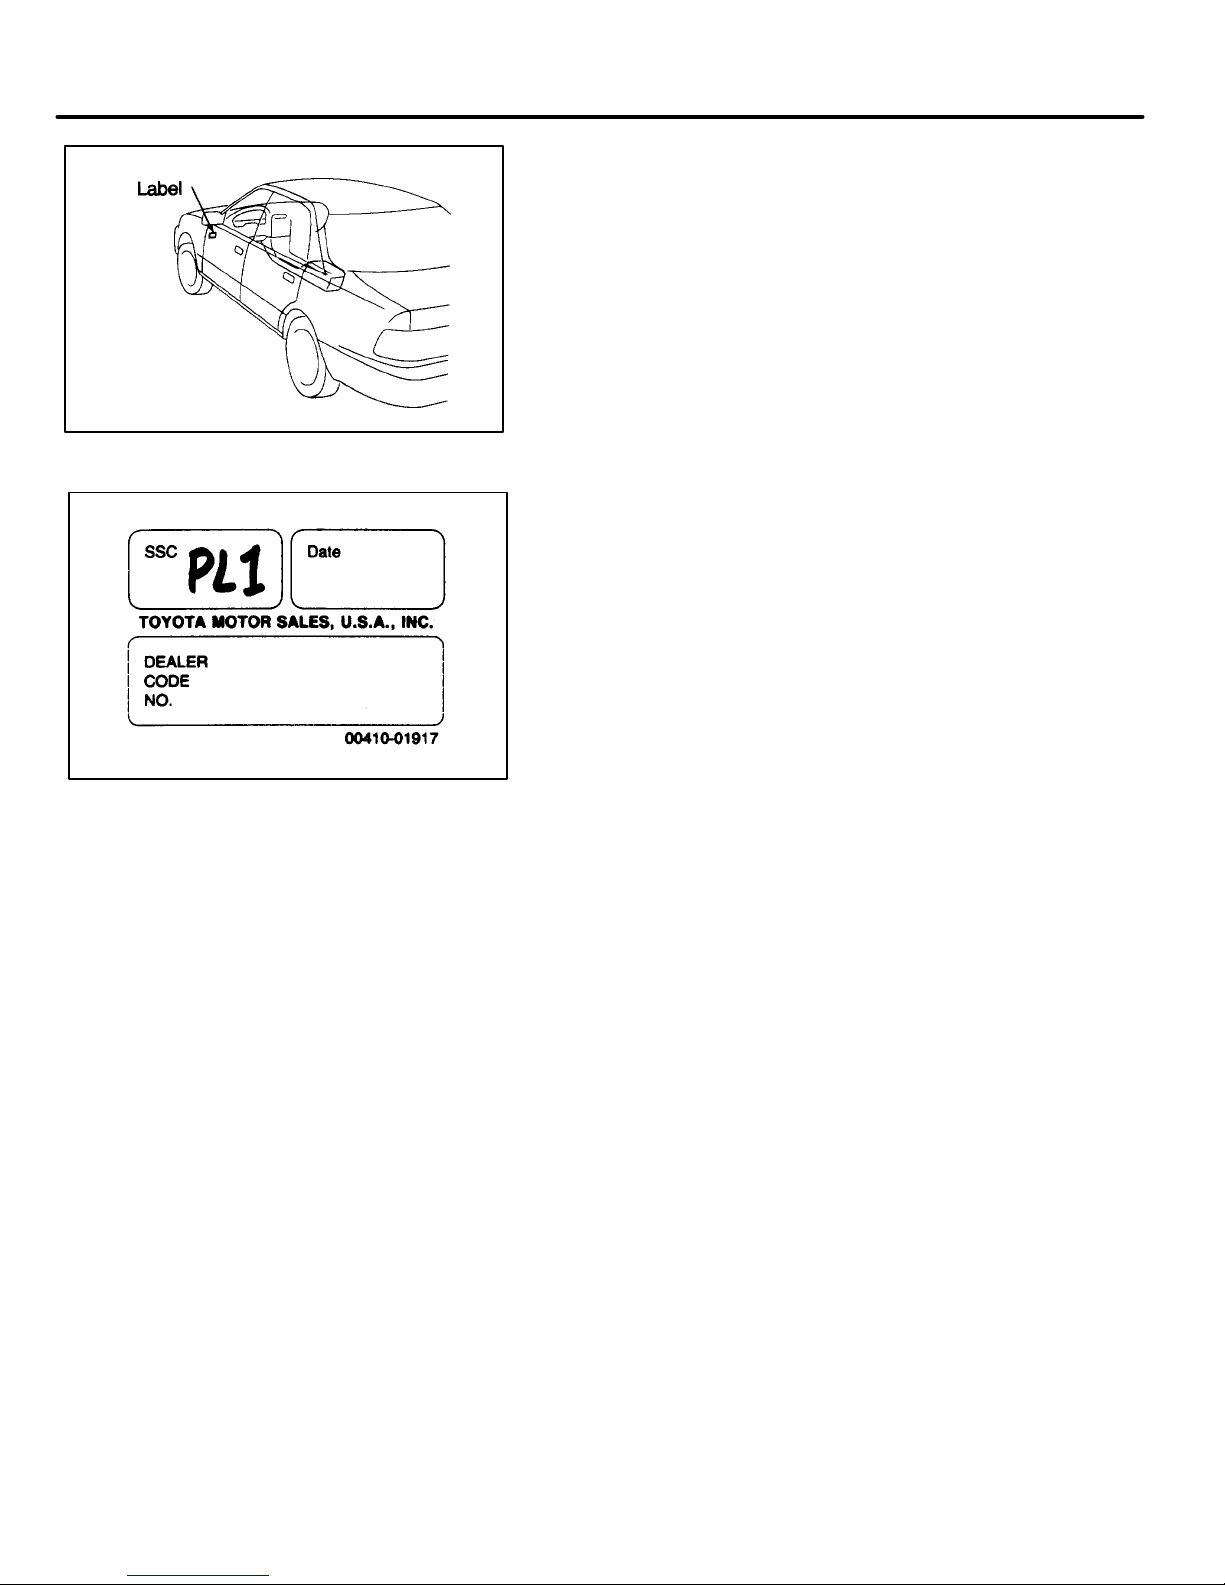
1. After completing the special service and
successfully performance testing the A/C
system, affix an SSC completion label to the left
front door hinge post near the door check.
NOTE: An SSC completion label is enclosed in the
owner ’s letter. Additional labels, in sheets of 50 (P/N
00410–01917) can be ordered through the non–parts
system on a 1459 order form or through the TDN
system.
2. Fill out the label.
62
Page 75

ES 300 A/C System Specifications
Torque:
Expansion valve x evaporator: 5.4 N–m
(55 Kg–cm, 48 in–lb)
Liquid and Suction Tube x A/C unit: 9.8 N–m
(100 Kg–cm, 7 ft–lb)
Refrigerant Charging Volume:
Specified amount: 950 g + 50 g
(33.51 oz + 1.76 oz, 2.1 lb + 0.1 lb)
63
 Loading...