

Page 1

LH95
STELI
Design by Manuela Simonelli & Andrea Quaglio
Page 2
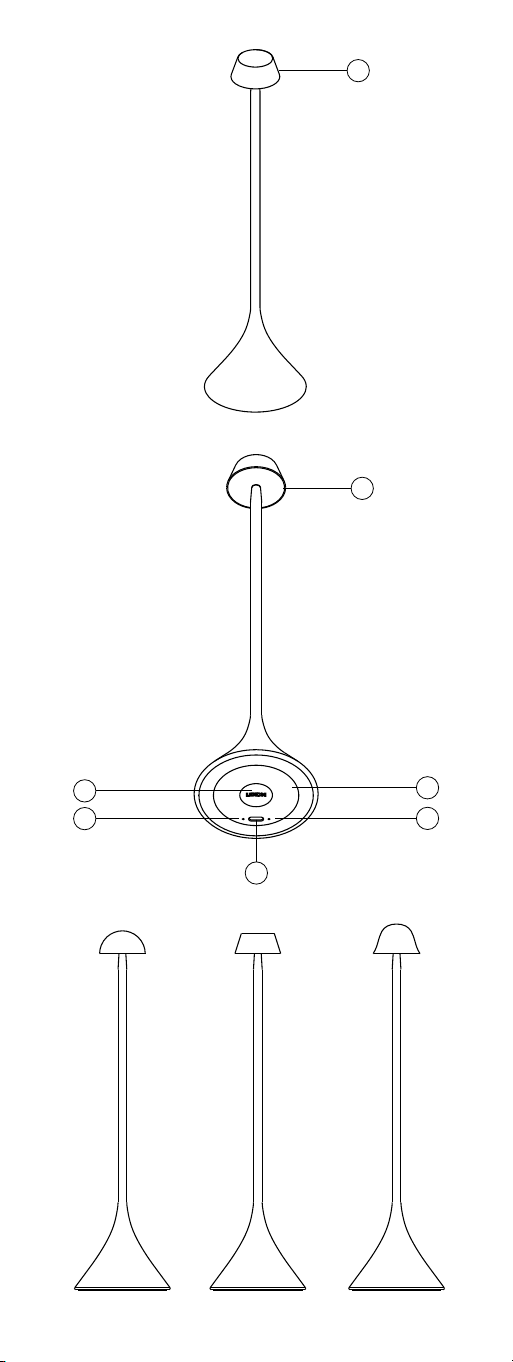
1
2
3
4
7
Steli Dome Steli Shade Steli Bell
5
6
Page 3
IN THE BOX
1x Steli 1x USB Type-C charging cable 1x User manual
PRODUCT OVERVIEW
1. Touch area (Lighting function) 5. Receiver for wireless charging
2. Lamp 6. LED indicator (battery & charging status)
3. BT Button (for lamp synchronisation) 7. USB Type-C charging port
4. Reset key
FEATURES
• LED technology with 9 colors (warm white, cold white, blue, yellow, green, red, purple, light pink & light blue)
• Dimmable LED lights with memory system
• Synchronisable LED lamp (Bluetooth mesh network)
• Suitable for outdoor use (IPX4)
• Rechargeable via wireless charging or USB Type-C
CHARGING
We recommend you to fully charge the battery before using Steli for the first time.
The initial full charge should take approximately 3 hours via USB charging and 7 hours via wireless charging.
LED information
Charge with USB cable LED status (Red LED)
Charging LED indicator remains ON
In use LED indicator remains OFF
Fully charged LED indicator remains OFF
Charge with Wireless charger Lamp status
Charging Lamp flashes green for 5 seconds when charging begins
Charge with USB cable
1. Plug the provided USB Type-C cable into the charging port of Steli.
2. Plug the USB end of the cable into any computer or any DC 5V power supply charger.
Charge with Wireless Charger
Steli has a built-in wireless charging receiver. You can charge the battery by using a wireless charger.
1. Place Steli at the center of the wireless charger.
2. Disconnect the device once the battery has been fully charged
OPERATING INSTRUCTIONS
Setting up one Steli lamp
• Touch the top of the lamp to turn it ON.
• There are 9 colors options you can select by simply touching the top of the lamp.
• To adjust brightness, touch the top area until you reached the desired brightness then release.
• To turn OFF the light, wait 3 seconds after the color selection then touch again.
The last color set will be remembered for next time.
Note: If you want to set Steli in cool and warm light mode only, quickly tap 3 times on the top area. To return to full set lighting mode,
repeat the procedure.
Syncing several Steli lamps (Interconnection network)
Syncing Steli with one or multiple Steli lamps does not require any third-party software/device.
To enjoy the multiple bulbs synchronization feature, follow below instructions:
1. Press and hold the BT button at the bottom of each lamp for 3 seconds to turn ON the communication module.
The Blue LED will start flashing.
2. Select one of the lamps and press the BT button twice to initiate the multi-pairing procedure.
Once procedure is complete, all lamps will be on the same color setting.
The lamp used for connection is now identified a MASTER in the system, its LED will keep flashing while others are turned
OFF
You can now interact from any lamp the change the color, adjust brightness or turn ON & OFF all lamps at once.
Important note: Bluetooth will automatically turn off after the lamp has been off for 60 minutes.
If you enable the Bluetooth® on one of your lamps to connect it to the network, but do not complete the pairing, the lamp's
Bluetooth mode will turn off after 3 minutes automatically
Add one or more Steli lamps to the network
1. To add one or more Steli lamps to the network, simply to it (them) ON by pressing and holding the BT button on each unit
for 3 seconds.
2. Press once on the pairing button of any lamp from the existing network (repeat the procedure with any new device).
Exclusive LOCK NETWORK feature
Steli is equipped with a unique locking system allowing only One lamp to control all others, preventing any change of color,
brightness or even turn ON/OFF to be made from any other lamp in the network. The main lamp (MASTER) is the only one to
control the network. All other lamps are becoming SLAVES.
To enable LOCK function, take the MASTER units and follow below instructions:
1. Press 5 times on the BT MASTER device button, it will send signal to ALL other lamps to LOCK.
2. In LOCK mode, only MASTER interact with other lamps. Its LED is double flashing every 3 seconds.
3. Network can be unlocked by quickly pressing 5 times on the BT button from the MASTER lamp
To change the MASTER device
1. Make sure the network is UNLOCKED
2. Quickly Press the BT button on any device for 10 times, this device will become the new MASTER device.
You can now LOCK and UNLOCK the network from this new device.
Important note: In LOCKED/UNLOCKED network mode, it is strongly recommended to always keep the MASTER device in
charge or fully charged to get the best experience and avoid loss of control of the entire network.
Other working operations:
• To turn OFF ALL the lamps when the network is locked, double tap on the top of the MASTER device.
You’ll need to tap on the MASTER again to turn all lamps back ON.
• To turn OFF only one lamp when the network is locked, long press on the BT button from more than 15 seconds until the lamp
turns OFF. (This will remove the lamp from the network. Repeat the pairing procedure above to bring it back to the network)
• To reset the lamp, insert a thin object into the hole (4) under the lamp and press the key inside.
A manual reset allows you to reboot your device and correct miscellaneous bugs (unrecognized device, unstable Bluetooth
connection...).
LED Information
Operation mode LED status (Blue LED)
Ready to pair Blinking quickly
Master device Blinking twice every 3 seconds
Locked devices Off
SAFETY PRECAUTIONS
• IPX4 water resistant device, resistant to rain, splash, and spray water.
• Never immerse your device in water to avoid internal short circuit, overheating, fire, deformation or even explosion of the
battery.
• Do not store your device in very hot or cold areas. It is recommended to use your device at room temperatures.
• Do not attempt to service, repair or disassemble the device yourself.
• Make sure to respect the technical specifications for charging and never use a power adapter delivering more voltage output
than the one indicated to avoid any irreversible damage to the internal circuit (DC Input: 5V)
• Do not place the Steli case on the wireless charger when conductive materials, such as metal objects and magnets, are
placed between the Steli case and the wireless charger.
Use only certified wireless chargers.
PRODUCT SPECIFICATIONS
Material: Aluminium/ABS Bluetooth® range: 10m
Weight: 135 g / 0.29 lbs Frequency range: 2402M-2480MHZ
Dimensions: Input port: DC 5V
Max lumen output: 120 lm Wireless input: 5W
Color temperature: Battery type: Li-polymer
Warm white: 2700K Battery capacity: 1500 mAh
Cold white: 6500K Charging system: USB Type-C or Supports wireless
charging
Battery voltage:
Charging time (wirelessly): approx. 5 hours Normal usage time: Up to 10h* (brightness at 75%)
Operating temperature: 0°C - 45°C International warranty: 1 year
*may vary based on product use, set light intensity and selected light color
Page 4
FRANÇAIS
DANS LA BOÎTE
1x Steli 1x Câble de charge USB Type-C 1x Manuel d'utilisation
VUE D'ENSEMBLE
1. Surface tactile (fonction d'éclairage) 5. Récepteur pour la recharge sans fil
2. Lampe 6. Indicateur LED (état de la batterie et de la charge)
3. Bouton Bluetooth (pour la synchronisation des lampes) 7. Port de charge USB Type-C
4. Bouton de réinitialisation
FEATURES
• Technologie LED avec 9 couleurs (blanc chaud, blanc froid, bleu, jaune, vert, rouge, violet, rose clair et bleu clair)
• Lampe avec variateur d'intensité et système de mémorisation
• Lampe synchronisable (réseau maillé Bluetooth)
• Adaptée pour une utilisation en extérieur (IPX4)
• Rechargeable via la charge sans fil ou via le câble USB Type-C
MISE EN CHARGE
Nous vous recommandons de charger complètement la batterie avant d'utiliser Steli pour la première fois.
La charge initiale complète dure environ 3 heures via la charge USB et 7 heures via la charge sans fil (par induction)
Informations sur l'indicateur LED
Mise en charge avec le câble USB Statut de la LED (LED rouge)
Chargement en cours Le voyant LED reste allumé
En cours d'utilisation Le voyant LED reste éteint
Chargement complet Le voyant LED reste éteint
Mise en charge avec le chargeur sans fil État de la lampe
Chargement en cours La lampe clignote en vert pendant 5 secondes lorsque le chargement commence
Mise en charge avec le câble USB
1. Branchez le câble USB Type-C fourni sur le port de charge du Steli.
2. Branchez l'autre extrémité USB du câble à n'importe quel ordinateur ou à n'importe quel chargeur à alimentation en courant
continu 5V
Mise en charge avec le chargeur sans fil
Steli dispose d'un récepteur de charge sans fil intégré. Vous pouvez charger la batterie en utilisant un chargeur sans fil (par
induction)
1. Placez le Steli au centre du chargeur sans fil.
2. Retirez l'appareil une fois que la batterie a été entièrement chargée.
INSTRUCTIONS D'UTILISATION
Utilisation d'une lampe Steli
• Appuyez une fois sur le haut de la lampe pour l'allumer.
• Il existe 9 options de couleurs que vous pouvez sélectionner en appuyant simplement sur le haut de la lampe.
• Pour régler la luminosité, touchez la partie supérieure de la lampe jusqu'à ce que vous atteigniez la luminosité souhaitée, puis
relâchez.
• Pour éteindre la lampe, attendez 3 secondes après la sélection de la couleur puis appuyez à nouveau sur le haut de la lampe.
La dernière couleur choisie restera en mémoire.
Remarque : si vous souhaitez régler le Steli en mode de lumière froide et chaude uniquement, appuyez rapidement 3 fois sur le
haut de la lampe. Pour revenir au mode d'éclairage complet, répétez la procédure.
Synchronisation avec plusieurs lampes Steli (Réseau interconnecté)
La synchronisation de Steli avec une ou plusieurs lampes Steli ne nécessite aucun logiciel/dispositif tiers.
Pour profiter de la fonction de synchronisation de plusieurs ampoules, suivez les instructions ci-dessous :
1. Appuyez et maintenez enfoncé le bouton BT qui se trouve sous chaque lampe pendant 3 secondes pour allumer le module de
communication. La LED bleue se met à clignoter.
2. Sélectionnez une des lampes et appuyez deux fois sur le bouton BT pour lancer la procédure de connexion.
Une fois la procédure terminée, toutes les lampes seront de la même couleur.
La lampe utilisée pour lors de la connexion est maintenant identifiée comme MASTER dans le système, sa LED continuera à
clignoter tandis que les autres seront éteintes.
Vous pouvez maintenant utiliser n'importe quelle lampe pour changer la couleur, régler la luminosité ou allumer et éteindre toutes
les lampes en même temps.
Remarque importante : le Bluetooth s'éteint automatiquement après 60 minutes d'inactivité de la lampe.
Si vous activez le Bluetooth® sur l'une de vos lampes pour la connecter au réseau, mais que vous ne terminez pas la procédure, le
mode Bluetooth de la lampe se désactivera automatiquement au bout de 3 minutes.
Ajouter une ou plusieurs lampes Steli au réseau
1. Pour ajouter une ou plusieurs lampes Steli au réseau, il suffit de les allumer en appuyant sur le bouton BT de chaque unité
pendant 3 secondes.
2. Appuyez une fois sur le bouton de connexion de n'importe quelle lampe du réseau existant (répétez la procédure avec tout
nouveau dispositif).
Fonction exclusive de VERROUILLAGE DU RÉSEAU
Steli est équipée d'un système de verrouillage unique permettant à une seule lampe de contrôler toutes les autres, empêchant tout
changement de couleur, de luminosité ou même de mise en marche/arrêt à partir de toute autre lampe du réseau. La lampe
principale (MASTER) est la seule à contrôler le réseau. Toutes les autres lampes deviennent des TÉMOINS.
Pour activer la fonction exclusive de VERROUILLAGE, prenez le MASTER et suivez les instructions ci-dessous :
1. Appuyez 5 fois sur le bouton BT du MASTER, il enverra un signal à TOUTES les autres lampes pour les verrouiller.
2. En mode LOCK, seul le MASTER interagit avec les autres lampes. Sa LED clignote deux fois toutes les 3 secondes.
3. Le réseau peut être déverrouillé en appuyant rapidement 5 fois sur le bouton BT de la lampe MASTER.
Pour changer le dispositif MASTER
1. Assurez-vous que le réseau est DÉVERROUILLÉ
2. Appuyez rapidement sur le bouton BT de n'importe quel appareil pendant 10 fois, cet appareil deviendra le nouvel appareil
MASTER. Vous pouvez maintenant verrouiller et déverrouiller le réseau à partir de ce nouveau dispositif.
Remarque importante : en mode réseau VERROUILLÉ / DÉVERROUILLÉ, il est fortement recommandé de toujours garder
l'appareil MASTER en charge ou complètement chargé pour obtenir une expérience optimale et éviter la perte de contrôle de
l'ensemble du réseau.
Autres opérations de fonctionnement :
• Pour éteindre TOUTES les lampes lorsque le réseau est verrouillé, tapez deux fois sur le dessus de l'appareil MASTER.
Vous devrez taper à nouveau sur le MASTER pour rallumer toutes les lampes.
• Pour éteindre une seule lampe lorsque le réseau est verrouillé, appuyez longuement sur le bouton BT pendant plus de 15
secondes jusqu'à ce que la lampe s'éteigne. (La lampe sera alors retirée du réseau. Répétez la procédure d'appairage ci-dessus
pour la réintégrer au réseau).
• TPour réinitialiser la lampe, insérez un objet fin dans le trou (4) sous la lampe et appuyez sur le bouton à l'intérieur de ce trou.
Une réinitialisation manuelle vous permet de redémarrer votre appareil et de corriger divers bugs (appareil non reconnu,
connexion Bluetooth instable...).
Informations sur l'indicateur LED
Mode Statut de la LED (LED bleue)
Prêt pour l'appariement Clignotement rapide
Dispositif principal Clignotement deux fois toutes les 3 secondes
Dispositifs verrouillés Éteint
PRÉCAUTIONS DE SÉCURITÉ
• Appareil étanche IPX4, résistant à la pluie, aux éclaboussures et aux projections d'eau.
• Ne plongez jamais votre appareil dans l'eau pour éviter tout court-circuit interne, toute surchauffe, tout incendie, toute
déformation ou même toute explosion de la batterie.
• Ne placez pas votre appareil dans des endroits très chauds ou très froids. Il est recommandé d'utiliser votre appareil à
température ambiante.
• N'essayez pas d'entretenir, de réparer ou de démonter l'appareil vous-même.
• Veillez à respecter les spécifications techniques de charge et n'utilisez jamais un adaptateur électrique délivrant une tension de
sortie supérieure à celle indiquée afin d'éviter tout dommage irréversible au circuit interne (Entrée: 5V).
• Ne placez pas le boîtier Steli sur le chargeur sans fil lorsque des matériaux conducteurs, tels que des objets métalliques et des
aimants, sont placés entre le boîtier Steli et le chargeur sans fil.
Utilisez uniquement des chargeurs sans fil certifiés.
SPÉCIFICATIONS DU PRODUIT
Matériau : Aluminium/ABS Portée Bluetooth® : 10m
Poids : 135 g Gamme de fréquences : 2402M-2480MHZ
Dimensions : Port d'entrée : DC 5V
Rendement lumineux max : 120 lm Entrée sans fil : 5W
Température de couleur : Type de batterie : Li-polymère
Blanc chaud : 2700K Capacité de la batterie : 1500 mAh
Blanc froid : 6500K Système de charge : USB Type-C ou Prise en charge de la
charge sans fil
Tension de la batterie : 3.7V Charging time (USB Type-C): approx. 3 hours
Autonomie : Jusqu'à 10h* (luminosité à 75%) Temps de charge (sans fil) : environ 5 heures
Operating temperature: 0°C - 45°C Garantie internationale : 1 an
*varie en fonction de l'utilisation, de l'intensité lumineuse définie et de la couleur de lumière sélectionnée
Page 5
EUROPEAN UNION
CE DIRECTIVE
LEXON hereby declares that the device follows the essential requirements and other relevant
provisions of the RED Directive 2014/53/EU.
The original EU declaration of conformity may be found at:
https://www.lexon-design.com/assets/certifications-ce-steli.pdf
RF Specification:
This device was tested for uncontrolled environment operations. To comply with RF exposure
requirements, a minimum separation distance of 20 cm must be maintained between the user’s body
and the product.
LEXON déclare que cet appareil est conforme aux exigences essentielles et aux autres dispositions
pertinentes de la directive RE Directives 2014/53/EU.
La déclaration de conformité originale de l'UE peut être consultée à l'adresse suivante : https://www.lex-
on-design.com/assets/certifications-ce-steli.pdf
Déclaration d'exposition RF:
L'appareil a été évalué pour répondre aux exigences générales d'exposition aux RF. L'appareil peut être
utilisé dans des conditions d'exposition portable sans restriction.
UK CONFORMITY ASSESSMENT
The object described above is in conformity with the essential requirements and other relevant
provisions of the UK Radio Equipment Regulations 2017 (SI 2017/1206).
The original UK declaration of conformity may be found at:
https://www.lexon-design.com/assets/certifications-ukca-steli.pdf.
This device was tested for uncontrolled environment operations. To comply with RF exposure
requirements, a minimum separation distance of 20cm must be maintained between the user’s body
and the product.
WPT:
Radiated H-Field: -34.32 dBuA/m(@10m)
TX/RX Frequency Range: 110-148 KHz
Bluetooth:
Transmitter power:8.12dBm
TX/RX Frequency Range: 2400-2480MHz
DISPOSAL AND RECYCLING INFORMATION
After the implementation of the European Directive 2012/19/EU in the national legal system, the
following applies: electrical and electronic devices may not be dis-posed of with domestic waste.
Consumers are obliged by law to return electrical and electronic device at the end of their service lives
to the public collecting points set up for this purpose or point of sale. Details to this are defined by the
national law of the respective country. This symbol on the product, the instruction manual or the
package indicates that a product is subject to these regulations. By recycling, reusing the materials or
other forms of utilizing old devices, you are making an important contribution to protecting our
environment.
USA - FCC STATEMENT
This device complies with part 15 of the FCC Rules.
Operation is subject to the following two conditions:
(1) This device may not cause harmful interference, and
(2) this device must accept any interference received, including interference that may cause undesired
operation. Notice:
Any changes or modifications not expressly approved by the party responsible for compliance could
void your authority to operate the equipment.
NOTE: This equipment has been tested and found to comply with the limits for a Class B digital device,
pursuant to part 15 of the FCC Rules. These limits are designed to provide reasonable protection
against harmful interference in a residential installation.
This equipment generates, uses and can radiate radio frequency energy and, if not installed and used
in accordance with the instructions, may cause harmful interference to radio communications. However,
there is no guarantee that interference will not occur in a particular installation. If this equipment does
cause harmful interference to radio or television reception, which can be determined by turning the
equipment off and on, the user is encouraged to try to correct the interference by one or more of the
following measures:
- Reorient or relocate the receiving antenna.
- Increase the separation between the equipment and receiver.
- Connect the equipment into an outlet on a circuit different from that to which the receiver is connected.
- Consult the dealer or an experienced radio/ TV technician for help.
RF exposure statements
The device has been evaluated to meet general RF exposure requirement. The device can be used in
portable exposure condition without restriction.
CANADA COMPLIANCE STATEMENT
This device complies with Industry Canada license-exempt RSSs. Operation is subject to the following
two conditions:
1) This device may not cause interference, and
2) This device must accept any interference, including interference that may cause undesired operation
of the device.
This Class B digital apparatus complies with Canadian ICES-003.
Le présent appareil est conforme aux CNR d'Industrie Canada applicables aux appareils radio exempts
de licence.
L'exploitation est autorisée aux deux conditions suivantes:
(1) l'appareil ne doit pas produire de brouillage, et
(2) l'utilisateur de l'appareil doit accepter tout brouillage
radioélectrique subi, même si le brouillage est susceptible d'en compromettre le fonctionnement.
This device contains licence-exempt transmitter(s)/receiver(s) that comply with Innovation, Science and
Economic Development Canada’s licence-exempt RSS(s). Operation is subject to the following two
conditions:
This device may not cause interference.
This device must accept any interference, including interference that may cause undesired operation of
the device.
RF exposure statement:
The device has been evaluated to meet general RF exposure requirement. The device can be used in
portable exposure condition without restriction.
Cet appareil contient des émetteurs / récepteurs exemptés de licence conformes aux RSS (RSS)
d'Innovation, Sciences et Développement économique Canada. Le fonctionnement est soumis aux
deux conditions suivantes:
Cet appareil ne doit pas causer d'interférences.
Cet appareil doit accepter toutes les interférences, y compris celles susceptibles de provoquer un
fonctionnement indésirable de l'appareil.
Déclaration d'exposition RF:
L'appareil a été évalué pour répondre aux exigences générales d'exposition aux RF. L'appareil peut être
utilisé dans des conditions d'exposition portable sans restriction.
 Loading...