

Page 1

X548 Series
User's Guide
November 2010 www.lexmark.com
Machine type(s):
7525
Model(s):
630, 632, 636
Page 2

Contents
Safety information.......................................................................................7
Learning about the printer...........................................................................9
Finding information about the printer......................................................................................................9
Selecting a location for the printer..........................................................................................................10
Printer configurations.............................................................................................................................12
Basic functions of the scanner.................................................................................................................12
Understanding the ADF and scanner glass..............................................................................................13
Understanding the printer control panel................................................................................................14
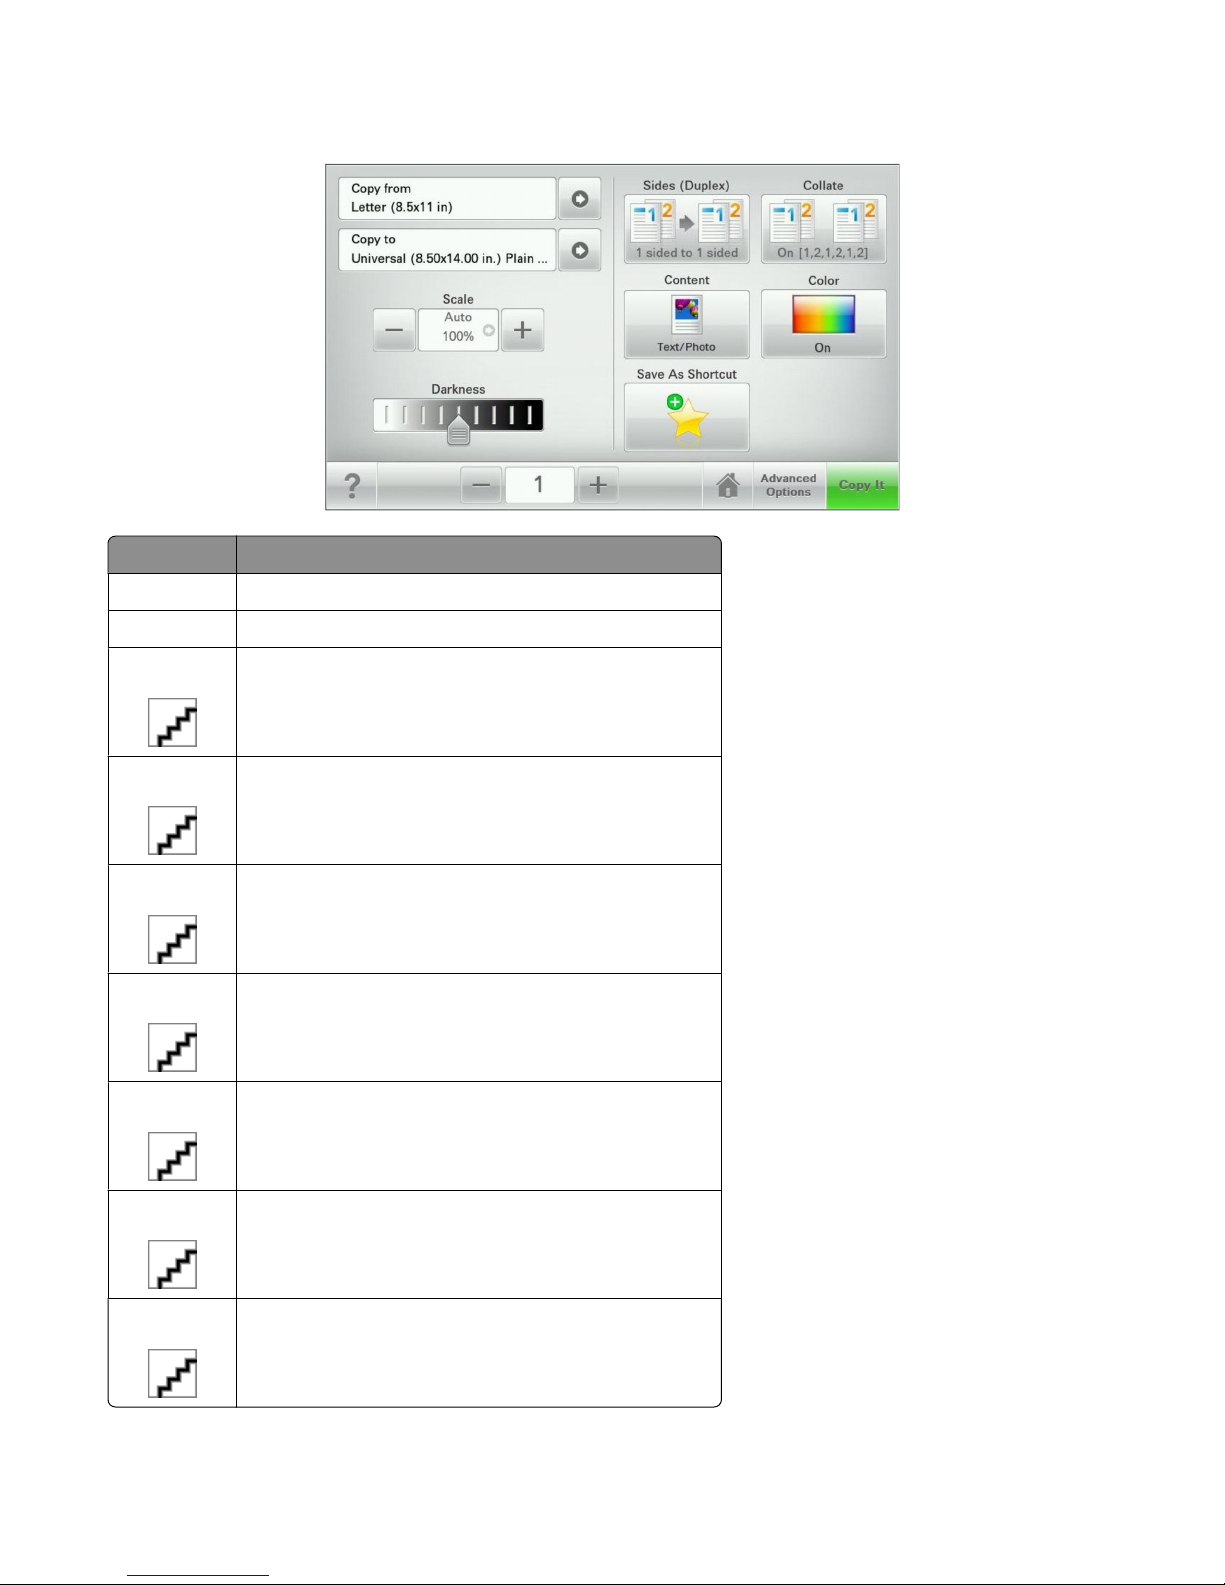
Understanding the home screen................................................................16
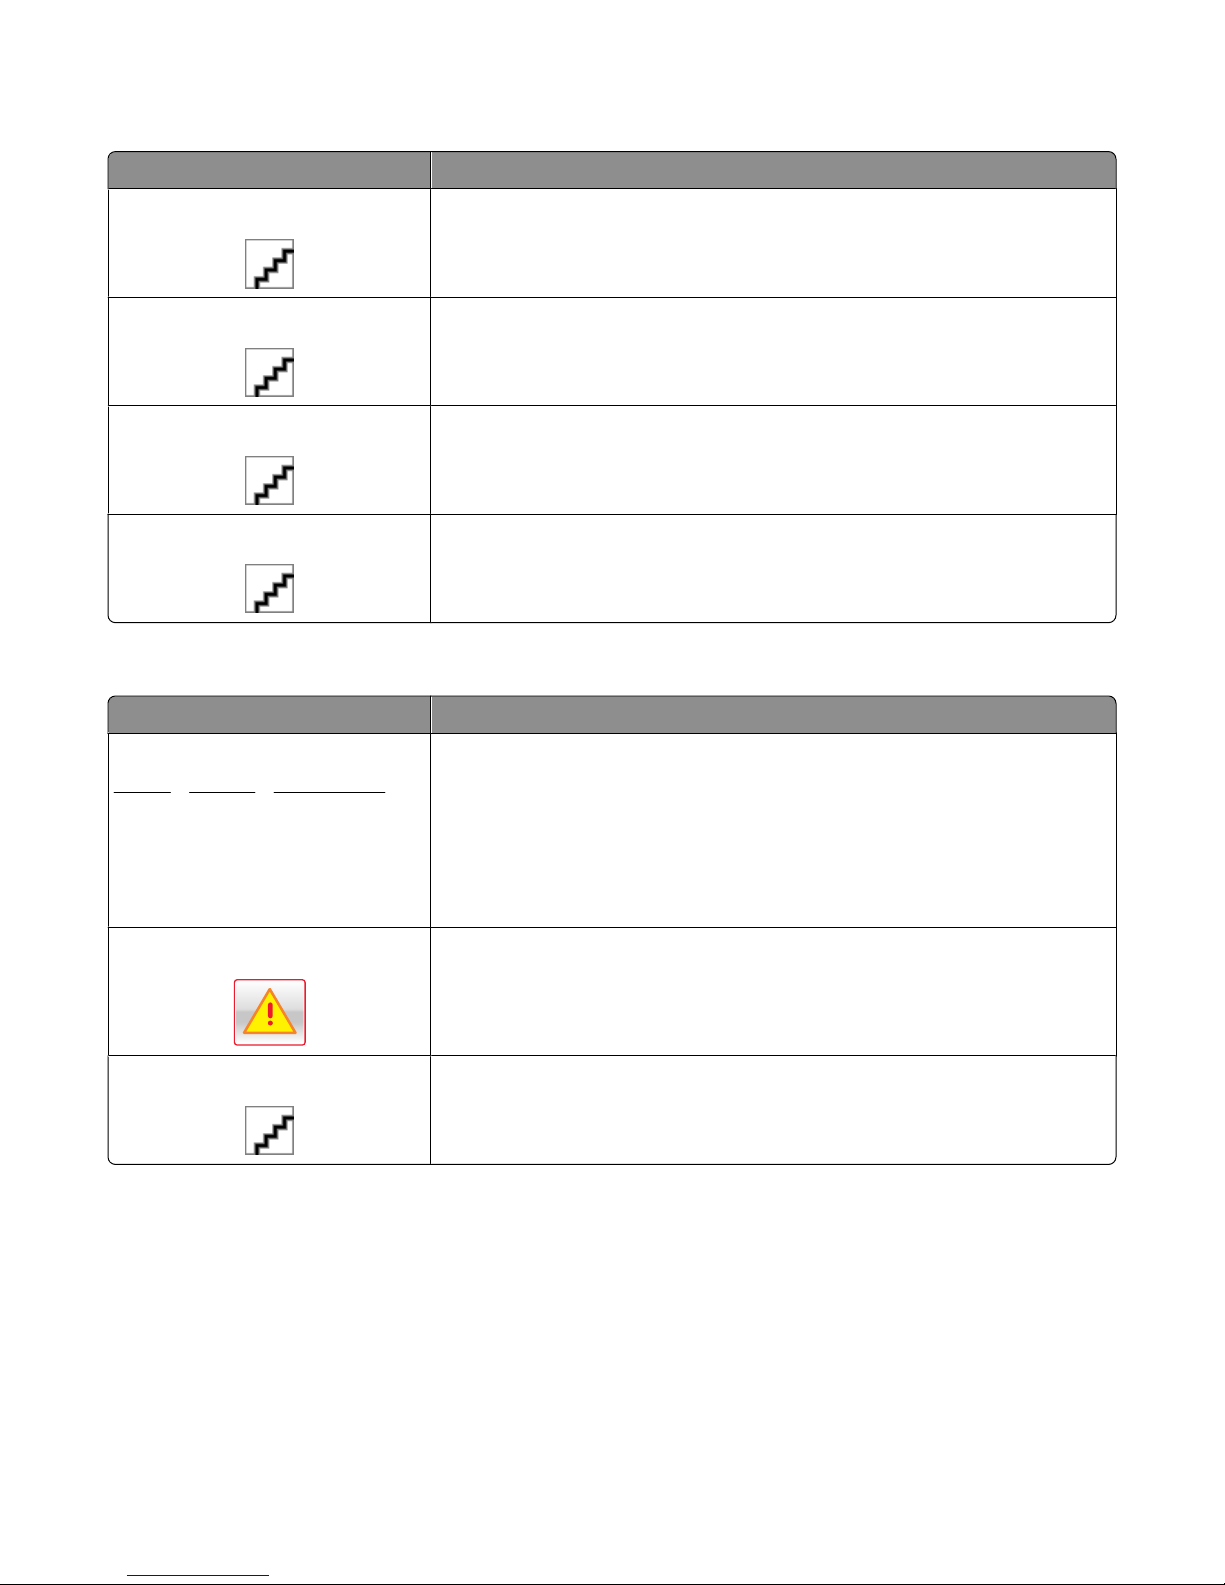
Understanding the home screen.............................................................................................................16
Using the touch-screen buttons..............................................................................................................17
Setting up and using the home screen applications....................................20
Customizing the home screen using the Embedded Web Server...........................................................20
Using the home screen applications.......................................................................................................20
Using Forms and Favorites......................................................................................................................21
Using Scan to Network............................................................................................................................23
Using the Remote Operator Panel..........................................................................................................25
Using My MFP.........................................................................................................................................26
Using WS-Scan.........................................................................................................................................27
Exporting and importing a configuration using the Embedded Web Server...........................................28
Additional printer setup.............................................................................29
Installing internal options........................................................................................................................29
Installing hardware options.....................................................................................................................38
Attaching cables......................................................................................................................................40
Verifying printer setup............................................................................................................................42
Setting up the printer software...............................................................................................................42
Installing the printer on a wired network...............................................................................................44
Minimizing your printer's environmental impact........................................46
Saving paper and toner...........................................................................................................................46
Saving energy..........................................................................................................................................47
Contents
2
Page 3

Recycling..................................................................................................................................................49
Loading paper and specialty media............................................................51
Setting the paper size and type...............................................................................................................51
Configuring Universal paper settings......................................................................................................51
Loading the standard 250-sheet tray and optional 550-sheet tray.........................................................51
Loading the 650-sheet duo drawer.........................................................................................................54
Loading the multipurpose feeder............................................................................................................55
Loading the manual feeder.....................................................................................................................57
Linking and unlinking trays......................................................................................................................58
Paper and specialty media guide................................................................60
Paper guidelines......................................................................................................................................60
Storing paper...........................................................................................................................................62
Supported paper sizes, types, and weights.............................................................................................62
Printing......................................................................................................65
Printing a document................................................................................................................................65
Printing from a flash drive.......................................................................................................................66
Printing on specialty media.....................................................................................................................68
Printing confidential and other held jobs................................................................................................71
Printing photos from a PictBridge-enabled digital camera.....................................................................73
Printing information pages......................................................................................................................73
Canceling a print job................................................................................................................................74
Copying......................................................................................................75
Making copies.........................................................................................................................................75
Copying film photos................................................................................................................................76
Copying on specialty media.....................................................................................................................76
Customizing copy settings.......................................................................................................................77
Placing information on copies.................................................................................................................82
Canceling a copy job................................................................................................................................82
Understanding the copy screens and options.........................................................................................83
E-mailing....................................................................................................86
Getting ready to e-mail...........................................................................................................................86
Creating an e-mail shortcut.....................................................................................................................87
E-mailing a document..............................................................................................................................88
Contents
3
Page 4

Customizing e-mail settings.....................................................................................................................89
Canceling an e-mail.................................................................................................................................90
Understanding e-mail options.................................................................................................................90
Faxing........................................................................................................93
Getting the printer ready to fax..............................................................................................................93
Creating shortcuts.................................................................................................................................107
Sending a fax.........................................................................................................................................108
Customizing fax settings........................................................................................................................110
Canceling an outgoing fax.....................................................................................................................112
Understanding fax options....................................................................................................................112
Holding and forwarding faxes...............................................................................................................114
Scanning to an FTP address......................................................................116
Creating shortcuts.................................................................................................................................116
Scanning to an FTP address...................................................................................................................117
Understanding FTP options...................................................................................................................118
Scanning to a computer or flash drive......................................................121
Scanning to a computer........................................................................................................................121
Scanning to a flash drive........................................................................................................................122
Using the ScanBack Utility.....................................................................................................................122
Understanding scan profile options......................................................................................................123
Understanding printer menus...................................................................125
Menus list..............................................................................................................................................125
Supplies menu.......................................................................................................................................126
Paper menu...........................................................................................................................................127
Reports menu........................................................................................................................................137
Network/Ports.......................................................................................................................................138
Security menu.......................................................................................................................................145
Settings menu........................................................................................................................................151
Help menu.............................................................................................................................................201
Securing the printer hard disk and other installed memory......................203
Statement of Volatility..........................................................................................................................203
Erasing volatile memory........................................................................................................................204
Erasing non-volatile memory................................................................................................................204
Contents
4
Page 5

Erasing printer hard disk memory using the Embedded Web Server...................................................204
Configuring printer hard disk encryption using the Embedded Web Server.........................................205
Maintaining the printer............................................................................206
Cleaning the exterior of the printer......................................................................................................206
Cleaning the scanner glass....................................................................................................................207
Storing supplies.....................................................................................................................................207
Checking the status of supplies.............................................................................................................208
Ordering supplies..................................................................................................................................208
Replacing supplies.................................................................................................................................209
Moving the printer................................................................................................................................227
Administrative support............................................................................229
Finding advanced networking and administrator information.............................................................229
Using the Embedded Web Server.........................................................................................................229
Checking the printer status...................................................................................................................229
Checking the virtual display...................................................................................................................229
Setting up e-mail alerts.........................................................................................................................230
Viewing reports.....................................................................................................................................230
Restoring factory default settings.........................................................................................................230
Clearing jams............................................................................................232
Avoiding jams........................................................................................................................................232
Understanding jam numbers and locations..........................................................................................232
200 paper jam.......................................................................................................................................234
201 paper jam.......................................................................................................................................234
202 paper jam.......................................................................................................................................235
230 paper jam.......................................................................................................................................237
235 paper jam.......................................................................................................................................237
24x paper jam........................................................................................................................................238
250 paper jam.......................................................................................................................................238
290–294 paper jams..............................................................................................................................239
Troubleshooting.......................................................................................240
Solving basic printer problems..............................................................................................................240
Understanding printer messages..........................................................................................................240
Solving printing problems.....................................................................................................................252
Contents
5
Page 6

Solving copy problems..........................................................................................................................255
Solving scanner problems.....................................................................................................................258
Solving fax problems.............................................................................................................................260
Solving home screen applications problems.........................................................................................264
Solving option problems........................................................................................................................268
Solving paper feed problems.................................................................................................................269
Solving print quality problems..............................................................................................................270
Solving color quality problems..............................................................................................................278
Embedded Web Server does not open.................................................................................................281
Contacting customer support................................................................................................................281
Notices.....................................................................................................282
Product information..............................................................................................................................282
Edition notice........................................................................................................................................282
Power consumption..............................................................................................................................286
Index........................................................................................................299
Contents
6
Page 7
Safety information
Connect the power cord to a properly grounded electrical outlet that is near the product and easily accessible.
Do not place or use this product near water or wet locations.
CAUTION—POTENTIAL INJURY: This product uses a laser. Use of controls or adjustments or performance of
procedures other than those specified herein may result in hazardous radiation exposure.
CAUTION—POTENTIAL INJURY: The lithium battery in this product is not intended to be replaced. There is a
danger of explosion if a lithium battery is incorrectly replaced. Do not recharge, disassemble, or incinerate a lithium
battery. Discard used lithium batteries according to the manufacturer's instructions and local regulations.
CAUTION—HOT SURFACE: The inside of the printer might be hot. To reduce the risk of injury from a hot component,
allow the surface to cool before touching.
This product uses a printing process that heats the print media, and the heat may cause the media to release emissions.
You must understand the section in your operating instructions that discusses the guidelines for selecting print media
to avoid the possibility of harmful emissions.
CAUTION—POTENTIAL INJURY: The printer weight is greater than 18 kg (40 lb) and requires two or more trained
personnel to lift it safely.
CAUTION—POTENTIAL INJURY: Before moving the printer, follow these guidelines to avoid personal injury or
printer damage:
• Turn the printer off using the power switch, and then unplug the power cord from the wall outlet.
• Disconnect all cords and cables from the printer before moving it.
• Lift the printer off the optional drawer, and set it aside instead of trying to lift the drawer and printer at the same
time.
Note: Use the handholds located on both sides of the printer to lift it off the optional drawer.
Use only the power cord provided with this product or the manufacturer's authorized replacement.
Use only the telecommunications (RJ-11) cord provided with this product or a 26 AWG or larger replacement when
connecting this product to the public switched telephone network.
CAUTION—SHOCK HAZARD: If you are accessing the system board or installing optional hardware or memory
devices sometime after setting up the printer, then turn the printer off, and unplug the power cord from the wall
outlet before continuing. If you have any other devices attached to the printer, then turn them off as well, and
unplug any cables going into the printer.
This product is designed, tested, and approved to meet strict global safety standards with the use of specific
manufacturer's components. The safety features of some parts may not always be obvious. The manufacturer is not
responsible for the use of other replacement parts.
CAUTION—SHOCK HAZARD: Make sure that all external connections (such as Ethernet and telephone system
connections) are properly installed in their marked plug-in ports.
CAUTION—POTENTIAL INJURY: Do not cut, twist, bind, crush, or place heavy objects on the power cord. Do not
subject the power cord to abrasion or stress. Do not pinch the power cord between objects such as furniture and
walls. If any of these things happen, a risk of fire or electrical shock results. Inspect the power cord regularly for
signs of such problems. Remove the power cord from the electrical outlet before inspecting it.
Refer service or repairs, other than those described in the user documentation, to a professional service person.
Safety information
7
Page 8

CAUTION—SHOCK HAZARD: To avoid the risk of electric shock when cleaning the exterior of the printer, unplug
the power cord from the wall outlet and disconnect all cables from the printer before proceeding.
CAUTION—SHOCK HAZARD: Do not use the fax feature during a lightning storm. Do not set up this product or
make any electrical or cabling connections, such as the fax feature, power cord, or telephone, during a lightning
storm.
CAUTION—TIPPING HAZARD: Floor-mounted configurations require additional furniture for stability. You must
use either a printer stand or printer base if you are using a high-capacity input tray, a duplex unit and an input
option, or more than one input option. If you purchased a multifunction printer (MFP) that scans, copies, and faxes,
you may need additional furniture. For more information, see www.lexmark.com/multifunctionprinters.
CAUTION—POTENTIAL INJURY: To reduce the risk of equipment instability, load each paper drawer or tray
separately. Keep all other drawers or trays closed until needed.
SAVE THESE INSTRUCTIONS.
Safety information
8
Page 9
Learning about the printer
Finding information about the printer
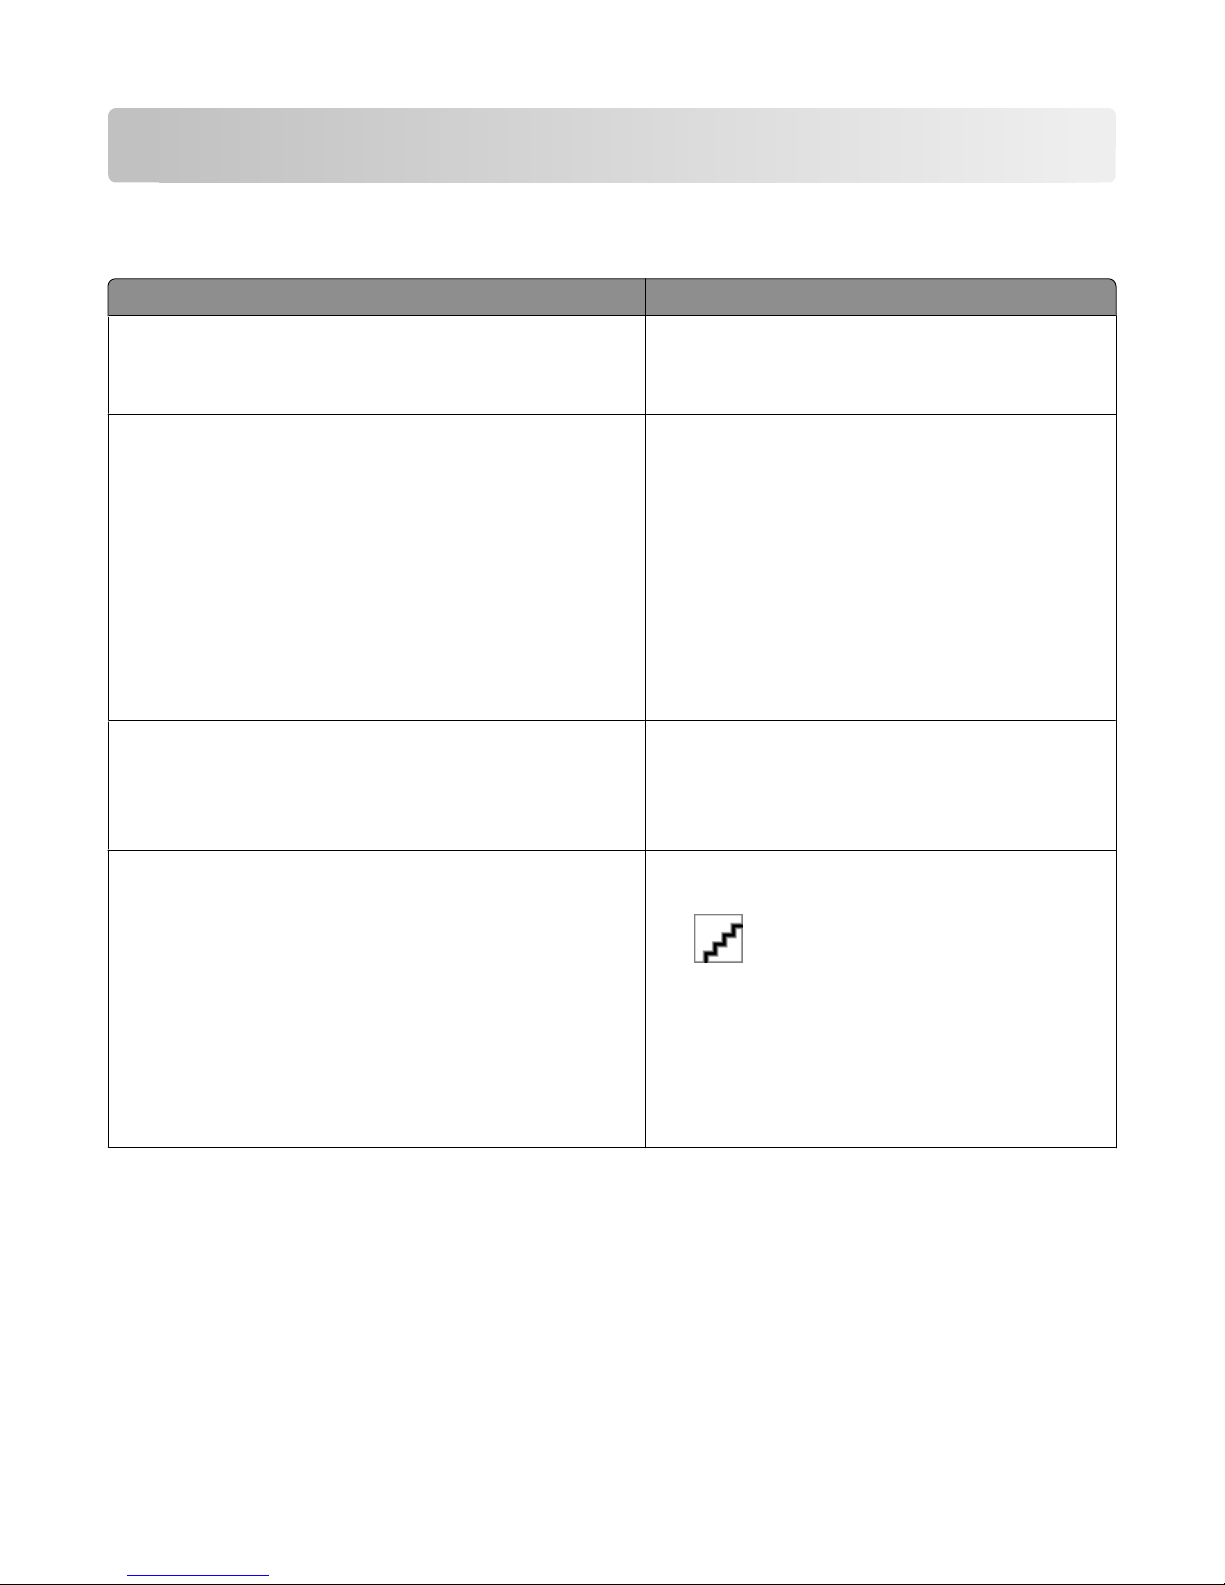
What are you looking for? Find it here
Initial setup instructions:
• Connecting the printer
• Installing the printer software
Additional setup and instructions for using the printer:
• Selecting and storing paper and specialty media
• Loading paper
• Configuring printer settings
Setup documentation—The setup documentation came
with the printer and is also available on the Lexmark Web
site at http://support.lexmark.com.
User's Guide—The User's Guide is available on the
Software and Documentation CD.
For updates, check our Web site at
http://support.lexmark.com.
• Viewing and printing documents and photos
• Setting up and using the printer software
• Configuring the printer on a network (depending on your
printer model)
• Caring for and maintaining the printer
• Troubleshooting and solving problems
Instructions for:
• Installing the printer using Guided or Advanced wireless setup
• Connecting the printer to an Ethernet or a wireless network
Networking Guide— Open the Software and
Documentation CD, and then look for Printer and
Software Documentation under the Pubs folder. From
the list of publications, click the Networking Guide link.
• Troubleshooting printer connection problems
Help using the printer software Windows or Mac Help—Open a printer software program
or application, and then click Help.
Click
Notes:
• The Help installs automatically with the printer
software.
• The printer software is located in the printer
Program folder or on the desktop, depending on
your operating system.
Learning about the printer
9
to view context-sensitive information.
Page 10

What are you looking for? Find it here
Latest supplemental information, updates, and tec hnical support:
• Documentation
• Driver downloads
• Live chat support
• E-mail support
• Telephone support
Lexmark Support Web site—
http://support.lexmark.com
Note: Select your country or region, and then select your
product to view the appropriate support site.
Support telephone numbers and hours of operation for
your country or region can be found on the Support Web
site or on the printed warranty that came with your
printer.
Record the following information (located on the store
receipt and at the back of the printer), and have it ready
when you contact support so they may serve you faster:
• Machine Type number
• Serial number
• Date purchased
• Store where purchased
Warranty information Warranty information varies by country or region:
• In the US—See the Statement of Limited Warranty
included with this printer, or at
http://support.lexmark.com.
• In other countries and regions—See the printed
warranty that came with your printer.
Selecting a location for the printer
When selecting a location for the printer, leave enough room to open trays, covers, and doors. If you plan to install any
options, then also leave enough room for them. It is important to:
• Make sure airflow in the room meets the latest revision of the ASHRAE 62 standard or the CEN Technical Committee
156 standard.
• Provide a flat, sturdy, and stable surface.
• Keep the printer:
– Away from the direct airflow of air conditioners, heaters, or ventilators
– Free from direct sunlight, humidity extremes, or temperature fluctuations
– Clean, dry, and free of dust
• Allow the following recommended amount of space around the printer for proper ventilation:
Learning about the printer
10
Page 11
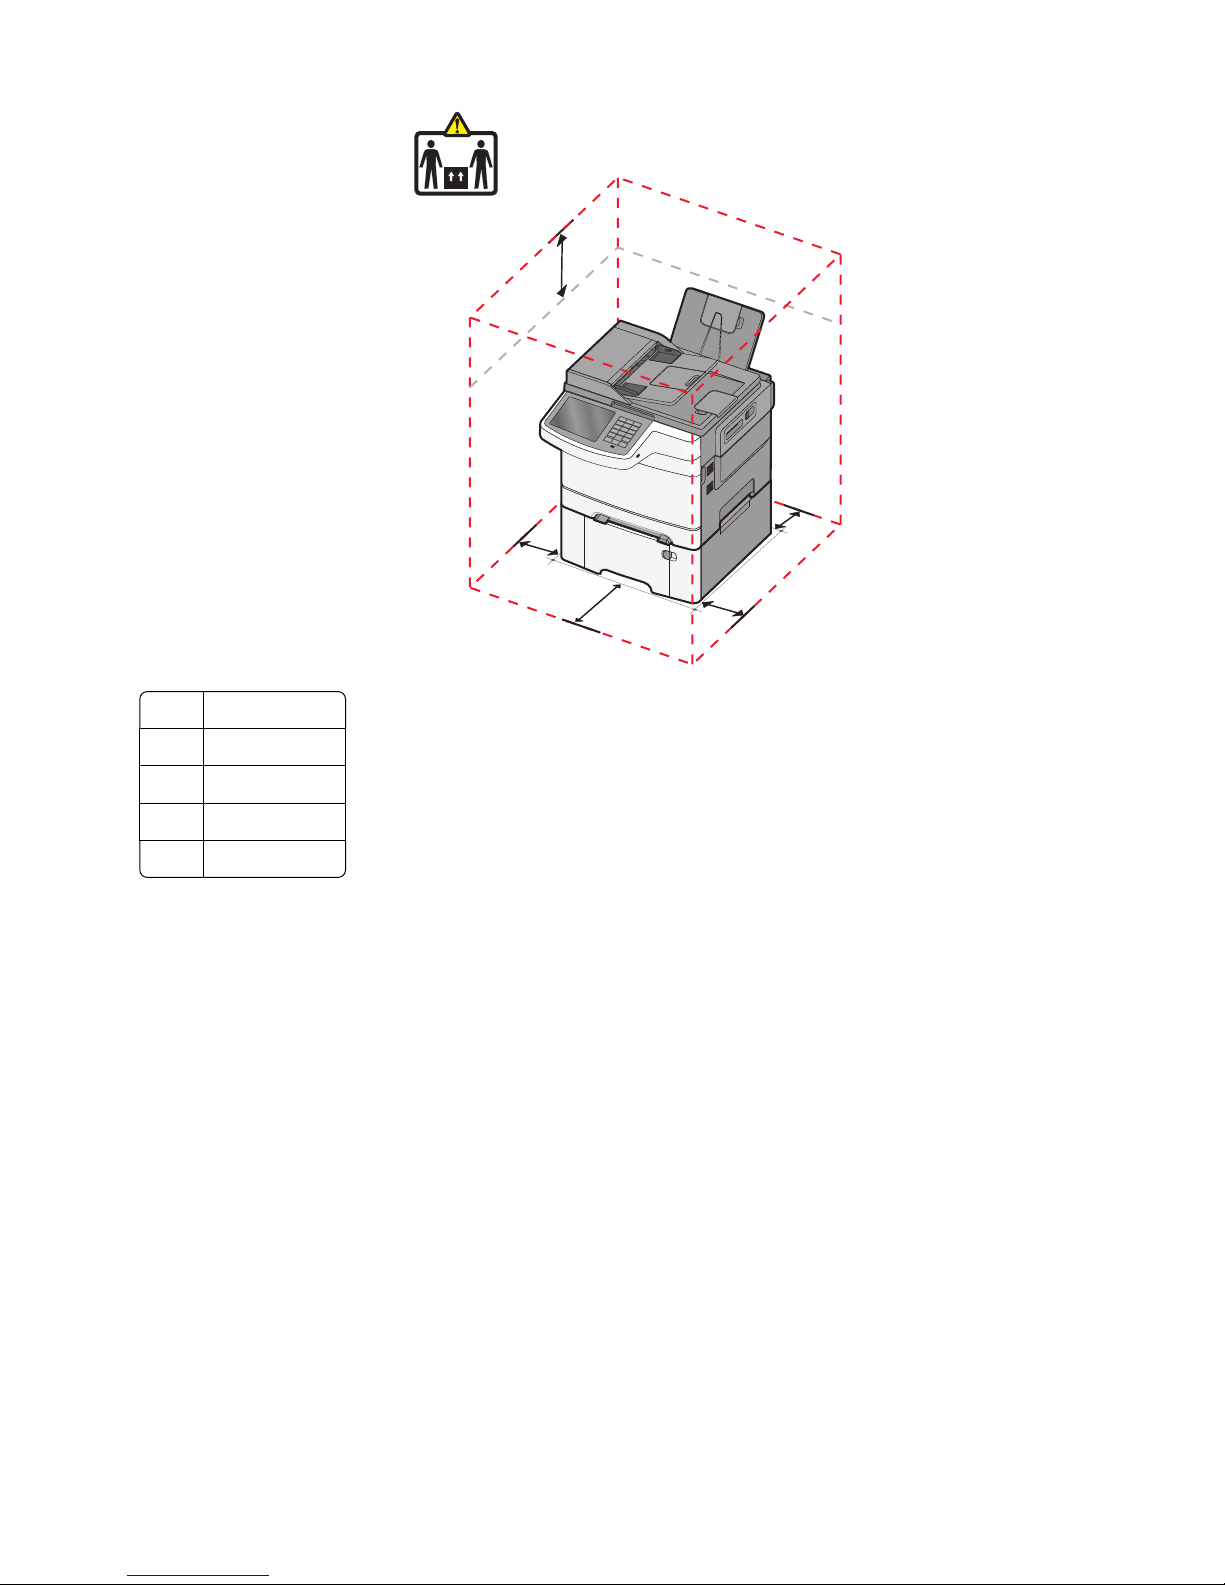
32.07 kg
(70.71 lb)
5
1
4
1 102 mm (4 in.)
2 508 mm (20 in.)
3 152 mm (6 in.)
4 76 mm (3 in.)
5 254 mm (10 in.)
3
2
Learning about the printer
11
Page 12
Printer configurations
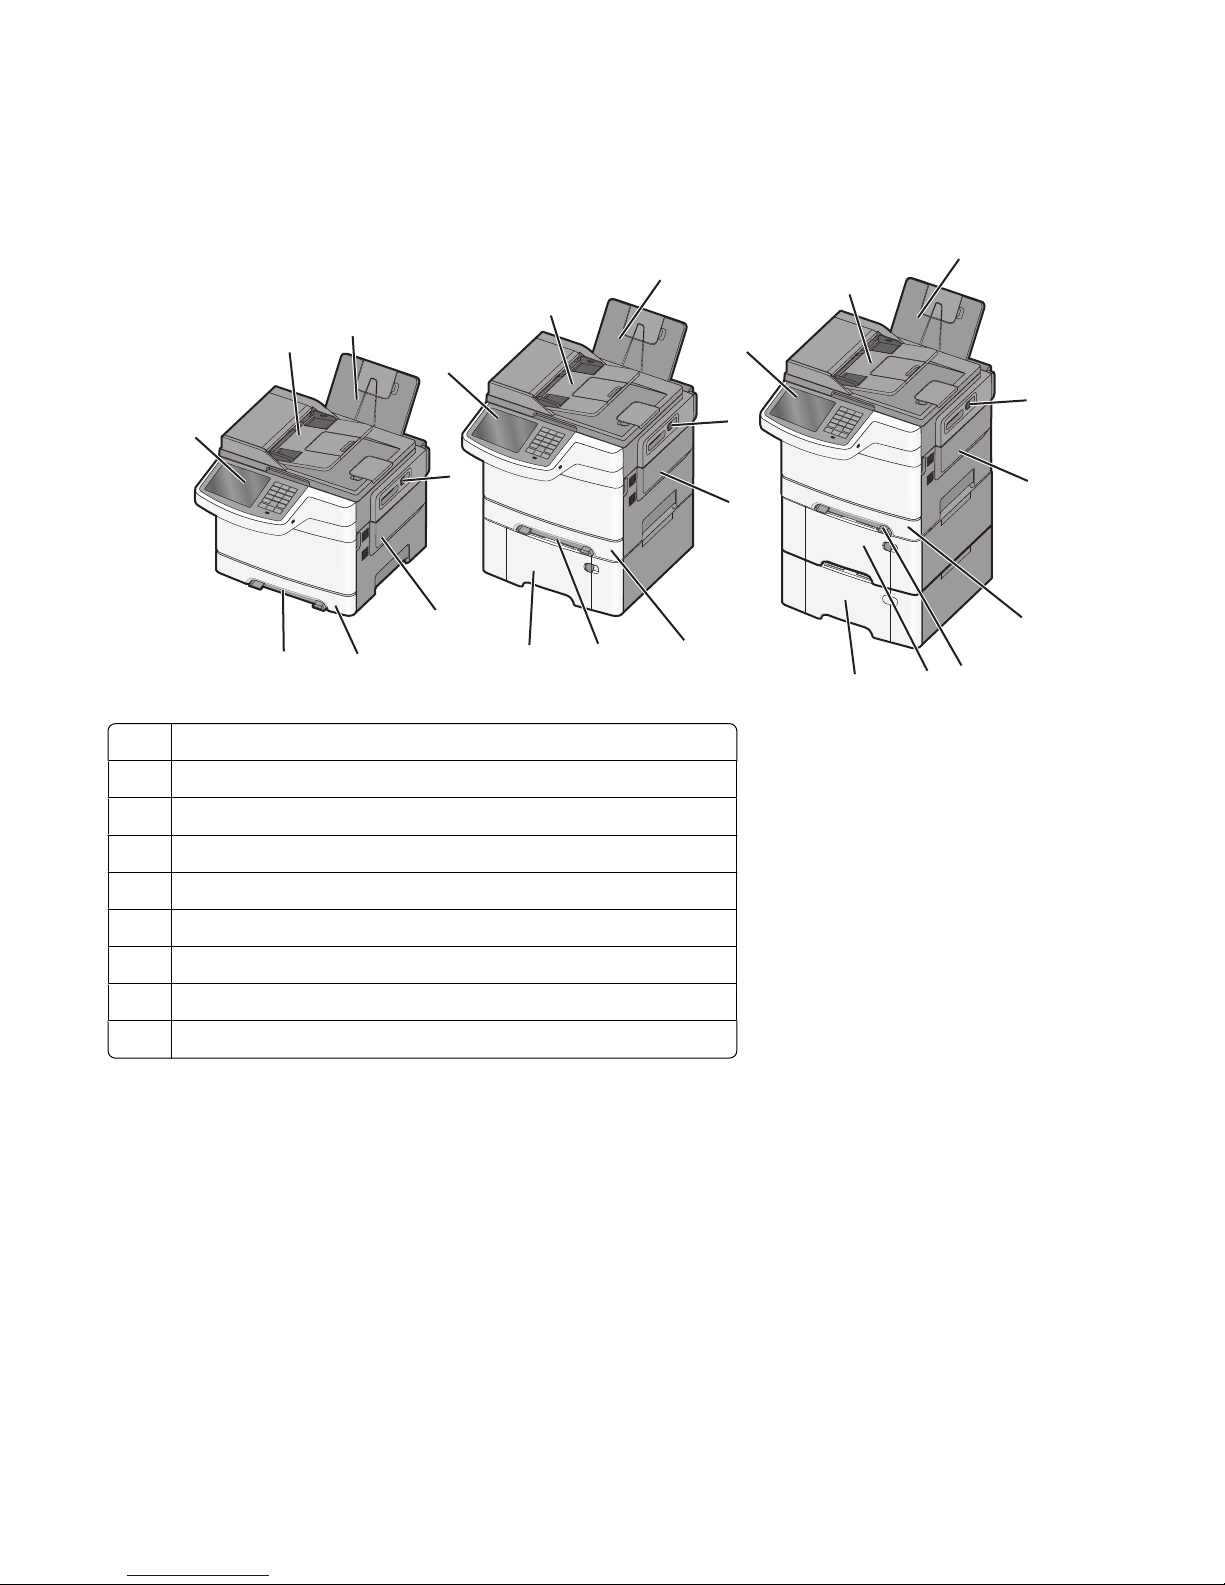
Basic models
2
1
3
1
3
3
2
1
4
2
4
4
5
7
1 Printer control panel
2 Automatic Document Feeder (ADF)
3 Standard exit bin
4 Top door latch
5 Right side cover
6 Standard 250-sheet tray (Tray 1)
7 Manual feeder
8 650-sheet duo drawer with integrated multipurpose feeder (Tray 2)
9 Optional 550-sheet tray (Tray 3)
6
8
7
6
5
5
6
7
9
8
Basic functions of the scanner
The scanner provides copy, fax, and scan-to-network capability for workgroups. You can:
• Make quick copies, or change the settings on the printer control panel to perform specific copy jobs.
• Send a fax using the printer control panel.
• Send a fax to multiple fax destinations at the same time.
• Scan documents and send them to your computer, an e-mail address, an FTP server, or a USB flash memory device.
Learning about the printer
12
Page 13
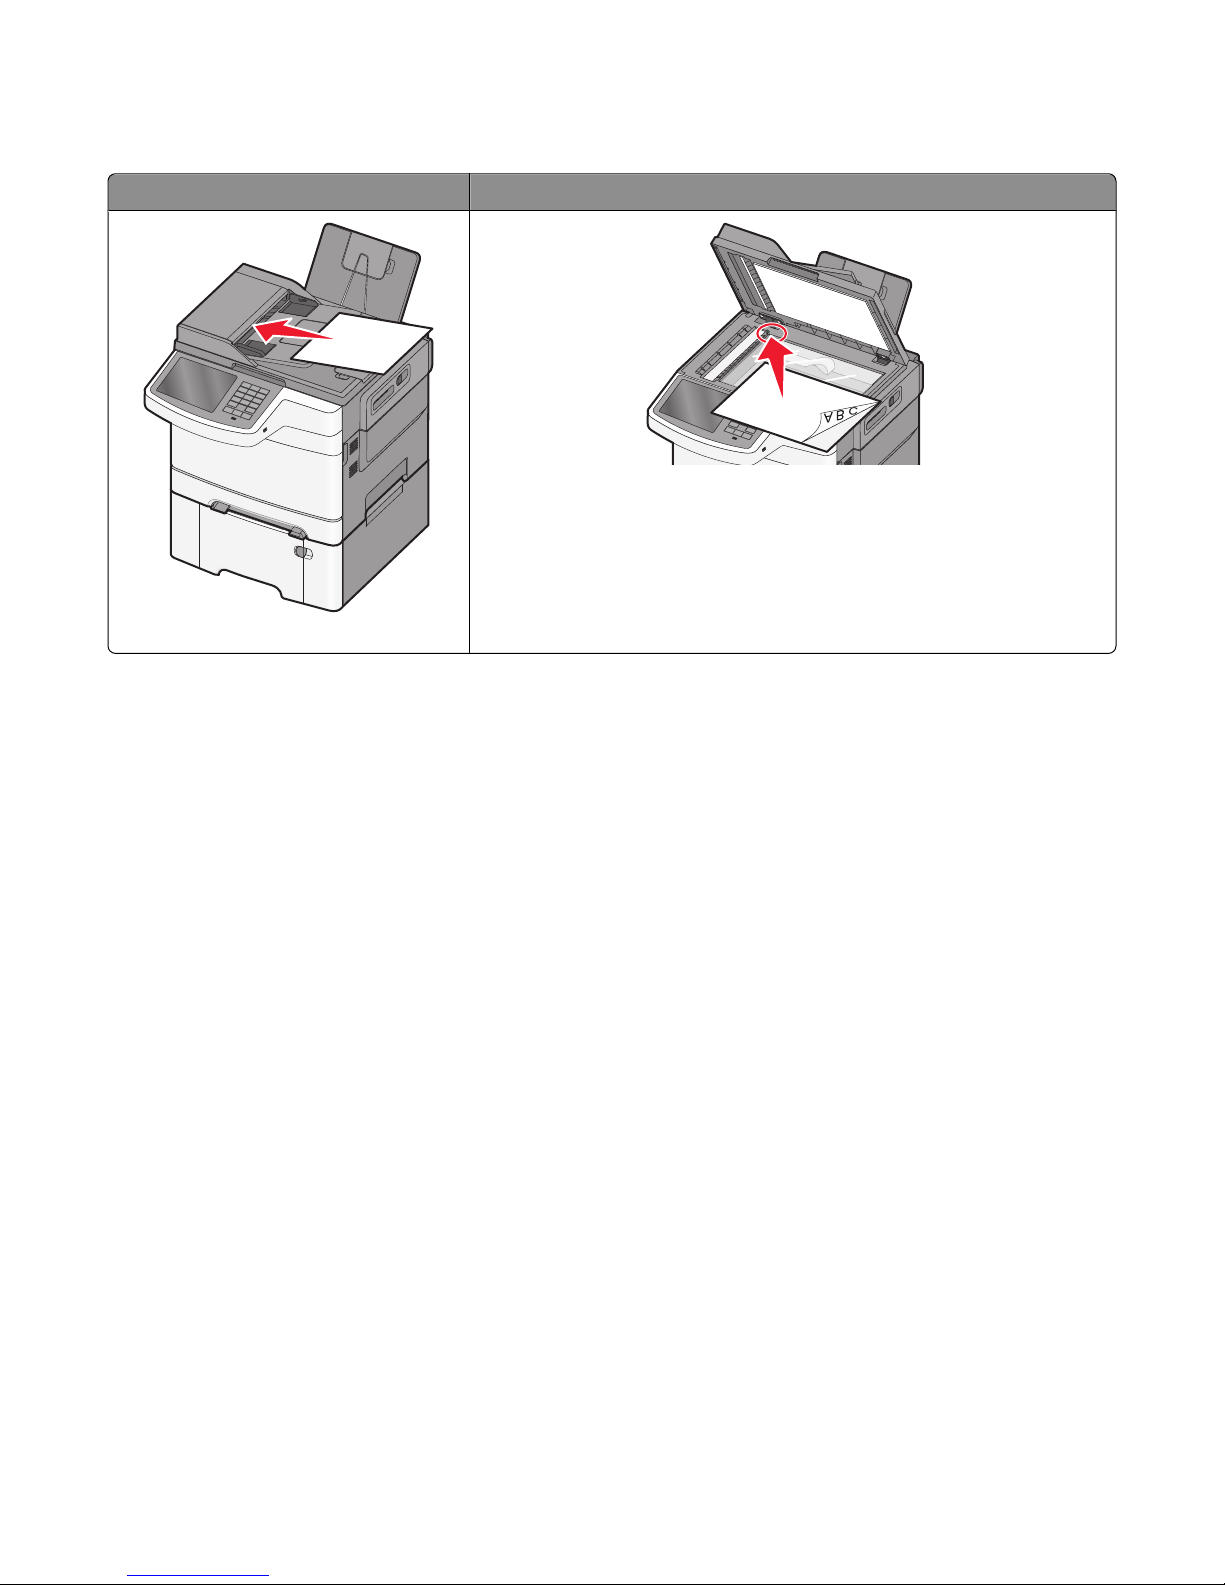
Understanding the ADF and scanner glass
Automatic Document Feeder (ADF) Scanner glass
AB C
Use the scanner glass for single pages, s mall items (such as postcards or photos),
transparencies, photo paper, or thin media (such as magazine clippings).
Use the ADF for multiple-page documents.
You can use the ADF or the scanner glass to scan documents.
Using the ADF
The ADF can scan multiple pages including duplex (two-sided) pages. When using the ADF:
Note: Duplex scanning is not available on selected printer models.
• Load the document into the ADF faceup, short edge first.
• Load up to 50 sheets of plain paper into the ADF.
• Scan sizes from 125 x 216 mm (4.9 x 8.5 in.) wide to 127 x 356 mm (5 x 14 in.) long.
• Scan media weights from 52 to 120 g/m
2
(14 to 32 lb).
• Do not load postcards, photos, small items, transparencies, photo paper, or thin media (such as magazine clippings)
into the ADF. Place these items on the scanner glass.
Using the scanner glass
The scanner glass can be used to scan or copy single pages or book pages. When using the scanner glass:
• Place a document facedown on the scanner glass in the corner with the green arrow.
• Scan or copy documents up to 215.9 x 355.6 mm (8.5 x 14 in.).
• Copy books up to 12.7 mm (0.5 in.) thick.
Learning about the printer
13
Page 14
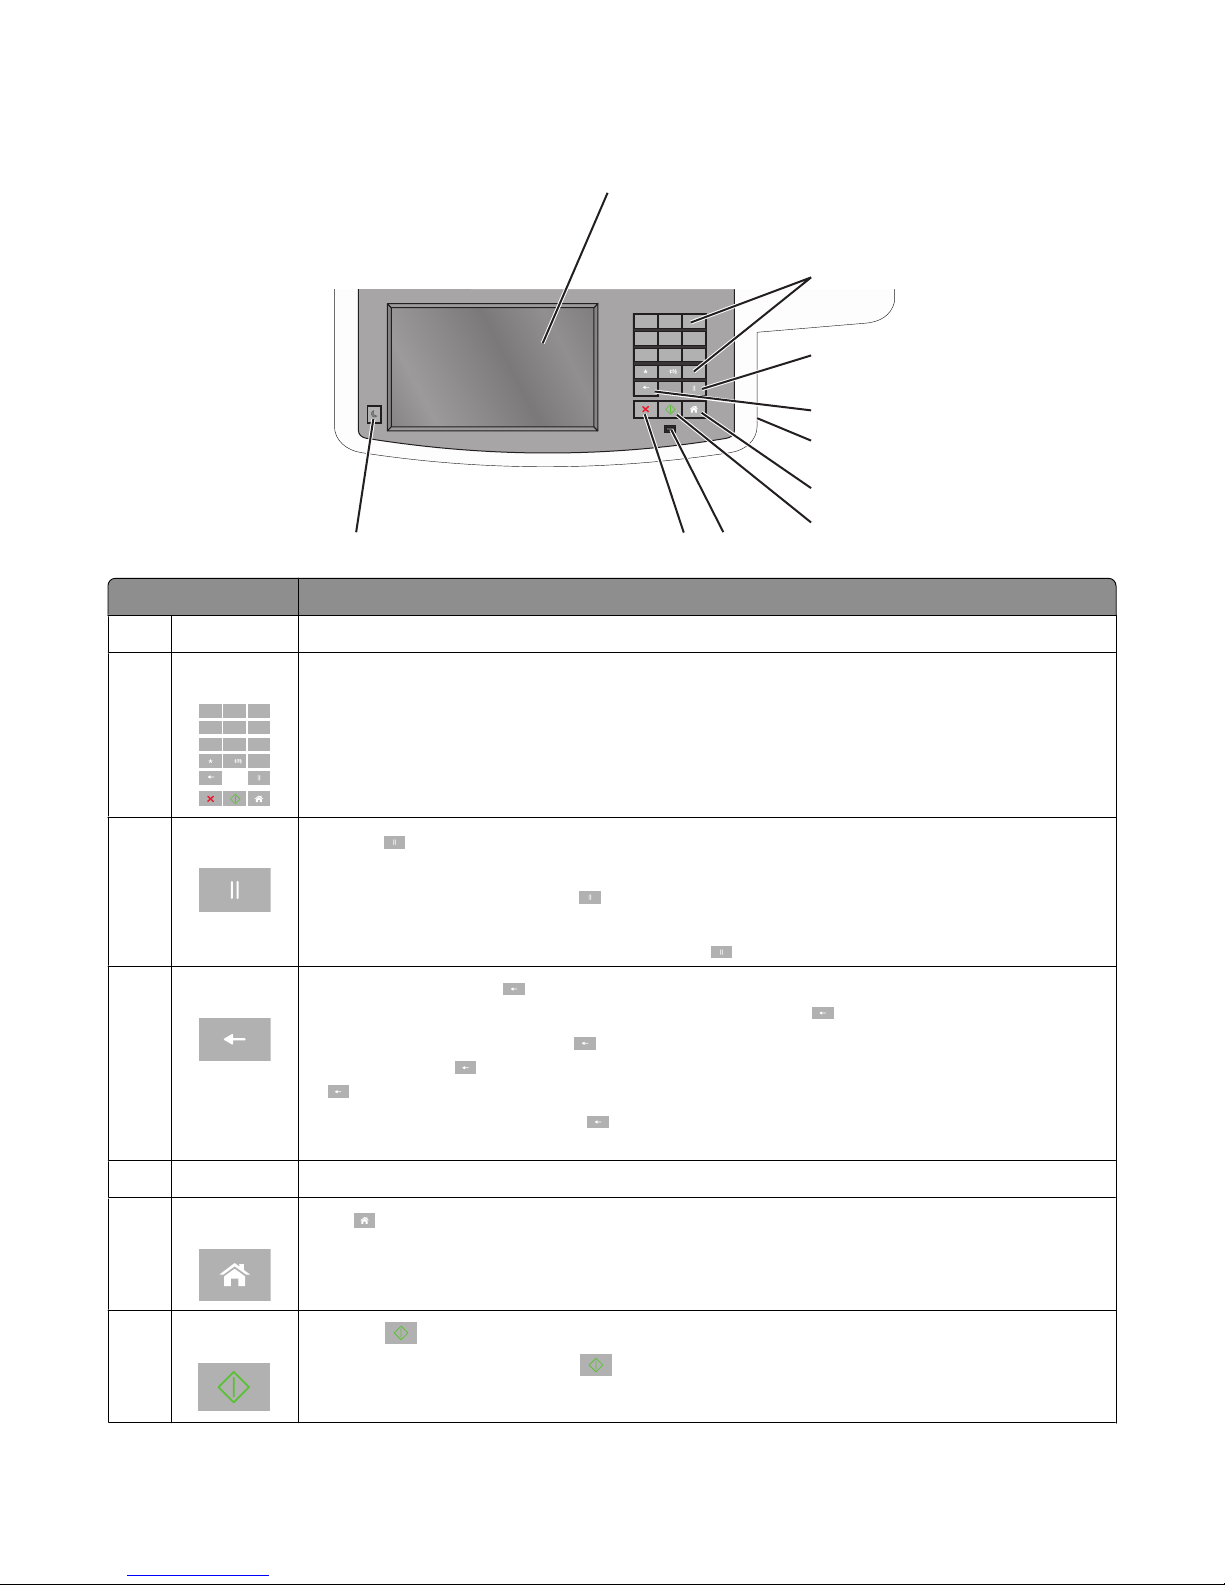
Understanding the printer control panel
1
2
ABC3DEF
@!.
2
1
MNO
JKL
GHI
6
5
4
WXYZ
TUV
PQRS
9
8
7
0
#
10
98
Item Description
1 Display View scanning, copying, faxing, and printing options as well as status and error messages.
3
4
5
6
7
2 Keypad
@!.
1
GHI
4
PQRS
7
3 Pause
ABC3DEF
2
JKL
5
TUV
8
0
Enter numbers, letters, or symbols on the display.
MNO
6
WXYZ
9
#
• Press to cause a two- or three-second dial pause in a fax number. In the Fax To field, a Pause
is represented by a comma (,).
• From the home screen, press to redial a fax number.
• The button functions only within the Fax menu or with fax functions. When outside of the Fax
menu, fax function, or home screen, pressing
4 Back In the Copy menu, press to delete the right-most digit of the value in the Copy Count. The default
value of 1 appears if the entire number is deleted by pressing
In the Fax Destination List, press
You can also press
causes the cursor to move up one line.
of
to delete an entire shortcut entry. Once an entire line is deleted, another press
In the E-mail Destination List, press
to delete the right-most digit of a number entered manually.
to delete the character to the left of the cursor. If the character
is in a shortcut, then the shortcut is deleted.
5 USB port Insert a flash drive to send data to the printer or to scan a file to the flash drive.
6 Home Press to return to the home screen.
causes an error beep.
numerous times.
7 Submit
• Press to initiate the current job indicated on the display.
• From the home screen, press to start a copy job with the default settings.
• If pressed while a job is scanning, then the button has no effect.
Learning about the printer
14
Page 15
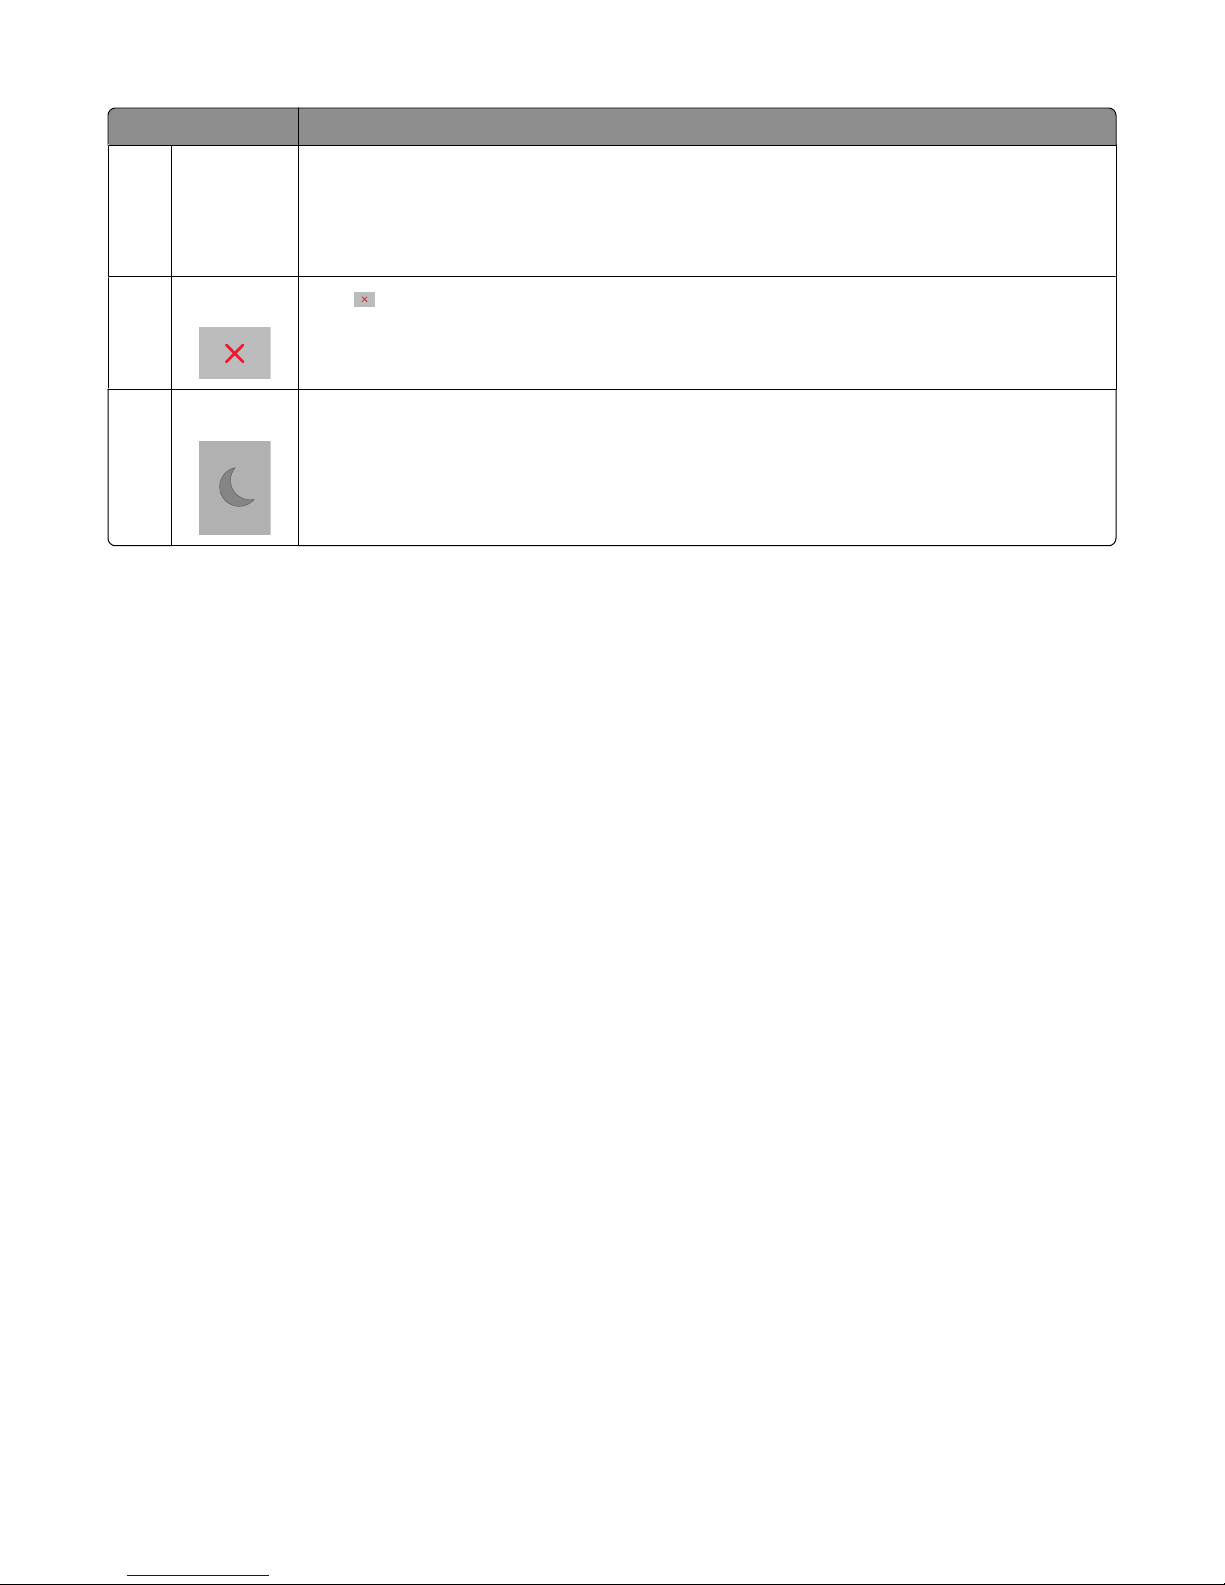
Item Description
8 Indicator light
• Off—The printer is off.
• Blinking green—The printer is warming up, processing data, or printing.
• Solid green—The printer is on, but idle.
• Blinking red—Operator intervention is needed.
9 Stop Press to stop all printer activity.
A list of options is offered once Stopped appears on the display.
10 Sleep Press to put printer into or out of Sleep Mode.
Learning about the printer
15
Page 16
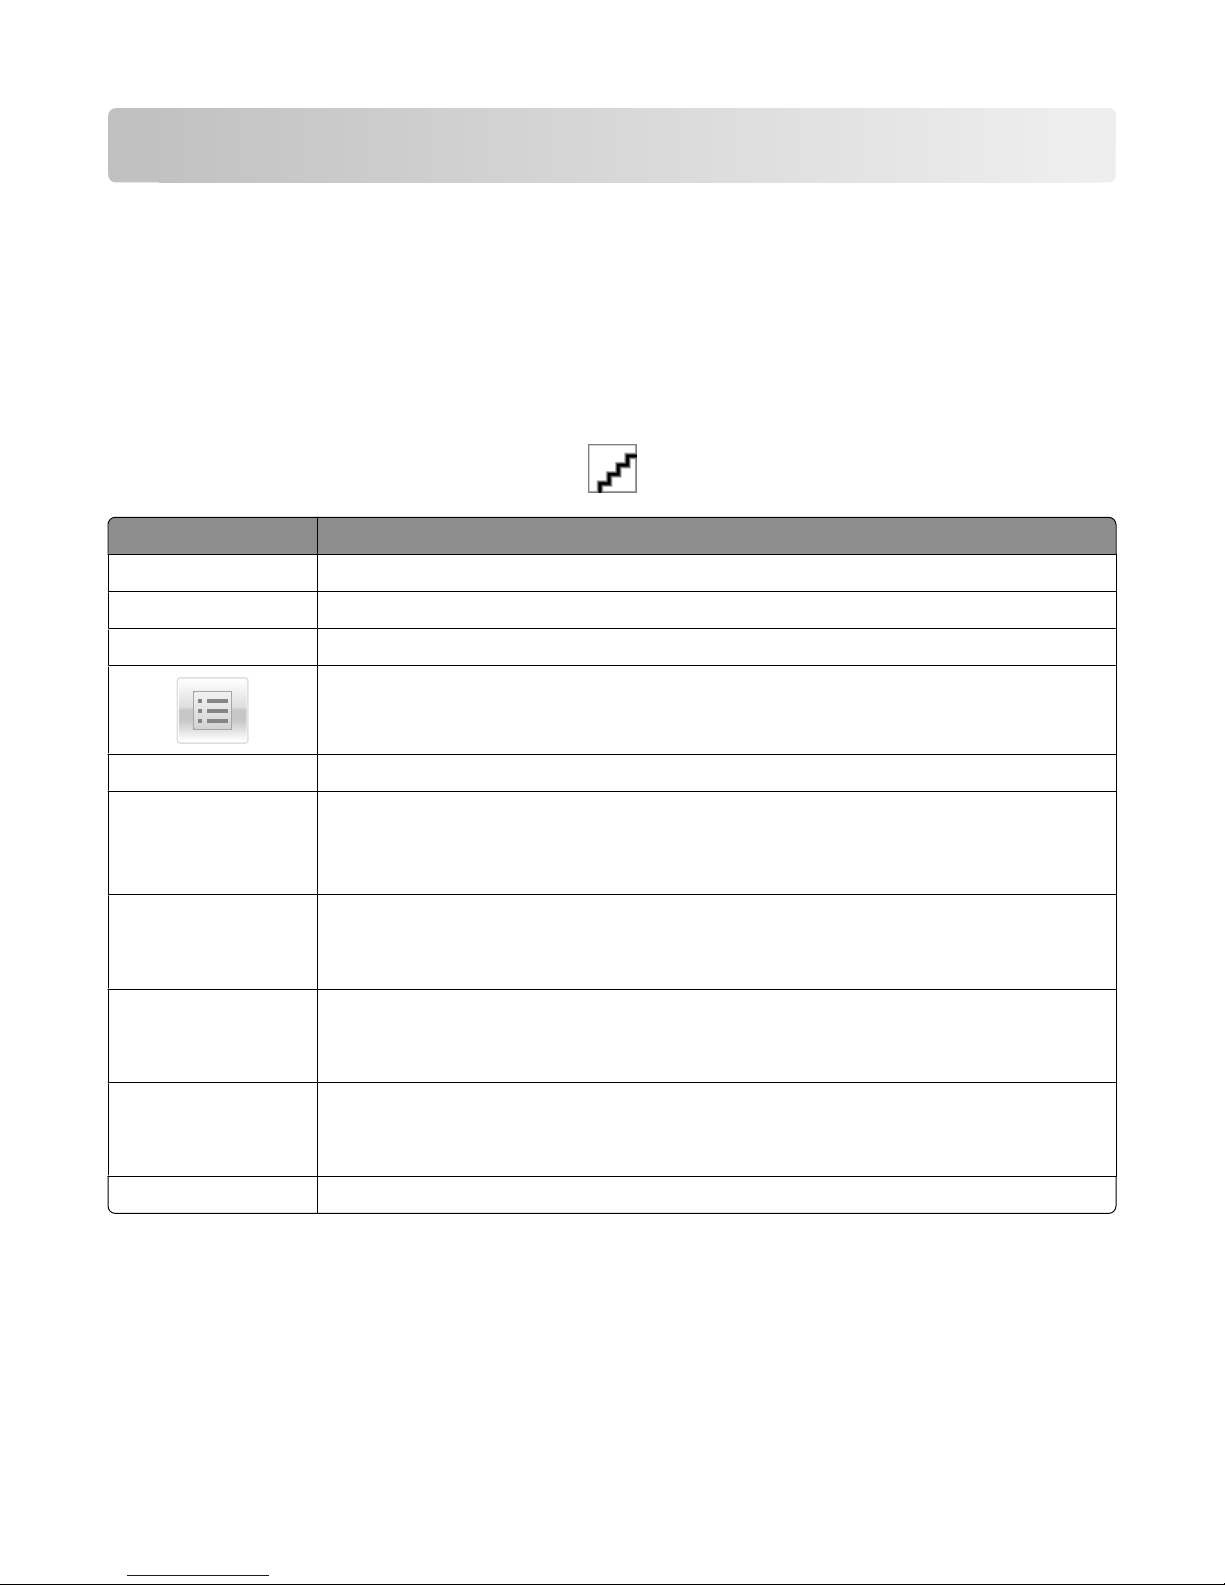
Understanding the home screen
Understanding the home screen
When the printer is turned on, the display shows a basic screen, referred to as the home screen. Touch the home screen
buttons and icons to initiate an action such as copying, faxing, or scanning; to open the menu screen; or to respond to
messages.
Note: Your home screen, icons, and buttons may vary depending on your home screen customization settings,
administrative setup, and active embedded solutions.
Touch To
Copy Access the Copy menus and make copies.
E-mail Access the E-mail menus and send e-mails.
Fax Access the Fax menus and send fax.
Access the printer menus.
Note: These menus are available only when the printer is in the Ready state.
FTP Access the File Transfer Protocol (FTP) menus and scan documents directly to an FTP server.
Status message bar
• Show the current printer status such as Ready or Busy.
• Show printer conditions such as Toner Low or Cartridge Low.
• Show intervention messages so the printer can continue processing.
Status/Supplies
• Display a warning or error message whenever the printer requires intervention to continue
processing.
• Access the messages screen for more information on the message, and how to clear it.
USB or USB Thumbdrive View, select, print, scan, or e-mail photos and documents from a flash drive.
Note: This button appears only when you return to the home screen while a memory card or flash
drive is connected to the printer.
Bookmarks Create, organize, and save a set of bookmarks (URL) into a tree view of folders and file links.
Note: The tree view supports only bookmarks created from this function, and not from any other
application.
Held Jobs Display all current held jobs.
Understanding the home screen
16
Page 17
Other buttons that may appear on the home screen:
Touch To
Search held jobs Search on any of the following items:
• User name for held or confidential print jobs
• Job names for held jobs, excluding confidential print jobs
• Profile names
• Bookmark container or print job names
• USB container or print job names for supported file types
Release Held Fax Access the list of held faxes.
Note: This button appears only when there are held faxes with a
scheduled hold time previously set.
Lock Device Open a password entry screen. Enter the correct password to lock the
printer control panel.
Note: This button appears only when the printer is unlocked and
password has been set.
Unlock Device Open a password entry screen. Enter the correct password to unlock
the printer control panel.
Note: This button appears only when the printer is locked. The printer
control panel buttons and shortcuts cannot be used while this appears.
Cancel Jobs Open the Cancel Jobs screen. The Cancel Jobs screen shows three
headings: Print, Fax, and Network.
The following options are available under the Print, Fax, and Network
headings:
• Print job
• Copy job
• Fax profile
• FTP
• E-mail send
Each heading has a list of jobs shown in a column under it which can
show only three jobs per screen. If more than three jobs exist in a
column, then an arrow appears enabling you to scroll through the jobs.
Change Language Launch the Change Language pop-up window that allows you to change
the primary language of the printer.
Using the touch-screen buttons
Note: Your home screen, icons, and buttons may vary depending on your home screen customization settings and
administrative setup.
Understanding the home screen
17
Page 18
Sample touch screen
Touch To
Submit Submit changes made in the printer settings.
Sample Copy Print a sample copy.
Right arrow Scroll to the right.
Left arrow Scroll to the left.
Home Return to the home screen.
Right increase Select a higher value.
Left decrease Select a lower value.
Exit Exit from the current screen.
Tips Open a context-sensitive Help dialog on the touch screen.
Understanding the home screen
18
Page 19
Other touch-screen buttons
Touch To
Accept Save a setting.
Cancel
• Cancel an action or a selection.
• Exit a screen and lets you return to the previous screen without saving changes.
Reset Reset values on the screen.
Radio button Select or clear an item.
Features
Feature Description
Menu trail line:
Menus > Settings > Copy Settings >
Number of Copies
A menu trail line is located at the top of each menu screen. This feature shows the
path taken to arrive at the current menu.
Touch any of the underlined words to return to that menu.
Number of Copies is not underlined since this is the current screen. If you touch an
underlined word on the Number of Copies screen before the Number of Copies is
set and saved, then the selection is not saved, and it does not become the default
setting.
Attendance message alert If an attendance message affects a function, then this icon appears and the red
indicator light blinks.
Warning If an error condition occurs, then this icon appears.
Understanding the home screen
19
Page 20
Setting up and using the home screen applications
Customizing the home screen using the Embedded Web Server
Accessing the Embedded Web Server
To access the Embedded Web Server, type your printer IP address or host name in the address field of your Web
browser.
Note: If you do not know the IP address or host name of the printer, then you can:
• View the information on the printer control panel home screen, or in the TCP/IP section under the Network/Ports
menu.
• Print a network setup page or menu settings page, and then locate the information in the TCP/IP section.
Customizing the home screen
1 From the Embedded Web Server, click Settings > General Settings > Home screen customization.
2 Select the home screen application to be displayed.
Note: You can also clear the check box to hide the home screen application.
3 Click Submit.
Note: If the application is not listed, then access the application configuration settings by clicking Settings > Device
Solutions > Solutions (eSF) > name of the application.
Using the home screen applications
Note: Your home screen, icons and buttons may vary depending on your home screen customization settings,
administrative setup, and active embed ded applications. Some applications are supported only on select printer models.
Touch To
Forms and Favorites
Scan to Network Scan your documents to specified network destinations.
• Access frequently used forms and bookmarks.
• Create your own index of forms, information sheets, and other materials you
print often.
To print a form, see “Printing forms” on page 22.
Note: If the application icon does not appear on the printer home screen, then you
need to set up the application.
Setting up and using the home screen applications
20
Page 21
Touch To
My MFP Customize your touch-screen settings, and then store these preferences on a flash
drive. Each time you insert your flash drive into the USB port of a printer that
supports My MFP, your preferred settings are automatically loaded.
Note: The application icon appears only when a flash drive with My MFP settings is
inserted into the USB port of the printer.
WS-Scan Scan your documents to a specified Windows-based application.
Note: This application is available only for network printers and computers that
support Microsoft Web Services.
Using Forms and Favorites
The Forms and Favorites application provides users with quick and easy access to frequently used forms or other
information that is regularly printed.
The Bookmark function is used to create a link to a form or electronic file at a predetermined URL or network location.
These files are then accessed only from the Forms and Favorites icon, and not from any other application.
When adding bookmarks from the printer Embedded Web Server, more configuration options are available than when
adding bookmarks from the printer control panel.
Changing the display icon and label
You can change the icon and associated text that appear on the printer home screen. If you do not want to use the
default icon for an application, then you can import new icons to be used for both the pressed and unpressed button
states.
Note: For information about compatible image file types and recommended file sizes, see the mouse-over help next
to each field.
1 From the Embedded Web Server, click Settings or Configuration.
2 Click Device Solutions > Solutions (eSF), or click Embedded Solutions.
3 Click the name of the application > Configure.
4 From the Home Screen Button section, you can:
• Specify a new icon text or label to be displayed above the icon on the home screen.
• Click Browse to select a new icon image file to represent the application on the home screen.
Setting up and using the home screen applications
21
Page 22

• Click Browse to select a new image file to be displayed while the application icon is being pressed.
5 Click Apply to save the settings or Reset to return to the previous settings.
Adding bookmarks using the printer control panel
Note: Bookmarks added from the printer control panel must be edited from the printer Embedded Web Server.
1 From the home screen, navigate to:
Forms and Favorites > Create Bookmark > enter a name for the new bookmark > Submit
This name will be displayed in the Forms menu when selecting a form to print.
2 Select Network, FTP, HTTP, or HTTPS to specify the network location or the protocol of the bookmark, and then
touch Submit.
3 Choose an authentication option, or enter the URL or network location of the form.
Note: The printer does not verify the validity of the URL or network location. Make sure that the location is entered
correctly.
4 Touch Submit.
Adding bookmarks using the Embedded Web Server
1 From the Embedded Web Server, click Settings or Configuration.
2 Click Device Solutions > Solutions (eSF), or click Embedded Solutions.
3 Click the name of the application, and then click Add under the Bookmarks field.
Note: You can also edit or delete a bookmark.
4 In the Name field, type a new bookmark name.
5 From the Location list, select the protocol or specify if it is located in a network folder. You may choose Network,
FTP, HTTP, or HTTPS.
6 In the PIN field, type a four-digit number. This field is optional and will require users to enter a PIN when printing
the bookmark.
7 Type the network address, the network domain name, the port, or the URL based on the location of the bookmark
specified in Step 4.
8 Under Authentication Options, select whether to require user authentication for this destination. The credentials
are used to access the network destination.
9 In the sections that follow, adjust the settings as necessary:
• Select check boxes to allow users to modify settings.
• Use radio buttons and drop-down menus to specify the default settings.
10 Click Apply to save the new bookmark.
Printing forms
From the home screen, navigate to:
Forms and Favorites > select the form from the list > enter the number of copies > adjust other settings > Submit
Setting up and using the home screen applications
22
Page 23

Using Scan to Network
Scan to Network lets users of a printer scan their documents to network destinations specified by the network
administrator. After the destinations (shared network folders) have been established on the network, the setup process
for the application involves installing and configuring the application on the appropriate printer(s) using the Embedded
Web Server.
Supported operating systems
For the application to work, the network destination must use any of the following operating systems:
• Using Network Share
– Microsoft Windows Vista Ultimate Edition
– Microsoft Windows 7 Ultimate
– Microsoft Windows 7 Ultimate x64 Edition
– Microsoft Windows Server Professional 2008
– Microsoft Windows Server 2008 x64 Edition
– Microsoft Windows Server 2003 Standard Edition SP1 or R2
– Microsoft Windows XP Professional SP2
– Microsoft Windows 2000 Professional SP4
– Microsoft Windows 2000 SP4
• Using File Transfer Protocol (FTP)
– Microsoft Windows Vista Ultimate Edition
– Microsoft Windows 7 Ultimate
– Microsoft Windows 7 Ultimate x64 Edition
– Microsoft Windows Server Professional 2008
– Microsoft Windows Server 2008 x64 Edition
– Microsoft Windows Server 2003 Standard Edition SP1 or R2
– Microsoft Windows XP Professional SP2
– Microsoft Windows 2000 Professional SP4
– Microsoft Windows 2000 SP4
– Red Hat Linux Enterprise Edition
– Sun Solaris 10
– Novell OES Linux SUSE 9
• Using Distributed File System (DFS) environment
– Stand-alone DFS
– Domain-based DFS
– Domain based DFS with one child domain used for authentication
Configuring the display icon and label
1 From the Embedded Web Server, click Settings or Configuration.
2 Click Device Solutions > Solutions (eSF), or click Embedded Solutions.
Setting up and using the home screen applications
23
Page 24

3 Click the name of the application > Configure.
4 From the Home Screen Button section, you can:
• Specify a new icon text or label to be displayed above the icon on the home screen.
• Click Browse to select a new icon image file to represent the application on the home screen.
• Click Browse to select a new image file to be displayed while the application icon is being pressed.
• Select Always show button to make the icon appear on the home screen even when there is no valid destination.
5 Click Apply to save the settings or Reset to return to the previous settings.
Configuring a destination using the Embedded Web Server
1 From the Embedded Web Server, click Settings or Configuration.
2 Click Device Solutions > Solutions (eSF), or click Embedded Solutions.
3 Click the name of the application > Configure > Add.
Note: You can also edit or delete existing destinations.
4 Type a name for the destination.
5 Select Network Folder or FTP Address, and then configure the selected destination.
6 Under Authentication Options, select whether or not to require user authentication for this destination. The
credentials are used to access the network destination.
7 In the sections that follow, adjust the settings as necessary:
• Select check boxes to allow users to modify settings.
• Use radio buttons and drop-down menus to specify the default settings.
8 Click OK.
9 Repeat steps step 3 on page 24 through step 8 on page 24 to add, edit, or delete destinations.
10 Click Apply.
Scanning documents at the printer
1 Load the document into the scanner.
Note: Documents may be loaded into the scanner in multiple ways. For information on the different methods of
loading documents into the scanner, see the User's Guide that came with the printer.
2 Touch the application icon.
3 Select the destination where you want to receive the scanned document.
Note: After steps 2 or 3, you may be required to enter the user name and password used to access the printer
depending on how the printer and the particular destination are configured. Contact your system support person
for login information.
4 Some additional job options may be available depending on how the application has been configured. Follow the
instructions on the screen to update the options. Contact your system support person for more information on
each option.
Setting up and using the home screen applications
24
Page 25

5 Touch Scan It or Send It. Depending on how the application has been configured, you may have the option to
preview and make adjustments to scanned pages.
6 To scan additional documents, load the next document into the scanner and select one of the following from the
confirmation screen:
• Touch Yes, to same destination to scan the document to the previous destination.
• Touch Yes, to a different destination to scan the document to a different destination.
• Touch No to finish the operation and return to the printer Home screen.
Using the Remote Operator Panel
The Remote Operator Panel application lets you remotely access the printer control panel display using the Embedded
Web Server.
Setting up the Remote Operator Panel
1 From the Embedded Web Server, click Settings or Configuration.
2 Click Device Solutions > Solutions (eSF), or click Embedded Solutions.
3 Select the name of the application, and then select the Enabled check box.
4 From the Authentication Type menu, select an authentication type.
Note: The Remote Management Access Control works only with the Remote Operator Panel Applet.
5 If you selected VNC Password Authentication as the authentication type, then enter a password in the VNC Password
field.
6 If you want to use SSL/TLS for data encryption, then select the Secure Connection check box.
7 Click Apply.
Remotely accessing the printer control panel using the Embedded Web Server
Note: This feature is available only on printers installed with the Remote Operator Panel application.
1 From the Embedded Web Server, click Applications > Remote Operator Panel.
2 Click Launch VNC Applet > Click here to continue.
A dialog appears, remotely showing a dynamic display of the printer control panel in its current state.
3 From the lower left side, refer to the keyboard key equivalent for each of the printer button commands.
Note: The location of the keyboard key equivalent may differ depending on the printer model.
Setting up and using the home screen applications
25
Page 26

Using My MFP
My MFP lets you customize your printer touch screen interface, and then store those preferences on a flash drive. Each
time the flash drive is inserted into the printer USB port, your preferences will be displayed. My MFP can save job
preferences, home screen preferences, and imported address book files.
Using My MFP Setup Wizard
1 Insert a flash drive into your printer USB port.
The contents of the drive appears on the display.
2 Touch Back to return to the home screen.
Note: Your system support person can configure the My MFP Setup Wizard to launch automatically the first time
you insert your flash drive. If the setup wizard launches automatically, then skip to Step 3.
3 From the home screen, touch Run My MFP Setup Wizard.
4 Select Yes, setup my preferences, and then touch OK.
Note: If you choose No at this step, then you will not be prompted to set up My MFP in the future when you insert
the same flash drive into a printer. If you change your mind and later wish to set up My MFP, then you will need
to manually delete all .mymfp files from the flash drive. For more information, see “Deleting My MFP data from
your USB drive” on page 27.
5 Enter your name, and then touch OK.
6 You can choose to enter your e-mail address, and then touch OK.
If you do not wish to include an e-mail address in your profile, then touch Skip.
7 Enter a password for your profile, and then touch OK.
If you do not wish to use a password with your profile, then touch Skip.
8 If necessary, enter the password again, and then touch OK.
Customizing My MFP settings
1 From the home screen, touch My MFP Configuration.
2 Touch the arrows to select which options to configure.
You can:
• Select home screen icons.
• Import an image for home screen wallpaper.
• Import one or more address books.
• Set preferences for Copy, Fax, E-mail, Scan to USB, and FTP functions.
• Edit your name.
• Password-protect your data.
• Add or edit your e-mail address.
• Remove the My MFP profile from your flash drive.
Setting up and using the home screen applications
26
Page 27

Using My MFP
My MFP lets you use the printer with a personalized profile. Each time you insert your flash drive into the USB port of
a printer that supports My MFP, your preferred settings are automatically loaded.
1 Insert your flash drive into the USB port.
If you have set password-protect for your profile, then enter your password to continue.
2 Select the function you want to use.
If individual functions such as print, copy, or fax are protected by a password or PIN, then you must enter the correct
credentials to use those functions.
3 When you are finished, remove your flash drive from the printer.
Deleting My MFP data from your USB drive
Using the My MFP interface
1 Touch My MFP Configuration.
2 From the Welcome screen use the arrows to scroll through the list of options until you see Remove My MFP data
from the drive.
3 Touch Remove My MFP data from the drive.
4 Select Delete profile, and touch Save Setting to clear your My MFP settings from your USB drive.
Manually deleting the data
1 Insert your USB drive into a computer.
2 Locate all files beginning with .mymfp (they will be grouped together).
3 Delete all files beginning with .mymfp.
Using WS-Scan
The Web Services - Scan application lets you scan documents at the printer, and then send the scanned image to your
computer. This application is available only for network printers and computers that support Microsoft Web Services.
To scan documents at the printer, see “Scanning documents at the printer” on page 24.
Setting up WS-Scan
1 From the computer screen, click , or click Start and then click Run.
2 In the Start Search or Run box, type control printers.
3 Press Enter, or click OK.
4 Click Add a printer, and then select Add a network, wireless or Bluetooth printer.
Note: The wireless or Bluetooth connection is available only on select printer models.
Setting up and using the home screen applications
27
Page 28

5 Select the printer that you want to have WS-Scan enabled, and then click Next.
If the printer is not listed, then you can search for the printer using its IP address. If you do not know the IP address
of the printer, then you can:
• View the information on the printer control panel home screen, or in the TCP/IP section under the
Networks/Ports menu.
• Print a network setup page or menu settings page and locate the information in the TCP/IP section.
6 Follow the instructions on the computer screen.
Exporting and importing a configuration using the Embedded
Web Server
You can export configuration settings into a text file that can then be imported and used to apply the settings to one
or more additional printers.
Exporting a configuration
1 From the Embedded Web Server, click Settings or Configuration.
2 Click Device Solutions > Solutions (eSF), or click Embedded Solutions.
3 From Installed Solutions, click the name of the application you want to configure.
4 Click Configure > Export.
5 Follow the instructions on the computer screen to save the configuration file, and then enter a unique file name or
use the default name.
Note: If a JVM Out of Memory error occurs, then repeat the export until the configuration file is saved.
Importing a configuration
1 From the Embedded Web Server, click Settings or Configuration.
2 Click Device Solutions > Solutions (eSF), or click Embedded Solutions.
3 From Installed Solutions, click the name of the application you want to configure.
4 Click Configure > Import.
5 Browse to the saved configuration file, and then load or preview it.
Note: If a timeout occurs and a blank screen appears, then refresh the browser, and then click Apply.
Setting up and using the home screen applications
28
Page 29

Additional printer setup
Installing internal options
CAUTION—SHOCK HAZARD: If you are accessing the system board or installing optional hardware or memory
devices sometime after setting up the printer, then turn the printer off, and unplug the power cord from the wall
outlet before continuing. If you have any other devices attached to the printer, then turn them off as well, and
unplug any cables going into the printer.
You can customize your printer connectivity and memory capacity by adding optional cards. The instructions in this
section explain how to install the available cards; you can also use them to locate a card for removal.
Available options
Note: Certain options are not available on selected printer models.
Memory cards
• Printer memory
• Flash memory
• Font cards
Additional printer setup
29
Page 30
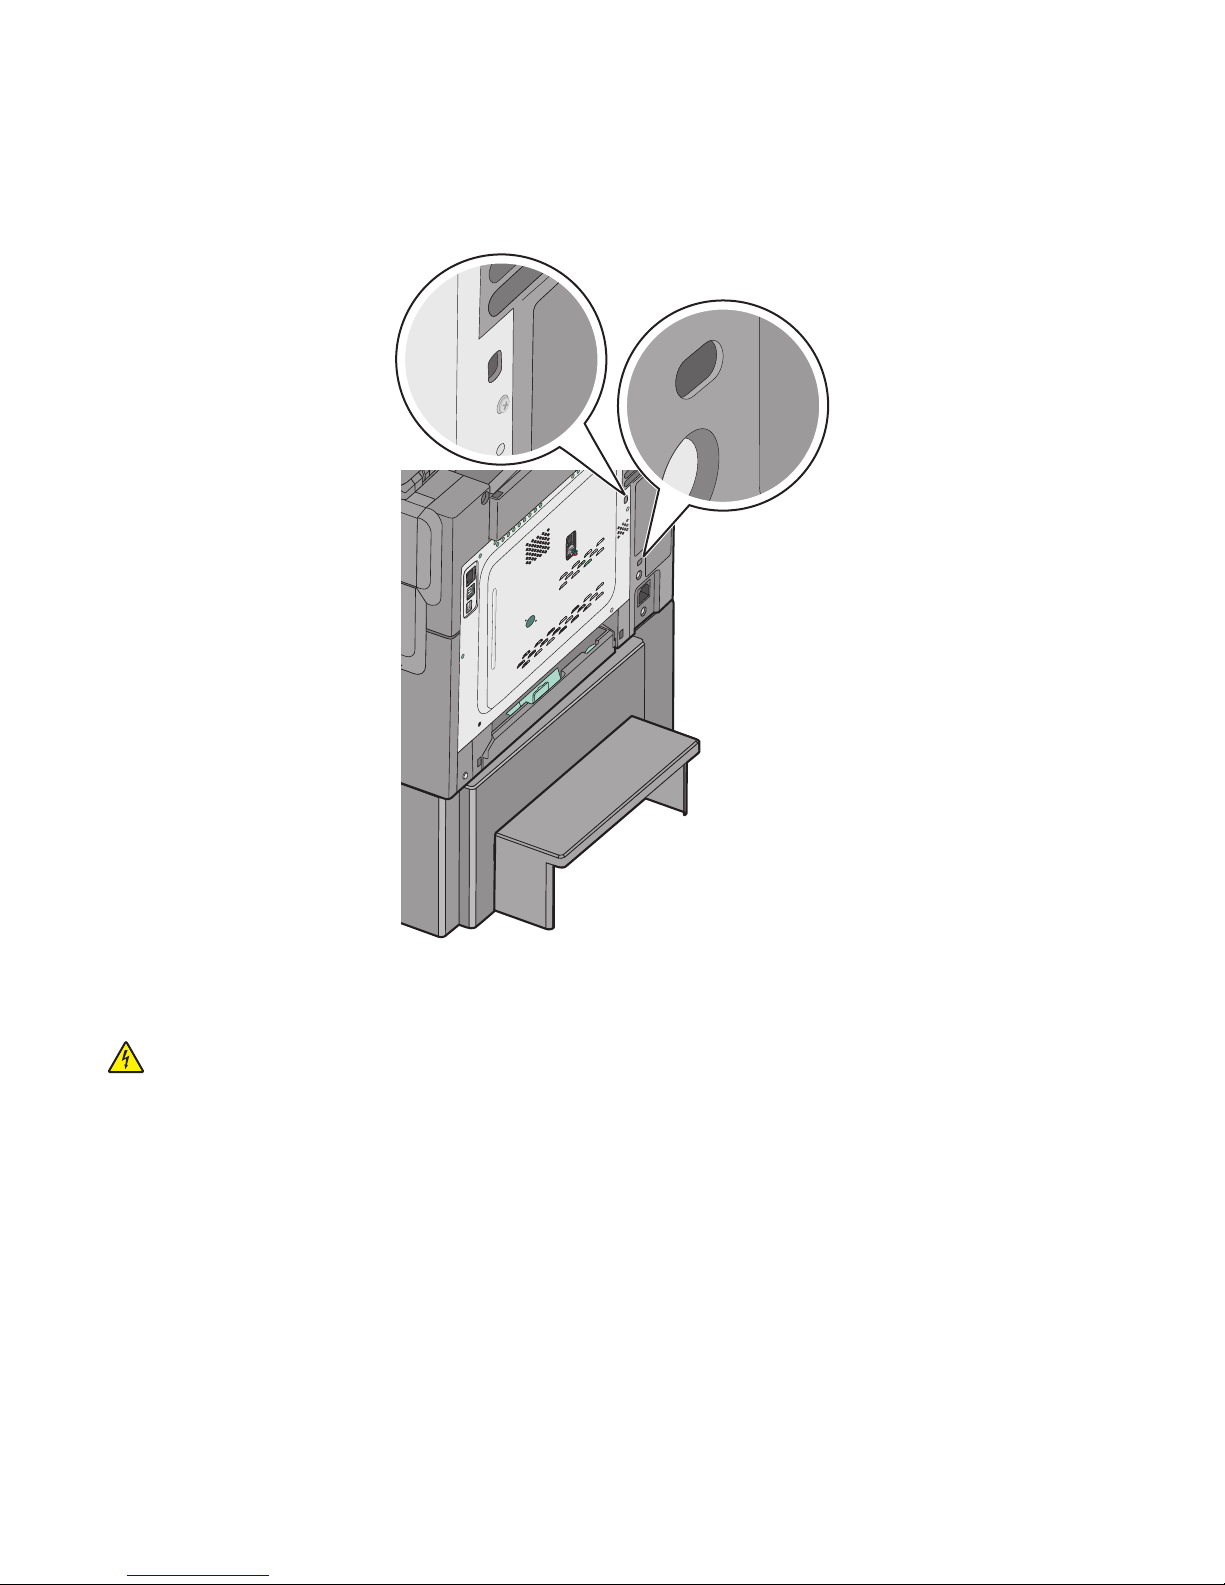
Using the security lock feature
The printer is equipped with a security lock feature. When a lock compatible with most laptop computers is attached,
the printer is locked. Once locked, the metal plate and the system board cannot be removed. Attach a security lock to
the printer in the location shown.
Installing a memory card
CAUTION—SHOCK HAZARD: If you are accessing the system board or installing optional hardware or memory
devices sometime after setting up the printer, then turn the printer off, and unplug the power cord from the wall
outlet before continuing. If you have any other devices attached to the printer, then turn them off as well, and
unplug any cables going into the printer.
Note: This task requires a flathead screwdriver.
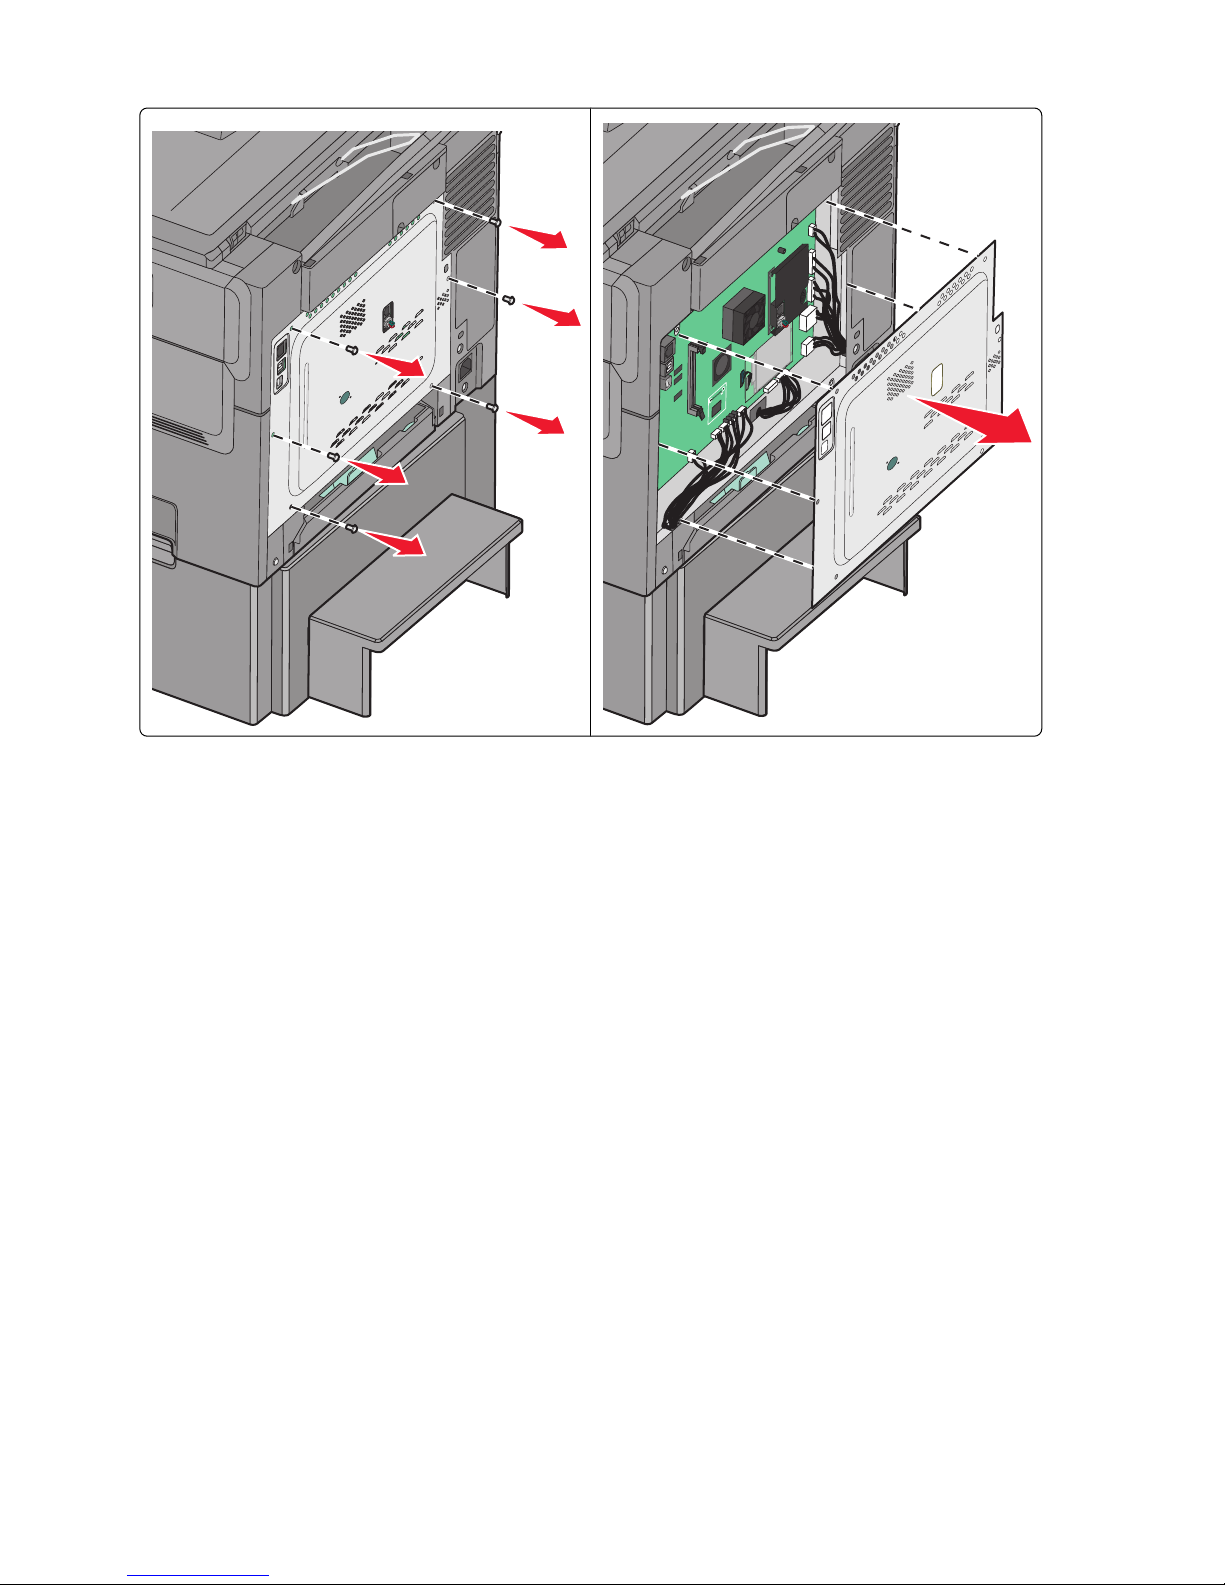
1 Access the system board at the back of the printer.
a Turn the screws on the cover counterclockwise to remove them.
b Remove the cover.
Additional printer setup
30
Page 31
Warning—Potential Damage: System board electronic components are easily damaged by static electricity. Touch
something metal on the printer before touching any system board electronic components or connectors.
2 Use the following illustration to locate the connector.
Warning—Potential Damage: System board electronic components are easily damaged by static electricity. Touch
something metal on the printer before touching any system board electronic components or connectors.
Additional printer setup
31
Page 32
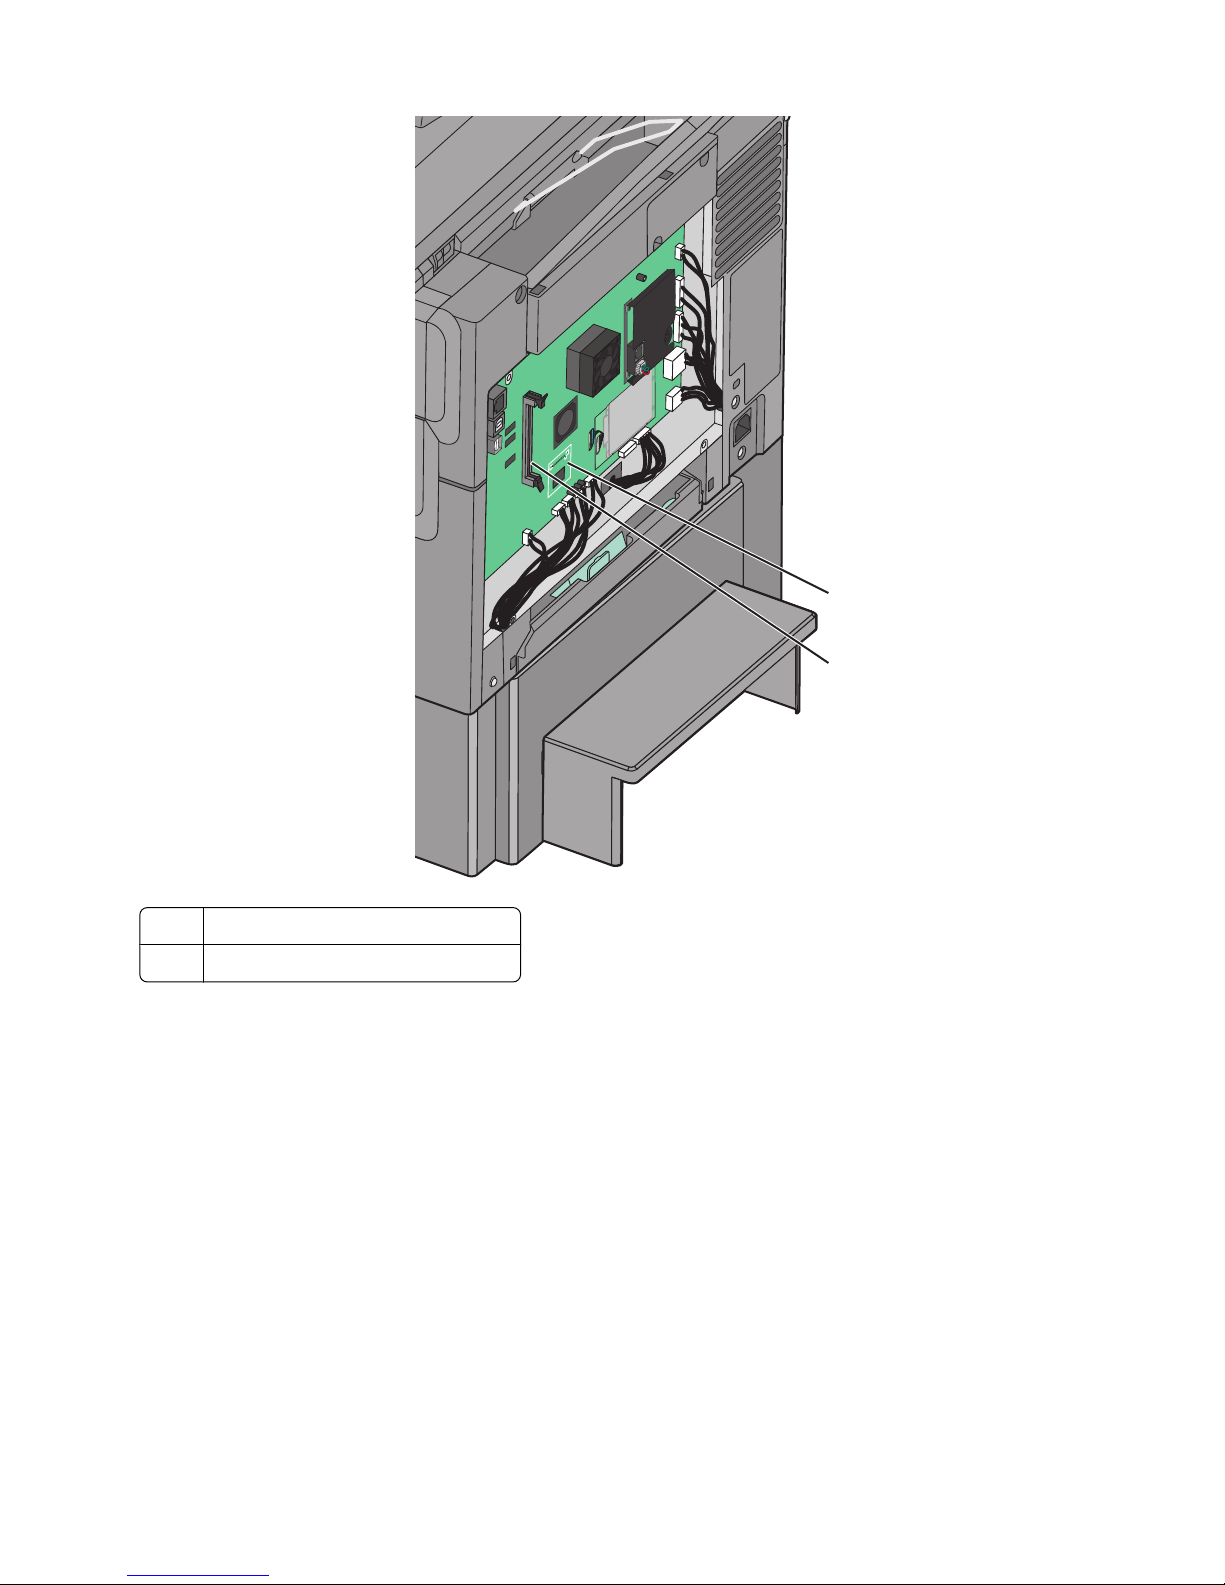
1 Flash memory or font card connector
2 Memory card connector
1
2
Additional printer setup
32
Page 33
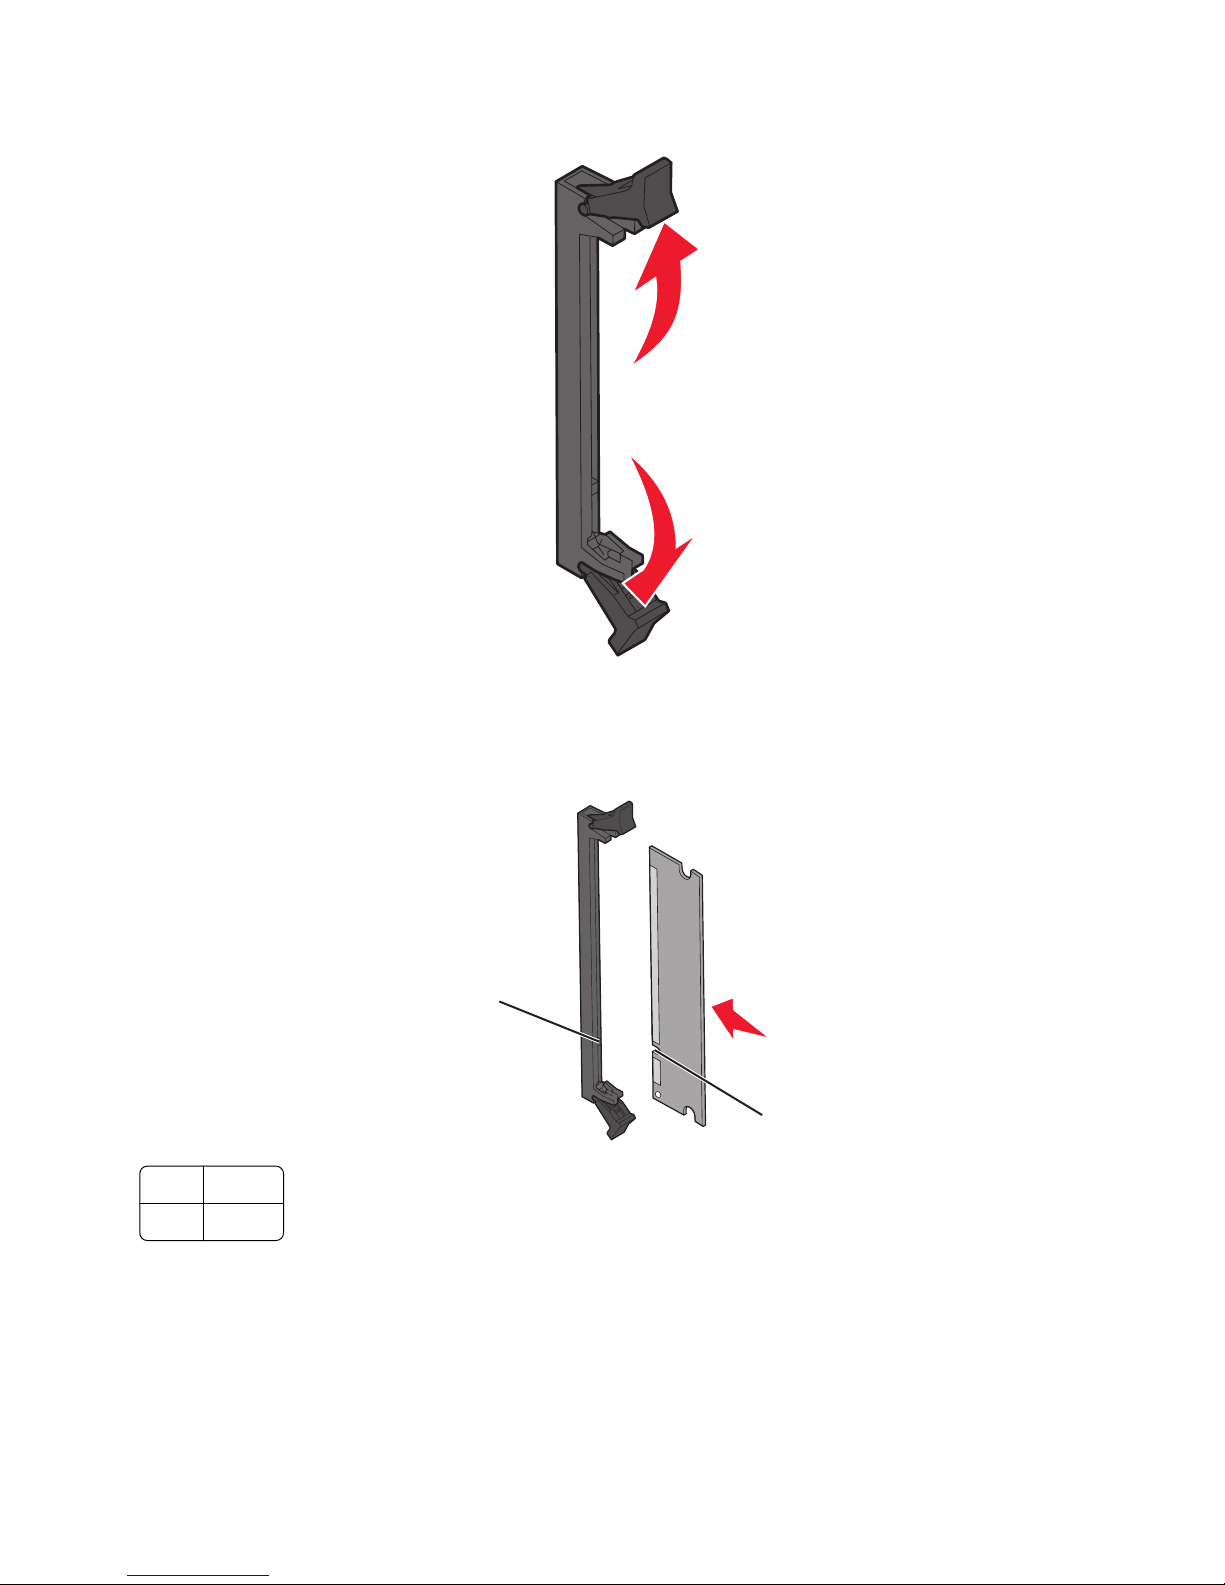
3 Open the memory card connector latches.
4 Unpack the memory card.
Note: Avoid touching the connection points along the edge of the card.
5 Align the notches on the memory card with the ridges on the connector.
2
1 Notches
2 Ridges
6 Push the memory card straight into the connector until it snaps into place.
1
Additional printer setup
33
Page 34
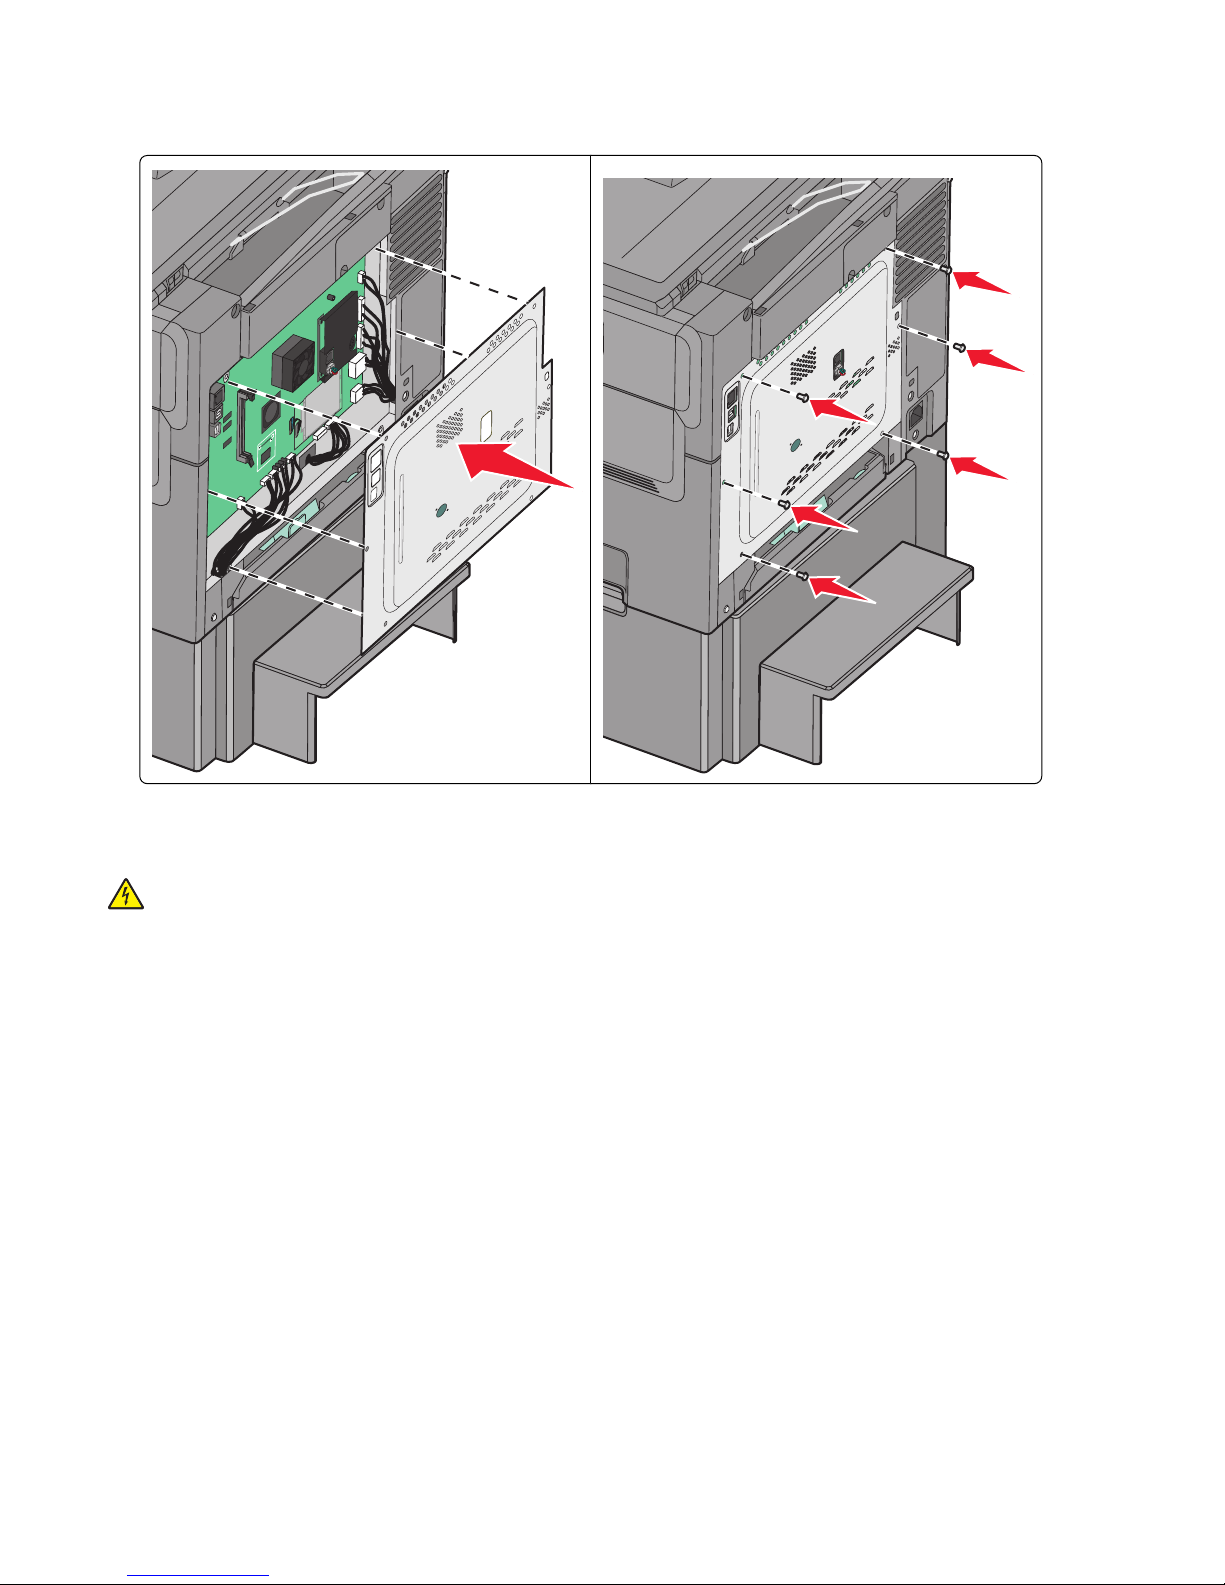
7 Reinstall the system board cover.
Installing a flash memory or font card
CAUTION—SHOCK HAZARD: If you are accessing the system board or installing optional hardware or memory
devices sometime after setting up the printer, then turn the printer off, and unplug the power cord from the wall
outlet before continuing. If you have any other devices attached to the printer, then turn them off as well, and
unplug any cables going into the printer.
Note: This task requires a flathead screwdriver.
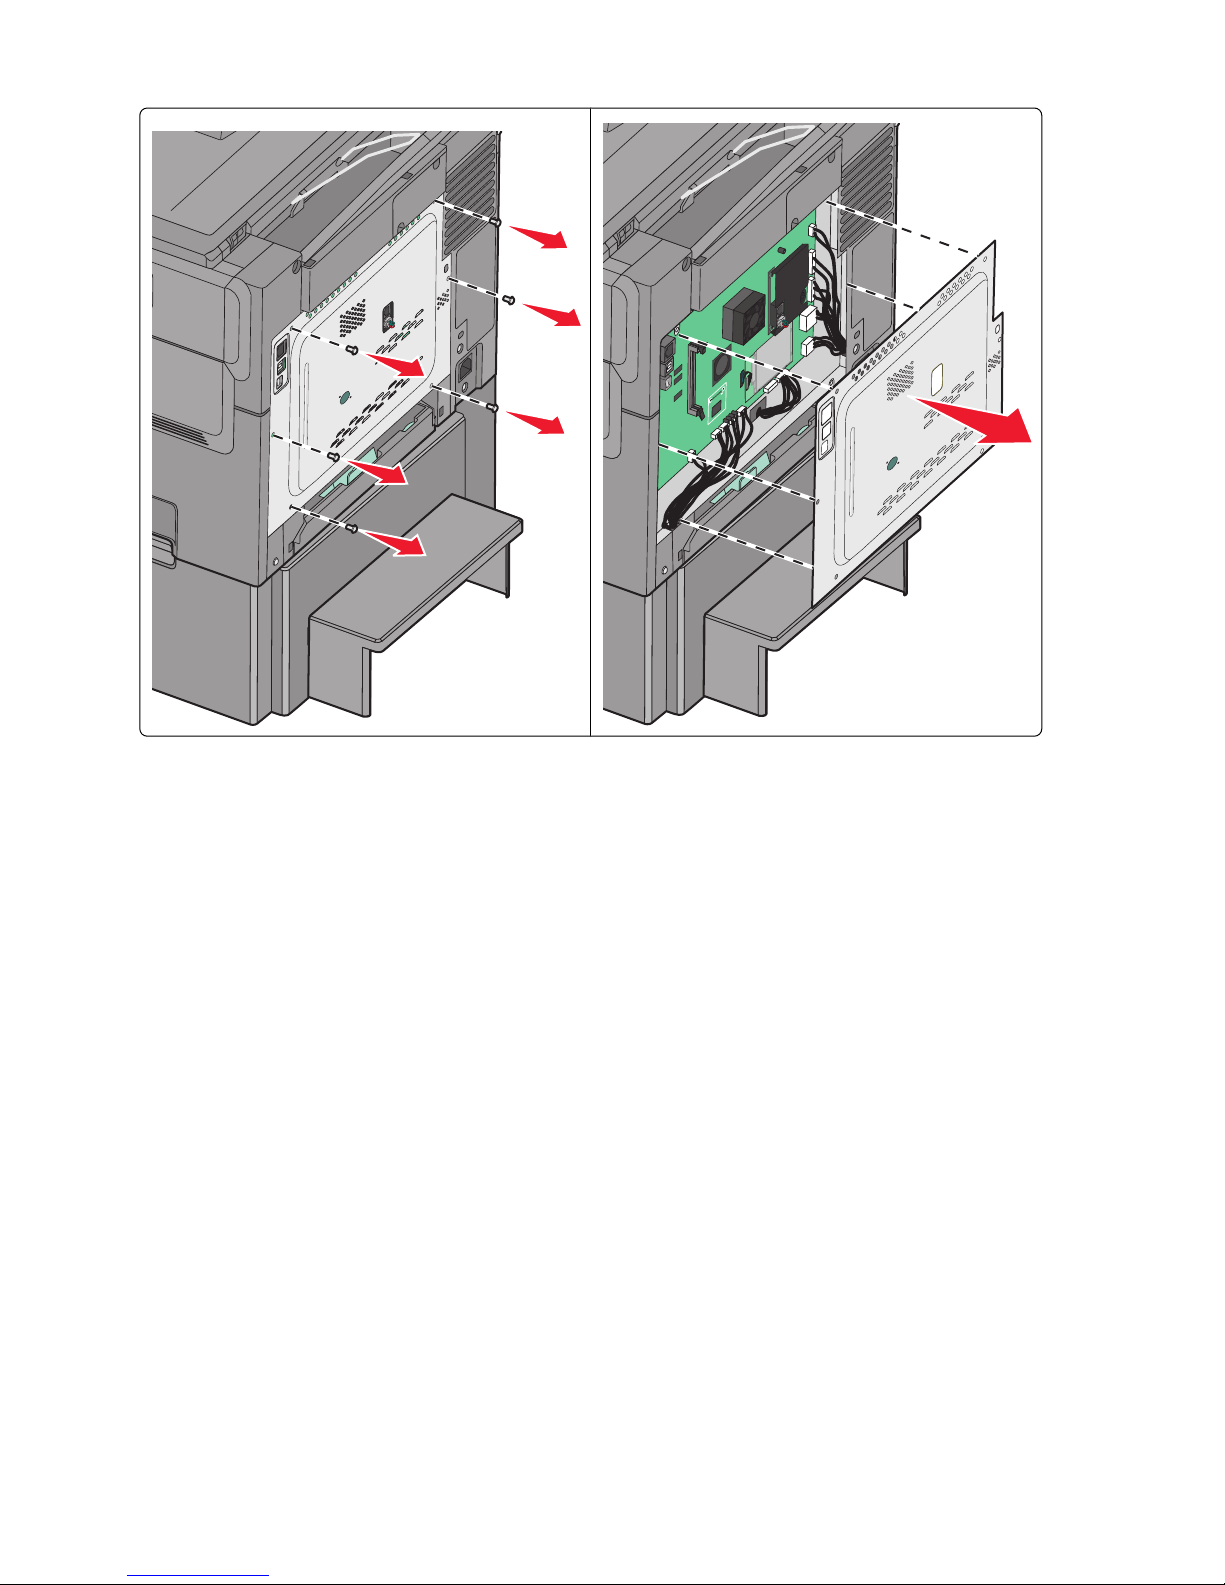
1 Access the system board at the back of the printer.
a Turn the screws on the cover counterclockwise to remove them.
b Remove the cover .
Additional printer setup
34
Page 35
Warning—Potential Damage: System board electronic components are easily damaged by static electricity. Touch
something metal on the printer before touching any system board electronic components or connectors.
2 Use the following illustration to locate the connector.
Warning—Potential Damage: System board electronic components are easily damaged by static electricity. Touch
something metal on the printer before touching any system board electronic components or connectors.
Additional printer setup
35
Page 36
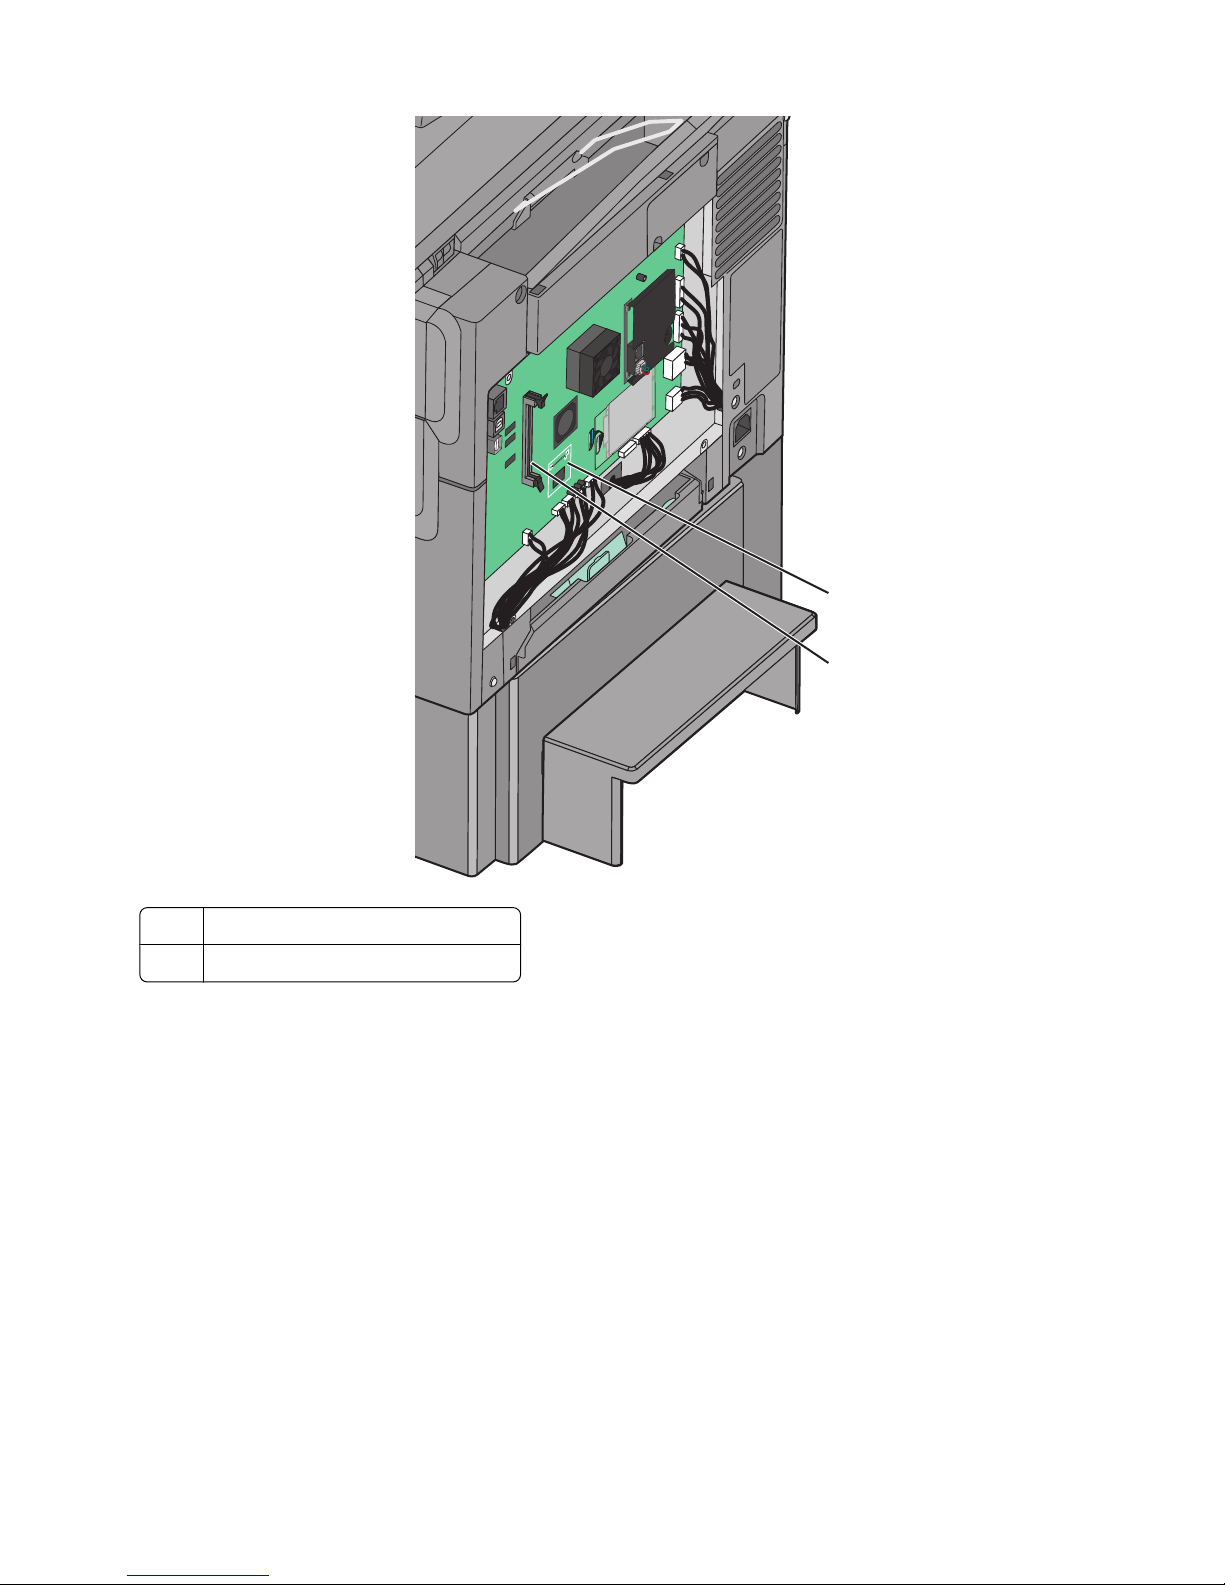
1 Flash memory or font card connector
2 Memory card connector
3 Unpack the flash memory or font card.
Note: Avoid touching the connection points along the edge of the card.
1
2
Additional printer setup
36
Page 37
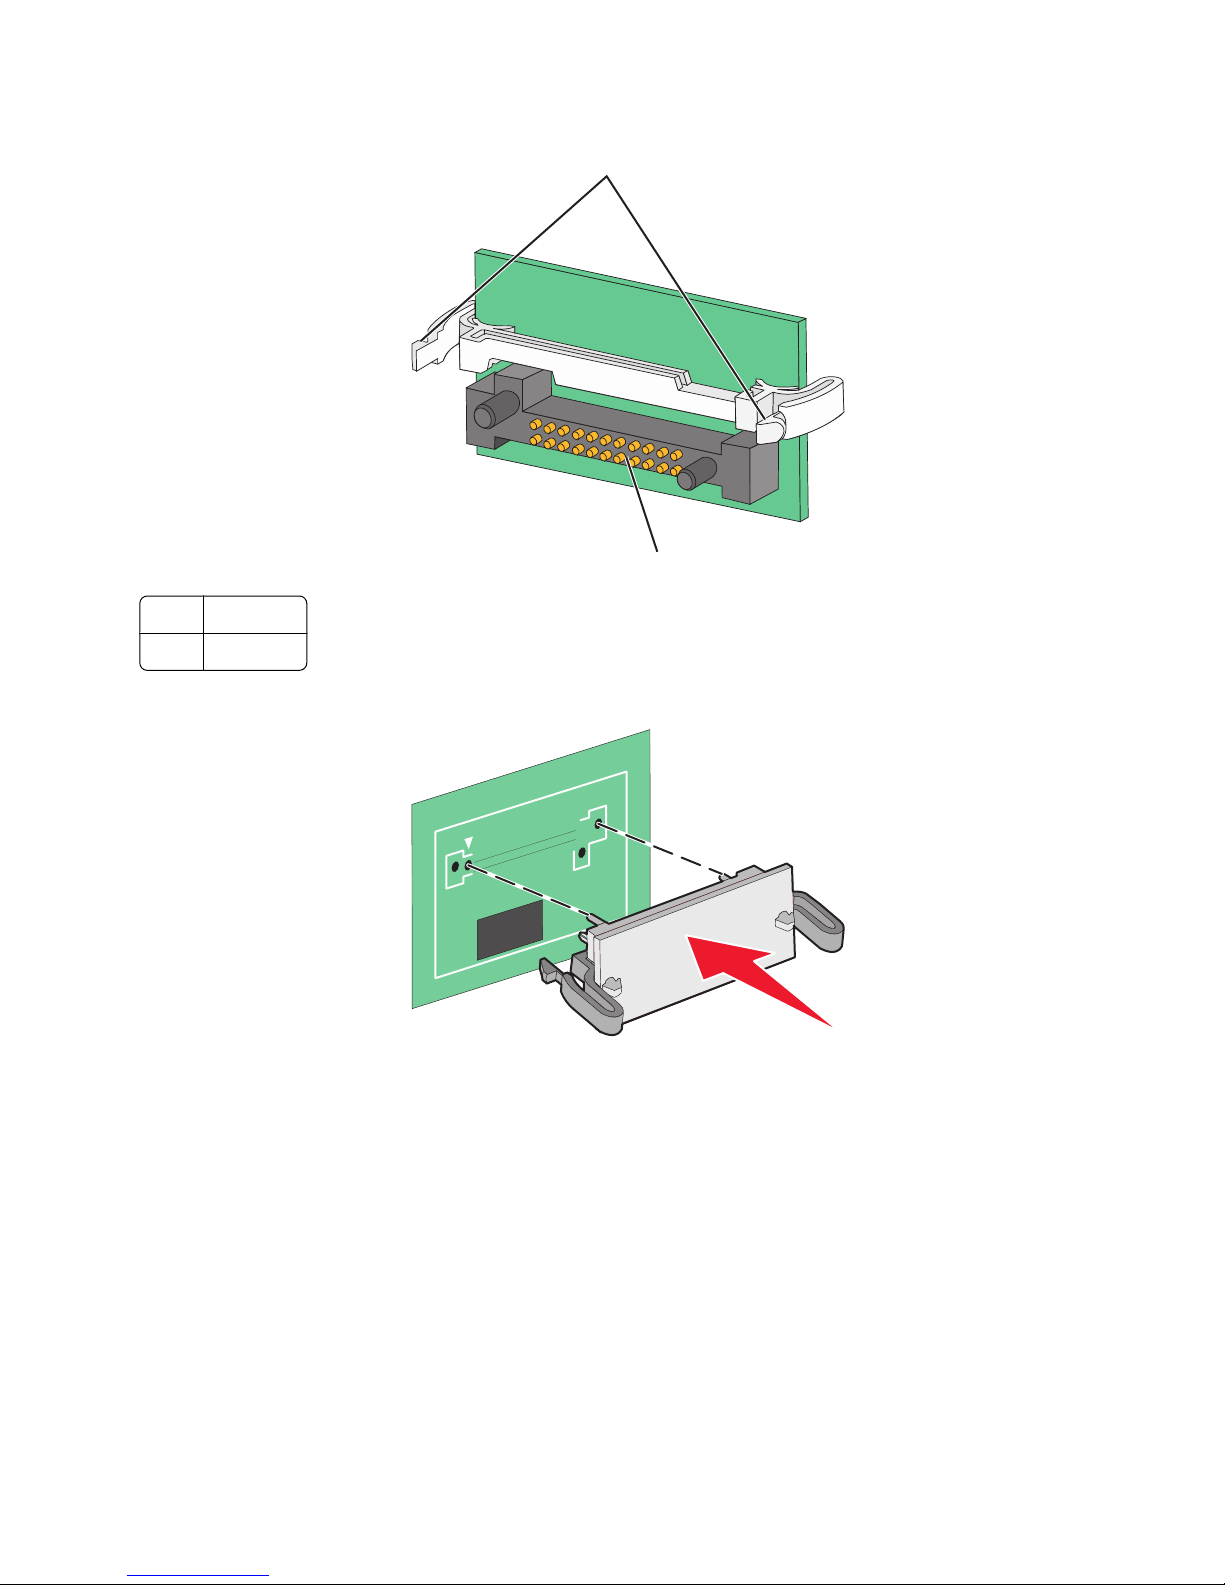
4 Holding the card by its sides, align the plastic pins on the card with the holes on the system board.
1
2
1 Plastic pins
2 Metal pins
5 Push the card firmly into place.
Note: The entire length of the connector on the card must touch and be flush against the system board.
Additional printer setup
37
Page 38
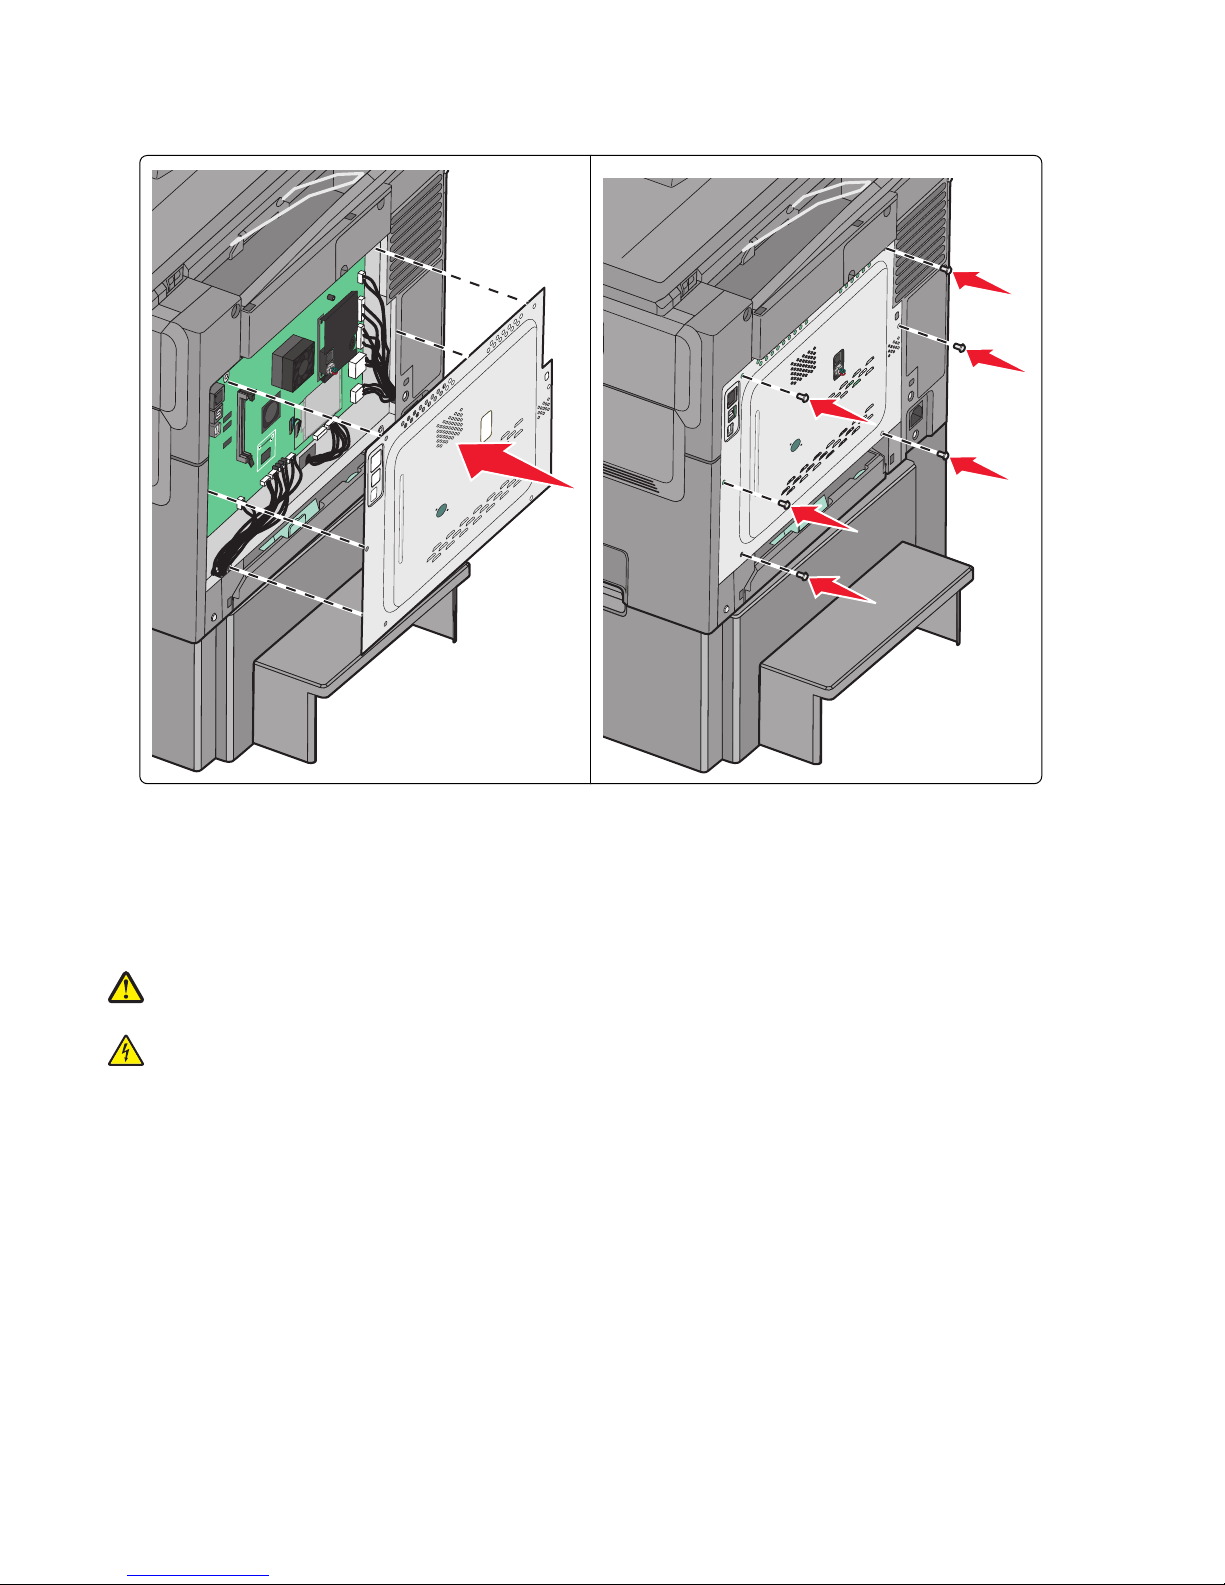
6 Reinstall the system board cover.
Installing hardware options
Order of installation
CAUTION—POTENTIAL INJURY: The printer weight is greater than 18 kg (40 lb), and requires two or more trained
personnel to lift it safely.
CAUTION—SHOCK HAZARD: If you are accessing the system board or installing optional hardware or memory
devices sometime after setting up the printer, then turn the printer off, and unplug the power cord from the wall
outlet before continuing. If you have any other devices attached to the printer, then turn them off as well, and
unplug any cables going into the printer.
• Optional 550-sheet tray (Tray 3)
• 650-sheet duo drawer (Tray 2)
• Printer
For more information on installing an optional 550-sheet tray, see the setup documentation that came with the option.
Additional printer setup
38
Page 39
Installing an optional tray or drawer
The printer supports two additional input sources: an optional 550-sheet tray and a 650-sheet duo drawer (Tray 2) with
an integrated multipurpose feeder.
Note: Some printer models may not support the optional 550-sheet tray.
CAUTION—POTENTIAL INJURY: The printer weight is greater than 18 kg (40 lb) and requires two or more trained
personnel to lift it safely.
CAUTION—SHOCK HAZARD: If you are accessing the system board or installing optional hardware or memory
devices sometime after setting up the printer, then turn the printer off, and unplug the power cord from the wall
outlet before continuing. If you have any other devices attached to the printer, then turn them off as well, and
unplug any cables going into the printer.
1 Unpack the optional tray, and then remove all packing material and the dust cover.
2 Place the tray near the printer.
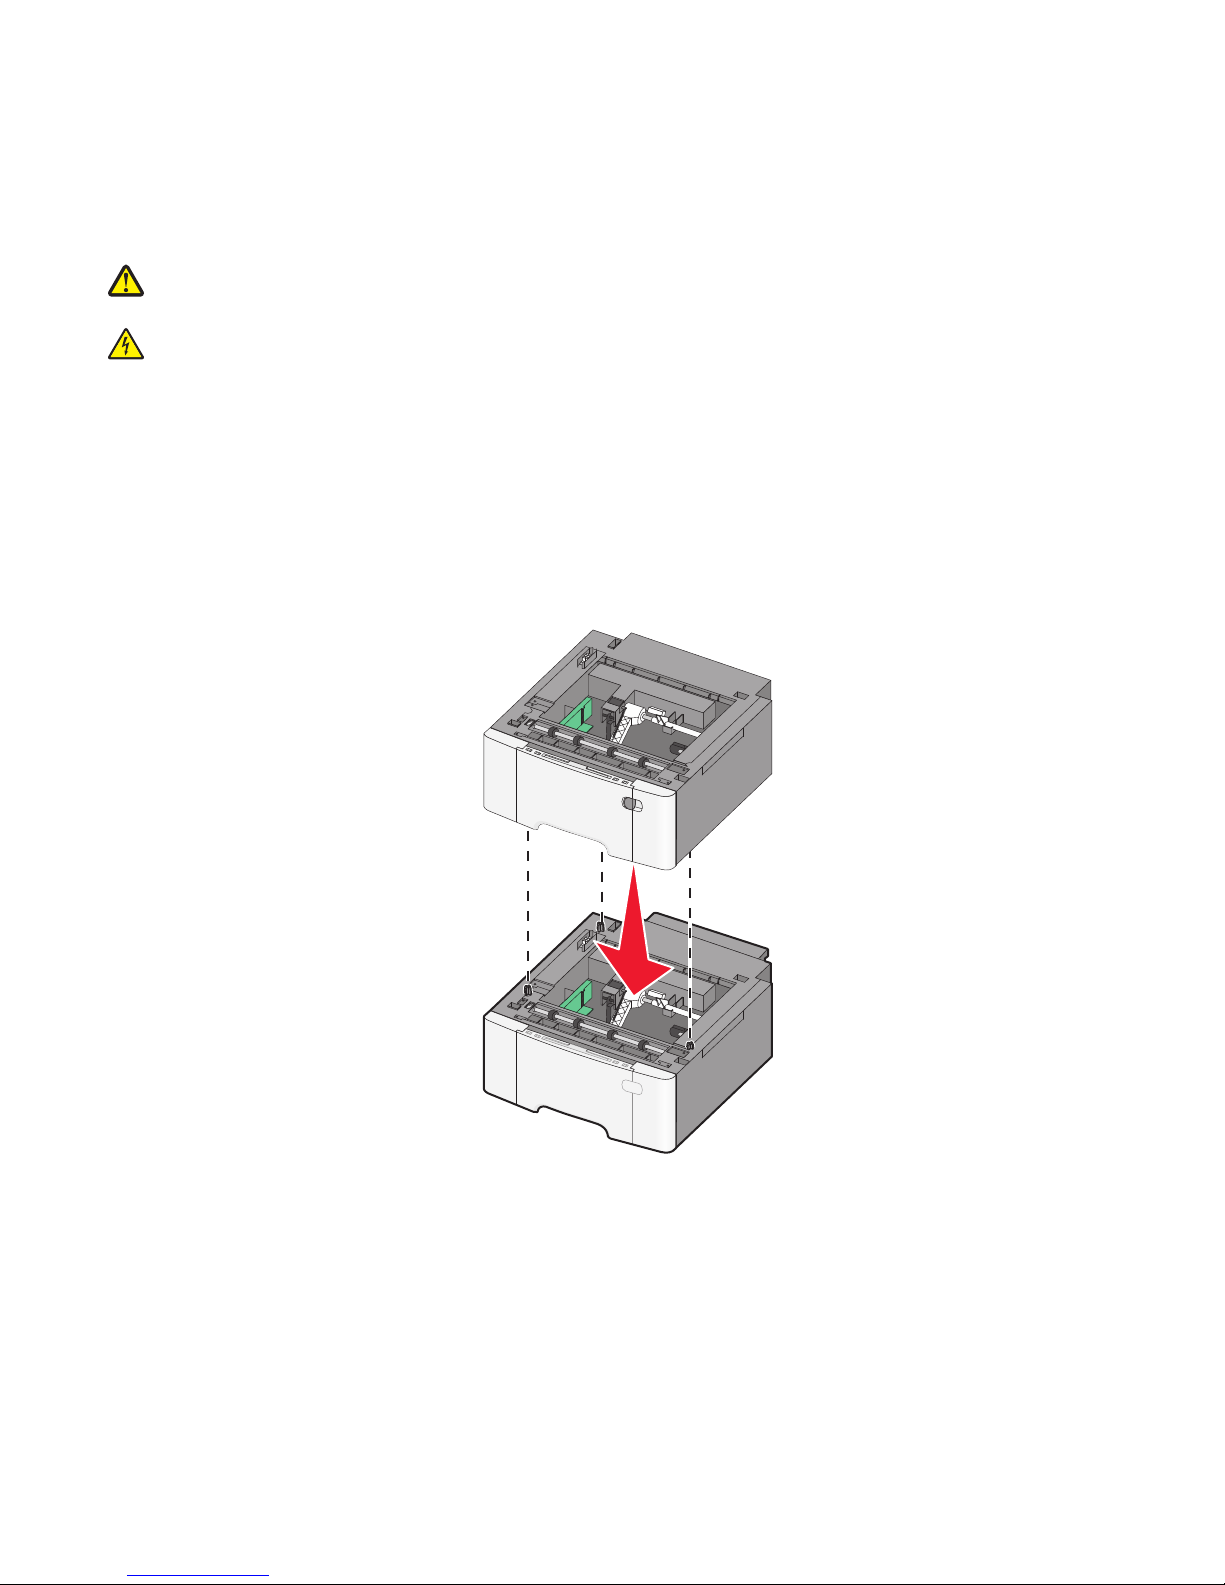
Note: If you are installing both the optional tray and the 650-sheet duo drawer, then the optional 550-sheet tray
must always be installed as the first tray (configuring from the bottom up).
3 Align the 650-sheet duo drawer with the optional 550-sheet tray, and then lower it into place.
Additional printer setup
39
Page 40
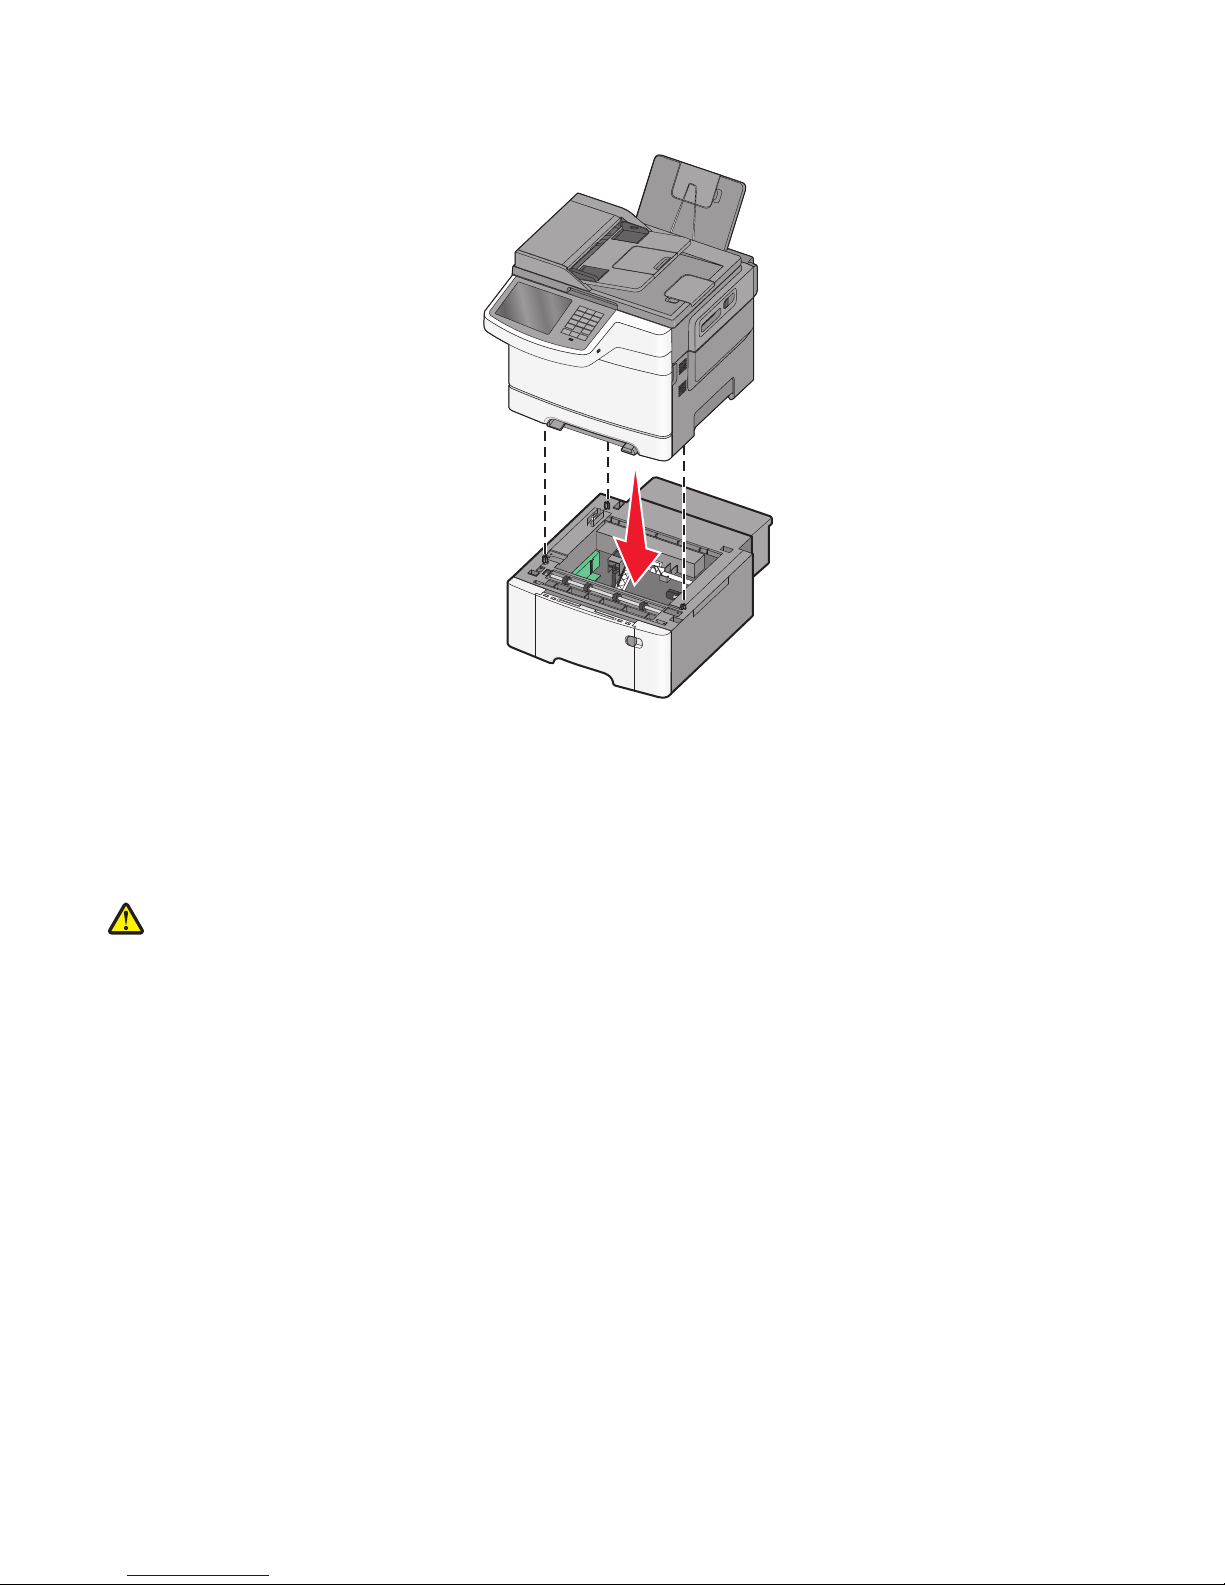
4 Align the printer with the 650-sheet duo drawer, lower the printer into place, and then install the dust covers.
Note: Once the printer software and any options are installed, it may be necessary to manually add the options in the
printer driver to make them available for print jobs. For more information, see “Updating available options in the printer
driver” on page 43.
Attaching cables
CAUTION—POTENTIAL INJURY: Do not use the fax feature during a lightning storm. Do not set up this product or
make any electrical or cabling connections, such as the fax feature, power cord, or telephone, during a lightning
storm.
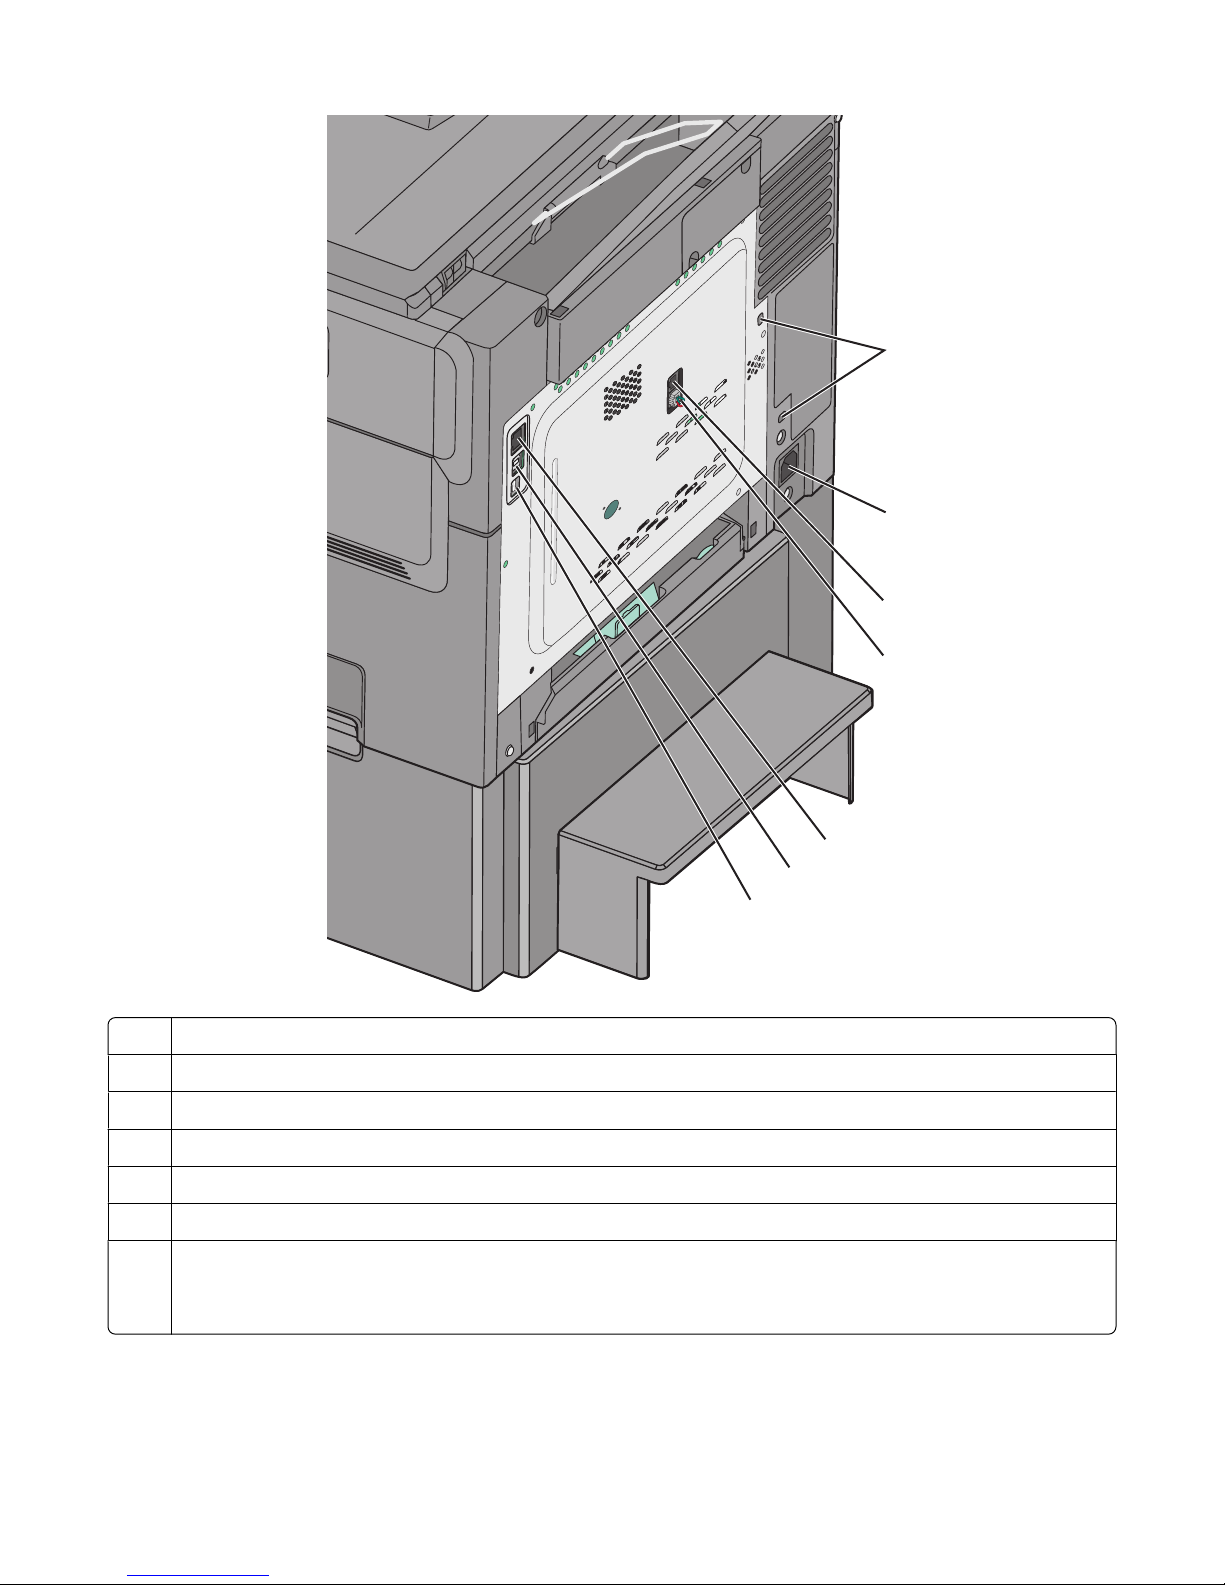
Connect the printer to the computer using a USB cable or Ethernet cable.
Be sure to match the following:
• The USB symbol on the cable with the USB symbol on the printer
• The appropriate Ethernet cable to the Ethernet port
Additional printer setup
40
Page 41
1
2
3
4
5
6
7
1 Security lock port
2 Printer power cord socket
3 Printer LINE port
4 Printer EXT port
5 Ethernet port
6 USB printer port
7 USB port
Warning—Potential Damage: Do not touch the USB cable, any network adapter, or the printer in the area shown
while actively printing. A loss of data or a malfunction can occur.
Additional printer setup
41
Page 42

Verifying printer setup
Once all hardware and software options are installed and the printer is turned on, verify that the printer is set up
correctly.
Printing a menu settings page
From the home screen, navigate to:
> Reports > Menu Settings Page
Printing a network setup page
If the printer is attached to a network, then print a network setup page to verify the network connection. This page
also provides important information that aids network printing configuration.
1 From the home screen, navigate to:
> Reports > Network Setup Page
2 Check the first section of the network setup page, and confirm that the status is Connected.
If the status is Not Connected, then the LAN drop may not be a ctive, or the networ k cable may be malfunctioning.
Consult a system support person for a solution, and then print another network setup page.
Setting up the printer software
Installing the printer software
For Windows users
1 Close all open software programs.
2 Insert the Software and Documentation CD.
Wait for the Welcome screen to appear.
If the CD does not launch after a minute, then do the following:
a Click , or click Start and then click Run.
b In the Start Search or Run box, type D:\setup.exe, where D is the letter of your CD or DVD drive.
c Press Enter, or click OK,
3 Click Install and then follow the instructions on the computer screen.
For Macintosh users
1 Close all open software applications.
2 Insert the Software and Documentation CD, and then double-click the software installer package.
3 Follow the instructions on the computer screen.
Additional printer setup
42
Page 43

Using the World Wide Web
1 Go to the Lexmark Web site at www.lexmark.com.
2 From the Drivers & Downloads menu, click Driver Finder.
3 Select your printer, and then select your operating system.
4 Download the driver and then install it.
Updating available options in the printer driver
Once the printer software and any options are installed, it may be necessary to manually add the options in the printer
driver to make them available for print jobs.
For Windows users
1 Open the printers folder:
a Click , or click Start and then click Run.
b In the Start Search or Run box, type control printers.
c Press Enter, or click OK.
2 Select the printer.
3 Right-click the printer, and then select Properties.
4 Click the Configuration tab.
5 Click Update Now - Ask Printer or manually add any installed hardware options under Configuration Options.
6 Click Apply.
For Macintosh users
In Mac OS X version 10.5 or later
1
From the Apple menu, navigate to:
System Preferences > Print & Fax > select your printer > Options & Supplies > Driver
2 Add any installed hardware options, and then click OK.
In Mac OS X version 10.4 or earlier
1
From the Finder, navigate to:
Go > Applications > Utilities
2 Double-click Printer Setup Utility or Print Center.
3 Select your printer.
4 From the Printers menu, choose Show Info.
5 Add any installed hardware options, and then click Apply Changes.
Additional printer setup
43
Page 44

Installing the printer on a wired network
These instructions apply to Ethernet and fiber optic network connections.
Note: Make sure you have completed the initial setup of the printer.
For Windows users
1 Insert the Software and Documentation CD.
If the installation screen does not appear after a minute, then launch the CD manually:
a Click , or click Start and then click Run.
b In the Start Search or Run box, type D:\setup.exe, where D is the letter of the CD or DVD drive.
c Press Enter, or click OK.
2 Click Install, and then follow the instructions on the computer screen.
Note: To configure the printer using a static IP address, IPv6, or scripts, select Advanced Options > Administrator
Tools.
3 Select Ethernet connection, and then click Continue.
4 Attach the appropriate cable to the computer and to the printer when instructed to do so.
5 Select the printer from the list, and then click Continue.
Note: If the configured printer does not appear on the list, then click Modify Search.
6 Follow the instructions on the computer screen.
For Macintosh users
1 Allow the network DHCP server to assign an IP address to the printer.
2 Obtain the printer IP address. You can:
a View the information on the printer control panel home screen, or in the TCP/IP section under the
Networks/Ports menu.
b Print a network setup page or menu settings page and locate the information in the TCP/IP section.
Note: You will need the IP address if you are configuring access for computers on a different subnet than the
printer.
3 Install the printer drivers, and then add the printer.
a Install a printer driver file on the computer:
1 Insert the Software and Documentation CD, and then double-click the installer package for the printer.
2 Follow the instructions on the computer screen.
3 Select a destination, and then click Continue.
4 From the Easy Install screen, click Install.
5 Type the user password, and then click OK.
All the necessary applications are installed in the computer.
6 Click Close when installation is complete.
Additional printer setup
44
Page 45

b Add the printer:
• For IP printing:
In Mac OS X version 10.5 or later
1 From the Apple menu, navigate to:
System Preferences > Print & Fax
2 Click +, and then click the IP tab.
3 Type the printer IP address in the address field, and then click Add.
In Mac OS X version 10.4 or earlier
1 From the Finder, navigate to:
Applications > Utilities
2 Double-click Printer Setup Utility or Print Center.
3 From the Printer List, click Add, and then click IP Printer.
4 Type in the printer IP address in the address field, and then click Add.
• For AppleTalk printing:
Note: Make sure AppleTalk is activated on your printer.
In Mac OS X version 10.5
1 From the Apple menu, navigate to:
System Preferences > Print & Fax
2 Click +, and then navigate to:
AppleTalk > select the printer from the list > Add
In Mac OS X version 10.4 or earlier
1 From the Finder, navigate to:
Applications > Utilities
2 Double-click Printer Setup Utility or Print Center.
3 From the Printer List, click Add.
4 Click Default Browser tab > More Printers.
5 From the first pop-up menu, select AppleTalk.
6 From the second pop-up menu, select Local AppleTalk Zone.
7 Select the printer from the list, and then click Add.
Note: If the printer does not show up in the list, then you may need to add it using the IP address. For more
information, contact your system support person.
Additional printer setup
45
Page 46

Minimizing your printer's environmental impact
Lexmark is committed to environmental sustainability and is continually improving its printers to reduce their impact
on the environment. We design with the environment in mind, engineer our packaging to reduce materials, and provide
collection and recycling programs. For more information, see:
• The Notices chapter
• The Environmental Sustainability section of the Lexmark Web site at www.lexmark.com/environment
• The Lexmark recycling program at www.lexmark.com/recycle
By selecting certain printer settings or tasks, you may be able to reduce your printer's impact even further. This chapter
outlines the settings and tasks that may yield a greater environmental benefit.
Saving paper and toner
Studies show that as much as 80% of the carbon footprint of a printer is related to paper usage. You can significantly
reduce your carbon footprint by using recycled paper and the following printing suggestions, such as printing on both
sides of the paper and printing multiple pages on one side of a single sheet of paper.
For information on how you can quickly save paper and energy using one printer setting, see “Using Eco-Mode” on
page 47.
Using recycled paper
As an environmentally conscious company, Lexmark supports the use of recycled office paper produced specifically for
use in laser printers. For more information on recycled papers that work well with your printer, see “Using recycled
paper and other office papers” on page 61.
Conserving supplies
Use both sides of the paper
If your printer model supports duplex printing, then you can control whether print appears on one or two sides of the
paper by selecting 2-sided printing from the Print dialog or from the Lexmark Toolbar.
Place multiple pages on one sheet of paper
You can print up to 16 consecutive pages of a multiple-page document onto one side of a single sheet of paper by
selecting a setting from the Multipage printing (N-Up) section of the Print dialog screen.
Check your first draft for accuracy
Before printing or making multiple copies of a document:
• Use the preview feature, which you can select from the Print dialog or from the Lexmark Toolbar to see how the
document will look like before you print it.
• Print one copy of the document to check its content and format for accuracy.
Minimizing your printer's environmental impact
46
Page 47
Avoid paper jams
Correctly set the paper type and size to avoid paper jams. For more information, see “Avoiding jams” on page 232.
Saving energy
Using Eco-Mode
1 Type the printer IP address into the address field of your Web browser.
If you do not know the IP address of the printer, you can:
• View the IP address on the printer control panel in the TCP/IP section under the Networks/Ports menu.
• Print a network setup page or the menu settings pages and locate the IP address in the TCP/IP section.
2 Click Settings > General Settings > Eco-Mode > select a setting > Submit.
Choose To
Off Use factory default settings for all settings associated with Eco-Mode. This setting supports the performance
specifications of your printer.
Energy Reduce energy use, especially when the printer is idle.
• Printer engine motors do not start until it is ready to print. You may notice a short delay before the first
page is printed.
• The printer enters Sleep mode after one minute of inactivity.
• When the printer enters Sleep mode, the printer control panel display and the standard exit bin lights
are turned off.
• If scanning is supported, the scanner lamps are activated only when a scan job is started.
Energy/Paper Use all the settings associated with Energy mode and Paper mode.
Paper
• Enable the automatic duplex feature.
• Turn off print log features.
Reducing printer noise
To select a Quiet Mode setting using the Embedded Web Server:
1 Type the printer IP address into the address field of your Web browser.
If you do not know the IP address of the printer, you can:
• View the IP address on the printer control panel in the TCP/IP section under the Networks/Ports menu.
• Print a network setup page or the menu settings pages and locate the IP address in the TCP/IP section.
2 Click Settings > General Settings > Quiet Mode > select a setting > Submit.
Minimizing your printer's environmental impact
47
Page 48
Choose To
Off
Note: Selecting Photo from the driver may disable Quiet
Mode and provide better print quality and full speed printing.
On Reduce printer noise.
Use factory default settings. This setting supports the
performance specifications of your printer.
• Print jobs will process at a reduced speed.
• Printer engine motors do not start until a document is
ready to print. There will be a short delay before the first
page is printed.
• If your printer has faxing capability, fax sounds are
reduced or disabled, including those made by the fax
speaker and ringer. The fax is placed in standby mode.
• The alarm control and cartridge alarm sounds are turned
off.
• The printer will ignore the Advance Start command.
Adjusting Sleep Mode
To save energy, you can decrease the number of minutes before the printer enters Sleep Mode.
Available settings range from 2–240 minutes. The factory default setting is 30 minutes.
Using the Embedded Web Server
1 Type the printer IP address or host name in the address field of your Web browser.
If you do not know the IP address or host name of the printer, then you can:
• View the information on the printer control panel home screen, or in the TCP/IP section under the
Networks/Ports menu.
• Print a network setup page or menu settings page and locate the information in the TCP/IP section.
2 Click Settings > General Settings > Timeouts.
3 In the Sleep Mode field, enter the number of minutes you want the printer to wait before it enters Sleep Mode.
4 Click Submit.
Using the printer control panel
1 From the home screen, navigate to:
> Settings > General Settings > Timeouts
2 Touch the arrows next to Sleep Mode to select the number of minutes you want the printer to wait before it
enters Sleep Mode.
3 Touch Submit.
Minimizing your printer's environmental impact
48
Page 49

Adjusting the brightness of the display
To save energy, or if you have trouble reading your display, then adjust the brightness of the display.
Available settings range from 20–100. The factory default setting is 100.
Using the Embedded Web Server
1 Type the printer IP address into the address field of your Web browser.
If you do not know the IP address of the printer, you can:
• View the IP address on the printer control panel in the TCP/IP section under the Networks/Ports menu.
• Print a network setup page or the menu settings pages and locate the IP address in the TCP/IP section.
2 Click Settings > General Settings.
3 In the Screen Brightness field, enter the brightness percentage you want for the display.
4 Click Submit.
Using the printer control panel
1 From the home screen, navigate to:
> Settings > General Settings
2 Touch the arrows until Screen Brightness appears, and then select a setting.
3 Touch Submit.
Recycling
Lexmark provides collection programs and environmentally progre ssi ve ap pro ac hes to recycl ing. For mor e inform ation,
see:
• The Notices chapter
• The Environmental Sustainability section of the Lexmark Web site at www.lexmark.com/environment
• The Lexmark recycling program at www.lexmark.com/recycle
Recycling Lexmark products
To return Lexmark products for recycling:
1 Visit our Web site at www.lexmark.com/recycle.
2 Find the product type you want to recycle, and then select your country or region from the list.
3 Follow the instructions on the computer screen.
Note: Printer supplies and hardware not listed in a Lexmark collection program may be recycled through your local
recycling center. Contact your local recycling center to determine the items they accept.
Minimizing your printer's environmental impact
49
Page 50

Recycling Lexmark packaging
Lexmark continually strives to minimize packaging. Less packaging helps to ensure that Lexmark printers ar e transported
in the most efficient and environmentally sensitive manner and that there is less packaging to dispose of. These
efficiencies result in fewer greenhouse emissions, energy savings, and natural resource savings.
Lexmark cartons are 100% recyclable where corrugated recycling facilities exist. Facilities may not exist in your area.
The foam used in Lexmark packaging is recyclable where foam recycling facilities exist. Facilities may not exist in your
area.
When you return a cartridge to Lexmark, you can reuse the box that the cartridge came in. Lexmark will recycle the
box.
Returning Lexmark cartridges for reuse or recycling
The Lexmark Cartridge Collection Program diverts millions of Lexmark cartridges from landfills annually by making it
both easy and free for Lexmark customers to return used cartridges to Lexmark for reuse or recycling. One hundred
percent of the empty cartridges returned to Lexmark are either reused or demanufactured for recycling. Boxes used
to return the cartridges are also recycled.
To return Lexmark cartridges for reuse or recycling, follow the instructions that came with your printer or cartridge and
use the prepaid shipping label. You can also do the following:
1 Visit our Web site at www.lexmark.com/recycle.
2 From the Toner Cartridges section, select your country or region from the list.
3 Follow the instructions on the computer screen.
Minimizing your printer's environmental impact
50
Page 51

Loading paper and specialty media
This section explains how to use the 250-sheet tray, the manual feeder, an optional 550-sheet tray, and the 650-sheet
duo drawer with an integrated multipurpose feeder. It also includes information about paper orientation, setting the
Paper Size and Paper Type, and linking and unlinking trays.
Setting the paper size and type
The Paper Size setting for the multipurpose feeder must be set manually from the Paper Size menu. The Paper Type
setting must be set manually for all trays that do not contain plain paper.
From the home screen navigate to:
> Paper Menu > Paper Size/Type > select a tray > select the paper size or type > Submit
Configuring Universal paper settings
The Universal Paper Size is a user-defined setting that lets you print on paper sizes that are not preset in the printer
menus. Set the Paper Size for the specified tray to Universal when the size you want is not available from the Paper
Size menu. Then, specify all of the following Universal size settings for your paper:
• Units of Measure
• Portrait Width
• Portrait Height
Note: The smallest supported Universal size is 76 x 127 mm (3 x 5 in.); the largest size is 216 x 356 mm (8.5 x 14 in.).
1 From the home screen, navigate to:
> Paper Menu > Universal Setup > Units of Measure > select a unit of measure
2 Touch Portrait Width or Portrait Height > select the width or height > Submit.
Loading the standard 250-sheet tray and optional 550-sheet tray
The printer has one standard 250-sheet tray (Tray 1) with an attached manual feeder. The 250-sheet tray, the 650sheet duo drawer, and the optional 550-sheet tray support the same paper sizes and types and are loaded in the same
way.
Note: Some printer models may not support the optional 550-sheet tray.
CAUTION—POTENTIAL INJURY: To reduce the risk of equipment instability, load each paper drawer or tray
separately. Keep all other drawers or trays closed until needed.
1 Pull the tray out.
Note: Do not remove trays while a job is printing or while Busy appears on the display. Doing so may cause a jam.
Loading paper and specialty media
51
Page 52
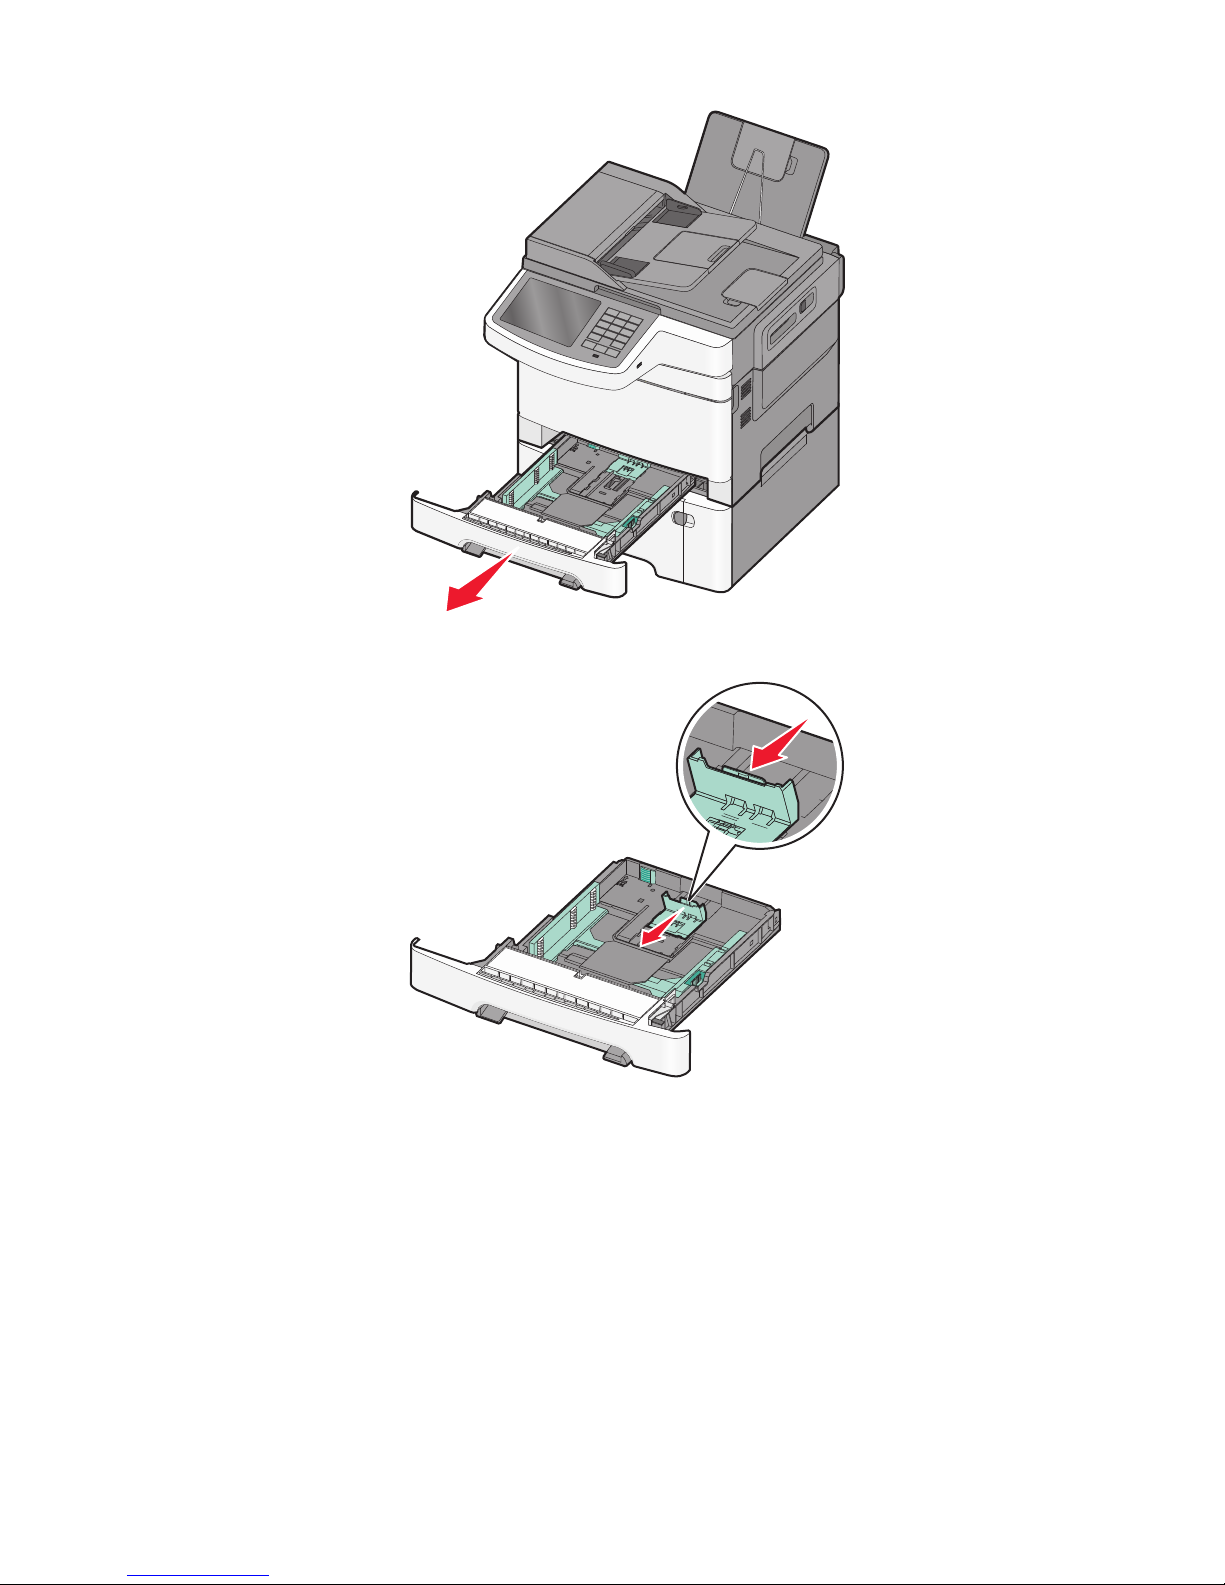
2 Squeeze the length guide tab, and then slide the guide to the correct position for the paper size being loaded.
Note: Use the size indicators on the bottom of the tray to help position the guide.
Loading paper and specialty media
52
Page 53
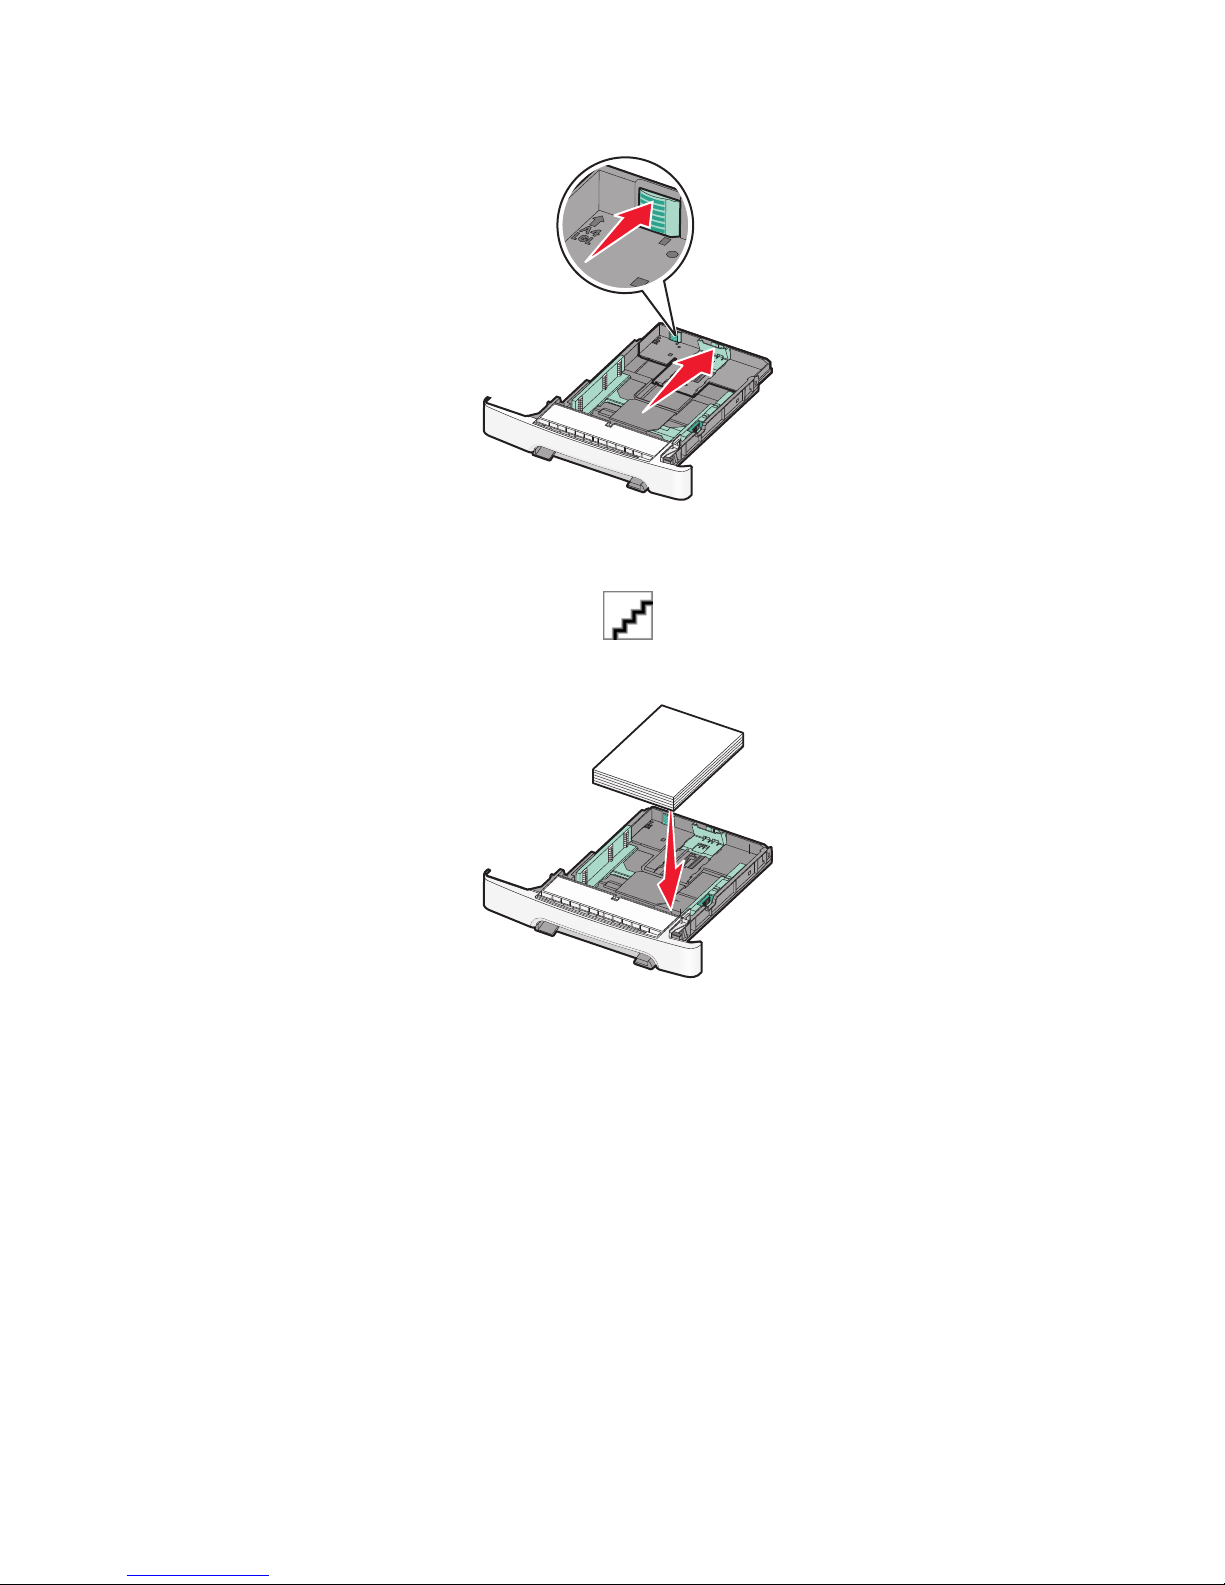
3 If the paper is longer than letter-size paper, then push the green tab at the back of the tray to extend it.
4 Flex the sheets back and forth to loosen them. Do not fold or crease the paper. Straighten the edges on a level
surface.
5 Load the paper stack with the recommended print side faceup.
6 Make sure the paper guides are secure against the edges of the paper.
Note: Make sure the side guides are placed tightly against the edges of the paper so that the image is registered
properly on the page.
Loading paper and specialty media
53
Page 54
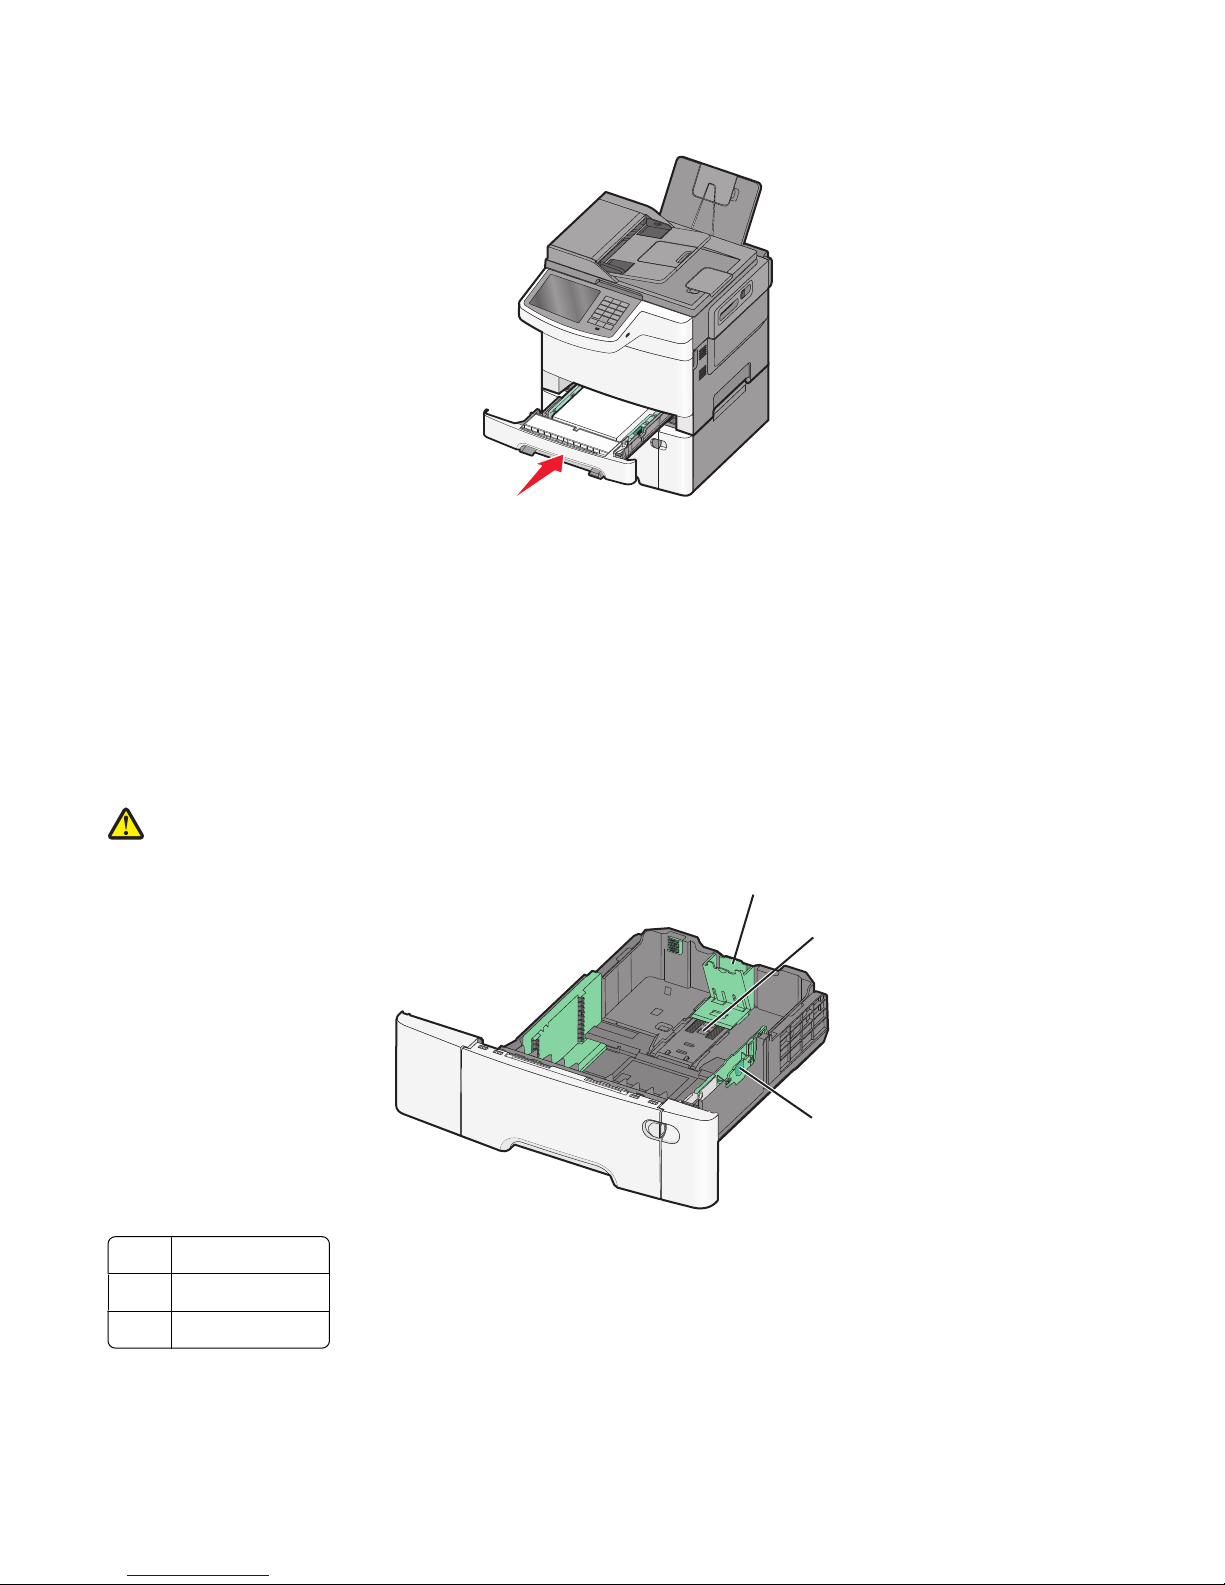
7 Insert the tray.
8 If a different type or size of paper was loaded than the type or size previously loaded in the tray, then change the
Paper Type or Paper Size setting for the tray from the printer control panel.
Note: Mixing paper sizes or types in a paper tray may cause jams.
Loading the 650-sheet duo drawer
The 650-sheet duo drawer (Tray 2) consists of a 550-sheet tray and an integrated 100-sheet multipurpose feeder. The
drawer is loaded in the same way as the 250-sheet tray and the optional 550-sheet tray, and supports the same paper
types and sizes. The only differences are the look of the guide tabs and the location of the paper size indicators.
CAUTION—POTENTIAL INJURY: To reduce the risk of equipment instability, load each paper drawer or tray
separately. Keep all other drawers or trays closed until needed.
1
2
3
1 Length guide tabs
2 Size indicators
3 Width guide tabs
Loading paper and specialty media
54
Page 55
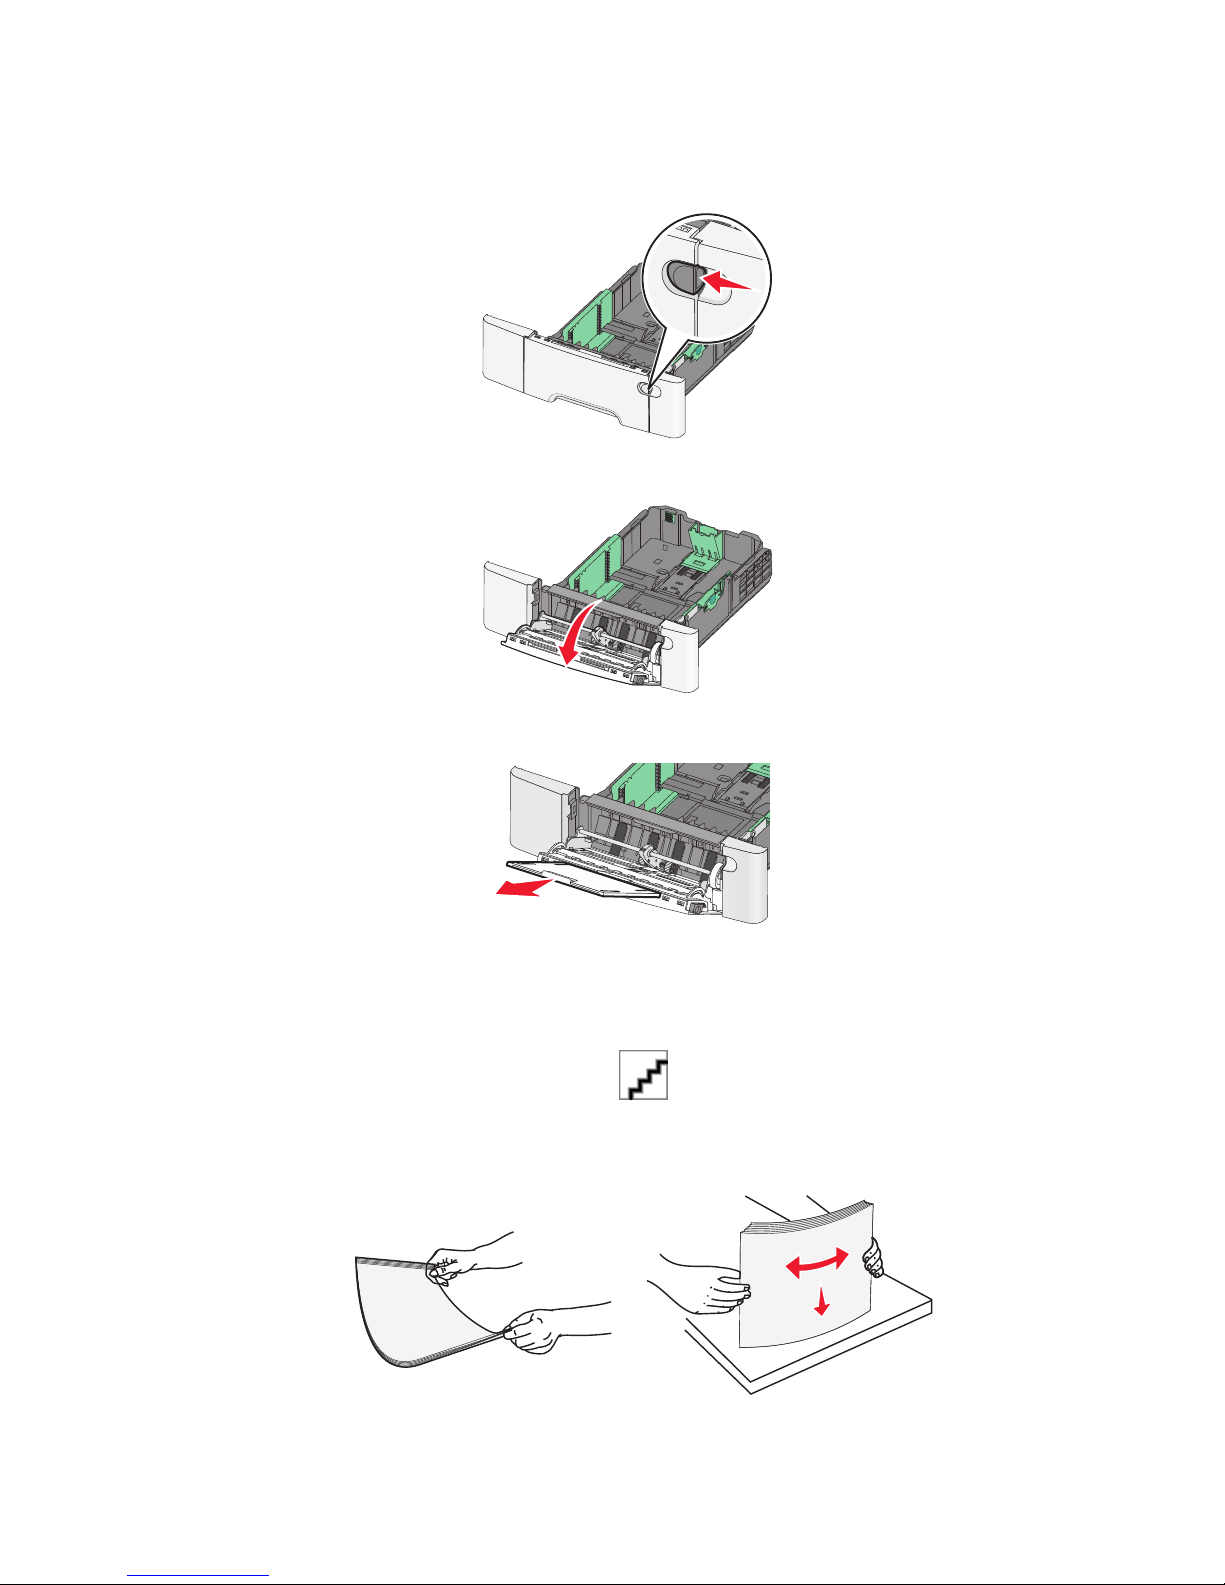
Loading the multipurpose feeder
1 Push the multipurpose feeder latch to the left.
2 Open the multipurpose feeder.
3 Grasp the extension, and pull it straight out until it is fully extended.
4 Prepare the paper for loading.
• Flex sheets of paper back and forth to loosen them. Do not fold or crease the paper. Straighten the edges on a
level surface.
• Hold transparencies by the edges. Straighten the edges on a level surface.
Note: Avoid touching the print side of transparencies. Be careful not to scratch them.
Loading paper and specialty media
55
Page 56
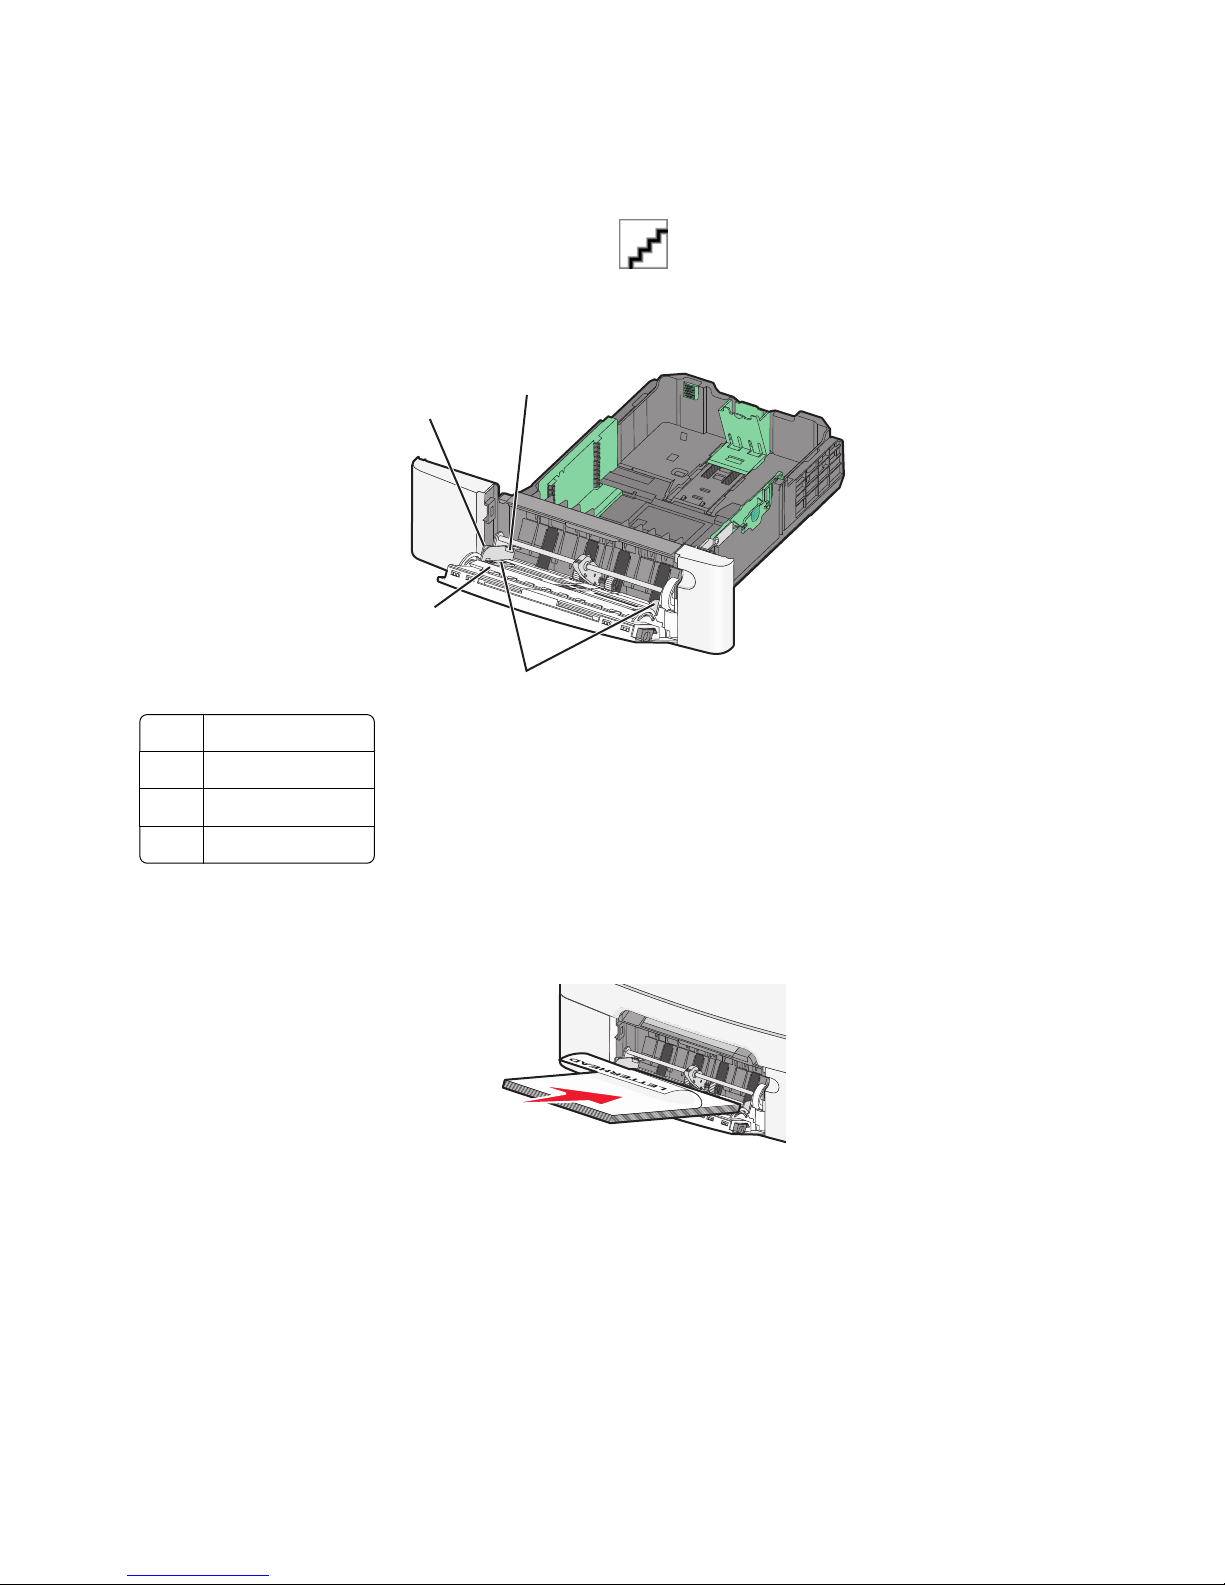
• Flex a stack of envelopes back and forth to loosen them. Straighten the edges on a level surface.
Warning—Potential Damage: Never use envelopes with stamps, clasps, snaps, windows, coated linings, or
self-stick adhesives. These envelopes may severely damage the printer.
5 Locate the stack height limiter and tab.
Note: Do not exceed the maximum stack height by forcing paper under the stack height limiter.
2
1
4
3
1 Tab
2 Stack height limiter
3 Width guide
4 Size indicators
6 Load the paper, and then adjust the width guide to lightly touch the edge of the paper stack.
• Load paper, card stock, and transparencies with the recommended print side facedown and the top edge
entering first.
• Load envelopes with the flap side up.
Notes:
• Do not load or close the multipurpose feeder while a job is printing.
• Load only one size and type of paper at a time.
Loading paper and specialty media
56
Page 57
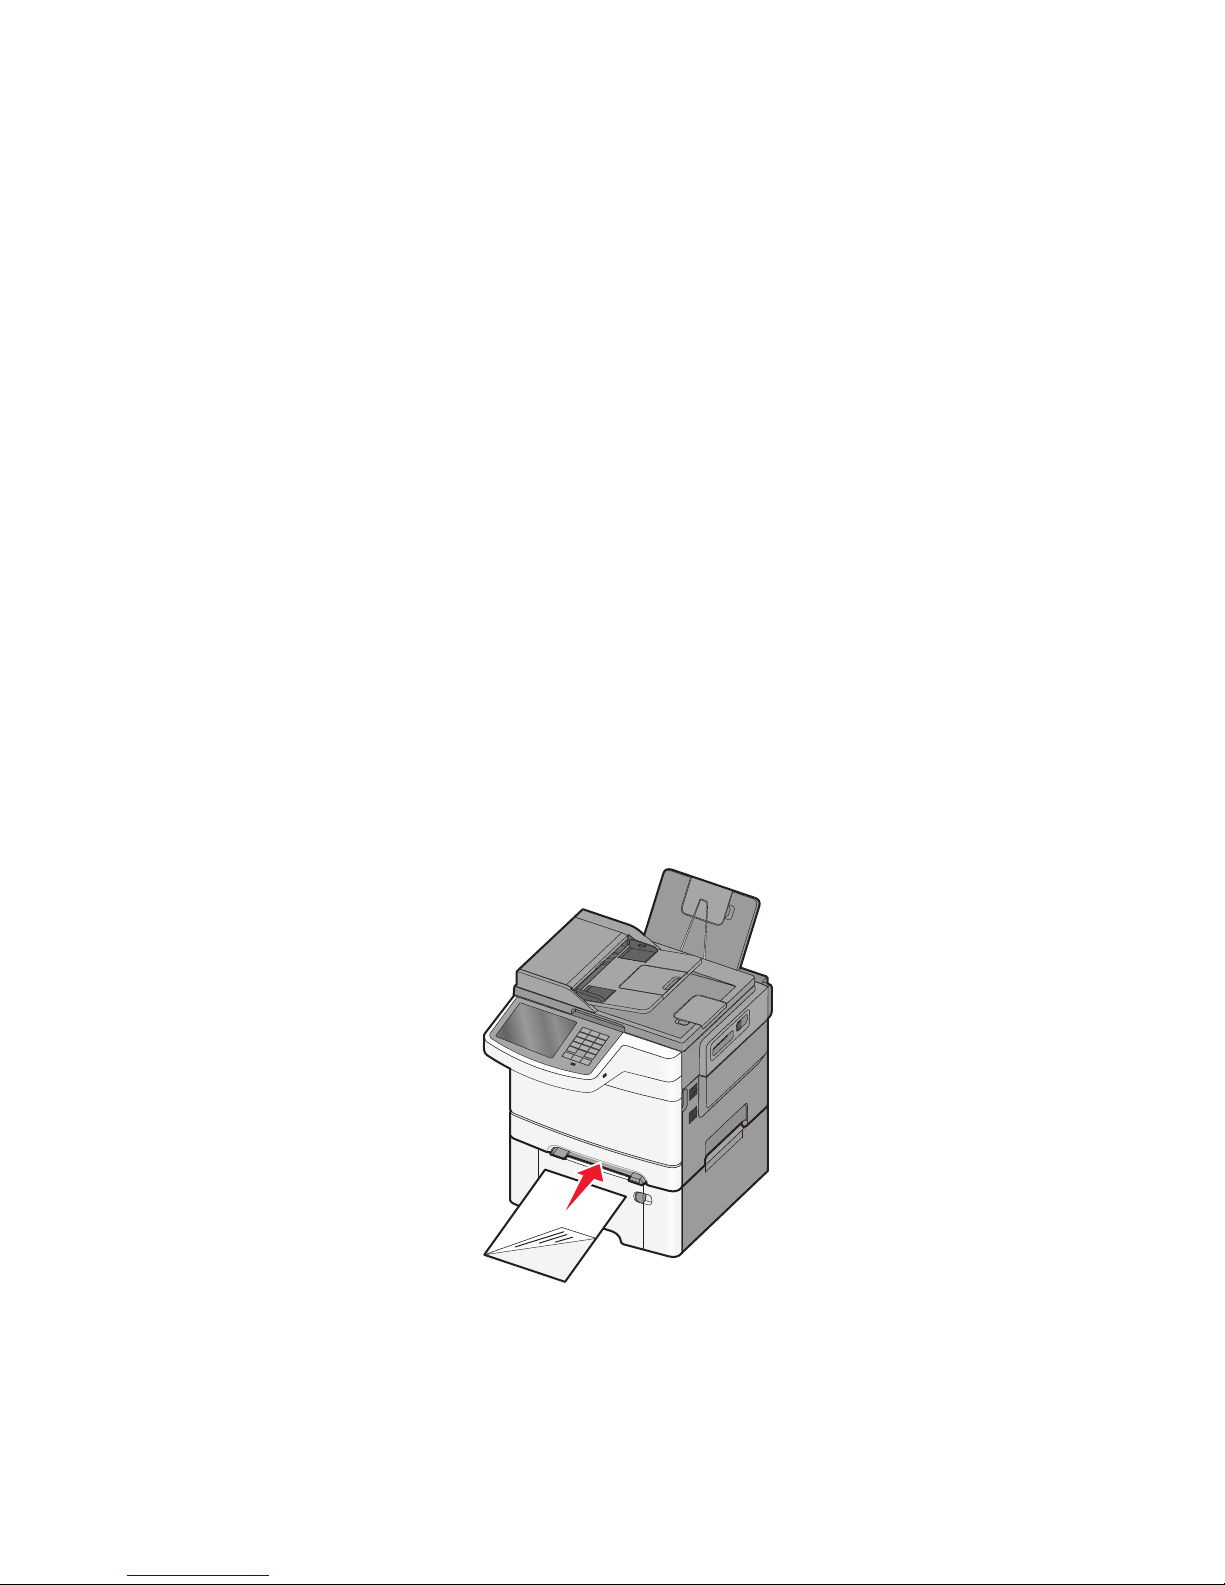
7 Make sure the paper is as far into the multipurpose feeder as it will go with very gentle pushing. Paper should lie
flat in the multipurpose feeder. Make sure the paper fits loosely in the multipurpose feeder and is not bent or
wrinkled.
8 From the printer control panel, set the Paper Size and Paper Type.
Loading the manual feeder
The standard 250-sheet tray has an integrated manual feeder that can be used to print on different types of media one
sheet at a time.
1 Send a manual print job.
For Windows users
a With a document open, click File > Print.
b Click Properties, Preferences, Options, or Setup.
c Navigate to:
Paper tab > Paper type > Manual Paper > OK > OK
For Macintosh users
a With a document open, choose File > Print.
b From the Copies & Pages or General pop-up menu, choose Manual Paper.
c Click OK or Print.
2 When Load Single Sheet Feeder with [paper type] [paper size] appears, load the sheet
facedown into the manual feeder. Load envelopes on the left side of the feeder with the flap side up.
Note: Align the long edge of the sheet so that it is flush with the right side of the manual feeder.
Loading paper and specialty media
57
Page 58
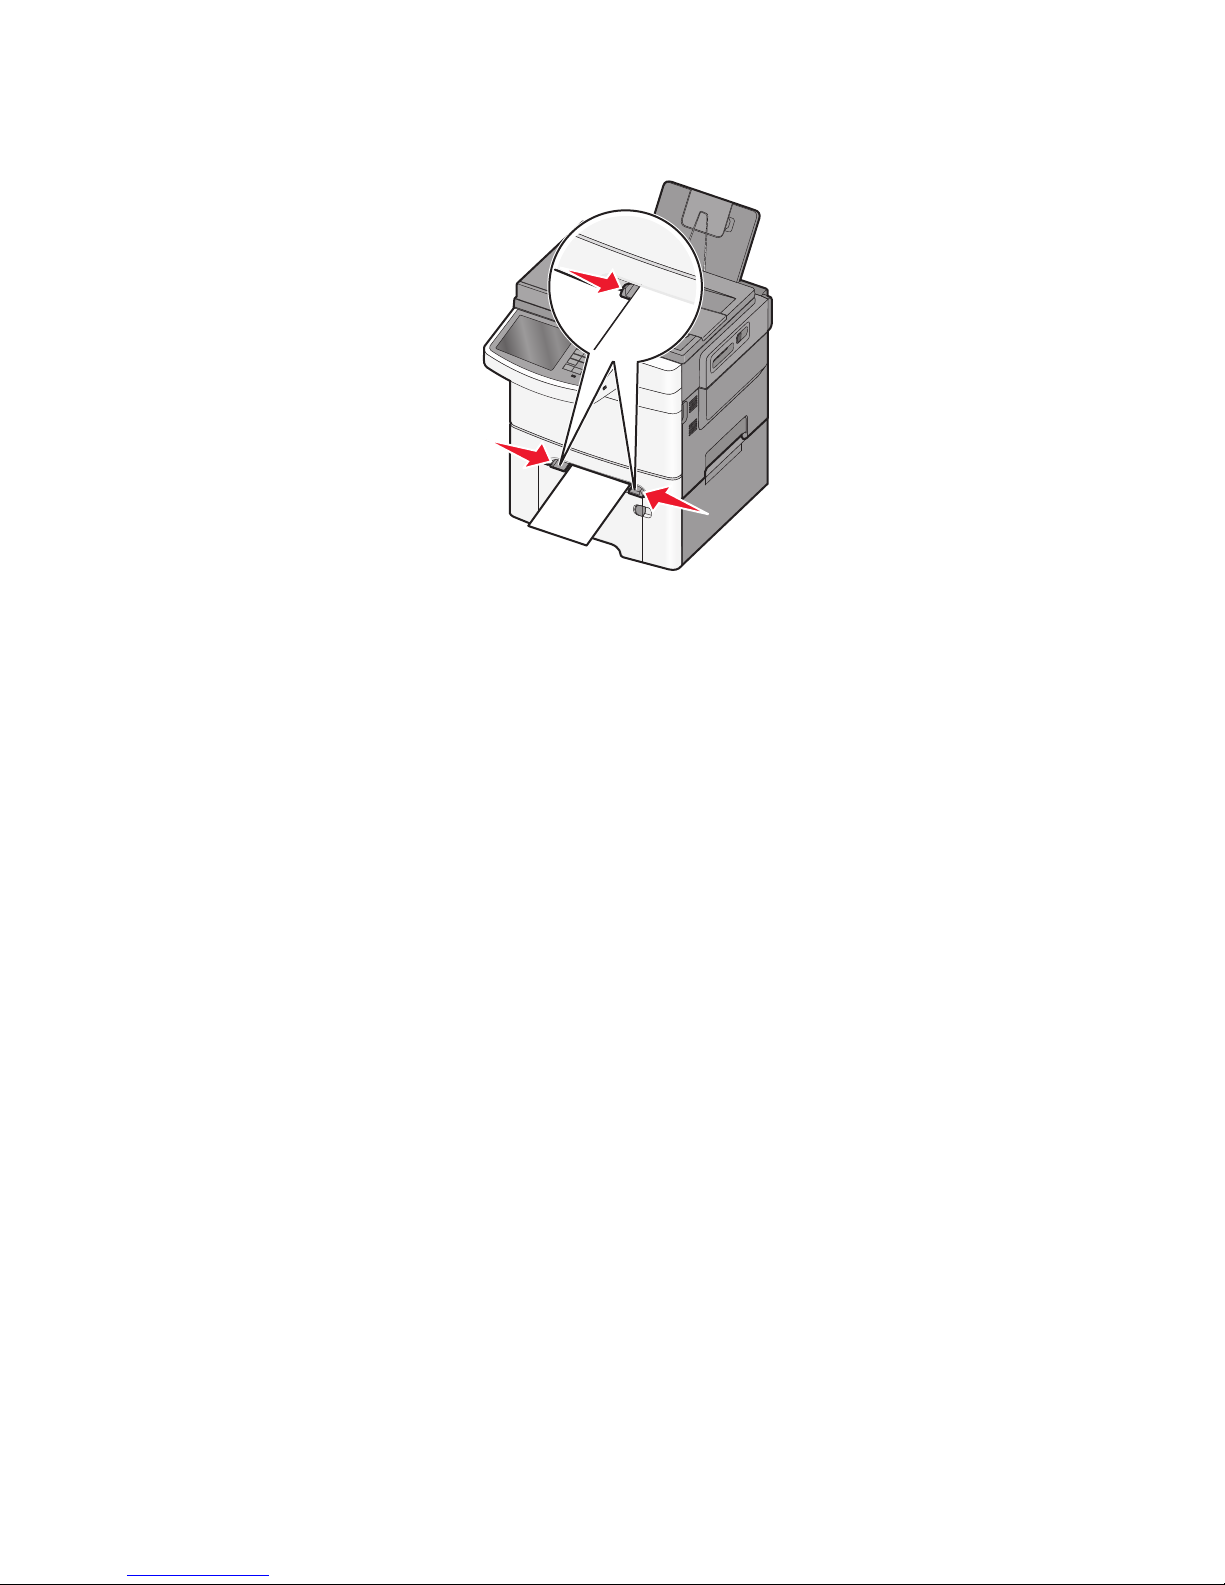
3 Adjust the width guides until they lightly touch the sheet. Do not force the width guides against the sheet. Doing
so may damage the sheet.
4 Push the sheet in until it stops. The printer pulls it in farther.
Note: To achieve the best possible print quality, use only high-quality media designed for laser printers.
Linking and unlinking trays
Linking trays
Tray linking is useful for large print jobs or multiple copies. When one linked tray is empty, paper feeds from the next
linked tray. When the Paper Size and Paper Type settings are the same for any trays, the trays are automatically linked.
The Paper Size setting for all trays must be set manually from the Paper Size menu. The Paper Type setting must be set
for all trays from the Paper Type menu. The Paper Type menu and the Paper Size menu are both available from the
Paper Size/Type menu.
Unlinking trays
Change one of the following tray settings:
• Paper Type
Paper Type names describe the paper characteristics. If the name that best describes your paper is used by linked
trays, then assign a different Paper Type name to the tray, such as Custom Type [x], or define your own custom
name.
• Paper Size
Paper Size settings must be set manually from the Paper Size menu.
Note: Trays that do not have the same settings as any other tray are not linked.
Warning—Potential Damage: Do not assign a Paper Type name that does not accurately describe the type of paper
loaded in a tray. The temperature of the fuser varies according to the specified Paper Type. Prints may not be properly
processed if an inaccurate Paper Type is selected.
Loading paper and specialty media
58
Page 59

Creating a custom name for a paper type
If the printer is on a network, you can use the Embedded Web Server to define a name other than Custom Type [x] for
each of the custom paper types loaded into the printer.
1 Type the printer IP address into the address field of your Web browser.
Note: If you do not know the IP address of the printer, then you can:
• View the IP address on the printer control panel in the TCP/IP section under the Networks/Ports menu.
• Print a network setup page or the menu settings pages and locate the IP address in the TCP/IP section.
2 Click Settings > Paper Menu > Custom Name > type a name > Submit.
Note: This custom name will replace the Custom Type [x] name under the Custom Types and Paper Size and Type
menus.
3 Click Custom Types > select a paper type > Submit.
Assigning a custom paper type name
Assign a custom paper type name to a tray when linking or unlinking trays.
From the home screen, navigate to:
> Paper Menu > Paper Size/Type > select a custom paper type name > select a tray > Submit
Configuring a custom name
If the printer is on a network, then you can use the Embedded Web Server to define a name other than Custom Type [x]
for each of the custom paper types loaded into the printer.
1 Type the printer IP address in the address field of your Web browser.
Note: If you do not know the IP address of the printer, then you can:
• View the IP address on the printer control panel in the TCP/IP section under the Networks/Ports menu.
• Print a network setup page or the menu settings pages and locate the IP address in the TCP/IP section.
2 Click Settings > Paper Menu > Custom Types > select the custom name you want to configure > select a paper or
specialty media type > Submit.
Loading paper and specialty media
59
Page 60

Paper and specialty media guide
Paper guidelines
Paper characteristics
The following paper characteristics affect print quality and reliability. Consider these characteristics when evaluating
new paper stock.
Weight
The printer can automatically feed paper weights from 60 to 176 g/m2 (16 to 47 lb bond) grain long. Paper lighter than
75 g/m
bond) grain long paper. For paper smaller than 182 x 257 mm (7.2 x 10.1 in.), we recommend 90 g/m
2
(20 lb) might not be stiff enough to feed properly, causing jams. For best performance, use 80 g/m2 (21 lb
2
or heavier paper.
Curl
Curl is the tendency for paper to curl at its edges. Excessive curl can cause paper feeding problems. Curl can occur after
the paper passes through the printer, where it is exposed to high temperatures. Storing paper unwrapped in hot, humid,
cold, or dry conditions, even in the trays, can contribute to paper curling prior to printing and can cause feeding
problems.
Smoothness
Paper smoothness directly affects print quality. If paper is too rough, toner cannot fuse to it properly. If paper is too
smooth, it can cause paper feeding or print quality issues. Always use paper between 100 and 300 Sheffield points;
however, smoothness between 150 and 200 Sheffield points produces the best print quality.
Moisture content
The amount of moisture in paper affects both print quality and the ability of the printer to feed the paper correctly.
Leave paper in its original wrapper until it is time to use it. This limits the exposure of paper to moisture changes that
can degrade its performance.
Condition paper before printing by storing it in its original wrapper in the same environment as the printer for 24 to
48 hours before printing. Extend the time several days if the storage or transportation environment is very different
from the printer environment. Thick paper may also require a longer conditioning period.
Grain direction
Grain refers to the alignment of the paper fibers in a sheet of paper. Grain is either grain long, running the length of
the paper, or grain short, running the width of the paper.
2
For 60 to 176 g/m
(16 to 47 lb bond) paper, use grain long fibers.
Fiber content
Most high-quality xerographic paper is made from 100% chemically treated pulped wood. This content provides the
paper with a high degree of stability resulting in fewer paper feeding problems and better print quality. Paper containing
fibers such as cotton possesses characteristics that can negatively affect paper handling.
Paper and specialty media guide
60
Page 61

Selecting paper
Using appropriate paper prevents jams and helps ensure trouble-free printing.
To help avoid jams and poor print quality:
• Always use new, undamaged paper.
• Before loading paper, know the recommended print side of the paper. This information is usually indicated on the
paper package.
• Do not use paper that has been cut or trimmed by hand.
• Do not mix paper sizes, types, or weights in the same source; mixing results in jams.
• Do not use coated papers unless they are specifically designed for electrophotographic printing.
Using recycled paper and other office papers
As an environmentally conscious company, Lexmark supports the use of recycled office paper produced specifically for
use in laser and LED (electrophotographic) printers. In 1998, Lexmark presented to the US government a study
demonstrating that recycled paper produced by major mills in the US fed as well as non-recycled paper. However, no
blanket statement can be made that all recycled paper will feed well.
Lexmark consistently tests its printers with recycled paper (20–100% post-consumer waste) and a variety of test paper
from around the world, using chamber tests for different temperature and humidity conditions. Lexmark has found no
reason to discourage the use of today's recycled office papers, but generally the following property guidelines apply
to recycled paper.
• Low moisture content (4–5%)
• Suitable smoothness (100–200 Sheffield units, or 140–350 Bendtsen units, European)
Note: Some much smoother papers (such as premium 24 lb laser and LED papers, 50–90 Sheffield units) and much
rougher papers (such as premium cotton papers, 200–300 Sheffield units) have been engineered to work very well
in laser and LED printers, despite surface texture. Before using these types of paper, consult your paper supplier.
• Suitable sheet-to-sheet coefficient of friction (0.4–0.6)
• Sufficient bending resistance in the direction of feed
Recycled paper, paper of lower weight (<60 g/m
that is cut grain-short for portrait (or short-edge) fed printers may have lower bending resistance than is required for
reliable paper feeding. Before using these types of paper for laser or LED (electrophotographic) printing, consult your
paper supplier. Remember that these are general guidelines only and that paper meeting these guidelines may still
cause paper feeding problems in any laser or LED printer (for example, if the paper curls excessively under normal
printing conditions).
2
[16 lb bond]) and/or lower caliper (<3.8 mils [0.1 mm]), and paper
Selecting preprinted forms and letterhead
Use these guidelines when selecting preprinted forms and letterhead:
• Use grain long for 60 to 176 g/m
• Use only forms and letterhead printed using an offset lithographic or engraved printing process.
• Avoid papers with rough or heavily textured surfaces.
Use papers printed with heat-resistant inks designed for use in xerographic copiers. The ink must be able to withstand
temperatures up to 200°C (392°F) without melting or releasing hazardous emissions. Use inks that are not affected by
the resin in toner. Inks that are oxidation-set or oil-based generally meet these requirements; latex inks might not.
When in doubt, contact the paper supplier.
2
weight paper.
Paper and specialty media guide
61
Page 62
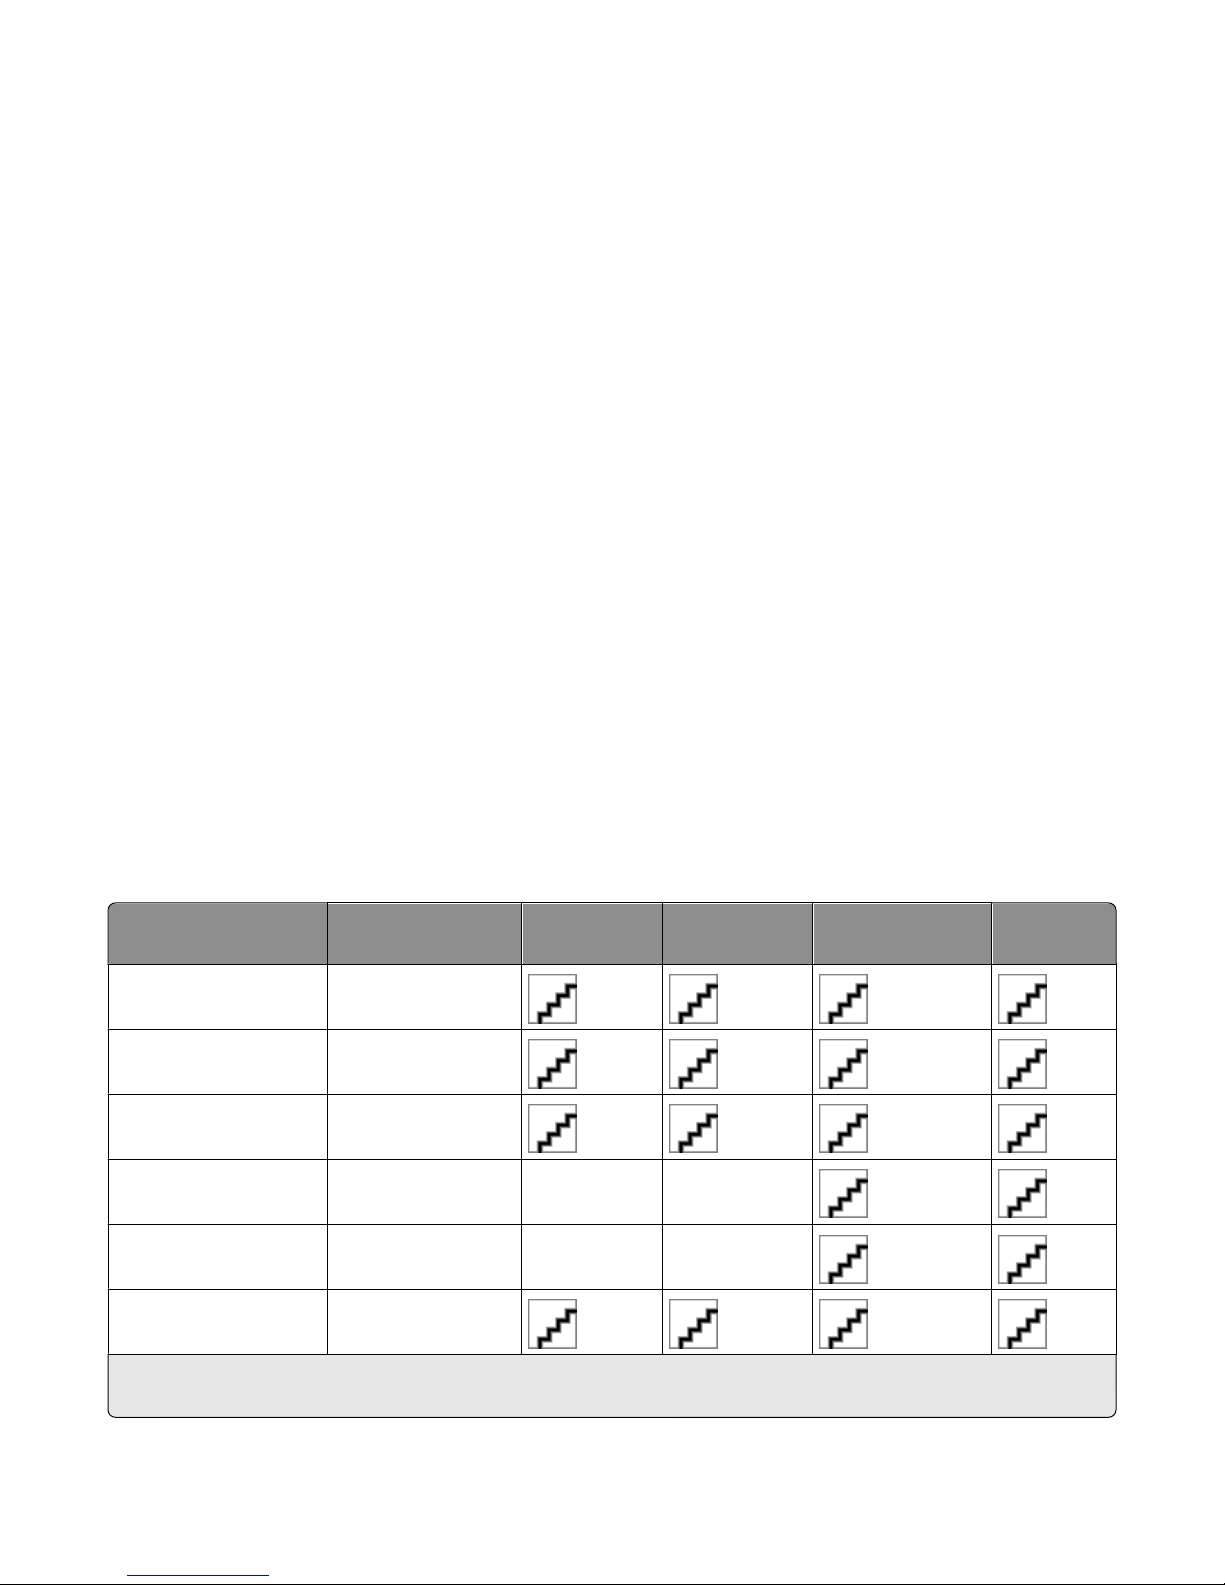
Preprinted papers such as letterhead must be able to withstand temperatures up to 200°C (392°F) without melting or
releasing hazardous emissions.
Storing paper
Use these paper storage guidelines to help avoid jams and uneven print quality:
• For best results, store paper where the temperature is 21°C (70°F) and the relative humidity is 40%. Most label
manufacturers recommend printing in a temperature range of 18 to 24 °C (65 to 75°F) with relative hum idity between
40 and 60%.
• Store paper in cartons when possible, on a pallet or shelf, rather than on the floor.
• Store individual packages on a flat surface.
• Do not store anything on top of individual paper packages.
Supported paper sizes, types, and weights
The following tables provide information on standard and optional paper sources and the types of paper they support.
Note: For an unlisted paper size, select the closest larger listed size.
Supported paper sizes
Notes:
• Your printer model may have a 650-sheet duo drawer, which consists of a 550-sheet tray and an integrated
100-sheet multipurpose feeder. The 550-sheet tray of the 650-sheet duo drawer supports the same paper sizes as
the optional 550-sheet tray. The integrated multipurpose feeder supports different paper sizes, types, and weights.
• Some printer models may not support the optional 550-sheet tray.
Paper size Dimensions 250-sheet tray Optional
550-sheet tray
A4 210 x 297 mm
(8.3 x 11.7 in.)
A5 148 x 210 mm
(5.83 x 8.3 in.)
JIS B5 182 x 257 mm
(7.2 x 10.1 in.)
A6 105 x 148 mm
(4.1 x 5.8 in.)
Statement 140 x 216 mm
(5.5 x 8.5 in.)
Letter 216 x 279 mm
(8.5 x 11 in.)
X X
X X
Multipurpose
feeder
Manual
feeder
*
When Universal is selected, the page is formatted for 216 x 356 mm (8.5 x 14 in.) unless the size is specified by the software
program.
Paper and specialty media guide
62
Page 63
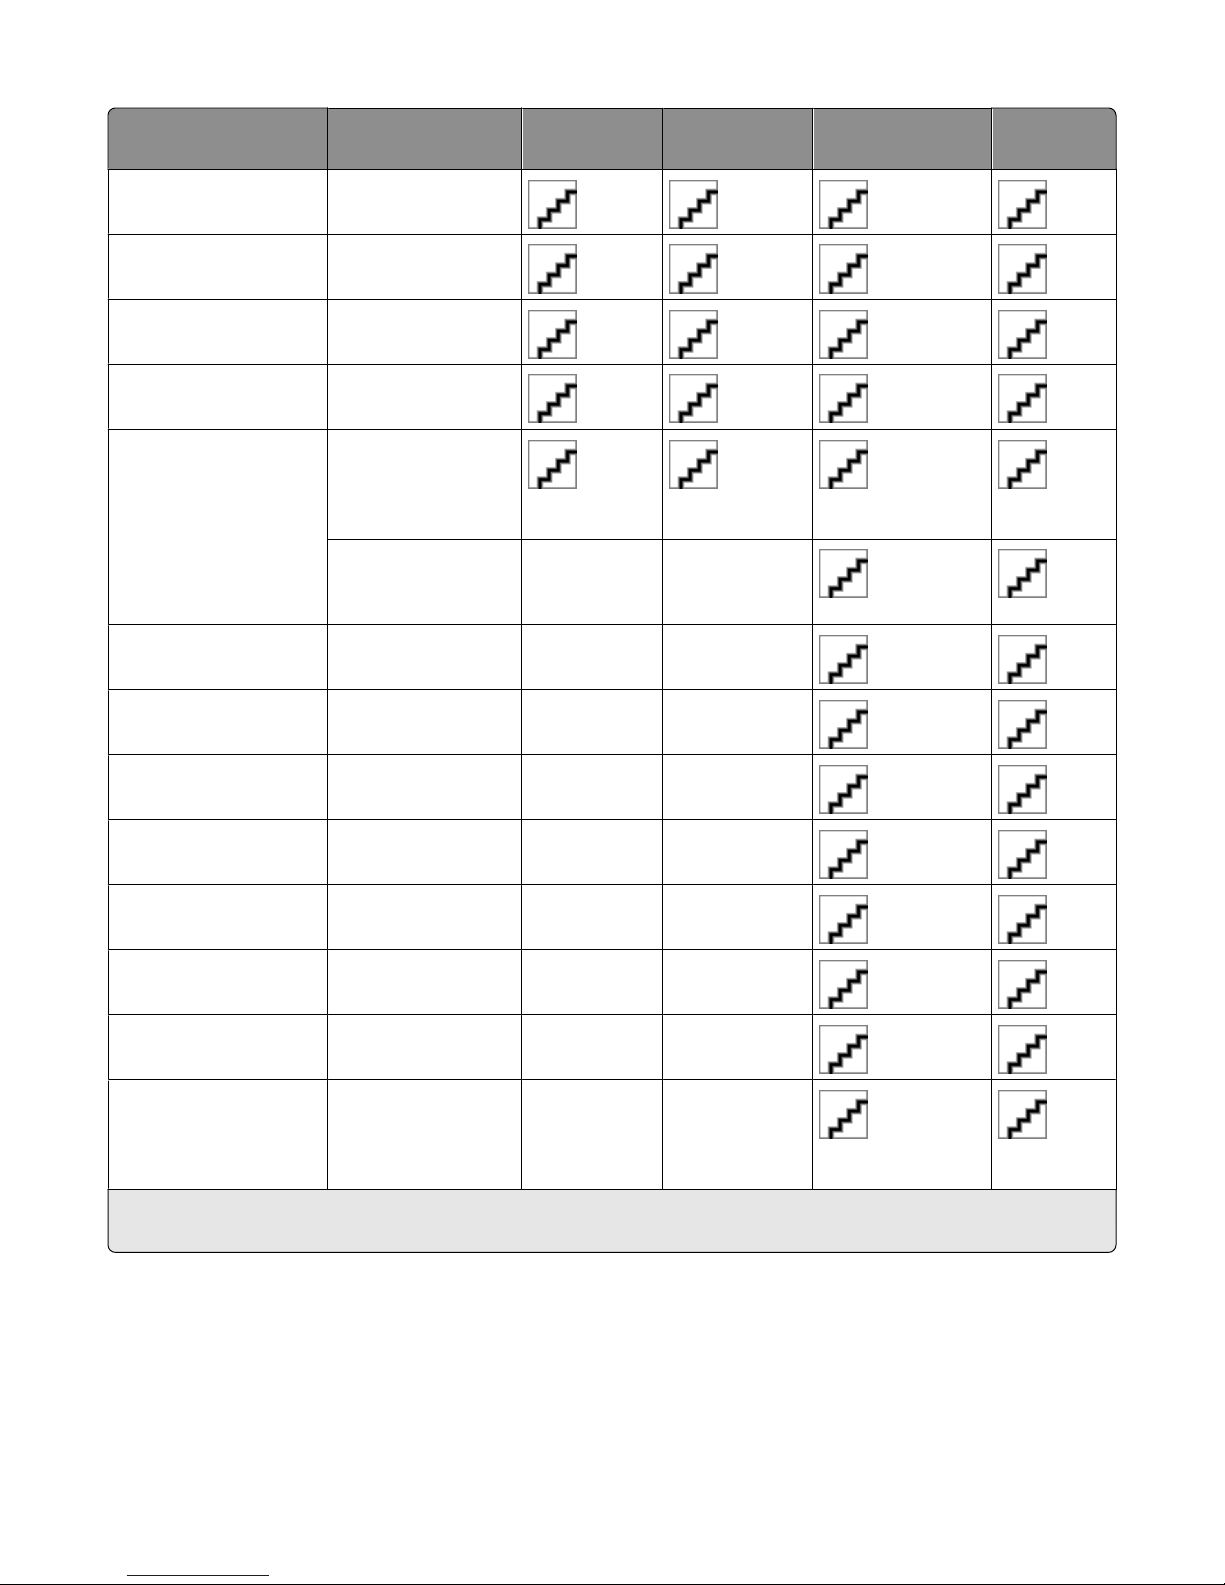
Paper size Dimensions 250-sheet tray Optional
550-sheet tray
Folio 216 x 330 mm
(8.5 x 13 in.)
Oficio (Mexico) 216 x 340 mm
(8.5 x 13 in.)
Legal 216 x 356 mm
(8.5 x 14 in.)
Executive 184 x 267 mm
(7.3 x 10.5 in.)
Multipurpose
feeder
Manual
feeder
Universal
*
148 x 210 mm
(5.8 x 8.3 in.) up to
216 x 356 mm
(8.5 x 14 in.)
76 x 127 mm (3 x 5 in.)
up to 216 x 356 mm
(8.5 x 14 in.)
7 3/4 Envelope
(Monarch)
98 x 191 mm
(3.9 x 7.5 in.)
9 Envelope 98 x 225 mm
(3.9 x 8.9 in.)
10 Envelope 105 x 241 mm
(4.1 x 9.5 in.)
DL Envelope 110 x 220 mm
(4.3 x 8.7 in.)
B5 Envelope 176 x 250 mm
(6.9 x 9.8 in.)
C5 Envelope 162 x 229 mm
(6.4 x 9 in.)
X X
X X
X X
X X
X X
X X
X X
Monarch 105 x 241 mm
(4.1 x 9.5 in.)
Other Envelope 98 x 162 mm
(3.9 x 6.3 in.) up to
176 x 250 mm
(6.9 x 9.8 in.)
*
When Universal is selected, the page is formatted for 216 x 356 mm (8.5 x 14 in.) unless the size is specified by the software
program.
X X
X X
Paper and specialty media guide
63
Page 64
Supported paper types and weights
Notes:
• Your printer model may have a 650-sheet duo drawer, which consists of a 550-sheet tray and an integrated
100-sheet multipurpose feeder. The 550-sheet tray of the 650-sheet duo drawer supports the same paper as the
optional 550-sheet tray. The integrated multipurpose feeder supports different paper sizes, types, and weights.
• Some printer models may not support the optional 550-sheet tray.
Paper type Standard 250-sheet
tray
Paper
1, 2
• Plain
• Bond
1, 2
• Glossy
• Colored
• Custom Type [x]
• Letterhead
1, 2
• Light
• Heavy
1, 2
• Preprinted
• Rough/Cotton
Recycled
Card stock
Transparencies X
2, 4, 5
Labels
1,2
1, 2, 3
• Paper
Envelopes
2, 6, 7
X X
Optional 550-sheet
tray
Multipurpose feeder Manual feeder
1
Paper types must be set to match the supported paper weights.
2
The duplex unit supports paper weights from 60 to 105 g/m2 (16–28-lb) grain long bond paper. The duplex unit does not
support card stock, transparencies, envelopes, or labels.
3
For 60 to 176 g/m2 (16–47-lb) bond paper, we recommend grain long fibers.
4
The pressure-sensitive area must enter the printer first.
5
Single-sided paper labels designed for laser printers are supported for occasional use. The use of paper labels should not
exceed 20 pages per month. Prolonged use may reduce fuser life. Vinyl, pharmacy, and dual-sided labels are not supported.
For more information, see the Card Stock & Label Guide on the Lexmark Web site at http://support.lexmark.com.
6
The maximum weight for 100 percent cotton envelopes is 90 g/m2 (24-lb) bond.
7
The cotton content limit for 105 g/m2 (28-lb) bond envelopes is 25 percent.
Paper and specialty media guide
64
Page 65

Printing
This chapter covers printing, printer reports, and job cancelation. The selection and handling of paper and specialty
media can affect how reliably documents print. For more information, see “Avoiding jams” on page 232 and “Storing
paper” on page 62.
Printing a document
Printing a document
1 From the printer control panel Paper menu, set the Paper Type and Paper Size to match the loaded paper.
2 Send the print job:
For Windows users
a With a document open, click File > Print.
b Click Properties, Preferences, Options, or Setup.
c Adjust settings as necessary.
d Click OK > Print.
For Macintosh users
a Customize the settings as needed in the Page Setup dialog:
1 With a document open, choose File > Page Setup.
2 Choose a paper size or create a custom size to match the loaded paper.
3 Click OK.
b Customize the settings as needed in the Print dialog:
1 With a document open, choose File > Print.
If necessary, click the disclosure triangle to see more options.
2 From the Print dialog and pop-up menus, adjust the settings as needed.
Note: To print on a specific paper type, adjust the paper type setting to match the loaded paper, or select
the appropriate tray or feeder.
3 Click Print.
Adjusting toner darkness
1 Type the printer IP address into the address field of your Web browser.
If you do not know the IP address of the printer, you can:
• View the IP address on the printer control panel in the TCP/IP section under the Networks/Ports menu.
• Print a network setup page or the menu settings pages and locate the IP address in the TCP/IP section.
2 Click Settings > Print Settings > Quality Menu > Toner Darkness.
Printing
65
Page 66
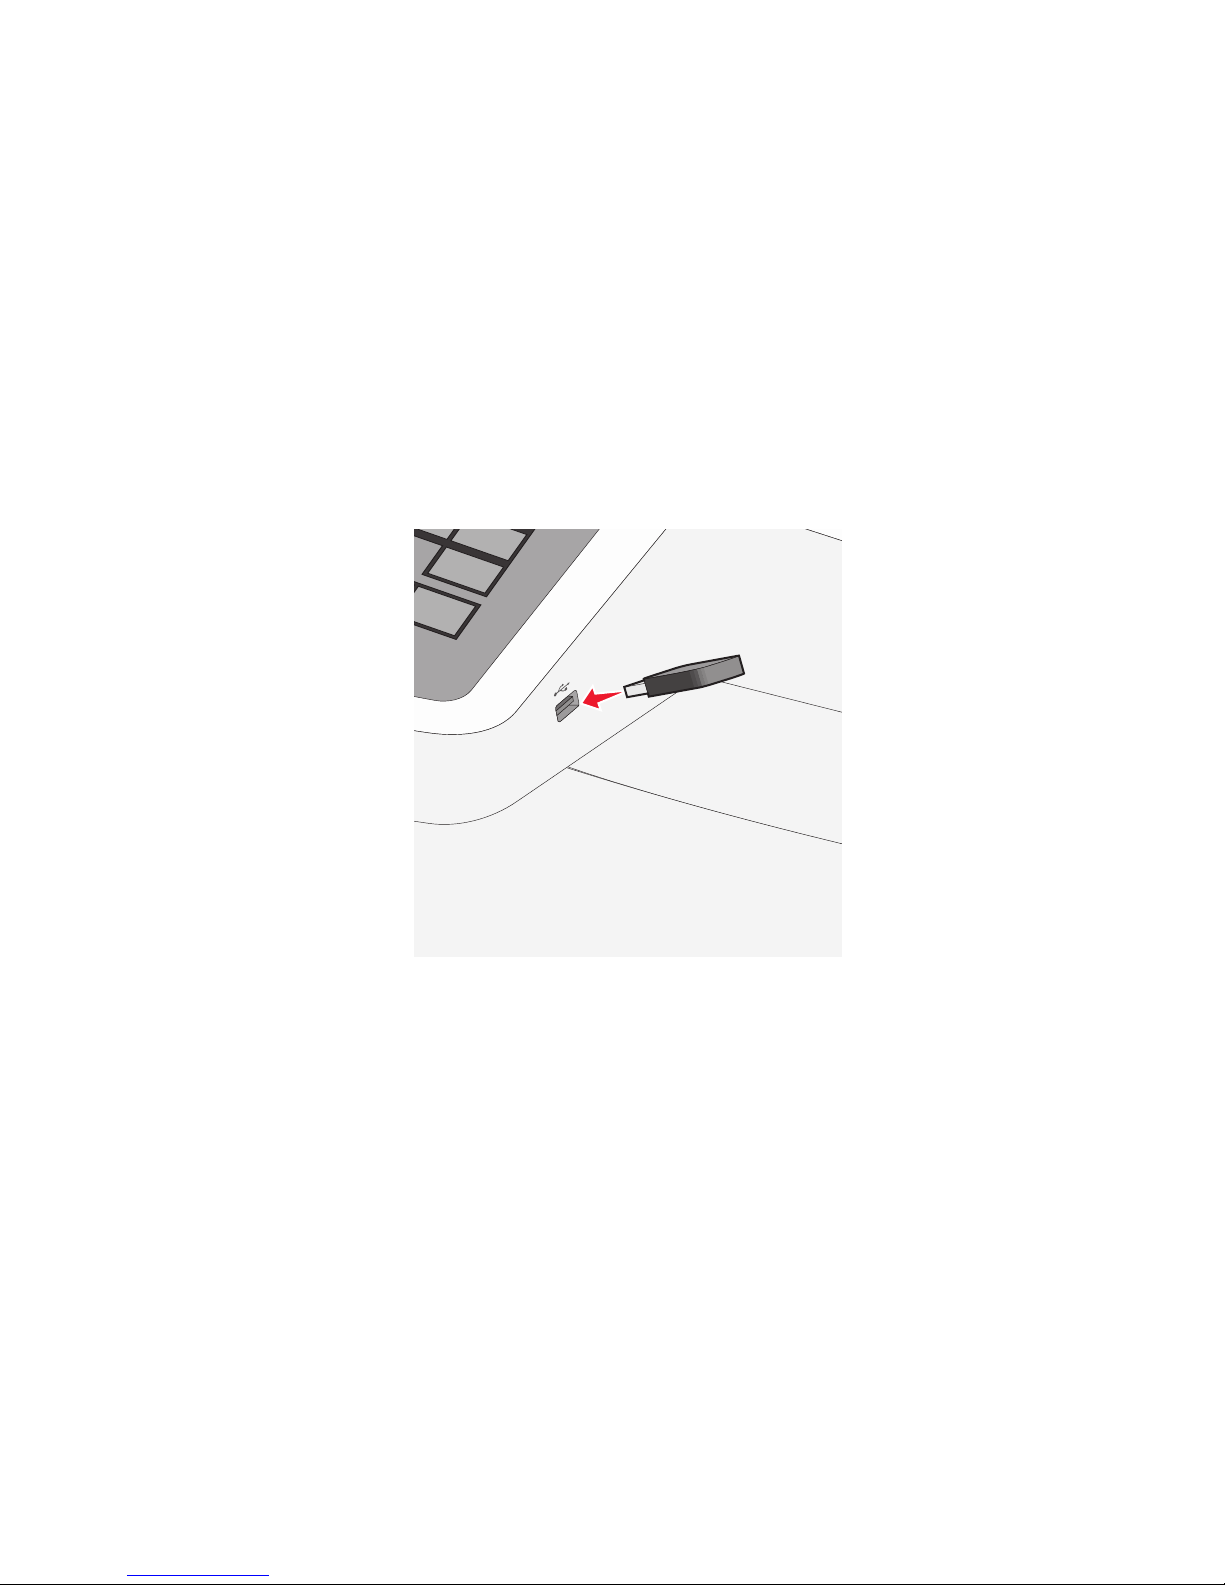
3 Adjust the toner darkness setting.
4 Click Submit.
Printing from a flash drive
Printing from a flash drive
Notes:
• Before printing an encrypted PDF file, enter the file password from the printer control panel.
• You cannot print files for which you do not have printing permissions.
1 Insert a flash drive into the USB port.
Notes:
• If you insert the flash drive when the printer requires attention, such as when a jam has occurred, then the
printer ignores the flash drive.
• If you insert the flash drive while the printer is processing other print jobs, then Busy appears. After these
print jobs are processed, you may need to view the held jobs list to print documents from the flash drive.
Warning—Potential Damage: Do not touch the USB cable, any network adapter, any connector, the memory
device, or the printer in the areas shown while actively printing, reading, or writing from the memory device. A
loss of data can occur.
Printing
66
Page 67
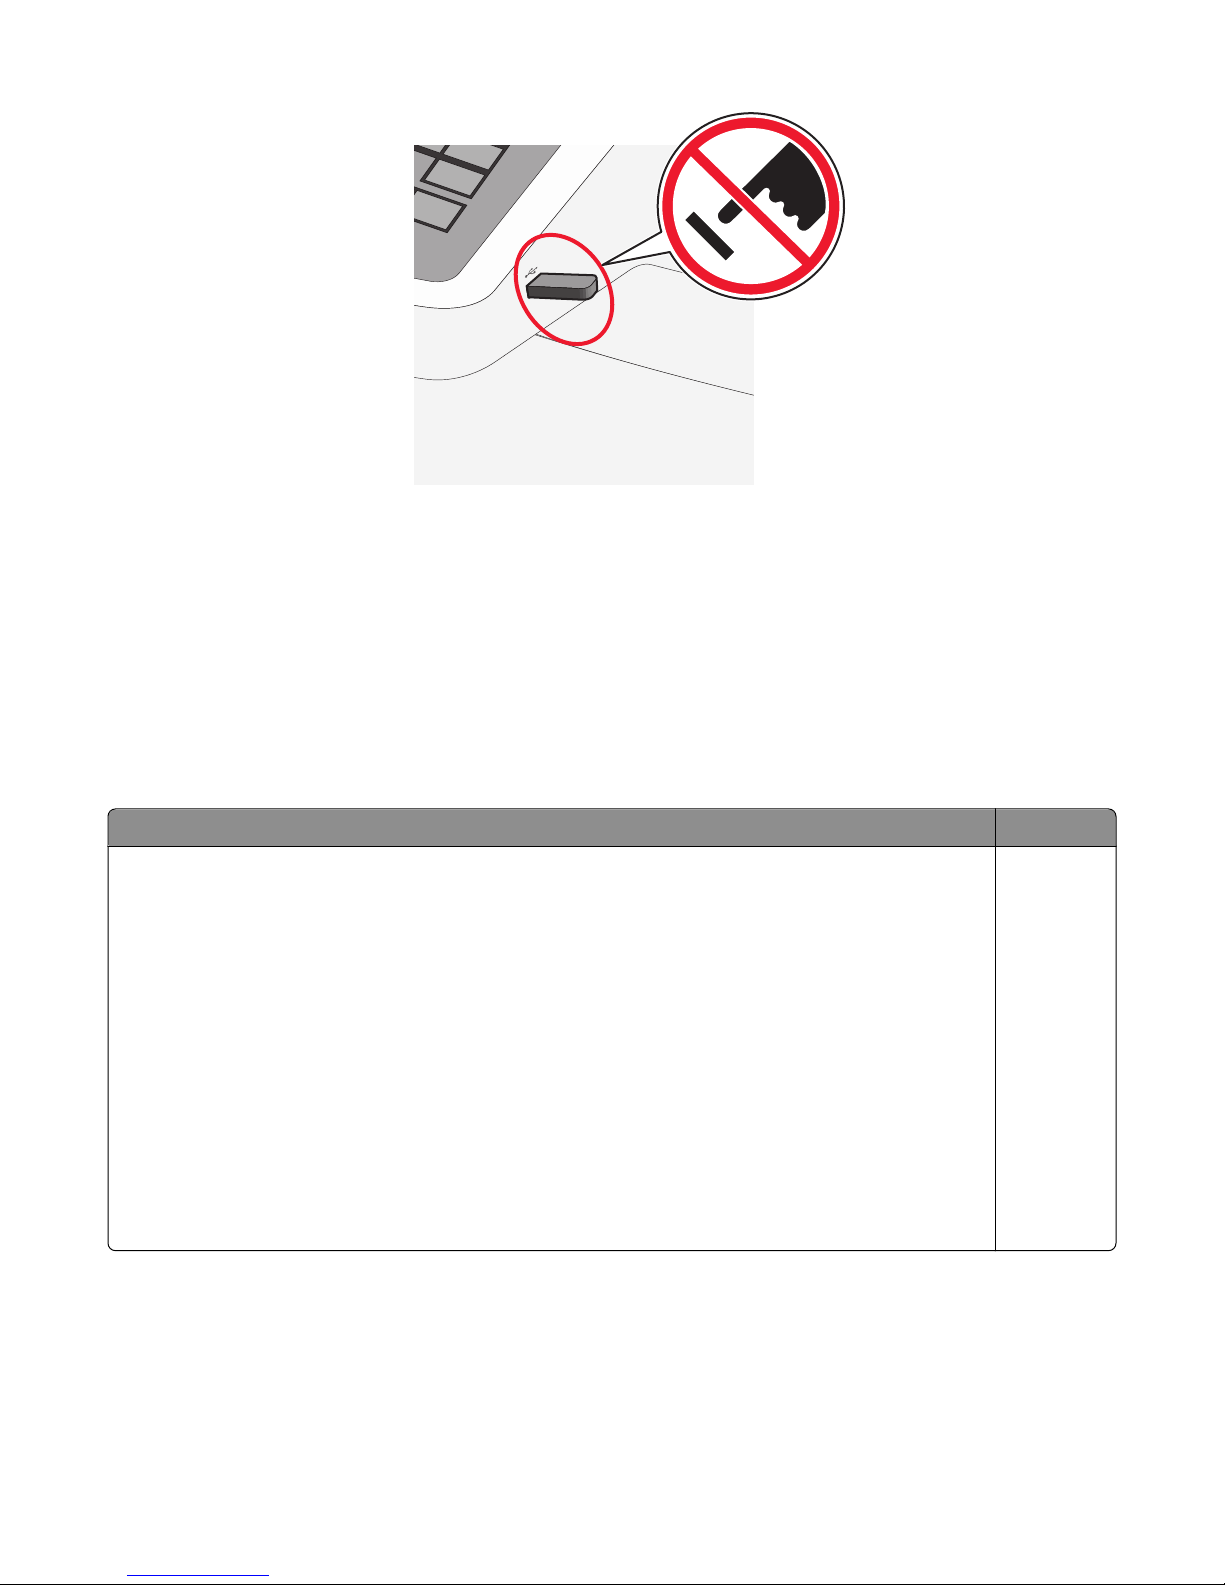
2 From the printer control panel, touch the document you want to print.
3 Touch the arrows to increase the number of copies to print, and then touch Print.
Notes:
• Do not remove the flash drive from the USB port until the document has finished printing.
• If you leave the flash drive in the printer after leaving the initial USB menu screen, then you can still print files
from the flash drive as held jobs.
Supported flash drives and file types
Flash drive File type
• Lexar JumpDrive 2.0 Pro (256MB, 512MB, or 1GB sizes)
• SanDisk Cruzer Mini (256MB, 512MB, or 1GB sizes)
Notes:
• Hi-Speed USB flash drives must support the Full-Speed standard. Devices supporting only USB low-speed
capabilities are not supported.
• USB flash drives must support the FAT (File Allocation Tables) system. Devices formatted with NTFS
(New Technology File System) or any other file system are not supported.
Documents:
• .pdf
• .xps
Images:
• .dcx
• .gif
• .JPEG
• .jpg
• .bmp
• .pcx
• .TIFF
• .tif
• .png
Printing
67
Page 68

Printing on specialty media
Tips on using card stock
Card stock is heavy, single-ply specialty media. Many of its variable characteristics, such as moisture content, thickness,
and texture, can significantly impact print quality. Print samples on the card stock being considered for use before
buying large quantities.
When printing on card stock:
• From MarkVision Professional, the printer software, or the printer control panel:
1 Set the Paper Type to Card Stock.
2 Set the Paper Weight to Card Stock Weight.
3 Set the Card Stock Weight to Normal or Heavy.
• Be aware that preprinting, perforation, and creasing may significantly affect the print quality and cause jams or
other paper handling problems.
• Check with the manufacturer or vendor to ensure the card stock can withstand temperatures up to 200°C (392°F)
without releasing hazardous emissions.
• Do not use preprinted card stock manufactured with chemicals that may contaminate the printer. Preprinting
introduces semi-liquid and volatile components into the printer.
• Use grain short card stock when possible.
Tips on using envelopes
Print samples on the envelopes being considered for use before buying large quantities.
When printing on envelopes:
• Feed envelopes from the manual feeder or optional multipurpose feeder.
• Set the Paper Type to Envelope, and select the envelope size.
• Use envelopes designed specifically for laser printers. Check with the manufacturer or vendor to ensure the
envelopes can withstand temperatures up to 200°C (392°F) without sealing, wrinkling, curling excessively, or
releasing hazardous emissions.
• For the best performance, use envelopes made from 60 g/m
weight for envelopes as long as the cotton content is 25% or less. All-cotton envelopes must not exceed 90 g/m
(24 lb bond) weight.
• Use only new envelopes.
• To optimize performance and minimize jams, do not use envelopes that:
– Have excessive curl or twist
– Are stuck together or damaged in any way
– Have windows, holes, perforations, cutouts, or embossing
– Have metal clasps, string ties, or folding bars
– Have an interlocking design
– Have postage stamps attached
– Have any exposed adhesive when the flap is in the sealed or closed position
2
(16 lb bond) paper. Use up to 105 g/m2 (28 lb bond)
2
Printing
68
Page 69
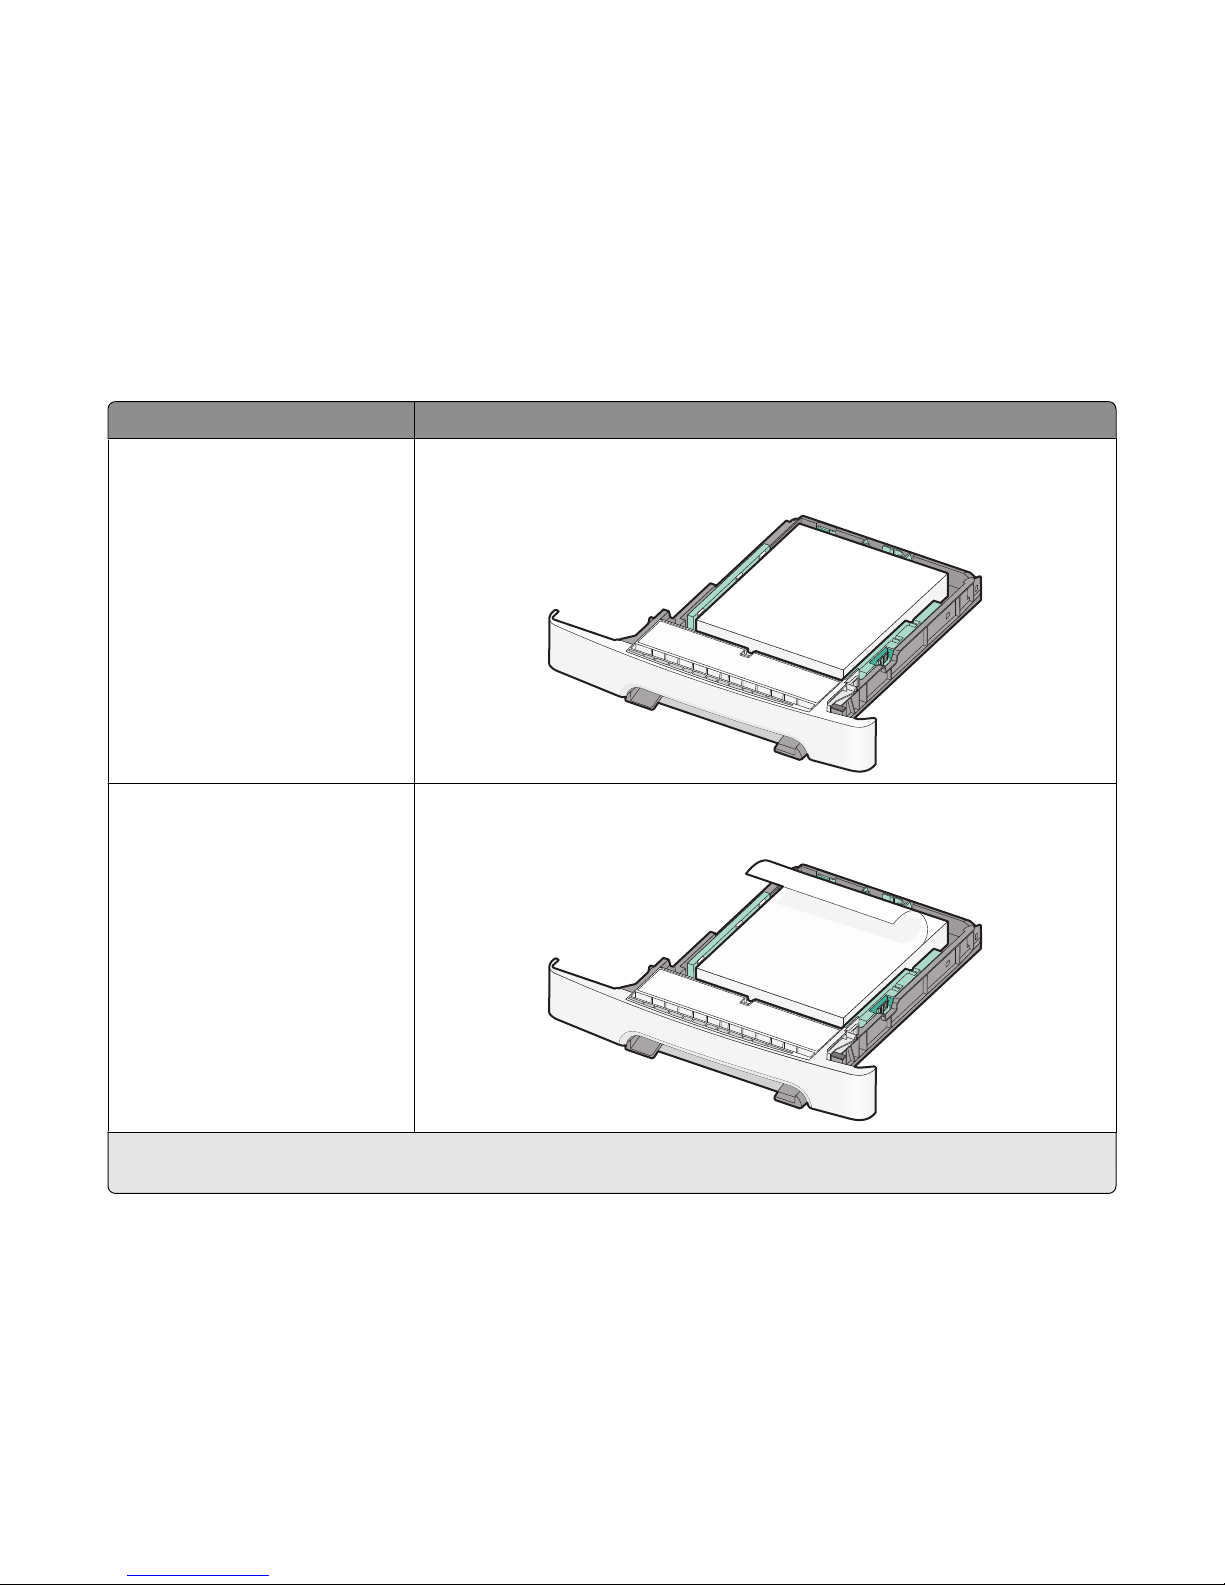
– Have bent corners
– Have rough, cockle, or laid finishes
• Adjust the width guides to fit the width of the envelopes.
Note: A combination of high humidity (over 60%) and the high printing temperature may wrinkle or seal envelopes.
Tips on using letterhead
Page orientation is important when printing on letterhead. Use the following table to determine which direction to
load the letterhead:
Source or process Print side and paper orientation
• Standard 250-sheet tray
• Optional 550-sheet tray
• Simplex (one-sided) printing
from trays
Duplex (two-sided) printing from
trays
Printed letterhead design is placed faceup. The top edge of the sheet with the logo is
placed at the front of the tray.
C
AB
Printed letterhead design is placed facedown. The top edge of the sheet with the logo
is placed at the back of the tray.
C
AB
Note: Check with the manufacturer or vendor to determine whether the chosen preprinted letterhead is acceptable for
laser printers.
Printing
69
Page 70
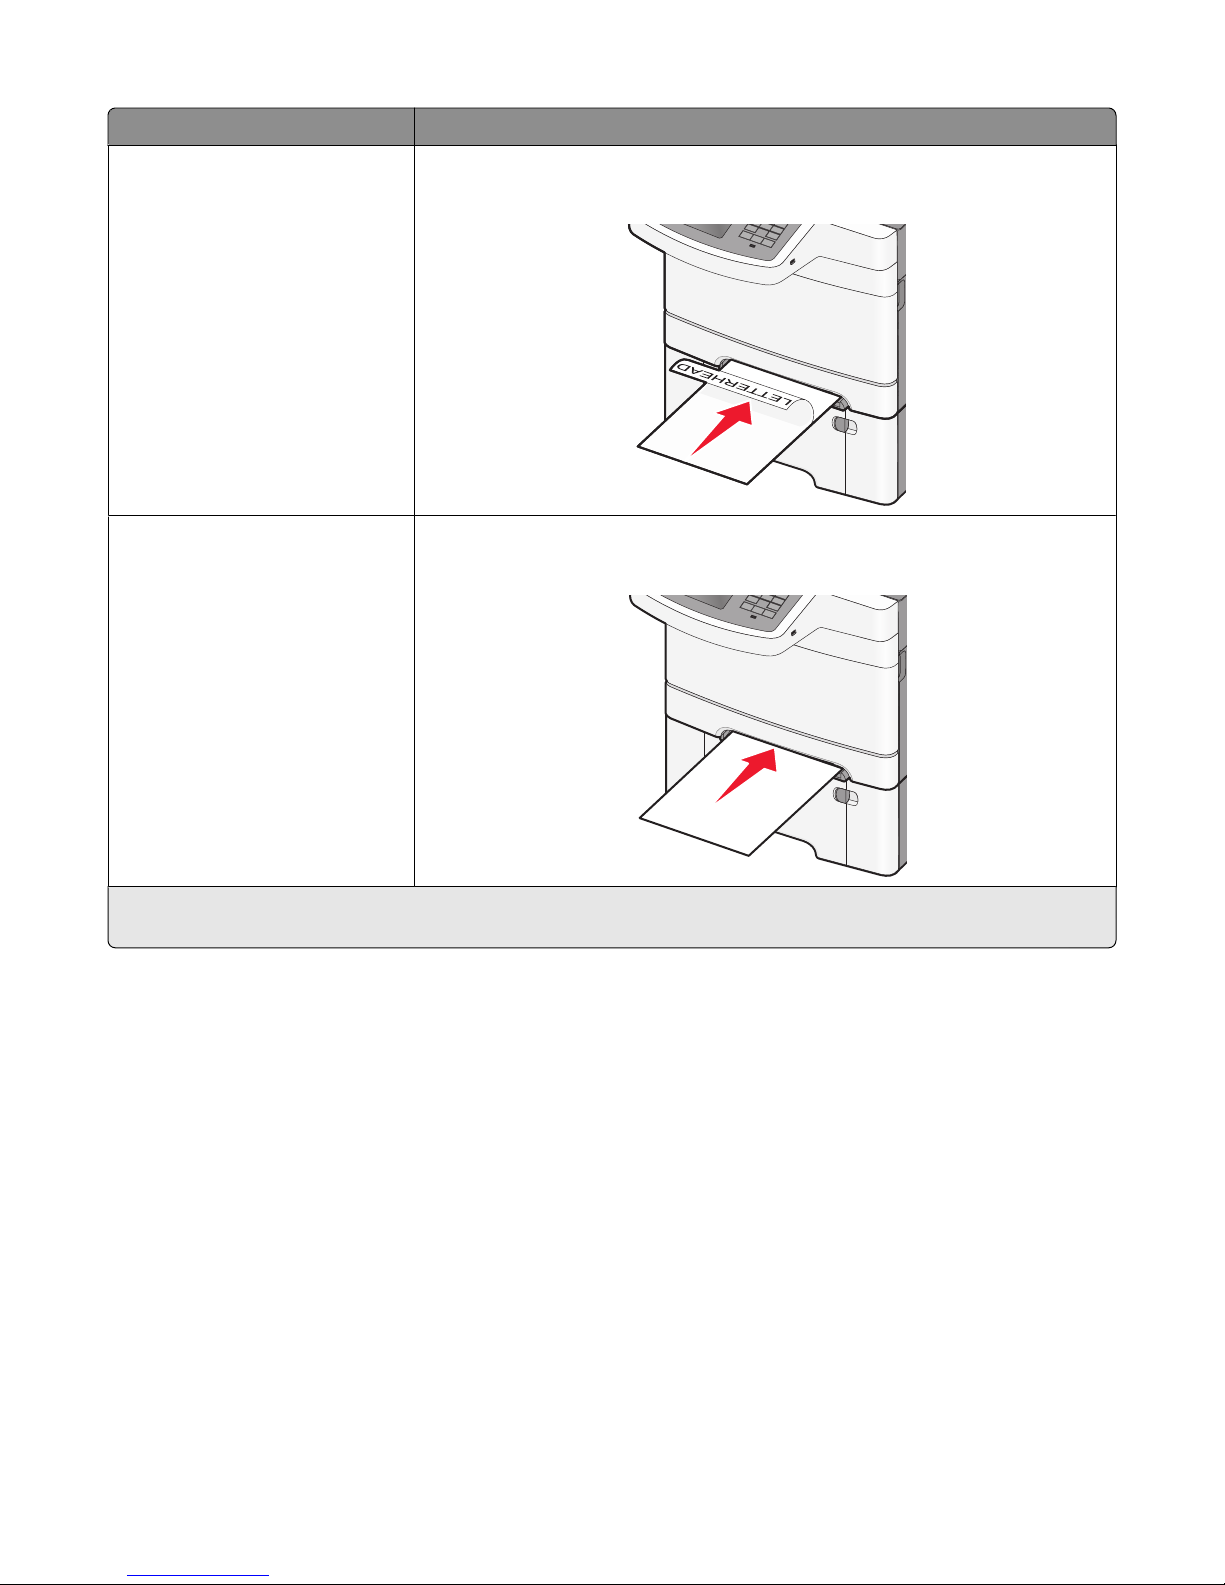
Source or process Print side and paper orientation
Manual feeder (simplex printing)
Multipurpose feeder
Manual feeder (duplex printing)
Multipurpose feeder
Preprinted letterhead design is placed facedown. The top edge of the sheet with the
logo should enter the manual feeder first.
Preprinted letterhead design is placed faceup. The top edge of the sheet with the logo
should enter the manual feeder last.
C
AB
Note: Check with the manufacturer or vendor to determine whether the chosen preprinted letterhead is acceptable for
laser printers.
Tips on using labels
Note: Use paper label sheets for occasional use only. Vinyl, pharmacy, and dual-sided labels are not supported.
For detailed information on label printing, characteristics, and design, see the Card Stock & Label Guide available on
the Lexmark Web site at http://support.lexmark.com.
When printing on labels:
• Use labels designed specifically for laser/LED printers. Check with the manufacturer or vendor to verify that:
– The labels can withstand temperatures up to 210°C (410°F) without sealing, excessive curling, wrinkling, or
releasing hazardous emissions.
Note: Labels can be printed at a higher fusing temperature up to 220°C (428°F) if Label Weight is set to Heavy.
Select this setting using the Embedded Web Server, or from the printer control panel Paper menu.
– Label adhesives, face sheet (printable stock), and topcoats can withstand up to 25 psi (172 kPa) pressure without
delaminating, oozing around the edges, or releasing hazardous fumes.
• Do not use labels with slick backing material.
Printing
70
Page 71

• Use full label sheets. Partial sheets may cause labels to peel off during printing, resulting in a jam. Partial sheets
also contaminate the printer and the cartridge with adhesive, and could void the printer and cartridge warranties.
• Do not use labels with exposed adhesive.
• Do not print within 1 mm (0.04 in.) of the edge of the label, of the perforations, or between die-cuts of the label.
• Be sure adhesive backing does not reach to the sheet edge. Zone coating of the adhesive at least 1 mm (0.04 in.)
away from edges is recommended. Adhesive material contaminates the printer and could void the warranty.
• If zone coating of the adhesive is not possible, remove a 1.6 mm (0.06 in.) strip on the leading and driver edge, and
use a non-oozing adhesive.
• Portrait orientation works best, especially when printing bar codes.
Tips on using transparencies
Print a test page on the transparencies being considered for use before buying large quantities.
When printing on transparencies:
• Feed transparencies from the 250-sheet tray, manual feeder, or optional multipurpose feeder.
• Use transparencies designed specifically for laser printers. Check with the manufacturer or vendor to ensure
transparencies are able to withstand temperatures up to 200°C (392°F) without melting, discoloring, offsetting, or
releasing hazardous emissions.
• To prevent print quality problems, avoid getting fingerprints on the transparencies.
Printing confidential and other held jobs
Storing print jobs in the printer
You can set the printer to store print jobs in the printer memory until you start the print job from the printer control
panel.
All print jobs that can be initiated by the user at the printer are called held jobs.
Note: Confidential, Verify, Reserve, a nd Repeat print jobs may be deleted if the printer requires extra memory to process
additional held jobs.
Print job type Description
Confidential Confidential lets you hold print jobs in the computer until you enter the PIN from
the control panel.
Note: The PIN is set from the computer. It must be four digits, using the numbers
0–9.
Verify Verify lets you print one copy of a print job while the printer holds the remaining
copies. It allows you to examine if the first copy is satisfactory. The print job is
automatically deleted from the printer memory once all copies are printed.
Reserve Reserve allows the printer to store print jobs for printing at a later time. The print
jobs are held until deleted from the Help Jobs menu.
Repeat Repeat prints and stores print jobs in the printer memory for reprinting.
Printing
71
Page 72

Printing confidential and other held jobs
Note: Confidential and Verify print jobs are automatically deleted from memory after printing. Repeat and Reserve
jobs are held in the printer until you choose to delete them.
For Windows users
1 With a document open, click File > Print.
2 Click Properties, Preferences, Options, or Setup.
3 Click Print and Hold.
4 Select the print job type (Confidential, Repeat, Reserve, or Verify), and then assign a user name. For a confidential
print job, also enter a four-digit PIN.
5 Click OK or Print.
6 From the printer home screen, release the print job.
• For confidential print jobs, navigate to:
Held jobs > your user name > Confidential Jobs > enter PIN > select print job > specify number of copies >
Print
• For other print jobs, navigate to:
Held jobs > your user name > select print job > specify number of copies > Print
For Macintosh users
1 With a document open, choose File > Print.
If necessary, click the disclosure triangle to see more options.
2 From the print options or Copies & Pages pop-up menu, choose Job Routing.
3 Select the print job type (Confidential, Repeat, Reserve, or Verify), and then assign a user name. For a confidential
print job, also enter a four-digit PIN.
4 Click OK or Print.
5 From the printer home screen, release the print job.
• For confidential print jobs, navigate to:
Held jobs > your user name > Confidential Jobs > enter PIN > select print job > specify number of copies >
Print
• For other print jobs, navigate to:
Held jobs > your user name > select print job > specify number of copies > Print
Printing
72
Page 73
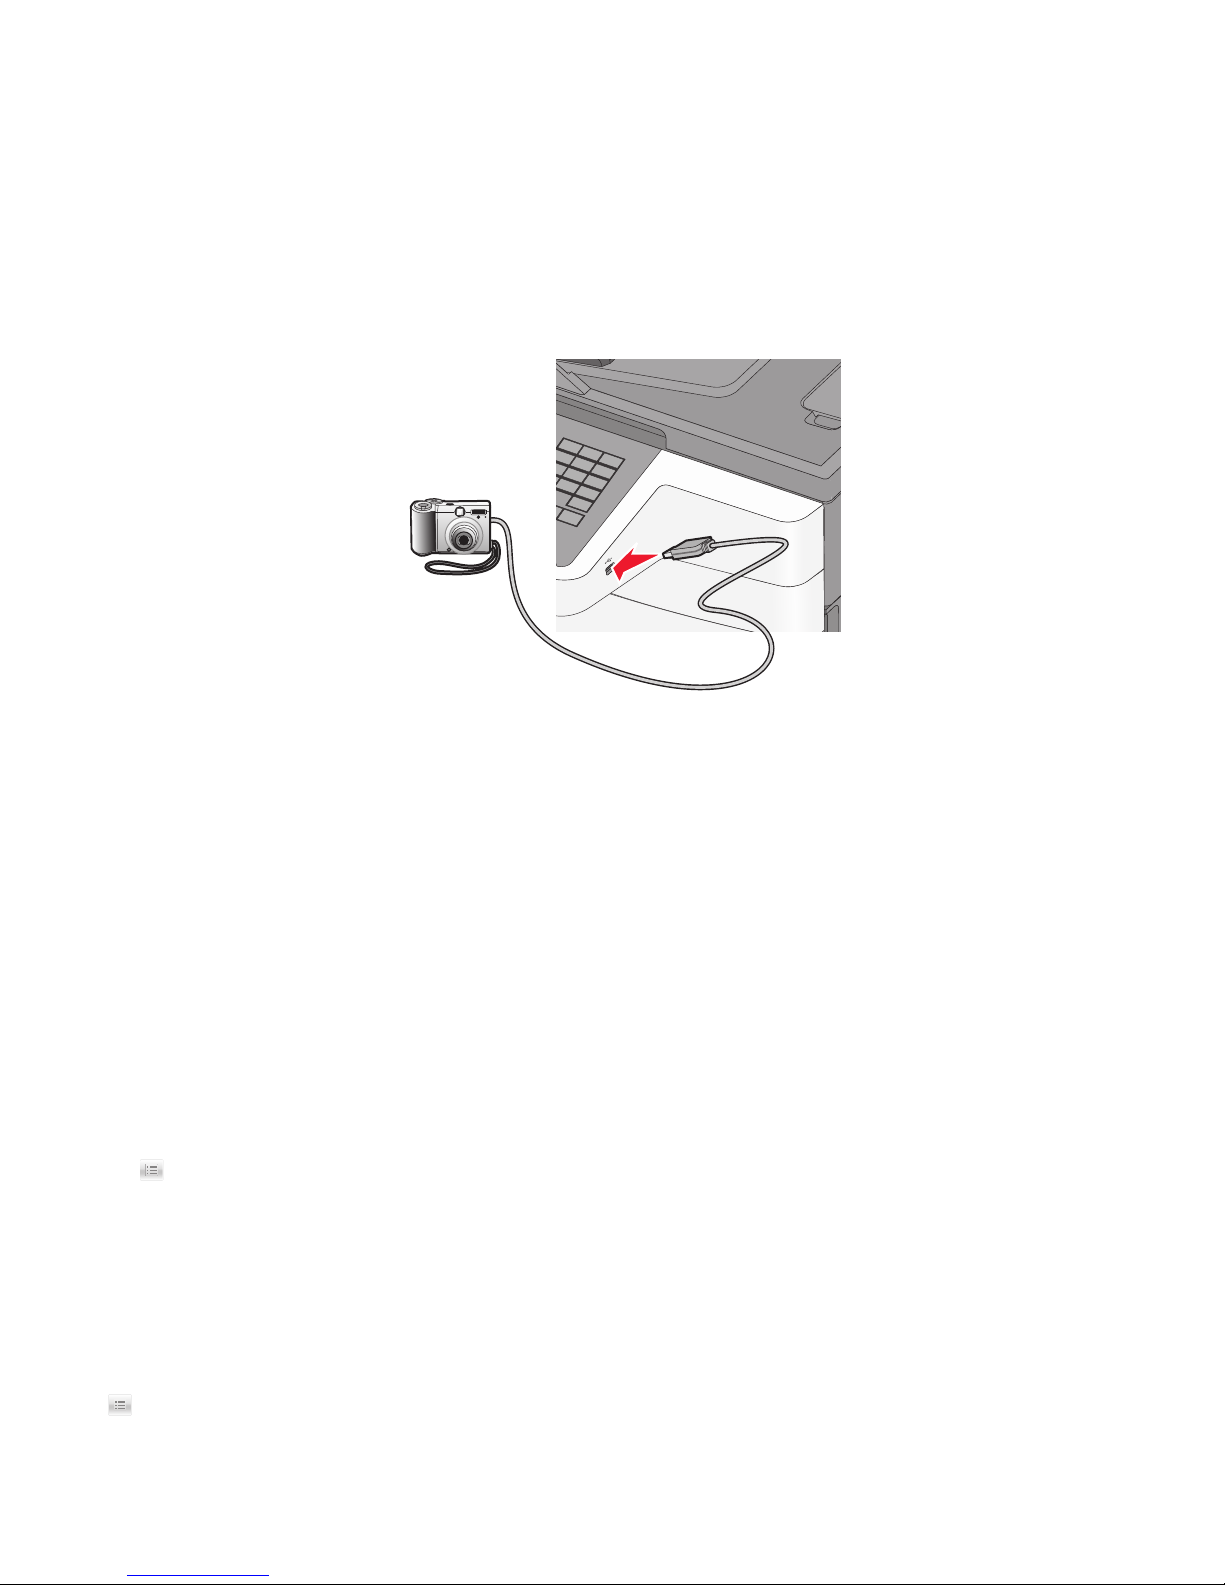
Printing photos from a PictBridge-enabled digital camera
You can connect a PictBridge-enabled digital camera to the printer, and use the buttons on the camera to select and
print photos.
1 Insert one end of the USB cable into the camera.
Note: Use only the USB cable that came with your camera.
2 Insert the other end of the USB cable into the USB port on the front of the printer.
Notes:
• Make sure the PictBridge-enabled digital camera is set to the correct USB mode. See the camera documentation
for more information.
• If the PictBridge connection is successful, then a confirmation message appears on the printer display.
3 Follow the instructions on the camera to select and print photos.
Note: If the printer is turned off while the camera is connected, then you must disconnect and then reconnect the
camera.
Printing information pages
Printing a font sample list
1 From the home screen, navigate to:
> Reports > Print Fonts
2 Touch PCL Fonts or PostScript Fonts.
Printing a directory list
A directory list shows the resources stored in a flash memory or on the printer hard disk.
From the home screen, navigate to:
> Reports > Print Directory
Printing
73
Page 74

Canceling a print job
Canceling a print job from the printer control panel
1 Touch Cancel Jobs on the touch screen, or press on the keypad.
2 Touch the job you want to cancel, and then touch Delete Selected Jobs.
Canceling a print job from the computer
For Windows users
1 Open the printers folder:
a Click , or click Start and then click Run.
b In the Start Search or Run box, type control printers.
c Press Enter, or click OK.
2 Double-click the printer icon.
3 Select the print job you want to cancel.
4 From the keyboard, press Delete.
For Macintosh users
In Mac OS X version 10.5 or later:
1 From the Apple menu, choose System Preferences > Print & Fax > Open Print Queue.
2 From the printer window, select the print job you want to cancel.
3 From the icon bar at the top of the window, click the Delete icon.
In Mac OS X version 10.4 or earlier:
1 From the Finder, navigate to:
Go > Applications
2 Double-click Utilities > Print Center or Printer Setup Utility.
3 Double-click the printer icon.
4 From the printer window, select the print job you want to cancel.
5 From the icon bar at the top of the window, click the Delete icon.
Printing
74
Page 75
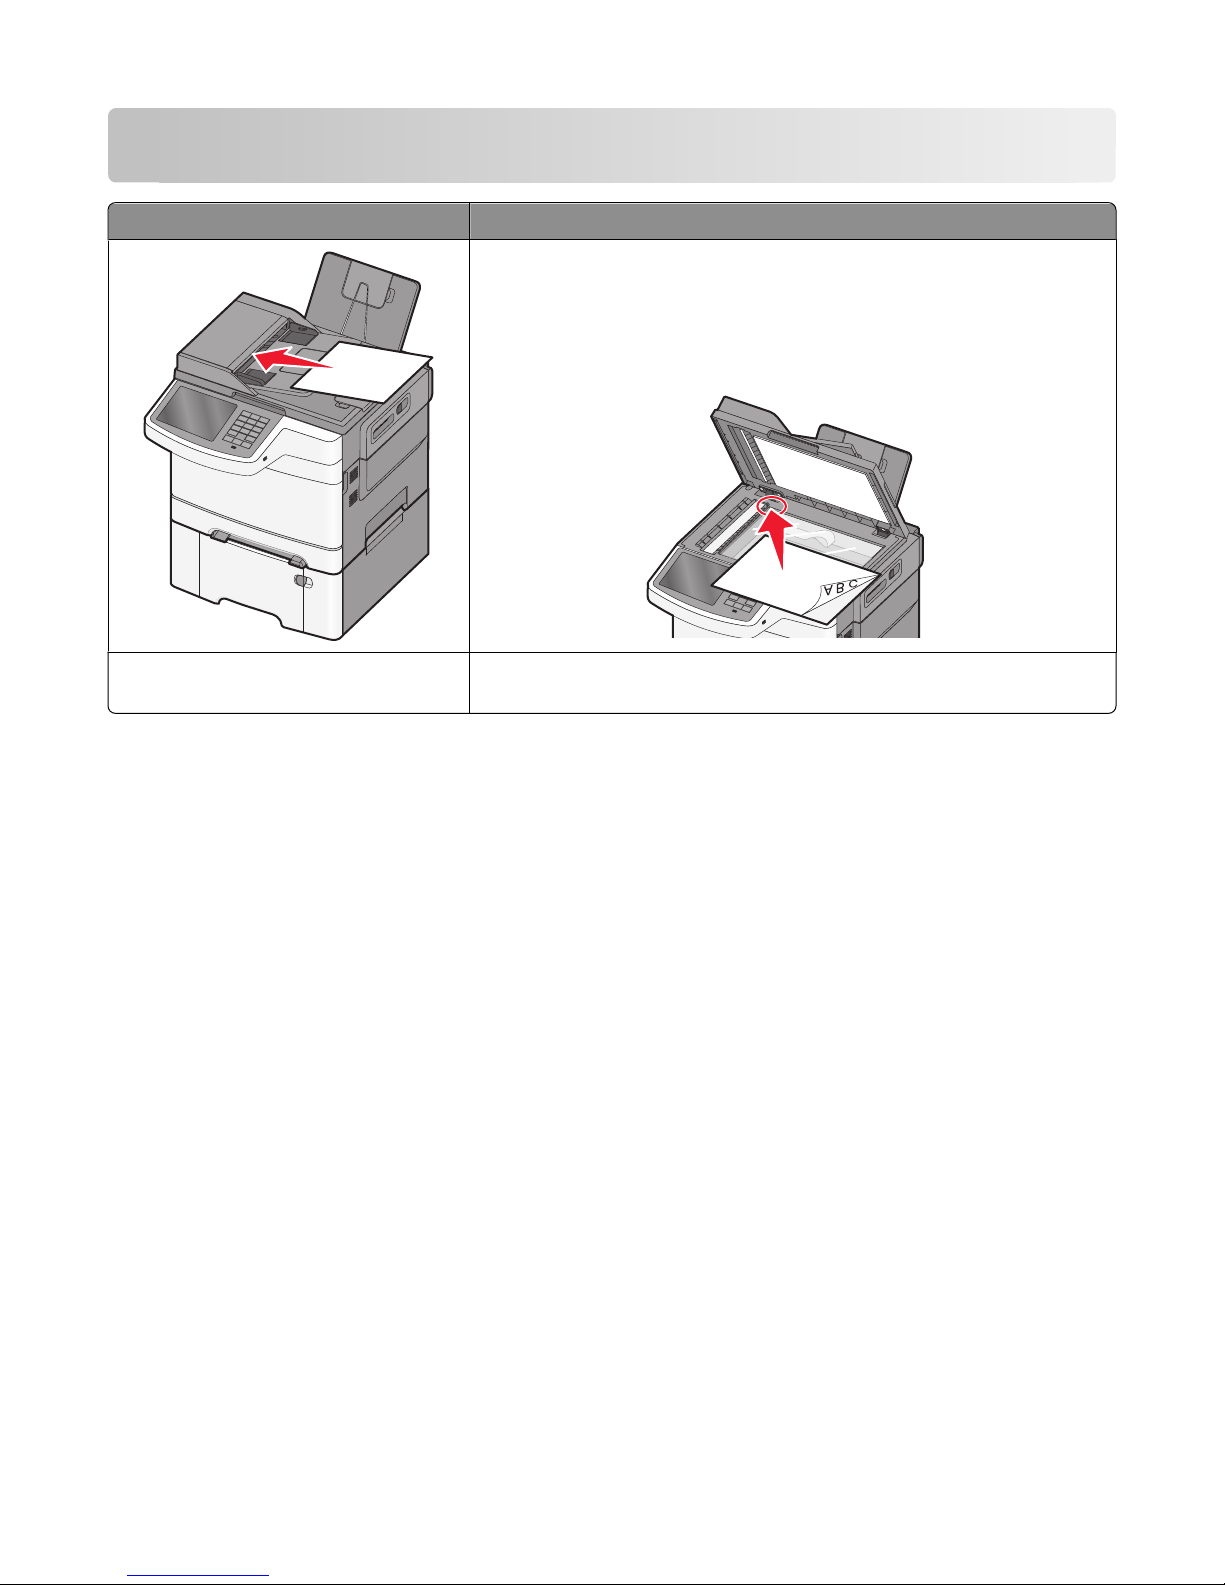
Copying
ADF Scanner glass
AB C
Use the ADF for multiple-page documents. Use the scanner glass for singl e pages, small items (such as postcards or photos),
transparencies, photo paper, or thin media (such as magazine clippings).
Making copies
Making a quick copy
1 Load an original document faceup, short edge first into the ADF or facedown on the scanner glass.
Note: Do not load postcards, photos, small items, transparencies, photo paper, or thin media (such as magazine
clippings) into the ADF. Place these items on the scanner glass.
2 If you are loading a document into the ADF, then adjust the paper guides.
3 From the printer control panel, touch Copy It.
Copying using the ADF
1 Load an original document faceup, short edge first into the ADF.
Note: Do not load postcards, photos, small items, transparencies, photo paper, or thin media (such as magazine
clippings) into the ADF. Place these items on the scanner glass.
2 Adjust the paper guides.
3 From the home screen, navigate to:
Copy > change the copy settings > Copy It
Copying
75
Page 76

Copying using the scanner glass
1 Place an original document facedown on the scanner glass in the upper left corner.
2 From the home screen, navigate to:
Copy > change the copy settings > Copy It
3 If you have more pages to scan, then place the next document on the scanner glass, and then touch Scan the Next
Page.
4 Touch Finish the Job to return to the home screen.
Copying film photos
1 Place a photo facedown on the upper left corner of the scanner glass.
2 From the home screen, navigate to:
Copy > Content > Photo >
> Photo/Film > > Copy It > Scan the Next Page or Finish the Job
Copying on specialty media
Copying on transparencies
1 Load an original document faceup, short edge first into the ADF or facedown on the scanner glass.
Note: Do not load postcards, photos, small items, transparencies, photo paper, or thin media (such as magazine
clippings) into the ADF. Place these items on the scanner glass.
2 If you are loading a document into the ADF, then adjust the paper guides.
3 From the home screen, navigate to:
Copy > Copy from > size of the original document >
4 Touch Copy to, and then select the tray that contains transparencies, or touch Manual Feeder Size.
5 Load transparencies in the multipurpose feeder.
6 From the home screen, navigate to:
> select the desired size of the transparencies > Manual Feeder Type > > Copy It
Copying on letterhead
1 Load an original document faceup, short edge first into the ADF or facedown on the scanner glass.
Note: Do not load postcards, photos, small items, transparencies, photo paper, or thin media (such as magazine
clippings) into the ADF. Place these items on the scanner glass.
2 If you are loading a document into the ADF, then adjust the paper guides.
Copying
76
Page 77

3 From the home screen, navigate to:
Copy > Copy from > size of the original document > Copy to > Manual Feeder
4 Place the letterhead faceup, top edge first in the multipurpose feeder.
5 Select the size of the letterhead.
6 Navigate to:
Continue > Letterhead > Continue > Copy It
Customizing copy settings
Copying in black and white
1 Load an original document faceup, short edge first into the ADF or facedown on the scanner glass.
Note: Do not load postcards, photos, small items, transparencies, photo paper, or thin media (such as magazine
clippings) into the ADF. Place these items on the scanner glass.
2 If you are loading a document into the ADF, then adjust the paper guides.
3 From the home screen, navigate to:
Copy > Allow color copies > Off >
> Submit
Copying to a different size
1 Load an original document faceup, short edge first into the ADF or facedown on the scanner glass.
Note: Do not load postcards, photos, small items, transparencies, photo paper, or thin media (such as magazine
clippings) into the ADF. Place these items on the scanner glass.
2 If you are loading a document into the ADF, then adjust the paper guides.
3 On the home screen, touch Copy.
4 Touch Copy from > select the size of the original document > .
5 Touch Copy to > select the size of the copy > .
6 Touch Copy It.
Making copies using paper from a selected tray
1 Load an original document faceup, short edge first into the ADF or facedown on the scanner glass.
Note: Do not load postcards, photos, small items, transparencies, photo paper, or thin media (such as magazine
clippings) into the ADF. Place these items on the scanner glass.
2 If you are loading a document into the ADF, then adjust the paper guides.
Copying
77
Page 78

3 From the home screen, navigate to:
Copy > Copy from > size of the original document > Copy to
4 Touch Manual Feeder or select the tray that contains the paper type you want to use.
Note: If you choose Manual Feeder, then you will also need to select the paper size and type.
5 Touch Copy It.
Copying different paper sizes
Use the ADF to copy original documents with different paper sizes. Depending on the paper sizes loaded and the “Copy
to” and “Copy from” settings, each copy is either printed on mixed paper sizes (Example 1) or scaled to fit a single paper
size (Example 2).
Example 1: Copying on mixed paper sizes
1 Load an original document faceup, short edge first into the ADF or facedown on the scanner glass.
Note: Do not load postcards, photos, small items, transparencies, photo paper, or thin media (such as magazine
clippings) into the ADF. Place these items on the scanner glass.
2 If you are loading a document into the ADF, then adjust the paper guides.
3 From the home screen, navigate to:
Copy > Copy from > Mixed Sizes >
The scanner identifies the different paper sizes as they are scanned. Copies are printed on mixed paper sizes
corresponding to the paper sizes of the original document.
> Copy to > Auto Size Match > > Copy It
Example 2: Copying on a single paper size
1 Load an original document faceup, short edge first into the ADF or facedown on the scanner glass.
Note: Do not load postcards, photos, small items, transparencies, photo paper, or thin media (such as magazine
clippings) into the ADF. Place these items on the scanner glass.
2 If you are loading a document into the ADF, then adjust the paper guides.
3 From the home screen, navigate to:
Copy > Copy from > Mixed Sizes >
The scanner identifies the different paper sizes as they are scanned, and then scales the mixed paper sizes to fit on
the paper size selected.
> Copy to > Letter > > Copy It
Copying on both sides of the paper (duplexing)
1 Load an original document faceup, short edge first into the ADF or facedown on the scanner glass.
Note: Do not load postcards, photos, small items, transparencies, photo paper, or thin media (such as magazine
clippings) into the ADF. Place these items on the scanner glass.
2 If you are loading a document into the ADF, then adjust the paper guides.
3 On the home screen, touch Copy.
Copying
78
Page 79

4 From the Sides (Duplex) area, touch the button for your preferred duplexing method.
The first number represents sides of the original documents; the second number represents sides of the copy. For
example, select 1-sided to 2-sided if you have 1-sided original documents and you want 2-sided copies.
5 Touch , and then Copy It.
Reducing or enlarging copies
Copies can be reduced to 25% of the original document size or enlarged to 400% of the original document size. The
factory default setting for Scale is Auto. If you leave Scale set to Auto, the content of your original document will be
scaled to fit the size of the paper onto which you are copying.
To reduce or enlarge a copy:
1 Load an original document faceup, short edge first into the ADF or facedown on the scanner glass.
Note: Do not load postcards, photos, small items, transparencies, photo paper, or thin media (such as magazine
clippings) into the ADF. Place these items on the scanner glass.
2 If you are loading a document into the ADF, then adjust the paper guides.
3 On the home screen, touch Copy.
4 From the Scale area, touch the arrows to enlarge or reduce your copies.
Touching “Copy to” or “Copy from” after setting Scale manually changes the scale value back to Auto.
5 Touch Copy It.
Adjusting copy quality
1 Load an original document faceup, short edge first into the ADF or facedown on the scanner glass.
Note: Do not load postcards, photos, small items, transparencies, photo paper, or thin media (such as magazine
clippings) into the ADF. Place these items on the scanner glass.
2 If you are loading a document into the ADF, then adjust the paper guides.
3 From the home screen, navigate to:
Copy > Content
4 Touch the button that best represents the content type of the document you are copying:
• Text—Use when the content of the original document is mostly text or line art.
• Graphics—Use when the original document is mostly business-type graphics such as pie charts, bar charts, and
animations.
• Text/Photo—Use when the original document is a mixture of text, graphics, and photos.
• Photo—Use when the original document is mostly a photo or an image.
5 Touch .
6 Touch the button that best represents the content source of the document you are copying:
• Color Laser—Use when the original document was printed using a color laser printer.
• Black/White Laser—Use when the original document was printed using a mono laser printer.
Copying
79
Page 80

• Inkjet—Use when the original document was printed using an inkjet printer.
• Photo/Film—Use when the original document is a photo from film.
• Magazine—Use when the original document is from a magazine.
• Newspaper—Use when the original document is from a newspaper.
• Press—Use when the original document was printed using a printing press.
• Other—Use when the original document was printed using an alternate or unknown printer.
7 Touch > Copy It.
Collating copies
If you print multiple copies of a document, then you can choose to print each copy as a set (collated) or to print the
copies as groups of pages (not collated).
Collated Not collated
By default, Collate is set to On. If you do not want to collate your copies, then change the setting to Off:
1 Load an original document faceup, short edge first into the ADF or facedown on the scanner glass.
Note: Do not load postcards, photos, small items, transparencies, photo paper, or thin media (such as magazine
clippings) into the ADF. Place these items on the scanner glass.
2 If you are loading a document into the ADF, then adjust the paper guides.
3 From the home screen, navigate to:
Copy > enter the number of copies > Collate > Off >
> Copy It
Placing separator sheets between copies
1 Load an original document faceup, short edge first into the ADF or facedown on the scanner glass.
Note: Do not load postcards, photos, small items, transparencies, photo paper, or thin media (such as magazine
clippings) into the ADF. Place these items on the scanner glass.
2 If you are loading a document into the ADF, then adjust the paper guides.
3 From the home screen, navigate to:
Copy > Advanced Options > Separator Sheets
Note: Collate must be set to On for the separator sheets to be placed between copies. If Collate is set to Off, then
the separator sheets are added to the end of the print job.
4 Select one of the following:
• Between Copies
• Between Jobs
Copying
80
Page 81

• Between Pages
• Off
5 Touch > Copy It.
Copying multiple pages onto a single sheet
In order to save paper, you can copy either two or four consecutive pages of a multiple-page document onto a single
sheet of paper.
Notes:
• The Paper Size must be set to Letter, Legal, A4, or JIS B5.
• The Copy Size must be set to 100%.
1 Load an original document faceup, short edge first into the ADF or facedown on the scanner glass.
Note: Do not load postcards, photos, small items, transparencies, photo paper, or thin media (such as magazine
clippings) into the ADF. Place these items on the scanner glass.
2 If you are loading a document into the ADF, then adjust the paper guides.
3 From the home screen, navigate to:
Copy > Advanced Options > Paper Saver > select desired output >
> Copy It
Creating a custom copy job (job build)
The custom copy job or job build is used to combine one or more sets of original documents into a single copy job. Each
set may be scanned using different job parameters. When a copy job is submitted and Custom Job is enabled, the
scanner scans the first set of original documents using the supplied parameters, and then it scans the next set with the
same or different parameters.
The definition of a set depends on the scan source:
• If you scan a document on the scanner glass, then a set consists of one page.
• If you scan multiple pages using the ADF, then a set consists of all scanned pages until the ADF becomes empty.
• If you scan one page using the ADF, then a set consists of one page.
For example:
1 Load an original document faceup, short edge first into the ADF or facedown on the scanner glass.
Note: Do not load postcards, photos, small items, transparencies, photo paper, or thin media (such as magazine
clippings) into the ADF. Place these items on the scanner glass.
2 If you are loading a document into the ADF, then adjust the paper guides.
3 From the home screen, navigate to:
Copy > Options > Custom Job > On > Done > Copy It
When the end of a set is reached, the scan screen appears.
Copying
81
Page 82

4 Load the next document faceup, short edge first into the ADF or facedown on the scanner glass, and then touch
Scan the Automatic Document Feeder or Scan the flatbed.
Note: If required, change the job settings.
5 If you have another document to scan, then repeat the previous step. Otherwise, touch Finish the job.
Placing information on copies
Placing the date and time at the top of each page
1 Load an original document faceup, short edge first into the ADF or facedown on the scanner glass.
Note: Do not load postcards, photos, small items, transparencies, photo paper, or thin media (such as magazine
clippings) into the ADF. Place these items on the scanner glass.
2 If you are loading a document into the ADF, then adjust the paper guides.
3 From the home screen, navigate to:
Copy > Advanced Options > Header/Footer
4 Pick an area of the page where you want to place the date and time.
5 Touch Yes or No > > Copy It.
Placing an overlay message on each page
An overlay message can be placed on each page. The message choices are Urgent, Confidential, Copy, Custom or Draft.
To place a message on the copies:
1 Load an original document faceup, short edge first into the ADF or facedown on the scanner glass.
Note: Do not load postcards, photos, small items, transparencies, photo paper, or thin media (such as magazine
clippings) into the ADF. Place these items on the scanner glass.
2 If you are loading a document into the ADF, then adjust the paper guides.
3 From the home screen, navigate to:
Copy > Advanced Options > Overlay > select overlay message >
4 Touch Copy It.
.
Canceling a copy job
Canceling a copy job while the document is in the ADF
When the ADF begins processing a document, the scanning screen appears. To cancel the copy job, touch Cancel Job
on the touch screen.
A “Canceling scan job” screen appears. The ADF clears all pages in the ADF and cancels the job.
Copying
82
Page 83

Canceling a copy job while copying pages using the scanner glass
Touch Cancel Job on the touch screen.
A “Canceling scan job” screen appears. Once the job is canceled, the copy screen appears.
Canceling a copy job while the pages are being printed
1 Touch Cancel Job on the touch screen, or press on the keypad.
2 Touch the job you want to cancel.
3 Touch Delete Selected Jobs.
The remaining print job is canceled. The home screen appears.
Understanding the copy screens and options
Copy from
This option opens a screen where you can enter the paper size of the original document.
• Touch the paper size that matches the original document.
• When “Copy from” is set to Mixed Sizes, the scanner identifies the different paper sizes as they are scanned. Copies
are printed on mixed paper sizes corresponding to the paper sizes of the original document.
Copy to
This option opens a screen where you can enter the paper size and type on which your copies will be printed.
• Touch the paper size and type that matches the paper loaded.
• If the paper size setting for “Copy from” and “Copy to” are different, then the printer automatically adjusts the
Scale setting to accommodate the difference.
Copies
This option allows you to set the number of copies to be printed.
Scale
This option creates an image from your copy that is proportionally scaled anywhere between 25% and 400%. Scale can
also be set for you automatically.
• When you want to copy from one size of paper to another, such as from legal-size to letter-size paper, setting the
“Copy from” and “Copy to” paper sizes automatically changes the scale to keep all the original document information
on your copy.
• Touch the left arrow to decrease the value by 1%; touch the right arrow to increase the value by 1%.
• Hold your finger on an arrow to make a continuous increment change.
• Hold your finger on an arrow for two seconds to cause the pace of the change to accelerate.
Copying
83
Page 84

Darkness
This option adjusts how light or dark your copies will turn out in relation to the original document.
Sides (Duplex)
Use this option to select duplex settings. You can print copies on one or two sides, make two-sided copies (duplex) of
two-sided original documents, make two-sided copies from one-sided original documents, or make one-sided copies
(simplex) from two-sided original documents.
Collate
This option keeps the pages of a print job stacked in sequence when printing multiple copies of the document. The
factory default setting for Collate is on; the output pages of your copies will be ordered (1,2,3) (1,2,3) (1,2,3). If you
want all the copies of each page to remain together, turn Collate off, and your copies will be ordered (1,1,1) (2,2,2)
(3,3,3).
Content
This option lets you set the original document type and source.
Choose content type from Text, Text/Photo, Photo, or Graphics.
• Text—Use when the content of the original document is mostly text or line art.
• Graphics—Use when the original document is mostly business-type graphics such as pie charts, bar charts, and
animations.
• Text/Photo—Use when the original document is a mixture of text, graphics, and photos.
• Photo—Use when the original document is mostly a photo or an image.
Choose content source from Color Laser, Black/White Laser, Inkjet, Photo/Film, Magazine, Newspaper, Press, or Other.
• Color Laser—Use when the original document was printed using a color laser printer.
• Black/White Laser—Use when the original document was printed using a mono laser printer.
• Inkjet—Use when the original document was printed using an inkjet printer.
• Photo/Film—Use when the original document is a photo from film.
• Magazine—Use when the original document is from a magazine.
• Newspaper—Use when the original document is from a newspaper.
• Press—Use when the original document was printed using a printing press.
• Other—Use when the original document was printed using an alternate or unknown printer.
Color
This option enables or disables color for the scanned image.
Copying
84
Page 85

Advanced Options
Touching the Advanced Options button opens a screen where you can change the following settings:
• Advanced Duplex—Use to specify the document orientation, whether documents are one-sided or two-sided, and
how documents are bound.
Note: Some Advanced Duplex options are available only on select printers.
• Advanced Imaging—Use to change or adjust Auto Center, Background Removal, Color Balance, Color Dropout,
Contrast, Mirror Image, Negative Image, Scan Edge to Edge, Shadow Detail, Sharpness, and Temperature settings
before you copy the document.
• Create Booklet—Use to create a booklet. You can choose between 1-sided and 2-sided.
Note: This option appears only when a print duplexer and printer hard disk are installed.
• Cover Page Setup—Use to set copy cover page and booklet cover page.
• Custom Job—Use to combine multiple scanning jobs into a single job.
• Edge Erase—Use to eliminate smudges or information around the edges of a document. You can choose to eliminate
an equal area around all four sides of the paper, or pick a particular edge. Edge Erase will erase whatever is within
the area selected, leaving nothing on that portion of the scan.
• Header/Footer—Use to turn on Date/Time, Page number, Bates number, or Custom text, and prints them in the
specified header or footer location.
• Margin Shift—Use to increase the size of the margin of a specified distance by shifting the scanned image. This can
be useful in providing space to bind or hole-punch copies. Use the increase or decrease arrows to set how much of
a margin you want. If the additional margin is too large, then the copy will be cropped.
• Overlay—Use to create a watermark (or message) that overlays the content of your copy. You can choose from
Urgent, Confidential, Copy, and Draft, or you can enter a custom message in the ”Enter custom text” field. The word
you pick will appear, faintly, in large print across each page.
Note: A custom overlay can also be created by your system support person. When a custom overlay is created, a
button with an icon of that overlay will be available.
• Paper Saver—Use to print two or more sheets of an original document together on the same page. Paper Saver is
also called N-up printing. The N stands for Number. For example, 2-up would print two pages of your document on
a single page, and 4-up would print four pages of your document on a single page. Touching Print Page Borders
adds or removes the outline border surrounding the original document pages on the output page.
• Separator Sheets—Use to place a blank piece of paper between copies, pages, or print jobs. The separator sheets
can be drawn from a tray that contains a type or color of paper that is different from the paper your copies are
printed on.
Save As Shortcut
This option allows the current settings to be saved as a shortcut by assigning a number.
Copying
85
Page 86
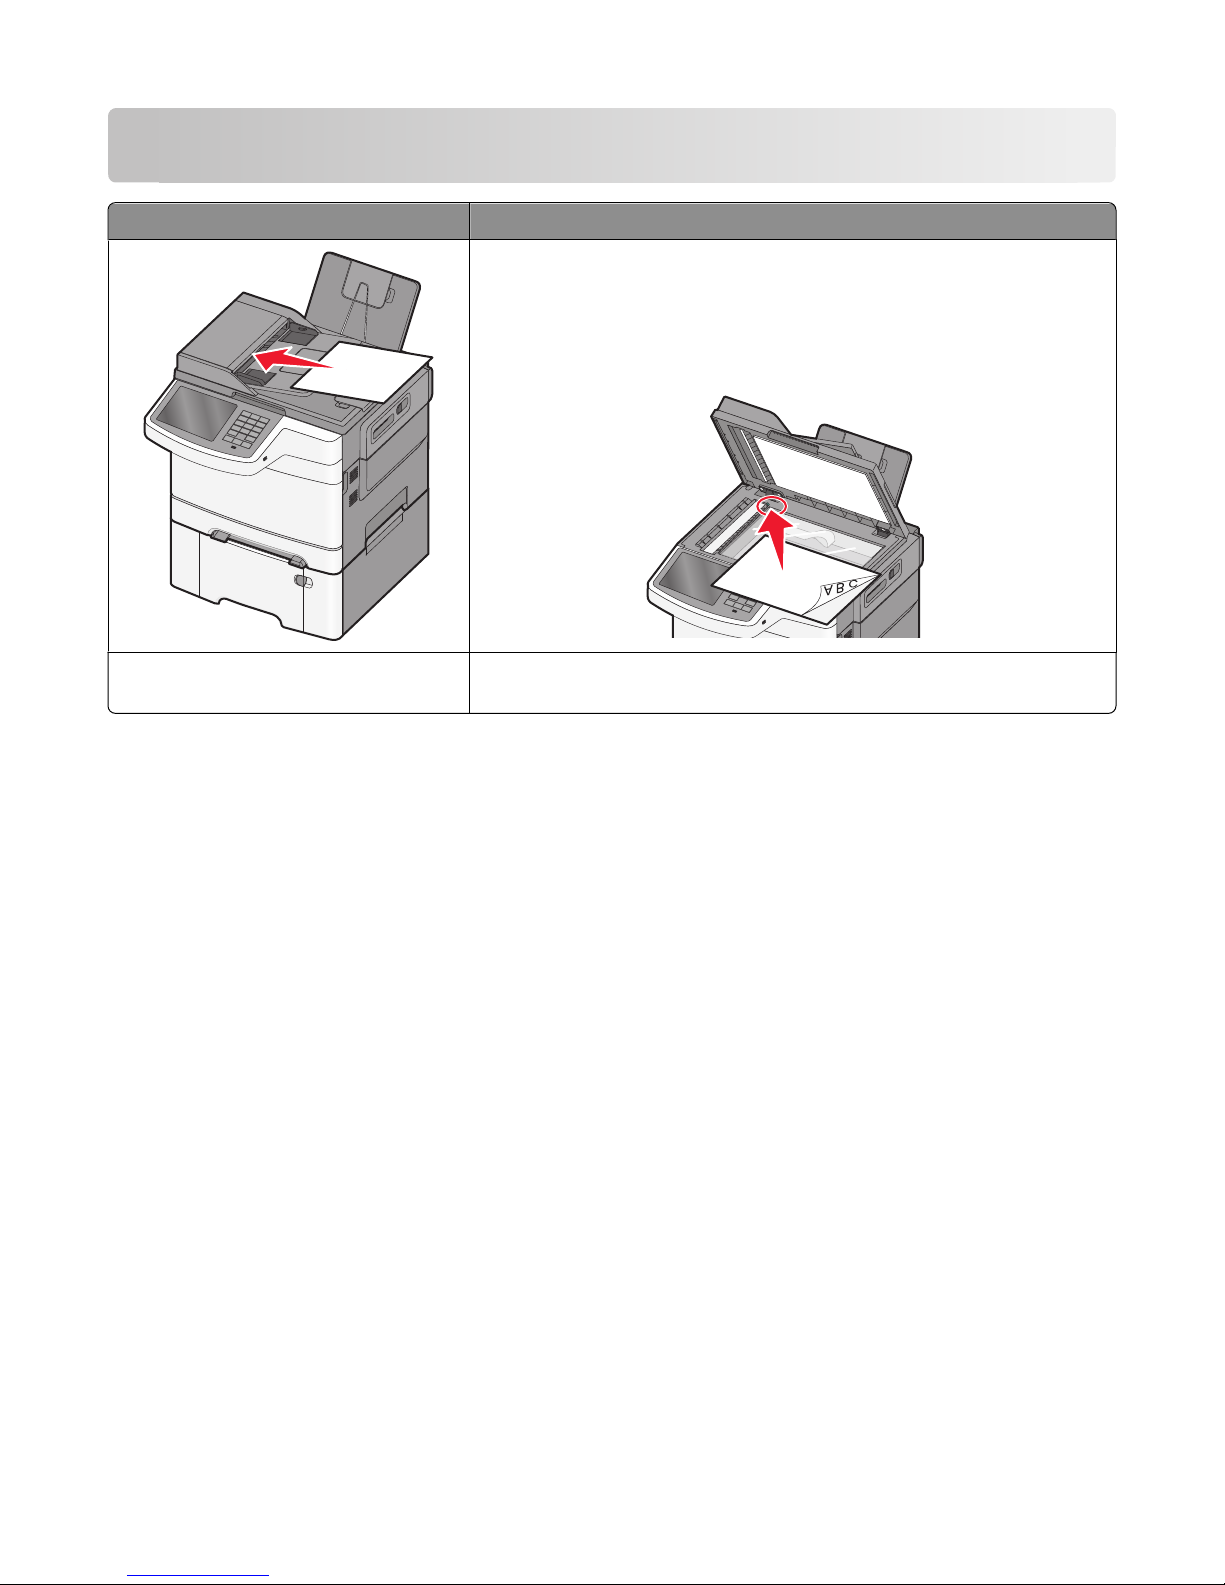
E-mailing
ADF Scanner glass
AB C
Use the ADF for multiple-page documents. Use the scanner glass for singl e pages, small items (such as postcards or photos),
transparencies, photo paper, or thin media (such as magazine clippings).
You can use the printer to e-mail scanned documents to one or more recipients. There are three ways to send an e-mail
from the printer. You can type the e-mail address, use a shortcut number, or use the address book.
Getting ready to e-mail
Setting up the e-mail function
1 Type the printer IP address into the address field of your Web browser.
If you do not know the IP address of the printer, you can:
• View the IP address on the printer control panel in the TCP/IP section under the Networks/Ports menu.
• Print a network setup page or the menu settings pages and locate the IP address in the TCP/IP section.
2 Click Settings.
3 Under Default Settings, click E-mail/FTP Settings.
4 Click E-mail Settings > Setup E-mail Server.
5 Fill in the fields with the appropriate information.
6 Click Submit.
Configuring e-mail settings
1 Type the printer IP address into the address field of your Web browser.
E-mailing
86
Page 87

If you do not know the IP address of the printer, you can:
• View the IP address on the printer control panel in the TCP/IP section under the Networks/Ports menu.
• Print a network setup page or the menu settings pages and locate the IP address in the TCP/IP section.
2 Click Settings > E-mail/FTP Settings > E-mail Settings.
3 Fill in the fields with the appropriate information.
4 Click Submit.
Creating an e-mail shortcut
Creating an e-mail shortcut using the Embedded Web Server
1 Type the printer IP address into the address field of your Web browser.
If you do not know the IP address of the printer, you can:
• View the IP address on the printer control panel in the TCP/IP section under the Networks/Ports menu.
• Print a network setup page or the menu settings pages and locate the IP address in the TCP/IP section.
2 Click Settings.
3 Under Other Settings, click Manage Shortcuts > E-mail Shortcut Setup.
4 Type a unique name for the recipient, and then enter the e-mail address.
Note: If you are entering multiple addresses, then separate each address with a comma (,).
5 Select the scan settings (Format, Content, Color, and Resolution).
6 Enter a shortcut number, and then click Add.
If you enter a number that is already in use, then you are prompted to select another number.
Creating an e-mail shortcut using the touch screen
1 From the home screen, navigate to:
E-mail > Recipient > type an e-mail address
To create a group of recipients, touch Next address, and then type the next recipient’s e-mail address.
2 Touch .
3 Type a unique name for the shortcut, and then touch Done.
4 Verify that the shortcut name and number are correct, and then touch OK.
If the name or number is incorrect, then touch Cancel, and then reenter the information.
E-mailing
87
Page 88

E-mailing a document
Sending an e-mail using the touch screen
1 Load an original document faceup, short edge first into the ADF or facedown on the scanner glass.
Note: Do not load postcards, photos, small items, transparencies, photo paper, or thin media (such as magazine
clippings) into the ADF. Place these items on the scanner glass.
2 If you are loading a document into the ADF, then adjust the paper guides.
Note: Make sure the size of the original document and the copy paper size are the same. Failure to set the proper
size may result to a cropped image.
3 From the home screen, navigate to:
E-mail > Recipient
4 Enter the e-mail address, or press
To enter additional recipients, touch Next Address, and then enter the address or shortcut number you want to
add.
Note: You can also enter an e-mail address using the address book.
#
and then enter the shortcut number.
5 Touch Done > Send It.
Sending an e-mail using a shortcut number
1 Load an original document faceup, short edge first into the ADF or facedown on the scanner glass.
Note: Do not load postcards, photos, small items, transparencies, photo paper, or thin media (such as magazine
clippings) into the ADF. Place these items on the scanner glass.
2 If you are loading a document into the ADF, then adjust the paper guides.
3 Press
To enter additional recipients, touch Next address, and then enter the address or shortcut number you want to
add.
4 Touch Send It.
#
, enter the shortcut number using the keypad, and then touch .
Sending an e-mail using the address book
1 Load an original document faceup, short edge first into the ADF or facedown on the scanner glass.
Note: Do not load postcards, photos, small items, transparencies, photo paper, or thin media (such as magazine
clippings) into the ADF. Place these items on the scanner glass.
2 If you are loading a document into the ADF, then adjust the paper guides.
3 From the home screen, navigate to:
E-mail >Recipient(s) >
> enter the name of recipient > Browse shortcuts
E-mailing
88
Page 89

4 Touch the name of the recipients.
To enter additional recipients, touch Next address, and then enter the address or shortcut number you want to
add, or search the address book.
5 Touch Done.
Customizing e-mail settings
Adding e-mail subject and message information
1 Load an original document faceup, short edge first into the ADF or facedown on the scanner glass.
Note: Do not load postcards, photos, small items, transparencies, photo paper, or thin media (such as magazine
clippings) into the ADF. Place these items on the scanner glass.
2 If you are loading a document into the ADF, then adjust the paper guides.
3 From the home screen, touch E-mail.
4 Type an e-mail address.
5 Touch Options > Subject.
6 Type the e-mail subject.
7 Touch Done > Message.
8 Type an e-mail message.
9 Touch Done > E-mail It.
Changing the output file type
1 Load an original document faceup, short edge first into the ADF or facedown on the scanner glass.
Note: Do not load postcards, photos, small items, transparencies, photo paper, or thin media (such as magazine
clippings) into the ADF. Place these items on the scanner glass.
2 If you are loading a document into the ADF, then adjust the paper guides.
3 From the home screen, navigate to:
E-mail > Recipient > type an e-mail address > Send as
4 Touch the button that represents the file type you want to send.
• PDF—Use this to create a single file with multiple pages, viewable with Adobe Reader. Adobe Reader is provided
free by Adobe at www.adobe.com.
• Secure PDF—Use this to create an encrypted PDF file that protects the file contents from unauthorized access.
• TIFF—Use this to create multiple files or a single file. If Multi-page TIFF is turned off in the Settings menu of the
Embedded Web Server, then TIFF saves one page in each file. The file size is usually larger than an equivalent
JPEG.
E-mailing
89
Page 90

• JPEG—Use this to create and attach a separate file for each page of your original document, viewable by most
Web browsers and graphics programs.
• XPS—Use this to create a single XML Paper Specification (XPS) file with multiple pages, viewable using an Internet
Explorer-hosted viewer and the .NET Framework, or by downloading a third-party standalone viewer.
5 Touch E-mail It.
Note: If you selected Secure PDF, you will be prompted to enter your password twice.
Canceling an e-mail
• When using the ADF, touch Cancel Job while Scanning appears.
• When using the scanner glass, touch Cancel Job while Scanning appears, or while Scan the Next Page /
Finish the Job appears.
Understanding e-mail options
Recipients
This option lets you enter the destination of your e-mail. You may enter multiple e-mail addresses.
Subject
This option lets you enter a subject line for your e-mail.
Message
This option lets you enter a message that will be sent with your scanned attachment.
File Name
This option lets you customize the attachment file name.
Original Size
This option opens a screen where you can choose the size of the documents you are going to e-mail.
• Touch a paper size button to select that size as the Original Size setting. The e-mail screen appears with the new
setting displayed.
• When “Original Size” is set to Mixed Sizes, you can scan an original document that contains mixed paper sizes.
Resolution
Adjusts the output quality of your e-mail. Increasing the image resolution increases the e-mail file size and the time
needed to scan your original document. Image resolution can be decreased to reduce the e-mail file size.
E-mailing
90
Page 91

Color
This option sets the output color for the scanned image. Touch to enable or disable color.
Content
This option lets you specify the content type and source of the original document.
Choose content type from Text, Text/Photo, Photo, or Graphics.
• Text—Use when the content of the original document is mostly text or line art.
• Graphics—Use when the original document is mostly business-type graphics such as pie charts, bar charts, and
animations.
• Text/Photo—Use when the original document is a mixture of text, graphics, and photos.
• Photo—Use when the original document is mostly a photo or an image.
Choose content source from Color Laser, Black/White Laser, Inkjet, Photo/Film, Magazine, Newspaper, Press, or Other.
• Color Laser—Use when the original document was printed using a color laser printer.
• Black/White Laser—Use when the original document was printed using a mono laser printer.
• Inkjet—Use when the original document was printed using an inkjet printer.
• Photo/Film—Use when the original document is a photo from film.
• Magazine—Use when the original document is from a magazine.
• Newspaper—Use when the original document is from a newspaper.
• Press—Use when the original document was printed using a printing press.
• Other—Use when the original document was printed using an alternate or unknown printer.
Darkness
This option adjusts how light or dark your scanned documents will turn out in relation to the original document.
Send As
This option sets the output (PDF, TIFF, JPEG or XPS) for the scanned image.
• PDF—Creates a single file with multiple pages, viewable with Adobe Reader. Adobe Reader is provided free by
Adobe at www.adobe.com.
• Secure PDF—Creates an encrypted PDF file that protects the file contents from unauthorized access
• TIFF—Creates multiple files or a single file. If Multi-page TIFF is turned off in the Settings menu of the Embedded
Web Server, then TIFF saves one page in each file. The file size is usually larger than an equivalent JPEG.
• JPEG—Creates and attaches a separate file for each page of your original document, viewable by most Web browsers
and graphics programs
• XPS—Creates a single XPS file with multiple pages, viewable using an Internet Explorer-hosted viewer and the .NET
Framework, or by downloading a third party standalone viewer
E-mailing
91
Page 92

Page Setup
This option lets you change the Sides (Duplex), Orientation, and Binding.
• Sides (Duplex)— Specifies if the original document is simplex (printed on one page) or duplex (printed on both
sides). This also identifies what needs to be scanned for inclusion in the e-mail.
• Orientation— Specifies the orientation of the original document, and then changes Sides and Binding to match the
orientation.
• Binding— Specifies if the original document is bound on the long-edge or short-edge side.
Scan Preview
This option displays the first page of the image before it is included in the e-mail. When the first page is scanned, the
scanning is paused and a preview image appears.
Advanced Options
Touching this button opens a screen where you can change the following settings:
• Advanced Imaging—Use to adjust the Background Removal, Color Balance, Color Dropout, Contrast, JPEG Quality,
Mirror Image, Negative Image, Scan Edge to Edge, Shadow Detail, Sharpness, and Temperature settings before you
e-mail the document.
• Custom Job—Use to combine multiple scanning jobs into a single job.
• Edge Erase—Use to eliminate smudges or information around the edges of a document. You can choose to eliminate
an equal area around all four sides of the paper, or pick a particular edge. Edge Erase will erase whatever is within
the area selected, leaving nothing on that portion of the scan.
• Transmission Log—Use to print the transmission log or transmission error log.
E-mailing
92
Page 93
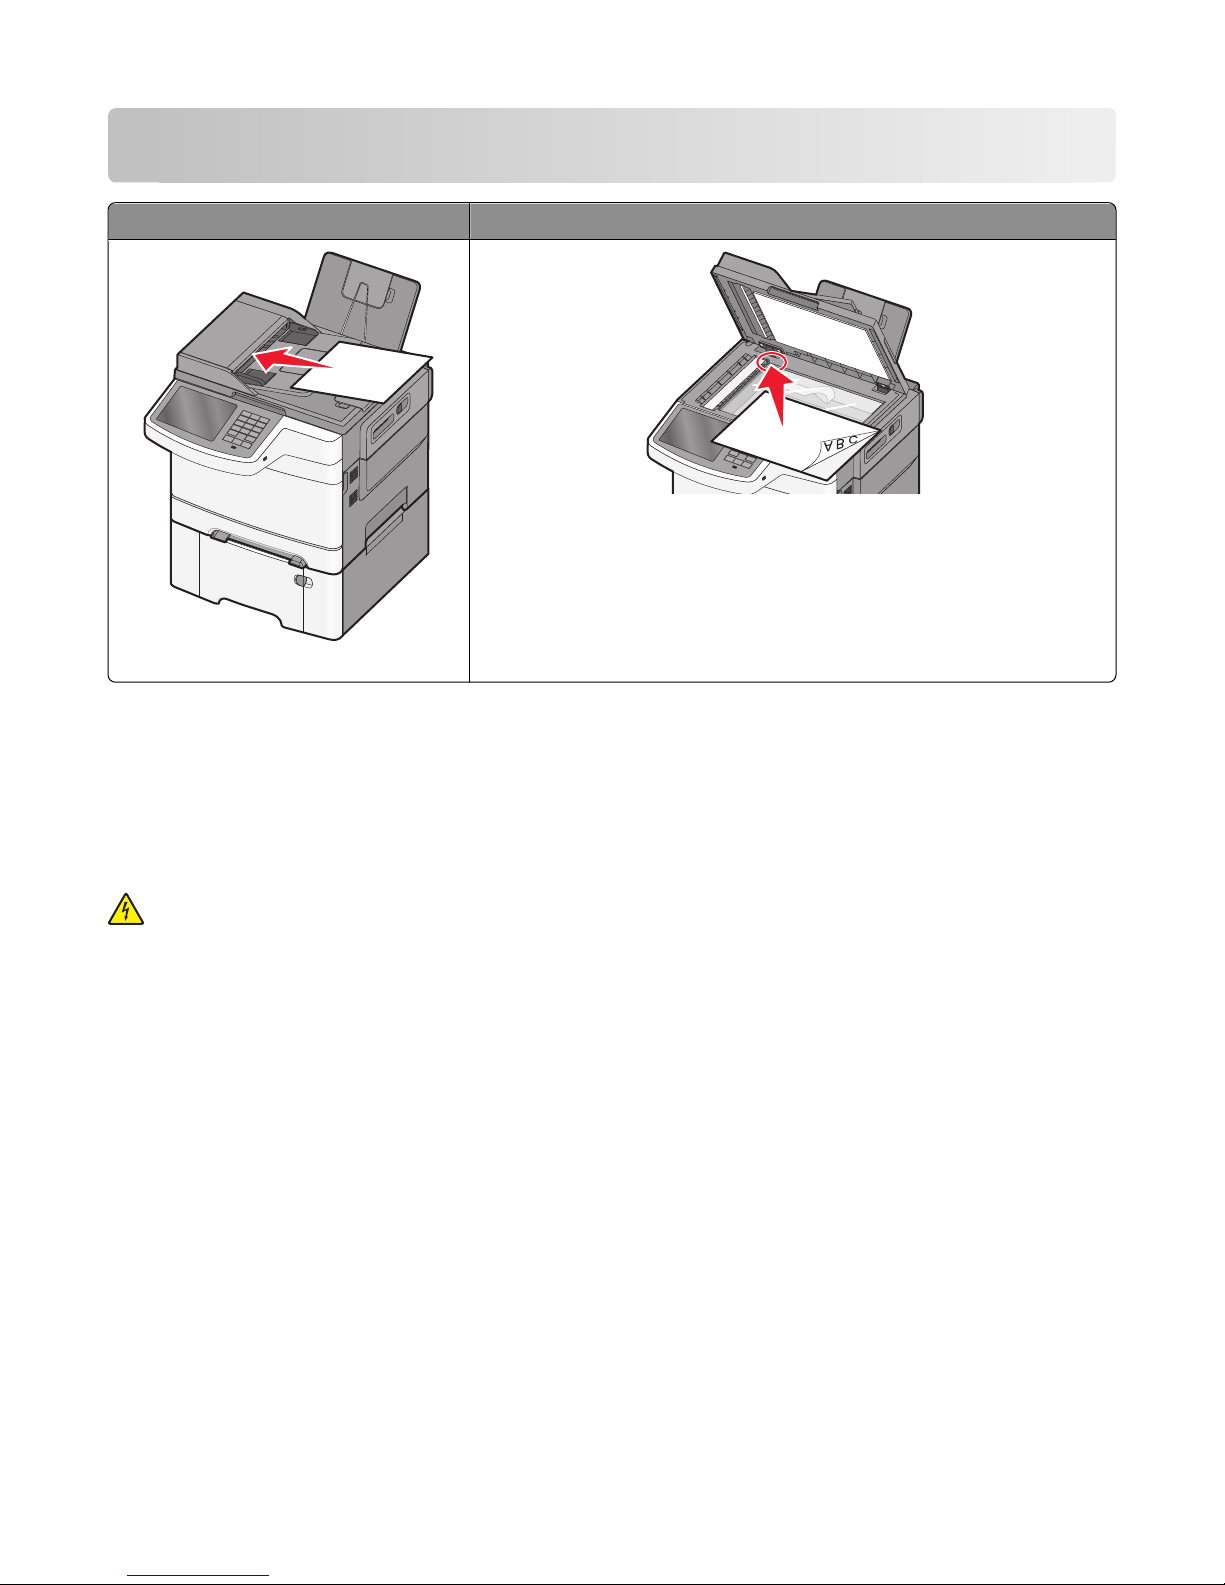
Faxing
ADF Scanner glass
AB C
Use the scanner glass for single pages, s mall items (such as postcards or photos),
transparencies, photo paper, or thin media (such as magazine clippings).
Use the ADF for multiple-page documents.
Getting the printer ready to fax
The following connection methods may not be applicable in all countries or regions.
Note: During the initial printer setup, deselect Fax and any other function you plan to set up later, and then touch
Continue. The indicator light may blink red if the fax function is enabled and not fully set up.
CAUTION—SHOCK HAZARD: Do not use the fax feature during a lightning storm. Do not set up this product or
make any electrical or cabling connections, such as the fax feature, power cord, or telephone, during a lightning
storm.
Warning—Potential Damage: Do not touch cables or the printer in the area shown while actively sending or receiving
a fax.
Faxing
93
Page 94
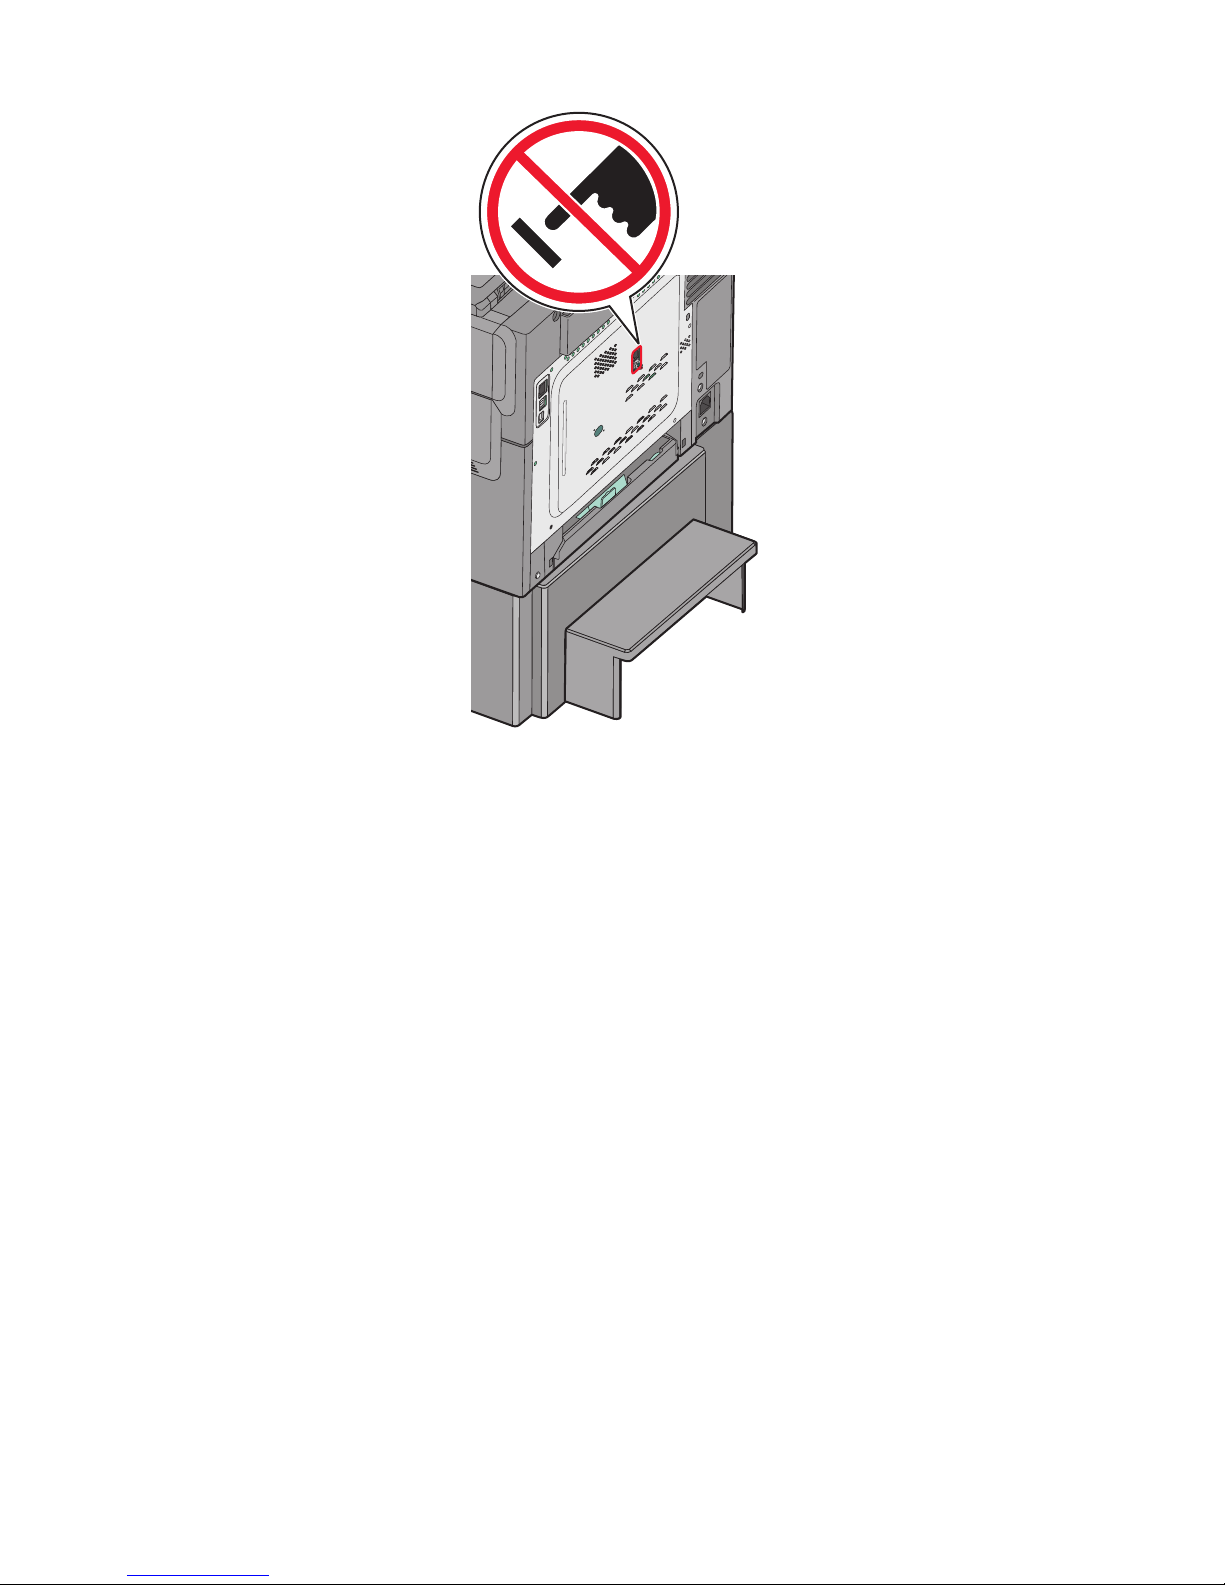
Initial fax setup
Many countries and regions require o utgoing faxes to contain the following information in a margin at the top or bottom
of each transmitted page, or on the first page of the transmission: station name (identification of the business, other
entity, or individual sending the message) and station number (telephone number of the sending fax machine, business,
other entity, or individual).
To enter your fax setup information, use the printer control panel, or use your browser to access the Embedded Web
Server and then enter the Settings menu.
Note: If you do not have a TCP/IP environment, then you must use the printer control panel to enter your fax setup
information.
Using the printer control panel for fax setup
When the printer is turned on for the first time or if the printer has been off for an extended time, a series of start-up
screens appear. If the printer has fax capabilities, then the following screens appear:
Fax Name or Station Name
Fax Number or Station Number
1 When Fax Name or Station Name appears, enter the name to be printed on all outgoing faxes.
2 After entering the Fax Name or Station Name, touch Submit.
3 When Fax Number or Station Number appears, enter the printer fax number.
4 After entering the Fax Number or Station Number, touch Submit.
Faxing
94
Page 95
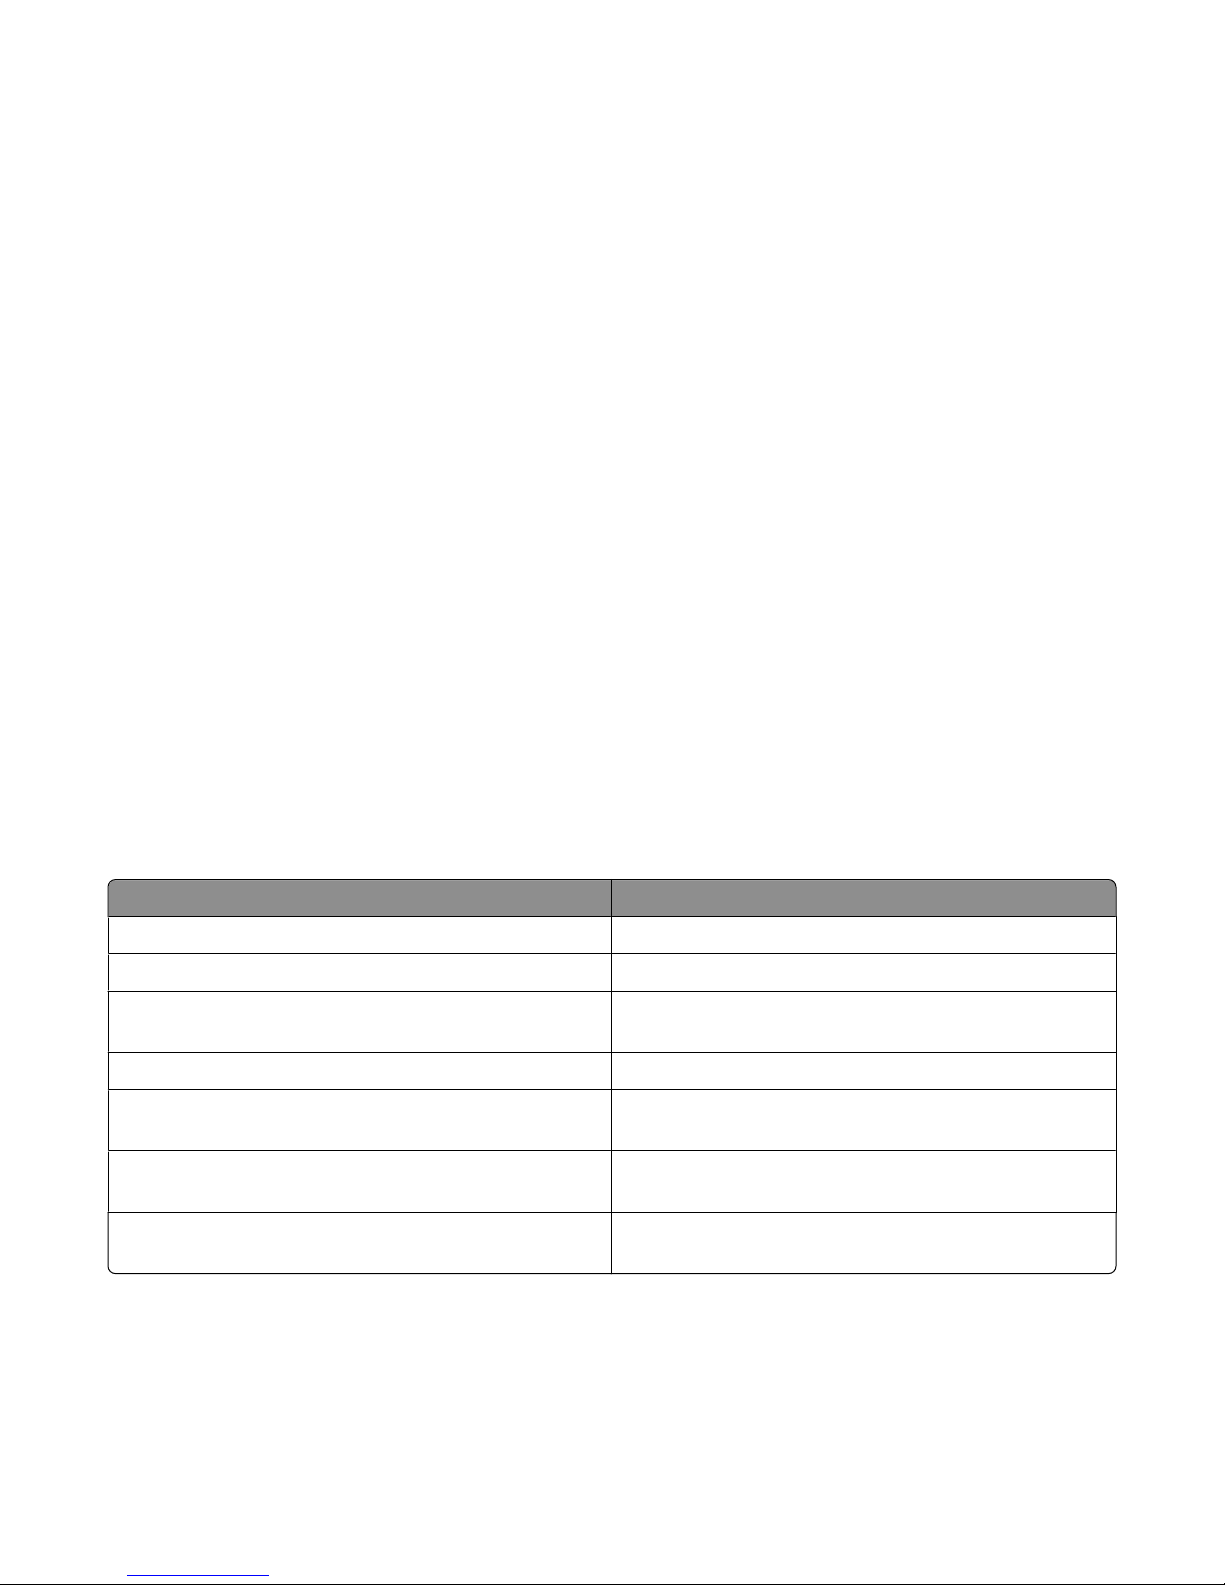
Using the Embedded Web Server for fax setup
1 Type the printer IP address into the address field of your Web browser.
If you do not know the IP address of the printer, you can:
• View the IP address on the printer control panel in the TCP/IP section under the Networks/Ports menu.
• Print a network setup page or the menu settings pages and locate the IP address in the TCP/IP section.
2 Click Settings > Fax Settings > Analog Fax Setup.
3 In the Fax Name or Station Name field, enter the name to be printed on all outgoing faxes.
4 In the Fax Number or Station Number field, enter the printer fax number.
5 Click Submit.
Choosing a fax connection
You can connect the printer with equipment such as a telephone, an answering machine, or a computer modem. To
determine the best way to set up the printer, see the following table.
Notes:
• The printer is an analog device that works best when directly connected to the wall outlet. Other devices (such as
a telephone or answering machine) can be successfully attached to pass through the printer, as described in the
setup steps.
• If you want a digital connection such as ISDN, DSL, or ADSL, a third-party device (such as a DSL filter) is required.
Contact your DSL provider for a DSL filter. The DSL filter removes the digital signal on the telephone line that can
interfere with the ability of the printer to fax properly.
• You do not need to attach the printer to a computer, but you do need to connect it to an analog telephone line to
send and receive faxes.
Equipment and service options Fax connection setup
Connect directly to the telephone line See “Connecting to an analog telephone line” on page 96
Connect to a Digital Subscriber Line (DSL or ADSL) service See “Connecting to a DSL service” on page 96.
Connect to a Private Branch eXchange (PBX) or Integrated
Services Digital Network (ISDN) system
Use a Distinctive Ring service See “Connecting to a distinctive ring service” on page 97.
Connect to a telephone line, telephone, and answering
machine
Connect through an adapter used in your area See “Connecting to an adapter for your country or region” on
Connect to a computer with a modem See “Connecting to a computer with a modem” on
See “Connecting to a PBX or ISDN system” on page 96.
See “Connecting the printer and a telephone or answering
machine to the same telephone line” on page 98
page 100.
page 105.
Faxing
95
Page 96
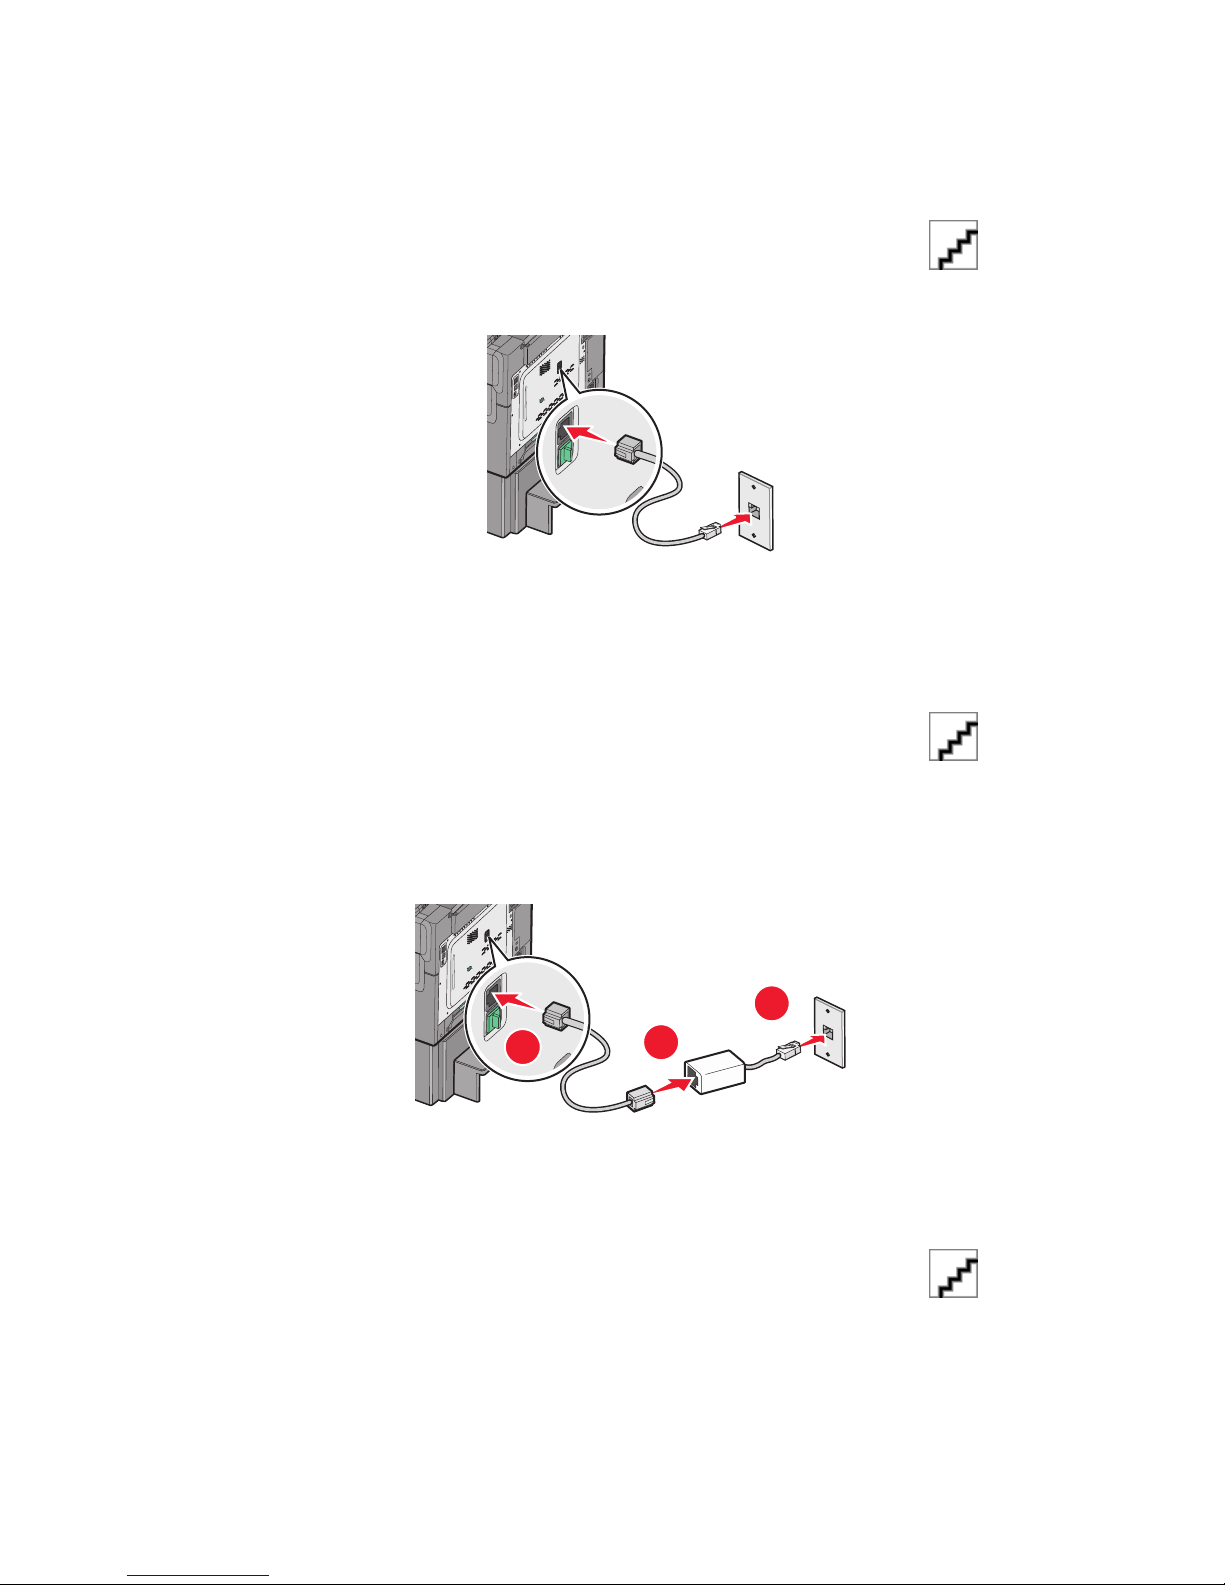
Connecting to an analog telephone line
If your telecommunications equipment uses a US-style (RJ11) telephone line, then follow these steps to connect the
equipment:
1 Connect one end of the telephone cable that came with the printer to the printer LINE port .
2 Connect the other end of the telephone cable to an active analog telephone wall jack.
Connecting to a DSL service
If you subscribe to a DSL service, then contact the DSL provider to obtain a DSL filter and telephone cord, and then
follow these steps to connect the equipment:
1 Connect one end of the telephone cable that came with the printer to the printer LINE port .
2 Connect the other end of the telephone cable to the DSL filter.
Note: Your DSL filter may look different than the one in the illustration.
3 Connect the DSL filter cable to an active telephone wall jack.
3
1
2
Connecting to a PBX or ISDN system
If you use a PBX or ISDN converter or terminal adapter, then follow these steps to connect the equipment:
1 Connect one end of the telephone cable that came with the printer to the printer LINE port .
2 Connect the other end of the telephone cable to the port designated for fax and telephone use.
Faxing
96
Page 97
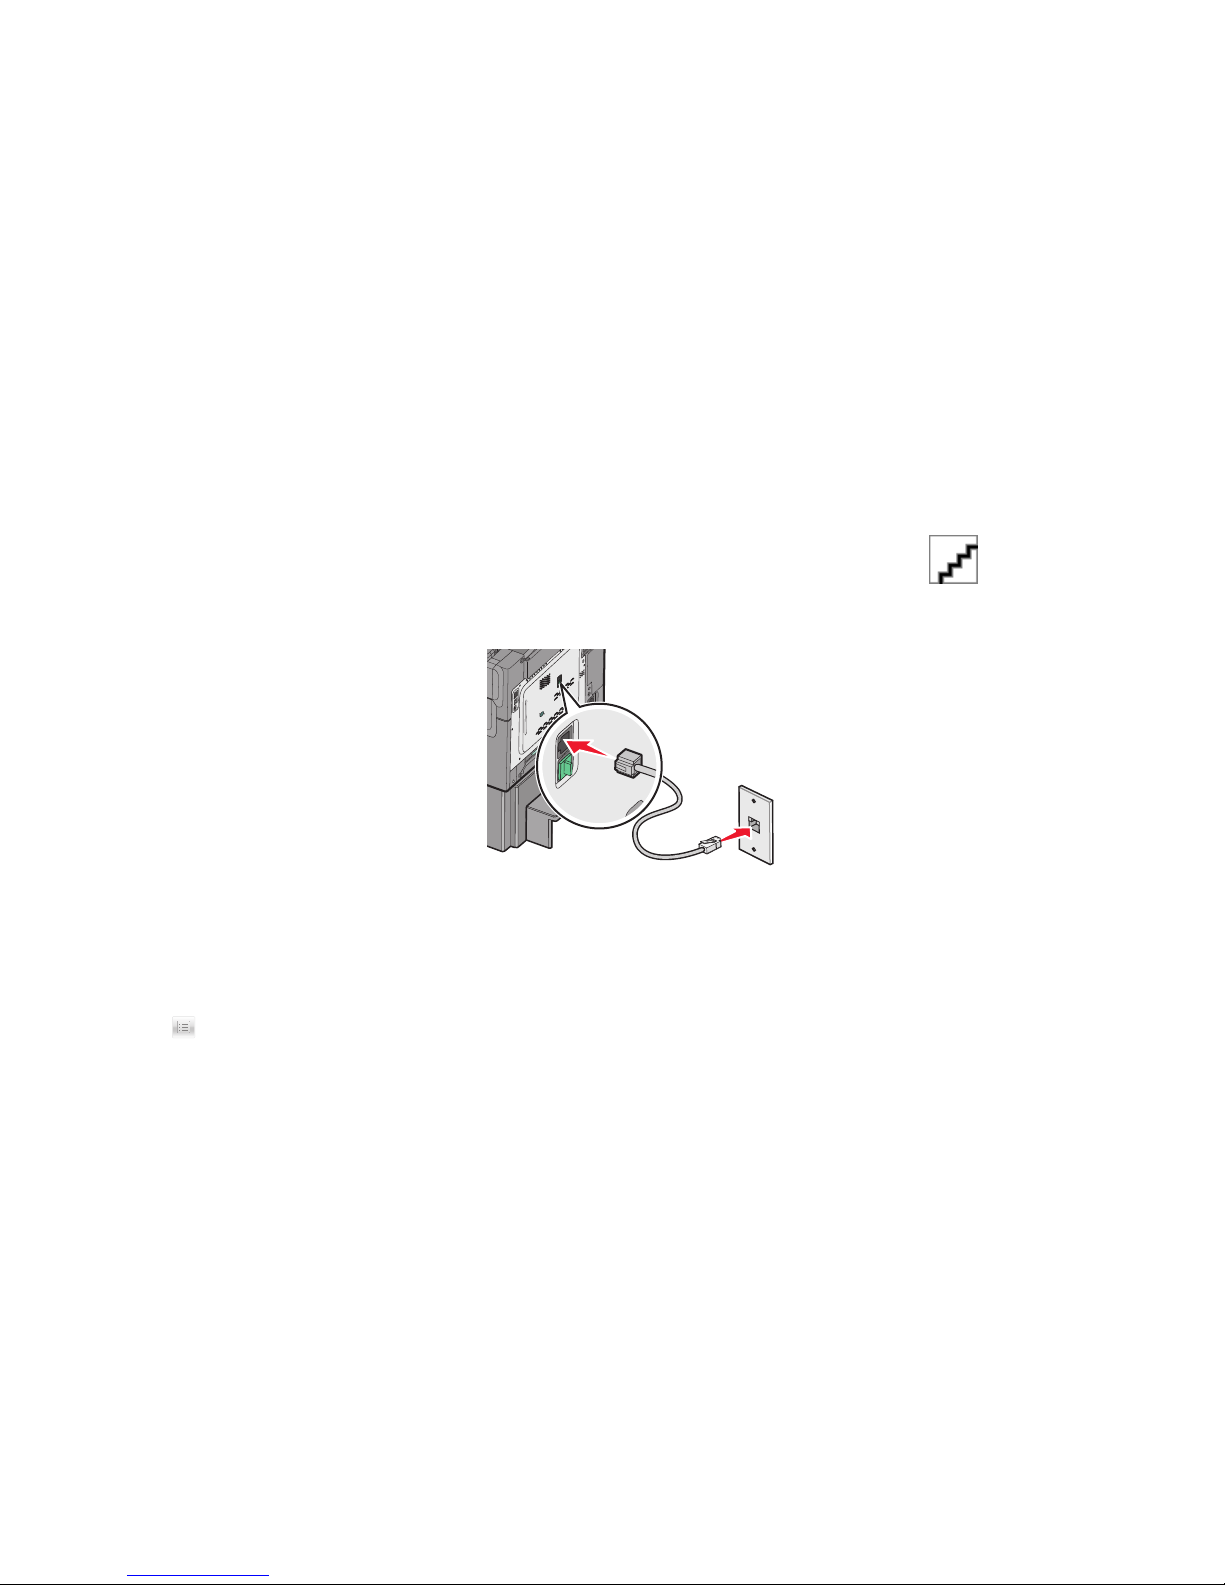
Notes:
• Make sure the terminal adapter is set to the correct switch type for your region.
• Depending on the ISDN port assignment, you may have to connect to a specific port.
• When using a PBX system, make sure the call waiting tone is off.
• When using a PBX system, dial the outside line prefix before dialing the fax number.
• For more information on using the fax with a PBX system, see the documentation that came with your PBX
system.
Connecting to a distinctive ring service
A distinctive ring service may be available from your telephone service provider. This service allows you to have multiple
telephone numbers on one telephone line, with each telephone number having a different ring pattern. This may be
useful for distinguishing between fax and voice calls. If you subscribe to a distinctive ring service, then follow these
steps to connect the equipment:
1 Connect one end of the telephone cable that came with the printer to the printer LINE port .
2 Connect the other end of the telephone cable to an active analog telephone wall jack.
3 Change the Distinctive Rings setting to match the setting you want for the printer to answer:
Note: The factory default setting for distinctive rings is On. This allows the printer to answer single, double, and
triple ring patterns.
a From the home screen, navigate to:
> Settings > Fax Settings > Analog Fax Settings > Distinctive Rings
b Select the pattern setting you want to change, and then touch Submit.
Faxing
97
Page 98
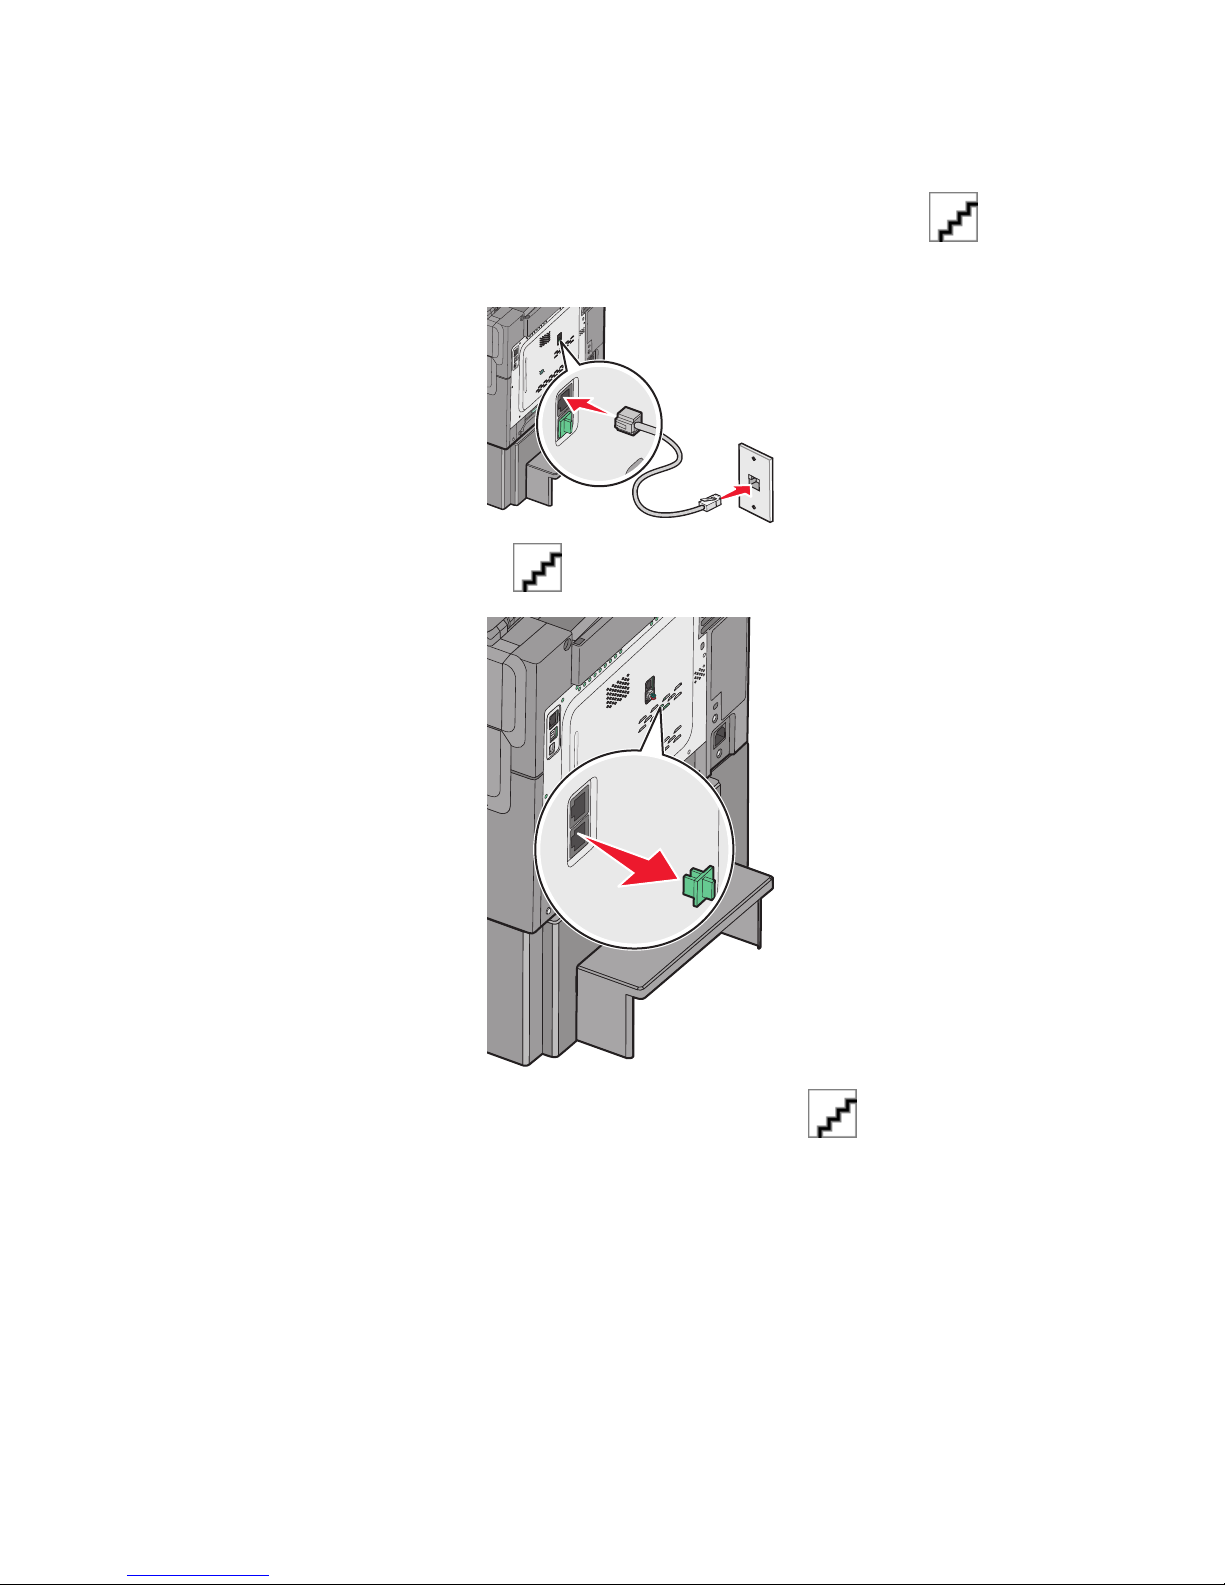
Connecting the printer and a telephone or answering machine to the same
telephone line
1 Connect one end of the telephone cable that came with the printer to the printer LINE port .
2 Connect the other end of the telephone cable to an active analog telephone wall jack .
3 Remove the plug from the printer EXT port .
4 Connect your telecommunications equipment directly to the printer EXT port .
Faxing
98
Page 99
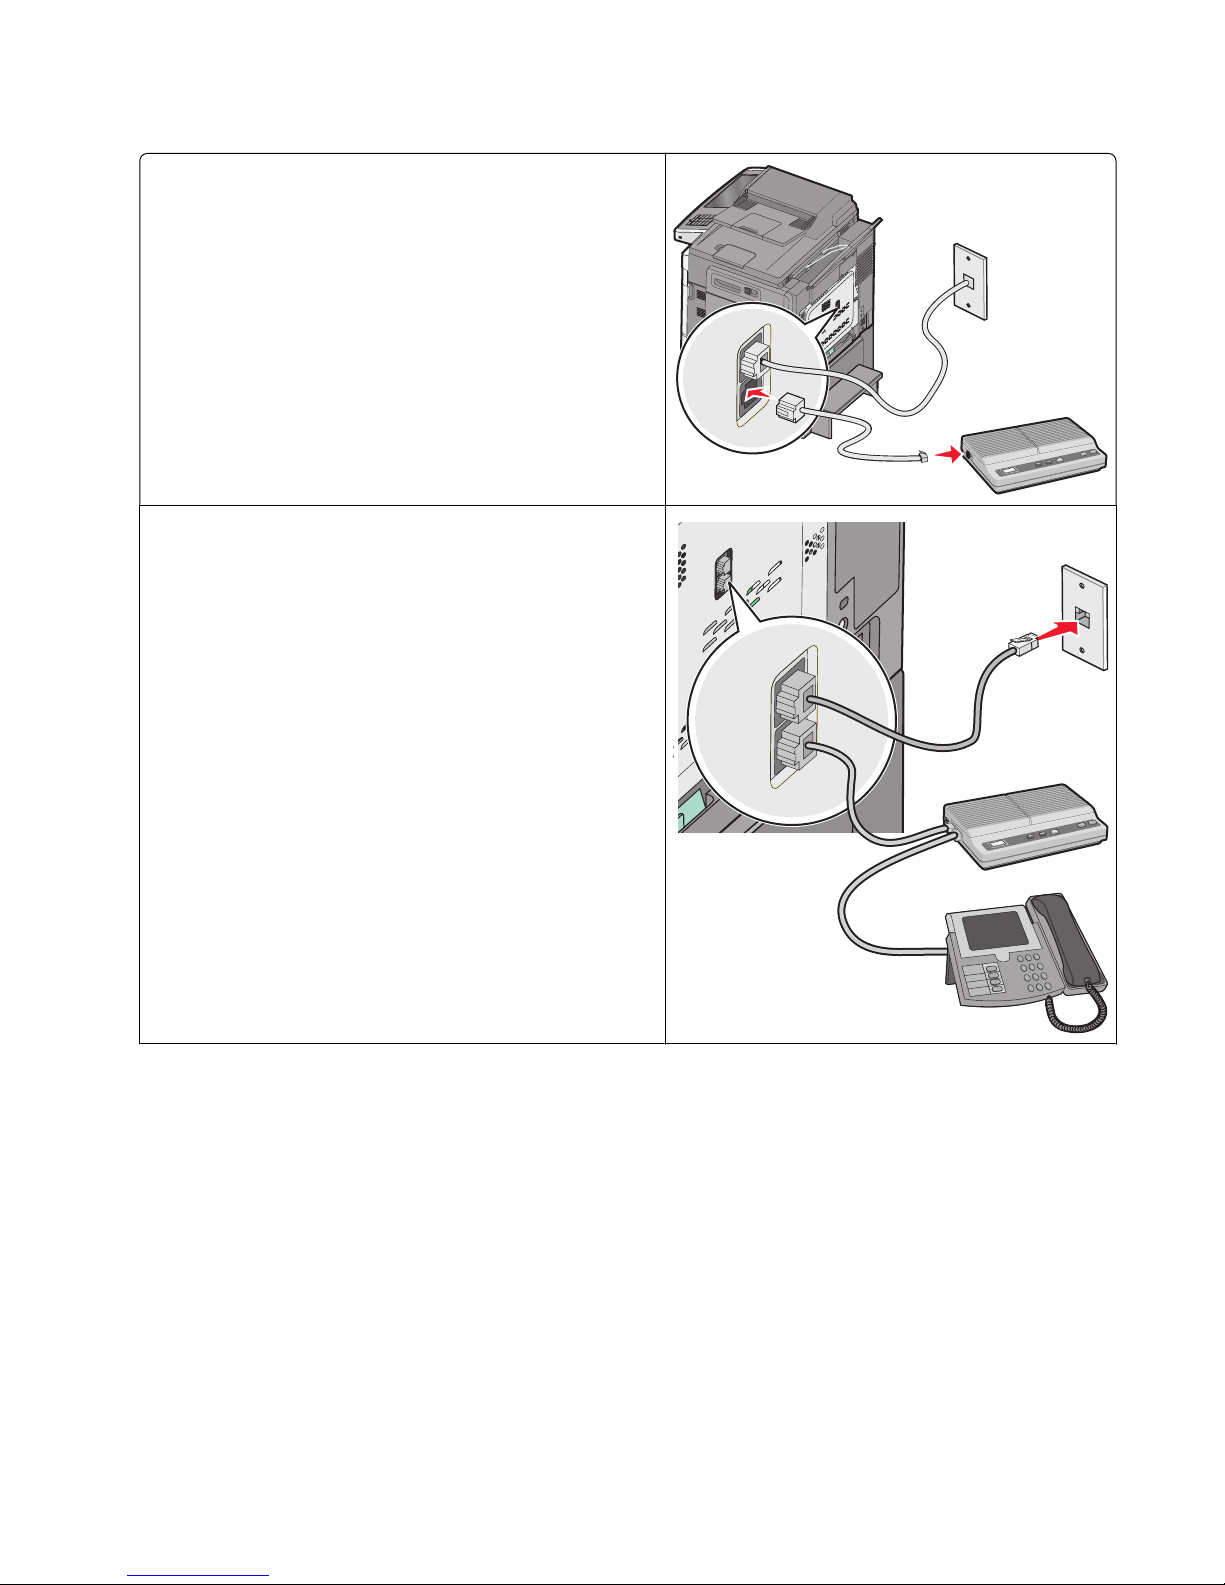
Use one of the following methods:
Answering machine
Answering machine and telephone
Faxing
99
Page 100
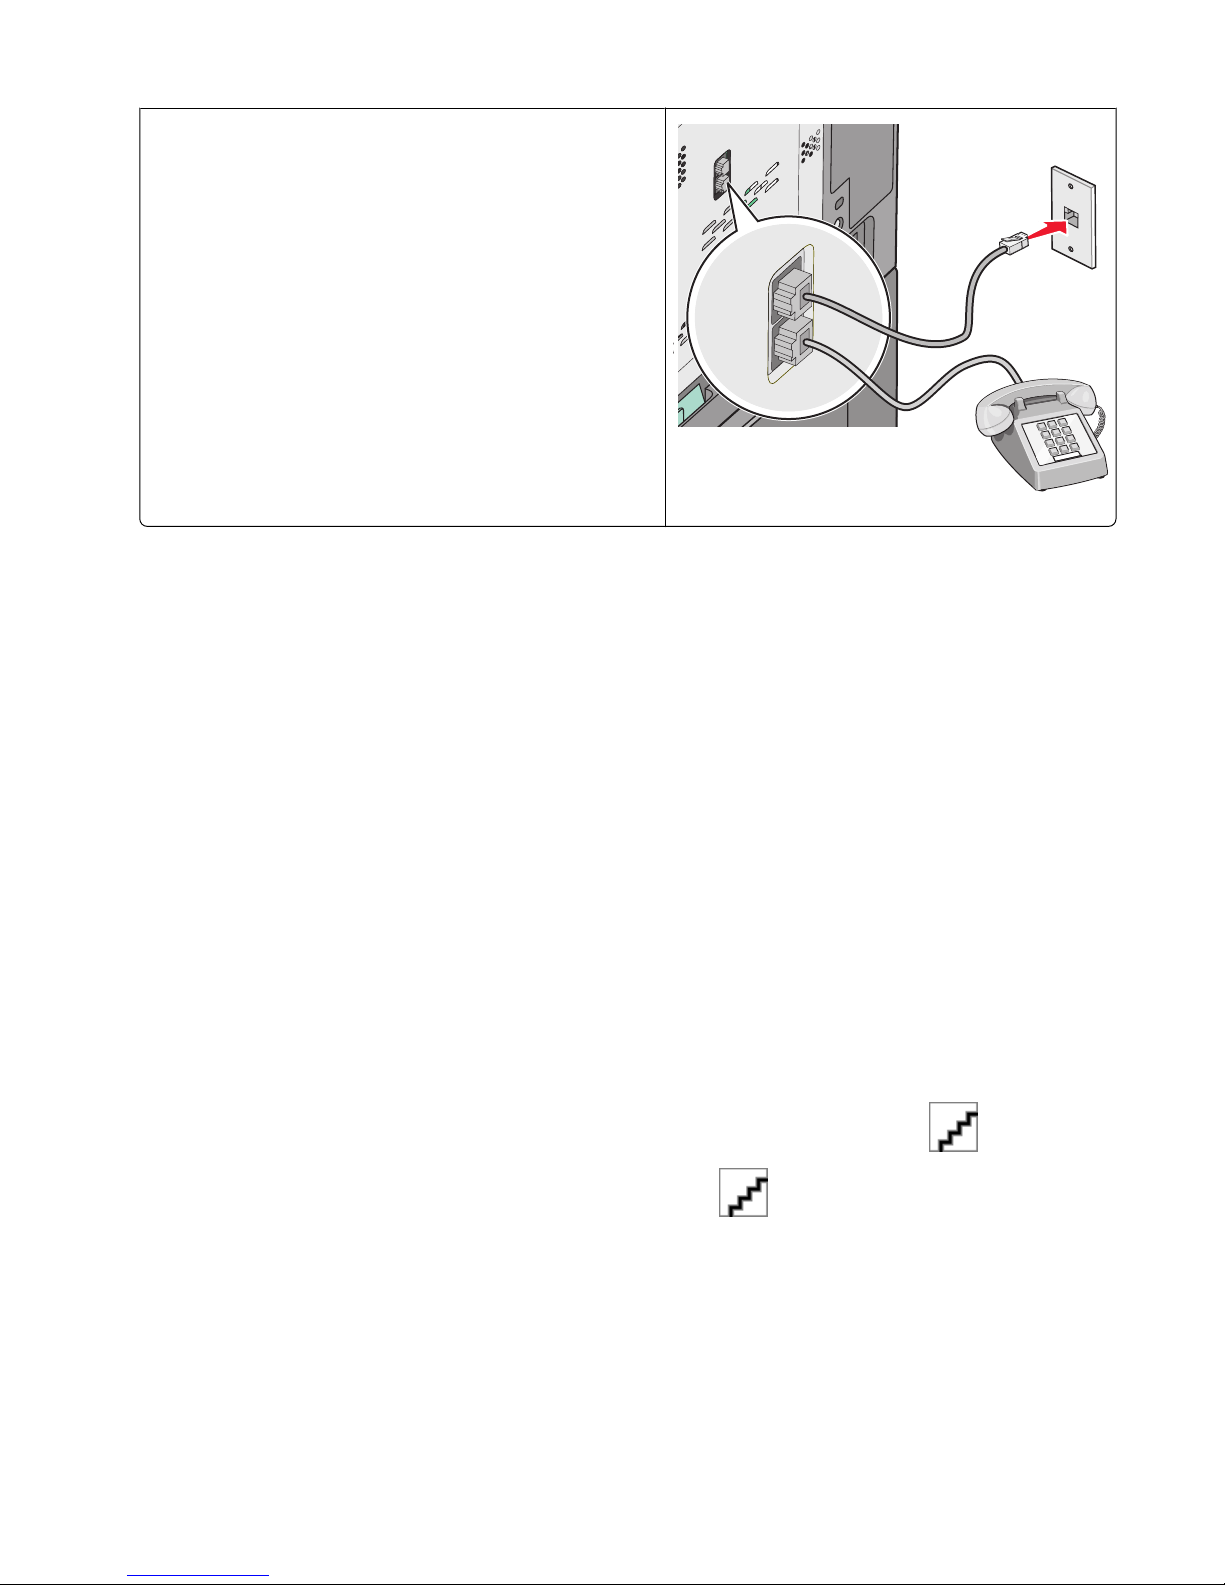
Telephone or a telephone with an integrated answering
machine
Connecting to an adapter for your country or region
The following countries or regions may require a special adapter to connect the telephone cable to the active telephone
wall jack:
Country/region
• Austria
• Cyprus
• Denmark
• Finland
• France
• Germany
• Ireland
• New Zealand
• Netherlands
• Norway
• Portugal
• Sweden
• Switzerland
• United Kingdom
• Italy
Countries or regions except Austria, Germany, and Switzerland
For some countries or regions, a telephone line adapter is included in the box. Use this adapter to connect an answering
machine, telephone, or other telecommunications equipment to the printer.
1 Connect one end of the telephone cable that came with the printer to the printer LINE port .
Note: There is a special RJ-11 plug installed in the printer EXT port
for the proper operation of the fax function and connected telephones.
2 Connect the other end of the telephone cable to the adapter, and then connect the adapter to the active telephone
wall jack.
. Do not remove this plug. It is necessary
Note: Your telephone adapter may look different than the one shown. It will fit the wall jack used in your location.
Faxing
100
 Loading...