

Page 1

Connection guide
Page 1 of 2
Connection guide
Note: For local printing, you must install the printer software (drivers) before connecting the USB cable.
Installing printer and software for local printing using Windows
1 Launch the drivers CD that shipped with the printer.
2Click Install Printer and Software.
Note: Some Windows operating systems require that you have administrative access to install printer
software (drivers) on the computer.
3Click Agree to accept the licens e agreement.
4 Select Suggested, and then click Next.
The Suggested option is the defaul t installation for local setup. If you need to install utilities, change
settings, or customize device drivers, select Custom. Follow the instructions on the computer screen.
5 Select Local Attach, and then click Finish.
Note: It may take a few minutes for the drivers to completely load.
6 Close the drivers CD installer appli cation.
7 Connect the USB cable. Be sur e to match the USB symbol on the cable to the USB symbol on the printer.
Note: Only Windows 98 SE, Windows Me, Windows 2000, Windows XP, and Windows Server 2003
operating systems support USB connections. Some UNIX, Linux, and Macintosh compute rs al so
support USB connections. See the c omputer operating sy stem documentation to see if your s ystem
supports USB.
8 Plug one end of the printer power cord into the socket at the back of the printer and the other end into a
properly grounded electrical outlet that is near the printer and easil y accessible.
9 Turn on the printer.
Plugging in the USB cable and turning on the printer prompts the Windo ws operating system to run the plug
and play scr eens to install the printer a s a new hardware device. The installation of printer software (drive rs)
done in step 1 should satisfy the plug and play requirements. When plug and play is finished, a printer
object will appear in your Printers folder .
Note: After the printer completes its internal tests, the Ready mess age indicates tha t the printer is ready
to receive jobs. If you see a message other than Ready on the display, see th e publications CD for
instructions on clearing the message.
10 Send a test page to print.
Using a parallel or serial cable
For detailed instructions, see the User’s Guide on the publications CD that shipped with the printer.
Local printing with Mac or UNIX/Linux
For detailed instructions, see the User’s Guide on the publications CD that shipped with the printer.
Page 2

Connection guide
Page 2 of 2
Installing printer and software for network printing using Windows
1 Make sure the printer is turned off and unplugged from the wall outlet.
2 Connect the printer to a LAN drop or hub using an Ethernet cable that is compatible with your network.
3 Plug one end of the printer power cord into the socket at the back of the printer and the other end into a
properly grounded outlet.
4 Turn on the printer.
Note: After the printer completes its internal tests, the Ready mess age indicates tha t the printer is ready
to receive jobs. If you see a message other than Ready on the display, see th e publications CD for
instructions on clearing the message.
5 Go to a computer on the same network, and launch the drivers CD that shipped with the printer.
6Click Install Printer and Software.
7Click Agree to accept the license agreement.
8 Select Suggested, and then click Next.
9 Select Network Attach, and then click Next.
10 Select your printer model from the list, and then click Next.
11 Select your printer port from the list, and then click Finish to complete the installation. A printer object is
created in the Printers folder on the computer.
If your printer port is not listed, clic k Add P ort. Enter the inf ormation requested to c reate a new p rinter port.
Select the option to create an Enhanced TCP/IP Network Port. Other port options will not give you full
functionality.
12 Send a test page to print.
Other network cabling options
The follo wing ma y also be a v ailab l e as network opt ions f or the printer. More inf ormation is a v ail abl e in the User’s
Guide on the publications CD that shipped with the printer.
• Fiber optic internal print servers
• Ethernet internal print servers
• Wireless internal print servers
• Ethernet external print servers
• Wireless external print servers
Detailed instructions for installation are shipped with the product.
Network printing using Mac, UNIX/Linux, or NetWare
For information about this support, see the User’s Guide on the publications CD that shipped with the printer.
You can find some additional information on the driv ers CD th at sh ippe d with t he printer. Launch the driv er s CD,
and click View Documentation.
Page 3
Information guide
Page 1 of 1
Information guide
There are numerous pub lications a vai lable to help you
understand the printer and its functions . This page will
help you locate pub lications and other information for
the printer .
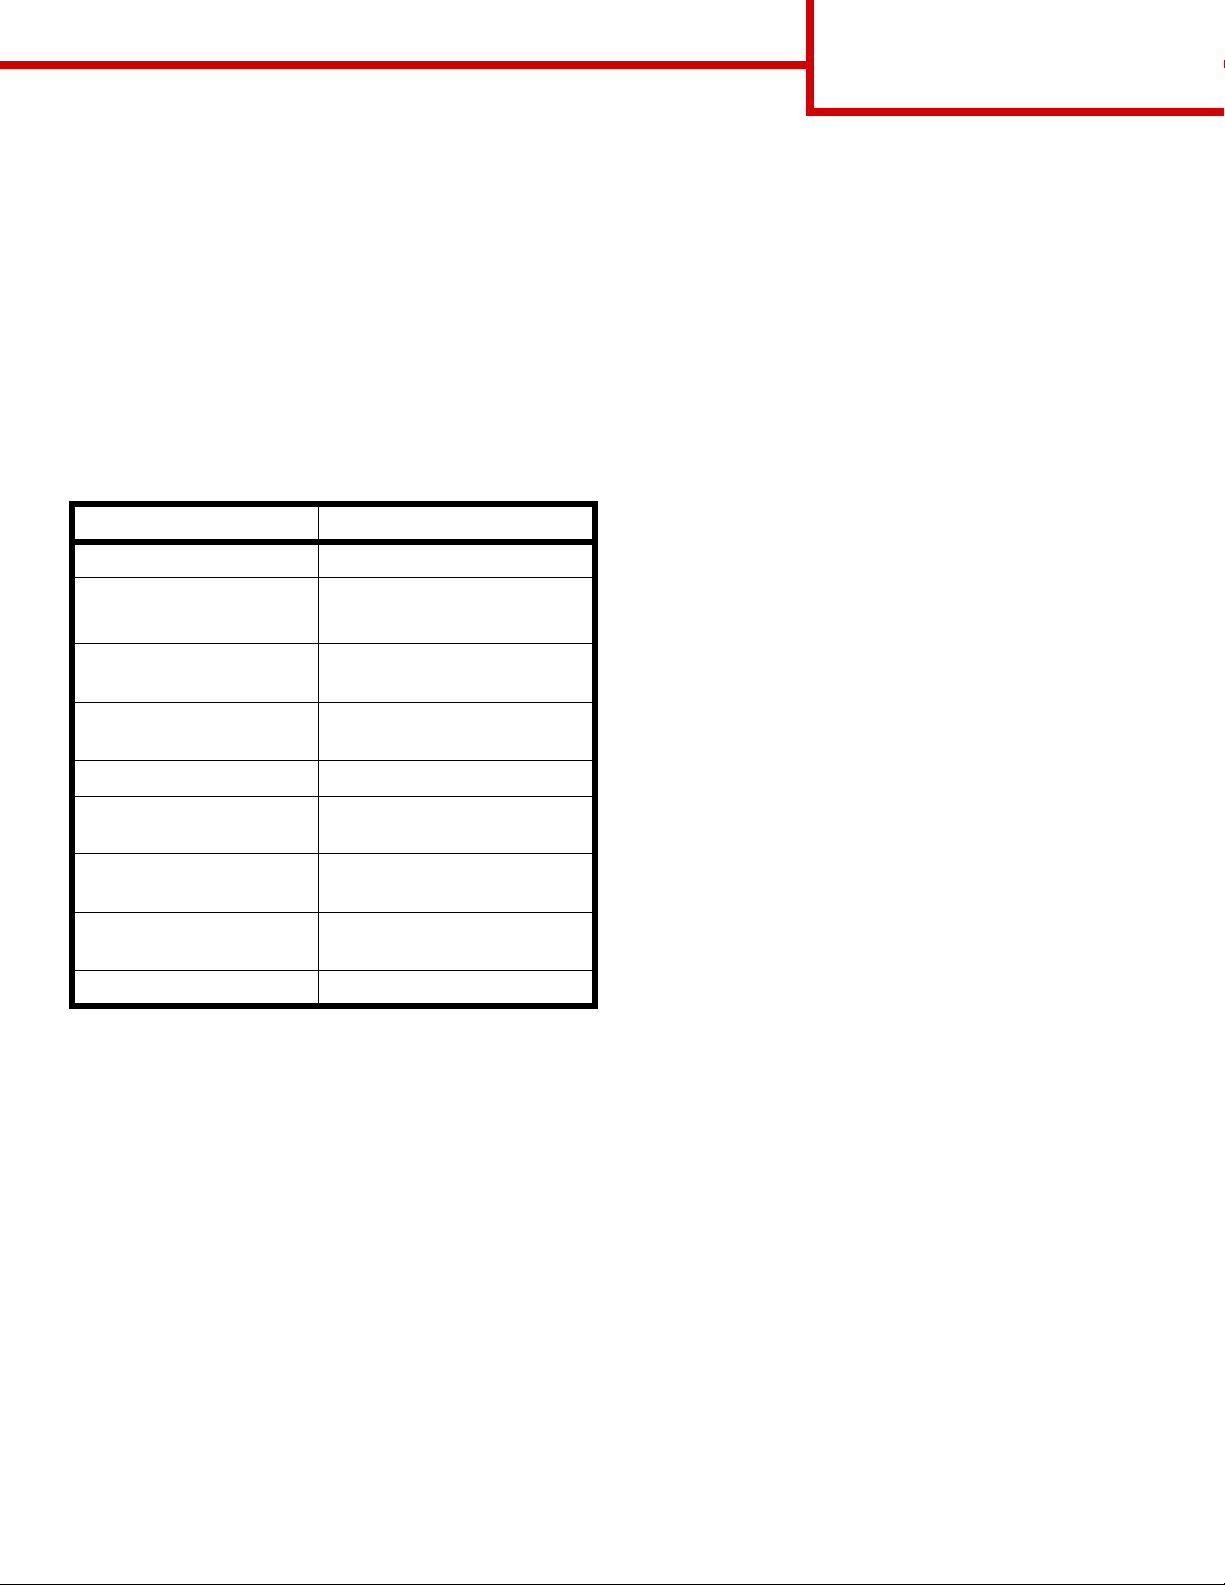
Help menu pages
There are Help menu pages resident in the printer.
Each topic can be printed individually, or select Print
All to print all of them.
Menu Item Use it to
Print All Print all of the guides.
Information Guid e
(this page)
Print Quality Gu ide Resolve print quality and
Printing Guide Send, print, cancel print jobs,
Locate additional information.
troubleshooting issues.
and load media.
The Menus and Messages Guide pro vides information
to change the printer settings. It describes the menus
available, the menu items under each menu, and the
values available.
Lexmark Web site
Copies of the User’s Guide, Setup sheet, Menus and
Messages Guide, and Help menu pages ar e available
on the Lexmark Web site at www.lexmark.com.
Drivers CD
The drivers CD which was shipped with the printer
contains the necessary printer drivers to get the printer
up and running. It may also contain printer utilities,
screen fonts, and additional documentation.
Other languages
The User’s Gui de, Setup sheet, Menus and Messages
Guide, and Help menu pages are also av ailable in
other languages.
Supplies Guide Order supplies.
Media Guide See what types of media are
supported by the printer.
Menu Map View all menus and menu
items available.
Connection Guide Connect the printer as a local
or network printer.
Moving Guide Safely move the printer.
Setup sheet
The Setup sheet packaged with the printer provides
information about setting up the printer.
Publications CD
The publications CD which was shipped with the
printer contains a User’s Guide, Setup sheet, Menus
and Messages Guide, and a copy of the Help menu
pages.
The User’s Guide provides information about loading
media, ordering supplies, troubleshooting, clearing
jams, and removing options. It also includes
administrative support information.
Page 4
Media guide
Page 1 of 2
Media guide
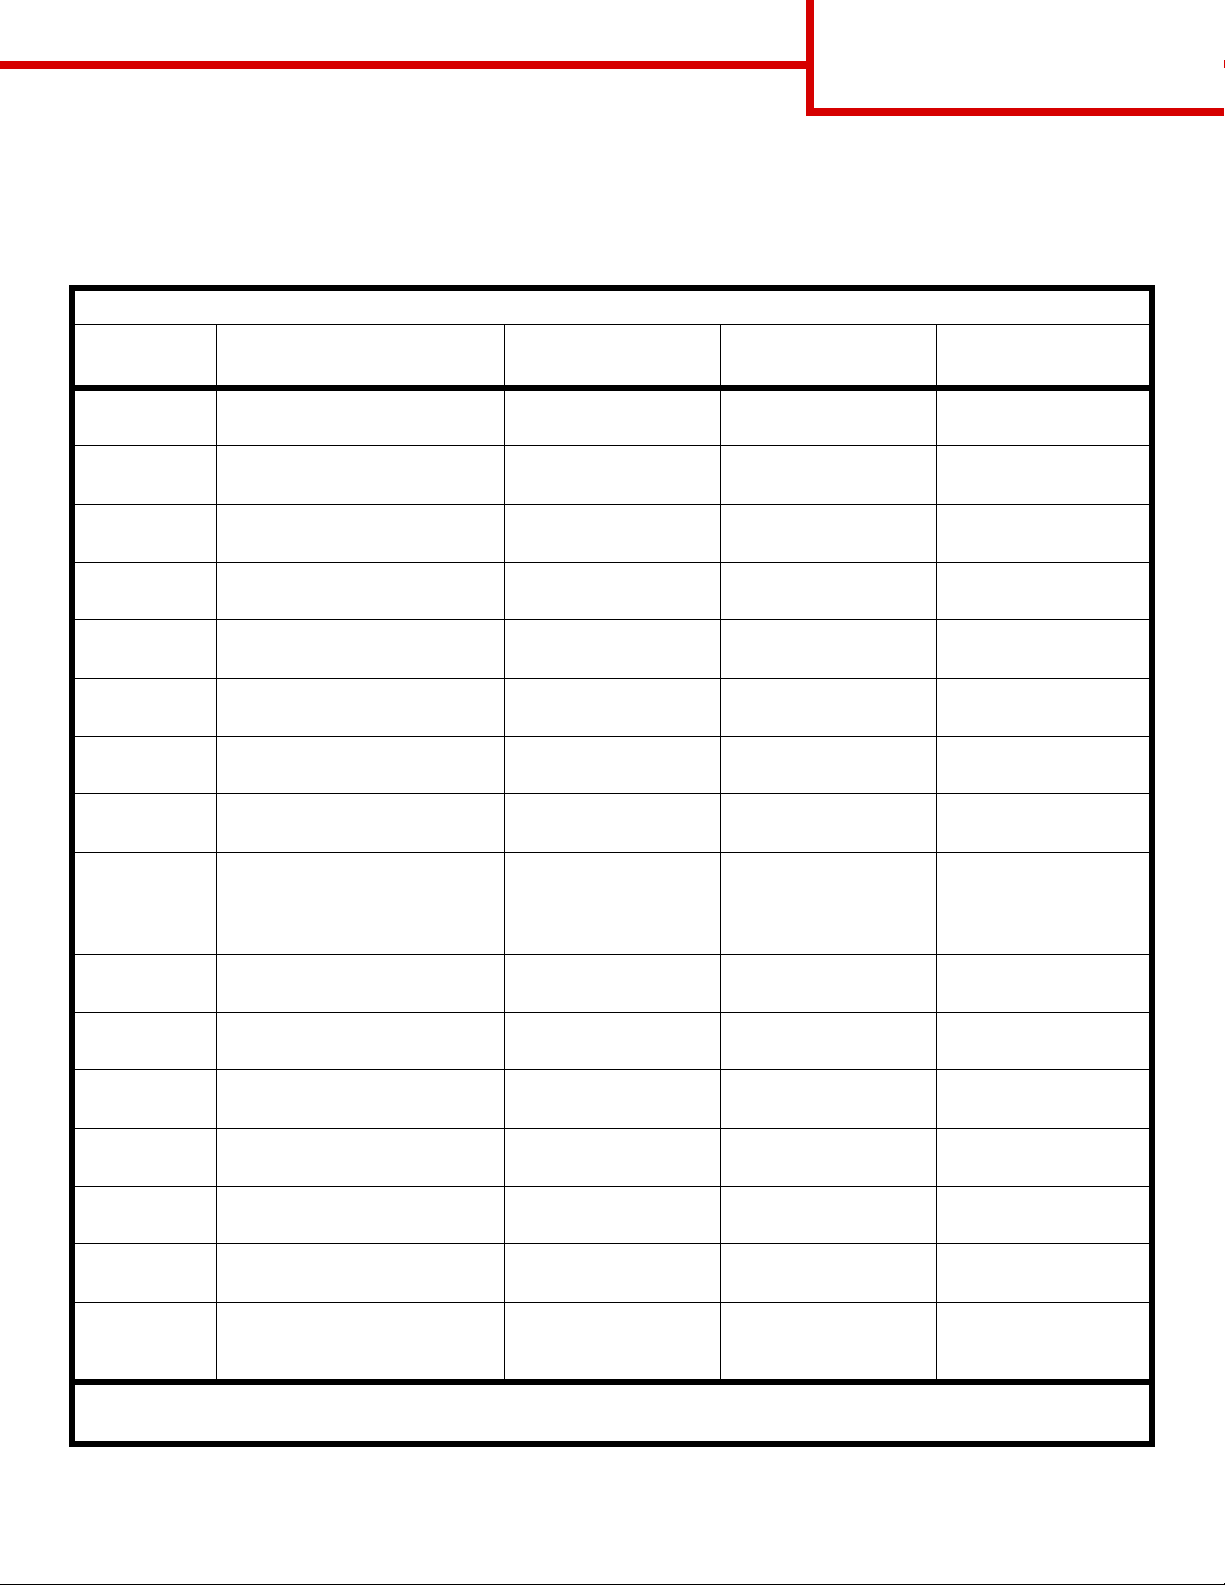
The printer supports the follo wing media sizes. Select custom sizes up to t he maximum specified f or the Universal
setting.
Legend: ✓ — supported ✘— unsupported
Media size Dimensions 250 and 500-sheet
trays
A4 210 x 297 mm
(8.27 x 11.7 in.)
A5 148 x 210 mm
(5.83 x 8.27 in.)
JIS B5 182 x 257 mm
(7.17 x 10.1 in.)
Letter 215.9 x 279.4 mm
(8.5 x 11 in.)
Legal 215.9 x 355.6 mm
(8.5 x 14 in.)
Executive 184.2 x 266.7 mm
(7.25 x 10.5 in.)
Folio 216 x 330 mm
(8.5 x 13 in.)
Statement 139.7 x 215.9 mm
(5.5 x 8.5 in.)
Universal** 69.85x210mm to
229 x 355.6 mm
(2.75 x 8.27 in. to
8.5 x 14.0 in.)
✓✓✓
✓✓✓
✓✓✓
✓✓✓
✓✓✓
✓✓✓
✓* ✓✘
✓* ✓✘
✓✓✘
Multipurpose
feeder
2000-sheet drawer
7 ¾ Envelope
(Monarch)
9 Envelope 98.4 x 225.4 mm
Com 10
Envelope
DL Envelope 110 x 220 mm
C5 Envelope 162 x 229 mm
B5 Envelope 176 x 250 mm
Other
Envelope
* This size does not appear in the Paper Size menu until Auto Size Sensing is changed. See the User’s Guide for more information.
** This size setting formats the page for 215.9 x 355.6 mm (8.5 x 14 in.) unless the size is specified by the software application.
98.4 x 190.5 mm
(3.875 x 7.5 in.)
(3.875 x 8.875 in.)
104.8 x 241.3 mm
(4.12 x 9.5 in.)
(4.33 x 8.66 in.)
(6.38 x 9.01 in.)
(6.93 x 9.84 in.)
98.4 x 89.0 mm to
297.0 x 431.8 mm
(3.9 x 3.5 in. to 11.7 x 17.0 in.)
✘✓✘
✘✓✘
✘✓✘
✘✓✘
✘✓✘
✘✓✘
✘✓✘
Page 5

Media guide
Page 2 of 2
Storing media
Use the follo wing guidelines for proper media st orage. These help av oid media feeding prob lems and uneven print
quality:
• For best results, store media in an environment whe re the t e mpe rature is approximately 21°C (70°F) and
the relative humidity is 40%.
• Store cartons of media on a pallet or shelf, rather than directly on the floor.
• When storing individual package s of media out of the original carton, make sure the y rest on a flat surf ace
so the edges do not buckle or curl.
• Do not place anything on top of the media packages.
• Store paper in its original wrapper until you load it into the printer.
Avoiding jams hints
The followi ng hints can help avoid jams:
• Use only recommended paper or specialty media (referred to as media).
• Do not overload the media sources. Make sure the stack height does not exceed the maximum height
indicated by the load line labels in the sources.
• Do not load wrinkled, creased, damp, or curled media.
• Flex, fan, and straighten media before you load it. If jams do occur with print media, try feeding one sheet
at a time through the multipurpose feeder.
• Do not use media that has been cut or trimmed by hand.
• Do not mix media sizes, w eights, or types in the same media source.
• Make sure the recommen ded print sid e is loaded in the s ourc e accord ing to y our s implex or duple x needs .
• Keep media stored in an acceptable environment . See “Storing media” for more information.
• Do not remove tr ays during a print job.
• Push all trays in firmly after loading them.
• Make sure th e guides in the tra ys are properly posit ioned for the s ize of media loaded. Make sure the guides
are not placed too tightly against the st ack of media.
• Make sure all cabl es that connect to the printer are correctly attached. See the Setup sheet for more
information.
• If a jam occurs, clear the entire media path. Se e the User’s Guide for information on clearing jams.
Page 6
Menu map
Page 1 of 1
Menu map
A number of menus are av ailab le on the operator panel to mak e it easy to change printer setti ngs. The menu map
below shows th e men us and men u i tems a vailable . For more information about menu items, see t he Men us and
Messages Guide on the publications CD.
Note: Some menu items may not be available based on the printer model or options installed.
Paper Menu
Default Source
Paper Size/Type
Configure MP
Envelope Enhance
Substitute Size
Paper Texture
Paper Weight
Paper Loading
Custom Types
Universal Setup
Bin Setup
Reports
Menu Settings Page
Device Statistics
Network Setup Page
Network [x] Setup Page
Profiles List
NetWare Setup Page
Print Fonts
Print Directory
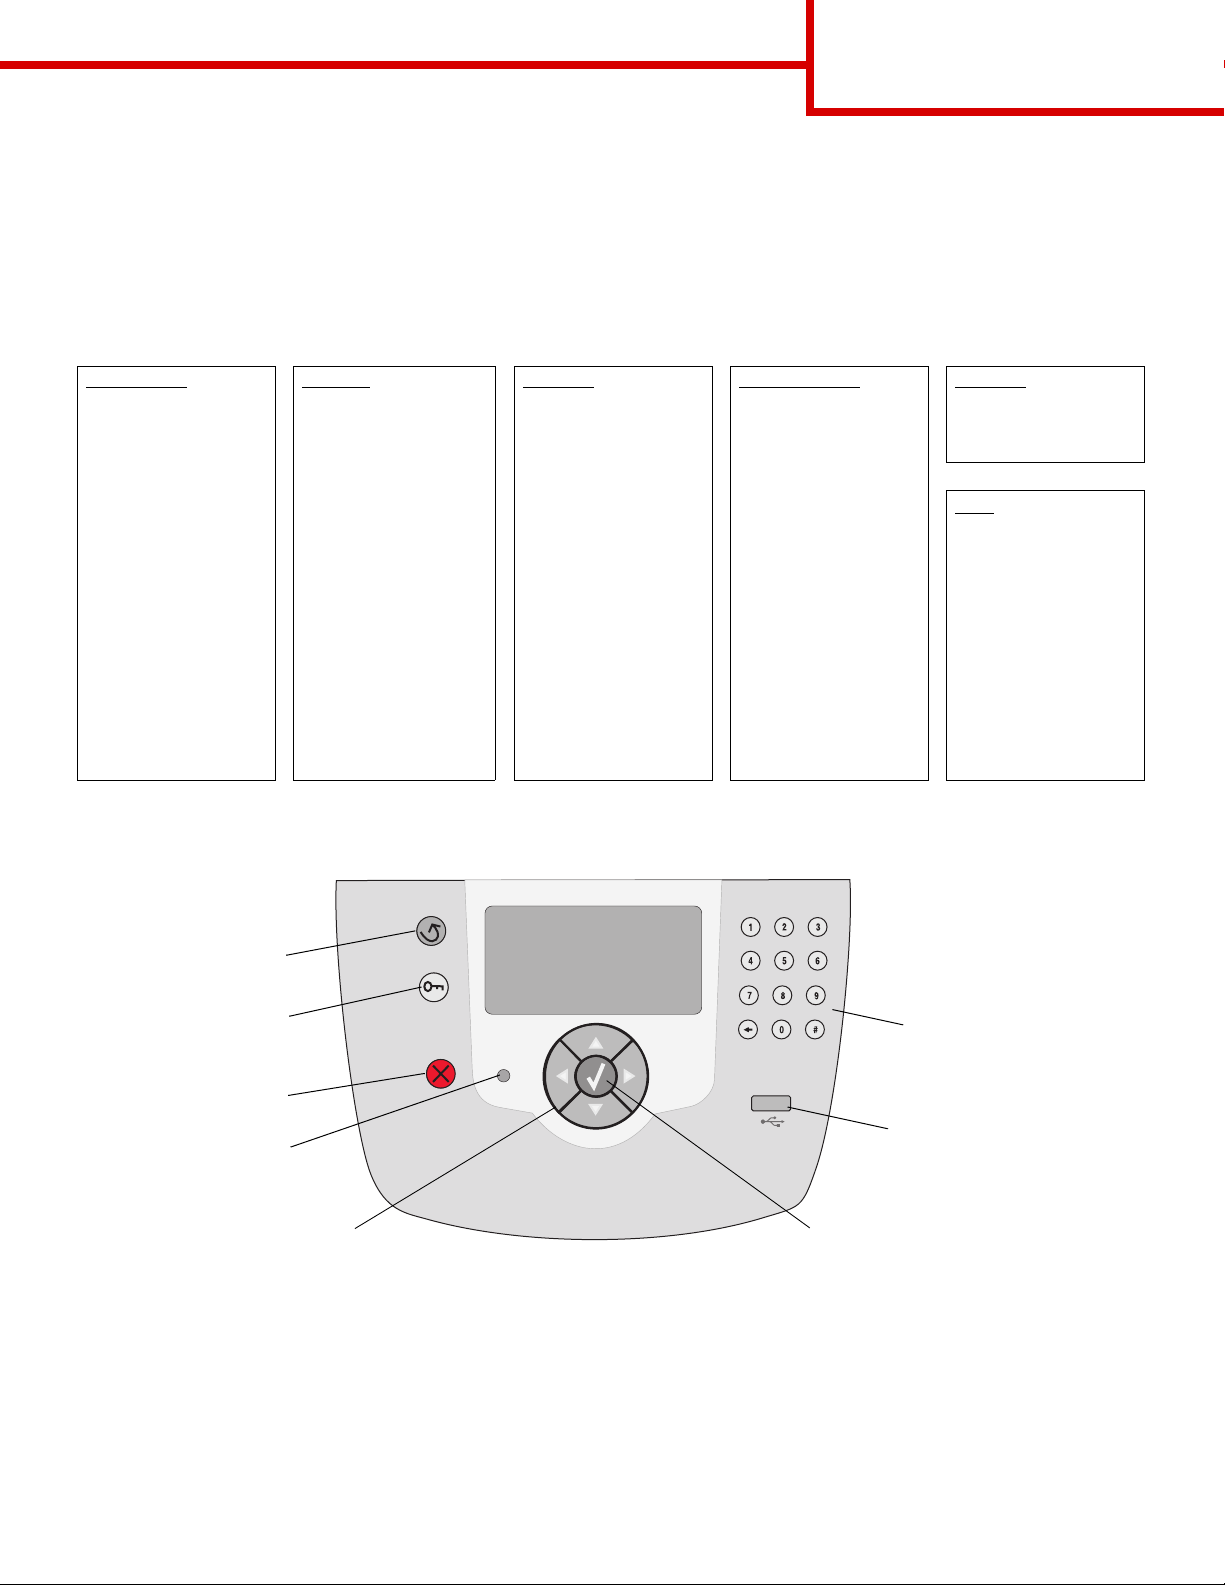
Understanding the operator panel
Back
Settings
Setup Menu
Finishing Menu
Quality Menu
Utilities Menu
PDF Menu
PostScript Menu
PCL Emul Menu
HTML Menu
Image Menu
Network/Ports
TCP/IP
IPv6
Standard Network
Network [x]
Standard USB
USB [x]
Parallel
Parallel [x]
Serial [x]
NetWare
AppleTalk
LexLink
Security
Max Invalid PIN
Job Expiration
Help
Print All
Print Quality
Printing Guide
Media Guide
Menu Map
Information Guide
Connection Guide
Moving Guide
Menu
Stop
Indicator light
Navigation b uttons
Select button
Numeric pad
USB Direct interface
For more information on the operator panel, see the User’s Guide on the publications CD.
Page 7

Moving the printer
Page 1 of 1
Moving the printer
Follow these guidelines to move the printer to another location.
CAUTION: The printer w eighs 23 kg (51 lb). It requires at least two people to lift it safely. Use the printer
handholds to lift it, and make sure your fingers are not under the printe r when you set it down.
CAUTION: Follow these guidelines to avoid injuring yourself or damaging the printer:
• Remove all printer options before moving the printer. Place the options in the original packaging.
• Always use at least two people to lift the printer.
• Always turn off the printer using the power switch before moving it.
• Disconnect all cords and cables from the printer before moving it.
Note: Damage to the printer caused by improper moving is not covered by the printer warranty.
Moving the printer and options to another location
The printer and options can be safely moved to another location by following these precautions:
• Keep the printer in an upright position.
• Any cart used to move the printer must h av e a surf ace ab le to support the full b ottom surf ace of the printer.
Any cart used to move the options must have a surf ace able to support the dimensions of the options.
• Severe jarring movements may cause damage to the printer and options, and must be avoided.
Page 8

Printing guide
Page 1 of 8
Printing guide
This help topic co vers i nf ormation about sending a job
to print, printing from a USB flash memory device,
canceling a print job, printing a menu settings page,
printing confidential jobs, printing on special media,
and loading paper.
Sending a job to print
A printer driver is software that lets your computer
communicate with your printer. When you choose
Print from a software application, a window
representing the printer driver opens. You can then
select the appropriate setti ngs for the specific job you
are sending to the printer . Print settings selec ted from
the driver override the default settings sele cted from
the printer operator panel.
You may need to click Properties or Setup from the
initial Print box to see all of the available printer
settings you can change. If you are no t familia r with a
feature in the printer driver window, open the online
Help for more information.
Printing from a USB flash memory
device
A USB Direct interface is located on the front of the
operator panel so y ou can i nsert a USB flash memory
device and print PDF documents.
1 Make sure the printer is on and Ready is
displayed.
2 Insert a USB flash memory device into the front
USB Direct interface.
Note: If you insert the drive when t he printer is
busy printing other jobs, the message
Printing other jobs will appear.
Select Continue and y our job prints after
the other jobs finish.
To suppo rt all the printer features, use the custom
printer drivers supplied with your printer.
To print a job from a typical Windows application:
1 Open the file you want to print.
2 From the File menu, select Print.
3 Select the correct printer , t hen modify the printer
settings as appropriate (such as the pages you
want to print or the number of copies).
4Click Properties or Setup to adjust printer
settings that were not available on the first
screen, and then click OK.
5Click OK or Print to send the job to the sel ected
printer.
3 Press until the appears next to the
document you want to print.
4 Press .
A screen asking the number of copies to be
printed appears.
5 To print only one copy, press . Otherwise,
press to indicate the number of copies , and
then press .
Note: Do not remove the USB flash memory
device from the USB Direct i nterface until
the document has finished printing.
The document will begin printing.
Page 9

Printing guide
Page 2 of 8
Canceling a print job
There are sev eral methods for canceling a print job:
• Canceling a job from the printer operator panel
• Canceling a job from a computer running
Windows
– Canceling a job from the taskbar
– Canceling a job from the desktop
• Canceling a job from a Macintosh computer
running Mac OS 9.x
• Canceling a job from a Macintosh computer
running Mac OS X
Canceling a job from the printer operator
panel
Note: For more information about the operator
panel, see Understanding the printer
operator panel in the User’s Guide.
3 Double-click the Printers icon.
A list of available printers appears.
4 Double-click the printer you selected when y ou
sent the job.
A list of print jobs appears in the printer window.
5 Select the job you want to cancel.
6 Press the Delete key on the keyboard.
Canceling a job from a Macintosh computer
running Mac OS 9.x
When you send a job to print, the printer icon for y our
selected printer appears on the desktop.
1 Double-click the printer icon on your desktop.
A list of print jobs appears in the printer window.
2 Select the print job you want to cancel .
3 Press the button with the trash can.
If the job you want to cancel is printing, and Busy
appears on the display:
1 Press on the operator panel.
2 Press until the appears next to Cancel
Job.
3 Press .
The message Canceling Job is displayed until
the job is canceled.
Canceling a job from a computer running
Windows
Canceling a job from the taskbar
When you send a job to print, a small printer icon
appears in the right corner of the taskbar .
1 Double-click the printer icon.
A list of print jobs appears in the printer window.
2 Select the job you want to cancel.
3 Press the Delete key on the keyboard.
Canceling a job from the desktop
Canceling a job from a Macintosh computer
running Mac OS X
1 Open Applications Æ Utilities, and then
double-click Print Center or Printer Setup.
2 Double-click the printer you are printing to.
3 In the printer window, select the print job you
want to cancel.
4 Press Delete.
Printing the menu settings page
You can print a menu settings page to review the
default printer settings and to verify your printer
options are installed correct ly.
1 Make sure the printer is on.
2 Press on the operator panel.
3 Press until the appears next to Reports.
4 Press .
5 Press until the appears next to Menu
Settings Page.
1 Minimize all programs to rev eal the desktop.
2 Double-click the My Computer icon.
Page 10

Printing guide
Page 3 of 8
6 Press .
The printer returns to Ready after the page
prints.
Printing a network setup page
You can print a network setup page to review the
default printer settings and to verif y the printer options
are installed correctly.
1 Make sure the printer is on.
2 Press on the operator panel.
3 Press until the appears next to Reports.
4 Press .
5 Press until the appears next to Network
Setup Page or Network <x> Setup Page.
6 Press .
The printer returns to the Ready state after the
network setup page prints.
you enter the same four-digit PIN from the operator
panel and choose to print or delete the job. This
ensures the job does not print until you are there to
retrieve it. No one else using the printer can print the
job without the PIN.
Windows
1 From a word pr ocessor, spre adsheet, browser,
or other application, select File
2Click Properties. (If there is no Properties
button, click Setup, and then cli ck Properties.)
3 Depending on the operating system, you may
have to c lick the Other Options tab
click Print and Hold.
Note: If you have difficulty finding Print and
Hold Æ Confidential Print, click Help and
refer to the topic Confi dential Print or
Print and Hold, and then follo w the driver
instructions.
4 Enter a User Name and PIN.
5 Send your job to the printer.
Æ Print.
Æ , and then
Printing confidential and held jobs
The confidential and held jobs f unction lets you print or
delete a confidential job, a verify print job, a reserve
print job, or a repeat print job.
When sending a job to the printer, you can specify in
the driver that you want the printer to hold the job in
memory . Once y our job is st ored in printer memory, go
to the printer and use the printer operator panel to
specify what you want to do with your print job.
All confidential and held jobs have a user name
associated with them. To access confidential or held
jobs, select Held Jobs fr om the home screen, and then
select your user name . After selecting your user name,
you can:
Print All Jobs Delete All Jobs
Print A Job Delete A Job
Print Copies
Printing a confidential job
When you send a confidential job to the printer, you
must enter a personal ident ification number (PIN) from
the driver. The PIN must be four digits using the
numbers 0–9. The job is held in printer memory until
Go to the printer when you are ready to retrieve
your confidential print job, and follow the steps
for printing held jobs.
Macintosh
1 From a word pr ocessor, spre adsheet, browser,
or other application, select File
2 In the Copies & P ages or Genera l pop-up menu,
select Job Routing.
a When using Mac OS 9, if Job Routing is not a
choice on the pop-up menu, select Plug-in
Preferences
b Then turn down the disclosure t riangle to the
left of Print Time Filters, and select Job
Routing.
c Then, in the pop-up menu, select Job
Routing.
3 In the radio group, select Confidential Print.
4 Enter a User Name and PIN.
5 Send your job to the printer.
Go to the printer when you are ready to retrieve
your confiden tial print job, and follow the “At the
printer” steps on page 4.
Æ Print Time Filters.
Æ Print.
Page 11

Printing guide
Page 4 of 8
At the printer
1 Press until the appears next to Held
Jobs.
2 Press .
3 Press until the appears next to your user
name.
4 Press .
5 Press until the appears next to
Confidential Jobs.
6 Press .
7 Enter your PIN.
For more information, see “Entering a personal
identification number ( PIN )”.
8 Press until the appears next to the job y ou
want to print.
9 Press .
Note: After your job prints, it is deleted from
printer memory.
Printing and deleting held jobs
Held jobs (V erify Print, Reserve Print, or Repeat Print)
are printed or deleted from the printer operator panel
and do not require a PIN number .
Verify Print
If you send a V erify Print j ob, the printer print s one copy
and holds the remaining copies you requested in
printer memory. Use Verify Print to e xam ine the first
copy to see if it is satisfactory before printing the
remaining copies. Once all copies are printed, the
Verify Print job is automatically deleted from printer
memory.
Reserve Print
If you send a Reserve Print job, the printer does not
print the job immediately. It stores the job in memory
so you can print the job lat er. The job is held in memory
until you delete it from the Held Jobs menu. Reserve
Print jobs may be deleted if the printer requir es extra
memory to process additional held jobs.
Repeat Print
Entering a personal identification number (PIN)
After you select y our user name and Conf identi al Job,
the Enter Pin screen appears.
1 Use the numeric pad to the right of the displa y to
enter the four-digit PIN associated with your
confidential job.
Note: As you enter the PIN, asterisks appear
on the display to ensure confidentiality.
If you enter an in valid PIN, the In valid PIN screen
appears.
Press to reenter the PIN or press until
the appears next to Cancel, and then
press .
2 Press until the appears next to the job you
want to print.
3 Press .
Note: After your job prints, it is deleted from
printer memory.
If you send a Repeat Print job, the printer prints all
requested copies of the job and stores the job in
memory so you can print additional copies later. You
can print additional copies as l ong as the job remains
stored in memory.
Note: Repeat Print jobs are automatically
deleted from printer memory when the
printer requires e xtra memory to process
additional held jobs.
Windows
1 From a word pr ocessor, spre adsheet, browser,
or other application, select File
Æ Print.
2Click Properties. (If there is no Properties
button, click Setup, and then cli ck Properties.)
3 Depending on the operating system, you may
have to click the Other Options tab, and then
click Print and Hold.
Note: If you have difficulty finding Print and
Æ Held Jobs, click Help, and refer
Hold
to the topic Held Jobs or Print and Hold,
then follow the driver instructions.
Page 12

Printing guide
Page 5 of 8
4 Select the type of held job you want, and then
send your job to the printer.
Go to the printer when you are ready to retrieve
your confidential print job, and f ollow the “At the
printer” steps on page 5.
Macintosh
1 From a word pr ocessor, spreadsheet, browser,
or other application, select File
Æ Print.
2 In the Copies & Pages or General pop-up
menu, select Job Routing.
a When using Mac OS 9, if Job Routing is not a
choice on the pop-up menu, select Plug-in
Preferences
Æ Print Time Filters.
b Then turn down the disclosure triangle to the
left of Print Time Filters, and select Job
Routing.
c Then, in the pop-up menu, select Job
Routing.
3 In the radio group , select th e type of held job y ou
want, enter a user n ame, and then send yo ur job
to the printer.
Go to the printer when you are ready to retrieve
your confidential print job, and f ollow the “At the
printer” steps on page 5.
At the printer
1 Press until the appears next to Held
Jobs.
2 Press .
3 Press until the appears next to your user
name.
4 Press .
5 Press until the appears next to the type of
action you want to perform:
Print All Jobs Delete All Jobs
Print A Job Delete A Job
The job will print or be deleted according to the
type of print job and action you selected.
Printing on specialty media
Media is paper , card stoc k, transparencies, l abels, and
envelo pes . The l ast four are sometimes ref er red to as
specialty media. Follow these instructions to print on
specialty media.
1 Load the media as specified for the tray being
used. See “Loading media” on page 6 for help.
2 From the printer operator panel, set the Paper
Type and Paper Siz e according to the medi a you
loaded. See “Setting the Paper Type and Paper
Size” on page 8 for help.
3 From the computer soft ware appl ication, set the
paper type, size, and source according to the
media you loaded.
Windows
a From a word processor, spreadsheet,
browser, or other application, select File
Print.
b Click Properties (or Options, Printer, or
Setup, depending on the appl ica tion) to vi ew
the printer driver settings.
c Click the Paper tab.
A paper tray list will appear.
d Select the tray containing the special media.
Note: If you have difficulty finding paper tray
list, click Help and then follow the driver
instructions.
e Select the media type (transparencies,
envelopes, and so on) from the Paper Type
list box.
f Select the size of the specialty media from
the Paper Size list box.
g Click OK, and then send the print job as
usual.
Æ
Print Copies
6 Press .
7 Press until the appears next to the job you
want.
8 Press .
Mac OS 9
a From a word processor, spreadsheet,
browser, or other application, select File
Page Setup.
b Select the size of the specialty media from
the Paper pop-up menu.
c Click OK.
Æ
Page 13

Printing guide
Page 6 of 8
d From the word processor, spreadsheet,
browser, or other application, select
File
Æ Print.
e With General selected on the top pop-up
menu, go to the Paper Sour ce pop-up menus
and select the tray containing the specialty
media, or the name of the media.
f Click Print.
Mac OS X
a From a word processor, spreadsheet,
browser, or other application, select File
Page Setup.
b Select the printer from the Format for pop-up
menu.
c Select the size of the specialt y med ia from
the Paper pop-up menu.
d Click OK.
e From the word processor, spreadsheet,
browser, or other application, select
File
Æ Print.
f On the Copies & Pages pop-up menu, select
Imaging.
g Select the specialty media on the
Paper Type pop-up menu.
h On the Imaging pop-up menu, select Paper
Feed.
i Select the tra y containing the specialty media
from the All pages from or First page from
/ Remaining from pop-up menus.
j Click Print.
Loading 250-sheet, 500-sheet trays, or the
universally adjustable tray
Do not remove trays while a job prints or while Busy
blinks on the operator panel. Doing so may cause a
jam.
1 Remove the tr ay from the printer , and place it on
a flat, level surface.
Æ
2 Squeeze the side guide tab, and slide the gui de
to the outside of the tray.
Loading media
Get the most from the printer by properly loading the
trays, and setting the types and sizes for media.
General guidelines
• Do not overload the media sources.
• Make sure the stac k height does not e xceed the
maximum height indicated by the labels on the
guides. Overloading may cause jams.
• Nev er mix media types within a tray.
Page 14

3 Squeeze the rear guide tab, and slide the guide
to the correct position f or the siz e media y ou are
loading.
Size indicators
L
G
L
A
4
L
T
R
EXEC
B
5
A
5
Printing guide
Page 7 of 8
Without an optional finisher
Simplex
4 Flex the sheets back and forth to loosen them,
then fan them. Do not fold or crease the print
media. Straighten the edges on a level surface.
5 Place the print media in the tray:
Note: Paper must be loaded differently in the
trays dep ending on the options y ou have
installed.
• print side face down for simplex (single-
sided) printing
• print side face up for duplex printing
Duplex
6 Squeeze the side guide tab, and slide the gui de
toward the inside of the tray until it lightly rests
against the edge of the media.
7 Insert the tray into the printer.
Page 15

Setting the Paper Type and Paper Size
After setting the Paper Type and Paper Size to the
correct values for the type and size used in the trays,
then any trays containing the same size and type are
automatically linked by the printer.
Note: If the size of the media you are l oading is
the same size of the media previously
loaded, do not change the Paper Size
setting.
To change the Paper Size and Paper Type setting:
1 Make sure your printer is on.
2 Press on the operator panel.
3 Press until the appears next to Paper
Menu.
Printing guide
Page 8 of 8
4 Press .
5 Press until the appears next to
Paper Size/Type.
6 Press .
7 Press until the appears next to the input
source you want to use .
8 Press .
9 Press until the appears next to the paper
size you want to use.
10 Press .
11 Press until the appears next to the paper
type you want to use.
12 Press .
This saves this setting as the new user default
size or type setting.
The message Submitting Selection
appears. The printer returns to the Ready state.
For more information, see:
• The Media Guide available in the Help Menu.
• The User’s Guide on the publications CD.
Page 16

Print quality and troubleshooting
Page 1 of 5
Print quality and troubleshooting
Many print quality problems can be solved b y replacing a supply or maintenance item that has reached the end
of its intended life. Check the operator panel for a message about a printer consumable. See the User’s Guide
for information about other ways to identify consumables that need to be replaced.
Note: Use only components and supplies from the printer manufacturer. Using supplies from other
manufacturers can degrade print quaility, performance, and safety.
The Quality Menu operator panel options can be adjust ed to help improve print quality. For more information
about these menu options, see the Menus and Messages Guide on the publications CD.
Menu selection Purpose Values
Print Resolution Defines the number of dots printed per inch (dpi). 600 dpi*
1200 Image Q
1200 dpi
2400 Image Q
Toner Darkness Lightens or darkens printed output and
conserves toner.
Brightness Adjusts the gray value of printed objects. -6 – +6 0* is the default setting.
Contrast Adjusts the contrast of printed objects. 0–5 0* is the default setting.
1–10 8* is the default setting.
Select a lower number to lighten
the printed output or save toner.
In addition, the Enhance Fine Lines and Gray Correction optio ns can be enabled to improve print quality. These
settings are available on the driver and on the printer Embedded Web Server (EWS) interface. For more
information about these options, see the driver Help.
Driver option Purpose Values
Enhance Fine Lines A selection to enable a print mode preferable for
certain files containing fine line detail, such as
architectural drawings, maps, electronic circuit
diagrams, and flow charts.
Gray Correction Automatically adjusts the contrast
enhancement applied to images.
Note: Selecting this feature disables the
manual Brightness and Contra st co ntr ols.
†
Values marked by an asterisk (*) are the factory default sett ings.
On In the driver, enable the check box.
Off* In the driver, disable the check box.
Auto* In the driver, enable the check box.
Off In the dri ve r , di sab le th e chec k bo x.
†
Page 17

Print quality and troubleshooting
Page 2 of 5
The information in the following table may help you solve print quality problems. If these suggestions still do not
correct the problem, call for service. You may have a printer part that requires adjustment or replacement.
Problem Action
Print is too light. • The toner may be low. To utilize the remaining toner, remove the cartridge by gripping the
handles with both hands. With the cartridge pointing downward, shake the print cartridge
back and forth. Reinstall the cartridge, and then press .
• Change the Toner Darkness setting in the Quality Menu.
ABC
DEF
• If you are printing on an uneven print surface, change the Paper Weight and Paper Texture
settings in the Paper Menu.
• Verify the correct print media is being used.
Toner smears or print
comes off the page.
ABC
DEF
T oner appears on the back
of the printed page.
Toner fog or background
shading appears on the
page.
ABC
• If you are printing on an uneven print surface, change the Paper Weight and Paper Texture
settings in the Paper Menu.
• Verify the print media is within the printer specifications. See the User’s Guide for more
details.
If the problem continues, turn the printer off, and contact the place you bought your printer.
Toner is on the transfer roll. To help prevent this, do not load print media that is smaller than
the page size of the job to be printed.
Open and close the printer top front cover to run the printer setup cycle and clean the transfer
roll.
• Check the print cartridge to make sure it is installed correctly.
• Replace the print cartridge.
• Replace the charge rolls.
DEF
Entire page is white. • Make sure the packaging material is removed from the print cartridge.
• Check the print cartridge to be sure it is installed correctly.
• The toner may be low. To utilize the remaining toner, remove the cartridge by gripping the
handles with both hands. With the cartridge arrows pointing downward, shake the print
cartridge back and forth. Reinstall the cartridge, and then press .
Page 18

Problem Action
ABC
DEF
Print quality and troubleshooting
Page 3 of 5
Streaks appear on the
page.
• The toner may be low. To utilize the remaining toner, remove the cartridge by gripping the
handles with both hands. With the cartridge arrows pointing downward, shake the print
cartridge back and forth. Reinstall the cartridge, and then press .
• If you are using preprinted forms, make sure the ink can withstand temperatures of 212°C
(414°F).
ABC
DEF
Printing is too dark. Change the Toner Darkness setting in the Quality Menu. See the Menus and Messages
Guide on the publications CD for more information.
Note: Macintosh computer users should make sure the lines per inch (lpi) setting is not set
too high in the software application.
ABC
DEF
Characters have jagged or
uneven edges.
• Change the Print Resolution setting in the Quality Menu to 600 dpi, 1200 Image Q,
1200 dpi, or 2400 Image Q. See the Menus and Messages Guide on the publications CD
for more settings information.
• If you are using downloaded fonts, verify the fonts are supported by the printer, the host
computer, and the software application.
Part or all of the page is
printed in black.
Check the print cartridge to see if it is installed correctly.
Make sure the charge roll is secure and not at end of life.
Page 19

Problem Action
ABC
DEF
Print quality and troubleshooting
Page 4 of 5
The job prints, but the top
and side margins are
incorrect.
• Make sure the Paper Size setting in the Paper Menu is correct.
• Make sure the margins are set correctly in your software application.
ABC
DEF
Ghost images appear. • Make sure the Paper Type setting in the Paper Menu is correct.
• Replace the print cartridge.
Gray background prints. • The Toner Darkness setting may be too dark. Change the Toner Darkness setting in the
Quality Menu. See the Menus and Messages Guide on the publications CD for more
information.
• The print cartridge may be defective. Replace the print cartridge.
Repeating defects appear. Either the print cartridge, transfer rollers, or the fuser is defective. See “Print quality
troubleshooting” for more information.
Some of the print is cut off
on the sides, top, or bottom
of the media.
Move the guides in the tray to the proper positions for the size loaded.
Print is skewed or
inappropriately slanted.
Transparency print quality
is poor.
• Use only transparencies recommended by the printer manufacturer.
• Make sure the Paper Type setting in the Paper Menu is set to Transparency.
Page 20

Print quality and troubleshooting
Page 5 of 5
Print quality troubleshooting
To help isolate print quality problems, print the Print Quality Test Pages.
Note: A (check mark) appears to the left of an item to indicate that it is selected.
1 Turn the printer off.
2 Hold down and , and turn the printer on.
The Performing Self Test message appears followed by Config Menu.
3 Press until Prt Quality Pgs is selected, and then press .
The pages are formatted. The Printing Quality Test Pages message appears, then the pages print.
The message remains on the operator panel until all the pages print.
The Print Quality Test P ages contain f our pages printed in English te xt only. The firs t page contains general
printer information. The s econd page i s g r ay with two b l ac k squ ares, and the third page is soli d b la c k. The
fourth page is blank so you can see if there i s streaked or smeared toner appearing on the page.
After the Print Quality Test Pages print, to exit the Config Menu:
4 Press until Exit Config Menu is selected, and then press .
5 The messages Resetting Printer and Performing Self Test appear, and the printer returns to
Ready .
If another type of print quality problem exists, see the Troubleshooting chapter in the User’s Guide on the
publications CD.
Page 21

Print defects guide
Page 1 of 1
Print defects guide
Match a set of repeating defects on a print job to the marks on one of the vertical lines. The line that best
matches the defects on the print job indicates which particular part is causing the defect.
For e xample, the distance be tween these tw o marks represents
a repeating defect that occurs every 28.3 mm (1.11 in.), which
means the charge rollers need to be replaced.
Replace the
charge rollers
Replace the
transfer roller
51.7 mm
(2.04 in.)
Note: If the defect appears on the printed side of a single-sided print
job, replace t he toner cartridge before replacing the fuser.
Replace the toner cartridge
Developer roll
defect
48.0 mm
(1.89 in.)
Photoconductor
defect
96.8 mm
(3.81 in.)
Replace the fuser
Backup roller
defect
88.0 mm
(3.46 in.)
Fuser hot roll
defect
95.2 mm
(3.75 in.)
28.3 mm
(1.11 in.)
Page 22

Supplies guide
Page 1 of 1
Supplies guide
Ordering a print cartridge
When the 88 Toner is Low message appears, you should order a new print
cartridge. Y ou ma y be able to print se veral more pages a fter the 88 Toner is Low
message appears by shaking the print cartridge.
To use the remaining toner , remov e the print cartridge, and then shake it back and
forth.
You need to have a new cartridge availab le when the current one no longer prints
satisfactorily. The following table lists the part numbers for ordering print cartridges.
Part number Description Average cartridge yield
Recommended print cartridges
64015SA
64016SE
64017SR
64015HA
64016HE
64017HR
64415XA
64416XE
64417XR
64004HA
64004HE
64004HR
64404XA
64404XE
64404XR
2
3
4
2
3
4
2
3
4
2
3
4
2
3
4
Return Program Print Cartridge 6,000 standard pages X X X
High Yield
21,000 standard pages X X X
Return Program Print Cartridge
Extra High Yield
32,000 standard pages X
Return Program Print Cartridge
High Yield Return Program Print Cartridge
21,000 standard pages X X X
for Label Applications
Extra High Yield Return Program Print
32,000 standard pages X
Cartridge for Label Applications
Other available print cartridges
64035SA
64036SE
64037SR
64035HA
64036HE
64037HR
64435XA
64436XE
64437XR
1
Declared yield value in acc orda nce with ISO/IEC 19752.
2
Designed for use only in North, Central and South America.
3
Designed for use only in Europe, Middle East and Africa.
4
Designed for use only in Asia, Australia and New Zealand.
2
3
4
2
3
4
2
3
4
Print Cartridge 6,000 standard pages X X X
High Yield Print Cartr idge 21,000 standard pages X X X
Extra High Yield Print Cartridge 32,000 standard pages X
1
T640 T642 T644
 Loading...